Owner Manual Refrigerator
Operating Instructions
About the operation of your freezer.
Starting the Freezer
- Clean the inside of the freezer with a mild solution of baking soda and water (see Care and Cleaning).
- Connect cord to power outlet.
- On models with a Temperature Monitor or High-Temp Alarm Switch, set the switch to the OFF position.
- Make sure the temperature control is set at 4.
- Allow freezer to operate for at least four hours before placing food inside.
- On models with a Temperature Monitor or High-Temp Alarm Switch, set the switch to the ON position.
Temperature Control
For safe food storage, allow 4 hours for the freezer to cool down completely. The freezer will run continuously for the first several hours. Foods that are already frozen may be placed in the freezer after the first few hours of operation. Unfrozen food should NOT be placed in the freezer until it has operated for 4 hours. Allow several hours after each one-step adjustment for the freezer temperature to stabilize.
When loading the freezer, freeze only 3 pounds of fresh food per cubic foot of space at a time. Distribute packages evenly throughout the freezer. It is not necessary to turn the control knob to a colder setting while freezing food.
Turning the control to OFF stops the cooling process but does not shut off power to the freezer.
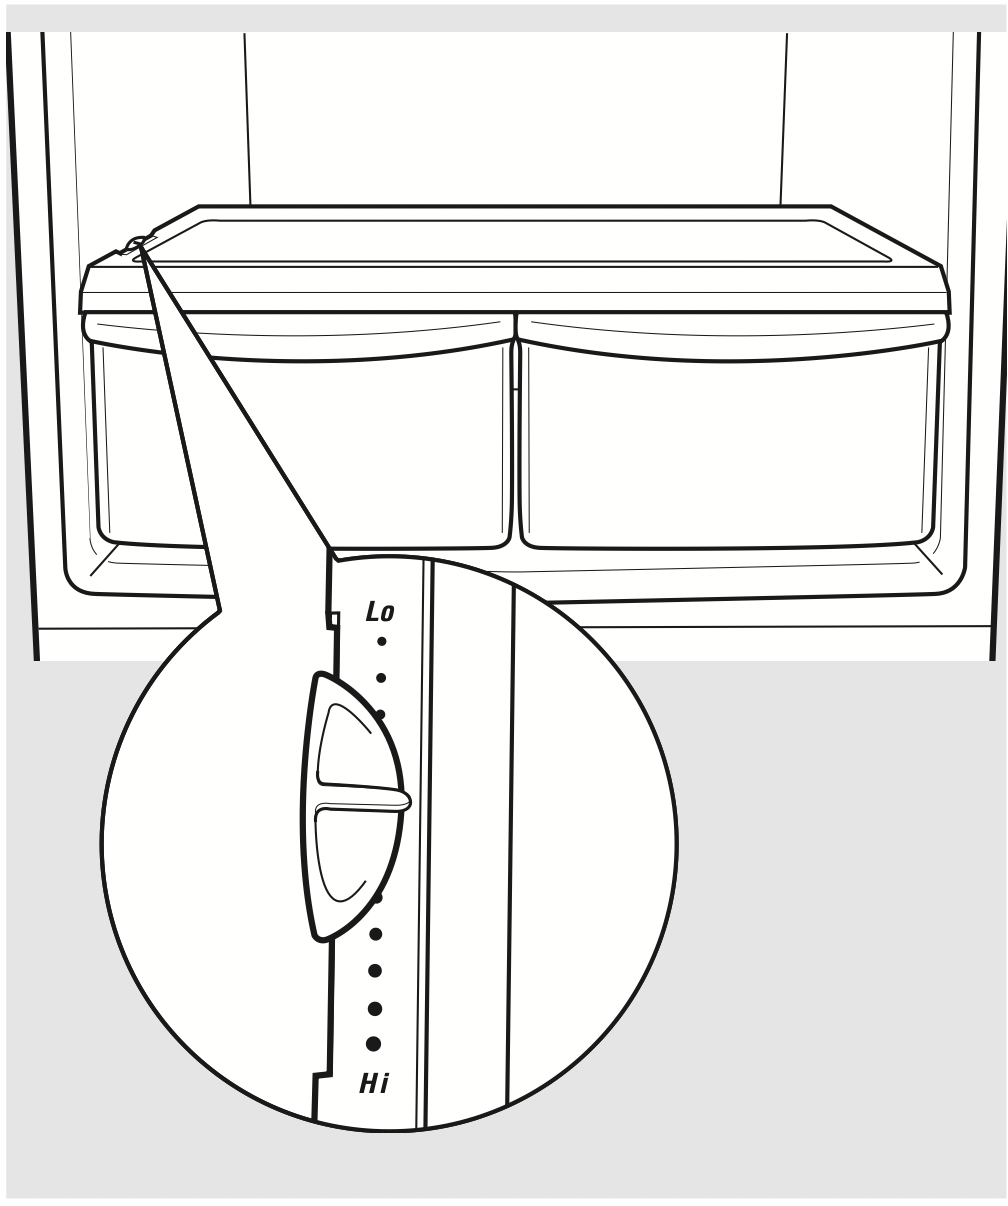
Electromechanical Temperature Control (Chest and some Upright models)
The electromechanical temperature control is preset to give satisfactory food storage temperatures. It is adjustable to provide a range of temperatures. Allow several hours for the temperature to stabilize between adjustments.
The electromechanical temperature control is on the outside left on the chest models and inside the freezer on upright models.

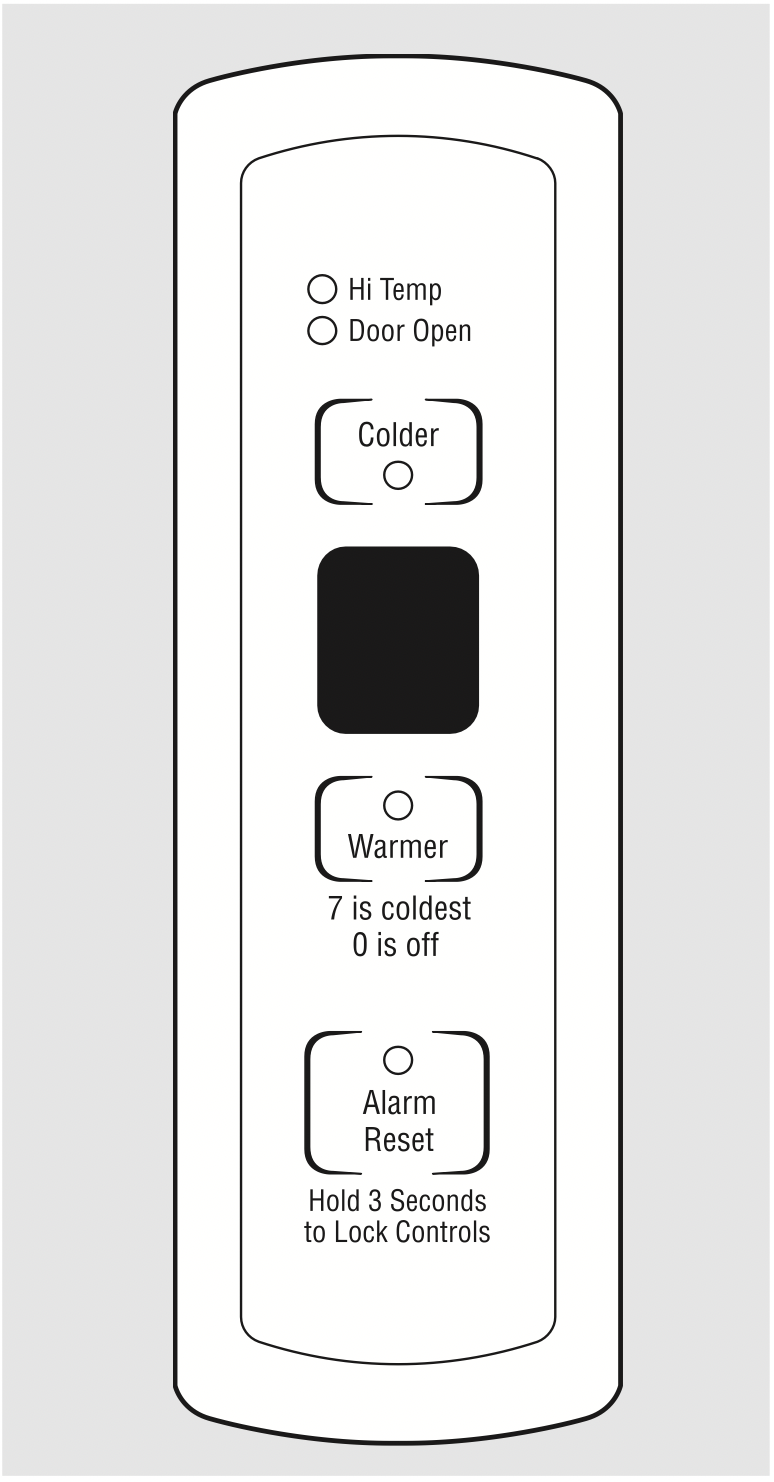
Electronic Temperature Control (some Upright Frost-Free models)
This electronic temperature control is located on the front of the freezer door. The temperature is factory-preset to provide satisfactory food storage temperatures. To adjust the temperature setting, press Colder to decrease temperatures and Warmer to increase temperatures. Allow several hours for the temperature to stabilize between adjustments.
To turn the freezer off, press Warmer until the display reads “0.” To turn the freezer on, press Colder until the display shows “4” or the desired setting.
To lock the controls, press Alarm Reset for 3 seconds. The display will read “L.” To unlock the controls, press Alarm Reset for 3 seconds. The display will read “U” and then display the current temperature.
This electronic control has a temperature alarm feature. If the inside temperature exceeds 23°F. An alarm will sound if the freezer temperature reaches unsafe levels. The alarm operates on household electricity. If the power fails, the alarm will not perform.
When the freezer is initially plugged in, the red Hi Temp light will come on and a buzzer will sound. The indicator light will stay on until the freezer temperature reaches 23°F or below. To silence the buzzer, push Alarm Reset. If the temperature in the freezer goes above 23°F for any reason, the Hi Temp light will come on and the buzzer will sound every hour until the temperature is below 23°F. To silence the buzzer, push Alarm Reset.
If an “E” appears on the display, contact your authorized service technician for repair. The freezer will continue to run until serviced.
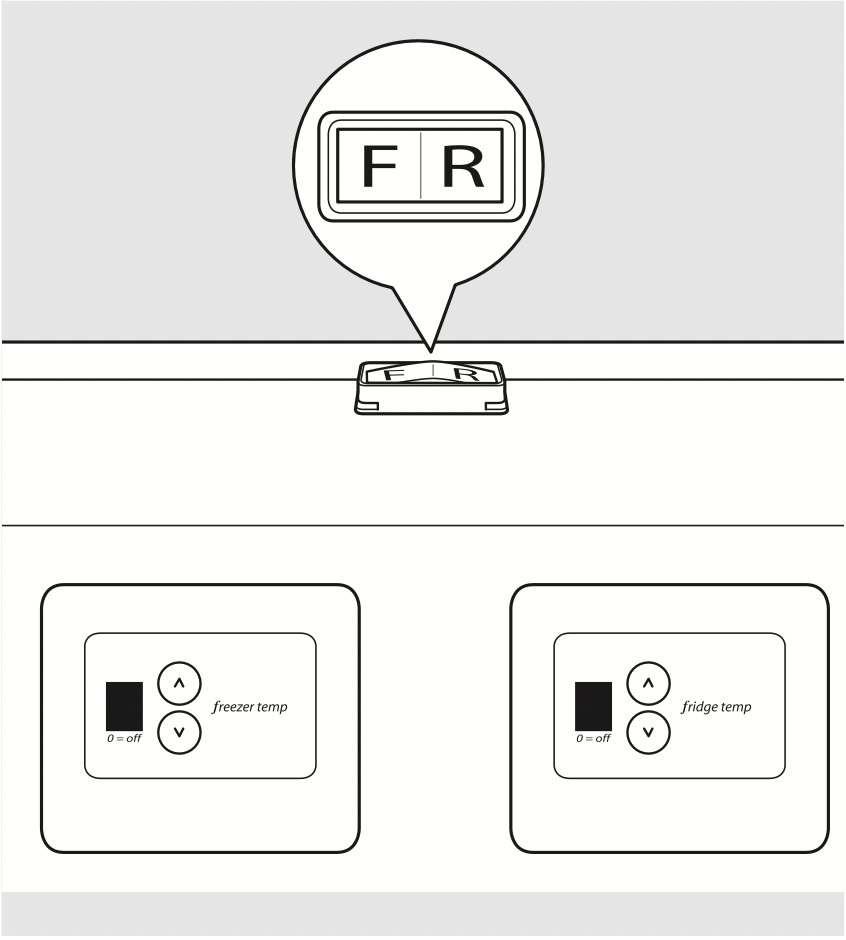
Convertible Freezer/Refrigerator (some Upright Frost-Free models)
The convertible model can operate as either a refrigerator or a freezer. The selection is made using the switch at the back of the unit marked F and R. With the switch in the F position, the freezer controls below this switch and to the left become active. With the switch in the R position, the refrigerator controls below this switch and to the right become active. Placing the switch in the middle position will turn off the unit completely and will disable all cooling functions.
The temperature on this model is preset. To adjust the temperature, push the UP button for warmer and the DOWN button for cooler temperatures. Allow several hours for the temperature to stabilize between adjustments.
When in the refrigerator mode, the Freeze Control Feature maintains proper interior refrigerator temperature even if placed in an area where the temperature is 10°F (-12°C).
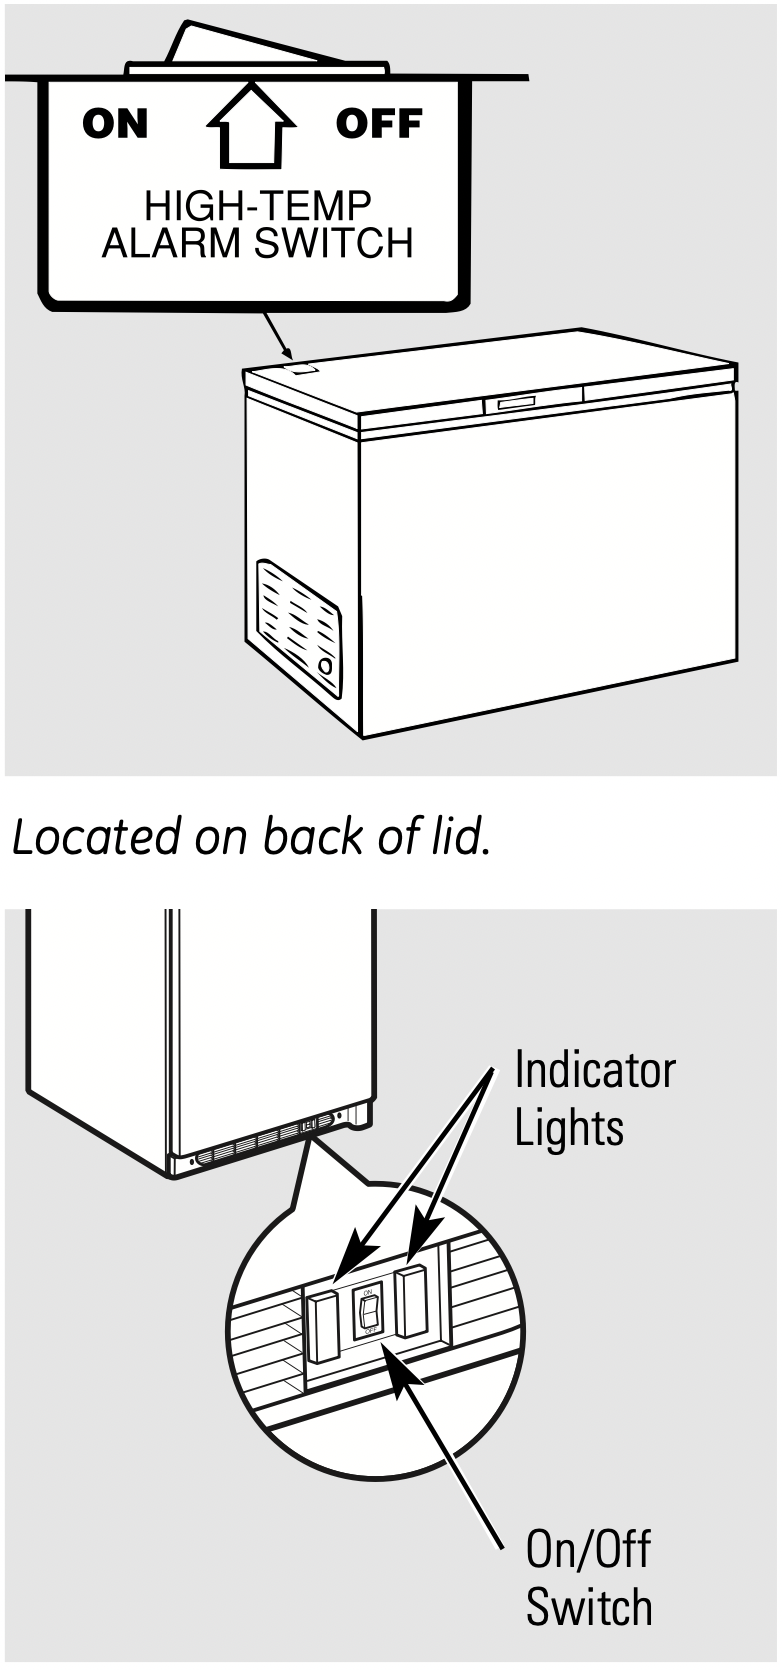
High-Temp Alarm Switch (on some models)
An alarm will sound if the freezer temperature reaches unsafe levels. The alarm operates on household electricity. If the power fails, the alarm will not perform.
An ON/OFF switch allows the temperature alarm to be deactivated if desired. The freezer is shipped with the switch in the OFF position. After the freezer has run long enough to lower the temperature, you may set the switch to the ON position.
CAUTION: Adding more than 3 pounds (1.5 kg) of warm food per cubic foot of freezer capacity can trigger the alarm.
To activate the alarm, set the switch to the ON position.
To deactivate the alarm, set the switch to the OFF position.
Electronic Temperature Alarm (some Electronic Chest models)
This feature is designed to provide a warning if the inside temperature reaches an unsafe level. The Temp Alarm feature operates on household electricity. It will not function if household electricity is interrupted.
When the freezer is initially plugged in, the red Temp Alarm indicator light blinks. The indicator light will continue to blink until the freezer has reached a safe freezing temperature. If a malfunction causes an unsafe temperature inside the freezer, the red light will blink and the buzzer will sound. To silence the buzzer, press the ALARM OFF button. The indicator light will continue to blink until a safe freezing temperature is again reached. If the problem is not solved within twelve (12) hours, the buzzer will turn on again. If the ALARM OFFbutton is not pressed, the buzzer will turn itself off automatically after 48 hours, but the red Temp Alarm light will continue to blink.

Power-On Light (on some models)
The Power-On Light indicates that the freezer is properly connected to the electrical power.
The light glows even when the temperature control is turned off.
Key-Ejecting Lock (on some models)
The key for the spring-loaded lock is automatically ejected–key will not remain in lock in either the open or closed position.
Keep the key out of reach of children and away from the freezer.
Freezer Shelves (on some models)
The spacers (on some models) are used to secure the shelves during shipping. Remove and discard the spacers.
Small objects are a choke hazard to children.
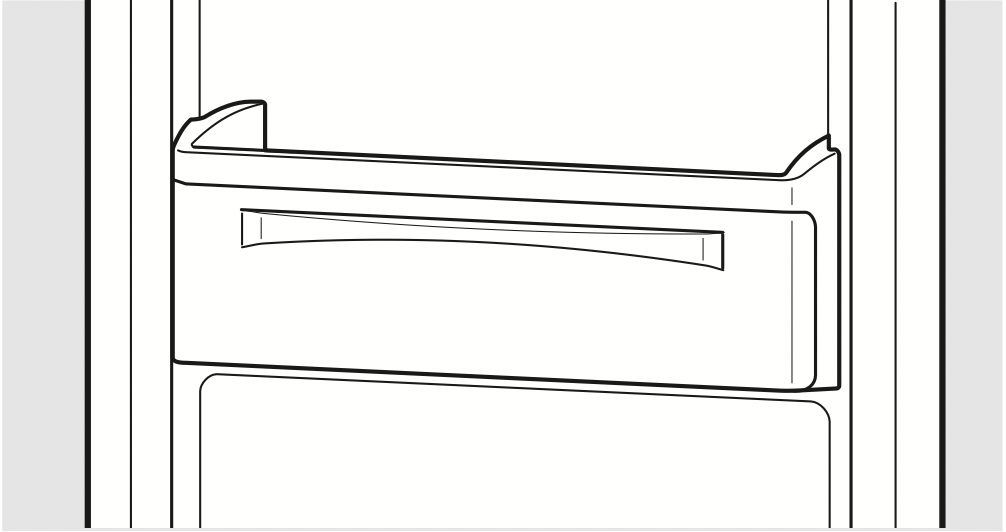
Tilt-Out Shelf (some Upright models)
This shelf is located inside on the freezer door and provides additional storage space. To access an item, tilt the top of the “basket” shelf down.

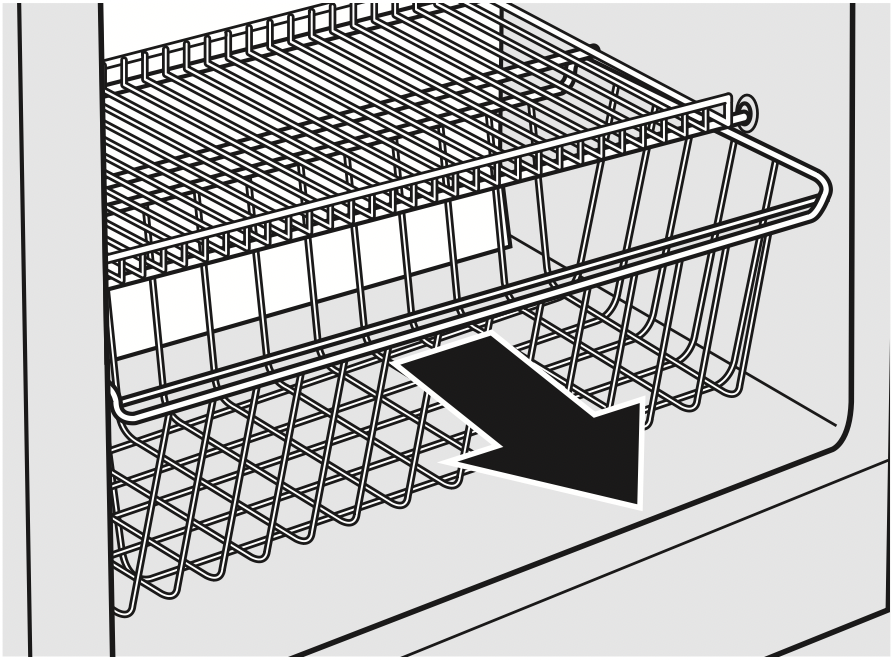
Slide-Out Basket (some Upright models)
A slide-out basket provides separate storage space for items that are difficult to store on shelves. It is located at the bottom of the freezer. To remove this basket, pull out and lift up.
Interior Light
The interior light comes on when the freezer door is opened. To replace the bulb, set the temperature control to OFF and unplug the electrical cord. Replace the bulb by unscrewing it from the fixture. Replace with the same size and wattage.
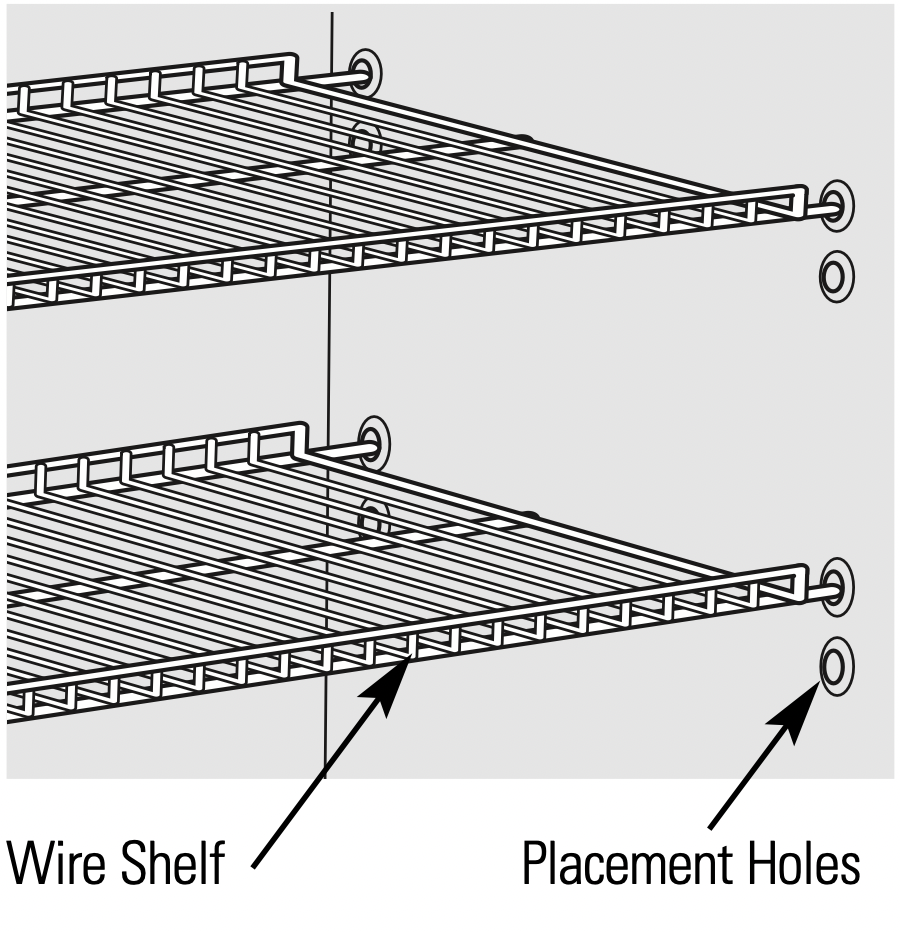
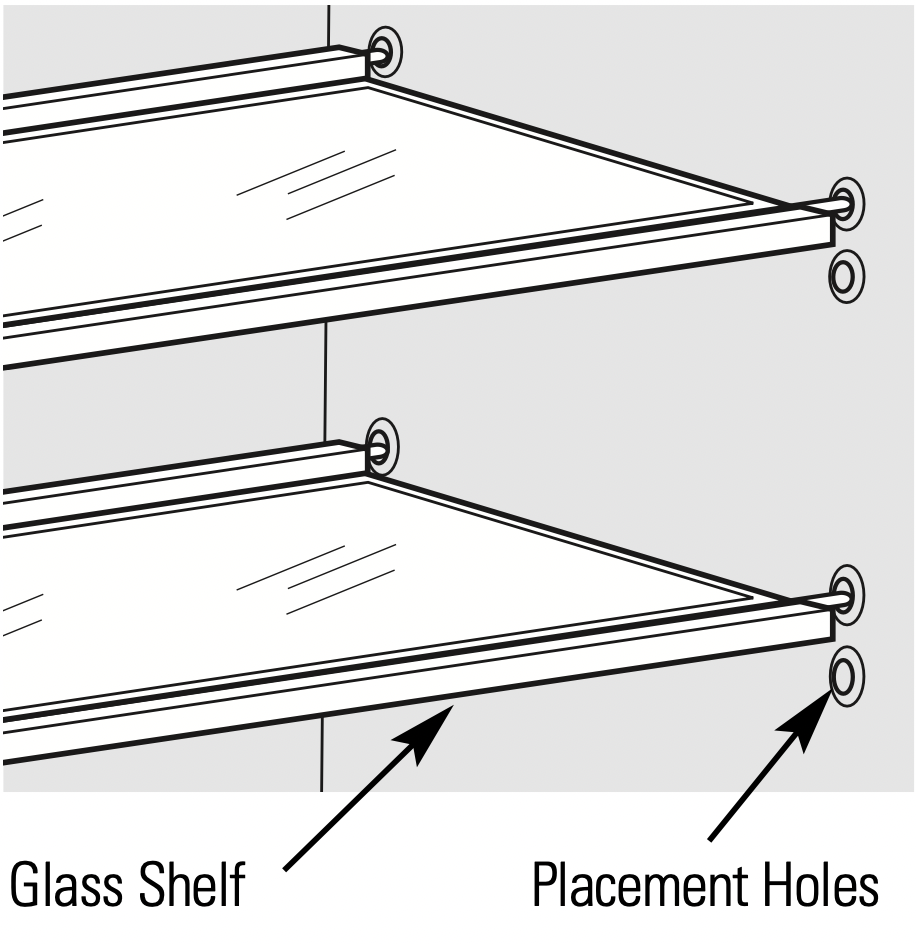
Adjustable Shelves (Upright models)
The adjustable shelves can be moved to different levels within the freezer. To move the shelf, grasp the shelf and push to either the right or the left to disengage the ends of the shelf from placement holes in the freezer. Tilt the shelf to release the other side. To install the shelf, reverse these directions.
Some models will have glass shelves and some models will have wire shelves.
Adjustable Door Bins (some Upright models)
The adjustable door bins provide flexible storage space. The number of bins varies by model.
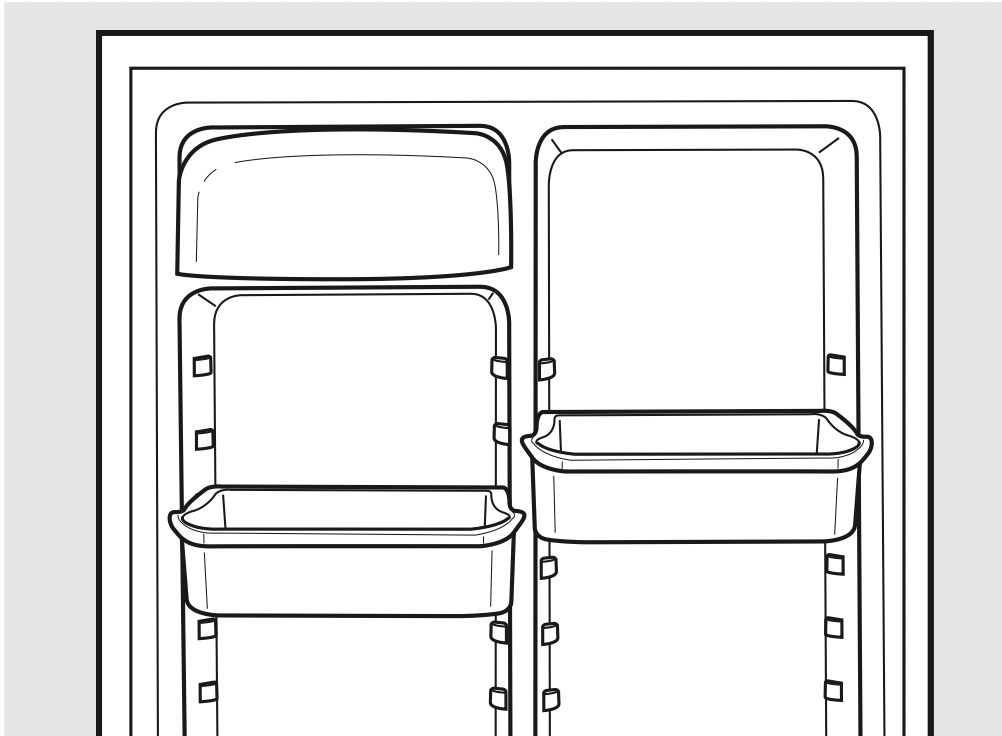
Crispers (some Upright models)
The crispers are designed for storing fruits, vegetables and other fresh produce. Items should be washed and drained well before placing in the crisper drawers.
One of the crisper drawers comes equipped with a Humidity Control. This allows you to control the humidity within that crisper. This can extend the life of fresh vegetables that keep best in high humidity.
Soft Freeze Zone (some Upright models)
The Soft Freeze Zone is specifically for foods such as ice cream. It is designed to maintain a higher temperature than the rest of the freezer.
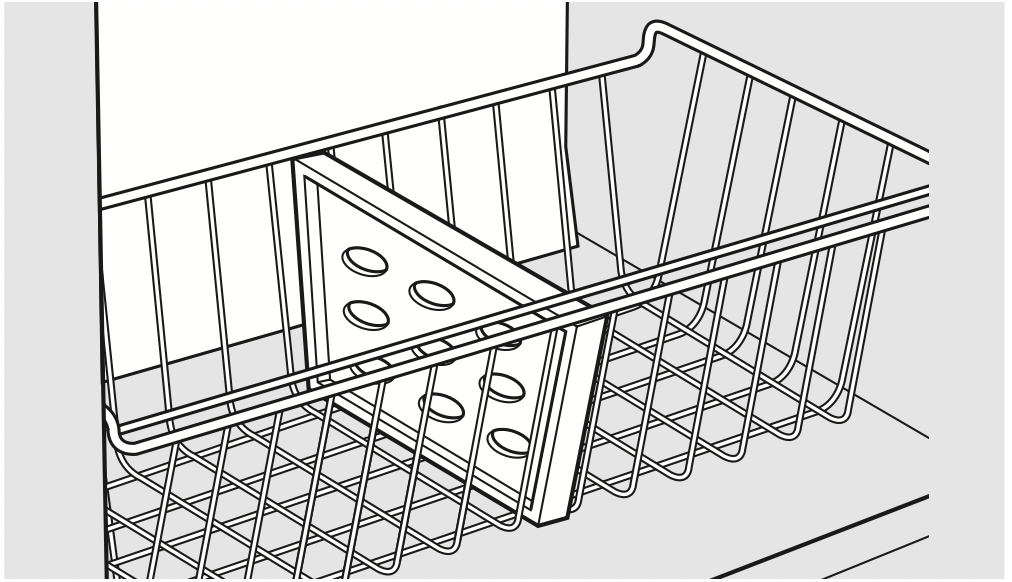
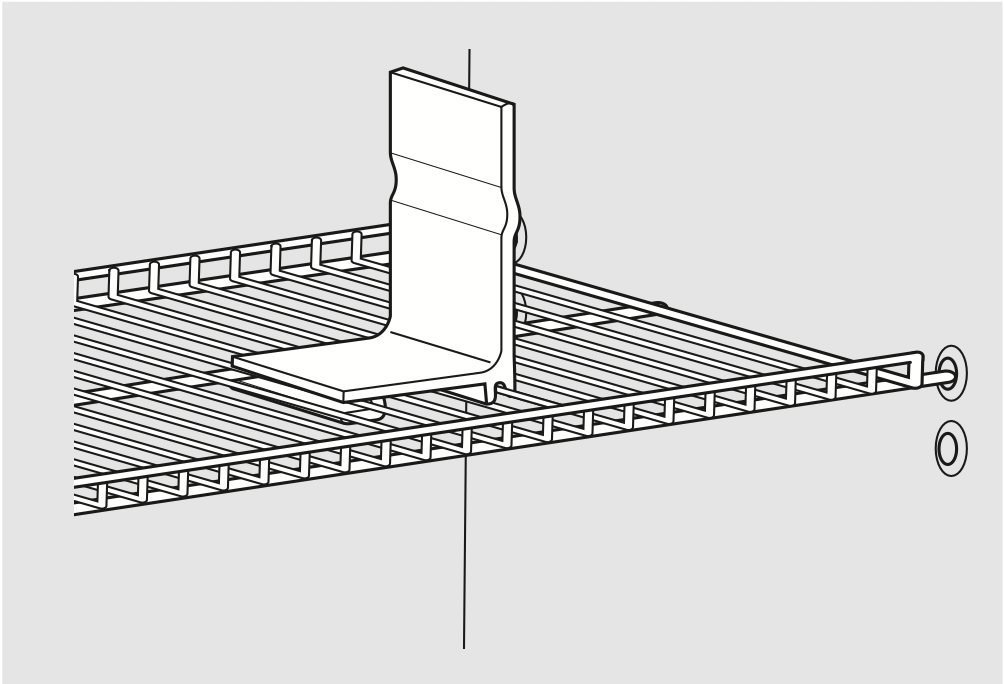
Basket Divider (some Upright models)
Organize your freezer basket by using the basket dividers supplied. To change the location, rotate the divider in a counterclockwise direction and pull up until it is free from the basket. Align the center of the divider with the center of the line in the bottom of the basket as shown in the figure. Rotate the divider clockwise until it snaps into place.
Wire Shelf Bookend (some Upright models)
Use these handy bookends to keep various boxed items stored neatly in your freezer. To adjust the location, simply unsnap the bookend from the wire shelf and snap into the next desired location.
Defrosting instructions (for Manual Defrost models)
In most climates, defrosting will be necessary only about twice a year.
To have your freezer operate most efficiently, do not permit more than 1/2 ″ (13 mm) of frost to accumulate on the shelves.
To remove frost, scrape with a plastic or wood spatula or scraper.
Do not use an ice pick or sharp-edged instrument as it may damage or scratch the freezer.
Do not use any electrical device in defrosting your freezer.
For Complete Defrosting
- Turn the temperature control to OFF and unplug the freezer.
- Remove all food and place it in corrugated boxes, insulated bags, picnic coolers, etc. Use towels and newspapers for insulation as needed.
- With the door/lid open, use pans of hot water to speed loosening of frost. Remove large pieces before they melt.
On models without a defrost drain, place towels or newspapers on the freezer bottom to catch the frost. The frost will loosen and fall. Remove towels and/or newspapers.
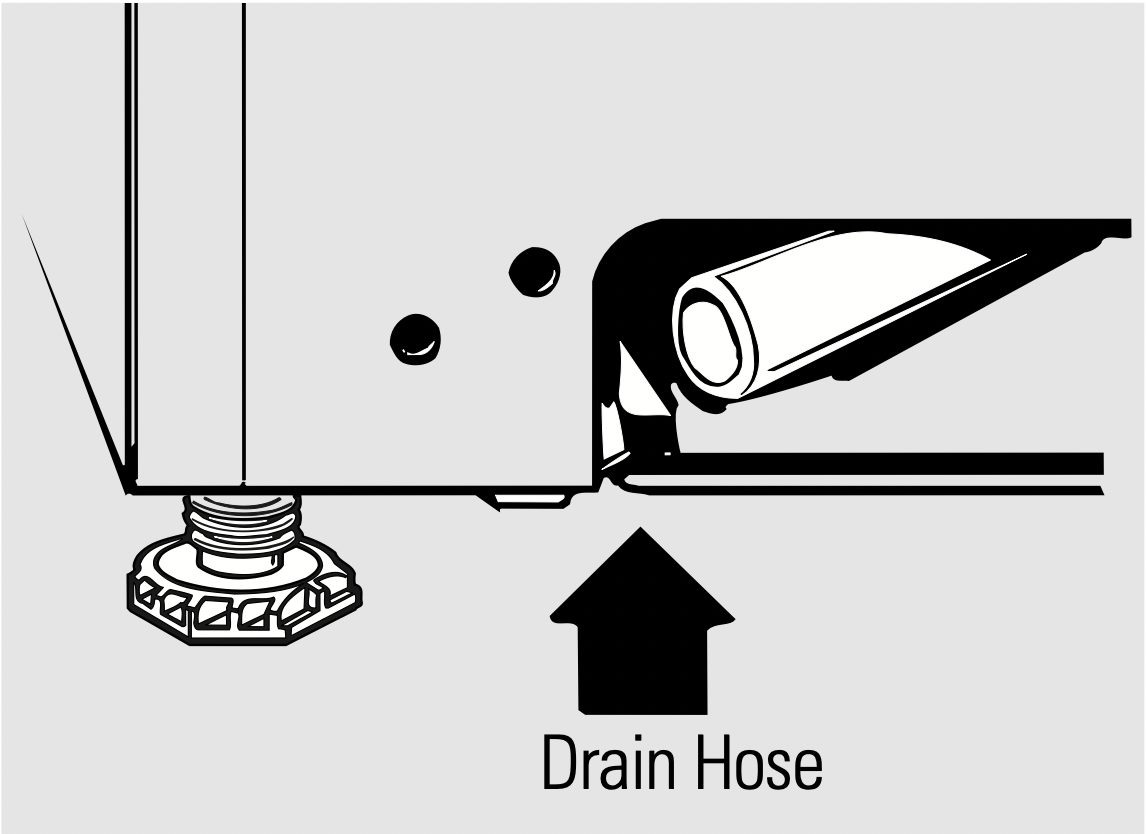
- a. Some Upright models have a hose adapter and a drain hose behind the base grille which carry the defrost water out from the freezer. Remove the base grille; then remove the drain plug and let the defrost water drain into a pan.
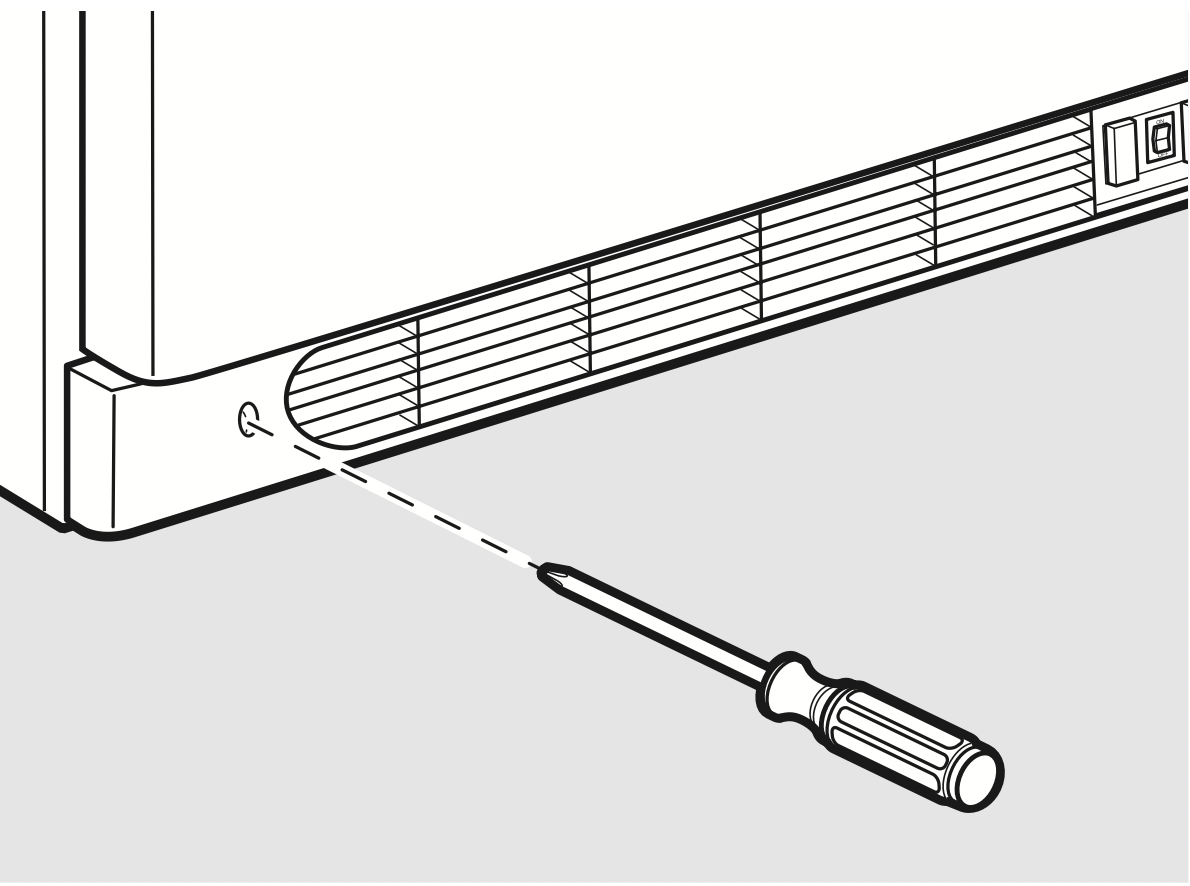
To remove the base grille (on some models), remove the two Phillips-head screws and pull the grille away from the freezer.
b. Some Chest models have a defrost water drain at the front and a hose adapter that is packaged in a bag in the bottom of the freezer. Remove the drain cap on the front of the freezer, insert the hose connector and attach the hose. Remove the drain plug inside the cabinet.
NOTE: Water may drip from the back flange of the lid cover during defrosting. This is normal. Ice builds up in the lid insulation when the lid is open for adding or removing food, and melts during the defrosting operation. - Sponge excess water from the bottom of the freezer as it collects to prevent overflowing.
- After defrosting, clean the inside of the freezer (see Care and Cleaning).
- a. On Upright models, be sure to replace the drain plug and return the drain tube to its position. Replace the base grille.
b. On Chest models, replace the drain plug inside the cabinet and the cap on the defrost drain. Fold over and dry the gasket on the hinge side of the lid. - Plug in the freezer. Return the temperature control to its previous position and return food to the freezer.
Care and cleaning
Cleaning Your Freezer
Outside. Protect the paint finish. The finish on the outside of the freezer is a high quality, baked-on paint finish. With proper care, it will stay new-looking and rust-free for years. Apply a coat of appliance polish wax when the freezer is new and then at least twice a year. Appliance polish wax also works well to remove tape residue from freezer surfaces.
Keep the finish clean. Wipe with a clean cloth lightly dampened with appliance polish wax or mild liquid dishwashing detergent. Dry and polish with a clean, soft cloth. Do not wipe the freezer with a soiled dishwashing cloth or wet towel. Do not use scouring pads, powdered cleaners, bleach, or cleaners containing bleach.
CAUTION: Care should be taken in moving the freezer away from the wall. All types of floor coverings can be damaged, particularly cushioned coverings and those with embossed surfaces.
Inside. Clean the inside of your freezer at least once a year. We recommend that the freezer be unplugged before cleaning. If this is not practical, wring excess moisture out of sponge or cloth when cleaning in the vicinity of switches, lights or controls.
Use warm water and baking soda solution–about a tablespoon of baking soda to a quart of water. Rinse thoroughly with water and wipe dry. Do not use cleaning powders or other abrasive cleaners. DO NOT wash removable parts in a dishwasher.
An open box of baking soda in the freezer will absorb stale freezer odors. Change the box every three months.
CAUTION: Damp objects stick to cold metal surfaces. DO NOT touch interior metal surfaces with wet or damp hands.
CAUTION: Freezer must be unplugged to avoid electrical hazard from power source when defrosting unit.
Some upright freezers are frost-free and defrost automatically, but should be cleaned occasionally.
No Defrosting (on No-Frost models)
You never have to defrost your new No-Frost freezer. It has been pre-set at the factory to defrost itself automatically.
Package labels always remain clearly legible, and packages will remain easy to separate and remove.
During defrosting, a slight noise may be noticed if the door is opened while the freezer is in the automatic defrosting cycle.
To Remove the Freezer Door (on Non-Electronic Control Upright models)
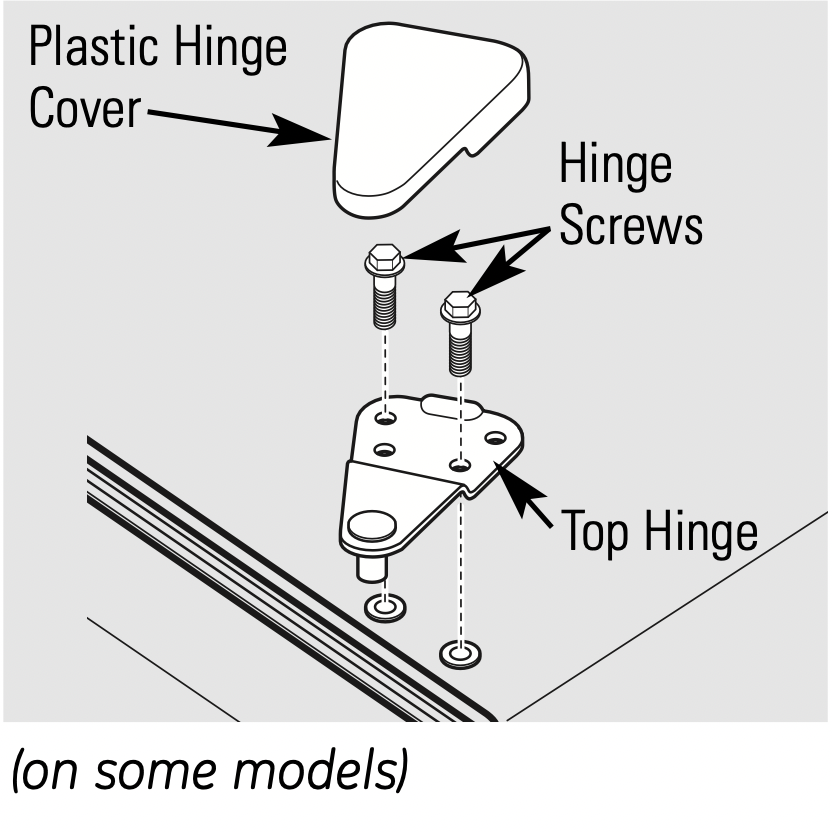
- Remove the plastic hinge cover by either lifting it off or folding it back (depending on model).
- Remove the screws holding the hinge to the top of the cabinet using a screwdriver, 5/16″ socket driver or wrench (depending on model).
- Remove the top hinge from the cabinet and lift the door up and off the lower hinge pin. Set the door aside.
- Remove the two screws from the bottom hinge.
To replace the doors, reverse the order of the above instructions.
CAUTION: It is very important that all hinge screws are securely tightened to ensure a secure assembly and prevent hinge slippage.
To Remove the Freezer Door (on Electronic Control Upright models)
The hinge screws are tamperproof. Please have an authorized service technician remove the door.
Lid Removal (on Chest models)
See lid removal instructions on either the back of the cabinet or the hinge label.
In Case of Extended Power Failure
- Keep freezer door/lid closed. Your freezer will keep food frozen for 24 hours provided warm air is not admitted.
- If freezer is out of operation for 24 hours or more, add dry ice. Leave ice in large pieces. Add more ice as required.
WARNING: Handling of dry ice can cause freezing of the hands—gloves or other protection is recommended. - If dry ice is not available, move food to a frozen food locker temporarily—until power is restored.
Preparing to Move
Disconnect the power cord plug from the wall outlet. Remove foods, defrost (on Manual Defrost models) and clean the freezer.
Secure all loose items such as grille and shelves by taping them securely in place to prevent damage.
Be sure freezer stays in upright position during actual moving and in van. The freezer must be secured in van to prevent movement. Protect outside of freezer with blanket.
Preparing for Vacation
To maintain freezer in operation during vacations, be sure your house power is not turned off. For sure protection of freezer contents, you may want to ask a neighbor to check the power supply and freezer operation every 48 hours.
For extended vacations or absences, you may prefer to move your frozen foods to a storage locker temporarily. If your freezer is to be left empty, disconnect power cord plug from wall outlet. To prevent formation of odors, place open box of baking soda in freezer and leave freezer door/lid open.
When the freezer is not operating, it can be left in an unheated house or room without damage to cabinet or mechanism.
- The freezer should be located in the coolest area of the room, away from heat-producing appliances or heating ducts, and out of direct sunlight.
- Let hot foods cool to room temperature before placing in the freezer. Overloading the freezer forces the compressor to run longer. Foods that freeze too slowly may lose quality or spoil.
- Be sure to wrap foods properly, and wipe containers dry before placing them in the freezer. This cuts down on frost buildup inside the freezer.
- Freezer shelves should not be lined with aluminum foil, wax paper or paper toweling. Liners interfere with cold air circulation, making the freezer less efficient.
- Organize and label food to reduce door openings and extended searches. Remove as many items as needed at one time, and close the door as soon as possible.

Troubleshooting
| Problem | Possible Causes |
What To Do |
|---|---|---|
| Freezer does not operate or Power-On Light is not on | Temperature control in OFF position. |
|
| Freezer is unplugged. |
|
|
| The fuse is blown/circuit breaker is tripped. |
|
|
| Freezer starts/stops too frequently | Door/lid left open. |
|
| Too frequent or too long door/lid openings. |
|
|
| Temperature control set too cold. |
|
|
| Freezer operates too long | Door/lid left open. |
|
| Too frequent or too long door/lid openings. |
|
|
| Temperature control set too cold. |
|
|
| Inadequate air circulation space around cabinet. |
|
|
| Room or outside weather is hot. |
|
|
|
Freezer has been disconnected recently for a period of time. |
|
|
| Large amounts of warm or hot food have been stored recently. |
|
|
| Noisy operation or cabinet vibrates | Floor may be weak, causing freezer to vibrate when compressor is on. |
|
| Cabinet is not positioned solidly on floor. |
|
|
| Freezer is touching the wall. |
|
|
| Freezer temperature too warm | Door/lid left open. |
|
|
Too frequent or too long door/lid openings. |
||
| Temperature control is set too warm. |
|
|
| Large amounts of water or hot food may have been stored recently. |
|
|
| Freezer has been disconnected recently. |
|
|
| Foods defrosting | Temperature control in OFF position. |
|
| Freezer is unplugged. |
|
|
| The fuse is blown/circuit breaker is tripped. |
|
|
| Door/lid left open. |
|
|
| Too frequent or too long door/lid openings. |
|
|
| Freezer temperature too cold | Temperature control set too cold. |
|
| Moisture forms on outside of cabinet | Not unusual during periods of high humidity. |
|
|
Door may not be seating properly, causing cold air from inside the freezer to meet warm moist air from the outside. |
|
|
| Interior light does not work (on some models) | No power at outlet. |
|
| Freezer is unplugged. |
|
|
| Light bulb burned out. |
|
|
| Door/lid won’t fully close by itself | Legs need adjusting. |
|
|
Package holding door/lid open. |
||
|
Slow starting time after being off |
Built-in overload protection |
|
| Excessive frost buildup | Door/lid left open. |
|
|
Too frequent or too long door/lid openings. |
||
|
Not unusual during periods of high humidity. |
||
| Freezer external surface temperature is warm | The external freezer walls can be as much as 30°F warmer than room temperature. |
|
| Louder sound levels whenever freezer is on | Modern freezers have increased storage capacity and more stable temperatures. They require a high-efficiency compressor. |
|
| Longer sound levels when compressor comes on | Freezer operates at higher pressures during the start of the ON cycle. |
|
| Popping or cracking sound when compressor comes on | Metal parts undergo expansion and contraction, as in hot water pipes. |
|
| Bubbling or gurgling sound, like boiling water |
Refrigerant (used to cool freezer) is circulating throughout the system. |
|
| Moisture forms on inside freezer walls |
Weather is hot and humid, which increases internal rate of frost buildup. |
|
| Door may not be seating properly. |
|
|
| Door is kept open too long, or is opened too frequently. |
|
|
| Odors in freezer | Interior needs to be cleaned. |
|
| Foods with strong odors are in the freezer. |
|

