
6DIHW\,QVWUXFWLRQV²
2SHUDWLQJ,QVWUXFWLRQV
&ORFNDQG7LPHU
2YHQ
%DNLQJDQG5RDVWLQJ
%URLOLQJ%URLOLQJ*XLGH
2YHQ&RQWURO
3RZHU2XWDJH
3UHKHDWLQJ
6DEEDWK)HDWXUH
6HOI&OHDQLQJ
6KHOYHV
6SHFLDO)HDWXUHV
6WHDP&OHDQ
7KHUPRVWDW$GMXVWPHQW
7LPHG%DNLQJ
DQG5RDVWLQJ
6XUIDFH&RRNLQJ
:DUPLQJ'UDZHU
&DUHDQG&OHDQLQJ
$OXPLQXP)RLO
%XUQHU$VVHPEO\
%XUQHU*UDWHV
&RQWURO3DQHODQG.QREV
&RRNWRS
'RRU5HPRYDO
'UDZHU
2YHQ%RWWRP
2YHQ/LJKW5HSODFHPHQW
2YHQ9HQWV
5DFNV
6HOI&OHDQLQJ
6WDLQOHVV6WHHO6XUIDFHV
,QVWDOODWLRQ
,QVWUXFWLRQV
²
$LU$GMXVWPHQW
$QWL7LS'HYLFH
$VVHPEOH6XUIDFH%XUQHUV
&KHFNLQJ%XUQHU
,JQLWLRQ
&RQQHFWLQJWKH5DQJH
WR*DV
'LPHQVLRQVDQG
&OHDUDQFHV
(OHFWULFDO&RQQHFWLRQV
/HYHOLQJWKH5DQJH
/3
7URXEOHVKRRWLQJ
7LSV
$FFHVVRULHV
&RQVXPHU6XSSRUW
&RQVXPHU6XSSRUW %DFN&RYHU
:DUUDQW\IRU&XVWRPHUV
LQ&DQDGD
:DUUDQW\IRU&XVWRPHUV
LQWKH86$
5DQJHV
*(
6WDQGDUG&OHDQ
-*%6
-*%6
-*%6
-*%6
-*66
5*%
5*%
5*%
5*%
5*%
6HOI&OHDQ
-*%
-*%
-*%
-*%
-*%3
-*%3
-*%3
5*%
5*%
5*%
2ZQHU·V0DQXDO
,QVWDOODWLRQ
,QVWUXFWLRQV
*($SSOLDQFHVFRP
)UHH6WDQGLQJ*DV
:ULWHWKHPRGHODQGVHULDO
QXPEHUVKHUH
0RGHO BBBBBBBBBBBBBBBBBBBB
6HULDOBBBBBBBBBBBBBBBBBBBBB
<RXFDQILQGWKHPRQDODEHORQ
WKHIURQWRIWKHUDQJHEHKLQGWKH
ZDUPLQJGUDZHURUORZHURYHQ
GUDZHU
,Q&DQDGDFRQWDFWXVDW
ZZZ*($SSOLDQFHVFD
)RUD6SDQLVKYHUVLRQ
RIWKLVPDQXDO
YLVLWRXU:HEVLWHDW
*($SSOLDQFHVFRP
3DUDFRQVXOWDUXQD
YHUVLRQHQHVSDxRO
GHHVWHPDQXDOGH
LQVWUXFFLRQHVYLVLWH
QXHVWURVLWLRGHLQWHUQHW
*($SSOLDQFHVFRP

,03257$176$)(7<,1)250$7,21
5($'$//,16758&7,216%()25(86,1*
6$9(7+(6(,16758&7,216
,03257$176$)(7<127,&(
7KH&DOLIRUQLD6DIH'ULQNLQJ:DWHUDQG7R[LF(QIRUFHPHQW$FWUHTXLUHVWKH*RYHUQRURI&DOLIRUQLDWRSXEOLVKDOLVWRI
VXEVWDQFHVNQRZQWRWKHVWDWHWRFDXVHFDQFHUELUWKGHIHFWVRURWKHUUHSURGXFWLYHKDUPDQGUHTXLUHVEXVLQHVVHVWR
ZDUQFXVWRPHUVRISRWHQWLDOH[SRVXUHWRVXFKVXEVWDQFHV
7KHILEHUJODVVLQVXODWLRQLQVHOIFOHDQRYHQVJLYHVRIIDYHU\VPDOODPRXQWRIFDUERQPRQR[LGHGXULQJWKHFOHDQLQJF\FOH
([SRVXUHFDQEHPLQLPL]HGE\YHQWLQJZLWKDQRSHQZLQGRZRUXVLQJDYHQWLODWLRQIDQRUKRRG
:$51,1*
'RQRWVWRUHRUXVHJDVROLQHRURWKHUIODPPDEOHYDSRUVDQGOLTXLGVLQWKHYLFLQLW\RIWKLVRUDQ\RWKHUDSSOLDQFH
:+$772'2,)<2860(//*$6
■ 'RQRWWU\WROLJKWDQ\DSSOLDQFH
■ 'RQRWWRXFKDQ\HOHFWULFDOVZLWFKGRQRWXVHDQ\SKRQHLQ\RXUEXLOGLQJ
■ ,PPHGLDWHO\FDOO\RXUJDVVXSSOLHUIURPDQHLJKERU·VSKRQH)ROORZWKHJDVVXSSOLHU·VLQVWUXFWLRQV
■ ,I\RXFDQQRWUHDFK\RXUJDVVXSSOLHUFDOOWKHILUHGHSDUWPHQW
,QVWDOODWLRQDQGVHUYLFHPXVWEHSHUIRUPHGE\DTXDOLILHGLQVWDOOHUVHUYLFHDJHQF\RUWKHJDVVXSSOLHU
:$51,1*
,IWKHLQIRUPDWLRQLQWKLVPDQXDOLVQRWIROORZHGH[DFWO\DILUHRUH[SORVLRQPD\
UHVXOWFDXVLQJSURSHUW\GDPDJHSHUVRQDOLQMXU\RUGHDWK
■$OOUDQJHVFDQWLS
■
%8516RURWKHU6(5,286,1-85,(6FDQUHVXOW
■ ,167$//DQG&+(&.WKHDQWLWLSEUDFNHWIROORZLQJWKHLQVWUXFWLRQVVXSSOLHGZLWKWKHEUDFNHW
7RUHGXFHWKHULVNRIWLSSLQJWKHUDQJHWKHUDQJHPXVWEHVHFXUHGE\DSURSHUO\LQVWDOOHGDQWLWLS
EUDFNHW6HHLQVWDOODWLRQLQVWUXFWLRQVVKLSSHGZLWKWKHEUDFNHWIRUFRPSOHWHGHWDLOVEHIRUHDWWHPSWLQJ
WRLQVWDOO
7RFKHFNLIWKHEUDFNHWLVLQVWDOOHGDQGHQJDJHGSURSHUO\ORRNXQGHUQHDWKWKHUDQJHWRVHHWKDW
WKHDQWLWLSDUPDWWDFKHGWRWKHVLGHSDQHOLVHQJDJHGLQWKHEUDFNHW2QVRPHPRGHOVWKHVWRUDJH
GUDZHURUNLFNSDQHOFDQEHUHPRYHGIRUHDVLHULQVSHFWLRQ,IYLVXDOLQVSHFWLRQLVQRWSRVVLEOHVOLGH
WKHUDQJHIRUZDUGFRQILUPWKHDQWLWLSEUDFNHWLVVHFXUHO\DWWDFKHGWRWKHIORRURUZDOODQGVOLGHWKHUDQJHEDFNVRWKH
DQWLWLSDUPVOLGHVMXVWXQGHUWKHDQWLWLSEUDFNHW,IWKHUDQJHLVSXOOHGIURPWKHZDOOIRUDQ\UHDVRQDOZD\VUHSHDWWKLV
SURFHGXUHWRYHULI\WKHUDQJHLVSURSHUO\VHFXUHGE\WKHDQWLWLSEUDFNHW
1HYHUFRPSOHWHO\UHPRYHWKHOHYHOLQJOHJVRUWKHUDQJHZLOOQRWEHVHFXUHGWRWKHDQWLWLSGHYLFHSURSHUO\
,I\RXGLGQRWUHFHLYHDQDQWLWLSEUDFNHWZLWK\RXUSXUFKDVHFDOOWRUHFHLYHRQHDWQRFRVWLQ&DQDGD
FDOO)RULQVWDOODWLRQLQVWUXFWLRQVRIWKHEUDFNHWYLVLW*($SSOLDQFHVFRPLQ&DQDGD*($SSOLDQFHVFD
:$51,1*
*($SSOLDQFHVFRP
6$9(7+(6(,16758&7,216
:$51,1*
1(9(5XVHWKLVDSSOLDQFHDVDVSDFHKHDWHUWRKHDW
RUZDUPWKHURRP'RLQJVRPD\UHVXOWLQFDUERQ
PRQR[LGHSRLVRQLQJDQGRYHUKHDWLQJRIWKHRYHQ
■8VHWKLVDSSOLDQFHIRULWVLQWHQGHGSXUSRVHDVGHVFULEHG
LQWKLVRZQHU·VPDQXDO
■+DYH\RXUUDQJHLQVWDOOHGDQGSURSHUO\JURXQGHGE\
DTXDOLILHGLQVWDOOHULQDFFRUGDQFHZLWKWKHSURYLGHG
LQVWDOODWLRQLQVWUXFWLRQV$Q\DGMXVWPHQWDQGVHUYLFH
VKRXOGEHSHUIRUPHGRQO\E\DTXDOLILHGJDVUDQJH
LQVWDOOHUVRUVHUYLFHWHFKQLFLDQV'RQRWDWWHPSWWRUHSDLU
RUUHSODFHDQ\SDUWRI\RXUUDQJHXQOHVVLWLVVSHFLILFDOO\
UHFRPPHQGHGLQWKLVPDQXDO
■<RXUUDQJHLVVKLSSHGIURPWKHIDFWRU\VHWIRUXVHZLWK
QDWXUDOJDV,WFDQEHFRQYHUWHGIRUXVHZLWK/3JDV
,IUHTXLUHGWKHVHDGMXVWPHQWVPXVWEHPDGHE\D
TXDOLILHGWHFKQLFLDQLQDFFRUGDQFHZLWKWKHLQVWDOODWLRQ
LQVWUXFWLRQVDQGORFDOFRGHV7KHDJHQF\SHUIRUPLQJWKLV
ZRUNDVVXPHVUHVSRQVLELOLW\IRUWKHFRQYHUVLRQ
■+DYHWKHLQVWDOOHUVKRZ\RXWKHORFDWLRQRIWKHUDQJH
JDVVKXWRIIYDOYHDQGKRZWRWXUQLWRIILIQHFHVVDU\
■3OXJ\RXUUDQJHLQWRDYROWJURXQGHGRXWOHWRQO\'R
QRWUHPRYHWKHURXQGJURXQGLQJSURQJIURPWKHSOXJ
,ILQGRXEWDERXWWKHJURXQGLQJRIWKHKRPHHOHFWULFDO
V\VWHPLWLV\RXUUHVSRQVLELOLW\DQGREOLJDWLRQWRKDYHDQ
XQJURXQGHGRXWOHWUHSODFHGZLWKDSURSHUO\JURXQGHG
WKUHHSURQJRXWOHWLQDFFRUGDQFHZLWKWKH1DWLRQDO
(OHFWULFDO&RGH'RQRWXVHRQH[WHQVLRQFRUGZLWKWKLV
DSSOLDQFH
■%HIRUHSHUIRUPLQJDQ\VHUYLFHXQSOXJWKHUDQJH
RUGLVFRQQHFWWKHSRZHUVXSSO\DWWKHKRXVHKROG
GLVWULEXWLRQSDQHOE\UHPRYLQJWKHIXVHRUVZLWFKLQJRII
WKHFLUFXLWEUHDNHU
■%HVXUHDOOSDFNLQJPDWHULDOVDUHUHPRYHGIURPWKH
UDQJHEHIRUHRSHUDWLQJWRSUHYHQWLJQLWLRQRIWKHVH
PDWHULDOV
■ $YRLGVFUDWFKLQJRULPSDFWLQJJODVVGRRUVFRRNWRSVRU
FRQWUROSDQHOV'RLQJVRPD\OHDGWRJODVVEUHDNDJH'R
QRWFRRNRQDSURGXFWZLWKEURNHQJODVV6KRFNILUHRU
FXWVPD\RFFXU
■ 'RQRWOHDYHFKLOGUHQDORQHRUXQDWWHQGHGLQDQ
DUHDZKHUHDQDSSOLDQFHLVLQXVH7KH\VKRXOGQHYHU
EHDOORZHGWRFOLPEVLWRUVWDQGRQDQ\SDUWRIWKH
DSSOLDQFH
■ 'RQRWVWRUHLWHPVRILQWHUHVWWRFKLOGUHQDERYHDUDQJH
RURQWKHEDFNJXDUGRIDUDQJH³FKLOGUHQFOLPELQJRQ
WKHUDQJHWRUHDFKLWHPVFRXOGEHVHULRXVO\LQMXUHG
■'RQRWDOORZDQ\RQHWRFOLPEVWDQGRUKDQJRQWKH
RYHQGRRUGUDZHURUFRRNWRS7KH\FRXOGGDPDJHWKH
UDQJHRUWLSLWRYHUFDXVLQJVHYHUHLQMXU\RUGHDWK
■1HYHUEORFNWKHYHQWVDLURSHQLQJVRIWKHUDQJH7KH\
SURYLGHWKHDLULQOHWVDQGRXWOHWVWKDWDUHQHFHVVDU\IRU
WKHUDQJHWRRSHUDWHSURSHUO\ZLWKFRUUHFWFRPEXVWLRQ
$LURSHQLQJVDUHORFDWHGDWWKHUHDURIWKHFRRNWRSDW
WKHWRSDQGERWWRPRIWKHRYHQGRRUDQGDWWKHERWWRP
RIWKHUDQJHXQGHUWKHZDUPLQJGUDZHUORZHURYHQ
GUDZHURUNLFNSDQHO
■ 8VHRQO\GU\SRWKROGHUV³PRLVWRUGDPSSRWKROGHUVRQ
KRWVXUIDFHVPD\UHVXOWLQEXUQVIURPVWHDP'RQRWOHW
SRWKROGHUVWRXFKVXUIDFHEXUQHUVEXUQHUJUDWHRURYHQ
KHDWLQJHOHPHQW'RQRWXVHDWRZHORURWKHUEXON\FORWK
LQSODFHRISRWKROGHUV
■%HFDUHIXOQRWWRWRXFKKRWVXUIDFHVRIWKHUDQJH
3RWHQWLDOO\KRWVXUIDFHVLQFOXGHEXUQHUVJUDWHVFRRNWRS
EDFNJXDUGRYHQDQGGRRULQWHULRUDQGFUHYLFHVDURXQG
WKHRYHQGRRU
■'RQRWKHDWXQRSHQHGIRRGFRQWDLQHUV3UHVVXUHFRXOG
EXLOGXSDQGWKHFRQWDLQHUFRXOGEXUVWFDXVLQJDQ
LQMXU\
■7RSURWHFWDJDLQVWIRRGERUQHLOOQHVVHQVXUHWKDW
WHPSHUDWXUHVRIPHDWDQGSRXOWU\SURGXFWVPHHW
RUH[FHHGWKH86'$PLQLPXPUHFRPPHQGHG
WHPSHUDWXUHVIRUIRRGVDIHW\)RUPRUHLQIRUPDWLRQ
VHHZZZLVLWGRQH\HWJRYRUFDOOWKH86'$PHDWDQG
SRXOWU\KRWOLQHDW
*(1(5$/6$)(7<,16758&7,216
:$51,1*
,03257$176$)(7<,1)250$7,21
5($'$//,16758&7,216%()25(86,1*
6$9(7+(6(,16758&7,216
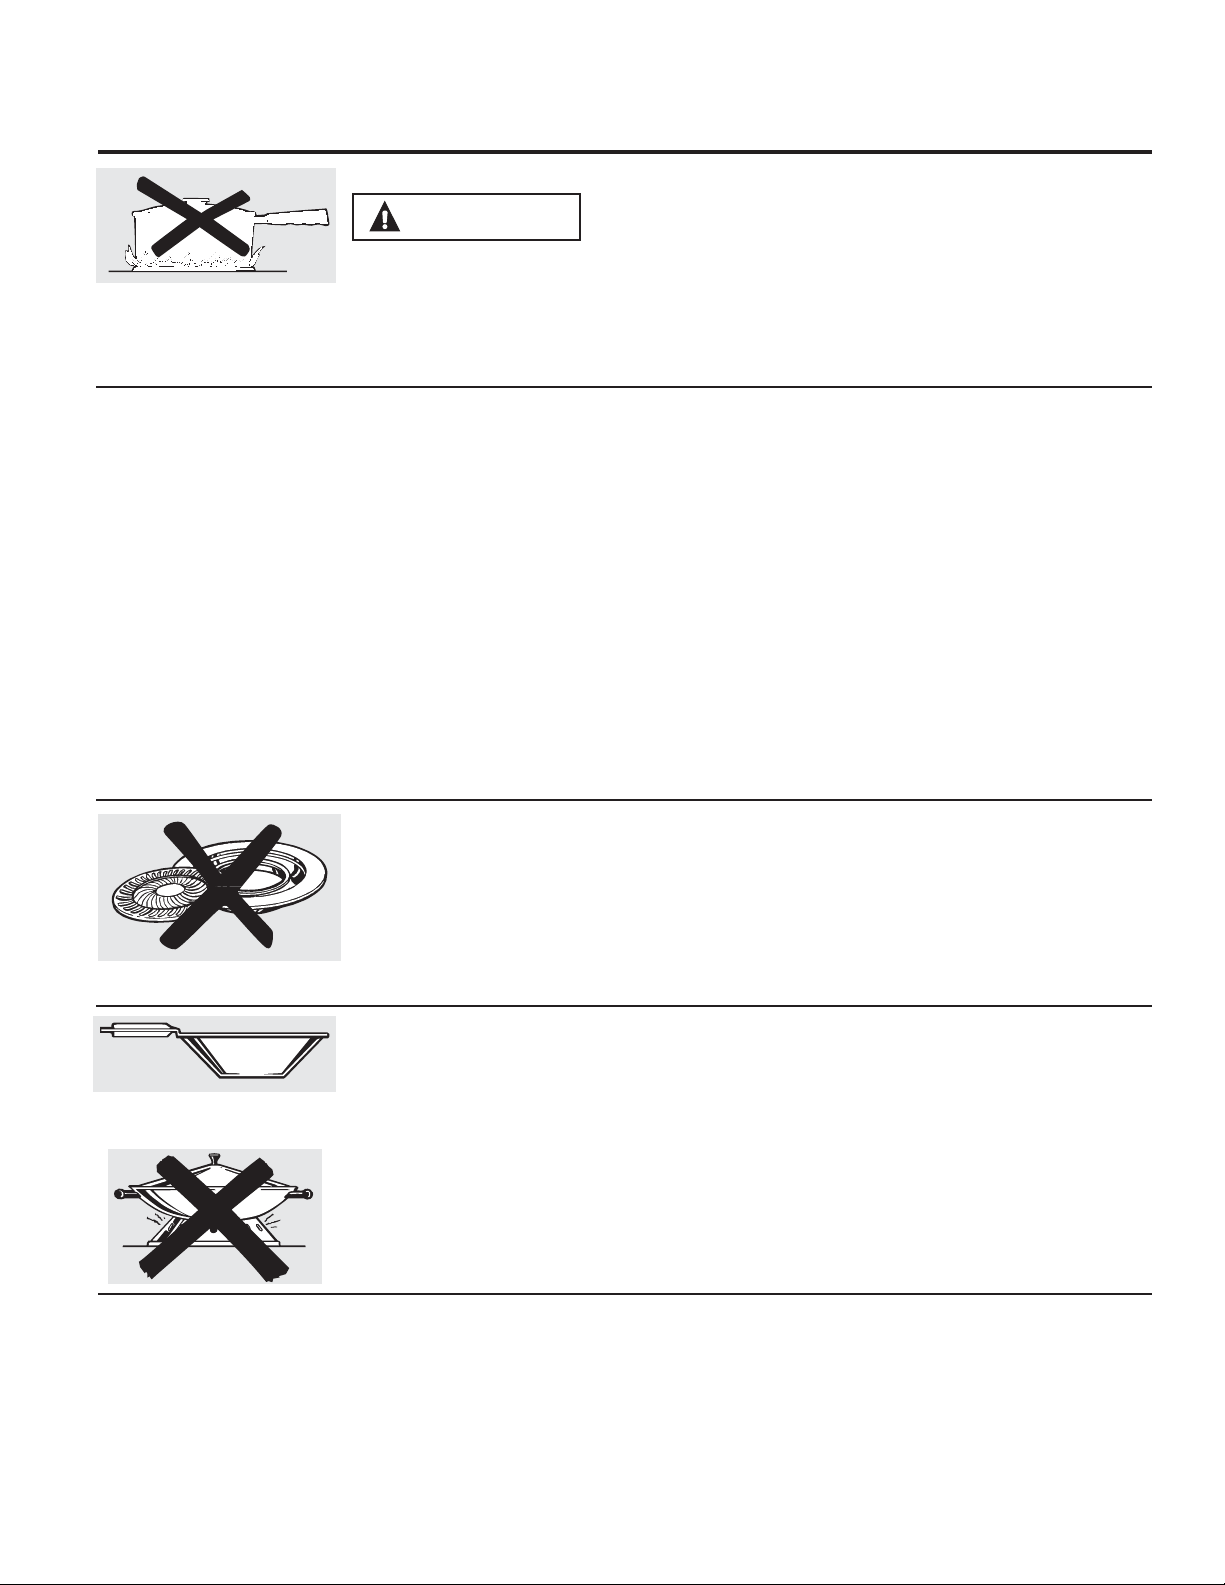
■'RQRWXVHZDWHURQJUHDVHILUHV1HYHUSLFNXS
DIODPLQJSDQ7XUQWKHFRQWUROVRII6PRWKHUD
IODPLQJSDQRQDVXUIDFHEXUQHUE\FRYHULQJWKHSDQ
FRPSOHWHO\ZLWKDZHOOILWWLQJOLGFRRNLHVKHHWRUIODW
WUD\,IQHFHVVDU\XVHDPXOWLSXUSRVHGU\FKHPLFDORU
IRDPW\SHILUHH[WLQJXLVKHU
■,IWKHUHLVDILUHLQWKHRYHQGXULQJEDNLQJWXUQWKHRYHQ
RIIDQGNHHSWKHGRRUFORVHGXQWLOWKHILUHJRHVRXW,I
QHFHVVDU\XVHDPXOWLSXUSRVHGU\FKHPLFDORUIRDP
W\SHILUHH[WLQJXLVKHU
■ ,IWKHUHLVDILUHLQWKHRYHQGXULQJVHOIFOHDQWXUQWKH
RYHQRIIDQGZDLWIRUWKHILUHWRJRRXW'RQRWIRUFH
WKHGRRURSHQ,QWURGXFWLRQRIIUHVKDLUDWVHOIFOHDQ
WHPSHUDWXUHVPD\OHDGWRDEXUVWRIIODPHIURPWKH
RYHQ)DLOXUHWRIROORZWKLVLQVWUXFWLRQPD\UHVXOWLQ
VHYHUHEXUQV
,17+((9(172)$),5(7$.(7+()2//2:,1*67(36
7235(9(17,1-85<$1'),5(635($',1*
■1HYHUOHDYHWKHVXUIDFHEXUQHUVXQDWWHQGHGDWPHGLXP
RUKLJKKHDWVHWWLQJV)RRGVHVSHFLDOO\RLO\IRRGVPD\
LJQLWHUHVXOWLQJLQILUHWKDWFRXOGVSUHDGWRVXUURXQGLQJ
FDELQHWV
■1HYHUOHDYHRLOXQDWWHQGHGZKLOHIU\LQJ,IDOORZHGWR
KHDWEH\RQGLWVVPRNLQJSRLQWRLOPD\LJQLWHUHVXOWLQJ
LQILUHWKDWPD\VSUHDGWRVXUURXQGLQJFDELQHWV8VHD
GHHSIDWWKHUPRPHWHUZKHQHYHUSRVVLEOHWRPRQLWRURLO
WHPSHUDWXUH
■ 7RDYRLGRLOVSLOORYHUDQGILUHXVHDPLQLPXPDPRXQWRI
RLOZKHQVKDOORZSDQIU\LQJDQGDYRLGFRRNLQJIUR]HQ
IRRGVZLWKH[FHVVLYHDPRXQWVRILFH
■ 8VHSURSHUSDQVL]HDQGDYRLGSDQVWKDWDUHXQVWDEOH
RUHDVLO\WLSSHG6HOHFWFRRNZDUHWKDWLVPDWFKHGWRWKH
VL]HRIWKHEXUQHU%XUQHUIODPHVVKRXOGEHDGMXVWHGVR
WKDWWKH\GRQRWH[WHQGEH\RQGWKHERWWRPRIWKHSDQ
([FHVVLYHIODPHPD\EHKD]DUGRXV
■$OZD\VXVHWKH/,7(SRVLWLRQZKHQLJQLWLQJWKHWRS
EXUQHUVDQGPDNHVXUHWKHEXUQHUVKDYHLJQLWHG
■ :KHQXVLQJJODVVFHUDPLFFRRNZDUHPDNHVXUHLWLV
VXLWDEOHIRUFRRNWRSVHUYLFHRWKHUVPD\EUHDNEHFDXVH
RIVXGGHQFKDQJHLQWHPSHUDWXUH
■7RPLQLPL]HWKHSRVVLELOLW\RIEXUQVLJQLWLRQRI
IODPPDEOHPDWHULDOVDQGVSLOODJHWKHKDQGOHRID
FRQWDLQHUVKRXOGEHWXUQHGWRZDUGWKHFHQWHURIWKH
UDQJHZLWKRXWH[WHQGLQJRYHUQHDUE\EXUQHUV
■ :KHQSUHSDULQJIODPLQJIRRGVXQGHUDKRRGWXUQWKH
IDQRQ
■ 'RQRWXVHDZRNZLWKDURXQGPHWDOVXSSRUWULQJWKH
ULQJPD\WUDSKHDWDQGEORFNDLUWRWKHEXUQHUUHVXOWLQJ
LQDFDUERQPRQR[LGHKD]DUG
■ 'RQRWDWWHPSWWROLIWWKHFRRNWRSLI\RXUUDQJHKDV
VHDOHGVXUIDFHEXUQHUV'RLQJVRPD\GDPDJHWKHJDV
WXELQJWRWKHVXUIDFHEXUQHUVUHVXOWLQJLQDJDVOHDNDQG
ULVNRIILUH
■ 'RQRWXVHDOXPLQXPIRLOWRFRYHUWKHJUDWHVRUOLQH
DQ\SDUWRIWKHFRRNWRS'RLQJVRPD\UHVXOWLQFDUERQ
PRQR[LGHSRLVRQLQJRYHUKHDWLQJRIWKHFRRNWRS
VXUIDFHVRUDSRWHQWLDOILUHKD]DUG
&22.7236$)(7<,16758&7,216
:$51,1*
:$51,1*
■'RQRWVWRUHRUXVHIODPPDEOHPDWHULDOVLQDQRYHQRU
QHDUWKHFRRNWRSLQFOXGLQJSDSHUSODVWLFSRWKROGHUV
OLQHQVZDOOFRYHULQJVFXUWDLQVGUDSHVDQGJDVROLQHRU
RWKHUIODPPDEOHYDSRUVDQGOLTXLGV
■
1HYHUZHDUORRVHILWWLQJRUKDQJLQJJDUPHQWVZKLOH
XVLQJWKHDSSOLDQFH$YRLGVWRULQJFRPPRQO\XVHG
LWHPVLQFDELQHWVDERYHWKHUDQJHDQGEHFDUHIXOZKHQ
UHDFKLQJRYHUWKHUDQJH&ORWKLQJLQFORVHSUR[LPLW\WR
EXUQHUVRUKRWVXUIDFHVPD\LJQLWHFDXVLQJVHYHUHEXUQV
■ 'RQRWOHWFRRNLQJJUHDVHRURWKHUIODPPDEOHPDWHULDOV
DFFXPXODWHLQRUQHDUWKHUDQJH*UHDVHLQWKHRYHQRU
RQWKHFRRNWRSPD\LJQLWH
■ &OHDQYHQWLODWLQJKRRGVIUHTXHQWO\*UHDVHVKRXOGQRW
EHDOORZHGWRDFFXPXODWHRQWKHKRRGRUILOWHU
.((3)/$00$%/(0$7(5,$/6$:$<)5207+(5$1*(
:$51,1*
*($SSOLDQFHVFRP
6$9(7+(6(,16758&7,216
:$51,1*
1(9(5FRYHUDQ\VORWVKROHVRU
SDVVDJHVLQWKHRYHQERWWRPRUFRYHUDQHQWLUHUDFNZLWK
PDWHULDOVVXFKDVDOXPLQXPIRLO'RLQJVREORFNVDLUIORZ
WKURXJKWKHRYHQDQGPD\FDXVHFDUERQPRQR[LGH
SRLVRQLQJ$OXPLQXPIRLOOLQLQJVPD\DOVRWUDSKHDWFDXVLQJ
DILUHKD]DUG
■6WDQGDZD\IURPWKHUDQJHZKHQRSHQLQJWKHRYHQ
GRRU+RWDLURUVWHDPZKLFKHVFDSHVFDQFDXVHEXUQV
WRKDQGVIDFHDQGRUH\HV
■ .HHSWKHRYHQIUHHIURPJUHDVHEXLOGXS*UHDVHLQWKH
RYHQPD\LJQLWH
■ 3ODFHRYHQUDFNVLQGHVLUHGORFDWLRQZKLOHRYHQLVFRRO
,IUDFNPXVWEHPRYHGZKLOHRYHQLVKRWEHFDUHIXOWR
DYRLGWRXFKLQJKRWVXUIDFHV
■3XOOWKHRYHQUDFNWRWKHVWRSORFNSRVLWLRQZKHQ
ORDGLQJDQGXQORDGLQJIRRGIURPWKHRYHQ7KLVKHOSV
SUHYHQWEXUQVIURPWRXFKLQJKRWVXUIDFHVRIWKHGRRU
DQGRYHQZDOOV
■ 'RQRWOHDYHLWHPVVXFKDVSDSHUFRRNLQJXWHQVLOVRU
IRRGLQWKHRYHQZKHQQRWLQXVH,WHPVVWRUHGLQDQ
RYHQFDQLJQLWH
■'RQRWOHDYHLWHPVRQWKHFRRNWRSQHDUWKHRYHQYHQW
ZKLFKLVLQWKHFHQWHURIWKHEDFNJXDUG,WHPVPD\
RYHUKHDWUHVXOWLQJLQDULVNRIILUHRUEXUQV
■:KHQXVLQJFRRNLQJRUURDVWLQJEDJVLQWKHRYHQIROORZ
WKHPDQXIDFWXUHU·VGLUHFWLRQV
■1HYHUEURLOZLWKGRRURSHQ2SHQGRRUEURLOLQJLVQRW
SHUPLWWHGGXHWRRYHUKHDWLQJRIFRQWURONQREV
29(16$)(7<,16758&7,216
:$51,1*
7KHVHOIFOHDQLQJIHDWXUHRSHUDWHVWKHRYHQDWWHPSHUDWXUHVKLJKHQRXJKWREXUQDZD\IRRGVRLOVLQWKHRYHQ
)ROORZWKHVHLQVWUXFWLRQVIRUVDIHRSHUDWLRQ
■%HIRUHRSHUDWLQJWKHVHOIFOHDQF\FOHUHPRYHSDQV
VKLQ\PHWDORYHQUDFNVDQGRWKHUXWHQVLOVIURPWKH
RYHQ2QO\SRUFHODLQFRDWHGRYHQUDFNVPD\EHOHIWLQ
WKHRYHQ'RQRWXVHVHOIFOHDQWRFOHDQRWKHUSDUWV
VXFKDVJUDWHV
■%HIRUHRSHUDWLQJWKHVHOIFOHDQF\FOHZLSHJUHDVHDQG
IRRGVRLOVIURPWKHRYHQ([FHVVLYHDPRXQWRIJUHDVH
PD\LJQLWHOHDGLQJWRVPRNHGDPDJHWR\RXUKRPH
■ ,IWKHVHOIFOHDQLQJPRGHPDOIXQFWLRQVWXUQWKHRYHQRII
DQGGLVFRQQHFWWKHSRZHUVXSSO\+DYHLWVHUYLFHGE\D
TXDOLILHGWHFKQLFLDQ
■ 'RQRWFOHDQWKHGRRUJDVNHW7KHGRRUJDVNHWLV
HVVHQWLDOIRUDJRRGVHDO&DUHVKRXOGEHWDNHQQRWWR
UXEGDPDJHRUPRYHWKHJDVNHW
■ 'RQRWXVHRYHQFOHDQHUV1RFRPPHUFLDORYHQFOHDQHU
RURYHQOLQHUSURWHFWLYHFRDWLQJRIDQ\NLQGVKRXOGEH
XVHGLQRUDURXQGDQ\SDUWRIWKHRYHQ
6(/)&/($1,1*29(16$)(7<,16758&7,216
6RPHPRGHOV
:$51,1*
■7KHSXUSRVHRIWKHZDUPLQJGUDZHULVWRKROGKRW
FRRNHGIRRGVDWVHUYLQJWHPSHUDWXUH%DFWHULDZLOOJURZ
YHU\UDSLGO\LQIRRGWKDWLVEHWZHHQDQG)'R
QRWSXWFROGIRRGLQZDUPLQJGUDZHU'RQRWNHHSIRRG
LQWKHZDUPLQJGUDZHUIRUPRUHWKDQKRXUV)DLOXUHWR
IROORZWKHVHLQVWUXFWLRQVPD\UHVXOWLQIRRGERUQHLOOQHVV
■'RQRWOHDYHSDSHUSURGXFWVSODVWLFVFDQQHGIRRGRU
FRPEXVWLEOHPDWHULDOVLQWKHGUDZHU7KH\PD\LJQLWH
■ 'RQRWWRXFKWKHKHDWLQJHOHPHQWRUWKHLQWHULRUVXUIDFH
RIWKHGUDZHU7KHVHVXUIDFHVPD\EHKRWHQRXJKWR
FDXVHEXUQV
■ 8VHFDUHZKHQRSHQLQJWKHGUDZHU2SHQWKHGUDZHUD
FUDFNDQGOHWKRWDLURUVWHDPHVFDSHEHIRUHUHPRYLQJ
RUUHSODFLQJIRRG+RWDLURUVWHDPWKDWHVFDSHVFDQ
FDXVHEXUQVWRKDQGVIDFHDQGRUH\HV
■ 'RQRWXVHDOXPLQXPIRLOWROLQHWKHZDUPLQJGUDZHU
)RLOLVDQH[FHOOHQWKHDWLQVXODWRUDQGZLOOWUDSKHDW
EHQHDWKLW7KLVZLOOXSVHWWKHSHUIRUPDQFHRIWKH
GUDZHUDQGSRWHQWLDOO\FDXVHDILUHKD]DUG
:$50,1*'5$:(5/2:(529(1'5$:(56$)(7<
,16758&7,216
6RPHPRGHOV
:$51,1*
7KURXJKRXWWKLVPDQXDOIHDWXUHVDQGDSSHDUDQFHPD\YDU\IURP\RXUPRGHO
+RZWR/LJKWD*DV6XUIDFH%XUQHU
0DNHVXUHDOOWKHVXUIDFHEXUQHUVDUHSODFHGLQ
WKHLUUHVSHFWLYHSRVLWLRQV
3XVKWKHFRQWURONQRELQDQGWXUQLWWRWKH/,7(
SRVLWLRQ
<RXZLOOKHDUDOLWWOHFOLFNLQJQRLVH³WKHVRXQG
RIWKHHOHFWULFVSDUNLJQLWLQJWKHEXUQHU
7XUQWKHNQREWRDGMXVWWKHIODPHVL]H,IWKH
NQREVWD\VDW/,7(LWZLOOFRQWLQXHWRFOLFN
:KHQRQHEXUQHULVWXUQHGWR/,7( DOOWKH
EXUQHUVVSDUN'RQRWDWWHPSWWRGLVDVVHPEOH
RUFOHDQDURXQGDQ\EXUQHUZKLOHDQRWKHU
EXUQHULVRQ$QHOHFWULFVKRFNPD\UHVXOWZKLFK
FRXOGFDXVH\RXWRNQRFNRYHUKRWFRRNZDUH
3XVKWKHFRQWURONQRELQDQGWXUQ
LWWRWKH/,7(SRVLWLRQ
%HIRUH/LJKWLQJD*DV%XUQHU
0DNHVXUHDOOEXUQHUVDUHLQSODFH
0DNHVXUHDOOJUDWHVRQWKHUDQJHDUH
SURSHUO\SODFHGEHIRUHXVLQJDQ\EXUQHU
$IWHU/LJKWLQJD*DV%XUQHU
'RQRWRSHUDWHWKHEXUQHUIRUDQH[WHQGHG
SHULRGRIWLPHZLWKRXWFRRNZDUHRQWKH
JUDWH7KHILQLVKRQWKHJUDWHPD\FKLS
ZLWKRXWFRRNZDUHWRDEVRUEWKHKHDW
%HVXUHWKHEXUQHUVDQGJUDWHVDUHFRRO
EHIRUH\RXSODFH\RXUKDQGDSRWKROGHU
FOHDQLQJFORWKVRURWKHUPDWHULDOVRQWKHP
6HDOHG*DV%XUQHUV6RPHPRGHOV
<RXUJDVUDQJHFRRNWRSKDVVHDOHGJDV
EXUQHUV7KH\RIIHUFRQYHQLHQFHFOHDQDELOLW\
DQGIOH[LELOLW\WREHXVHGLQDZLGHUDQJHRI
FRRNLQJDSSOLFDWLRQV
7KHVPDOOHVWEXUQHULQWKHULJKWUHDUSRVLWLRQ
LVWKHVLPPHUEXUQHU2QVRPHPRGHOVWKH
ULJKWIURQWSRVLWLRQWULSOHIODPHEXUQHUZLOOEH
WKHVLPPHUEXUQHU7KLVEXUQHUFDQEHWXUQHG
GRZQWR6,0IRUDYHU\ORZVLPPHUVHWWLQJ
,WSURYLGHVSUHFLVHFRRNLQJSHUIRUPDQFHIRU
GHOLFDWHIRRGVVXFKDVVDXFHVRUIRRGVWKDW
UHTXLUHORZKHDWIRUDORQJFRRNLQJWLPH
7KHPHGLXPOHIWUHDUDQGWKHODUJHOHIW
IURQWEXUQHUVDUHWKHSULPDU\EXUQHUV
IRUPRVWFRRNLQJ7KHVHJHQHUDOSXUSRVH
EXUQHUVFDQEHWXUQHGGRZQIURP+,WR/2WR
VXLWDZLGHUDQJHRIFRRNLQJQHHGV
7KHH[WUDODUJHEXUQHUULJKWIURQWWULSOHIODPH
EXUQHURUOHIWIURQWEXUQHURQVRPHPRGHOVDUH
WKHPD[LPXPRXWSXWEXUQHUV/LNHWKHRWKHU
IRXUEXUQHUVLWFDQEHWXUQHGGRZQIURP+,WR
6,0IRUDZLGHUDQJHRIFRRNLQJDSSOLFDWLRQV
8VLQJWKHJDVVXUIDFHEXUQHUV
0HGLXP
6PDOO
/DUJH
&HQWHURYDO
RQVRPH
PRGHOV
([WUD/DUJH
([WUD
/DUJH
RQ
VRPH
PRGHOV
+RZWR6HOHFW)ODPH6L]H
:$51,1*
)ODPHVWKDWDUH
QRWFRYHUHGE\FRRNZDUHPD\SUHVHQWDULVN
RIEXUQVRUFORWKLQJLJQLWLRQ1HYHUOHWIODPHV
H[WHQGEH\RQGWKHVLGHVRIWKHFRRNZDUH
:DWFKWKHIODPHQRWWKHNQREDV\RXDGMXVW
KHDW:KHQIDVWKHDWLQJLVGHVLUHGWKHIODPH
VL]HRQDJDVEXUQHUVKRXOGPDWFKWKH
FRRNZDUH\RXDUHXVLQJ
)ODPHVODUJHUWKDQWKHERWWRPRIWKHFRRNZDUH
ZLOOQRWUHVXOWLQIDVWHUKHDWLQJDQGPD\EH
KD]DUGRXV
,Q&DVHRI3RZHU)DLOXUH
,QFDVHRIDSRZHUIDLOXUH\RXFDQOLJKWWKH
JDVVXUIDFHEXUQHUVRQ\RXUUDQJHZLWKD
PDWFK+ROGDOLWPDWFKWRWKHEXUQHUWKHQ
SXVKLQDQGWXUQWKHFRQWURONQREWRWKH/,7(
SRVLWLRQ8VHH[WUHPHFDXWLRQZKHQOLJKWLQJ
EXUQHUVWKLVZD\
6XUIDFHEXUQHUVLQXVHZKHQDQHOHFWULFDO
SRZHUIDLOXUHRFFXUVZLOOFRQWLQXHWRRSHUDWH
QRUPDOO\
*($SSOLDQFHVFRP
:RN7KLV:D\
:HUHFRPPHQGWKDW\RXXVHDLQFKRU
VPDOOHUIODWERWWRPHGZRN0DNHVXUHWKHZRN
ERWWRPVLWVIODWRQWKHJUDWH7KH\DUHDYDLODEOH
DW\RXUORFDOUHWDLOVWRUH
2QO\DIODWERWWRPHGZRNVKRXOGEHXVHG
'RQRWXVHDZRNVXSSRUWULQJ3ODFLQJWKH
ULQJRYHUWKHEXUQHURUJUDWHPD\FDXVHWKH
EXUQHUWRZRUNLPSURSHUO\UHVXOWLQJLQFDUERQ
PRQR[LGHOHYHOVDERYHDOORZDEOHVWDQGDUGV
7KLVFRXOGEHGDQJHURXVWR\RXUKHDOWK
8VHDIODWERWWRPHGZRN
6WRYH7RS*ULOOV6HDOHGEXUQHUPRGHOV
'RQRWXVHVWRYHWRSJULOOVRQ\RXUVHDOHGJDV
EXUQHUV,I\RXXVHWKHVWRYHWRSJULOORQWKH
VHDOHGJDVEXUQHULWZLOOFDXVHLQFRPSOHWH
FRPEXVWLRQDQGFDQUHVXOWLQH[SRVXUHWR
FDUERQPRQR[LGHOHYHOVDERYHDOORZDEOH
FXUUHQWVWDQGDUGV
7KLVFDQEHKD]DUGRXVWR\RXUKHDOWK
7RSRI5DQJH&RRNZDUH
$OXPLQXP0HGLXPZHLJKWFRRNZDUHLV
UHFRPPHQGHGEHFDXVHLWKHDWVTXLFNO\
DQGHYHQO\0RVWIRRGVEURZQHYHQO\LQDQ
DOXPLQXPVNLOOHW8VHVDXFHSDQVZLWKWLJKW
ILWWLQJOLGVZKHQFRRNLQJZLWKPLQLPXP
DPRXQWVRIZDWHU
&DVW,URQ,IKHDWHGVORZO\PRVWVNLOOHWVZLOO
JLYHVDWLVIDFWRU\UHVXOWV
(QDPHOZDUH8QGHUVRPHFRQGLWLRQVWKH
HQDPHORIVRPHFRRNZDUHPD\PHOW)ROORZ
FRRNZDUHPDQXIDFWXUHU·VUHFRPPHQGDWLRQV
IRUFRRNLQJPHWKRGV
*ODVV7KHUHDUHWZRW\SHVRIJODVV
FRRNZDUH³WKRVHIRURYHQXVHRQO\DQG
WKRVHIRUWRSRIUDQJHFRRNLQJVDXFHSDQV
FRIIHHDQGWHDSRWV*ODVVFRQGXFWVKHDW
YHU\VORZO\
+HDWSURRI*ODVV&HUDPLF&DQEHXVHGIRU
HLWKHUVXUIDFHRURYHQFRRNLQJ,WFRQGXFWV
KHDWYHU\VORZO\DQGFRROVYHU\VORZO\&KHFN
FRRNZDUHPDQXIDFWXUHU·VGLUHFWLRQVWREH
VXUHLWFDQEHXVHGRQJDVUDQJHV
6WDLQOHVV6WHHO7KLVPHWDODORQHKDVSRRU
KHDWLQJSURSHUWLHVDQGLVXVXDOO\FRPELQHG
ZLWKFRSSHUDOXPLQXPRURWKHUPHWDOVIRU
LPSURYHGKHDWGLVWULEXWLRQ&RPELQDWLRQ
PHWDOVNLOOHWVXVXDOO\ZRUNVDWLVIDFWRULO\
LIWKH\DUHXVHGZLWKPHGLXPKHDWDVWKH
PDQXIDFWXUHUUHFRPPHQGV
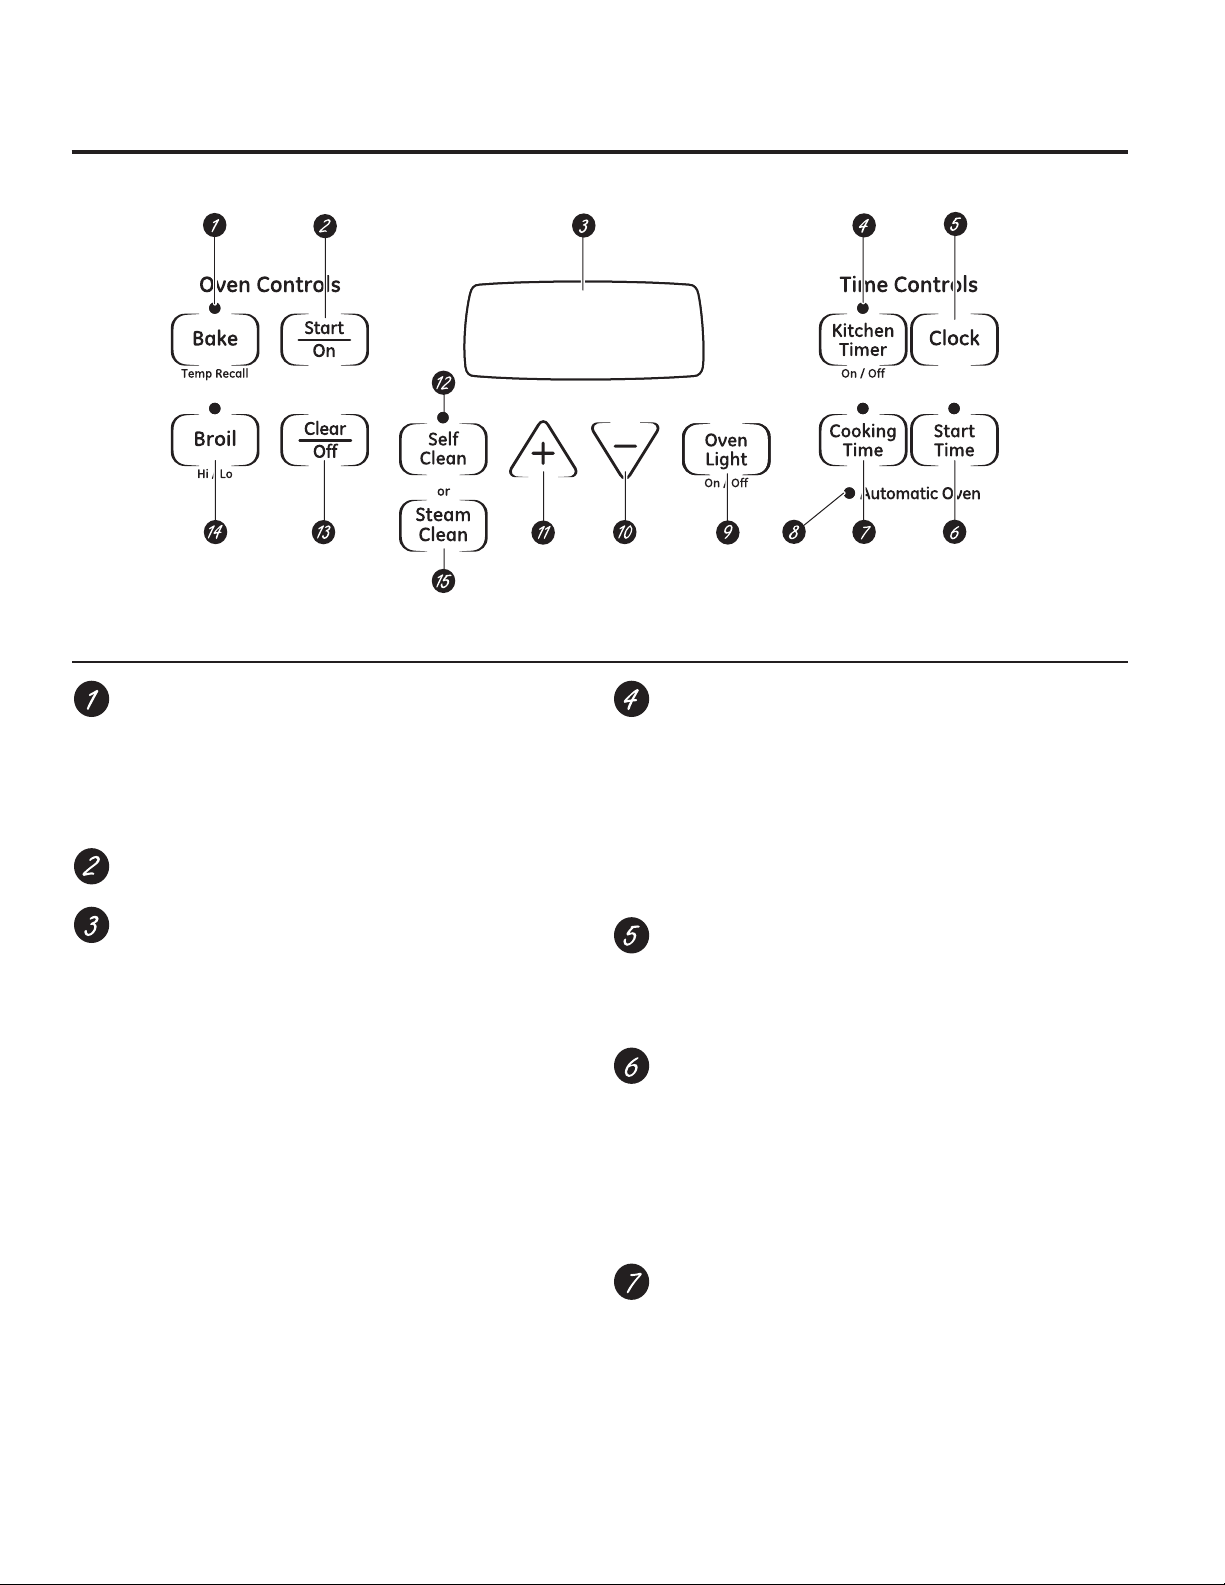
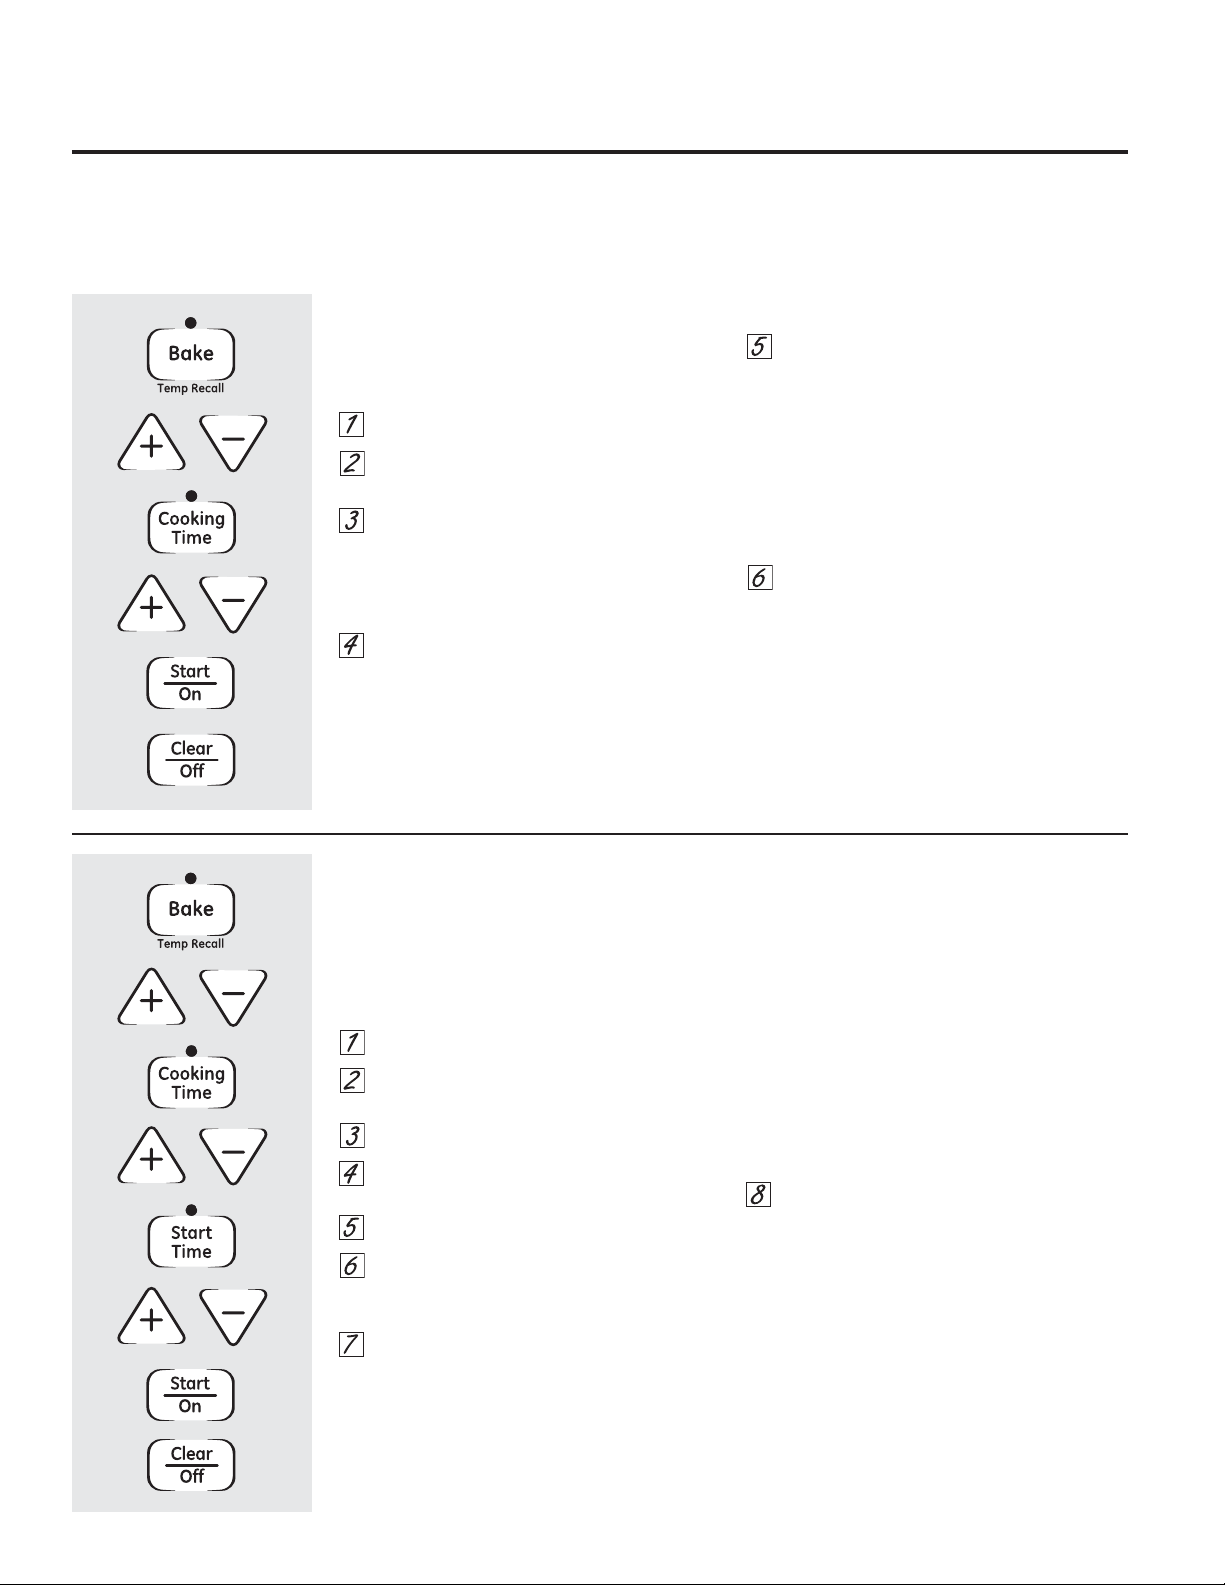
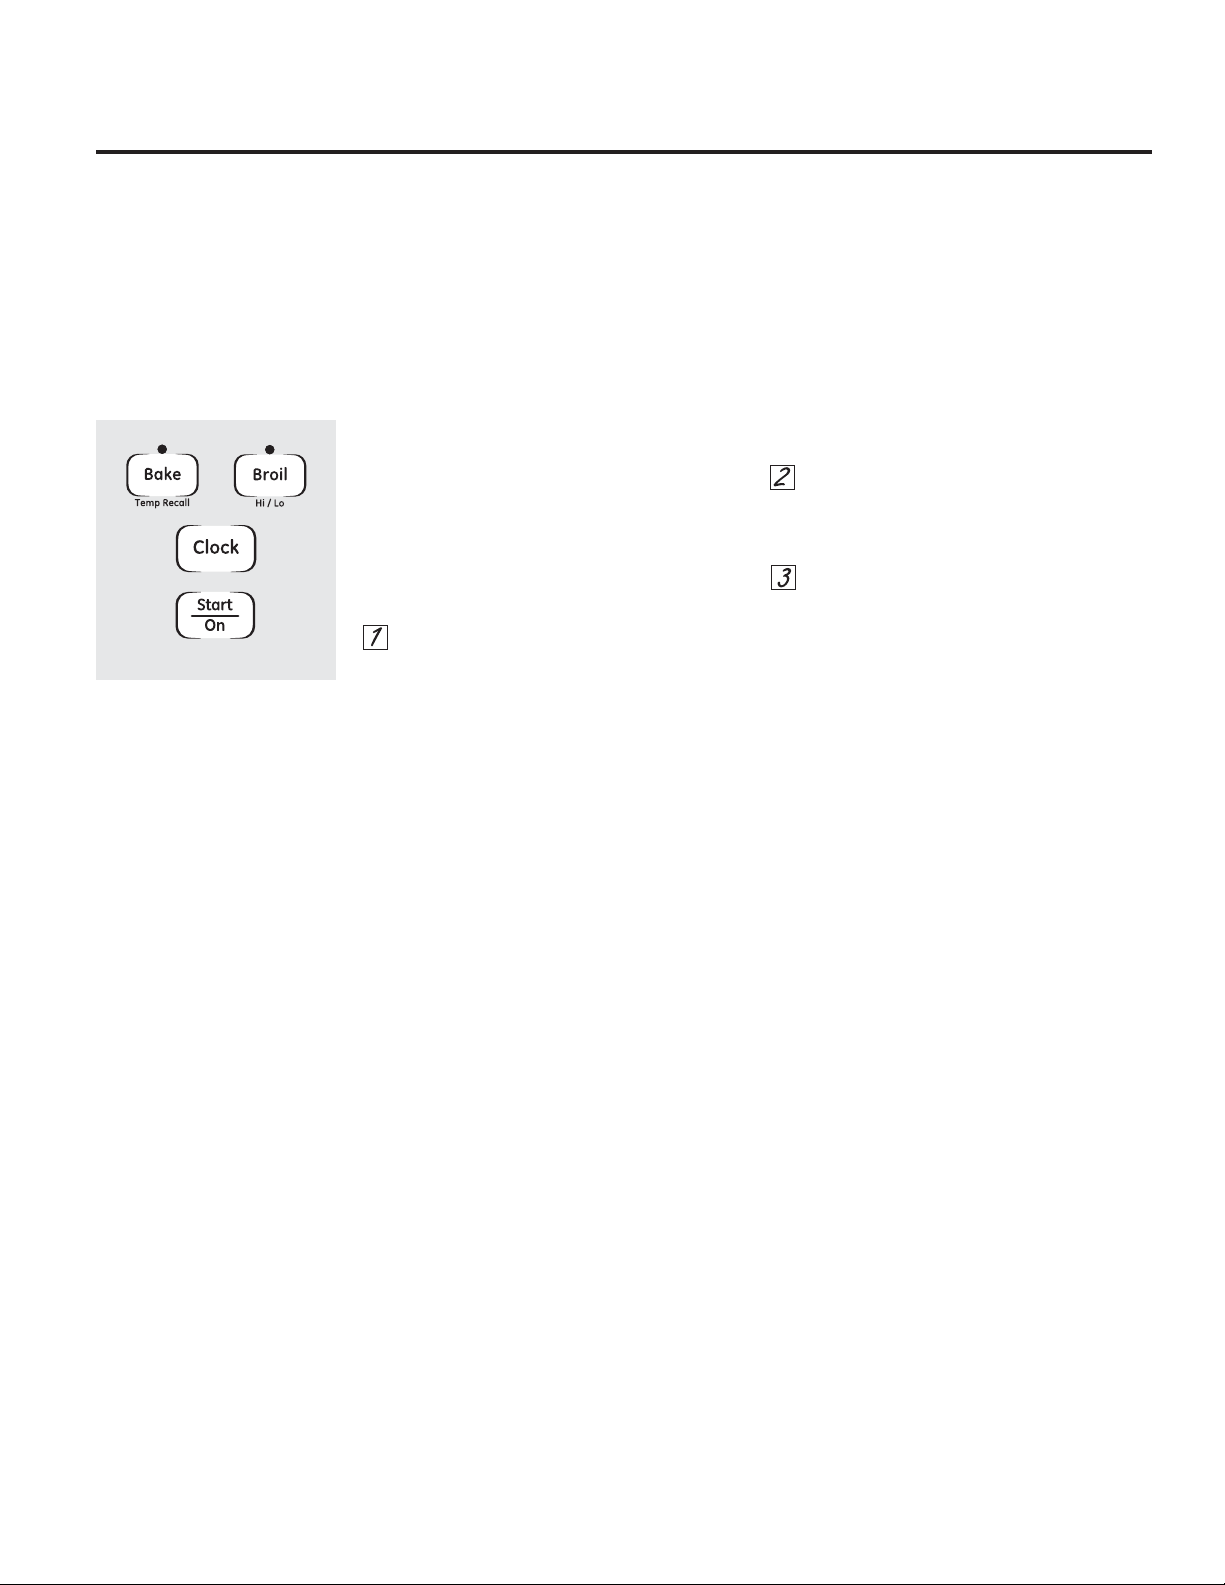
2YHQ&RQWURO&ORFNDQG7LPHU)HDWXUHVDQG6HWWLQJVRQVRPHPRGHOV
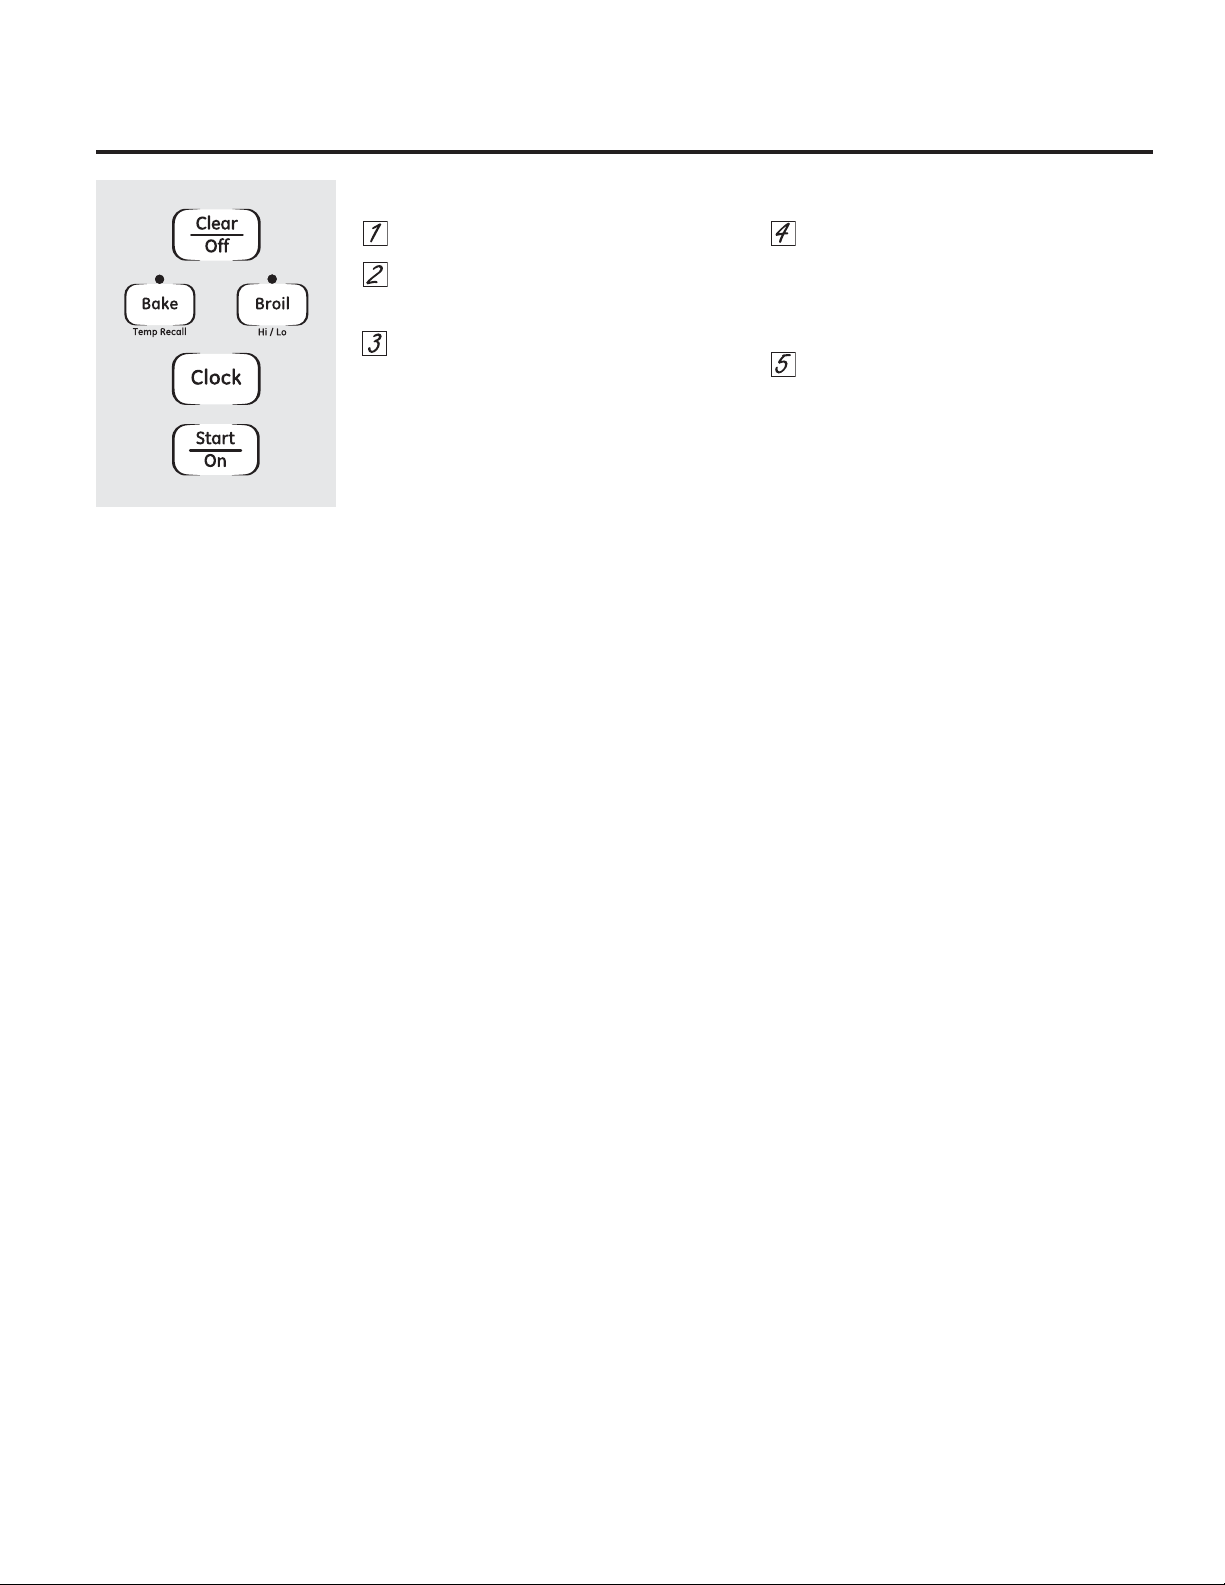
%DNH7HPS5HFDOO3DG
7RXFKWKLVSDGWRVHOHFWWKHEDNHIXQFWLRQ
%DNH/LJKW
)ODVKHVZKLOHLQHGLWPRGH³\RXFDQFKDQJHWKHRYHQ
WHPSHUDWXUHDWWKLVSRLQW*ORZVZKHQWKHRYHQLVLQEDNH
PRGH
6WDUW2Q3DG
0XVWEHWRXFKHGWRVWDUWDQ\FRRNLQJRUFOHDQLQJIXQFWLRQ
'LVSOD\
6KRZVWKHWLPHRIGD\RYHQWHPSHUDWXUHZKHWKHUWKH
RYHQLVLQWKHEDNHEURLORUVHOIFOHDQLQJPRGHDQGWKH
WLPHVVHWIRUWKHWLPHURUDXWRPDWLFRYHQRSHUDWLRQV7KH
GLVSOD\ZLOOVKRZ35(ZKLOHSUHKHDWLQJ:KHQWKHRYHQ
UHDFKHVWKHVHOHFWHGWHPSHUDWXUHWKHRYHQFRQWUROZLOO
EHHSDQGWKHGLVSOD\ZLOOVKRZWKHRYHQWHPSHUDWXUH
,I´)²µDQGDQXPEHURUOHWWHUIODVKLQWKHGLVSOD\DQGWKHRYHQ
FRQWUROVLJQDOVWKLVLQGLFDWHVDIXQFWLRQHUURUFRGH
,I\RXURYHQZDVVHWIRUDWLPHGRYHQRSHUDWLRQDQGDSRZHU
RXWDJHRFFXUUHGWKHFORFNDQGDOOSURJUDPPHGIXQFWLRQVPXVW
EHUHVHW
7KHWLPHRIGD\ZLOOIODVKLQWKHGLVSOD\ZKHQWKHUHKDVEHHQD
SRZHURXWDJH5HVHWWKHFORFN
,IWKHIXQFWLRQHUURUFRGHDSSHDUVGXULQJWKHVHOIFOHDQLQJF\FOH
FKHFNWKHRYHQGRRUODWFK7KHODWFKKDQGOHPD\KDYHEHHQ
PRYHGHYHQLIRQO\VOLJKWO\IURPWKHODWFKHGSRVLWLRQ0DNHVXUH
WKHODWFKLVPRYHGWRWKHULJKWDVIDUDVLWZLOOJR
7RXFKWKH&OHDU2IISDG$OORZWKHRYHQWRFRROIRURQHKRXU3XW
WKHRYHQEDFNLQWRRSHUDWLRQ,IWKHIXQFWLRQHUURUFRGHUHSHDWV
GLVFRQQHFWWKHSRZHUWRWKHUDQJHDQGFDOOIRUVHUYLFH
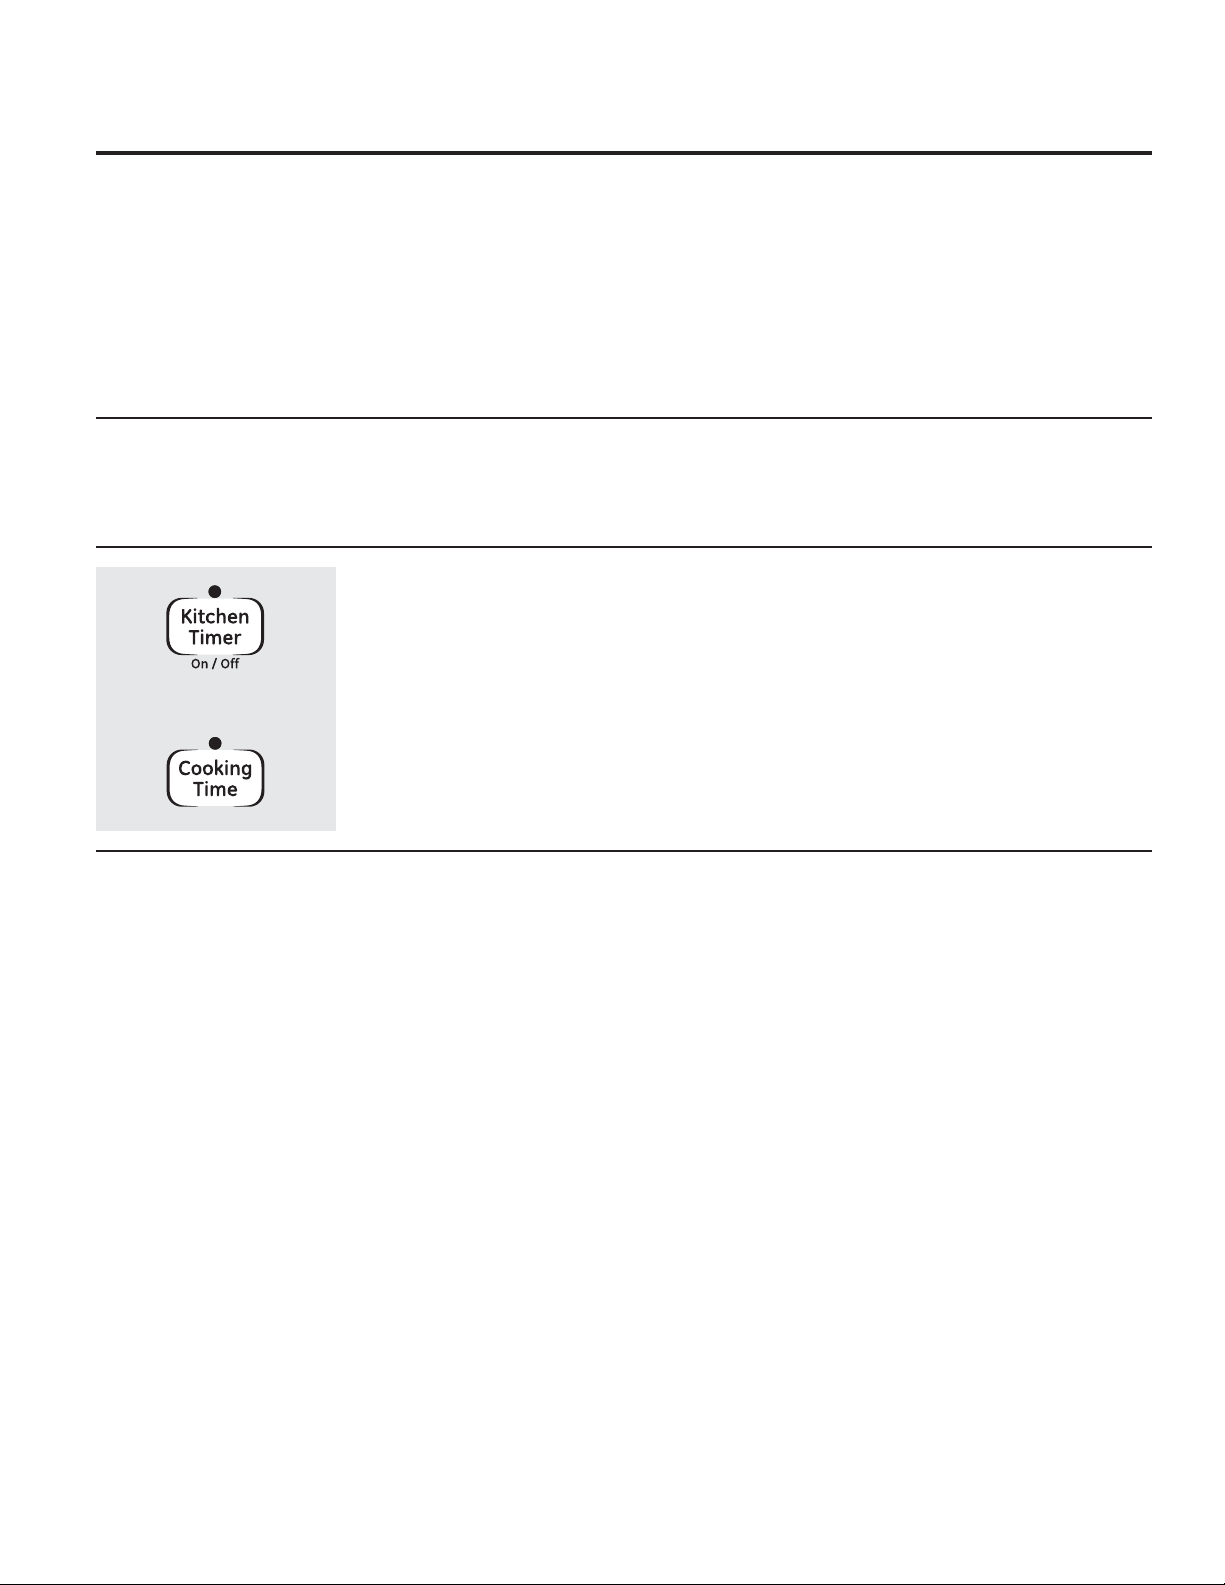
.LWFKHQ7LPHU2Q2II3DG
7RXFKWKLVSDGWRVHOHFWWKHWLPHUIHDWXUH
7KHQSUHVVWKHDQG²SDGVWRDGMXVWWKHWLPHU
7LPHU/LJKW
)ODVKHVZKLOHLQHGLWPRGH³\RXFDQFKDQJH
WKHVHWWLPHDWWKLVSRLQW*ORZVZKHQWKHWLPHUKDVEHHQ
DFWLYDWHG)ODVKHVDJDLQZKHQWKHWLPHKDVUXQRXWXQWLOWKH
FRQWUROLVUHVHW
&ORFN3DG
7RVHWWKHFORFNSUHVVWKLVSDGWZLFHDQGWKHQSUHVVWKH
DQG²SDGV7KHWLPHRIGD\ZLOOIODVKLQWKHGLVSOD\ZKHQ
WKHRYHQLVILUVW
WXUQHGRQ
6WDUW7LPH3DGRQVRPHPRGHOV
8VHDORQJZLWKWKH&RRNLQJ7LPHRU6HOI&OHDQSDGVWR
VHWWKHRYHQWRVWDUWDQGVWRSDXWRPDWLFDOO\DWDWLPH\RX
VHW
6WDUW7LPH/LJKW
)ODVKHVZKLOHLQHGLWPRGH³\RXFDQFKDQJH
WKHVWDUWWLPHDWWKLVSRLQW*ORZVZKHQWKHIXQFWLRQKDV
EHHQDFWLYDWHG
&RRNLQJ7LPH3DGRQVRPHPRGHOV
7RXFKWKLVSDGDQGWKHQWRXFKWKHRU²SDGVWRVHWWKH
DPRXQWRIWLPH\RXZDQW\RXUIRRGWRFRRN7KHRYHQZLOO
VKXWRIIZKHQWKHFRRNLQJWLPHKDVUXQRXW
&RRNLQJ7LPH/LJKW
)ODVKHVZKLOHLQHGLWPRGH³\RXFDQFKDQJH
WKHVHWWLPHDWWKLVSRLQW*ORZVZKHQWKHIXQFWLRQKDVEHHQ
DFWLYDWHG)ODVKHVDJDLQZKHQWKHWLPHKDVUXQRXWXQWLOWKH
FRQWUROLVUHVHW
7KURXJKRXWWKLVPDQXDOIHDWXUHVDQGDSSHDUDQFHPD\YDU\IURP\RXUPRGHO
8VLQJWKHRYHQFRQWUROV
*($SSOLDQFHVFRP
2YHQ&RQWURO&ORFNDQG7LPHU)HDWXUHVDQG6HWWLQJVRQVRPHPRGHOV
$XWRPDWLF2YHQ/LJKWRQVRPHPRGHOV
7KLVOLJKWVDQ\WLPHWKHRYHQKDVEHHQSURJUDPPHGXVLQJ
WKH&RRNLQJ7LPHRU6WDUW7LPHIXQFWLRQV
2YHQ/LJKW2Q2II3DG
7RXFKWKLVSDGWRWXUQWKHRYHQOLJKWRQRURII
²3DG
6KRUWWDSVWRWKLVSDGZLOOGHFUHDVHWKHWLPHRU
WHPSHUDWXUHE\VPDOODPRXQWV7RXFKDQGKROGWKHSDG
WRGHFUHDVHWKHWLPHRUWHPSHUDWXUHE\ODUJHUDPRXQWV
3DG
6KRUWWDSVWRWKLVSDGZLOOLQFUHDVHWKHWLPHRU
WHPSHUDWXUHE\VPDOODPRXQWV7RXFKDQGKROGWKHSDG
WRLQFUHDVHWKHWLPHRUWHPSHUDWXUHE\ODUJHUDPRXQWV
6HOI&OHDQ3DGRQVRPHPRGHOV
7RXFKWKLVSDGWRVHOHFWWKHVHOIFOHDQLQJIXQFWLRQ6HHWKH
8VLQJWKHVHOIFOHDQLQJRYHQVHFWLRQ
&OHDQ/LJKW
)ODVKHVZKLOHLQHGLWPRGH³\RXFDQFKDQJHWKHOHQJWKRI
WLPHIRUWKHVHOIFOHDQF\FOHDWWKLVSRLQW*ORZVZKHQWKH
RYHQLVLQWKHVHOIFOHDQF\FOH$IWHUWKHVHOIFOHDQF\FOHWKH
OLJKWZLOOWXUQRII8QODWFKWKHGRRU
&OHDU2II3DG
7RXFKWKLVSDGWRFDQFHO$//RYHQRSHUDWLRQVH[FHSWWKH
FORFNDQGWLPHU
%URLO+L/R3DG
7RXFKWKLVSDGWRVHOHFWWKHEURLOIXQFWLRQ
%URLO/LJKW
)ODVKHVZKLOHLQHGLWPRGH³\RXFDQVZLWFKIURP+LWR/R
%URLODWWKLVSRLQW*ORZVZKHQWKHRYHQLVLQEURLOPRGH
,QGLFDWRU/LJKWVRQVRPHSDGV
( ' , 7 PRGHODVWVVHYHUDOVHFRQGVDIWHUWKHODVWSDGSUHVV
6WDUW7LPHDQG&RRNLQJ7LPHZLOOEHWKHRQO\SDGVOLWLI
HLWKHURIWKHVHRSWLRQVLVVHOHFWHG([DPSOH6WDUW7LPHLV
VHOHFWHGZLWK%DNH³WKH6WDUW7LPHSDGZLOOUHPDLQOLWXQWLO
WKHFORFNUHDFKHVWKHSURJUDPPHGWLPHDWZKLFKSRLQWLW
ZLOOWXUQRIIDQGWKH%DNH7HPS5HFDOOSDGOLJKWZLOOOLJKWXS
6WHDP&OHDQ3DGRQVRPHPRGHOV
7RXFKWKLVSDGIRUHDVLHUFOHDQLQJOLJKWVRLOLQJRIWKHRYHQ
FDYLW\RUGRRU
OVEN TEMP
2
0
0
2
5
0
3
0
0
3
5
0
4
0
0
4
5
0
5
0
0
B
R
O
I
L
C
L
E
A
N
O
F
F
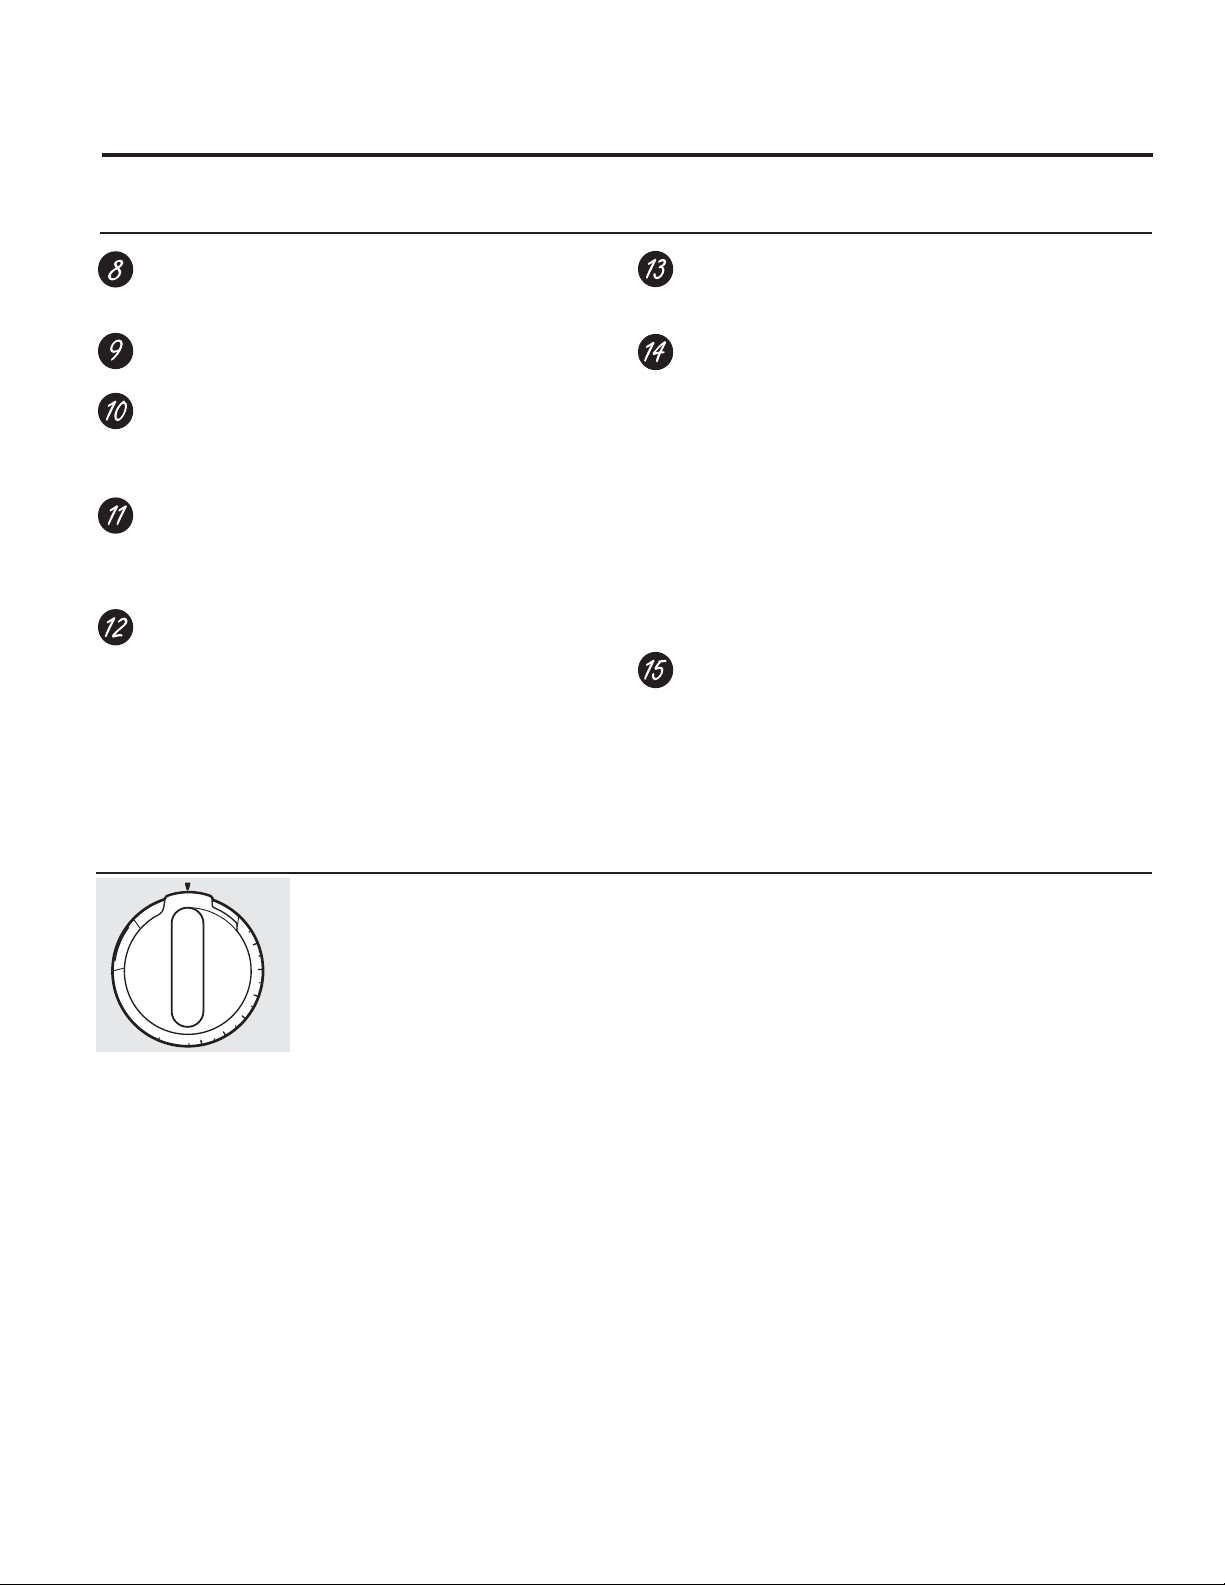
7XUQWKH29(17(03NQREWRWKHVHWWLQJ\RXZDQW
7KHRYHQF\FOLQJOLJKWFRPHVRQGXULQJFRRNLQJ
2YHQ7HPSHUDWXUH.QRERQVRPHPRGHOV
$SSHDUDQFHPD\YDU\
7KURXJKRXWWKLVPDQXDOIHDWXUHVDQGDSSHDUDQFHPD\YDU\IURP\RXUPRGHO
<RXKDYHWKHFKRLFHRIKDYLQJWKHWLPHUVKRZWKHWLPHFRXQWLQJ
GRZQRUWKHWLPHRIGD\,QHLWKHUFDVHWKHWLPHUZLOOVLJQDODWWKH
HQGRIWKHWLPHUSHULRGWRDOHUW\RXWKDWWKHWLPHLVXS
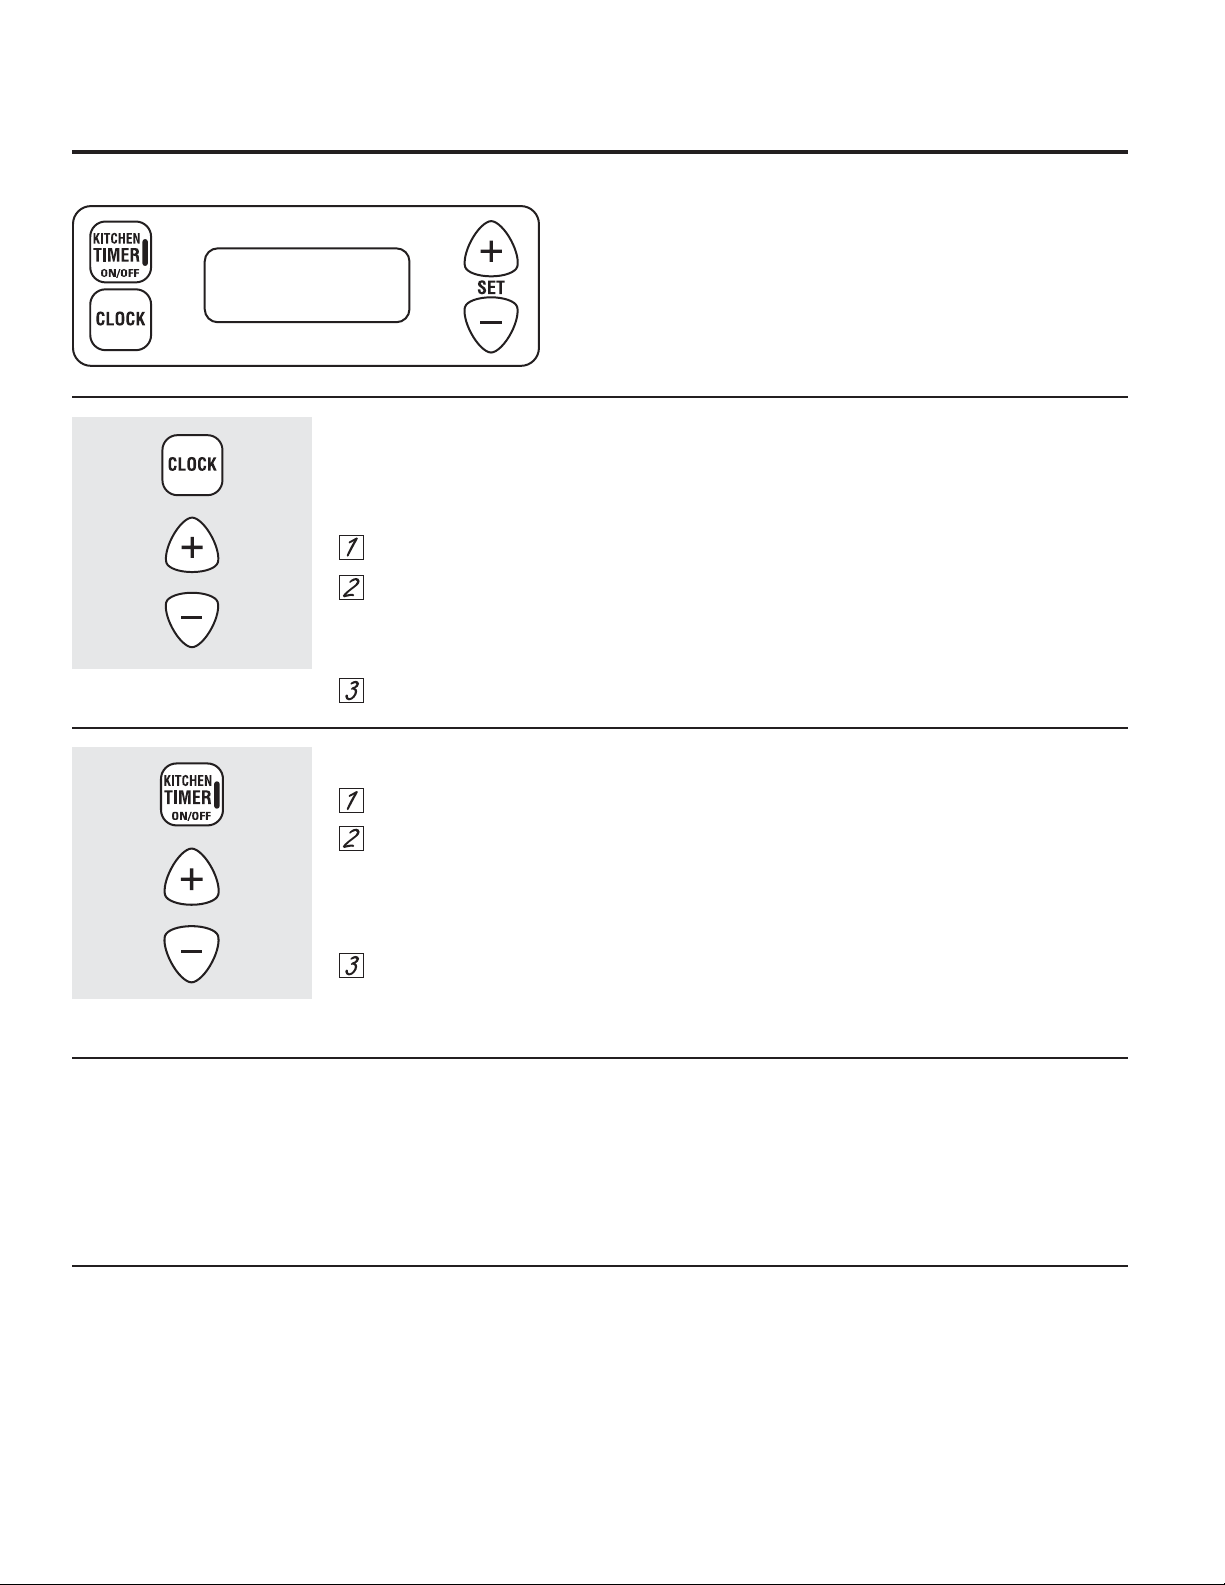
8VLQJWKHFORFNDQGWLPHU
7R6HWWKH&ORFN
127(:KHQ\RXILUVWSOXJLQWKHUDQJHRUDIWHU
D
SRZHUIDLOXUHWKHHQWLUH&ORFN7LPHUGLVSOD\ZLOO
OLJKWXS
3UHVVWKH&/2&.SDG
3UHVVDQGKROGWKHRU²SDGDQGWKHWLPH
RIGD\ZLOOFKDQJHPLQXWHVDWDWLPH7R
FKDQJHWKHWLPHE\VLQJOHPLQXWHVJLYHWKH
SDGVVKRUWWDSV
3UHVVWKH&/2&.SDGWRVWDUWWKHFORFN
7R6HWWKH.LWFKHQ7LPHU
3UHVVWKH.,7&+(17,0(5212))SDG
8VHWKHDQG²SDGVWRVHWWKHWLPHU6KRUW
WDSVRQWKHRU²SDGFKDQJHWKHWLPHU·V
VHWWLQJRQHPLQXWHDWDWLPH3UHVVLQJDQG
FRQWLQXLQJWRKROGWKHSDGLQFUHDVHVWKH
VHWWLQJPLQXWHVDWDWLPH
2QFH\RXKDYHVHW\RXUWLPHUSUHVVWKH
.,7&+(17,0(5212))SDGWRVWDUW
WLPLQJ
$VWKHWLPHUFRXQWVGRZQDVLJQDOZLOOLQGLFDWH
ZKHQRQHPLQXWHLVOHIW$IWHUWKLVVLJQDOWKH
GLVSOD\ZLOOFRXQWGRZQLQVHFRQGV:KHQWLPH
UXQVRXWDILQDOVLJQDOZLOOVRXQG3UHVVWKH
.,7&+(17,0(5212))SDGWRVWRSWKHVLJQDO
7R&KDQJHRU&DQFHOWKH
.LWFKHQ7LPHU
6HWWLQJ
:KHQWKHWLPHULVFRXQWLQJGRZQXVHWKHDQG
²SDGWRFKDQJHWKHUHPDLQLQJWLPHRUSUHVV
WKH.,7&+(17,0(5212))SDGWRVWRSWKH
WLPHU7KHWLPHUFDQQRWEHFDQFHOOHGXQOHVV\RX
KDYHIXOO\FRPSOHWHG´VHWWLPHUµLQVWUXFWLRQV
DERYH
'LVSOD\&ORFN:KLOH
.LWFKHQ7LPHU
,V2SHUDWLQJ
3UHVVLQJWKH&/2&.SDGZKLOHWKHWLPHULV
RSHUDWLQJZLOOQRWLQWHUIHUHZLWKWKHWLPHU·V
RSHUDWLRQWKHGLVSOD\ZLOOFKDQJHWRVKRZWKH
FORFNEXWWKHWLPHUZLOOFRQWLQXHWRFRXQWGRZQ
DQGZLOOVWLOOVLJQDOZKHQWLPHLVXS3UHVVWKH
.,7&+(17,0(5212))SDGDJDLQWRFKDQJH
WKHGLVSOD\EDFNWRVKRZWKHWLPHU
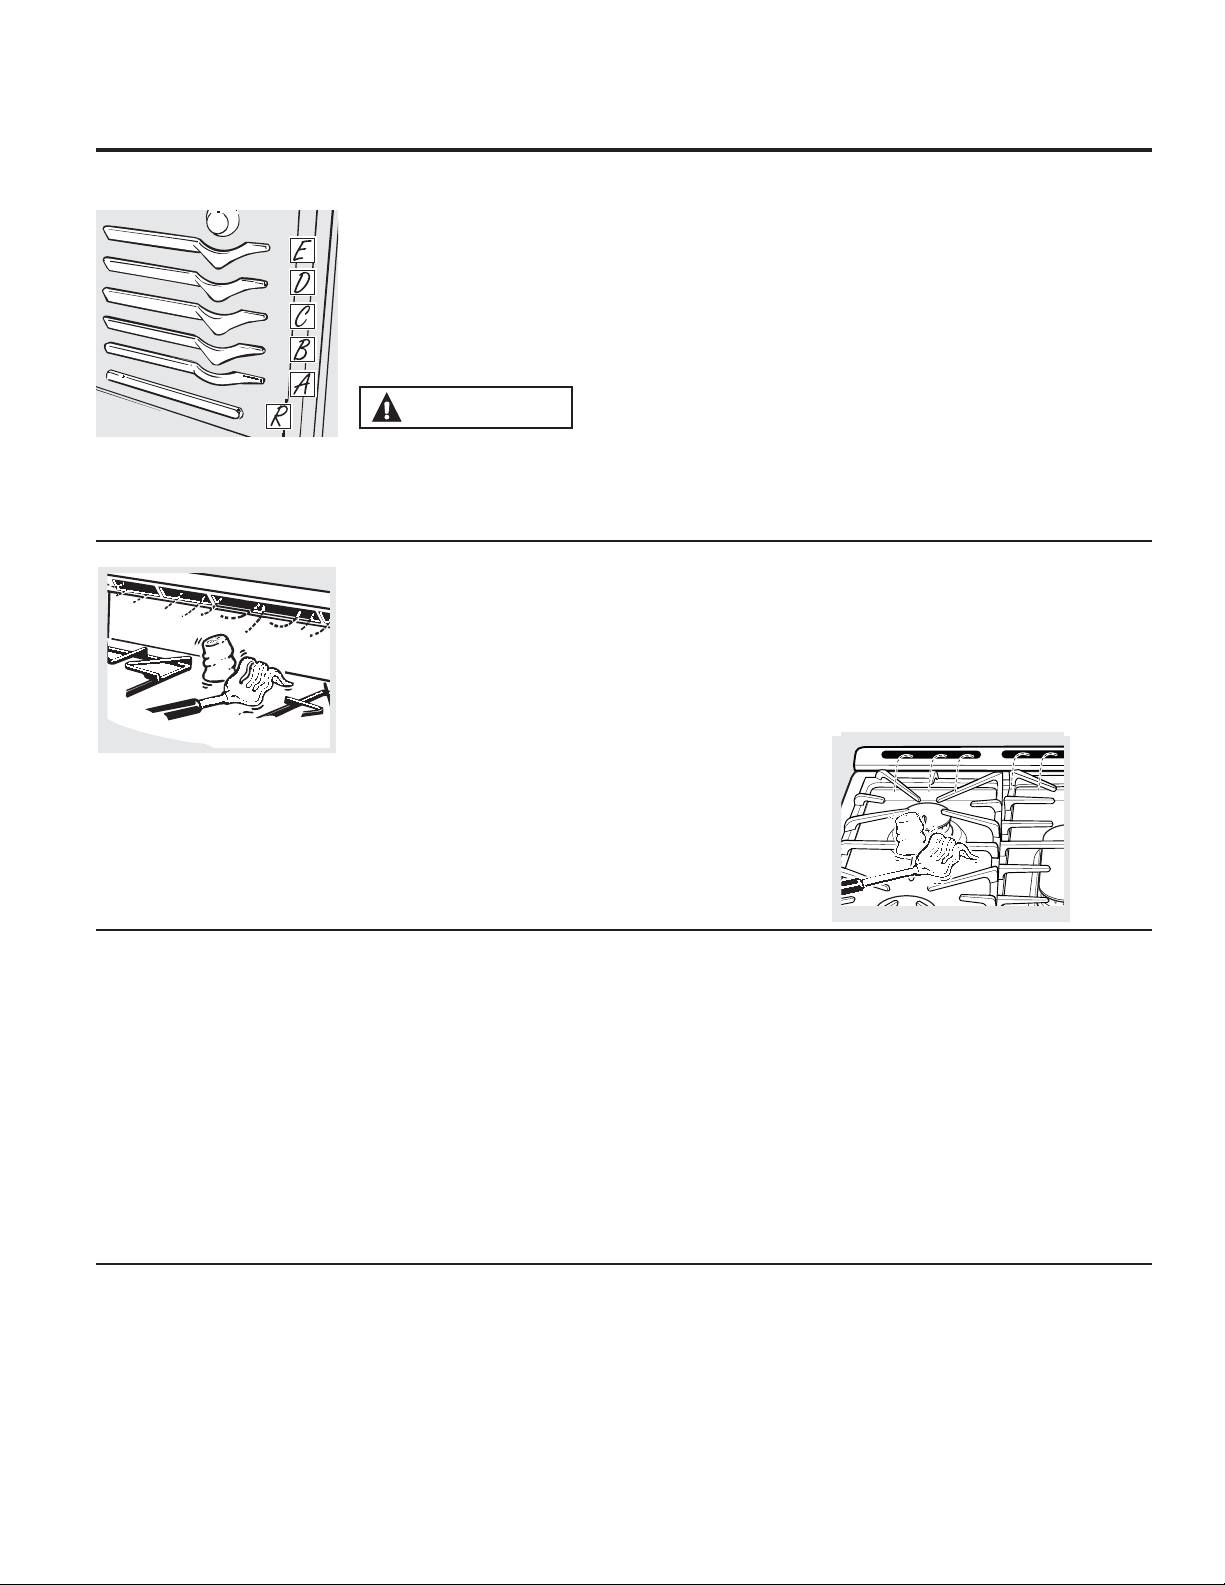
7RDYRLGSRVVLEOHEXUQVSODFHWKHVKHOYHVLQWKHGHVLUHGSRVLWLRQEHIRUH\RXWXUQWKHRYHQRQ
%HIRUH\RXEHJLQ«
7KHVKHOYHVKDYHVWRSORFNVVRWKDWZKHQ
SODFHGFRUUHFWO\RQWKHVKHOIVXSSRUWV$
WKURXJK(WKH\ZLOOVWRSEHIRUHFRPLQJ
FRPSOHWHO\RXWDQGZLOOQRWWLOW
:KHQSODFLQJDQGUHPRYLQJFRRNZDUHSXOOWKH
VKHOIRXWWRWKHEXPSRQWKHVKHOIVXSSRUW
&$87,21:KHQ\RXDUH
XVLQJDUDFNLQWKHORZHVWSRVLWLRQ5\RX
ZLOOQHHGWRXVHFDXWLRQZKHQSXOOLQJWKH
UDFNRXW:HUHFRPPHQGWKDW\RXSXOOWKH
UDFNRXWVHYHUDOLQFKHVDQGWKHQXVLQJWZR
SRWKROGHUVSXOOWKHUDFNRXWE\KROGLQJWKH
VLGHVRILW7KHUDFNLVORZDQG\RXFDQEH
EXUQHGLI\RXSXW\RXUKDQGLQWKHPLGGOHRI
WKHUDFNDQGSXOODOOWKHZD\RXW
7RUHPRYHDVKHOI SXOOLWWRZDUG\RXWLOWWKH
IURQWHQGXSDQGSXOOLWRXW
7RUHSODFH SODFHWKHHQGRIWKHVKHOIVWRS
ORFNVRQWKHVXSSRUWWLOWXSWKHIURQWDQGSXVK
WKHVKHOILQ
127(7KHVKHOILVQRWGHVLJQHGWRVOLGHRXWDW
WKHVSHFLDOORZVKHOI5SRVLWLRQ
7KHRYHQKDVVKHOISRVLWLRQV
,WDOVRKDVDVSHFLDOORZVKHOI
SRVLWLRQ5IRUH[WUDODUJHLWHPV
VXFKDVDODUJHWXUNH\
3RZHU2XWDJH
7KHRYHQRUEURLOHUFDQQRWEHOLWGXULQJDSRZHU
IDLOXUH
,IWKHRYHQLVLQXVHZKHQDSRZHUIDLOXUH
RFFXUVWKHRYHQEXUQHUVKXWVRII7KLVLV
EHFDXVHWKHIORZRIJDVLVDXWRPDWLFDOO\
VWRSSHGDQGZLOOQRWUHVXPHXQWLOSRZHULV
UHVWRUHG
2YHQ/LJKW
2QVRPHPRGHOVWRXFKWKH2YHQ/LJKWSDG
RQWKHXSSHUFRQWUROSDQHOWRWXUQWKHOLJKWRQ
RURII
2QVRPHPRGHOVXVHWKHVZLWFKRQWKHORZHU
FRQWUROSDQHOWRWXUQWKHOLJKWRQRURII
8SSHU2YHQ9HQW
<RXURYHQLVYHQWHGWKURXJKGXFWVDWWKHUHDU
RIWKHUDQJH'RQRWEORFNWKHVHGXFWVZKHQ
FRRNLQJLQWKHRYHQ³LWLVLPSRUWDQWWKDWWKH
IORZRIKRWDLUIURPWKHRYHQDQGIUHVKDLU
WRWKHRYHQEXUQHUEHXQLQWHUUXSWHG$YRLG
WRXFKLQJWKHYHQWRSHQLQJVRUQHDUE\VXUIDFHV
GXULQJRYHQRUEURLOHURSHUDWLRQ³WKH\PD\
EHFRPHKRW
+DQGOHVRISRWVDQGSDQVRQWKHFRRNWRS
PD\EHFRPHKRWLIOHIWWRRFORVHWRWKHYHQW
'RQRWOHDYHSODVWLFRUIODPPDEOHLWHPVRQ
WKHFRRNWRS³WKH\PD\PHOWRULJQLWHLIOHIW
WRRFORVHWRWKHYHQW
'RQRWOHDYHFORVHGFRQWDLQHUVRQWKH
FRRNWRS7KHSUHVVXUHLQFORVHGFRQWDLQHUV
PD\LQFUHDVHZKLFKPD\FDXVHWKHP
WREXUVW
0HWDOLWHPVZLOOEHFRPHYHU\KRWLIWKH\DUH
OHIWRQWKHFRRNWRSDQGFRXOGFDXVHEXUQV
3ODVWLFLWHPVRQWKHFRRNWRSPD\
PHOWLIOHIWWRRFORVHWRWKHYHQW
9HQWDSSHDUDQFHDQGORFDWLRQYDU\
8VLQJWKHRYHQ *($SSOLDQFHVFRP
8VLQJWKHXSSHURYHQ
+RZWR6HWWKH8SSHU2YHQIRU%DNLQJRU5RDVWLQJ
<RXURYHQLVQRWGHVLJQHGIRURSHQGRRU
FRRNLQJ
7RXFKWKH%DNHSDG
7RXFKWKHQXPEHUSDGVWRVHWWKHGHVLUHG
WHPSHUDWXUH
7RXFKWKH6WDUWSDG
7KHZRUG21DQGZLOOEHGLVSOD\HG
$VWKHRYHQKHDWVXSWKHGLVSOD\ZLOOVKRZWKH
FKDQJLQJWHPSHUDWXUH:KHQWKHRYHQUHDFKHV
WKHWHPSHUDWXUH\RXVHWDWRQHZLOOVRXQG
7RFKDQJHWKHRYHQWHPSHUDWXUHGXULQJ%$.(
F\FOHSUHVVWKH%DNHSDGDQGWKHQWKHQXPEHU
SDGVWRJHWWKHQHZWHPSHUDWXUH
&KHFNIRRGIRUGRQHQHVVDWPLQLPXPWLPH
RQUHFLSH&RRNORQJHULIQHFHVVDU\
7RXFKWKH&OHDU2IISDGZKHQFRRNLQJLV
FRPSOHWH
127($FRROLQJIDQPD\DXWRPDWLFDOO\WXUQ
RQDQGRIIWRFRROLQWHUQDOSDUWV7KLVLVQRUPDO
DQGWKHIDQPD\FRQWLQXHWRUXQHYHQDIWHUWKH
RYHQLVWXUQHGRII
7KHRYHQKDVDVSHFLDOORZVKHOI
5SRVLWLRQMXVWDERYHWKHRYHQ
ERWWRP8VHLWZKHQH[WUDFRRNLQJ
VSDFHLVQHHGHGIRUH[DPSOH
ZKHQFRRNLQJDODUJHWXUNH\7KH
VKHOILVQRWGHVLJQHGWRVOLGHRXW
DWWKLVSRVLWLRQ
,I\RXUPRGHOKDVDGRRUODWFKGRQRWORFNWKHRYHQGRRUZLWKWKHODWFKGXULQJEDNLQJRUURDVWLQJ
7KHODWFKLVXVHGIRUVHOIFOHDQLQJRQO\
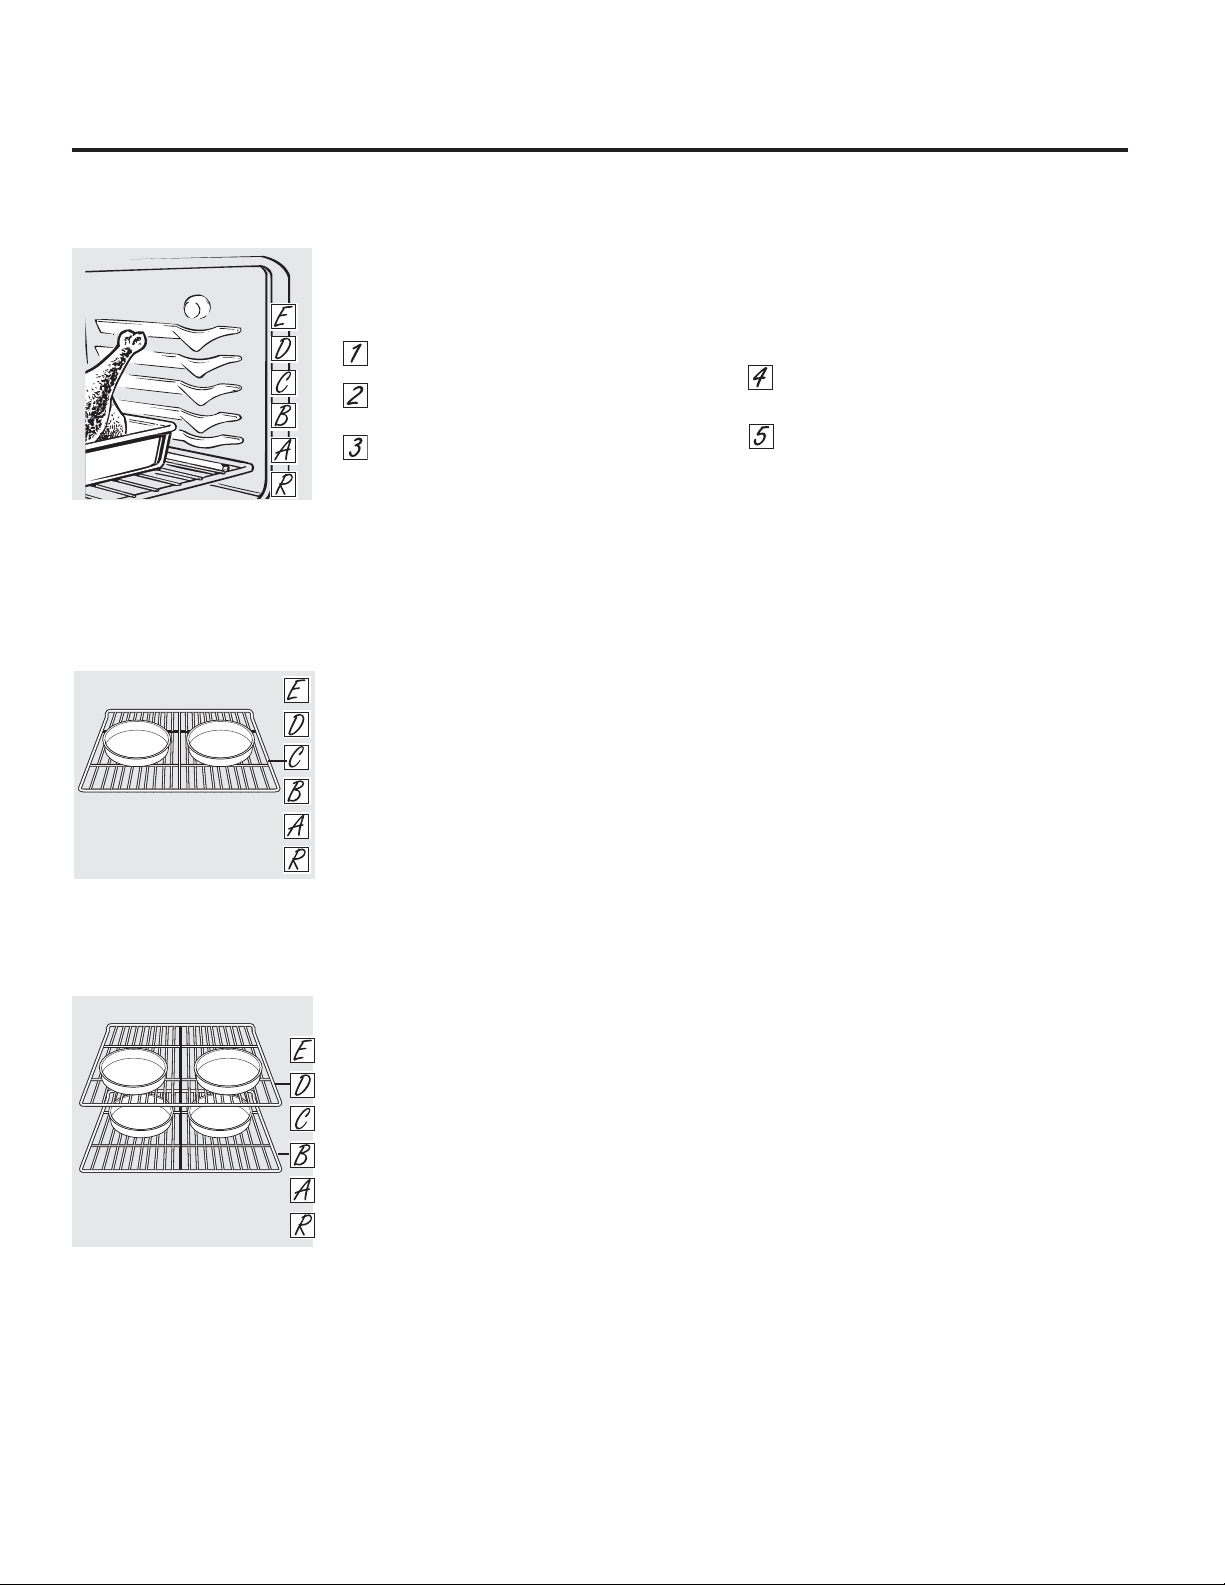
3UHKHDWLQJDQG3DQ3ODFHPHQW
7RDYRLGSRVVLEOHEXUQVSODFHWKHUDFNVLQWKH
GHVLUHGSRVLWLRQEHIRUH\RXWXUQRQWKHRYHQ
3UHKHDWWKHRYHQLIWKHUHFLSHFDOOVIRULW
7RSUHKHDWVHWWKHRYHQDWWKHFRUUHFW
WHPSHUDWXUH3UHKHDWLQJLVQHFHVVDU\IRUJRRG
UHVXOWVZKHQEDNLQJFDNHVFRRNLHVSDVWU\DQG
EUHDGV
)RURYHQVZLWKRXWDSUHKHDWLQGLFDWRUOLJKWRU
WRQHSUHKHDWPLQXWHV
%DNLQJUHVXOWVZLOOEHEHWWHULIEDNLQJSDQV
DUHFHQWHUHGLQWKHRYHQDVPXFKDVSRVVLEOH
3DQVVKRXOGQRWWRXFKHDFKRWKHURUWKHZDOOVRI
WKHRYHQ,I\RXQHHGWRXVHWZRVKHOYHVVWDJJHU
WKHSDQVVRRQHLVQRWGLUHFWO\DERYHWKHRWKHU
DQGOHDYHDSSUR[LPDWHO\
øµEHWZHHQSDQV
IURPWKHIURQWEDFNDQGVLGHVRIWKHZDOO
:KHQEDNLQJRQDVLQJOHUDFN
EDNLQJUHVXOWVZLOOEHEHWWHULI
EDNLQJSDQVDUHFHQWHUHGLQWKH
RYHQDVPXFKDVSRVVLEOH
:KHQEDNLQJIRXUFDNHOD\HUVDWDWLPH
XVHUDFNV%DQG'3ODFHWKHORZHU
SDQVDWWKHEDFNRIWKHUDFNDQGWKH
XSSHUSDQVWRWKHIURQWRIWKHUDFN
VKRZQVRWKDWRQHSDQLVQRWGLUHFWO\
DERYHDQRWKHU

2YHQ0RLVWXUH
$V\RXURYHQKHDWVXSWKHWHPSHUDWXUHFKDQJH
RIWKHDLULQWKHRYHQPD\FDXVHZDWHUGURSOHWV
WRIRUPRQWKHGRRUJODVV7KHVHGURSOHWV
DUHKDUPOHVVDQGZLOOHYDSRUDWHDVWKHRYHQ
FRQWLQXHVWRKHDWXS
$OXPLQXP)RLO
'RQRWXVHDOXPLQXPIRLOWROLQHRYHQERWWRPV
7KHIRLOZLOOWUDSKHDWEHORZDQGXSVHWWKH
SHUIRUPDQFHRIWKHRYHQ)RLOFDQPHOWDQG
SHUPDQHQWO\GDPDJHWKHRYHQERWWRP
'DPDJHIURPLPSURSHUXVHRIDOXPLQXPIRLOLV
QRWFRYHUHGE\WKHSURGXFWZDUUDQW\
)RLOPD\EHXVHGWRFDWFKVSLOOVE\SODFLQJD
VKHHWRQDORZHUUDFNVHYHUDOLQFKHVEHORZ
WKHIRRG'RQRWXVHPRUHIRLOWKDQQHFHVVDU\
DQGQHYHUHQWLUHO\FRYHUDQRYHQUDFNZLWK
DOXPLQXPIRLO.HHSIRLODWOHDVWµIURP
RYHQZDOOVWRSUHYHQWSRRUKHDWFLUFXODWLRQ
*($SSOLDQFHVFRP
+RZWR6HWWKH8SSHU2YHQIRU%URLOLQJ
3ODFHWKHPHDWRUILVKRQDEURLOHUJULGLQ
DEURLOHUSDQ
)ROORZVXJJHVWHGVKHOISRVLWLRQVLQWKH
%URLOLQJ*XLGH
7KHRYHQGRRUPXVWEHFORVHGGXULQJ
EURLOLQJ
7RXFKWKH%URLO+L/RSDGRQFHIRU
+L%URLO
7RFKDQJHWR/R%URLOWRXFKWKH%URLO+L
/RSDGDJDLQ
7RXFKWKH6WDUWSDG$´&/26(GRRUµ
UHPLQGHULVGLVSOD\HG
:KHQEURLOLQJLVILQLVKHGWRXFKWKH&OHDU
2IISDG
6HUYHWKHIRRGLPPHGLDWHO\DQGOHDYHWKHSDQ
RXWVLGHWKHRYHQWRFRROGXULQJWKHPHDOIRU
HDVLHVWFOHDQLQJ
8VH/R%URLOWRFRRNIRRGVVXFKDVSRXOWU\
RUWKLFNFXWVRIPHDWWKRURXJKO\ZLWKRXWRYHU
EURZQLQJWKHP
,I\RXUPRGHOKDVDGRRUODWFKGRQRWORFNWKHRYHQGRRUZLWKWKHODWFKGXULQJEURLOLQJ7KHODWFKLVXVHGIRUVHOIFOHDQLQJ
RQO\2QVRPHPRGHOV\RXUUDQJHKDVDFRPSDUWPHQWEHORZWKHRYHQIRUEURLOLQJ
&ORVHWKHGRRU$OZD\VEURLOZLWK
WKHGRRUFORVHG
8VLQJWKHXSSHURYHQ
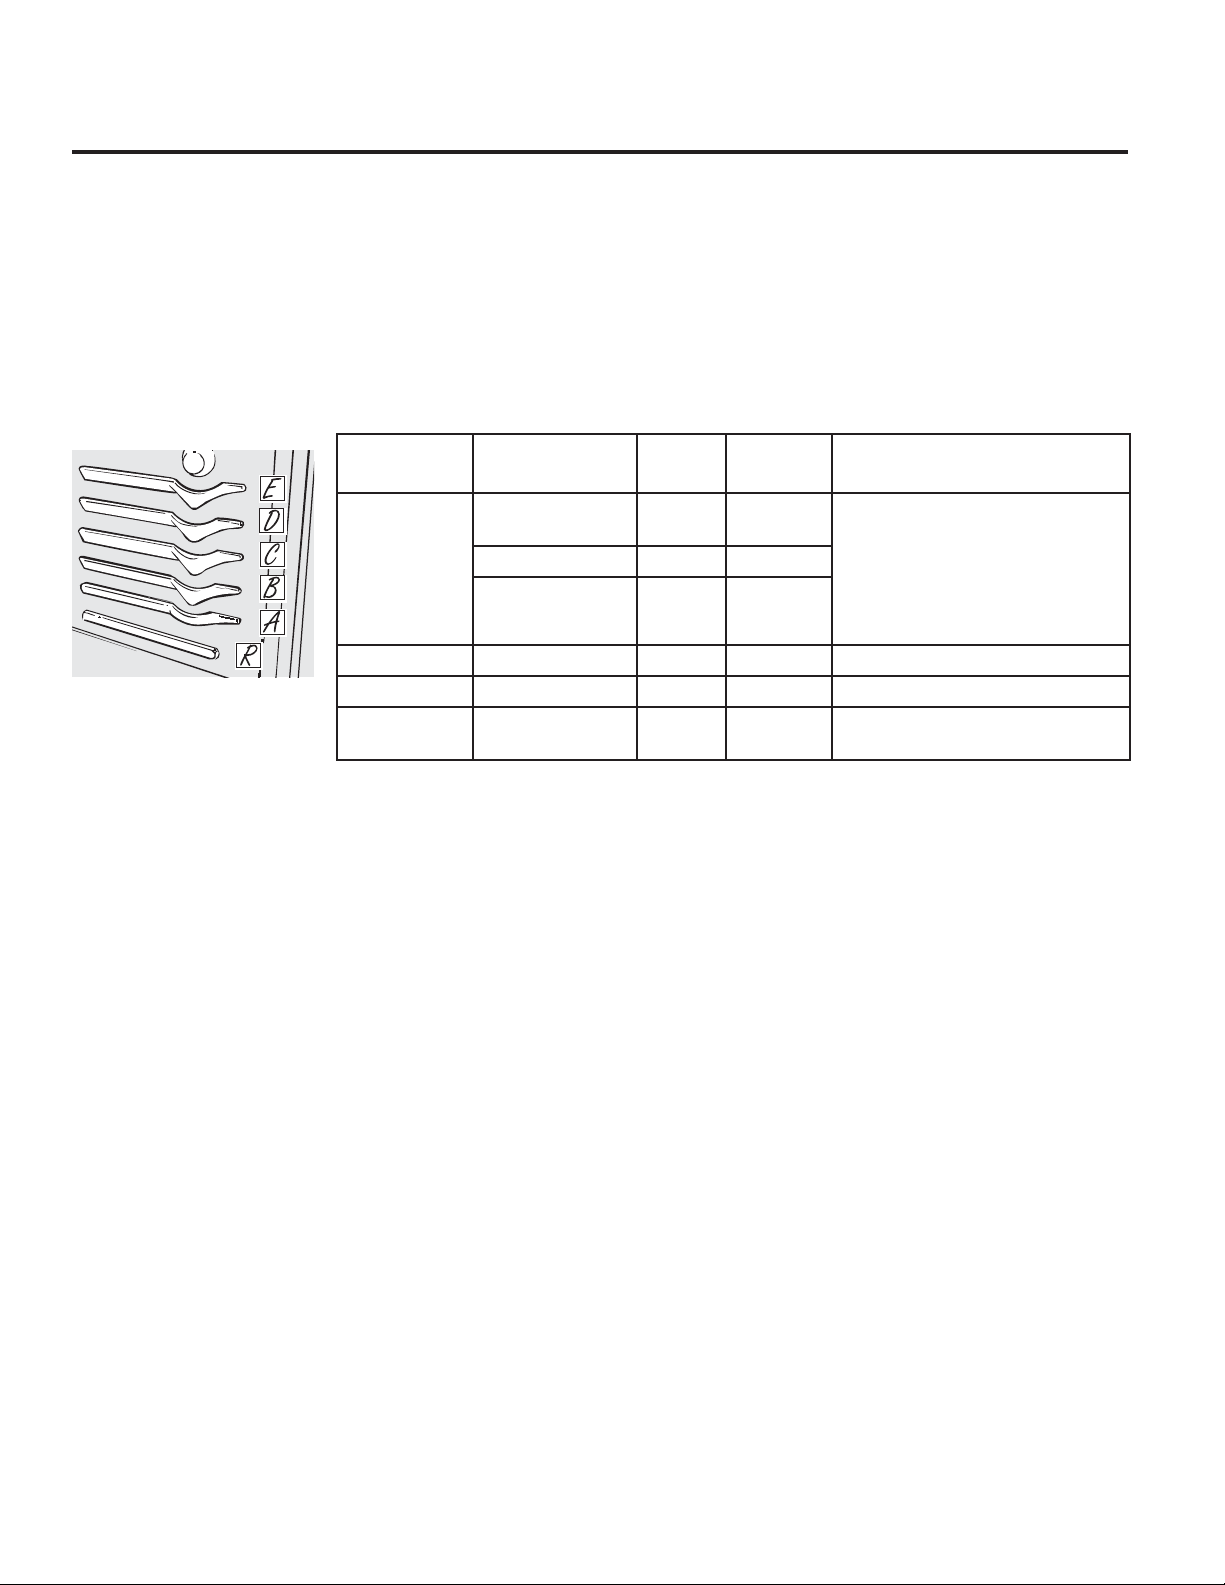
7KHRYHQKDVVKHOISRVLWLRQV
%URLOLQJJHQHUDOO\VKRXOGWDNH
SODFHRQUDFN&RUKLJKHU5DFN5LV
IRUURDVWLQJ
)RRG
'HVLUHG
'RQHQHVV
%URLO
6HWWLQJ
5DFN
3RVLWLRQ
&RPPHQWV
%HHI6WHDNV
RUJURXQG
EHHISDWWLHV
5DUH
0HGLXP5DUH
+L ( 6WHDNVOHVVWKDQµWKLFNPD\
FRRNWKURXJKEHIRUHEURZQLQJ
7RDYRLGIODUHXSVWULPH[FHVV
IDW
7RDYRLGFXUOLQJVODVKIDWDWµ
LQWHUYDOV
0HGLXP +L '(
:HOO'RQH +L '
&KLFNHQ +L & %URLOVNLQVLGHGRZQILUVW
)LVK +L ' +DQGOHDQGWXUQYHU\FDUHIXOO\
3RUN&KRSV +L ' 7RDYRLGFXUOLQJVODVKIDWDWµ
LQWHUYDOV
%URLOLQJ*XLGH
7KHVL]HZHLJKWWKLFNQHVVFXWVWDUWLQJ
WHPSHUDWXUHDQGSHUVRQDOSUHIHUHQFHRI
GRQHQHVVZLOODIIHFWEURLOLQJWLPHV7KLVJXLGH
LVLQWHQGHGDVDJHQHUDOUHFRPPHQGDWLRQDQG
LVEDVHGRQPHDWVDWUHILJHUDWRUWHPSHUDWXUH
3UHKHDWLQJWKHEURLOHUPLQXWHVLV
UHFRPPHQGHG
$GMXVWUDFNSRVLWLRQRUEURLOVHWWLQJWR
DFKLHYHGLIIHUHQWUHVXOWV
)RUJUHDWHUVHDULQJDQGOHVVLQWHUQDO
GRQHQHVV
3UHKHDWWKHEURLOHUIRUPLQXWHV
8VHUDFNSRVLWLRQVFORVHUWRWKHEURLOHU
8VH%URLO+LVHWWLQJ
)RUOHVVVHDULQJPHDWWKDWLVFRRNHG
WKURXJKDQGWKLFNHUFXWVRIPHDW
8VHUDFNSRVLWLRQVIDUWKHUIURPWKHEURLOHU
7U\EURLOORZVHWWLQJ
86'$UHFRPPHQGVWKHIROORZLQJPLQLPXPVDIHLQWHUQDOWHPSHUDWXUHV
5DZEHHISRUNODPEDQGYHDOVWHDNVRUFKRSV)DVPHDVXUHGZLWKDIRRG
WKHUPRPHWHUEHIRUHUHPRYLQJPHDWIURPWKHKHDWVRXUFH)RUVDIHW\DQGTXDOLW\DOORZ
PHDWWRUHVWIRUDWOHDVWWKUHHPLQXWHVEHIRUHFDUYLQJRUFRQVXPLQJ
5DZJURXQGEHHISRUNODPERUYHDO)DVPHDVXUHGZLWKDIRRRGWKHUPRPHWHU
3RXOWU\)DVPHDVXUHGZLWKDIRRGWKHUPRPHWHU
)RUPRUHLQIRUPDWLRQVHHZZZLVLWGRQH\HWJRYRUFDOOWKH86'$PHDWDQGSRXOWU\KRWOLQHDW

*($SSOLDQFHVFRP
+RZWR6HWWKH%URLOHU&RPSDUWPHQWRQVRPHPRGHOV
%URLOLQJLVFRRNLQJIRRGE\GLUHFWKHDWIURP
DERYHWKHIRRG0RVWILVKDQGWHQGHUFXWVRI
PHDWFDQEHEURLOHG)ROORZWKHVHGLUHFWLRQVWR
NHHSVSDWWHULQJDQGVPRNLQJWRDPLQLPXP
<RXUUDQJHKDVDFRPSDUWPHQWEHORZWKHRYHQ
IRUEURLOLQJ
%RWKWKHRYHQDQGEURLOHUFRPSDUWPHQWGRRUV
PXVWEHFORVHGGXULQJEURLOLQJ
7XUQPRVWIRRGVRQFHGXULQJFRRNLQJWKH
H[FHSWLRQLVWKLQILOOHWVRIILVKRLORQHVLGHSODFH
WKDWVLGHGRZQRQEURLOHUJULGDQGFRRNZLWKRXW
WXUQLQJXQWLOGRQH7LPHIRRGVIRUDERXW
RQHKDOIWKHWRWDOFRRNLQJWLPHWXUQIRRGWKHQ
FRQWLQXHWRFRRNWRSUHIHUUHGGRQHQHVV
<RXFDQFKDQJHWKHGLVWDQFHRIWKHIRRG
IURPWKHKHDWVRXUFHE\SRVLWLRQLQJWKH
EURLOHUSDQDQGJULGRQRQHRIWKUHHUDFN
SRVLWLRQVLQWKHEURLOHUFRPSDUWPHQW³$
ERWWRPRIEURLOHUFRPSDUWPHQW%PLGGOH
DQG&WRS3ODFLQJIRRGFORVHWRWKHEXUQHU
LQFUHDVHVH[WHULRUEURZQLQJRIWKHIRRG
EXWDOVRLQFUHDVHVVSODWWHULQJDQGWKH
SRVVLELOLW\RIIDWVLJQLWLQJ7KLFNHUIRRGVDQG
IRRGVWKDWQHHGWREHFRRNHGWKRURXJKO\
VKRXOGEHEURLOHGRQDUDFNSRVLWLRQIDUWKHU
IURPWKHEURLOHU
3UHKHDWLQJWKHEURLOHURURYHQLVQRW
QHFHVVDU\DQGFDQSURGXFHSRRUUHVXOWV
3UHKHDWLQJWKHEURLOHUPD\SURGXFHEHWWHU
UHVXOWVIRUVRPHIRRGVEXWLVQRWQHFHVVDU\
,IPHDWKDVIDWRUJULVWOHDURXQGWKHHGJH
FXWYHUWLFDOVODVKHVWKURXJKERWKDERXWs
DSDUW,IGHVLUHGWKHIDWPD\EHWULPPHG
OHDYLQJDOD\HUDERXWsWKLFN
$UUDQJHWKHIRRGRQWKHJULGDQGSRVLWLRQ
WKHEURLOHUSDQRQWKHDSSURSULDWHUDFNLQ
WKHRYHQRUEURLOLQJFRPSDUWPHQW
&ORVHWKHRYHQDQGEURLOHUFRPSDUWPHQW
GRRU
7XUQWKH29(1&21752/NQREWR%52,/
:KHQEURLOLQJLVILQLVKHGWXUQWKH29(1
&21752/NQREWR2))5HPRYHWKHEURLOHU
SDQIURPWKHEURLOHUFRPSDUWPHQWDQG
VHUYHWKHIRRGLPPHGLDWHO\/HDYHWKHSDQ
RXWVLGHWKHUDQJHWRFRRO
$OXPLQXP)RLO
<RXFDQXVHDOXPLQXPIRLOWROLQH\RXUEURLOHU
SDQDQGEURLOHUJULG+RZHYHU\RXPXVWPROG
WKHIRLOWLJKWO\WRWKHJULGDQGFXWVOLWVLQLWMXVW
OLNHWKHJULG
&XWVOLWVLQWKHIRLOMXVWOLNHWKHJULG
%URLOLQJ&RPSDUWPHQW*XLGH6XJJHVWLRQV
■$OZD\VXVHWKHEURLOHUSDQDQGJULGWKDW
FRPHVZLWK\RXUUDQJH,WLVGHVLJQHGWR
PLQLPL]HVPRNLQJDQGVSDWWHULQJE\WUDSSLQJ
MXLFHVLQWKHVKLHOGHGORZHUSDUWRIWKHSDQ
■)RUVWHDNVDQGFKRSVVODVKIDWHYHQO\DURXQG
WKHRXWVLGHHGJHVRIWKHPHDW7RVODVKFXW
FURVVZLVHWKURXJKWKHRXWHUIDWVXUIDFHMXVW
WRWKHHGJHRIWKHPHDW8VHWRQJVWRWXUQ
WKHPHDWRYHUWRSUHYHQWSLHUFLQJWKHPHDW
DQGORVLQJMXLFHV
■,IGHVLUHGPDULQDWHPHDWVRUFKLFNHQEHIRUH
EURLOLQJ2UEUXVKZLWKEDUEHFXHVDXFHODVW
²PLQXWHVRQO\
■:KHQDUUDQJLQJWKHIRRGRQWKHSDQGRQRW
OHWIDWW\HGJHVKDQJRYHUWKHVLGHVEHFDXVH
GULSSLQJIDWFRXOGVRLOWKHRYHQ
■7KHEURLOHUFRPSDUWPHQWGRHVQRWQHHGWREH
SUHKHDWHG+RZHYHUIRUYHU\WKLQIRRGVRUWR
LQFUHDVHEURZQLQJSUHKHDWLIGHVLUHG
■)UR]HQVWHDNVFDQEHEURLOHGE\SRVLWLRQLQJ
WKHUDFNDWWKHQH[WORZHVWUDFNSRVLWLRQDQG
LQFUHDVLQJWKHFRRNLQJWLPHJLYHQLQWKLVJXLGH
øWLPHVSHUVLGH

1RWDOOIHDWXUHVDUHRQDOOPRGHOV
7KHWLPHULVDPLQXWHWLPHURQO\
7KH&OHDU2IISDGGRHVQRWDIIHFW
WKHWLPHU
7R6HWWKH7LPHU
7KHWLPHUGRHVQRWFRQWURORYHQRSHUDWLRQV
7KHPD[LPXPVHWWLQJRQWKHWLPHULVKRXUV
DQGPLQXWHV
7RXFKWKH.LWFKHQ7LPHU2Q2IISDG
7RXFKWKHRU²SDGVXQWLOWKHDPRXQWRI
WLPH\RXZDQWVKRZVLQWKHGLVSOD\7KH
PD[LPXPWLPHWKDWFDQEHHQWHUHGLQ
PLQXWHVLV7LPHVPRUHWKDQPLQXWHV
VKRXOGEHFKDQJHGWRKRXUVDQGPLQXWHV
,I\RXPDNHDPLVWDNHWRXFKWKH.LWFKHQ7LPHU
2Q2IISDGDQGEHJLQDJDLQ
7RXFKWKH6WDUW2QSDG7KHWLPHZLOOVWDUW
FRXQWLQJGRZQDOWKRXJKWKHGLVSOD\GRHV
QRWFKDQJHXQWLORQHPLQXWHKDVSDVVHG
:KHQWKHWLPHUUHDFKHVWKHFRQWURO
ZLOOEHHSWLPHVIROORZHGE\RQHEHHS
HYHU\VHFRQGVXQWLOWKH.LWFKHQ7LPHU
2Q2IISDGLVWRXFKHG
7R6HWWKH&ORFN
7KHFORFNPXVWEHVHWWRWKHFRUUHFWWLPHRIGD\
IRUWKHDXWRPDWLFRYHQWLPLQJIXQFWLRQVWRZRUN
SURSHUO\7KHWLPHRIGD\FDQQRWEHFKDQJHG
GXULQJDGHOD\HGFRRNLQJRUDGHOD\HGVHOI
FOHDQLQJF\FOH
7RXFKWKH&ORFNSDGWZLFH
7RXFKWKHRU²SDGV
,IWKHRU²SDGVDUHQRWWRXFKHGZLWKLQRQH
PLQXWHDIWHU\RXWRXFKWKH&ORFN SDGWKH
GLVSOD\UHYHUWVWRWKHRULJLQDOVHWWLQJ,IWKLV
KDSSHQVWRXFKWKH&ORFNSDGWZLFHDQG
UHHQWHUWKHWLPHRIGD\
7RXFKWKH6WDUW2QSDGXQWLOWKHWLPHRI
GD\VKRZVLQWKHGLVSOD\7KLVHQWHUVWKH
WLPHDQGVWDUWVWKHFORFN
7RFKHFNWKHWLPHRIGD\ZKHQWKHGLVSOD\LV
VKRZLQJRWKHULQIRUPDWLRQVLPSO\WRXFKWKH
&ORFNSDG7KHWLPHRIGD\VKRZVXQWLODQRWKHU
SDGLVWRXFKHG
0DNHVXUHWKHFORFNLVVHWWRWKH
FRUUHFWWLPHRIGD\
7R7XUQ2IIWKH&ORFN'LVSOD\
,I\RXKDYHVHYHUDOFORFNVLQ\RXUNLWFKHQ\RX
PD\ZLVKWRWXUQRIIWKHWLPHRIGD\FORFN
GLVSOD\RQ\RXUUDQJH
7RXFKWKH&ORFNSDGRQFHWRWXUQRIIWKH
WLPHRIGD\GLVSOD\$OWKRXJK\RXZLOOQRW
EHDEOHWRVHHLWWKHFORFNPDLQWDLQVWKH
FRUUHFWWLPHRIGD\
7RXFKWKH&ORFNSDGWZLFHWRUHFDOOWKH
FORFNGLVSOD\
8VLQJWKHFORFNDQGWLPHURQVRPHPRGHOV
1RWDOOIHDWXUHVDUHRQDOOPRGHOV
7R5HVHWWKH7LPHU
,IWKHGLVSOD\LVVWLOOVKRZLQJWKHWLPHUHPDLQLQJ
\RXPD\FKDQJHLWE\WRXFKLQJWKH.LWFKHQ
7LPHU2Q2IISDGDQGWKHQWRXFKLQJWKHRU
²SDGVXQWLOWKHWLPH\RXZDQWDSSHDUVLQWKH
GLVSOD\
,IWKHUHPDLQLQJWLPHLVQRWLQWKHGLVSOD\FORFN
VWDUWWLPHRUFRRNLQJWLPHDUHLQWKHGLVSOD\
UHFDOOWKHUHPDLQLQJWLPHE\WRXFKLQJWKH
.LWFKHQ7LPHU2Q2IISDGDQGWKHQWRXFKLQJ
WKHRU²SDGVWRHQWHUWKHQHZWLPH\RXZDQW
7R&DQFHOWKH7LPHU
7RXFKWKH.LWFKHQ7LPHU2Q2IISDGWZLFH
(QGRI&\FOH7RQHVRQVRPHPRGHOV
&OHDUWKHWRQHVE\SUHVVLQJWKHSDGRIWKH
IXQFWLRQ\RXDUHXVLQJ
3RZHU2XWDJH
,IDIODVKLQJWLPHLVLQWKHGLVSOD\\RXKDYH
H[SHULHQFHGDSRZHUIDLOXUH5HVHWWKHFORFN
7RUHVHWWKHFORFNWRXFKWKH&ORFNSDG(QWHU
WKHFRUUHFWWLPHRIGD\E\WRXFKLQJWKHRU²
SDGV7RXFKWKH6WDUW2QSDG
RU
*($SSOLDQFHVFRP
'RQRWORFNWKHRYHQGRRUZLWKWKHODWFKGXULQJWLPHGFRRNLQJ7KHODWFKLVXVHGIRUVHOIFOHDQLQJRQO\
127()RRGVWKDWVSRLOHDVLO\³VXFKDVPLONHJJVILVKVWXIILQJVSRXOWU\DQGSRUN³VKRXOGQRWEHDOORZHGWRVLWIRUPRUH
WKDQKRXUEHIRUHRUDIWHUFRRNLQJ5RRPWHPSHUDWXUHSURPRWHVWKHJURZWKRIKDUPIXOEDFWHULD%HVXUHWKDWWKHRYHQ
OLJKWLVRIIEHFDXVHKHDWIURPWKHEXOEZLOOVSHHGKDUPIXOEDFWHULDJURZWK
8VLQJWKHWLPHGEDNLQJDQGURDVWLQJIHDWXUHVRQVRPHPRGHOV
+RZWR6HWDQ,PPHGLDWH6WDUWDQG$XWRPDWLF6WRS
7KHRYHQZLOOWXUQRQLPPHGLDWHO\DQGFRRNIRUD
VHOHFWHGOHQJWKRIWLPH$WWKHHQGRIWKHFRRNLQJ
WLPHWKHRYHQZLOOWXUQRIIDXWRPDWLFDOO\
7RXFKWKH%DNHSDG
7RXFKWKHRU²SDGVWRVHWWKHRYHQ
WHPSHUDWXUH
7RXFKWKH&RRNLQJ7LPHSDG
127(,I\RXUUHFLSHUHTXLUHVSUHKHDWLQJ\RX
PD\QHHGWRDGGDGGLWLRQDOWLPHWRWKHOHQJWKRI
WKHFRRNLQJWLPH
7RXFKWKHRU²SDGVWRVHWWKHEDNLQJ
WLPH
7KHFRRNLQJWLPHWKDW\RXHQWHUHGZLOOEH
GLVSOD\HG,I\RXVHOHFW&RRNLQJ7LPHILUVWDQG
WKHQDGMXVWWKH%DNH7HPSHUDWXUHWKHRYHQ
WHPSHUDWXUHZLOOEHGLVSOD\HGLQVWHDG
7RXFKWKH6WDUW2QSDG
7KHGLVSOD\VKRZVHLWKHUWKHRYHQWHPSHUDWXUH
WKDW\RXVHWRUWKHFRRNLQJWLPHFRXQWGRZQ
7KHGLVSOD\VWDUWVZLWK35(LIVKRZLQJWKHRYHQ
WHPSHUDWXUH
7KHRYHQZLOOFRQWLQXHWRFRRNIRUWKH
SURJUDPPHGDPRXQWRIWLPHWKHQWXUQRII
DXWRPDWLFDOO\
7RXFKWKH&OHDU2IISDGWRFOHDUWKH
GLVSOD\LIQHFHVVDU\
5HPRYHWKHIRRGIURPWKHRYHQ5HPHPEHU
HYHQWKRXJKWKHRYHQVKXWVRIIDXWRPDWLFDOO\
IRRGVFRQWLQXHFRRNLQJDIWHUFRQWUROVDUHRII
+RZWR6HWD'HOD\HG6WDUWDQG$XWRPDWLF6WRS
7KHRYHQZLOOWXUQRQDWWKHWLPHRIGD\\RXVHW
FRRNIRUDVSHFLILFOHQJWKRIWLPHDQGWKHQWXUQ
RIIDXWRPDWLFDOO\
0DNHVXUHWKHFORFNVKRZVWKHFRUUHFWWLPHRI
GD\
7RXFKWKH%DNHSDG
7RXFKWKHRU²SDGVWRVHWWKHRYHQ
WHPSHUDWXUH
7RXFKWKH&RRNLQJ7LPHSDG
7RXFKWKHRU²SDGVWRVHWWKHGHVLUHG
OHQJWKRIFRRNLQJWLPH
7RXFKWKH6WDUW7LPHSDG
7RXFKWKHRU²SDGVWRVHWWKHWLPHRI
GD\\RXZDQWWKHRYHQWRWXUQRQDQG
VWDUWFRRNLQJ
7RXFKWKH6WDUW2QSDG
127($QDWWHQWLRQWRQHZLOOVRXQGLI\RXDUH
XVLQJWLPHGEDNLQJDQGGRQRWWRXFKWKH
6WDUW2QSDG
127(,I\RXZRXOGOLNHWRFKHFNWKHWLPHV\RX
KDYHVHWWRXFKWKH6WDUW7LPHSDGWRFKHFNWKH
VWDUWWLPH\RXKDYHVHWRUWRXFKWKH&RRNLQJ
7LPHSDGWRFKHFNWKHOHQJWKRIFRRNLQJWLPH
\RXKDYHVHW
:KHQWKHRYHQWXUQVRQDWWKHWLPHRIGD\
\RXKDYHVHWWKHGLVSOD\ZLOOVKRZ35(XQWLOLW
UHDFKHVWKHVHOHFWHGWHPSHUDWXUHDQGWKHQLW
ZLOOGLVSOD\WKHRYHQWHPSHUDWXUH
$WWKHHQGRIFRRNLQJWLPHWKHRYHQZLOOWXUQRII
DQGWKHHQGRIF\FOHWRQHZLOOVRXQG
7RXFKWKH&OHDU2IISDGWRFOHDUWKH
GLVSOD\LIQHFHVVDU\
5HPRYHWKHIRRGIURPWKHRYHQ5HPHPEHU
HYHQWKRXJKWKHRYHQVKXWVRIIDXWRPDWLFDOO\
IRRGVFRQWLQXHFRRNLQJDIWHUFRQWUROVDUHRII
<RXUQHZWRXFKSDGFRQWUROKDVDGGLWLRQDOIHDWXUHVWKDW\RXPD\FKRRVHWRXVH7KHIROORZLQJDUHWKHIHDWXUHVDQGKRZ
\RXPD\DFWLYDWHWKHP
7KHVSHFLDOIHDWXUHPRGHVFDQRQO\EHDFWLYDWHGZKLOHWKHGLVSOD\LVVKRZLQJWKHWLPHRIGD\7KH\UHPDLQLQWKHFRQWURO·V
PHPRU\XQWLOWKHVWHSVDUHUHSHDWHG
:KHQWKHGLVSOD\VKRZV\RXUFKRLFHWRXFKWKH
6WDUW2QSDG7KHVSHFLDOIHDWXUHVZLOOUHPDLQLQPHPRU\DIWHUDSRZHU
IDLOXUH
127(7KH6DEEDWKIHDWXUHDQGWKH7KHUPRVWDW$GMXVWPHQWIHDWXUHDUHDOVR6SHFLDO)HDWXUHVEXWWKH\DUHDGGUHVVHG
VHSDUDWHO\LQWKHIROORZLQJVHFWLRQV
6SHFLDOIHDWXUHVRI\RXURYHQFRQWURORQVRPHPRGHOV *($SSOLDQFHVFRP
+RXU6KXW2II
:LWKWKLVIHDWXUHVKRXOG\RXIRUJHWDQGOHDYH
WKHRYHQRQWKHFRQWUROZLOODXWRPDWLFDOO\
WXUQRIIWKHRYHQDIWHUKRXUVGXULQJEDNLQJ
IXQFWLRQVRUDIWHUKRXUVGXULQJDEURLOIXQFWLRQ
,I\RXZLVKWRWXUQ2)) WKLVIHDWXUHIROORZWKH
VWHSVEHORZ
7RXFKWKH%DNHDQG%URLO+L/RSDGVDW
WKHVDPHWLPHIRUVHFRQGVXQWLOWKH
GLVSOD\VKRZV6)
7RXFKWKH&ORFNSDG7KHGLVSOD\ZLOOVKRZ
21KRXUVKXWRII7RXFKWKH&ORFNSDG
UHSHDWHGO\XQWLOWKHGLVSOD\VKRZV2))QR
VKXWRII
7RXFKWKH6WDUW2QSDGWRDFWLYDWHWKHQR
VKXWRIIDQGOHDYHWKHFRQWUROVHWLQWKLV
VSHFLDOIHDWXUHVPRGH

7KH6DEEDWKIHDWXUHFDQEHXVHGIRUEDNLQJURDVWLQJRQO\,WFDQQRWEHXVHGIRUEURLOLQJVHOIFOHDQLQJRUGHOD\VWDUW
FRRNLQJ
127(7KHRYHQOLJKWFRPHVRQDXWRPDWLFDOO\RQVRPHPRGHOVZKHQWKHGRRULVRSHQHGDQGJRHV
RIIZKHQWKHGRRULVFORVHG7KHEXOEPD\EHUHPRYHG6HHWKH2YHQ/LJKW5HSODFHPHQWVHFWLRQ2Q
PRGHOVZLWKDOLJKWVZLWFKRQWKHFRQWUROSDQHOWKHRYHQOLJKWPD\EHWXUQHGRQDQGOHIWRQ
+RZWR6HWIRU7LPHG%DNLQJ5RDVWLQJ³,PPHGLDWH6WDUWDQG$XWRPDWLF6WRS
127(7RXQGHUVWDQGKRZWKHRYHQFRQWUROZRUNV
SUDFWLFHXVLQJUHJXODUQRQ6DEEDWK,PPHGLDWH6WDUW
DQG$XWRPDWLF6WRSEHIRUHHQWHULQJWKH6DEEDWK
PRGH
0DNHVXUHWKHFORFNVKRZVWKHFRUUHFWWLPHRIGD\
DQGWKHRYHQLVRII
7RXFKDQGKROGERWKWKH%DNHDQG%URLO+L/R
SDGVDWWKHVDPHWLPHXQWLOWKHGLVSOD\VKRZV
6)
7DSWKH&ORFN SDGXQWLO6$EDSSHDUVLQWKH
GLVSOD\
7RXFKWKH6WDUW2Q SDGDQGԸZLOODSSHDULQ
WKHGLVSOD\
7RXFKWKH&RRNLQJ7LPHSDG
7RXFKWKHRU²SDGVWRVHWWKHGHVLUHGOHQJWK
RIFRRNLQJWLPHEHWZHHQPLQXWHDQGKRXUV
DQGPLQXWHV7KHFRRNLQJWLPHWKDW\RX
HQWHUHGZLOOEHGLVSOD\HG
7RXFKWKH6WDUW2Q SDG
7RXFKWKH%DNHSDG1RVLJQDOZLOOEHJLYHQ
7KHSUHVHWVWDUWLQJWHPSHUDWXUHZLOO
DXWRPDWLFDOO\EHVHWWR7DSWKHRU²
SDGVWRLQFUHDVHRUGHFUHDVHWKHWHPSHUDWXUH
LQLQFUHPHQWV7KHWHPSHUDWXUHFDQEHVHW
EHWZHHQDQG1RVLJQDORU
WHPSHUDWXUHZLOOEHJLYHQ
7RXFKWKH6WDUW2Q SDG
$IWHUDUDQGRPGHOD\SHULRGRIDSSUR[LPDWHO\
VHFRQGVWRPLQXWHԸԷZLOODSSHDULQWKH
GLVSOD\LQGLFDWLQJWKDWWKHRYHQLV
EDNLQJ
URDVWLQJ
,IԸԷGRHVQ·WDSSHDULQWKHGLVSOD\
VWDUWDJDLQDW6WHS
7RDGMXVWWKHRYHQWHPSHUDWXUHWRXFKWKH%DNHSDG
DQGWDSWKHRU²SDGVWRLQFUHDVHRUGHFUHDVHWKH
WHPSHUDWXUHLQLQFUHPHQWV7RXFKWKH6WDUW2Q
SDG
:KHQFRRNLQJLVILQLVKHGWKHGLVSOD\ZLOOFKDQJH
IURPԸԷWRԸLQGLFDWLQJWKDWWKHRYHQKDVWXUQHG
2))EXWLVVWLOOVHWLQ6DEEDWK5HPRYHWKHFRRNHG
IRRG
+RZWR6HWIRU5HJXODU%DNLQJ5RDVWLQJ
127(7RXQGHUVWDQGKRZWKHRYHQFRQWUROZRUNV
SUDFWLFHXVLQJUHJXODUEDNLQJQRQ6DEEDWKEHIRUH
HQWHULQJ6DEEDWKPRGH
0DNHVXUHWKHFORFNVKRZVWKHFRUUHFWWLPHRIGD\
DQGWKHRYHQLVRII
7RXFKDQGKROGERWKWKH%DNHDQG%URLO+L/R
SDGVDWWKHVDPHWLPHXQWLOWKHGLVSOD\VKRZV
6)
7DSWKH&ORFN SDGXQWLO6$EDSSHDUVLQWKH
GLVSOD\
7RXFKWKH6WDUW2Q SDGDQGԸZLOODSSHDULQ
WKHGLVSOD\
7RXFKWKH%DNH SDG1RVLJQDOZLOOEHJLYHQ
7KHSUHVHWVWDUWLQJWHPSHUDWXUHZLOO
DXWRPDWLFDOO\EHVHWWR7DSWKHRU²
SDGVWRLQFUHDVHRUGHFUHDVHWKHWHPSHUDWXUH
LQLQFUHPHQWV7KHWHPSHUDWXUHFDQEHVHW
EHWZHHQDQG1RVLJQDORU
WHPSHUDWXUHZLOOEHJLYHQ
7RXFKWKH6WDUW2Q SDG
$IWHUDUDQGRPGHOD\SHULRGRIDSSUR[LPDWHO\
VHFRQGVWRPLQXWHԸԷZLOODSSHDULQWKH
GLVSOD\LQGLFDWLQJWKDWWKHRYHQLV
EDNLQJ
URDVWLQJ
,IԸԷGRHVQ·WDSSHDULQWKHGLVSOD\
VWDUWDJDLQDW6WHS
7RDGMXVWWKHRYHQWHPSHUDWXUHWRXFKWKH%DNHSDG
DQGWDSWKHRU²SDGVWRLQFUHDVHRUGHFUHDVHWKH
WHPSHUDWXUHLQLQFUHPHQWV7RXFKWKH6WDUW2Q
SDG
127(7KH&OHDU2IIDQG&RRNLQJ7LPHSDGVDUH
DFWLYHGXULQJWKH6DEEDWKIHDWXUH
:KHQWKHGLVSOD\VKRZVԸWKH
RYHQLVVHWLQ6DEEDWK:KHQWKH
GLVSOD\VKRZV
ԸԷWKHRYHQLV
EDNLQJURDVWLQJ
:KHQWKHGLVSOD\VKRZVԸWKH
RYHQLVVHWLQ6DEEDWK:KHQWKH
GLVSOD\VKRZV
ԸԷWKHRYHQLV
EDNLQJURDVWLQJ
K
&(57,),('
6$%%$7+
02'(
8VLQJWKH6DEEDWKIHDWXUHRQVRPHPRGHOV
'HVLJQHGIRUXVHRQWKH-HZLVK6DEEDWKDQG+ROLGD\V
8VLQJWKH6DEEDWKIHDWXUHRQVRPHPRGHOV
'HVLJQHGIRUXVHRQWKH-HZLVK6DEEDWKDQG+ROLGD\V *($SSOLDQFHVFRP
+RZWR([LWWKH6DEEDWK)HDWXUH
7RXFKWKH&OHDU2IISDG
,IWKHRYHQLVFRRNLQJZDLWIRUDUDQGRPGHOD\
SHULRGRIDSSUR[LPDWHO\VHFRQGVWR
PLQXWHXQWLORQO\ԸLVLQWKHGLVSOD\
7RXFKDQGKROGERWKWKH%DNHDQG%URLO+L
/RSDGVDWWKHVDPHWLPHXQWLOWKHGLVSOD\
VKRZV6)
7DSWKH&ORFNSDGXQWLO21RU2))DSSHDUVLQ
WKHGLVSOD\21LQGLFDWHVWKDWWKHRYHQZLOO
DXWRPDWLFDOO\WXUQRIIDIWHUKRXUV2))
LQGLFDWHVWKDWWKHRYHQZLOOQRWDXWRPDWLFDOO\
WXUQRII6HHWKH6SHFLDOIHDWXUHVVHFWLRQIRUDQ
H[SODQDWLRQRIWKH+RXU6KXW2IIIHDWXUH
7RXFKWKH6WDUW2Q SDG
127(,IDSRZHURXWDJHRFFXUUHGZKLOHWKHRYHQ
ZDVLQ6DEEDWKWKHRYHQZLOODXWRPDWLFDOO\WXUQRII
DQGVWD\RIIHYHQZKHQWKHSRZHUUHWXUQV7KHRYHQ
FRQWUROPXVWEHUHVHW

<RXPD\ILQGWKDW\RXUQHZRYHQFRRNVGLIIHUHQWO\WKDQWKHRQHLWUHSODFHG8VH\RXUQHZRYHQIRUDIHZZHHNVWR
EHFRPHPRUHIDPLOLDUZLWKLW,I\RXVWLOOWKLQN\RXUQHZRYHQLVWRRKRWRUWRRFROG\RXFDQDGMXVWWKHWKHUPRVWDW\RXUVHOI
'RQRWXVHWKHUPRPHWHUVVXFKDVWKRVHIRXQGLQJURFHU\VWRUHVWRFKHFNWKHWHPSHUDWXUHVHWWLQJRI\RXURYHQ
7KHVHWKHUPRPHWHUVPD\YDU\²GHJUHHV
127(7KLVDGMXVWPHQWZLOOQRWDIIHFWWKHEURLOLQJRUWKHVHOIFOHDQLQJWHPSHUDWXUHV7KHDGMXVWPHQWZLOOEHUHWDLQHG
LQPHPRU\DIWHUDSRZHUIDLOXUH
$GMXVWWKHRYHQWKHUPRVWDW³'RLW\RXUVHOI
7R$GMXVWWKH7KHUPRVWDWRQVRPHPRGHOV
7RXFKWKH%DNHDQG%URLO+L/RSDGV
DWWKHVDPHWLPHIRUVHFRQGVXQWLO
WKHGLVSOD\VKRZV6)
7RXFKWKH%DNHSDG$WZRGLJLWQXPEHU
VKRZVLQWKHGLVSOD\
7KHRYHQWHPSHUDWXUHFDQEHDGMXVWHGXS
WR)KRWWHURU²)FRROHU7RXFK
WKHSDGWRLQFUHDVHWKHWHPSHUDWXUHLQ
GHJUHHLQFUHPHQWV
7RXFKWKH²SDGWRGHFUHDVHWKH
WHPSHUDWXUHLQGHJUHHLQFUHPHQWV
:KHQ\RXKDYHPDGHWKHDGMXVWPHQW
WRXFKWKH6WDUW2QSDGWRJREDFNWRWKH
WLPHRIGD\GLVSOD\8VH\RXURYHQDV\RX
ZRXOGQRUPDOO\
127(7KLVDGMXVWPHQWZLOOQRWDIIHFWWKHEURLOLQJ
RUVHOIFOHDQLQJWHPSHUDWXUHV,WZLOOEHUHWDLQHG
LQPHPRU\DIWHUDSRZHUIDLOXUH
0RVWUHFLSHVIRUEDNLQJKDYHEHHQGHYHORSHGXVLQJKLJKIDWSURGXFWVVXFKDVEXWWHURUPDUJDULQHIDW,I\RX
GHFUHDVHWKHIDWWKHUHFLSHPD\QRWJLYHWKHVDPHUHVXOWVDVZLWKDKLJKHUIDWSURGXFW
5HFLSHIDLOXUHFDQUHVXOWLIFDNHVSLHVSDVWULHVFRRNLHVRUFDQGLHVDUHPDGHZLWKORZIDWVSUHDGV7KHORZHUWKHIDW
FRQWHQWRIDVSUHDGSURGXFWWKHPRUHQRWLFHDEOHWKHVHGLIIHUHQFHVEHFRPH
)HGHUDOVWDQGDUGVUHTXLUHSURGXFWVODEHOHG´PDUJDULQHµWRFRQWDLQDWOHDVWIDWE\ZHLJKW/RZIDWVSUHDGVRQWKHRWKHUKDQG
FRQWDLQOHVVIDWDQGPRUHZDWHU7KHKLJKPRLVWXUHFRQWHQWRIWKHVHVSUHDGVDIIHFWVWKHWH[WXUHDQGIODYRURIEDNHGJRRGV)RUEHVW
UHVXOWVZLWK\RXUROGIDYRULWHUHFLSHVXVHPDUJDULQHEXWWHURUVWLFNVSUHDGVFRQWDLQLQJDWOHDVWYHJHWDEOHRLO
7KHW\SHRIPDUJDULQHZLOODIIHFWEDNLQJSHUIRUPDQFH
OVEN TEMP
2
0
0
2
5
0
3
0
0
3
5
0
4
0
0
4
5
0
5
0
0
B
R
O
I
L
C
L
E
A
N
O
F
F
)URQWRI29(17(03NQRE
NQREDSSHDUDQFHPD\YDU\
7R$GMXVWWKH7KHUPRVWDWRQPRGHOVZLWKDQ29(17(03.QRE
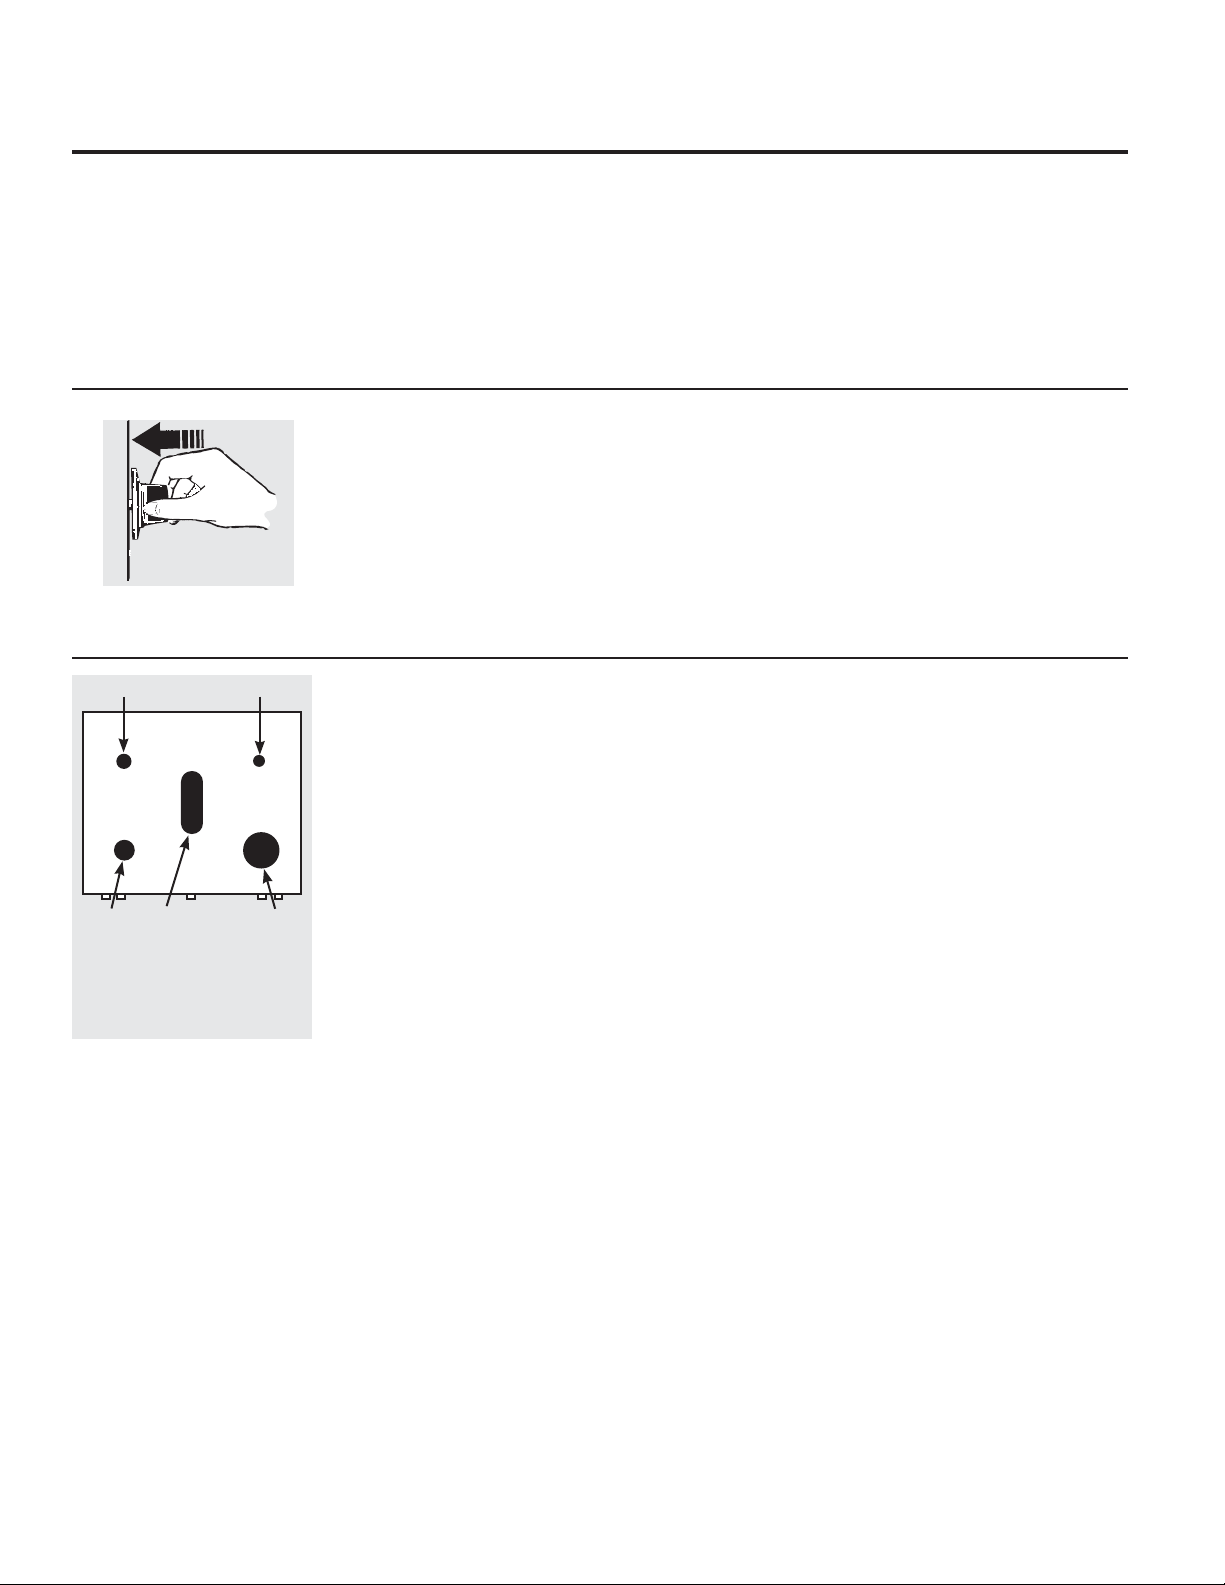
3XOOWKH29(17(03NQRERIIWKHUDQJH
DQGORRNDWWKHEDFNVLGH7RPDNHDQ
DGMXVWPHQWORRVHQDSSUR[LPDWHO\RQH
WXUQEXWGRQRWFRPSOHWHO\UHPRYHWKH
WZRVFUHZVRQWKHEDFNRIWKHNQRE
:LWKWKHEDFNRIWKHNQREIDFLQJ\RXKROG
WKHRXWHUHGJHRIWKHNQREZLWKRQHKDQG
DQGWXUQWKHIURQWRIWKHNQREZLWKWKH
RWKHUKDQG
7RLQFUHDVHWKHRYHQWHPSHUDWXUHPRYH
WKHWRSVFUHZWRZDUGWKHULJKW<RX·OOKHDU
DFOLFNIRUHDFKQRWFK\RXPRYHWKHNQRE
7RGHFUHDVHWKHRYHQWHPSHUDWXUHPRYH
WKHWRSVFUHZWRZDUGWKHOHIW
(DFKFOLFNZLOOFKDQJHWKHRYHQ
WHPSHUDWXUHDSSUR[LPDWHO\)5DQJH
LVSOXVRUPLQXV)IURPWKHDUURZ:H
VXJJHVWWKDW\RXPDNHWKHDGMXVWPHQW
RQHFOLFNIURPWKHRULJLQDOVHWWLQJDQG
FKHFNRYHQSHUIRUPDQFHEHIRUHPDNLQJ
DQ\DGGLWLRQDODGMXVWPHQWV
$IWHUWKHDGMXVWPHQWLVPDGHUHWLJKWHQ
VFUHZVVRWKH\DUHVQXJEXWEHFDUHIXO
QRWWRRYHUWLJKWHQ
5HSODFHWKHNQREPDWFKLQJWKHIODWDUHD
RIWKHNQREWRWKHVKDIWDQGFKHFN
SHUIRUPDQFH
L
O
O
S
E
N
S
C
R
E
W
S
T
O
R
O
T
A
T
E
M
A
K
E
C
O
O
L
E
R
M
A
K
E
H
O
T
T
E
R
%DFNRI29(17(03NQRE
NQREDSSHDUDQFHPD\YDU\
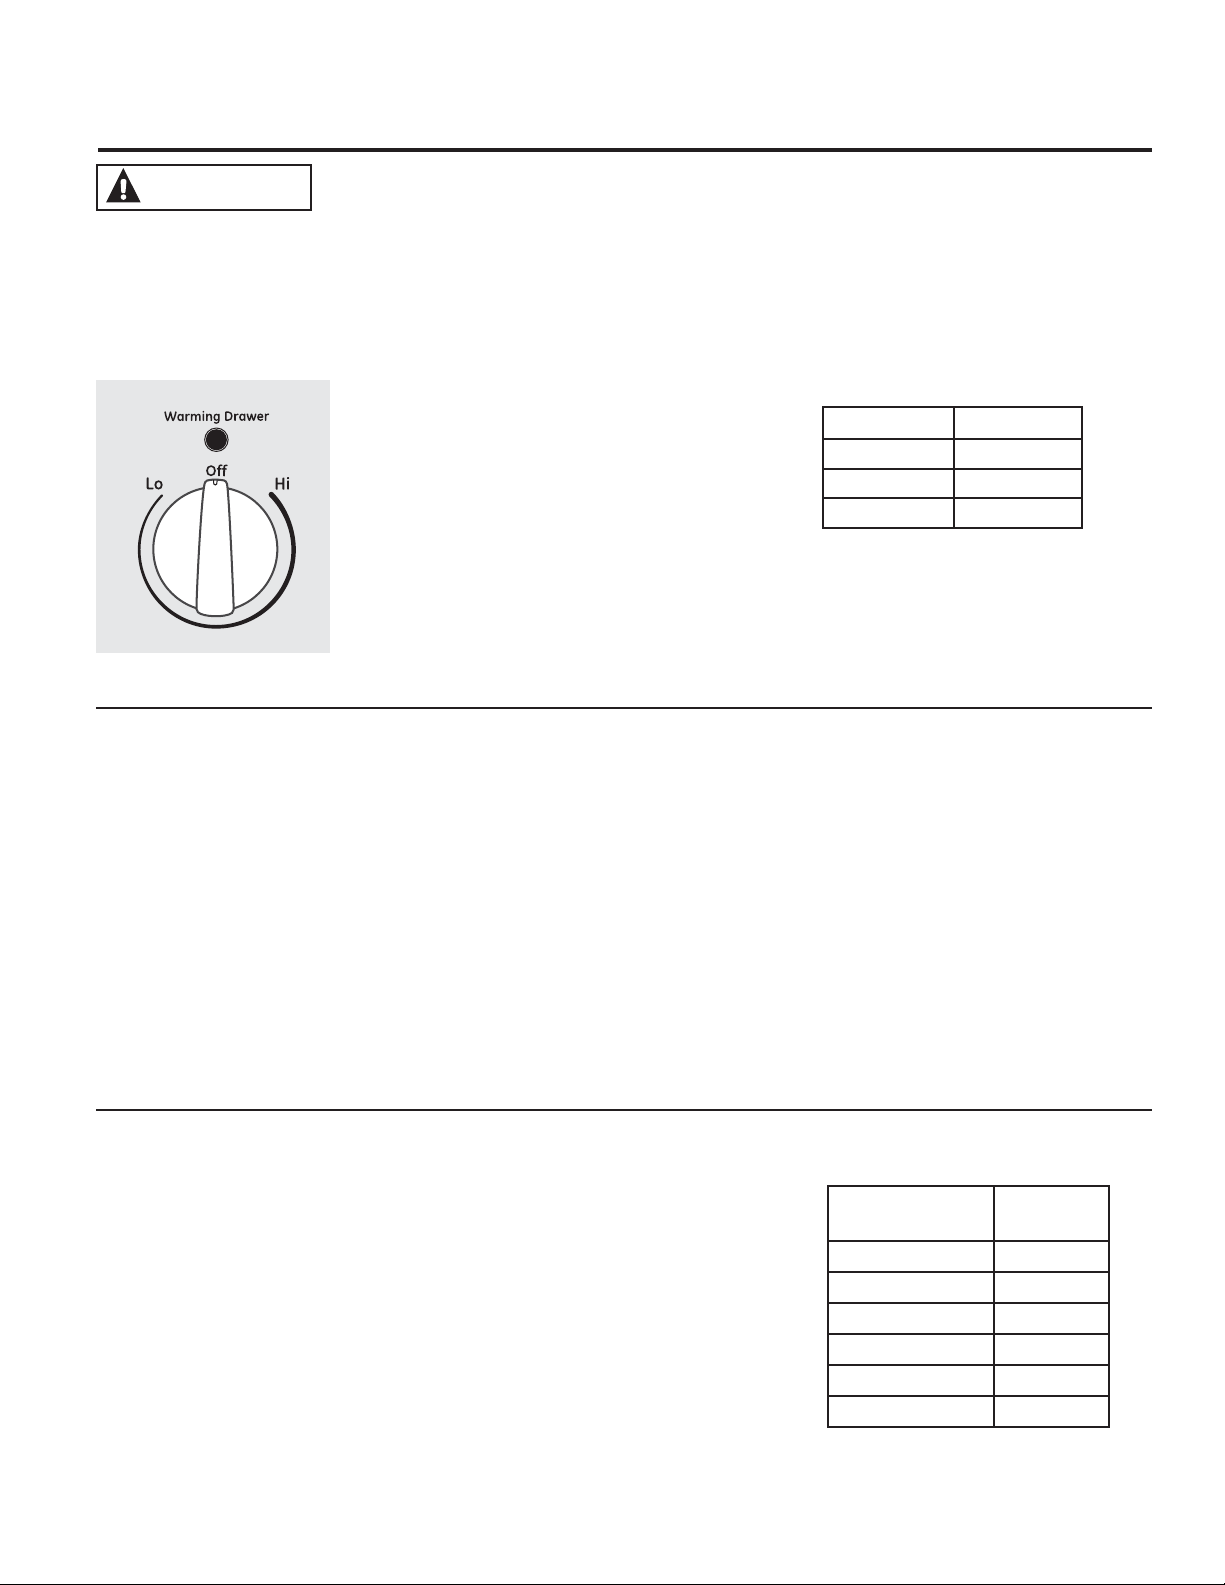
:$51,1*)22'32,621+$=$5'%DFWHULDPD\JURZLQIRRGWHPSHUDWXUHVEHORZ)
$OZD\VVWDUWZLWKKRWIRRG'RQRWXVH:$50VHWWLQJVWRKHDWFROGIRRG
'RQRWZDUPIRRGIRUPRUHWKDQKRXUV
7KHZDUPLQJGUDZHUZLOONHHSKRWFRRNHGIRRGVDWVHUYLQJWHPSHUDWXUH$OZD\VVWDUWZLWKKRWIRRG'RQRWXVHWR
KHDWFROGIRRGRWKHUWKDQFULVSLQJFUDFNHUVFKLSVRUGU\FHUHDO)DLOXUHWRIROORZWKHVHLQVWUXFWLRQVPD\UHVXOWLQ
IRRGERUQHLOOQHVV
3XVKDQGWXUQWKHFRQWURONQREWRDQ\GHVLUHG
VHWWLQJ
127(6
7KHZDUPLQJGUDZHUFDQQRWEHXVHGGXULQJD
VHOIFOHDQF\FOH
7KHZDUPLQJGUDZHUKDVWKUHHVHWWLQJVDQG
7KHVHVHWWLQJVPDLQWDLQGLIIHUHQWWHPSHUDWXUH
OHYHOVLQWKHZDUPLQJGUDZHU
2QVRPHPRGHOVLIXVLQJWKHRYHQDWWKHVDPH
WLPHDVWKHZDUPLQJGUDZHURQO\WKHRYHQ
VHWWLQJVZLOOEHGLVSOD\HG
8VLQJWKHHOHFWULFZDUPLQJGUDZHURQVRPHPRGHOV *($SSOLDQFHVFRP
1XPEHU3DG 6HWWLQJ
/RSLHV
0HGFDVVHUROHV
+LPHDWV
&RQWURO.QRERQPRGHOVHTXLSSHGZLWKDNQRE
:KHQ8VLQJWKH:DUPLQJ'UDZHU
7HPSHUDWXUH6HOHFWLRQ&KDUW
7KHZDUPLQJGUDZHUZLOONHHSKRWFRRNHG
IRRGVDWVHUYLQJWHPSHUDWXUH$OZD\VVWDUWZLWK
KRWIRRG'RQRWXVHWRKHDWFROGIRRGRWKHU
WKDQFULVSLQJFUDFNHUVFKLSVRUGU\FHUHDO
$OORZDSSUR[LPDWHO\PLQXWHVIRUWKH
ZDUPLQJGUDZHUWRSUHKHDW
'RQRWSXWOLTXLGRUZDWHULQWKHZDUPLQJ
GUDZHU
$OOIRRGVSODFHGLQWKHZDUPLQJGUDZHU
VKRXOGEHFRYHUHGZLWKDOLGRUDOXPLQXP
IRLO:KHQZDUPLQJSDVWULHVRUEUHDGVWKH
FRYHUVKRXOGEHYHQWHGWRDOORZPRLVWXUH
WRHVFDSH
)RRGVKRXOGEHNHSWKRWLQLWVFRRNLQJ
FRQWDLQHURUWUDQVIHUUHGWRDKHDWVDIH
VHUYLQJGLVK
127(3ODVWLFFRQWDLQHUVRUSODVWLFZUDSZLOO
PHOWLILQGLUHFWFRQWDFWZLWKWKHGUDZHUSDQ
RUDKRWXWHQVLO0HOWHGSODVWLFPD\QRWEH
UHPRYDEOHDQGLVQRWFRYHUHGXQGHU\RXU
ZDUUDQW\
5HPRYHVHUYLQJVSRRQVHWFEHIRUHSODFLQJ
FRQWDLQHUVLQZDUPLQJGUDZHU
7RNHHSVHYHUDOGLIIHUHQWIRRGVKRWVHWWKH
FRQWUROWRWKHIRRGQHHGLQJWKHKLJKHVWVHWWLQJ
7KHWHPSHUDWXUHW\SHDQGDPRXQWRIIRRG
DQGWKHWLPHKHOGZLOODIIHFWWKHTXDOLW\RIWKH
IRRG
5HSHDWHGRSHQLQJRIWKHGUDZHUDOORZVWKH
KRWDLUWRHVFDSHDQGWKHIRRGWRFRRO
:LWKODUJHORDGVLWPD\EHQHFHVVDU\WRXVH
DKLJKHUZDUPLQJGUDZHUVHWWLQJDQGFRYHU
VRPHRIWKHFRRNHGIRRGLWHPV
'RQRWXVHSODVWLFFRQWDLQHUVRUSODVWLFZUDS
)22'7<3( &21752/
6(77,1*
&DVVHUROH 0('
&KLOL +,
3L]]D 0('
3RWDWRHVEDNHG +,
7RUWLOOD&KLSV /2
:DIIOHV /2

7R&ULVS6WDOH,WHPV
7R:DUP6HUYLQJ%RZOVDQG3ODWHV
3ODFHIRRGLQORZVLGHGGLVKHVRUSDQV
3UHKHDWRQ/2VHWWLQJ
&KHFNFULVSQHVVDIWHUPLQXWHV$GGWLPH
DVQHHGHG
7RZDUPVHUYLQJERZOVDQGSODWHVVHWWKH
FRQWURORQ/2
&$87,21
'LVKHVZLOOEHKRW8VHSRWKROGHUVRUPLWWV
ZKHQUHPRYLQJKRWGLVKHV
8VHRQO\KHDWVDIHGLVKHV
,I\RXZDQWWRKHDWILQHFKLQDSOHDVHFKHFN
ZLWKWKHPDQXIDFWXUHURIWKHGLVKHVIRUWKHLU
PD[LPXPKHDWWROHUDQFH
<RXPD\ZDUPHPSW\VHUYLQJGLVKHVZKLOH
SUHKHDWLQJWKHGUDZHU
8VLQJWKHHOHFWULFZDUPLQJGUDZHURQVRPHPRGHOV
,I\RXUPRGHOKDVDGRRUODWFKQHYHUIRUFHWKHODWFKKDQGOH)RUFLQJWKHKDQGOHZLOOGDPDJHWKHGRRUORFNPHFKDQLVP
7KHRYHQGRRUPXVWEHFORVHGDQGDOOFRQWUROVVHWFRUUHFWO\IRUWKHF\FOHWRZRUNSURSHUO\
%HIRUHD&OHDQ&\FOH
)RUWKHILUVWVHOIFOHDQF\FOHZHUHFRPPHQG
YHQWLQJ\RXUNLWFKHQZLWKDQRSHQZLQGRZRU
XVLQJDYHQWLODWLRQIDQRUKRRG
5HPRYHDQ\EURLOHUSDQEURLOHUJULGDOO
FRRNZDUHSUREHDQGDQ\DOXPLQXPIRLOIURP
WKHRYHQ³WKH\FDQQRWZLWKVWDQGWKHKLJK
FOHDQLQJWHPSHUDWXUHV
127(
,I\RXURYHQLVHTXLSSHGZLWKQLFNHORYHQ
VKHOYHVUHPRYHWKHPEHIRUH\RXEHJLQWKH
VHOIFOHDQF\FOH
,I\RXURYHQLVHTXLSSHGZLWKJUD\
SRUFHODLQFRDWHGRYHQVKHOYHVWKH\PD\EH
OHIWLQWKHRYHQGXULQJWKHVHOIFOHDQF\FOH
6RLORQWKHIURQWIUDPHRIWKHUDQJHDQG
RXWVLGHWKHJDVNHWRQWKHIURQWIUDPHZLOO
QHHGWREHFOHDQHGE\KDQG&OHDQWKHVH
DUHDVZLWKKRWZDWHUVRDSILOOHGVFRXULQJ
SDGVRUFOHDQVHUVVXFKDV6RIW6FUXE
5LQVH
ZHOOZLWKFOHDQZDWHUDQGGU\:LSHRIIWKH
IODWLQQHUGRRUDQGJODVVZLWKVRDS\ZDWHU
DQGVSRQJH
'RQRWFOHDQWKHJDVNHW7KHILEHUJODVV
PDWHULDORIWKHIURQWIUDPHJDVNHWFDQQRW
ZLWKVWDQGDEUDVLRQ,WLVHVVHQWLDOIRUWKH
JDVNHWWRUHPDLQLQWDFW,I\RXQRWLFHLW
EHFRPLQJZRUQRUIUD\HGUHSODFHLW
:LSHXSDQ\KHDY\VSLOORYHUVRQWKHRYHQ
ERWWRP
0DNHVXUHWKHRYHQOLJKWEXOEFRYHULVLQSODFH
DQGWKHRYHQOLJKWLVRII
,03257$17 7KHKHDOWKRIVRPHELUGVLV
H[WUHPHO\VHQVLWLYHWRWKHIXPHVJLYHQRII
GXULQJWKHVHOIFOHDQLQJF\FOHRIDQ\UDQJH
0RYHELUGVWRDQRWKHUZHOOYHQWLODWHGURRP
127( 8VHFDXWLRQZKHQRSHQLQJWKHXSSHU
RYHQDIWHUWKHVHOIFOHDQF\FOHKDVHQGHG7KH
RYHQPD\VWLOOEHKRW
:LSHXSKHDY\VRLORQWKHRYHQ
ERWWRP
8VLQJWKHVHOIFOHDQLQJXSSHURYHQRQVRPHPRGHOV *($SSOLDQFHVFRP
'2127KDQG
FOHDQJDVNHW2Q
VRPHPRGHOV
WKHJDVNHWLVRQ
WKHLQQHUGRRU
'2KDQGFOHDQ
LQVLGHGRRUIUDPH
DQGJODVV
'2KDQGFOHDQRYHQIUDPH
+RZWR6HWWKH2YHQIRU&OHDQLQJ
)ROORZWKHGLUHFWLRQVLQWKH%HIRUHD&OHDQ
&\FOHVHFWLRQ
/DWFKWKHGRRU
127(1HYHUIRUFHWKHODWFK,IWKHRYHQLV
WRRKRW\RXZLOOQRWEHDEOHWRVOLGHWKHODWFK
$OORZWKHRYHQWRFRRO
7RXFKWKH6HOI&OHDQ SDG
7RXFKWKHRU²SDGVXQWLOWKHGHVLUHG
&OHDQ7LPHLVGLVSOD\HG
7KH&OHDQ7LPHLVQRUPDOO\KRXUVDQG
PLQXWHV<RXFDQFKDQJHWKH&OHDQ7LPHWR
DQ\WLPHEHWZHHQDQGKRXUVGHSHQGLQJRQ
WKHDPRXQWRIVRLOLQ\RXURYHQ
7RXFKWKH6WDUW2Q SDG
7KHVHOIFOHDQF\FOHZLOODXWRPDWLFDOO\
EHJLQDIWHU&/($1 LVGLVSOD\HGDQGWKHWLPH
FRXQWGRZQDSSHDUVLQWKHGLVSOD\
:KLOHWKHRYHQLVVHOIFOHDQLQJ\RXFDQWRXFK
WKH&ORFNSDGWRGLVSOD\WKHWLPHRIGD\7R
UHWXUQWRWKHFOHDQFRXQWGRZQWRXFKWKH6HOI
&OHDQSDG
7KHRYHQVKXWVRIIDXWRPDWLFDOO\ZKHQWKH
FOHDQF\FOHLVFRPSOHWHDQGZLOOIODVKLQ
WKHGLVSOD\
6OLGHWKHODWFKKDQGOHWRWKHOHIWDVIDUDVLW
ZLOOJRDQGRSHQWKHGRRU
+RZWR6HWWKH2YHQIRU&OHDQLQJRQPRGHOVZLWKDQ29(17(03.QRE
)ROORZWKHGLUHFWLRQVLQWKH%HIRUHD&OHDQ
&\FOHVHFWLRQ
/DWFKWKHGRRU
7XUQWKH29(17(03 NQREWR&/($1
7KH&OHDQ7LPHLVKRXUVDQGPLQXWHV7KH
VHOIFOHDQOLJKWZLOOFRPHRQDQGVWD\RQXQWLOWKH
VHOIFOHDQF\FOHLVFRPSOHWH
7KHRYHQVKXWVRIIDXWRPDWLFDOO\ZKHQWKHFOHDQ
F\FOHLVFRPSOHWH
$IWHUDFOHDQF\FOHWXUQWKH29(17(03
NQREWR2))DQGVOLGHWKHODWFKKDQGOHWR
WKHOHIWDVIDUDVLWZLOOJR
7RFDQFHOVHOIFOHDQF\FOHWXUQ29(17(03
NQREWRRIIDQGVOLGHODWFKWROHIWDVIDUDVLWZLOO
JR:DLWXQWLOVHOIFOHDQOLJKWVWRSVEOLQNLQJ8VH
RYHQDVGHVLUHG
127(1HYHUIRUFHWKHODWFK,IWKHRYHQLVWRR
KRW\RXZLOOQRWEHDEOHWRVOLGHWKHODWFK$OORZ
WKHRYHQWRFRRO
OVEN TEMP
2
0
0
2
5
0
3
0
0
3
5
0
4
0
0
4
5
0
5
0
0
B
R
O
I
L
C
L
E
A
N
O
F
F
$IWHUD&OHDQ&\FOH
<RXPD\QRWLFHVRPHZKLWHDVKLQWKHRYHQ
:LSHLWXSZLWKDGDPSFORWKDIWHUWKHRYHQ
FRROV
,IZKLWHVSRWVUHPDLQUHPRYHWKHPZLWKD
VRDSILOOHGVFRXULQJSDGDQGULQVHWKRURXJKO\
ZLWKDYLQHJDUDQGZDWHUPL[WXUH
7KHVHGHSRVLWVDUHXVXDOO\DVDOWUHVLGXHWKDW
FDQQRWEHUHPRYHGE\WKHFOHDQF\FOH
,IWKHRYHQLVQRWFOHDQDIWHURQHFOHDQF\FOH
UHSHDWWKHF\FOH
<RXFDQQRWVHWWKHRYHQIRUFRRNLQJXQWLOWKH
RYHQLVFRROHQRXJKIRUWKHGRRUWRXQORFN
:KLOHWKHRYHQLVVHOIFOHDQLQJ\RXFDQ
WRXFKWKH&ORFNSDGWRGLVSOD\WKHWLPH
RIGD\7RUHWXUQWRWKHFOHDQFRXQWGRZQ
WRXFKWKH&RRNLQJ7LPHSDG
,IWKHVKHOYHVEHFRPHKDUGWRVOLGHDSSO\D
VPDOODPRXQWRIYHJHWDEOHRLORUFRRNLQJRLOWR
DSDSHUWRZHODQGZLSHWKHHGJHVRIWKHRYHQ
VKHOYHVZLWKWKHSDSHUWRZHO
&DUHDQGFOHDQLQJRIWKHUDQJH
7KHRYHQGRRUPXVWEHFORVHGDQGDOOFRQWUROVVHWFRUUHFWO\IRUWKHF\FOHWRZRUNSURSHUO\
+RZWR'HOD\WKH6WDUWRI&OHDQLQJRQVRPHPRGHOV
<RXFDQVHWWKHRYHQFRQWUROWRGHOD\VWDUWWKH
RYHQFOHDQIRUDVSHFLILFOHQJWKRIWLPHDQGWKHQ
WXUQRIIDXWRPDWLFDOO\
0DNHVXUHWKHFORFNVKRZVWKHFRUUHFWWLPHRI
GD\
)ROORZWKHGLUHFWLRQVLQWKH%HIRUHD&OHDQ&\FOH
VHFWLRQ
/DWFKWKHGRRU
127(1HYHUIRUFHWKHODWFK,IWKHRYHQLVWRR
KRW\RXZLOOQRWEHDEOHWRVOLGHWKHODWFK$OORZ
WKHRYHQWRFRRO
7RXFKWKH6HOI&OHDQSDG
7RXFKWKH RU² SDGVWRVHWWKH&OHDQ
7LPH
7KH&OHDQ7LPHLVSUHVHWIRUKRXUVDQG
PLQXWHV<RXFDQFKDQJHWKH&OHDQ7LPHWRDQ\
WLPHEHWZHHQDQGKRXUVGHSHQGLQJRQWKH
DPRXQWRIVRLOLQ\RXURYHQ,IDGLIIHUHQW&OHDQ
7LPHLVGHVLUHGWRXFKWKHRU²SDGVXQWLOWKH
GHVLUHG&OHDQ7LPHLVGLVSOD\HG
7RXFKWKH6WDUW7LPHSDG
&KDQJHWKH6WDUW7LPHE\WRXFKLQJWKHRU²
SDGV7KHVWDUWWLPHZLOODSSHDULQWKHGLVSOD\
7RXFKWKH6WDUW2Q SDG
7KHVHOIFOHDQF\FOHZLOODXWRPDWLFDOO\EHJLQDW
WKHWLPHVHW
:KLOHWKHRYHQLVVHOIFOHDQLQJ\RXFDQWRXFK
WKH&ORFNSDGWRGLVSOD\WKHWLPHRIGD\7R
UHWXUQWRWKHFOHDQFRXQWGRZQWRXFKWKH6HOI
&OHDQSDG
7KHRYHQVKXWVRIIDXWRPDWLFDOO\ZKHQWKH
FOHDQF\FOHLVFRPSOHWHDQGZLOOIODVKLQ
WKHGLVSOD\
6OLGHWKHODWFKKDQGOHWRWKHOHIWDVIDUDVLW
ZLOOJRDQGRSHQWKHGRRU
7R6WRSD&OHDQ&\FOHRQVRPHPRGHOV
7RXFKWKH&OHDU2IISDG
:DLWXQWLOWKHRYHQKDVFRROHGEHORZWKH
ORFNLQJWHPSHUDWXUHWRXQODWFKWKHGRRU<RX
ZLOOQRWEHDEOHWRRSHQWKHGRRUULJKWDZD\
XQOHVVWKHRYHQKDVFRROHGEHORZWKHORFNLQJ
WHPSHUDWXUH
*($SSOLDQFHVFRP
%HVXUHHOHFWULFDOSRZHULVRIIDQGDOOVXUIDFHVDUHFRROEHIRUHFOHDQLQJDQ\SDUWRIWKHUDQJH
:$51,1*,I\RXUUDQJHLVUHPRYHGIRUFOHDQLQJVHUYLFLQJRUDQ\UHDVRQEH
VXUHWKHDQWLWLSGHYLFHLVUHHQJDJHGSURSHUO\ZKHQWKHUDQJHLVUHSODFHG)DLOXUHWRWDNH
WKLVSUHFDXWLRQFRXOGUHVXOWLQWLSSLQJRIWKHUD
QJHDQGFDXVHLQMXU\
7RFKHFNLIWKHEUDFNHWLVLQVWDOOHGDQGHQJDJHGSURSHUO\FDUHIXOO\WLSWKHUDQJHIRUZDUG7KH
EUDFNHWVKRXOGVWRSWKHUDQJHZLWKLQLQFKHV,ILWGRHVQRWWKHEUDFNHWPXVWEHUHLQVWDOOHG
,IWKHUDQJHLVSXOOHGIURPWKHZDOOIRUDQ\UHDVRQDOZD\VUHSHDWWKLVSURFHGXUHWRYHULI\WKH
UDQJHLVSURSHUO\VHFXUHGE\WKHDQWLWLSEUDFNHW
,I\RXUUDQJHKDVQRDQWLWLSEUDFNHWFDOOWRUHFHLYHRQHDWQRFRVW
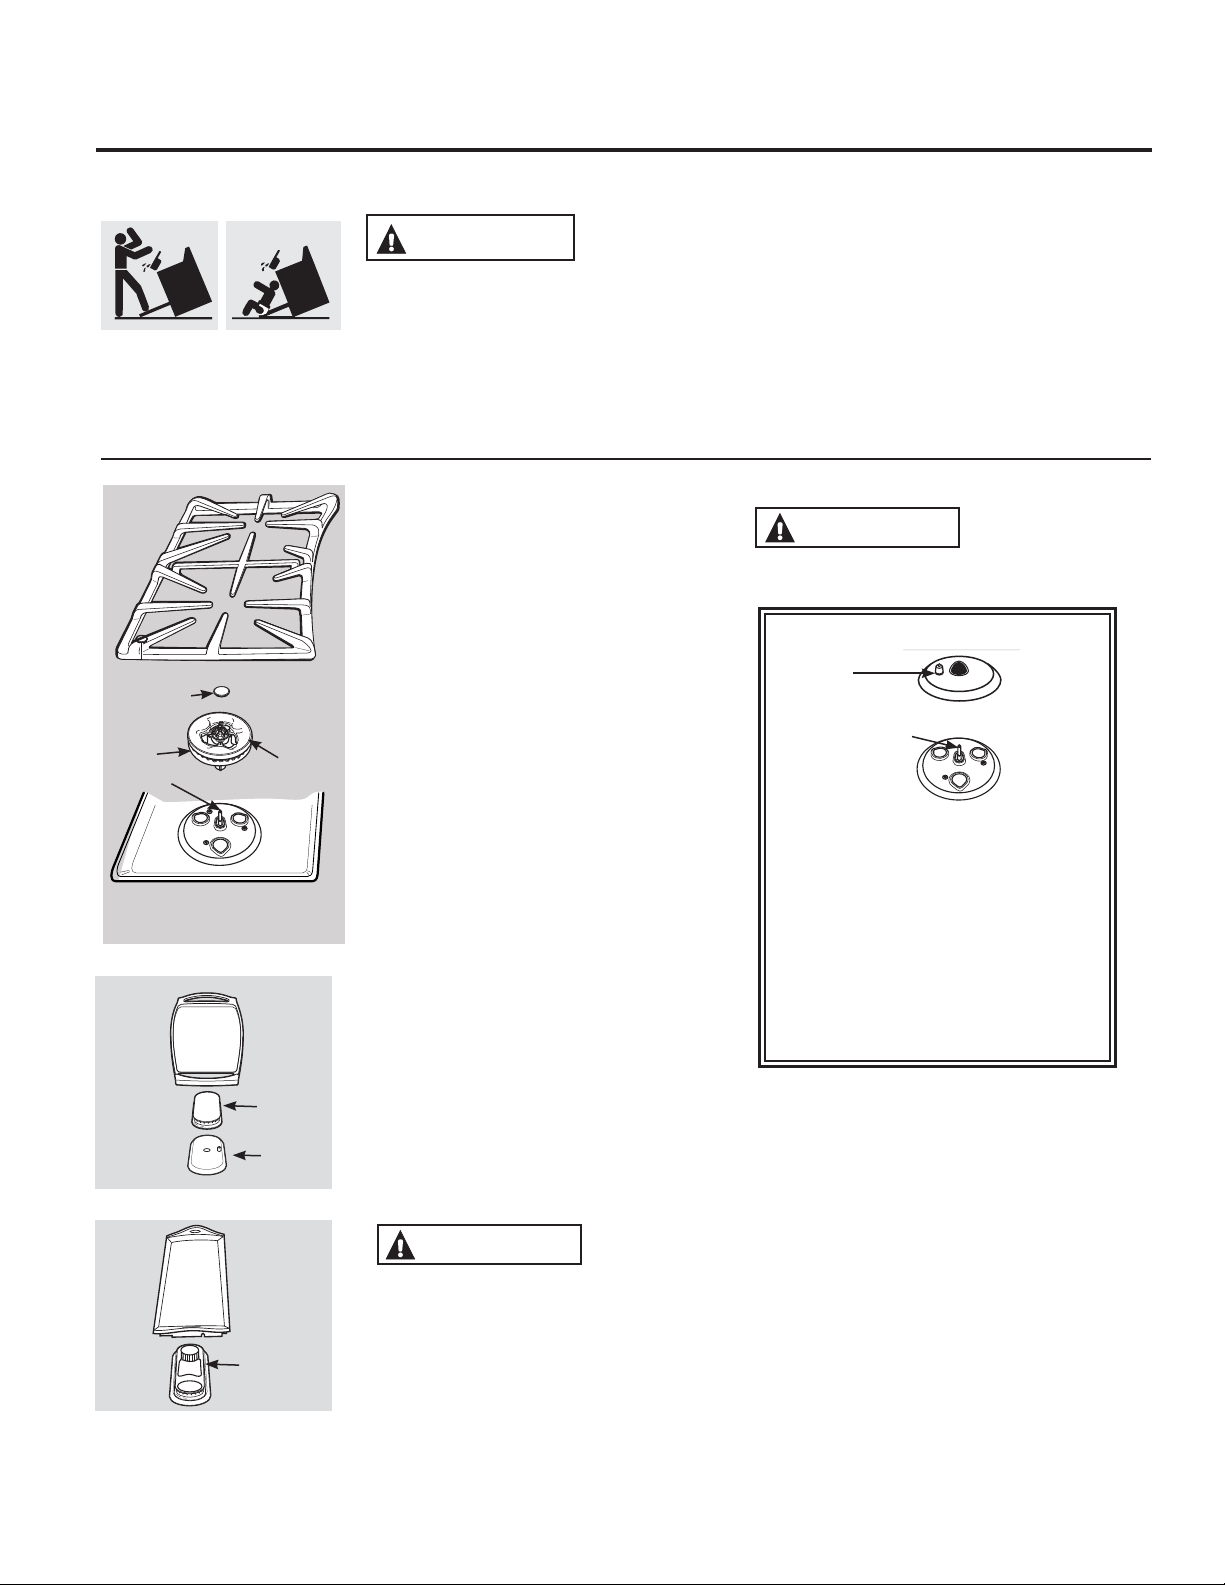
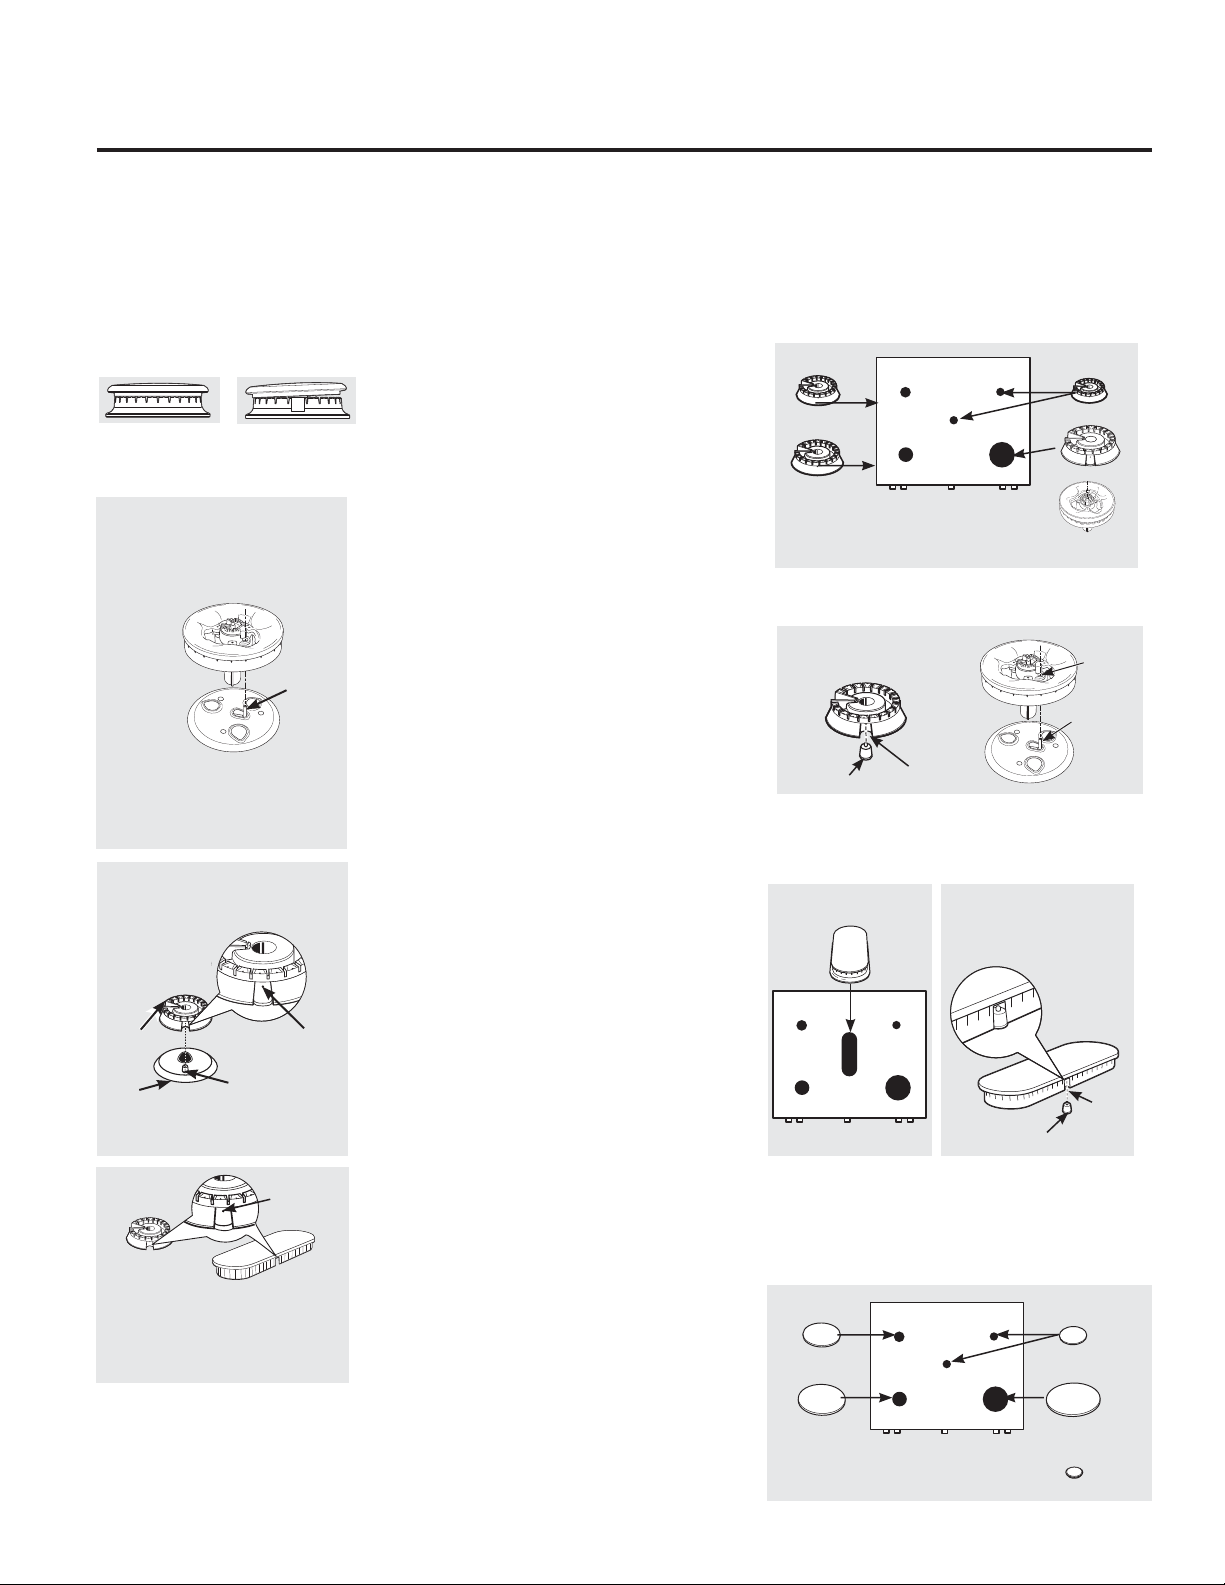
6HDOHG%XUQHU$VVHPEOLHVRQVRPHPRGHOV
7XUQDOOFRQWUROV2)) EHIRUHUHPRYLQJWKH
EXUQHUSDUWV
7KHURXQGVLGHEXUQHUFDSVDQGEXUQHU
KHDGVFDQEHOLIWHGRIIPDNLQJWKHPHDV\WR
FOHDQ7KHHOHFWURGHVDUHQRWUHPRYDEOH
7KHRYDOFHQWHUEXUQHUKHDGDQGFDS
DVVHPEO\FDQEHOLIWHGRIIPDNLQJLWHDV\
WRFOHDQ7KHEXUQHUHOHFWURGHLVQRW
UHPRYDEOH
7KHWULULQJEXUQHULQQHUFDSFDQEHOLIWHG
RIIIRUFOHDQLQJWKHRXWHUFDSDQGEDVH
DVVHPEO\FDQEHOLIWHGRIIWKHFRRNWRSDVRQH
SLHFHIRUFOHDQLQJSXUSRVHV
&$87,21
'RQRWRSHUDWHWKH
FRRNWRSZLWKRXWDOOEXUQHUSDUWVDQGJUDWHV
LQSODFH
7KHHOHFWURGHRIWKHVSDUNLJQLWHULV
H[SRVHGZKHQWKHEXUQHUKHDGLV
UHPRYHG:KHQRQHEXUQHULVWXUQHG
WR/,7( DOOWKHEXUQHUVVSDUN'R
QRWDWWHPSWWRGLVDVVHPEOHRUFOHDQ
DURXQGDQ\EXUQHUZKLOHDQRWKHU
EXUQHULVRQ$QHOHFWULFVKRFNPD\
UHVXOWZKLFKFRXOGFDXVH\RXWRNQRFN
RYHUKRWFRRNZDUH
%XUQHUKHDG
DQGFDS
DVVHPEO\
%XUQHUKHDG
FDSDQG
HOHFWURGH
&HQWHU
JULGGOH
&KHI·V
JULGGOH
(OHFWURGH
6LGHJUDWH
2XWHU
EXUQHU
FDS
,QQHUEXUQHU
FDS
&RRNWRS
7UL5LQJ%XUQHU
RQVRPHPRGHOV
(OHFWURGH
%XUQHU
EDVH
RU
(OHFWURGH
7ULULQJEDVH
RQVRPHPRGHOV
(OHFWURGH
&$87,21
'RQRWUHPRYH
WULULQJRUEULGJHEXUQHUFDSIURPKHDG
7KHWULULQJRUEULGJHEXUQHUKHDGDQGFDS
DVVHPEO\FDQEHOLIWHGRIIPDNLQJLWHDV\WR
FOHDQ7KHHOHFWURGHLVQRWUHPRYDEOH
6WDQGDUG7ZLQ%XUQHU$VVHPEOLHVRQVRPHPRGHOV
2QPRGHOVZLWKVWDQGDUGWZLQEXUQHUVWKH
FRRNWRSOLIWVXSIRUHDV\DFFHVV
7XUQDOOFRQWUROV2))EHIRUHUHPRYLQJEXUQHU
SDUWVDQGGULSSDQVLIVRHTXLSSHG
7KHEXUQHUJUDWHVDQGGULSSDQVLIVRHTXLSSHG
FDQEHOLIWHGRIIPDNLQJWKHPHDV\WRFOHDQ
7KHKROHVLQWKHVXUIDFHEXUQHUVRI\RXUUDQJH
PXVWEHNHSWFOHDQDWDOOWLPHVIRUSURSHU
LJQLWLRQDQGDQHYHQXQKDPSHUHGIODPH
<RXVKRXOGFOHDQWKHVXUIDFHEXUQHUVURXWLQHO\
HVSHFLDOO\DIWHUEDGVSLOORYHUVZKLFKFRXOGFORJ
WKHVHKROHV
:LSHRIIVXUIDFHEXUQHUV,IKHDY\VSLOORYHU
RFFXUVUHPRYHWKHVXUIDFHEXUQHUVIURPWKH
UDQJH%XUQHUVOLIWRXWIRUFOHDQLQJ/LIWXSWKH
FRRNWRSDQGWKHQOLIWRXWWKHVXUIDFHEXUQHUV
7RUHPRYHEXUQHGRQIRRGVRDNWKHVXUIDFH
EXUQHULQDVROXWLRQRIPLOGOLTXLGGHWHUJHQWDQG
KRWZDWHU6RDNWKHVXUIDFHEXUQHUIRUWR
PLQXWHV
)RUPRUHVWXEERUQVWDLQVXVHDFOHDQVHUOLNH
6RIW6FUXE
EUDQGRU%RQ$PL
EUDQG5LQVHZHOO
WRUHPRYHDQ\WUDFHVRIWKHFOHDQVHUWKDWPLJKW
FORJWKHVXUIDFHEXUQHURSHQLQJV
'RQRWXVHVWHHOZRROEHFDXVHLWZLOOFORJWKH
VXUIDFHEXUQHURSHQLQJVDQGVFUDWFKWKH
VXUIDFHEXUQHUV,IWKHKROHVEHFRPHFORJJHG
FOHDQWKHPZLWKDVHZLQJQHHGOHRUWZLVWWLH
%HIRUHSXWWLQJWKHVXUIDFHEXUQHUEDFNVKDNH
RXWH[FHVVZDWHUDQGWKHQGU\LWWKRURXJKO\E\
VHWWLQJLWLQDZDUPRYHQIRUPLQXWHV7KHQ
SODFHLWEDFNLQWKHUDQJHPDNLQJVXUHLWLV
SURSHUO\VHDWHGDQGOHYHO
&KHFNWKHIODPHSDWWHUQRIHDFKEXUQHU,IWKH
IODPHVDUH´MXPS\µQRWVWHDG\FOHDQWKHKROHV
DJDLQZLWKDVHZLQJQHHGOHRUWZLVWWLH
*UDWH
'ULSSDQLIVRHTXLSSHG
6XUIDFHEXUQHU
&$87,21
'RQRWRSHUDWHWKHFRRNWRSZLWKRXWDOO
EXUQHUSDUWVGULSSDQVLIVRHTXLSSHG
DQGJUDWHVLQSODFH
&OHDQWKHVHKROHVWKRURXJKO\RQHDFK
EXUQHU
)RUFOHDQLQJLQIRUPDWLRQRQVHDOHGEXUQHUV
VHHVHFWLRQEHORZ6HDOHGEXUQHUFRRNWRSV
GRQRWOLIWXS
'ULS3DQVLIVRHTXLSSHG
5HPRYHWKHJUDWHVDQGOLIWRXWWKHGULSSDQV
'ULSSDQVFDQEHFOHDQHGLQDGLVKZDVKHURU
E\KDQG
:KHQUHSODFLQJWKHGULSSDQVPDNHVXUHWKH\
DUHLQWKHFRUUHFWSRVLWLRQ
3ODFHWKHPLQDFRYHUHGFRQWDLQHU$GG
FXSDPPRQLDDQGOHWVRDNVHYHUDOKRXUVRU
RYHUQLJKW:DVKULQVHZHOODQGGU\
&$87,21'RQRWFOHDQWKHGULS
SDQVLQDVHOIFOHDQLQJRYHQ
&DUHDQGFOHDQLQJRIWKHUDQJH
*($SSOLDQFHVFRP
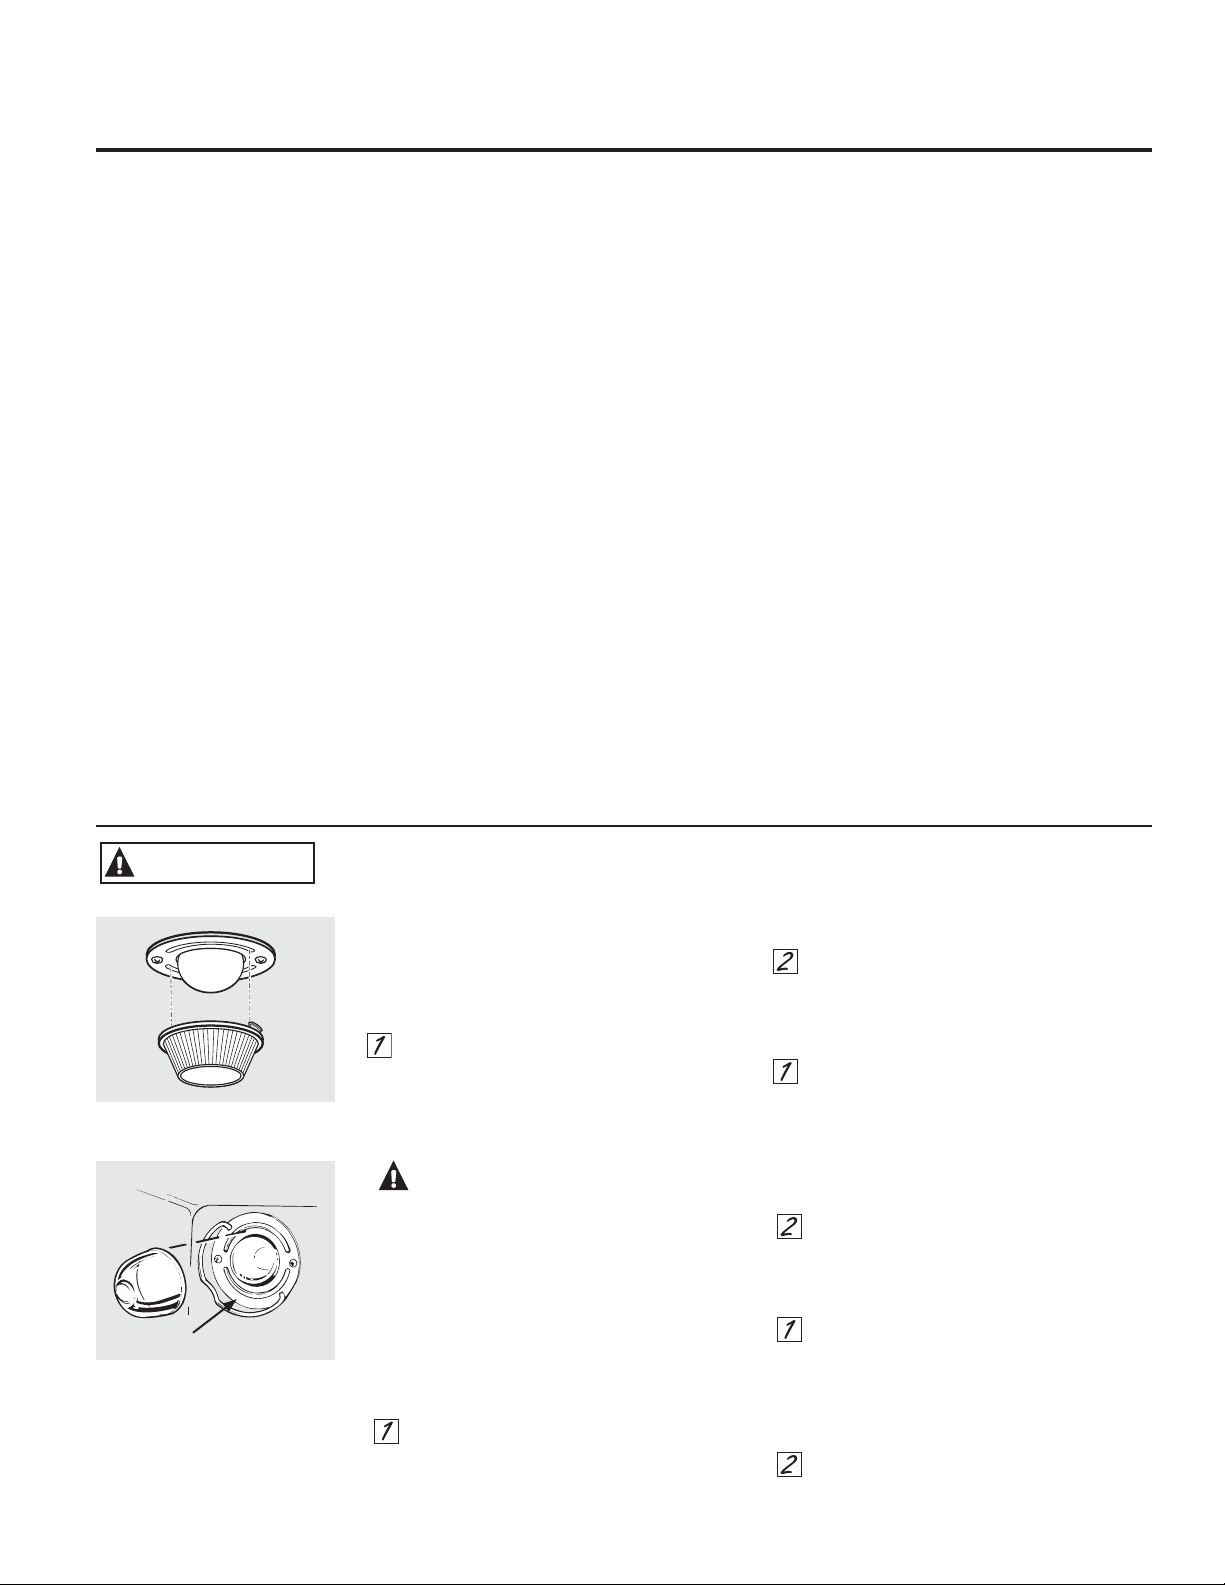
%XUQHU&DSV%DVHVDQG+HDGV
%HIRUHUHPRYLQJWKHEXUQHUFDSVDQGKHDGV
RQVRPHPRGHOVUHPHPEHUWKHLUVL]HDQG
ORFDWLRQ5HSODFHWKHPLQWKHVDPHORFDWLRQ
DIWHUFOHDQLQJ
127('RQRWXVHVWHHOZRRORUVFRXULQJ
SRZGHUVWRFOHDQWKHEXUQHUSDUWV
%XUQHUFDSV
/LIWRIIZKHQFRRO:DVKEXUQHUFDSVLQKRW
VRDS\ZDWHUDQGULQVHZLWKFOHDQZDWHU<RX
PD\VFRXUZLWKDSODVWLFVFRXULQJSDGWR
UHPRYHEXUQHGRQIRRGSDUWLFOHV
7ULULQJEXUQHURQVRPHPRGHOV
7KHRXWHUFDSRQWKHWULULQJEXUQHULVQRW
UHPRYDEOH2QO\WKHFHQWHUURXQGFDSPD\EH
UHPRYHGIRUFOHDQLQJ
7RFOHDQWKHEXUQHUEDVHVXVHVRDS\ZDWHUDQGD
SODVWLFVFRXULQJSDG:LSHFOHDQZLWKDGDPSFORWK
0DNHVXUHWKDWQRZDWHUJHWVLQWRWKHEXUQHU
EDVHV$OORZWKHPWRGU\IXOO\EHIRUHXVLQJ
%XUQHU+HDGVRQVRPHPRGHOVDQG2YDO
&HQWHU%XUQHU+HDG&DS$VVHPEO\
7KHEXUQHUKHDGVDQGWKHRYDOEXUQHUKHDGFDS
DVVHPEO\DUHUHPRYDEOH6LPSO\OLIWWKHPRIIWKH
UDQJHIRUFOHDQLQJ
)RUSURSHULJQLWLRQPDNHVXUHWKHVPDOOKROHLQ
WKHVHFWLRQWKDWILWVRYHUWKHHOHFWURGHLVNHSW
RSHQ$VHZLQJQHHGOHRUZLUHWZLVWWLHZRUNV
ZHOOWRXQFORJLW
7KHVOLWVLQWKHEXUQHUKHDGVPXVWEHNHSWFOHDQ
DWDOOWLPHVIRUDQHYHQXQKDPSHUHGIODPH
&ORJJHGRUGLUW\EXUQHUSRUWVRUHOHFWURGHVZLOO
QRWDOORZWKHEXUQHUWRRSHUDWHSURSHUO\
$Q\VSLOORQRUDURXQGDQHOHFWURGHPXVW
EHFDUHIXOO\FOHDQHG7DNHFDUHWRQRWKLWDQ
HOHFWURGHZLWKDQ\WKLQJKDUGRULWFRXOGEH
GDPDJHG
&OHDQWKHEXUQHUKHDGVURXWLQHO\HVSHFLDOO\
DIWHUEDGVSLOORYHUVZKLFKFRXOGFORJWKH
RSHQLQJV/LIWRIIZKHQFRRO
7RUHPRYHEXUQHGRQIRRGVRDNWKHEXUQHU
KHDGVLQDVROXWLRQRIPLOGOLTXLGGHWHUJHQW
DQGKRWZDWHUIRU²PLQXWHV)RUPRUH
VWXEERUQVWDLQVXVHDWRRWKEUXVK
$IWHUFOHDQLQJ
%HIRUHSXWWLQJWKHEXUQHUFDSVKHDGVRQVRPH
PRGHOVDQGRYDOKHDGFDSDVVHPEO\EDFN
VKDNHRXWH[FHVVZDWHUDQGWKHQGU\WKHP
WKRURXJKO\E\VHWWLQJLQDZDUPRYHQIRU
PLQXWHV
5HSODFHPHQW%XUQHU+HDGVRQVRPHPRGHOV
5HSODFHEXUQHUKHDGVRYHUWKHHOHFWURGHVRQ
WKHFRRNWRSLQWKHFRUUHFWORFDWLRQVDFFRUGLQJ
WRWKHLUVL]H7KHUHLVRQHVPDOORQHPHGLXP
RQHODUJHDQGRQHH[WUDODUJHEXUQHUKHDG
0DNHVXUHWKHVORWRUKROHGHSHQGLQJRQPRGHOLQ
WKHEXUQHUKHDGLVSRVLWLRQHGRYHUWKHHOHFWURGH
2YDO&HQWHU%XUQHU+HDG&DS$VVHPEO\
5HSODFHWKHRYDOFHQWHUKHDGFDSDVVHPEO\RYHU
WKHHOHFWURGHRQWKHFRRNWRS
&DSV
5HSODFHWKHPDWFKLQJVL]HFDSVRQWRWKHEXUQHU
EDVHVRUKHDGV
0DNHVXUHWKDWWKHKHDGVRQVRPHPRGHOVDQG
FDSVDUHUHSODFHGLQWKHFRUUHFWORFDWLRQV
7KHRYDOEXUQHUKHDGFDSDVVHPEO\LV
UHPRYDEOH6LPSO\OLIWLWRIIWKHUDQJHIRU
FOHDQLQJ8VHDVHZLQJQHHGOHRUWZLVWWLH
WRXQFORJWKHVPDOOKROHLQWKHEXUQHU
KHDGV
%XUQHUFDSLV
SURSHUO\VHDWHG
%XUQHUFDSLV
127SURSHUO\
VHDWHG
)URQWRIUDQJH
7ULULQJFDS
RQVRPHPRGHOV
RQVRPHPRGHOV
(OHFWURGH
6ORW
)URQWRIUDQJH
2YDOKHDGDQGFDS
DVVHPEO\
0DNHVXUHWKHVORWLQWKH
EXUQHUKHDGLVSRVLWLRQHG
RYHUWKHHOHFWURGH
+ROHLQ
EXUQHU
KHDG
(OHFWURGH
%XUQHUKHDG
%XUQHUEDVH
7ULULQJKHDGRQVRPHPRGHOV
0DNHVXUHWKHULQJLQWKHEXUQHUKHDG
LVSRVLWLRQHGRYHUWKHHOHFWURGHDQG
WKDWWKHEXUQHUKHDGLVIXOO\LQVHUWHG
LQVLGHWKHEXUQHUEDVH$VPDOOJDS
EHWZHHQWKHEDVHDQGKHDGLVQRUPDO
(OHFWURGH
6WDELOLW\FKDPEHU
%XUQHU
EDVH
)URQWULJKWKHDGRQVRPHPRGHOV
IURQWOHIWKHDGEDFNULJKWKHDGDQG
EDFNOHIWKHDG
0DNHVXUHWKHVORWLQWKHEXUQHUKHDG
LVSRVLWLRQHGRYHUWKHHOHFWURGH
8VHDVHZLQJ
QHHGOHRUWZLVWWLH
WRXQFORJWKH
VPDOOKROHLQWKH
EXUQHUKHDG
%XUQHUKHDGVRQVRPHPRGHOV
7KHEXUQHUKHDGVRQVRPHPRGHOV
DUHUHPRYDEOH6LPSO\OLIWWKHPRII
WKHUDQJHIRUFOHDQLQJ
%XUQHUKHDG
)URQWRIUDQJH
7ULULQJKHDG
RQVRPHPRGHOV
RQVRPHPRGHOV
6ORW
(OHFWURGH
RU
+ROH
(OHFWURGH
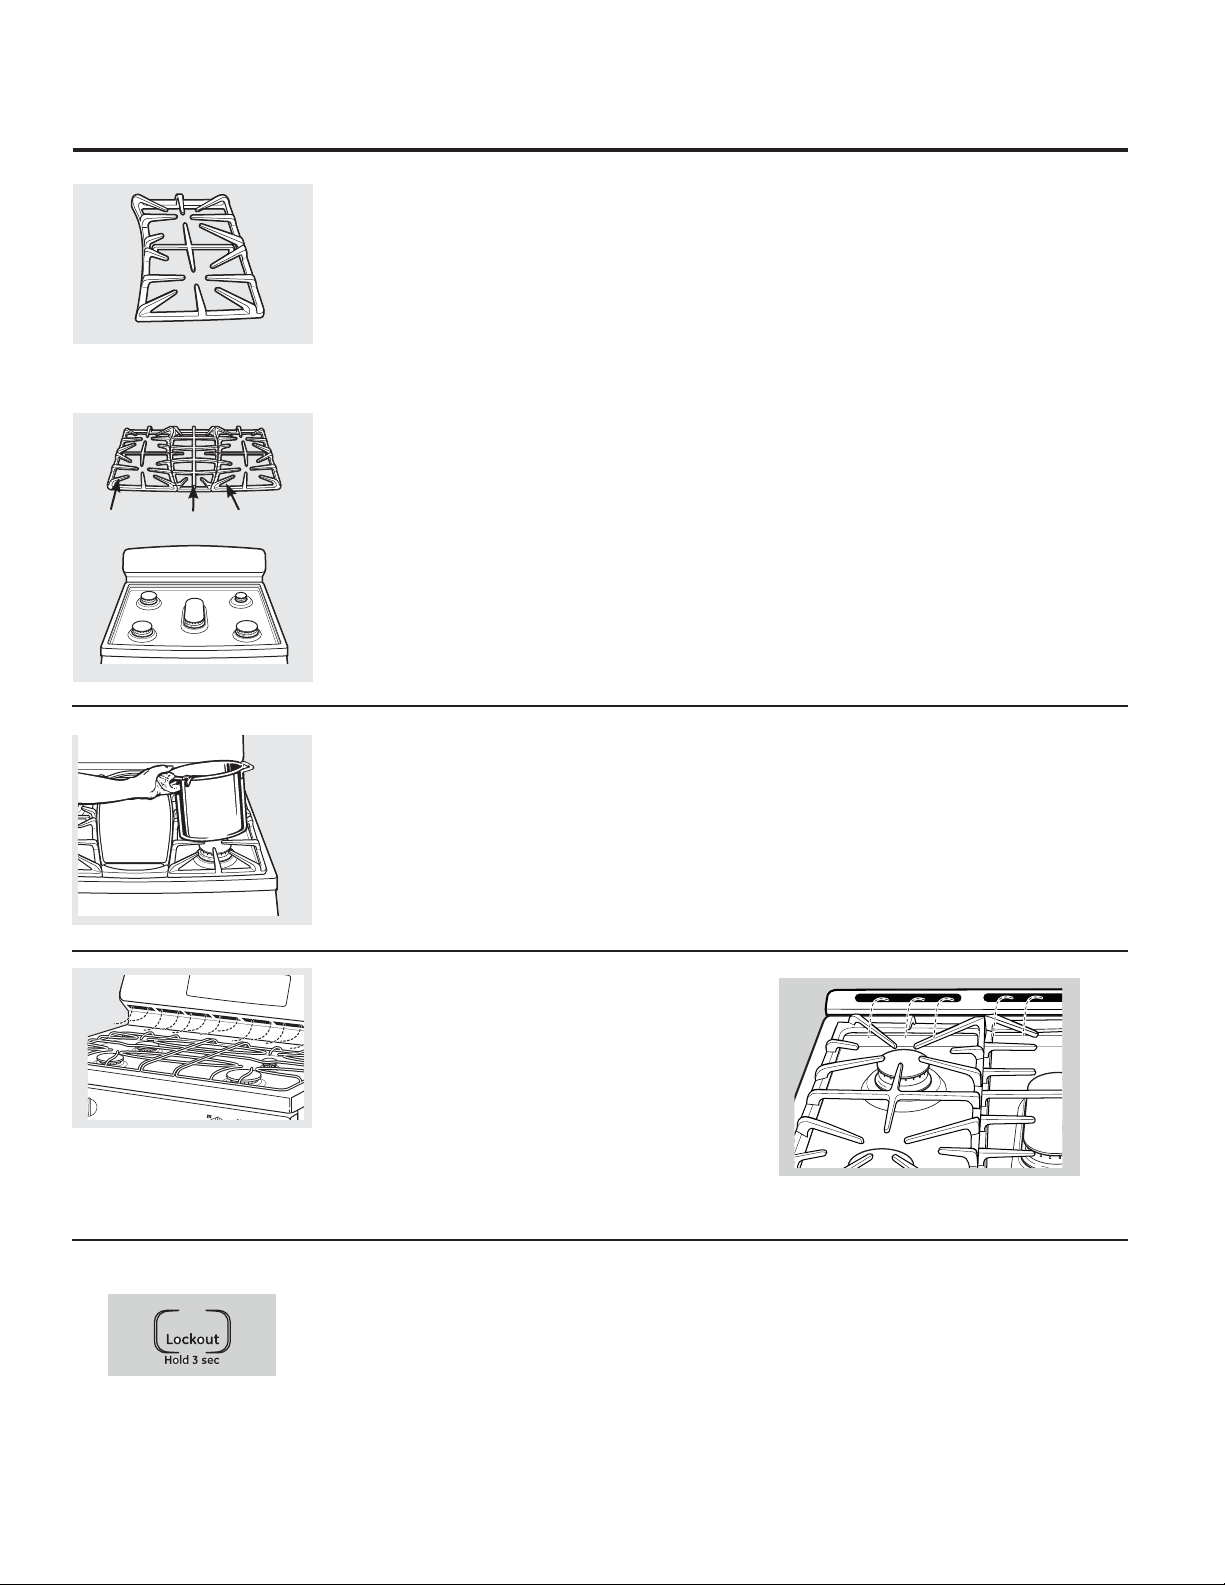
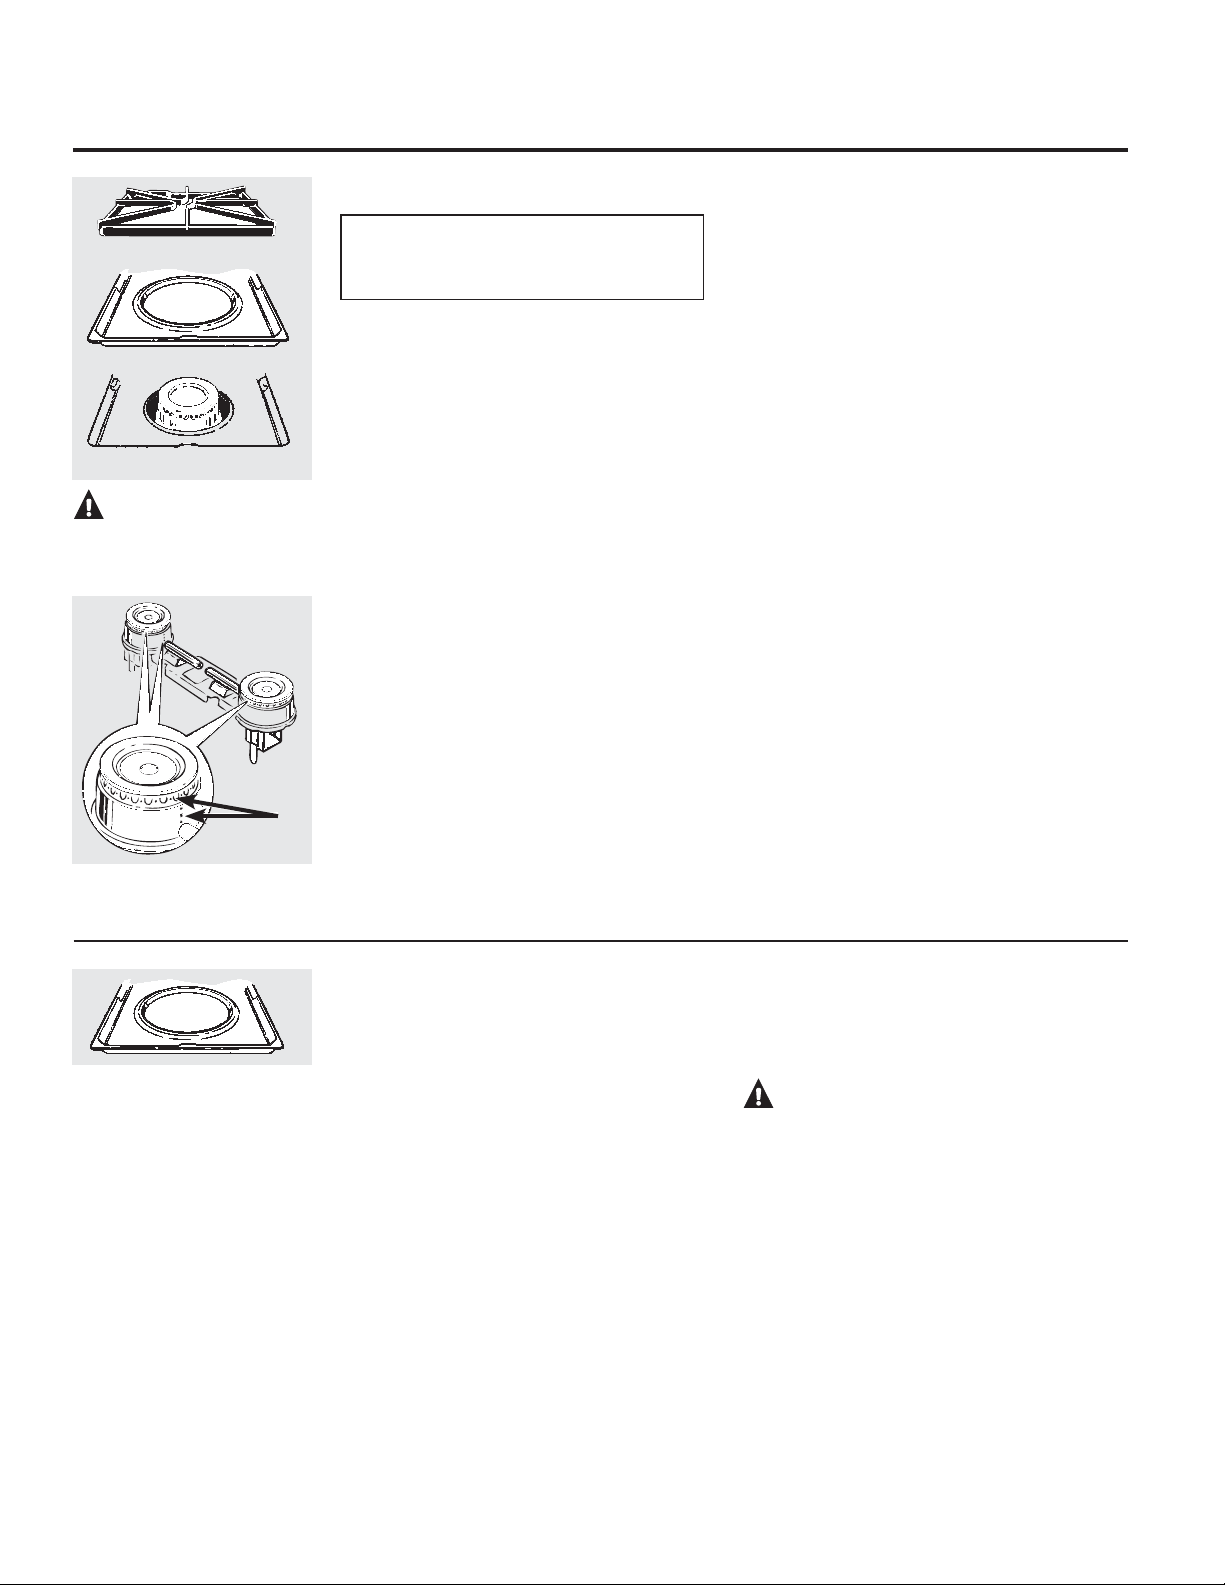
%XUQHU*UDWHV
<RXUUDQJHKDVWZRRUWKUHHSURIHVVLRQDOVW\OH
GRXEOHJUDWHV7KHVHJUDWHVDUHSRVLWLRQ
VSHFLILF)RUPD[LPXPVWDELOLW\WKHVHJUDWHV
VKRXOGRQO\EHXVHGLQWKHLUSURSHUSRVLWLRQ
WKH\FDQQRWEHLQWHUFKDQJHGOHIWWRULJKWRU
IURQWWREDFN)RUFRQYHQLHQFHWKHXQGHUVLGHV
RIWKHOHIWDQGULJKWJUDWHVDUHPDUNHG´/()7
)5217µDQG´5,*+7)5217µ0DNHVXUHWKH
IURQWSRUWLRQRIERWKJUDWHVLVLQIURQW7KH
PLGGOHJUDWHKDVDERZLQIURQW0DNHVXUHWKH
ERZHGSRUWLRQLVWRZDUGWKHIURQWRIWKHUDQJH
,QDGGLWLRQWKHPLGGOHJUDWHLVVXSSRUWHGE\WKH
OHIWDQGULJKWJUDWHVDQGPXVWEHLQVWDOOHG/$67
IRUVWDELOLW\
&OHDQLQJ
/LIWRXWZKHQFRRO*UDWHVVKRXOGEHZDVKHG
UHJXODUO\DQGRIFRXUVHDIWHUVSLOORYHUV:DVK
WKHPLQKRWVRDS\ZDWHUDQGULQVHZLWKFOHDQ
ZDWHU:KHQUHSODFLQJWKHJUDWHVEHVXUH
WKH\DUHSRVLWLRQHGVHFXUHO\RYHUWKHEXUQHUV
5HSODFHWKHJUDWHVVRWKDWFRQWLQXRXVDUFVDUH
IRUPHGZLWKWKHFHQWHUULEVRIDOOWKUHHJUDWHV
'RQRWRSHUDWHDEXUQHUIRUDQH[WHQGHGSHULRG
RIWLPHZLWKRXWFRRNZDUHRQWKHJUDWH7KH
ILQLVKRQWKHJUDWHPD\FKLSZLWKRXWFRRNZDUH
WRDEVRUEWKHKHDW
7RJHWULGRIEXUQHGRQIRRGSODFHWKHJUDWHVLQ
DFRYHUHGFRQWDLQHU$GGFXSDPPRQLDDQG
OHWWKHPVRDNVHYHUDOKRXUVRURYHUQLJKW:DVK
ULQVHZHOODQGGU\
$OWKRXJKWKH\DUHGXUDEOHWKHJUDWHVZLOO
JUDGXDOO\ORVHWKHLUVKLQHUHJDUGOHVVRIWKH
EHVWFDUH\RXFDQJLYHWKHP7KLVLVGXHWRWKHLU
FRQWLQXDOH[SRVXUHWRKLJKWHPSHUDWXUHV<RX
ZLOOQRWLFHWKLVVRRQHUZLWKOLJKWHUFRORUJUDWHV
127('RQRWFOHDQWKHJUDWHVLQDVHOIFOHDQLQJ
RYHQ
7KHJUDWHVPD\EHFOHDQHGLQD
GLVKZDVKHU
$SSHDUDQFHPD\YDU\
/HIW)URQW
5LJKW)URQW
&HQWHU
2YHQ$LU9HQWV
1HYHUEORFNWKHYHQWVDLURSHQLQJVRIWKH
UDQJH7KH\SURYLGHWKHDLULQOHWDQGRXWOHWWKDW
DUHQHFHVVDU\IRUWKHUDQJHWRRSHUDWHSURSHUO\
ZLWKFRUUHFWFRPEXVWLRQ
$LURSHQLQJVDUHORFDWHGDWWKHUHDURIWKH
FRRNWRSDWWKHWRSDQGERWWRPRIWKHRYHQ
GRRUDQGDWWKHERWWRPRIWKHUDQJH
8SSHU&RQWURO3DQHORQVRPHPRGHOV
2QPRGHOVVRHTXLSSHGORFNRXWWKHWRXFKSDGV
EHIRUHFOHDQLQJ
&OHDQXSVSODWWHUVZLWKDGDPSFORWK
<RXPD\DOVRXVHDJODVVFOHDQHU
5HPRYHKHDYLHUVRLOZLWKZDUPVRDS\ZDWHU
'RQRWXVHDEUDVLYHVRIDQ\NLQG
8QORFNWKHWRXFKSDGVDIWHUFOHDQLQJ
9HQWDSSHDUDQFHDQGORFDWLRQYDU\
Gas/Control
&RRNWRS6XUIDFH
7RDYRLGGDPDJLQJWKHSRUFHODLQHQDPHO
VXUIDFHRIWKHFRRNWRSDQGWRSUHYHQWLW
IURPEHFRPLQJGXOOFOHDQXSVSLOOVULJKWDZD\
)RRGVZLWKDORWRIDFLGWRPDWRHVVDXHUNUDXW
IUXLWMXLFHVHWFRUIRRGVZLWK
KLJKVXJDUFRQWHQWFRXOGFDXVHDGXOOVSRW
LIDOORZHGWRVHW
:KHQWKHVXUIDFHKDVFRROHGZDVKDQGULQVH
)RURWKHUVSLOOVVXFKDVIDWVSDWWHULQJVZDVK
ZLWKVRDSDQGZDWHURQFHWKHVXUIDFHKDV
FRROHG7KHQULQVHDQGSROLVKZLWKDGU\FORWK
127()RUVWDLQOHVVVWHHOFRRNWRSVUHIHU
WRWKH6WDLQOHVVVWHHOVXUIDFHVVHFWLRQ
&DUHDQGFOHDQLQJRIWKHUDQJH

*($SSOLDQFHVFRP
/RZHU&RQWURO3DQHO)URQW0DQLIROG3DQHODQG.QREV
,W·VDJRRGLGHDWRZLSHWKHFRQWUROSDQHODIWHU
HDFKXVHRIWKHRYHQ8VHDGDPSFORWKWR
FOHDQRUULQVH)RUFOHDQLQJXVHPLOGVRDSDQG
ZDWHURUDVROXWLRQRIYLQHJDUDQGZDWHU
)RUULQVLQJXVHFOHDQZDWHU3ROLVKGU\ZLWKD
VRIWFORWK
'RQRWXVHDEUDVLYHFOHDQVHUVVWURQJOLTXLG
FOHDQHUVSODVWLFVFRXULQJSDGVRURYHQFOHDQHUV
RQWKHFRQWUROSDQHO³WKH\ZLOOGDPDJHWKH
ILQLVK
'RQRWWU\WREHQGNQREVE\SXOOLQJWKHPXS
RUGRZQRUE\KDQJLQJDWRZHORURWKHUVXFK
ORDGV7KLVFDQGDPDJHWKHJDVYDOYHVKDIW
7KHFRQWURONQREVPD\EHUHPRYHGIRUHDVLHU
FOHDQLQJ
0DNHVXUHWKHNQREVDUHLQWKH2))SRVLWLRQV
DQGSXOOWKHPVWUDLJKWRIIWKHVWHPVIRU
FOHDQLQJ
7KHNQREVFDQEHFOHDQHGLQDGLVKZDVKHURU
WKH\PD\DOVREHZDVKHGZLWKVRDSDQGZDWHU
0DNHVXUHWKHLQVLGHVRIWKHNQREVDUHGU\
EHIRUHUHSODFLQJ
5HSODFHWKHNQREVLQWKH2))SRVLWLRQWRHQVXUH
SURSHUSODFHPHQW
0HWDOSDUWVFDQEHFOHDQHGZLWKVRDSDQG
ZDWHU'RQRWXVHVWHHOZRRODEUDVLYHV
DPPRQLDDFLGVRUFRPPHUFLDORYHQFOHDQHUV
'U\ZLWKDVRIWFORWK
127(.QREVDUHQRWLQWHUFKDQJHDEOH%HVXUHWR
UHLQVWDOOWKHNQREVWRWKHRULJLQDOORFDWLRQ
6XUIDFHEXUQHUNQRE
/RZHURYHQNQRERQVRPHPRGHOV
5HGOLQH
/LIW8S&RRNWRSRQPRGHOVZLWKVWDQGDUGWZLQEXUQHUV
&OHDQWKHDUHDXQGHUWKHFRRNWRSRIWHQ
%XLOWXSVRLOHVSHFLDOO\JUHDVHPD\FDWFKRQ
ILUH
7RPDNHFOHDQLQJHDVLHUWKHFRRNWRSPD\EH
OLIWHGXS
127('RQRWOLIWWKHFRRNWRSRQVHDOHGEXUQHU
PRGHOV/LIWLQJWKHFRRNWRSFDQOHDGWRGDPDJH
DQGLPSURSHURSHUDWLRQRIWKHUDQJH
7RUDLVHWKHFRRNWRS
%HVXUHWKHEXUQHUVDUHWXUQHGRII
5HPRYHWKHJUDWHV
*UDVSWKHWZRIURQWEXUQHUZHOOVDQGOLIW
XS
&OHDQXQGHUWKHFRRNWRSZLWKKRWVRDS\ZDWHU
DQGDFOHDQFORWK,I\RXUHPRYHG\RXUVXUIDFH
EXUQHUVZKLOHFOHDQLQJPDNHVXUHWKH\DUH
SURSHUO\VHDWHGZKHQUHSODFLQJWKHP
$IWHUFOHDQLQJORZHUWKHFRRNWRSEHFDUHIXO
QRWWRSLQFK\RXUILQJHUV
6RPHPRGHOVKDYHGXDOVXSSRUW
URGVWKDWZLOOKROGWKHFRRNWRSXS
ZKLOH\RXFOHDQXQGHUQHDWKLW
2YHQ%RWWRP
7KHRYHQERWWRPKDVDSRUFHODLQHQDPHO
ILQLVK7RPDNHFOHDQLQJHDVLHUSURWHFWWKH
RYHQERWWRPIURPH[FHVVLYHVSLOORYHUVE\
SODFLQJDFRRNLHVKHHWRQWKHUDFNEHORZWKH
UDFN\RXDUHFRRNLQJRQ7KLVLVSDUWLFXODUO\
LPSRUWDQWZKHQEDNLQJDIUXLWSLHRURWKHU
IRRGVZLWKDKLJKDFLGFRQWHQW+RWIUXLW
ILOOLQJVRURWKHUIRRGVWKDWDUHKLJKO\DFLGLF
VXFKDVWRPDWRHVVDXHUNUDXWDQGVDXFHV
ZLWKYLQHJDURUOHPRQMXLFHPD\FDXVHSLWWLQJ
DQGGDPDJHWRWKHSRUFHODLQHQDPHOVXUIDFH
DQGVKRXOGEHZLSHGXSLPPHGLDWHO\
7RFOHDQXSVSLOORYHUVXVHVRDSDQGZDWHUDQ
DEUDVLYHFOHDQHURUVRDSILOOHGVFRXULQJSDG
5LQVHZHOOWRUHPRYHDQ\VRDSEHIRUHVHOI
FOHDQLQJ

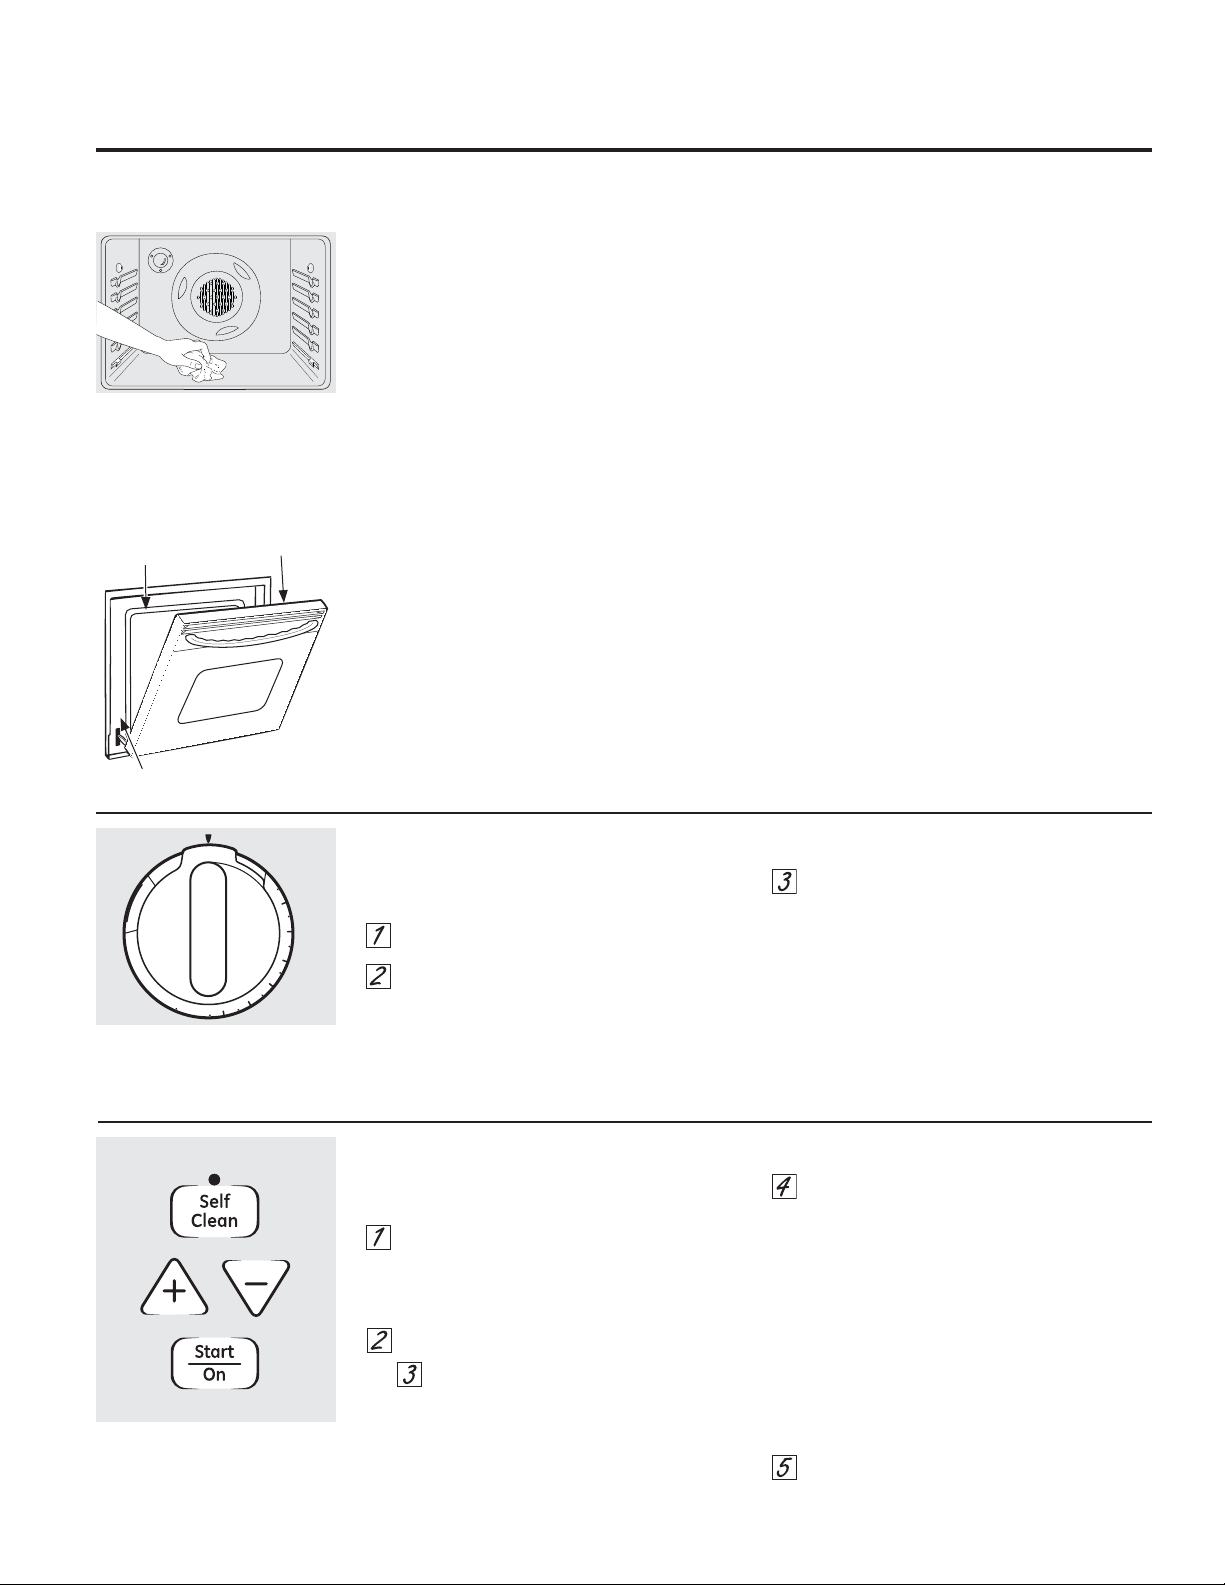
7KHGRRULVYHU\KHDY\%HFDUHIXOZKHQ
UHPRYLQJDQGOLIWLQJWKHGRRU
'RQRWOLIWWKHGRRUE\WKHKDQGOH
7RUHPRYHWKHGRRU
)XOO\RSHQWKHGRRU
3XOOWKHKLQJHORFNVGRZQWRZDUGWKHGRRU
IUDPHWRWKHXQORFNHGSRVLWLRQ$WRRO
VXFKDVDVPDOOIODWEODGHVFUHZGULYHU
PD\EHUHTXLUHG
)LUPO\JUDVSERWKVLGHVRIWKHGRRUDWWKH
WRS
&ORVHGRRUWRWKHGRRUUHPRYDOSRVLWLRQ
ZKLFKLVKDOIZD\EHWZHHQWKHEURLOVWRS
SRVLWLRQDQGIXOO\FORVHG
/LIWGRRUXSDQGRXWXQWLOWKHKLQJHDUP
LVFOHDURIWKHVORW
7RUHSODFHWKHGRRU
)LUPO\JUDVSERWKVLGHVRIWKHGRRUDWWKH
WRS
:LWKWKHGRRUDWWKHVDPHDQJOHDVWKH
UHPRYDOSRVLWLRQVHDWWKHLQGHQWDWLRQRI
WKHKLQJHDUPLQWRWKHERWWRPHGJHRIWKH
KLQJHVORW7KHQRWFKLQWKHKLQJHDUPPXVW
EHIXOO\VHDWHGLQWRWKHERWWRPRIWKHVORW
)XOO\RSHQWKHGRRU,IWKHGRRUZLOOQRW
IXOO\RSHQWKHLQGHQWDWLRQLVQRWVHDWHG
FRUUHFWO\LQWKHERWWRPHGJHRIWKHVORW
3XVKWKHKLQJHORFNVXSDJDLQVWWKHIURQW
IUDPHRIWKH
RYHQFDYLW\WR
WKHORFNHG
SRVLWLRQ
&ORVHWKHRYHQ
GRRU
5HPRYDEOH2YHQ'RRURQVRPHPRGHOV
/LIW2II2YHQ'RRURQVRPHPRGHOV
5HPRYDOSRVLWLRQ
+LQJH
ORFN
3XOOKLQJHORFNVGRZQWRXQORFN
,QGHQWDWLRQ
%RWWRP
HGJHRI
VORW
+LQJHDUP
6ORW
+LQJH
ORFN
3XVKKLQJHORFNVXSWRORFN
+LQJH
DUP
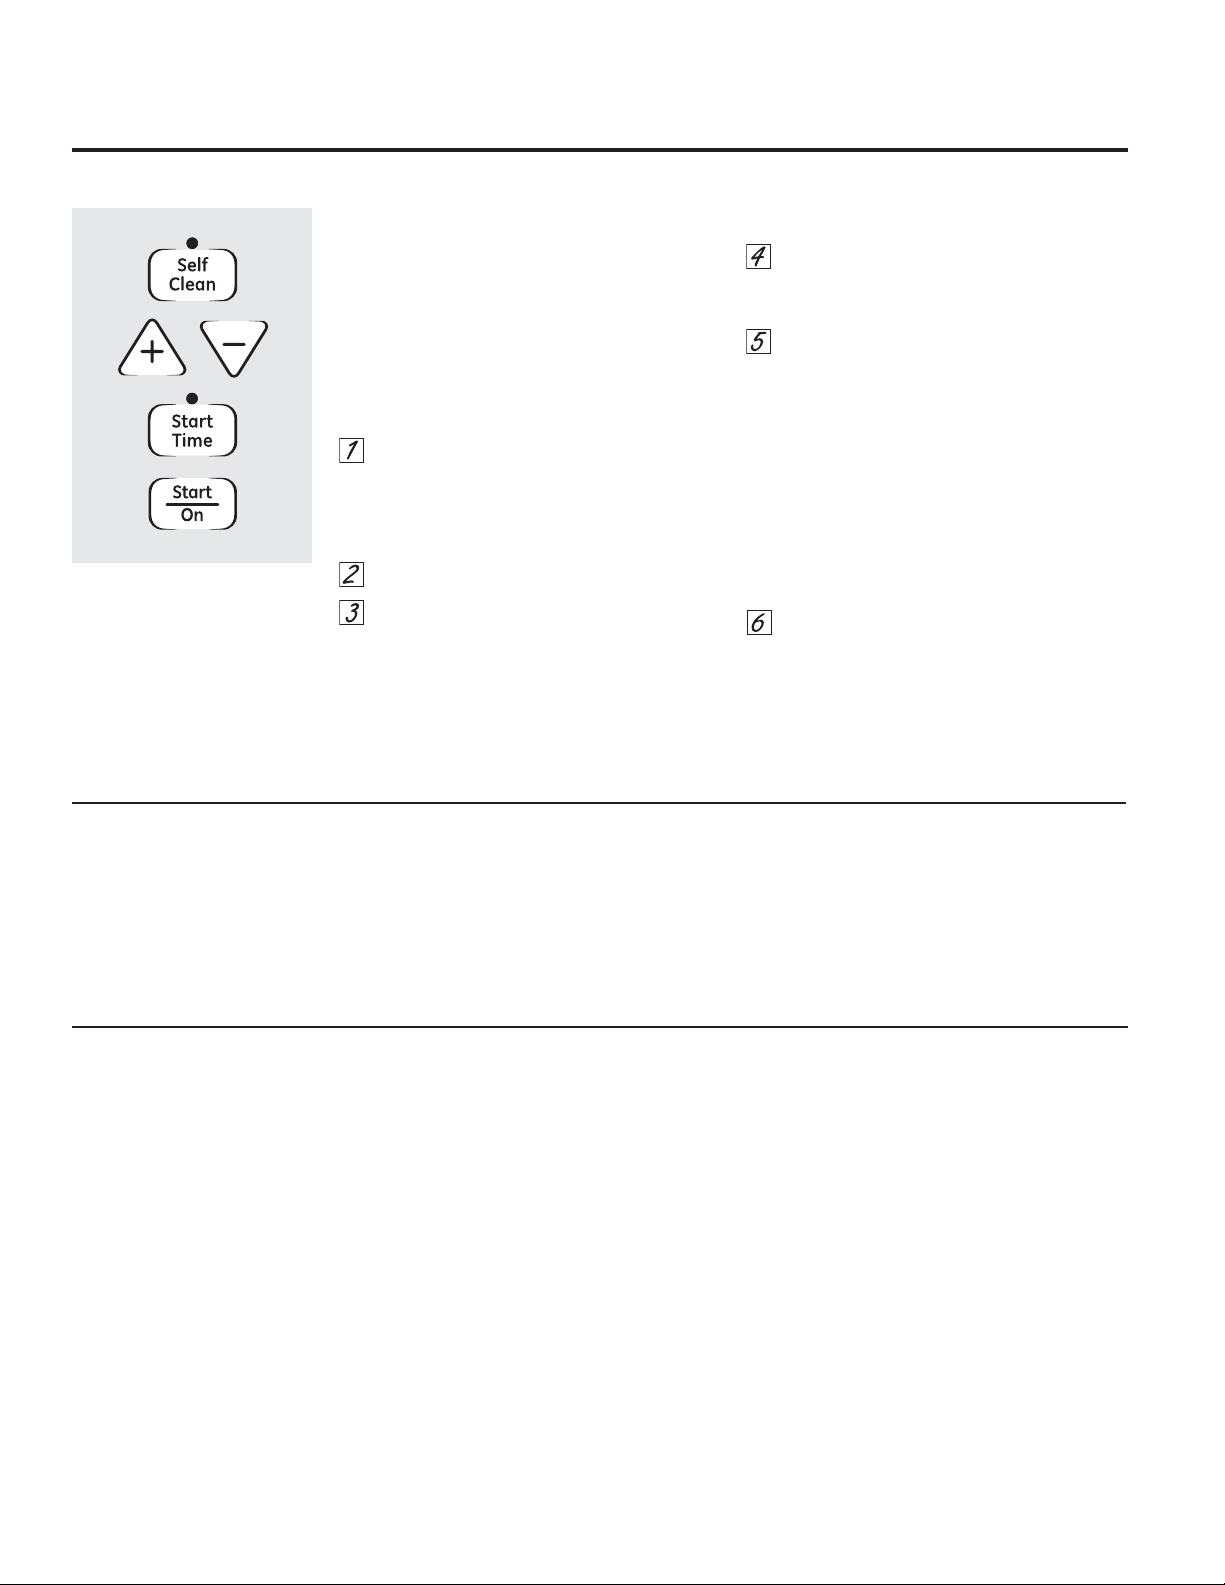
7KHRYHQGRRULVUHPRYDEOHEXWLWLVKHDY\
<RXPD\QHHGKHOSUHPRYLQJDQGUHSODFLQJ
WKHGRRU
7RUHPRYHWKHGRRU
2SHQLWDIHZLQFKHVWRWKHVSHFLDOVWRS
SRVLWLRQWKDWZLOOKROGWKHGRRURSHQ
*UDVSILUPO\RQHDFKVLGHDQGOLIWWKH
GRRUVWUDLJKWXSDQGRIIWKHKLQJHV
127(%HFDUHIXOQRWWRSODFHKDQGVEHWZHHQ
WKHKLQJHDQGWKHRYHQGRRUIUDPHVLQFHWKH
KLQJHFRXOGVQDSEDFNDQGSLQFKILQJHUV
7RUHSODFHWKHGRRU
0DNHVXUHWKHKLQJHVDUHLQWKHVSHFLDO
VWRSSRVLWLRQ3RVLWLRQWKHVORWVLQWKH
ERWWRPRIWKHGRRUVTXDUHO\RYHUWKH
KLQJHV
/RZHUWKHGRRUVORZO\DQGHYHQO\RYHU
ERWKKLQJHVDWWKHVDPHWLPH,IWKH
KLQJHVVQDSEDFNDJDLQVWWKHRYHQ
IUDPHSXOOWKHPEDFNRXW
/LIWWKHGRRUVWUDLJKWXSDQG
RIIWKHKLQJHV
2YHQ5DFNV
$OORYHQUDFNVPD\EHFOHDQHGE\KDQGZLWKDQ
DEUDVLYHFOHDQHURUVWHHOZRRO$IWHUFOHDQLQJ
ULQVHWKHUDFNVZLWKFOHDQZDWHUDQGGU\ZLWKD
FOHDQFORWK*UD\SRUFHODLQFRDWHGRYHQUDFNV
PD\UHPDLQLQWKHRYHQGXULQJWKHVHOIFOHDQLQJ
F\FOHZLWKRXWEHLQJGDPDJHG7KHQLFNHOSODWHG
RYHQUDFNVPD\UHPDLQLQWKHRYHQGXULQJWKH
VHOIFOHDQLQJF\FOHEXWWKH\ZLOOORVHWKHLUOXVWHU
DQGEHFRPHKDUGWRVOLGH,WZLOOEHQHFHVVDU\
WRJUHDVHDOORYHQUDFNVLGHHGJHVZLWKDOLJKW
FRDWLQJRIYHJHWDEOHRLODIWHUFOHDQLQJWKHPE\
KDQGRULQWKHRYHQ7KLVZLOOKHOSPDLQWDLQWKH
HDVHRIVOLGLQJWKHUDFNVLQDQGRXWRIWKHRYHQ
&OHDQLQJWKH'RRU
7RFOHDQWKHLQVLGHRIWKHGRRU
■'RQRWDOORZH[FHVVZDWHUWRUXQLQWRDQ\
KROHVRUVORWVLQWKHGRRU
■:LSHGLVKZDVKLQJGHWHUJHQWRYHUDQ\
EDNHGRQVSDWWHUVRQWKHJODVV8VHDVLQJOH
VLGHGVDIHW\UD]RUEODGHWRFOHDQLWRII7KHQ
ZLSHRYHUWKHJODVVZLWKDVRDS\FORWKWR
UHPRYHDQ\UHVLGXHDQGGU\RII
■7KHDUHDRXWVLGHWKHJDVNHWFDQEHFOHDQHG
ZLWKDVRDSILOOHGSODVWLFVFRXULQJSDG
7RFOHDQWKHRXWVLGHRIWKHGRRU
■8VHVRDSDQGZDWHUWRWKRURXJKO\FOHDQWKH
WRSVLGHVDQGIURQWRIWKHRYHQGRRU5LQVH
ZHOO<RXPD\DOVRXVHDJODVVFOHDQHUWR
FOHDQWKHJODVVRQWKHRXWVLGHRIWKHGRRU
■6SLOODJHRIPDULQDGHVIUXLWMXLFHVWRPDWR
VDXFHVDQGEDVWLQJPDWHULDOVFRQWDLQLQJ
DFLGVPD\FDXVHGLVFRORUDWLRQDQGVKRXOGEH
ZLSHGXSLPPHGLDWHO\:KHQWKHVXUIDFHLV
FRROFOHDQDQGULQVH
■'RQRWXVHRYHQFOHDQHUVFOHDQVLQJSRZGHUV
RUKDUVKDEUDVLYHVRQWKHRXWVLGHRIWKHGRRU
7KHJDVNHWLVGHVLJQHGZLWKDJDSDWWKH
ERWWRPWRDOORZIRUSURSHUDLUFLUFXODWLRQ
'RQRWUXERUFOHDQWKHGRRUJDVNHW³LWKDV
DQH[WUHPHO\ORZUHVLVWDQFHWRDEUDVLRQ
,I\RXQRWLFHWKHJDVNHWEHFRPLQJZRUQ
IUD\HGRUGDPDJHGLQDQ\ZD\RULILWKDV
EHFRPHGLVSODFHGRQWKHGRRU\RXVKRXOG
KDYHLWUHSODFHG
&DUHDQGFOHDQLQJRIWKHUDQJH
*($SSOLDQFHVFRP
6WDLQOHVV6WHHO6XUIDFHV
RQVRPHPRGHOV
'RQRWXVHDVWHHOZRROSDGLWZLOOVFUDWFKWKH
VXUIDFH
7KLVZLOOKHOS\RXWRPDLQWDLQWKHEULJKWQHVV
DQGDSSHDUDQFHRI\RXUVWDLQOHVVVWHHOUDQJH
■,QRUGHUWRDYRLGDQ\GLVFRORUDWLRQVDQGRU
JUHDVHVWDLQVZHUHFRPPHQGFOHDQLQJDQG
UHPRYLQJDQ\VSLOOVVSRWVDQGJUHDVHIURP
WKHUDQJHDIWHUXVH
■,WLVLPSRUWDQWWRXVHDVRIWFORWKRUSDSHU
WRZHOHYHU\WLPHWKHUDQJHLVFOHDQHGWR
DYRLGDQ\VFUDWFKHV
5HDGFDUHIXOO\WKHLQVWUXFWLRQVRQWKHEDFNRI
WKH%ULJKWHQHUIRUEHWWHUUHVXOWV
&OHDQLQJ,QVWUXFWLRQV
5HPRYHJUDWHV
:DVKXVLQJZDUPVRDS\ZDWHU
:HWVRIWFORWKRUSDSHUWRZHODYRLGXVLQJ
H[FHVVLYHZDWHU
:LSHWKHVXUIDFHLQWKHGLUHFWLRQRIWKHJUDLQ
IROORZLQJWKHVWHHOOLQHV
5LQVHDQGZULQJRXWDVRIWFORWKRUSDSHU
WRZHODQGGU\WKHUDQJH
$SSO\DGHJUHDVHUWKDWGRHVQRWFRQWDLQ
VRGLXPK\GUR[LGHRUVWDLQOHVVVWHHOFOHDQHU
IROORZLQVWUXFWLRQV
5HSHDWVWHSV²DVPDQ\WLPHVDVQHHGHG
3XWJUDWHVEDFNLQSODFH
)ROORZWKHVHLQVWUXFWLRQVIRUDQ\VWDLQOHVVVWHHO
VXUIDFHRQ\RXUUDQJH
'212786(IRUFRRNWRSRUVWDLQOHVVVWHHO
SDUWVFOHDQLQJ
&DXVWLFO\HVRGLXPK\GUR[LGHRUFOHDQHUV
FRQWDLQLQJWKLVFKHPLFDO
+DUGRUVWHHOZRROSDGV
$EUDVLYHPDWHULDOVRUFKHPLFDOV
7RLQTXLUHDERXWSXUFKDVLQJVWDLQOHVVVWHHO
DSSOLDQFHFOHDQHURUSROLVKRUWRILQGWKH
ORFDWLRQRIDGHDOHUQHDUHVW\RXSOHDVHFDOORXU
WROOIUHHQXPEHU
1DWLRQDO3DUWV&HQWHU 86
&DQDGD
*($SSOLDQFH3DUWVFRP86
ZZZ*($SSOLDQFHVFD&DQDGD
2YHQ/LJKW5HSODFHPHQWRQVRPHPRGHOV
%HVXUHWROHWWKHOLJKWFRYHUDQGEXOEFRRO
FRPSOHWHO\
7RUHPRYHWKHFRYHU
7ZLVWOHQVFRXQWHUFORFNZLVHDERXWD
TXDUWHUWXUQWRUHPRYH
'RQRWUHPRYHDQ\VFUHZVWRUHPRYHWKHFRYHU
5HSODFHEXOEZLWKDZDWWDSSOLDQFH
EXOERUWZRSURQJKDORJHQEXOEDV
DSSURSULDWH
7RUHSODFHWKHFRYHU
/LQHXSWDEVRIOHQVLQIURQWRIWDEVRQ
KRXVLQJDQGURWDWHFORFNZLVHWRHQJDJH
:$51,1*
6KRFNRU%XUQ+D]DUG%HIRUHUHSODFLQJRYHQOLJKWEXOEGLVFRQQHFWWKHHOHFWULFDOSRZHUWRWKH
UDQJHDWWKHPDLQIXVHRUFLUFXLWEUHDNHUSDQHO)DLOXUHWRGRVRPD\UHVXOWLQHOHFWULFVKRFNRUEXUQ
2YHQ/LJKW5HSODFHPHQWRQVRPHPRGHOV
&$87,21
%HIRUHUHSODFLQJ
\RXURYHQOLJKWEXOEGLVFRQQHFWWKHHOHFWULFDO
SRZHUWRWKHUDQJHDWWKHPDLQIXVHRUFLUFXLW
EUHDNHUSDQHO%HVXUHWROHWWKHOLJKWFRYHU
DQGEXOEFRROFRPSOHWHO\
7KHRYHQOLJKWEXOELVFRYHUHGZLWKDUHPRY
DEOHJODVVFRYHUWKDWLVKHOGLQSODFHZLWKD
EDLOVKDSHGZLUH5HPRYHWKHRYHQGRRULI
GHVLUHGWRUHDFKFRYHUHDVLO\
7RUHPRYH
+ROGDKDQGXQGHUWKHFRYHUVRLW
GRHVQ·WIDOOZKHQUHOHDVHG:LWKILQJHUV
RIWKHVDPHKDQGILUPO\SXVKEDFNWKH
ZLUHFRYHUKROGHU/LIWRIIWKHFRYHU
'RQRWUHPRYHDQ\VFUHZVWRUHPRYH
WKHFRYHU
'RQRWWRXFKKRWEXOEZLWKDZHWFORWK
5HSODFHEXOEZLWKDZDWWKRXVHKROG
DSSOLDQFHEXOE
7RUHSODFHFRYHU
3ODFHLWLQWRWKHJURRYHRIWKHOLJKW
UHFHSWDFOH3XOOWKHZLUHIRUZDUGWRWKH
FHQWHURIWKHFRYHUXQWLOLWVQDSVLQWR
SODFH:KHQLQSODFHWKHZLUHKROGVWKH
FRYHUILUPO\%HFHUWDLQWKHZLUHLVLQWKH
GHSUHVVLRQLQWKHFHQWHURIWKHFRYHU
&RQQHFWHOHFWULFDOSRZHUWRWKHUDQJH
:LGHFRYHUKROGHU
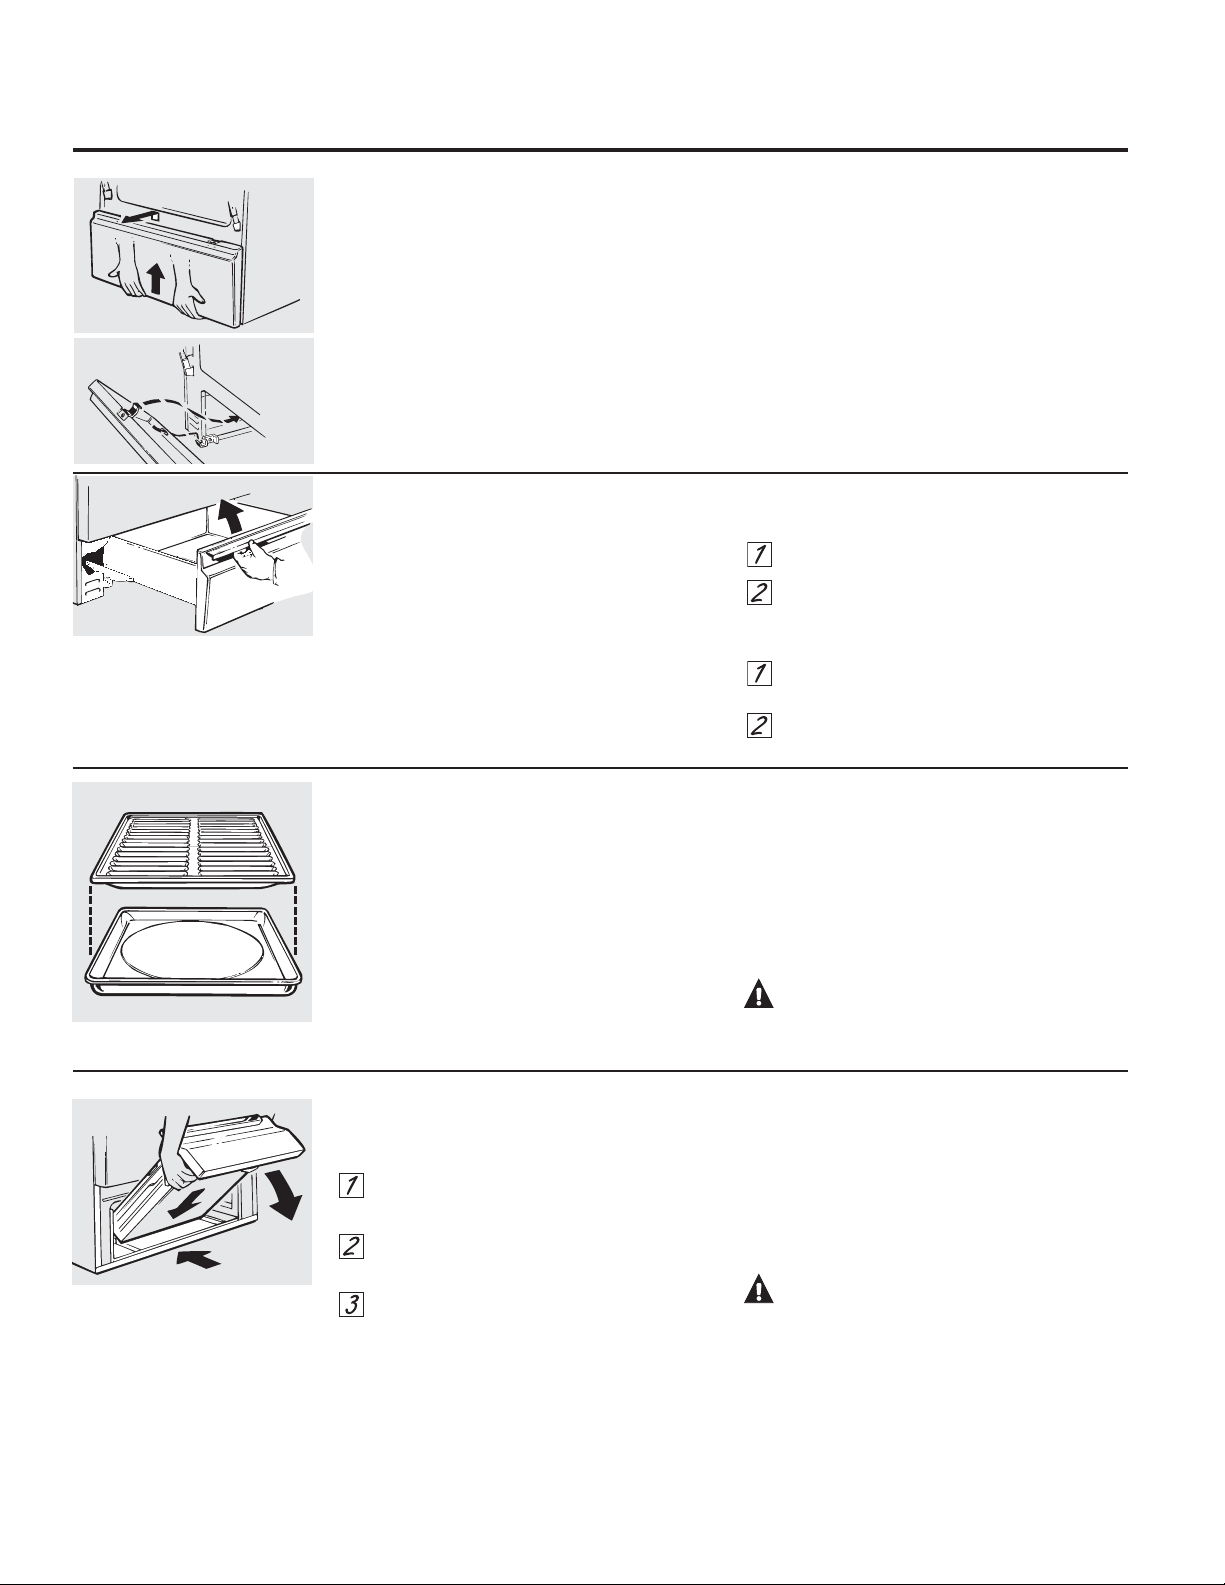
5HPRYDEOH6WRUDJH'UDZHURQVRPHPRGHOV
7KHVWRUDJHGUDZHULVDJRRGSODFHWRVWRUH
FRRNZDUHDQGEDNHZDUH'RQRWVWRUHSODVWLFV
DQGIODPPDEOHPDWHULDOLQWKHGUDZHU
7KHVWRUDJHGUDZHUPD\EHUHPRYHGIRU
FOHDQLQJXQGHUWKHUDQJH&OHDQWKHVWRUDJH
GUDZHUZLWKDGDPSFORWKRUVSRQJH1HYHUXVH
KDUVKDEUDVLYHVRUVFRXULQJSDGV
7RUHPRYHVWRUDJHGUDZHU
3XOOGUDZHUVWUDLJKWRXWXQWLOLWVWRSV
7LOWWKHIURQWRIWKHGUDZHUXSDQGIUHHRI
WKHUDQJH
7RUHSODFHVWRUDJHGUDZHU
6HWWKHVWRSVRQWKHEDFNRIWKHGUDZHU
RYHUWKHVWRSVLQWKHUDQJH
6OLGHGUDZHUHYHQO\DQGVWUDLJKWEDFNVR
WKDWWKHUDLOVLQWKHUDQJHDUHHQJDJHG
7KHVWRUDJHGUDZHUPD\EH
UHPRYHGIRUFOHDQLQJXQGHUWKH
UDQJH
5HPRYDEOH.LFN3DQHORQVRPHPRGHOV
7KHNLFNSDQHOPD\EHUHPRYHGIRUFOHDQLQJ
XQGHUWKHUDQJH
7RUHPRYH
/LIWXSWKHERWWRPRIWKHSDQHOVOLJKWO\WR
GLVHQJDJHWKHSDQHOIURPWKHWDEVDWWKHEDVH
RIWKHUDQJH3XOOWKHERWWRPRIWKHSDQHO
IRUZDUGXQWLOWKHVSULQJFOLSVDUHUHOHDVHGDW
WKHWRSRIWKHSDQHO
7RUHSODFH
,QVHUWWKHWZRVORWVDWWKHERWWRPRIWKHSDQHO
RQWRWKHWZRWDEVDWWKHEDVHRIWKHUDQJHDQG
SXVKWKHWRSRIWKHSDQHOIRUZDUGWRHQJDJH
WKHVSULQJFOLSV
5HPRYDEOH%URLOHU'UDZHU
RQVRPHPRGHOV
7RUHPRYH
:KHQWKHEURLOHULVFRROUHPRYHWKHJULG
DQGSDQ
3XOOWKHEURLOHUGUDZHURXWXQWLOLWVWRSV
WKHQSXVKLWEDFNLQDERXWRQHLQFK
*UDVSWKHKDQGOHOLIWDQGSXOOWKHEURLOHU
GUDZHURXW&OHDQWKHEURLOHUGUDZHUZLWK
KRWVRDS\ZDWHU
7RUHSODFH
+ROGWKHEURLOHUGUDZHULQWKHUDLVHGSRVLWLRQDV
\RXVOLGHLWSDUWZD\LQWRWKHUDQJH7KHQORZHU
WKHGUDZHUDQGSXVKLWFRPSOHWHO\FORVHG
:$51,1*),5(+$=$5'
'RQRWVWRUHFRRNZDUHDQGEDNHZDUHLQEURLOHU
GUDZHU7KLVFRXOGUHVXOWLQILUH
%URLOHU3DQDQG*ULG
$IWHUEURLOLQJUHPRYHWKHEURLOHUSDQIURPWKH
RYHQ5HPRYHWKHJULGIURPWKHSDQ&DUHIXOO\
SRXURXWJUHDVHIURPWKHSDQLQWRDSURSHU
FRQWDLQHU:DVKDQGULQVHWKHEURLOHUSDQDQG
JULGLQKRWZDWHUZLWKDVRDSILOOHGRUSODVWLF
VFRXULQJSDG
,IIRRGKDVEXUQHGRQVSULQNOHWKHJULGZLWK
GHWHUJHQWZKLOHKRWDQGFRYHUZLWKZHWSDSHU
WRZHOVRUDGLVKFORWK6RDNLQJWKHSDQZLOO
UHPRYHEXUQHGRQIRRGV
7KHEURLOHUSDQDQGJULGPD\EHFOHDQHGZLWKD
FRPPHUFLDORYHQFOHDQHU
%RWKWKHEURLOHUSDQDQGJULGFDQDOVREH
FOHDQHGLQDGLVKZDVKHU
'RQRWVWRUHDVRLOHGEURLOHUSDQDQGJULG
DQ\ZKHUHLQWKHUDQJH
&$87,21'RQRWFOHDQWKHEURLOHU
SDQRUJULGLQDVHOIFOHDQLQJRYHQ
*ULG
3DQ
&DUHDQGFOHDQLQJRIWKHUDQJH
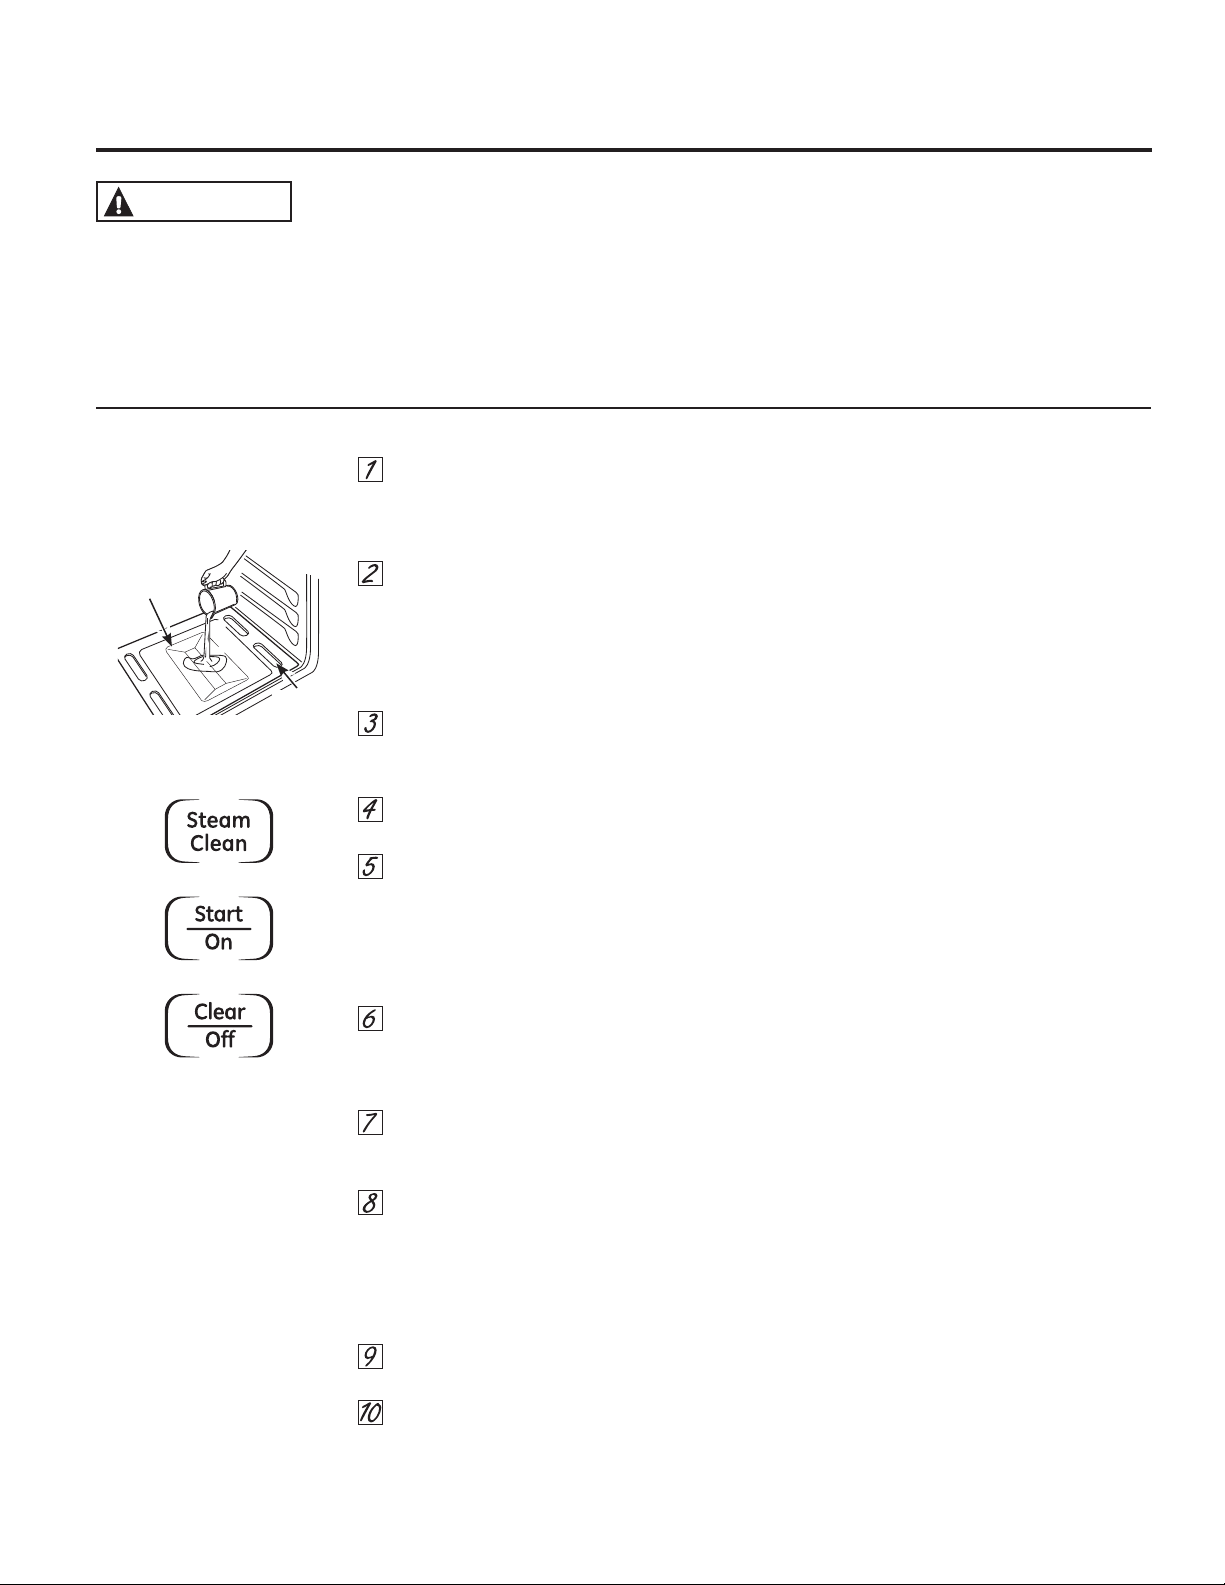
5HPRYHUDFNVDQGDFFHVVRULHVIURPWKH
RYHQFDYLW\'RQRWSODFHFRRNZDUHRU
RWKHULWHPVLQWKHRYHQGXULQJWKH6WHDP
&OHDQF\FOH
3RXUFXSR]URRPWHPSHUDWXUH
ZDWHURQWRWKHUHFHVVHGDUHDRIWKHRYHQ
ERWWRP'RQRWDGGFOHDQLQJVROXWLRQVRU
FKHPLFDOVRIDQ\NLQGWRWKHZDWHU'RQRW
SRXUZDWHUGRZQWKHEXUQHUVORWVRQRYHQ
ERWWRP
&ORVHWKHGRRU
3UHVVWKH6WHDP&OHDQSDGWKHQSUHVV
6WDUW2Q
$PLQXWHF\FOHZLOOEHJLQWRFRXQW
GRZQRQWKHGLVSOD\
:KHQWKH6WHDP&OHDQF\FOHLVFRPSOHWH
WKHRYHQFRQWUROZLOOEHHSDQGWKH6WHDP
&OHDQOLJKWZLOOEOLQN3UHVVWKH&OHDU2II
SDGDQGRSHQWKHGRRU
7KHRYHQERWWRPDQGUHPDLQLQJZDWHU
ZLOOVWLOOEHYHU\ZDUPDWWKHHQGRIWKH
F\FOH7KLVLVQRUPDO
5HPRYHVRLOVXVLQJDVFUXEEUXVKRUQ\ORQ
VFRXULQJSDG$VRDSILOOHGVWHHOZRROSDG
PD\EHXVHGRQO\RQWKHSRUFHODLQRYHQ
LQWHULRU7KHXVHRIDEUDVLYHSDGVZLOO
VFUDWFKWKHGRRUJODVV'RQRWZLSHVRLO
RUZDWHURQWRWKHGRRUJDVNHW
5HPRYHDQ\UHPDLQLQJZDWHUZLWKDGU\
FORWKRUVSRQJH
/HDYHWKHGRRURSHQWRDLUGU\
,03257$17127(6
,IDVWHDPFOHDQF\FOHLVLQLWLDWHGZLWKRXW
ZDWHUSUHVVWKH&OHDU2IISDGWRHQGWKH
F\FOH:DLWIRUWKHUDQJHWRFRROWRURRP
WHPSHUDWXUHEHIRUHSRXULQJZDWHULQWR
WKHUHFHVVHGDUHDDQGLQLWLDWLQJDQRWKHU
VWHDPF\FOH
'RQRWRSHQWKHGRRUGXULQJWKH6WHDP
&OHDQF\FOH$QHUURUEHHSZLOOVRXQGXSRQ
RSHQLQJWKHGRRU
3UHVV&OHDU2IISDGDWDQ\WLPHWRHQGWKH
F\FOH
,IPLQHUDOGHSRVLWVUHPDLQLQWKHRYHQERW
WRPDIWHUFOHDQLQJXVHDFORWKRUVSRQJH
VRDNHGLQYLQHJDUWRUHPRYHWKHP
6RPHZDWHUPD\GULSIURPWKHERWWRPRI
WKHRYHQGRRU,IWKLVKDSSHQVZLSHLWXSDW
WKHHQGRIWKHF\FOH
7KHGRRUJDVNHWPD\EHZHWZKHQWKH
6WHDP&OHDQF\FOHILQLVKHV7KLVLVQRUPDO
'RQRWFOHDQWKHJDVNHW
,IVRLOVWLOOUHPDLQVDIWHUFOHDQLQJWKHRYHQ
VHHWKH&DUHDQG&OHDQLQJRIWKH5DQJH
VHFWLRQRIWKH2ZQHU·V0DQXDOIRUDGGL
WLRQDORSWLRQV
8VLQJ6WHDP&OHDQRQVRPHPRGHOV *($SSOLDQFHVFRP
&$87,21
'XULQJWKHVWHDPFOHDQF\FOH
WKHRYHQERWWRPEHFRPHVKRWHQRXJKWRFDXVHEXUQV
:DLWXQWLOWKHF\FOHLVRYHUPLQXWHVEHIRUHZLSLQJ
WKHLQVLGHVXUIDFHVRIWKHRYHQ)DLOXUHWRGRVRPD\
UHVXOWLQEXUQV
7KH6WHDP&OHDQF\FOHPDNHVLWHDVLHUWRFOHDQOLJKWVRLOIURP
WKHSRUFHODLQRYHQLQWHULRUDQGGRRUJODVV
7KHUDQJHVKRXOGEHDWURRPWHPSHUDWXUHEHIRUHEHJLQ
QLQJWKH6WHDP&OHDQF\FOH,IWKHRYHQLVWRRKRW´+RWµZLOO
DSSHDURQWKHGLVSOD\DQGWKHF\FOHZLOOQRWDFWLYDWHXQWLOWKH
RYHQFRROVGRZQ
7KH6WHDP&OHDQF\FOHSHUIRUPVEHVWRQQHZVSLOOVRUVRLOV
%XUQHGRQIRRGLVPRUHGLIILFXOWWRUHPRYH
3RXUFXSRIZDWHURQWRWKHRYHQ
IORRU
7R%HJLQ6WHDP&OHDQ&\FOH
5HFHVVHG
$UHD
%XUQHU
6ORWV
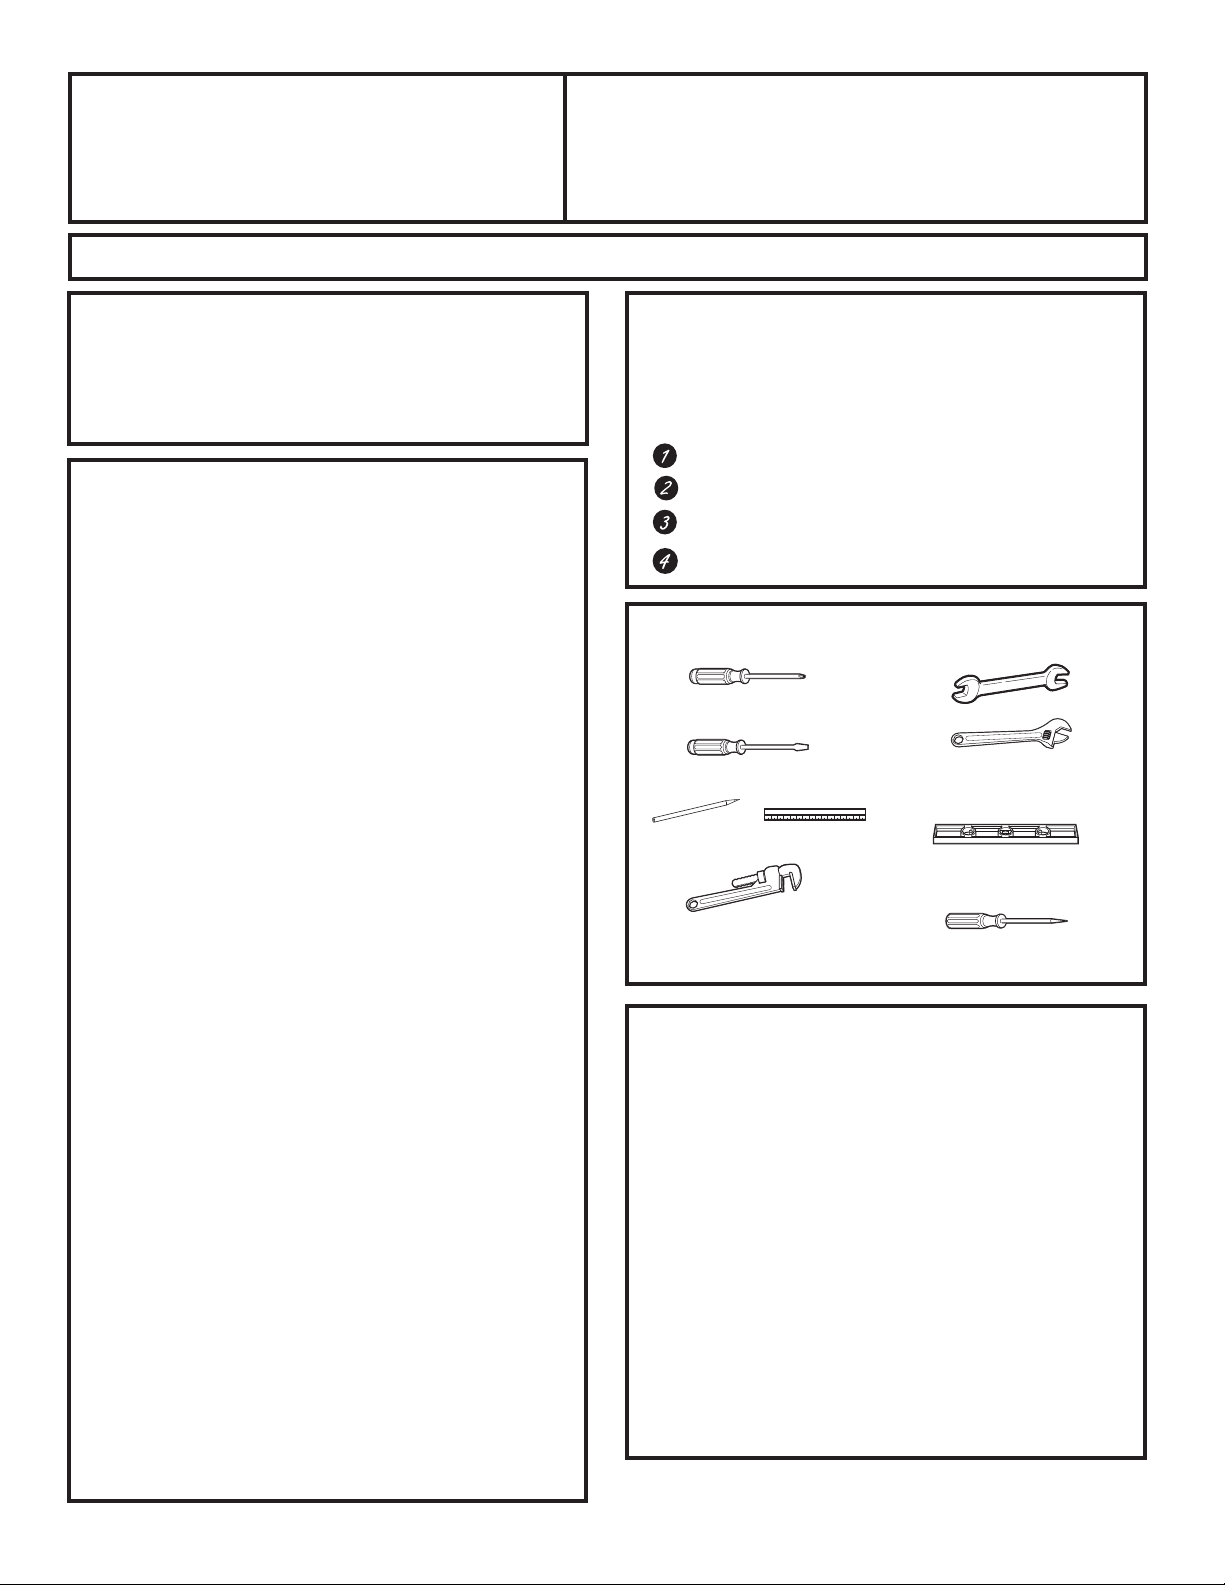
%()25(<28%(*,1
5HDGWKHVHLQVWUXFWLRQVFRPSOHWHO\DQGFDUHIXOO\
,QVWDOODWLRQRIWKLVUDQJHPXVWFRQIRUPZLWKORFDO
FRGHVRULQWKHDEVHQFHRIORFDOFRGHVZLWKWKH
1DWLRQDO)XHO*DV&RGH$16,=1)3$ODWHVW
HGLWLRQ,Q&DQDGDLQVWDOODWLRQPXVWFRQIRUPZLWK
WKHFXUUHQW1DWXUDO*DV,QVWDOODWLRQ&RGH&$1
&*$%RUWKHFXUUHQW3URSDQH,QVWDOODWLRQ
&RGH&$1&*$%DQGZLWKORFDOFRGHVZKHUH
DSSOLFDEOH7KLVUDQJHKDVEHHQGHVLJQFHUWLILHGE\
&6$,QWHUQDWLRQDODFFRUGLQJWR$16,=ODWHVW
HGLWLRQDQG&DQDGLDQ*DV$VVRFLDWLRQDFFRUGLQJWR
&$1&*$ODWHVWHGLWLRQ
$VZLWKDQ\DSSOLDQFHXVLQJJDVDQGJHQHUDWLQJKHDW
WKHUHDUHFHUWDLQVDIHW\SUHFDXWLRQV\RXVKRXOGIROORZ
<RXZLOOILQGWKHVHSUHFDXWLRQVLQWKH,PSRUWDQW6DIHW\
,QIRUPDWLRQVHFWLRQLQWKHIURQWRIWKLVPDQXDO5HDG
WKHPFDUHIXOO\
,03257$17²6DYHWKHVHLQVWUXFWLRQVIRU
ORFDOHOHFWULFDOLQVSHFWRU·VXVH
,03257$17²2EVHUYHDOOJRYHUQLQJ
FRGHVDQGRUGLQDQFHV
1RWHWR,QVWDOOHU²/HDYHWKHVHLQVWUXFWLRQVZLWK
WKHDSSOLDQFHDIWHULQVWDOODWLRQLVFRPSOHWHG
1RWHWR&RQVXPHU².HHSWKLV2ZQHU·V0DQXDO
DQG,QVWDOODWLRQ,QVWUXFWLRQVIRUIXWXUHUHIHUHQFH
1RWH²7KLVDSSOLDQFHPXVWEHSURSHUO\JURXQGHG
6HUYLFHU²7KHHOHFWULFDOGLDJUDPLVLQDQHQYHORSH
DWWDFKHGWRWKHEDFNRIWKHUDQJH
3URSHULQVWDOODWLRQLVWKHUHVSRQVLELOLW\RIWKHLQVWDOOHU
3URGXFWIDLOXUHGXHWRLPSURSHULQVWDOODWLRQLVQRW
FRYHUHGXQGHUWKH:DUUDQW\
0RELOH+RPH$GGLWLRQDO,QVWDOODWLRQ5HTXLUHPHQWV
7KHLQVWDOODWLRQRIWKLVUDQJHPXVWFRQIRUPWRWKH
0DQXIDFWXUHG+RPH&RQVWUXFWLRQDQG6DIHW\6WDQGDUG
7LWOH&)53DUWIRUPHUO\WKH)HGHUDO6WDQGDUG
IRU0RELOH+RPH&RQVWUXFWLRQXVHWKH6WDQGDUGIRU
0DQXIDFWXUHG+RPH,QVWDOODWLRQV$16,$1)3$
$RUZLWKORFDOFRGHV
0RELOHKRPHLQVWDOODWLRQVUHTXLUH
:KHQWKLVUDQJHLVLQVWDOOHGLQDPRELOHKRPHLWPXVW
EHVHFXUHGWRWKHIORRUGXULQJWUDQVLW$Q\PHWKRGRI
VHFXULQJWKHUDQJHLVDGHTXDWHDVORQJDVLWFRQIRUPVWR
WKHVWDQGDUGVOLVWHGDERYH
,QVWDOODWLRQ
5DQJH
,QVWUXFWLRQV
'RQRWVWRUHRUXVHFRPEXVWLEOHPDWHULDOVJDVROLQH
RURWKHUIODPPDEOHYDSRUVDQGOLTXLGVLQWKHYLFLQLW\
RIWKLVRUDQ\RWKHUDSSOLDQFH
,I\RXVPHOOJDV
2SHQZLQGRZV
'RQ·WWRXFKHOHFWULFDOVZLWFKHV
([WLQJXLVKDQ\RSHQIODPH
,PPHGLDWHO\FDOO\RXUJDVVXSSOLHU
)25<2856$)(7<
,QWKH&RPPRQZHDOWKRI0DVVDFKXVHWWV
7KLVSURGXFWPXVWEHLQVWDOOHGE\DOLFHQVHGSOXPEHURU
JDVILWWHU
:KHQXVLQJEDOOW\SHJDVVKXWRIIYDOYHVWKH\VKDOOEH
WKH7KDQGOHW\SH
$IOH[LEOHJDVFRQQHFWRUZKHQXVHGPXVWQRWH[FHHGIHHW
722/6<28:,//1(('
)ODWEODGHVFUHZGULYHU
3LSHZUHQFKHV
RQHIRUEDFNXS
3KLOOLSVVFUHZGULYHU
2SHQHQGRU
DGMXVWDEOHZUHQFK
3HQFLODQGUXOHU
/HYHO
'ULOODZORUQDLO
0$7(5,$/6<280$<1(('
*DVOLQHVKXWRIIYDOYH
3LSHMRLQWVHDODQWRU8/DSSURYHGSLSHWKUHDGWDSHZLWK
7HIORQWKDWUHVLVWVDFWLRQRIQDWXUDODQG/3JDVHV
)OH[LEOHPHWDODSSOLDQFHFRQQHFWRU´,'
$IRRWOHQJWKLVUHFRPPHQGHGIRUHDVHRILQVWDOODWLRQ
EXWRWKHUOHQJWKVDUHDFFHSWDEOH1HYHUXVHDQROG
FRQQHFWRUZKHQLQVWDOOLQJDQHZUDQJH
)ODUHXQLRQDGDSWHUIRUFRQQHFWLRQWRJDVVXSSO\OLQH
´RU´137[´,'
)ODUHXQLRQDGDSWHUIRUFRQQHFWLRQWRSUHVVXUHUHJXODWRU
RQUDQJH´137[´,'
/LTXLGOHDNGHWHFWRURUVRDS\ZDWHU
/DJEROWRU´2'VOHHYHDQFKRUIRUFRQFUHWH
IORRUVRQO\
7HIORQ5HJLVWHUHGWUDGHPDUNRI'X3RQW
,I\RXKDYHTXHVWLRQVFDOO*(&$5(6RUYLVLWRXU:HEVLWHDW*($SSOLDQFHVFRP
,QVWDOODWLRQ,QVWUXFWLRQV
:$51,1*
,167$//$7,216$)(7<
,16758&7,216
5HDGWKHVHLQVWUXFWLRQVFRPSOHWHO\DQGFDUHIXOO\
)DLOXUHWRIROORZWKHVHLQVWUXFWLRQVFDQUHVXOWLQ
HOHFWULFDOVKRFNILUHVHULRXVLQMXU\RUGHDWK
,PSURSHULQVWDOODWLRQDGMXVWPHQWDOWHUDWLRQVHUYLFH
RUPDLQWHQDQFHFDQFDXVHLQMXU\RUSURSHUW\
GDPDJH5HIHUWRWKLVPDQXDO)RUDVVLVWDQFHRU
DGGLWLRQDOLQIRUPDWLRQFRQVXOWDTXDOLILHGLQVWDOOHU
VHUYLFHDJHQF\PDQXIDFWXUHUGHDOHURUWKHJDV
VXSSOLHU
1HYHUUHXVHROGIOH[LEOHFRQQHFWRUV7KHXVHRIROG
IOH[LEOHFRQQHFWRUVFDQFDXVHJDVOHDNVDQGSHUVRQDO
LQMXU\$OZD\VXVH1(:IOH[LEOHFRQQHFWRUVZKHQ
LQVWDOOLQJDJDVDSSOLDQFH
/HDNWHVWLQJRIWKHDSSOLDQFHVKDOOEHFRQGXFWHG
DFFRUGLQJWRWKHPDQXIDFWXUHULQVWUXFWLRQV
5HPRYHDOOSDFNLQJPDWHULDODQGOLWHUDWXUHIURPRYHQ
EHIRUHFRQQHFWLQJJDVDQGHOHFWULFDOVXSSO\WRUDQJH
'RQRWDWWHPSWWRRSHUDWHWKHRYHQRIWKLVUDQJH
GXULQJDSRZHUIDLOXUH(OHFWULF,JQLWLRQPRGHOVRQO\
+DYH\RXUUDQJHLQVWDOOHGE\DTXDOLILHGLQVWDOOHU
<RXUUDQJHPXVWEHHOHFWULFDOO\JURXQGHGLQ
DFFRUGDQFHZLWKORFDOFRGHVRULQWKHDEVHQFHRI
ORFDOFRGHVLQDFFRUGDQFHZLWKWKH1DWLRQDO(OHFWULFDO
&RGH$16,1)3$ODWHVWHGLWLRQ,Q&DQDGD
HOHFWULFDOJURXQGLQJPXVWEHLQDFFRUGDQFHZLWKWKH
FXUUHQW&6$&&DQDGLDQ(OHFWULFDO&RGH3DUW
DQGRUORFDOFRGHV6HH(OHFWULFDO&RQQHFWLRQV LQWKLV
VHFWLRQ
%HIRUHLQVWDOOLQJ\RXUUDQJHRQOLQROHXPRUDQ\RWKHU
V\QWKHWLFIORRUFRYHULQJPDNHVXUHWKHIORRUFRYHULQJ
FDQZLWKVWDQG)ZLWKRXWVKULQNLQJZDUSLQJRU
GLVFRORULQJ'RQRWLQVWDOOWKHUDQJHRYHUFDUSHWLQJ
XQOHVVDVKHHWRI´WKLFNSO\ZRRGRUVLPLODU
LQVXODWRULVSODFHGEHWZHHQWKHUDQJHDQGFDUSHWLQJ
0DNHVXUHWKHFDELQHWVIORRUDQGZDOOFRYHULQJV
DURXQGWKHUDQJHFDQZLWKVWDQGKHDWJHQHUDWHGE\
WKHUDQJHXSWR)
$YRLGSODFLQJFDELQHWVDERYHWKHUDQJH7RUHGXFH
WKHKD]DUGFDXVHGE\UHDFKLQJRYHUWKHRSHQIODPHV
RIRSHUDWLQJEXUQHUVLQVWDOODYHQWLODWLRQKRRGRYHU
WKHUDQJHWKDWSURMHFWVIRUZDUGDWOHDVW´EH\RQG
WKHIURQWRIWKHFDELQHWV
7KHYHQWLODWLQJKRRGPXVWEHFRQVWUXFWHG
RIVKHHWPHWDOQRWOHVVWKDQ´WKLFN
,QVWDOODERYHWKHFRRNWRSZLWKDFOHDUDQFHRIQRW
OHVVWKDQ´EHWZHHQWKHKRRGDQGWKHXQGHUVLGH
RIWKHFRPEXVWLEOHPDWHULDORUPHWDOFDELQHW7KH
KRRGPXVWEHDWOHDVWDVZLGHDVWKHDSSOLDQFHDQG
FHQWHUHGRYHUWKHDSSOLDQFH&OHDUDQFHEHWZHHQWKH
FRRNLQJVXUIDFHDQGWKHYHQWLODWLRQKRRGVXUIDFH
08671(9(5%(/(667+$1´
(;&(37,21,QVWDOODWLRQRIDOLVWHGPLFURZDYHRYHQRU
FRRNLQJDSSOLDQFHRYHUWKHFRRNWRSVKDOOFRQIRUPWR
WKHLQVWDOODWLRQLQVWUXFWLRQVSDFNHGZLWKWKDWDSSOLDQFH
,IFDELQHWVDUHSODFHGDERYHWKHUDQJH
DOORZDPLQLPXPFOHDUDQFHRI´EHWZHHQWKH
FRRNLQJVXUIDFHDQGWKHERWWRPRIXQSURWHFWHG
FDELQHWV
,ID´FOHDUDQFHEHWZHHQFRRNLQJVXUIDFHDQG
RYHUKHDGFRPEXVWLEOHPDWHULDORUPHWDOFDELQHWV
FDQQRWEHPDLQWDLQHGSURWHFWWKHXQGHUVLGHRIWKH
FDELQHWVDERYHWKHFRRNWRSZLWKQRWOHVVWKDQ´
LQVXODWLQJPLOOERDUGFRYHUHGZLWKVKHHWPHWDOQRWOHVV
WKDQ´WKLFN&OHDUDQFHEHWZHHQWKHFRRNLQJ
VXUIDFHDQGSURWHFWHGFDELQHWV08671(9(5%(/(66
7+$1´
7KHYHUWLFDOGLVWDQFHIURPWKHSODQHRIWKHFRRNLQJ
VXUIDFHWRWKHERWWRPRIDGMDFHQWRYHUKHDGFDELQHWV
H[WHQGLQJFORVHUWKDQ´WRWKHSODQHRIWKHUDQJH
VLGHVPXVWQRWEHOHVVWKDQ´6HHWKH'LPHQVLRQV
DQG&OHDUDQFHV LOOXVWUDWLRQLQWKLVVHFWLRQ
'RQRWLQVWDOOWKLVSURGXFWZLWKDQDLUFXUWDLQKRRGRU
RWKHUUDQJHKRRGWKDWRSHUDWHVE\EORZLQJDLUGRZQRQ
WKHFRRNWRS7KLVDLUIORZPD\LQWHUIHUHZLWKRSHUDWLRQRI
WKHJDVEXUQHUVUHVXOWLQJLQILUHRUH[SORVLRQKD]DUG
&$87,212QO\WKH*(&DIpEUDQGHGVHULHV
RI$GYDQWLXP
RUPLFURZDYHRYHUWKHUDQJHRYHQVDUH
GHVLJQHGWREHLQVWDOOHGDERYHWKH*(&DIpUDQJH6XUIDFHV
DERYHDJDVUDQJHFDQEHFRPHKRW,QVWDOODWLRQRIDQ\RWKHU
RYHUWKHUDQJHRYHQDERYHD*(&DIpUDQJHPD\UHVXOWLQ
VXUIDFHWHPSHUDWXUHVWKDWFDQFDXVHEXUQV
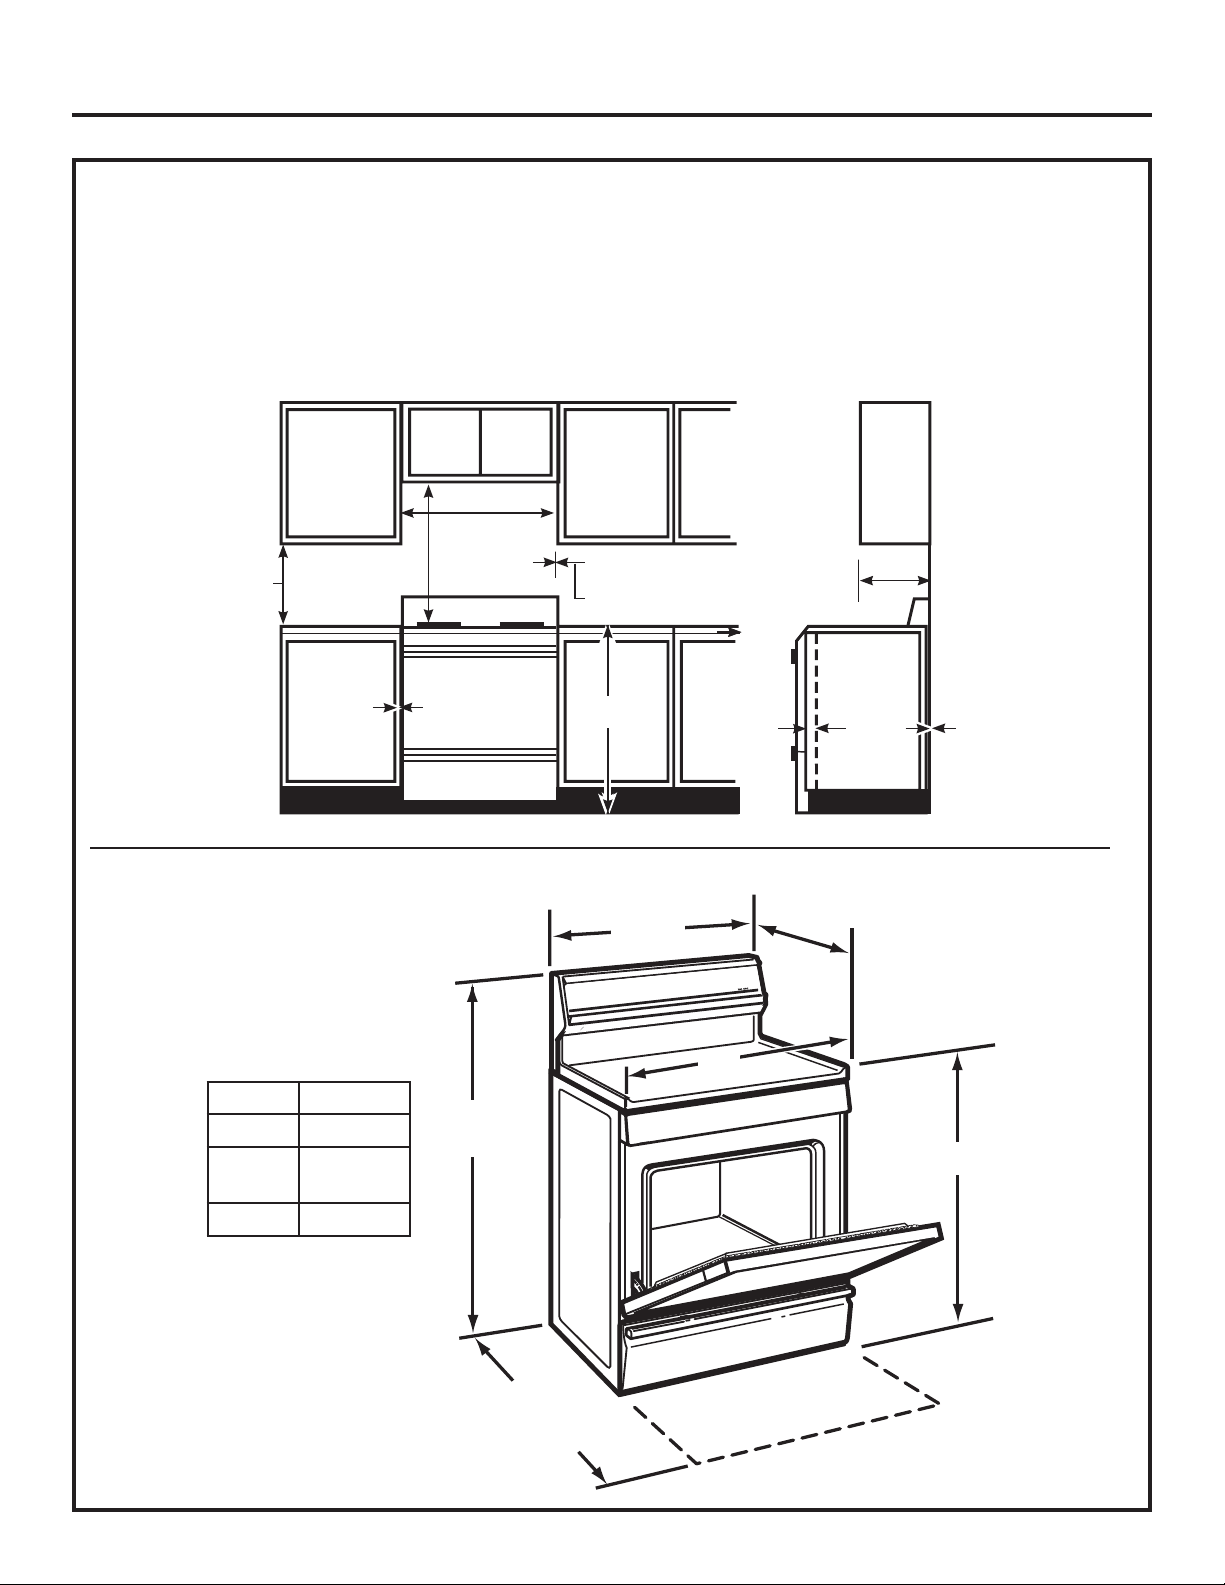
,QVWDOODWLRQ,QVWUXFWLRQV
3URYLGHDGHTXDWHFOHDUDQFHVEHWZHHQWKHUDQJHDQGDGMDFHQWFRPEXVWLEOHVXUIDFHV7KHVHGLPHQVLRQVPXVWEH
PHWIRUVDIHXVHRI\RXUUDQJH7KHORFDWLRQRIWKHHOHFWULFDORXWOHWDQGSLSHRSHQLQJVHH*DV3LSHDQG(OHFWULF
2XWOHW/RFDWLRQVPD\EHDGMXVWHGWRPHHWVSHFLILFUHTXLUHPHQWV
7KHUDQJHPD\EHSODFHGZLWK´FOHDUDQFHIOXVKDWWKHEDFNZDOO
)RULVODQGLQVWDOODWLRQ0RGHO-*66PDLQWDLQLQPLQLPXPIURPFXWRXWWREDFNHGJHRIFRXQWHUWRSDQGLQ
PLQLPXPIURPFXWRXWWRVLGHHGJHVRIFRXQWHUWRS
',0(16,216$1'&/($5$1&(6
µ
'HSWKZLWKGRRUFORVHGLQFOXGHVGRRUKDQGOH
'HSWKYDULHVGHSHQGLQJRQPRGHO
6HHVSHFLILFDWLRQVVKHHWIRU\RXUPRGHO
µ
µ
µ
'HSWKZLWKGRRURSHQ
µ
µ
µ
+HLJKW
µ
*ODVVGRRU
3RUFHODLQGRRU
+HLJKW 0RGHO
µ -*66
µ -*%6
-*%6
µ 5*%
7RFDELQHWVEHORZ
FRRNWRSDQGDWWKH
UDQJHEDFN
7RFDELQHWV
EHORZ
FRRNWRSDQG
DWWKHUDQJH
EDFN
µ
µ
0LQLPXP
µ
0D[LPXP
GHSWKIRU
FDELQHWVDERYH
FRXQWHUWRSV
)URQWHGJHRI
WKHUDQJHVLGH
SDQHOIRUZDUG
IURPFDELQHW
µ
µPLQLPXP
µ
0LQLPXPWR
FDELQHWVRQ
HLWKHUVLGH
RIWKHUDQJH
µ
µ
µ
µ
WRZDOORQHLWKHUVLGH
VWDQGDUGEXUQHUPRGHOV
WRZDOORQHLWKHUVLGH
VHDOHGEXUQHUPRGHOV

,QVWDOODWLRQ,QVWUXFWLRQV
/2&$7,21
'RQRWORFDWHWKHUDQJHZKHUHLWPD\EHVXEMHFWWR
VWURQJGUDIWV$Q\RSHQLQJVLQWKHIORRURUZDOOEHKLQG
WKHUDQJHVKRXOGEHVHDOHG0DNHVXUHWKHRSHQLQJV
DURXQGWKHEDVHRIWKHUDQJHWKDWVXSSO\IUHVKDLU
IRUFRPEXVWLRQDQGYHQWLODWLRQDUHQRWREVWUXFWHG
E\FDUSHWLQJRUZRRGZRUN
<RXUUDQJHOLNHPDQ\RWKHUKRXVHKROGLWHPVLV
KHDY\DQGFDQVHWWOHLQWRVRIWIORRUFRYHULQJVVXFKDV
FXVKLRQHGYLQ\ORUFDUSHWLQJ8VHFDUHZKHQPRYLQJ
WKHUDQJHRQWKLVW\SHRIIORRULQJ,WLVUHFRPPHQGHG
WKDWWKHIROORZLQJVLPSOHDQGLQH[SHQVLYHLQVWUXFWLRQV
EHIROORZHGWRSURWHFW\RXUIORRU
7KHUDQJHVKRXOGEHLQVWDOOHGRQDVKHHWRISO\ZRRG
RUVLPLODUPDWHULDO:KHQWKHIORRUFRYHULQJHQGVDW
WKHIURQWRIWKHUDQJHWKHDUHDWKDWWKHUDQJHZLOOUHVW
RQVKRXOGEHEXLOWXSZLWKSO\ZRRGWRWKHVDPHOHYHORU
KLJKHUWKDQWKHIORRUFRYHULQJ
7KLVZLOODOORZWKHUDQJHWREHPRYHGIRUFOHDQLQJ
RUVHUYLFLQJ$OVRPDNHVXUH\RXUIORRUFRYHULQJZLOO
ZLWKVWDQG)6HHWKH,QVWDOODWLRQ6DIHW\,QVWUXFWLRQV
VHFWLRQ
0DNHVXUHWKHZDOOFRYHULQJVDURXQG\RXUUDQJHFDQ
ZLWKVWDQGWKHKHDWJHQHUDWHGXSWR)E\WKH
UDQJH6HHWKH,QVWDOODWLRQ6DIHW\,QVWUXFWLRQVVHFWLRQ
,03257$17
5HPRYHDOOWDSHDQGSDFNDJLQJ0DNHVXUHWKHEXUQHUV
DUHSURSHUO\VHDWHGDQGOHYHO
7DNHWKHDFFHVVRU\SDFNRXWRIWKHRYHQDQGRUGUDZHU
&KHFNWREHVXUHWKDWQRUDQJHSDUWVKDYHFRPHORRVH
GXULQJVKLSSLQJ
&219(57,1*72/3*$6
RUFRQYHUWLQJ
EDFNWRQDWXUDOJDVIURP/3
7KLVUDQJHOHDYHVWKHIDFWRU\VHWIRUXVHZLWKQDWXUDO
JDV,I\RXZDQWWRFRQYHUWWR/3JDVWKHFRQYHUVLRQ
PXVWEHSHUIRUPHGE\DTXDOLILHG/3JDVLQVWDOOHU
7KHFRQYHUVLRQLQVWUXFWLRQVDQG/3RULILFHVFDQEHIRXQG
DWWDFKHGWRWKHUDQJHQH[WWRWKHSUHVVXUHUHJXODWRU
.HHSWKHVHLQVWUXFWLRQVDQGWKHRULILFHVLQFDVH\RXZDQW
WRFRQYHUWEDFNWRQDWXUDOJDV
<RXUUDQJHLVGHVLJQHGWRRSHUDWHDWDPDQLIROGSUHVVXUH
RIµRIZDWHUFROXPQRQQDWXUDOJDVRULIGHVLJQHGIRU/3
JDVSURSDQHRUEXWDQHµRIZDWHUFROXPQ
0DNHVXUH\RXDUHVXSSO\LQJ\RXUUDQJHZLWKWKHW\SH
RIJDVIRUZKLFKLWLVGHVLJQHG
7KLVUDQJHLVFRQYHUWLEOHIRUXVHRQQDWXUDORU
SURSDQHJDV,I\RXGHFLGHWRXVHWKLVUDQJHRQ/3JDV
FRQYHUVLRQPXVWEHPDGHE\DTXDOLILHG/3LQVWDOOHU
EHIRUHDWWHPSWLQJWRRSHUDWHWKHUDQJHRQWKDWJDV
)RUSURSHURSHUDWLRQWKHSUHVVXUHRIQDWXUDOJDVVXSSOLHG
WRWKHUHJXODWRUPXVWEHEHWZHHQ´DQG´RIZDWHU
FROXPQ
)RU/3JDVWKHSUHVVXUHVXSSOLHGPXVWEHEHWZHHQ´
DQG´RIZDWHUFROXPQ
:KHQFKHFNLQJIRUSURSHURSHUDWLRQRIWKHUHJXODWRU
WKHLQOHWSUHVVXUHPXVWEHDWOHDVWJUHDWHUWKDQWKH
RSHUDWLQJPDQLIROGSUHVVXUHDVJLYHQDERYH
7KHSUHVVXUHUHJXODWRUORFDWHGDWWKHLQOHWRIWKHUDQJH
PDQLIROGPXVWUHPDLQLQWKHVXSSO\OLQHUHJDUGOHVVRI
ZKHWKHUQDWXUDORU/3JDVLVEHLQJXVHG
$IOH[LEOHPHWDODSSOLDQFHFRQQHFWRUXVHGWRFRQQHFWWKH
UDQJHWRWKHJDVVXSSO\OLQHVKRXOGKDYHDQ,'RI´
DQGEHIHHWLQOHQJWKIRUHDVHRILQVWDOODWLRQ,Q&DQDGD
IOH[LEOHFRQQHFWRUVPXVWEHVLQJOHZDOOPHWDOFRQQHFWRUV
QRORQJHUWKDQIHHWLQOHQJWK
3529,'($'(48$7(*$66833/<

,QVWDOODWLRQ,QVWUXFWLRQV
&211(&77+(5$1*(72*$6
6KXWRIIWKHPDLQJDVVXSSO\YDOYHEHIRUHGLVFRQQHFWLQJ
WKHROGUDQJHDQGOHDYHLWRIIXQWLOWKHQHZKRRNXSKDV
EHHQFRPSOHWHG'RQ·WIRUJHWWRUHOLJKWWKHSLORWRQRWKHU
JDVDSSOLDQFHVZKHQ\RXWXUQWKHJDVEDFNRQ
%HFDXVHKDUGSLSLQJUHVWULFWVPRYHPHQWRIWKHUDQJHWKH
XVHRID&6$,QWHUQDWLRQDOFHUWLILHGIOH[LEOHPHWDODSSOLDQFH
FRQQHFWRULVUHFRPPHQGHGXQOHVVORFDOFRGHVUHTXLUHD
KDUGSLSHGFRQQHFWLRQ
1HYHUXVHDQROGFRQQHFWRUZKHQLQVWDOOLQJDQHZUDQJH
,IWKHKDUGSLSLQJPHWKRGLVXVHG\RXPXVWFDUHIXOO\DOLJQ
WKHSLSHWKHUDQJHFDQQRWEHPRYHGDIWHUWKHFRQQHFWLRQLV
PDGH
7RSUHYHQWJDVOHDNVSXWSLSHMRLQWFRPSRXQGRQRUZUDS
SLSHWKUHDGWDSHZLWK7HIORQDURXQGDOOPDOHH[WHUQDO
SLSHWKUHDGV
$,QVWDOODPDQXDOJDVOLQHVKXWRIIYDOYHLQWKHJDVOLQHLQ
DQHDVLO\DFFHVVHGORFDWLRQRXWVLGHRIWKHUDQJH0DNH
VXUHHYHU\RQHRSHUDWLQJWKHUDQJHNQRZVZKHUHDQG
KRZWRVKXWRIIWKHJDVVXSSO\WRWKHUDQJH
%,QVWDOOPDOH´IODUHXQLRQDGDSWHUWRWKH´137
LQWHUQDOWKUHDGDWLQOHWRIUHJXODWRU8VHDEDFNXSZUHQFK
RQWKHUHJXODWRUILWWLQJWRDYRLGGDPDJH
:KHQLQVWDOOLQJWKHUDQJHIURPWKHIURQWUHPRYHWKH
HOERZIRUHDVLHULQVWDOODWLRQ
&,QVWDOOPDOH´RU´IODUHXQLRQDGDSWHUWRWKH137
LQWHUQDOWKUHDGRIWKHPDQXDOVKXWRIIYDOYHWDNLQJFDUH
WREDFNXSWKHVKXWRIIYDOYHWRNHHSLWIURPWXUQLQJ
'&RQQHFWIOH[LEOHPHWDODSSOLDQFHFRQQHFWRUWRWKH
DGDSWHURQWKHUDQJH3RVLWLRQUDQJHWRSHUPLW
FRQQHFWLRQDWWKHVKXWRIIYDOYH
(:KHQDOOFRQQHFWLRQVKDYHEHHQPDGHPDNHVXUHDOO
UDQJHFRQWUROVDUHLQWKHRIISRVLWLRQDQGWXUQRQWKHPDLQ
JDVVXSSO\YDOYH8VHDOLTXLGOHDNGHWHFWRUDWDOOMRLQWV
DQGFRQQHFWLRQVWRFKHFNIRUOHDNVLQWKHV\VWHP
:$51,1*)LUHKD]DUG'RQRWXVHD
IODPHWRFKHFNIRUJDVOHDNV
:KHQXVLQJWHVWSUHVVXUHVJUHDWHUWKDQSVLJWRSUHVVXUH
WHVWWKHJDVVXSSO\V\VWHPRIWKHUHVLGHQFHGLVFRQQHFWWKH
UDQJHDQGLQGLYLGXDOVKXWRIIYDOYHIURPWKHJDVVXSSO\
SLSLQJ:KHQXVLQJWHVWSUHVVXUHVRI
SVLJRUOHVVWRWHVWWKHJDVVXSSO\V\VWHPVLPSO\
LVRODWHWKHUDQJHIURPWKHJDVVXSSO\V\VWHPE\FORVLQJWKH
LQGLYLGXDOVKXWRIIYDOYH
7HIORQ5HJLVWHUHGWUDGHPDUNRI'X3RQW
*$63,3($1'(/(&75,&$/287/(7/2&$7,216
5HFRPPHQGHGDUHDIRU9
RXWOHWRQUHDUZDOODQGDUHDIRU
WKURXJKWKHZDOOFRQQHFWLRQRI
SLSHVWXEDQGVKXWRIIYDOYH
5HFRPPHQGHGDUHD
IRUWKURXJKWKHIORRU
FRQQHFWLRQRISLSHVWXE
DQGVKXWRIIYDOYH
&$87,217RSUHYHQW
GUDIWVIURPDIIHFWLQJEXUQHU
RSHUDWLRQVHDODOORSHQLQJVLQIORRU
DQGZDOO
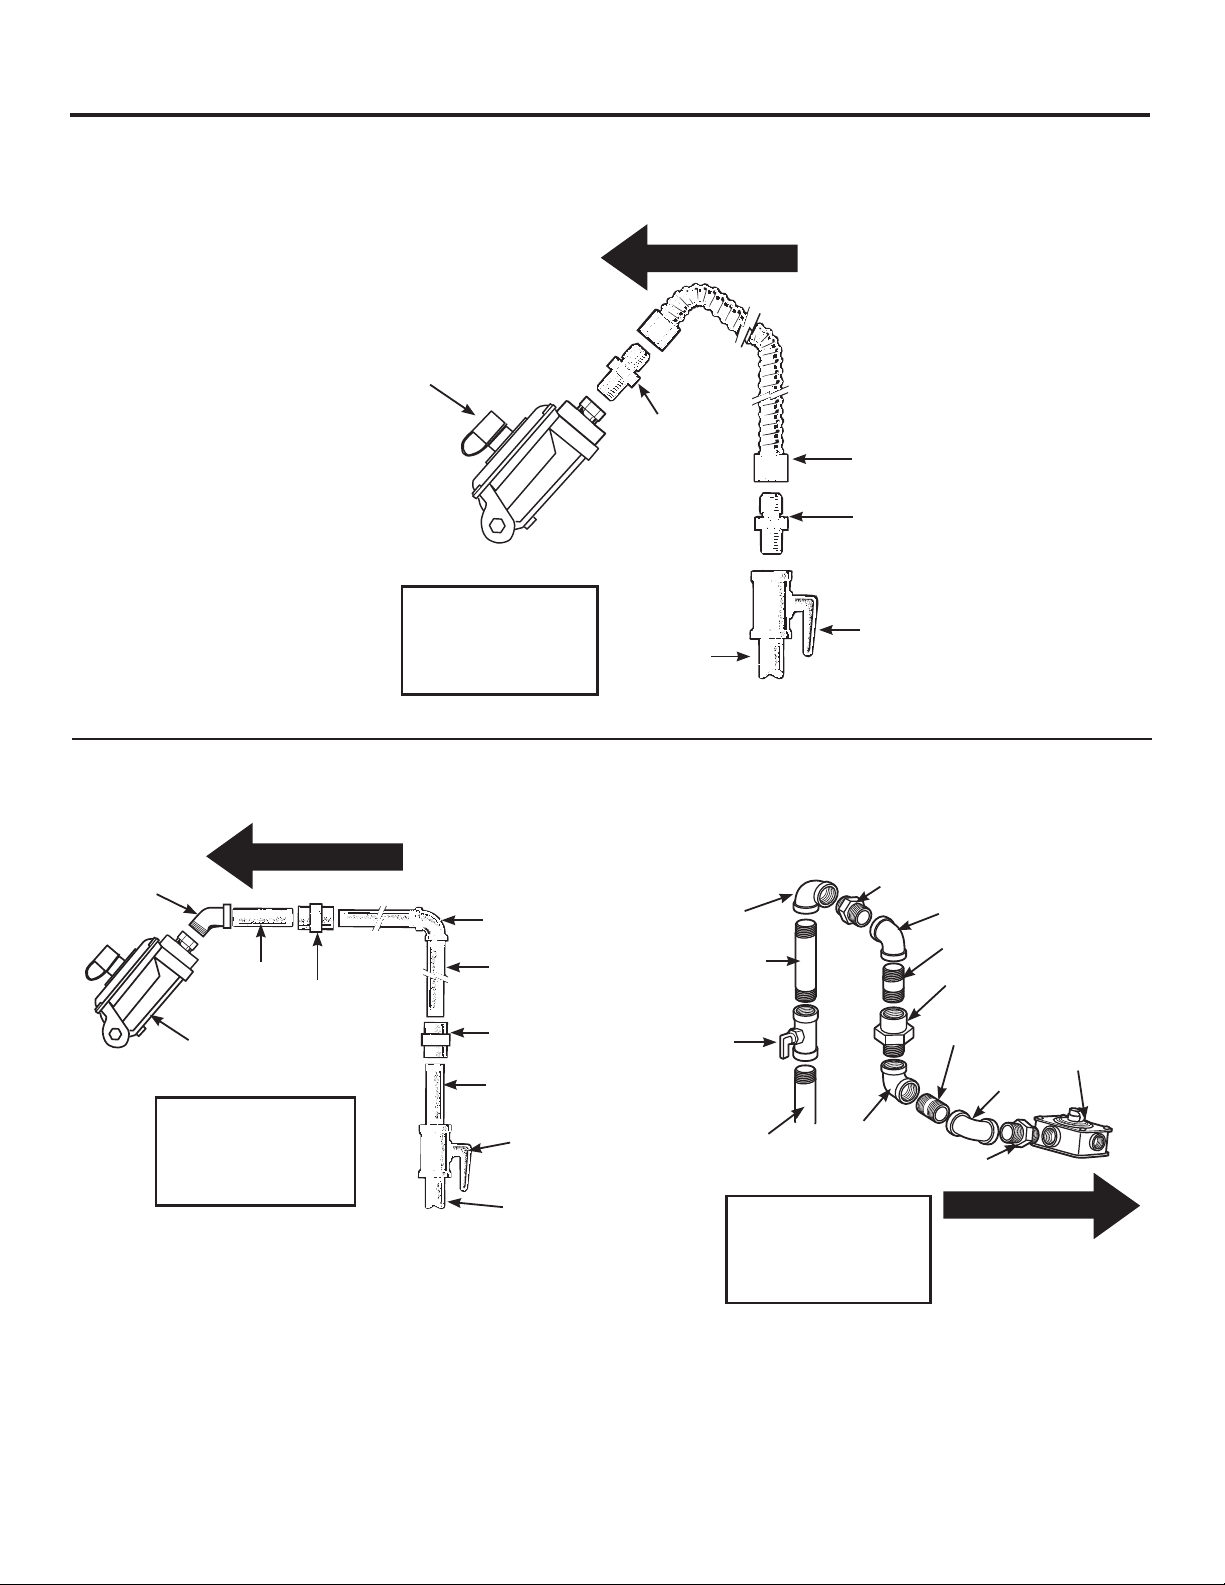
,QVWDOODWLRQ,QVWUXFWLRQV
3UHVVXUH
UHJXODWRU
*
DV)ORZLQWR5DQJH
)OH[
FRQQHFWRU
IWPD[
$GDSWHU
,QVWDOOHU,QIRUP
WKHFRQVXPHURI
WKHORFDWLRQRIWKH
JDVVKXWRIIYDOYH
´RU´
*DVSLSH
$GDSWHU
*DV
VKXWRII
YDOYH
*DV
VKXWRII
YDOYH
´RU´
*DVSLSH
*DV)ORZLQWR5DQJH
3UHVVXUH
UHJXODWRU
1LSSOH
(OERZ
(OERZ
$GDSWHU
$GDSWHU
(OERZ
4XLFNFRQQHFW
RUXQLRQ
,QVWDOOHU,QIRUPWKH
FRQVXPHURIWKH
ORFDWLRQRIWKHJDV
VKXWRIIYDOYH
$OWHUQDWH+RRNXS
1LSSOH
1LSSOH
(OERZ
3UHVVXUH
UHJXODWRU
(OERZ
1LSSOH
8QLRQ
(OERZ
%ODFN
LURQSLSH
8QLRQ
1LSSOH
,QVWDOOHU,QIRUP
WKHFRQVXPHURI
WKHORFDWLRQRIWKH
JDVVKXWRIIYDOYH
*DV)ORZLQWR5DQJH
*DV
VKXWRII
YDOYH
´RU´
*DVSLSH
)/(;,%/(&211(&725+22.83
5,*,'3,3(+22.83237,216
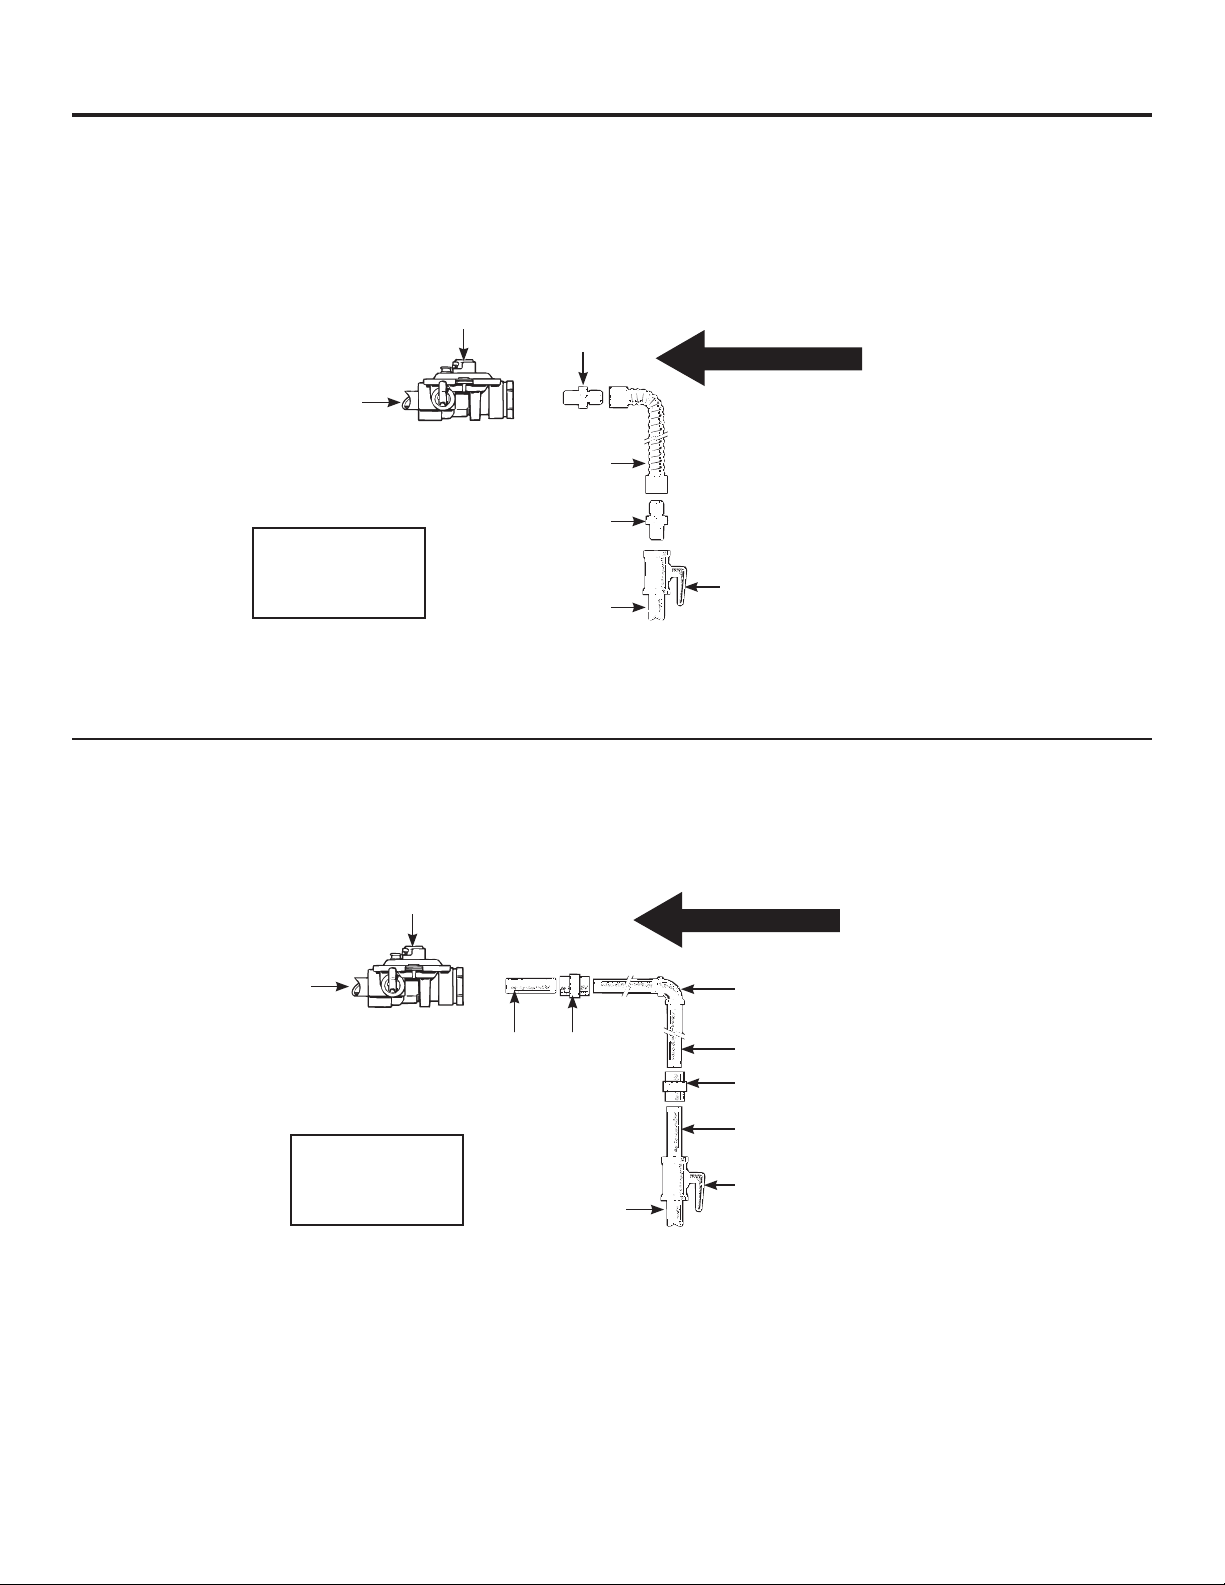
,QVWDOODWLRQ,QVWUXFWLRQV
5,*,'3,3(+22.83IRUPRGHOVHTXLSSHGZLWK6WDQGDUG7ZLQ%XUQHUV
)/(;,%/(&211(&725+22.83
IRUPRGHOVHTXLSSHGZLWK6WDQGDUG7ZLQ%XUQHUV
8QLRQ
1LSSOH
0DQLIROG
SLSH
1LSSOH
8QLRQ
%ODFNLURQSLSH
(OERZ
3UHVVXUH
UHJXODWRU
*DV)ORZLQWR5DQJH
,QVWDOOHU,QIRUPWKH
FRQVXPHURIWKH
ORFDWLRQRIWKHJDV
VKXWRIIYDOYH
sRUs
*DVSLSH
*DVVKXWRII
YDOYH
$GDSWHU
sRUs
*DVSLSH
$GDSWHU
)OH[FRQQHFWRU
IHHWPD[LPXP
0DQLIROG
SLSH
3UHVVXUH
UHJXODWRU
*DVVKXWRII
YDOYH
*DV)ORZLQWR5DQJH
,QVWDOOHU,QIRUPWKH
FRQVXPHURIWKH
ORFDWLRQRIWKHJDV
VKXWRIIYDOYH
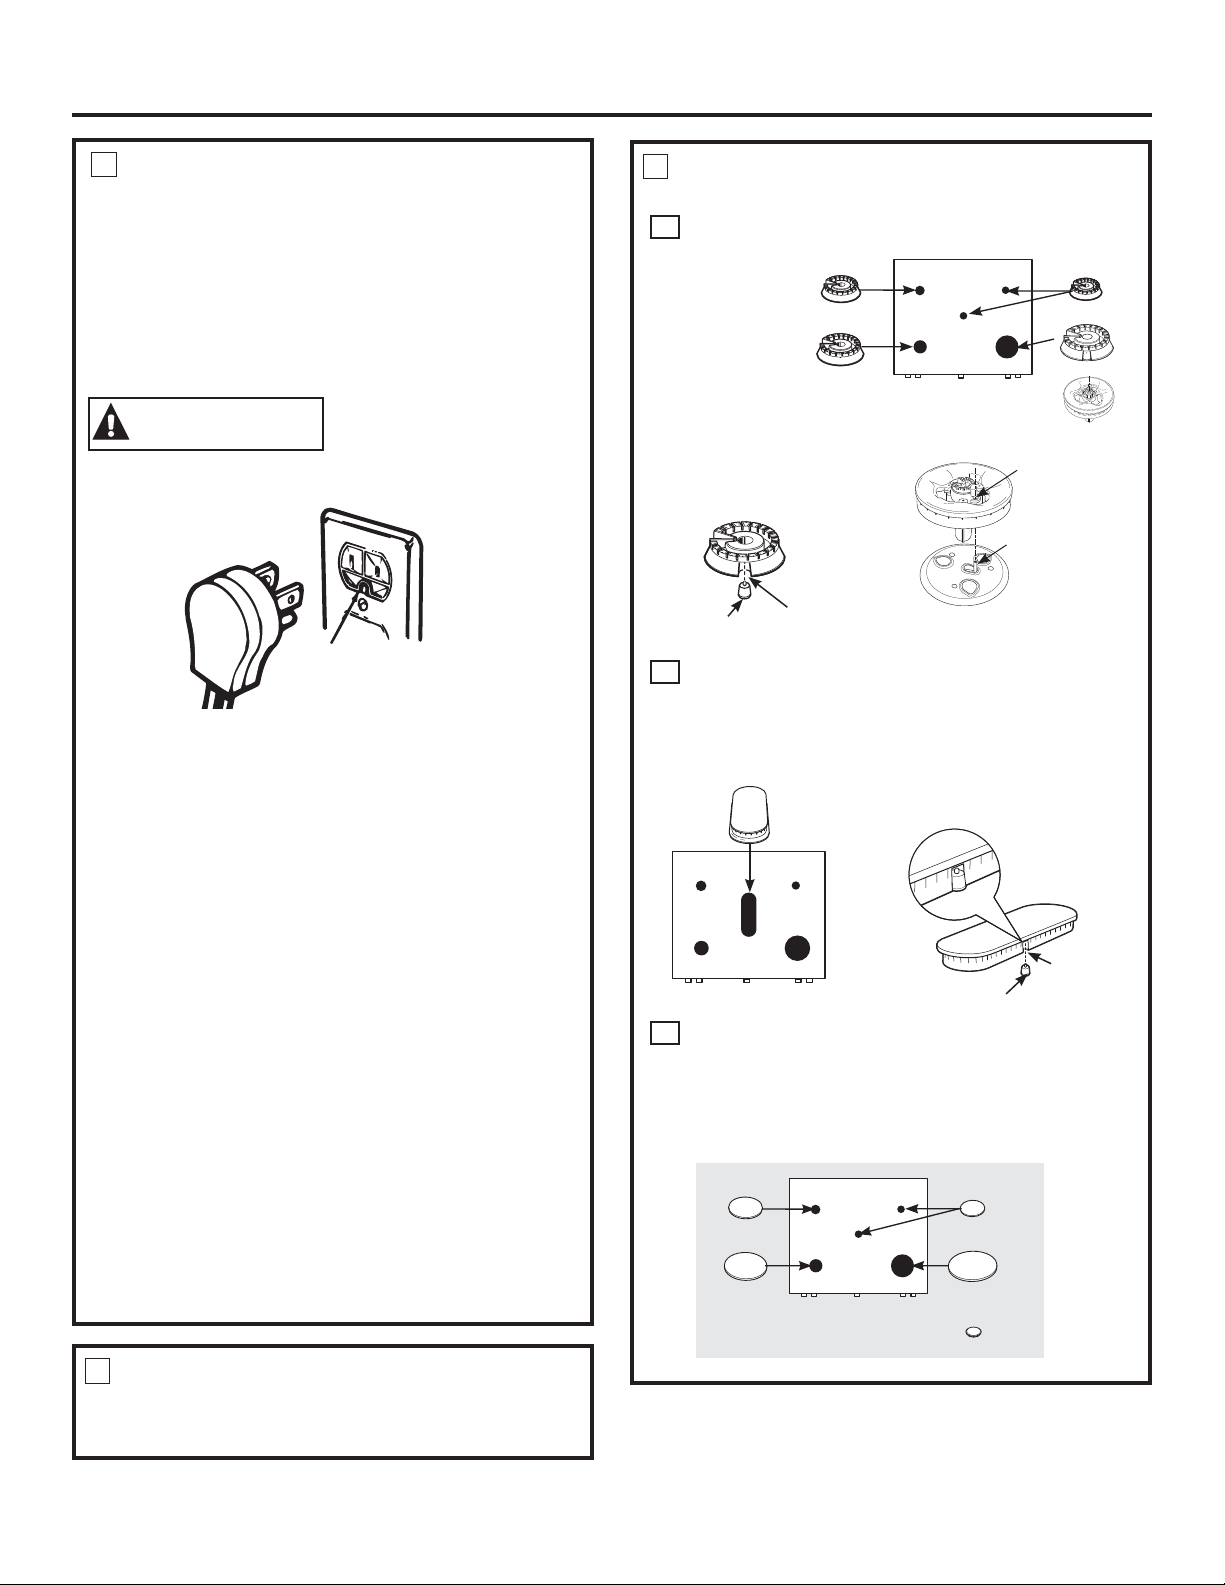
,QVWDOODWLRQ,QVWUXFWLRQV
(/(&75,&$/&211(&7,216
(OHFWULFDO5HTXLUHPHQWV
YROW+HUW]SURSHUO\JURXQGHGGHGLFDWHGFLUFXLW
SURWHFWHGE\DDPSRUDPSFLUFXLWEUHDNHURUWLPH
GHOD\IXVH
1RWH8VHRIDXWRPDWLFZLUHOHVVRUZLUHGH[WHUQDO
VZLWFKHVWKDWVKXWRIISRZHUWRWKHDSSOLDQFHDUHQRW
UHFRPPHQGHGIRUWKLVSURGXFW
*URXQGLQJ
:$51,1*6KRFN+D]DUG7KLV
DSSOLDQFHPXVWEHSURSHUO\JURXQGHG)DLOXUH
WRGRVRFDQUHVXOWLQHOHFWULFVKRFN
7KHSRZHUFRUGRIWKLVDSSOLDQFHLVHTXLSSHGZLWKD
WKUHHSURQJJURXQGLQJSOXJZKLFKPDWHVZLWKDVWDQGDUG
WKUHHSURQJJURXQGLQJZDOOUHFHSWDFOHWRPLQLPL]HWKH
SRVVLELOLW\RIHOHFWULFVKRFNKD]DUGIURPWKLVDSSOLDQFH
7KHFXVWRPHUVKRXOGKDYHWKHZDOOUHFHSWDFOHDQGFLUFXLW
FKHFNHGE\DTXDOLILHGHOHFWULFLDQWRPDNHVXUHWKH
UHFHSWDFOHLVSURSHUO\JURXQGHG
:KHUHDVWDQGDUGWZRSURQJZDOOUHFHSWDFOHLV
HQFRXQWHUHGLWLVWKHSHUVRQDOUHVSRQVLELOLW\DQG
REOLJDWLRQRIWKHFXVWRPHUWRKDYHLWUHSODFHGZLWKD
SURSHUO\JURXQGHGWKUHHSURQJZDOOUHFHSWDFOH
'212781'(5$1<&,5&8067$1&(6&87255(029(
7+(7+,5'*5281'3521*)5207+(32:(5&25''2
12786($1$'$37(5'212786($1(;7(16,21&25'
$ZRUGDERXW*)&,·V²*)&,·VDUHQRWUHTXLUHGRU
UHFRPPHQGHGIRUJDVUDQJHUHFHSWDFOHV
*URXQG)DXOW&LUFXLW,QWHUUXSWHUV*)&,·VDUHGHYLFHVWKDW
VHQVHOHDNDJHRIFXUUHQWLQDFLUFXLWDQGDXWRPDWLFDOO\
VZLWFKRIISRZHUZKHQDWKUHVKROGOHDNDJHOHYHOLV
GHWHFWHG7KHVHGHYLFHVPXVWEHPDQXDOO\UHVHWE\WKH
FRQVXPHU7KH1DWLRQDO(OHFWULFDO&RGHUHTXLUHVWKHXVHRI
*)&,·VLQNLWFKHQUHFHSWDFOHVLQVWDOOHGWRVHUYHFRXQWHUWRS
VXUIDFHV3HUIRUPDQFHRIWKHUDQJHZLOOQRWEHDIIHFWHG
LIRSHUDWHGRQD*)&,SURWHFWHGFLUFXLWEXWRFFDVLRQDO
QXLVDQFHWULSSLQJRIWKH*)&,EUHDNHULVSRVVLEOH
(QVXUHSURSHUJURXQG
H[LVWVEHIRUHXVH
6($/7+(23(1,1*6
6HDODQ\RSHQLQJVLQWKHZDOOEHKLQGWKHUDQJHDQGLQWKH
IORRUXQGHUWKHUDQJHZKHQKRRNXSVDUHFRPSOHWHG
$66(0%/(685)$&(%851(56RQ
VRPHPRGHOV
$
%XUQHU+HDGV
3ODFHEXUQHU
KHDGVRYHU
WKHHOHFWURGHV
RQWKH
FRRNWRSLQ
WKHFRUUHFW
ORFDWLRQV
DFFRUGLQJWR
WKHLUVL]H
%
2YDO&HQWHU%XUQHU+HDG&DS$VVHPEO\
3ODFHWKHRYDOFHQWHUKHDGFDSDVVHPEO\RYHUWKH
HOHFWURGHRQWKHFRRNWRS
&
&DSV
3ODFHWKHPDWFKLQJVL]HFDSVRQWRWKHEXUQHUEDVHV
RUKHDGV
0DNHVXUHWKDWWKHKHDGVRQVRPHPRGHOVDQGFDSV
DUHUHSODFHGLQWKHFRUUHFWORFDWLRQV
)URQWRIUDQJH
RQVRPHPRGHOV
7ULSOHIODPHKHDG
RQVRPHPRGHOV
6ORW
(OHFWURGH
RU
0DNHVXUHWKHVORWLQWKH
EXUQHUKHDGLVSRVLWLRQHG
RYHUWKHHOHFWURGH
)URQWULJKWEXUQHU
RQVRPHPRGHOV
+ROH
(OHFWURGH
(OHFWURGH
6ORW
)URQWRIUDQJH
2YDOKHDGDQGFDS
DVVHPEO\
0DNHVXUHWKHVORWLQWKH
EXUQHUKHDGLVSRVLWLRQHG
RYHUWKHHOHFWURGH
)URQWRIUDQJH
7ULULQJFDS
RQVRPHPRGHOV
RQVRPHPRGHOV
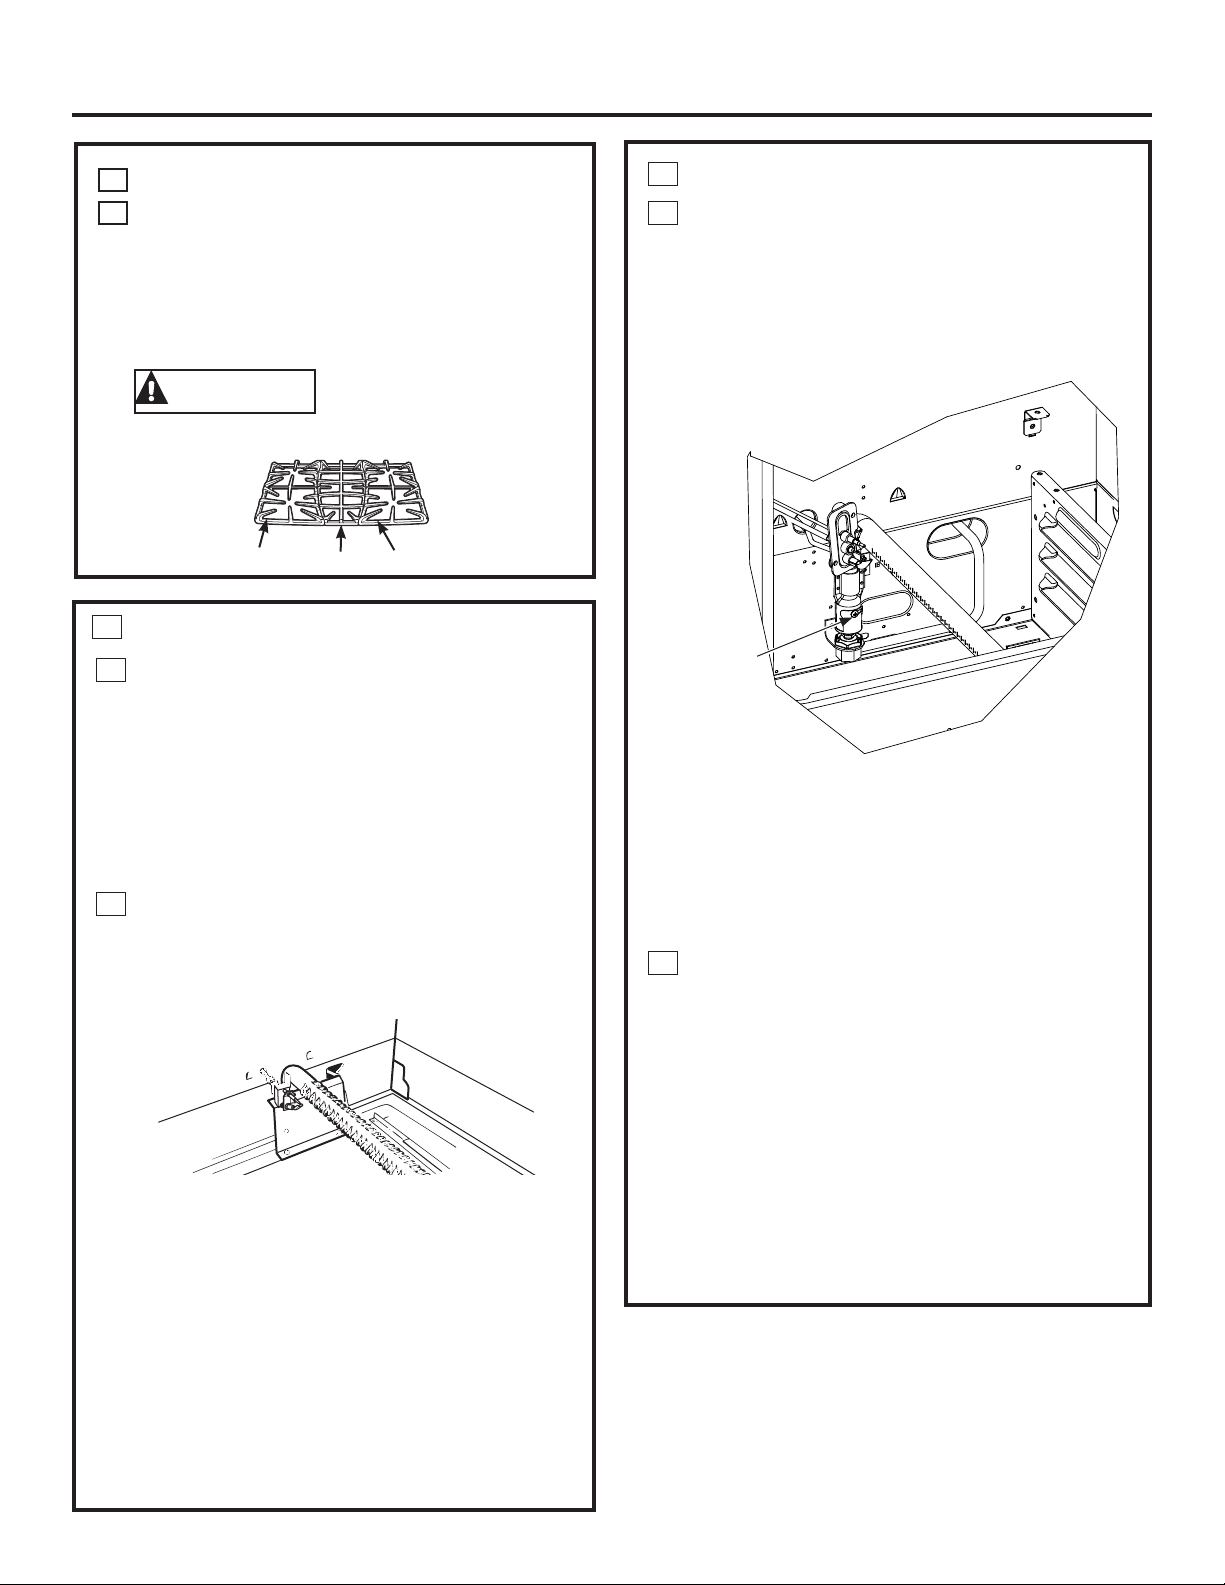
$66(0%/(685)$&(%851(56
&217
'
*UDWHV
3ODFHWKHOHIWULJKWDQGFHQWHUJUDWHVRQWKHFRRNWRS
7KHVHJUDWHVDUHSRVLWLRQVSHFLILF7KHXQGHUVLGHVRI
WKHOHIWDQGULJKWJUDWHVDUHPDUNHG´/()7)5217µDQG
´5,*+7)5217µ2QVRPHPRGHOVWKHXQGHUVLGHRIWKH
JUDWHVDUHPDUNHG´2XWVLGHµ3ODFHWKHPLGGOHJUDWH
ZLWKLWVERZHGIURQWWRZDUGWKHIURQWRIWKHUDQJH
&$87,21
'RQRWRSHUDWHWKHEXUQHU
ZLWKRXWDOOEXUQHUSDUWVLQSODFH
,QVWDOODWLRQ,QVWUXFWLRQV
/HIW)URQW
5LJKW)URQW
&HQWHU
$
&KHFN,JQLWLRQRI2YHQ%XUQHU
7KHRYHQLVGHVLJQHGWRRSHUDWHTXLHWO\DQG
DXWRPDWLFDOO\7RRSHUDWHWKHRYHQWXUQWKH
29(1&21752/NQREWRDVHWWLQJDERYH)
7KHRYHQEXUQHUZLOOLJQLWHDQGEXUQXQWLOWKH
VHWWHPSHUDWXUHLVUHDFKHG7KHRYHQEXUQHU
ZLOOFRQWLQXHWRF\FOHRQDQGRIIDVQHFHVVDU\WR
PDLQWDLQWKHRYHQDWWKHWHPSHUDWXUHLQGLFDWHG
E\WKH29(1&21752/NQRE
%
$GMXVW%DNH%XUQHU$LU$GMXVWPHQW6KXWWHU
RQ0RGHOVZLWKD%URLOHU'UDZHULI
1HFHVVDU\
'HWHUPLQHLIWKHERWWRPEXUQHUIODPHVDUH
EXUQLQJSURSHUO\
:LWKWKHRYHQERWWRPUHPRYHGSURSHUO\
DGMXVWHGIODPHVVKRXOGKDYHDSSUR[LPDWHO\
sEOXHFRQHVDQGLIUDQJHLVVXSSOLHGZLWK
QDWXUDOJDVVKRXOGEXUQZLWKQR\HOORZWLSSLQJ
:LWKPRVW/3JDVVPDOO\HOORZWLSVDWWKHHQG
RIRXWHUFRQHVDUHQRUPDO)ODPHVVKRXOG
QRWOLIWRIIEXUQHUSRUWV,IOLIWLQJLVREVHUYHG
JUDGXDOO\UHGXFHDLUVKXWWHURSHQLQJXQWLO
IODPHVDUHVWDELOL]HG
7KHVKXWWHUIRUWKHRYHQEXUQHULVQHDUWKH
EDFNZDOORIWKHRYHQDQGEHKLQGWKHEURLOHU
GUDZHU
/,*+77+(%851(56
/,*+77+(%851(56&217
&
$GMXVW%URLO%XUQHU$LU$GMXVWPHQW6KXWWHURQ
0RGHOVZLWKD%URLOHU'UDZHULI1HFHVVDU\
FRQW
7R5HPRYHWKH%URLOHU'UDZHU
3XOOWKHGUDZHURXWXQWLOLWVWRSVWKHQSXVKLW
EDFNLQDERXWRQHLQFK
*UDVSKDQGOHOLIWDQGSXOOEURLOHUGUDZHURXW
2QVRPHPRGHOVUHPRYHWKHPHWDOVKLHOGDW
WKHUHDURIWKHFDYLW\
7RDGMXVWWKHIORZRIDLUWRWKHEXUQHUORRVHQ
WKH3KLOOLSVKHDGVFUHZDQGURWDWHWKHVKXWWHU
WRDOORZPRUHRUOHVVDLULQWRWKHEXUQHUWXEH
'
&KHFN,JQLWLRQRI6XUIDFH%XUQHUV
2SHUDWLRQRIDOOFRRNWRSDQGRYHQEXUQHUVVKRXOG
EHFKHFNHGDIWHUWKHUDQJHDQGJDVVXSSO\OLQHV
KDYHEHHQFDUHIXOO\FKHFNHGIRUOHDNV
6HOHFWDWRSEXUQHUNQREDQGVLPXOWDQHRXVO\SXVK
LQDQGWXUQWR/,7(SRVLWLRQ<RXZLOOKHDUDFOLFNLQJ
VRXQGLQGLFDWLQJSURSHURSHUDWLRQRIWKHVSDUN
PRGXOH2QFHWKHDLUKDVEHHQSXUJHGIURPWKH
VXSSO\OLQHVEXUQHUVVKRXOGOLJKWZLWKLQVHFRQGV
$IWHUEXUQHUOLJKWVURWDWHNQRERXWRIWKH/,7(
SRVLWLRQ7U\HDFKEXUQHULQVXFFHVVLRQXQWLODOO
EXUQHUVKDYHEHHQFKHFNHG
/RRVHQDLU
DGMXVWPHQW
VKXWWHU

,QVWDOODWLRQ,QVWUXFWLRQV
/,*+77+(%851(56FRQW
4XDOLW\RI)ODPHV
7KHFRPEXVWLRQTXDOLW\RIEXUQHUIODPHVQHHGVWR
EHGHWHUPLQHGYLVXDOO\
,IEXUQHUIODPHVORRNOLNH$FDOOIRUVHUYLFH
1RUPDOEXUQHUIODPHVVKRXOGORRNOLNH%RU&
GHSHQGLQJRQWKHW\SHRIJDV\RXXVH
:LWK/3JDVVRPH\HOORZWLSSLQJRQRXWHUFRQHVLV
QRUPDO
(
5HSODFH2YHQ3DUWV
$IWHUDOODGMXVWPHQWVDUHPDGHUHSODFHWKH
EURLOHUGUDZHURYHQERWWRPUDFNVDQGRYHQ
GRRU
$<HOORZIODPHV³&DOO
IRUVHUYLFH
%<HOORZWLSVRQ
RXWHUFRQHV³1RUPDO
IRU/3JDV
&6RIWEOXH
IODPHV³1RUPDOIRU
QDWXUDOJDV
$'-867%52,/$1'29(1%851(5
$,5$'-8670(176+877(5,1$
6(/)&/($1,1*29(1,)1(&(66$5<
$LUDGMXVWPHQWVKXWWHUVIRUWKHWRSDQGERWWRPEXUQHUV
UHJXODWHWKHIORZRIDLUWRWKHIODPHV
7KHDLUDGMXVWPHQWVKXWWHUIRUWKHWRSEURLOEXUQHULVLQ
WKHFHQWHURIWKHUHDUZDOORIWKHRYHQ
$LU
DGMXVWPHQWVKXWWHU
/RRVHQ
7KHVKXWWHUIRUWKHERWWRPRYHQEXUQHULVQHDUWKHEDFN
ZDOOEHKLQGWKHZDUPLQJGUDZHU5HPRYHWKHGUDZHU6HH
WKH&DUHDQGFOHDQLQJRIWKHUDQJH VHFWLRQ
7RDGMXVWWKHIORZRIDLUWRHLWKHUEXUQHUORRVHQWKH
3KLOOLSVKHDGVFUHZDQGURWDWHWKHVKXWWHUWRZDUGRSHQ
RUFORVHGSRVLWLRQDVQHHGHG
7KHIODPHVIRUWKHWRSEURLOEXUQHUVKRXOGEHVWHDG\ZLWK
DSSUR[LPDWHO\´EOXHFRQHVDQGVKRXOGQRWH[WHQGRXW
RYHUWKHHGJHVRIWKHEXUQHUEDIIOH
7RGHWHUPLQHLIWKHERWWRPEXUQHUIODPHVDUHEXUQLQJ
SURSHUO\UHPRYHWKHRYHQERWWRP)ODPHVVKRXOGKDYH
DSSUR[LPDWHO\´EOXHFRQHVDQGLIUDQJHLVVXSSOLHG
ZLWKQDWXUDOJDVVKRXOGEXUQZLWKQR\HOORZWLSSLQJ
:LWKPRVW/3JDVVPDOO\HOORZWLSVDWWKHHQGRIRXWHU
FRQHVDUHQRUPDO)ODPHVVKRXOGQRWOLIWRIIEXUQHUSRUWV
,IOLIWLQJLVREVHUYHGJUDGXDOO\UHGXFHDLUVKXWWHURSHQLQJ
XQWLOIODPHVDUHVWDELOL]HG
7RUHPRYHWKHRYHQERWWRP
$5HPRYHWKHVFUHZVKROGLQJGRZQUHDURIWKHRYHQ
ERWWRP
%*UDVSWKHRYHQERWWRPDWILQJHUVORWVRQHDFKVLGH
&/LIWWKHUHDURIWKHRYHQERWWRPHQRXJKWRFOHDUWKH
OLSRIWKHUDQJHIUDPHSXVKLWEDFNDQGWKHQSXOOLWXS
DQGRXW
$'-867%52,/$1'29(1%851(5
$,5$'-8670(176+877(5,1$6(/)
&/($1,1*29(1,)1(&(66$5<
&217
2YHQERWWRP
$LUDGMXVWPHQW
VKXWWHU
/RRVHQ
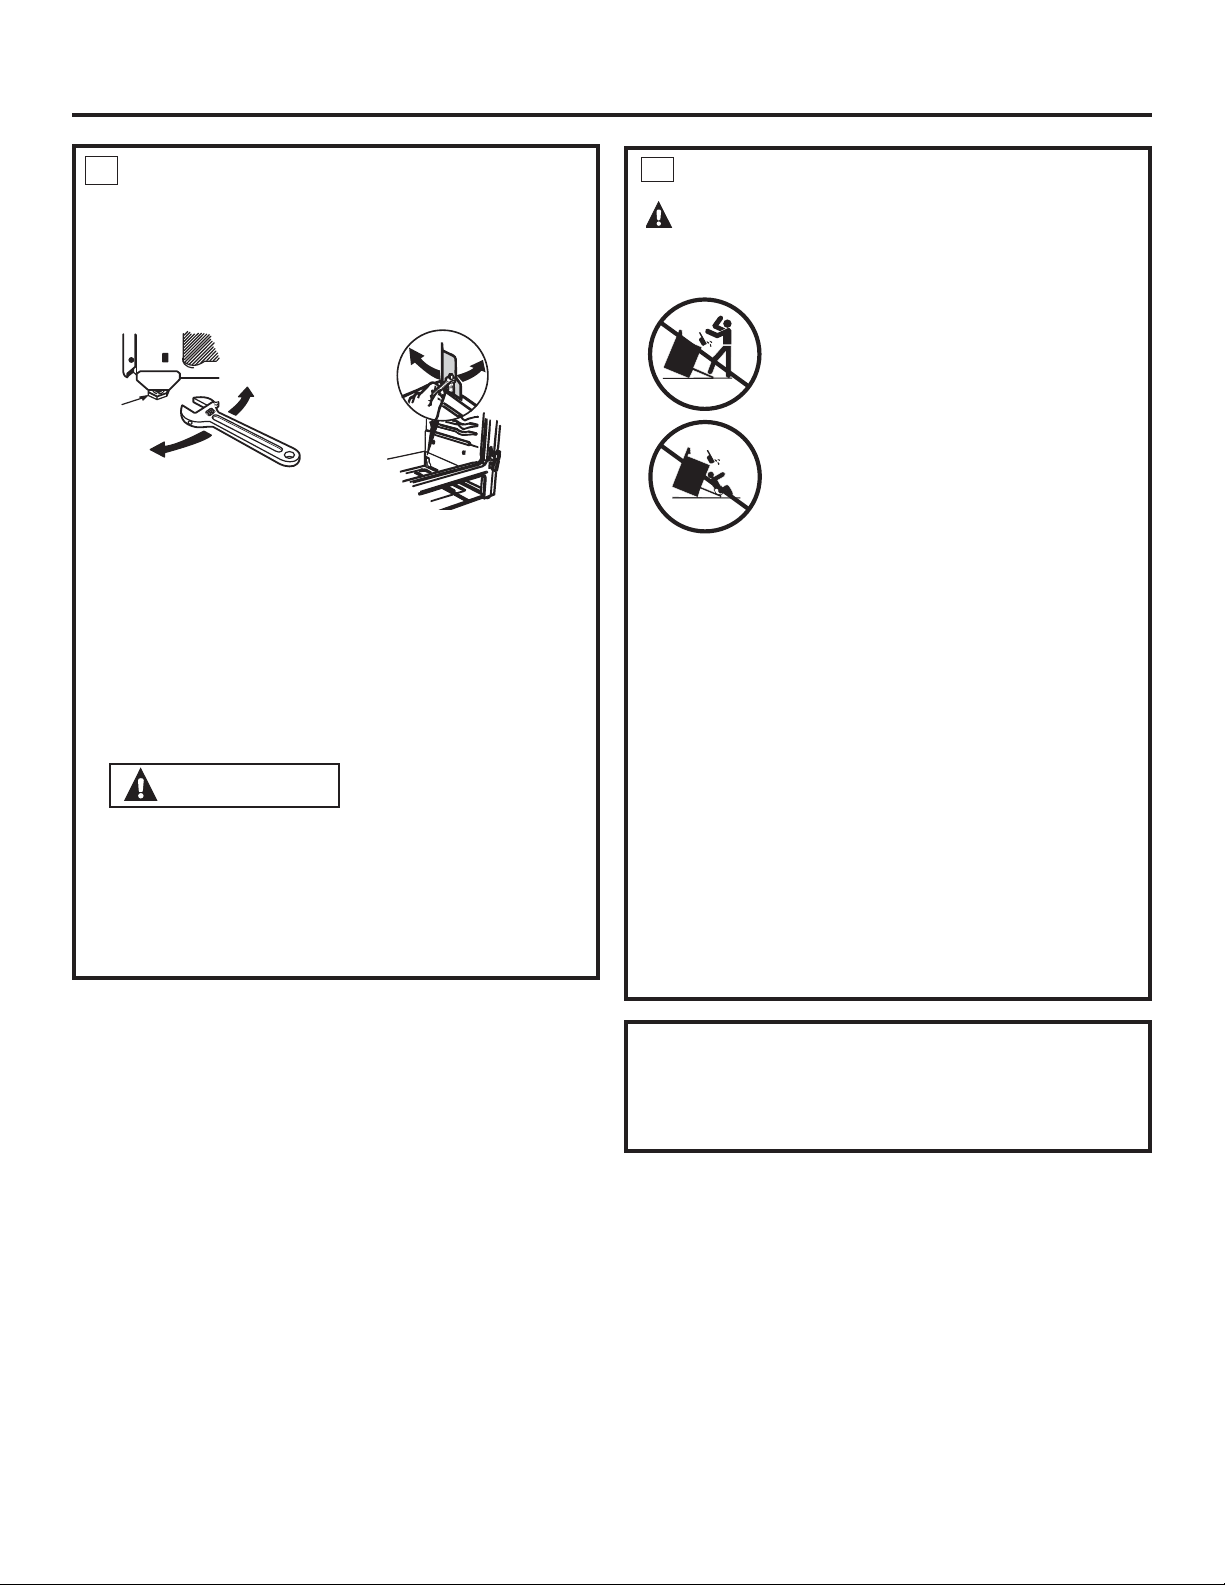
,QVWDOODWLRQ,QVWUXFWLRQV
/(9(/,1*7+(5$1*(
$,QVWDOOWKHRYHQVKHOYHVLQWKHRYHQDQGSRVLWLRQWKH
UDQJHZKHUHLWZLOOEHLQVWDOOHGZLWKIURQWDFFHVVWR
IURQWOHYHOLQJOHJVDQGUHDUDFFHVVWRUHDUOHYHOLQJ
OHJV$OOOHJVPXVWEHOHYHOHG%()25(WKHSURGXFWLV
LQVWDOOHG
%&KHFNIRUOHYHOQHVVE\SODFLQJDVSLULWOHYHORUDFXS
SDUWLDOO\ILOOHGZLWKZDWHURQRQHRIWKHRYHQVKHOYHV
,IXVLQJDVSLULWOHYHOWDNHWZRUHDGLQJV³ZLWKWKHOHYHO
SODFHGGLDJRQDOO\ILUVWLQRQHGLUHFWLRQDQGWKHQWKHRWKHU
&5HPRYHWKHGUDZHURQVRPHPRGHOV6HHWKH&DUHDQG
FOHDQLQJRIWKHUDQJHVHFWLRQ7KHIURQWOHYHOLQJOHJVFDQ
EHDGMXVWHGIURPWKHERWWRPDQGWKHUHDUOHJVFDQEH
DGMXVWHGIURPWKHWRSRQVRPHPRGHOVRUWKHERWWRP
'8VHDQRSHQHQGRUDGMXVWDEOHZUHQFKWRDGMXVWWKH
OHYHOLQJOHJVXQWLOWKHUDQJHLVOHYHO
:$51,1*1HYHUFRPSOHWHO\UHPRYH
WKHOHYHOLQJOHJDVWKHUDQJHZLOOQRWEHVHFXUHGWRWKH
DQWLWLSGHYLFHSURSHUO\
($IWHUOHYHOLQJWKHXQLWVOLGHLWLQWRILQDOSRVLWLRQDQG
YHULI\OHYHOQHVV
)$IWHUWKHUDQJHLVOHYHOVOLGHWKHUDQJHDZD\IURPWKH
ZDOOVRWKDWWKH$QWL7LSGHYLFHFDQEHLQVWDOOHG
/HJ
OHYHOHU
/RZHU
UDQJH
5DLVH
UDQJH
RQVRPHPRGHOV
5DLVH
UDQJH
/RZHU
UDQJH
RQVRPHPRGHOV
,167$//,1*7+($17,7,3'(9,&(
:+(1$//+22.836$5(&203/(7('
0DNHVXUHDOOFRQWUROVDUHOHIWLQWKHRIISRVLWLRQ0DNH
VXUHWKHIORZRIFRPEXVWLRQDQGYHQWLODWLRQDLUWRWKH
UDQJHLVXQREVWUXFWHG
:$51,1*
$17,7,3'(9,&(
$OOUDQJHVFDQWLS
%8516RURWKHU6(5,286,1-85,(6FDQ
UHVXOW
,167$//DQG&+(&.WKHDQWLWLSEUDFNHW
IROORZLQJWKHLQVWUXFWLRQVVXSSOLHGZLWK
WKHEUDFNHW
7RUHGXFHWKHULVNRIWLSSLQJWKHUDQJHWKHUDQJHPXVWEH
VHFXUHGE\DSURSHUO\LQVWDOOHGDQWLWLSEUDFNHW)ROORZWKH
LQVWUXFWLRQVSDFNDJHGZLWKWKHEUDFNHW
7RFKHFNLIWKHEUDFNHWLVLQVWDOOHGDQGHQJDJHG
SURSHUO\ORRNXQGHUQHDWKWKHUDQJHWRVHHWKDWWKH
UHDUOHYHOLQJOHJLVHQJDJHGLQWKHEUDFNHW2QVRPH
PRGHOVWKHVWRUDJHGUDZHURUNLFNSDQHOFDQEH
UHPRYHGIRUHDV\LQVSHFWLRQ,IYLVXDOLQVSHFWLRQLVQRW
SRVVLEOHVOLGHWKHUDQJHIRUZDUGFRQILUPWKHDQWLWLS
EUDFNHWLVVHFXUHO\DWWDFKHGWRWKHIORRURUZDOODQG
VOLGHWKHUDQJHEDFNVRWKHUHDUOHYHOLQJOHJLVXQGHUWKH
DQWLWLSEUDFNHW
,IWKHUDQJHLVSXOOHGIURPWKHZDOOIRUDQ\UHDVRQDOZD\V
UHSHDWWKLVSURFHGXUHWRYHULI\WKHUDQJHLVSURSHUO\
VHFXUHGE\WKHDQWLWLSEUDFNHW
,I\RXUUDQJHKDVQRDQWLWLSEUDFNHWFDOOWR
UHFHLYHRQHDWQRFRVW

3UREOHP 3RVVLEOH&DXVHV :KDW7R'R
3OXJRQUDQJHLVQRWFRPSOHWHO\ 0DNHVXUHHOHFWULFDOSOXJLVSOXJJHGLQWRDOLYHSURSHUO\
LQVHUWHGLQWKHHOHFWULFDORXWOHW JURXQGHGRXWOHW
%XUQHUVOLWVRQWKHVLGHRIWKH 5HPRYHWKHEXUQHUVDQGFOHDQWKHP&KHFNWKH
EXUQHUPD\EHFORJJHG HOHFWURGHDUHDIRUEXUQHGRQIRRGRUJUHDVH6HH
WKH&DUHDQGFOHDQLQJRIWKHUDQJHVHFWLRQ
,PSURSHUEXUQHUDVVHPEO\ 0DNHVXUHWKHEXUQHUSDUWVDUHLQVWDOOHGFRUUHFWO\
6HHWKH&DUHDQGFOHDQLQJRIWKHUDQJHVHFWLRQ
%XUQHUIODPHVYHU\ ,PSURSHUDLUWRJDVUDWLR ,IUDQJHLVFRQQHFWHGWR/3JDVFRQWDFWWKHSHUVRQ
ODUJHRU\HOORZ ZKRLQVWDOOHG\RXUUDQJHRUPDGHWKHFRQYHUVLRQ
6XUIDFHEXUQHUVOLJKW 7KHRYHQJDVVKXWRIIYDOYH 7RFKHFNWKHRYHQJDVVKXWRIIYDOYHUHPRYHWKH
EXWRYHQGRHVQRW PD\KDYHDFFLGHQWDOO\EHHQ GUDZHUVHHWKH&DUHDQGFOHDQLQJRIWKHUDQJH
PRYHGGXULQJFOHDQLQJRU VHFWLRQ)RUORZHURYHQGUDZHUPRGHOVUHPRYHWKH
PRYLQJ UHDUDFFHVVSDQHOE\XQVFUHZLQJWKHWKXPEVFUHZV
LQWKHXSSHUOHIWDQGULJKWFRUQHUV/RRNIRUWKHJDV
VKXWRIIOHYHUDWWKHEDFNRIWKHUDQJH
&RQWUROVLJQDOVDIWHU <RXIRUJRWWRHQWHUDEDNH 7RXFKWKH%DNHSDGDQGGHVLUHGWHPSHUDWXUH
HQWHULQJFRRNLQJWLPH WHPSHUDWXUHRUFOHDQLQJWLPH RUWKH6HOI&OHDQSDGDQGGHVLUHGFOHDQWLPH
RUVWDUWWLPH
)RRGGRHVQRWEDNHRU
2YHQFRQWUROVLPSURSHUO\VHW 6HHWKH8VLQJWKHXSSHURYHQVHFWLRQ
URDVWSURSHUO\LQWKH
6KHOISRVLWLRQLVLQFRUUHFW 6HHWKH8VLQJWKHXSSHURYHQVHFWLRQ
XSSHURYHQ
,QFRUUHFWFRRNZDUHRUFRRNZDUH 6HHWKH8VLQJWKHXSSHURYHQVHFWLRQ
RILPSURSHUVL]HEHLQJXVHG
2YHQWKHUPRVWDWQHHGV 6HHWKH$GMXVWWKHXSSHURYHQWKHUPRVWDW³'RLW
DGMXVWPHQW\RXUVHOIVHFWLRQ
&ORFNQRWVHWFRUUHFWO\ 6HHWKH8VLQJWKHFORFNDQGWLPHU VHFWLRQ
$OXPLQXPIRLOXVHGLPSURSHUO\ 6HHWKH&DUHDQGFOHDQLQJRIWKHUDQJHVHFWLRQ
LQWKHRYHQ
2YHQERWWRPQRWVHFXUHO\ 6HHWKH,QVWDOODWLRQRIWKHUDQJH VHFWLRQ
VHDWHGLQSRVLWLRQ
%XUQHUVGRQRWOLJKW 3OXJRQUDQJHLVQRW 0DNHVXUHHOHFWULFDOSOXJLVSOXJJHGLQWRDOLYHSURSHUO\
FRPSOHWHO\LQVHUWHGLQWKH JURXQGHGRXWOHW
HOHFWULFDORXWOHW
*DVVXSSO\QRWFRQQHFWHG 6HHWKH,QVWDOODWLRQ,QVWUXFWLRQVWKDWFDPHZLWK\RXU
RUWXUQHGRQ UDQJH
%ULGJHEXUQHUZRQ·WOLJKW 6HH+RZWR/LJKW%ULGJH%XUQHUIRU0RGHO3*%VHFWLRQ
7URXEOHVKRRWLQJ7LSV
6DYHWLPHDQGPRQH\5HYLHZWKHFKDUWVRQWKHIROORZLQJ
SDJHVILUVWDQG\RXPD\QRWQHHGWRFDOOIRUVHUYLFH
%HIRUH\RXFDOOIRUVHUYLFH«
7RSEXUQHUVGRQRWOLJKW
RUGRQRWEXUQHYHQO\
7KHIURQWULJKWEXUQHULV
GHVLJQHGWRKDYHVOLJKWO\
VPDOOHUIODPHVEHWZHHQ
WKHDQGR·FORFN
SRVLWLRQV7KLVLVQRUPDO
/HYHULV
VKRZQFORVHG
38//7223(1
6HDOHGEXUQHUPRGHOV
7KXPEVFUHZV
/RZHURYHQGUDZHUPRGHOV

7URXEOHVKRRWLQJ7LSV
3UREOHP 3RVVLEOH&DXVHV :KDW7R'R
%XUQHUVGRQRWOLJKW $IXVHLQ\RXUKRPHPD\EH 5HSODFHWKHIXVHRUUHVHWWKHFLUFXLWEUHDNHU
FRQW EORZQRUWKHFLUFXLWEUHDNHU
WULSSHG
%XUQHUSDUWVQRWUHSODFHG 6HHWKH&DUHDQGFOHDQLQJRIWKHUDQJH VHFWLRQ
FRUUHFWO\
)RRGGRHVQRWEURLO 2YHQFRQWUROVLPSURSHUO\VHW 0DNHVXUH\RXWRXFKWKH%URLO+L/RSDG
SURSHUO\LQWKHXSSHURYHQ
2YHQGRRUQRWFORVHG 6HHWKH8VLQJWKHXSSHURYHQVHFWLRQ
,PSURSHUVKHOISRVLWLRQ 6HHWKH%URLOLQJ*XLGH
EHLQJXVHG
)RRGEHLQJFRRNHG )RUEHVWUHVXOWVXVHDSDQGHVLJQHGIRUEURLOLQJ
LQDKRWSDQ 0DNHVXUHLWLVFRRO
&RRNZDUHQRWVXLWHG )RUEHVWUHVXOWVXVHDSDQGHVLJQHGIRUEURLOLQJ
IRUEURLOLQJ
2YHQERWWRPQRWVHFXUHO\ 6HHWKH,QVWDOODWLRQRIWKHUDQJHVHFWLRQ
VHDWHGLQSRVLWLRQ
8SSHURYHQWHPSHUDWXUH 2YHQWKHUPRVWDW 6HHWKH$GMXVWWKHXSSHURYHQWKHUPRVWDW³'RLW
WRRKRWRUWRRFROG QHHGVDGMXVWPHQW\RXUVHOIVHFWLRQ
&ORFNDQGWLPHU 3OXJRQUDQJHLVQRWFRPSOHWHO\ 0DNHVXUHHOHFWULFDOSOXJLVSOXJJHGLQWRDOLYHSURSHUO\
GRQRWZRUN LQVHUWHGLQWKHHOHFWULFDORXWOHW JURXQGHGRXWOHW
$IXVHLQ\RXUKRPHPD\EH 5HSODFHWKHIXVHRUUHVHWWKHFLUFXLWEUHDNHU
EORZQRUWKHFLUFXLWEUHDNHU
WULSSHG
2YHQFRQWUROVLPSURSHUO\VHW 6HHWKH8VLQJWKHFORFNDQGWLPHU VHFWLRQ
8SSHURYHQOLJKWGRHV /LJKWEXOELVORRVHRUGHIHFWLYH 7LJKWHQRUUHSODFHWKHEXOE
QRWZRUN
3OXJRQUDQJHLVQRWFRPSOHWHO\ 0DNHVXUHHOHFWULFDOSOXJLVSOXJJHGLQWRDOLYHSURSHUO\
LQVHUWHGLQWKHHOHFWULFDORXWOHW JURXQGHGRXWOHW
8SSHURYHQZLOOQRW 7KHRYHQWHPSHUDWXUHLVWRR $OORZWKHUDQJHWRFRROWRURRPWHPSHUDWXUHDQG
VHOIFOHDQ KLJKWRVHWDVHOIFOHDQRSHUDWLRQ UHVHWWKHFRQWUROV
2YHQFRQWUROVLPSURSHUO\VHW 6HHWKH8VLQJWKHVHOIFOHDQLQJXSSHURYHQVHFWLRQ
2QPRGHOVZLWKDGRRUODWFK 0DNHVXUH\RXPRYHWKHGRRUODWFKKDQGOHDOOWKHZD\
WKHRYHQGRRULVQRWLQWKH WRWKHULJKW
ORFNHGSRVLWLRQ
´&UDFNOLQJµRU 7KLVLVWKHVRXQGRIWKH 7KLVLVQRUPDO
´SRSSLQJµVRXQG PHWDOKHDWLQJDQGFRROLQJ
GXULQJERWKWKHFRRNLQJDQG
FOHDQLQJIXQFWLRQV
%HIRUH\RXFDOOIRUVHUYLFH«

*($SSOLDQFHVFRP
3UREOHP 3RVVLEOH&DXVHV :KDW7R'R
([FHVVLYHVPRNLQJ ([FHVVLYHVRLO 7RXFKWKH&OHDU2II SDG2SHQWKHZLQGRZVWR
ULGWKHURRPRIVPRNH:DLWXQWLOWKH/2&.(''225
OLJKWJRHVRII:LSHXSWKHH[FHVVVRLODQGUHVHWWKH
FOHDQF\FOH
2YHQGRRUZLOOQRWRSHQ 2YHQWRRKRW $OORZWKHRYHQWRFRROEHORZORFNLQJWHPSHUDWXUH
DIWHUDFOHDQF\FOH 'RQRWORFNWKHGRRUZLWKWKHGRRUODWFKH[FHSWZKHQ
XVLQJWKHVHOIFOHDQIHDWXUH
2YHQQRWFOHDQDIWHUD 2YHQFRQWUROVQRWSURSHUO\VHW 6HHWKH8VLQJWKHVHOIFOHDQLQJXSSHURYHQ VHFWLRQ
FOHDQF\FOH
2YHQZDVKHDYLO\VRLOHG &OHDQXSKHDY\VSLOORYHUVEHIRUHVWDUWLQJWKHFOHDQ
F\FOH+HDYLO\VRLOHGRYHQVPD\QHHGWRVHOIFOHDQ
DJDLQRUIRUDORQJHUSHULRGRIWLPH
´'RRUµDSSHDUVLQWKH /DWFKKDQGOHZDVPRYHGWRWKH 0RYHWKHODWFKKDQGOHWRWKHULJKWRQO\ZKHQVHWWLQJ
GLVSOD\RQPRGHOV ULJKWEXWDSURJUDPRWKHUWKDQ WKHVHOIFOHDQLQJF\FOH
ZLWKDGRRUODWFK VHOIFOHDQZDVVHOHFWHG
´/2&.'225µIODVKHV 7KHVHOIFOHDQF\FOHKDVEHHQ &ORVHWKHRYHQGRRUDQGRQPRGHOVZLWKDODWFKPRYH
LQWKHGLVSOD\ VHOHFWHGEXWWKHGRRULVQRW WKHODWFKDOOWKHZD\WRWKHULJKW
FORVHGDQGRQPRGHOVZLWKDODWFK
WKHODWFKZDVQRWPRYHGDOOWKH
ZD\WRWKHULJKW
/2&.(''225OLJKW 7KHRYHQGRRULVORFNHG 7RXFKWKH&OHDU2IISDG$OORZWKHRYHQWRFRRO
LVRQZKHQ\RXZDQW EHFDXVHWKHWHPSHUDWXUH DQGWKHQRQPRGHOVZLWKDGRRUODWFKXQORFNWKHGRRU
WRFRRN LQVLGHWKHRYHQKDVQRW
GURSSHGEHORZWKH
ORFNLQJWHPSHUDWXUH
´)³DQGDQXPEHURU 2QPRGHOVZLWKDGRRUODWFK 7KHODWFKPD\KDYHEHHQPRYHGHYHQLIRQO\VOLJKWO\
OHWWHUµIODVKLQWKHGLVSOD\ LIDIXQFWLRQHUURUFRGHDSSHDUV IURPWKHORFNHGSRVLWLRQ0DNHVXUHWKHODWFKLVPRYHG
GXULQJWKHVHOIFOHDQLQJF\FOH WRWKHULJKWDVIDUDVLWZLOOJR
FKHFNWKHRYHQGRRUODWFK
<RXKDYHDIXQFWLRQHUURUFRGH 7RXFKWKH&OHDU2IISDG$OORZWKHRYHQWRFRROIRU
RQHKRXU3XWWKHRYHQEDFNLQWRRSHUDWLRQ
,IWKHIXQFWLRQFRGHUHSHDWV 'LVFRQQHFWDOOSRZHUWRWKHUDQJHIRUPLQXWHV
DQGWKHQUHFRQQHFWSRZHU,IWKHIXQFWLRQHUURU
FRGHUHSHDWVFDOOIRUVHUYLFH
2YHQVKHOYHVDUH 7KHQLFNHOVKHOYHVLIVRHTXLSSHG $SSO\DVPDOODPRXQWRIYHJHWDEOHRLOWRDSDSHU
GLIILFXOWWRVOLGH ZHUHFOHDQHGLQDVHOIFOHDQF\FOH WRZHODQGZLSHWKHHGJHVRIWKHRYHQVKHOYHVZLWK
7KHJUD\SRUFHODLQFRDWHGVKHOYHV WKHSDSHUWRZHO'RQRWVSUD\ZLWK3DP
RURWKHU
LIVRHTXLSSHGZHUHLPSURSHUO\ OXEULFDQWVSUD\V
FOHDQHG
´3UREHµDSSHDUVLQ 7KLVLVUHPLQGLQJ\RXWRHQWHUD (QWHUDSUREHWHPSHUDWXUH
WKHGLVSOD\VRPHPRGHOV SUREHWHPSHUDWXUHDIWHUSOXJJLQJ
LQWKHSUREH
:DWHUUHPDLQLQJRQ 7KLVLVQRUPDO 5HPRYHDQ\UHPDLQLQJZDWHUZLWKDGU\FORWKRUVSRQJH
RYHQIORRUDIWHUVWHDP
FOHDQF\FOH

3UREOHP 3RVVLEOH&DXVHV :KDW7R'R
'LVSOD\JRHVEODQN $IXVHLQ\RXUKRPHPD\EH 5HSODFHWKHIXVHRUUHVHWWKHFLUFXLWEUHDNHU
EORZQRUWKHFLUFXLWEUHDNHUWULSSHG
7KHFORFNLVLQWKHEODFNRXWPRGH
6HHWKH6SHFLDOIHDWXUHVRI\RXURYHQFRQWUROVHFWLRQ
'LVSOD\IODVKHV 3RZHUIDLOXUH 5HVHWWKHFORFN
8QDEOHWRJHWWKH 2YHQFRQWUROSDGVZHUH7KH%DNHDQG%URLO+L/RSDGVPXVWEHWRXFKHGDW
GLVSOD\WRVKRZ´6)µ QRWSUHVVHGSURSHUO\ WKHVDPHWLPHDQGKHOGIRUVHFRQGV
3RZHURXWDJH 3RZHURXWDJHRUVXUJH 5HVHWWKHFORFN,IWKHRYHQZDVLQXVH\RXPXVWUHVHW
FORFNIODVKHV LWE\WRXFKLQJWKH&OHDU2IISDGVHWWLQJWKHFORFN
DQGUHVHWWLQJDQ\FRRNLQJIXQFWLRQ
´%XUQLQJµRU´RLO\µ 7KLVLVQRUPDOLQDQHZRYHQ 2SHQDZLQGRZWRYHQWLODWHWKHURRP
RGRUHPLWWLQJIURP DQGZLOOGLVDSSHDUTXLFNO\
WKHYHQW
6WURQJRGRU $QRGRUIURPWKHLQVXODWLRQ 7KLVLVWHPSRUDU\
DURXQGWKHLQVLGHRIWKHRYHQ
LVQRUPDOIRUWKHILUVWIHZWLPHV
WKHRYHQLVXVHG
)DQQRLVHVRPHPRGHOV
$FRROLQJIDQ
PD\WXUQRQ 7KLVLVQRUPDO7KHFRROLQJIDQZLOOWXUQRQWRFRROLQWHUQDO
SDUWV,WPD\UXQIRUXSWRKUVDIWHUWKHRYHQLVWXUQHG
RII
'UDZHUGRHVQRWVOLGH 7KHGUDZHULVRXWRIDOLJQPHQW )XOO\H[WHQGWKHGUDZHUDQGSXVKLWDOOWKHZD\LQ
VPRRWKO\RUGUDJV 6HHWKH&DUHDQGFOHDQLQJRIWKHUDQJHVHFWLRQ
'UDZHULVRYHUORDGHGRUORDG 5HGXFHZHLJKW5HGLVWULEXWHGUDZHUFRQWHQWV
LVXQEDODQFHG
/RZHURYHQGUDZHURU $IXVHLQ\RXUKRPHPD\EH 5HSODFHWKHIXVHRUUHVHWWKHFLUFXLWEUHDNHU
ZDUPLQJGUDZHUZLOO EORZQRUWKHFLUFXLWEUHDNHU
QRWZRUN WULSSHG
7KHRYHQLVVHOIFOHDQLQJ :DLWIRUWKHVHOIFOHDQF\FOHWRILQLVKDQGWKHRYHQWRFRRO
&RQWUROVLPSURSHUO\VHW 6HHWKH(OHFWULFZDUPLQJGUDZHURU/RZHURYHQ
GUDZHUVHFWLRQ
([FHVVLYHFRQGHQVDWLRQ /LTXLGLQGUDZHU 5HPRYHOLTXLG
LQWKHGUDZHU
8QFRYHUHGIRRGV &RYHUIRRGZLWKOLGRUDOXPLQXPIRLO
7HPSHUDWXUHVHWWLQJWRRKLJK 5HGXFHWHPSHUDWXUHVHWWLQJ
)RRGGULHVRXWLQWKH 0RLVWXUHHVFDSLQJ &RYHUIRRGZLWKOLGRUDOXPLQXPIRLO
ORZHURYHQGUDZHURU
'UDZHUQRWIXOO\FORVHG 3XVKGUDZHULQXQWLOODWFKHQJDJHV
ZDUPLQJGUDZHU
7URXEOHVKRRWLQJ7LSV
%HIRUH\RXFDOOIRUVHUYLFH«
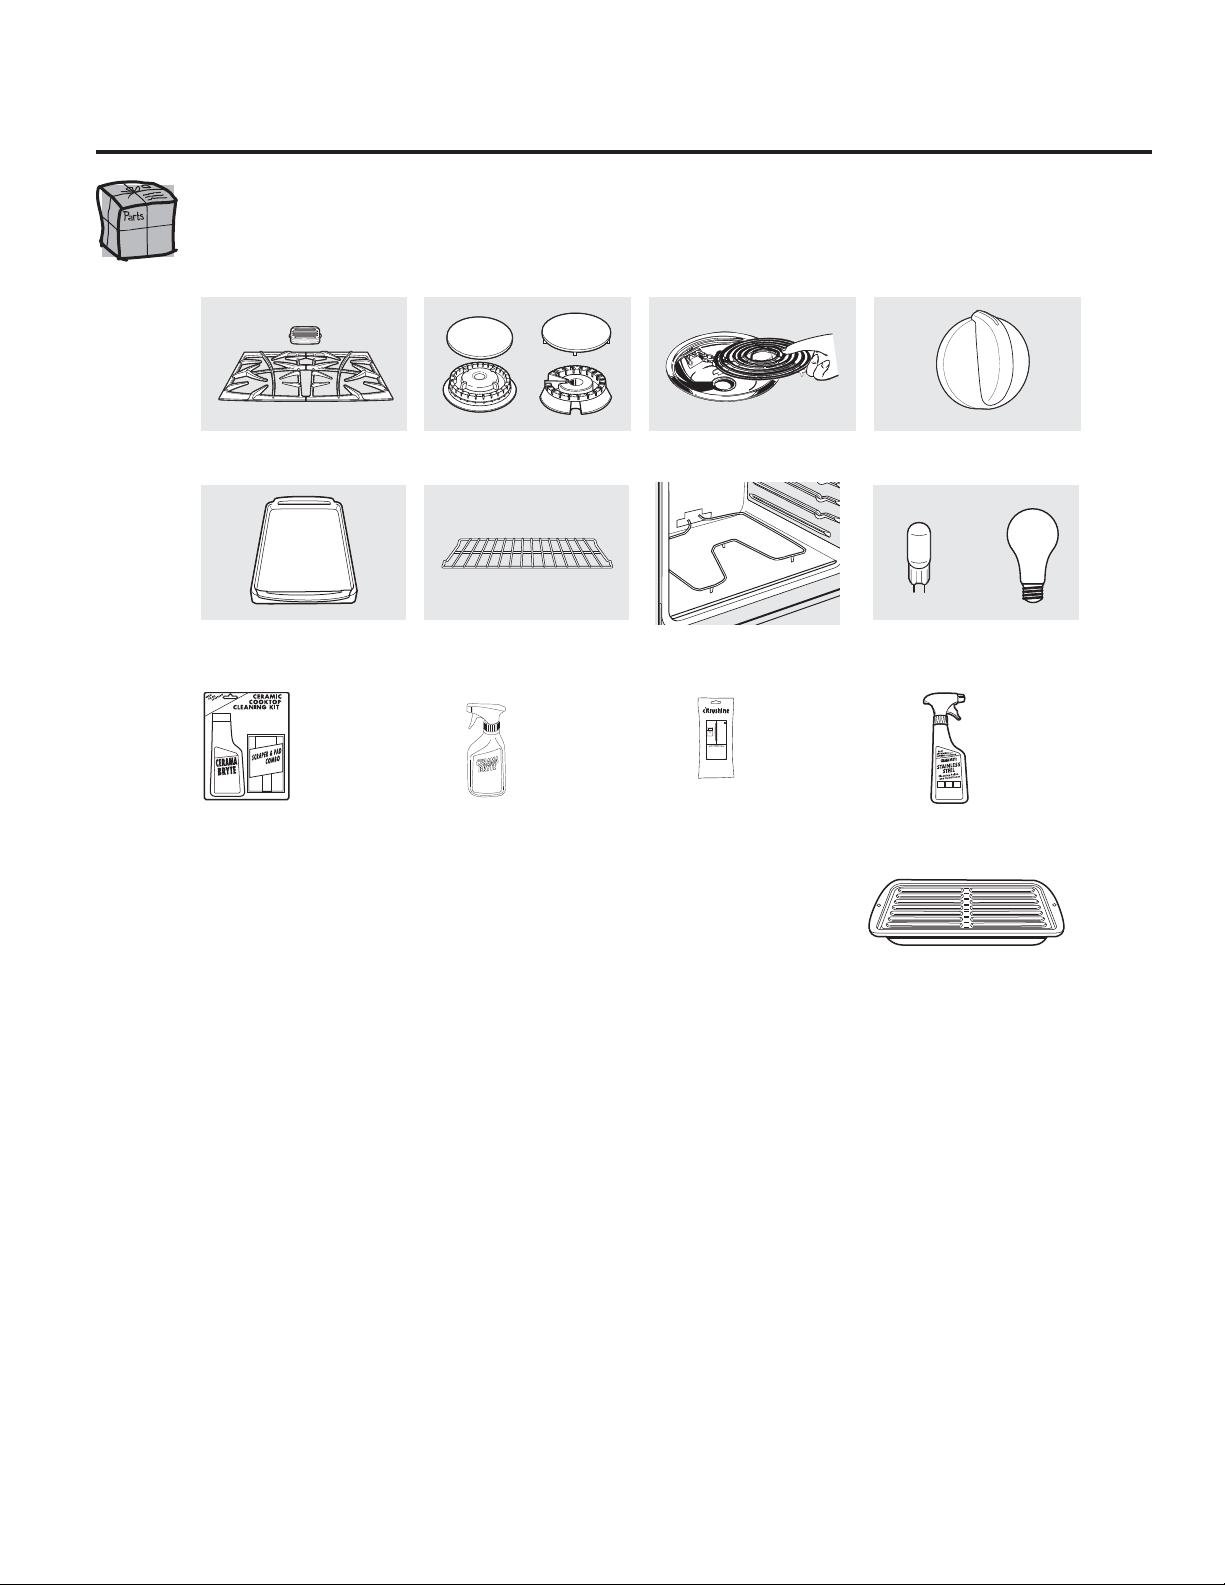
$FFHVVRULHV
/RRNLQJ)RU6RPHWKLQJ0RUH"1RWDOODFFHVVRULHVDUHDYDLODEOHIRUDOOPRGHOV
<RXFDQILQGWKHVHDFFHVVRULHVDQGPDQ\PRUHDW*($SSOLDQFH3DUWVFRP86
RUZZZ*($SSOLDQFHVFD&DQDGDRUFDOO86RU&DQDGD
GXULQJQRUPDOEXVLQHVVKRXUV+DYH\RXUPRGHOQXPEHUUHDG\
([SHULHQFHWKHVHRWKHUJUHDWSURGXFWVWRNHHS\RXUNLWFKHQORRNLQJJUHDW
*HWWKHPRVWRXWRI\RXU%URLOHU3DQ1RWIRUXVHZLWK%URLOHU'UDZHUPRGHOV
8VH\RXUSDQDQGJULGFRYHUWREURLOKDPEXUJHUVVHDIRRGVWHDNVYHJHWDEOHVEDFRQFKRSVDQGVRPXFK
PRUH7KHSDQEHORZFDWFKHVWKHH[FHVVIDWVDQGRLOV
*HQXLQH*(3DUW
(DV\7R&OHDQ
2QH<HDU:DUUDQW\
/LPLWHG7LPH2IIHU)UHH6KLSSLQJ
:KHQ\RXRUGHU\RXUEURLOHUSDQZLWKLQGD\VRISXUFKDVLQJ\RXU*(FRRNLQJSURGXFW
6PDOO /DUJH ;/
863DUW :%; :%; :%;
&DQDGD3DUW '* '* 1$
'LPHQVLRQV µ:[µ+[µ' µ:[µ+[µ' µ:[µ+[µ'
7KHODUJHVWDQGDUGEURLOSDQGRHVQRWILWLQµµUDQJHV
7KH;/SDQGRHVQRWILWLQµZDOORYHQVµGURSLQVRUµµUDQJHV
6XUIDFH(OHPHQWVDQG'ULS
3DQV
*UDWHV 6XUIDFH%XUQHU+HDGVDQG&DSV
2YHQ(OHPHQWV /LJKW%XOEV
.QREV
2YHQ5DFNV
RU
*ULGGOH
7RSODFH\RXURUGHUFDOO86&DQDGDRUPDLOWKLVIRUPWR
,QWKH86*(3DUWV32%R[0HPSKLV71,Q&DQDGD*(3DUWV)DFWRU\/DQH0RQFWRQ1%(&0
%URLOHU3DQ2UGHU)RUP
4XDQWLW\BBBBBBBBBBBBBBBBBBBB 3DUW1XPEHU BBBBBBBBBBBBBBBBBBBBBBBBBBBBBBBBBBBBBBBBBBBBBBBBBB
BBBBBBBBBBBBBBBBBBBB BBBBBBBBBBBBBBBBBBBBBBBBBBBBBBBBBBBBBBBBBBBBBBBBBBBBBBBBBBBBBB
BBBBBBBBBBBBBBBBBBBB BBBBBBBBBBBBBBBBBBBBBBBBBBBBBBBBBBBBBBBBBBBBBBBBBBBBBBBBBBBBBB
0RGHO1XPEHUBBBBBBBBBBBBBB 6HULDO1XPEHU BBBBBBBBBBBBBBBBBB %UDQG BBBBBBBBBBBBBBB 'DWHRI3XUFKDVHBBBBBBBBBB
)LUVW1DPHBBBBBBBBBBBBBBBBBBBBBBBBBBBBBBBBBBBBBBBBBBBB /DVW1DPHBBBBBBBBBBBBBBBBBBBBBBBBBBBBBBBBBBBBBBBBBBBBBB
$GGUHVVBBBBBBBBBBBBBBBBBBBBBBBBBBBBBBBBBBBBBBBBBBBBBBBBBBBBBBBBBBBBBBBBBBBBBBBBBBBBBBBBBBBBBBBBBBBBBBBBBBBBBBBBBB
&LW\BBBBBBBBBBBBBBBBBBBBBBBBBBBBBBBBBBBBBBBBBBBBBBBBBB 6WDWHBBBBBBBBBBB =LS&RGHBBBBBBBBBBBBBBBBBBBBBBBBBBBBB
3KRQHBBBBBBBBBBBBBBBBBBBBBBBBBBBBBBBBBBBBBBBBBBBBBBBB (0DLOBBBBBBBBBBBBBBBBBBBBBBBBBBBBBBBBBBBBBBBBBBBBBBBBBB
&KHFN BBBBBB 0RQH\2UGHUBBBBBB
&DOOLQWKH86RULQ&DQDGDIRUFXUUHQWSULFLQJ$OOFUHGLWFDUGRUGHUVPXVWEHFDOOHGLQ
BBBBBBBBBBBBBBBBBBBBBBBBBBBBBBBBBBBBBBBBBBBBBBBBB
:;;*&6
:;;
:;;
30;
&HUDPD%U\WH
&HUDPLF&RRNWRS
&OHDQLQJ.LW
,QFOXGHVFOHDQHU
VFUDSHUDQGSDG
&HUDPD%U\WH
7RXFK8S6SUD\
&LWUXVKLQH
6WDLQOHVV6WHHO
:LSHV
&HUDPD%U\WH
6WDLQOHVV6WHHO
$SSOLDQFH
&OHDQHU
STAINESS STEEL WIPES

1RWHV

*($SSOLDQFHVFRP

■6HUYLFHWULSVWR\RXUKRPHWRWHDFK\RXKRZWRXVH
WKHSURGXFW
■,PSURSHULQVWDOODWLRQGHOLYHU\RUPDLQWHQDQFH
■3URGXFWGDPDJHRUIDLOXUHRIWKHSURGXFWLILWLVDEXVHG
PLVXVHGPRGLILHGXVHGIRURWKHUWKDQWKHLQWHQGHG
SXUSRVHRUXVHGFRPPHUFLDOO\
■5HSODFHPHQWRIKRXVHIXVHVRUUHVHWWLQJRIFLUFXLWEUHDNHUV
■'DPDJHWRWKHSURGXFWFDXVHGE\DFFLGHQWILUHIORRGV
RUDFWVRI*RG
■,QFLGHQWDORUFRQVHTXHQWLDOGDPDJHFDXVHGE\SRVVLEOH
GHIHFWVZLWKWKLVDSSOLDQFH
■'DPDJHFDXVHGDIWHUGHOLYHU\
■3URGXFWQRWDFFHVVLEOHWRSURYLGHUHTXLUHGVHUYLFH
■5HSODFHPHQWRIEDWWHU\RQFRUGOHVVPRGHOV
:KDW*(:LOO1RW&RYHU
7KLVZDUUDQW\LVH[WHQGHGWRWKHRULJLQDOSXUFKDVHUDQGDQ\VXFFHHGLQJRZQHUIRUSURGXFWVSXUFKDVHGIRUKRPH
XVHZLWKLQWKH86$,IWKHSURGXFWLVORFDWHGLQDQDUHDZKHUHVHUYLFHE\D*($XWKRUL]HG6HUYLFHULV
QRWDYDLODEOH\RXPD\EHUHVSRQVLEOHIRUDWULSFKDUJHRU\RXPD\EHUHTXLUHGWREULQJWKHSURGXFWWRDQ
$XWKRUL]HG*(6HUYLFH/RFDWLRQIRUVHUYLFH,Q$ODVNDWKHZDUUDQW\H[FOXGHVWKHFRVWRIVKLSSLQJRUVHUYLFHFDOOVWR
\RXUKRPH
6RPHVWDWHVGRQRWDOORZWKHH[FOXVLRQRUOLPLWDWLRQRILQFLGHQWDORUFRQVHTXHQWLDOGDPDJHV7KLVZDUUDQW\JLYHV
\RXVSHFLILFOHJDOULJKWVDQG\RXPD\DOVRKDYHRWKHUULJKWVZKLFKYDU\IURPVWDWHWRVWDWH7RNQRZZKDW\RXU
OHJDOULJKWVDUHFRQVXOW\RXUORFDORUVWDWHFRQVXPHUDIIDLUVRIILFHRU\RXUVWDWH·V$WWRUQH\*HQHUDO
:DUUDQWRU*HQHUDO(OHFWULF&RPSDQ\/RXLVYLOOH.<
)RU7KH3HULRG2I *(:LOO5HSODFH
2QH<HDU $Q\SDUWRIWKHUDQJHZKLFKIDLOVGXHWRDGHIHFWLQPDWHULDOVRUZRUNPDQVKLS'XULQJWKLV
)URPWKHGDWHRIWKH OLPLWHGRQH\HDUZDUUDQW\*(ZLOODOVRSURYLGHIUHHRIFKDUJHDOOODERUDQGLQKRPHVHUYLFH
RULJLQDOSXUFKDVH WRUHSODFHWKHGHIHFWLYHSDUW
*(*DV5DQJH:DUUDQW\)RUFXVWRPHUVLQWKH8QLWHG6WDWHV
$OOZDUUDQW\VHUYLFHSURYLGHGE\RXU)DFWRU\6HUYLFH&HQWHUV
RUDQDXWKRUL]HG&XVWRPHU&DUH
WHFKQLFLDQ7RVFKHGXOH
VHUYLFHRQOLQHKRXUVDGD\YLVLWXVDW*($SSOLDQFHVFRPRU
FDOO*(&$5(63OHDVHKDYHVHULDOQXPEHUDQG
PRGHOQXPEHUDYDLODEOHZKHQFDOOLQJIRUVHUYLFH
6WDSOH\RXUUHFHLSWKHUH
3URRIRIWKHRULJLQDOSXUFKDVH
GDWHLVQHHGHGWRREWDLQVHUYLFH
XQGHUWKHZDUUDQW\
(;&/86,212),03/,(':$55$17,(6³<RXUVROHDQGH[FOXVLYHUHPHG\LVSURGXFWUHSDLUDVSURYLGHG
LQWKLV/LPLWHG:DUUDQW\$Q\LPSOLHGZDUUDQWLHVLQFOXGLQJWKHLPSOLHGZDUUDQWLHVRIPHUFKDQWDELOLW\RU
ILWQHVVIRUDSDUWLFXODUSXUSRVHDUHOLPLWHGWRRQH\HDURUWKHVKRUWHVWSHULRGDOORZHGE\ODZ

$OOZDUUDQW\VHUYLFHSURYLGHGE\RXU)DFWRU\6HUYLFH&HQWHUV
RUDQDXWKRUL]HG&XVWRPHU&DUH
WHFKQLFLDQ)RUVHUYLFH
FDOO3OHDVHKDYHVHULDOQXPEHUDQGPRGHO
QXPEHUDYDLODEOHZKHQFDOOLQJIRUVHUYLFH
■6HUYLFHWULSVWR\RXUKRPHWRWHDFK\RXKRZWRXVH
WKHSURGXFW
■,PSURSHULQVWDOODWLRQGHOLYHU\RUPDLQWHQDQFH
■3URGXFWGDPDJHRUIDLOXUHRIWKHSURGXFWLILWLVDEXVHG
PLVXVHGPRGLILHGXVHGIRURWKHUWKDQWKHLQWHQGHG
SXUSRVHRUXVHGFRPPHUFLDOO\
■5HSODFHPHQWRIKRXVHIXVHVRUUHVHWWLQJRIFLUFXLWEUHDNHUV
■'DPDJHWRWKHSURGXFWFDXVHGE\DFFLGHQWILUHIORRGV
RUDFWVRI*RG
■,QFLGHQWDORUFRQVHTXHQWLDOGDPDJHFDXVHGE\SRVVLEOH
GHIHFWVZLWKWKLVDSSOLDQFH
■'DPDJHFDXVHGDIWHUGHOLYHU\
■3URGXFWQRWDFFHVVLEOHWRSURYLGHUHTXLUHGVHUYLFH
■5HSODFHPHQWRIEDWWHU\RQFRUGOHVVPRGHOV
:KDW0DEH:LOO1RW&RYHU
)RU7KH3HULRG2I 0DEH:LOO5HSODFH
2QH<HDU $Q\SDUWRIWKHUDQJHZKLFKIDLOVGXHWRDGHIHFWLQPDWHULDOVRUZRUNPDQVKLS'XULQJWKLV
)URPWKHGDWHRIWKH OLPLWHGRQH\HDUZDUUDQW\0DEHZLOODOVRSURYLGHIUHHRIFKDUJHDOOODERUDQGLQKRPHVHUYLFH
RULJLQDOSXUFKDVH WRUHSODFHWKHGHIHFWLYHSDUW
:$55$1725,61275(63216,%/()25&216(48(17,$/'$0$*(6
:DUUDQWRU0$%(&$1$'$,1&
*(*DV5DQJH:DUUDQW\)RUFXVWRPHUVLQ&DQDGD
6WDSOH\RXUUHFHLSWKHUH
3URRIRIWKHRULJLQDOSXUFKDVH
GDWHLVQHHGHGWRREWDLQ
VHUYLFHXQGHUWKHZDUUDQW\
(;&/86,212),03/,(':$55$17,(6³<RXUVROHDQGH[FOXVLYHUHPHG\LVSURGXFWUHSDLUDVSURYLGHG
LQWKLV/LPLWHG:DUUDQW\$Q\LPSOLHGZDUUDQWLHVLQFOXGLQJWKHLPSOLHGZDUUDQWLHVRIPHUFKDQWDELOLW\RU
ILWQHVVIRUDSDUWLFXODUSXUSRVHDUHOLPLWHGWRRQH\HDURUWKHVKRUWHVWSHULRGDOORZHGE\ODZ

&RQVXPHU6XSSRUW
*($SSOLDQFHV:HEVLWH ,QWKH86*($SSOLDQFHVFRP
+DYHDTXHVWLRQRUQHHGDVVLVWDQFHZLWK\RXUDSSOLDQFH"7U\WKH*($SSOLDQFHV:HEVLWHKRXUVDGD\
DQ\GD\RIWKH\HDU)RUJUHDWHUFRQYHQLHQFHDQGIDVWHUVHUYLFH\RXFDQQRZGRZQORDG2ZQHU·V0DQXDOV
RUGHUSDUWVRUHYHQVFKHGXOHVHUYLFHRQOLQH,Q&DQDGDZZZ*($SSOLDQFHVFD
6FKHGXOH6HUYLFH ,QWKH86*($SSOLDQFHVFRP
([SHUW*(UHSDLUVHUYLFHLVRQO\RQHVWHSDZD\IURP\RXUGRRU*HWRQOLQHDQGVFKHGXOH\RXUVHUYLFHDW\RXU
FRQYHQLHQFHKRXUVDQ\GD\RIWKH\HDU2UFDOO*(&$5(6GXULQJQRUPDOEXVLQHVVKRXUV
,Q&DQDGDFDOO
5HDO/LIH'HVLJQ6WXGLR ,QWKH86*($SSOLDQFHVFRP
*(VXSSRUWVWKH8QLYHUVDO'HVLJQFRQFHSW³SURGXFWVVHUYLFHVDQGHQYLURQPHQWVWKDWFDQEHXVHGE\SHRSOHRI
DOODJHVVL]HVDQGFDSDELOLWLHV:HUHFRJQL]HWKHQHHGWRGHVLJQIRUDZLGHUDQJHRISK\VLFDODQGPHQWDODELOLWLHV
DQGLPSDLUPHQWV)RUGHWDLOVRI*(·V8QLYHUVDO'HVLJQDSSOLFDWLRQVLQFOXGLQJNLWFKHQGHVLJQLGHDVIRUSHRSOHZLWK
GLVDELOLWLHVFKHFNRXWRXU:HEVLWHWRGD\)RUWKHKHDULQJLPSDLUHGSOHDVHFDOO7''*($&
,Q&DQDGDFRQWDFW 0DQDJHU&RQVXPHU5HODWLRQV0DEH&DQDGD,QF
6XLWH)DFWRU\/DQH
0RQFWRQ1%(&0
([WHQGHG:DUUDQWLHV ,QWKH86*($SSOLDQFHVFRP
3XUFKDVHD*(H[WHQGHGZDUUDQW\DQGOHDUQDERXWVSHFLDOGLVFRXQWVWKDWDUHDYDLODEOHZKLOH\RXUZDUUDQW\LVVWLOO
LQHIIHFW<RXFDQSXUFKDVHLWRQOLQHDQ\WLPHRUFDOOGXULQJQRUPDOEXVLQHVVKRXUV*(&RQVXPHU+RPH
6HUYLFHVZLOOVWLOOEHWKHUHDIWHU\RXUZDUUDQW\H[SLUHV,Q&DQDGDFDOO
3DUWVDQG$FFHVVRULHV ,QWKH86*($SSOLDQFH3DUWVFRP
,QGLYLGXDOVTXDOLILHGWRVHUYLFHWKHLURZQDSSOLDQFHVFDQKDYHSDUWVRUDFFHVVRULHVVHQWGLUHFWO\WRWKHLUKRPHV9,6$
0DVWHU&DUGDQG'LVFRYHUFDUGVDUHDFFHSWHG2UGHURQOLQHWRGD\KRXUVHYHU\GD\RUE\SKRQHDW
GXULQJQRUPDOEXVLQHVVKRXUV
,QVWUXFWLRQVFRQWDLQHGLQWKLVPDQXDOFRYHUSURFHGXUHVWREHSHUIRUPHGE\DQ\XVHU2WKHUVHUYLFLQJJHQHUDOO\
VKRXOGEHUHIHUUHGWRTXDOLILHGVHUYLFHSHUVRQQHO&DXWLRQPXVWEHH[HUFLVHGVLQFHLPSURSHUVHUYLFLQJPD\FDXVH
XQVDIHRSHUDWLRQ
&XVWRPHUVLQ&DQDGDVKRXOGFRQVXOWWKH\HOORZSDJHVIRUWKHQHDUHVW0DEHVHUYLFHFHQWHURUFDOO
&RQWDFW8V ,QWKH86*($SSOLDQFHVFRP
,I\RXDUHQRWVDWLVILHGZLWKWKHVHUYLFH\RXUHFHLYHIURP*(FRQWDFWXVRQRXU:HEVLWHZLWKDOOWKHGHWDLOVLQFOXGLQJ
\RXUSKRQHQXPEHURUZULWHWR *HQHUDO0DQDJHU&XVWRPHU5HODWLRQV
*($SSOLDQFHV$SSOLDQFH3DUN
/RXLVYLOOH.<
,Q&DQDGDZZZ*($SSOLDQFHVFDRUZULWHWR 'LUHFWRU&RQVXPHU5HODWLRQV0DEH&DQDGD,QF
6XLWH)DFWRU\/DQH
0RQFWRQ1%(&0
5HJLVWHU<RXU$SSOLDQFH ,QWKH86*($SSOLDQFHVFRP
5HJLVWHU\RXUQHZDSSOLDQFHRQOLQH³DW\RXUFRQYHQLHQFH7LPHO\SURGXFWUHJLVWUDWLRQZLOODOORZIRUHQKDQFHG
FRPPXQLFDWLRQDQGSURPSWVHUYLFHXQGHUWKHWHUPVRI\RXUZDUUDQW\VKRXOGWKHQHHGDULVH<RXPD\DOVRPDLO
LQWKHSUHSULQWHGUHJLVWUDWLRQFDUGLQFOXGHGLQWKHSDFNLQJPDWHULDO,Q&DQDGDZZZ*($SSOLDQFHVFD
3ULQWHGLQ0H[LFR
7KLVERRNLVSULQWHGRQUHF\FOHGSDSHU

&RFLQDV
*(
/LPSLH]D
(VWiQGDU
-*%6
-*%6
-*%6
-*%6
-*66
5*%
5*%
5*%
5*%
5*%
$XWR/LPSLH]D
-*%
-*%
-*%
-*%
-*%3
-*%3
-*%3
5*%
5*%
5*%
0DQXDOGHO
SURSLHWDULR
,QVWUXFFLRQHVGH
,QVWDODFLyQ
*($SSOLDQFHVFRP
D*DVFRQ)XQFLyQGH$XWR/LPSLH]D
(VFULEDORVQ~PHURVGHPRGHOR\
GHVHULHDTXt
1GH0RGHOR BBBBBBBBBBBBBBB
1GH6HULH BBBBBBBBBBBBBBBBB
/RVSXHGHHQFRQWUDUHQODHWLTXHWD
TXHVHHQFXHQWUDHQHOIUHQWHGHOD
FRFLQDGHWUiVGHOFDMyQFDOHQWDGRU
RHQHOFDMyQLQIHULRUGHOKRUQR
(Q&DQDGiFRPXQtTXHVH
FRQQRVRWURVHQ
ZZZ*($SSOLDQFHVFD
,QVWUXFFLRQHV
GHVHJXULGDG
²
,QVWUXFFLRQHVGH
)XQFLRQDPLHQWR
5HORM\7HPSRUL]DGRU
+RUQR
+RUQHDGRR'RUDGR
$VDU*XtDSDUD$VDU
&RQWUROGHO+RUQR
&RUWHGH&RUULHQWH
3UHFDOHQWDPLHQWR
0RGR6DEiWLFR
+RUQRVGH$XWR/LPSLH]D
(VWDQWHV
)XQFLRQHV(VSHFLDOHV
/LPSLH]DDO9DSRU
$MXVWHGHO7HUPRVWDWR
+RUQHDGR\$VDGR
6XSHUILFLHGH&RFFLyQ
&DMyQ&DOHQWDGRU
&XLGDGR\/LPSLH]D
3DSHOGH$OXPLQLR
(QVDPEOHVGHO4XHPDGRU
3DUULOODVGHORV4XHPDGRUHV
3DQHOGH&RQWURO\3HULOODV
6XSHUILFLHGHOD&RFLQD
5HWLURGHOD3XHUWD
&DMyQ
3DUWH,QIHULRUGHO+RUQR
5HHPSOD]RGHOD/X]
GHO+RUQR
9HQWLODGRUHVGHO+RUQR
(VWDQWHVGHO+RUQR
+RUQRVGH$XWR/LPSLH]D
6XSHUILFLHVGH$FHUR
,QR[LGDEOH
,QVWUXFFLRQHV
GH,QVWDODFLyQ
²
$MXVWHGHO$LUH
'LVSRVLWLYR$QWL9XHOFR
(QVDPEOHORV4XHPDGRUHV
6XSHUILFLDOHV
&RQWUROGH(QFHQGLGR
GHO4XHPDGRU
&RQHFWHOD&RFLQDDO*DV
'LPHQVLRQHV\(VSDFLRV
1LYHODFLyQGHOD&RFLQD
/3
&RQVHMRVSDUD6ROXFLRQDU
3UREOHPDV
$FFHVRULRV
6RSRUWHDO&OLHQWH
6RSRUWHDO&OLHQWH&RQWUDWDSD
*DUDQWtDSDUD&OLHQWHV
HQ&DQDGi
*DUDQWtDSDUD&OLHQWHV
HQ((88
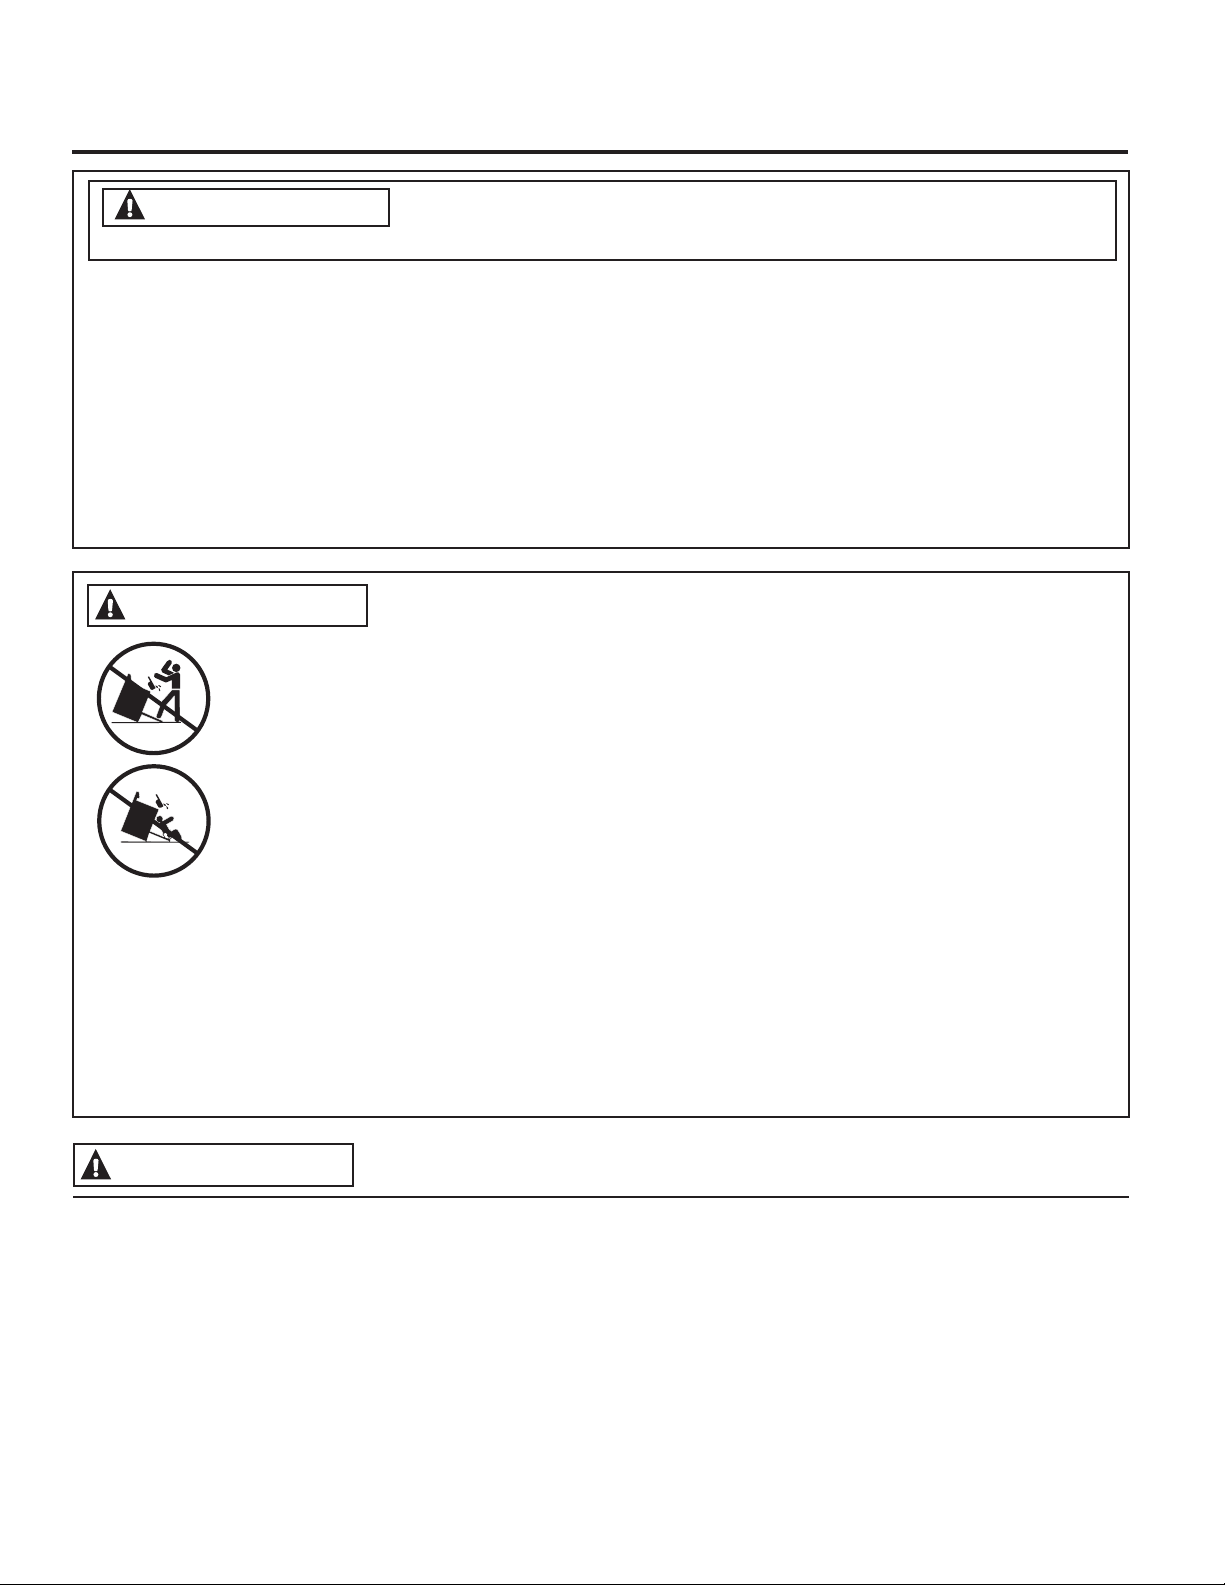
,1)250$&,Ï1,03257$17('(6(*85,'$'
/($72'$6/$6,16758&&,21(6$17(6'(86$5
*8$5'((67$6,16758&&,21(6
$'9(57(1&,$
$9,62'(6(*85,'$',03257$17(
/D/H\GH$JXD3RWDEOH,QRFXD\7UDWDPLHQWRGH5HVLGXRV7y[LFRVGH&DOLIRUQLD&DOLIRUQLD6DIH'ULQNLQJ:DWHUDQG
7R[LF(QIRUFHPHQW$FWVROLFLWDDO*REHUQDGRUGH&DOLIRUQLDTXHSXEOLTXHXQDOLVWDGHVXVWDQFLDVTXHHOHVWDGRUHFRQRFH
TXHSURGXFHQFiQFHUGHIHFWRVGHQDFLPLHQWRXRWURVGDxRVUHSURGXFWLYRV\VROLFLWDDORVHPSUHVDULRVTXHDGYLHUWDQD
VXVFOLHQWHVVREUHODSRVLEOHH[SRVLFLyQDWDOHVVXVWDQFLDV
(ODLVODQWHGHILEUDGHYLGULRHQORVKRUQRVGHDXWROLPSLH]DGHVSLGHXQDSHTXHxDFDQWLGDGGHPRQy[LGRGHFDUERQR
GXUDQWHHOFLFORGHOLPSLH]D/DH[SRVLFLyQSXHGHVHUPLQLPL]DGDVLVHYHQWLODFRQXQDYHQWDQDDELHUWDRVLVHXVDXQ
YHQWLODGRURFDPSDQD
1RJXDUGHQLXVHJDVROLQDXRWURVYDSRUHVLQIODPDEOHV\OtTXLGRVFHUFDGHHVWHQLGHRWURVHOHFWURGRPpVWLFRV
48e'(%(+$&(56,+8(/(*$6
■ 1RLQWHQWHLOXPLQDUQLQJ~QHOHFWURGRPpVWLFR
■ 1RWRTXHQLQJ~QLQWHUUXSWRUHOpFWULFRQRXVHWHOpIRQRVHQVXHGLILFLR
■ 'HLQPHGLDWROODPHDVXSURYHHGRUGHJDVGHVGHHOWHOpIRQRGHXQYHFLQR
■ 6LQRVHSXHGHFRPXQLFDUFRQVXSURYHHGRUGHJDVOODPHDOGHSDUWDPHQWRGHERPEHURV
/DLQVWDODFLyQ\ODVUHSDUDFLRQHVGHEHUiQVHUUHDOL]DGDVSRUXQLQVWDODGRUFDOLILFDGRDJHQFLDGHVHUYLFLRVRHO
SURYHHGRUGHJDV
$'9(57(1&,$
6LODLQIRUPDFLyQGHHVWHPDQXDOQRVHVLJXHH[DFWDPHQWHVHSRGUi
SURGXFLUXQLQFHQGLRRH[SORVLyQRFDVLRQDQGRGDxRVVREUHODSURSLHGDGOHVLRQHVRODPXHUWH
■7RGDVODVFRFLQDVSXHGHQVXIULUFDtGDV
■
6HSXHGHQSURGXFLU48(0$'85$6\RWUDV/(6,21(6*5$9(6
■ ,167$/(\&21752/(HOVRSRUWHDQWLYROFDGXUDVVLJXLHQGRODVLQVWUXFFLRQHVVXPLQLVWUDGDV
FRQHOVRSRUWH
3DUDUHYLVDUVLHOVRSRUWHHVWDLQVWDODGR\DMXVWDGRGHIRUPDDSURSLDGDPLUHTXHGHEDMRGH
ODFRFLQDHOEUD]RDQWLYROWHRHQVDPEODGRHQHOODWHUDOHVWHDMXVWDGRDOVRSRUWH(QDOJXQRV
PRGHORVHOFDMyQGHDOPDFHQDPLHQWRRHOSDQHOGHSURWHFFLyQVHSXHGHUHWLUDUSDUDXQD
LQVSHFFLRQPDVIiFLO6LQRHVSRVLEOHUHDOL]DUXQDLQVSHFFLyQYLVXDOGHVOLFHODFRFLQDKDFLD
DGHODQWHFRQILUPHTXHHOVRSRUWHDQWLYROFDGXUDVHVWpDMXVWDGRGHIRUPDVHJXUDDOSLVRROD
SDUHG\GHVOLFHODFRFLQDKDFLDDWUDVGHPRGRTXHHOEUD]RDQWLYROWHRVHGHVOLFHSRUGHEDMR
GHOVRSRUWHDQWLYROFDGXUDV6LODFRFLQDHVH[SXOVDGDGHODSDUHGSRUDOJXQDUD]RQVLHPSUHUHSLWDHVWH
SURFHGLPLHQWRDILQGHYHULILFDUTXHHVWpDVHJXUDGDGHIRUPDFRUUHFWDFRQXQVRSRUWHDQWLYROFDGXUDV
1XQFDUHWLUHFRPSOHWDPHQWHODVSDWDVQLYHODGRUDV\DTXHODFRFLQDQRHVWDUiDVHJXUDGDGHIRUPDDGHFXDGDDO
GLVSRVLWLYRDQWLYROFDGXUDV
6LQRUHFLELyHOVRSRUWHDQWLYROFDGXUDVFRQVXFRPSUDOODPHDOSDUDUHFLELUXQRVLQFRVWRHQ
&DQDGiOODPHDO3DUDDFFHGHUDLQVWUXFFLRQHVGHLQVWDODFLyQGHOVRSRUWHYLVLWH*($SSOLDQFHV
FRPHQ&DQDGi*($SSOLDQFHVFD
$'9(57(1&,$
*($SSOLDQFHVFRP
$'9(57(1&,$
181&$XVHHVWHHOHFWURGRPpVWLFRSDUDFDOHQWDUHO
DPELHQWH&RPRFRQVHFXHQFLDGHHVWRVHSRGUi
SURGXFLUHQYHQHQDPLHQWRFRQPRQy[LGRGHFDUERQR\
HOVREUHFDOHQWDPLHQWRGHOKRUQR
■8VHHVWHHOHFWURGRPpVWLFRVyORSDUDVXSURSyVLWR
RULJLQDOFRPRVHGHVFULEHHQHOPDQXDOGHOSURSLHWDULR
■6ROLFLWHTXHXQLQVWDODGRUFDOLILFDGRLQVWDOHVXFRFLQD
\TXHHVWpFRUUHFWDPHQWHFRQHFWDGDDWLHUUDGH
DFXHUGRFRQODVLQVWUXFFLRQHVGHLQVWDODFLyQSURYLVWDV
&XDOTXLHUDMXVWH\WUDEDMRGHVHUYLFLRWpFQLFRGHEHUi
VHUUHDOL]DGR~QLFDPHQWHSRULQVWDODGRUHVGHFRFLQDV
DJDVFDOLILFDGRVRSRUWpFQLFRVGHOVHUYLFLR1RLQWHQWH
UHSDUDURUHHPSOD]DUQLQJXQDSDUWHGHODFRFLQDD
PHQRVTXHHVWRVHUHFRPLHQGHHVSHFtILFDPHQWHHQHVWH
PDQXDO
■6XFRFLQDHVHQYLDGDGHVGHODIiEULFDSDUDXVRFRQ
JDVQDWXUDO3XHGHVHUFRQYHUWLGDSDUDXVRFRQJDV/3
6LVHUHTXLHUHQHVWRVDMXVWHVGHEHQVHUUHDOL]DGRVSRU
XQWpFQLFRFDOLILFDGRGHDFXHUGRFRQODVLQVWUXFFLRQHV
GHLQVWDODFLyQ\FyGLJRVORFDOHV/DDJHQFLDTXHUHDOL]D
HVWHWUDEDMRDVXPHODUHVSRQVDELOLGDGGHODFRQYHUVLyQ
■6ROLFLWHTXHHOLQVWDODGRUOHPXHVWUHODXELFDFLyQGHOD
YiOYXODGHFLHUUHGHODFRFLQDDJDV\FyPRDSDJDUODHQ
FDVRGHVHUQHFHVDULR
■(QFKXIHODFRFLQDHQXQWRPDFRUULHQWHFRQFRQH[LyQ
DWLHUUDGHYROWLRV~QLFDPHQWH1RUHWLUHODSDWD
UHGRQGDGHFRQH[LyQDWLHUUDGHOHQFKXIH6LWLHQHGXGDV
VREUHODFRQH[LyQDWLHUUDGHOVLVWHPDHOpFWULFRSDUD
KRJDUHVVXUHVSRQVDELOLGDG\REOLJDFLyQFRQWDUFRQ
HOUHHPSOD]RGHXQWRPDFRUULHQWHVLQFRQH[LyQDWLHUUD
SRUXQWRPDFRUULHQWHGHWUHVSDWDVFRUUHFWDPHQWH
FRQHFWDGRDWLHUUDGHDFXHUGRFRQHO&yGLJR1DFLRQDO
GH(OHFWULFLGDG1RXVHSURORQJDGRUHVFRQHVWH
HOHFWURGRPpVWLFR
■$QWHVGHUHDOL]DUFXDOTXLHUVHUYLFLRWpFQLFRGHVHQFKXIH
ODFRFLQDRGHVFRQHFWHHOVXPLQLVWURGHFRUULHQWHGHVGH
HOSDQHOGHGLVWULEXFLyQGHOKRJDUUHWLUDQGRHOIXVLEOHR
GHVFRQHFWDQGRHOGLV\XQWRU
■$VHJ~UHVHGHTXHWRGRVORVPDWHULDOHVGHHPEDODMH
VHDQUHWLUDGRVGHODFRFLQDDQWHVGHVXXVRDILQGH
HYLWDUTXHHVWRVPDWHULDOHVVHLQFHQGLHQ
■ (YLWHUDOODGXUDVRLPSDFWRVVREUHODVSXHUWDVGHPHWDO
FRFLQDVRSDQHOHVGHFRQWURO+DFHUHVWRSRGUiSURGXFLU
ODURWXUDGHYLGULRV1RFRFLQHXQSURGXFWRFRQXQYLGULR
URWR(VSRVLEOHTXHVHSURGX]FDQGHVFDUJDVLQFHQGLRR
FRUWHV
■ 1RGHMHDORVQLxRVVRORVRIXHUDGHVXUDGLRGH
DWHQFLyQHQHOiUHDGRQGHHOHOHFWURGRPpVWLFRVH
HQFXHQWUHHQXVR1XQFDVHOHVGHEHUiSHUPLWLU
WUHSDUVHQWDUVHRSDUDUVHVREUHQLQJXQDSDUWHGHO
HOHFWURGRPpVWLFR
■ 1RJXDUGHDUWtFXORVGHLQWHUpVSDUDORVQLxRVVREUHXQD
FRFLQDRHQODSDUWHWUDVHUDGHODPLVPD²6LXQQLxR
WUHSDVREUHODFRFLQDSDUDDOFDQ]DUDUWtFXORVHVSRVLEOH
TXHVXIUDOHVLRQHVJUDYHV
■1RSHUPLWDTXHQDGLHVHWUHSHVHSDUHRVHFXHOJXHGH
ODSXHUWDGHOKRUQRGHOFDMyQRGHODSDUWHVXSHULRUGH
ODFRFLQD6HSRGUiGDxDUODFRFLQDRSURYRFDUVXFDtGD
RFDVLRQDQGROHVLRQHVJUDYHVRODPXHUWH
■1XQFDEORTXHHODVYHQWLODFLRQHVDEHUWXUDVGHDLUHGH
ODFRFLQD/DVPLVPDVEULQGDQODVHQWUDGDV\VDOLGDV
GHDLUHTXHVRQQHFHVDULDVSDUDTXHODFRFLQDRSHUH
GHIRUPDFRUUHFWDFRQODFRPEXVWLyQDGHFXDGD/DV
DEHUWXUDVGHDLUHHVWiQXELFDGDVHQODSDUWHWUDVHUD
GHODFRFLQDHQODSDUWHVXSHULRUHLQIHULRUGHODSXHUWD
GHOKRUQR\HQODSDUWHLQIHULRUGHODFRFLQDGHEDMRGHO
FDMyQFDOHQWDGRUGHOFDMyQGHOKRUQRLQIHULRURGHOSDQHO
GHSURWHFFLyQ
■ 8VHVyORVRVWHQHGRUHVGHROODVVHFRV²ORVVRVWHQHGRUHV
K~PHGRVVREUHVXSHUILFLHVFDOLHQWHVSXHGHQSURGXFLU
TXHPDGXUDVGHELGRDOYDSRU1RSHUPLWDTXHORV
VRVWHQHGRUHVGHROODVWHQJDQFRQWDFWRFRQORV
TXHPDGRUHVVXSHUILFLDOHVODSDUULOODGHORVTXHPDGRUHV
RHOHOHPHQWRGHFDOHIDFFLyQGHOKRUQR1RXVHXQD
WRDOODXRWUDWHODYROXPLQRVDSDUDUHHPSOD]DUHOPDQJR
GHODVFDFHURODV
■7HQJDFXLGDGRGHQRWRFDUODVVXSHUILFLHVFDOLHQWHV
GHODFRFLQD/DVVXSHUILFLHVSRWHQFLDOPHQWHFDOLHQWHV
LQFOX\HQORVTXHPDGRUHVSDUULOODVSDUWHVXSHULRUGH
ODFRFLQDSDUWHWUDVHUDKRUQRHLQWHULRUGHODSXHUWD\
DEHUWXUDVDOUHGHGRUGHODSXHUWDGHOKRUQR
■1RFDOLHQWHHQYDVHVGHFRPLGDTXHQRKD\DQVLGR
DELHUWRV6HSRGUtDDFXPXODUSUHVLyQ\HOFRQWHQHGRU
SRGUtDH[SORWDURFDVLRQDQGRXQDOHVLyQ
■&RPRSURWHFFLyQFRQWUDHQIHUPHGDGHVWUDQVPLWLGDVD
WUDYpVGHODFRPLGDDVHJ~UHVHGHTXHODVWHPSHUDWXUDV
GHORVSURGXFWRVFRQFDUQH\DYHDOFDQFHQRVXSHUHQ
ODVWHPSHUDWXUDVPtQLPDVGHVHJXULGDGDOLPHQWDULD
UHFRPHQGDGDVSRU86'$3DUDPiVLQIRUPDFLyQYLVLWH
ZZZLVLWGRQH\HWJRYROODPHDODOtQHDJUDWXLWDGH
FDUQHV\DYHVGH86'$DO
$'9(57(1&,$
,16758&&,21(6*(1(5$/(6'(6(*85,'$'
*8$5'((67$6,16758&&,21(6
,1)250$&,Ï1,03257$17('(6(*85,'$'
/($72'$6/$6,16758&&,21(6$17(6'(86$5
■
1RXVHDJXDVREUHHOIXHJRGHODJUDVD1XQFDWRPHXQD
ROODTXHVHHVWpLQFHQGLDQGR$SDJXHORVFRQWUROHV([WLQJD
ODROODTXHVHHVWpLQFHQGLDQGRVREUHXQTXHPDGRU
VXSHUILFLDOFXEULHQGRODROODFRPSOHWDPHQWHFRQVX
WDSDFRUUHVSRQGLHQWHXQDKRMDPHWiOLFDGHJDOOHWDVR
XQDEDQGHMDSODQD6LHVQHFHVDULRXVHXQTXtPLFRVHFR
PXOWLXVRRXQH[WLQWRUGHFKRUURGHHVSXPD
■
(QFDVRGHTXHKD\DIXHJRHQHOKRUQRGXUDQWHOD
FRFFLyQDSDJXHHOKRUQR\PDQWHQJDODSXHUWDFHUUDGD
KDVWDTXHHOIXHJRVHH[WLQJD6LHVQHFHVDULRXVHXQ
TXtPLFRVHFRPXOWLXVRRXQH[WLQWRUGHFKRUURGHHVSXPD
■ (QFDVRGHTXHKD\DIXHJRHQHOKRUQRGXUDQWHHO
SHUtRGRGHDXWROLPSLH]DDSDJXHHOKRUQR\HVSHUH
DTXHHOIXHJRVHH[WLQJD1RIXHUFHODSXHUWD
SDUDDEULUOD/DHQWUDGDGHDLUHIUHVFRVREUHODV
WHPSHUDWXUDVGHDXWROLPSLH]DSRGUiFRQGXFLUDOD
SURGXFFLyQGHOODPDVHQHOKRUQR6LQRVHVLJXHQHVWDV
LQVWUXFFLRQHVVHSRGUiQSURGXFLUTXHPDGXUDVJUDYHV
$'9(57(1&,$
(1&$62'(,1&(1',26,*$/266,*8,(17(63$626
3$5$(9,7$5/(6,21(62/$3523$*$&,Ï1'(/)8(*2
■
1XQFDSLHUGDGHYLVWDORVTXHPDGRUHVFXDQGRVH
HQFXHQWUHQHQODVFRQILJXUDFLRQHVGHFDORUPHGLDRDOWD
/DVFRPLGDVHVSHFLDOPHQWHODVTXHVHSUHSDUDQFRQ
DFHLWHVHSXHGHQLQFHQGLDUORFXDOSXHGHRFDVLRQDUXQ
LQFHQGLRTXHVHSURSDJXHDORVJDELQHWHVSUy[LPRV
■1XQFDSLHUGDGHYLVWDHODFHLWHFXDQGRHVWpIULHQGR6L
VHFDOLHQWDPiVDOOiGHVXSXQWRGHFRFFLyQHODFHLWH
VHSXHGHTXHPDU\SURYRFDUXQLQFHQGLRTXHVHSXHGH
SURSDJDUDORVJDELQHWHVSUy[LPRV8VHXQWHUPyPHWUR
SDUDJUDVDVSURIXQGDVVLHPSUHTXHVHDSRVLEOHDILQGH
PRQLWRUHDUODWHPSHUDWXUDGHODFHLWH
■ 3DUDHYLWDUGHUUDPHVHLQFHQGLRVXVHXQDFDQWLGDG
PtQLPDGHDFHLWHFXDQGRHVWpIULHQGRHQXQDROODTXH
QRVHDSURIXQGD\HYLWHFRFLQDUFRPLGDVFRQJHODGDV
FRQFDQWLGDGHVH[FHVLYDVGHKLHOR
■
8VHHOWDPDxRGHROODDGHFXDGRSDUDHYLWDUTXHVHDQ
LQHVWDEOHVRTXHVXIUDQFDtGDVIiFLOPHQWH6HOHFFLRQH
XWHQVLOLRVTXHFRLQFLGDQFRQHOWDPDxRGHOTXHPDGRU/DV
OODPDVGHOTXHPDGRUVHGHEHUiQDMXVWDUGHPRGRTXHQR
VHH[WLHQGDQPiVDOOiGHODSDUWHLQIHULRUGHODROOD8QD
FDQWLGDGH[FHVLYDGHOODPDSXHGHUHSUHVHQWDUXQULHVJR
■
6LHPSUHXVHODSRVLFLyQ/,7(DOHQFHQGHUORVTXHPDGRUHV
VXSHULRUHV\DVHJ~UHVHGHTXHHVWRVVHKD\DQHQFHQGLGR
■
$OXVDUXWHQVLOLRVGHYLGULRFHUiPLFDDVHJ~UHVHGHTXH
VHDQDGHFXDGRVSDUDHOVHUYLFLRGHFRFLQDRWURVVHSRGUiQ
URPSHUGHELGRDXQFDPELRUHSHQWLQRGHWHPSHUDWXUD
■$ILQGHPLQLPL]DUSRVLEOHVTXHPDGXUDVLQFHQGLRGH
PDWHULDOHVLQIODPDEOHV\GHUUDPHVODPDQLMDGHXQ
HQYDVHGHEHUiVHULQFOLQDGDKDFLDHOFHQWURGHODFRFLQD
VLQTXHVHH[WLHQGDVREUHORVTXHPDGRUHVFHUFDQRV
■ $OSUHSDUDUFRPLGDVOODPHDQWHVGHEDMRGHXQD
FDPSDQDHQFLHQGDHOYHQWLODGRU
■ 1RXVHXQZRNFRQXQDQLOORFRQVRSRUWHGHPHWDO
UHGRQGR(ODQLOORSRGUiDWUDSDUFDORU\EORTXHDUHODLUH
KDFLDHOTXHPDGRUSURGXFLHQGRHOULHVJRGHHPLVLyQGH
PRQy[LGRGHFDUERQR
■ 1RLQWHQWHOHYDQWDUODHVWXIDVLORVTXHPDGRUHVGHOD
VXSHUILFLHHVWiQVHOODGRV+DFHUHVWRSRGUtDGDxDUOD
WXEHUtDGHJDVKDVWDORVTXHPDGRUHVVXSHUILFLDOHV
RFDVLRQDQGRXQDSpUGLGDGHJDV\ULHVJRGHLQFHQGLR
■ 1RXVHSDSHOGHDOXPLQLRSDUDFXEULUUHMLOODVFXDOTXLHU
SDUWHGHODFRFLQD6LVHKDFHHVWRVHSRGUiSURGXFLU
HQYHQHQDPLHQWRFRQPRQy[LGRGHFDUERQR
VREUHFDOHQWDPLHQWRGHODVVXSHUILFLHVGHODFRFLQDRXQ
SRVLEOHULHVJRGHLQFHQGLR
$'9(57(1&,$
,16758&&,21(6'(6(*85,'$''(/$3$57(
683(5,25'(/$&2&,1$
■1RJXDUGHQLXVHPDWHULDOHVLQIODPDEOHVHQXQKRUQR
RFHUFDGHODSDUWHVXSHULRUGHODFRFLQDLQFOX\HQGR
SDSHOSOiVWLFRVRVWHQHGRUHVGHROODVWUDSRVFREHUWRUHV
GHSDUHGFRUWLQDVSDxRV\JDVROLQDXRWURVYDSRUHV\
OtTXLGRVLQIODPDEOHV
■
1XQFDXVHSUHQGDVKROJDGDVRTXHFXHOJXHQPLHQWUDV
XVDHOHOHFWURGRPpVWLFR(YLWHDFXPXODUDUWtFXORV
FRP~QPHQWHXVDGRVHQJDELQHWHVVREUHODFRFLQD\
WHQJDFXLGDGRDOH[WHQGHUODPDQRVREUHODFRFLQD
/DURSDTXHVHHQFXHQWUHFHUFDGHORVTXHPDGRUHVR
VXSHUILFLHVFDOLHQWHVVHSRGUiHQFHQGHURFDVLRQDQGR
TXHPDGXUDVJUDYHV
■
1RSHUPLWDTXHODJUDVDGHODFRFFLyQXRWURVPDWHULDOHV
LQIODPDEOHVVHDFXPXOHQHQRFHUFDGHODFRFLQD/D
JUDVDGHOKRUQRRVREUHODFRFLQDVHSRGUiLQFHQGLDU
■ /LPSLHODVFDPSDQDVGHYHQWLODFLyQGHIRUPDIUHFXHQWH
1RVHGHEHSHUPLWLUODDFXPXODFLyQGHJUDVDHQOD
FDPSDQDRHOILOWUR
$'9(57(1&,$
0$17(1*$/260$7(5,$/(6,1)/$0$%/(6
$/(-$'26'(/$&2&,1$
*8$5'((67$6,16758&&,21(6
*($SSOLDQFHVFRP
$'9(57(1&,$
181&$FXEUDQLQJXQD
UDQXUDDJXMHURVRSDVDMHVHQHOIRQGRGHOKRUQRQLFXEUD
XQHVWDQWHHQWHURFRQPDWHULDOHVWDOHVFRPRSDSHOGH
DOXPLQLR+DFHUHVWREORTXHDHOIOXMRGHDLUHDWUDYpVGHO
KRUQR\SXHGHRFDVLRQDUHQYHQHQDPLHQWRFRQPRQy[LGR
GHFDUERQR/RVUHFXEULPLHQWRVGHDOXPLQLRWDPELpQ
SXHGHQDWUDSDUHOFDORUFDXVDQGRULHVJRGHLQFHQGLR
■0DQWpQJDVHDOHMDGRGHODFRFLQDDODEULUODSXHUWDGHO
KRUQR(ODLUHFDOLHQWHRHOYDSRUTXHVDOHSXHGHFDXVDU
TXHPDGXUDVHQODVPDQRVURVWUR\XRMRV
■ 0DQWHQJDHOKRUQROLEUHGHDFXPXODFLyQGHJUDVD/D
JUDVDHQHOKRUQRVHSXHGHLQFHQGLDU
■ &RORTXHORVHVWDQWHVGHOKRUQRHQODXELFDFLyQ
FRUUHVSRQGLHQWHPLHQWUDVpVWHVHHQFXHQWUDIUtR6L
HVQHFHVDULRUHWLUDUHOHVWDQWHPLHQWUDVHOKRUQRVH
HQFXHQWUDFDOLHQWHHYLWHWRFDUODVVXSHUILFLHVFDOLHQWHV
■&RORTXHHOHVWDQWHGHOKRUQRHQODSRVLFLyQGHEORTXHR
DOLQWURGXFLU\UHWLUDUFRPLGDGHOKRUQR(VWRD\XGDD
HYLWDUTXHPDGXUDVSRUWRFDUVXSHUILFLHVFDOLHQWHVGHOD
SXHUWD\ODVSDUHGHVGHOKRUQR
■ 1RGHMHSURGXFWRVWDOHVFRPRSDSHOXWHQVLOLRVGH
FRFLQDQLFRPLGDHQHOKRUQRFXDQGRQRHVWpHQ
XVR/RVDUWtFXORVJXDUGDGRVHQHOKRUQRVHSXHGHQ
LQFHQGLDU
■1RGHMHDUWtFXORVHQODSDUWHVXSHULRUGHODFRFLQDFHUFD
GHODYHQWLODFLyQGHOKRUQRTXHHVWiHQHOFHQWURGHOD
SDUWHWUDVHUD/RVDUWtFXORVVHSXHGHQVREUHFDOHQWDU\
H[LVWHULHVJRGHLQFHQGLRRTXHPDGXUDV
■$OXVDUODVEROVDVSDUDFRFLQDURGRUDUHQHOKRUQRVLJD
ODVLQVWUXFFLRQHVGHOIDEULFDQWH
■1XQFDDVHFRQODSXHUWDDELHUWD6HSURKtEHDVDUFRQOD
SXHUWDDELHUWDGHELGRDOVREUHFDOHQWDPLHQWRGHODVSHULOODV
GHFRQWURO
$'9(57(1&,$
,16758&&,21(6'(6(*85,'$'
/DIXQFLyQGHDXWROLPSLH]DXVDHOKRUQRHQWHPSHUDWXUDVORVXILFLHQWHPHQWHDOWDVFRPRSDUDFRQVXPLUUHVWRVGH
FRPLGDTXHKD\DGHQWURGHOPLVPR3DUDXQIXQFLRQDPLHQWRVHJXURVLJDHVWDVLQVWUXFFLRQHV
■$QWHVGHXWLOL]DUHOFLFORGHDXWROLPSLH]DUHWLUHODV
ROODVHVWDQWHVGHPHWDOEULOODQWHGHOKRUQR\RWURV
XWHQVLOLRVTXHKD\DGHQWURGHOPLVPR6yORVHSXHGHQ
GHMDUGHQWURGHOKRUQRORVHVWDQWHVSDUDKRUQRFRQ
UHFXEULPLHQWRGHSRUFHODQD1RXVHODIXQFLyQGHDXWR
OLPSLH]DSDUDOLPSLDURWUDVSDUWHVWDOHVFRPRSDUULOODV
■$QWHVGHXWLOL]DUHOFLFORGHDXWROLPSLH]DOLPSLHODJUDVD
\UHVWRVGHFRPLGDTXHKD\DHQHOKRUQR8QDFDQWLGDG
H[FHVLYDGHJUDVDVHSXHGHLQFHQGLDUORFXDOSXHGH
SURGXFLUGDxRVFRQKXPRHQVXKRJDU
■ 6LHOPRGRGHDXWROLPSLH]DIXQFLRQDGHIRUPD
LQFRUUHFWDDSDJXHHOKRUQR\GHVFRQHFWHHOVXPLQLVWUR
GHFRUULHQWH6ROLFLWHHOVHUYLFLRGHXQWpFQLFRFDOLILFDGR
■ 1ROLPSLHODMXQWDGHODSXHUWD/DMXQWDGHODSXHUWDHV
HVHQFLDOSDUDXQEXHQVHOODGR6HGHEHWHQHUFXLGDGR
GHQRIURWDUGDxDUQLPRYHUODMXQWD
■ 1RXVHOLPSLDGRUHVSDUDKRUQR1RVHGHEHUiXVDU
OLPSLDGRUSDUDKRUQRVFRPHUFLDOHVQLUHYHVWLPLHQWRV
GHSURWHFFLyQSDUDKRUQRVGHQLQJ~QWLSRHQR
DOUHGHGRUGHFXDOTXLHUSDUWHGHOKRUQR
$'9(57(1&,$
,16758&&,21(6'(6(*85,'$''(/+2512&21
)81&,Ï1'($872/,03,(=$OJXQRVPRGHORV
■(OSURSyVLWRGHOFDMyQFDOHQWDGRUHVPDQWHQHUODV
FRPLGDVFRFLQDGDVDWHPSHUDWXUDSDUDVHUYLU/DV
EDFWHULDVFUHFHQGHIRUPDPX\UiSLGDHQODVFRPLGDV
FRQWHPSHUDWXUDVHQWUH)\)1RFRORTXH
FRPLGDIUtDHQHOFDMyQFDOHQWDGRU1RJXDUGHFRPLGD
HQHOFDMyQFDOHQWDGRUSRUPiVGHKRUDV6LQR
VHVLJXHQHVWDVLQVWUXFFLRQHVVHSRGUiQSURGXFLU
HQIHUPHGDGHVJHQHUDGDVHQODFRPLGD
■
1RGHMHSURGXFWRVGHSDSHOSOiVWLFRVFRPLGDHQODWDGDR
PDWHULDOHVFRPEXVWLEOHVHQHOFDMyQ6HSXHGHQLQFHQGLDU
■ 1RWRTXHHOHOHPHQWRFDOHQWDGRUQLODVXSHUILFLH
LQWHULRUGHOFDMyQ(VSRVLEOHTXHODVVXSHUILFLHVHVWpQ
ORVXILFLHQWHPHQWHFDOLHQWHVFRPRSDUDSURYRFDU
TXHPDGXUDV
■
7HQJDFXLGDGRDODEULUHOFDMyQ$EUDXQSRFRHOFDMyQ
\GHMHTXHVDOJDDLUHFDOLHQWHRYDSRUDQWHVGHUHWLUDUR
UHHPSOD]DUODFRPLGD(ODLUHFDOLHQWHRHOYDSRUTXHVDOH
SXHGHFDXVDUTXHPDGXUDVHQODVPDQRVURVWUR\XRMRV
■ 1RXVHSDSHOGHDOXPLQLRSDUDUHYHVWLUHOFDMyQ
FDOHQWDGRU(ODOXPLQLRHVXQH[FHOHQWHDLVODQWHGHO
FDORU\DWUDSDUiHOFDORUGHEDMRGHpVWH(VWRDOWHUDUi
HOIXQFLRQDPLHQWRGHOFDMyQ\H[LVWHHOULHVJRGHTXHVH
SURGX]FDXQLQFHQGLR
$'9(57(1&,$
,16758&&,21(6'(6(*85,'$''(/&$-Ï1
&$/(17$'25&$-Ï1'(/+2512,1)(5,25$OJXQRVPRGHORV
*8$5'((67$6,16758&&,21(6
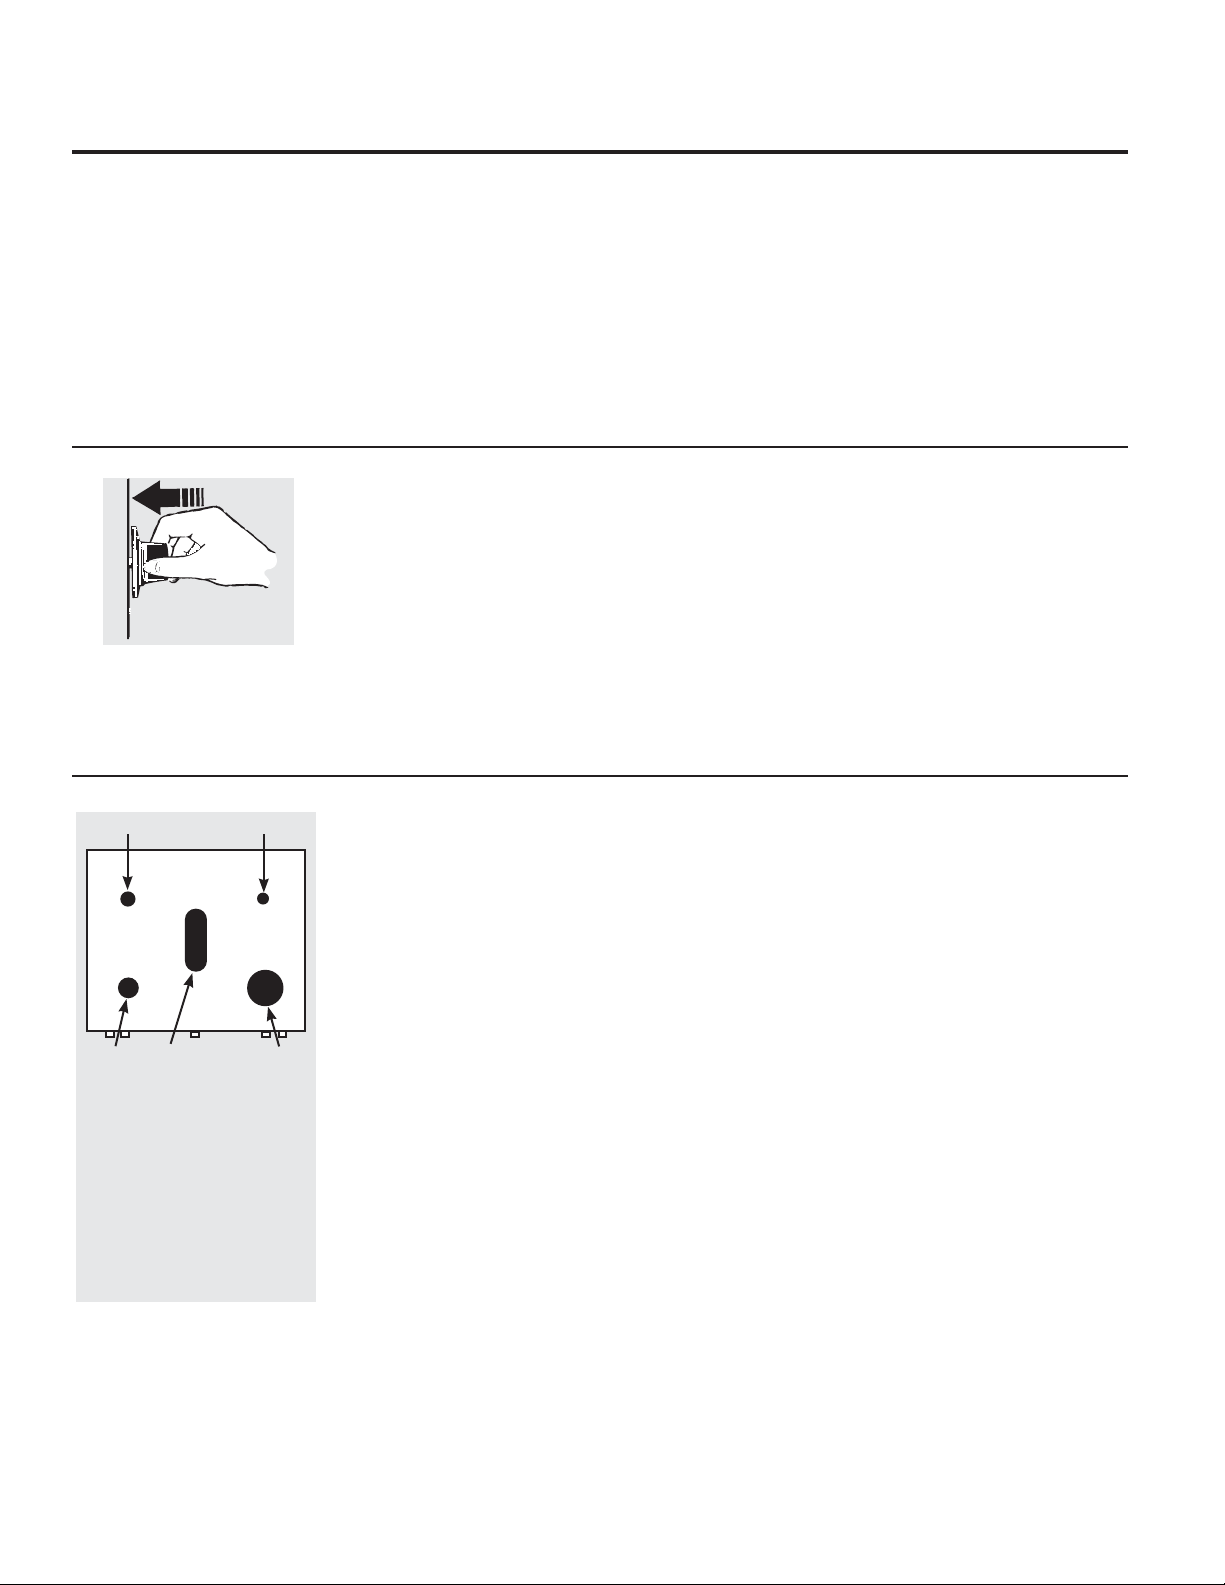
(VSRVLEOHTXHODVIXQFLRQHV\DSDULHQFLDVYDUtHQFRQUHODFLyQDVXPRGHORDORODUJRGHOPDQXDO
&yPR(QFHQGHUXQ4XHPDGRU6XSHUILFLDOGH*DV
$VHJ~UHVHGHTXHWRGRVORVTXHPDGRUHV
VXSHUILFLDOHVHVWpQXELFDGRVHQVXVSRVLFLRQHV
UHVSHFWLYDV
(PSXMHHOPDQJRGHFRQWURO\JLUHHOPLVPR
KDVWDODSRVLFLyQ/,7(
(VFXFKDUiXQSHTXHxRUXLGRGHFOLF²HO
VRQLGRGHODFKLVSDHOpFWULFDTXHHQFLHQGHHO
TXHPDGRU
*LUHODSHULOODSDUDDMXVWDUHOWDPDxRGH
ODOODPD6LODSHULOODSHUPDQHFHHQ/,7(
FRQWLQXDUiKDFLHQGRFOLF
&XDQGRXQTXHPDGRUVHJLUDD/,7(WRGRV
ORVTXHPDGRUHVKDFHQFKLVSD1RLQWHQWH
GHVHQVDPEODUQLOLPSLDUXQTXHPDGRUPLHQWUDV
RWURTXHPDGRUHVWiHQFHQGLGR(VSRVLEOHTXH
VHSURGX]FDXQDGHVFDUJDHOpFWULFDORFXDO
SRGUtDKDFHUTXHYXHOTXHXQXWHQVLOLRGHFRFLQD
FDOLHQWH
(PSXMHHOPDQJRGHFRQWURO\JLUH
HOPLVPRKDVWDODSRVLFLyQ/,7(
$QWHVGH(QFHQGHUXQ4XHPDGRUGH*DV
$VHJ~UHVHGHTXHWRGRVORVTXHPDGRUHV
HVWpQHQVXOXJDU
$VHJ~UHVHGHTXHWRGDVODVSDUULOODVGHOD
FRFLQDHVWpQFRUUHFWDPHQWHXELFDGDVDQWHV
GHXVDUXQTXHPDGRU
/XHJRGH(QFHQGHUXQ4XHPDGRUGH*DV
1RXWLOLFHHOTXHPDGRUGXUDQWHXQSHUtRGRGH
WLHPSRSURORQJDGRVLQXQXWHQVLOLRGHFRFLQD
VREUHODSDUULOOD(ODFDEDGRGHODSDUULOODVH
SXHGHUHVTXHEUDMDUVLQRKD\XQXWHQVLOLRGH
FRFLQDTXHDEVRUEDHOFDORU
$VHJ~UHVHGHTXHORVTXHPDGRUHV\ODV
SDUULOODVHVWpQIUtRVDQWHVGHFRORFDUODPDQR
WRPDUHOPDQJRGHXQDROODWUDSRVGH
OLPSLH]DXRWURVPDWHULDOHVVREUHHVWRV
4XHPDGRUHVGH*DV6HOODGRV$OJXQRVPRGHORV
/DSDUWHVXSHULRUGHVXFRFLQDDJDVFXHQWD
FRQTXHPDGRUHVGHJDVVHOODGRV/HRIUHFHQ
FRQYHQLHQFLDIDFLOLGDGGHOLPSLH]D\IOH[LELOLGDG
SDUDVHUXVDGRVHQXQDDPSOLDYDULHGDGGH
DSOLFDFLRQHVGHFRFLQD
(OTXHPDGRUPiVSHTXHxRHQODSRVLFLyQ
WUDVHUDGHUHFKDHVHOTXHPDGRUDIXHJROHQWR
(QDOJXQRVPRGHORVHOTXHPDGRUGHWULSOH
OODPDTXHVHHQFXHQWUDHQODSRVLFLyQIURQWDO
GHUHFKDHVHOTXHPDGRUDIXHJROHQWR(VWH
TXHPDGRUVHSXHGHSDVDUD6,0)XHJR/HQWR
SDUDTXHIXQFLRQHDXQIXHJRPX\OHQWR%ULQGD
XQIXQFLRQDPLHQWRGHFRFFLyQPX\SUHFLVR
SDUDFRPLGDVGHOLFDGDVWDOHVFRPRVDOVDVR
FRPLGDVTXHUHTXLHUHQIXHJROHQWRGXUDQWHXQ
SHUtRGRGHWLHPSRGHFRFFLyQODUJR
/RVTXHPDGRUHVPHGLDQRDWUiVDOD
L]TXLHUGD\JUDQGHIUHQWHDODL]TXLHUGDVRQ
ORVTXHPDGRUHVSULQFLSDOHVSDUDODPD\RUtD
GHODVFRFFLRQHV(VWRVTXHPDGRUHVGHXVR
JHQHUDOVHSXHGHQSDVDUGH+,$OWRD/2
%DMRDILQGHTXHVHDGHF~HQDXQDDPSOLD
YDULHGDGGHQHFHVLGDGHVGHFRFFLyQ
(OTXHPDGRUH[WUDJUDQGHDOIUHQWHDOD
GHUHFKDTXHPDGRUGHWULSOHOODPDRDOIUHQWH
DODL]TXLHUGDHQDOJXQRVPRGHORVHVHO
TXHPDGRUGHPi[LPDSURGXFFLyQ$OLJXDOTXH
ORVRWURVFXDWURTXHPDGRUHVVHSXHGHSDVDU
GH+,$OWRD6,0)XHJR/HQWRSDUDXQDDPSOLD
YDULHGDGGHDSOLFDFLRQHVGHFRFFLyQ
&yPRXVDUORVTXHPDGRUHVVXSHUILFLDOHVGHJDV
0HGLDQR
3HTXHxR
*UDQGH
&HQWUR
RYDODGR
HQDOJXQRV
PRGHORV
([WUD/DUJH
([WUD
*UDQGH
HQ
DOJXQRV
PRGHORV
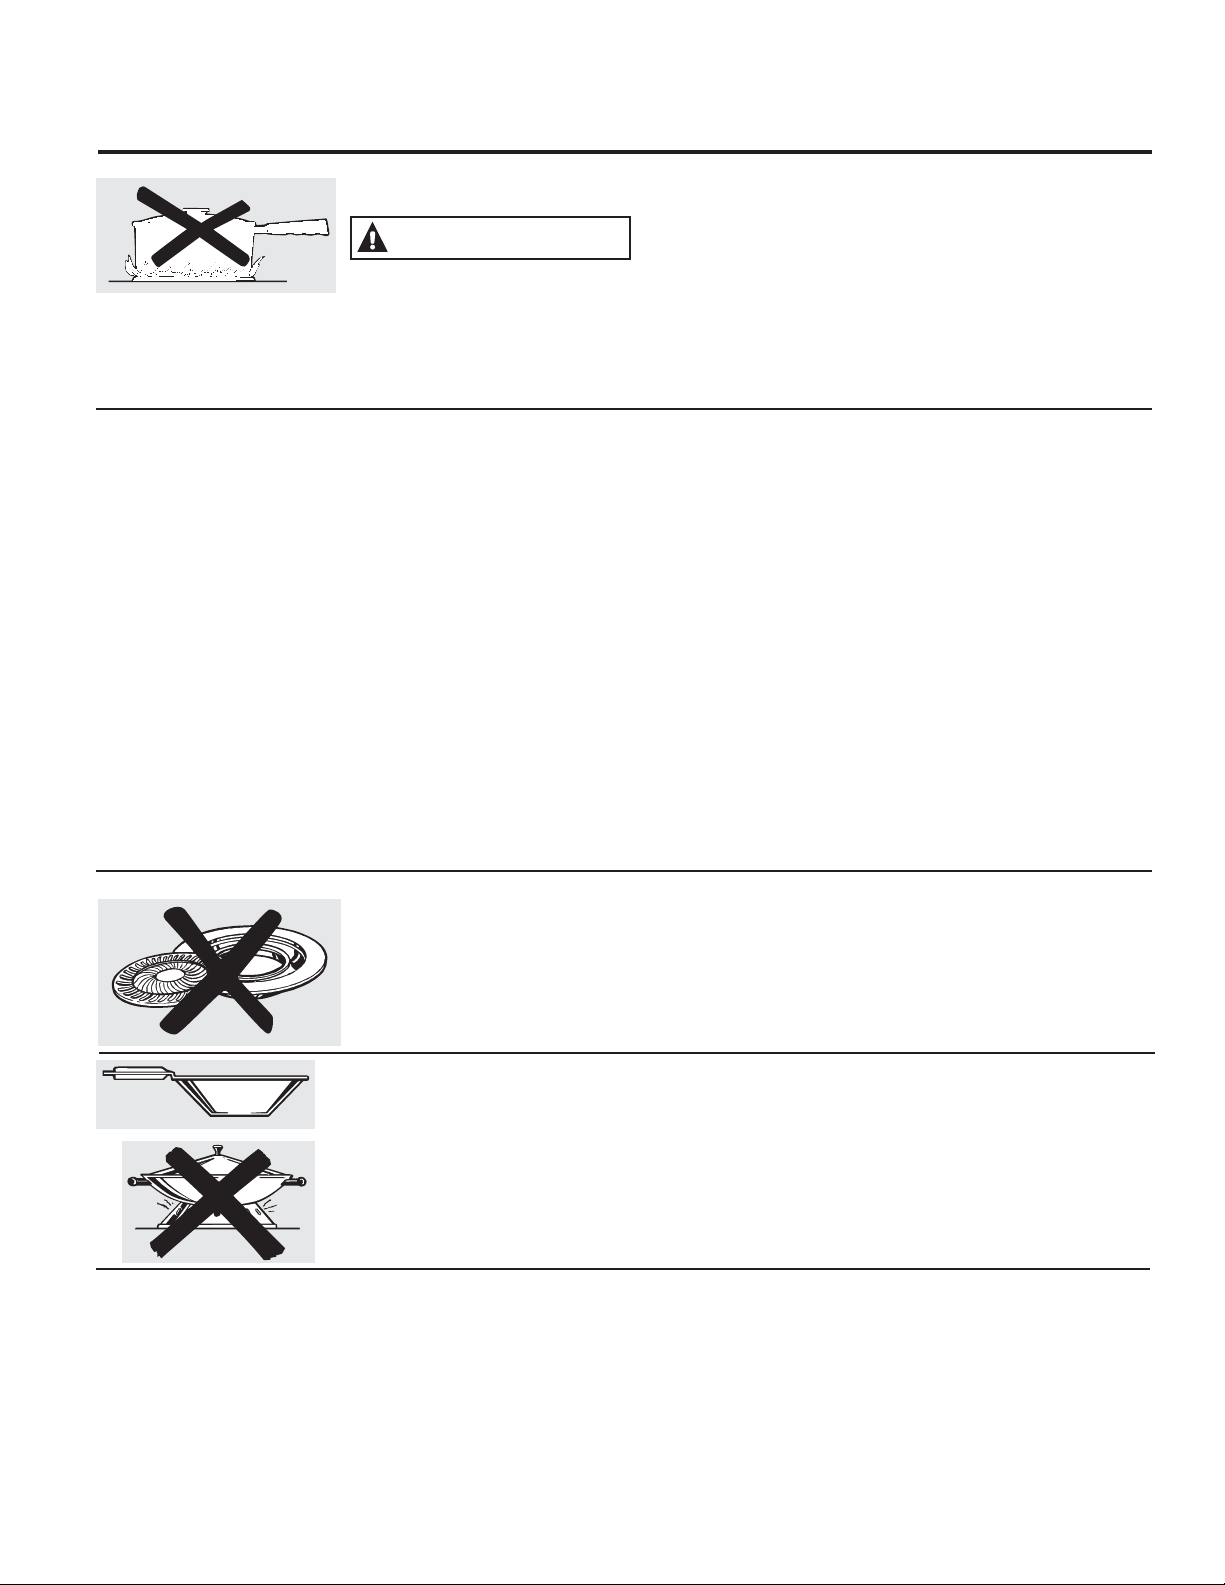
&yPR6HOHFFLRQDUHO7DPDxRGHOD/ODPD
8WHQVLOLRVREUHOD&RFLQD
$'9(57(1&,$
/DVOODPDV
GHOTXHPDGRUTXHQRHVWiQFXELHUWDVSRUHO
XWHQVLOLRGHFRFLQDSXHGHQSUHVHQWDUXQ
ULHVJRGHTXHPDGXUDVRLQFHQGLRGHWHODV
1XQFDSHUPLWDTXHODVOODPDVVHH[WLHQGDQ
PiVDOOiGHORVFRVWDGRVGHOXWHQVLOLR
2EVHUYHODOODPDQRODSHULOODDPHGLGDTXH
UHGXFHHOFDORU&XDQGRVHGHVHHFDOHQWDUGH
IRUPDUiSLGDHOWDPDxRGHODOODPDGHXQ
TXHPDGRUGHJDVGHEHUiVHUHTXLYDOHQWHFRQHO
XWHQVLOLRGHFRFLQDTXHHVWpXVDQGR
&XDQGRODVOODPDVVHDQPiVJUDQGHVTXHODSDUWH
LQIHULRUGHOXWHQVLOLRGHFRFLQDQRFDOHQWDUiQHO
XWHQVLOLRPiVUiSLGR\SRGUtDQVHUULHVJRVDV
(Q&DVRGH&RUWHGH&RUULHQWH
(QFDVRGHFRUWHGHFRUULHQWHSXHGHHQFHQGHU
ORVTXHPDGRUHVGHJDVVXSHUILFLDOHVGHOD
FRFLQDFRQXQIyVIRUR$FHUTXHXQIyVIRUR
SUHQGLGRDOTXHPDGRU\OXHJRSUHVLRQH\
JLUHODSHULOODGHFRQWUROKDVWDODSRVLFLyQ
/,7(7HQJDHVSHFLDOFXLGDGRDOHQFHQGHUORV
TXHPDGRUHVGHHVWDPDQHUD
/RVTXHPDGRUHVTXHVHHVWpQXVDQGRFXDQGR
VHSURGX]FDXQFRUWHGHFRUULHQWHHOpFWULFD
FRQWLQXDUiQIXQFLRQDQGRQRUPDOPHQWH
127$6LHO%ORTXHRGHO&RQWUROGH*DVHVWi
HQXVRHQHOPRPHQWRGHOFRUWHGHFRUULHQWH
ORVTXHPDGRUHVVXSHUILFLDOHVQRVHSRGUiQ
HQFHQGHU
*($SSOLDQFHVFRP
8VHHO:RNGH(VWD)RUPD
5HFRPHQGDPRVTXHXVHXQZRNGHSXOJDGDV
RPiVSHTXHxRFRQIRQGRSODQR$VHJ~UHVHGH
TXHHOIRQGRGHOZRNVHDSR\HGHIRUPDSODQD
VREUHODSDUULOOD(VWiQGLVSRQLEOHVHQVXWLHQGD
PLQRULVWDORFDO
6yORVHGHEHUiXVDUXQZRNFRQIRQGRSODQR
1RXVHXQDQLOORGHVRSRUWHSDUDZRN&RORFDUHO
DQLOORVREUHHOTXHPDGRURSDUULOODSRGUiKDFHU
TXHHOTXHPDGRUIXQFLRQHGHIRUPDLQDGHFXDGD
SURGXFLHQGRQLYHOHVGHPRQy[LGRGHFDUERQR
TXHVXSHUDQORVHVWiQGDUHVSHUPLWLGRV(VWR
SXHGHVHUSHOLJURVRSDUDVXVDOXG
8VHXQZRNFRQIRQGRSODQR
3DUULOODVSDUDOD3DUWH6XSHULRUGHOD&RFLQD0RGHORVFRQTXHPDGRUVHOODGR
1RXVHSDUULOODVSDUDODSDUWHVXSHULRUGHOD
FRFLQDVREUHORVTXHPDGRUHVGHJDVVHOODGRV6L
XVDODSDUULOODSDUDODSDUWHVXSHULRUGHODFRFLQD
HQHOTXHPDGRUGHJDVVHOODGRRFDVLRQDUi
XQDFRPEXVWLyQLQFRPSOHWD\SRGUiSURGXFLU
H[SRVLFLyQDQLYHOHVGHPRQy[LGRGHFDUERQR
VXSHULRUHVDORVHVWiQGDUHVDFWXDOPHQWH
SHUPLWLGRV
7KLVFDQEHKD]DUGRXVWR\RXUKHDOWK
$OXPLQLR6HUHFRPLHQGDXQXWHQVLOLRGHSHVR
PHGLDQR\DTXHFDOLHQWDGHIRUPDUiSLGD\
SDUHMD/DPD\RUtDGHODVFRPLGDVVHGRUDQ
GHIRUPDSDUHMDHQXQVDUWpQGHDOXPLQLR
8VHFDFHURODVFRQWDSDKHUPpWLFDFXDQGR
FRFLQHFRQFDQWLGDGHVPtQLPDVGHDJXD
+LHUUR)RUMDGR6LFRFLQDUiGHIRUPDOHQWDOD
PD\RUtDGHORVVDUWHQHVOHGDUiQUHVXOWDGRV
VDWLVIDFWRULRV
8WHQVLOLRVGHHVPDOWH%DMRFLHUWDV
FRQGLFLRQHVHOHVPDOWHGHDOJXQRVXWHQVLOLRV
GHFRFLQDVHSXHGHQGHUUHWLU6LJDODV
UHFRPHQGDFLRQHVVREUHPpWRGRVGHFRFFLyQ
GHOIDEULFDQWHGHXWHQVLOLRVGHFRFLQD
9LGULR([LVWHQGRVWLSRVGHXWHQVLOLRVGHFRFLQD
GHYLGULR²DTXHOORVSDUDXVRFRQHOKRUQR
~QLFDPHQWH\DTXHOORVSDUDODFRFFLyQHQOD
SDUWHVXSHULRUGHODFRFLQDFDFHURODVFDIp\
WHWHUDV/RVFRQGXFWRUHVGHYLGULRFDOLHQWDQGH
IRUPDPX\OHQWD
&HUiPLFDGH9LGULR5HVLVWHQWHDO&DORU6H
SXHGHQXVDUSDUDFXDOTXLHUVXSHUILFLHRSDUD
FRFFLyQHQHOKRUQR&RQGXFHHOFDORUGHIRUPD
PX\OHQWD\VHHQIUtDGHIRUPDPX\UiSLGD
&RQVXOWHODVLQVWUXFFLRQHVGHOIDEULFDQWHGH
XWHQVLOLRVGHFRFLQDSDUDVDEHUFRQVHJXULGDGVL
VHSXHGHXVDUFRQFRFLQDVDJDV
$FHUR,QR[LGDEOH(VWHPHWDOSRVHH
SURSLHGDGHVGHFDOHQWDPLHQWROLPLWDGDV\
QRUPDOPHQWHVHFRPELQDFRQFREUHDOXPLQLR
XRWURVPDWHULDOHVSDUDXQDPHMRUGLVWULEXFLyQ
GHOFDORU/RVVDUWHQHVFRQFRPELQDFLyQGH
PHWDOHVQRUPDOPHQWHIXQFLRQDQGHIRUPD
VDWLVIDFWRULDVLVHXVDQFRQFDORUPHGLRFRPR
ORUHFRPLHQGDHOIDEULFDQWH

8VRGHORVFRQWUROHVGHOKRUQR
(VSRVLEOHTXHODVIXQFLRQHV\DSDULHQFLDVYDUtHQFRQUHODFLyQDVXPRGHORDORODUJRGHOPDQXDO
7HFOD%DNH7HPS5HFDOO5HFRUGDWRULRGH+RUQHDU
7HPSHUDWXUD
3UHVLRQHSDUDVHOHFFLRQDUODIXQFLyQKRUQHDU
/X]GH+RUQHDGR
7LWLODPLHQWUDVVHHQFXHQWUDHQHOPRGRHGLWDU²XVWHGSXHGH
FDPELDUODWHPSHUDWXUDGHOKRUQRHQHVWHSXQWR%ULOOD
FXDQGRHOKRUQRVHHQFXHQWUDHQHOPRGRGHKRUQHDGR
7HFOD6WDUW2Q,QLFLDU(QFHQGLGR
3UHVLRQHSDUDVHOHFFLRQDUKRUQHDUFRQODIXQFLyQGH
FRQYHFFLyQ
3DQWDOOD
0XHVWUDODKRUDGHOGtDWHPSHUDWXUDGHOKRUQRVLHO
KRUQRHVWiHQHOPRGRKRUQHDUDVDURDXWROLPSLH]D
\ORVWLHPSRVFRQILJXUDGRVSDUDODVIXQFLRQHVGHO
WHPSRUL]DGRURGHKRUQRDXWRPiWLFR(QODSDQWDOOD
DSDUHFHUi35(PLHQWUDVVHHVWpSUHFDOHQWDQGR&XDQGR
HOKRUQRDOFDQFHODWHPSHUDWXUDVHOHFFLRQDGDHOFRQWURO
GHOKRUQRHPLWLUiXQSLWLGR\ODSDQWDOODPRVWUDUiOD
WHPSHUDWXUDGHOKRUQR
6L´)\XQQ~PHURROHWUDµWLWLODQHQODSDQWDOOD\HOFRQWUROGHOKRUQR
GDXQDVHxDOHVWRLQGLFDXQFyGLJRGHHUURUGHIXQFLyQ
6LVXKRUQRIXHFRQILJXUDGRSDUDXQIXQFLRQDPLHQWRSRUWLHPSR\VH
SURGXFHXQFRUWHGHFRUULHQWHHOUHORM\ODVIXQFLRQHVSURJUDPDGDV
VHUiQUHLQLFLDGRV
/DKRUDGHOGtDWLWLODUiHQODSDQWDOODFXDQGRKD\DKDELGRXQFRUWH
GHFRUULHQWH
5HLQLFLHHOUHORM
6LODIXQFLyQFyGLJRGHHUURUDSDUHFHGXUDQWHHOFLFORGHDXWR
OLPSLH]DFRQWUROHODWUDEDGHODSXHUWDGHOKRUQR(VSRVLEOHTXH
ODPDQLMDGHODWUDEDVHKD\DPRYLGRLQFOXVRDXQTXHVyORKD\D
VLGROHYHPHQWHGHODSRVLFLyQGHEORTXHR$VHJ~UHVHGHTXHOD
WUDEDVHDPRYLGDKDFLDODGHUHFKDWDQWRFRPRVHDSRVLEOH
3UHVLRQHODWHFOD&OHDU2II%RUUDU$SDJDU3HUPLWDTXHHO
KRUQRVHHQIUtHGXUDQWHXQDKRUD&RORTXHHOKRUQRQXHYDPHQWH
HQIXQFLRQDPLHQWR6LHOFyGLJRGHHUURUGHIXQFLyQVHUHSLWH
GHVFRQHFWHODFRUULHQWHGHOKRUQR\OODPHDOVHUYLFLRWpFQLFR
7HFOD.LWFKHQ7LPHU2Q2II7HPSRUL]DGRUGH&RFLQD
(QFHQGLGR$SDJDGR
3UHVLRQHSDUDVHOHFFLRQDUODIXQFLyQGHOFRQWDGRU
/XHJR
SUHVLRQHODVWHFODV\²SDUDDMXVWDUHOWHPSRUL]DGRU
/X]GHOWHPSRUL]DGRU
7LWLODFXDQGRVHHQFXHQWUDHQHOPRGRHGLWDUXVWHGSXHGH
FDPELDUHOKRUDULRFRQILJXUDGRHQHVWHSXQWR%ULOODFXDQGR
HOWHPSRUL]DGRUKDVLGRDFWLYDGR7LWLODQXHYDPHQWHFXDQGR
HOWHPSRUL]DGRUILQDOL]yKDVWDTXHHOFRQWUROHVUHLQLFLDGR
7HFODGH5HORM
3DUDFRQILJXUDUHOUHORMSUHVLRQHODWHFODGRVYHFHV\OXHJR
SUHVLRQHODVWHFODV\/DKRUDGHOGtDWLWLODUiHQODSDQWDOOD
FXDQGRHOKRUQRVHHQFLHQGDSRUSULPHUDYH]
7HFOD6WDUW7LPH+RUDGH,QLFLRHQDOJXQRVPRGHORV
8VHMXQWRFRQODVWHFODV&RRNLQJ7LPH7LHPSRGH
&RFFLyQR6HOI&OHDQ$XWR/LPSLH]DSDUDFRQILJXUDUHO
KRUQRSDUDTXHVHLQLFLH\GHWHQJDGHIRUPDDXWRPiWLFD
HQHOWLHPSRTXHFRQILJXUy
/X]GH+RUDGH,QLFLR
7LWLODPLHQWUDVVHHQFXHQWUDHQHOPRGRHGLWDU²XVWHGSXHGH
FDPELDUODKRUDGHLQLFLRHQHVWHSXQWR%ULOODFXDQGROD
IXQFLyQIXHDFWLYDGD
7HFOD&RRNLQJ7LPH7LHPSRGH&RFFLyQHQDOJXQRV
PRGHORV
3UHVLRQHHVWDWHFOD\OXHJRSUHVLRQHODVWHFODV\SDUD
FRQILJXUDUODFDQWLGDGGHWLHPSRGXUDQWHHOFXDOGHVHH
TXHVXFRPLGDVHFRFLQH(OKRUQRVHDSDJDUiFXDQGRHO
WLHPSRGHFRFFLyQVHKD\DWHUPLQDGR
/X]GH7LHPSRGH&RFFLyQ
7LWLODFXDQGRVHHQFXHQWUDHQHOPRGRHGLWDUXVWHGSXHGH
FDPELDUHOWLHPSRFRQILJXUDGRHQHVWHSXQWR%ULOODFXDQGR
ODIXQFLyQKDVLGRDFWLYDGR7LWLODQXHYDPHQWHFXDQGRHO
WHPSRUL]DGRUILQDOL]yKDVWDTXHHOFRQWUROHVUHLQLFLDGR
)XQFLRQHV\&RQILJXUDFLRQHVGHO&RQWUROGHO+RUQR5HORM\
7HPSRUL]DGRU
HQDOJXQRVPRGHORV
/DVIXQFLRQHVDSDULHQFLD\XELFDFLRQHV
GHODVWHFODVSXHGHQYDULDU

*($SSOLDQFHVFRP
OVEN TEMP
2
0
0
2
5
0
3
0
0
3
5
0
4
0
0
4
5
0
5
0
0
B
R
O
I
L
C
L
E
A
N
O
F
F
)XQFLRQHV\&RQILJXUDFLRQHVGHO&RQWUROGHO+RUQR5HORM\7HPSRUL]DGRU
HQDOJXQRVPRGHORV
/X]GHO+RUQR$XWRPiWLFDHQDOJXQRVPRGHORV
,OXPLQDHQFXDOTXLHUPRPHQWRHQTXHHOKRUQRKD\DVLGR
SURJUDPDGRXVDQGRODVIXQFLRQHV&RRNLQJ7LPH7LHPSR
GH&RFFLyQR6WDUW7LPH+RUDGH,QLFLR
7HFOD2YHQ/LJKW2Q2II(QFHQGLGR$SDJDGRGHOD/X]
GHO+RUQR
3UHVLRQHHVWDWHFODSDUDHQFHQGHURDSDJDUODOX]GHO
KRUQR
7HFOD
*ROSHFLWRVFRUWRVVREUHHVWDWHFODUHGXFLUiQHOWLHPSR
RODWHPSHUDWXUDHQSHTXHxDVFDQWLGDGHV0DQWHQJD
SUHVLRQDGDODWHFODSDUDUHGXFLUHOWLHPSRROD
WHPSHUDWXUDHQJUDQGHVFDQWLGDGHV
7HFOD
*ROSHFLWRVFRUWRVVREUHHVWDWHFODLQFUHPHQWDUiQHO
WLHPSRRODWHPSHUDWXUDHQSHTXHxDVFDQWLGDGHV
0DQWHQJDSUHVLRQDGDODWHFODSDUDLQFUHPHQWDUHOWLHPSR
RODWHPSHUDWXUDHQJUDQGHVFDQWLGDGHV
7HFOD6HOI&OHDQ$XWR/LPSLH]DHQDOJXQRVPRGHORV
3UHVLRQHHVWDWHFODSDUDVHOHFFLRQDUODIXQFLyQGHDXWR
OLPSLH]D&RQVXOWHODVHFFLyQ8VLQJWKHVHOIFOHDQLQJRYHQ
8VRGHOKRUQRGHDXWROLPSLH]D
/X]GH/LPSLH]D
7LWLODPLHQWUDVVHHQFXHQWUDHQHOPRGRHGLWDU²XVWHGSXHGH
FDPELDUODFDQWLGDGGHWLHPSRGHOFLFORGHDXWROLPSLH]DHQ
HVWHSXQWR%ULOODFXDQGRHOKRUQRVHHQFXHQWUDHQHOFLFOR
GHDXWROLPSLH]D/XHJRGHOFLFORGHDXWROLPSLH]DODOX]VH
DSDJDUi'HVWUDEHODSXHUWD
7HFOD&OHDU2II%RUUDU$SDJDU
3UHVLRQHHVWDWHFODSDUDFDQFHODU72'$6ODVRSHUDFLRQHV
GHOKRUQRH[FHSWRHOUHORM\HOWHPSRUL]DGRU
7HFOD%URLO+L/R$VDU$OWR%DMR
3UHVLRQHHVWDWHFODSDUDVHOHFFLRQDUODIXQFLyQDVDU
/X]SDUD$VDU
7LWLODPLHQWUDVVHHQFXHQWUDHQHOPRGRHGLWDU³XVWHGSXHGH
SDVDUGHODIXQFLyQ%URLO$VDUHQ+L$OWRD/R%DMRHQHVWH
SXQWR%ULOODFXDQGRHOKRUQRVHHQFXHQWUDHQHOPRGR%URLO
$VDU
/XFHV,QGLFDGRUDVHQDOJXQDVWHFODV
(OPRGR(',7(GLWDUGXUDYDULRVVHJXQGRVOXHJRGHKDEHU
SUHVLRQDGROD~OWLPDWHFOD6WDUW7LPH+RUDGH,QLFLR\
&RRNLQJ7LPH7LHPSRGH&RFFLyQVHUiQODV~QLFDVWHFODV
HQFHQGLGDVVLFXDOTXLHUDGHHVWDVRSFLRQHVHVVHOHFFLRQDGD
(MHPSOR6WDUW7LPH+RUDGH,QLFLRHVVHOHFFLRQDGDFRQ
ODWHFOD%DNH+RUQHDU³ODWHFOD6WDUW7LPH+RUDGH
,QLFLRSHUPDQHFHUiHQFHQGLGDKDVWDTXHHOUHORMOOHJXH
DOWLHPSRSURJUDPDGRHQFX\RSXQWRVHDSDJDUi\ODOX]
GHODWHFOD%DNH7HPS5HFDOO5HFRUGDWRULRGH+RUQHDGR
7HPSHUDWXUDVHHQFHQGHUi
7HFOD6WHDP&OHDQ3DG/LPSLH]DDO9DSRUHQDOJXQRV
PRGHORV
7RXFKWKLVSDGIRUHDVLHUFOHDQLQJOLJKWVRLOLQJRIWKHRYHQ
FDYLW\RUGRRU
3UHVLRQHODSHULOOD29(17(037HPSHUDWXUDGHO+RUQRHQODFRQILJXUDFLyQTXHGHVHH
/DOX]FtFOLFDGHOKRUQRVHHQFLHQGHGXUDQWHODFRFFLyQ
3HULOODGHOD7HPSHUDWXUDGHO+RUQRHQDOJXQRVPRGHORV
/DDSDULHQFLDSXHGHYDULDU

(VSRVLEOHTXHODVIXQFLRQHV\DSDULHQFLDVYDUtHQFRQUHODFLyQDVXPRGHORDORODUJRGHOPDQXDO
8VWHGWLHQHODRSFLyQGHTXHHOWHPSRUL]DGRUPXHVWUHODFXHQWD
UHJUHVLYDGHODKRUDGHOGtD(QWDOFDVRHOWHPSRUL]DGRUHPLWLUi
XQDVHxDODOFRQFOXLUHOSHUtRGRSDUDDOHUWDUTXHHOWLHPSR
ILQDOL]y
8VRGHOUHORM\HOWHPSRUL]DGRU
3DUD&RQILJXUDUHO5HORM
127$$OHQFKXIDUSRUSULPHUDYH]ODFRFLQDR
OXHJRGHXQFRUWHGHFRUULHQWHWRGDODSDQWDOODGHO
5HORM7HPSRUL]DGRUVHLOXPLQDUi
3UHVLRQHODWHFOD&/2&.5HORM
0DQWHQJDSUHVLRQDGDODWHFODR\OD
KRUDGHOGtDFDPELDUiGHDPLQXWRVSRU
YH]3DUDFDUJDUODKRUDHQPLQXWHVGpD
ODVWHFODVJROSHFLWRVFRUWRV
3UHVLRQHODWHFOD&/2&.5HORMSDUDLQLFLDU
HOUHORM
3DUD3URJUDPDUHO7HPSRUL]DGRUGHOD&RFLQD
3UHVLRQHODWHFOD.,7&+(17,0(5212))
(QFHQGLGR$SDJDGRGHO7HPSRUL]DGRUGH
OD&RFLQD
3UHVLRQHODVWHFODVRSDUDSURJUDPDUHO
WHPSRUL]DGRU*ROSHFLWRVFRUWRVHQODV
WHFODVR²FDPELDQODFRQILJXUDFLyQGHO
WHPSRUL]DGRUGHDXQPLQXWRSRUYH]
0DQWHQHUSUHVLRQDGDODWHFODLQFUHPHQWD
ODFRQILJXUDFLyQGHDPLQXWRVSRUYH]
8QDYH]FRQILJXUDGRHOWHPSRUL]DGRU
SUHVLRQHODWHFOD.,7&+(17,0(5212))
(QFHQGLGR$SDJDGRGHO7HPSRUL]DGRUGH
OD&RFLQDSDUDLQLFLDUHOFRQWHR
$PHGLGDTXHHOWHPSRUL]DGRUUHDOLFHODFXHQWD
UHJUHVLYDXQDVHxDOGDUiXQDLQGLFDFLyQ
FXDQGRIDOWHXQPLQXWR/XHJRGHODVHxDO
ODSDQWDOODUHDOL]DUiODFXHQWDUHJUHVLYDHQ
VHJXQGRV&XDQGRHOWLHPSRILQDOLFHVHHPLWLUi
XQDVHxDOILQDO3UHVLRQHODWHFOD.,7&+(1
7,0(5212))(QFHQGLGR$SDJDGRGHO
7HPSRUL]DGRUGHOD&RFLQDSDUDGHWHQHUOD
VHxDO
3DUD&DPELDUR&DQFHODUOD&RQILJXUDFLyQGHO7HPSRUL]DGRUGHOD&RFLQD
&XDQGRHOWHPSRUL]DGRUHVWpUHDOL]DQGROD
FXHQWDUHJUHVLYDXWLOLFHODWHFODR²SDUD
FDPELDUHOWLHPSRUHVWDQWHRSUHVLRQHODWHFOD
.,7&+(17,0(5212))(QFHQGLGR$SDJDGR
GHO7HPSRUL]DGRUGHOD&RFLQDSDUDGHWHQHU
HOWHPSRUL]DGRU(OWHPSRUL]DGRUQRVHSXHGH
FDQFHODUDPHQRVTXHKD\DFRPSOHWDGRODV
LQVWUXFFLRQHVDQWHULRUHVGHµFRQILJXUDFLyQGHO
WHPSRUL]DGRUµHQVXWRWDOLGDG
0RVWUDUHO5HORM0LHQWUDVHO7HPSRUL]DGRUGHOD&RFLQD(VWi)XQFLRQDQGR
3UHVLRQDUODWHFOD&/2&.5HORMPLHQWUDVHO
WHPSRUL]DGRUHVWiIXQFLRQDQGRQRLQWHUIHULUi
FRQHOIXQFLRQDPLHQWRGHOWHPSRUL]DGRUOD
SDQWDOODFDPELDUiSDUDPRVWUDUHOUHORMSHUR
HOWHPSRUL]DGRUFRQWLQXDUiODFXHQWDUHJUHVLYD
\D~QGDUiODVHxDOFXDQGRHOWLHPSRILQDOLFH
3UHVLRQHODWHFOD.,7&+(17,0(5212))
(QFHQGLGR$SDJDGRGHO7HPSRUL]DGRUGHOD
&RFLQDSDUDPRGLILFDUODSDQWDOODDILQGHTXH
PXHVWUHHOWHPSRUL]DGRU
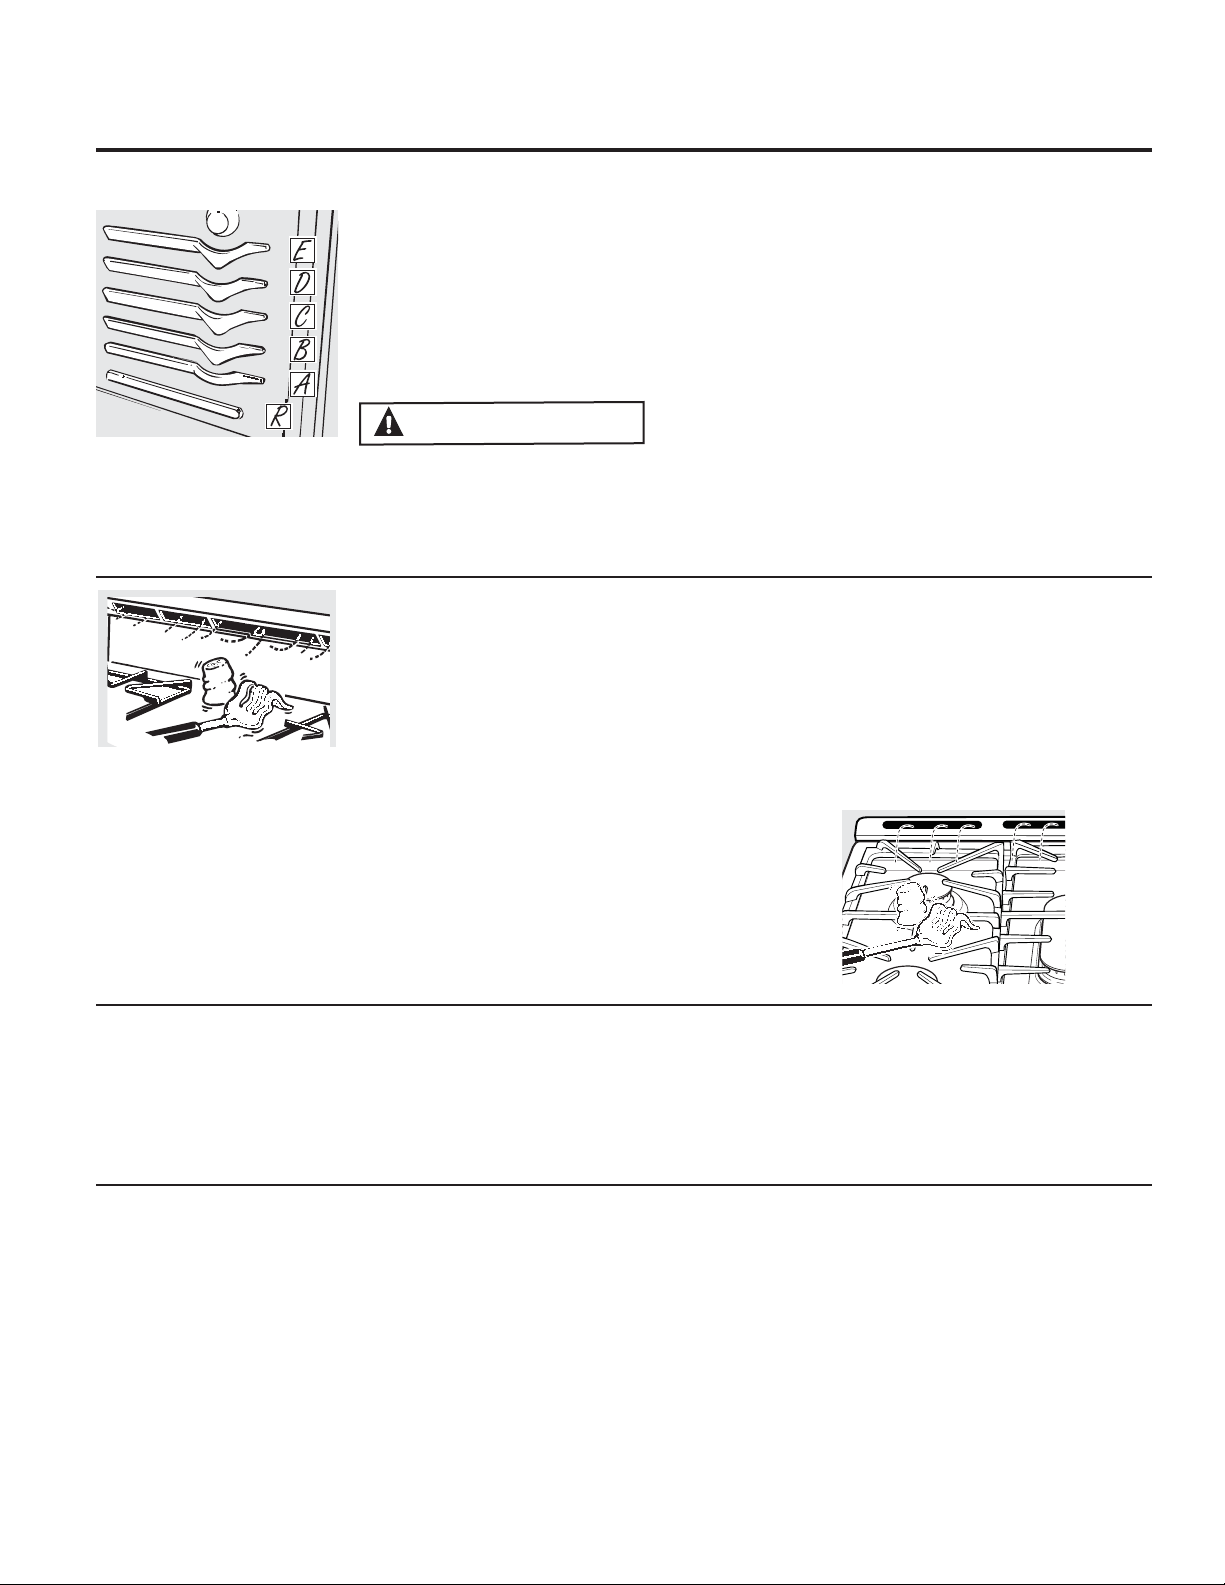
8VRGHO+RUQRV *($SSOLDQFHVFRP
3DUDHYLWDUSRVLEOHVTXHPDGXUDVFRORTXHORVHVWDQWHVHQODSRVLFLyQGHVHDGDDQWHVGHHQFHQGHUHOKRUQR
$QWHVGHFRPHQ]DU«
/RVHVWDQWHVSRVHHQEORTXHDGRUHVGHPRGR
TXHDOFRORFDUORVFRUUHFWDPHQWHVREUHORV
VRSRUWHV$D(VHGHWHQGUiQDQWHVGHVDOLUVH
FRPSOHWDPHQWH\QRVHLQFOLQDUiQ
$OFRORFDU\UHWLUDUXWHQVLOLRVGHFRFLQDHPSXMH
HOHVWDQWHKDFLDDIXHUDGHOWRSHVREUHHO
VRSRUWHGHOHVWDQWH
35(&$8&,Ï1
$OXVDU
XQHVWDQWHHQODSRVLFLyQPiVEDMD5
VHGHEHUiWHQHUFXLGDGRDOHPSXMDUHO
HVWDQWHYDULDVSXOJDGDVKDFLDDIXHUD\
OXHJRXWLOL]DQGRGRVVRVWHQHGRUHVGHROOD
HPSXMHHOHVWDQWHKDFLDDIXHUDVRVWHQLHQGR
ORVODGRV(OHVWDQWHHVWiHQXQDSRVLFLyQ
EDMD\XVWHGSRGUtDVXIULUXQDTXHPDGXUD
VLFRORFDODPDQRHQPHGLRGHOPLVPRDO
HPSXMDUKDFLDDIXHUD
3DUDUHWLUDUHOHVWDQWHHPSXMHHOPLVPRKDFLD
XVWHGLQFOLQHHOH[WUHPRIURQWDOKDFLDDUULED\
HPSXMHKDFLDDIXHUD
3DUDKDFHUXQUHHPSOD]RFRORTXHHOH[WUHPR
GHOHVWDQWHEORTXHDGRUHVHQHOVRSRUWHLQFOLQH
HOIUHQWHKDFLDDUULED\HPSXMHHOHVWDQWHKDFLD
DGHQWUR
127$(OHVWDQWHQRHVWiGLVHxDGRSDUD
GHVOL]DUVHKDFLDDIXHUDHQODSRVLFLyQHVSHFLDO
GHOHVWDQWHEDMR5
(OKRUQRWLHQHSRVLFLRQHVGH
HVWDQWHV7DPELpQFXHQWDFRQXQD
SRVLFLyQHVSHFLDOGHOHVWDQWHEDMR
5SDUDFRVDVPiVJUDQGHVWDOHV
FRPRXQSDYRJUDQGH
9HQWLODFLyQGHO+RUQR6XSHULRU
6XKRUQRHVYHQWLODGRDWUDYpVGHFRQGXFWRVHQ
ODSDUWHWUDVHUDGHODFRFLQD1REORTXHHHVWRV
FRQGXFWRVDOFRFLQDUHQHOKRUQR²HVLPSRUWDQWHTXH
HOIOXMRGHDLUHFDOLHQWHGHVGHHOKRUQR\HODLUHIUHVFR
KDFLDHOTXHPDGRUGHOKRUQRQRVHDQLQWHUUXPSLGRV
(YLWHWRFDUODVDEHUWXUDVGHODYHQWLODFLyQR
VXSHUILFLHVFHUFDQDVGXUDQWHHOIXQFLRQDPLHQWRGHO
KRUQR\HODVDGRU²VHSRGUiQFDOHQWDU
/DVPDQLMDVGHODVROODV\FDFHURODVVH
SRGUiQFDOHQWDUDOHVWDUHQODSDUWHVXSHULRU
GHOKRUQRVLVHODVXELFDGHPDVLDGRFHUFDGH
ODYHQWLODFLyQ
1RGHMHDUWtFXORVGHSOiVWLFRRLQIODPDEOHV
VREUHODSDUWHVXSHULRUGHODFRFLQDVH
SRGUiQGHUUHWLURLQFHQGLDUVHVLVHHQFXHQWUDQ
GHPDVLDGRFHUFDGHODYHQWLODFLyQ
1RGHMHHQYDVHVFHUUDGRVHQODSDUWH
VXSHULRUGHODFRFLQD/DSUHVLyQHQHQYDVHV
FHUUDGRVVHSRGUiLQFUHPHQWDUORFXDOSRGUi
KDFHUTXHH[SORWHQ
/RVDUWtFXORVGHPHWDOVHFDOHQWDUiQ
GHPDVLDGRVLVHORVGHMDVREUHODSDUWH
VXSHULRUGHODFRFLQD\SRGUiQRFDVLRQDU
LQFHQGLRV
/RVDUWtFXORVGHSOiVWLFRVREUHOD
SDUWHVXSHULRUGHOKRUQRVHSRGUiQ
GHUUHWLUVLVHORVGHMDGHPDVLDGR
FHUFDGHODYHQWLODFLyQ
/DDSDULHQFLD\ODXELFDFLyQGHOD
YHQWLODFLyQYDUtDQ
&yPR&RQILJXUDUHO&RPSDUWLPLHQWRSDUD$VDUHQDOJXQRVPRGHORV
(OKRUQRRSDUULOODQRVHSRGUiQLOXPLQDU
GXUDQWHXQFRUWHGHFRUULHQWH
6LVHSURGXFHXQFRUWHGHFRUULHQWHPLHQWUDV
HOKRUQRHVWiHQXVRHOTXHPDGRUGHOKRUQR
VHDSDJD(VWRVHGHEHDTXHHOIOXMRGHJDVVH
GHWLHQHGHIRUPDDXWRPiWLFD\QRVHUHLQLFLD
KDVWDTXHUHJUHVDODFRUULHQWH
/X]GHO+RUQR
(QDOJXQRVPRGHORVSUHVLRQHODWHFOD2YHQ
/LJKW/X]GHO+RUQRTXHVHHQFXHQWUDHQHO
SDQHOGHFRQWUROVXSHULRUSDUDHQFHQGHUR
DSDJDUODOX]
(QDOJXQRVPRGHORVXWLOLFHHOLQWHUUXSWRUTXH
VHHQFXHQWUDHQHOSDQHOGHFRQWUROLQIHULRU
SDUDHQFHQGHURDSDJDUODOX]

&yPR&RQILJXUDUHO+RUQR,QIHULRUSDUD+RUQHDGRR'RUDGR
6XKRUQRQRHVWiGLVHxDGRSDUDODFRFFLyQFRQ
ODSXHUWDDELHUWD
3UHVLRQHODWHFOD%DNH+RUQHDU
7RXFKWKHQXPEHUSDGVWRVHWWKHGHVLUHG
WHPSHUDWXUH
3UHVLRQHODWHFOD6WDUW,QLFLDU
$SDUHFHUiODSDODEUD21(QFHQGLGR\
$PHGLGDTXHHOKRUQRVHFDOLHQWHODSDQWDOOD
PRVWUDUiHOFDPELRGHWHPSHUDWXUD&XDQGRHO
KRUQRDOFDQFHODWHPSHUDWXUDTXHSURJUDPy
VRQDUiQXQSLWLGR
3DUDFDPELDUODWHPSHUDWXUDGHOKRUQRGXUDQWH
HOFLFOR%$.(+RUQHDUSUHVLRQHODWHFOD%DNH
+RUQHDU\OXHJRODVWHFODVQXPpULFDVSDUD
REWHQHUODQXHYDWHPSHUDWXUD
&RQWUROHTXHODFRPLGDHVWpKHFKDHQHO
WLHPSRPtQLPRGHFRFFLyQGHODUHFHWD
&RFLQHGXUDQWHPiVWLHPSRVLHV
QHFHVDULR
3UHVLRQHODWHFOD&OHDU2II%RUUDU
$SDJDUFXDQGRODFRFFLyQHVWpFRPSOHWD
127$(VSRVLEOHTXHHOYHQWLODGRUVHHQFLHQGD
\DSDJXHGHIRUPDDXWRPiWLFDSDUDHQIULDUODV
SDUWHVLQWHULRUHV(VWRHVQRUPDO\HVSRVLEOH
TXHHOYHQWLODGRUFRQWLQ~HIXQFLRQDQGRLQFOXVR
OXHJRGHTXHHOKRUQRVHDSDJXH
(OKRUQRFXHQWDFRQXQDSRVLFLyQ
HVSHFLDOSDUDHVWDQWHEDMR5MXVWR
VREUHODSDUWHLQIHULRUGHOKRUQR
8VHHVWDSRVLFLyQFXDQGRQHFHVLWH
HVSDFLRDGLFLRQDOSDUDODFRFFLyQ
3RUHMHPSORFXDQGRFRFLQHXQSDYR
JUDQGH(OHVWDQWHQRHVWiGLVHxDGR
SDUDGHVOL]DUVH\VHUOHYDQWDGRHQ
HVWDSRVLFLyQ
8VRGHOKRUQR
6LVXPRGHORFXHQWDFRQXQDWUDEDSDUDSXHUWDQREORTXHHODSXHUWDFRQODWUDEDGXUDQWHHOKRUQHDGRRWRVWDGR
/DWUDEDVHXVDSDUDODIXQFLyQGHDXWROLPSLH]D~QLFDPHQWH
3UHFDOHQWDPLHQWR\8ELFDFLyQGH2OODV
3DUDHYLWDUSRVLEOHVTXHPDGXUDVFRORTXH
ORVHVWDQWHVHQODSRVLFLyQGHVHDGDDQWHVGH
HQFHQGHUHOKRUQR
3UHFDOLHQWHHOKRUQRVLODUHFHWDORUHTXLHUH
3DUDFDOHQWDUHOKRUQRSUHYLDPHQWHDMXVWH
ODWHPSHUDWXUDFRUUHFWD(VQHFHVDULR
SUHFDOHQWDUHOKRUQRSDUDHOKRUQHDGRSRU
FRQYHFFLyQ\SDUDREWHQHUEXHQRVUHVXOWDGRV
DOFRFLQDUWRUWDVJDOOHWDVSDVWHOHV\SDQHV
3DUDKRUQRVVLQXQDOX]RWRQRLQGLFDGRUGH
SUHFDOHQWDPLHQWRSUHFDOLHQWHGXUDQWH
PLQXWRV
/RVUHVXOWDGRVGHOKRUQHDGRVHUiQPHMRUHV
VLODVFDFHURODVGHKRUQHDGRVHHQFXHQWUDQ
HQHOFHQWURGHOKRUQRODPD\RUFDQWLGDGGH
WLHPSRSRVLEOH/DVFDFHURODVQRGHEHQWRFDUVH
PXWXDPHQWHQLWRFDUODVSDUHGHVGHOKRUQR
6LQHFHVLWDXVDUGRVHVWDQWHVHVFDORQHODVROODV
GHPRGRTXHXQRQRHVWpGLUHFWDPHQWHVREUH
HORWUR\GHMHDSUR[LPDGDPHQWHXQHVSDFLR
GHòµHQWUHODVROODVGHVGHHOIUHQWHODSDUWH
WUDVHUD\ORVFRVWDGRVGHODSDUHG
127$1RKRUQHHQLDOPDFHQHQDGDHQ
QLQJXQRGHORVKRUQRVGXUDQWHXQFLFORGHDXWR
OLPSLH]D
$OKRUQHDUFXDWURFDSDVGH
WRUWDGHXQDVRODYH]XVHORV
HVWDQWHV%\'&RORTXHODV
ROODVLQIHULRUHVHQODSDUWH
WUDVHUDGHOHVWDQWH\ODVROODV
VXSHULRUHVHQODSDUWHIURQWDO
GHOHVWDQWHTXHVHPXHVWUD
GHPRGRTXHXQDROODQRHVWp
GLUHFWDPHQWHVREUHODRWUD
$OKRUQHDUHQXQVRORHVWDQWH
ORVUHVXOWDGRVGHOKRUQHDGR
VHUiQPHMRUHVVLODVFDFHURODV
GHKRUQHDGRVHHQFXHQWUDQ
HQHOFHQWURGHOKRUQROD
PD\RUFDQWLGDGGHWLHPSR
SRVLEOH

8VRGHOKRUQRVXSHULRU
+XPHGDGGHO+RUQR
$PHGLGDTXHHOKRUQRVHFDOLHQWHHOFDPELR
GHWHPSHUDWXUDHQHODLUHGHOKRUQRSRGUi
JHQHUDUODIRUPDFLyQGHJRWDVGHDJXDHQHO
YLGULRGHODSXHUWD(VWDVJRWDVVRQLQRIHQVLYDV
\VHHYDSRUDUiQDPHGLGDTXHHOKRUQRVHVLJD
FDOHQWDQGR
3DSHOGH$OXPLQLR
1RXVHSDSHOGHDOXPLQLRSDUDUHYHVWLUHO
IRQGRGHOKRUQR(ODOXPLQLRDWUDSDUiHOFDORU
LQIHULRU\DOWHUDUiHOIXQFLRQDPLHQWRGHOKRUQR
(ODOXPLQLRVHSXHGHGHUUHWLU\GDxDUGH
IRUPDSHUPDQHQWHODSDUWHLQIHULRUGHOKRUQR
/RVGDxRVSRUXVRLQDGHFXDGRGHOSDSHOGH
DOXPLQLRQRHVWiQFXELHUWRVSRUODJDUDQWtDGHO
SURGXFWR
6HSRGUiXVDUDOXPLQLRSDUDHYLWDUGHUUDPHV
FRORFDQGRXQDKRMDVREUHXQHVWDQWHLQIHULRU
YDULDVSXOJDGDVGHEDMRGHODFRPLGD1RXVH
PiVDOXPLQLRTXHHOQHFHVDULR\QXQFDFXEUD
WRWDOPHQWHHOHVWDQWHGHXQKRUQRFRQSDSHOGH
DOXPLQLR0DQWHQJDHODOXPLQLRDSRUORPHQRV
µGHODVSDUHGHVGHOKRUQRSDUDHYLWDUXQD
FLUFXODFLyQGHILFLHQWHGHOFDORU
&yPR3URJUDPDUHO+RUQR6XSHULRUSDUD$VDU
&RORTXHODFDUQHRSHVFDGRVREUHXQD
UHMLOODSDUDDVDUHQXQDFDFHURODSDUD
DVDU
8VHODVSRVLFLRQHVVXJHULGDVSDUDUHSLVDV
HQOD*XtDSDUD$VDU
/DSXHUWDGHOKRUQRVHGHEHUiFHUUDU
GXUDQWHHODVDGR
3UHVLRQHODWHFOD%URLO+L/R$VDGR$OWR
%DMRXQDYH]SDUD$VDGR$OWR
3DUDFDPELDUD/R%URLO$VDGR%DMR
SUHVLRQHODWHFOD%URLO+L$VDGR$OWR
QXHYDPHQWH
3UHVLRQHODWHFOD6WDUW,QLFLDU6HH[KLEH
HOUHFRUGDWRULR´&(55$5ODSXHUWDµ
8QDYH]WHUPLQDGRHODVDGRSUHVLRQHOD
WHFOD&OHDU2II%RUUDU$SDJDU
6LUYDODFRPLGDGHIRUPDLQPHGLDWD\GHMH
ODROODDIXHUDGHOKRUQRSDUDTXHVHHQIUtH
GXUDQWHODFRPLGDSDUDXQDOLPSLH]DPiVIiFLO
8VH/R%URLO$VDGR%DMRSDUDFRFLQDU
FRPLGDVFRPRSDYRRFRUWHVJUXHVRVGHFDUQH
HQIRUPDFRPSOHWDVLQTXHVHGRUHQHQH[FHVR
6LVXPRGHORFXHQWDFRQXQDWUDEDSDUDSXHUWDQREORTXHHODSXHUWDFRQODWUDEDGXUDQWHHODVDGR/DWUDEDVHXVDSDUD
ODIXQFLyQGHDXWROLPSLH]D~QLFDPHQWH(QDOJXQRVPRGHORVVXFRFLQDFXHQWDFRQXQFRPSDUWLPLHQWRSDUDDVDUGHEDMR
GHOKRUQR
&LHUUHODSXHUWD6LHPSUHDVHFRQOD
SXHUWDFHUUDGD

8VRGHOKRUQRVXSHULRU
*XtDSDUD$VDU
(OKRUQRFXHQWDFRQSRVLFLRQHV
GHHVWDQWHV*HQHUDOPHQWHVH
GHEHUtDDVDUHQHOHVWDQWH&RHQ
XQRVXSHULRU(OHVWDQWH5HVSDUD
GRUDU
&RPLGD
3UHSDUDFLyQ
'HVHDGD
&RQILJX
UDFLyQ
SDUD
$VDU
3RVLFLyQ
GHO
(VWDQWH
&RPHQWDULRV
%LIH%LVWHFV
RKDP
EXUJXHVDV
GHFDUQH
SLFDGD
-XJRVRPHGLR $OWR ( (VGLItFLOFRFLQDUHQHOSXQWR
MXJRVRORVELVWHFVGHXQJURVRU
LQIHULRUDµ(VSRVLEOHTXHVH
FRFLQHQDQWHVGHGRUDUVH
3DUDHYLWDURQGHDGRVFRUWHOD
JUDVDSRULQWHUYDORVGHµ
7pUPLQRPHGLR $OWR '(
%LHQFRFLGR $OWR '
3ROOR $OWR & $VHGHOODGRGHODSLHOKDFLD
DEDMRSULPHUR
3HVFDGR $OWR ' 6RVWHQJD\JLUHFRQPXFKR
FXLGDGR
&RVWLOODVGH
FHUGR
$OWR ' 3DUDHYLWDURQGHDGRVFRUWHOD
JUDVDSRULQWHUYDORVGHµ
(OWDPDxRSHVRJURVRUFRUWHWHPSHUDWXUD
LQLFLDO\VXSUHIHUHQFLDGHSUHSDUDFLyQ
DIHFWDUiQORVWLHPSRVGHODVDGR/DILQDOLGDGGH
ODJXtDHVEULQGDUXQDUHFRPHQGDFLyQJHQHUDO
\HVWiEDVDGDHQFDUQHVFRQWHPSHUDWXUDGH
UHIULJHUDGRU6HUHFRPLHQGDSUHFDOHQWDUOD
SDUULOODHQWUH\PLQXWRV
3DUDORJUDUUHVXOWDGRVGLIHUHQWHVDMXVWH
ODSRVLFLyQGHOHVWDQWHRODFRQILJXUDFLyQ
SDUDDVDU
3DUDXQPD\RUGRUDGRGHODVXSHUILFLH\
PHQRUFRFFLyQLQWHUQD
3UHFDOLHQWHODSDUULOODGXUDQWHPLQXWRV
3UHFDOLHQWHODSDUULOODGXUDQWHPLQXWRV
8VHODFRQILJXUDFLyQ%URLO+L$VDGR$OWR
3DUDXQPHQRUGRUDGRH[WHUQRGHODFDUQH
TXHHVFRPSOHWDPHQWHFRFLQDGD\ORV
FRUWHVJUXHVRVGHFDUQH
8VHODVSRVLFLRQHVGHORVHVWDQWHVPiV
DOHMDGDVGHODSDUULOOD
8VHODFRQILJXUDFLyQGHDVDGREDMR
86'$UHFRPLHQGDODVVLJXLHQWHVWHPSHUDWXUDVPtQLPDVLQWHUQDV\VHJXUDV
&DUQHFUXGDFHUGRFRUGHUR\ELVWHFGHWHUQHUDRFRVWLOODV)GHDFXHUGRFRQOD
PHGLFLyQGHXQWHUPyPHWURGHFRPLGDDQWHVGHUHWLUDUODFDUQHGHODIXHQWHGHFDORU
3RUFXHVWLRQHVGHVHJXULGDG\FDOLGDGGHMHGHVFDQVDUODFDUQHGXUDQWHSRUORPHQRVWUHV
PLQXWRVDQWHVGHFRUWDURFRQVXPLU
&DUQHSLFDGDFUXGDFHUGRFRUGHURRWHUQHUD)GHDFXHUGRFRQODPHGLFLyQGHXQ
WHUPyPHWURGHFRPLGDV
$YH)GHDFXHUGRFRQODPHGLFLyQGHXQWHUPyPHWURGHFRPLGDV
3DUDPiVLQIRUPDFLyQYLVLWHZZZLVLWGRQH\HWJRYROODPHDODOtQHDJUDWXLWDGHFDUQHV\DYHVGH
86'$DO
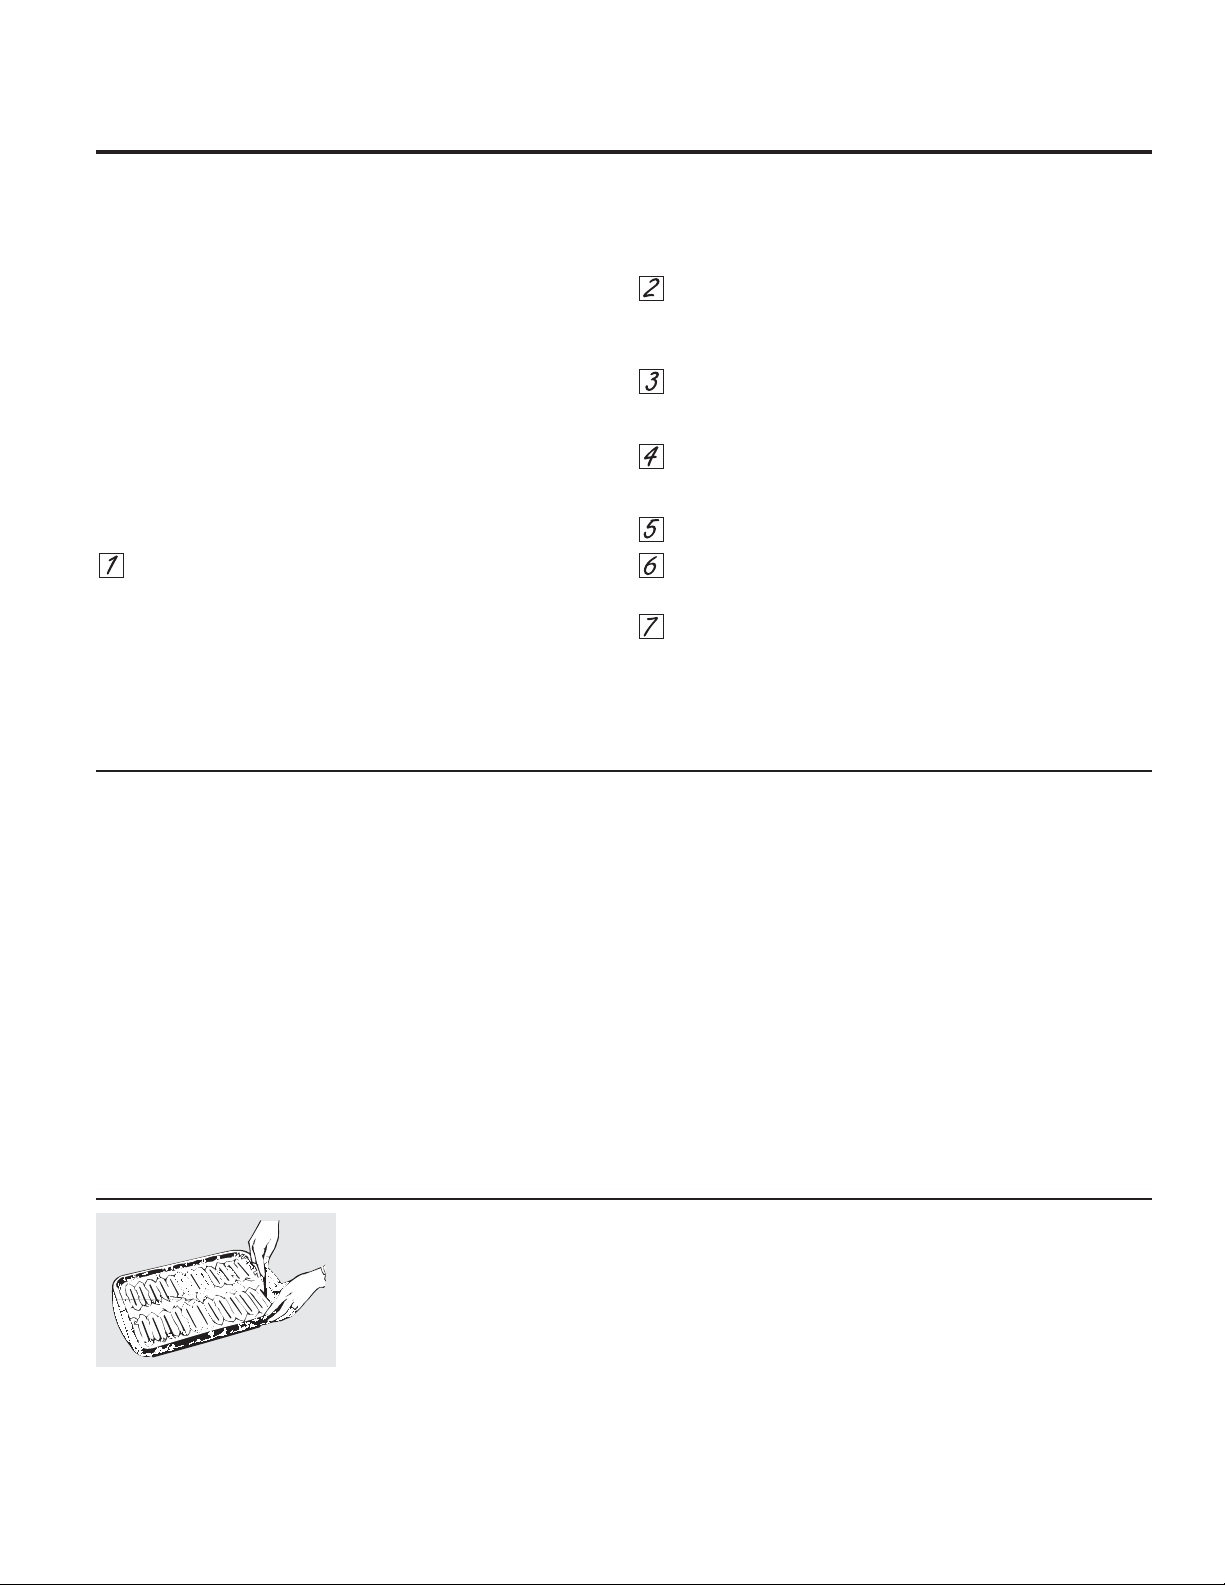
*($SSOLDQFHVFRP
&yPR&RQILJXUDUHO+RUQRSDUD$VDU
$VDUHVFRFLQDUODFRPLGDXWLOL]DQGRFDORUGLUHFWDPHQWHGHVGH
DUULEDGHODFRPLGD$VDUHVFRFLQDUODFRPLGDXWLOL]DQGRFDORU
GLUHFWDPHQWHGHVGHDUULEDGHODFRPLGD
6XFRFLQDFXHQWDFRQXQFRPSDUWLPLHQWRSDUDDVDUGHEDMRGHO
KRUQR
7DQWRODSXHUWDGHOKRUQRFRPRODGHOFRPSDUWLPLHQWRSDUD
DVDUVHGHEHUiQFHUUDUGXUDQWHHODVDGR
'pYXHOWDODPD\RUtDGHODVFRPLGDVXQDYH]GXUDQWHODFRFFLyQ
DH[FHSFLyQGHORVILOHWHVILQRVGHSHVFDGRDFHLWHXQODGR
FRORTXHGLFKRODGRKDFLDDEDMRHQODSDULOODSDUDDVDU\FRFLQH
VLQGDUYXHOWDKDVWDTXHHVWpOLVWR&RFLQHODVFRPLGDVGXUDQWH
DSUR[LPDGDPHQWHODPLWDGGHOWLHPSRGHFRFFLyQGpYXHOWDOD
FRPLGD\OXHJRFRQWLQ~HFRFLQDQGRKDVWDHOSXQWRGHFRFFLyQ
SUHIHULGR
8VWHGSXHGHFDPELDUODGLVWDQFLDGHODFRPLGDGHVGHOD
IXHQWHGHFDORUSRVLFLRQDQGRODFDFHUROD\ODUHMLOODSDUD
DVDUHQXQDGHODVWUHVSRVLFLRQHVGHORVHVWDQWHVGHO
FRPSDUWLPLHQWRSDUDDVDU²$SDUWHLQIHULRUGHO
FRPSDUWLPLHQWRSDUDDVDU%SDUWHLQWHUPHGLD\&SDUWH
VXSHULRU&RORFDUFRPLGDFHUFDGHOTXHPDGRULQFUHPHQWD
HOGRUDGRH[WHUQRGHODFRPLGDSHURWDPELpQLQFUHPHQWD
ODVVDOSLFDGXUDV\ODSRVLELOLGDGGHTXHVHLQFHQGLHQODV
JUDVDV/DVFRPLGDVPiVJUXHVDV\DTXHOODVTXHVHGHEHQ
FRFLQDUFRPSOHWDPHQWHVHGHEHUtDQDVDUHQXQHVWDQWH
FRQODSRVLFLyQPiVDOHMDGDGHODVDGRU
1RHVQHFHVDULRSUHFDOHQWDUODSDULOODRHOKRUQR\HVWR
SXHGHSURGXFLUPDORVUHVXOWDGRV3UHFDOHQWDUHODVDGRU
SHUPLWLUiPHMRUHVUHVXOWDGRVSDUDDOJXQDVFRPLGDVSHUR
QRHVQHFHVDULR
6LODFDUQHSRVHHJUDVDRFDUWtODJRVVREUHHOERUGHFRUWHWLUDV
YHUWLFDOHVVREUHDPEDVDµGHGLVWDQFLD6LVHGHVHDODJUDVD
VHSRGUiFRUWDUGHMDQGRXQDFDSDGHXQJURVRUGHµ
8ELTXHODFRPLGDHQODUHMLOOD\SRVLFLRQHODFDFHURODSDUD
DVDUHQHOHVWDQWHDSURSLDGRGHOKRUQRRGHO
FRPSDUWLPLHQWRSDUDDVDU
&LHUUHODSXHUWDGHOKRUQR\GHOFRPSDUWLPLHQWRSDUDDVDU
*LUHODSHULOOD29(1&21752/7HPSHUDWXUDGHO+RUQRD
%52,/$VDU
$OILQDOL]DUGH$VDUJLUHODSHULOOD29(1&21752/
7HPSHUDWXUDGHO+RUQRD2))$SDJDGR5HWLUHODFDFHUROD
SDUDDVDUGHOFRPSDUWLPLHQWRSDUDDVDU\VLUYDODFRPLGD
GHIRUPDLQPHGLDWD'HMHODFDFHURODIXHUDGHODFRFLQD
SDUDTXHVHHQIUtH
3DSHOGH$OXPLQLR
8VWHGSXHGHXVDUSDSHOGHDOXPLQLRSDUD
DOLQHDUODFDFHURODSDUDDVDU\ODUHMLOODSDUD
DVDU6LQHPEDUJRGHEHUiPROGHDUHOSDSHOGH
DOXPLQLRGHIRUPDDMXVWDGDDODUHMLOOD\FRUWDU
ODVDEHUWXUDVDOLJXDOTXHHQODUHMLOOD
5HFRUWHODVDEHUWXUDVGHOSDSHOGH
DOXPLQLRDOLJXDOTXHHQODUHMLOOD
6XJHUHQFLDVGHOD*XtDGHO&RPSDUWLPLHQWRSDUD$VDU
■6LHPSUHXVHODFDFHUROD\ODUHMLOODSDUDDVDU
LQFOXLGDVFRQVXFRFLQD)XHURQGLVHxDGDV
SDUDPLQLPL]DUHOKXPR\ODVVDOSLFDGXUDV
DWUDSDQGRORVMXJRVHQODSDUWHLQIHULRU
FXELHUWDGHODFDFHUROD
■
$OFRFLQDUHQELVWHFV\WUR]RVFRUWHODJUDVD
GHIRUPDSDUHMDDOUHGHGRUGHORVH[WUHPRV
H[WHULRUHVGHODFDUQH5HDOLFHGLFKRFRUWHHQ
IRUPDGLDJRQDODWUDYpVGHODVXSHUILFLHGH
JUDVDH[WHULRUKDVWDHOH[WUHPRGHODFDUQH8VH
WHQD]DVSDUDGDUYXHOWDODFDUQHDILQGHHYLWDU
ODSHUIRUDFLyQGHODFDUQH\ODSpUGLGDGHMXJRV
■6LORGHVHDPDULQHODVFDUQHVRHOSROORDQWHV
GHDVDU2FXEUDFRQVDOVDGHEDUEDFRDVyOR
ORV~OWLPRVRPLQXWRV
■$OXELFDUODFRPLGDHQODFDFHURODQRGHMH
TXHORVH[WUHPRVFRQJUDVDFXHOJXHQVREUH
ORVFRVWDGRV\DTXHHOJRWHRGHJUDVDSRGUtD
HQVXFLDUHOKRUQR
■1RHVQHFHVDULRSUHFDOHQWDUHO
FRPSDUWLPLHQWRSDUDDVDU6LQHPEDUJR
FRQFRUWHVPX\ILQRVGHFRPLGDRSDUD
LQFUHPHQWDUHOGRUDGRSUHFDOLHQWHVLORGHVHD
■/RVELVWHFVFRQJHODGRVVHSRGUiDVDU
SRVLFLRQDQGRHOHVWDQWHHQODVLJXLHQWH
SRVLFLyQLQIHULRUGHOHVWDQWHHLQFUHPHQWDQGR
HOWLHPSRGHFRFFLyQGDGRHQHVWDJXtDò
YHFHVSRUODGR
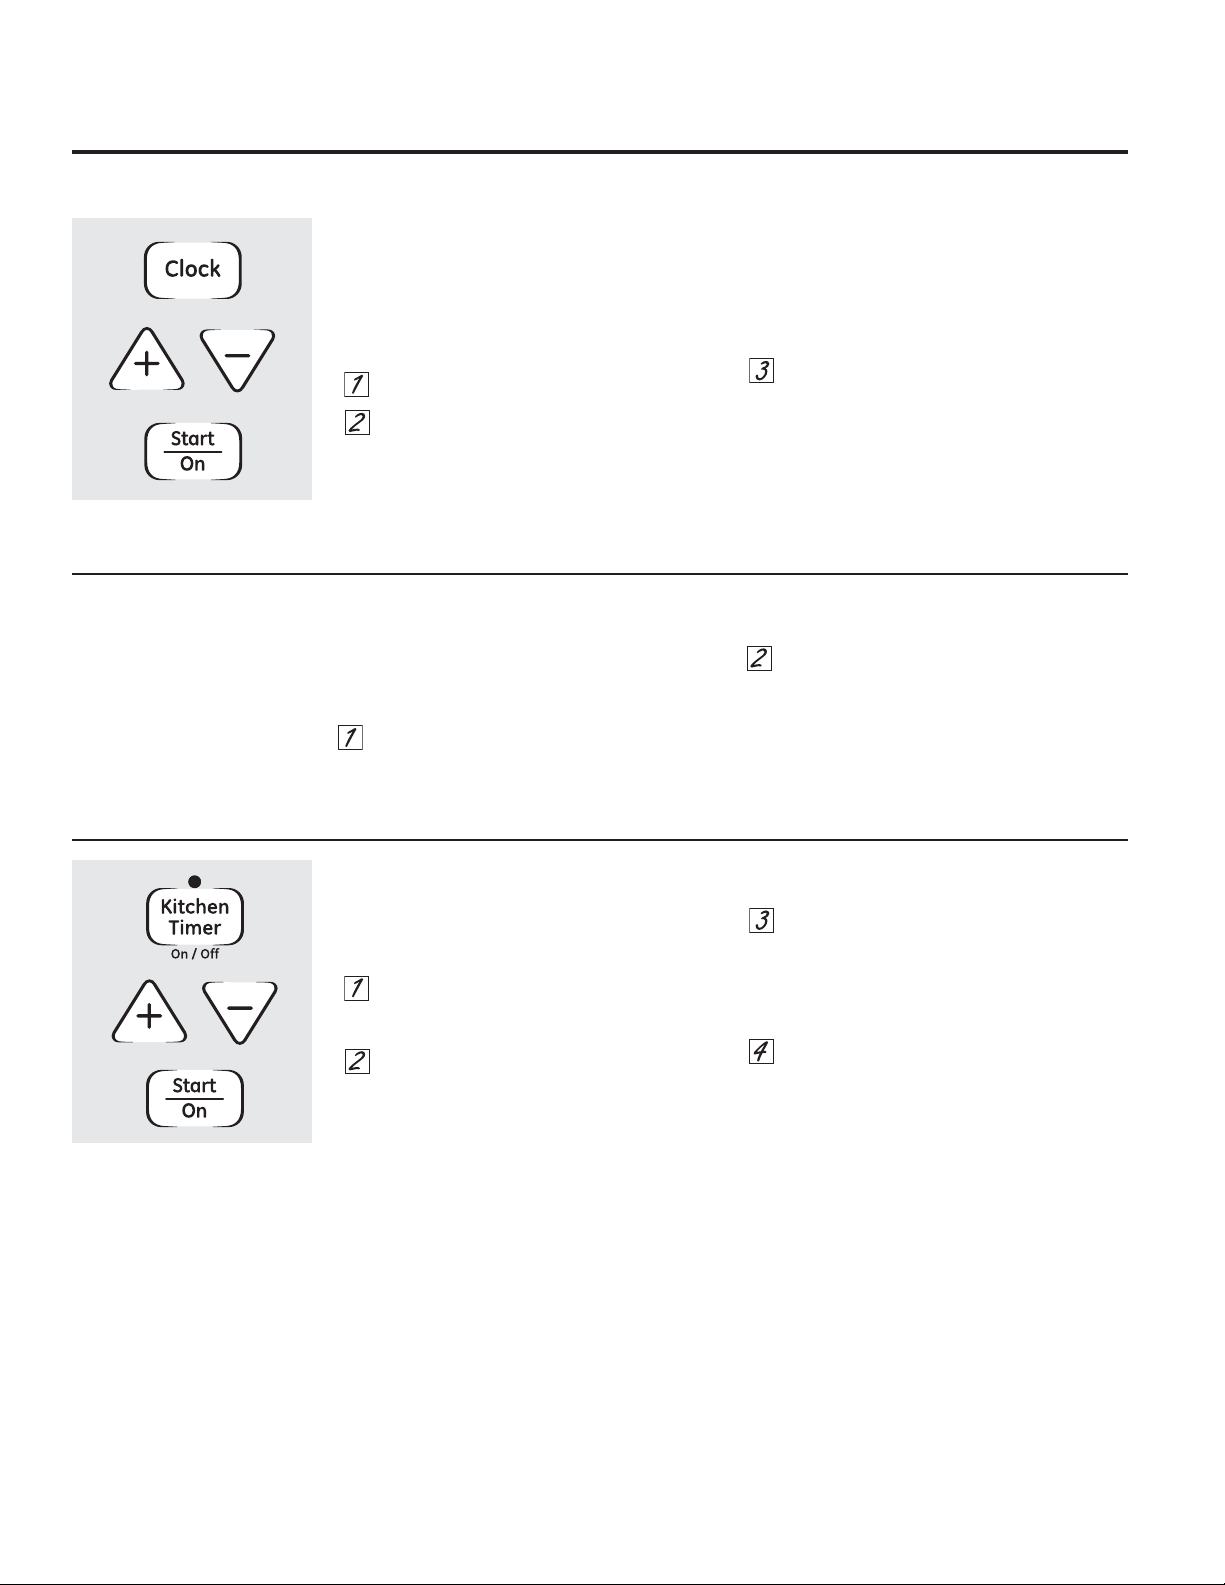
1RWRGDVODVIXQFLRQHVFRUUHVSRQGHQDWRGRVORVPRGHORV
3DUD&RQILJXUDUHO5HORM
(OUHORMVHGHEHUiFRQILJXUDUHQODKRUDFRUUHFWD
GHOGtDSDUDTXHODVIXQFLRQHVDXWRPiWLFDV
GHOWHPSRUL]DGRUGHOKRUQRIXQFLRQHQGH
IRUPDDGHFXDGD/DKRUDGHOGtDQRVHSXHGH
FDPELDUGXUDQWHXQKRUQHDGRSRUWLHPSRRHO
FLFORGHDXWROLPSLH]D
3UHVLRQHODWHFOD
&/2&.
5HORM
3UHVLRQHODVWHFODVR
6LODVWHFODVRQRVHSUHVLRQHGHQWURGHXQ
PLQXWROXHJRGHKDEHUWRFDGRODWHFOD&/2&.
5HORMODSDQWDOODYXHOYHDODFRQILJXUDFLyQRULJLQDO
6LHVWRVXFHGHSUHVLRQHODWHFOD&ORFN5HORMGRV
YHFHV\YXHOYDDLQJUHVDUODKRUDGHOGtD
3UHVLRQHODWHFOD67$57,QLFLDUKDVWDTXH
ODKRUDGHOGtDDSDUH]FDHQODSDQWDOOD
(VWRLQJUHVDODKRUDHLQLFLDHOUHORM
3DUDFRQWURODUODKRUDGHOGtDFXDQGRODSDQWDOOD
PXHVWUDRWUDLQIRUPDFLyQVLPSOHPHQWH
SUHVLRQHODWHFOD
&/2&.
5HORM/DKRUDGHOGtD
DSDUHFHKDVWDTXHRWUDWHFODHVSUHVLRQDGD
3DUD&RQILJXUDUHO7HPSRUL]DGRUVyORHOKRUQRLQIHULRU
(OWHPSRUL]DGRUQRFRQWURODHOIXQFLRQDPLHQWR
GHOKRUQR/DFRQILJXUDFLyQPi[LPDGHO
WHPSRUL]DGRUHVKRUDV\PLQXWRV
3UHVLRQHODWHFOD.LWFKHQ7LPHU2Q2II
(QFHQGLGR$SDJDGRGHO7HPSRUL]DGRU
GH&RFLQD
3UHVLRQHODVWHFODVRKDVWDTXHOD
FDQWLGDGGHWLHPSRTXHGHVHHDSDUH]FD
HQODSDQWDOOD(OWLHPSRPi[LPRTXHVH
SXHGHLQJUHVDUHQPLQXWRVHV/RV
WLHPSRVVXSHULRUHVDPLQXWRVVH
GHEHUtDQFDPELDUDKRUDV\PLQXWRV
6LFRPHWHXQHUURUSUHVLRQHODWHFOD.LWFKHQ
7LPHU2Q2II(QFHQGLGR$SDJDGRGHO
7HPSRUL]DGRUGH&RFLQD\YXHOYDDFRPHQ]DU
3UHVLRQHODWHFOD6WDUW,QLFLDU/XHJRGH
SUHVLRQDUODWHFOD6WDUW,QLFLDU6HW
&RQILJXUDFLyQGHVDSDUHFHHVWROHLQGLFD
TXHHOWLHPSRHVWiHQFXHQWDUHJUHVLYD
DXQTXHODSDQWDOODQRFDPELDKDVWDTXH
KD\DSDVDGRXQPLQXWR
&XDQGRHOFRQWDGRUOOHJXHDHOFRQWURO
KDUiSLWLGRVVHJXLGRVSRUXQSLWLGRFDGD
VHJXQGRVKDVWDTXHVHSUHVLRQHODWHFOD
.LWFKHQ7LPHU2Q2II(QFHQGLGR
$SDJDGRGHO7HPSRUL]DGRUGH&RFLQD
$VHJ~UHVHTXHHOUHORMPDUTXHOD
KRUDFRUUHFWDGHOGtD
/DIXQFLyQGHWHPSRUL]DGRUVyOR
FXHQWDSRUPLQXWRV/DIXQFLyQ
&OHDU2II%RUUDU$SDJDUQR
DIHFWDHOWHPSRUL]DGRU
8VRGHOUHORM\HOWHPSRUL]DGRU
3DUD$SDJDUOD3DQWDOODGHO5HORM
6LFXHQWDFRQYDULRVUHORMHVHQVXFRFLQDHV
SRVLEOHTXHGHVHHDSDJDUODSDQWDOODFRQOD
KRUDGHOGtDHQVXHVWXID
3UHVLRQHODWHFOD&/2&.5HORMXQDYH]
SDUDDSDJDUODSDQWDOODGHODKRUDGHOGtD
$XQTXHQRODSRGUiYHUHOUHORMPDQWLHQH
ODKRUDFRUUHFWDGHOGtD
3UHVLRQHODWHFOD&/2&.5HORMGRVYHFHV
SDUDUHJUHVDUDODSDQWDOODGHOUHORM

&RUWHGH&RUULHQWH
6LODKRUDDSDUHFHWLWLODQGRHQODSDQWDOOD
VLJQLILFDTXHVHSURGXMRXQFRUWHGHFRUULHQWH
5HLQLFLHHOUHORM
3UHVLRQHODWHFOD&/2&.5HORMXQDYH]SDUD
UHLQLFLDU,QJUHVHODKRUDGHOGtDFRUUHFWD
SUHVLRQDQGRODVWHFODVQXPpULFDVDSURSLDGDV
3UHVLRQHODWHFOD67$57,QLFLR
3DUD5HLQLFLDUHO7HPSRUL]DGRU
6LODSDQWDOODD~QPXHVWUDHOWLHPSRUHVWDQWH
ODSXHGHFDPELDUSUHVLRQDQGRODWHFOD.LWFKHQ
7LPHU2Q2II(QFHQGLGR$SDJDGRGHO
7HPSRUL]DGRUGH&RFLQD\OXHJRSUHVLRQDQGR
ODVWHFODVQXPpULFDVKDVWDTXHHOWLHPSRTXH
GHVHDDSDUH]FDHQODSDQWDOOD
6LHOWLHPSRUHVWDQWHQRVHHQFXHQWUDHQOD
SDQWDOODUHWUDVRGHOFRPLHQ]RGHOUHORMR
WLHPSRGHFRFFLyQDSDUHFHQHQODSDQWDOOD
UHFXHUGHHOWLHPSRUHVWDQWHSUHVLRQDQGR
ODWHFOD.LWFKHQ7LPHU2Q2II(QFHQGLGR
$SDJDGRGHO7HPSRUL]DGRUGH&RFLQD\OXHJR
SUHVLRQDQGRODVWHFODVQXPpULFDVSDUDLQJUHVDU
HOQXHYRWLHPSRTXHGHVHH
3DUD&DQFHODUHO7HPSRUL]DGRU
3UHVLRQHODWHFOD.LWFKHQ7LPHU2Q2II
(QFHQGLGR$SDJDGRGHO7HPSRUL]DGRUGH
&RFLQDGRVYHFHV
*($SSOLDQFHVFRP
1RWRGDVODVIXQFLRQHVFRUUHVSRQGHQDWRGRVORVPRGHORV
7RQRVGH)LQGH&LFORHQDOJXQRVPRGHORV
%RUUHORVWRQRVSUHVLRQDQGRODWHFODGHOD
IXQFLyQTXHHVWiXVDQGR
RU

8VRGHODVIXQFLRQHVGHKRUQHDGR
\GRUDGRSRUWLHPSR
HQDOJXQRVPRGHORV
1REORTXHHODSXHUWDGHOKRUQRFRQODWUDEDGXUDQWHODFRFFLyQSRUWLHPSR/DWUDEDVHXVDSDUDODDXWROLPSLH]D~QLFDPHQWH
127$/DVFRPLGDVTXHVHHFKDQDSHUGHUUiSLGDPHQWHWDOHVFRPROHFKHKXHYRVSHVFDGRUHOOHQRVDYH\FHUGRQRVH
GHEHUiQGHMDUUHSRVDUSRUPiVGHKRUDDQWHV\GHVSXpVGHODFRFFLyQ/DWHPSHUDWXUDDPELHQWHHVWLPXODHOGHVDUUROOR
GHEDFWHULDVQRFLYDV$VHJ~UHVHGHTXHODOX]GHOKRUQRHVWpDSDJDGD\DTXHHOFDORUGHODOiPSDUDDFHOHUDUiHO
FUHFLPLHQWRGHEDFWHULDVQRFLYDV
&yPR&RQILJXUDUXQ,QLFLR,QPHGLDWR\'HWHQFLyQ$XWRPiWLFD
(OKRUQRVXSHULRUVHHQFHQGHUiGHIRUPD
LQPHGLDWD\VHFRFLQDUiSRUXQSHUtRGRGHWLHPSR
VHOHFFLRQDGR$OILQDOGHOWLHPSRGHFRFFLyQHOKRUQR
VHDSDJDUiDXWRPiWLFDPHQWH
3UHVLRQHODWHFOD%DNH+RUQHDU
3UHVLRQHODVWHFODVRSDUDSURJUDPDUOD
WHPSHUDWXUDGHOKRUQR
3UHVLRQHODWHFOD&RRNLQJ7LPH7LHPSRGH
&RFFLyQ
127$6LVXUHFHWDUHTXLHUHFDOHQWDUHQIRUPDSUHYLD
HVSRVLEOHTXHQHFHVLWHWLHPSRDGLFLRQDOVREUHHO
WLHPSRGHFRFFLyQ
3UHVLRQHODVWHFODVRSDUDSURJUDPDUHO
WLHPSRGHKRUQHDGR
$SDUHFHUiHOWLHPSRGHFRFFLyQTXHLQJUHVy6L
VHOHFFLRQD&RRNLQJ7LPH&RFFLyQSRU7LHPSR
SULPHUR\OXHJRDMXVWD%DNH7HPSHUDWXUH
7HPSHUDWXUDGH+RUQHDGRDSDUHFHUiHQFDPELROD
WHPSHUDWXUDGHOKRUQR
3UHVLRQHODWHFOD6WDUW,QLFLDU
/DSDQWDOODPXHVWUDODWHPSHUDWXUDGHOKRUQR
TXHFRQILJXUyRODFXHQWDUHJUHVLYDGHOD
FRFFLyQSRUWLHPSR/DSDQWDOODFRPLHQ]DFRQ
35(VLVHHVWiPRVWUDQGRODWHPSHUDWXUDGHO
KRUQR
(OKRUQRFRQWLQXDUiFRFLQDQGRGXUDQWHOD
FDQWLGDGGHWLHPSRSURJUDPDGD\OXHJRGH
DSDJDUiGHIRUPDDXWRPiWLFD
3UHVLRQHODWHFOD&OHDU2II%RUUDU$SDJDU
SDUDDSDJDUODSDQWDOODVLHVQHFHVDULR
5HWLUHODFRPLGDGHOKRUQR5HFXHUGHTXHDXQTXH
HOKRUQRVHDSDJXHGHIRUPDDXWRPiWLFDOD
FRPLGDTXHSHUPDQH]FDGHQWURGHpVWHFRQWLQXDUi
FRFLQiQGRVHFXDQGRHOKRUQRHVWpDSDJDGR
&yPR&RQILJXUDUXQ,QLFLR5HWUDVDGR\'HWHQFLyQ$XWRPiWLFD
(OKRUQRVHHQFHQGHUiHQHOKRUDULRGHOGtDTXH
FRQILJXUHFRFLQDUiGXUDQWHXQSHUtRGRGHWLHPSR
HVSHFtILFR\OXHJRVHDSDJDUiDXWRPiWLFDPHQWH
$VHJ~UHVHTXHHOUHORMPDUTXHODKRUDFRUUHFWDGHOGtD
3UHVLRQHODWHFOD%DNH+RUQHDU
3UHVLRQHODVWHFODVRSDUDSURJUDPDUOD
WHPSHUDWXUDGHOKRUQR
3UHVLRQHODWHFOD&RRNLQJ7LPH7LHPSRGH
&RFFLyQ
3UHVLRQHODVWHFODVR²SDUDFRQILJXUDUOD
FDQWLGDGGHWLHPSRGHFRFFLyQGHVHDGR
3UHVLRQHODWHFOD'HOD\6WDUW5HWUDVDU,QLFLR
3UHVLRQHODVWHFODVR²SDUDFRQILJXUDUOD
KRUDGHOGtDHQTXHGHVHDTXHHOKRUQRVH
HQFLHQGDHLQLFLHODFRFFLyQ
3UHVLRQHODWHFOD6WDUW,QLFLDU
127$8QWRQRGHDWHQFLyQVRQDUiVLHVWiXVDQGR
HOKRUQHDGRSRUWLHPSR\QRVHGHEHWRFDUODWHFOD
6WDUW2Q,QLFLR(QFHQGLGR
127$6LGHVHDFRQWURODUORVKRUDULRVFRQILJXUDGRV
SUHVLRQHODWHFOD6WDUW7LPH+RUDGH,QLFLRSDUD
FRQWURODUODKRUDGHLQLFLRTXHFRQILJXUyRSUHVLRQH
ODWHFOD&RRNLQJ7LPH7LHPSRGH&RFFLyQSDUD
FRQWURODUHOSHUtRGRGHWLHPSRGHFRFFLyQTXH
SURJUDPy
&XDQGRHOKRUQRVHHQFLHQGDHQODKRUDGHOGtD
TXHFRQILJXUyODSDQWDOODPRVWUDUi35(KDVWD
TXHDOFDQFHODWHPSHUDWXUDVHOHFFLRQDGD\OXHJR
PRVWUDUiODWHPSHUDWXUDGHOKRUQR
$OILQDOL]DUHOWLHPSRGHFRFFLyQ(OKRUQRVHDSDJDUi
\VHHVFXFKDUiHOWRQRGHOILQDOGHOFLFOR
3UHVLRQHODWHFOD&OHDU2II%RUUDU$SDJDUSDUD
DSDJDUODSDQWDOODVLHVQHFHVDULR
5HWLUHODFRPLGDGHOKRUQR5HFXHUGHTXHDXQTXHHO
KRUQRVHDSDJXHGHIRUPDDXWRPiWLFDODFRPLGDTXH
SHUPDQH]FDGHQWURGHpVWHFRQWLQXDUiFRFLQiQGRVH
FXDQGRHOKRUQRHVWpDSDJDGR
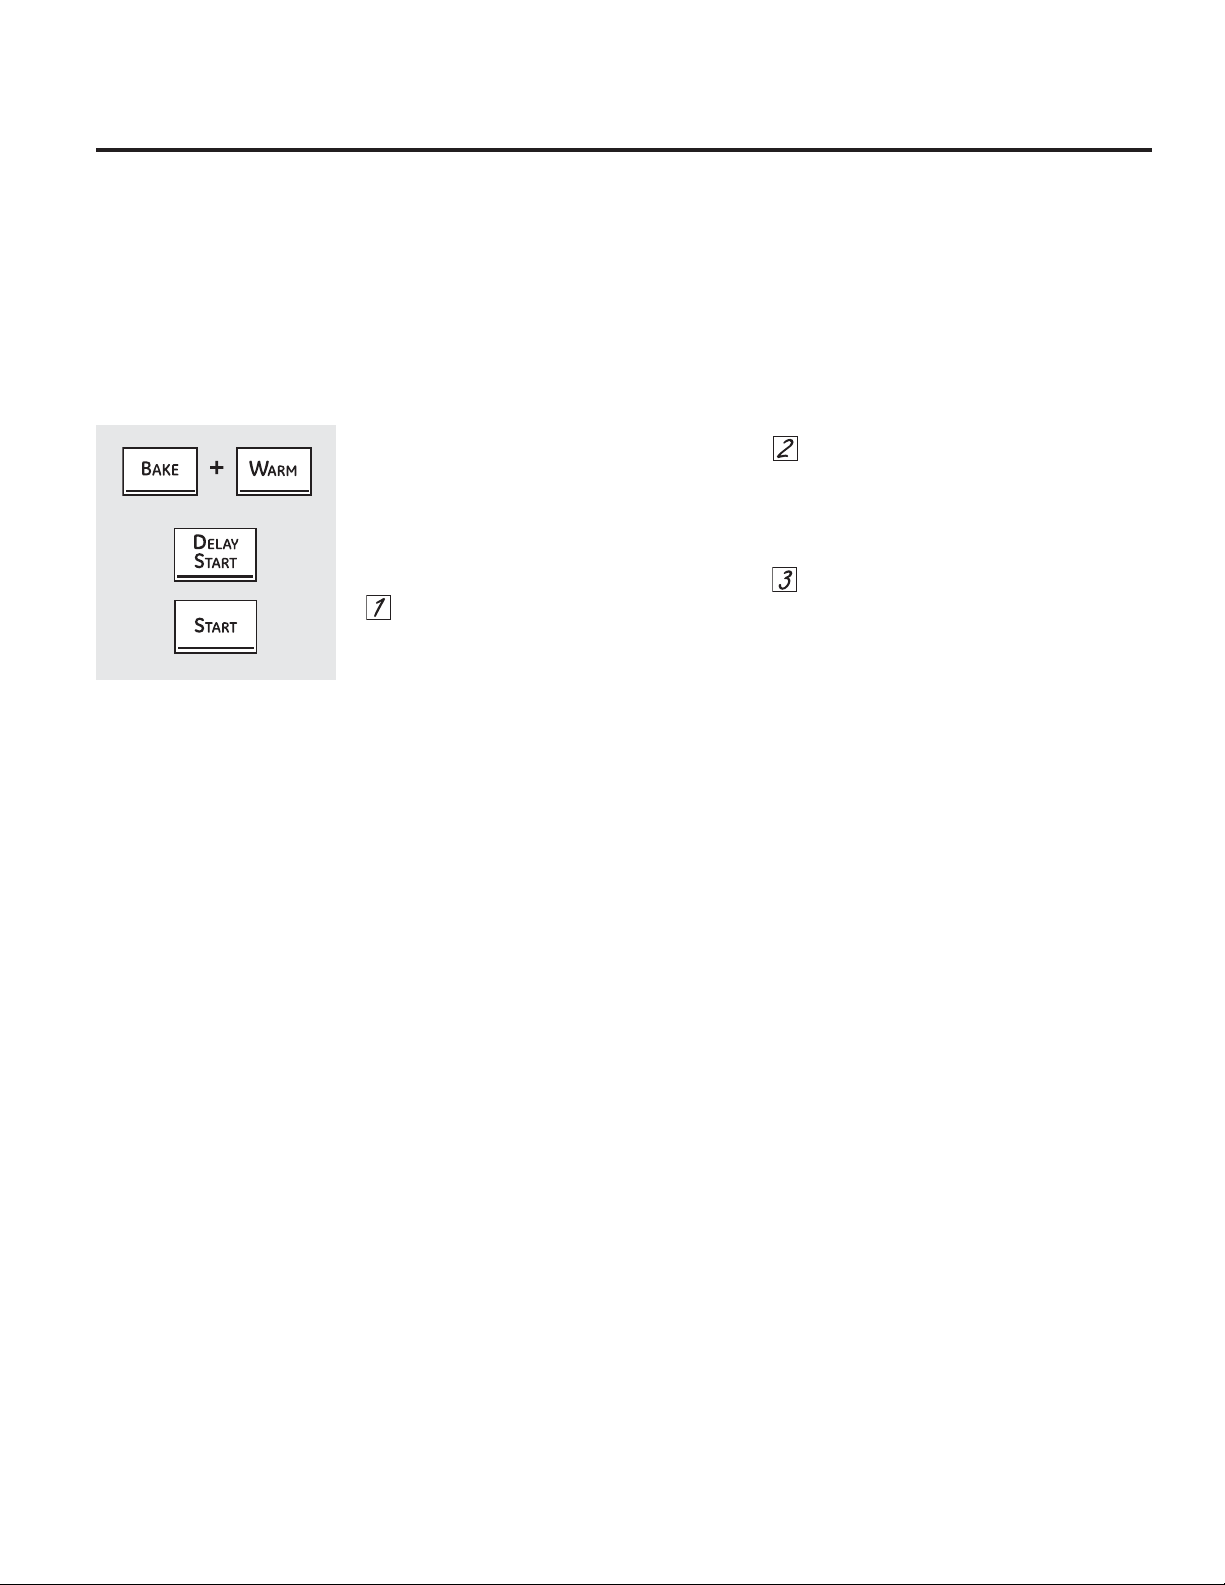
6XQXHYRFRQWUROGHWHFODVWiFWLOHVFXHQWDFRQIXQFLRQHVDGLFLRQDOHVTXHSXHGHHOHJLUXVDU/DVVLJXLHQWHVVRQODV
IXQFLRQHV\FyPRODVSXHGHDFWLYDU
/RVPRGRVGHIXQFLRQHVHVSHFLDOHVVyORSXHGHQVHUDFWLYDGRVPLHQWUDVTXHODSDQWDOODHVWiPRVWUDQGRODKRUDGHOGtD
3HUPDQHFHQHQODPHPRULDGHOFRQWUROKDVWDTXHVHUHSLWHQORVSDVRV
&XDQGRODSDQWDOODPXHVWUHVXHOHFFLyQSUHVLRQHODWHFOD6WDUW2Q,QLFLDU
(QFHQGLGR
/DVIXQFLRQHVHVSHFLDOHV
SHUPDQHFHUiQHQODPHPRULDOXHJRGHXQFRUWHGHFRUULHQWH
127$/DIXQFLyQ6DEEDWK0RGR6DEiWLFR\ODIXQFLyQ7KHUPRVWDW$GMXVWPHQW$MXVWHGHO7HUPRVWDWRVRQWDPELpQ
)XQFLRQHV(VSHFLDOHVSHURVHGHWDOODQGHIRUPDVHSDUDGDHQODVVLJXLHQWHVVHFFLRQHV
&RUWHGH+RUDV
&RQHVWDIXQFLyQHQFDVRGHROYLGDUVH\GHMDU
HOKRUQRSUHQGLGRHOFRQWURODSDJDUiGHIRUPD
DXWRPiWLFDHOKRUQROXHJRGHKRUDVGXUDQWH
ODVIXQFLRQHVGHKRUQHDGR\OXHJRGHKRUDV
GXUDQWHODIXQFLyQDVDU
6LGHVHDGHVDFWLYDUHVWDIXQFLyQVLJDORV
VLJXLHQWHVSDVRV
3UHVLRQHODVWHFODV%DNHDQG%URLO+L/R
+RUQHDU\$VDU$OWR%DMRDOPLVPR
WLHPSRGXUDQWHVHJXQGRVKDVWDTXHOD
SDQWDOODPXHVWUH6)
3UHVLRQHODWHFOD&ORFN5HORM(QOD
SDQWDOODDSDUHFHUi21(QFHQGHU
DSDJDGRHQKRUDV3UHVLRQHODWHFOD
&ORFN5HORMHQIRUPDUHSHWLGDKDVWDTXH
ODSDQWDOODPXHVWUH2))$SDJDUVLQ
DSDJDGR
7RXFKWKH6WDUW2Q
,QLFLDU
(QFHQGLGR
SDGWRDFWLYDWHWKHQRVKXWRIIDQGOHDYH
WKHFRQWUROVHWLQWKLVVSHFLDOIHDWXUHV
PRGH
)XQFLRQHVHVSHFLDOHVHQHOFRQWUROGHOKRUQREDMR *($SSOLDQFHVFRP
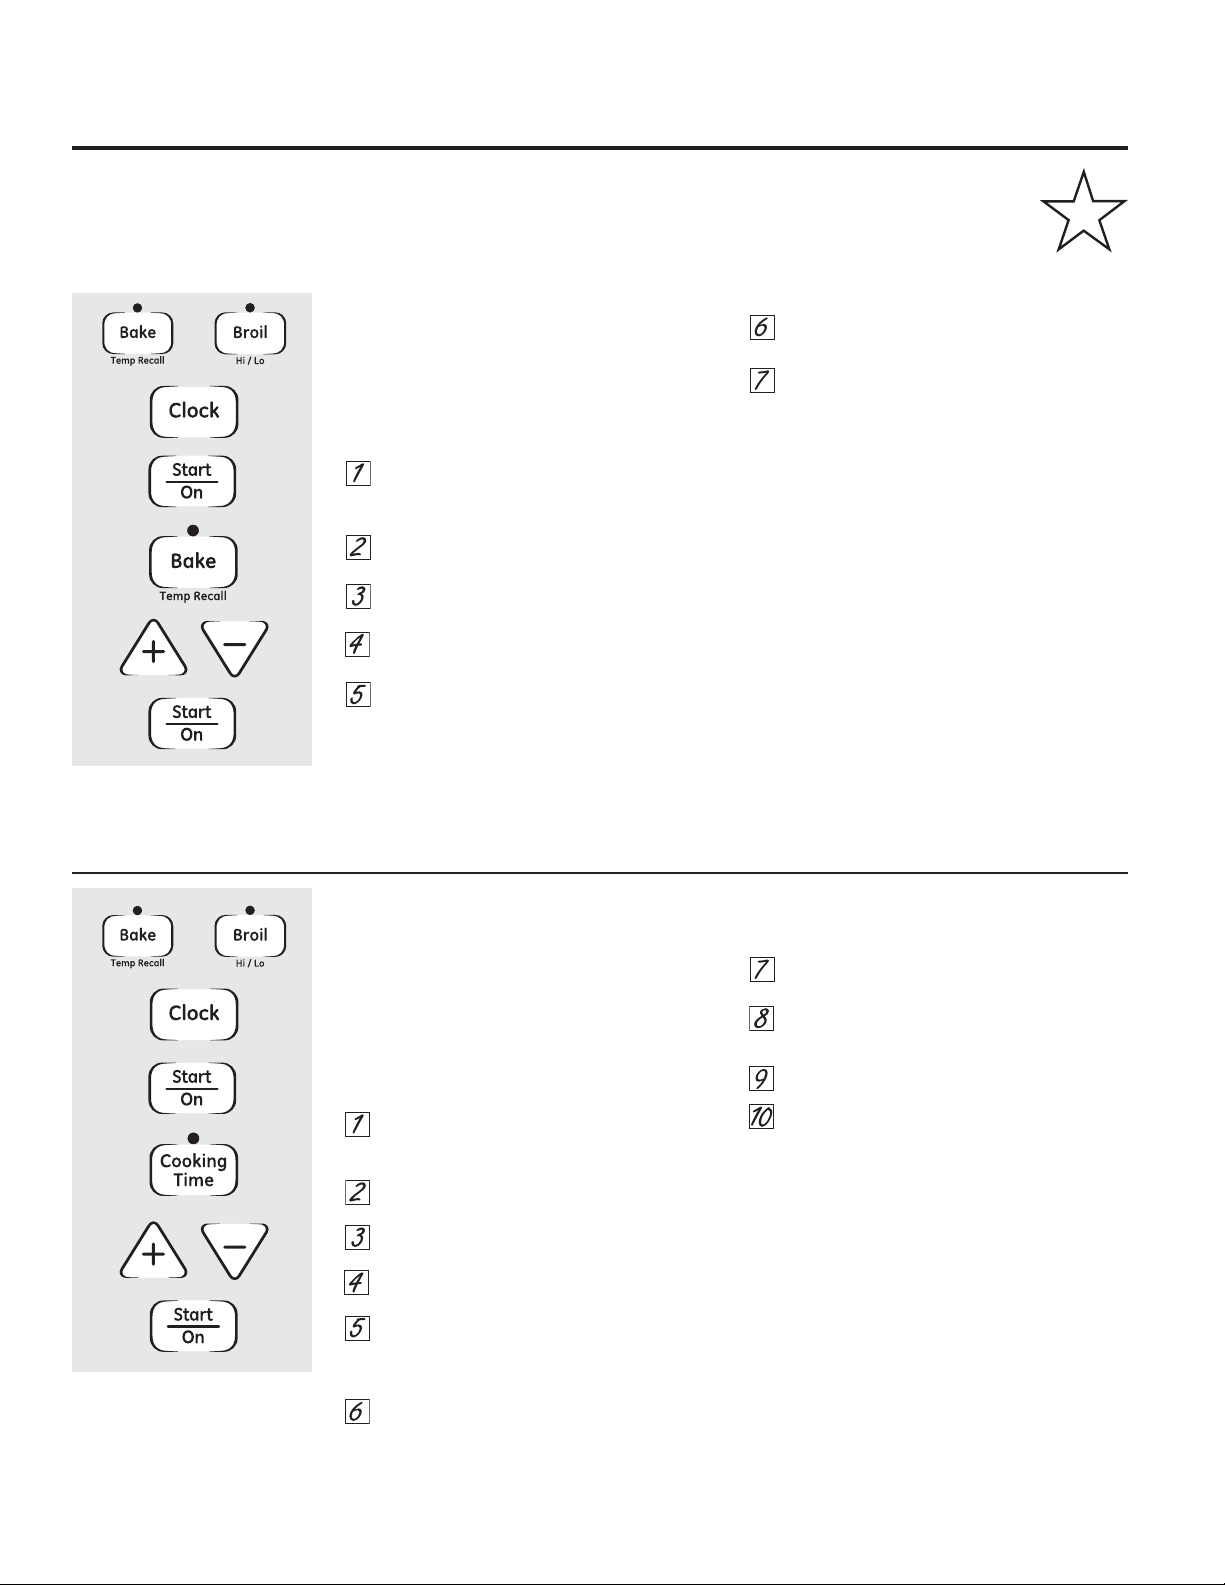
/DIXQFLyQ6DEEDWK6DEiWLFRVHSXHGHXVDUSDUDKRUQHDUDVDUHQHOKRUQR1RVHSXHGHXVDUSDUDODFRFFLyQSRUDVDU
DXWROLPSLH]DR'HOD\6WDUW,QLFLR5HWUDVDGR
127$/DOX]GHOKRUQRVHHQFLHQGHGHIRUPDDXWRPiWLFDHQDOJXQRVPRGHORVFXDQGRODSXHUWDVHDEUH\VHDSDJDFXDQGR
ODSXHUWDVHFLHUUD/DOiPSDUDVHSXHGHUHWLUDU/HDODVHFFLyQGH5HHPSOD]RGHOD/X]GHO+RUQR(QPRGHORVFRQLQWHUUXSWRU
GHOX]HQHOSDQHOGHFRQWUROODOX]GHOKRUQRVHSXHGHHQFHQGHU\GHMDUHQFHQGLGD
&yPRSURJUDPDUXQ+RUQHDGR$VDGR&RP~Q
127$3DUDHQWHQGHUFyPRIXQFLRQDHOFRQWURO
GHOKRUQRXWLOLFHHOKRUQHDGRUHJXODUVLQPRGR
VDEiWLFRDQWHVGHLQJUHVDU6DEEDWK0RGR
6DEiWLFR
$VHJ~UHVHTXHHOUHORMPDUTXHODKRUDFRUUHFWD
GHOGtD\TXHHOKRUQRHVWpDSDJDGR
3UHVLRQHODVWHFODV%DNHDQG%URLO+L/R
+RUQHDU\$VDU$OWR%DMRDOPLVPR
WLHPSRKDVWDTXHODSDQWDOODPXHVWUH6)
3UHVLRQHOHYHPHQWHODWHFOD&ORFN5HORM
KDVWDTXHDSDUH]FD6$EHQODSDQWDOOD
3UHVLRQHODWHFOD
6WDUW2Q,QLFLDU
(QFHQGLGR
\DSDUHFHUiHQODSDQWDOOD
3UHVLRQHODWHFOD%DNH+RUQHDU1RVH
GDUiQLQJXQDVHxDO
/DWHPSHUDWXUDGHLQLFLRSUHFRQILJXUDGDVH
DMXVWDUiDXWRPiWLFDPHQWHHQ
3UHVLRQHOHYHPHQWHODVWHFODVR²SDUD
LQFUHPHQWDURUHGXFLUODWHPSHUDWXUDSRU
LQFUHPHQWRVGHJUDGRV/DWHPSHUDWXUD
VHSXHGHFRQILJXUDUHQWUH\1R
VHGDUiQLQJXQDVHxDOQLWHPSHUDWXUD
3UHVLRQHODWHFOD
6WDUW2Q,QLFLDU
(QFHQGLGR
/XHJRGHOSHUtRGRGHGHPRUDDOD]DUGH
HQWUHDSUR[LPDGDPHQWHVHJXQGRV\
PLQXWRDSDUHFHUiHQODSDQWDOOD
LQGLFDQGRTXHHOKRUQRHVWiKRUQHDQGR
DVDQGR6LQRDSDUHFHHQODSDQWDOOD
FRPLHQFHQXHYDPHQWHHQHO3DVR
3DUDDMXVWDUODWHPSHUDWXUDGHOKRUQRSUHVLRQH
ODWHFOD%DNH+RUQHDU\SUHVLRQHODVWHFODV
R²SDUDLQFUHPHQWDURUHGXFLUODWHPSHUDWXUD
SRULQFUHPHQWRVGH3UHVLRQHODWHFOD6WDUW
2Q,QLFLDU(QFHQGHU
127$/DVWHFODV&OHDU2II%RUUDU$SDJDU
\&RRNLQJ7LPH7LHPSRGH&RFFLyQHVWiQ
DFWLYDVGXUDQWHODIXQFLyQ6DEEDWK6DEiWLFR
&yPR&RQILJXUDU+RUQHDGR$VDGRSRU7LHPSR²&RPLHQ]R,QPHGLDWR\
'HWHQFLyQ$XWRPiWLFD
127$3DUDHQWHQGHUFyPRIXQFLRQDHO
FRQWUROGHOKRUQRXWLOLFHHO,PPHGLDWH6WDUW
,QLFLR,QPHGLDWR\$XWRPDWLF6WRS'HWHQFLyQ
$XWRPiWLFDVLQPRGRVDEiWLFRDQWHVGH
LQJUHVDU6DEEDWK0RGR6DEiWLFR
$VHJ~UHVHTXHHOUHORMPDUTXHODKRUDFRUUHFWD
GHOGtD\TXHHOKRUQRHVWpDSDJDGR
3UHVLRQHODVWHFODV%DNHDQG%URLO+L/R
+RUQHDU\$VDU$OWR%DMRDOPLVPR
WLHPSRKDVWDTXHODSDQWDOODPXHVWUH6)
3UHVLRQHOHYHPHQWHODWHFOD&ORFN5HORM
KDVWDTXHDSDUH]FD6$EHQODSDQWDOOD
3UHVLRQHODWHFOD
6WDUW2Q,QLFLDU
(QFHQGLGR
\DSDUHFHUiHQODSDQWDOOD
3UHVLRQHODWHFOD&RRNLQJ7LPH7LHPSR
GH&RFFLyQ
7RXFKWKHRU²SDGVWRVHWWKHGHVLUHG
OHQJWKRIFRRNLQJWLPHEHWZHHQPLQXWH
DQGKRXUVDQGPLQXWHV7KHFRRNLQJ
WLPHWKDW\RXHQWHUHGZLOOEHGLVSOD\HG
3UHVLRQHODWHFOD
6WDUW2Q,QLFLDU
(QFHQGLGR
3UHVLRQHODWHFOD%DNH+RUQHDU1RVH
GDUiQLQJXQDVHxDO
3UHVLRQHODVWHFODVQXPpULFDVHLQJUHVHOD
WHPSHUDWXUDGHVHDGD1RVHGDUiQLQJXQD
VHxDOQLWHPSHUDWXUD
3UHVLRQHODWHFOD6WDUW,QLFLDU
/XHJRGHOSHUtRGRGHGHPRUDDOD]DUGH
HQWUHDSUR[LPDGDPHQWHVHJXQGRV\
PLQXWRDSDUHFHUiHQODSDQWDOOD
LQGLFDQGRTXHHOKRUQRHVWiKRUQHDQGR
DVDQGR6LQRDSDUHFHHQODSDQWDOOD
FRPLHQFHQXHYDPHQWHHQHO3DVR
3DUDDMXVWDUODWHPSHUDWXUDGHOKRUQRSUHVLRQH
ODWHFOD%DNHKRUQHDU\SUHVLRQHODVWHFODV
R²SDUDLQFUHPHQWDURUHGXFLUODWHPSHUDWXUD
SRULQFUHPHQWRVGH3UHVLRQHODWHFOD6WDUW
2Q,QLFLDU(QFHQGHU&XDQGRODFRFFLyQKD\D
ILQDOL]DGRODSDQWDOODFDPELDUiGHD
LQGLFDQGRTXHHOKRUQRHVWiHQ2))$SDJDGR
SHURD~QHVWiHQ6DEEDWK6DEiWLFR5HWLUHOD
FRPLGDFRFLQDGD
&XDQGRODSDQWDOODPXHVWUD
HOKRUQRHVWiFRQILJXUDGRHQ
6DEEDWK6DEiWLFR&XDQGROD
SDQWDOODPXHVWUDHOKRUQRHVWi
FRQILJXUDGRHQKRUQHDGRDVDGR
&XDQGRODSDQWDOODPXHVWUD
HO
KRUQRHVWiFRQILJXUDGRHQ6DEEDWK
6DEiWLFR&XDQGRODSDQWDOODPXHVWUD
HOKRUQRHVWiFRQILJXUDGRHQ
KRUQHDGRDVDGR
8VRGHO0RGR6DEiWLFR
HQDOJXQRVPRGHORV
'LVHxDGRSDUDXVDUHQHO'HVFDQVR-XGtR\)HULDGRV
K
&(57,),('
6
$%%$7+
02'(
02'26$%È7,&2
&(57,),&$'2

&yPR6DOLUHO0RGR6DEiWLFR
3UHVLRQHODWHFOD&OHDU2II%RUUDU$SDJDU
6LHOKRUQRHVWiFRFLQDQGRHVSHUHXQ
SHUtRGRGHUHWUDVRDOD]DUGH
DSUR[LPDGDPHQWHHQWUHVHJXQGRV\
PLQXWRKDVWDTXHVyORDSDUH]FDHQOD
SDQWDOOD
3UHVLRQHODVWHFODV%DNHDQG%URLO+L/R
+RUQHDU\$VDU$OWR%DMRDOPLVPR
WLHPSRKDVWDTXHODSDQWDOODPXHVWUH6)
3UHVLRQHOHYHPHQWHODWHFOD&ORFN5HORMKDVWD
TXHDSDUH]FD21(QFHQGHUX2))$SDJDUHQ
ODSDQWDOOD21(QFHQGHULQGLFDTXHHOKRUQR
VHDSDJDUiGHIRUPDDXWRPiWLFDOXHJRGH
KRUDV2))$SDJDULQGLFDTXHHOKRUQRQRVH
DSDJDUiGHIRUPDDXWRPiWLFD3DUDDFFHGHUD
XQDH[SOLFDFLyQGHODIXQFLyQ+RXU6KXW2II
$SDJDU'HVSXpVGH+RUDVFFRQVXOWHOD
VHFFLyQGH)XQFLRQHV(VSHFLDOHV
3UHVLRQHODWHFOD
6WDUW2Q,QLFLDU
(QFHQGLGR
127$6LVHSURGXMHUDXQFRUWHGHOX]PLHQWUDV
HOKRUQRVHHQFXHQWUDHQ0RGR6DEiWLFRpVWH
VHDSDJDUiDXWRPiWLFDPHQWH\SHUPDQHFHUi
DSDJDGRLQFOXVRFXDQGRUHJUHVHODOX](O
FRQWUROGHOKRUQRVHGHEHUHLQLFLDU
*($SSOLDQFHVFRP
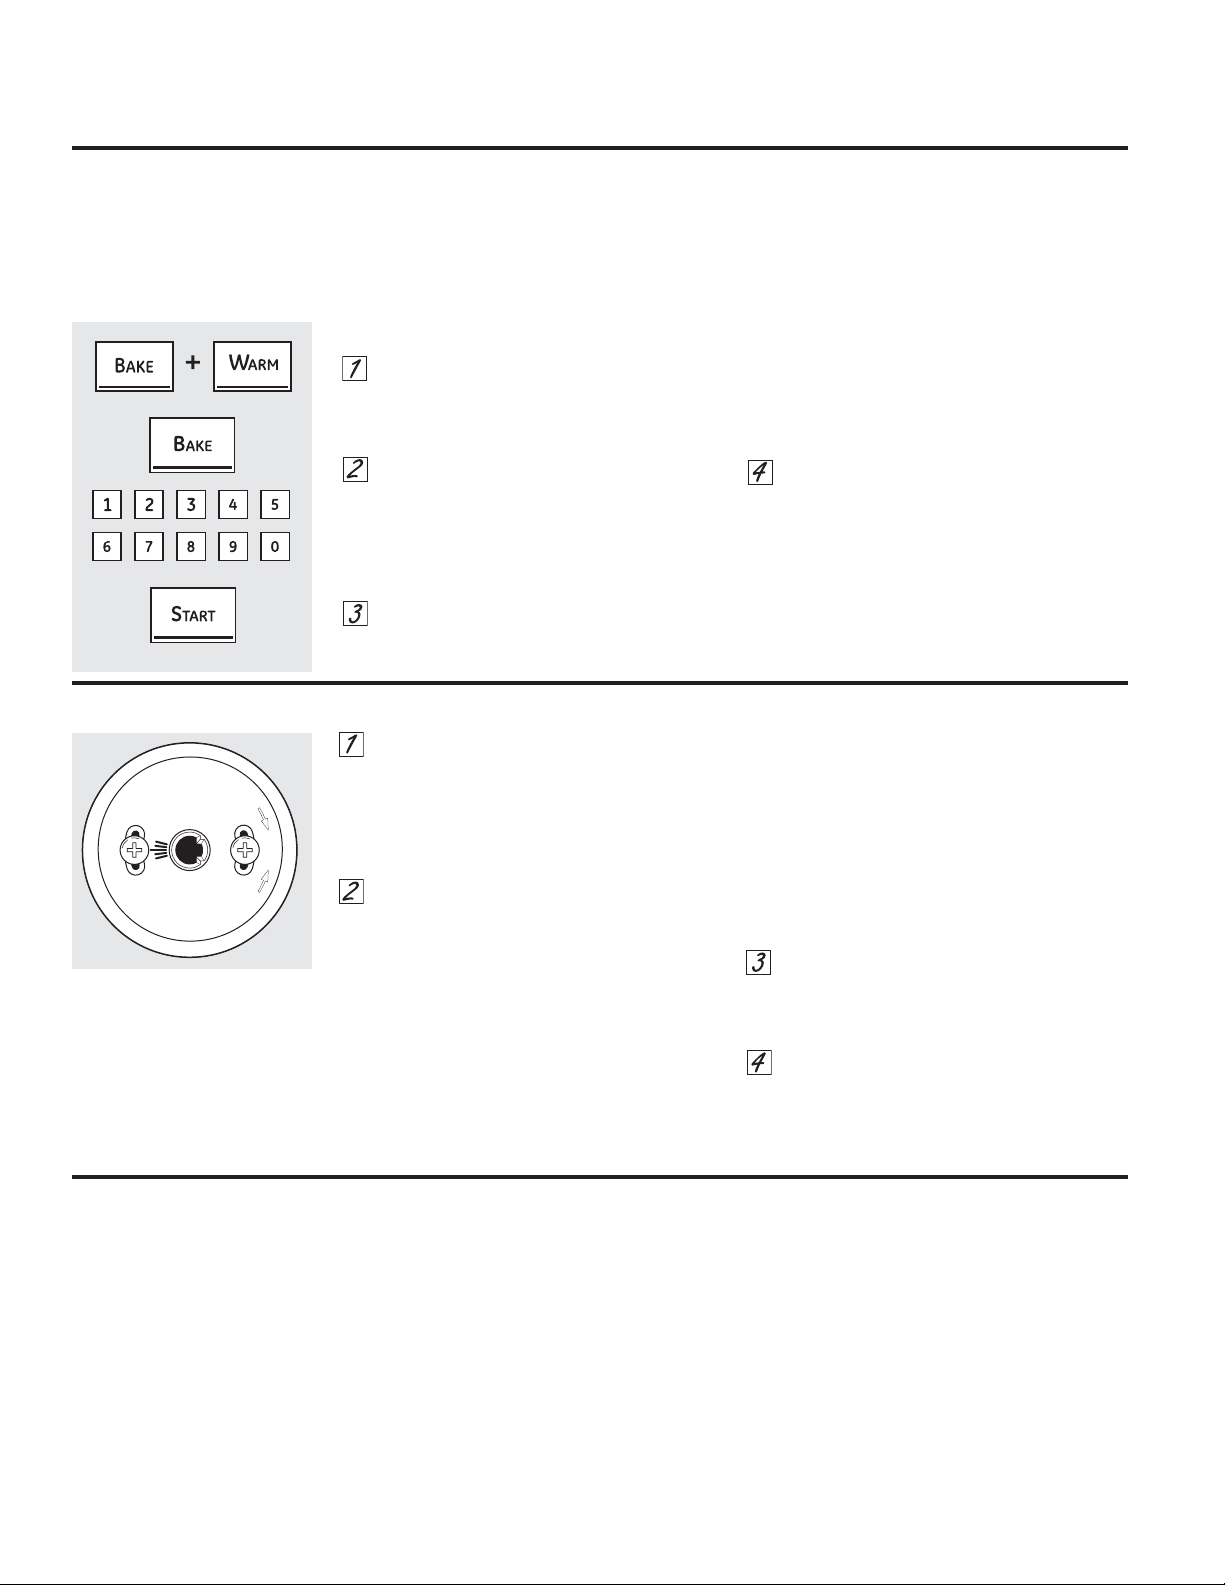
(VSRVLEOHTXHHQFXHQWUHTXHVXKRUQRQXHYRFRFLQDGHIRUPDGLIHUHQWHDOTXHUHHPSOD]y8VHVXKRUQRQXHYRGXUDQWH
DOJXQDVVHPDQDVSDUDIDPLOLDUL]DUVHFRQHOPLVPR6LD~QSLHQVDTXHVXKRUQRQXHYRHVWiGHPDVLDGRFDOLHQWHRGHPDVLDGR
IUtRSRGUiDMXVWDUHOWHUPRVWDWRXVWHGPLVPR
1RXVHWHUPyPHWURVWDOHVFRPRORVTXHVHYHQGHQHQODVWLHQGDVSDUDFRQWURODUODWHPSHUDWXUDGHOKRUQR(VWRV
WHUPyPHWURVSXHGHQYDULDUHQWUH\JUDGRV
127$(VWHDMXVWHQRDIHFWDUiHODVDGRRODVWHPSHUDWXUDVGHDXWROLPSLH]D(ODMXVWHVHJXDUGDUiHQODPHPRULDOXHJRGH
XQFRUWHGHFRUULHQWH
7R$GMXVWWKH/RZHU7KHUPRVWDW
3DUD$MXVWDUHO7HUPRVWDWR
3UHVLRQHODVWHFODV%DNHDQG%URLO+L/R
+RUQHDU\$VDU$OWR%DMRDOPLVPR
WLHPSRGXUDQWHVHJXQGRVKDVWDTXHOD
SDQWDOODPXHVWUH6)
3UHVLRQHODWHFOD%DNH+RUQHDU(QOD
SDQWDOODVHPXHVWUDXQQ~PHURGHGRV
GtJLWRV
3UHVLRQH%DNH+RUQHDUXQDYH]SDUD
UHGXFLUODWHPSHUDWXUDGHOKRUQRRGRV
YHFHVSDUDLQFUHPHQWDUODPLVPD
/DWHPSHUDWXUDGHOKRUQRVHSXHGH
DMXVWDUKDVWD)&PiVFDOLHQWH
R)&PiVIUtD3UHVLRQHODWHFOD
SDUDLQFUHPHQWDUODWHPSHUDWXUDSRU
LQFUHPHQWRVGHJUDGR
3UHVLRQHODWHFODSDUDUHGXFLUOD
WHPSHUDWXUDSRUGHVFHQVRVGHJUDGR
&XDQGRKD\DUHDOL]DGRHODMXVWHSUHVLRQH
ODWHFOD
6WDUW2Q,QLFLDU
(QFHQGLGR
SDUD
UHJUHVDUDODSDQWDOODGHODKRUDGHOGtD
8VHVXKRUQRFRPRORKDUtDQRUPDOPHQWH
127$(VWHDMXVWHQRDIHFWDUiHODVDGRRODV
WHPSHUDWXUDVDVDGR\OLPSLH]DDXWRPiWLFD(O
DMXVWHVHJXDUGDUiHQODPHPRULDOXHJRGHXQ
FRUWHGHFRUULHQWH
$MXVWHORVWHUPRVWDWRV£+iJDORXVWHGPLVPR
(PSXMHODSHULOOD29(17(03
7HPSHUDWXUDGHO+RUQRIXHUDGHOUDQJR\
REVHUYHODSDUWHWUDVHUD3DUDUHDOL]DUXQ
DMXVWHDIORMHDSUR[LPDGDPHQWHXQJLUR
SHURVLQTXLWDUFRPSOHWDPHQWHORVGRV
WRUQLOORVHQODSDUWHWUDVHUDGHODSHULOOD
&RQODSDUWHWUDVHUDGHOWRUQLOORKDFLD
XVWHGVRVWHQJDHOH[WUHPRH[WHULRUGHOD
SHULOODFRQXQDPDQR\JLUHHOIUHQWHGHOD
PLVPDFRQDRWUDSDUDLQFUHPHQWDUOD
WHPSHUDWXUDGHOKRUQRPXHYDHOWRUQLOOR
VXSHULRUKDFLDODGHUHFKD
(VFXFKDUiXQVRQLGRGHFOLFSRUFDGD
DEHUWXUDTXHPXHYDODSHULOOD3DUDUHGXFLU
ODWHPSHUDWXUDGHOKRUQRPXHYDHOWRUQLOOR
VXSHULRUKDFLDODL]TXLHUGD
&DGDFOLFFDPELDUiODWHPSHUDWXUDGHO
KRUQRHQDSUR[LPDGDPHQWH)(O
UDQJRHVGHPiV)RPHQRV)
GHVGHODIOHFKD
6XJHULPRVTXHKDJDHODMXVWHGHDXQ
FOLFGHVGHODFRQILJXUDFLyQRULJLQDO\TXH
FRQWUROHHOUHQGLPLHQWRGHOKRUQRDQWHVGH
KDFHUFXDOTXLHUDMXVWHDGLFLRQDO
8QDYH]UHDOL]DGRHODMXVWHYXHOYDD
DMXVWDUORVWRUQLOORVGHPRGRTXHHVWpQ
ILUPHVSHURWHQJDFXLGDGRGHQR
DMXVWDUORVHQH[FHVR
5HHPSODFHODSHULOODHQOD]DQGRHOiUHD
SODQDGHODPLVPDFRQHOKXHFR\FRQWUROH
HOIXQFLRQDPLHQWR
T
O
M
A
K
E
O
V
E
N
C
O
O
L
E
R
T
U
R
N
D
I
S
K
A
P
P
R
O
X
.
1
0
˚
F
P
E
R
N
O
T
C
H
T
O
M
A
K
E
O
V
E
N
H
O
T
T
E
R
T
U
R
N
D
I
S
K
T
O
A
D
J
U
S
T
O
V
E
N
T
E
M
P
E
R
A
T
U
R
E
L
O
O
S
E
N
S
C
R
E
W
S
A
N
D
R
O
T
A
T
E
/DPD\RUtDGHODVUHFHWDVSDUDKRUQHDUIXHURQGHVDUUROODGDVXWLOL]DQGRSURGXFWRVFRQDOWRFRQWHQLGRGHJUDVDWDOHV
FRPRPDQWHFDRPDUJDULQDGHJUDVD6LVHUHGXFHODFDQWLGDGGHJUDVDHVSRVLEOHTXHODUHFHWDQRGpORVPLVPRV
UHVXOWDGRVFRPRFRQXQSURGXFWRFRQDOWRFRQWHQLGRGHJUDVD
3XHGHKDEHUIDOODVHQODSUHSDUDFLyQGHODUHFHWDVLODVWRUWDVWDUWDVSDVWHOHVJDOOHWDVRGXOFHVVHSUHSDUDQFRQSURGXFWRV
XQWDGRVFRQEDMRFRQWHQLGRGHJUDVD&XDQWRPiVEDMRHVHOFRQWHQLGRGHJUDVDGHOSURGXFWRXQWDGRPiVQRWRULDVVRQ
HVWDVGLIHUHQFLDV
/RVHVWiQGDUHVIHGHUDOHVUHTXLHUHQTXHORVSURGXFWRVFRQODHWLTXHWD´PDUJDULQDµFRQWHQJDQSRUORPHQRVXQGHJUDVDSRU
SHVR3RURWUDSDUWHORVSURGXFWRVFRQEDMRFRQWHQLGRGHJUDVDSRVHHQPHQRVJUDVD\PiVDJXD(ODOWRFRQWHQLGRGHKXPHGDG
DIHFWDODWH[WXUD\HOVDERUGHORVSURGXFWRVKRUQHDGRV3DUDXQPHMRUUHVXOWDGRFRQVXVYLHMDVUHFHWDVIDYRULWDVXVHPDUJDULQD
PDQWHFDRSURGXFWRVSDUDXQWDUTXHFRQWHQJDQSRUORPHQRVXQGHDFHLWHYHJHWDO
£(OWLSRGHPDUJDULQDDIHFWDUiHOUHQGLPLHQWRGHOKRUQHDGR
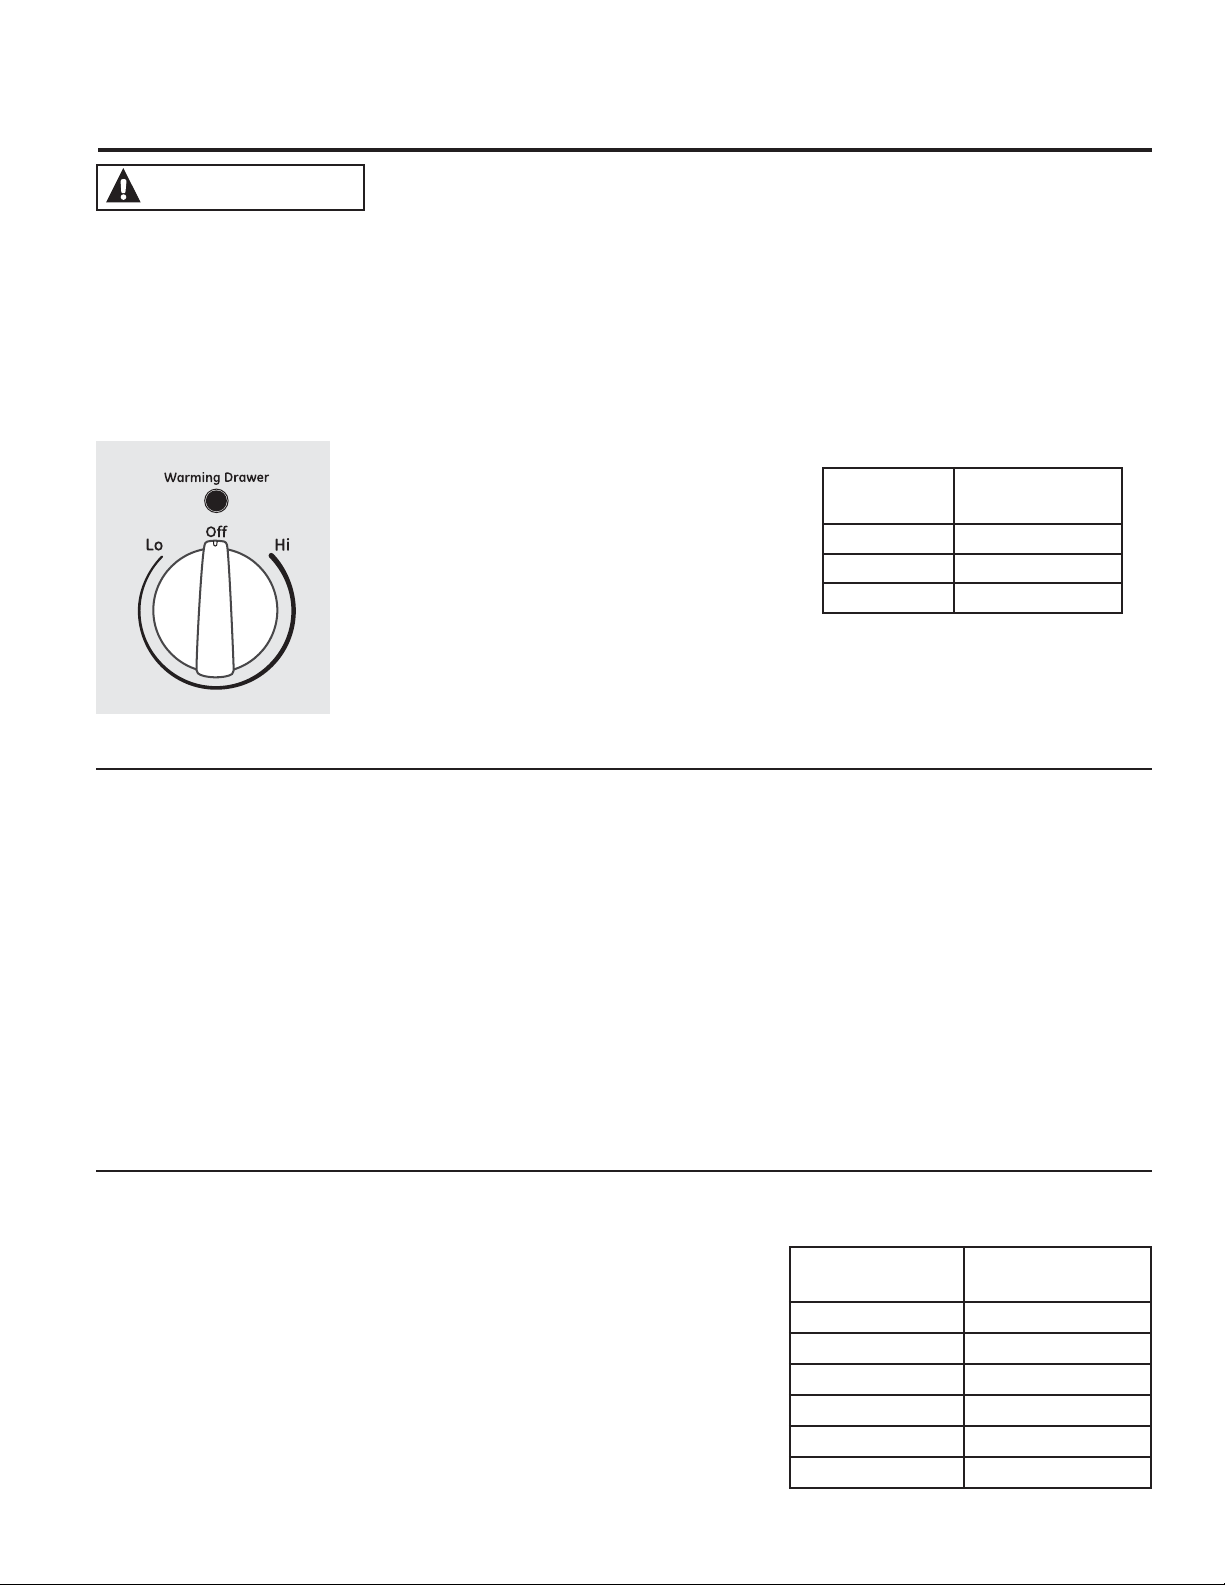
$'9(57(1&,$5,(6*2'((19(1(1$0,(172&21&20,'$6HSXHGHQGHVDUUROODUEDFWHULDV
FXDQGRODFRPLGDHVWpDXQDWHPSHUDWXUDLQIHULRUDORV
6LHPSUHFRPLHQFHFRQFRPLGDFDOLHQWH1RXVHFRQILJXUDFLRQHVHQ:$50&DOLHQWHSDUDFDOHQGDU
FRPLGDIUtD
1RFDOLHQWHFRPLGDGXUDQWHPiVGHKRUDV
(OFDMyQFDOHQWDGRUPDQWHQGUiODVFRPLGDVFDOLHQWHV\FRFLQDGDVHQODWHPSHUDWXUDSDUDVHUYLU6LHPSUHFRPLHQFH
FRQFRPLGDFDOLHQWH1RORXVHSDUDFDOHQWDUFRPLGDIUtDH[FHSWRJDOOHWDVFUXMLHQWHVSDSDVIULWDVRFHUHDOHVVHFRV
6LQRVHVLJXHQHVWDVLQVWUXFFLRQHVVHSRGUiQSURGXFLUHQIHUPHGDGHVJHQHUDGDVHQODFRPLGD
3UHVLRQH\JLUHODSHULOODGHFRQWUROKDFLD
FXDOTXLHUFRQILJXUDFLyQGHVHDGD
127$6
(OFDMyQFDOHQWDGRUQRVHSXHGHXVDUGXUDQWHXQ
FLFORGHDXWROLPSLH]D
(OFDMyQFDOHQWDGRUSRVHHWUHVFRQILJXUDFLRQHV
\(VWDVFRQILJXUDFLRQHVPDQWLHQHQGLIHUHQWHV
QLYHOHVGHWHPSHUDWXUDHQHOFDMyQFDOHQWDGRU
(QDOJXQRVPRGHORVVLVHXVDHOKRUQRHOPLVPR
WLHPSRTXHHOFDMyQFDOHQWDGRUVyORVHPRVWUDUiQ
ODVFRQILJXUDFLRQHVGHOKRUQR
8VRGHOFDMyQFDOHQWDGRUHOpFWULFRHQDOJXQRVPRGHORV *($SSOLDQFHVFRP
7HFOD
1XPpULFD
&RQILJXUDFLyQ
%DMRWDUWDV
0HGLRFD]XHODV
$OWRFDUQHV
3HULOODGH&RQWUROHQPRGHORVHTXLSDGRVFRQXQDSHULOOD
$O8VDUHO&DMyQ&DOHQWDGRU
&XDGURGH6HOHFFLyQGH7HPSHUDWXUD
(OFDMyQFDOHQWDGRUPDQWHQGUiODVFRPLGDV
FDOLHQWHV\FRFLQDGDVHQODWHPSHUDWXUDSDUD
VHUYLU6LHPSUHFRPLHQFHFRQFRPLGDFDOLHQWH
1RORXVHSDUDFDOHQWDUFRPLGDIUtDH[FHSWR
JDOOHWDVFUXMLHQWHVSDSDVIULWDVRFHUHDOHV
VHFRV
'HMHTXHHOFDMyQFDOHQWDGRUVHSUHFDOLHQWH
GXUDQWHDSUR[LPDGDPHQWHPLQXWRV
1RFRORTXHOtTXLGRQLDJXDHQHOFDMyQ
FDOHQWDGRU
7RGDVODVFRPLGDVFRORFDGDVHQHOFDMyQ
FDOHQWDGRUVHGHEHUiQFXEULUFRQXQDWDSD
RSDSHOGHDOXPLQLR$OFDOHQWDUSDVWHOHV
RSDQHVODWDSDVHGHEHUiYHQWLODUSDUD
GHMDUTXHODKXPHGDGVDOJD
/DFRPLGDVHGHEHUtDPDQWHQHUFDOLHQWH
HQVXHQYDVHGHFRFFLyQRWUDQVIHULUODDXQ
SODWRFRQSURWHFFLyQWpUPLFDSDUDVHUYLU
127$/RVHQYDVHVGHSOiVWLFRRHQYROWRULRV
GHSOiVWLFRVHGHUUHWLUiQVLHVWiQHQFRQWDFWR
GLUHFWRFRQHOFDMyQROODRXWHQVLOLRFDOLHQWH(V
SRVLEOHTXHQRSXHGDTXLWDUHOSOiVWLFRGHUUHWLGR
\HVWRQRHVWiFXELHUWRSRUODJDUDQWtD
5HWLUHODVFXFKDUDVSDUDVHUYLUHWFDQWHVGH
FRORFDUHQYDVHVHQHOFDMyQFDOHQWDGRU
3DUDPDQWHQHUFDOLHQWHVYDULRVWLSRVGH
FRPLGDVGLIHUHQWHVSURJUDPHODWHPSHUDWXUD
HQODFRQILJXUDFLyQSDUDFRPLGDVTXH
QHFHVLWDQHOJUDGRPiVDOWR
/DWHPSHUDWXUDWLSR\FDQWLGDGGHFRPLGD\
HOWLHPSRDIHFWDUiQODFDOLGDGGHODFRPLGD
/DDSHUWXUDUHSHWLGDGHOFDMyQSHUPLWHTXHHO
DLUHFDOLHQWHVDOJD\TXHODFRPLGDVHHQIUtH
&RQFDQWLGDGHVJUDQGHVHVSRVLEOHTXHVHD
QHFHVDULRXVDUXQDFRQILJXUDFLyQGHOFDMyQ
FDOHQWDGRUPiVDOWD\FXEULUSDUWHGHORV
tWHPVGHFRPLGDFRFLQDGRV
1RXVHUHFLSLHQWHVQLHQYROWRULRVGHSOiVWLFR
7,32'(&20,'$ &21),*85$&,Ï1
'(/&21752/
&D]XHOD 0(',2
&KLOL $/72
3L]]D 0(',2
3DSDVKRUQHDGDV $/72
7RUWLOODGH3DSDV %$-2
:DIOHV %$-2

3DUDTXHËWHPV'XURVTXHGHQ&URFDQWHV
3DUD&DOHQWDU7D]RQHV\3ODWRVSDUD6HUYLU
&RORTXHFRPLGDHQSODWRVRFDFHURODVHQOD
SDUWHLQIHULRU
3UHFDOLHQWHHQODFRQILJXUDFLyQ/2
%$-2
&RQWUROHVLHVWiFURFDQWHOXHJRGH
PLQXWRV$JUHJXHWLHPSRVHJ~QVHD
QHFHVDULR
3DUDFDOHQWDUWD]RQHV\SODWRVSDUDVHUYLU
FRQILJXUHHOFRQWUROHQ/2%$-2
35(&$8&,Ï1
/RVSODWRVHVWDUiQFDOLHQWHV8VHVRVWHQHGRUHV
GHROODVRJXDQWHVDOUHWLUDUSODWRVFDOLHQWHV
8VHVyORSODWRVUHVLVWHQWHVDOFDORU
6LGHVHDFDOHQWDUSRUFHODQDILQDFRQVXOWH
DOIDEULFDQWHGHORVSODWRVVREUHHOQLYHOGH
WROHUDQFLDPi[LPDDOFDORU
3XHGHFDOHQWDUSODWRVYDFtRVSDUDVHUYLU
PLHQWUDVSUHFDOLHQWHHOFDMyQ
8VRGHOFDMyQFDOHQWDGRUHOpFWULFRHQDOJXQRVPRGHORV
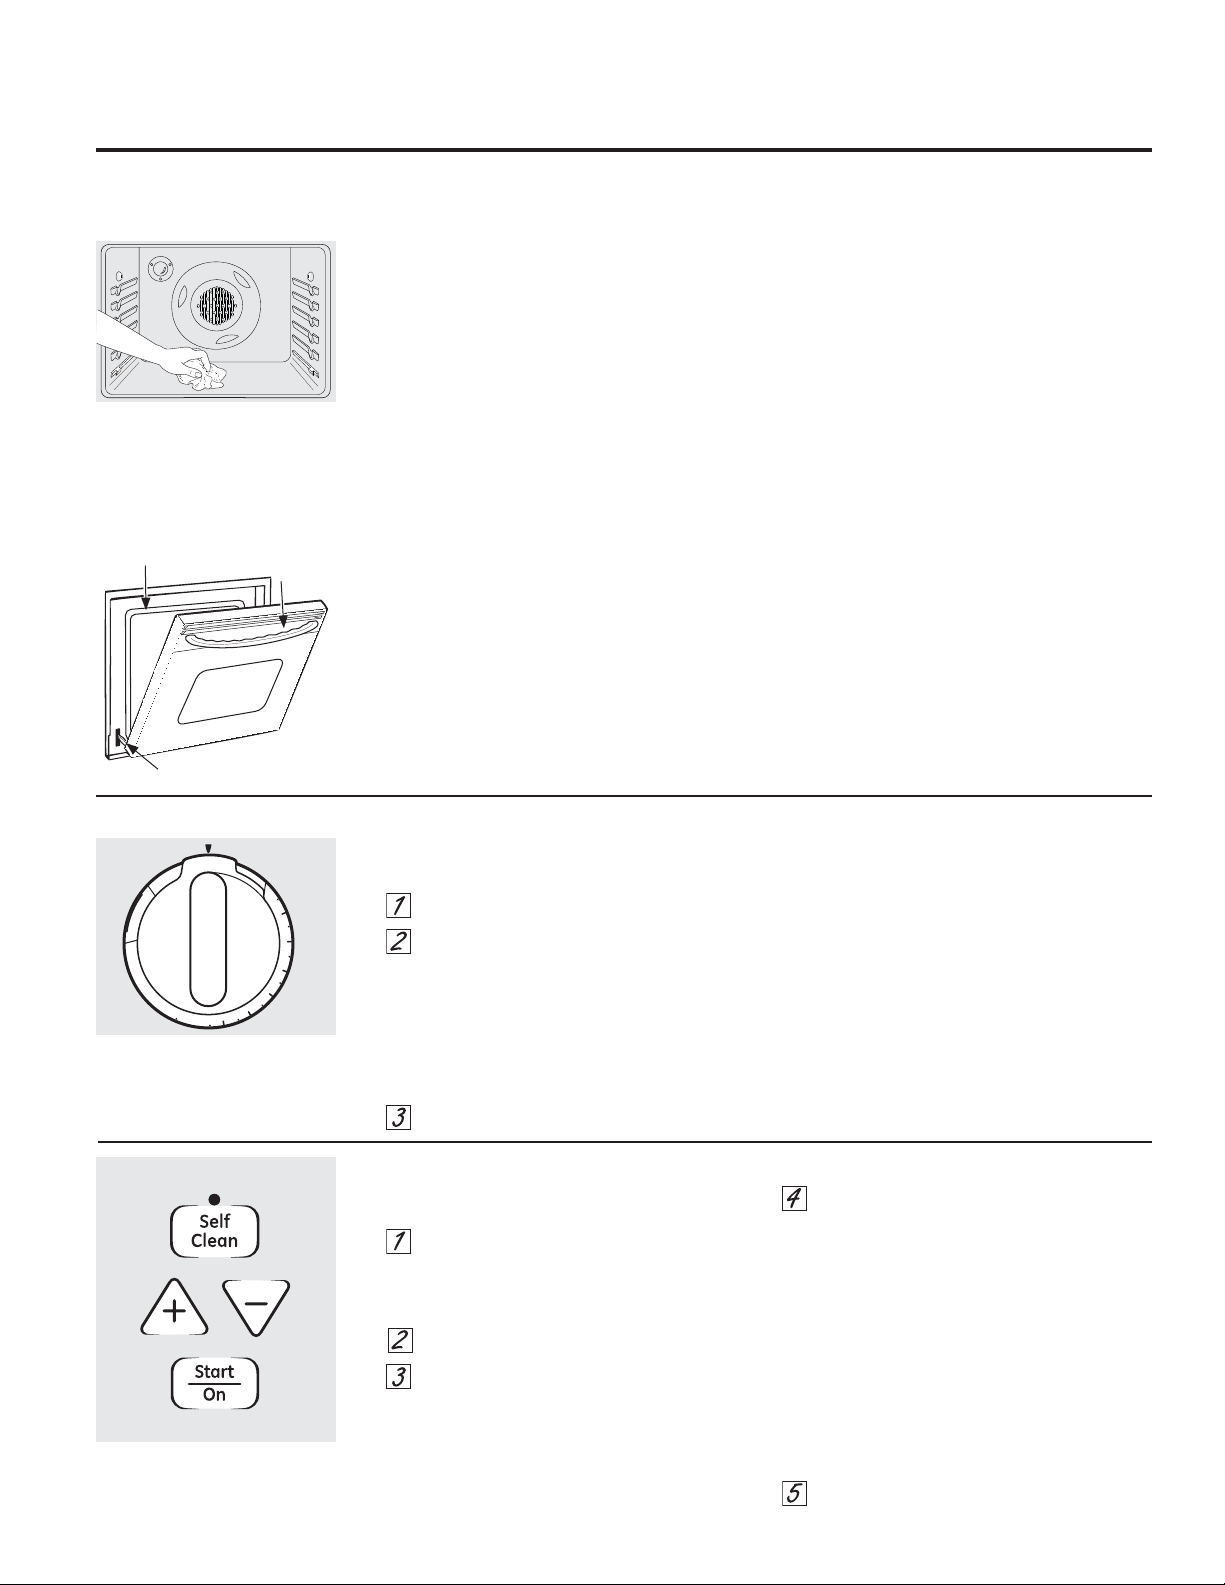
6LVXPRGHORFXHQWDFRQXQDWUDEDQXQFDIXHUFHODPDQLMDGHODWUDED)RU]DUODPDQLMDGDxDUiHOPHFDQLVPRGHEORTXHRGHODSXHUWD
/DSXHUWDGHOKRUQRGHEHUiHVWDUFHUUDGD\WRGRVORVFRQWUROHVFRQILJXUDGRVGHIRUPDFRUUHFWDSDUDTXHHOFLFORIXQFLRQH
DGHFXDGDPHQWH
$QWHVGHXQ&LFORGH/LPSLH]D
3DUDHOSULPHUFLFORGHOLPSLH]D
UHFRPHQGDPRVYHQWLODUVXFRFLQDFRQXQD
YHQWDQDDELHUWDRXVDUXQYHQWLODGRUR
FDPSDQDGHYHQWLODFLyQ
5HWLUHFXDOTXLHUROODSDUDDVDUUHMLOODSDUDDVDU
WRGRVORVXWHQVLOLRVGHFRFLQDVRQGD\FXDOTXLHU
SDSHOGHDOXPLQLRGHQWURGHOKRUQR\DTXHQR
UHVLVWLUiQODVDOWDVWHPSHUDWXUDVGHOLPSLH]D
127$
6LHOKRUQRVHHQFXHQWUDHTXLSDGRFRQ
HVWDQWHVSDUDKRUQRGHQtTXHOUHWLUHORV
PLVPRVDQWHVGHFRPHQ]DUFRQHOFLFORGH
DXWROLPSLH]D
6LVXKRUQRHVWiHTXLSDGRFRQHVWDQWHV
SDUDKRUQRJULVHV\FXELHUWRVGHSRUFHODQD
VHSRGUiQGHMDUGHQWURGHOKRUQRGXUDQWHHO
FLFORGHDXWROLPSLH]D
/DVXFLHGDGHQODHVWUXFWXUDIURQWDOGHOD
FRFLQD\ODSDUWHH[WHUQDGHODMXQWDGH
ODHVWUXFWXUDIURQWDOVHGHEHUiQOLPSLDU
HQIRUPDPDQXDO/LPSLHHVWDViUHDVFRQ
DJXDFDOLHQWHDOPRKDGLOODVGHYLUXWD\
MDEyQROLPSLDGRUHVWDOHVFRPR6RIW6FUXE
(QMXDJXHELHQFRQDJXDFDOLHQWH\VHTXH
/LPSLHODSXHUWDSODQDLQWHULRU\HOYLGULR
FRQDJXD\MDEyQ\HVSRQMD
1ROLPSLHODMXQWD(OPDWHULDOGHILEUDGHYLGULR
GHODMXQWDGHODHVWUXFWXUDIURQWDOQRUHVLVWHOD
DEUDVLyQ(VHVHQFLDOTXHODMXQWDSHUPDQH]FD
LQWDFWD6LREVHUYDTXHFRPLHQ]DDJDVWDUVHR
GHVKLODFKDUVHUHHPSODFHODPLVPD
/LPSLHFXDOTXLHUGHUUDPHLPSRUWDQWHVREUH
HOIRQGRGHOKRUQR
$VHJ~UHVHGHTXHODWDSDGHODOiPSDUDGHOX]
GHOKRUQRVHHQFXHQWUHHQVXOXJDU\TXHOD
OX]GHOPLVPRHVWpDSDJDGD
,03257$17(/DVDOXGGHDOJXQDVDYHV
HVH[WUHPDGDPHQWHVHQVLEOHDORVKXPRV
HPLWLGRVGXUDQWHHOFLFORGHDXWROLPSLH]DGH
FXDOTXLHUFRFLQD&RORTXHODVDYHVHQRWUD
KDELWDFLyQELHQYHQWLODGD
127$7HQJDFXLGDGRDODEULUHOKRUQR
VXSHULRUXQDYH]TXHHOFLFORGHDXWR
OLPSLH]DKD\DILQDOL]DGR(VSRVLEOHTXHHO
KRUQRD~QHVWpFDOLHQWH
/LPSLHFXDOTXLHUVXFLHGDG
LPSRUWDQWHVREUHHOIRQGRGHOKRUQR
8VRGHORVKRUQRVGHDXWR
OLPSLH]DVXSHULRUHQDOJXQRVPRGHORV *($SSOLDQFHVFRP
12OLPSLH
ODMXQWD
PDQXDOPHQWH
HQDOJXQRV
PRGHORVODMXQWD
VHHQFXHQWUDHQ
ODSXHUWDLQWHULRU
+$*$XQDOLPSLH]D
PDQXDOGHQWUR
GHODSXHUWD\GHO
YLGULR
+$*$XQDOLPSLH]DPDQXDO
GHODHVWUXFWXUDGHOKRUQR
&yPR3URJUDPDUHO+RUQRSDUDVX/LPSLH]D
6LJDODVLQVWUXFFLRQHVHQODVHFFLyQ$QWHVGH
XQ&LFORGH/LPSLH]D
7UDEHODSXHUWD
127$1XQFDIXHUFHODWUDED6LHOKRUQRHVWi
GHPDVLDGRFDOLHQWHQRSRGUiGHVOL]DUODWUDED
'HMHTXHHOKRUQRVHHQIUtH
3UHVLRQHODWHFOD6HOI&OHDQ$XWR/LPSLH]D
3UHVLRQHODVWHFODVRKDVWDTXHHO
7LHPSRGH/LPSLH]DGHVHDGRVHPXHVWUH
(O7LHPSRGH/LPSLH]DHVQRUPDOPHQWH
KRUDV\PLQXWRV3XHGHFDPELDUHO7LHPSR
GH/LPSLH]DDFXDOTXLHUWLHPSRHQWUH\
KRUDVGHSHQGLHQGRGHODFDQWLGDGGH
VXFLHGDGHQHOKRUQR
3UHVLRQHODWHFOD6WDUW2Q,QLFLDU(QFHQGHU
(OFLFORGHDXWROLPSLH]DFRPHQ]DUi
DXWRPiWLFDPHQWHOXHJRGHTXH&/($1
/LPSLH]DVHDYLVXDOL]DGR\TXHODFXHQWD
UHJUHVLYDGHWLHPSRDSDUH]FDHQODSDQWDOOD
0LHQWUDVHOKRUQRHVWiUHDOL]DQGRODDXWR
OLPSLH]DSXHGHSUHVLRQDUODWHFOD&ORFN5HORM
SDUDPRVWUDUODKRUDGHOGtD3DUDUHJUHVDUD
ODFXHQWDUHJUHVLYDGHOLPSLH]DSUHVLRQHOD
WHFOD6HOI&OHDQ$XWR/LPSLH]D
(OKRUQRVHDSDJDGHIRUPDDXWRPiWLFD
FXDQGRHOFLFORGHOLPSLH]DHVWiFRPSOHWR\
WLWLODUiHQODSDQWDOOD
'HVOLFHODPDQLMDGHODWUDEDKDFLDOD
L]TXLHUGDKDVWDHOOtPLWH\DEUDODSXHUWD
&yPR&RQILJXUDUHO+RUQRSDUDVX/LPSLH]DHQPRGHORVFRQODSHULOOD29(1
7(037HPSHUDWXUDGHO+RUQR
6LJDODVLQVWUXFFLRQHVHQODVHFFLyQ$QWHVGH
XQ&LFORGH/LPSLH]D
7UDEHODSXHUWD
*LUHODSHULOOD29(17(037HPSHUDWXUD
GHO+RUQRSDUD/,03,$5
(O7LHPSRGH/LPSLH]DHVKRUDV\PLQXWRV
/DOX]GHDXWROLPSLH]DVHHQFHQGHUi\
SHUPDQHFHUiHQFHQGLGDKDVWDTXHHOFLFORGH
DXWROLPSLH]DHVWpFRPSOHWR
(OKRUQRVHDSDJDGHIRUPDDXWRPiWLFD
FXDQGRHOFLFORGHOLPSLH]DHVFRPSOHWDGR
/XHJRGHXQFLFORGHOLPSLH]DJLUHOD
SHULOOD29(17(037HPSHUDWXUDGHO
+RUQRKDFLDODSRVLFLyQ2))$SDJDGR\
GHVOLFHODPDQLMDGHODWUDEDKDFLDOD
L]TXLHUGDKDVWDVXOtPLWH
3DUDFDQFHODUHOFLFORGHDXWROLPSLH]DJLUHOD
SHULOOD29(17(037HPSHUDWXUDGHO+RUQR
KDFLDODSRVLFLyQGHDSDJDGR\GHVOLFHOD
WUDEDKDFLDODL]TXLHUGDKDVWDVXOtPLWH(VSHUH
KDVWDTXHODOX]GHDXWROLPSLH]DGHMHGH
WLWLODU8VHHOKRUQRWDQWRFRPRORGHVHH
127$1XQFDIXHUFHODWUDED6LHOKRUQRHVWi
GHPDVLDGRFDOLHQWHQRSRGUiGHVOL]DUODWUDED
'HMHTXHHOKRUQRVHHQIUtH
OVEN TEMP
2
0
0
2
5
0
3
0
0
3
5
0
4
0
0
4
5
0
5
0
0
B
R
O
I
L
C
L
E
A
N
O
F
F
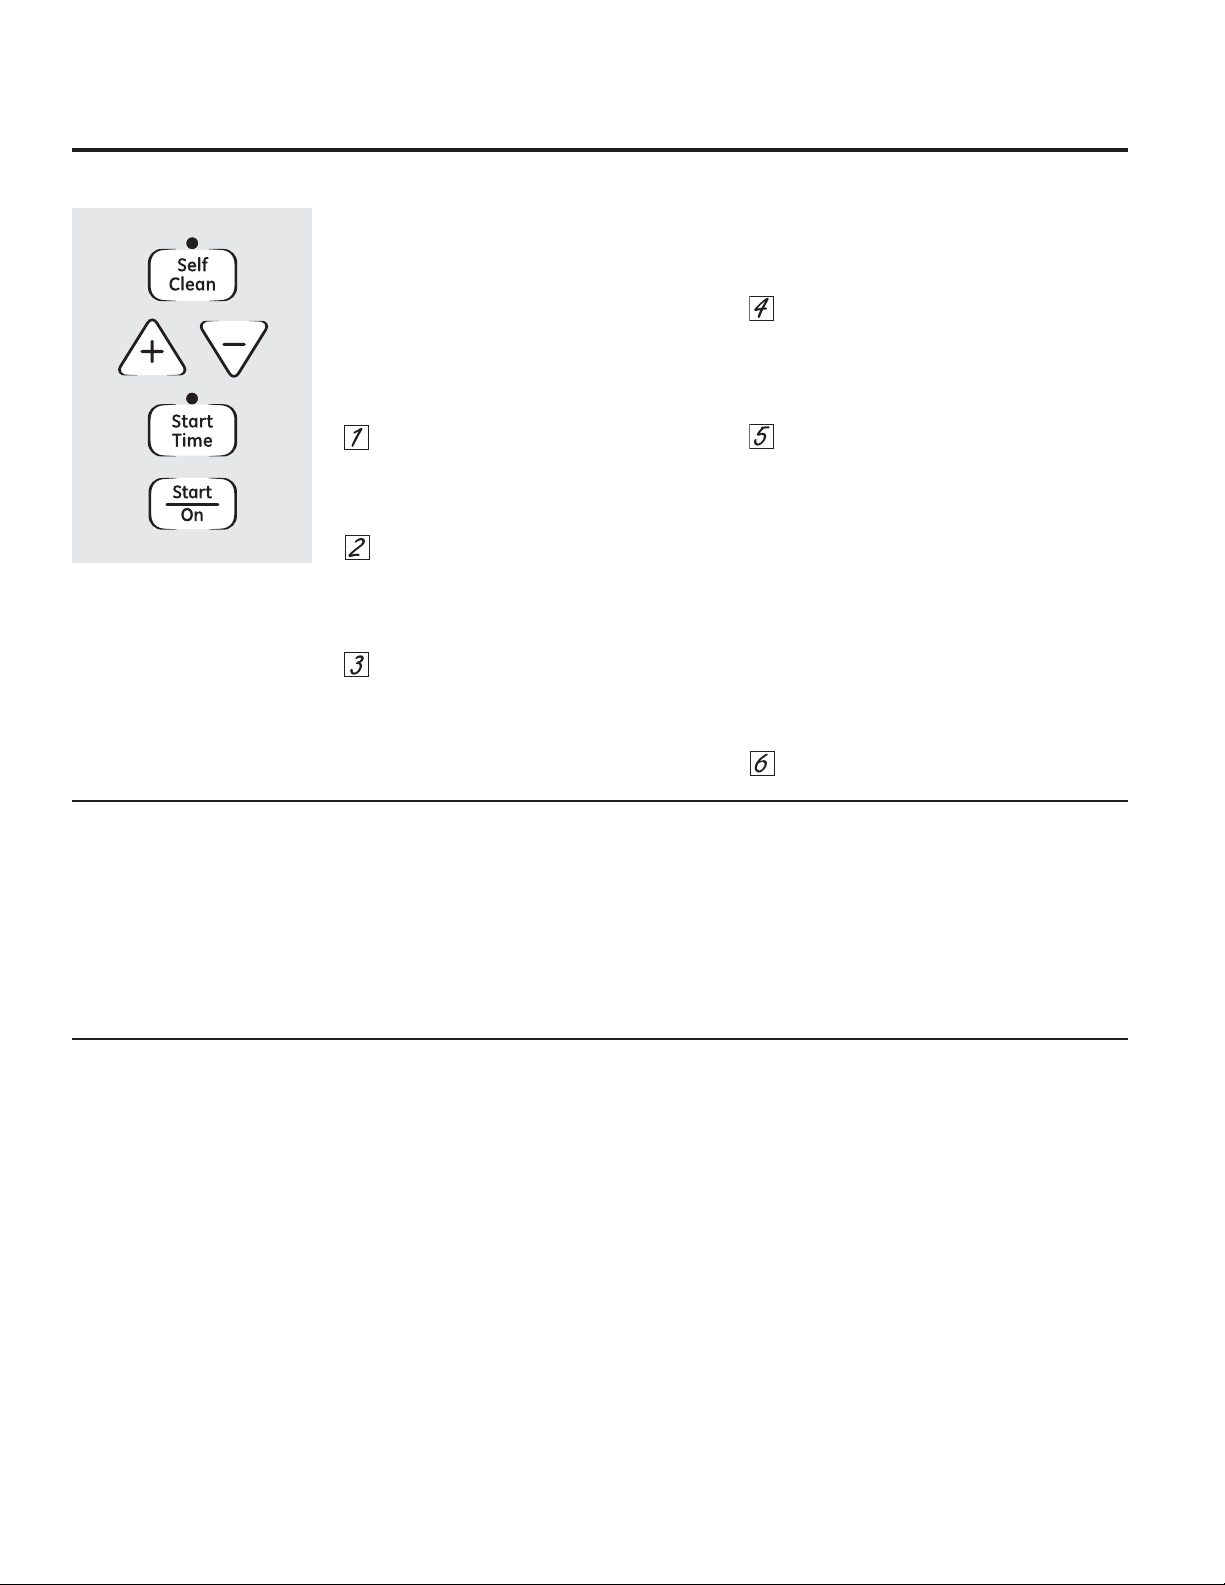
/DSXHUWDGHOKRUQRGHEHUiHVWDUFHUUDGD\WRGRVORVFRQWUROHVFRQILJXUDGRVGHIRUPDFRUUHFWDSDUDTXHHOFLFORIXQFLRQH
DGHFXDGDPHQWH
&RPR5HWUDVDUHO,QLFLRGHOD/LPSLH]D
HQDOJXQRVPRGHORV
3XHGHSURJUDPDUHOFRQWUROGHOKRUQRSDUD
GHPRUDULQLFLDUHOKRUQROLPSLDUGXUDQWHXQ
SHUtRGRGHWLHPSRHVSHFtILFR\OXHJRDSDJDUVH
GHIRUPDDXWRPiWLFD
$VHJ~UHVHTXHHOUHORMPDUTXHODKRUDFRUUHFWD
GHOGtD
6LJDODVLQVWUXFFLRQHVHQODVHFFLyQ$QWHVGHXQ
&LFORGH/LPSLH]D
7UDEHODSXHUWD
127$1XQFDIXHUFHODWUDED6LHOKRUQRHVWi
GHPDVLDGRFDOLHQWHQRSRGUiGHVOL]DUODWUDED
'HMHTXHHOKRUQRVHHQIUtH
3UHVLRQHODWHFOD6HOI&OHDQ$XWR
/LPSLH]D
127$/RVTXHPDGRUHVVXSHUILFLDOHVVH
DSDJDUiQGHIRUPDDXWRPiWLFDFXDQGRHOFLFOR
GHDXWROLPSLH]DFRPLHQFH
3UHVLRQHODVWHFODVRSDUDSURJUDPDU
&OHDQ7LPH7LHPSRGH/LPSLH]D
(O7LHPSRGH/LPSLH]DHVQRUPDOPHQWHKRUDV
\PLQXWRV3XHGHFDPELDUHO7LHPSRGH
/LPSLH]DDFXDOTXLHUWLHPSRHQWUH\KRUDV
GHSHQGLHQGRGHODFDQWLGDGGHVXFLHGDGHQ
HOKRUQR6LVHGHVHDXQ7LHPSRGH/LPSLH]D
GLIHUHQWHSUHVLRQHODVWHFODVR²KDVWDTXHHO
7LHPSRGH/LPSLH]DGHVHDGRVHDYLVXDOL]DGR
3UHVLRQHODWHFOD6WDUW7LPH7LHPSRGH
,QLFLR
&DPELHHO7LHPSRGH,QLFLRSUHVLRQDQGRODV
WHFODVR/DWLHPSRGHLQLFLRDSDUHFHUiHQOD
SDQWDOOD
3UHVLRQHODWHFOD6WDUW2Q,QLFLDU
(QFHQGHU
(OFLFORGHDXWROLPSLH]DFRPHQ]DUiGHIRUPD
DXWRPiWLFDHQODKRUDSURJUDPDGD
0LHQWUDVHOKRUQRHVWiUHDOL]DQGRODDXWR
OLPSLH]DSXHGHSUHVLRQDUODWHFOD&ORFN5HORM
SDUDYLVXDOL]DUODKRUDGHOGtD3DUDUHJUHVDU
DODFXHQWDUHJUHVLYDGHOLPSLH]DSUHVLRQHOD
WHFOD6HOI&OHDQ$XWR/LPSLH]D
(OKRUQRVHDSDJDGHIRUPDDXWRPiWLFD
FXDQGRHOFLFORGHOLPSLH]DHVWiFRPSOHWR\
WLWLODUiHQODSDQWDOOD
'HVOLFHODPDQLMDGHODWUDEDKDFLDOD
L]TXLHUGDKDVWDHOOtPLWH\DEUDODSXHUWD
'HVSXpVGHXQ&LFORGH/LPSLH]D
(VSRVLEOHTXHREVHUYHFHQL]DEODQFDHQHO
KRUQR/LPSLHODPLVPDFRQXQDWHODK~PHGD
XQDYH]TXHHOKRUQRVHHQIUtH
6LTXHGDQPDQFKDVEODQFDVHOLPLQHODV
PLVPDVFRQXQHVWURSDMRFRQMDEyQ\HQMXDJXH
FRPSOHWDPHQWHFRQXQDPH]FODGHDJXD\
YLQDJUH
(VWRVGHSyVLWRVVRQQRUPDOPHQWHXQUHVLGXR
GHVDOTXHQRSXHGHVHUHOLPLQDGRSRUHOFLFOR
GHOLPSLH]D
6LHOKRUQRQRVHOLPSLDOXHJRGHXQFLFORGH
OLPSLH]DUHSLWDHOFLFOR
1RSXHGHFRQILJXUDUHOKRUQRSDUDFRFLQDU
KDVWDTXHHOPLVPRHVWpORVXILFLHQWHPHQWH
FDOLHQWHSDUDTXHODSXHUWDVHGHVEORTXHH
0LHQWUDVHOKRUQRHVWiUHDOL]DQGRODIXQFLyQ
GHDXWROLPSLH]DSXHGHSUHVLRQDUODWHFOD
&ORFN5HORMSDUDYLVXDOL]DUODKRUDGHOGtD
3DUDUHJUHVDUDODFXHQWDUHJUHVLYDGH
OLPSLH]DSUHVLRQHODWHFOD&RRNLQJ7LPH
7LHPSRGH&RFFLyQ
6LUHVXOWDGLItFLOGHVOL]DUORVHVWDQWHVDSOLTXH
XQDFDQWLGDGUHGXFLGDGHDFHLWHYHJHWDO
RDFHLWHGHFRFLQDDXQDWRDOODGHSDSHO\
OLPSLHORVH[WUHPRVGHORVHVWDQWHVGHOKRUQR
FRQXQDWRDOODGHSDSHO
&XLGDGR\OLPSLH]DGHODFRFLQD
3DUD'HWHQHUXQ&LFORGH/LPSLH]DHQDOJXQRVPRGHORV
3UHVLRQHODWHFOD&OHDU2II%RUUDU$SDJDU
(VSHUHKDVWDTXHHOKRUQRVHKD\DHQIULDGR
SRUGHEDMRGHODWHPSHUDWXUDGHEORTXHRSDUD
GHVWUDEDUODSXHUWD1RSRGUiDEULUODSXHUWD
GHLQPHGLDWRDPHQRVTXHHOKRUQRVHKD\D
HQIULDGRSRUGHEDMRGHODWHPSHUDWXUDGH
EORTXHR
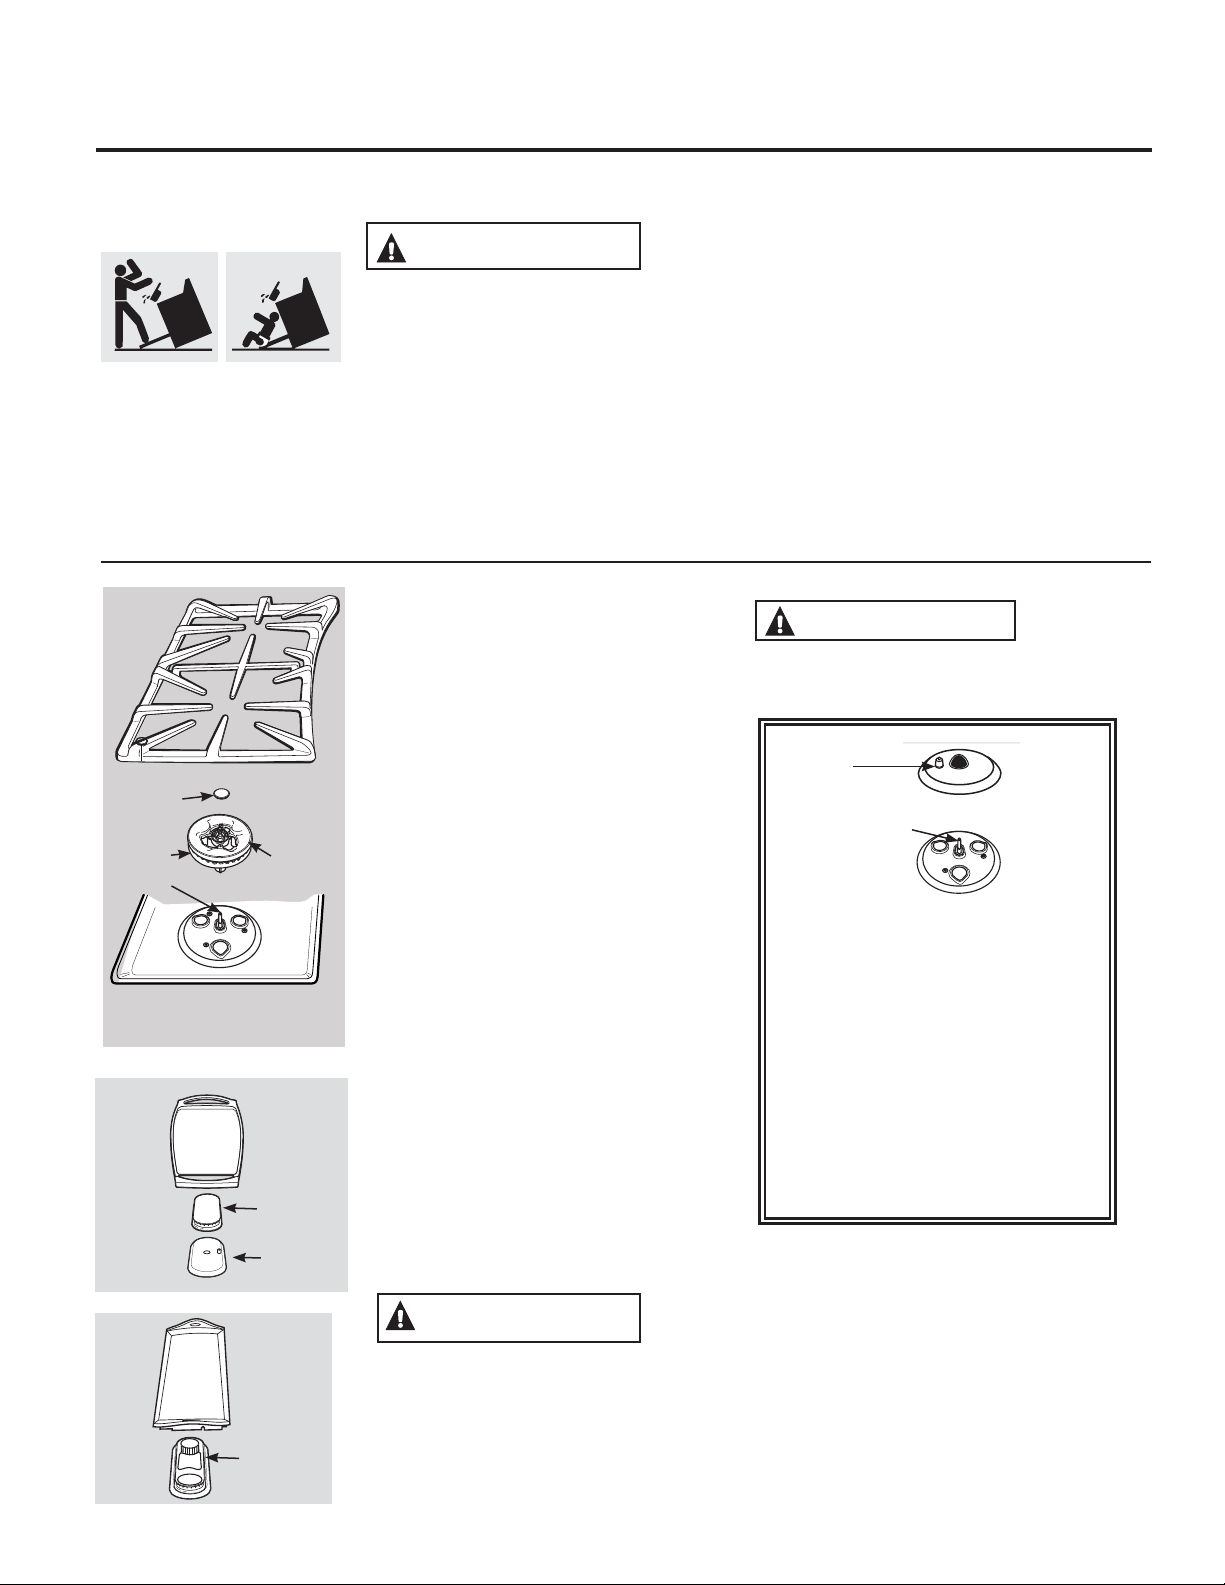
*($SSOLDQFHVFRP
$VHJ~UHVHGHTXHODFRUULHQWHHOpFWULFDHVWpDSDJDGD\TXHWRGDVODVVXSHUILFLHVHVWpQIUtDVDQWHVGHOLPSLDU
FXDOTXLHUSDUWHGHODFRFLQD
$'9(57(1&,$
6LODFRFLQDHVUHWLUDGDSDUDVXOLPSLH]DVHUYLFLRWpFQLFR
RFXDOTXLHURWUDUD]yQDVHJ~UHVHGHTXHHOGLVSRVLWLYRDQWLYROFDGXUDVYXHOYDDVHU
FRORFDGRGHIRUPDFRUUHFWDFXDQGRODFRFLQDVHDLQVWDODGDQXHYDPHQWH6LQRVHWLHQH
HVWDSUHFDXFLyQVHSRGUiRFDVLRQDUODFDtGDGHODFRFLQD\SURYRFDUOHVLRQHV
3DUDFRQWURODUTXHHOVRSRUWHHVWpLQVWDODGR\VXMHWDGRGHIRUPDDGHFXDGDFRQFXLGDGRLQFOLQH
ODFRFLQDKDFLDDGHODQWH(OVRSRUWHGHEHUtDGHWHQHUODFRFLQDGHQWURGHODVSXOJDGDV6LQROR
KDFHHOVRSRUWHVHGHEHUiYROYHUDLQVWDODU
(QFDVRGHTXHODFRFLQDVHDHPSXMDGDGHODSDUHGSRUDOJXQDUD]yQVLHPSUHUHSLWDHVWH
SURFHGLPLHQWRSDUDYHULILFDUTXHODFRFLQDHVWpFRUUHFWDPHQWHDVHJXUDGDSRUHOVRSRUWHDQWL
YROFDGXUDV
6LODFRFLQDQRFXHQWDFRQHOVRSRUWHDQWLYROFDGXUDVOODPHDOSDUDUHFLELUXQR
VLQFRVWR
(QVDPEOHVGHO4XHPDGRU6HOODGRHQDOJXQRVPRGHORV
&RORTXHWRGRVORVFRQWUROHVHQODSRVLFLyQ
2))$SDJDUDQWHVGHUHWLUDUODVSDUWHVGHO
TXHPDGRU
/DVWDSDVGHOTXHPDGRUODWHUDOUHGRQGR\
ODVFDEH]DVGHORVTXHPDGRUHVVHSXHGHQ
OHYDQWDUIDFLOLWDQGRVXOLPSLH]D/RV
HOHFWURGRVQRVHSXHGHQUHWLUDU
/DFDEH]DGHOTXHPDGRUFHQWUDORYDODGR
\ORVHQVDPEOHVGHODVWDSDVVHSXHGHQ
OHYDQWDUIDFLOLWDQGRVXOLPSLH]D(OHOHFWURGR
GHOTXHPDGRUQRVHSXHGHUHWLUDU
/DWDSDLQWHUQDGHOTXHPDGRUGHWUHVDQLOORV
VHSXHGHOHYDQWDUSDUDVXOLPSLH]D/DWDSD
H[WHUQD\HOHQVDPEOHGHODEDVHVHSXHGHQ
OHYDQWDUGHODSDUWHVXSHULRUGHODFRFLQD
FRPRXQDVRODSLH]DFRQSURSyVLWRVGH
OLPSLH]D
35(&$8&,Ï1
1RXVHOD
SDUWHVXSHULRUGHODFRFLQDVLQTXHWRGDVODV
SDUWHVGHORVTXHPDGRUHV\ODVSDUULOODVHVWpQ
HQVXVUHVSHFWLYRVOXJDUHV
(OHOHFWURGRGHOHQFHQGHGRUGHOD
FKLVSDHVH[SXHVWRFXDQGRODFDEH]D
GHOTXHPDGRUHVUHWLUDGD&XDQGR
XQTXHPDGRUVHJLUDD/,7(WRGRVORV
TXHPDGRUHVKDFHQFKLVSD1RLQWHQWH
GHVHQVDPEODUQLOLPSLDUXQTXHPDGRU
PLHQWUDVRWURTXHPDGRUHVWi
HQFHQGLGR(VSRVLEOHTXHVHSURGX]FD
XQDGHVFDUJDHOpFWULFDORFXDOSRGUtD
KDFHUTXHYXHOTXHXQXWHQVLOLRGH
FRFLQDFDOLHQWH
7DSDGHOD
FDEH]DGHORV
TXHPDGRUHV\
HOHFWURGR
3DUULOOD
GHOFKHI
R
(OHFWURGR
%DVHGHWUHVDQLOORV
HQDOJXQRVPRGHORV
(OHFWURGR
35(&$8&,Ï1
1RUHWLUH
ODWDSDGHOTXHPDGRUGHOSXHQWHGHOD
FDEH]D
/DFDEH]DGHOTXHPDGRUGHOSXHQWHGH
WUHVDQLOORV\ORVHQVDPEOHVGHODVWDSDVVH
SXHGHQOHYDQWDUIDFLOLWDQGRVXOLPSLH]D(O
HOHFWURGRQRVHSXHGHUHWLUDU
&DEH]DGHO
TXHPDGRU\
HQVDPEOHGH
ODWDSD
3ODQFKD
GHOFHQWUR
(OHFWURGR
3DUULOODODWHUDO
7DSDGHO
TXHPDGRU
H[WHUQR
7DSDGHO
TXHPDGRU
LQWHUQR
&RFLQD
4XHPDGRUGHWUHVDQLOORV
HQDOJXQRVPRGHORV
(OHFWURGR
%DVHGHO
TXHPDGRU
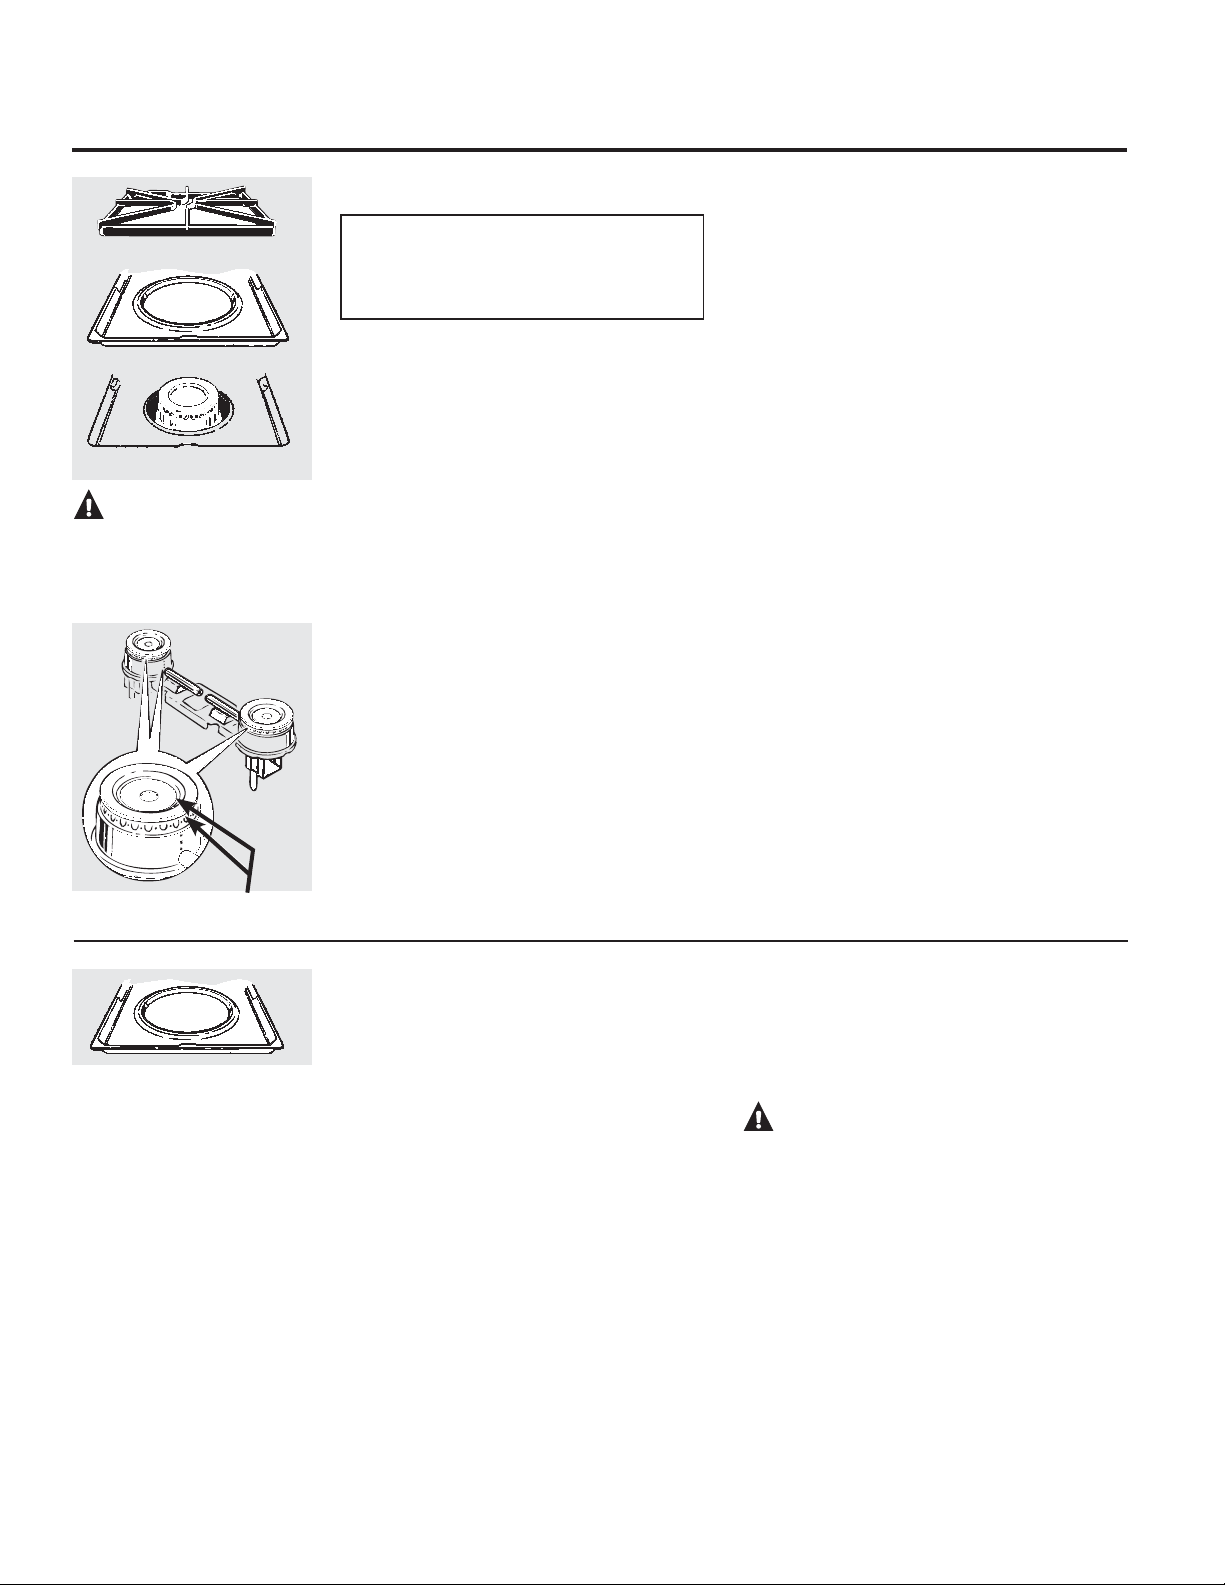
&XLGDGR\OLPSLH]DGHODFRFLQD
(QVDPEOHVGHO4XHPDGRU'REOH(VWiQGDUHQDOJXQRVPRGHORV
(QPRGHORVFRQTXHPDGRUHVGREOHVHVWiQGDU
ODSDUWHVXSHULRUGHODHVWXIDVHOHYDQWDSDUD
IiFLODFFHVR
&RORTXHWRGRVORVFRQWUROHVHQ2))$SDJDU
DQWHVGHUHWLUDUODVSDUWHVGHOTXHPDGRU\ODV
FXEHWDVGHJRWHRVLVHLQFOX\HQ
/DVSDUULOODVGHORVTXHPDGRUHV\ODVFXEHWDV
GHJRWHRVLVHLQFOX\HQVHSXHGHQOHYDQWDU
IDFLOLWDQGRODOLPSLH]D
/RVDJXMHURVGHODVFDEH]DVGHORVTXHPDGRUHV
GHVXFRFLQDVHGHEHQPDQWHQHUOLPSLRVHQ
WRGRPRPHQWRSDUDXQFRUUHFWRHQFHQGLGR\
XQDOODPDSDUHMD\VLQREVWUXFFLRQHV
'HEHUtDOLPSLDUODVFDEH]DVGHORVTXHPDGRUHV
GHIRUPDUXWLQDULDHVSHFLDOPHQWHOXHJRGH
GHUUDPHVLPSRUWDQWHVTXHSRGUtDQEORTXHDU
ODVDEHUWXUDV
/LPSLHODVFDEH]DVGHORVTXHPDGRUHV6LVH
SURGXFHQGHUUDPHVLPSRUWDQWHVUHWLUHODV
FDEH]DVGHORVTXHPDGRUHVGHODFRFLQD
/RVTXHPDGRUHVVHSXHGHQOHYDQWDUSDUDVX
OLPSLH]D/HYDQWHODHVWXID\OXHJROHYDQWHODV
FDEH]DVGHORVTXHPDGRUHV
3DUDUHWLUDUFRPLGDTXHPDGDPRMHODV
FDEH]DVGHORVTXHPDGRUHVHQXQDVROXFLyQ
GHGHWHUJHQWHOtTXLGRVXDYH\DJXDFDOLHQWH
0RMHODFDEH]DGHOTXHPDGRUSRUHQWUH\
PLQXWRV
6LVHWUDWDGHPDQFKDVGLItFLOHVXVHXQ
OLPSLDGRUGHODVPDUFDV6RIW6FUXER%RQ
$PL(QMXDJXHELHQSDUDUHWLUDUFXDOTXLHU
UDVWURGHOOLPSLDGRUTXHSRGUtDREVWUXLUODV
DEHUWXUDVGHODVFDEH]DVGHORVTXHPDGRUHV
1RXVHHVWURSDMRV\DTXHREVWUXLUiQODV
DEHUWXUDVGHODVFDEH]DVGHORVTXHPDGRUHV
\UD\DUiQVXVVXSHUILFLHV6LORVDJXMHURVVRQ
REVWDFXOL]DGRVOLPSLHORVPLVPRVFRQXQD
DJXMDGHFRVHURXQDODPEUHGREODGR
$QWHVGHYROYHUDFRORFDUODFDEH]DGHO
TXHPDGRUVDFXGDHOH[FHVRGHDJXD\OXHJR
VHTXHFRPSOHWDPHQWHFRORFDQGRODFDEH]D
HQXQKRUQRFDOLHQWHGXUDQWHPLQXWRV
/XHJRYXHOYDDFRORFDUODFDEH]DHQODHVWXID
DVHJXUiQGRVHGHTXHHVWpFRORFDGD\QLYHODGD
FRUUHFWDPHQWH
&RQWUROHHOSDWUyQGHODOODPDGHFDGD
TXHPDGRU6LODVOODPDV´VDOWDQµQRHVWiQ
SDUHMDVµOLPSLHORVDJXMHURVQXHYDPHQWHFRQ
XQDDJXMDGHFRVHURXQDODPEUHGREODGR
3DUULOOD
&XEHWDGHJRWHRVLHVWiLQFOXLGD
4XHPDGRU6XSHUILFLDO
35(&$8&,Ï1
1RXVHODSDUWHVXSHULRUGHODFRFLQD
VLQTXHWRGDVODVSDUWHVGHORV
TXHPDGRUHVFXEHWDVGHJRWHRVL
HVWiQLQFOXLGDV\ODVSDUULOODVHVWpQHQ
VXVUHVSHFWLYRVOXJDUHV
/LPSLHFRPSOHWDPHQWHORV
DJXMHURVGHFDGDTXHPDGRU
3DUDDFFHGHUDLQIRUPDFLyQVREUH
OLPSLH]DGHTXHPDGRUHVVHOODGRVFRQVXOWH
ODVLJXLHQWHVHFFLyQ/DVHVWXIDVFRQ
TXHPDGRUHVVHOODGRVQRVHOHYDQWDQ
&XEHWDVGH*RWHRVLVHLQFOX\HQ
5HWLUHODVSDUULOODV\OHYDQWH\UHWLUHODVFXEHWDV
GHJRWHR/DVFXEHWDVGHJRWHRVHSXHGHQ
OLPSLDUHQXQODYDYDMLOODVRHQIRUPDPDQXDO
$OUHHPSOD]DUODVFXEHWDVGHJRWHRDVHJ~UHVH
GHTXHHVWpQHQODSRVLFLyQFRUUHFWD
&RORTXHODVPLVPDVHQXQHQYDVHFXELHUWR
$JUHJXHóGHWD]DGHDPRQtDFR\GHMHHQ
UHPRMRGXUDQWHYDULDVKRUDVRGXUDQWHOD
QRFKH/DYHHQMXDJXHELHQ\VHTXH
35(&$8&,Ï1
1ROLPSLHODV
FXEHWDVGHJRWHRHQHOKRUQRGHDXWROLPSLH]D
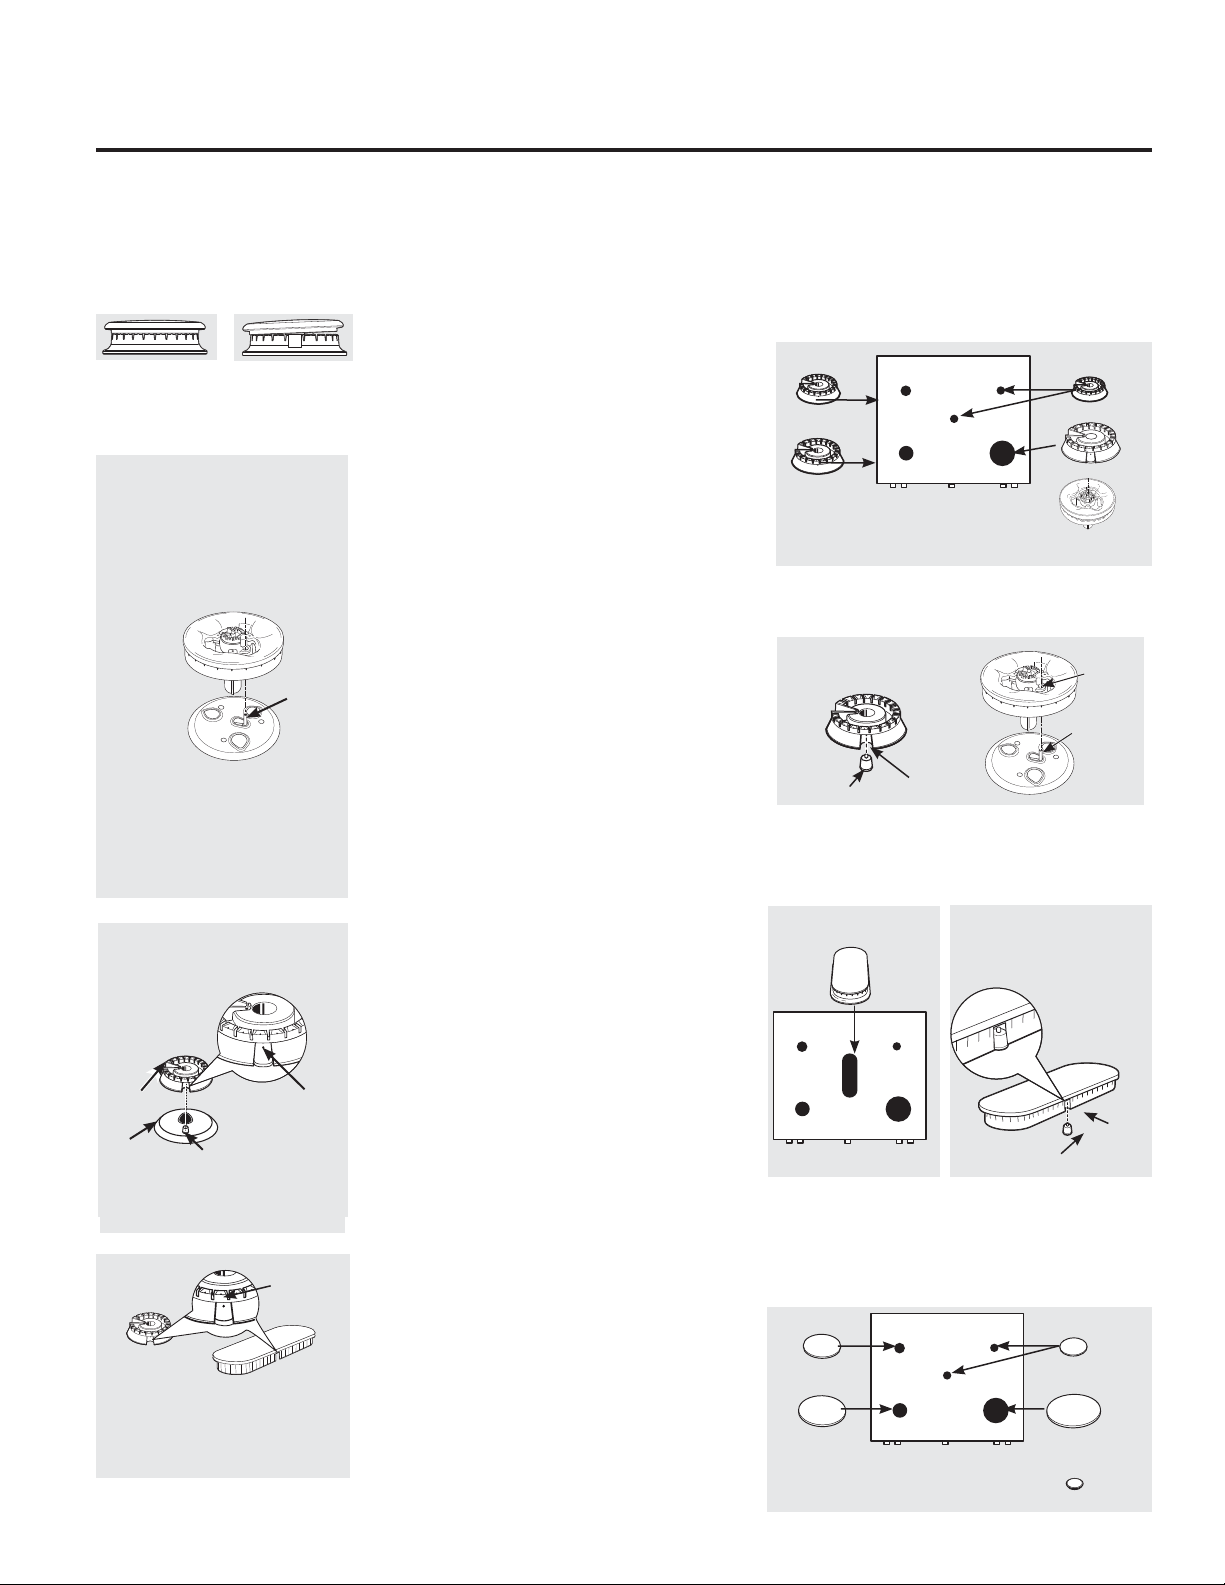
*($SSOLDQFHVFRP
7DSDV%DVHV\&DEH]DVGH4XHPDGRUHV
$QWHVGHUHWLUDUODVWDSDV\FDEH]DVGHORV
TXHPDGRUHVHQDOJXQRVPRGHORVUHFXHUGHVX
WDPDxR\XELFDFLyQ5HHPSODFHORVPLVPRVHQ
ODPLVPDXELFDFLyQOXHJRGHODOLPSLH]D
127$1RXVHHVWURSDMRVQLSROYRVSDUDIUHJDU
SDUDOLPSLDUODVSDUWHVGHOTXHPDGRU
7DSDVGHORV4XHPDGRUHV
/HYDQWDUFXDQGRHVWpQIUtDV/DYHODVWDSDVGHORV
TXHPDGRUHVHQDJXDFDOLHQWHFRQMDEyQ\HQMXDJXH
FRQDJXDOLPSLD3XHGHIUHJDUFRQXQDEDVHGH
IUHJDGRSOiVWLFDSDUDHOLPLQDUSDUWtFXODVGHFRPLGD
TXHPDGDV
4XHPDGRUGHWUHVDQLOORVHQDOJXQRV
PRGHORV
/DFDSDH[WHULRUGHOTXHPDGRUGHWUHVDQLOORVQR
VHSXHGHUHWLUDU6yORODWDSDUHGRQGDGHOFHQWUR
VHSXHGHUHWLUDUSDUDVXOLPSLH]D
3DUDOLPSLDUODVEDVHVGHORVTXHPDGRUHVXVH
DJXDFRQMDEyQ\XQDEDVHSDUDIUHJDUGHSOiVWLFR
/LPSLHFRQXQDWHODK~PHGD
$VHJ~UHVHGHTXHQRLQJUHVHDJXDDODVEDVHVGH
ORVTXHPDGRUHV3HUPLWDTXHVHVHTXHQWRWDOPHQWH
DQWHVGHXVDU
&DEH]DVGHORV4XHPDGRUHVHQDOJXQRV
PRGHORV\(QVDPEOHGHOD7DSD&DEH]D
GHO4XHPDGRU2YDODGR&HQWUR
/DVFDEH]DVGHORVTXHPDGRUHV\HOHQVDPEOHGHOD
FDEH]DWDSDGHOTXHPDGRURYDODGRVHSXHGHQUHWLUDU
6LPSOHPHQWHOHYDQWHODVPLVPDVGHODFRFLQDSDUDVX
OLPSLH]D
3DUDXQHQFHQGLGRDGHFXDGRDVHJ~UHVHGHTXH
HODJXMHURSHTXHxRHQODVHFFLyQTXHFRLQFLGHFRQ
HOHOHFWURGRVHPDQWHQJDDELHUWR3XHGHXVDUXQD
DJXMDGHFRVHURXQSUHFLQWRSDUDGHVEORTXHDUOR
/DVKHQGLGXUDVGHODVFDEH]DVGHORVTXHPDGRUHV
VHGHEHQPDQWHQHUOLPSLDVHQWRGRPRPHQWRSDUD
REWHQHUXQDOODPDSDUHMD\VLQREVWUXFFLyQ
/DVSDUWHVEORTXHDGDVRVXFLDVGHORVTXHPDGRUHV
RORVHOHFWURGRVQRSHUPLWLUiQTXHHOTXHPDGRU
IXQFLRQHGHIRUPDFRUUHFWD
&XDOTXLHUGHUUDPHHQRDOUHGHGRUGHXQHOHFWURGRVH
GHEHUiOLPSLDUGHIRUPDFXLGDGRVD7HQJDFXLGDGR
GHQRJROSHDUXQHOHFWURGRFRQQDGDGXUR\DTXHVH
SRGUiGDxDU
/LPSLHODVFDEH]DVGHORVTXHPDGRUHVGHIRUPD
UXWLQDULDHVSHFLDOPHQWHOXHJRGHGHUUDPHV
LPSRUWDQWHVTXHSRGUtDQEORTXHDUODVDEHUWXUDV
/HYDQWDUFXDQGRHVWpIUtD
3DUDHOLPLQDUODFRPLGDTXHPDGDPRMHODV
FDEH]DVGHORVTXHPDGRUHVHQXQDVROXFLyQGH
GHWHUJHQWHOtTXLGRVXDYH\DJXDFDOLHQWHSRUHQWUH
\PLQXWRV&XDQGRVHWUDWHGHPDQFKDV
PiVGLItFLOHVXVHXQFHSLOORGHGLHQWHV
/XHJRGHODOLPSLH]D
$QWHVGHFRORFDUODVWDSDV\FDEH]DVGH
ORVTXHPDGRUHVHQDOJXQRVPRGHORV\HO
HQVDPEOHGHODFDEH]DWDSDQXHYDPHQWH
HVFXUUDHOH[FHVRGHDJXD\OXHJRVHTXHODV
PLVPDVWRWDOPHQWHSURJUDPDQGRHOKRUQR
SDUDTXHHVWpFDOLHQWHSRUPLQXWRV
5HHPSOD]RGHODV&DEH]DVGHORV
4XHPDGRUHV
HQDOJXQRVPRGHORV
5HHPSODFHODVFDEH]DVGHORVTXHPDGRUHVVREUHORV
HOHFWURGRVHQODSDUWHVXSHULRUGHODFRFLQDHQODV
XELFDFLRQHVFRUUHFWDVGHDFXHUGRFRQVXWDPDxR
+D\XQDFDEH]DGHTXHPDGRUSHTXHxDXQD
PHGLDQDXQDJUDQGH\XQDH[WUDJUDQGH
$VHJ~UHVHGHTXHODUDQXUDRDJXMHURGHSHQGLHQGR
GHOPRGHORGHOTXHPDGRUHVWpSRVLFLRQDGRVREUHHO
HOHFWURGR
(QVDPEOHGHOD&DEH]D7DSDGHO4XHPDGRU
2YDODGR&HQWUR
5HHPSODFHHOHQVDPEOHGHODFDEH]DWDSDRYDODGD
FHQWURVREUHHOHOHFWURGRHQODSDUWHVXSHULRUGHODFRFLQD
7DSDV
5HHPSODFHODVWDSDVGHWDPDxRFRLQFLGHQWHHQODV
EDVHV\FDEH]DVGHORVTXHPDGRUHV
$VHJ~UHVHGHTXHODVFDEH]DVHQDOJXQRVPRGHORV
\ODVWDSDVVHDQUHHPSOD]DGDVHQODVXELFDFLRQHV
FRUUHFWDV
(OHQVDPEOHGHODFDEH]DWDSDRYDOGHO
TXHPDGRUVHSXHGHUHWLUDU6LPSOHPHQWH
OHYDQWHODPLVPDGHODFRFLQDSDUD
VXOLPSLH]D8VHXQDDJXMDGHFRVHUR
SUHFLQWRVSDUDGHVEORTXHDUHOSHTXHxR
DJXMHURHQHOTXHPDGRU
/DWDSDGHO
TXHPDGRUHVWi
FRUUHFWDPHQWH
FRORFDGD
/DWDSDGHO
TXHPDGRU
12HVWi
FRUUHFWDPHQWH
FRORFDGD
)UHQWHGHODFRFLQD
7DSDGHWUHVDQLOORV
HQDOJXQRVPRGHORV
HQDOJXQRVPRGHORV
(OHFWURGR
5DQXUD
)UHQWHGHODFRFLQD
&DEH]DRYDODGD\
HQVDPEOHGHODWDSD
$VHJ~UHVHGHTXHODUDQXUD
GHODFDEH]DGHOTXHPDGRU
HVWpSRVLFLRQDGDVREUHHO
HOHFWURGR
$JXMHUR
HQOD
FDEH]DGHO
TXHPDGRU
(OHFWURGR
&DEH]DGHO
TXHPDGRU
%DVHGHO
TXHPDGRU
&DEH]DGHWUHVDQLOORVHQDOJXQRV
PRGHORV
$VHJ~UHVHGHTXHHODQLOORGH
ODFDEH]DGHOTXHPDGRUHVWp
SRVLFLRQDGRVREUHHOHOHFWURGR\
TXHODFDEH]DGHOTXHPDGRUHVWp
FRPSOHWDPHQWHLQVHUWDGDGHQWURGH
ODEDVHGHOTXHPDGRU8QDSHTXHxD
EUHFKDHQWUHODEDVH\ODFDEH]DHV
QRUPDO
(OHFWURGR
&iPDUDGHHVWDELOLGDG
%DVHGHO
TXHPDGRU
&DEH]DIURQWDOGHUHFKDHQDOJXQRV
PRGHORVFDEH]DIURQWDOL]TXLHUGD
FDEH]DWUDVHUDGHUHFKD\FDEH]D
WUDVHUDL]TXLHUGD
$VHJ~UHVHGHTXHODUDQXUDGH
ODFDEH]DGHOTXHPDGRUHVWp
SRVLFLRQDGDVREUHHOHOHFWURGR
8VHXQDDJXMDGH
FRVHURSUHFLQWRV
SDUDGHVEORTXHDU
HOSHTXHxRDJXMHUR
HQODFDEH]DGHO
TXHPDGRU
&DEH]DVGHOTXHPDGRUHQDOJXQRV
PRGHORV
/DVFDEH]DVGHOTXHPDGRUHQ
DOJXQRVPRGHORVVHSXHGHQUHWLUDU
6LPSOHPHQWHOHYDQWHODVPLVPDVGH
ODSDUULOODSDUDVXOLPSLH]D
&DEH]DGHO
TXHPDGRU
)UHQWHGHODFRFLQD
&DEH]DGHWUHVDQLOORV
HQDOJXQRVPRGHORV
HQDOJXQRVPRGHORV
5DQXUD
(OHFWURGR
R
$JXMHUR
(OHFWURGR
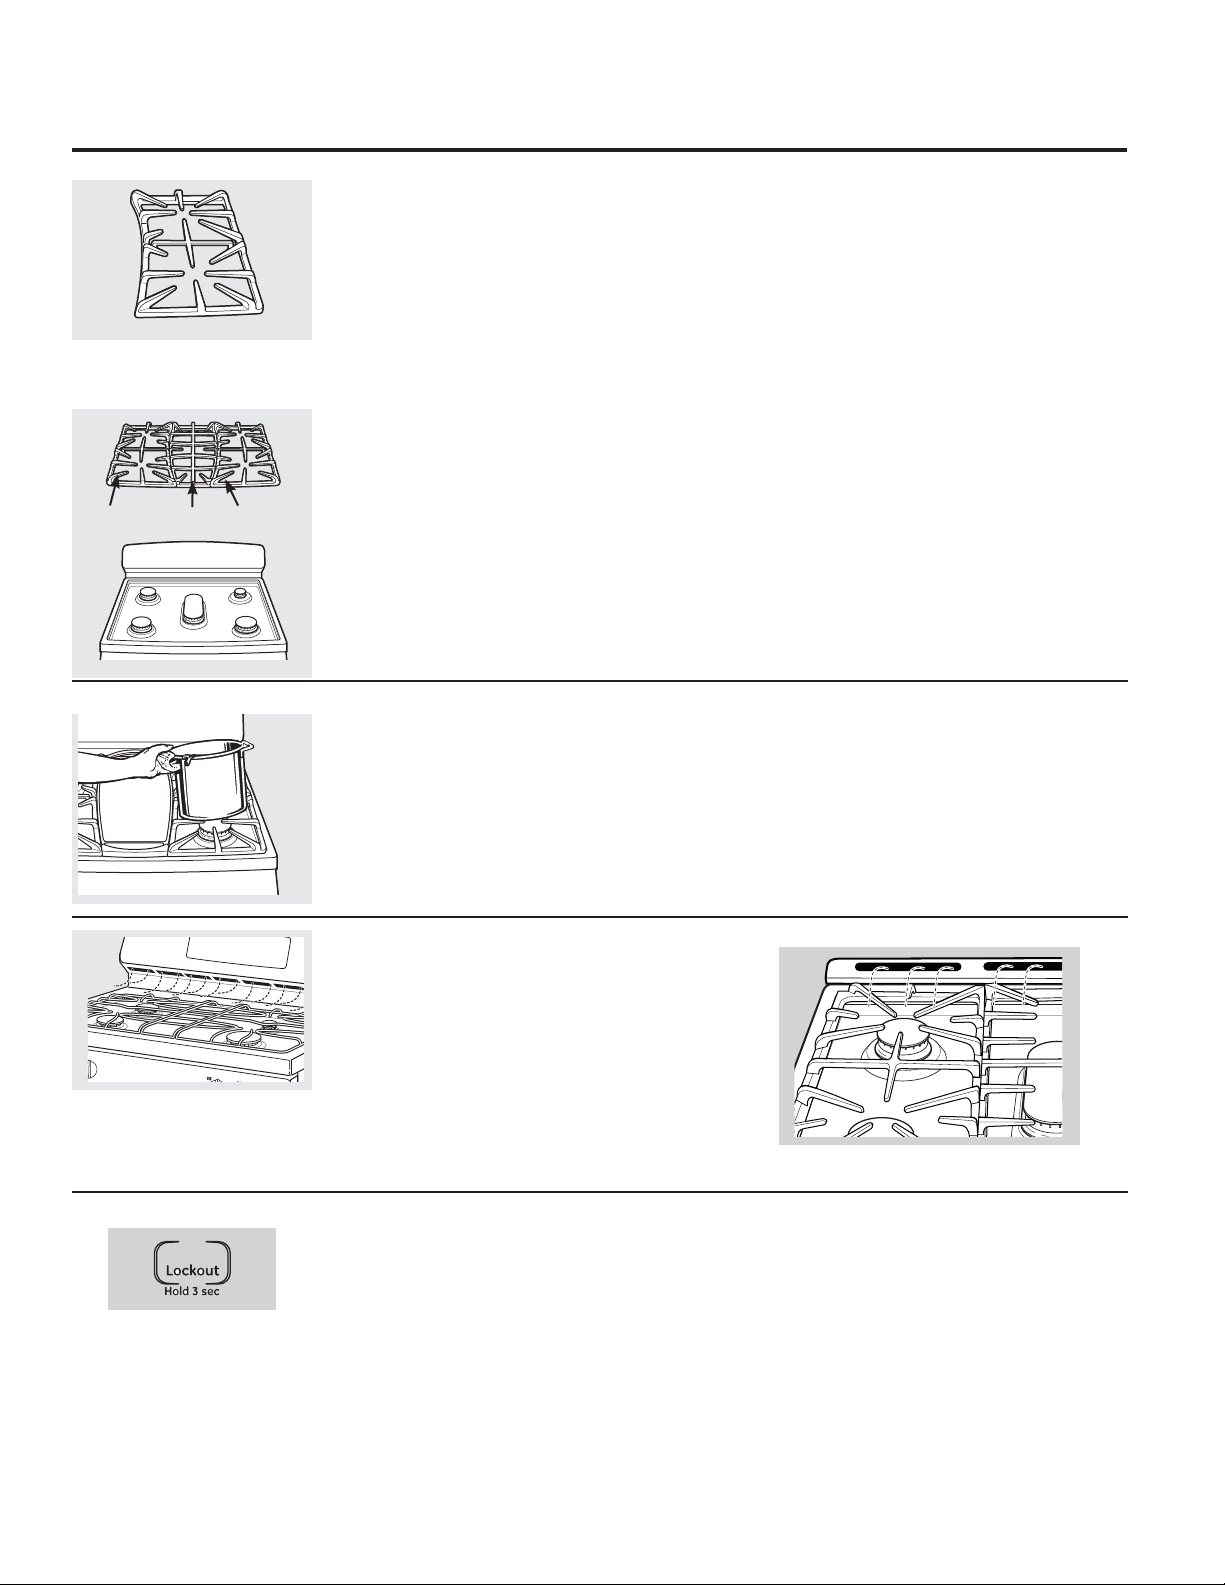
3DUULOODVGHORV4XHPDGRUHV
6XFRFLQDFXHQWDFRQWUHVSDUULOODVGREOHV
GHWLSRSURIHVLRQDO(VWDVSDUULOODVSRVHHQ
SRVLFLRQHVHVSHFtILFDV3DUDXQDHVWDELOLGDG
Pi[LPDHVWDVSDUULOODVVyORVHGHEHUiQXVDUHQ
VXSRVLFLyQDGHFXDGDQRVHSXHGHQFDPELDU
GHL]TXLHUGDDGHUHFKDRGHOIUHQWHDDWUiV
3DUDPD\RUFRQYHQLHQFLDORVODGRVLQIHULRUHV
GHODVSDUULOODVL]TXLHUGD\GHUHFKDHVWiQ
PDUFDGDV´/()7)5217µ)UHQWH,]TXLHUGR\
´5,*+7)5217µ)UHQWH'HUHFKR$VHJ~UHVH
GHTXHODSRVLFLyQIURQWDOGHDPEDVSDUULOODV
HVWpHQHOIUHQWH/DSDUULOODLQWHUPHGLDSRVHH
XQDUFRHQHOIUHQWH$VHJ~UHVHGHTXHODSDUWH
DUTXHDGDHVWpKDFLDHOIUHQWHGHODFRFLQD
$GHPiVODSDUULOODLQWHUPHGLDHVWiDSR\DGD
SRUODVSDUULOODVL]TXLHUGD\GHUHFKD\GHEHVHU
LQVWDODGDDOILQDOSDUDPD\RUHVWDELOLGDG
/LPSLH]D
/HYDQWHODVPLVPDVFXDQGRHVWpQIUtDV/DV
SDUULOODVVHGHEHQODYDUGHIRUPDUHJXODU\SRU
VXSXHVWROXHJRGHGHUUDPHV/DYHODVSDUULOODV
FRQDJXDFDOLHQWH\MDEyQ\HQMXDJXHFRQDJXD
OLPSLD$OUHHPSOD]DUODVSDUULOODVDVHJ~UHVHGH
TXHHVWpQSRVLFLRQDGDVGHIRUPDVHJXUDVREUH
ORVTXHPDGRUHV5HHPSODFHODVSDUULOODVGH
PRGRTXHVHIRUPHQDUFRVFRQWLQXRVFRQODV
OtQHDVFHQWUDOHVGHODVWUHVSDUULOODV
1RXWLOLFHHOTXHPDGRUGXUDQWHXQSHUtRGRGHWLHPSR
SURORQJDGRVLQXQXWHQVLOLRGHFRFLQDVREUHODUHMLOOD
(ODFDEDGRGHODSDUULOODVHSXHGHUHVTXHEUDMDUVLQR
KD\XQXWHQVLOLRGHFRFLQDTXHDEVRUEDHOFDORU
3DUDOLEHUDUVHGHFRPLGDVTXHPDGDVFRORTXH
ODVSDUULOODVHQXQHQYDVHFXELHUWR$JUHJXH
XQDWD]DGHóGHDPRQtDFR\GHMHTXH
SHUPDQH]FDQPRMDGDVYDULDVKRUDVGXUDQWHOD
QRFKH/DYHHQMXDJXHELHQ\VHTXH
$XQTXHVRQGXUDEOHVODVSDUULOODVSHUGHUiQ
JUDGXDOPHQWHVXEULOORPiVDOOiGHOPHMRU
FXLGDGRTXHOHVSXHGDGDU(VWRVHGHEHD
ODH[SRVLFLyQFRQWLQXDDDOWDVWHPSHUDWXUDV
2EVHUYDUiHVWRDQWHVFRQSDUULOODVGHFRORUFODUR
127$1ROLPSLHODVSDUULOODVHQHOKRUQRGHDXWR
OLPSLH]D
/DVSDUULOODVVHSXHGHQOLPSLDUHQ
XQODYDYDMLOODV
/DDSDULHQFLDSXHGHYDULDU
)UHQWH
,]TXLHUGR
)UHQWH
'HUHFKR
&HQWUR
&XLGDGR\OLPSLH]DGHODFRFLQD
9HQWLODFLRQHVGH$LUHGHO+RUQR
1XQFDEORTXHHODVYHQWLODFLRQHVDEHUWXUDV
GHDLUHGHODFRFLQD/DVPLVPDVEULQGDQODV
HQWUDGDV\VDOLGDVGHDLUHTXHVRQQHFHVDULDV
SDUDTXHODFRFLQDRSHUHGHIRUPDFRUUHFWD
FRQODFRPEXVWLyQDGHFXDGD
/DVDEHUWXUDVGHDLUHVHHQFXHQWUDQXELFDGDV
HQODSDUWHWUDVHUDGHODFRFLQDHQODSDUWH
VXSHULRUHLQIHULRUGHODSXHUWDGHOKRUQR\HQOD
SDUWHLQIHULRUGHODFRFLQD
3DQHOGH&RQWURO6XSHULRUHQDOJXQRVPRGHORV
(QPRGHORVHTXLSDGRVGHHVWHPRGREORTXHH
ODVWHFODVWiFWLOHVDQWHVGHOLPSLDU
&RQVXOWHODLQIRUPDFLyQGH%ORTXHRGHO&RQWURO
GH*DVHQODVIXQFLRQHV(VSHFLDOHVGHOD
VHFFLyQGHFRQWUROGHVXKRUQRHQHVWHPDQXDO
/LPSLHFXDOTXLHUVDOSLFDGXUDFRQXQDWHOD
K~PHGD
7DPELpQSXHGHXVDUXQOLPSLDGRUGHYLGULRV
(OLPLQHODVXFLHGDGLPSRUWDQWHFRQDJXD
FDOLHQWH\MDEyQ1RXVHQLQJ~QWLSRGHPDWHULDO
DEUDVLYR
9XHOYDDDFWLYDUODVWHFODVWiFWLOHVOXHJRGHOD
OLPSLH]D
/DDSDULHQFLD\ODXELFDFLyQGHODYHQWLODFLyQYDUtDQ
Gas/Control
6XSHUILFLHGHOD3DUWH6XSHULRUGHOD&RFLQD
$ILQGHHYLWDUGDxRVVREUHODVXSHUILFLH
HVPDOWDGDGHSRUFHODQDVREUHODSDUWHVXSHULRU
GHODFRFLQD\SDUDHYLWDUTXHTXHGHVLQEULOOR
OLPSLHORVGHUUDPHVGHLQPHGLDWR/DFRPLGD
FRQPXFKRiFLGRWRPDWHVFKXFUXWMXJRVGH
IUXWDHWFRODVFRPLGDVFRQDOWRFRQWHQLGRGH
D]~FDUSXHGHQGHMDUXQHVSDFLRVLQEULOORVLQR
VHOLPSLDQ
&XDQGRODVXSHUILFLHHVWpIUtDODYH\HQMXDJXH
3DUDRWURVGHUUDPHVWDOHVFRPRVDOSLFDGXUDV
GHJUDVDODYHFRQDJXD\MDEyQXQDYH]TXHOD
VXSHUILFLHVHKD\DHQIULDGR/XHJRHQMXDJXH\
SXODFRQXQDWHODVHFD
127$3DUDODVFRFLQDVGHDFHURLQR[LGDEOH
FRQVXOWHODVHFFLyQVREUHVXSHUILFLHVGHDFHUR
LQR[LGDEOH
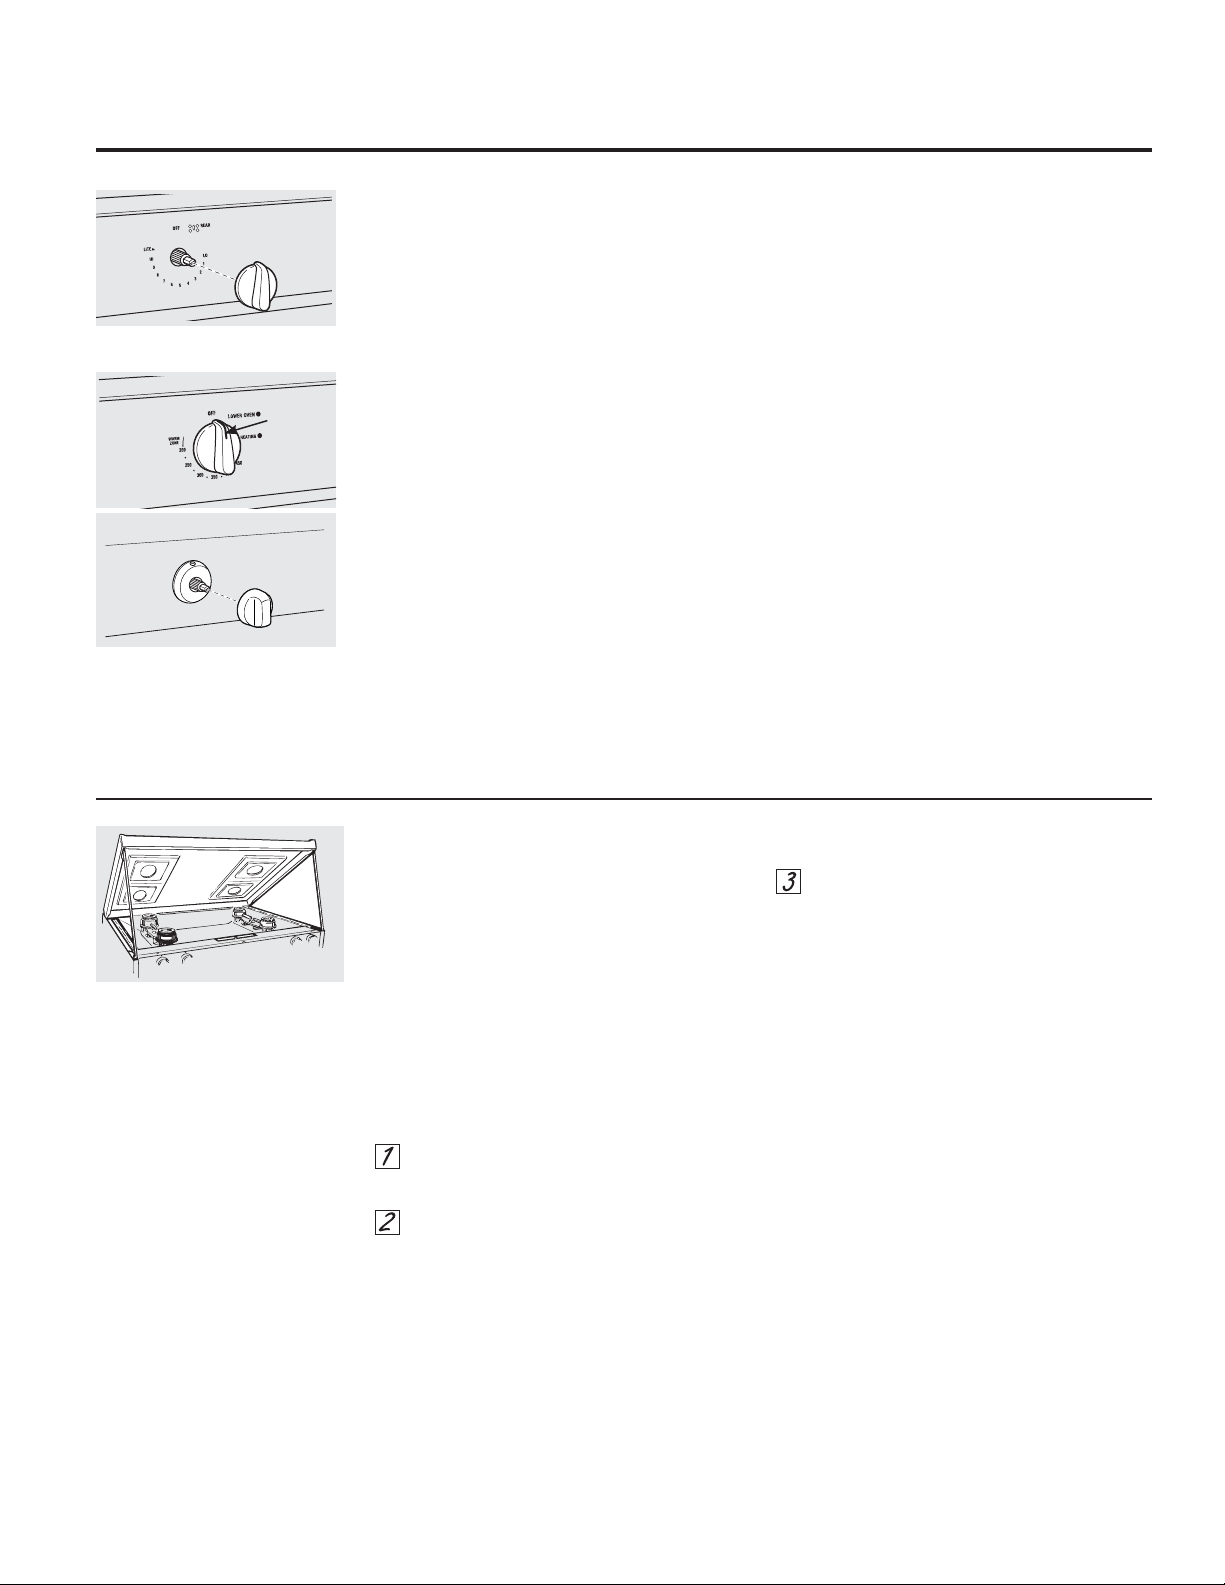
*($SSOLDQFHVFRP
3DQHOGH&RQWURO,QIHULRU3DQHOGHO&ROHFWRU)URQWDO\3HULOODV
8QDEXHQDLGHDHVOLPSLDUHOSDQHOGHFRQWURO
OXHJRGHFDGDXVRGHOKRUQR8VHXQDWHOD
K~PHGDSDUDOLPSLDURHQMXDJDU3DUDOLPSLDU
XVHMDEyQVXDYH\DJXDRXQDVROXFLyQTXH
VHDPLWDGGHYLQDJUH\PLWDGGHDJXD3DUD
HQMXDJDUXVHDJXDOLPSLD3XODHQVHFRFRQ
XQDWHODVXDYH
1RXVHOLPSLDGRUHVDEUDVLYRVOLPSLDGRUHV
OtTXLGRVIXHUWHVDOPRKDGLOODVSDUDIUHJDUGH
SOiVWLFR\OLPSLDGRUHVGHKRUQRHQHOSDQHOGH
FRQWUROGDxDUiQHODFDEDGR
1RLQWHQWHLQFOLQDUODVSHULOODVHPSXMDQGRODV
PLVPDVKDFLDDUULEDRKDFLDDEDMRRFROJDQGR
XQDWRDOODXRWUDVFDUJDVGHHVWHWLSR(VWR
SXHGHGDxDUHOHMHGHODYiOYXODGHJDV
/DVSHULOODVGHFRQWUROVHSXHGHQUHWLUDUSDUD
IDFLOLWDUODOLPSLH]D
$VHJ~UHVHGHTXHODVSHULOODVHVWpQHQODV
SRVLFLRQHV2))$SDJDGR\HPSXMHODVPLVPDV
GHVGHORVVRSRUWHVGHIRUPDGHUHFKDSDUDVX
OLPSLH]D
/DVSHULOODVVHSXHGHQOLPSLDUHQXQODYDYDMLOODV
RWDPELpQVHSXHGHQODYDUFRQDJXD\MDEyQ
$VHJ~UHVHGHTXHORVLQWHULRUHVGHODVSHULOODV
HVWpQVHFRVDQWHVGHYROYHUDFRORFDUODV
5HHPSODFHODVSHULOODVHQODSRVLFLyQ2))
$SDJDGRSDUDDVHJXUDUXQDXELFDFLyQ
DGHFXDGD
/DVSLH]DVPHWiOLFDVVHSXHGHQOLPSLDUFRQ
DJXD\MDEyQ1RXVHHVWURSDMRVDEUDVLYRV
DPRQtDFRViFLGRVROLPSLDGRUHVSDUDKRUQRV
FRPHUFLDOHV6HTXHFRQXQDWHODVHFD
127(/DVSHULOODVQRVHSXHGHQFDPELDU
GHOXJDU$VHJ~UHVHGHYROYHUDLQVWDODUODV
SHULOODVHQVXVXELFDFLRQHVRULJLQDOHV
3HULOODGHOTXHPDGRUVXSHUILFLDO
3HULOODGHOKRUQRLQIHULRUHQDOJXQRV
PRGHORV
/tQHDURMD
(OHYDGRUGHOD(VWXIDHQPRGHORVFRQTXHPDGRUHVJHPHORVHVWiQGDU
/LPSLHHOiUHDGHEDMRGHODHVWXIDFRQ
IUHFXHQFLD/DVXFLHGDGDFXPXODGD
HVSHFLDOPHQWHODJUDVDVHSXHGHLQFHQGLDU
3DUDIDFLOLWDUODOLPSLH]DODHVWXIDSXHGHVHU
OHYDQWDGD
127$1ROHYDQWHODHVWXIDHQPRGHORVFRQ
TXHPDGRUHVVHOODGRV/HYDQWDUODFRFLQD
SXHGHSURGXFLUGDxRV\XQIXQFLRQDPLHQWR
LQDSURSLDGRGHODHVWXID
3DUDOHYDQWDUODHVWXID
$VHJ~UHVHGHTXHORVFRQWUROHVGHOD
VXSHUILFLHHVWpQDSDJDGRV
5HWLUHODVSDUULOODVV
7RPHORVGRVTXHPDGRUHVIURQWDOHV\
OHYiQWHORV
/LPSLHGHEDMRGHODHVWXIDFRQDJXDFDOLHQWH\
MDEyQ\XQDWHODVHFD6LUHWLUyORVTXHPDGRUHV
GXUDQWHODOLPSLH]DDVHJ~UHVHGHTXHVH
HQFXHQWUHQFRUUHFWDPHQWHSRVLFLRQDGRVDO
UHHPSOD]DUORV
/XHJRGHODOLPSLH]DEDMHODHVWXIDHYLWH
SLQFKDUVHORVGHGRV
$OJXQRVPRGHORVFXHQWDQFRQ
YDUDVGHVRSRUWHGXDOTXH
VRVWHQGUiQODHVWXIDPLHQWUDV
OLPSLDVXSDUWHLQIHULRU
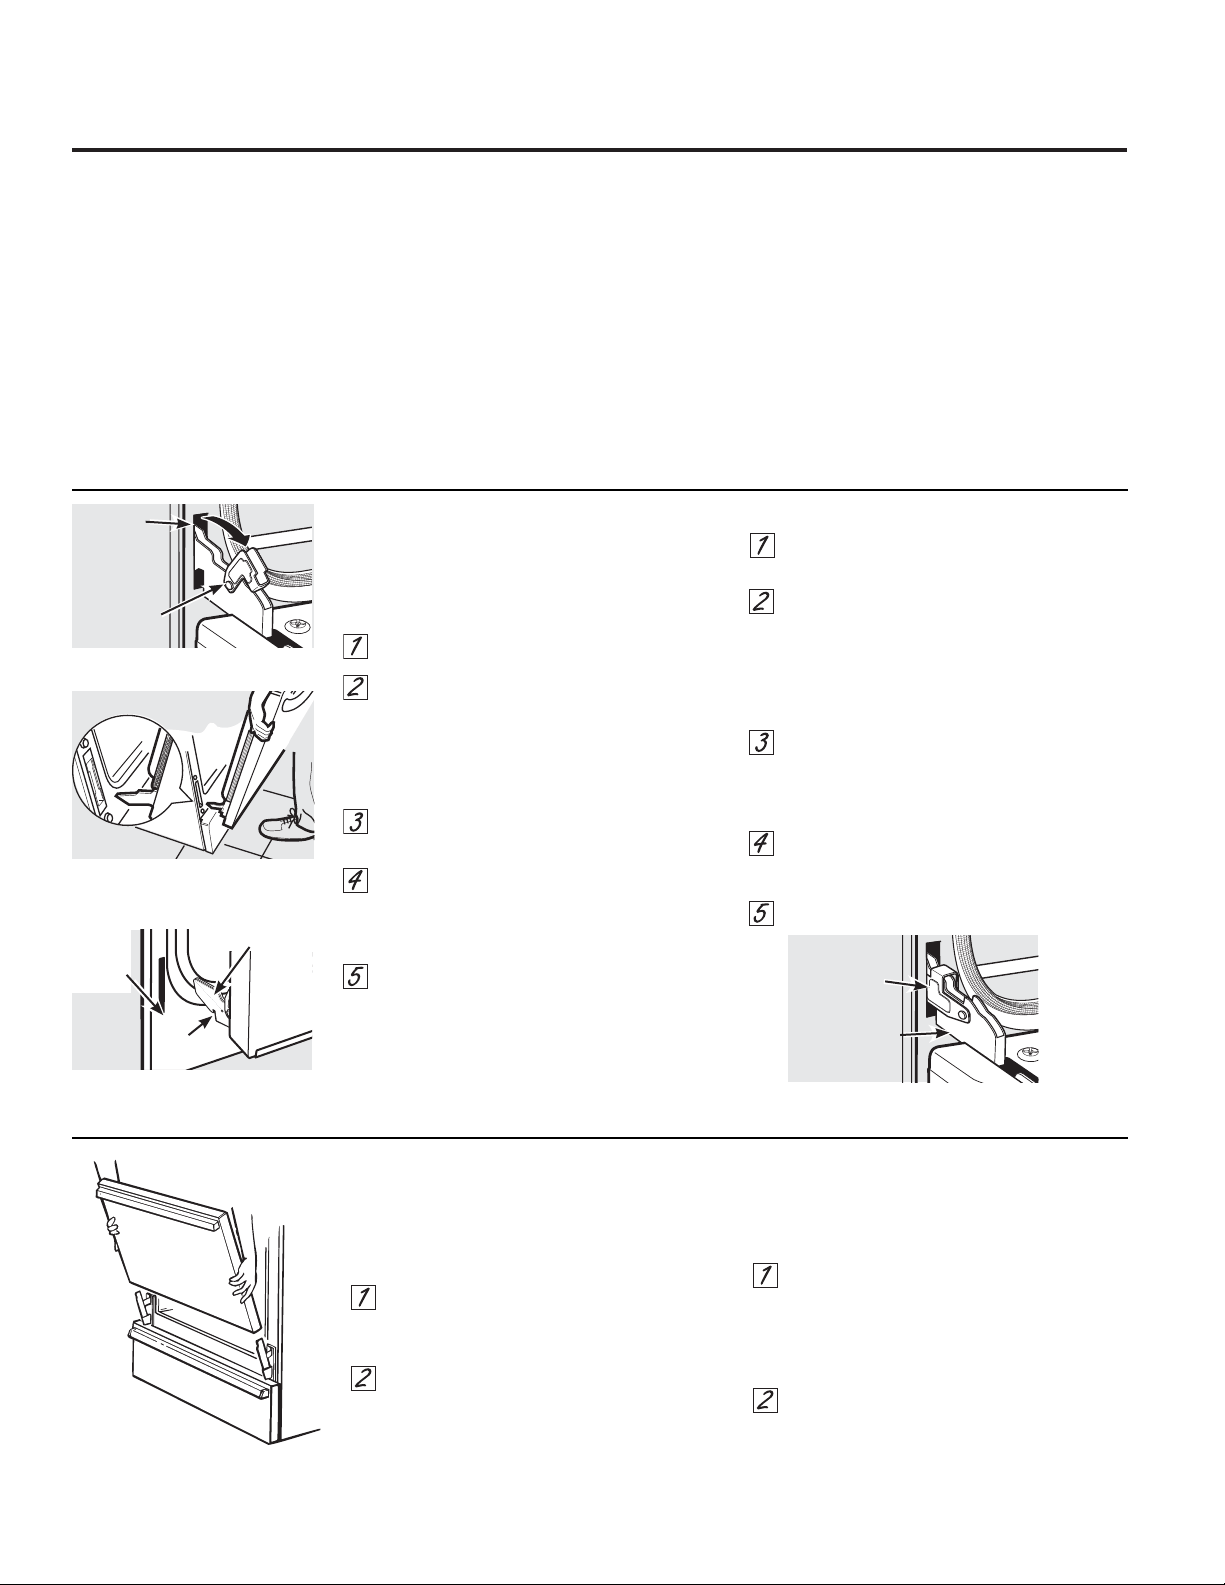
&XLGDGR\OLPSLH]DGHODFRFLQD
3DUWH,QIHULRUGHO+RUQR
/DSDUWHLQIHULRUGHOKRUQRSRVHHXQDFDEDGR
GHSRUFHODQDHVPDOWDGD3DUDIDFLOLWDUOD
OLPSLH]DSURWHMDHOIRQGRGHOKRUQRGH
GHUUDPHVH[FHVLYRVFRORFDQGRXQDKRMDGH
JDOOHWDVHQHOHVWDQWHTXHHVWiGHEDMRGHO
HVWDQWHVREUHHOFXDOHVWiFRFLQDQGR(VWR
HVSDUWLFXODUPHQWHLPSRUWDQWHDOKRUQHDU
XQDWDUWDGHIUXWDXRWUDVFRPLGDVFRQDOWR
FRQWHQLGRGHiFLGR/RVUHOOHQRVGHIUXWD
FDOLHQWHXRWUDVFRPLGDVFRQDOWRFRQWHQLGR
GHiFLGRWDOHVFRPRWRPDWHFKXFUXW\
VDOVDVFRQYLQDJUHRMXJRGHOLPyQSXHGHQ
RFDVLRQDUILVXUDV\GDxRVVREUHODVXSHUILFLH
GHSRUFHODQDHVPDOWDGD\VHGHEHUiQOLPSLDU
LQPHGLDWDPHQWH
3DUDOLPSLDUGHUUDPHVXVHDJXD\MDEyQXQ
OLPSLDGRUDEUDVLYRRXQDDOPRKDGLOODSDUD
IUHJDUOOHQDGHMDEyQ(QMXDJXHELHQSDUD
HOLPLQDUFXDOTXLHUUHVWRGHMDEyQDQWHVGHOD
IXQFLyQGHDXWROLPSLH]D
/DSXHUWDHVPX\SHVDGD7HQJDFXLGDGRDO
UHWLUDU\OHYDQWDUODSXHUWD
1ROHYDQWHODSXHUWDXVDQGRODPDQLMD
3DUDUHWLUDUODSXHUWD
$EUDODSXHUWDWRWDOPHQWH
(PSXMHORVEORTXHRVGHELVDJUDKDFLD
DEDMRHQGLUHFFLyQDODHVWUXFWXUDGHOD
SXHUWDKDVWDODSRVLFLyQGHVEORTXHDGD(V
SRVLEOHTXHQHFHVLWHXQDKHUUDPLHQWDWDO
FRPRXQGHVWRUQLOODGRUSHTXHxRGHSXQWD
SODQD
)LUPHPHQWHWRPHDPERVODGRVGHOD
SXHUWDSRUODSDUWHVXSHULRU
&LHUUHODSXHUWDKDVWDODSRVLFLyQGHUHWLUR
GHODPLVPDTXHHVWiHQODPLWDGHQWUHOD
SRVLFLyQGHGHWHQFLyQSDUDDVDU\
WRWDOPHQWHFHUUDGD
/HYDQWHODSXHUWDKDFLDDUULED\KDFLD
DIXHUDKDVWDTXHHOEUD]RGHODELVDJUD
HVWpIXHUDGHODUDQXUD
3DUDUHHPSOD]DUODSXHUWD
)LUPHPHQWHWRPHDPERVODGRVGHOD
SXHUWDSRUODSDUWHVXSHULRU
&RQODSXHUWDHQHOPLVPRiQJXORTXHHQ
ODSRVLFLyQGHUHWLURDSR\HODKHQGLGXUD
HQODUDQXUDGHODELVDJUD/DDEHUWXUDHQ
HOEUD]RGHODELVDJUDGHEHUiHVWDU
WRWDOPHQWHDSR\DGDHQODSDUWHLQIHULRUGH
ODUDQXUD
$EUDODSXHUWDWRWDOPHQWH6LODSXHUWDQR
VHDEUHWRWDOPHQWHODKHQGLGXUDQRHVWi
FRUUHFWDPHQWHDSR\DGDHQHOH[WUHPR
LQIHULRUGHODUDQXUD
(PSXMHORVEORTXHRVGHELVDJUDFRQWUDOD
HVWUXFWXUDIURQWDOGHODFDYLGDGGHOKRUQR
HQODSRVLFLyQGHEORTXHR
&LHUUHODSXHUWDGHOKRUQR
3XHUWDGHO+RUQRGHVPRQWDEOHHQDOJXQRVPRGHORV
/HYDQWHOD3XHUWDGHO+RUQRHQDOJXQRVPRGHORV
%ORTXHRGH
ODELVDJUD
3RVLFLyQGHUHWLUR
%ORTXHRGH
ODELVDJUD
(PSXMHORVEORTXHRVGHODELVDJUD
KDFLDDUULEDSDUDEORTXHDU
(PSXMHORVEORTXHRVGHELVDJUD
KDFLDDEDMRSDUDGHVEORTXHDU
+HQGLGXUD
([WUHPH
LQIHULRU
GHOD
UDQXUD
%UD]RGHODELVDJUD
5DQXUD
%UD]RGHOD
ELVDJUD
/DSXHUWDGHOKRUQRVHSXHGHUHWLUDUSHUR
HVSHVDGD(VSRVLEOHTXHQHFHVLWHD\XGD
SDUDUHWLUDU\UHHPSOD]DUODSXHUWD
3DUDUHWLUDUODSXHUWD
$EUDODPLVPDXQDVSXOJDGDVKDVWDOD
SRVLFLyQGHGHWHQFLyQHVSHFtILFDTXH
VRVWHQGUiODSXHUWDDELHUWD
6RVWHQJDODPLVPDGHPDQHUDILUPH
VREUHFDGDODGR\OHYDQWHODSXHUWDKDFLD
DUULED\DIXHUDGHODVELVDJUDV
127$$VHJ~UHVHGHQRFRORFDUODVPDQRV
HQWUHODELVDJUD\HOPDUFRGHODSXHUWD
GHOKRUQR\DTXHODELVDJUDSRGUtDKDFHU
SUHVLyQEUXVFDPHQWH\ODVWLPDUORVGHGRV
3DUDUHHPSOD]DUODSXHUWD
$VHJ~UHVHGHTXHODVELVDJUDVVHHQFXHQ
WUHQHQODSRVLFLyQGHGHWHQFLyQHVSHFt
ILFD3RVLFLRQHODVUDQXUDVHQODSDUWH
LQIHULRUGHODSXHUWDGLUHFWDPHQWHVREUH
ODVELVDJUDV
+DJDGHVFHQGHUODSXHUWDGHIRUPDOHQWD
\SDUHMDVREUHDPEDVELVDJUDVDOPLVPR
WLHPSR6LODVELVDJUDVKDFHQSUHVLyQ
EUXVFDPHQWHVREUHHOPDUFRHPSXMHODV
PLVPDVKDFLDDIXHUD
/HYDQWHODSXHUWDKDFLDDU
ULED\DIXHUDGHODVELVDJUDV
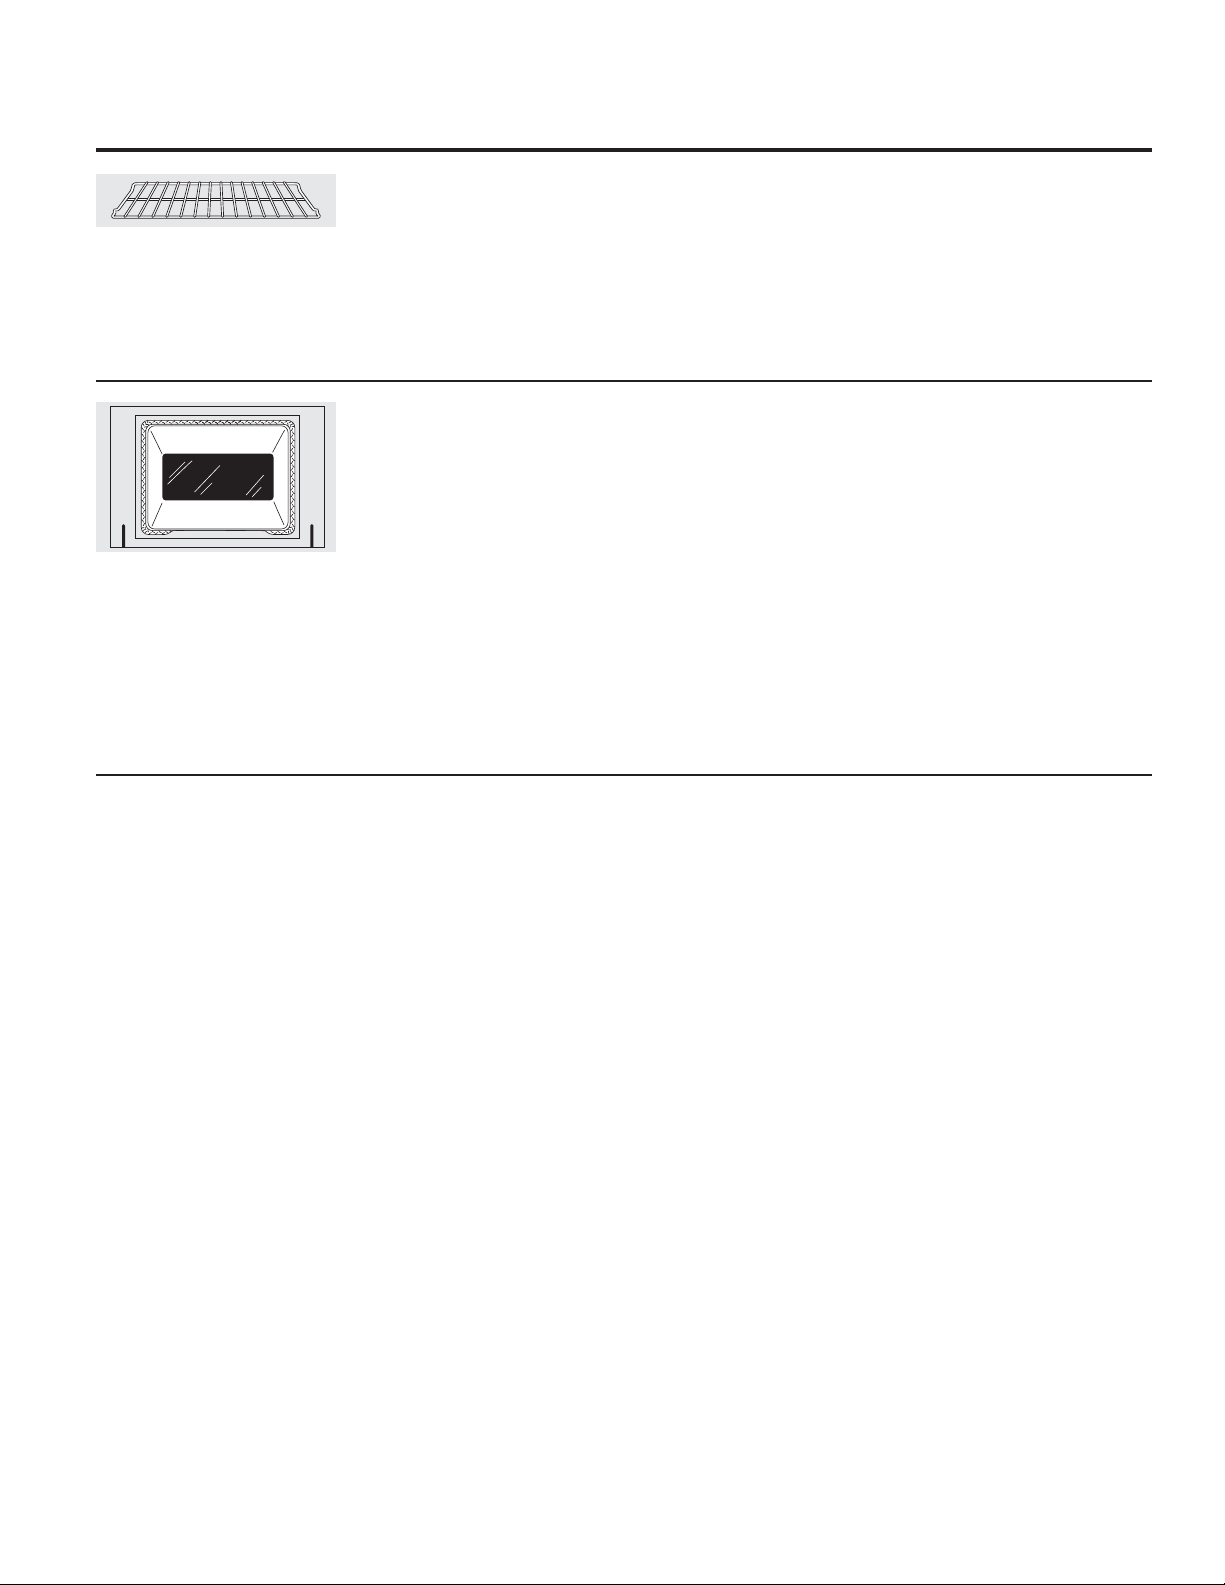
*($SSOLDQFHVFRP
(VWDQWHVGHO+RUQR
7RGDVODVSDUULOODVGHOKRUQRVHSRGUiQOLPSLDUD
PDQRFRQXQOLPSLDGRUDEUDVLYRRYLUXWD/XHJR
GHODOLPSLH]DHQMXDJXHODVSDUULOODVFRQDJXD
OLPSLD\VHTXHFRQXQDWHODOLPSLD/DVSDUULOODV
GHOKRUQRJULVHV\FXELHUWDVGHSRUFHODQD
SRGUiQSHUPDQHFHUHQHOKRUQRGXUDQWHHO
FLFORGHDXWROLPSLH]DVLQVXIULUQLQJ~QWLSRGH
GDxRV/DVSDUULOODVGHOKRUQRGHQtTXHOSRGUiQ
SHUPDQHFHUHQHOPLVPRGXUDQWHHOFLFORGH
DXWROLPSLH]DSHURSHUGHUiQVXOXVWUH\VHUi
GLItFLOGHVOL]DUODV6HUiQHFHVDULRHQJUDVDU
WRGRVORVFRVWDGRVGHODSDUULOODGHOKRUQRFRQ
XQDFDSDVXDYHGHDFHLWHYHJHWDOOXHJRGH
OLPSLDUODVDPDQRRHQHOKRUQR(VWRD\XGDUi
DTXHODVSDUULOODVVHSXHGDQGHVOL]DUFRQ
IDFLOLGDGIXHUDGHKRUQR
/LPSLH]DGHOD3XHUWD
3DUDOLPSLDUHOLQWHULRUGHODSXHUWD
■1RSHUPLWDTXHHOH[FHGHQWHGHDJXDHQWUHD
QLQJ~QDJXMHURRUDQXUDVGHODSXHUWD
■$SOLTXHGHWHUJHQWHSDUDODYDUSODWRVVREUH
FXDOTXLHUVDOSLFDGXUDTXHKD\DVREUHHO
YLGULRGHELGRDOKRUQHDGR8VHHOILORGHXQD
QDYDMDGHOODGRVHJXURSDUDGHVSHMDUOR
/XHJROLPSLHHOYLGULRFRQXQDWHODFRQMDEyQ
SDUDHOLPLQDUFXDOTXLHUUHVLGXR\VHTXH
■(OiUHDIXHUDGHODMXQWDVHSXHGHOLPSLDUFRQ
XQDDOPRKDGLOODSDUDIUHJDUGHSOiVWLFRFRQ
MDEyQ
3DUDOLPSLDUHOH[WHULRUGHODSXHUWD
■8VHDJXD\MDEyQSDUDOLPSLDU
FRPSOHWDPHQWHODSDUWHVXSHULRUORVODGRV
\HOIUHQWHGHODSXHUWDGHOKRUQR(QMXDJXH
ELHQ7DPELpQSXHGHXVDUXQOLPSLDGRU
GHYLGULRSDUDOLPSLDUHOYLGULRGHODSDUWH
H[WHULRUGHODSXHUWD
■(OGHUUDPHGHDGRERMXJRVGHIUXWD
VDOVDVGHWRPDWH\PDWHULDOHVJODVHDGRV
TXHFRQWHQJDQiFLGRVSXHGHQRFDVLRQDU
GHVFRORUDFLyQ\VHGHEHUiQOLPSLDUGH
LQPHGLDWR&XDQGRODVXSHUILFLHHVWpIUtDODYH
\HQMXDJXH
■1RXVHOLPSLDGRUHVSDUDKRUQRSROYRVGH
OLPSLH]DRDEUDVLYRVGXURVVREUHODSDUWH
H[WHULRUGHODSXHUWD
/DMXQWDHVWiGLVHxDGDFRQXQ
HVSDFLRHQODSDUWHLQIHULRUSDUD
SHUPLWLUODFLUFXODFLyQGHDLUH
DGHFXDGD
1RIURWHQLOLPSLHODMXQWDGHOD
SXHUWDSRVHHXQDUHVLVWHQFLD
H[WUHPDGDPHQWHEDMDDODDEUDVLyQ
6LREVHUYDTXHODMXQWDVHYXHOYH
FDOLHQWHVHGHVKLODFKDRGDxDGH
FXDOTXLHUIRUPD\VLTXHGyIXHUD
GHODSXHUWDGHEHUiUHHPSOD]DUOD
PLVPD
6XSHUILFLHVGH$FHUR,QR[LGDEOH
HQDOJXQRVPRGHORV
1RXVHYLUXWDVGHDFHURpVWDVGDxDUiQOD
VXSHUILFLH
(VWRD\XGDUiDPDQWHQHUHOEULOOR\HODVSHFWR
GHVXFRFLQDGHDFHURLQR[LGDEOH
■$ILQGHHYLWDUFXDOTXLHUGHVFRORUDFLyQ\R
PDQFKDVGHJUDVDUHFRPHQGDPRVOLPSLDU
\UHPRYHUFXDOTXLHUGHUUDPHPDQFKDV\
JUDVDGHODFRFLQDOXHJRGHVXXVR
■(VLPSRUWDQWHXVDUXQDWHODVXDYHRWRDOODGH
SDSHOFDGDYH]TXHVHOLPSLDODFRFLQDDILQ
GHHYLWDUUDOODGXUDV
/HDFRQFXLGDGRODVLQVWUXFFLRQHVTXH
DSDUHFHQHQHOUHYHUVRGHO5HDO]DGRUGH%ULOOR
SDUDXQPHMRUUHVXOWDGR
,QVWUXFFLRQHVGH/LPSLH]D
5HWLUHODVSDUULOODV
/DYHXVDQGRDJXDFDOLHQWH\MDEyQ
7HODK~PHGDVXDYHRWRDOODGHSDSHOHYLWH
XVDUDJXDHQH[FHVR
/LPSLHODVXSHUILFLHHQODGLUHFFLyQGHO
YHWHDGRVLJXLHQGRODVOtQHDVGHDFHUR
(QMXDJXH\HVWUXMHXQDWHODVXDYHRXQD
WRDOODGHSDSHO\VHTXHODFRFLQD
$SOLTXHXQGHVHQJUDVDQWHTXHQRFRQWHQJD
KLGUy[LGRGHVRGLRRXQOLPSLDGRUGHDFHUR
LQR[LGDEOHVLJDODVLQVWUXFFLRQHV
5HSLWDORVSDVRVDWDQWDVYHFHVFRPR
VHDQHFHVDULR
9XHOYDDFRORFDUORVHVWDQWHV
6LJDODVLQVWUXFFLRQHVSDUDFXDOTXLHUVXSHUILFLH
GHDFHURLQR[LGDEOHGHVXFRFLQD
12/286(SDUDOLPSLDUODSDUWHVXSHULRUGH
ODFRFLQDRODVSDUWHVGHDFHURLQR[LGDEOH
/HMtDFiXVWLFDKLGUy[LGRGHVRGLRR
OLPSLDGRUHVTXHFRQWHQJDQHVWHTXtPLFR
$OPRKDGLOODVGXUDVRGHHVWURSDMR
0DWHULDOHVRTXtPLFRVDEUDVLYRV
3DUDFRQVXOWDUVREUHODFRPSUDGH
OLPSLDGRUHVRSXOLGRUHVSDUDHODUWHIDFWRGH
DFHURLQR[LGDEOHRSDUDEXVFDUODXELFDFLyQ
GHOYHQGHGRUPLQRULVWDPiVFHUFDQRDVX
KRJDUFRPXQtTXHVHDOQ~PHURJUDWXLWR
&HQWUR1DFLRQDOGH3LH]DV
((88
&DQDGi
*($SSOLDQFH3DUWVFRP((88
ZZZ*($SSOLDQFHVFD&DQDGi
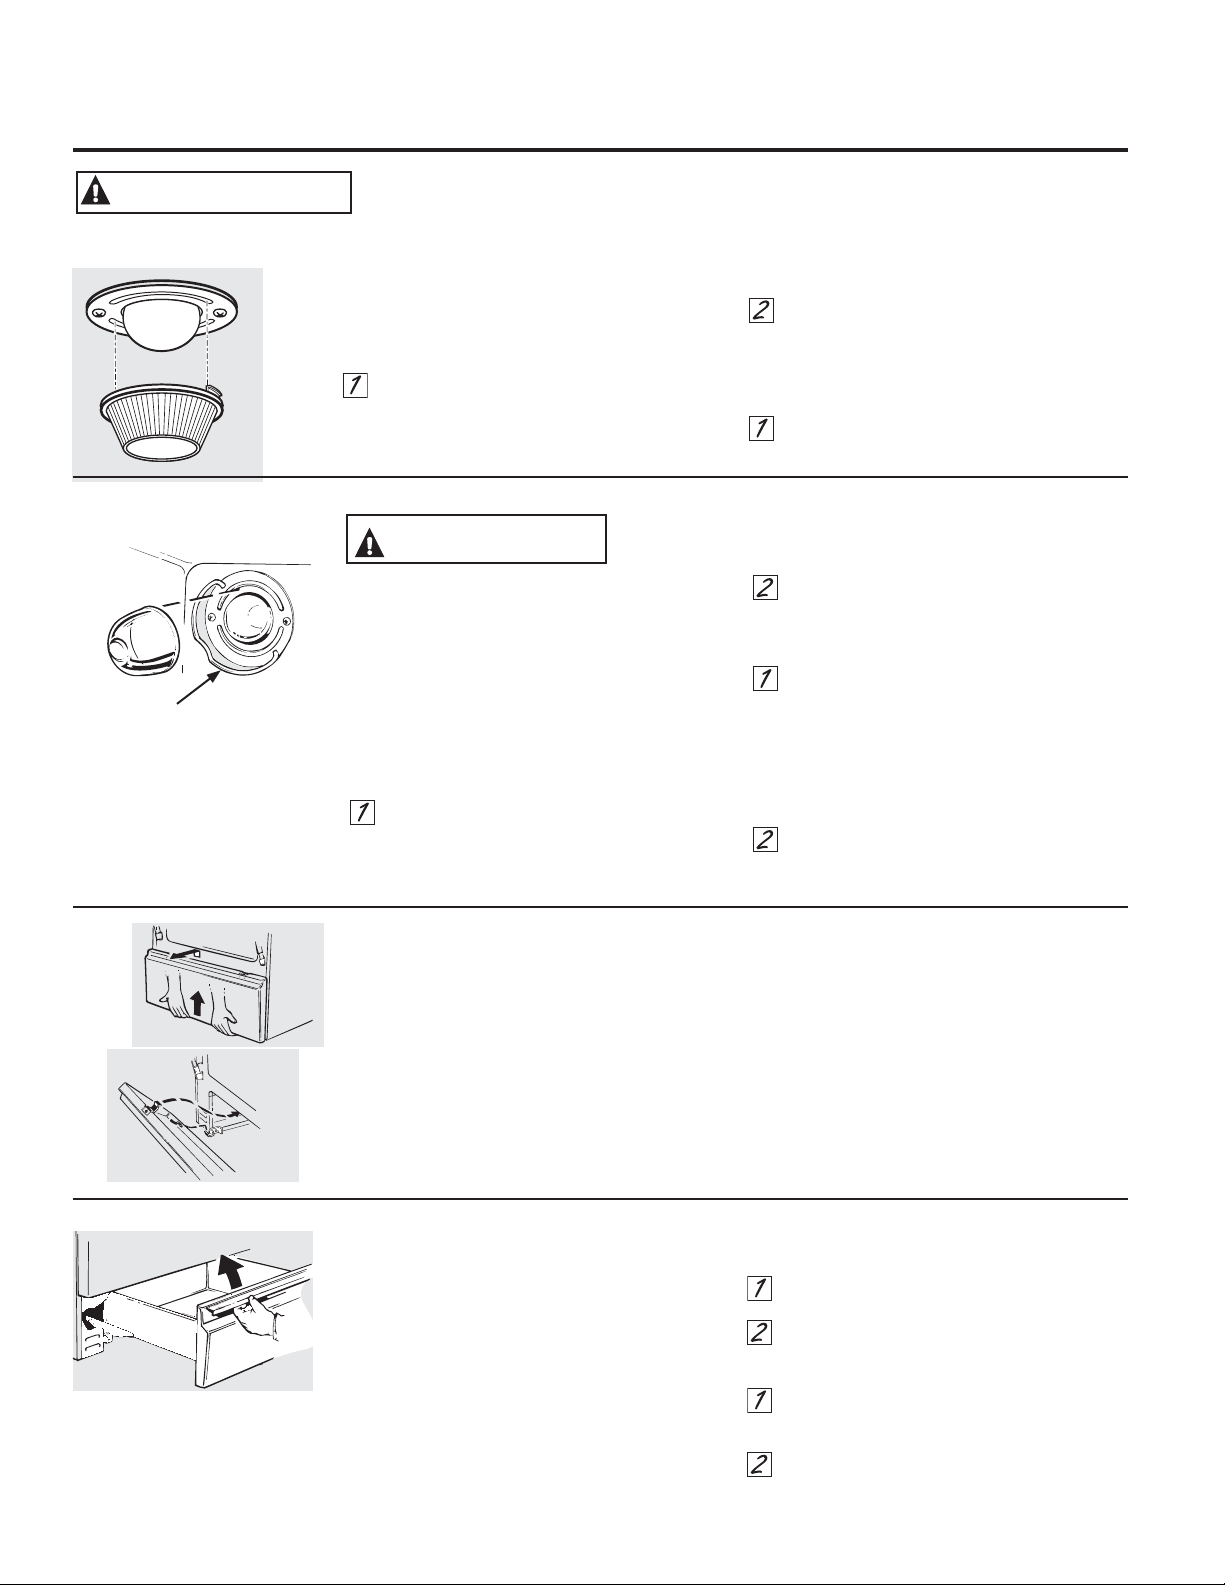
5HHPSOD]RGHOD/X]GHO+RUQRHQDOJXQRVPRGHORV
5HHPSOD]RGHOD/X]GHO+RUQRHQDOJXQRVPRGHORV
$VHJ~UHVHGHGHMDUTXHODWDSDGHODOX]\OD
OiPSDUDVHHQIUtHQFRPSOHWDPHQWH
3DUDUHWLUDUODWDSD
'REOHORVFULVWDOHVHQGLUHFFLyQFRQWUDULDD
ODVDJXMDVGHOUHORMDSUR[LPDGDPHQWHXQ
FXDUWR
1RUHWLUHQLQJ~QWRUQLOORSDUDUHWLUDUODWDSD
5HHPSODFHODOiPSDUDSRUXQDSDUD
HOHFWURGRPpVWLFRVGHZDWWVRSRUXQD
OiPSDUDGHOX]KDOyJHQDGHGRVSDWDV
VHJ~QFRUUHVSRQGD
3DUDUHHPSOD]DUODWDSD
/LQHXSWDEVRIOHQVLQIURQWRIWDEVRQ
KRXVLQJDQGURWDWHFORFNZLVHWRHQJDJH
&DMyQGH$OPDFHQDPLHQWR([WUDtEOHHQDOJXQRVPRGHORV
(OFDMyQGHDOPDFHQDPLHQWRHVXQEXHQOXJDU
SDUDJXDUGDUXWHQVLOLRVGHFRFLQD\SDQDGHUtD
1RJXDUGHSOiVWLFRVQLPDWHULDOHVLQIODPDEOHVHQ
HOFDMyQ
(OFDMyQGHDOPDFHQDPLHQWRVHSRGUiUHWLUDU
SDUDOLPSLDUGHEDMRGHODFRFLQD/LPSLHHO
FDMyQGHDOPDFHQDPLHQWRFRQXQDWHODR
HVSRQMDK~PHGD1XQFDXVHDEUDVLYRVGXURVQL
DOPRKDGLOODVSDUDIUHJDU
3DUDUHWLUDUHOFDMyQGHDOPDFHQDPLHQWR
(PSXMHHOFDMyQKDFLDDIXHUDKDVWDTXHVH
GHWHQJD
,QFOLQHHOIUHQWHGHOFDMyQKDFLDDUULED\
DIXHUDGHODFRFLQD
3DUDUHWLUDUHOFDMyQGHDOPDFHQDPLHQWR
&RQILJXUHORVSXQWRVGHGHWHQFLyQHQOD
SDUWHWUDVHUDGHOFDMyQVREUHODV
GHWHQFLRQHVHQODFRFLQD
'HVOLFHHOFDMyQGHIRUPDSDUHMD\GHUHFKR
KDFLDDWUiVGHPRGRTXHORVULHOHVGHOD
FRFLQDTXHGHQDMXVWDGRV
(OFDMyQGHDOPDFHQDPLHQWRVH
SRGUiUHWLUDUSDUDOLPSLDUGHEDMR
GHODFRFLQD
$'9(57(1&,$
5LHVJRGH'HVFDUJD(OpFWULFDR,QFHQGLR$QWHVGHUHHPSOD]DUODOiPSDUDGHOX]GHO
KRUQRGHVFRQHFWHODFRQH[LyQHOpFWULFDGHOKRUQRGHOIXVLEOHSULQFLSDORGHOSDQHOGHOGLV\XQWRU6LHVWRQRVHFXPSOHVH
SRGUiSURGXFLUXQDGHVFDUJDHOpFWULFDRLQFHQGLR
35(&$8&,Ï1
$QWHV
GHUHHPSOD]DUODOiPSDUDGHOX]GHOKRUQR
GHVFRQHFWHODFRQH[LyQHOpFWULFDGHODFRFLQD
GHOIXVLEOHSULQFLSDORGHOSDQHOGHOGLV\XQWRU
$VHJ~UHVHGHGHMDUTXHODWDSDGHODOX]\OD
OiPSDUDVHHQIUtHQFRPSOHWDPHQWH
/DOiPSDUDGHOX]GHOKRUQRHVWiFXELHUWD
SRUXQDWDSDGHYLGULRH[WUDtEOHTXHHV
VRVWHQLGDSRUXQFDEOHTXHODFUX]D5HWLUHOD
SXHUWDGHOKRUQRVLORGHVHDSDUDOOHJDUDOD
WDSDIiFLOPHQWH
3DUDUHWLUDU
6RVWHQJDXQDPDQRGHEDMRGHODWDSDGH
PRGRTXHQRVHFDLJDDOVHUOLEHUDGD&RQ
ORVGHGRVHQODPLVPDPDQRHPSXMH
ILUPHPHQWHHOVXVSHQVRUGHODWDSDGHO
FDEOH/HYDQWHODWDSD
1RUHWLUHQLQJ~QWRUQLOORSDUDUHWLUDUOD
WDSD
1RWRTXHODOiPSDUDFDOLHQWHFRQXQDWHOD
K~PHGD5HHPSODFHODOiPSDUDSRUXQDSDUD
HOHFWURGRPpVWLFRVKRJDUHxRVGHZDWWV
3DUDUHHPSOD]DUODWDSD
&RORTXHODPLVPDUDQXUDGHOUHFHSWiFXOR
GHODOX](PSXMHHOFDEOHKDFLDDGHODQWH
KDVWDHOFHQWURGHODWDSDKDVWDTXHHQWUH
HQHOOXJDUFRUUHFWR8QDYH]HQVXOXJDU
HOFDEOHVRVWLHQHODWDSDILUPHPHQWH
$VHJ~UHVHGHTXHHOFDEOHVHHQFXHQWUH
HQODKHQGLGXUDTXHHVWiHQHOFHQWURGHOD
WDSD
&RQHFWHHOFDEOHGHHOHFWULFLGDGDOD
FRFLQD
$PSOLRVXVSHQVRU
GHWDSD
&XLGDGR\OLPSLH]DGHODFRFLQD
3DQHOGH$OPDFHQDPLHQWR([WUDtEOHHQDOJXQRVPRGHORV
(OSDQHOGHDOPDFHQDPLHQWRVHSRGUiUHWLUDU
SDUDOLPSLDUGHEDMRGHODFRFLQD
3DUDUHWLUDU
/HYDQWHODSDUWHLQIHULRUGHOSDQHOVXDYHPHQWH
SDUDGHVWUDEDUHOSDQHOGHODVOHQJHWDVHQOD
EDVHGHODHVWXID(PSXMHODSDUWHLQIHULRUGHO
SDQHOKDFLDDGHODQWHKDVWDTXHORVFOLFVFRQ
UHVRUWHVHDQOLEHUDGRVHQODSDUWHVXSHULRUGHO
SDQHO
3DUDUHHPSOD]DU
,QVHUWHODVGRVUDQXUDVHQODSDUWHLQIHULRUGHO
SDQHOHQODVGRVOHQJHWDVHQODEDVHGHOD
HVWXID\SUHVLRQHODSDUWHVXSHULRUGHOSDQHO
KDFLDDGHODQWHSDUDHQJDQFKDUORVFOLFVFRQ
UHVRUWH
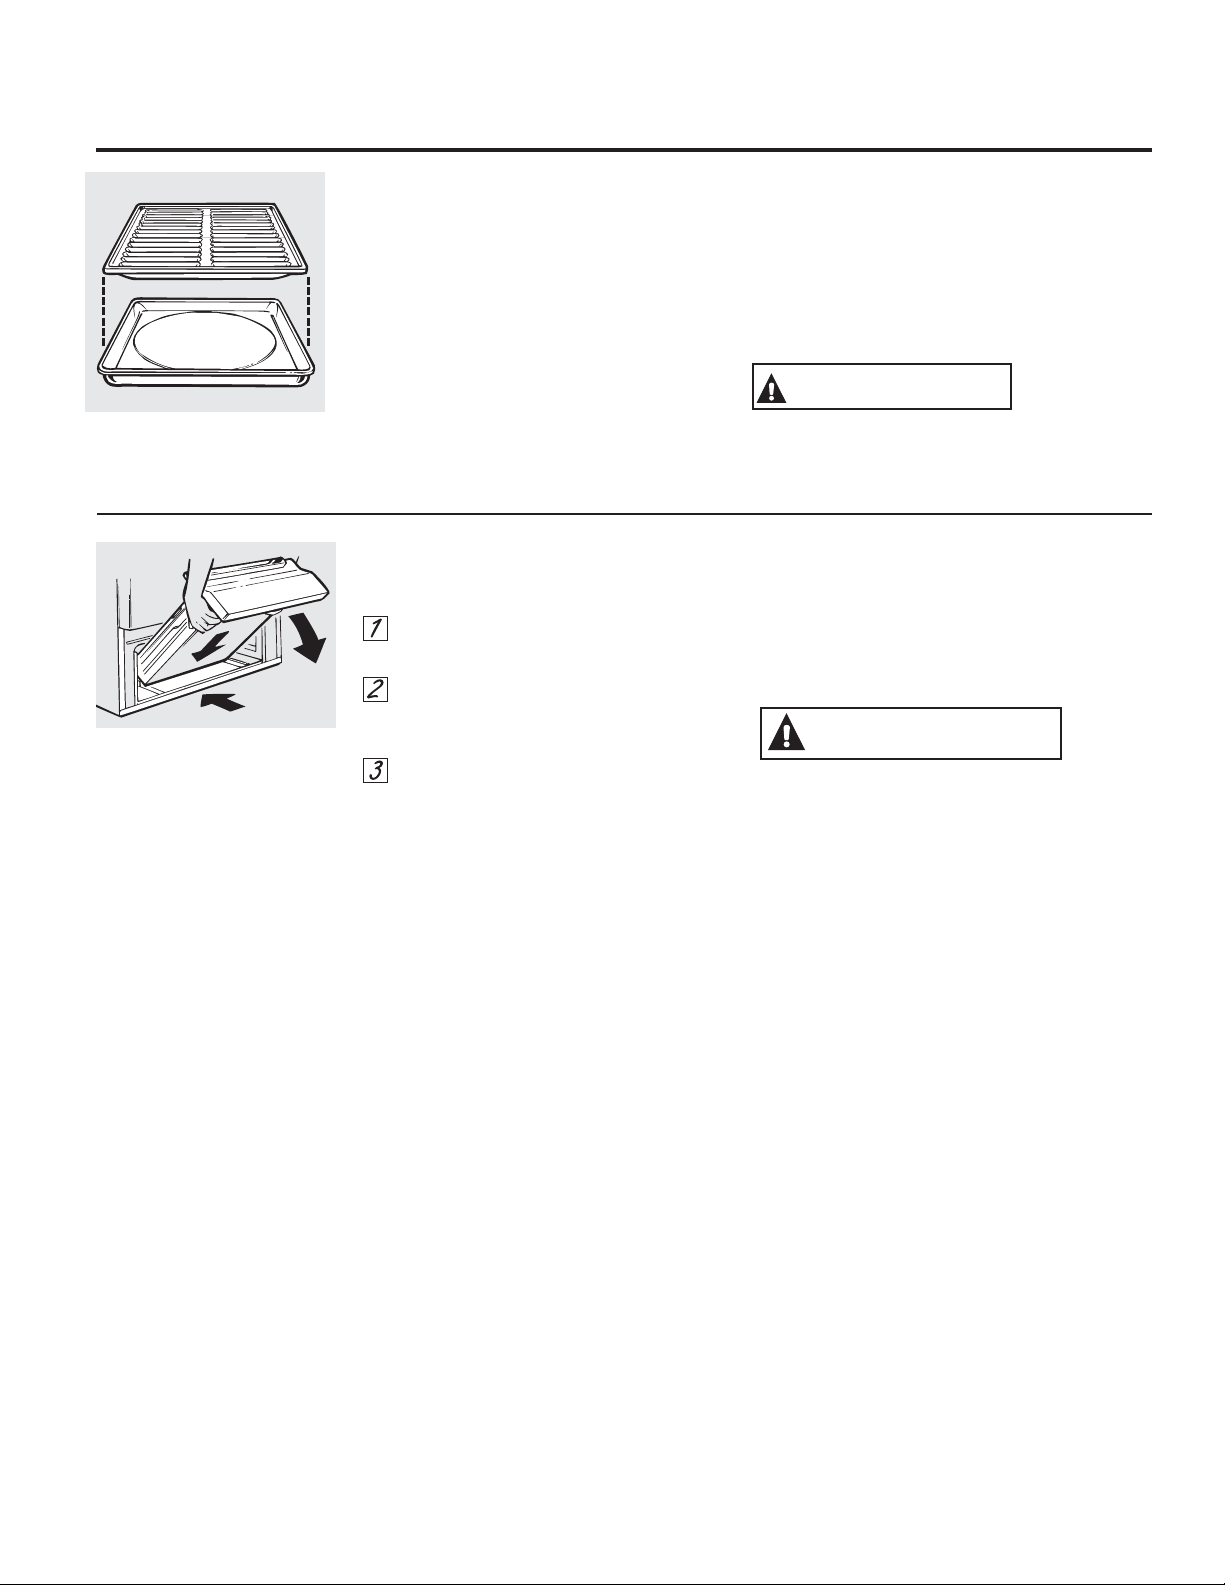
&DMyQDVDGRUH[WUDtEOHHQDOJXQRVPRGHORV
3DUDUHPRYHU
&XDQGRHODVDGRUHVWHIULRUHWLUHDUHMLOOD\
ODEDQGHMD
-DOHHOFDMyQKDFLDDIXHUDKDVWDTXHVH
GHWHQJDGHVSXpVUHJUpVHORFHUFDGHXQD
SXOJDGD
6XMHWHODMDODGHUDOHYDQWH\MDOHHOFDMyQ
KDFLDDIXHUD/LPSLHHOFDMyQFRQDJXD
FDOLHQWH\MDEyQ
3DUDUHHPSOD]DUOR
6XMHWHHOFDMyQHQODPLVPDSRVLFLyQWDOFRPR
ORUHPRYLyHQODHVWXIDGHVSXpVEDMHHOFDMyQ\
HPS~MHORKDVWDVXSRVLFLyQGHFHUUDGR
$'9(57(1&,$
5LHVJR
GHLQFHQGLR
1RJXDUGHORVXWHQVLOLRVGH
FRFLQD\SDUDKRUQHDUHQHOFDMyQGHODVDGRU
(VWRSRGUtDSURYRFDUXQLQFHQGLR
*($SSOLDQFHVFRP
%DQGHMDSDUD$VDU\5HMLOOD
/XHJRGHDVDUUHWLUHODEDQGHMDSDUDDVDUGHO
FRPSDUWLPLHQWRSDUDDVDU5HWLUHODUHMLODGH
ODEDQGHMD&RQFXLGDGRYLHUWDODJUDVDGHOD
EDQGHMDHQXQUHFLSLHQWHDGHFXDGR/DYH\
HQMXDJXHODEDQGHMDSDUDDVDU\ODSDUULOODHQ
DJXDFDOLHQWHFRQXQHVWURSDMRSDUDIUHJDU
SOiVWLFROOHQRGHMDEyQ
6LODFRPLGDVHTXHPyURFtHODUHMLOODFRQ
GHWHUJHQWHPLHQWUDVHVWiFDOLHQWH\FXEUD
FRQWRDOODVGHSDSHOPRMDGDVRFRQXQSDxR
GHFRFLQD5HPRMDUODEDQGHMDHOLPLQDUiODV
FRPLGDVTXHPDGDV
/DEDQGHMDSDUDDVDU\ODUHMLOODVHSRGUiQ
OLPSLDUFRQXQOLPSLDGRUGHKRUQRFRPHUFLDO
/DEDQGHMDSDUDDVDU\ODUHMLOODWDPELpQVH
SRGUiQOLPSLDUHQXQODYDYDMLOODV
1RJXDUGHODEDQGHMDSDUDDVDU\ODUHMLOODHQ
QLQJXQDSDUWHGHODFRFLQD
35(&$8&,Ï1
1ROLPSLHOD
EDQGHMDSDUDDVDUQLODUHMLOODHQHOKRUQRGH
DXWROLPSLH]D
5HMLOOD
%DQGHMD

5HWLUHORVHVWDQWHV\DFFHVRULRVGHOD
FDYLGDGGHOKRUQR1RFRORTXHXWHQVLOLRV
XRWURVDUWtFXORVHQHOKRUQRGXUDQWHHO
&LFORGH/LPSLH]DDO9DSRU
9LHUWDWD]DR]GHDJXDDWHPSHU
DWXUDDPELHQWHHQHOiUHDLQWHUPHGLDGHO
IRQGRGHOKRUQR1RDJUHJXHVROXFLRQHV
GHOLPSLH]DQLTXtPLFRVGHQLQJ~QWLSRDO
DJXD1RYLHUWDDJXDVREUHODVUDQXUDV
GHORVTXHPDGRUHVHQHOIRQGRGHOKRUQR
&LHUUHODSXHUWD
3UHVLRQHODWHFOD6WHDP&OHDQ/LPSLH]D
DO9DSRUOXHJRSUHVLRQH6WDUW2Q,QL
FLDU(QFHQGHU
8QFLFORGHPLQXWRVFRPHQ]DUiOD
FXHQWDUHJUHVLYDHQODSDQWDOOD
&XDQGRHOFLFOR6WHDP&OHDQ/LPSLH]D
DO9DSRUHVWiFRPSOHWRODOX]GH6WHDP
&OHDQ/LPSLH]DDO9DSRUWLWLODUi3UH
VLRQHODWHFOD&OHDU2II%RUUDU$SDJDU
\DEUDODSXHUWD
(OIRQGRGHOKRUQR\HODJXDUHVWDQWHD~Q
HVWDUiQPX\FDOLHQWHVDOILQDOGHOFLFOR
(VWRHVQRUPDO
5HWLUHODVXFLHGDGIUHJDQGRFRQXQFHSLOOR
RDOPRKDGLOODGHQ\ORQ6HSRGUiXVDU
XQDDOPRKDGLOODGHHVWURSDMRFRQMDEyQ
~QLFDPHQWHVREUHHOLQWHULRUGHOKRUQRGH
SRUFHODQD(OXVRGHDOPRKDGLOODVDEUD
VLYDVUD\DUiQODSXHUWDGHYLGULR1R
OLPSLHODVXFLHGDGQLHODJXDGHODMXQWD
GHODSXHUWD
5HWLUHHODJXDUHVWDQWHFRQXQDHVSRQMD
RWHODVHFD
'HMHODSXHUWDDELHUWDSDUDTXHVHVHTXH
FRQHODLUH
127$6,03257$17(6
6LXQFLFORGHOLPSLH]DDOYDSRUHVLQLFLDGR
VLQDJXDSUHVLRQHODWHFOD&OHDU2II%RU
UDU$SDJDUSDUDILQDOL]DUGLFKRFLFOR
(VSHUHDTXHODFRFLQDVHHQIUtHDWHPSHU
DWXUDDPELHQWHDQWHVGHYHUWHUDJXDHQHO
iUHDLQWHUPHGLDHLQLFLDURWURFLFORGHYDSRU
1RDEUDODSXHUWDGXUDQWHHOFLFOR6WHDP
&OHDQ/LPSLH]DDO9DSRU8QSLWLGRGHHU
URUVRQDUiDODEULUODSXHUWD
3UHVLRQHODWHFOD&OHDU2II%RUUDU$SDJDU
HQFXDOTXLHUPRPHQWRSDUDILQDOL]DUHOFLFOR
6LSHUPDQHFHQGHSyVLWRVPLQHUDOHVHQ
HOIRQGRGHOKRUQROXHJRGHODOLPSLH]D
XVHXQDWHODRHVSRQMDPRMDGDHQYLQDJUH
SDUDHOLPLQDUORVPLVPRV
(VSRVLEOHTXHJRWHHDOJRGHDJXDGHVGHOD
SDUWHLQIHULRUGHODSXHUWDGHOKRUQR6LHVWR
VXFHGHOLPSLHODPLVPDDOILQDOL]DUHOFLFOR
/DMXQWDGHODSXHUWDSRGUiHVWDUPRMDGD
FXDQGRHOFLFOR6WHDP&OHDQ/LPSLH]DDO
9DSRUILQDOLFH(VWRHVQRUPDO1ROLPSLHOD
MXQWD
6LD~QSHUPDQHFHVXFLHGDGOXHJRGHOD
OLPSLH]DGHOKRUQRFRQVXOWHODVHFFLyQ
GH&XLGDGR\OLPSLH]DGHOD&RFLQDHQ
HO0DQXDOGHO3URSLHWDULRSDUDRSFLRQHV
DGLFLRQDOHV
8VRGHOD/LPSLH]DDO9DSRUHQDOJXQRVPRGHORV
35(&$8&,Ï1
'XUDQWHHOFLFORGHOLPSLH]D
DOYDSRUHOIRQGRGHOKRUQRVHYXHOYHORVXILFLHQWHPHQWH
FDOLHQWHFRPRSDUDRFDVLRQDUTXHPDGXUDV(VSHUH
KDVWDTXHHOFLFORHVWpWHUPLQDGRPLQXWRVDQWHVGH
OLPSLDUODVVXSHUILFLHVLQWHULRUHVGHOKRUQR6LHVWRQRVH
FXPSOHVHSRGUiVXIULUTXHPDGXUDV
(OFLFOR6WHDP&OHDQ/LPSLH]DDO9DSRUIDFLOLWDODOLPSLH]DGH
VXFLHGDGOHYHHQHOLQWHULRUGHOKRUQRGHSRUFHODQD\VREUHOD
SXHUWDGHYLGULR
/DFRFLQDHVWDUiDWHPSHUDWXUDDPELHQWHDQWHVGH
FRPHQ]DUHOFLFOR6WHDP&OHDQ/LPSLH]DDO9DSRU6LHO
KRUQRHVWiGHPDVLDGRFDOLHQWHHQODSDQWDOODVHYLVXDOL]DUi
´+RWµ&DOLHQWH\HOFLFORQRVHDFWLYDUiKDVWDTXHHOKRUQR
VHHQIUtH
(OFLFOR6WHDP&OHDQ/LPSLH]DDO9DSRUIXQFLRQDPHMRUHQ
QXHYRVGHUUDPHVRVXFLHGDGHV/DFRPLGDTXHPDGDHVPiV
GLItFLOGHHOLPLQDU
9LHUWDWD]DGHDJXDHQHOSLVRGHO
KRUQR
3DUD&RPHQ]DUHO&LFORGH/LPSLH]DDO9DSRU
ÈUHD
,QWHUPHGLD
5DQXUDV
GHORV
4XHPDGRUHV
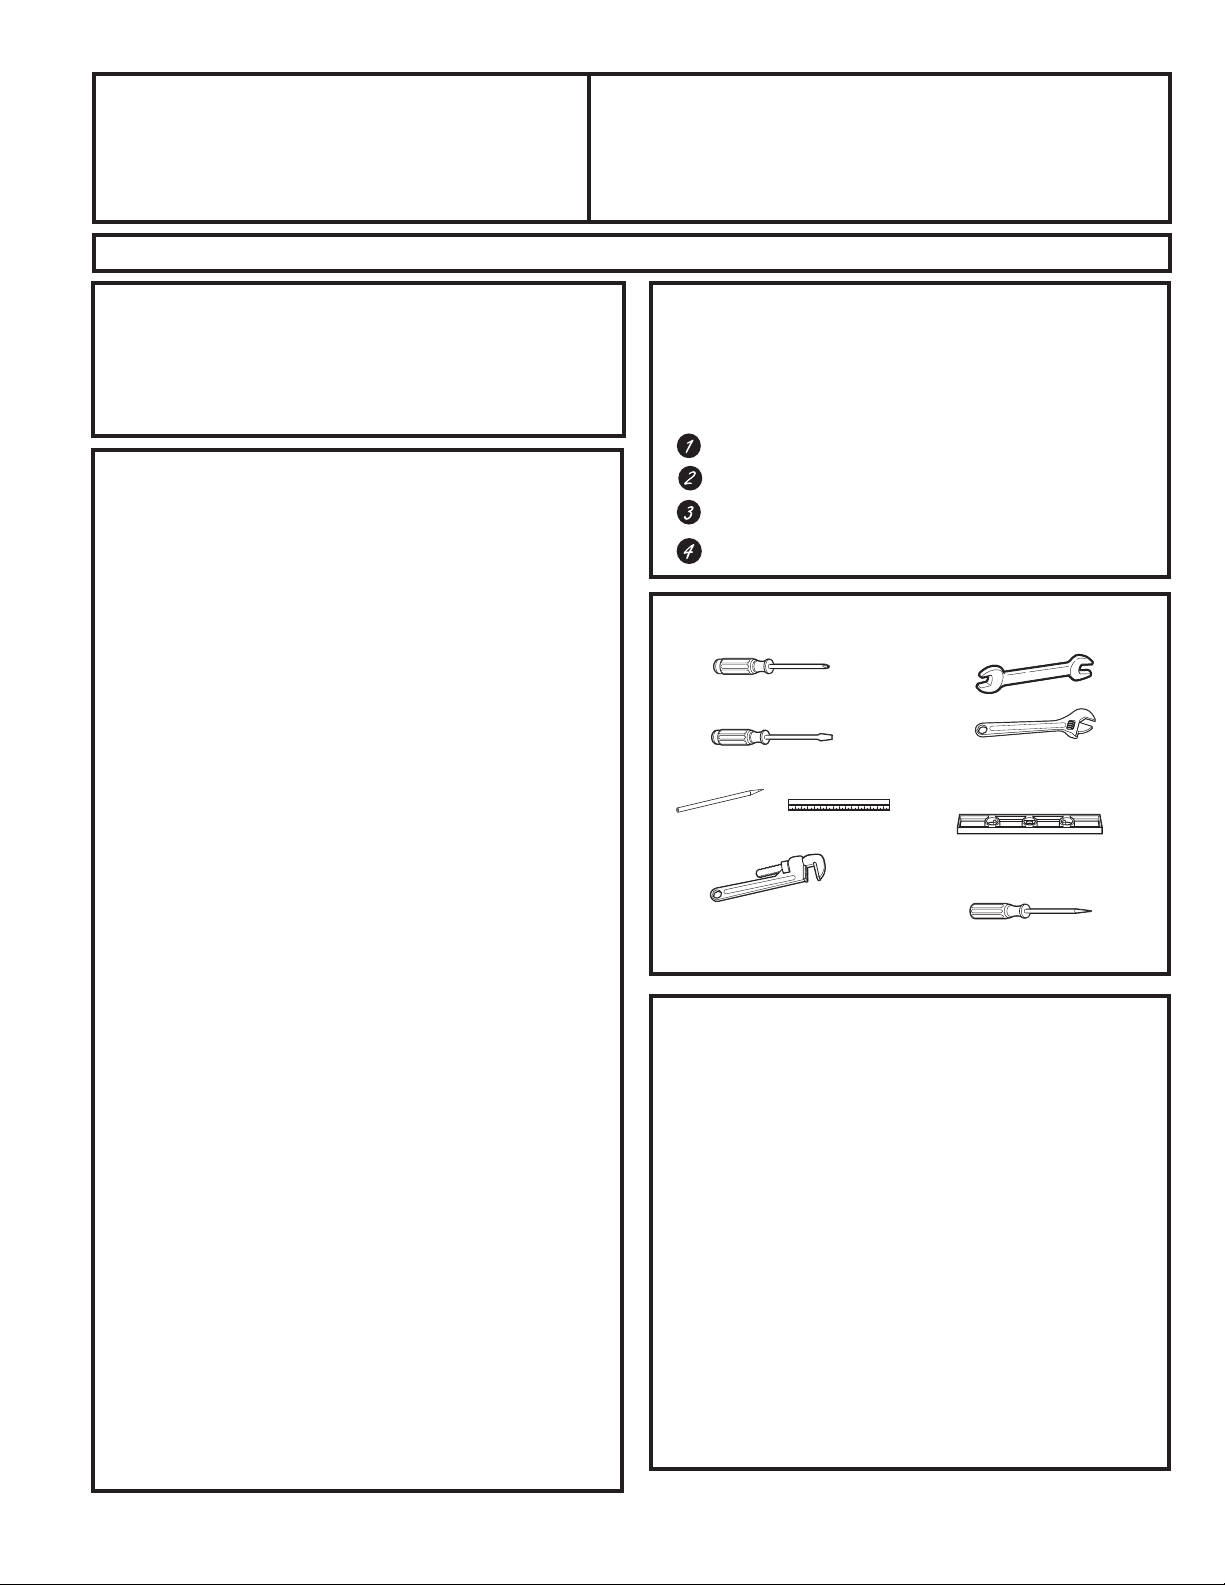
$17(6'(&20(1=$5
/HDHVWDVLQVWUXFFLRQHVHQVXWRWDOLGDG\DWHQWDPHQWH
(VWDFRFLQDVHGHEHUiLQVWDODUGHDFXHUGRFRQORVFyGLJRV
ORFDOHVRHQODDXVHQFLDGHFyGLJRVORFDOHVFRQHO&yGLJR
GH*DV&RPEXVWLEOH1DFLRQDO$16,=1)3$~OWLPD
HGLFLyQ(Q&DQDGiODLQVWDODFLyQGHEHUiVHUFRQIRUPH
FRQHO&yGLJRGH,QVWDODFLyQGH*DV1DWXUDODFWXDO&$1
&*$%RHO&yGLJRGH,QVWDODFLyQGH3URSDQRDFWXDO
&$1&*$%\FRQORVFyGLJRVORFDOHVFXDQGR
FRUUHVSRQGD(VWDFRFLQDIXHGLVHxDGD\FHUWLILFDGDSRU
&6$,QWHUQDWLRQDOGHDFXHUGRFRQ$16,=~OWLPD
HGLFLyQ\FRQOD&DQDGLDQ*DV$VVRFLDWLRQ$VRFLDFLyQGH
*DVGH&DQDGi&$1&*$~OWLPDHGLFLyQ
$OLJXDOTXHFRQFXDOTXLHUHOHFWURGRPpVWLFRTXHXWLOLFHJDV
\JHQHUHFDORUH[LVWHQFLHUWDVSUHFDXFLRQHVGHVHJXULGDG
TXHVHGHEHUiQVHJXLU(QFRQWUDUiHVWDVSUHFDXFLRQHVHQ
ODVHFFLyQGH,QIRUPDFLyQ,PSRUWDQWHGH6HJXULGDGHQHO
IUHQWHGHHVWHPDQXDO/HDODVPLVPDVGHWHQLGDPHQWH
,03257$17(²
&RQVHUYHHVWDVLQVWUXFFLRQHV
SDUDXVRGHOLQVSHFWRUGHHOHFWULFLGDGORFDO
,03257$17(²&XPSODFRQWRGRVORVFyGLJRV
\RUGHQDQ]DVJXEHUQDPHQWDOHV
1RWDSDUDHO,QVWDODGRU²*XDUGHHVWDV
LQVWUXFFLRQHVFRQHOHOHFWURGRPpVWLFRXQDYH]
FRPSOHWDGDODLQVWDODFLyQ
1RWDSDUDHO&RQVXPLGRU²*XDUGHHVWH
0DQXDOGHO3URSLHWDULR\ODV,QVWUXFFLRQHVGH,QVWDODFLyQ
SDUDUHIHUHQFLDIXWXUD
1RWD²(VWHHOHFWURGRPpVWLFRGHEHUiHVWDUFRQHFWDGRD
WLHUUDGHIRUPDDGHFXDGD
6HUYLFLR7pFQLFR²(OGLDJUDPDHOpFWULFRVH
HQFXHQWUDHQXQVREUHDGMXQWRDOUHYHUVRGHODFRFLQD
/DFRUUHFWDLQVWDODFLyQGHOSURGXFWRHVUHVSRQVDELOLGDG
GHOLQVWDODGRU
6LVHSURGXFHQIDOODVHQHOSURGXFWRGHELGRDXQD
LQVWDODFLyQLQDGHFXDGDOD*DUDQWtDQRFXEULUiODVPLVPDV
&DVD5RGDQWH²5HTXLVLWRVGH,QIRUPDFLyQ$GLFLRQDO
(VWDFRFLQDVHGHEHUiLQVWDODUFRQIRUPHFRQHO(VWiQGDUGH
&RQVWUXFFLyQ\6HJXULGDGSDUD+RJDU7tWXOR&)53LH]D
DQWHULRUPHQWH(VWiQGDU)HGHUDOSDUDODV&RQVWUXFFLRQHVHQ
&DVDV0yYLOHVXVHHOHVWiQGDUSDUDODV,QVWDODFLRQHVGH&DVDV
)DEULFDGDV$16,$1)3$$RFRQFyGLJRVORFDOHV
/DVLQVWDODFLRQHVHQFDVDVPyYLOHVUHTXLHUHQ
&XDQGRODFRFLQDHVLQVWDODGDHQXQDFDVDPyYLOVHGHEHUi
DVHJXUDUDOSLVRGXUDQWHHOWUiQVLWR&XDOTXLHUPpWRGRSDUD
DVHJXUDUODFRFLQDHVDGHFXDGRVLHPSUH\FXDQGRVHUHDOLFH
FRQIRUPHFRQORVHVWiQGDUHVTXHILJXUDQDFRQWLQXDFLyQ
,QVWUXFFLRQHV
&RFLQD
GH,QVWDODFLyQ
1RJXDUGHQLXVHPDWHULDOHVFRPEXVWLEOHVJDVROLQDX
RWURVYDSRUHVLQIODPDEOHV\OtTXLGRVFHUFDGHpVWHQL
GHRWURVHOHFWURGRPpVWLFRV
6LKXHOHJDV
$EUDODVYHQWDQDV
1RWRTXHORVHQFKXIHVHOpFWULFRV
([WLQJDFXDOTXLHUOODPDDELHUWD
,QPHGLDWDPHQWHOODPHDVXSURYHHGRUGHJDV
3$5$686(*85,'$'
(QHO&RPPRQZHDOWKGH0DVVDFKXVHWWV
(VWHSURGXFWRGHEHVHULQVWDODGRSRUXQSORPHUR
OLFHQFLDGRRXQPHFiQLFRJDVLVWD
$OXVDUYiOYXODVGHFLHUUHGHJDVWLSREDOyQGHEHUiQVHU
GHOWLSRGHPDQLMD7
$OXVDUXQFRQHFWRUGHJDVIOH[LEOHQRGHEHUiH[FHGHUORVSLHV
+(55$0,(17$61(&(6$5,$6
'HVWRUQLOODGRUFRQFDEH]DSODQD
/ODYHSDUDWXEHUtD
XQDGHUHSXHVWR
'HVWRUQLOODGRU3KLOLSV
/ODYHFRQH[WUHPR
DELHUWRRDMXVWDEOH
/iSL]\UHJOD
1LYHO
7DODGURSXQ]yQRFODYR
0$7(5,$/(61(&(6$5,26
9iOYXODGHFLHUUHSDUDWXEHUtDGHJDV
6HOODGRUSDUDMXQWDGHWXEHUtDR8/²FLQWDSDUDWXEHUtD
DSUREDGDFRQ7HIOyQUHVLVWHQWHDODDFFLyQGHJDVHV
QDWXUDOHVR/3
&RQHFWRUSDUDDUWHIDFWRPHWiOLFRIOH[LEOHµ,'
6HUHFRPLHQGDXQDORQJLWXGGHSLHVSDUDXQDIiFLO
LQVWDODFLyQSHURRWUDVORQJLWXGHVVRQDFHSWDEOHV1XQFD
XVHXQFRQHFWRUYLHMRDOLQVWDODUXQDFRFLQDQXHYD
$GDSWDGRUSDUDXQLyQFyQLFDSDUDODFRQH[LyQDO
VXPLQLVWURGHJDVµRòµ137[òµ,'
$
GDSWDGRUSDUDXQLyQFyQLFDSDUDODFRQH[LyQDO
UHJXODGRUGHSUHVLyQHQODFRFLQDµRòµ137[òµ,'
'HWHFWRUGHSpUGLGDGHOtTXLGRRDJXDFRQMDEyQ
7RUQLOORGHFRPSUHVLyQRVXMHWDGRUGHPDQJDGHòµ
2'VyORSDUDSLVRVGHFRQFUHWR
7HIOyQ0DUFDUHJLVWUDGDSRU'X3RQW
$QWHFXDOTXLHUGXGDOODPHDO*(&$5(6RYLVLWHQXHVWURVLWLRZHEHQ*($SSOLDQFHVFRP

,QVWUXFFLRQHVGH,QVWDODFLyQ
$'9(57(1&,$
,16758&&,21(63$5$81$
,167$/$&,Ï16(*85$
/HDHVWDVLQVWUXFFLRQHVHQVXWRWDOLGDG\
DWHQWDPHQWH6LQRVHVLJXHQHVWDVLQVWUXFFLRQHVVH
SRGUiSURGXFLUGHVFDUJDHOpFWULFDLQFHQGLROHVLRQHV
JUDYHVRODPXHUWH
8QDLQVWDODFLyQDMXVWHDOWHUDFLyQVHUYLFLRR
PDQWHQLPLHQWRLQDGHFXDGRVSXHGHQRFDVLRQDU
OHVLRQHVRGDxRVVREUHODSURSLHGDG&RQVXOWH
HVWHPDQXDO3DUDUHFLELUDVLVWHQFLDRLQIRUPDFLyQ
DGLFLRQDOFRQVXOWHDXQLQVWDODGRUFDOLILFDGRDJHQFLD
GHVHUYLFLRIDEULFDQWHFRPHUFLDQWHRSURYHHGRUGH
JDV
1XQFDYXHOYDDXVDUFRQHFWRUHVIOH[LEOHVYLHMRV
(OXVRGHFRQHFWRUHVIOH[LEOHVYLHMRVSXHGH
RFDVLRQDUJRWHUDV\OHVLRQHVSHUVRQDOHV6LHPSUH
XVHFRQHFWRUHVIOH[LEOHV18(926DOLQVWDODU
HOHFWURGRPpVWLFRVDJDV
/DSUXHEDGHJRWHUDVGHOHOHFWURGRPpVWLFRVH
GHEHUiUHDOL]DUGHDFXHUGRFRQODVLQVWUXFFLRQHVGHO
IDEULFDQWH
5HWLUHWRGRHOPDWHULDOGHHPEDODMH\PDWHULDOHVFULWR
GHOKRUQRDQWHVGHFRQHFWDUHOJDV\HOVXPLQLVWURGH
FRUULHQWHDODFRFLQD
1RLQWHQWHXWLOL]DUHOKRUQRGHHVWDFRFLQDGXUDQWH
XQFRUWHGHFRUULHQWHVyORHQPRGHORVGHHQFHQGLGR
HOpFWULFR
6ROLFLWHTXHVXFRFLQDVHDLQVWDODGDSRUXQLQVWDODGRU
FDOLILFDGR
6XFRFLQDGHEHUiHVWDUFRUUHFWDPHQWHFRQHFWDGD
DWLHUUDGHDFXHUGRFRQORVFyGLJRV\RUGHQDQ]DV
ORFDOHVRHQDXVHQFLDGHFyGLJRVORFDOHVGHDFXHUGR
FRQHO&yGLJR1DFLRQDOGH(OHFWULFLGDG1DWLRQDO
(OHFWULF&RGH$16,1)3$12~OWLPDHGLFLyQ
(Q&DQDGiODFRQH[LyQDWLHUUDVHGHEHUiUHDOL]DUGH
DFXHUGRFRQOD3DUWHGHO&yGLJRGH(OHFWULFLGDGGH
&DQDGi&6$&\RORVFyGLJRVORFDOHV(QHVWD
VHFFLyQFRQVXOWHODV&RQH[LRQHV(OpFWULFDV
$QWHVGHLQVWDODUVXFRFLQDVREUHOLQyOHR\FXDOTXLHU
RWURUHYHVWLPLHQWRGHSLVRVLQWpWLFRDVHJ~UHVHGH
TXHHOUHYHVWLPLHQWRGHOSLVRUHVLVWDORV)VLQ
FRQWUDHUVHFRPEDUVHRGHVFRORUDUVH1RLQVWDOHOD
FRFLQDVREUHDOIRPEUDVDPHQRVTXHKD\DXQDKRMD
GHFRQWUDFKDSDGRGHXQJURVRUGHóµRXQDLVODQWH
VLPLODUHQWUHODFRFLQD\ODDOIRPEUD
$VHJ~UHVHGHTXHORVJDELQHWHVHOSLVR\ORV
UHYHVWLPLHQWRVGHSDUHGDOUHGHGRUGHODFRFLQD
SXHGDQUHVLVWLUHOFDORUGHKDVWD)JHQHUDGRSRU
ODFRFLQD
(YLWHXVDUJDELQHWHVVREUHODFRFLQD3DUDUHGXFLU
HOULHVJRRFDVLRQDGRSRUODH[WHQVLyQGHODVOODPDV
DELHUWDVGHORVTXHPDGRUHVHQIXQFLRQDPLHQWR
LQVWDOHXQDFDPSDQDGHYHQWLODFLyQVREUHODFRFLQD
TXHVHSUR\HFWHKDFLDDGHODQWHSRUORPHQRVDµGHO
IUHQWHGHORVJDELQHWHV
/DFDPSDQDGHYHQWLODFLyQGHEHUiHVWDUFRQVWUXLGD
GHXQDOiPLQDGHPHWDOGHQRPHQRVGHµGH
JURVRU,QVWDOHVREUHODSDUWHVXSHULRUGHODFRFLQD
GHMDQGRXQHVSDFLRGHQRPHQRVGHóµHQWUHOD
FDPSDQD\ODSDUWHLQIHULRUGHOJDELQHWHGHPDWHULDO
FRPEXVWLEOHRPHWDO/DFDPSDQDGHEHUiVHUSRU
ORPHQRVWDQDQFKDFRPRHOHOHFWURGRPpVWLFR\
HVWDUFHQWUDGDVREUHHOPLVPR(OGHVSHMHHQWUHOD
VXSHUILFLHGHFRFFLyQ\ODVXSHUILFLHGHODFDPSDQD
GHYHQWLODFLyQ181&$'(%(6(5,1)(5,25$µ
(;&(3&,Ï1/DLQVWDODFLyQGHXQKRUQRPLFURRQGDV
RHOHFWURGRPpVWLFRGHFRFFLyQTXHILJXUHQHQODOLVWD
VREUHODSDUWHVXSHULRUGHODFRFLQDGHEHUiFXPSOLU
FRQODVLQVWUXFFLRQHVGHLQVWDODFLyQSURYLVWDVFRQHO
HOHFWURGRPpVWLFR
6LVHXELFDQJDELQHWHVVREUHODFRFLQDGHMHXQ
HVSDFLRPtQLPRGHµHQWUHODVXSHUILFLHGHFRFFLyQ
\ODSDUWHLQIHULRUGHORVJDELQHWHVGHVSURWHJLGRV
6LQRVHSXHGHPDQWHQHUXQDGLVWDQFLDGHµHQWUH
ODVXSHUILFLHGHFRFFLyQ\HOPDWHULDOFRPEXVWLEOHHQ
ODSDUWHVXSHULRURORVJDELQHWHVGHPHWDOSURWHMDOD
SDUWHLQIHULRUGHORVJDELQHWHVVREUHODSDUWHVXSHULRU
GHODFRFLQDFRQQRPHQRVGHµGHFDUWXOLQD
FRP~QDLVODQWHFXELHUWDFRQXQDOiPLQDGHPHWDO
GHQRPHQRVGHµGHJURVRU(OGHVSHMHHQWUH
ODVXSHUILFLHGHFRFFLyQ\ORVJDELQHWHVSURWHJLGRV
181&$'(%(6(5,1)(5,25$µ
/DGLVWDQFLDYHUWLFDOGHVGHHOSODQRGHODVXSHUILFLH
GHFRFFLyQKDVWDODSDUWHLQIHULRUGHORVJDELQHWHV
DG\DFHQWHVGHODSDUWHVXSHULRUTXHVHH[WLHQGHQ
PiVFHUFDTXHµDOSODQRGHORVODGRVGHOD
FRFLQDQRGHEHUiVHULQIHULRUDODVµ&RQVXOWH
ODLOXVWUDFLyQGH'LPHQVLRQHV\(VSDFLRVHQHVWD
VHFFLyQ
1RLQVWDOHHVWHSURGXFWRFRQXQDFDPSDQDFRQFRUWLQD
GHDLUHXRWUDFDPSDQDGHFRFLQDTXHIXQFLRQHOOHYDQGR
DLUHDODSODFDGHFRFFLyQ(OIOXMRGHDLUHSRGUiLQWHUIHULU
HQHOIXQFLRQDPLHQWRGHORVTXHPDGRUHVGHJDV
SURGXFLHQGRULHVJRVGHLQFHQGLRRH[SORVLyQ
35(&$8&,Ï16yORODVHULHGHPDUFD
GH&DIp$GYDQWLXPGH*(RORVKRUQRVPLFURRQGDVGH
FDOLGDGH[FHSFLRQDOHVWiQGLVHxDGRVSDUDVXLQVWDODFLyQ
VREUHHOKRUQR&DIpGH*((VSRVLEOHTXHODVVXSHUILFLHV
VREUHXQDFRFLQDDJDVVHFDOLHQWHQ/DLQVWDODFLyQGH
FXDOTXLHURWURKRUQRH[FHSFLRQDOVREUHXQKRUQR&DIpGH
*(SXHGHSURGXFLUWHPSHUDWXUDVVXSHUILFLDOHVTXHSXHGHQ
RFDVLRQDUTXHPDGXUDV

3DUDJDELQHWHV
GHEDMRGHODSDUWH
VXSHULRUGHODFRFLQD
\ODSDUWHWUDVHUDGH
ODFRFLQD
3DUD
JDELQHWHV
GHEDMRGHOD
SDUWHVXSHULRU
GHODFRFLQD
\ODSDUWH
WUDVHUDGHOD
FRFLQD
µ
µ
0tQLPR
µ
3URIXQGLGDG
PtQLPDSDUD
JDELQHWHVVREUH
PRVWUDGRUHV
([WUHPR
IURQWDOGHO
SDQHOODWHUDO
GHODFRFLQD
DGHODQWHGHO
JDELQHWH
µ
µ
µ
0tQLPRSDUD
JDELQHWHVHQ
FDGDODGRGH
ODSDUULOOD
µ
µ
3URIXQGLGDGFRQODSXHUWDFHUUDGD
LQFOX\HODPDQLMDGHODSXHUWD
/DSURIXQGLGDGYDUtDGHSHQGLHQGR
GHOPRGHOR&RQVXOWHODKRMDGH
HVSHFLILFDFLRQHVGHVXPRGHOR
µ
µ
µ
µ
µ
3URIXQGLGDGFRQODSXHUWD
DELHUWD
µ
$OWXUD
,QVWUXFFLRQHVGH,QVWDODFLyQ
'HMHHOHVSDFLRDGHFXDGRHQWUHODFRFLQD\ODVVXSHUILFLHVFRPEXVWLEOHVDG\DFHQWHV(VWDVGLPHQVLRQHVVHGHEHUiQ
FXPSOLUSDUDXQXVRVHJXURGHVXFRFLQD/DXELFDFLyQGHOWRPDFRUULHQWHGHHOHFWULFLGDG\ODDEHUWXUDGHODWXEHUtD
FRQVXOWH8ELFDFLRQHVGHO*DV\HO7RPDFRUULHQWH(OpFWULFRVHSRGUiQDMXVWDUSDUDFXPSOLUFRQORVUHTXLVLWRV
HVSHFtILFRV
/DFRFLQDVHGHEHUiXELFDUFRQXQHVSDFLRQLYHODGRGHµFRQUHODFLyQDODSDUHGWUDVHUD
3DUDODLQVWDODFLyQGHODLVOD0RGHOR-*66GHMHXQHVSDFLRPtQLPRGHòµHQWUHODDEHUWXUD\HOH[WUHPR
WUDVHURGHODPHVDGD\XQPtQLPRGHµHQWUHODDEHUWXUD\ORVH[WUHPRVODWHUDOHVGHODPHVDGD
',0(16,21(6<(63$&,26
µ
µ
µ
µ
KDVWDODSDUHGHQFDGDODGRHQ
PRGHORVFRQTXHPDGRUHVHVWiQGDU
KDVWDODSDUHGHQFDGDODGRHQ
PRGHORVFRQTXHPDGRUHVVHOODGRV
$OWXUD
0RGHOR
µ -*66
µ -*%6
-*%6
µ 5*%
3XHUWDGHYLGULR
3RUFHODLQGRRU

,QVWUXFFLRQHVGH,QVWDODFLyQ
8%,&$&,Ï1
1RXELTXHODFRFLQDGRQGHSXHGDKDEHUFRUULHQWHVGH
DLUHIXHUWHV&XDOTXLHUDEHUWXUDHQHOSLVRRODSDUHG
GHWUiVGHODFRFLQDGHEHUiQHVWDUVHOODGDV$VHJ~UHVH
GHTXHODVDEHUWXUDVDOUHGHGRUGHODEDVHGHOD
FRFLQDTXHEULQGDQDLUHIUHVFRSDUDODFRPEXVWLyQ
\YHQWLODFLyQQRHVWpQREVWUXLGDVSRUDOIRPEUDVQL
SLH]DVGHFDUSLQWHUtD
6XFRFLQDDOLJXDOTXHPXFKRVRWURVDUWtFXORVGHOKRJDU
HVSHVDGD\VHSXHGHFRORFDUVREUHUHYHVWLPLHQWRVGH
SLVRVXDYHVWDOHVFRPRDOIRPEUDVRYLQLORDFROFKRQDGR
7HQJDFXLGDGRDOPRYHUODSDULOODHQHVWHWLSRGHSLVRV
6HUHFRPLHQGDTXHVHVLJDQODVVLJXLHQWHVLQVWUXFFLRQHV
VLPSOHV\HFRQyPLFDVSDUDSURWHJHUVXSLVR
/DFRFLQDVHGHEHUtDLQVWDODUVREUHXQDOiPLQDGH
PDGHUDFRQWUDFKDSDGDRPDWHULDOVLPLODU&XDQGR
HOUHYHVWLPLHQWRGHOSLVRILQDOL]DIUHQWHDODFRFLQD
HOiUHDGRQGHODFRFLQDVHDSR\DUiGHEHUiVHUGH
FRQWUDFKDSDGRDOPLVPRQLYHORPiVDOWRTXHHO
UHYHVWLPLHQWRGHOSLVR
(VWRSHUPLWLUiTXHODFRFLQDSXHGDVHUPRYLGDSDUDVX
OLPSLH]DRUHSDUDFLRQHVWpFQLFDV$GHPiVDVHJ~UHVH
GHTXHHOUHYHVWLPLHQWRGHVXSLVRUHVLVWDORV
)&RQVXOWHODVHFFLyQGH,QVWUXFFLRQHVSDUDXQD
,QVWDODFLyQ6HJXUD
$VHJ~UHVHGHTXHHOUHYHVWLPLHQWRGHSDUHGDOUHGHGRU
GHODFRFLQDSXHGDUHVLVWLUHOFDORUGHKDVWD
)JHQHUDGRSRUODFRFLQD&RQVXOWHODVHFFLyQGH
,QVWUXFFLRQHVSDUDXQD,QVWDODFLyQ6HJXUD
£,03257$17(
5HPRYHDOOWDSHDQGSDFNDJLQJ0DNHVXUHWKHEXUQHUV
DUHSURSHUO\VHDWHGDQGOHYHO
7DNHWKHDFFHVVRU\SDFNRXWRIWKHRYHQDQGRUGUDZHU
&KHFNWREHVXUHWKDWQRUDQJHSDUWVKDYHFRPHORRVH
GXULQJVKLSSLQJ
&219(57,5$*$6/3
RFRQYHUWLU
QXHYDPHQWHDJDVQDWXUDOGH/3
(VWDFRFLQDGHMDODFRQILJXUDFLyQGHIiEULFDSDUD
XVRFRQJDVQDWXUDO6LGHVHDFRQYHUWLUDJDV/3OD
FRQYHUVLyQGHEHUiVHUUHDOL]DGDSRUXQLQVWDODGRUGH
JDV/3FDOLILFDGR
/DVLQVWUXFFLRQHVGHFRQYHUVLyQ\ORVRULILFLRV/3
VHSXHGHQHQFRQWUDUDGMXQWRVDODFRFLQDMXQWRDO
UHJXODGRUGHSUHVLyQ
*XDUGHHVWDVLQVWUXFFLRQHV\ORVRULILFLRVHQFDVRGH
TXHORGHVHHFRQYHUWLUQXHYDPHQWHDJDVQDWXUDO
6XFRFLQDIXHGLVHxDGDSDUDIXQFLRQDUFRQXQDSUHVLyQ
GHOFROHFWRUGHµVREUHXQDFROXPQDGHDJXDDJDV
QDWXUDORVLVHGHVHDXVDUFRQJDV/3SURSDQR\EXWDQR
XQDFROXPQDGHDJXDGHµ
$VHJ~UHVHGHTXHHVWpVXPLQLVWUDQGRDVXFRFLQDHOWLSR
GHJDVSDUDHOFXDOIXHGLVHxDGD
(VWDFRFLQDHVFRQYHUWLEOHSDUDXVRFRQJDVQDWXUDOR
JDVSURSDQR6LGHFLGHXVDUHVWDFRFLQDFRQJDV/3XQ
LQVWDODGRUGH/3FDOLILFDGRGHEHUiUHDOL]DUODFRQYHUVLyQ
DQWHVGHLQWHQWDUXWLOL]DUODFRFLQDFRQGLFKRJDV
3DUDXQDLQVWDODFLyQDGHFXDGDODSUHVLyQGHOJDVQDWXUDO
VXPLQLVWUDGRDOUHJXODGRUGHEHUiVHUGHXQDFROXPQDGH
DJXDGHHQWUHµ\µ
3DUDHOJDV/3ODSUHVLyQVXPLQLVWUDGDGHEHUiVHUGHXQD
FROXPQDGHDJXDGHHQWUHµ\µ
$OFRQWURODUHOIXQFLRQDPLHQWRDGHFXDGRGHOUHJXODGRUOD
SUHVLyQGHHQWUDGDGHEHUiVHUSRUORPHQRVµPD\RUTXH
ODSUHVLyQGHIXQFLRQDPLHQWRWXERFRPRVHLQGLFDPiV
DUULED
(OUHJXODGRUGHSUHVLyQXELFDGRHQODHQWUDGDGHOWXERGH
ODFRFLQDGHEHUiSHUPDQHFHUHQODOtQHDGHVXPLQLVWUR
PiVDOOiGHVLHOJDVQDWXUDOR/3HVWiVLHQGRXVDGR
8QFRQHFWRUGHPHWDOIOH[LEOHGHOHOHFWURGRPpVWLFR
XVDGRSDUDFRQHFWDUODFRFLQDDOVXPLQLVWURGHJDV
GHEHUtDWHQHUXQ,'GHòµ\SLHVGHORQJLWXGSDUDXQD
LQVWDODFLyQPiVIiFLO(Q&DQDGiORVFRQHFWRUHVIOH[LEOHV
GHEHUiQVHUFRQHFWRUHVPHWiOLFRVGHSDUHGVLPSOHVGH
QRPiVGHSLHVGHORQJLWXG
%5,1'((/680,1,6752'(*$6
$'(&8$'2
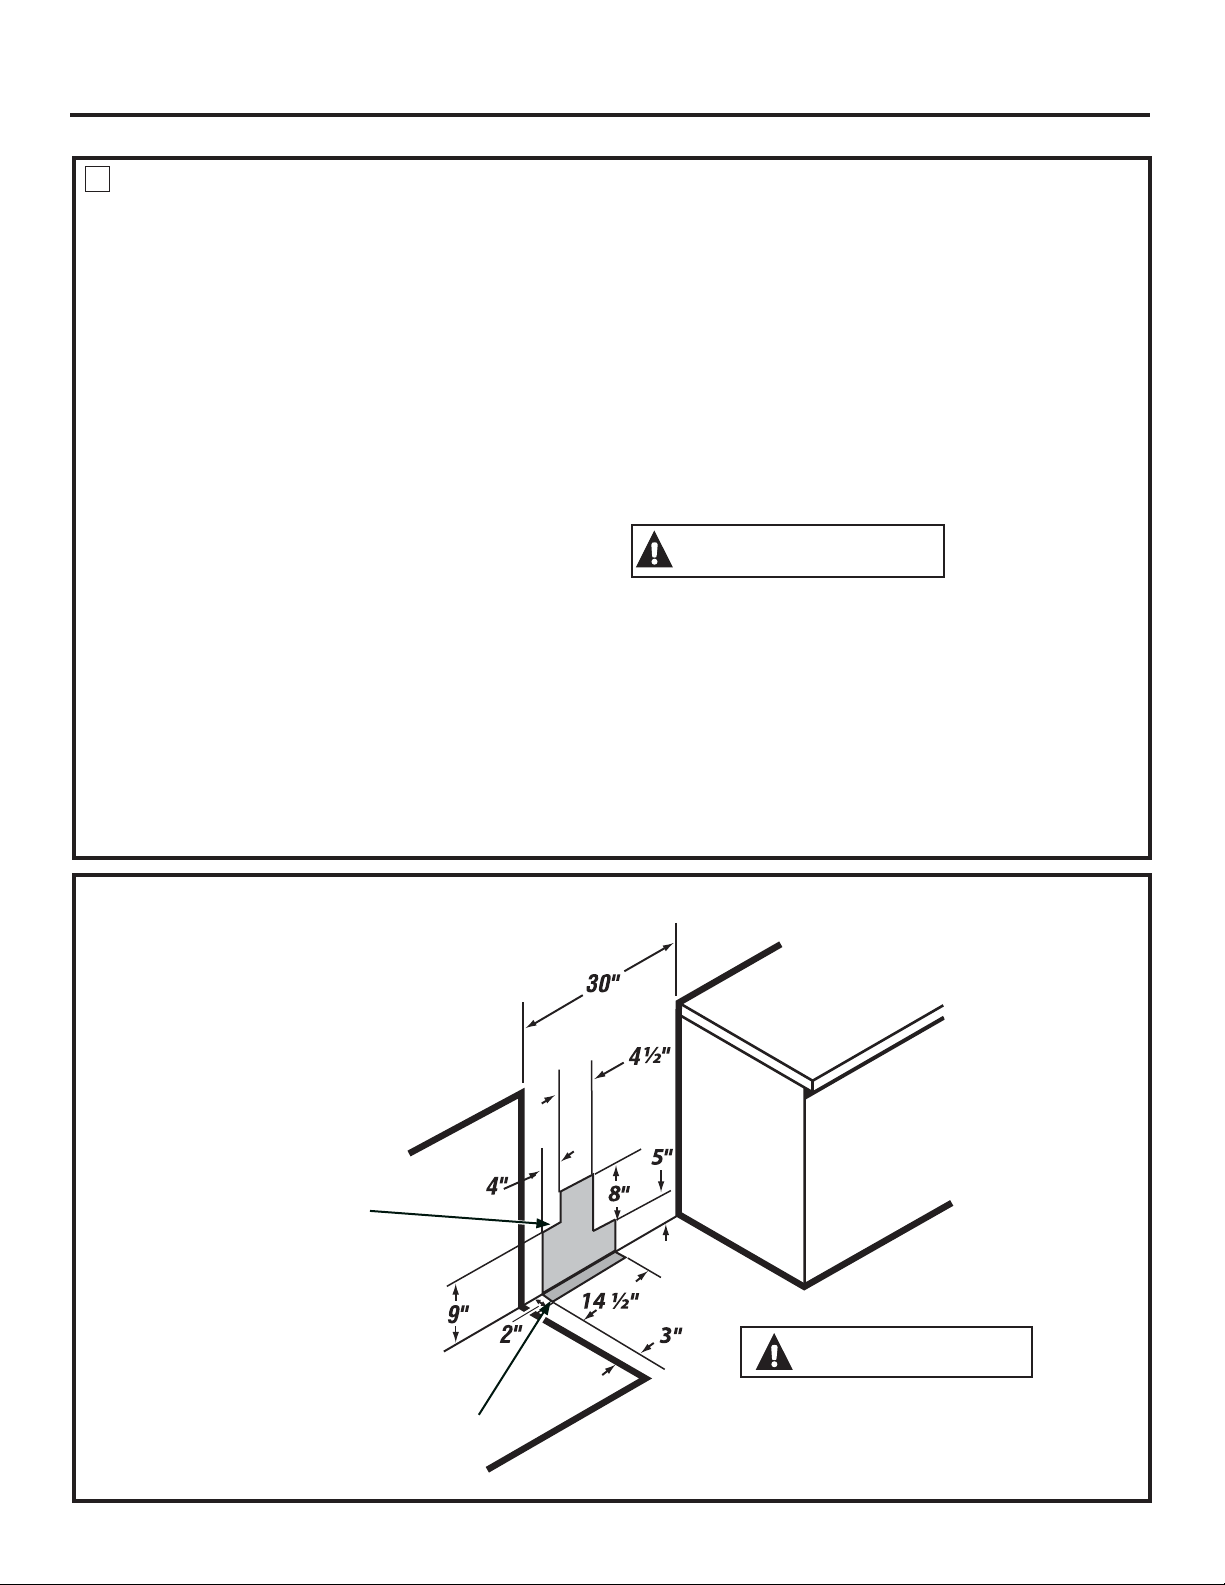
,QVWUXFFLRQHVGH,QVWDODFLyQ
&21(&7(/$&2&,1$$/*$6
&LHUUHODYiOYXODSULQFLSDOGHVXPLQLVWURGHJDVDQWHVGH
GHVFRQHFWDUVXYLHMDFRFLQD\GHMHODPLVPDDSDJDGD
KDVWDTXHODQXHYDFRQH[LyQVHKD\DFRPSOHWDGR
1RROYLGHYROYHUDHQFHQGHUHOSLORWRHQRWURV
HOHFWURGRPpVWLFRVDJDVFXDQGRYXHOYDDHQFHQGHUHO
JDV
'HELGRDTXHODVWXEHUtDVGXUDVUHVWULQJHQHOPRYLPLHQWR
GHODFRFLQDVHUHFRPLHQGDHOXVRGHOFRQHFWRUSDUD
HOHFWURGRPpVWLFRVGHPHWDOIOH[LEOHFRQFHUWLILFDFLyQ
LQWHUQDFLRQDOGH&6$DPHQRVTXHORVFyGLJRVORFDOHV
UHTXLHUDQXQDFRQH[LyQGHWXEHUtDGXUD
1XQFDXVHXQFRQHFWRUYLHMRDOLQVWDODUXQDFRFLQDQXHYD6L
VHXVDHOPpWRGRGHWXEHUtDGXUDGHEHUiDOLQHDUODPLVPD
FRQFXLGDGRODFRFLQDQRVHSRGUiPRYHUXQDYH]UHDOL]DGD
ODFRQH[LyQ
3DUDHYLWDUSpUGLGDVGHJDVFRORTXHHOFRPSXHVWRGHOD
MXQWDGHJDVRHQYXHOYDODFLQWDSDUDURVFDVGHWXEHUtDV
FRQ7HIOyQDOUHGHGRUGHWRGDVODVURVFDVGHWXEHUtDPDFKR
H[WHUQDV
$,QVWDOHXQDYiOYXODGHFLHUUHPDQXDOGHODOtQHDGHJDV
HQODOtQHDGHJDVHQXQDXELFDFLyQGHIiFLODFFHVRIXHUD
GHODFRFLQD$VHJ~UHVHGHTXHWRGDVODVSHUVRQDVTXH
XVHQODFRFLQDVHSDQGyQGH\FyPRFHUUDUHOVXPLQLVWUR
GHJDVGHODFRFLQD
%,QVWDOHHODGDSWDGRUGHODXQLyQFyQLFDPDFKRGHòµDOD
URVFDLQWHUQDGHµGH137HQODHQWUDGDGHOUHJXODGRU
8VHODOODYHGHUHSXHVWRHQHODFFHVRULRUHJXODGRUSDUD
HYLWDUGDxRV
$OLQVWDODUODFRFLQDGHVGHHOIUHQWHUHWLUHHOFRGRGH
SDUDXQDLQVWDODFLyQPiVIiFLO
&,QVWDOHXQDGDSWDGRUSDUDXQLyQFyQLFDGHòµRôµD
ODURVFDLQWHUQDGH137GHODYiOYXODGHFLHUUHPDQXDO
SURFXUDQGRHYLWDUTXHODYiOYXODGHFLHUUHQRJLUH
'&RQHFWHHOFRQHFWRUGHPHWDOIOH[LEOHGHO
HOHFWURGRPpVWLFRDODGDSWDGRUGHODFRFLQD3RVLFLRQHOD
FRFLQDSDUDSHUPLWLUODFRQH[LyQHQODYiOYXODGHFLHUUH
(&XDQGRWRGDVODVFRQH[LRQHVVHKD\DQUHDOL]DGR
DVHJ~UHVHGHTXHWRGRVORVFRQWUROHVGHODFRFLQDHVWpQ
HQODSRVLFLyQGHDSDJDGR\HQFLHQGDODYiOYXODGH
VXPLQLVWURSULQFLSDOGHJDV8VHXQGHWHFWRUGHSpUGLGD
GHOtTXLGRHQWRGDVODVXQLRQHV\FRQH[LRQHVSDUD
FRQWURODUSpUGLGDVHQHOVLVWHPD
$'9(57(1&,$5LHVJRGH
LQFHQGLR1RXVHXQDOODPDSDUDFRQWURODUODV
SpUGLGDVGHJDV
$OXVDUSUHVLyQGHSUXHEDVXSHULRUDòSVLJSDUDFRQWURODU
ODSUHVLyQGHOVLVWHPDGHVXPLQLVWURGHJDVGHODUHVLGHQFLD
GHVFRQHFWHODFRFLQD\ODYiOYXODGHFLHUUHLQGLYLGXDOGH
ODWXEHUtDGHVXPLQLVWURGHJDV$OXVDUODVSUHVLRQHVGH
SUXHEDGHòSVLJRPHQRVSDUDFRQWURODUHOVLVWHPD
GHVXPLQLVWURGHJDVVLPSOHPHQWHDtVOHODFRFLQDGHO
VLVWHPDGHVXPLQLVWURGHJDVFHUUDQGRODYiOYXODGHFLHUUH
LQGLYLGXDO
7HIOyQ0DUFDUHJLVWUDGDSRU'X3RQW
8%,&$&,21(6'(/$78%(5Ë$'(*$6<'(/720$&255,(17((/e&75,&2
ÈUHDUHFRPHQGDGDSDUD
WRPDFRUULHQWHGH9HQOD
SDUHGWUDVHUD\iUHDSDUDOD
FRQH[LyQGHOWXERGHHVFDSH\
ODYiOYXODGHVHJXULGDGDWUDYpV
GHODSDUHG
ÈUHDUHFRPHQGDGDSDUD
FRQH[LyQDWUDYpVGHOSLVR
GHOWXERGHHVFDSH\OD
YiOYXODGHVHJXULGDG
35(&$8&,Ï13DUD
HYLWDUTXHXQDFRUULHQWHGHDLUH
DIHFWHHOIXQFLRQDPLHQWRGHO
TXHPDGRUVHOOHWRGDVODVDEHUWXUD
HQODSDUHG\HOSLVR

,QVWUXFFLRQHVGH,QVWDODFLyQ
5HJXODGRU
GHSUHVLyQ
)OXMRGHO*DVHQOD&RFLQD
&RQHFWRU
IOH[LEOH
SLHVPi[
$GDSWDGRU
,QVWDODGRU,QIRUPHDO
FRQVXPLGRUVREUHOD
XELFDFLyQGHODYiOYXOD
GHFLHUUHGHJDV
7XEHUtDGH
JDVGHòµ
Rôµ
$GDSWDGRU
9iOYXODGH
FLHUUHGH
JDV
9iOYXOD
GHFLHUUH
GHJDV
7XEHUtDGHJDVGH
òµRôµ
)OXMRGHO*DVHQOD&RFLQD
5HJXODGRU
GHSUHVLyQ
%RTXLOOD
URVFDGD
&RGRGH
&RGRGH
$GDSWDGRU
$GDSWDGRU
&RGRGH
8QLyQRFRQH[LyQ
UiSLGD
,QVWDODGRU,QIRUPHDO
FRQVXPLGRUVREUHOD
XELFDFLyQGHODYiOYXOD
GHFLHUUHGHJDV
&RQH[LyQ$OWHUQD
%RTXLOODURVFDGD
%RTXLOODURVFDGD
&RGR
GH
5HJXODGRU
GHSUHVLyQ
&RGRGH
%RTXLOOD
URVFDGD
8QLyQ
&RGRGH
7XEHUtDGH
KLHUURQHJUR
8QLyQ
%RTXLOOD
URVFDGD
,QVWDODGRU,QIRUPH
DOFRQVXPLGRUVREUH
ODXELFDFLyQGHOD
YiOYXODGHFLHUUHGH
JDV
)OXMRGHO*DVHQOD&RFLQD
9iOYXOD
GHFLHUUH
GHJDV
7XEHUtDGH
JDVGHòµ
Rôµ
&21(;,Ï1'(/&21(&725)/(;,%/(
23&,21(6'(&21(;,Ï1'(78%(5Ë$5Ë*,'$

&21(;,Ï1'(/&21(&725)/(;,%/(
SDUDPRGHORVHTXLSDGRVFRQ4XHPDGRUHV'REOHV(VWiQGDU
,QVWUXFFLRQHVGH,QVWDODFLyQ
&21(&725'(78%(5Ë$5Ë*,'$SDUDPRGHORVHTXLSDGRVFRQ4XHPDGRUHV'REOHV
(VWiQGDU
8QLRQ
%RTXLOOD
URVFDGD
7XEHUtD
P~OWLSOH
%RTXLOODURVFDGD
8QLRQ
7XEHUtDGHKLHUURQHJUR
&RGRGH
5HJXODGRU
GHSUHVLyQ
)OXMRGHO*DVHQOD&RFLQD
,QVWDODGRU,QIRUPH
DOFRQVXPLGRU
VREUHODXELFDFLyQ
GHODYiOYXODGH
FLHUUHGHJDV
7XEHUtDGHJDV
GHòµRôµ
9iOYXODGH
FLHUUHGHJDV
$GDSWDGRU
7XEHUtDGHJDV
GHòµRôµ
$GDSWDGRU
&RQHFWRUIOH[LEOH
SLHVGHPi[LPR
7XEHUtD
P~OWLSOH
5HJXODGRU
GHSUHVLyQ
9iOYXODGH
FLHUUHGHJDV
)OXMRGHO*DVHQOD&RFLQD
,QVWDODGRU,QIRUPH
DOFRQVXPLGRU
VREUHODXELFDFLyQ
GHODYiOYXODGH
FLHUUHGHJDV
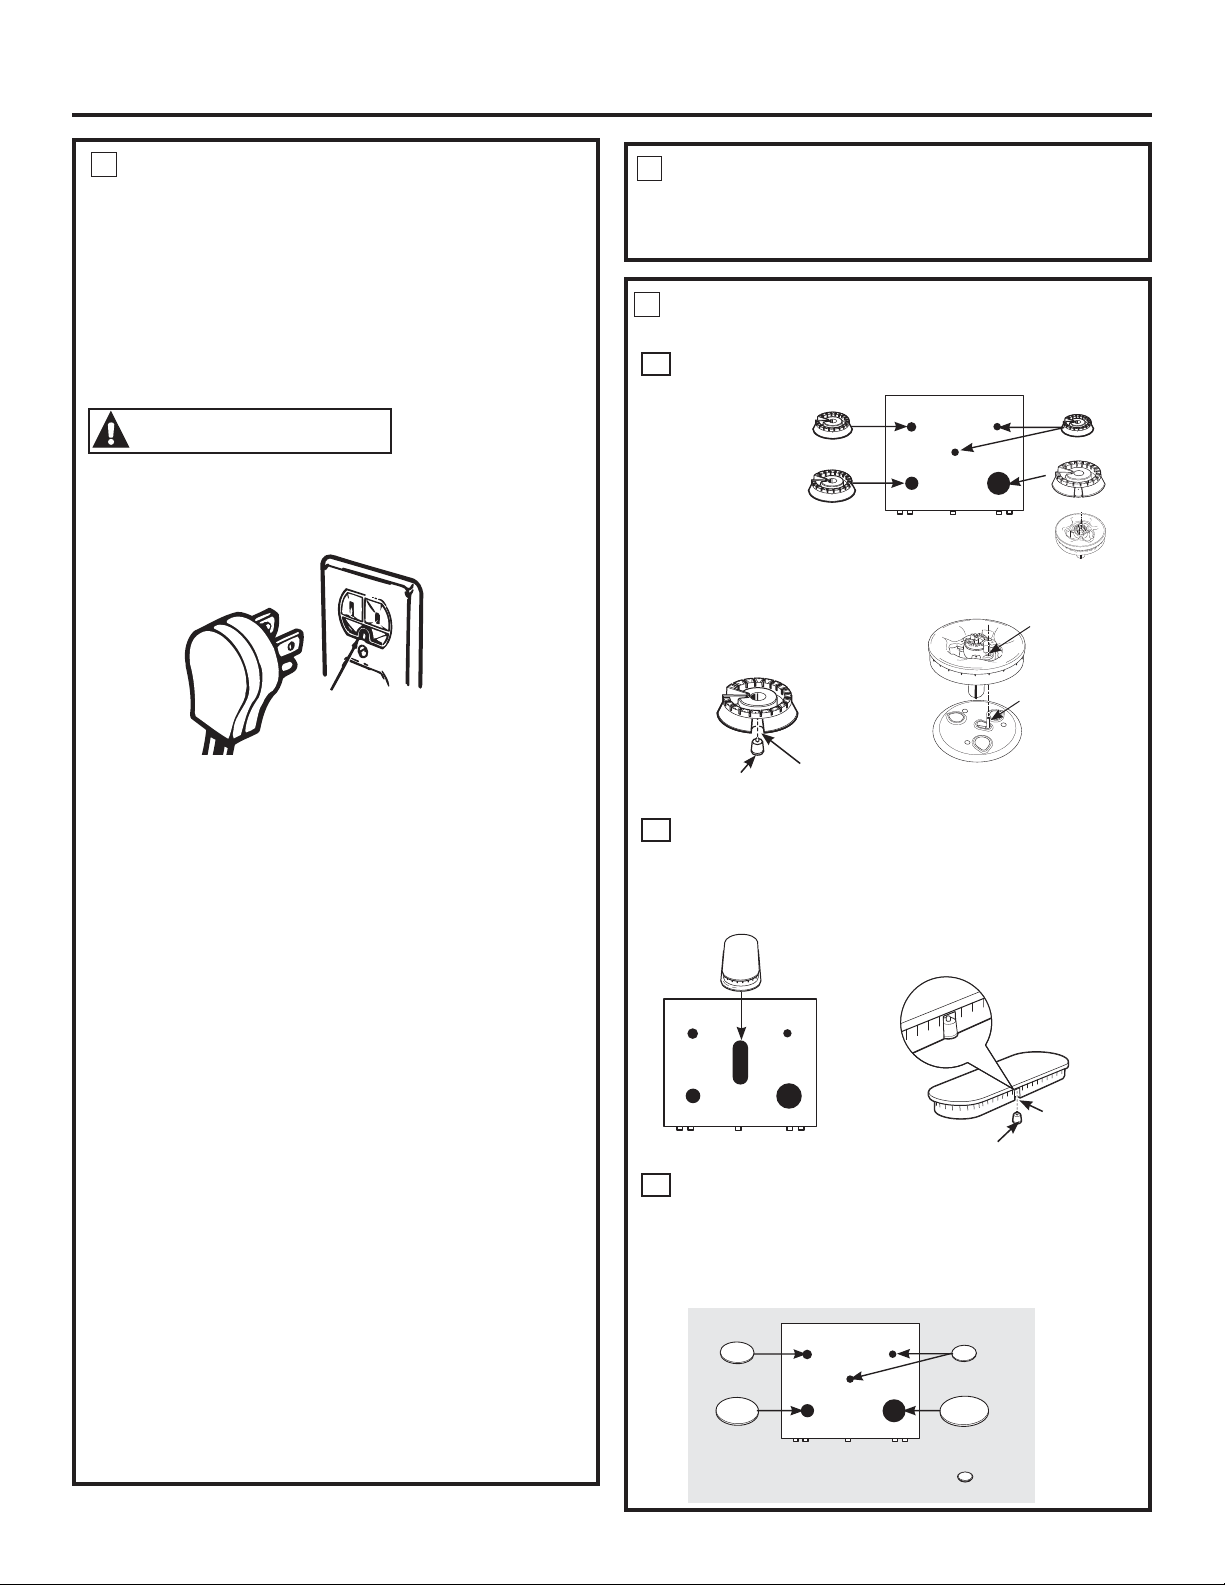
,QVWUXFFLRQHVGH,QVWDODFLyQ
&21(;,21(6(/e&75,&$6
5HTXLVLWRV(OpFWULFRV
&LUFXLWRHVSHFtILFRGHYROWLRV+HUW]FRUUHFWDPHQWH
FRQHFWDGRDWLHUUDSRUXQGLV\XQWRUGHRDPSHUHVR
IXVLEOHGHUHWUDVR
1RWD1RVHUHFRPLHQGDSDUDHVWHSURGXFWRHOXVRGH
LQWHUUXSWRUHVDXWRPiWLFRVLQDOiPEULFRVRFRQFDEOHDGR
H[WHUQRTXHDSDJDQODFRUULHQWHGHOHOHFWURGRPpVWLFR
&RQH[LyQD7LHUUD
$'9(57(1&,$
5LHVJRGH
'HVFDUJD(VWHHOHFWURGRPpVWLFRGHEHUiHVWDU
FRQHFWDGRDWLHUUDGHIRUPDDGHFXDGD6LQRFXPSOH
FRQHVWRVHSRGUiQSURGXFLUGHVFDUJDVHOpFWULFDV
(OFDEOHGHFRUULHQWHGHHVWHHOHFWURGRPpVWLFRFXHQWDFRQ
XQHQFKXIHGHSDWDVFRQH[LyQDWLHUUDTXHVHFRQHFWD
DXQWRPDFRUULHQWHGHSDUHGHVWiQGDUGHFDEOHVSDUD
PLQLPL]DUODSRVLELOLGDGGHULHVJRVGHGHVFDUJDVHOpFWULFDV
SRUSDUWHGHOPLVPR
(OFOLHQWHGHEHUiFRQWUDWDUDXQHOHFWULFLVWDFDOLILFDGR
SDUDTXHFRQWUROHHOFLUFXLWRDILQGHDVHJXUDUTXHHO
WRPDFRUULHQWHHVWpFRUUHFWDPHQWHFRQHFWDGRDWLHUUD
(QFDVRGHFRQWDUFRQXQWRPDFRUULHQWHGHSDUHGGH
FDEOHVHVODUHVSRQVDELOLGDG\REOLJDFLyQGHOFOLHQWH
UHHPSOD]DUORSRUXQWRPDFRUULHQWHGHSDUHGGHFDEOHV
FRUUHFWDPHQWHFRQHFWDGRDWLHUUD
181&$%$-21,1*81$&,5&8167$1&,$&257(1,
(/,0,1((/7(5&(5&$%/(7,(55$'(/&$%/('(
&255,(17(
8QDVSDODEUDVVREUHORV*)&,²QRVHUHTXLHUHQQLVH
UHFRPLHQGDQORV*)&,SDUDUHFHSWiFXORVGHFRFLQDVD
JDV
/RV,QWHUUXSWRUHVGH&LUFXLWRGH7LHUUD*)&,VRQ
GLVSRVLWLYRVTXHGHWHFWDQSpUGLGDVGHFRUULHQWHHQXQ
FLUFXLWR\DXWRPiWLFDPHQWHDSDJDQODFRUULHQWHFXDQGR
HOOtPLWHGHOQLYHOGHSpUGLGDHVGHWHFWDGR(OFRQVXPLGRU
GHEHUiUHLQLFLDUHVWRVGLVSRVLWLYRVGHIRUPDPDQXDO(O
&yGLJR1DFLRQDOGH(OHFWULFLGDGUHTXLHUHHOXVRGHORV*)&,
HQUHFHSWiFXORVGHFRFLQDLQVWDODGRVSDUDVXSHUILFLHVGH
PRVWUDGRUHV(OIXQFLRQDPLHQWRGHODFRFLQDQRVHYHUi
DIHFWDGRVLVHXWLOL]DHQXQFLUFXLWR*)&,SURWHJLGRSHUR
HVSRVLEOHTXHVHSURGX]FDQGHWHQFLRQHVRFDVLRQDOHVQR
GHVHDGDVGHOLQWHUUXSWRU*)&,
$VHJ~UHVHGHFRQWDUFRQ
XQDFRQH[LyQDWLHUUD
DGHFXDGDDQWHVGHXVDU
6(//$'2'($%(5785$6
6HOOHFXDOTXLHUDEHUWXUDHQODSDUHGGHWUiVGHODFRFLQD\HQ
HOSLVRGHEDMRGHODFRFLQDFXDQGRODVFRQH[LRQHVVHKD\DQ
FRPSOHWDGR
$
&DEH]DVGHOTXHPDGRUHQDOJXQRVPRGHORV
&RORTXHODV
FDEH]DVGHORV
TXHPDGRUHV
VREUHORV
HOHFWURGRV
HQODSDUWH
VXSHULRUGH
ODFRFLQDHQ
ODVXELFDFLRQHV
FRUUHFWDVGHDFXHUGR
FRQVXWDPDxR
%
(QVDPEOHGHOD&DEH]D7DSDGHO4XHPDGRU2YDODGR&HQWUR
&RORTXHHOHQVDPEOHGHODFDEH]DWDSDRYDODGDFHQWUR
VREUHHOHOHFWURGRHQODSDUWHVXSHULRUGHODFRFLQD
&
7DSDV
&RORTXHODVWDSDVGHWDPDxRFRLQFLGHQWHHQODVEDVHVR
FDEH]DVGHORVTXHPDGRUHV
$VHJ~UHVHGHTXHODVFDEH]DVHQDOJXQRVPRGHORV
\ODVWDSDVVHDQUHHPSOD]DGDVHQODVXELFDFLRQHV
FRUUHFWDV
)UHQWHGHODFRFLQD
HQDOJXQRVPRGHORV
&DEH]DGHWULSOHOODPD
HQDOJXQRVPRGHORV
5DQXUD
(OHFWURGR
R
$VHJ~UHVHGHTXHODUDQXUDGH
ODFDEH]DGHOTXHPDGRUHVWp
SRVLFLRQDGDVREUHHOHOHFWURGR
4XHPDGRUIURQWDOGHUHFKR
HQDOJXQRVPRGHORV
$JXMHUR
(OHFWURGR
(OHFWURGR
5DQXUD
)UHQWHGHODFRFLQD
&DEH]DRYDODGD\
HQVDPEOHGHODWDSD
$VHJ~UHVHGHTXHODUDQXUDGH
ODFDEH]DGHOTXHPDGRUHVWp
SRVLFLRQDGDVREUHHOHOHFWURGR
)UHQWHGHODFRFLQD
7DSDGHWUHVDQLOORV
HQDOJXQRVPRGHORV
HQDOJXQRVPRGHORV
(16$0%/(/2648(0$'25(6
683(5),&,$/(6HQDOJXQRVPRGHORV
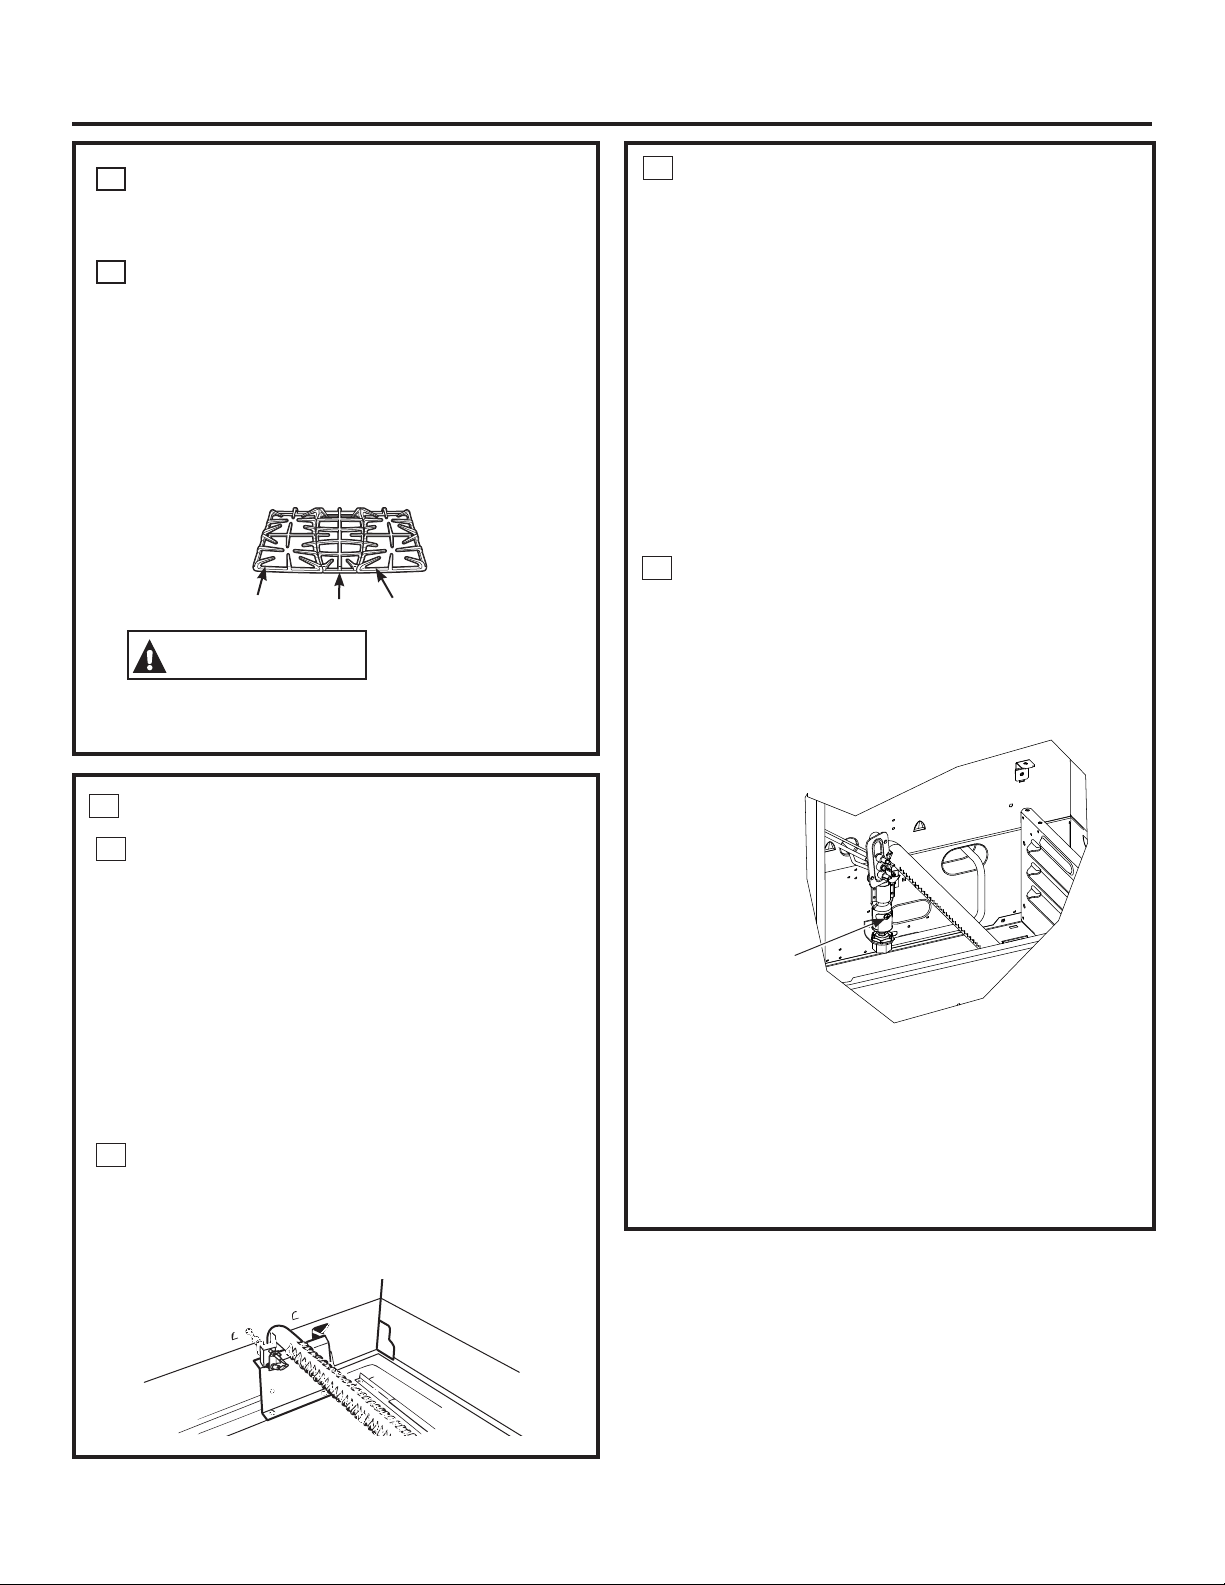
(16$0%/(/2648(0$'25(6
683(5),&,$/(6
HQDOJXQRVPRGHORV
&217
'
3DUULOODV
&RORTXHODVSDUULOODVL]TXLHUGDGHUHFKD\FHQWUDOHQ
ODSDUWHVXSHULRUGHODFRFLQD(VWDVSDUULOODVSRVHHQ
SRVLFLRQHVHVSHFtILFDV/RVODGRVLQIHULRUHVGHODV
SDUULOODVL]TXLHUGD\GHUHFKDHVWiQPDUFDGDV´/()7
)5217µ)UHQWH,]TXLHUGR\´5,*+7)5217µ)UHQWH
'HUHFKR(QDOJXQRVPRGHORVODSDUWHLQIHULRUGHODV
SDUULOODVSRVHHQODPDUFD´2XWVLGHµ$IXHUD&RORTXHOD
SDUULOODLQWHUPHGLDFRQIUHQWHHQFRUYDGRKDFLDHOIUHQWH
GHODSDUULOOD
35(&$8&,Ï1
1RXVHHOTXHPDGRU
VLQTXHWRGDVODVSDUWHVGHORVTXHPDGRUHV
HVWpQHQVXVUHVSHFWLYRVOXJDUHV
)UHQWH,]TXLHUGR
)UHQWH'HUHFKR
&HQWUR
,QVWUXFFLRQHVGH,QVWDODFLyQ
$
&RQWUROHHO(QFHQGLGRGHO4XHPDGRUGHO
+RUQR
(OKRUQRVHGLVHxySDUDIXQFLRQDUGHIRUPD
VLOHQFLRVD\DXWRPiWLFD3DUDXWLOL]DUHOKRUQRJLUH
ODSHULOOD29(1&21752/&RQWUROGHO+RUQRDXQD
FRQILJXUDFLyQVXSHULRUDORV)(OTXHPDGRU
GHOKRUQRVHHQFHQGHUi\TXHPDUiKDVWDTXHVH
DOFDQFHODWHPSHUDWXUDFRQILJXUDGD(OTXHPDGRU
GHOKRUQRFRQWLQXDUiHOFLFORGHHQFHQGLGR\
DSDJDGRVHJ~QVHDQHFHVDULRSDUDPDQWHQHUHO
KRUQRHQODWHPSHUDWXUDLQGLFDGDSRUODSHULOOD
29(1&21752/&RQWUROGHO+RUQR
%
$MXVWHHO2EWXUDGRUGH$MXVWHGH$LUHGHO
4XHPDGRUSDUD+RUQHDUHQ0RGHORVFRQXQ
&DMyQSDUD$VDUVLHV1HFHVDULR
'HWHUPLQHVLODVOODPDVGHOTXHPDGRULQIHULRUVH
HVWiQTXHPDQGRGHIRUPDDSURSLDGD
,/80,1$&,Ï1'(/2648(0$'25(6
8QDYH]UHWLUDGRHOIRQGRGHOKRUQRODVOODPDV
FRUUHFWDPHQWHDMXVWDGDVGHEHQWHQHUFRQRV
D]XOHVGHDSUR[LPDGDPHQWHµ\VLODFRFLQDHV
VXPLQLVWUDGDFRQJDVQDWXUDOGHEHUiQTXHPDUVLQ
SXQWDVDPDULOODV&RQODPD\RUtDGHORVJDVHV/3
ODVSXQWDVGHOODPDDPDULOODVDOILQDOGHORVFRQRV
H[WHULRUHVVRQQRUPDOHV/DVOODPDVQRGHEHQ
OHYDQWDUORVSDUWHVGHOTXHPDGRU6LVHREVHUYD
XQDHOHYDFLyQUHGX]FDJUDGXDOPHQWHODDEHUWXUD
GHOREWXUDGRUGHDLUHKDVWDTXHODVOODPDVVH
HVWDELOLFHQ
(OREWXUDGRUGHOTXHPDGRUGHOKRUQRVH
HQFXHQWUDFHUFDGHODSDUHGWUDVHUDGHOKRUQR\
GHWUiVGHOFDMyQSDUDDVDU
&
$MXVWHHO2EWXUDGRUGH$MXVWHGH$LUHGHO
4XHPDGRUSDUD$VDUHQ0RGHORVFRQXQ&DMyQ
SDUD$VDUVLHV1HFHVDULRFRQW
3DUDUHWLUDUHO&DMyQSDUD$VDU
(PSXMHHOFDMyQKDFLDDIXHUDKDVWDTXH
VHGHWHQJDOXHJRHPSXMHHOPLVPRKDFLD
DGHQWURDSUR[LPDGDPHQWHXQDSXOJDGD
7RPDODPDQLMDOHYDQWH\HPSXMHHOFDMyQ
SDUDDVDUKDFLDDIXHUD
3DUDDMXVWDUHOIOXMRGHDLUHKDFLDHOTXHPDGRU
DIORMHHOWRUQLOORWLSR3KLOOLSV\JLUHHOREWXUDGRU
SDUDSHUPLWLUTXHPiVRPHQRVDLUHLQJUHVHSRU
HOWXERGHOTXHPDGRU
,/80,1$&,Ï1'(/2648(0$'25(6
&217
$IORMHHO
REWXUDGRU
GHDMXVWHGH
DLUH

,QVWUXFFLRQHVGH,QVWDODFLyQ
$-867((/2%785$'25'($-867('(
$,5(3$5$$6$5<'(/48(0$'25
'(/+2512(181+2512'($872
/,03,(=$6,(61(&(6$5,2
/RVREWXUDGRUHVGHDMXVWHGHDLUHSDUDORVTXHPDGRUHV
GHODSDUWHVXSHULRUHLQIHULRUUHJXODQHOIOXMRGHDLUHGH
ODVOODPDV
(OREWXUDGRUGHDMXVWHGHDLUHSDUDHOTXHPDGRUVXSHULRU
DVDUHVWiHQHOFHQWURGHODSDUHGWUDVHUDGHOKRUQR
(OREWXUDGRUGHOTXHPDGRULQIHULRUKRUQRVHHQFXHQWUD
FHUFDGHODSDUHGWUDVHUDGHWUiVGHOFDMyQFDOHQWDGRU
5HWLUHHOFDMyQ&RQVXOWHODVHFFLyQGH&XLGDGR\OLPSLH]D
GHODFRFLQD
3DUDDMXVWDUHOIOXMRGHDLUHGHFDGDTXHPDGRUDIORMHHO
WRUQLOORFRQFDEH]D3KLOOLSV\JLUHHOREWXUDGRUKDFLDOD
SRVLFLyQDELHUWDRFHUUDGDVHJ~QVHDQHFHVDULR
/DVOODPDVGHOTXHPDGRUVXSHULRUDVDUGHEHUiQHVWDU
SDUHMDVFRQFRQRVD]XOHVGHDSUR[LPDGDPHQWHµ\QRVH
GHEHUiQH[WHQGHUPiVDOOiGHORVERUGHVGHOGHIOHFWRUGHO
TXHPDGRU
2EWXUDGRUGH
DMXVWHGHDLUH
)ORMR
2EWXUDGRU
GHDMXVWHGHDLUH
)ORMR
'
&RQWUROHHO(QFHQGLGRGHORV4XHPDGRUHVGHOD
6XSHUILFLH
(OIXQFLRQDPLHQWRGHWRGRVORVTXHPDGRUHVGHO
KRUQR\SDUWHVXSHULRUGHODFRFLQDVHGHEHQ
FRQWURODUXQDYH]TXHODFRFLQD\ODVOtQHDVGH
VXPLQLVWURGHJDVKD\DQVLGRFXLGDGRVDPHQWH
FRQWURODGDVSDUDYHULILFDUTXHQRKD\DSpUGLGDV
6HOHFFLRQHODSHULOODGHXQTXHPDGRUVXSHULRU\
GHIRUPDVLPXOWiQHDHPSXMHHOPLVPR\JLUHDOD
SRVLFLyQ/,7(/X](VFXFKDUiXQVRQLGRGHFOLFTXH
LQGLFDHOIXQFLRQDPLHQWRDGHFXDGRGHOPyGXORGH
FKLVSHR8QDYH]TXHHODLUHVHKD\DSXUJDGRGHODV
OtQHDVGHVXPLQLVWURORVTXHPDGRUHVVHGHEHUiQ
HQFHQGHUGHQWURGHORVVHJXQGRV/XHJRGHTXH
ORVTXHPDGRUHVVHLOXPLQHQJLUHODSHULOODIXHUDGH
ODSRVLFLyQ/,7(/X]3UXHEHFDGDTXHPDGRUGH
IRUPDVXFHVLYDKDVWDTXHWRGRVORVTXHPDGRUHV
KD\DQVLGRFRQWURODGRV
&DOLGDGGHODV/ODPDV
/DFDOLGDGGHFRPEXVWLyQGHODVOODPDVGHO
TXHPDGRUVHGHEHUiGHWHUPLQDUYLVXDOPHQWH
6LODVOODPDVGHOTXHPDGRUVHYHQFRPR
HQ$OODPHDOVHUYLFLRWpFQLFR(ODVSHFWR
GHODOODPDQRUPDOVHYHFRPRHQ%R&
GHSHQGLHQGRGHOWLSRGHJDVTXHXVH
&RQJDV/3HVQRUPDOTXHKD\DDOJXQDVSXQWDV
DPDULOODVHQORVFRQRVH[WHUQRV
(
5HHPSODFHODV3LH]DVGHO+RUQR
8QDYH]UHDOL]DGRVWRGRVORVDMXVWHVUHHPSODFHHO
FDMyQSDUDDVDUHOIRQGRGHOKRUQRORVHVWDQWHV\
ODSXHUWDGHOKRUQR
&/ODPDVD]XO
VXDYH³1RUPDO
SDUDJDVQDWXUDO
%3XQWDVDPDULOODV
HQFRQRVH[WHUQRV³
1RUPDOSDUDHOJDV/3
$/ODPDV
DPDULOODV³/ODPH
DOVHUYLFLRWpFQLFR
,/80,1$&,Ï1'(/2648(0$'25(6
&217
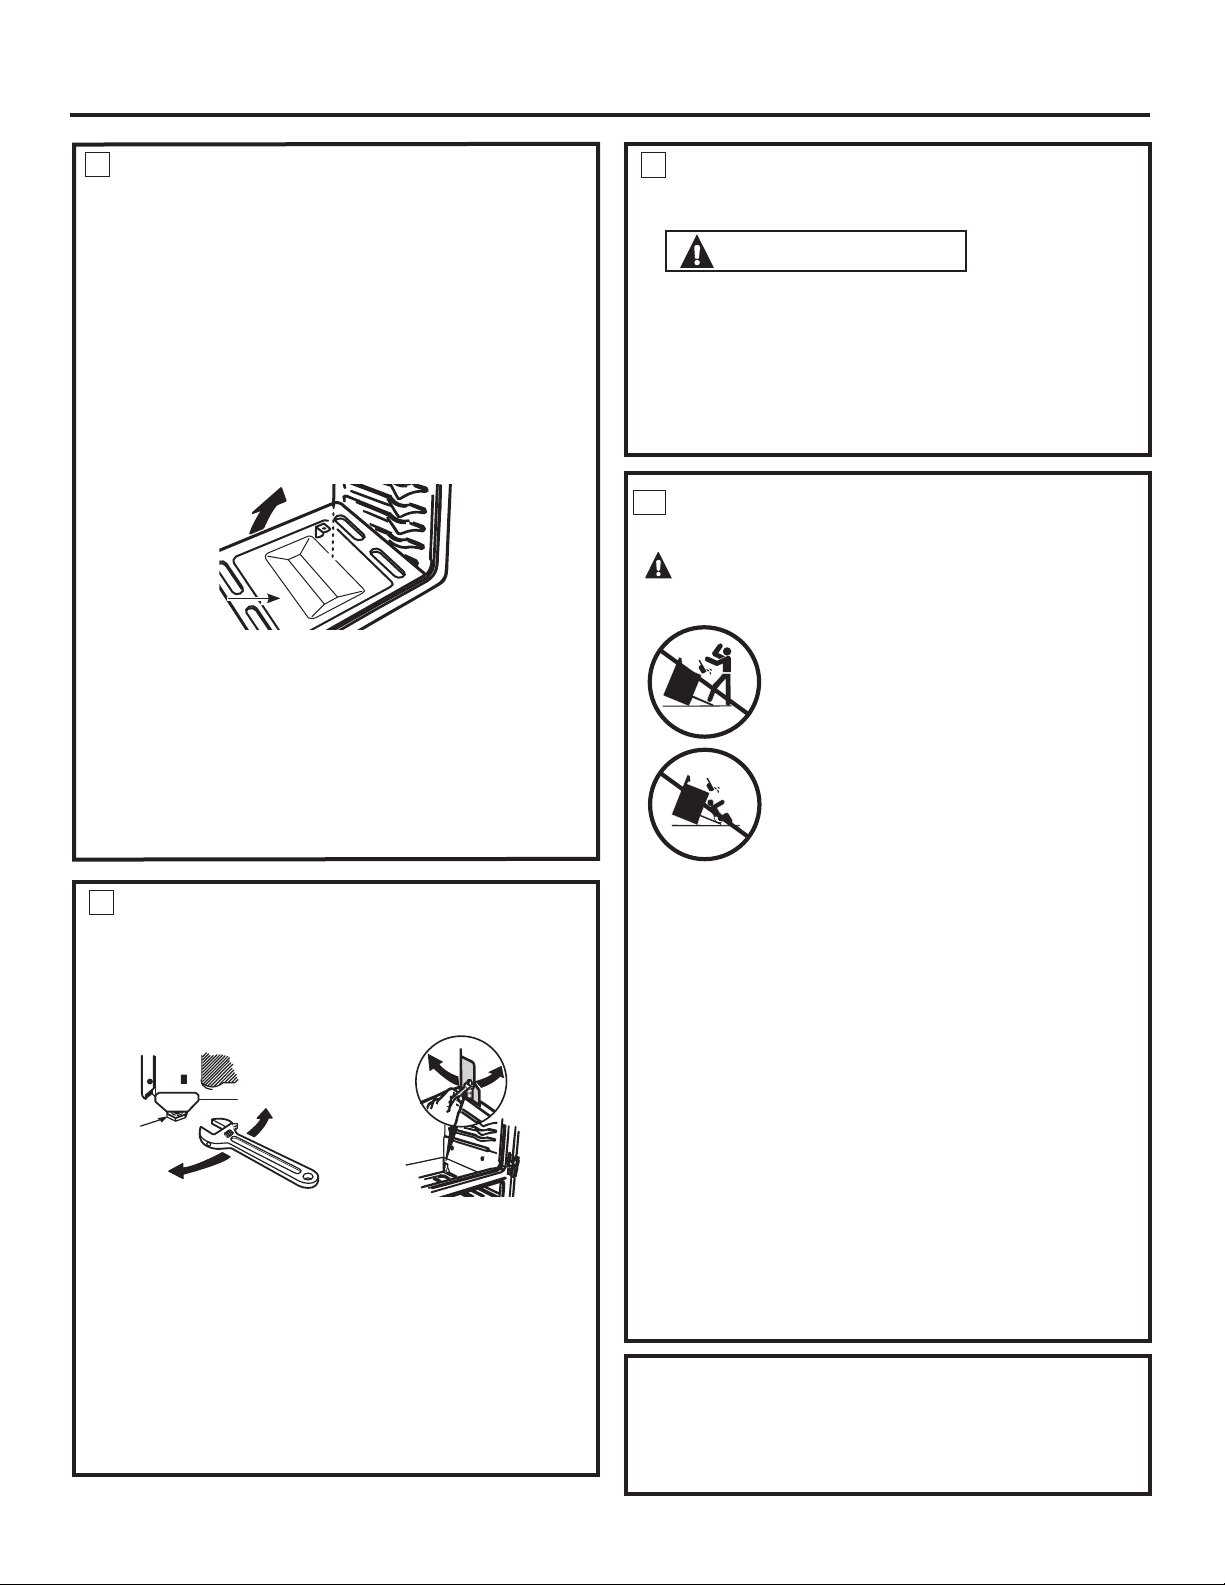
3DUDUHWLUDUODSDUWHLQIHULRUGHOKRUQR
$5HWLUHORVWRUQLOORVTXHVRVWLHQHQODSDUWHWUDVHUDGHO
IRQGRGHOKRUQR
%7RPHHOIRQGRGHOKRUQRGHODVUDQXUDVSDUDORVGHGRV
DFDGDODGR
&/HYDQWHODSDUWHWUDVHUDGHOIRQGRGHOKRUQROR
VXILFLHQWHFRPRSDUDGHVSHMDUHOUHERUGHGHOD
HVWUXFWXUDGHODFRFLQDHPSXMHODPLVPDKDFLDDWUiV\
OXHJRHPSXMHKDFLDDUULED\DIXHUD
,QVWUXFFLRQHVGH,QVWDODFLyQ
$-867((/2%785$'25'($-867('(
$,5(3$5$$6$5<'(/48(0$'25
'(/+2512(181+2512'($872
/,03,(=$6,(61(&(6$5,2
3DUDGHWHUPLQDUVLODVOODPDVGHOTXHPDGRULQIHULRUHVWiQ
TXHPDQGRGHIRUPDDGHFXDGDUHWLUHODSDUWHLQIHULRU
GHOKRUQR/DVOODPDVGHEHQWHQHUFRQRVD]XOHVGH
DSUR[LPDGDPHQWHµ\VLODFRFLQDHVVXPLQLVWUDGDFRQ
JDVQDWXUDOGHEHUiQTXHPDUVLQSXQWDVDPDULOODV&RQ
ODPD\RUtDGHORVJDVHV/3ODVSXQWDVGHOODPDDPDULOODV
DOILQDOGHORVFRQRVH[WHULRUHVVRQQRUPDOHV/DVOODPDV
QRGHEHQOHYDQWDUORVSDUWHVGHOTXHPDGRU6LVHREVHUYD
XQDHOHYDFLyQUHGX]FDJUDGXDOPHQWHODDEHUWXUDGHO
REWXUDGRUGHDLUHKDVWDTXHODVOODPDVVHHVWDELOLFHQ
1,9(/$&,Ï1'(/$&2&,1$
$
,QVWDOHORVHVWDQWHVGHOKRUQRHQHOPLVPR\SRVLFLRQH
ODFRFLQDHQHOOXJDUGRQGHVHUiLQVWDODGDFRQDFFHVR
IURQWDODODVSDWDVQLYHODGRUDVIURQWDOHV\DFFHVRWUDVHUR
DODVSDWDVQLYHODGRUDVWUDVHUDV7RGDVODVSDWDVGHEHUiQ
VHUQLYHODGDV$17(6GHTXHHOSURGXFWRVHDLQVWDODGR
%&RQWUROHODQLYHODFLyQXELFDQGRXQQLYHOGHEXUEXMDRXQD
WD]DSDUFLDOPHQWHOOHQDGHDJXDHQXQRGHORVHVWDQWHV
GHOKRUQR6LXVDUiXQQLYHOGHEXUEXMDKDJDGRVOHFWXUDV
FRQHOQLYHOXELFDGRGHIRUPDGLDJRQDOSULPHURHQXQD
GLUHFFLyQ\OXHJRHQODRWUD
&5HWLUHHOFDMyQHQDOJXQRVPRGHORV&RQVXOWHODVHFFLyQ
GH&XLGDGR\OLPSLH]DGHODFRFLQD/DVSDWDVQLYHODGRUDV
IURQWDOHVVHSRGUiQDMXVWDUGHVGHODSDUWHLQIHULRU\ODV
SDWDVWUDVHUDVVHSRGUiQDMXVWDUGHVGHODSDUWHVXSHULRU
HQDOJXQRVPRGHORVRGHVGHODSDUWHLQIHULRU
1LYHODGRU
GHSDWDV
%DMDUOD
FRFLQD
6XELUOD
FRFLQD
HQDOJXQRVPRGHORV
6XELUOD
FRFLQD
%DMDUOD
FRFLQD
HQDOJXQRVPRGHORV
3DUWH,QIHULRU
GHO+RUQR
'8VHXQDOODYHGHWXHUFDVRDMXVWDEOHSDUDDMXVWDUODV
SDWDVQLYHODGRUDVKDVWDTXHODFRFLQDHVWpQLYHODGD
$'9(57(1&,$1XQFDUHWLUH
FRPSOHWDPHQWHODVSDWDVQLYHODGRUDV\DTXHOD
FRFLQDQRHVWDUiDVHJXUDGDGHIRUPDDGHFXDGDDO
GLVSRVLWLYRDQWLYROFDGXUDV
(/XHJRGHQLYHODUODXQLGDGGHVOLFHKDVWDODSRVLFLyQ
ILQDO\YHULILTXHODQLYHODFLyQ
)/XHJRGHTXHODFRFLQDHVWpQLYHODGDDOHMHODFRFLQD
GHODSDUHGGHPRGRTXHVHSXHGDLQVWDODUHO
GLVSRVLWLYRDQWLYROFDGXUDV
1,9(/$&,Ï1'(/$&2&,1$&217
,167$/$&,Ï1'(/',6326,7,92$17,
92/&$'85$6
$'9(57(1&,$
',6326,7,92$17,92/&$'85$6
7RGDVODVFRFLQDVSXHGHQVXIULUFDtGDV
6HSXHGHQSURGXFLU48(0$'85$6\
RWUDV/(6,21(6*5$9(6
,167$/(\&21752/(HOVRSRUWHDQWL
YROFDGXUDVVLJXLHQGRODVLQVWUXFFLRQHV
VXPLQLVWUDGDVFRQHOVRSRUWH
$ILQGHUHGXFLUHOULHVJRGHFDtGDGHODFRFLQDpVWD
GHEHUiHVWDUDVHJXUDGDSRUXQVRSRUWHDQWLYROFDGXUDV
FRUUHFWDPHQWHLQVWDODGR6LJDODVLQVWUXFFLRQHVHPEDODGDV
FRQHOVRSRUWH
3DUDFRQWURODUVLHOVRSRUWHHVLQVWDODGR\DMXVWDGRGH
IRUPDDSURSLDGDPLUHTXHGHEDMRGHODFRFLQDODSDWD
QLYHODGRUDWUDVHUDHVWpDMXVWDGDDOVRSRUWH(QDOJXQRV
PRGHORVHOFDMyQGHDOPDFHQDPLHQWRRHOSDQHOGH
SURWHFFLyQVHSXHGHQUHWLUDUSDUDXQDIiFLOLQVSHFFLyQ
6LQRHVSRVLEOHUHDOL]DUXQDLQVSHFFLyQYLVXDOGHVOLFH
ODFRFLQDKDFLDDGHODQWHFRQILUPHTXHHOVRSRUWHDQWL
YROFDGXUDVHVWpDMXVWDGRGHIRUPDVHJXUDDOSLVRROD
SDUHG\GHVOLFHODFRFLQDKDFLDDWUiVGHPRGRTXHODSDWD
QLYHODGRUDWUDVHUDVHHQFXHQWUHGHEDMRGHOVRSRUWHDQWL
YROFDGXUDV
(QFDVRGHTXHODFRFLQDVHDHPSXMDGDGHODSDUHGSRU
DOJXQDUD]yQVLHPSUHUHSLWDHVWHSURFHGLPLHQWRSDUD
YHULILFDUTXHODFRFLQDHVWpFRUUHFWDPHQWHDVHJXUDGDSRU
HOVRSRUWHDQWLYROFDGXUDV
6LODFRFLQDQRFXHQWDFRQHOVRSRUWHDQWLYROFDGXUDV
OODPHDOSDUDUHFLELUXQRVLQFRVWR
&8$1'272'$6/$6&21(;,21(66(
+$<$1&203/(7$'2
$VHJ~UHVHGHTXHWRGRVORVFRQWUROHVTXHGHQHQODSRVLFLyQ
GHDSDJDGR$VHJ~UHVHGHTXHHOIOXMRGHODFRPEXVWLyQ\HO
DLUHGHYHQWLODFLyQDODFRFLQDHVWpQGHVREVWUXLGRV

&RQVHMRVSDUDOD6ROXFLyQGH3UREOHPDV
£$KRUUHWLHPSR\GLQHUR3ULPHURUHYLVHORVFXDGURVTXHDSDUHFHQHQODV
VLJXLHQWHVSiJLQDV\HVSRVLEOHTXHQRQHFHVLWHVROLFLWDUUHSDUDFLRQHV
$QWHVGH6ROLFLWDUHO6HUYLFLR7pFQLFR«
/HYHULV
VKRZQFORVHG
38//7223(1
6HDOHGEXUQHUPRGHOV
7KXPEVFUHZV
/RZHURYHQGUDZHUPRGHOV
3UREOHPD &DXVDV3RVLEOHV 4Xp+DFHU
/RVTXHPDGRUHVQRVH
HQFLHQGHQRQRTXHPDQ
GHIRUPDSDUHMD(O
TXHPDGRUIURQWDOGHUH
FKRHVWiGLVHxDGRSDUD
TXHVXVOODPDVVHDQ
XQSRFRPiVSHTXHxDV
HQWUHODVSRVLFLRQHVGH
ODV\ODVHQSXQWR
(VWRHVQRUPDO
(OHQFKXIHHQODFRFLQDQRHVWi
FRPSOHWDPHQWHLQVHUWDGRHQHO
WRPDFRUULHQWHHOpFWULFR
$VHJ~UHVHGHTXHHOFDEOHGHHOHFWULFLGDGHVWpHQFKXIDGR
HQXQWRPDFRUULHQWHFRUUHFWDPHQWHFRQHFWDGRDWLHUUD
/DVKHQGLGXUDVDOFRVWDGRGHO
TXHPDGRUVHSRGUiQDWDVFDU
5HWLUHORVTXHPDGRUHVROLPSLHORVPLVPRV&RQWUROHTXHQR
KD\DFRPLGDTXHPDGDQLJUDVDHQHOiUHDGHOHOHFWURGR
&RQVXOWHODVHFFLyQGH&XLGDGR\OLPSLH]DGHODFRFLQD
(QVDPEOHGHOTXHPDGRULQD
SURSLDGR
$VHJ~UHVHGHTXHODVSDUWHVGHOTXHPDGRUHVWpQLQVWDODGDV
FRUUHFWDPHQWH&RQVXOWH&XLGDGR\OLPSLH]DHQODVHFFLyQ
GHODFRFLQD
/ODPDVGHOTXHPDGRU
PX\JUDQGHVRDPDULOODV
,PSURSHUDLUWRJDVUDWLR 6LODFRFLQDHVFRQHFWDGDDJDV/3FRQWDFWHDODSHUVRQD
TXHLQVWDOyODFRFLQDRTXHKL]RODFRQYHUVLyQ
/RVTXHPDGRUHVVXSHU
ILFLDOHVVHHQFLHQGHQ
SHURHOKRUQRQR
6HSXGRKDEHUPRYLGRODYiOYXOD
GHFLHUUHGHOKRUQRGHIRUPDDF
FLGHQWDOGXUDQWHODOLPSLH]DRDO
PRYHUOR
3DUDFRQWURODUODYiOYXODGHFLHUUHGHJDVGHOKRUQRUHWLUH
HOFDMyQOHD&XLGDGR\OLPSLH]DGHODVHFFLyQGHOKRUQR
3DUDPRGHORVGHOFDMyQGHOKRUQRLQIHULRUUHWLUHHOSDQHOGH
DFFHVRWUDVHURGHVHQURVFDQGRORVWRUQLOORVGHSXOJDUHQODV
HVTXLQDVVXSHULRUL]TXLHUGD\GHUHFKD%XVTXHODSDODQFD
GHFLHUUHGHOJDVHQODSDUWHWUDVHUDGHODFRFLQD
(OFRQWUROGDODVHxDOOXHJR
GHLQJUHVDUHOWLHPSRGH
FRFFLyQRHOWLHPSRGHLQLFLR
2OYLGyLQJUHVDUXQDWHPSHU
DWXUDGHKRUQHDGRRWLHPSRGH
OLPSLH]D
3UHVLRQHODWHFOD%DNH+RUQHDU\ODWHPSHUDWXUDGHVHDGD
RODWHFOD6HOI&OHDQ$XWR/LPSLH]D\HOWLHPSRGHOLPSLH]D
GHVHDGR
/DFRPLGDQRVHKRUQHD
QLVHWXHVWDHQHOKRUQR
VXSHULRU
&RQWUROHVGHOKRUQRFRQILJXUD
GRVGHIRUPDLQFRUUHFWD
/HDODVHFFLyQVREUH8VRGHOKRUQRVXSHULRU
/DSRVLFLyQGHOHVWDQWHHVLQFRUUHFWD
/HDODVHFFLyQVREUH8VRGHOKRUQRVXSHULRU
8VRGHOXWHQVLOLRLQFRUUHFWRRGH
XQXWHQVLOLRGHWDPDxRLQFRUUHFWR
/HDODVHFFLyQVREUH8VRGHOKRUQRVXSHULRU
(OWHUPRVWDWRGHOKRUQRGHEHVHU
DMXVWDGR
/HDODVHFFLyQ$MXVWHHOWHUPRVWDWRGHOKRUQRVXSHULRU£+i
JDORXVWHGPLVPR
(OUHORMQRVHFRQILJXUyFRUUHFWDPHQWH
/HDODVHFFLyQ8VRGHOUHORM\GHOWHPSRUL]DGRU
6HXVySDSHOGHDOXPLQLRGH
IRUPDLQFRUUHFWDHQHOKRUQR
/HDODVHFFLyQ&XLGDGR\OLPSLH]DGHODFRFLQD
(OIRQGRGHOKRUQRQRHVWi
FRUUHFWDPHQWHDMXVWDGRHQVX
SRVLFLyQ
/HDODVHFFLyQ,QVWDODFLyQGHODFRFLQD
(OTXHPDGRUQRVH
HQFLHQGH
(OHQFKXIHHQODFRFLQDQRHVWi
FRPSOHWDPHQWHLQVHUWDGRHQHO
WRPDFRUULHQWHHOpFWULFR
$VHJ~UHVHGHTXHHOFDEOHGHHOHFWULFLGDGHVWpHQFKXIDGR
HQXQWRPDFRUULHQWHFRUUHFWDPHQWHFRQHFWDGRDWLHUUD
(OVXPLQLVWURGHJDVQRIXH
FRQHFWDGRRHQFHQGLGR
&RQVXOWHODV,QVWUXFFLRQHVGH,QVWDODFLyQSURYLVWDVFRQVX
FRFLQD
(OTXHPDGRUGHOSXHQWHQRVH
HQFLHQGH
&RQVXOWHODVHFFLyQ&yPR,OXPLQDUHO4XHPDGRUGHO3XHQWH
SDUDHO0RGHOR3*%

*($SSOLDQFHVFRP
3UREOHPD &DXVDV3RVLEOHV 4Xp+DFHU
/RVTXHPDGRUHVQRVH
HQFLHQGHQFRQW
(VSRVLEOHTXHXQIXVLEOHGHVX
KRJDUVHKD\DTXHPDGRRTXHHO
GLV\XQWRUVHKD\DGHVFRQHFWDGR
5HHPSODFHHOIXVLEOHRUHLQLFLHHOGLV\XQWRU
/DVSLH]DVGHOTXHPDGRUQRIXHU
RQUHHPSOD]DGDVFRUUHFWDPHQ
/HDODVHFFLyQ&XLGDGR\OLPSLH]DGHODFRFLQD
/DFRPLGDQRDVDGH
IRUPDFRUUHFWDHQHO
KRUQRVXSHULRU
&RQWUROHVGHOKRUQRFRQILJXUDGRV
GHIRUPDLQFRUUHFWD
$VHJ~UHVHGHSUHVLRQDUODWHFOD%URLO+L/R$VDU$OWR
%DMR
/DSXHUWDGHOKRUQRQRVHFHUUy
FRUUHFWDPHQWH
/HDODVHFFLyQVREUH8VRGHOKRUQRVXSHULRU
6HXVyXQDSRVLFLyQLQFRUUHFWD
SDUDODUHSLVD
/HDOD*XtDSDUD$VDU
6HFRFLQyFRPLGDHQXQDROOD
FDOLHQWH
3DUDXQPHMRUUHVXOWDGRXVHXQDROODGLVHxDGDSDUDDVDU
$VHJ~UHVHGHTXHHVWpIUtD
8WHQVLOLRGHFRFLQDLQDGHFXDGR
SDUDDVDU
3DUDXQPHMRUUHVXOWDGRXVHXQDROODGLVHxDGDSDUDDVDU
(OIRQGRGHOKRUQRQRHVWiFRUUHFWD
PHQWHDMXVWDGRHQVXSRVLFLyQ
/HDODVHFFLyQ,QVWDODFLyQGHODFRFLQD
7HPSHUDWXUDGHOKRUQRVX
SHULRUGHPDVLDGRFDOLHQWH
RGHPDVLDGRIUtD
(OWHUPRVWDWRGHOKRUQRGHEHVHU
DMXVWDGR
/HDODVHFFLyQ$MXVWHHOWHUPRVWDWRGHOKRUQRVXSHULRU£+i
JDORXVWHGPLVPR
(OUHORM\HOWHPSRUL]D
GRUQRIXQFLRQDQ
(OHQFKXIHHQODFRFLQDQRHVWi
FRPSOHWDPHQWHLQVHUWDGRHQHO
WRPDFRUULHQWHHOpFWULFR
$VHJ~UHVHGHTXHHOFDEOHGHHOHFWULFLGDGHVWpHQFKXIDGR
HQXQWRPDFRUULHQWHFRUUHFWDPHQWHFRQHFWDGRDWLHUUD
(VSRVLEOHTXHXQIXVLEOHGHVXKRJDU
VHKD\DTXHPDGRRTXHHOGLV\XQWRU
VHKD\DGHVFRQHFWDGR
5HHPSODFHHOIXVLEOHRUHLQLFLHHOGLV\XQWRU
&RQWUROHVGHOKRUQRFRQILJXUDGRV
GHIRUPDLQFRUUHFWD
/HDODVHFFLyQ8VRGHOUHORM\GHOWHPSRUL]DGRU
/DOX]GHOKRUQRQR
IXQFLRQD
/DOiPSDUDHVWiIORMDRSUHVHQWD
GHIHFWRV
$MXVWHRUHHPSODFHODOiPSDUD
(OHQFKXIHHQODFRFLQDQRHVWi
FRPSOHWDPHQWHLQVHUWDGRHQHO
WRPDFRUULHQWHHOpFWULFR
$VHJ~UHVHGHTXHHOFDEOHGHHOHFWULFLGDGHVWpHQFKXIDGR
HQXQWRPDFRUULHQWHFRUUHFWDPHQWHFRQHFWDGRDWLHUUD
(OKRUQRVXSHULRUQR
UHDOL]DODDXWROLPS
LH]D
/DWHPSHUDWXUDGHOKRUQRHVWi
GHPDVLDGRFDOLHQWHSDUDFRQILJXUDU
XQIXQFLRQDPLHQWRGHDXWROLPSLH]D
(VSHUHDTXHODFRFLQDVHHQIUtHDWHPSHUDWXUDDPELHQWH\
UHLQLFLHORVFRQWUROHV
&RQWUROHVGHOKRUQRFRQILJXUDGRV
GHIRUPDLQFRUUHFWD
/HDODVHFFLyQ+RUQRVXSHULRUFRQIXQFLyQGHDXWROLPSLH]D
(QPRGHORVFRQWUDEDSDUDSXHU
WDODSXHUWDGHOKRUQRQRHVWiHQ
ODSRVLFLyQEORTXHDGD
$VHJ~UHVHGHPRYHUODPDQLMDGHODWUDEDGHODSXHUWDWRWDO
PHQWHKDFLDODGHUHFKD
6RQLGRGH´FKLVSRU
URWHRµR´WUDTXHRµ
eVWHHVHOVRQLGRGHPHWDOFDOHQWiQ
GRVHRHQIULiQGRVHGXUDQWHODV
IXQFLRQHVGHFRFFLyQ\OLPSLH]D
(VWRHVQRUPDO

&RQVHMRVSDUDOD6ROXFLyQ
GH3UREOHPDV
3UREOHPD &DXVDV3RVLEOHV 4Xp+DFHU
([FHVRGHKXPR +D\H[FHVRGHVXFLHGDG 3UHVLRQHODWHFOD&OHDU2II%RUUDU$SDJDURJLUHODSHULOOD
GHOKRUQRVXSHULRUDODSRVLFLyQ2))$SDJDGR\SUHVLRQHOD
WHFOD&OHDU2II%RUUDU$SDJDU$EUDODVYHQWDQDVSDUD
OLEHUDUHOKXPRHQODKDELWDFLyQ(VSHUHKDVWDTXHODOX]
/2&.(''2253XHUWD7UDEDGDGHVDSDUH]FD/LPSLHHO
H[FHVRGHVXFLHGDG\UHLQLFLHHOFLFORGHOLPSLH]D
/DSXHUWDGHOKRUQRQR
VHDEULUiOXHJRGHXQ
FLFORGHOLPSLH]D
(OKRUQRHVWiGHPDVLDGRFDOLHQWH (VSHUHDTXHHOKRUQRVHHQIUtHSRUGHEDMRGHODWHPSHU
DWXUDGHEORTXHR1REORTXHHODSXHUWDFRQODWUDEDSDUD
SXHUWDH[FHSWRDOXVDUODIXQFLyQDXWROLPSLH]D
(OKRUQRQROLPSLD
OXHJRGHXQFLFORGH
OLPSLH]D
/RVFRQWUROHVGHOKRUQRQRHVWiQ
FRUUHFWDPHQWHFRQILJXUDGRV
/HDODVHFFLyQ+RUQRVXSHULRUFRQIXQFLyQGHDXWROLPSLH]D
(OKRUQRHVWDEDGHPDVLDGRVXFLR /LPSLHGHUUDPHVH[FHVLYRVDQWHVGHLQLFLDUHOFLFORGH
OLPSLH]D(VSRVLEOHTXHVHDQHFHVDULRXVDUDXWROLPSLH]DQ
XHYDPHQWHHQKRUQRVFRQPXFKDVXFLHGDGRSRUSHUtRGRV
GHWLHPSRPiVSURORQJDGRV
´'RRUµ3XHUWDDSDUHFH
HQODSDQWDOODHQPRGHORV
FRQSXHUWDFRQWUDED
/DPDQLMDGHODWUDEDVHPRYLyD
ODGHUHFKDSHURVHVHOHFFLRQyXQ
SURJUDPDTXHQRHVDXWROLPS
LH]D
0XHYDODPDQLMDGHODWUDEDKDFLDODGHUHFKDVyORDOFRQILJ
XUDUHOFLFORGHDXWROLPSLH]D
´/2&.'225µ3XHUWD
7UDEDGDWLWLODHQOD
SDQWDOOD
(OFLFORGHDXWROLPSLH]DIXHVH
OHFFLRQDGRSHURODSXHUWDQRHVWi
FHUUDGD\HQPRGHORVFRQWUDED
ODPLVPDQRVHPRYLyWRWDOPHQWH
DODGHUHFKD
&LHUUHODSXHUWDGHOKRUQR\HQPRGHORVFRQWUDEDPXHYD
ODWUDEDWRWDOPHQWHKDFLDODGHUHFKD
/DOX]GH/2&.('
'2253XHUWD%OR
TXHDGDHVWiHQFHQ
GLGDFXDQGRGHVHD
FRFLQDU
/DSXHUWDGHOKRUQRHVWiEOR
TXHDGDGHELGRDTXHODWHP
SHUDWXUDLQWHULRUGHOKRUQR
QRGHVFHQGLySRUGHEDMRGHOD
WHPSHUDWXUDGHEORTXHR
3UHVLRQHODWHFOD&OHDU2II%RUUDU$SDJDU(VSHUHDTXHHO
KRUQRVHHQIUtH\OXHJRHQPRGHORVFRQWUDEDSDUDSXHUWD
GHVWUDEHODSXHUWD
´)²\XQQ~PHURR
OHWUDµWLWLODHQODSDQ
WDOOD
(QPRGHORVFRQXQDWUDEDSDUD
SXHUWDVLDSDUHFHXQFyGLJRGH
HUURUGHIXQFLyQGXUDQWHHOFLFORGH
DXWROLPSLH]DFRQWUROHODWUDEDGH
ODSXHUWDGHOKRUQR
(VSRVLEOHTXHODWUDEDVHKD\DPRYLGRLQFOXVRDXQTXHVyOR
KD\DVLGROHYHPHQWHGHODSRVLFLyQGHEORTXHR$VHJ~UHVH
GHTXHODWUDEDVHDPRYLGDKDFLDODGHUHFKDWDQWRFRPR
VHDSRVLEOH
7LHQHXQFyGLJRGHHUURUGH
IXQFLyQ
3UHVLRQHODWHFOD&OHDU2II%RUUDU$SDJDU3HUPLWDTXHHO
KRUQRVHHQIUtHGXUDQWHXQDKRUD&RORTXHHOKRUQRQXHYD
PHQWHHQIXQFLRQDPLHQWR
6LHOFyGLJRGHIXQFLyQVHUHSLWH 'HVFRQHFWHWRWDOPHQWHODFRUULHQWHGHOKRUQRSRUPLQXWRV
\OXHJRYXHOYDDFRQHFWDUODPLVPD6LHOFyGLJRGHHUURUGH
IXQFLyQVHUHSLWHOODPHDOVHUYLFLRWpFQLFR
/DVUHSLVDVGHOKRUQR
VRQGLItFLOHVGHGHVOL]DU
/DVUHSLVDVGHQtTXHOVLHVWiHTXL
SDGDGHHVWHPRGRIXHURQOLPSLD
GDVHQHOFLFORGHDXWROLPSLH]D/DV
UHSLVDVJULVHVFRQUHFXEULPLHQWR
GHSRUFHODQDVLHVWiHTXLSDGDGH
HVWHPRGRVHOLPSLDURQGHIRUPD
LQFRUUHFWD
$SOLTXHXQDFDQWLGDGUHGXFLGDGHDFHLWHYHJHWDODXQD
WRDOODGHSDSHO\OLPSLHORVH[WUHPRVGHODVUHSLVDVFRQ
GLFKDWRDOODGHSDSHO1RURFtHFRQ3DPRFXDOTXLHURWUR
OXEULFDQWHHQHVSUD\
´3UREHµ6RQGD
DSDUHFHHQODSDQWDOOD
HQDOJXQRVPRGHORV
(VWROHHVWiUHFRUGDQGRTXHLQJUHVH
XQDWHPSHUDWXUDGHVRQGDOXHJRGH
HQFKXIDUODVRQGD
,QJUHVHXQDWHPSHUDWXUDGHVRQGD
$QWHVGH6ROLFLWDUHO6HUYLFLR7pFQLFR«

3UREOHPD &DXVDV3RVLEOHV 4Xp+DFHU
/DSDQWDOODTXHGDHQ
EODQFR
(VSRVLEOHTXHXQIXVLEOHGHVX
KRJDUVHKD\DTXHPDGRRTXHHO
GLV\XQWRUVHKD\DGHVFRQHFWDGR
5HHPSODFHHOIXVLEOHRUHLQLFLHHOGLV\XQWRU
(OUHORMHVWiHQHOPRGRGHSDQ
WDOODRVFXUD
/HDODVIXQFLRQHV(VSHFLDOHVGHODVHFFLyQGHFRQWUROGHO
KRUQR
/DSDQWDOODWLWLOD
&RUWHGHFRUULHQWH 5HLQLFLHHOUHORM
1RVHORJUDTXHOD
SDQWDOODPXHVWUH´6)µ
/DVWHFODVGHFRQWUROGHOKRUQR
QRVHSUHVLRQDURQGHIRUPD
DGHFXDGD
/DVWHFODV%DNH+RUQHDU\%URLO+L/R$VDU$OWR%DMR
VHGHEHUiQSUHVLRQDUDOPLVPRWLHPSR\PDQWHQHUSRU
VHJXQGRV
&RUWHGHFRUULHQWHHOUHORM
WLWLOD
&RUWHRH[FHVRGHFRUULHQWH 5HLQLFLHHOUHORM6LHOKRUQRHVWXYRHQXVRGHEHUiUHLQLFLDUHO
PLVPRSUHVLRQDQGRODWHFOD&OHDU2II%RUUDU$SDJDUFRQ
ILJXUDQGRHOUHORM\UHLQLFLDQGRFXDOTXLHUIXQFLyQGHFRFFLyQ
2ORUD´TXHPDGRµR
´DFHLWHµGHVGHODYHQ
WLODFLyQ
(VWRHVQRUPDOHQXQKRUQR
QXHYR\GHVDSDUHFHUiFRQHO
UiSLGDPHQWH
$EUDODYHQWDQDSDUDYHQWLODUODKDELWDFLyQ
2ORUIXHUWH 8QRORUHQODDLVODFLyQDOUHGHGRU
GHOLQWHULRUGHOKRUQRHVQRUPDO
GHVGHODVSULPHUDVYHFHVHQTXH
HOKRUQRHVXVDGR
(VWRHVWHPSRUDULR
5XLGRGHOYHQWLODGRU
HQDOJXQRVPRGHORVY
8QYHQWLODGRUSDUDHQIULDURXQ
YHQWLODGRUSRUFRQYHFFLyQGHSHQGL
HQGRGHODIXQFLyQTXHHVWpXVDQGR
VHSRGUiQHQFHQGHU
(VWRHVQRUPDO(OYHQWLODGRUGHFRQYHFFLyQIXQFLRQDUi
KDVWDTXHODIXQFLyQILQDOLFHRODSXHUWDVHDEUD
(OFDMyQQRVHGHVOL]D
GHIRUPDSDUHMDRVH
DUUDVWUD
(OFDMyQHVWiGHVDOLQHDGR ([WLHQGDWRWDOPHQWHHOFDMyQ\HPSXMHHOPLVPRWRWDOPHQWH
KDFLDDGHQWUR&RQVXOWHODVHFFLyQ&XLGDGR\OLPSLH]DGHOD
FRFLQD
(OFDMyQHVWiVREUHFDUJDGRROD
FDUJDHVWiGHVEDODQFHDGD
5HGX]FDHOSHVR5HGLVWULEX\DORVFRQWHQLGRVGHOFDMyQ
(OFDMyQGHOKRUQRLQIH
ULRURHOFDMyQFDOHQWD
GRUQRIXQFLRQD
(VSRVLEOHTXHXQIXVLEOHGHVX
KRJDUVHKD\DTXHPDGRRTXHHO
GLV\XQWRUVHKD\DGHVFRQHFWDGR
5HHPSODFHHOIXVLEOHRUHLQLFLHHOGLV\XQWRU
(OKRUQRHVWiUHDOL]DQGRODIXQFLyQ
GHDXWROLPSLH]D
(VSHUHDTXHHOFLFORGHDXWROLPSLH]DILQDOLFH\TXHHOKRUQR
VHHQIUtH
/RVFRQWUROHVHVWiQFRQILJXUDGRVGH
IRUPDLQFRUUHFWD
&RQVXOWHODVHFFLyQGHOFDMyQFDOHQWDGRURODVHFFLyQGHO
KRUQRLQIHULRU
&RQGHQVDFLyQH[FH
VLYDHQHOFDMyQ
/tTXLGRHQHOFDMyQ 5HWLUHHOOtTXLGR
&RPLGDVQRFXELHUWDV &XEUDODFRPLGDFRQXQDWDSDRSDSHOGHDOXPLQLR
/DFRQILJXUDFLyQGHWHPSHUDWXUDHV
GHPDVLDGRDOWD
5HGX]FDODFRQILJXUDFLyQGHWHPSHUDWXUD
/DFRPLGDVHVHFD
HQHOFDMyQGHOKRUQR
LQIHULRURHQHOFDMyQ
FDOHQWDGRU
(VFDSHGHKXPHGDG &XEUDODFRPLGDFRQXQDWDSDRSDSHOGHDOXPLQLR
'UDZHUQRWIXOO\FORVHG (PSXMHHOFDMyQKDFLDDGHQWURKDVWDTXHODWUDEDTXH
DMXVWH
*($SSOLDQFHVFRP

■9LDMHVGHOWpFQLFRGHOVHUYLFLRDVXKRJDUSDUDHQVHxDUOHD
XVDUHOSURGXFWR
■,QVWDODFLyQLQDGHFXDGDHQWUHJDRPDQWHQLPLHQWR
■3)DOODVRGDxRVGHOSURGXFWRHQFDVRGHDEXVRPDOXVRR
XVRSDUDSURSyVLWRVGLIHUHQWHVDORULJLQDORXVRFRPHUFLDO
■5HHPSOD]RGHIXVLEOHVGHODFDVDRUHLQLFLRGHGLV\XQWRUHV
■'DxRVRFDVLRQDGRVVREUHHOSURGXFWRSRUDFFLGHQWH
LQFHQGLRLQXQGDFLRQHVRFDWiVWURIHVQDWXUDOHV
■'DxRVFRQVHFXHQWHVRLQFLGHQWDOHVFDXVDGRVSRUSRVLEOHV
GHIHFWRVVREUHHVWHSURGXFWR
■'DxRFDXVDGRGHVSXpVGHODHQWUHJD
■3URGXFWRQRDFFHVLEOHSDUDEULQGDUHOVHUYLFLRUHTXHULGR
■5HHPSOD]RGHODEDWHUtDHQPRGHORVLQDOiPEULFRV
4Xp1R&XEULUi*(
(VWDJDUDQWtDVHH[WLHQGHDOFRPSUDGRURULJLQDO\DFXDOTXLHUGXHxRVXEVLJXLHQWHGHSURGXFWRVFRPSUDGRVSDUD
XVRKRJDUHxRGHQWURGH((886LHOSURGXFWRVHHQFXHQWUDHQXQiUHDGRQGHQRVHHQFXHQWUDGLVSRQLEOHHOVHUYLFLR
WpFQLFRGHXQ3URYHHGRUGH6HUYLFLRGH*($XWRUL]DGRXVWHGVHUiUHVSRQVDEOHSRUHOFRVWRGHXQYLDMHRVHSRGUi
UHTXHULUTXHWUDLJDHOSURGXFWRDXQD8ELFDFLyQGHO6HUYLFLR7pFQLFRGH*($XWRUL]DGRSDUDUHFLELUHOVHUYLFLR(Q
$ODVNDODJDUDQWtDH[FOX\HHOFRVWRGHHQYtRROODPDGDVGHOVHUYLFLRDVXKRJDU
$OJXQRVHVWDGRVQRSHUPLWHQODH[FOXVLyQROLPLWDFLyQGHGDxRVIRUWXLWRVRFRQVHFXHQWHV(VWDJDUDQWtDOHGD
GHUHFKRVOHJDOHVHVSHFtILFRV\HVSRVLEOHTXHWHQJDRWURVGHUHFKRVOHJDOHVTXHYDUtDQHQWUHXQHVWDGR\RWUR3DUD
FRQRFHUFXiOHVVRQVXVGHUHFKRVOHJDOHVFRQVXOWHDODRILFLQDGHDVXQWRVGHOFRQVXPLGRUORFDORHVWDWDORDO)LVFDO
GHVX(VWDGR
*DUDQWH*HQHUDO(OHFWULF&RPSDQ\/RXLVYLOOH.<
3RUHO3HUtRGRGH *(5HHPSOD]DUi
8Q$xR &XDOTXLHUSDUWHGHODFRFLQDTXHIDOOHGHELGRDXQGHIHFWRHQORVPDWHULDOHVRODIDEULFDFLyQ'XUDQWH
'HVGHODIHFKDGHOD HVWDJDUDQWtDOLPLWDGDGHXQDxR*(WDPELpQSURYHHUiVLQFRVWRWRGRHOWUDEDMR\HOVHUYLFLRHQ
FRPSUDRULJLQDO HOKRJDUUHODFLRQDGRFRQHOUHHPSOD]RGHODSDUWHTXHSUHVHQWHGHIHFWRV
*DUDQWtDGHOD&RFLQDD*DVGH*()RUFXVWRPHUVLQWKH8QLWHG6WDWHV
7RGRHOVHUYLFLRGHJDUDQWtDHVSURYLVWRSRUQXHVWURV&HQWURVGH6HUYLFLR
GH)DEULFDFLyQRXQWpFQLFRDXWRUL]DGRGH6HUYLFLRDO&OLHQWH&XVWRPHU
&DUH3XHGHSURJUDPDUXQDFRQVXOWDDOVHUYLFLRWpFQLFRDWUDYpVGHO
,QWHUQHWODVGHOGtDYLVLWiQGRQRVHQ*($SSOLDQFHVFRPROODPDQGR
DO*(&$5(6&XDQGROODPHSDUDVROLFLWDUHOVHUYLFLR
WHQJDORVQ~PHURVGHVHULH\GHPRGHORGLVSRQLEOHV
$EURFKHVXUHFLERDTXt3DUD
DFFHGHUDOVHUYLFLRWpFQLFR
GHDFXHUGRFRQODJDUDQWtD
GHEHUiFRQWDUFRQODSUXHED
GHODIHFKDRULJLQDOGHFRPSUD
(;&/86,Ï1'(*$5$17Ë$6,03/Ë&,7$6³6X~QLFD\H[FOXVLYDDOWHUQDWLYDHVODUHSDUDFLyQGHOSURGXFWR
FRPRVHLQGLFDHQOD*DUDQWtD/LPLWDGD/DVJDUDQWtDVLPSOtFLWDVLQFOX\HQGRJDUDQWtDVLPSOtFLWDVGH
FRPHUFLDELOLGDGRFRQYHQLHQFLDVREUHXQSURSyVLWRSDUWLFXODUVHOLPLWDQDXQDxRRDOSHUtRGRPiVFRUWR
SHUPLWLGRSRUODOH\

1RWHV
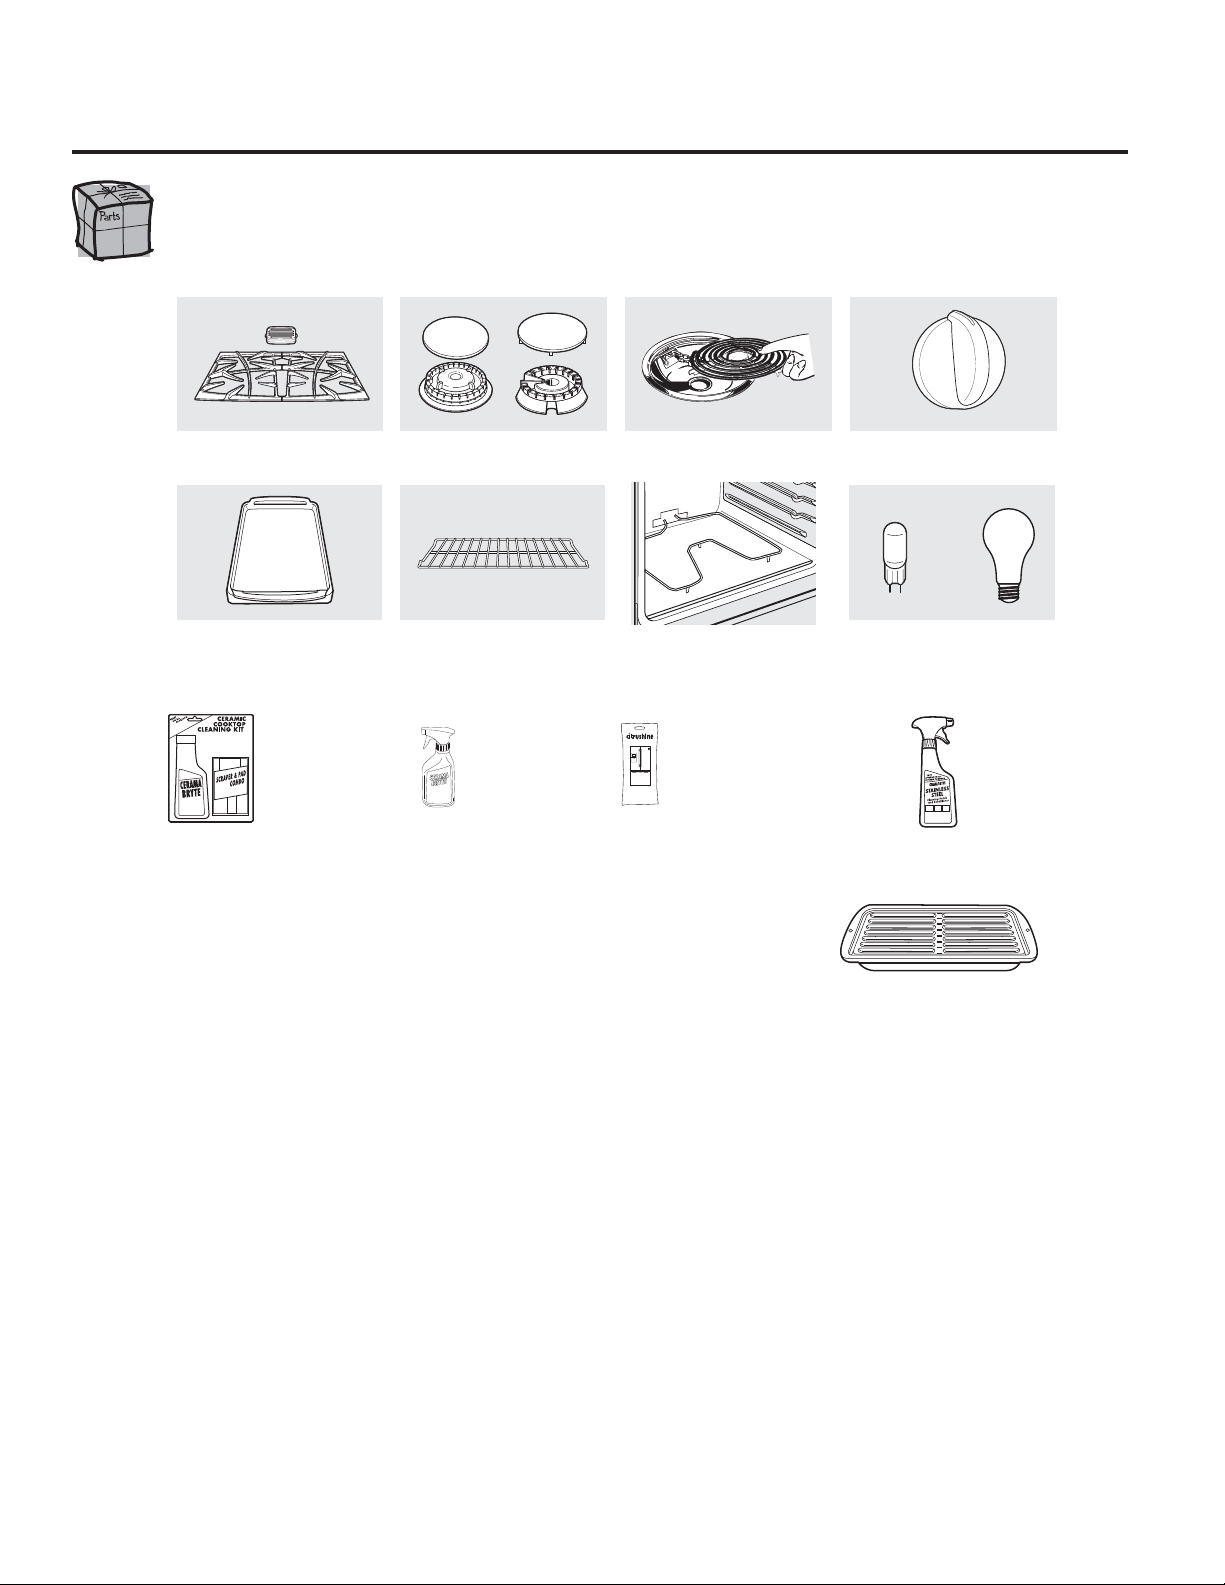
$FFHVRULRV
¢%XVFD$OJR0iV"1RWDOODFFHVVRULHVDUHDYDLODEOHIRUDOOPRGHOV
3XHGHHQFRQWUDUHVWRVDFFHVRULRV\PXFKRPiVHQ*($SSOLDQFH3DUWVFRP((88RHQ
ZZZ*($SSOLDQFHVFD&DQDGiROODPDQGRDO((88RDO
&DQDGiGXUDQWHHOKRUDULRFRPHUFLDOKDELWXDO7HQJDDPDQRVXQ~PHURGHPRGHOR
(OHPHQWRVGHVXSHUILFLH\
EDQGHMDVFROHFWRUDV
3DUULOODV &DEH]DOHVRWDSDVGH
TXHPDGRUHVGHVXSHUILFLH
(OHPHQWRVGHOKRUQR /iPSDUDVGHOX]
3HULOODV
(VWDQWHVGHO+RUQR
R
3ODQFKD
£3UXHEHHVWRVRWURVH[FHOHQWHVSURGXFWRVSDUDTXHVXFRFLQDVHYHDHVWXSHQGD
£$SURYHFKHDOPi[LPRVXEDQGHMDSDUDDVDU1RSDUDXVDUFRQPRGHORVGHFDMyQDVDGRU
£8WLOLFHVXEDQGHMD\WDSDGHUHMLOODSDUDDVDUKDPEXUJXHVDVIUXWRVGHPDUILOHWHVYHJHWDOHVSDQFHWD
FRVWLOODV\PXFKRPiV/DEDQGHMDLQIHULRUUHWLHQHHOH[FHVRGHJUDVDV\DFHLWHV
3LH]D*(JHQXLQD
)iFLOGHOLPSLDU
*DUDQWtDGHXQDxR
£2IHUWDGHWLHPSROLPLWDGR£(QYtRVLQFDUJR
&XDQGRVROLFLWHODEDQGHMDSDUDDVDUGHQWURGHORVGtDVGHKDEHUDGTXLULGRVXSURGXFWRGHFRFLQD*(
3HTXHxD *UDQGH ([WUDJUDQGH
1GHSLH]D :%; :%; :%;
'LPHQVLRQHV µ$[µ$[µ3 µ$[µ$[µ3 µ$[µ$[µ3
/DEDQGHMDSDUDDVDUJUDQGHHVWiQGDUQRHQWUDHQFRFLQDVGHSXOJDGDV
/DEDQGHMDH[WUDJUDQGHQRHQWUDHQKRUQRVGHSDUHGHVGHSXOJDGDVHPSRWUDGDVGHSXOJDGDVRFRFLQDVGHSXOJDGDV
/ODPHDORXWLOLFHHVWHIRUPXODULRSDUDHQYLDUVXVROLFLWXGSRUFRUUHR
*(3DUWV32%R[0HPSKLV71
)RUPXODULRGHVROLFLWXGGHODEDQGHMDSDUDDVDU
&DQWLGDG BBBBBBBBBBBBBBBBBBB 1~PHURGHSLH]DBBBBBBBBBBBBBBBBBBBBBBBBBBBBBBBBBBBBBBBBBBBBBBBBBBBBBBBBBBBBB
BBBBBBBBBBBBBBBBBBBB BBBBBBBBBBBBBBBBBBBBBBBBBBBBBBBBBBBBBBBBBBBBBBBBBBBBBBBBBBBBBB
BBBBBBBBBBBBBBBBBBBB BBBBBBBBBBBBBBBBBBBBBBBBBBBBBBBBBBBBBBBBBBBBBBBBBBBBBBBBBBBBBB
1~PHURGHPRGHORBBBBBBBBBBBB 1~PHURGHVHULH BBBBBBBBBBBBBBBB 0DUFDBBBBBBBBBBBBBB )HFKDGHFRPSUDBBBBBBBBB
1RPEUH BBBBBBBBBBBBBBBBBBBBBBBBBBBBBBBBBBBBBBBBBBBBBB $SHOOLGRBBBBBBBBBBBBBBBBBBBBBBBBBBBBBBBBBBBBBBBBBBBBBBBBB
'LUHFFLyQ BBBBBBBBBBBBBBBBBBBBBBBBBBBBBBBBBBBBBBBBBBBBBBBBBBBBBBBBBBBBBBBBBBBBBBBBBBBBBBBBBBBBBBBBBBBBBBBBBBBBBBBB
&LXGDG BBBBBBBBBBBBBBBBBBBBBBBBBBBBBBBBBBBBBBBBBBBBBBB (VWDGRBBBBBBBBBB &yGLJR3RVWDOBBBBBBBBBBBBBBBBBBBBBBBBB
7HOpIRQRBBBBBBBBBBBBBBBBBBBBBBBBBBBBBBBBBBBBBBBBBBBBBB &RUUHRHOHFWUyQLFRBBBBBBBBBBBBBBBBBBBBBBBBBBBBBBBBBBBBBBBB
&KHFN BBBBBB *LURSRVWDOBBBBBB
3DUDFRQVXOWDUVREUHORVSUHFLRVDFWXDOHVOODPHDO7RGDVODVyUGHQHVFRQWDUMHWDGHFUpGLWRVHGHEHUiQUHDOL]DU
HQIRUPDWHOHIyQLFD
BBBBBBBBBBBBBBBBBBBBBBBBBBBBBBBBBBBBBBBBBBBBBBBBB
✁
30;
&HUDPD%U\WH
/LPSLDGRU
GHDUWHIDFWRV
GHDFHUR
LQR[LGDEOH
:;; :;;
&HUDPD%U\WH
5HWRFDU6SUD\
&LWUXVKLQH
7RDOOLWDVSDUD
SXOLUDUWHIDFWRV
GHDFHUR
LQR[LGDEOH
STAINESS STEEL WIPES
:;;*&6
&HUDPD%U\WH
.LW
GHOLPSLH]D
GHDQDIHV
YLWURFHUiPLFRV
,QFOX\HOLPSLDGRU
UDVTXHWD\SDxR
7RGRHOVHUYLFLRGHJDUDQWtDHVSURYLVWRSRUQXHVWURV&HQWURVGH
6HUYLFLRGH)DEULFDFLyQRXQWpFQLFRDXWRUL]DGRGH6HUYLFLRDO
&OLHQWH&XVWRPHU&DUH3DUDVROLFLWDUHOVHUYLFLRWpFQLFROODPH
DO&XDQGROODPHSDUDVROLFLWDUHOVHUYLFLRWHQJD
ORVQ~PHURVGHVHULH\PRGHORGLVSRQLEOHV
■9LDMHVGHOWpFQLFRGHOVHUYLFLRDVXKRJDUSDUDHQVHxDUOHD
XVDUHOSURGXFWR
■,QVWDODFLyQLQDGHFXDGDHQWUHJDRPDQWHQLPLHQWR
■)DOODVRGDxRVGHOSURGXFWRHQFDVRGHDEXVRPDOXVRR
XVRSDUDSURSyVLWRVGLIHUHQWHVDORULJLQDORXVRFRPHUFLDO
■5HHPSOD]RGHIXVLEOHVGHODFDVDRUHLQLFLRGHGLV\XQWRUHV
■'DxRVRFDVLRQDGRVVREUHHOSURGXFWRSRUDFFLGHQWH
LQFHQGLRLQXQGDFLRQHVRFDWiVWURIHVQDWXUDOHV
■'DxRVFRQVHFXHQWHVRLQFLGHQWDOHVFDXVDGRVSRUSRVLEOHV
GHIHFWRVVREUHHVWHSURGXFWR
■'DxRFDXVDGRGHVSXpVGHODHQWUHJD
■3URGXFWRQRDFFHVLEOHSDUDEULQGDUHOVHUYLFLRUHTXHULGR
■5HHPSOD]RGHODEDWHUtDHQPRGHORVLQDOiPEULFRV
4Xp1R&XEULUi0DEH
3RUHO3HUtRGRGH 0DEH5HHPSOD]DUi
8Q$xR &XDOTXLHUSDUWHGHODFRFLQDTXHIDOOHGHELGRDXQGHIHFWRHQORVPDWHULDOHVRODIDEULFDFLyQ'XUDQWH
'HVGHODIHFKDGHOD HVWDJDUDQWtDOLPLWDGDGHXQDxR0DEHWDPELpQSURYHHUiVLQFRVWRWRGRHOWUDEDMR\HOVHUYLFLRHQ
FRPSUDRULJLQDO OKRJDUUHODFLRQDGRFRQHOUHHPSOD]RGHODSDUWHTXHSUHVHQWHGHIHFWRV
(/*$5$17(12(65(63216$%/(325&8$/48,(5'$f2&216(&8(17(
*DUDQWH0$%(&$1$'$,1&
*DUDQWtDGHOD&RFLQDD*DVGH*(3DUDFOLHQWHVHQ&DQDGi
$EURFKHVXUHFLERDTXt3DUD
DFFHGHUDOVHUYLFLRWpFQLFR
GHDFXHUGRFRQODJDUDQWtD
GHEHUiFRQWDUFRQODSUXHED
GHODIHFKDRULJLQDOGHFRPSUD
(;&/86,Ï1'(*$5$17Ë$6,03/Ë&,7$6³6X~QLFD\H[FOXVLYDDOWHUQDWLYDHVODUHSDUDFLyQGHOSURGXFWR
FRPRVHLQGLFDHQOD*DUDQWtD/LPLWDGD/DVJDUDQWtDVLPSOtFLWDVLQFOX\HQGRJDUDQWtDVLPSOtFLWDVGH
FRPHUFLDELOLGDGRFRQYHQLHQFLDVREUHXQSURSyVLWRSDUWLFXODUVHOLPLWDQDXQDxRRDOSHUtRGRPiVFRUWR
SHUPLWLGRSRUODOH\

6RSRUWHDO&OLHQWH
6LWLR:HEGH(OHFWURGRPpVWLFRVGH*( (Q((88*($SSOLDQFHVFRP
¢'HVHDUHDOL]DUXQDFRQVXOWDRQHFHVLWDD\XGDFRQVXHOHFWURGRPpVWLFR"£,QWHQWHDWUDYpVGHO6LWLR:HEGH
(OHFWURGRPpVWLFRVGH*(ODVKRUDVGHOGtDFXDOTXLHUGtDGHODxR3DUDPD\RUFRQYHQLHQFLD\XQVHUYLFLRPiV
UiSLGRDKRUDSXHGHGHVFDUJDUHO0DQXDOGHO3URSLHWDULRRUGHQDUSLH]DVRLQFOXVRSURJUDPDUHOVHUYLFLRWpFQLFRD
WUDYpVGH,QWHUQHW(Q&DQDGiZZZ*($SSOLDQFHVFD
6HUYLFLR3URJUDPDGR (Q((88*($SSOLDQFHVFRP
(OVHUYLFLRGHUHSDUDFLyQGHH[SHUWRVGH*(HVWiDVyORXQSDVRGHVXSXHUWD£&RQpFWHVHDWUDYpVGH,QWHUQHW
\SURJUDPHVXVHUYLFLRDVXFRQYHQLHQFLDODVKRUDVGHOGtDFXDOTXLHUGtDGHODxR2OODPHDO*(&$5(6
GXUDQWHHOKRUDULRFRPHUFLDOKDELWXDO
,Q&DQDGDFDOO
(VWXGLRGH'LVHxRGHOD9LGD5HDO (Q((88*($SSOLDQFHVFRP
*(DSR\DHOFRQFHSWRGH'LVHxR8QLYHUVDO²SURGXFWRVVHUYLFLRV\DPELHQWHVTXHSXHGHQVHUXVDGRVSRUSHUVRQDVGH
WRGDVODVHGDGHVWDPDxRV\FDSDFLGDGHV5HFRQRFHPRVODQHFHVLGDGGHUHDOL]DUGLVHxRVSDUDXQDDPSOLDJDPDGH
KDELOLGDGHVHLQFDSDFLGDGHVItVLFDV\PHQWDOHV3DUDPiVGHWDOOHVVREUHODVDSOLFDFLRQHVGH'LVHxR8QLYHUVDOGH*(
LQFOX\HQGRLGHDVGHGLVHxRGHFRFLQDVSDUDSHUVRQDVFRQLQFDSDFLGDGHVYLVLWHQXHVWURVLWLRZHEKR\6REUHFDVRVGH
LQFDSDFLGDGDXGLWLYDFRPXQtTXHVHDO7''*($&
(Q&DQDGiFRPXQtTXHVHFRQ 0DQDJHU&RQVXPHU5HODWLRQV0DEH&DQDGD,QF
6XLWH)DFWRU\/DQH
0RQFWRQ1%(&0
*DUDQWtDV([WHQGLGDV (Q((88*($SSOLDQFHVFRP
$GTXLHUDXQDJDUDQWtDH[WHQGLGDGH*(\FRQR]FDVREUHGHVFXHQWRVHVSHFLDOHVTXHHVWiQGLVSRQLEOHVPLHQWUDVVX
JDUDQWtDD~QHVWiYLJHQWH/DSXHGHDGTXLULUDWUDYpVGH,QWHUQHWHQFXDOTXLHUPRPHQWRROODPDQGRDO
GXUDQWHHOKRUDULRFRPHUFLDOKDELWXDO/RV6HUYLFLRVSDUDHO&RQVXPLGRU+RJDUHxRGH*(D~QHVWDUiQDOOtFXDQGRVX
JDUDQWtDFDGXTXH(Q&DQDGiOODPHDO
3LH]DV\$FFHVRULRV (Q((88*($SSOLDQFH3DUWVFRP
,QGLYLGXRVFDOLILFDGRVSDUDUHDOL]DUHOVHUYLFLRWpFQLFRGHVXVSURSLRVHOHFWURGRPpVWLFRVSRGUiQVROLFLWDUHOHQYtRGHSLH]DV
RDFFHVRULRVGLUHFWDPHQWHDVXVKRJDUHVVHDFHSWDQODVWDUMHWDV9,6$0DVWHU&DUG\'LVFRYHU2UGHQHKR\DWUDYpVGH
,QWHUQHWODVKRUDVGHOGtDRHQIRUPDWHOHIyQLFDOODPDQGRDOGXUDQWHHOKRUDULRFRPHUFLDOKDELWXDO
/DVLQVWUXFFLRQHVTXHILJXUDQHQHVWHPDQXDOFXEUHQORVSURFHGLPLHQWRVTXHVHUiQUHDOL]DGRVSRUFXDOTXLHU
XVXDULR2WURVVHUYLFLRVWpFQLFRVJHQHUDOPHQWHGHEHUtDQVHUGHULYDGRVDSHUVRQDOFDOLILFDGRGHOVHUYLFLR6HGHEHUi
WHQHUFXLGDGR\DTXHXQDUHSDUDFLyQLQGHELGDSRGUiRFDVLRQDUTXHHOIXQFLRQDPLHQWRQRVHDVHJXUR
/RVFOLHQWHVGH&DQDGiGHEHUiQEXVFDUHO&HQWURGHVHUYLFLRWpFQLFR0DEHPiVFHUFDGRHQODVSiJLQDVDPDULOODVR
OODPDUDO
&RQWiFWHQRV ,QWKH86*($SSOLDQFHVFRP
6LQRVHHQFXHQWUDVDWLVIHFKRFRQHOVHUYLFLRTXHUHFLELyGH*(FRPXQtTXHVHFRQQRVRWURVDWUDYpVGHQXHVWURVLWLR
ZHEFRQWRGRVORVGHWDOOHVLQFOX\HQGRVXQ~PHURWHOHIyQLFRRHVFULEDD *HQHUDO0DQDJHU&XVWRPHU
5HODWLRQV
*($SSOLDQFHV$SSOLDQFH3DUN
/RXLVYLOOH.<
(Q&DQDGiZZZ*($SSOLDQFHVFDRHVFULEDD
'LUHFWRU&RQVXPHU5HODWLRQV0DEH&DQDGD,QF
6XLWH)DFWRU\/DQH
0RQFWRQ1%(&0
5HJLVWUHVX(OHFWURGRPpVWLFR ,QWKH86*($SSOLDQFHVFRP
5HJLVWUHVXHOHFWURGRPpVWLFRQXHYRDWUDYpVGH,QWHUQHW£DVXFRQYHQLHQFLD8QUHJLVWURSXQWXDOGHVXSURGXFWR
SHUPLWLUiXQDPHMRUFRPXQLFDFLyQ\XQVHUYLFLRPiVSXQWXDOGHDFXHUGRFRQORVWpUPLQRVGHVXJDUDQWtDHQFDVR
GHVXUJLUODQHFHVLGDG7DPELpQSXHGHHQYLDUXQDFDUWDHQODWDUMHWDGHLQVFULSFLyQSUHLPSUHVDTXHVHLQFOX\HFRQHO
PDWHULDOHPSDTXHWDGR(Q&DQDGiZZZ*($SSOLDQFHVFD
,PSUHVRHQ0p[LFR
(VWHOLEURIXHLPSUHVRHQSDSHOUHFLFODGR

