User manual Refrigerator
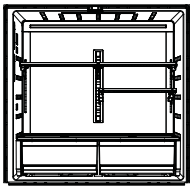
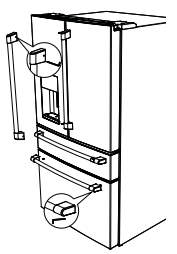
Features
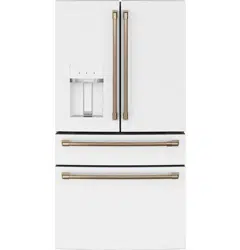
Model CVE and CXE
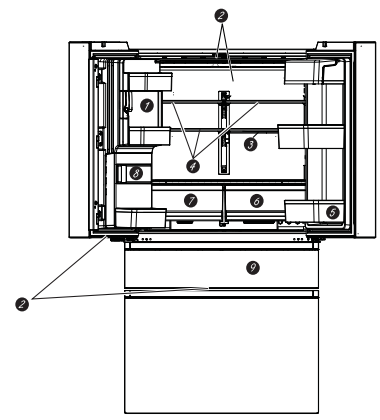
1. Space-saving ice maker
Ice maker and bin are located on the door creating more usable storage space.
2. Showcase LED lighting
LED lighting is positioned throughout the interior to spotlight areas in the refrigerator. LEDs are located under the fresh food door to light the convertible drawer, and LEDs are under the convertible drawer to light the freezer drawer.
3. QuickSpace™ shelf
Functions as a normal full-sized shelf when needed and easily slides back to store tall items below.
4. Spillproof shelves
Designed to capture your spills for easier clean up.
5. Removable door bin
Can be removed for those with a wall limiting the door opening
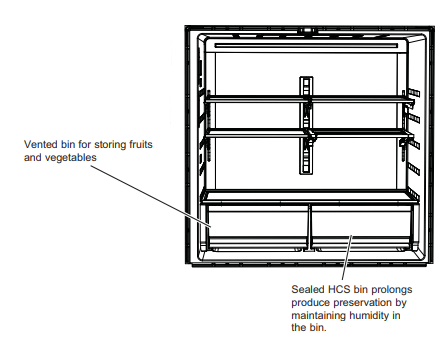
6. HCS (Humidity Control System)
Sealed HCS bin prolongs produce preservation by maintaining humidity in the bin.
7. Vented Bin
Vented bin for storing fruits and vegetables.
8. Water filter
Filters water and ice.
9. Convertible drawer
Select the best temperature to store your food.
Model CQE
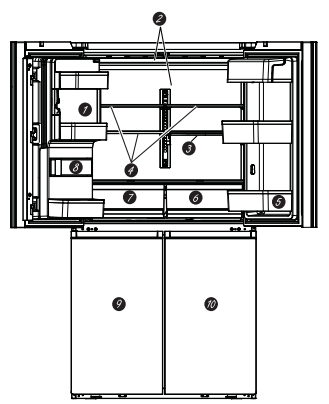
1. Space-saving ice maker
Ice maker and bin are located on the door creating more usable storage space.
2. Showcase LED lighting
LED lighting is positioned throughout the interior to spotlight areas in the refrigerator.
3. QuickSpace™ shelf
Functions as a normal full-sized shelf when needed and easily slides back to store tall items below.
4. Spillproof shelves
Designed to capture your spills for easier clean up.
5. Removable door bin
Can be removed for those with a wall limiting the door opening.
6. HCS (Humidity Control System)
Sealed HCS bin prolongs produce preservation by maintaining humidity in the bin.
7. Vented Bin
Vented bin for storing fruits and vegetables.
8. Water filter
Filters water and ice.
9. Freezer
Compartment for storing your frozen food. The middle and bottom door bins tilt-out for easy access.
10. Convertible Zone
Compartment that can store frozen food, fresh food, or wine.
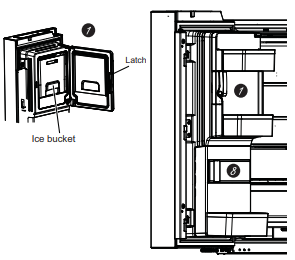
Door ice bin
- Open left refrigerator door.
- Pull down latch to release bin door.
- Using handhold lift ice bucket up and out to clear locators in bottom of bin.
- To replace the ice bucket, set it on the guide brackets and push until the ice bucket seats properly.
- If bucket cannot be replaced, rotate the Ice Bucket Fork 1/4 turn clockwise.
Ice/water filter
Certified to reduce chlorine-resistant cysts, lead, select pharmaceuticals, and more. For easy filter replacement instructions see page 10.
Freezer door bin
Middle and bottom bins on the freezer for can be tilted out for easy access.
Controls
All Models
We are continuously updating our software. Please reference the full owner's manual online for the latest functionality at cafeappliances.com. In Canada, visit cafeappliances.ca.
The recommended temperature settings, preset from the factory, are 37°F (3°C) for the refrigerator and 0°F (-18°C) for the freezer.
NOTE: The refrigerator is shipped with protective film covering the temperature controls.
If this film was not removed during installation, remove it now.
The temperature controls are preset in the factory at 37°F (3°C) for the refrigerator compartment and 0°F ( 18°C) for the freezer compartment. Allow 24 hours for the temperature to stabilize to the preset recommended settings.
To Change the Refrigerator Temperature:
Press the Settings button ( ) until “Fridge” is. highlighted. Press the Up or Down arrow buttons to increase or decrease temperature settings.
To Change the Freezer Temperature:
Press the Settings button () until “Freezer” is highlighted. Press the Up or Down arrow buttons to increase or decrease temperature settings.
The cooling system can be turned off by pressing the Settings button () until either “Fridge” or "Freezer" is highlighted. Press and hold both the Up and Down arrow buttons for 3 seconds. *--” will be displayed when the system is off. Turning the cooling system off stops. the cooling to the refrigerator. but it does not shut off the electrical power. The cooling system can be turned on by returning to the “Fridge” or "Freezer" setting and pressing the On button.
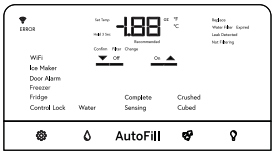
Control Settings
Settings () - Press the Settings symbol () to scroll through the refrigerator functions.
- Control Lock - Press ON to lock out ice and water dispenser and all feature and temperature buttons. Press and hold OFF for 3 seconds to deactivate.
- Fridge - Press Up or Down button to increase or decrease temperature from 34°F (1°C) to 42°F (6°C).
- Freezer - Press Up or Down button to increase or decrease temperature from -6°F (-21°C) to 5°F (-15°C).
- Door Alarm - Sounds an alert when the freezer or refrigerator doors have been left open. Snooze the alert by pressing any key. Press On or Off to activate or deactivate Door Alarm while an alert is not active.
- Icemaker - Press On or Off to start/stop Icemaker.
- WiFi - Press On to start the WiFi connection process per the instructions on Page 13. Press Off to disable WiFi. Note that restarting WiFi requires repeating the WiFi connection process.
Water ( ) - Press to select Ice or Water to dispense. when the paddle is pressed.
AutoFill - Press to initiate automatic sensing to fill from dispenser.
Ice ( ) - Press to select crushed or cubed ice when the paddle is pressed.
Light ( ) - Press to illuminate dispenser. Chime will accompany each press.
Fahrenheit / Celsius:
Temperature display can be switched between
Fahrenheit and Celsius. Press Settings button (£33) to navigate to “Fridge” or “Freezer’. then press and hold the Ice button and Light button for three seconds.
Volume Control:
Alert volume can be adjusted from High to Low and Off. Press Settings button (£83) to navigate to “Icemaker’. then press and hold the Tce button and Light button for three seconds.
Sabbath Mode:
Simultaneously hold the Settings (). Water. and Light buttons for three seconds to enter and exit Sabbath mode. Display will show “SA” and mode will automatically exit after 3 days.
Dispenser
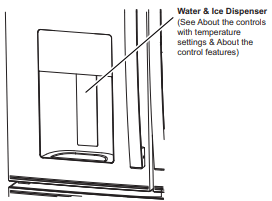
Important Facts About Your Dispenser
- Do not add ice from trays or bags to the door icemaker bucket. It may not crush or dispense.
- Avoid overfilling glass with ice and use of narrow glasses. Backed-up ice can jam the chute or cause the door in the chute to freeze shut. If ice is blocking the chute remove the ice bucket, poke it through with a wooden spoon.
- Beverages and foods should not be quick-chilled in the door icemaker bin. Cans, bottles or food packages in the storage drawer may cause the icemaker or auger to jam.
- To keep dispensed ice from missing the glass, put the glass close to, but not touching, the dispenser opening.
- Some crushed ice may be dispensed even though you selected CUBED. This happens occasionally when a few cubes accidentally get directed to the crusher.
- After crushed ice is dispensed, some water may drip from the chute.
- Sometimes a small mound of snow will form on the door in the ice chute. This condition is normal and usually occurs when you have dispensed crushed ice repeatedly. The snow will eventually evaporate.
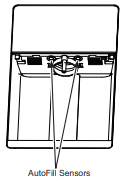
AutoFill
To Use HANDS FREE AutoFill:
- Center container on Recess Dispenser Tray as far back as possible without activating paddle and remove hand from container
- Press AutoFill.
To Stop AutoFill
- Press ANY key, including AutoFill, to stop.
Important Facts about AutoFill
- For optimum results. use a uniform container between 4-8" (10-20 om) tall and 2-6” (5-15 om) wide
- Fill level and functionality may vary on containers taller than 8" (20 cm) or wider than 6” (15 cm)
- Container volumes may vary. If ERROR” message is given. try a different container
- AutoFill will time out
- Handles. straws. and gamishes on the rim of the container my cause overfiling or variation in fil may occur depending on the location of the container. water flow rate. container shape. and ice cubes.
- Keep sensors clean with a clean damp cloth. and do not spray liquid or cleaners directly on sensors
- AutoFill works best with household water pressure of 60 to 100 psi (414 to 689 kPa)
- Ice in container may affect fill volume. If issues are experienced. use less ice.
XWFE Water Filter
Water Filter Cartridge
The water filter cartridge is located in the left-hand refrigerator door behind the rectangular access panel.
When to Replace the Filter Cartridge
The Replace Water Filter message on the control panel will illuminate when the water filter cartridge needs to be replaced soon. The Water Filter Expired message will illuminate when the water filter cartridge needs to be replaced. The water filter can be replaced earlier if the flow of water to the dispenser or icemaker decreases. Once either message is illuminated, dispensing water will show Confirm Filter Change; do not confirm until the water filter is replaced
REMOVING THE FILTER
If you are replacing the filter, first remove the previous one by gently grasping the filter and slowly turning it to the left, about a ¼ turn. The filter should automatically release itself when you have rotated it far enough to the left. A small amount of water may drip down.
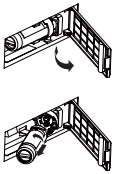
CAUTION If air has been trapped in the system, the filter cartridge may be ejected as it is removed. Use caution when removing.
FILTER BYPASS PLUG
To reduce the risk of property damage due to water leakage, you MUST use the filter bypass plug when a replacement filter cartridge is not available. Some models do not come equipped with the filter bypass plug. To obtain a free bypass plug, call 800.692.6630 and request WR17X33825 filter bypass plug. In Canada, call 800.561.3344. The dispenser and icemaker will not operate without either the filter or bypass plug installed. The bypass plug is installed in the same way as a filter cartridge.
INSTALLING THE FILTER IN A BOTTOM FREEZER REFRIGERATOR
- Open the filter cartridge housing by pulling the door open.
- Line up the ports on the filter with the ports on the filter cartridge holder, and gently insert the filter.

- Slowly turn the filter to the right until it stops. DO NOT OVERTIGHTEN. As you turn the filter, it will automatically adjust itself into position. The filter will move about a ¼ turn or 90 degrees, until the filter cannot be turned, and the label faces outward.
- Slowly push the filter up into the clips.
- Close the filter cartridge housing by gently pushing the door closed until the tabs lock into place.
- Run water from the dispenser for 2 gallons or approximately 5 minutes to clear the system. Water may spurt out and air bubbles may be visible during this process. If water is not flowing, check to make sure the filter has been fully rotated to the right.
- When dispensing water, press the button underneath the Confirm Filter Change message. If replacing the water filter before the message appeared, press the Settings () button until " Icemaker" is highlighted, then hold down the Water and Ice buttons simultaneously for 3 seconds.
Refrigerator Storage Options
Rearranging the Shelves
Shelves in the refrigerator compartment are adjustable.
To remove:
- Remove all items from the shelf.
- Tilt the shelf up at the front.
- Lift the shelf up at the back and bring the shelf out.
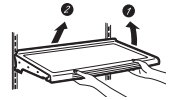
To replace:
- While tilting the shelf up, insert the top hook at the back of the shelf in a slot on the track.
- Lower the front of the shelf until the bottom of the shelf locks into place.
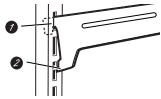
Spillproof Shelves
Spillproof shelves have special edges to help prevent spills from dripping to lower shelves.
Quick Space Shelf
This shelf splits in half and slides under itself for storage of tall items on the shelf below.
This shelf can be removed and replaced or relocated (just like spillproof shelves).
NOTE: The back half of the Quick Space Shelf is not adjustable.
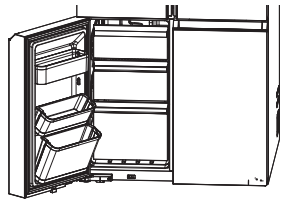
Door Bins
Fixed bins can easily be carried from refrigerator to work area.
To remove: Lift bin straight up, then pull out. The door bins are not interchangeable, note the location upon removal and replace the bin in its proper location.
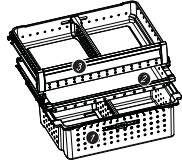
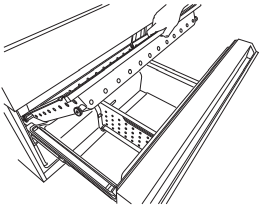
Climate Zone Bins
Keep fruits and vegetables organized in separate compartments for easy access.
Excess water that may accumulate in the bottom of the drawers or under the drawers should be wiped dry
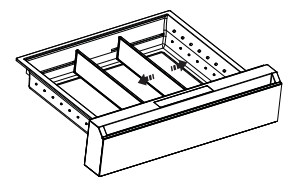
CONVERTIBLE DRAWER - Model CVE and CXE Only
How To Adjust Drawer Dividers
Grasp divider at the top and slide to the left or right .
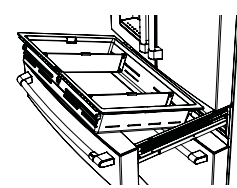
How to Remove and Replace Drawer
To remove:
- Pull the drawer out to the stop position.
- Remove the convertible drawer basket by lifting while rotating the basket upward
To replace:
- Place drawer back in first and rotate drawer front down to seat on slide.
- Push the drawer in to closed position. Convertible drawer basket will be loose if re-installed backwards. Look for " FRONT" emboss to help with re-installation.
BASKETS, DRAWERS, AND BINS - Model CVE and CXE Only
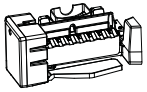
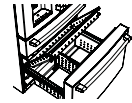
Freezer Basket and Drawer
Tilt-Out Bin in the Freezer
To remove:
Press the tab on the right side bracket to remove the freezer drawer bin
To replace:
Slide bin into location until it locks into place.
Basket Removal
To remove:
- Push the top freezer drawer basket all the way inside the freezer compartment. Top drawer is NOT removeable.
- Pull the pizza tray all the way out and lift up until the pizza tray is free to remove.
- Press the tab on the right side bracket to remove the freezer door bin.
- Lift the bottom freezer drawer basket slightly back. then up and out of the drawer.
To replace:
- Place drawer back in frst and rotate drawer front down to seat on slide.
Bottom freezer drawer basket must be in place before installing the pizza drawer.
Automatic Icemaker
A newly installed refrigerator may take 12 to 24 hours to begin making ice.
Automatic Icemaker
The icemaker will produce seven cubes per cycle approximately 100-130 cubes in a 24-hour period. depending on freezer compartment temperature. room temperature. number of door openings and other use conditions.
The icemaker will fil with water when it cools to 15°F (10°C). A newly installed refrigerator may take 12 to 24 hours to begin making ice cubes.
If the reftigerator is operated before the water line connection is made to the unit or if the water supply to an operating refrigerator is tured off. make sure that the icemaker is turned off. Once the water has been connected to the refrigerator. the icemaker may be tumed on using the controls.
You may hear a buzzing sound each time the icemaker fills with water.
To fil the bucket to maximum capacity after installation. dispense 3-4 cubes at 12 hours and 18 hours. Allow 1-2 days for the bucket to completly fill with ice.
Throw away the first few batches of ice to allow the water line to clear.
Be sure nothing interferes with the sweep of the feeler arm.
When the bin fills to the level of the feeler arm, the icemaker will stop producing ice. It is normal for several cubes to be joined together.
If ice is not used frequently, old ice cubes will become cloudy, taste stale and shrink.
NOTE: In homes with lower-than-average water pressure, you may hear the icemaker cycle multiple times when making one batch of ice.
To turn the icemaker ON/OFF, use the Settings button to navicate to the Icemaker selection. w
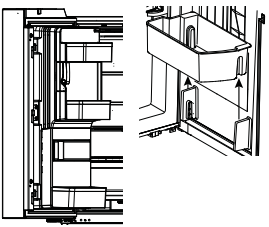
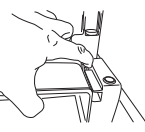
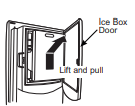
Ice Bucket and Dispenser
- Open the ice box door on inside of the left door.
- Pull up and out on the ice bucket in the left hand door to remove it from the compartment .
- To replace the ice bucket, set it on the guide brackets and push until the ice bucket seats properly.
Care and Cleaning
Behind the Refrigerator
Be careful when moving the refrigerator away from the wall. All types of floor coverings can be damaged, particularly cushioned coverings and those with embossed surfaces.
Raise the leveling legs located at the bottom front of the refrigerator.
Pull the refrigerator straight out and return it to position by pushing it straight in. Moving the refrigerator in a side direction may result in damage to the floor covering or refrigerator.
Lower the leveling legs until they touch the floor.
Preparing for Vacation
For long vacations or absences. remove food and unplug the refrigerator. Clean the interior with a baking soda solution of one tablespoon (16 mi) of baking soda to one quart (1 lite) of water. Leave the doors open.
If the temperature can drop below freezing. have a {qualified service technician drain the water supply system to prevent serious property damage due to flooding
1. Turn refrigerator off (see CONTROLS. page 9) or unplug the refrigerator.
2. Empty ice bucket
3. Turn water supply off
If you cut the water supply off, turn off the icemaker.
Upon returning from vacation:
1. Replace the water filter.
2. Run 2 gallons (7.57 liters) of water through the cold water dispenser (about 5 minutes) to flush the system.
Preparing to Move
Secure all loose items such as shelves and drawers by taping them securely in place to prevent damage.
When using a hand truck to move the refrigerator, do not rest the front or back of the refrigerator against the hand truck. This could damage the refrigerator.
Handle only from the sides of the refrigerator.
Be sure the refrigerator stays in an upright position during moving.
Installation Instructions
INSTALLING THE REFRIGERATOR
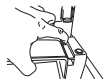
1 REFRIGERATOR AND FREEZER HANDLE INSTALLATION (on some models)
Before You Start….
- To avoid injury, wear closed-toe shoes when installing the handles.
- While installing the handle, grasp the handle firmly to ensure it does not fall or scratch the appliance’s finish.
- IMPORTANT: To make sure the handles are accurately installed, please review the instructions and graphics before you begin installation.
- IMPORTANT: Do not use power tools to tighten set screws.
Handle appearance may vary based on model; however, the installation process is the same.
- Remove any protective film from the door or drawer fronts before installing handles (if applicable).
- Remove handle from packaging and locate the provided 1/8" hex key.
- Place the handle over the mounting fasteners until it is flush against the surface of the door.
- Tighten both set screws in the handle end caps by turning the 1/8" hex key clockwise until the handle will not hang loose or fall from its mounting. Do not fully tighten yet.
- IMPORTANT: Hold the handle firmly against the door, make sure there are no gaps between the handle end caps and the door, and fully tighten the set screws.
To remove the handles, reverse the installation process.
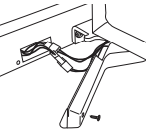
2 REMOVE LEFT-HAND DOOR
1. Loosen the icemaker water supply tube.
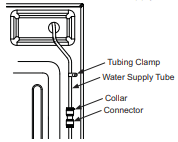
- Loosen and remove the tubing clamp which holds the water supply tube to the back of the refrigerator.
- Remove the black collar from water supply tube connector at the top right back of the refrigerator.
- Press the white flange down and separate the water supply line from the connector.
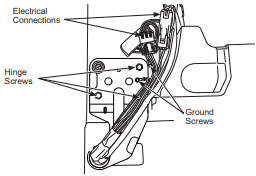
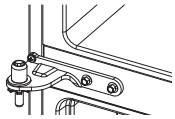
2. Remove the left hinge cover by removing 2 hinge cover screws with a Phillips head screwdriver and lifting from the left side. Disconnect electrical connectors and pull the water supply tube through the case.
3. Securely tape the door shut with masking tape or have a second person support the door.
4. Remove screws holding hinge with a 5/16" socket. Lift hinge from refrigerator and door.
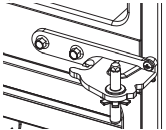
3 REMOVE RIGHT-HAND DOOR
- Remove right hinge cover
- Securely tape the door shut with masking tape or have a second person support the door
- Remove screws holding hinge with a 5/16” socket Lift hinge from refrigerator and door.
- Remove the tape keeping the door as straight as possible. then lift up to remove.
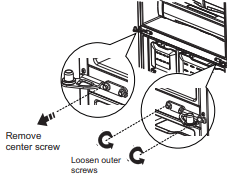
4 REMOVE CENTER HINGE (if necessary)
Remove screws that secure hinge to the cabinet. Inner screws need a 5/16" socket. Outer screws needs a Phillips #2.
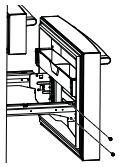
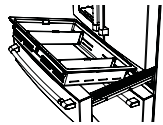
5 REMOVING CONVERTIBLE DRAWER (on some models)
1. Remove the convertible drawer basket by lifting while rotating the basket upward.
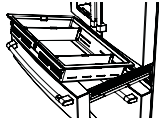
2. Disconnect the wiring control connection for the convertible drawer.
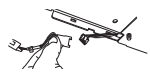
- Using a flat-head screwdriver, remove cover over electric connectors on inside right of the drawer frame. The cover hooks through the drawer frame toward the inside of the refrigerator.
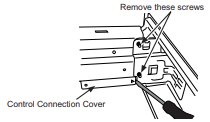
- Press the tab in the center of the connector to separate. afro
3. Remove 2 screws from each side of the frame with a 5/16" socket.
4. Remove door by lifting off hooks.
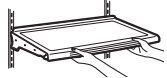
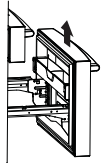
6 REMOVE PIZZA TRAY AND LOWER FREEZER BASKET (on some models)
1. Push the top freezer drawer basket all the way inside the freezer compartment.
2. Pull the pizza tray all the way out and lift up until the pizza tray is free to remove.
3. Press the tab on the right side bracket to remove Pres the freezer drawer bin.
4. Lift the bottom freezer drawer basket slightly back. then up and out of the drawer.
5. Pull the lower basket and slide mechanism to full extension using both hands.
6. Remove the basket resting on the slides.
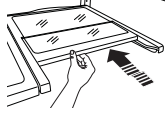
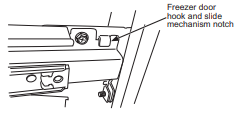
7 REMOVE THE FREEZER DRAWER (on some models)
1. Pull the freezer drawer open to full extension.
2. Remove two screw from each side of the frame with a 5/16" socket.
3. Remove the door by lifting off hooks.
4. Push the bottom basket slides back until the slide mechanism self retracts.
8. REMOVE LOWER LEFT-HAND DOOR (on some models)
1. Securely tape the door shut with masking tape or have a second person support the door.
2. Remove the center hinge with a 5/16" socket and Phillips head screwdriver.
3. Remove the tape keeping the door as straight as possible, then lift up to remove.
9. REMOVE LOWER RIGHT-HAND DOOR (on some models)
1. Open lower right-hand door 90°.
2. Remove lower hinge cover by removing Phillips head screw and unsnapping cover from hinge.
3. Disconnect 2 harnesses.
4. Securely tape the door shut with masking tape or have a second person support the door.
5. Remove the center hinge with a 5/16" socket and Phillips head screwdriver.
6. Remove the tape keeping the door as straight as possible, then lift up to remove.
Freezer door is heavy Use both hands to secure the door before lifting.
- Pull the lower basket slide mechanism to full extension with both hands.
- Lift the freezer door and align the hooks with the notches on the slide mechanisms. NOTE: Place one side in first, then align the other side.
- Replace the attachment screws and torque the screws to 65 in-lb (7.34 N-m).
To reassemble doors, reverse removal steps. Be careful wires pass through bottom hight-hand hinge.
10. REMOVE LOWER HINGE (if necessary) (on some models)
Remove screws that secure hinge to the cabinet. ,
Inner screws need a 5/16" socket. Outer screw needs a Phillips #2."
11. RE-INSTALL CONVERTIBLE DRAWER (on some models)
To reassemble doors. reverse removal steps. Convertible backwards. Look for “FRONT” emboss to help with reinstallation.
12. REPLACE FREEZER DRAWER (on some models)
Freezer door is heavy Use both hands to secure the door before lifting.
- Pull the lower basket slide mechanism to full extension with both hands.
- Lift the freezer door and align the hooks with the notches on the slide mechanisms. NOTE: Place one side in first. then align the other side.
Troubleshooting Tips
Not filtering
Install correct water filter
Reset Water Filter Water Filter Expired
- Water filter leaking or needs replacing
Replace water filter, or install filter bypass * To reset filter timer, press the Settings ( ) button until " Icemaker" is highlighted, then hold down the Water and Ice buttons simultaneously for 3 seconds."
Water filter indicator light is not lit
- This is normal. This indicator will turn on to tell you that you need to replace the filter soon.
See Water Filter for more information.
Handle is loose/handle has a gap.
See Installing the Refrigerator section for detailed instructions.
Refrigerator beeping
- The door alarm is beeping
Turn off or disable with door closed
If door open and alarm is sounding, you can only asnooze the alarm.
Refrigerator lights off and “SA* shown in display
- Unit is in Sabbath mode system's off
Simultaneously hold the Settings ( ) button, Water, and Light buttons for three seconds to exit Sabbath mode
Not cooling
- The cooling system is off
See Controls.
Water has poor tastelodor
- Water dispenser has not been used for a long time
Dispense water, until all water in system is replenished.
Water in glass is warm
- Normal when refigerator is first
Wait 24 hours for the refrigerator to completely cool down.
- Water dispenser has not been used for a long time
Dispense water, until all water in system is replenished
Allow several hours for replenished supply to chill
Water dispenser does not work
- Water supply line turned off or not connected
See Installing the Water Line
- Water filter clogged or filter/bypass plug not installed
Replace filter cartridge or remove filter and install bypass plug.
- Air may be trapped in the water system
Press the dispenser arm for at least 5 minutes.
- Water in reservoir is frozen because the controls are set too cold
Set the refrigerator control to a warmer setting and wait 24 hours. If the water does not dispense after 24 hours, call for service
Water spurting from dispenser
- Newly installed filter cartridge
Run water from the dispenser for 5 minutes (about 2 gallons)
No walter or ice cube production
- Supply line or shutoff valve is clogged
Call a plumber
Replace filter cartridge or remove filter and install bypass plug*
- Filter cartridge not properly installed
Remove and reinstall filter cartridge, being certain that it locks in place.
Check that the icemaker is turned on. See Controls
Water is leaking from dispenser
- Air may be present in the water line system, causing water to drip after being dispensed
Dispense water for at least 5 minutes to remove air from system
AUTO FILL under fill/no fill
- Not all containers work with AutoFill
Try different container
See page 12
Clean sensor. See page 12
AUTO FILL overfills
- Not all containers work with AutoFill
Try different container
Use less ice
Ensure hands are away from the cup prior to pressing the AutoFill key
Freezer cooling, refrigerator not cooling
- Normal, when refrigerator first plugged in or after extended power outage
Wait 24 hours for temperature in both compartments to reach selected temperatures.
Ice dispenser opens after closing freezer drawer
The ice dispenser door may open after closing freezer door to allow access.
My refrigerator door squeaks
- Diminished lubricant because of accidental cleaning of the lubricant on the hinge
It is best to order GEA lubricant service part number WR97X166 and apply on the hinge at specified location.
It is possible to spray some non-toxic lubricant such as silicone based nonstick cooking spray, petroleum jelly or NSF approved food grade lubricants.
IMPORTANT: Do not use WD-40 as it will remove any remaining grease in or around the hinge
Make sure the unit is leveled
- If doors were removed and reassembled during installation process, waterline and/harness under Top Hinge cover may get out of position and rub against door while door swivels.
Remove the Top Hinge cover and make sure the waterline and harness that passes through the hinge pin has been properly seated and does not touch the any of the door parts during rotation.
Applying some food grade lubricant around door thimble area will also help.