User manual POWERbot
Installation
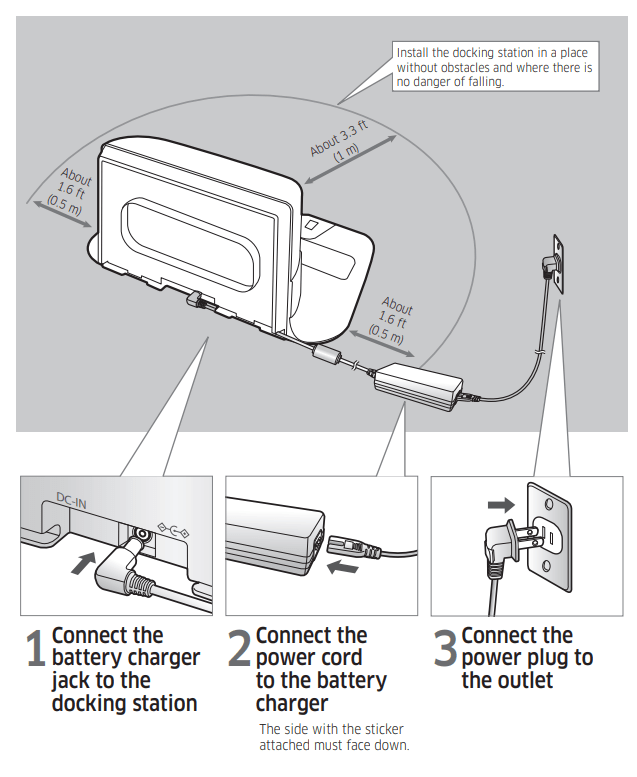
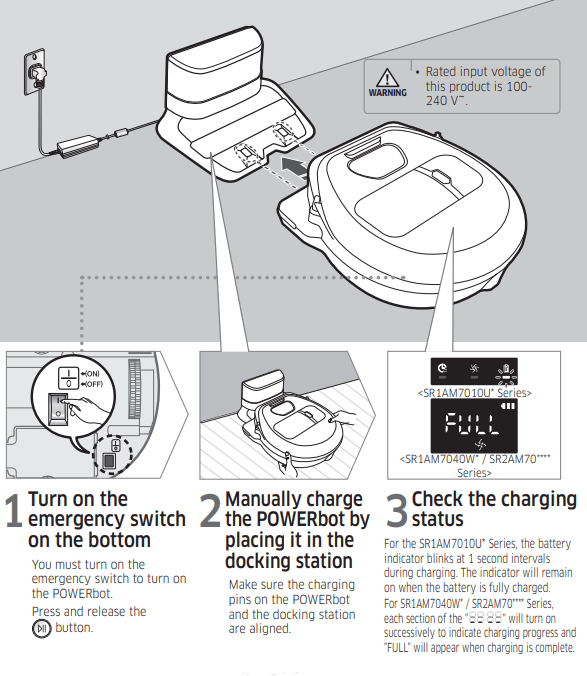
The docking station must be plugged in and turned on at all times.
Accessories
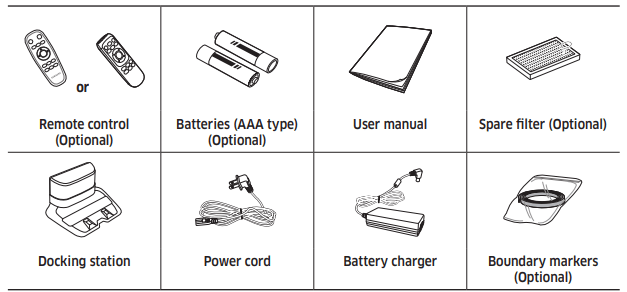
✻ Accessories may differ depending on the models.
✻ Refer to page 17 for the installation of boundary markers
Installation note
Note
- Install the docking station in a place where the floor is level and the wall is straight.
- It is best to install the docking station along the grain of wooden floors.
- If the emergency switch is off, the POWERbot will not charge even if it is docked in the docking station.
- Always turn on the power of the docking station.
- If power is not supplied to the docking station, the POWERbot cannot find it and cannot automatically recharge.
- If the POWERbot is left detached from the docking station, the battery will drain.
- If the POWERbot is in sleep mode, power will not come on even if the emergency switch is turned off and then on. Press and hold the [Start/Stop] button on the POWERbot to turn the sleep mode off.
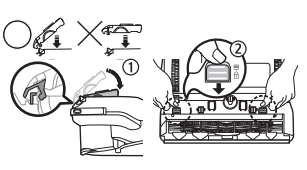
Charging
- After completely charging the POWERbot for the first time (after purchase), it can be used for 60 min. in Nomal (
 ) mode. (Refer to the page 41 for the charging time.)
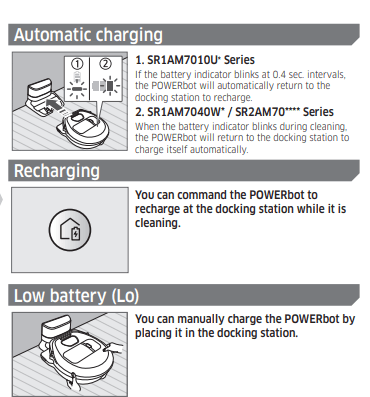
- Smart Charging: If the POWERbot's charge runs low while it is in Auto clean mode, it will automatically return to the docking station to recharge, and then will return to the cleaning area after its battery is 2/3rds charged. (Maximum: 2 times.)
Steps to take if automatic recharging is not occuring:
Reconsider the location of the docking station when:
- the docking station is located in a place where the POWERbot cannot easily access it.
- the distance between the docking station and POWERbot is over 16.4 ft (5 m).
- It may take a long time for the POWERbot to return to the docking station for recharging
Manually charge the POWERbot when:
- the docking station is located in a corner
- the battery is fully exhausted fthe POWERbot is immobilized by an obstacle (furniture, etc.)
- the POWERbot can't climb a threshold near the docking station (The maximum height of a threshold the POWERbot can climb is about 0.6 in (1.5 cm)).
- the battery indicator blinks and "Lo" is displayed fthe battery indicator blinks (Applicable to SR1AM7010U* Series)
- the POWERbot is set to the Spot clean or Manual clean mode
Using POWERbot
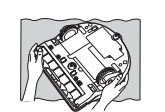
You must turn on the emergency switch on the bottom of the unit before using POWERbot. 
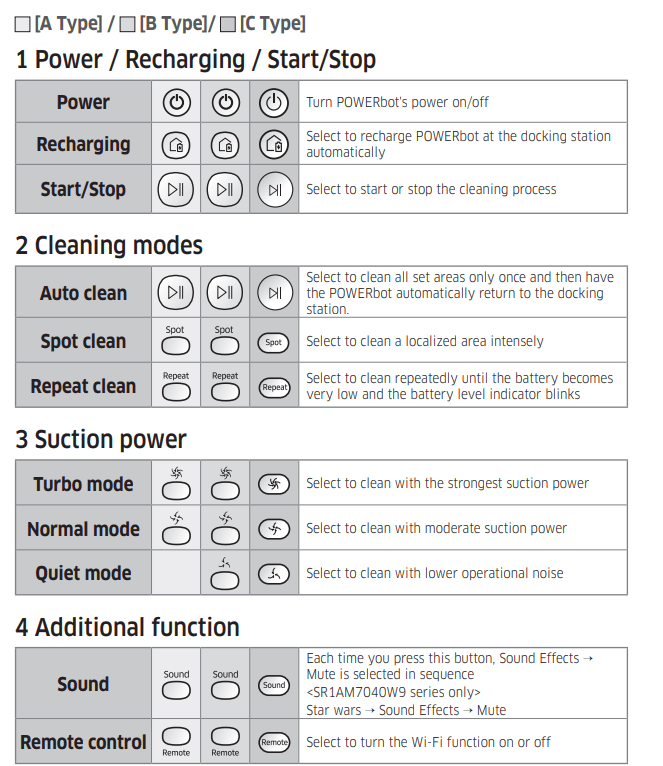
Turning the power on/off
Press the  button for more than 3 seconds
- When POWERbot is not used for 30 min.; SR1AM70**U* / SR2AM70**U* series: Enters energy-saving mode. SR1AM70**W* / SR2AM70**W* series: Automatically returns to the docking station to be charged.
Selecting cleaning modes
- If POWERbot fails to return to the docking station, it will enter energy-saving mode and the display panel will be turned off.
- To exit the energy-saving mode, press the [Start/Stop ] or [Power
 ] button on the main body or the remote control.
- If cleaning in Auto clean mode is completed within 15 minutes, POWERbot cleans 1 more time
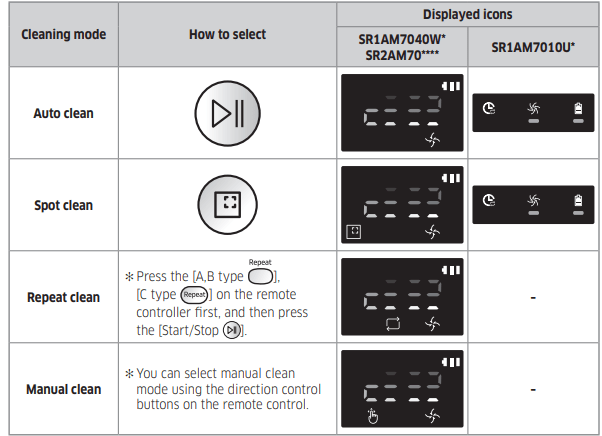
Cleaning method for each mode
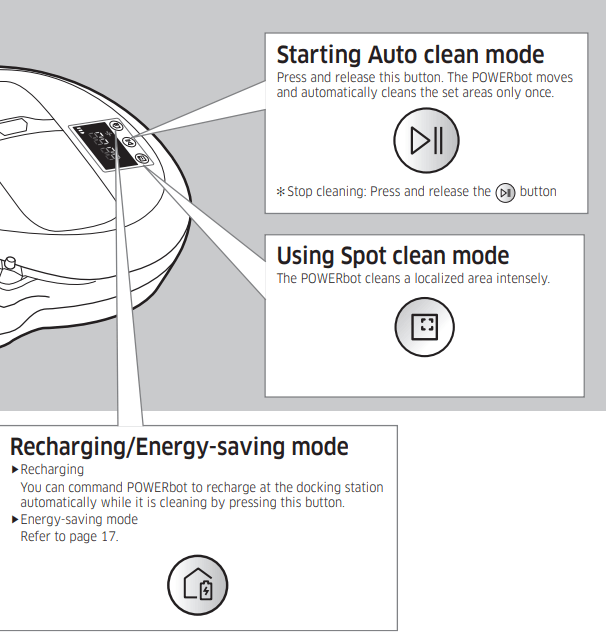
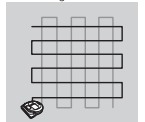
- Auto clean: Automatically cleans the set areas only once. ✻ SR1AM7010U* series : Cleans repeatedly until the battery is depleted.
- Spot clean: Cleans a localized area intensely. It can be used to clean bread or cookie crumbs.
- Manual clean: You can move POWERbot with the remote control to clean the desired spot. ✻ This function is not available on the SR1AM7010U* series.
- Repeat clean: Cleans repeatedly until the battery is depleted. ✻ This function is not available on the SR1AM7010U* series.
Note: If you select Auto clean or Repeat clean, the POWERbot cleans the area near the docking station first.
Using special cleaning functions
About the boundary markers
 : To prevent the POWERbot from entering the following areas, place the boundary markers on the floor in an
  shape at intervals of about 5.9 in (15 cm).
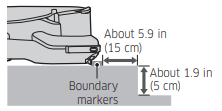
- Where a raised spot exceeds 1.9 in (5 cm)
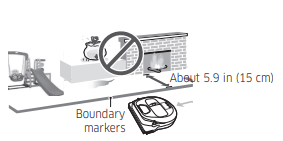
- Where there is a slide, swing, fireplace, or any flammable substance or moisture.
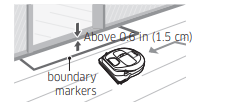
- Where a threshold is higher than 0.6 in (1.5 cm)
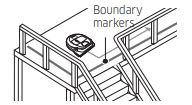
- Where there is risk of falling such as near stairs, porches, or guardrails.
Using Energy-saving mode
You can select the Energy-saving mode to save energy during battery charging. Energy-saving mode turns off all functions except battery charging. Use it to reduce power consumption while you are away from home for an extended period of time.

Note
- If you select the Auto/Max/Manual clean mode or press the Point cleaning button, the Energy-saving mode will be cancelled.
- When Energy-saving mode is on, setting the schedule will cancel Energy-saving mode.
- If you select the Energy-saving mode after setting the schedule, the schedule will not be cancelled.
- If the docking station is off, Energy-saving mode will be cancelled.
- If the battery is completely flat, place the POWERbot on the docking station, and then press the [Start/Stop ] button on the main body.
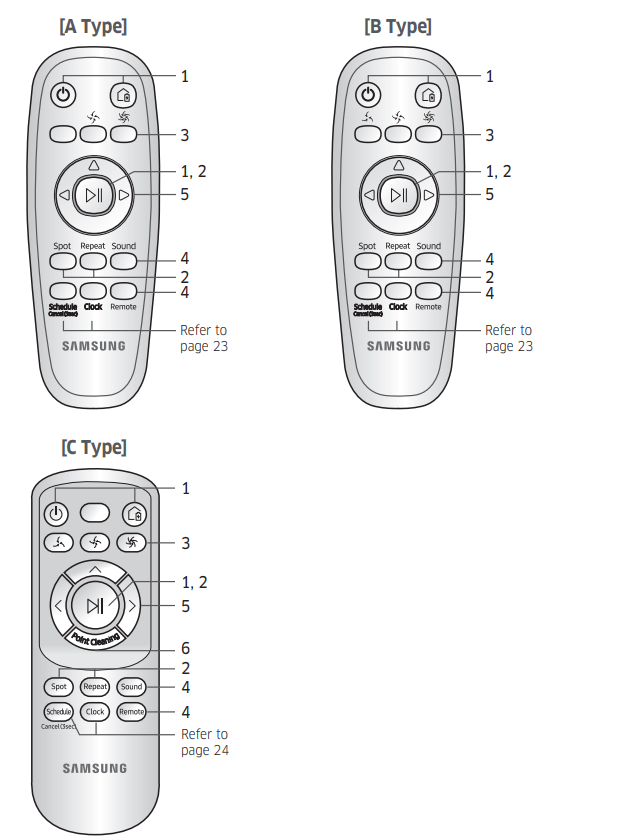
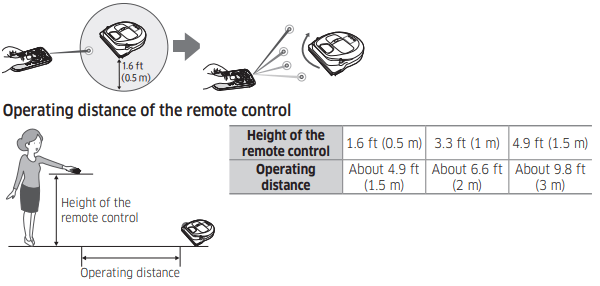
Using the remote control
- SR1AM7010U5 series only: Star wars (Mute function is not available.)
- Turning the emergency switch off and then on will not cancel or change the settings.
5 Manual clean mode & Direction control
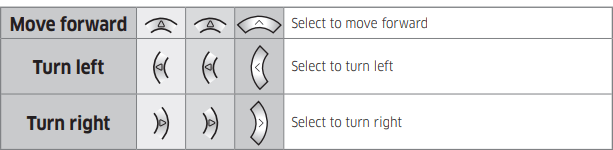
- Moving backward is not available.
6 Point cleaning: Available only with C type remote controllers.
- You can use the remote control to direct the POWERbot to clean a desired spot while the POWERbot is cleaning.
- Point the red light on the floor within 1.6 ft (0.5 m) of the POWERbot's location.
- Press and hold the Point cleaning button to move the red light to the desired spot. The POWERbot will follow the light while cleaning.
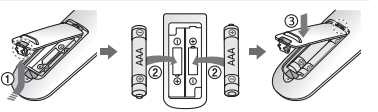
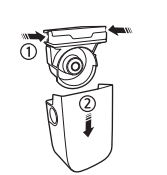
Inserting batteries: Open the battery cover by lifting it up while pressing the locking tab. Insert the batteries as shown in the illustration, and then close the cover until it clicks into place.
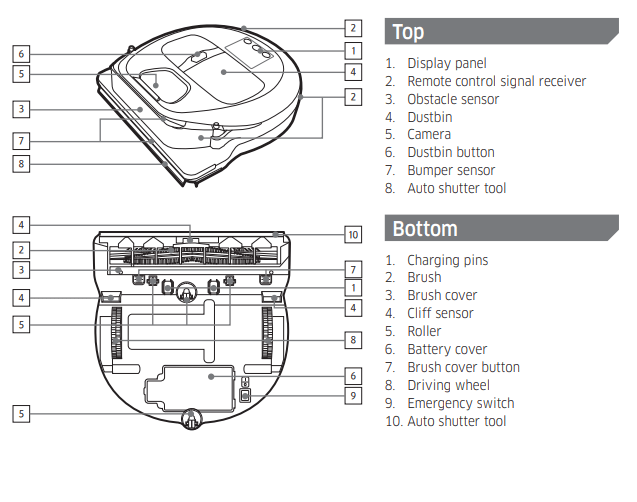
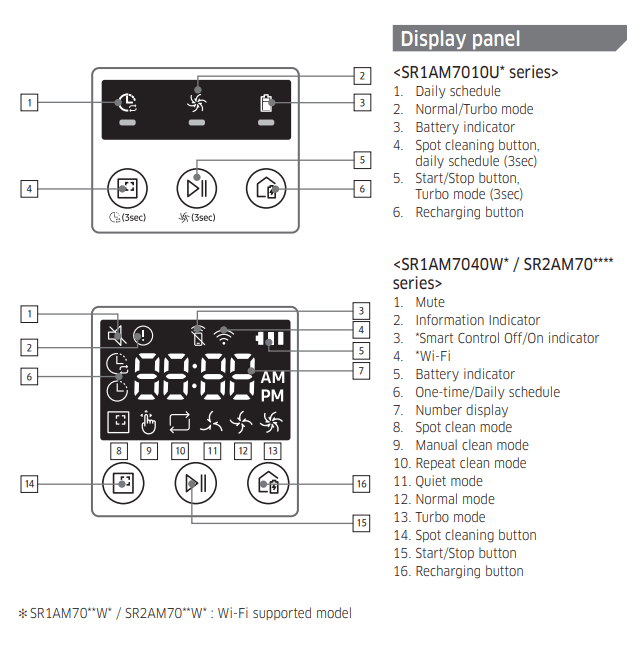
Name of each part
Setting time/schedule
[A Type, B Type] Only Auto clean mode can be scheduled.
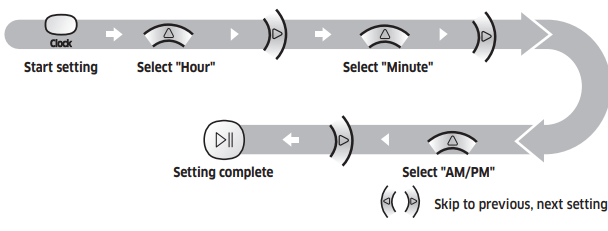
Setting the time: You must set the current time before using the One-time/daily schedule function.
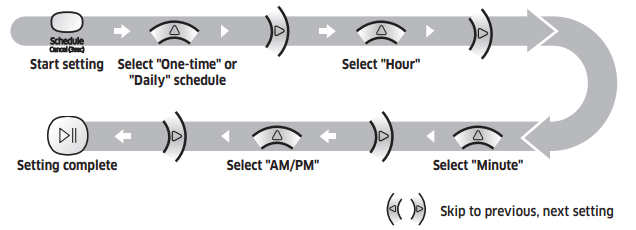
Setting the schedule: You can set/cancel the schedule only when the POWERbot is docked in the docking station.
Cancelling during setup:  The setting will be canceled automatically if there's no input for 7 seconds.
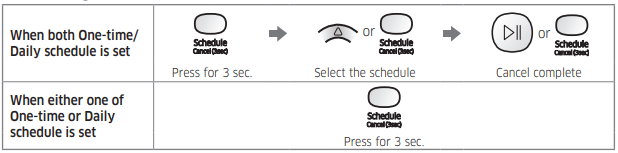
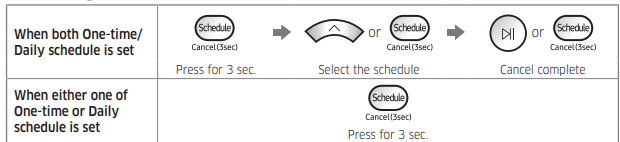
Cancelling One-time/Daily schedule
[C Type] Only Auto clean mode can be scheduled.
Setting the time: You must set the current time before using the One-time/daily schedule function.
Setting the schedule: You can set/cancel the schedule only when the POWERbot is docked in the docking station.
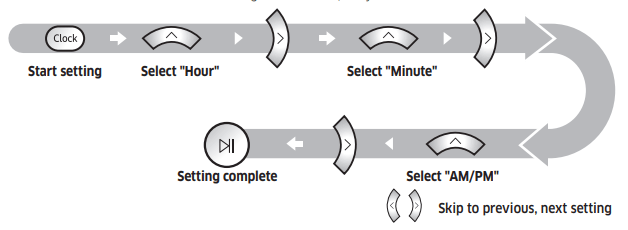
Cancelling during setup: The setting will be canceled automatically if there's no input for 7 seconds.

Cancelling One-time/Daily schedule:
[SR1AM7010U* series] For the models which do not include a remote control, you can set a daily schedule as described below.
Setting the schedule: You can set/cancel the schedule only when the POWERbot is docked in the docking station.
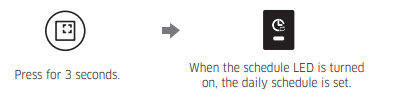
- The time you pressed the button will be set as the time that the POWERbot is scheduled to begin cleaning. The POWERbot will automatically begin cleaning every day at that scheduled time.
Cancelling daily schedule

Cleaning and maintaining 
You must turn off the emergency switch before cleaning the POWERbot.
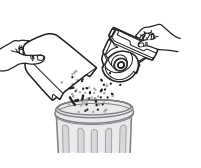
Cleaning the dustbin
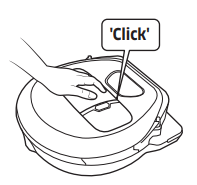
1 Press the button to remove the dustbin
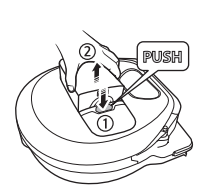
2 Remove the dustbin cover
3 Remove dust in the dustbin and cyclone unit
4 Detach the cyclone unit from the dustbin cover, and then wash the dustbin and the filter

5 Reassemble the dustbin
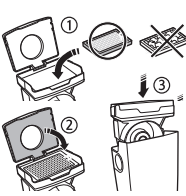
6 Reinsert the dustbin into the main body until it clicks
Cleaning the sensors and the camera
- Lightly wipe with a soft cloth. Do not use water or cleaning solutions.

Cleaning the brush and Auto shutter tool
- Brush design may differ depending on the model.
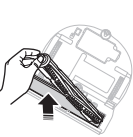
1 Remove the brush cover
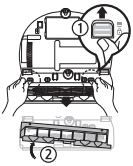
2 Remove the brush
3 Clean the brush
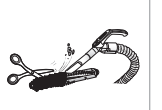
4 Clean the auto shutter tool
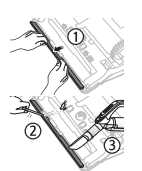
5 Reassemble the brush
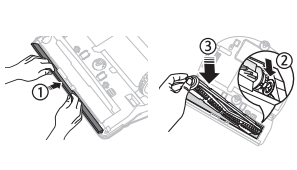
6 Reassemble the brush cover
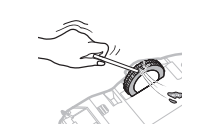
Cleaning the Driving wheel
1 Put a soft cloth on the floor and place POWERbot upside-down on the cloth.
2 Use a blunt rod or tweezers to remove foreign matter.
SmartThings App
The SmartThings App is only compatible with models that have a Wi-Fi function.
Setting up the wireless router
- Please refer to the user manual of your wireless router if you have access problems.
- Samsung POWERbot supports only Wi-Fi 2.4 Ghz.
- Samsung POWERbot supports IEEE 802.11b/g/n and Soft-AP.
- IEEE 802.11n is recommened.
- Samsung POWERbot supports only DHCP (Dynamic Host Configuration Protocol). Please make sure that the DHCP server option is activated on your wireless router.
- POWERbot supports the WEP-OPEN, WPA-PSK/TKIP, and WPA2-PSK/AES for the authentication and encryption protocols.
- WPA2-PSK/AES is recommended.
- Confirm that your router has a unique SSID and password.
- The quality of your wireless network connection may be influenced by the surrounding wireless environment.
- If your Internet service provider has permanently registered the MAC address (a unique identification number) of your PC or modem, your POWERbot may not be able to connect to the Internet. Ask your Internet service provider about the procedure to connect an apparatus other than a PC to the Internet.
- If your internet service provider requires your ID or password to connect to the internet, your POWERbot may not be able to connect. If this is the case, you must enter your ID or password when connecting to the Internet.
- The POWERbot may not be able to connect to the Internet because of firewall issues. Contact your Internet service provider to resolve these issues.
- Some wireless routers may transmit an abnormal Domain Name Server (DNS) address even if the Internet is not connected. If this occurs, contact the manufacturer of your wireless router and your Internet service provider.
- If you still cannot connect to the Internet even after trying the procedure provided by your Internet service provider, please contact an authorized Samsung service center.
- If your router is not a Wi-Fi certified product, The POWERbot may not be able to connect to the Internet.
Downloading the SmartThings App
- Download and install the SmartThings app from the markets (Google Play Store, Apple App Store, or Samsung Galaxy Apps). To find the app, use the keyword “SmartThings”.
- Note
- SmartThings is incompatible with tablets and some mobile devices.
- Android 6.0 or later (at least 2GB of RAM) is recommended.
- iPad and some mobile devices may not be supported.
- iOS 10.0 or later / iPhone 6 or later is supported.
- Visit Play Store or App Store to see if your mobile device is compatible with SmartThings.
- The supported features are subject to change without any prior notice.
Setting up a Samsung account
- You must sign in to a Samsung account before using the SmartThings app.
- To set up a Samsung account, you can follow the directions provided by the SmartThings app.
- Or, if you have a Samsung smartphone, you can add your Samsung account in the setting app of your smartphone. Then, it will automatically sign in to your Samsung account.
Adding a device to the SmartThings APP
- Connect your smartphone to your wireless router.
- Launch the SmartThings app on your smartphone.
- If a pop-up saying that a new device has been found appears, tap ADD NOW.
- If the pop-up doesn’t appear, tap the + button and select the device which you want to connect from the list of AVAILABLE DEVICES.
- If your device doesn’t appear in the list, add the device manually by selecting the device type and selecting the specific device model.
- [Android] The connection to your device will be progressed automatically.
- [iOS] Open the setting app, and select [robot vacuum] Samsung in the Wi-Fi list.
- Provide the authentication when you are directed to do so.
- [Android] The connetion to your wireless router will be progressed automatically.
- [iOS] Open the setting app, and select the wireless router in the Wi-Fi list.
- The remaining setup will be automatically done. Then, a new Device Card will be added.
Note
- If you cannot complete the product registration, please take the following steps.
- Try the registration procedure again as you have directed by the pop-up messages.
- Confirm that the UPnP option of your wireless router is active, and then try the registration procedure again.
- Confirm that your wireless router is operating in wireless mode, and then try the registration procedure again.
- If you have two or more POWERbots, turn off the other POWERbots, and then try to register your POWERbot again.
- If there is any other wireless router that has the same SSID as your wireless router, the registration might be failed.
- Smart control and Wi-Fi indicator
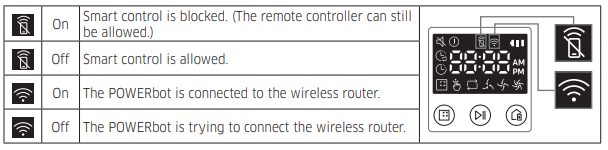
- When the Smart control is blocked, you cannot control the POWERbot on your smartphone.
- The POWERbot and your smartphone are not connected to the same wireless router, a response delay may occur depending on your network environment.
Software Update
- When the POWERbot is charging on the docking station, the POWERbot connects to the server and then checks if a software is available. If a new software is found, POWERbot will automatically download and update it.
- If “UP” is displayed on the display panel while the POWERbot is charging, it means that an update is in progress. Please wait for completing the update before using the POWERbot.
Using the SmartThings APP
When you tap the device card on the SmartThings app, the plug-in for your device will be launched.
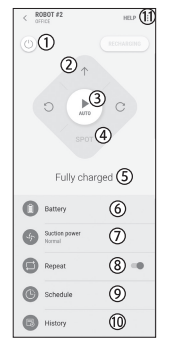
1. Power (on / off)
2. Directional controls with Manual clean mode (Forward, Left turn, Right turn)
3. Auto clean mode (start /stop)
4. Spot clean mode
5. Current status
6. Battery status
7. Suction power
8. Repeat option (on / off)
9. Schedule (Once / Daily)
- The current time of the device will be synchronized when entering the schedule setting.
- A scheduled cleaning will only be started when the device is charging on the docking station.
10. Cleaning history
11. Settings > Voice Guide
Notes and cautions
Charging
Notes
- If the battery overheats during charging, it may take longer to charge.
- If automatic charging is not working, do the following:
- Turn the emergency switch (on the bottom of POWERbot) off and on again.
- Unplug the docking station's power plug and then plug it back on.
- Unplug the docking station, and then check whether there is any foreign matter on the charging pins. If there is, clean the POWERbot and the charging pins of the docking station with a dry cloth or rag.
- Check for any obstacles such as reflective objects, chairs, etc. near the docking station.
- If the POWERbot is left detached from the docking station, the battery will drain.
- Try to keep the POWERbot in the docking station so it can charge continuously when not in use. However, you should turn off the emergency switch and leave the docking station unplugged if you plan to be out of your house for long periods of time such as when you go on vacation, etc.
Using
- The POWERbot may get caught on thresholds, etc. during cleaning.
- To restart operation, shut off the emergency switch, move the POWERbot to an area where it can move easily, and then turn on the power again.
- The POWERbot cannot completely clean areas it cannot enter, such as corners, between the wall and sofa, etc.
- Please use another cleaning tool to clean them regularly
- he POWERbot cannot vacuum clumps of dirt, so some may remain on the floor after cleaning.
- Please use another cleaning tool to clean them regularly.
- If POWERbot is turned off, you cannot turn it on by pressing the Power button on the remote control. Press and hold the [Start/Stop] button on POWERbot.
- You cannot select and have the POWERbot execute Spot clean mode while it is charging.
- If you press the Manual clean / Point cleaning button while the POWERbot is charging, the POWERbot will detach itself from the docking station and then go into standby mode.
Cleaning and maintenance
Notes
- If you washed the dustbin and filter with water
- Dustbin: Completely wipe out the water.
- Filter: Completely dry it in the shade before using.
- When cleaning the auto shutter tool, do not pull the auto shutter tool out too hard.
Caution
- Watch your fingers when attaching or detaching the filter, since they may get stuck in the dustbin's intake.
- To avoid blockages by foreign matter, do not let the POWERbot vacuum up toothpicks, cotton swabs etc.
- If it is difficult to remove foreign matter from the brush, contact an authorized Samsung service center.
- Since the brush removes dirt from the floor during cleaning, foreign matter such as thread, long hair, etc. may get caught in it. For the best cleaning results, check and clean it regularly.
- If a brush or brush cover is not assembled correctly after the maintenance work, scratches may occur on the floor, or product malfunction may occur. Therefore, assemble them correctly by checking the maintenance method.
About the battery
- Purchase batteries at authorized Samsung centers and check for the Samsung symbol (
 ) on the battery. Confirm that you have the correct model battery before purchasing.
- This battery is exclusively for the Samsung Electronics POWERbot. Do not use it for any other product.
- Do not disassemble or modify the battery.
- Do not throw the battery out in a fire or heat it.
- Do not connect any metallic object to the charging contacts (+, -).
- Store the battery indoors (at 0 °C~40 °C).
- If the battery malfunctions, do not disassemble it yourself. Contact your nearest Samsung service center.
- Battery charging time and usage time may decrease the more the battery is used. If the battery’s lifespan has been exceeded and it no longer recharges or functions properly, have it replaced at a Samsung service center.
- The battery warranty period is 6 months from the date of purchase.
About the IrDA sensor
- Infrared signal transmission may not be smooth in locations exposed to halogen lamps or in outdoor locations.
- The POWERbot uses 3 types of infrared devices. Each of the devices has a different priority level. A device may not work if it's signal is superseded by a device with a higher priority.
- Infrared signal Priority: Smart control > Docking station
- Different infrared signals may interfere with one another and cause the devices to malfunction if they are used together in a small space or in close proximity.
- If more than one POWERbot is used simultaneously, they may malfunction due to interference between infrared signals
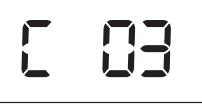
<SR1AM7010U* series>
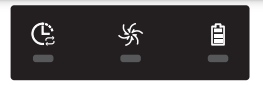
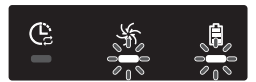
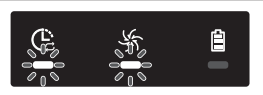
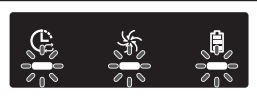
1 The three indicators below blink and an information codes alarm sounds.
2 Turn off the emergency switch, check the instructions below, and then take appropriate action.
3 The information code will disappear when you turn on the emergency switch
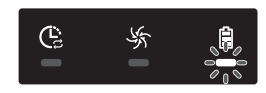
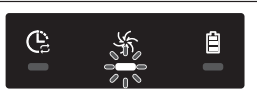
Information codes animation

 The POWERbot is caught, stuck or trapped while moving.
- Turn off the emergency switch, and then move the POWERbot to another area.
 Foreign matter is caught in the brush.
- Turn off the emergency switch, and then remove the foreign matter from the brush.
 Foreign matter is caught in the left Driving wheel.
- Turn off the emergency switch, and then remove the foreign matter from the Driving wheel.
 Foreign matter is caught in the right Driving wheel.
- Turn off the emergency switch, and then remove the foreign matter from the Driving wheel.
 The bumper sensor needs to be checked.
- Turn off the emergency switch, and then turn it back on.
- If the information code does not disappear, check if there's any foreign matter between the bumper and the main body. If there is, pull the bumper slightly, and then remove the foreign matter.
 Foreign matter has accumulated on the obstacle sensor.
 Foreign matter has accumulated on the cliff sensor.
- Turn off the emergency switch, and then clean the cliff sensor with a soft cloth.
 Main PCB needs to be checked.
- Turn off and restart the product. If the same problem occurs repeatedly, a service check is required.
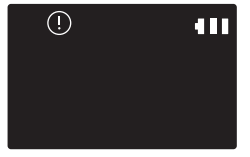
<SR1AM7040W* / SR2AM70**** series>
1 The information code below appears and an information codes alarm sounds.
2 Turn off the emergency switch, check the instructions below, and then take appropriate action
3 The information code will disappear when you turn on the emergency switch
 The POWERbot is caught, stuck or trapped while moving.
- Turn off the emergency switch, and then move the POWERbot to another area.
 Foreign matter is caught in the brush.
- Turn off the emergency switch, and then remove the foreign matter from the brush.
 Foreign matter is caught in the left Driving wheel.
- Turn off the emergency switch, and then remove the foreign matter from the Driving wheel.
 Foreign matter is caught in the right Driving wheel.
- Turn off the emergency switch, and then remove the foreign matter from the Driving wheel.
 The bumper sensor needs to be checked.
- Turn off the emergency switch, and then turn it back on.
- If the information code does not disappear, check if there's any foreign matter between the bumper and the main body. If there is, pull the bumper slightly, and then remove the foreign matter
 Foreign matter has accumulated on the obstacle sensor.
- Turn off the emergency switch, and then clean the front and rear sensor with a soft cloth.
 Foreign matter has accumulated on the cliff sensor.
- Turn off the emergency switch, and then clean the cliff sensor with a soft cloth.
 Main PCB needs to be checked.
- Turn off and restart the product. If the same problem occurs repeatedly, a service check is required.
Troubleshooting
1. The POWERbot is not working at all.
- Check if the emergency switch is on.
- Check if all the icons are displayed on the display panel. fCheck if the POWERbot's battery is depleted.
- If "Lo" is displayed, place the POWERbot in the docking station to charge it.
- If the battery indicator is blinking, manually place the POWERbot in the docking station to charge. (SR1AM7010U* series only)
- Replace the batteries (AAA type) if the remote control is not working
2. The POWERbot has stopped during cleaning.
- If "Lo" is displayed on the display panel, place the POWERbot in the docking station to charge it. fIf the battery indicator is blinking, manually place the POWERbot in the docking station to charge. (SR1AM7010U* series only)
- If the POWERbot is immobilized by an obstacle such as a cord, threshold etc, pick it up and move it away from the obstacle.
- If any fabric or string is caught in a drive wheel, turn off the emergency switch and remove the fabric or string
3. Suction power is weak.
- When there's too much dust in the dustbin, suction power may be weakened. Turn off the emergency switch, and then empty the dustbin.
- If the intake (on the bottom of the POWERbot) is blocked by foreign matter, turn off the emergency switch, and then remove the foreign matter from the intake.
- When noise suddenly increases, turn off the emergency switch, and then empty the dustbin
4. The POWERbot cannot find the docking station.
- Check if there's a power failure or whether the power plug is unplugged.
- Remove any obstacles around the docking station that may prevent the POWERbot from returning to the docking station.
- If there's foreign matter on the charging pins, charging can be affected. Clean the foreign matter off the pins.
5. The POWERbot suddenly cleans diagonally.
- Check if the docking station is installed along the grain of a wooden or tile floor.
- The POWERbot may clean in a diagonal direction if it is moving to another area using the shortest route. It may also move at a diagonal if it made contact with an obstacles at that angle, if it was charged at the docking station at an angle, or if the grain of the wooden/tile floor is skewed in that direction.
6. Point cleaning is not working.
- If you point the red light directly at the POWERbot, it may not move in desired direction.
- Point the red light on the floor within 1.6 ft (0.5 m) of the POWERbot. ✻ Do not use point cleaning in direct sunlight, under bright light, or on dark floors.
7. I have installed the SmartThings app, but the POWERbot fails to connect.
- You can use the SmartThings app with the POWERbot only after connecting the wireless router and the POWERbot through the EasySetup procedure
8. I cannot log into my Samsung account.
- Check your ID and password on the screen of the Samsung account.
9. A message appears saying there is a failure during Easy-Setup.
- You may have failed temporarily due to the distance from the wireless router or other obstacles. Please try again after a while
10. The SmartThings app does not work even though your smart phone is normally connected to the POWERbot.
- Turn off the SmartThings app and then run it again, or disconnect the smart phone from the wireless router and then connect it again. Or turn off the power supply of the POWERbot, turn it on, wait for a minute or longer, and then run the SmartThings app again.
11. The functions of the SmartThings App do not work.
- Check if the POWERbot's Smart control blocking function is On. (When Smart control is blocked, the Wi-Fi indicator is turned off. You can only use the remote control to control the POWERbot remotely.)
12. The SmartThings Robot Vacuum App fails to start.
- Check if the POWERbot is connected to the wireless router.
13. The POWERbot is not connected to Wi-Fi.
- Check the setting status of the wireless router.
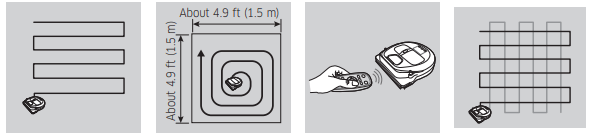
14. The Intelligent Power Control function works on a normal floor. (It should only work on carpets.)
- Check whether the floor is uneven and whether the POWERbot works with its body a bit lifted up.
- Check whether there is any foreign matter on the cliff sensor which is on the bottom of the POWERbot.
- Check whether the floor color is dark
15. The Intelligent Power: Control function does not work.
- When the POWERbot cleans a carpet with short fibers and bright color, it may recognize the carpet as a floor and then the Intelligent Power Control function may not work.
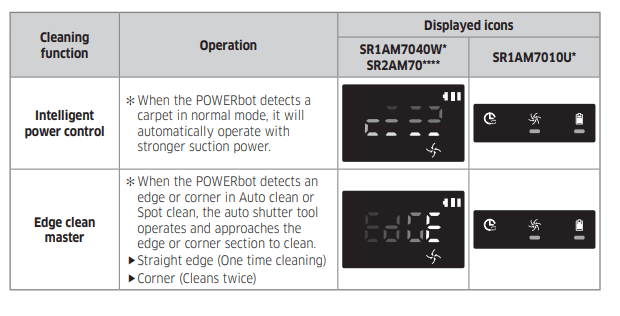
16. The Edge Clean Master function does not work.
- If the POWERbot cannot recognize a wall, the Edge clean master may not work:
- When an obstacle made of reflective material is in front of the wall
- When the wall itself is made of reflective material
- When the wall is a dark color
17. The Edge Clean Master function works though there is no wall or corner.
- Check whether small obstacles are arranged in a narrow space.
- If the POWERbot recognizes the front obstacle as a wall, the Edge clean master function may work.
18. The Edge Clean Master function works though the POWERbot has not approached a wall or corner.
- If the degree of the angle of a corner which the POWERbot detects is large, the Edge clean master function may work even though the POWERbot has not approached the wall or corner
19. SmartThings App cannot be installed.
- SmartThings App operates on Android OS 6.0 or later, iOS 10 or later.
- The supporting OS version for SmartThings App may change later.
- For rooted smart devices, standard installation and use will not be guaranteed
20. A message of product registration failure appears.
- Try the product registration procedure again by referring to the popup messages.
- Please refer to the “Setting up the wireless router” in the user manual.
- Please refer to the steps for completing the product registration in the user manual section "Adding a device to the SmartThings APP".
- When the product registration fails repeatedly, reset the POWERbot and Smartphone, run the SmartThings App again and try the product registration.
- The same Samsung account should be used for the login of App and product registration.
- All users should use the Samsung account issued by the same country.
21. During product registration, recharging button is pressed and held as instructed but the next step does not appear.
- Press the recharging button until you hear it beep.
- If the next step does not appear within several seconds, press the recharging button one more time.
22. During product registration, the wireless router I want to connect cannot be searched.
- Cancel the product registration, run the SmartThings App again, and try the product registration again.
23. During product registration, the AP password 1111122222 is not input correctly.
- Press and hold the “[robot vacuum] Samsung” on the network list and delete the network to initialize the password.
24. During product registration, the password of the connecting wireless router is not input correctly.
- Cancel the product registration, run the SmartThings App again, and try the product registration again.
- Press and hold the wireless router you want to connect on the network list, and delete the network to initialize the password.
25. A connection cut between the SmartThings App and the POWERbot occurs though the product registration is completed.
- Refresh the screen and wait.
- Run the SmartThings App again.
- Check whether there is an internet connection problem. Especially, a firewall may interrupt standard operation.
26. A connection cut between the SmartThings App and the POWERbot suddenly occurs during normal operation of the app.
- If the POWERbot is distant from a wireless router, connection cut may occur. fReset the POWERbot and the smart phone, and check the connection again.
- If the connection cut occurs repeatedly, try the product registration again.
- When the SSID/password of a wireless router is changed, try the product registration again.
27. Controlling with SmartThings App does not work since the remote control function is disabled.
- Remote control function is disabled status. Make the remote control function enabled status with a remote controller.
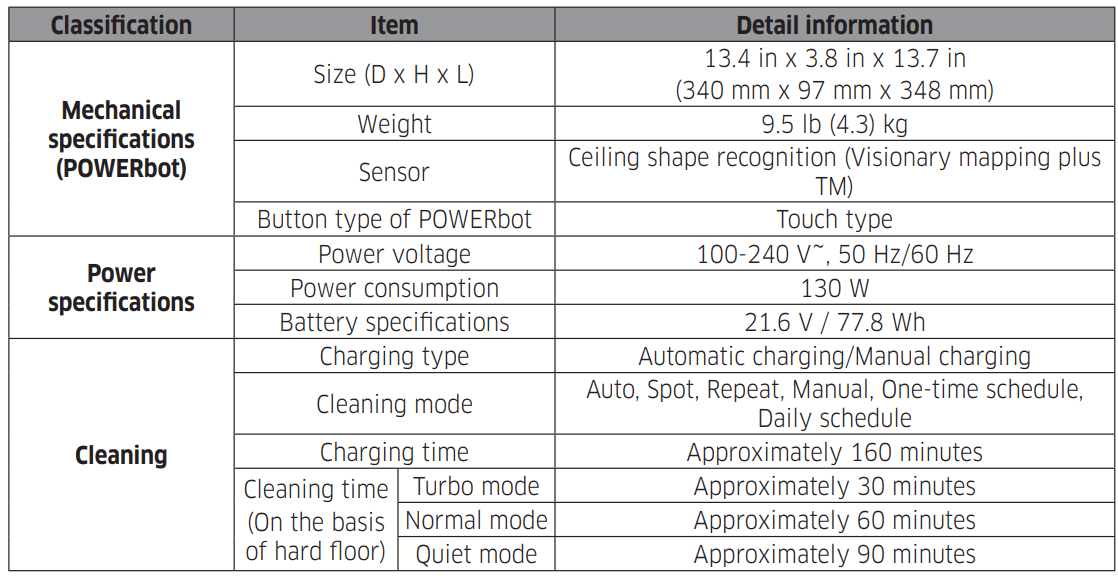
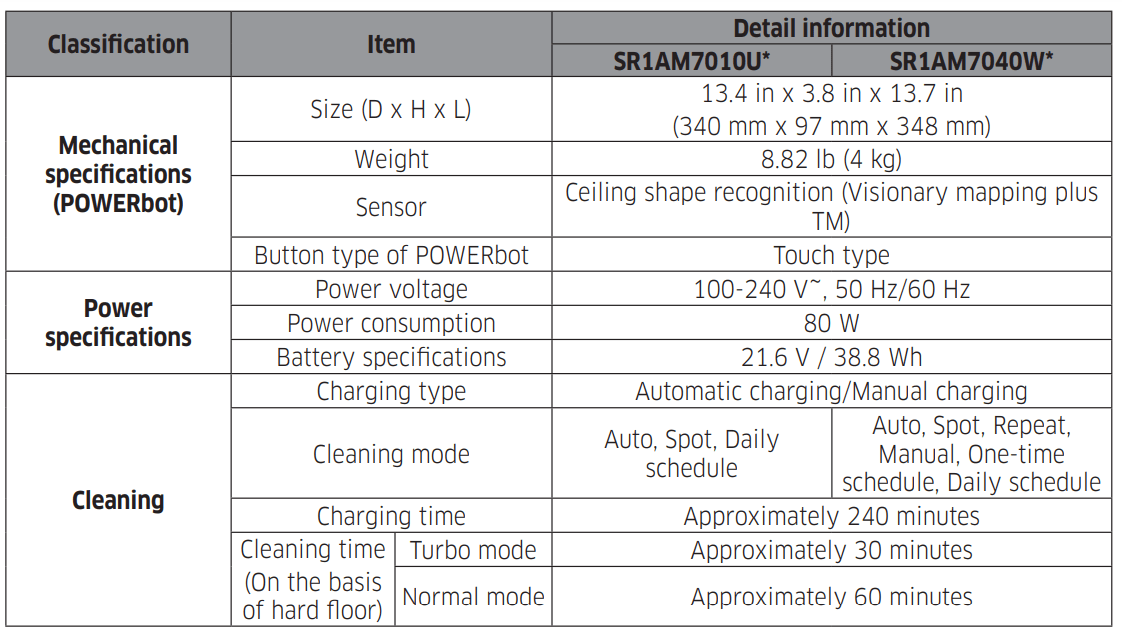
Specifications
<SR1AM7010U*, SR1AM7040W* series>
<SR2AM70**** series>