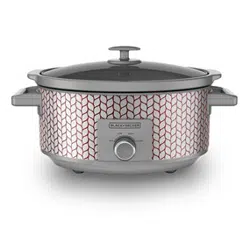
User manual Slow Cooker
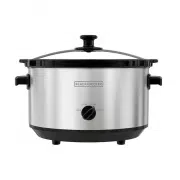
GETTING TO KNOW YOUR SOUS-VIDE SLOW COOKER
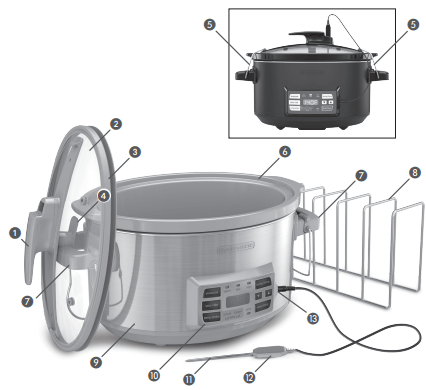
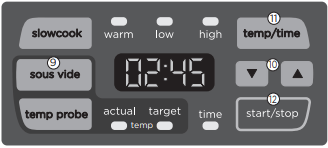
1. Lid handle
2. Tempered glass Lid (Part #SCD7007-01) gray, (Part # SCD7007MBD-01) black
3. Rubber gasket (Part # SCD1007-02) gray, (Part # SCD7007-02) black
4. Lid hanger
5. Locking wires
6. Stoneware pot (Part # SC1007-03) gray, (Part # SC4007-03) black
7. Handles
8. Rack (Part # SCD7007-04)
9. Cooking base
10. Control panel
11. Temperature probe (Part # SCD7007-05)
12. Probe handle
13. Port for temperature probe jack
14. Two disposable bags (not shown)
GETTING STARTED
This appliance is intended for household use only.
- Remove all packing material, any stickers, and the plastic band around the power plug.
- Wash all removable parts as instructed in CARE AND CLEANING. Place the clean, dry stoneware pot in the cooking base
- Select a location where the cooker is to be used. Place the unit on a stable, heat resistant surface, free from cloth, liquids and any other flammable materials. Place the unit with ample space all the way around it, and far enough away from the wall, to allow heat to flow without damage to cabinets and walls.
CHOOSE A FUNCTION FOR YOUR MEAL
- SLOW COOKING: Soups, stews, and combinations of meats and vegetables.
- TEMPERATURE PROBE: Roasts and other larger cuts of meat cooked without vegetables in the bottom of the pot or elevated by the rack.
- SOUS-VIDE: Meat in single-serving sized portions, cooked in bags in a water bath, then removed and seared to caramelize the outside.
- The stoneware pot gets hot. When in use, always use oven mitts or potholders when touching any outer or inner surface of the appliance
- If there is a power outage 2 hours or less, the slow cooker will resume cooking and continue for the remaining amount of time programmed. If the power was out longer than 2 hours the time will flash “----” to indicate that the food should be discarded. If you are not sure how long the slow cooker has been off, discard the food.
- During first few minutes of use you may notice smoke and a slight odor. This is caused by oil that may have been used during manufacturing of the unit and will not impact the performance.
- Do not add cold food if the stoneware pot is hot, and vice versa. The stoneware material is not meant to handle sudden changes in temperature.
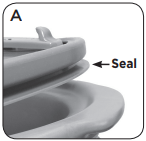
- Ensure that the rubber gasket is installed when using the slow cooker. The locking mechanism will not seal properly without the rubber gasket.
- When installing the rubber gasket make sure that the seal is oriented downwards. (A)
LOCKING AND UNLOCKING THE LID
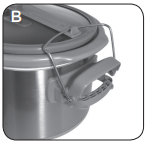
1. Place the stoneware pot in the cooking base. Then place the lid, with gasket installed, on top.
2. Swing the locking wires on both handles up and around, until they fit into the hooks on the lid. Once the wires are in the hooks, the handles on the cooking base will be in the open, unlocked position. (B)
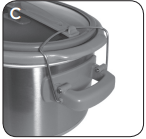
3. Lock both the handles by pushing down on them. This will lock the lid in place. Always make sure the handles are securely in the locked position before moving the slow cooker. (C)
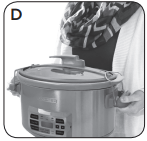
Important: Always carry the slow cooker from the cooking base handles. Make sure to securely grasp the bottom portion of the handles to avoid the handles separating or unlocking unexpectedly while carrying. (D) Never lift the slow cooker by the lid handle. Detach temperature probe before carrying slow cooker.
4. To unlock, push up the top part of the handles into the open, unlocked position. Then swing the locking wires down and around to the cooking base.
Important: When unlocking, keep your fingers out from between the top part of the handles and the edge of the stoneware.
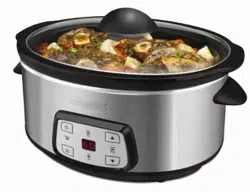
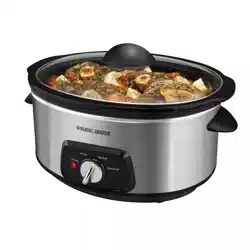
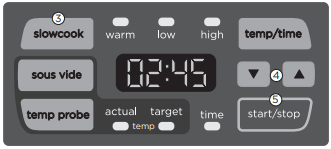
SLOW COOK FUNCTIONS
Note: The temperatures for the Slow Cook and Keep Warm functions are fixed at 175°F for low, 190°F for high, and 140°F for (keep) warm. Do not use the temperature probe for these functions.
1. Add ingredients to the stoneware pot and cover with glass lid.
2. Plug in the appliance. The main control display will blink “----”. This indicates that the heat is off and the appliance is ready to be set for cooking.
3. Click the SLOWCOOK button until the light over either your choice of low or high is on.
Note: Do not use the warm setting to cook. Only use it to keep warm cooked food that is already hot.
Presets: The default times for slow cooking are 8 hours on low and 4 hours on high.
4. If you wish, adjust the amount of time you wish to cook by using the arrows. The maximum time that can be set is 20 hours.
5. Press the START/STOP button to begin cooking. The numbers will stop flashing. The “:” between the numbers will blink, indicating the unit is cooking.
Note: You may adjust the time during the cooking cycle by pressing the arrows. After 3 seconds of no buttons being pressed, the numbers will stop flashing and the new amount of time for cooking will begin.
End of cooking cycle: When time is up, the unit will beep three times and automatically switch to Keep Warm. The light for “warm” will go on and the numbers will start counting up from zero (00:00) to 4 hours (04:00).
6. After the Keep Warm cycle has been on for 4 hours, the unit will power off and return to the default display: “----”.
Note: Do not keep foods on the warm setting for more than 4 hours.
- Unplug the appliance when not in use and always allow the slow cooker to completely cool before cleaning.
SLOW COOKING GENERAL TIPS
- The stoneware pot should always be filled from ½ to 3⁄4 full, to avoid over and under cooking.
- Always slow cook with the lid on.
- Open the lid as little as possible to assure even cooking. Every time the lid is removed, the cooking time increases by 15–20 minutes.
- Most recipes can be cooked on either HIGH or LOW. Many recipes will give the time for both.
- Low: Often used for longer cooking times, 8–10 hours, for tougher cuts of meat.
- High: Cooking on high setting is similar to a covered pot on the stove top. Foods will cook on high in about half the time required for low cooking. Additional liquid may be required as foods can boil on high.
- Warm: Only use to keep cooked foods at a food-safe serving temperature and should not be used to cook foods. It is not recommended to use “Warm” for more than 4 hours.
SLOW COOKING MEATS
- The higher the fat content, the less liquid needed. Also, place thickly sliced onions under fattier meat to keep it above the drippings.
- Browning before cooking in the slow cooker is not necessary; however, browning meats, lightly coated in flour gives more body and flavor to sauces.
- Make sure top of meat does not touch the lid.
- Cooking times will vary depending upon the size of the meat, the bones and the cut. Meat with bone-in will take longer to cook. Lean meats and poultry will cook faster.
- Use HIGH for more tender cuts of meat; use LOW for tougher cuts.
- Always thoroughly thaw meats before cooking them in the slow cooker.
- Fish cooks quickly; add it for the last 15 minutes.
SLOW COOKING VEGETABLES
- Place vegetables such as carrots, potatoes, turnips, and beet at the very bottom of the stoneware pot and always cover them with liquids. They usually take longer to cook than most meat.
- Vegetables cook well; they develop better flavor and don’t break down as they would in your oven.
SEASONINGS IN THE SLOW COOKER
- Fresh herbs should be added at the end of the cooking cycle. If cooked too long they lose their color and flavor.
- Dried herbs work well in the slow cooker and can be added at the beginning. They can become stronger on longer cooking; begin with less and add at end, if needed.
- Whole herbs and spices flavor better in slow cooking than crushed or ground.
TEMPERATURE PROBE

1. Add protein to the stoneware pot and cover with glass lid.
2. Plug in the appliance. The main control display will blink “----”. This indicates that the heat is off and the appliance is ready to be set for cooking.
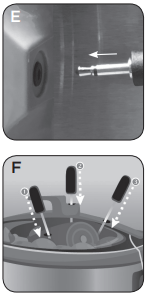
3. Insert the jack of the temp probe into the port on the right side of the control panel. (E)
4. Lock lid and insert temperature probe into food. There are three insertion portals in the lid. (F) Insert the probe at the thickest part of the meat, but not touching bone.
Note: While meat is cooking, the muscle fibers contract and start to push out the probe. Check the position of the probe tip during cooking and reposition as needed.
5. Click the TEMP PROBE button. The light below the “target temp” will light up. This indicates that you are setting the temperature that you want the food to be cooked to.
6. The default temperature is set at 180°F. Adjust to your desired temperature with the arrows.
7. Press START/STOP to begin cooking. The light for “actual temp” will illuminate. The number display will show the actual temperature that the probe is sensing from within the food.
Note: The actual temperature may display higher than set temperature in temp probe function. This is normal. The temperature will return to the set temperature as the unit calibrates.
End of cooking cycle: When the internal temperature of the meat has reached the target temperature, the unit will beep two times and automatically switch to a cycle holding the food at the target temperature. To help you keep track of the length of time the food has been held at that temperature, the numbers will start counting up from zero (00:00).
Caution: Do not hold food at or below 130°F for longer than 2 hours for food safety reasons.
- Unplug the appliance when not in use and always allow the slow cooker to completely cool before cleaning.
TEMPERATURE PROBE COOKING CHART
| Food |
Temperature |
Time |
Notes |
| Beef roaststough cuts (chuck, brisket, shank, round), 2.5–6 lbs. (1.1–2.7 kg) |
180°F–195°F (82–90 °C) |
10–36 hours |
The longer you can cook these cuts of meat the more tender they will be |
| Beef roaststender cuts (prime rib, tenderloin, strip loin, 2.5–6 lbs. (1.1–2.7 kg) |
Medium: 130°F–150°F (55–65 °C)
Well Done: 150°F–160°F (65 – 70 °C)
|
6–12 hours |
Cooking time will vary depending on the size of the roast. Do not cook a roast at a temperature lower than 130°F. |
| Pork roaststough cuts (shoulder or blade); can be bone in or boneless, 2.5–6 lbs. (1.1–2.7 kg) |
180°F–195°F (82–90 °C) |
10–36 hours |
The longer you can cook these cuts of meat the more tender they will become. |
| Pork Roaststender cuts (tenderloin, loin, rib and ham), 2.5–6 lbs. (1.1–2.7 kg) |
Medium: 130°F–150°F (55–65 °C)
Well Done: 150°F–160°F (65–70 °C)
|
6–12 hours |
Cooking time will vary depending on the size of the roast. Do not cook a roast at a temperature lower than 130°F. |
| Whole Chickenup to 5 lbs. (2.25 kg) |
160°F–170°F (70–76 °C) |
4–8 hours |
The chicken will start to fall apart if left in the unit longer than 8 hours. |
SOUS-VIDE
1. Place rack into the center bottom of the stoneware pot.
2. Add hot water and fill to approximately half way.
Note: Hot tap water is a good start for most sous-vide cooking. Do not use cold water. Cold water can take up to 2 hours to heat to cooking temperature. To ensure that water heats as quickly as possible, do not remove lid while heating.
3. Plug in the appliance. The main control display will blink “----”. This indicates that the heat is off and the appliance is ready to be set for cooking.
4. Insert the jack of the temp probe into the port on the right side of the control panel. (G)
5. Season meat, put into bags. Expel all air from bags and seal.
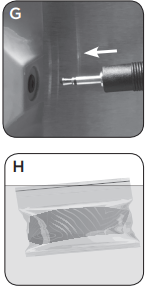
How to expel air with the immersion method: Mostly seal the bag with food in it, except for one corner. Using a separate container of cool water, slowly push the bag into the water, expelling as much of the air as possible, until you almost get to the opening. (H) Seal it all the way closed, being careful not to get water into the bag.
6. Load bagged food into the rack and ensure bags are fully submerged. Add additional water if needed.
7. Cover with glass lid and lock.
8. Insert temperature probe through one of the portals of the lid into the water (not the food).
9. Press SOUS VIDE. The light for “target temp” will go on, indicating that you are setting the cooking temperature.
10. The default cooking temperature is set at 135°F. Adjust to your desired temperature with the arrows. The available range is 100°F to 195°F in this function.
11. Press TEMP/TIME to set the time you wish to cook. The “time” light will go on. The default is one (01:00) hour. Adjust length of cooking time with the arrows.
12. Press START/STOP to begin the cooking cycle. The light for “actual temp” will illuminate. The number display will show the actual temperature that the probe is sensing from within the water.
Note: At this point the water will start heating up to the target temperature. The amount of time that takes varies. The bagged food can stay in the water during the heating up time as long as the set temperature is 130°F or above. The cooking cycle timer will only begin to count down once the water has reached the target temperature.
End of cooking cycle: When time is up, the unit will beep three times and automatically switch the heat off. Remove the food bags from the water at this time.
As an indication to show how long the unit has been cooling, the light for “time” will go on and the numbers will start counting up from zero (00:00) to 4 hours (04:00) and then return to the default screen “----”.
- Unplug the appliance when not in use and always allow the slow cooker to completely cool before cleaning.
FINISH/SEAR THE FOOD
Food cooked in the sous-vide is moist and edible straight from the packet but meat is more delicious after a quick, hot searing.
1. Heat up a cast iron skillet and add olive or avocado oil. Sear meat to your preferred brown up to 2 minutes per side.
2. You can alternatively use a broiler or a grill. Just keep in mind that the food is already done and you are only searing the outside.
NOTES ON COOKING TIMES AND FOOD SAFETY
In order to make sure the food is safe to eat, sous-vide cooking depends on the combination of the superior heat transfer of water, precise temperature, and a longer length of time cooking.
- Do not take meat out of the sous-vide early. Let it cook at least for the minimum length of time on the chart at the correct temperature.
- It is OK to leave meat in the sous-vide longer than the minimum time range. (Fish is the exception to this rule. Fish will get mushy if overcooked in the sous-vide.)
- Remove meat at or before the maximum time for food safety and to preserve texture.
- If you are using thinner cuts than those we specified in the charts, cook only to the minimum amount of time and remove from the water bath to maintain texture
SOUS-VIDE COOKING CHART
| Food |
Temperature |
Cooking Time* |
Notes |
| Beef steaks- (NY Strip; sirloin, tenderloin, ribeye, T-Bone) |
Rare: 118°F– 130°F (48–55 °C)
Medium: 130°F– 150°F (55–65 °C)
Well Done: 150°F– 160°F (65–70 °C)
|
Rare: 1 hour –2 ½ hrs.
Medium: 1 ½ hrs. –3 ½ hrs.
Well Done: 2–4 hrs.
|
Be aware that if you want to cook your steak rare then do not leave it in the water for longer than 2 hours. Bacterial growth occurs after 2 hours and your risk of illness increases. |
| Pork Chops or Lamb chops- bone in and boneless (Ribeye, loin) |
Rare: 118°F– 130°F (48–55 °C)
Medium: 130°F– 150°F (55–65 °C)
Well Done: 150°F– 160°F (65–70 °C)
|
Rare: 1 hour –2 ½ hrs.
Medium: 1 ½ hrs. –3 ½ hrs.
Well Done: 2–4 hrs.
|
We recommend cooking your chops to 135Fthis makes a very tender and juicy chop. |
| Chicken partsbone-in or boneless (breast, leg, wing, thigh) |
Medium: 130°F– 150°F (55–65 °C)
Well Done: 150°F– 160°F (65–70 °C)
|
Medium: 2–4 hrs.
Well done: 3–5 hrs.
|
Boneless chicken will cook faster than bone-in. |
*Cooking time will start after the water has reached cooking temperature.
CARE AND CLEANING
This product contains no user serviceable parts. Refer service to qualified service personnel.
CLEANING
IMPORTANT: Never immerse the jack, wire, or handle of the temperature probe or cooking base in water or other liquids.
1. Always unplug and allow to completely cool before cleaning.
2. Remove temperature probe. To clean the probe, wipe only the metal probe end with a cloth dampened with warm water and dish soap. Dry thoroughly.
3. Wash stoneware pot and glass lid in warm water with dish soap. Remove the rubber gasket and hand wash separately. If food sticks to the stoneware pot, fill with warm and dish water and allow it to soak before cleaning with a nonabrasive scouring pad.
NOTE: Do not use abrasive cleaners on the stoneware pot.
NOTE: Both the stoneware pot and glass lid are dishwasher safe.
4. Rinse and dry thoroughly.
5. Wipe interior and exterior of the cooking base with a soft, slightly damp cloth or sponge. Never use abrasive cleansers or scouring pads to clean the cooking base, as they may damage the surfaces.
6. Allow to dry thoroughly before storing.
STORING
Make sure that the appliance is thoroughly dry. Never wrap the cord tightly around the appliance; keep it loosely coiled. Store the probe inside the stoneware pot.
TROUBLESHOOTING
| PROBLEM |
POSSIBLE CAUSE |
SOLUTION |
| Food is undercooked while slow cooking |
• You may have used the wrong setting.
• The power may have been interrupted.
• The lid may have been improperly placed on the stoneware pot.
• Lid has been removed too many times during operation.
|
• Make sure you use the correct setting for the recipe.
• If the power was interrupted and you don’t know for how long; discard the food.
• Make sure the lid is placed evenly on top of the stoneware pot.
• Keep the lid closed. Every time the lid is removed it adds 15–20 minutes to the cooking time.
|
| Food is overcooked while slow cooking |
• There may be a difference between your favorite recipe and the operation of the slow cooker.
• Not all slow cookers cook exactly the same; the settings could be cooking slightly different than slow cookers that have been used previously.
|
• As you use the slow cooker settings, make note of any changes in time on your favorite recipes. |
| The meat was done but the vegetables were under-cooked while slow cooking |
• The foods may have been improperly placed in the slow cooker. |
• Place the vegetables on the bottom and sides of the stoneware pot.
• Place the meat on top of the vegetables and in the center of the stoneware pot.
|
| While in the temperature probe or sous-vide mode, there are no numbers on the digital display for the actual temp. |
• The temperature probe jack might not be inserted all the way into the port. |
• Check the connection and plug the jack all the way in. |
| While using the temperature probe function, the actual temp doesn't seem to be rising. |
• The probe might not be inserted properly and is reading the temperature of the air around the meat. |
• Re-insert the probe deeply into the thickest part of the meat. |
| • The lid may have been improperly placed on the stoneware pot. |
• Make sure the lid is placed evenly on top of the stoneware pot.
• Keep the lid closed.
|
If additional assistance is needed, please contact our consumer service team at 1-800-465-6070.