
Loading ...
Loading ...
Loading ...
16 17
Clock/Timer
Setting the clock
1 In Standby mode, press PROG/CLOCK
button.
➜ The clock digits for the hours flash.
2 Press ¡1 / 2™ to set the hours.
3 Press PROG/CLOCK again.
➜ The clock digits for the minutes flash.
4 Press ¡1 / 2™ to set the minutes.
5 Press PROG/CLOCK to confirm the time.
Note:
– If the clock has not been set, -- --:-- -- will be
displayed.
Setting the timer
● The system can be used as an alarm clock. CD
or TUNER can be set to switch on at a preset
time. The clock time needs to be set first before
the timer can be used.
● If no button is pressed within 90 seconds during
timer setup, the system will exit timer setting
mode automatically.
1 In any mode, press TIMER on the remote
control for more than 2 seconds.
2 Press ¡1 / 2™ (or CD/TUNER/DOCK on
the remote control) to select sound source.
3 Press TIMER to confirm your desired source.
➜ The clock digits for the hours flash.
4 Press ¡1 / 2™ to set the hours.
5 Press TIMER again.
➜ The clock digits for the minutes flash.
6 Press ¡1 / 2™ to set the minutes.
7 Press TIMER to confirm the time.
➜ The timer is now set and actiated.
Notes:
- If source CD is selected and no disc is in the CD
tray or the disc has an error, TUNER will be
selected automatically.
- If source DOCK is selected and no iPod/Philips
GoGear is docked or no dock connection is made,
TUNER will be selected automatically.
- At the set time of wake up, the set will turn on at
volume level 12.
To activate and deactivate timer
● In standby or during playback, press
TIMER once.
➜ Display shows
if activated, and disappears
if deactivated.
Note:
- In the Eco-power standby mode( The display goes
blank. ), timer can be also be activated if timer is
set.
Activating and deactivating
SLEEP
The sleep timer enables the system to switch off
by itself after a set period of time. The clock time
needs to be set first before the sleep timer can
be used.
● Press SLEEP on the remote control repeatly to
select desired time before
system shuts off.
➜ Display shows SLEEP and
series of time options for
selection:
,
,
,
,
,
...
● To deactivate, press SLEEP on the remote
control once or more until “
“
is shown, or
press STANDBY ON on the system or
remote control.
MICRO SY STEM
iR
AM
MCM118D
SLEEP TIMER
Dock
IMPORTANT!
– MCM118D comes with two dock
types. Use the designated dock type, as
indicated on the bottom panel of the
dock supplied, to work with either Philips
GoGear or Apple iPod.
– Do not connect Mini-USB port both
on the main unit and the supplied dock
to a computer or any other USB devices.
It is only for connecting the supplied
dock and the main unit to let them work
together.
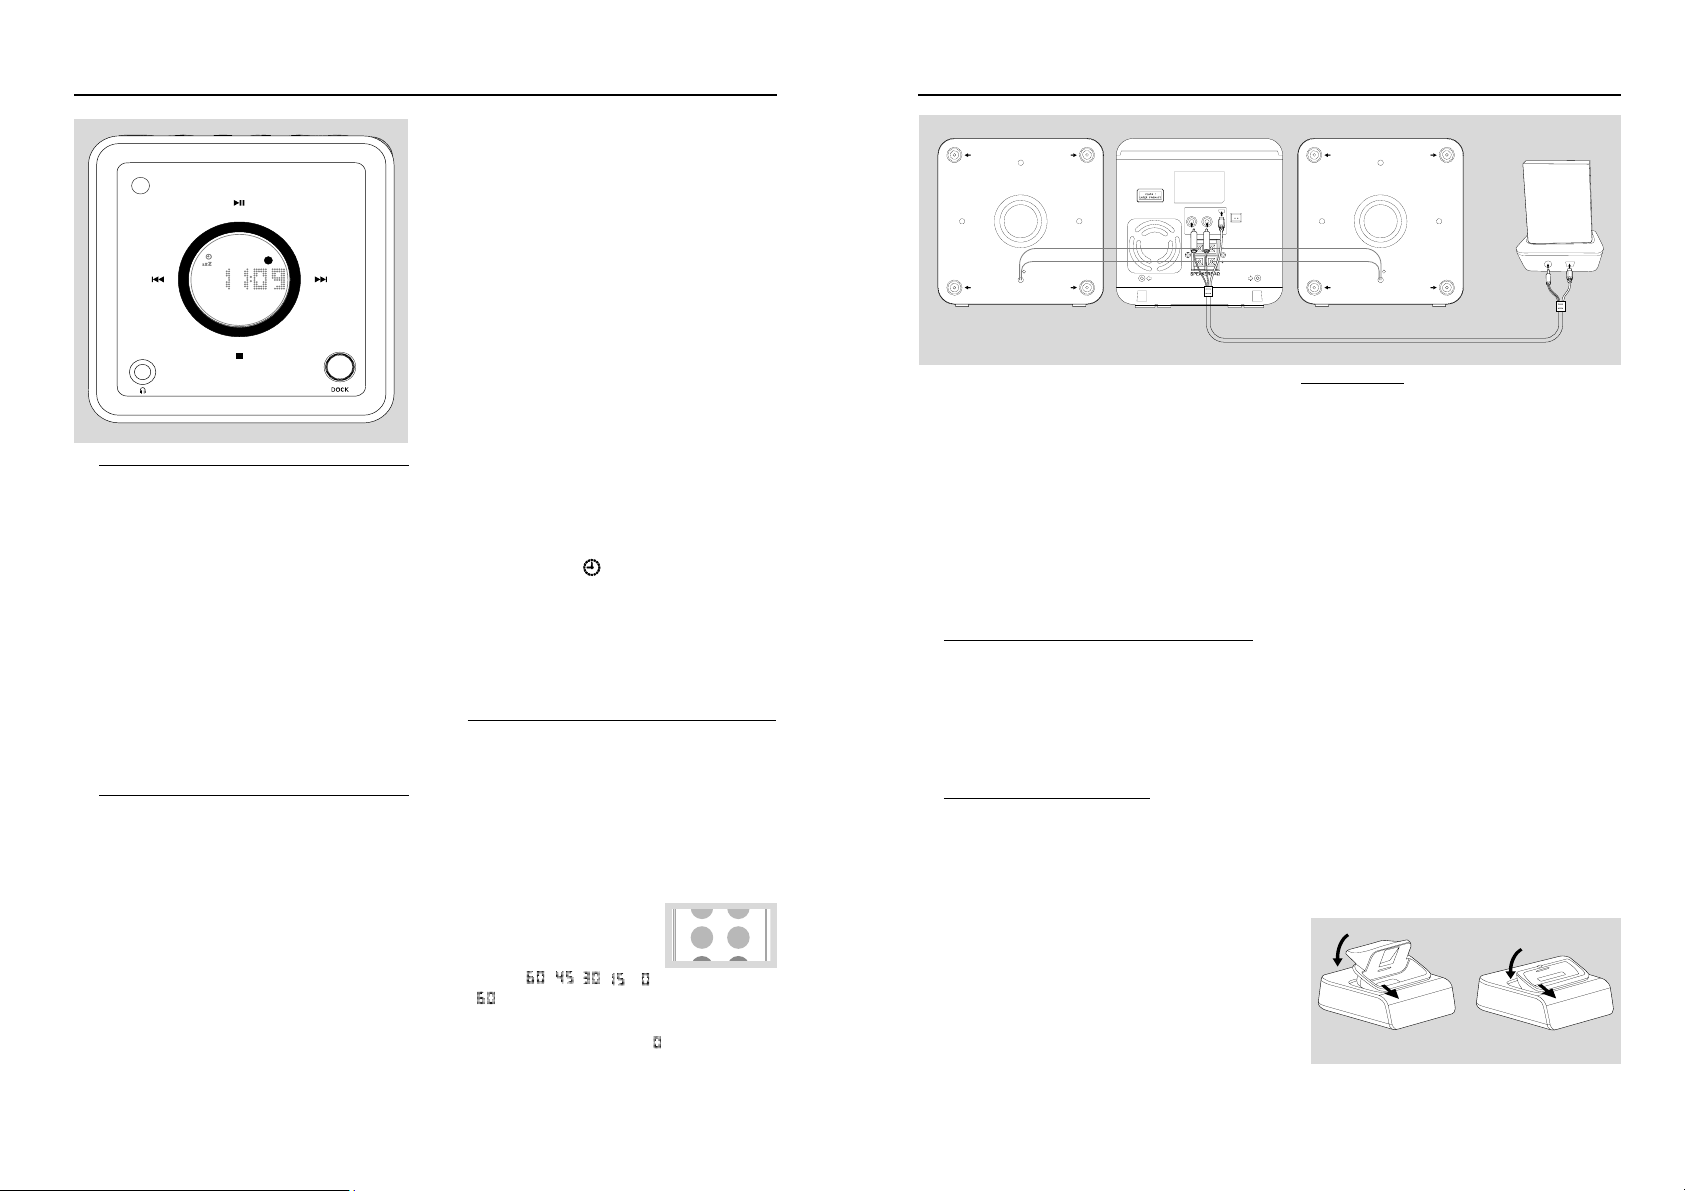
Playing iPod /Philips GoGear
using the dock
By connecting the supplied dock to your Hi-Fi
system, you can listen to the sound of the
docked player through the powerful speakers of
the Hi-Fi system.
Compatible portable player
● Most Apple iPod models with 30-pin dock
connector as follows:
20GB, 40GB, 20/30GB Photo, 40/60GB Photo,
30GB Video, 60GB Video, Mini and Nano.
● Philips GoGear players with dock connectors
as follows:
- HDD1420, HDD1620, HDD1630, HDD1635,
HDD1820, HDD1830, HDD1835;
- HDD1840, 1850;
- HDD6320, HDD6330
Speaker
(right)
Speaker
(left)
AC MAINS~
RIGHT
DOCKING IN
LR
LEFT
Portable player
Dock
Adaptor for iPod
Adaptor for Philips GoGear
2
2
1
1
Dock adaptor
Before plugging your player in the dock, snap the
suitable dock adaptor into the dock to provide a
snug fit for the player to be docked.
Selecting the correct dock adaptor
● For the iPod dock, 8 dock adaptors of different
type, as indicated at the back of the adaptor, are
included to fit the following iPod:
20GB, 40GB, 20/30GB Photo, 40/60GB Photo,
30GB Video, 60GB Video, Mini and Nano.
● For the Philips GoGear dock, 3 dock adaptors of
different type are included. Each adaptor is
marked a number from “1” to “3” at its back.
These numbers indicate the fit Philips GoGear
players as follows:
“1” = HDD6320/6330
“2” = HDD1420/1620/1630/1635/1820/
1830/1835
“3” = HDD1840/1850
Installing the dock adaptor
● First align two latches and two holes on the
adaptor and the dock, then gently push in the
adaptor until it clicks.
Loading ...
Loading ...