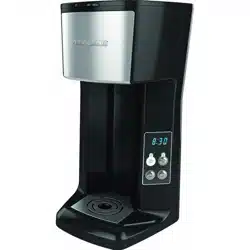
Operating your breville gourmet single cup brewer™
Installing the water filter
For the best tasting gourmet coffee, tea or hot cocoa, Breville recommends using bottled or filtered water.
The Water Filter provided with the Brewer can significantly reduce substances that affect the smell and taste of water such as free chlorine, certain pesticides and organic impurities as well as traces of heavy metals.
NOTE: The Water Filter can be removed from the Brewer. If you choose to install the Water Filter, it is recommended to replace the filter every 2 months or 60 tank refills, more often if you have hard water. We recommend removing the Water Filter if using filtered water, or if you choose not to replace the Water Filter every 2 months, as the filter may clog and affect the smell and taste of the water. If you choose not to install the Water Filter, you are ready to start the One-time Priming Process
NOTE: Do not use water that has been treated by a 'water softener'. The increase in sodium levels in the water can cause scaling in the brewer and hinder its performance.
Follow these steps each time you install a new Water Filter to ensure it filters optimally.
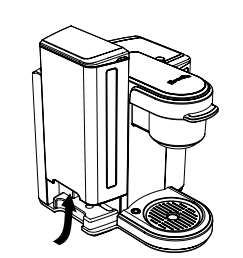
Remove the Water Tank from the Brewer by gripping the handle located on the left side of the Water Tank, then lift upwards
Remove the Water Tank Lid.
Rinse the Water Tank with fresh water and replace back onto the Brewer.
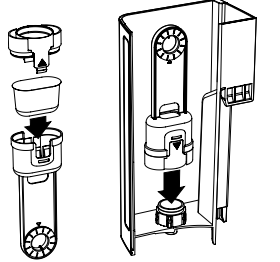
Remove the Upper and Lower Filter Holder and Water Filter from the polybag. Unwrap the Water Filter from its protective plastic..
Soak the Water Filter for 5 minutes then rinse for 30 seconds. It is normal to see a grey residue after soaking the filter..
Wash the Lower Filter Holder, ensuring the stainless steel mesh is free of residue.
Insert the Water Filter into the Upper Filter Holder, then attach the Lower Filter Holder so it locks into place.
Set the date dial on the Upper Filter Holder 2 months ahead. This will remind you when the Charcoal Filter will need to be replaced.
Place the assembled Filter Holder into the Water Tank, aligning so the date dial is visible from outside the Tank. Push down hard on the assembled Filter Holder until it snaps into place.
Your Brewer is ready for the one-time priming process.
NOTE: Replace the Water Filter every 2 months, or 60 tank refills, more if you have hard water. To order replacement Water Filters, visit www.breville.com. We recommend removing the Water Filter if you choose not to replace the Water Filter every 2 months, as the filter may clog and affect the smell and taste of the water.
One-time priming process
Priming fills the internal tank with water and cleanses the brewing system. You cannot use your Brewer until it has been primed for its first use.
NOTE: If the Brewer has been exposed to temperatures below freezing, allow the Brewer at least two hours to reach room temperature before priming. A frozen or extremely cold Brewer will not prime properly and can cause damage.
1.Unwrap the power cord and plug the Brewer into a grounded outlet.
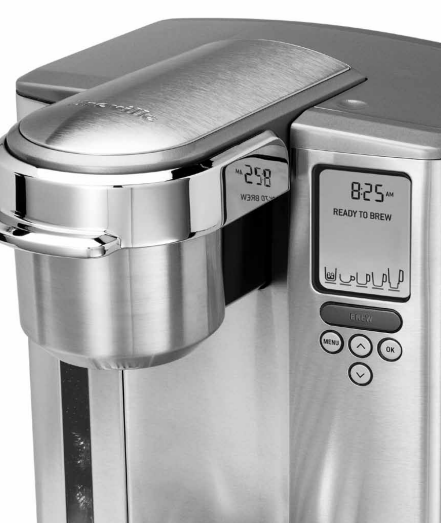
2.Place a 12 oz. mug on the Drip Tray Plate. The drip tray plate and drip tray can be removed to accomodate taller mugs and travel mugs.
3.Fill the Water Tank with water up to the 'MAX' mark on the viewing window. The Water Tank can be filled in two ways:
Remove the Water Tank Lid and pour water directly into the Water Tank while it is still attached to the Brewer, then replace the Lid.
Remove the Water Tank Lid, then gripping the handle located on the left side of the Water Tank, lift upwards. Fill with water. Place the Water Tank back onto the Brewer and replace the Lid.
NOTE: Do not use water that has been treated by a 'water softener'. The increase in sodium levels in the water can cause scaling in the brewer and hinder its performance.
4.Press and release the Power Switch located on the lower back, right side of the Brewer. The Power Switch is spring loaded and will return to its original position.
5.The Water Tank LED and LCD screen will illuminate. The Brewer will automatically fill with water and make a quiet vibrating sound. This is normal. The LCD screen will indicate 'HEATING'.
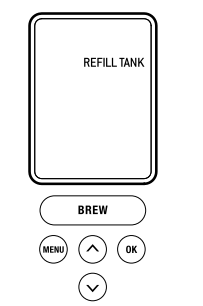
NOTE: If the Water Tank is empty or not in place on the Brewer, the Water Tank LED’s will flash and the LCD screen will indicate ‘REFILL TANK’. None of the control panel buttons will be active until water is added to the Water Tank.
6.Once the water is heated, the LCD screen will indicate 'OPEN HEAD'. Open the Brewing Chamber Head by raising and lowering the Safety Locking Arm completely. Do not insert a K-Cup® during this process. This will allow you to run a cleansing brew. The 'BREW' button will now be illuminated.
7.Press the 'BREW' button. This will start a cleansing brew which will complete the priming sequence. Hot water will flow into your mug. When the water flow stops, discard the hot water.
8. The LCD screen will indicate ‘HEATING’ as the Brewer heats the water for the next brew cycle. Once the water is heated, the LCD screen may indicate ‘REFILL TANK’.
9. Fill the Water Tank with water up to the 'MAX' mark on the viewing window.
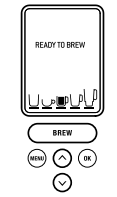
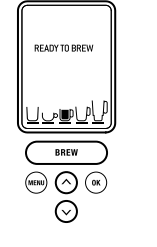
10. The LCD screen will indicate ‘OPEN HEAD’. Open the Brewing Chamber Head by raising and lowering the Safety Locking Arm completely. The LCD screen will indicate ‘READY TO BREW’.
11. The one-time priming process is now complete and you are ready for your first K-Cup® brew or My K-Cup® brew
Brewing a K-Cup®
Follow the instructions, Installing the Water Filter (page 9) and the One-time Priming Process (page 10). The Brewer should be turned on and the Water Tank should be filled and illuminated.
The LCD screen will indicate ‘READY TO BREW’. The and buttons will illuminate and the ‘BREW’ button will illuminate and flash for up to 60 seconds. NOTE: If the ‘BREW’ button is not pressed in 60 seconds, the LCD screen will indicate ‘OPEN HEAD’ and the ‘BREW’ button will be disabled to prevent accidental activation. To re-activate the brew sequence, open the Brewing Chamber Head by raising and lowering the Safety Locking Arm completely.
Place a cup or mug on the Drip Tray Plate. The drip tray plate and drip tray can be removed to accomodate taller mugs and travel mugs.
Raise the Safety Locking Arm. The Brewing Chamber will open toward you.
Select a K-Cup®.
Place the K-Cup® in the K-Cup® Holder (located in the Brewing Chamber). Do not remove the foil lid or puncture the K-Cup®. NOTE: There are two sharp needles that puncture the K-Cup®. One on the underside of the Brewing Chamber Head and the other in the base of the K-Cup® Holder. To avoid risk of injury, do not put your fingers in the Brewing Chamber or K-Cup® Holder.
Lower the Safety Locking Arm to close the Brewing Chamber Head over the K-Cup® Holder. When closed completely, the LCD screen will indicate ‘READY TO BREW’. The and buttons will illuminate and the ‘BREW’ button will illuminate and flash for up to 60 seconds.
The LCD screen will indicate the default brew size (7.25 oz.). To choose a different size, press the button to go up in size or the button to go down in size. NOTE: Select from a stronger small cup (5.25 oz. serving), a small mug (7.25 oz. serving), a large mug (9.25 oz. serving), a travel mug (11.25 oz. serving) or iced beverage setting (3.25oz serving). The iced beverage setting is only available on the the BKC700XL. The small mug (7.25 oz. serving) is the default brew size. To program your favorite brew size, refer to Setting the ‘BREW SIZE’ feature. NOTE: To use the iced beverage setting, place a tall glass filled with ice on the drip tray. Use your favorite K-Cup®, select the iced beverage brew size button. Add more ice once brewing is complete, add cream and sugar if desired. The iced beverage setting is only available on the BKC700XL.
Once the brew size is selected, press the ‘BREW’ Button. The ‘BREW’ button will stop flashing, the and buttons will no longer be lit. The LCD screen will indicate ‘BREWING’ and the selected brew size.
The LCD screen will indicate ‘BREWING’, however there may be a short pause before the brewing process begins. The process lasts about 60 seconds and ends with a burst of air to remove all liquid from the K-Cup®.
NOTE: There is extremely hot water in the K-Cup® Holder during the brewing process. To avoid risk of injury, do not raise the Safety Locking Arm or open the Brewing Chamber during the brewing process. Following the brew, the LCD screen will indicate ‘HEATING’ as the Brewer heats the water for the next brew cycle. This process lasts about 15 seconds. The pump will make a vibrating sound. This is normal.
9. Raise the Safety Locking Arm, remove and dispose of the used K-Cup®. Use caution as the K-Cup® will be hot.
10. Enjoy your first cup of gourmet coffee, tea or hot cocoa!
11. The LCD screen will indicate ‘READY TO BREW’, indicating that the next K-Cup® can be inserted for the next brew cycle.
Brewing with the My K-Cup® Accessory
The Breville Gourmet Single Cup Brewer™ comes with a My K-Cup® accessory. The dishwasher safe, reusable My K-Cup® allows you to use your own grind of coffee so you can adjust the amount and type of coffee to suit your tastes. Along with the included measuring scoop, this accessory conveniently stores in the easy open compartment on top of the brewer.
1. Follow the instructions, Installing the Water Filter (page 9) and the One-time Priming Process (page 10). The Brewer should be turned on and the Water Tank should be filled and illuminated.
NOTE: Do not use water that has been treated by a 'water softener'. The increase in sodium levels in the water can cause scaling in the brewer and hinder its performance.
2. The LCD screen will indicate ‘READY TO BREW’.
NOTE: If the ‘BREW’ button is not pressed in 60 seconds, the LCD screen will indicate ‘OPEN HEAD’ and the ‘BREW’ button will be disabled to prevent accidental activation. To re-activate the brew sequence, open the Brewing Chamber Head by raising and lowering the Safety Locking Arm completely
3.Place a cup or mug on the Drip Tray Plate. The drip tray plate and drip tray can be removed to accomodate taller mugs and travel mugs.
4.Open the storage compartment located on top of the Brewer by pressing the finger indent on the right side. Remove the My K-Cup® accessory.
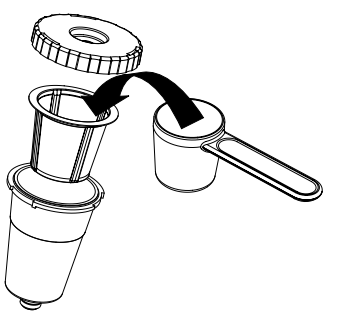
5.Disassemble the My K-Cup® accessory by removing the Lid from the Holder in a counterclockwise direction. Remove the Filter Basket from the Holder.
6.Wash the My K-Cup® Lid, Filter Basket and Holder in warm soapy water prior to first use. Rinse and dry thoroughly.
7.Insert the Filter Basket into the Holder.
8.Use the My K-Cup® Measuring Scoop to fill the Filter Basket with 1 level scoop maximum of coffee. 1 level scoop is equivalent to 2 tablespoons. Alternatively, there are line markings on the inside of the Filter Basket that indicate 1 tablespoon and 2 tablespoons so you can adjust the amount of coffee to your personal preference. Do not fill the Filter Basket with more than one level scoop of coffee or tamp the grinds. Ensure the coffee remains loose and there are no coffee grinds remaining on the upper rim of the Filter Basket. Screw on the Lid to seal.
NOTE: 1 level scoop = 2 tablespoons We recommend this for the small mug 7.25 oz. serving. Or, if you like a stronger brew, select the small cup 5.25 oz. serving. If you grind your own beans:
Start with a coarser grind similar to a French Press grind.
Experiment with grinds similar to drip brewing grinds.
Avoid a fine espresso grind setting that could clog the Filter Basket or result in poor extraction.
9. Raise the Safety Locking Arm. The Brewing chamber will open toward you.
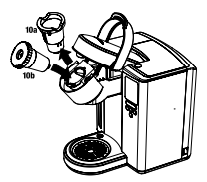
10. Place the assembled My K-Cup® Holder into the Brewing Chamber. To do this:
Remove the K-Cup® Holder from the Brewing Chamber (10a). Store the K-Cup® Holder in the My K-Cup® Storage compartment located on top of the Brewer.
Insert the assembled My K-Cup® Holder into the Brewing Chamber (10b), ensuring to align the arrow on the My K-Cup® Lid with the arrow in the Brewing Chamber.
11. Lower the Safety Locking Arm to close the Brewing Chamber Head over the My K-Cup® Holder. When closed completely, the LCD screen will indicate ‘READY TO BREW’. The and buttons will illuminate and the ‘BREW’ button will illuminate and flash for up to 60 seconds.
The LCD screen will indicate the default brew size (7.25 oz.). To choose a different size, press the to go up in size or the button to go down in size.
Once the brew size is selected, press the ‘BREW’ Button. The ‘BREW’ button will stop flashing, the and buttons will no longer be lit. The LCD screen will indicate ‘BREWING’ and the selected brew size.
12. The LCD screen will indicate ‘BREWING’, however there may be a short pause before the brewing process begins. The process lasts about 60 seconds and ends with a burst of air to remove all liquid from the My K-Cup® Holder.
13. Raise the Safety Locking Arm, remove the assembled My K-Cup® Holder. Use caution as the My K-Cup® Holder will be hot.
14. Disassemble the My K-Cup® Holder by removing the Lid from the Holder in a counter-clockwise direction. Remove the Filter Basket from the Holder, discard the grounds and rinse out the Filter Basket and Holder.
15. Enjoy your first cup of gourmet coffee, tea or hot cocoa!
SROPPING THE BREW PROCESS
To stop brewing after the process has started, press and release the Power Switch on the right side of the Brewer to the ‘OFF’ status. The flow of coffee, tea or hot cocoa will stop, the heating element will shut off and the LED’s illuminating the Water Tank will no longer be lit. The LCD screen will indicate the time, ‘ON-OFF TIME’ and ‘AUTO OFF’. None of the control panel buttons will be active until the Brewer is turned back on.
NOTE: You may get less coffee, tea or hot cocoa during your next brew. After a terminated brew, we recommend that you follow the instructions for Brewing hot water (page 18). Your next brew will then dispense the correct volume according to the brew size you have selected.
Brewing hot water
The Brewer is able to dispense a cup of hot water for making hot chocolate in a packet, for use in cooking, for making soups, etc. Follow the instructions Brewing a K-Cup® (page 12), without inserting a K-Cup®.
NOTE: After brewing a hot cocoa K-Cup®, or stopping the brew process mid-cycle, we recommend running a hot water brew cycle
Refilling the water tank: The LCD screen will indicate ‘REFILL TANK’ when the water level in the Water Tank is low or if the Water Tank has been removed.
Fill the Water Tank with water up to the 'MAX' mark on the viewing window. The Water Tank can be filled in two ways:
Remove the Water Tank Lid and pour water directly into the Water Tank while it is still attached to the Brewer, then replace the Lid.
Remove the Water Tank Lid, then gripping the handle located on the left side of the Water Tank, lift upwards. Fill with water. Place the Water Tank back onto the Brewer and replace the Lid.
The LCD screen will indicate either:
‘OPEN HEAD’. Raise and lower the Safety Locking Arm completely.
‘HEATING’ as the Brewer heats the water for the next brew cycle. This process lasts about 15 seconds. The pump will make a vibrating sound. This is normal.
Once the Safety Locking Arm is opened and lowered, or the water is heated, the LCD screen will indicate ‘READY TO BREW’, indicating the brew cycle can begin. The and buttons will illuminate and the ‘BREW’ button will illuminate and flash for up to 60 seconds.
Purging the brewer: If the Brewer has not been used for more than one week, you should renew the water from the inner tank by purging the brewer.
If there is water in the Water Tank, remove the Water Tank Lid, then gripping the handle located on the left side of the Water Tank, lift upwards. Discard the water, rinse and refill with bottled or filtered water. Place the Water Tank back onto the Brewer and replace the Lid.
If there is no water in the Water Tank, refill with water. Place the Water Tank back onto the Brewer and replace the Lid.
Ensure the Brewer is turned on. Raise and lower the Safety Locking Arm on the Brewer without inserting a K-Cup®.
The LCD screen will indicate ‘READY TO BREW’ and the ‘BREW’ button will illuminate and flash.
The LCD screen will indicate the default brew size (7.25 oz. serving unless programmed otherwise). Select the largest brew size (11.25 oz. serving) by pressing the button on the control panel.
Place a 12 oz. mug on the Drip Tray Plate. The drip tray plate and drip tray can be removed to accomodate taller mugs and travel mugs.
Press the ‘BREW’ button. Hot water will flow into your mug. When the flow stops, discard the hot water.
Repeat this process 2 more times to completely renew the water from inner tank.
MENU & PROGRAMMING
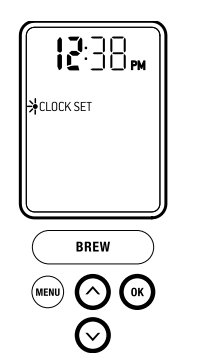
Setting the ‘CLOCK SET’ feature
Setting the clock is optional. When the clock is set, the time will appear on the LCD screen.
NOTE: You must set the clock if using the ‘ON-OFF TIME’ feature.
Press the ‘MENU’ button. The menu programming options will appear on the LCD screen with a blinking indicator on ‘CLOCK SET’.
Press the ‘OK’ button. The hour will blink, indicating the hour is ready to be set.
Press the orbutton to reach the appropriate hour. If the hour has passed 12, the indicator switches from AM to PM.
Once the appropriate hour is reached, press the ‘OK’ button. The minutes will blink, indicating that the minutes are ready to be set.
Press the or button to reach the appropriate minute.
Once the appropriate minute is reached, press the ‘OK’ button. The LCD screen will return to the menu programming options.
To exit the menu programming options, press the ‘MENU’ button. Alternatively, press the button to reach ‘EXIT MENU’ and press the ‘OK’ button. The LCD screen will return to the main screen and indicate the time selected.
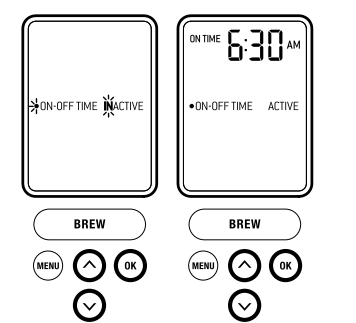
Setting the ‘ON-OFF TIME’ feature
This feature allows you to program the specific time when the Brewer will automatically turn on and/or off. By programming your Brewer to automatically turn on, you will not have to wait for the Brewer to heat the water in the Water Tank. It will take the Brewer approximately 3½ minutes to heat the water from room temperate.
Press the ‘MENU’ button. The menu programming options will appear on the LCD screen with a blinking indicator on ‘CLOCK SET’.
Press the button to reach ‘ON-OFF TIME’.
Press the ‘OK’ button.
Press the orbutton to see the two options:
‘ON-OFF TIME’ will be ‘INACTIVE’, indicating that the Brewer will not turn on or off automatically. Press the ‘OK’ button to select this option. The LCD screen will return to the menu programming options.
‘ON-OFF TIME’ will be ‘ACTIVE’, indicating the Brewer will automatically turn on and/or off according to the specific times you set. Press the ‘OK’ button to select this option.
Setting the ‘ON TIME’
The LCD screen will display ‘ON TIME’, indicating that the time you wish the Brewer to automatically turn on is ready to be set. The hour will blink, indicting the hour is ready to be set.
Press the orbutton to reach the appropriate hour. If the hour has passed 12, the indicator switches from AM to PM.
Once the appropriate hour is reached, press the ‘OK’ button. The minutes will blink, indicating that the minutes are ready to be set.
Press the orbutton to reach the appropriate minute.
Once the appropriate minute is reached, press the ‘OK’ button. The LCD screen will display ‘OFF TIME’, indicating that the time you wish the Brewer to automatically turn off is ready to be set.
Setting the ‘OFF TIME’
Follow the instructions (ii to iv) for Setting the ‘ON TIME’.
Once the appropriate time is reached, press the ‘OK’ button. The LCD screen will return to the menu programming options
5.To exit the menu programming options, press the ‘MENU’ button. Alternatively, press the button to reach ‘EXIT MENU’ and press the ‘OK’ button. The LCD screen will return to the main screen and indicate whether you have activated the ‘ON-OFF TIME’ feature.
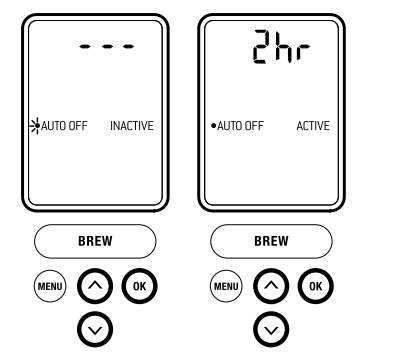
Setting the ‘AUTO OFF’ Feature
This feature automatically turns the Brewer off after 2 hours from the last brew
Press the ‘MENU’ button. The programming options will appear on the LCD screen with a blinking indicator on ‘CLOCK SET’.
Press the button to reach ‘AUTO OFF’.
Press the ‘OK’ button.
Press the or button to see the two options:
‘AUTO OFF’ will be ‘INACTIVE’ and the LCD screen will display ‘- - -’, indicating that the Brewer will not turn off automatically. Press the ‘OK’ button to select this option. The LCD screen will return to the menu programming options.
‘AUTO OFF’ will be ‘ACTIVE’ and the LCD screen will display ‘2 hr’, indicating the Brewer will automatically turn off after 2 hours. Press the ‘OK’ button. The LCD screen will return to the menu programming options.
To exit the menu programming options, press the ‘MENU’ button. Alternatively, press the button to reach ‘EXIT MENU’ and press the ‘OK’ button. The LCD screen will return to the main screen and indicate whether you have activated the ‘AUTO OFF’ feature.
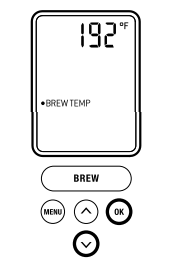
Setting the ‘BREW TEMP’ feature
The Brewer brews coffee at a preset temperature of 192°F. You can adjust this temperature down by 5°F if you prefer a cooler cup of coffee, tea or hot cocoa.
Press the ‘MENU’ button. The programming options will appear on the LCD screen with a blinking indicator on ‘CLOCK SET’.
Press the button to reach ‘BREW TEMP’.
Press the ‘OK’ button. The LCD screen will indicate the default brew temperature, 192°F or the pre-programmed brew temperature.
Press the or button to reach the appropriate brew temperature. The temperature can only be set between 187°F and 192°F.
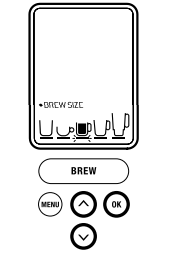
Setting the ‘BREW SIZE’ feature
This feature allows you to avoid scrolling through brew sizes if a particular size is chosen most often.
Press the ‘MENU’ button. The menu programming options will appear on the LCD screen with a blinking indicator on ‘CLOCK SET’.
Press the button to reach ‘BREW SIZE’. Press the ‘OK’ button. The LCD screen will indicate the default brew size (7.25 oz.).
Press the button to go up in size or the button to go down in size.
Once the brew size is selected, press the ‘OK’ button. The LCD screen will return to the menu programming options.
To exit the menu programming options, press the ‘MENU’ button. Alternatively, press the button to reach ‘EXIT MENU’ and press the ‘OK’ button. The LCD screen will return to the main screen and indicate the brew size selected.
CARE & CLEANING
Before cleaning, ensure the Brewer has been turned off. Switch off at the wall outlet, unplug the power cord and allow the machine to cool.
Cleaning the brewer housing
Regular cleaning of the Brewer’s housing and external components is recommended.
Never immerse the Brewer in water or other liquids. Wipe the housing with a soft, damp cloth then dry thoroughly. NOTE: Do not use abrasive scouring pads or cleaners when cleaning the housing as they may scratch the surface.
The Drip Tray and Drip Tray Plate can accumulate up to 12 oz. of overflow. The water level indicator visible through the Drip Tray Plate will pop up when this occurs. The Drip Tray and Drip Tray Plate should then be removed, emptied and cleaned. To remove the Drip Tray assembly, slide it toward you, keeping it level at all times to avoid spilling. Wash both parts in warm soapy water with a soft cloth, then rinse and dry thoroughly. The Drip Tray and Drip Tray Plate are also top-shelf dishwasher safe.
Cleaning the K-Cup® Holder
Regular cleaning of the K-Cup® Holder is recommended.
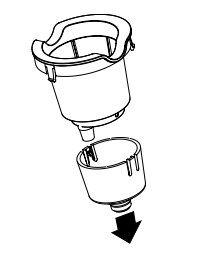
Raise the Safety Locking Arm and remove the K-Cup® Holder from the Brewing Chamber (refer to Brewing with the My K-Cup® Accessory, page 14)
Disassemble the K-Cup® Holder by pulling downwards on the Funnel located at the base of the Holder.
Wash both parts in warm soapy water with a soft cloth, then rinse and dry thoroughly. The K-Cup® Holder and Funnel are also top-shelf dishwasher safe. NOTE: The K-Cup® Holder houses a needle in the inside base. Should a clog arise due to coffee grinds, it can be cleaned using a paper clip or similar tool. Insert the paper clip into the Needle to loosen the clog and push it out. To avoid risk of injury, do not put your fingers in the K-Cup® Holder.
After cleaning, place the Funnel back onto the K-Cup® Holder.
Place the assembled K-Cup® Holder back into the Brewing Chamber, aligning the arrow on the K-Cup® Holder with the arrow in the Brewing Chamber. Use caution when doing this as there is a sharp needle on the underside of the Brewing Chamber Head that punctures the K-Cup®.
Cleaning the My K-Cup® accessory
Regular cleaning of the My K-Cup® accessory is recommended.
Remove the assembled My K-Cup® Holder from the Brewer by raising the Safety Locking Arm. Use caution as the My K-Cup® Holder will be hot.
Disassemble the My K-Cup® Holder by removing the Lid from the Holder in a counter-clockwise direction. Remove the Filter Basket from the Holder, discard the grounds.
Wash the Lid, Filter Basket and Holder in warm soapy water with a soft cloth, then rinse and dry thoroughly. All My K-Cup® parts are topshelf dishwasher safe.
Store the assembled My K-Cup® Holder in the My K-Cup® Storage compartment located on top of the Brewer.
Cleaning the water tank and lid
Wipe the Water Tank Lid with a soft, damp cloth then dry thoroughly. The Lid should not be put into the dishwasher.
Wash the Water Tank in warm soapy water with a soft cloth, then rinse and dry thoroughly. Do not dry the inside of the Tank with a cloth as lint may remain. The Water Tank should not be put into the dishwasher.
NOTE: Rinse the Water Tank thoroughly after cleaning to ensure that no cleaners or cleaning solutions remain as they may contaminate the water supply in the Brewer.
Cleaning the water filter
Regular cleaning of the Water Filter is recommended. We suggest doing this when the Water Filter is replaced every 2 months or 60 tank refills.
Disassemble the Water Filter by removing the Lower Filter Holder from the Upper Filter Holder. Discard the Water Filter.
Wash the Upper and Lower Filter Holder in warm soapy water with a soft cloth, then rinse and dry thoroughly. Both parts are also top-shelf dishwasher safe. NOTE: Replace the Water Filter every 2 months, or 60 tank refills, more if you have hard water.
To order replacement Water Filters, visit www.breville.com.
We recommend removing the Water Filter if you choose not to replace the Water Filter every 2 months, as the filter may clog and affect the smell and taste of the water.
Descaling the brewer
Mineral content in water varies from place to place. Depending on the mineral content of the water in your area, calcium deposits or scale may build up in your Brewer. Scale is non-toxic, but left unattended, it can hinder the Brewer’s performance. Descaling your Brewer helps maintain the heating element, and other internal parts of the Brewer that come in contact with water.
NOTE: Do not use water that has been treated by a 'water softener'. The increase in sodium levels in the water can cause scaling in the brewer and hinder its performance.
The Brewer should be descaled every 3-6 months to ensure optimal performance. It is possible for calcium deposits to build up faster, making it necessary to descale more often.
This Brewer is equipped with sensors to detect when scale buildup is interfering with the performance of the Brewer. When this is detected, the LCD screen will indicate ’DESCALE’.
NOTE: The Brewer will continue to operate even when the LCD screen indicates ‘DESCALE’.
However, if you do not descale the Brewer soon after it is displayed, continued scale build-up could damage the Brewer. If this occurs, ‘DESCALE’ will begin to flash, alerting you to the potential damage to the Brewer if you do not descale immediately.
Promptly follow these steps each time the LCD screen indicates ‘DESCALE’ to ensure the Brewer functions optimally
Empty the Water Tank.
Pour vinegar into the Water Tank, filling up to the 'MAX' mark on the water tank viewing window.
Place a 12 oz. or larger ceramic cup (do not use a plastic cup) on the Drip Tray. The Drip Tray and Drip Tray Plate can be removed to accomodate taller mugs and travel mugs
Select the largest brew size (11.25 oz. serving) by pressing the button on the control panel.
Run a cleansing brew without a K-Cup® (refer to Brewing Hot Water, page 18). Pour the contents of the cup into the sink.
Repeat the cleansing brew process until the Water Tank is empty, pouring the contents of the cup into the sink after each cycle. Remember to raise and lower the Safety Locking Arm between each cycle so the control panel buttons illuminate.
Let the Brewer stand for at least 4 hours while still on.
Rinse the Water Tank thoroughly and fill with fresh water.
Place a 12 oz. or larger ceramic cup (do not use a plastic cup) on the Drip Tray.
Run a cleansing brew without a K-Cup® (refer to Brewing Hot Water, page 18). Pour the contents of the cup into the sink.
Repeat the cleansing brew process until the Water Tank is empty, pouring the contents of the cup into the sink after each cycle. You may need to perform additional rinse cycles if you notice any residual taste. Remember to raise and lower the Safety Locking Arm between each cycle so the control panel buttons illuminate.
Disconnect the power plug from the wall outlet for at least 15 minutes, then re-plug the power cord into the wall outlet. The machine is now ready to use.
NOTE: If the LCD screen continues to indicate ‘DESCALE’ after completing the process, repeat the 'Descaling the Brewer' process
Storage
Before cleaning or moving the Brewer to a different location, ensure the Brewer has been turned off. Switch off at the wall outlet, unplug the power cord and allow the machine to cool. The Water Tank should be emptied and dried thoroughly.
Store your Brewer in its upright position to avoid water leakage from the inner tank.
Store your Brewer in a frost free environment. Storing the Brewer in a cold environment runs the risk of water freezing inside the Brewer and causing damage. If your Brewer has been stored in an environment below freezing, ensure to let it warm to room temperature for at least 2 hours before using.
When preparing to use the Brewer after storage, we recommend rinsing the Water Tank with fresh water and running three cleansing brews without a K-Cup ® (refer to Brewing Hot Water, page 18).
BKC600XL Priming Instructions
Follow the instructions, Installing the Water Filter (page 9) and the One-time Priming Process (page 10). The Brewer should be turned on and the Water Tank should be filled and illuminated.
The LCD screen will indicate ‘READY TO BREW’. The and buttons will illuminate and the ‘BREW’ button will illuminate and flash for up to 60 seconds. NOTE: If the ‘BRE W’ button is not pressed in 60 seconds, the LCD screen will indicate ‘O PEN HEAD’ and the ‘BRE W’ button will be disabled to prevent accidental activation. To re-activate the brew sequence, open the Brewing Chamber Head by raising and lowering the Safety Locking Arm completely.
Place a cup or mug on the Drip Tray Plate. The drip tray plate and drip tray can be removed to accomodate taller mugs and travel mugs.
Raise the Safety Locking Arm. The Brewing Chamber will open toward you.
The Water Tank LED will illuminate. The LCD screen will illuminate and indicate 'PRIME'. The 'BREW' button will illuminate and flash.
A K-Cup ® should not be used for the one time priming process.
Press the 'BREW' button. The Brewer will fill with water and make a vibratin sound. This is normal. The Brewer will then cease to vibrate and begin heating the water. The LCD screen will indicate 'HEATING' during this period.
Once the water is heated, the LCD screen will no longer indicate 'HEATING'. The 'BREW' button will illuminate and flash for up to 60 seconds.
Press the 'BREW' button. This will start a cleansing brew which will complete the priming sequence. The LCD screen will no longer indicate 'PRIMING'. Hot water will flow into your mug. When the flow stops, discard the hot water.
The LCD screen will indicate ‘HEATING’ as the Brewer heats the water for the next brew cycle. Once the water is heated, the LCD screen may indicate ‘REFILL TANK’.
Fill the Water Tank with water up to the 'MAX' mark on the viewing window.
The LCD screen will indicate ‘OPEN HEAD’. Open the Brewing Chamber Head by raising and lowering the Safety Locking Arm completely. The LCD screen will indicate ‘READY TO BREW’.
The one-time priming process is now complete and you are ready for your first K-Cup ® brew (page 12) or My K-Cup ® brew (page 14).
TROUBLESHOOTING
POSSIBLE PROBLEM
EASY SOLUTION
Brewer will not switch on
Plug the Brewer into an independent outlet.
Check that the Brewer is plugged in securely.
Plug into a different outlet.
Reset circuit breaker if necessary.
Make sure that the Power Switch has been turned on. The Water Tank should be illuminated. The ‘BREW’ button, andbuttons should be illuminated.
Brewer will not brew
After placing the K-Cup® in the K-Cup® Holder, or the My K-Cup® Holder into the Brewing Chamber, ensure the Safety Locking Arm is pushed down securely The LCD screen should indicate ‘READY TO BREW’. The andbuttons should illuminate and the 'BREW' button should illuminate & flash for up to 60 seconds.
If the LCD screen indicates ‘REFILL TANK’, add water to the Water Tank or make sure the Water Tank is attached correctly to the Brewer (page 18).
If the LCD screen indicates ‘REFILL TANK’ even after refilling, contact Customer Service on 1-866-BREVILLE (1-866-273-8455).
If the ‘BREW’ button is not pressed in 60 seconds, the LCD screen will indicate ‘OPEN HEAD’ and the ‘BREW’ button will be disabled to prevent accidental activation. To re-activate the brew sequence, open the Brewing Chamber Head by raising and lowering the Safety Locking Arm completely.
The Exit Needle may be clogged (refer Cleaning the K-Cup® Holder, page 27).
Coffee is too weak or watery
Reduce the brew size selection for a “stronger” tasting cup of coffee (refer to Setting the ‘BREW SIZE’ feature, page 24).
Try an Extra Bold K-Cup®. They have 30% more ground coffee in each K-Cup® portion pack.
Brewer dispenses a partial cup
The Exit Needle may be clogged (refer to Cleaning the K-Cup® Holder, page 27).
The Water Tank may have been removed during brewing. Replace the Water Tank and perform a cleansing brew without a K-Cup® (refer to Brewing Hot Water, page 18).
If the LCD screen indicates ‘DESCALE’, follow the instructions, Descaling your Brewer (page 28)
If you have repeated the descale procedure on your Brewer two times and the message is still displayed, contact Customer Service on 1-866-BREVILLE (1-866-273-8455).
The time is not displayed on the LCD screen
The time will not be displayed on the LCD screen unless you have set it. To set the clock, follow the instructions, Setting the ‘CLOCK SET’ feature (page 21).
If power is interrupted to the Brewer, you will need to set the clock again.
Brewer shuts off or turns on automatically
Check to make sure that the ‘ON-OFF TIME’ and/ or the ‘AUTO OFF’ features have not been set. To do this, press the ‘MENU’ button and scroll through the programming options. Both the ‘ON-OFF TIME’ and ‘AUTO OFF’ features should be ‘INACTIVE‘. If ‘INACTIVE’ is not displayed, follow the instructions, Setting the ‘ON-OFF TIME’ feature (page 21) and Setting the ‘AUTO OFF’ feature (page 23).
The blue light in the water tank is flashing
The water level is low and a full cup cannot be brewed. Add water to the Water Tank, following the instructions, Re-filling the Water Tank (page 18).
The LCD screen continues to indicate 'DESCALE' after completing the process
Repeat the 'Descaling the Brewer' process (page 28).
After the 'Descaling the Brewer' process, ensure to disconnect the power plug from the wall outlet for at least 15 minutes, then re-plug the power plug into the wall outlet.
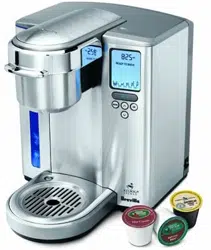
NOTE: There are over 200 varieties of Keurig K-Cups® from 13 gourmet partners. For more information on K-Cups® or K-Cup® ordering, visit www.breville.com.
#1 Has this happened to anyone?! Just started: If you select a larger cup size, it still only gives a small amount of cofffee and takes forever to pour
I've had this machine for over two years and have not had any issues with it, but we use filtered water so it doesn't get lime or calcium build up. Also, when I put a new k-cup in I push down on it to poke the bottom rod/tube into the k-cup before closing the lit. This prevents particulates of the coffee from blowing up into the top tube and clogging it up. Most k-cups are under pressure and without pushing down to puncture the bottom first it will puncture the top first when you close it. As for the odd amounts of coffee dispensed, I had that exact problem with my old Keurig machine and would fix it by just cleaning it either with vinegar or a store bought Descaler, we used "Cleancaf Cleaner for Home Coffee and Espresso Equipment" and it worked very well. Good luck!
#2 does the water reservoir remove to fill it up or is it stationary and you have to pour water directly into it?
You do not have to remove the reservoir to fill it; I just take the top cover off and pour water from a glass until the water level reaches the fill line. You do have to remove the reservoir to wash it and to remove/replace the filter; this is very easy to do. Knock on wood, I have had zero problems with the unit in the eight months I have owned it.
#3 Has anyone ever figured out how to get a decent cup of coffee out of this machine? I can only get pale watery cooofee that barely tastes like coffee.
We've owned this machine for for about four years and it makes great coffee both using pods and using ground coffee in the K cup. However, I did have problems when I used a pod and didn't use the holder for it - it did come out watery - could this be your problem?
#4 Uses the same but beware that we too purchased it for use in an office environment and it quit working after about 4 weeks. I reviewing the reviews after the fact, it appears this is a common problem. Really unfortunate because it looks great but nearly $300 for a coffee maker that won't hold up is ridiculous.
Uses the same but beware that we too purchased it for use in an office environment and it quit working after about 4 weeks. I reviewing the reviews after the fact, it appears this is a common problem. Really unfortunate because it looks great but nearly $300 for a coffee maker that won't hold up is ridiculous.

 and
and  buttons will illuminate and the ‘BREW’ button will illuminate and flash for up to 60 seconds. NOTE: If the ‘BREW’ button is not pressed in 60 seconds, the LCD screen will indicate ‘OPEN HEAD’ and the ‘BREW’ button will be disabled to prevent accidental activation. To re-activate the brew sequence, open the Brewing Chamber Head by raising and lowering the Safety Locking Arm completely.
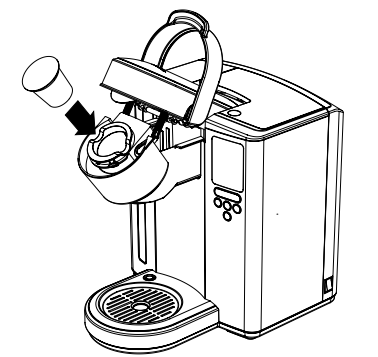
 arrow on the My K-Cup® Lid with the
  arrow in the Brewing Chamber.