User manual Dishwasher
Operations
Control panel
DDW24M99** Series

DDW24T99* Series

| 01 POWER |
Press to turn the dishwasher on or off. When a cycle is complete, all other indicators turn off with “0” on the display. Then, the dishwasher turns off automatically. |
| 02 Cycle Selector |
Press to select a cycle according to the soil level of your dishes. The corresponding cycle indicator turns on. The default cycle is Normal. |
| 03 Lower Rack |
Lower Rack only: If this option is selected, only the lower rack nozzle is activated to reduce both the cycle time and power consumption. Use this cycle to wash a small load of dishes or glasses in the lower rack. To wash heavily soiled items, add the Zone Booster option.
Zone Booster: Select this option to improve the cleaning performance. A powerful jet is activated and directed at items in the left side of the lower rack. This option can increase power consumption slightly.
NOTE If you use the lower rack only, the upper nozzle will be disabled. So do not load items in the upper rack. However, the Zone Booster option is available regardless of availability of the upper nozzle.
|
| 04 Speed Booster |
Select this option to reduce the cycle time. This is available only with the Auto, Normal, Heavy, and Delicate cycles. |
| 05 Hi-Temp Wash |
Select this option to increase the main-wash temperature to improve the cleaning performance for loads containing stubborn, baked-on food. This is available only with the Auto, Normal, Heavy and Express 60 cycles. |
| 06 Sanitize (Control Lock) |
With this selected, the water temperature increases to 163 °F (73 °C) in the final rinse for high temperature sanitization. For more information, see the Options section on page 30.
Control Lock: Control Lock allows you to lock the buttons on the control panel except for the POWER button. For more information, see the Control Lock section on page 34.
|
| 07 iQ Control |
You can monitor and control the dishwasher remotely through a Wi-Fi connection. To connect the dishwasher to your smart phone for the first time, press and hold iQ Control. For more information, see the Dacor iQ Kitchen section on page 33. |
| 08 Display |
Displays information of the current cycle including the cycle name/time, remaining time, and settings as well as an information code if found. |
| 09 Delay Start |
You can delay the cycle starting time. For more information, see the Delay Start section on page 34. |
| 10 START (Cancel & Drain) |
Press START to start operation. Make sure the door is closed.
*Cancel & Drain: To cancel the current cycle and drain the dishwasher, press and hold START for 3 seconds.
|
Indicators
| Control Lock indicator |
 |
Lights up if Control Lock is activated, and blinks for several seconds if any button except for the POWER button is pressed. |
| Self Clean indicator |
 |
Lights up if Self Clean is activated, and blinks for 5 seconds every 20-22 cycles. The cycle counter disappears when the Self Clean cycle is complete, or the dishwasher reaches the 23rd cycle. |
| Rinse Refill indicator |
 |
Lights up if the dishwasher runs out of rinse aid. |
NOTE All indicators light up when the dishwasher enters Standby mode or is stopped. However, they all turn off when the dishwasher is operating.
Simple steps to start
- Open the door, and then load the dishwasher. Make sure dishes are empty.
- If applicable, put the dishes in the lower rack. If adding the Zone Booster option, put the dishes in the left side of the lower rack.
- Apply detergent to the detergent dispenser. For better results, add rinse aids.
- Press POWER, and then select a cycle with necessary options (Speed Booster, Sanitize, etc). Availability of cycles depends on the model.
- Press START, and then close the door. The dishwasher starts the cycle after draining for a few seconds.
NOTE
Touchpad responsiveness
To prevent the touch-enabled controls from losing responsiveness, follow these instructions.

- Touch the center of each button with one finger.
- Do not touch more than one button at a time, except as directed.
- Clean the surface of the control panel regularly with a soft, damp cloth.
Cycle overview

| 01 Auto |
This cycle detects the level of soil and automatically initiates the optimal cycle, which is appropriate for all levels of soiled items. |
| 02 Normal |
This cycle reduces power and water consumption, which is appropriate for normally soiled items. To reduce the cycle time, select the Speed Booster option. |
| 03 Heavy |
Select this cycle for heavily soiled items. |
| 04 Delicate |
Select this cycle for lightly soiled, fragile items such as fine, crystal, and wine glasses. With this selected, the Zone Booster and Sanitize options will be disabled.
CAUTION Do not use this cycle for other glassware. Clouding or etching may occur.
|
| 05 Express 60 |
Select this cycle to clean lightly soiled items within about 1 hour. With this selected, the Speed booster and Zone Booster options will be disabled. |
| 06 Rinse Only |
Select this cycle to only rinse items that do not need to be washed. This cycle does not use detergent. |
| 07 Self Clean |
Use this cycle to clean the dishwasher’s tub. Make sure the dishwasher is empty. If the dishwasher needs self cleaning, the Self Clean indicator blinks for 5 seconds after the dishwasher turns on. If you start the dishwasher when the indicator is blinking, the indicator will turn off automatically.
CAUTION Do not use this cycle to clean dishes.
|
Options
| Speed Booster |
Select this option to reduce the cycle time. |
| Hi-Temp Wash |
Select this option to increase the main-wash temperature to improve the cleaning performance for loads containing stubborn, baked-on food. |
| Sanitize |
With this selected, the water temperature increases to 163 °F (73 °C) in the final rinse for high temperature sanitization. The corresponding indicator blinks when the water temperature reaches the sanitary temperature (over 155 °F / 68 °C), and then stays solid until the sanitizing process is complete.
• The Sanitize function complies with NSF/ANSI Standard 184 for residential dishwashers. Certified residential dishwashers are not intended for licensed food establishments. Your dishwasher is NSF Certified.
• Only the Heavy cycle with the Sanitize option has been designed to meet the requirements for soil removal and sanitization efficacy in NSF 184.
• Unavailable with the Delicate and Rinse Only cycles.
|
Settings
You can change the sound settings or display brightness to your preference. To change the settings, press Delay Start and Sanitize simultaneously for 3 seconds. Press Sanitize to navigate through sub menus, and press Delay Start to confirm your changes.

Sound
Press Sanitize until ‘U1’ or ‘U0’ is displayed. To mute the dishwasher, select ‘U0’, and then press Delay Start. To unmute, select ‘U1’, and then press Delay Start.
Auto Release™ Dry
The Auto Release™ Dry function is designed to improve drying performance. It automatically opens the dishwasher's door 5 to 15 minutes before a cycle ends. You can use 2 methods to activate or deactivate this function.
In Setting mode
- Press and hold Delay Start and Sanitize simultaneously for 3 seconds to enter Setting mode.
- Keep pressing Sanitize until ‘A1’ or ‘A0’ is displayed. Select one between ‘A1’ (enabled) and ‘A0’ (disabled). For better results, select ‘A1’ (default).
- Press Delay Start to confirm your changes.
On the control panel
- To activate the Auto Release™ Dry function, press and hold Lower Rack and Hi-Temp Wash simultaneously for 3 seconds. ‘A1’ will be displayed.
- To deactivate, press and hold the buttons again for 3 seconds. ‘A0’ will be displayed.
NOTE
- Once the door opens to let steams out, it cannot be closed manually for the next 2 minutes. This is normal and not a product defect.
- This function is not available with the Rinse Only cycle.
Getting started
Using Dacor iQ Kitchen, you can control your dishwasher from your smart device remotely. For improved performance, the content and design of the app is subject to change without notice.
- Launch the Dacor iQ Kitchen App on your smartphone.
- If ‘Dish Washer’s’ is not listed, tap Add Device > Select other device > Dish Washer on the app screen.
- Press and hold Smart Control on your dishwasher’s control panel for more than seconds until the ‘AP’ message appears on the display.
- When the device registration is complete, turn on the Smart Control function on your dishwasher and control your dishwasher remotely
Delay Start
You can delay the cycle starting time up to 24 hours in 1-hour increments. To increase the delay time, press Delay Start ( ). The hour displayed indicates the time at which the cycle will start.
- Open the door, and then load the dishwasher.
- Press Delay Start (), and then press or hold Delay Start () to change the time in 1-hour increments.
- Close the door, and then press START.
NOTE To change the delay time once the dishwasher has started, press POWER and restart the dishwasher.
Control Lock
To prevent children from playing with the dishwasher, Control Lock locks all button controls except for POWER.
- To activate Control Lock, press and hold Sanitize for 3 seconds. With Control Lock activated, you cannot select a cycle or option, or start an operation.
- To deactivate Control Lock, press and hold Sanitize again for 3 seconds
- Control Lock remains active after the dishwasher restarts. To cancel Control Lock, you must deactivate it first.
- To add detergent or more items while Control Lock is active, you must deactivate Control Lock first.
Care and Maintenance
Cleaning
Keep the dishwasher clean to improve performance, reduce unnecessary repairs, and lengthen the lifecycle.
Exterior
Clean spills on the surface of the dishwasher as they occur. Use a soft, damp cloth on the control panel to gently wipe away spills and dust.
CAUTION
- Do not use benzene, wax, thinner, chlorine bleach, alcohol, or other chemical substances. These materials may discolour the surface of the dishwasher and cause stains.
- The dishwasher has electric parts inside. Do not sprinkle water directly onto the dishwasher. Protect electrical components from coming in contact with water.
- For a stainless-steel door panel, use a stainless steel cleaner for home appliances and a clean, soft cloth.
Interior
Clean the interior of the dishwasher on a regular basis to remove any dirt or food particles. Wipe inside the dishwasher and inside the door with a wet dishcloth. We recommend filling the detergent dispenser with dishwasher soap, and then running the Self Clean cycle with an empty dishwasher.
To keep the cutlery pad clean, turn it over after using it. To remove white spots and odours from the cutlery pad, run the Self Clean cycle with an empty dishwasher and no detergent until the cutlery pad flushes. Then, stop the cycle and apply an 8-ounce cup of white vinegar into the lower basket. Close the door and resume the cycle.
CAUTION Do not remove the front seal (the long rubber seal enclosing the opening of the dishwasher). The seal keeps the inner side of the dishwasher sealed.
Use a damp cloth to remove lime scale or grease deposits inside the dishwasher. Alternatively, apply some detergent, and then run an empty cycle using the highest rinse temperature.
CAUTION To avoid damaging the motor, use caution when manually moving the water reflector.
Nozzles
To prevent the nozzles from being clogged or if the nozzles are clogged, remove and clean each nozzle. Use caution when removing the nozzles as they may break.
Upper nozzle

- Open the door, and then pull out the upper rack to reveal the upper nozzle.
- Loosen and remove the nut, and then remove the nozzle.
- Unclog and clean the nozzle.
- Reinsert the nozzle, and then tighten the nut by hand.
- Rotate the nozzle by hand to make sure the nozzle is engaged correctly.
Top nozzle
- Open the door, and then pull out the upper rack. The top nozzle is visible on the top.
- Turn counter clockwise and remove the nozzle cap, and then remove the nozzle.
- Unclog and clean the nozzle.
- Reinsert the nozzle, and then tighten the cap clockwise.
- Rotate the nozzle by hand to make sure the nozzle is engaged correctly.
Filter
We recommend cleaning the filter every month.

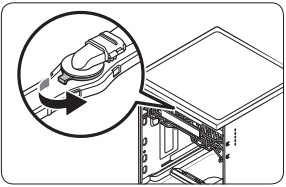
1. Open the door, and then remove the lower rack first.
2. Turn the filter handle counter clockwise to unlock the filter cover.
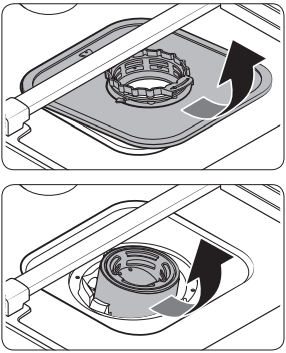
3. Remove the filter cover, and then the cylindrical micro filter underneath.
4. Remove any dirt and impurities from the micro filter and the filter cover.
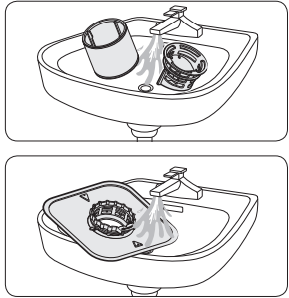
5. Rinse them with running water, and then dry well.
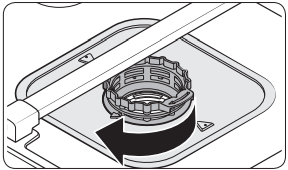
6. Reinsert the filter, and then the filter cover.
7. Turn the filter handle clockwise to lock.
CAUTION Make sure the filter cover is closed properly. A loose cover can reduce the filtering performance.
Drain pump
If the dishwasher fails to drain because the drain pump is clogged with foreign matter or there is an abnormal noise coming from the drain pump, you must unclog and clean the drain pump as instructed below.
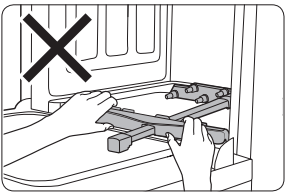
1. Remove the lower rack.
2. See the Filter section to remove the cylindrical micro filter. Then, remove any moisture from the filter using a sponge.
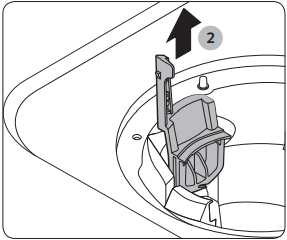
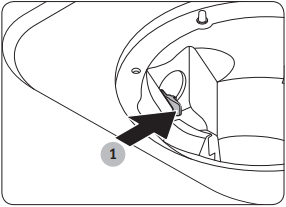
3. Remove the drain-pump cover by pushing its handle in the arrow direction (1), and then pulling up (2).
4. Check the impeller if it's in good condition. Then, remove any impurities from the pump.
5. Reinsert the drain-pump cover into place, and then press it down until you hear a clicking sound.
Long-term care
If you will not use the dishwasher for an extended period of time, first drain the unit completely, and then disconnect the water hose. Shut off the water supply valve and the circuit breaker. Water remaining in the hoses or the internal components can damage the dishwasher.
Troubleshooting
Checkpoints
If you encounter an issue to check with the dishwasher, first check the table below and try the suggestions.
| Symptom |
Possible Cause |
Action |
| The dishwasher does not start. |
The door is not completely closed. |
• Make sure the door is latched and completely closed.
• Make sure the upper rack is properly joined with the duct nozzle.
• Make sure the upper rack is properly assembled.
|
| The START (Reset) Button is not selected. |
• Make sure the door is latched and completely closed. Then, press START. |
| No cycle is selected. |
• Select a cycle. |
| The power cord is not connected. |
• Connect the power cord. |
| Water is not being supplied. |
• Make sure the water supply valve is open. |
| The control panel is locked. |
• Unlock the Control Lock function. |
| The dishwasher takes too long to start operation. |
The dishwasher is connected to a cold water supply. |
• To work properly, the dishwasher must be connected to a hot water supply. If connected to a cold water supply, additional time is required to heat the cold water. |
| The dishwasher has bad odours. |
Water remains from the previous cycle. |
• With the dishwasher empty, add detergent, and then run the Normal cycle to clean the dishwasher. |
| The drain hose is obstructed. |
• Contact a qualified service technician to remove any obstruction from the drain hose. |
| The dishwasher is not used daily or soiled dishes are left in unit too long. |
• With the dishwasher empty and no detergent, place a glass with 8 ounces of vinegar upright into the lower rack, and then run the Normal cycle. |
| Water remains in the dishwasher after a cycle has finished. |
The drain hose is folded or clogged. |
• Straighten and unclog the hose. |
| Food remains on dishes |
An incorrect cycle was selected. |
• Select a cycle according to the soil level of the dishes as instructed in this manual. |
| The filters or nozzles are clogged or not correctly fastened. |
• Clean the filters or nozzles. Make sure the filters are correctly fastened. See the Cleaning section on page 35. |
| An insufficient amount of detergent or no detergent was used. |
• Use the correct amount of detergent for each load. We recommend using a powdered or gel type of detergent. |
| The water pressure is low. |
• Make sure the pressure is between 20 psi and 120 psi (140-830 kPa). |
| The water temperature is low. |
• Connect the water supply line to a hot water supply. For best performance, the temperature of the supplied water must reach 120 °F (49 °C). |
| Dishes improperly loaded or overloaded. |
• Arrange the dishes so they do not interfere with the nozzles and/or the detergent dispenser. See the Loading dishes section on page 17. |
| The water is too hard. |
• Use a commercial dishwasher cleaner.
• Use high-quality, fresh detergent with rinse aid.
• Clean the filter at least once per month.
• Use a water softener additive designed for dishwashers featuring the water softener.
|
| Dishes are not dried well. |
There is no rinse aid in the dispenser, or not enough rinse aid was used. |
• Add a liquid type of rinse aid. Check the rinse aid settings. |
| The water temperature is low when the dishwasher is operating. |
Connect the water supply line to a hot water source. Use rinse aid with the Sanitize option. |
| Too many dishes have been loaded. |
• Proper loading of items can affect drying performance. Load your dishes as recommended. See the Loading dishes section on page 17. |
| Glasses and cups spilled water onto other dishes while being unloaded. |
• Empty the lower rack first, and then the upper rack. This will avoid water dripping from the upper rack onto the dishes in the lower rack. |
| Auto Release™ is turned off. |
• Turn Auto Release™ Dry on. Press and hold Lower Rack and Hi-Temp Wash for 3 seconds to access the Auto Release™ menu. Select A1 to activate Auto Release™ Dry. |
| The dishwasher is too noisy. |
The dishwasher makes a sound when the dispenser cover is open and the drain pump has just started. |
• This is normal. |
| The dishwasher is not level. |
• Make sure the dishwasher is level. |
| Foreign material (screws, plastic pieces) is in the pump chamber. |
• Contact a qualified service technician to remove foreign materials from the pump chamber. |
| The nozzle bumps against the dishes, creating a chopping sound. |
• Rearrange the dishes. |
| Leaves glasses with a light film. |
• The water supplied is soft and too much detergent was used.
• Aluminium dishes were included in the wash load.
|
• Underload the dishwasher and use a rinse aid to reduce the detergent.
• Remove the marks on the dishes using a low sensitivity cleaner.
|
| Yellow or brown film remains on dishes. |
Coffee and tea soils. |
• Remove the soils using a spot cleaner. |
| The nozzle does not rotate smoothly. |
The nozzle is clogged with food particles. |
• Clean the nozzle. See the Cleaning section on page 35. |
| The nozzle is blocked by a dish or pot and cannot rotate. |
• After placing the dishes into the racks, rotate the nozzle by hand to check whether any of the dishes interfere with the nozzle. |
| Water won’t pump out of the dishwasher. |
The drain system is clogged. |
• Clean the drain pump by removing the drain pump cover. See the Drain pump section on page 39. |
| The upper rack is bent after dishes are loaded. |
The dishes are not loaded properly. |
• Arrange the dishes as recommended. See the Loading dishes section on page 17. |
Information codes
If the dishwasher fails to operate, you may see an information code on the display. Check the table below and try the suggestions.
| Code |
Action |
| LC |
Leakage check
• Close the water supply valve. Go to your home’s circuit breaker panel, and set the dishwasher’s circuit breaker switch to off. Then, contact the installer to repair. If the issue continues, contact a local Dacor customer center.
|
| 4C |
Water supply check
• Check if the water supply valve is closed, if the water supply is suspended, or if the water inlet valve or line is frozen or clogged by foreign particles. If the issue continues, contact a local Dacor customer center.
|
| 5C |
Drain check
• Close the water supply valve. Check if the drain hose is clogged or folded. Check if the drain hole inside the pump is clogged. If the issue continues, contact a local Dacor customer center.
|
| HC |
High temperature heating check
• Functional check. With the dishwasher empty, add detergent, and then run a cycle. If the issue continues, go to your home’s circuit breaker panel, and set the dishwasher’s circuit breaker switch to off. Then, contact a local Dacor customer center.
|
| 3C |
Pump operation check
• Functional check. Turn off the dishwasher and restart. If the issue continues, contact a local Dacor customer center.
|
| PC |
Zone wash function check
• Functional check. Turn the dishwasher off and try to start it again. If the issue continues, contact a local Dacor customer center.
|
| AP |
Connect with a smart phone.
• When the control panel displays ‘AP’, press and hold iQ Control on the control panel to connect your dishwasher with your smart phone.
|