User manual Portable Air Conditioner
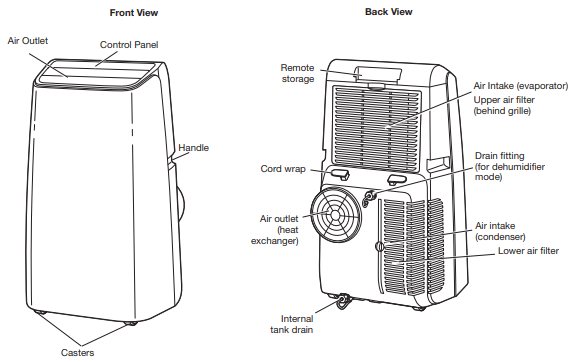
PARTS AND FEATURES
Installation Parts Supplied
Check that all parts are included in parts package.
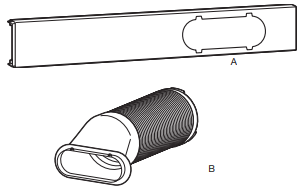
A. Window insert panel (1)
B. Flexible vent hose assembly (1)
Electrical Requirements
The electrical ratings for your air conditioner are listed on the model and serial number label. The model and serial number label is located on the back of the air conditioner cabinet.
Electrical Requirements

- 115-volt (103.5 min. - 126.5 max.)
- 0-12 amps
- 15-amp time-delay fuse or circuit-breaker
- If there is a “Single Circuit Only” label on the unit, use on a dedicated single-outlet circuit only. If a dedicated single-outlet circuit is not available, then it is the customer’s responsibility to have a singleoutlet circuit installed by a qualified electrician.
- If there is no “Single Circuit Only” label on the unit, the unit may be used on any branch circuit of correct voltage and adequate current protection rating.
Recommended Grounding Method
This air conditioner must be grounded. This air conditioner is equipped with a power supply cord having a grounded 3-prong plug. To minimize possible shock hazard, the cord must be plugged into a mating, grounded 3-prong outlet, grounded in accordance with all local codes and ordinances. If a mating outlet is not available, it is the customer’s responsibility to have a properly grounded 3-prong outlet installed by a qualified electrical installer. It is the customer’s responsibility:
- To contact a qualified electrical installer.
- To assure that the electrical installation is adequate and in conformance with National Electrical Code, ANSI/NFPA 70 — latest edition, and all local codes and ordinances.
Copies of the standards listed may be obtained from:
National Fire Protection Association
1 Batterymarch Park
Quincy, MA 02269
Power Supply Cord
NOTE: Your air conditioner’s power supply cord may differ from the one shown. This portable air conditioner is equipped with a power supply cord required by UL. This power supply cord contains state-of-the-art electronics that sense leakage current. If the cord is crushed, the electronics detect leakage current and power will be disconnected in a fraction of a second.
To test your power supply cord:
1. Plug power supply cord into a grounded 3-prong outlet.
2. Press RESET (on some models, a green light will turn on).
3. Press TEST.
4. Press and release RESET. The power supply cord is ready for operation.
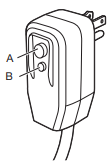
A. Reset button B. Test button
NOTES:
- The Reset button must be pushed in for proper operation.
- The power supply cord must be replaced if it fails to trip when the test button is pressed or fails to reset.
- Do not use the power supply cord as an off/on switch. The power supply cord is designed as a protective device.
- A damaged power supply cord must be replaced with a new power supply cord obtained from the product manufacturer and must not be repaired.
- The power supply cord contains no user-serviceable parts. Opening the tamper-resistant case voids all warranty and performance claims.
INSTALLATION INSTRUCTIONS
Prepare Air Conditioner for Installation
Remove Packaging Materials:
- Handle the air conditioner gently while unpacking the unit.
- Remove the carton top and lift the air conditioner from the base pad.
- Remove tape and glue residue from surfaces before turning on the air conditioner. Rub a small amount of liquid dish soap over the adhesive with your fingers. Wipe with a damp cloth and dry.
- Do not use sharp instruments, rubbing alcohol, flammable fluids, or abrasive cleaners to remove tape or glue. These products can damage the surface of your air conditioner.
- Be sure to check all packing materials for parts before discarding.
- Dispose of/recycle packaging materials in an appropriate way
Window Opening Requirements
This air conditioner may be used with standard double-hung windows and with vertical sliding windows.
Double-Hung Window Opening Measurements:
- 26 5⁄8" (67.6 cm) minimum to 52" (1.35 m) maximum opening width
- 4" (10.2 cm) minimum opening height
Vertical Sliding Window Opening Measurements:
- 4" (10.2 cm) minimum opening width
- 26 5⁄8" (67.7 cm) minimum to 52" (1.35 m) maximum opening height
IMPORTANT: For window openings between 265⁄8" (67.6 cm) and 37" (94 cm), it will be necessary to cut the slider panel extension to fit the window opening.
Install Window Slider Panel
1. Position slider panel in window
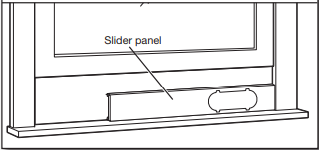
Position the window slider panel in the window opening.
2. Extend and secure slider panel
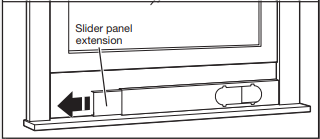
Extend the slider panel extension until it fills the window opening. Be sure the vent opening in the slider panel is not covered.
If the window is too narrow to fit the slider panel without blocking the vent opening:
- Remove the slider panel extension from the slider panel.
- Using a hand saw, cut the slider panel extension to fit the window opening. Leave as much panel as possible without covering the vent opening(s) in the slider panel.
- Slider the slider panel extension back into the slider panel.
Assemble Vent Hose
1. Attach vent hose to air conditioner
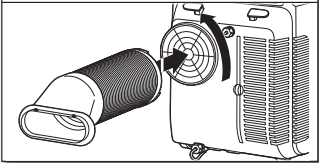
Insert the round connector of the vent hose into the exhaust port on the back of the air conditioner. Turn counterclockwise to lock into place.
2. Attach vent hose to slider panel
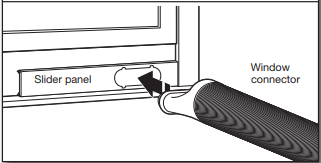
Position the air conditioner in the desired location.
Extend the vent hose enough to reach from the air conditoner to the window. Be sure there are no sharp bends or kinks in the hose.
Press the window connector end of the vent hose into the opening on the slider panel as shown. It will clip into place.
Drain Hose Connection (optional)
When using the air conditioner for dehumidification only, you may attach a hose (not included) for water drainage into a floor drain.
The drain hose must be below the drain port on the back of the air conditioner.
1. Remove drain fitting plug

Turn the drain port retainer plug counterclockwise to remove, then pull out the rubber drain plug.
2. Install drain hose
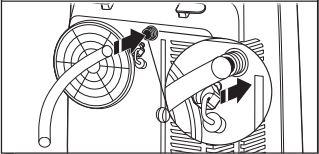
Insert the drain hose into the drain fitting on the air conditioner. Insert the other end of the drain hose into a floor drain or other suitable drain.
Installing/replacing the batteries in the remote
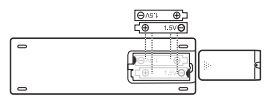
NOTE: The remote uses two AAA 1.5V batteries (included). Replace batteries when the battery indicator in the upper right corner of the remote display is empty.
To remove the batteries:
Remove the battery compartment cover and remove the batteries.
To reinstall the batteries:
Place the batteries into the battery compartment as shown, then reinstall the cover.
NOTE:
- Do not drop the remote control; this may damage the remote control.
- Remove the batteries if the remote control is not used for a month or longer.
- Dispose of used batteries responsibly.
Electrical Connection
1. Plug into grounded 3-prong outlet
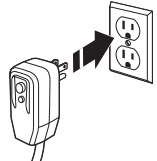
Plug into a grounded 3-prong outlet.
Press the RESET button on the power supply cord. See “Electrical Requirements.”
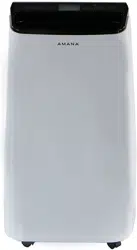
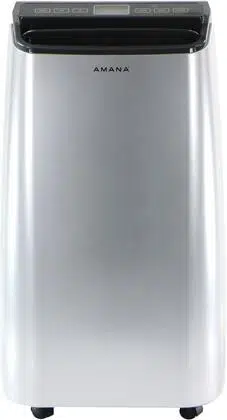
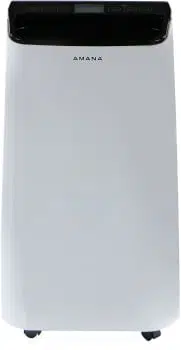
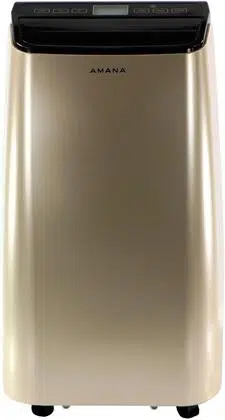
USING YOUR AIR CONDITIONER
 Appearance may vary
Turning the Air Conditoner ON or OFF
Press POWER to turn the air conditoner on or off.

IMPORTANT:
- If you turn off the air conditioner, wait at least 3 minutes before turning it back on. This prevents the air conditioner from blowing a fuse or tripping a circuit breaker.
- The recommended operating temperature range is between 44°F (7°C) and 95°F (35°C). Operating the air conditioner above or below this range may cause the the inside evaporator coil to freeze up, and the air conditioner will not operate properly
NOTE: In the event of a power failure, your air conditioner will operate at the previous settings when the power is restored.
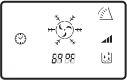
Display
During normal operation, display will show the current room temperature and the mode and settings. When the UP or DOWN button is pressed, the unit will display the set temperature or delay time.
Selecting the Mode
The Mode button has three settings:
Press the MODE button until the indicator light below the desired setting is lit.

Cooling (COOL) Mode
During Cooling mode, the air conditioner cools air from the room and vents hot air to the outdoors through the vent hose(s). Adjust fan speed and the temperature setting to fit your desired comfort level. Temperature setting range is 61°F–90°F (16°C–32°C). IMPORTANT: The vent hose(s) must exhaust to the outdoors when using Cooling mode.

Dehumidify (Dry) Mode
 Air is dehumidified as it passes through the unit, without being in full cooling mode. The fan speed is set automatically to LOW and cannot be adjusted .
IMPORTANT: For best results, the continuous drain hose should be connected.
Fan (FAN) Mode
In this mode, only the fan will run. Air is circulated through the room with no cooling.
NOTE: The air conditioner does not need to be vented to the outdoors in Fan mode.
Selecting the Fan Speed
The Fan has 3 speed settings:
Press the FAN button until the desired setting is selected.
Adjusting the Temperature
Press the UP or DOWN buttons to adjust the set temperature up or down in 1° increments. Temperature setting range is 61°F–90°F (16°C–32°C). After 10 seconds, the display will return to the current room temperature.

NOTE: Temperature may only be adjusted in Cooling mode. When in TIMER mode, pressing the UP or DOWN buttons will adjust the delay time for the air condtioner to shut off or turn on.
Using the Timer
Auto Shut-Off
You can set the air conditoner to shut off automatically after a set number of hours, up to 24 hours.

To set Auto Shut-Off:
1. With the air conditioner in fan mode, press Timer.
2. Use the UP and DOWN buttons to select the number of hours, up to 24 hours. The Timer indicator will remain displayed to let you know the timer is set.
3. After the set time, the air conditioner will turn off automatically.
Auto Start
You can set the air conditioner with the TIMER to start automatically after a set number of hours.
1. With the air conditoner OFF, press TIMER.
2. Use the UP or DOWN button to select the number of hours before the air conditioner should turn on, up to 24 hours. The TIMER indicator will be displayed to let you know the timer is set.
3. After the set time, the air conditioner will start automatically in Cooling mode with the last temperature and fan settings used.
Other Functions
Bucket Full Warning “FL”
This air conditioner has an internal tank to hold accumulated water from the condenser. Normally, this water is evaporated and exhausted to the outside. However, in periods of high humidity, the internal tank may become full. If this happens, “FL” will appear in the display, a tone will sound, and the air conditioner will turn off until the internal tank is emptied. See “Care and Cleaning”.
Normal Operating Sounds
When your air conditioner is operating normally, you may hear sounds such as:
- Droplets of water hitting the condenser, causing a pinging or clicking sound. The water droplets help cool the condenser.
- Air movement from the fan.
- Clicks from the thermostat cycle.
- Vibrations or noise due to poor wall or window construction.
- A high-pitched hum or pulsating noise caused by the modern high-efficiency compressor cycling on and off.
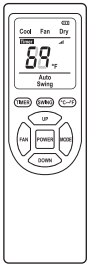
Using the Remote Control
The remote control allows you to turn the air conditioner on and off, as well as select the Mode, Fan Speed, and set the temperature and time using the same method as the control panel. The LCD display on the remote will display the current mode and settings.
Additional functions are only available through the remote.
Switching between Fahrenheit and Celsius:
Press the °C–°F button on the remote to toggle the displayed units between °F and °C.
Auto Swing Mode:
 Pressing the Swing button will toggle Auto Swing mode on and off. In Auto Swing mode, the air outlet louvers will move automatically to improve circulation. Auto Swing will appear in the remote display and the Auto Swing icon will appear in the air conditioner display.
NOTE: Remote control may vary in appearance.
CARE AND CLEANING
Your new air conditioner is designed to give you many years of dependable service. This section tells you how to clean and care for your air conditioner properly.
Cleaning the Air Filters
The air filters are removable for easy cleaning. A clean filter helps remove dust, lint, and other particles from the air and is important for best cooling and operating efficiency. Check the filters every 2 weeks to see whether they need cleaning.
NOTE: For best performance, do not operate the air conditioner without the filters in place.
Use a vacuum cleaner to clean air filters. If the air filters are very dirty, wash them in warm water with a mild detergent.
NOTE: Do not wash the air filters in the dishwasher or use any chemical cleaners; it may damage the filters. Air dry the air filters completely before reinstalling to ensure maximum efficiency

Removing the Lower Air Filter
1. Remove the lower air filter
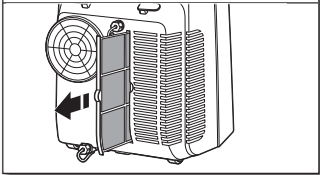
- Turn off the air conditioner.
- Pull the lower air filter straight out from the back of the air conditioner.
Reinstalling the air filter:
- Reinstall the air filter in the air conditioner by reversing step 2 above.
Removing the Upper Air Filter
1. Remove the air intake cover
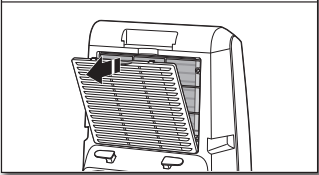
- Turn off the air conditioner.
- Remove the air intake cover by pulling the top of the cover away from the air conditioner, then lifting the bottom tabs out of the slots on the air conditioner.
2. Remove the air filter
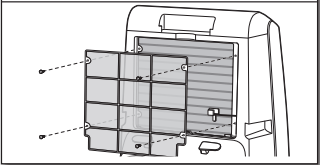
- Using a Phillips screwdriver, remove the 4 screws holding the filter in place.
- Pull the air filter straight out of the air conditioner.
Reinstalling the air filter:
- Reinstall the air filter in the air conditioner by reversing step 2 above.
- 2Insert the tabs on the bottom of the air intake cover into the slots on the air conditioner, then press the top into place until it clicks to lock.
Cleaning the Air Conditioner Cabinet
- Turn off the air conditioner.
- Wipe the air conditioner cabinet with a soft, damp cloth.
- Wipe dry with soft cloth.
Storing the Air Conditioner
If the air conditioner will not be used for an extended period of time, prepare it for storage with the following steps.
1. Run the air coditioner in Fan mode for a few hours to dry any moisture from the coils.
2. Turn off the air conditioner and unplug it. Remove the batteries from the remote.
3. Remove the drain plug from the internal tank to remove and drain any remaining water from the tank. See “Draining the Internal Tank”.
4. Remove, clean, and reinstall the air filters.
5. Remove the vent hose and window slider panel and store them in a safe place.
Draining the Internal Tank
If the air conditioner turns off and “FL” appears in the display, it is necessary to drain the internal tank before using the air conditoner again.
1. Draining the internal tank
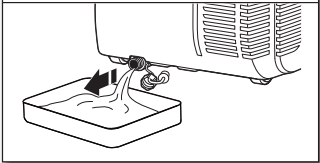
1. Turn off and unplug the air conditioner.
2. Place a pan or small bucket under the drain.
3. Remove the drain plug retainer by turning it counterclockwise.
4. Pull out the rubber drain plug.
5. Allow water to drain into pan or bucket.
6. Reinstall the rubber drain plug by pressing firmly into place.
7. Thread drain plug retainer clockwise onto drain, then tighten hand tight.
TROUBLESHOOTING
Before calling for service, try the suggestions below to see whether you can solve your problem without outside help.
Air conditioner will not operate
- The power supply cord is unplugged. Plug into a grounded 3-prong outlet. See “Electrical Requirements.”
- The power supply cord has tripped (Reset button has popped out). Press and release RESET to resume operation.
- A household fuse has blown, or circuit breaker has tripped. Replace the fuse or reset the circuit breaker. If the problem continues, call an electrician. See “Electrical Requirements.”
- The Power button has not been pressed. Press POWER.
- The local power has failed. Wait for power to be restored.
- The internal water tank is full. If “FL” appears in the display, empty the internal tank. See “Draining the Internal Tank”.
Air conditioner blows fuses or trips circuit breakers
- Too many appliances are being used on the same circuit. Unplug or relocate appliances that share the same circuit.
- Time-delay fuse or circuit breaker of the wrong capacity is being used. Replace with a time-delay fuse or circuit breaker of the correct capacity. See “Electrical Requirements.”
- You are trying to restart the air conditioner too soon after turning off the air conditioner. Wait at least 3 minutes after turning off the air conditioner before trying to restart the air conditioner.
Air conditioner power supply cord trips (Reset button pops out)
- Disturbances in your electrical current can trip the power supply cord (Reset button will pop out) (Reset button will pop out). Press and release RESET to resume operation.
- Electrical overload, overheating, a pinched cord, or aging can trip the power supply cord (Reset button will pop out). After correcting the problem, press and release RESET to resume operation.
NOTE: A damaged power supply cord must be replaced with a new power supply cord obtained from the product manufacturer and must not be repaired.
Air conditioner seems to run too much
- The current air conditioner replaced an older model. The use of more efficient components may cause the air conditioner to run longer than an older model, but the total energy consumption will be less. Newer air conditioners do not emit the “blast” of cold air you may be accustomed to from older air conditioners, but this is not an indication of lesser cooling capacity or efficiency. Refer to the efficiency rating (EER) and capacity rating (in BTU/h) marked on the air conditioner.
- The air conditioner is in a heavily occupied room, or heatproducing appliances are in use in the room. Use exhaust vent fans while cooking or bathing and try not to use heatproducing appliances during the hottest part of the day. A higher-capacity air conditioner may be required, depending on the size of the room being cooled.
Air conditioner cycles on and off too much or does not cool room in cooling mode
- The air conditioner is not properly sized for your room. Check the cooling capabilities of your room air conditioner. Room air conditioners are not designed to cool multiple rooms.
- The filter is dirty or obstructed by debris. Clean the filter.
- There is excessive heat or moisture (open container cooking, showers, etc.) in the room. Use a fan to exhaust heat or moisture from the room. Try not to use heat-producing appliances during the hottest part of the day.
- The air intakes are blocked. Install the air conditioner in a location where the louvers are free from curtains, blinds, furniture, etc.
- The temperature of the room you are trying to cool is extremely hot. Allow extra time for the air conditioner to cool off a very hot room.
- Windows or doors to the outside are open. Close all windows and doors.
- The temperature setting is not set to a cool enough setting. Adjust the temperature to a cooler setting by pressing the DOWN button to reduce the temperature. Set the Fan control to the highest setting.
Error codes in display
- If E1 or or E2 appears in the display, call for service.
- If FL appears in the display, empty the water bucket.
Remote control not working
- Check the battery level display on the remote. If necessary, replace the batteries.
- Make sure the remote is pointed at the air conditioner and that nothing is blocking the remote sensor window on the control panel.
SPECIFICATIONS
| Model |
AMAP10AW / AB / AD |
AMAP12AW / AB / AD |
| Voltage/Frequency |
115 VAC/60Hz |
115 VAC/60Hz |
| Current/Amperage |
10.1 A |
12.5 A |
| Cooling Capacity (BTUs/hour) |
10,000 |
12,000 |
| Coolant Type |
R410A |
R410A |
| Timer |
24-hour |
24-hour |
| Dimensions W x D x H |
14.2" x 16.9" x 28.7"
360 x 430 x 730 mm
|
14.2" x 16.9" x 28.7"
360 x 430 x 730 mm
|
| Weight |
54.0 lbs.
24.5 kg
|
60.6 lbs.
27.5 kg
|