
LCD TV
User’s Guide
For use with models: L26HDF12TA / L26HDM12 /
L32HDF12TA / L32HDM12 / L40FHDF12TA /
L40FHDM12
Need Assistance?
Please visit our website at www.tclusa.com
or call 1-877-300-8837.
2
This symbol indicates that this product contains mercury. Special disposal of this product for environmental
reasons may be required under the laws applicable to your jurisdiction. For disposal or recycling information,
please contact your local authorities or the Electronic Industries Alliance: www.eiae.org.
Refer to thHLGHQWL¿FDWLRQUDWLQJODEHOORFDWHGRQWKHEDFNSDQHORI\RXUSURGXFWIRULWVSURSHURSHUDWLQJYROWDJH
)&&UHJXODWLRQVVWDWHWKDWXQDXWKRUL]HGFKDQJHVRUPRGL¿FDWLRQVWRWKLVHTXLSPHQWPD\YRLGWKHXVHU¶VDXWKRULW\WR
operate it.
Cable TV Installer: This reminder is provided to call your attention to Article 820-40 of the National Electrical Code
(Section 54 of the Canadian Electrical Code, Part 1) which provides guidelines for proper grounding and, in particular,
VSHFL¿HVWKDWWKHFDEOHJURXQGVKRXOGEHFRQQHFWHGWRWKHJURXQGLQJV\VWHPRIWKHEXLOGLQJDVFORVHWRWKHSRLQWRI
cable entry as practical.
Important: 7KLVWHOHYLVLRQLVDWDEOHPRGHODQGLVGHVLJQHGWRVLWRQD¿UPÀDWVXUIDFH'RQ¶WSODFHWKH79RQVRIW
FDUSHWLQJRUVLPLODUVXUIDFHEHFDXVHWKHYHQWLODWLRQVORWVRQWKHERWWRPRIWKHXQLWZLOOEHEORFNHGUHVXOWLQJLQUHGXFHG
lifetime from overheating. To assure adequate ventilation for this product, maintain a spacing of 4 inches from the top
DQGVLGHRIWKH79UHFHLYHUDQGLQFKHVIURPWKHUHDURIWKH79UHFHLYHUDQGRWKHUVXUIDFHV
$OVRPDNHVXUHWKHVWDQGRUEDVH\RXXVHLVRIDGHTXDWHVL]HDQGVWUHQJWKWRSUHYHQWWKH79IURPEHLQJDFFLGHQWDOO\
WLSSHGRYHUSXVKHGRIIRUSXOOHGRII7KLVFRXOGFDXVHSHUVRQDOLQMXU\DQGRUGDPDJHWRWKH795HIHUWRWKH
Important Safety Instructions on the next page.
7KH3RZHUEXWWRQIROORZHGE\WKHSRZHUV\PERORQWKLV79DQG\RXUUHPRWHFRQWUROSXWVWKH79LQWRDYHU\
low-power standby mode but will not completely turn the power off. In order to completely shut the power off, you will
QHHGWRGLVFRQQHFWWKHSRZHUFRUGIURPWKHRXWOHW7KHPDLQVSOXJDSSOLDQFHFRXSOHULVXVHGDVGLVFRQQHFWGHYLFH
WKHGLVFRQQHFWGHYLFHVKDOOUHPDLQUHDGLO\RSHUDEOH7KHUHIRUH\RXVKRXOGHQVXUHWKDWWKH79LVLQVWDOOHGLQDPDQQHU
that allows you to disconnect the power cord when desired.
Product Information
Keep your sales receipt to obtain warranty parts and service and for proof of purchase. Attach it here and record the
serial and model numbers in case you need them. These numbers are located on the product.
Model No. ______________________ Serial No._____________________________________
Purchase Date __________________ Dealer/Address/Phone___________________________
WARNING
7KHEDWWHULHVVKDOOQRWEHH[SRVHGWRH[FHVVLYHKHDWVXFKDVVXQVKLQH¿UHRUWKHOLNH
&DXWLRQ7RUHGXFHWKHULVNRIHOHFWULFVKRFNGRQRWUHPRYHFRYHURUEDFN1RXVHUVHUYLFHDEOHSDUWVLQVLGH
5HIHUVHUYLFLQJWRTXDOL¿HGVHUYLFHSHUVRQQHO
This symbol indicates “dangerous voltage”
LQVLGHWKHSURGXFWWKDWSUHVHQWVDULVNRI
HOHFWULFVKRFNRUSHUVRQDOLQMXU\
This symbol indicates important
instructions accompanying the product.
This symbol indicates that this product incorporates
double insulation between hazardous main voltage
and user accessible parts. When servicing, use only
identical replacement parts.
WARNING
7RUHGXFHWKHULVNRI¿UHRUHOHFWULFVKRFNGRQRW
expose this product to rain or moisture. This product
should not be exposed to dripping or splashing. No
REMHFWV¿OOHGZLWKOLTXLGVVXFKDVYDVHVVKRXOGEH
placed on the component.
7KH79LVXQVWDEOHLILWLVQRWSURSHUO\DWWDFKHGWR
the base or mounted to the wall. Please follow the
base or wall mounting instructions provided in the
8VHU¶V*XLGHWRHQVXUH\RXUVDIHW\
WARNING
CAUTION
RISK OF ELECTRIC SHOCK.
'212723(1
Important Information
Product Registration
3OHDVHUHJLVWHU\RXU7&/SXUFKDVHRQOLQHDWZZZWFOXVDFRP,WZLOOPDNHLWHDVLHUWRFRQWDFW\RXVKRXOGLWHYHUEH
necessary. Registration is not required for warranty coverage.
3
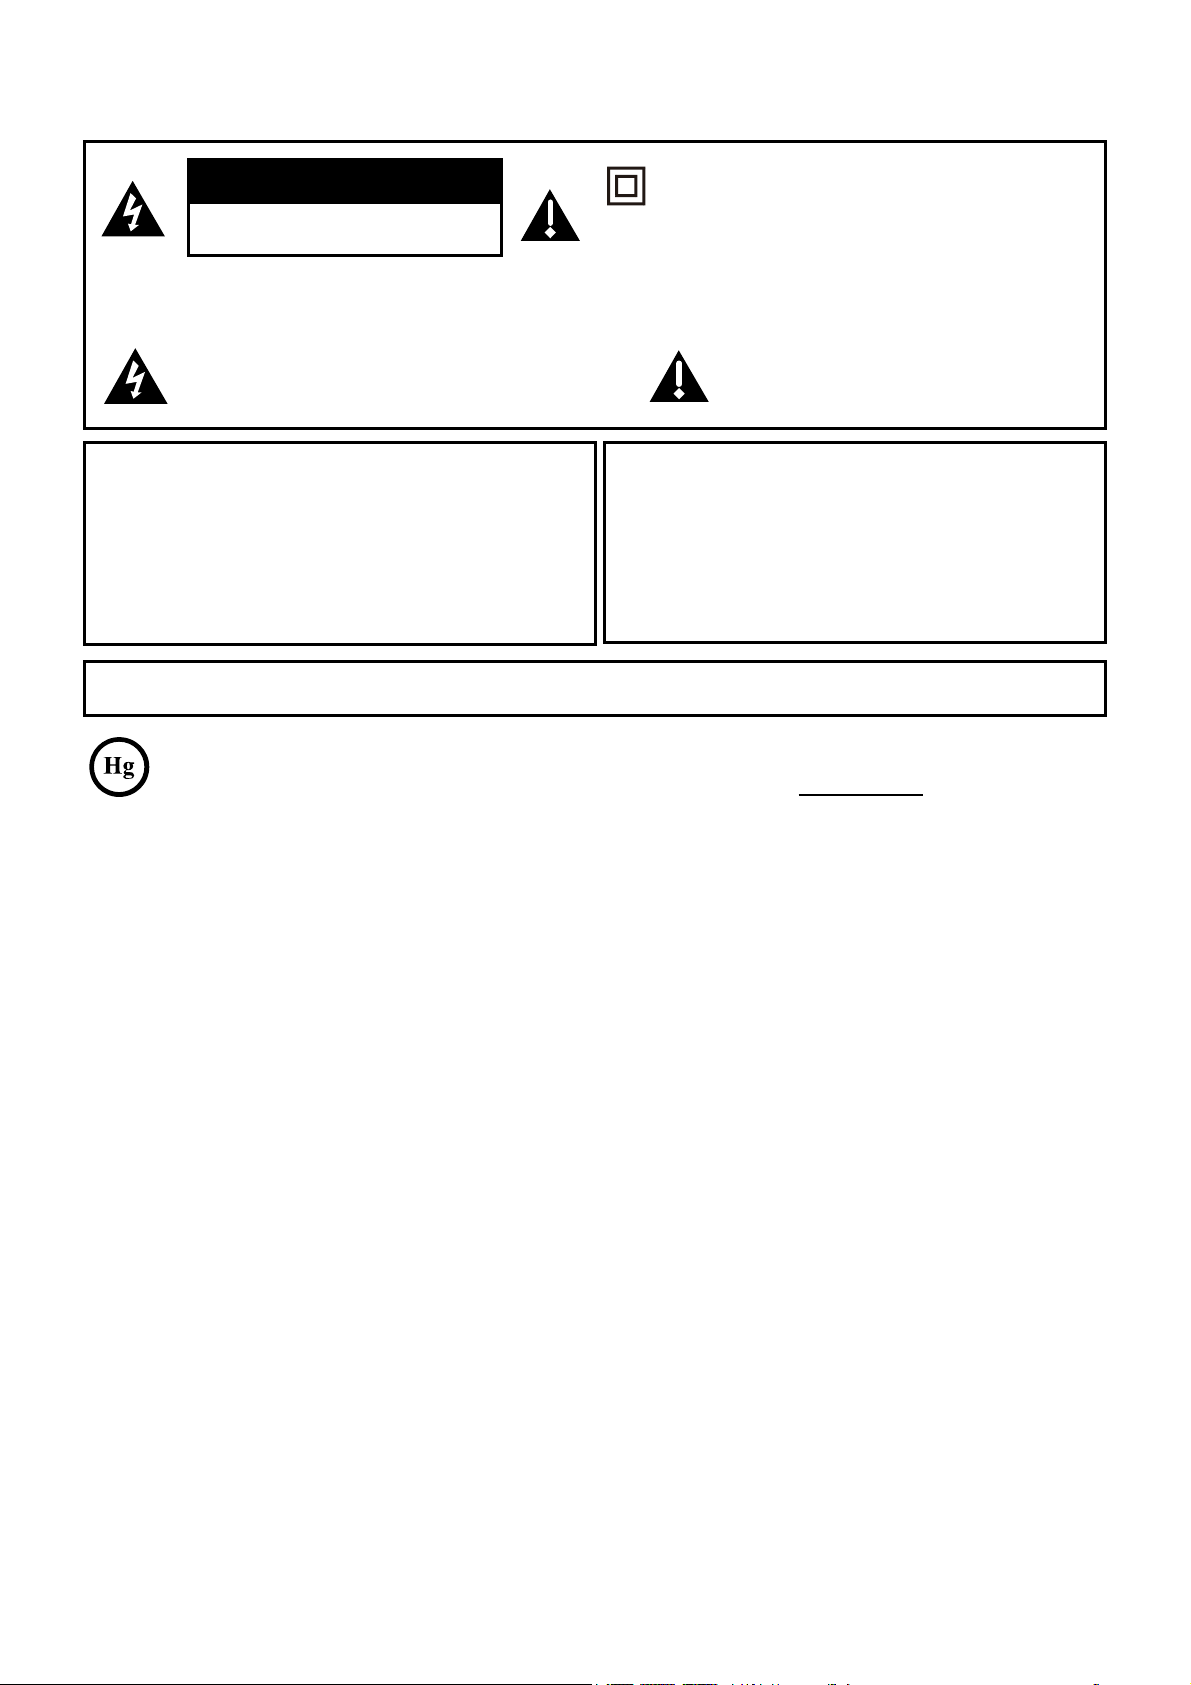
ANTENNA LEAD IN WIRE
GROUND CLAMP
GROUNDING CONDUCTORS
(NEC SECTION 810-21)
GROUND CLAMPS
POWER SERVICE GROUNDING
ELECTRODE SYSTEM
(NEC ART 250, PARTH)
ELECTRIC SERVICE
EQUIPMENT
ANTENNA DISCHARGE
UNIT(NEC SECTION 810-20)
Important Safety Instructions
1. Read and follow all instructions.
2. Keep these instructions.
3. Heed all warnings.
'RQRWEORFNDQ\YHQWLODWLRQRSHQLQJV,QVWDOOLQDFFRUGDQFHZLWKWKHPDQXIDFWXUHU¶VLQVWUXFWLRQV
'RQRWLQVWDOOQHDUDQ\KHDWVRXUFHVVXFKDVUDGLDWRUVKHDWUHJLVWHUVVWRYHVRURWKHUDSSDUDWXV
LQFOXGLQJDPSOL¿HUVWKDWSURGXFHKHDW
'RQRWQHJDWHWKHVDIHW\SXUSRVHRIWKHSRODUL]HGRUJURXQGLQJW\SHSOXJ$SRODUL]HGSOXJKDV
two blades with one wider than the other. A grounding type plug has two blades and a third
grounding prong. The wide blade or the third prong is provided for your safety. If the provided plug
GRHVQRW¿W\RXURXWOHWFRQVXOWDQHOHFWULFLDQIRUUHSODFHPHQWRIWKHREVROHWHRXWOHW
3URWHFWWKHSRZHUFRUGIURPEHLQJZDONHGRQRUSLQFKHGSDUWLFXODUO\DWSOXJVUHFHSWDFOHVDQGWKH
point where it exits from the component.
'RQRWXVHWKLVFRPSRQHQWQHDUZDWHU
2QO\XVHWKHDWWDFKPHQWVDFFHVVRULHVVSHFL¿HGE\WKHPDQXIDFWXUHU
10. Clean only with dry cloth.
8VHRQO\ZLWKWKHFDUWVWDQGWULSRGEUDFNHWRUWDEOHVSHFL¿HGE\WKHPDQXIDFWXUHURUVROGZLWK
WKHFRPSRQHQW:KHQWKH79LVSODFHGRQDFDUWXVHFDXWLRQZKHQPRYLQJWKHFDUWWRDYRLGLQMXU\
from tip-over.
12. Unplug this component during lightning storms or when unused for long periods of time.
5HIHUDOOVHUYLFLQJWRTXDOL¿HGVHUYLFHSHUVRQQHO6HUYLFHLVUHTXLUHGZKHQWKHFRPSRQHQWLV
damaged in any way, such as power supply cord or plug damage, liquid spilled on or objects falling
onto the component, rain or moisture exposure, abnormal operation, or if the component has been
dropped.
14. If an outside antenna or cable system is connected to the product, be sure the antenna or
cable system is grounded so as to provide some protection against voltage surges and built-up
VWDWLFFKDUJHV6HFWLRQRIWKH1DWLRQDO(OHFWULFDO&RGH$16,1)3$1R6HFWLRQ
54 of Canadian Electrical Code, Part 1) provides information with respect to proper grounding of
the mast and supporting structure, grounding of the lead-in wire to an antenna-discharge unit, size
of grounding conductors, location of antenna-discharge unit, connection to grounding electrodes,
and requirements for the grounding electrode. See following example:

4
Important Information ..............................2
Important Safety Instructions...................3
Chapter 1 - Connections and Setup
Before Initial Setup .................................5
Protect Against Power Surges.............5
Safety Information ..............................5
Avoid Audio Interference ....................5
$YRLG'LUHFW/LJKW ................................5
&KHFN6XSSOLHG3DUWV..........................5
$WWDFKLQJ<RXU79WRWKH7DEOH6WDQG......... 6
0RXQWLQJ<RXU79WRWKH:DOO ..................7
([SODQDWLRQRI-DFNVDQG%XWWRQVRQ79
....8
Rear Panel ...........................................8
6LGH,QSXW-DFNV...................................9
793DQHO%XWWRQV .................................9
Obtain the Signal.....................................10
What You Need ....................................10
What You Need to Know ......................10
Choose Your Connections.......................11
&RPSRVLWH9LGHR&RQQHFWLRQ*RRG ..12
&RPSRQHQW9LGHR&RQQHFWLRQ%HWWHU.12
+'0,&RQQHFWLRQ%HVW......................13
+'0,'9,&RQQHFWLRQ..........................13
PC Connection.....................................14
3OXJLQWKH79..........................................14
Put Batteries in the Remote.....................14
7XUQRQWKH79.........................................14
Using the Remote Control to Complete the
Initial Setup..............................................14
Complete the Initial Setup .......................15
Set the Menu Language.......................15
6HWWKH79/RFDWLRQ0RGH ...................15
Set the Time Zone................................15
Auto Channel Scan..............................16
6NLS6FDQ.............................................16
Chapter 2 - Understanding the Basics
7XUQLQJWKH792QDQG2II ......................17
6HOHFWLQJWKH9LGHR,QSXW6RXUFH ............17
Selecting a Channel ................................17
$GMXVWLQJ0XWLQJWKH9ROXPH...................17
Screen Formats.......................................18
Channel Banner.......................................18
Chapter 3 - Using the Remote Control
Remote Control Buttons ..........................19
Chapter 4 - Using the TV Menu
Using the Menu System ..........................20
Picture Menu ...........................................20
Picture Settings....................................20
Expert Settings.....................................20
Advanced Settings...............................21
PC Settings..........................................21
Reset Picture Settings .........................21
Sound Menu ............................................22
Setup Menu .............................................23
Signal Type ..........................................23
Channel Scan ......................................23
&KDQQHO6NLS........................................24
Channel Edit ........................................24
,QSXW6NLS.............................................25
Input Labels .........................................25
Closed Caption ....................................26
Time Setup...........................................27
System Information..............................27
Reset All...............................................28
3DUHQWDO&RQWUROVDQG9&KLS..................28
&KDQJH9&KLS3DVVZRUG....................28
&KDQQHO%ORFN......................................29
%XWWRQ%ORFN.........................................29
9&KLS5DWLQJ(QDEOH...........................29
9&KLS5DWLQJ6FUHHQ ..........................30
869&KLS795DWLQJV .........................30
%ORFNLQJ6SHFL¿F&RQWHQW7KHPHV ......30
869&KLS0RYLH5DWLQJ/LPLW..............31
%ORFNLQJ&DQDGD9&KLS5DWLQJV.........31
2SHQ9&KLS ........................................32
%ORFNLQJ8QUDWHG([HPSW3URJUDPV....32
5HVHW'RZQORDGDEOH'DWD ...................32
,QSXW%ORFN ...........................................32
Language Menu.......................................32
USB Menu ...............................................33
USB Connection......................................33
Chapter 5 - Other Information
)UHTXHQWO\$VNHG4XHVWLRQV)$4V .......34
Troubleshooting.......................................35
Care and Cleaning...................................37
9&KLS5DWLQJ([SODQDWLRQV.....................38
869&KLS5DWLQJ6\VWHP....................38
&DQDGLDQ(QJOLVK9&KLS5DWLQJ6\VWHP ...38
&DQDGLDQ)UHQFK9&KLS5DWLQJ6\VWHP....39
7HOHYLVLRQ6SHFL¿FDWLRQV..........................39
Limited Warranty .....................................40
Table of Contents

5
Before Initial Setup
Protect Against Power Surges
Connect all components before you plug any power cords into the wall outlet or power strip.
1(9(5SOXJ\RXU79LQWRDQRXWOHWWKDWLVFRQWUROOHGE\DZDOOVZLWFK
7XUQRIIWKH79EHIRUH\RXFRQQHFWRUGLVFRQQHFWDQ\FDEOHV
0DNHVXUHDOODQWHQQDVDQGFDEOHVDUHSURSHUO\JURXQGHG5HIHUWRWKH,PSRUWDQW6DIHW\
Instructions.
Safety Information
3URWHFWFRPSRQHQWVIURPRYHUKHDWLQJ
'RQ¶WEORFNYHQWLODWLRQKROHVRQDQ\RIWKHFRPSRQHQWV$UUDQJHWKHFRPSRQHQWVVRWKDWDLUFDQ
circulate freely.
'RQ¶WVWDFNFRPSRQHQWV
,I\RXSODFHWKHFRPSRQHQWLQDVWDQGPDNHVXUH\RXDOORZDGHTXDWHYHQWLODWLRQ
,I\RXFRQQHFWDQDXGLRUHFHLYHURUDPSOL¿HUSODFHLWRQWKHWRSVKHOIVRWKHKHDWHGDLUIURPLWZRQ¶W
harm other components.
Avoid Audio Interference
3RVLWLRQFDEOHVSURSHUO\LQVHUWHDFKFDEOH¿UPO\LQWRWKHGHVLJQDWHGMDFN
,I\RXSODFHFRPSRQHQWVDERYHWKH79URXWHDOOFDEOHVGRZQRQHVLGHRIWKHEDFNRIWKH79LQVWHDG
of straight down the middle.
,I\RXUDQWHQQDXVHVRKPWZLQOHDGFDEOHVGRQRWFRLOWKHFDEOHV
.HHSWZLQOHDGFDEOHVDZD\IURPDXGLRYLGHRFDEOHV
Avoid Direct Light
'RQ¶WSODFHWKH79ZKHUHVXQOLJKWRUURRPOLJKWLQJLVGLUHFWHGWRZDUGWKHVFUHHQ8VHVRIWRULQGLUHFW
lighting.
Check Supplied Parts
&KHFNWKDWWKHIROORZLQJSDUWVZHUHSDFNHGZLWK\RXUSURGXFW
1 Remote Control and 2 AAA Batteries
8VHU¶V*XLGH
4XLFN6WDUW*XLGH
Parts List for Table Stand (see page 6)
*UDSKLFVFRQWDLQHGZLWKLQWKLVSXEOLFDWLRQDUHSUHVHQWDWLRQRQO\
Chapter 1 - Connections and Setup
Replacing your remote
If you need to replace your remote, visit www.tclusa.com. A shipping and handling fee, and the appropriate sales tax, will be charged
upon ordering. Have your Visa or MasterCard ready.
6
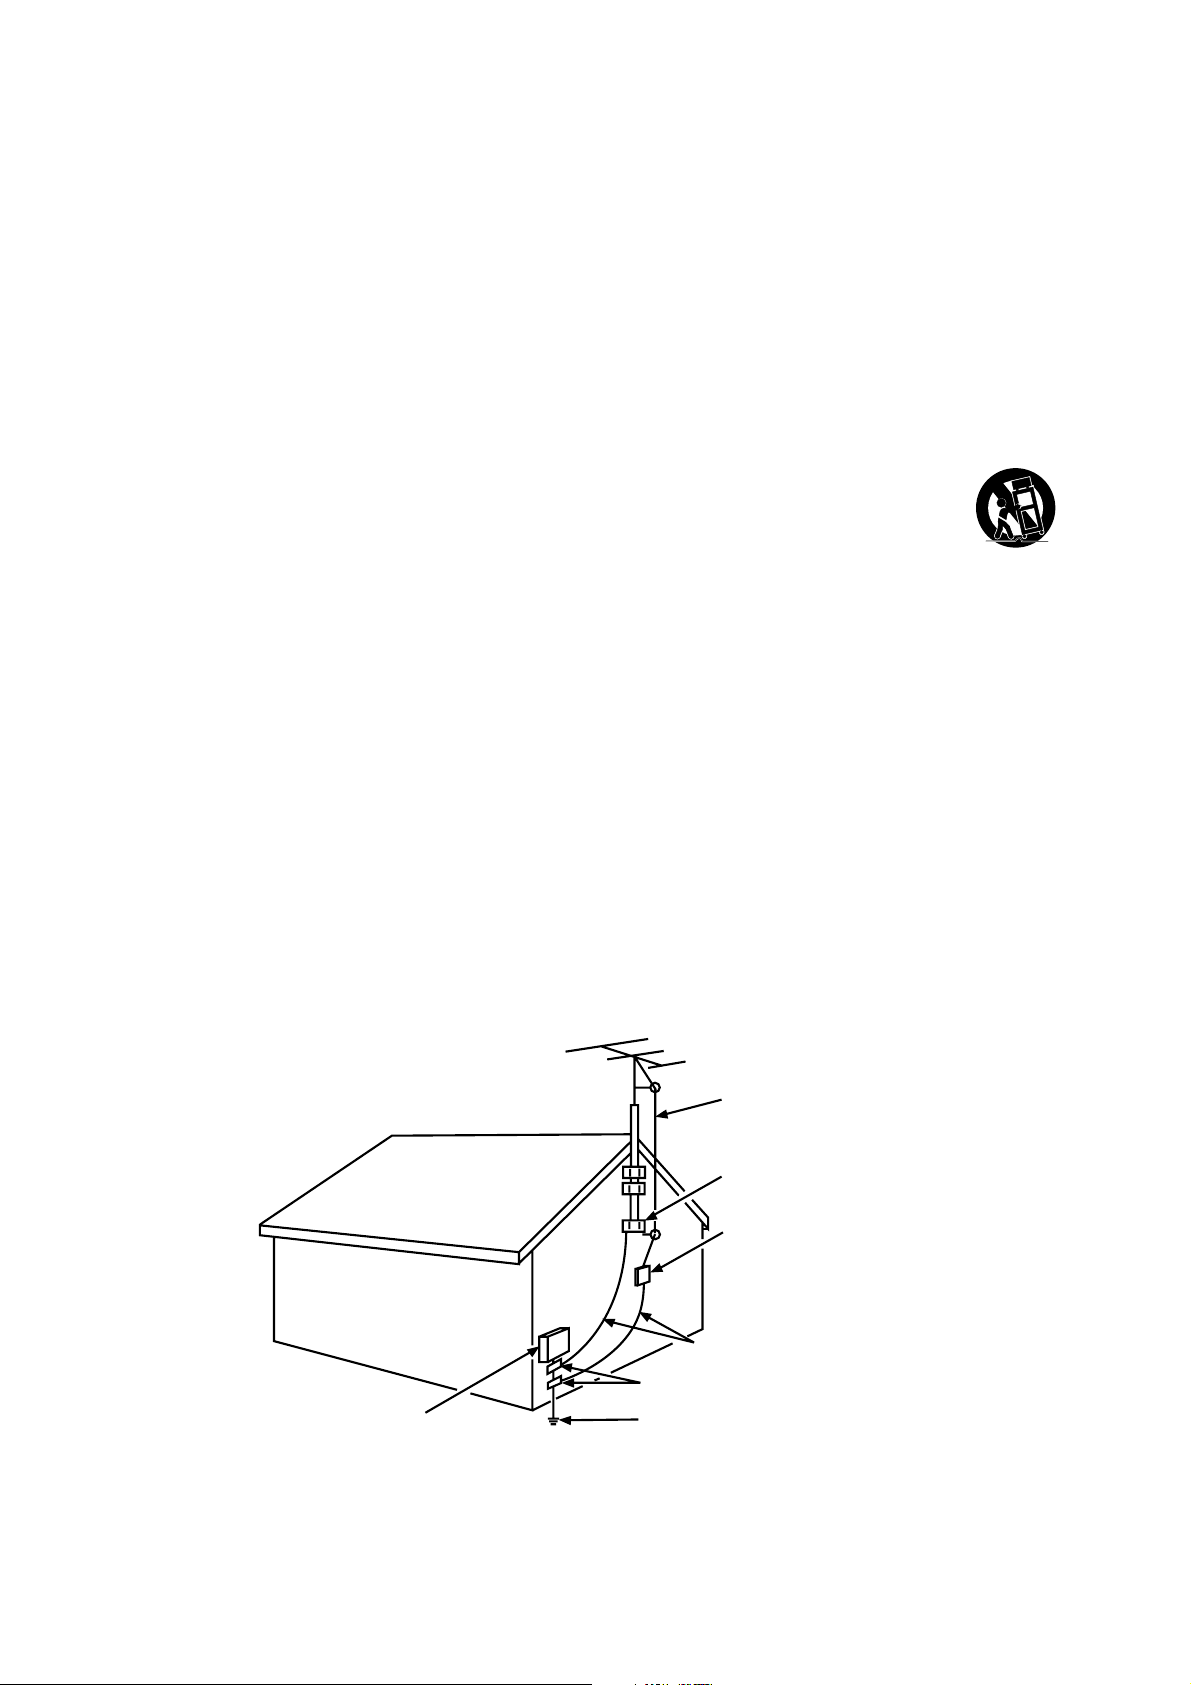
Attaching Your TV to the Table Stand
<RXU79FRPHVZLWKRXWWKHWDEOHVWDQGDWWDFKHGVRWKDW\RXFDQFKRRVHWRPRXQW\RXU79HLWKHUWR
LWVWDEOHVWDQGRUWRDZDOOZDOOPRXQWVROGVHSDUDWHO\,I\RXZDQWWRPRXQW\RXU79WRWKHZDOOGRQ¶W
DWWDFKWKHWDEOHVWDQGUHPRYHWKHKLQJHFRYHUDQGKLQJH)ROORZWKH0RXQWLQJ<RXU79WRWKH:DOO
instructions on page 7.
First, UHPRYHWKH79EDJDQGSODFHLWRQDODUJHÀDWVXUIDFHVXFKDVDWDEOHRUFRXQWHUWRS
5HPRYHWKH79IURPWKHFDUWRQDQGSODFHLWIDFHGRZQRQWKH79EDJ%HVXUHWKDWWKH79LV
face down to avoid scratching the screen.
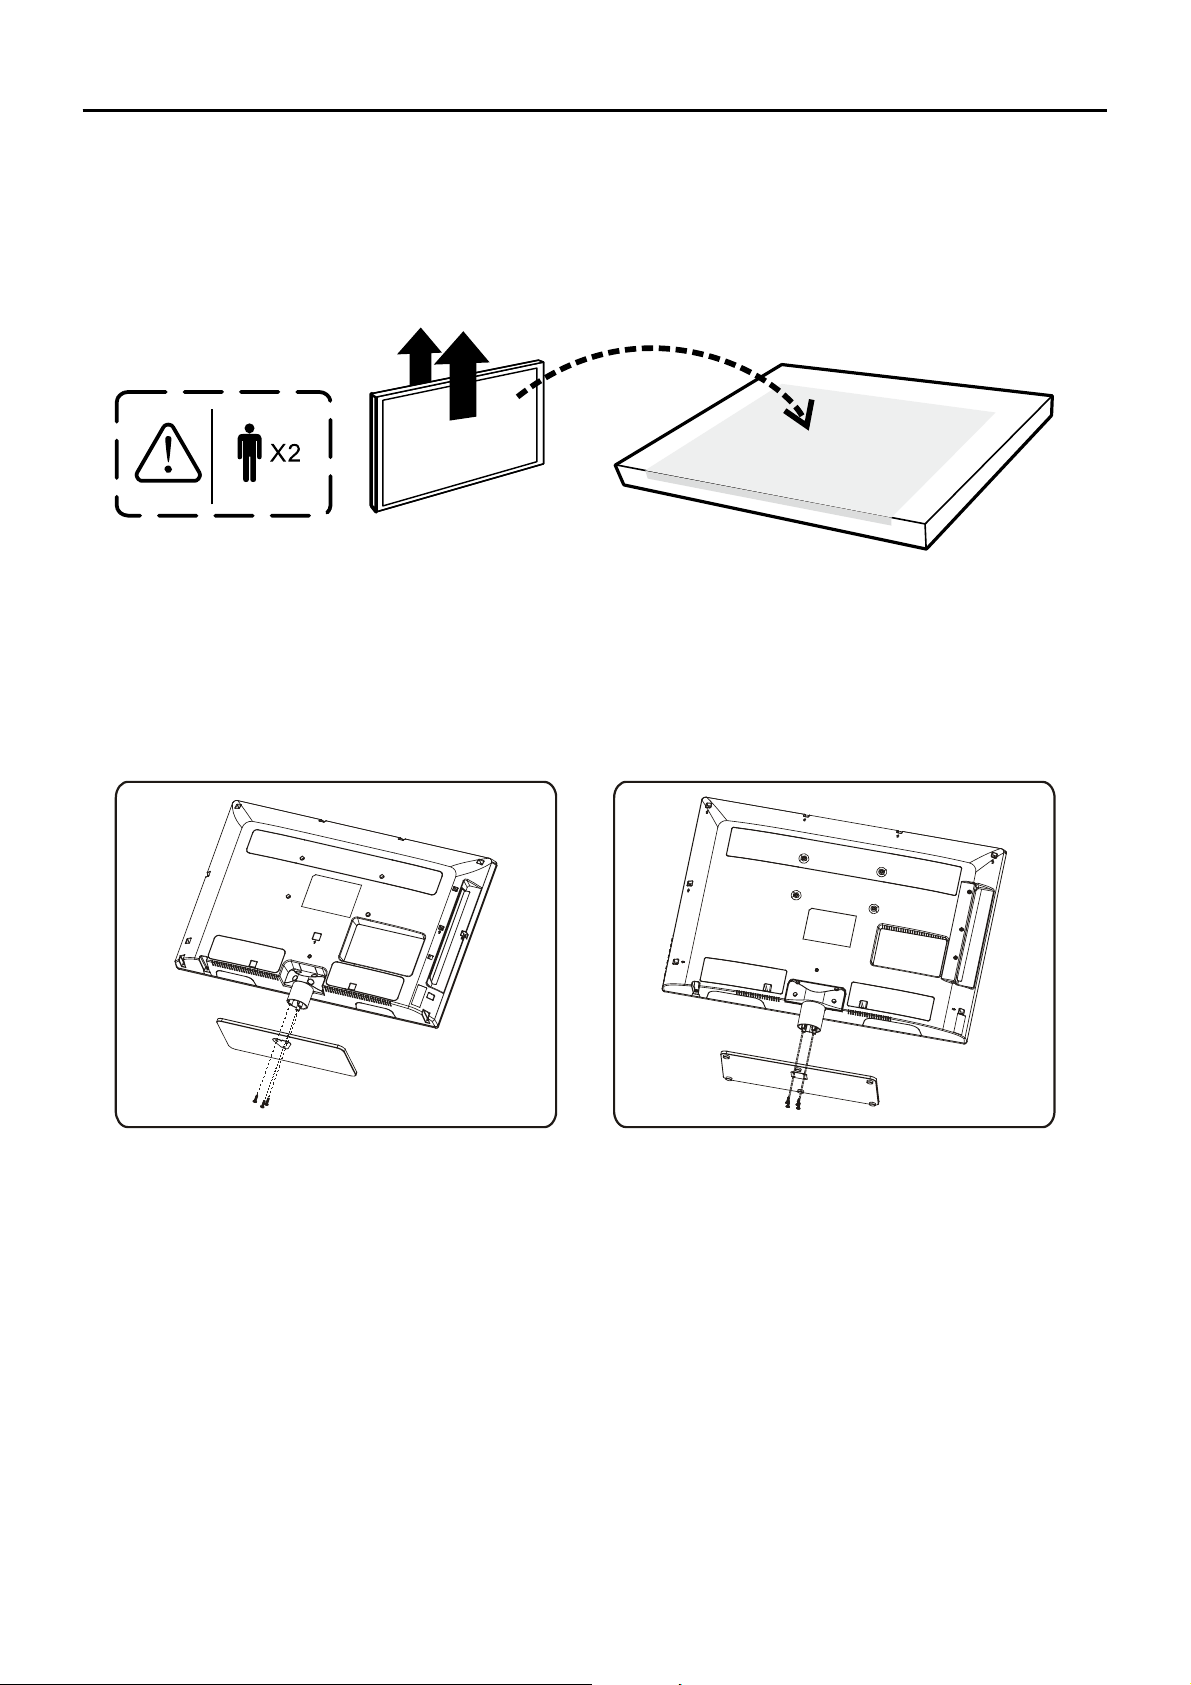
Then follow the steps below:
1RWH$IRUPRGHOV/+')7$/+'0
%IRUPRGHOV/+')7$/+'0/)+')7$/)+'0
AB

7
,I\RXDUHPRXQWLQJ\RXU79WRWKHZDOOGRQ¶WDWWDFKWKHWDEOHVWDQGUHPRYHWKHKLQJHFRYHUDQG
hinge.
0RXQWLQJ<RXU79WRWKH:DOO
7KH9(6$QXPEHULVWKHKRUL]RQWDODQGYHUWLFDOPHDVXUHPHQWRIWKHPRXQWLQJKROHV)RUH[DPSOH
200x100 refers to the fact that the mounting measurements are 200mm horizontally and 100mm vertically.
Notes: Follow the directions included with the wall mount to mount the TV to the wall.
Caution: <RXUZDOOPRXQWPXVWEHDEOHWREHDUDPLQLPXPRI¿YHWLPHVWKH79¶VQHWZHLJKWWRDYRLGFDXVLQJGDPDJH
7RPRXQW\RXU79WRWKHZDOOSXUFKDVHD9(6$ZDOOPRXQW
0RGHOV/+')7$/+'0
/+')7$/+'0
0RGHOV/)+')7$/)+'0
Purchase a VESA 200 x 100, M4 screw
Purchase a VESA 400 x 400 , M6 screw

8
ANT/CABLE/SAT IN
Lets you connect a coaxial cable to receive the signal from your antenna, cable, or cable box, or
satellite receiver.
AUDIO (R/L) OUT 8VHDQ5&$DXGLRFDEOHWRFRQQHFW\RXU79WRDFRPSDWLEOHDXGLRUHFHLYHUQRW
availble in USB mode)
AUDIO/VIDEO IN 1 (AV 1) /HWV\RXFRQQHFWDFRPSRQHQWWKDWKDVFRPSRVLWHYLGHRMDFNVVXFKDVD
9&5RU'9'SOD\HU
L AUDIO 3URYLGHVOHIWDXGLRFRQQHFWLRQZKHQXVLQJWKH9,'(2,1MDFN7KHOHIWDXGLR
FRQQHFWRUVDUHXVXDOO\ZKLWH)RUPRQRDXGLRVRXUFHVEHVXUHWRXVHWKH/$8',2,1
R AUDIO 3URYLGHVULJKWDXGLRFRQQHFWLRQZKHQXVLQJWKH9,'(2,1MDFN7KHULJKWDXGLR
connector is usually red.
COMPONENT IN 1 and IN 2 /HWV\RXFRQQHFWDFRPSRQHQWWKDWKDVFRPSRQHQWYLGHRMDFNVVXFKDV
D'9'SOD\HU
CMPT Y Pb Pr (Component Video) Provides good picture quality because the video is separated
into three signals. Use three video-grade or component video cables for the connection.
CMPT L AUDIO3URYLGHVOHIWDXGLRFRQQHFWLRQZKHQXVLQJWKH&0379,'(2LQSXWV7KHOHIWDXGLR
FRQQHFWRULVXVXDOO\ZKLWH)RUPRQRDXGLRVRXUFHVEHVXUHWRXVHWKHOHIW$8',2LQSXW
CMPT R AUDIO3URYLGHVULJKW$8',2FRQQHFWLRQZKHQXVLQJWKH&0379,'(2LQSXWV7KHULJKW
audio connector is usually red.
SPDIF OUT - DIGITAL AUDIO OUT (coaxial) 8VHDGLJLWDOFRD[LDOFDEOHWRFRQQHFW\RXU79WRD
compatible audio receiver.
HDMI IN 3 /HWV\RXFRQQHFWDFRPSRQHQWVXFKDVDGLJLWDOFDEOHER[ZLWKDQ+'0,RXWSXWIRUWKH
best picture quality.
HDMI/DVI IN 1 +LJK'H¿QLWLRQ0XOWLPHGLD,QWHUIDFH'LJLWDO9LVXDO,QWHUIDFH3URYLGHVDQ
uncompressed digital connection that carries both video and audio data by way of an integrated
PLQLSOXJFDEOH6LQFH+'0,WHFKQRORJ\LVEDVHGRQ'LJLWDO9LVXDO,QWHUIDFH'9,WKHMDFNRQWKHEDFN
RI\RXU79LVDOVRFRPSDWLEOHZLWK'9,FRPSRQHQWV
(PC IN) VGA &RQQHFW\RXUFRPSXWHURURWKHUFRPSRQHQWZLWKD9*$RXWSXWWRWKLVMDFNXVLQJD
SLQ'VXEFDEOH
DVI/PC AUDIO IN (used for DVI/PC only) 3URYLGHVDXGLRFRQQHFWLRQZKHQXVLQJ+'0,'9,,1387
MDFNIRU'9,RUZKHQXVLQJ3&,1
Note: If using a DVI component, remember to connect the audio cable because the DVI cable carries
only the picture signal, not the sound.
S-VIDEO IN $OORZV\RXWRFRQQHFWDQ69,'(2FDEOHIURPDQRWKHUFRPSRQHQW0DNHVXUH\RXDOVR
FRQQHFWDXGLRFDEOHVIRUPWKHFRPSRQHQWWRWKH79VKDUHWKHVDPH$8',2LQWSXWMDFNVRI$97R
DFFHVVDFRPSRQHQWFRQQHFWHGWRWKH69,'(2MDFNSUHVVWKHINPUT button on your remote until
you select S-VIDEO.
Explanation of Jacks and Buttons on TV
7KLVVHFWLRQGHVFULEHVWKHMDFNVRQWKHEDFNSDQHORI\RXU797KHUHDUHVHYHUDOZD\VWRFRQQHFW
components.
Y
Pb
Pr
ANT/CABLE
/SAT IN
COMPONENT
IN 2 (CMPT 2)
L
AUDIO
R
DVI/PC
AUDIO
IN
VGA
PC IN
Y
Pb
Pr
COMPONENT
IN 1 (CMPT 1)
L
AUDIO
R
HDMI
IN 3
HDMI/DVI IN 1
VIDEO
AUDIO-R
AUDIO/VIDEO
IN 1 (AV 1)
AUDIO-L
SPDIF
OUT
S-VIDEO IN
AUDIO OUT
RL
Rear Panel

9
6LGH,QSXW-DFNV
(HEADPHONE) Allow you to connect headphones to
OLVWHQWRWKHVRXQGFRPLQJIURPWKH79
USB
Allows you to connect a compatible mass storage device
XVLQJD86%MDFN
HDMI IN 2
Lets you connect a component, such as a digital cable box,
ZLWKDQ+'0,RXWSXWIRUWKHEHVWSLFWXUHTXDOLW\
AUDIO/VIDEO IN 2 (AV 2) Lets you connect a component
WKDWKDVFRPSRVLWHYLGHRMDFNVVXFKDVD9&5RU'9'
player.
L AUDIO Provides left audio connection when using the
9,'(2,1MDFN7KHOHIWDXGLRFRQQHFWRUVDUHXVXDOO\
white. For mono audio sources, be sure to use the
/$8',2,1
R AUDIO Provides right audio connection when using the
9,'(2,1MDFN7KHULJKWDXGLRFRQQHFWRULVXVXDOO\UHG
79 Panel Buttons
If you cannot locate your remote, you can use the 79 panel
buttonsRQ\RXU79WRRSHUDWHPDQ\79IHDWXUHV
CH+/-
Press CH+/- to select channels stored in the channel list or to
DFWDVXSGRZQDUURZ
) through the menu items.
VOL+/-
Press VOL +/- to increase or decrease the volume or to act
DVWKHULJKWOHIWDUURZ
) through the menu items.
VOL+ also to act as OK button when in the menu system.
MENU
Press the MENUEXWWRQWREULQJXSWKH79¶V0DLQPHQX
INPUT
Press the INPUT button to select the signal source.
POWER (
)
Press the POWEREXWWRQWRWXUQWKH79RQDQGRII
6LGH$9
Side Panel Button
VIDEO
L
AUDIO
R
HDMI
IN 2
USB
AUDIO/VIDEO IN 2
(AV 2)
INPUT
MENU
CH
CH
VOL
VOL
10
Outdoor or indoor Antenna
Cable Box,
(WallOutlet)
RF Coaxial
Wire
(75 ohm)
Or
Or
/SAT IN
ANT/CABLE
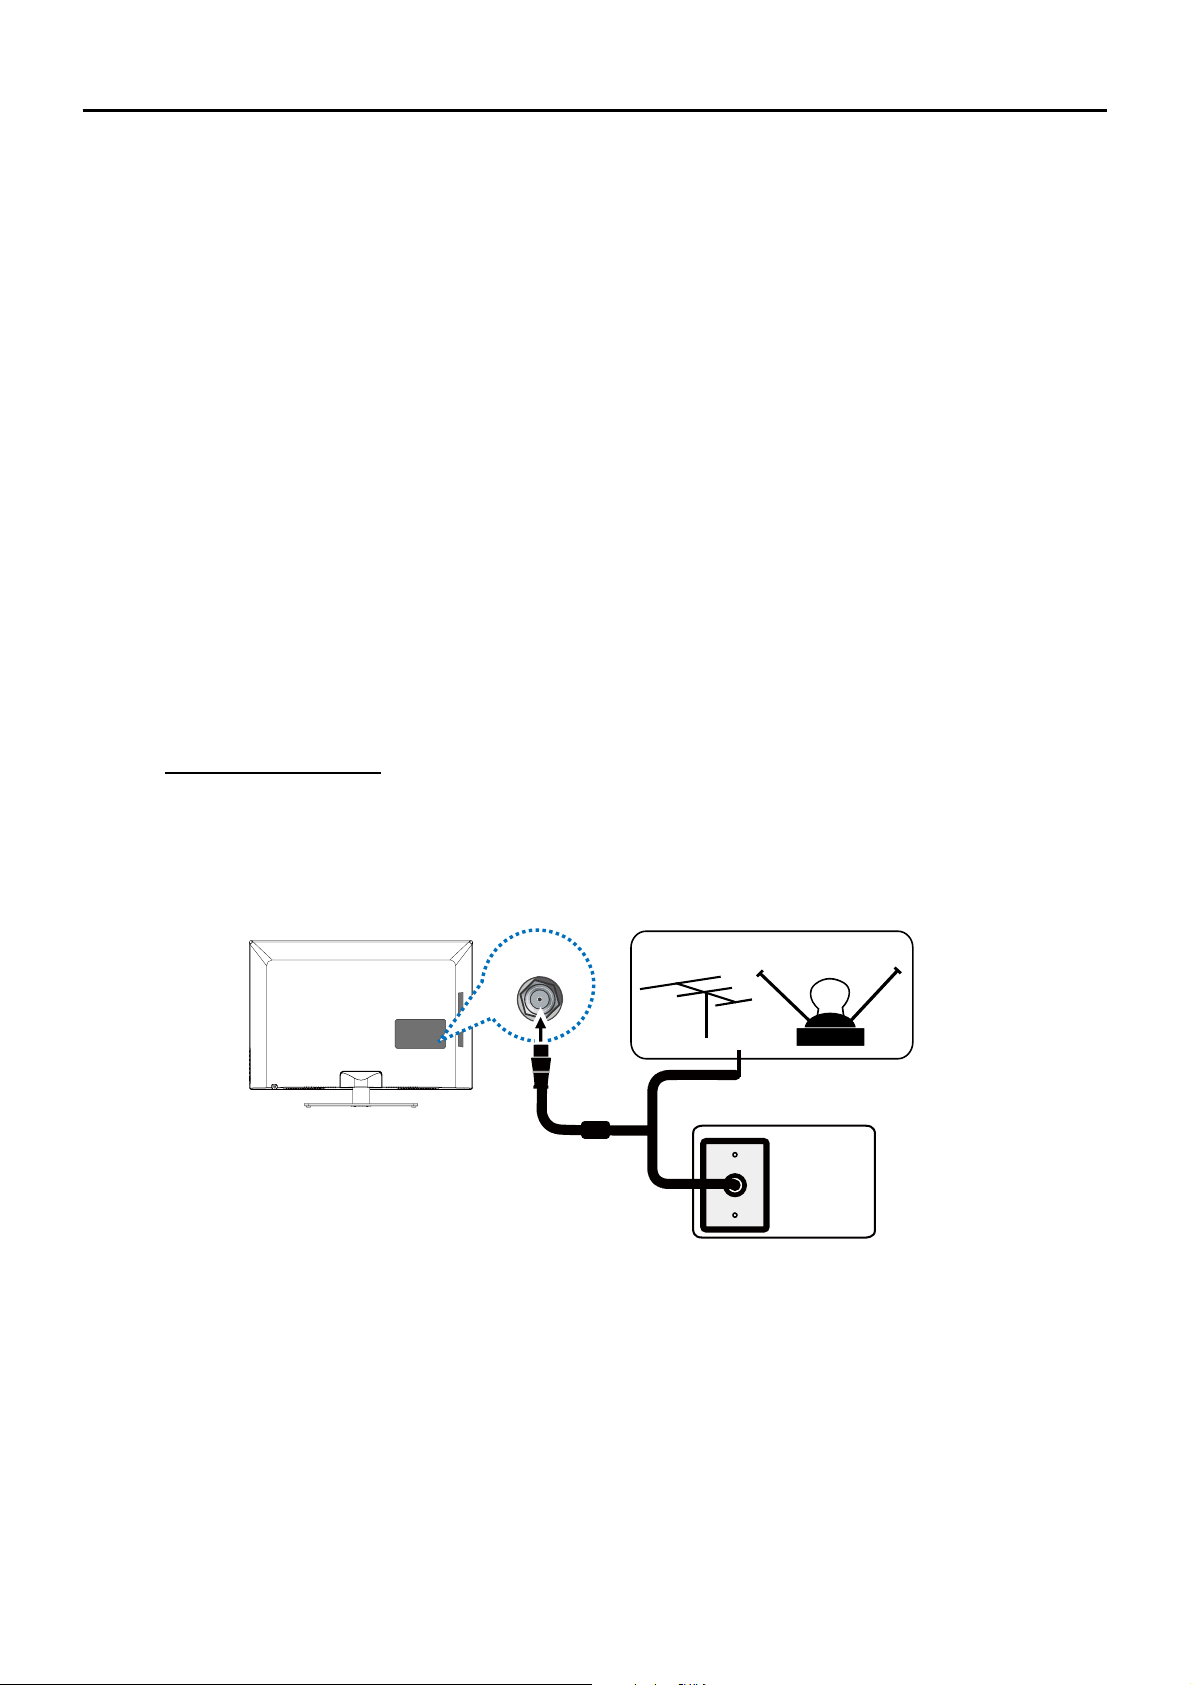
Connect the RF coaxial cable on your home outlet to the ANT/CABLE/SAT IN
MDFNRIWKLVXQLW
Once all connections are complete, turn on the unit and begin the initial setup process, scanning for
channels in your area.
Obtain the Signal
7KH¿UVWVWHSLQFRQQHFWLQJ\RXU79LVREWDLQLQJWKHVLJQDO7KHEDFNSDQHORI\RXU79DOORZV\RXWR
UHFHLYHDQDORJDQGRUGLJLWDOFKDQQHOVE\XVLQJWKH$17(11$&$%/(,1387
%HIRUH\RXFRQQHFW\RXU79\RXKDYHWRGHWHUPLQHZKHWKHU\RXZLOOEHXVLQJDQDQWHQQDRUDFDEOH
service to obtain the signal.
What You Need
Antenna (Rabbit Ears) Or Outdoor Antenna with Coaxial Cable
Plug the antenna or coaxial cable from the wall outlet into the ANT/CABLE/SAT INRQWKHEDFNRIthe
79<RXDUHUHDG\WRUHFHLYHRIIDLUORFDOGLJLWDODQGDQDORJFKDQQHOV
Cable Service
3OXJWKHFRD[LDOFDEOHIURPWKHZDOORXWOHWLQWRWKH$17&$%/(6$7,1RQWKHEDFNRIWKH79<RXDUH
ready to receive your cable channels.
Set-Top Box
If you have a set-top box, you may need to call your cable company or satellite service provider. They
may recommend special cables to allow you to view digital channels.
What You Need to Know
9LVLWwww.antennaweb.org for help in deciding what type of antenna to use in order to receive the
local digital channels available to you. Enter your location, and the program will list local analog
and digital stations available using your antenna.
:KHQ\RXZDWFK79WKHChannel Banner displays the type of channel currently viewed.
11
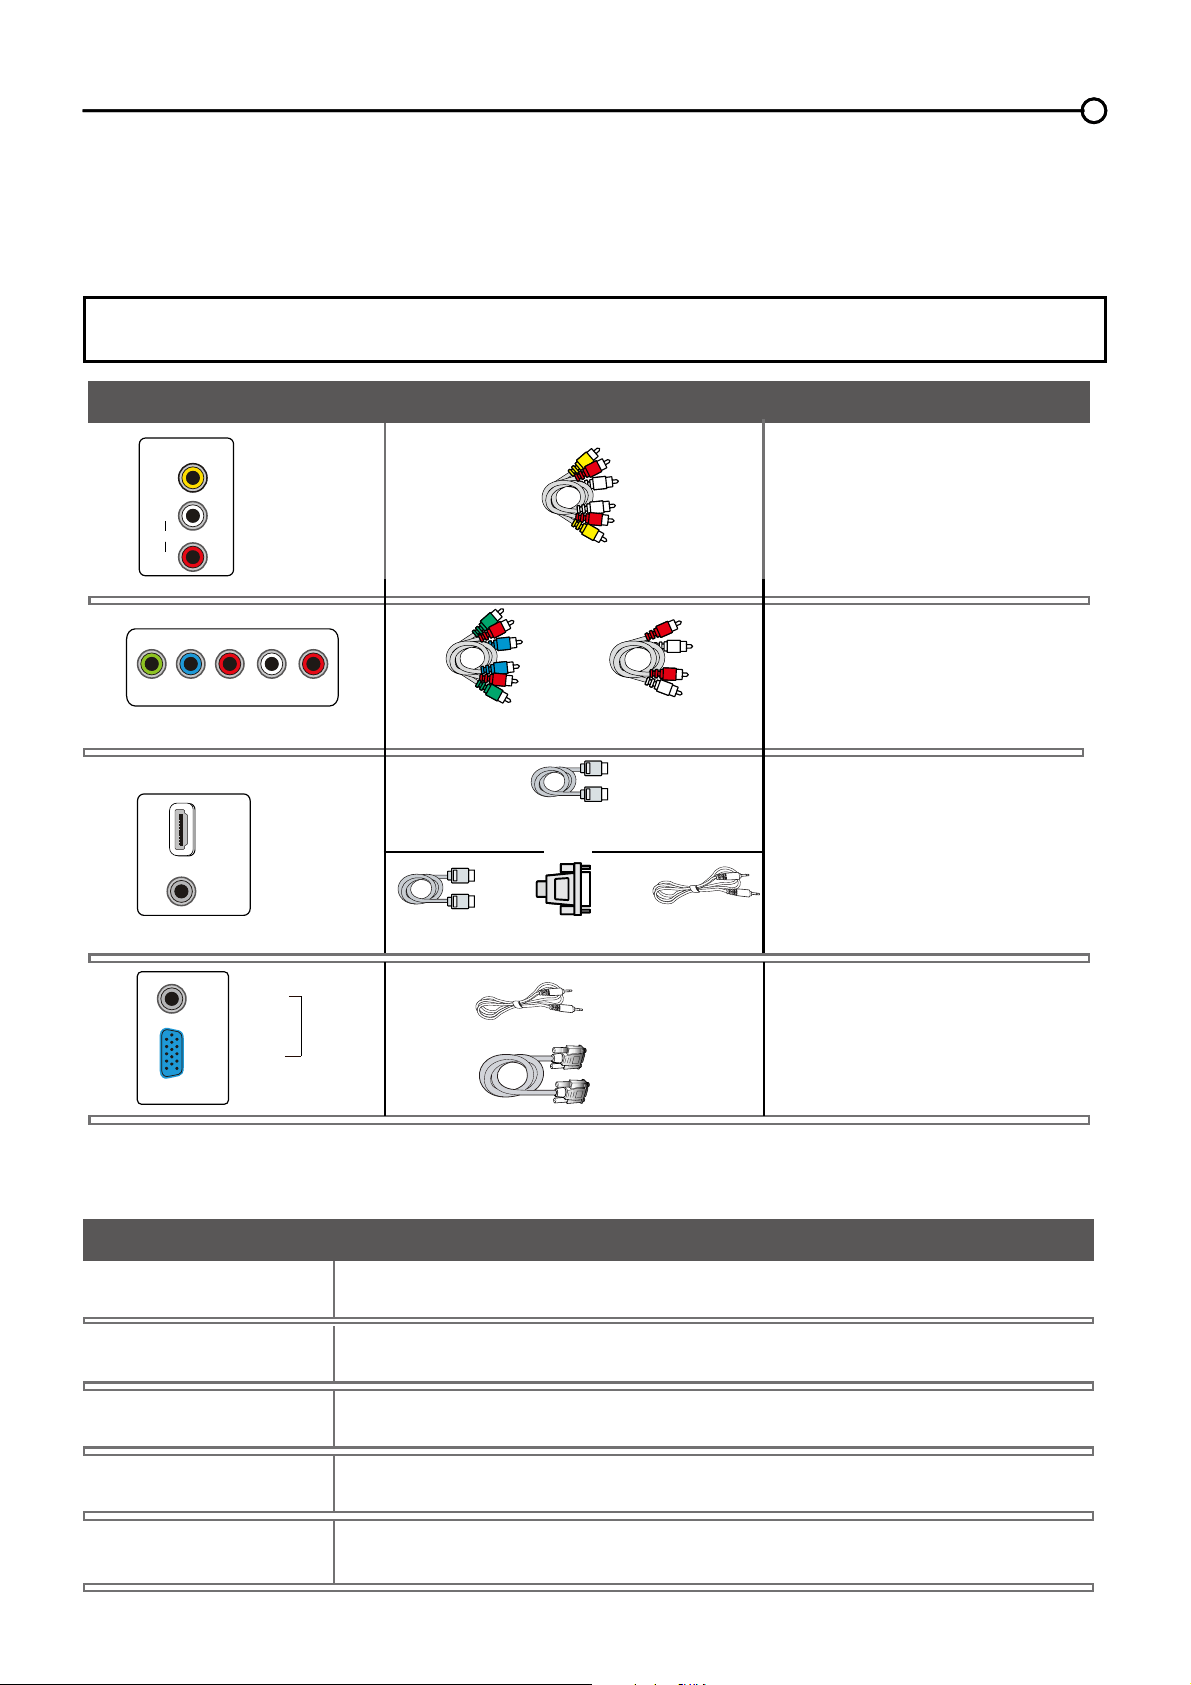
Choose Your Connections
7KHUHDUHVHYHUDOZD\VWRFRQQHFWFRPSRQHQWVVXFKDV'9'SOD\HUVDQGVHWWRSER[HVWR\RXU
793OHDVHXVHWKHIROORZLQJFKDUWWRGHWHUPLQHZKLFKFRQQHFWLRQVDUHEHVWIRU\RX3URFHHGWRWKH
appropriate pages to connect your components.
Note: No cables are supplied with this unit. Please purchase the necessary cables. A high-speed
+'0,FDEOHLVUHFRPPHQGHGIRUEHWWHUFRPSDWLELOLW\
$XGLR9LGHR
page 12
page 12
page 13
page 14
&RPSRQHQW9LGHR Audio
Jacks Used Cable Needed Go to...
+'0,
TM
+'0,'9,$GDSWHU
+
OR
Audio
Audio
Audio
Audio
+'0,'9,
Y Pb Pr
Audio L and R
Audio L and R
9LGHR
9*$
9*$
PC IN
+'0,
TM
+'0,WKH+'0,ORJRDQG+LJK'H¿QLWLRQ0XOWLPHGLD,QWHUIDFHDUHWUDGHPDUNVRUUHJLVWHUHG
WUDGHPDUNVRI+'0,/LFHQVLQJ//&
Input Signal Compatability
$QWHQQD&DEOH480i, 480p, 720p, 1080i (NTSC, ATSC, and QAM formats)
&RPSRVLWH9LGHR480i
&RPSRQHQW9LGHR 480i, 480p, 720p/60Hz, 1080i/60Hz, 1080p/60Hz
+'0, 480i, 480p, 720p/60Hz, 1080i/60Hz, 1080p/60Hz
PC VGA SVGA XGA
VIDEO
L
AUDIO
R
AUDIO/VIDEO
IN (AV)
Y
Pb
Pr L
AUDIO
R
COMPONENT IN (CMPT)
HDMI/DVI IN 1
DVI/PC
AUDIO
IN
DVI/PC
AUDIO
IN
VGA
12
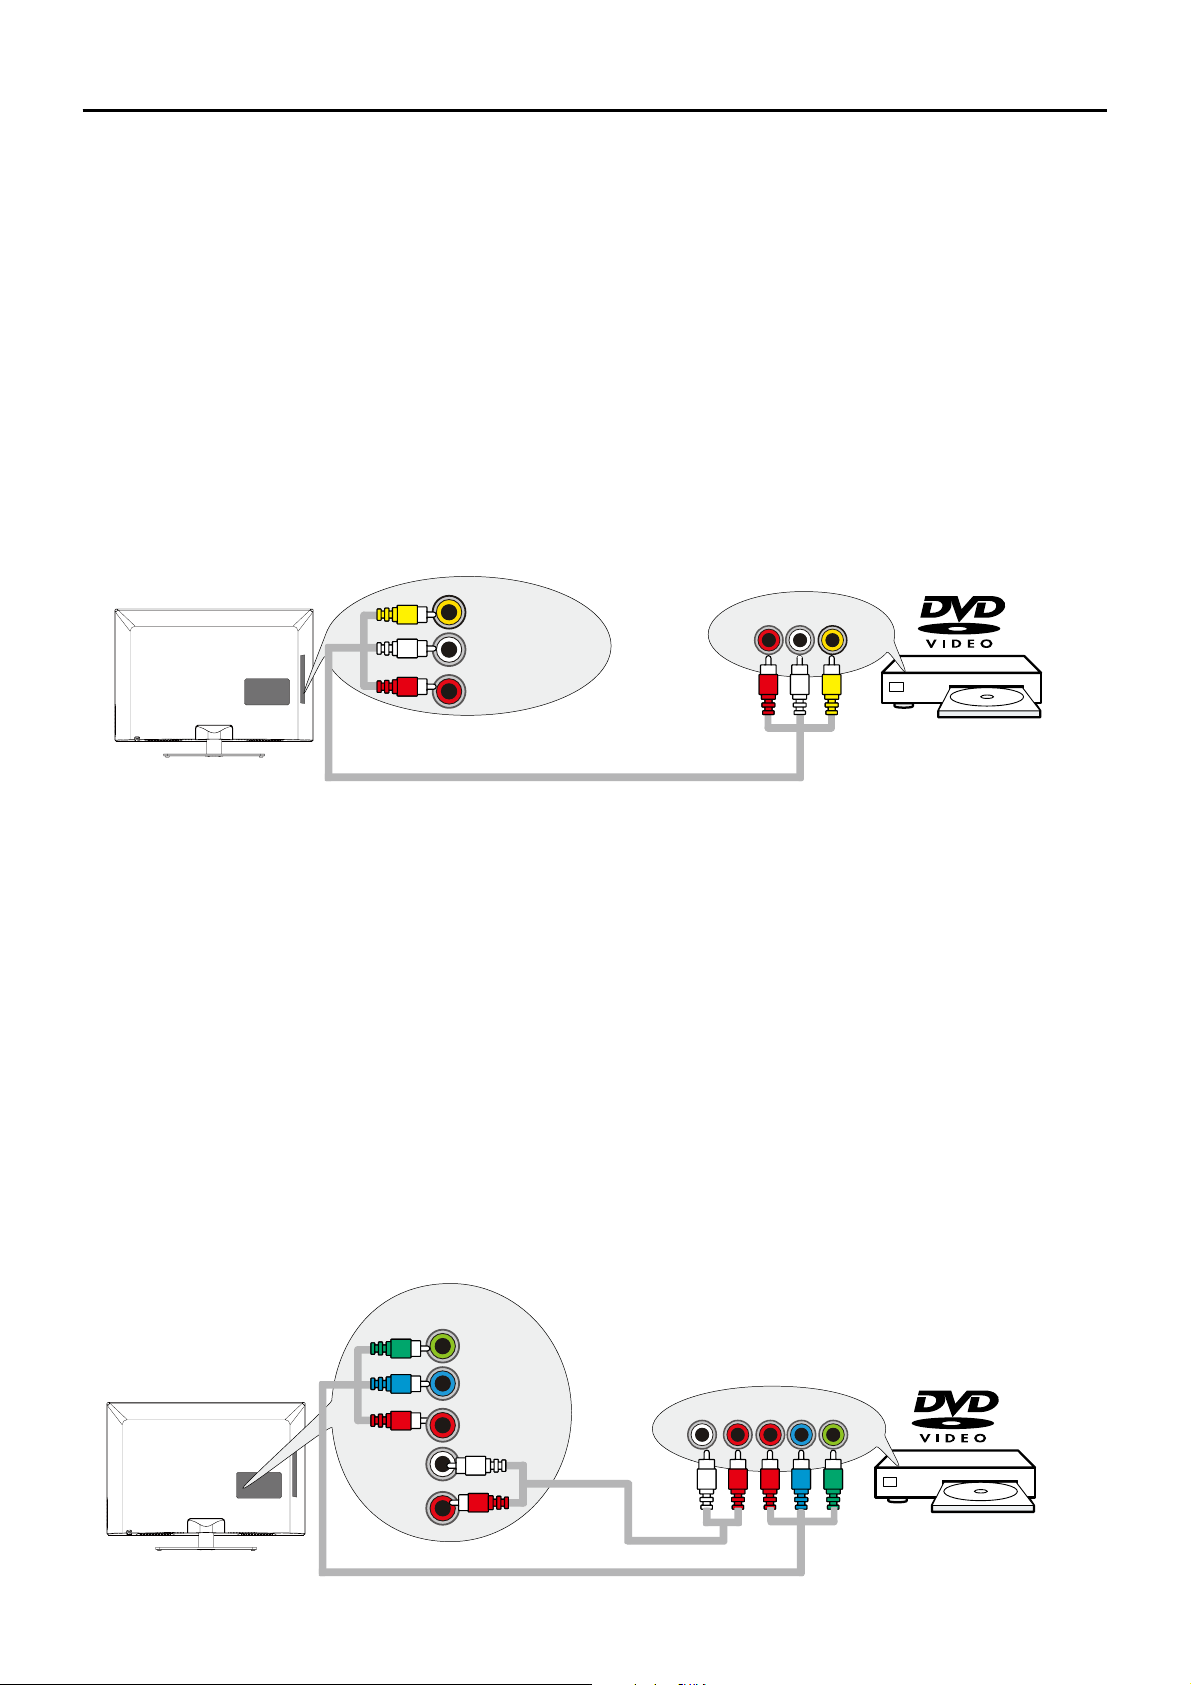
&RPSRVLWH9LGHR&RQQHFWLRQ*RRG
7RFRQQHFWDFRPSRQHQWZLWKDYLGHRRXWSXWMDFNVXFKDVD'9'SOD\HUIROORZWKHVHVWHSV
([DPSOH'9'3OD\HU
&RQQHFW\RXUFDEOHDQGRURIIDLUDQWHQQDDVGHVFULEHGRQSDJH
2. Connect the yellow video cable to the (AV2) VIDEOMDFNRQWKHVLGHRIWKH79DQGWRWKHYLGHR
RXWSXWMDFNRQWKH'9'SOD\HU
3. Connect the red and white audio cables to the (AV2ULJKWDQGOHIWDXGLRMDFNVRQWKHVLGHRIWKH79
DQGWRWKHDXGLRRXWSXWMDFNVRQWKH'9'SOD\HU
7XUQRQ\RXU79WKHQWXUQRQWKH'9'SOD\HU
5. Press the INPUT button on the remote control to open the Input list. Once open, press the INPUT
button repeatedly to select AV2.
Note: same operation for connection to the AV1RQWKHEDFNRIWKH79
7KLVLVDQH[DPSOHRIDFRQQHFWLRQXVLQJWKHFRPSRVLWHYLGHRMDFN
&RPSRQHQW9LGHR&RQQHFWLRQ%HWWHU
Component video connection offers better picture quality for video devices connected to the unit. To
FRQQHFWDFRPSRQHQWWKDWKDV<3E3UMDFNVVXFKDVD'9'SOD\HUIROORZWKHVHVWHSV
([DPSOH'9'3OD\HU
&RQQHFW\RXUFDEOHDQGRURIIDLUDQWHQQDDVGHVFULEHGRQSDJH
2.
Connect three video cables or special Y Pb Pr cables to the COMPONENT IN 1 (CMPT 1) Y Pb Pr
MDFNVRQWKHEDFNRIWKH79DQGWRWKH<3E3URXWSXWVRQWKH'9'SOD\HU
3. Connect your red and white audio cables to the COMPONENT IN 1 (CMPT 1) R and L AUDIO
MDFNVRQWKHEDFNRIWKH79DQGWRWKHDXGLRRXWSXWMDFNVRQWKH'9'SOD\HU
7XUQRQ\RXU79WKHQWXUQRQWKH'9'SOD\HU
5. Press the INPUT button on the remote control to open the Input list. Once open, press the INPUT
button repeatedly to select CMPT1.
Note: same operation for connection to the COMPONENT IN 2 (CMPT 2) on the back of the TV.
7KLVLVDQH[DPSOHRIDFRQQHFWLRQXVLQJWKHFRPSRQHQWYLGHRMDFNV
VIDEO
L
AUDIO
R
AUDIO/VIDEO
IN 2 (AV 2)
VIDEOLR
AUDIO
AUDIO/VIDEO OUT
LRPrPbY
COMPONENT
IN 1 (CMPT 1)
L
AUDIO
R
Y
Pb
Pr
COMPONENT OUT
13
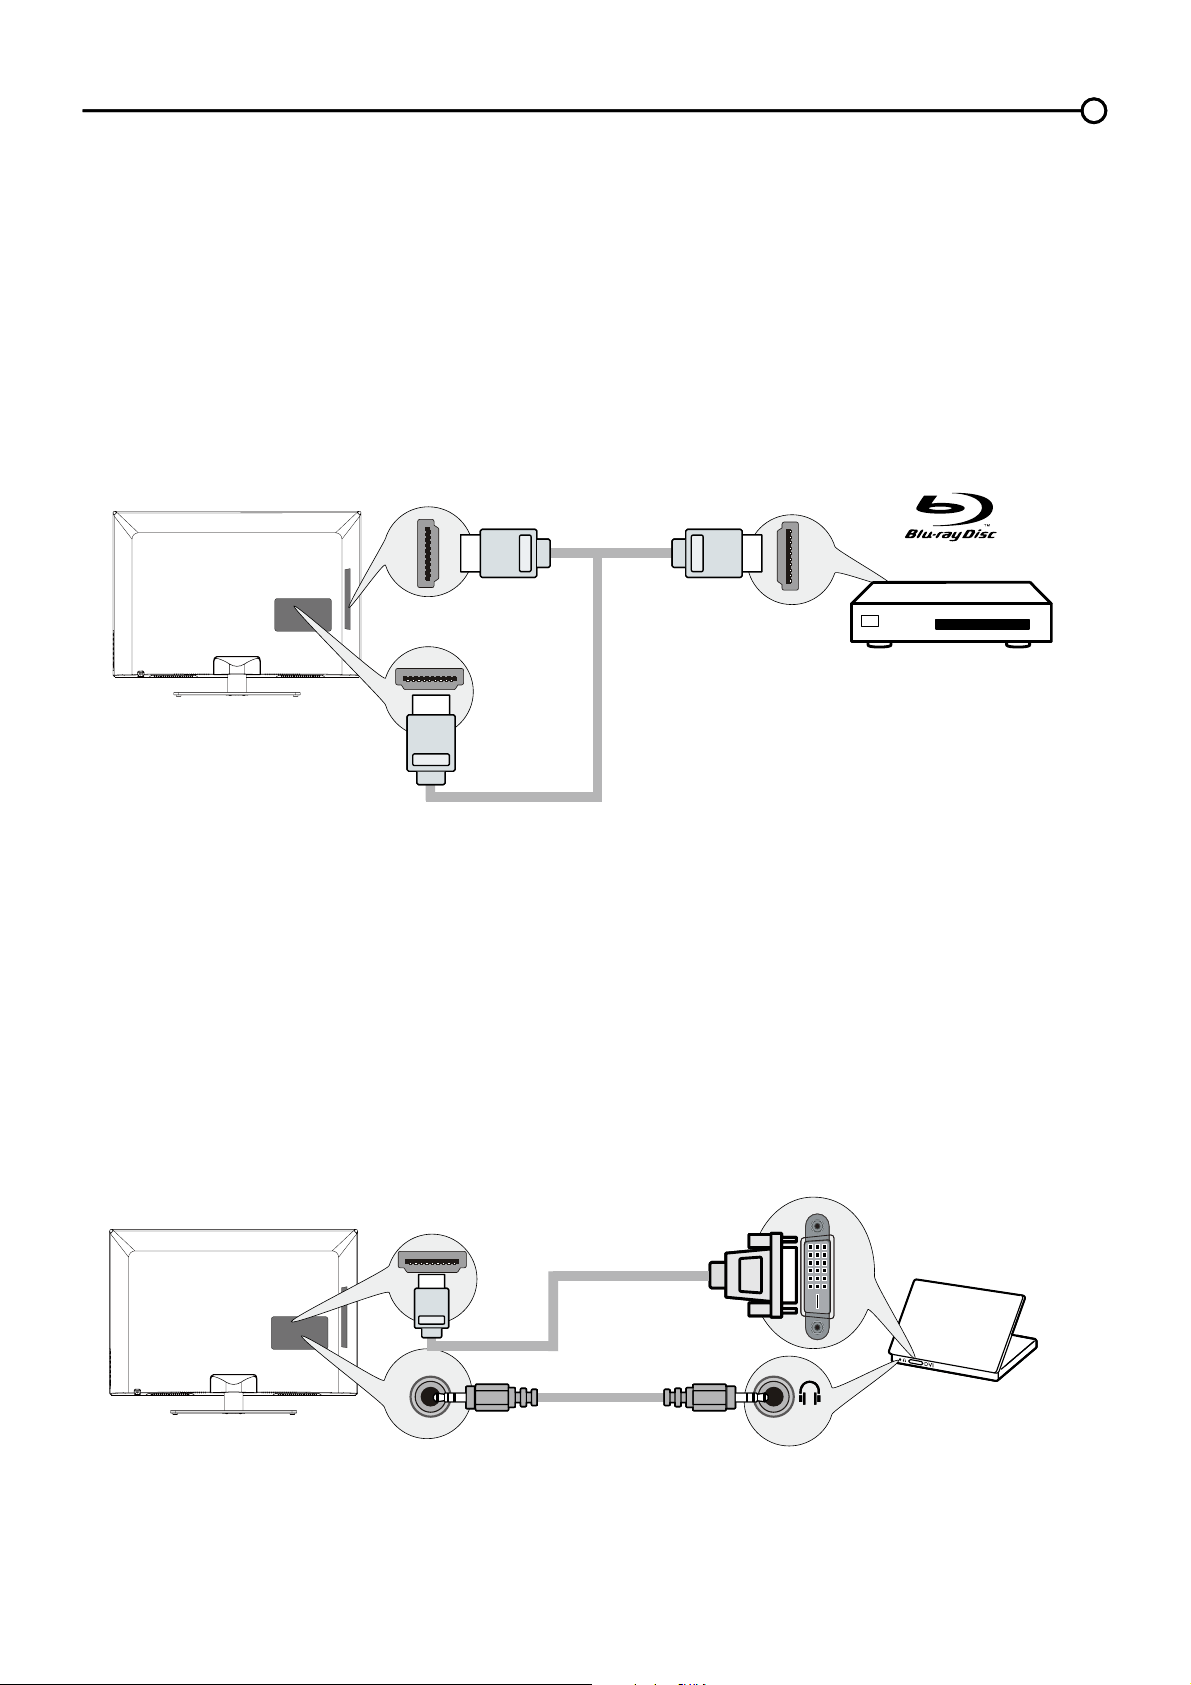
+'0,'9,&RQQHFWLRQ
6LQFH+'0,WHFKQRORJ\LVEDVHGRQ'LJLWDO9LVXDO,QWHUIDFH'9,WKHMDFNRQWKHEDFNRI\RXU79LV
also compatiEOHZLWKFRPSRQHQWVWKDWKDYHD'9,RXWSXWMDFN
Example: Personal Computer (PC)
&RQQHFWDQ+'0,FDEOHWRWKHHDMI/DVI IN 1MDFNRQWKHEDFNRIWKH79
$WWDFKDQ+'0,'9,DGDSWHURQWKHRWKHUHQGRIWKH+'0,FDEOHWKHQFRQQHFWLWWRWKH'9,RXWSXW
MDFNRQWKH3&
6LQFH\RX¶UHXVLQJDQ+'0,'9,DGDSWHU\RXQHHGWRFRQQHFWDVHSDUDWHDXGLRFDEOHWRWKHDVI
AUDIO INMDFNRQWKHEDFNRIWKH79DQGWKHDXGLRRXSXWMDFNRQWKH3&
7XUQRQ\RXU79WKHQWXUQRQWKH3&
5. Press the INPUT button on the remote control to open the Input list. Once open, press the INPUT
button repeatedly to select HDMI 1.
+'0,&RQQHFWLRQ%HVW
+LJK'H¿QLWLRQ0XOWLPHGLD,QWHUIDFH+'0,WHFKQRORJ\LVDQXQFRPSUHVVHGGLJLWDOFRQQHFWLRQWKDW
carries both video and audio data by way of an integrated mini-plug cable.
([DPSOH&RPSRQHQWZLWK+'0,MDFN
&RQQHFWDQ+'0,FDEOHWRWKHHDMI IN 2MDFNRQWKHVLGHRIWKH79RUWKHHDMI/DVI IN 1
MDFNRUHDMI IN 3 MDFNRQWKHEDFNRIWKH79DQGWRWKH+'0,RXWSXWMDFNRQWKH
component.
7XUQRQ\RXU79WKHQWXUQRQWKHFRPSRQHQW
3. Press the INPUT button on the remote control to open the Input list. Once open, press the INPUT
button repeatedly to select
HDMI 2 (or HDMI 1 or HDMI 3).
Note: You can use HDMI connection as alternative to cable input.
Don't forget:
If necessary, connect antenna or cable to get a picture. Go to page 10 for instructions.
HDMI OUT
OR
SET-TOP BOX
HDMI IN 2
HDMI CABLE
OR
HDMI/DVI IN 1
or
HDMI IN 3
To HDMI/DVI IN 1 only
HDMI-DVI
conversion cable
Audio cable
DVI/PC AUDIO IN
DVI
14
Plug in the TV
3OXJWKHHQGRIWKHSRZHUFRUGLQWRDQRXWOHWLQVHUWLQJWKHSOXJFRPSOHWHO\'RQRWSOXJWKH79LQWRDQ
outlet controlled by a light switch.
Put Batteries in the Remote
5HPRYHWKHEDWWHU\FRPSDUWPHQWFRYHUIURPWKHEDFNRIWKHUHPRWHFRQWUROE\SXVKLQJWKHWDEDQG
lifting off the cover.
,QVHUW$$$EDWWHULHVPDNLQJVXUHWKHSRODULWLHVDQGDUHDOLJQHGFRUUHFWO\
5HSODFHWKHFRYHU
Turn on the TV
7XUQRQ\RXU79E\SUHVVLQJWKH EXWWRQRQWKH79RUWKH button on the remote control.
Using the Remote Control to Complete the Initial Setup
<RXZLOOQHHGWRXVHWKHUHPRWHFRQWUROWRFRPSOHWHWKHVHWXSRI\RXU797KHUHPRWHFRQWURODOORZV
\RXWRQDYLJDWHWKURXJKDQGVHOHFWLWHPVWKDWDSSHDULQWKHRQVFUHHQPHQXV7KHSURFHVVZRUNVWKH
same on all menu screens: highlight your choice and select it.
To highlight an item in the menu list, press the up or down arrow ( ) to move up or down. Use the
OK button or right arrow (
) to view other selections for the highlighted menu choice or to display a
sub-menu.
Note: Highlighted items stand out from other menu items on the list (appear darker, brighter, or a
different color).
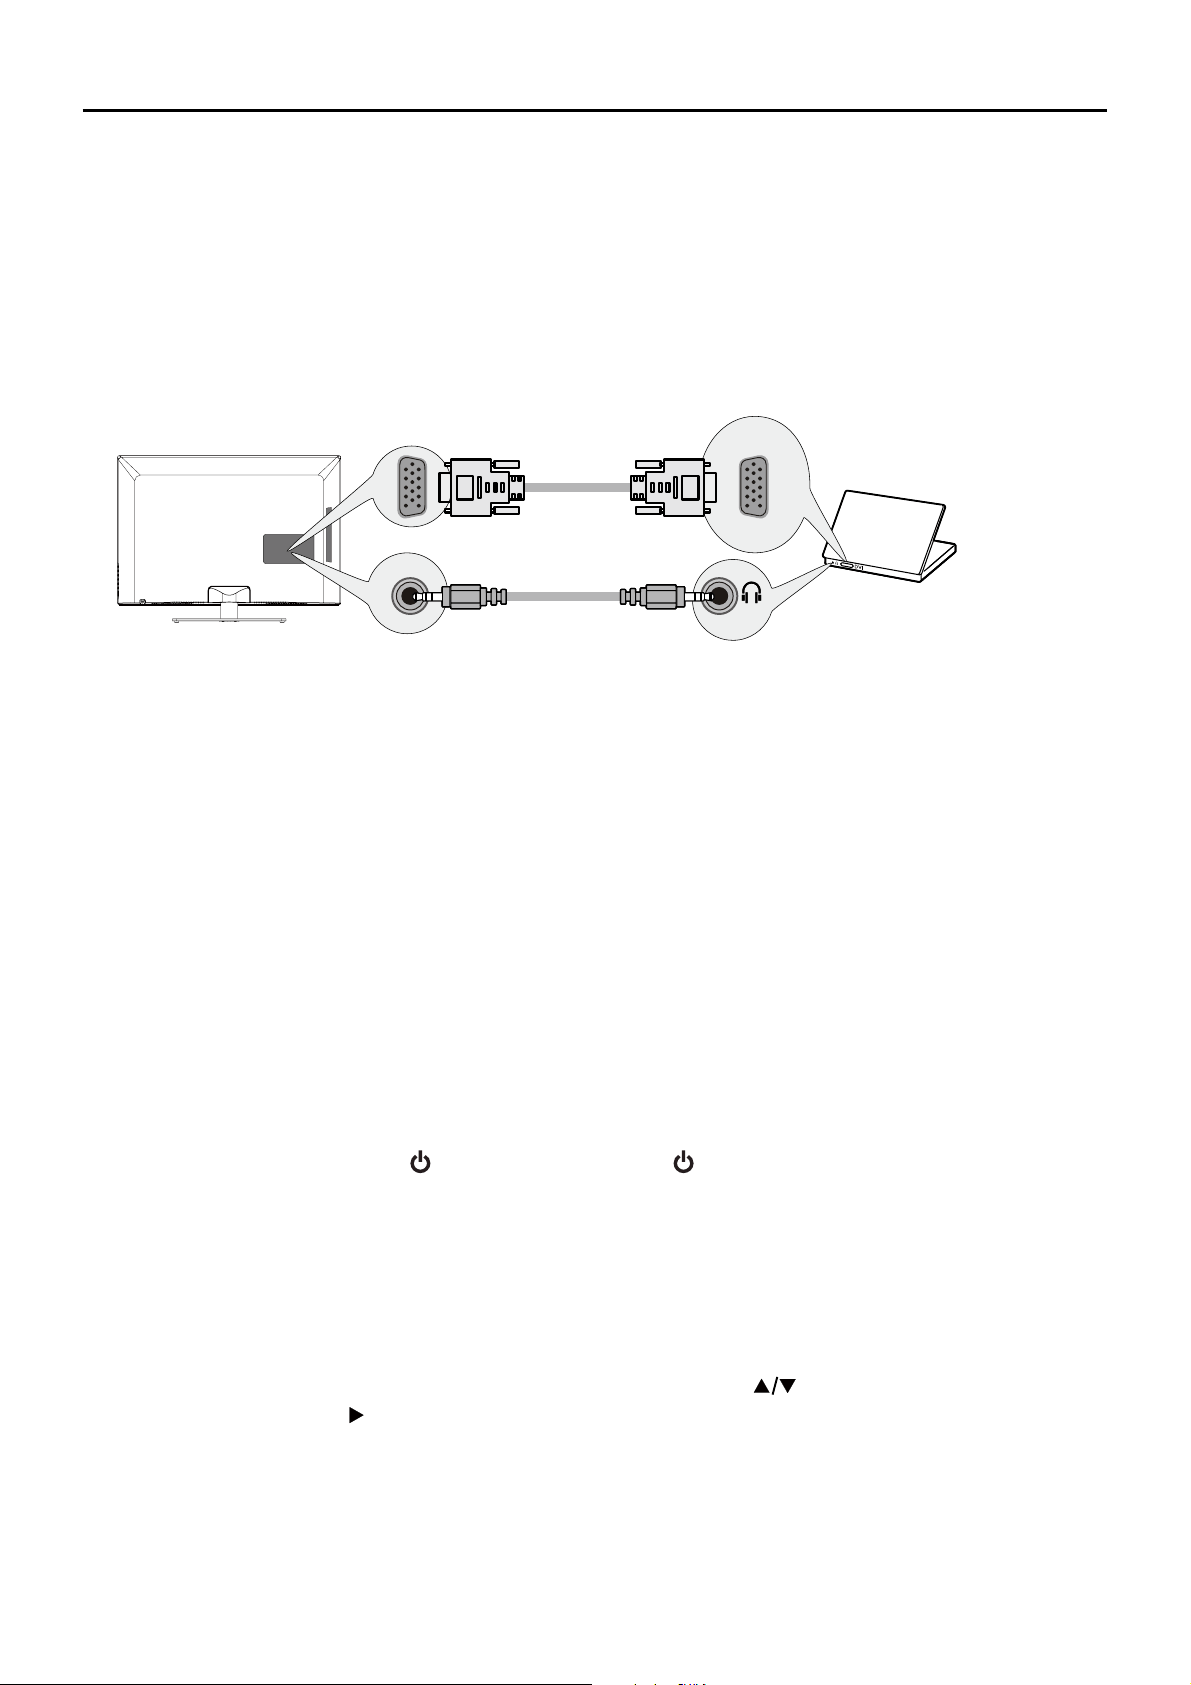
PC Connection
7RFRQQHFWDSHUVRQDOFRPSXWHUDQGXVH\RXU79DVDPRQLWRUIROORZWKHVHVWHSV
&RQQHFWRQHHQGRIDSLQPRQLWRUFDEOH9*$FDEOHWRWKHPC IN VGAMDFNRQWKH79DQGWKH
RWKHUHQGWRWKH3&¶VYLGHRRXWSXWMDFN
2. Connect an audio cable to the PC AUDIO INMDFNRQWKHEDFNRIWKH79DQGWKHRWKHUHQGWRWKH
DXGLRRXWSXWMDFNRQWKH3&
7XUQRQ\RXU79WKHQWXUQRQWKH3&
4. Press the INPUT button on the remote control to open the Input list. Once open, press the INPUT
button repeatedly to select PC.
To PC VIDEO
IN (VGA)
VGA cable
Audio cable
DVI/PC AUDIO IN
VGA
15
Complete the Initial Setup
7KHPHQXV\VWHPLQ\RXU79DOORZVDOORIWKH79¶VIHDWXUHVWRZRUNSURSHUO\7KH¿UVWWLPH\RXWXUQ
RQ\RXU79WKH,QLWLDO6HWXS:L]DUGRSHQVZKLFKJXLGHV\RXWKURXJKWKHVHWXSSURFHVVLQFOXGLQJ
/DQJXDJH79/RFDWLRQ7LPH=RQH7XQHUDQG&KDQQHO6FDQ
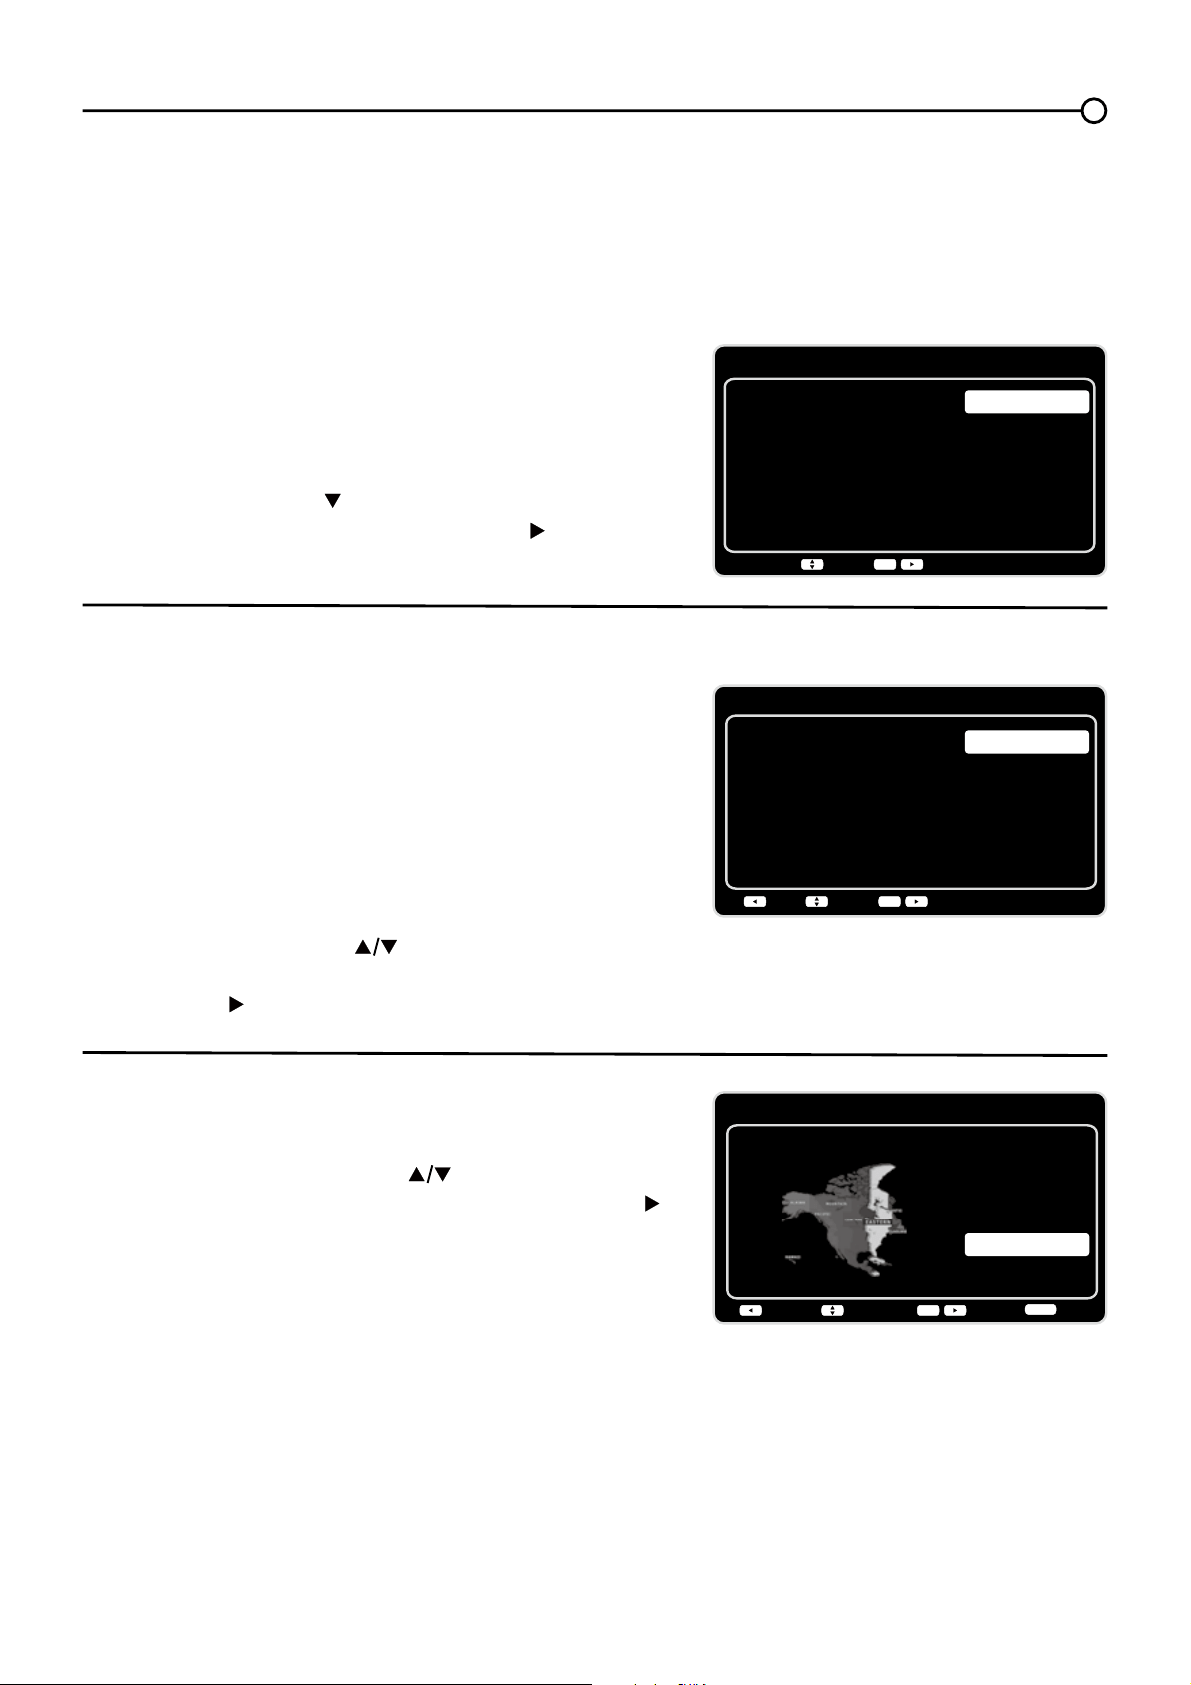
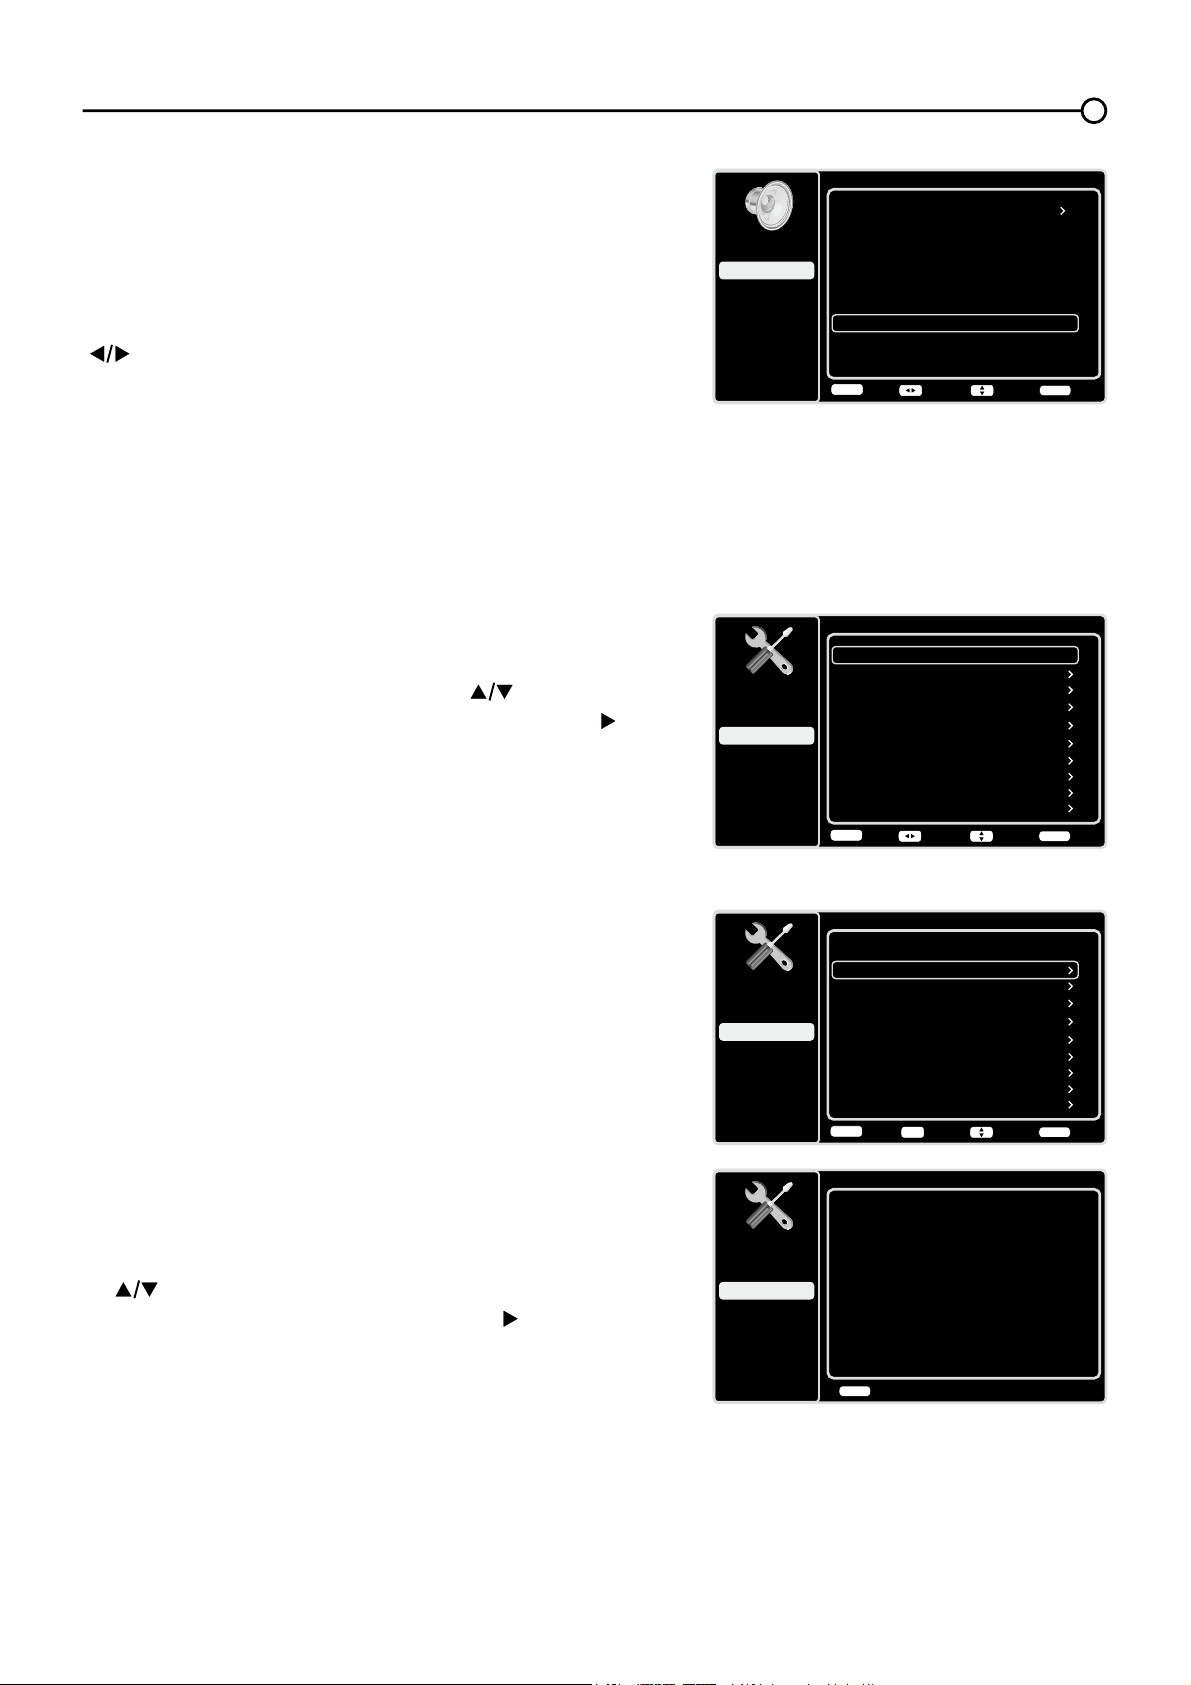
Set the Menu Language
7KH¿UVWVWHSRIWKHVHWXSUHTXLUHV\RXWRVHOHFW\RXU
preferred language for the menu system. If English is
your preferred language, press the OK button on the
remote control. To select another language use the
down arrow button ( ) until that language is selected
then press OK or the right arrow button ( ) to proceed
to the next screen.
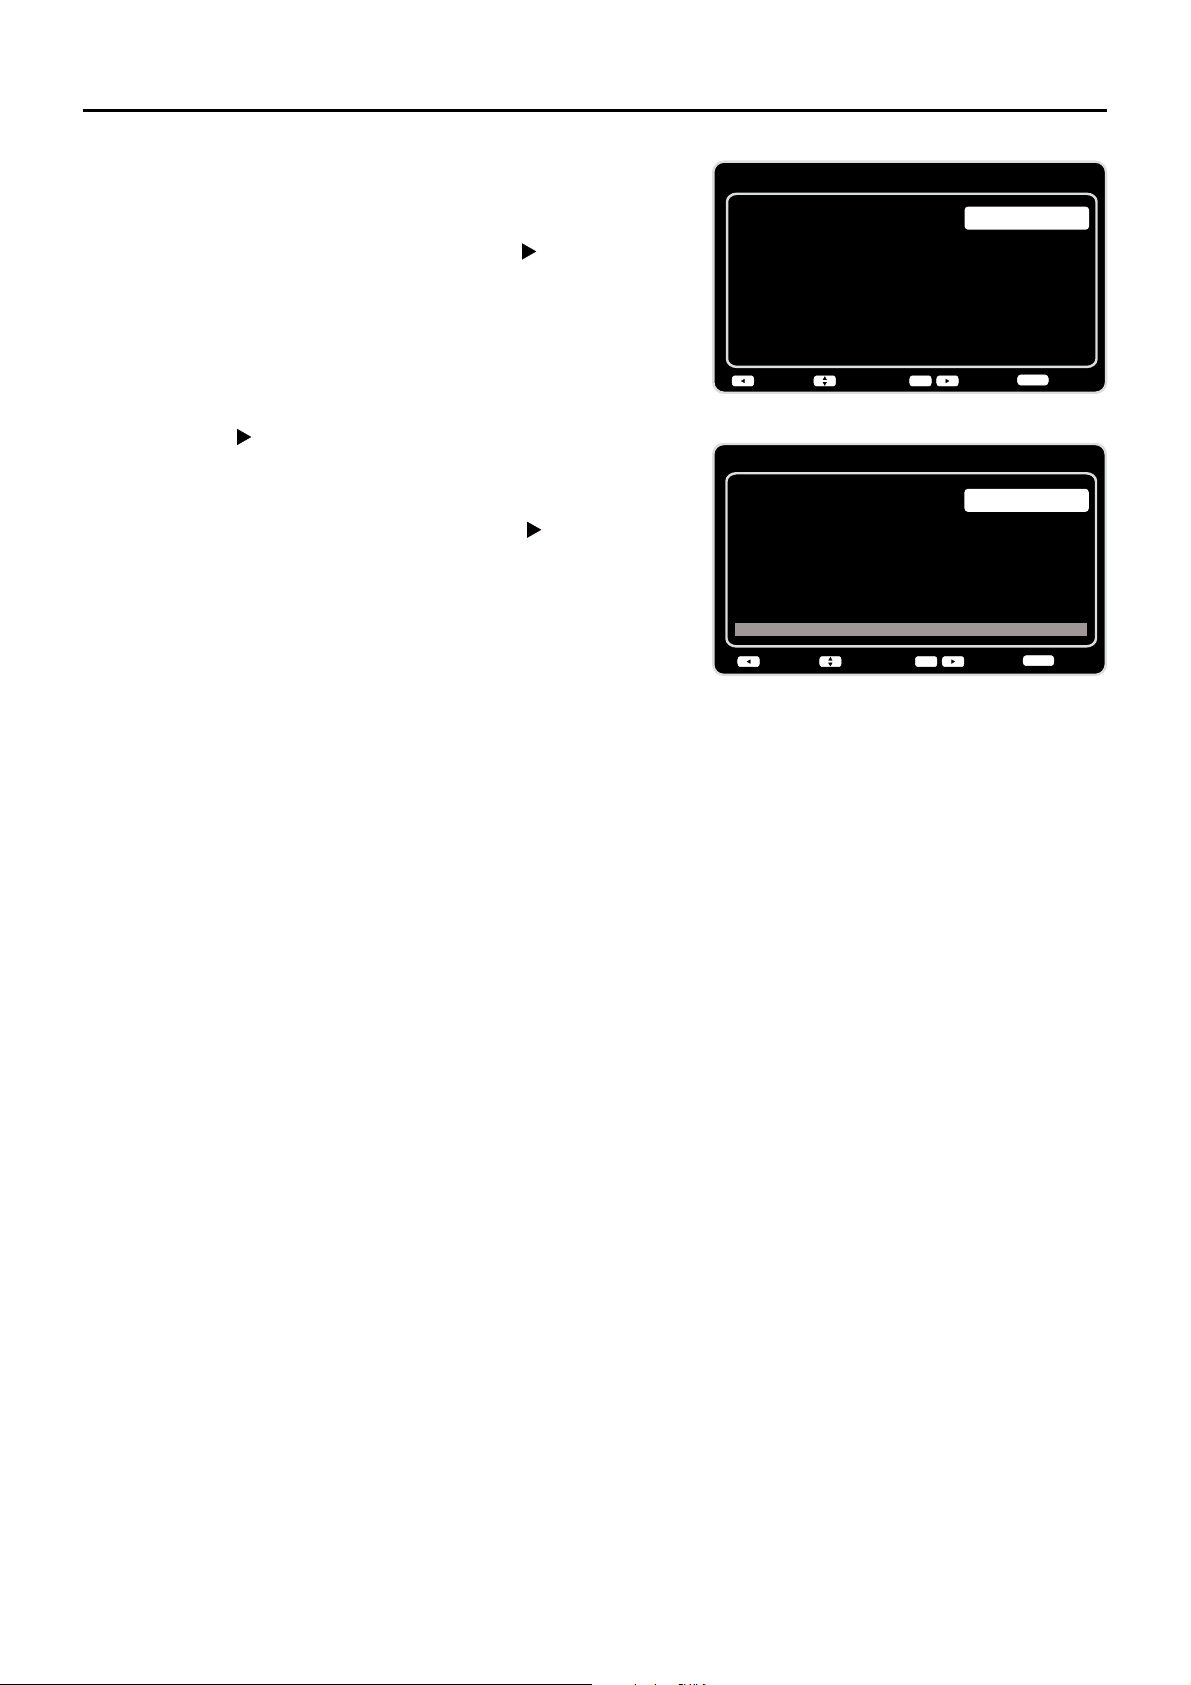
6HWWKH79/RFDWLRQ0RGH
$IWHUFKRRVLQJWKHODQJXDJHDPHQXVFUHHQDVNV\RXWR
VHWWKH79/RFDWLRQ
&KRRVLQJ³Home´IRUWKH79/RFDWLRQDVVLJQV
the optimal picture settings for most home
environments.
&KRRVLQJ³Retail´VHWVWKHXQLWXSZLWKSUHGH¿QHG
settings for retail displays.
Use the up or down arrow ( ) to select the desired
location setting (Home/RetailWKHQSUHVVWKHOK button
or right arrow ( ) to continue to the next screen.
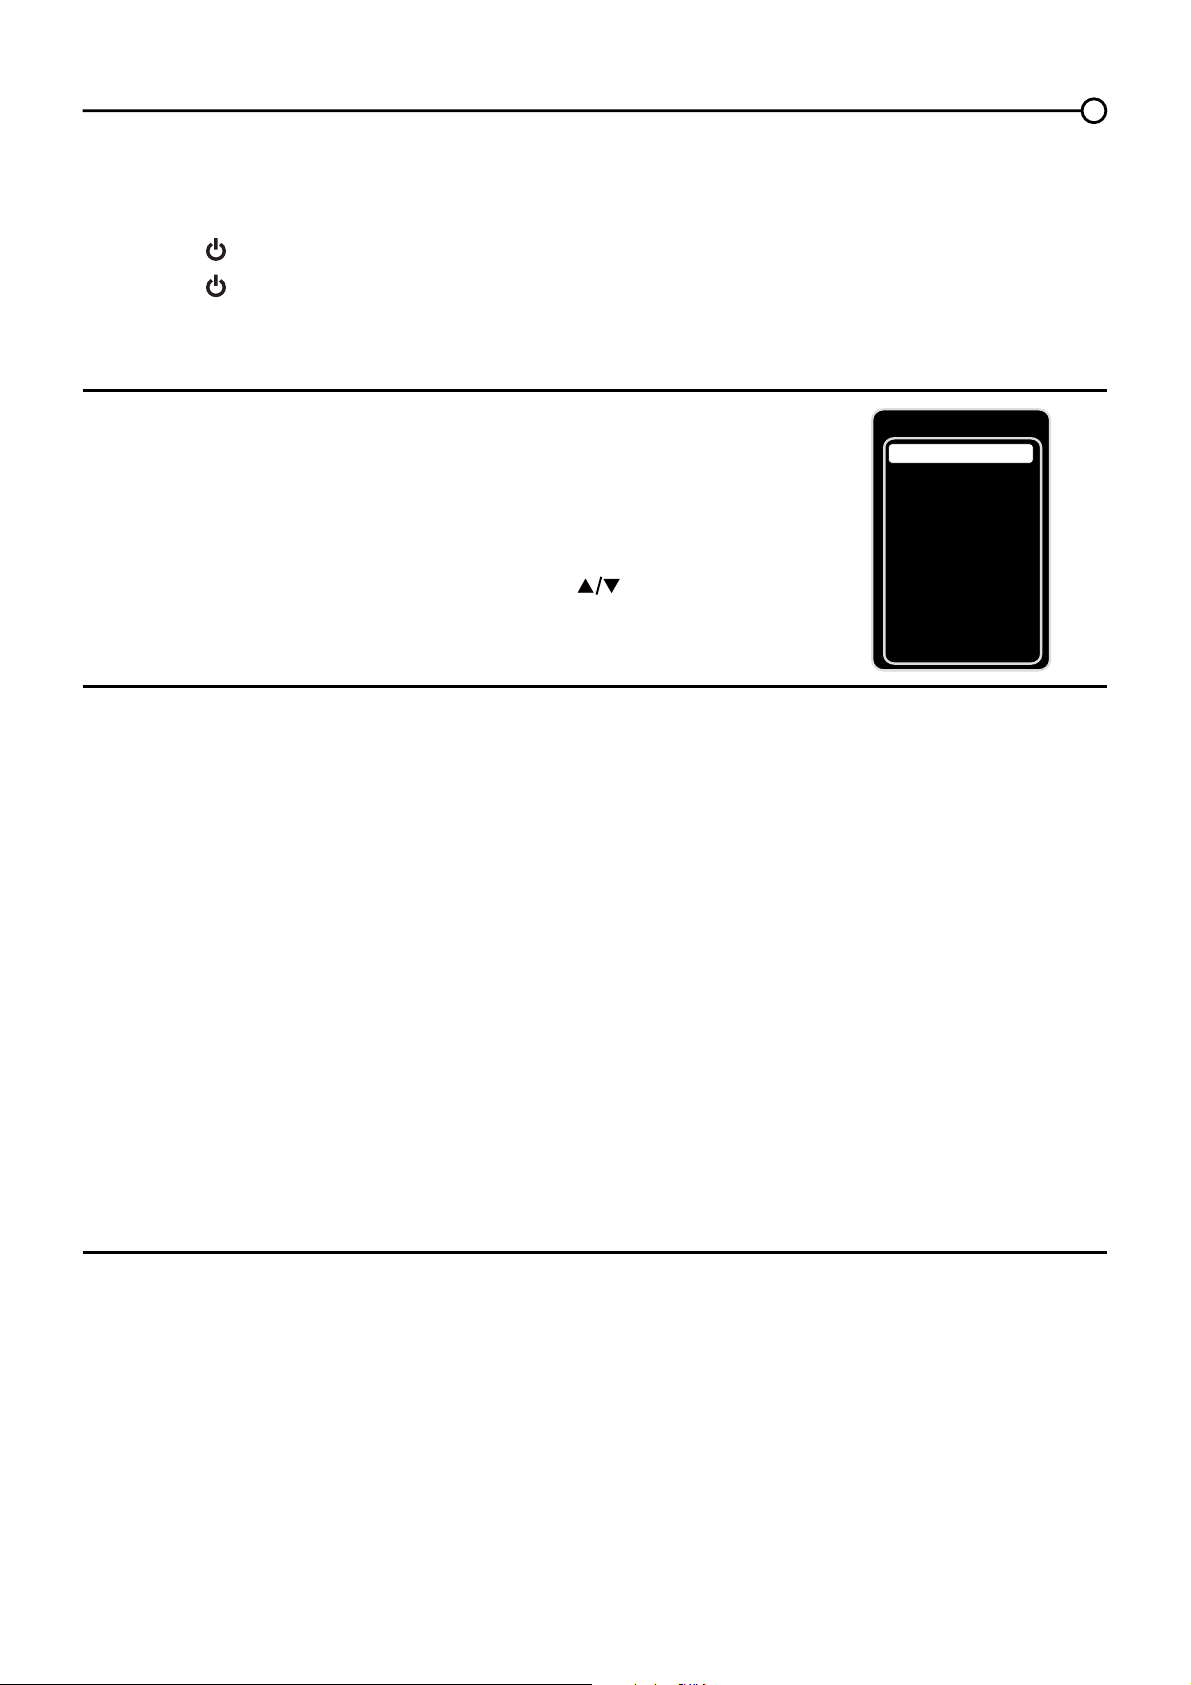
Set the Time Zone
Use the up or down arrows ( ) to select the current
local time zone. Press the OK button or right arrow ( )
to continue to the next screen.
Initial Setup
Please select your language:
Language
NextSelect
OK
Español
Français
English
Initial Setup
TV Location
TV Location
Retail
Home
Back NextSelect
OK
Initial Setup
Time Zone
Please select your time zone:
Alaska
Pacific
Hawaii
Mountain
Central
Eastern
Atlantic
Newfoudland
EASTERN
Back NextSelect
Exit
CLEAR
OK
16
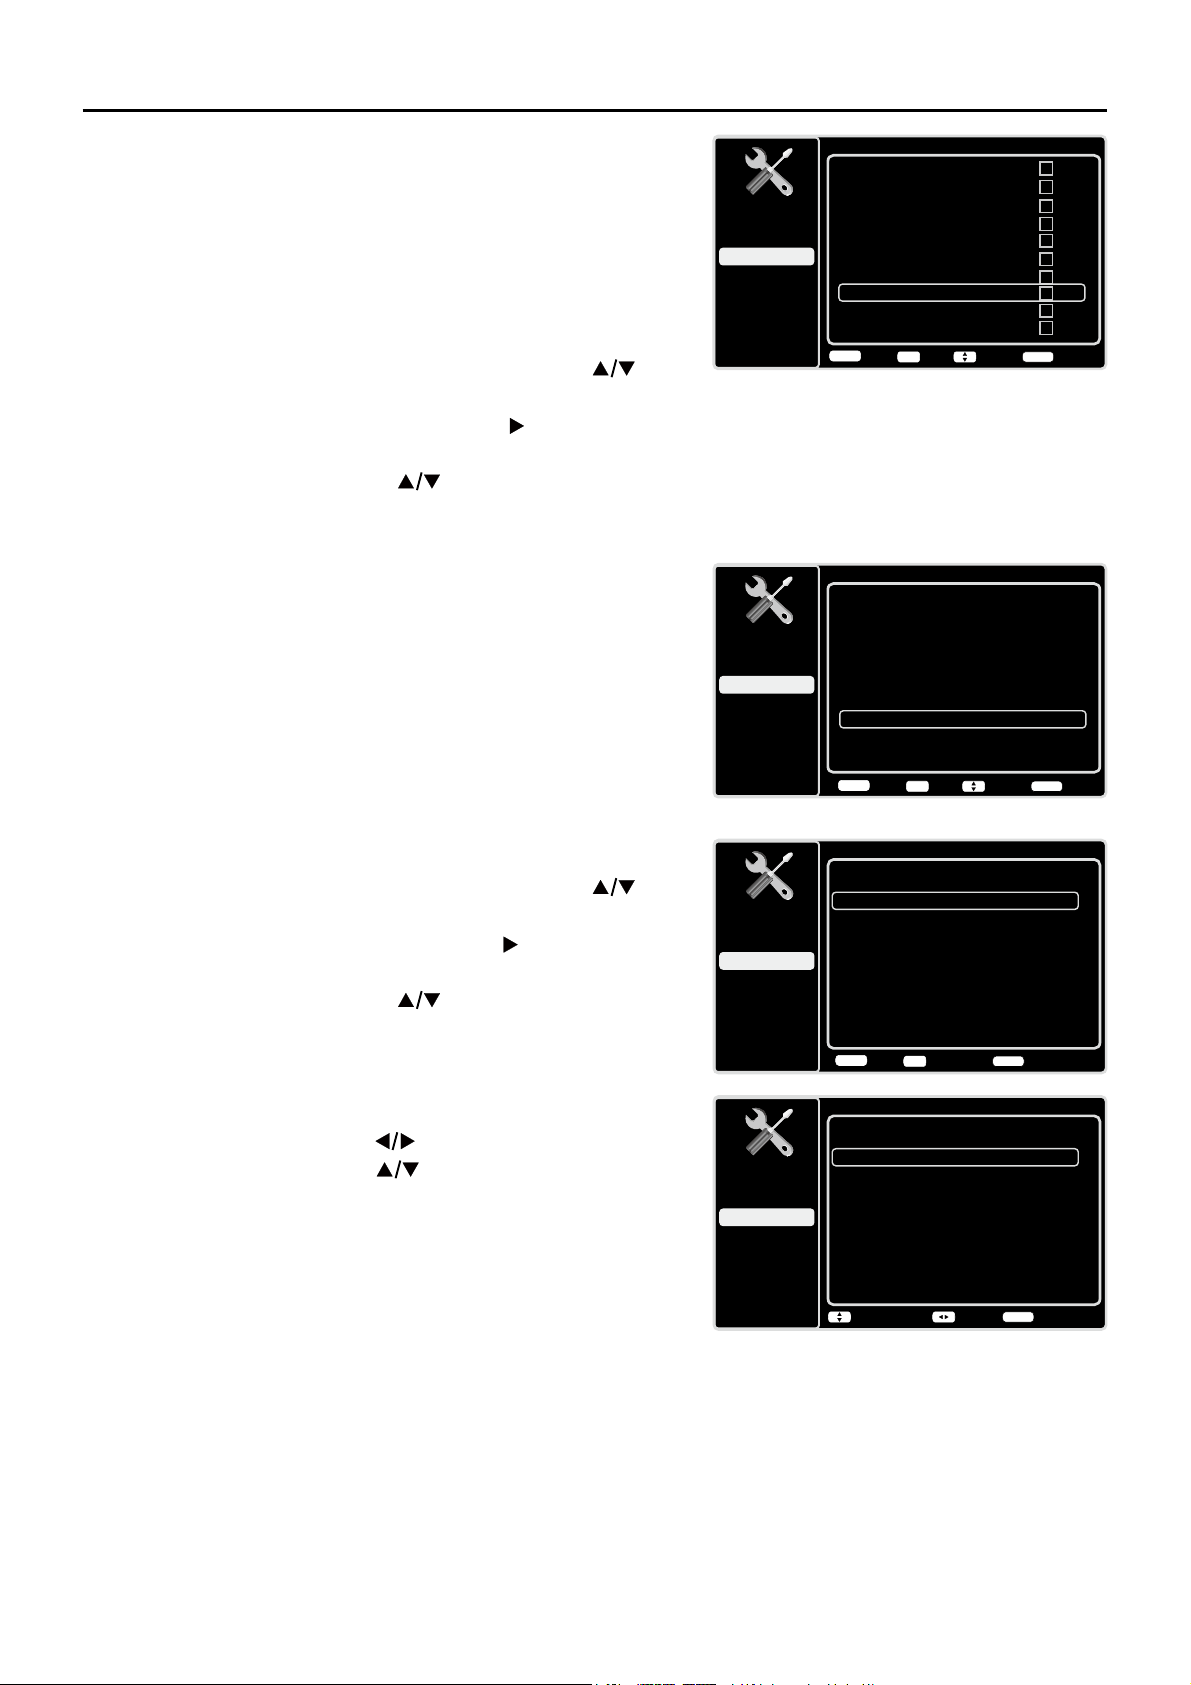
Auto Channel Scan
1. On the Tuner screen, select either Antenna or Cable/
Sat. Press the OK button or right arrow ( ) to continue
to the next screen.
Note: If you are using a satellite or cable set-top box,
you do not have to complete the Channel Search.
2. The Channel Scan screen is now displayed. The
default choice is to scan. Press the OK button or the
right arrow (
) to begin the channel scan for available
FKDQQHOVWREHVWRUHGLQWKH79¶VPHPRU\
Note: If you do not want to scan for channels at this
time, press the OK button or right arrow (
) to stop the
scanning process.
3. The screen will change to show the progress of the
scanning process.
:KHQWKHVFDQQLQJLV¿QLVKHGWKHXQLWKDVFRPSOHWHG
the Initial Setup.
5. Press CLEAR to exit the Wizard and begin watching
79
6NLS6FDQ
,I\RXVHOHFWWRVNLSWKH$XWR6FDQQLQJSURFHVVE\FKRRVLQJ
Skip Scan or by pressing the CLEAR button, you will need
to follow this process the next time you decide to complete
this procedure.
1. Select the TV as input (using the INPUTNH\
*RWKURXJKWKHPHQXRSWLRQVWRVHOHFWWKHSignal Type,
which will display the option of scanning the channels
again.
3. If you are using a satellite or cable set-top box, you do
not have to complete the Channel Search.
Note: See the Setup Menu to:
6FDQFKDQQHOVDXWRPDWLFDOO\DJDLQSDJH
$GGGHVLUHGFKDQQHOVQRWPHPRUL]HGE\WKHChannel
Skip (page 24).
5HVHWWKHWLPH]RQHSDJH
See the Language Menu to:
&KDQJHWRDQRWKHUODQJXDJHSDJH
Initial Setup
Tuner
Please select your tuner mode:
Cable/Sat
Antenna
Back NextSelect
Exit
CLEAR
OK
Initial Setup
Channel Scan
First, please connect Cable/Sat or
Antenna. Start Channel Scan
now?
If you skip this step, the
Channel Scan could be performed
in Setup menu later.
Skip Scan
Scan
0%
Back NextSelect
Exit
CLEAR
OK
17
Selecting a Channel
1. Select the desired channel by using the CH+/- RUWKHQXPHULFNH\SDG
The CH+/- can select only memorized channels.
6HOHFWQRQPHPRUL]HGFKDQQHOVXVLQJWKHQXPHULFNH\SDG
7RXVHWKHQXPHULFNH\SDG
Analog TV Channels – When selecting an analog channel, such as channel 12, press the 1,
then the 2, then press OK.
DTV ±:KHQVHOHFWLQJGLJLWDOFKDQQHOVVXFKDVEHVXUHWRSUHVVWKHGRWLQWKH
appropriate place. So, for 12.3, you would press 1, then 2, then dot, then 3. Press OK to select.
3. Press GO BACK to return to the previously viewed channel.
What is a Sub-channel?
A sub-channel is a channel such as 12.3. By using high-compression technology, digital broadcasting
enables multiple signals to be sent simultaneously. Therefore, you can select more than one program
per main channel, since digital broadcasting technology can distinguish between multiple channels on
DVLQJOHQHWZRUN
Turning the TV On and Off
3OXJWKHSRZHUFRUGIURPWKH79LQWRDQ$&SRZHURXWOHW
2. Press
WRWXUQRQWKH79
3. Press
WRWXUQRIIWKH79:KHQ\RXWXUQWKH79RIILWDXWRPDWLFDOO\JRHVLQWR6WDQGE\0RGH
Note: When your TV is in Standby Mode, it is still receiving some power. To completely
disconnect the power, unplug the power cord.
Selecting the Video Input Source
7XUQRQWKH79WKHQSUHVV INPUT on the remote control.
The INPUT list appears.
2. To select an input source, press the INPUT button
repeatedly or use the up and down arrows (
) to
highlight the video source and press OK to select.
Adjusting/Muting the Volume
1.
Use the VOL +/- to adjust the volume. The volume bar will be displayed at the bottom part of your
79VFUHHQZKHQ\RXDUHDGMXVWLQJWKHYROXPH7KHYROXPHEDUGLVDSSHDUVDIHZVHFRQGVDIWHU
you have completed the adjustment.
2. Press MUTEWRWXUQWKHVRXQGRQDQGRII7KH087(PDUNLVGLVSOD\HGRQWKH79VFUHHQIRUD
few seconds.
3. When you press MUTE again, the volume reverts to its previous level. Or you can press the
VOL + to cancel the mute function.
Chapter 2 - Understanding the Basics
Input
AV1
CMPT2 No Label
PC No Label
HDMI1 No Label
HDMI2 No Label
TV
No Label
AV2 No Label
S-VIDEO
No Label
CMPT1 No Label
HDMI3 No Label
18
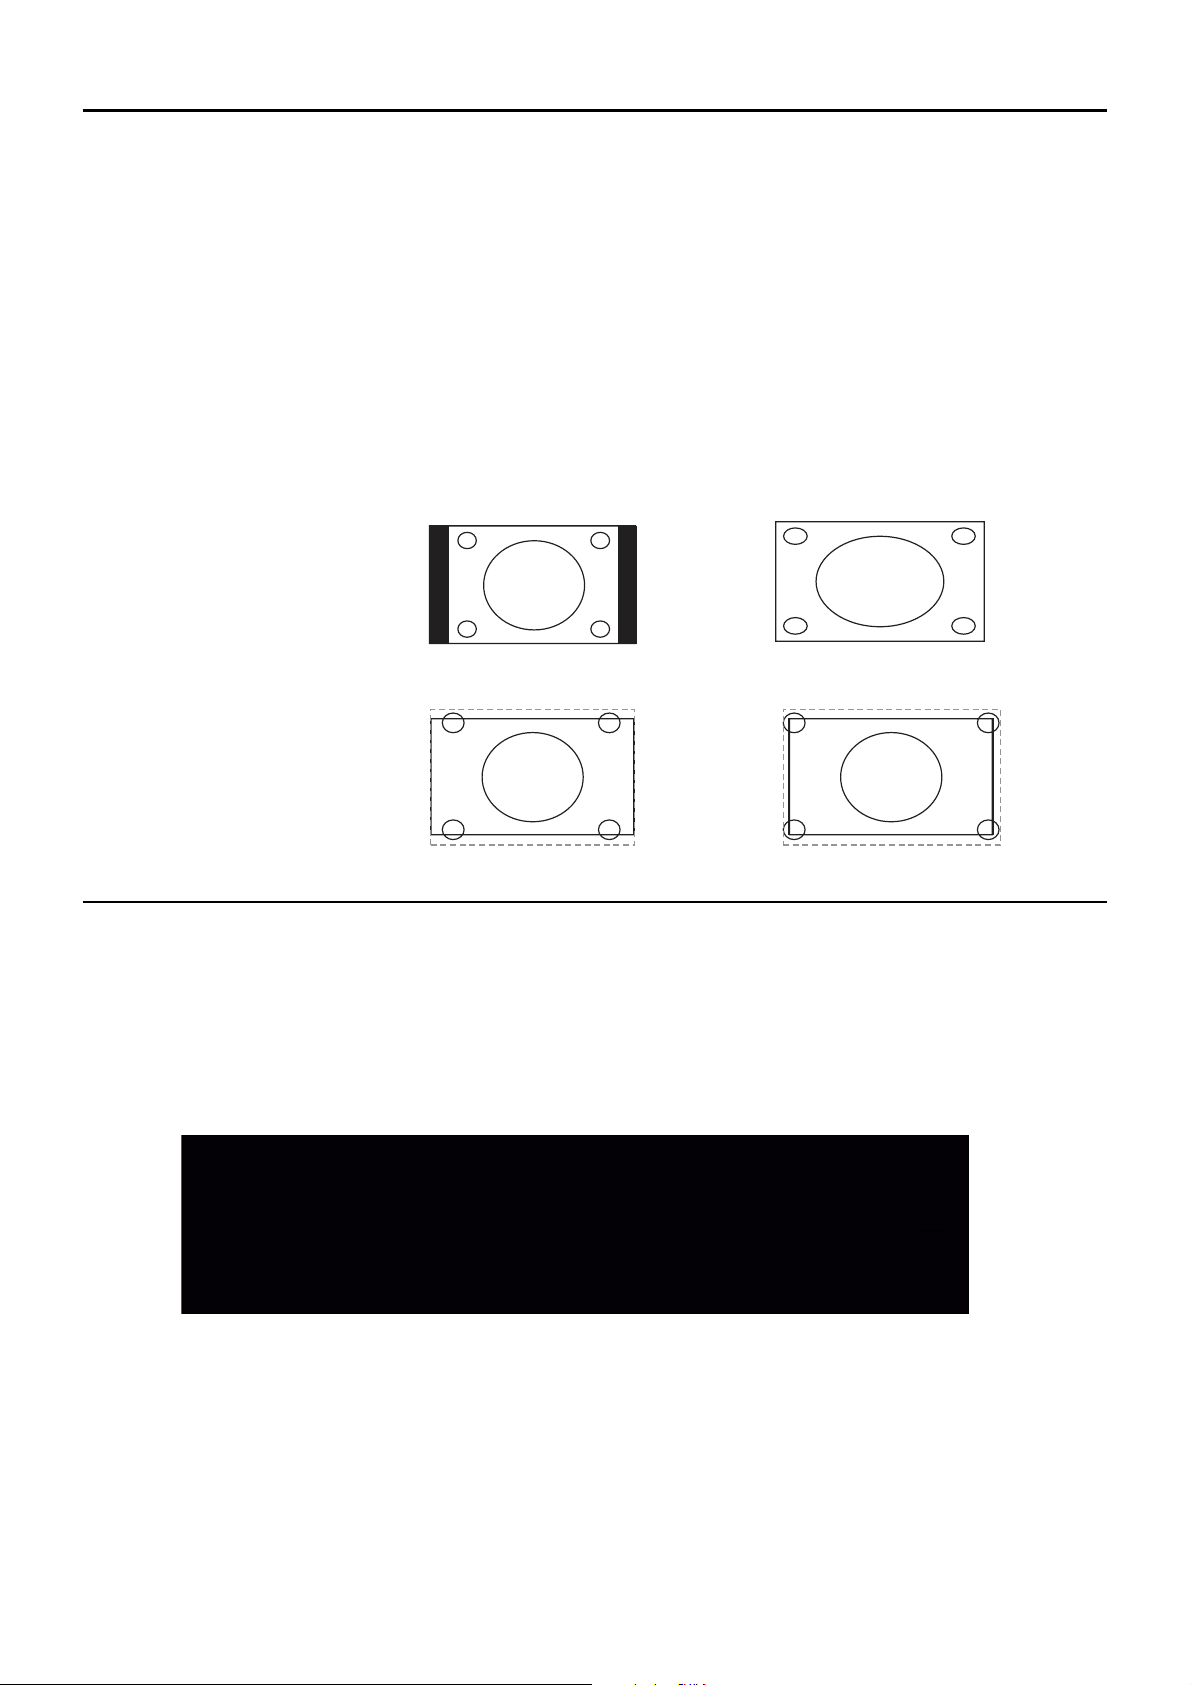
Screen Formats
6FUHHQIRUPDWUHIHUVWRWKHZD\WKHSLFWXUHLVGLVSOD\HGRQ\RXU793UHVVWKHZOOM -/+ button on
your remote to see if a different format is available for the video you are viewing. The format changes
as you press the ZOOM -/+ button, and the format type is displayed at the bottom left of the screen.
$QDORJYLGHRLVVHQWLQDIRUPDWZKLFK\RXU79GLVSOD\VLQDIRUPDW0RVWGLJLWDOYLGHRLVVHQW
LQDIRUPDWZKLFK¿OOV\RXUVFUHHQEXWLWVRPHWLPHVLVVHQWLQZKLFKGRHVQRW¿OO\RXUVFUHHQ
,WGHSHQGVRQKRZWKHVWDWLRQRUFRPSRQHQWFRQQHFWHGWR\RXU79LVIRUPDWWLQJWKHYLGHR,IWKHUHDUH
bars on the screen, press the ZOOM -/+ button to try a different format that may eliminate the bars.
6RPHEDUVFDQ¶WEHUHPRYHGEHFDXVHRIWKHZD\WKHIRUPDWLVVHQWE\WKHEURDGFDVWHU3UHVVZOOM -/+
repeatedly to cycle through the available display formats.
Examples of the different formats appear below. Each format is available for analog video, but it might
not be available for digital video.
Channel Banner
There are several indicators that may appear when you press the INFO button on the remote control,
such as channel number, channel name, rating information, cureent time, effective dcannning lines
and etc., these information vary depending on the different program. This display is called the Channel
Banner. The following is an example describing the items on the Channel Banner screen.
Normal
Cinema
Full
Zoom
Note: For HD Video, press
ZOOM -/+
to choose
from Full, Expand, Normal
and Zoom. For HDMI and
CMPT inputs, there is also
a No Overscan format.
SD channel 1, Event 844
4:00 AM - 7:00 AM
No Rated
No Information
704x480iFAV
English1
06:55 AM
D 42.1
ATLC-DT
Cable/Sat
19
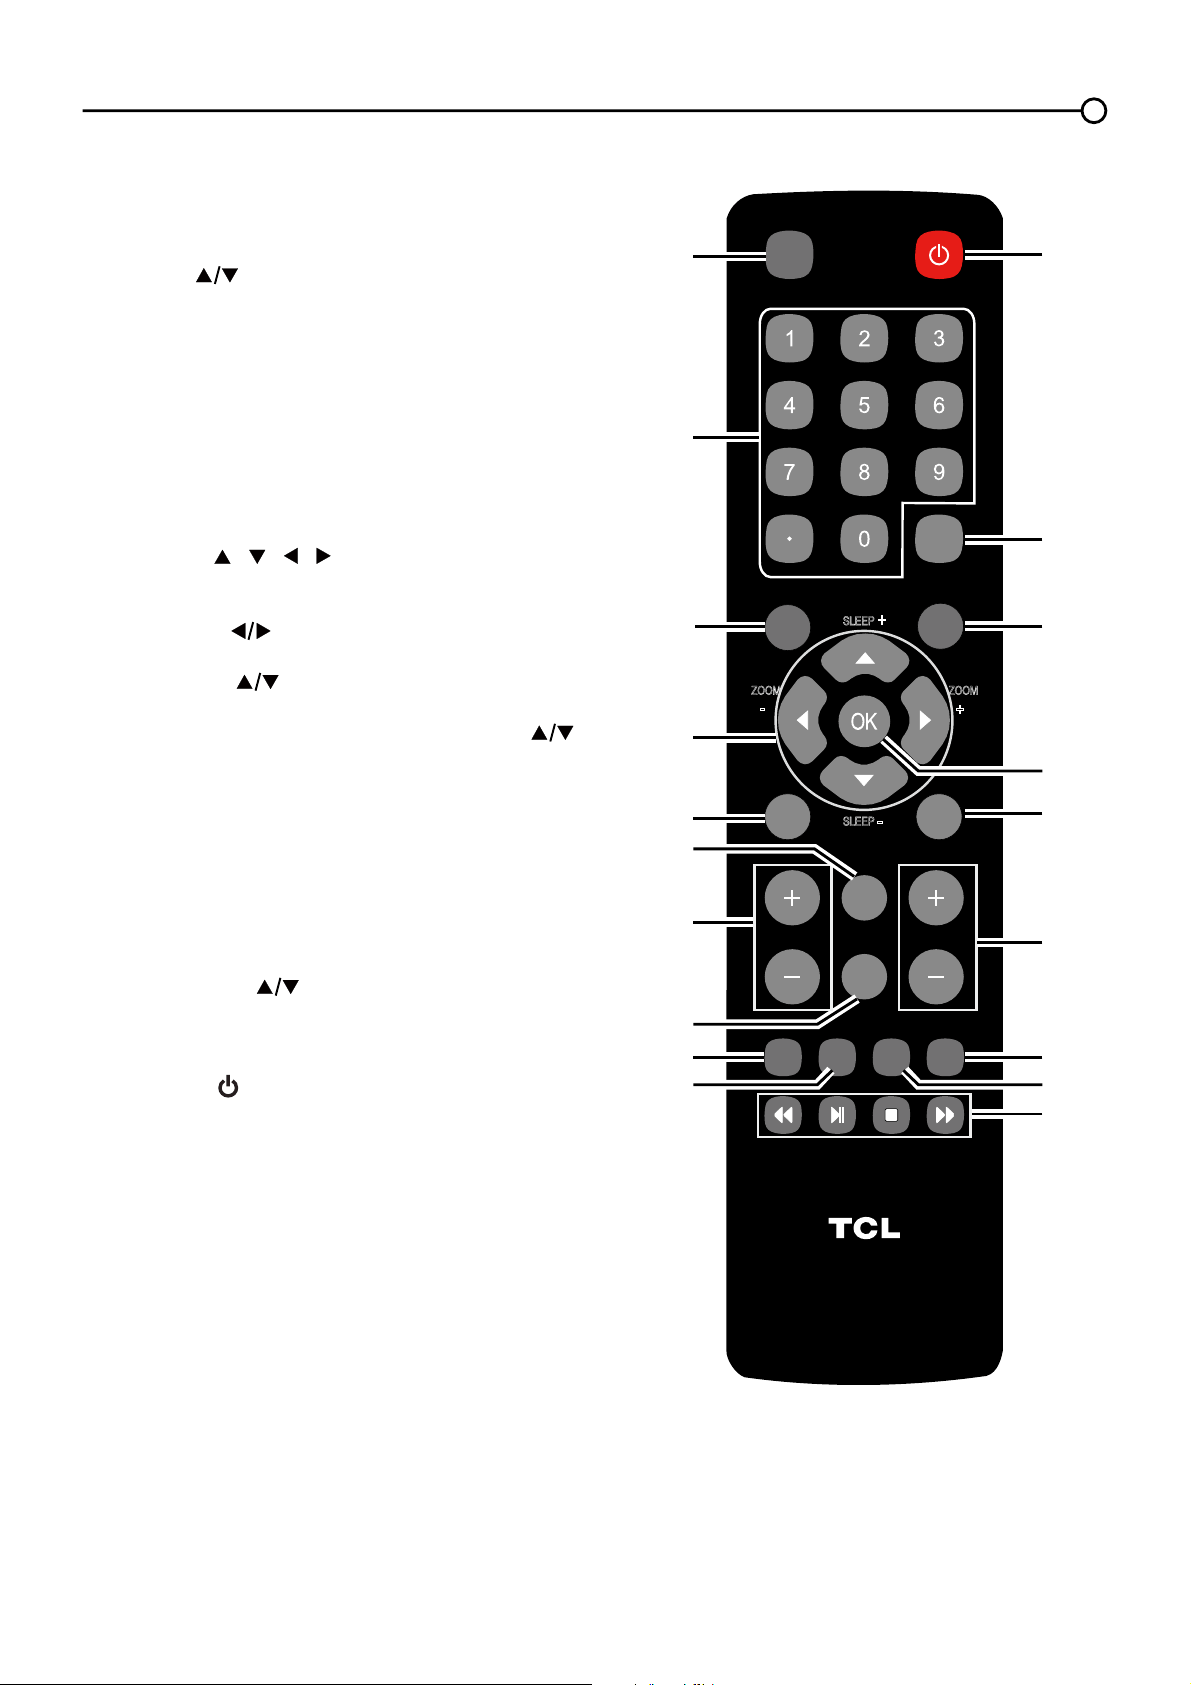
Chapter 3 - Using the Remote Control
VOL CH
RC3000N02
INPUT
GUIDE
MENU
CLEAR
GO BACK
INFO
MUTE
FAV
MEDIA
MTS
TV
PIC
ZOOM
SLEEP
SLEEP
+
+
ZOOM
-
-
8
9
1
2
3
4
5
7
6
10
11
1
2
1
5
1
6
1
8
1
3
1
7
1
9
1
4
Remote Control Buttons
1. INPUT – Press the INPUT button to open the
Input list; then press the INPUT button repeatedly
to select the video input, or press the up and down
arrows ( )
to highlight options, and press OK to
select the desired option.
2. Alphanumeric Buttons – Using these
buttons, enter channel numbers. To enter a
channel, press the number buttons and press OK
(or let the entry timeout).
To enter a digital channel with a sub-channel,
HQWHUWKHPDLQFKDQQHOWKHQSUHVVWKHGRWWKH
sub-channel, and then the OK button.
3. MENU – Press the MENU button to display the
Main Menu.
4. Arrows (
/ / / ) – Use the four arrows to
highlight different items in the TV menu and to
adjust the menu controls.
ZOOM -/+ (
) – Press to select the desired
screen format.
SLEEP +/- ( ) – Press to set the TV to turn off
after a given amount of time.
Note: In USB mode, the up or down arrow ( ) can
also be used for rotating a photo when showing the
photo.
5. PIC – Press to select your desired picture mode.
6. INFO – If no menus are currently active, press the
INFO button to display the Channel Banner.
7. VOL+/- – Increases or decreases the TV volume.
8. MUTE – Press to turn the volume on and off.
9. FAV – Press the FAV button to browse the
channels in your favorite list. Use the up and
down arrows (
) to highlight options, then press
OK to select.
10. MEDIA –
Press the MEDIA button to enter the
USB menu directly.
11. POWER ( ) – Press the POWER button to turn
the TV on and off.
12. GUIDE – Press the GUIDE button to display the
program guide. Program guide details are only
available on digital channels.
13. CLEAR – Press the CLEAR button to remove any
menu or display from the screen and return to
normal viewing.
14.OK – Press to display Channel List menu. When
the TV is in the Menu system, press the OK button
WRFRQ¿UP\RXUVHOHFWLRQ
15.GO BACK – Pressing the GO BACK button
returns you to the previously viewed channel.
16.CH + or CH - – Press the CH+/- buttons to select
channels and external input mode.
17.TV – Press to access to the TV mode.
18.MTS – Press to select your desired sound mode.
19.These buttons can be used for playing music and
photos in the USB menu.
20
Using the Menu System
7KLVVHFWLRQH[SORUHVWKHPHQXVRI\RXU79(DFKPHQX
is outlined and detailed to help you get the most from your
797RDFFHVVWKHPHQXV\VWHPIROORZWKHVHVWHSV
1. Press the MENU button to open the main menu.
2. Use the up and down arrows (
) to highlight an
option and press the OK button or the right arrow ( ) to
enter its sub-menu.
3. Press the up and down arrows (
) to highlight an
LWHPWKHQSUHVVWKHOHIWRUULJKWDUURZV )
to adjust the selected items, or press the OK button or
the right arrow ( ) to enter the next screen.
4. Press the OKEXWWRQWRFRQ¿UP\RXUVHOHFWLRQV
5. Press the MENU button to return to the previous
screen, or press the CLEAR button to close the menu.
Note:
Use the text at the bottom of the screen to assist you.
Descriptions of each menu are discussed in the order they
appear.
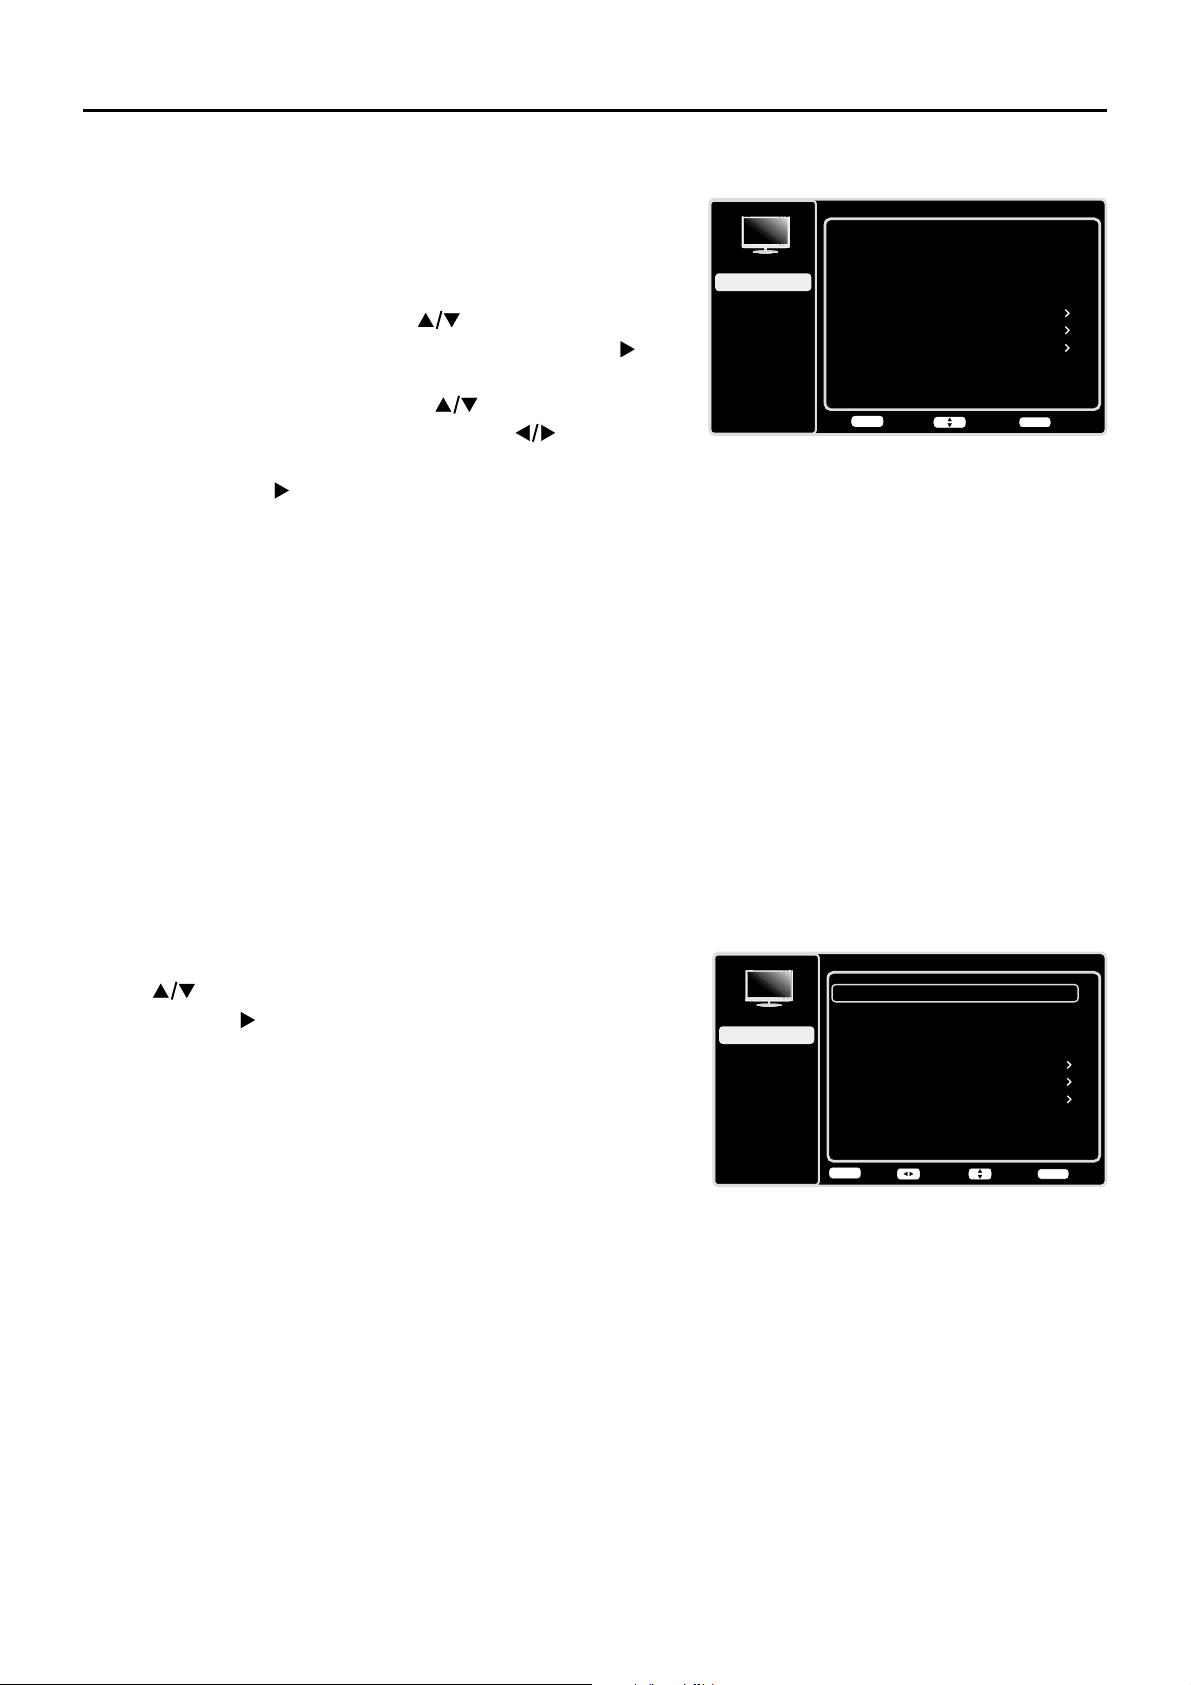
Picture Menu
The Picture Menu contains menus and controls to
FRQ¿JXUHWKHZD\WKHSLFWXUHDSSHDUV7KHPicture Menu
RSWLRQVDSSO\WRWKHYLGHRIRUWKHPDLQ79DQG9,'(2
INPUT selections.
To access the Picture Menu, press the MENU button on
the remote to open the Main menu. Press the up or down
arrow (
) to select PictureWKHQSUHVVWKHOK button or
the right arrow (
) to display options.
Picture Settings:
Picture Preset - 'LVSOD\VDOLVWWKDWOHWV\RXVHOHFW
one of the preset picture settings: Natural, Sports,
Personal or ECO, Vibrant, Cinematic. Choose the
setting that is best for your viewing environment.
Brightness - Adjusts the brightness of the picture.
Contrast - Adjusts the difference between the light and
GDUNDUHDVRIWKHSLFWXUH
Sharpness - Adjusts the crispness of the edges in the
picture.
Expert Settings
Backlight -$GMXVWVWKHEDFNOLJKWOHYHOWKHPHQX
line is grayed out by default. Only when “Dynamic
Backlight”and “Light Sensor” are both set to “Off”, the
menu line can be adjustable.
Picture
Setup
Parental Control
Language
Sound
Picture
USB
Exit
Picture Preset
Brightness
Natural
Advanced Settings
50
Sharpness
5
Contrast
75
Reset Picture Settings
Expert Settings
Back
MENU
Adjust Select Exit
CLEAR
Chapter 4 - Using the TV Menu
Picture
Setup
Parental Control
Language
Sound
Picture
USB
Exit
CLEAR
Enter Select Back
OK
Picture Preset
Brightness
Natural
Advanced Settings
50
Sharpness
5
Contrast
75
Reset Picture Settings
Expert Settings
CLEAR
21
Expert Settings
Setup
Parental Control
Language
Sound
Picture
USB
Exit
Backlight
Color
50
50
Color Temperature
0
Tint
0
Back
MENU
Adjust Select Exit
CLEAR
Color - Adjusts the richness of the color.
Tint - This option adjusts the balance between the red
and green levels.
Color Temperature - Adjusts the color temperature from
cool to warm.
Note: Color and Tint are not available in PC mode.
Advanced Settings
Light Sensor – When activated, this feature monitors
the ambient light conditions in the room and adjusts the
79¶VEDFNOLJKWIRURSWLPXPYLHZLQJ,WDOVRVHUYHVDVDQ
HQHUJ\VDYLQJIHDWXUHE\ORZHULQJWKHEDFNOLJKWSRZHU
OHYHOZKHQDSSURSULDWHW\SLFDOO\LQGDUNHUFRQGLWLRQV
Dynamic Backlight – This option automatically adjusts
WKHEULJKWQHVVRIWKHEDFNOLJKWDFFRUGLQJWRWKHFRQWHQW
of the incoming signal. Dynamic Backlight optimizes
the picture quality and decreases power consumption.
Noise Reduction – This setting reduces picture “static”
or any type of interference. This feature is especially
XVHIXOIRUSURYLGLQJDFOHDUHUSLFWXUHLQZHDNDQDORJ
signal conditions. Choose between these options:
Low for a softer, smoother picture that retains picture
sharpness and detail.
Middle for a slightly softer picture than the Low
setting.
High for an even softer, smoother picture than
the other settings (the picture detail is somewhat
decreased).
SABC (Scene Adaptive Brightness Control) –
Option: On/Off. If set to On mode, distribution of
EULJKWQHVVHYHU\VFHQHLVSLFNHGRXWDXWRPDWLFDOO\79
always adjusts appropriate brightness by full automation.
PC Settings
- This option allows you to adjust the PC
settings when in PC mode.
Reset Picture Settings
- This function allows you to
reset all the picture settings to the factory default settings.
Advanced Settings
Setup
Parental Control
Language
Sound
Picture
USB
Exit
Light Sensor
Dynamic Backlight
Off
Off
Off
Nosie Reduction
Auto
SABC
Back
MENU
Adjust Select Exit
CLEAR
Picture
Setup
Parental Control
Language
Sound
Picture
USB
Exit
Picture Preset
Brightness
Natural
Advanced Settings
50
Contrast
75
Reset Picture Settings
Expert Settings
PC
Back
MENU
Enter Select Exit
CLEAR
OK
Only in PC mode

22
Sound Menu
The Sound Menu lets you adjust audio output. To access
the Sound Menu, press MENU on the remote, and then
use the up and down arrows ( ) to highlight Sound from
the Main Menu. Press the OK button RUULJKWDUURZNH\
)
to select. The following options will be displayed:
Equalizer – 7KH¿YHEDQGHTXDOL]HUDOORZV\RXWRDGMXVW
WKHDXGLRIUHTXHQF\VHWWLQJV<RXFDQVHOHFWRQHRIWKH¿YH
preset options or create a custom preset.
Equalizer±$OORZV\RXWRFKRRVHDVSHFL¿F
sound preset:
Standard, Music, Voice, Movie, and
Personal.
Frequency Range – 'LVSOD\VWKHGLIIHUHQWJUDSKLF
equalizer names set for each sound preset option.
&KRRVHDEDQGDQGPDNHDGMXVWPHQWV:KHQPDNLQJ
adjustments, the Equalizer option automatically
changes to Personal. Press the left or right arrow
( ) to select the desired frequency (100Hz, 300Hz,
1KHz, 3KHz, 10KHz) you wish to adjust. Use the up
and down arrows ( ) to adjust the level. When you
KDYH¿QLVKHGDGMXVWLQJWKHOHYHOVSUHVVWKHMENU
button to exit.
Sound
Setup
Parental Control
Language
Sound
Picture
Equalizer
Balance
Surround
Analog TV Sound
USB
Exit
0
On
Stereo
Speaker
On
SPDIF Type
Dolby Digital
Auto Volume Control
Off
Back
MENU
Enter Select Exit
CLEAR
OK
Balance – Adjust the amount of audio sent to the left and
ULJKWVSHDNHUV
Surround – Option On/Off. When turned on, this option
enables a mode which simulates a surround sound effect.
Speaker – Option On/Off. When you select the Off option,
WKHVRXQGVSHDNHURQWKH79ZLOOEHWXUQHGRII
SPDIF Type – This option controls the type of audio stream
VHQWWRWKH'LJLWDO$XGLR2XWSXWMDFN$YDLODEOHRSWLRQVDUH
Dolby Digital, PCM, or Off.
only available for analog channels
Auto Volume Control – Option On/Off. This option reduces the annoying blasts in volume that often
RFFXUGXULQJFRPPHUFLDOEUHDNVDQGDOVRDPSOL¿HVVRIWHUVRXQGVLQSURJUDPPDWHULDOHOLPLQDWLQJWKH
need for constant volume adjustment.
Analog TV Sound – This option controls the manner in which the sound comes through your
VSHDNHUV2SWLRQVDYDLODEOHYDU\DFFRUGLQJWRWKHLQSXWVHOHFWHG
0RQRDYDLODEOHIRUUHJXODU79YLHZLQJRQO\± This option plays the sound in mono only. Use
WKLVVHWWLQJZKHQUHFHLYLQJEURDGFDVWVZLWKZHDNVWHUHRVLJQDOV
6WHUHR±7KLVRSWLRQVSOLWVWKHLQFRPLQJVWHUHRDXGLRVLJQDOLQWROHIWDQGULJKWFKDQQHOV0RVW79
programs and recorded materials have stereo audio. The word “Stereo” appears in the Channel
Banner when you tune to a program that is broadcast in stereo.
6HFRQG$XGLR3URJUDP6$3±7KLVRSWLRQSOD\VWKHSURJUDP¶VDXGLRLQDVHFRQGODQJXDJH
if available. The letters “SAP” appear in the Channel Banner when you tune to a program that
is broadcast with SAP information. SAP audio is broadcast in mono only. SAP is also used to
EURDGFDVWDSURJUDP¶VDXGLRZLWKGHVFULSWLRQVRIWKHYLGHRIRUWKHYLVXDOO\LPSDLUHG
Sound
Setup
Parental Control
Language
Sound
Picture
Equalizer
Balance
Surround
Analog TV Sound
USB
Exit
0
On
Stereo
Speaker
On
SPDIF Type
Dolby Digital
Auto Volume Control
Off
Back
MENU
Adjust Select Exit
CLEAR
23
Default Audio Language – Choose the language you
prefer for dialog on digital channels. If the preferred
ODQJXDJHLVQRWEURDGFDVWHGZLWKWKHSURJUDPWKHQWKH79
plays the default audio for the program (usually English in
the US). There are 3 available default languages (English,
French, Spanish).
Current Audio Language – Press the left or right arrow
(
) to choose from the list of languages available for the
SURJUDP\RX¶UHZDWFKLQJ7KHODQJXDJHFKRVHQEHFRPHV
your preferred language for all digital channels until you turn
WKH79RII,IWKHODQJXDJHFKRVHQLVQRWEHLQJEURDGFDVWHG
ZLWKDSURJUDPWKH79SOD\VWKHGHIDXOWODQJXDJHIRUWKH
program (usually English in the US).
only available for digital channels
Sound
Setup
Parental Control
Language
Sound
Picture
Equalizer
Balance
Surround
USB
Exit
0
On
Default Audio Language
English
Current Audio Language
Unknown
Speaker
On
SPDIF Type
Dolby Digital
Auto Volume Control
Off
Back
MENU
Adjust Select Exit
CLEAR
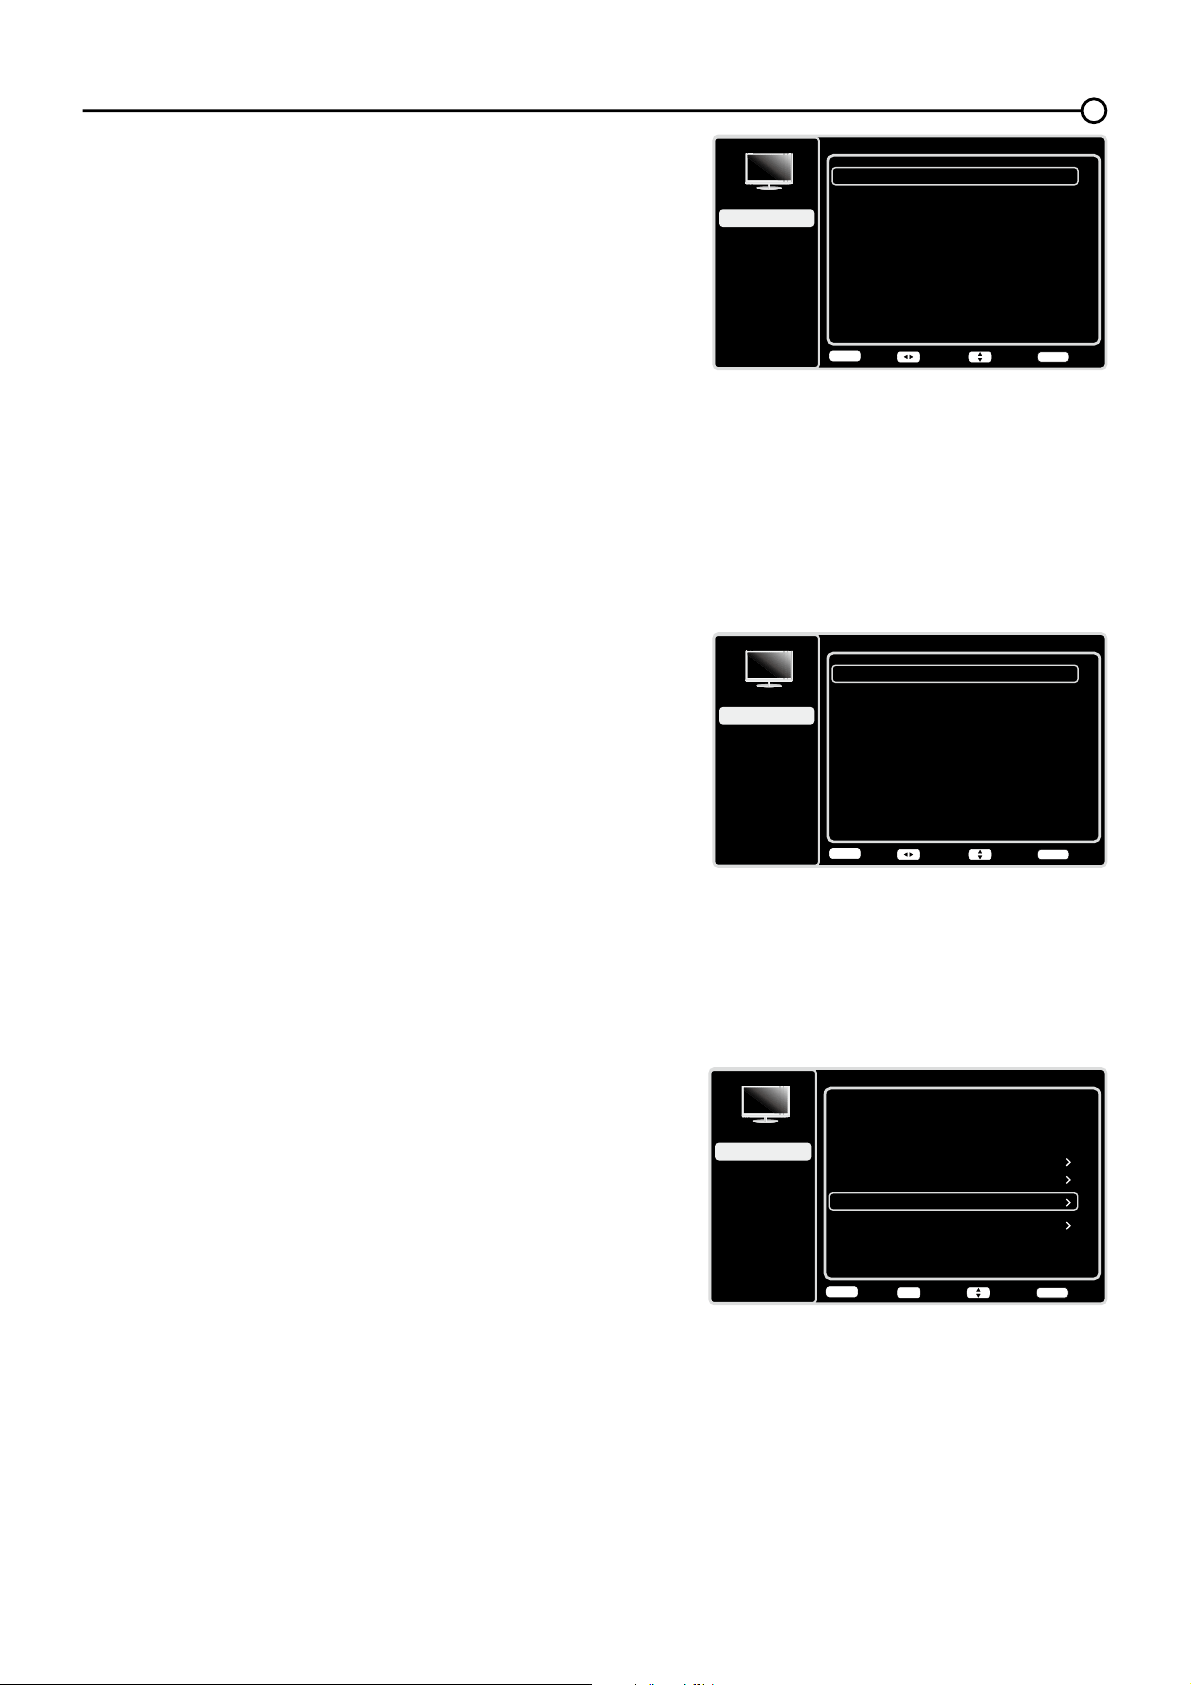
Setup Menu
The Setup0HQXDOORZV\RXWRFRQ¿JXUHWKH79ZLWK\RXU
preferences. Press MENU on the remote to open the Main
Menu. Press the up and down arrows ( ) to select
SetupWKHQSUHVVWKHOK button or the right arrow (
) to
display the following options:
Signal Type
Choose the type of signal (Cable/Sat or Antenna) you
have connected to the ANT/CABLE/SAT IN.
Channel Scan
:KHQ\RXSHUIRUPD&KDQQHO6FDQ\RXU79VHDUFKHVIRU
channels with signals and stores the channel information
LQWKH&KDQQHO/LVW7KHQDV\RXZDWFK79DQGSUHVVCH+
or CH-\RXU79JRHVWRWKHQH[WRUSUHYLRXVFKDQQHOLQ
WKH&KDQQHO/LVWDQGVNLSVWKHFKDQQHOVWKDWGRQRWKDYH
signals.
,IWKH79VLJQDOVRXUFHFKDQJHV±IRUH[DPSOHLI\RX
FKDQJHIURPDQRXWGRRUDQWHQQDWRFDEOH79±\RXZLOO
need to rescan for channels.
To automatically scan for channels:
1. After choosing a signal type, press the up or down arrow
(
) to highlight Channel Scan.
2. Press the OK button or the right arrow (
) to start the
scan. You can see the search progress and how many
channels are found in the on-screen menu. (Note: If you
wish to stop the search, press the CLEAR button.)
3. After the scan is complete, press the OK button to
restart scan, or press the MENU button to return to the
previous menu, or press the CLEAR button to close the
menu.
Setup
Setup
Parental Control
Language
Sound
Picture
Signal Type
Channel Scan
USB
Exit
Antenna
Channel Skip
Channel Edit
Input Skip
Input Labels
Closed Caption
Time Setup
System Information
Back
MENU
Adjust Select Exit
CLEAR
Reset All
Setup
Setup
Parental Control
Language
Sound
Picture
Signal Type
Channel Scan
USB
Exit
Antenna
Channel Skip
Channel Edit
Input Skip
Input Labels
Closed Caption
Time Setup
System Information
Back
MENU
Enter Select Exit
CLEAR
Reset All
OK
Channel Scan
Setup
Parental Control
Language
Sound
Picture
Signal Type
USB
Exit
Antenna
Status: Scanning.
Progress
Analog Channels Found
Digital Channels Found
3%
0
0
Cancel Scan
CLEAR
24
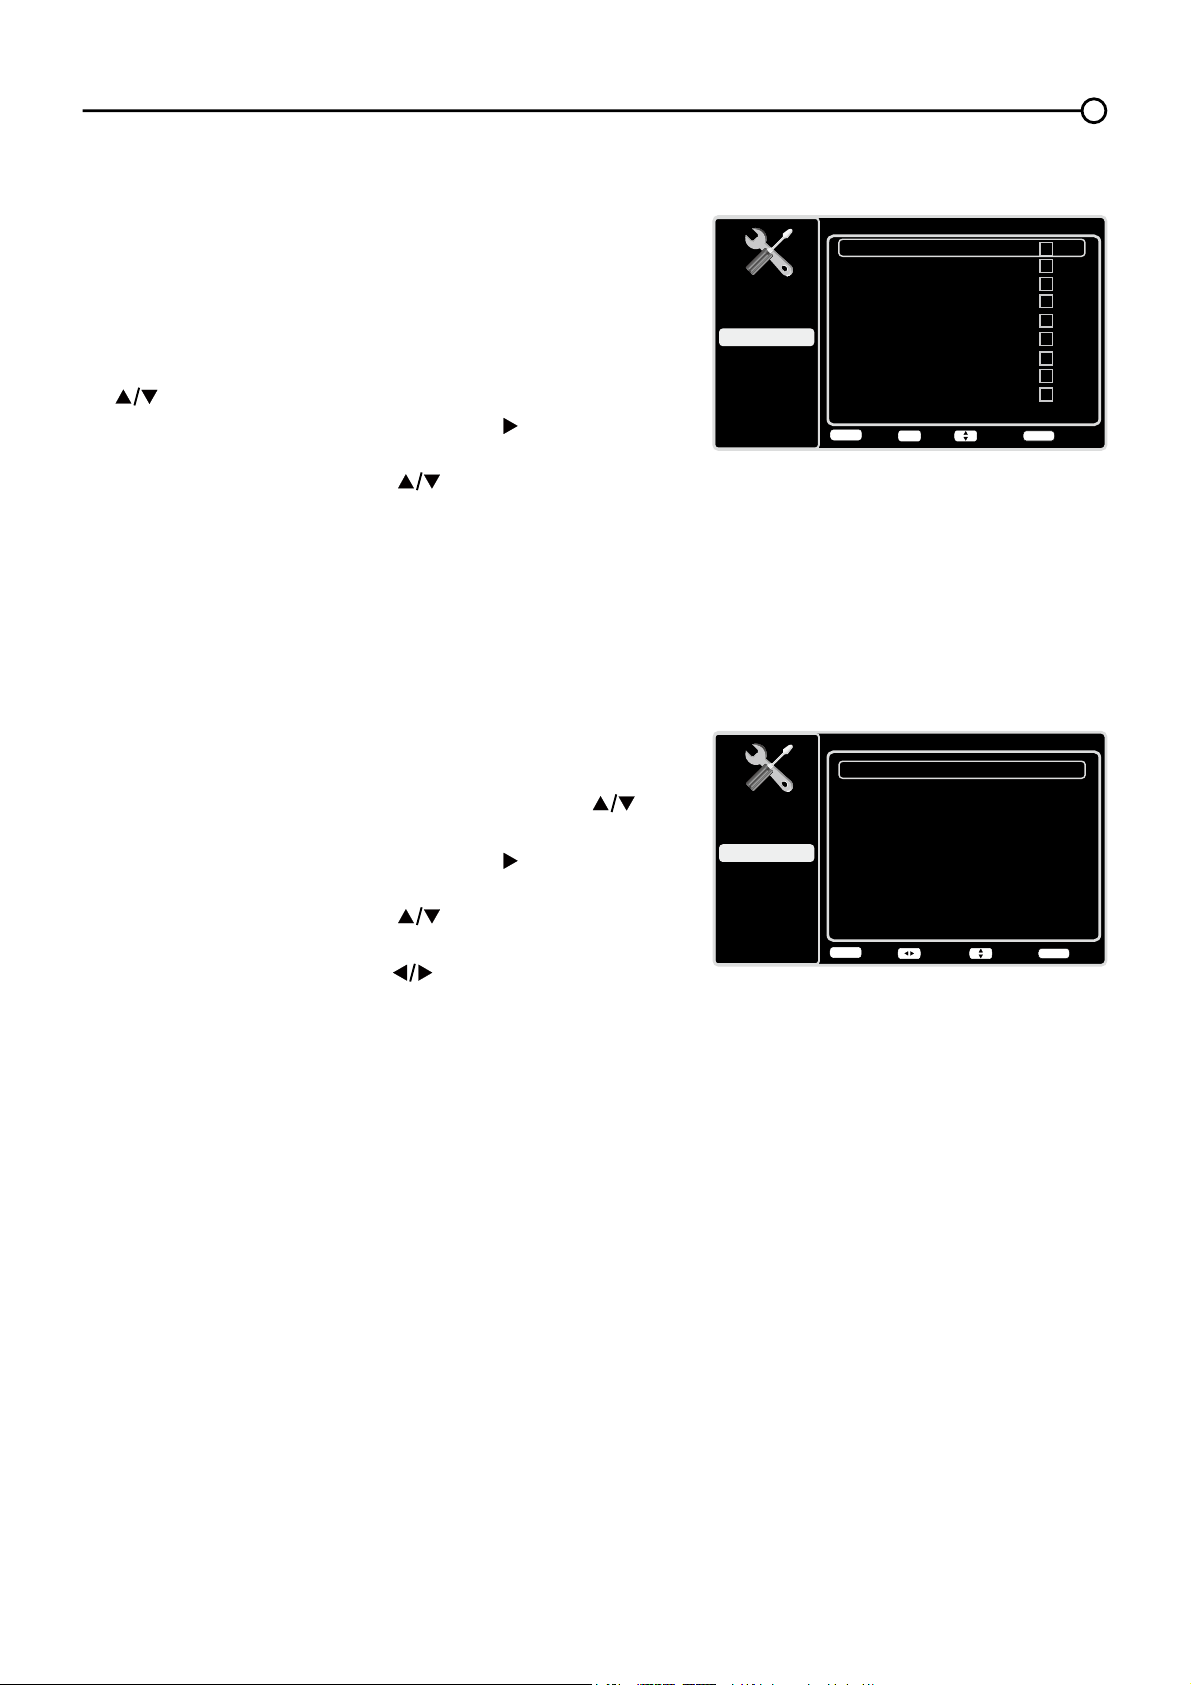
&KDQQHO6NLS
You can hide channels in the Channel List. Then, when you
press the CH+ or CH-EXWWRQWKH79ZLOOVNLSWKHKLGGHQ
channels. You can still tune to these hidden channels
by pressing the number of the channel on the numeric
NH\SDG
7RKLGHVSHFL¿FFKDQQHOV
1. In the Setup Menu, press the up or down arrow ( ) to
highlight Channel Skip.
2. Press the OK button or the right arrow ( ) to open the
Channel Skip screen.
3. Press the up or down arrow ( ) to highlight the
FKDQQHO\RXZLVKWRVNLSWKHQSUHVVWKHOK button to
FKHFNWKHKLJKOLJKWHGFKDQQHO<RXFDQDGGWKH
FKDQQHOEDFNLQWRWKH&KDQQHO/LVWE\KLJKOLJKWLQJLWDQG
XQFKHFNLQJLW
4. Repeat the process to hide additional channels.
5. Press the MENU button to return to the previous menu,
or press the CLEAR button to close the menu.
Channel Edit
The Channel Edit function allows you to add or change
a channel label, only for analog channels. You cannot
change the name on digital channels.
To edit an analog channel name:
1. In the Setup Menu, press the up or down arrow ( ) to
highlight Channel Edit.
2. Press the OK button or the right arrow ( ) to open the
Channel List screen.
3. Press the up or down arrow ( ) to highlight the
channel you wish to label or edit.
4. Press the OK button to enter the Channel Edit screen.
5. The Channel Name will be highlighted, press the OK
button to start editting.
6. Use the left or right arrow ( WRVHOHFWWKHLQSXW¿HOG
use the up or down arrow ( ) to enter the name for
the channel.
7. Press the OK EXWWRQWRFRQ¿UPDQGVDYHWKHQHZODEHO
8. Press the MENU button to return to the previous menu,
or press the CLEAR button to close the menu.
Channel Skip Page 1/7
Setup
Parental Control
Language
Sound
Picture
12
USB
Exit
Analog
13
Analog
14
Analog
15
Analog
16
Analog
17
Analog
18
Analog
19
Analog
20
Analog
21
Analog
Back
MENU
Set Select Exit
CLEAR
OK
Channel Edit
Page 1/14
Setup
Parental Control
Language
Sound
Picture
12
USB
Exit
Analog
13
Analog
14
Analog
15
Analog
16
Analog
17
Analog
18
Analog
19
Analog
20
Analog
21
Analog
Back
MENU
Set Select Exit
CLEAR
OK
Channel Edit
Setup
Parental Control
Language
Sound
Picture
Channel number:
USB
Exit
19
Channel name:
Back
MENU
Start Edit Exit
CLEAR
OK
Channel Edit
Setup
Parental Control
Language
Sound
Picture
Channel number:
USB
Exit
19
Channel name:
- - - - - - -
CursorName Entry End Edit
OK
25
,QSXW6NLS
You can hide video inputs in the Channel List. This option
allows you to remove the inputs from the Channel List so
you do not encounter them when channeling up or down.
2QFH\RXKDYHKLGGHQLQSXWVWKH79ZLOOVNLSWKHVHLQSXWV
when you press the CH+ or CH- button.
To hide video inputs:
1. In the Setup Menu screen, press the up or down arrow
( ) to highlight Input Skip.
2. Press the OK button or the right arrow ( ) to open the
Input Lists screen.
3. Press the up or down arrow ( ) to highlight the video
input you want to hide.
4. Press the OKEXWWRQWRFKHFNWKHKLJKOLJKWHGLQSXW<RX
FDQDGGDQLQSXWE\KLJKOLJKWLQJLWDQGXQFKHFNLQJLW
5. Repeat the process to hide additional video inputs.
6. Press the MENU button to return to the previous menu,
or press the CLEAR button to close the menu.
Input Labels
<RXFDQDGGDODEHOWRDYLGHRLQSXWVRXUFHWRPDNHLW
easier to identify.
1. In the Setup Menu, press the up or down arrow ( ) to
highlight Input Labels.
2. Press the OK button or the right arrow ( ) to open the
Input Labels screen.
3. Press the up or down arrow ( ) to highlight the input
source you wish to label.
4. Press the left or right arrow (
) to select the label for
this source.
5. Press the MENU button to return to the previous menu,
or press the CLEAR button to close the menu.
Input Skip
Setup
Parental Control
Language
Sound
Picture
USB
Exit
AV1
HDMI1
HDMI2
No Label
AV2
No Label
S-VIDEO
No Label
PC
No Label
No Label
CMPT1
No Label
CMPT2
No Label
No Label
HDMI3
No Label
Back
MENU
Set Select Exit
CLEAR
OK
Input Labels
Setup
Parental Control
Language
Sound
Picture
USB
Exit
AV1
CMPT1
No Label
No Label
AV2
No Label
S-VIDEO
No Label
PC
No Label
HDMI1
No Label
CMPT2
No Label
HDMI2
No Label
HDMI3
No Label
Back
MENU
Adjust Select Exit
CLEAR

26
Closed Caption
Many programs are encoded with closed captioning information, which allows you to display the audio
SRUWLRQRIDSURJUDPDVWH[WRQWKH79VFUHHQ
Note: Closed caption settings are not available for HDMI, CMPT or PC INPUTS. These settings must
EHVHWLQWKHFRQQHFWHGFRPSRQHQW¶VPHQX&ORVHGFDSWLRQLQJLVQRWDYDLODEOHRQDOOFKDQQHOVDWDOO
WLPHV2QO\VSHFL¿FSURJUDPVDUHHQFRGHGZLWKFORVHGFDSWLRQLQJLQIRUPDWLRQ:KHQDGLJLWDOSURJUDP
is closed captioned, CC is displayed in the Channel Banner.
The Closed Caption options are:
CC Setting – This option allows you to choose the way
closed captioning information appears on the screen.
Off - No captioning information displayed.
On Always – Choose this option if you want captioning
information to be shown whenever available.
On When Mute – This option allows the closed
captioning to display (when available) whenever the
79¶VVRXQGLVPXWHG7KHFDSWLRQLQJLQIRUPDWLRQLVQRW
displayed when the sound is not muted.
Analog CC Type – This option lets you select the
captioning mode used for displaying caption information,
when available. If you are unsure of the differences among
the modes, you may prefer to leave the closed captioned
mode set to CC1, which displays complete text of the
program in the primary language in your area.
Digital CC Type If available, this allows you to select a
closed caption service mode (1-6) for digital channels.
Digital CC Preset If available, this allows you to select
between Off and On options. On mode allows you to set
the options below.
Digital CC Style – This option lets you customize the
following display options, if available:
Caption Style – Select either As Broadcaster or
Custom options. If you choose Custom options, the
setting changes according to the options you choose.
Digital CC Size – Set the size of the digital closed
caption text: Default, Small, Standard or Large.
Digital CC Font - Select a character design for
the digital closed caption text. A font is a complete
DVVRUWPHQWRIOHWWHUVQXPEHUVSXQFWXDWLRQPDUNVHWF
in a given design. You can choose from a variety of
IRQWV'HIDXOW6W\OH
Digital CC Background Color – Set the appearance of
WKHDUHDEHKLQGWKHGLJLWDOFORVHGFDSWLRQWH[W'HIDXOW
%ODFN:KLWH5HG*UHHQ%OXH<HOORZ0DJHQWDRU
Cyan.
Digital CC Background Opacity – Set the appearance
of the area behind the digital closed caption text:
'HIDXOW6ROLG)ODVKLQJ7UDQVOXFHQWRU7UDQVSDUHQW
Closed Caption
Setup
Parental Control
Language
Sound
Picture
CC Setting
Analog CC Type
USB
Exit
On Always
Digital CC Type
Digital CC Preset
Digital CC Style
Off
On
Back
MENU
Adjust Select Exit
CLEAR
Digital CC Style
Setup
Parental Control
Language
Sound
Picture
Caption Style
Digital CC Size
USB
Exit
Custom
Digital CC Font
Digital CC Opacity
Style1
Solid
Large
Digital CC Background Color
Black
Digital CC Background Opacity
Solid
Digital CC Color
White
Back
MENU
Adjust Select Exit
CLEAR
Note: These captioning style options
only have an effect on true digital closed
captions. Not all captioning on digital
channels is digital captioning--it depends
on what the broadcaster is sending. If the
closed captioning for a program is not
digital, the Digital CC style settings will not
have an effect.
27
Digital CC Color – &KRRVHWKHFRORURIWKHGLJLWDOFORVHGFDSWLRQWH[W'HIDXOW%ODFN:KLWH5HG
*UHHQ%OXH<HOORZ0DJHQWDRU&\DQ
Digital CC Opacity – 6HWWKHDSSHDUDQFHRIWKHGLJLWDOFORVHGFDSWLRQWH[W'HIDXOW6ROLG)ODVKLQJ
Translucent, or Transparent.
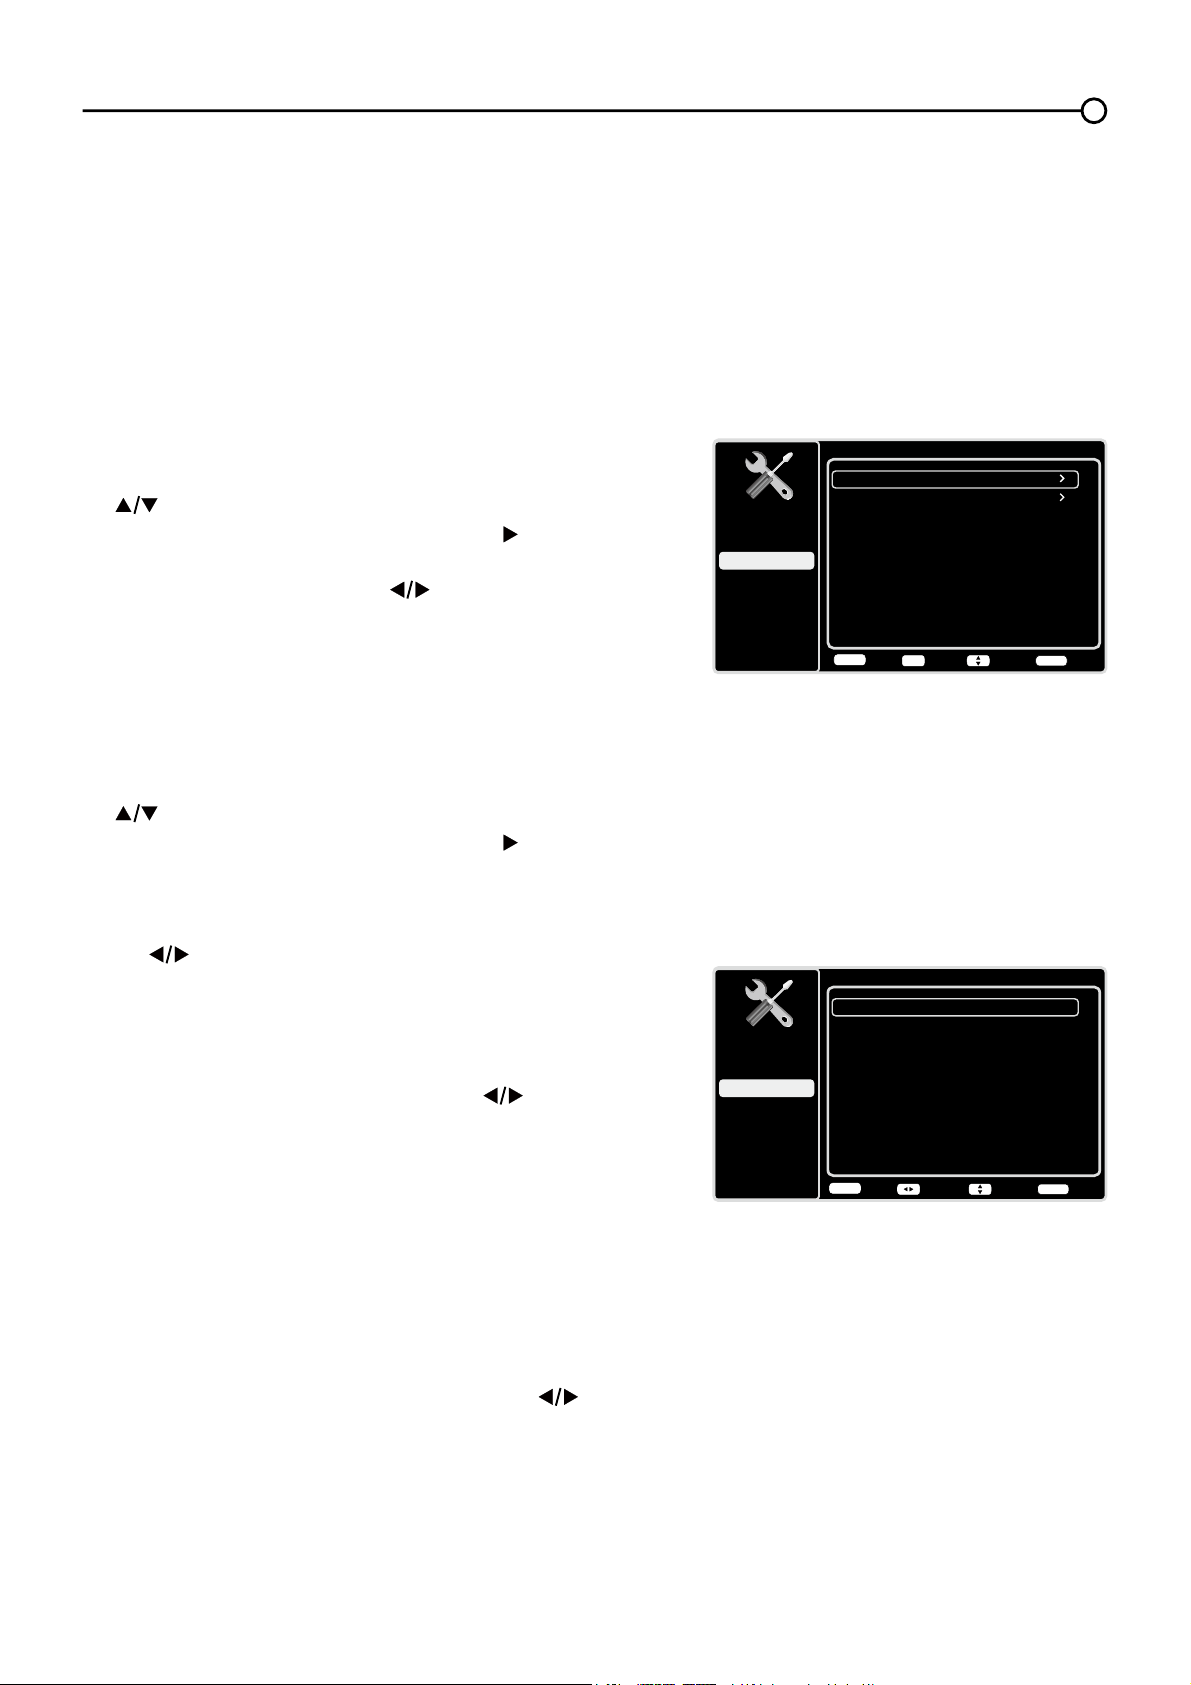
Time Setup
Time Zone
You can select the current local time. Options are: Eastern,
$WODQWLF1HZIRXQGODQG+DZDLL$ODVND3DFL¿F
Mountain and Central.
To choose a time zone:
1. In the Time Setup Menu, press the up or down arrow
( ) to highlight Time Zone.
2. Press the OK button or the right arrow ( ) to proceed to
the next screen.
3. Press the left or right arrow ( ) to select the time zone
for your area.
4. Press the MENUEXWWRQWRJREDFNWRWKHSUHYLRXV
screen, or press the CLEAR button to close the menu.
Time
To set the time:
1. In the Time Setup Menu, press the up or down arrow
( ) to highlight Time.
2. Press the OK button or the right arrow ( ) to proceed to
the next screen.
3. Options on this screen include:
a. Auto Synchronization – Press the left or right arrow
( ) to choose On to acquire the time automatically
from digital channels.
b. Daylight Saving – Select Auto or off for the
'D\OLJKW6DYLQJ7LPH
c. Date±:KHQ'DWHLVKLJKOLJKWHGXVHWKHOK button
WRVHOHFWWKHLQSXW¿HOGWKHQXVH ) to set the
date. (Note: using the same way to set the time
below)
d. Time – Lets you set the time manually.
e. Power On Timer – Select Once/Daily/Off.
f. Power On Time – Allows you to set the time you
ZDQWWKH79WRWXUQLWVHOIRQ
g. Power Off Timer – Select Select Once/Daily/Off.
h. Power Off Time – Allows you to set the time you
ZDQWWKH79WRWXUQLWVHOIRII
Sleep Timer –
Press the left or right arrow ( ) to set
WKH79WRWXUQRIIDIWHUDJLYHQDPRXQWRIWLPH
System Information
This option allows you to see the system information
LQFOXGLQJ3DQHO,'6:9HUVLRQ6HUYLFH0RGHO1R
Time Setup
Setup
Parental Control
Language
Sound
Picture
Time Zone
Time
USB
Exit
OFF
Sleep Timer
Back
MENU
Enter Select Exit
CLEAR
OK
Time
Setup
Parental Control
Language
Sound
Picture
Auto Synchronization
Date
USB
Exit
Off
Daylight Saving Off
Time
2010-01-01
02:16PM
Power On Timer
Power On Time
On
Power Off Timer
12:00AM
Power Off Time
12:00AM
On
Back
MENU
Adjust Select Exit
CLEAR
28
Parental Controls and V-Chip
7KHFKRLFHVLQWKH869&KLSDQG&DQDGD9&KLSPHQXVLQYROYHVRIWZDUHLQVLGH\RXU79UHIHUUHG
WRDV9&KLSZKLFKDOORZV\RXWREORFN79SURJUDPVDQGPRYLHV79SURJUDPVFDQEHEORFNHGE\
DJHEDVHGUDWLQJVVXFKDV790$6HHSDJH,IDYDLODEOH79SURJUDPVFDQDOVREHEORFNHGE\
FRQWHQWVXFKDVDGXOWODQJXDJH/6HHSDJH0RYLHVFDQRQO\EHEORFNHGE\DJHEDVHGUDWLQJV
6HHSDJH2QFH\RXEORFNSURJUDPV\RXFDQXQEORFNWKHPE\HQWHULQJDSDVVZRUG%\GHIDXOW
WKHVRIWZDUHLQVLGH\RXU79LVWXUQHGRIIRUXQORFNHG)RULQVWUXFWLRQVWRORFN9&KLSVHHSDJH
V-Chip - US and Canada
9&KLSUHDGVWKHSURJUDP¶VDJHEDVHGUDWLQJ790$79HWFDQGFRQWHQWWKHPHV9LROHQFH
9$GXOW/DQJXDJH/HWF,I\RXKDYHEORFNHGWKHUDWLQJDQGRUFRQWHQWWKHPHVWKDWWKHSURJUDP
FRQWDLQV\RXUHFHLYHDPHVVDJHWKDWWKHFKDQQHOLVFXUUHQWO\EORFNHG&KDQJHWKHFKDQQHORUSUHVV
OK to enter your password and temporarily deactivate the parental controls.
Broadcasters are not required to provide content themes, so programs received with no content
WKHPHVDUHEORFNHGRQO\LI\RXEORFNWKHLUDJHEDVHGUDWLQJ<RXFDQDOVREORFNSURJUDPVWKDWKDYH
been given an Exempt rating, and programs that are considered unrated. See page 38 for the US and
Canada ratings explanations.
Reset All
This option resets all settings (except parental control settings) to the factory defaults. When you select
WKLVRSWLRQDFRQ¿UPDWLRQER[RSHQV1RWH,IVRPHFKDQQHOVDUHEORFNHG\RXPXVWHQWHUWKH9FKLS
password, then you can follow the operation below).
1. Press the left or right arrows ( ) to select OK or Cancel.
2. Press the OKEXWWRQWRFRQ¿UP
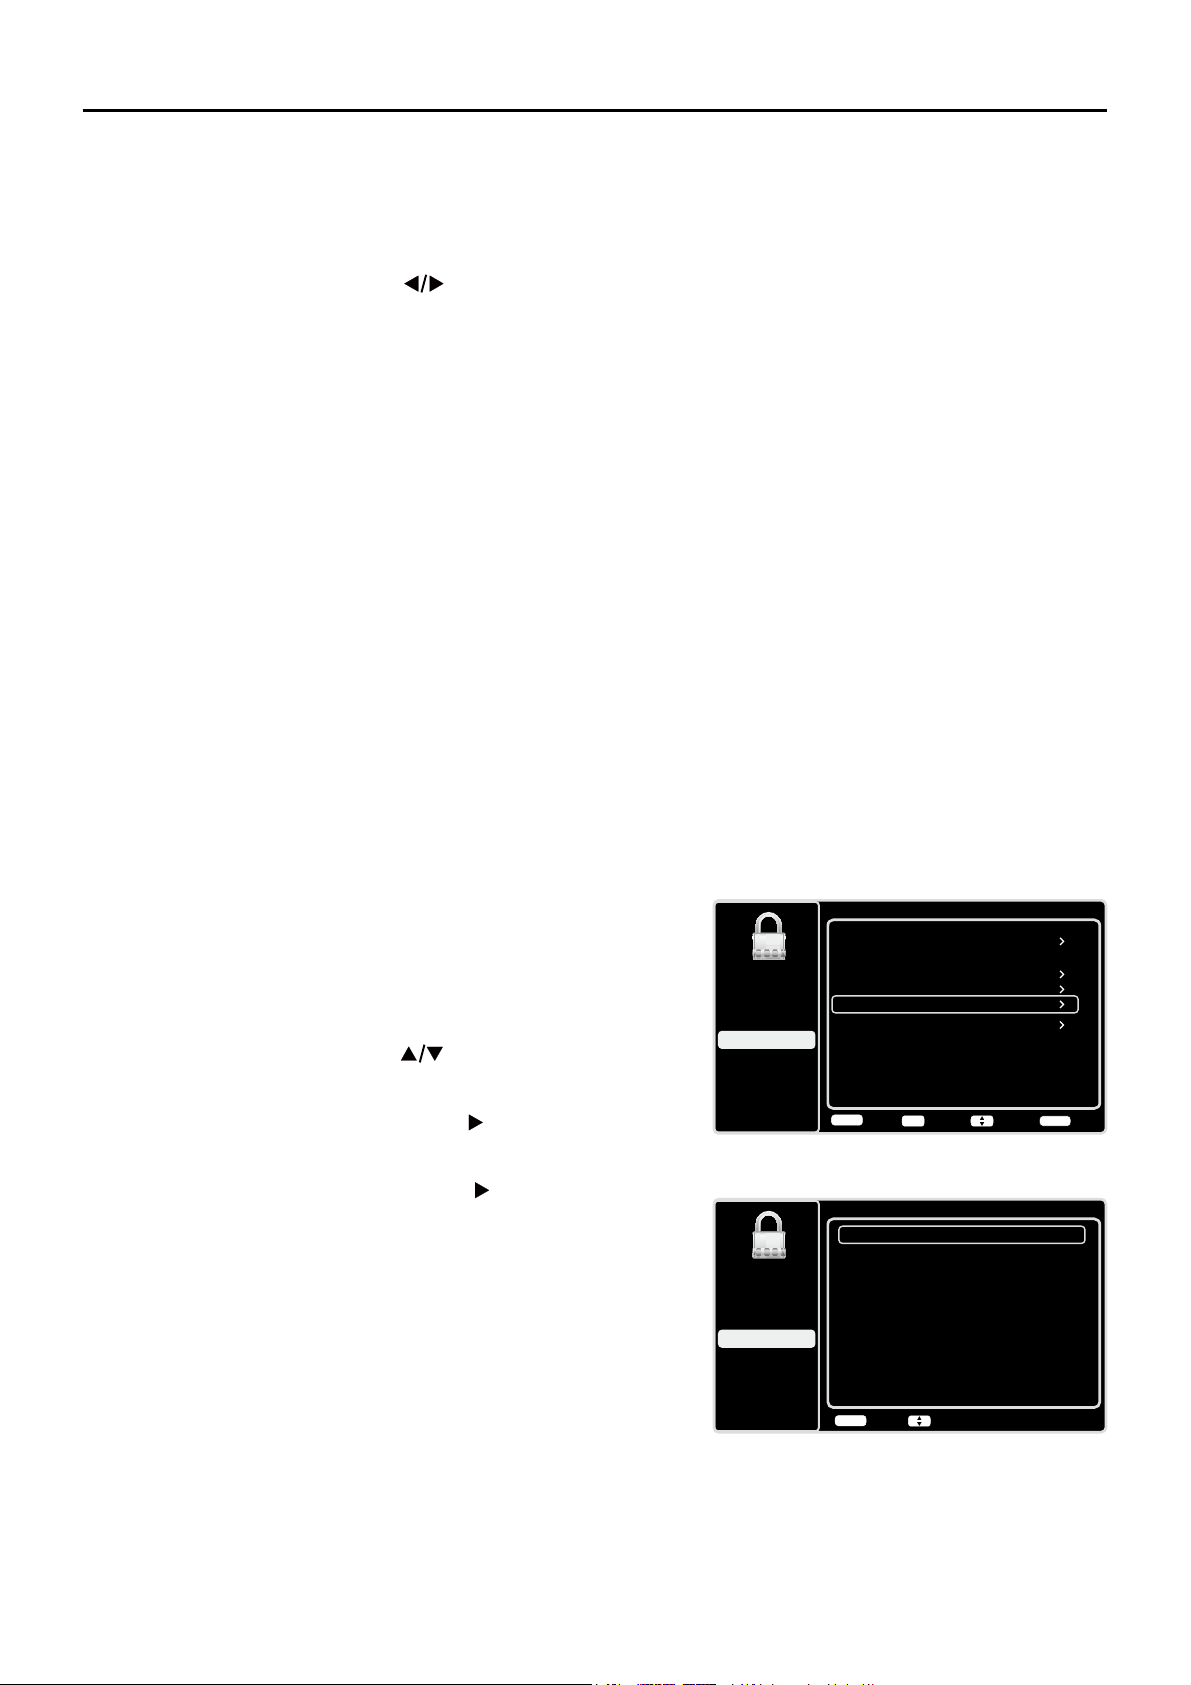
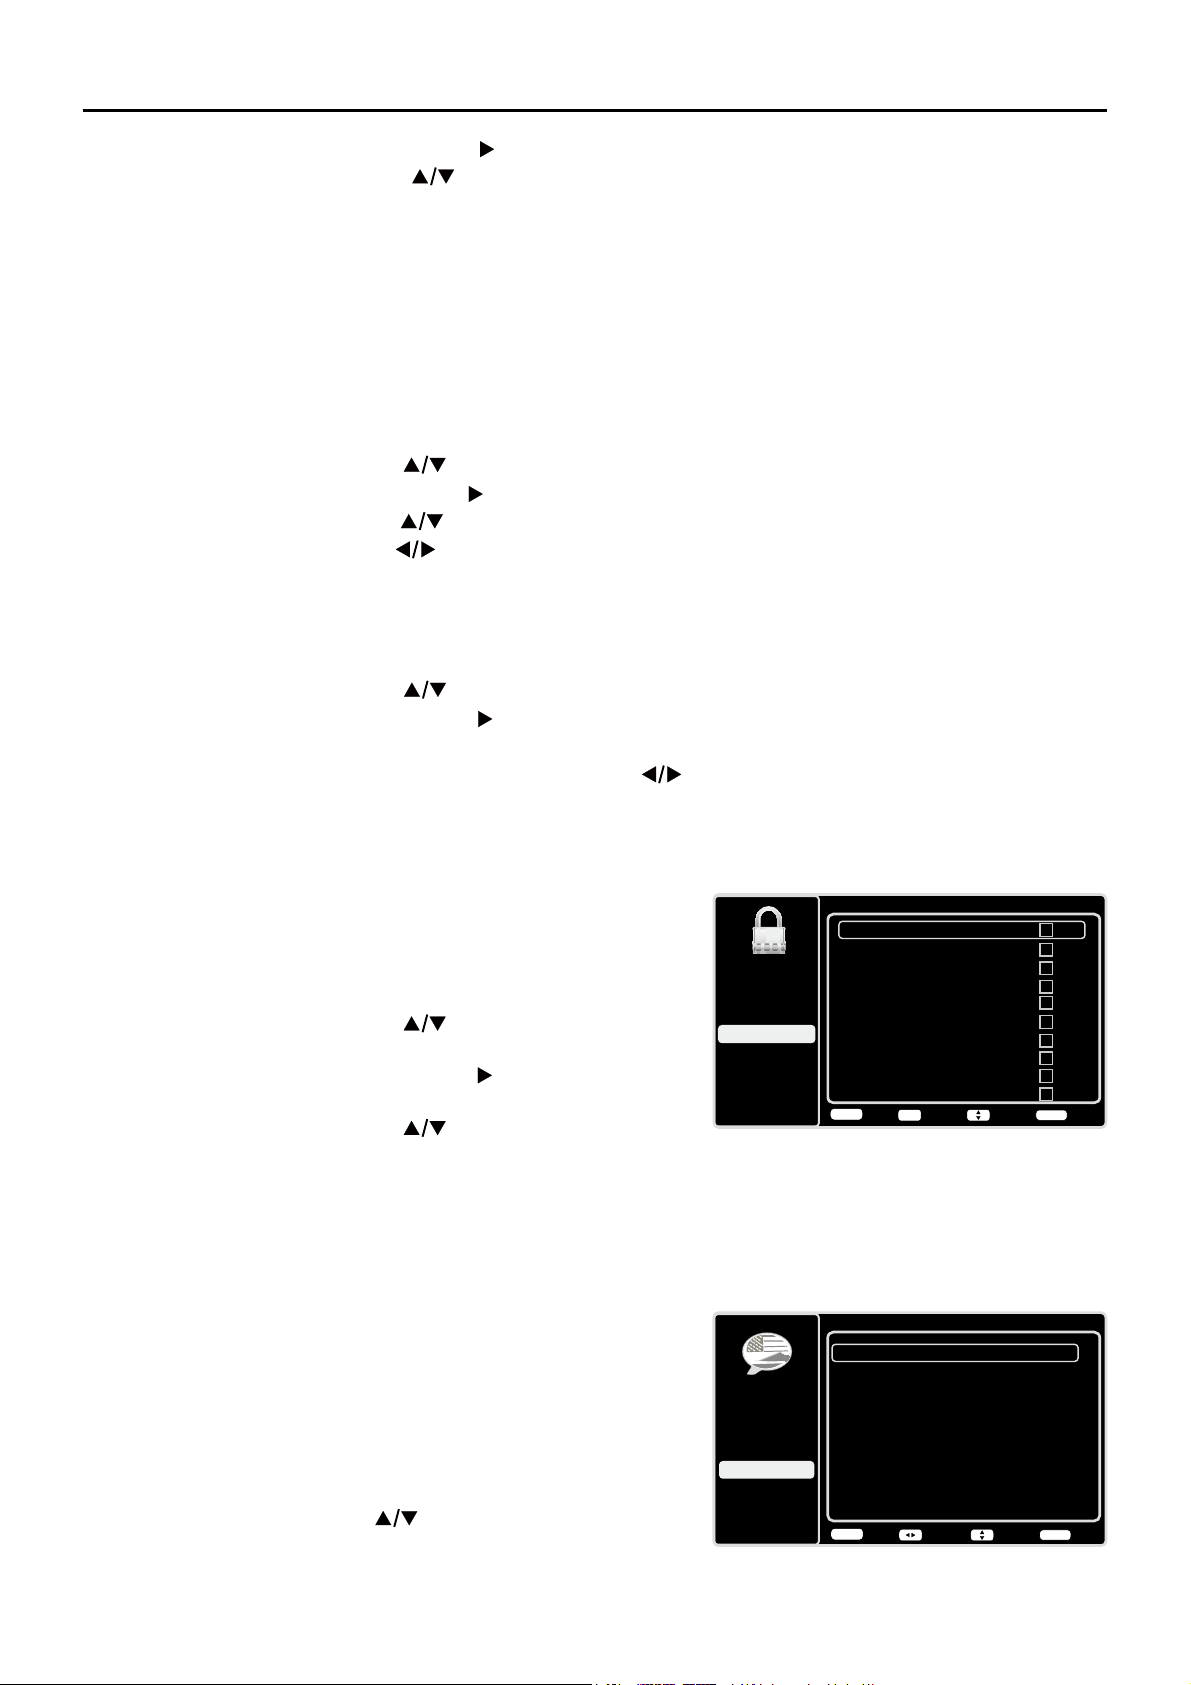
&KDQJH9&KLS3DVVZRUG
7KH¿UVWWLPH\RXHQWHUWKH3DUHQWDO&RQWUROPHQX\RX
must set a password in order to adjust other parental control
VHWWLQJV7RHQWHUD9&KLS3DVVZRUGIROORZWKHVHVWHSV
1. Press the MENU button to display the Main Menu.
2. Press the up or down arrow (
) to highlight Parental
Control.
3. Press the OK button or right arrow (
) to enter the next
screen,
Change
Password is highlighted.
4. Press the OK button or right arrow ( ) to enter the
Change
Password screen.
8VHWKHQXPHULFNH\SDGWRHQWHUWKHIRXUGLJLWQXPEHU
for your password.
5HHQWHUWKHVDPHFRGHWRFRQ¿UPWKHSDVVZRUG7KH
next time you wish to access the Parental Control
PHQX\RXPXVWHQWHUWKHFRUUHFWSDVVZRUG¿UVW
Note: the super password is 2458. If you forget your
password, enter it to override any existing password.
Setup
Parental Control
Language
Sound
Picture
USB
Exit
Change Password
New Password
----
----
Confirm Password
Back
MENU
Select Menu
Parental Control
Channel Block
Button Block
Setup
Parental Control
Language
Sound
Picture
USB
Exit
V-Chip
Input Block
Change Password
Off
Back
MENU
Enter Select Exit
CLEAR
OK
Reset All
29
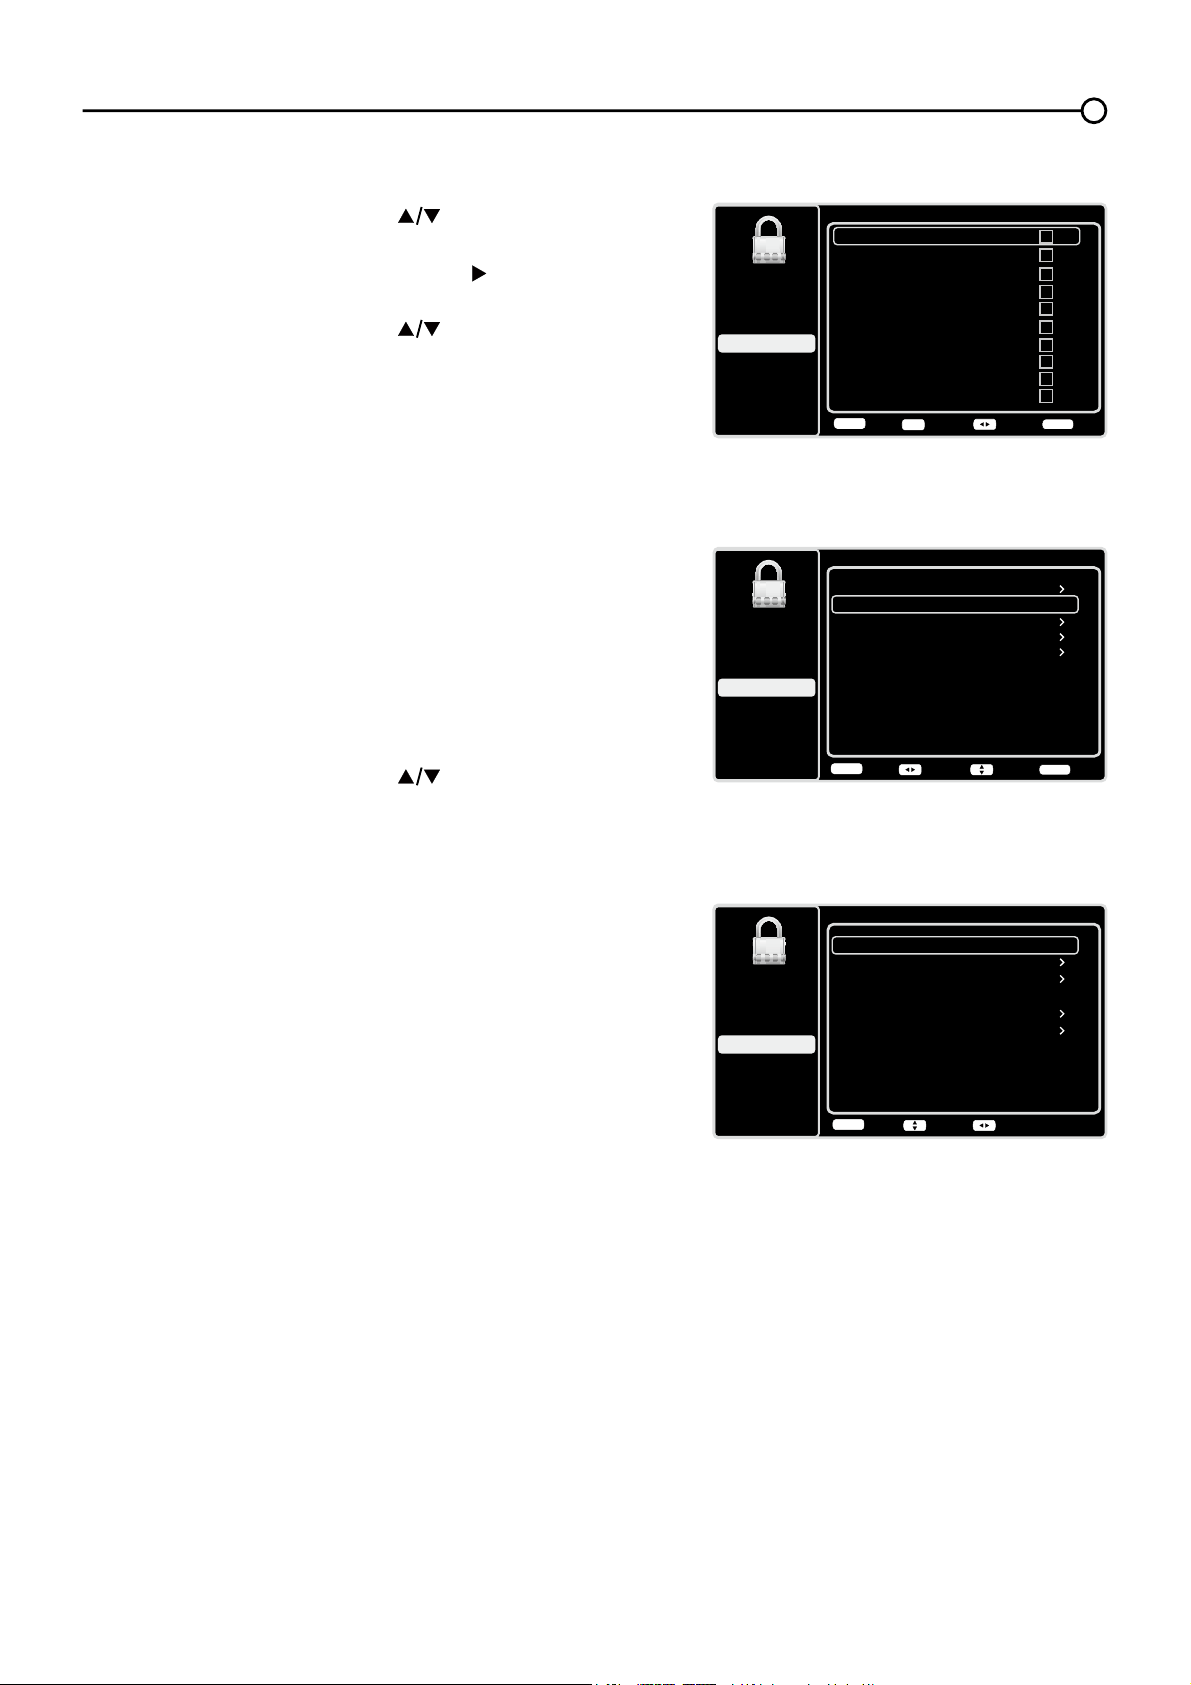
&KDQQHO%ORFN
7REORFNDVSHFL¿FFKDQQHOIROORZWKHVHVWHSV
1. Press the up or down arrow (
) to highlight Channel
Block in the Parental Control submenu.
2. Press the OK button or right arrow ( ) to display the
Channel List screen.
3. Press the up or down arrow ( ) to select the channel
\RXZLVKWREORFN
4. Press the OKEXWWRQWRSODFHDFKHFNPDUNLQWKHER[
WREORFNWKDWFKDQQHO:KHQ\RXWXQHWRWKDWFKDQQHO
you will need to enter a password to view the channel
programming.
%XWWRQ%ORFN
7KLVRSWLRQDOORZV\RXWREORFNGLVDEOHRUXQEORFNHQDEOH
WKH79SDQHOEXWWRQV7KHUHPRWHFRQWUROVWLOOWXQHVWR
DQ\FKDQQHO,I\RXDUHXVLQJWKLVWRNHHSFKLOGUHQIURP
changing channels, be sure to remove access to any
UHPRWHWKDWLVFDSDEOHRIRSHUDWLQJWKH79ZKLOH\RXKDYH
the 79SDQHOEXWWRQEORFNHG
7REORFNWKH79SDQHOEXWWRQVIROORZWKHVHVWHSV
1. Press the up or down arrow ( ) to highlight Button
Block in the Parental Control submenu.
2. Choose the On option.
3. To enable these buttons again, return to this menu and
choose the Off option.
Channel Block Page 1/7
2
Analog
3
Analog
4
Analog
5
Analog
6
Analog
7
Analog
8
Analog
9
Analog
10
Analog
11
Analog
Setup
Parental Control
Language
Sound
Picture
USB
Exit
Back
MENU
Adjust Page Exit
CLEAR
OK
Parental Control
Channel Block
Button Block
Setup
Parental Control
Language
Sound
Picture
USB
Exit
V-Chip
Input Block
Change Password
Off
Back
MENU
Adjust Select Exit
CLEAR
9&KLS5DWLQJ(QDEOH
You must remember to set Rating Enable to On mode to
KDYHWKHIROORZLQJ9&KLSUDWLQJOLPLWVWRWDNHHIIHFW
V-Chip
Rating Enable
US V-Chip
Setup
Parental Control
Language
Sound
Picture
USB
Exit
Canada V-Chip
Unrated/Exempt Ratings
On
Reset Downloadable Data
View
Back
MENU
AdjustSelect
Open V-Chip
30
869&KLS795DWLQJV
<RXFDQDXWRPDWLFDOO\EORFNDOOSURJUDPUDWLQJVDERYHD
VSHFL¿HGDJHEDVHGUDWLQJOHYHO
1. Choose Parental Control from the Main Menu. If
SDUHQWDOFRQWUROVKDYHSUHYLRXVO\EHHQORFNHG\RX
must enter your password.
2. Press the up or down arrow (
) to select V-Chip.
3. Press the OK button or right arrow (
) to enter the
next screen.
4. Press the up or down arrow (
) to select US V-Chip.
5. Press the OK button or right arrow (
) to enter the
next screen.
6. US TV Ratings is highlighted, press the OK button
or right arrow (
) to enter the next screen.
7. Use the up or down arrow (
) to select the desired
rating.
8. Press the OK button repeatedly to toggle between
9LHZDQG%ORFN
9. Use the MENU button repeatedly to return to the Main
Menu.
%ORFNLQJ6SHFL¿F&RQWHQW7KHPHV
From the US V-Chip0HQX\RXFDQVHWVXEUDWLQJVWREORFNVSHFL¿FSURJUDPVEDVHGRQWKHLUFRQWHQW
7REORFNSURJUDPFRQWHQW
1. Press the up or down arrow ( ) to select V-Chip in the Parental Control submenu.
2. Press the OK button or right arrow ( ) to enter the next screen.
3. Press the up or down arrow( ) to select US V-Chip.
4. Press the OK button or right arrow (
) to enter the next screen.
5. US TV Ratings is highlighted, press the OK button or right arrow ( ) to enter the next screen.
6. Use the up, down, left and right arrows (
) to select the desired rating.
7. Press the OKEXWWRQUHSHDWHGO\WRWRJJOHEHWZHHQ9LHZDQG%ORFN
7RYLHZFRQWHQWWKHPHVDIWHU\RX¶YHORFNHGWKHPIROORZWKHVDPHVWHSVDVDERYHWRXQORFN
US TV Ratings
TV-Y
TV-G
TV-PG
TV-14
TV-MA
Setup
Parental Control
Language
Sound
Picture
USB
Exit
A D L S V FV
Allowed Rating Blocked Rating
TV-Y7
Back
MENU
Select Lock/Unlock
OK
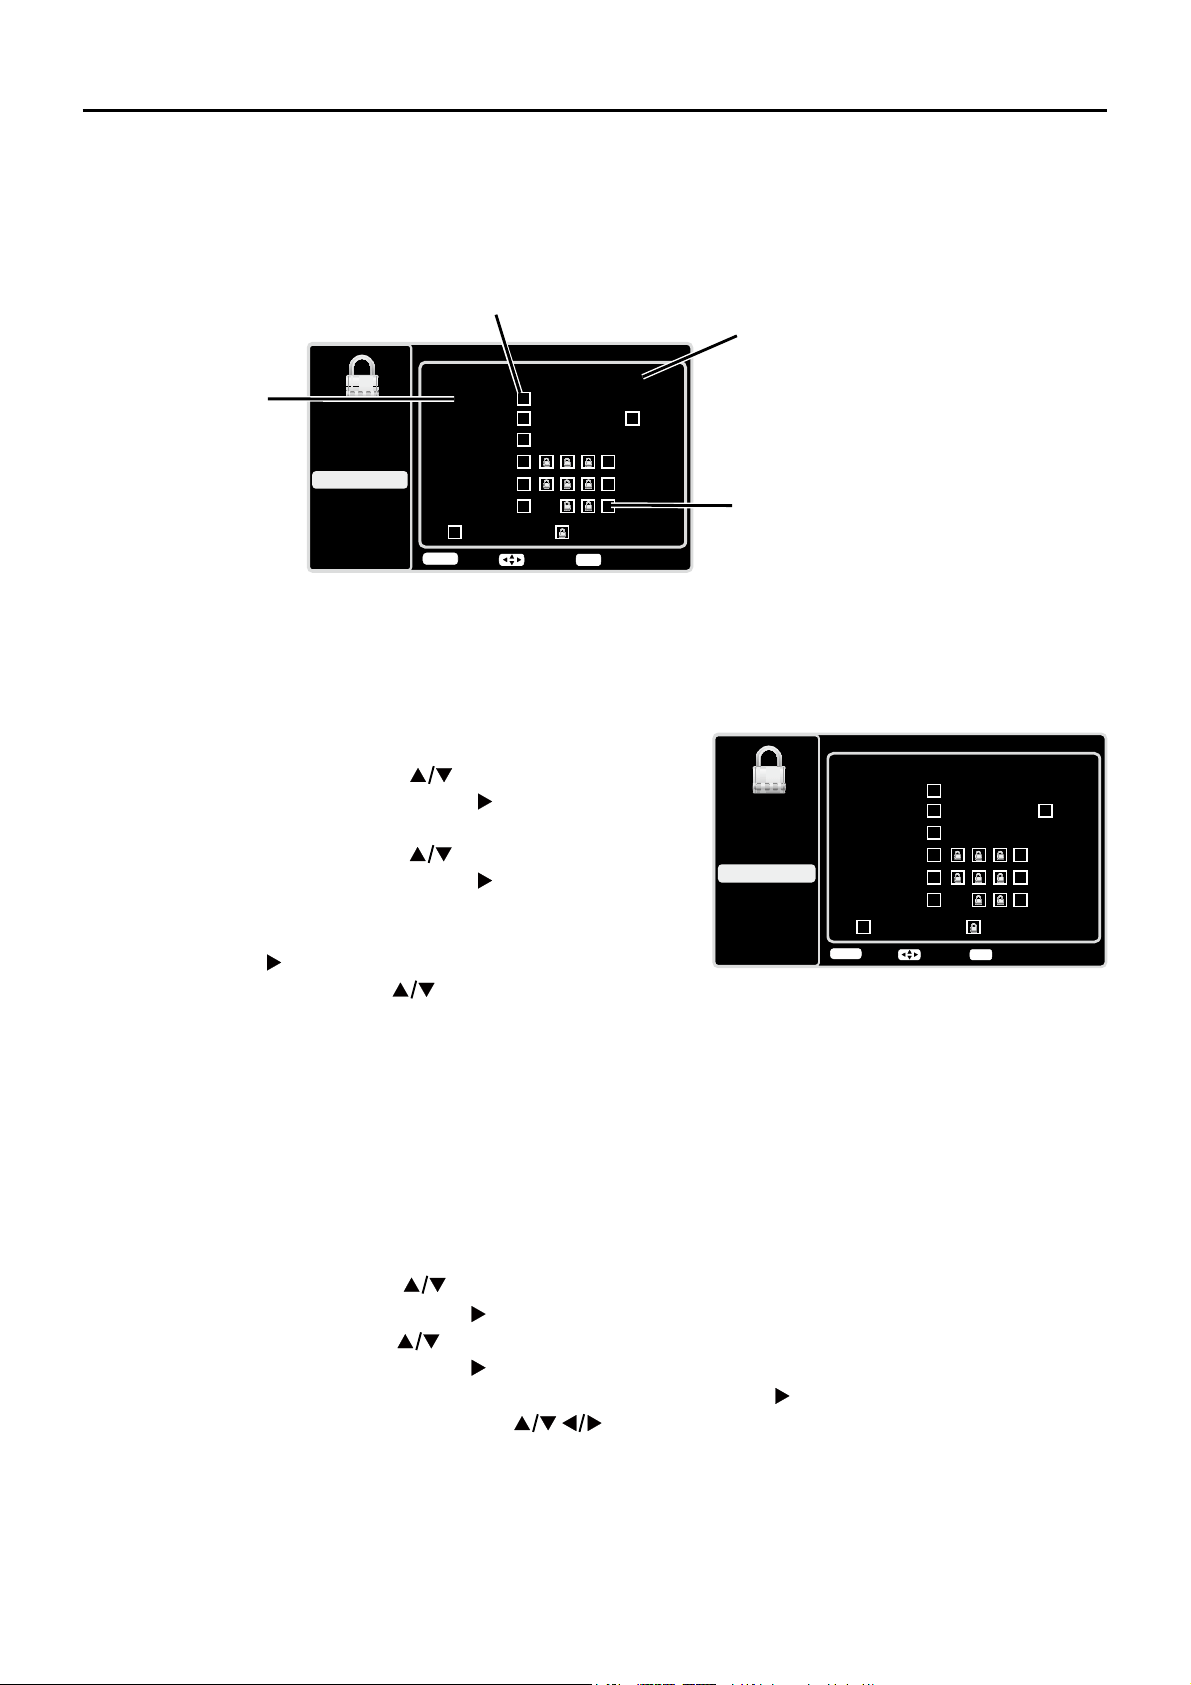
9&KLS5DWLQJ6FUHHQ
7KHIROORZLQJJUDSKLFGHWDLOVZKHUHLWHPVDUHORFDWHGZLWKLQWKH795DWLQJVRSWLRQZLWKWKH869&KLS
menu.
US TV Ratings
TV-Y
TV-G
TV-PG
TV-14
TV-MA
Setup
Parental Control
Language
Sound
Picture
USB
Exit
ADLSVFV
Allowed Rating Blocked Rating
TV-Y7
Rating Status Field
Lets you select whether the status
of the age-based rating to the left
is view or block.
Rating Field
Lets you select
from a list of age-
based ratings you
can block or view.
Content Themes
Lists the content
themes you can
blockor view.
Content Status Fields
Lets you select which content
themes to view for the selected
rating, and whether the status of
the content theme is currently
unlocked or locked.
Back
MENU
Select Lock/Unlock
OK
31
869&KLS0RYLH5DWLQJ/LPLW
6HWPRYLHUDWLQJOLPLWVE\EORFNLQJPRYLHVUDWHGDERYHD
VSHFL¿HGOHYHO7RDFFHVVWKH0RYLH5DWLQJ/LPLW0HQX
follow these steps:
1. Press the up or down arrow ( ) to select V-Chip in
the Parental Control submenu.
2. Press the OK button or right arrow ( ) to enter the
next screen.
3. Press the up or down arrow ( ) to select US V-Chip.
4. Press the OK button or right arrow (
) to enter the
next screen.
5. Press the up or down arrow( ) to select US Movie
Ratings.
6. Press the OK button or right arrow ( ).
7. Press the up or down arrow ( ) to select the desired
rating.
8. Press the OK button repeatedly to toggle between
9LHZDQG%ORFN
%ORFNLQJ&DQDGD9&KLS5DWLQJV
,I\RXUHFHLYH&DQDGLDQSURJUDPV\RXFDQEORFN&DQDGLDQ
(QJOLVKDQG)UHQFK9&KLSE\UDWLQJVRQO\:KHQ\RXEORFN
DSDUWLFXODUUDWLQJ\RXDXWRPDWLFDOO\EORFNWKHKLJKHUUDWHG
SURJUDPVDVZHOO7REORFN&DQDGLDQ(QJOLVKDQG)UHQFK
program ratings, follow these steps:
1. Press the up or down arrow ( ) to select V-Chip in
the Parental Control submenu.
2. Press the OK button or right arrow ( ) to enter the
next screen.
3. Press the up or down arrow (
) to select Canada
V-Chip.
4. Press the OK button or right arrow ( ) to proceed to
the next screen.
5. Press the up or down arrow (
) to select Canadian
English Ratings or Canadian French Ratings.
Rating
G
PG
PG-13
R
NC-17
X
Category
General audience
Unsuitable for children under 13
Restricted; under 17 requires accompanying
parent or adult guardian
No one under 17 admitted
Mature audience only
Parental guidance suggested
Canadian English Ratings
C
C8+
G
PG
14+
Setup
Parental Control
Language
Sound
Picture
USB
Exit
Allowed Rating Blocked Rating
18+
Back
MENU
Lock/UnlockSelect
OK
Hierarchy of Age-Based Ratings
790$
Mature Audience Only
79
Parents Strongly Cautioned
793*
3DUHQWV*XLGDQFH6XJJHVWHG
79*
*HQHUDO$XGLHQFH
79<
'LUHFWHGWR&KLOGUHQ<HDUVDQG
Older
79<
All Children
'
6H[XDOO\([SOLFLW'LDORJXH
L
Adult Language
S
Sexual Situations
9
9LROHQFH
)9
)DQWDV\9LROHQFH
Content Themes
32
Language Menu
To select the preferred language for all menus, follow the
steps below. You can choose between English, Espanol, or
Francais.
1. Press MENU on the remote control (the Main Menu
appears).
2. Use the up or down arrow (
) to select Language.
Language
Setup
Parental Control
Language
Sound
Picture
English
On
USB
Exit
Español
Desactivado
Français
Désactivé
Back
MENU
Adjust Select Exit
CLEAR
%ORFNLQJ8QUDWHG([HPSW3URJUDPV
7KH8QUDWHG([HPSW5DWLQJVRSWLRQOHWV\RXGHFLGHLISURJUDPVWKDWWKH9&KLSUHFRJQL]HVDVXQUDWHG
RUH[HPSWFDQEHYLHZHG8QUDWHG79SURJUDPVPD\LQFOXGHQHZVVSRUWVSROLWLFDOUHOLJLRXVORFDO
and weather programs, emergency bulletins, public announcements, and programs without ratings.
The Exempt option applies to both US and Canadian unrated programs and Canadian programs rated E.
1. Press the up or down arrow (
) to select V-Chip in the Parental Control submenu.
2. Press the OK button or right arrow ( ) to proceed to the next screen.
3. Press the up or down arrow ( ) to highlight Unrated/Exempt Ratings.
4. Press the left or right arrow ( ) to toggle between View and Block.
View All unrated programs are available.
Block All unrated programs are not available.
5HVHW'RZQORDGDEOH'DWD
1. Press the up or down arrow ( ) to select V-Chip in the Parental Control submenu.
2. Press the OK button or right arrow ( ) to proceed to the next screen.
6HOHFWWKLVRSWLRQWRUHVHWWKHGRZQORDGDEOH9&KLSGDWD:KHQ\RXVHOHFWWKLVRSWLRQD
FRQ¿UPDWLRQER[RSHQV3UHVVWKHOHIWRUULJKWDUURZ ) to select.
4. Press the OK button to reset the downloadable rating data, if present.
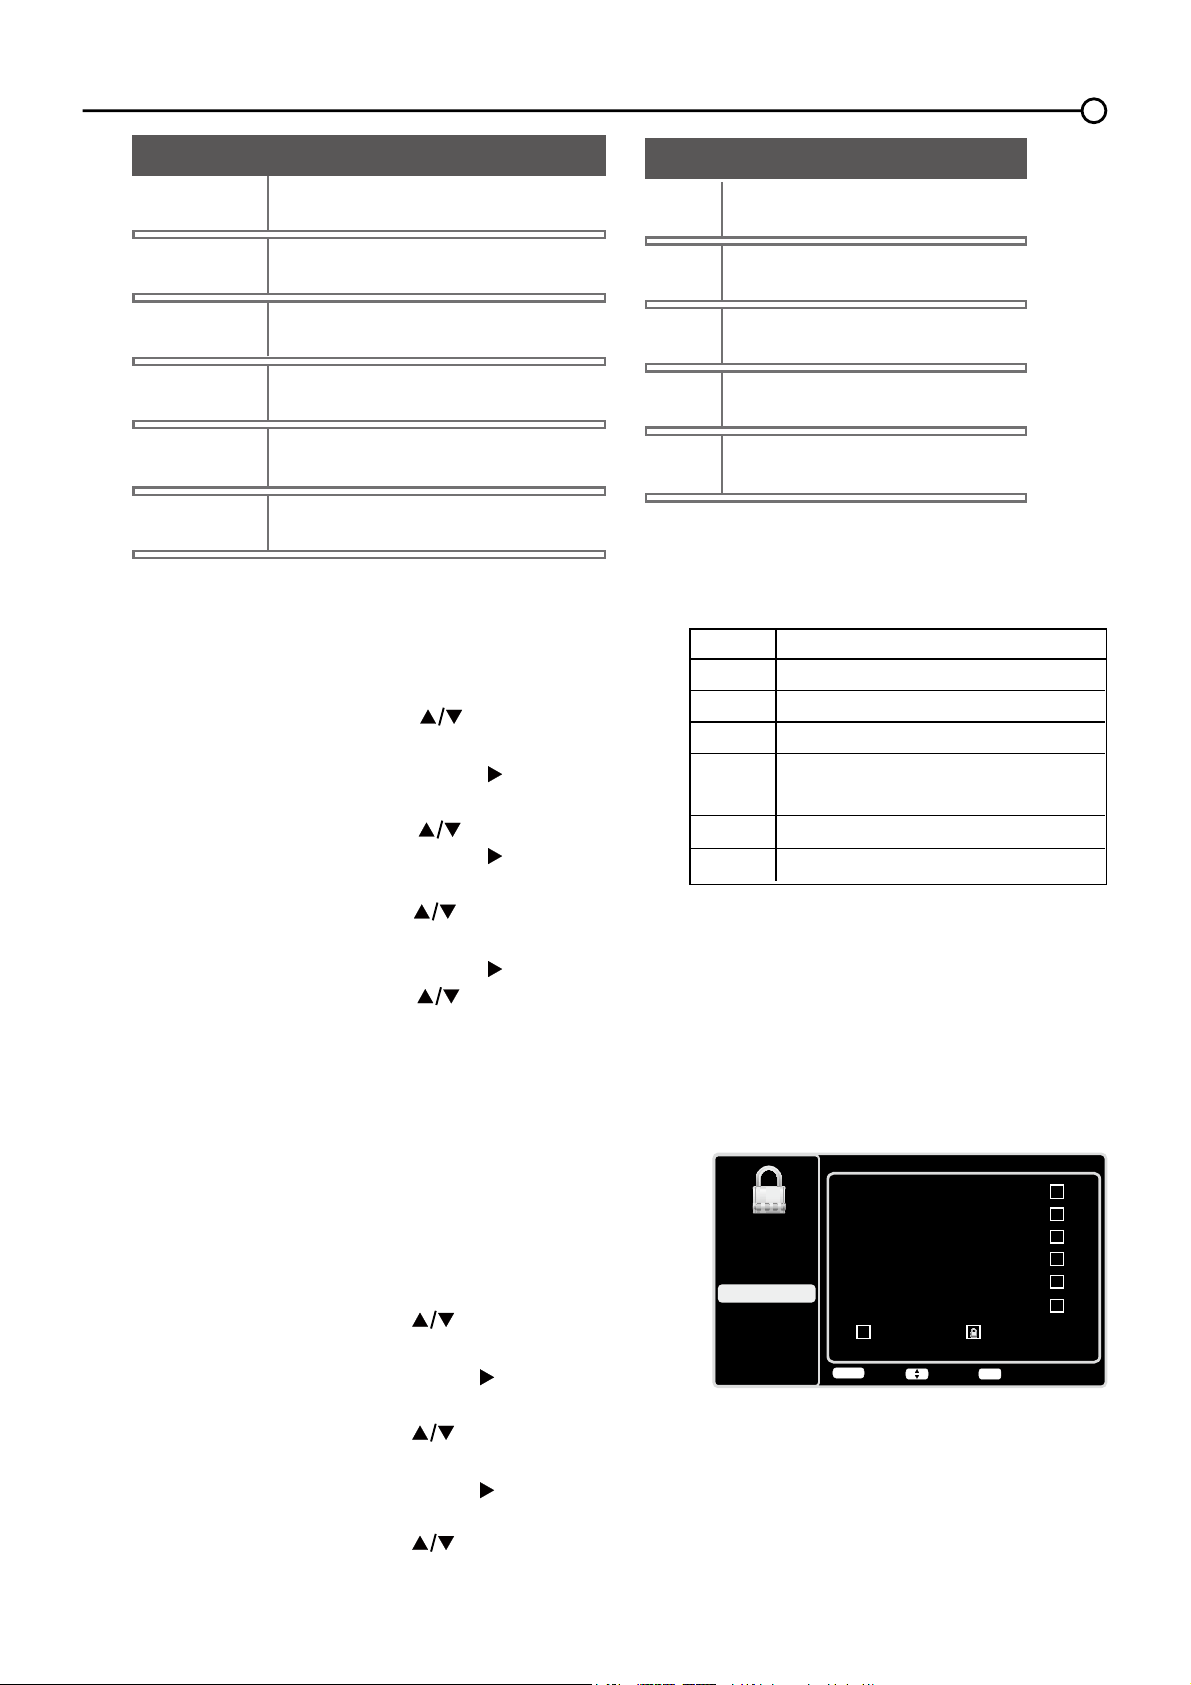
,QSXW%ORFN
1. Press MENU on the remote control (the Main Menu
appears).
2. Select Parental Control. If parental controls have
SUHYLRXVO\EHHQORFNHG\RXPXVWHQWHU\RXUSDVVZRUG
3. Press the up or down arrow ( ) to highlight Input
Block.
4. Press the OK button or right arrow ( ) to display the
Input Source List screen.
5. Press the up or down arrow (
) to place a
FKHFNPDUNLQWKHER[WREORFNWKHLQSXW:KHQ
you tune to that input, you will need to enter a password
to view the channel.
6. Press the OKEXWWRQWRFRQ¿UP\RXUVHOHFWLRQ$
ORFNHGXQORFNHGLFRQDSSHDUVQH[WWRWKHVHOHFWHGLQSXW
Setup
Parental Control
Language
Sound
Picture
USB
Exit
Input Block
PC
HDMI1
HDMI2
CMPT1
CMPT2
HDMI3
TV
AV1
AV2
S-VIDEO
Back
MENU
Adjust Select Exit
CLEAR
OK
6. Press the OK button or right arrow ( ) to proceed.
7. Press the up or down arrow ( ) to select the desired rating.
8. Press the OK EXWWRQWRWRJJOHEHWZHHQ9LHZDQG%ORFN
2SHQ9&KLS
- allows you to select the downloadable rating level. In the event that a new rating
system is provided by the broadcaster, the new rating options would appear within this menu.

33
USB Menu
7KH86%IHDWXUHRQ\RXU79DOORZV\RXWRSOD\DXGLR¿OHVIRUPDWVXSSRUWHG03RUGLVSOD\SLFWXUHVIRUPDW
VXSSRUWHG-3(*7RXWLOL]HWKLVIHDWXUHIROORZWKHVHVWHSV
1. Press MENU on the remote control (the Main Menu appears).
2. Use the up or down arrow ( ) to select USB.
3. Press the OK button or the right arrow (
) to proceed to the USB Screen. Or, you can press the MEDIA
button on the remote control to display the USB screen directly. (Note: if no USB device is inserted, “No
Media” displays on the screen, only suppport FAT format and unpartitioned USB device)
Media Brower:
Select
Media Brower, press OK to enter, then
press the up or down arrow
( WRVHOHFWD¿OHRU¿OHIROGHUSUHVVOK and use the following menus:
Open -
6HOHFWWRGLVSOD\WKHIROGHU¿OHOLVWLQWKH86%GHYLFH
Thumbnail -
Select to
GLVSOD\WKHWKXPEQDLORIWKHIROGHUV¿OHVRQO\DYDLODEOHIRUSKRWRIROGHUV¿OHV
Slideshow -
6HOHFWWRWRVWDUWSKRWRVOLGHVKRZ7KHPHQXOLQHLVJUD\HGRXWLIWKHUHLVQRSKRWR¿OHLQ
the root of the current USB device.
Play Music -
6HOHFWWRSOD\EDFNWKHPXVLF7KHPHQXOLQHLVJUD\HGRXWLIWKHUHLVQRPXVLF¿OHLQWKH
URRWRIWKHFXUUHQW8GLVN
Return -
Select to return to the previous menu.
Media Settings
Select
Media Settings, press OK to enter, then
use the following menus:
Photo Settings -
Select to display Photo Settings submenu.
Slideshow Interval
-
Select the Slideshow Interval: 5 Seconds, 10 Seconds, 20 Seconds
.
Slideshow Effect -
Select the Slideshow Effect.
Slideshow Repeat
-
Select the options: Off/On.
Thumbnail Size-
Select to
display the thumbnail size: 5X3 and 3X2.
Music Settings -
Select to display Music Settings submenu.
Music Play Mode
-
Select the options: Once, Play All, Random.
Music Play
Repeat -
Select the options: Off/On .
Music Auto Play
-
Select the options: Off/On.
4.
Press the MENUEXWWRQWRJREDFNWRWKHSUHYLRXVPHQXRUSUHVVWKHCLEAR button to exit.
USB Connection
<RXFDQFRQQHFWDGHYLFHZLWK86%WR\RXU79RUXVHD86%ÀDVKGULYH
only suppport FAT format and
unpartitioned USB device
.
7KLVFRQQHFWLRQDOORZV\RXWRLQVHUWD86%ÀDVKGULYHGLUHFWO\RUFRQQHFWDFRPSDWLEOHPDVVVWRUDJH
device with USB, such as a digital camera, a multi-format card reader, or an MP3 player. If you have
a USB drive, plug it into the drive directly. If you have a device with a USB port, connect one end of
WKH86%FDEOHWRWKH86%SRUWDQGWKHRWKHUHQGWRWKH86%MDFNRQWKHVLGHRIWKH797RDFFHVVDQG
adjust the options of the USB device, refer to USB Menu.
Side of this unit
Or
3. Press the OK button or right arrow ( ) to display the Language Screen.
4. Press the up or down arrow ( ) to select the preferred language for the menu.
5. Press the left or right arrow ( ) to select On or Off.
6. Press the MENU or CLEARNH\WRH[LWWKHPHQX

34
Frequently Asked Questions (FAQs)
:KDW¶VWKHTXLFNHVWZD\WRYLHZ+LJK'H¿QLWLRQ+'YLGHR"
Connect an off-air antenna to the ANT/CABLE/SAT IN to view free local digital channels. You may
need to purchase an antenna. (See page 10 for more information).
9LVLWwww.antennaweb.org for assistance in deciding what type of antenna to use to receive the local
digital channels available to you. By entering your location, this mapping program tells you which local
analog and digital stations are available using a certain antenna.
$UHWKHUHRWKHUZD\VWRYLHZ+LJK'H¿QLWLRQ+'YLGHR"
Besides using an off-air antenna as mentioned above, you can also use a set-top box to receive
digital video. Contact your cable company or satellite provider to purchase digital programming
and have them connect the box to ensure you are viewing channels the best way.
How do I tell an analog channel from a digital channel?
Press the INFO button to display the Channel Banner/RRNDWWKHERWWRPULJKWFRUQHURIWKHVFUHHQ
7KHGRWLVGLVSOD\HGIRUDGLJLWDOFKDQQHO,IWKHUHLVQRGRWLWLVDQDQDORJFKDQQHO
Why are there bars on my screen and can I get rid of them?
0RVWGLJLWDOYLGHRLVVHQWLQDIRUPDWZKLFK¿OOV\RXUVFUHHQEXWLVVRPHWLPHVVHQWLQZKLFK
GRHVQRW¿OO\RXUVFUHHQ,WGHSHQGVRQKRZWKHVWDWLRQRUGHYLFHFRQQHFWHGWR\RXU79LVIRUPDWWLQJ
the video. If there are bars on the screen, press the ZOOM -/+ button to try a different format that
PD\HOLPLQDWHWKHEDUV6RPHEDUVFDQ¶WEHUHPRYHGEHFDXVHRIWKHZD\WKHIRUPDWLVVHQWE\WKH
broadcaster. The format changes as you press the ZOOM -/+ button and the format type is displayed
at the bottom left of the screen. For more information on screen formats, go to page 18.
:K\GRHVFKDQQHOVHDUFK¿QGDORWRIFKDQQHOVEXWZKHQ,WU\WRWXQHWR
them, there’s nothing there?
6RPHFKDQQHOVHQDEOHGE\WKHFDEOHFRPSDQ\GRQ¶WFDUU\SURJUDPPLQJVXFKDVYLGHRRQGHPDQG
:KHQFKDQQHOVDUHXQDYDLODEOH\RXU79VFUHHQLVEODQNRUDSSHDUVOLNHVQRZ<RXSUREDEO\ZDQWWR
UHPRYHWKHVHFKDQQHOVIURP\RXU&KDQQHO/LVW5HPRYHWKHVHLQWKH&KDQQHO6NLS0HQX*RWRSDJH
24 for more information.
:K\GRHVWKH¿UVWFKDQQHOVHDUFKWDNHDORQJWLPH"
,I\RXKDYHERWKDQDORJDQGGLJLWDOFKDQQHOVWKH79LVORRNLQJIRUDOODYDLODEOHFKDQQHOVLQWKH&KDQQHO
/LVW,I\RXGRKDYHGLJLWDOFKDQQHOVWKH79LVDOVRVHDUFKLQJIRUVFUDPEOHGFKDQQHOVQRQVFUDPEOHG
channels, and each sub-channel of that digital channel.
Chapter 5 - Other Information

35
Troubleshooting
0RVWSUREOHPV\RXHQFRXQWHUZLWK\RXU79FDQEHFRUUHFWHGE\FRQVXOWLQJWKHIROORZLQJ
troubleshooting list.
793UREOems
The TV won’t turn on.
0DNHVXUHWKH79LVSOXJJHGLQ
&KHFNWKHZDOOUHFHSWDFOHRUH[WHQVLRQFRUGWRPDNHVXUHLWLV³OLYH´E\SOXJJLQJLQDQRWKHUGHYLFH
7KH79SDQHOFRQWUROVPD\EHORFNHGGLVDEOHG8VHWKHUHPRWHFRQWUROWRXQORFNWKH79SDQHO
controls.
6HOHFWWKH%XWWRQ%ORFNIHDture on the Parental Control menu and press OKWRXQFKHFNWKHER[
There is no picture and no sound but the TV is on.
<RXPD\EHWXQHGWRDQLQSXWZLWKQRFRPSRQHQWFRQQHFWHGWRLW,I\RX¶UHWU\LQJWRYLHZD
connected component, press INPUT until the picture from that component appears.
7KH6LJQDO7\SHRSWLRQPD\EHVHWLQFRUUHFWO\*RWRSDJHIRUGHWDLOHGLQVWUXFWLRQV
7KHFKDQQHOPD\EHEODQN7U\FKDQJLQJFKDQQHOV
,I\RX¶UHZDWFKLQJ\RXU9&5DQGLW¶VFRQQHFWHGZLWKFRD[LDOFDEOHWRWKHANT/CABLE/SAT INMDFN
WXQHWKH79WRFKDQQHORUZKLFKHYHUFKDQQHOLVVHOHFWHGRQWKHVZLWFKRQWKHEDFNRI\RXU
9&5$OVRPDNHVXUHWKH799&5EXWWRQRQWKH9&5LVLQWKHFRUUHFWPRGHSUHVVWKH799&5
button oQ\RXU9&5
7KHVRXQGLV¿QHEXWWKHSLFWXUHLVSRRUTXDOLW\
,I\RX¶UHJHWWLQJDEODFNDQGZKLWHSLFWXUHIURPDFRPSRQHQW\RX¶YHFRQQHFWHGWR\RXU79
\RXPLJKWKDYH\RXUYLGHRFDEOHVFRQQHFWHGWRWKHZURQJMDFNV$\HOORZYLGHRFDEOHFRQQHFWV
WRWKH\HOORZ9,'(2,1387MDFNRQWKHVLGHRUEDFNRI\RXU79WKUHHYLGHRFDEOHVRUEXQGOHG
component video cables (red, blue, and green) connect to the corresponding COMPONENT INPUT
MDFNVRQWKHEDFNRI\RXU79
&KHFNWKHDQWHQQDFRQQHFWLRQV0DNHVXUHDOORIWKHFDEOHVDUH¿UPO\FRQQHFWHGWRWKHMDFNV
ThereLVQRVRXQGEXWWKHSLFWXUHLV¿QH
.
7KHVRXQGPLJKWEHPXWHG7U\SUHVVLQJWKHYROXPHXSEXWWRQWRUHVWRUHVRXQG
,IXVLQJ'9,RU<3%35UHPHPEHUWRDOVRFRQQHFWWKHGHYLFH¶VOHIWDQGULJKWDXGLRRXWSXWMDFNVWR
WKH79¶V/DQG5$8',2,1387MDFNV
7KHVRXQGVHWWLQJVPD\QRWEHVHWFRUUHFWO\*RWRSDJHIRUPRUHLQIRUPDWLRQ
,I\RXUDXGLRVRXUFHKDVRQO\RQHMDFNRULVDPRQRDXGLRVRXUFHPDNHVXUH\RXKDYHSOXJJHG
WKHFRQQHFWLRQLQWRWKH/$8',2,1387MDFNRQWKH79
The screen is blank.
&KHFN\RXUFRQQHFWLRQV,I\RXXVHG\HOORZUHGDQGZKLWHFDEOHVWRFRQQHFWPDNHVXUHWKH\¶UH
FRQQHFWHGWRWKHUHGZKLWHDQG\HOORZ$8',29,'(2,1387MDFNVRQWKHVLGHRUEDFNRIWKH79
,I\RX¶UHWU\LQJWRZDWFKVRPHWKLQJWKDW¶VSOD\LQJRQDFRPSRQHQWFRQQHFWHGWRWKH79OLNHD'9'
press INPUT until you get to the correct video input channel.
0DNHVXUHWKHFRPSRQHQWFRQQHFWHGWRWKH79LVWXUQHGRQ
7U\DQRWKHUFKDQQHO

36
The buttons on the TV panel don’t work.
7KH79SDQHOFRQWUROVPD\EHORFNHGGLVDEOHG8VHWKHUHPRWHFRQWUROWRXQORFNWKH79SDQHO
FRQWUROVE\VHOHFWLQJWKH%XWWRQ%ORFNIHDWXUHLQWKH3DUHQWDO&RQWURO0HQXDQGSUHVVW
he left or right
arrow ( )
WRXQFKHFNWKHER[
8QSOXJWKH79IRUPLQXWHVDQGWKHQSOXJLWEDFNLQ7XUQWKH79RQDQGWU\DJDLQ
The TV turns off unexpectedly.
7KHHOHFWURQLFSURWHFWLRQFLUFXLWPD\KDYHEHHQDFWLYDWHGEHFDXVHRIDSRZHUVXUJH:DLW
VHFRQGVDQGWKHQWXUQWKH79RQDJDLQ,IWKLVKDSSHQVIUHTXHQWO\WKHYROWDJHLQ\RXUKRXVH
may be abnormally high or low.
8QSOXJ:DLWPLQXWHV3OXJLQDJDLQ
You can’t select a certain channel.
7KHFKDQQHOPD\EHEORFNHGRUQRWDSSURYHGLQWKHParental Control Menu.
,IXVLQJD9&5FKHFNWRPDNHVXUHWKHTV/VCREXWWRQRQWKH9&5LVLQWKHFRUUHFWPRGHSUHVV
the TV/VCREXWWRQRQ\RXU9&5
3UHVVWKHTV button and then try to change channels.
The stereo reception is noisy.
,WPD\EHDZHDNVWDWLRQ8VHWKH6RXQG0HQXDQG$QDORJ796RXQGWRFKRRVHPRQR
A black box appears on the screen.
&ORVHGFDSWLRQLQJPLJKWEHRQ&KHFN&ORVHG&DSWLRQLQWKH6HWXSPHQX*RWRSDJHIRUPRUH
instructions.
You are having problems with the HDMI Connection.
0DNHVXUHWKH+'0,RU'9,FRPSRQHQWLVWXUQHGRQDQGWKHFDEOHVDUH¿UPO\FRQQHFWHG,I
problems still occur, turn off your component and reconnect it. Reset the power by unplugging the
SRZHUFRUGDQGSOXJJLQJLWEDFNLQ
,I\RXDUHWXQHGWRWKHHDMI 1, HDMI 2 or HDMI 3,1387DQG\RX¶UHUHFHLYLQJ8QXVDEOH
Signal message onscreen, press the INFO button on the remote. If Acquiring Channel appears in
the Channel BannerWKH+'0,RU'9,GHYLFHLVQ¶WUHVSRQGLQJ&RQWDFWWKHPDQXIDFWXUHURIWKH
+'0,RU'9,GHYLFHIRUIXUWKHUDVVLVWDQFH
,I\RXWXQHWRWKHHDMI 1, HDMI 2 or HDMI 3 INPUT and you see snow, the video goes in
DQGRXWRUWKHYLGHRWDNHVDORQJWLPHWRDSSHDU\RXU+'0,RU'9,FRPSRQHQWLVKDYLQJ
WURXEOHVHQGLQJYLGHRLQIRUPDWLRQWRWKH795HFRQQHFW\RXUGHYLFH5HVHWWKHSRZHUE\
XQSOXJJLQJWKHSRZHUFRUGDQGSOXJJLQJLWEDFNLQ,ISUREOHPVSHUVLVWWU\FRQQHFWLQJWKH<
3E3UMDFNVLIWKH\DUHDYDLODEOHRUFRQWDFWWKHPDQXIDFWXUHURIWKH+'0,RU'9,FRPSRQHQW
for further assistance.
,I\RXKDYHEODFNEDUVRQHDFKVLGHRI\RXUSLFWXUHWKHFRPSRQHQW\RXFRQQHFWHGPLJKWKDYHD
VZLWFKRUDPHQXRSWLRQDOORZLQJ\RXWRFKDQJHWKHSLFWXUHTXDOLW\RXWSXWWKDWZLOO¿[WKLV&KRRVH
either 720p or 1080i.

37
The remote control doesn’t work.
6RPHWKLQJPLJKWEHEHWZHHQWKHUHPRWHDQGWKHUHPRWHOLJKWVHQVRURQWKHIURQWRIWKH790DNH
sure there is a clear path.
7KHUHPRWHPD\QRWEHDLPHGGLUHFWO\DWWKH79
7KHEDWWHULHVLQWKHUHPRWHPD\EHZHDNGHDGRULQVWDOOHGLQFRUUHFWO\3XWQHZEDWWHULHVLQWKH
remote.
The Universal Remote control doesn’t work.
7KLV79XWLOL]HVQHZUHPRWHFRQWUROVLJQDOVDQGPD\QRWEHFRPSDWLEOHZLWK\RXUH[LVWLQJXQLYHUVDO
remote (e.g. satellite box remotes, cable box remotes, and generic universal remotes, etc.). Over time,
QHZHUXQLYHUVDOUHPRWHVZLOOEHFRPHDYDLODEOHWKDWVKRXOGSLFNXSWKHQHZ79FRGHV
You are experiencing problems with V-Chip/Parental Controls.
,IWKHUDWLQJOLPLWVGRQ¶WZRUN\RXPXVWORFNWKHVHWWLQJV*RWRWKH0DLQ0HQXSUHVV0(18RQ\RXU
UHPRWHVHOHFW3DUHQWDO&RQWURO6HOHFW9&KLSDQGWKHQSUHVVWKHOHIWRUULJKWDUURZ ) to proceed
to the next screen. Rating Enable is highlighted. Press the left or right arrow ( ) to select On to have
WKHUDWLQJOLPLWVWDNHHIIHFW
The V-Chip won’t let me watch a program even though it’s not rated as
violent.
0D\EHWKHPRYLHZDVJLYHQDQ151RW5DWHGVWDWXV$IWHU\RXEORFNPRYLHUDWLQJV\RXPXVWVHW15
WR9LHZ6HSDUDWHO\LQRUGHUWRYLHZPRYLHVZLWKDQ15UDWLQJ
What else can I do?
,I\RX¶YHEHHQWKURXJKWKH7URXEOHVKRRWLQJVHFWLRQDQGQRWKLQJKDV¿[HG\RXUSUREOHPWU\UHERRWLQJ
\RXU791RWHWKDWDIWHUDUHERRW\RXPD\QHHGWRUXQ\RXU79WKURXJKWKHVHWXSSURFHVVDJDLQ7R
GRDUHERRWXQSOXJWKHSRZHUFRUGIURPWKHZDOORXWOHWRUSRZHUVWULS.HHS\RXU79XQSOXJJHGIRU
DERXWPLQXWHV7KHQSOXJLQWKH79DQGWXUQLWRQ6HHLIWKHSUREOHPLV¿[HG,IWKHSUREOHPUHPDLQV
WKHQSOHDVHYLVLWZZZWFOXVDFRPIRUXSGDWHG)$4VRUFRQWDFW7&/&XVWRPHU6XSSRUWDWWKHVXSSRUW
QXPEHUSURYLGHGLQ\RXU:DUUDQW\XQGHU³+RZ7R*HW6HUYLFH´
Care and Cleaning
&DXWLRQ7XUQ2))\RXU79EHIRUHFOHDQLQJ
<RX FDQFOHDQWKH79 DV UHTXLUHGXVLQJD VRIW OLQWIUHHFORWK%HVXUH WR RFFDVLRQDOO\GXVWWKH
ventilation slots in the cabinet to help assure adequate ventilation.
IMPORTANT: Never use strong cleaning agents, such as ammonia-based cleaners, or abrasive
SRZGHU7KHVH W\SHV RI FOHDQHUV ZLOO GDPDJH WKH797KH 79¶VVFUHHQPD\EH FOHDQHG ZLWK D VRIW
OLQWIUHHFORWKDVZHOO7DNHFDUHQRWWRVFUDWFKRUPDUWKHVFUHHQ,IQHFHVVDU\\RXPD\XVHDFORWK
dampened with warm water. While cleaning, do not spray liquid directly on the screen, or allow liquid to
UXQGRZQWKHVFUHHQDQGLQVLGHWKH79$OVRQHYHUSODFHGULQNVRUYDVHVZLWKZDWHURQWRSRIWKH79
7KLVFRXOGLQFUHDVHWKHULVNRI¿UHVKRFNKD]DUGRUGDPDJHWRWKH79

38
V-Chip Rating Explanations
US V-Chip Rating System
TV-MA0DWXUH$XGLHQFH2QO\6SHFL¿FDOO\GHVLJQHGWREHYLHZHGE\DGXOWVDQGPD\EHXQVXLWDEOHIRU
children under 17. It contains one or more of the following content themes: crude indecent language (L),
H[SOLFLWVH[XDODFWLYLW\6RUJUDSKLFYLROHQFH9
TV-143DUHQWV6WURQJO\&DXWLRQHG&RQWDLQVVRPHPDWHULDOWKDWPDQ\SDUHQWVZRXOG¿QGXQVXLWDEOH
for children under 14. Parents are strongly urged to exercise greater care in monitoring this program
and are cautioned against letting children under the age of 14 watch unattended. This program
FRQWDLQVRQHRUPRUHRIWKHIROORZLQJFRQWHQWWKHPHVLQWHQVHO\VXJJHVWLYHGLDORJXH'VWURQJFRDUVH
ODQJXDJH/LQWHQVHVH[XDOVLWXDWLRQV6RULQWHQVHYLROHQFH9
TV-PG 3DUHQWDO*XLGDQFH6XJJHVWHG&RQWDLQVPDWHULDOWKDWSDUHQWVPD\¿QGXQVXLWDEOHIRU\RXQJHU
children. Many parents may want to watch it with their younger children. The program contains one or
PRUHRIWKHIROORZLQJFRQWHQWWKHPHVVRPHVXJJHVWLYHGLDORJXH'LQIUHTXHQWFRDUVHODQJXDJH/
VRPHVH[XDOVLWXDWLRQV6RUPRGHUDWHYLROHQFH9
TV-G3DUHQWDO$XGLHQFH0RVWSDUHQWVZRXOG¿QGWKLVSURJUDPVXLWDEOHIRUDOODJHV,WFRQWDLQVOLWWOHRU
QRVH[XDOGLDORJXH'RUVLWXDWLRQV6QRVWURQJODQJXDJH/DQGOLWWOHRUQRYLROHQFH9
TV-Y7'LUHFWHGWR&KLOGUHQ\HDUVDQGROGHU'HVLJQHGIRUFKLOGUHQDJHVDQGDERYH,WPD\EH
PRUHDSSURSULDWHIRUFKLOGUHQZKRKDYHDFTXLUHGWKHGHYHORSPHQWDOVNLOOVQHHGHGWRGLVWLQJXLVK
EHWZHHQPDNHEHOLHYHDQGUHDOLW\7KHPHVDQGHOHPHQWVLQWKLVSURJUDPPD\LQFOXGHPLOGIDQWDV\
YLROHQFH)9RUFRPHGLFYLROHQFHRUPD\IULJKWHQFKLOGUHQXQGHUWKHDJHRI
TV-Y (All Children) Themes and elements in this program are designed for a young audience, including
children ages 2-6. It is not expected to frighten younger children.
Canadian English V-Chip Rating System
18+ (Adult) Programming intended for adults 18 and older. It may contain elements of violence,
ODQJXDJHDQGVH[XDOFRQWHQWZKLFKFRXOGPDNHLWXQVXLWDEOHIRUYLHZHUVXQGHU9LROHQFH
*XLGHOLQHV0D\FRQWDLQYLROHQFHLQWHJUDOWRWKHGHYHORSPHQWRIWKHSORWFKDUDFWHURUWKHPHLQWHQGHG
IRUDGXOWDXGLHQFHV2WKHU&RQWHQW*XLGHOLQHV0D\FRQWDLQJUDSKLFODQJXDJHDQGH[SOLFLWSRUWUD\DOVRI
QXGLW\DQGRUVH[
14+ (Viewer 14 and over) Programming contains themes or content which may not be suitable for
viewers under the age of 14. Parents are strongly cautioned to exercise discretion in permitting viewing
E\SUHWHHQVDQGHDUO\WHHQV9LROHQFH*XLGHOLQHV0D\FRQWDLQLQWHQVHVFHQHVRIYLROHQFH&RXOGGHDO
ZLWKPDWXUHWKHPHVDQGVRFLHWDOLVVXHVLQDUHDOLVWLFIDVKLRQ2WKHU&RQWHQW*XLGHOLQHV0D\FRQWDLQ
VFHQHVRIQXGLW\DQGRUVH[XDODFWLYLW\7KHUHFRXOGEHIUHTXHQWXVHRISURIDQLW\
PG (Parental Guidance) Programming intended for a general audience but which may not be
suitable for younger children (under the age of 8). Parents may consider some content inappropriate
IRUXQVXSHUYLVHGYLHZLQJE\FKLOGUHQDJHG9LROHQFH*XLGHOLQHV'HSLFWLRQVRIFRQÀLFWDQGRU
DJJUHVVLRQZLOOEHOLPLWHGDQGPRGHUDWHPD\LQFOXGHSK\VLFDOIDQWDV\RUVXSHUQDWXUDOYLROHQFH2WKHU
&RQWHQW*XLGHOLQHV0D\FRQWDLQLQIUHTXHQWPLOGSURIDQLW\RUPLOGO\VXJJHVWLYHODQJXDJH&RXOGDOVR
contain brief scenes of nudity.
G (General Audience) Programming considered acceptable for all ages groups. While not designed
VSHFL¿FDOO\IRUFKLOGUHQLWLVXQGHUVWRRG\RXQJHUYLHZHUVPD\EHSDUWRIWKHDXGLHQFH9LROHQFH
*XLGHOLQHV:LOOFRQWDLQYHU\OLWWOHYLROHQFHHLWKHUSK\VLFDORUYHUEDORUHPRWLRQDO:LOOEHVHQVLWLYHWR
themes which could frighten a younger child, will not depict realistic scenes of violence which minimize
RUJORVVRYHUWKHHIIHFWVRIYLROHQWDFWV2WKHU&RQWHQW*XLGHOLQHV7KHUHPD\EHVRPHLQRIIHQVLYH
slang, no profanity and no nudity.

39
C8+ (Children 8 and older) Programming generally considered acceptable for children 8 years and
RYHUWRZDWFKRQWKHLURZQ9LROHQFH*XLGHOLQHV9LROHQFHZLOOQRWEHSRUWUD\HGDVWKHSUHIHUUHG
DFFHSWDEOHRURQO\ZD\WRUHVROYHFRQÀLFWRUHQFRXUDJHFKLOGUHQWRLPLWDWHGDQJHURXVDFWVZKLFKWKH\
may see on television. Any realistic depictions of violence will be infrequent, discreet, of low intensity
DQGZLOOVKRZWKHFRQVHTXHQFHVRIWKHDFWV2WKHU&RQWHQW*XLGHOLQHV7KHUHZLOOEHQRSURIDQLW\
nudity or sexual content.
C (Children)3URJUDPPLQJLQWHQGHGIRUFKLOGUHQXQGHUDJH9LROHQFH*XLGHOLQHV&DUHIXODWWHQWLRQ
LVSDLGWRWKHPHVZKLFKFRXOGWKUHDWHQFKLOGUHQ¶VVHQVHRIVHFXULW\DQGZHOOEHLQJ7KHUHZLOOEH
QRUHDOLVWLFVFHQHVRIYLROHQFH'HSLFWLRQVRIDJJUHVVLYHEHKDYLRUZLOOEHLQIUHTXHQWDQGOLPLWHGWR
SRUWUD\DOVWKDWDUHFOHDUO\LPDJLQDU\FRPHGLFRUXQUHDOLVWLFLQQDWXUH2WKHU&RQWHQW*XLGHOLQHV7KHUH
will be no offensive language, nudity or sexual content.
Canadian French V-Chip Rating System
18 ans+ (Adult) Programming is for adults only. This program contains sustained violence
or extremely violent scenes.
16 ans+ (Viewer 16 and over) Programming is not suitable for those under age 16. This
program contains frequent scenes of violence or intensely violent scenes.
13 ans+ (Viewer 13 and over) Programming may not be suitable for children under the
age of 13. This program either contains several violent scenes or one or more scenes that
DUHYLROHQWHQRXJKWRDIIHFWWKHP9LHZLQJLQWKHFRPSDQ\RIDQDGXOWLVWKHUHIRUHVWURQJO\
recommended for children under the age of 13.
8 ans+ (Viewer 8 and over) Not recommended for young children. This program is suitable
for most audiences, but it contains mild or occasional violence that could upset young
FKLOGUHQ9LHZLQJLQWKHFRPSDQ\RIDQDGXOWLVWKHUHIRUHUHFRPPHQGHGIRU\RXQJFKLOGUHQ
(under the age of 8) who do not distinguish between reality and imagination.
G (General Audience) This program is suitable for audiences of all ages. It contains
no violence, or any violence that it does contain is either minimal or is presented in a
humorous manner, as a caricature, or in an unrealistic way.
7HOHYLVLRQ6SHFL¿FDWLRQV
Broadcasting system US System NTSC-M
$76&VWDQGDUG96%4$0
5HFHLYLQJ&KDQQHOV 9+)
UHF14-69
&$79 $:
37-59 (AA)-(WW)
60-85 (AAA)-(ZZZ)
86-94 (86)-(94)95-99 (A-5)-(A-1)
100-135 (100)-(135)
01 (4A)
Tuner type Frequency synthesized
Screen refresh rate 60Hz

40
TTE Technology, Inc. (“TTE”) Limited Warranty
$OO/&'/('0RGHOV
(;&(37727+((;7(17352+,%,7('%<$33/,&$%/(/$:7+,6:$55$17<
'2(6127&29(5$1'$6'(6&5,%('%(/2:77((;35(66/<',6&/$,06$//
$&78$/$1',03/,(':$55$17,(6:,7+5(63(&772$1<352'8&786(')25
,167,787,21$/2527+(5&200(5&,$/385326(6,1&/8',1*%87127
/,0,7('725(17$/385326(6
What your warranty covers:
'HIHFWVLQPDWHULDOVRUZRUNPDQVKLSWRWKHRULJLQDORZQHURIWKLV
7&/SURGXFWZKHQSXUFKDVHGIURPDQ$XWKRUL]HG'HDOHURI7&/EUDQGSURGXFWVDQGSDFNDJHGZLWK
this warranty statement.
New LCD/LED Televisions
For how long after your purchase:
7ZR\HDUVIURPGDWHRISXUFKDVHIRUSDUWV
7ZR\HDUVIURPGDWHRISXUFKDVHIRUODERU
What we will do:
$W77(¶VGLVFUHWLRQSD\DQ$XWKRUL]HG7&/6HUYLFH&HQWHUIRUERWKODERUFKDUJHVDQGSDUWVWR
UHSDLU\RXUWHOHYLVLRQRUUHSODFH\RXUWHOHYLVLRQZLWKDQHZRUUHIXUELVKHGUHPDQXIDFWXUHG
unit. See “How to get service”.
How to get service:
&DOO1-877-300-88373OHDVHKDYH\RXUXQLW¶VGDWHRISXUFKDVHSODFHRISXUFKDVHDQGPRGHO
VHULDOQXPEHUUHDG\7KHPRGHOVHULDOQXPEHULQIRUPDWLRQFDQEHIRXQGRQWKHEDFNRI\RXUXQLW
$UHSUHVHQWDWLYHZLOOWURXEOHVKRRW\RXUSUREOHPRYHUWKHSKRQH,ILWLVGHWHUPLQHGWKDW\RXUXQLW
requires service, the service location will be at the sole discretion of TTE based upon the TTE
Limited Warranty statement.
$WWKHVROHGLVFUHWLRQRI77(WHOHYLVLRQVFUHHQVL]HV´DQGVPDOOHUZLOOHLWKHUEHUHSDLUHGDWDQ
$XWKRUL]HG7&/6HUYLFH&HQWHURUGLUHFWO\H[FKDQJHGIRUDQHZRUUHIXUELVKHGUHPDQXIDFWXUHG
unit. At the sole discretion of TTE, television screen sizes 33” through 55” will either be repaired
at an Authorized TCL Service Center or repaired in-home.
If repaired at an Authorized TCL Service Center, TTE is not responsible for transportation costs
to the Authorized TCL Service Center. However, TTE will pay for return shipping. TTE will
SURYLGHLQVWUXFWLRQVIRUSDFNDJLQJDQGVKLSSLQJWKHXQLW3URRIRISXUFKDVHLQWKHIRUPRIDELOORI
VDOHRUUHFHLSWHGLQYRLFHIURPDQ$XWKRUL]HG'HDOHUZKLFKLVHYLGHQFHWKDWWKHSURGXFWLVZLWKLQ
the warranty period must be presented to obtain warranty service.
What your warranty does not cover:
&XVWRPHULQVWUXFWLRQ<RXU2ZQHU¶V0DQXDOGHVFULEHVKRZWRLQVWDOODGMXVWDQGRSHUDWH\RXU
XQLW$Q\DGGLWLRQDOLQIRUPDWLRQVKRXOGEHREWDLQHGIURP\RXU$XWKRUL]HG'HDOHU
,QVWDOODWLRQDQGUHODWHGDGMXVWPHQWV
'DPDJHUHVXOWLQJIURPQRQDSSURYHGLQVWDOODWLRQPHWKRGV
6LJQDOUHFHSWLRQSUREOHPVQRWFDXVHGE\\RXUXQLW
'DPDJHIURPPLVXVHRUQHJOHFW
%DWWHULHV
$WHOHYLVLRQWKDWKDVEHHQPRGL¿HGRULQFRUSRUDWHGLQWRRWKHUSURGXFWVRULVXVHGIRULQVWLWXWLRQDO
or other commercial purposes (including but not limited to rental purposes).
$XQLWSXUFKDVHGRUVHUYLFHGRXWVLGHWKH86$
$XQLWVROGDVLVRUZLWKDOOIDXOWV
$FWVRIQDWXUHVXFKDVEXWQRWOLPLWHGWROLJKWQLQJGDPDJH
6SHFLDOLQFLGHQWDORUFRQVHTXHQWLDOGDPDJHV

41
Product Registration:
3OHDVHUHJLVWHU\RXU7&/SXUFKDVHRQOLQHDWZZZWFOXVDFRP,WZLOOPDNHLWHDVLHUWRFRQWDFW\RX
should it ever be necessary. Registration is not required for warranty coverage.
Limitation of Warranty:
7+(:$55$17<67$7('$%29(,67+(21/<:$55$17<$33/,&$%/(727+,6
PRODUCT. NO VERBAL OR WRITTEN INFORMATION GIVEN BY TTE TECHNOLOGY,
INC., ITS AGENTS OR EMPLOYEES SHALL CREATE A GUARANTY OR IN ANY WAY
INCREASE OR MODIFY THE SCOPE OF THIS WARRANTY.
5(3$,5255(3/$&(0(17$63529,'('81'(57+,6:$55$17<,67+((;&/86,9(
REMEDY OF THE CONSUMER. TTE TECHNOLOGY, INC. SHALL NOT BE LIABLE FOR
SPECIAL, INCIDENTAL OR CONSEQUENTIAL DAMAGES RESULTING FROM
THE USE OF THIS PRODUCT OR ARISING OUT OF ANY BREACH OF ANY EXPRESS OR
IMPLIED WARRANTY ON THIS PRODUCT. THIS DISCLAIMER OF WARRANTIES AND LIMITED
WARRANTY ARE GOVERNED BY THE LAWS OF THE STATE OF CALIFORNIA.
EXCEPT TO THE EXTENT PROHIBITED BY APPLICABLE LAW, ANY IMPLIED WARRANTY
OF MERCHANTABILITY OR FITNESS FOR A PARTICULAR PURPOSE ON THIS PRODUCT IS
LIMITED TO THE APPLICABLE WARRANTY AND WARRANTY PERIOD SET FORTH ABOVE.
How State Law relates to this warranty:
6RPHVWDWHVGRQRWDOORZWKHH[FOXVLRQQRUOLPLWDWLRQRILQFLGHQWDORUFRQVHTXHQWLDOGDPDJHVRU
limitations on how long an implied warranty lasts, so the above limitations or exclusions may
not apply to you.
7KLVZDUUDQW\JLYHV\RXVSHFL¿FOHJDOULJKWVDQG\RXDOVRPD\KDYHRWKHUULJKWVWKDWYDU\IURPVWDWH
to state.
If you purchased your unit outside the United States or seek warranty coverage outside the
United States: This warranty does not apply. Contact your dealer for warranty information.
Service calls which do not involve defective materials or workmanship are not covered by this
warranty. Costs of such service calls are the sole responsibility of the purchaser.

FCC Information
This equipment has been tested and found to comply with the limits for a Class B digital device,
pursuant to Part 15 of the FCC Rules. These limits are designed to provide reasonable protection
against harmful interference in a residential installation. This equipment generates, uses, and can
radiate radio frequency energy and, if not installed and used in accordance with the instructions, may
cause harmful interference to radio communications. However, there is no guarantee that interference
will not occur in a particular installation. If this equipment does cause harmful interference to radio
or television reception, which can be determined by turning the equipment off and on, the user is
encouraged to try to correct the interference by one or more of the following measures:
5HRULHQWRUUHORFDWHWKHUHFHLYLQJDQWHQQD
,QFUHDVHWKHVHSDUDWLRQEHWZHHQWKHHTXLSPHQWDQGUHFHLYHU
&RQQHFWWKHHTXLSPHQWLQWRDQRXWOHWRQDFLUFXLWGLIIHUHQWIURPWKDWWRZKLFKWKHUHFHLYHULV
connected.
&RQVXOWWKHGHDOHURUDQH[SHULHQFHGUDGLR79WHFKQLFLDQIRUKHOS
This Class B digital apparatus complies with Canadian ICES-003.
Please do not send any products to the Corona address listed in this manual or on the carton. This will
only add delays in service for your product.
Manufactured under license from Dolby Laboratories.
“Dolby” and the double-D symbol are registered trademarks of Dolby Laboratories.
TTE Technology, Inc.
1255 Graphite Drive Corona, CA 92881
©2011 TTE Technology, Inc.
TCL and associated marks are trademarks of TCL S.A.used
under license to TTE Corporation.
Printed in China
Part No.: 72-F12C8B-XNA1C

TV LCD
Guía del usuario
Para usar con los modelos: L26HDF12TA /
L26HDM12 /L32HDF12TA / L32HDM12 /
L40FHDF12TA / L40FHDM12
¿Necesita asistencia?
Por favor, visite nuestro sitio Web en www.tclusa.com
o llame al 1-877-300-8837.

Información Importante
Este símbolo indica que el producto contiene mercurio. Las leyes aplicables a su jurisdicción podrían requerir la eliminación
especial de este producto debido a consideraciones ambientales. Si desea información para la eliminación o reciclaje, por
favor comuníquese con las autoridades en su localidad o con Electronic Industries Alliance: www.eiae.org.
Instalador de televisión por cable: Este recordatorio tiene la intención de llamar su atención al artículo 820-40 del
Código Nacional de Electricidad (sección 54 del Código Eléctrico de Canadá, Parte 1) que establece los lineamientos
para una conexión correcta a tierra, y estipula especialmente que el cable a tierra deberá estar conectado al sistema
GHSXHVWDDWLHUUDGHOHGL¿FLRWDQFHUFDGHOSXQWRGHHQWUDGDGHOFDEOHFRPRVHDSRVLEOH
Importante: (VWHWHOHYLVRUHVXQPRGHORGHPHVD\KDVLGRGLVHxDGRSDUDSHUPDQHFHUHQXQDVXSHU¿FLH¿UPH
\SODQD1RFRORTXHHOWHOHYLVRUHQDOIRPEUDVVXDYHVRXQDVXSHU¿FLHVLPLODU\DTXHODVUDQXUDVGHYHQWLODFLyQ
de la parte inferior de la unidad podrían quedar bloqueadas, y eso reduciría la vida útil del aparato debido al
sobrecalentamiento. Para garantizar la ventilación adecuada de este producto, mantenga un espacio de 10 cm
desde la parte superior y los lados del receptor del televisor, y 5 cm desde la parte posterior del receptor del televisor
\RWUDVVXSHU¿FLHV
&HUFLyUHVHWDPELpQGHTXHODVXSHU¿FLHRHOVRSRUWHWHQJDQHOWDPDxR\UHVLVWHQFLDDGHFXDGRVSDUDHYLWDUTXHHO
televisor se voltee o caiga accidentalmente como resultado de un tirón o empujón. Esto podría ocasionar lesiones
personales y/o daños al televisor. Consulte la sección Importantes Instrucciones de Seguridad en la página siguiente.
El botón de Encendido (seguido del símbolo de alimentación) de este TV y de su mando a distancia, ponen el televisor
en un modo de espera de muy bajo consumo, pero no lo apagan completamente. Para apagarlo completamente, tiene
que desconectar el cable de alimentación del tomacorriente. El enchufe de la alimentación se utiliza como dispositivo
de desconexión del dispositivo, por lo que debe ser de fácil acceso. Por lo tanto, debe asegurarse de que el TV esté
instalado de manera tal que pueda desconectar el cable de alimentación cuando lo desee.
Información Sobre el Producto
Guarde el recibo como prueba de su compra y preséntelo para obtener repuestos o solicitar servicio bajo garantía.
Anéxelo aquí y anote los números de serie y de modelo para referencia en caso necesario. Estos números se
encuentran en el producto.
No. de Modelo ______________________ No. de Serie________________________________
Fecha de Compra ___________________ Distribuidor/Dirección/Teléfono_________________
Precaución: Para reducir el riesgo de un choque eléctrico, no retire la tapa (ni la parte posterior). No contiene
SLH]DVTXHHOXVXDULRSXHGDUHSDUDU6yORSHUVRQDOFDOL¿FDGRGHVHUYLFLRSXHGHKDFHUUHSDUDFLRQHV
Este símbolo indica “voltaje peligroso”
dentro del producto que implica el riesgo de
sufrir un choque eléctrico o una lesión.
Este símbolo indica instrucciones
importantes que acompañan al producto.
Este símbolo indica que este producto incorpora
un aislamiento doble entre los peligrosos voltajes
principales y las piezas accesibles al usuario. Al darle
mantenimiento, use sólo piezas de repuesto idénticas.
ADVERTENCIA
Para disminuir el riesgo de incendios o descargas
eléctricas, no exponga este producto a la lluvia ni a
la humedad. Este producto no deberá exponerse a
goteos o salpicaduras. No se debe colocar objetos que
FRQWHQJDQOtTXLGRVFRPRSRUHMHPSORÀRUHURVVREUHHO
componente.
(OWHOHYLVRUHVWDUiLQHVWDEOHVLQRVH¿MD
correctamente a la base o se monta en la
pared. Para garantizar su seguridad, acate las
instrucciones para la base o el montaje en pared
incluidas en la Guía del Usuario.
ADVERTENCIA
PRECAUCIÓN
RIESGO DE CHOQUE
ELÉCTRICO. NO ABRIR.
ADVERTENCIA
Las baterías no quedarán expuestas a un calor excesivo como a los rayos directos del sol, fuego o similar.
/DVQRUPDVGHOD)&&HVWDEOHFHQTXHORVFDPELRVRPRGL¿FDFLRQHVDHVWHHTXLSRVLQDXWRUL]DFLyQSXHGHQDQXODUOD
autoridad del usuario a usar el equipo.
&RQVXOWHODHWLTXHWDGHLGHQWL¿FDFLyQHVSHFL¿FDFLRQHVXELFDGDHQHOSDQHOSRVWHULRUGHOSURGXFWRSDUDYHUODWHQVLyQ
de funcionamiento adecuada.
Registro del Producto
Por favor registre su compra TCL on-line en www.tclusa.com. Será más fácil contactar con usted en caso necesario.
No es necesario registrarse para la cobertura de la garantía.
2
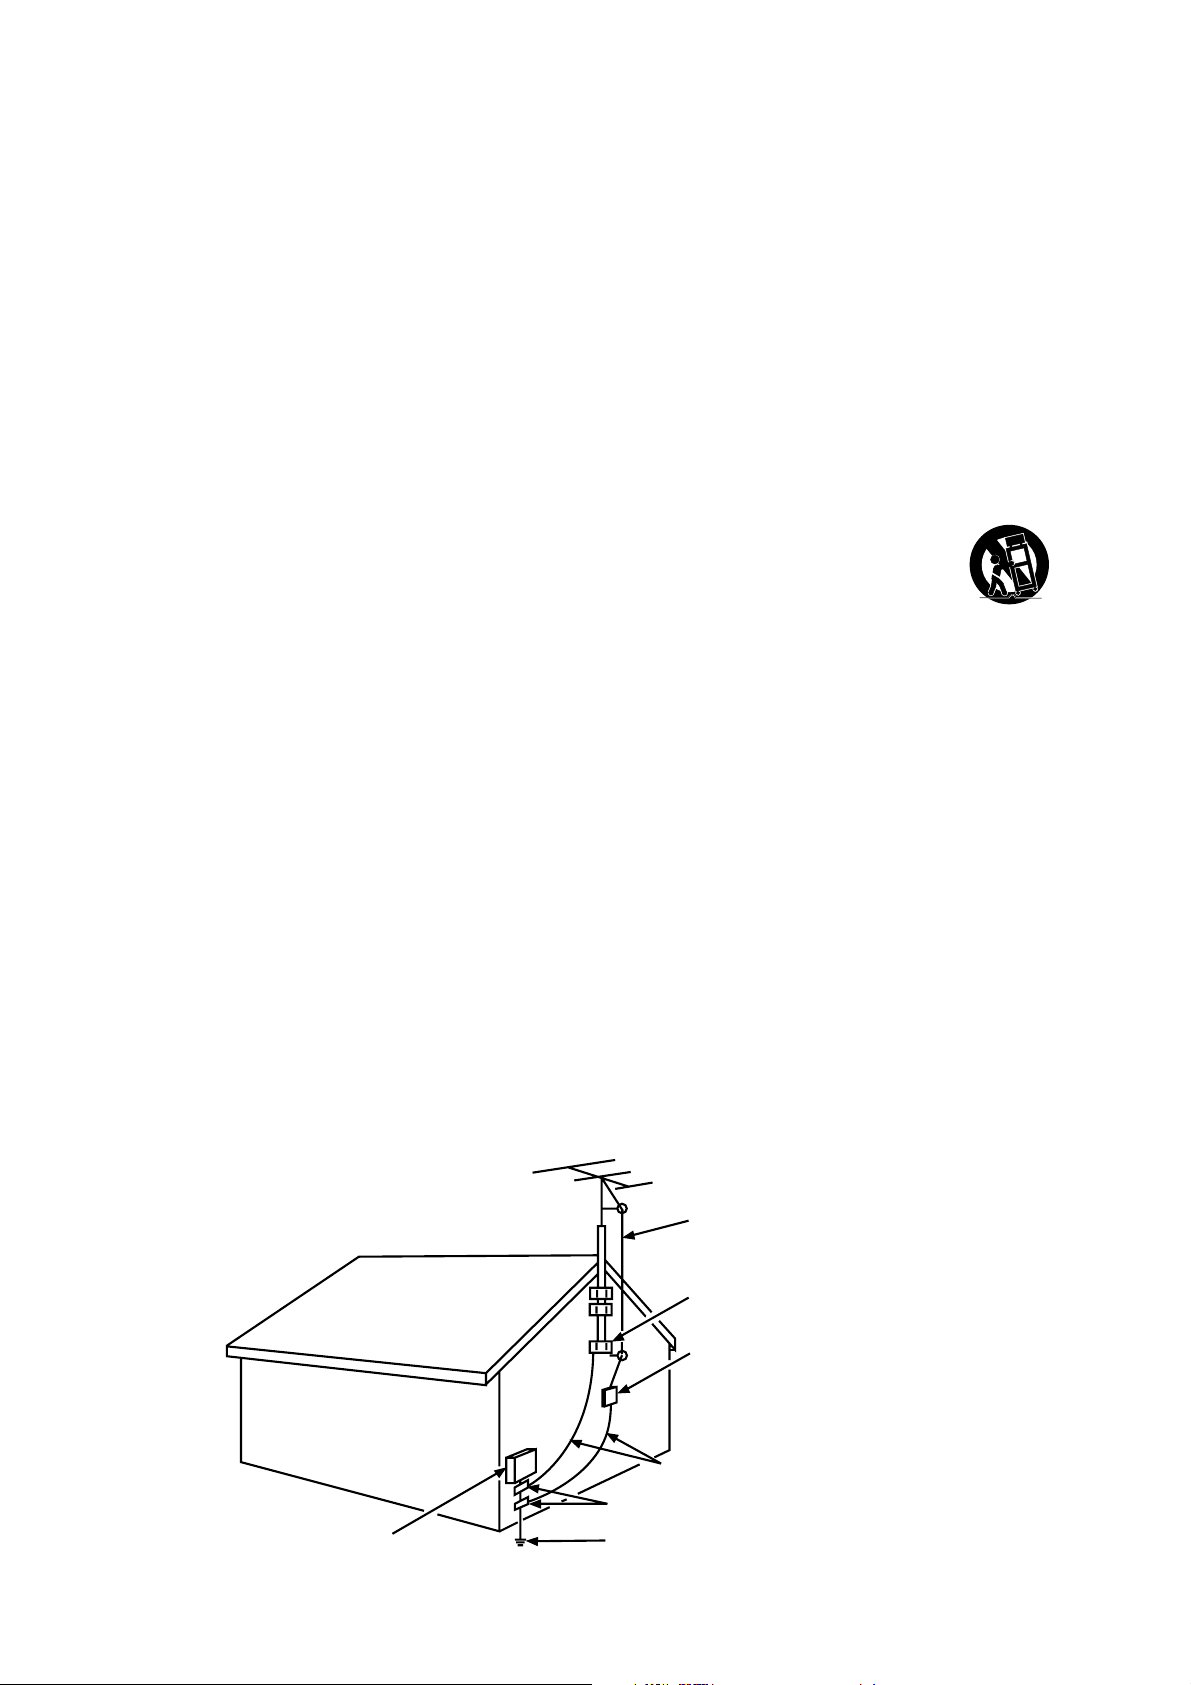
Importantes Instrucciones de Seguridad
1. Lea y observe todas las instrucciones.
2. Conserve estas instrucciones.
3. Haga caso a todas las advertencias.
1RREVWUX\DQLQJ~QRUL¿FLRGHYHQWLODFLyQ,QVWDOHHQFRQIRUPLGDGFRQODVLQVWUXFFLRQHVGHO
fabricante.
5. No instale cerca de fuentes térmicas, como radiadores, reguladores de calefacción, cocinas y
RWURVDSDUDWRVTXHJHQHUHQFDORULQFOXLGRVORVDPSOL¿FDGRUHV
6. No ignore el propósito de seguridad que tiene el enchufe polarizado o puesto a tierra. Un enchufe
polarizado tiene dos paletas, una más ancha que la otra. Un enchufe puesto a tierra tiene dos
paletas y una espiga de conexión a tierra. La paleta más ancha o la tercera espiga se ha incluido
por su seguridad. Si el enchufe provisto no encaja en su tomacorriente, solicítele a un electricista
que reemplace ese tomacorriente obsoleto.
7. Proteja el cable de alimentación de modo que no resulte pisado ni aprisionado, especialmente en
el enchufe, los receptáculos y el punto por donde sale del componente.
8. No use este componente cerca del agua.
8VHVyORORVDFFHVRULRVHVSHFL¿FDGRVSRUHOIDEULFDQWH
10. Limpie sólo con un trapo seco.
8VHVyORFRQHOFDUULWREDVHWUtSRGHVRSRUWHRPHVDTXHHVSHFL¿FDHOIDEULFDQWHRTXHVHYHQGH
con el componente. Si el televisor se coloca en un carrito, tenga cuidado al mover el carrito para
evitar que voltee y haga daño.
12. Desenchufe este componente en caso de tormentas o de lapsos prolongados de inactividad.
6ROLFLWHDOSHUVRQDOWpFQLFRFDOL¿FDGRWRGRWLSRGHPDQWHQLPLHQWRGHOSURGXFWR6HUiQHFHVDULR
hacerle el mantenimiento cuando el componente haya sufrido algún tipo de daño, por ejemplo, si
se ha dañado el enchufe o el cable de alimentación eléctrica, si se ha derramado líquido o han
caído objetos dentro del componente, exposición a la lluvia o humedad, funcionamiento anormal,
o si se ha dejado caer el componente.
14. Si ha conectado el producto a una antena o sistema de cable, cerciórese de poner a tierra
WDODQWHQDRVLVWHPDGHFDEOHFRQHO¿QGHEULQGDUFLHUWDSURWHFFLyQFRQWUDVREUHWHQVLyQ\
acumulación de cargas estáticas. La sección 810 de las Normas para Instalaciones Eléctricas,
ANSI/NFPA 70-1984, (Sección 54 del Código Eléctrico de Canadá, Parte 1) contiene información
reglamentaria acerca de la puesta a tierra del mástil y la estructura de soporte, la puesta a tierra
del conductor de conexión al descargador de la antena, el calibre de los conductores a tierra, la
ubicación del descargador de la antena, la conexión al electrodo de puesta a tierra y los requisitos
del electrodo de puesta a tierra. Vea el ejemplo a continuación:
CABLE DE ENTRADA DE ANTENA
ABRAZADERA A TOMA TIERRA
CONDUCTORES A TIERRA
(NEC SECCIÓN 810-21)
ABRAZADERAS A TOMA TIERRA
SISTEMA DE ELECTRODOS DE TOMA
DE TIERRA PARA EL SERVICIO ELÉCTRICO
(NEC ART 250, PARTE H)
EQUIPO DE
SERVICIO ELÉCTRICO
UNIDAD DE DESCARGA DE ANTENA
(NEC SECCIÓN 810-20)
3

Información importante .........................................2
Instrucciones de seguridad importantes ...............3
&DStWXOR&RQH[LRQHV\FRQ¿JXUDFLyQ
Antes del ajuste inicial .........................................5
Protéjase de sacudidas eléctricas ....................5
Información de seguridad ................................5
Evite interferencias de sonido ..........................5
Evite iluminación directa ...................................5
Compruebe las piezas suministradas ...............5
Colocar su TV sobre el soporte sobremesa .........6
Montar su TV en la pared .....................................7
Explicación de los conectores y botones
de la TV ................................................................8
Panel trasero ....................................................8
Conectores de entrada laterales ......................9
Botones del panel del TV .................................9
Cómo recibir la señal ..........................................10
Lo que usted necesita ....................................10
Lo que usted debe saber ................................10
Elija sus conexiones ...........................................11
Conexión de vídeo compuesto (Buena) .........12
Conexión de vídeo por componentes (Mejor) 12
Conexión HDMI (La mejor) .............................13
Conexión HDMI/DVI .......................................13
Conexión PC...................................................14
Conectar la TV....................................................14
Instalar las baterías en el control remoto ...........14
Encender la TV ...................................................14
Usar el control remoto para completar el ajuste
inicial...................................................................14
Completar el ajuste inicial...................................15
Seleccionar el idioma de los menús ...............15
&RQ¿JXUDUHOPRGRGHXELFDFLyQGHOD79 .....15
Seleccionar la zona horaria ............................15
Búsqueda automática de canales ..................16
Saltar Búsqueda .............................................16
Capítulo 2 -
Entender el funcionamiento básico
Encender y apagar la TV ....................................17
Seleccionar la entrada de vídeo .........................17
Seleccionar un canal ..........................................17
Ajustar/Silenciar el volumen ...............................17
Formatos de pantalla ..........................................18
Cuadro de información del canal ........................18
Capítulo 3 -
Cómo utilizar el control remoto
Botones del control remoto.................................19
Capítulo 4 - Cómo usar el menú TV
Cómo utilizar el sistema de menús.................... 20
Menú Imagen..................................................... 20
&RQ¿JXUDFLyQGH,PDJHQ............................... 20
Ajustes Expertos ............................................ 20
Ajustes Avanzados ........................................ 21
Configuración PC........................................... 21
5HVWDEOHFHUFRQ¿JXUDFLyQGH,PDJHQ ........... 21
Menú Sonido ..................................................... 22
0HQ~&RQ¿JXUDFLyQ .......................................... 23
Tipo de señal ................................................. 23
Búsqueda de canales .................................... 23
Saltar Canal ................................................... 24
Editar Canal ................................................... 24
Saltar Entrada ................................................ 25
Nombre de Entradas...................................... 25
Subtitulado electrónico .................................. 26
&RQ¿JXUDFLyQGHODKRUD................................ 27
Información del sistema ................................. 27
Restablecer todo............................................ 28
Control de padres y V-Chip ............................... 28
Cambiar la contraseña V-Chip....................... 28
Bloqueo de Canal .......................................... 29
Bloqueo de Botones ...................................... 29
+DELOLWDUODFODVL¿FDFLyQ9&KLS ..................... 29
3DQWDOODGHFODVL¿FDFLyQ9&KLS .................... 30
&ODVL¿FDFLRQHVGH799&KLSHQ((88 ...... 30
%ORTXHDUWHPDVGHFRQWHQLGRHVSHFt¿FR ....... 30
&ODVL¿FDFLRQHVGH3HOtFXODV9&KLS
en EE.UU. ...................................................... 31
%ORTXHDUODVFODVL¿FDFLRQHV
V-Chip en Canadá ......................................... 31
Abrir V-Chip ................................................... 32
%ORTXHDUSURJUDPDV³6LQFODVL¿FDU([HQWRV´ 32
Restablecer Información Descargable........... 32
Bloquear Entrada ........................................... 32
Menú Lenguaje .................................................. 32
Menú USB ......................................................... 33
Conexión USB ................................................... 33
Capítulo 5 - Información adicional
Preguntas Frecuentes ....................................... 34
Resolución de problemas .................................. 35
Cuidado y limpieza ............................................ 37
([SOLFDFLyQGHODFODVL¿FDFLyQ9&KLS ............... 38
6LVWHPDGHFODVL¿FDFLyQ9&KLSHQ((88 .. 38
6LVWHPDGHFODVL¿FDFLyQ9&KLSHQ,QJOpV
de Canadá ..................................................... 38
6LVWHPDGHFODVL¿FDFLyQ9&KLS
en Francés de Canadá .................................. 39
(VSHFL¿FDFLRQHVGHOWHOHYLVRU............................ 39
Garantía limitada ............................................... 40
Índice de contenidos
4

Antes del ajuste inicial
Protéjase de sacudidas eléctricas
Conecte todos los componentes antes de enchufar cualquier cable al tomacorriente de
alimentación eléctrica o extensión.
1RHQFKXIH181&$HOWHOHYLVRUHQXQWRPDFRUULHQWHFRQWURODGRSRUXQLQWHUUXSWRUGHSDUHG
$SDJXHHOWHOHYLVRUDQWHVGHFRQHFWDURGHVFRQHFWDUORVFDEOHV
$VHJ~UHVHTXHWRGDVODVDQWHQDV\FDEOHVWHQJDQXQDFRQH[LyQDWLHUUDDGHFXDGD&RQVXOWHOD
sección Instrucciones de seguridad importantes.
Información de seguridad
3URWHMDORVFRPSRQHQWHVGHXQVREUHFDOHQWDPLHQWR
1RREVWUX\DORVRUL¿FLRVGHYHQWLODFLyQHQFXDOTXLHUDGHORVFRPSRQHQWHV$FRPyGHORVGHWDO
manera que el aire circule libremente.
1RDSLOHORVFRPSRQHQWHVXQRVREUHRWUR
6LFRORFDHOFRPSRQHQWHHQXQPXHEOHRVRSRUWHDVHJ~UHVHTXHODYHQWLODFLyQVHDDGHFXDGD
6LYDDFRQHFWDUXQUHFHSWRURDPSOLILFDGRUGHVRQLGRFROyTXHORHQODUHSLVDVXSHULRUGHPDQHUD
que el aire caliente no dañe otros componentes.
Evite interferencias de sonido
6LW~HORVFDEOHVFRUUHFWDPHQWHLQVHUWHFDGDFDEOHILUPHPHQWHHQHOFRQHFWRUFRUUHVSRQGLHQWH
6LYDDFRORFDUFRPSRQHQWHVHQFLPDGHOWHOHYLVRUGLULMDWRGRVORVFDEOHVKDFLDDEDMRSRUXQODGRGH
la parte trasera del televisor en lugar de hacerlo por el centro.
6LVXDQWHQDXWLOL]DFDEOHVELILODUHVGHRKPLRVQRORVHQUROOH
0DQWHQJDORVFDEOHVELILODUHVDOHMDGRVGHORVFDEOHVSDUDDXGLR\YLGHR
Evite iluminación directa
No coloque el televisor donde la luz del sol o la iluminación de la habitación incidan directamente
sobre la pantalla. Utilice luz tenue o indirecta.
Compruebe las piezas suministradas
Compruebe que se suministraron las siguientes piezas con su producto.
PDQGRDGLVWDQFLD\EDWHUtDV$$$
*XtDGHXVXDULR
*XtDGH,QLFLR5iSLGR
/LVWDGH3DUWHVSDUD6RSRUWHGH79(ver páginas 6)
&DStWXOR&RQH[LRQHV\FRQ¿JXUDFLyQ
Los gráficos utilizados en esta publicación tienen sólo fines ilustrativos.
5
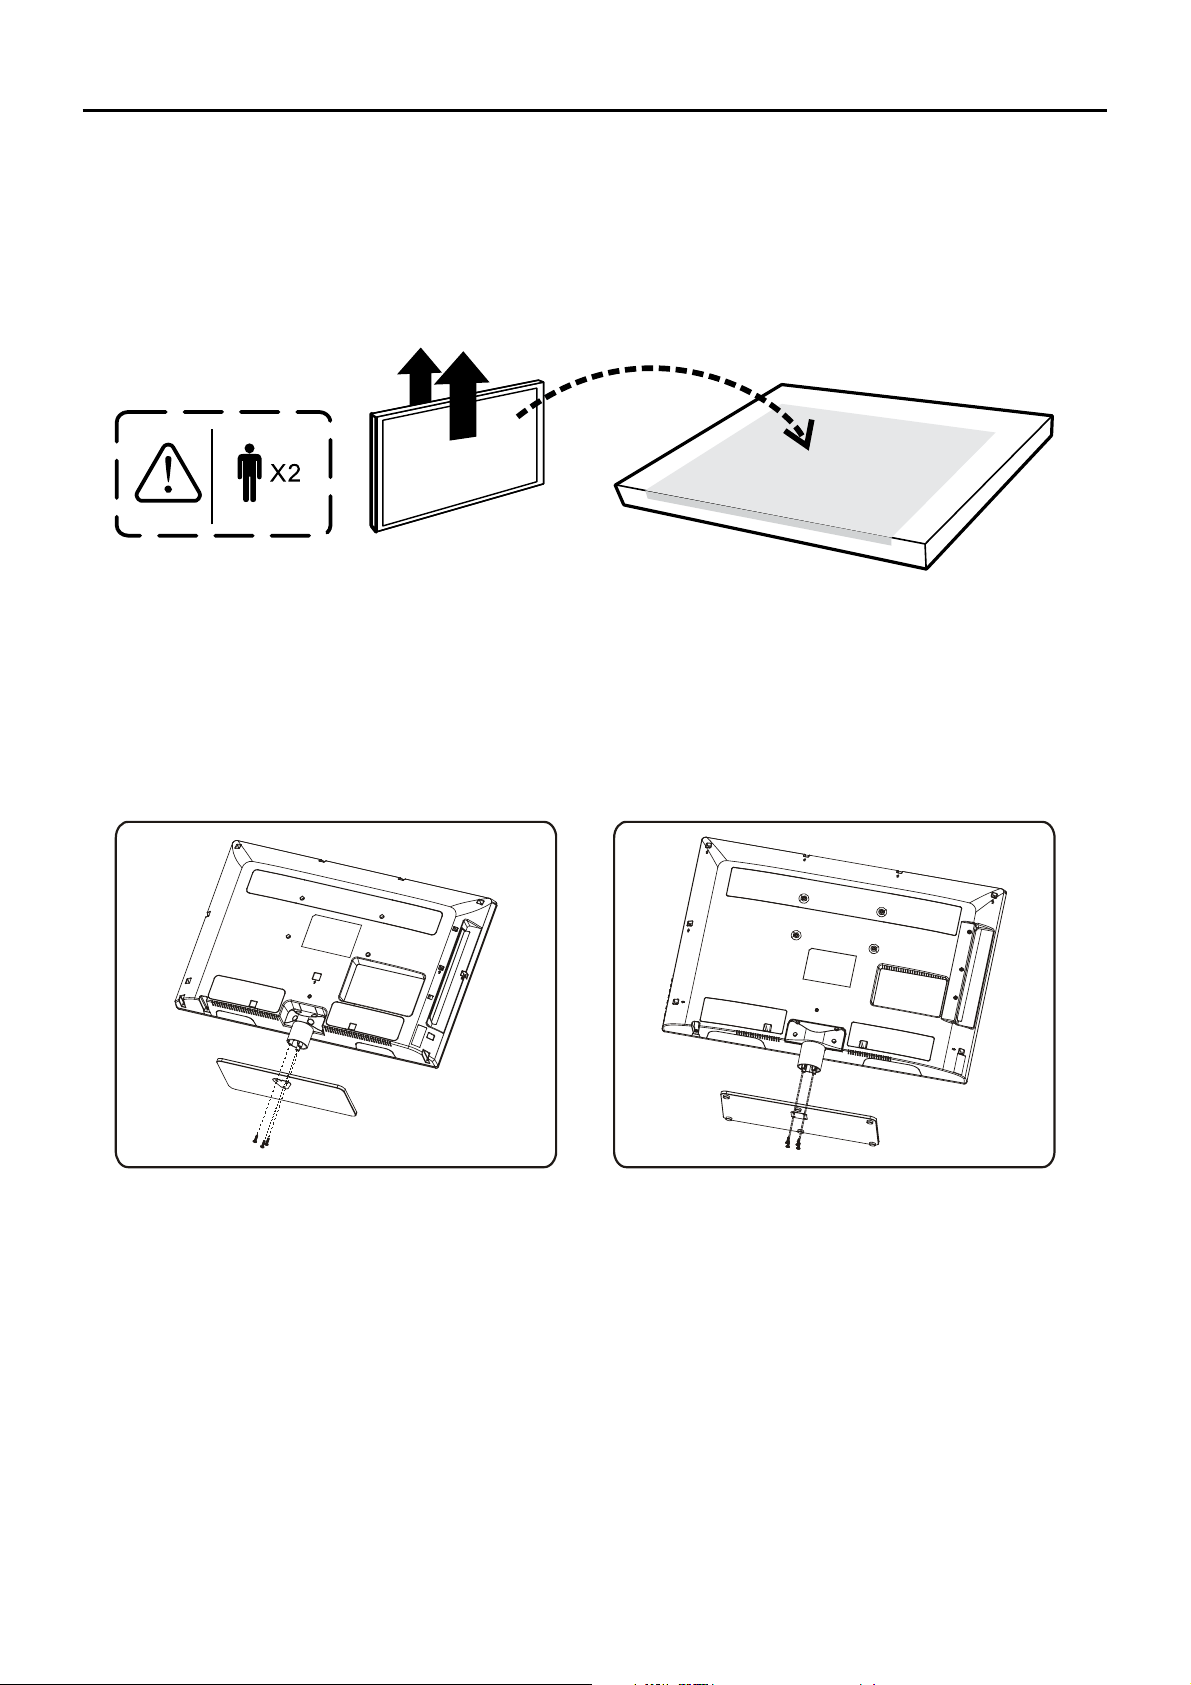
Colocar su TV sobre el soporte sobremesa
Su televisor viene con el soporte sobremesa desmontado de modo que usted puede elegir si montar
su televisor en una mesa o sobre la pared (en soporte de pared se vende por separado). Si desea
montar el TV en la pared, no le coloque la base de sobremesa, retire la bisagra y la tapa de la
bisagra. Siga las instrucciones de ‘Montar su TV en la pared’ en la página 7.
3ULPHURVDTXHHOWHOHYLVRUGHODEROVDGHSOiVWLFR\FROyTXHORVREUHXQDVXSHU¿FLHSODQD
grande, como una mesa o encimera. Quite los cartones del TV y colóquela boca abajo sobre
la bolsa del TV. Asegúrese de colocar el TV hacia abajo para evitar arañar la pantalla.
Siga entonces los pasos que se indican a continuación:
Nota: A para el modelos L26HDF12TA / L26HDM12.
B para los modelos L32HDF12TA / L32HDM12 / L40FHDF12TA / L40FHDM12.
AB
6

Si desea montar el TV en la pared, no le coloque la base de sobremesa, retire la bisagra y la tapa de
la bisagra.
Montar su TV en la pared
(OQ~PHUR9(6$HVODPHGLGDKRUL]RQWDO\YHUWLFDOGHORVRUL¿FLRVGHPRQWDMH3RUHMHPSOR[TXLHUH
decir que las medidas del montaje son 200mm horizontalmente y 100mm verticalmente.
Notas: Siga las instrucciones incluidas con el montaje en pared para montar el televisor a la pared.
Precaución: Su montaje en pared debe ser capaz de soportar al menos 5 veces el peso neto de su TV para
evitar ocasionar daños.
Para montar el televisor en la pared, compre un montaje en pared VESA.
Modelos L26HDF12TA /L26HDM12 /
L32HDF12TA / L32HDM12
Modelos L40FHDF12TA / L40FHDM12
Adquiera un montaje VESA 200x100,
tamaño de tornillo M4
Adquiera un montaje VESA 400x400,
tamaño de tornillo M6
7
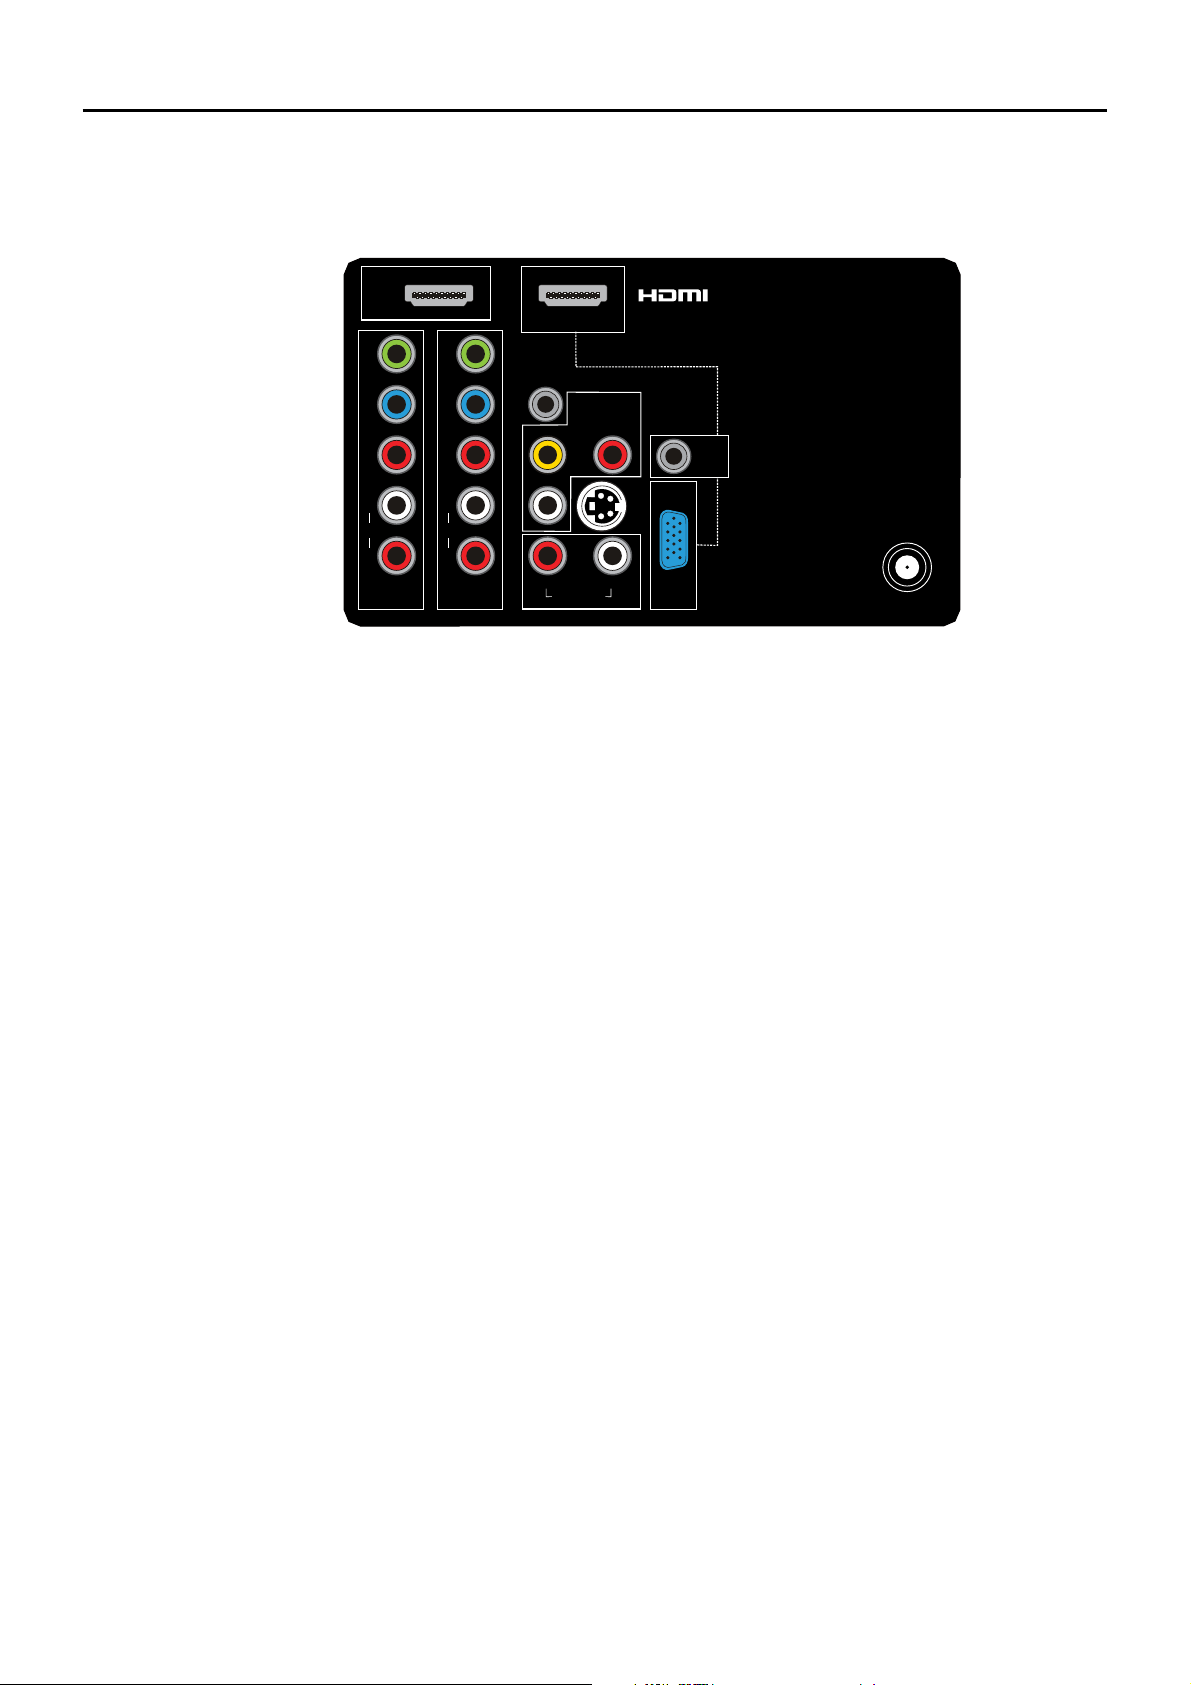
ANT/CABLE/SAT IN
Le permite conectar un cable coaxial para recibir la señal de la antena, cable, descodificador TV o receptor
satélite.
AUDIO (R/L) OUT Utilice un cable de audio RCA para conectar su TV a un receptor de audio compatible.
(No disponible en el modo USB)
AUDIO/VIDEO IN 1 (AV 1) Le permite conectar un componente que tenga conectores de vídeo compuesto,
como un lector VCR o DVD.
L AUDIO Brinda una conexión de audio izquierda al utilizar el conector VIDEO IN. Generalmente, estos
conectores de audio son blancos Para fuentes de audio monofónico, asegúrese de utilizar el conector
AUDIO IN izquierdo.
R AUDIO Brinda una conexión de audio derecha al utilizar el conector VIDEO IN. Generalmente este
conector de audio es rojo.
COMPONENT IN 1 y IN 2 Le permite conectar un componente que tenga conectores de vídeo por
componentes, como un lector DVD.
CMPT Y Pb Pr (Video por componentes) Permite obtener una imagen de buena calidad ya que la señal
de video se divide en tres. Para esta conexión, use tres cables clasificados para video o cables de video
por componentes.
CMPT L AUDIO Proporciona la conexión del canal de audio izquierdo cuando usa las entradas CMPT
VIDEO. Normalmente el conector de audio izquierdo es blanco. Para fuentes de audio monofónico,
asegúrese de utilizar el conector AUDIO INPUT izquierdo.
&0375$8',2Proporciona la conexión del canal de audio derecho cuando usa las entradas CMPT
VIDEO. Normalmente este conector de audio es rojo.
SPDIF OUT – SALIDA AUDIO DIGITAL (coaxial) Utilice un cable coaxial digital para conectar su televisor
a un receptor de audio compatible.
HDMI IN 3 Le permite conectar un componente, tal como un aparato descodificador digital por cable, con
una salida HDMI para obtener una imagen de óptima calidad.
HDMI/DVI IN 1 (Interfaz Multimedia de Alta Definición/Interfaz Visual Digital) Proporciona una conexión
digital sin comprimir que transmite tanto datos de video como de audio por medio de un cable con mini-
conector integrado. Dado que la tecnología HDMI se basa en la Interfaz Visual Digital (DVI, siglas en inglés),
el conector de la parte posterior de su televisor es también compatible con los componentes DVI.
(PC IN) VGA Conecte su PC u otro componente son salida VGA a este conector usando un cable D-sub con
clavija de 15-pines.
DVI/PC AUDIO IN (sólo se usa para DVI/PC) Proporciona conexión de audio cuando usa la entrada HDMI/
DVI INPUT 1 para DVI o la entrada PC IN.
Nota: Si está utilizando un componente DVI, no olvide conectar los cables de audio izquierdo y derecho, ya
que el cable de DVI sólo transmite señales de imagen, no de sonido.
S-VIDEO IN Le permite conectar un cable de S-VIDEO desde otro componente. Asegúrese de conectar los
cables de audio desde el componente al TV (comparte los mismos conectores de entrada AUDIO que el
AV1). Para acceder al componente conectado en el conector S-VIDEO, pulse el botón INPUT de su control
remoto hasta que seleccione S-VIDEO.
Panel trasero
Explicación de los conectores y botones de la TV
Esta sección describe los conectores del panel trasero de su TV. Hay varias maneras de conectar los
componentes.
Y
Pb
Pr
ANT/CABLE
/SAT IN
COMPONENT
IN 2 (CMPT 2)
L
AUDIO
R
DVI/PC
AUDIO
IN
VGA
PC IN
Y
Pb
Pr
COMPONENT
IN 1 (CMPT 1)
L
AUDIO
R
HDMI
IN 3
HDMI/DVI IN 1
VIDEO
AUDIO-R
AUDIO/VIDEO
IN 1 (AV 1)
AUDIO-L
SPDIF
OUT
S-VIDEO IN
AUDIO OUT
RL
8

Conectores de entrada laterales
(AUDÍFONOS) Le permite conectar sus auriculares/audífonos para
escuchar el sonido procedente del televisor.
USB
Le permite conectar a un dispositivo de almacenamiento masivo usando
el conector USB.
HDMI IN 2
/HSHUPLWHFRQHFWDUXQFRPSRQHQWHWDOFRPRXQDSDUDWRGHVFRGL¿FDGRU
digital por cable, con una salida HDMI para obtener una imagen de
óptima calidad.
AUDIO/VIDEO IN 2 (AV 2) Le permite conectar un componente que
tenga conectores de vídeo compuesto, como un lector VCR o DVD.
L AUDIO Brinda una conexión de audio izquierda al utilizar el
conector VIDEO IN. Generalmente, estos conectores de audio son
blancos Para fuentes de audio monofónico, asegúrese de utilizar el
conector AUDIO IN izquierdo.
R AUDIO Brinda una conexión de audio derecha al utilizar el conector
VIDEO IN. Generalmente este conector de audio es rojo.
Botones del panel del TV
Si no puede encontrar el mando a distancia, puede utilizar los botones
del panel frontal de su TV para operar muchas de las funciones del
equipo.
CH+/-
Pulse CH+/- para seleccionar los canales memorizados en la lista de
FDQDOHVRSDUDQDYHJDUDUULEDRDEDMRŸźSRUORVHOHPHQWRVGHO
menú.
VOL+/-
Pulse VOL +/- para aumentar o reducir el volumen o para navegar a
GHUHFKDRL]TXLHUGDŹŻSRUORVHOHPHQWRVGHOPHQ~
VOL+ también funciona como botón OK en el sistema de menús.
MENU
Pulse el botón MENU para que aparezca el menú principal del televisor.
INPUT
Presione el botón INPUT para seleccionar la fuente de señal.
POWER (
)
Pulse el botón POWER para encender y apagar el televisor.
AV lateral
Botón del Panel lateral
VIDEO
L
AUDIO
R
HDMI
IN 2
USB
AUDIO/VIDEO IN 2
(AV 2)
INPUT
MENU
CH
CH
VOL
VOL
9

8QDYH]FRPSOHWDGDVWRGDVODVFRQH[LRQHVHQFLHQGDODXQLGDGHLQLFLHHOSURFHVRGHFRQ¿JXUDFLyQ
buscando los canales de su área.
Cómo recibir la señal
El primer paso de la conexión de su televisor es recibir la señal. El panel posterior del televisor le
permite recibir canales digitales y/o analógicos mediante la entrada ANTENNA/CABLE INPUT.
Antes de conectar el televisor, debe determinar si va a utilizar una antena o un servicio de cable para
recibir la señal.
Lo que usted necesita
Antena (tipo ‘orejas de conejo’) o antena exterior con cable coaxial
Conecte la antena o el cable coaxial, procedente de la salida de la pared, al conector ANT/CABLE/
SAT IN de la parte posterior del televisor. Ya está listo para recibir canales analógicos y canales
digitales locales.
Servicio de cable
Conecte el cable coaxial, procedente de la salida de la pared, al conector ANT/CABLE/SAT IN de la
parte posterior del televisor. Ya está listo para recibir sus canales por cable.
'HVFRGL¿FDGRUSRUFDEOH
6LWLHQHXQGHVFRGL¿FDGRUSRUFDEOHWDOYH]QHFHVLWHOODPDUDODFRPSDxtDGHFDEOHRDOSURYHHGRUGH
servicio de satélite. Ellos le recomendarán cables especiales para permitirle ver canales digitales.
Lo que usted debe saber
9LVLWHwww.antennaweb.org para obtener ayuda para decidir el tipo de antena que debe utilizar
de modo de recibir los canales digitales locales disponibles en su área. Ingrese su ubicación, y el
programa desplegará una lista de las emisoras analógicas y digitales disponibles cuando utilice la
antena.
&XDQGRYHOD79HOcuadro de información del canal muestra el tipo de canal que está
sintonizando en esos momentos.
Conecte el cable coaxial RF que sale de la pared al conector de entrada
ANT/CABLE/SAT IN de esta unidad.
SAT IN
ANT/CABLE/
Antena de exteriores o interior
Descodificador
TV cable,
(Toma de pared)
Cable
coaxial de RF
(75 ohmios)
O
O
10
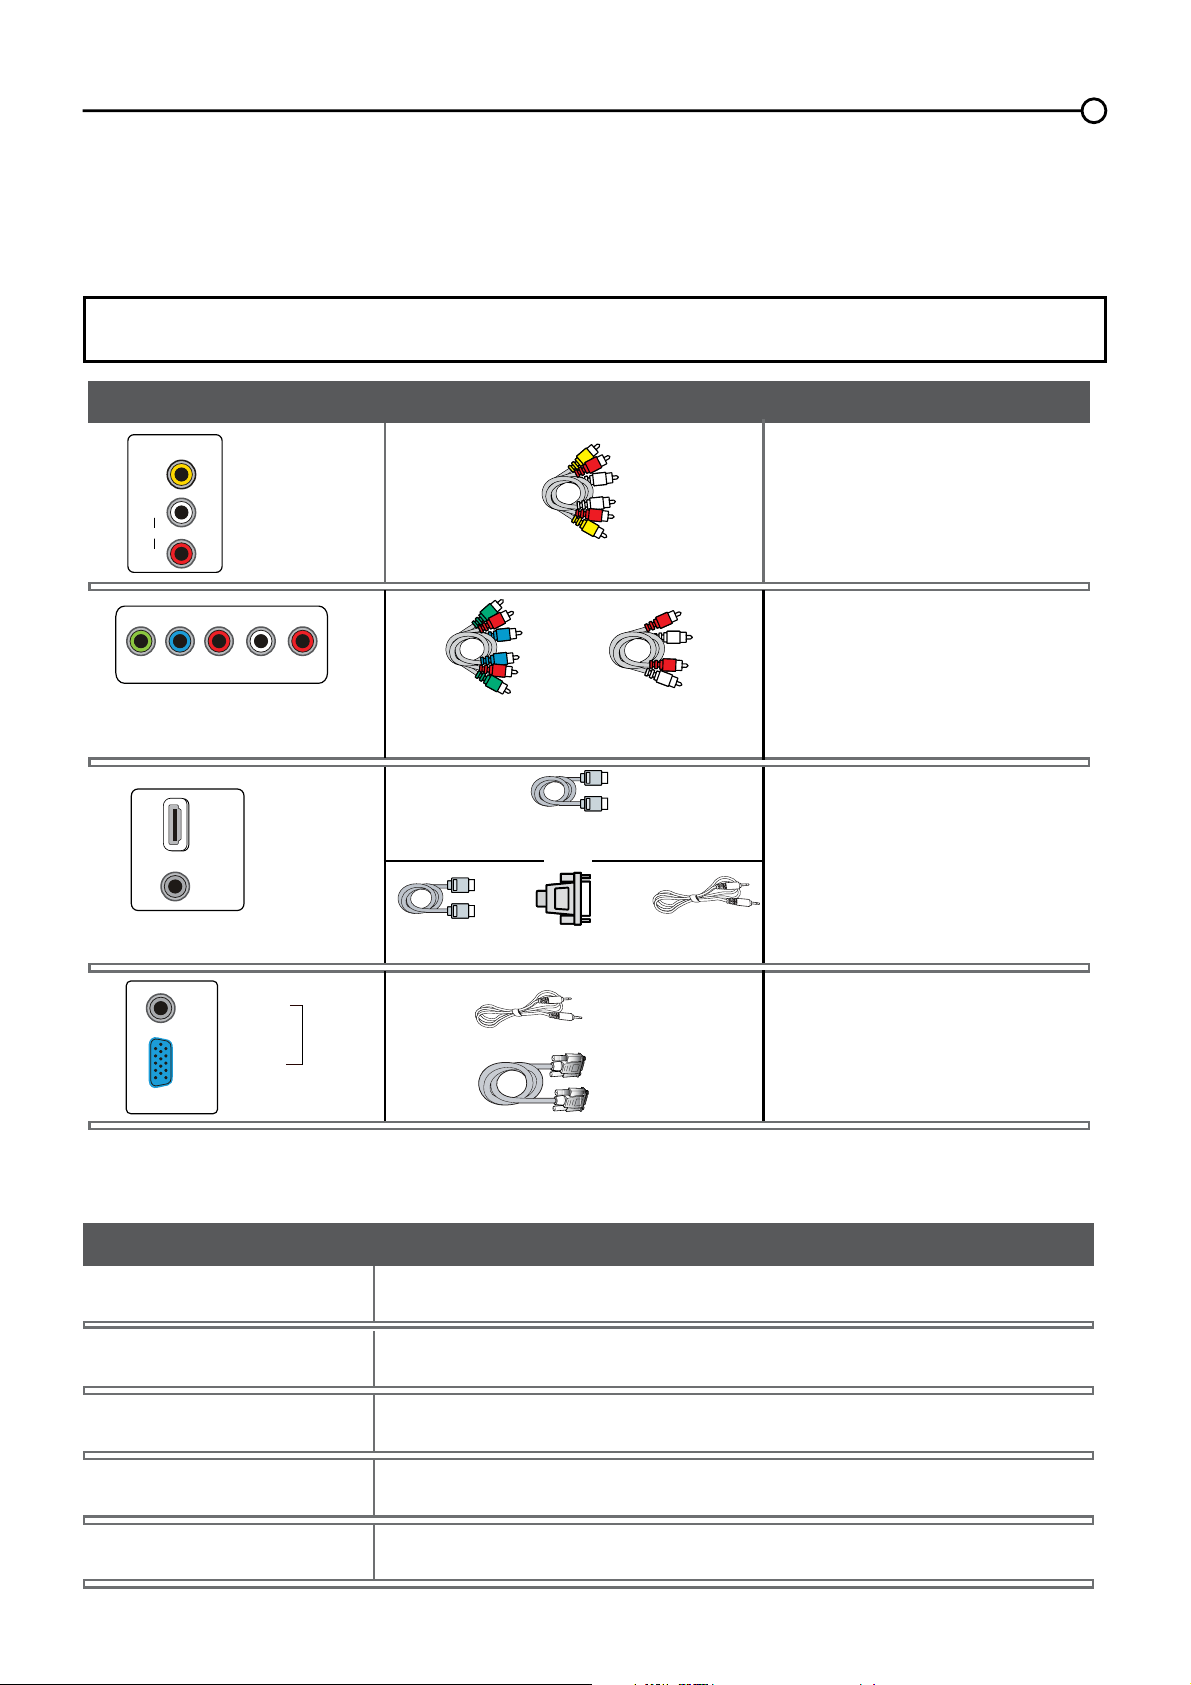
HDMI
TM
+ Adaptador HDMI/DVI +
O
Audio
página 13
página 14
HDMI
TM
+'0,HOORJRWLSRGH+'0,\+LJK'H¿QLWLRQ0XOWLPHGLD,QWHUIDFHVRQPDUFDVFRPHUFLDOHVR
registradas de HDMI Licensing LLC.
Entrada Compatibilidad de señal
Antena/Cable 480i, 480p, 720p, 1080i (formatos NTSC, ATSC, QAM)
Video compuesto 480i
Video por componentes 480i, 480p, 720p/60Hz, 1080i/60Hz, 1080p/60HZ
HDMI 480i, 480p, 720p/60Hz, 1080i/60Hz, 1080p/60Hz
PC VGA SVGA XGA
Elija sus conexiones
([LVWHQYDULDVPDQHUDVGHFRQHFWDUFRPSRQHQWHVWDOHVFRPROHFWRUHVGH'9'\GHVFRGL¿FDGRUHV
por cable, a su televisor. Utilice el siguiente cuadro para determinar que conexión es la mejor para su
caso particular. Consulte las páginas adecuadas para conectar sus componentes
Nota: No se suministran los cables con esta unidad. Por favor, compre los cables que necesite.
Es recomendable un cable HDMI de alta velocidad para una mejor compatibilidad.
Audio/Video
página 12
Vídeo por
componentes
Audio
Conectores usados Cables necesarios Vaya a...
página 12
Audio
Audio
HDMI/DVI
Y Pb Pr
Audio Izdo.
y Dcho.
Audio Izdo.
y Dcho.
Video
VGA
VIDEO
L
AUDIO
R
AUDIO/VIDEO
IN (AV)
Y
Pb
Pr L
AUDIO
R
COMPONENT IN (CMPT)
HDMI/DVI IN 1
DVI/PC
AUDIO
IN
Audio
VGA
DVI/PC
AUDIO
IN
VGA
PC IN
11

Conexión de vídeo compuesto (Buena)
Para conectar un componente con conector de salida de video, tal como un Lector de DVD, siga los
siguientes pasos:
Ejemplo: Lector DVD
1. Conecte el cable y/o su antena de exteriores como se describe en la página 10.
2. Conecte el cable de video amarillo al conector VIDEO (AV2) de la parte trasera del televisor y al
conector de salida de video del Lector de DVD.
3. Conecte los cables de audio rojo y blanco a los conectores de audio izquierdo y derecho (AV2) en
la parte posterior del televisor y a los conectores de salida de audio del Lector de DVD.
(QFLHQGDVX79OXHJRHQFLHQGDHOOHFWRUGH'9'
5. Pulse el botón INPUTSDUDDEULUODOLVWDGH(175$'$6OXHJRSXOVHINPUT varias veces para
seleccionar AV2.
Nota: la misma operación que para la conexión del AV1 en el panel trasero del TV.
Este es un ejemplo de una conexión utilizando los conectores de video compuesto
Conexión de vídeo por componentes (Mejor)
La conexión de video por componentes ofrece mejor calidad de vídeo para los dispositivos
conectados a la unidad. Para conectar un componente con conectores Y Pb Pr, tal como un Lector de
DVD, siga los siguientes pasos:
Ejemplo: Lector DVD
1. Conecte el cable y/o su antena de exteriores como se describe en la página 10.
2.
Conecte los tres cables de video o cables Y Pb Pr especiales a los conectores COMPONENT IN 1
(CMPT 1) Y Pb Pr
en la parte posterior del televisor y a las salidas Y Pb Pr del Lector de DVD.
3. Conecte los cables de audio rojo y blanco a los conectores de entrada de audio COMPONENT
IN 1 (CMPT 1) R y L en la parte trasera del televisor y a los conectores de salida de audio del
reproductor DVD.
(QFLHQGDVX79OXHJRHQFLHQGDHOOHFWRUGH'9'
5. Pulse el botón INPUT en el control remoto para abrir la lista de entradas. Una vez abierta, pulse
varias veces el botón INPUT hasta seleccionar CMPT 1.
Nota: la misma operación que para la conexión de la entrada por COMPONENT IN 2 (CMPT 2) en
el panel trasero del TV.
Éste es un ejemplo de una conexión utilizando los conectores de video por componentes.
VIDEO
L
AUDIO
R
VIDEOLR
AUDIO
SALIDA AUDIO/VIDEO
ENTRADA 2 AUDIO/
VIDEO (AV2)
LRPrPbY
L
AUDIO
R
Y
Pb
Pr
COMPONENT
IN 1 (CMPT 1)
COMPONENT OUT
12
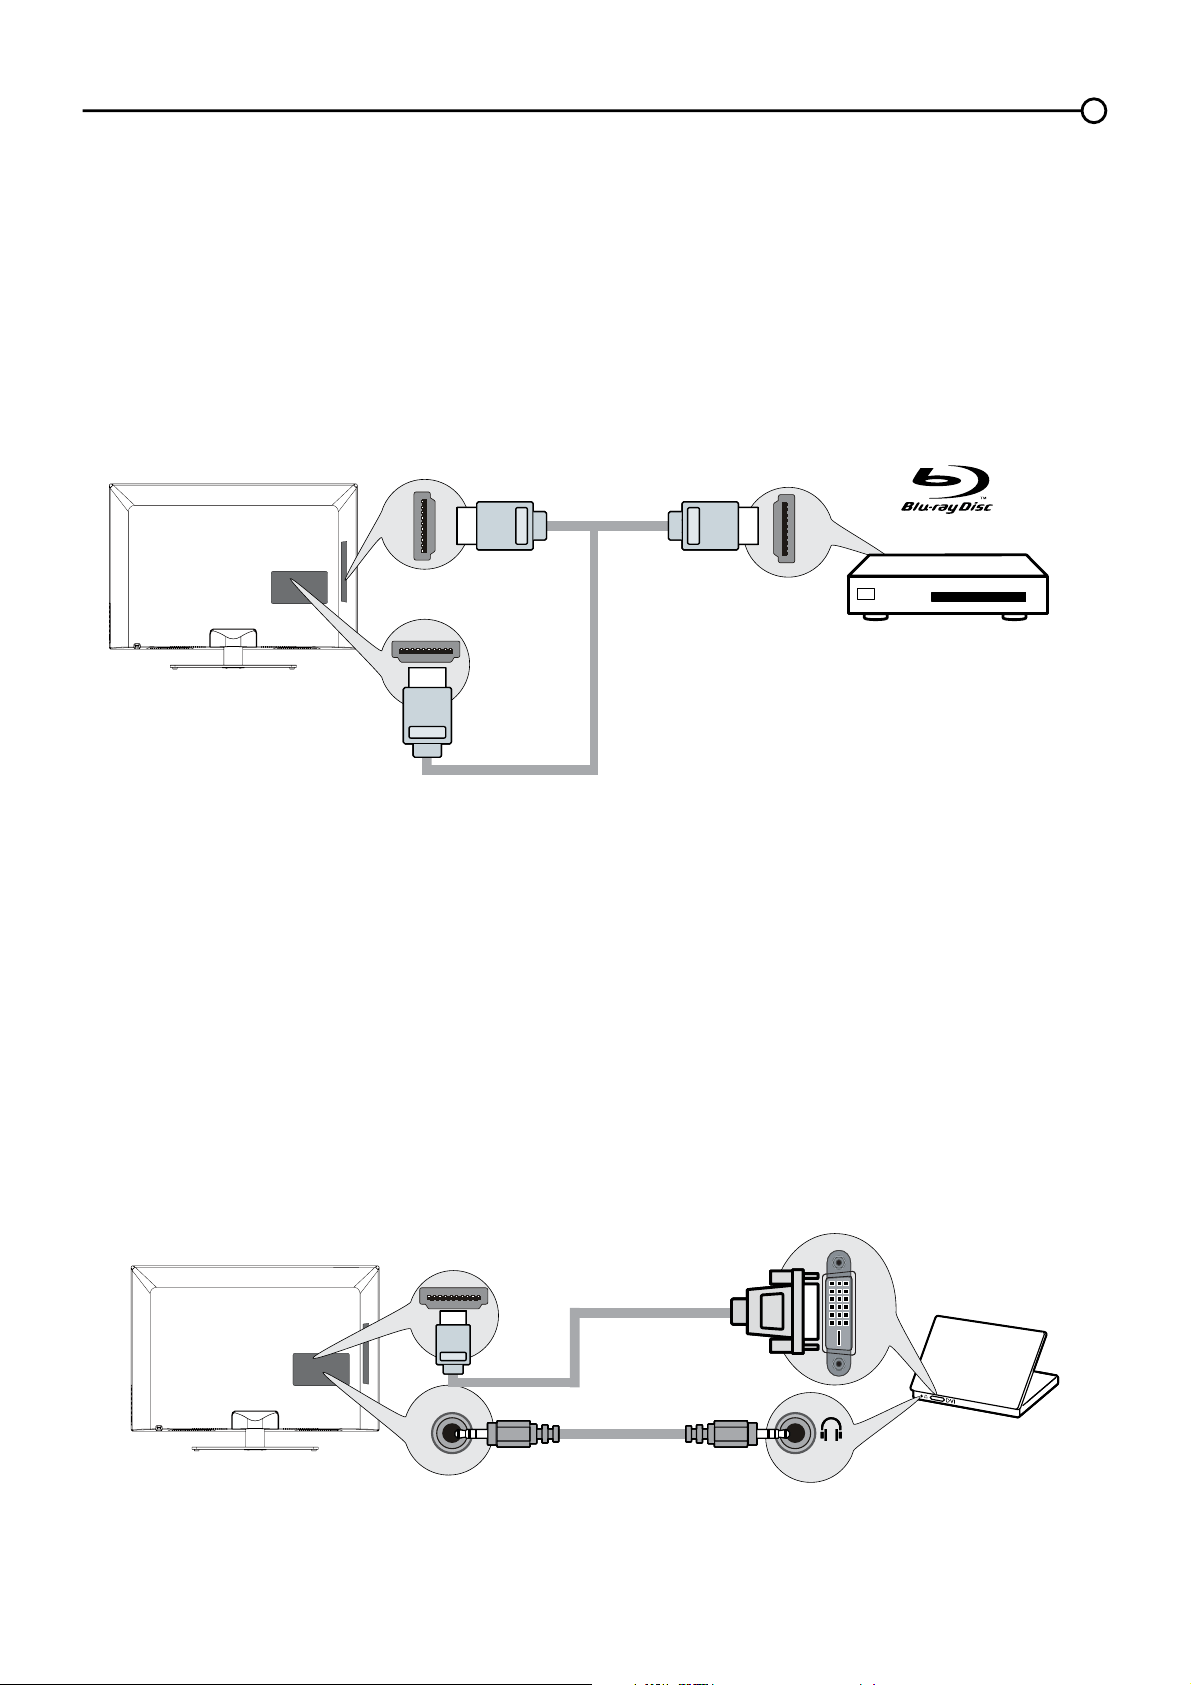
Conexión HDMI/DVI
Dado que la tecnología HDMI se basa en la Interfaz Visual Digital (DVI, siglas en inglés), el conector
de la parte posterior de su televisor es también compatible con los componentes que tengan
conectores de salida DVI.
Ejemplo: Computadora personal (PC)
1. Conecte un cable HDMI al conector de entrada HDMI/DVI IN 1 en la parte trasera del televisor.
$FRSOHXQDGDSWDGRU+'0,'9,HQHOWHUPLQDOGHOFDEOH+'0,OXHJRFRQHFWHHODGDSWDGRUDO
conector de salida DVI del PC.
3. Ya que está usando un adaptador HDMI/DVI, puede que necesite conectar los cables de audio por
separado al conector de entrada DVI AUDIO IN en la parte posterior del televisor y en el conector
de audio de la parte posterior del PC.
(QFLHQGDVX79OXHJRHQFLHQGDHO3&
5. Pulse el botón INPUT en el control remoto para abrir la lista de entradas. Una vez abierta, pulse
varias veces el botón INPUT hasta seleccionar HDMI 1.
Conexión HDMI (La mejor)
/DWHFQRORJtDGH,QWHUID]0XOWLPHGLDGH$OWD'H¿QLFLyQ+'0,HVXQDFRQH[LyQGLJLWDOVLQFRPSULPLU
que transmite tanto datos de video como de audio por medio de un cable con mini-conector integrado.
Ejemplo: Componente con conector HDMI.
1. Conecte un cable HDMI al conector de entrada HDMI IN 2 en el lateral del televisor (o al conector
de entrada HDMI/DVI IN 1 o al conector HDMI IN 3 en la parte trasera del televisor) y al conector
de salida HDMI en el componente.
(QFLHQGDVX79OXHJRHQFLHQGDHOFRPSRQHQWH
3. Pulse el botón INPUT en el control remoto para abrir la lista de entradas. Una vez abierta, pulse
varias veces el botón INPUT hasta seleccionar HDMI 2 (o HDMI 1 o HDMI 3).
Nota: Puede usar la conexión HDMI como alternativa a la conexión de entrada de la TV por cable.
No olvide:
De ser necesario, conecte una antena o cable para obtener una imagen. Consulte la instrucciones de la página 10.
O
SET-TOP BOX
Cable de HDMI
O
ENTRADA HDMI 2
ENTRADA HDMI/DVI 1
o ENTRADA HDMI 3
SALIDA HDMI
DVI
Sólo a la entrada HDMI/DVI 1
ENTRADA AUDIO DVI/PC
Cable de audio
Cable con
conversión HDMI-DVI
13
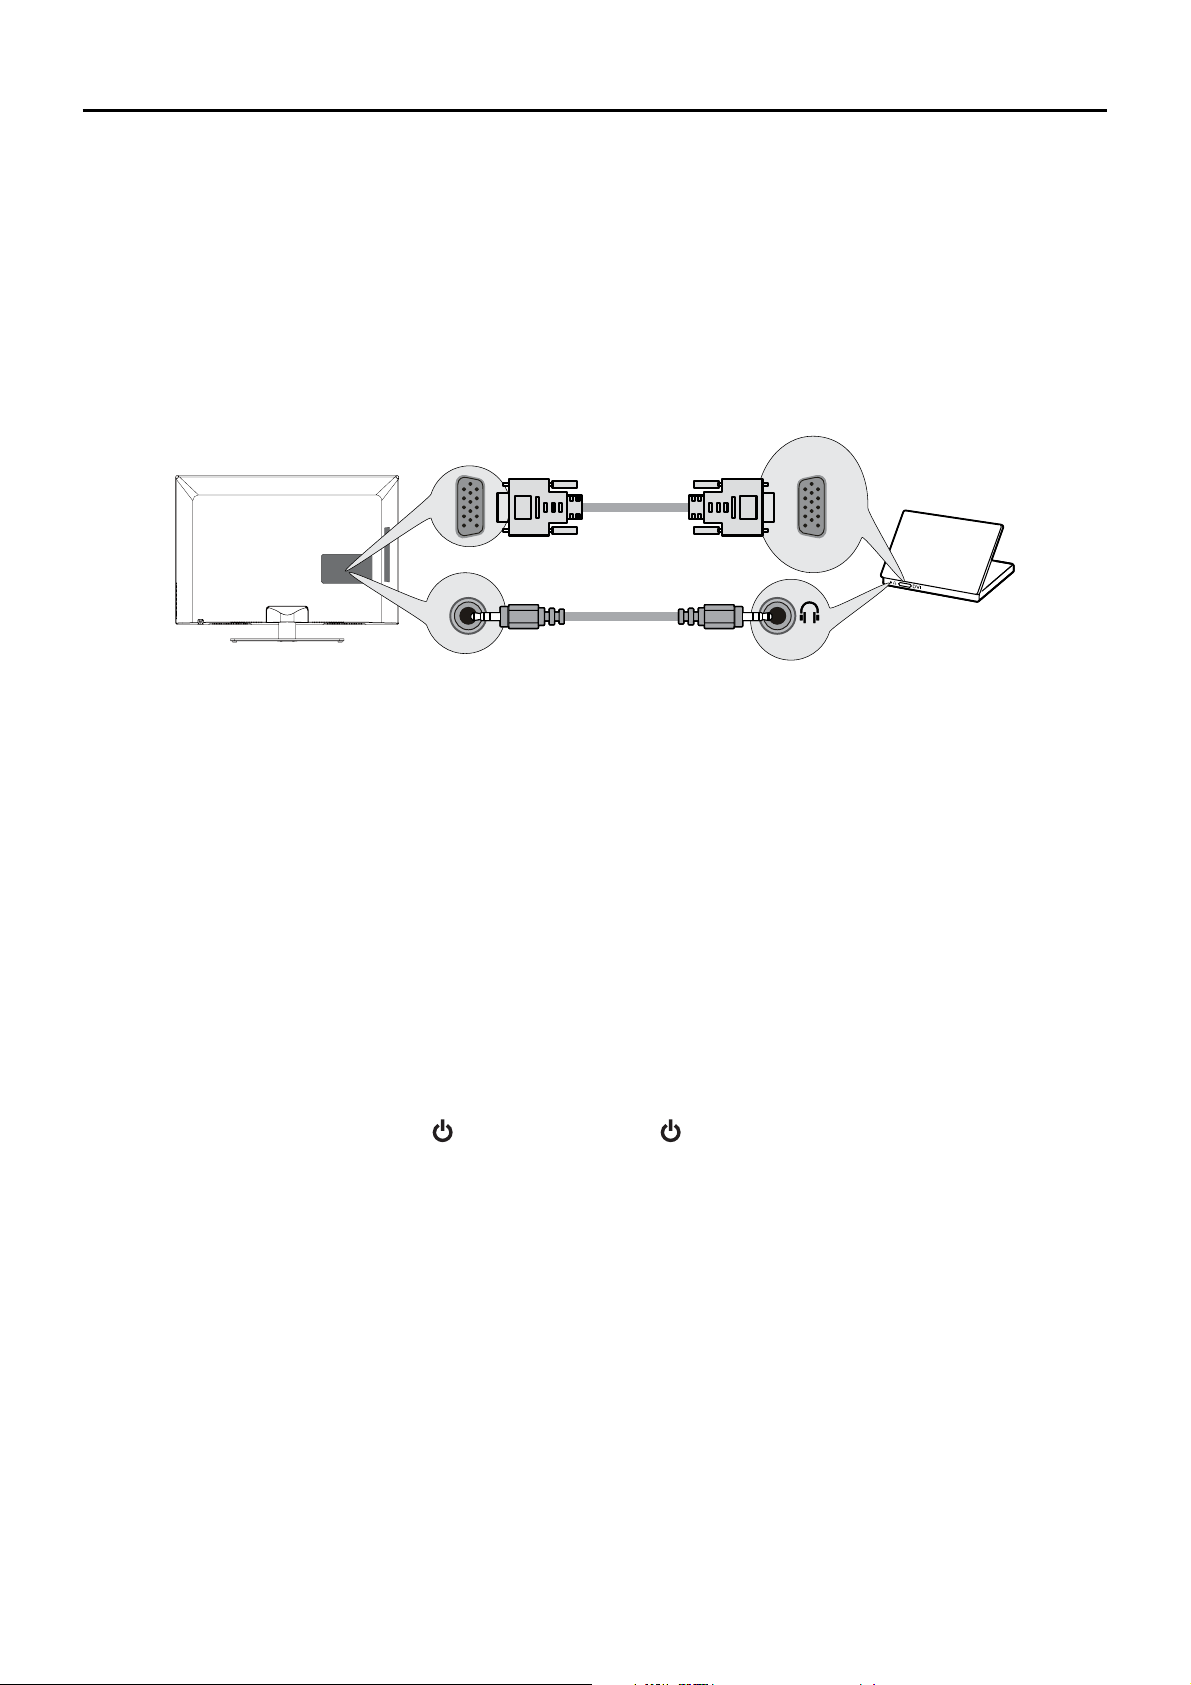
Conectar la TV
Enchufe el extremo del cable de alimentación en un tomacorriente, introduciendo el enchufe
completamente. No enchufe el TV en un tomacorriente controlado por un interruptor.
Instalar las baterías en el control remoto
5HWLUHODWDSDGHOFRPSDUWLPLHQWRGHODVEDWHUtDVGHODSDUWHSRVWHULRUGHOFRQWUROUHPRWR
empujando la lengüeta y levantando la tapa.
&RORTXHEDWHUtDV$$$\FHUFLyUHVHGHUHVSHWDUODSRODULGDG\
9XHOYDDFRORFDUODWDSD
Encender la TV
Encienda su TV pulsando el botón de su TV o el botón de su mando a distancia.
Usar el control remoto para completar el ajuste inicial
Necesitará utilizar el control remoto para completar el ajuste de su Televisor. El control remoto le
permite navegar a través de los menús y seleccionar elementos que aparecen en los menús en
pantalla. Este proceso funciona de la misma manera en todas las pantallas de menú: resalte su
opción y selecciónela.
3DUDVHOHFFLRQDUXQHOHPHQWRGHPHQ~XWLOLFHODÀHFKDKDFLDDUULEDRKDFLDDEDMRŸźSDUD
desplazarse hacia arriba o hacia abajo. Utilice el botón OKRODÀHFKDKDFLDODGHUHFKDŹSDUDYHU
otras opciones del menú resaltado o para desplegar un submenú.
Nota: Los elementos resaltados sobresalen del resto de elementos del menú (aparecen más oscuros,
más brillantes o en diferente color).
Conexión PC
Para conectar un PC y usar su TV como monitor, siga los pasos siguientes:
1. Conecte un extremo de cable de monitor de 15 pines (cable VGA) al conector de entrada PC IN
VGA de la TV y el otro extremo a la salida de video del PC.
2. Conecte un cable de audio al conector de entrada PC AUDIO IN en el panel trasero de la TV y el
otro extremo al conector de salida de audio del PC.
(QFLHQGDVX79OXHJRHQFLHQGDHO3&
4. Pulse el botón INPUT en el control remoto para abrir la lista de entradas. Una vez abierta, pulse
varias veces el botón INPUT hasta seleccionar PC.
VGA
A la entrada
PC IN (VGA)
Entrada DVI/PC AUDIO
Cable de audio
Cable VGA
14
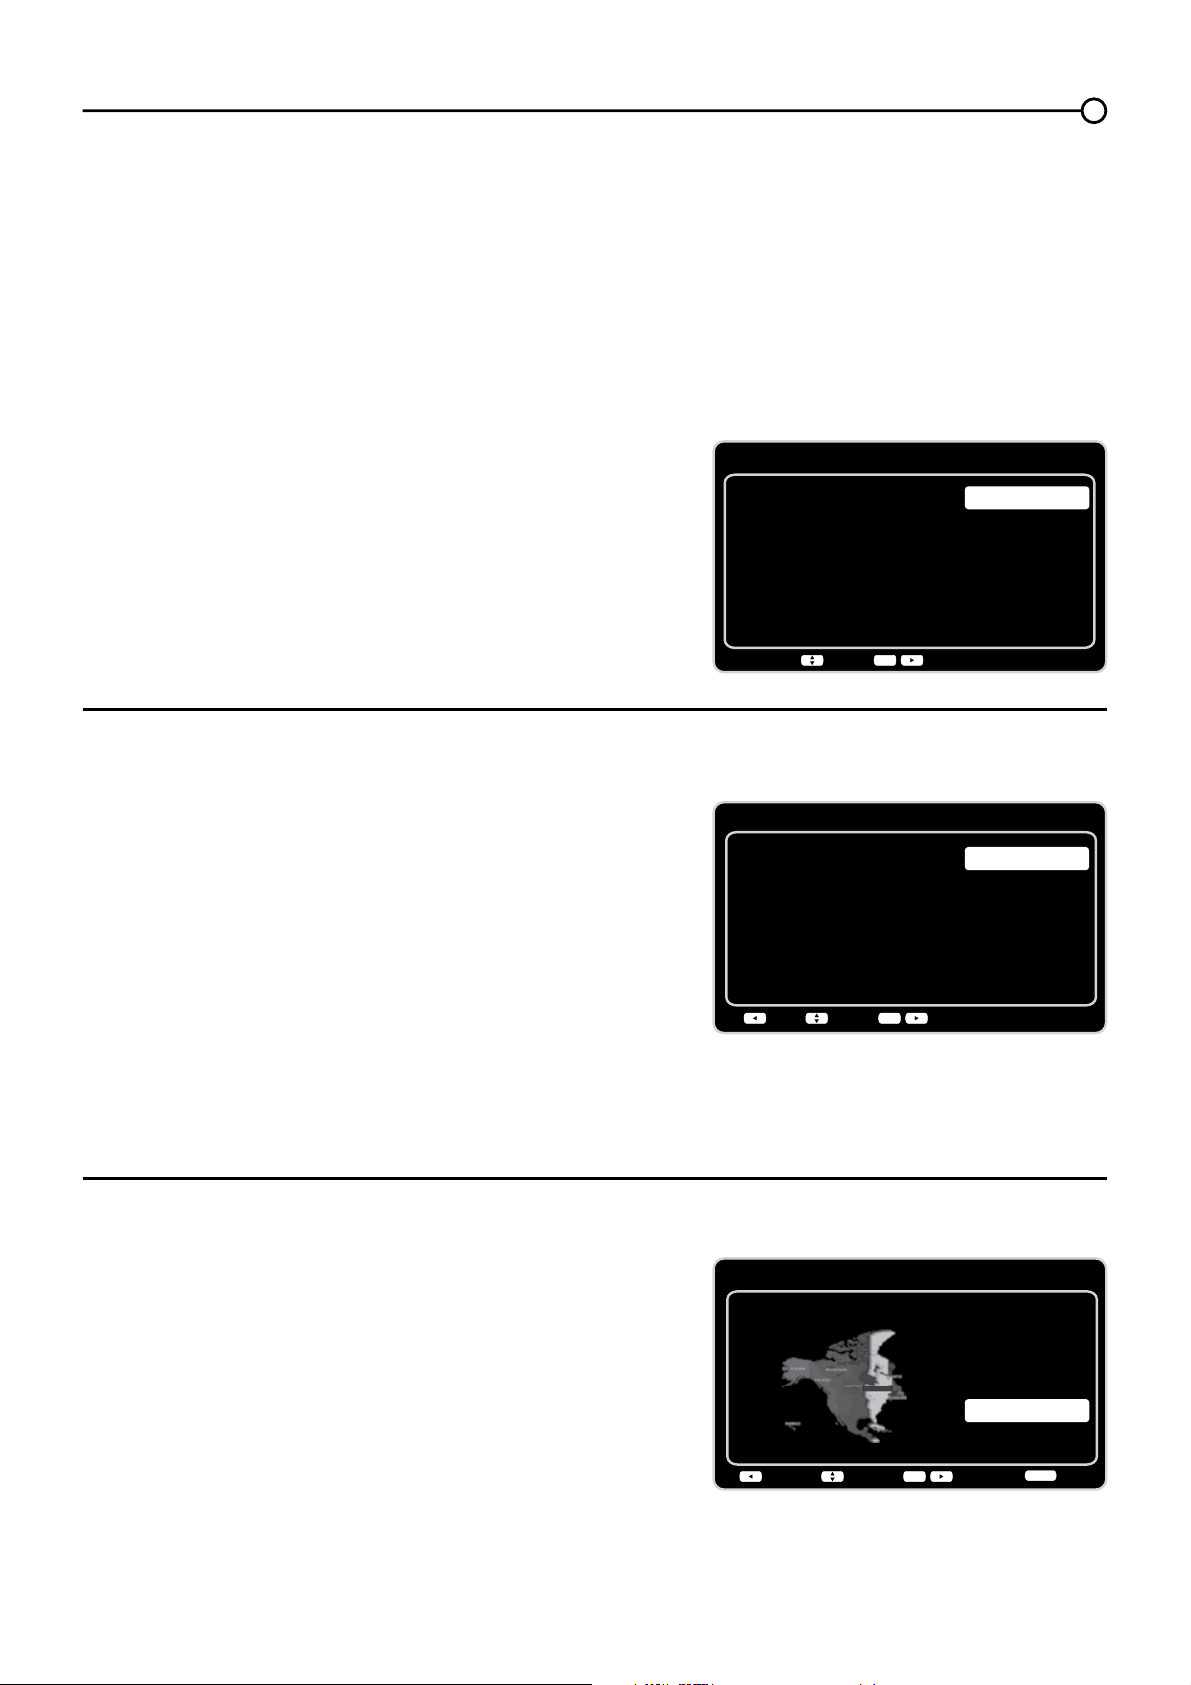
Configuración inicial
Zona Horaria
Por favor, seleccione su Zona Horaria:
Volver SiguienteElegir
Salir
CLEAR
OK
Alaska
Pacífico
Hawai
Montaña
Central
Este
Atlántico
Terranova
Este
Configuración inicial
Ubicación TV
Ubicación TV
Minorista
Residencia
Volver SiguienteElegir
OK
Initial Setup
Please select your language:
Language
NextSelect
OK
Español
Français
English
Completar el ajuste inicial
El sistema de menús de su televisor permite que todas las funciones de su televisor funcionen
FRUUHFWDPHQWH/DSULPHUDYH]TXHHQFLHQGHVXWHOHYLVRUVHDEUHHODVLVWHQWHGHFRQ¿JXUDFLyQTXH
OHJXtDDWUDYpVGHOSURFHVRGHFRQ¿JXUDFLyQLQFOX\HQGRLGLRPDXELFDFLyQGHOWHOHYLVRU]RQDKRUDULD
sintonizador y búsqueda de canales
Seleccionar el idioma de los menús
(OSULPHUSDVRGHODFRQ¿JXUDFLyQOHSLGHVHOHFFLRQDU
HOLGLRPDTXHSUH¿HUHXVDUHQHOVLVWHPDGHPHQ~V
Si Inglés es su idioma preferido, pulse OK y proceda
DFRQ¿JXUDUHOPRGR8ELFDFLyQ793DUDVHOHFFLRQDU
RWURLGLRPDRSULPDODÀHFKDKDFLDDEDMRźKDVWDTXH
el idioma quede resaltado, y selecciónelo pulsando el
botón OKRODÀHFKDKDFLDODGHUHFKDŹ).
&RQ¿JXUDUHOPRGRµ8ELFDFLyQ79
Después de seleccionar el idioma, una pantalla de menú
OHSHGLUiTXHFRQ¿JXUHODXELFDFLyQGHOWHOHYLVRU
6HOHFFLRQDQGR³Residencia” para la ubicación del
televisor asignará los ajustes de imagen óptimos
para la mayoría de ambientes domésticos.
(OLJLHQGRODRSFLyQ³Minorista´FRQ¿JXUHODXQLGDG
FRQORVDMXVWHVSUHGH¿QLGRVSDUDH[SRVLFLyQGH
productos en los escaparates.
8VHODVÀHFKDVKDFLDDUULEDRKDFLDDEDMRŸźSDUD
seleccionar el ajuste de ubicación deseado (Residencia/
MinoristaOXHJRSXOVHHOERWyQOKRODÀHFKDKDFLDOD
derecha (Ź) para continuar con la pantalla siguiente.
Seleccionar la zona horaria
Use las fechas hacia arriba o hacia abajo (Ÿź) para
seleccionar la zona horaria actual. Pulse el botón OK
RODÀHFKDKDFLDODGHUHFKDŹ) para continuar con la
pantalla siguiente.
15
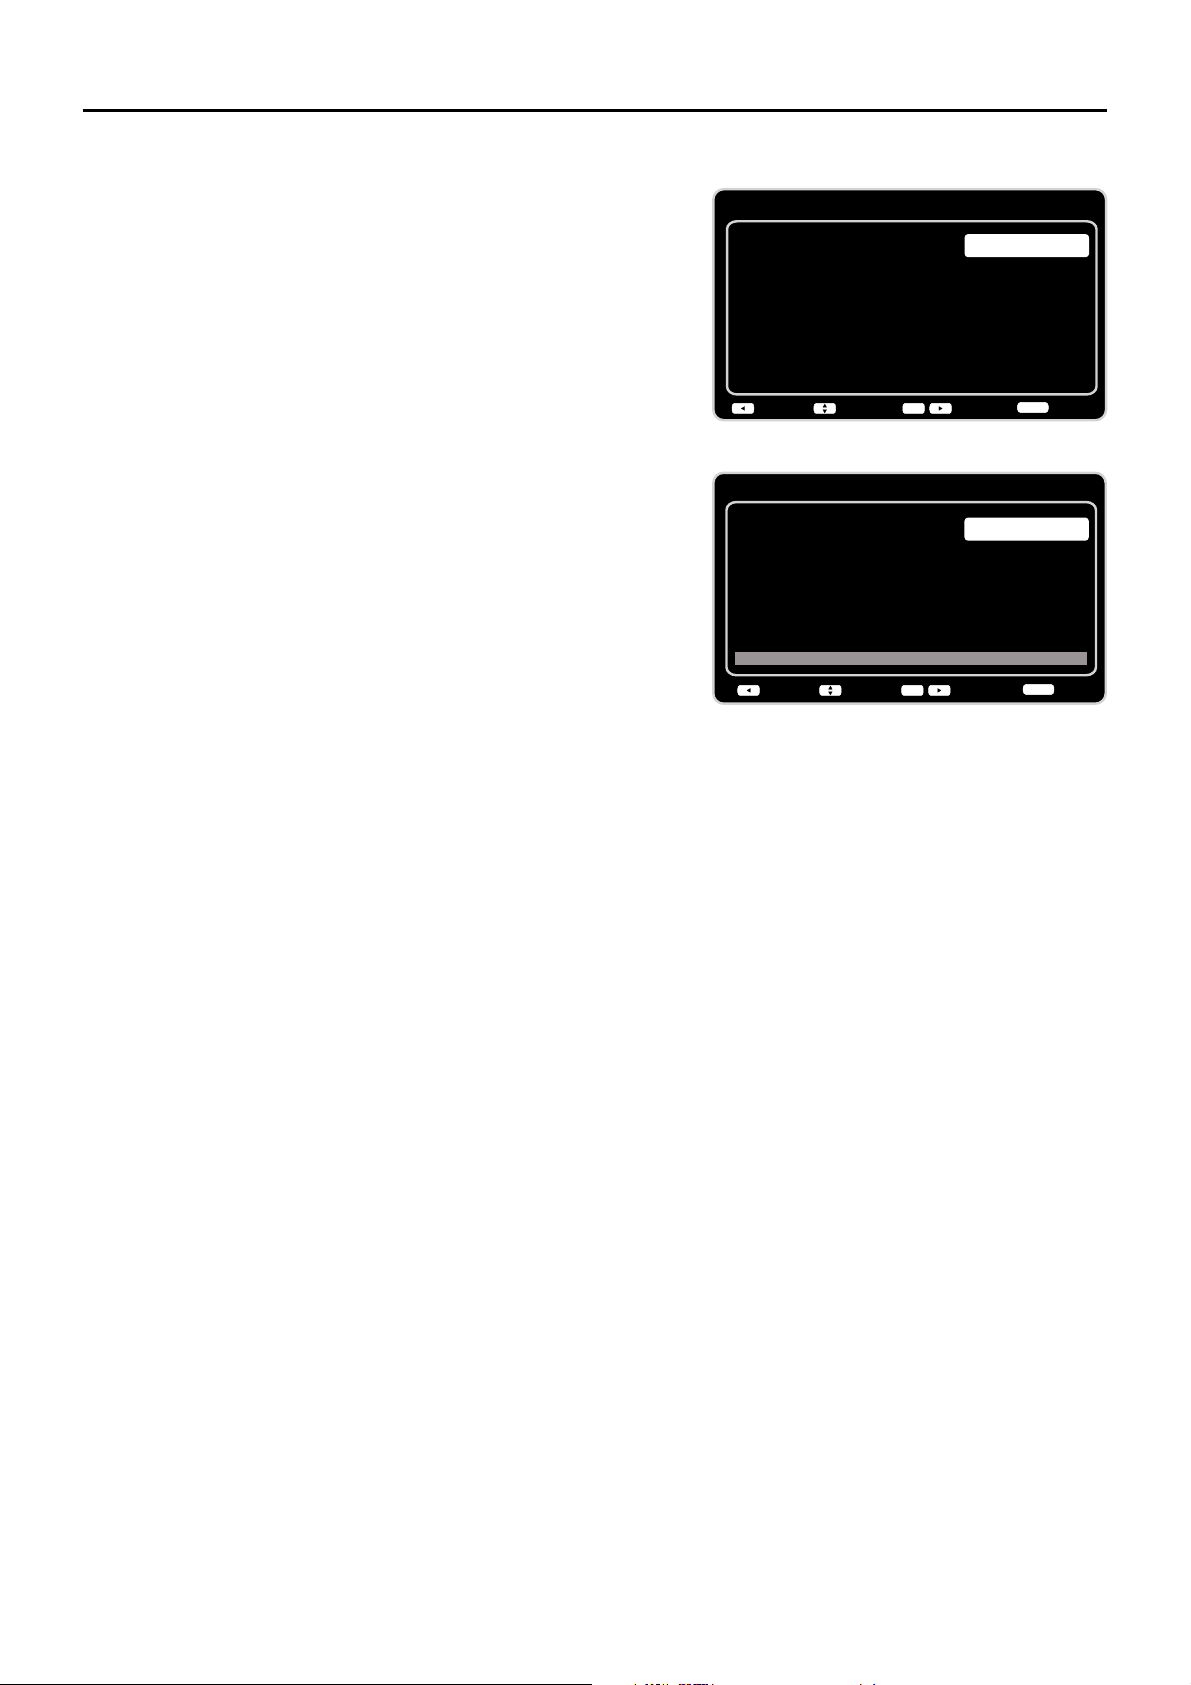
Configuración inicial
Búsqueda de canales
Saltar búsqueda
Búsqueda
0%
Volver SiguienteElegir
Salir
CLEAR
OK
Primero, conecte el cable o la
antena. ¿Iniciar la Búsqueda de
Canales ahora?
Si usted se salta este paso, la
Búsqueda de Canales podría
hacerse en el menú de
Configuración más tarde.
Configuración inicial
Sintonizador
Por favor, seleccione su
modo del sintonizador:
Cable/Sat
Antena
Volver SiguienteElegir
Salir
CLEAR
OK
Búsqueda automática de canales
1. En la pantalla de Sintonía, seleccione o Antena o
Cable/Sat. Pulse el botón OKRODÀHFKDKDFLDOD
derecha (Ź) para continuar con la pantalla siguiente.
Nota:6LHVWiXVDQGRVDWpOLWHRXQGHVFRGL¿FDGRU
por cable,
no tendrá que completar la búsqueda de
canales.
2. Aparece ahora la pantalla de Búsqueda de canales.
La opción por defecto es Explorar. Pulse el botón OK o
ODÀHFKDKDFLDODGHUHFKDŹ) para iniciar la búsqueda
de canales para encontrar los canales disponibles y
almacenarlos en la memoria del televisor.
Nota: Si no desea buscar canales en este momento,
pulse el botón OKRODÀHFKDKDFLDODGHUHFKDŹ)
para detener el proceso de búsqueda.
3. La pantalla cambiará para mostrar el progreso del
proceso de búsqueda.
&XiQGR¿QDOL]DODE~VTXHGDODXQLGDGKDFRPSOHWDGR
el ajuste inicial.
5. Pulse CLEAR para salir del asistente y empezar a ver
la TV.
Saltar Búsqueda
Si selecciona saltar el proceso de búsqueda automática
seleccionando Saltar búsqueda o pulsando el botón
CLEAR, necesitará realizar este proceso la próxima vez
que decida completar este procedimiento.
1. Seleccione TV como entrada (usando la tecla de
ENTRADA).
2. Navegue por las opciones del menú para seleccionar el
Tipo de señal, que le presentará la opción de volver a
buscar los canales.
6LHVWiXVDQGRVDWpOLWHRXQGHVFRGL¿FDGRUSRUFDEOHQR
tendrá que completar la búsqueda de canales.
Nota: Vea el menú de &RQ¿JXUDFLyQ para:
9ROYHUDEXVFDUORVFDQDOHVDXWRPiWLFDPHQWH
(página 23).
$xDGLUFDQDOHVQRPHPRUL]DGRVPHGLDQWHOD
Búsqueda de canales (página 24).
5HDMXVWDUOD]RQDKRUDULDSiJLQD
Vea el menú de Lenguaje para:
&DPELDUDRWURLGLRPDSiJLQD
16

Entrada
AV1
CMPT2
PC
HDMI1
HDMI2
TV
Sin etiqueta
Sin etiqueta
Sin etiqueta
Sin etiqueta
Sin etiqueta
Sin etiqueta
Sin etiqueta
Sin etiqueta
Sin etiqueta
AV2
S-VIDEO
CMPT1
HDMI3
Seleccionar un canal
1. Seleccione el canal deseado usando CH+/- o los botones numéricos.
El botón CH+/- sólo puede seleccionar canales memorizados.
Seleccione canales no memorizados usando los botones numéricos.
2. Cómo usar los botones numéricos:
Canales TV analógicos – Cuando seleccione un canal analógico, como el canal 12, pulse el 1,
luego el 2 y luego pulse OK.
DTV ±&XDQGRVHOHFFLRQHFDQDOHVGLJLWDOHVFRPRHODVHJ~UHVHGHSUHVLRQDUHOSXQWR
en el lugar apropiado. Así, para 12.3, debería pulsar el 1, luego el 2, después el punto y luego el
3. Pulse OK para seleccionar.
3. Pulse GO BACK para regresar al canal visto anteriormente.
¿Qué es un Sub-canal?
Un sub-canal es un canal como el 12.3. Utilizando una tecnología de alta-compresión, la transmisión
digital habilita señales múltiples que son enviadas simultáneamente. Por consiguiente, usted puede
seleccionar más de un programa por cada canal, ya que la tecnología de transmisión puede distinguir
entre los múltiples canales en un única red.
Encender y apagar la TV
1. Conecte el cable de alimentación desde la TV en un tomacorriente.
2. Pulse el botón
para encender el televisor.
3. Pulse el botón
para apagar el televisor. Cuando apaga el televisor, automáticamente entra en
Modo Standby.
Nota: Cuando su televisor está en modo Standby, continúa recibiendo Potencia. Para cortar
completamente la potencia, desenchufe el cable de alimentación.
Seleccionar la fuente de entrada de vídeo
(QFLHQGDHOWHOHYLVRUOXHJRSXOVH INPUT en el control remoto.
Aparece la lista de ENTRADAS.
2. Para seleccionar una fuente de entrada, pulse el botón INPUT varias
YHFHVRXWLOLFHODVIHFKDVKDFLDDUULED\KDFLDDEDMRŸźSDUD
resaltar la fuente de vídeo y pulse OK para seleccionar.
Ajustar/Silenciar el volumen
1. Use el botón VOL+/- para ajustar el volumen. La barra indicadora de volumen aparecerá en
la parte inferior de la pantalla del televisor cuando lo esté ajustando. La barra de volumen
desaparece transcurridos unos segundos después de que haya realizado el ajuste.
2. Pulse el botón MUTE para activar o desactivar el sonido. La marca de SILENCIO aparece en la
pantalla del televisor durante unos segundos.
3. Cuando pulse el botón MUTE otra vez, recupera el sonido a su nivel previo. También puede
presionar el botón VOL + para cancelar la función de silenciamiento del audio.
Capítulo 2 - Entender el funcionamiento básico
17
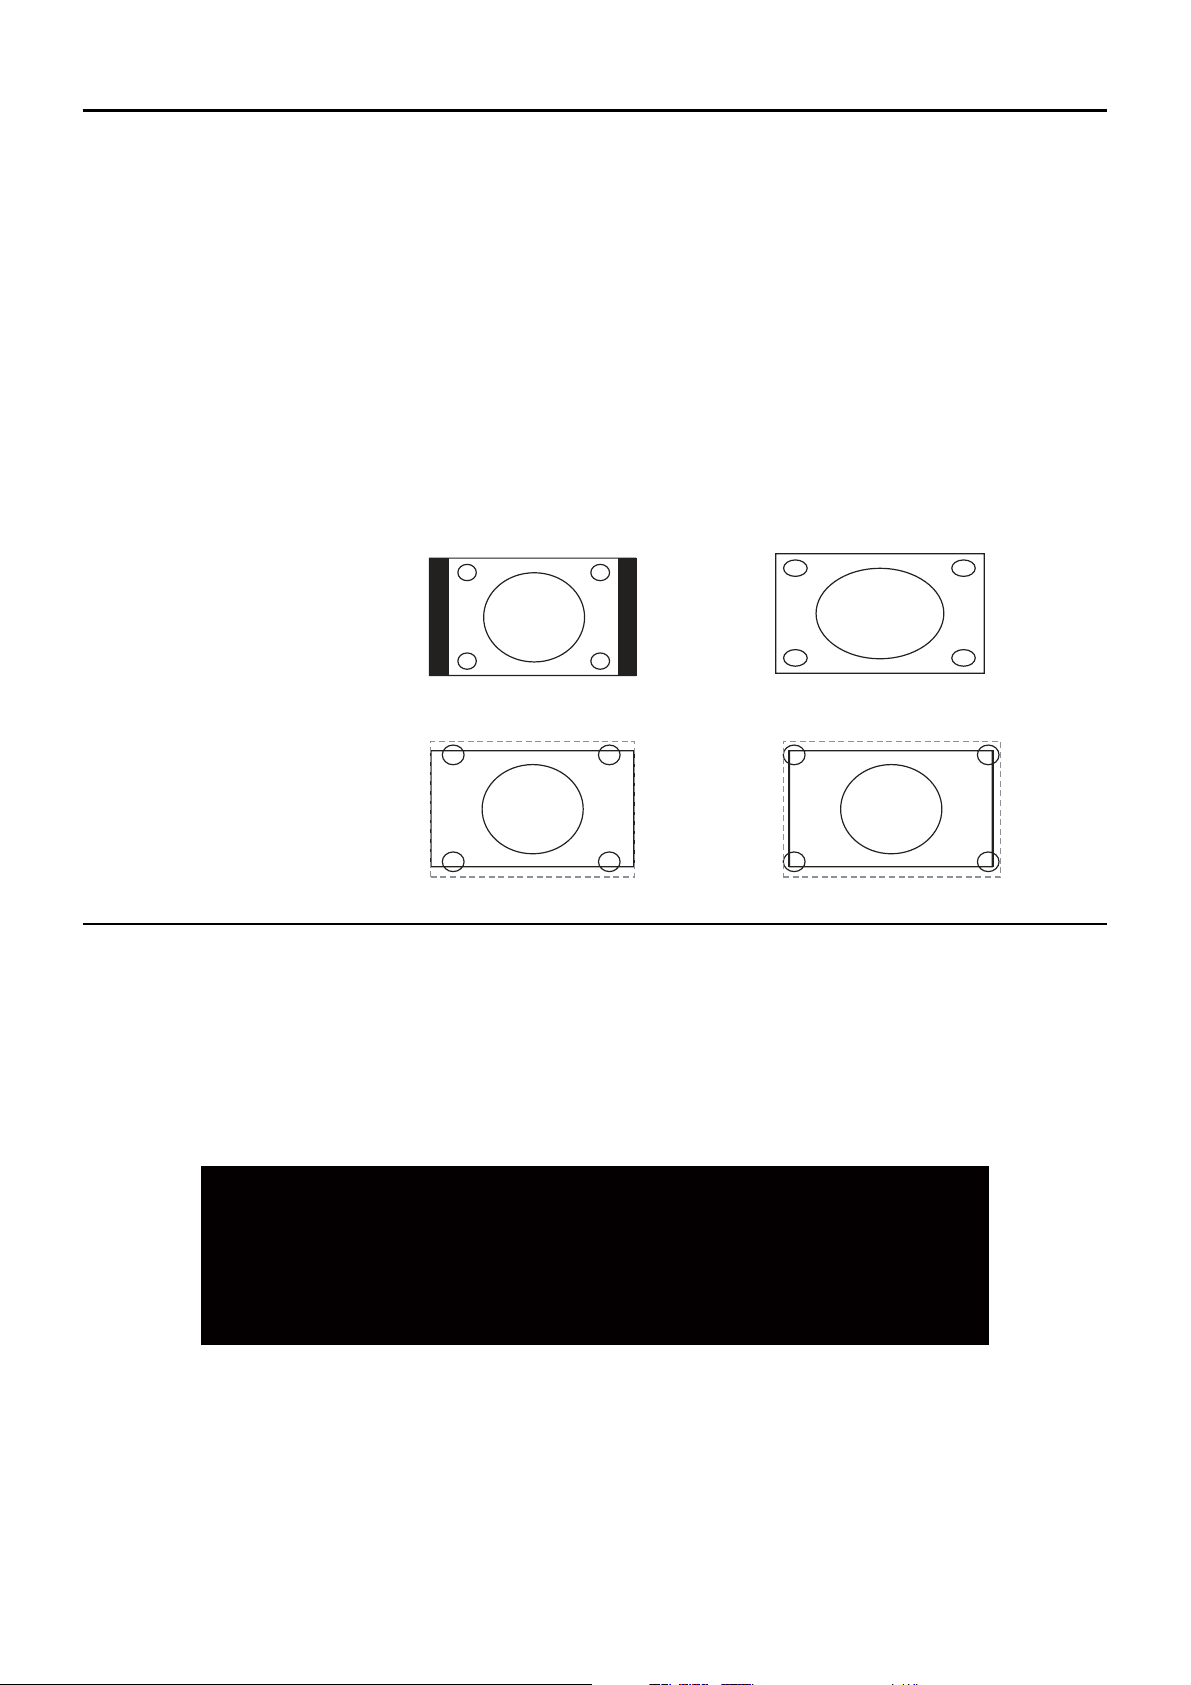
Formatos de pantalla
El formato de pantalla es la forma en que la imagen aparece en la pantalla del televisor. Pulse el botón
ZOOM -/+ en el control remoto para ver si se encuentra disponible un formato diferente para el video que
está viendo.
El formato cambia cada vez que presiona el botón ZOOM -/+ y el tipo de formato se
muestra en la parte inferior izquierda de la pantalla.
El video analógico se envía en formato 4/3, que su televisor muestra en formato 16/9. La mayoría de video
digital se envía en formato 16/9, el cual llena su pantalla, pero algunas veces se envía en formato 4/3, el
cual no llena su pantalla. Depende de como la emisora o el componente conectado a su televisor formatee
el vídeo. Si aparecen barras en la pantalla, pulse el botón ZOOM -/+ para utilizar un formato diferente que
pueda eliminar las barras. Algunas barras no se pueden eliminar al modo que la emisora transmiten el
formato. Pulse ZOOM -/+ varias veces para moverse cíclicamente por los formatos de pantalla disponibles.
A continuación encontrará ejemplos de los diferentes formatos. Todos los formatos están disponibles para
vídeo analógico, pero puede que alguno no lo esté para vídeo digital.
Cuadro de información del canal
Cuando pulsa el botón INFO en el control remoto pueden aparecer varios indicadores, como el
Q~PHURGHOFDQDOHOQRPEUHGHOFDQDOLQIRUPDFLyQGHODFODVL¿FDFLyQKRUDDFWXDOOtQHDVHIHFWLYDVGH
HVFDQHRHWFHVWDLQIRUPDFLyQGL¿HUHGHSHQGLHQGRGHOSURJUDPD(VWDSDQWDOODVHGHQRPLQDCuadro
de información del canal. A continuación se muestra un ejemplo de los elementos presentes en el
Cuadro de información del canal.
Normal
Cinema
Completo
Zumbido
Nota: para Vídeo HD,
pulse el botón ZOOM -/+
y elija entre Completo,
Expandido, Nomal y Zoom.
Para las entradas HDMI
y CMPT, también está el
formato Sin Overscan (con
bordes).
SD canal 1, Evento 844
4:00 AM - 7:00 AM
No Clasificado
Sin información
704x480iFAV
Inglés1
06:55 AM
D 42.1
ATLC-DT
Cable/Sat
18
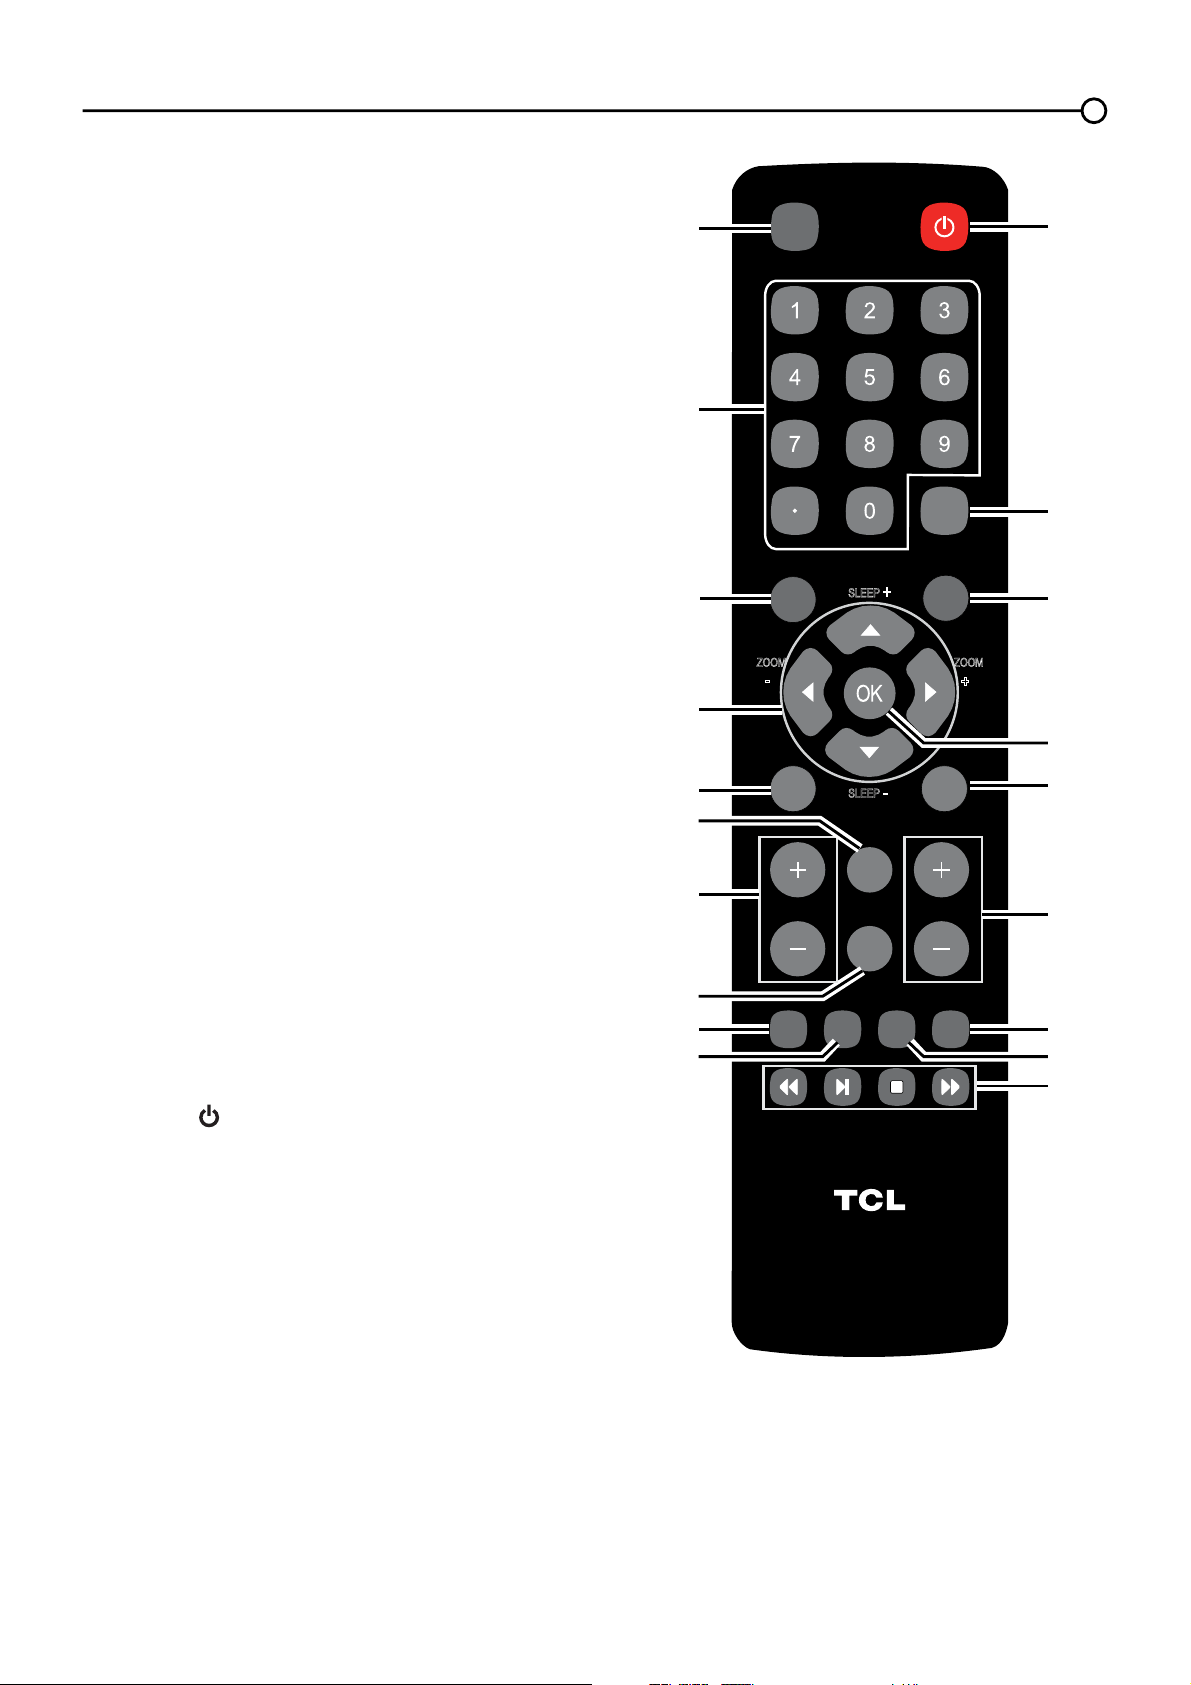
Capítulo 3 - Cómo usar el control remoto
Botones del control remoto
1. INPUT – Pulse el botón INPUT para abrir la lista de
Entradas; luego pulse el botón INPUT varias veces para
seleccionar la entrada de vídeo, o use las fechas hacia
arriba o hacia abajo (
Ÿ/ź
)
para resaltar las opciones, y
pulse OK para seleccionar la opción deseada.
2. Botones alfanuméricos – Usando estos botones,
introduzca los números de los canales. Para ver un canal,
pulse los botones numéricos y luego el botón OK (o deje
que transcurra el tiempo de espera).
Para ver un canal digital con un subcanal, introduzca el
Q~PHURGHOFDQDOSULQFLSDOOXHJRHOSXQWRHOVXEFDQDO
y luego pulse el botón OK.
3. MENU – Pulse el botón MENU para acceder al menú
principal.
4. Flechas (Ÿ/ź/Ż/Ź) – 8WLOLFHODVFXDWURÀHFKDVSDUD
resaltar las opciones del menú de TV y ajustar los
controles del menú.
ZOOM -/+ ŻŹ±3UHVLyQHORVSDUDVHOHFFLRQDUHO
formato de pantalla deseado.
SLEEP +/- Ÿ/ź± Presiónelo para apagar el TV
transcurrido un periodo de tiempo establecido.
Nota:(QPRGR86%ODÀHFKDGHGLUHFFLyQDUULEDRDEDMR
ŸźVHSXHGHXVDUSDUDJLUDUXQDIRWRFXDQGRODHVWp
YLHQGR
5. PIC – Presiónelo para seleccionar el modo de imagen
deseado.
6. INFO – Si no hay más menús activos en pantalla, pulse el
botón INFO para mostrar el Cuadro de Información del
Canal.
7. VOL+/- – Reduce o aumenta el volumen del televisor.
8. MUTE – Púlselo para activar o desactivar el volumen.
9. FAV – Pulse el botón FAV para navegar por los canales de
VXOLVWDGHIDYRULWRV8WLOLFHODVÀHFKDVKDFLDDUULED\KDFLD
abajo (Ÿ/ź) para resaltar las opciones, luego pulse OK
para seleccionar.
10. MEDIA –
Pulse el botón MEDIA para entrar directamente en el
menú USB.
11. POWER ( ) – Pulse el botón POWER para encender y
apagar el televisor.
12. GUIDE – Pulse el botón GUIDE para mostrar la guía del
programa. Los detalles de la guía del programa sólo están
disponibles en los canales digitales.
13. CLEAR – Pulse el botón CLEAR para borrar cualquier
menú o presentación de la pantalla y regresar al modo
normal de visualización.
14. OK – Presiónelo para mostrar el menú de Lista de
Canales. Cuando se encuentra en el sistema de menús,
pulse el botón OK SDUDFRQ¿UPDUVXVHOHFFLyQ
15. GO BACK – Al pulsar el botón GO BACK vuelve al canal
visto previamente.
16. CH + o CH - – Use los botones CH+/- para seleccionar los
canales y el modo de entrada externa.
17. TV – Presiónelo para tener acceso al modo TV.
18. MTS – Presiónelo para seleccionar el modo de audio
deseado.
19. Estos botones se pueden usar para oír música y ver fotos
desde el menú USB.
19
VOL CH
RC3000N02
INPUT
GUIDE
MENU
CLEAR
GO BACK
INFO
MUTE
FAV
MEDIA
MTS
TV
PIC
ZOOM
SLEEP
SLEEP
+
+
ZOOM
-
-
8
9
1
2
3
4
5
7
6
10
11
12
15
16
18
13
17
19
14
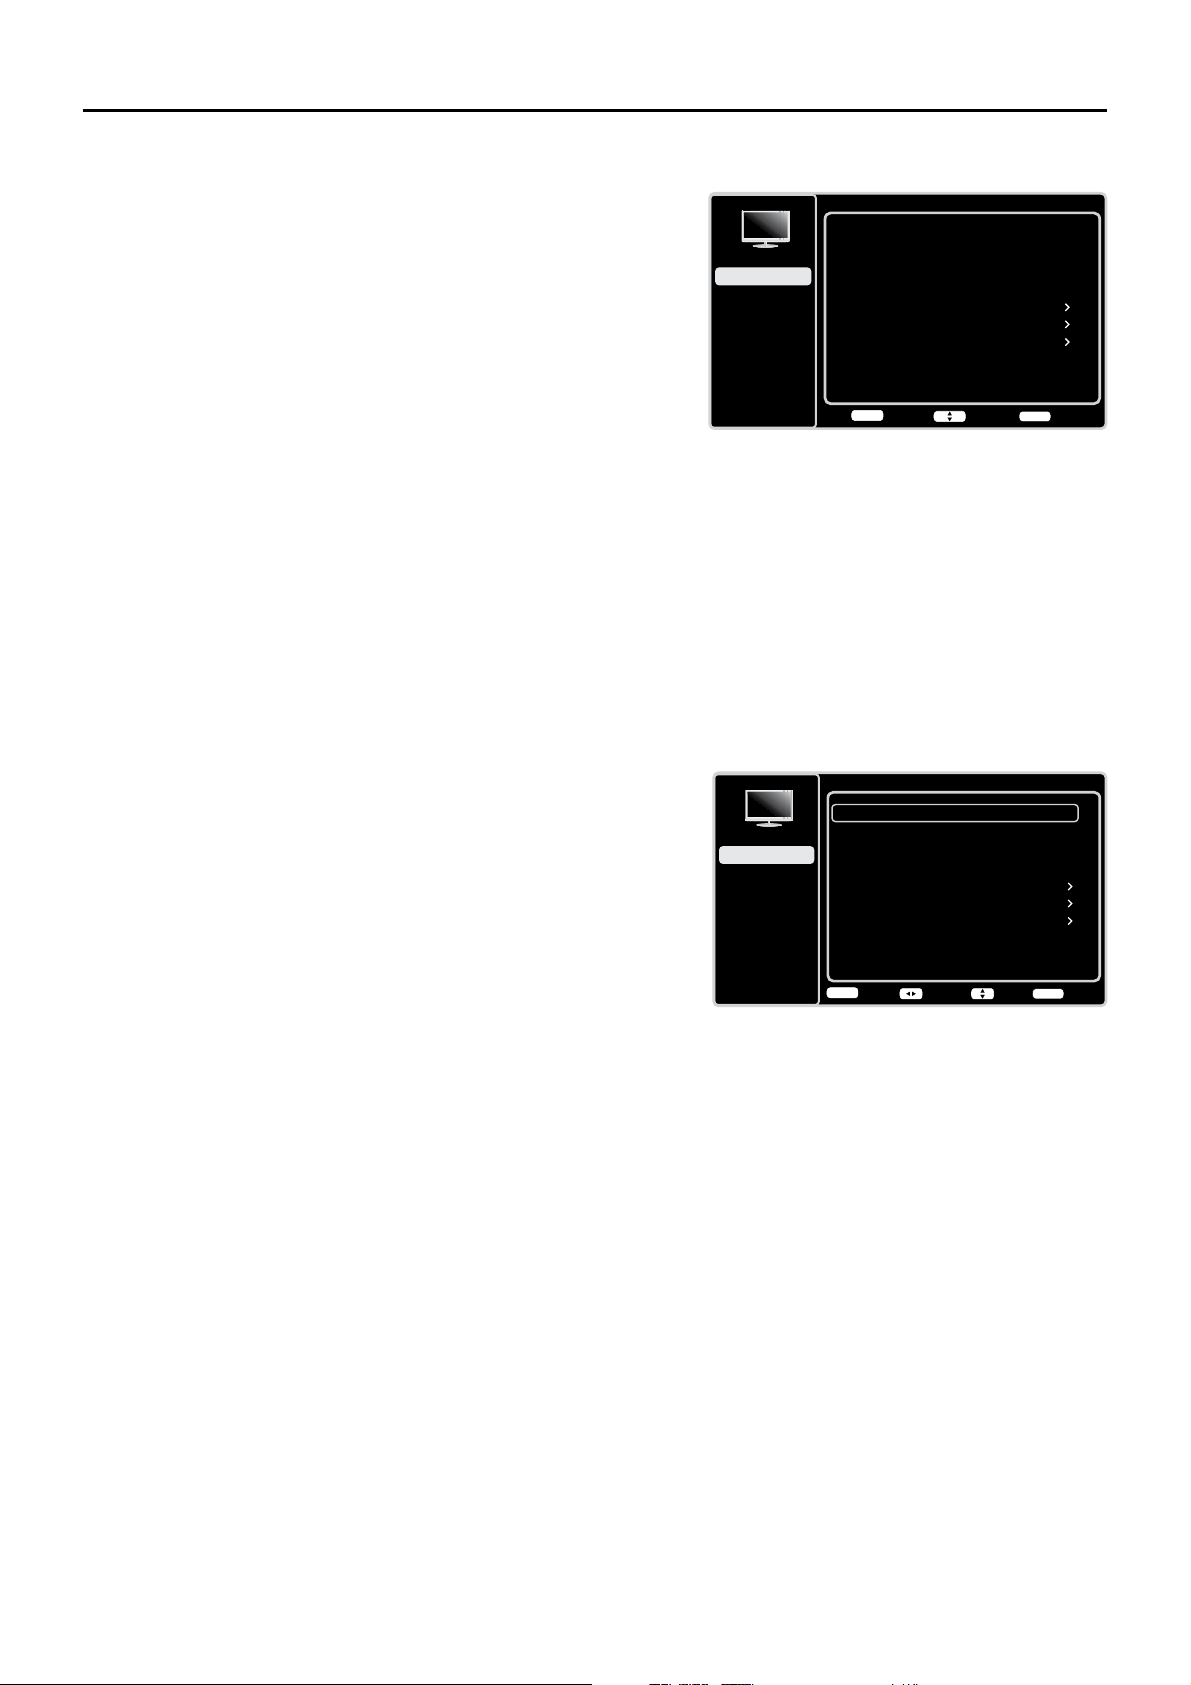
CLEAR
Intro Elegir Volver
OK
Preajuste Imagen
Brillo
Natural
Ajustes Avanzados
50
Nitidez
5
Contraste
75
Modificar configuración de imagen
Ajustes Expertos
CLEAR
Configuración
Control de Padres
Lenguaje
Sonido
Imagen
USB
Salir
Imagen
Capítulo 4 - Cómo usar el menú TV
Cómo utilizar el sistema de menús
Esta sección explora los menús de su televisor. Cada menú se
GHVFULEH\GHWDOODSDUDD\XGDUOHDREWHQHUHOPHMRUEHQH¿FLRGHVX
televisor. Para acceder al sistema de menús, siga estos pasos:
1. Pulse el botón MENU para abrir el menú principal.
8VHODVÀHFKDVKDFLDDUULED\KDFLDDEDMRŸ/ź) para resaltar
una opción y pulse el botón OK RODÀHFKDKDFLDODGHUHFKD
(Ź) para desplegar el submenú.
8VHODVÀHFKDVKDFLDDUULED\KDFLDDEDMRŸźSDUDUHVDOWDU
XQHOHPHQWROXHJRXVHODVÀHFKDVKDFLDODL]TXLHUGDRKDFLDOD
GHUHFKDŻŹSDUDDMXVWDUHOHOHPHQWRVHOHFFLRQDGRRSXOVH
OKRODÀHFKDKDFLDODGHUHFKDŹSDUDHQWUDUHQODSDQWDOOD
siguiente.
4. Pulse el botón OKSDUDFRQ¿UPDUVXVVHOHFFLRQHV
5. Pulse el botón MENU para regresar a la pantalla previa, o
pulse el botón CLEAR para cerrar el menú.
Nota:
Use el texto que aparece en la parte inferior de la pantalla como
ayuda. Se comentan las descripciones de cada menú en el orden
en el que aparecen.
Menú Imagen
El menú ImagenFRQWLHQHPHQ~V\FRQWUROHVSDUDFRQ¿JXUDU
la apariencia de la imagen. Las opciones del menú Imagen se
aplican al video para las selecciones de las entradas principales
TV y VIDEO INPUT.
Para acceder al menú Imagen, pulse el botón MENU en el control
UHPRWRSDUDDEULUHOPHQ~SULQFLSDO8VHODVÀHFKDVKDFLDDUULEDR
hacia abajo (Ÿź) para seleccionar ImagenOXHJRSXOVHHOERWyQ
OK RODÀHFKDKDFLDODGHUHFKDŹSDUDPRVWUDUODVRSFLRQHV
Ajustes de imagen:
Preajuste Imagen - Muestra una lista que le permite
VHOHFFLRQDUXQRGHORVDMXVWHVSUHGH¿QLGRVNatural,
Deportes, Personal o ECO, Brillante, Cinema. Seleccione
el ajuste que mejor convenga para el entorno donde ve la TV.
Brillo – Ajusta el brillo de la imagen.
Contraste – Ajusta la diferencia entre las áreas claras y
oscuras de la imagen.
Nitidez±$MXVWDODGH¿QLFLyQGHORVERUGHVGHODLPDJHQ
Ajustes Expertos
Luz de fondo – Ajusta el nivel de la luz de fondo. La línea
de menú está atenuada por defecto. Solamente cuando las
opciones “Luz de fondo dinámica” y “Sensor de luz” están
desactivadas, puede ajustarse la línea de menú.
Color – Ajusta la riqueza del color.
Volver
MENU
Ajustar Elegir Salida
CLEAR
Preajuste Imagen
Brillo
Natural
Ajustes Avanzados
50
Nitidez
5
Contraste
75
Modificar configuración de imagen
Ajustes Expertos
Configuración
Control de Padres
Lenguaje
Sonido
Imagen
USB
Salir
Imagen
20
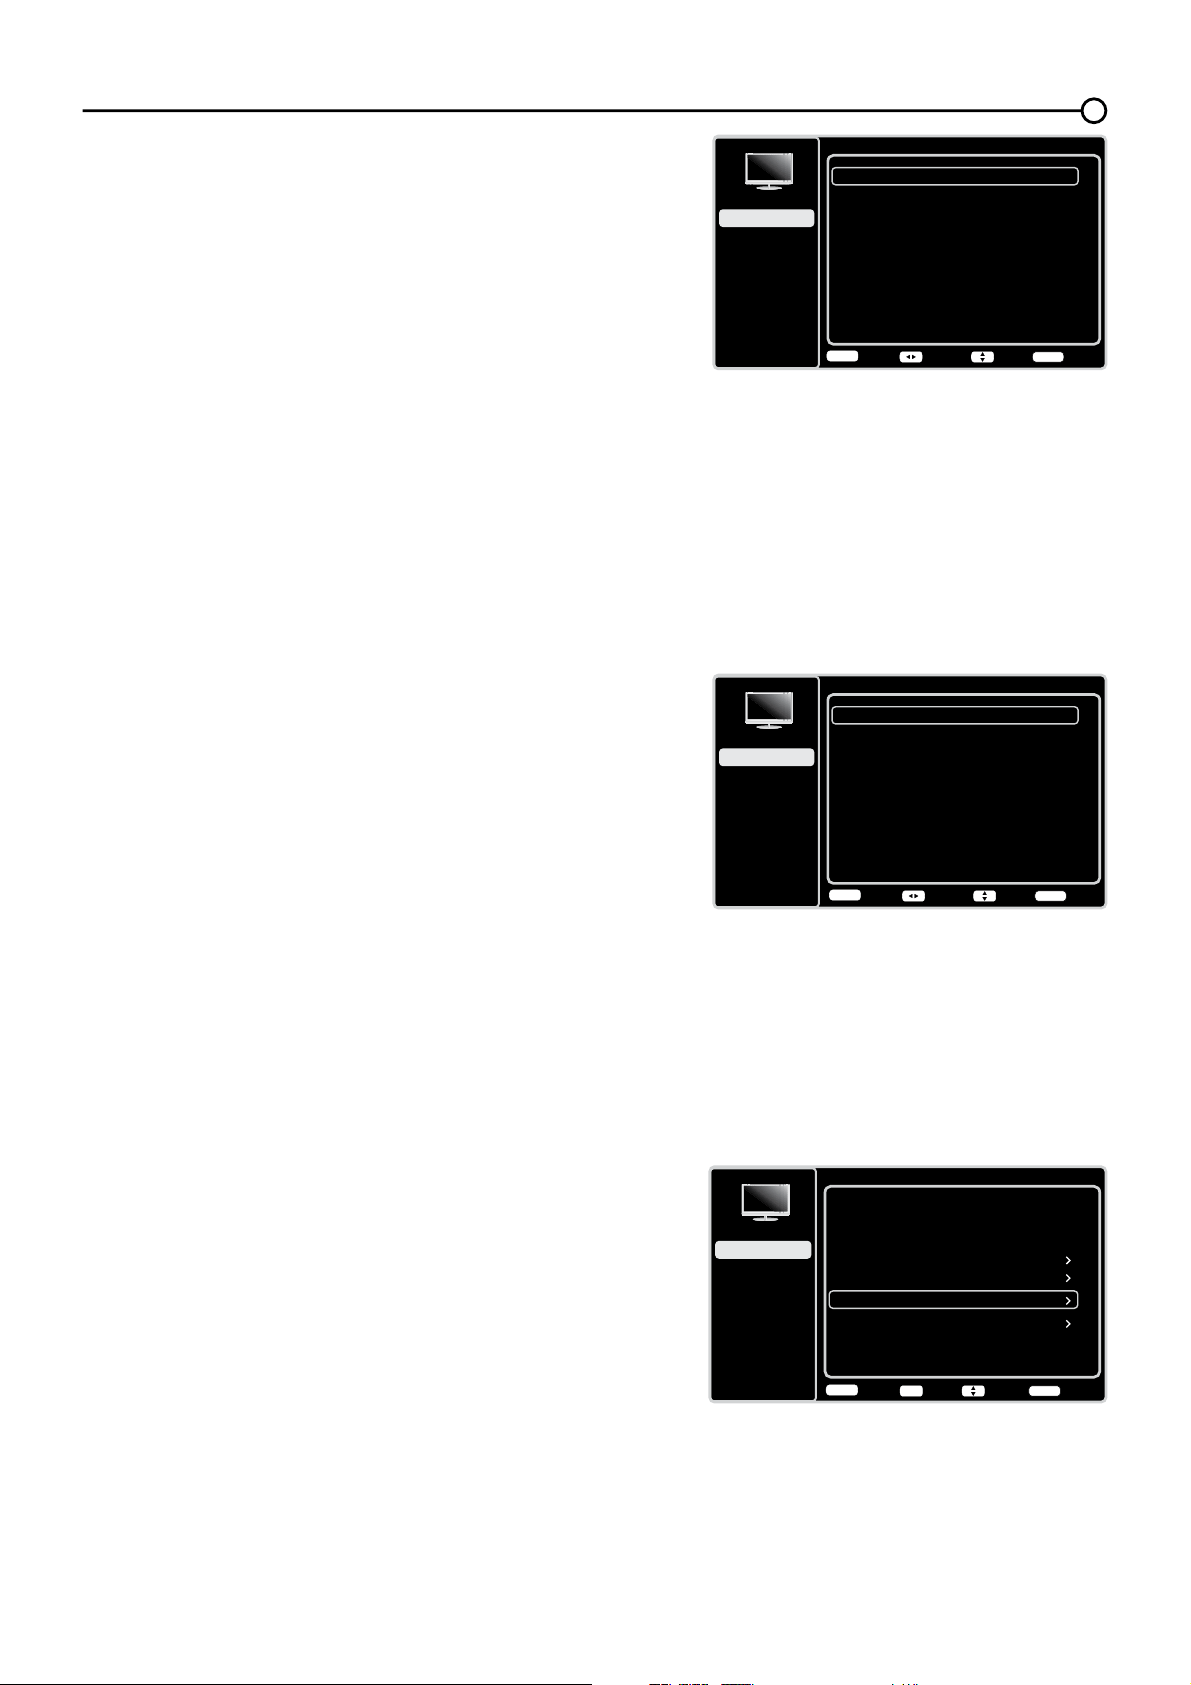
Preajuste Imagen
Brillo
Natural
Ajustes Avanzados
50
Contraste
75
Modificar configuración de imagen
Ajustes Expertos
PC
Volver
MENU
Intro Elegir Salida
CLEAR
OK
Configuración
Control de Padres
Lenguaje
Sonido
Imagen
USB
Salir
Imagen
Ajustes Avanzados
Sensor de Luz
Luz de Fondo Dinámica
Desactivado
Desactivado
Desactivado
Reducción de Ruido
Auto
SABC
Volver
MENU
Ajustar Elegir Salida
CLEAR
Configuración
Control de Padres
Lenguaje
Sonido
Imagen
USB
Salir
Tinte – Esta opción ajusta el equilibrio entre los niveles de
rojo y verde.
Temperatura del Color – Ajusta la temperatura del color
desde frío a caliente.
Nota: las opciones Color y Tinte no están disponibles en
modo PC.
Ajustes Avanzados
Sensor de luz – Cuando está activada, esta
característica monitorea las condiciones de iluminación
ambiente en la habitación y ajusta la luz de fondo del
televisor para ofrecer una visualización óptima. Esto
sirve además como característica de ahorro de energía
disminuyendo el nivel de potencia de la luz de fondo
cuando sea apropiado (por lo general en condiciones
más oscuras).
Luz de fondo dinámica – Esta opción ajusta
automáticamente el brillo de la luz de fondo de acuerdo
con el contenido de la señal entrante. La opción Luz
de fondo dinámica optimiza la calidad de imagen y
reduce el consumo de energía eléctrica.
Reducción de ruido – Este ajuste reduce la “estática”
de la imagen o cualquier tipo de interferencia. Esta
característica es especialmente útil para obtener una
imagen más clara en presencia de señales analógicas
débiles. Elija entre estas opciones:
Baja para una imagen más tenue y pura que
retenga la nitidez y los detalles de la imagen.
Mediana para una imagen un poco más tenue que
Baja.
Alta para una imagen más tenue y pura que la de
los demás ajustes (el detalle de la imagen se verá
algo reducido).
SABC (Control de Brillo Adaptativo de Escena) –
Opciones: Activado/Desactivado. En modo
Activado, la distribución del brillo en cada escena es
seleccionada automáticamente, el TV ajusta el brillo
apropiado de modo completamente automático.
&RQ¿JXUDFLyQ3&- Esta opción le permite ajustar
los ajustes del PC cuando esté en modo PC.
0RGL¿FDUFRQ¿JXUDFLyQGHLPDJHQ- Esta
función le permite recuperar todos los ajustes de imagen
de fábrica por defecto.
Sólo en modo PC
Ajustes Expertos
Luz de fondo
Color
50
50
Temperatura de Color
0
Tinte
0
Volver
MENU
Ajustar Elegir Salida
CLEAR
Configuración
Control de Padres
Lenguaje
Sonido
Imagen
USB
Salir
21
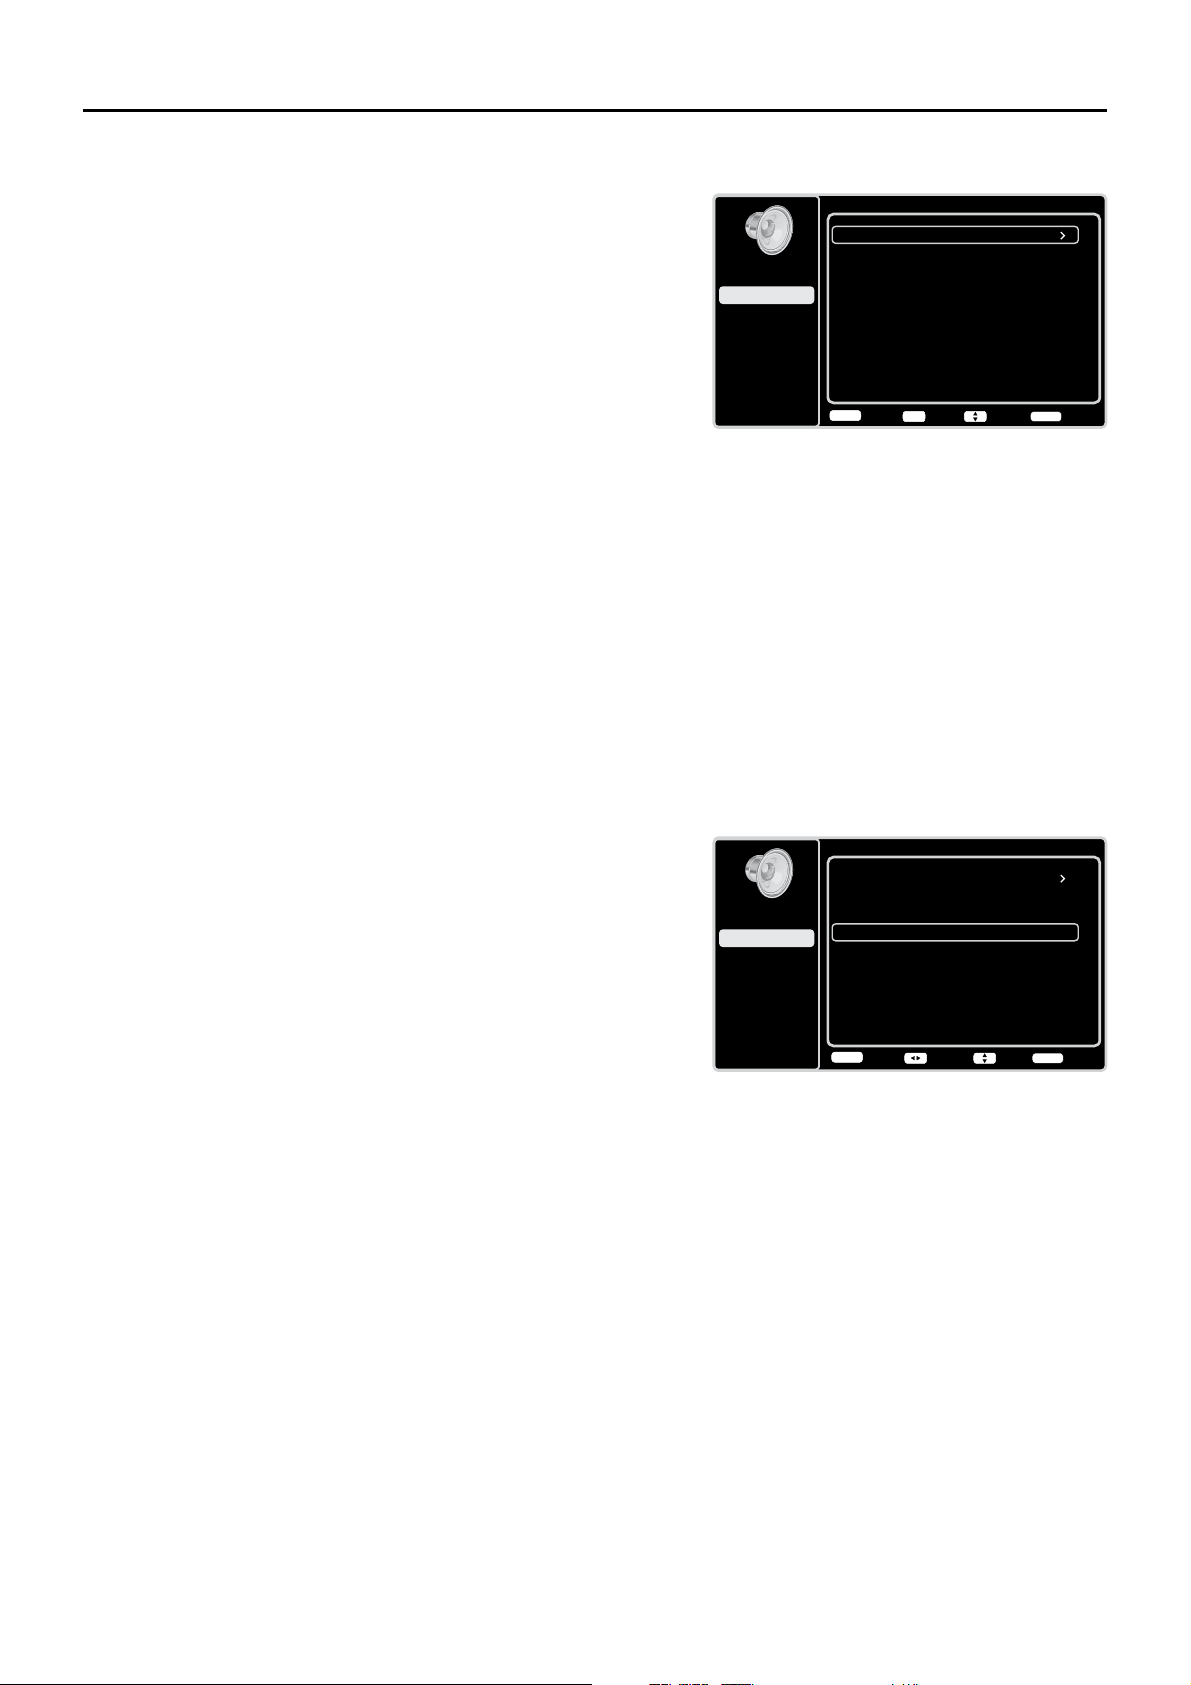
Sonido
Ecualizador
Balance
Surround
Sonido TV análogo
0
Activado
Activado
Estéreo
Altavoz
Tipo SPDIF
Dolby Digital
Ctrl Volumen Auto.
Desactivado
Volver
MENU
Ajustar Elegir Salida
CLEAR
Configuración
Control de Padres
Lenguaje
Sonido
Imagen
USB
Salir
Sonido
Ecualizador
Balance
Surround
Sonido TV análogo
0
Activado
Activado
Estereofónico
Altavoz
Tipo SPDIF
Dolby Digital
Ctrl volumen auto.
Desactivado
Volver
MENU
Intro Elegir Salida
CLEAR
OK
Configuración
Control de Padres
Lenguaje
Sonido
Imagen
USB
Salir
Menú Sonido
El menú Sonido le permite ajustar la salida de audio. Para
acceder al menú Sonido, pulse MENU en el control remoto,
\OXHJRXVHODVÀHFKDVKDFLDDUULED\KDFLDDEDMRŸźSDUD
resaltar Sonido en el menú principal. Pulse el botón OK o la
ÀHFKDKDFLDODGHUHFKDŹ) para seleccionar. Se muestran las
siguientes opciones:
Ecualizador – (OHFXDOL]DGRUJUi¿FRGHFLQFREDQGDVOH
permite realizar los ajustes de las frecuencias de audio. Puede
elegir uno de los preajustes del ecualizador de cinco bandas o
crear su propio ajuste personal preestablecido.
Ecualizador±/HSHUPLWHHOHJLUXQVRQLGRHVSHFt¿FR
preestablecido
: Estándar, Película, Voz, Música y
Personal.
Gama Frecuencia – Muestra las diferentes bandas
GHOHFXDOL]DGRUJUi¿FRDMXVWDGDVSDUDFDGDXQDGHODV
opciones de Preajuste de sonido. Seleccione una banda
y realice los ajustes. Cuando realiza ajustes, la opción
Ecualizador cambia automáticamente a Personal. Use
ODÀHFKDKDFLDODGHUHFKDRKDFLDODL]TXLHUGDŻŹ)
para seleccionar la frecuencia (100Hz, 300Hz, 1KHz,
.+].+]TXHGHVHDDMXVWDU/XHJRXWLOLFHODÀHFKD
hacia arriba o hacia abajo (
Ÿź) para ajustar el nivel.
Cuando termine de ajustar los niveles, pulse el botón
MENU para salir
.
Balance – Ajusta el nivel de audio que se envía a los
altavoces izquierdo y derecho.
Surround – Optiones Activado/Desactivado. Cuando se
activa, esta opción babilita un modo que simula en efecto de
sonido envolvente.
Altavoz – Opciones Activado/Desactivado. Cuando
selecciona desactivar, el sonido del altavoz de la TV se apaga.
Tipo SPDIF –(VWDRSFLyQFRQWURODHOWLSRGHÀXMRGHDXGLR
enviado al conector de salida de Audio Digital. Las opciones
disponibles son Dolby Digital, PCM, o Des.
Ctrl Volumen Auto. – Optiones Activado/Desactivado. Esta opción reduce el desagradable aumento de
YROXPHQTXHDPHQXGRRFXUUHGXUDQWHORVDQXQFLRVFRPHUFLDOHVWHOHYLVLYRV\WDPELpQDPSOL¿FDORVVRQLGRV
más débiles en el material del programa, eliminando la necesidad de un constante ajuste de volumen.
Sonido TV analógico – Controla la forma en que el sonido sale a través de los altavoces. Las opciones
disponibles varían de acuerdo con el tipo de entrada seleccionado.
0RQRVyORGLVSRQLEOHSDUDYHUSURJUDPDFLyQGH79UHJXODU± Esta opción reproduce el sonido
sólo en modo monofónico. Utilice este ajuste si recibe programación con una señal estereofónica débil.
Estéreo – Esta opción divide la señal entrante de audio estereofónico entre los canales izquierdo y
derecho. La mayoría de los programas televisivos y materiales grabados tienen audio estereofónico.
La palabra “Estéreo” aparece en el Cuadro de Información del Canal cuando usted sintoniza un
programa transmitido con sonido estereofónico.
Programa de Audio Secundario (SAP) – Esta opción reproduce el sonido del programa en un
segundo idioma, si está disponible. Las letras “SAP” aparecen en el Cuadro de Información del Canal
cuando usted sintoniza un programa transmitido con información SAP. El audio SAP se difunde
solamente en audio monofónico. SAP también se utiliza para difundir el audio del programa con
descripciones del vídeo para invidentes.
Sólo disponible para los canales analógicos
22
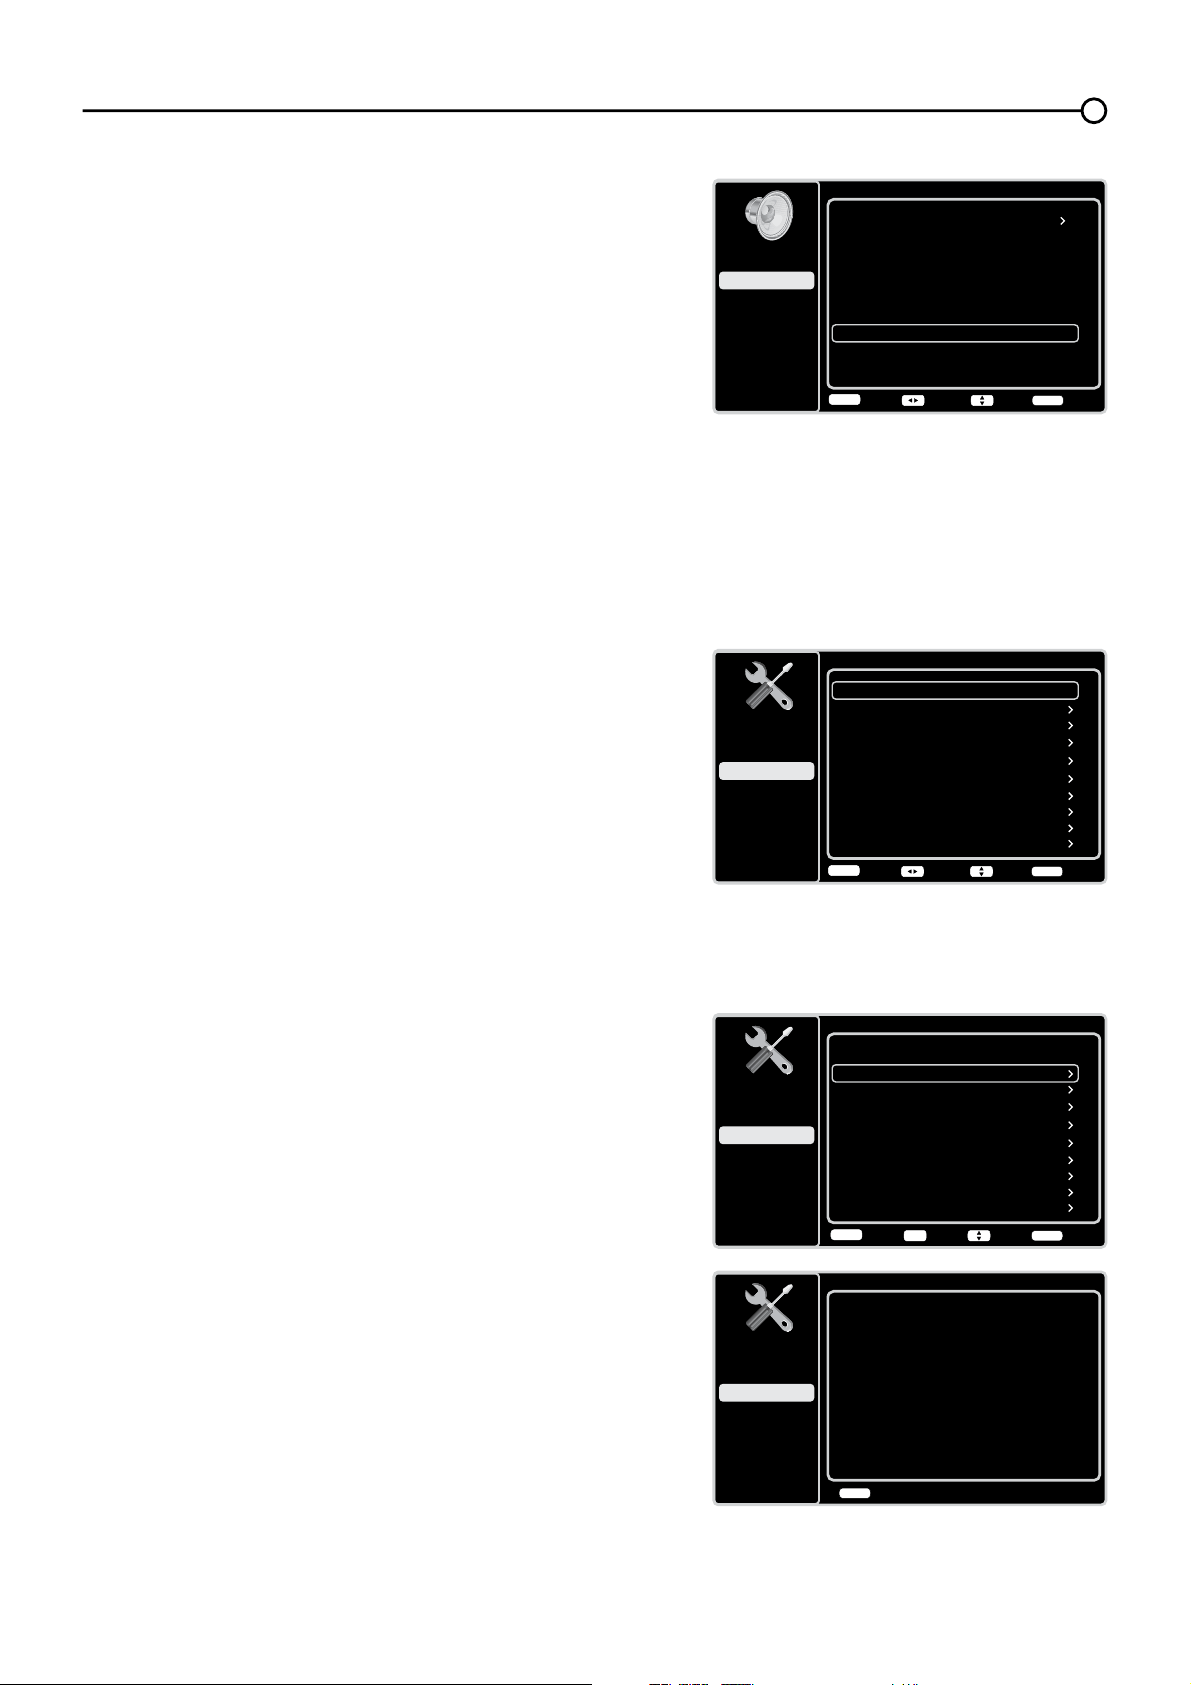
Búsqueda de canales
Tipo de Señal
Antena
Estado: Buscando...
Progreso
Canales Analógicos Encontrados
Canales Digitales Encontrados
3%
0
0
Cancelar exploración
CLEAR
Configuración
Control de Padres
Lenguaje
Sonido
Imagen
USB
Salir
Configuración
Tipo de Señal
Búsqueda de canales
Antena
Saltar Canal
Editar Canal
Saltar Entrada
Nombre de Entradas
Subtítulos
Configuración de hora
Información del Sistema
Volver
MENU
Intro Elegir Salida
CLEAR
Restablecer Todos
OK
Configuración
Control de Padres
Lenguaje
Sonido
Imagen
USB
Salir
Configuración
Tipo de Señal
Búsqueda de canales
Antena
Saltar Canal
Editar Canal
Saltar Entrada
Nombre de Entradas
Subtítulos
Configuración de la hora
Información del Sistema
Volver
MENU
Ajustar Elegir Salida
CLEAR
Restablecer Todos
Configuración
Control de Padres
Lenguaje
Sonido
Imagen
USB
Salir
Sonido
Ecualizador
Balance
Surround
0
Activado
Idioma de Audio por Omisión
Inglés
Idioma actual del audio
Desconocido
Altavoz
Activado
Tipo SPDIF
Dolby Digital (AC3)
Ctrl Volumen Auto.
Desactivado
Volver
MENU
Ajustar Elegir Salida
CLEAR
Configuración
Control de Padres
Lenguaje
Sonido
Imagen
USB
Salir
Idioma de Audio por Omisión – Elija el idioma de audio
TXHSUH¿HUDSDUDHOGLiORJRHQORVFDQDOHVGLJLWDOHV6L
el idioma preferido no es transmitido en el programa,
entonces la TV reproduce el idioma de audio por defecto
del programa (normalmente Inglés en los EE.UU.). Hay 3
idiomas de audio por defecto disponibles (Inglés, Francés
y Español).
Idioma actual del audio ±8VHODÀHFKDKDFLDODL]TXLHUGD
o hacia la derecha (
ŻŹ) para elegirlo de la lista de
idiomas disponibles para el programa que está viendo. El
idioma seleccionado pasa a ser su idioma preferido para
todos los canales digitales hasta que apague el televisor.
Si el idioma elegido no es transmitido en el programa,
entonces la TV reproduce el idioma por defecto del
programa (normalmente inglés en los EE.UU.).
0HQ~&RQ¿JXUDFLyQ
El menú &RQ¿JXUDFLyQOHSHUPLWHFRQ¿JXUDUHOWHOHYLVRU
según sus preferencias. Pulse MENU en el control remoto
SDUDDEULUHOPHQ~SULQFLSDO8VHODVÀHFKDVKDFLDDUULEDR
hacia abajo (Ÿź) para seleccionar &RQ¿JXUDFLyQOXHJR
pulse el botón OK RODÀHFKDKDFLDODGHUHFKDŹSDUD
mostrar las siguientes opciones:
Tipo de señal
Seleccione el tipo de señal (Cable/Sat o Antena) que
tiene conectada en la entrada ANT/CABLE/SAT IN.
Búsqueda de canales
Cuando realiza una búsqueda de canales, su TV busca
canales con señal y almacena la información del canal en
la Lista de canales. Entonces, cuando usted vea la TV y
pulse el botón CH+ o CH-, su TV va al canal siguiente o
al anterior de la Lista de canales y salta aquellos canales
sin señal.
Si cambia la fuente de señal de la TV – por ejemplo, si
cambia de la antena exterior a la TV por cable – necesitará
buscar los canales otra vez.
Para buscar los canales automáticamente:
'HVSXpVGHHOHJLUXQWLSRGHVHxDOXVHODÀHFKDKDFLD
DUULEDRKDFLDDEDMRŸźSDUDUHVDOWDUBúsqueda de
canales.
3XOVHHOERWyQ2.RODÀHFKDKDFLDODGHUHFKDŹSDUD
iniciar la búsqueda. En el menú de la pantalla puede
ver el progreso de la búsqueda y cuantos canales ha
encontrado.(Nota: Si desea detener la búsqueda, pulse
el botón CLEAR.)
3. Tras terminar la búsqueda, pulse el botón OK para
reiniciar la búsqueda, o pulse el botón MENU para
regresar al menú previo, o pulse el botón CLEAR para
cerrar el menú.
Sólo disponible para los canales analógicos
23
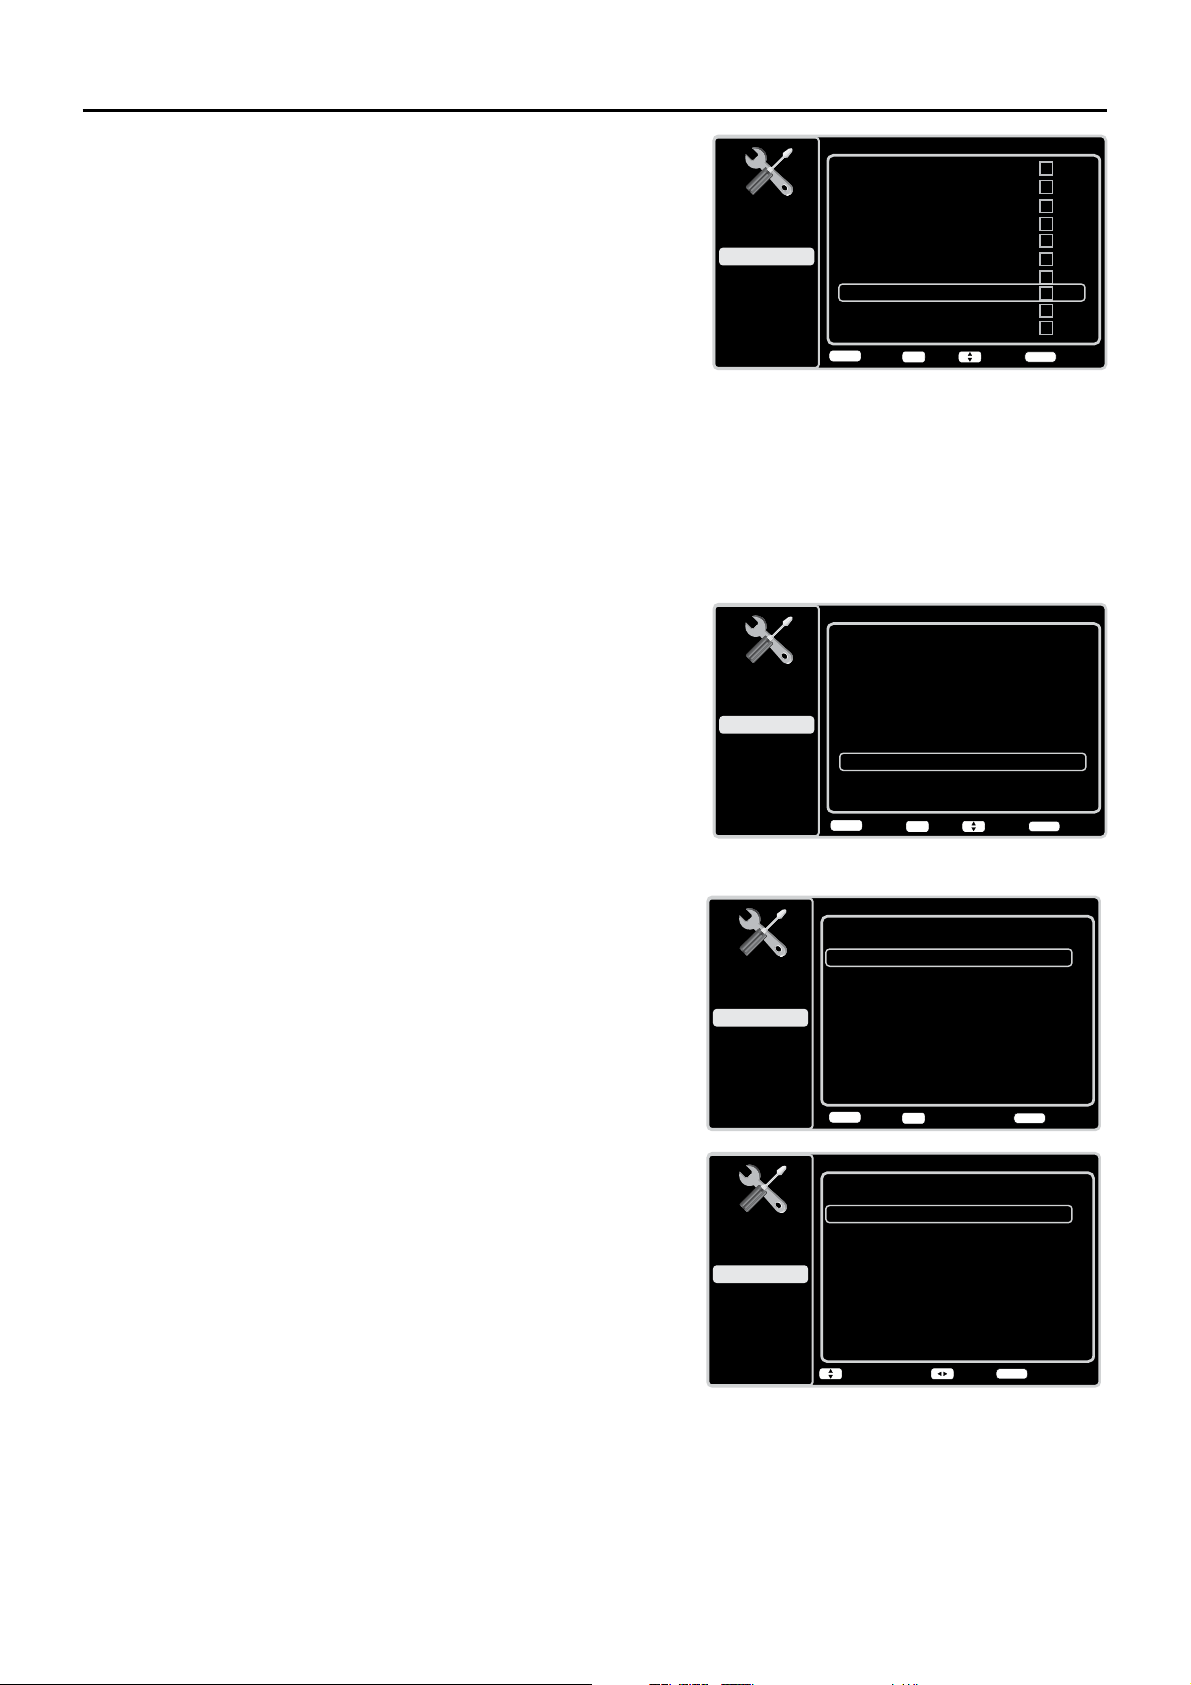
Editar Canal
Página 1/14
12
Análogo
13
Análogo
14
Análogo
15
Análogo
16
Análogo
17
Análogo
18
Análogo
19
Análogo
20
Análogo
21
Análogo
Volver
MENU
Fijar Elegir Salida
CLEAR
OK
Configuración
Control de Padres
Lenguaje
Sonido
Imagen
USB
Salir
Saltar Canal Página 1/7
12
Análogo
13
Análogo
14
Análogo
15
Análogo
16
Análogo
17
Análogo
18
Análogo
19
Análogo
20
Análogo
21
Análogo
Volver
MENU
Fijar Elegir Salida
CLEAR
OK
Configuración
Control de Padres
Lenguaje
Sonido
Imagen
USB
Salir
Saltar Canal
Usted puede ocultar canales de la Lista de canales.
Entonces, cuando usted pulse el botón CH+ o CH-,
la TV saltará los canales ocultos. Usted puede seguir
sintonizando estos canales ocultos pulsando el número del
canal con los botones numéricos.
3DUDRFXOWDUXQFDQDOHVSHFt¿FR
1. En el menú &RQ¿JXUDFLyQXVHODÀHFKDKDFLDDUULEDR
KDFLDDEDMRŸźSDUDUHVDOWDUSaltar Canal.
2. Pulse el botón OKRODÀHFKDKDFLDODGHUHFKDŹSDUD
iniciar la pantalla para Saltar Canal.
8VHODÀHFKDKDFLDDUULEDRKDFLDDEDMRŸźSDUD
UHVDOWDUHOFDQDOTXHGHVHDVDOWDUOXHJRSXOVHHOERWyQ
OK para marcar el canal resaltado. Usted puede
recuperar el canal para la Lista de canales, resaltándolo
y quitándole la marca.
4. Repita el proceso para ocultar otros canales.
5. Pulse el botón MENU para regresar al menú previo, o
pulse el botón CLEAR para cerrar el menú.
Editar Canal
La función Editar canales le permite añadir o cambiar la
etiqueta del canal, solamente para canales analógicos. No
se pueden cambiar los nombres de los canales digitales.
Para editar el nombre de un canal analógico:
1. En el menú &RQ¿JXUDFLyQXVHODÀHFKDKDFLDDUULEDR
KDFLDDEDMRŸźSDUDUHVDOWDUEditar Canal.
2. Pulse el botón OKRODÀHFKDKDFLDODGHUHFKDŹSDUD
iniciar la pantalla de Lista de canales.
8VHODÀHFKDKDFLDDUULEDRKDFLDDEDMRŸźSDUD
resaltar el canal que desea etiquetar o editar.
4. Pulse el botón OK para entrar en la pantalla de Editar
Canal.
5. Se resaltará el Nombre del Canal , pulse el botón OK
para entrar en modo edición.
8VHODVÀHFKHVKDFLDODL]TXLHUGDRGHUHFKDŻŹSDUD
VHOHFFLRQDUHOFDPSRDDVMXWDUXVHODVÀHFKDDUULED\
DEDMRŸźSDUDLQWURGXFLUHOQRPEUHGHOFDQDO
7. Pulse el botón OKSDUDFRQ¿UPDU\JXDUGDUODQXHYD
etiqueta.
8. Pulse el botón MENU regresar al menú previo, o pulse
el botón CLEAR para cerrar el menú.
Editar Canal
Número de Canal:
19
Nombre del canal
Volver
MENU
Iniciar Edición Salida
CLEAR
OK
Configuración
Control de Padres
Lenguaje
Sonido
Imagen
USB
Salir
Editar Canal
Número de Canal:
19
Nombre del canal
- - - - - - -
Cursor
Introd. Nombre
Fin Edición
OK
Configuración
Control de Padres
Lenguaje
Sonido
Imagen
USB
Salir
24
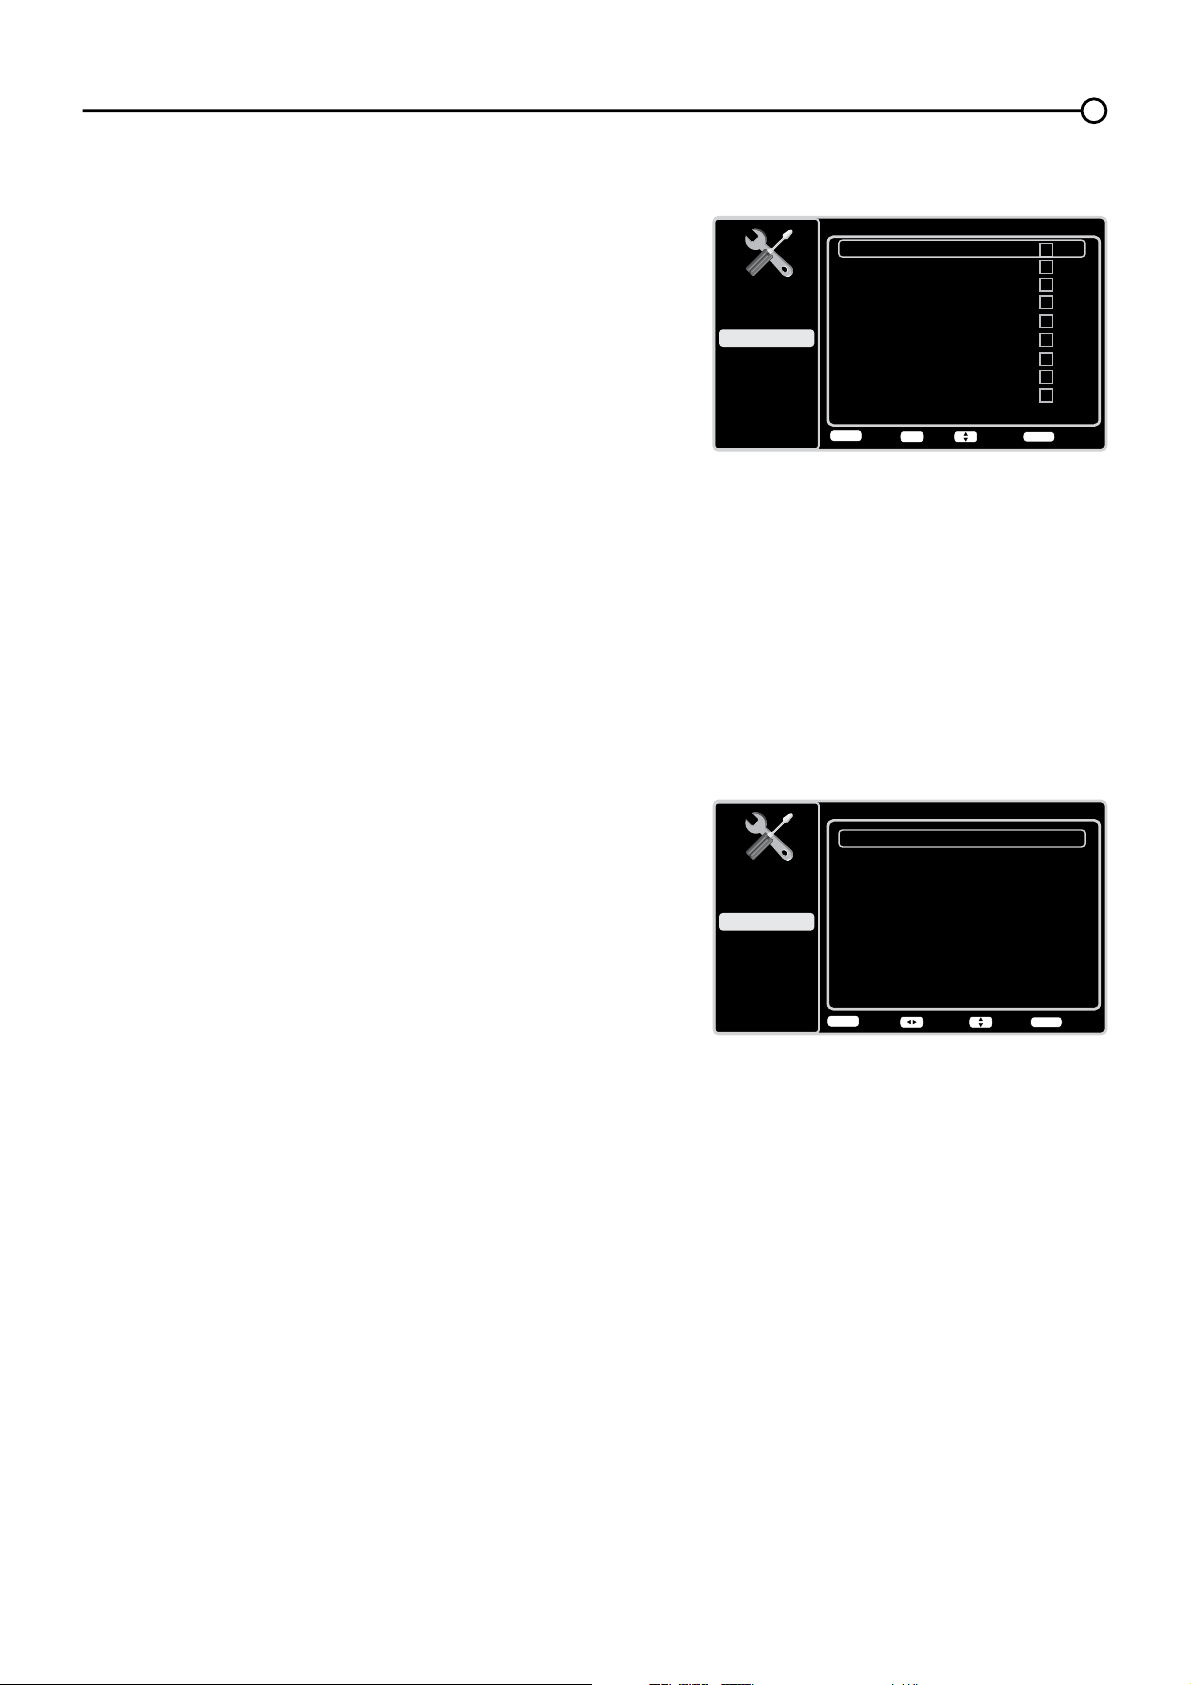
Nombre de Entradas
AV1
CMPT1
Sin etiqueta
Sin etiqueta
AV2
Sin etiqueta
S-VIDEO
Sin etiqueta
PC
Sin etiqueta
HDMI1
Sin etiqueta
CMPT2
Sin etiqueta
HDMI2
Sin etiqueta
HDMI3
Sin etiqueta
Volver
MENU
Ajustar Elegir Salida
CLEAR
Configuración
Control de Padres
Lenguaje
Sonido
Imagen
USB
Salir
Saltar Entrada
AV1
HDMI1
HDMI2
Sin etiqueta
AV2
Sin etiqueta
S-VIDEO
Sin etiqueta
PC
Sin etiqueta
Sin etiqueta
CMPT1
Sin etiqueta
CMPT2
Sin etiqueta
Sin etiqueta
HDMI3
Sin etiqueta
Volver
MENU
Fijar
Elegir Salida
CLEAR
OK
Configuración
Control de Padres
Lenguaje
Sonido
Imagen
USB
Salir
Saltar Entrada
Usted puede ocultar entradas de vídeo de la Lista de
canales. Esta opción le permite eliminar las entradas de la
Lista de canales de modo que no se las encuentre cuando
navegue arriba o abajo por los canales. Una vez que haya
ocultado las entradas, la TV saltará esas entradas cuando
utilice los botones CH+ o CH-.
Para ocultar entradas de vídeo:
1. En el menú &RQ¿JXUDFLyQXVHODÀHFKDKDFLDDUULEDR
KDFLDDEDMRŸźSDUDUHVDOWDUSaltar Entrada.
2. Pulse el botón OKRODÀHFKDKDFLDODGHUHFKDŹSDUD
abrir la pantalla de la Lista de entradas.
8VHODÀHFKDKDFLDDUULEDRKDFLDDEDMRŸźSDUD
resaltar la entrada de vídeo que desea ocultar.
4. Pulse el botón OK para marcar la entrada resaltada.
Usted puede añadir una entrada resaltándola y
quitándole la marca.
5. Repita el proceso para ocultar otras entras de vídeo.
6. Pulse el botón MENU para regresar al menú previo, o
pulse el botón CLEAR para cerrar el menú.
Nombre de Entradas
Usted puede añadir una etiqueta a una fuente de entrada
GHYtGHRSDUDLGHQWL¿FDUODIiFLOPHQWH
1. En el menú &RQ¿JXUDFLyQXVHODÀHFKDKDFLDDUULEDR
KDFLDDEDMRŸźSDUDUHVDOWDUNombre de Entradas.
2. Pulse el botón OKRODÀHFKDKDFLDODGHUHFKDŹSDUD
iniciar la pantalla de Nombre de Entradas.
8VHODÀHFKDKDFLDDUULEDRKDFLDDEDMRŸźSDUD
resaltar la fuente de entrada que desea etiquetar.
8VHODÀHFKDKDFLDODL]TXLHUGDRKDFLDODGHUHFKD
ŻŹSDUDVHOHFFLRQDUHVWDIXHQWH
5. Pulse el botón MENU para regresar al menú previo, o
pulse el botón CLEAR para cerrar el menú.
25
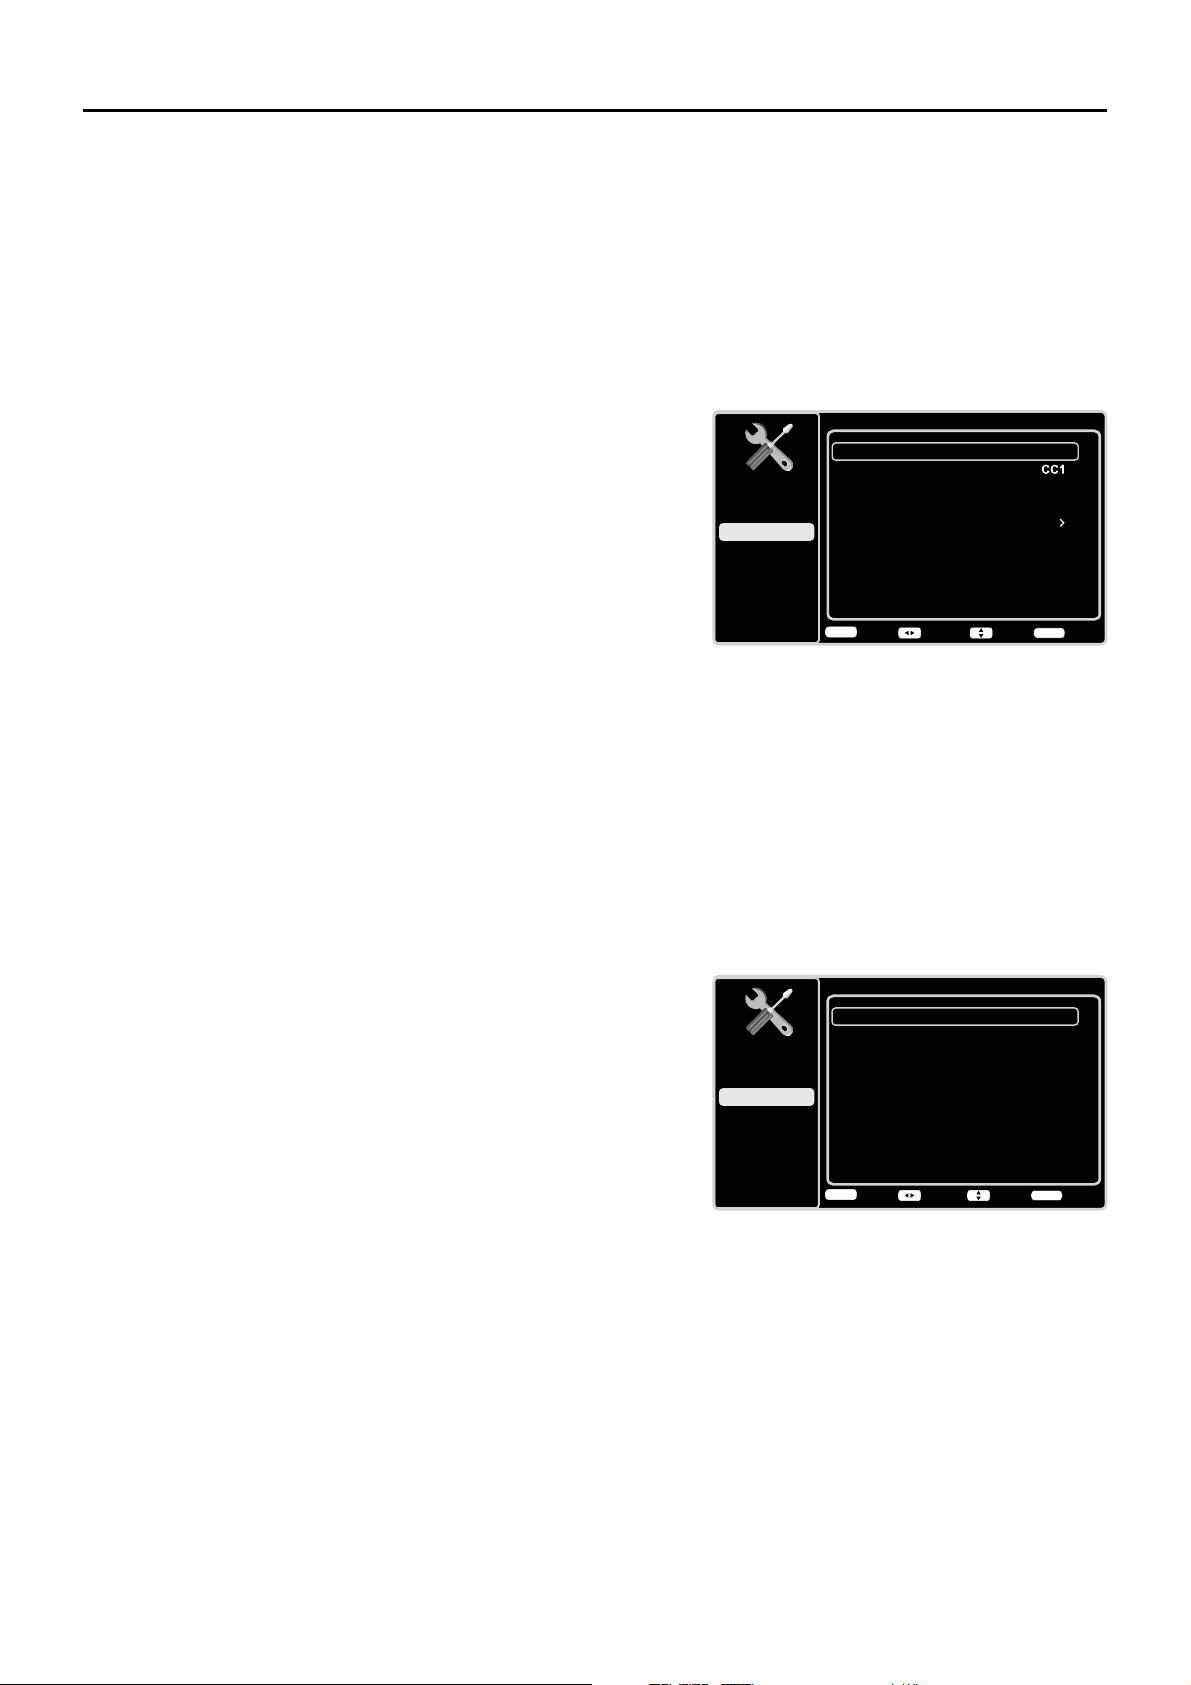
Estilo CC digital
Estilo de Subtítulos
Tamaño CC digital
Personal
Fuente CC digital
Opacidad CC dig.
Estilo1
Solid
Grande
Color de fondo CC dig.
Black
Opacidad de fondo CC dig. Solid
Color CC digital
Blanco
Volver
MENU
Ajustar
Elegir
Salida
CLEAR
Configuración
Control de Padres
Lenguaje
Sonido
Imagen
USB
Salir
Subtítulos
Ajuste CC
Tipo CC analógico
Encendido Siempre
Tipo CC digital
Preajuste CC digital
Estilo CC digital
Desactivado
Activado
Volver
MENU
Ajustar Elegir Salida
CLEAR
Configuración
Control de Padres
Lenguaje
Sonido
Imagen
USB
Salir
Subtitulado electrónico
0XFKRVSURJUDPDVYLHQHQFRGL¿FDGRVFRQVXEWtWXOR&&TXHOHSHUPLWHGHVSOHJDUHQODSDQWDOODGHO
televisor la porción sonora de un programa en forma de texto.
Nota: Los ajustes de subtítulos no se encuentran disponibles para las entradas HDMI o PC INPUTS.
(VWRVDMXVWHVGHEHQFRQ¿JXUDUVHHQHOPHQ~GHOFRPSRQHQWHFRQHFWDGR/RVVXEWtWXORVQRHVWiQ
GLVSRQLEOHVHQWRGRVORVFDQDOHVHQWRGRPRPHQWR6yORSURJUDPDVHVSHFt¿FRVVRQFRGL¿FDGRVFRQ
subtítulos. Cuando un programa digital tiene subtitulado electrónico, aparece CC en el Cuadro de
información del canal.
Las opciones de los subtítulos son:
Ajuste CC – Esta opción le permite seleccionar la manera en
que aparece la información de subtítulos en la pantalla.
Desactivado – No se muestran subtítulos.
Encendido Siempre – Elija esta opción si desea ve la
información de subtítulos siempre que esté disponible.
Activado sin sonido – Muestra la información de
subtítulos, si está disponible, siempre que se oprima el
botón MUTE para silenciar el sonido del televisor. Si está
activado el sonido, no se muestran los subtítulos.
Tipo CC analógico – De estar disponible, esta opción le
permite seleccionar el modo de subtítulos utilizado para
mostrar información de subtítulos. Si no está seguro de las
GLIHUHQFLDVHQWUHORVPRGRVTXL]iVSUH¿HUDGHMDUHOPRGRGH
subtítulos ajustado en CC1, el cual muestra un texto completo
del programa en el idioma primario en su área.
Tipo CC digital. De estar disponible, esta opción le permite
seleccionar un servicio de diálogo subtitulado (1 a 6) para los
canales digitales.
Preajuste CC digital Si está disponible, esto le permite
seleccionar entre las opciones Desact. y Act. El modo Act. le
permite establecer las opciones que aparecen a continuación.
Estilo CC Digital – Esta opción le permite personalizar las
siguientes opciones del visualizador, si están disponibles:
Estilo de Subtítulos – Seleccione entre las opciones
Como radiodifusor o Personal. Si elige la opción
Personal, los ajustes cambian dependiendo de las
opciones que elija.
Tamaño CC digital – Seleccione el tamaño del texto de los
subtítulos: Por defecto, Pequeña, Estándar o Grande.
Fuente CC digital - Seleccione un diseño de caracteres
para el texto de los subtítulos digitales. Una fuente es
un conjunto completo de letras, números, signos de
puntuación, etc. en un tipo de fuente determinado. Puede
escoger entre una variedad de fuentes. (Por defecto, Estilo
1-7)
Color de fondo CC digital – Ajuste el color del área
detrás del texto de los subtítulos: Por defecto, Negro,
Blanco, Rojo, Verde, Azul, Amarillo, Magenta o Cian.
Opacidad de fondo CC digital – Seleccione la
apariencia del área detrás del texto de los subtítulos:
Por defecto, Sólido, Parpadeante, Translúcido o
Transparente.
Nota: Estas opciones de estilos de
subtítulos funcionan únicamente con
subtítulos digitales reales. No todos
los subtítulos en canales digitales son
subtítulos digitales--esto depende de lo que
la emisora envíe. Si los subtítulos para un
programa no son digitales, los ajustes de
Estilo CC digital no funcionarán
26
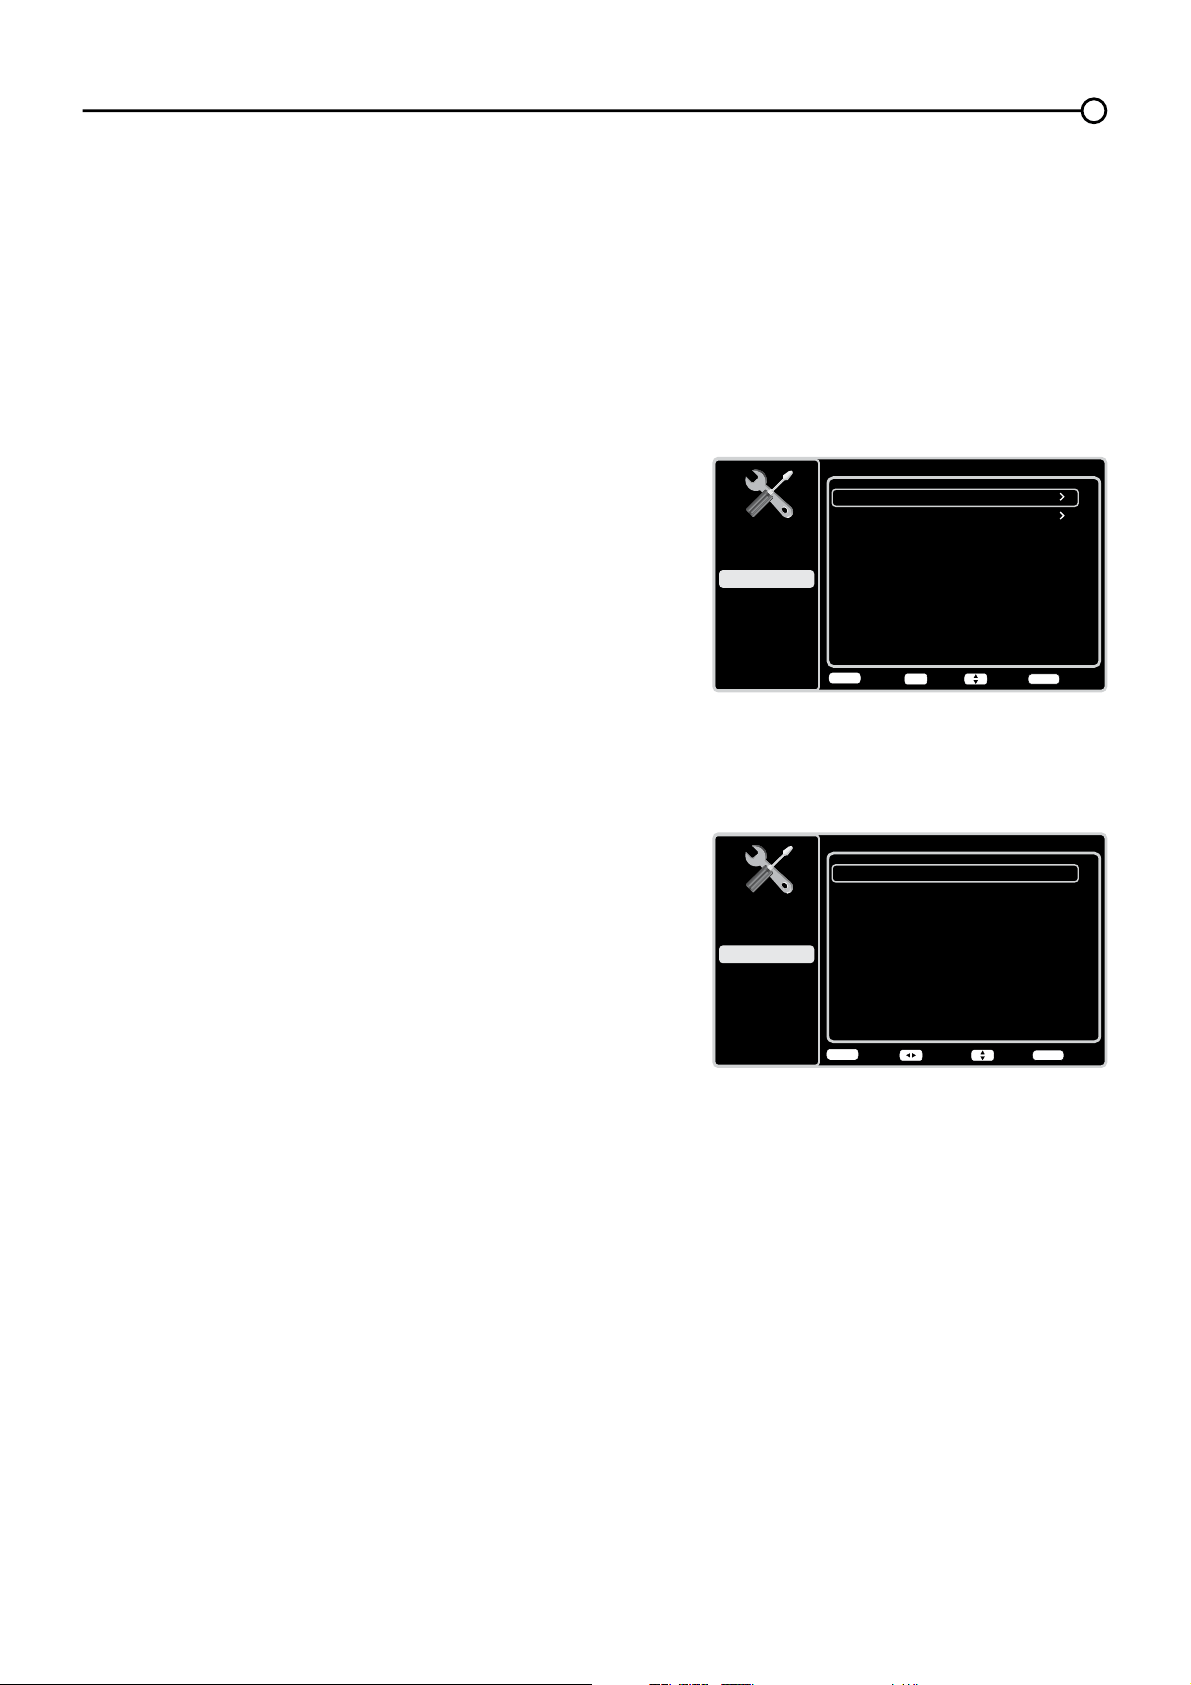
Hora
Sincronía Automática
Fecha
Desactivado
Hora de Verano Desactivado
Hora
2010-01-01
02:16PM
Temporizador de encendido
Hora de encendido
Activado
Temporizador de Apagado
12:00AM
Hora de Apagado
12:00AM
Activado
Volver
MENU
Ajustar Elegir Salida
CLEAR
Configuración
Control de Padres
Lenguaje
Sonido
Imagen
USB
Salir
Configuración de la hora
Zona Horaria
Hora
Desactivado
Tiempo suspensión
Volver
MENU
Intro Elegir Salida
CLEAR
OK
Configuración
Control de Padres
Lenguaje
Sonido
Imagen
USB
Salir
&RQ¿JXUDFLyQGHODKRUD
Zona Horaria
Usted puede seleccionar la hora local actual. Las opciones son:
(VWH$WOiQWLFR7HUUDQRYD+DZDL$ODVND3DFt¿FR0RQWDxD\
Central.
Para elegir una zona horaria:
1. En el menú &RQ¿JXUDFLyQGHODKRUDXVHODÀHFKDKDFLD
DUULEDRKDFLDDEDMRŸźSDUDUHVDOWDUZona Horaria.
2. Pulse el botón OKRODÀHFKDKDFLDODGHUHFKDŹSDUD
proceder a la pantalla siguiente.
8VHODÀHFKDKDFLDODL]TXLHUGDRKDFLDODGHUHFKDŻŹSDUD
seleccionar la zona de su área.
4. Pulse el botón MENU para regresar a la pantalla previa, o pulse
el botón CLEAR para cerrar el menú.
Hora
Para ajustar la hora:
1. En el menú &RQ¿JXUDFLyQGHODKRUD, XVHODÀHFKDKDFLD
DUULEDRKDFLDDEDMRŸźSDUDUHVDOWDU Hora.
2. Pulse el botón OKRODÀHFKDKDFLDODGHUHFKDŹSDUD
proceder a la pantalla siguiente.
3. Las opciones de esta pantalla incluyen:
a. Sincronía Automática±8VHODÀHFKDKDFLDODL]TXLHUGD
RKDFLDODGHUHFKDŻŹSDUDHOHJLUAct para adquirir
automáticamente la hora de los canales digitales.
b. Hora de Verano – Seleccione Auto u Off para el cambio de
horario de verano.
c. Fecha – Cuando tenga esta opción resaltada, pulse el botón
OK SDUDVHOHFFLRQDU HO FDPSRD DMXVWDU OXHJR XVHŻŹ
para establecer la fecha. (Nota: use el mismo procedimiento
para ajustar la hora a continuación)
d. Hora – Le permite ajustar la hora manualmente.
e. Temporizador de encendido – Seleccione Una vez/
Diariamente/ Des.
f. Hora de encendido – Le permite ajustar la hora a la que
desea que se encienda automáticamente el televisor.
g. Temporizador de Apagado – Seleccione Una vez/
Diariamente/ Des.
h. Hora de Apagado – Le permite ajustar la hora a la que
desea que se apague automáticamente el televisor.
Tiempo de suspensión±8VHODÀHFKDKDFLDODL]TXLHUGDR
KDFLDODGHUHFKDŻŹSDUDHVWDEOHFHUHOSHULRGRWUDVHOFXDOVH
apagará el televisor.
Información del Sistema
Esta opción le permite ver la información del sistema incluyendo la
ID del panel, la Versión del SW, el Núm.de servicio del modelo.
Color CC digital – Seleccione el color del texto de los subtítulos: Por defecto, Negro, Blanco, Rojo,
Verde, Azul, Amarillo, Magenta o Cian.
Opacidad CC digital – Seleccione la apariencia del texto de los subtítulos: Por defecto, Sólido,
Parpadeante, Translúcido o Transparente.
27
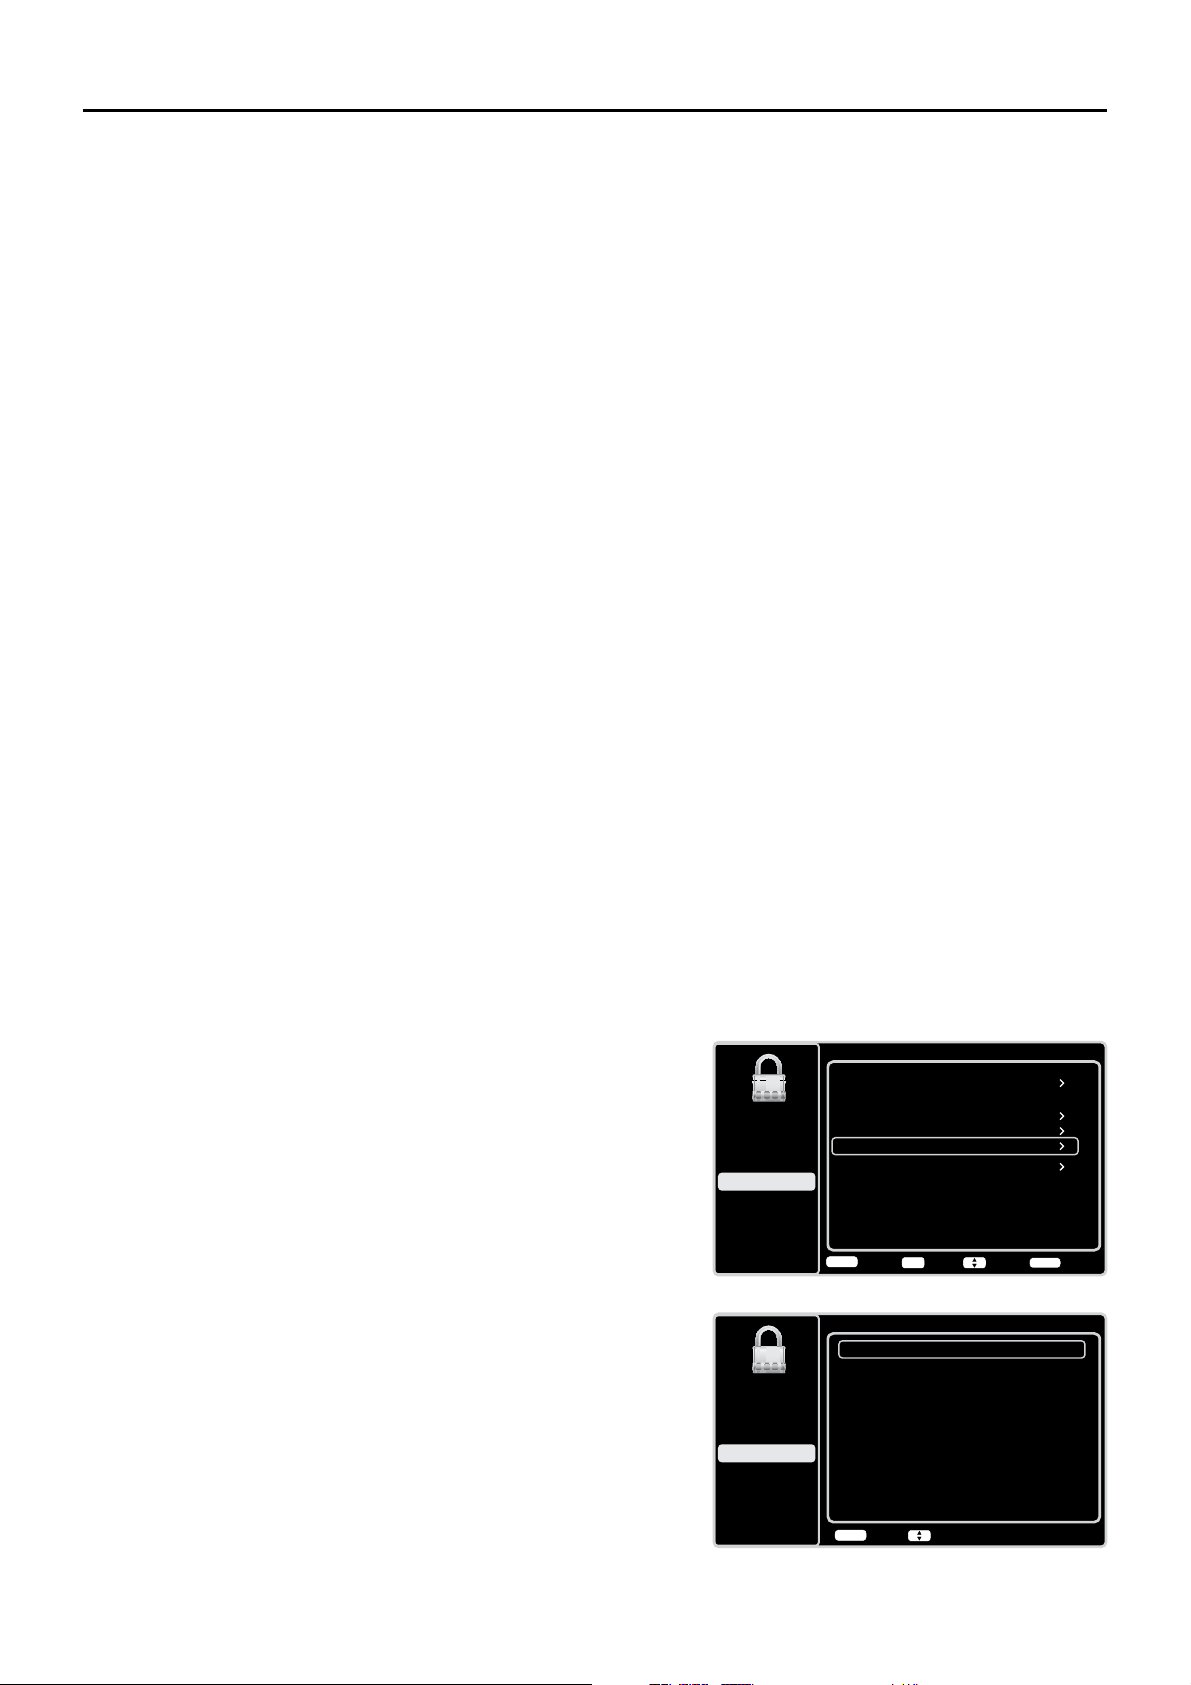
Crear Contraseña
Nueva Contraseña
----
----
Confirmar Contraseña
Volver
MENU
Seleccionar Menú
Configuración
Control de Padres
Lenguaje
Sonido
Imagen
USB
Salir
Control de Padres
Bloqueo de Canal
Bloqueo de Botones
V-Chip
Bloquear Entrada
Cambiar Contraseña
Desactivado
Volver
MENU
Intro Elegir Salida
CLEAR
OK
Restablecer Todos
Configuración
Control de Padres
Lenguaje
Sonido
Imagen
USB
Salir
Control de Padres y V-Chip
Las opciones en los menús V-Chip EE.UU. y V-Chip Canadá involucran el conjunto de programas incluido
en su televisor, conocido como V-Chip, el cual le permite bloquear programas y películas de TV. Los
SURJUDPDVSXHGHQEORTXHDUVHVHJ~QODVFODVL¿FDFLRQHVEDVDGDVHQODHGDGWDOHVFRPR790$&RQVXOWH
la página 30). De estar disponible, los programas de TV pueden además bloquearse según el contenido, tal
como lenguaje de adultos (L) (Consulte la página 30). Las películas pueden bloquearse únicamente según
ODVFODVL¿FDFLRQHVEDVDGDVHQODHGDG&RQVXOWHODSiJLQD'HVSXpVGHEORTXHDUORVSURJUDPDVXVWHG
puede desbloquearlos introduciendo una contraseña. Como opción predeterminada, el software ubicado
dentro del televisor está desactivado o desbloqueado. Consulte la página 29 para obtener instrucciones
sobre cómo bloquear la V-Chip.
V-Chip - EE.UU. y Canadá
(O9&KLSOHHODFODVL¿FDFLyQGHOSURJUDPDEDVDGDHQODHGDG790$79HWF\ORVWHPDVGHO
FRQWHQLGR9LROHQFLD9/HQJXDMHGH$GXOWRV/HWF6LXVWHGKDEORTXHDGRODFODVL¿FDFLyQ\RORV
temas del contenido que los programas contienen, recibirá un mensaje indicándole que el canal se
encuentra actualmente bloqueado. Cambie de canal o pulse OK para introducir la contraseña y desactivar
temporalmente el Control de Padres.
Las emisoras no están en la obligación de suministrar los temas de su contenido, por lo cual aquellos
SURJUDPDVTXHQRHVSHFL¿TXHQORVWHPDVGHVXFRQWHQLGRVHUiQEORTXHDGRVVyORVLXVWHGEORTXHyVX
FRUUHVSRQGLHQWHFODVL¿FDFLyQEDVDGDHQODHGDG3XHGHEORTXHDUDGHPiVSURJUDPDVTXHKDQVLGR
GHVLJQDGRVFRPR³([HQWRV´\SURJUDPDVFRQVLGHUDGRV³6LQ&ODVL¿FDU´&RQVXOWHODSiJLQDSDUDREWHQHU
H[SOLFDFLRQHVVREUHODVFODVL¿FDFLRQHVGH((88\&DQDGi
Restablecer todo
Esta opción recupera todos los parámetros de fábrica (excepto los ajustes de control de padres).
6LVHOHFFLRQDHVWDRSFLyQDSDUHFHXQFXDGURGHFRQ¿UPDFLyQ1RWDVLWLHQHDOJXQRVFDQDOHV
bloqueados, debe introducir la contraseña V-Chip, entonces podrá seguir el funcionamiento siguiente).
8VHODÀHFKDKDFLDODL]TXLHUGDRKDFLDODGHUHFKDŻŹ) para seleccionar OK o Cancelar.
2. Pulse el botón OKSDUDFRQ¿UPDU
Cambiar la contraseña V-Chip
La primera vez que entra en el menú de Control de Padres, debe
GHHVWDEOHFHUXQDFRQWUDVHxDSDUDDMXVWDUODFRQ¿JXUDFLyQGHO
control de padres. Para introducir una contraseña V-Chip, siga
estos pasos:
1. Pulse el botón MENU para mostrar el menú principal.
8VHODÀHFKDKDFLDDUULEDRKDFLDDEDMRŸźSDUDUHVDOWDU
Control de Padres.
3. Pulse el botón OKRODÀHFKDKDFLDODGHUHFKDŹSDUD
entrar en la pantalla siguiente, y la opción Cambiar
Contraseña se encuentra resaltada.
4. Pulse el botón OKRODÀHFKDKDFLDODGHUHFKDŹSDUD
entrar en la pantalla para Cambiar Contraseña.
5. Use el teclado numérico para escribir cuatro números para
su contraseña.
9XHOYDDHVFULELUHOPLVPRFyGLJRSDUDFRQ¿UPDUOD
contraseña. La próxima vez que desee acceder al menú de
Control de Padres, primero deberá introducir la contraseña
correcta.
Nota: la supercontraseña es 2458. Si olvida su contraseña,
escríbala para anular cualquier contraseña existente.
28
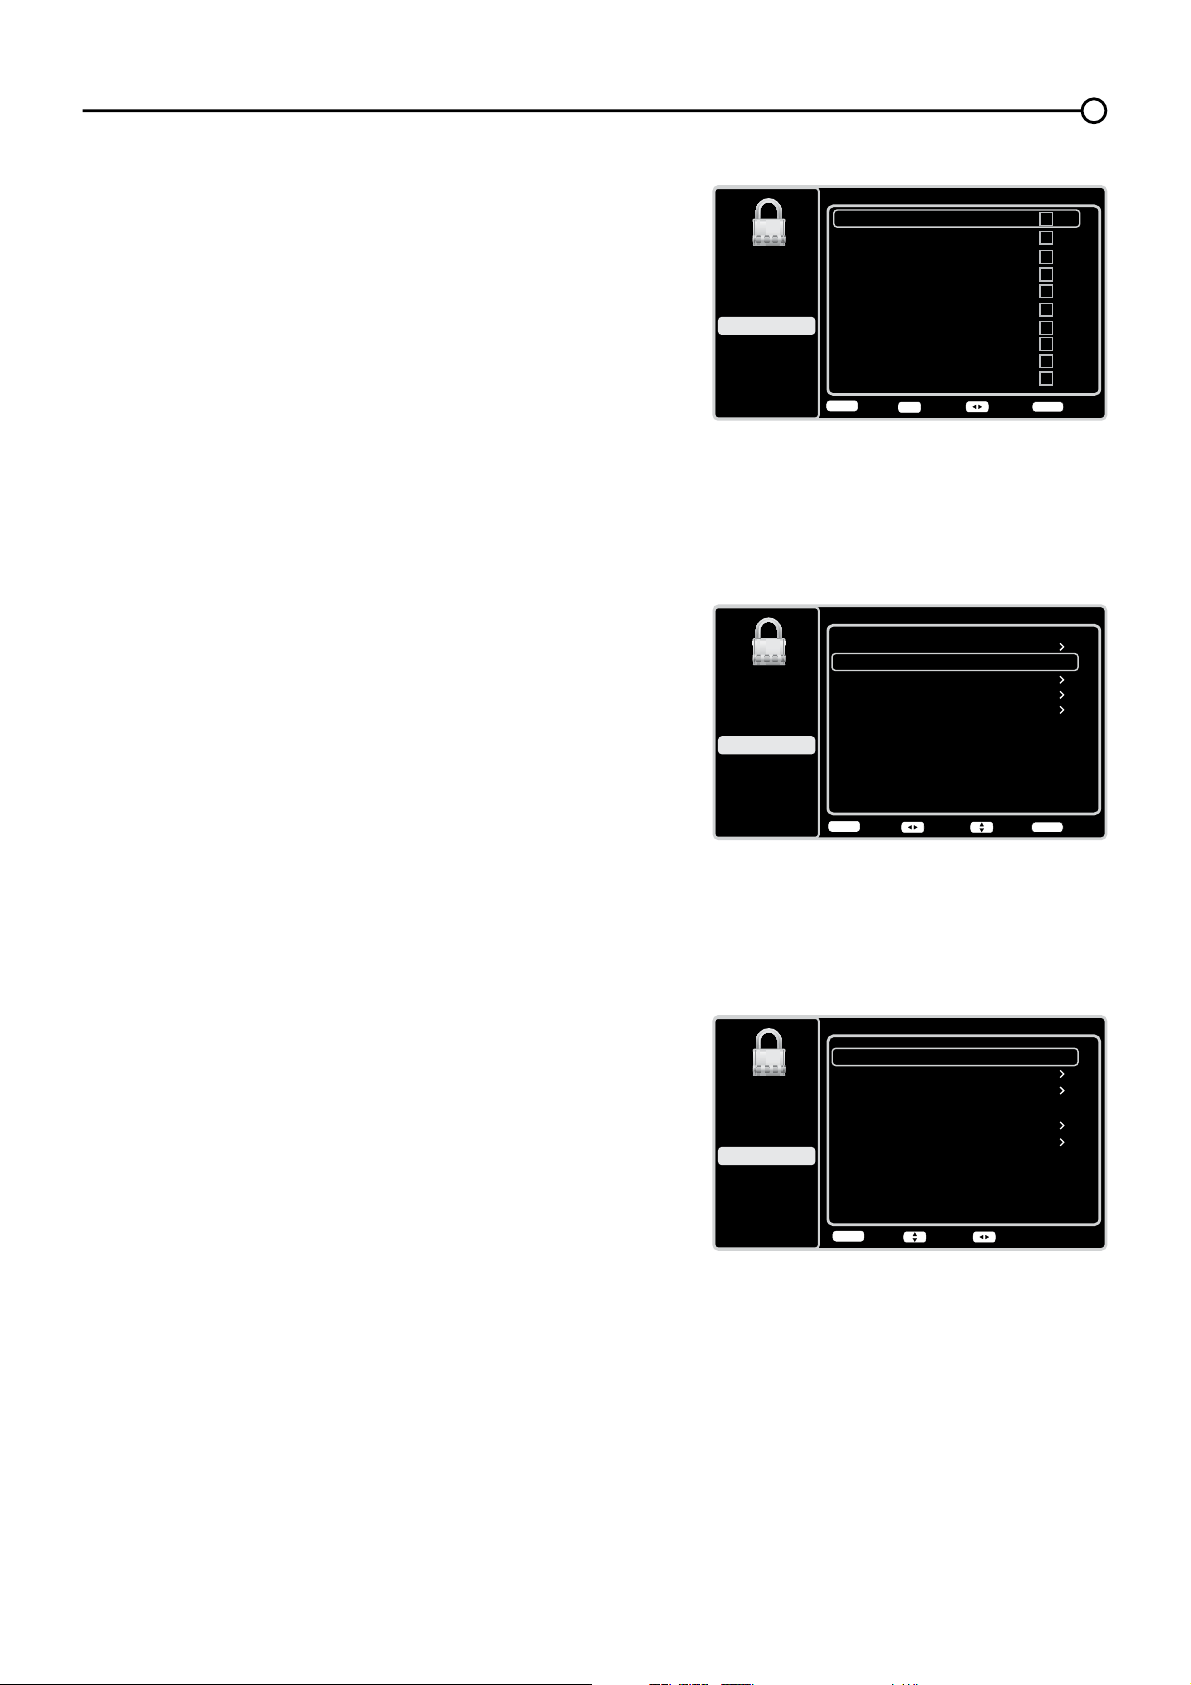
Bloqueo de Canal
3DUDEORTXHDUXQFDQDOHVSHFt¿FRVLJDHVWRVSDVRV
3XOVHODÀHFKDKDFLDDUULEDRKDFLDDEDMRŸźSDUD
resaltar Bloqueo de Canal en el submenú de Control
de Padres.
2. Pulse el botón OKRODÀHFKDKDFLDODGHUHFKDŹSDUD
iniciar la pantalla de Lista de canales.
8VHODÀHFKDKDFLDDUULEDRKDFLDDEDMRŸźSDUD
seleccionar el canal que desea bloquear.
4. Pulse el botón OKSDUDPDUFDUHOFXDGURGHYHUL¿FDFLyQ
y bloquear ese canal. Cuando usted sintonice ese
canal, necesitará introducir la contraseña para ver la
programación del canal.
Bloqueo de Botones
Esta opción le permite bloquear (inhabilitar) o desbloquear
(habilitar) los botones del panel de la TV. El mando
a distancia continúa sintonizando cualquier canal. Si
utiliza esto para evitar que los niños cambien de canal,
asegúrese de retirar cualquier mando a distancia que
podrían utilizar para cambiar de canal en su TV, mientras
tenga bloqueados los botones del panel de la TV.
Para bloquear los botones del panel de la TV, siga estos
pasos:
3XOVHODÀHFKDKDFLDDUULEDRKDFLDDEDMRŸź) para
resaltar Bloqueo de Botones en el submenú de
Control de Padres.
2. Elija la opción Activar.
3. Para volver a habilitar estos botones, regrese a este
menú y seleccione la opción Desactivar.
+DELOLWDUODFODVL¿FDFLyQ9&KLS
Debe recordar establecer Activar niveles en modo
ActivarSDUDTXHWHQJDHIHFWRORVOtPLWHVGHFODVL¿FDFLyQ
V-Chip que a continuación se indican.
29
Control de Padres
Bloqueo de Canal
Bloqueo de Botones
V-Chip
Bloquear entrada
Cambiar Contraseña
Desactivado
Volver
MENU
Ajustar Elegir Salida
CLEAR
Configuración
Control de Padres
Lenguaje
Sonido
Imagen
USB
Salir
Bloqueo de Canal Página 1/7
2
Análogo
3
Análogo
4
Análogo
5
Análogo
6
Análogo
7
Análogo
8
Análogo
9
Análogo
10
Análogo
11
Análogo
Volver
MENU
Ajustar Página Salida
CLEAR
OK
Configuración
Control de Padres
Lenguaje
Sonido
Imagen
USB
Salir
V-Chip
Activar niveles
V-Chip EE.UU.
V-Chip Canadá
Sin Clasf./Exentos
Activado
Restablecer Información Descargable
Ver
Volver
MENU
AjustarElegir
Abrir V-Chip
Configuración
Control de Padres
Lenguaje
Sonido
Imagen
USB
Salir
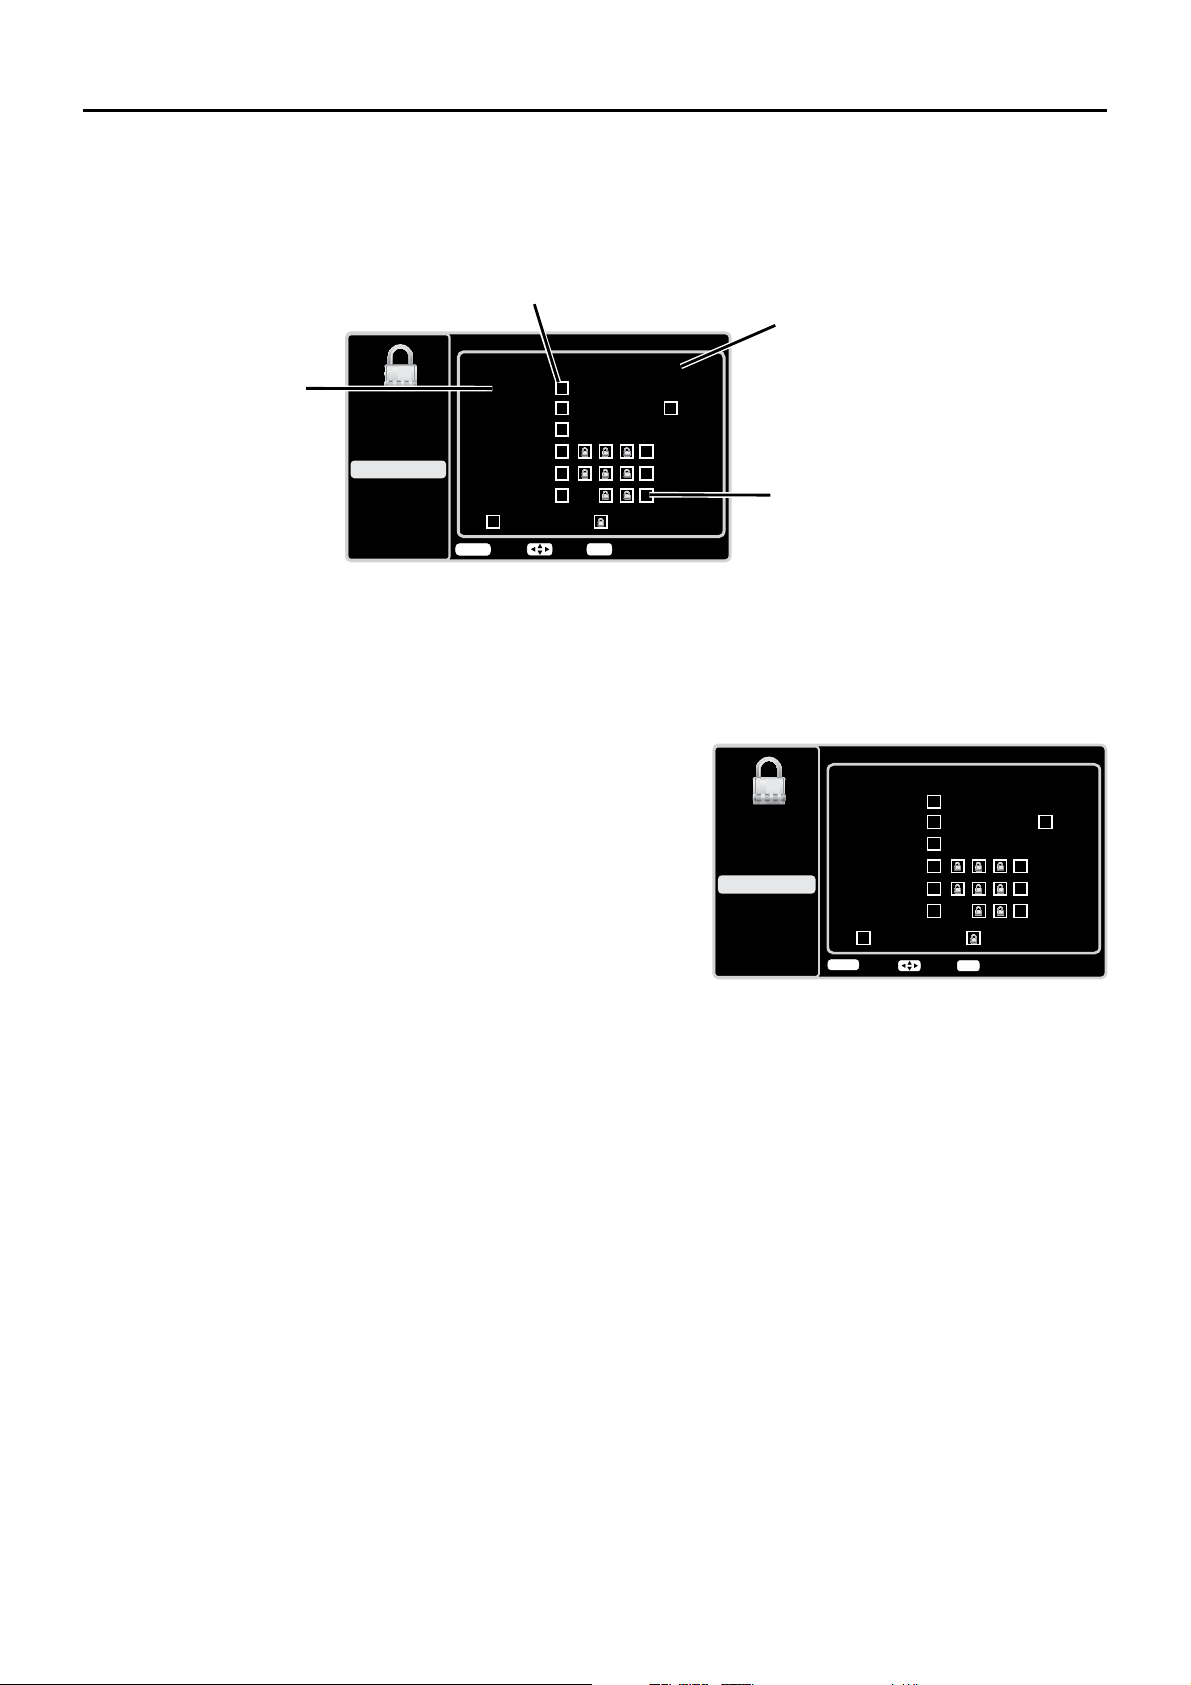
Clasif. TV en EEUU
TV-Y
TV-G
TV-PG
TV-14
TV-MA
ADLSVFV
Clasif Permitida Clasif Bloqueada
TV-Y7
Volver
MENU
Elegir
Bloquear/Desbloquear
OK
Configuración
Control de Padres
Lenguaje
Sonido
Imagen
USB
Salir
Campos de estado del contenido
Le permite seleccionar los temas del
contenido por clasificación
seleccionada y si el estado actual del
tema está desbloqueado o bloqueado.
Temas del contenido
Enumera los temas del contenido
que usted puede bloquear o ver.
Campo de clasificación
Permite seleccionar de
una lista, las clasificaciones
basadas en la edad que
puede bloquear o ver.
Campo de estado de la clasificación
Le permite seleccionar si el límite del
estado de la clasificación basada en la
edad a la izquierda es ver o bloquear.
&ODVL¿FDFLRQHVGH799&KLSHQ((88
%ORTXHDUWHPDVGHFRQWHQLGRHVSHFt¿FR
Desde el menú V-Chip EE.UU.XVWHGSXHGHHVWDEOHFHUXQDFODVL¿FDFLyQPiVSURIXQGDSDUDEORTXHDU
SURJUDPDVHVSHFt¿FRVVHJ~QVXFRQWHQLGR3DUDEORTXHDUHOFRQWHQLGRGHOSURJUDPD
3XOVHODÀHFKDKDFLDDUULEDRKDFLDDEDMR
Ÿź) para resaltar V-Chip en el submenú de Control de
Padres.
2. Pulse el botón OKRODÀHFKDKDFLDODGHUHFKDŹSDUDHQWUDUHQODSDQWDOODVLJXLHQWH
8VHODÀHFKDKDFLDDUULEDRKDFLDDEDMR
Ÿź) para seleccionar V-Chip EE.UU..
4. Pulse el botón OKRODÀHFKDKDFLDODGHUHFKDŹSDUDHQWUDUHQODSDQWDOODVLJXLHQWH
5. La opción Clasif. TV en EE.UU. se encuentra resaltada, Pulse el botón OKRODÀHFKDKDFLDODGHUHFKD
ŹSDUDHQWUDUHQODSDQWDOODVLJXLHQWH
8VHODÀHFKDKDFLDDUULEDKDFLDDEDMRKDFLDODL]TXLHUGDRKDFLDODGHUHFKD
ŸźŻŹSDUDVHOHFFLRQDU
ODFODVL¿FDFLyQGHVHDGD
7. Pulse el botón OK varias veces para cambiar entre Ver y Bloquear.
Para volver a ver los temas de contenido después de bloquearlos, siga los pasos anteriores para desbloquearlos.
3DQWDOODGHFODVL¿FDFLyQ9&KLS
(OVLJXLHQWHJUi¿FRPXHVWUDODSRVLFLyQGHORVHOHPHQWRVHQODRSFLyQ&ODVL¿FDFLRQHVGH79FRQHOPHQ~
V-Chip EE.UU.
6HSXHGHQEORTXHDUDXWRPiWLFDPHQWHWRGDVODVFODVL¿FDFLRQHV
de programa que sean superiores a una determinada
FODVL¿FDFLyQEDVDGDHQODHGDG
1. Seleccione Control de Padres en el menú principal. Si ha
bloqueado anteriormente el acceso a Control de padres, será
necesario introducir la contraseña.
8VHODÀHFKDKDFLDDUULEDRKDFLDDEDMRŸźSDUD
seleccionar V-Chip.
3. Pulse el botón OKRODÀHFKDKDFLDODGHUHFKDŹSDUDHQWUDU
en la pantalla siguiente.
8VHODÀHFKDKDFLDDUULEDRKDFLDDEDMRŸźSDUD
seleccionar V-Chip EE.UU..
5. Pulse el botón OKRODÀHFKDKDFLDODGHUHFKDŹSDUDHQWUDU
en la pantalla siguiente.
6. La opción Clasif. TV en EE.UU., Pulse el botón OKRODÀHFKD
KDFLDODGHUHFKDŹSDUDHQWUDUHQODSDQWDOODVLJXLHQWH
8VHODÀHFKDKDFLDDUULEDRKDFLDDEDMRŸźSDUD
VHOHFFLRQDUODFODVL¿FDFLyQGHVHDGD
8. Pulse el botón OK varias veces para cambiar entre Ver y
Bloquear.
9. Pulse el botón MENU varias veces hasta regresar al menú
principal.
30
Clasif. TV en EEUU
TV-Y
TV-G
TV-PG
TV-14
TV-MA
A D L S V FV
Clasif Permitida Clasif Bloqueada
TV-Y7
Volver
MENU
Elegir
Bloquear/Desbloquear
OK
Configuración
Control de Padres
Lenguaje
Sonido
Imagen
USB
Salir
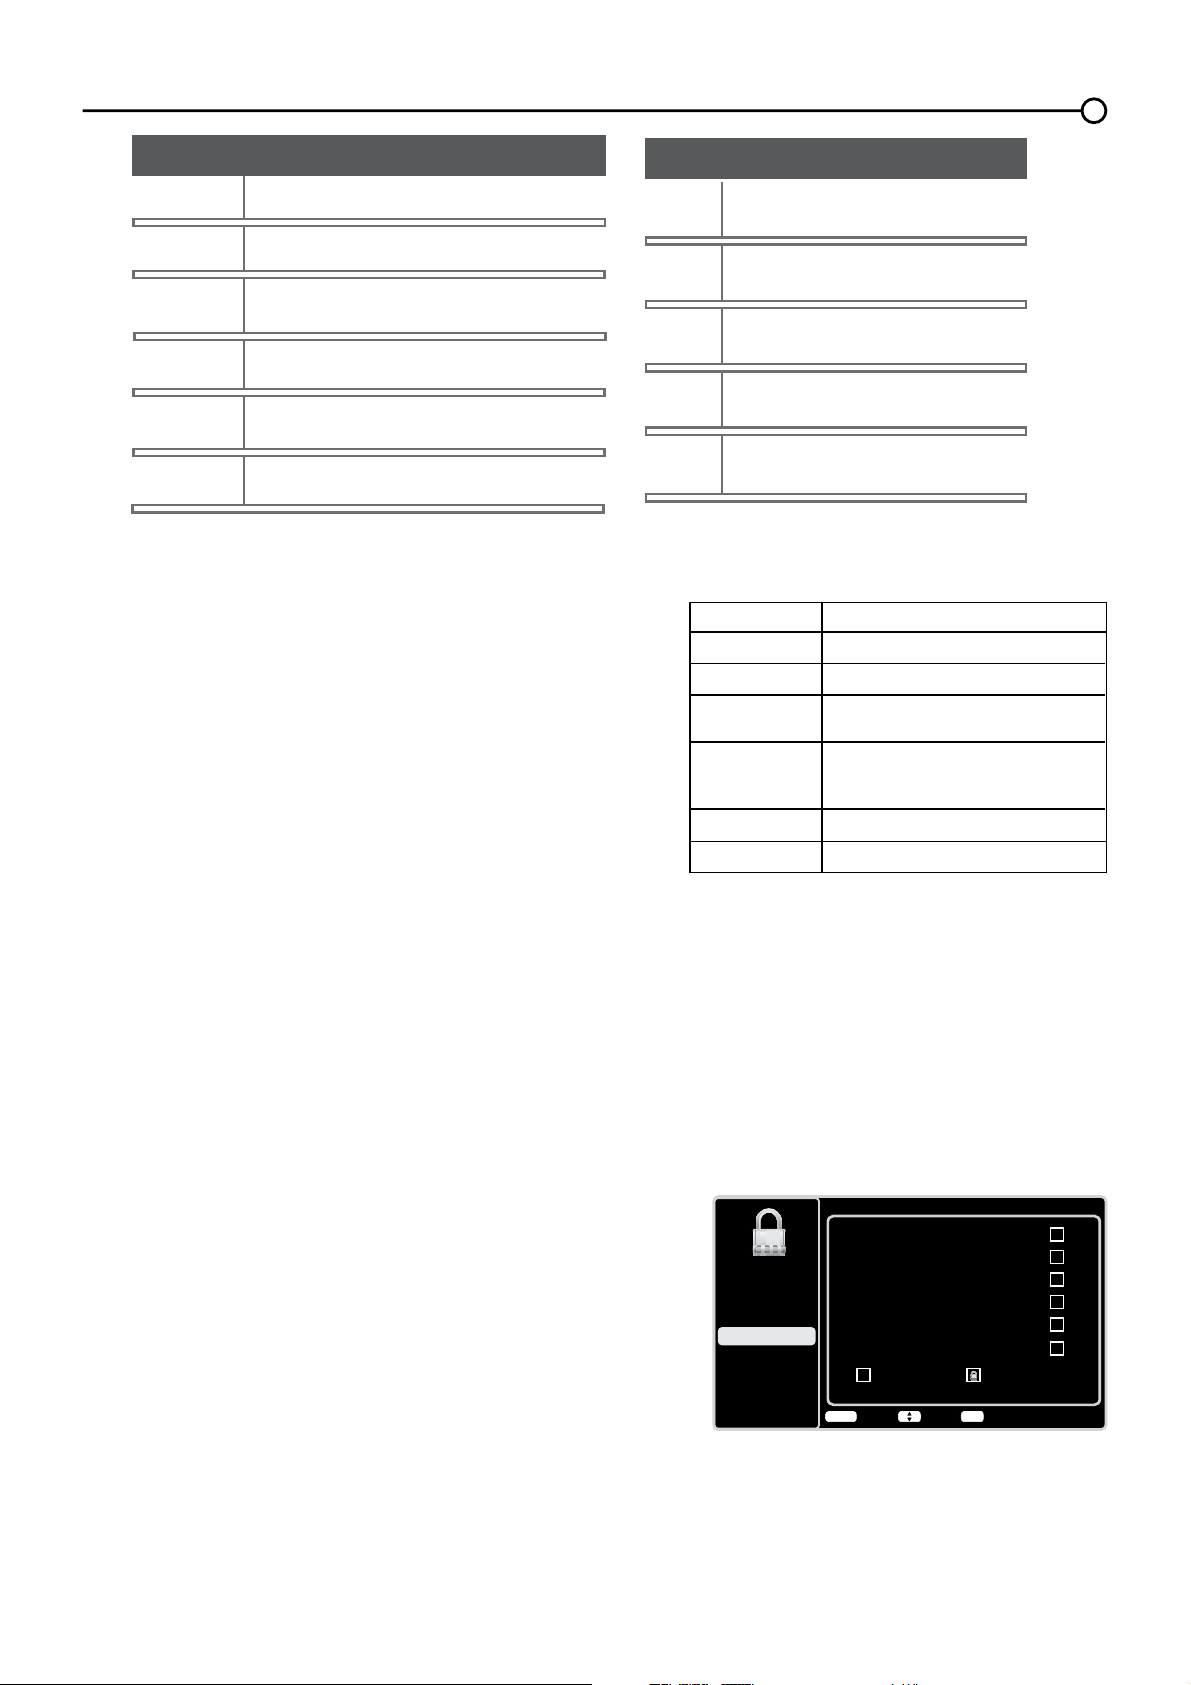
Clasif. ingl. Canadá
C
C8+
G
PG
14+
Clasif permitida Clasif bloqueada
18+
Volver
MENU
Bloquear/Desbloquear
Elegir
OK
Configuración
Control de Padres
Lenguaje
Sonido
Imagen
USB
Salir
/tPLWHGHFODVL¿FDFLyQGHSHOtFXODV9&KLSHQ((88
%ORTXHDUODVFODVL¿FDFLRQHV9&KLSHQ&DQDGi
Si usted recibe programas de Canadá, puede bloquear la V-Chip
SDUDIUDQFpVHLQJOpVGH&DQDGiVRODPHQWHSRUFODVL¿FDFLRQHV
&XDQGREORTXHDXQDFODVL¿FDFLyQSDUWLFXODUDXWRPiWLFDPHQWH
EORTXHDDGHPiVORVSURJUDPDVFRQFODVL¿FDFLRQHVPiVDOWDV3DUD
EORTXHDUFODVL¿FDFLRQHVGHSURJUDPDVFDQDGLHQVHVHQIUDQFpVH
inglés, siga estos pasos:
3XOVHODÀHFKDKDFLDDUULEDRKDFLDDEDMRŸźSDUDUHVDOWDU
V-Chip en el submenú de Control de Padres.
2. Pulse el botón OKRODÀHFKDKDFLDODGHUHFKDŹSDUDHQWUDUHQ
la pantalla siguiente.
8VHODÀHFKDKDFLDDUULEDRKDFLDDEDMRŸźSDUDVHOHFFLRQDU
V-Chip Canadá.
4. Pulse el botón OKRODÀHFKDKDFLDODGHUHFKDŹSDUDSURFHGHU
a la pantalla siguiente.
3XOVHODÀHFKDKDFLDDUULEDRKDFLDDEDMRŸźSDUDVHOHFFLRQDU
Clasif. ingl. Canadá o Clasif. fran. Canadá.
Clasificación
G
PG
PG-13
R
NC-17
X
Categoría
Para todo público
No recomendable para niños
menores de 13 años
Restringido; menores de 17 años
requieren acompañamiento de
un adulto responsable
No se admiten menores de 17 años
Sólo para adultos
Se sugiere la orientación de los padres
-HUDUTXtDGHODVFODVL¿FDFLRQHVEDVDGDVHQODHGDG
TV-MA
Sólo para adultos
TV-14
$GYHUWHQFLD¿UPHDORVSDGUHV
TV-PG
Se sugiere la orientación de los padres
TV-G
Para todo público
TV-Y7
Dirigido a niños de 7 años y mayores
TV-Y
Para todos los niños
D
Diálogo sexual explícito
L
Lenguaje para adultos
S
Situaciones de carácter sexual
V
Violencia
FV
Violencia de fantasía
Temas del contenido
$MXVWHORVOtPLWHVGHFODVL¿FDFLyQGHSHOtFXODVEORTXHDQGRODV
SHOtFXODVFODVL¿FDGDVSRUHQFLPDGHXQQLYHOHVSHFL¿FDGR3DUD
ORJUDUDFFHVRDOPHQ~/tPLWHGH&ODVL¿FDFLyQ3HOtFXODVVLJD
estos pasos:
3XOVHODÀHFKDKDFLDDUULEDRKDFLDDEDMR
Ÿź) para resaltar
V-Chip en el submenú de Control de Padres.
2. Pulse el botón OKRODÀHFKDKDFLDODGHUHFKDŹSDUDHQWUDU
en la pantalla siguiente.
8VHODÀHFKDKDFLDDUULEDRKDFLDDEDMR
Ÿź) para
seleccionar V-Chip EE.UU..
4. Pulse el botón OKRODÀHFKDKDFLDODGHUHFKDŹSDUDHQWUDU
en la pantalla siguiente.
8VHODÀHFKDKDFLDDUULEDRKDFLDDEDMR
Ÿź) para
seleccionar Cls. películas EE.UU..
6. Pulse el botón OKRODÀHFKDKDFLDODGHUHFKDŹ
8VHODÀHFKDKDFLDDUULEDRKDFLDDEDMR
Ÿź) para
VHOHFFLRQDUODFODVL¿FDFLyQGHVHDGD
8. Pulse el botón OK varias veces para cambiar entre Ver y
Bloquear.
31
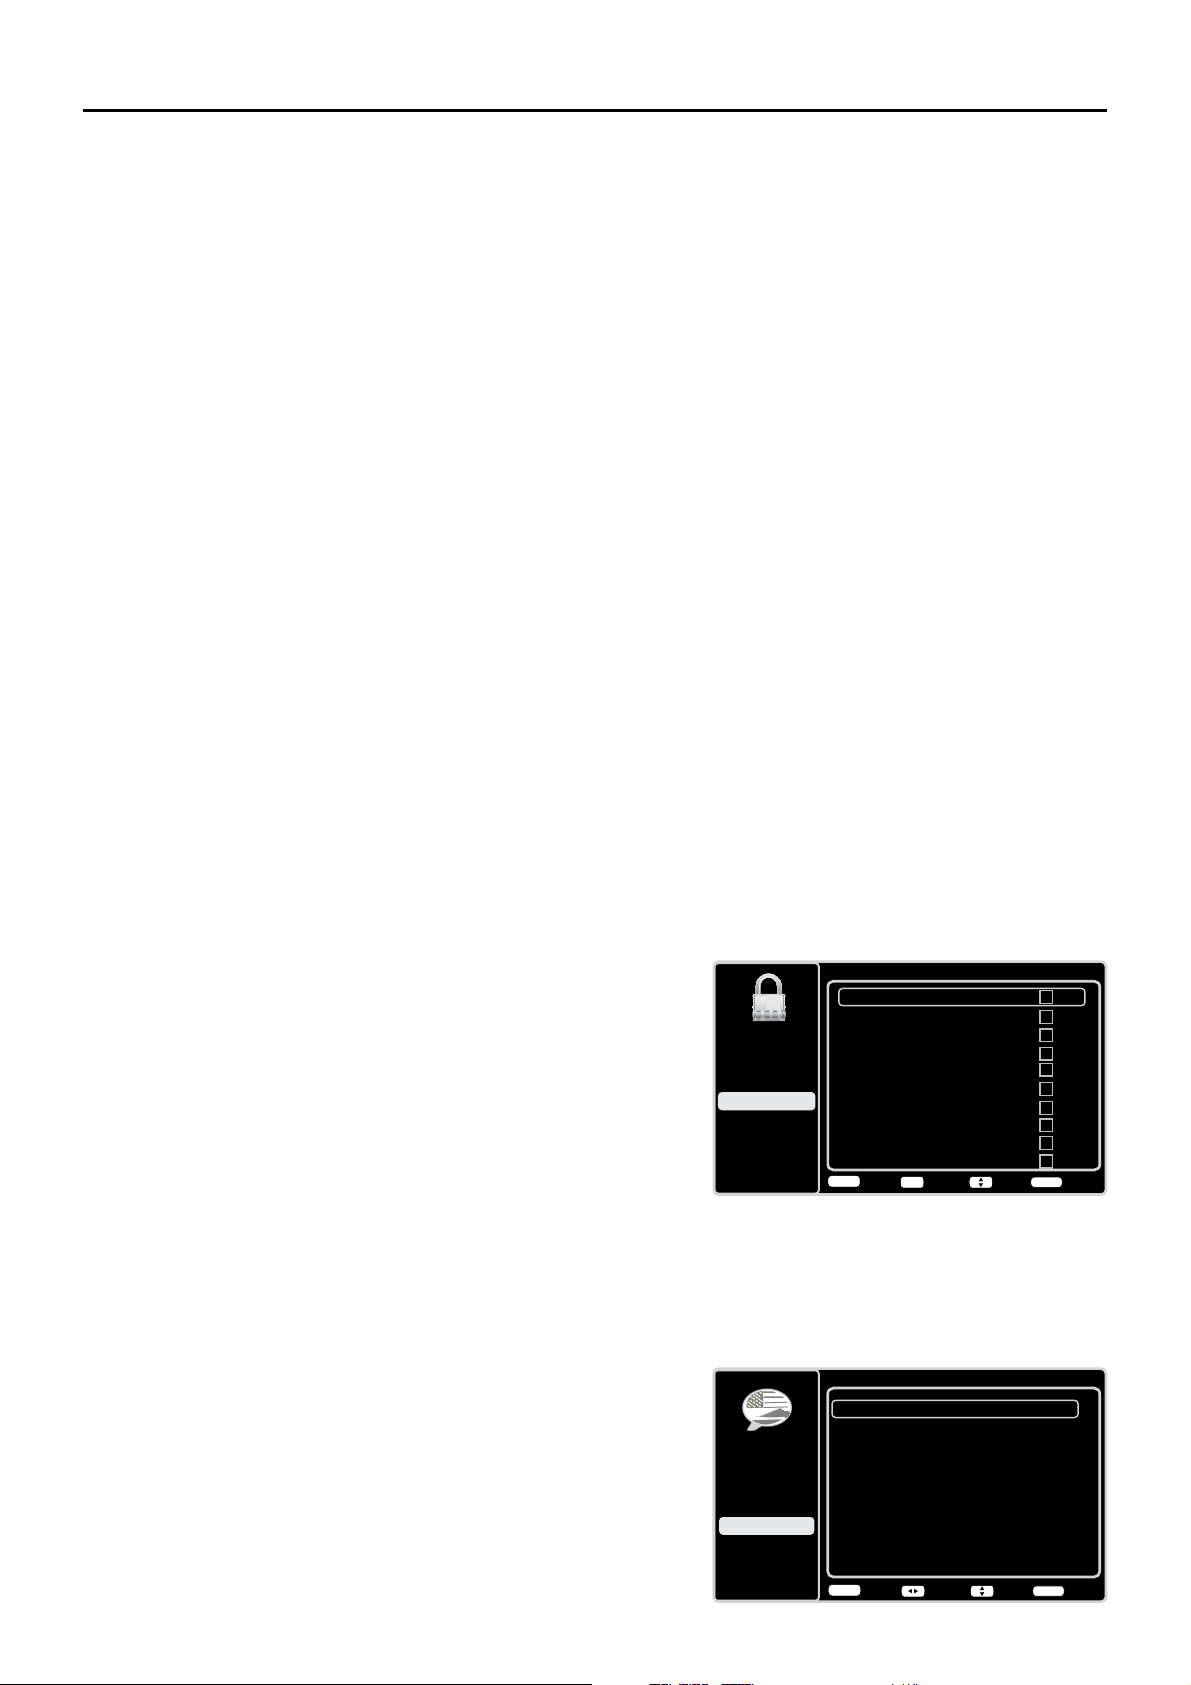
Menú Lenguaje
Para seleccionar el lenguaje preferido para todos los menús,
siga los pasos que se indican a continuación: Usted puede
elegir entre Inglés, Español o Francés.
1. Pulse MENU en el control remoto (aparece el menú
principal).
8VHODÀHFKDKDFLDDUULEDRKDFLDDEDMRŸźSDUD
seleccionar Lenguaje.
%ORTXHDUSURJUDPDV³6LQFODVL¿FDU([HQWRV´
La opción Sin Clasf./Exentos le permite decidir si pueden verse los programas que V-Chip reconoce como
VLQFODVL¿FDURH[HQWRV/RVSURJUDPDVWHOHYLVLYRVVLQFODVL¿FDUSXHGHQLQFOXLUQRWLFLHURVGHSRUWLYRV
políticos, religiosos, locales y sobre el estado del tiempo, comunicados de emergencia, declaraciones
S~EOLFDV\RWURVSURJUDPDVVLQFODVL¿FDU/DRSFLyQ([HQWRVVHDSOLFDWDQWRDORVSURJUDPDVVLQFODVL¿FDUGH
((88\&DQDGiFRPRDORVSURJUDPDVFDQDGLHQVHVFODVL¿FDGRV(
3XOVHODÀHFKDKDFLDDUULEDRKDFLDDEDMRŸźSDUDUHVDOWDUV-Chip en el submenú de Control de
Padres.
2. Pulse el botón OKRODÀHFKDKDFLDODGHUHFKDŹSDUDSURFHGHUDODSDQWDOODVLJXLHQWH
8VHODÀHFKDKDFLDDUULEDRKDFLDDEDMRŸźSDUDUHVDOWDUHOPHQ~Sin Clasf./Exentos.
8VHODIHFKDDODL]TXLHUGDRDODGHUHFKDŻŹSDUDFDPELDUHQWUHVer y Bloquear.
Ver 7RGRVORVSURJUDPDVVLQFODVL¿FDUHVWiQGLVSRQLEOHV
Bloquear 1LQJ~QSURJUDPDVLQFODVL¿FDUHVWiGLVSRQLEOH
Restablecer Información Descargable
3XOVHODÀHFKDKDFLDDUULEDRKDFLDDEDMRŸźSDUDUHVDOWDUV-Chip en el submenú de Control de
padres.
2. Pulse el botón OKRODÀHFKDKDFLDODGHUHFKDŹSDUDSURFHGHUDODSDQWDOODVLJXLHQWH
3. Seleccione esta opción para restablecer los datos V-Chip descargables. Si selecciona esta opción,
DSDUHFHXQFXDGURGHFRQ¿UPDFLyQ3XOVHODÀHFKDKDFLDODL]TXLHUGDRKDFLDODGHUHFKDŻŹSDUD
seleccionar.
4. Pulse el botón OKSDUDUHVWDEOHFHUORVGDWRVGHFODVL¿FDFLyQGHVFDUJDEOHVVLHVWiQSUHVHQWHV
Bloquear Entrada
1. Pulse MENU en el control remoto (aparece el menú
principal).
2. Seleccione Control de Padres. Si ha bloqueado
anteriormente el acceso a Control de padres, será necesario
introducir la contraseña.
8VHODÀHFKDKDFLDDUULEDRKDFLDDEDMRŸźSDUDUHVDOWDU
el menú Bloquear Entrada.
4. Pulse el botón OKRODÀHFKDKDFLDODGHUHFKDŹSDUD
mostrar la pantalla de Lista de Fuentes.
3XOVHODÀHFKDKDFLDDUULEDRKDFLDDEDMRŸźSDUD
marcar el cuadro para bloquear la entrada. Cuando usted
sintonice esa entrada, necesitará introducir la contraseña
para ver el canal.
6. Pulse el botón OKSDUDFRQ¿UPDUVXVHOHFFLyQ$SDUHFHUi
el icono de un candado cerrado/abierto junto a la entrada
seleccionada.
6. Pulse el botón OKRODÀHFKDKDFLDODGHUHFKDŹSDUDSURFHGHU
8VHODÀHFKDKDFLDDUULEDRKDFLDDEDMRŸźSDUDVHOHFFLRQDUODFODVL¿FDFLyQGHVHDGD
8. Pulse el botón OK para cambiar entre Ver y Bloquear.
La opción Open V-Chip OHSHUPLWHVHOHFFLRQDUHOQLYHOGHFODVL¿FDFLyQGHVFDUJDEOH(Q
HOFDVRGHTXHODHPLVRUDSURSRUFLRQHXQQXHYRVLVWHPDGHFODVL¿FDFLyQODVQXHYDVRSFLRQHVGH
FODVL¿FDFLyQDSDUHFHUtDQHQHVWHPHQ~
32
Bloquear Entrada
PC
HDMI1
HDMI2
CMPT1
CMPT2
HDMI3
TV
AV1
AV2
S-VIDEO
Volver
MENU
Ajustar Elegir Salida
CLEAR
OK
Configuración
Control de Padres
Lenguaje
Sonido
Imagen
USB
Salir
Lenguaje
English
Off
Español
Activado
Français
Désactivé
Volver
MENU
Ajustar
Elegir Salida
CLEAR
Configuración
Control de Padres
Lenguaje
Sonido
Imagen
USB
Salir
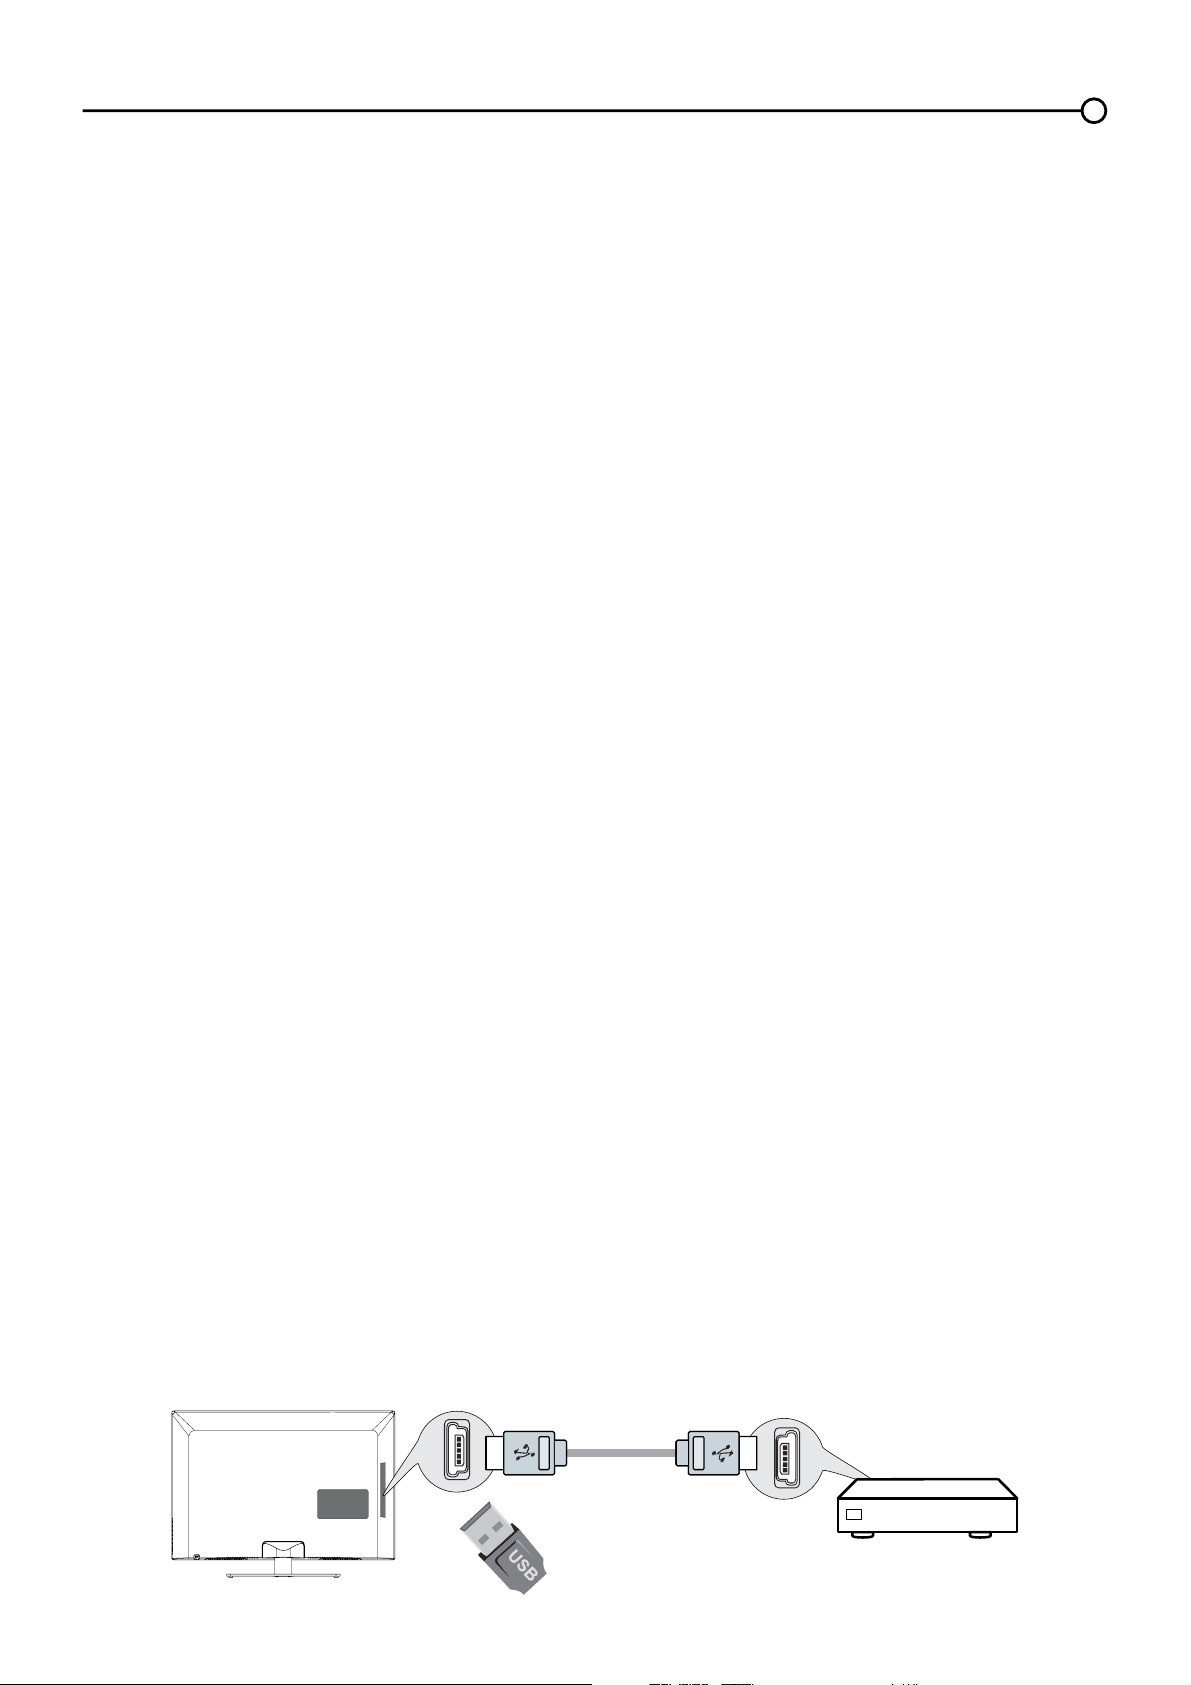
Menú USB
La función USB en su televisor le permite reproducir archivos de audio (formato soportado: MP3) o mostrar imágenes
(formato soportado: JPEG). Para utilizar esta función, siga estos pasos:
1. Pulse MENU en el control remoto (aparece el menú principal).
8VHODÀHFKDKDFLDDUULEDRKDFLDDEDMRŸźSDUDVHOHFFLRQDUUSB.
3. Pulse el botón OKRODÀHFKDKDFLDODGHUHFKDŹSDUDSURFHGHUDODSDQWDOODUSB. O, puede pulsar el botón
MEDIA en el control remoto para mostrar la pantalla USB directamente.
(Nota: si no está insertado ningún
dispositivo USB, se muestra en la pantalla “Medio no encontrado”, se soportan solamente dispositivos USB en formato
FAT y sin particionar)
Explorador de medios: Seleccione Explorador de medios, pulse OKSDUDHQWUDUOXHJRSXOVHODÀHFKD
KDFLDDEDMRRKDFLDDUULEDŸźSDUDVHOHFFLRQDUXQDUFKLYRRXQDFDUSHWDSXOVHOK y use los siguientes
menús:
Abrir – Selecciónelo para mostrar la lista de archives/carpetas del dispositivo USB.
Miniatura – Selecciónelo para ver las miniaturas de las carpetas/archivos, sólo en caso de carpetas/archivos de
imágenes.
Diaporama – Selecciónelo para iniciar una presentación de las fotos. La línea de menú se atenúa si no hay
archives de imagen en la raíz del dispositivo USB actual.
Reproducir música – Selecciónelo para reproducir música. La línea de menú se atenúa si no hay archives de
música en la raíz del disco USB actual.
Volver – Selecciónelo para regresar al menú previo.
Ajuste de medios: Seleccione Ajuste de medios, pulse OK para entrar luego use los menús siguientes:
Ajuste de Foto – Selecciónelo para mostrar el submenú de Ajustes de Fotos.
Intervalo de las diapositivas – Seleccione el Intervalo de las diapositivas: 5 Segundos, 10 Segundos,
20 Segundos.
Efecto de presentación – Seleccione el Efecto de presentación.
Repetir presentación – Seleccione entre las opciones: Activado/Desactivado.
Tamaño miniatura – Seleccione el tamaño de la presentación de las miniaturas: 5X3 y 3X2.
Ajuste de la Música – Selecciónelo para mostrar el submenú de Ajuste de la Música.
Modo de reproducción de música– Seleccione las opciones: Una vez, Todo, Aleatorio.
Repetir reproducción de música – Seleccione las opciones: Activado/Desactivado.
Reproducción automática de música – Seleccione las opciones: Activado/Desactivado.
4. Pulse el botón MENU para regresar al menú previo, o pulse CLEAR para salir.
Conexión USB
Usted puede conectar un dispositivo con salida USB a su televisor, o usar un dispositivo de memoria USB,
sólo soporta formato FAT y dispositivo USB sin particiones.
Esta conexión le permite conectar un dispositivo de memoria Flash USB directamente o un dispositivo de
almacenamiento masivo con USB, como una cámara de fotos digital, un multi-lector de tarjetas o un lector
MP3. Si tiene una memoria USB, conéctela directamente en este conector. Si tiene un dispositivo con puerto
USB, conecte un extremo del cable USB al puerto USB del dispositivo y el otro extremo al conector USB en
el lateral del televisor. Para acceder y ajustar las opciones del dispositivo USB, vea el Menú USB.
3. Pulse el botón OKRODÀHFKDKDFLDODGHUHFKDŹSDUDPRVWUDUODSDQWDOODLenguaje.
8VHODÀHFKDKDFLDDUULEDRKDFLDDEDMRŸźSDUDVHOHFFLRQDUHOLGLRPDSUHIHULGRSDUDHOPHQ~
8VHODÀHFKDKDFLDODL]TXLHUGDRKDFLDODGHUHFKDŻŹSDUDVHOHFFLRQDUAct o Des.
6. Pulse el botón MENU o CLEAR para salir del menú.
O
Lateral de esta unidad
33

Preguntas Frecuentes
¢&XiOHVODPDQHUDPiVIiFLOGHYHUYLGHRGH$OWD'H¿QLFLyQ+'"
Conecte una antena local a la entrada ANT/CABLE/SAT IN para ver canales digitales locales gratis.
Quizá deba comprar una antena. (Consulte mayor información en la página 10.)
Visite www.antennaweb.org si necesita ayuda para decidir el tipo de antena que debe utilizar de
modo de recibir los canales digitales locales disponibles en su área. Ingresando su ubicación,
este programa de encuadramiento le indica las emisoras analógicas y digitales locales que están
disponibles si se utiliza determinado tipo de antena.
¢([LVWHQRWUDVIRUPDVGHYHUYLGHRGHDOWDGH¿QLFLyQ"
Además de utilizar una antena aérea como se mencionó arriba, puede utilizar un convertidor para
recibir video digital. Comuníquese con la compañía de cable o el proveedor de servicio de satélite
para adquirir programación digital y solicíteles que conecten el convertidor de manera de asegurar la
mejor visualización de canales posible.
¿Cómo puedo distinguir un canal analógico de uno digital?
Pulse el botón INFO para mostrar el Cuadro de información del canal. Observe la esquina inferior
GHUHFKDGHODSDQWDOOD(OSXQWRDSDUHFHSDUDORVFDQDOHVGLJLWDOHVVLQRKD\XQSXQWRHVXQFDQDO
analógico.
¿Por qué hay barras en la pantalla y cómo puedo borrarlas?
La mayoría de video digital se envía en formato 16/9, el cual llena su pantalla, pero algunas veces
se envía en formato 4/3, el cual no llena su pantalla. Depende de cómo la emisora o el dispositivo
conectado al televisor formatee el video. Si aparecen barras en la pantalla, oprima el botón
ZOOM -/+ para utilizar un formato diferente que pueda eliminar las barras. Algunas barras no se
pueden eliminar debido a la manera en que las emisoras transmiten el formato. El formato cambia a
medida que presiona el botón ZOOM -/+ y el tipo de formato se muestra en la parte inferior izquierda
de la pantalla. Para mayor información sobre los formatos de pantalla, vaya a la página 18.
¿Por qué la búsqueda de canales encuentra muchos canales pero cuando
trato de sintonizarlos no se ve nada?
Algunos canales habilitados por la empresa de cable no tienen programación, p. ej., video a petición.
Cuando los canales no se encuentran disponibles, la pantalla de su televisor aparece en blanco o
borrosa. Posiblemente desee eliminar esos canales de la lista de canales. Elimínelos a través del
menú Lista de Canales. Consulte información adicional en la página 24.
¿Por qué la primera búsqueda de canales tarda tanto?
Si tiene canales analógicos y digitales, el televisor buscará todos los canales disponibles en la
OLVWDGHFDQDOHV6LWLHQHFDQDOHVGLJLWDOHVHOWHOHYLVRUEXVFDUiDGHPiVORVFDQDOHVFRGL¿FDGRVQR
FRGL¿FDGRV\VHFXQGDULRVUHODFLRQDGRVDGLFKRFDQDOGLJLWDO
Capítulo 5 - Información adicional
34

Resolución de Problemas
La mayoría de los problemas que puede experimentar con su televisor pueden corregirse consultando
la siguiente lista de resolución de problemas.
Problemas con el Televisor
El televisor no enciende.
$VHJ~UHVHTXHHOWHOHYLVRUHVWpHQFKXIDGR
5HYLVHHOWRPDFRUULHQWHGHSDUHGRHOFDEOHGHH[WHQVLyQSDUDDVHJXUDUVHTXHIXQFLRQDFRUUHFWDPHQWH
conectando otro dispositivo.
/RVFRQWUROHVGHOSDQHOGHOD79SXHGHQHVWDUEORTXHDGRVLQKDELOLWDGRV8WLOLFHHOPDQGRDGLVWDQFLD
para desbloquear los controles del panel de la TV.
6HOHFFLRQHODIXQFLyQ%ORTXHDU%RWRQHVHQHOPHQ~&RQWUROGH3DGUHV\RSULPDOK para cancelar la
selección del cuadro.
No hay imagen ni sonido pero el televisor está encendido.
4XL]iVKD\DVLQWRQL]DGRXQDHQWUDGDGRQGHQRVHKDFRQHFWDGRQLQJ~QFRPSRQHQWH6LHVWiLQWHQWDQGR
ver un componente conectado, oprima INPUT hasta que la imagen proveniente del componente
aparezca.
7DOYH]ODRSFLyQ7LSRGH6HxDOKD\DVLGRDMXVWDGDGHIRUPDLQFRUUHFWD&RQVXOWHLQVWUXFFLRQHVGHWDOODGDV
en la página 23.
3XHGHVHUTXHHOFDQDOHVWpHQEODQFR,QWHQWHFDPELDUGHFDQDO
6LHVWiYLHQGRVX9&5\pVWDVHHQFXHQWUDDFRSODGDPHGLDQWHXQFDEOHFRD[LDODOFRQHFWRUANTENNA/
CABLE/SAT IN, sintonice el televisor en el canal 3 ó 4 (el que esté seleccionado por el interruptor 3/4
en la parte posterior de su VCR). Además, asegúrese que el botón TV/VCR de la VCR esté en el modo
adecuado (oprima el botón TV/VCR de su VCR).
El sonido se escucha bien, pero la calidad de la imagen es pobre.
6LREWLHQHXQDLPDJHQHQEODQFR\QHJURGHXQFRPSRQHQWHFRQHFWDGRDOWHOHYLVRUTXL]iDFRSOy
los cables de video en los conectores incorrectos. Un cable de video amarillo se acopla al conector
GHHQWUDGD9,'(2,1387DPDULOORGHOODGRRSDUWHSRVWHULRUGHOWHOHYLVRUWUHVFDEOHVGHYLGHRRXQ
mazo de cables de video de componente (rojo, azul y verde) se acoplan a los conectores de entrada
COMPONENT INPUT correspondientes de la parte posterior del televisor.
5HYLVHODVFRQH[LRQHVGHODDQWHQD&HUFLyUHVHGHTXHWRGRVORVFDEOHVHVWpQ¿UPHPHQWHDFRSODGRVD
los conectores.
No hay sonido, pero la imagen se ve bien.
3XHGHVHUTXHVHKD\DVLOHQFLDGRHOVRQLGR2SULPDHOERWyQGHDXPHQWDUYROXPHQSDUDUHVWLWXLUHO
sonido.
6LHVWiXVDQGR'9,69LGHRR<3%35UHFXHUGHDFRSODUWDPELpQORVFRQHFWRUHVGHVDOLGDGHDXGLR
izquierdo y derecho del dispositivo a los conectores AUDIO INPUT L y R del televisor.
3XHGHTXHORVDMXVWHVGHVRQLGRQRHVWpQHVWDEOHFLGRVFRUUHFWDPHQWH&RQVXOWHLQIRUPDFLyQDGLFLRQDOHQ
la página 22.
6LVXIXHQWHGHDXGLRLQFOX\HVyORXQFRQHFWRURHVXQDIXHQWHGHDXGLRPRQRIyQLFRDVHJ~UHVHGH
haber enchufado la conexión en el conector AUDIO INPUT izquierdo del televisor.
La pantalla aparece en blanco.
5HYLVHODVFRQH[LRQHV6LXWLOL]yORVFDEOHVDPDULOORURMR\EODQFRSDUDOOHYDUDFDERODFRQH[LyQ
asegúrese que estén acoplados a los conectores de entrada VIDEO INPUT amarillo, rojo y blanco del
lado o parte posterior del televisor, y no a los conectores de VIDEO OUTPUT de la parte posterior del
televisor.
6LHVWiLQWHQWDGRYHUDOJRTXHVHHVWiUHSURGXFLHQGRHQXQFRPSRQHQWHFRQHFWDGRDOWHOHYLVRUWDOFRPR
un disco DVD), oprima INPUT hasta llegar al canal de entrada de video correcto.
$VHJ~UHVHTXHHOFRPSRQHQWHFRQHFWDGRDOWHOHYLVRUHVWpHQFHQGLGR
,QWHQWHFDPELDUGHFDQDO
35

Los botones del panel frontal no trabajan.
/RVFRQWUROHVGHOSDQHOGHOD79SXHGHQHVWDUEORTXHDGRVLQKDELOLWDGRV8WLOLFHHOPDQGRD
distancia para desbloquear los controles del panel de la TV, seleccionando la función de Bloquear
%RWyQHQHOPHQ~GH&RQWURO3DUHQWDO\SXOVDQGRODÀHFKDL]TXLHUGDRGHUHFKDŻŹSDUD
desmarcar la casilla.
'HVHQFKXIHHOWHOHYLVRUPLQXWRV\YXpOYDORDHQFKXIDU(QFLHQGDHOWHOHYLVRUHLQWHQWHGHQXHYR
El televisor se apaga inesperadamente.
4XL]iVHKD\DDFWLYDGRHOFLUFXLWRGHSURWHFFLyQHOHFWUyQLFDGHELGRDXQDGHVFDUJDGHFRUULHQWH
Espere 30 segundos y vuelva a encender el televisor. Si este problema se presenta con frecuencia,
es posible que su casa reciba un voltaje anormal muy alto o muy bajo.
'HVHQFK~IHOR(VSHUHPLQXWRV9XpOYDORDHQFKXIDU
No puedo seleccionar cierto canal.
7DOYH]HOFDQDOKDVLGREORTXHDGRRQRKDVLGRDSUREDGRPHGLDQWHHOPHQ~ Control de Padres.
6LXWLOL]DXQD9&5DVHJ~UHVHTXHHOERWyQTV/VCR de la VCR esté en el modo adecuado (oprima
el botón TV/VCR de su VCR).
2SULPDHOERWyQTV y luego intente cambiar los canales.
La recepción estereofónica es ruidosa.
Tal vez sea una emisora con poca potencia. Utilice el Menú Sonido y Tipo de Sonido para
seleccionar Mono.
Aparece un recuadro negro en la pantalla.
3XHGHVHUTXHHVWpDFWLYDGDODIXQFLyQGH6XEWtWXORV5HYLVH6XEWtWXORVHQHOPHQ~&RQ¿JXUDFLyQ
Consulte instrucciones adicionales en la página 26.
Está confrontando problemas con la conexión HDMI.
$VHJ~UHVHTXHHOFRPSRQHQWH+'0,R'9,HVWpHQFHQGLGR\TXHORVFDEOHVHVWpQ¿UPHPHQWH
conectados. Si aún confronta problemas, apague el componente y vuelva a conectarlo. Reajuste la
potencia desenchufando el cable de alimentación y enchufándolo otra vez.
6LHVWiVLQWRQL]DGRDHDMI 1, HDMI 2 o HDMI 3 INPUT y está recibiendo un mensaje en pantalla
de Señal Inservible, oprima el botón INFO del control remoto. Si Adquiriendo Canal aparece en el
Cuadro de información del canal, el dispositivo HDMI o DVI no está respondiendo. Comuníquese
con el fabricante del dispositivo HDMI o DVI para obtener ayuda adicional.
6LVLQWRQL]DHDMI 1, HDMI 2 o HDMI 3 INPUT y ve nieve, el video viene y se va, o el video se tarda
en aparecer, su componente HDMI o DVI tiene problemas para enviarle información acerca del
video al televisor. Vuelva a conectar el dispositivo. Desenchufe y enchufe nuevamente el cordón
de alimentación eléctrica para restablecer la alimentación. Si los problemas persisten, trate de
conectar en vez en los conectores Y Pb Pr si estos están disponibles o póngase en contacto con el
fabricante del componente HDMI o DVI para obtener ayuda adicional.
6LDSDUHFHQEDUUDVQHJUDVDFDGDODGRGHODLPDJHQHVSRVLEOHTXHHOFRPSRQHQWHTXHXVWHG
conectó tenga un interruptor o una opción de menú que le permita a usted cambiar la salida de
calidad de imagen que corregirá esto. Elija 720p, o bien 1080i.
36

No funciona el control remoto.
4XL]iKD\DDOJRLQWHU¿ULHQGRHQWUHHOFRQWUROUHPRWR\HOVHQVRUSDUDFRQWUROUHPRWRHQODSDUWH
frontal del televisor. Asegúrese que esté despejado el paso.
7DOYH]HOFRQWUROUHPRWRQRHVWiDSXQWDQGRGLUHFWDPHQWHDOWHOHYLVRU
(VSRVLEOHTXHODVEDWHUtDVGHOFRQWUROUHPRWRWHQJDQSRFDFDUJDHVWpQGHVFDUJDGDVRHVWpQPDO
instaladas. Instale baterías nuevas en el control remoto.
No funciona el control remoto.
Este televisor usa nuevos códigos de control remoto y puede no ser compatible con su control
UHPRWRXQLYHUVDODFWXDOSRUHMHPSORFRQWUROHVUHPRWRVGHUHFHSWRUHVVDWpOLWHGHGHVFRGL¿FDGRUHVGH
cable, genéricos universales, etc.). En un futuro próximo, los nuevos controles remotos universales
disponibles podrán recoger los nuevos códigos de los televisores.
Está teniendo problemas con V-Chip/Control de padres.
6LORVOtPLWHVGHFODVL¿FDFLyQQRIXQFLRQDQGHEHEORTXHDUODFRQ¿JXUDFLyQ(QWUHHQHOPHQ~SULQFLSDO
(pulse MENU en el control remoto), seleccione Control de padres. Seleccione V-Chip y luego pulse
ODÀHFKDKDFLDODL]TXLHUGDRKDFLDODGHUHFKDŻŹSDUDSURFHGHUDODSDQWDOODVLJXLHQWH/DRSFLyQ
$FWLYDU1LYHOHVHVWiUHVDOWDGD3XOVHODÀHFKDKDFLDODL]TXLHUGDRKDFLDODGHUHFKDŻŹSDUD
VHOHFFLRQDU$FWSDUDTXHORVOtPLWHVGHFODVL¿FDFLyQWHQJDQHIHFWR
/D9&KLSQRPHSHUPLWHYHUSURJUDPDVDXQTXHQRHVWiQFODVL¿FDGRV
como violentos.
4XL]iDODSHOtFXODVHOHKD\DDVLJQDGRODFRQGLFLyQ15³QRFODVL¿FDGD´'HVSXpVGHEORTXHDUOD
FODVL¿FDFLyQSDUDSHOtFXODVGHEHUiFRQ¿JXUDU15HQ9HU6HSDUDGDPHQWHD¿QGHSRGHUYHUSHOtFXODV
FRQFODVL¿FDFLyQ15
¿Qué más puedo hacer?
Si ha utilizado la sección de Resolución de Problemas y nada ha solucionado su problema, intente
reiniciar su televisor. Tenga en cuenta que al reiniciarlo, quizá sea necesario realizar de nuevo
el proceso de instalación. Para reiniciar el televisor, desconecte el cable de alimentación del
tomacorriente de la pared o de la extensión. Mantenga el televisor desconectado durante 5 minutos.
/XHJRHQFKXIHHOWHOHYLVRU\HQFLpQGDOR9HUL¿TXHTXHVHKD\DFRUUHJLGRHOSUREOHPD6LHOSUREOHPD
continúa, entonces visite www.tclusa.com para actualizar la preguntas más comunes (FAQ’s) o
contacte con el Servicio de Asistencia al Cliente de TCL en el número indicado en la Garantía en el
apartado “Cómo obtener servicio”.
Cuidado y Limpieza
Precaución: APAGUE el televisor antes de limpiar.
Puede limpiar el televisor según sea necesario, con un paño suave sin pelusa. Asegúrese de limpiar
ocasionalmente las ranuras de ventilación del mueble para garantizar una ventilación adecuada.
IMPORTANTE: Nunca use limpiadores fuertes como, por ejemplo, limpiadores a base de amoníaco
o polvos abrasivos. Estos tipos de limpiadores ocasionan daños al televisor. También se puede
limpiar la pantalla del televisor con un paño suave sin pelusa. Tenga cuidado de no rayar ni manchar
la pantalla. Si es necesario, puede usar un paño humedecido con agua tibia. Al limpiar, no rocíe la
pantalla directamente con líquido ni deje que se deslice por la misma hacia el interior del televisor.
,JXDOPHQWHQXQFDSRQJDYDVRVQLÀRUHURVOOHQRVGHDJXDHQFLPDGHOWHOHYLVRU(VWRSRGUtDDXPHQWDU
el riesgo de incendio, choques eléctricos y daños al televisor.
37

([SOLFDFLyQGHODV&ODVL¿FDFiones de V-Chip
6LVWHPDGH&ODVL¿FDFLyQGH9&KLS((88
TV-MA6yORSDUDDGXOWRV(VSHFt¿FDPHQWHGLVHxDGRSDUDVHUYLVWRSRUDGXOWRV\TXL]iVHD
inadecuado para menores de 17 años. Contiene uno o más de los siguientes temas: lenguaje
indecente y grosero (L), actividad sexual explícita (S) o violencia vívida (V).
TV-146HOHVDGYLHUWH¿UPHPHQWHDORVSDGUHV&RQWLHQHPDWHULDOTXHPXFKRVSDGUHVSRGUtDQ
FRQVLGHUDULQDGHFXDGRSDUDPHQRUHVGHDxRV6HOHVLQVWD¿UPHPHQWHDORVSDGUHVDYLJLODU
más cuidadosamente este programa y a no dejar que menores de 14 años lo vean sin supervisión.
Este programa contiene uno o más de los siguientes temas: diálogos intensamente sugerentes (D),
lenguaje vulgar y subido de tono (L), situaciones sexuales intensas (S) o violencia intensa (V).
TV-PG (Se sugiere la orientación de los padres) Contiene material que algunos padres pueden
FRQVLGHUDULQDGHFXDGRSDUDORVQLxRV4XL]iPXFKRVSDGUHVSUH¿HUDQYHUORMXQWRFRQVXVKLMRV(VWH
programa contiene uno o más de los siguientes temas: algunos diálogos intensamente sugerentes
(D), lenguaje vulgar poco frecuente (L), algunas situaciones sexuales (S) o violencia moderada (V).
TV-G (Adulto presente) La mayoría de los padres podría considerar este programa adecuado para
cualquier edad. Contiene pocos diálogos (D) o situaciones sexuales (S) o ninguno, sin lenguaje
subido de tono (L), o poca violencia o ninguna (V).
TV-Y7 (Dirigido a niños de 7 años y mayores) Diseñado para niños cuya edad sea 7 años o más.
4XL]iVHDPiVDSURSLDGRSDUDQLxRVTXH\DKD\DQDOFDQ]DGRODPDGXUH]VX¿FLHQWHSDUDGLVFHUQLU
HQWUHOD¿FFLyQ\ODUHDOLGDG/RVWHPDV\HOHPHQWRVGHHVWHSURJUDPDSXHGHQFRQWHQHUIDQWDVtD
violenta (FV) o comedia violenta moderadas, o pueden asustar a los menores de 7 años.
TV-Y (Para todos los niños) Los temas y elementos de este programa están diseñados para un
público joven que incluya niños entre 2 y 6 años de edad. No se cree que pueda asustar a los niños
más pequeños.
6LVWHPDGH&ODVL¿FDFLyQGH9&KLSSDUD,QJOpVGH&DQDGi
18+ (Adultos) Programación diseñada para adultos de 18 años y mayores. Podría contener
elementos de violencia, lenguaje y material de carácter sexual que podría hacerlo inapropiado
para menores de 18 años. Lineamientos sobre violencia: Podría contener violencia esencial para el
desarrollo de la trama, los personajes o el tema, diseñada para adultos. Otros lineamientos sobre el
contenido: Podría contener lenguaje vívido y representaciones explícitas de desnudos o actividad
sexual.
14+ (Audiencia de 14 años y mayores) La programación contiene temas o contenido que podría
VHULQDGHFXDGRSDUDPHQRUHVGHDxRV6HOHVLQVWD¿UPHPHQWHDORVSDGUHVDHMHUFHUGLVFUHFLyQ
si permiten que preadolescentes y adolescentes jóvenes vean estos programas. Lineamientos sobre
violencia: Podría contener escenas de violencia intensa. Podría tratar sobre temas para adultos y
asuntos sociales de una manera realista. Otros lineamientos sobre el contenido: Podría contener
escenas de desnudos y/o actividad de carácter sexual. Podría contener uso regular de lenguaje
obsceno.
PG (Orientación de los padres) Programación diseñada para todo público pero podría ser
inadecuada para los niños (menores de 8 años). Los padres podrían considerar parte del material
inapropiado para ser visto sin supervisión por niños entre 8 a 13 años de edad. Lineamientos sobre
YLROHQFLD/DVGHVFULSFLRQHVGHFRQÀLFWRV\RDJUHVLRQHVVHUiQOLPLWDGDVRPRGHUDGDVSRGUtDQ
contener violencia física, fantástica o sobrenatural. Otros lineamientos sobre el contenido: Podría
contener lenguaje profano moderado o lenguaje sugestivo reducido. Podría contener además algunas
escenas breves de desnudos.
38

G (Para todo público) Programación considerada aceptable para todas las edades. Aunque no ha
VLGRGLVHxDGDHVSHFt¿FDPHQWHSDUDQLxRVVHHQWLHQGHTXHORVQLxRVSRGUtDQIRUPDUSDUWHGHOS~EOLFR
Lineamientos sobre violencia: Contiene muy poca violencia, ya sea física, verbal o emocional. Se
relaciona con temas que podrían asustar a niños pequeños, no muestra escenas reales de violencia,
lo cual minimiza o disimula los efectos de actos de violencia. Otros lineamientos sobre el contenido:
Podría contener algunas expresiones inofensivas, mas ningún lenguaje obsceno ni desnudos.
C8+ (Niños de 8 años y mayores) Programación usualmente considerada aceptable para que niños
de 8 años y mayores vean sin necesidad de contar con la supervisión de un adulto. Lineamientos
sobre violencia: La violencia no se representa como la manera preferida, aceptable o única de
UHVROYHUFRQÀLFWRVQLDOLHQWDDORVQLxRVDLPLWDUDFWRVSHOLJURVRVTXHSXGLHUDQYHUSRUWHOHYLVLyQ/DV
descripciones reales de violencia son poco frecuentes, discretas, de poca intensidad y presentan las
consecuencias de tales actos. Otros lineamientos sobre el contenido: No contiene lenguaje obsceno,
desnudos ni material de carácter sexual.
C (Niños) Programación diseñada para niños menores de 8 años. Lineamientos sobre violencia: Se
presta cuidadosa atención a los temas que pudieran amenazar el sentido de seguridad y bienestar de
los niños. No contiene escenas realistas de violencia. La representación de comportamiento agresivo
es poco frecuente y se limita a representaciones que son claramente imaginarias, cómicas o irreales.
Otros lineamientos sobre el contenido: No contendrá lenguaje ofensivo, desnudos ni contenido de
carácter sexual.
6LVWHPDGH&ODVL¿FDFLyQGH9&KLSSDUD)UDQFpVGH&DQDGi
18 ans + (Adultos) Programación diseñada para adultos solamente. Este programa contiene
violencia continua o escenas extremadamente violentas.
16 ans + (Audiencia de 16 años y mayores) Programación inapropiada para menores de 16 años.
Este programa contiene frecuentes escenas de violencia o escenas intensamente violentas.
13 ans + (Audiencia de 13 años y mayores) La programación podría ser inadecuada para niños
menores de 13 años. Este programa puede contener varias escenas violentas o una o más escenas
ORVX¿FLHQWHPHQWHYLROHQWDVSDUDORJUDUDIHFWDUORV6HUHFRPLHQGDHQIiWLFDPHQWHODFRPSDxtDGHXQ
adulto para niños menores de 13 años que vean este tipo de programa.
8 ans + (Audiencia de 8 años y mayores) No se recomienda para niños pequeños. Este programa
es adecuado para casi todas las edades, pero contiene violencia moderada u ocasional que podría
perturbar a niños pequeños. Por lo tanto, se recomienda que los niños pequeños (menores de 8
DxRVTXLHQHVQRVDEHQGLVWLQJXLUHQWUHODUHDOLGDG\OD¿FFLyQYHDQHVWRVSURJUDPDVHQFRPSDxtD
de un adulto.
G (Todas las edades) Este programa es adecuado para público de todas las edades. No contiene
violencia, o la violencia que pudiera contener es mínima o se presenta de una manera humorística, en
forma de caricaturas, o de una manera irreal.
(VSHFL¿FDFLRQHVGHOWHOHYLVRU
Sistema de difusión NTSC-M sistema EE.UU.
Estándar ATSC (8VSB), QAM
Canales en recepción VHF 2-13
UHF 14-69
CATV 14-36 (A)-(W)
37-59 (AA)-(WW)
60-85 (AAA)-(ZZZ)
86-94 (86)-(94)95-99 (A-5)-(A-1)
100-135 (100)-(135)
01 (4A)
Tipo de sintonizador Frecuencia sintetizada
Frecuencia de actualización de Pantalla 60 Hz
39

Garantía Limitada de TTE Technology, Inc. (“TTE”)
TODOS LOS MODELOS LCD/LED
SALVO HASTA EL PUNTO QUE LAS LEYES APLICABLES LO PROHÍBAN, ESTA
GARANTÍA NO CUBRE, Y SEGÚN SE DESCRIBE ABAJO TTE EXPRESAMENTE
EXCLUYE, TODA GARANTÍA VIGENTE Y EMERGENTE CON RESPECTO A
CUALQUIER PRODUCTO UTILIZADO PARA PROPÓSITOS INSTITUCIONALES U
OTROS PROPÓSITOS COMERCIALES (INCLUYENDO PERO NO LIMITÁNDOSE A
PROPÓSITOS DE ALQUILER).
Qué cubre su Garantía:
Defectos en materiales y mano de obra al propietario original de este
producto TCL cuando ha sido comprado en un punto de venta autorizado de productos de la marca TCL
y que estén embalados con esta declaración en la garantía.
Nuevos televisores LCD/LED
Por cuánto tiempo después de su compra:
'RVDxRVGHVGHODIHFKDGHFRPSUDSDUDSLH]DV
'RVDxRVGHVGHODIHFKDGHFRPSUDSDUDPDQRGHREUD
Qué hacemos nosotros:
$GLVFUHFLyQGH77(SDJDUDXQ&HQWURGH6HUYLFLR$XWRUL]DGR7&/ORVJDVWRVGHPDQRGH
obra y de piezas para reparar su televisor, o reemplazar su televisor con una unidad nueva o
reconstruida/remanufacturada. Consulte “Cómo obtener el servicio”.
Cómo obtener el servicio:
/ODPHDO1-877-300-8837. Por favor tenga a mano la fecha de compra de la unidad, el lugar de
compra y el número de serie/modelo. Puede encontrar la información del número de serie/modelo
en la parte trasera de su unidad.
8QUHSUHVHQWDQWHOHUHVROYHUiVXSUREOHPDSRUWHOpIRQR6LVHGHWHUPLQDTXHVXXQLGDGQHFHVLWD
reparación, el lugar del servicio será a discreción exclusiva de TTE dependiendo del estado de la
Garantía Limitada de TTE.
$ HQWHUD GLVFUHFLyQGH77( SDQWDOODVGHWHOHYLVRUHV GH ´RPiV SHTXHxDVVHUHSDUDUi R HQ
Centros de Reparaciones TCL autorizados o se cambiarán directamente por una unidad nueva
o reacondicionada/reparada. A entera discreción de TTE, pantalla de televisión de 33” a 55”
serán o reparadas en un Centro de Reparaciones autorizado TDL o reparadas en su propia casa.
Si se repara en un Centro de reparaciones autorizado TCL, TTE no es responsable de los costes
de transporte hasta el Centro de Reparaciones autorizado TCL. Sin embargo, TTE pagará de
envío de vuelta. TTE le proporcionará instrucciones para el embalaje y el envío de la unidad.
Tiene que presentar la prueba de compra en forma de factura de venta o un albarán de recibo de
un distribuidor autorizado, que es la evidencia de que el producto está en garantía, para obtener
el servicio de garantía.
Qué es lo que no cubre la garantía:
,QVWUXFFLyQ SDUD HO FOLHQWH 6X PDQXDO GHO XVXDULR GHVFULEH FRPR LQVWDODU DMXVWDU \ XWLOL]DU VX
unidad. Cualquier información adicional debería obtenerla de un Distribuidor autorizado.)
,QVWDODFLyQ\DMXVWHVUHODFLRQDGRV
'DxRVDFDXVDGHPpWRGRVGHLQVWDODFLyQQRDSUREDGRV
3UREOHPDVFRQODUHFHSFLyQGHODVHxDOQRFDXVDGRVSRUVXXQLGDG
'DxRVFDXVDGRVSRUHOXVRLQGHELGRRQHJOLJHQFLD
%DWHUtDV
7HOHYLVRUHVTXHVHKD\DQPRGL¿FDGRRLQFRUSRUDGRDRWURVSURGXFWRVRTXHVHXWLOLFHQSDUD¿QHV
institucionales o comerciales (incluyendo pero no limitándose a propósitos de alquiler).
8QDXQLGDGFRPSUDGDRDODTXHVHOHKD\DKHFKRPDQWHQLPLHQWRIXHUDGHORV((88
8QDXQLGDGYHQGLGDFRPRVHHQFXHQWUHRFRQWRGDVVXVIDOODV
&DXVDVGHIXHU]DPD\RUFRPRSRUHMHPSORHQWUHRWURVGDxRVFDXVDGRVSRUUD\RV
'DxRVHVSHFLDOHVLQFLGHQWDOHVRFRQVHFXHQWHV
40

Registro del Producto:
Por favor registre su compra TCL on-line en www.tclusa.com. Será más fácil contactar con usted en
caso necesario. No es necesario registrarse para la cobertura de la garantía.
Limitación de la Garantía:
(67$*$5$17Ë$(6/$Ò1,&$*$5$17Ë$$3/,&$%/(3$5$(67(352'8&721,1*81$
INFORMACIÓN ORAL O ESCRITA PROPORCIONADA POR TTE TECHNOLOGY, INC., SUS
AGENTES O SUS EMPLEADOS IMPLICA GARANTÍA NI EXCEDE O MODIFICA EN MEDIDA
ALGUNA EL ALCANCE DE ESTA GARANTÍA.
/$5(3$5$&,Ï12(/5((03/$=26(*Ò1/2',638(672%$-2(67$*$5$17Ë$
ES REMEDIO EXCLUSIVO DEL CONSUMIDOR. TTE TECHNOLOGY, INC. NO SERÁ
RESPONSABLE DE DAÑOS ESPECIALES, INCIDENTALES O EMERGENTES QUE
RESULTEN DEL USO DE ESTE PRODUCTO O DEL INCUMPLIMIENTO DE CUALQUIER
GARANTÍA EXPRESA O IMPLÍCITA DE ESTE PRODUCTO. ESTA EXCLUSIÓN DE
RESPONSABILIDAD DE LAS GARANTÍAS Y GARANTÍA LIMITADA ESTÁ REGULADA POR
LAS LEYES DEL ESTADO DE CALIFORNIA. SALVO EN LA MEDIDA EN QUE LAS LEYES
APLICABLES LO PROHÍBAN, TODA GARANTÍA IMPLÍCITA DE COMERCIALIZACIÓN
O ADECUACIÓN PARA UN PROPÓSITO EN PARTICULAR CONCERNIENTE A ESTE
PRODUCTO SE LIMITA A LA GARANTÍA Y AL PERIODO DE GARANTÍA APLICABLES AQUÍ
ESTABLECIDOS.
Cómo se relacionan las leyes estatales con esta garantía:
$OJXQRVHVWDGRVQRSHUPLWHQODH[FOXVLyQRODOLPLWDFLyQGHGDxRVLQFLGHQWDOHVRHPHUJHQWHVR
la limitación en la duración de una garantía implícita, de modo que las limitaciones o exclusiones
anteriores pueden no aplicarse en su caso.
(VWDJDUDQWtDOHFRQ¿HUHGHUHFKRVOHJDOHVHVSHFt¿FRVVHJ~QHOHVWDGRSXHGHGLVIUXWDUDGHPiV
de otros derechos.
Si compró la unidad fuera de los Estados Unidos o busca disfrutar de la garantía fuera de los
Estados Unidos: Esta garantía no es aplicable. Póngase en contacto con su distribuidor y solicite
información acerca de la garantía.
Solicitudes de mantenimiento que no impliquen defectos materiales o de mano de obra
no están amparadas por esta garantía. El costo de tales solicitudes de mantenimiento es
responsabilidad exclusiva del comprador.
41

Información de la FCC
Este equipo ha sido probado, y se consideró que cumple con los límites de los aparatos digitales
GH&ODVH%GHDFXHUGRFRQODVHVSHFL¿FDFLRQHVGHOD3DUWHGHODV5HJODVGHOD)&&(O
objetivo de estos límites es ofrecer una protección razonable contra interferencias nocivas en una
LQVWDODFLyQUHVLGHQFLDO(VWHHTXLSRJHQHUDXWLOL]D\SXHGHUDGLDUHQHUJtDGHUDGLRIUHFXHQFLD\VLQR
se instala y utiliza de acuerdo con estas instrucciones, puede generar interferencia perjudicial para
ODVUDGLRFRPXQLFDFLRQHV6LQHPEDUJRQRVHJDUDQWL]DTXHQRVHSURGXFLUiLQWHUIHUHQFLDHQXQD
LQVWDODFLyQHQSDUWLFXODU6LVXHTXLSRFDXVDLQWHUIHUHQFLDSHUMXGLFLDOSDUDODUHFHSFLyQGHUDGLRR
televisión, que puede averiguar apagando y encendiendo el equipo, intente corregirla mediante uno o
varios de los siguientes procedimientos:
9XHOYDDRULHQWDURFDPELHGHOXJDUODDQWHQDUHFHSWRUD
$XPHQWHODVHSDUDFLyQHQWUHHOHTXLSR\HOUHFHSWRU
&RQHFWHHVWHHTXLSRDXQWRPDFRUULHQWHHQXQFLUFXLWRGLIHUHQWHDOTXHHVWpFRQHFWDGRHOUHFHSWRU
&RQVXOWHDOGLVWULEXLGRURDXQWpFQLFRH[SHULPHQWDGRGHUDGLR\WHOHYLVLyQSDUDVROLFLWDUDVLVWHQFLD
(VWHDSDUDWRGLJLWDO&ODVH%FXPSOHFRQODQRUPDFDQDGLHQVH,&(6
No envíe ningún producto a la dirección de Corona que aparece en este manual o en la caja de
FDUWyQ(VWRVyORRFDVLRQDUiUHWUDVRVHQHOVHUYLFLRDVXSURGXFWR
Fabricado bajo licencia de Dolby Laboratories.
“Dolby” y el símbolo doble D son marcas comerciales registradas de Dolby Laboratories.
77(7HFKQRORJ\,QF
*UDSKLWH'ULYH&RURQD&$
77(7HFKQRORJ\,QF
7&/\PDUFDVDVRFLDGDVVRQPDUFDVFRPHUFLDOHVGH7&/6$
XWLOL]DGDVEDMROLFHQFLDSDUD77(&RUSRUDWLRQ
Impreso en China
1~PHURGHSDUWH)&%;1$C