User Guide ELECTRONIC DRYER
CONTROL PANEL AND FEATURES
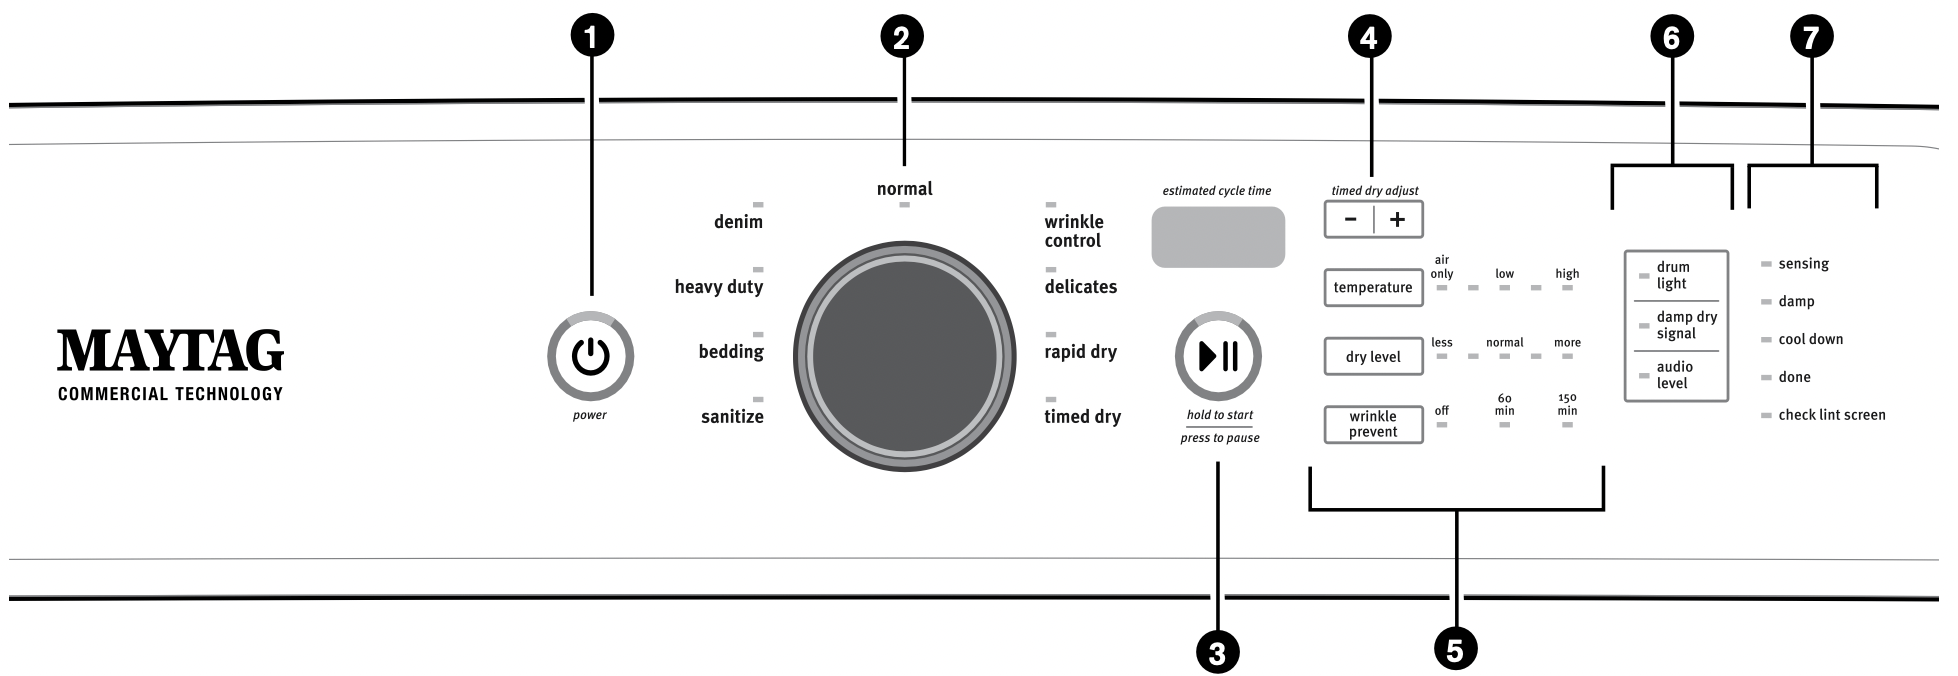
NOTE: The control panel features a sensitive surface that responds to a light touch of your finger. To ensure your selections are registered, touch the control panel with your finger tip, not your fingernail. When selecting a setting or option, simply touch its name.
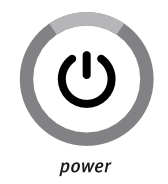
- POWER
Touch to turn the dryer on and off. Touch to stop/cancel a cycle at any time.
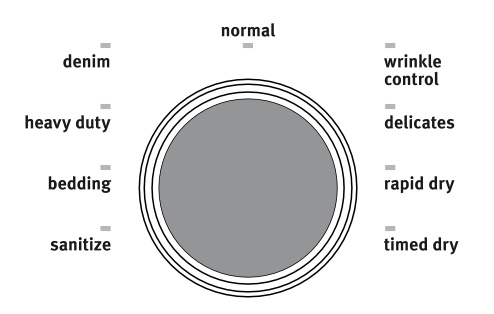
- CYCLE CONTROL KNOB
Use your dryer’s cycle control knob to select available cycles on your dryer. Turn the knob to select a cycle for your laundry load. See “Cycle Guide” for detailed descriptions of cycles.
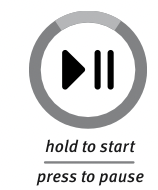
- START/PAUSE
Touch and hold to start a cycle, or touch once while a cycle is in process to pause it.
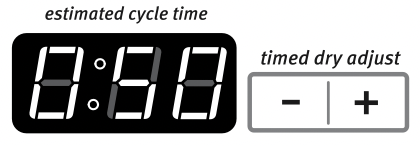
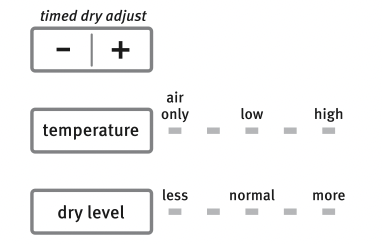
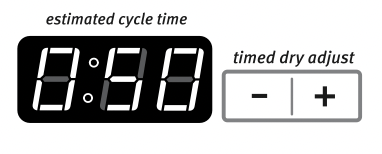
- TIMED DRY ADJUST
Use “+” and “–” with Timed Cycles to increase or decrease the length of a Timed Dry or Rapid Dry cycle.
- LED DISPLAY AND SETTINGS
When you select a cycle, its default settings will light up and the Estimated Time Remaining (for Sensor Cycles) or actual time remaining (for Timed Cycles) will be displayed.
Touch the setting names next to the display to adjust settings. See “Cycle Guide” for available settings on each cycle. Not all settings are available with all cycles.
Temperature
When using Timed Cycles, you may select a dry temperature based on the type of load you are drying. Use the warmest setting safe for the garments in the load. Follow garment label instructions.
NOTE: Sensor Cycles allow temperature adjustment. At most, 3 of available temperatures (not including Air Only) are allowed.
Dry Level
You may adjust the Dry Level on Sensor Cycles (except for the Sanitize cycle), if desired.
NOTE: Dryness level is for use with Sensor Cycles only.
Wrinkle Prevent
If you will be unable to remove a load immediately, touch Wrinkle Prevent to add either 60 or 150 minutes of periodic tumbling to help reduce wrinkling.
- OPTIONS
Use to select available options for your dryer. Not all cycles and options are available on all models.
Drum Light
Select DRUM LIGHT to turn on the light inside the dryer drum. When touched during a cycle, or when the dryer is not running, the Drum Light turns on and will remain on until DRUM LIGHT is touched again, the door is opened and closed, a cycle is started, or the door is left open for 5 minutes.
Touch DRUM LIGHT at any time to turn the drum light on or off.
Damp Dry Signal
Touch to set the Damp Dry Signal to ON or OFF. When selected, a series of beeps will sound when the load is damp but not completely dry. This will allow you to remove clothes that do not need to dry completely. This signal can also be used as a signal to rearrange the load when drying bulky items that do not tumble well, such as comforters. This option is not available on Sanitize or the Timed cycles.
Audio Level
Touch AUDIO LEVEL to change end beep and button sounds simultaneously to Low, High, or Off.
- CYCLE STATUS LIGHTS
The indicator bar on the right side of the control will let you know what stage of the drying cycle is in process.
Sensing
The Sensing indicator will light during Sensor Cycles to indicate that the moisture sensor on the dryer is operating. This indicator will not light during Timed Cycles or options such as Wrinkle Prevent.
Damp
This indicator shows that the load is partially dried and items that you may wish to hang up or iron while still damp may be removed.
Cool Down
The dryer has finished drying with heat and is now tumbling the load without heat to cool it down and reduce wrinkling.
Done
This will indicate that the selected cycle has ended and the load may be removed from the dryer. If Wrinkle Prevent has been selected, the dryer may continue to tumble the load, even if the Done indicator is lit.
Check Lint Screen
The Check Lint Screen indicator light will flash as a reminder to clean the lint screen. It will flash until the door is opened or a cycle is started. It will turn off when the dryer is turned off.
CYCLE GUIDE
SENSOR CYCLES
Senses moisture in the load and shuts off when the load reaches the selected dryness level. The dry temperature shown is the default temperature. This setting can be modified on some cycles but is not retained for future drying with this cycle. The dryness level shown is the default dryness setting. This setting can be changed on some cycles and will be retained for future drying with this cycle. Available options shown in bold are default settings for that cycle.
Use Sensor Cycles for better fabric care and energy savings
To get the most energy savings and enhanced fabric care from your dryer, use the Sensing cycles. These cycles measure the drying air temperature and moisture levels to turn the dryer off once the load reaches the selected dryness level. For electric models, dryer performance and results may vary with service voltage less than 240.
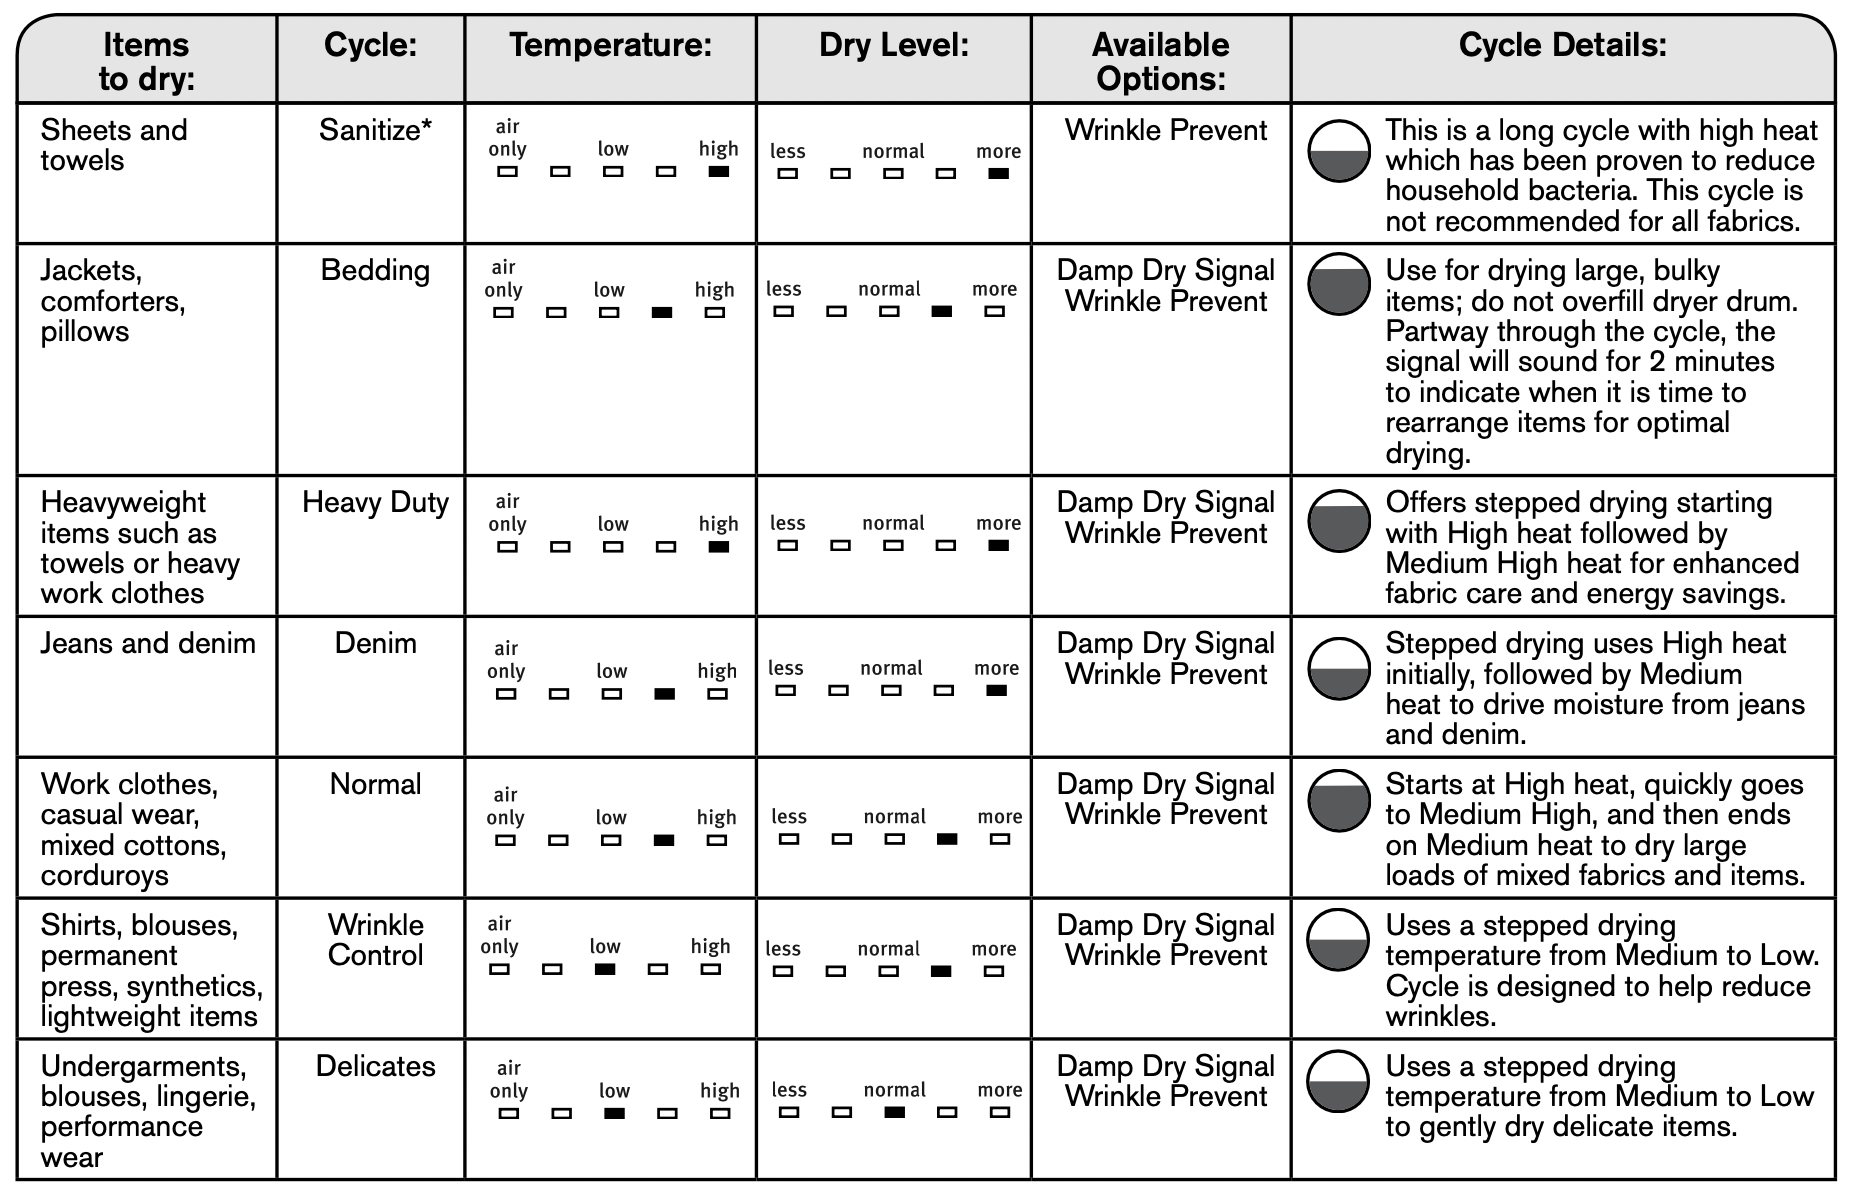
* Extended high-heat drying cycle intended to help sanitize items such as sheets and towels. This cycle is not recommended for all fabrics.
For best results, this cycle should be run to completion to ensure sanitization and do not interrupt cycle.
Load Size Recommendations
For best results, follow the wet load size recommendations noted for each cycle.
 Small load: Fill the dryer drum with 3–4 items, not more than 1/4 full.
 Medium load: Fill the dryer drum up to about 1/2 full.
 Large load: Fill the dryer drum up to about 3/4 full. Do not overload. Items need to tumble freely.
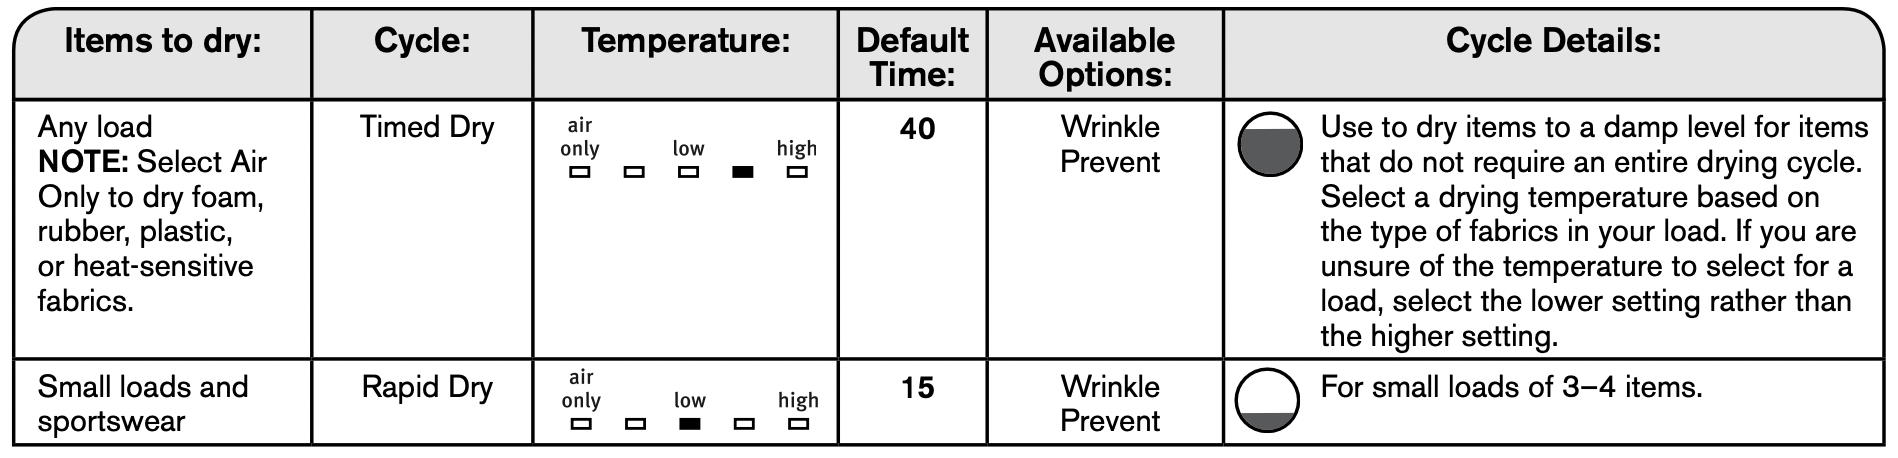
TIMED CYCLES
Settings shown and options in bold are default settings for that cycle.
Not all features and cycles are available on all models.
Not all settings and options are available on each cycle.
Adjusting drying time on Timed Cycles
When you select a Timed Cycle, the default time appears in the display. Use the “+” and “–” buttons to increase or decrease the time in 1-minute increments. Touch and hold to change the time in 5-minute increments.
The maximum dry time is 150 minutes.
Selecting the Temperature
A High heat setting may be used for drying heavyweight items such as towels and work clothes.
A Low to Medium heat setting may be used for drying mediumweight items such as sheets, blouses, dresses, underwear, permanent press fabrics, and some knits.
Use a no heat (air dry) setting for foam, rubber, plastic, or heatsensitive fabrics.
Line dry bonded or laminated fabrics.
NOTE: If you have questions about drying temperatures for various loads, refer to the care label directions.
Load Size Recommendations
For best results, follow the load size recommendations noted for each cycle.
 Small load: Fill the dryer drum with 3–4 items, not more than 1/4 full.
 Medium load: Fill the dryer drum up to about 1/2 full.
 Large load: Fill the dryer drum up to about 3/4 full. Do not overload. Items need to tumble freely.
USING YOUR DRYER
WARNING - Explosion Hazard
- Keep flammable materials and vapors, such as gasoline, away from dryer.
- Do not dry anything that has ever had anything flammable on it (even after washing).
- Failure to follow these instructions can result in death, explosion, or fire.
WARNING: To reduce the risk of fire, electric shock, or injury to persons, read the IMPORTANT SAFETY INSTRUCTIONS before operating this appliance.
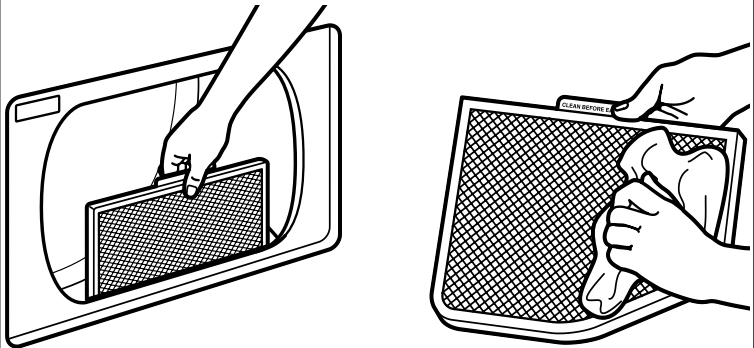
- Clean the lint screen
Clean the lint screen before each load. Pull the lint screen out of its holder. Roll lint off the screen with your fingers. Do not rinse or wash screen to remove lint. Push the lint screen firmly back into place.
For additional cleaning information, see “Dryer Care.”
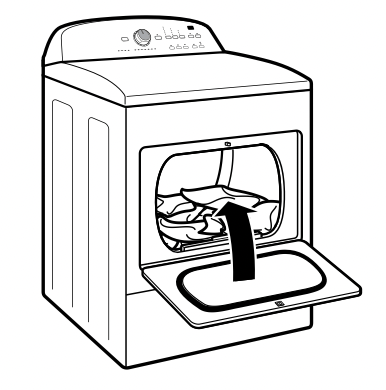
- Load the dryer
Open the door by pulling on the handle. Place laundry in the dryer. Add a dryer sheet to wet load, if desired. Close the door.
IMPORTANT: Do not tightly pack the dryer. Items need to tumble freely. Tightly packing can lead to poor drying performance and may increase wrinkling and tangling.
- Touch POWER
Touch POWER to turn on the dryer.
- Select the desired cycle
Select the desired cycle for your load. See the “Cycle Guide” for more information about each cycle. Not all cycles are on all models.
- Adjust cycle settings, if desired
You may adjust different settings, depending on whether you have selected a Sensor Cycle or Timed Cycle. See the “Cycle Guide” for detailed information.
NOTE: Not all options and settings are available with all cycles. Not all cycles are on all models.
Sensor Cycles:
You can select a different dryness level, depending on your load, by touching DRY LEVEL to scroll to More, Normal, or Less. Selecting More, Normal, or Less automatically adjusts the dryness level at which the dryer will shut off. Dry Level can be changed in the first 5-8 minutes of the cycle.
Sensor cycles give the best drying in the shortest time. Drying time varies based on fabric type, load size, and dryness setting.
Timed Cycles:
When you select a Timed Cycle, the default time appears in the display. Touch “+” and “–” to increase or decrease the time in 1-minute increments. Touch and hold to change the time in 5-minute increments.
The default temperature may be changed by touching Temperature until the desired dry temperature is lit.
- Select any additional options
Add additional options by touching that option. If you will be unable to remove the load promptly, select the Wrinkle Prevent options before touching Start.
NOTE: Not all options and settings are available with all cycles.

- Touch and hold START to begin cycle
Touch and hold START to begin the cycle.
- Remove garments promptly after cycle is finished
Promptly remove garments after cycle has completed to reduce wrinkling. If you will be unable to remove the load promptly, select the Wrinkle Prevent option.

Changing the Sensor Cycle settings to increase drying time
If all your loads on all Sensor Cycles are consistently not as dry as you would like, you may change the default settings to increase or decrease the default dryness level.
Your sensor drying settings can be adjusted to adapt to different installations, environmental conditions, or personal preference. This change is retained and will affect all of your Sensor cycles, not just the current cycle/load. There are 5 drying settings, which are displayed using the time display:
0 Much wetter clothes, 30% less drying time.
1 Slightly wetter clothes, 15% less drying time.
2 Factory preset dryness level.
3 Slightly drier clothes, 15% more drying time.
4 Much drier clothes, 30% more drying time.
To change the drying settings:
NOTE: The settings cannot be changed while the dryer is running or paused. The dryer must be in standby mode (power is off) to adjust the default settings.
- Before starting a cycle, touch and hold DRY LEVEL for 6 seconds.
- Touch DRY LEVEL to select the dryness level shown in the time display: 0, 1, 2, 3, or 4.
- Touch START to save the new dryness level setting.
DRYER CARE
CLEANING THE DRYER LOCATION
Keep dryer area clear and free from items that would block the air flow for proper dryer operation. This includes clearing piles of laundry in front of the dryer.
WARNING - Explosion Hazard
- Keep flammable materials and vapors, such as gasoline, away from dryer.
- Place dryer at least 18 inches (460 mm) above the floor for a garage installation.
- Failure to follow these instructions can result in death, explosion, or fire.
CLEANING THE DRYER INTERIOR
To clean dryer drum
- Use a mild hand dish detergent mixed at a low concentration with very warm water, and rub with a soft cloth.
- Rinse well with a wet sponge or towel.
- Tumble a load of clean clothes or towels to dry drum
OR
Use a microfiber cloth and hot water in a spray bottle to clean the drum and a second microfiber towel to dry.
NOTE: Garments that contain unstable dyes, such as denim blue jeans or brightly colored cotton items, may discolor the rear of the dryer interior. These stains are not harmful to your dryer and will not stain future loads of clothes. Dry unstable dye items inside out to avoid transfer of dye.
REMOVING ACCUMULATED LINT
From Inside the Dryer Cabinet
Lint should be removed every 2 years, or more often, depending on dryer usage. Cleaning should be done by a qualified appliance servicer or ventilation system cleaner.
From the Exhaust Vent
Lint should be removed every 2 years, or more often, depending on dryer usage.
CLEANING THE LINT SCREEN
Every load cleaning The lint screen is located in the top of the dryer. The control panel has an indicator light “Check Lint” to remind you to clean the lint screen after each load. A screen blocked by lint can increase drying time.
To clean:
- Pull the lint screen out of its holder. Roll lint off the screen with your fingers. Do not rinse or wash screen to remove lint. Wet lint is hard to remove.
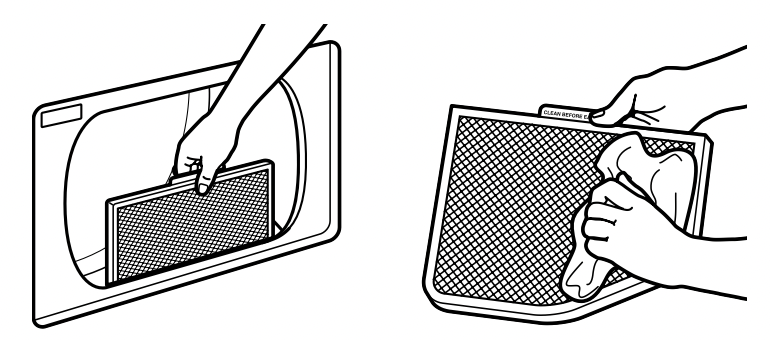
- Push the lint screen firmly back into place.
IMPORTANT:
- Do not run the dryer with the lint screen loose, damaged, blocked, or missing. Doing so can cause overheating and damage to both the dryer and fabrics.
- If lint falls off the screen into the dryer during removal, check the exhaust hood and remove the lint. See “Venting Requirements” in the Installation Instructions.
As needed cleaning
Laundry detergent and fabric softener residue can build up on the lint screen. This buildup can cause longer drying times for your clothes or cause the dryer to stop before your load is completely dry. The screen is probably clogged if lint falls off while the screen is in the dryer.
Clean the lint screen with a nylon brush every 6 months, or more frequently, if it becomes clogged due to a residue buildup.
To wash:
- Roll lint off the screen with your fingers.
- Wet both sides of lint screen with hot water.
- Wet a nylon brush with hot water and liquid detergent.
Scrub lint screen with the brush to remove residue buildup.
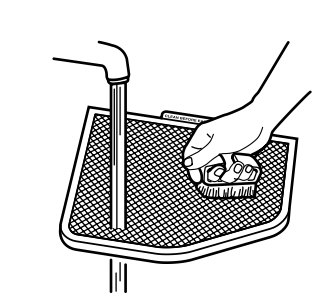
- Rinse screen with hot water.
- Thoroughly dry lint screen with a clean towel.
Reinstall screen in dryer.
NON-USE, STORAGE, AND MOVING CARE
Non-Use or Storage Care
Operate your dryer only when you are at home. If you will be on vacation or not using your dryer for an extended period of time, you should:
- Unplug dryer or disconnect power.
- Clean lint screen. See “Cleaning the Lint Screen.”
Moving Care
For power supply cord-connected dryers:
- Unplug the power supply cord.
- Gas models only: Close shut-off valve in gas supply line.
- Gas models only: Disconnect gas supply line pipe and remove fittings attached to dryer pipe.
- Gas models only: Cap the open fuel supply line.
- Make sure leveling legs are secure in dryer base.
- Use tape to secure dryer door.
WARNING - Electrical Shock Hazard
- Disconnect power before servicing.
- Replace all parts and panels before operating.
- Failure to do so can result in death or electrical shock.
For direct-wired dryers:
- Disconnect power.
- Disconnect wiring from dryer and secure wire ends.
- Make sure leveling legs are secure in dryer base.
- Use tape to secure dryer door.
Reinstalling the Dryer
Follow the Installation Instructions to locate, level, and connect the dryer.
TROUBLESHOOTING
|
If you experience
|
Possible Causes
|
Solution
|
|
Dryer Operation
|
|
Dryer will not run
|
Door not closed completely.
|
Make sure the dryer door is closed completely.
|
|
Start not touched firmly or held long enough.
|
Touch and hold START 2-5 seconds.
|
|
Household fuse is blown, circuit breaker has tripped, or dryer is not plugged in.
|
There may be 2 household fuses or circuit breakers for the dryer. Check that both fuses are intact and tight or that both circuit breakers have not tripped. Replace the fuses or reset the circuit breaker. If the problem continues, call an electrician.
|
|
Incorrect power supply.
|
Electric dryers require 240-volt or 208-volt power supply. Check with a qualified electrician.
|
|
Wrong type of fuse.
|
Use a time-delay fuse.
|
|
Dryer will not heat
|
Household fuse is blown or circuit breaker has tripped.
|
The drum may be turning, but you may not have heat. Electric dryers use 2 household fuses orcircuit breakers. Replace the fuses or reset the circuit breaker. If the problem continues, call anelectrician.
|
|
Incorrect power supply.
|
Electric dryers require 240-volt or 208-volt power supply. Check with a qualified electrician.
|
|
The gas supply line valve not open.
|
For gas dryers, make sure that the valve on the gas supply line is open.
|
|
Unusual Noise
|
|
Thumping noise
|
Dryer hasn’t been used in a while.
|
This is normal. The thumping sound should diminish after a few minutes of use.
|
|
Rattling or vibrating noise
|
A small object caught between the edges of dryer drum.
|
Check the front and rear edges of the drum for small objects. Clean out pockets beforelaundering.
|
|
Dryer isn’t properly leveled.
|
The dryer may vibrate if not properly installed. See the Installation Instructions. All four dryer feet should be in firm contact with the floor.
|
|
Clothing is balled up in dryer.
|
When balled up, the load will bounce, causing the dryer to vibrate. Separate the load items and restart the dryer.
|
|
Clicking noise
|
Gas valve operating.
|
On gas dryers, you may hear the gas valve clicking as it opens and closes. This is normal.
|
|
Dryer Results
|
|
Clothes are not drying satisfactorily, clothes are balling or tangling, or drying times are too long
|
Lint screen is clogged with lint.
|
Clean lint screen before each load.
|
|
The exhaust vent or outside exhaust hood is clogged with lint, restricting air movement.
|
Run the dryer on Air Only for 5–10 minutes. Hold your hand under the outside exhaust hood to check air movement. If you do not feel air movement, clean exhaust system of lint or replace exhaust vent with heavy metal or flexible metal vent. See the Installation Instructions.
|
|
The exhaust vent is not the correct length.
|
Check that the exhaust vent is not too long or has too many turns. Long venting will increase drying times. See the Installation Instructions.
|
|
The exhaust vent diameter is not the correct size.
|
Use 4" (102 mm) diameter vent material.
|
|
The dryer is not level.
|
Clothes not contacting the moisture sensors during Sensor cycles. See “Level Dryer” in the Installation Instructions.
|
|
The Air Only temperature setting has been selected.
|
Select the correct temperature for the types of garments being dried. See “Cycle Guide.”
|
|
The load is too large and heavy to dry quickly.
|
Separate the load to tumble freely.
|
|
The dryer is located in ar oom with temperature below 45ºF (7ºC).
|
Proper operation of dryer cycles requires temperatures above 45ºF (7ºC).
|
|
The dryer is located in a closet.
|
Closet doors must have ventilation openings at the top and bottom of the door. The front of the dryer requires a minimum of 1" (25 mm) of air space, and, for most installations, the rear of the dryer requires 5" (127 mm). See the Installation Instructions.
|
|
Cycletime is too short
|
The load may not be contacting the sensor strips on Sensor Cycles.
|
Level the dryer. See the Installation Instructions. All four dryer feet should be in firm contact with the floor.
|
|
The Sensor Cycle is ending early.
|
Change the dryness level setting on Sensor Cycles. Increasing or decreasing the dryness level will change the amount of drying time in a cycle. If loads are consistently ending too early, see also “Changing the Sensor Cycle settings to increase or decrease drying time.”
|
|
Lint on load
|
Lint screen is clogged with lint.
|
Clean lint screen before each load.
|
|
Stains on load
|
Improper use of fabric softener.
|
Add dryer fabric softener sheets at the beginning of the cycle. Fabric softener sheets added to a partially dried load can stain your garments.
|
|
Stains on drum
|
Loose dyes in clothes.
|
Drum stains are caused by dyes in clothing (usually blue jeans). These will not transfer to other clothing.
|
|
Loads are wrinkled
|
The load was not removed from dryer at the end of the cycle.
|
Select Steam Refresh Cycle (on some models) to tumble the load with water and heat. This cycle is best for smoothing out wrinkles and reducing odors from dry loads consisting of one to 9 dry items of wrinkle-free cotton, cotton-polyester blend, common knits, and synthetic garments.
NOTE: Refer to garment care label instructions. Dry-clean-only garments are not recommended.
|
|
The dryer was tightly packed.
|
Dry smaller loads that can tumble freely. Results may also vary depending on fabric type. This cycle is best for reducing wrinkles and odors from loads consisting of wrinkle-free cotton, cotton-polyester blends, common knits, and synthetics.
|
|
Odors
|
Recent painting, staining, or varnishing in the area where your dryer is located.
|
Ventilate the area. When the odors or fumes are gone from the area, rewash and dry the clothing.
|
|
Load too hot
|
Load removed before cool down portion of cycle complete.
|
Allow the dryer to complete the cool down portion of the cycle before removing the load.
|
|
Using Timed Dry cycle with a high temperature setting.
|
Select an Sensor Cycle with a lower heat setting to avoid overdrying the load.
|
|
Dryer Displaying Code Message or Indicator Is Lit
|
|
“PF” (power failure)
|
The drying cycle has been interrupted by a power failure.
|
Touch the START key to clear the PF error message; then press and hold the START key to resume cycle.
|
|
“L2” Diagnostic Code (low or no line voltage condition)
|
There may be a problem with your home power supply, keeping the dryer’s heater from turning on.
|
The dryer will continue to run when this diagnostic code is present. Touch any pad to clear the code from the display and return to the estimated time remaining.
Try the following:
- Check to see if a household fuse has blown or circuit breaker has tripped. Electric dryers use two household fuses or breakers. Replace the fuse or reset the circuit breaker.
- Confirm that the power cord is properly installed. Refer to the Installation Instructions for details.
- Select a Timed Dry heated cycle, and restart the dryer. If the message persists, consult a qualified electrician.
|
|
“F# E#” (F1 E1, F3 E1,etc.) variable service codes.
|
The dryer is in need of service.
|
If a code beginning with an “F” appears in the display, alternating between F# and E#, the dryer control has detected a problem that requires service. Call for service.
|