Loading ...
Loading ...
Loading ...
En-6
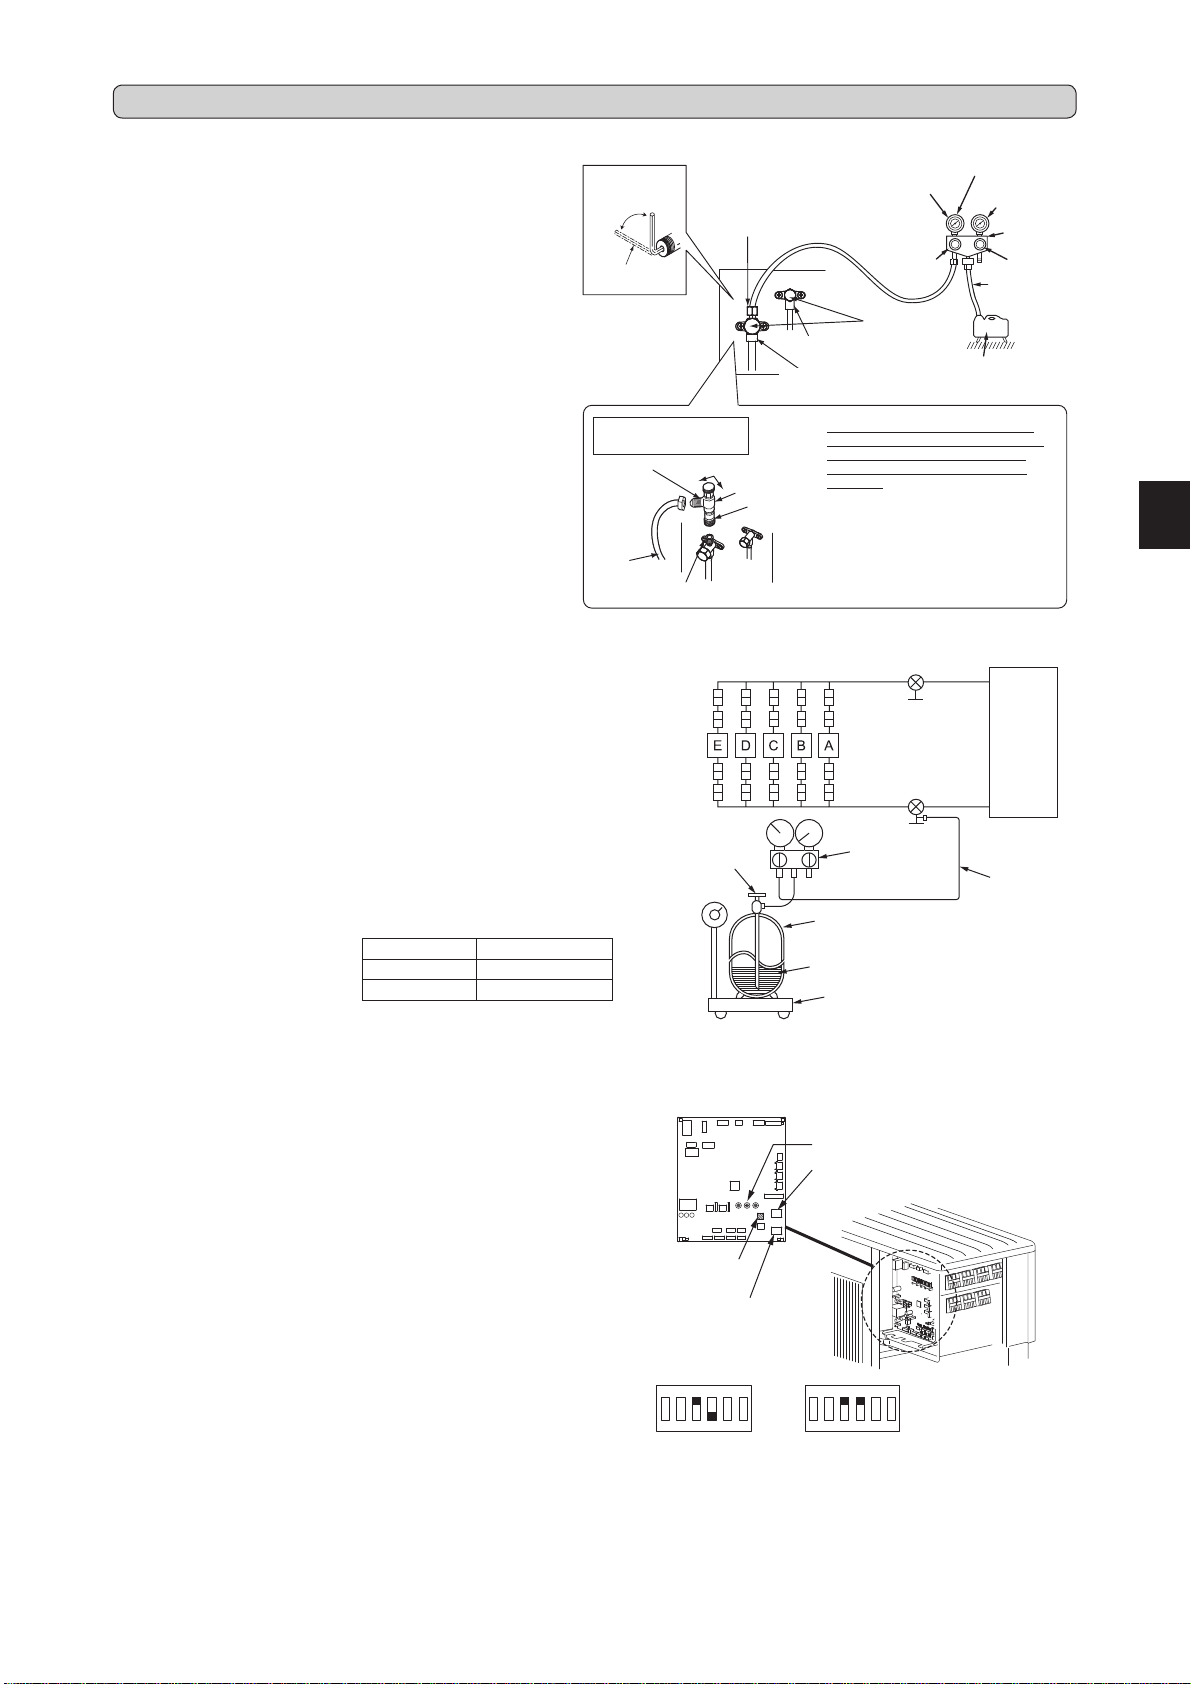
4-1. PURGING PROCEDURES AND LEAK TEST
4-2. GAS CHARGE
Performgaschargetounit.
1)Connectgascylindertotheserviceportofstopvalve.
2)Performairpurgeofthepipe(orhose)comingfromrefrigerantgascylinder.
3)Replenishspeciedamountoftherefrigerant,whileoperatingtheairconditioner
for cooling.
Note:
Incaseofaddingrefrigerant,complywiththequantityspeciedfortherefrigerat-
ing cycle.
CAUTION:
Whenchargingtherefrigerantsystemwithadditionalrefrigerant,besuretouse
liquidrefrigerant.Addinggasrefrigerantmaychangethecompositionoftherefriger-
antinthesystemandaffectnormaloperationoftheairconditioner.Also,charge
theliquidrefrigerantslowly,otherwisethecompressorwillbelocked.
Tomaintain the high pressure of the gas cylinder,warm the gas cylinder with
warmwater(under40°C)duringcoldseason.Butneverusenakedreorsteam.
1)Removeserviceportcapofstopvalveonthesideoftheoutdoorunit
gaspipe.(Thestopvalvesarefullyclosedandcoveredincapsintheir
initialstate.)
2)Connectgaugemanifoldvalveandvacuumpumptoserviceportofstop
valveonthegaspipesideoftheoutdoorunit.
3)Runthevacuumpump.(Vacuumizeformorethan15minutes.)
4)Checkthevacuumwithgaugemanifoldvalve,thenclosegaugemanifold
valve,andstopthevacuumpump.
5)Leaveasitisforoneortwominutes.Makesurethepointerofgauge
manifoldvalveremainsinthesameposition.Conrmthatpressuregauge
shows-0.101MPa[Gauge](-760mmHg).
6)Removegaugemanifoldvalvequicklyfromserviceportofstopvalve.
7)Fullyopenallstopvalvesonthegaspipeandtheliquidpipe.Operating
withoutfullyopeninglowerstheperformanceandthiscausestrouble.
8)Referto1-2.,andchargetheprescribedamountofrefrigerantifneeded.
Besuretochargeslowlywithliquidrefrigerant.Otherwise,composition
oftherefrigerantinthesystemmaybechangedandaffectperformance
of the air conditioner.
9)Tightencapofserviceporttoobtaintheinitialstatus.
10
)Leaktest
Stopvalve
forGAS
Gaugemani-
foldvalve(for
R410A)
Compoundpressure
gauge(forR410A)
–0.101MPa
(–760mmHg)
Handle
Low
HandleHigh
Vacuumpump
(forR410A)
Chargehose
(forR410A)
*Close
*Open
Hexagonal
wrench
*4to5turns
Stopvalve
forLIQUID
Pressuregauge
(forR410A)
Precautionswhenus-
ingthecontrolvalve
Whenattachingthecontrolvalve
totheserviceport,valvecoremay
deformorloosenifexcesspres-
sureisapplied.Thismaycause
gasleak.
Serviceport
Chargehose
(forR410A)
Body Close
Open
Controlvalve
A
Whenattachingthecontrolvalveto
theserviceport,makesurethatthe
valvecoreisinclosedposition,and
then tighten part A. Do not tighten
partA orturnthebodywhen valve
coreisinopenposition.
Union
Stopvalve
Liquid
pipe
Indoor
unit
Stopvalvewith
serviceport
Gas
pipe
Refrigerant gas
cylinder
operatingvalve
(forR410A)
Gaugemanifold
valve(forR410A)
Chargehose
(forR410A)
RefrigerantgascylinderforR410Awithsiphon
Electronic scale for refrigerant charging
Refrigerant(liquid)
Outdoor
unit
Union
Union
Union
4. PURGING PROCEDURES, LEAK TEST, AND TEST RUN
Serviceportcap
(Torque13.7to
17.7N•m,140to
180kgf•cm)
Stopvalvecap
(Torque19.6to
29.4N•m,200
to300kgf•cm)
Model Indoor unit
MXZ-5E100VAD
A
–
E
MXZ-4E80VAD
A
–
D
4-3. LOCKING THE OPERATION MODE OF THE AIR CONDITIONER (COOL, DRY, HEAT)
COOL/DRY HEAT
• Descriptionofthefunction:
Withthisfunction,oncetheoperationmodeislockedtoeitherCOOL/DRYmode
orHEATmode,theairconditioneroperatesinthatmodeonly.
* Changingthesettingisrequiredtoactivatethisfunction.Pleaseexplainabout
thisfunctiontoyourcustomersandaskthemwhethertheywanttouseit.
[How to lock the operation mode]
1)Besure toturn offthe mainpower forthe airconditioner beforemaking the
setting.
2)Setthe“3”ofSW1ontheoutdoorcontrollerboardtoONtoenablethisfunction.
3)Tolockthe operationmodein COOL/DRYmode,setthe “4”ofSW1 onthe
outdoorcontrollerboardtoOFF.TolocktheoperationinHEATmode,setthe
sameswitchtoON.
4)Turnonthemainpowerfortheairconditioner.
SW1
ON
1 2 3 4 5 6
SW1
ON
1 2 3 4 5 6
LED
SW1
SW871
SW2
WG79A696H02_en.indd 6 2016/04/21 14:46:40
Loading ...
Loading ...
Loading ...