Write the model and serial numbers here:
Model # __________________________
Serial # __________________________
Find these numbers on a label on the left
side, near the middle of the refrigerator
compartment.
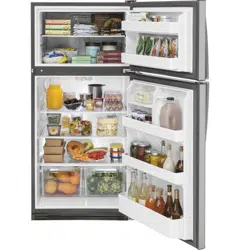
Top-Freezer Refrigerators
Owner’s Manual
and Installation
Instructions
Contents
Safety Information .................3
Using the Refrigerator
Temperature Control ..............5
Refrigerator Shelves ..............5
Drawers ........................6
Freezer Shelf ....................6
Care And Cleaning ................7
Installation Instructions
Preparing to Install the Refrigerator ...9
Reversing the Door Swing .........10
Troubleshooting Tips
Normal Operating Sounds .........13
Troubleshooting Tips .............14
Limited Warranty .................16
Accessory ......................17
Consumer Support ...............18
Models: XTS21
49-1000103 Rev. 0 07-18 GEA
English/Español
2 49-1000103
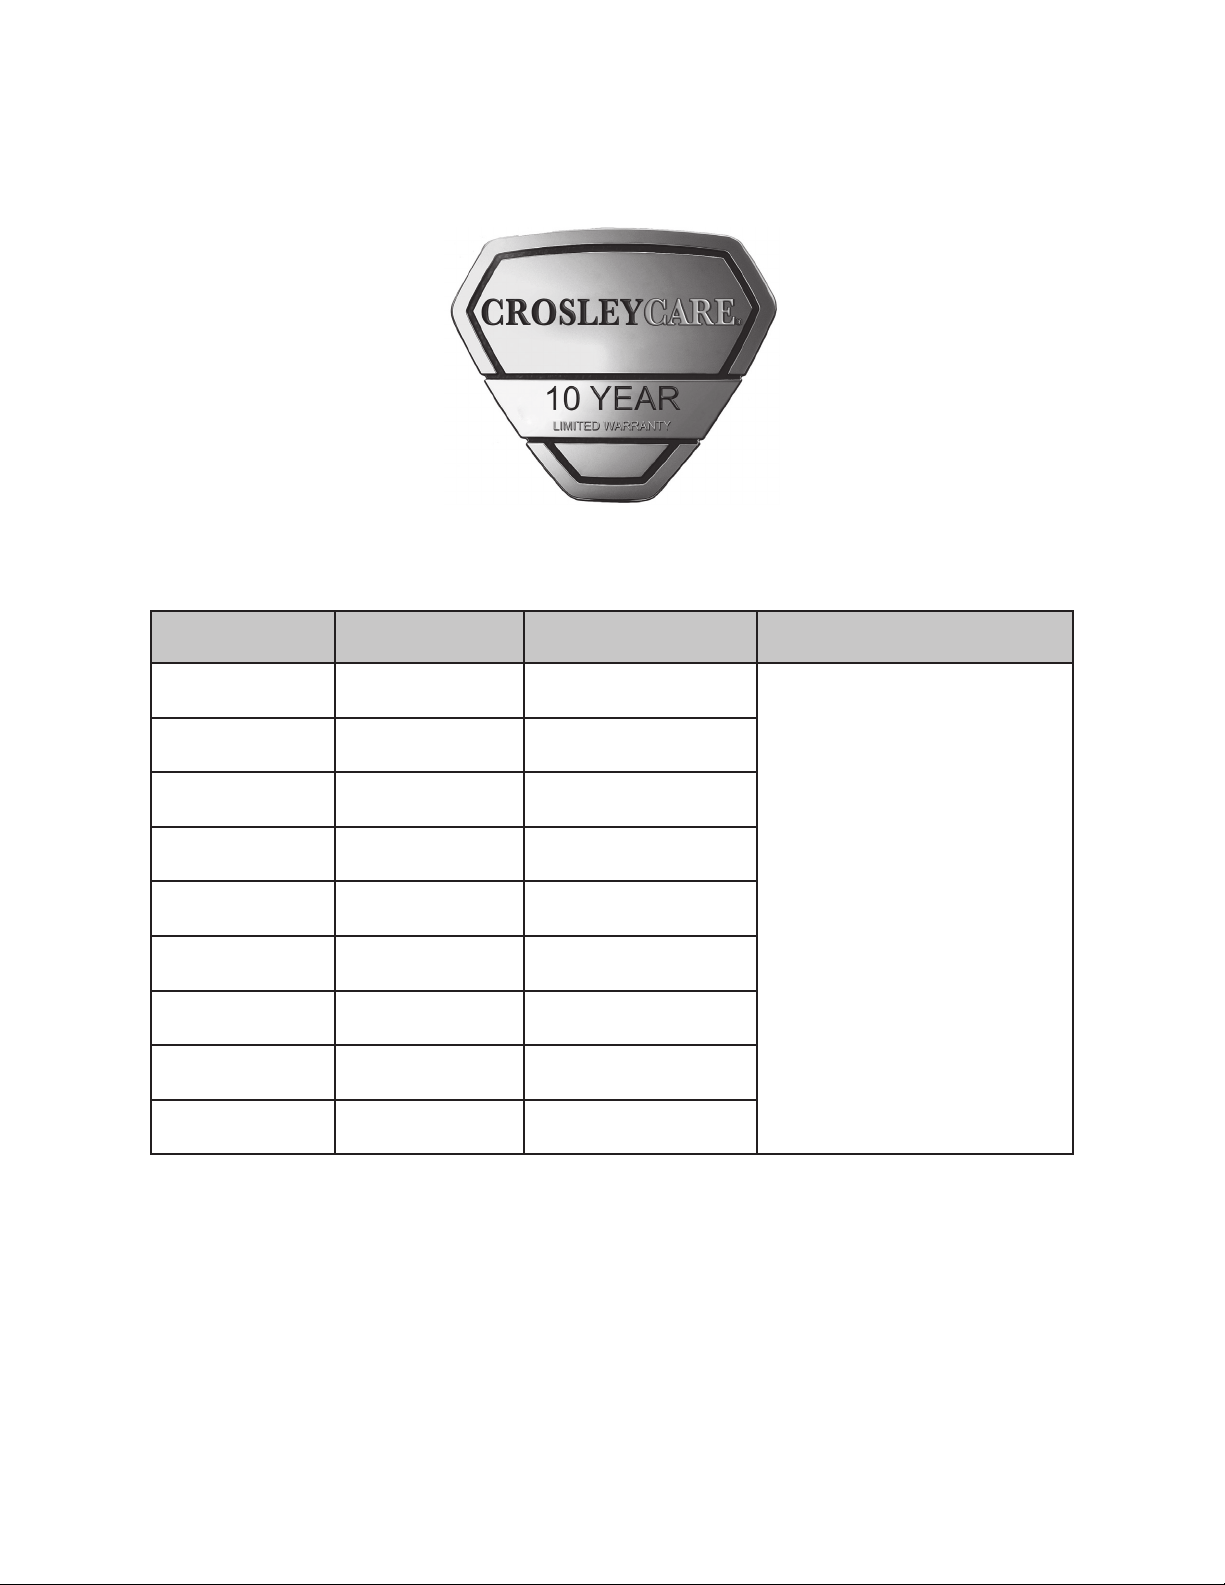
America's iconic brand, backed by America's best appliance warranty!
10 Year Limited Warranty FREE on all Crosley Appliances!
Visit Crosley.com/mycrosley to register the extended limited warranty.
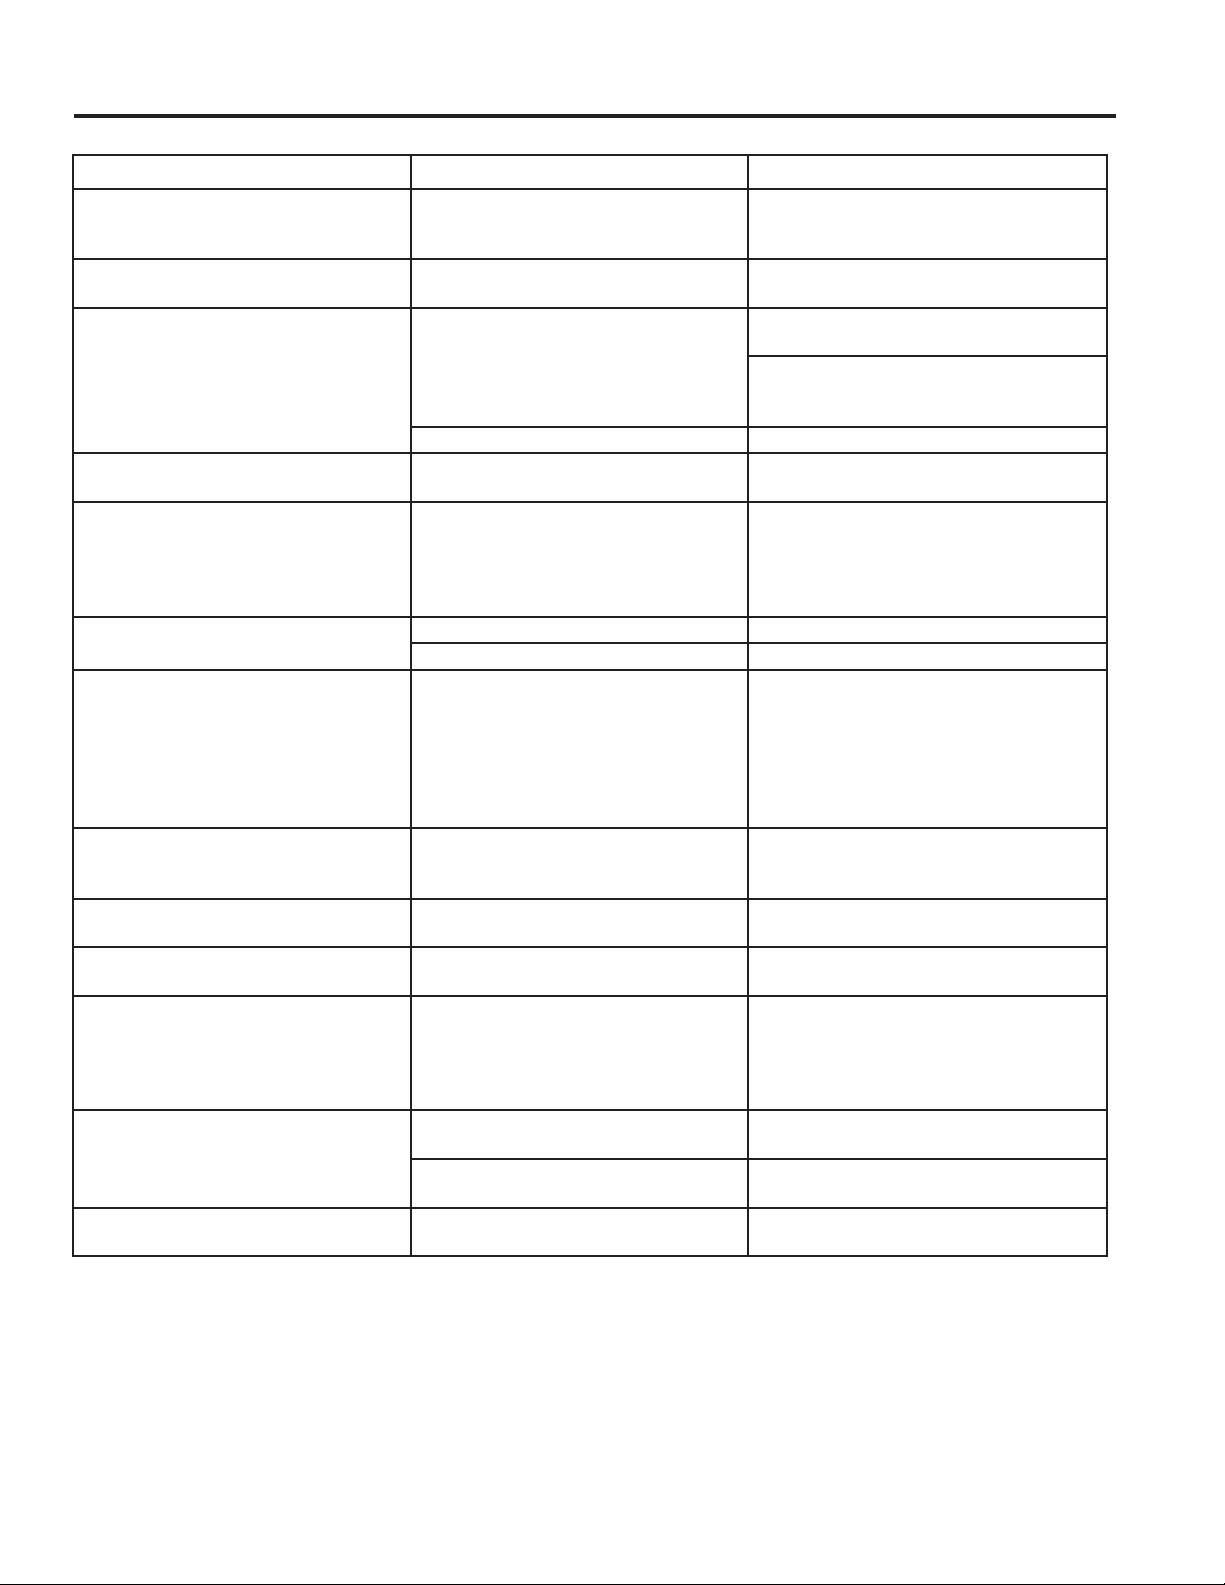
APPLIANCE COMPONENT
MANUFACTURER'S
LIMITED WARRANTY
CROSLEY'S EXTENDED
LIMITED WARRANTY
Refrigerator or
Freezer
Compressor 1 Year
10 Years
Including 1 year Manufacturer's
Coverage
Top-Load Washer
Gearcase/
Transmission
1 Year
Front-Load
Washer
Motor 1 Year
Compact Washer Motor 1 Year
Washer/Dryer
Stack Unit
Motor/Heating
Element
1 Year
Dishwasher Motor 1 Year
Gas/Electric Dryer
Motor/Heating
Element
1 Year
Electric Range
Bake/Broil/Surface
Elements
1 Year
Gas Range
Ignitors and Spark
Modules
1 Year
49-1000103 3
CAUTION
To reduce the risk of injury when using your refrigerator, follow these basic safety
precautions.
■ Donotcleanglassshelvesorcoverswithwarm
water when they are cold. Glass shelves and
covers may break if exposed to sudden temperature
changes or impact, such as bumping or dropping.
Tempered glass is designed to shatter into many
small pieces if it breaks.
■ Keepfingersoutofthe“pinchpoint”areas;
clearances between the doors and between the
doors and cabinet are necessarily small. Be careful
closing doors when children are in the area.
■ Donottouchthecoldsurfacesinthefreezer
compartment when hands are damp or wet, skin
may stick to these extremely cold surfaces.
■ Donotrefreezefrozenfoodswhichhavethawed
completely.
■ Inrefrigeratorswithautomaticicemakers,avoid
contact with the moving parts of the ejector
mechanism, or with the heating element that
releases the cubes. Do not place fingers or hands
on the automatic ice making mechanism while the
refrigerator is plugged in.
SAFETY INFORMATION
READ AND SAVE THESE INSTRUCTIONS
WARNING
To reduce the risk of fire, explosion, electric shock, or injury when using your
refrigerator, follow these basic safety precautions:
■ Thisrefrigeratormustbeproperlyinstalled
and located in accordance with the Installation
Instructions before it is used.
■ Unplugtherefrigeratorbeforemakingrepairs,
replacing a light bulb, or cleaning.
NOTE: Power to the refrigerator cannot be
disconnected by any setting on the control panel.
NOTE: Repairs must be performed by a qualified
Service Professional.
■ Replaceallpartsandpanelsbeforeoperating.
■ Donotuseanextensioncord.
■ Donotstoreorusegasolineorotherflammable
vapors and liquids in the vicinity of this or any other
appliance.
■ Donotstoreexplosivesubstancessuchasaerosol
cans with a flammable propellant in this appliance.
■ Topreventsuffocationandentrapmenthazards
to children, remove the fresh food and freezer
doors from any refrigerator before disposing of it or
discontinuing its use.
■ Toavoidseriousinjuryordeath,childrenshouldnot
stand on, or play in or with the appliance.
■ Childrenandpersonswithreducedphysical,sensory
or mental capabilities or lack of experience and
knowledge can use this appliance only if they are
supervised or have been given instructions on safe
use and understand the hazards involved.
■ Thisapplianceisintendedtobeusedinhousehold
and similar applications such as: staff kitchen areas
inshops,officesandotherworkingenvironments;
farmhouses;byclientsinhotels,motels,bed
&breakfastandotherresidentialenvironments;
catering and similar non-retail applications.
IMPORTANT SAFETY INFORMATION
READ ALL INSTRUCTIONS BEFORE USING THE APPLIANCE
INSTALLATION
WARNING
EXPLOSION HAZARD
Keepflammablematerialsandvapors,suchasgasoline,awayfromrefrigerator.Failuretodosocanresultinfire,
explosion, or death.
4 49-1000103
PROPER DISPOSAL OF YOUR OLD REFRIGERATOR
Do not, under any circumstances, cut or remove the third (ground) prong from the power cord. For
personal safety, this appliance must be properly grounded.
The power cord of this appliance is equipped with a
3-prong (grounding) plug which mates with a standard
3-prong (grounding) wall outlet to minimize the
possibility of electric shock hazard from this appliance.
Have the wall outlet and circuit checked by a qualified
electrician to make sure the outlet is properly
grounded.
Where a standard 2-prong wall outlet is encountered, it
is your personal responsibility and obligation to have it
replaced with a properly grounded 3-prong wall outlet.
Do not use an adapter.
The refrigerator should always be plugged into its own
individual electrical outlet which has a voltage rating
that matches the rating plate.
A 115 Volt AC, 60 Hz, 15- or 20-amp fused, grounded
electrical supply is required. This provides the best
performance and also prevents overloading house
wiring circuits which could cause a fire hazard from
overheated wires.
Never unplug your refrigerator by pulling on the power
cord. Always grip plug firmly and pull straight out from
the outlet.
Immediately discontinue use of a damaged supply
cord. If the supply cord is damaged, it must be
replaced by a qualified service professional with an
authorized service part from the manufacturer.
When moving the refrigerator away from the wall, be
careful not to roll over or damage the power cord.
CONNECTING ELECTRICITY
WARNING
ELECTRICAL SHOCK HAZARD
Plug into a grounded 3-prong outlet
Do not remove the ground prong
Do not use an adapter
Do not use an extension cord.
Failure to follow these instructions can result in death, fire, or electrical shock.
SAFETY INFORMATION
IMPORTANT SAFETY INFORMATION
READ ALL INSTRUCTIONS BEFORE USING THE APPLIANCE
READ AND SAVE THESE INSTRUCTIONS
WARNING
SUFFOCATION AND ENTRAPMENT HAZARD
Failure to follow these disposal instructions can result in death or serious injury
IMPORTANT: Child entrapment and suffocation
are not problems of the past. Junked or abandoned
refrigerators are still dangerous even if they will sit
for“justafewdays.”Ifyouaregettingridofyourold
refrigerator, please follow the instructions below to help
prevent accidents.
Before You Throw Away Your Old Appliance
■Takeoffthefreshfoodandfreezerdoors.
■ Leave the shelves in place so that children may not
easily climb inside.
Refrigerant and Foam Disposal:
Dispose of appliance in accordance with Federal and Local Regulations. Contact your local authorities for the
environmentally safe disposal of your appliance.
49-1000103 5
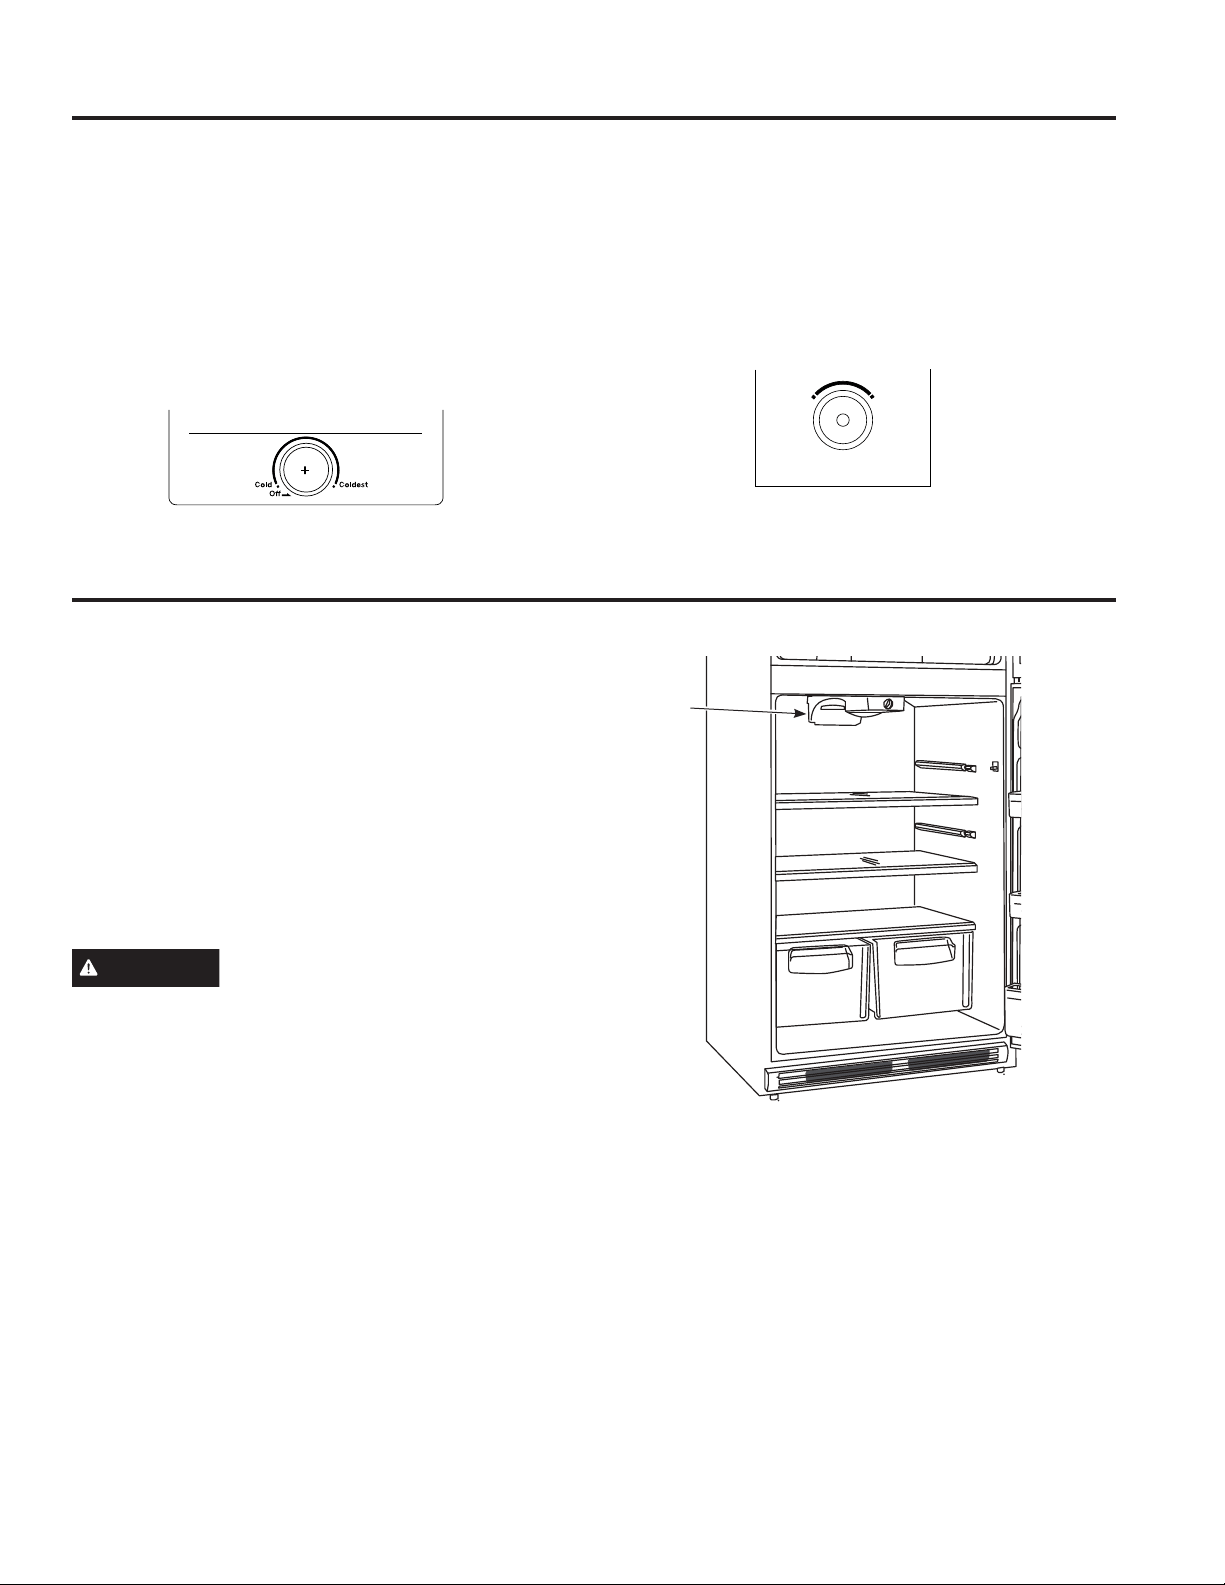
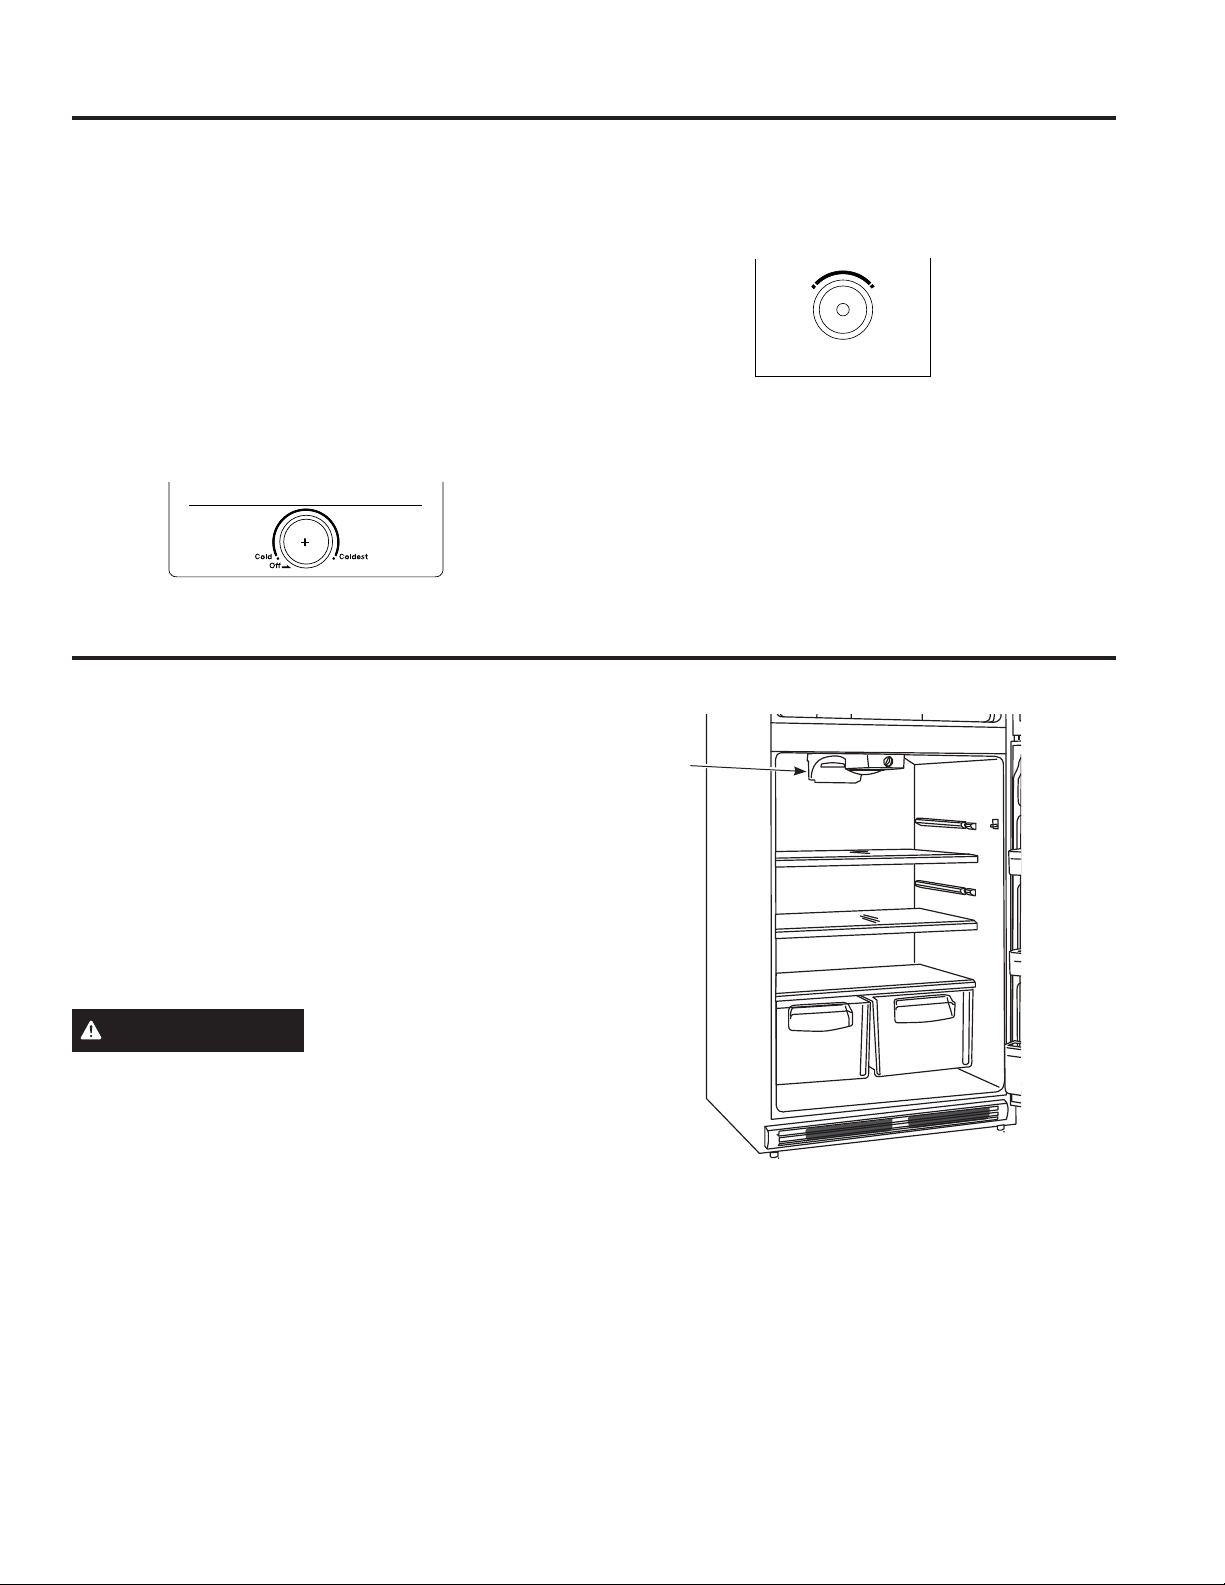
The temperature control adjusts the refrigerator from its
warmest to coldest settings. There are both a refrigerator
control and a freezer control.
Refrigerator Temperature Control
Your refrigerator will come with the recommended factory
setting in the mid position. For colder temperature,
turn the knob clockwise toward Coldest. For warmer
temperature, turn the dial counter-clockwise toward
Cold. To turn off the cooling in both compartments, turn
the knob counter-clockwise to the vertical off position.
You will hear and feel the control click, and the knob will
not turn farther. Note that this does not shut off power to
the refrigerator.
Freezer Air Flow Control
There is a control on the air tower in the freezer that
controls how much cold air is in the freezer. The
actual temperature control is only in the refrigerator
compartment.
Temperature Control
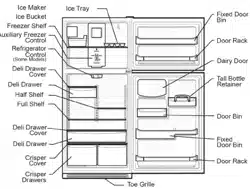
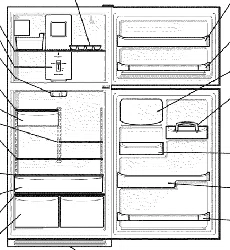
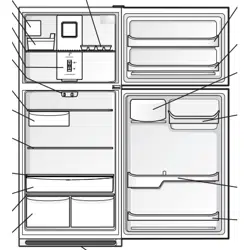
Fresh Food Compartment Shelves
USING THE REFRIGERATOR: Temperature Control / Shelves
Shelf supports at various levels allow you to custom-space your shelves. Shelves shown below in recommended
locations.
Not all features are on all models.
Full-Width Shelves
Some models have a stationary tempered glass shelf,
a spillproof shelf or two steel wire stationary shelves.
These shelves can be moved to another place in the
fresh food compartment.
When placed correctly on the shelf supports, the shelf
will stop before coming completely out of the refrigerator
and will not tilt when you place food on it or remove food
from it.
CAUTION
Do not clean glass shelves or covers
with warm water when they are cold. Glass shelves and
covers may break if exposed to sudden temperature
changes or impact such as bumping or dropping.
Tempered glass is designed to shatter into many small
pieces if it breaks.
NOTE: Do not block air outlet by placing food items
directly against it. Erratic temperatures may result.
Cold
Coldest
Airow
behind
light bulb

6 49-1000103
Drawers
USING THE REFRIGERATOR: Drawers/Freezer Shelf
Climate Zone Drawer
Keepfruitsandvegetablesorganizedinseparate
compartments for easy access.
Excess water that may accumulate in the bottom of the
drawers or under the drawers should be wiped dry.
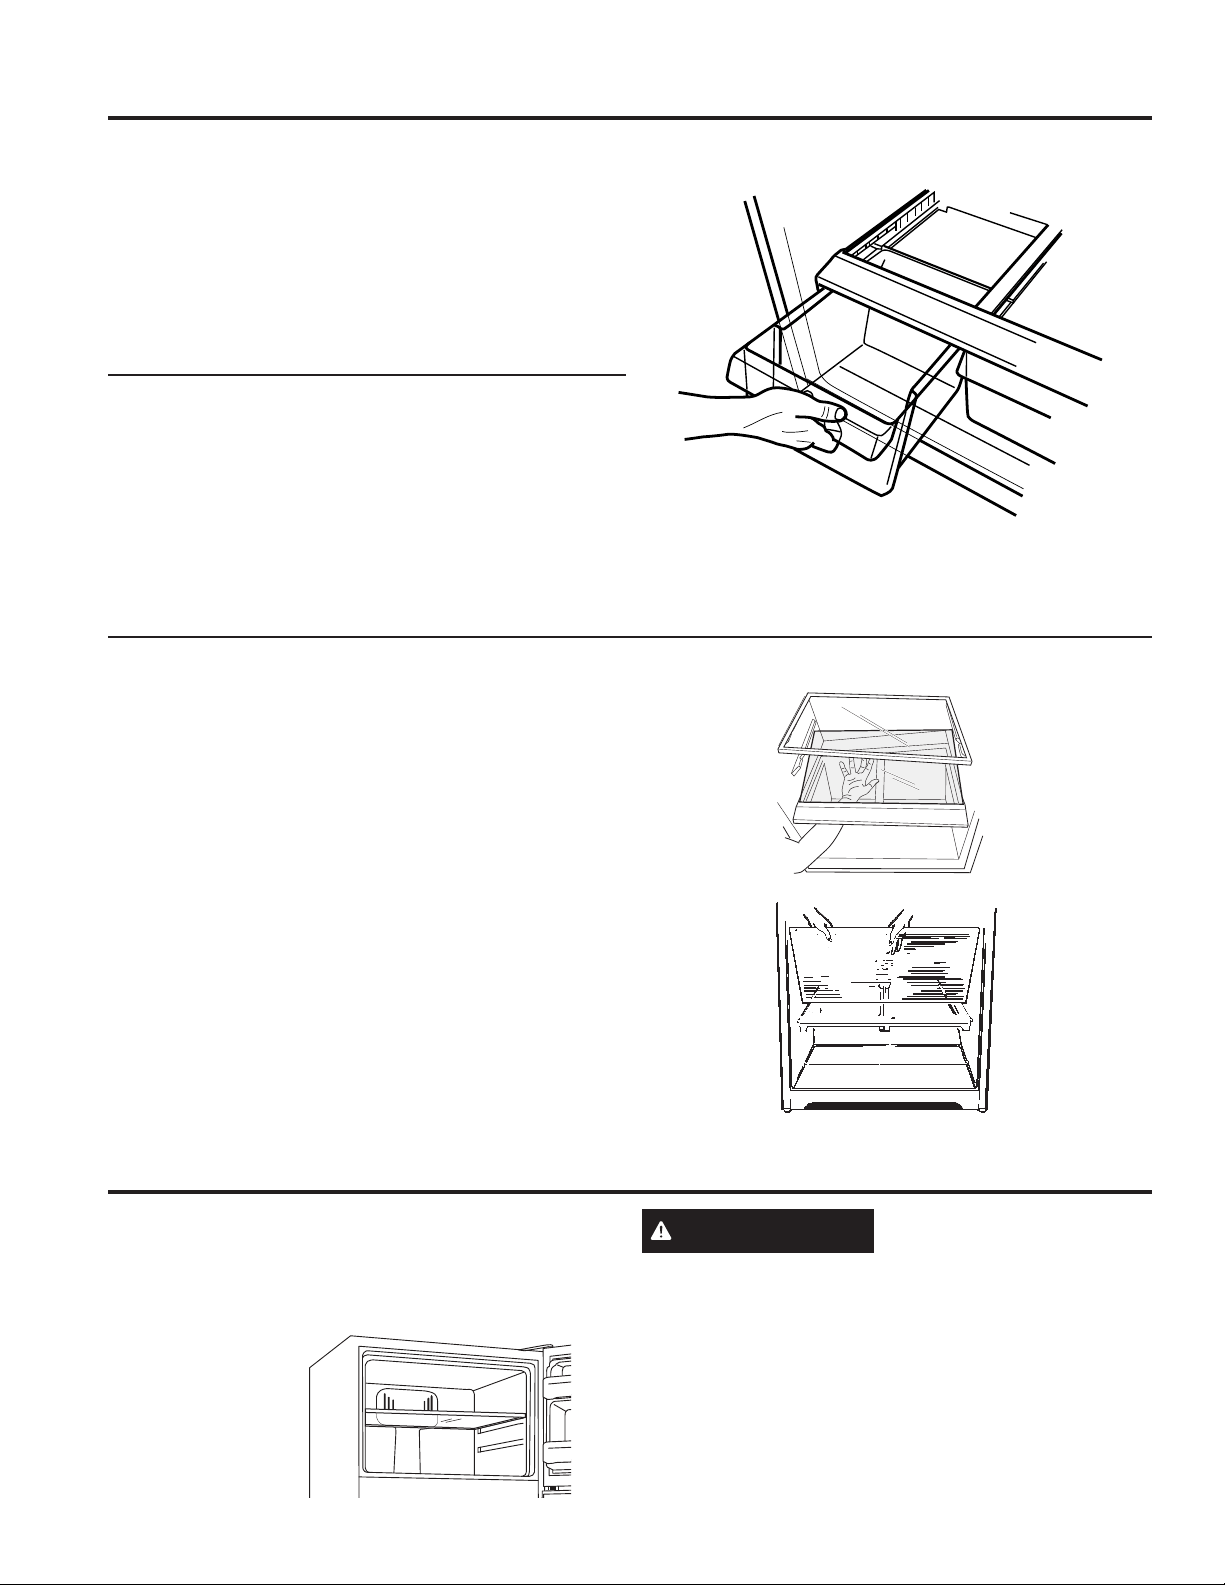
Drawer Removal
Drawers can be removed easily by grasping the sides
and lifting up slightly while pulling drawers past the stop
location.
Cover Removal
To remove:
1. Remove the drawers.
2. Reach in, push the back of glass cover up. Tilt it and
take it out. Avoid cleaning the cold glass cover with
hot water because the extreme temperature difference
may cause it to break.
3. Remove the drawer frame. (Always remove the glass
cover before you take out the drawer frame.)
Lift the frame off the supports at each side and back,
pull it forward, tilt it and take it out.
To replace:
1. Lower the frame until it rests on the supports at each
side and back.
2. Replace the glass cover
3. Replace the drawers.
Freezer Compartment Shelf
When placed correctly on the shelf supports, the glass
shelf will stop before coming completely out of the
freezer and will not tilt when you place food on it or
remove food from it.
CAUTION
Do not clean glass shelves or covers
with warm water when they are cold. Glass shelves and
covers may break if exposed to sudden temperature
changes or impact such as bumping or dropping.
Tempered glass is designed to shatter into many small
pieces if it breaks.
49-1000103 7
Care and Cleaning
CARE AND CLEANING
Cleaning the Outside
The door handles and trim (on some models). Clean
with a cloth dampened with soapy water. Dry with a soft
cloth.
Keep the outside clean. Wipe with a clean cloth lightly
dampened with kitchen appliance wax or mild liquid dish
detergent. Dry and polish with a clean, soft cloth.
Do not wipe the refrigerator with a soiled dish cloth or
wet towel. These may leave a residue that can erode
the paint. Do not use scouring pads, powdered cleaners,
bleach or cleaners containing either bleach or ammonia
because these products can scratch and weaken the
paint finish.
The stainless steel doors and door handles (on some
models) can be cleaned with a commercially available
stainless steel cleaner. Cleaners with oxalic acid such as
BarKeepersFriendSoftCleanser™willremovesurface
rust, tarnish and small blemishes. Use only a liquid
cleanser free of grit and rub in the direction of the brush
lines with a damp soft sponge. Do not use appliance
wax or polish on the stainless steel.
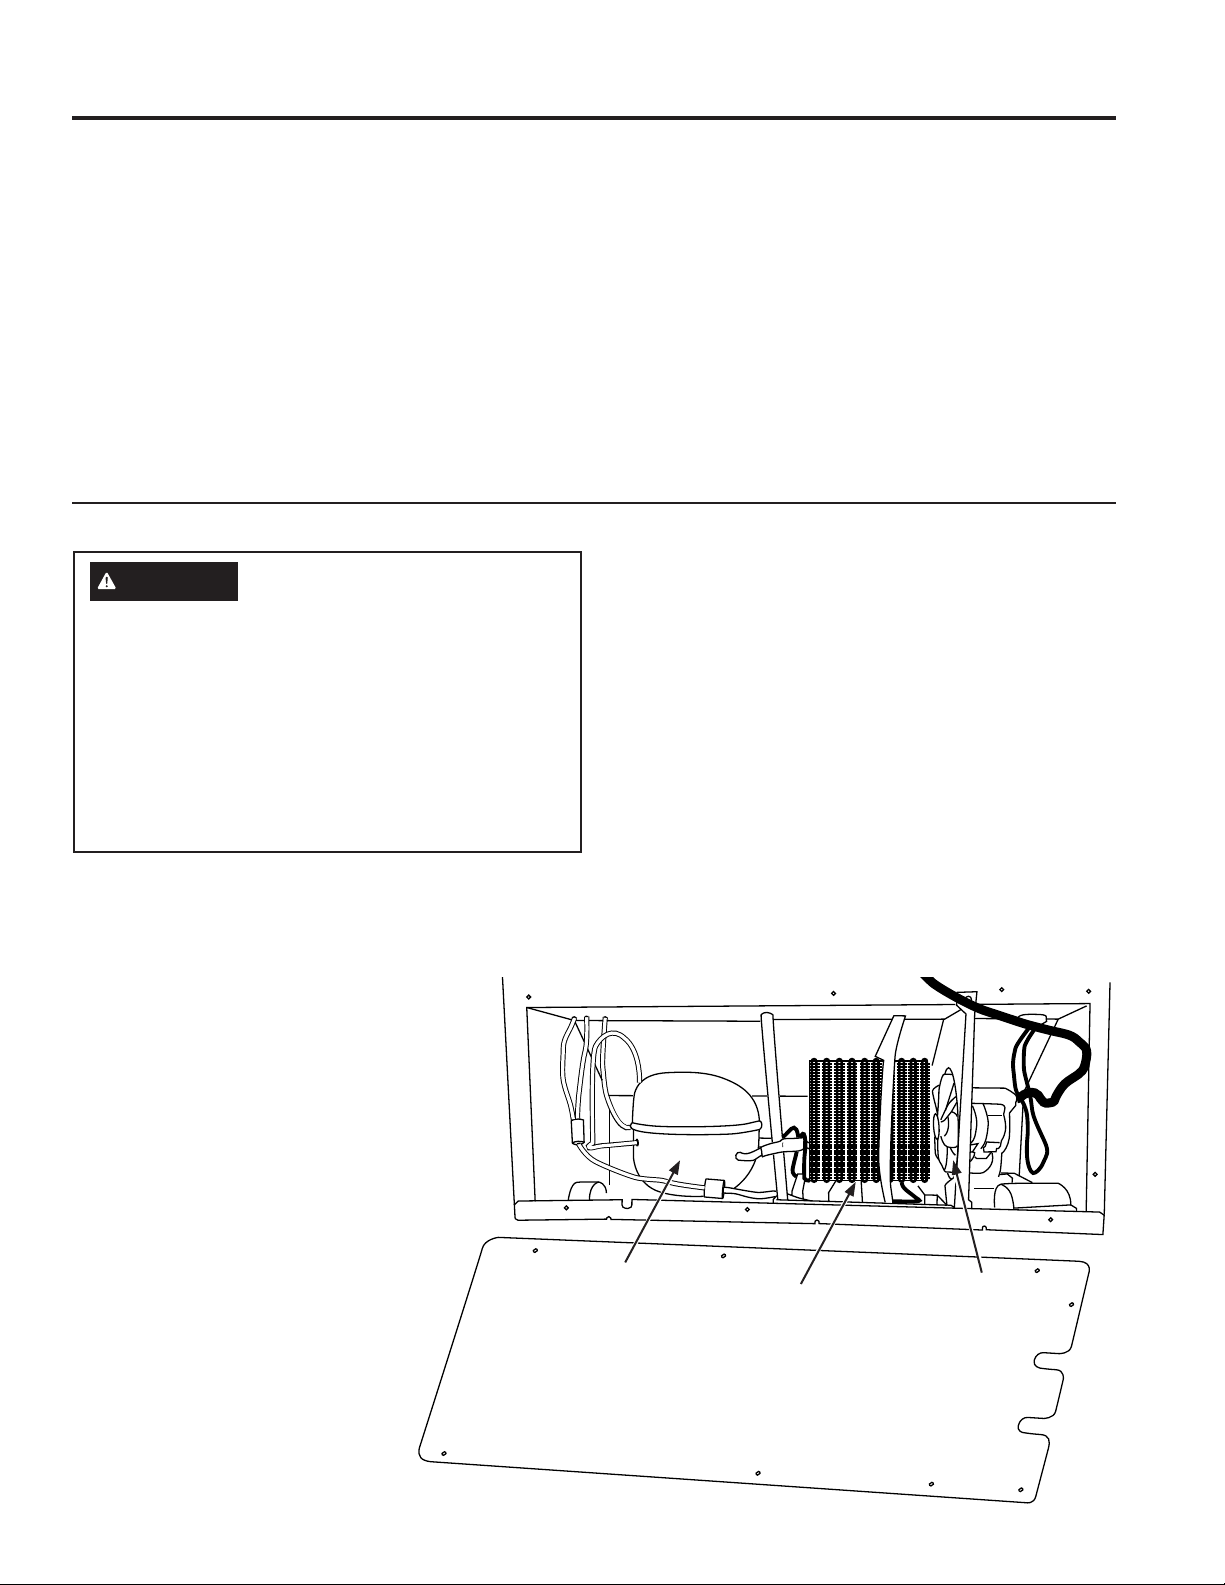
Cleaning the Condenser
WARNING
To reduce the risk of death or
electric shock, you must follow these
instructions:
■ Unplug the refrigerator before removing any
panels.
■ Do not contact or damage any wiring while the
panel is removed.
■ Replace all parts and panels before plugging
the refrigerator back in.
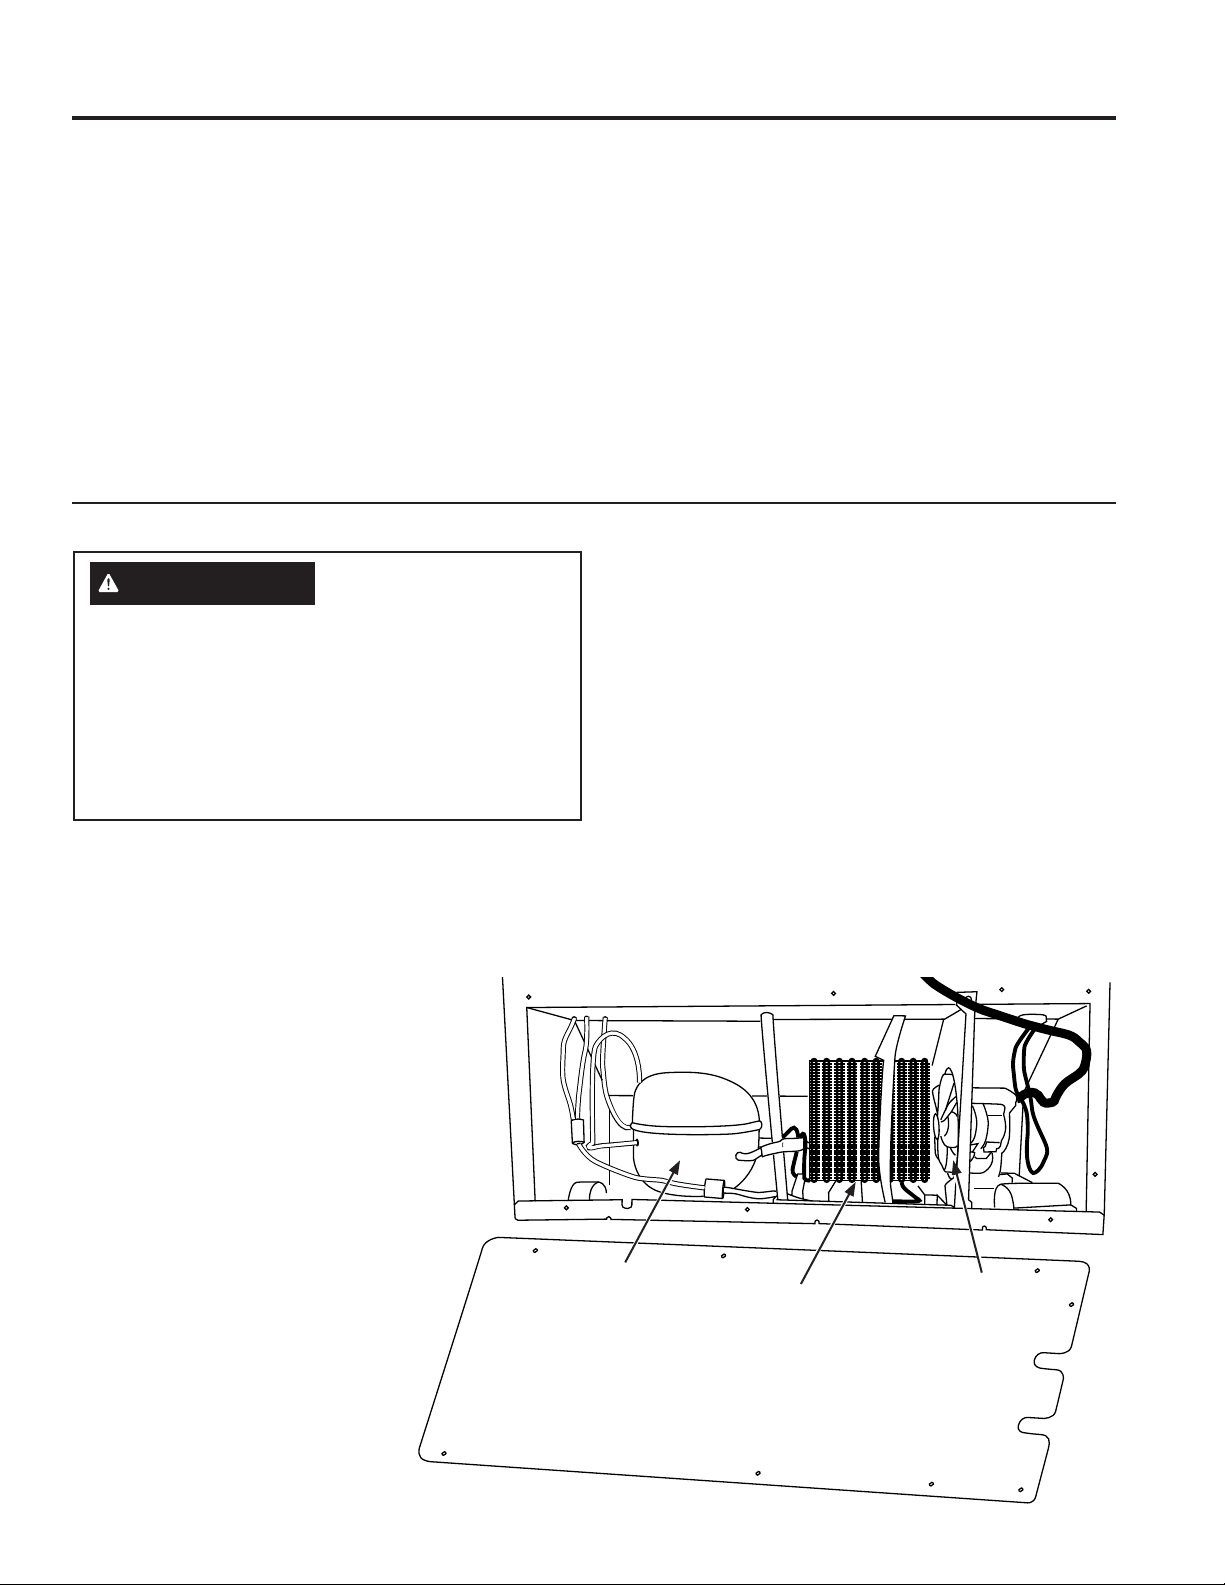
Periodically, the condenser of the refrigerator will
become covered with dust and dirt. This can make your
refrigerator cool less effectively and use more energy.
You can improve the refrigerators' performance by
cleaning the condenser. It is located
at the back of your refrigerator, at the
bottom, behind the access cover.
Cleaning the condenser requires a
philliips screwdriver, vacuum cleaner
and soft brush with a long handle.
To clean the condenser:
1. Turn off the refrigerator.
2. Turn the leveling legs at each
front corner of the refrigerator
counterclockwise until the rollers
support the refrigerator.
3. Roll the refrigerator out far
enough so you can get behind it
at the bottom. Be sure not to pull
out any water lines connected to
your refrigerator.
4. Unplug the refrigerator.
5. Use the Phillips head screwdriver
to remove the screws securing
the cover to the refrigerator.
6. Locate the condenser. It is between the compressor
and the fan. It is a black square shape made of
tubes with fins.
7. Vacuum the condenser. Use the brush to gently
loosen dust and dirt from the gaps and fins of the
condenser.
8. Once the condenser is clean, reinstall the access
cover, replacing all screws.
9. Plug in the refrigerator.
10. Return it to its normal position. Turn the legs
clockwise until the legs again bear the weight of the
refrigerator. Also level the refrigerator as required
11. Turn the refrigerator back on and turn the control
clockwise until it returns to mid setting (vertical) or the
previous position of the control. Check to see if the
refrigerator begins operating.
Compressor
Access Cover
Fan
Condenser - clean with a soft,
long handled brush and a
vacuum cleaner

8 49-1000103
Care And Cleaning
CARE AND CLEANING
Preparing for Vacation
For long vacations or absences, remove food and
unplug the refrigerator. Move the temperature control
dial to the OFF position, and clean the interior with a
baking soda solution of one tablespoon (15 ml) of baking
soda to one quart (1 liter) of water. Leave the doors
open.
Ifanicemeakerhasbeeninstalleditmustbeturnedoff;
move the switch to the OFF position on the power switch
model. Shut off the water supply to the refrigerator.
If the temperature can drop below freezing, have a
qualified servicer drain the water supply system (on
some models) to prevent serious property damage due
to flooding.
Preparing to Move
Secure all loose items such as grille, shelves and
drawers by taping them securely in place to prevent
damage.
To prevent the doors from opening while moving, secure
them to the case with tape. Be sure the refrigerator stays
in an upright position during moving.
Light Bulb Replacement
WARNING
Before replacing a burned-out light
bulb, the refrigerator should be unplugged in order to
avoid contact with a live wire filament. (A burned-out
light bulb may break when being replaced.) Turning the
control to the OFF position does not remove power to
the light circuit.
Depending on your model, the lights in the refrigerator
and freezer compartments may use either 5 watt
LED bulbs with a medium base or 40 watt appliance
incandescent bulbs with a medium base. Follow the
instructions specific to your model.
IMPORTANT:
● UseonlyULlistedLEDreplacementbulbsthatare
recommended for wet/damp environments. The
refrigerator and freezer are considered to be wet/damp
environments. If using a brand of LED bulb other than
the recommended LED bulb, before installation, read
and follow all instructions on the LED packaging. LED
bulbs should be 5 Watts with a medium base.
● IfanincandescentbulbisusedtoreplaceanLED
bulb, use only incandescent bulbs for household
appliances with a maximum wattage of 40 with a
medium base.
Moving the Refrigerator
Be careful when moving the refrigerator away from
the wall. All types of floor coverings can be damaged,
particularly cushioned coverings and those with
embossed surfaces.
Turn the leveling legs at each front corner of the
refrigerator counterclockwise until the rollers support
the refrigerator. Pull the refrigerator straight out and
return it to position by pushing it straight in. Moving the
refrigerator in a side direction may result in damage to
the floor covering or refrigerator.
When pushing the refrigerator back, make sure you don’t
roll over the power cord or ice maker supply line (on
some models).
After rolling the refrigerator back into place, turn the legs
clockwise until the legs again bear the weight of the
refrigerator.
Cleaning the Inside
To help prevent odors, leave an open box of baking
soda in the fresh food and freezer compartments.
Unplug the refrigerator before cleaning.
If this is not practical, wring excess moisture out of
sponge or cloth when cleaning around switches, lights or
controls.
Use warm water and baking soda solution—about a
tablespoon (15 ml) of baking soda to a quart (1 liter) of
water. This both cleans and neutralizes odors. Rinse and
wipe dry.
After cleaning the door gaskets, apply a thin layer of
petroleum jelly to the door gaskets at the hinge side.
This helps keep the gaskets from sticking and bending
out of shape.
CAUTION
Do not clean glass shelves or covers
with warm water when they are cold. Glass shelves and
covers may break if exposed to sudden temperature
changes or impact such as bumping or dropping.
Tempered glass is designed to shatter into many small
pieces if it breaks.
Do not wash any plastic refrigerator parts in the
dishwasher.
49-1000103 9
Installation Instructions XTS21 Models
BEFORE YOU BEGIN
Read these instructions completely and carefully.
• IMPORTANT – Save these instructions for
local inspector’s use.
• IMPORTANT – Observe all governing codes
and ordinances.
• Note to Installer – Be sure to leave these
instructions with the Consumer.
• Note to Consumer – Keeptheseinstructions
for future reference.
• Skill level – Installation of this appliance requires
basic mechanical skills.
• Completion time –
Refrigerator Installation 15 minutes
Reversing the Door Swing 15 minutes
• Proper installation is the responsibility of the
installer.
• Product failure due to improper installation is not
covered under the Warranty.
REFRIGERATOR LOCATION
• Do not install the refrigerator where the temperature
will go below 55°F (12.7°C) because it will not run
often enough to maintain proper temperatures.
• Do not install the refrigerator where the
temperature will go above 100°F (37°C) because
it will not perform properly.
• Do not install the refrigerator in a location exposed to
water (rain, etc.) or direct sunlight.
• Install it on a floor strong enough to support it fully
loaded.
CLEARANCES
Allow a 2" (50mm) back clearance for ease of
installation, proper air circulation and plumbing and
electrical connections.
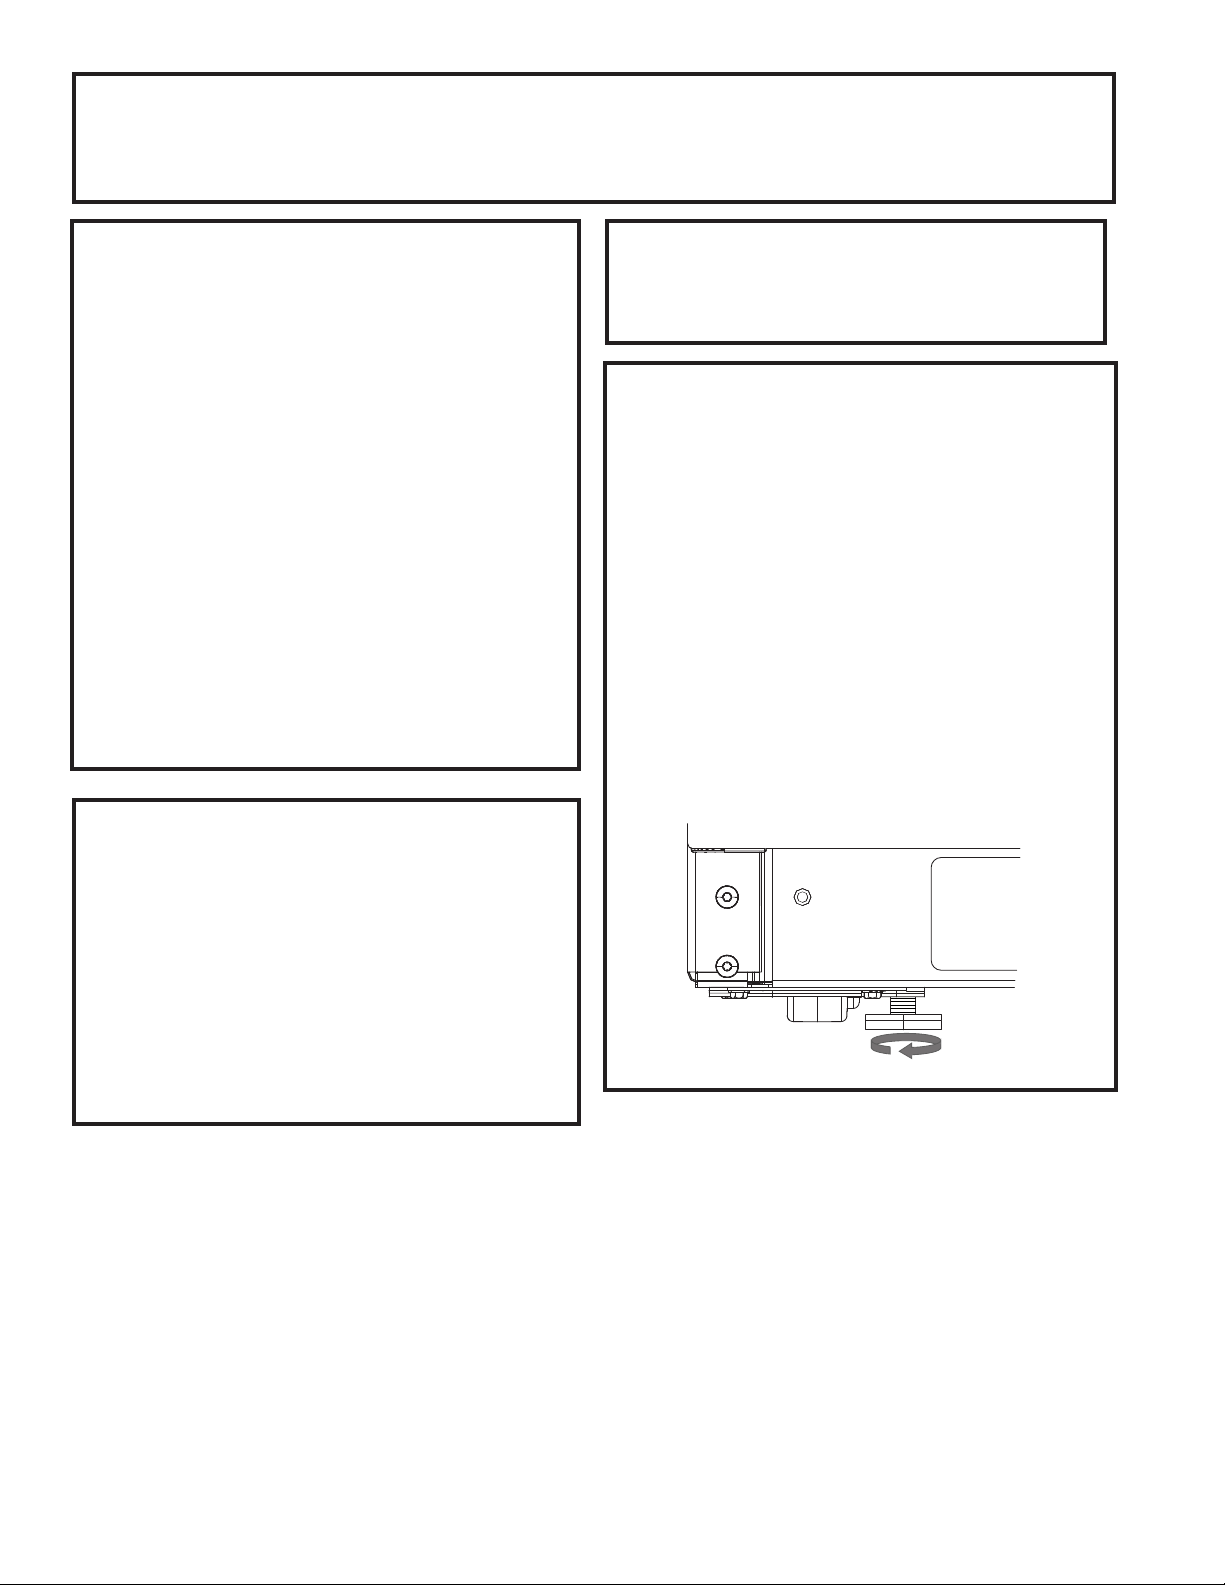
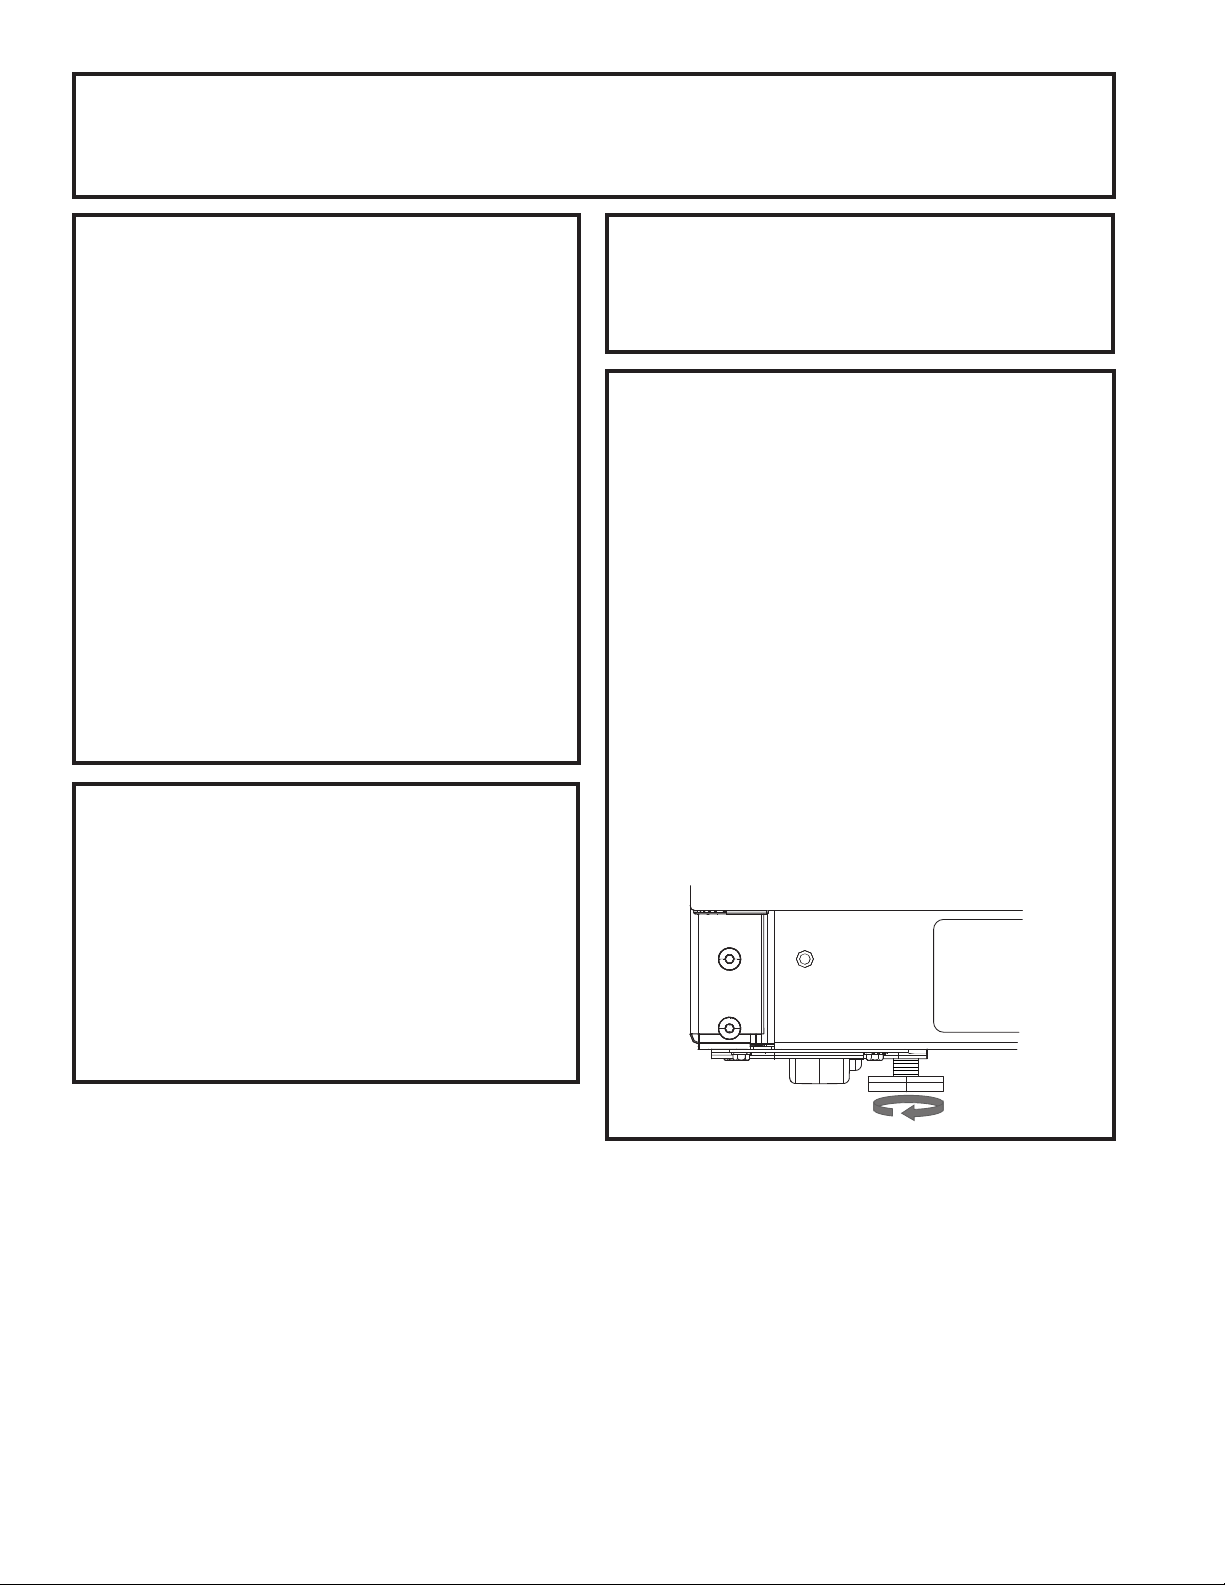
ROLLERS AND LEVELING LEGS
Leveling legs near each front corner of the
refrigerator are adjustable. They firmly position the
refrigerator and prevent it from moving when the doors
are opened. Leveling legs should be set so the front
of the refrigerator is raised just enough that the doors
close easily when opened about halfway.
Turn the leveling legs clockwise to raise the
refrigerator, counterclockwise to lower it.
Rollers next to the leveling legs allow you to move the
refrigerator away from the wall for cleaning.
Turn the legs counterclockwise until the weight of the
refrigerator is transferred from them to the rollers. After
rolling the refrigerator back into place, turn the legs
clockwise until the legs again bear the weight of the
refrigerator.
If you have questions, call GE Appliances at 800.432.2737 or visit GEAppliances.com.
INSTALLATION INSTRUCTIONS
10 49-1000103
Installation Instructions
INSTALLATION INSTRUCTIONS
IMPORTANT NOTES
When reversing the door swing:
• Read the instructions all the way through before
starting.
• Tighten all hinge screws but avoid over-tightening to
prevent stripping.
• Handle parts carefully to avoid scratching paint.
• Set screws down by their related parts to avoid
losing them.
• Provide a non-scratching work surface for the doors.
CAUTION
Lifting Hazard
The Fresh Food and Freezer doors are heavy. Use
both hands to secure the doors before lifting.
IMPORTANT: Once you begin, do not move the
cabinet until door-swing reversal is completed.
These instructions are for changing the hinges from
the right side to the left side—if you ever want to
change the hinges back to the right side, follow these
same instructions and reverse all references to left
and right.
BEFORE YOU START
1. Unplug the refrigerator from its electrical outlet.
2. Empty all door shelves, including the dairy
compartment.
IMPORTANT: Do not let either door drop to the floor.
To do so could damage the door stop.
3. Remove the front grille if it
is installed.
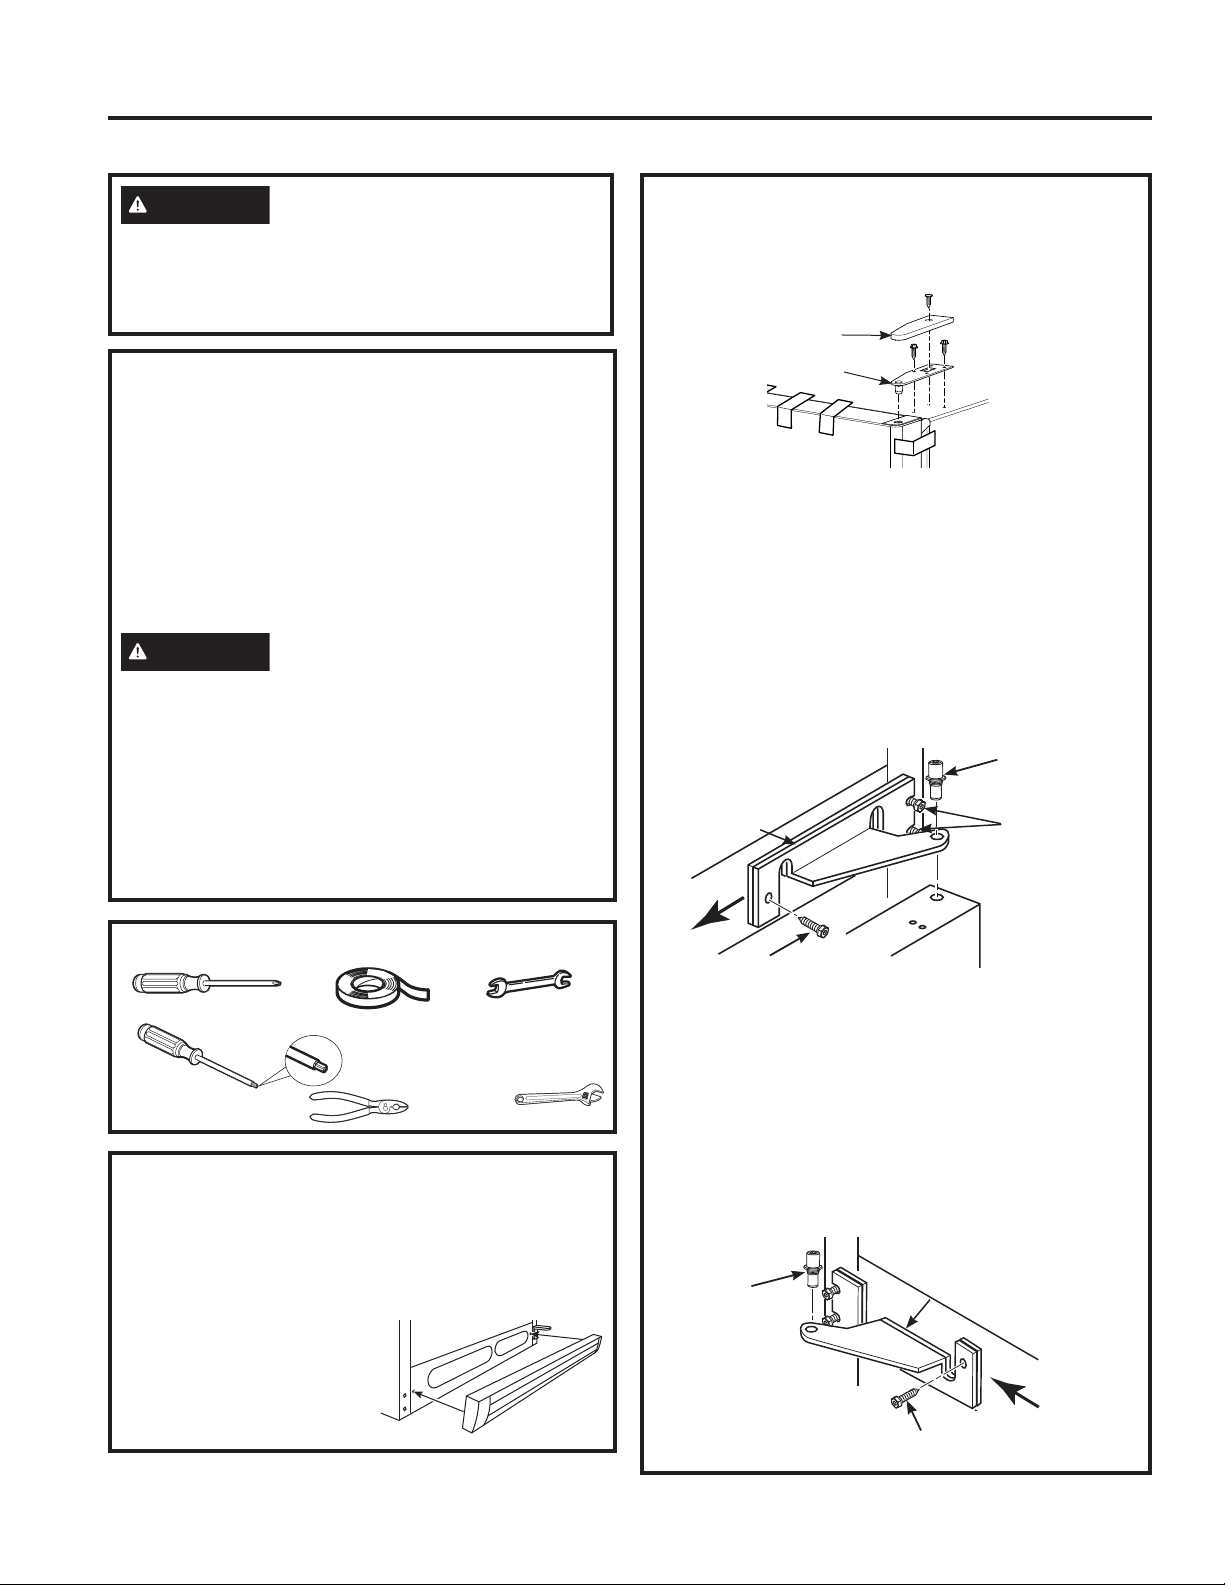
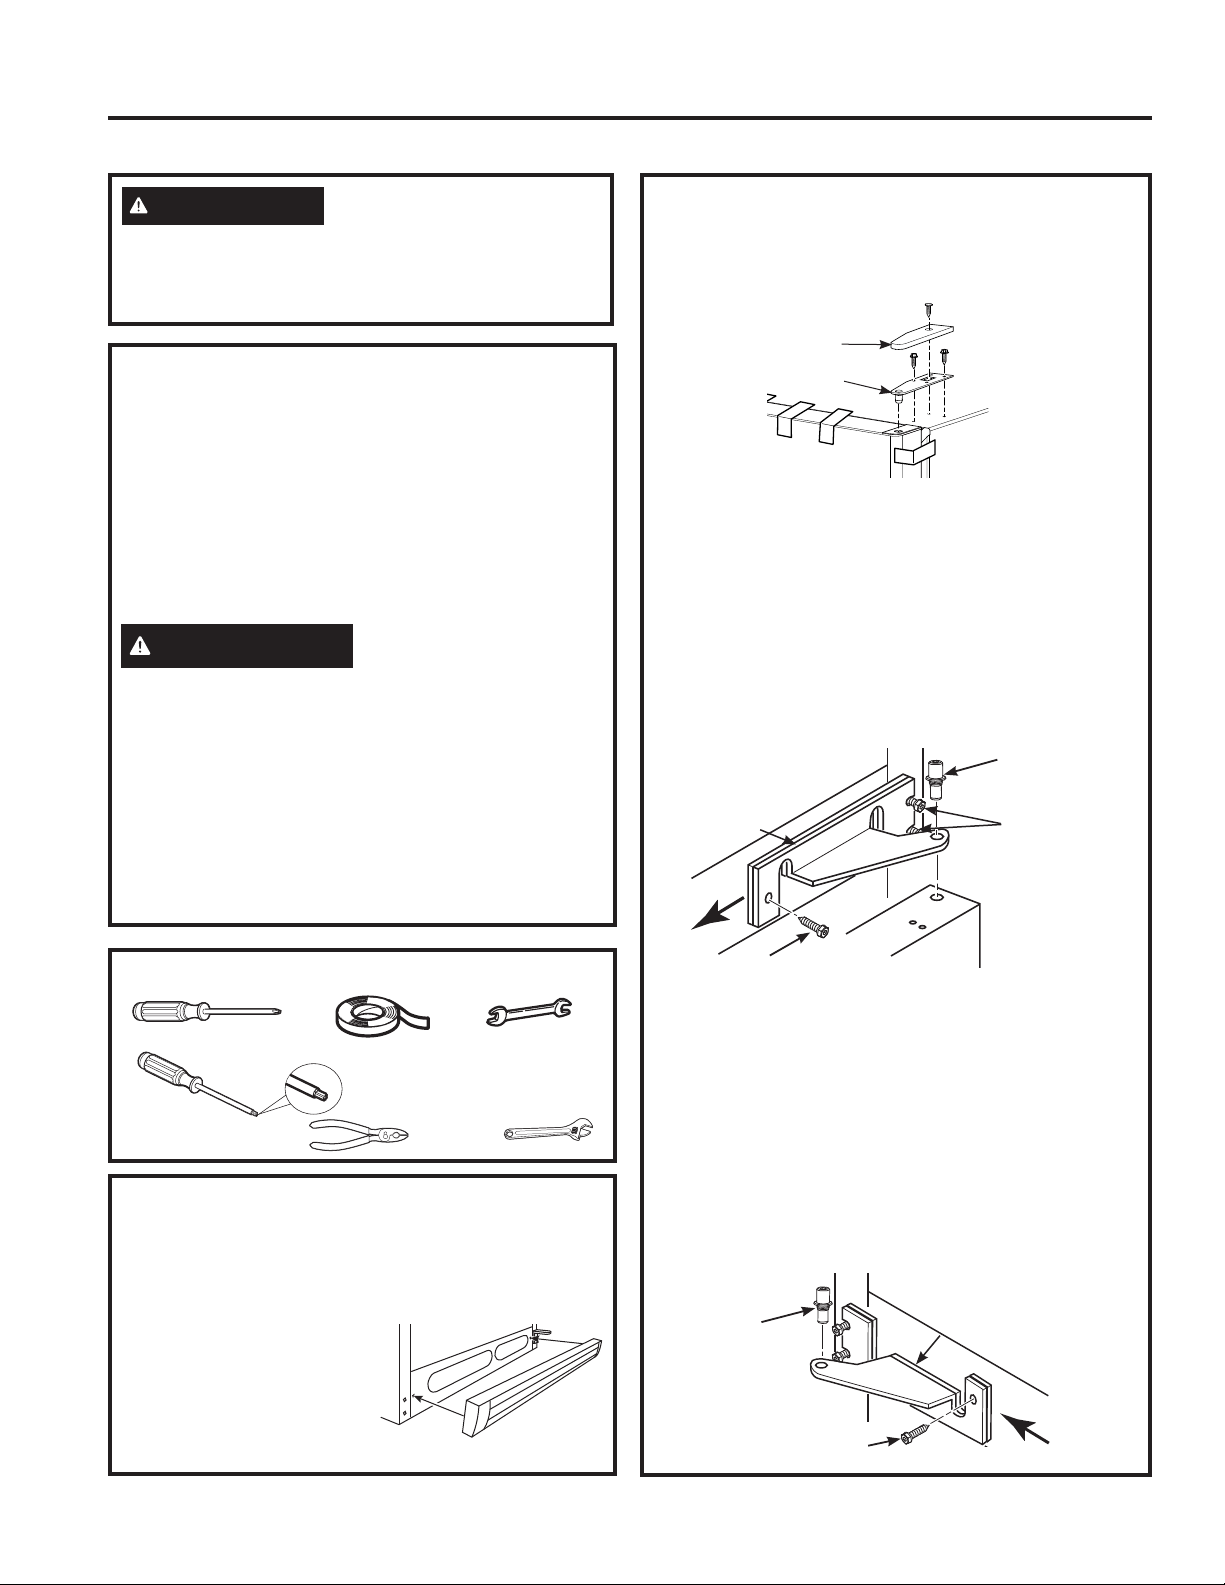
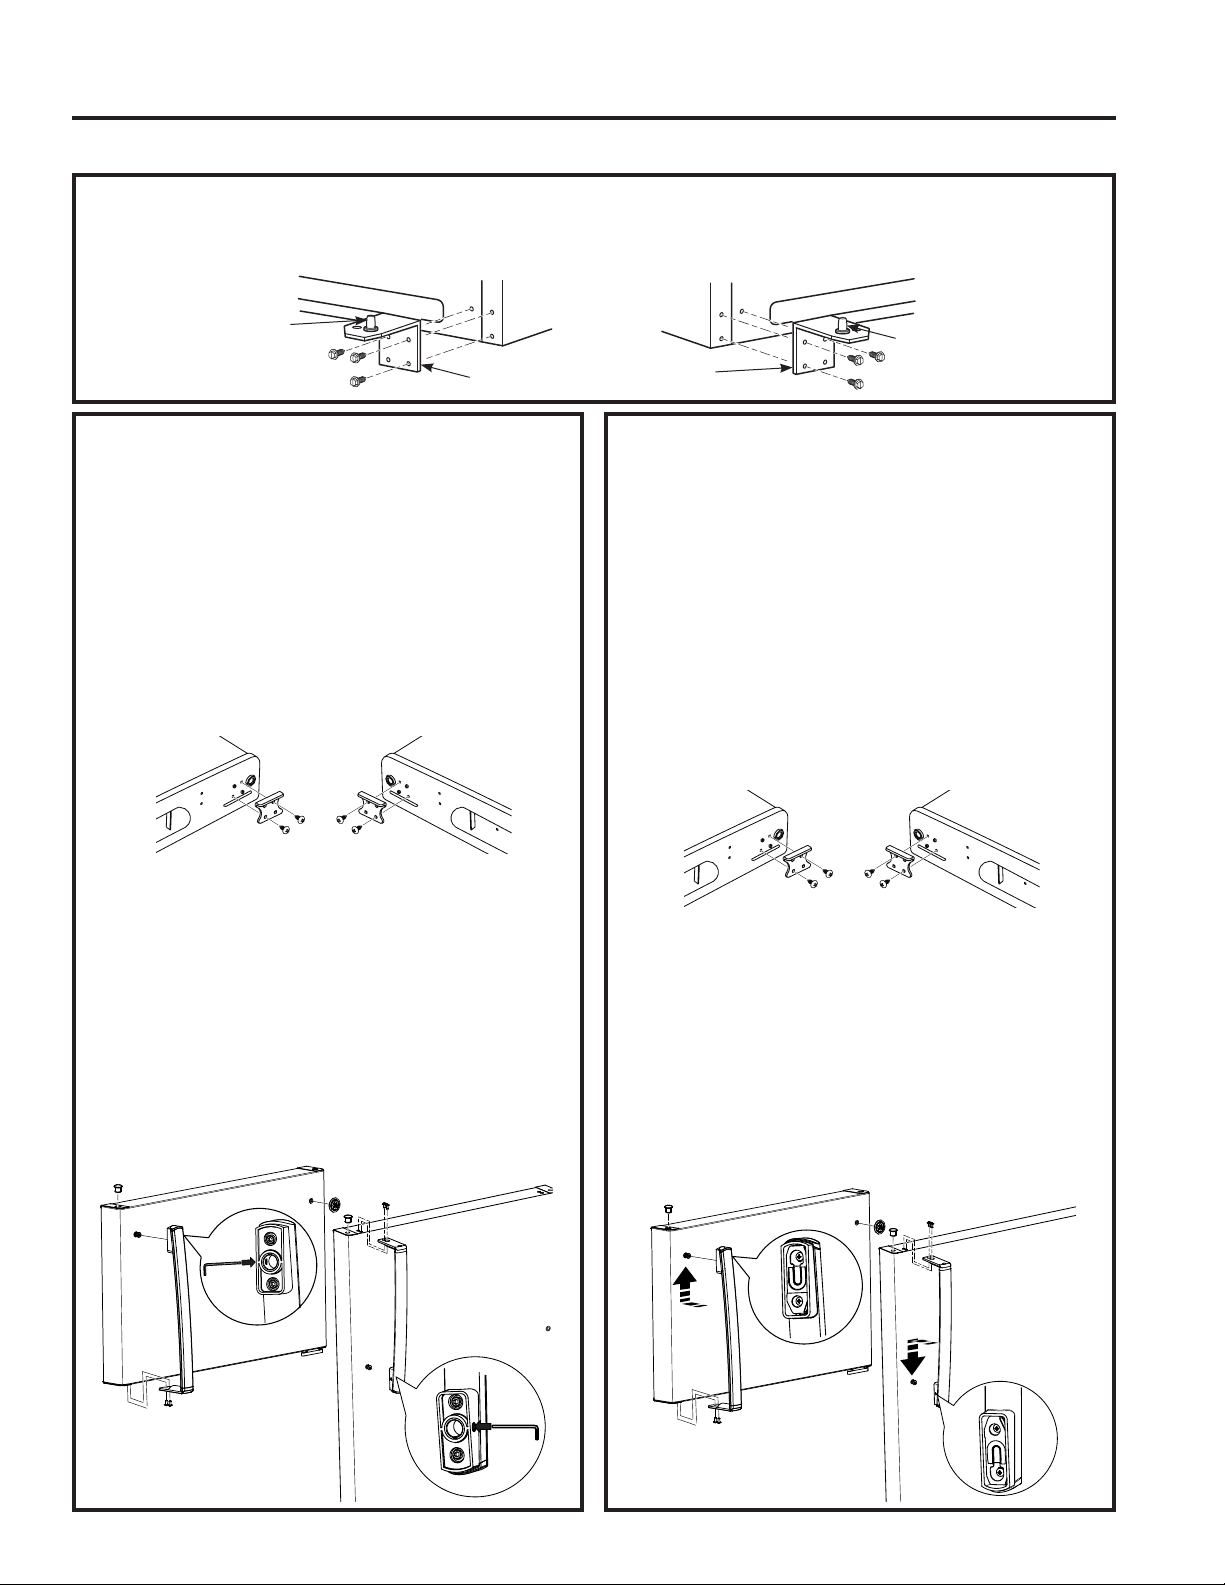
REMOVING THE DOORS
1. Tape the freezer door shut with masking tape.
2. Remove the hinge cover and screws that hold the
top hinge to the cabinet.
3. Lift the hinge straight up to free the hinge pin from
the socket in the top of the door and set it aside,
along with its screws.
4. Remove the tape. Lift the door off the center hinge
pin and set the door on a non-scratching surface with
the outside up.
5. Unscrew center hinge pin. Be sure to retain plastic
washer(s) for reinstallation. Remove refrigerator
door from bottom hinge and set the door on a non-
scratching surface with the outside up.
6. Use either a wrench or T25 Torx screwdriver to
remove center hinge and plastic spacer(s) by
unscrewing center bolt, loosening side bolts and sliding
hinge to the center of the cabinet. Tighten bolts back
into place and replace the center bolt.
7. Remove the center bolt on the opposite side and
loosen side bolts. Flip the center hinge and spacer
over so the placement of the hinge pin will be toward
the outside. Slide center hinge and spacers behind
side bolts. Reinstall center bolt and tighten side bolts.
REVERSING THE DOOR SWING
TOOLS REQUIRED
Phillips screwdriver
Masking tape
5/16”&3/8"
open-end wrenches
or adjustable
wrench
Torx T25
(some models)
Pliers
Top Hinge
Top Hinge
Cover
Center Hinge
Pin and Washer
Center Bolt
Loosen
Side Bolts
Hinge and
Spacer
Center Bolt
Center
Hinge
Pin and
Washer
Hinge and
Spacer
WARNING
Follow all steps when reversing
the door swing. Failure to follow these instructions,
leaving off parts, or overtightening screws, can lead
to the door falling off and result in injury and property
damage.
49-1000103 11
Installation Instructions
INSTALLATION INSTRUCTIONS
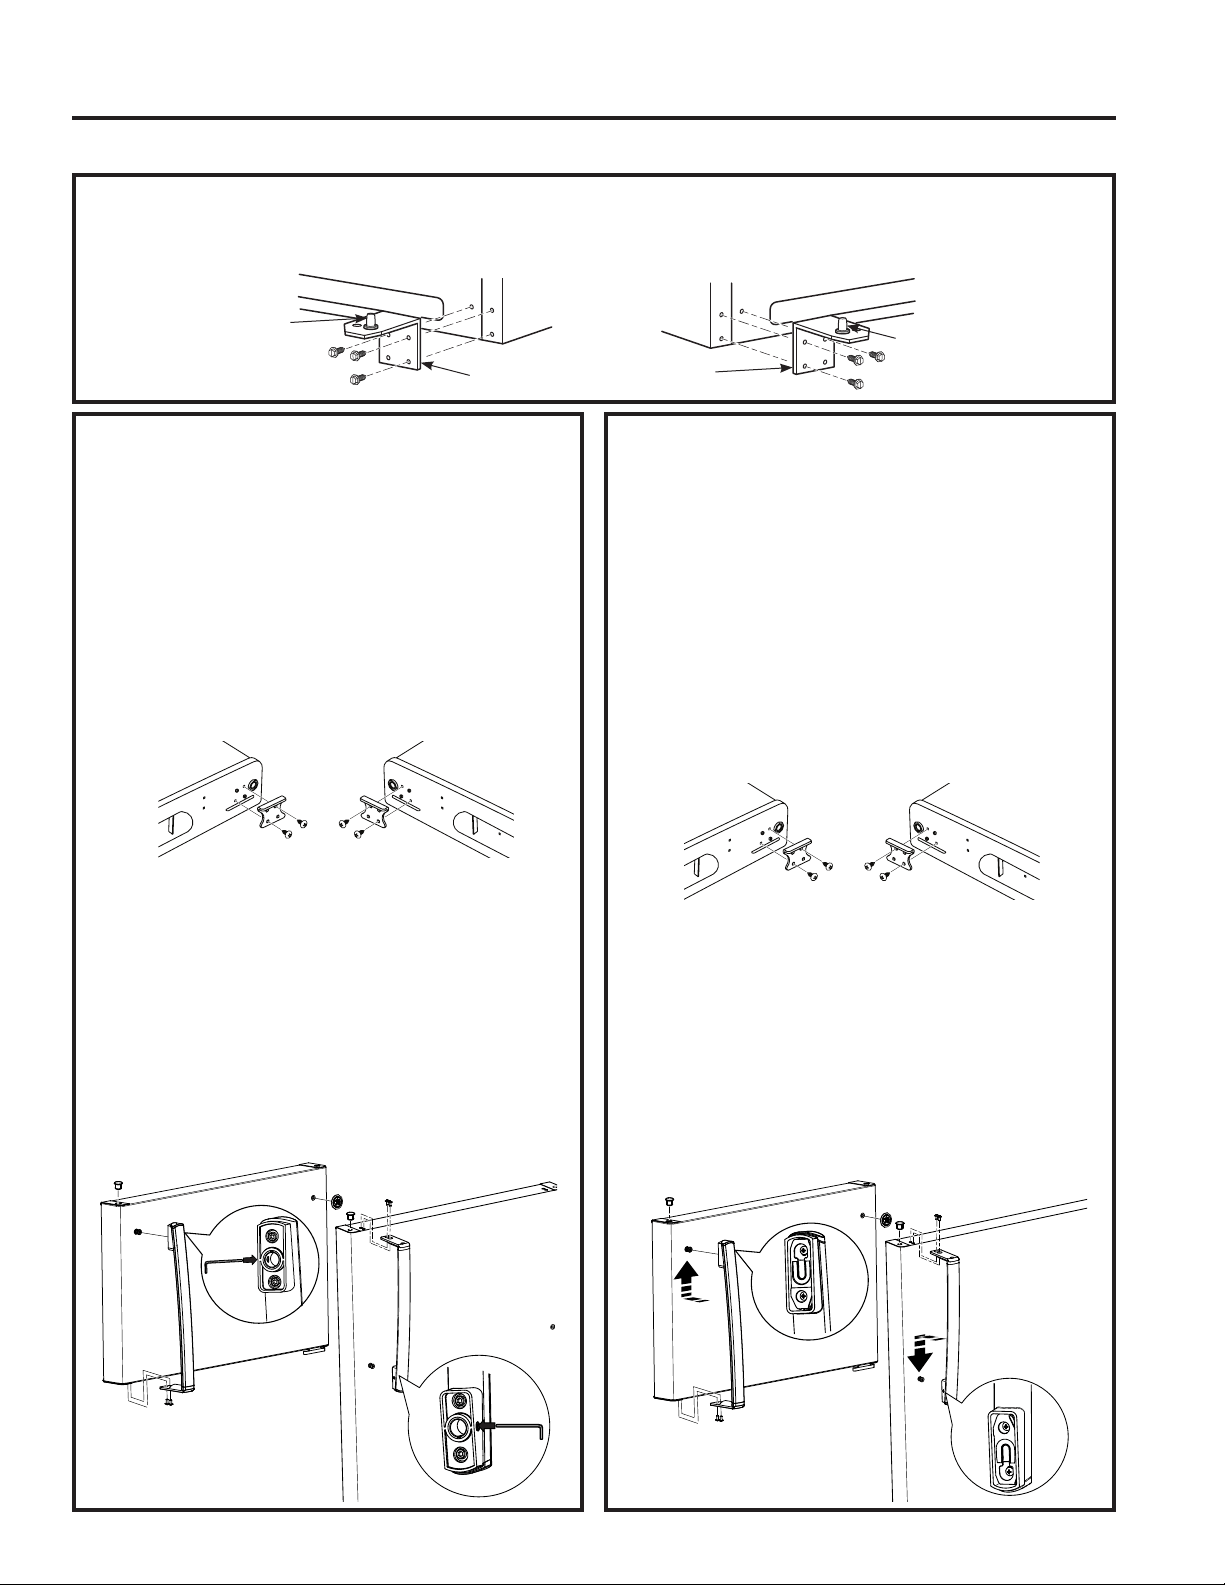
REMOVING THE DOORS (Cont.)
8. Remove the bottom hinge bolts and relocate the
bottom hinge to the opposite side of the cabinet.
Tighten
bolts.
9. Unscrew the hinge pin and move to the other hole
and tighten.
REVERSING THE DOOR HANDLES
Stainless Steel Handle
1. Remove handle screws from the top and bottom of
fresh food door.
2. Loosensetscrewonhandlewiththeprovided1/8”
wrench.
3. Remove door handle.
4. Change places between the handle fastener and
plug button on door front.
5. Move the large and small hole covers on top and
front of the door to fill the now vacant holes.
6. On both the refrigerator and freezer doors, remove
the screws from the door stop on one side with a
Phillips screwdriver. Install the door stop onto the
other side of the door.
7. Attach handle to fresh food door with screws at
topofhandle.Use1/8”allenwrenchtotightenset
screw at bottom of handle.
8. Attach handle to freezer door with screws at bottom
ofhandle.Usetheprovided1/8”allenwrenchto
tighten set screw at top of handle.
9. Attach badge on freezer door opposite the handle.
REVERSING THE DOOR HANDLES
Plastic Handle Assembly
1. Remove handle screws from the top of fresh food
door. Remove handle screws from the bottom of
freezer door.
2. Remove door handle on fresh food door by sliding
the handle up off of the fastener. Remove door
handle on freezer door by sliding the handle down
off of the fastener.
3. Change places between the handle fastener and
plug button on door front.
4. Move the large and small hole covers on top and
front of the door to fill the now vacant holes.
5. On both the refrigerator and freezer doors, remove
the screws from the door stop on one side with a
Phillips screwdriver. Install the door stop onto the
other side of the door.
6. Attach handle to fresh food door by sliding handle
down onto fastener and with screws at top of
handle.
7. Attach handle to freezer door by sliding handle up
onto fastener and with screws at bottom of handle.
8. Attach badge on freezer door opposite the handle.
REVERSING THE DOOR SWING (CONT.)
Bottom Hinge
Hinge Pin
Bottom Hinge
Hinge Pin

12 49-1000103
RE-HANGING THE DOORS (Cont.)
3. Lower the freezer
door onto the center
hinge pin. Be sure the
washer is in place on
the pin.
4. Tilt the door towards
the cabinet. Install the
top hinge fitting the pin
into the socket on the
top of the door.
5. Make sure the door is slightly above the top of the
cabinet and the gap between the doors is even
across the front. Tighten the top hinge screws. Do
not over-tighten these screws. Tighten them until
they are just snug, and then turn them another
one-half turn.
6. Replace the top hinge cover.
Installation Instructions
INSTALLATION INSTRUCTIONS
REVERSING THE DOOR SWING (CONT.)
RE-HANGING THE DOORS
1. Lower the fresh food
door onto the bottom
hinge pin. Be sure the
washer is in place on
the pin.
2. Tilt the door towards the
cabinet. As the door is
brought into position,
align the socket in the
door with the hole in the
center hinge. Place the
center hinge pin into the hole in the center hinge
and tighten. Make sure the washer is on the top of
the hinge pin.
Top
Hinge
Top Hinge
Cover
Center
Hinge
Gap
Hinge
Pin with
Washer
Center
Hinge
Plastic
Washer
Hinge
Pin
Hinge
Pin
Plastic
Washer

49-1000103 13
Normal Operating Sounds
TROUBLESHOOTING TIPS: Normal Operating Sounds
■ The new high
efficiency compressor
may run faster and
longer than your old
refrigerator and you may hear a high-pitched hum
or pulsating sound while it is operating.
■ You may hear a whooshing sound when the doors
close. This is due to pressure equalizing within the
refrigerator.
Newer refrigerators sound different from older refrigerators. Modern refrigerators have more features and use newer
technology.
■ You may hear the fans spinning at high
speeds.
This happens when the refrigerator
is first plugged in, when the doors
are opened frequently or when a
large amount of food is added to the
refrigerator or freezer compartments.
The fans are helping to maintain the
correct temperatures.
CLICKS,POPS,
CRACKSandCHIRPS
■ You may hear cracking or popping sounds when
the refrigerator is first plugged in. This happens as
the refrigerator cools to the correct temperature.
■ The compressor may cause a clicking or chirping
sound when attempting to restart (this could take
up to 5 minutes).
■ Expansion and contraction of cooling coils during
and after defrost can cause a cracking or popping
sound.
■ On models with an ice maker, after an ice making
cycle, you may hear the ice cubes dropping into the
ice bucket.
WATER SOUNDS
■ The flow of refrigerant through the freezer cooling coils
may make a gurgling noise like boiling water.
■ Water dropping on the defrost heater can cause a
sizzling, popping or buzzing sound during the defrost
cycle.
■ A water dripping noise may occur during the defrost
cycle as ice melts from the evaporator and flows into
the drain pan.
■ Closing the door may cause a gurgling sound due to
pressure equalization.
Do you hear what I hear? These sounds are normal.
HUMMM...
WHOOSH...
14 49-1000103
Troubleshooting Tips... Before you call for service
TROUBLESHOOTING TIPS
Save time and money! Review the charts on the following pages first and you may not need to call for service. If
needed, service can be scheduled by calling 800.544.4780
Problem Possible Causes What to Do
Refrigerator does not operate Refrigerator in defrost cycle. Wait about 30 minutes for defrost cycle
to end.
Either or both controls set to OFF Set the controls to a lower temperature
setting.
Refrigerator is unplugged. Push the plug completely into the outlet.
The fuse is blown/circuit breaker is
tripped.
Replace fuse or reset the breaker.
Motor operates for long periods
or cycles on and off frequently.
(Modern refrigerators with more
storage space and a larger freezer
require more operating time. They
start and stop often to maintain even
temperatures.)
Normal when refrigerator is first
plugged in.
Wait 24 hours for the refrigerator to
completely cool down.
Often occurs when large amounts of
food are placed in refrigerator.
This is normal.
Door left open. Check to see if package is holding door
open.
Hot weather or frequent door
openings.
This is normal.
Temperature controls set at the
coldest setting.
See Temperature Control section.
Refrigerator or freezer compartment
too warm
Temperature control not set cold
enough.
See Temperature Control section.
Warm weather or frequent door
openings.
Set the temperature control one step
colder. See Temperature Control
section.
Door left open. Check to see if package is holding door
open.
Frost or ice crystals on frozen food
(frost within package is normal)
Door left open. Check to see if package is holding door
open.
Too frequent or too long door
openings.
This is normal.
Divider between refrigerator and
freezer compartments feels warm.
Automatic energy saver system
circulates warm liquid around
the front edge of the freezer
compartment.
This helps prevent condensation on the
outside.
Automatic ice maker does not work
(if installed).
Ice maker power switch is in the
OFF position.
Set the power switch to ON position.
Water supply turned off or not
connected.
See Installing the water line section of
the ice maker installation instructions.
Freezer compartment too warm. Wait 24 hours for the refrigerator to
completely cool down.
Piled up cubes in the storage bin
cause the ice maker to shut off.
Level cubes by hand.
Ice cubes stuck in ice maker. Turnotheicemaker,removecubes,
and turn the ice maker back on.
Ice cubes have bad odor/taste Ice storage bin needs cleaning. Empty and was bin. Discard old ice.
Food transmitting odor/taste to ice Wrap foods well.
Interior of refrigerator needs
cleaning.
See Care and Cleaning section.
Slow ice cube freezing Door left open. Check to see if package is holding door
open.
49-1000103 15
Troubleshooting Tips... Before you call for service
Problem Possible Causes What to Do
Frequent buzzing sound from the ice
maker (if installed).
Ice maker power switch is in the ON
position but the water supply to the
refrigerator has not been connected.
Set the power switch to the OFF
position.KeepingitintheONposition
will damage the water valve.
No ice cube production (if ice maker
is installed).
Supply line or shutoff valve is
clogged.
Call a plumber.
Refrigerator has odor. Foods transmitting odor to
refrigerator.
Foods with strong odors should be
tightly wrapped.
Keepanopenboxofbakingsoda
intherefrigerator;replaceevery3
months.
Interior needs cleaning. See Care and Cleaning section.
Moisture forms on outside of
refrigerator.
Not unusual during periods of high
humidity.
Wipe surface dry.
Moisture collects inside (in humid
weather, air carries moisture into
refrigerator when doors are opened)
Due to the higher humidity in the
refrigerator, you may on occasion
experience fog or small amounts
of moisture in the refrigerator
compartment.
This is normal and may come and
goasdierentfoodloadsand
environmental conditions change.
Wipe dry with a paper towel if desired.
Interior light does not work No power at the outlet. Replace fuse or reset the breaker.
Light bulb is burned out. See Care and Cleaning section.
Hot air from the bottom of the
refrigerator
Normal air flow cooling motor. In the
refrigeration process, it is normal
that heat be expelled in the area
under the refrigerator. Some floor
coverings are sensitive and will
discolor at these normal and safe
temperatures.
This is normal.
Refrigerator never shuts off but the
temperatures are ok.
Adaptive defrost keeps compressor
running during door openings.
This is normal. The refrigerator will
cycleoafterthedoorremainsclosed
for 2 hours.
Door not closing properly. Door gasket on hinge side sticking
or folding over.
Applyparanwaxtothefaceofthe
gasket.
Door does not close by itself Leveling legs need adjusting. See Rollers and Leveling Legs in the
Installation instructions section.
Freezer door opens when
refrigerator door is closed.
This is normal if the door closes
after it pops open.
This indicates that there is a good
seal on the freezer door. If the freezer
door does not automatically close after
popping open, then see Door does
not close by itself, above.
Food freezing in the refrigerator. Food too close to the air vent at the
back of the refrigerator.
Move food away from the air vent.
Refrigerator control is set too cold. Move the refrigerator control to a
warmer temperature.
Handle is loose/handle has a gap. Handle needs to be adjusted. See Reversing Door Handles in the
Installation Instructions section.
TROUBLESHOOTING TIPS
16 49-1000103
LIMITED WARRANTY
Staple your receipt here. Proof of the original purchase
date is needed to obtain service under the warranty.
■ Service trips to your home to teach you how to use
the product.
■Improperinstallation,deliveryormaintenance.
■Failureoftheproductifitisabused,misused,or
used for other than the intended purpose or used
commercially.
■Lossoffoodduetospoilage.
■Replacementofhousefusesorresettingofcircuit
breakers.
■Damagetofinish,suchassurfacerust,tarnish,or
small blemishes not reported within 48 hours of
delivery.
■Replacementofthewaterfiltercartridge,if
included, due to water pressure that is outside
the specified operating range or due to excessive
sediment in the water supply.
■Replacementofthelightbulbs,ifincluded,or
water filter cartridge, if included, other than as
noted above.
■Damagetotheproductcausedbyaccident,fire,
floods or acts of God.
■Incidentalorconsequentialdamagecausedby
possible defects with this appliance.
■Productnotaccessibletoproviderequiredservice.
■Damagecausedbyanon-GEAppliancesBrand
water filter.
This warranty will not cover:
For the Period of: GE Appliances Will Replace
One Year
From the date of the original
purchase
Any part of the refrigerator which fails due to a defect in materials or workmanship.
During the limited one-year warranty, GE Appliances will also provide, free of
charge, all labor and related service to replace the defective part.
Crosley.com
Your appliance is covered by a limited warranty, as listed below, by GE Appliances. All warranty service is provided by
our GE Appliances Factory Service Centers, or an authorized service technician. To schedule service, call Crosley at
800.544.4780. Please have your serial number and your model number available when calling for service.
Crosley
®
Corporation Refrigerator Limited Warranty
EXCLUSION OF IMPLIED WARRANTIES
Your sole and exclusive remedy is product repair as provided in this Limited Warranty. Any implied warranties,
including the implied warranties of merchantability or fitness for a particular purpose, are limited to one year or the
shortest period allowed by law.
This limited warranty is extended to the original purchaser and any succeeding owner for products purchased for
home use within the USA. If the product is located in an area where service by a GE Appliances Authorized Servicer
is not available, you may be responsible for a trip charge or you may be required to bring the product to an Authorized
GE Appliances Service location for service. In Alaska, the limited warranty excludes the cost of shipping or service
calls to your home.
Some states do not allow the exclusion or limitation of incidental or consequential damages. This limited warranty
gives you specific legal rights, and you may also have other rights which vary from state to state. To know what your
legal rights are, consult your local or state consumer affairs office or your state’s Attorney General.
Warrantor: GE Appliances, a Haier company
Louisville, KY 40225
Crosley
®
Extended Warranty
In addition to the warranty shown above, ask your dealer or visit us at Crosley.com/warranty regarding the
Crosley 10-Year Extended Limited Warranty that comes to you at no extra charge. This warranty will cover
your product after the initial manufacturer’s warranty expires up through 10 years. Please contact Crosley at
Crosley.com or call Crosley at 800.356.5268 for specific details.
49-1000103 17
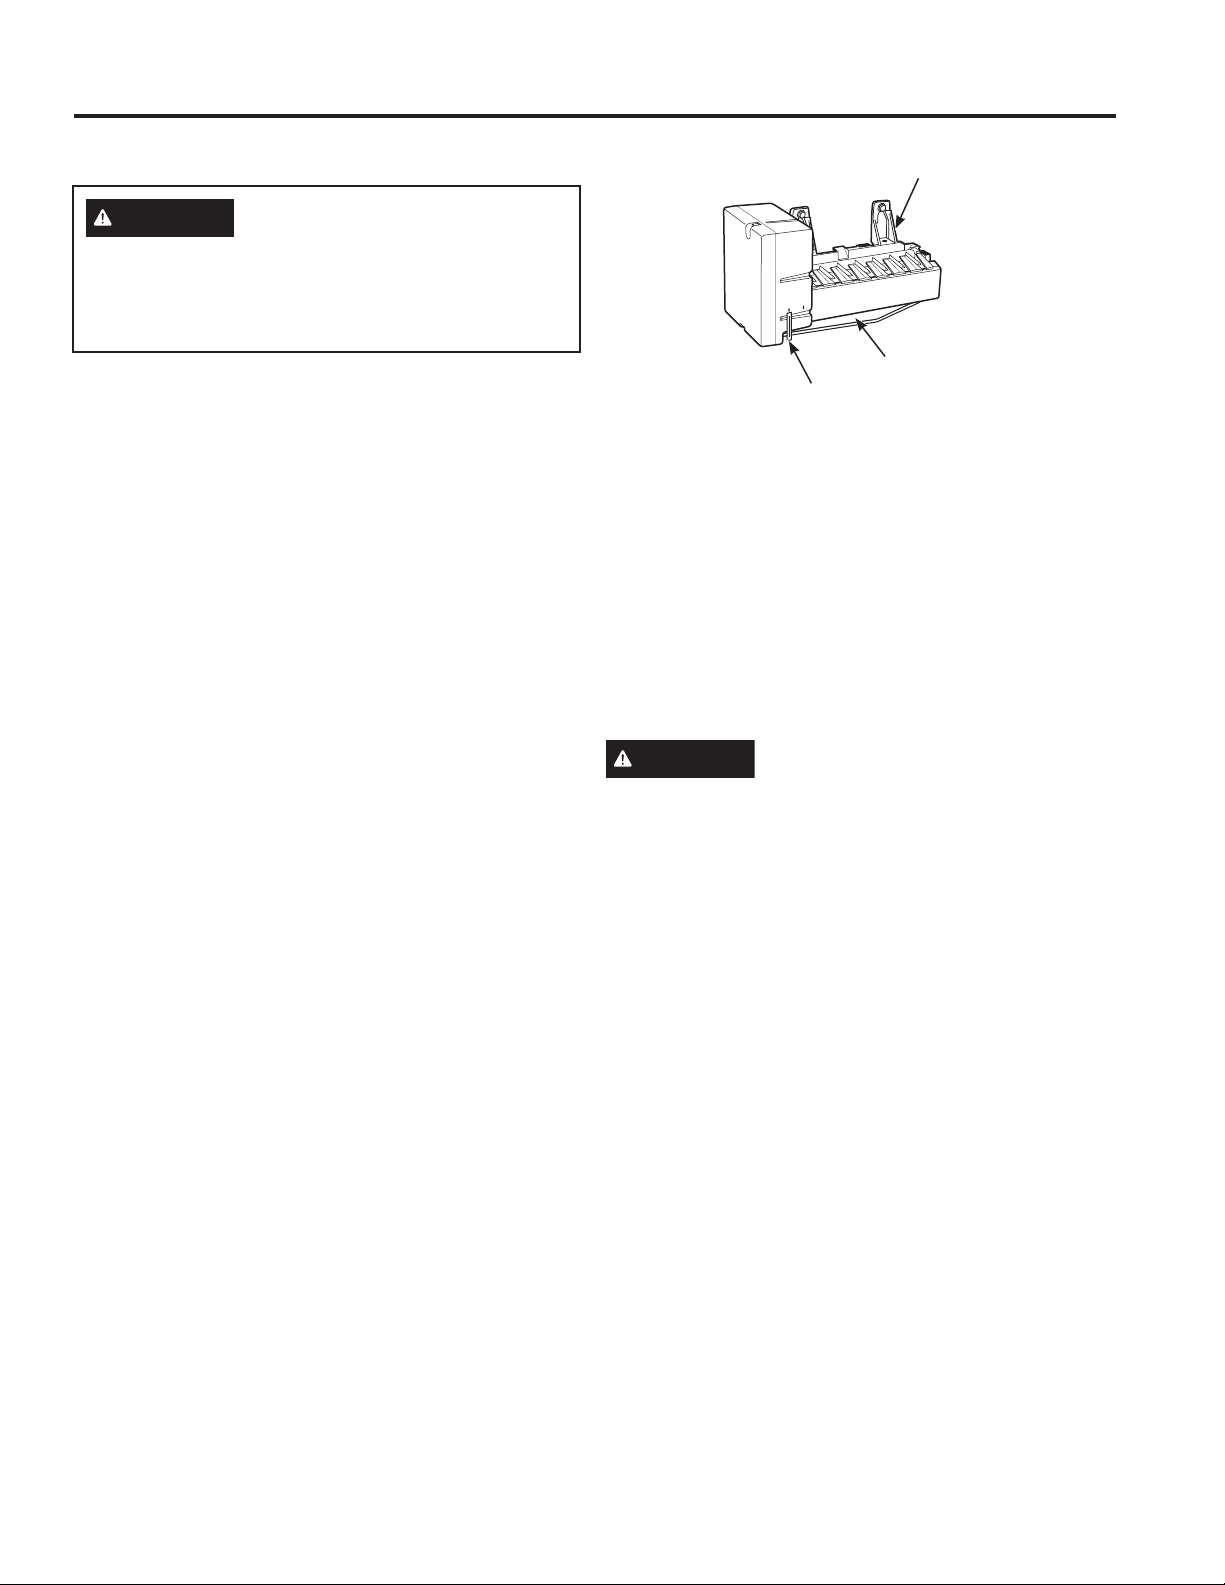
Ice Maker Accessory Kit:
An IM4D ice maker accessory kit is available at extra
cost.
For ice maker installation, follow Installation Instruction
"V" using the short (8") fill tube assembly, unless fill tube
is already installed.
To order, call GE Appliances at 800.432.2737 or visit
GEAppliances.com.
AUTOMATIC ICE MAKER
The ice maker will produce approximately 70-100
cubes in a 24-hour period, depending on the freezer
compartment temperature, room temperature, number of
door openings and other use conditions.
If the refrigerator is operated before the water connection
is made to the ice maker, set the switch OFF.
When the refrigerator has been connected to the water
supply, set the switch ON position.
The ice maker will fill with water when it cools to 15°F.
A newly-installed refrigerator may take 12 to 24 hours to
begin making ice cubes.
Once the ice maker starts to make ice, it may take up
to 48 hours to fill the bin, depending on the temperature
settings and number of door openings.
You will hear a buzzing sound each time the ice maker
fills with water.
NOTICE: Throw away the first few batches of ice to
allow the water line to clear.
Be sure nothing interferes with the sweep of the feeler
arm.
When the bin fills to the level of the feeler arm, the ice
maker will stop producing ice.
It is normal for several cubes to be joined together.
If ice is not used frequently, old ice cubes will become
cloudy, taste stale, shrink or fuse together.
CAUTION
Avoid contact with the moving parts
of the ejector mechanism, or with the heating element
(located on the bottom of the ice maker) that releases
the cubes. Do not place fingers or hands on the
automatic ice making mechanism while the refrigerator is
plugged in.
Accessory
ON
OFF
Ice maker
Feeler Arm
Power Switch
ACCESSORY
WARNING
Connect to potable water supply only.
A cold water supply is required for automatic
icemaker operation. The water pressure must be
between 40 and 120 psi (275-827 kilopascals)

18 49-1000103
Printed in United States
Consumer Support
CONSUMER SUPPORT
Crosley Website
Have a question or need assistance with your appliance? Try the Crosley Website 24 hours a day, any day of the
year at Crosley.com. You can also shop for more great Crosley products on our website.
Register Your Appliance
Register your new appliance on-line at your convenience at crosley.com/mycrosley. Timely product registration will
allow for enhanced communication and prompt service under the terms of your warranty, should the need arise. You
may also mail in the pre-printed registration card included in the packing material.
Schedule Service
Crosley repair service is only one step away from your door. Call 800.544.4780 during normal business hours to
schedule service.
CROSLEYCARE
®
10 Year Limited Warranty
When you buy a Crosley appliance, you receive one of the best warranties available in the appliance industry.
For more information, visit Crosley.com/warranty. Visit Crosley.com/mycrosley to register the extended limited
warranty.
Parts and Accessories
Individuals qualified to service their own appliances can have parts or accessories sent directly to their homes (VISA,
MasterCard and Discover cards are accepted). Order on-line today 24 hours every day.
Visit GEApplianceparts.com or by phone at 877.959.8688 during normal business hours.
Instructions contained in this manual cover procedures to be performed by any user. Other servicing
generally should be referred to qualified service personnel. Caution must be exercised, since improper
servicing may cause unsafe operation.
Congelador Superior
Refrigeradores
Contenido
Información de Seguridad ..........3
Operación del Refrigerador
Control de la temperatura. ..........5
Estantes del refrigerador ...........5
Cajóns .........................6
Estante del Freezer ...............6
Cuidado y Limpieza ................7
Instrucciones Para La Instalación
Preparación para instalar
el refrigerador ..................9
Inversión de Balanceo
de la Puerta ..................10
Solución de Problemas
Sonidos normales de operación ....13
Consejos para la solución
de problemas ..................14
Garantía Limitada ................16
Accesorio .......................17
Soporte al Consumidor ............18
Models: XTS21
49-1000103 Rev. 0 07-18 GEA
Español
Manual del
Propietario
e Instalación
Escriba los números de modelo y de serie aquí:
Número de modelo : ____________________
Número de serie: _______________________
Busque estos números en una etiqueta del
lado izquierdo, cerca de la parte intermedia del
compartimiento del refrigerador.
2 49-60761-2
¡La icónica marca estadounidense apoyada por la mejor garantía de electrodomésticos
estadounidense! ¡Garantía Limitada por 10 Años GRATUITA en todos los
Electrodomésticos Crosley!
Visite Crosley.com/mycrosley y registre la garantía limitada extendida.
ELECTRODO-
MÉSTICO
COMPONENTE
GARANTÍA LIMITADA
DEL FABRICANTE
GARANTÍA LIMITADA
EXTENDIDA DE CROSLEY
Refrigerador o
Freezer
Compresor 1 Año
10 años
Incluyendo Cobertura del
Fabricante por 1 Año
Lavadora de
Carga Superior
Caja de engranajes/
Transmisión
1 Año
Lavadora de
Carga Frontal
Motor 1 Año
Lavadora
Compacta
Motor 1 Año
Unidad de
Almacenamiento
de Lavadora/
Secadora
Motor/Elemento de
Calefacción
1 Año
Lavavajillas Motor 1 Año
Secadora a Gas/
Eléctrica
Motor/Elemento de
Calefacción
1 Año
Cocina Eléctrica
Elementos para
Hornear/ Asar/ de la
Supercie
1 Año
Cocina a Gas
Arrancadoras y
Módulos de Chispa
1 Año
49-60761-2 3
INFORMACIÓN DE SEGURIDAD
LEA Y GUARDE ESTAS INSTRUCCIONES
INFORMACIÓN IMPORTANTE DE SEGURIDAD
LEA TODAS LAS INSTRUCCIONES ANTES DE USAR
PRECAUCIÓN
A fin de reducir el riesgo de lesiones al usar el refrigerador, siga estas precauciones
básicas.
■ Nolimpieestantesdevidrionitapasconaguacaliente
cuando estén fríos. Los estantes de vidrio y las tapas
se pueden romper si son expuestos a cambios de
temperatura repentinos o impactos, tales como sacudones
o caídas. El vidrio templado está diseñado para destruirse
en pequeñas piezas en caso de rotura.
■ Mantengalosdedosfueradelosespaciosde“riesgode
lastimaduras”; los despejes entre las puertas y entre las
puertas y el gabinete son necesariamente pequeños.
Tenga el cuidado de cerrar las puertas cuando los niños
se encuentren en el área.
■ Notoquelassuperficiesfríasdelcompartimientodel
freezer cuando las manos estén húmedas o mojadas,
ya que la piel se podrá adherir a estas superficies
extremadamente frías.
■ Novuelvaacongelarcomidasquehayanestado
totalmente congeladas en forma previa.
■ Enrefrigeradoresconmáquinasdehacerhielo
automáticas, evite el contacto con las partes móviles del
mecanismo eyector o con el elemento de calefacción que
libera los cubos. No coloque los dedos ni las manos en el
mecanismo de la máquina de hielo automática mientras el
refrigerador esté enchufado.
ADVERTENCIA
A fin de reducir el riesgo de incendio, explosión, descargas eléctricas o lesiones al usar
su refrigerador, siga estas precauciones básicas de seguridad:
■ Esterefrigeradorsedeberáinstalaryubicar
adecuadamente de acuerdo con las Instrucciones de
Instalación antes de ser usado.
■ Desenchufeelrefrigeradorantesdehacerreparaciones,
reemplazar una lámpara de luz o hacer una limpieza.
Nota: La corriente que va al refrigerador no puede ser
desconectada por ninguna configuración del panel de
control.
Nota: Las reparaciones deberán ser realizadas por un
Profesional del Servicio Técnico calificado.
■ Reemplacetodaslaspiezasypanelesantesdeluso.
■ Nouseunprolongador.
■ Noguardeniusegasolinauotrosvaporesinflamablesy
líquidos cerca de este ni de otro electrodoméstico.
■ Noguardesustanciasexplosivastalescomolatas
de aerosoles con propelentes inflamables en este
electrodoméstico.
■ Afindeevitarriesgosdequelosniñossufranasfixiao
queden atrapados, retire las puertas de comidas frescas y
del freezer de cualquier refrigerador antes de deshacerse
o dejar de usar el mismo.
■ Losniñosylaspersonasconcapacidadfísica,
sensorial o mental reducida o con falta de experiencia y
conocimiento podrán usar este electrodoméstico sólo si
son supervisados o les fueron dadas instrucciones sobre
un uso seguro y entienden los riesgos involucrados.
■ Esteelectrodomésticofuediseñadoparausohogareñoy
para aplicaciones similares tales como: áreas de personal de
cocina en tiendas, oficinas y otros espacios laborales; casas
de campo; por clientes en hoteles, moteles, hostales y otros
espacios residenciales, catering y aplicaciones no minoristas
similares.
INSTALACIÓN
ADVERTENCIA
RIESGO DE EXPLOSIÓN
Mantenga cualquier material y vapores inflamables, tales como gasolina, alejados del refrigerador. Si no se cumple con esto
se podrá producir una explosión, incendio o la muerte.
4 49-60761-2
CONEXIÓN DE LA ELECTRICIDAD
INFORMACIÓN DE SEGURIDAD
INFORMACIÓN IMPORTANTE DE SEGURIDAD
LEA TODAS LAS INSTRUCCIONES ANTES DE USAR
LEA Y GUARDE ESTAS INSTRUCCIONES
Nunca, bajo ninguna circunstancia, corte o elimine el tercer cable (tierra) del cable de corriente. Para su seguridad
personal, este electrodoméstico debe estar adecuadamente conectado a tierra.
El cable de corriente de este electrodoméstico contiene un
enchufe de 3 cables (conexión a tierra) que se conecta a un
tomacorriente de pared estándar de 3 cables (conexión a
tierra) para minimizar la posibilidad de riesgos de descargas
eléctricas por parte del mismo.
Contrate a un electricista calificado para que controle el
tomacorriente y el circuito eléctrico, a fin de asegurar que el
enchufe esté correctamente conectado a tierra.
En caso de contar con un tomacorriente de pared de 2
cables, es su responsabilidad y obligación reemplazarlo
por un tomacorriente de pared de 3 cables correctamente
conectado a tierra. No use un adaptador.
El refrigerador debería estar siempre conectado a un enchufe
específico con un índice de voltaje equivalente al que figura
en su etiqueta de características técnicas.
Se requiere un suministro eléctrico con fusible y conexión
a tierra de 115 voltios de CA, 60 Hz, 15 o 20 amperes.
Esto garantiza el mejor funcionamiento y además previene
la sobrecarga de los circuitos del hogar, lo cual podría
ocasionar riesgos de incendio debido al recalentamiento de
cables.
Nunca desenchufe el refrigerador tirando del cable de
corriente. Siempre tome su enchufe firmemente y empuje el
mismo hacia afuera para retirarlo.
Repare o reemplace de inmediato todos los cables de
corriente pelados o con cualquier tipo de daño. No use
un cable con cortaduras o abrasión sobre su extensión o
extremos.
Al alejar el refrigerador de la pared, se deberá tener cuidado
de que no ruede sobre ni dañe el cable de corriente.
ADVERTENCIA
RIESGO DE DESCARGA ELÉCTRICA
Enchufe en un tomacorriente con conexión a tierra de 3 cables.
No elimine el cable de conexión a tierra.
No use un adaptador.
No use un prolongador.
Si no se siguen estas instrucciones se podrá producir a muerte, incendios o descargas eléctricas.
ADVERTENCIA
PELIGRO DE SUFFOCATION Y ENTRAPMENT
El incumplimiento de estas instrucciones de eliminación puede causar la muerte o lesiones graves.
IMPORTANTE: Que un niño quede atrapado o que sufra
una asfixia no son problemas del pasado. Los refrigeradores
antiguos o abandonados aún son peligrosos, incluso aunque
seconservenpor“sólounospocosdías”.Sisedesharádesu
antiguo refrigerador, siga las siguientes instrucciones a fin de
evitar accidentes.
Antes de Descartar su Antiguo Aparato:
■ Retire las puertas de comidas frescas y del freezer.
■Dejelosestantesensulugardemodoquelosniñosno
puedan trepar dentro con facilidad.
Cómo Eliminar Refrigerantes y Gomaespumas:
DescarteelelectrodomésticodeacuerdoconlasRegulacionesFederalesyLocales.Comuníqueseconlasautoridadeslocales
para descartar su electrodoméstico de forma ambientalmente segura
49-60761-2 5
El control de temperatura ajusta el refrigerador desde la
configuración más caliente a la más fría. Cuenta tanto con un
control del refrigerador como con un control del freezer.
Control de Temperatura del Refrigerador
Su refrigerador contará con una configuración de fábrica
recomendada en la posición media. Para una temperatura más
fría, gire la perilla en dirección de las agujas del reloj hasta
Coldest (Lo Más Frío). Para una temperatura más cálida, gire
la perilla en dirección contraria a las agujas del reloj hasta Cold
(Frío). Para apagar la refrigeración en ambos compartimientos,
gire la perilla en dirección contraria a las agujas del reloj hasta
la posición vertical de apagado. Escuchará y sentirá el sonido
de clic del control, y la perilla ya no seguirá girando. Observe
que esto no apaga la corriente del refrigerador.
Control del Flujo de Aire del Freezer
Hay un control en la torre de aire del freezer que controla
cuánto aire frío hay en el freezer. El control de temperatura
real sólo está en el compartimiento del refrigerador.
Control de la temperatura
Estantes del compartimiento de alimentos frescos
OPERACIÓN DEL REFRIGERADORE: Control de la temperatura / Estantes
Soportes de los estantes en diferentes niveles le permiten personalizar los espacios de los estantes. A continuación se muestran
estantes en las ubicaciones recomendadas.
No todas las funciones corresponden a todos los modelos.
Estantes con Ancho Completo
Algunos modelos tienen un estante deslizante en alambre de
acero, un estante de vidrio temperado estacionario, un estante
a prueba de salpicaduras o dos estantes estacionarios en
alambre de acero. Estos estantes se pueden mover hacia otro
lugar en el compartimiento de alimentos frescos.
El estante deslizante de tamaño completo tiene frenos. Cuando
se coloca correctamente en los soportes del estante, el estante
frena antes de salirse completamente del refrigerador y no se
inclinará cuando coloque o retire alimentos del mismo.
PRECAUCIÓN
No limpie estantes de vidrio
ni tapas con agua caliente cuando estén fríos. Los estantes
de vidrio y las tapas se pueden romper si son expuestos a
cambios de temperatura repentinos o impactos tales como
sacudones o caídas. El vidrio templado está diseñado para
destruirse en pequeñas piezas en caso de rotura.
NOTA: No bloquee la salida de aire colocando ítems de
comida directamente contra ésta. Se podrán producir
temperaturas erráticas.
Cold
Coldest
Flujo de aire
detrás de la
lámpara de
luz
6 49-60761-2
Cajóns
OPERACIÓN DEL REFRIGERADORE: Cajóns/Estante del congelador
Cajón de Área Climática
Mantenga las frutas y verduras organizadas en
compartimientos separados para un fácil acceso.
El exceso de agua que se puede acumular en la parte inferior
de los cajones o debajo de los mismos se deberá limpiar.
Retiro del Cajón
Los cajones pueden ser retirados con facilidad tomando
ambos lados y levantando levemente mientras se los empuja
superando el punto de detención.
Retiro de la Tapa
Para retirar:
1. Retire las gavetas.
2. Alcance y empuje la parte trasera de la tapa de vidrio hacia
arriba. Inclínela y sáquela. Evite limpiar la cubierta de vidrio
fría con agua caliente ya que la diferencia de temperaturas
extremas podría causar que se quiebre.
3. Retire el marco de la gaveta. (Siempre retire la cubierta de
vidrio antes de sacar el marco de la gaveta.)
Levante el marco de los soportes en cada costado y atrás,
hale hacia delante, incline y saque.
Para reemplazar:
1. Baje el marco hasta que descanse sobre los soportes en
cada costado y atrás.
2. Reemplace la tapa de vidrio.
3. Reemplace las gavetas.
Estante del compartimiento del congelador
Cuando se coloquen de forma correcta en los soportes de
los estantes, los dos estantes fijos con cables de acero se
detendrán antes de salir completamente del freezer y no se
inclinarán al colocar o retirar comida de los mismos.
PRECAUCIÓN
No limpie estantes de vidrio
ni tapas con agua caliente cuando estén fríos. Los estantes
de vidrio y las tapas se pueden romper si son expuestos a
cambios de temperatura repentinos o impactos tales como
sacudones o caídas. El vidrio templado está diseñado para
destruirse en pequeñas piezas en caso de rotura.
49-60761-2 7
Cuidado y limpieza
CUIDADO Y LIMPIEZA
Limpieza exterior
Las manijas de la puerta y accesorio (en algunos modelos).
Limpie con un paño humedecido con agua jabonosa. Seque
con un paño seco.
Mantenga el exterior limpio. Límpielo con un paño
ligeramente humedecido con cera de cocina para
electrodomésticos o detergente líquido suave para platos.
Seque y brille con un paño limpio y seco.
No limpie el refrigerador con un paño sucio para platos o con
una toalla mojada. Estos pueden dejar residuos y pueden
erosionar la pintura. No use almohadillas de restregar,
limpiadores en polvo, blanqueadores o limpiadores que
contengan blanqueadores o amoníaco ya que estos productos
pueden raspar y debilitar el acabado de pintura.
Los puertas y las manijas de las puertas de acero
inoxidable (en algunos modelos) pueden ser limpiados con
un limpiador para acero inoxidable para usos comerciales.
Los limpiadores con ácido oxálico tales como Bar Keepers
Friend Soft Cleanser™ eliminarán el óxido sobre la superficie,
deslustres y pequeñas manchas. Use sólo un limpiador líquido
libre de material abrasivo y frote en la dirección de las líneas
del cepillo con una esponja suave y húmeda. No utilice cera
para electrodomésticos sobre el acero inoxidable.
Limpieza del Condensador
ADVERTENCIA
A fin de reducir el riesgo de
muerte o de descargas eléctricas, se deberán seguir
estas instrucciones:
■ Desenchufe el refrigerador antes de retirar cualquier
panel.
■ No genere contacto ni dañe cualquier cable mientras
el panel es retirado.
■ Reemplace todas las piezas y paneles antes de
volver a enchufar el refrigerador.
Deformaperiódica,elcondensadordelrefrigeradorquedará
cubierto por polvo y suciedad. Esto podrá hacer que su
refrigerador enfríe con menor efectividad y que utilice mayor
cantidad de energía.
Podrá mejorar el rendimiento del refrigerador, limpiando el
condensador. El mismo se encuentra ubicado en la parte
trasera de su refrigerador, en la parte
inferior, detrás de la tapa de acceso.
La limpieza del condensador requiere de
un destornillador Phillips, una aspiradora
y un cepillo suave con mango largo.
Para limpiar el condensador:
1. Apague el refrigerador.
2. Gire las patas niveladoras en cada
esquina del refrigerador en contra
de las agujas del reloj, hasta que las
mismas apoyen el refrigerador.
3. Haga girar el refrigerador hacia afuera
lo suficiente como para que usted
pueda ubicarse detrás del mismo,
en la parte inferior. Asegúrese de
no sacar ninguna tubería de agua
conectada a su refrigerador.
4.Desenchufeelrefrigerador.
5. Use un destornillador con cabeza
Phillips para retirar los tornillos que
aseguran la tapa del refrigerador.
6. Ubique el condensador. El mismo se encuentra entre el
compressor y el ventilador. Es negro y de forma cuadrada,
con tubos y alerones.
7. Aspire el condensador. Use el cepillo para aflojar
suavemente el polvo y la suciedad de los espacios y
alerones del condensador.
8. Una vez que el condensador se encuentre limpio, reinstale
la tapa de acceso, reemplazando todos los tornillos.
9. Enchufe el refrigerador.
10. Vuelva a colocar el mismo en su posición normal. Gire las
patas en dirección hacia las agujas del reloj, hasta que
las mismas soporten nuevamente el peso del refrigerador.
También nivele el refrigerador de la forma requerida.
11. Vuelva a girar el refrigerador y gire el control en
dirección de las agujas del reloj, hasta que regrese a la
configuración media (vertical) o a la posición previa del
control. Controle que el refrigerador comience a funcionar.
Compresor
Compresor
Ventilador
Condensador – limpie el
mismo con un cepillo suave
y con mango largo y con una
aspiradora

8 49-60761-2
Cuidado y limpieza
CUIDADO Y LIMPIEZA
Cómo prepararse para las vacaciones
Para una largas vacaciones o ausencias, retire los alimentos
y desconecte el refrigerador. Gire el dial de control de la
temperatura hacia la posición OFF (apagado), y limpie el
interior con una solución de una cucharada de bicarbonato (15
ml)yuncuarto(1litro)deagua.Dejelaspuertasabiertas.
Si una máquina de hielos fue instalada, deberá ser apagada;
mueva el interruptor hasta la posición OFF (apagado) en el
modelo con interruptor de encendido. Cierre el suministro de
agua conectado al refrigerador.
Si la temperatura puede caer por debajo del punto de
congelamiento, haga que una persona calificada drene el
sistema del suministro de agua (en algunos modelos) para
evitar serios daños a la propiedad causados por inundaciones.
Cómo prepararse para trasladarse
Asegure todos los artículos sueltos como la rejilla, los estantes
y cajones pegándolos con cinta en su lugar para evitar daños.
A fin de evitar la apertura de puertas durante el movimiento,
asegure las mismas al cuerpo con cinta. Asegúrese de que el
refrigerador permanezca en una posición vertical durante el
traslado.
Reposición de la bombilla
ADVERTENCIA
Antes de reemplazar una
lámpara quemada, el refrigerador deberá ser desenchufado
a fin de evitar el contacto con el filamento de un cable con
corriente. (Existe riesgo de que una lámpara quemada se
rompa durante su reemplazo). Girar el control a la posición
OFF no desconecta la corriente del circuito de la luz.
Dependiendodesumodelo,laslucesdeloscompartimientos
delrefrigeradorydelfreezerpodránusarlámparasLEDde
5 watts con base mediana o lámparas incandescentes para
electrodomésticos de 40 watts con base mediana. Siga las
instrucciones específicas de su modelo.
IMPORTANTE:
● UsesololámparasLEDdereemplazodelalistadeUL
recomendadas para ambientes mojados/ húmedos. El
refrigerador y el freezer son considerados ambientes
mojados/húmedos.SiusaráunamarcadelámparaLED
que no sea la recomendada, antes de la instalación lea y
sigatodaslasinstruccionesdelembalajedelaluzLED.
LaslámparasLEDdeberánserde5wattsconunabase
mediana.
●Siesusadaunalámparaincandescenteparareemplazar
unalámparaLED,usesólolámparasincandescentespara
electrodomésticos hogareños con una cantidad de watts
máxima de 40 con una base mediana.
Mover el refrigerador
Tenga cuidado al mover el refrigerador lejos de la pared.
Todos los tipos de cubiertas de piso se pueden dañar,
particularmente las cubiertas acojinadas y aquellas con
superficies con diseños en relieve.
Hale el refrigerador en línea recta y regréselo a su posición
empujándolo de la misma forma. Mover el refrigerador en una
dirección lateral puede resultar en daños a la superficie del
piso o al refrigerador.
Cuando empuje de nuevo el refrigerador, asegúrese de no
pisar el cable eléctrico o la línea de suministro a la máquina de
hielos (en algunos modelos).
Despuésderodarelrefrigeradorasuposición,girelaspatas
del refrigerador en el sentido de las manecillas del reloj hasta
que las patas sostengan nuevamente el peso del refrigerador.
Limpieza interior
Para ayudar a evitar olores, deje una caja abierta de
bicarbonato en los compartimientos de alimentos frescos y en
el congelador.
Desconecte el refrigerador antes de limpiarlo. Si esto no es
práctico, escurra la humedad excesiva con una esponja o paño
al limpiar alrededor de los interruptores, luces o controles.
Use una solución de agua tibia y bicarbonato—una cucharada
(15 ml) de bicarbonato para un cuarto (1 litro) de agua. Esto
limpia y neutraliza los olores. Enjuague y seque.
Despuésdelimpiarlosempaquesdelapuerta,apliqueuna
capa delgada de vaselina en los empaques de la puerta en el
costado de la bisagra. Esto ayuda a evitar que los empaques
se peguen y se doblen hasta perder su forma.
PRECAUCIÓN
No limpie estantes de vidrio
ni tapas con agua caliente cuando estén fríos. Los estantes
de vidrio y las tapas se pueden romper si son expuestos a
cambios de temperatura repentinos o impactos tales como
sacudones o caídas. El vidrio templado está diseñado para
destruirse en pequeñas piezas en caso de rotura.
No lave ninguna parte plástica del refrigerador en la lavadora
de platos.
49-60761-2 9
RODILLOS Y PATAS
NIVELADORAS
Las patas niveladoras cerca de cada esquina delantera
del refrigerador son ajustables. Éstas colocan firmemente el
refrigerador y evitan que se mueva cuando las puertas se
abran. Las patas niveladoras se deben colocar de manera
que el frente del refrigerador se levante lo suficiente para
que las puertas se cierren fácilmente cuando se abran
hasta la mitad.
Gire las patas niveladoras en el sentido de las manecillas
del reloj para levantar el refrigerador, y en el sentido
contrario para bajarlo.
Los rodillos al lado de las patas niveladoras le permiten
mover el refrigerador lejos de la pared para limpiarlo.
Gire las patas en el sentido contrario de las manecillas
del reloj hasta que el peso del refrigerador se traslade de
éstashacialosrodillos.Despuésderodarelrefrigerador
de nuevo hacia su lugar, gire las patas en el sentido de
las manecillas del reloj hasta que las patas sostengan
nuevamente el peso del refrigerador.
Instrucciones de instalación Modelo XTS21
ÁREA
Dejeunespaciotraserode2”(50mm)parafacilitarla
instalación, una adecuada circulación de aire y la plomería
y las conexiones eléctricas.
ANTES DE EMPEZAR
Lea estas instrucciones completa y
cuidadosamente.
• IMPORTANTE – Guarde estas instrucciones
para uso del inspector local.
• IMPORTANTE – Observe todos los códigos y
órdenes de ley.
• Nota al instalador – Asegúrese de dejar estas
instrucciones con el consumidor.
• Nota al consumidor – Conserve estas instrucciones
para referencia futura.
• Nivel de destreza – La instalación de este aparato
requiere de destrezas mecánicas básicas.
• Tiempo de ejecución –
Instalación del refrigerador 15 minutos
Invertir el vaivén de la puerta 15 minutos
• La instalación apropiada es la responsabilidad del
instalador.
• La falla del producto debido a una instalación inadecuada
no está cubierta por la garantía.
UBICACIÓN DEL REFRIGERADOR
• No instale el refrigerador donde la temperatura baje de
55°F (12.7°C) ya que no correrá con suficiente frecuencia
para mantener las temperaturas apropiadas.
• No instale el refrigerador donde la temperatura sea
superior a los 100ºF (37ºC), ya que no funcionará de
forma correcta.
• No instale el refrigerador en una ubicación expuesta al
agua (lluvia, etc.) o en contacto directo con la luz solar.
• Instále a en un piso fuerte para que lo soporte con carga
completa.
¿Preguntas? Llame GE Appliances a 800.432.2737 o visite GEAppliances.com
INSTRUCCIONES DE INSTALACIÓN
10 49-60761-2
Instrucciones de instalación
INSTRUCCIONES DE INSTALACIÓN
NOTAS IMPORTANTES
Al invertir el vaivén de la puerta:
• Lea las instrucciones completamente antes de empezar.
• Ajuste todos los tornillos de la bisagra, pero no ajuste en
exceso para evitar dañar la capa de pintura.
• Maneje las partes con cuidado para evitar raspar la
pintura.
• Ajuste los tornillos con sus partes relacionadas, a fin de
evitar su pérdida.
•Dispongadeunasuperficiedetrabajoquenoseraspe
para las puertas.
PRECAUCIÓN
Riesgo al Levantar
La Puerta de Comidas Frescas y las puertas del Freezer
son pesadas. Use ambas manos para asegurar las
puertas antes de levantarlas.
IMPORTANTE: Una vez que empiece, no mueva el
gabinete hasta que haya completado el proceso de invertir
el vaivén de la puerta.
Estas instrucciones son para cambiar las bisagras del
lado derecho al izquierdo, si alguna vez desea cambiar las
bisagras al lado derecho nuevamente - siga las mismas
instrucciones e invierta toda las referencias hacia la
izquierda y derecha.
ANTES DE INICIAR
1. Desconecte el refrigerador del tomacorriente
eléctrico.
2. Desocupetodoslosestantesdelapuerta,incluyendoel
compartimiento de lácteos.
IMPORTANTE: No permita
que ninguna puerta se caiga
al piso, ya que esto podría
dañar el freno de la puerta.
3. Retire la rejilla frontal, si
fue instalada.
RETIRO DE LAS PUERTAS
1. Coloque cinta de mascarar en el cierre de la puerta del
freezer.
2. Retire la tapa de la bisagra y los tornillos que sostienen
la bisagra superior del gabinete.
3. Levante la bisagra directamente hacia arriba para liberar
el pasador de la bisagra del casquillo en la parte superior
de la puerta y colóquela a un lado, junto con los tornillos
correspondientes.
4. Retire la cinta. Levante la puerta desde el perno de la
bisagra central y coloque la puerta sobre una superficie que
no raye con la parte exterior hacia arriba.
5. Desenrosquelaclavijadelabisagracentral.Asegúrese
de retener la arandela(s) de plástico para la reinstalación.
Retire la puerta del refrigerador de la bisagra inferior y
configure la puerta en una superficie donde no se raye,
colocando el lado externo hacia afuera.
6. Use una llave o un destornillador T25 Torx para retirar
la bisagra central y el espaciador(es) de plástico,
desenroscando el tornillo central, aflojando los tornillos
laterales y deslizando la bisagra hasta el centro del gabinete.
Vuelva a ajustar los tornillos en su posición y reemplace el
tornillo central.
7. Retire el tornillo central del lado opuesto y afloje los tornillos
laterales.Dévueltalabisagracentralyelespaciador,de
modo que la colocación de la clavija de la bisagra quede
hacialaparteexterna.Deslicelabisagracentralylos
espaciadores detrás de los tornillos laterales. Vuelva a
instalar el tornillo central y ajuste los tornillos laterales.
CÓMO INVERTIR EL VAIVÉN DE LA PUERTA
Destornilladordeestrella
HERRAMIENTAS REQUERIDAS
Cinta de enmascarar
Llaves con
extremos abiertos
o llave ajustable de
5/16” y 3/8”
Llave Torx T25
(algunos modelos)
Pinzas
Bisagra Superior
Tapa de la Bisagra
Superior
Clavija de la
Bisagra Central
y Arandela
Tornillo Central
Aojelos
Tornillos
Laterales
Bisagra y
Espaciador
Tornillo Central
Clavija de
la Bisagra
Central y
Arandela
Bisagra y
Espaciador
ADVERTENCIA
Siga todos los pasos al invertir la
dirección de la apertura de la puerta. Si no se siguen estas
instrucciones, dejando piezas sin uso o ajustando tornillos
en exceso, esto podrá hacer que la puerta se caiga y
producir lesiones y daños sobre la propiedad.
49-60761-2 11
Instrucciones de instalación
INSTRUCCIONES DE INSTALACIÓN
RETIRO DE LAS PUERTAS (Cont.)
8. Retire los tornillos de la bisagra inferior y reubique la
bisagra inferior sobre el lado opuesto del gabinete. Ajuste
los tornillos.
9. Desenrosquelaclavijadelabisagraymuevalamismaal
otro agujero y ajuste.
INVERTIR LAS MANIJAS DE LAS
PUERTAS
Manija de acero inoxidable
1. Retire los tornillos de la manija de la parte superior de la
puerta de comidas frescas.
2. Afloje el tornillo de la manija con la llave de 1/8” provista.
3. Retire la manija de la puerta.
4. Intercambie los lugares entre el ajuste de la manija y el
botón de corriente en el frente de la puerta.
5. Mueva las cubiertas de los orificios grandes y pequeños
en la parte superior y frontal de la puerta para llenar los
orificios ahora vacíos.
6. Tanto en el refrigerador como en las puertas del freezer,
retire los tornillos de la detención de la puerta sobre un
lado con un destornillador Phillips. Instale la detención de
la puerta sobre el otro lado de la misma.
7. Adhiera la manija a la puerta de comidas frescas con
tornillos en la parte superior de la manija. Use una llave
Allen de 1/8” para ajustar el tornillo específico en la parte
inferior de la manija.
8. Adhiera la manija a la puerta del freezer con tornillos al
final de la manija. Use la llave Allen de 1/8 provista” para
ajustar el tornillo específico en la parte superior de la
manija.
9. Adhiera la insignia en la puerta del freezer en la posición
opuesta a la manija.
INVERTIR LAS MANIJAS DE LAS
PUERTAS
Ensamble de la manija plástica
1. Retire los tornillos de la manija de la parte superior de
la puerta de comidas frescas. Retire los tornillos de la
manija de la parte inferior de la puerta del freezer.
2. Retire la manija en la puerta de comidas frescas,
deslizando la manija hacia arriba y afuera del ajuste.
Retire la manija en la puerta del freezer, deslizando la
manija hacia abajo y afuera del ajuste.
3. Intercambie los lugares entre el ajuste de la manija y el
botón de corriente en el frente de la puerta.
4. Mueva las cubiertas de los orificios grandes y pequeños
en la parte superior y frontal de la puerta para llenar los
orificios ahora vacíos.
5. Tanto en el refrigerador como en las puertas del freezer,
retire los tornillos de la detención de la puerta sobre un
lado con un destornillador Phillips. Instale la detención de
la puerta sobre el otro lado de la misma.
6. Adhiera la manija a la puerta de comidas frescas,
deslizando la misma hacia abajo en el ajuste y con
tornillos en la parte superior de la manija.
7. Adhiera la manija a la puerta del freezer, deslizando la
manija hacia arriba sobre el ajuste y con los tornillos en
la parte inferior de la manija.
8. Adhiera la insignia en la puerta del freezer en la posición
opuesta a la manija
CÓMO INVERTIR EL VAIVÉN DE LA PUERTA (CONT.)
Bisagra Inferior
Clavija de la Bisagra
Bisagra Inferior
Clavija de la Bisagra
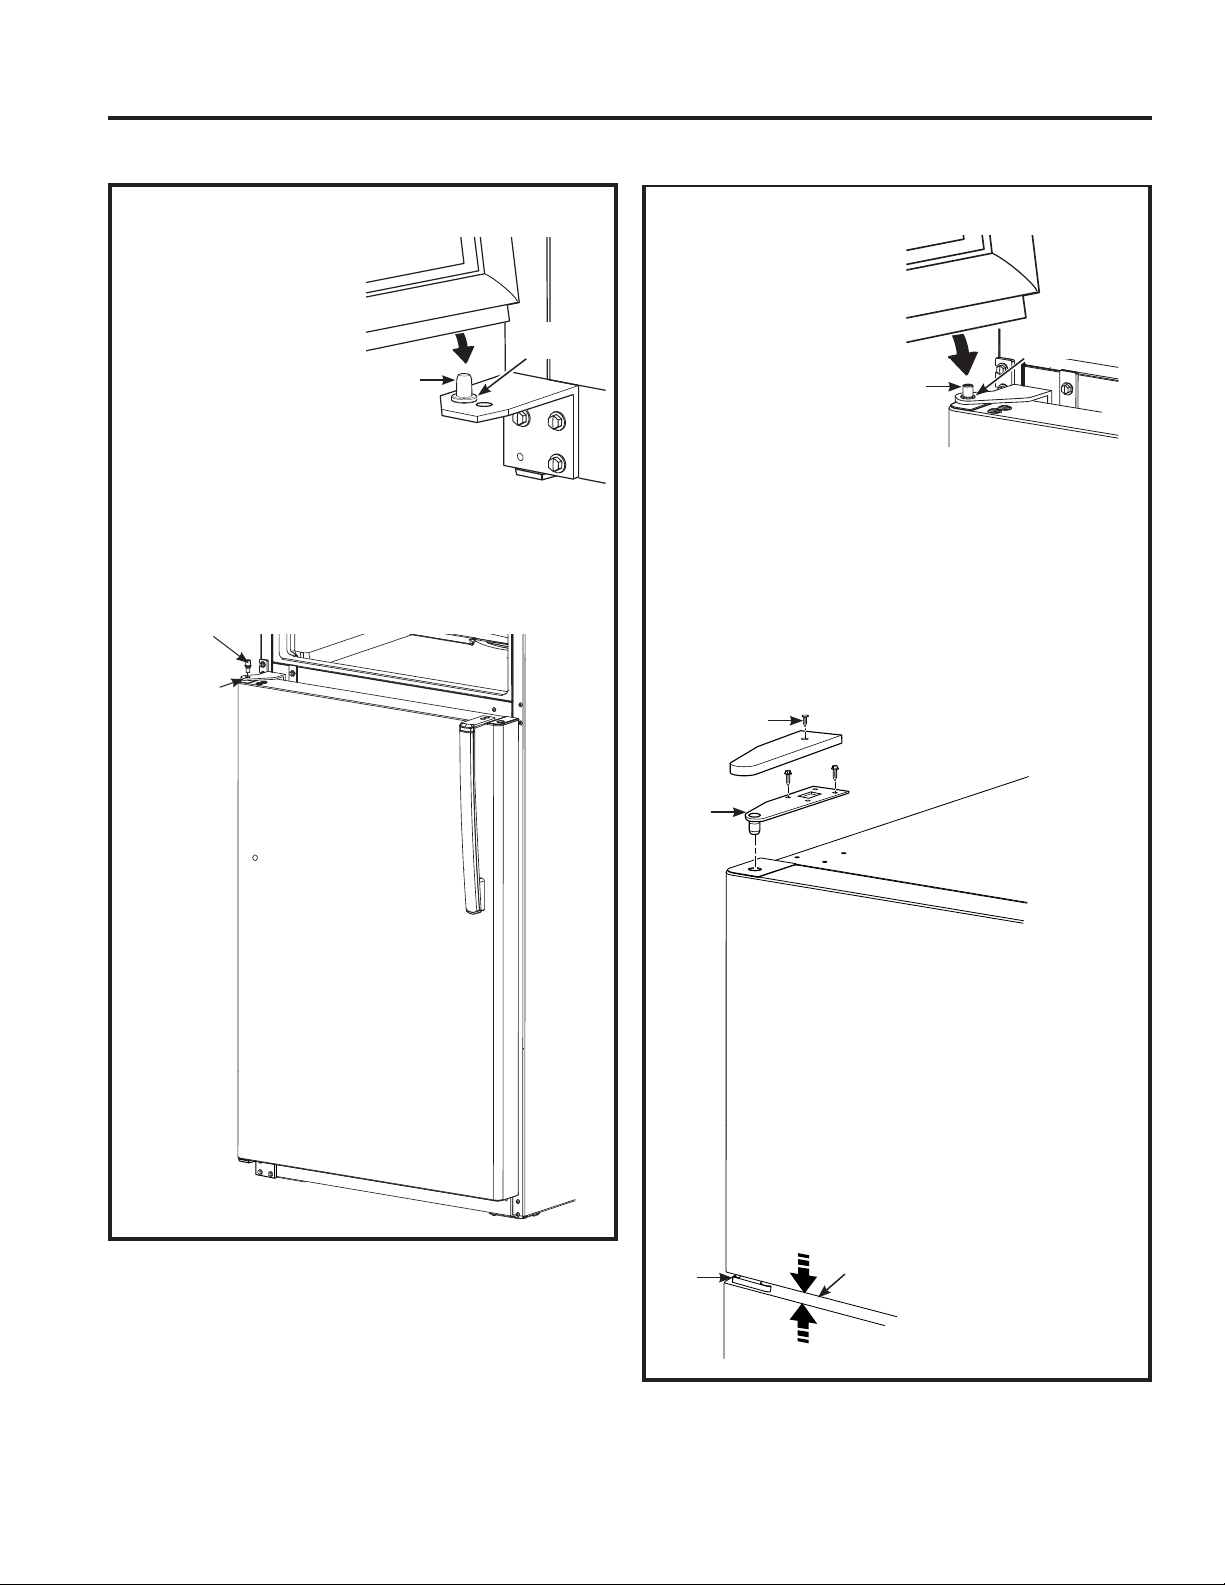
12 49-60761-2
VOLVER A COLGAR LAS
PUERTAS
(Cont.)
3. Baje la
puerta del congelador al
pasador de la bisagra
central. Asegúrese de
que la arandela esté
correctamente colocada en
el perno.
4. Incline la puerta hacia el gabinete, levantando la bisagra
superior de modo que el perno calce en la ficha sobre la
parte superior de la puerta.
5. Asegúrese de que la puerta esté apenas sobre la parte
superior del gabinete y que la brecha entre las puertas
sea pareja a lo largo del frente. Asegure los tornillos de
la bisagra superior. No ajuste estos tornillos en exceso.
Presione los mismos hasta que queden ajustados, y
luego dé medio giro adicional.
6. Reemplace la tapa de la bisagra superior.
Instrucciones de instalación
INSTRUCCIONES DE INSTALACIÓN
CÓMO INVERTIR EL VAIVÉN DE LA PUERTA (CONT.)
VOLVER A COLGAR LAS
PUERTAS
1. Baje la puerta de alimentos
frescos al perno de la
bisagra inferior. Asegúrese
de que la arandela esté
correctamente colocada en
el perno.
2. Incline la puerta hacia el
gabinete. A medida que
la puerta se coloca en su
posición, Alinee la ficha en
la puerta con el agujero en
la bisagra central. Coloque el perno de la bisagra central
en el agujero de la bisagra central y ajuste la misma con
una llave de boca de 3/8”. Asegúrese de que la arandela
esté en la parte superior del perno de la bisagra.
Bisagra
Superior
Tapa de
la Bisagra
Superior
Bisagra
Central
Brecha
Perno de la
Bisagra con
Arandela
Bisagra
Central
Plastic
Washer
Hinge
Pin
Hinge
Pin
Plastic
Washer
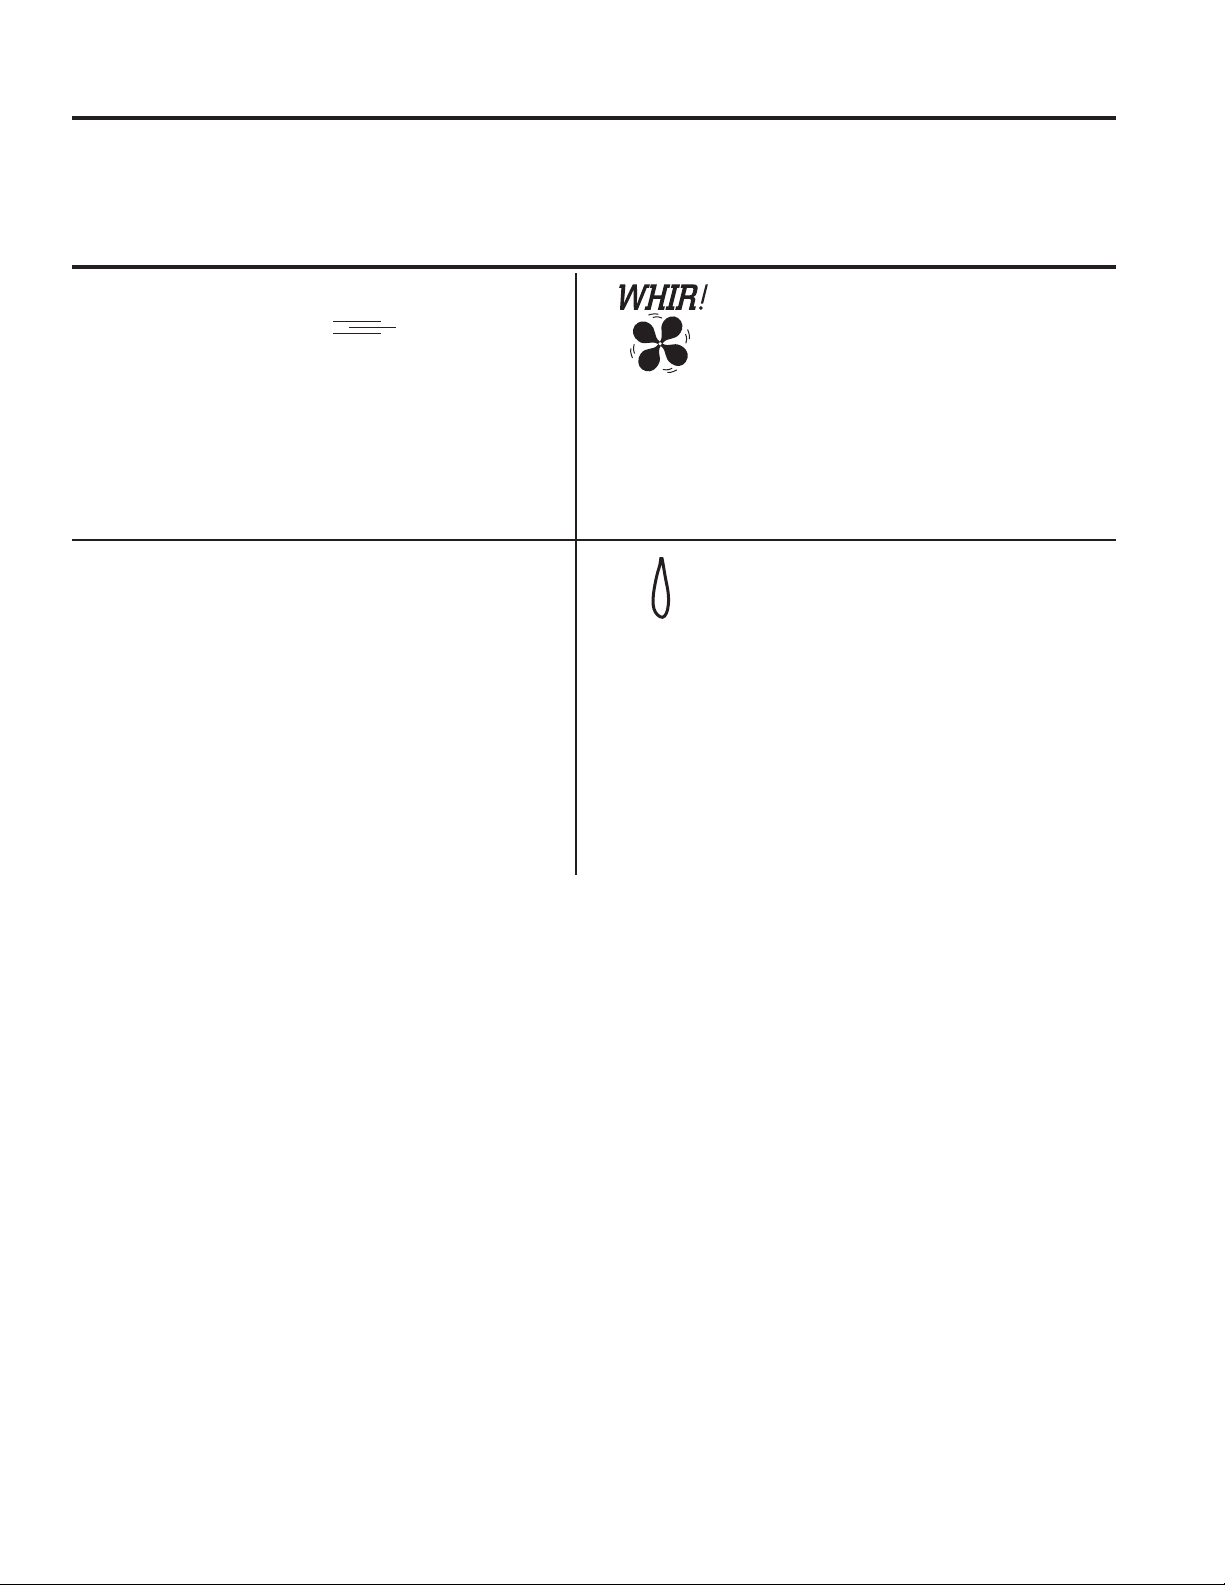
49-60761-2 13
Sonidos De Funcionamiento Normal
SOLUCIÓN DE PROBLEMAS: SonidosDeFuncionamientoNormal
■ Es posible que el nuevo
compresor de alta
efectividad funcione más
rápido y por más tiempo
que aquel de su refrigerador
antiguo, y es posible que escuche un zumbido o sonido
de pulsación en un tono alto mientras está funcionando.
■ Esposiblequeescuchegorgoteosalcerrarlapuerta.
Esto se debe al equilibrio de la presión dentro del
refrigerador.
El sonido de los refrigeradores nuevos es diferente al de aquellos más antiguos. Los refrigeradores modernos
cuentan con más funciones y utilizan una tecnología más nueva.
■ Es posible que escuche los ventiladores
girar en altas velocidades.
Esto sucede cuando el refrigerador se
enchufa por primera vez, cuando las
puertas se abren con frecuencia o cuando
una gran cantidad de comida es agregada
a los compartimientos del refrigerador o del
freezer. Los ventiladores están ayudando a
mantener las temperaturas correctas.
CHASQUIDOS,ESTALLIDOS,
CRUJIDO,GORJEOS
■ Puedeescucharsonidoscomodecrujidooestallidos
cuando el refrigerador se conecta por primera vez. Esto
pasa a medida que el refrigerador se enfría hasta la
temperatura correcta.
■ Elcompresorpuedecausarunchasquidooungorjeo
cuando intenta volver a arrancar (esto puede tomar hasta
5 minutos).
■ Expansiónycontraccióndelasbobinasduranteo
después del ciclo de descongelación puede causar
sonidos como de crujido o estallidos.
■ Enmodelosconmáquinadehielos,despuésde
completar un ciclo de hacer hielo, se pueden escuchar
los cubos de hielo cuando caen a la bandeja de hielos.
SONIDOSDEAGUA
■ Elfluidodelrefrigeranteatravésdelasbobinaspuede
producir un sonido de borboteo como de agua hirviendo.
■ Elaguaquecaeenelcalentadordedescongelaciónpuede
causar un chisporroteo, estallido o zumbido durante el ciclo
de descongelación.
■ Unruidodeaguacayendosepuedeescucharduranteel
ciclo de descongelación a medida que el hielo se derrite del
evaporador y fluye hacia la bandeja de drenaje.
■ Elcierredelaspuertaspuedeproducirunsonidodegorgoteo
debido a la estabilización de la presión.
¿Escuchas lo que yo escucho? Estos sonidos son normales.
HUMMM...
WHOOSH...
14 49-60761-2
Solución de problemas.. Antes de Solicitar el Servicio Técnico
SOLUCIÓN DE PROBLEMAS
¡Ahorre tiempo y dinero! Primero revise los cuadros que aparecen en las siguientes páginas y es posible que no necesite solicitar
reparaciones.Desernecesario,podráprogramarelserviciotécnicovisitándonosenGEAppliances.com o llamando al
800.432.2737.
Problema Causas Posibles Qué Hacer
El refrigerador no opera El refrigerador está en el ciclo de
descongelado.
Espere unos 30 minutos hasta que el ciclo
de descongelado termine.
El dial de control de la temperatura está en la
posición OFF.
Ajuste los controles en una configuración de
temperatura inferior.
El refrigerador está desconectado. Empuje el enchufe completamente en el
tomacorriente.
El fusible está quemado / el interruptor
automático se saltó
Reemplace el fusible o fije el interruptor
El motor opera con frecuencia
por largos periodos o ciclos
de forma intermitente (Los
refrigeradores modernos con
más espacio de almacenamiento
y un congelador más grande
requieren de más tiempo de
operación. Arrancan y paran
con frecuencia para mantener
temperaturas uniformes.)
Normal cuando el refrigerador se conecta
inicialmente.
Espere 24 horas hasta que el refrigerador
se enfríe por completo.
Con frecuencia ocurre cuando grandes
cantidades de alimentos se almacenan en el
refrigerador.
Esto es normal.
La puerta se deja abierta. Revise si un paquete está reteniendo la
puerta abierta.
El clima caliente o abrir la puerta
frecuentemente.
Esto es normal.
El dial de control de la temperatura están en
en el nivel más frío.
Lea la sección del Control de Temperatura.
Compartimiento del refrigerador
o congelador demasiado cálido
El control de temperatura no se fijó bastante
frío.
Lea la sección del Control de Temperatura.
(Si fue instalada).
Clima caluroso o aperturas frecuentes de la
puerta.
Configure el control de temperatura un
nivel más frío. Lea la sección del Control de
Temperatura.
La puerta se deja abierta. Revise si un paquete está reteniendo la
puerta abierta.
Hielo o cristales de hielo en los
alimentos congelados (El hielo
dentro de un paquete es normal)
La puerta se deja abierta. Revise si un paquete está reteniendo la
puerta abierta.
Abrir la puerta con mucha frecuencia o por
mucho tiempo.
Esto es normal.
El divisor entre los
compartimientos
del refrigerador y del freezer se
siente
caliente
El sistema de ahorro de energía automático
hace circular líquido caliente alrededor
del extremo frontal del compartimiento del
freezer.
Esto ayuda a evitar la condensación en la
parte exterior.
La maquina de hielos automática
no funciona(Si fue instalada).
El interruptor de corriente de la máquina
de hielos se encuentra en la posición OFF
(Apagado).
Congureelinterruptordecorrienteenla
posición ON (Encendido).
El suministro del agua está apagado o no
está conectado.
Consulte la sección de Instalación de la
tubería de agua, en las instrucciones de
instalación de la máquina de hielos.
El compartimiento del congelador no es muy
frío.
Espere 24 horas para que el refrigerador se
enfríe completamente.
Hay cubos amontonados en el recipiente de
almacenamiento que causan que la máquina
de hielos se apague.
Nivele los cubos con la mano.
Hay cubos de hielos atorados en la máquina
de hielos.
Apague la máquina de hacer hielo, retire los
cubos, y vuelva a encender la máquina de
hacer hielo.
Los cubos de hielo tienen olor /
sabor
El recipiente de almacenamiento de hielos
necesita limpieza.
Desocupeelrecipienteylávelo.Deseche
los cubos viejos.
Hay alimentos que trasmiten olor / sabor a
los cubos de hielo.
Envuelva bien las comidas.
El interior del refrigerador necesita limpieza. Lea la sección de Cuidado y limpieza
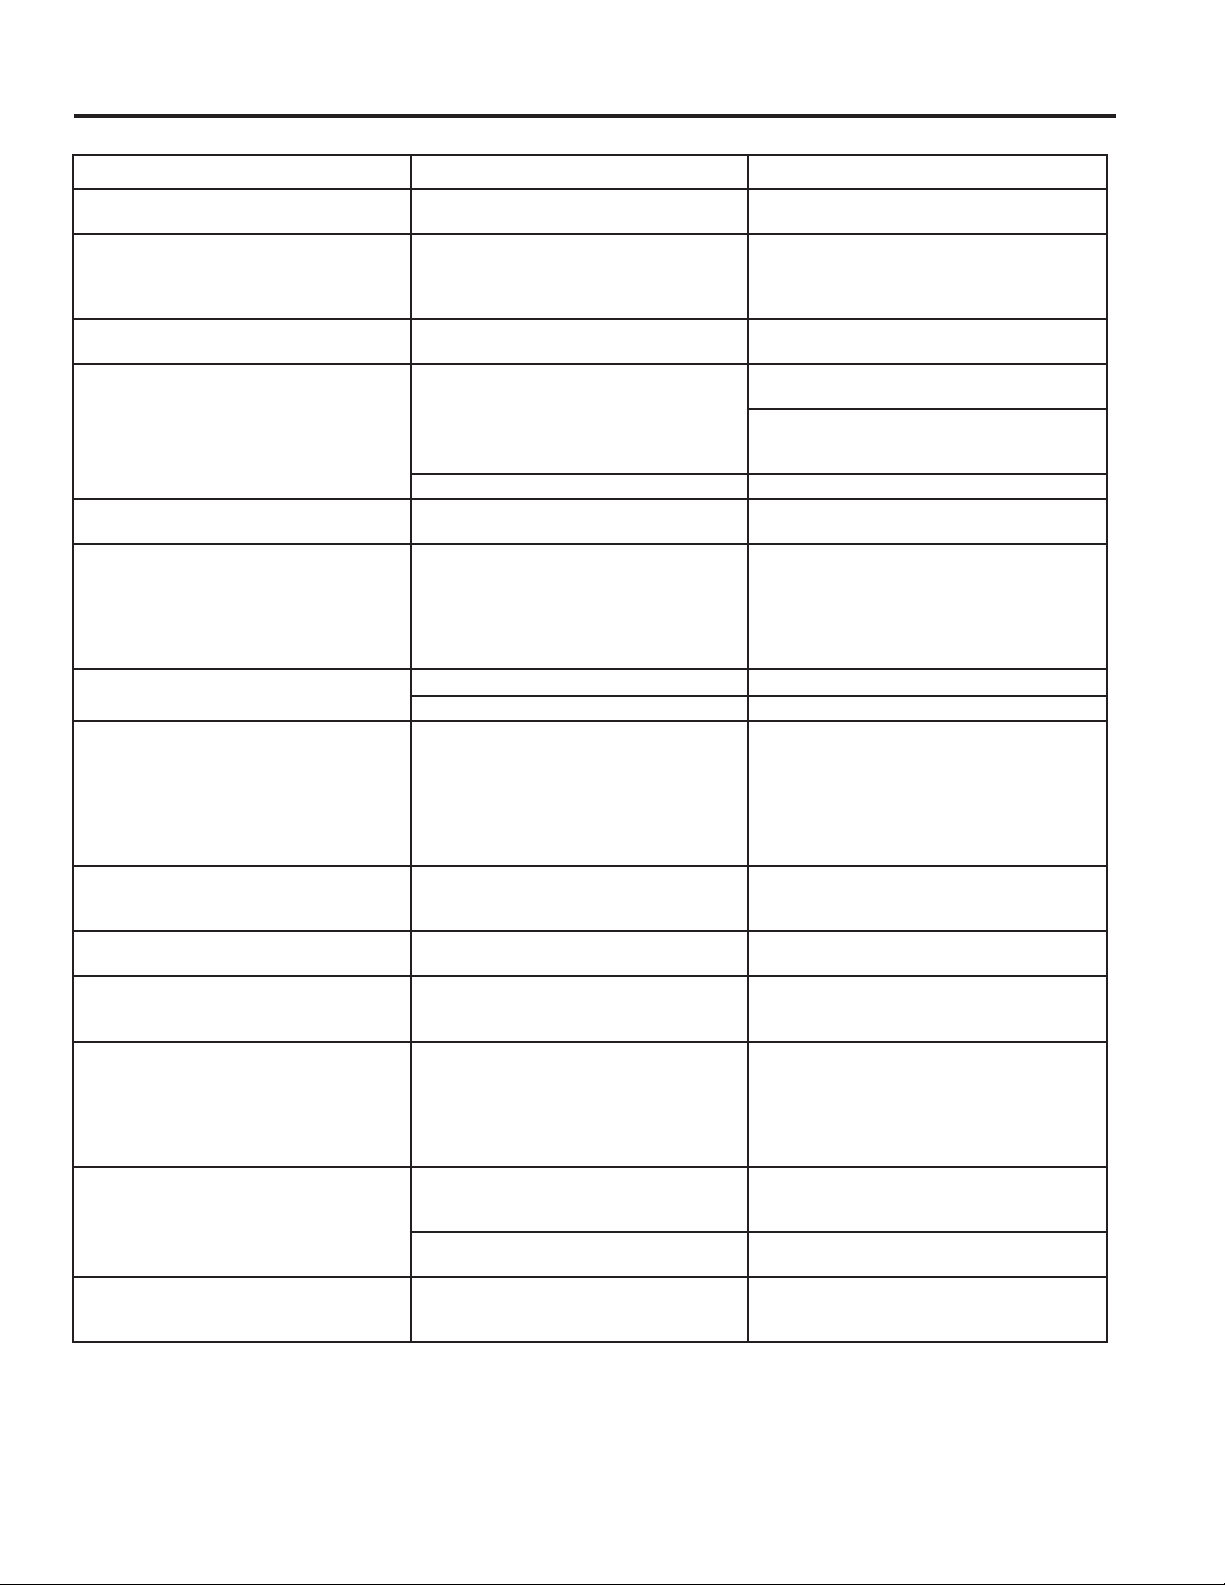
49-60761-2 15
Solución de problemas... Antes de Solicitar el Servicio Técnico
Problema Causas Posibles Qué Hacer
Congelamiento lento de los cubos de
hielo
La puerta se deja abierta. Revise si un paquete está reteniendo la
puerta abierta.
Sonido de zumbido frecuente de la
máquina de hielos (si la máquina de
hielos fue instalada)
El interruptor de la máquina de hielos
se encuentra en la posición ON
(Encendido), pero el suministro de agua
al refrigerador no fue conectado.
CongureelinterruptorenlaposiciónOFF
(Apagado). Mantenerlo en la posición ON
(Encendido) dañará la válvula de agua.
Sin producción de cubos de hielo (si
la máquina de hielos fue instalada)
Está tapada la línea de agua o la llave
de paso.
Llame a un plomero.
El refrigerador huele Alimentos transmitiendo olores al
refrigerador.
Alimentos con olores fuertes deben estar
tapados.
Guarde una caja de bicarbonato de sodio
en el refrigerador; cámbiela cada tres
meses.
El interior requiere limpieza. Lea la sección de Cuidado y limpieza.
Se forma humedad en la superficie
del refrigerador
No es extraño durante periodos de alta
humedad.
Sequelasupercie.
Humedad se forma al interior
(en clima húmedo, el aire lleva la
humedad al refrigerador cuando las
puertas se abren)
Debidoalaltoniveldehumedad
en el refrigerador, es posible que
ocasionalmente se empañe o que se
produzcan pequeñas cantidades de
humedad en el compartimiento del
refrigerador.
Esto es normal y puede variar
dependiendo de las cantidades de comida
y condiciones climáticas. Seque con una
toalla de papel si lo desea.
La luz interna no funciona No hay corriente en el tomacorriente. Reemplace el fusible o reinicie el disyuntor.
La lámpara se quemó. Lea la sección de Cuidado y limpieza.
Aire caliente de la parte de abajo del
refrigerador
Motor de enfriamiento normal del flujo
del aire. En el proceso de refrigeración,
es normal que salga calor de la parte
inferior del refrigerador. Algunas
cubiertas de piso son sensibles y se
decolorarán ante estas temperaturas
normales y seguras.
Esto es normal.
El refrigerador nunca se apaga pero
las temperaturas están bien
La descongelación adaptable mantiene
el compresor funcionando durante las
aperturas de la puerta.
Esto es normal. El refrigerador concluirá su
ciclo cuando la puerta permanezca cerrada
durante 2 horas.
La puerta no cierra correctamente La junta de la puerta del lado de la
bisagra se está adhiriendo o doblando.
Apliqueparanasobrelacaradelajunta.
La puerta no se cierra sola Las patas niveladoras necesitan ajuste. Consulte la sección de Ruedas y Patas
Niveladoras en la sección de Instrucciones
de Instalación.
La puerta del congelador
se abre cuando la puerta del
refrigerador está cerrada
Esto es normal si después de abrirse, la
puerta del congelador se cierra sola.
Esto indica que la puerta del freezer está
bien sellada. Si la puerta del freezer no
se cierra de forma automática luego de su
apertura instantánea, entonces consulte la
sección sobre La puerta no se cierra sola,
más arriba.
La comida se congela en el
refrigerador
La comida está demasiado cerca de la
ventilación de aire, en la parte trasera
del refrigerador.
Aleje la comida de la ventilación de aire.
El control del refrigerador está
demasiado frío.
Mueva el control del refrigerador a una
temperatura más cálida.
La manija está floja / la manija tiene
una
brecha
La manija debe ajustarse. Consulte la sección sobre Inversión de
las Manijas de la Puerta en la sección de
Instrucciones de Instalación.
SOLUCIÓN DE PROBLEMAS
16 49-60761-2
GARANTÍA LIMITADA
Grape aquí su recibo. Se requiere facilitar prueba de la fecha
de compra original para obtener un servicio bajo la garantía.
Por el Período de: GE Appliances Reemplazará
Un Año
Desdelafechadela
compra original
Cualquier parte del refrigerador que falle debido a defectos en los materiales o en la fabricación.
Duranteestagarantía limitada de un año, GE Appliances también proporcionará, sin costo
alguno, toda la mano de obra y el servicio relacionado para reemplazar partes defectuosas.
■ Viajes de servicio a su hogar para enseñarle cómo
usar el producto.
■ Instalación o entrega inapropiada, o mantenimiento
impropio.
■ Fallas del producto si hay abuso, mal uso, o uso
para otros propósitos que los propuestos, o uso
para fines comerciales.
■ Pérdida de alimentos por averías.
■ Reemplazo de fusibles de su hogar o reajuste de
interruptores de circuito.
■ Daños sobre el acabado, tales como óxido sobre
la superficie, deslustres o manchas pequeñas no
informadas dentro de las 48 horas luego de la
entrega.
■ Reemplazo del cartucho del filtro de agua, si
incluido, debido a presión de agua afuera de las
limites de operación especificados o sedimento
excesivo en el suministro de agua.
■ Reemplazo de las bombillas, si incluidas, o del
cartucho de filtro de agua, si incluido, diferente a
como se especifica anteriormente.
■ Daño al producto causado por accidente, fuego,
inundaciones o actos de Dios.
■ Incidental or consequential damage caused by
possible defects with this appliance.
■ Producto no accesible para facilitar el servicio
requerido.
■ Los daños causados por un filtro de agua Marca
no GE Appliances.
Esta garantía no cubre:
Crosley.com
Su electrodoméstico está cubierto por una garantía limitada, como figura a continuación, de GE Appliances. Todo
el servicio de garantía es provisto por nuestros Centros de Servicio de Fabricación de Electrodomésticos GE
Appliances, o por un técnico autorizado del servicio técnico. Para programar el servicio técnico, comuníquese con
Crosley al 800.544.4780. Cuando llame para solicitar el servicio técnico, tenga los números de serie y modelo
disponibles.
Garantía limitada del refrigerador de Crosley
®
Corporation
EXCLUSIÓN DE GARANTÍAS IMPLÍCITAS
Su única y exclusiva alternativa es la reparación del producto, como se indica en la Garantía Limitada. Las
garantías implícitas, incluyendo garantías implícitas de comerciabilidad o conveniencia sobre un propósito
particular, se limitan a un año o al período más corto permitido por la ley.
Esta garantía se extiende al comprador original y a cualquier dueño subsiguiente de productos comprados para
uso hogareño dentro de EE.UU. Si el producto está en un área donde no se encuentra disponible un Proveedor
Autorizado del Servicio Técnico de GE Appliances, usted será responsable por el costo de un viaje o se podrá
requerir que traiga el producto a una ubicación del Servicio Técnico de GE Appliances Autorizado para recibir el
servicio. En Alaska, la garantía excluye el costo de envío o llamadas del servicio a su hogar.
Algunos estados no permiten la exclusión o limitación de daños fortuitos o consecuentes. Esta garantía le da
derechos legales específicos y es posible que tenga otros derechos legales que varían entre un estado y otro. Para
conocer cuáles son sus derechos legales, consulte a la oficina de asuntos del consumidor local o estatal o al Fiscal
de su estado.
Garante: GE Appliances, a Haier company
Louisville, KY 40225
Garantía Extendida de Crosley®
Además de la garantía que figura más arriba, solicítele a su vendedor minorista o en Crosley.com/warranty la
Garantía Limitada Extendida por 10 Años de Crosley, la cual es provista sin costo adicional. Esta garantía
cubrirá su producto cuando la garantía inicial del fabricante caduque luego de 10 años. Para conocer detalles
específicos, por favor comuníquese con Crosley a través de Crosley.com o llame a Crosley al 800.356.5268.
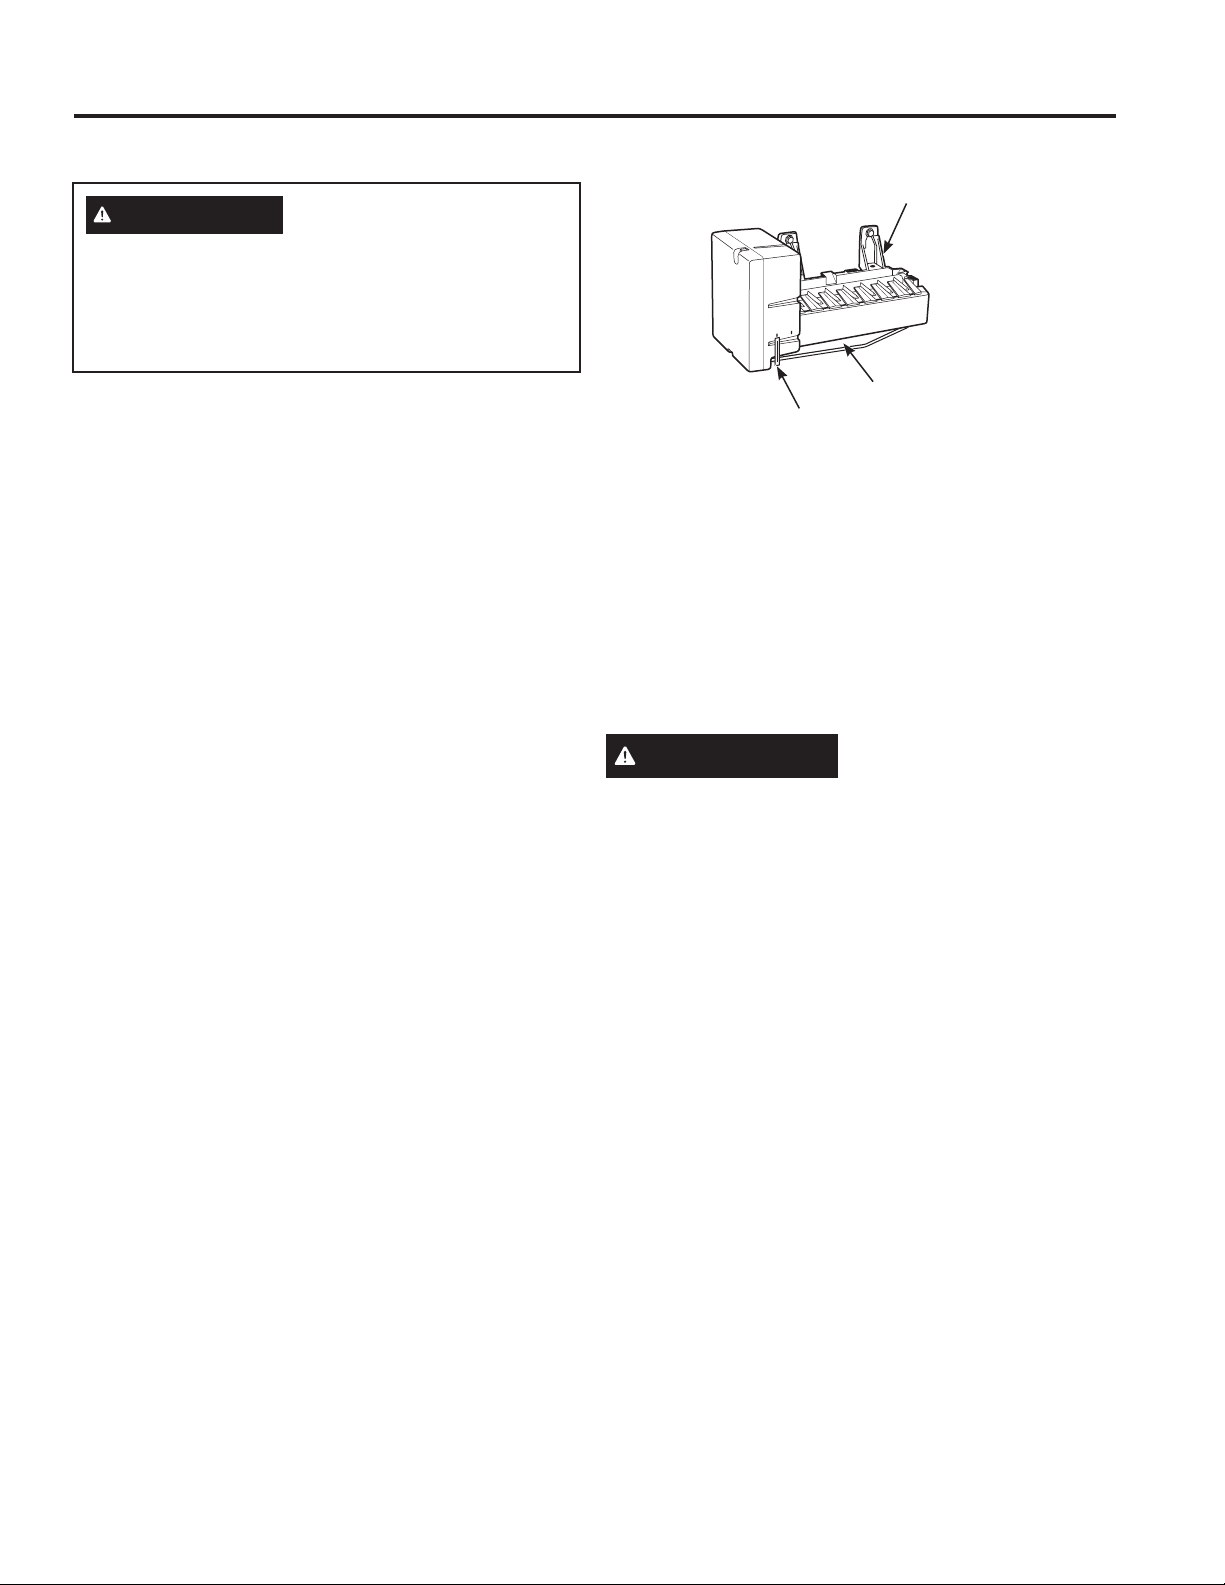
49-60761-2 17
Kit de Accesorios de la Máquina de Hielos:
ElaccesoriodelamáquinadehielosIM4Destádisponiblepor
un costo adicional. Para la instalación de la máquina de hielos,
siga la Instrucción de Instalación "V", usando el ensamble del
tubo de llenado corto (8") , a menos que el tubo de llenado ya
se encuentre instalado.
Para realizar una orden, llame a GE Appliances al
800.432.2737 o visite GEAppliances.com.
AUTOMATIC ICE MAKER
La máquina de hielos producirá siete cubos por ciclo,
aproximadamente entre 70–100 cubos en un período de 24
horas, dependiendo de la temperatura en el compartimiento
del congelador, la temperatura del sitio, las veces que se abra
la puerta y otras condiciones.
Si el refrigerador se opera antes de hacer la conexión del agua
hacia la máquina de hielos, fije el interruptor de corriente en la
posición de OFF (apagado).
Cuando el refrigerador se haya conectado al suministro de
agua, fije el interruptor de corriente en la posición de ON
(encendido).
La máquina de hielos se llenará de agua cuando se enfríe y
llegue a los 15°F. Un refrigerador recién instalado puede tomar
desde 12 hasta 24 horas para empezar a hacer cubos de
hielo.
Una vez que la máquina de hielos comienza a producir el hielo,
podrá tardar hasta 48 horas en llenar el cubo, dependiendo
de las configuraciones de temperatura y de la cantidad de
aperturas de la puerta.
Escuchará un zumbido cada vez que la máquina de hielos se
llene de agua.
NOTA:Desechelosprimeroscubosdehieloparapermitirque
la tubería se limpie.
Asegúrese de que nada interfiera con el recorrido del brazo
indicador.
Cuando el recipiente se llena hasta el nivel del brazo indicador,
la máquina dejará de producir hielos.
Es normal que varios cubos se peguen.
Si el hielo no se utiliza frecuentemente, los cubos de hielo
viejos se volverán oscuros, con sabor a viejo, se reducirán de
tamaño y se fusionarán.
PRECAUCIÓN
Evite el contacto con las partes
en movimiento del mecanismo expulsor o con el elemento
de calefacción (ubicado en la parte inferior de la máquina de
hielos) que expulsa los cubos. No coloque los dedos ni las
manos en el mecanismo de la máquina de hielos automática
mientras el refrigerador esté enchufado.
Accesorio
ON
OFF
Máquina de
hielos
Brazo indicador
Interruptor
de corriente
ACCESORIO
ADVERTENCIA
Realice la conexión a un suministro de agua potable
únicamente.
Se requiere un suministro de agua fría para el
funcionamiento de la máquina de hielos automática. La
presión del agua deberá estar entre 40 y 120 psi (275-827
kilopascales).

18 49-60761-2
Impreso en Estados Unidos
SOPORTE PARA EL CONSUMIDOR
Soporte para el Consumidor
Crosley Website
¿Desearealizarunaconsultaonecesitaayudaconsuelectrodoméstico?VisiteelsitioWebdeCroslydurantelas24horas,
cualquier día del año en Crosley.com. Usted también puede comprar otros grandes productos de Crosley en nuestro sitio Web.
Registre su Electrodoméstico
¡Registre su electrodoméstico nuevo a través de Internet, según su convenienciaen crosley.com/mycrosley. Un registro puntual
de su producto permitirá una mejor comunicación y un servicio más puntual de acuerdo con los términos de su garantía, en caso
de surgir la necesidad. También puede enviar una carta en la tarjeta de inscripción preimpresa que se incluye con el material
embalado.
Servicio Programado
El servicio de reparación de Crosley está a sólo un paso de su puerta. Para programar el servicio técnico, comuníquese al
800.544.4780 durante el horario de atención comercial.
Garantía Limitada de 10 Años de CROSLEYCARE
®
Cuando compre un electrodoméstico Crosley, recibirá una de las mejores garantías disponibles en la industria de
electrodomésticos. Para más información, visite Crosley.com/warranty. Visite Crosley.com/mycrosley y registre la garantía
limitada extendida.
Piezas y Accesorios
Aquellos individuos calificados para realizar el servicio técnico de sus propios electrodomésticos podrán solicitar el envío de
piezasoaccesoriosdirectamenteasushogares(seaceptanlastarjetasVISA,MasterCardyDiscover).Ordenehoyatravésde
Internet durante las 24 horas, todos los días. Visita GEApplianceparts.com o de forma telefónica al 877.959.8688 durante el
horario de atención comercial.
Las instrucciones que figuran en este manual cubren los procedimientos que serán realizados por cualquier usuario.
Otros servicios técnicos generalmente deben ser derivados a personal calificado del servicio. Se deberá tener cuidado,
ya que una reparación indebida podrá hacer que el funcionamiento no sea seguro.