
GEAppliances.com
Refrigerators
Top-Freezer
197D8622P001 49-60655-3 09-13 GE
Safety Instructions ..........2–4
Operating Instructions
Temperature Controls ..............5
Shelves .........................5, 6
Storage Drawers ................6, 7
Automatic Icemaker ................7
Care and Cleaning .................8
Installation Instructions
Preparing to Install
the Refrigerator ....................9
Water Line Installation ........10–12
Reversing the Door Swing .....13–16
Troubleshooting Tips
Normal Operating Sounds ........17
Before You Call For Service ...... 18, 19
Consumer Support
Refrigerator Warranty .......... 23
Consumer Support ...... Back Cover
Write the model and serial
numbers here:
Model # ____________________
Serial # _____________________
<RXFDQ¿QGWKHPRQDODEHORQ
the upper left side of the fresh food
compartment.
Models 16, 17, 18
Owner’s Manual and
Installation Instructions
2
DESECHE EL REFRIGERADOR CORRECTAMENTE
(OHQFLHUURRVRIRFDFLyQGHQLxRVQRHVXQSUREOHPD
del pasado. Los refrigeradores desechados o
DEDQGRQDGRVVRQWRGDYtDSHOLJURVLQFOXVRVL
VyORYDQDSHUPDQHFHU´XQRVSRFRVGtDVµ6LYD
a desechar su refrigerador, por favor siga las
siguientes instrucciones para ayudar a evitar
accidentes.
Antes de desechar su viejo refrigerador o
congelador:
Retire las puertas y deséchelas de forma
separada.
Deje los estantes en su lugar de manera que los
QLxRVQRSXHGDQVXELUIiFLOPHQWH
Si el refrigerador tiene una llave, póngala en uso.
Refrigerantes
Todos los aparatos de refrigeración contienen
UHIULJHUDQWHVORVFXDOHVVHGHEHQUHWLUDUDQWHVGH
la eliminación del producto de acuerdo con la ley
federal. Si va a desechar algún aparato antiguo de
UHIULJHUDFLyQFRQVXOWHFRQODFRPSDxtDDFDUJR
GHGHVHFKDUHODSDUDWRSDUDVDEHUTXpKDFHU
¡
PELIGRO! RIESGO DE ENCIERRO DE NIÑOS
PROPER DISPOSAL OF THE REFRIGERATOR
&KLOGHQWUDSPHQWDQGVXȺRFDWLRQDUHQRWSUREOHPVRI
WKHSDVW-XQNHGRUDEDQGRQHGUHIULJHUDWRUVDUHVWLOO
GDQJHURXV«HYHQLIWKH\ZLOOVLWIRU´MXVWDIHZGD\Vµ,I
you are getting rid of your old refrigerator, please follow
WKHLQVWUXFWLRQVEHORZWRKHOSSUHYHQWDFFLGHQWV
Before You Throw Away Your Old
Refrigerator or Freezer:
7DNHRȺWKHGRRUV
Leave the shelves in place so that children may not
HDVLO\FOLPELQVLGH
,IWKHUHIULJHUDWRUKDVDORFNPDNHLWXQXVDEOH
Refrigerants
All refrigeration products contain refrigerants, which
XQGHUIHGHUDOODZPXVWEHUHPRYHGSULRUWRSURGXFW
disposal. If you are getting rid of an old refrigeration
product, check with the company handling the
GLVSRVDODERXWZKDWWRGR
DANGER! RISK OF CHILD ENTRAPMENT
USO DE CABLES DE EXTENSIÓN
'HELGRDSHOLJURVSRWHQFLDOHVGHVHJXULGDGEDMRFLHUWDVFRQGLFLRQHVQRVRSRQHPRVDOXVRGHFDEOHVGHH[WHQVLyQ
6LQHPEDUJRVLGHEHXVDUXQFDEOHGHH[WHQVLyQHVDEVROXWDPHQWHQHFHVDULRTXHVHDXQWLSRGHFDEOHGH
H[WHQVLyQSDUDDSDUDWRVFRQFRQH[LyQDWLHUUDGHWUHVFDEOHVTXHHVWpHQODOLVWDGH8/HQORV(VWDGRV8QLGRVRHQ
ODOLVWD&6$HQ&DQDGiTXHWHQJDXQHQFKXIHGHWLSRFRQH[LyQDWLHUUD\VDOLGD\TXHHOJUDGRHOpFWULFRGHOFDEOH
VHDGHDPSHULRVPtQLPR\YROWLRV
USE OF EXTENSION CORDS
Because of potential safety hazards under certain conditions, we strongly recommend against the
XVHRIDQH[WHQVLRQFRUG
+RZHYHULI\RXPXVWXVHDQH[WHQVLRQFRUGLWLVDEVROXWHO\QHFHVVDU\WKDWLWEHD8/OLVWHGZLUHJURXQGLQJW\SH
DSSOLDQFHH[WHQVLRQFRUGKDYLQJDJURXQGLQJW\SHSOXJDQGRXWOHWDQGWKDWWKHHOHFWULFDOUDWLQJRIWKHFRUGEH
DPSHUHVPLQLPXPDQGYROWV
IMPORTANT SAFETY INFORMATION.
READ ALL INSTRUCTIONS BEFORE USING.
IMPORTANTE INFORMACIÓN DE SEGURIDAD.
LEA TODAS LAS INSTRUCCIONES ANTES DE SU USO.
IMPORTANT SAFETY INFORMATION.
READ ALL INSTRUCTIONS BEFORE USING. GEAppliances.com
WARNING!
8VHWKLVDSSOLDQFHRQO\IRULWVLQWHQGHGSXUSRVHDVGHVFULEHGLQWKLV2ZQHU·V0DQXDO
SAFETY PRECAUTIONS
:KHQXVLQJHOHFWULFDODSSOLDQFHVEDVLFVDIHW\SUHFDXWLRQVVKRXOGEHIROORZHGLQFOXGLQJWKHIROORZLQJ
7KLVUHIULJHUDWRUPXVWEHSURSHUO\LQVWDOOHGDQGORFDWHG
LQDFFRUGDQFHZLWKWKH,QVWDOODWLRQ,QVWUXFWLRQVEHIRUH
it is used.
'RQRWDWWHPSWWRRUDOORZFKLOGUHQWRFOLPEVWDQG
or hang on the shelves in the refrigerator. They
could damage the refrigerator and seriously injure
themselves.
Do not touch the cold surfaces in the freezer
compartment when hands are damp or wet. Skin may
VWLFNWRWKHVHH[WUHPHO\FROGVXUIDFHV
'RQRWVWRUHRUXVHJDVROLQHRURWKHUÀDPPDEOH
vapors and liquids in the vicinity of this or any other
appliance.
.HHS¿QJHUVRXWRIWKH´SLQFKSRLQWµDUHDVFOHDUDQFHV
EHWZHHQWKHGRRUVDQGEHWZHHQWKHGRRUVDQG
FDELQHWDUHQHFHVVDULO\VPDOO%HFDUHIXOFORVLQJGRRUV
when children are in the area.
8QSOXJWKHUHIULJHUDWRUEHIRUHFOHDQLQJDQGPDNLQJ
repairs.
NOTE: :HVWURQJO\UHFRPPHQGWKDWDQ\VHUYLFLQJEH
SHUIRUPHGE\DTXDOL¿HGLQGLYLGXDO
In refrigerators with automatic icemakers, avoid
contact with the moving parts of the ejector
PHFKDQLVPRUZLWKWKHKHDWLQJHOHPHQWORFDWHGRQ
WKHERWWRPRIWKHLFHPDNHUWKDWUHOHDVHVWKHFXEHV
'RQRWSODFH¿QJHUVRUKDQGVRQWKHDXWRPDWLF
icemaking mechanism while the refrigerator is
plugged in.
Turning the temperature control to the OFF position
does not remove power to the light circuit.
Do not refreeze frozen foods which have thawed
completely.
Before replacing a burned-out light bulb, the
refrigerator should be unplugged in order to avoid
FRQWDFWZLWKDOLYHZLUH¿ODPHQW$EXUQHGRXWOLJKW
PD\EUHDNZKHQEHLQJUHSODFHG
IMPORTANTE INFORMACIÓN DE SEGURIDAD.
LEA TODAS LAS INSTRUCCIONES ANTES DE SU USO.
¡ADVERTENCIA!
8VHHVWHDSDUDWRVyORFRQHO¿QSDUDHOFXDOIXHGLVHxDGRFRPRVHGHVFULEHHQHVWH0DQXDOGHOSURSLHWDULR
MESURES DE SÉCURITÉ
$OXVDUDSDUDWRVHOpFWULFRVVHGHEHQVHJXLUSUHFDXFLRQHVEiVLFDVGHVHJXULGDGLQFOX\HQGRODVVLJXLHQWHV
No intente ni permita que los niños se trepen, paren
o cuelguen de los estantes del refrigerador. Este
UHIULJHUDGRUGHEHLQVWDODUVH\XELFDUVHFRUUHFWDPHQWH
según las Instrucciones de instalación antes de su
uso.
No intente ni permita que los niños se trepen, paren
RFXHOJXHQGHORVHVWDQWHVGHOUHIULJHUDGRU3RGUtDQ
dañar el refrigerador y sufrir graves daños.
1RWRTXHODVVXSHU¿FLHVIUtDVHQHOFRPSDUWLPLHQWR
del congelador con las manos húmedas o
PRMDGDV/DSLHOVHSXHGHSHJDUDHVWDVVXSHU¿FLHV
H[WUHPDGDPHQWHIUtDV
No almacene o use gasolina u otros vapores y
OtTXLGRVLQÀDPDEOHVHQODViUHDVFHUFDQDVDHVWHRD
cualquier otro aparato.
0DQWHQJDORVGHGRVDOHMDGRVGHODViUHDVHVWUHFKDV
los espacios entre las puertas y entre las puertas y
ORVJDELQHWHVVRQQHFHVDULDPHQWHSHTXHxRV7HQJD
cuidado al cerrar las puertas cuando haya niños en el
iUHD
Desconecte el refrigerador antes de limpiar y hacer
reparaciones.
127$5HFRPHQGDPRVHQIiWLFDPHQWHTXHFXDOTXLHU
VHUYLFLRVHDUHDOL]DGRSRUXQLQGLYLGXRFDOL¿FDGR
(QORVUHIULJHUDGRUHVFRQPiTXLQDVGHKLHOR
DXWRPiWLFDVHYLWHHOFRQWDFWRFRQOas partes en
movimiento del mecanismo eyector, o con el
HOHPHQWRGHFDOHIDFFLyQXELFDGRHQODSDUWHLQIHULRU
GHODPiTXLQDGHKLHORVTXHH[SXOVDORVFXERV1R
coloque los dedos o las manos en el mecanismo de
ODPiTXLQDGHKLHORVPLHQWUDVHOUHIULJHUDGRUHVWp
conectado.
Girar el control de temperatura a la posición apagado
no retira la corriente del circuito de luz.
No vuelva a congelar alimentos que se han
descongelado por completo.
Antes de reemplazar una lámpara de luz quemada,
se deberá desenchufar HOUHIULJHUDGRUD¿QGHHYLWDU
HOFRQWDFWRFRQHO¿ODPHQWRTXHD~QWLHQHFRUULHQWH
8QDOiPSDUDGHOX]TXHPDGDVHSXHGHTXHEUDUDO
VHUUHHPSOD]DGD
3
IMPORTANT SAFETY INFORMATION.
READ ALL INSTRUCTIONS BEFORE USING.
WARNING!
HOW TO CONNECT ELECTRICITY
'RQRWXQGHUDQ\FLUFXPVWDQFHVFXWRUUHPRYHWKHWKLUGJURXQGSURQJIURPWKHSRZHUFRUG
)RUSHUVRQDOVDIHW\WKLVDSSOLDQFHPXVWEHSURSHUO\JURXQGHG
The power cord of this appliance is equipped with a 3-prong
JURXQGLQJSOXJZKLFKPDWHVZLWKDVWDQGDUGSURQJ
JURXQGLQJZDOORXWOHWWRPLQLPL]HWKHSRVVLELOLW\RIHOHFWULF
shock hazard from this appliance.
+DYHWKHZDOORXWOHWDQGFLUFXLWFKHFNHGE\DTXDOL¿HG
electrician to make sure the outlet is properly grounded.
Where a ungrounded 2-prong wall outlet is encountered,
LWLV\RXUSHUVRQDOUHVSRQVLELOLW\DQGREOLJDWLRQWRKDYHLW
replaced with a properly grounded 3-prong wall outlet.
7KHUHIULJHUDWRUVKRXOGDOZD\VEHSOXJJHGLQWRLWVRZQ
individual electrical outlet which has a voltage, wattage and
frequency that match the rating plate.
7KLVSURYLGHVWKHEHVWSHUIRUPDQFHDQGDOVRSUHYHQWV
RYHUORDGLQJKRXVHZLULQJFLUFXLWVZKLFKFRXOGFDXVHD¿UH
hazard from overheated wires.
1HYHUXQSOXJ\RXUUHIULJHUDWRUE\SXOOLQJRQWKHSRZHUFRUG
$OZD\VJULSSOXJ¿UPO\DQGSXOOVWUDLJKWRXWIURPWKHRXWOHW
Repair or replace immediately all power cords that have
EHFRPHIUD\HGRURWKHUZLVHGDPDJHG'RQRWXVHDFRUG
WKDWVKRZVFUDFNVRUDEUDVLRQGDPDJHDORQJLWVOHQJWKRUDW
either end.
:KHQPRYLQJWKHUHIULJHUDWRUDZD\IURPWKHZDOOEH
careful not to roll over or damage the power cord.
IMPORTANTE INFORMACIÓN DE SEGURIDAD.
LEA TODAS LAS INSTRUCCIONES ANTES DE SU USO.
¡ADVERTENCIA!
CÓMO CONECTAR LA ELECTRICIDAD
%DMRQLQJXQDFLUFXQVWDQFLDQRFRUWHQLUHWLUHODWHUFHUDSDWDFRQH[LyQDWLHUUDGHOFDEOHGHHOHFWULFLGDG3RU
VHJXULGDGSHUVRQDOHVWHDSDUDWRGHEHHVWDUFRUUHFWDPHQWHFRQHFWDGRDWLHUUD
(OFDEOHHOpFWULFRGHHVWHDSDUDWRHVWiSURYLVWRGHXQ
HQFKXIHGHWUHVSDWDVFRQH[LyQDWLHUUDTXHHQFDMD
HQXQWRPDFRUULHQWHHVWiQGDUGHRUL¿FLRVFRQH[LyQ
DWLHUUDSDUDPLQLPL]DUODSRVLELOLGDGGHSHOLJURGHXQ
choque eléctrico de este aparato.
Haga que el tomacorriente de la pared y el circuito
VHDQUHYLVDGRVSRUXQHOHFWULFLVWDFDOL¿FDGRSDUD
DVHJXUDUTXHHOWRPDFRUULHQWHWLHQHODFRQH[LyQDWLHUUD
apropiada.
En caso de contar con un tomacorriente de pared
GHFODYLMDVHVVXUHVSRQVDELOLGDG\REOLJDFLyQ
reemplazarlo por un tomacorriente de pared de 3
clavijas correctamente conectado a tierra.
(OUHIULJHUDGRUGHEHUtDHVWDUVLHPSUHFRQHFWDGRDXQ
HQFKXIHHVSHFt¿FRFRQXQtQGLFHGHYROWDMHYDWDMH\
IUHFXHQFLDHTXLYDOHQWHVORVTXH¿JXUDQHQVXHWLTXHWD
GHFDUDFWHUtVWLFDVWpFQLFDV
(VWRRIUHFHHOPHMRUGHVHPSHxR\WDPELpQHYLWD
VREUHFDUJDUORVFLUFXLWRVHOpFWULFRVGHODFDVDTXH
SRGUtDQFDXVDUXQLQFHQGLRDSDUWLUGHORVFDEOHV
recalentados.
1XQFDGHVFRQHFWHVXUHIULJHUDGRUKDODQGRGHOFDEOH
HOpFWULFR6LHPSUHWRPHHOHQFKXIH¿UPHPHQWH\KiOHOR
directamente del tomacorriente.
5HSDUHRUHHPSODFHGHLQPHGLDWRWRGRVORVFDEOHV
eléctricos que se hayan desgastado o dañado. No use
XQFDEOHTXHWHQJDJULHWDVRGDxRVGHDEUDVLyQHQVX
ORQJLWXGRHQFXDOTXLHUH[WUHPR
Al retirar el refrigerador de la pared, tenga cuidado de no
HQUROODURGDxDUHOFDEOHHOpFWULFR
LEA Y SIGA CUIDADOSAMENTE ESTA INFORMACIÓN DE SEGURIDAD.
CONSERVE ESTAS INSTRUCCIONES
READ AND FOLLOW THIS SAFETY INFORMATION CAREFULLY.
SAVE THESE INSTRUCTIONS
4

About the fresh food compartment shelves.
About the temperature control dial. GEAppliances.com
Shelf supports at various levels allow you to custom-space your shelves. Not all features are on all models.
Full-Width Shelves
Some models have a stationary tempered
glass shelf, a spillproof shelf, or two steel
wire stationary shelves. These shelves can
EHPRYHGWRDQRWKHUSODFHLQWKHIUHVKIRRG
compartment.
When placed correctly on the shelf supports,
WKHVKHOIZLOOVWRSEHIRUHFRPLQJFRPSOHWHO\
out of the refrigerator and will not tilt when
you place food on it or remove food from it.
Half-Width Shelves
One end of the shelf rests on a molded side-wall
VXSSRUWDEUDFNHWRQWKHRWKHUHQGKRRNVLQWR
DWUDFNRQWKHUHDUFDELQHWZDOO
7RUHPRYHOLIWWKHVKHOIXSDWIURQWWKHQRȺWKH
support and out of the track.
To replace, select desired shelf height. With
VKHOIIURQWUDLVHGVOLJKWO\KRRNWKHEUDFNHW·VWRS
lug into the track, then lower the shelf onto the
support.
NOTE: The shelf to the right of the track is
GHVLJQHGWRKRRNLQWRWKHULJKWKDQGVORWWKH
shelf to the left is designed
to hook into the left-hand
slot.
2
Lift up and out
1
Tilt up
To remove a full-width shelf when the
fresh food compartment door cannot
EHRSHQHGIXOO\
Lift rear
Pull forward and down
Lift rear
Pull forward
To remove the full-width shelves
5
Turning the dial to OFF VWRSVFRROLQJLQERWKFRPSDUWPHQWV³IUHVKIRRGDQGIUHH]HU,WGRHVQRWVKXWRȺSRZHUWR
the refrigerator.
Temperature Control Dial RQVRPHPRGHOV
The temperature control dial adjust refrigerator from warmest to coldest.
The recommended factory setting is shown in illustration to the left. For colder
WHPSHUDWXUHWXUQGLDOFORFNZLVHWRZDUGVQRZÀDNH)RUZDUPHUWHPSHUDWXUHWXUQ
GLDOFRXQWHUFORFNZLVHDZD\IURPVQRZÀDNHDOORZKRXUVIRUDGMXVWPHQW
OFF
OFF
OFF
Recommened
factory setting
Coldest setting
Warmest setting
OFF
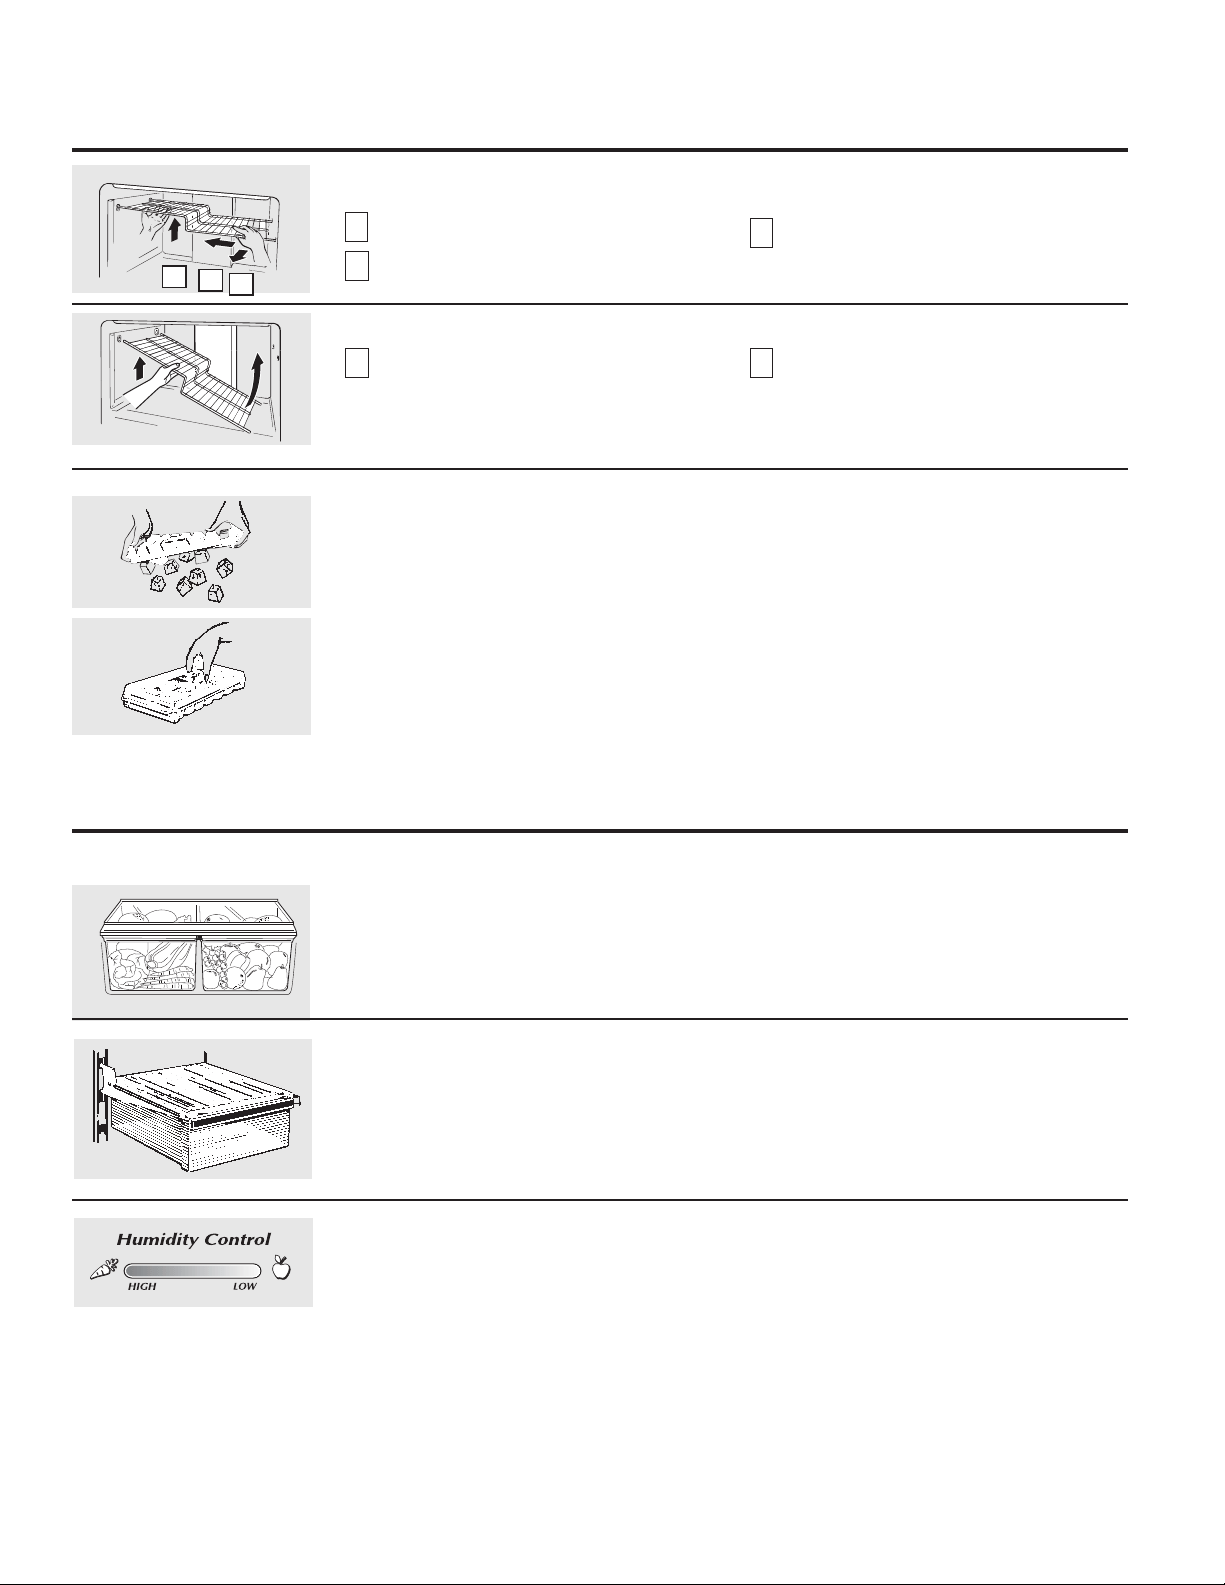
Adjustable Humidity Drawer RQVRPHPRGHOV
Slide the control all the way to the
HIGH setting to provide high humidity
UHFRPPHQGHGIRUPRVWYHJHWDEOHV
Slide the control all the way to the LOW
setting to provide lower humidity levels
recommended for most fruits.
7KHVQDFNVGUDZHUFDQEHPRYHGWRWKH
PRVWXVHIXOORFDWLRQIRU\RXUIDPLO\·VQHHGV
Snacks Drawer
Not all features are on all models.
About the storage drawers.
6
Fruit and Vegetable Drawers
([FHVVZDWHUWKDWPD\DFFXPXODWHLQWKH
ERWWRPRIWKHGUDZHUVVKRXOGEHHPSWLHG
and the drawers wiped dry.
About the freezer compartment shelves.
Step Shelf RQVRPHPRGHOV
7RUHPRYHWKHVWHSVKHOI
1
Lift left side of shelf slightly.
2
Move shelf to the left to free its right ends
IURPKROHVLQWKHFDELQHWZDOO
3
Lower right side of shelf, move shelf to the
right and take it out.
To replace the step shelf:
1
:LWKVKHOIWLOWHGDVVKRZQ¿WOHIWHQGVRI
VKHOILQWRKROHVLQFDELQHWZDOO
2
Lift left side of shelf slightly, swing shelf up,
¿WULJKWHQGVRIVKHOILQWRKROHVLQFDELQHW
wall, and lower shelf into place.
1
2
3
Ice Trays RQVRPHPRGHOV
,FHWUD\VDUHGHVLJQHGWRUHOHDVHLFHFXEHV
easily. Hold tray upside-down over a
FRQWDLQHUDQGWZLVWERWKHQGVWRUHOHDVH
FXEHV
For only one or two ice cubes, leave the tray
ULJKWVLGHXSWZLVWERWKHQGVVOLJKWO\DQG
UHPRYHGHVLUHGQXPEHURIFXEHV Wash ice
trays and storage bin in lukewarm water
only. Do not put them in an automatic
dishwasher.

About storage drawer and cover removal.
GEAppliances.com
Not all features are on all models.
Twin Drawer Shelf
7RUHPRYH
1
Remove the drawers.
2
Reach in, push the front of glass cover up,
and at the same time, pull it forward as far
as it will come.
Tilt it and take it out. Avoid cleaning the cold
JODVVFRYHUZLWKKRWZDWHUEHFDXVHWKH
H[WUHPHWHPSHUDWXUHGLȺHUHQFHPD\FDXVHLW
WREUHDN
3
5HPRYHWKHGUDZHUIUDPH$OZD\VUHPRYH
WKHJODVVFRYHUEHIRUH\RXWDNHRXWWKH
GUDZHUIUDPH
/LIWWKHIUDPHRȺWKHVXSSRUWVDWHDFKVLGH
DQGEDFNSXOOLWIRUZDUGWLOWLWDQGWDNHLWRXW
7RUHSODFH
1
Lower the frame until it rests on the
VXSSRUWVDWHDFKVLGHDQGEDFN
2
Replace the glass cover, pushing its rear
HGJH¿UPO\LQWRWKHUHDUIUDPHFKDQQHO
and gently lowering the front into place.
3
Replace the drawers.
Drawer and Cover Removal
'UDZHUVFDQEHUHPRYHGHDVLO\E\JUDVSLQJ
the sides and lifting up slightly while pulling
drawers past the stop location.
7RUHPRYHWKHFRYHUOLIWLWRȺLWVVXSSRUWV
pull it forward, tilt it and take it out.
About the automatic icemaker.
$QHZO\LQVWDOOHGUHIULJHUDWRUPD\WDNHWRKRXUVWREHJLQPDNLQJLFH
Automatic Icemaker RQVRPHPRGHOV
7KHLFHPDNHUZLOOSURGXFHDSSUR[LPDWHO\
FXEHVLQDKRXUSHULRGGHSHQGLQJ
on the freezer compartment temperature, room
WHPSHUDWXUHQXPEHURIGRRURSHQLQJVDQGRWKHU
use conditions.
,IWKHUHIULJHUDWRULVRSHUDWHGEHIRUHWKHZDWHU
connection is made to the icemaker, set the switch
to OFF or move the feeler arm to the STOPXS
position.
:KHQWKHUHIULJHUDWRUKDVEHHQFRQQHFWHG
to the water supply, set the switch to the ON
position or move the feeler arm to the ON
GRZQSRVLWLRQ
7KHLFHPDNHUZLOO¿OOZLWKZDWHUZKHQLWFRROVWR
15°F. A newly-installed refrigerator may take 12 to
KRXUVWREHJLQPDNLQJLFHFXEHV
Once the icemaker starts to make ice, it may
WDNHXSWRKRXUVWR¿OOWKHELQGHSHQGLQJRQ
WKHWHPSHUDWXUHVHWWLQJVDQGQXPEHURIGRRU
openings.
<RXZLOOKHDUDEX]]LQJVRXQGHDFKWLPHWKH
LFHPDNHU¿OOVZLWKZDWHU
7KURZDZD\WKH¿UVWIHZEDWFKHVRILFHWRDOORZ
the water line to clear.
Be sure nothing interferes with the sweep of the
feeler arm.
:KHQWKHELQ¿OOVWRWKHOHYHORIWKHIHHOHUDUP
the icemaker will stop producing ice.
,WLVQRUPDOIRUVHYHUDOFXEHVWREHMRLQHG
together.
,ILFHLVQRWXVHGIUHTXHQWO\ROGLFHFXEHVZLOO
EHFRPHFORXG\WDVWHVWDOHVKULQNRUIXVH
together.
Icemaker Accessory Kit
If your refrigerator did not already come equipped
with an automatic icemaker, an icemaker
DFFHVVRU\NLWLVDYDLODEOHDWH[WUDFRVW
&KHFNWKHEDFNRIWKHUHIULJHUDWRUIRU
WKHVSHFL¿FLFHPDNHUNLWQHHGHGIRU
your model.
Feeler Arm
in the STOP
XSSRVLWLRQ
Feeler Arm in
the ONGRZQ
position
7
7KHUHDUHW\SHVRILFHPDNHUV
Power switch model
Feeler arm model
ON
OFF
Ice maker
Feeler Arm
Power Switch

Care and cleaning of the refrigerator.
8
Cleaning the Outside
The door handles and trimRQVRPHPRGHOV&OHDQZLWKD
cloth dampened with soapy water. Dry with a soft cloth.
Keep the outside clean. Wipe with a clean cloth lightly
GDPSHQHGZLWKNLWFKHQDSSOLDQFHZD[RUPLOGOLTXLGGLVK
detergent. Dry and polish with a clean, soft cloth.
The stainless steel panels and door handles RQVRPH
PRGHOVFDQEHFOHDQHGZLWKDFRPPHUFLDOO\DYDLODEOH
VWDLQOHVVVWHHOFOHDQHU&OHDQHUVZLWKR[DOLFDFLGVXFKDV
Bar Keepers Friend
®
Soft Cleanser will remove rust, tarnish
DQGVPDOOEOHPLVKHV8VHRQO\DOLTXLGFOHDQVHUIUHHRIJULW
DQGUXELQWKHGLUHFWULRQRIWKHEUXVKOLQHVZLWKDGDPSVRIW
VSRQJH'RQRWXVHDSSOLDQFHZD[RUSROLVKRQWKHVWDLQOHVV
steel.
Do not wipe the refrigerator with a soiled dish cloth or wet
towel. These may leave a residue that can erode the paint.
Do not use scouring pads, powdered cleaners, bleach or
cleaners containing either bleach or ammonia because these
SURGXFWVFDQVFUDWFKDQGZHDNHQWKHSDLQW¿QLVK
Cleaning the Inside
To help prevent odorsOHDYHDQRSHQER[RIEDNLQJVRGDLQ
the fresh food and freezer compartments.
Unplug the refrigerator before cleaning.
,IWKLVLVQRWSUDFWLFDOZULQJH[FHVVPRLVWXUHRXWRIVSRQJH
or cloth when cleaning around switches, lights or controls.
8VHZDUPZDWHUDQGEDNLQJVRGDVROXWLRQ³DERXWD
WDEOHVSRRQPORIEDNLQJVRGDWRDTXDUWOLWHURIZDWHU
7KLVERWKFOHDQVDQGQHXWUDOL]HVRGRUV5LQVHDQGZLSHGU\
After cleaning the door gaskets, apply a thin layer of
petroleum jelly to the door gaskets at the hinge side. This
KHOSVNHHSWKHJDVNHWVIURPVWLFNLQJDQGEHQGLQJRXWRI
shape.
Avoid cleaning cold glass shelves (on some models) with
KRWZDWHUEHFDXVHWKHH[WUHPHWHPSHUDWXUHGLȺHUHQFH
may cause them to break. Handle glass shelves carefully.
Bumping tempered glass can cause it to shatter.
Do not wash any plastic refrigerator parts in the dishwasher.
Condenser
There is no need for routine
condenser cleaning in normal
home operating environments.
However, in environments that
PD\EHSDUWLFXODUO\GXVW\RU
greasy, the condenser should
EHFOHDQHGSHULRGLFDOO\IRU
HȻFLHQWUHIULJHUDWRURSHUDWLRQ
To clean the condenser, turn the temperature control dial to
OFF. Sweep away or vacuum up dust.
)RUEHVWUHVXOWVXVHDEUXVKVSHFLDOO\GHVLJQHGIRUWKLV
SXUSRVH,WLVDYDLODEOHDWPRVWDSSOLDQFHSDUWVVWRUHV
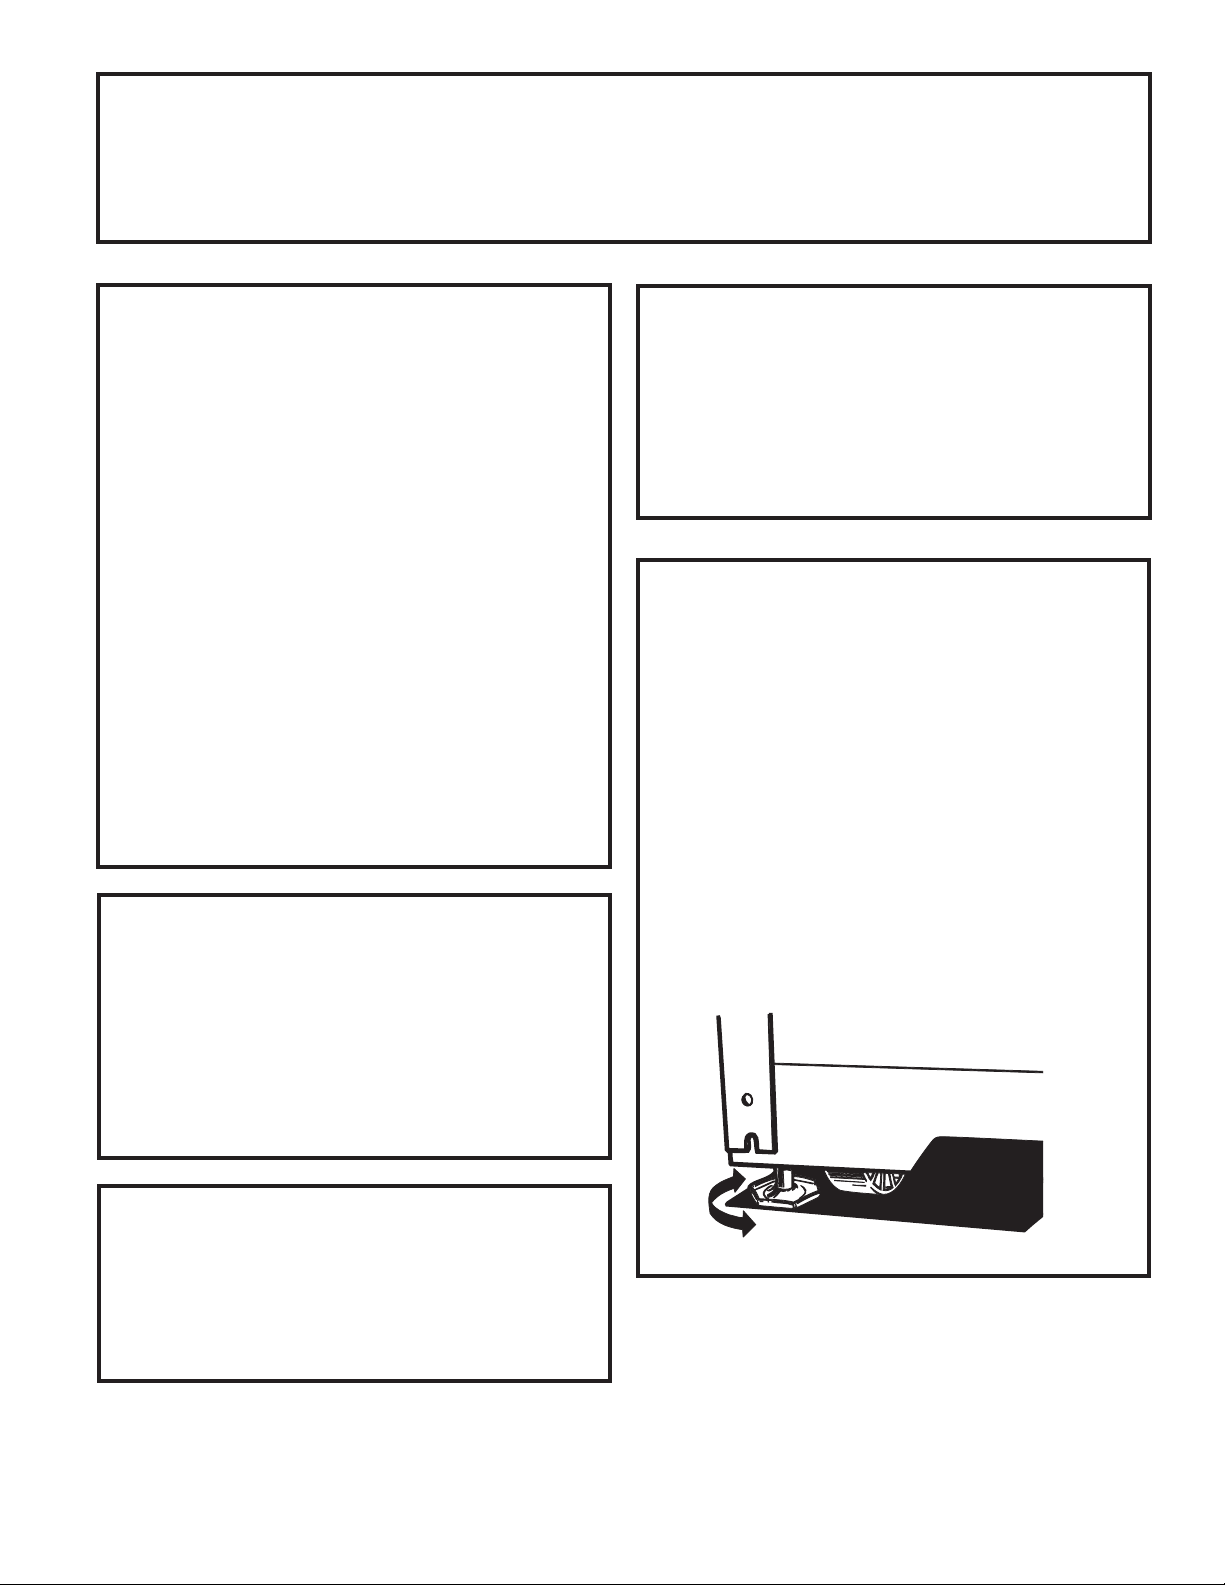
Moving the Refrigerator
Be careful when moving the refrigerator away from
WKHZDOO$OOW\SHVRIÀRRUFRYHULQJVFDQEHGDPDJHG
SDUWLFXODUO\FXVKLRQHGFRYHULQJVDQGWKRVHZLWKHPERVVHG
surfaces.
Turn the leveling legs at each front corner of the refrigerator
counterclockwise until the rollers support the refrigerator. Pull
WKHUHIULJHUDWRUVWUDLJKWRXWDQGUHWXUQLWWRSRVLWLRQE\SXVKLQJ
it straight in. Moving the refrigerator in a side direction may
UHVXOWLQGDPDJHWRWKHÀRRUFRYHULQJRUUHIULJHUDWRU
When pushing the refrigerator back, make sure you don’t
roll over the power cord or icemaker supply line (on some
models).
$IWHUUROOLQJWKHUHIULJHUDWRUEDFNLQWRSODFHWXUQWKH
OHJVFORFNZLVHXQWLOWKHOHJVDJDLQEHDUWKHZHLJKWRIWKH
refrigerator.
Light Bulb Replacement
7RUHSODFHDEXUQHGRXWEXOEXQSOXJWKHUHIULJHUDWRUIURP
LWVHOHFWULFDORXWOHWXQVFUHZWKHEXOEZKHQFRRODQGUHSODFH
LWZLWKDQDSSOLDQFHEXOERIWKHVDPHRUORZHUZDWWDJH
Turning the control to the OFF position does not remove
power to the light circuit.
Preparing for Vacation
)RUORQJYDFDWLRQVRUDEVHQFHVUHPRYHIRRGDQGXQSOXJ
the refrigerator. Move the temperature control dial to the
OFFSRVLWLRQDQGFOHDQWKHLQWHULRUZLWKDEDNLQJVRGD
VROXWLRQRIRQHWDEOHVSRRQPORIEDNLQJVRGDWRRQH
TXDUWOLWHURIZDWHU/HDYHWKHGRRUVRSHQ
Move the feeler arm to the STOP XSSRVLWLRQRUPRYHWKH
switch to the OFF position on the slide switch model and
VKXWRȺWKHZDWHUVXSSO\WRWKHUHIULJHUDWRU
,IWKHWHPSHUDWXUHFDQGURSEHORZIUHH]LQJKDYHDTXDOL¿HG
VHUYLFHUGUDLQWKHZDWHUVXSSO\V\VWHPRQVRPHPRGHOVWR
SUHYHQWVHULRXVSURSHUW\GDPDJHGXHWRÀRRGLQJ
Preparing to Move
6HFXUHDOOORRVHLWHPVVXFKDVJULOOHVKHOYHVDQGGUDZHUVE\
taping them securely in place to prevent damage.
Be sure the refrigerator stays in an upright position during
moving.
Cleaning the condenser coils.
CLEARANCES
BEFORE YOU BEGIN
Read these instructions completely and carefully.
IMPORTANT – Save these instructions
IRUORFDOLQVSHFWRU·VXVH
IMPORTANT – 2EVHUYHDOOJRYHUQLQJ
codes and ordinances.
Note to Installer – Be sure to leave these
instructions with the Consumer.
Note to Consumer – Keep these instructions
for future reference.
Skill level – Installation of this appliance requires
EDVLFPHFKDQLFDOVNLOOV
Completion time – Refrigerator Installation
15 minutes
Reversing the Door Swing
1 hour
3URSHULQVWDOODWLRQLVWKHUHVSRQVLELOLW\RIWKHLQVWDOOHU
3URGXFWIDLOXUHGXHWRLPSURSHULQVWDOODWLRQLVQRW
covered under the Warranty.
Do not install the refrigerator where the temperature
ZLOOJREHORZ)&EHFDXVHLWZLOOQRWUXQRIWHQ
enough to maintain proper temperatures.
,QVWDOOLWRQDÀRRUVWURQJHQRXJKWRVXSSRUWLWIXOO\
loaded.
REFRIGERATOR LOCATION
Allow the following clearances for ease of installation,
SURSHUDLUFLUFXODWLRQDQGSOXPELQJDQGHOHFWULFDO
connections.
6LGHVµPP
7RSµPP
%DFNµPP
Leveling legs near each front corner of the refrigerator
DUHDGMXVWDEOH7KH\¿UPO\SRVLWLRQWKHUHIULJHUDWRU
and prevent it from moving when the doors are
RSHQHG/HYHOLQJOHJVVKRXOGEHVHWVRWKHIURQWRIWKH
refrigerator is raised just enough that the doors close
HDVLO\ZKHQRSHQHGDERXWKDOIZD\
Turn the leveling legs clockwise to raise the refrigerator,
counterclockwise to lower it.
RollersQH[WWRWKHOHYHOLQJOHJVDOORZ\RXWRPRYHWKH
refrigerator away from the wall for cleaning.
Turn the legs counterclockwise until the weight of the
refrigerator is transferred from them to the rollers. After
UROOLQJWKHUHIULJHUDWRUEDFNLQWRSODFHWXUQWKHOHJV
FORFNZLVHXQWLOWKHOHJVDJDLQEHDUWKHZHLJKWRIWKH
refrigerator.
ROLLERS AND LEVELING LEGS
,IWKHUHIULJHUDWRUKDVDQLFHPDNHULWZLOOKDYHWREH
connected to a cold water line. A water supply kit
FRQWDLQLQJFRSSHUWXELQJVKXWRȺYDOYH¿WWLQJVDQG
LQVWUXFWLRQVLVDYDLODEOHDWH[WUDFRVWIURP\RXUGHDOHU
E\YLVLWLQJRXU:HEVLWHDWGEAppliances.com or from
Parts and Accessories, 1.877.959.8688.
WATER SUPPLY TO THE ICEMAKER (on
some models)
9
Installation Instructions Models 16, 17, 18
If you have questions, call 1.800.GE.CARES or YLVLWRXU:HEVLWHDWGEAppliances.com
10
WHAT YOU WILL NEED
Copper or GE SmartConnect
™
Refrigerator Tubing kit,
µRXWHUGLDPHWHUWRFRQQHFWWKHUHIULJHUDWRUWRWKH
ZDWHUVXSSO\,IXVLQJFRSSHUEHVXUHERWKHQGVRIWKH
WXELQJDUHFXWVTXDUH
7RGHWHUPLQHKRZPXFKWXELQJ\RXQHHGPHDVXUH
WKHGLVWDQFHIURPWKHZDWHUYDOYHRQWKHEDFNRIWKH
UHIULJHUDWRUWRWKHZDWHUVXSSO\SLSH7KHQDGG·
P%HVXUHWKHUHLVVXȻFLHQWH[WUDWXELQJDERXW·>
P@FRLOHGLQWRWXUQVRIDERXWµ>FP@GLDPHWHUWR
allow the refrigerator to move out from the wall after
installation.
INSTALLING THE WATER LINE (ON SOME MODELS)
Installation Instructions
BEFORE YOU BEGIN
Recommended copper water supply kits are WX8X2,
:;;RU:;;GHSHQGLQJRQWKHDPRXQWRIWXELQJ
you need. Approved plastic water supply lines are GE
SmartConnect
™
5HIULJHUDWRU7XELQJ:;;
:;;DQG:;;
When connecting your refrigerator to a GE Reverse
Osmosis Water System, the only approved installation is
with a GE RVKit. For other reverse osmosis water systems,
IROORZWKHPDQXIDFWXUHU·VUHFRPPHQGDWLRQV
7KLVZDWHUOLQHLQVWDOODWLRQLVQRWZDUUDQWHGE\WKH
refrigerator or icemaker manufacturer. Follow these
LQVWUXFWLRQVFDUHIXOO\WRPLQLPL]HWKHULVNRIH[SHQVLYH
water damage.
:DWHUKDPPHUZDWHUEDQJLQJLQWKHSLSHVLQKRXVH
SOXPELQJFDQFDXVHGDPDJHWRUHIULJHUDWRUSDUWVDQG
OHDGWRZDWHUOHDNDJHRUÀRRGLQJ&DOODTXDOL¿HGSOXPEHU
WRFRUUHFWZDWHUKDPPHUEHIRUHLQVWDOOLQJWKHZDWHU
supply line to the refrigerator.
7RSUHYHQWEXUQVDQGSURGXFWGDPDJHGRQRWKRRNXS
the water line to the hot water line.
,I\RXXVH\RXUUHIULJHUDWRUEHIRUHFRQQHFWLQJWKHZDWHU
line, make sure the ice maker power switch is in the OFF
SRVLWLRQRQSRZHUVZLWFKPRGHOVRUWKH feeler arm in the
STOPXSSRVLWLRQRQIHHOHUDUPPRGHOV
'RQRWLQVWDOOWKHLFHPDNHUWXELQJLQDUHDVZKHUH
WHPSHUDWXUHVIDOOEHORZIUHH]LQJ
:KHQXVLQJDQ\HOHFWULFDOGHYLFHVXFKDVDSRZHUGULOO
GXULQJLQVWDOODWLRQEHVXUHWKHGHYLFHLVGRXEOHLQVXODWHG
or grounded in a manner to prevent the hazard of electric
VKRFNRULVEDWWHU\SRZHUHG
$OOLQVWDOODWLRQVPXVWEHLQDFFRUGDQFHZLWKORFDO
SOXPELQJFRGHUHTXLUHPHQWV
WARNING! &RQQHFWWRSRWDEOHZDWHU
supply only.
¡
ADVERTENCIA! Conecte al
VXPLQLVWURGHDJXDSRWDEOHVRODPHQWH
1
WHAT YOU WILL NEED Cont
GE SmartConnect
™
5HIULJHUDWRU7XELQJ.LWVDUHDYDLODEOH
LQWKHIROORZLQJOHQJWKV
·P ²:;;
·P ²:;;
·P ²:;;
%HVXUHWKDWWKHNLW\RXVHOHFWDOORZVDWOHDVW·PDV
GHVFULEHGDERYH
NOTE: The only GE approved plastic tubing is that
supplied in GE SmartConnect
™
Refrigerator Tubing kits.
Do not use any other plastic water supply line because
the line is under pressure at all times. Certain types of
plastic will crack or rupture with age and cause water
damage to your home.
A GE water supply kit FRQWDLQLQJWXELQJVKXWRȺYDOYH
DQG¿WWLQJVOLVWHGEHORZLVDYDLODEOHDWH[WUDFRVWIURP
your dealer or from Parts and Accessories.
A cold water supply 7KHZDWHUSUHVVXUHPXVWEH
EHWZHHQDQGSVL²EDU
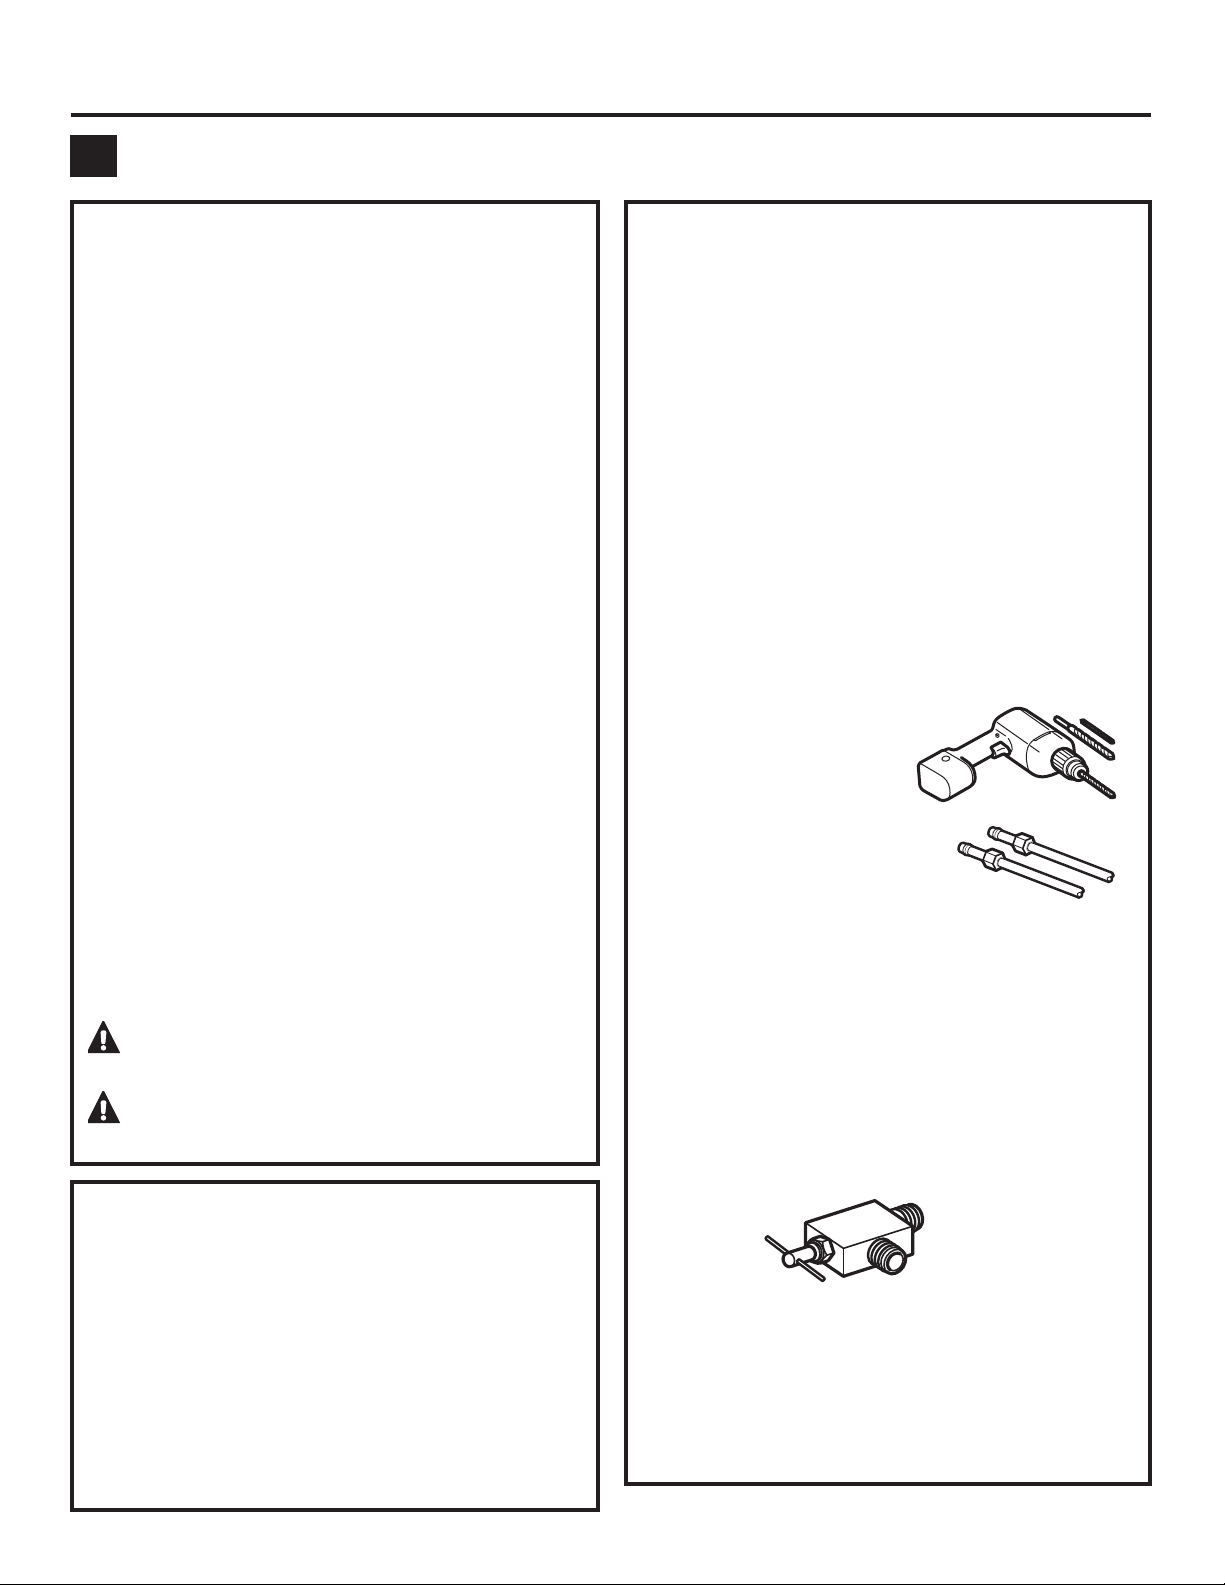
Power drill.
1/2µ or adjustable wrench.
Straight and Phillips
blade screwdriver.
Two 1/4µ outer diameter
compression nuts and
2 ferrules (sleeves)³WRFRQQHFW
WKHFRSSHUWXELQJWRWKHVKXWRȺ
valve and the refrigerator water
valve.
OR
,I\RXDUHXVLQJD*(6PDUW&RQQHFW
™
Refrigerator
7XELQJNLWWKHQHFHVVDU\¿WWLQJVDUHSUHDVVHPEOHGWR
WKHWXELQJ
,I\RXUH[LVWLQJFRSSHUZDWHUOLQHKDVDÀDUHG¿WWLQJ
at the end, you will need an adapterDYDLODEOHDW
SOXPELQJVXSSO\VWRUHVWRFRQQHFWWKHZDWHUOLQHWRWKH
refrigerator OR \RXFDQFXWRȺWKHÀDUHG¿WWLQJZLWKD
tube cutterDQGWKHQXVHDFRPSUHVVLRQ¿WWLQJ'RQRW
cut formed end from GE SmartConnect
™
Refrigerator
WXELQJ
6KXWRȹYDOYH to connect to the cold water line. The
VKXWRȺYDOYHVKRXOGKDYHDZDWHULQOHWZLWKDPLQLPXP
LQVLGHGLDPHWHURIµDWWKHSRLQWRIFRQQHFWLRQWR
the COLD WATER LINE 6DGGOHW\SHVKXWRȺYDOYHVDUH
included in many water supply kits. Before purchasing,
make sure a saddle-type valve complies with your local
SOXPELQJFRGHV
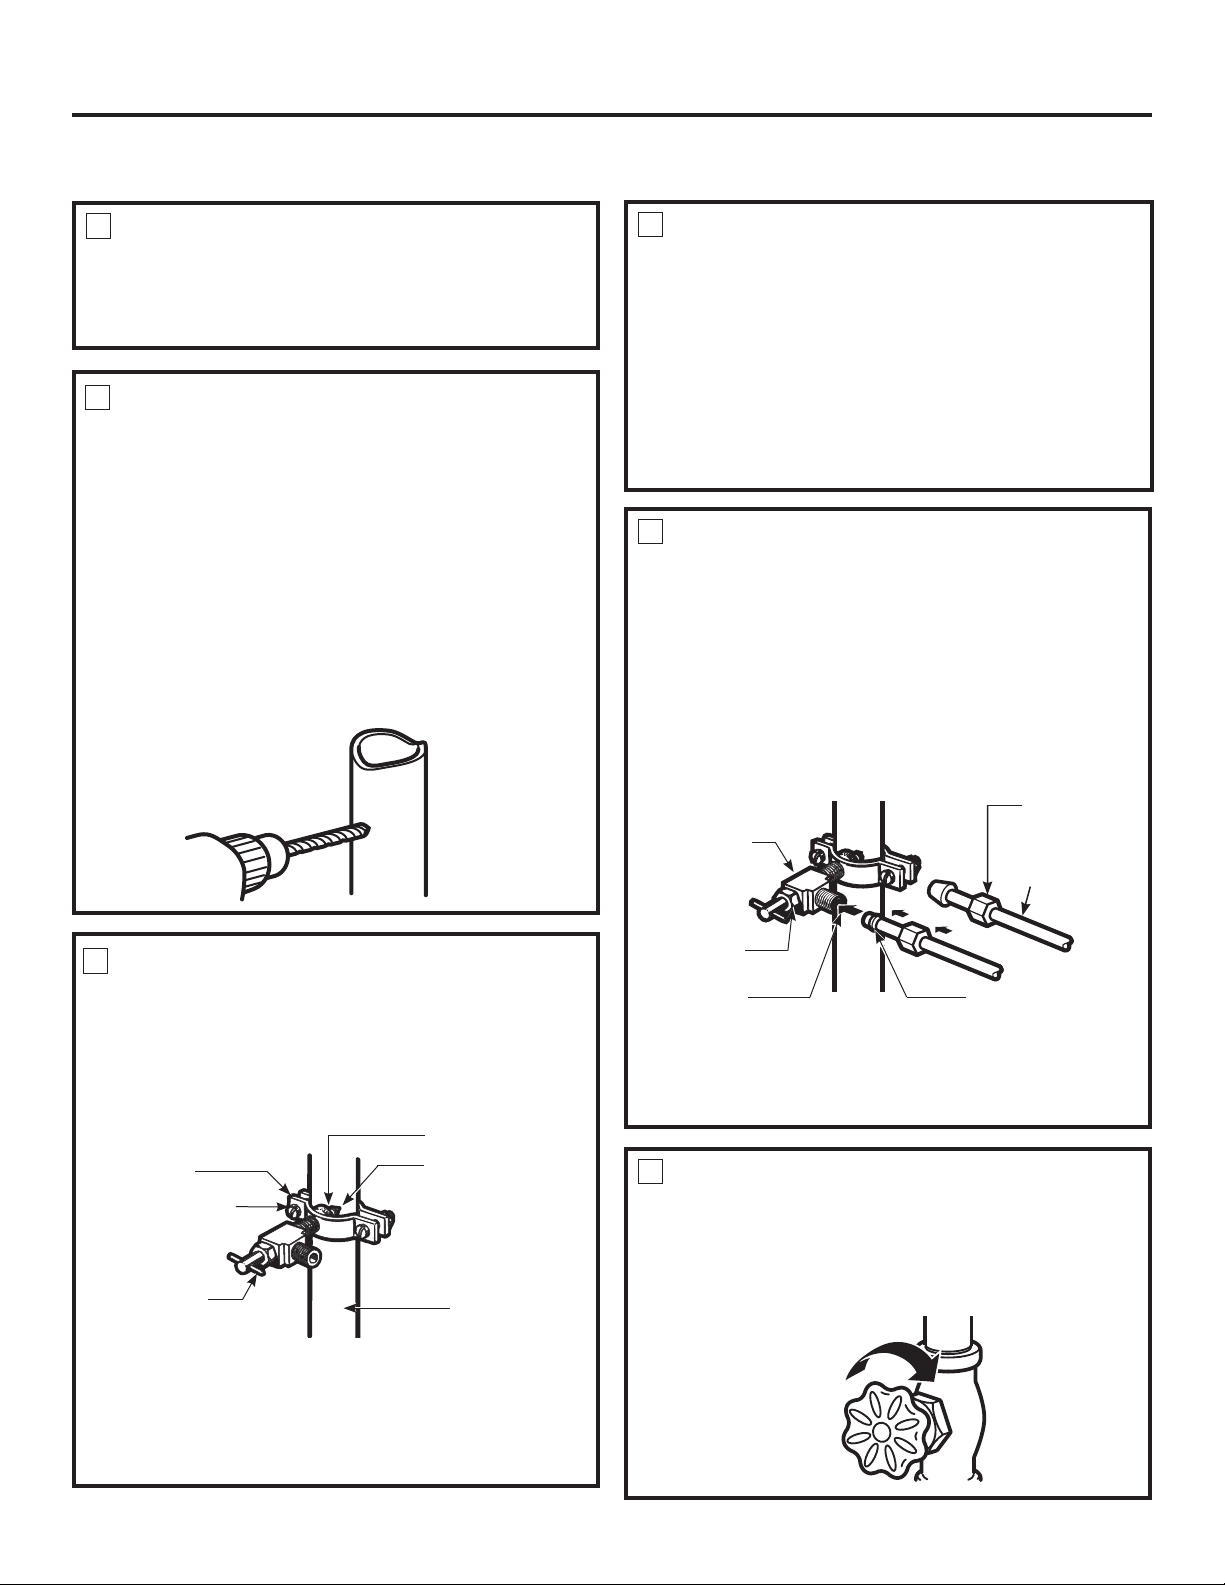
Installation Instructions
,QVWDOOWKHVKXWRȺYDOYHRQWKHQHDUHVWIUHTXHQWO\XVHGGULQNLQJZDWHUOLQH
1
SHUT OFF THE MAIN WATER SUPPLY
AND UNPLUG REFRIGERATOR
7XUQRQWKHQHDUHVWIDXFHWFRXQWHUFORFNZLVHORQJ
enough to clear the line of water.
11
Choose a location for the valve that is easily
DFFHVVLEOH,WLVEHVWWRFRQQHFWLQWRWKHVLGHRID
vertical water pipe. When it is necessary to connect
into a horizontal water pipe, make the connection to
WKHWRSRUVLGHUDWKHUWKDQDWWKHERWWRPWRDYRLG
GUDZLQJRȺDQ\VHGLPHQWIURPWKHZDWHUSLSH
'ULOODµKROHLQWKHZDWHUSLSHHYHQLIXVLQJDVHOI
SLHUFLQJYDOYHXVLQJDVKDUSELW5HPRYHDQ\EXUUV
resulting from drilling the hole in the pipe. Take care
not to allow water to drain into the drill. Failure to
GULOODµKROHPD\UHVXOWLQUHGXFHGLFHSURGXFWLRQ
RUVPDOOHUFXEHV
DRILL THE HOLE FOR THE VALVE
2
)DVWHQWKHVKXWRȺYDOYHWRWKHFROGZDWHUSLSHZLWKWKH
pipe clamp.
Tighten the clamp screws until the sealing washer
EHJLQVWRVZHOO
NOTE'RQRWRYHUWLJKWHQRU\RXPD\FUXVKWKHWXELQJ
NOTE:&RPPRQZHDOWKRI0DVVDFKXVHWWV3OXPELQJ
&RGHV&05VKDOOEHDGKHUHGWR6DGGOHYDOYHV
are illegal and use is not permitted in Massachusetts.
&RQVXOWZLWK\RXUOLFHQVHGSOXPEHU
FASTEN THE SHUTOFF VALVE
3
Washer
Inlet End
Clamp
Screw
Vertical Cold
Water Pipe
Saddle-Type
6KXWRȺ9DOYH
Pipe Clamp
6
FLUSH OUT THE TUBING
7XUQWKHPDLQZDWHUVXSSO\RQFRXQWHUFORFNZLVHDQG
ÀXVKRXWWKHWXELQJXQWLOWKHZDWHULVFOHDU
6KXWWKHZDWHURȺDWWKHZDWHUYDOYHDIWHUDERXW
RQHTXDUWOLWHURIZDWHUKDVEHHQÀXVKHGWKURXJK
WKHWXELQJ
5
CONNECT THE TUBING TO THE VALVE
3ODFHWKHFRPSUHVVLRQQXWDQGIHUUXOHVOHHYHIRU
FRSSHUWXELQJRQWRWKHHQGRIWKHWXELQJDQGFRQQHFW
LWWRWKHVKXWRȺYDOYH
0DNHVXUHWKHWXELQJLVIXOO\LQVHUWHGLQWRWKHYDOYH
Tighten the compression nut securely.
)RUSODVWLFWXELQJIURPD*(6PDUW&RQQHFW
™
5HIULJHUDWRU7XELQJNLWLQVHUWWKHPROGHGHQGRIWKH
WXELQJLQWRWKHVKXWRȺYDOYHDQGWLJKWHQFRPSUHVVLRQ
nut until it is hand tight, then tighten one additional
turn with a wrench. Overtightening may cause leaks.
NOTE:&RPPRQZHDOWKRI0DVVDFKXVHWWV3OXPELQJ
&RGHV&05VKDOOEHDGKHUHGWR6DGGOHYDOYHV
are illegal and use is not permitted in Massachusetts.
&RQVXOWZLWK\RXUOLFHQVHGSOXPEHU
Saddle-Type
6KXWRȺ9DOYH
Compression
Nut
SmartConnect
™
7XELQJ
Packing Nut
Outlet Valve
)HUUXOHVOHHYH
4
ROUTE THE TUBING
5RXWHWKHWXELQJEHWZHHQWKHFROGZDWHUOLQHDQGWKH
refrigerator.
5RXWHWKHWXELQJWKURXJKDKROHGULOOHGLQWKHZDOORU
ÀRRUEHKLQGWKHUHIULJHUDWRURUDGMDFHQWEDVHFDELQHW
DVFORVHWRWKHZDOODVSRVVLEOH
NOTE:%HVXUHWKHUHLVVXȻFLHQWH[WUDWXELQJDERXW
IHHW>FP@FRLOHGLQWRWXUQVRIDERXWµ>FP@
GLDPHWHUWRDOORZWKHUHIULJHUDWRUWRPRYHRXWIURP
the wall after installation.
Installation Instructions
12
INSTALLING THE WATER LINE (CONT.)
1
7
CONNECT THE TUBING TO THE
REFRIGERATOR
NOTES:
%HIRUHPDNLQJWKHFRQQHFWLRQWRWKHUHIULJHUDWRUEH
sure the refrigerator power cord is not plugged into
the wall outlet.
:HUHFRPPHQGLQVWDOOLQJDZDWHU¿OWHULI\RXUZDWHU
supply has sand or particles that could clog the screen
RIWKHUHIULJHUDWRU·VZDWHUYDOYH,QVWDOOLWLQWKHZDWHU
line near the refrigerator. If using GE SmartConnect
™
5HIULJHUDWRU7XELQJNLW\RXZLOOQHHGDQDGGLWLRQDOWXEH
:;;WRFRQQHFWWKH¿OWHU'RQRWFXWSODVWLF
WXEHWRLQVWDOO¿OWHU
Remove the access cover.
5HPRYHWKHSODVWLFÀH[LEOH
cap from the water valve
UHIULJHUDWRUFRQQHFWLRQ
3ODFHWKHFRPSUHVVLRQQXWDQGIHUUXOHVOHHYHRQWR
WKHHQGRIWKHWXELQJDVVKRZQ2Q*(6PDUW&RQQHFW
™
5HIULJHUDWRU7XELQJNLWWKHQXWVDUHDOUHDG\DVVHPEOHG
WRWKHWXELQJ
,QVHUWWKHHQGRIWKHWXELQJLQWRWKHZDWHUYDOYH
FRQQHFWLRQDVIDUDVSRVVLEOH:KLOHKROGLQJWKHWXELQJ
WLJKWHQWKH¿WWLQJ
)RUSODVWLFWXELQJIURPD*(6PDUW&RQQHFW
™
5HIULJHUDWRU7XELQJNLWLQVHUWWKHPROGHGHQGRIWKH
WXELQJLQWRWKHVKXWRȺYDOYHDQGWLJKWHQFRPSUHVVLRQ
nut until it is hand tight, then tighten one additional
turn with a wrench. Overtightening may cause leaks.
)DVWHQWKHWXELQJLQWRWKHFODPSSURYLGHGWRKROGLWLQD
vertical position. You may need to pry open the clamp.
8
TURN THE WATER
ON AT THE
SHUTOFF VALVE
Tighten any connections
that leak.
7XELQJ
Clamp
1/4” Compression
Nut
Ferrule
VOHHYH
SmartConnect
™
7XELQJ
Refrigerator Connection
1/4”
Copper
7XELQJ
9
INSTALLING THE REFRIGERATOR
Plug in the refrigerator.
$UUDQJHWKHFRLORIWXELQJVR
WKDWLWGRHVQRWYLEUDWHDJDLQVW
WKHEDFNRIWKHUHIULJHUDWRU
or against the wall. Push the
UHIULJHUDWRUEDFNWRWKHZDOO
Reattach the access cover.
ON
OFF
On power switch models, set the icemaker power
switch to the 0N position. On feeler arm models,
move the feeler arm to the ONGRZQSRVLWLRQ7KH
LFHPDNHUZLOOQRWEHJLQWRRSHUDWHXQWLOLWUHDFKHVLWV
RSHUDWLQJWHPSHUDWXUHRI)²&RUEHORZ,WZLOO
WKHQEHJLQRSHUDWLRQDXWRPDWLFDOO\
NOTE: In lower water pressure conditions, the water
valve may turn on up to 3 times to deliver enough
water to the icemaker.
START THE ICEMAKER
Power
switch
Power switch model
Feeler Arm in the
STOPXSSRVLWLRQ
Feeler Arm in
the ONGRZQSRVLWLRQ
Feeler arm model
10

13
Installation Instructions
REVERSING THE DOOR SWING
2
:KHQUHYHUVLQJWKHGRRUVZLQJ
5HDGWKHLQVWUXFWLRQVDOOWKHZD\WKURXJKEHIRUHVWDUWLQJ
+DQGOHSDUWVFDUHIXOO\WRDYRLGVFUDWFKLQJSDLQW
6HWVFUHZVGRZQE\WKHLUUHODWHGSDUWVWRDYRLGXVLQJ
them in the wrong places.
3URYLGHDQRQVFUDWFKLQJZRUNVXUIDFHIRUWKHGRRUV
IMPORTANT:2QFH\RXEHJLQGRQRWPRYHWKHFDELQHWXQWLO
door-swing reversal is completed.
These instructions are for changing the hinges from the
ULJKWVLGHWRWKHOHIWVLGH³LI\RXHYHUZDQWWRFKDQJHWKH
KLQJHVEDFNWRWKHULJKWVLGHIROORZWKHVHVDPHLQVWUXFWLRQV
and reverse all references to left and right.
IMPORTANT NOTES
Phillips screwdriver
TOOLS REQUIRED
Masking tape
7RU77RU[GULYHU
QHHGHGIRUVRPH
PRGHOV
5/16”KH[KHDG
socket driver
5/16” open-end
wrench
Putty knife or thin-
EODGHVFUHZGULYHU
2.1 Tape the door shut with masking tape.
2.2 With a 5/16”KH[KHDGVRFNHWGULYHUUHPRYHWKH
VFUHZVWKDWKROGWKHWRSKLQJHWRWKHFDELQHW
REMOVE THE FREEZER DOOR
2
2.3 Lift the hinge straight up to free the hinge pin
from the socket in the top of the door and set it
aside, along with its screws.
2.6 Transfer the 2 screws from the opposite side of
WKHFDELQHWWRWKHVFUHZKROHVYDFDWHGE\WKHWRS
hinge removal.
2.5 Set the door on a non-scratching surface with
the outside up.
2.4 Remove the tape and tilt the door away from the
FDELQHW/LIWLWRȺWKHFHQWHUKLQJHSLQ
Top Hinge
1.1 Unplug the refrigerator from its electrical outlet.
1.2 Empty all door shelves, including the dairy
compartment.
CAUTION: 'RQRWOHWHLWKHUGRRUGURSWRWKHÀRRU7R
do so could damage the door stop.
BEFORE YOU START
1
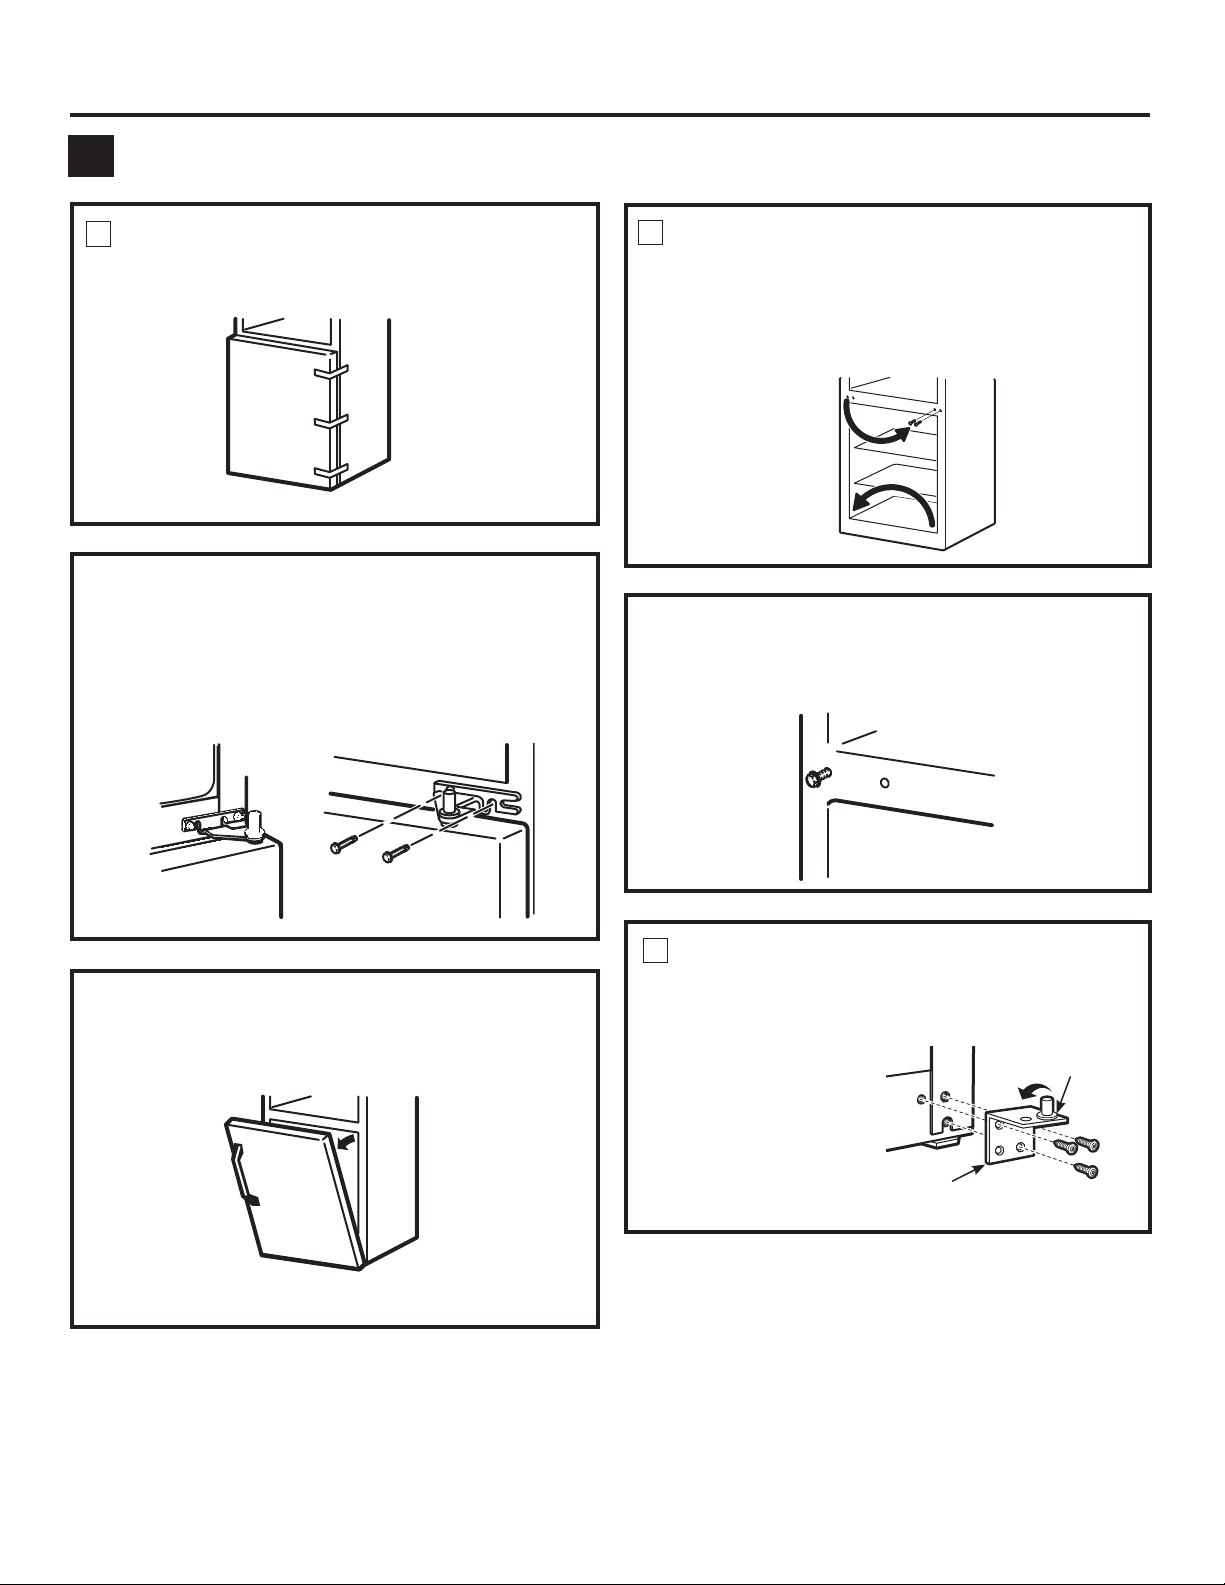
Installation Instructions
3.1 Tape the door shut with masking tape.
REMOVE THE FRESH FOOD DOOR
3
3.4 Set the door outside-up on a non-scratching surface.
3.3 Remove the tape and tilt the door away from the
FDELQHW/LIWWKHGRRUIURPWKHSLQLQWKHERWWRP
KLQJHEUDFNHW,IWKHSODVWLFZDVKHUVWLFNVWRWKHGRRU
ERWWRPSXWLWEDFNRQWKHKLQJH
3.2 Using a 5/16”KH[KHDGVRFNHWVFUHZGULYHUDQGD
5/16” open-end wrench, remove the two screws
KROGLQJWKHFHQWHUKLQJHWRWKHFDELQHW/LIWWKH
center hinge to free its pin from the socket in the
top of the door, and set hinge and screws aside.
Be careful not to lose the center hinge spacer and
washer.
3.7 Take one of the screws removed in step 2 and start
it in the outermost screw hole on the opposite side.
'RQRWGULYHLWDOOWKHZD\GRZQ³OHDYHHQRXJKVSDFH
XQGHUWKHVFUHZKHDGIRUWKLFNQHVVRIWKHEUDFNHW
14
REVERSING THE HARDWARE
4
REVERSING THE DOOR SWING (CONT.)
2
3.5 Transfer the two screws from the opposite side of the
FDELQHWWRWKHVFUHZKROHVYDFDWHGE\WKHFHQWHUKLQJH
removal.
3.67UDQVIHUWKHZDVKHULI\RXUPRGHOKDVRQHWRWKH
opposite side.
3
REMOVE THE FRESH FOOD DOOR (CONT.)
4.1 0RYHWKHERWWRPKLQJHEUDFNHWDQGSODVWLFZDVKHUIURP
the right side to the left side.
Plastic
Washer
Hinge
Bracket
Switch the hinge pin to the
RSSRVLWHVLGHRIWKHEUDFNHW
Installation Instructions
REVERSING THE DOOR HANDLES
5
5.1.2 Remove the handle.
Top
4.2 Interchange hinge and screws at top right with
VFUHZVDWWRSOHIWRIFDELQHWDo not tighten screws
on hinge side at this time.
NOTES:
6RPHKLQJHVKDYHIRXUKROHV:KLFKKROHV\RXXVH
for installing the hinge depends on which side you
install the hinge.
7KHRXWHUHGJHRIWKHKLQJHVKRXOGEHSDUDOOHOWR
the edge of the case for correct installation.
Installing the hinge on
the left.
Installing the hinge on
the right.
Plug
15
5.3 Reinstall the fresh food door handle
5.3.1 Attach the handle to the right side of the
door with screws at the top
and under the handle plug.
5.3.2 Reinstall the handle plug.
REVERSING THE HARDWARE
(CONT.)
4
5.1 Transfer fresh food door handle
5.1.1 Remove the handle plug using a tape-tipped
putty knife under the edge, and remove the
screw underneath. Remove the two screws
holding the handle to the top of the door.
5.1.3 5HPRYHSOXJEXWWRQIURPWKHWRSKLQJHKROHRQWKH
left side of the door and insert it into the hole on the
RSSRVLWHVLGHWKDWZDVYDFDWHGE\UHPRYDORIWKHWRS
hinge.
Plug Button
5.1.43XOOWKHSOXJEXWWRQIURPWKHIURQWRIWKHGRRUDQG
transfer it to the opposite side.
5.2 Transfer door stop
5.2.1 Move the plastic door stop and screws from
the right side to the left side.
To reattach the
handle on the
opposite side.
Plug Button
REVERSING THE DOOR HANDLES (CONT.)
5
Plastic Door Stop
Left Side
Right Side
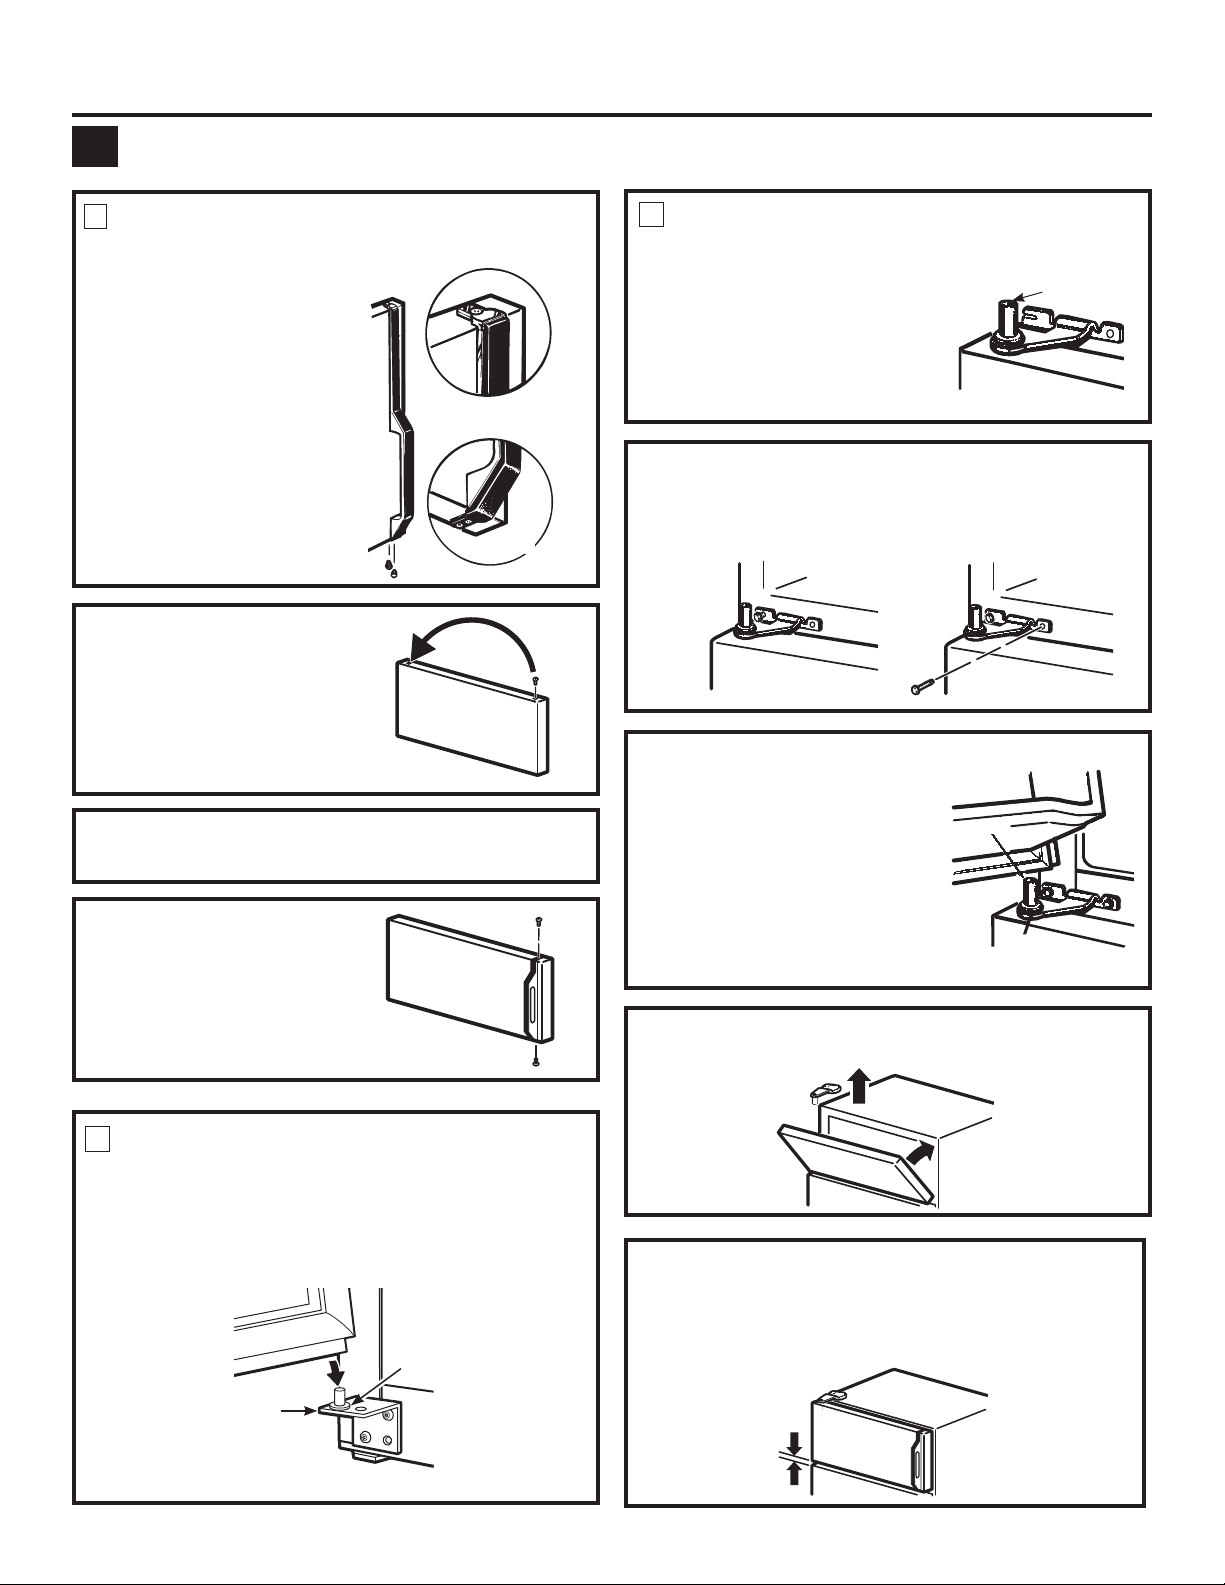
5.4 Transfer Freezer Door Handle
5.4.1 Remove the screw
holding the handle
to the top of the
door and the two
screws holding the
KDQGOHWRWKHERWWRP
of the door.
5.4.2 Remove the handle.
Installation Instructions
TOP
BOTTOM
Top
Bottom
16
6.1.2 Insert the pin on the center hinge into the socket in the
top of the door. Place the spacer, then the washer, on
the hinge pin.
NOTE: The center hinge must
EHWXUQHGRYHUDVVKRZQZKHQ
mounted on the left side.
Plastic Washer
and Spacer
Hinge Pin
6.2 Re-hang the freezer door
6.2.1 Lower the freezer door
onto the center hinge
pin. Be sure the
washer and spacer
are in place on the pin.
RE-HANGING THE DOORS (CONT.)
6
Center Hinge Pin
Plastic Washer
and Spacer
REVERSING THE DOOR SWING (CONT.)
2
6.1.3 7LOWWKHGRRUWRZDUGWKHFDELQHW$VWKHGRRULVEURXJKW
into position, slide the hinge under the head of the screw
ZKLFKHDUOLHUKDGEHHQSDUWO\GULYHQLQWRWKHRXWHUPRVW
KROH,QVHUWWKHUHPDLQLQJVFUHZWKHQWLJKWHQERWK
screws securely.
5.4.3 Remove the screw from the
right top edge of the door
and insert it into the handle
screw hole on the left side.
5.4.4 Transfer the door stop as shown in preceding
section 5.2.
5.4.5 Attach the handle to the
right edge of the door with
VFUHZVDWWRSDQGERWWRP
XVLQJERWWRPKROHVYDFDWHG
E\UHPRYDORIWKHGRRUVWRS
screws.
6.1 Re-hang the fresh food door
6.1.1/RZHUWKHIUHVKIRRGGRRURQWRWKHERWWRP
hinge pin. Be sure the washer is in place on
the pin.
RE-HANGING THE DOORS
6
Plastic
Washer
Hinge
Bracket
6.2.2 7LOWWKHGRRUWRZDUGWKHFDELQHWOLIWLQJWKHWRSKLQJHVR
WKHSLQ¿WVLQWRWKHVRFNHWRQWKHWRSRIWKHGRRU
6.2.3. 0DNHVXUHWKHGRRULVVOLJKWO\DERYHWKHWRSRIWKH
FDELQHWDQGWKHJDSEHWZHHQWKHGRRUVLVHYHQ
across the front. Tighten the top hinge screws. Do not
overtighten these screws–tighten them until they are
just snug, then turn them another one-half turn.
REVERSING THE DOOR HANDLES (CONT.)
5
17
7KHQHZKLJKHȻFLHQF\
compressor may run
faster and longer than
your old refrigerator and
you may hear a high-pitched hum or pulsating sound
while it is operating.
You may hear a whooshing sound when the doors close.
This is due to pressure equalizing within the refrigerator.
Normal operating sounds.
GEAppliances.com
1HZHUUHIULJHUDWRUVVRXQGGLȺHUHQWIURPROGHUUHIULJHUDWRUV0RGHUQUHIULJHUDWRUVKDYHPRUHIHDWXUHV
and use newer technology.
You may hear the fans spinning at high
speeds.
This happens when the refrigerator is
¿UVWSOXJJHGLQZKHQWKHGRRUVDUH
opened frequently or when
a large amount of food is added to the refrigerator or
freezer compartments. The fans are helping to maintain
the correct temperatures.
CLICKS, POPS,
CRACKS and CHIRPS
You may hear cracking or popping sounds when the
UHIULJHUDWRULV¿UVWSOXJJHGLQ7KLVKDSSHQVDVWKHUHIULJHUDWRU
cools to the correct temperature.
The compressor may cause a clicking or chirping sound when
DWWHPSWLQJWRUHVWDUWWKLVFRXOGWDNH
XSWRPLQXWHV
([SDQVLRQDQGFRQWUDFWLRQRIFRROLQJFRLOVGXULQJDQGDIWHU
defrost can cause a cracking or popping sound.
On models with an icemaker, after an icemaking cycle, you
PD\KHDUWKHLFHFXEHVGURSSLQJLQWRWKHLFHEXFNHW
WATER SOUNDS
7KHÀRZRIUHIULJHUDQWWKURXJKWKHIUHH]HUFRROLQJFRLOVPD\
PDNHDJXUJOLQJQRLVHOLNHERLOLQJZDWHU
Water dropping on the defrost heater can cause a sizzling,
SRSSLQJRUEX]]LQJVRXQGGXULQJWKHGHIURVWF\FOH
A water dripping noise may occur during the defrost cycle as ice
melts from the evaporator and flows into the drain pan.
Closing the door may cause a gurgling sound due to pressure
equalization.
Do you hear what I hear? These sounds are normal.
For additional information on normal
icemaker operating sounds, see the
About the automatic icemaker section.
HUMMM...
WHOOSH...
18
Before you call for service…
7URXEOHVKRRWLQJ7LSV
Save time and money! Review the charts on the following
SDJHV¿UVWDQG\RXPD\QRWQHHGWRFDOOIRUVHUYLFH
Problem Possible Causes What To Do
Refrigerator does not
operate
Refrigerator in defrost cycle. :DLWDERXWPLQXWHVIRUGHIURVWF\FOHWRHQG
Temperature control dial in OFF
position.
Move the temperature control dial to a temperature setting.
Refrigerator is unplugged. Push the plug completely into the outlet.
The fuse is blown/circuit breaker is
tripped.
5HSODFHIXVHRUUHVHWWKHEUHDNHU
Vibration or rattling (slight
vibration is normal)
Roller screws or leveling legs need
adjusting.
See Rollers and Leveling Legs.
Fresh food or freezer
compartment too warm
Temperature control dial not set cold
enough.
See About the temperature control dial.
Warm weather or frequent door
openings.
Set the temperature control dial one step colder. See About
the temperature control dial.
Door left open. Check to see if package is holding door open.
Package blocking air duct in freezer
compartment.
&KHFNWRVHHLISDFNDJHLVEORFNLQJDLUGXFWLQIUHH]HU
compartment.
Motor operates for
long periods or cycles
RQDQGRȹIUHTXHQWO\
(Modern refrigerators
with more storage space
and a larger space and
a larger freezer require
more operating time.
They start and stop
often to maintain even
temperatures.)
1RUPDOZKHQUHIULJHUDWRULV¿UVW
plugged in.
Wait 24 hours for the refrigerator to completely cool down.
Often occurs when large amounts of
food are placed in refrigerator.
This is normal.
Door left open. Check to see if package is holding door open.
Hot weather or frequent door
openings.
This is normal.
Temperature control dial set at the
coldest setting.
See About the temperature control dial.
Grille and condenser need cleaning. See Care and cleaning.
Frost or ice crystals on
frozen food (frost within
package is normal)
Door left open. Check to see if package is holding door open.
Too frequent or too long door
openings.
Automatic icemaker does
not work (on some models)
Icemaker is not on. Move the feeler arm to the ONGRZQSRVLWLRQRUPRYHWKH
power switch to the ON position
:DWHUVXSSO\WXUQHGRȹRUQRW
connected.
See Installing the water line.
Freezer compartment too warm. Wait 24 hours for the refrigerator to completely cool down.
Piled up cubes in the storage bin
FDXVHWKHLFHPDNHUWRVKXWRȹ
/HYHOFXEHVE\KDQG
Frequent “buzzing” sound
supply to the refrigerator
has not been connected
Icemaker is on but the water
Move the feeler arm to the STOPXSSRVLWLRQRUPRYH
the power switch to the OFF position, Keeping it on will
damage the water valve..
Cubes too small :DWHUVKXWRȹYDOYHFRQQHFWLQJ
refrigerator to water line may be
clogged.
&DOOWKHSOXPEHUWRFOHDUWKHYDOYH
Slow ice cube freezing Door left open. Check to see if package is holding door open.
Temperature control dial not set cold
enough.
See About the temperature control dial.
Problem Possible Causes What To Do
Ice cubes have odor/taste Ice storage bin needs cleaning. (PSW\DQGZDVKELQ'LVFDUGROGFXEHV
Food transmitting odor/taste to ice cubes. Wrap foods well.
Interior of refrigerator needs cleaning See Care and cleaning.
Moisture forms on cabinet
surface between the doors
Not unusual during periods of high
humidity.
Wipe surface dry and reset temperature control
dial one setting colder.
Moisture collects inside (in
humid weather, air carries
moisture into refrigerator
when doors reopened)
Too frequent or too long door openings.
Refrigerator has odor Foods transmitting odor to refrigerator. )RRGVZLWKVWURQJRGRUVVKRXOGEHWLJKWO\ZUDSSHG
.HHSDQRSHQER[RIEDNLQJVRGDLQWKH
UHIULJHUDWRUUHSODFHHYHU\WKUHHPRQWKV
Interior needs cleaning. See Care and cleaning.
7URXEOHVKRRWLQJ7LSV
GEAppliances.com
19

Notes.
20

Notes.
GEAppliances.com
21

Notes.
22
23
Refrigerator Warranty.
$OOZDUUDQW\VHUYLFHSURYLGHGE\RXU)DFWRU\6HUYLFH&HQWHUV
or an authorized Customer Care
®
technician. To schedule
service, on-line, 24 hours a day, visit us at GEAppliances.com, or
FDOO*(&$5(63OHDVHKDYHVHULDOQXPEHUDQG
PRGHOQXPEHUDYDLODEOHZKHQFDOOLQJIRUVHUYLFH
For The Period Of: GE Will Replace:
GE and GE PROFILE MODELS:
One Year Any part of the refrigerator which fails due to a defect in materials or workmanship.
From the date of the During this limited one-year warranty, GE will also provide, free of charge, DOOODERUDQG
original purchase related service to replace the defective part.
Thirty Days Any part RIWKHZDWHU¿OWHUFDUWULGJHZKLFKIDLOVGXHWRDGHIHFWLQPDWHULDOVRUZRUNPDQVKLS
:DWHU¿OWHULILQFOXGHG 'XULQJWKLVlimited thirty-day warranty, GE will also provide, free of charge, a replacement water
)URPWKHRULJLQDO ¿OWHUFDUWULGJH
purchase date of
the refrigerator
GE PROFILE MODELS ONLY:
Five Years Any part of the sealed refrigerating system WKHFRPSUHVVRUFRQGHQVHUHYDSRUDWRU
*(3UR¿OHPRGHOVRQO\ DQGDOOFRQQHFWLQJWXELQJZKLFKIDLOVGXHWRDGHIHFWLQPDWHULDOVRUZRUNPDQVKLS
From the date of the During this OLPLWHG¿YH\HDUVHDOHGUHIULJHUDWLQJV\VWHPZDUUDQW\GE will also provide,
original purchase free of charge,DOOODERUDQGUHODWHGVHUYLFHWRUHSODFHWKHGHIHFWLYHSDUWLQWKHVHDOHG
refrigerating system.
Service trips to your home to teach you how to use the
product.
Improper installation, delivery or maintenance.
Failure of the product if it is abused, misused, or used for
other than the intended purpose or used commercially.
Loss of food due to spoilage.
Replacement of house fuses or resetting of circuit
breakers.
'DPDJHWRWKH¿QLVKPXVWEHUHSRUWHGZLWKLQKRXUV
following delivery of the appliance.
'DPDJHWR¿QLVKLQFOXGLQJUXVWWDUQLVKRUVPDOO
blemishes, after delivery.
Products which are not defective, broken, or which are
working as described in the Owner’s Manual.
5HSODFHPHQWRIWKHZDWHU¿OWHUFDUWULGJHLILQFOXGHGGXH
WRZDWHUSUHVVXUHWKDWLVRXWVLGHWKHVSHFL¿HGRSHUDWLQJ
range or due to excessive sediment in the
water supply.
5HSODFHPHQWRIWKHOLJKWEXOEVLILQFOXGHGRUZDWHU¿OWHU
cartridge, if included, other than as noted above.
'DPDJHWRWKHSURGXFWFDXVHGE\DFFLGHQW¿UHÀRRGV
or acts of God.
Incidental or consequential damage caused by possible
defects with this appliance.
Product not accessible to provide required service.
What GE Will Not Cover:
7KLVZDUUDQW\LVH[WHQGHGWRWKHRULJLQDOSXUFKDVHUDQGDQ\VXFFHHGLQJRZQHUIRUSURGXFWVSXUFKDVHGIRU
KRPHXVHZLWKLQWKH86$,IWKHSURGXFWLVORFDWHGLQDQDUHDZKHUHVHUYLFHE\D*($XWKRUL]HG6HUYLFHULV
QRWDYDLODEOH\RXPD\EHUHVSRQVLEOHIRUDWULSFKDUJHRU\RXPD\EHUHTXLUHGWREULQJWKHSURGXFWWRDQ
$XWKRUL]HG*(6HUYLFHORFDWLRQIRUVHUYLFH,Q$ODVNDWKHZDUUDQW\H[FOXGHVWKHFRVWRIVKLSSLQJRUVHUYLFHFDOOV
to your home.
6RPHVWDWHVGRQRWDOORZWKHH[FOXVLRQRUOLPLWDWLRQRILQFLGHQWDORUFRQVHTXHQWLDOGDPDJHV7KLVZDUUDQW\
JLYHV\RXVSHFL¿FOHJDOULJKWVDQG\RXPD\DOVRKDYHRWKHUULJKWVZKLFKYDU\IURPVWDWHWRVWDWH7RNQRZZKDW
\RXUOHJDOULJKWVDUHFRQVXOW\RXUORFDORUVWDWHFRQVXPHUDȺDLUVRȻFHRU\RXUVWDWH·V$WWRUQH\*HQHUDO
Warrantor: General Electric Company. Louisville, KY 40225
Staple your receipt here.
Proof of the original purchase
GDWHLVQHHGHGWRREWDLQ
service under the warranty.
(;&/86,212),03/,(':$55$17,(6³<RXUVROHDQGH[FOXVLYHUHPHG\LVSURGXFWUHSDLUDVSURYLGHGLQ
this Limited Warranty. Any implied warranties, including the implied warranties of merchantability or
¿WQHVVIRUDSDUWLFXODUSXUSRVHDUHOLPLWHGWRRQH\HDURUWKHVKRUWHVWSHULRGDOORZHGE\ODZ
Consumer Support.
GEAppliances.com
GEAppliances.com
+DYHDTXHVWLRQRUQHHGDVVLVWDQFHZLWK\RXUDSSOLDQFH"7U\WKH*($SSOLDQFHV:HEVLWHKRXUVDGD\
DQ\GD\RIWKH\HDU)RUJUHDWHUFRQYHQLHQFHDQGIDVWHUVHUYLFH\RXFDQQRZGRZQORDG2ZQHU·V0DQXDOV
order parts, or even schedule service on-line.
*($SSOLDQFHV:HEVLWH www.Hotpoint.com
Schedule Service www.Hotpoint.com
([SHUW*(UHSDLUVHUYLFHLVRQO\RQHVWHSDZD\IURP\RXUGRRU*HWRQOLQHDQGVFKHGXOH\RXUVHUYLFHDW\RXU
FRQYHQLHQFHKRXUVDQ\GD\RIWKH\HDU2UFDOO*(&$5(6GXULQJQRUPDOEXVLQHVVKRXUV
*(VXSSRUWVWKH8QLYHUVDO'HVLJQFRQFHSW³SURGXFWVVHUYLFHVDQGHQYLURQPHQWVWKDWFDQEHXVHGE\SHRSOHRI
DOODJHVVL]HVDQGFDSDELOLWLHV:HUHFRJQL]HWKHQHHGWRGHVLJQIRUDZLGHUDQJHRISK\VLFDODQGPHQWDODELOLWLHV
DQGLPSDLUPHQWV)RUGHWDLOVRI*(·V8QLYHUVDO'HVLJQDSSOLFDWLRQVLQFOXGLQJNLWFKHQGHVLJQLGHDVIRUSHRSOHZLWK
GLVDELOLWLHVFKHFNRXWRXU:HEVLWHWRGD\)RUWKHKHDULQJLPSDLUHGSOHDVHFDOO7''*($&
Real Life Design Studio GEAppliances.com
([WHQGHG:DUUDQWLHV GEAppliances.com
3XUFKDVHD*(H[WHQGHGZDUUDQW\DQGOHDUQDERXWVSHFLDOGLVFRXQWVWKDWDUHDYDLODEOHZKLOH\RXUZDUUDQW\LVVWLOO
LQHȺHFW<RXFDQSXUFKDVHLWRQOLQHDQ\WLPHRUFDOOGXULQJQRUPDOEXVLQHVVKRXUV*(&RQVXPHU
+RPH6HUYLFHVZLOOVWLOOEHWKHUHDIWHU\RXUZDUUDQW\H[SLUHV
GEAppliances.com
GEAppliances.com
,QGLYLGXDOVTXDOL¿HGWRVHUYLFHWKHLURZQDSSOLDQFHVFDQKDYHSDUWVRUDFFHVVRULHVVHQWGLUHFWO\WRWKHLUKRPHV9,6$
0DVWHU&DUGDQG'LVFRYHUFDUGVDUHDFFHSWHG2UGHURQOLQHWRGD\KRXUVHYHU\GD\RUE\SKRQHDW
GXULQJQRUPDOEXVLQHVVKRXUV
,QVWUXFWLRQVFRQWDLQHGLQWKLVPDQXDOFRYHUSURFHGXUHVWREHSHUIRUPHGE\DQ\XVHU2WKHUVHUYLFLQJJHQHUDOO\VKRXOG
EHUHIHUUHGWRTXDOL¿HGVHUYLFHSHUVRQQHO&DXWLRQPXVWEHH[HUFLVHGVLQFHLPSURSHUVHUYLFLQJPD\FDXVHXQVDIH
operation.
Parts and Accessories GEAppliancesParts.com
,I\RXDUHQRWVDWLV¿HGZLWKWKHVHUYLFH\RXUHFHLYHIURP*(FRQWDFWXVRQRXU:HEVLWHZLWKDOOWKHGHWDLOVLQFOXGLQJ
\RXUSKRQHQXPEHURUZULWHWR *HQHUDO0DQDJHU&XVWRPHU5HODWLRQV
GE Appliances, Appliance Park
Louisville, KY 40225
Contact Us www.Hotpoint.com
5HJLVWHU\RXUQHZDSSOLDQFHRQOLQH³DW\RXUFRQYHQLHQFH Timely product registration will allow for
enhanced communication and prompt service under the terms of your warranty, should the need arise.
You may also mail in the pre-printed registration card included in the packing material.
Register Your Appliance www.Hotpoint.com
Printed in the United States
Printed on Recycled Paper

