OWNER'S
MANUAL
36” and 48”
Professional Dual Fuel Ranges
ENGLISH/FRANÇAIS/ESPAÑOL
MONOGRAM.COM

2 49-2000877 Rev. 4
MODEL INFORMATION
WRITE DOWN THE MODEL AND SERIAL NUMBERS
You’ll find them on a label located behind the left burner
knob or below the control panel which is visible when the
oven door is opened.
Use these numbers in any correspondence or service calls
concerning your appliance.
Please write these numbers here:
Model Number
Serial Number
MODEL NUMBERS - ZDP364, ZDP484
TABLE OF CONTENTS
MODEL INFORMATION .....................................................................................2
CONSUMER SUPPORT .....................................................................................3
SAFETY INFORMATION ....................................................................................4
USING THE RANGE ........................................................................................9
Connecting Your Wifi Enabled Range .......................................................................9
Features of the Range and Cooktop .......................................................................10
Accent Lighting ........................................................................................11
In Case of Power Failure ................................................................................11
Surface Burners .......................................................................................11
Top-of-the-Range Cookware .............................................................................12
Wok Cooking .........................................................................................13
TrueTemp Precision Cooking System ......................................................................13
Griddle ..............................................................................................17
Grill .................................................................................................18
Features of the Oven ...................................................................................20
Oven Control .........................................................................................21
Settings ..............................................................................................22
WiFi Connect and Remote Enable .........................................................................22
Sabbath .............................................................................................24
Oven Air Vents ........................................................................................25
Aluminum Foil and Oven Liners ..........................................................................25
Oven Racks ..........................................................................................25
Oven Modes ..........................................................................................26
Baking ...............................................................................................27
Broiling ..............................................................................................28
Convection Cooking ....................................................................................29
Convection Baking .....................................................................................29
Convection Roasting ...................................................................................30
Convection Broiling .....................................................................................31
Warming ............................................................................................32
Proofing .............................................................................................32
Precision Cooking ......................................................................................32
Temperature Probe ....................................................................................33
Oven Cooking Guide ...................................................................................35
Oven Cookware Guidelines ..............................................................................35
Air Fry Cooking Guide ..................................................................................37
CARE AND CLEANING ....................................................................................38
Control Panel and Knobs ................................................................................38
Broiler Pan, Grid, and Roasting Rack ......................................................................38
Oven Exterior .........................................................................................39
Oven Interior ..........................................................................................39
Steam Cleaning .......................................................................................39
Self--Cleaning .........................................................................................40
Oven Racks ..........................................................................................41
Temperature Probe ....................................................................................41
Oven Bottom ..........................................................................................41
Oven Door ...........................................................................................42
Oven Lights ..........................................................................................43
Dual-Flame Stacked and Multi-Ring Burners .................................................................44
Spark Igniter and Electrodes .............................................................................45
Burner Grates .........................................................................................45
Grease Trough ........................................................................................45
Griddle ..............................................................................................45
TROUBLESHOOTING .....................................................................................46
MONOGRAM LIMITED WARRANTY ..........................................................................49

49-2000877 Rev. 4 3
CONSUMER SUPPORT
MONOGRAM WEBSITE
Have a question or need assistance with your appliance? Try the Monogram website 24 hours a day, any day of the year! You can
also shop for more great Monogram products and take advantage of all our on-line support services designed for your convenience. In
the US: monogram.com.
In Canada: monogram.ca
REGISTER YOUR APPLIANCE
Register your new appliance on-line at your convenience! Timely product registration will allow for enhanced
communication and prompt service under the terms of your warranty, should the need arise. You may also mail in the
pre-printed registration card included in the packing material. In the US: monogram.com/register.
In Canada: monogram.ca
SCHEDULE SERVICE
Expert Monogram repair service is only one step away from your door.
To request service in the US, visit our website at monogram.com/contact or call 800.444.1845
In Canada : monogram.ca ou 888.880.3030
REMOTE CONNECTIVITY
For assistance with wireless network connectivity (for models with remote enable),
visit our website at monogram.com/connect
PARTS AND ACCESSORIES
Individuals qualified to service their own appliances can have parts or accessories sent directly to their homes
(VISA, MasterCard and Discover cards are accepted). Order on-line today 24 hours every day.
In the US: monogram.com/ownership/parts or call 800.444.1845
In Canada: monogram.ca or 800.661.1616
Instructions contained in this manual cover procedures to be performed by any user. Other servicing generally
should be referred to qualified service personnel. Caution must be exercised, since improper servicing may
cause unsafe operation.
CONTACT US
If you are not satisfied with the service you receive from Monogram, contact us on our website with all the details
including your phone number at monogram.com/contact.
4 49-2000877 Rev. 4
IMPORTANT SAFETY INFORMATION
READ ALL INSTRUCTIONS BEFORE USING THE APPLIANCE
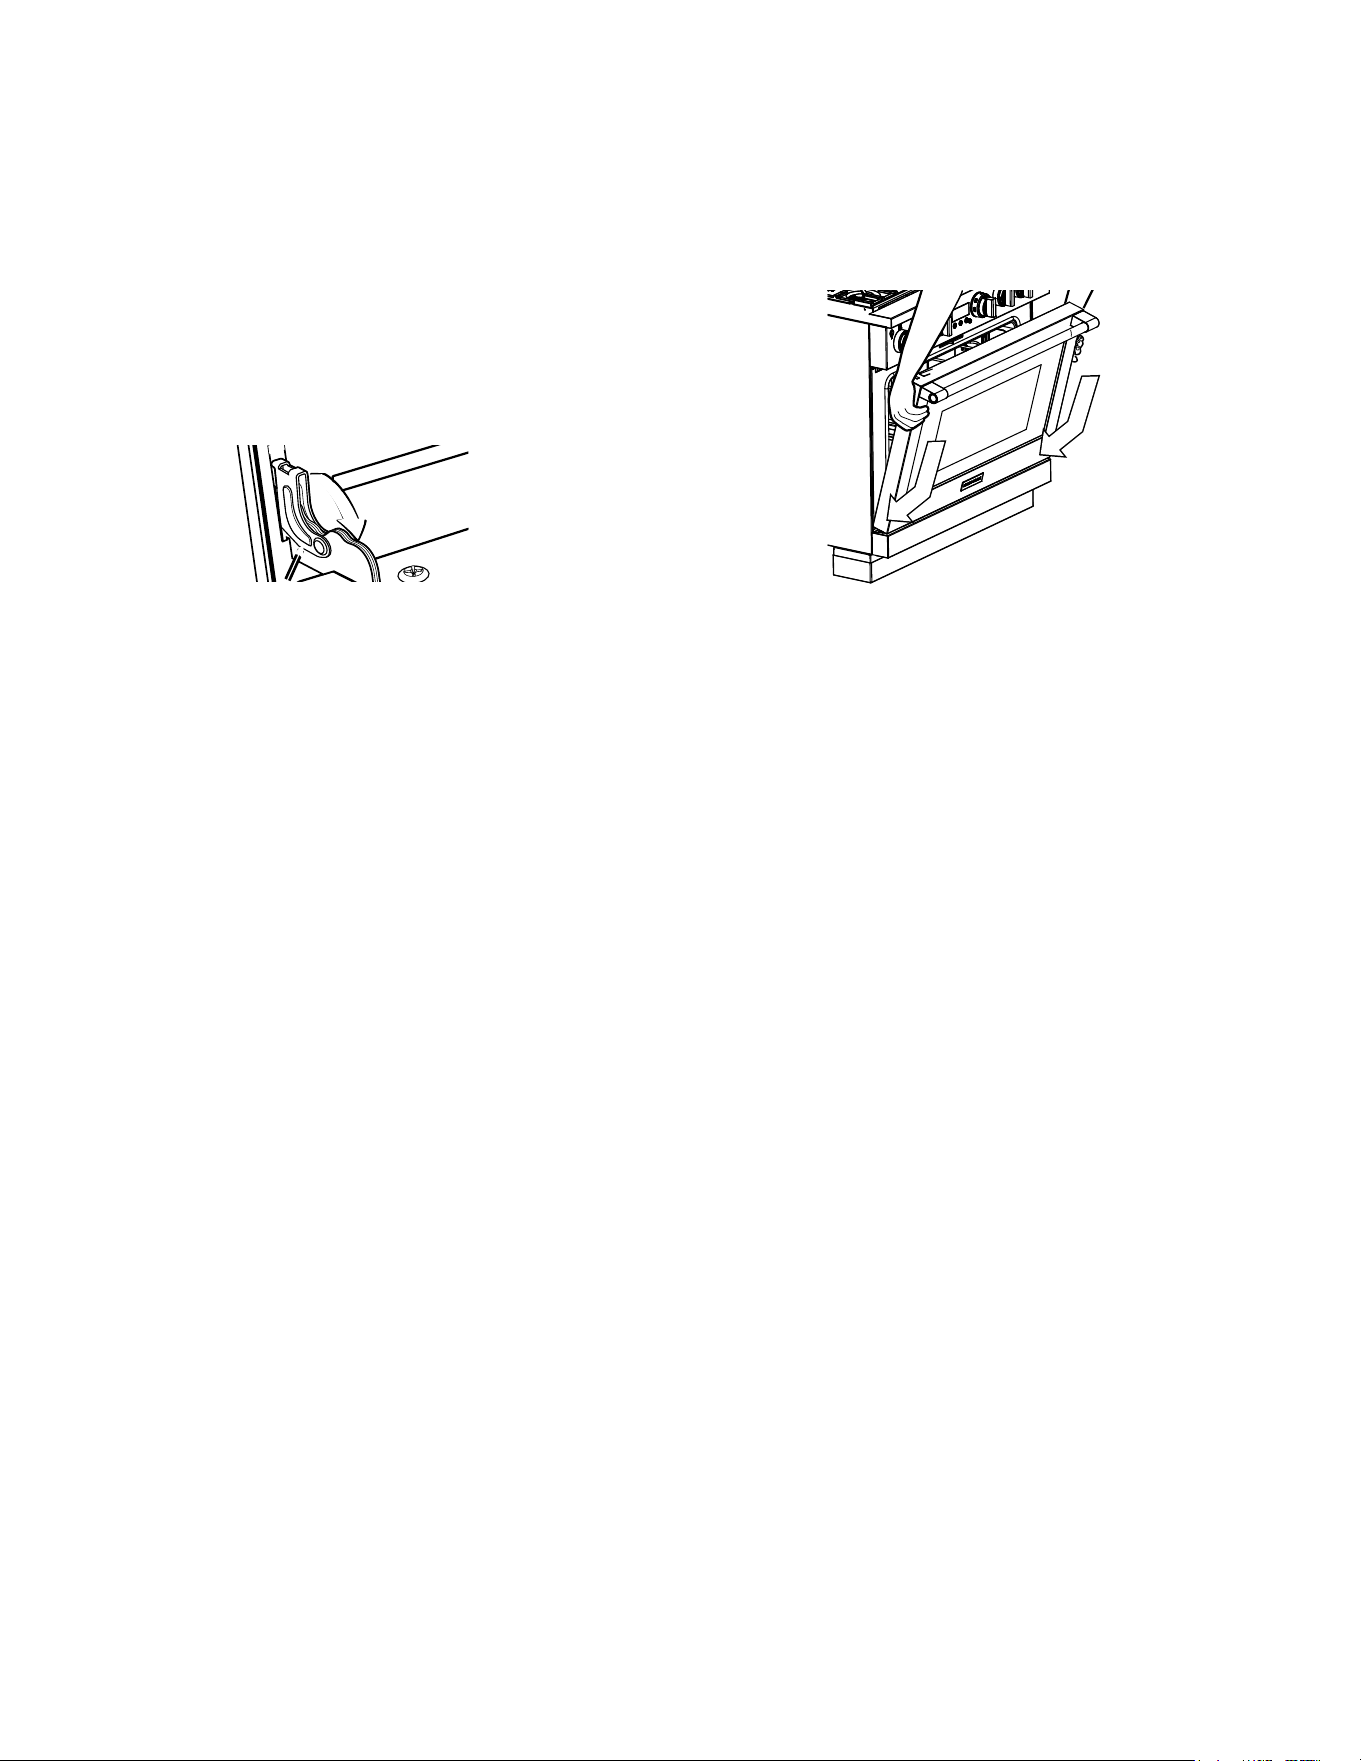
ANTI-TIP DEVICE
To reduce the risk of tipping the range, the range must
be secured by a properly installed anti-tip bracket. See
installation instructions shipped with the bracket for
complete details before attempting to install.
For Professional Gas Ranges
To check if the bracket is installed and engaged
properly, look underneath the range to see that the rear
leveling leg is engaged in the bracket. On some models,
the kick panel can be removed for easy inspection. If
visual inspection is not possible, slide the range forward,
confirm the anti-tip bracket is securely attached to
the floor or wall, and slide the range back so the rear
leveling leg is under the anti-tip bracket.
If the range is pulled from the wall for any reason,
always repeat this procedure to verify the range is
properly secured by the anti-tip bracket.
Never completely remove the leveling legs or the range
will not be secured to the anti-tip device properly.
WARNING
If the information in this manual is not followed exactly, a fire or
explosion may result, causing property damage, personal injury or death.
- Do not store or use gasoline or other flammable vapors and liquids in the vicinity of this
or any other appliance.
- WHAT TO DO IF YOU SMELL GAS
Ŷ'RQRWWU\WROLJKWDQ\DSSOLDQFH
Ŷ'RQRWWRXFKDQ\HOHFWULFDOVZLWFKGRQRWXVHDQ\SKRQHLQ\RXUEXLOGLQJ
Ŷ,PPHGLDWHO\FDOO\RXUJDVVXSSOLHUIURPDQHLJKERU¶VSKRQH)ROORZWKHJDVVXSSOLHU¶V
instructions.
Ŷ,I\RXFDQQRWUHDFK\RXUJDVVXSSOLHUFDOOWKHILUHGHSDUWPHQW
- Installation and service must be performed by a qualified installer, service agency or the
gas supplier.
Anti-Tip Bracket
Kit Included
Rear View
• A child or adult can tip the range and be killed.
• Install the anti-tip bracket to the wall or floor.
• Engage the range to the anti-tip bracket by sliding the
range back such that the foot is engaged.
• Re-engage the anti-tip bracket if the range is moved.
• Failure to do so can result in death or serious burns
to children or adults.
Tip-Over Hazard
WARNING
49-2000877 Rev. 4 5
WARNING
Read all safety instructions before using the product. Failure to follow these instructions may result
in fire, electrical shock, serious injury or death.
WARNING
GENERAL SAFETY INSTRUCTIONS
Ŷ 8VHWKLVDSSOLDQFHIRULWVLQWHQGHGSXUSRVHDV
described in this owner’s manual.
Ŷ +DYH\RXUUDQJHLQVWDOOHGDQGSURSHUO\JURXQGHGE\
a qualified installer in accordance with the provided
installation instructions.
Ŷ
Any adjustment and service should be performed only by
a qualified gas range installer or service technician. Do
not attempt to repair or replace any part of your range
unless it is specifically recommended in this manual.
Ŷ <RXUUDQJHLVVKLSSHGIURPWKHIDFWRU\VHWIRUXVH
with natural gas. It can be converted for use with
propane (LP). If required, these adjustments must be
made by a qualified technician in accordance with the
installation instructions and local codes. The agency
performing this work assumes responsibility for the
conversion.
Ŷ +DYHWKHLQVWDOOHUVKRZ\RXWKHORFDWLRQRIWKHUDQJH
gas shut-off valve and how to turn it off if necessary.
Ŷ 'XDO)XHO,IWKHKHDWLQJHOHPHQWLQWKHRYHQGHYHORSV
a glowing spot or shows other signs of damage,
do not use that area of the range. A glowing spot
indicates the element may fail and present a potential
burn, fire, or shock hazard. Turn the heating element
off immediately and have it replaced by a qualified
service technician.
Ŷ %HIRUHSHUIRUPLQJDQ\VHUYLFHXQSOXJWKHUDQJH
or disconnect the power supply at the household
distribution panel by removing the fuse or switching
off the circuit breaker.
Ŷ %HVXUHDOOSDFNLQJPDWHULDOVDUHUHPRYHGIURPWKH
range before operating to prevent ignition of these
materials.
Ŷ $YRLGVFUDWFKLQJRULPSDFWLQJJODVVGLVSOD\V'RLQJ
so may lead to glass breakage. Do not cook on a
product with broken glass. Shock, fire, or cuts may
occur.
Ŷ 'RQRWOHDYHFKLOGUHQDORQHRUXQDWWHQGHGLQDQDUHD
where an appliance is in use. They should never
be allowed to climb, sit or stand on any part of the
appliance.
Ŷ
CAUTION
Do not store items of interest to
children in cabinets above an oven - children climbing
on the oven to reach items could be seriously injured.
Ŷ 1HYHUEORFNWKHYHQWVDLURSHQLQJVRIWKHUDQJH
They provide the air inlets and outlets that are
necessary for the range to operate properly with
correct combustion. Air openings are located at the
rear of the cooktop, at the top and bottom of the oven
door, and at the bottom of the range.
Ŷ 8VHRQO\GU\SRWKROGHUV²PRLVWRUGDPSSRWKROGHUV
on hot surfaces may result in burns from steam. Do
not let pot holders touch surface burners, burner
grate, or oven heating element. Do not use a towel or
other bulky cloth in place of pot holders.
Ŷ 'RQRWWRXFKWKHKHDWLQJHOHPHQWVRUWKHLQWHULRU
surface of the oven. These surfaces may be hot
enough to burn even though they are dark in color.
During and after use, do not touch, or let clothing
or other flammable materials contact any interior
area of the oven; allow sufficient time for cooling
first. Other surfaces of the appliance may become
hot enough to cause burns. Potentially hot surfaces
include the burners, grates, oven vent opening,
surfaces near the opening, crevices around the
oven door, metal trim parts above the door, any
backguard, or high shelf surface.
Ŷ 'RQRWKHDWXQRSHQHGIRRGFRQWDLQHUV3UHVVXUH
could build up and the container could burst, causing
an injury.
Ŷ &RRNIRRGWKRURXJKO\WRKHOSSURWHFWDJDLQVW
foodborne illness. Minimum safe food temperature
recommendations can be found at
IsItDoneYet.gov and fsis.usda.gov. Use a food
thermometer to take food temperatures and check
several locations.
IMPORTANT SAFETY INFORMATION
READ ALL INSTRUCTIONS BEFORE USING THE APPLIANCE
READ AND SAVE THESE INSTRUCTIONS
WARNING
NEVER use this appliance as a
space heater to heat or warm the room. Doing so
may result in carbon monoxide poisoning and
overheating of the oven.
6 49-2000877 Rev. 4
IMPORTANT SAFETY INFORMATION
READ ALL INSTRUCTIONS BEFORE USING THE APPLIANCE
READ AND SAVE THESE INSTRUCTIONS
WARNING
GENERAL SAFETY INSTRUCTIONS (cont.)
Ŷ 'RQRWDOORZDQ\RQHWRFOLPEVWDQGRUKDQJRQWKH
oven door, drawer or cooktop. They could damage the
range or tip it over causing severe injury or death.
Ŷ .HHSWKHYHQWLODWRUKRRGDQGJUHDVHILOWHUVFOHDQ
to maintain good venting and to avoid grease fires.
Turn the ventilator OFF in case of a fire or when
intentionally "flaming" liquor or other spirits on the
cooktop. The blower if in operation, could spread the
flames.
WARNING
KEEP FLAMMABLE MATERIALS AWAY FROM THE RANGE
Failure to do so may result in fire or personal injury.
Ŷ 'RQRWVWRUHRUXVHIODPPDEOHPDWHULDOVLQDQRYHQRU
near the cooktop, including paper, plastic, pot holders,
linens, wall coverings, curtains, drapes and gasoline
or other flammable vapors and liquids.
Ŷ 1HYHUZHDUORRVHILWWLQJRUKDQJLQJJDUPHQWVZKLOH
using the appliance. These garments may ignite if
they contact hot surfaces causing severe burns.
Ŷ 'RQRWOHWFRRNLQJJUHDVHRURWKHUIODPPDEOH
materials accumulate in or near the range. Grease in
the oven or on the cooktop may ignite.
WARNING
IN THE EVENT OF A FIRE, TAKE THE FOLLOWING
STEPS TO PREVENT INJURY AND FIRE SPREADING
Ŷ
Do not use water on grease fires. Never pick up a
flaming pan. Turn the controls off. Smother a flaming pan
on a surface unit by covering the pan completely with
a well-fitting lid, cookie sheet or flat tray. Use a multi-
purpose dry chemical or foam-type fire extinguisher.
Ŷ ,IWKHUHLVDILUHLQWKHRYHQGXULQJEDNLQJVPRWKHUWKH
fire by closing the oven door and turning the oven off
or by using a multi-purpose dry chemical or foam-type
fire extinguisher.
Ŷ ,IWKHUHLVDILUHLQWKHRYHQGXULQJVHOIFOHDQWXUQWKH
oven off and wait for the fire to go out. Do not force
the door open. Introduction of fresh air at self-clean
temperatures may lead to a burst of flame from the
oven. Failure to follow this instruction may result in
severe burns.
WARNING
SELF-CLEANING OVEN SAFETY INSTRUCTIONS
The self-cleaning feature operates the oven at temperatures high enough to burn away food soils in the oven. Follow
these instructions for safe operation.
Ŷ 'RQRWWRXFKRYHQVXUIDFHVGXULQJVHOIFOHDQ
operation. Keep children away from the oven during
self-cleaning. Failure to follow these instructions may
cause burns.
Ŷ %HIRUHRSHUDWLQJWKHVHOIFOHDQF\FOHUHPRYHSDQV
shiny metal oven racks, and other utensils from the
oven. Only porcelain-coated oven racks may be left in
the oven.
Ŷ %HIRUHRSHUDWLQJWKHVHOIFOHDQF\FOHZLSHJUHDVH
and food soils from the oven. Excessive amount of
grease may ignite leading to smoke damage to your
home.
Ŷ ,IWKHVHOIFOHDQLQJPRGHPDOIXQFWLRQVWXUQWKHRYHQ
off and disconnect the power supply. Have it serviced
by a qualified technician.
Ŷ 'RQRWXVHDSURWHFWLYHFRDWLQJWROLQHWKHRYHQDQG
do not use commercial oven cleaner unless certified
for use in a self-cleaning oven.
Ŷ 'RQRWFOHDQWKHGRRUJDVNHW7KHGRRUJDVNHWLV
essential for a good seal. Care should be taken not to
rub, damage or move the gasket.
Ŷ IMPORTANT: The health of some birds is extremely
sensitive to the fumes given off during the self-
cleaning cycle of any range. Move birds to another
well-ventilated room.
49-2000877 Rev. 4 7
IMPORTANT SAFETY INFORMATION
READ ALL INSTRUCTIONS BEFORE USING THE APPLIANCE
READ AND SAVE THESE INSTRUCTIONS
WARNING
COOKTOP SAFETY INSTRUCTIONS
WARNING
NEVER Operate the
Top Surface Cooking Section of this
Appliance Unattended.
• Failure to follow this warning statement
could result in fire, explosion, or burn
hazard that could cause property
damage, personal injury, or death.
• If a fire should occur, keep away from
the appliance and immediately call your
fire department.
DO NOT ATTEMPT TO EXTINGUISH AN
OIL/GREASE FIRE WITH WATER.
Ŷ 1HYHUOHDYHRLOXQDWWHQGHGZKLOHIU\LQJ,IDOORZHGWR
heat beyond its smoking point, oil may ignite resulting
in fire that may spread to surrounding cabinets. Use
a deep fat thermometer whenever possible to monitor
oil temperature.
Ŷ 7RDYRLGRLOVSLOORYHUDQGILUHXVHWKHPLQLPXP
amount of oil when using a shallow pan-frying and
avoid cooking frozen foods with excessive amounts
of ice.
Ŷ 8VHSURSHUSDQVL]HDQGDYRLGSDQVWKDWDUHXQVWDEOH
or easily tipped. Select cookware that is matched
to the size of the burner. Burner flames should
be adjusted so that they do not extend beyond
the bottom of the pan. Excessive flame may be
hazardous.
Ŷ $OZD\VXVHWKH/,7(SRVLWLRQZKHQLJQLWLQJWKHWRS
burners and make sure the burners have ignited.
Ŷ :KHQXVLQJJODVVFHUDPLFFRRNZDUHPDNHVXUHLW
is suitable for cooktop service; others may break
because of sudden change in temperature.
Ŷ 7RPLQLPL]HWKHSRVVLELOLW\RIEXUQVLJQLWLRQRI
flammable materials and spillage, the handle of a
container should be turned toward the center of the
range without extending over nearby burners.
Ŷ 'RQRWXVHDZRNZLWKDURXQGPHWDOVXSSRUWULQJ
The ring may trap heat and block air to the burner
resulting in a carbon monoxide hazard.
Ŷ 'RQRWDWWHPSWWROLIWWKHFRRNWRS'RLQJVRPD\
damage the gas tubing to the surface burners
resulting in a gas leak and risk of fire.
Ŷ 'RQRWXVHDOXPLQXPIRLOWRFRYHUWKHJUDWHVRU
line any part of the cooktop. Doing so may result
in carbon monoxide poisoning, overheating of the
cooktop surfaces, or a potential fire hazard.
8 49-2000877 Rev. 4
WARNING
OVEN SAFETY INSTRUCTIONS
WARNING
NEVER cover any slots, holes,
or passages in the oven bottom or cover an
entire rack with materials such as aluminum foil
or oven liners. Doing so blocks air flow through
the oven and may cause carbon monoxide
poisoning. Never place foil or oven liners on the
oven bottom. They can trap heat causing risk of
smoke or fire.
Ŷ 6WDQGDZD\IURPWKHUDQJHZKHQRSHQLQJWKHRYHQ
door. Hot air or steam which escapes can cause
EXUQVWRKDQGVIDFHDQGRUH\HV
Ŷ 1HYHUSODFHFRRNLQJXWHQVLOVSL]]DRUEDNLQJVWRQHV
or any type of foil or liner on the oven floor. These
items can trap heat or melt, resulting in damage to the
product and risk of shock, smoke or fire.
Ŷ 3ODFHRYHQUDFNVLQGHVLUHGORFDWLRQZKLOHRYHQLV
cool. If rack must be moved while oven is hot, be
careful to avoid touching hot surfaces.
Ŷ 'RQRWOHDYHLWHPVVXFKDVSDSHUFRRNLQJXWHQVLOVRU
food in the oven when not in use. Items stored in an
oven can ignite.
Ŷ 'RQRWOHDYHLWHPVRQWKHFRRNWRSQHDUWKHRYHQ
vent. Items may overheat resulting in a risk of fire or
burns.
Ŷ 1HYHUEURLOZLWKGRRURSHQ2SHQGRRUEURLOLQJLVQRW
permitted due to overheating of control knobs.
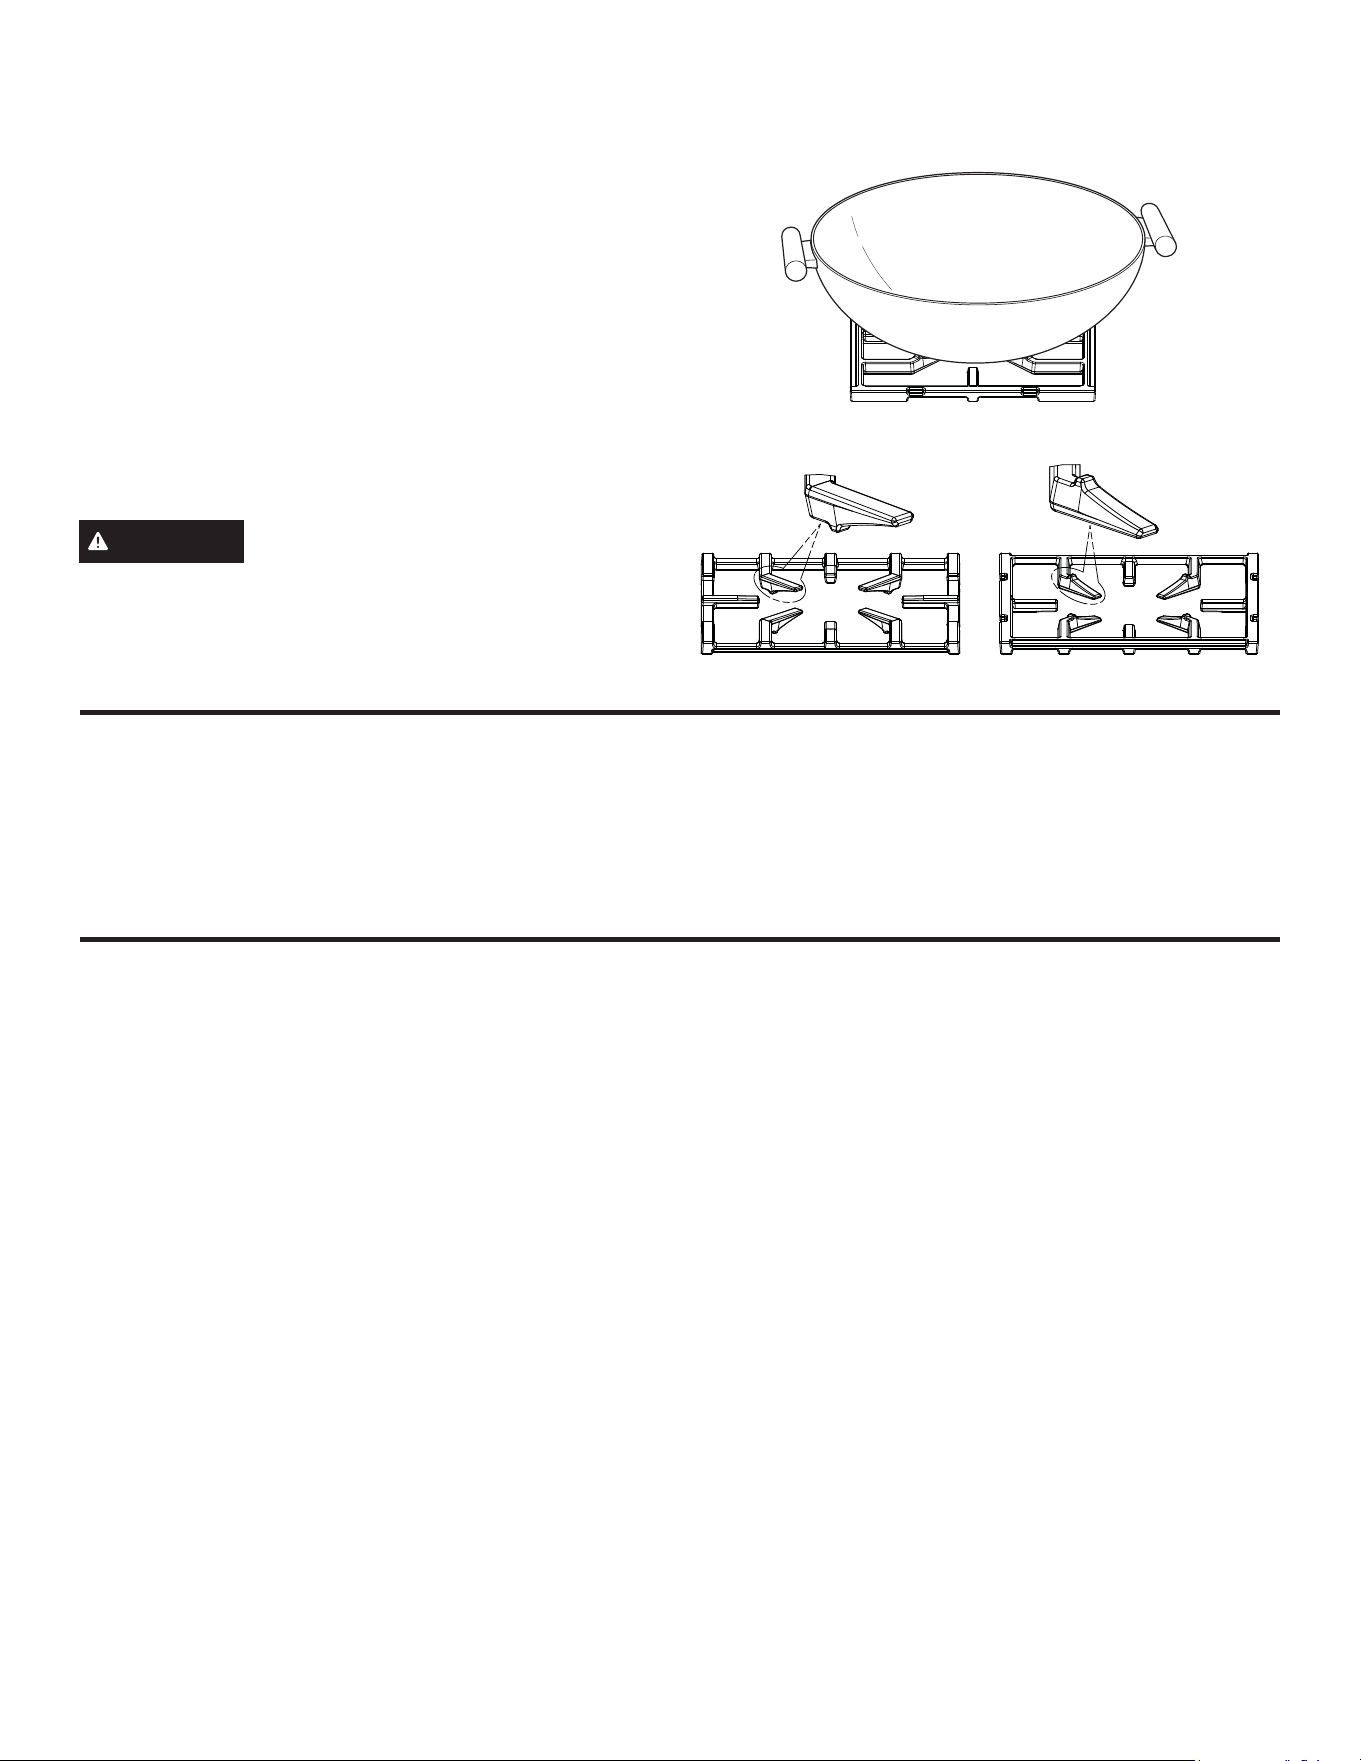
How to Remove Protective Shipping Film and Packaging Tape
Carefully grasp a corner of the protective shipping film with
your fingers and slowly peel it from the appliance surface.
Do not use any sharp items to remove the film. Remove all
of the film before using the appliance for the first time.
To assure no damage is done to the finish of the product,
the safest way to remove the adhesive from packaging tape
on new appliances is an application of a household liquid
dishwashing detergent. Apply with a soft cloth and allow to
soak.
NOTE: The adhesive must be removed from all parts. It
cannot be removed if it is baked on.
IMPORTANT SAFETY INFORMATION
READ ALL INSTRUCTIONS BEFORE USING THE APPLIANCE
READ AND SAVE THESE INSTRUCTIONS
NOTE: Some cooking functions and features are not available until after you WiFi connect your new oven to your local
wireless network. Please follow the instructions on the oven control and the WiFi & Remote Enable section of this guide.
This provides capability to use SmartHQ app functions and ensures that the oven has the latest software.

49-2000877 Rev. 4 9
USING THE RANGE
On initial setup, this range requires a software update to
enable all features. To perform the update, download
the SmartHQ app and then follow instructions to connect
the range to your home wifi network. Some features are
available only via the SmartHQ app. For more information
on how to get connected, reference the “Wifi & Remote
Enable” section of this guide.
CONNECTING YOUR WIFI ENABLED
RANGE
Your range is designed to provide you with two-way
communication between your appliance and smart device.
By using the SmartHQ mobile app, you will be able to
control essential range operations such as temperature
settings and cooking modes using your smartphone or
tablet.*
What you will need
Your range uses your existing home WiFi network to
communicate between the appliance and your smart
device. In order to setup your range, you will need to gather
some information:
1. Each range has connected appliance information that
includes an Appliance Network Name and Password.
These are the two important details that you will need
to connect to the appliance. This information is found in
the WiFi Settings menu on the unit display.
2. Have your smart phone or tablet ready with the ability to
access the internet and download apps.
3. You will need to know the password of your home WiFi
router. Have this password ready while you are setting
up your range.
Connecting your Wi-Fi Connect Enabled Range
1. Have your smart phone or tablet ready with the ability to
access the internet and download apps.
2. You will need to know the password of your home Wi-Fi
router. Have this password ready while you are setting
up your Monogram range.
3. On your smart phone or tablet, visit
monogram.com/connect to learn more about
connected appliance features and to download the app
to connect to your range.
4. Follow the onscreen instructions in the app to connect
your Monogram range. When connected, your range
should show that it is connected to your home Wi-Fi
network.
5. If there are issues connecting wirelessly to your range,
please call 800.220.6899 and ask for assistance
regarding range wireless connectivity.
To connect additional smart devices, repeat steps 3 and 4.
Note that any changes or modifications to the remote
enable device installed on this range that are not expressly
approved by the manufacturer could void the user’s
authority to operate the equipment.
* Compatible Apple or Android devices and home WiFi network required.
REMOTE ENABLE EQUIPMENT
This device complies with part 15 of the FCC Rules.
Operation is subject to the following two conditions: (1) This
device may not cause harmful interference, and (2) this
device must accept any interference received, including
interference that may cause undesired operation.
The wireless communication equipment installed on this
range has been tested and found to comply with the limits
for a Class B digital device, pursuant to part 15 of the FCC
Rules. These limits are designed to:
(a) provide reasonable protection against harmful
interference in a residential installation. This equipment
generates, uses, and can radiate radio frequency energy
and, if not installed and used in accordance with the
instructions, may cause harmful interference to radio
communications. However, there is no guarantee that
interference will not occur in a particular installation. If this
equipment does cause harmful interference to radio or
television reception, which can be determined by turning
the equipment off and on, the user is encouraged to try
to correct the interference by one or more of the following
measures:
• Reorient or relocate the receiving antenna.
• Increase the separation between the equipment and
receiver.
• Connect the equipment into an outlet on a circuit different
from that to which the receiver is connected.
&RQVXOWWKHGHDOHURUDQH[SHULHQFHGUDGLR79WHFKQLFLDQ
for help.
(b) accept any interference received, including interference
that may cause undesired operation of the device.
Note that any changes or modifications to the wireless
communication device installed on this range that are not
expressly approved by the manufacturer could void the
user’s authority to operate the equipment.
10 49-2000877 Rev. 4
USING THE RANGE
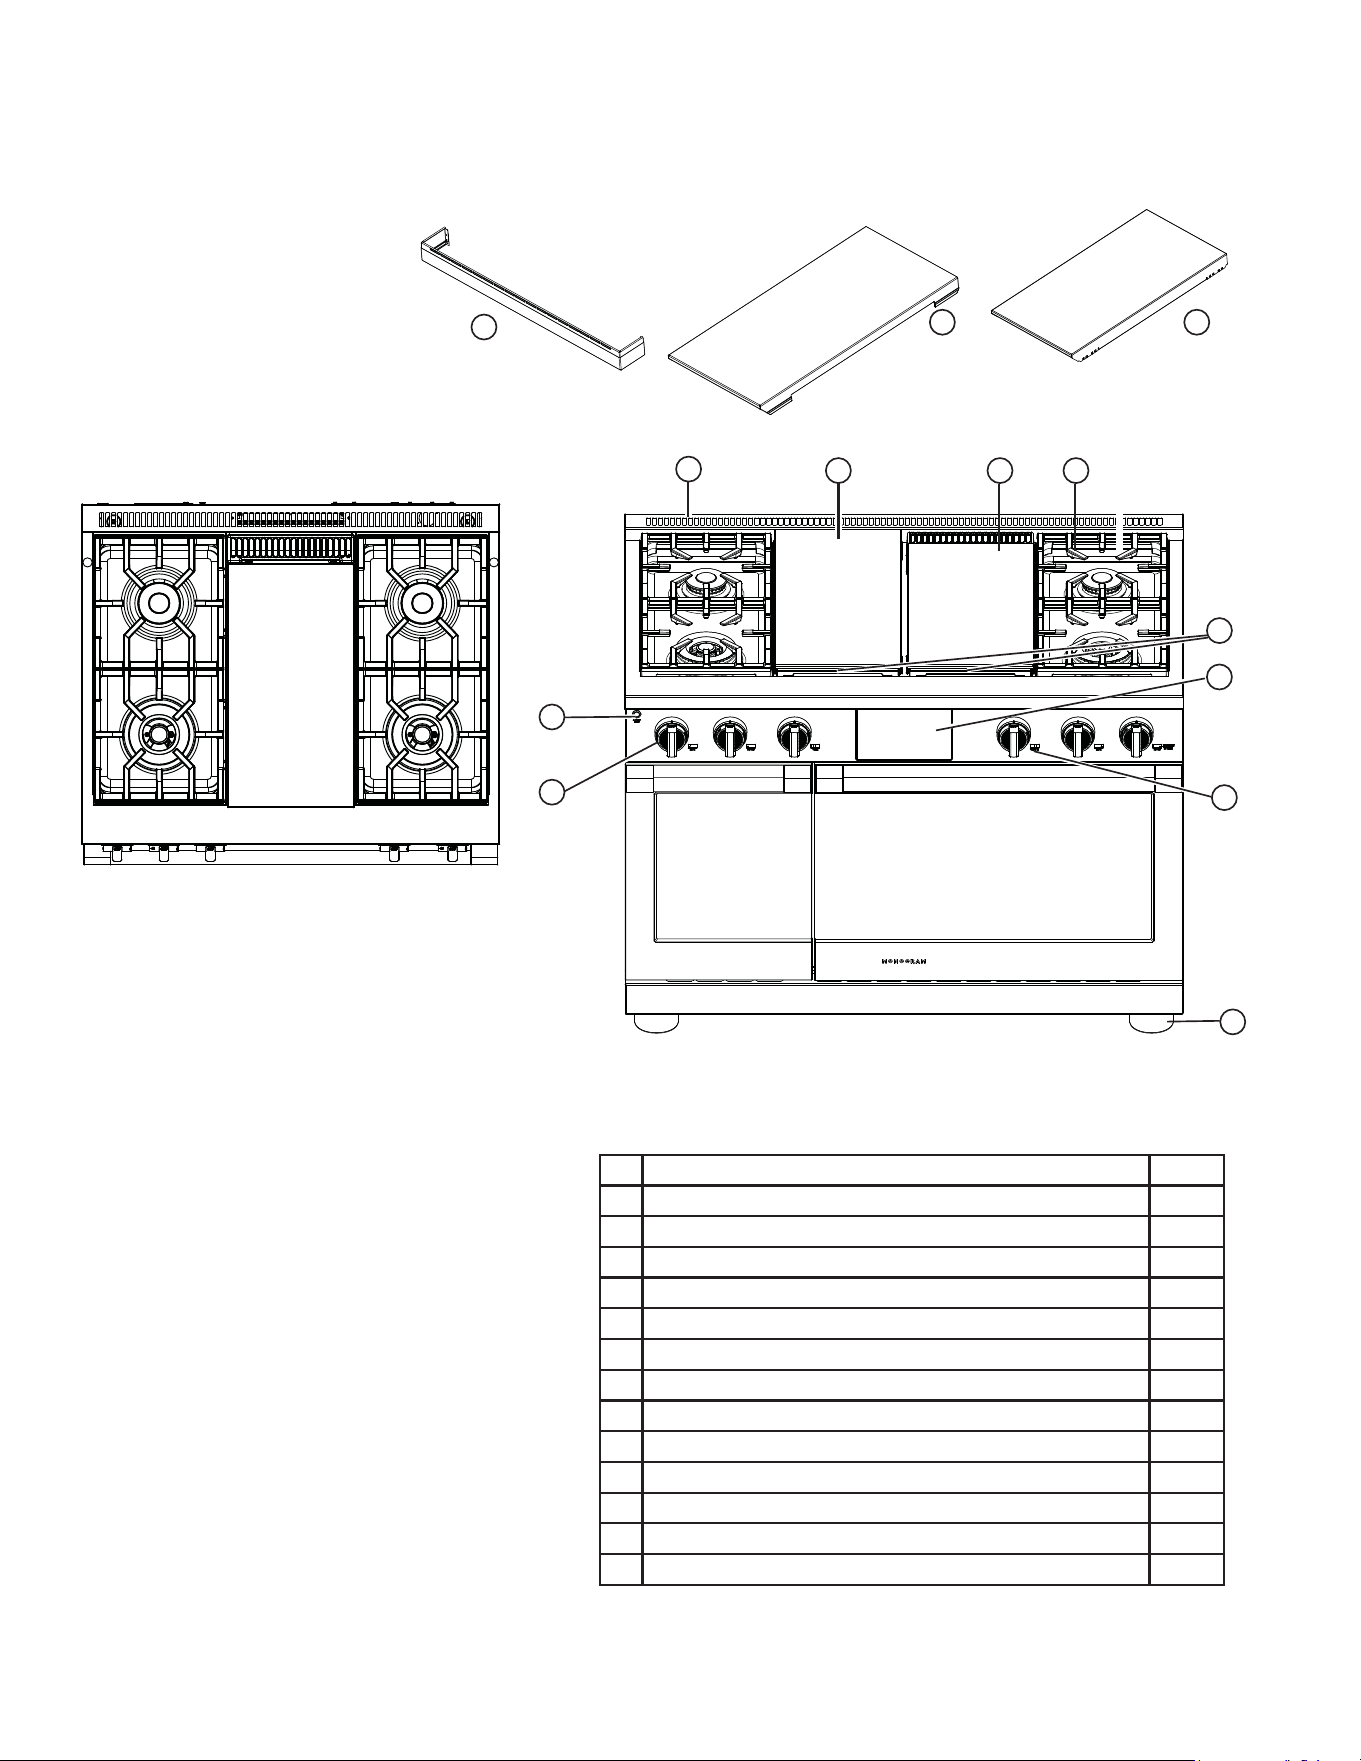
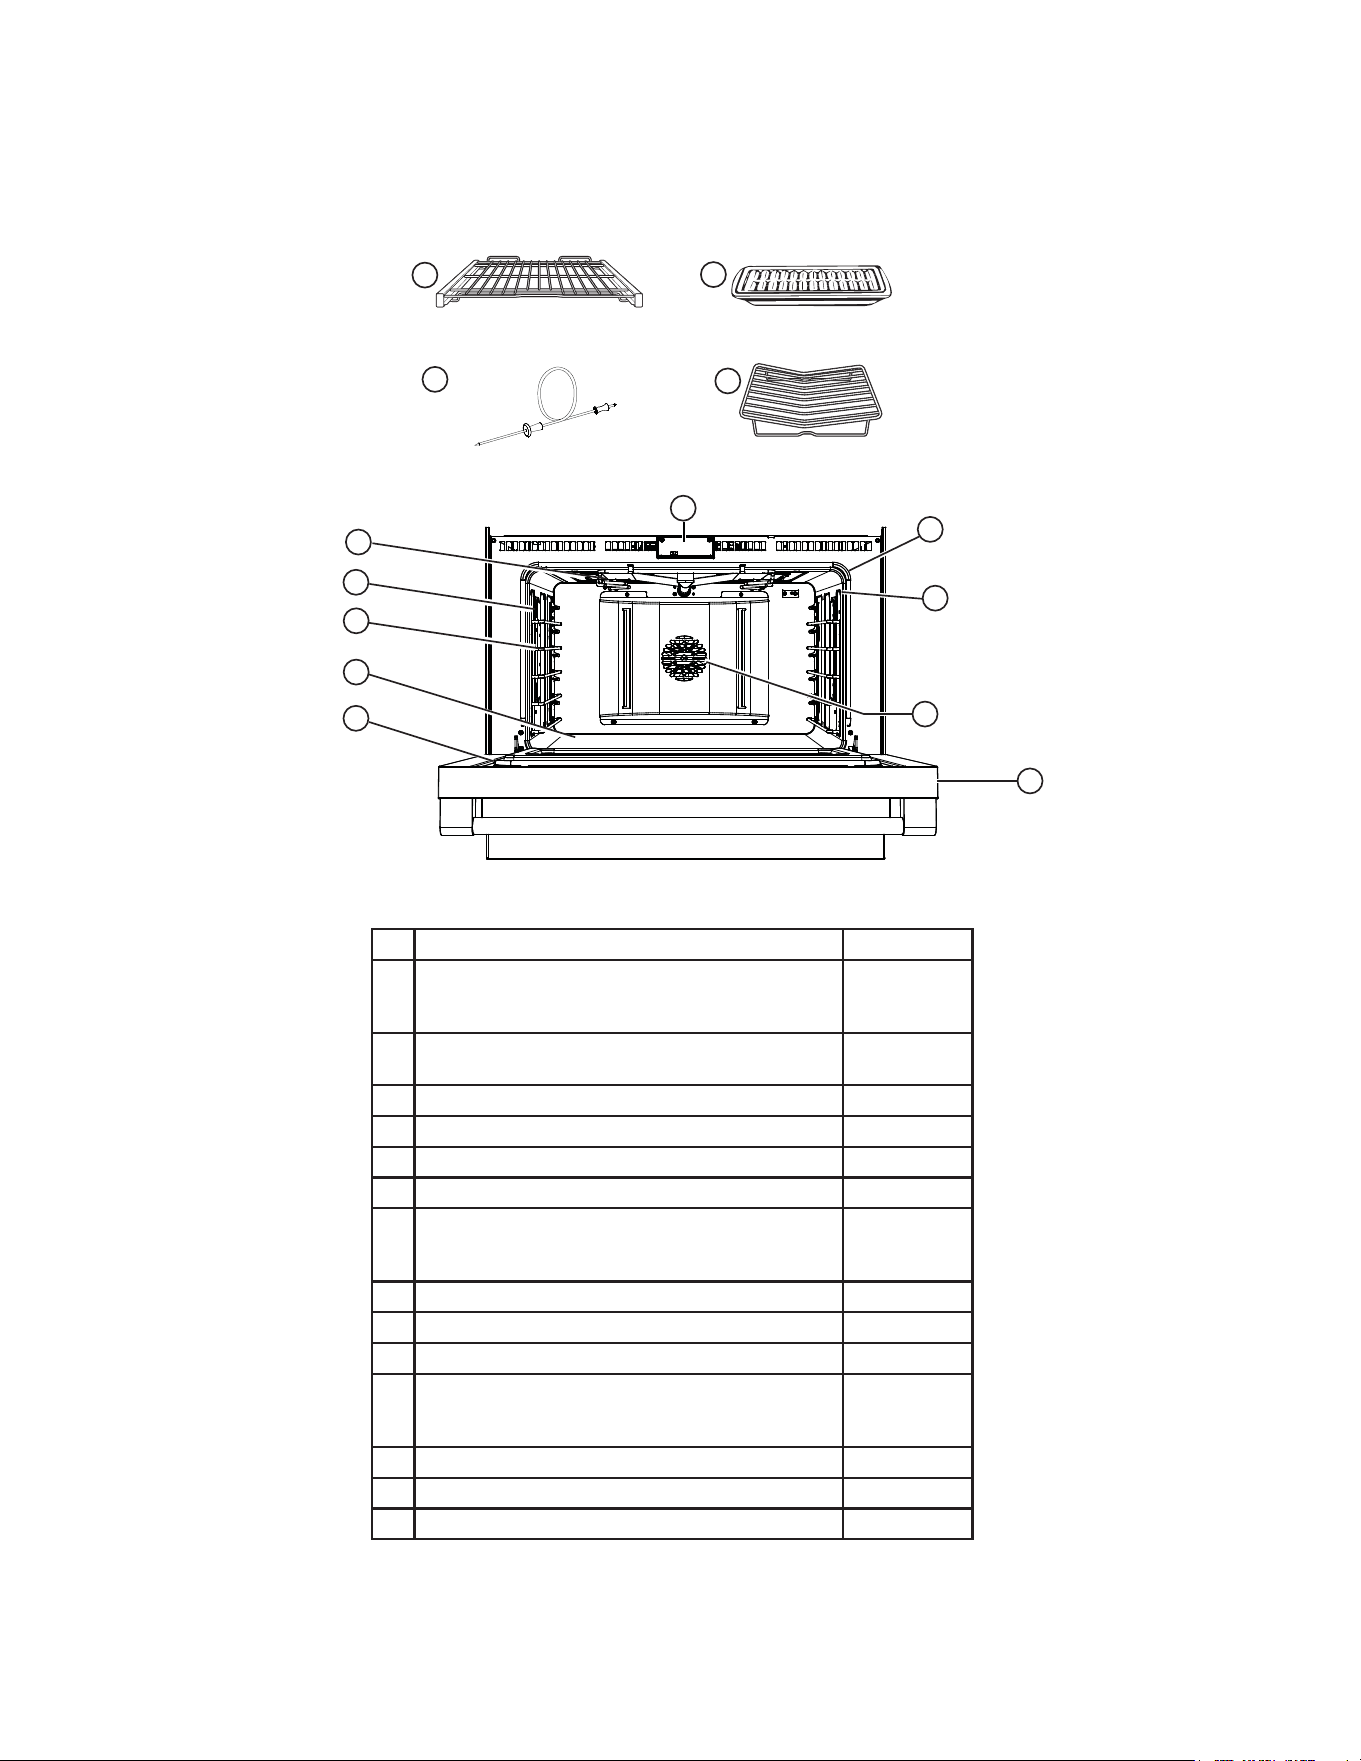
FEATURES OF THE RANGE AND COOKTOP
(Not all features are on all models. Appearance may vary.)
Double oven model shown includes a left oven.
Griddle CoverGrill Cover
(on some models)
Toekick
Feature Index Page
1 Toekick
2 Grill Cover (on some models)
3 Griddle Cover
4 Oven Vents 25
5 Grill and Griddle Grease Trough 45
6 Grill (on some models) 18, 19
7 Griddle 17, 45
8 Cooktop Burner Grates 13, 45
9 Burner Location Indicator
10 Accent Lighting Control 11, 12
11 Burner Control Knob with Lighted Bezel 12, 38
12 Oven Display 21-24
13 Leveling System (4)
1
32
11
10
5
12
13
6 7 8
4
9
49-2000877 Rev. 4 11
USING THE RANGE
IN CASE OF A POWER FAILURE
In the event of a power failure, the oven is inoperable and
no attempt should be made to operate it. The right front
Precision burner is also inoperable if there is a power
failure. However, the surface burners may be lit with a
match. Using extreme caution, hold a lit match near the
ports beneath the surface burner cap, then slowly turn the
knob to the LITE position. Once lit, surface burners will
continue to operate normally.
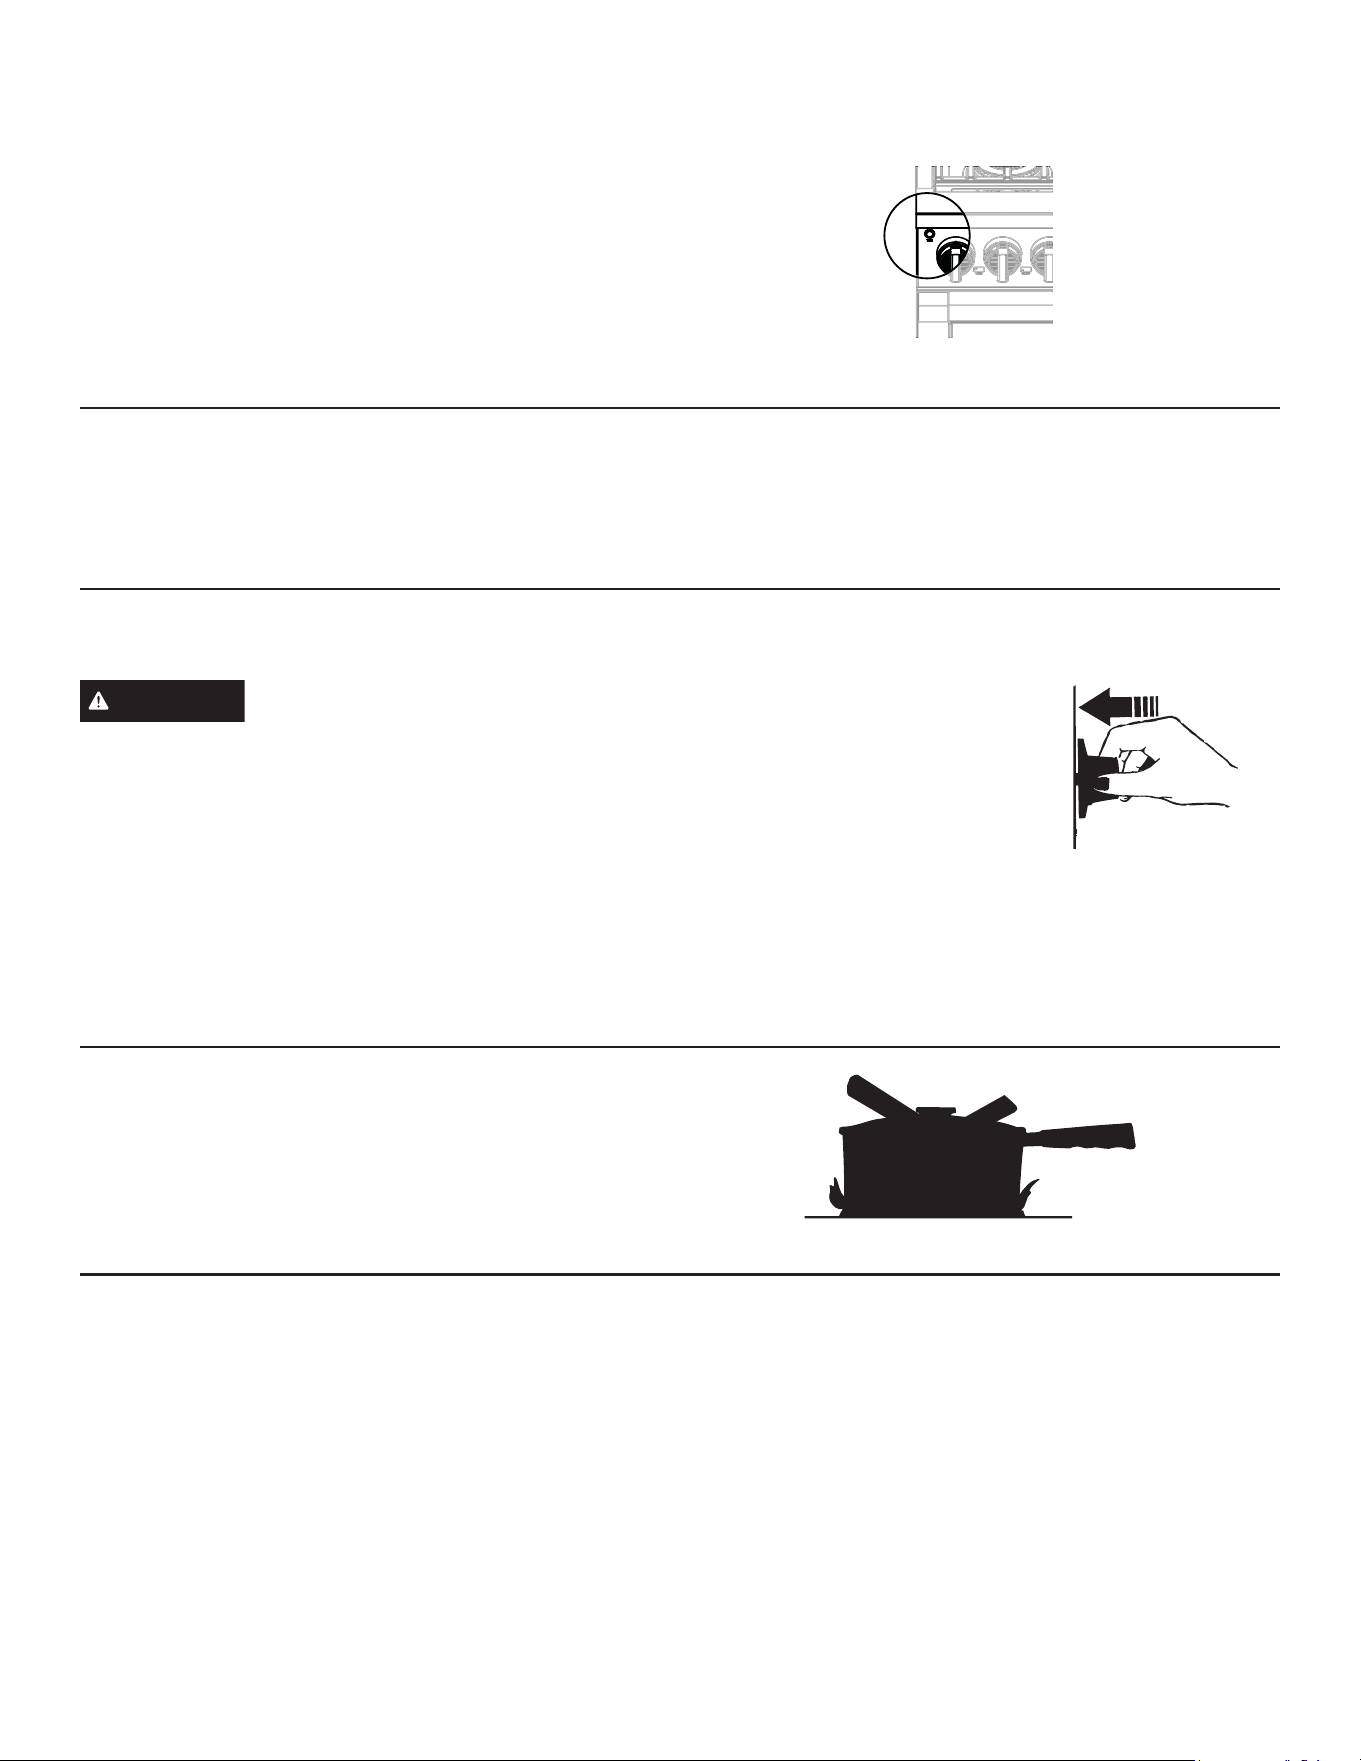
SURFACE BURNERS
Lighting a Surface Burner
WARNING
Burners should be operated only when
covered by cookware. Burner flames not covered by
cookware present a risk of fire or clothing ignition.
Never let flames extend beyond the sides of the
cookware. Failure to comply may result in serious
injury.
Make sure all burners are in their correct locations and
fully assembled before attempting to operate any burner.
Select a burner and find its control knob. Push the knob in
and turn it to the LITE position.
<RX ZLOO KHDU D FOLFNLQJ QRLVH²
the sound of the electric spark
igniting the burner. When one
burner is turned to LITE, all
burners will spark. Sparking will
continue as long as the knob
remains at LITE. Once gas is
ignited, turn the knob to adjust
the flame size.
Automatic Reignition
The burners on this range will automatically relight if the
flame goes out.
Using the Surface Burners
NOTES:
Ŷ 'R QRW RSHUDWH WKH EXUQHU IRU DQ H[WHQGHG SHULRG RI
time without cookware on the grate. The finish on the
grate may discolor or chip without cookware to absorb
the heat.
Ŷ 'R QRW DWWHPSW WR GLVDVVHPEOH DQ\ EXUQHU ZKLOH DQRWKHU
burner is on. Damage to the product may occur.
Ŷ %H VXUH WKH EXUQHUV DQG JUDWHV DUH FRRO EHIRUH \RX
place your hand, a pot holder or cleaning materials on
them.
Your rangetop has sealed gas burners that offer
convenience, cleanability and flexibility for a wide range of
cooking applications.
Selecting a Flame Size
Watch the flame, not the knob, as you adjust heat. When
rapid heating is desired, the flame size should match the
size of the cookware you are using. Flames larger than
the bottom of the cookware will not heat faster and may be
hazardous.
These flames are too large for the pot
Push the control knob in and
turn it to the LITE position.
ACCENT LIGHTING CONTROL
This button controls the LED accent lighting to the control
panel. Custom color options for the knob and task lighting
are available in the settings menu and more though the
SmartHQ app.
Ŷ /(' $FFHQW OLJKW 21
Ŷ /(' $FFHQW OLJKW 21 DQG NQRE OLJKWV 21
Ŷ $OO 2))
12 49-2000877 Rev. 4
USING THE RANGE
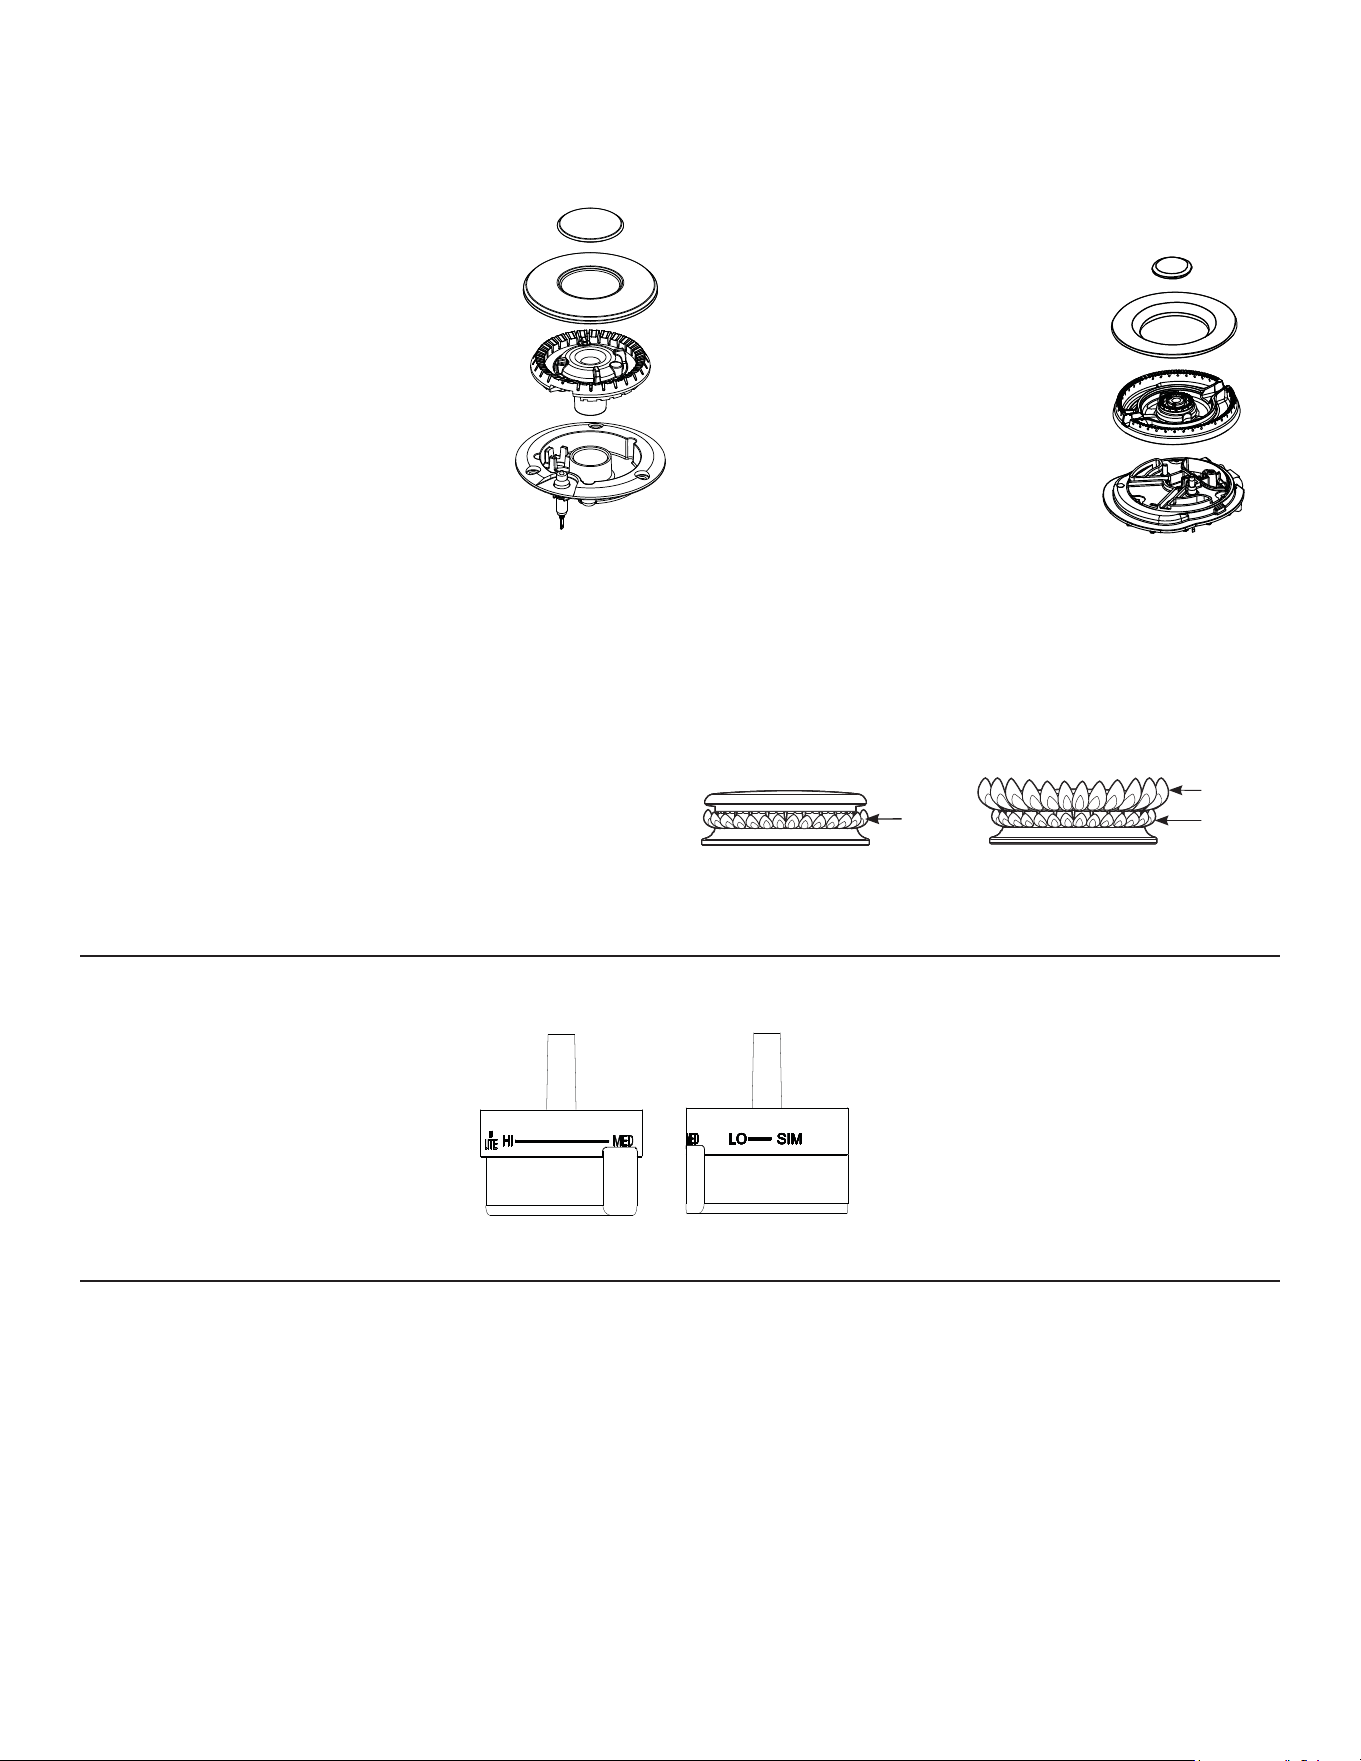
Dual-Flame Stacked Burners
Dual-Flame Stacked burners on your range have two sets
of flames stacked one on top of the other; the dual-flame
burners have a lower (simmer) flame and a upper (main)
flame.
When a burner is turned on, the lower flame will always
light and stay on.
Simmering:
The stacked burner design provides a wide range of heat
settings with which to simmer. Depending on the type and
quantity of food, and pan size, the flame can be adjusted to
suit your specific need.
Cooking:
Settings from LO to MED will use both upper and lower
flames. Use HI for larger diameter cookware.
HI is intended to sear foods quickly and boil large
quantities of water.
Dual Stack burners are supplied with black enamel caps
and brass inserts that sit in the center. The inserts may be
removed depending on consumer preference.
Lower
Flame
Upper
Flame
Lower
Flame
TOP-OF-RANGE COOKWARE
Aluminum: Medium-weight cookware is recommended
because it heats quickly and evenly. Most foods brown
evenly in an aluminum skillet. Use saucepans with tight-
fitting lids when cooking with minimum amounts of water.
Stainless Steel: This metal alone has poor heating
properties and is usually combined with copper, aluminum
or other metals for improved heat distribution. Combination
metal skillets usually work satisfactorily if they are used
with medium heat or as the manufacturer recommends.
Cast-Iron: If heated slowly, most skillets will give
satisfactory results.
Enamelware: Under some conditions, the enamel of some
cookware may melt. Follow the cookware manufacturer’s
recommendations for cooking methods.
Glass:7KHUHDUHWZRW\SHVRIJODVVFRRNZDUH²WKRVH
for oven use only and those for top-of-range cooking
(saucepans, coffee and teapots). Glass conducts heat very
slowly.
Heatproof Glass Ceramic: Can be used for either surface
or oven cooking. It conducts heat very slowly and cools
very slowly. Check the cookware manufacturer’s directions
to be sure it can be used on gas ranges.
Multi-Ring Burner
Top View Of The Multi-Ring Burner Knob
The Multi-Ring Burner has an inner and
outer ring of flame. For large cookware,
activate all rings by setting the burner
between Hi and Med.
For small cookware or low heating
applications, only activate the inner
rings by setting the burner between Lo
and Sim.
Multi-ring burners are supplied with both
brass and black enamel caps, either
can be used depending on consumer
preference.
SURFACE BURNERS (cont.)
Types of Surface Burners
Dual-Flame Stacked Burner:
Use this burner for general cooking purposes.
Size cookware appropriately to the flames.
Multi-Ring Burner:
Use this burner for large cookware or
for simmering applications.
49-2000877 Rev. 4 13
USING THE RANGE
WOK COOKING
The burner grates are uniquely designed to cook on either
side. The flat side accommodates flat bottom cookware
(stockpots, sauce pans, frying pans and flat bottom woks),
while the wok side is designed to hold a wide variety of
round bottom woks from 14" to 16" without the need for a
separate ring.
For easy access, a front burner location is
recommended for wok cooking.
The front left or right burner is recommended for wok
FRRNLQJRQƎDQGƎUDQJHVDQGOHIWIURQWRQ
ranges.
WARNING
Do not use a wok support ring. Placing
the ring over the burner or grate may cause the burner
to work improperly, resulting in carbon monoxide levels
above allowable standards. This could be hazardous to
your health.
Wok Side
Flat Side
Peak
TrueTemp Precision Cooking Control Modes
There are two control modes available:
ŶApp Control - set the temperature with the SmartHQ or
the Hestan Cue mobile app.
ŶLocal Control - set the temperature on the range
display screen.
App Control
After setting up precision cooking mode on the LCD screen
and activating closed loop cooking by turning the burner
knob to High, open the SmartHQ mobile app to update
target temperature. To use Hestan Cue for temperature
control and recipes, open the Hestan Cue app and follow
on screen instructions.
Local Control
Follow closed loop cooking setup as displayed and set
temperature via LCD screen. The set temperature will be
shown on the display.
TRUETEMP PRECISION COOKING SYSTEM
The Precision Cooking feature allows precise temperature
control for improved results. This feature is located on the
front right burner and communicates via Bluetooth with
smart accessories such as Hestan Cue cookware.
Pairing a Bluetooth
®
Device
To pair a Bluetooth device, refer to Settings section.
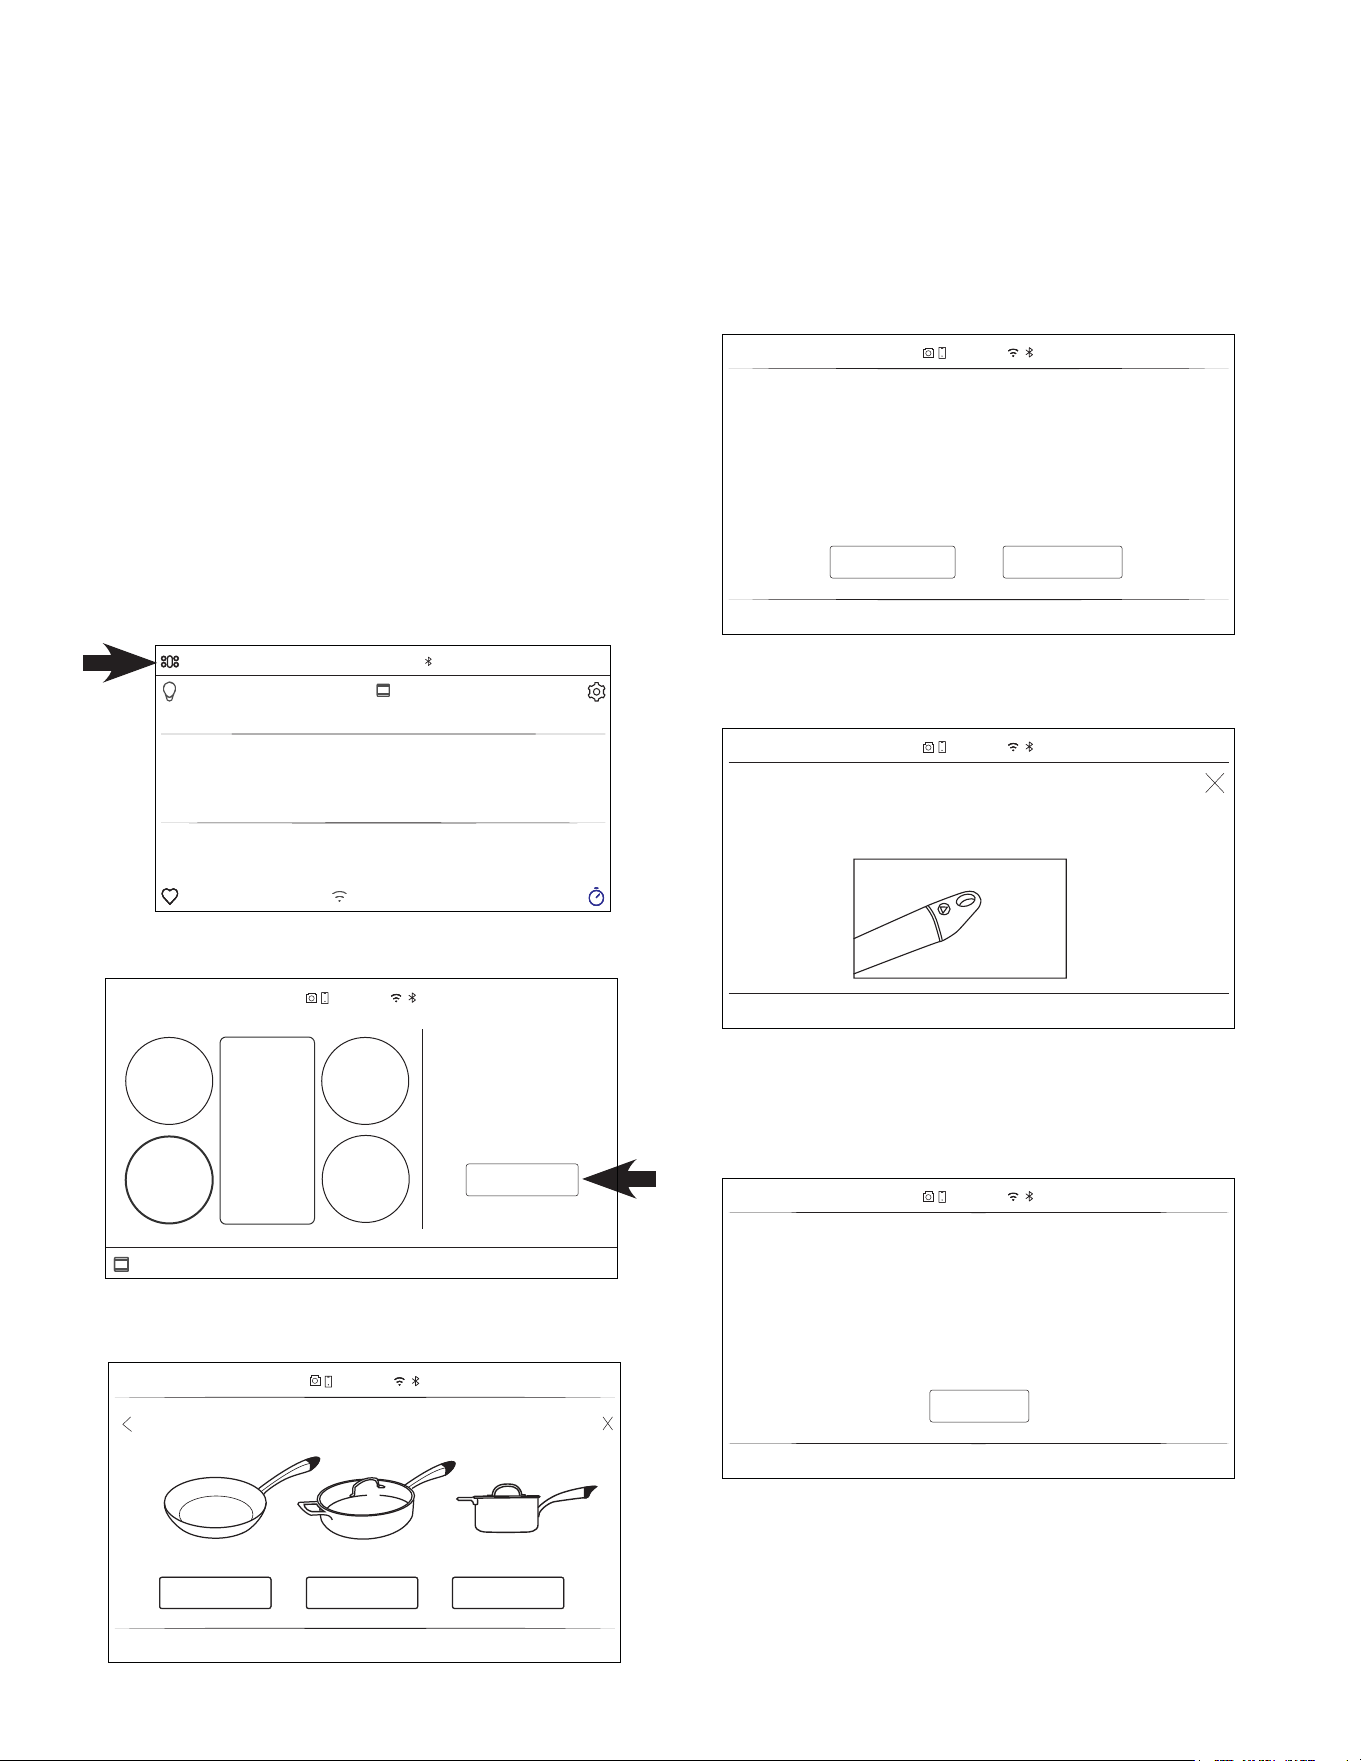
14 49-2000877 Rev. 4
USING THE RANGE
TRUETEMP PRECISION COOKING SYSTEM (Cont.)
Use Precision Cooking with Hestan Cue
®
Cookware
The range is able to communicate via Bluetooth with smart
accessories such as Hestan Cue
®
cookware. Each smart
accessory must be paired with the range to establish the
Bluetooth connection. See Settings – Bluetooth.
Once paired, the Hestan Cue
®
cookware becomes
available as a Precision Cooking option. Multiple pieces of
cookware may be paired. You will be prompted to activate
each time you use Precision Cooking if multiple pieces of
cookware are paired.
Hestan Cue
®
Cookware
1. The front right burner should be turned OFF to begin.
2. Touch the TO COOKTOP banner at the top of the
display.
3. Touch Start.
4. If multiple pieces of Hestan Cue cookware are paired,
select the cookware desired for use on the unit display.
If no paired accessories are found, Precision Cooking
will cancel. Refer to Settings - Bluetooth to pair Hestan
Cue
®
cookware.
5. Activate your Hestan Cue
®
cookware by firmly double
tapping the black plastic endcap.
If activated Hestan Cue
®
cookware does not match
selected cookware, ensure correct module is inserted
into the handle. Modules should not be swapped
between unique cookware.
TO OVEN
START
Set and maintain precise
temperatures with
confidence using the
TrueTemp™ Precision
Cooking System
10:35 AM
OFF
OFF
TRUETEMP
BURNER
OFF
OFF
10:35 AM
SELECT HESTAN CUE COOKWARE
CHEFS POT SAUCE POTSMART PAN
NO COOKWARE PAIRED
Precision cooking works only with Hestan Cue
®
cookware.
Select pair now to exit and go to settings to pair cookware.
PAIR NOWLEARN MORE
10:35 AM
ACTIVATE COOKWARE
Double tap handle of your Hestan Cue
®
cookware until
prompted to set temperature
10:35 AM
CHECK COOKWARE
The activated cookware does not match your selection.
Insure correct module is inserted in pan handle.
DISMISS
10:35 AM
TO COOKTOP 10:35 AM
OVEN
Bake Broil Convection
Precision
Cooking
More
Air Fry
GET CONNECTED
49-2000877 Rev. 4 15
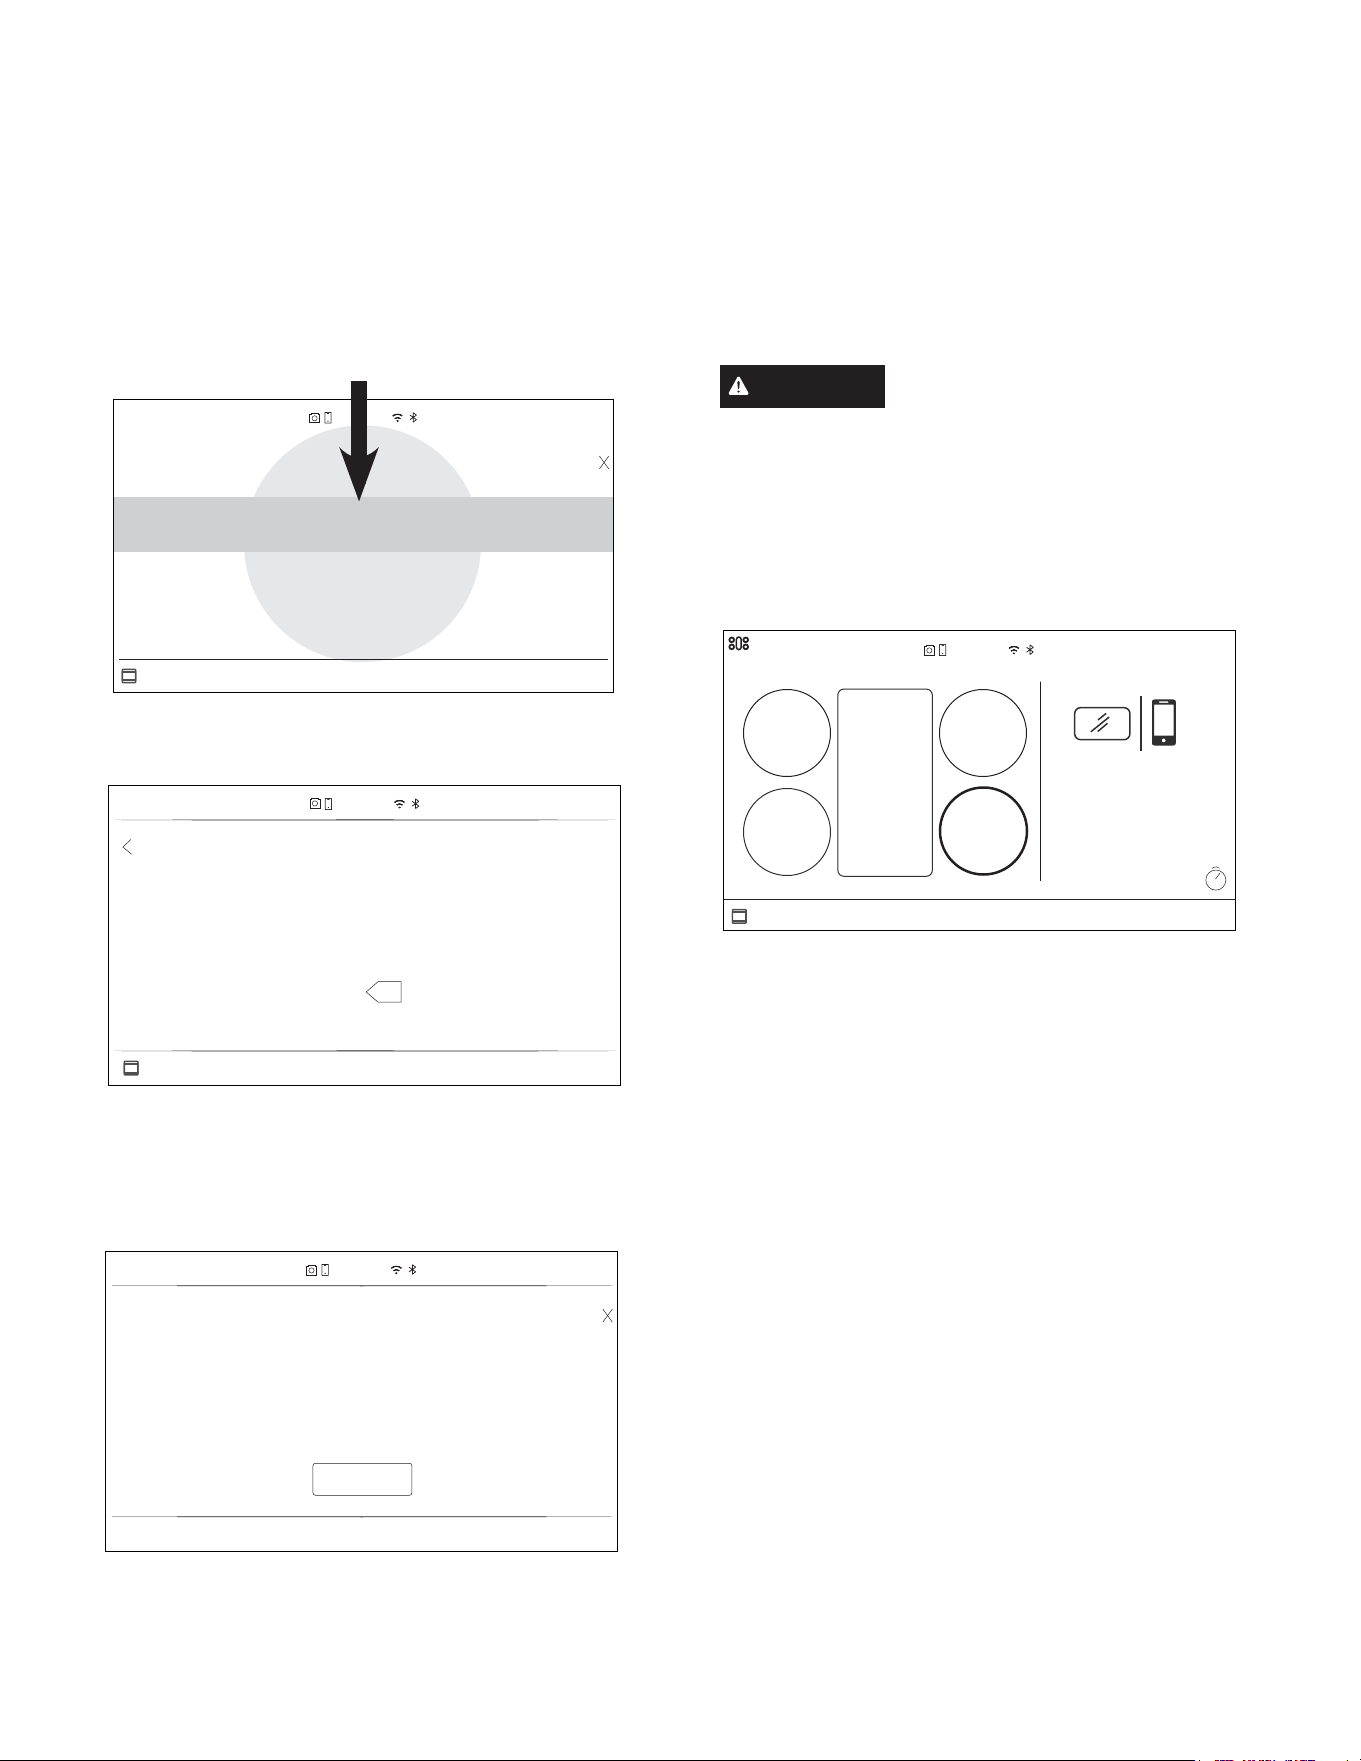
6. Set pan temperature by sliding the temperatures left or
right.
NOTE: Burner may turn on and off automatically when
maintaining a low temperature setting or reducing the
temperature.
If a specific temperature is desired, press the highlighted
temperature.
7. Knob lighting for the precision burner should now pulse
blue. Make sure activated Hestan Cue
®
cookware is
centered over the burner and turn the burner knob to
high position.
Setup will be cancelled after 2 minutes of inactivity.
The temperature set point will appear on the right
front burner graphic on screen. Temperature can be
changed by selecting the temperature status or using
the SmartHQ App.
CAUTION
When a TrueTemp Precision Cooking
&RQWURO0RGHKDVEHHQLQLWLDWHGWKHEXUQHUÀDPHVL]H
will increase if the pan is removed from the grates
without canceling the mode. In addition, use caution
not to place the plastic Hestan Cue pan handle over an
RSHQEXUQHUÀDPHRUKRWRYHQYHQWWRSUHYHQWGDPDJH
to the plastic battery housing.
Hestan cookware module battery:
If the unit cancels your precision cooking cycle, the
precision cooking device may need a battery replacement.
Replace the AAA battery located in the handle of the
Hestan Cue cookware. Please contact the device
manufacturer if problem persists after battery replacement.
To preserve battery life, twist module a quarter of a turn to
loosen module and disconnect pan when not in use.
USING THE RANGE
Hestan Cue
®
Cookware (Cont.)
TRUETEMP PRECISION COOKING SYSTEM (Cont.)
10:35 AM
STARTX
1 2 3
4 5 6
7 8 9
0
350
°F
TO OVEN
250 275 300 325 350
°F
375 400 425 450
10:35 AM
NEXT
TRUETEMP™
PRECISION COOKING
TO OVEN
TURN BURNER KNOB TO HIGH
Place your cookware on front right burner. To begin
TrueTemp™ Precision Cooking, turn the front right burner
knob to “HI”
CANCEL
10:35 AM
TO OVEN
10:00
Tap the temperature
status to set TrueTemp™
temperature or use
SmartHQ app to control
remotely.
10:35 AM
OFF
OFF
175
°F
OFF
OFF
COOKTOP
16 49-2000877 Rev. 4
USING THE RANGE
TRUETEMP PRECISION COOKING SYSTEM (Cont.)
Food Variation
Temp. (F)
Butter Melt 240
Melt and Hold 150
Brown 350
Clarify 240
Chocolate Melt and Hold 115
Crepes 375
Eggs Fried - white and
tender
250
Fried - browned and
crispy
350
Omelette 275
Scrambled 275
French Toast - 0.5-
0.875” thick
375
French Toast - 1-1.5”
thick
350
Grilled Sandwiches -
0.5-1” thick
375
Grilled Sandwiches -
1.125-2.5” thick
350
Pancakes 375
Potatoes Diced - 0.5-1” thick 375
Patties 375
Shredded 375
Food Thickness
(in)
Temp. (F)
Bacon 375
Beef - ground 350
Beef - patties 0.5 - 0.875
375
1 - 1.5 350
Beef - steak (rare) 0.5 - 0.875 400
1 - 1.5 375
Beef - steak (medium rare) 0.5 - 0.875 400
1 - 1.5 375
Beef - steak (medium) 0.5 - 0.875 375
1 - 1.5 350
Beef - steak (medium well) 0.5 - 0.875 375
1 - 1.5 350
Beef - steak (well) 0.5 - 0.875 375
1 - 1.5 350
Chicken - breasts 0.5 - 0.875 375
1 - 1.5 350
Chicken - thighs 0.5 - 0.875 375
1 - 1.5 350
Chicken - ground 350
Pork - chops 0.5 - 0.875 375
1 - 1.5 350
Pork - ground 350
Sausage - ground 350
Sausage - links 0.25 - 0.875 350
1 - 1.5 325
Sausage - patties 0.25 - 0.875 375
Seafood - fish fillet or steak 0.25 - 0.875 425
1 - 1.5 400
Seafood - scallops 425
Suggested Cooking Temperatures for Common Foods
49-2000877 Rev. 4 17
USING THE RANGE
GRIDDLE
GRIDDLE SAFETY PRECAUTIONS, LEVELING
Remove the metal cover before turning the griddle on.
The griddle assembly should not be removed for cleaning.
Once the unit is in position, the griddle can be leveled.
Remove the flue cover by lifting it straight up. Be careful
not to scratch the surrounding stainless steel surfaces
during removal of the flue cover.
The two inner screws are clamping screws for securing the
griddle in place. Loosen these two screws before leveling.
Do not remove these two screws.
The two outer screws are leveling screws. Do not remove
these two screws. They can be turned to level the griddle
or to provide a forward slope to help grease and oils to
drain away from the food being cooked. After the first few
uses, you will be able to judge the slope best suited for the
foods you are cooking and personal preference.
After leveling the griddle, tighten the clamping screws to
secure griddle in place. Hand tighten screws; do not over-
tighten.
USING THE GRIDDLE
Clean the griddle thoroughly with hot soapy water before
first use and after subsequent uses. The griddle surface is
made of durable, highly polished Type 304 stainless steel
backed by an aluminum plate for even heat distribution.
Apply a light coating of cooking oil to the griddle surface to
help prevent food from sticking.
To heat the griddle, push in and turn the control knob to
the desired temperature setting. The light on the bezel
will glow to indicate that the thermostat control is working.
The griddle is thermostatically controlled and can be set to
maintain any temperature from 200ºF to 450ºF. Permit the
griddle to preheat for 10 minutes before placing food on it.
NOTE: Unlike the surface burners which use spark
igniters, the griddle uses a hot surface igniter. Gas flows to
the griddle burner and ignites 45 seconds after the control
knob is turned to a set temperature.
Food Item Temperature Setting
Pancakes 375ºF
Hamburgers 400ºF
Bacon* 400ºF
Grilled Cheese 350ºF
Eggs 275ºF
*NOTE: Place bacon on a cold griddle. Do not preheat.
WARNING
Fire Hazard
Ŷ 8VHFDUHZKHQFRRNLQJJUHDV\IRRGV6SLOOHGJUHDVHPD\UHVXOWLQILUH
Ŷ 1HYHUSODFHDQ\LWHPVRQWKHJULGGOHZKHQLWLVQRWLQXVH+HDWIURPVXUURXQGLQJEXUQHUVFDQKHDWWKH
griddle and may result in fire.
Ŷ 3ODFHDQGUHPRYHWKHJULGGOHRQO\ZKHQJULGGOHLVFRRODQGDOOVXUIDFHEXUQHUVDUHWXUQHG2))
Griddle flue cover
Clamping
screws
Leveling
screws
18 49-2000877 Rev. 4
USING THE RANGE
GRILL (on some models)
GRILL SAFETY PRECAUTIONS
Grease Flare-ups:
Occasionally, during grilling, grease drippings can ignite
creating minor bursts of flame for a second or two. This is
normal when grilling.
The grill radiant baffle is designed to catch excess grease,
limiting flare-ups.
If a flare-up becomes excessive, remove the food from the
grill and lower the heat setting until the flare-up subsides.
To further reduce flare-ups, trim excess fat around the
edges of steaks and chops, use hamburger that is lean,
remove the skin from poultry, etc.
Use a long spatula and a non-flammable mitt when turning
food on the grill.
Avoid grilling high fat or grease content foods like bacon
on the grill. See using the Griddle.
Grill Cover:
Remove the cover before lighting the burner. For your
safety, the cover must be removed when using the grill. If
the cover is left in place it will become extremely hot.
Cookware:
Do not use any cookware on the grill.
WARNING
Fire Hazard
Ŷ 8VHFDUHZKHQFRRNLQJJUHDV\IRRGV6SLOOHGJUHDVHPD\UHVXOWLQILUH
Ŷ 1HYHUSODFHDQ\LWHPVRQWKHJULOOZKHQLWLVQRWLQXVH+HDWIURPVXUURXQGLQJEXUQHUVFDQKHDWWKHJULOO
and may result in fire.
Ŷ 3ODFHDQGUHPRYHWKHJULOORQO\ZKHQJULOOHLVFRRODQGDOOVXUIDFHEXUQHUVDUHWXUQHG2))
USING THE GRILL
Remove the cover before lighting the burner. The cover
must be removed when using the IR grill.
Set the control knob to PREHEAT. The longer the grill is
preheated, the darker the grill marks will be on the food.
Allow 5 to 15 minutes to fully preheat the grill.
After preheat, the control knob may be set to any position
between HI and LO.
Do not leave the grill unattended at any time.
The intense heat caramelizes fats and juices creating
authentic barbecued flavor. The IR grill will achieve the
same results as an outdoor grill.
All gas grills cook differently. Adjust cooking times and
methods when using the IR grill.
Clean the grill grate, grease trough and grease basin after
each use. Remove the parts for cleaning after they are
cool to the touch.
NOTE: The grill will take approximately 45 seconds to
ignite. Unlike the surface burners, which use electric
igniters, the grill uses a Glo-Bar for ignition. It takes
approximately 45 seconds for the Glo-Bar to reach
temperature. Gas is only supplied to the grill once the Glo-
Bar reaches temperature.
49-2000877 Rev. 4 19
USING THE RANGE
GRILL (on some models) (Cont.)
GRILL GRATES
Remove the cover before lighting the grill.
The grill grate is reversible. Place the handle end toward
the front of the cooktop.
The grate will change color when subjected to the heat,
and as oils cook onto the surface. This is normal and does
not affect the cooking performance.
The porcelainized cast-iron grill grate does not need to be
seasoned.
One side of the grate (Side A) is grooved and should be
used for foods such as steak or hamburger patties. The
grooves are sloped so the excess liquids and oils run
toward the front of the grill and into the grease trough.
The other side of the grate (Side B) is designed for delicate
foods such as fish.
Turn and move foods as needed.
Side A Side B
Food Setting Preheat
Hamburger Patties (8) HI or LO 5 Minutes
Chicken Breast (6)
(Bone side down) LO 5 Minutes
T-Bone Steak
´WKLFN LO 5 Minutes
Salmon LO 5 Minutes
Vegetables (Zucchini) LO 10 Minutes
GRILL RADIANT BAFFLE
Models equipped with an IR grill have a radiant baffle
which distributes the heat from the burners evenly across
the grill area. The grill baffle also helps to limit grease
flare-ups.
The grill baffle rests on tabs in the grill opening. Be sure
the baffle is secured in place by fully engaging the tabs.
IMPORTANT: Avoid contact with the igniter. It is fragile
and can chip or break.
Support Tabs
Glo-Bar Igniter
20 49-2000877 Rev. 4
FEATURES OF THE OVEN
NOTE: Not all features are on all models.
USING THE RANGE
2
3
14
1
4
Full Extension Oven Rack
Temperature Probe
Broiler Pan and Grid
Roasting Rack
Feature Index Page
1 Full Extension Oven Rack(s)
²LQRYHQ5LJKW2YHQRQPRGHOV
²LQOHIWRYHQ
25, 26, 41
2 Broiler Pan and Grid - 1 large in oven (Right oven
on 48" models), 1 small in left oven
30, 38
3 Temperature Probe - 1 per oven 33, 34, 41
4 Roasting Rack 30, 38
5 Broil System
6 Halogen Oven Columns 43
7 Oven Rack Supports
²SRVLWLRQVLQRYHQ5LJKW2YHQRQPRGHOV
²SRVLWLRQVLQOHIWRYHQ
25, 26
8 +LGGHQ%DNH(OHPHQWXQGHURYHQÀRRU
9 Oven Door Seal 40
10 Oven Frame Seal 40
11 Temperature Probe Outlet
²ULJKWVLGHLQRYHQ5LJKW2YHQRQPRGHOV
²OHIWVLGHLQOHIWRYHQ
33, 34
12 Convection Fan 29
13 Soft-Close Oven Door 42
14 Automatic Oven Door Latch
13
8
5
12
11
10
9
7
6

49-2000877 Rev. 4 21
USING THE RANGE
OVEN CONTROLS
Bake
This option allows the user to access traditional the
traditional bake mode.
Broil
Broil can be selected to access Broil Low and Broil High.
See the Oven Modes section for more information.
Convection
This option allows you to utilize the convection system
to cook in a variety of modes. See the Cooking Modes
section for more information.
Precision Cooking
Precision Cooking is a suite of customized cooking cycles
that have been designed for specific foods. The display will
guide you through setting the oven and food appropriately
for the cycle selected. Precision cooking cycles vary based
on food type; see the Cooking Modes section for more
detailed information.
Air Fry
The Air Fry mode is designed to produce foods with a
crispier exterior than traditional oven cooking. See the Air
Fry Cooking Guide section for more information.
More
Select this option to access the Proof, Warm, Self Clean,
and Steam Clean options.
Oven Light
To turn on or off the oven cavity lights, press the . Both
cavity lights will be illuminated if using a double oven.
Settings
Press the to access the Settings. See the Settings
section for more information.
Lock Control
Select this option in order to lock the LCD from any
undesired screen selections. To unlock the screen, press
and press Unlock on the next screen.
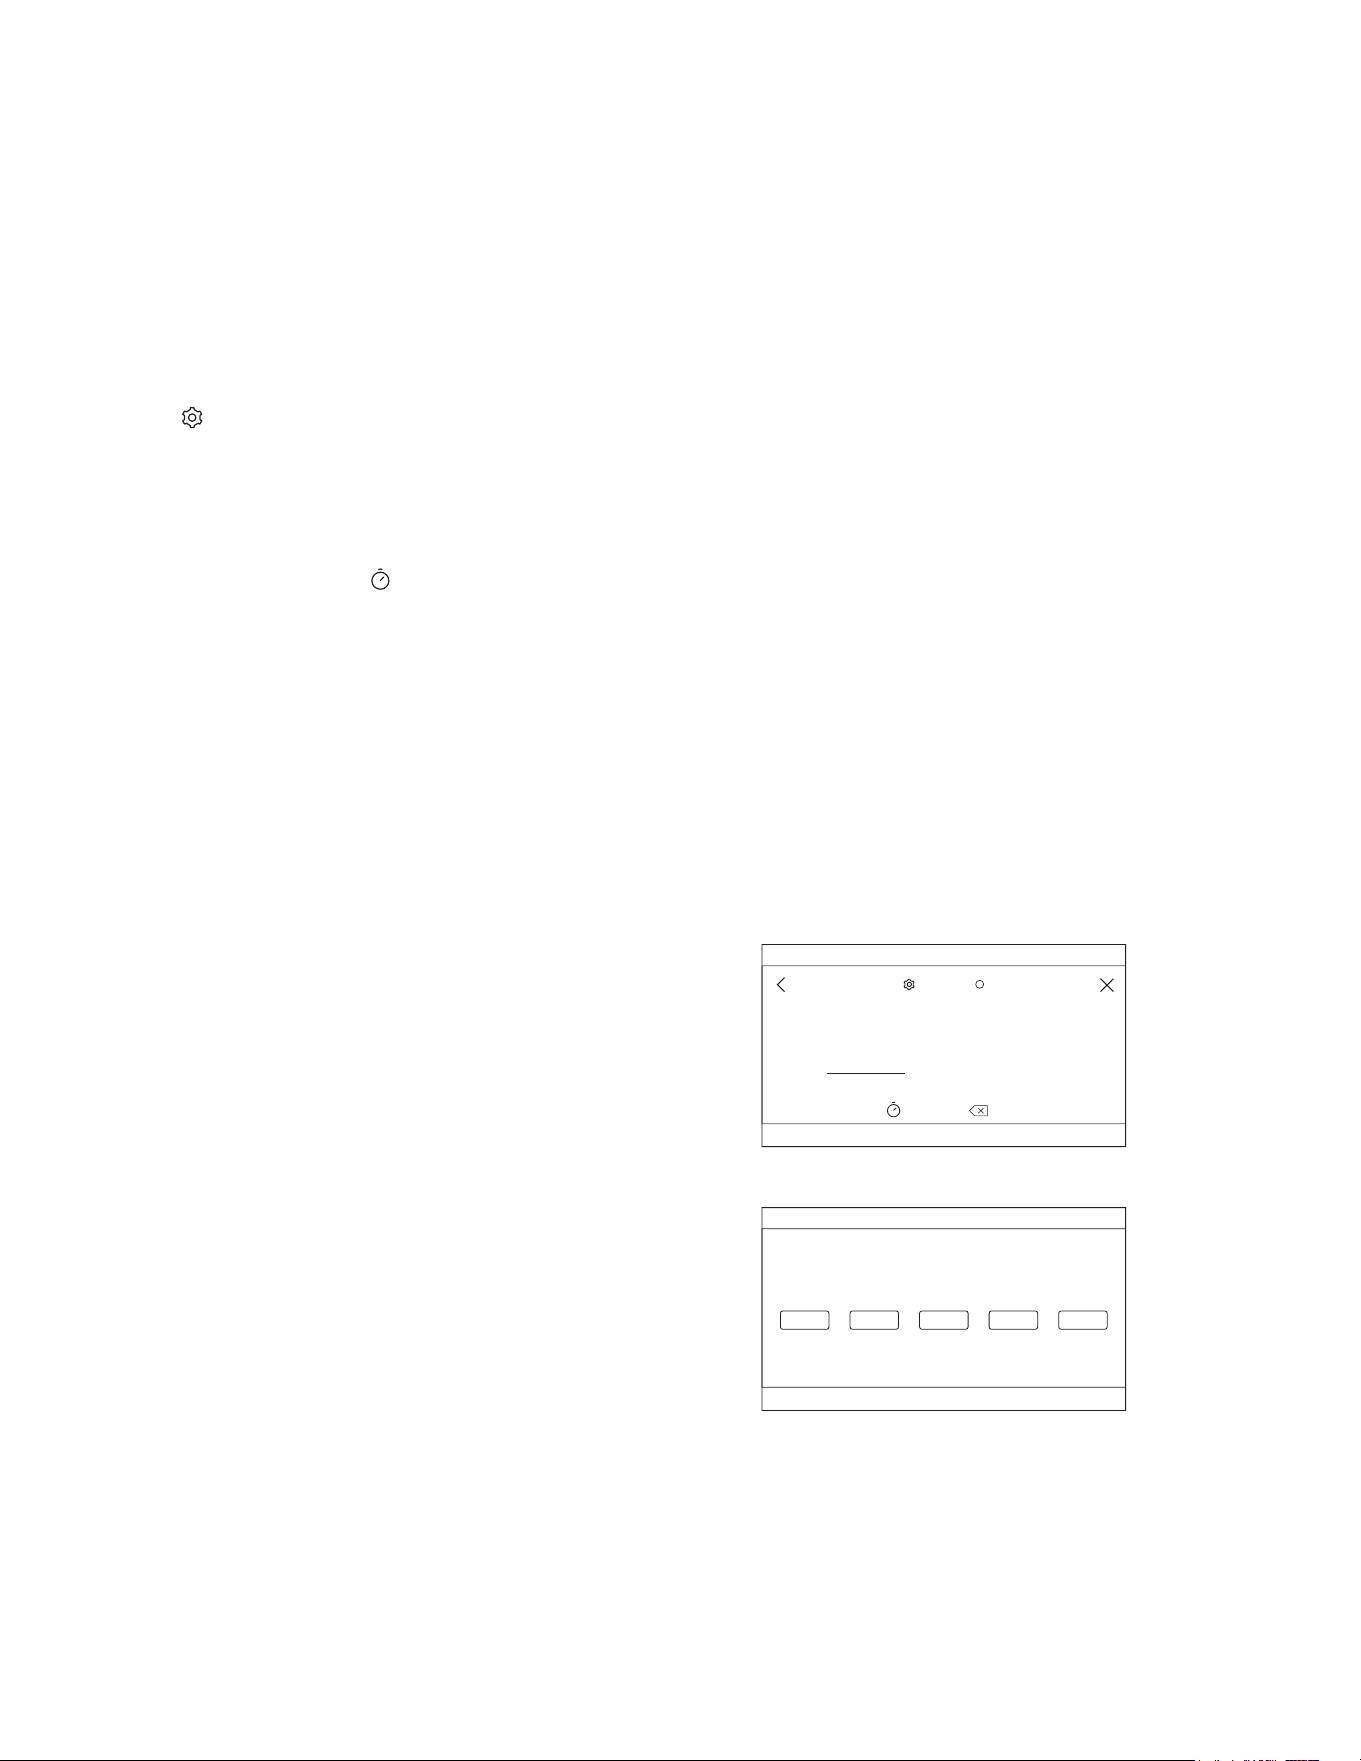
Kitchen Timer
This feature works as a countdown timer. Press the
, select the amount of time for the timer to operate, and
press Start. The oven will continue to operate once the
timer countdown is complete. To turn off the timer, select
the and press Clear.
Cook Time
This function counts down cooking time and turns off the
oven when the cooking time is complete. Press the
during a cycle, select the amount of cooking time, and
press Start.
Delay Time
This feature delays the start time for an oven cycle. Use
this feature to set a time when you want the oven to start.
Select a cycle, then press the . Select the time of day for
the oven to turn on and press Start. A cook time can also
be programmed if desired.
Wi-Fi & Remote Enable
Press
GET CONNECTED
to connect your oven to Wi-Fi.
This option allows you to download content to your oven
and control it remotely. The oven must be connected
to Wi-Fi before Remote Enable can be activated. For
instructions on how to connect your oven, see the Wi-Fi
&RQQHFW5HPRWH (QDEOH VHFWLRQ XQGHU 6HWWLQJV LQ WKLV
manual.
TO COOKTOP 10:35 AM
OVEN
Bake Broil Convection
Precision
Cooking
More
Air Fry
GET CONNECTED
22 49-2000877 Rev. 4
USING THE RANGE
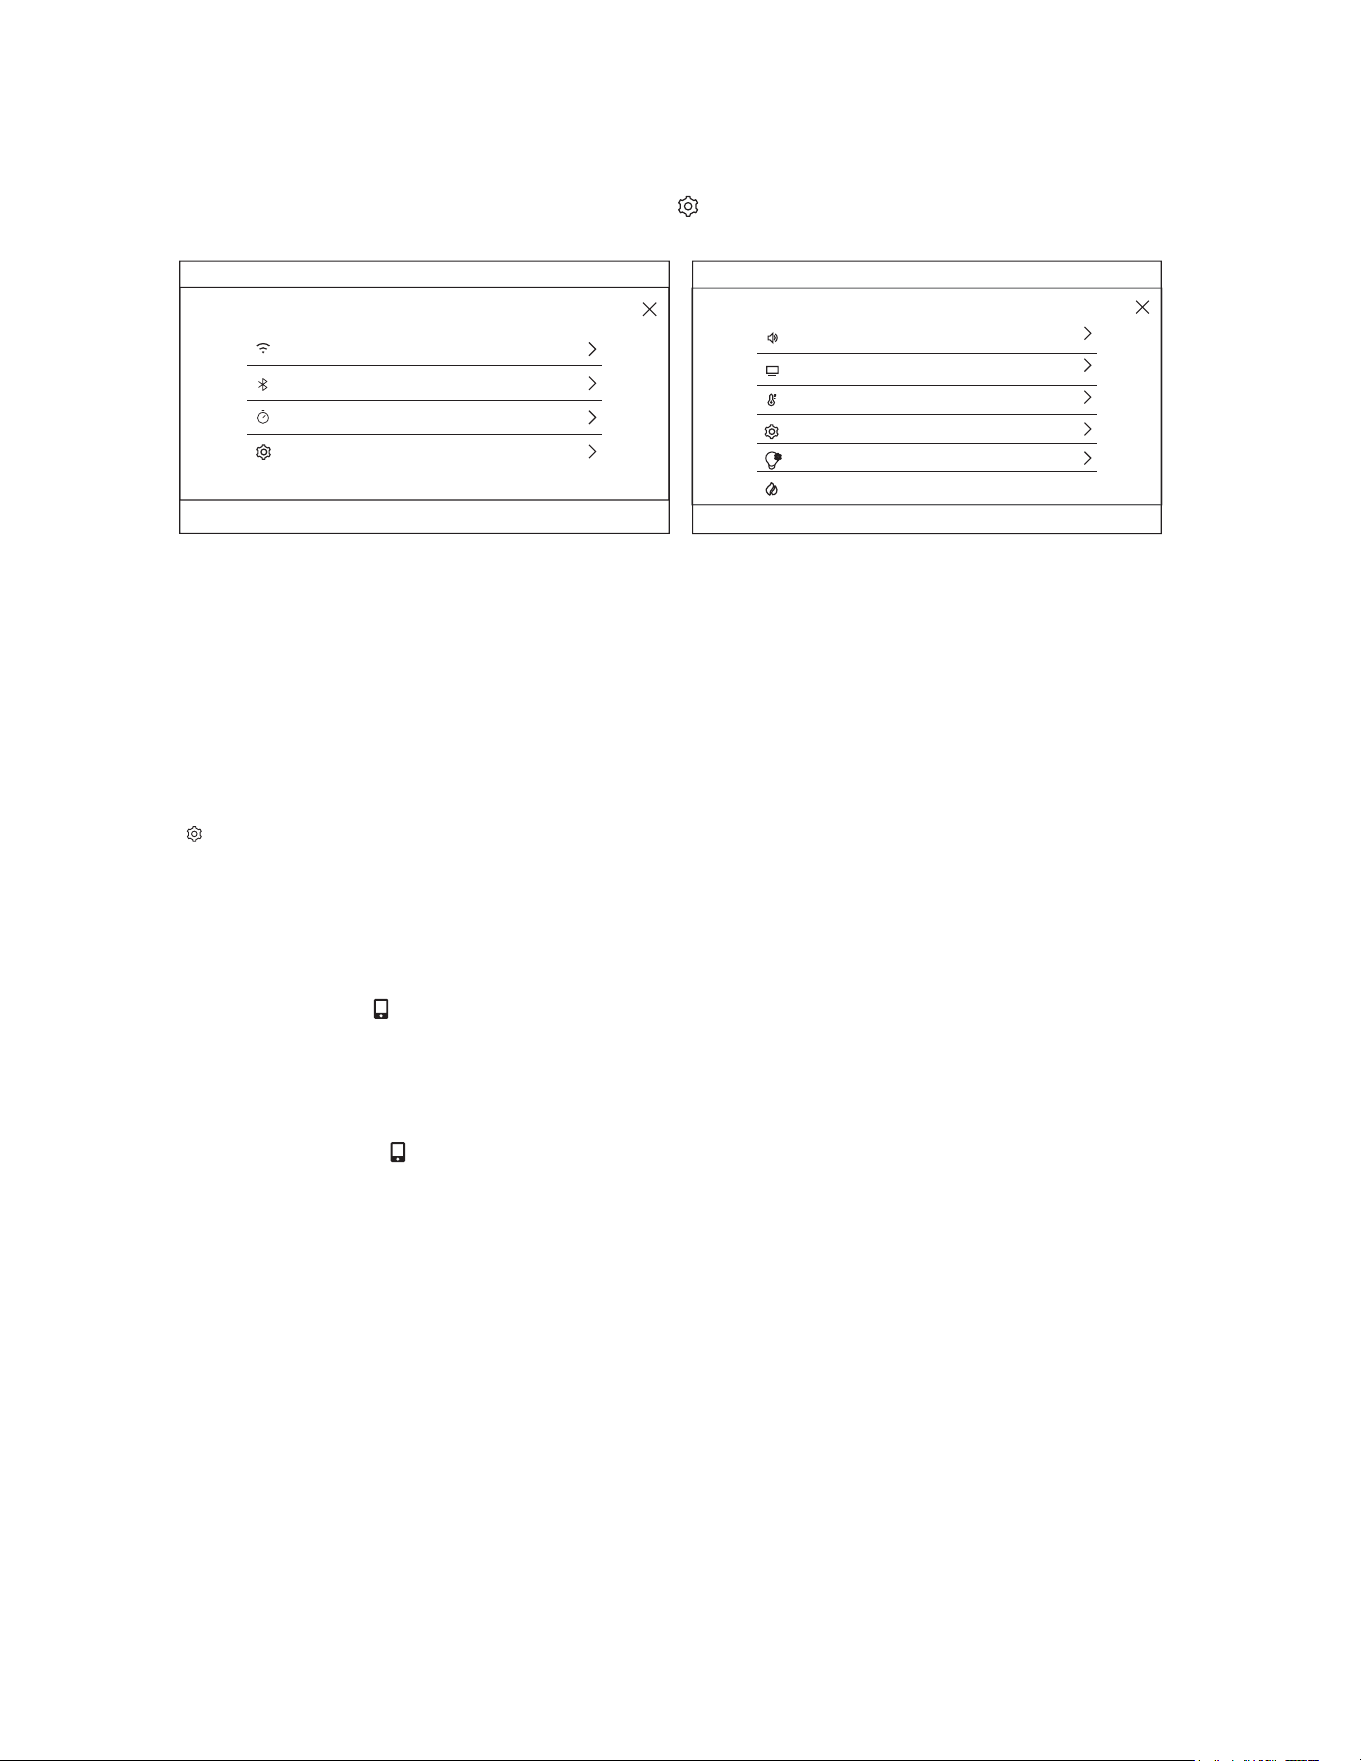
SETTINGS
* Compatible Apple or Android devices and home WiFi network required.
There are numerous settings that are accessed by pressing in the top right corner of the main screen.
Wi-Fi & Remote Enable
This appliance is configurable to allow remote operation
at any time. Do not store any flammable materials or
temperature sensitive items inside or on top of this
appliance. By using the Wi-Fi Connect feature, you will
be able to control essential oven operations such as
temperature settings, timers and cooking modes using
your smart device.*
Select the then Wi-Fi & Remote Enable - follow the
instructions on your oven display and smart device app. It
is necessary to turn on Wi-Fi before using Remote Enable
on your oven.
See the Connecting Your Wifi Enabled Range section, on
page 9, for the full process of how to connect the range.
Remote Starting your Oven
To be able to start the oven remotely once connected to
Wi-Fi, press Remote Enable on the main menu or access
Wi-Fi & Remote Enable in the settings menu and turn
Remote Enable on. The oven can now be started remotely
using a connected device. The icon must be active to
start the oven remotely. To disconnect your smart device
from Remote Enable, access the Wi-Fi & Remote Enable
settings and turn Remote Enable off.
NOTE: )RRGV WKDW VSRLO HDVLO\²VXFK DV PLON HJJV ILVK
VWXIILQJV SRXOWU\ DQG SRUN²VKRXOG QRW EH DOORZHG WR
sit for more than 1 hour before or after cooking. Room
temperature promotes the growth of harmful bacteria. Be
sure that the oven light is off because heat from the bulb
will speed harmful bacteria growth.
Set Clock
This feature allows you to set the clock and specifies
how the time of day will be displayed. Options are for a
standard 12-hour clock with AM and PM selections or
24-hour military time display.
Sabbath
Sabbath mode disables the oven lights (the oven light
will not turn on when the door is opened), all sounds
(the control will not beep when the screen is pressed),
Convection modes, Broil modes, Warm, Proof, and all time
functions. Sabbath mode can only be used with traditional
Bake. Please reference the Sabbath Mode section for
more information.
Sound
This setting screen allows you to change the volume, the
end of cycle tone, and turn on or off the touch sound.
Lighting
This setting controls the brightness of the accent lighting.
See accent lighting for more information.
Cooktop Fuel
Allows you to select the supply gas for your pro range.
Natural gas is the default selection.
Slide up and down to access all the settings
COOKING
SYSTEM
SETTINGS
SOUND
DISPLAY
12:30 PM
LIGHTING
COOKTOP FUEL
SETTINGS
12:30 PM
Wi-Fi & REMOTE ENABLE
BLUETOOTH
SET CLOCK
SABBATH
49-2000877 Rev. 4 23
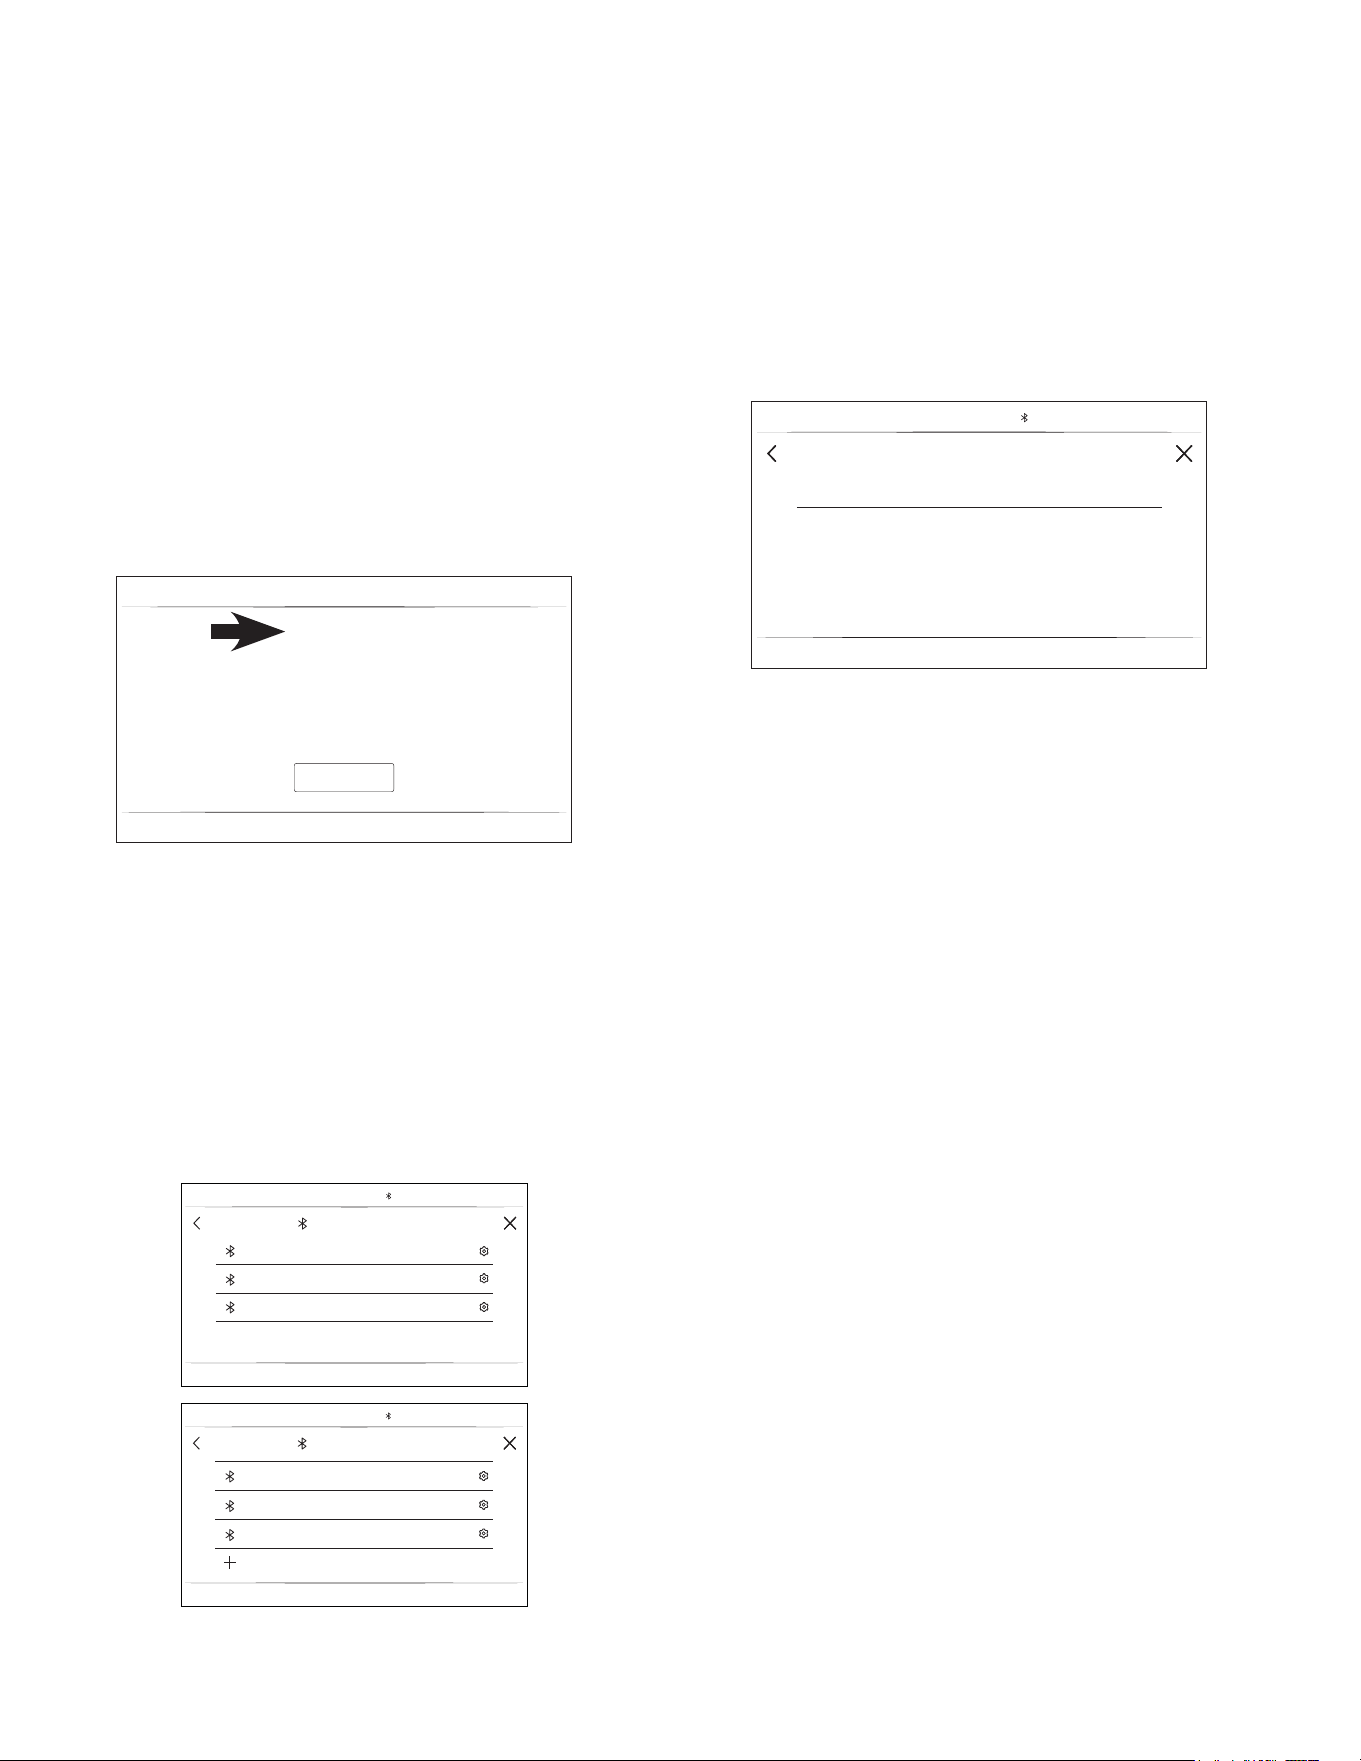
USING THE RANGE
SETTINGS
Bluetooth
®
Pairing
Connected features such as the Hestan Cue Cookware
and Chef Connect enabled products like an over-the-range
microwave oven or range hood can be paired using the
Bluetooth
®
feature. To pair those products to the range, press
the Settings pad and select Bluetooth
®
. Select Pair and
follow the corresponding instructions included with the mating
Bluetooth
®
enabled product. The range will cancel pairing
mode after two minutes if no mating device is detected. Select
Remove to confirm product is paired or to un-pair from range.
1. Touch Gear for Settings Menu.
2. Touch Bluetooth in Settings Menu.
When no device is paired, the range will search automatically.
This will timeout after 2 minutes if no device is found.
3. Follow the instructions for device you wish to pair.
a. For Chef Connect - Follow the instructions on the
mating Chef Connect enabled product. When a Chef
Connect product is paired, the Clock time of day will sync
automatically across products.
b. For Hestan Cue
®
cookware Firmly double tap the black
plastic endcap.
When devices are paired, they appear in a list that scrolls.
To pair a new Bluetooth device:
1. Scroll down the list to + PAIR NEW DEVICE to add another.
To remove a Bluetooth device:
1. Touch the device name.
2. Touch FORGET THIS DEVICE.
Display
This screen shows the options for brightness, clock off,
and energy saver. Clock off will remove the clock from the
display when the screen is inactive, but it will be shown
after pressing the screen.
Cooking
Ŷ The oven is set to Fahrenheit, however, in this setting
the cooking unit can be changed to Celsius.
Ŷ Auto Recipe Conversion can be turned on in order
to automatically reduce the programmed cooking
temperature for Convection Bake or Convection Bake
Multi. Note that this will only reduce the cooking
temperature, not the baking time. When the 12 Hour
Shut Off option is turned on, it will automatically shut off
the oven after 12 hours of continuous use.
Ŷ Adjust Temperature allows the oven temperature to be
adjusted up to 35°F hotter or down to 35°F cooler. Use
this feature if you believe your oven temperature is too
hot or cold and wish to change it. For double ovens,
the upper and lower oven temperatures are adjusted
separately.
System
This screen allows you to clear your saved user data and
shows the current software version.
CANCEL
BLUETOOTH
10:35 AM
Scannning for compatiable bluetooth devices…
Turn device on and put it in pairing mode.
PAN 1
PAN 2
MWO_VENT 1
BLUETOOTH
10:35 AM
BLUETOOTH
10:35 AM
PAIR NEW DEVICES
MWO_VENT 1
PAN 2
MWO_VENT 2
MWO_VENT 2
10:35 AM
FORGET THIS DEVICE
24 49-2000877 Rev. 4
USING THE RANGE
SABBATH
Sabbath mode disables the oven lights (the oven light will not turn on when the door is opened), all sounds (the control
will not beep when the screen is pressed), Convection modes, Broil modes, Warm, Proof, and all time functions. Sabbath
mode can only be used with traditional Bake.
NOTE: If a power outage occurs during when the oven is in Sabbath Mode, the unit will return to Sabbath Mode when
power is restored.
Entering Sabbath Mode
Press the on the main screen to access the Settings
menu and scroll down to Sabbath.
Start a Sabbath Bake
Use the keypad on the screen to enter the temperature
that you would like to use for Sabbath Bake. Once the
temperature is set, press the to set the cook time for the
cycle in hours and minutes. If using a double oven, you
can then set the temperature and time desired for the other
cavity by selecting it to the left of the temperature display.
If a timer is not set, the oven will start a bake cycle during
Sabbath mode and continue until Sabbath mode is turned
off. Once you have programmed the temperature and time,
press Start. The next screen will display the settings that
you programmed for your Sabbath Bake.
Adjusting the Temperature During a
Sabbath Bake
If the temperature needs to be adjusted after programming
the oven for a Sabbath Bake, press one of the temperature
icons displayed on the Sabbath cycle screen and press
Enter. This will allow you to adjust the temperature for the
cycle. Note that the display will not show that the oven
temperature has been changed.
Exit the Sabbath Mode
To exit Sabbath mode, either press the X in the upper
right corner if in the programming screen, or press Exit
Sabbath if in the cycle screen. There is also an option to
turn off the cycle when on the cycle screen by pressing
Turn Off, but your oven will still remain in Sabbath mode
until you exit the mode. NOTE: If a power outage occurs
while the oven is in Sabbath Mode, the unit will return to
Sabbath Mode when power is restored, however the oven
will return to the off state even if it was in the middle of a
bake cycle when the power outage occurred.
SABBATH
ENTER TURN OFFOven On
EXIT SABBATH
12:30 PM
Select temperature, then press ENTER to edit.
200°F 250°F 300°F 350°F 400°F
Programming Screen
Sabbath Cycle Screen
12:30 PM
SABBATH
BAKE TEMP
123
456
789
0
i
---
°F
START
49-2000877 Rev. 4 25
USING THE RANGE
OVEN AIR VENTS
Never block the vents (air openings) of the range. They
provide the air inlet and outlet that are necessary for the
range to keep cool and operate properly with correct
combustion.
Air openings are located at the rear of the cooktop, at the top
and bottom of the oven door, and at the bottom of the range.
ALUMINUM FOIL AND OVEN LINERS
CAUTION
Do not use any type of foil or oven liner to
cover the oven bottom. These items can trap heat or melt,
resulting in damage to the product and risk of shock, smoke
or fire. Damage from improper use of these items is not
covered by the product warranty.
Foil may be used to catch spills by placing a sheet on a lower
rack, several inches below the food. Do not use more foil
than necessary and never entirely cover an oven rack with
DOXPLQXPIRLO.HHSIRLODWOHDVW´IURPRYHQZDOOVWR
prevent poor heat circulation.
Do not block
rear vents
Aluminum
foil to catch
spillovers
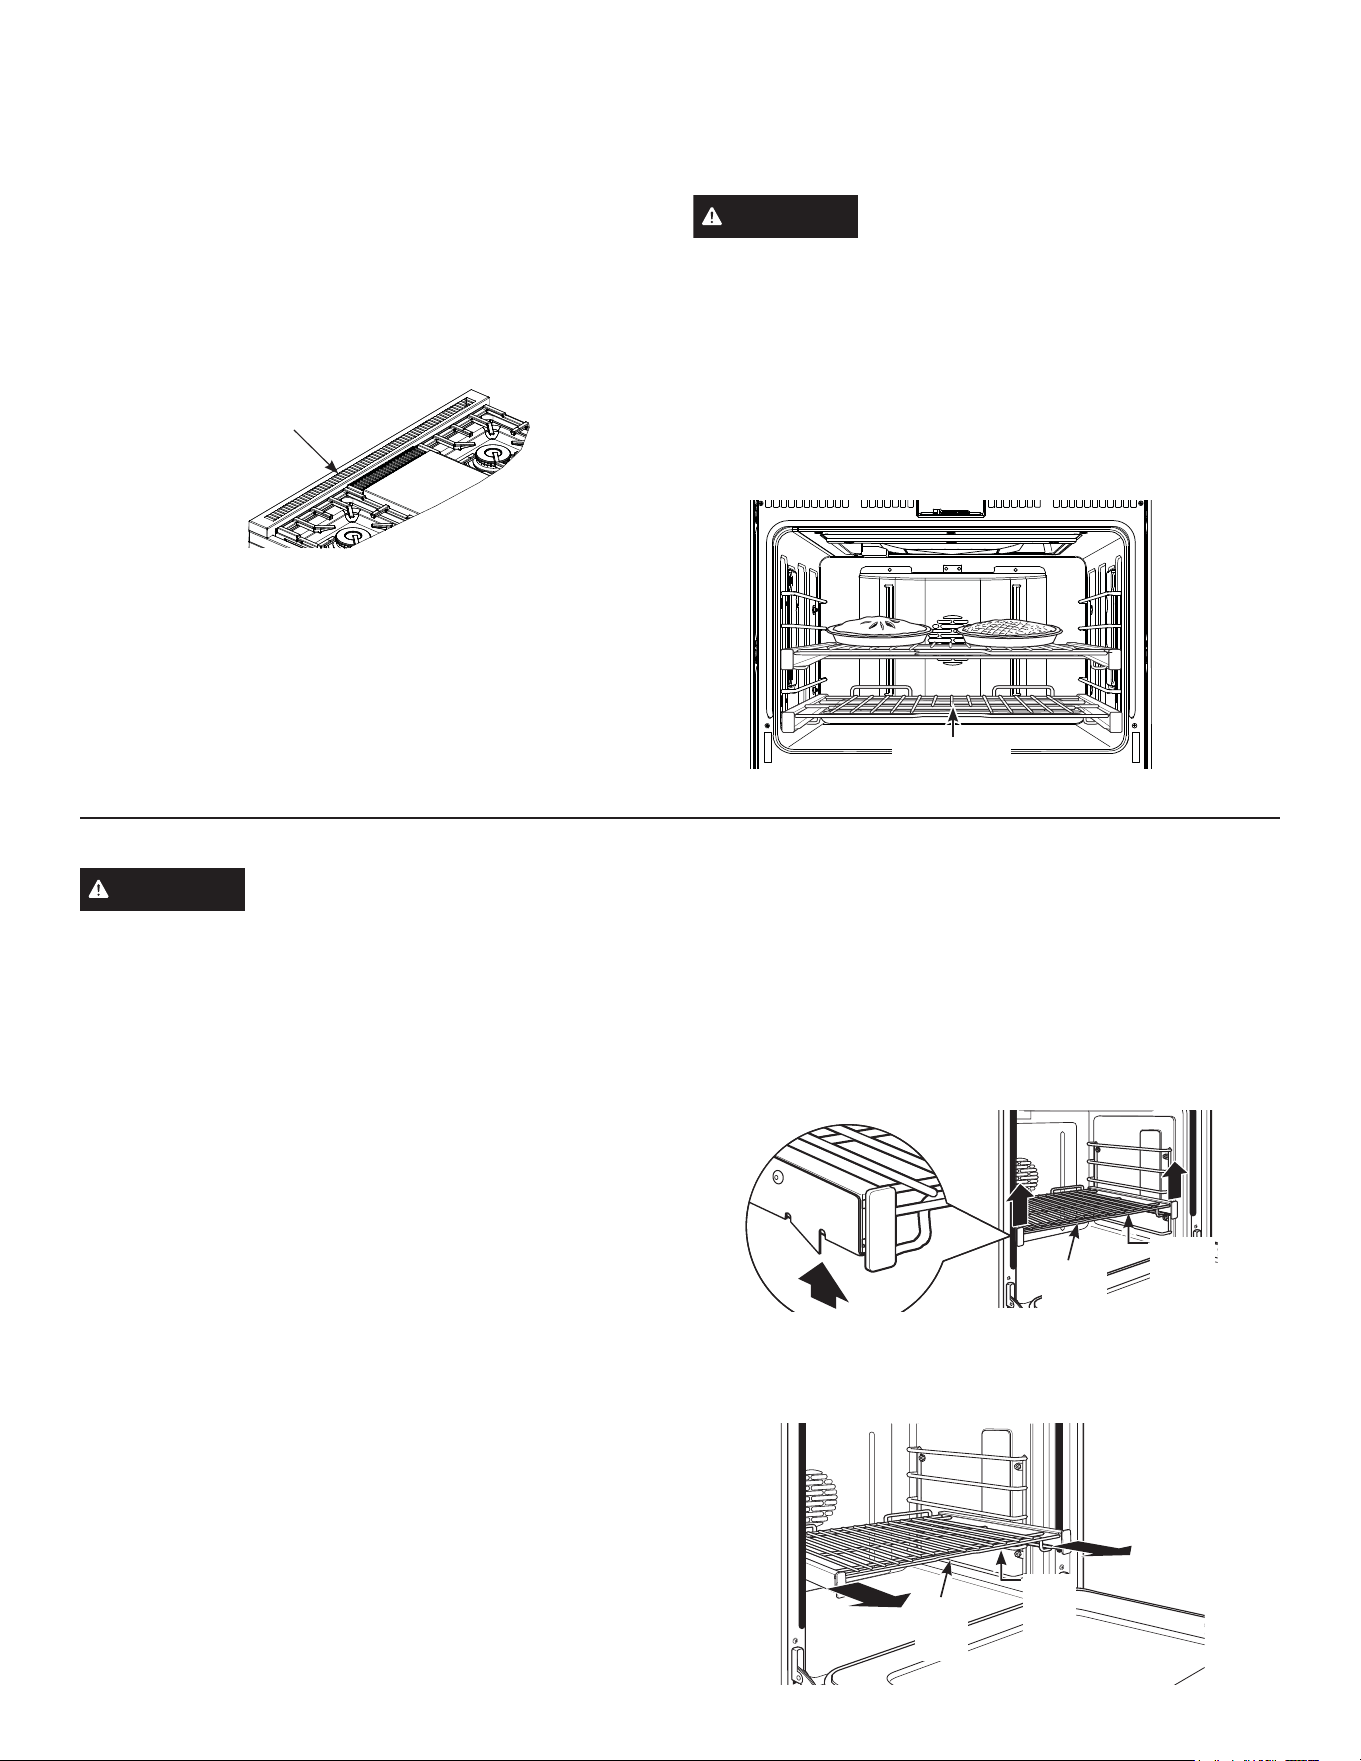
OVEN RACKS
CAUTION
To avoid possible burns, place the racks
in the correct position before turning on the oven.
Recommended rack positions for various types of food are
provided in the Cooking Guide. Adjusting rack position is
one way to impact cooking results. For example, if you
would prefer darker tops on cakes, muffins, or cookies, try
moving food one rack position higher. If you find foods are
too brown on top try moving them down next time.
When baking with multiple pans and on multiple racks,
HQVXUHWKHUHLVDWOHDVHEHWZHHQSDQVWRDOORZ
sufficient space for air to flow.
<RXU2YHQPD\KDYHH[WHQVLRQUDFNVDQGRUORZSURILOH
racks.
Refer to the Cooking Guide and Oven Modes sections for
rack position recommendations.
Full Extension Oven Racks
The racks have a frame that locks into the rack supports
on both sides. Once the frame is locked into place, always
pull the rack out, by its upper front rail, to its full extension
stop position, when placing or removing cookware.
Remove and Replace Oven Racks
To remove a rack:
1. Make sure the rack is pushed all the way into the oven.
2. Grasp the rack by both its upper front rail and its lower
front rail and lift straight up to unlock the front rack locks
from the rack supports.
3. Firmly holding onto both the upper and lower front rack
rails, pull the rack forward and remove it from the oven.
Lift to unlock front rack locks
from the rack support
Lower
front
rail
Upper
front
rail
Front rack lock
Lower
front
rail
Upper
front
rail
26 49-2000877 Rev. 4
USING THE RANGE
OVEN RACKS (Cont.)
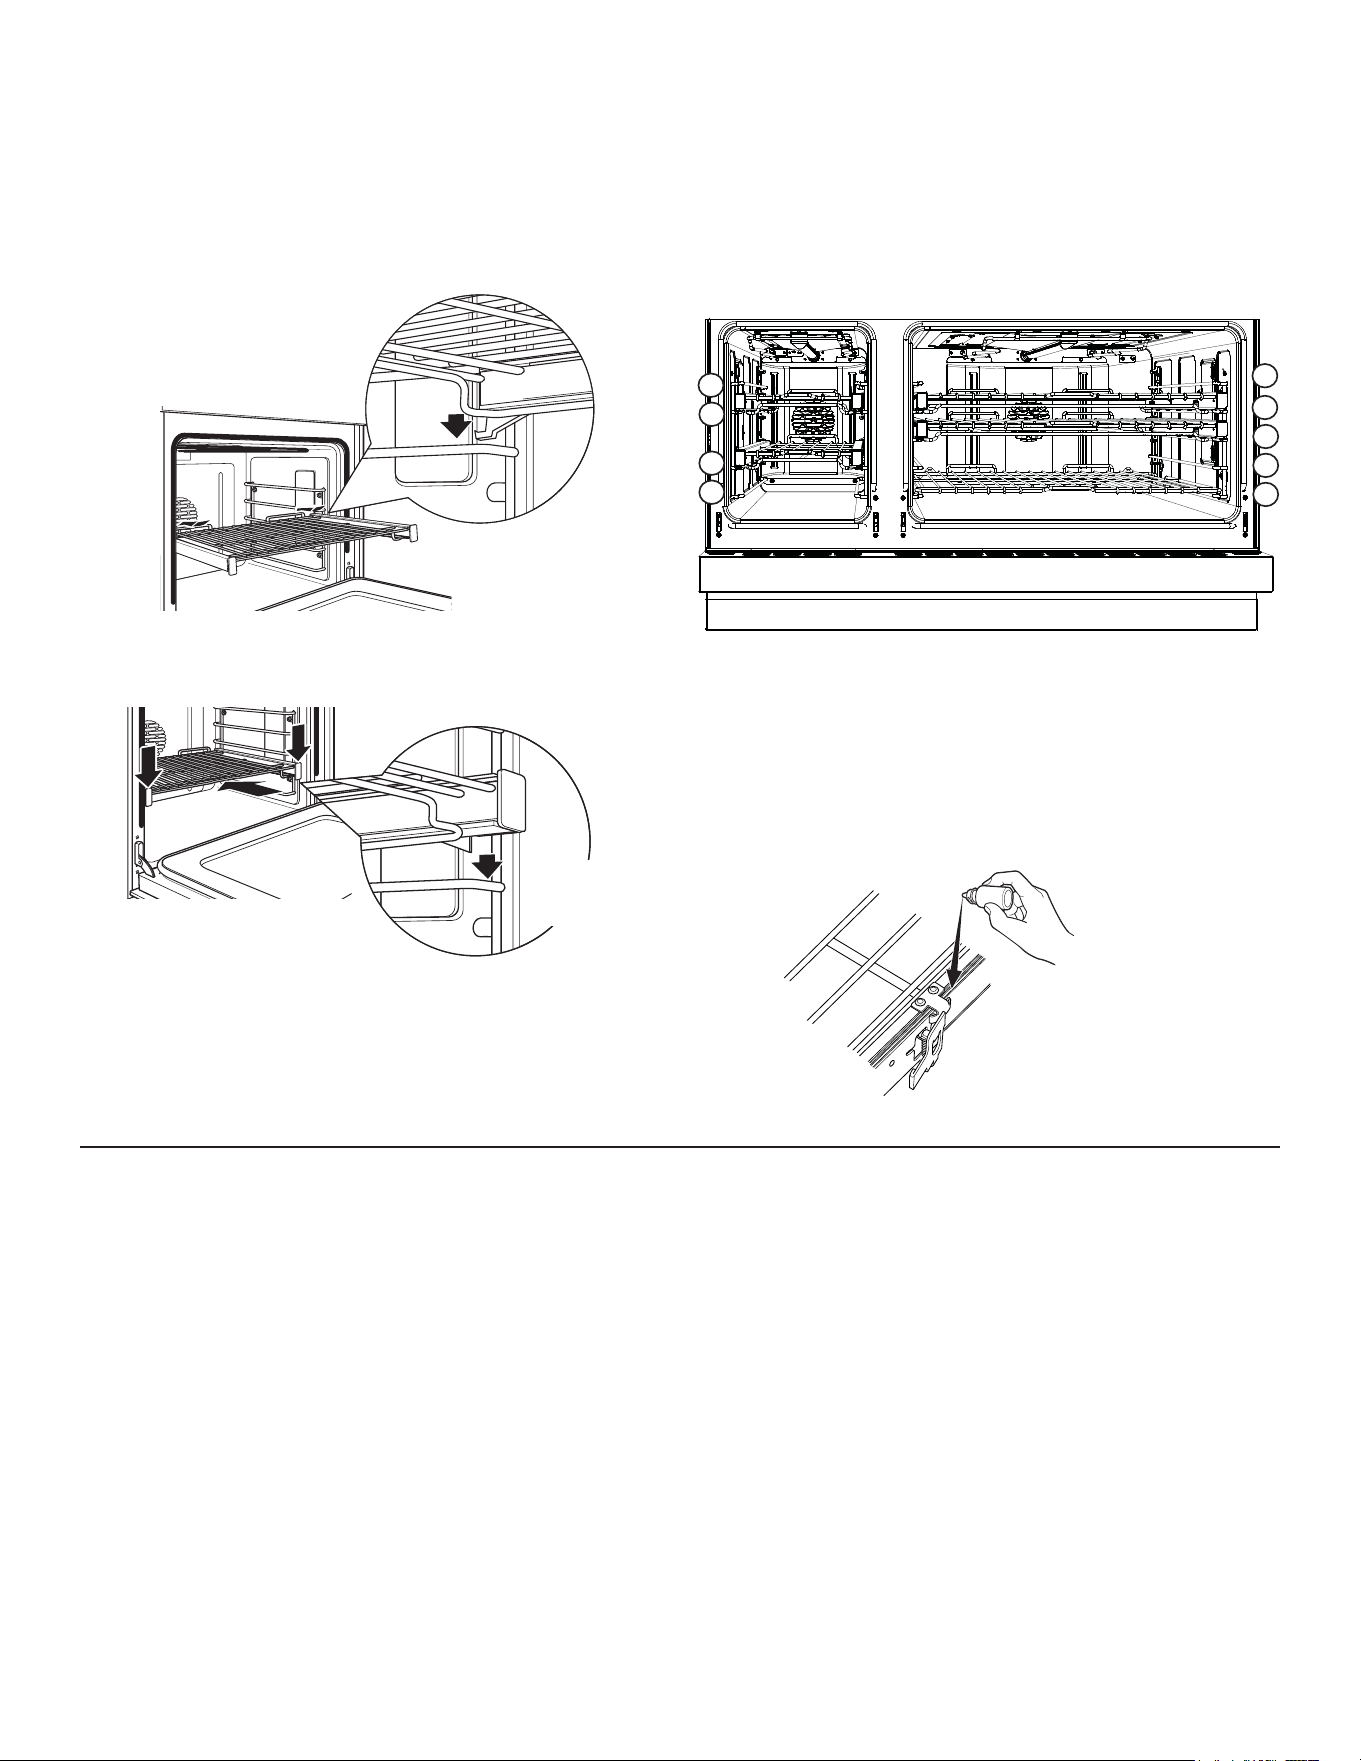
To replace a rack:
1. Place the rear rack locks over and onto the rack supports
(five rack positions are available including the top position).
2. Slide the rack all the way in until the rear rack locks are
secure on the rear rack supports and press the front rack
locks onto the front rack supports.
3. Pull the rack all the way out to check that it is properly
engaged. If extension racks are difficult to replace or
remove, wipe the oven rack supports with cooking oil. Do
not wipe oil on the rack slides.
Racks may become difficult to slide, especially after a
self-clean cycle. To improve sliding conditions, use a soft
cloth or paper towel to rub vegetable oil on the left and right
HGJHVRIWKHUDFNVDQGRUUDFNVXSSRUWV
NOTE: Remove unused racks when using the oven for
faster preheat, improved efficiency, and optimal cooking
performance.
To lubricate the paddle:
Shake lubricant and apply to the moving parts of the
paddle mechanisms as shown.
Slide the rack all the way
in and push down to lock
the front rack locks onto
the front rack supports
Front
rack
lock
OVEN MODES
Your new oven has a variety of cooking modes to help
you get the best results. The modes are described
below. Refer to the Cooking Guide section for
recommended rack positions and other tips for using
these modes. Place racks in the desired position(s)
prior to starting the oven.
For some cooking modes, such as Bake, Convection
Bake, and Convection Roast, the oven will preheat and
a tone will sound when the oven is ready for cooking.
Some cooking modes do not require preheating. To
reduce preheat times, remove unused racks and avoid
opening the oven door until the preheat tone sounds.
While in use, oven heaters and the convection fan will
cycle on and off as needed to maintain appropriate
cooking conditions. Avoid frequently opening the
oven door, as this can impact cooking times and
performance.
NOTE: A cooling fan will turn on to cool internal parts.
This is normal, and the fan may continue to run even
after the oven is turned off.
3
3
4
4
2
2
1
1
5

49-2000877 Rev. 4 27
USING THE RANGE
BAKING
The Bake mode is intended for single rack cooking. When
preparing baked goods such as cakes, cookies and
pastries, always preheat the oven first.
How to Set the Oven for Baking
To use this mode press the BAKE option on the main
menu and scroll to the desired temperature and press
START/OFF to turn the oven on.
The oven will now begin to preheat. The temperature
display will begin at 100ºF.
The preheat tune will sound when the oven is preheated
and food can now be placed inside the oven.
Press oven display button START/OFF to turn oven OFF
when baking is finished.
Use the temperature probe when a precise internal
temperature is important. See the Temperature Probe
section for more information.
For best results when baking 4 cake layers, place four
pans using racks 2 and 4. Stagger the pans so that one
pan is not directly above another as shown above.
See the oven racks section for how to use, remove and
replace the racks.
3
4
2
1
5
BAKING GUIDE
TEMPERATURE SETTING
When selecting a temperature, the traditional preset
temperatures are shown and can be selected by
scrolling horizontally and selecting the desired
temperature. If you wish to cook at an alternate
temperature, press the temperature in the middle
of the screen and a number pad will appear so the
desired temperature can be input.
TYPE OF FOOD
RECOMMENDED
RACK
POSITION(S)LEFT
OVEN
(48" models only)
RECOMMENDED
RACK POSITION(S)
OVEN or RIGHT
OVEN
(48" models only)
Layer cakes, sheet cakes,
bundt cakes, quick breads
on a single rack 2 2 or 3
Layer cakes on multiple
racks - 2 and 4
&KLႇRQFDNHVDQJHOIRRG 11
Cookies, biscuits, scones,
PXႈQVRQDVLQJOHUDFN 22 or 3
Yeast Breads 2 2 or 3
Roasts 2 2 or 3
Whole Chicken 2 2 or 3
Bone-in chicken breasts,
legs, thighs 2 2 or 3
Boneless chicken breasts 2 2 or 3
Whole turkey 1 1 or 2
Turkey breast 1 or 2 2 or 3
Casseroles 2 or 3 2 or 3
Pizza on a single rack 2 2 or 3
Potato products, chicken
nuggets, appetizers on a
single rack 2 2 or 3
Vegetables 2 or 3 3 or 4
Suggested shelf positions are intended as general guidelines. Experiment
with these positions for specific foods and personal preference.

28 49-2000877 Rev. 4
USING THE RANGE
BROILING
The Broil modes are intended for searing and crisping.
Always broil with the oven door closed. Monitor food
closely while broiling. Use caution when broiling on the
upper rack positions as placing food closer to the broil
burner increases smoking, spattering and the possibility of
fats igniting.
Try broiling foods that you would normally grill. Adjust
rack positions to adjust the intensity of the heat to the
food. Place foods closer to the broil burner when a seared
surface and rare interior is desired. Thicker foods and
foods that need to be cooked through should be broiled on
a lower rack position or by using a lower broil setting.
8VH%URLO+LJKIRUWKLQQHUFXWVRIPHDWDQGRUZKHQ\RX
would like to have a seared surface and rare interior. Use
%URLO/RZIRUWKLFNHUFXWVRIPHDWDQGRUIRRGVWKDW\RX
would like cooked all the way through. It is not necessary
to preheat when using broil modes; however, preheating
for 5-10 minutes is recommended for better searing
results.
How to Set the Oven for Broiling
Select BROIL on the main menu, then select High or
Low depending on the amount of searing and the internal
temperature that is preferred and press START/OFF.
NOTE: Always broil with the door closed.
Press oven display button START/OFF to turn oven OFF
when broiling is finished.
NOTE: Broil can not be started if the temperature probe is
plugged in. Never leave your probe inside the oven during
a broil cycle.
Aluminum Foil
You can use aluminum foil to line the broiler pan and broiler
grid. However, you must mold the foil tightly to the grid and
cut slits in it just like the grid.
BROILING GUIDE
Due to the variety of of meats and cuts available, you may
select alternate rack positions based on personal preferences
of doneness and external searing. For optimal searing,
preheat oven for 5-10 minutes.
The size, weight, thickness, starting temperature and your
preference of doneness will affect broiling times. This guide is
based on meats at refrigerator temperature.
3
4
2
5
NOTE: In general, high-
er rack positions yield
darker external searing
and lower positions
yield more doneness.
TYPE OF FOOD SETTING
RECOMMENDED RACK
POSITION(S)LEFT OVEN
(48" models only)
RECOMMENDED RACK
POSITION(S)OVEN or
RIGHT OVEN
(48" models only)
Hamburgers HIGH 3 or 4 4 or 5
Steaks & Chops HIGH 3 or 4 4 or 5
Fish LOW RULQFKWKLFNRUOHVV
RU!LQFK
RULQFKWKLFNRUOHVV
RU!LQFK
Bone-in chicken
breasts, legs, thighs
LOW 2 2 or 3
Boneless chicken
breasts
LOW 2 2 or 3
Vegetables LOW 2 or 3 3 or 4
The U.S. Department of Agriculture says “Rare beef is popular, but you should know that cooking it
to only 140°F means some food poisoning organisms may survive.” (Source: Safe Food Book. Your
Kitchen Guide. USDA Rev. June 1985.)
49-2000877 Rev. 4 29
USING THE RANGE
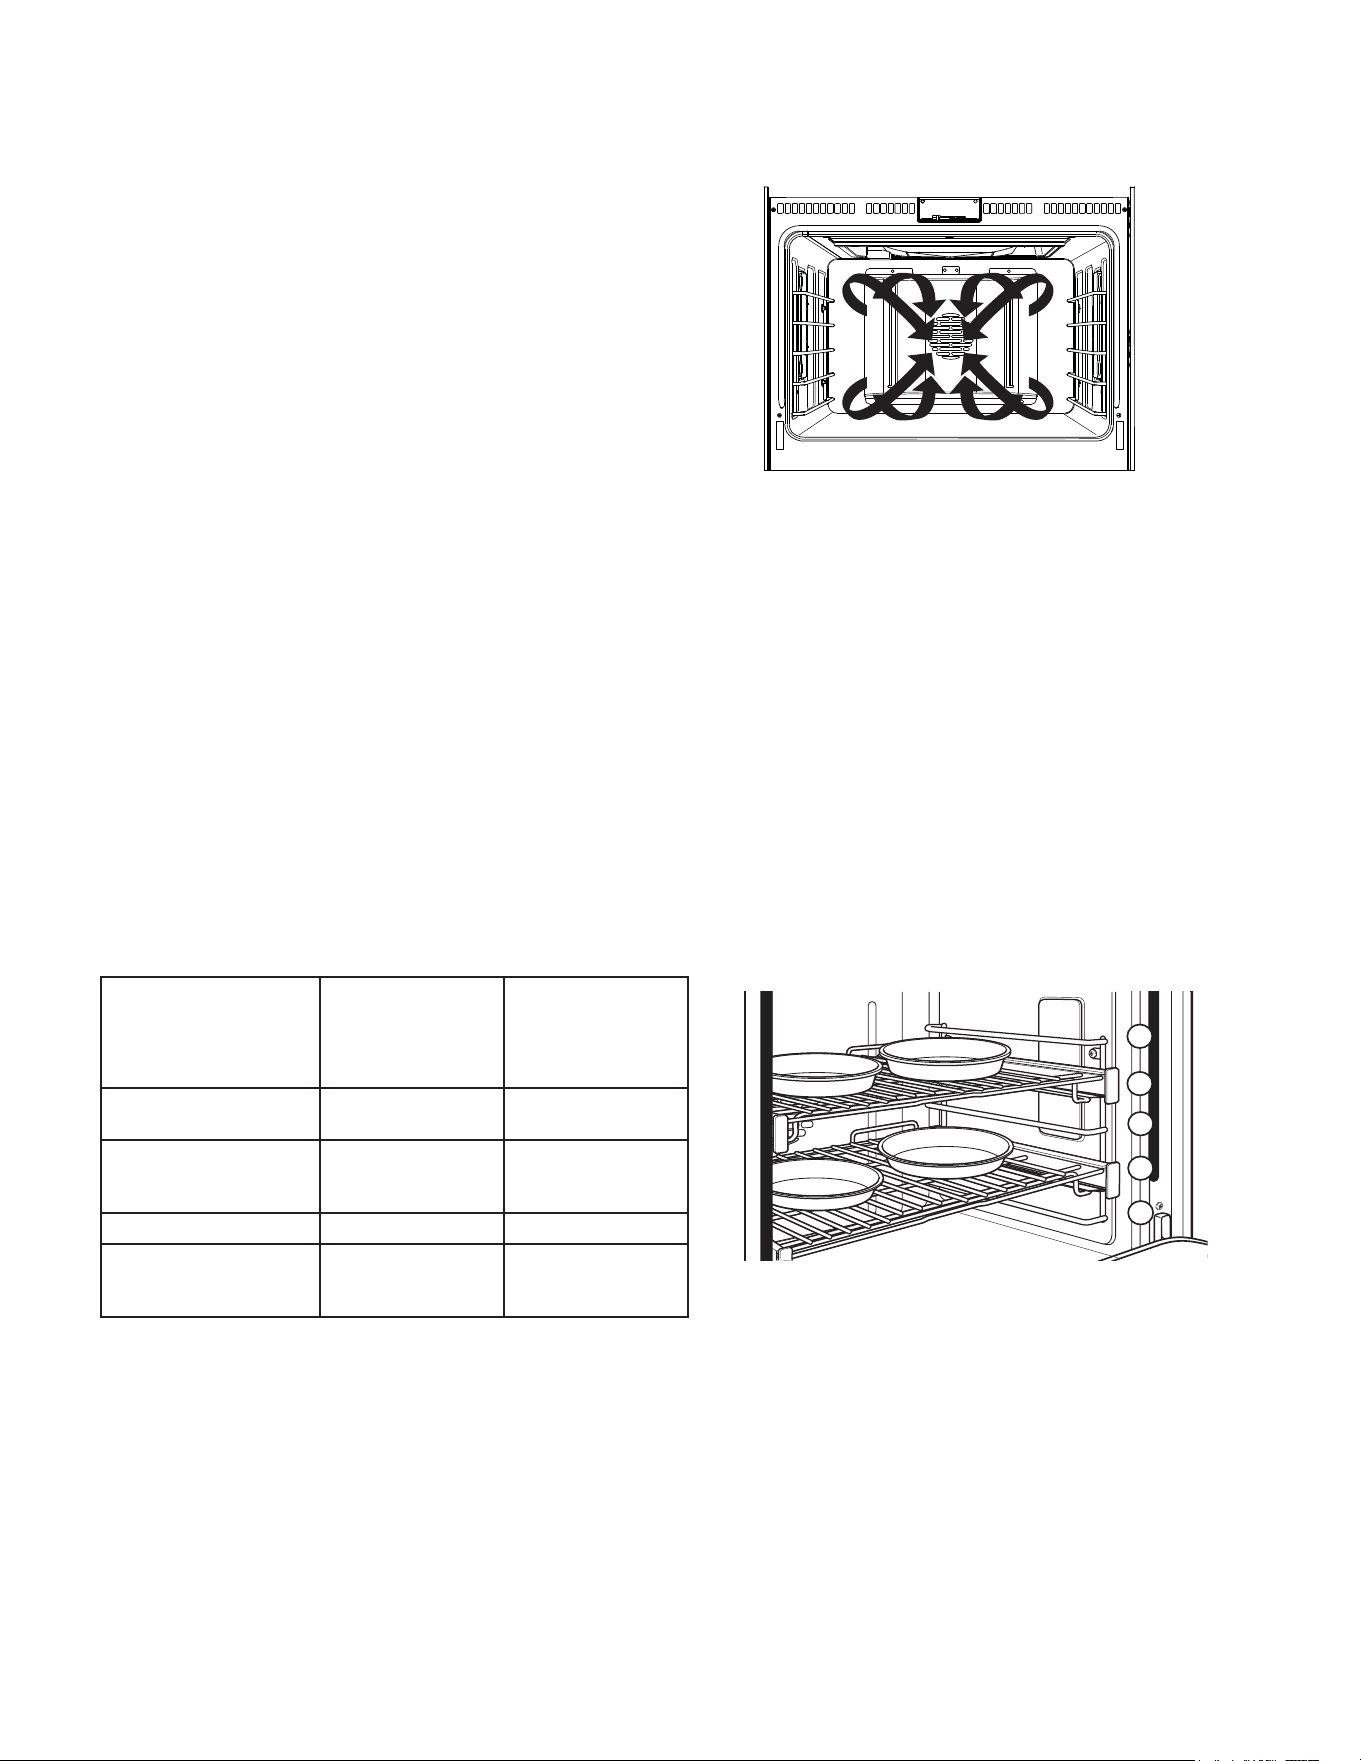
CONVECTION COOKING
These modes utilize Precise Air to enhance cooking
HYHQQHVVLPSURYHEURZQLQJDQGRUUHGXFHFRRNLQJWLPHV
NOTE: The convection fan shuts off when the oven door is
opened.
CONVECTION BAKING
The Convection Bake Multi Rack mode is intended for baking on multiple racks at the same time. This mode uses Precise
Air to enhance cooking evenness. Your oven is equipped with Auto Recipe Conversion, so it is not necessary to adjust
the temperature when using this mode. Always preheat when using this mode. Cooking times may be slightly longer for
multiple racks than what would be expected for a single rack.
How to Set the Oven for Multi-Rack Convection Baking
To use this mode press the CONV BAKE option on the
main menu and scroll to the desired temperature and press
START/OFF to turn the oven on.
The oven will now begin to preheat. The temperature
display will begin at 100°F.
The preheat tune will sound when the oven is preheated
and food can be placed inside the oven.
Press oven display button START/OFF to turn oven OFF
when convection cooking is finished.
Use the temperature probe when a precise internal
temperature is important. See the Temperature Probe
section for more information.
For best results when baking 4 cake layers, place four
pans using racks 2 and 4. Cakes should be centered front
to back on both racks.
See the oven racks section for how to use, remove and
replace the racks.
Suggested shelf positions are intended as general
guidelines. Experiment with these positions for specific
foods and personal preference.
FOOD TYPE
RECOMMENDED
RACK POSITION(S)
LEFT OVEN
(48" models only)
RECOMMENDED
RACK POSITION(S)
OVEN or RIGHT
OVEN
(48" models only)
Layer cakes on multiple
racks
- 2 and 4
Cookies, biscuits,
VFRQHVPXႈQVRQ
multiple racks
2 and 3
2 and 4
1, 3, and 5
Pizza on multiple racks - 2 and 4
Potato products, chicken
nuggets, appetizers on
multiple racks
2 and 3 2 and 4
3
4
2
1
5

30 49-2000877 Rev. 4
USING THE RANGE
Suggested shelf positions are intended as general guidelines. Experiment
with these positions for specific foods and personal preference.
Grid
Broiler pan
Roasting Rack
CONVECTION ROASTING
The Convection Roast mode is intended for roasting vegetables and whole cuts of meat on a single rack. This mode uses
Precise Air to improve browning and reduce cooking time. Check food earlier than the suggested recipe time. It is not
necessary to preheat when using this mode.
How to Set the Oven for Convection Roasting
To use this mode press the CONV ROAST option on the
main menu and scroll to the desired temperature and press
START/OFF to turn the oven on.
The oven will now begin to preheat. The temperature
display will begin at 100°F.
The preheat tune will sound when the oven is preheated
and food can be placed inside the oven.
Press oven display button START/OFF to turn oven OFF
when convection cooking is finished.
Use the temperature probe when a precise internal
temperature is important. See the Temperature Probe section
for more information.
See the oven racks section for how to use, remove and
replace the racks.
Convection Roasting Tips
Use the broiler pan, grid and the roasting rack for best results
when roasting large cuts of meat. Use the broiler pan when
roasting vegetables. Use the broiler pan and grid when
roasting small cuts of meats.
To assemble, place the grid on the broiler pan and put the
roasting rack over them.
3
4
2
1
5
FOOD TYPE
RECOMMENDED
RACK
POSITION(S)
LEFT OVEN
(48" models only)
RECOMMENDED
RACK POSITION(S)
OVEN or RIGHT
OVEN
(48" models only)
Roasts 2 2 or 3
Whole Chicken 2 2 or 3
Whole turkey - 1 or 2
Turkey breast - 2
Potato products, chicken
nuggets, appetizers on a
single rack 2 2 or 3
Vegetables 2 or 3 3
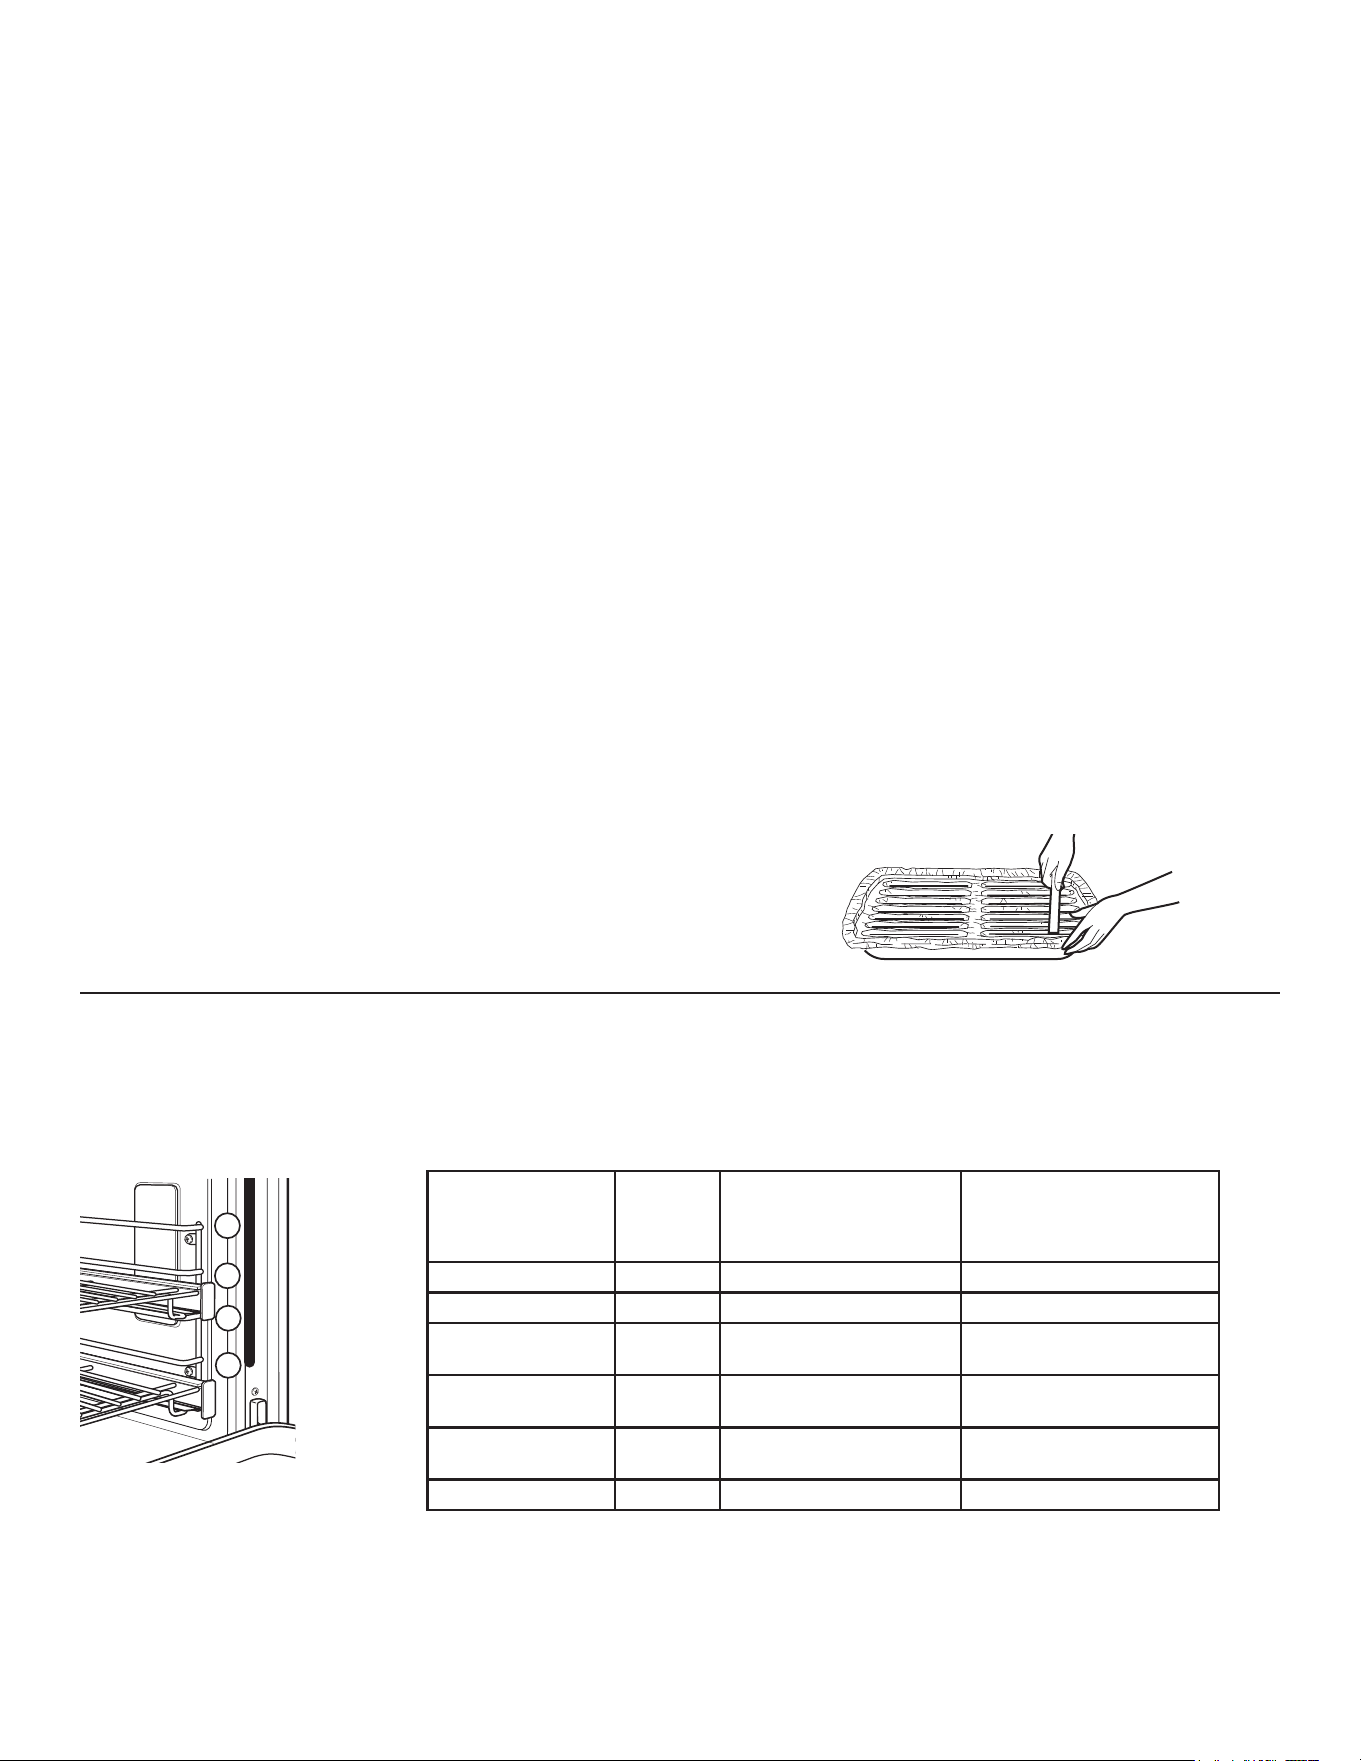
49-2000877 Rev. 4 31
USING THE RANGE
CONVECTION BROILING
The Convection Broil modes are intended for searing and
crisping. Always broil with the oven door closed. Monitor
food closely while broiling. Use caution when broiling on
the upper rack positions as placing food closer to the broil
burner increases smoking, spattering and the possibility of
fats igniting.
Try broiling foods that you would normally grill. Adjust rack
positions to adjust the intensity of the heat to the food.
Place foods closer to the broil burner when a seared sur-
face and rare interior is desired. Thicker foods and foods
that need to be cooked through should be broiled on a
lower rack position or by using a lower broil setting.
The Convection Broil modes use the broil heater along with
air movement for improved searing and browning. Use
&RQYHFWLRQ%URLO+LJKIRUWKLQQHUFXWVRIPHDWDQGRUZKHQ
you would like to have a seared surface and rare interior.
8VHWKH&RQYHFWLRQ%URLO/RZIRUWKLFNHUFXWVRIPHDWDQG
or foods that you would liked cooked all the way through.
It is not necessary to preheat when using Convection Broil
modes; however, preheating for 5-10 minutes is recom-
mended for better searing results.
How to Set the Oven for Convection Broiling
To use this mode press the CONV BROIL option on the
main menu and scroll to the desired temperature and press
START/OFF to turn the oven on.
The oven will now begin to preheat. The temperature
display will begin at 100°F.
The preheat tune will sound when the oven is preheated
and food can be placed inside the oven.
Press oven display button START/OFF to turn oven OFF
when convection cooking is finished.
NOTE: Always broil with the door closed.
See the oven racks section for how to use, remove and
replace the racks.
NOTE: Broil can not be started if the temperature probe is
plugged in. Never leave your probe inside the oven during
a broil cycle.
Aluminum Foil
You can use aluminum foil to line the broiler pan and broiler
grid. However, you must mold the foil tightly to the grid and
cut slits in it just like the grid.
CONVECTION BROILING GUIDE
Due to the variety of of meats and cuts available, you may
select alternate rack positions based on personal preferences
of doneness and external searing. For optimal searing,
preheat oven for 5-10 minutes.
The size, weight, thickness, starting temperature and your
preference of doneness will affect broiling times. This guide is
based on meats at refrigerator temperature.
3
4
2
5
NOTE: In general, high-
er rack positions yield
darker external searing
and lower positions
yield more doneness.
TYPE OF FOOD SETTING
RECOMMENDED RACK
POSITION(S)LEFT OVEN
(48" models only)
RECOMMENDED RACK
POSITION(S)OVEN or
RIGHT OVEN
(48" models only)
Hamburgers HIGH 3 or 4 4 or 5
Steaks & Chops HIGH 3 or 4 4 or 5
Fish LOW RULQFKWKLFNRUOHVV
RU!LQFK
RULQFKWKLFNRUOHVV
RU!LQFK
Bone-in chicken
breasts, legs, thighs
LOW 2 2 or 3
Boneless chicken
breasts
LOW 2 2 or 3
Vegetables LOW 2 or 3 3 or 4
The U.S. Department of Agriculture says “Rare beef is popular, but you should know that cooking it
to only 140°F means some food poisoning organisms may survive.” (Source: Safe Food Book. Your
Kitchen Guide. USDA Rev. June 1985.)

32 49-2000877 Rev. 4
USING THE RANGE
PROOFING
Proof mode maintains a warm environment for rising yeast-leavened dough. For best results, cover the dough while
proofing and check early to avoid over-proofing.
How to Set the Oven for Proofing
Use rack position 2 or 3 in the oven (right Oven on 48"
models). Use rack position 2 in the left oven.
1. To use this mode press the PROOF option on the
PDLQPHQXDQGSUHVV67$572))WRWXUQWKHRYHQRQ
The display will show “PROOF”. PROOF mode will not
operate when oven is above 125°F. The display will
scroll “too hot to proof”. Allow the oven time to cool.
2. When proofing is finished, press START/OFF to turn
the oven off.
CAUTION
Do not use the proofing mode for
warming food or keeping food hot. The proofing oven
temperature is not hot enough to hold foods at safe
temperatures.
PRECISION COOKING
These modes provide guidance or pre-set cooking
algorithms to assist the user in cooking various types of
food. The selection you make in the Precision Cooking
menu will guide you to input the information required to
help cook your food. At the end of estimated cooking time,
check the food to see if it is done to your liking. Note that
differences in food shape,preparation and preferences for
doneness can impact the time required to cook the food.
Some cycles require the food temperature probe supplied
with your oven. The target temperature for the probe is
automatically set based on selections made for each food.
Always check foods using a secondary food thermometer
as probe placement can impact the measured temperature.
See the Temperature Probe section for more information.
WARMING
The Warm mode is intended to keep hot foods hot. Cover
foods that need to remain moist and do not cover foods
that should be crisp. Preheating is not required. Do not use
this mode to heat cold food other than crisping crackers,
chips or dry cereal. It is also recommended that food not
be kept warm for more than 2 hours.
How to Set the Oven for Warming
1. To use this mode press the WARM option on the main
menu and press START/OFF to turn the oven on.
2. When warm is finished, press START/OFF to turn the
oven off.
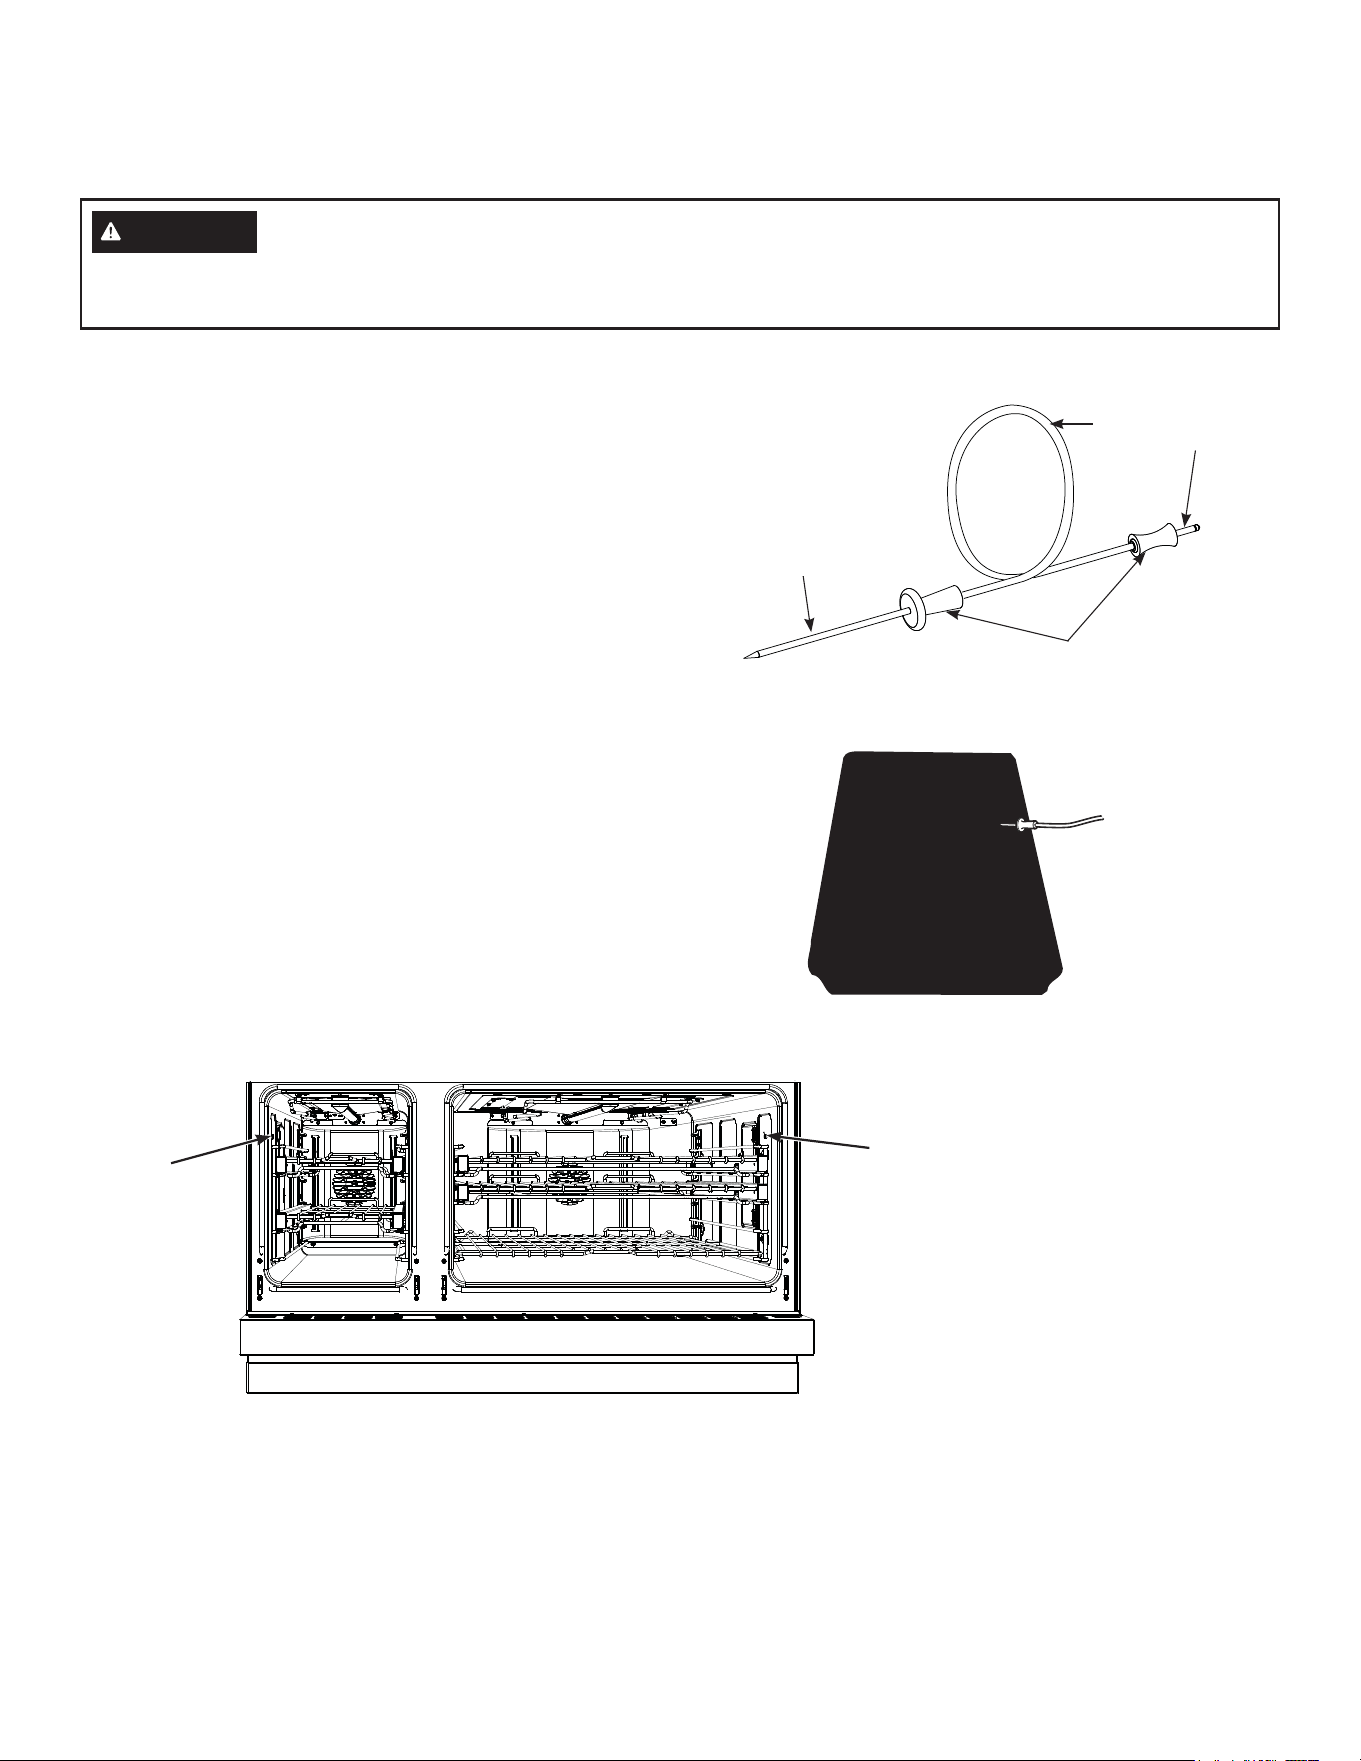
49-2000877 Rev. 4 33
USING THE RANGE
TEMPERATURE PROBE
Probe
Connector
Probe
Connector
Proper Probe Placement
After preparing the meat and placing it on the cooking pan
follow these instructions for proper probe placement.
Ŷ ,QVHUWWKHSUREHLQWRWKHIRRGVRWKDWWKHWLSRIWKH
probe will rest in the center of the thickest part of
the food. For best performance the probe should
be fully inserted into the food. If the probe is not
located properly, it may not accurately measure the
temperature of the coolest portion of the food. Some
foods, particularly small items, are not well suited for
cooking with the probe due to their shape or size.
Ŷ 7KHSUREHVKRXOGQRWWRXFKERQHIDWRUJULVWOH
Ŷ )RUZKROHSRXOWU\LQVHUWWKHSUREHLQWRWKHWKLFNHVWSDUW
of the breast.
Ŷ )RUERQHOHVVURDVWVLQVHUWWKHSUREHLQWRWKHFHQWHURI
the roast.
Ŷ )RUERQHLQKDPRUODPELQVHUWWKHSUREHLQWRWKH
center of the lowest large muscle or joint.
Ŷ )RUFDVVHUROHVRUGLVKHVVXFKDVPHDWORDILQVHUWWKH
probe into the center of the dish.
Ŷ )RUILVKLQVHUWWKHSUREHIURPMXVWDERYHWKHJLOOLQWR
the meatiest area, parallel to the backbone.
Cable
Plug
Probe
Handles
The temperature probe has a skewer-like probe at one end and
a plug at the other end that goes into the outlet in the oven.
WARNING
Consuming undercooked food can result in foodborne illness. Use probe according to
the following instructions to ensure all portions of the food reach minimum safe cooking temperatures.
Recommendations for minimum safe food temperatures can be found at foodsafety.gov or IsItDoneYet.gov.

34 49-2000877 Rev. 4
USING THE RANGE
TEMPERATURE PROBE (Cont.)
Probe Usage
To use the probe without preheating:
1. Insert the probe into the food (see Proper Probe
Placement).
2. Place the food in the oven and connect the probe into
the probe outlet in the oven.
3. Select the desired cooking mode and temperature.
Before pressing start, press the Probe icon at the bottom
left of the screen. The probe setting screen will be
displayed. Enter the desired internal food temperature
and press Start. The probe temperature can be set
between 100°F and 200°F.
To use the probe with preheating:
1. Press the desired cook mode (Traditional Bake,
Convection Bake, or Convection Roast) pad and
enter the desired cooking temperature.
2. Insert the probe into the food (see Proper Probe
Placement).
3. Once the oven is preheated, place the food in the oven
and connect the probe to the probe outlet, making sure
it is fully inserted. Use caution, the oven walls and
probe outlet are hot.
4. The oven will detect that the probe has been inserted
and the probe setting screen will be displayed. Enter
the desired internal food temperature and press Start.
The probe temperature can be set between 100°F and
200°F.
Probe Care Guidelines
Ŷ 8VHRISUREHVRWKHUWKDQWKHRQHSURYLGHGZLWKWKLV
product may result in damage to the probe input jack.
Ŷ 8VHWKHKDQGOHVRIWKHSUREHDQGSOXJZKHQLQVHUWLQJ
and removing them from the meat and outlet
Ŷ 7RDYRLGGDPDJLQJ\RXUSUREHGRQRWXVHWRQJVWRSXOO
on the cable when removing it.
Ŷ 7RDYRLGEUHDNLQJWKHSUREHPDNHVXUHIRRGLV
completely defrosted before inserting the probe.
Ŷ 7RSUHYHQWSRVVLEOHEXUQVGRQRWXQSOXJWKHSUREH
from the outlet until the oven has cooled.
Ŷ 1HYHUOHDYHWKHSUREHLQVLGHWKHRYHQGXULQJDVHOIRU
steam clean cycle.
Ŷ 'RQRWVWRUHWKHSUREHLQWKHRYHQ
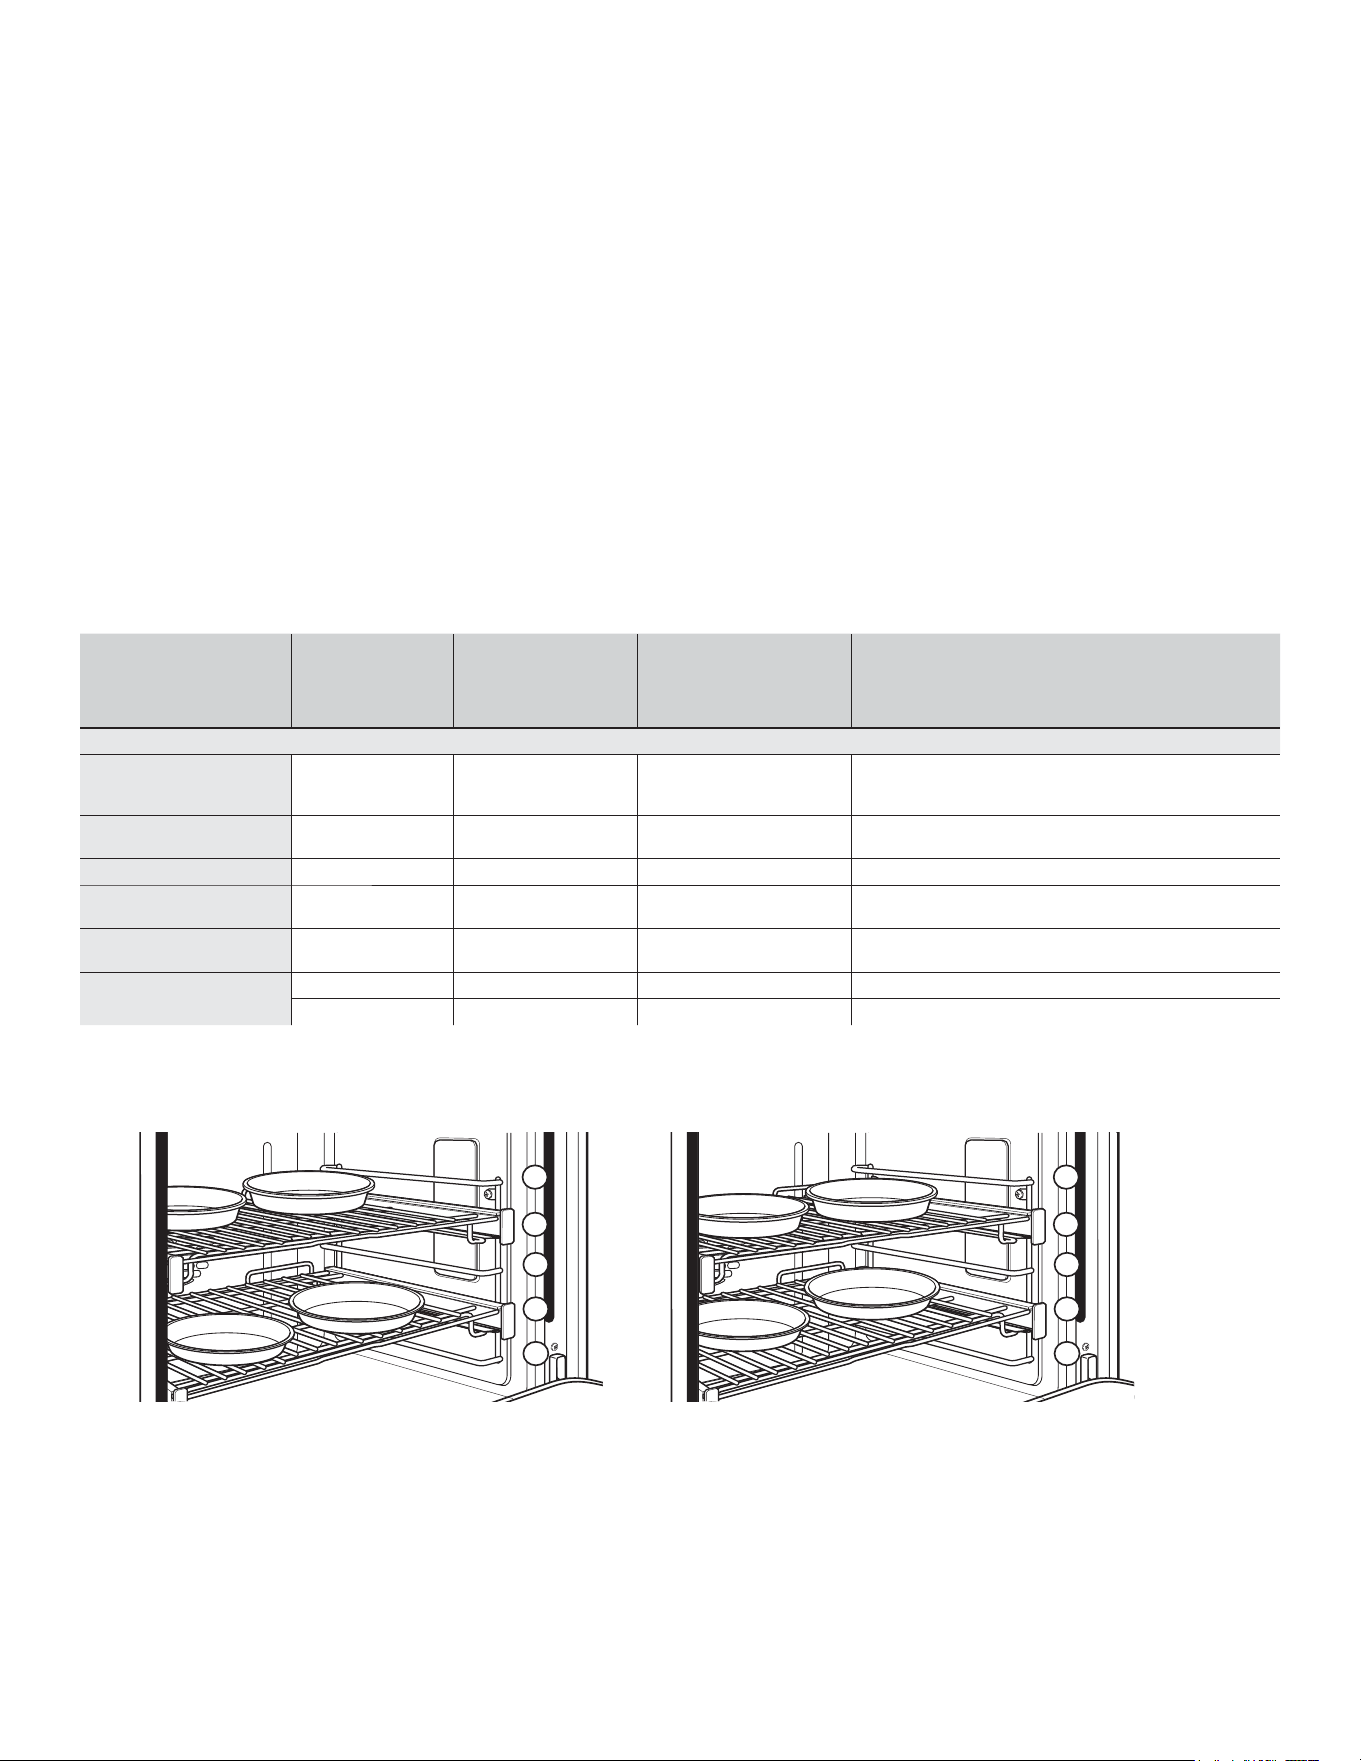
49-2000877 Rev. 4 35
Cook food thoroughly to help protect against food borne illness. Minimum safe food temperature recommendations for
food safety can be found at IsItDoneYet.gov. Use a food thermometer to measure food temperatures.
OVEN COOKWARE GUIDELINES
The material, finish, and size of cookware affect baking
performance.
Dark, coated and dull pans absorb heat more readily than
light, shiny pans. Pans that absorb heat more readily can
result in a browner, crisper, and thicker crust. If using dark
and coated cookware check food earlier than minimum
cook time. If undesirable results are obtained with this type
of cookware consider reducing oven reducing temperature
by 25F next time.
Shiny pans can produce more evenly cooked baked goods
such as cakes and cookies.
Glass and ceramic pans heat slowly but retain heat well.
These types of pans work well for dishes such as pies and
custards.
Air insulated pans heat slowly and can reduce bottom
browning.
Keep cookware clean to promote even heating.
Stoneware heats slowly and retains heat well. It is
recommended to preheat this type of cookware if possible.
Additional cook time may be required.
Cookware used in broil modes must be broil safe.
OVEN COOKING GUIDE
*For best results when baking 4 cake layers, place four pans using racks 2 and 4. Stagger the pans so that one pan is not directly
above another as shown.
FOOD TYPE
RECOMMENDED
MODE(S)
RECOMMENDED
RACK POSITION(S)
LEFT OVEN
(48" models only)
RECOMMENDED
RACK POSITION(S)
OVEN or RIGHT OVEN
(48" models only) ADDITIONAL SUGGESTIONS
Baked Goods
Layer cakes, sheet cakes,
bundt cakes, muffins, quick
breads on a Single Rack
Bake 2 2 or 3 Use shiny cookware.
Layer cakes on Multiple
Racks*
Bake
Convection Bake
- 2 and 4 Ensure adequate airflow (see illustration below).
Chiffon cakes (angel food) Bake 1 1 Use shiny cookware.
Cookies, biscuits, scones
on a Single Rack
Bake 2 2 or 3 Use shiny cookware.
Cookies, biscuits, scones
on Multiple Racks
Convection Bake Multi 2 and 3
2 and 4
1, 3, and 5
Ensure adequate airflow.
Yeast Breads
Proof 1 or 2 2 or 3 Cover dough loosely.
Bake 2 2 or 3
Rack positions for baking 4 cake layers at a time Rack positions for convection baking 4 cake
layers at a time. Center the pans on the racks
as shown.
3
4
2
1
5
3
4
2
1
5
Continued on next page
36 49-2000877 Rev. 4
OVEN COOKING GUIDE
Cook food thoroughly to help protect against food borne illness. Minimum safe food temperature recommendations for food safety
can be found at IsItDoneYet.gov. Make sure to use a food thermometer to take food temperatures.
FOOD TYPE
RECOMMENDED
MODE(S)
RECOMMENDED
RACK POSITION(S)
LEFT OVEN
(48" models only)
RECOMMENDED
RACK POSITION(S)
OVEN or RIGHT OVEN
(48" models only) ADDITIONAL SUGGESTIONS
Beef & Pork
Hamburgers
Broil High
Convection Broil High
3 or 4 4 or 5
8VHDEURLOSDQPRYHIRRGGRZQIRUPRUHGRQHQHVVOHVV
searing. Watch food closely when broiling. For best performance
center food below the broil heater.
Steaks & Chops
Broil High
Convection Broil High
3 or 4 4 or 5
8VHDEURLOSDQPRYHIRRGGRZQIRUPRUHGRQHQHVVOHVV
searing. Watch food closely when broiling. For best performance
center food below the broil heater.
Roasts
Bake
Convection Roast
2 2 or 3
Use a low sided pan such as a broil pan. Preheating is not
necessary.
Casseroles Bake 2 or 3 2 or 3
Fish
Broil Low
Convection Broil Low
RULQFKWKLFNRU
less)
RU!LQFK
RULQFKWKLFNRUOHVV
RU!LQFK
0RYHIRRGGRZQIRUPRUHGRQHQHVVOHVVVHDULQJ:DWFKIRRG
closely when broiling. For best performance center food below
the broil heater.
Frozen Convenience Foods
Pizza on a Single Rack Bake 2 2 or 3 Do not preheat.
Pizza on Multiple Racks Convection Bake Multi - 2 and 4 Stagger pizzas left to right, do not place directly over each other.
Potato products, chicken
nuggets, appetizers on a
Single Rack
Bake
Convection Roast
22 or 3
'RQRWSUHKHDW8VHGDUNFRRNZDUHIRUPRUHEURZQLQJFULVSLQJ
use shiny cookware for less browning.
Potato products, chicken
nuggets, appetizers on
Multiple Racks
Convection Bake Multi 2 and 3 2 and 4
8VHGDUNFRRNZDUHIRUPRUHEURZQLQJFULVSLQJXVHVKLQ\
cookware for less browning.
Poultry
Whole chicken
Bake
Convection Roast
2 2 or 3 Use a low sided pan such as a broil pan.
Bone-in chicken breasts,
legs, thighs
Broil Low
Convection Broil Low
Bake
2 2 or 3
If breaded or coated in sauce avoid Broil High modes. Broil
skin side down first. Watch food closely when broiling. For best
performance when broiling, center food below the broil heater.
Boneless chicken breasts
Broil Low
Convection Broil Low
Bake
2 2 or 3
0RYHIRRGGRZQIRUPRUHGRQHQHVVOHVVVHDULQJDQGXSIRU
JUHDWHUVHDULQJEURZQLQJZKHQEURLOLQJ)RUEHVWSHUIRUPDQFH
when broiling, center food below the broil element or burner.
Whole turkey
Bake
Convection Roast
- 1 or 2 Use a low sided pan such as a broil pan.
Turkey Breast
Bake
Convection Roast
- 2 Use a low sided pan such as a broil pan.
Vegetables
Bake
Convection Roast
Broil Low
Convection Broil Low
2 or 3 3
8VHGDUNFRRNZDUHIRUPRUHEURZQLQJFULVSLQJXVHVKLQ\
cookware for less browning.
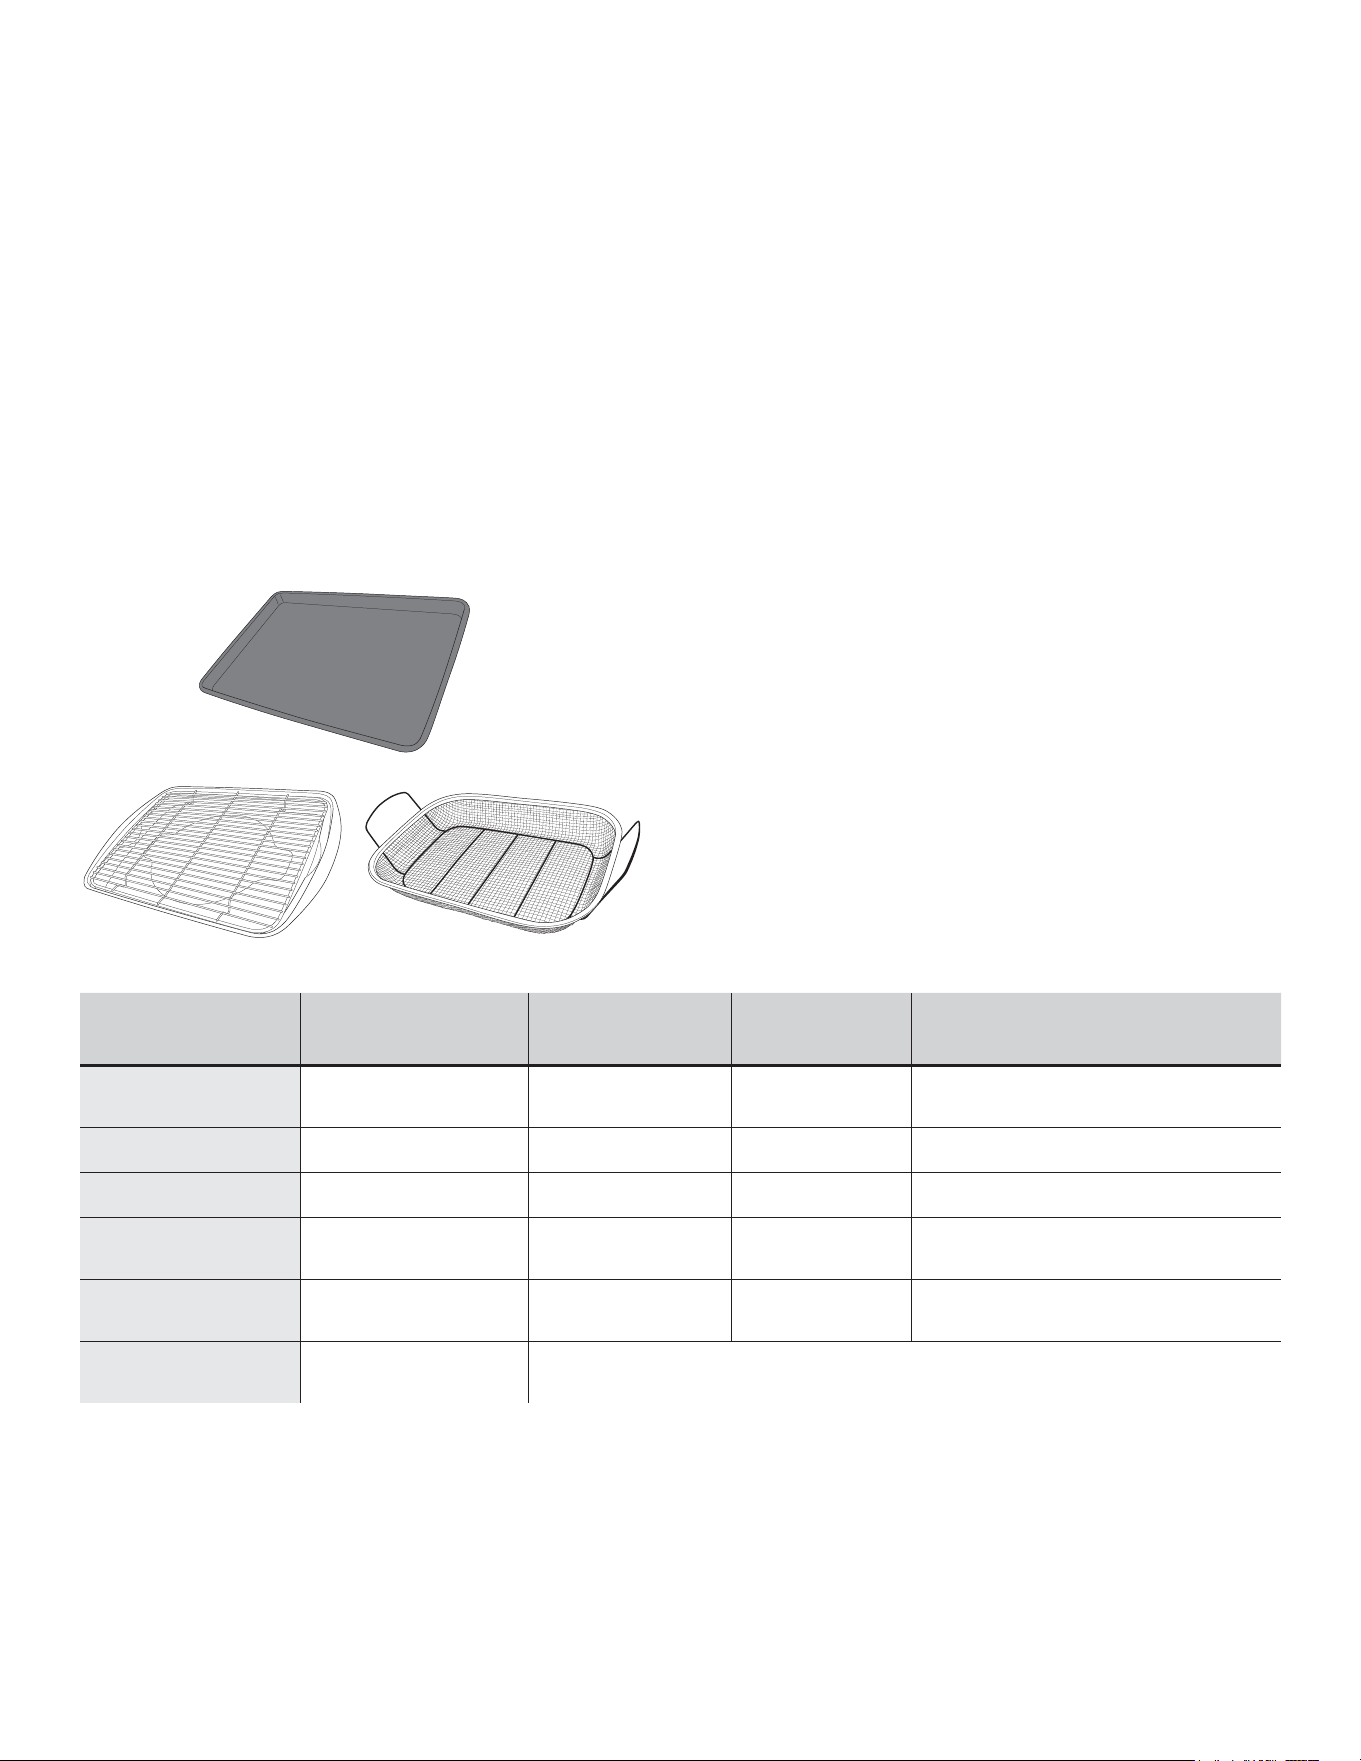
49-2000877 Rev. 4 37
AIR FRY COOKING GUIDE
Air Fry is a special, no-preheat, cooking mode that is
designed to produce foods with a crispier exterior than
traditional oven cooking. Select Air Fry, then input the
desired set temperature and press Start. The temperature
can be set between 300°F and 500°F.
Air Fry Cookware Guidelines
• Only use broil safe cookware when using Air Fry mode.
• A dark sheet pan is recommended. A dark pan promotes
better browning and crisping.
• Oven baking baskets and baking grids can also be used.
A sheet pan should be placed on the rack below the
foods to catch any drippings when using a baking basket.
General Tips for Air Fry Mode
• The Air Fry mode is designed for cooking on a single
rack.
• The Air Fry mode is designed to be used without
preheating.
• Foods may cook faster than expected if the oven is
already hot when food is placed in the oven.
• When air frying foods with sauce, it is recommended to
apply the sauce at the end of cooking.
• If foods are browning too quickly, try a lower rack position
or lower oven set temperature.
• For packaged foods, use traditional oven cooking
instructions for set temperature and expected cook time.
• It is not necessary to flip or stir food during cooking
• Arrange food in a single layer on the pan, do not overload
the pan.
• Always check internal food temperature to confirm
minimum safe temperatures have been reached.
Minimum safe food temperatures can be found on
packages and at IsItDoneYet.gov.
FOOD TYPE
RECOMMENDED
RACK POSITION(S)
RECOMMENDED
SET TEMPERATURES
(F°)
RECOMMENDED
COOK TIME (MIN) NOTES
Fresh boneless fish or
poultry pieces, breaded such
as nuggets, tenders, fillets
3 for Oven or Right Oven
2 for Left Oven (48” Range only)
375-400 15-30
User lower set temperatures for larger pieces. Use
shiny cookware.
Fresh bone in
chicken wings
3 for Oven or Right Oven
2 for Left Oven (48” Range only)
375-400 25-40
Salt wings or coat in a dry rub, if using sauce apply
after cooking or toward the end of cooking
Fresh bone in chicken
drumsticks or thighs
3 for Oven or Right Oven
2 for Left Oven (48” Range only)
375-400 30-55 User lower set temperatures for larger pieces.
Fresh French fries,
thin (< ½ inch)
3 for Oven or Right Oven
2 for Left Oven (48” Range only)
400-425 15-30
Parchment paper is recommended when preparing
fresh French fries. For crispier fries, toss fries in corn
starch or rice flour before cooking.
Fresh French fries,
thick (> ½ inch)
3 for Oven or Right Oven
2 for Left Oven (48” Range only)
375-400 20-35
Parchment paper is recommended when preparing
fresh French fries. For crispier fries, toss fries in corn
starch or rice flour before cooking.
Frozen packaged
foods
3 for Oven or Right Oven
2 for Left Oven (48” Range only)
Use traditional oven(not Air Fry) cooking instructions as a guideline for set temperature and cook time. Additional
cook time beyond recommended package time may be required for some foods. If oven is hot when starting, food
may cook faster than the minimum package time.
Primary recommended cookware
Alternate cookware options
OVEN COOKING GUIDE
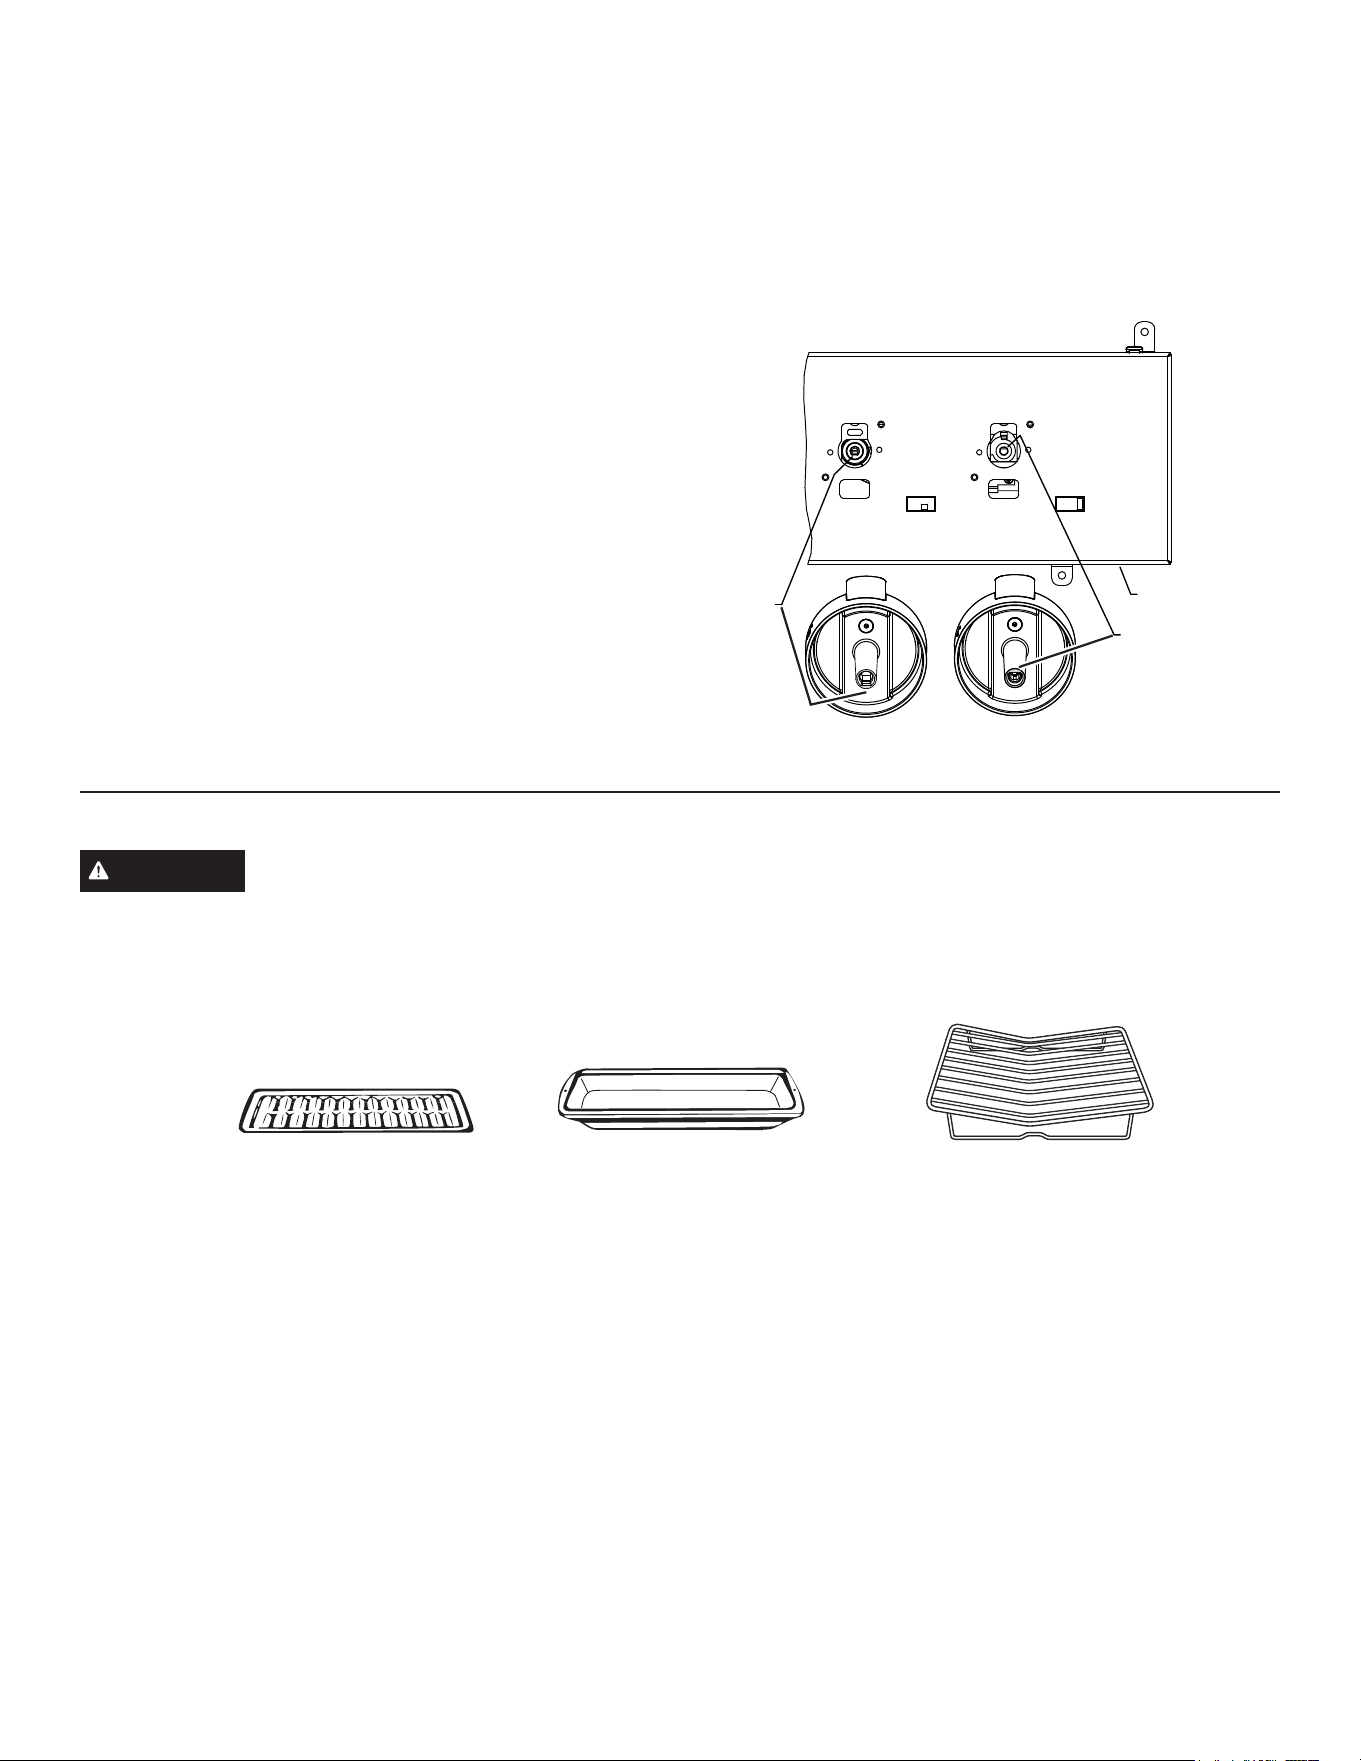
38 49-2000877 Rev. 4
CARE AND CLEANING
CONTROL PANEL AND KNOBS
It’s a good idea to wipe the control panel after each use.
Clean with mild soap and water or vinegar and water,
rinse with clean water and polish dry with a soft cloth.
Do not use abrasive cleansers, strong liquid cleansers,
plastic scouring pads or oven cleaners on the control panel
because they will damage the finish.
For easier cleaning, the control knobs may be removed by
pulling them directly outwards once the knobs are in the
OFF position. Do not pull knobs up or down or hang objects
on them. This can damage the gas valve shaft. See the
Surface Burner section for a detailed view of these knobs.
The knobs can be washed by hand with soap and water.
When removing the burner knobs, remember their location.
The knobs are not interchangeable, these knobs must be
placed in the same location after cleaning. See the Surface
Burner sections for a detailed view of these knobs. To
replace knobs after cleaning, align the bottom of the knob
with the matching clip orientation to the shaft inside the
bezel. Push knob until completed seated.
Use a soft, non abrasive cloth to clean the inside of the
bezel. Do not remove diffuser film. Do not expose to
moisture or it will damage lighting electronics.
BROILER PAN, GRID AND ROASTING RACK
CAUTION
Do not clean the broiler pan, grid or
roasting rack in a self-cleaning oven.
The broiler pan, grid and roasting rack are all dishwasher
safe. However, baked on foods may require washing by
hand with a commercial oven cleaner or abrasive deter-
gent.
Do not store a soiled broiler pan or grid anywhere in the
oven. Always properly dispose of excess grease.
Grid
Roasting Rack
%HVXUHHOHFWULFDOSRZHULVRႇDQGDOOVXUIDFHVDUHFRROEHIRUHFOHDQLQJDQ\SDUWRIWKHUDQJH
GriddleFront
Control Panel
Flat Side
Flat
Side
OFF OFF
Burner Knobs
Broiler pan

49-2000877 Rev. 4 39
CARE AND CLEANING
OVEN INTERIOR
The interior of your new oven can be cleaned manually
or by using Steam Clean mode. Spillage of marinades,
fruit juices, tomato sauces and basting liquids containing
acids may cause discoloration and should be wiped up
immediately. Let hot surfaces cool, then clean and rinse.
Manual Cleaning
Do not use oven cleaners (unless certified for self-cleaning
oven), strong liquid cleansers, steel wool, or scouring pads
on the interior of the oven. Clean with a mild soap and
water, or vinegar and water solution. Rinse with clean water
and dry with a soft cloth. When cleaning surfaces, make
sure that they are at room temperature.
Steam Clean Mode
Steam clean is intended to clean small spills using water
and a lower cleaning temperature than Self-Clean.
To use the Steam Clean feature:
1. Start with the oven at room temperature.
2. Wipe excess grease and soils from the oven.
3. Pour one cup of water onto the bottom of the oven.
4. Close the door.
Do not open the door during the 30 minute Steam Clean
cycle. At the end of the Steam Clean cycle, soak up the
remaining water, and wipe the moisture-softened soil from
the oven walls and door.
OVEN EXTERIOR
Do not use oven cleaners, abrasive cleansers, strong liquid
cleansers, steel wool, plastic scouring pads, or cleaning
powders on the interior or exterior of the oven. Clean with
a mild soap and water or vinegar and water solution. Rinse
with clean water and dry with a soft cloth. When cleaning
surfaces, make sure that they are at room temperature and
not in direct sunlight.
If stain on the door vent trim is persistent, use a mild
abrasive cleaner and a sponge-scrubber for best results.
Spillage of marinades, fruit juices, tomato sauces and
basting liquids containing acids may cause discoloration
and should be wiped up immediately. Let hot surfaces
cool, then clean and rinse.
Painted Surface
Painted surfaces may include the door and trim around
the control panel. Clean these with soap and water or a
vinegar and water solution. Do not use commercial oven
cleaners, cleaning powders, steel wool or harsh abrasives
on any painted surface.
Stainless Steel
Do not use a steel wool pad; it will scratch the surface. To
clean the stainless steel surface, use warm sudsy water or
a stainless steel cleaner or polish. Always wipe the surface
in the direction of the grain. Follow the cleaner instructions
for cleaning the stainless steel surface. Cleaners with
oxalic acid such as Bar Keepers Friend Soft Cleanser™
will remove surface rust, tarnish and small blemishes. Use
only a liquid cleanser free of grit and rub in the direction of
the brush lines with a damp, soft sponge. To inquire about
purchasing cleaning products including stainless steel
appliance cleaner or polish, see the Consumer Support
section for further information.
STEAM CLEANING OVEN
How to Set the Oven for Steam Cleaning
1. Select CLEAN on the main menu, then select STEAM
CLEAN.
The control automatically defaults to the recommended
clean cycle time.
2. Press oven display button START/OFF to start the STEAM
CLEAN cycle.
To interrupt a steam clean cycle, press oven display
button START/OFF.

40 49-2000877 Rev. 4
CARE AND CLEANING
How to Set the Oven for Self-Cleaning
1. Turn off all surface burners. (The CLEAN cycle will not
start until all surface burners have been turned off.)
2. Close the door.
3. Select the More option, then select Self Clean.
4. The control automatically defaults to the recommended
clean cycle time of 5 hours. The clean time may be
adjusted to any time between 3 and 5 hours. The
display will show the actual time remaining.
5. Press oven display button START/OFF to start the SELF-
CLEAN cycle.
The symbol will flash as the oven door is locked. It
will not be possible to open the oven door during the
clean cycle.
6. After the clean cycle is complete and the oven has
cooled, the will turn off. Press oven display button
START/OFF.
To interrupt a self-clean cycle, press oven display button
START/OFF. When the oven has cooled to a safe
temperature, the symbol will turn off indicating the
door may be opened.
An interrupted clean cycle cannot be restarted until after
the oven is cool enough for the door to unlock.
After a Self Clean Cycle
You may notice some white ash in the oven. Wipe it up with
a damp cloth after the oven cools.
If white spots remain, remove them with warm sudsy water
and rinse thoroughly with a vinegar and water mixture.
These deposits are usually a salt residue that cannot be
removed by the clean cycle.
If the oven is not clean after one clean cycle, repeat the
cycle.
SELF-CLEANING OVEN
Safety
The self-clean oven feature is designed to make cleaning
the inside of the oven easy by using very high temperatures
to burn away food spills.
WARNING
Wipe up excess grease and other food
spills with a damp cloth. Excessive food soils can ignite
leading to smoke and heat damage.
Ŷ'RQRWFOHDQWKHRYHQVHDOVGDPDJHFDQRFFXU
Ŷ5HPRYHFRRNZDUHEURLOHUSDQJULGSUREHDQGDQ\
aluminum foil from the oven.
Ŷ0DNHVXUHWKHRYHQOLJKWOHQVDQGOHQVIUDPHDUHLQ
place.
Ŷ'RQRWXVHFRPPHUFLDORYHQFOHDQHUVDEUDVLYHVRURYHQ
protectors in or near the self-cleaning oven.
Ŷ:HUHFRPPHQGYHQWLQJ\RXUNLWFKHQZLWKDQRSHQ
ZLQGRZRUXVLQJDYHQWLODWLRQIDQKRRGGXULQJWKH
self-clean cycle.
Ŷ&OHDQVRLOIURPDURXQGWKHIUDPHDQGIURPDURXQGWKH
oven door, outside the oven seals. These areas must be
cleaned by hand.
Ŷ7KHRYHQUDFNVPD\EHOHIWLQWKHRYHQGXULQJWKH
self-clean cycle.
IMPORTANT: The health of some birds is extremely
sensitive to the fumes given off during the self-cleaning
cycle of any oven. Move birds to another well-ventilated
room.
NOTE: During the self-clean cycle, the cooktop will be
locked out and not functional. If a surface burner is turned
on after the self-clean cycle has begun, a warning will be
displayed on the Oven Display “err turn surf frnr off” and a
beeping sound will be heard.
NOTE: Self-Clean will not work if the temperature probe is
plugged in.
On double oven models, you cannot initiate Self Clean
modes in both ovens at the same time. In addition, you
cannot perform any other range function while one oven is
performing a Self Clean. The oven not performing a Self
Clean will be prevented from selecting another oven mode.
If the cooktop burner is turned on, a screen message will
prompt the user to turn off the burner or the Self Clean will
automatically be cancelled.

49-2000877 Rev. 4 41
CARE AND CLEANING
OVEN RACKS
NOTE: The racks may remain in the oven during the self-
cleaning cycle without being damaged.
Periodically, the oven racks may need to be lubricated
using the Graphite Lubrication shipped with your range.
To order additional Graphite Lubrication, call our National
Parts Center at 800.626.2002 and reference WB02T10303.
1. Remove rack from the oven. See the Full extension
oven racks section.
2. Fully extend the rack on a table or countertop.
Newspaper may be placed underneath the rack for
easy cleanup.
3. If there is debris in the slide tracks, wipe it away using a
paper towel. NOTE: Any graphite lubricant wiped away
must be replaced.
4. Shake the graphite lubricant before opening it. Starting
with left slide mechanism of the rack, place four (4)
small drops of lubricant on the two (2) bottom tracks of
the slide close to the bearing carriers.
5. Repeat for the right slide mechanism of the rack.
6. Open and close the rack several times to distribute the
lubricant.
7. Replace the cap on the lubricant and shake it again.
Turn the rack over and repeat steps 3, 4, 5 and 6.
8. Close the rack, turn rack right-side-up and place in the
oven. See the Full extension oven racks section.
9. Repeat above steps for each rack.
NOTE: Do not use a cooking spray or other lubricant
sprays on the slides.
Rack right-
side-up
Right side
Left side
Rack right-side-up
TEMPERATURE PROBE
Allow the temperature probe to cool before cleaning.
The probe should be cleaned with soap and water by hand.
Do not immerse the temperature probe in water.
Do not store the temperature probe in the oven.
Do not clean the temperature probe in the self-cleaning oven.
OVEN BOTTOM
The oven bottom has a porcelain enamel finish. To make
cleaning easier, protect the oven bottom from excessive
spillovers. A smaller sheet of foil or sheet tray may be used
to catch a spillover by placing it on the rack below the rack
you are cooking on. This is particularly important when
baking a fruit pie or other foods that are highly acidic. Hot
fruit fillings or other foods that are highly acidic (such as
tomatoes, sauerkraut and sauces with vinegar or lemon
juice) may cause pitting and damage to the porcelain
enamel surface and should be wiped up immediately.
Never fully cover a rack with aluminum foil. This will disturb
the heat circulation and result in poor baking.
To clean up spillovers, use soap and water, an abrasive
cleaner or soap-filled scouring pad. Rinse well to remove
soap before self-cleaning.
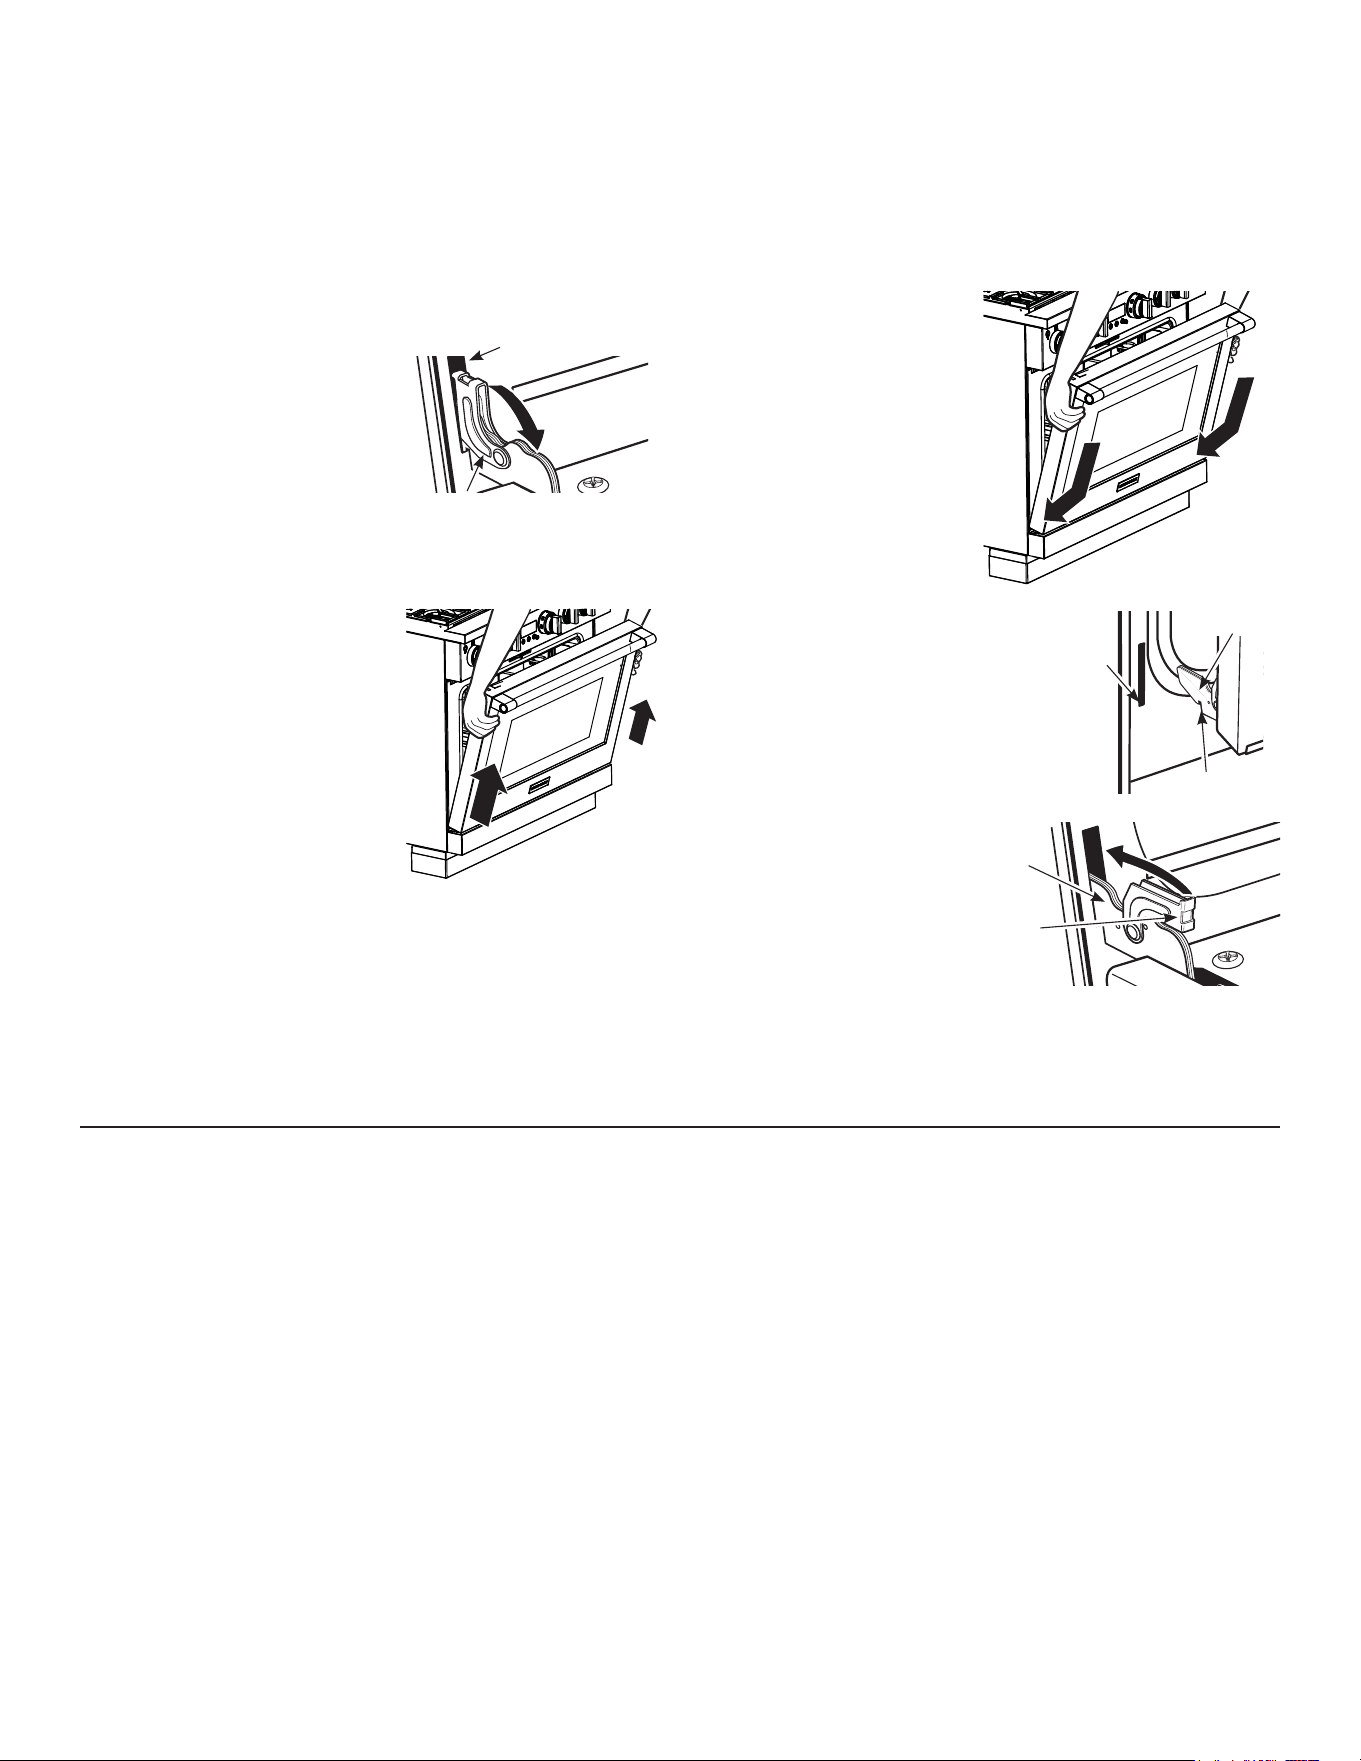
42 49-2000877 Rev. 4
CARE AND CLEANING
LIFT-OFF SOFT-CLOSE OVEN DOOR
The door is very heavy. Be careful when removing and lifting the door.
Do not lift the door by the handle.
To remove the door:
1. Fully open the door.
2. Pull the hinge locks down
toward the door frame, to
the unlocked position. A tool,
such as a small flat-blade
screwdriver, may be
required.
3. Firmly grasp both sides of the door at the top.
4. Close door to the
door removal position,
(approximately 15 degrees
from closed) and lift it up and
out until the hinge arm is clear
of the slot.
To replace the door:
1. Firmly grasp both sides of
the door at the top.
2. With the door at the same
angle as the removal position,
seat the indentation of the
hinge arm into the bottom
edge of the hinge slot. The
notch in the hinge arm must
be fully seated into the bottom
of the slot.
3. Fully open the door. If
the door will not fully
open, the indentation is
not seated correctly in
the bottom edge of the
slot.
4. Push the hinge locks up
against the front frame
of the oven cavity, to the locked position.
5. Close the oven door.
CLEANING THE OVEN DOOR
Cleaning the Door Interior
Do not allow excess water to run into any holes or slots in
the door .
Wipe dish soap over any baked-on spatters on the glass.
Use a single sided safety razor blade to clean it off. Then
wipe over the glass with a soapy cloth to remove any
residue and dry off.
The area outside the gasket can be cleaned with a
soap-filled plastic scouring pad. Do not rub or clean
the door gasket - it has an extremely low resistance to
abrasion.
If you notice the gasket becoming worn, frayed or damaged
in any way or if it has become displaced on the door, you
should have it replaced.
Cleaning the Door Exterior
If a stain on the door vent trim is persistent, use a mild
abrasive cleaner and a sponge-scrubber for best results.
Do not use this method on any other surface.
Stainless Steel Surfaces (on some models)
Do not use a steel wool pad; it will scratch the surface. To
clean the stainless steel surface, use warm sudsy water or
a stainless steel cleaner or polish. Always wipe the surface
in the direction of the grain. Follow the cleaner instructions
for cleaning the stainless steel surface. To inquire about
purchasing cleaning products including stainless steel
appliance cleaner or polish, see the Consumer Support
section for further information.
Removal
position
Replacement
position
Pull hinge locks down to unlock
Hinge lock
Slot
Hinge arm
Indentation
Bottom
edge of
slot
Push hinge locks up to lock
Hinge
lock
Hinge
arm
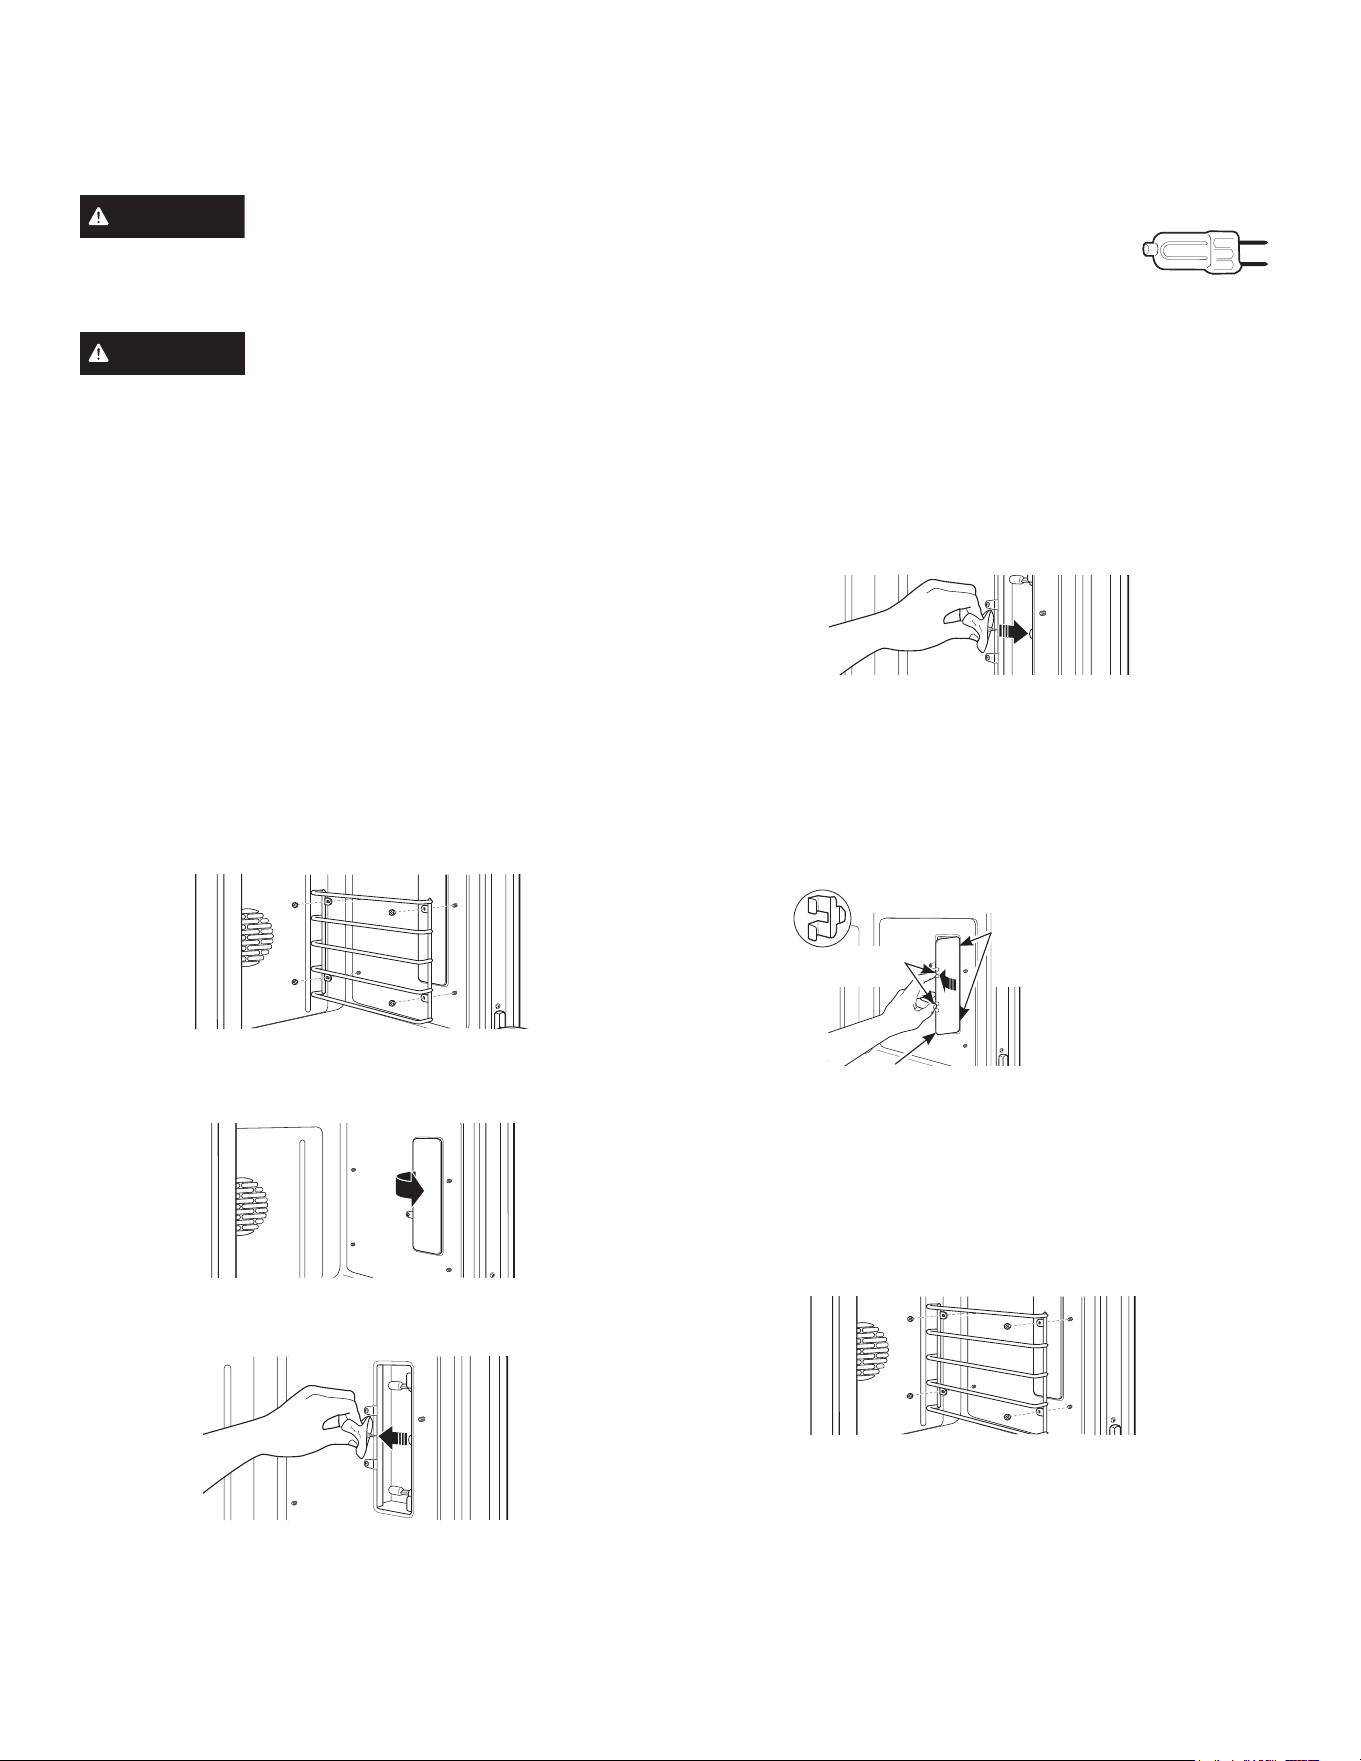
49-2000877 Rev. 4 43
CARE AND CLEANING
OVEN LIGHTS
WARNING
SHOCK OR BURN HAZARD: Before
replacing oven light bulb, disconnect the electrical power to
the range at the main fuse or circuit breaker panel. Failure
to do so may result in electric shock or burn.
CAUTION
BURN HAZARD: The glass cover and
bulb should be removed when cool. Touching hot glass
with bare hands or a damp cloth can cause burns.
Each oven is equipped with halogen light columns located
on the side walls of the oven. The lights come on when the
door is opened or when the oven is in a cooking cycle.
Each light assembly consists of a removable light cover
with two locking clips and a light compartment with three
halogen bulbs.
Be sure to let the light cover and bulb cool completely. For
your safety, do not touch a hot bulb with bare hands or a
damp cloth.
To remove:
1. Remove the racks from the oven. See the Full
extension oven racks section.
8VLQJDƎQXWGULYHUUHPRYHWKHIRXUQXWVKROGLQJ
the rack supports to the oven wall.
3. Remove the glass light cover by pulling its back edge
out and rolling it toward you. Do not remove any
screws.
4. Using gloves or a dry cloth, remove the burned-out light
bulb by pulling it straight out.
To replace:
Use a new 120-volt Halogen bulb, with G8
pins, not to exceed 40 watts.
Replacement bulbs may be purchased by calling
800.626.2002. Order Part Number WB25X39610.
NOTE: Higher wattage bulbs will damage your oven.
Using gloves or a dry cloth, remove the bulb from its
packaging. Do not touch the bulb with bare fingers. Oil
from bare fingers may cause hot spots on the glass
surface and lead to premature failure of the bulb. If you do
touch the glass, clean it with alcohol prior to installation.
1. Push the bulb straight into the receptacle all the way.
2. Replace the light cover, by placing its front edge under
the front two tabs in the light compartment. Roll the
back edge into place, making sure that it is firmly
seated.
NOTE: If the locking clips fell from the glass lens cover,
hold them on the cover, in the correct position, while
replacing the cover on the light compartment.
The light cover must be in place when using the
oven.
3. Reinstall the rack support. Be sure to orient the support
so that the top tabs for the nuts are closest to the top
of the oven. Lightly secure with the four nuts removed
earlier, but do not over-tighten or the enamel could be
chipped.
4. Replace the racks. See the Full extension oven racks
section.
5. Reconnect electrical power to the oven.
Press the light cover into place
Place front
edge of lens
cover under
front two tabs
Locking
clips

44 49-2000877 Rev. 4
CARE AND CLEANING
DUAL-FLAME STACKED AND MULTI-RING BURNERS
CAUTION
DO NOT OPERATE THE BURNER
WITHOUT ALL BURNER PARTS IN PLACE.
Surface burners should be cleaned routinely, especially
after bad spillovers, which could clog the slots and holes in
the burner heads.
The electrode is located at the rear of each burner. Do not
attempt to disassemble or clean around any burner while
another burner is on. An electric shock may result.
To remove the burner parts:
1. Turn all controls OFF before removing any burner parts.
2. When cool, you may lift off the burner grates, burner
caps and burner heads for easier cleaning. Do not
remove the burner bases.
NOTE: Be sure to replace the burners in the same location
and orientation.
Cleaning the brass burner caps
Monogram burner caps are constructed of 100% brass,
so that you can take advantage of the natural thermal
properties of this premium quality material to elevate your
cooking experience.
Real brass has a natural patina that builds up over time as
it is exposed to heat and the atmosphere. This patina and
deeper brass hue are formed to protect the burners from
corrosion. This oxidation process is to be expected and
ensures that your brass burners will withstand even the
highest temperatures.
To remove burnt-on grease from the caps and restore the
beautiful brass look, soak the caps in a solution of 1 cup
water and 1 tbsp white vinegar for up to 18 hours or 1 cup
ZDWHUDQGFXSZKLWHYLQHJDUIRUXSWRKRXU:LSHZLWK
a soft cloth. Do not clean with a metallic brush, as this can
damage the brass.
If you do not like the appearance of the brass caps, you
may remove the brass insert on the dual stack burner and
replace with the optional black enamel caps for the multi-
ring burner, which are included with your product.
Cleaning the burner heads
Lift off burner parts only when cool. Wash in hot, soapy
water.
To remove burned-on food, soak the burner heads in a
solution of mild liquid detergent and hot water for 20–30
minutes. For more stubborn stains, use a plastic scouring
pad or toothbrush.
If the spill goes inside the burner head assembly, wash it
under running water and shake to remove excess water.
After Cleaning
Before replacing the burner parts, shake out excess water
and then dry them thoroughly.
To replace the burner parts for Multi Ring:
Align the burner head as shown. Pass the igniter through
the opening in the burner head while ensuring the ignitor
arrow is pointing toward the ignitor. Make sure the burner
lies flat. Install the burner caps taking care to check that
they lie flat on the burner head. Check burner operation to
ensure uniform, blue flame around the burner. If there are
yellow or uneven flames, immediately turn the burner off,
let it cool, and readjust the burner and burner caps.
To replace the burner parts for Dual Flame:
Make sure that the burner parts are replaced in the correct
location and orientation.
1. Replace the burner head on top of the burner base,
making sure that the hole in the burner head is properly
aligned with the electrode in the burner base. A small
gap between the base and head is normal.
2. Place the burner cap on top of the burner head. Make
sure that the burner cap is properly seated on the burner
head.
Burner
Head
Burner
Base
Electrode
Electrode
Burner
Cap
Multi-Ring Burner Dual-Flame Stacked
Burner
Inner Burner
Cap
(Removable)
Outer
Burner Cap
(Removable)
Burner
Head
Burner cap not properly seated
Burner cap properly seated
Ignitor
Arrow
Ignitor
Cooktop without
burner installed
Front
Burner in correct
orientation
Front
Burner correctly
installed
Front
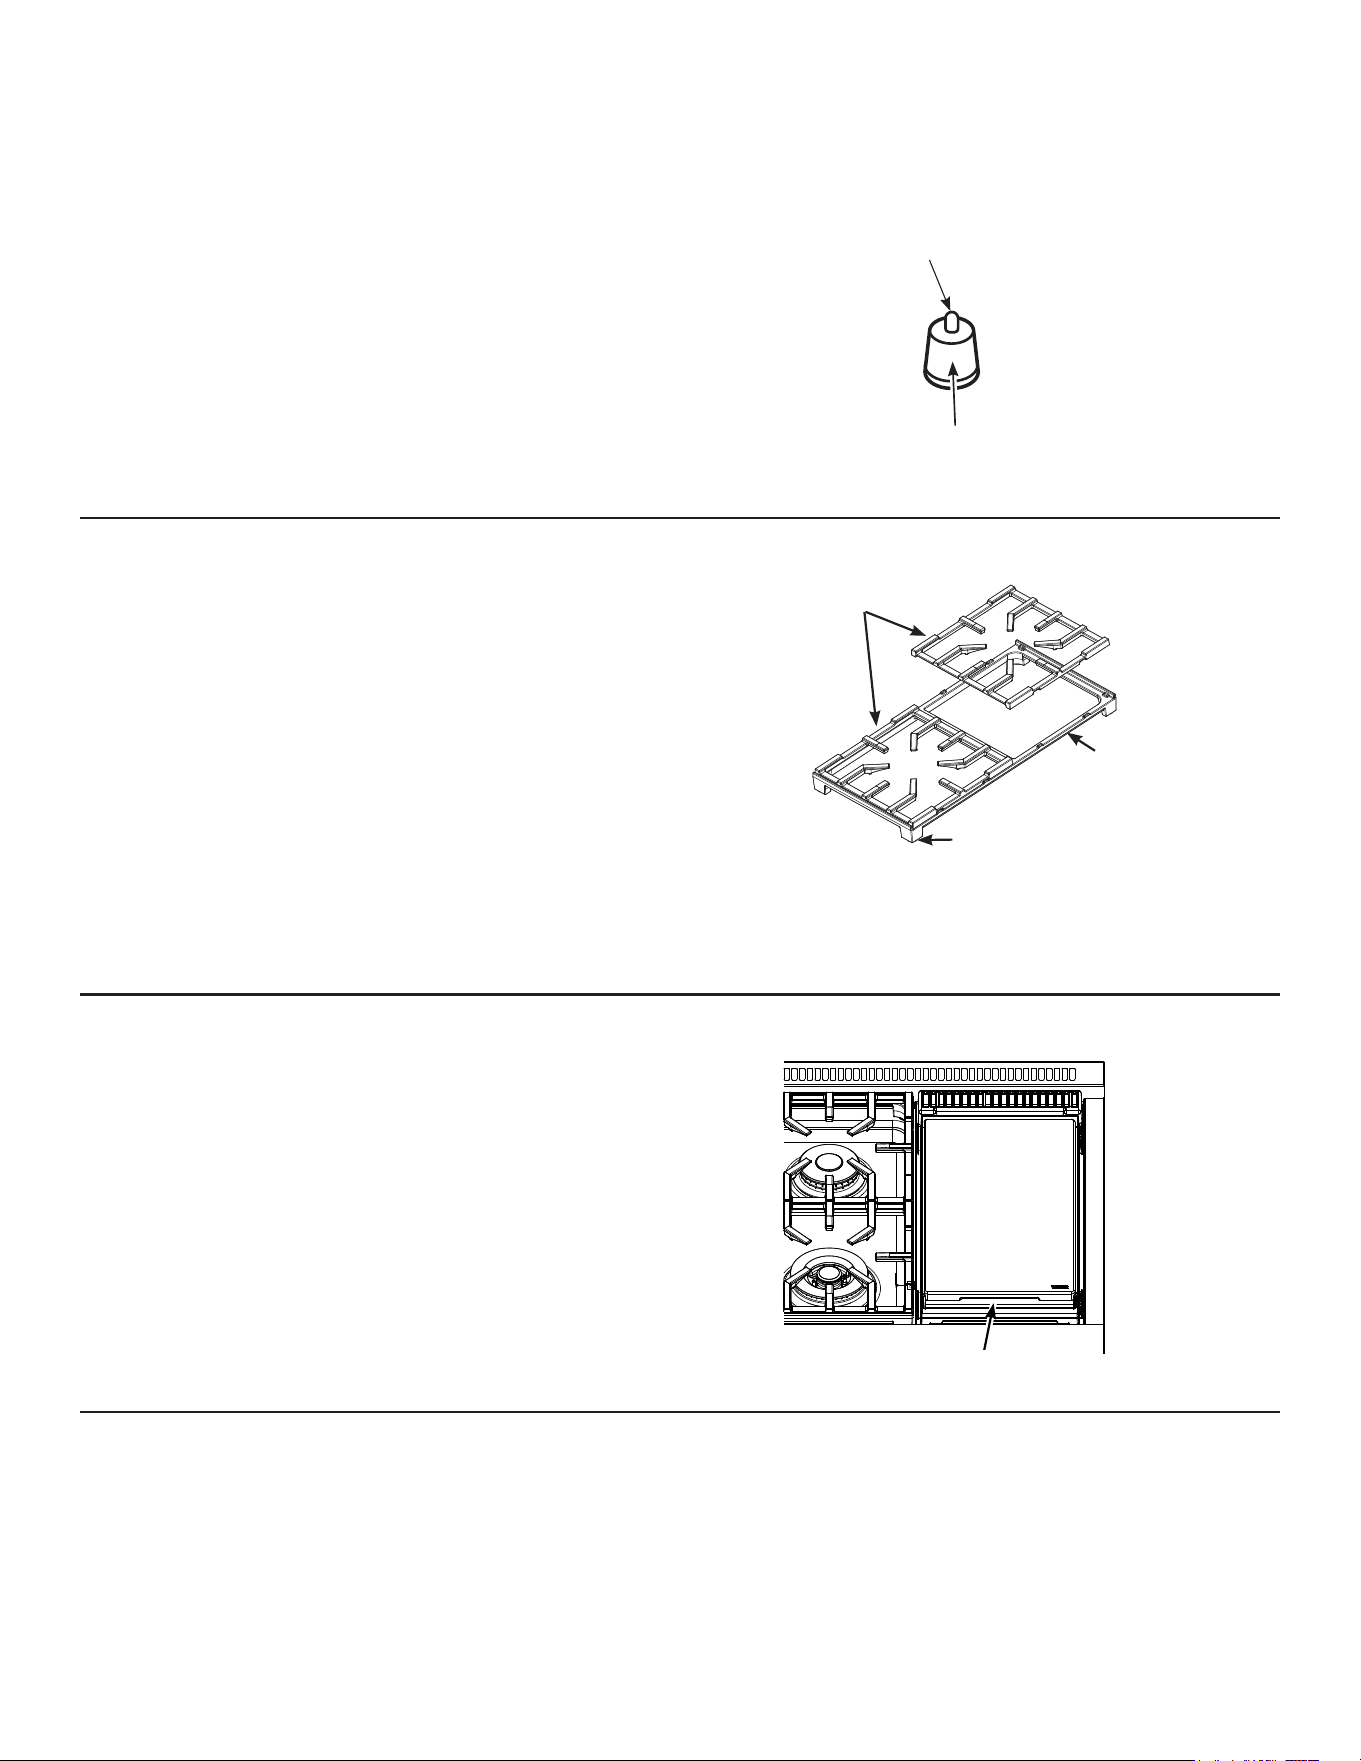
49-2000877 Rev. 4 45
CARE AND CLEANING
BURNER GRATES
The enameled cast-iron burner grates should be cleaned
regularly.
Wash them in hot soapy water, rinse, and dry thoroughly.
Although they are durable, the grates will gradually lose
their shine, regardless of the best care you can give
them. This is due to their continual exposure to high
temperatures.
Do not operate a burner for an extended period of time
without cookware on the grate. The finish on the grate may
chip without cookware to absorb the heat.
For stability, the frames have rubber pads on each corner.
During cleaning and use, be careful not to damage or snag
rubber pads.
Grates
Frame
Pads
GREASE TROUGH (on some models)
Grease from the griddle will drain into the enameled cast-
iron grease trough at the front of the range. Ensure grease
trough is pushed underneath the griddle lip in order to
catch grease while cooking. Once the trough has cooled, it
may be lifted out for easier cleaning.
To remove the cool grease trough from the griddle, slide it
toward the front and lift up.
Do not allow grease to accumulate in the grease trough as
it can be a fire hazard. Clean the grease trough as soon
as they are cool. The grease trough can be cleaned by
hand with hot soapy water or in the dishwasher. Wipe any
spillage in the trough basin with a soft cloth.
GRIDDLE (on some models)
Thoroughly clean the griddle of grease and food particles,
using a square-edged metal spatula, while it is still hot.
Wipe the griddle with a dry, heavy, coarse cloth to remove
any remaining residue and food particles. If the griddle
is cleaned with anything other than a dry, heavy, coarse
cloth, it will need to be reseasoned.
Never flood the hot griddle with cold water. This could
cause the griddle to crack or warp.
NOTE: It is normal for the stainless steel griddle to discolor
to a yellow-brown color after use.
Grease trough
SPARK IGNITER AND ELECTRODES
The electrode of the electronic ignition system is positioned
at the rear of the burner base. When cleaning the cooktop,
be careful not to snag the igniter with your cleaning cloth.
Damage to the igniter could occur.
Be careful not to push in a control knob while cleaning. It
could cause the igniter to spark.
Make sure that the white ceramic igniters on the cooktop
are dry and clean. Clean the metal portion of the electrode
with a soft cloth or emery board.
Do not attempt to remove the electrode from the cooktop.
Clean this metal part
with an emery board.
Do not clean this white
ceramic part with an
emery board.

46 49-2000877 Rev. 4
Save time and money! Review the charts on the following pages first and you may not need to call for service.
TROUBLESHOOTING TIPS
Problem Possible Cause
Oven Will Not Work A fuse in your home may be blown or the circuit breaker tripped.
The oven controls are not properly set.
The oven controls are set for cleaning. If necessary, allow the oven to cool; then open the door.
Surface Burners Light But
Oven Does Not
The oven gas shut-off valve may have accidentally been moved during cleaning or moving.
Oven Light(S) Do Not Work The light bulb is defective. Replace the bulb.
The oven lights do not come on during self-cleaning.
The oven is set for Proof mode. The lights cycle on and off as necessary to maintain Proof
temperature.
Food Does Not Bake Or
Roast Properly
The oven controls are improperly set. See the Baking or Roasting section.
Oven not preheated for a long enough time; wait for the oven to signal preheat.
Incorrect cookware or cookware of improper size being used. See Baking Tips.
Racks in the wrong position. See the Baking or Roasting section.
Use a foil tent to slow down browning during roasting.
Oven thermostat needs adjustment. See the Oven thermostat adjustment section.
Food Does Not Broil
Properly
This model is designed for closed door broiling only. Close the door. Always broil with the door
closed.
The oven controls are not set at BROIL. See the Broiling section.
The probe is plugged into the outlet in the oven. Remove the probe from the oven.
Improper rack position being used.
Cookware is not suited for broiling. Use the broiling pan and grid that came with your oven.
Aluminum foil used on the broiling pan and grid has not been fitted properly and slit as
recommended.
Cracking Or Popping
Sound
This is normal. This is the sound of the metal heating and cooling during both the cooking and
cleaning functions.
Oven Temperature Too Hot
Or Too Cold
Oven thermostat needs adjustment. See the Oven thermostat adjustment section.
F- And A Number Flash In
The Display
The oven has a function error code. Allow the oven to cool for one hour. Put the oven back into
operation.
Disconnect all power to the oven for 30 seconds and then reconnect power. If the function error
code repeats, call for service.
Display Goes Blank The display is blank when the oven or timer is not in use.
A fuse in your home may be blown or the circuit breaker tripped. Replace the fuse or reset the
circuit breaker.
“Probe” Appears In The
Display
This is reminding you to enter a probe temperature after plugging in the probe. Enter a probe
temperature
Steam From The Vent When using the convection mode, it is normal to see steam coming out of the oven vent. As
the number of racks or amount of food being cooked increases, the amount of visible steam will
increase.
Power Outage If the oven was in use during a power outage or surge, the oven must be reset.
49-2000877 Rev. 4 47
TROUBLESHOOTING TIPS
Problem Possible Cause
Burning Or Oily Odor
Emitting From The Vent
This is normal in a new oven and will disappear in time.
Strong Odor This is temporary. An odor from the insulation around the inside of the oven is normal for the first
few times the oven is used.
Fan Noise A cooling fan or a convection fan (depending on the function you are using) may turn on. This is
normal. The cooling fan will turn on to cool internal parts. It may run after the oven is turned off. The
convection fan may cycle on and off until the function is over or the door is opened.
Convection Fan Not On All
The Time
The convection fan (depending on the function you are using) may cycle on and off until the function
is over or the door is opened for optimized performance. This is normal. In addition, the convection
fan may cycle in the clockwise and counter clockwise direction until the function is over or the door
is opened.
Burners do not light
Plug on range is not completely inserted in the electrical outlet. Make sure electrical plug is plugged
into a live, properly grounded outlet.
Gas supply not connected or turned on. See the Installation Instructions that came with your range.
A fuse in your home may be blown or the circuit breaker tripped. Replace the fuse or reset the
circuit breaker.
Burner parts not replaced correctly. See the Care and Cleaning of the range section.
Burner slots near the electrode may be clogged. Remove the burners and clean them. Check the
electrode area for burned-on food or grease. See the Care and Cleaning of the range section.
Food residue on electrode Lightly polish flat tip of electrode with nail file or sandpaper until shiny.
Top burners do not burn
evenly
Improper burner assembly. Make sure the burner caps are seated correctly. See the Care and
Cleaning of the range section.
Burner slots on the side of the burner may be clogged. Remove the burners for cleaning. See the Care
and Cleaning of the range section.
Burner flames are very
large or yellow
Improper air to gas ratio. If range is connected to Propane gas, contact the technician who installed
your range or made the conversion.
Condensation Or Fogging
On The Inner Door Glass
Condensation or fogging on the inside of the oven door glass is normal during the preheating of the
oven and will evaporate usually by the end of the preheating cycle.
Oven Will Not Self Clean The oven temperature is too high to set a self-clean operation.
Allow the oven to cool below the locking temperature and reset the controls.
The controls are not properly set. See the Self-Cleaning Oven section.
Oven Not Clean After A
Clean Cycle
The oven was heavily soiled. Clean up heavy spillovers before starting the clean cycle. Heavily
soiled ovens may need to self-clean again.
Oven is connected to a 208V electrical supply. Set your cleaning time for 5 hours.
The oven controls are not properly set. See the Self-Cleaning Oven section.
Oven Racks Are Difficult
To Slide
The racks were cleaned in the self-clean cycle and now need periodic lubrication.
Do not spray with a cooking spray or other lubricant sprays. See Full extension oven racks in the
Care and Cleaning section.
Timer Does Not Work The timer cannot be used while the oven is self-cleaning.
“Err Turn Surface Burners
Off” Appears In The
Display
Self-clean is in progress and the Cooktop Lockout feature is activated. No surface cooking is
permitted during the self-clean operation. Wait until the self-cleaning operation has been completed.
48 49-2000877 Rev. 4
Problem Possible Cause What To Do
Pan won't pair or activate when
tapping handle
Tapping force is too light. Double tap the pan with firm taps (or knock) on the black
plastic endcap.
Battery in pan is low or dead. Replace AAA battery, installing with positive end out of handle.
Using different pan hardware. Check that your pan has a black endcap that unscrews from
the end of the handle. Pans with an oval module reading
"Hestan Cue
®
" will not work.
Experiencing performance or
minor technical issues including
seeing 20°F or 100°F as set
temperature
Old unit or pan software. Connect your unit to the SmartHQ mobile app and update
unit software. Connect your unit and pan to the Hestan Smart
Cooking app and update pan software.
The unit cancelled my precision
cooking mode
Battery in device is low or dead. Replace AAA battery in pan.
Old unit or pan software. Connect your unit to the SmartHQ mobile app and update
unit software. Connect your unit and pan to the Hestan Smart
Cooking app and update pan software.
Your precision cooking device has gone out
of range.
This could indicate a problem with the device. If the problem
persists, please contact the device manufacturer.
Your precision cooking device had a
computation malfunction.
The unit lost communication with your
precision cooking device.
This could indicate a problem with the device or the unit.
If the problem persists, please contact the device or unit
manufacturer.
Some cooking techniques and set
temperatures in combination may trigger a
fault in the temperature sensing algorithm.
Re-start the precision cooking mode by turning the knob to
the off position and set up precision cooking again. If problem
persists under the same conditions but is not consistent in
other use cases, contact the unit manufacturer.
Unable to reach set temperature in
Precision Cooking mode
Boiling water or cooking liquid based
foods at high temperatures will result
in temperature stalls close to the set
temperature.
Use temperature settings for pan frying, sautéing, and searing
when using Hestan Cue cookware.
Hestan Cue cookware battery life
does not last as long as expected
Pan is sensing slight vibrations when not
in use.
Turn plastic end of handle one half rotation to disconnect
power.
TROUBLESHOOTING TIPS
49-2000877 Rev. 4 49
Ŷ6HUYLFHWULSVWR\RXUKRPHWRWHDFK\RXKRZWRXVH
the product.
Ŷ'LVFRORUDWLRQRIWKHJULGGOHSODWHRURYHQUDFNV
Ŷ&KLSSLQJRISRUFHODLQHQDPHOJUDWHVRURYHQUDFNV
Ŷ5HSODFHPHQWRIKRXVHIXVHVRUUHVHWWLQJRIFLUFXLW
breakers.
Ŷ,QFLGHQWDORUFRQVHTXHQWLDOGDPDJHFDXVHGE\
possible defects with this appliance.
Ŷ'DPDJHDIWHUGHOLYHU\
Ŷ'DPDJHWRWKHSURGXFWFDXVHGE\DFFLGHQWILUHIORRGV
or acts of God.
Ŷ3URGXFWGDPDJHRUIDLOXUHRIWKHSURGXFWLILWLV
abused, misused, used for other than the intended
purpose, or used commercially.
Ŷ,PSURSHULQVWDOODWLRQGHOLYHU\RUPDLQWHQDQFH
If you have an installation problem, contact your
dealer or installer. You are responsible for providing
adequate electrical, gas, exhausting and other
connecting facilities as described in the Installation
Instructions provided with the product.
Ŷ3URGXFWQRWDFFHVVLEOHWRSURYLGHUHTXLUHGVHUYLFH
MONOGRAM LIMITED WARRANTY
Monogram.com
All warranty service is provided by our Factory Service Centers, or an authorized Customer Care
®
technician. To schedule
service online, visit us at monogram.com/contact. In Canada, visit monogram.ca.
EXCLUSION OF IMPLIED WARRANTIES
Your sole and exclusive remedy is product repair as provided in this Limited Warranty. Any implied warranties, including the
implied warranties of merchantability or fitness for a particular purpose, are limited to one year or the shortest period allowed
by law.
This limited warranty is extended to the original purchaser and any succeeding owner for products purchased
for home use within the USA. If the product is located in an area where service by an Authorized Servicer is not
available, you may be responsible for a trip charge or you may be required to bring the product to an Authorized
Service location. In Alaska, the limited warranty excludes the cost of shipping or service calls to your home.
Some states do not allow the exclusion or limitation of incidental or consequential damages. This limited warranty
gives you specific legal rights, and you may also have other rights which vary from state to state. To know what
your legal rights are, consult your local or state consumer affairs office or your state’s Attorney General.
Warrantor: GE Appliances, a Haier company
Louisville KY,40225
Warrantor in Canada: MC Commercial Inc.
Burlington, ON L7R 5B6
For the period of Monogram Appliances will replace
Limited two-year
warranty
For two years from date of original purchase, we will provide, free of charge, parts and service
labor in your home to repair or replace any part of the appliance that fails because of a
manufacturing defect.
Limited five-year
warranty
For five years from the date of original purchase, we will provide, free of charge, replacement
gas surface burners if they fail in normal household use. (The grill, griddle and oven burners
are not included.) You pay for the service trip to your home and all service labor charges.
Limited lifetime
warranty
For the lifetime of the gray porcelain enamel oven racks, we will provide, free of charge,
replacement racks if they fail in normal household use. You pay for the service trip to your
home and all service labor charges.
What Monogram will not cover:
Staple your receipt here. Proof of the original purchase
date is needed to obtain service under the warranty.
Servicing your appliance may require the use of the onboard data port for diagnostics. This gives a Monogram
Factory Service technician the ability to quickly diagnose any issues with your appliance and helps Monogram
improve its products by providing Monogram with information on your appliance. If you do not want your
appliance data to be sent to Monogram, please advise your technician NOT to submit the data to Monogram at
the time of service.

49-2000877 Rev. 4
11-21 GEA
Printed in the Mexico

MANUEL
D’UTILISATION
91 cm (36 po) et 121 cm (48 po)
Cuisinières au gaz naturel
ou au propane professionnelles
FRANÇAIS
MONOGRAM.COM

2 49-2000877 Rev. 4
RENSEIGNEMENTS CONCERNANT LE MODÈLE
ÉCRIVEZ LES NUMÉROS DE MODÈLE ET DE SÉRIE
Vous les trouverez sur une étiquette placée derrière le bouton du
brûleur gauche ou sous le panneau de commande, dans la partie
visible lorsque la porte du four est ouverte.
Utilisez ces numéros dans toute correspondance ou dans tous
vos appels de service relatifs à votre appareil.
Veuillez écrire ces numéros ici :
Numéro du modèle
Numéro de série
NUMÉROS DE MODÈLES
ZDP364, ZDP484
TABLE DES MATIÈRES
RENSEIGNEMENTS CONCERNANT LE MODÈLE ...............................................................2
SOUTIEN AU CONSOMMATEUR .............................................................................3
CONSIGNES DE SÉCURITÉ .................................................................................5
UTILISANT LA CUISINIÈRE .................................................................................9
Connexion de votre four compatible Wi-Fi ....................................................................9
Fonctions de la cuisinière et de la table de cuisson ............................................................10
L'éclairage d’accentuation ................................................................................11
En cas de panne de courant ..............................................................................11
Brûleurs de surface .....................................................................................11
Récipients pour la cuisson en surface .......................................................................12
Cuisiner au wok ........................................................................................13
Système de cuisson de précision TrueTemp .................................................................13
Plaque chauffante ......................................................................................17
Grill ..................................................................................................18
Caractéristiques de votre four .............................................................................19
Fonctions du panneau de commande et du minuteur ...........................................................20
Paramètres. . . . . . . . . . . . . . . . . . . . . . . . . . . . . . . . . . . . . . . . . . . . . . . . . . . . . . . . . . . . . . . . . . . . . . . . . . . . . . . . . . . . . . . . . . . .21
Sabbat ...............................................................................................24
Évents du four .........................................................................................25
Papier d’aluminium et doublures de four ....................................................................25
Grilles du four. . . . . . . . . . . . . . . . . . . . . . . . . . . . . . . . . . . . . . . . . . . . . . . . . . . . . . . . . . . . . . . . . . . . . . . . . . . . . . . . . . . . . . . . . .25
Modes du four .........................................................................................26
Cuisson au fourl ........................................................................................27
Cuisson au grill ........................................................................................28
Cuisson par convection ..................................................................................29
Cuisson au four par convection ............................................................................29
Rôtissage par convection. . . . . . . . . . . . . . . . . . . . . . . . . . . . . . . . . . . . . . . . . . . . . . . . . . . . . . . . . . . . . . . . . . . . . . . . . . . . . . . . .30
Grillage par convection ..................................................................................31
Tenue au chaud .......................................................................................32
Fermentation ..........................................................................................32
Cuisson de précision ....................................................................................32
Sonde de température ...................................................................................33
Guide de cuisson au four ................................................................................35
Conseils sur les récipients de cuisson au four ................................................................35
ENTRETIEN ET NETTOYAGE ...............................................................................38
Panneau de commande et boutons .........................................................................38
Lèchefrite, tôle perforée et grille de rôtissage ................................................................38
Extérieur du four .......................................................................................39
Intérieur du four ........................................................................................39
Nettoyage à la vapeur ...................................................................................39
Four autonettoyant ......................................................................................40
Grilles de four. . . . . . . . . . . . . . . . . . . . . . . . . . . . . . . . . . . . . . . . . . . . . . . . . . . . . . . . . . . . . . . . . . . . . . . . . . . . . . . . . . . . . . . . . .41
Sonde de température ...................................................................................41
Bas du four. . . . . . . . . . . . . . . . . . . . . . . . . . . . . . . . . . . . . . . . . . . . . . . . . . . . . . . . . . . . . . . . . . . . . . . . . . . . . . . . . . . . . . . . . . . .41
Porte du four ..........................................................................................42
Lampes du four ........................................................................................43
Brûleurs à double flammes superposées/à plusieurs anneaux ....................................................44
Déclencheur d’étincelles et électrodes ......................................................................45
Grilles de brûleur .......................................................................................45
Dalot à graisse ........................................................................................45
Plaque chauffante ......................................................................................45
TRUCS DE DÉPANNAGE ..................................................................................46
GARANTIE LIMITÉE ......................................................................................49

49-2000877 Rev. 4 3
SOUTIEN AU CONSOMMATEUR
SITE WEB DE MONOGRAM
Vous avez des questions ou besoin d’aide avec votre réfrigérateur? Essayez le site Web de Monogram. Ce site est disponible 24
heures par jour, et tous les jours de l’année! Vous pouvez aussi magasiner d’autres magnifiques produits Monogram et profiter de
tous les services de soutien en ligne conçus pour votre commodité.
Aux É.-U. : monogram.com. Au Canada : monogram.ca
ENREGISTREZ VOTRE ÉLECTROMÉNAGER
Enregistrez votre nouvel appareil en ligne au moment qui vous convient le mieux! L’enregistrement de votre produit dans les délais
prescrits permet une meilleure communication et un service rapide, selon les modalités de votre garantie, si besoin est. Vous pouvez
également envoyer par courrier la carte d’enregistrement pré-imprimée qui se trouve dans l’emballage de votre appareil.
Aux États-Unis : monogram.com/register. Au Canada : monogram.ca
SERVICE DE RÉPARATION
Un service de réparation expert GE Appliances se trouve à quelques pas de chez vous. Rendez-vous sur notre site et programmez, à
votre convenance, une visite de réparation à n’importe quel jour de l’année.
Aux États-Unis monogram.com ou 800.444.1845
Au Canada : monogram.ca ou 888.880.3030
CONNEXION À DISTANCE
Pour de l’assistance concernant la connexion à un réseau sans fil (modèles équipés de cette fonction), visitez notre site sur
monogram.com/connect aux États-Unis seulement.
PIÈCES ET ACCESSOIRES
Les personnes qualifiées pour réparer leurs propres appareils peuvent commander des pièces détachées et des accessoires et les
faire envoyer directement à leur domicile (les cartes VISA, MasterCard et Discover sont acceptées). Commandez en ligne 24 heures
par jour.
Aux États-Unis : monogram.com/ownership/parts ou 800.444.1845
Au Canada : monogram.ca ou 800.661.1616
Les instructions contenues dans le présent manuel comportent des procédures que tout utilisateur peut effectuer. Les
autres types de réparation doivent généralement être confiés à un technicien qualifié. Usez de prudence : une réparation ou
un entretien mal effectués peuvent rendre l’utilisation de l’appareil dangereuse.
Les consommateurs au Canada doivent consulter le centre de service Mabe le plus proche, visiter notre site web sur monogram.ca
ou 800.661.1616.
COMMUNIQUEZ AVEC NOUS
Si vous êtes insatisfait du service reçu par Monogram, communiquez avec nous par l’entremise de notre site Web en mentionnant
tous les détails y compris votre numéro de téléphone, ou écrivez : monogram.com/contact
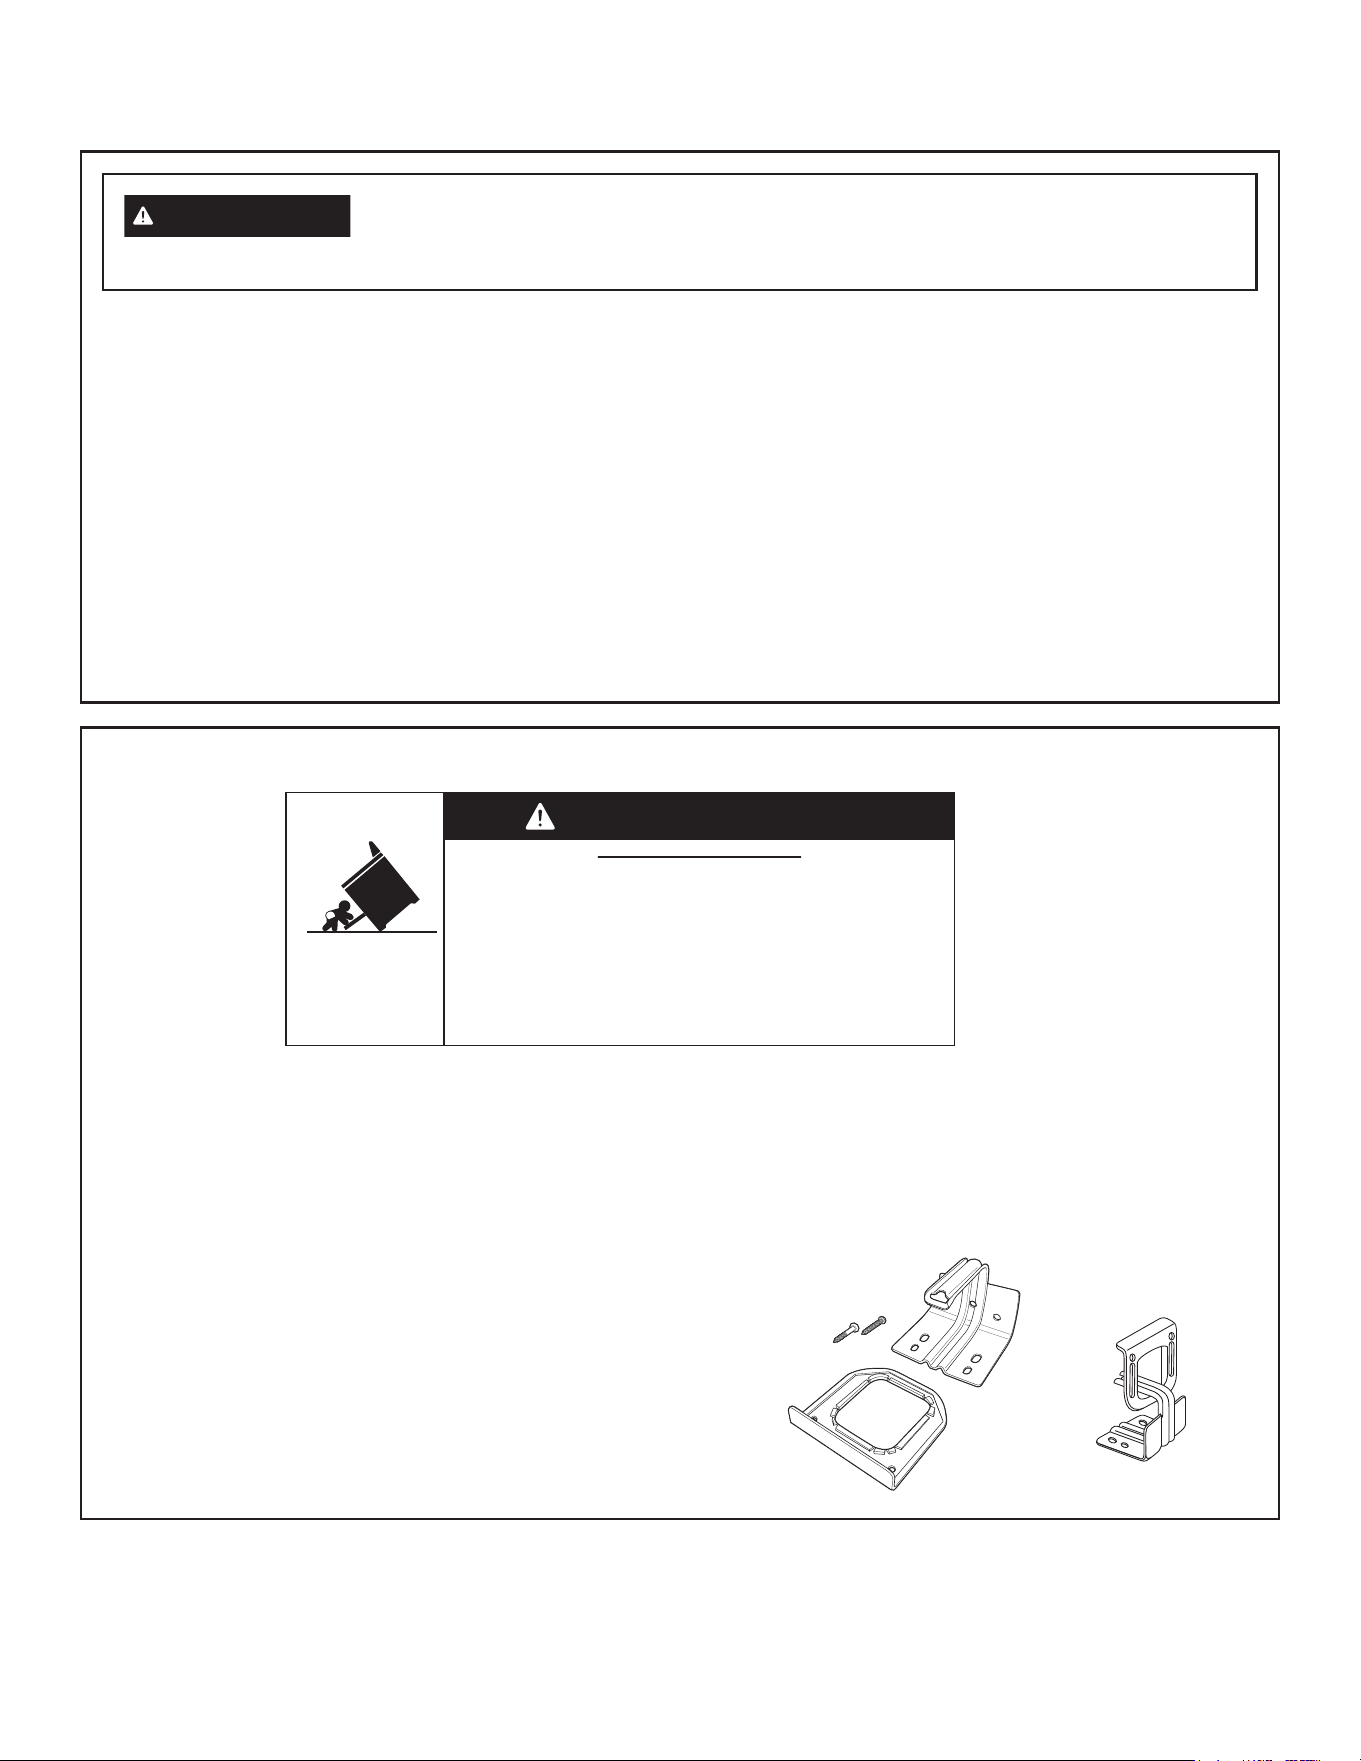
4 49-2000877 Rev. 4
SOUTIEN AU CONSOMMATEUR
DISPOSITIF ANTIBASCULEMENT
Afin de réduire le risque de basculement, la cuisinière doit être
correctement fixée par une ferrure antibasculement. Consultez
les instructions d’installation livrées avec la ferrure pour
l’information détaillée avant de tenter l’installation.
Cuisinières au gaz professionnelles
Pour vérifier si la ferrure est installée et engagée correctement,
regardez sous la cuisinière pour voir si le pied de nivellement
arrière est engagé dans la ferrure. Sur certains modèles, on
peut enlever le coup-de-pied pour faciliter l’inspection. Si
l’inspection visuelle n’est pas possible, glissez la cuisinière
vers l’avant, assurez-vous que la ferrure antibasculement est
solidement fixée au plancher ou au mur, puis repoussez la
cuisinière de façon à engager le pied de nivellement sous la
ferrure antibasculement.
Si la cuisinière est éloignée du mur pour une raison
quelconque, répétez toujours cette procédure pour vérifier
que la cuisinière est correctement fixée par la ferrure
antibasculement.
N’enlevez jamais totalement les pieds de nivellement sinon
la cuisinière ne sera pas fixée par la ferrure antibasculement
correctement.
AVERTISSEMENT
Si les consignes du manuel ne sont pas respectées, il y a un risque
d’incendie ou d’explosion et des dommages matériels, physiques et la mort.
- Ne stockez ou n’utilisez pas d’essence ou d’autres vapeurs ou liquides inflammables à
proximité de la cuisinière ou de tout autre appareil.
- QUE FAIRE SI JE DÉTECTE UNE ODEUR DE GAZ
Ŷ1¶DOOXPH]SDVO¶DSSDUHLO
Ŷ1HWRXFKH]DXFXQLQWHUUXSWHXUQ¶XWLOLVH]SDVGHWpOpSKRQH
Ŷ$SSHOH]LPPpGLDWHPHQWYRWUHIRXUQLVVHXUGHJD]DYHFOHWpOpSKRQHGXYRLVLQ6XLYH]
les instructions du fournisseur.
Ŷ6LYRXVQHSDUYHQH]SDVjMRLQGUHOHIRXUQLVVHXUGHJD]DSSHOH]OHVSRPSLHUV
- L’installation et l’entretien doivent être effectués par un installateur qualifié, un centre de
réparation ou le fournisseur de gaz.
• Un enfant ou un adulte peut faire basculer la cuisinière
et ainsi perdre la vie.
• Posez la ferrure antibasculement sur le mur ou le plancher.
• Remettez la cuisinière en place en la glissant de façon que
son pied s’insère dans la ferrure antibasculement.
• Insérez le pied de nouveau si vous déplacez la cuisinière.
• L’omission d’observer ces consignes peut occasionner
la mort ou des brûlures graves aux enfants ou aux adultes.
Risque de basculement
AVERTISSEMENT
Trousse de ferrure
antibasculement incluse
Vue arrière

49-2000877 Rev. 4 5
LISEZ CES INSTRUCTIONS ET RANGEZ-LES SOIGNEUSEMENT
CONSIGNES DE SÉCURITÉ IMPORTANTES
LISEZ TOUTES LES INSTRUCTIONS AVANT D'UTILISER L'APPAREIL
AVERTISSEMENT
Veuillez lire toutes les consignes avant d’utiliser ce produit. Le non-respect de ces instructions pourrait
entraîner un incendie, un choc électrique, une blessure grave voire la mort.
AVERTISSEMENT
CONSIGNES GÉNÉRALES DE SÉCURITÉ
AVERTISSEMENT
N’utilisez JAMAIS cet
électroménager comme appareil de chauffage
pour réchauffer la pièce. Cela pourrait causer un
empoisonnement au monoxyde de carbone et la
surchauffe du four.
Ŷ 8WLOLVH]FHWpOHFWURPpQDJHUXQLTXHPHQWDX[ILQVDX[TXHOOHV
il est fait mention dans ce manuel du propriétaire.
Ŷ /¶LQVWDOODWLRQHWODPLVHjODWHUUHGRLYHQWrWUHUpDOLVpHVSDU
un installateur qualifié en conformité avec les instructions
d’installation fournies.
Ŷ 7RXWUpJODJHHWWRXWHUpSDUDWLRQGHYUDLHQWrWUHUpDOLVpV
par un installateur de cuisinière au gaz ou un technicien
en réparation qualifiés. Ne tentez pas de réparer ou de
remplacer une pièce de cette cuisinière à moins que cela
soit spécifiquement recommandé dans ce manuel.
Ŷ 9RWUHFXLVLQLqUHHVWH[SpGLpHGHO¶XVLQHSUrWHSRXUXQH
alimentation au gaz naturel. Elle peut être convertie
pour le gaz propane. Si nécessaire, ces conversions
doivent être réalisées par un technicien qualifié
conformément aux instructions d’installation et aux codes
locaux. L’intermédiaire qui réalise ce travail assume la
responsabilité de la conversion
Ŷ 'HPDQGH]jO¶LQVWDOODWHXUGHYRXVPRQWUHUO¶HPSODFHPHQW
du robinet de sectionnement du gaz de la cuisinière et
comment le fermer si nécessaire.
Ŷ *D]HWpOHFWULFLWp1¶XWLOLVH]SDVODSDUWLHG¶XQHFXLVLQLqUH
sur laquelle l’élément chauffant développe un point
incandescent ou démontre des signes de bris. Un point
incandescent de l’élément indique que l’élément peut être
défectueux et représente un risque possible de brûlures,
d’incendie et d’électrocution. Éteignez immédiatement
l’élément chauffant et faites-le remplacer par un technicien
réparateur qualifié.
Ŷ $YDQWWRXWHUpSDUDWLRQGpEUDQFKH]ODFXLVLQLqUHRX
coupez l’alimentation électrique au panneau de distribution
domestique en retirant le fusible ou en désarmant le
disjoncteur.
Ŷ $VVXUH]YRXVGHUHWLUHUWRXWOHPDWpULHOG¶HPEDOODJHGH
la cuisinière avant d’allumer celle-ci afin de prévenir
l’inflammation de ce matériel.
Ŷ eYLWH]GHUD\HUOHVVXUIDFHVGHYHUUH&HODSRXUUDLWFDXVHU
le bris du verre. Ne cuisez pas d’aliments sur du verre brisé.
Cela pourrait occasionner une décharge électrique, un
incendie ou des blessures.
Ŷ 1HODLVVH]SDVG¶HQIDQWVVHXOVRXVDQVVXUYHLOODQFHGDQV
la zone où l’électroménager est en cours d’utilisation. On
ne devrait jamais leur permettre de grimper, s’asseoir ou se
tenir sur quelque partie de l’électroménager que ce soit.
Ŷ
ATTENTION
Ne rangez pas les articles qui attirent
les enfants dans des armoires au-dessus d’une cuisinière,
un enfant qui grimpe sur la cuisinière pour atteindre un
article peut se blesser gravement.
Ŷ 1¶REVWUXH]MDPDLVOHVRULILFHVG¶DLUGHODFXLVLQLqUH,OV
procurent les entrées et les sorties d’air nécessaires pour
un fonctionnement avec une combustion correcte. Les
orifices d’air sont situés à l’arrière de la table de cuisson,
dans le haut et le bas de la porte du four, et dans le bas de
la cuisinière.
Ŷ 8WLOLVH]VHXOHPHQWGHVSRLJQpHVRXPLWDLQHVVqFKHVFDU
des brûlures de vapeur peuvent survenir au contact des
surfaces chaudes si elles sont humides. Ne laissez pas les
poignées ou mitaines toucher les brûleurs de surface, les
grilles de brûleurs ou les éléments chauffants. N’utilisez pas
une serviette ou autre linge de grande taille à la place d’une
poignée ou de mitaines.
Ŷ 1HWRXFKH]SDVDX[pOpPHQWVFKDXIIDQWVRXjODVXUIDFH
intérieure du four. Ces surfaces peuvent s’avérer
suffisamment chaudes pour brûler même si elles sont d’une
couleur foncée. Pendant et après l’utilisation, ne touchez
pas à l’intérieur du four et ne laissez pas des vêtements
ou d’autres matières inflammables entrer en contact avec
celui-ci; laissez d’abord le four se refroidir suffisamment.
D’autres surfaces de l’électroménager peuvent devenir
suffisamment chaudes pour causer des brûlures. Parmi
les surfaces potentiellement chaudes, mentionnons les
brûleurs, les grilles, les orifices d’air du four, les surfaces
près des orifices, les fissures autour de la porte du four, les
pièces de garniture métalliques au-dessus de la porte, les
dosserets et les surfaces des tablettes en hauteur.
Ŷ 1HFKDXIIH]SDVGHFRQWHQDQWVG¶DOLPHQWVQRQRXYHUWV
L’augmentation de la pression peut faire éclater le
contenant et causer des blessures.
6 49-2000877 Rev. 4
LISEZ CES INSTRUCTIONS ET RANGEZ-LES SOIGNEUSEMENT
CONSIGNES DE SÉCURITÉ IMPORTANTES
LISEZ TOUTES LES INSTRUCTIONS AVANT D'UTILISER L'APPAREIL
AVERTISSEMENT
CONSIGNES GÉNÉRALES DE SÉCURITÉ (suite)
Ŷ &XLVH]OHVDOLPHQWVjIRQGSRXUYRXVSUpPXQLUFRQWUHOHV
maladies d’origine alimentaire. Des recommandations relatives
aux températures de cuisson minimales sûres sont accessibles
sur les sites IsItDoneYet.gov et fsis.usda.gov.Utilisez un
thermomètre pour aliments et vérifiez à plusieurs endroits.
Ŷ 1HODLVVH]SHUVRQQHJULPSHUVHWHQLURXV¶DFFURFKHUj
la porte du four, sur le tiroir ou la table de cuisson. Cela
pourrait endommager la cuisinière ou la faire basculer et
causer des blessures graves ou la mort.
Ŷ *DUGH]ODKRWWHGXYHQWLODWHXUHWOHVILOWUHVjJUDLVVH
propres afin de maintenir une bonne ventilation et prévenir
les feux de graisse. Mettez le ventilateur en arrêt (OFF)
dans l’éventualité d’un incendie ou lors de l’inflammation
intentionnelle d’un spiritueux sur la table de cuisson. La
soufflante en marche peut propager les flammes.
AVERTISSEMENT
GARDEZ LES MATIÈRES INFLAMMABLES À DISTANCE DE LA CUISINIÈRE
L’omission de prendre cette précaution peut causer un incendie ou une blessure corporelle.
Ŷ 1HUDQJH]QLQ¶XWLOLVH]GHVPDWLqUHVLQIODPPDEOHVGDQVXQ
four ou près de la table de cuisson, y compris du papier, du
plastique, des poignées ou mitaines, du linge de maison, du
revêtement mural, des rideaux, des draperies, de l’essence
ou d’autres vapeurs ou liquides inflammables.
Ŷ 1HSRUWH]MDPDLVGHYrWHPHQWVDPSOHVRXSHQGDQWVORUV
de l’utilisation de l’électroménager. Ces vêtements peuvent
prendre feu au contact de surfaces chaudes et causer des
brûlures graves.
Ŷ 1HODLVVH]SDVODJUDLVVHGHFXLVVRQQLG¶DXWUHVPDWLqUHV
inflammables s’accumuler dans ou à proximité de la
cuisinière. La graisse dans le four ou sur la table de cuisson
peut prendre feu.
AVERTISSEMENT
DANS L’ÉVENTUALITÉ D’UN INCENDIE, PRENEZ LES MESURES SUIVANTES
AFIN DE PRÉVENIR LES BLESSURES ET LA PROPAGATION DU FEU
Ŷ 1HYHUVH]SDVG¶HDXVXUXQIHXGHJUDLVVH1HSUHQH]
jamais une casserole en flammes. Mettez les commandes à
la position d’arrêt (OFF). Étouffez une casserole en flammes
sur un élément de surface en recouvrant la casserole
complètement avec un couvercle bien adapté, une tôle
à biscuit ou un plateau bien plat. Utilisez un extincteur à
poudre sèche ou à mousse.
Ŷ 6LXQIHXVHGpFODUHGDQVOHIRXUSHQGDQWODFXLVVRQ
étouffez-le en fermant la porte du four et en mettant le four
à la position d’arrêt (OFF) ou en utilisant un extincteur à
poudre sèche ou à mousse.
Ŷ 6LXQIHXVHGpFODUHGDQVOHIRXUSHQGDQWO¶DXWRQHWWR\DJH
mettez le four à la position d’arrêt (OFF) et attendez
que le feu cesse. Ne forcez pas l’ouverture de la porte.
L’introduction d’air frais à des températures d’autonettoyage
peut provoquer un jaillissement de flammes dans le four.
L’omission d’observer cette mise en garde peut causer des
brûlures graves.
AVERTISSEMENT
CONSIGNES DE SÉCURITÉ RELATIVES AU FOUR AUTONETTOYANT
La fonction d’autonettoyage élève la température du four à des degrés suffisants pour brûler complètement les souillures
alimentaires dans le four. Suivez les instructions suivantes pour un fonctionnement sûr.
Ŷ 1HWRXFKH]SDVOHVVXUIDFHVSHQGDQWOHSURFHVVXV
d’autonettoyage. Gardez les enfants à l’écart du four
pendant l’autonettoyage. L’omission d’observer ces
instructions peut occasionner des brûlures.
Ŷ $YDQWGHODQFHUOHF\FOHG¶DXWRQHWWR\DJHUHWLUH]OHV
casseroles, les grilles métalliques luisantes et tous les
autres ustensiles du four. Seules les grilles recouvertes de
porcelaine peuvent être laissées dans le four.
Ŷ $YDQWGHODQFHUOHF\FOHG¶DXWRQHWWR\DJHHVVX\H]ODJUDLVVH
et les souillures alimentaires dans le four. Une quantité
excessive de graisse peut s’enflammer et causer des
dommages par la fumée.
Ŷ 6LOHPRGHG¶DXWRQHWWR\DJHQHIRQFWLRQQHSDVELHQpWHLJQH]
le four (OFF) et coupez l’alimentation électrique. Faites
réparer l’appareil par un technicien qualifié.
Ŷ 1¶XWLOLVH]SDVGHUHYrWHPHQWVGHSURWHFWLRQSRXUGRXEOHU
le four ni de nettoyants pour le four du commerce sauf
s’il est certifié que vous pouvez les utiliser dans un four à
autonettoyage.
Ŷ 1HQHWWR\H]SDVOHMRLQWG¶pWDQFKpLWpGHODSRUWH&HMRLQW
d’étanchéité est essentiel pour garantir l’étanchéité. Il faut
veiller à ne pas frotter, endommager ni déplacer le joint
d’étanchéité.
Ŷ IMPORTANT : Certains oiseaux sont extrêmement
sensibles aux vapeurs dégagées durant le cycle
d’autonettoyage de n’importe quelle cuisinière. Placez les
oiseaux dans une autre pièce, bien ventilée.
49-2000877 Rev. 4 7
LISEZ CES INSTRUCTIONS ET RANGEZ-LES SOIGNEUSEMENT
CONSIGNES DE SÉCURITÉ IMPORTANTES
LISEZ TOUTES LES INSTRUCTIONS AVANT D'UTILISER L'APPAREIL
AVERTISSEMENT
CONSIGNES DE SÉCURITÉ RELATIVES À LA TABLE DE CUISSON
AVERTISSEMENT
N’utilisez JAMAIS la section de cuisson
en surface de cet électroménager sans
surveillance.
• L’omission de se conformer à cet
avertissement pourrait causer un
incendie ou une explosion représentant
un risque de dommage à la propriété,
de blessure ou de décès.
• Dans l’éventualité d’un incendie,
tenez-vous à l’écart de l’électroménager
et appelez immédiatement votre service
d’incendie.
NE TENTEZ PAS D’ÉTEINDRE UN FEU
D’HUILE OU DE GRAISSE AVEC DE
L'EAU.
Ŷ 1HODLVVH]MDPDLVGHO¶KXLOHHQFRXUVGHIULWXUHVDQV
surveillance. Au-delà de son point de fumée, l’huile peut
s’enflammer et causer un incendie pouvant se propager
aux armoires environnantes. Utilisez un thermomètre à
bain de friture lorsque c’est possible afin de surveiller la
température de l’huile.
Ŷ 3RXUSUpYHQLUOHGpERUGHPHQWG¶KXLOHHWO¶LQFHQGLH
consécutif, utilisez une quantité d’huile minimale lorsque
vous utilisez une casserole peu profonde et évitez de cuire
des aliments congelés qui comportent trop de glace.
Ŷ 8WLOLVH]XQHFDVVHUROHG¶XQHWDLOOHDSSURSULpHHWpYLWH]
celles qui sont instables ou qui basculent facilement.
Réglez les flammes du brûleur de façon qu’elles ne
dépassent pas le fond de la casserole. Des flammes trop
intenses présentent un risque.
Ŷ 8WLOLVH]WRXMRXUVODSRVLWLRQ/,7(DOOXPDJHORUVTXHYRXV
allumez les brûleurs supérieurs et assurez-vous qu’ils sont
bien allumés.
Ŷ /RUVTXHYRXVXWLOLVH]XQHEDWWHULHGHFXLVLQHHQYHUUHRX
céramique, assurez-vous qu’elle convient à la chaleur d’une
table de cuisson; certaines peuvent éclater en raison du
brusque changement de température.
Ŷ 3RXUPLQLPLVHUODSRVVLELOLWpGHEUOXUHG¶DOOXPDJHGH
matières inflammables ou de débordement, la poignée du
récipient doit être orientée vers le centre de la table de
cuisson sans se trouver au-dessus des brûleurs environnants.
Ŷ 1¶XWLOLVH]SDVXQZRNGRWpG¶XQDQQHDXGHVXSSRUW
métallique. L’anneau peut emprisonner la chaleur, bloquer
l’air au brûleur et présenter un risque d’intoxication au
monoxyde de carbone.
Ŷ 1HWHQWH]SDVGHVRXOHYHUODWDEOHGHFXLVVRQ&HOD
peut endommager la tuyauterie de gaz aux brûleurs
occasionnant une fuite de gaz et un risque d’incendie.
Ŷ 1¶XWLOLVH]SDVGHSDSLHUDOXPLQLXPSRXUUHFRXYULUOHVJULOOHV
ou une partie de la table de cuisson. Cela peut mener à une
intoxication au monoxyde de carbone, à la surchauffe des
surfaces de la table de cuisson ou à un incendie.
8 49-2000877 Rev. 4
LISEZ CES INSTRUCTIONS ET RANGEZ-LES SOIGNEUSEMENT
CONSIGNES DE SÉCURITÉ IMPORTANTES
LISEZ TOUTES LES INSTRUCTIONS AVANT D'UTILISER L'APPAREIL
AVERTISSEMENT
CONSIGNES DE SÉCURITÉ RELATIVES AU FOUR
AVERTISSEMENT
Ne recouvrez JAMAIS les
fentes, les trous ou les passages dans le bas du four,
ni une grille en entier, avec une matière telle que du
papier d’aluminium ou une doublure de four. Un tel
recouvrement bloque la circulation d’air dans le four
et peut causer un empoisonnement au monoxyde de
FDUERQH1HSODFH]MDPDLVGXSDSLHUG¶DOXPLQLXPRX
une doublure de four dans le bas du four. Ces matières
peuvent emprisonner la chaleur et poser un risque de
fumée ou d’incendie.
Ŷ 7HQH]YRXVjO¶pFDUWGHODFXLVLQLqUHORUVTXHYRXVRXYUH]
la porte du four. La vapeur ou l’air chauds qui s’échappent
peuvent brûler les mains, la figure et/ou les yeux.
Ŷ 1HSODFH]MDPDLVG¶XVWHQVLOHVGHSLHUUHVjSL]]DRXGH
cuisson, ni tout type de papier ou de doublure sur le fond du
four. Ces articles peuvent emprisonner la chaleur ou fondre,
endommageant le produit et causant un risque de décharge
électrique, d’enfumage ou d’incendie.
Ŷ $WWHQGH]TXHOHIRXUVRLWUHIURLGLSRXUSODFHUOHVJULOOHV
du four aux emplacements désirés. Si la grille doit être
déplacée alors que le four est chaud, évitez de toucher aux
surfaces chaudes.
Ŷ 1HODLVVH]GHVDUWLFOHVWHOVTXHGXSDSLHUGHVXVWHQVLOHV
ou des aliments dans le four lorsqu’il n’est pas utilisé. Les
articles rangés dans le four peuvent s’enflammer.
Ŷ 1HODLVVH]SDVGHVDUWLFOHVVXUODWDEOHGHFXLVVRQSUqV
de l’orifice de ventilation du four. Les articles peuvent
surchauffer et poser un risque d’incendie ou de brûlure.
Ŷ 1¶XWLOLVH]MDPDLVODIRQFWLRQGHJULOODYHFODSRUWHRXYHUWH/D
cuisson au grill avec la porte ouverte n’est pas autorisée en
raison du risque de surchauffe des boutons de commande.
Comment retirer la pellicule protectrice et le ruban adhésif de l’emballage
Avec précaution, agrippez un coin de la pellicule protectrice avec
vos doigts et retirez-la lentement de la surface de l’électroménager.
N’utilisez pas d’articles coupants pour retirer la pellicule. Retirez
toute la pellicule avant d’utiliser l’électroménager pour la première
fois.
Pour s’assurer de l’absence de dommages au fini du produit, la
meilleure manière de retirer le ruban adhésif sur un électroménager
neuf consiste à appliquer un détergent pour lave-vaisselle liquide
domestique. Appliquez avec un linge doux et laissez imbiber.
REMARQUE : L’adhésif doit être retiré de toutes les parties. Cela
sera impossible s’il est cuit.
REMARQUE : Certaines fonctions de cuisson ne sont pas disponibles même après la connexion Wi-Fi de votre nouveau
IRXUjYRWUHUpVHDXVDQV¿OORFDO9HXLOOH]VXLYUHOHVLQVWUXFWLRQVVXUOHSDQQHDXGHFRPPDQGHGXIRXUHWGHODVHFWLRQ
Wi-Fi et contrôle à distance de ce guide. Ces instructions vous apprennent comment utiliser les fonctions de l’application
SmartHQ et mettre à jour le logiciel de votre four.

49-2000877 Rev. 4 9
UTILISATION DE LA CUISINIÈRE
Lors de sa mise en service initiale, cette cuisinière nécessite une mise à jour logicielle pour activer toutes les fonctions. Pour procéder
à la mise à jour, téléchargez l’application SmartHQ et suivez les instructions de connexion de la cuisinière à votre réseau Wi-Fi
domestique. Certaines fonctions ne sont disponibles qu’en passant par l’application SmartHQ. Pour plus de renseignements sur la
méthode de connexion, reportez-vous à la section « Connexion Wi-Fi et contrôle à distance » de ce manuel.
CONNEXION DE VOTRE CUISINIÈRE
COMPATIBLE WI-FI
Votre cuisinière est conçue pour vous procurer une
communication bidirectionnelle entre votre électroménager et un
appareil intelligent. Grâce à l’application mobile SmartHQ, vous
serez en mesure de contrôler les fonctions essentielles de la
cuisinière telles que le réglage de la température et du mode de
cuisson à l’aide d’une tablette ou d’un téléphone intelligent.*
Ce dont vous aurez besoin
Votre cuisinière utilise votre réseau WI-FI domestique pour
communiquer entre l’électroménager et votre appareil intelligent.
Pour configurer votre cuisinière, vous devez recueillir certains
renseignements :
1. Chaque cuisinière dispose de renseignements sur l’appareil
connecté, incluant un nom de réseau et un mot de passe.
Il s’agit des deux renseignements importants dont vous
avez besoin pour connecter votre électroménager. Cette
information se trouve dans le menu des paramètres Wi-Fi sur
l'écran de l’appareil.
2. Préparez votre tablette ou votre téléphone intelligent en vue
d’accéder à l’Internet et de télécharger des applications.
3. Vous devez connaître le mot de passe de votre routeur Wi-Fi
domestique. Ayez ce mot de passe à portée de la main lors
de la configuration de votre cuisinière.
Connexion de votre cuisinière compatible Wi-Fi
1. Préparez votre tablette ou votre téléphone intelligent en vue
d’accéder à l’Internet et de télécharger des applications.
2. Vous devez connaître le mot de passe de votre routeur Wi-Fi
domestique. Ayez ce mot de passe à portée de main lors de
la configuration de votre cuisinière Monogram.
3. Sur votre téléphone intelligent ou votre tablette, visitez
monogram com/connect pour en savoir davantage sur les
fonctions de connexion d’électroménagers et pour télécharger
l’application appropriée.
4. Suivez les instructions de l’application sur l’écran pour
connecter votre cuisinière Monogram. Une fois connecté,
votre cuisinière devrait indiquer qu’elle est connectée au
réseau Wi-Fi de votre domicile.
5. Si la connexion sans fil de votre cuisinière pose problème,
veuillez composer le 800.220.6899 et demander de
l’assistance concernant la connectivité sans fil.
Pour connecter des appareils intelligents supplémentaires,
répétez les étapes 3 et 4.
Notez que toute modification ou remplacement du dispositif
de communication à distance de cette cuisinière qui n’est pas
explicitement approuvé(e) par le fabricant peut annuler le droit de
l'utilisateur de se servir de cet équipement.
*Des appareils Apple ou Android compatibles et un réseau Wi-Fi domestique
sont requis.
ÉQUIPEMENT COMMANDÉ À DISTANCE
Cet appareil est conforme aux prescriptions de la partie 15 des
règles de la FCC. Le fonctionnement de cet équipement est
assujetti aux deux conditions suivantes : (1) Cet appareil ne
doit pas causer de brouillage préjudiciable; et (2) cet appareil
doit accepter tout brouillage qu’il reçoit, y compris celui pouvant
entraîner un fonctionnement indésirable.
L’équipement de communication sans fil installé dans cette table
de cuisson a été testé et déclaré conforme aux limites d’un
appareil numérique de Classe B, conformément à la partie 15 de
la réglementation de la FCC. Ces limites sont conçues pour :
(a) assurer une protection raisonnable contre le brouillage
nuisible dans une installation résidentielle. Cet équipement
génère, utilise et émet des fréquences radio qui, en cas
d'une installation erronée ou d'une utilisation non-conforme
aux instructions de ce manuel d'utilisation peuvent causer un
brouillage nuisible aux communications radio. Il n'y a cependant
aucune garantie qu'un brouillage nuisible ne surviendra pas
dans une installation donnée. Si cet équipement cause un
brouillage nuisible sur votre poste radio ou de télévision, ce
que vous pouvez déterminer en éteignant et en rallumant votre
équipement, il est conseillé à l'utilisateur d'essayer de pallier
ce brouillage nuisible en prenant l'une ou l'autre des mesures
suivantes :
• Réorienter ou repositionner l'antenne de réception.
• Augmenter la distance entre l'équipement et le récepteur.
• Brancher l'équipement dans une prise d'un circuit qui diffère de
celui auquel le récepteur est branché.
• Consulter le revendeur ou un technicien en radio-télévision pour
obtenir de l'aide.
(b) accepter tout brouillage qu’il reçoit, y compris celui pouvant
entraîner un fonctionnement indésirable de l’appareil.
Notez que tout changement ou toute modification de l’équipement
de communication sans fil qui ne sont pas explicitement
approuvés par le fabricant peuvent annuler le droit de l'utilisateur
de se servir de cet équipement.

10 49-2000877 Rev. 4
UTILISATION DE LA CUISINIÈRE
FONCTIONS DE LA CUISINIÈRE ET DE LA TABLE DE CUISSON
(Toutes les fonctions ne sont pas présentes sur tous les modèles. L’apparence peut varier d’un modèle à l’autre).
Le modèle à double four illustré est doté d’un four à gauche.
Couvercle de plaque
et de grill
Plinthe
Index des composants Page
1 Plinthe
2 Couvercle de grill (sur certains modèles)
3 Couvercles de plaque et de grill
4 Évents du four
25
5 'DORWjJUDLVVHGHJULOOHWGHSODTXHFKDXႇDQWH 45
6 Grill (sur certains modèles) 18, 19
7 3ODTXHFKDXႇDQWH 17, 45
8 Grilles de brûleur de table de cuisson 13, 45
9 Indicateur d’emplacement de brûleur
10 Commande de l'éclairage d’accentuation 11, 12
11 Bouton de commande du brûleur avec cadran éclairé 12, 38
12 Écran de four 21-24
13 Système d’équilibrage (4)
Couvercle de grill
(certains modèles)
1
3
2
5
12
13
6 7 8
4
9
11
10
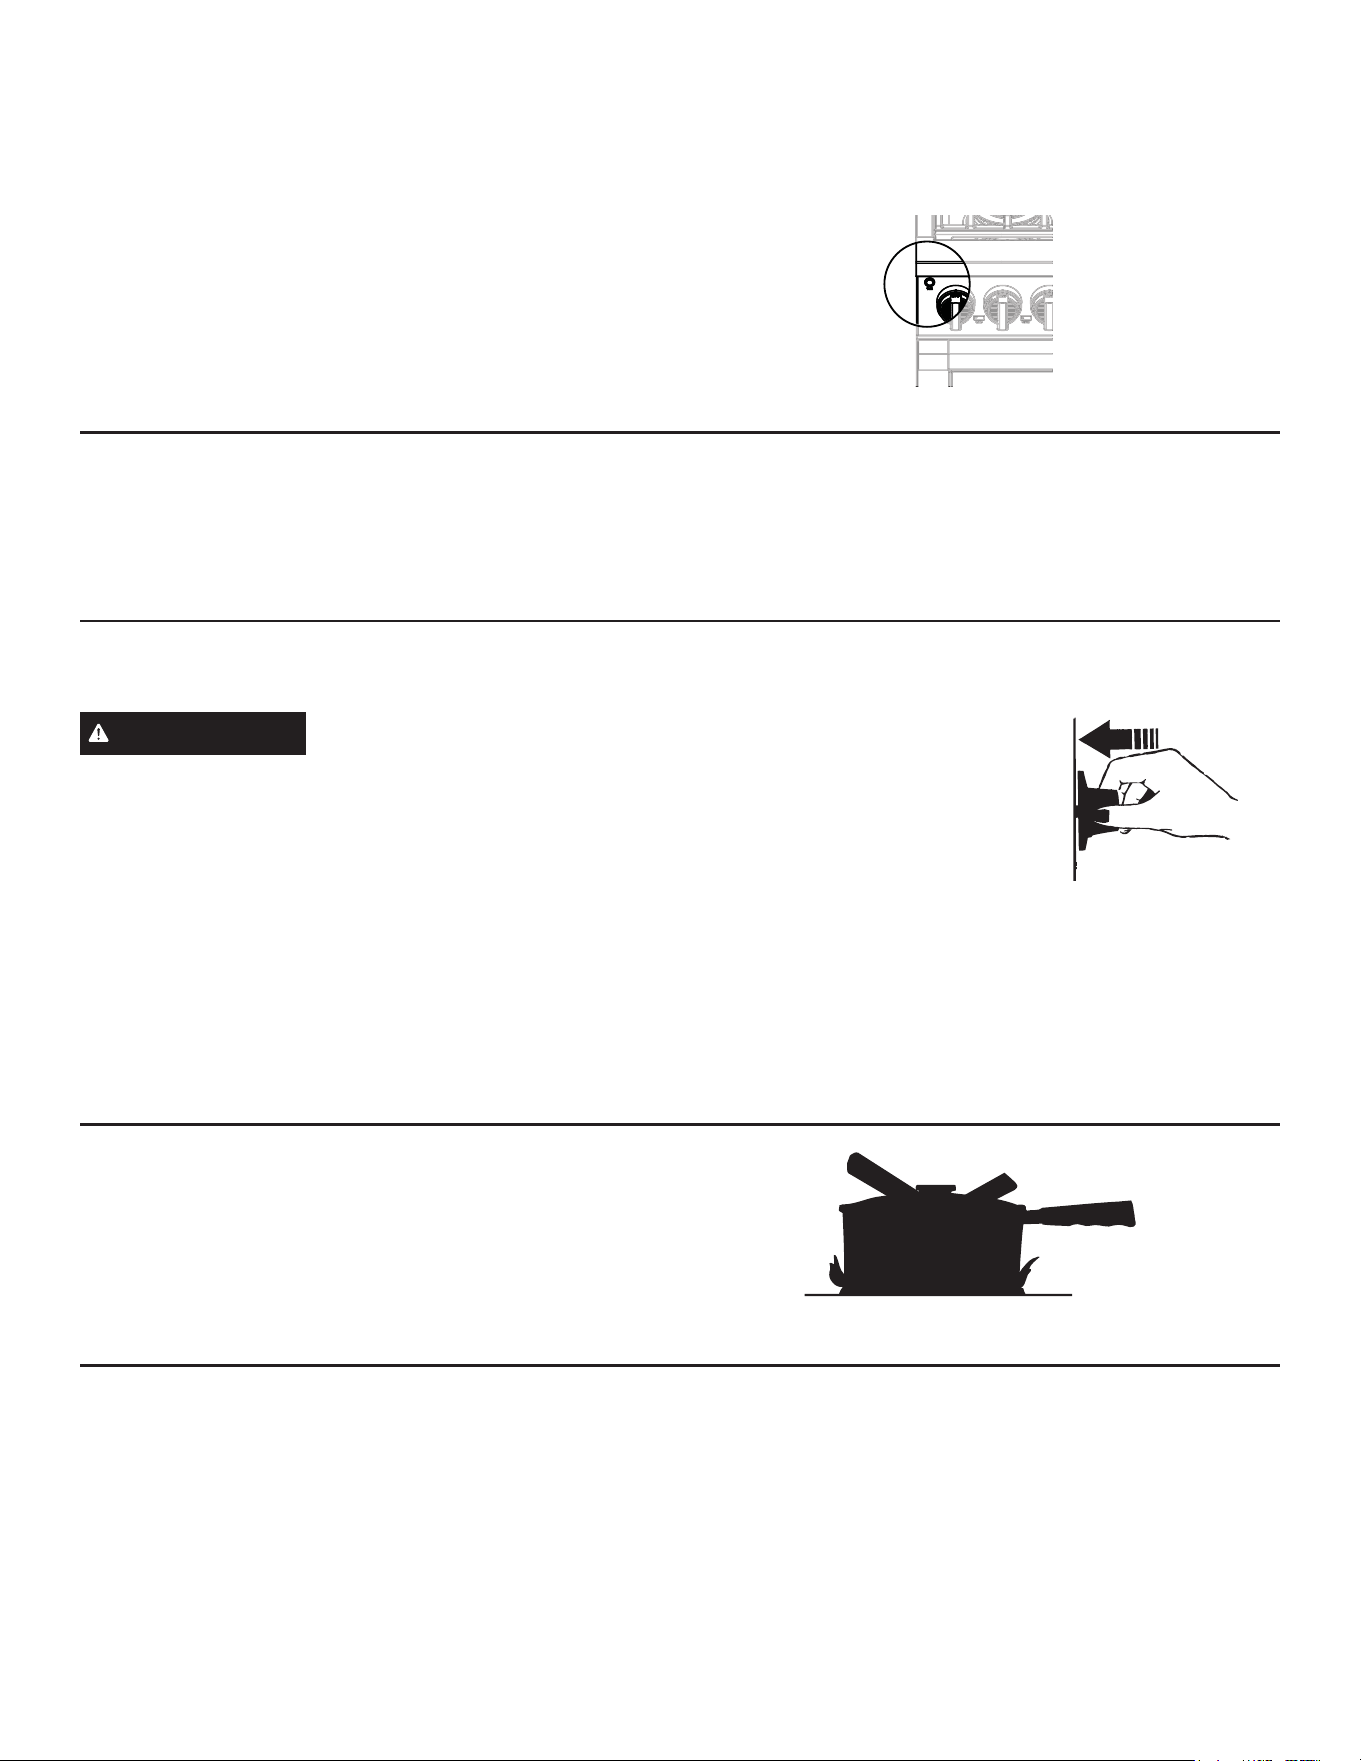
49-2000877 Rev. 4 11
UTILISATION DE LA CUISINIÈRE
EN CAS DE PANNE DE COURANT
Dans l’éventualité d’une panne de courant, il devient impossible
de commander le four et il ne faut pas tenter de le faire. Le
brûleur de cuisson de précision avant droit n’est également pas
fonctionnel en cas de panne de courant.. Toutefois, on peut
allumer les brûleurs de surface à l’aide d’une allumette. En usant
d’une extrême prudence, tenez une allumette allumée près des
orifices en dessous du chapeau du brûleur de surface, puis
tournez lentement le bouton jusqu’à la position LITE (allumage).
Une fois allumés, les brûleurs de surface fonctionneront
normalement.
BRÛLEURS DE SURFACE
Allumage d’un brûleur de surface
AVERTISSEMENT
Il faut utiliser les brûleurs
uniquement lorsqu’ils sont recouverts d’un récipient
(casserole, poêlon, etc.) de cuisson. Les flammes de brûleur
non recouvertes par un ustensile de cuisson présentent
un risque d’incendie ou d’inflammation de vêtement. Ne
ODLVVH] MDPDLV OHV IODPPHV GpSDVVHU GHV F{WpV GX UpFLSLHQW
de cuisson. L'omission d'observer cette directive peut
occasionner des blessures graves.
Assurez-vous que tous les brûleurs se trouvent au bon
emplacement et complètement assemblés avant de tenter
d’utiliser un brûleur quelconque.
Sélectionnez un brûleur et trouvez son bouton de commande.
Poussez le bouton et tournez-le jusqu’à la position LITE
(allumage).
Vous entendrez un clic, c’est-à-dire
le son de l’étincelle électrique qui
allume le brûleur. Lorsqu’un brûleur
est tourné à LITE, tous les brûleurs
vont produire une étincelle. La
production d’étincelles se poursuivra
aussi longtemps que le bouton
se situera à LITE. Une fois le gaz
allumé, tournez le bouton pour
régler la taille de la flamme.
Rallumage automatique
Les brûleurs de cette cuisinière se rallumeront automatiquement
si la flamme s’éteint.
Utilisation des brûleurs de surface
REMARQUES :
Ŷ1H IDLWHV SDV IRQFWLRQQHU OH EUOHXU GXUDQW XQH ORQJXH SpULRGH
sans récipient de cuisson sur la grille. Le fini de la grille peut
se décolorer ou s’écailler sans récipient pour absorber la
chaleur.
Ŷ1H WHQWH] SDV GH GpPRQWHU XQ EUOHXU SHQGDQW TX¶XQ DXWUH
brûleur est allumé. Vous risquez d’endommager le produit.
Ŷ$VVXUH]YRXV TXH OHV EUOHXUV HW OHV JULOOHV VRQW UHIURLGLV DYDQW
de mettre votre main, une poignée ou des agents nettoyants
sur ceux-là.
Le dessus de votre cuisinière est doté de brûleurs au gaz scellés
qui procurent commodité, facilité de nettoyage et flexibilité pour
un large éventail d’utilisations de cuisson.
Sélection de la taille de flamme
Regardez la flamme, et non le bouton, lorsque vous réglez la
chaleur. Lorsqu’un chauffage rapide est désiré, la taille de la
flamme doit correspondre à la taille du récipient de cuisson que
vous utilisez. Les flammes plus grandes que le bas du récipient
ne chaufferont pas plus rapidement et elles peuvent s’avérer
dangereuses.
Ces flammes sont trop grandes pour le récipient
Pousser le bouton de
commande et tourner jusqu’à
la position LITE.
COMMANDE DE L'ÉCLAIRAGE D’ACCENTUATION
Ce bouton commande l’éclairage d’accentuation DEL au panneau
de commande. Des options de couleurs personnalisées pour le
bouton et l’éclairage des tâches sont disponibles dans le menu
des paramètres et davantage dans l’application SmartHQ.
Ŷ /(' $FFHQW OLJKW 21 ODPSH G¶DFFHQWXDWLRQ DFWLYpH
Ŷ/(' $FFHQW OLJKW 21 DQG NQRE OLJKWV 21 ODPSHV
d’accentuation et du bouton activées)
Ŷ $OO 2)) WRXWHV OHV ODPSHV GpVDFWLYpHV
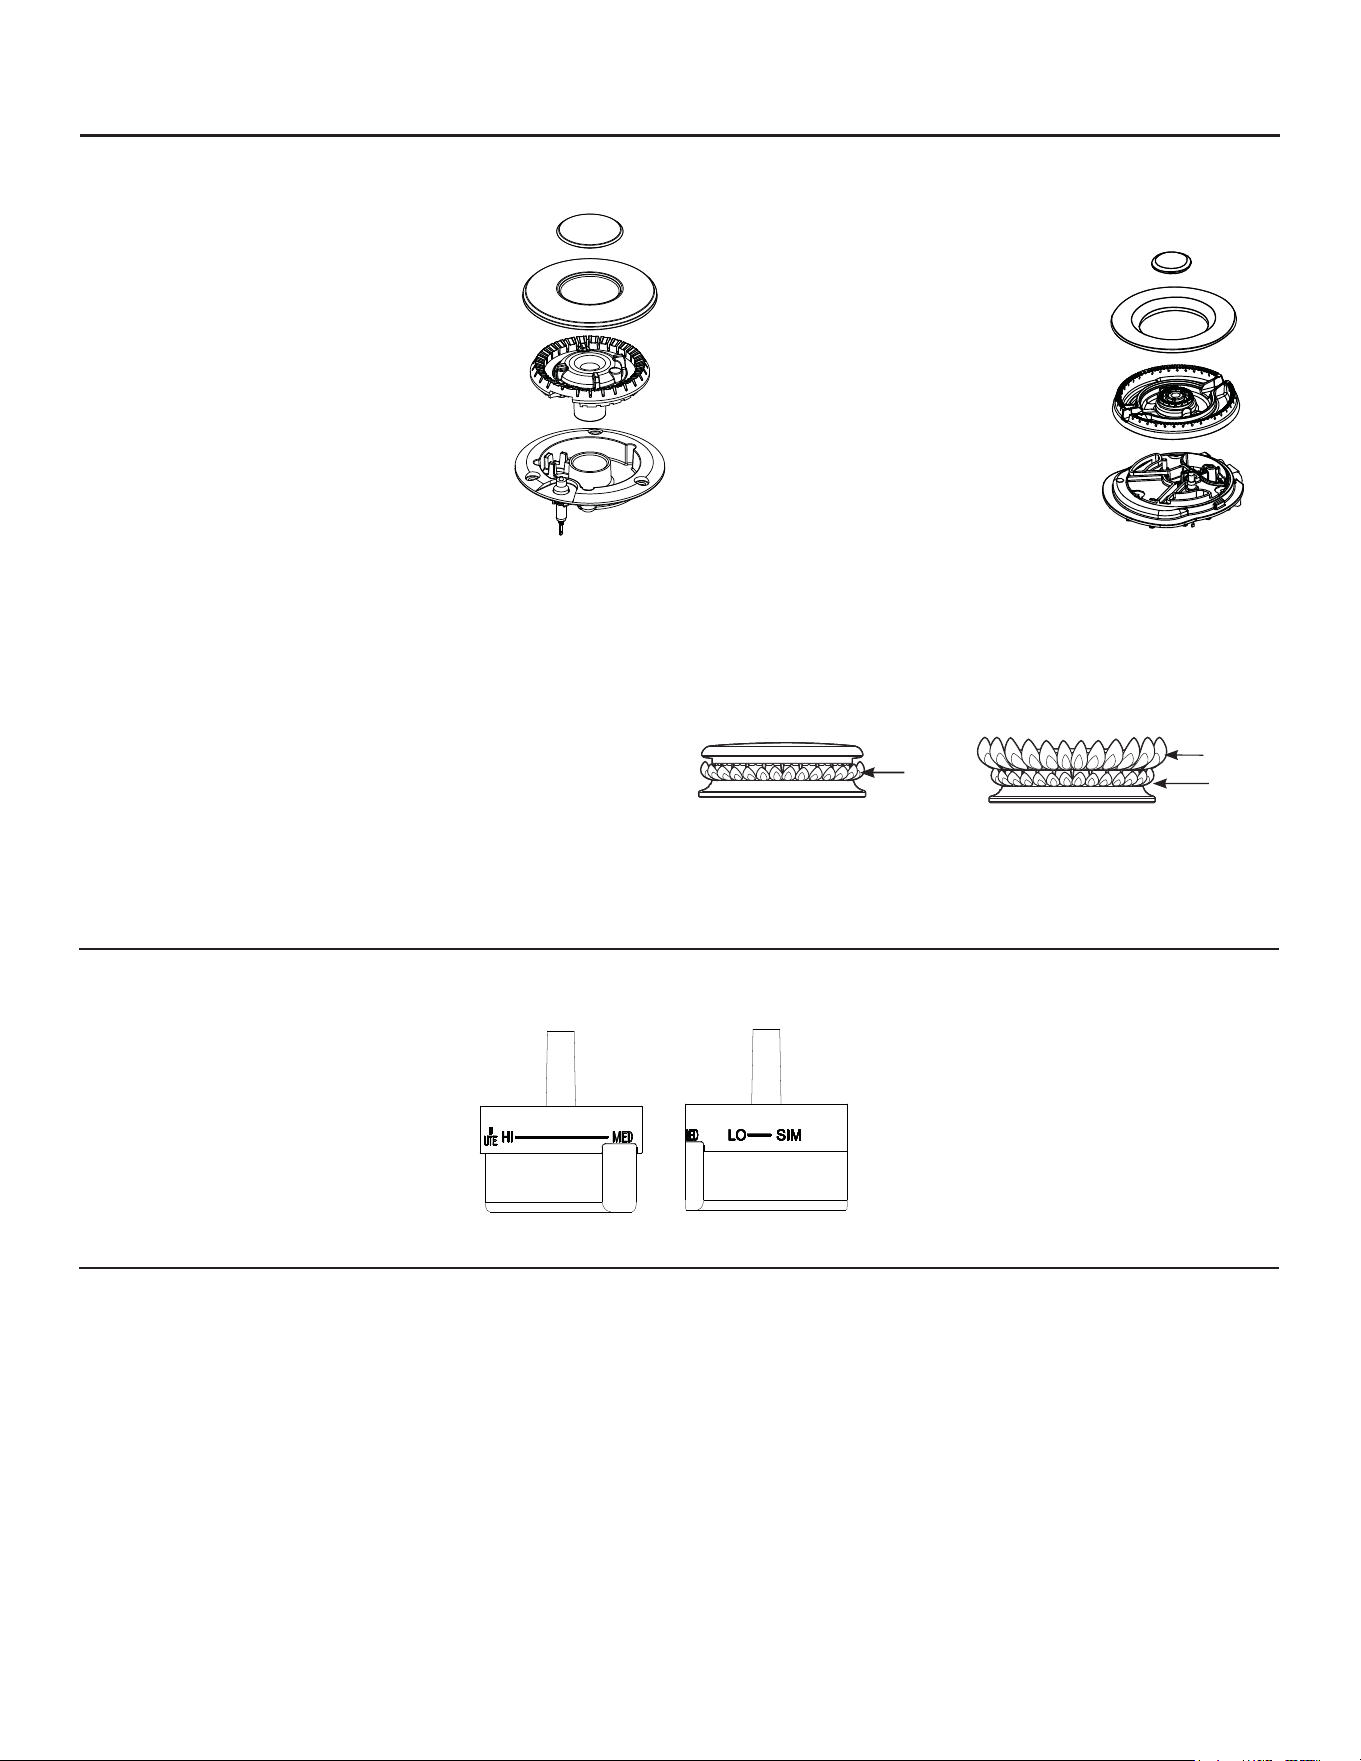
12 49-2000877 Rev. 4
UTILISATION DE LA CUISINIÈRE
Brûleurs Double Flamme Superposés
Les brûleurs à double flammes superposées de votre cuisinière
produisent deux ensembles de flammes dont l’un est superposé sur
l’autre, les brûleurs double flamme disposent d’une flamme réduite
(feu doux) et d’une flamme plus importante (feu principal).
Lorsqu’un brûleur est activé, la flamme (feu doux) se maintient
toujours allumée.
)HXGRX[RXPLMRWDJH
Le brûleur à deux rangées de flammes a été conçu pour fournir
un éventail de réglages de puissance qui inclut le feu doux ou
mijotage. Selon le type et la quantité de nourriture et de la taille
de la casserole, la flamme peut être réglée pour s’ajuster à vos
besoins spécifiques.
Cuisson :
Les réglages allant de LO à MED utilisent les flammes réduites
ainsi que les flammes principales. Utilisez HI vous utilisez un
ustensile d’un diamètre plus important.
HI est destiné à saisir les aliments rapidement et faire bouillir
de grandes quantités d’eau.
Les brûleurs à double flammes sont livrés avec des chapeaux en
émail noir et des pièces insérées en laiton qui reposent dans le
centre. Le consommateur peut retirer les pièces insérées s’il le
souhaite.
Feu
doux
Feu
principal
Feu
doux
Brûleur à plusieurs anneaux
Le brûleur à plusieurs anneaux est doté
de deux groupes d’anneaux, intérieur et
extérieur. Pour les grands récipients, activez
tous les anneaux en réglant le brûleur entre
Hi et Med.
Pour les petits récipients et la cuisson
à faible chaleur, activez seulement les
anneaux intérieurs en réglant le brûleur entre
Lo et Sim.
Les brûleurs à plusieurs anneaux sont livrés
avec des chapeaux en émail noir et en laiton,
au choix du consommateur.
Récipients pour la cuisson en surface
Aluminium : Nous recommandons des récipients de poids
moyen car ils s'échauffent rapidement et uniformément. La
plupart des aliments brunissent uniformément dans un poêlon en
aluminium. Utilisez des casseroles avec des couvercles étanches
lorsque vous cuisez avec une quantité d'eau minimale.
Acier inoxydable : Seul, ce métal ne comporte pas de propriétés
calorifiques intéressantes et il est généralement combiné avec
le cuivre, l’aluminium et d'autres métaux afin d’améliorer la
distribution de la chaleur. Les poêlons aux métaux combinés
donnent de bons résultats s’ils sont utilisés à chaleur moyenne
ou selon les recommandations du fabricant.
Fonte : S’ils sont chauffés lentement, la plupart des poêlons
donneront des résultats satisfaisants.
Métal émaillé : Dans certaines conditions, l’émail de certains
récipients de cuisson peut fondre. Suivez les recommandations
du fabricant pour les méthodes de cuisson.
Verre : Il existe deux types de récipients en verre, ceux qui
vont au four seulement et ceux pour la cuisson en surface
(casseroles, récipients pour le café et le thé). Le verre conduit la
chaleur très lentement.
Vitrocéramique résistante à la chaleur : Elle peut s’utiliser
autant pour le four qu’en surface. Sa conduction de chaleur et
son refroidissement s’effectuent très lentement. Consultez les
directives du fabricant du récipient pour savoir s’il convient aux
cuisinières au gaz.
Vue de dessus du bouton du brûleur à plusieurs anneaux
Types de brûleurs de surface
Brûleur à double flammes superposées :
Utilisez ce brûleur à des fins de cuisson générales.
Utilisez un récipient de cuisson dont la taille
correspond aux flammes.
Brûleur à plusieurs anneaux :
Utilisez ce brûleur pour les grands récipients
ou les plats à mijoter.
BRÛLEURS DE SURFACE (suite)
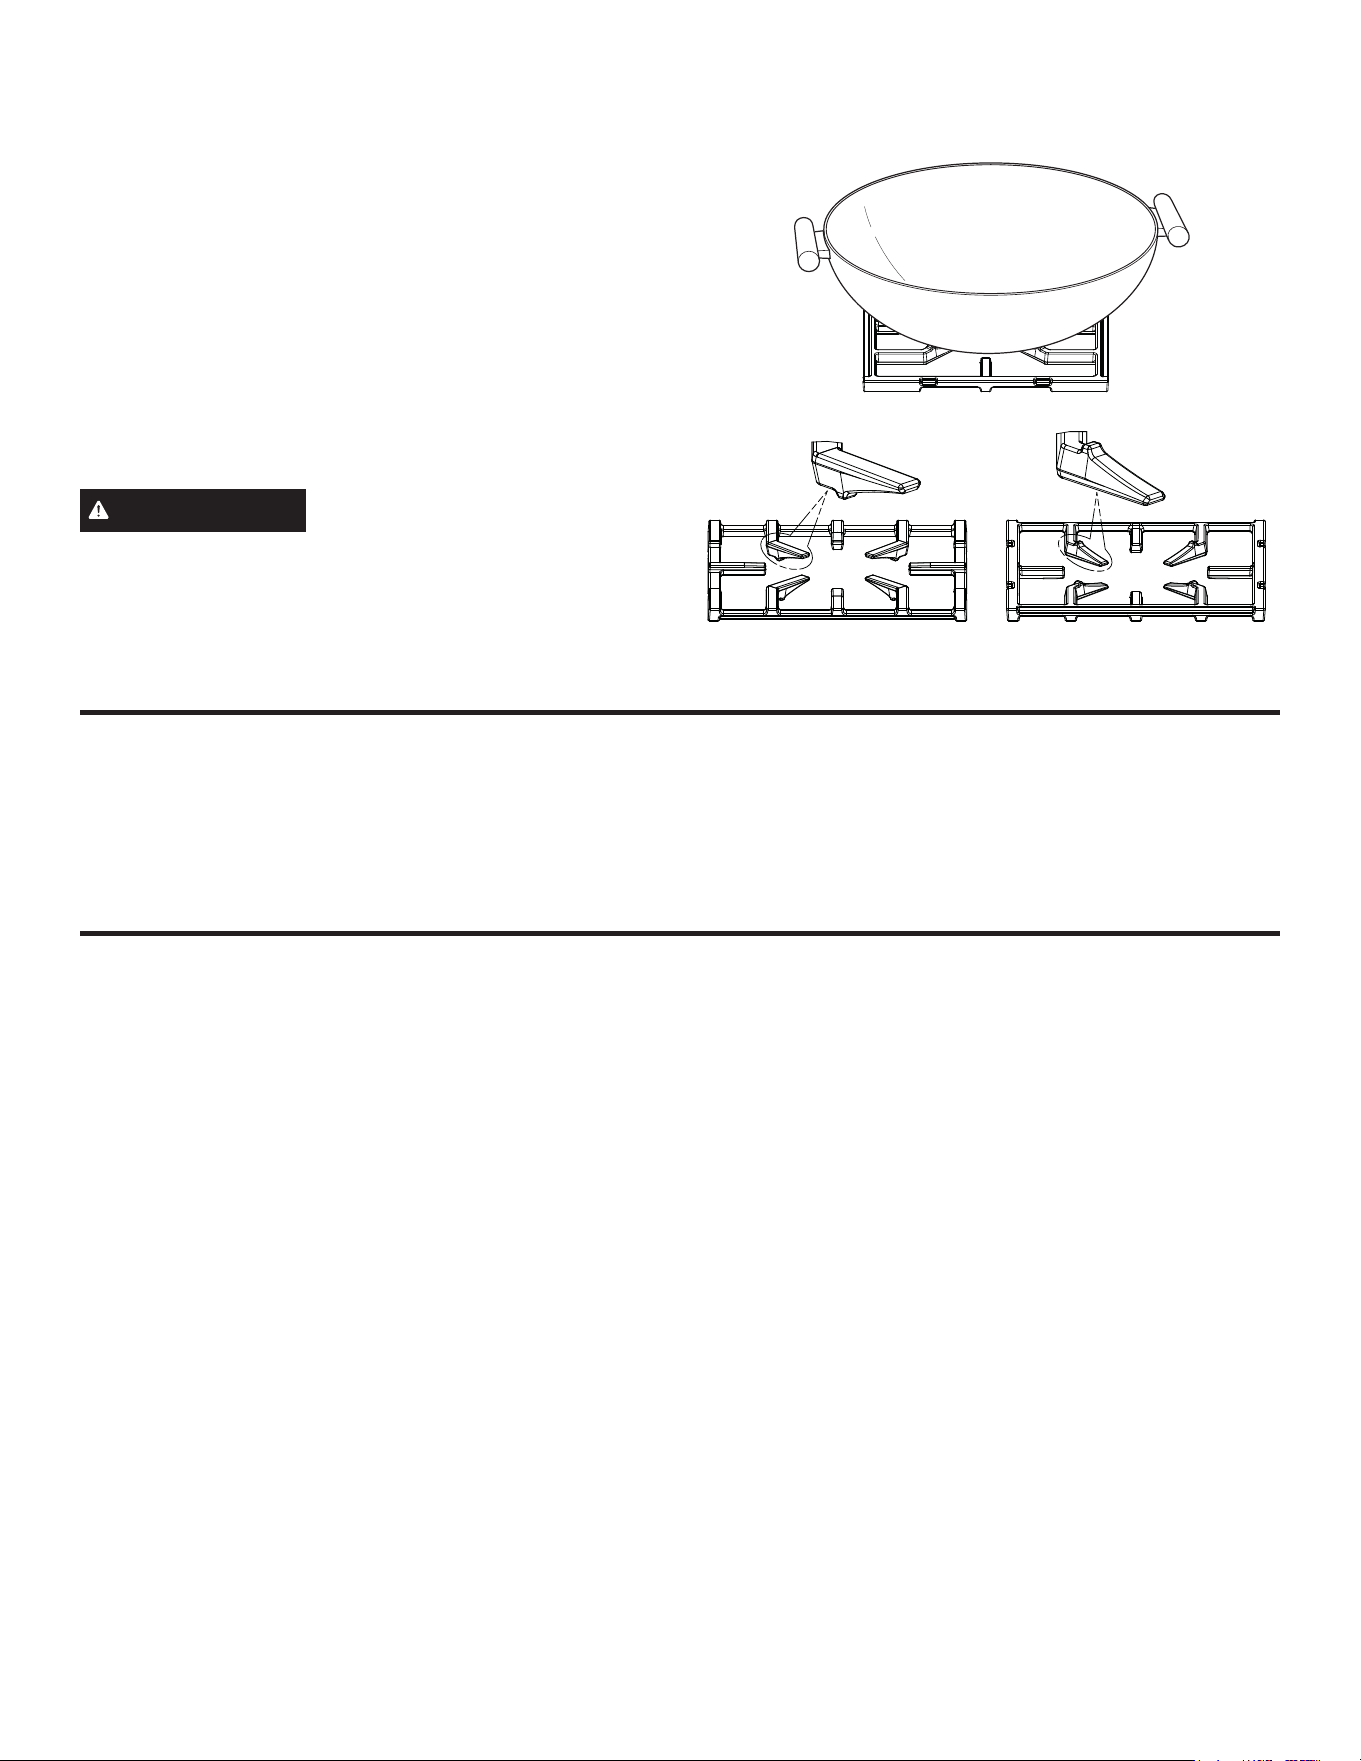
49-2000877 Rev. 4 13
UTILISATION DE LA CUISINIÈRE
Cuisiner au wok
Les grilles des brûleurs ont été spécialement conçues pour être
utilisées sur deux faces. La face plate convient aux ustensiles
à fond plat (marmites, casseroles, poêles à frire et woks à fond
plat),
tandis que le côté wok est conçu pour une grande variété
de woks à fond rond de 14 à 16 po de diamètre sans nécessiter
un anneau particulier.
Pour plus de commodité, il est recommandé d’utiliser un
brûleur frontal lorsque vous cuisinez à l’aide d’un wok.
Les brûleurs avant gauche ou droit sont recommandés pour la
cuisson au wok sur les cuisinières de 36 à 48 po, et le brûleur
avant gauche sur les cuisinières de 30 po.
AVERTISSEMENT
N’utilisez pas un anneau de support de
wok. Placer un tel anneau au-dessus d’un brûleur ou d’une grille
peut nuire au bon fonctionnement du brûleur, ce qui augmentera
le niveau de monoxyde de carbone au-dessus des valeurs
admissibles. Cela peut présenter un risque pour votre santé.
Face du wok Face plate
Pic
0RGHVGHFRQWU{OHGHODFXLVVRQGHSUpFLVLRQ7UXH7HPS
Deux modes de contrôle sont disponibles :
Ŷ&RQWU{OHSDUDSSOLFDWLRQ La température se règle au moyen
des applications mobiles SmartHQ ou Hestan Cue.
Ŷ&RQWU{OHORFDO/DWHPSpUDWXUHVHUqJOHVXUO¶pFUDQGHOD
cuisinière.
&RQWU{OHSDUDSSOLFDWLRQ
Après avoir réglé le mode de cuisson de précision sur l’écran
ACL et activé la cuisson en boucle fermée en tournant le bouton
du brûleur à High, lancez l’application mobile SmartHQ pour
mettre à jour la température cible. Pour utiliser Hestan Cue pour
contrôler la température et obtenir des recettes, lancez cette
application et suivez les instructions sur l’écran.
&RQWU{OHORFDO
Suivez les instructions sur l’écran ACL pour régler la cuisson en
boucle fermée et la température. Le réglage de la température
apparaîtra sur l’écran.
SYSTÈME DE CUISSON DE PRÉCISION TRUETEMP
La fonction de cuisson de précision permet un contrôle précis
de la température afin d’améliorer les résultats. Cette fonction
est située sur le brûleur avant droit et communique via Bluetooth
avec des accessoires intelligents tels que les ustensiles Hestan
Cue.
Appariement d’un appareil Bluetooth
®
Pour apparier un appareil Bluetooth, reportez-vous à la section
Paramètres.
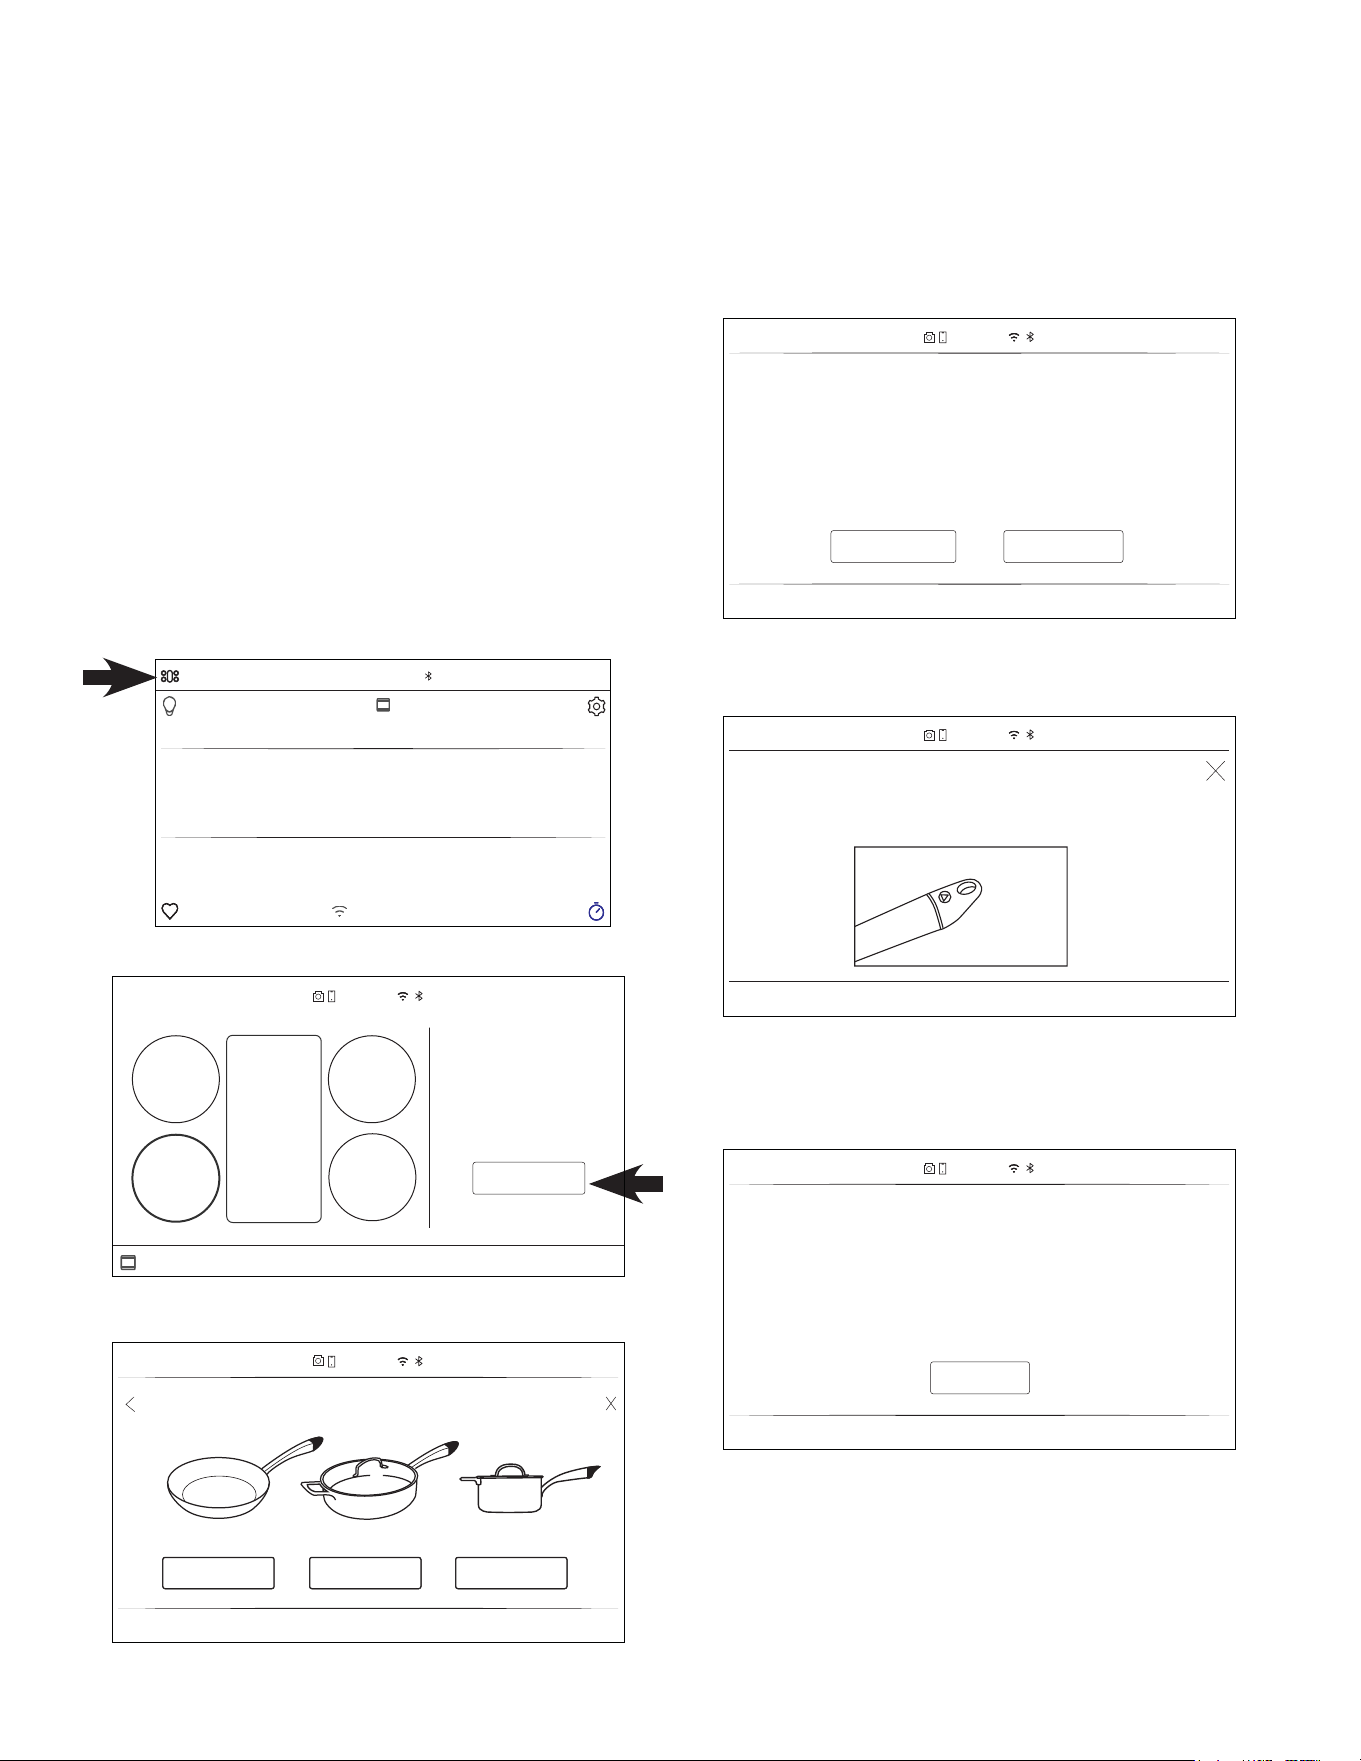
14 49-2000877 Rev. 4
UTILISATION DE LA CUISINIÈRE
SYSTÈME DE CUISSON DE PRÉCISION TRUETEMP (suite)
Utiliser la cuisson de précision avec des ustensiles Hestan Cue
®
La cuisinière peut communiquer via Bluetooth avec des
accessoires intelligents tels que les ustensiles de la marque
Hestan Cue
®
. Chaque accessoire intelligent peut s’apparier avec
la cuisinière en établissant une connexion Bluetooth. Voyez
Paramètres - Bluetooth.
Une fois apparié, l’ustensile Hestan Cue
®
devient disponible
comme option de la cuisson de précision. Il est possible
d’apparier plusieurs ustensiles. Si plusieurs ustensiles sont
appariés, vous serez invité à les activer chaque fois que vous
utilisez la cuisson de précision.
Ustensiles Hestan Cue
®
1. Le brûleur avant droit doit être tourné à OFF (arrêt) pour
commencer.
2. Touchez la bannière TO COOKTOP (vers la table de
cuisson) dans le haut de l’écran.
3. Touchez Start (démarrer).
4. Si plusieurs ustensiles de cuisson Hestan Cue sont appariés,
sélectionnez l’ustensile désiré sur l’écran de la cuisinière.
Si aucun ustensile apparié n’est trouvé, la cuisson de précision
sera annulée. Reportez-vous à Paramètres - Bluetooth pour
apparier un ustensile Hestan Cue
®
.
5. Activez votre ustensile Hestan Cue
®
en tapant deux fois
fermement sur le capuchon d’extrémité en plastique noir.
Si l’ustensile Hestan Cue® activé ne correspond pas à
l’ustensile sélectionné, assurez-vous que le bon module est
inséré dans la poignée.
Les modules ne doivent pas être interchangés entre des
ustensiles distincts.
TO OVEN
START
Set and maintain precise
temperatures with
confidence using the
TrueTemp™ Precision
Cooking System
10:35 AM
OFF
OFF
TRUETEMP
BURNER
OFF
OFF
10:35 AM
SELECT HESTAN CUE COOKWARE
CHEFS POT SAUCE POTSMART PAN
NO COOKWARE PAIRED
Precision cooking works only with Hestan Cue
®
cookware.
Select pair now to exit and go to settings to pair cookware.
PAIR NOWLEARN MORE
10:35 AM
ACTIVATE COOKWARE
Double tap handle of your Hestan Cue
®
cookware until
prompted to set temperature
10:35 AM
CHECK COOKWARE
The activated cookware does not match your selection.
Insure correct module is inserted in pan handle.
DISMISS
10:35 AM
TO COOKTOP 10:35 AM
OVEN
Bake Broil Convection
Precision
Cooking
More
Air Fry
GET CONNECTED
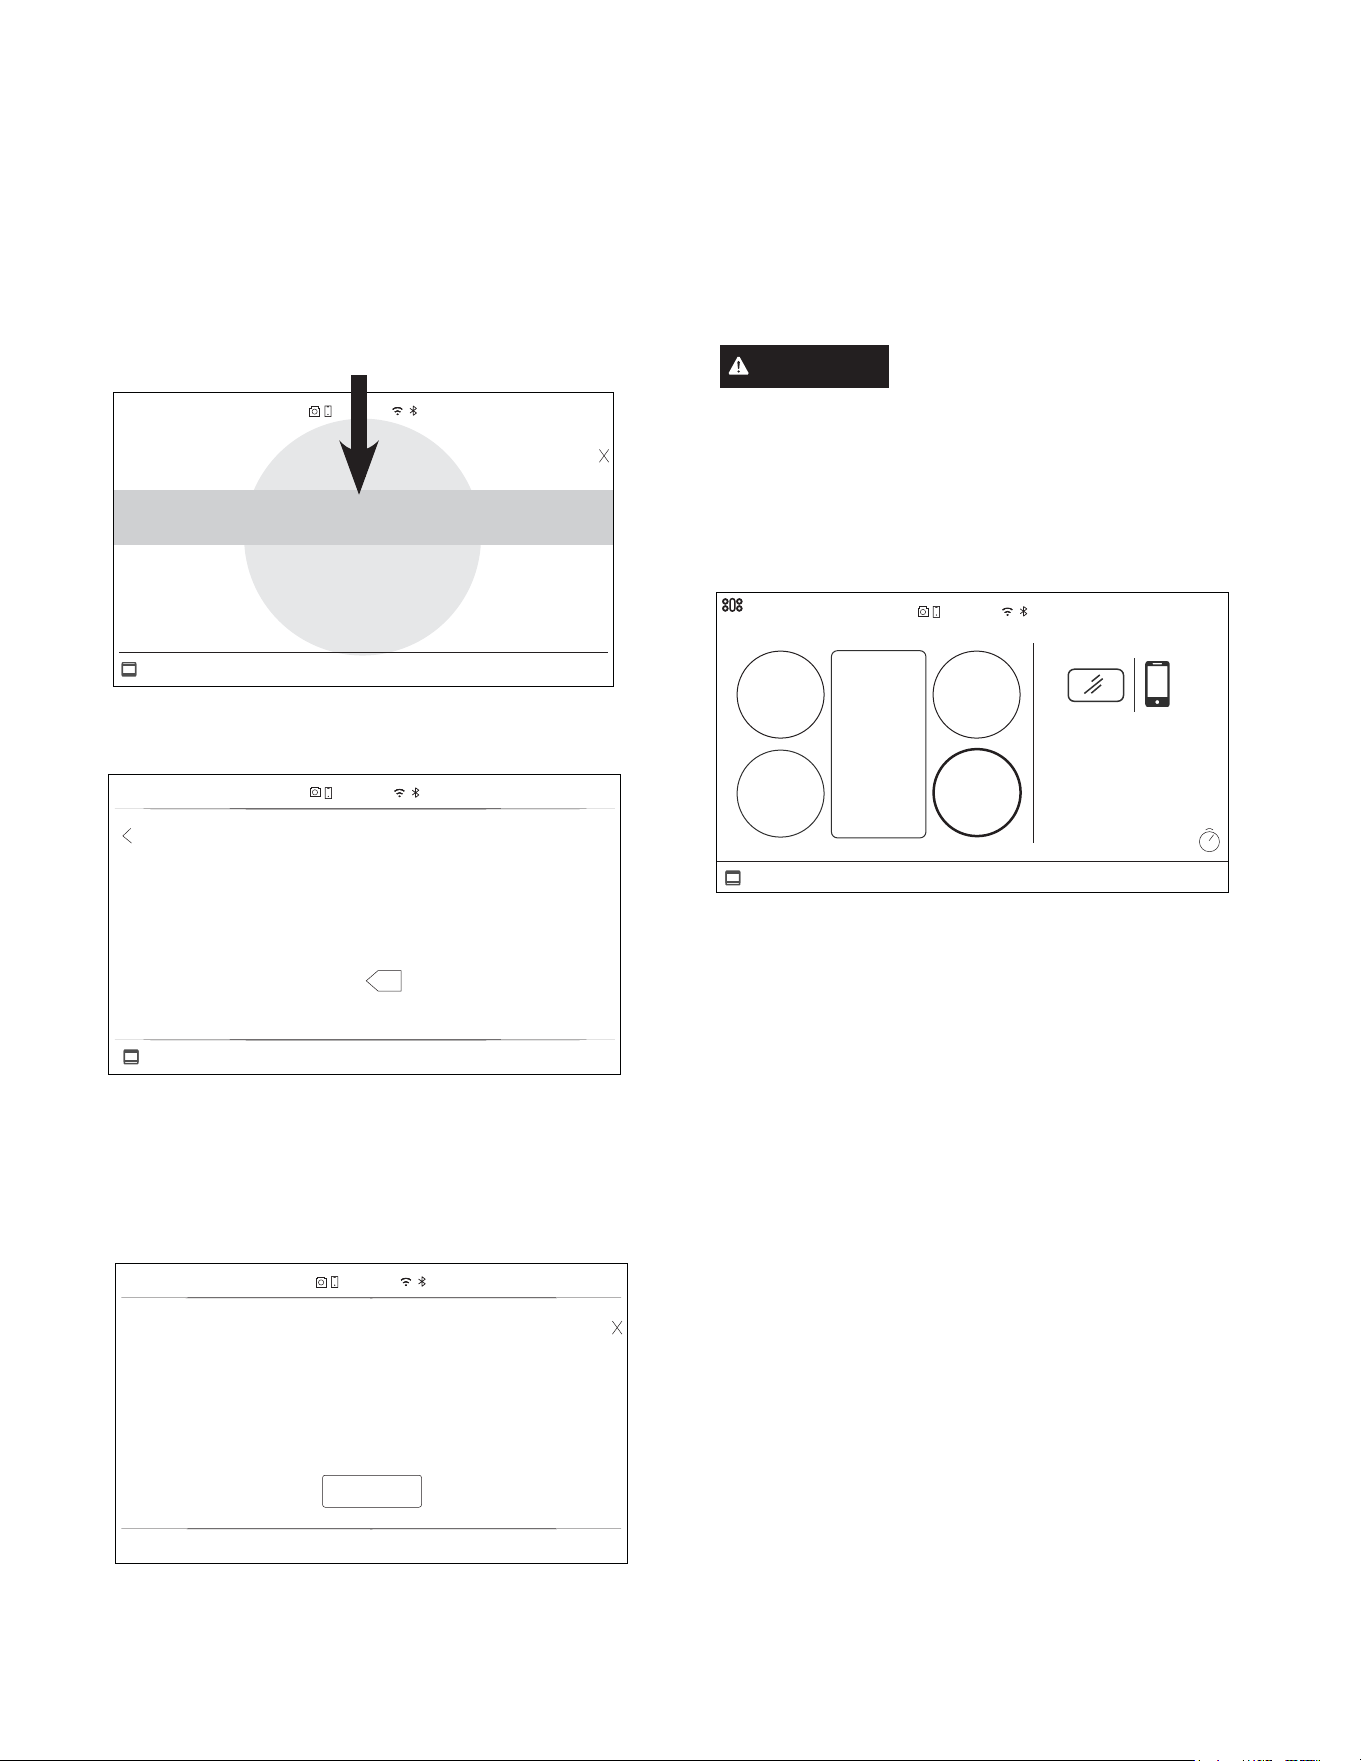
49-2000877 Rev. 4 15
UTILISATION DE LA CUISINIÈRE
6. Réglez la température de l’ustensile en faisant défiler
les températures vers la gauche ou la droite.
REMARQUE : Le brûleur peut s’allumer ou s’éteindre
automatiquement lorsqu’il faut réduire la température ou la
maintenir basse.
Si une température précise est désirée, pressez la
température en surbrillance.
7. Le bouton du brûleur de précision devrait maintenant clignoter
une lumière bleu. Assurez-vous que l’ustensile Hestan Cue
®
activé est centré au-dessus du brûleur et tournez le bouton du
brûleur à la position High (haute température).
La procédure de réglage sera annulée après 2 minutes
d’inactivité.
Le réglage de température apparaîtra sur le dessin du brûleur
avant droit sur l’écran. Vous pouvez changer la température
en sélectionnant l’état de la température ou via l’application
SmartHQ.
ATTENTION
Lorsqu’un mode de contrôle de la cuisson
GHSUpFLVLRQ7UXH7HPSHVWDFWLYpODWDLOOHGHODÀDPPHGX
brûleur va augmenter si la casserole est retirée de la grille
sans annuler le mode. Aussi, veillez à ne pas placer la
poignée de la casserole Hestan Cue en plastique au-dessus
G¶XQHÀDPPHGHEUOHXURXG¶XQpYHQWGHIRXUFKDXGD¿QGH
ne pas endommager le logement de(s) pile(s) en plastique.
Pile du module d’ustensile Hestan :
Si l’appareil annule votre cycle de cuisson de précision, il se
peut que l’ustensile apparié nécessite un remplacement de pile.
Remplacez la pile AAA située dans la poignée de l’ustensile
Hestan Cue. Veuillez communiquer avec le fabricant de
l’ustensile si le problème persiste après le remplacement de la
pile.
Afin de préserver la durée de vie de la pile, tournez le module
d’un quart de tour pour desserrer le module et déconnecter
l’ustensile quand il n’est pas utilisé.
Ustensiles Hestan Cue
®
(suite)
SYSTÈME DE CUISSON DE PRÉCISION TRUETEMP (suite)
10:35 AM
STARTX
1 2 3
4 5 6
7 8 9
0
350
°F
TO OVEN
250 275 300 325 350
°F
375 400 425 450
10:35 AM
NEXT
TRUETEMP™
PRECISION COOKING
TO OVEN
TURN BURNER KNOB TO HIGH
Place your cookware on front right burner. To begin
TrueTemp™ Precision Cooking, turn the front right burner
knob to “HI”
CANCEL
10:35 AM
TO OVEN
10:00
Tap the temperature
status to set TrueTemp™
temperature or use
SmartHQ app to control
remotely.
10:35 AM
OFF
OFF
175
°F
OFF
OFF
COOKTOP
16 49-2000877 Rev. 4
UTILISATION DE LA CUISINIÈRE
Aliment Variation
Temp. (ºF)
Beurre Fondre 240
Fondre et maintenir 150
Brunir 350
&ODUL¿HU 240
Chocolat Fondre et maintenir 115
Crêpes françaises 375
Œufs )ULW±%ODQFHW¿OHW 250
Frit – Bruni et crous-
tillant
350
Omelette 275
Brouillés 275
Pain doré – Épaiss.
0,5–0,875 po
375
Pain doré – Épaiss.
1–1,5 po
350
Sandwichs grillés –
Épaiss. 0,5–1 po
375
Sandwichs grillés –
Épaiss. 1,125–2,5 po
350
Crêpes 375
Pommes de terre Cubes – Épaiss. 0,5-1
po
375
Rondelles 375
Râpées 375
Aliment Épaisseur
(po)
Temp. (ºF)
Bacon
375
Bœuf - fricadelles 350
Bœuf - fricadelles 0.5 - 0.875
375
1 - 1.5 350
Bœuf - steak (saignant) 0.5 - 0.875 400
1 - 1.5 375
Bœuf - steak (mi-saignant) 0.5 - 0.875 400
1 - 1.5 375
Bœuf - steak (à point) 0.5 - 0.875 375
1 - 1.5 350
Bœuf - steak (à point, bien cuit) 0.5 - 0.875 375
1 - 1.5 350
Bœuf - steak (bien cuit) 0.5 - 0.875 375
1 - 1.5 350
Poulet - poitrines 0.5 - 0.875 375
1 - 1.5 350
Poulet - cuisses 0.5 - 0.875 375
1 - 1.5 350
Poulet - haché 350
Porc - côtelettes 0.5 - 0.875 375
1 - 1.5 350
Porc - haché 350
Saucisse - hachée 350
Saucisse - chapelet 0.25 - 0.875 350
1 - 1.5 325
Saucisse - fricadelles 0.25 - 0.875 375
Poisson - fillet ou steak de
poisson
0.25 - 0.875 425
1 - 1.5 400
Fruits de mer – pétoncles 425
Températures de cuisson suggérées pour les aliments usuels
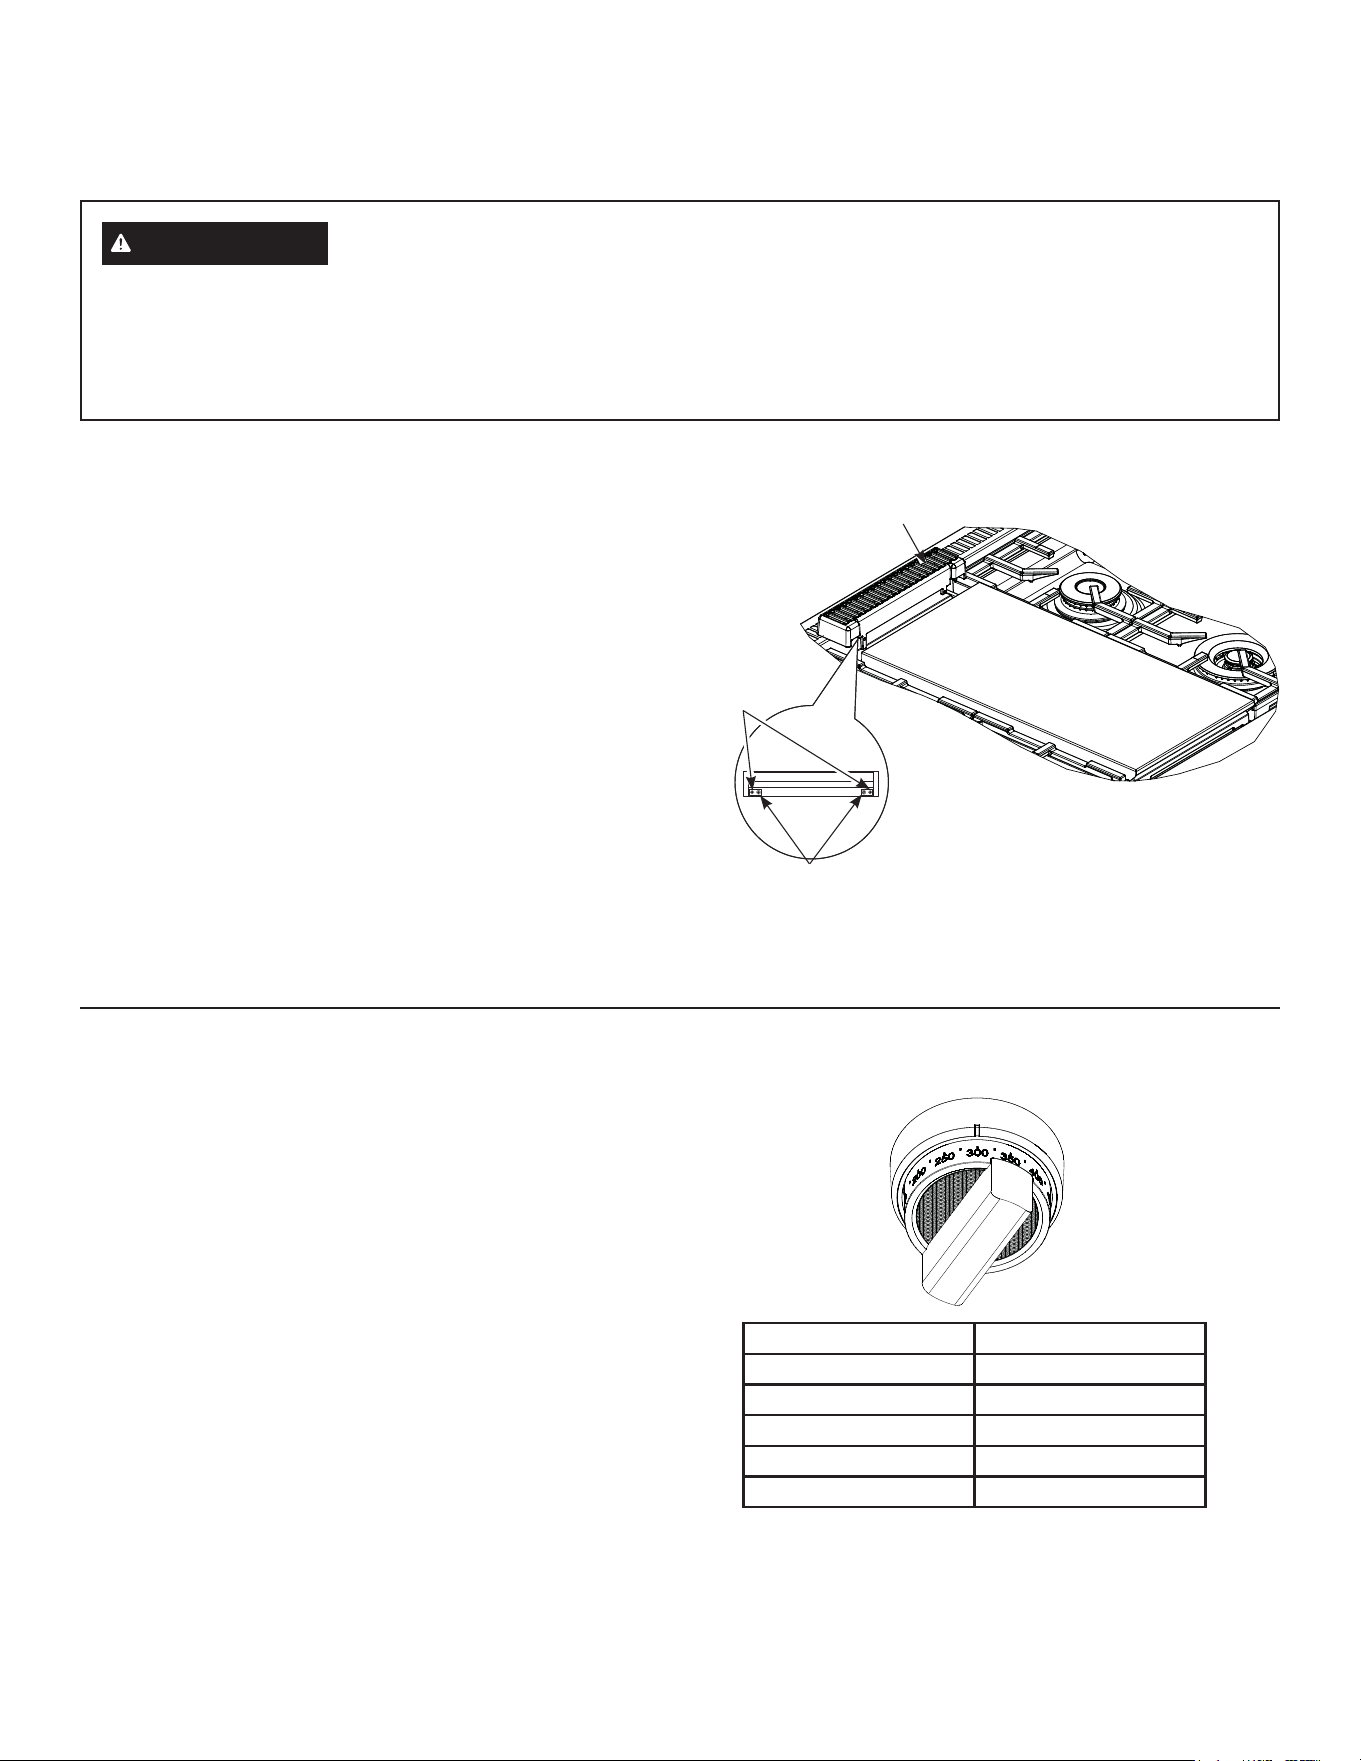
49-2000877 Rev. 4 17
UTILISATION DE LA CUISINIÈRE
PLAQUE CHAUFFANTE
PRÉCAUTIONS DE SÉCURITÉ DE LA PLAQUE CHAUFFANTE, RÉGLAGE DE LA
HAUTEUR
Retirez le couvercle en métal et la planche à trancher avant
d’allumer la plaque chauffante.
Les éléments de la plaque chauffante ne doivent pas être
retirés lors de son entretien.
Une fois que le dispositif est prêt, vous pouvez régler la hauteur.
Retirez le conduit d’aération en le tirant dessus à l’horizontale.
Veillez à ne pas rayer les surfaces en acier inoxydable alentour
lorsque vous retirez le couvercle du conduit d’aération.
Les deux vis intérieures sont des vis à crampons qui servent à
maintenir la plaque en place. Desserrez ces deux vis avant de
procéder au réglage de la hauteur de la plaque. Ne retirez pas
ces deux vis.
Les deux vis extérieures sont des vis de réglage de hauteur. Ne
retirez pas ces deux vis. Vous pouvez les desserrer pour régler
la plaque ou bien pour créer une légère inclinaison par laquelle
s’écouleront les huiles et les graisses lorsque vous serez en
train de cuisiner. Après les premières utilisations, vous serez en
mesure de déterminer l’inclinaison la plus adéquate selon les
aliments que vous préparez ou selon vos préférences.
Après avoir réglé la hauteur de la plaque, resserrez les vis à
crampons pour fixer la plaque dans sa position de départ. Serrez
les vis à la main, ne pas serrer excessivement.
UTILISER LA PLAQUE CHAUFFANTE
Nettoyez la plaque chauffante soigneusement avec de l’eau
savonneuse avant la première utilisation et après les utilisations
subséquentes. La surface de la plaque chauffante est fabriquée
avec de l’acier inoxydable de type 304 résistant, à polissage de
haute précision, doublé d’une plaque en aluminium pour distribuer la
chaleur uniformément. Appliquez un léger film d’huile de cuisson sur
la surface de la plaque chauffante afin d’empêcher les aliments de
coller.
Pour chauffer la plaque chauffante, poussez et tournez le bouton
de commande jusqu’au réglage de température désiré. La lampe
du cadran va s’allumer pour indiquer que la commande du
thermostat fonctionne. La plaque chauffante est commandée par
thermostat et peut se régler à n’importe quelle température entre
200 ºF et 450 ºF (93 ºC à 232 ºC). Laissez la grille se réchauffer
durant 10 minutes avant d’y placer des aliments.
REMARQUE : Contrairement aux brûleurs de surface qui utilisent
des allumeurs à étincelle, la plaque chauffante utilise un allumeur
de surface chaude. Une fois le bouton de commande tourné à la
température choisie, il faut environ 45 secondes pour que le gaz
alimente le brûleur.
AVERTISSEMENT
Risque d’incendie
Ŷ 8VH]GHSUXGHQFHORUVGHODFXLVVRQG¶DOLPHQWVJUDLVVHX[/¶pFRXOHPHQWGHJUDLVVHSHXWSURYRTXHUXQLQFHQGLH
Ŷ 1HSODFH]MDPDLVXQDUWLFOHTXHOFRQTXHVXUODSODTXHFKDXIIDQWHORUVTXHFHOOHFLQ¶HVWSDVXWLOLVpH/DFKDOHXUGHV
brûleurs environnants peut chauffer la plaque chauffante et provoquer un incendie.
Ŷ 3ODFH]HWHQOHYH]ODSODTXHFKDXIIDQWHVHXOHPHQWORUVTX¶HOOHHVWUHIURLGLHHWTXHWRXVOHVEUOHXUVGHVXUIDFHVRQW
éteints (OFF).
Aliment Température
Crêpes 375ºF (190°C)
Biftecks hachés 400ºF (204°C)
Bacon* 400ºF (204°C)
Fromage fondu 350ºF (176°C)
Œufs 275ºF (135°C°)
* REMARQUE : Disposez le bacon sur une plaque froide.
Ne pas préchauffer.
Couvercle du conduit d’aération
Vis à crampons
Vis de
réglage
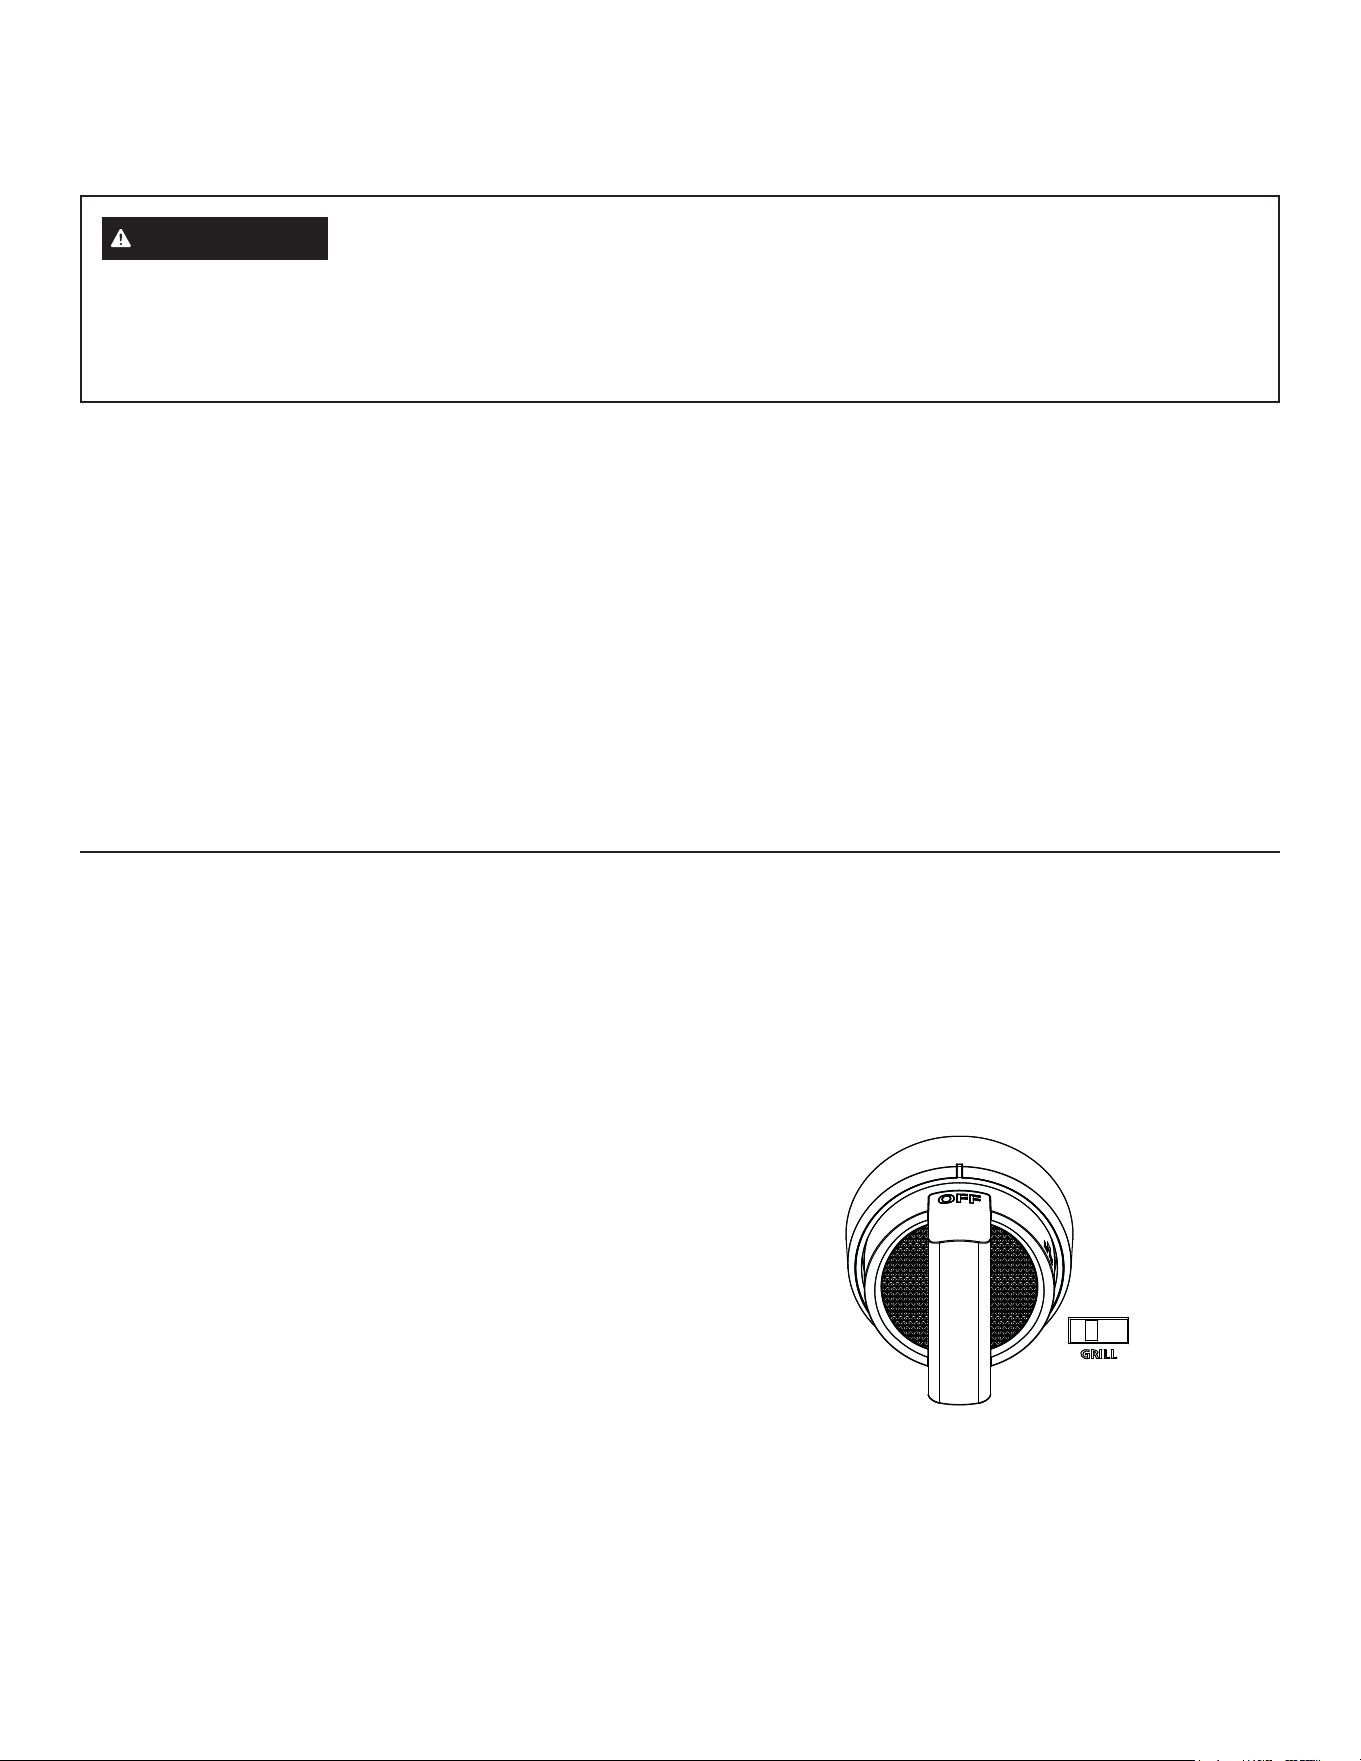
18 49-2000877 Rev. 4
GRILLE (sur certains modèles)
PRÉCAUTIONS DE SÉCURITÉ DE LA PLAQUE CHAUFFANTE
Éclaboussures de graisse :
Parfois pendant la cuisson au grill, les éclaboussures de graisse
peuvent prendre feu et créer de petites flammes pendant une à
deux secondes. Ne vous inquiétez pas.
Le déflecteur de rayonnement du grill est conçu pour récupérer le
trop-plein de graisse, limitant ainsi les éclaboussures.
Si une éclaboussure se produit, retirez les aliments du grill et
baissez la température jusqu’à la disparition de l’éclaboussure.
Pour minimiser davantage les éclaboussures, essuyez la graisse
superflue autour des bords des biftecks et des côtelettes, utilisez
un steak haché maigre, retirez la peau de la volaille, etc.
Utilisez une longue spatule et un gant non inflammable pour
retourner la nourriture sur le grill.
Évitez de griller des aliments à haute teneur en gras tels que du
bacon sur le grill. Voyez la section sur la plaque chauffante.
Couvercle du grill :
Retirez le couvercle avant d’allumer le brûleur. Pour votre
sécurité, le couvercle doit être retiré lors de l’utilisation du grill.
Si vous n’avez pas retiré le couvercle, il pourrait chauffer de
manière excessive.
Ustensile de cuisson :
N’utilisez aucun ustensile de cuisson sur le grill.
AVERTISSEMENT
Risque d’incendie
Ŷ 8VH]GHSUXGHQFHORUVGHODFXLVVRQG¶DOLPHQWVJUDLVVHX[/¶pFRXOHPHQWGHJUDLVVHSHXWSURYRTXHUXQLQFHQGLH
Ŷ 1HSODFH]MDPDLVXQDUWLFOHTXHOFRQTXHVXUOHJULOOORUVTXHFHOXLFLQ¶HVWSDVXWLOLVp/DFKDOHXUGHVEUOHXUV
environnants peut chauffer le grill et provoquer un incendie.
Ŷ 3ODFH]HWHQOHYH]OHJULOOVHXOHPHQWORUVTX¶LOHVWUHIURLGLHWTXHWRXVOHVEUOHXUVGHVXUIDFHVRQWpWHLQWV2))
UTILISER LE GRILL INFRAROUGE
Retirez le couvercle avant d’allumer le brûleur. Pour votre
sécurité, le couvercle doit être retiré lors de l’utilisation du grill
infrarouge.
Réglez le bouton de commande sur PREHEAT (Préchauffer).
Plus la durée de préchauffage du grill est longue, plus le dorage
sur la nourriture sera prononcé.
Allouez 5 à 15 minutes pour compléter le préchauffage du grill.
Après le préchauffage, le bouton de commande peut être réglé
sur n’importe quelle position entre HI (Haut) et LO (Bas).
*DUGH]WRXMRXUVXQRHLOVXUOHJULOOLQIUDURXJH
La cuisson intense durcit les graisses et les jus, créant ainsi
un goût de barbecue authentique. Le grill infrarouge offrira les
mêmes résultats qu’un grill d’extérieur.
Tous les grills au gaz offrent différentes cuissons. Réglez les
temps et les méthodes de cuisson lorsque vous utilisez le grill
infrarouge.
Nettoyez la grille du grill, la lèchefrite et la cuve à graisse après
chaque utilisation. Retirez les pièces du grill pour les nettoyer, une
fois froides au toucher.
REMARQUE : Le grill tardera environ 45 secondes à s’allumer.
À l’inverse des brûleurs de surface, qui utilisent des allumeurs
électriques, le grill utilise un élément incandescent pour
l’allumage. Il faut compter environ 45 secondes avant que
l’élément incandescent atteigne la température. Le grill n’est
alimenté en gaz que lorsque l’élément incandescent atteint la
température.
UTILISATION DE LA CUISINIÈRE

49-2000877 Rev. 4 19
UTILISATION DE LA CUISINIÈRE
GRILLE (sur certains modèles) (suite)
GRILLES DU GRILL
Retirez le couvercle avant d’allumer le grill infrarouge.
La grille du grill est réversible. Placez l’extrémité de la poignée
vers l’avant de la table de cuisson.
La grille changera de couleur sous l’effet de la chaleur, et pendant
la cuisson des huiles sur la surface. C’est normal et cela n’altère
pas la cuisson.
Vous n’êtes pas tenu d’assaisonner la grille de cuisson en fonte
porcelaine du grill.
Un côté de la grille (côté A) est rainuré et doit être utilisé pour
des aliments tels que les biftecks ou les fricadelles de viande
hachée. Les rainures sont inclinées de sorte que le trop-plein
de liquide et d’huile s’écoule sur l’avant du grill et terminent leur
course dans la lèchefrite.
L’autre côté de la grille (côté B) est conçu pour les aliments
délicats tels que les poissons.
Retournez et déplacez les aliments au besoin.
DÉFLECTEUR DU GRILL
Les modèles équipés d’un grill infrarouge possèdent un
déflecteur qui répartit la chaleur fournie par les brûleurs de façon
homogène sur le grill. Le déflecteur du grill permet également de
limiter les projections de graisse.
Le déflecteur est posé sur des languettes situées dans l’ouverture
du grill. Assurez-vous que le déflecteur soit correctement installé
en introduisant entièrement les languettes.
IMPORTANT : Évitez tout contact avec l’allumeur. Il est fragile et
il se peut se casser ou se briser facilement.
Languettes de support
Allumeur Glo-Bar
Plat Réglage 3UpFKDXႇDJH
Fricadelles de viande
hachés (8) HI ou LO 5 Minutes
Poitrine de poulet (6)
(Os vers le bas) LO 5 Minutes
Bifsteck d’aloyau
(3,7 cm [1-1/2 po]) LO 5 Minutes
Saumon LO 5 Minutes
Légumes (courgette) LO 10 Minutes
Côté A Côté B
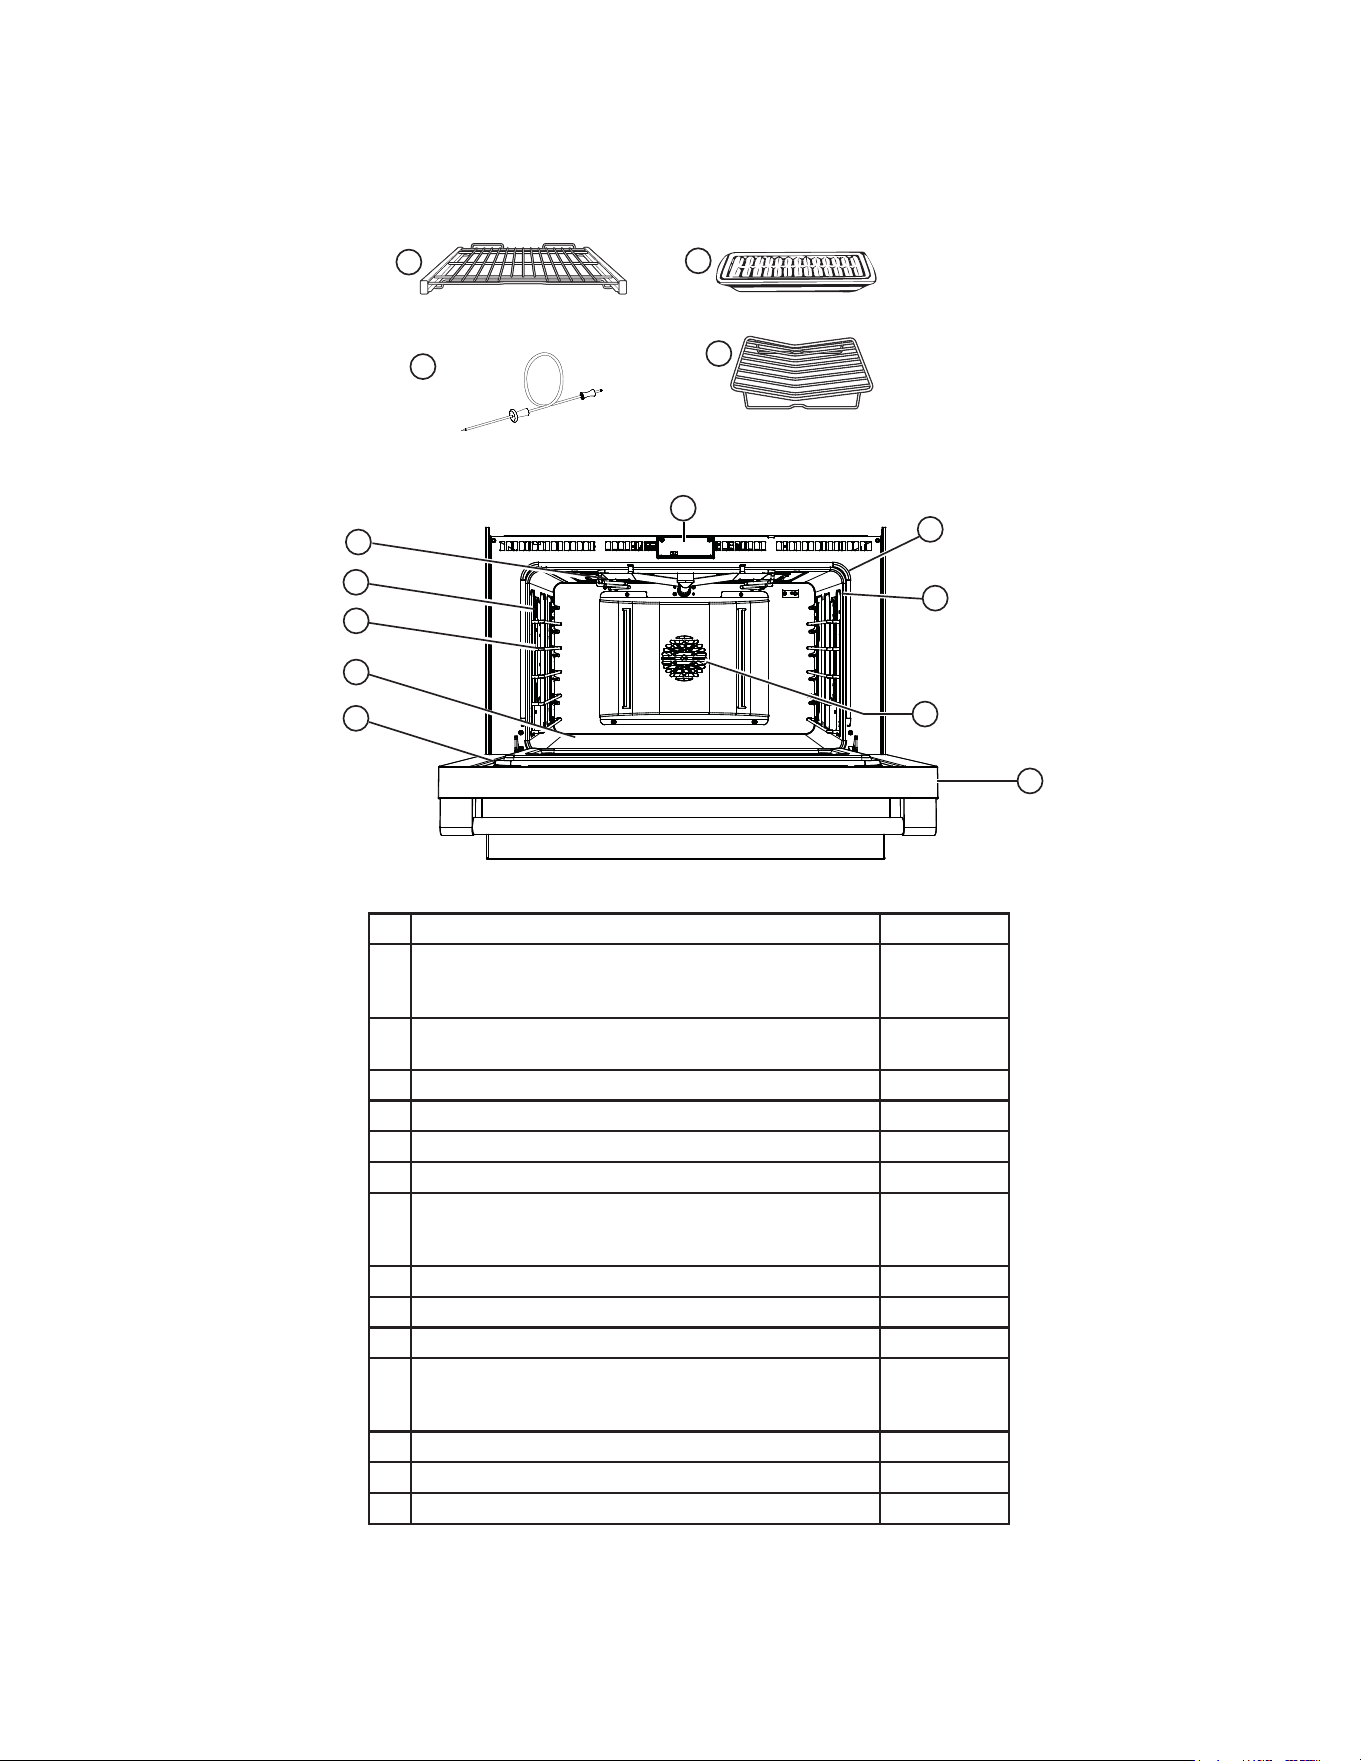
20 49-2000877 Rev. 4
CARACTÉRISTIQUES DE VOTRE FOUR
REMARQUE : Toutes les fonctions ne sont pas présentes sur tous les modèles
UTILISATION DE LA CUISINIÈRE
2
3
1
4
Grille de four extensible
Barquette et grille
Sonde de température
Grille de rôtissage
Index des fonctions Page
1 Grille(s) de four extensible(s)
— 3 dans le four (four droit sur modèles 48 po)
— 2 dans le four gauche
25, 26, 41
2 Barquette et grille - 1 dans le four (four droit sur modèles
48 po)
1 petite dans le four gauche
30, 38
3 Sonde de température -- 1 par four 33, 34, 41
4 Grille de rôtissage 30, 38
5 Système de rôtissage
6 Colonnes de four halogènes 43
7 Supports de grille de four
— 5 positions dans le four (four droit sur modèles 48 po)
— 4 positions dans le four gauche
25, 26
8 Élément de cuisson dissimulé (sous le sol du four)
9 Joint de porte de four 40
10 Joint de cadre du four 40
11 Prise de sonde de température
— côté droit dans le four (four droit sur modèles 48 po)
— côté gauche dans le four gauche
33, 34
12 Ventilateur de convection 29
13 Porte de four à fermeture souple 42
14 Verrou de porte de four automatique
13
8
5
12
11
10
9
7
6
14
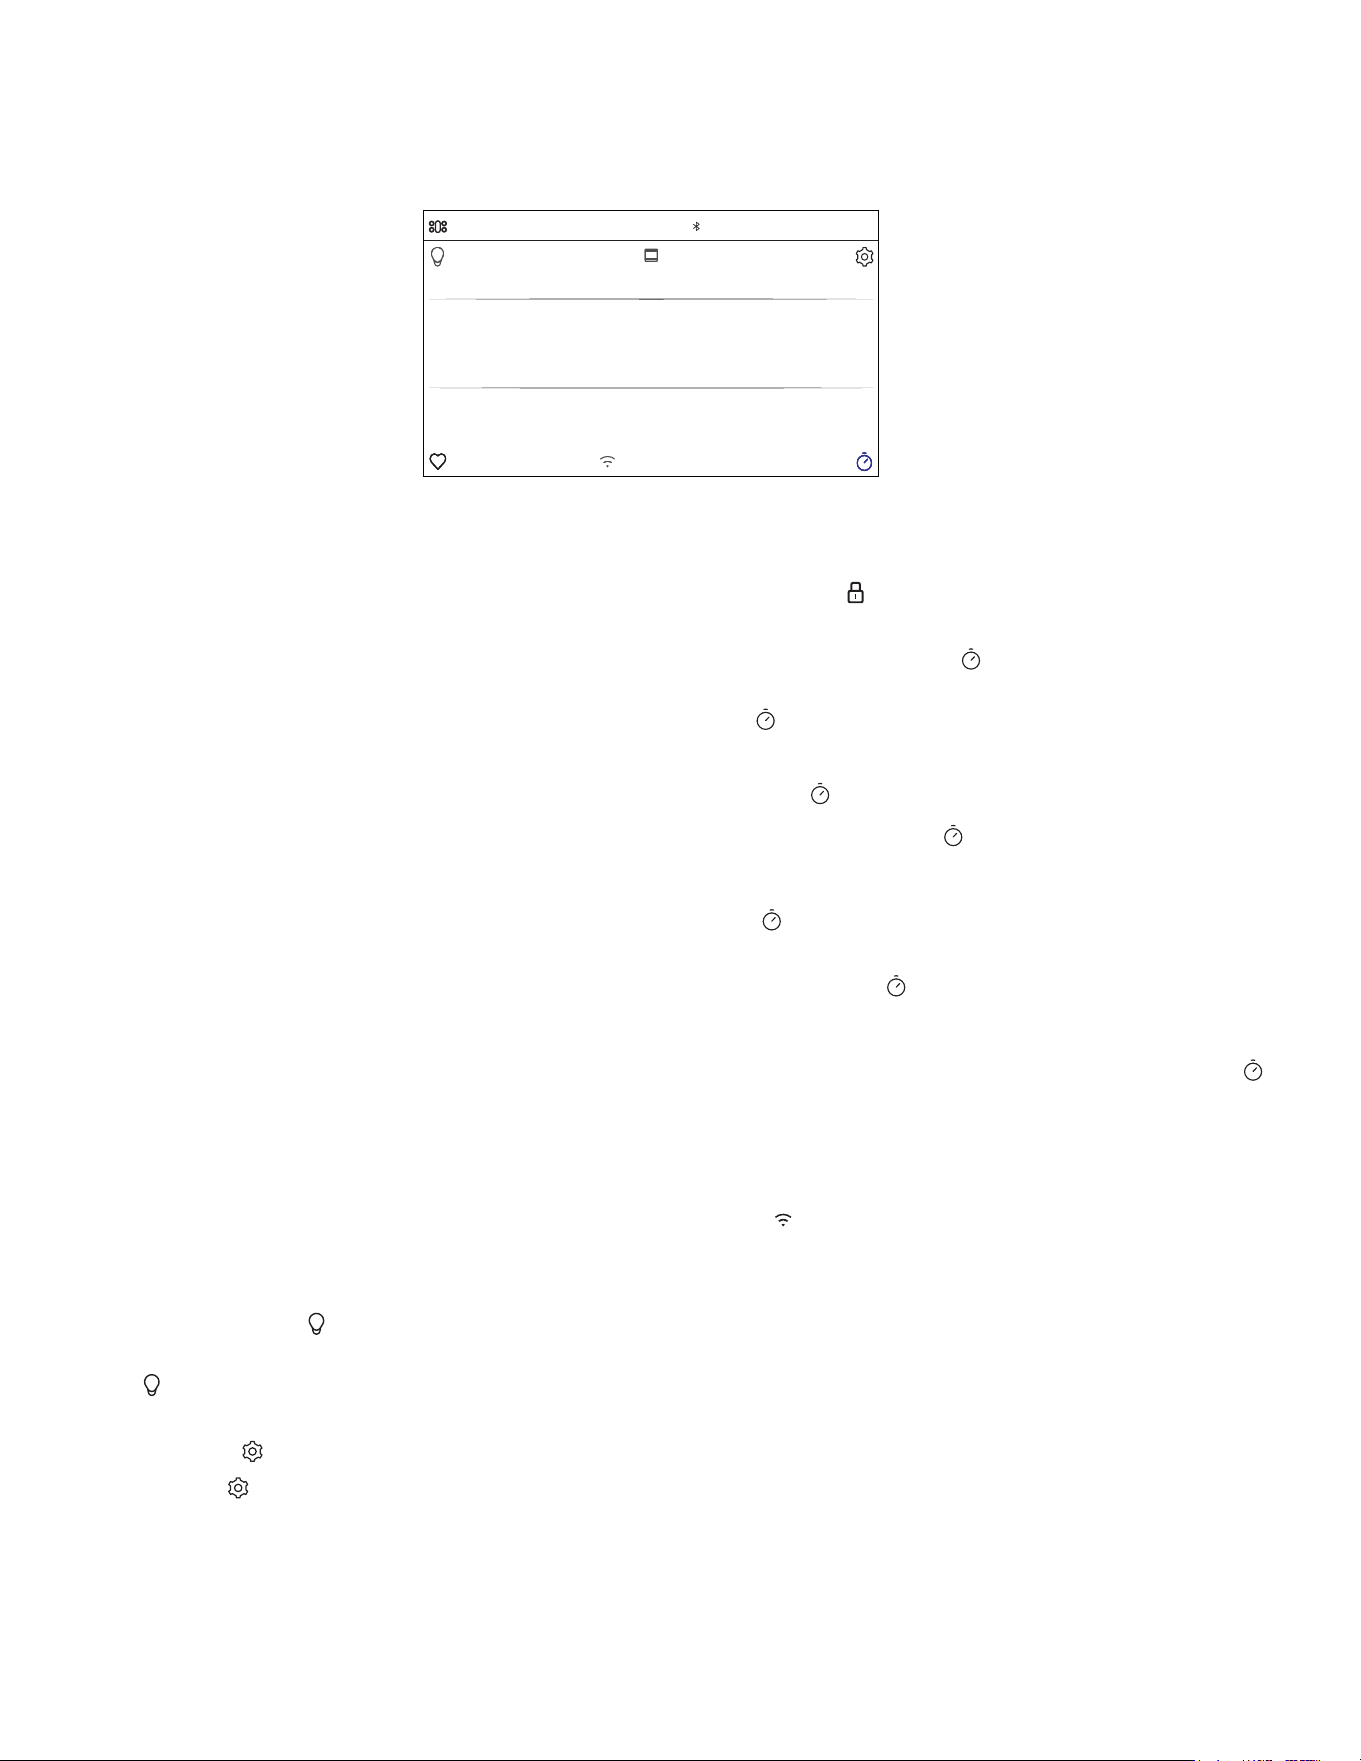
49-2000877 Rev. 4 21
UTILISATION DE LA CUISINIÈRE
FONCTIONS DU PANNEAU DE COMMANDE ET DU MINUTEUR
Cuisson au four traditionnelle (Bake)
Cette option permet à l’utilisateur d’avoir accès au mode de
cuisson au four traditionnelle.
Cuisson au grill (Broil)
On peut sélectionner Broil pour accéder à Broil Low et Broil High.
Voyez la section Modes du four pour plus d’informations.
Convection
Cette option vous permet d’utiliser le système de
convection pour cuire dans une variété de modes. Voyez
la section Modes de cuisson pour plus d’informations.
Cuisson de précision
La cuisson de précision est une suite de cycles de cuisson
personnalisés conçue pour des aliments particuliers. L’écran vous
guidera pour le réglage du four et la préparation des aliments
selon le cycle choisi. Les cycles de cuisson de précision varient
selon le type d’aliment; voyez la section Modes de cuisson pour
plus d’informations.
Friture à air chaud (Air Fry)
Le mode de friture à air chaud (Air Fry) est conçu pour donner
aux aliments une surface extérieure plus croustillante que la
cuisson au four traditionnelle. Voyez la section Guide de cuisson
pour la friture à air chaud pour plus d’informations.
Fonctions supplémentaires (More)
Sélectionnez cette pour accéder aux options Proof (fermentation),
Warm (tenue au chaud), Self Clean (autonettoyage) et Steam
Clean (nettoyage à la vapeur).
Éclairage du four
Pour allumer ou éteindre les lampes de la cavité du four, pressez
l’icône
. Les lampes des deux cavités seront allumées si vous
utilisez un four double.
Paramètres
Pressez l’icône pour accéder aux paramètres. Voyez la
section Paramètres pour plus d’informations.
Commande de verrouillage
Sélectionnez cette option pour protéger l’afficheur de la cuisinière
contre toute sélection non désirée sur l’écran. Pour déverrouiller
l’écran, pressez
et pressez Unlock (déverrouiller) sur la
fenêtre suivante.
Minuteur de cuisine
Cette fonction agit comme un minuteur à rebours. Pressez
l’icône
, sélectionnez le temps que doit compter le minuteur,
puis pressez Start. Le four va continuer à fonctionner une fois le
compte à rebours du minuteur terminé. Pour arrêter le minuteur,
sélectionnez
et pressez Clear (effacer).
Temps de cuisson
Cette fonction fait le compte à rebours du temps de cuisson et
éteint le four lorsque le compte à rebours est terminé. Pressez
l’icône
pendant un cycle, sélectionnez le temps de cuisson,
puis pressez Start.
Temporisateur
Cette fonction diffère le démarrage d’un cycle de cuisson au
four. Utilisez cette fonction pour régler l’heure à laquelle vous
voulez démarrer le four. Sélectionnez un cycle, puis pressez
. Sélectionnez l’heure du jour à laquelle le four s’allumera et
pressez Start. Vous pouvez aussi programmer un temps de
cuisson si vous le désirez.
:L)L HW FRQWU{OH j GLVWDQFH
Pressez
GET CONNECTED
pour connecter votre four au réseau
Wi-Fi. Cette option vous permet de télécharger des informations
pour votre four et de le contrôler à distance. Le four doit être
connecté au Wi-Fi avant que le contrôle à distance (Remote
Enable) puisse être activé. Pour des instructions sur la façon de
connecter votre four, voyez Wi-Fi et contrôle à distance sous la
section Paramètres de ce manuel.
TO COOKTOP 10:35 AM
OVEN
Bake Broil Convection
Precision
Cooking
More
Air Fry
GET CONNECTED

22 49-2000877 Rev. 4
UTILISATION DE LA CUISINIÈRE
PARAMÈTRES
* Compatible avec appareils Apple ou Android, réseau Wi-Fi domestique requis.
Plusieurs paramètres sont accessibles en pressant l’icône dans le coin supérieur droit de l’écran principal.
:L)L HW FRQWU{OH j GLVWDQFH :L)L 5HPRWH
Enable)
Vous pouvez configurer cet électroménager afin de le contrôler
à distance à tout moment. Ne rangez pas des matières
inflammables ou des articles sensibles à la température à
l’intérieur ou sur le dessus de la cuisinière. Grâce à la fonction
Wi-Fi, vous serez en mesure de contrôler les fonctions
essentielles du four telles que le réglage de la température,
des minuteurs et des modes de cuisson à partir d’un appareil
intelligent.*
Sélectionnez
puis :L)L 5HPRWH (QDEOH et suivez les
instructions sur l’écran de votre four et l’écran de votre appareil
intelligent. Il est nécessaire d’activer la connexion Wi-Fi avant
d’utiliser Remote Enable (contrôle à distance) sur votre four.
Voyez la section Connexion de votre cuisinière compatible Wi-Fi
de la page 9 pour la procédure de connexion complète de votre
cuisinière.
Démarrage à distance de votre four
Pour démarrer votre four à distance une fois qu’il est connecté
au Wi-Fi, pressez Remote Enable sur le menu principal ou
accédez à la fonction Wi-Fi & Remote Enable dans le menu des
paramètres et activez l’option Remote Enable. Vous pouvez
maintenant démarrer le four à distance à l’aide de votre appareil
intelligent connecté. L’icône doit être active pour démarrer le
four à distance. Pour déconnecter votre appareil intelligent de la
fonction Remote Enable, accédez au menu de :L)L 5HPRWH
Enable et désactivez l’option Remote Enable.
REMARQUE : Les aliments qui se gâtent rapidement, tels que
lait, œufs, poisson, farce, volaille et porc, ne doivent pas être
laissés sans réfrigération plus de une (1) heure avant ou après
la cuisson. La température ambiante favorise la croissance de
bactéries nocives. Assurez-vous de fermer la lampe du four car
la chaleur de l’ampoule accélère la croissance des bactéries
nocives.
Réglage de l’horloge (Set Clock)
Cette fonction vous permet de régler l’horloge et la façon
dont l’heure du jour doit s’afficher. Vous avez le choix de
l’heure standard à 12 heures avec sélection de AM ou PM,
ou de l’heure militaire à 24 heures.
Sabbat
Le mode sabbat désactive l’éclairage du four (les lampes
ne s’allumeront pas à l’ouverture de la porte), tous les
sons (un bip ne se fera pas entendre à la pression d’une
commande) ainsi que les modes Convection, Broil, Warm,
Proof et toutes les minuteries. Le mode sabbat ne peut
être utilisé qu’avec la cuisson au four traditionnelle (Bake).
Veuillez vous reporter à la section sur le mode sabbat pour
plus d’informations.
Tonalité (Sound)
Ce menu vous permet de changer le volume sonore, la fin
de la tonalité du cycle, et d’activer ou désactiver la tonalité
des touches.
Éclairage (Lighting)
Ce paramètre contrôle la luminosité de l’éclairage d’accentuation.
Voyez la section sur l'éclairage d’accentuation pour plus
d’informations.
Carburant de la table de cuisson (Cooktop
Fuel)
Vous permet de sélectionner l’alimentation en gaz de votre
cuisinière. Le gaz naturel est la sélection par défaut.
)DLUH Gp¿OHU YHUV OH KDXW RX OH EDV SRXU DFFpGHU j WRXV OHV SDUDPqWUHV
SETTINGS
12:30 PM
Wi-Fi & REMOTE ENABLE
BLUETOOTH
SET CLOCK
SABBATH
COOKING
SYSTEM
SETTINGS
SOUND
DISPLAY
12:30 PM
LIGHTING
COOKTOP FUEL
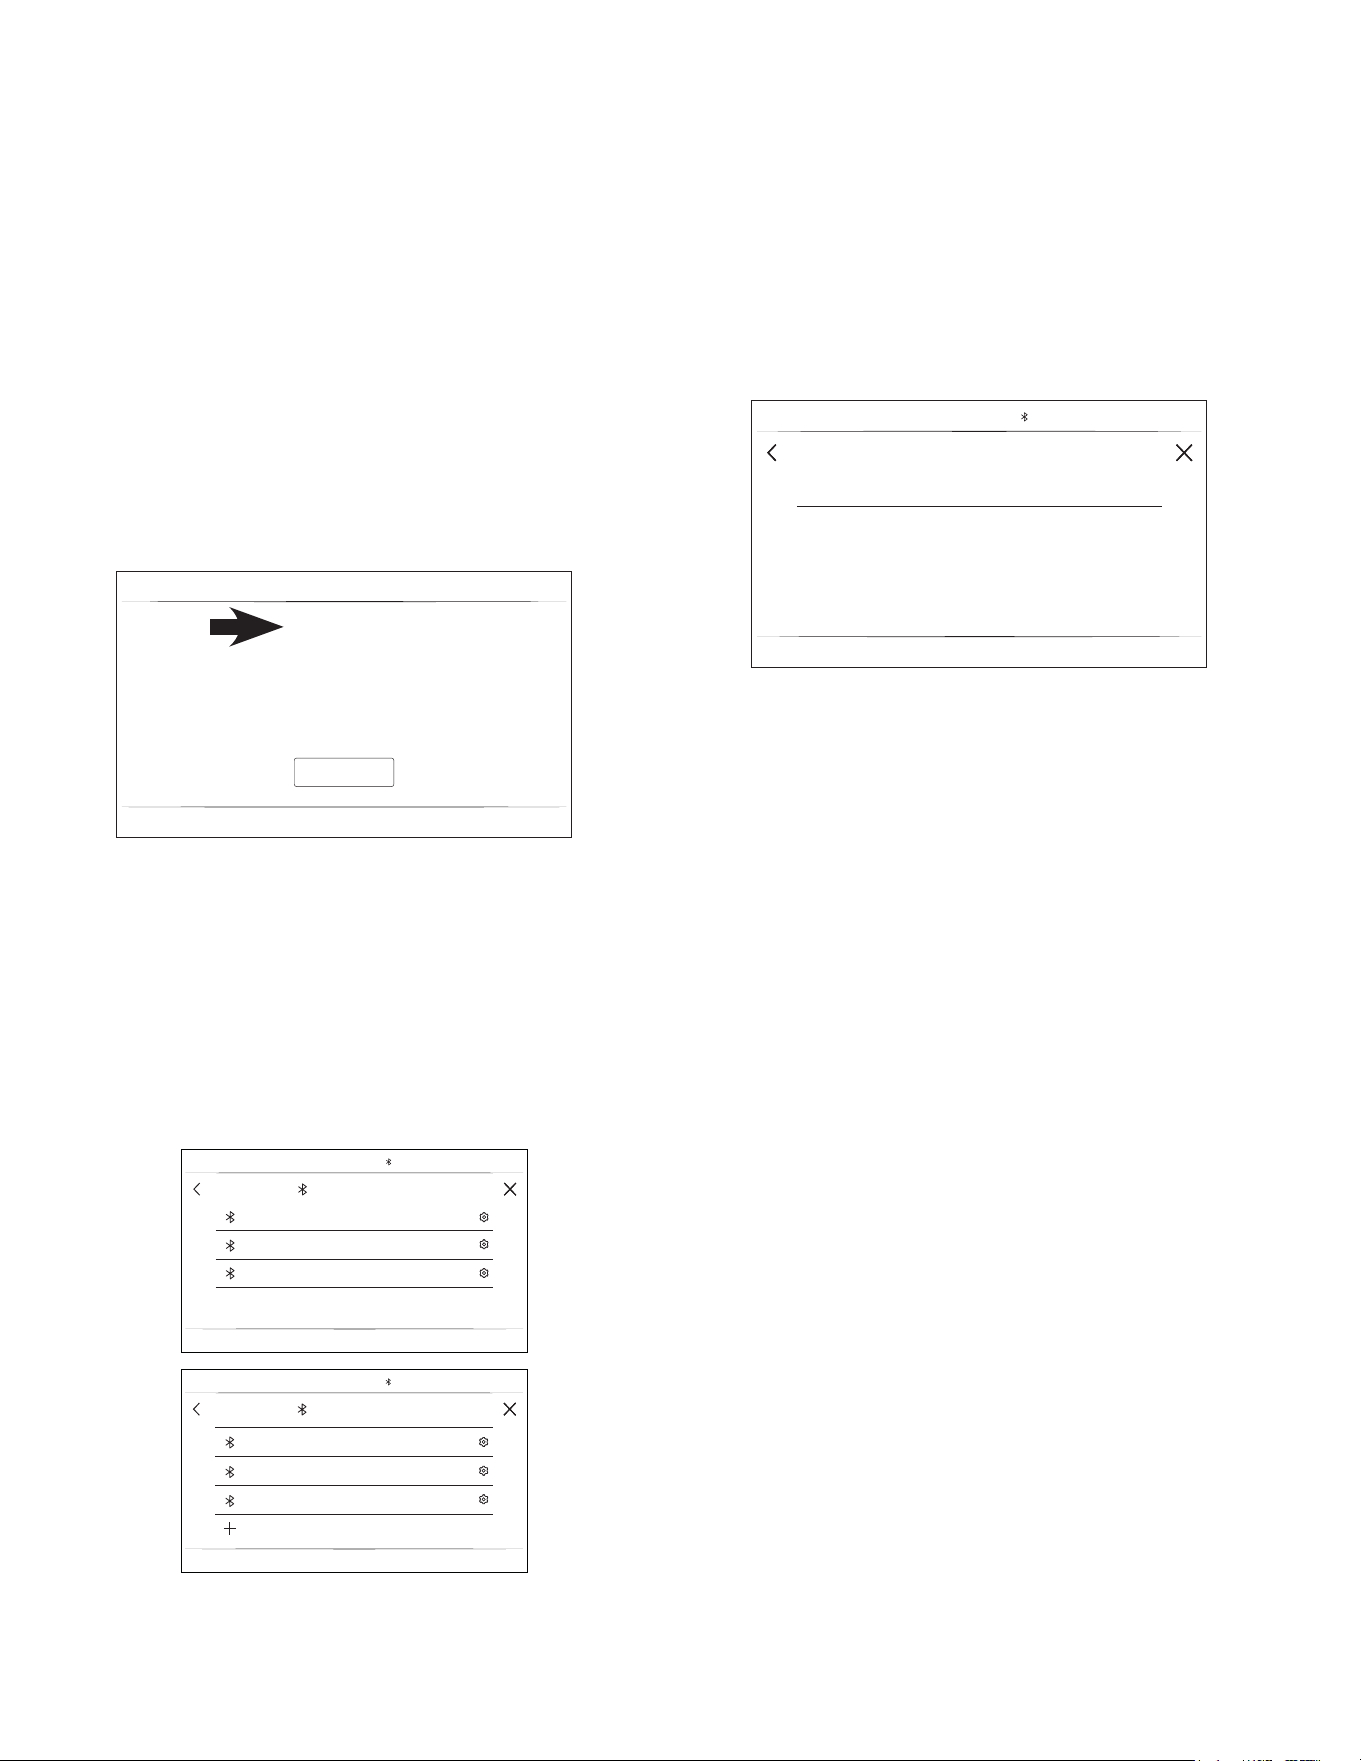
49-2000877 Rev. 4 23
UTILISATION DE LA CUISINIÈRE
PARAMÈTRES
Appariement Bluetooth
®
Des accessoires connectés tels que les ustensiles Hestan Cueet les
produits compatibles Chef Connect comme un four à micro-ondes
à hotte intégrée ou une hotte de cuisinière peuvent être appariés
à l’aide de la fonction Bluetooth
®
. Pour apparier ces produits à
la cuisinière, pressez la touche des paramètres et sélectionnez
Bluetooth
®
. Sélectionnez Pair (apparier) et suivez les instructions
correspondantes incluses avec le produit compatible Bluetooth®.
La cuisinière annulera le mode d’appariement après deux minutes
si aucun appareil n’est détecté. Sélectionnez Remove (retirer) pour
confirmer l’appariement du produit ou pour mettre fin à l’appariement.
1. Touchez Gear (équipement) pour le menu Settings (paramètres).
2. Touchez Bluetooth dans le menu Settings.
La cuisinière effectuera automatiquement une recherche d’appareil
si aucun n'est apparié. La recherche cessera au bout de 2 minutes si
aucun appareil n’est trouvé.
3. Suivez les instructions de l’appareil que vous souhaitez apparier.
a. Lorsqu’un produit Chef Connect est apparié, la
synchronisation de l’heure du jour s’effectue automatiquement
entre les produits.
b. Pour les ustensiles Hestan Cue
®
, tapez deux fois fermement
sur le capuchon d’extrémité en plastique noir.
Une fois appariés, les appareils figurent sur une liste défilante.
Pour apparier un nouvel appareil Bluetooth :
1. Faites défiler la liste jusqu’à + PAIR NEW DEVICE (apparier un
nouvel appareil) pour ajouter un appareil.
Pour retirer un appareil Bluetooth :
1. Touchez le nom de l’appareil.
2. Touchez FORGET THIS DEVICE (oublier cet appareil).
Affichage (Display)
Cet écran affiche les options Brightness (luminosité), Clock Off
(retirer l’horloge) et Energy Saver (économie d’énergie). Clock Off
fait disparaître l’horloge lorsque l’écran est inactif, mais celle-ci
réapparaîtra en touchant l’écran.
Cuisson (Cooking)
Ŷ Le four est réglé aux degrés Fahrenheit, mais on peut ici
passer aux Celsius.
Ŷ La fonction Auto Recipe Conversion (conversion de
recette automatique) peut être activée afin de réduire
automatiquement la température de cuisson programmée
pour les modes Convection Bake ou Convection Bake Multi.
Notez que cela ne réduira que la température de cuisson, et
non le temps de cuisson. Lorsque l’option 12 Hour Shut Off
(arrêt automatique 12 heures) est activée, le four s’éteindra
automatiquement au bout de 12 heures de fonctionnement
continu.
Ŷ La fonction Adjust Temperature (ajuster la température)
permet d’augmenter ou de réduire la température du four
35°F. Utilisez cette fonction si vous souhaitez modifier la
température du four parce que vous croyez qu’elle est
trop élevée ou trop basse. Pour les fours doubles, les
températures des fours supérieur et inférieur sont ajustées
séparément.
Système (System)
Cet écran vous permet d’effacer vos données d’utilisateur
sauvegardées et affiche la version courante du logiciel.
CANCEL
BLUETOOTH
10:35 AM
Scannning for compatiable bluetooth devices…
Turn device on and put it in pairing mode.
PAN 1
PAN 2
MWO_VENT 1
BLUETOOTH
10:35 AM
BLUETOOTH
10:35 AM
PAIR NEW DEVICES
MWO_VENT 1
PAN 2
MWO_VENT 2
MWO_VENT 2
10:35 AM
FORGET THIS DEVICE
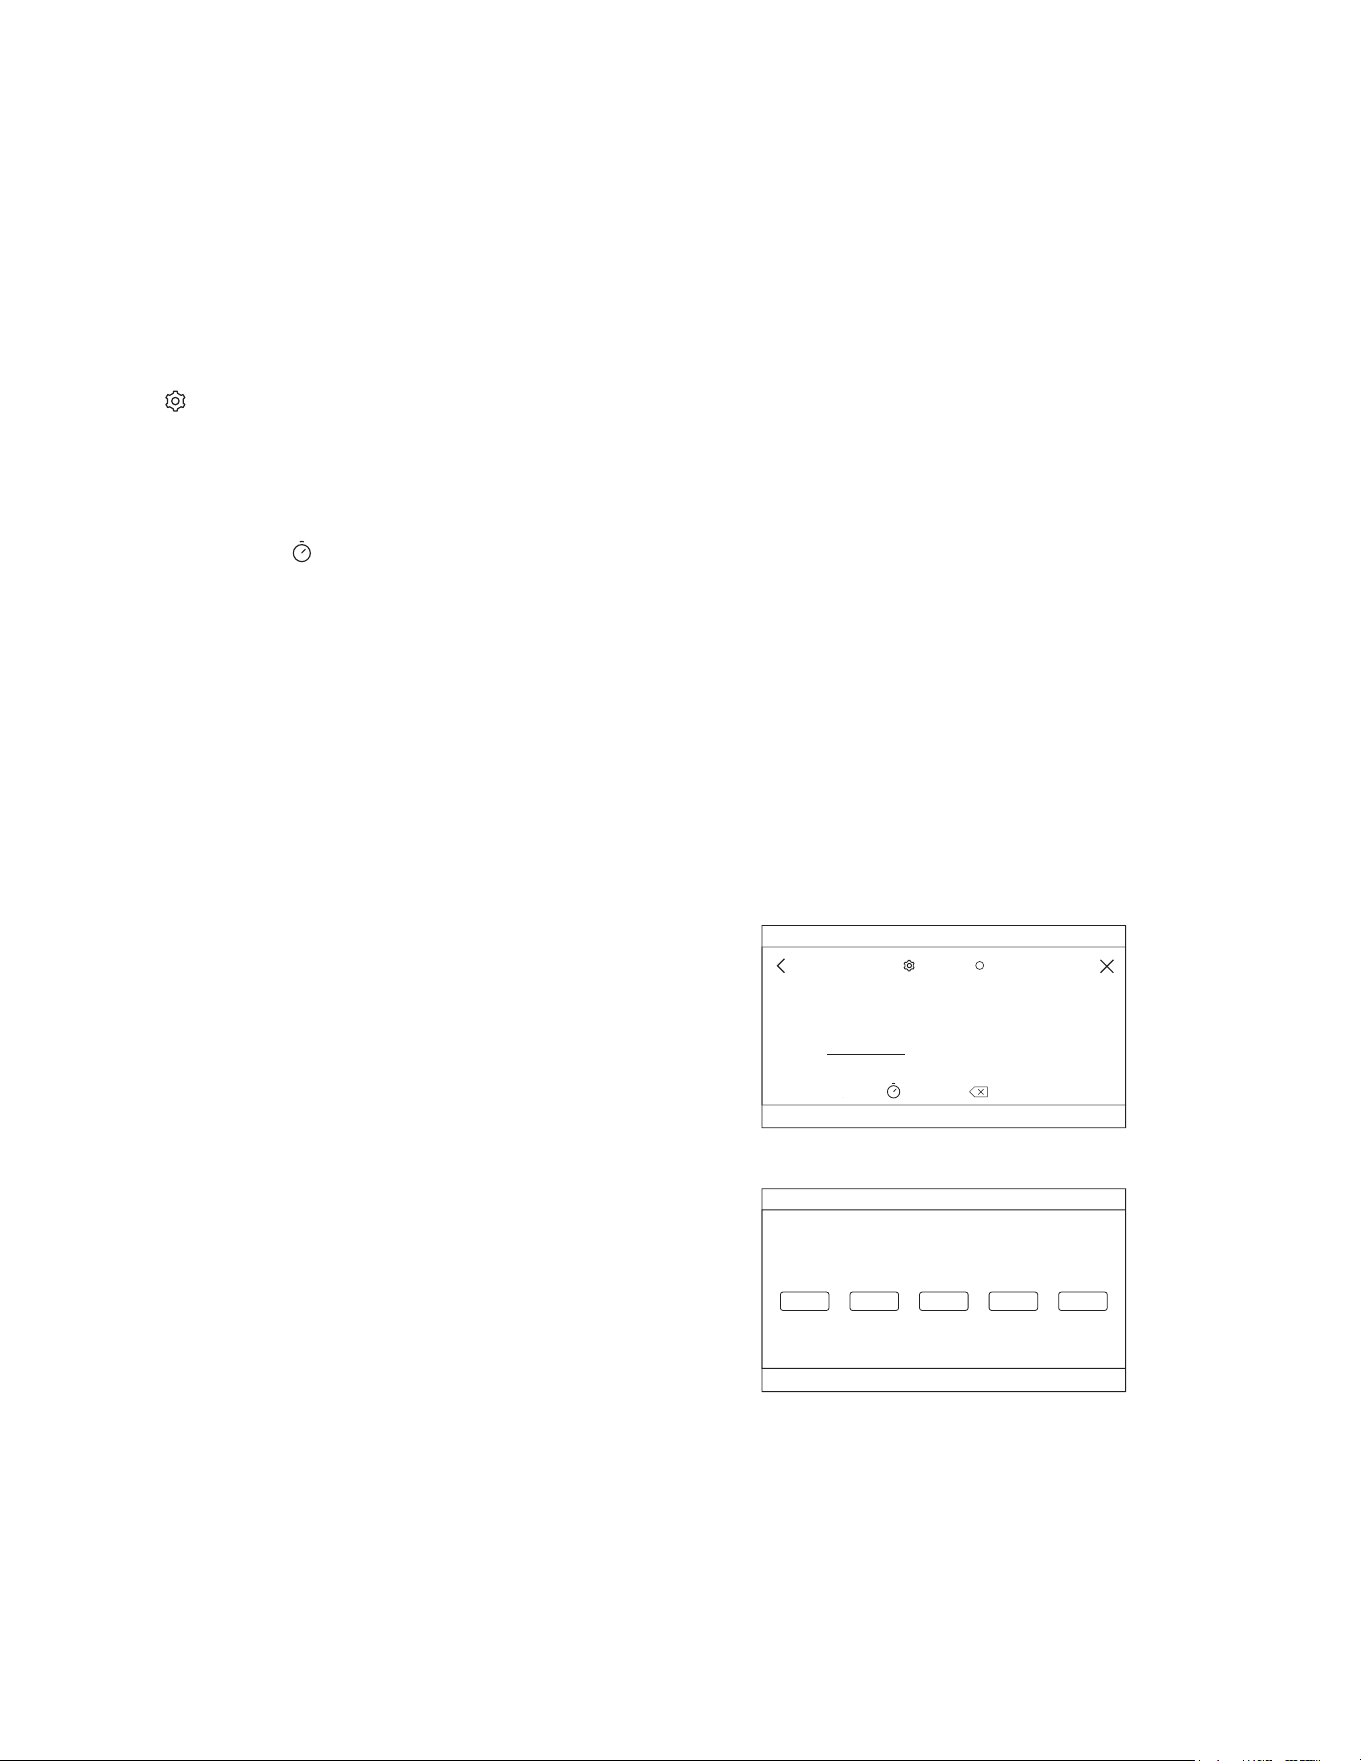
24 49-2000877 Rev. 4
SABBAT (Sabbath)
Le mode sabbat désactive l’éclairage du four (les lampes ne s’allumeront pas à l’ouverture de la porte), tous les sons (un bip ne se
fera pas entendre à la pression d’une commande) ainsi que les modes Convection, Broil, Warm, Proof et toutes les minuteries. Le
mode sabbat ne peut être utilisé qu’avec la cuisson au four traditionnelle (Bake).
REMARQUE : Si une panne de courant survient pendant que le four est en mode sabbat, la cuisinière retournera dans ce mode dès
le rétablissement de l’alimentation électrique.
Activation du mode sabbat
Pressez sur l'écran principal pour accéder au menu des
paramètres puis défilez jusqu’à Sabbath.
Démarrer une cuisson en mode sabbat
Utilisez le clavier tactile sur l’écran pour entrer la température
désirée pour la cuisson en mode sabbat. Une fois la température
réglée, pressez l’icône
pour régler le temps de cuisson du
cycle en heures et minutes. Si vous utilisez un four double,
vous pouvez régler la température et le temps de cuisson de
l’autre cavité en les sélectionnant sur la gauche de l’affichage
de température. Si une minuterie n’a pas été réglée, le four
va démarrer un cycle de cuisson pendant le mode sabbat et
continuera jusqu’à la désactivation du mode sabbat. Une fois que
vous avez programmé la température et le temps de cuisson,
pressez Start (démarrer). La prochaine fenêtre affichera les
réglages que vous avez programmés pour la cuisson en mode
sabbat.
$MXVWHU OD WHPSpUDWXUH SHQGDQW XQH FXLVVRQ
en mode sabbat
Si la température doit être ajustée après une programmation en
mode sabbat, pressez une des icônes de température affichées
sur la fenêtre du cycle sabbat et pressez Enter (entrer). Cela
vous permettra d’ajuster la température du cycle de cuisson.
Notez que l’écran n’indiquera pas que la température du four a
été modifiée.
Quitter le mode sabbat
Pour quitter le mode sabbat, pressez le X dans le coin supérieur
droit dans la fenêtre de programmation, ou pressez Exit Sabbath
(quitter le mode sabbat) si vous vous trouvez dans la fenêtre du
cycle. Vous avez aussi le choix de désactiver le cycle dans la
fenêtre du cycle en pressant Turn Off (arrêt), mais le four restera
dans le mode sabbat jusqu’à ce que vous quittiez ce mode.
REMARQUE : Si une panne de courant survient pendant que le
four est en mode sabbat, la cuisinière retournera dans ce mode
dès le rétablissement du courant; cependant, le four retournera
dans l'état de désactivation s’il était au milieu d’un cycle de
cuisson lorsque la panne est survenue.
SABBATH
ENTER TURN OFFOven On
EXIT SABBATH
12:30 PM
Select temperature, then press ENTER to edit.
200°F 250°F 300°F 350°F 400°F
Fenêtre de programmation
Fenêtre de cycle sabbat
12:30 PM
SABBATH
BAKE TEMP
123
456
789
0
i
---
°F
START
UTILISATION DE LA CUISINIÈRE
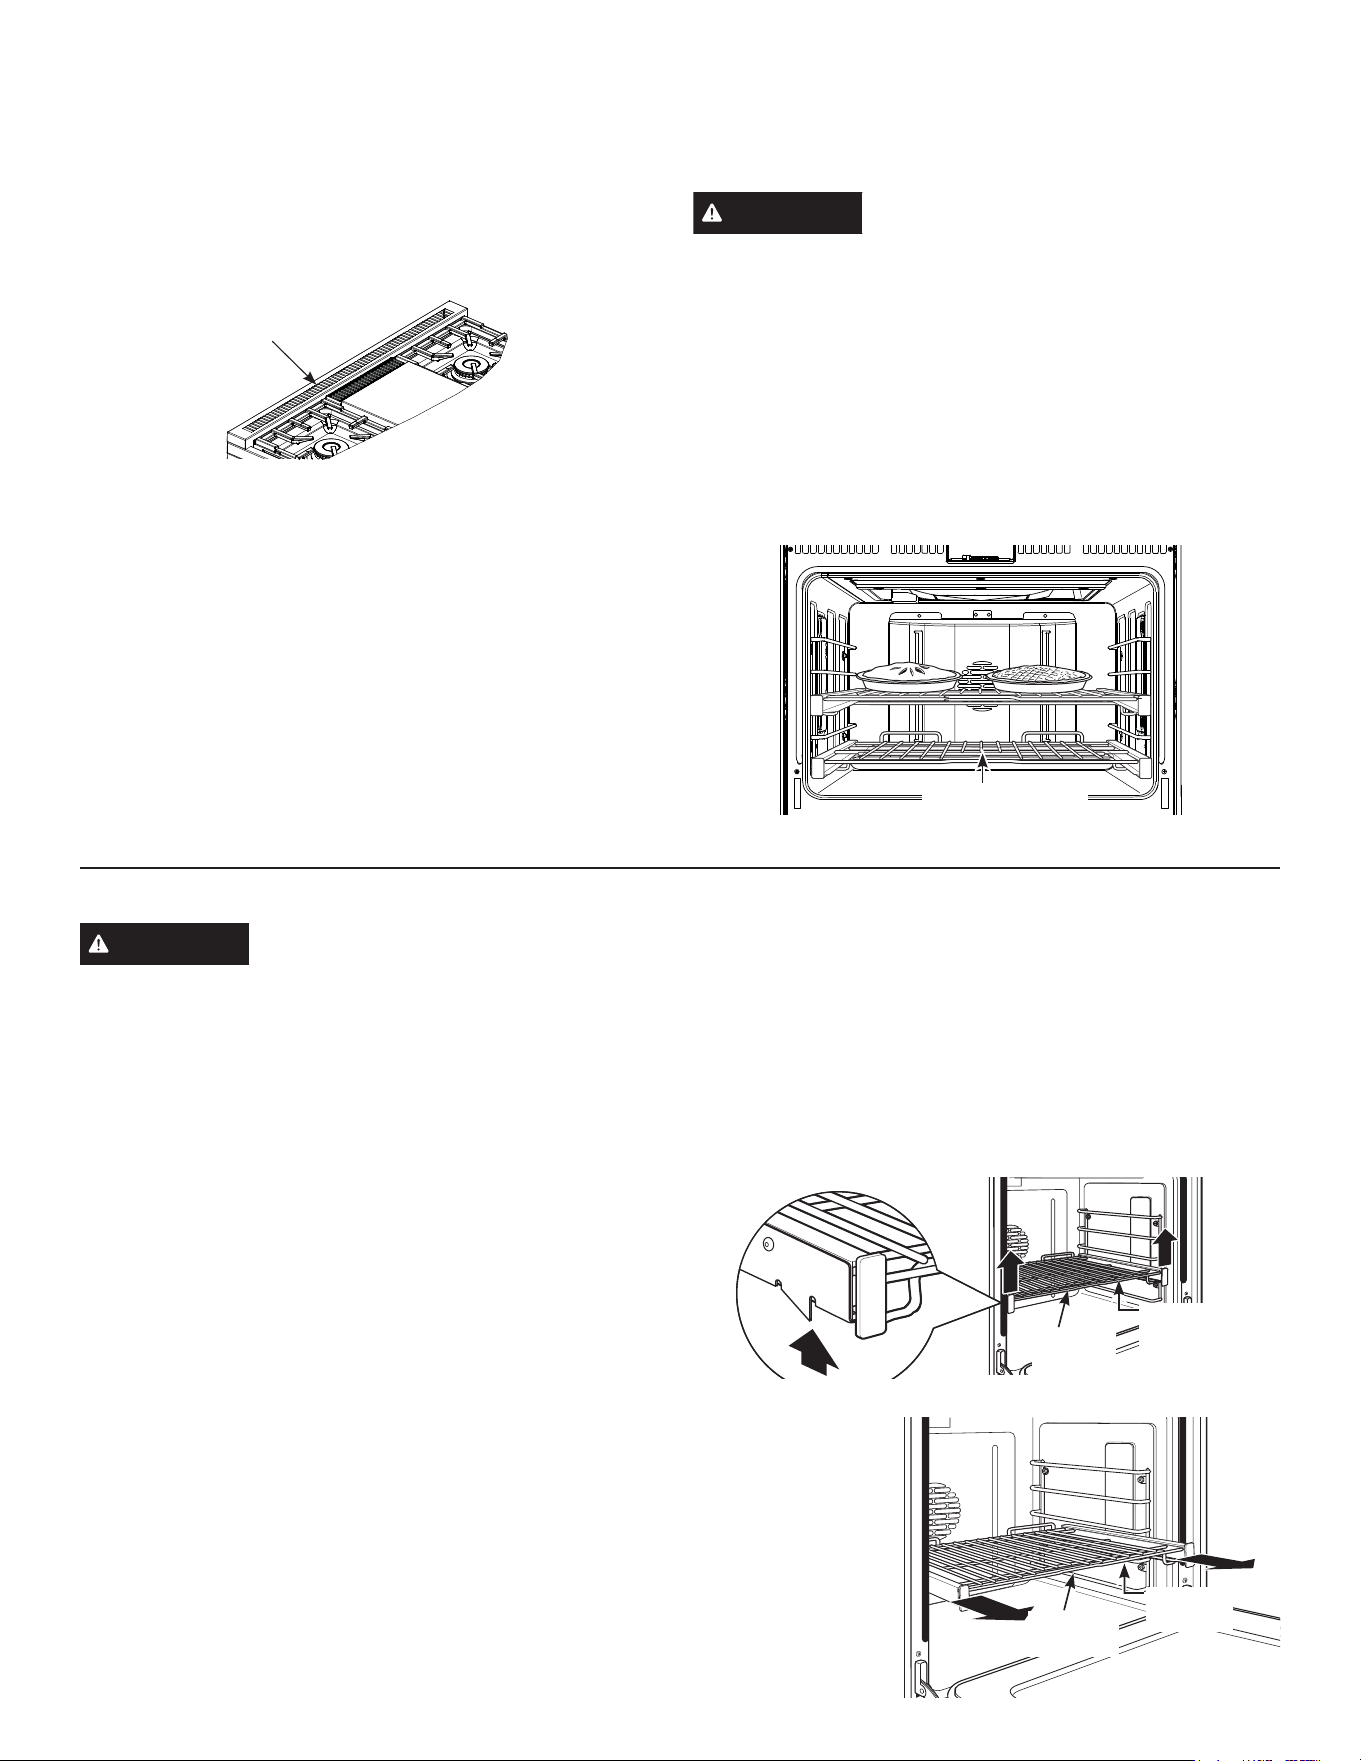
49-2000877 Rev. 4 25
ÉVENTS DU FOUR
N’obstruez jamais les évents (orifices d’air) de la cuisinière. Ils
procurent l’entrée et la sortie d’air nécessaires pour refroidir
la cuisinière et procurer la combustion adéquate à un bon
fonctionnement.
Les orifices d’air sont situés à l’arrière de la table de cuisson, dans
le haut et le bas de la porte du four, et dans le bas de la cuisinière.
Papier d’aluminium et doublures de four
ATTENTION
Abstenez-vous d’utiliser tout type de papier
ou de doublure dans le fond du four. Ces articles peuvent
emprisonner la chaleur ou fondre, endommageant le produit
et causant un risque de décharge électrique, d’enfumage ou
d’incendie. Les dommages résultant de l’usage inapproprié de ces
articles ne sont pas couverts par la garantie du produit.
Pour protéger des débordements, une feuille d’aluminium peut
être placée sur une grille inférieure se trouvant à plusieurs
centimètres en dessous des aliments. N’utilisez pas plus de
papier d’aluminium que nécessaire et ne recouvrez jamais la
totalité d’une grille avec le papier. Laissez une distance d’au
moins 3,8 cm (1 1/2 po) entre le papier et les parois du four pour
permettre une bonne distribution de chaleur.
UTILISATION DE LA CUISINIÈRE
Feuille d’aluminium
pour recueillir les
débordements
Ne bloquez pas
les évents arrière
GRILLES DU FOUR
ATTENTION
Afin déviter les brûlures éventuelles, placez
les grilles dans la bonne position avant d’allumer le four.
Les positions de grille recommandées pour divers types
d’aliments figurent dans le Guide de cuisson. La position de la
grille a un effet sur les résultats de la cuisson. Par exemple, si
vous préférez des dessus de gâteaux, de muffins ou de biscuits
plus grillés, montez la grille d’une position. Si vous trouvez que
les aliments brunissent trop, descendez-les la prochaine fois.
Lors d’une cuisson nécessitant plusieurs récipients sur plusieurs
grilles, laissez un espace d’au moins 1½ po entre ceux-ci pour
assurer la circulation d’air.
Votre four comporte peut-être des grilles extensibles et/ou des
grilles à profil bas.
Reportez-vous aux sections Guide de cuisson et Modes du four
pour des recommandations sur le placement des grilles.
Grilles de cuisson extensibles
Les grilles diposent d’un cadre qui s’emboîte dans les supports
des deux côtés. Une fois le cadre encastré, faites toujours glisser
la grille par son rail supérieur, sur la position de butée de son
extension pour placer ou retirer les plats.
Retirer et replacer les grilles du four
Pour retirer une grille :
1. Veillez à ce que la grille soit introduite jusqu’à atteindre le fond
du four.
2. Saisissez la grille par son rail avant supérieur et par le rail
arrière inférieur et soulevez-la pour débloquer les verrous
avant de ses supports.
3. En tenant
fermement
les rails avant
supérieur et
inférieur, tirez la
grille vers vous et
retirez-la du four.
Soulevez pour débloquer les
verrous du support
Rail
avant
inférieur
Rail avant
supérieur
Verrou de grille avant
Rail avant
inférieur
Rail avant
supérieur
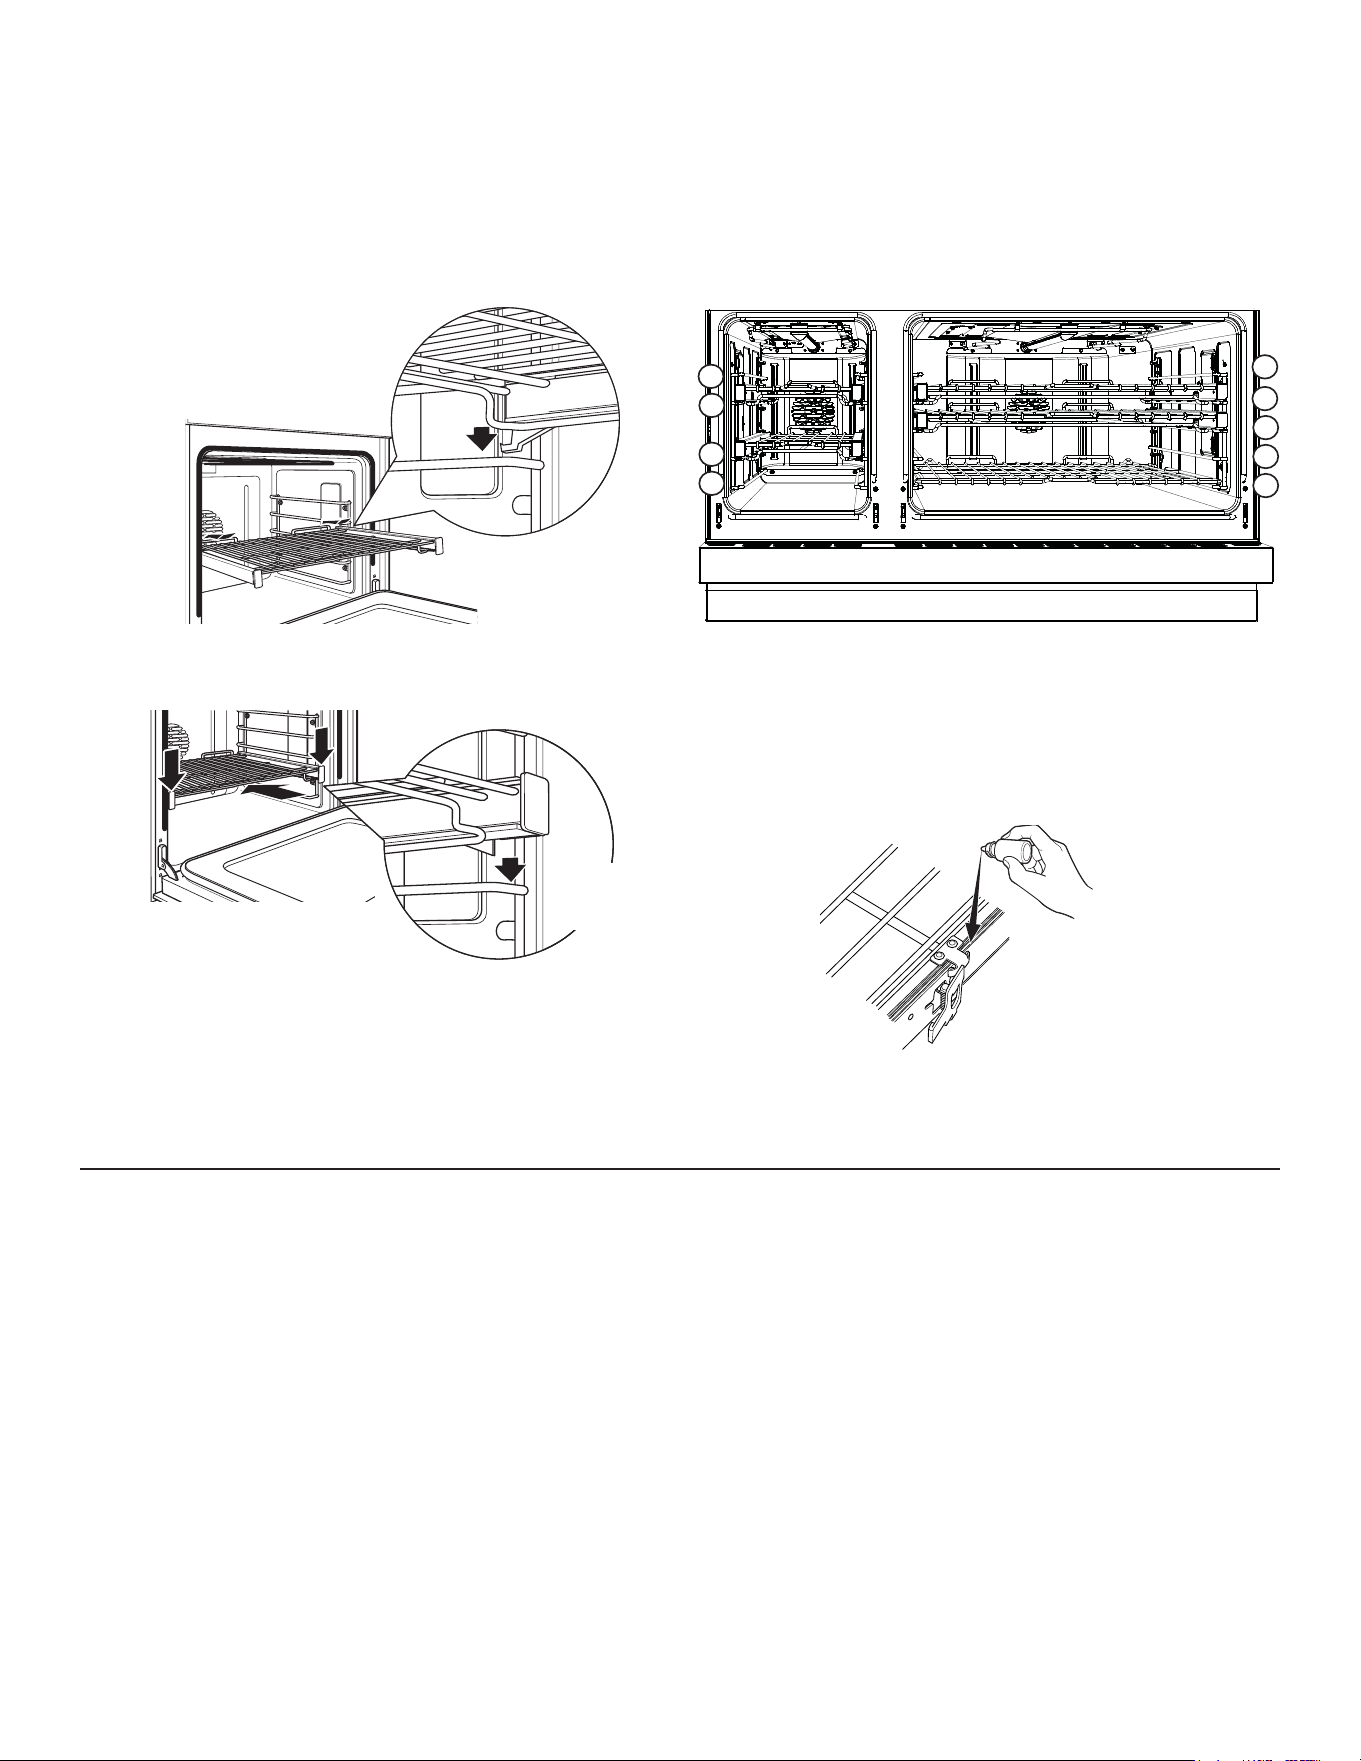
26 49-2000877 Rev. 4
GRILLES DU FOUR (Suite)
Pour replacer une grille :
1. Placez les verrous de la grille arrière sur les supports (cinq
positions de cuisson sont disponibles, position supérieure
comprise).
2. Faites glisser complètement la grille jusqu’à ce que le verrous
de la grille arrière avant soient fixés sur les supports, et
appuyez sur les verrous de la plaque avant sur les supports.
3. Faites glisser la grille vers vous afin de vérifier si elle a été
correctement introduite. Si les grilles extensibles sont difficiles
à retirer ou replacer, essuyez les supports de grille avec de
l’huile de cuisson. Ne mettez pas d’huile sur les glissières des
grilles.
Les grilles peuvent devenir difficiles à glisser, en particulier après un
cycle d’autonettoyage. Pour améliorer le glissement, utilisez un linge
doux ou une serviette de papier pour appliquer de l’huile végétale
sur les bords gauche et droit des grilles et/ou des supports de grille.
REMARQUE : Retirez les grilles non utilisées lorsque vous utilisez
le four pour un préchauffage plus rapide, une efficacité accrue et un
résultat de cuisson optimal.
Pour lubrifier la palette :
Secouez le lubrifiant et appliquez-en sur les pièces mobiles des
mécanismes de la palette comme illustré.
UTILISATION DE LA CUISINIÈRE
Faites coulisser la grille au
maximum et poussez pour
verrouiller les verrous de grille
avant sur les supports avant
Verrou
de grille
avant
MODES DU FOUR
Votre nouveau four comporte une variété de modes de
cuisson pour vous aider à obtenir les meilleurs résultats. Les
modes sont décrits ci-dessous. Reportez-vous à la section
Guide de cuisson pour les positions de grille recommandées
et d'autres conseils pour l’utilisation de ces modes. Placez
les grilles dans les positions désirées avant de démarrer le
four.
Pour certains modes de cuisson tels que Bake, Convection
Bake et Convection Roast, le four va préchauffer et
une tonalité va retentir lorsque le four sera prêt pour la
cuisson. Certains modes de cuisson ne nécessitent pas de
préchauffage. Pour réduire le temps de préchauffage, retirez
les grilles non utilisées et évitez d’ouvrir la porte du four
jusqu’à la tonalité.
Une fois le four en marche, les éléments chauffants et
le ventilateur de convection vont s’allumer et s’éteindre
en alternance afin de maintenir les conditions de cuisson
appropriées. Évitez d’ouvrir la porte du four trop souvent car
cela a un impact sur le temps et l’efficacité de la cuisson.
REMARQUE : Un ventilateur de refroidissement s’enclenchera
pour refroidir les composants internes. C’est normal, et le
ventilateur continuera probablement de fonctionner même lorsque
le four est éteint.
3
3
4
4
2
2
1
1
5
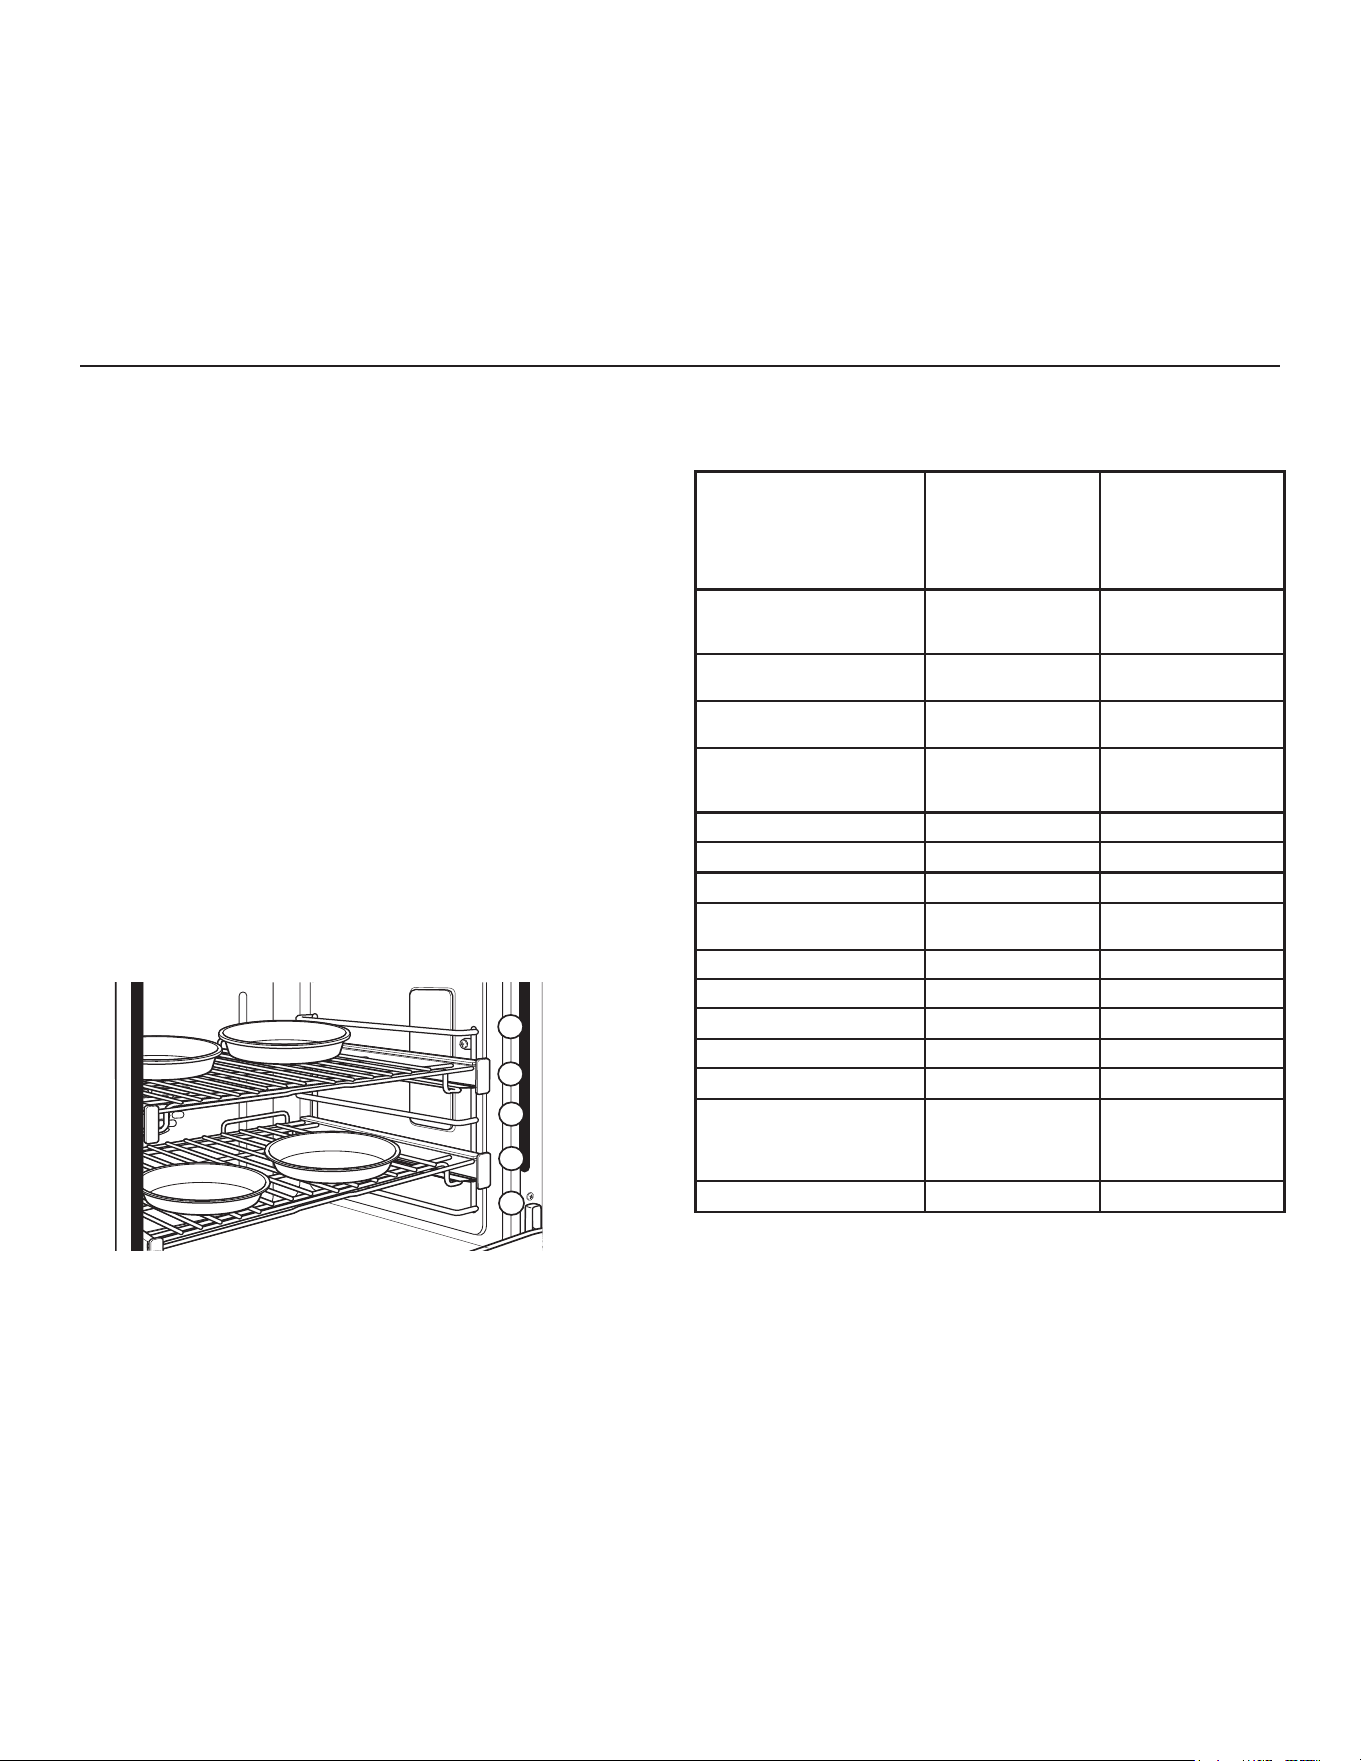
49-2000877 Rev. 4 27
CUISSON AU FOUR
Comment régler le four pour la cuisson
Pour utiliser ce mode, pressez l’option BAKE (cuisson au four)
sur le menu principal et faites défiler jusqu’à la température
désirée puis pressez START/OFF (démarrer/arrêt) pour allumer
le four.
Le four commencera alors à préchauffer. L’affichage de la
température commencera à 100ºF (37°C),.
Vous entendrez une tonalité lorsque le four sera préchauffé et
les aliments pourront être placés dans le four.
Pressez le bouton START/OFF pour éteindre (OFF) le four une
fois la cuisson terminée.
Utilisez la sonde de température lorsqu’il est important de
disposer d’un température interne précise. Voyez la section sur la
sonde de température pour plus d’informations.
Pour les meilleurs résultats lorsque vous cuisez un gâteau
à 4 étages, placez quatre moules en utilisant les grilles 2 et
4. Positionnez les moules de façon qu’aucun ne se trouve
directement au-dessus d’un autre, comme illustré ci-dessus.
Voyez la section sur les grilles de four pour savoir comment les
utiliser, les retirer et les remettre en place.
UTILISATION DE LA CUISINIÈRE
3
4
2
1
5
GUIDE DE CUISSON
RÉGLAGE DE LA TEMPÉRATURE
Les températures préréglées traditionnelles sont affichées
et vous pouvez les faire défiler horizontalement pour
sélectionner celle que vous désirez. Pour choisir une
température qui n’y figure pas, pressez la température au
centre de l'écran et un pavé numérique apparaîtra afin que
vous puissiez entrer la température désirée.
Les positions de grille de cuisson suggérées ne sont fournies qu’à titre indicatif.
Essayez ces positions pour des aliments spécifiques ou vos préférences
personnelles.
TYPE D’ALIMENT
POSITIONS
DE GRILLE
RECOMMANDÉES
- FOUR GAUCHE
(modèles 48 po
seulement)
POSITIONS DE
GRILLE RECOM-
MANDÉES - FOUR
OU FOUR DROIT
(modèles 48 po
seulement)
Gâteaux étagés, gâteaux
plaques, gâteaux Bundt, pains
éclairs sur une seule grille 2 2 ou 3
Gâteaux étagés sur plusieurs
grilles - 2 et 4
Gâteaux mousselines (gâ-
teaux des anges) 1 1
Biscuits, petits gâteaux secs,
VFRQHVPXႈQVVXUXQHVHXOH
grille 2 2 ou 3
Pains à la levure 2 2 ou 3
Rôtis 2 2 ou 3
Poulet entier 2 2 ou 3
Poitrines, cuisses, pilons non
désossés 2 2 ou 3
Poitrines de poulet désossées 2 2 ou 3
Dinde entière - 1 ou 2
Poitrine de dinde 1 ou 2 2 ou 3
Casseroles 2 ou 3 2 ou 3
Pizza sur une seule grille 2 2 ou 3
Produits à base de pommes
de terre, poulet, croquettes,
hors-d’œuvre sur une seule
grille 2 2 ou 3
Légumes 2 ou 3 3 ou 4
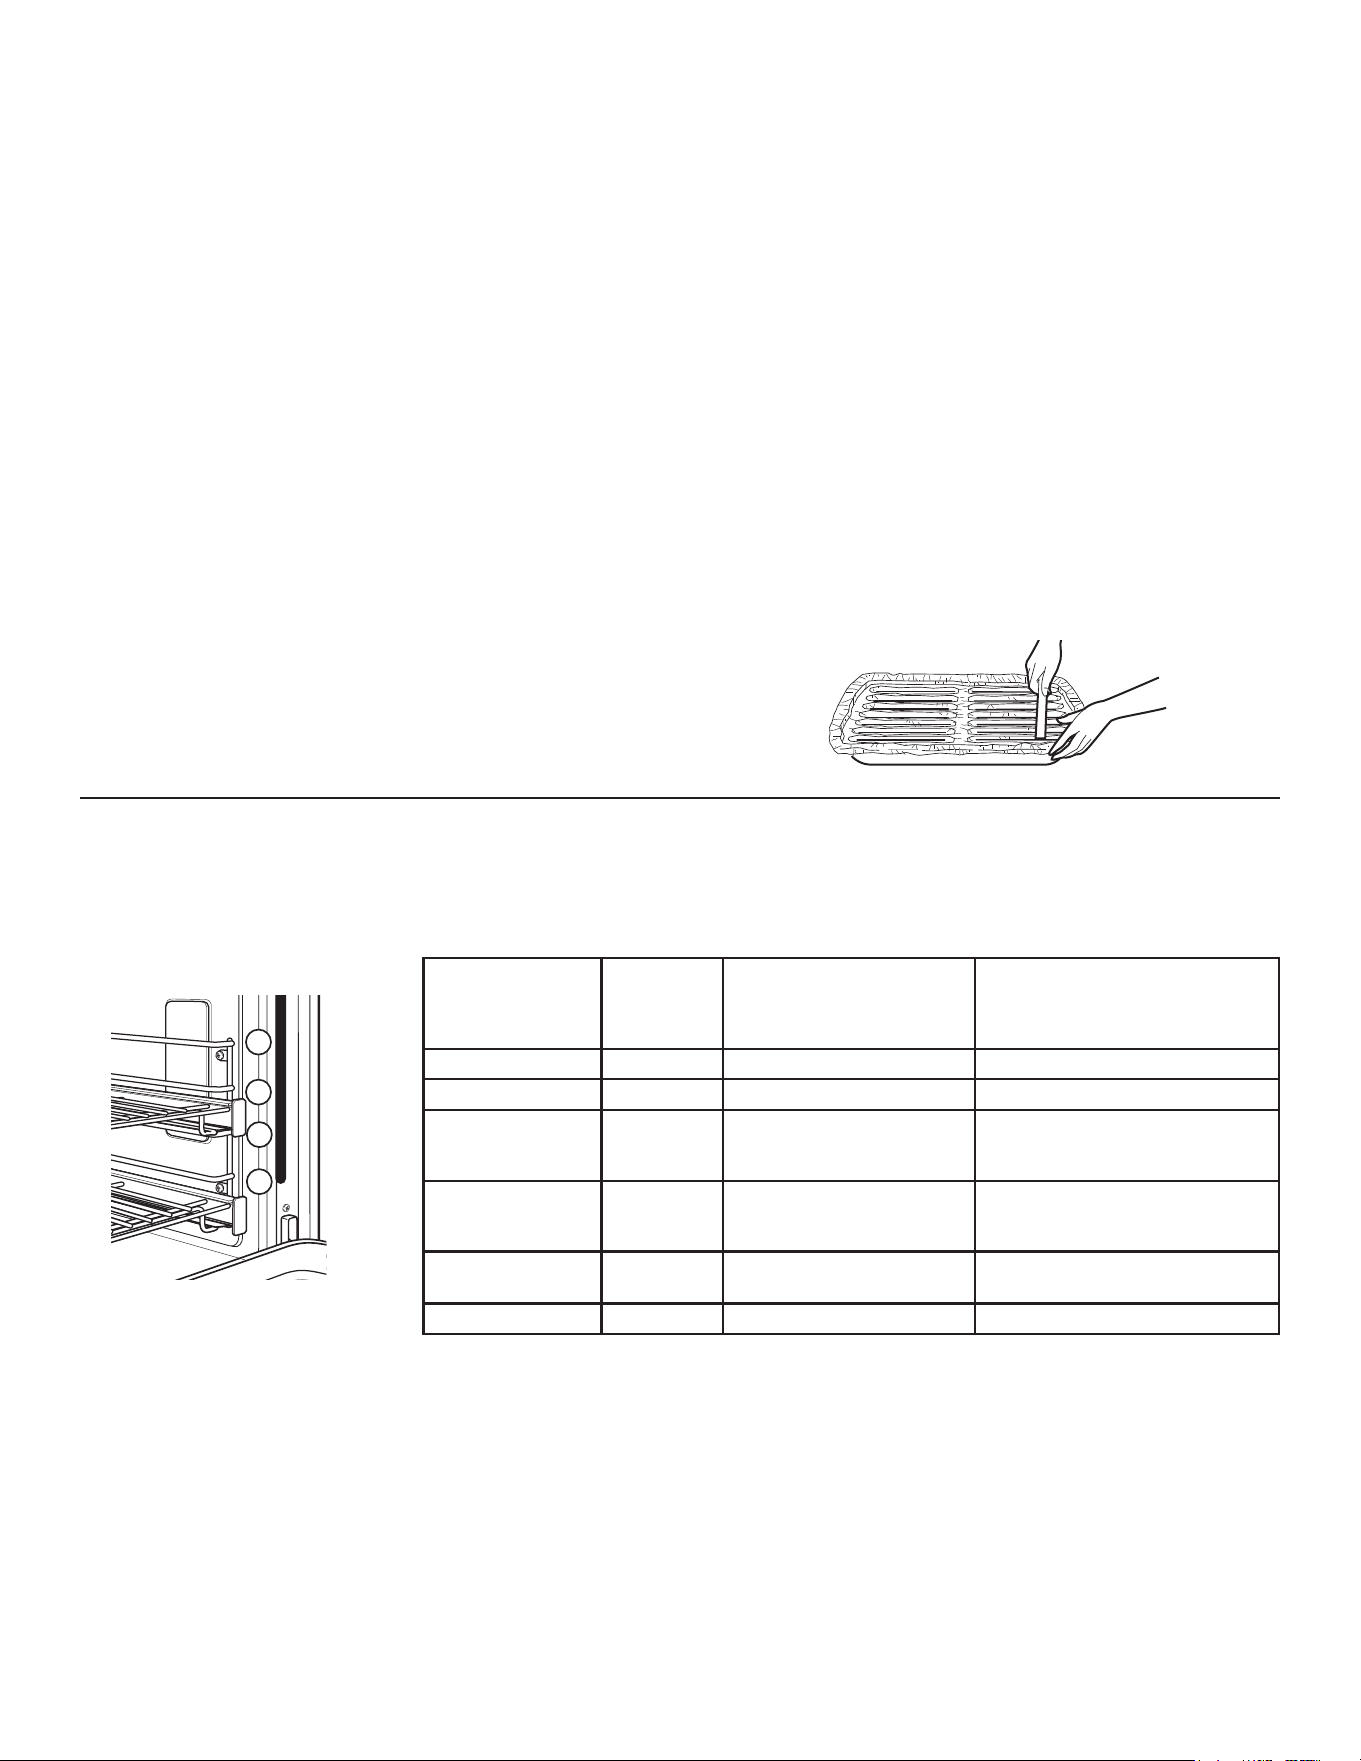
28 49-2000877 Rev. 4
UTILISATION DE LA CUISINIÈRE
CUISSON AU GRILL
Les modes de cuisson au grill (Broil) sont destinés à saisir les
aliments et les rendre croustillants. Grillez (Broil) toujours avec
la porte du four fermée. Surveillez les aliments étroitement
lorsque vous les grillez. Usez de prudence lors du grillage sur
les positions de grille supérieures car approcher les aliments du
brûleur de grillage augmente la fumée, les éclaboussements et la
possibilité d’enflammer la graisse.
Commencez par des aliments que vous avez l’habitude de
griller. Réglez les positions de grille pour ajuster l’intensité de
la chaleur sur l’aliment. Placez l’aliment plus près du brûleur de
grillage lorsqu’une surface plus grillée ou un intérieur plus cuit est
souhaité. Les aliments plus épais ou ceux qu’il faut bien cuire de
part en part doivent griller sur une position de grille plus basse ou
à une puissance de grillage moins élevée.
Utilisez l’option Broil High (grillage maximal) pour les coupes
de viandes plus minces et/ou lorsque vous désirez obtenir une
surface grillée avec l’intérieur saignant. Utilisez l’option Broil
Low (grillage minimal) pour les coupes de viandes plus épaisses
ou les aliments cuits de part en part. Il n'est pas nécessaire de
préchauffer lorsque vous utilisez un mode de grillage; cependant,
un préchauffage de 5 à 10 minutes est recommandé pour un
grillage plus accentué en surface.
Comment régler le four pour la cuisson au grill
Sélectionnez BROIL (cuisson au grill) sur le menu principal,
puis sélectionnez High (haute temp.) ou Low (basse temp.) selon
le degré de saisie et de température interne désirés et pressez
START/OFF (démarrer/arrêt).
REMARQUE : Lancez la cuisson au grill avec la porte fermée.
Pressez le bouton START/OFF pour éteindre (OFF) le four une
fois la cuisson au grill terminée.
REMARQUE : La cuisson au grill ne fonctionnera pas si la
sonde est branchée. Ne laissez jamais la sonde à l’intérieur du
four pendant un programme de cuisson au grill.
Feuille d’aluminium
vous pouvez utiliser une feuille d’aluminium pour aligner la
barquette sur la grille de cuisson. Vous devez toutefois mouler la
barquette sur la grille et faire des incisions qui épousent les fentes
de la grille.
Guide de cuisson au grill
Les positions de grille de cuisson suggérées ne sont fournies
qu’à titre indicatif. Procédez à des essais avec ces positions pour
des aliments spécifiques et vos préférence personnelle.
La taille, le poids, l’épaisseur, la température de début de cuisson
et le degré de cuisson de votre choix auront une incidence
sur la durée de cuisson au grill. Ce guide prend des viandes à
température de réfrigérateur comme exemples.
REMARQUE : En général,
des positions de grilles hautes
procurent un grillage externe
plus foncé et les positions
basses, un degré de cuisson
plus élevé.
3
4
2
5
Le ministère américain à l’Agriculture déclare « Le boeuf saignant est populaire, mais vous devriez savoir que si vous
réglez sa cuisson sur 140°F, les organismes nocifs pour les aliments risquent de survivre à la cuisson. » Source : Safe
Food Book. Your Kitchen Guide. USDA Rev. Juin 1985.)
TYPE D’ALIMENT RÉGLAGE
POSITIONS DE GRILLE
RECOMMANDÉES - FOUR
GAUCHE (modèles 48 po
seulement)
POSITIONS DE GRILLE RECOM-
MANDÉES - FOUR OU FOUR
DROIT (modèles 48 po seule-
ment)
Hamburgers HAUT 3 ou 4 4 ou 5
Steaks et côtelettes HAUT 3 ou 4 4 ou 5
Poisson BAS 3 ou 4 (1/2 po d’épaisseur ou
moins) 2 ou 3 (>1/2 po)
4 ou 5 (1/2 po d’épaisseur
ou moins)
3 ou 4 (>1/2 po)
Poitrines, cuisses,
pilons de poulet non
désossés
BAS 2 2 ou 3
Poitrines de poulet
désossées
BAS 2 2 ou 3
Légumes BAS 2 ou 3 3 ou 4
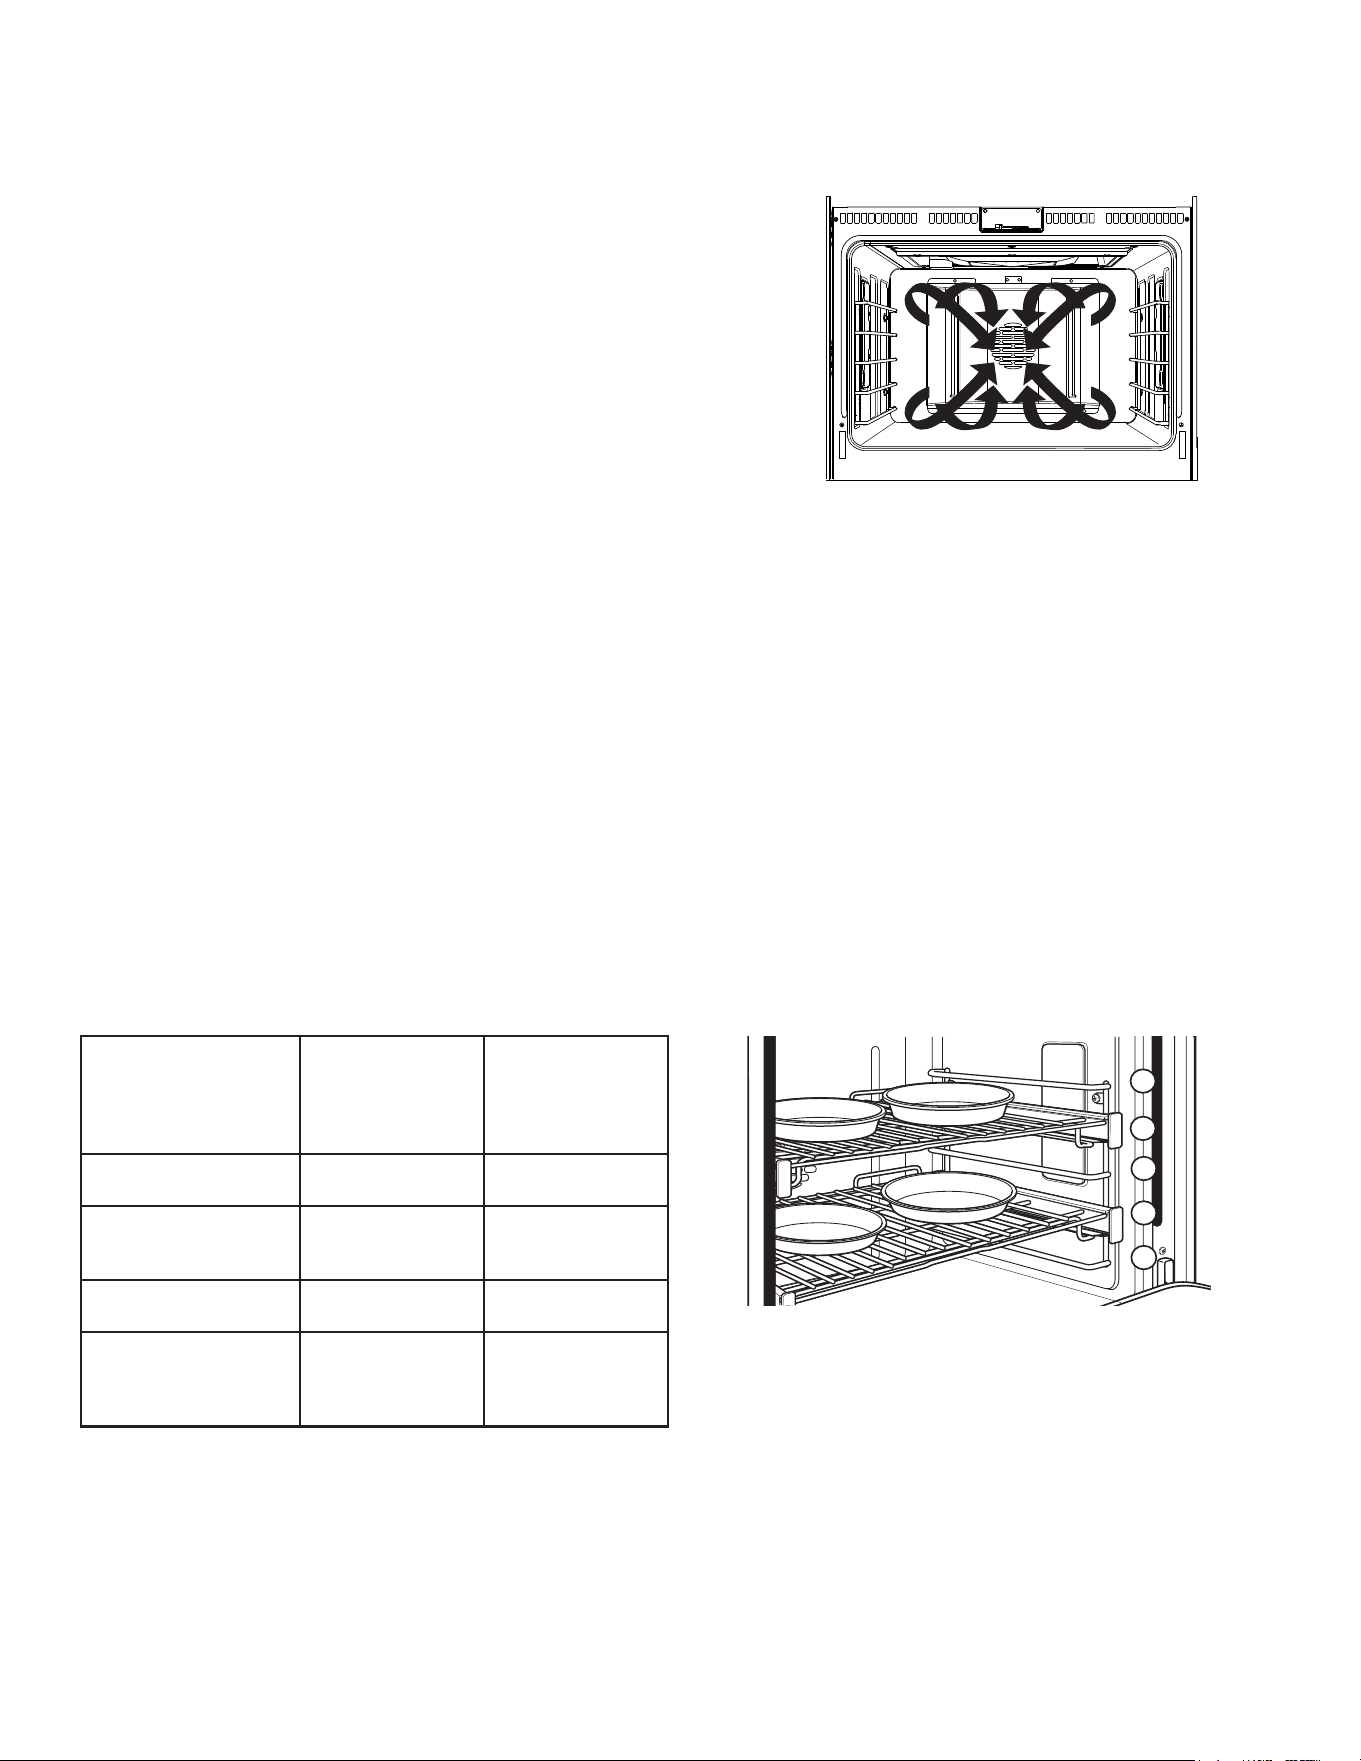
49-2000877 Rev. 4 29
UTILISATION DE LA CUISINIÈRE
CUISSON PAR CONVECTION
Ce mode utilise une circulation d’air précise pour améliorer
l’uniformité de la cuisson, le brunissement des aliments et/ou
réduire le temps de cuisson.
REMARQUE : Le ventilateur de convection s’éteint lorsque la
porte du four est ouverte.
Comment régler le four pour une cuisson par convection sur plusieurs grilles
Pour utiliser ce mode, pressez l’option CONV BAKE (cuisson
par convection) sur le menu principal et faites défiler jusqu’à la
température désirée puis pressez START/OFF (démarrer/arrêt)
pour allumer le four.
Le four commencera alors à préchauffer. L’affichage de la
température commencera à 100°F.
Vous entendrez une tonalité lorsque le four sera préchauffé et
les aliments pourront être placés dans le four.
Pressez le bouton START/OFF pour éteindre (OFF) le four une
fois la cuisson par convection terminée.
Utilisez la sonde à température lorsque la température interne est
élevée. Voyez la section sur la sonde de température pour plus
d’informations.
Pour les meilleurs résultats lorsque vous cuisez un gâteau à 4
étages, placez quatre moules en utilisant les grilles 2 et 4. Les
gâteaux doivent être centrés d’avant en arrière sur les deux
grilles.
Voyez la section sur les grilles de four pour savoir comment les
utiliser, les retirer et les remettre en place.
CUISSON PAR CONVECTION (CONV BAKE)
Le mode de cuisson par convection sur plusieurs grilles (Convection Bake Multi Rack) est destiné à une cuisson simultanée sur plu-
sieurs grilles. Ce mode utilise une circulation d’air précise pour améliorer l’uniformité de la cuisson. Votre four est équipé de la fonction
de conversion de recette automatique (Auto Recipe Conversion) de sorte qu’il n’est pas nécessaire de régler la température lorsque
YRXVXWLOLVH]FHPRGH3UpFKDXႇH]WRXMRXUVOHIRXUORUVTXHYRXVXWLOLVH]FHPRGH/HVWHPSVGHFXLVVRQSHXYHQWOpJqUHPHQWVHSURORQ-
ger avec plusieurs grilles comparativement à une seule grille.
Les suggestions de position des grilles sont à titre
d’indication seulement. Faites votre propre expérience de
ces positions en fonction d’aliments particuliers et de vos
préférences.
TYPE D’ALIMENT
POSITIONS
DE GRILLE
RECOMMANDÉES
- FOUR GAUCHE
(modèles 48 po
seulement)
POSITIONS DE
GRILLE RECOM-
MANDÉES - FOUR
OU FOUR DROIT
(modèles 48 po seu-
lement)
Gâteaux étagés sur
plusieurs grilles
-2 et 4
Biscuits, petits gâteaux
VHFVVFRQHVPXႈQVVXU
plusieurs grilles
2 et 3
2 et 4
1, 3, et 5
Pizzas sur plusieurs
grilles
-2 et 4
Produits à base de
pommes de terre, poulet,
croquettes, hors-d’œuvre
sur plusieurs grilles
2 et 3 2 et 4
3
4
2
1
5
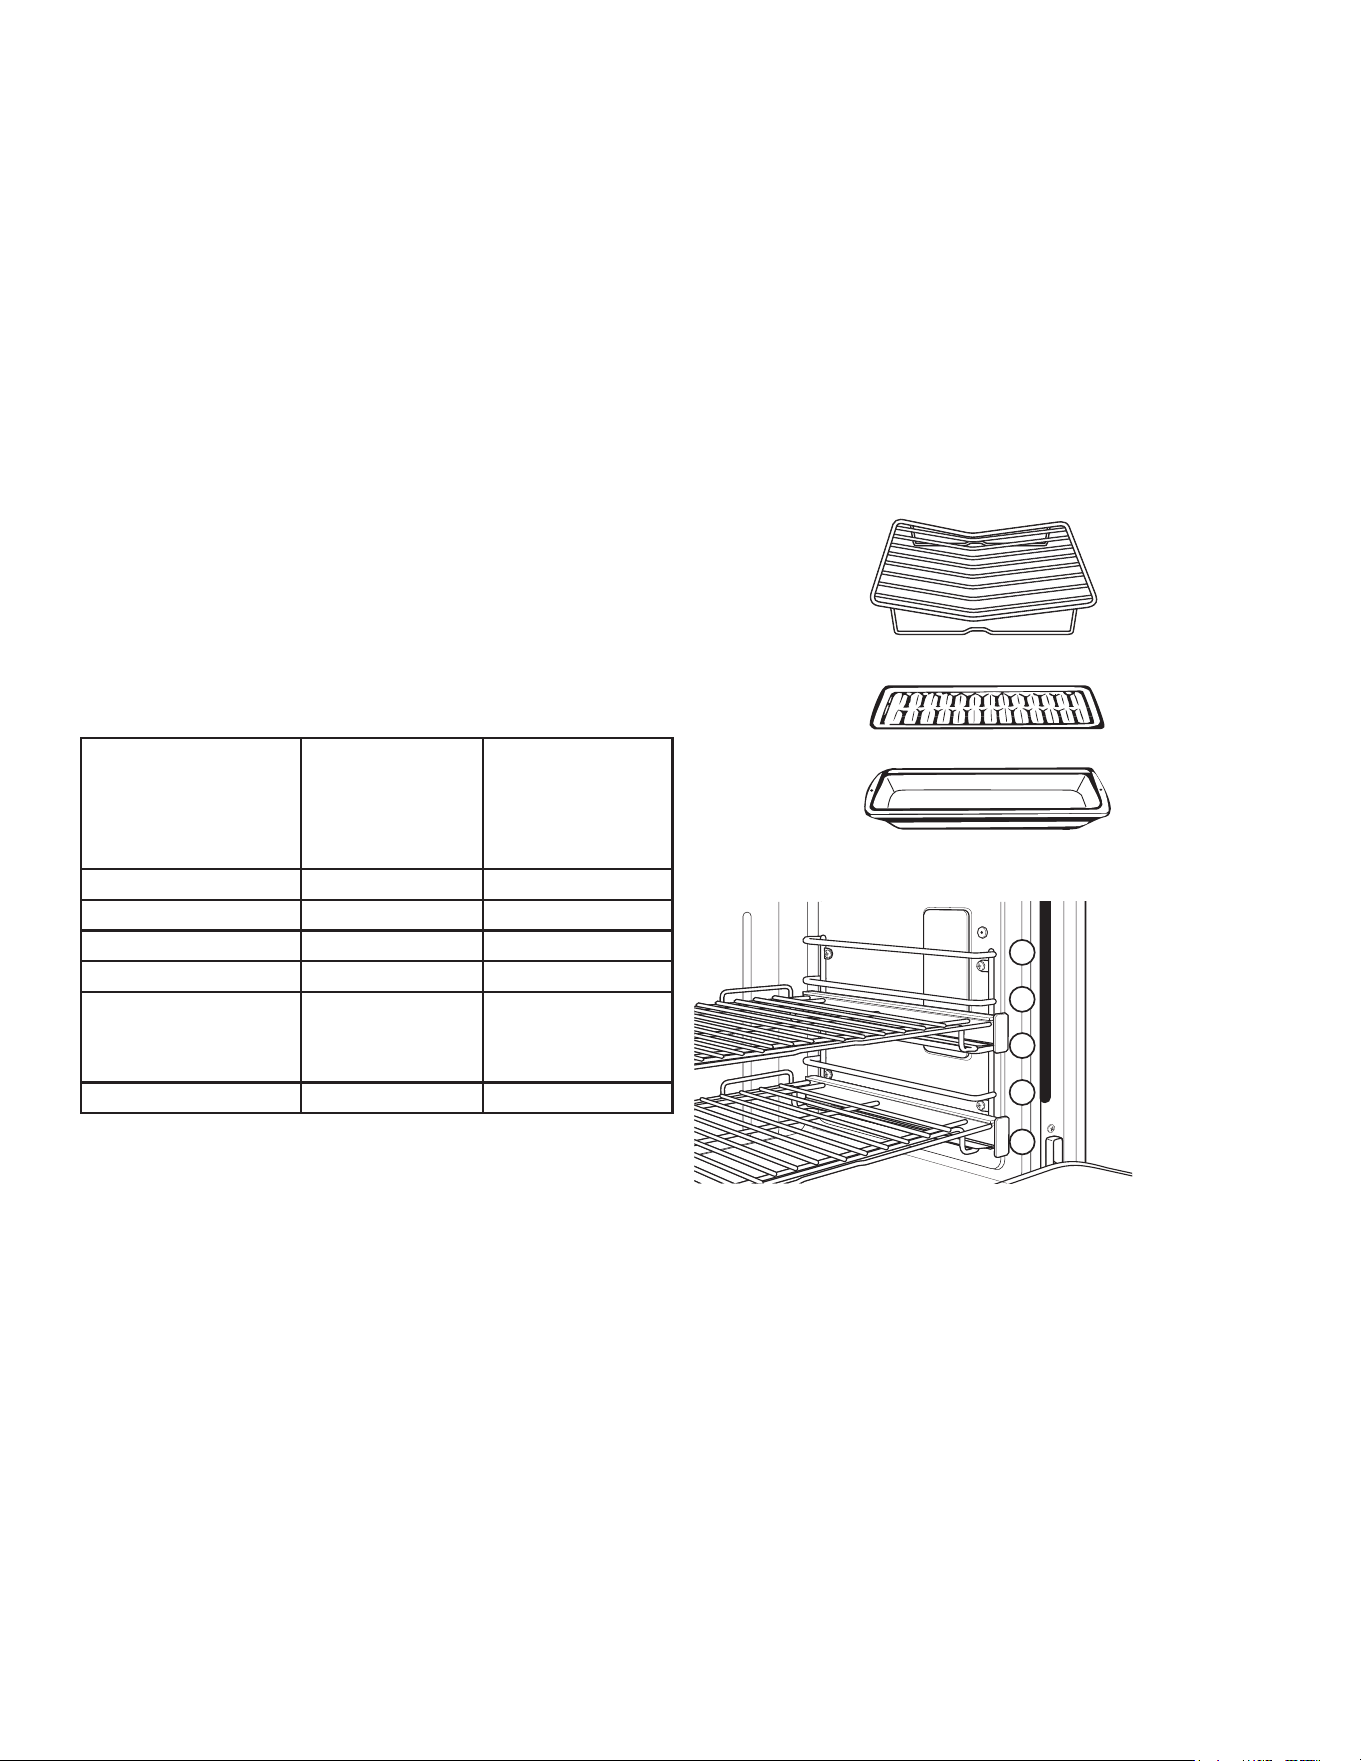
30 49-2000877 Rev. 4
Comment régler le four sur la cuisson ou le
U{WLVVDJHSDUFRQYHFWLRQ
Pour utiliser ce mode, pressez l’option &21952$67U{WLVVDJH
par convection) sur le menu principal et faites défiler jusqu’à la
température désirée puis pressez START/OFF (démarrer/arrêt)
pour allumer le four.
Le four commencera alors à préchauffer. L’affichage de la
température commencera à 100°F
.
Vous entendrez une tonalité lorsque le four sera préchauffé et
les aliments pourront être placés dans le four.
Pressez le bouton START/OFF pour éteindre (OFF) le four une fois
la cuisson par convection terminée.
Utilisez la sonde à température lorsque la température interne est
élevée.
Voyez la section sur la sonde de température pour plus
d’informations.
&RQVHLOVSRXUU{WLVVDJHSDUFRQYHFWLRQ
Pour les meilleurs résultats, utilisez la lèchefrite, la tôle perforée et
la grille de rôtissage pour rôtir les grandes pièces de viande. Utilisez
la lèchefrite pour rôtir les légumes. Utilisez la lèchefrite et la tôle
perforée pour rôtir les petites pièces de viande.
Pour assembler, placez la viande sur la grille de rôtissage.
UTILISATION DE LA CUISINIÈRE
3
4
2
1
5
Tôle perforée
Lèchefrite
Grille de rôtissage
Les suggestions de position des grilles sont à titre d’indication seulement.
Faites votre propre expérience de ces positions en fonction d’aliments
particuliers et de vos préférences.
RÔTISSAGE PAR CONVECTION
Le mode de rôtissage par convection (CONV ROAST) est conçu pour rôtir les légumes et les pièces de viande entières sur une seule
JULOOH&HPRGHXWLOLVHXQHFLUFXODWLRQG¶DLUSUpFLVHSRXUDPpOLRUHUOHEUXQLVVHPHQWHWUpGXLUHOHWHPSVGHFXLVVRQ9pUL¿H]OHVDOLPHQWV
SOXVW{WTXHOHWHPSVGHFXLVVRQVXJJpUpGDQVOHVUHFHWWHV/HSUpFKDXႇDJHQ¶HVWSDVQpFHVVDLUHDYHFFHPRGH
TYPE D’ALIMENT
POSITIONS
DE GRILLE
RECOMMANDÉES
- FOUR GAUCHE
(modèles 48 po
seulement)
POSITIONS DE
GRILLE RECOM-
MANDÉES - FOUR
OU FOUR DROIT
(modèles 48 po
seulement)
Rôtis 2 2 ou 3
Poulet entier 2 2 ou 3
Dinde entière - 1 ou 2
Poitrine de dinde -2
Produits à base de
pommes de terre, poulet,
croquettes, hors-d’œuvre
sur une seule grille 2 2 ou 3
Légumes 2 ou 3 3

49-2000877 Rev. 4 31
UTILISATION DE LA CUISINIÈRE
GRILLAGE PAR CONVECTION
Les modes de grillage par convection (Convection Broil) sont des-
tinés à saisir les aliments et les rendre croustillants. Grillez (Broil)
toujours avec la porte du four fermée. Surveillez les aliments étroi-
tement lorsque vous les grillez. Usez de prudence lors du grillage
sur les positions de grille supérieures car approcher les aliments
du brûleur de grillage augmente la fumée, les éclaboussements et
ODSRVVLELOLWpG¶HQÀDPPHUODJUDLVVH
Commencez par des aliments que vous avez l’habitude de griller.
Réglez les positions de grille pour ajuster l’intensité de la chaleur
sur l’aliment. Placez l’aliment plus près du brûleur de grillage lors-
qu’une surface plus grillée ou un intérieur plus cuit est souhaité.
Les aliments plus épais ou ceux qu’il faut bien cuire de part en
part doivent griller sur une position de grille plus basse ou à une
puissance de grillage moins élevée.
Les modes de grillage par convection utilisent l’élément chauf-
fant du grill accompagné d’un mouvement d’air pour améliorer la
saisie et le brunissage. Utilisez le réglage maximal (Convection
Broil High) pour les coupes de viandes plus minces et/ou lorsque
vous désirez obtenir une surface grillée avec l’intérieur saignant.
Utilisez le réglage minimal (Convection Broil Low) pour les coupes
de viandes plus épaisses ou les aliments cuits de part en part. Il
QHVWSDVQpFHVVDLUHGHSUpFKDXႇHUORUVTXHYRXVXWLOLVH]XQPRGH
GHJULOODJHSDUFRQYHFWLRQFHSHQGDQWXQSUpFKDXႇDJHGHj
minutes est recommandé pour un grillage plus accentué.
Comment régler le four pour le grillage par
convection
Pour utiliser ce mode, pressez l’option B sur le menu principal et
faites défiler jusqu’à la température désirée puis pressez START/
OFF (démarrer/arrêt) pour allumer le four.
Le four commencera alors à préchauffer. L’affichage de la
température commencera à 100°F
.
Vous entendrez une tonalité lorsque le four sera préchauffé et
les aliments pourront être placés dans le four.
REMARQUE : Lancez la cuisson au grill avec la porte fermée.
Pressez le bouton START/OFF pour éteindre (OFF) le four une fois
la cuisson par convection terminée.
Voyez la section sur les grilles de four pour savoir comment les
utiliser, les retirer et les remettre en place.
REMARQUE : La cuisson au grill ne fonctionnera pas si la
sonde est branchée. Ne laissez jamais la sonde à l’intérieur du
four pendant un programme de cuisson au grill.
Feuille d’aluminium
Vous pouvez utiliser une feuille d’aluminium pour aligner la
barquette sur la grille de cuisson. Vous devez toutefois mouler la
barquette sur la grille et faire des incisions qui épousent les fentes
de la grille.
Guide de cuisson au grill
Les positions de grille de cuisson suggérées ne sont fournies
qu’à titre indicatif. Procédez à des essais avec ces positions pour
des aliments spécifiques et vos préférence personnelle.
La taille, le poids, l’épaisseur, la température de début de cuisson
et le degré de cuisson de votre choix auront une incidence
sur la durée de cuisson au grill. Ce guide prend des viandes à
température de réfrigérateur comme exemples.
REMARQUE : En général,
des positions de grilles hautes
procurent un grillage externe
plus foncé et les positions
basses, un degré de cuisson
plus élevé.
3
4
2
5
Le ministère américain à l’Agriculture déclare « Le boeuf saignant est populaire, mais vous devriez savoir que si vous
réglez sa cuisson sur 140°F, les organismes nocifs pour les aliments risquent de survivre à la cuisson. » Source : Safe
Food Book. Your Kitchen Guide. USDA Rev. Juin 1985.)
TYPE D’ALIMENT RÉGLAGE
POSITIONS DE GRILLE
RECOMMANDÉES - FOUR
GAUCHE (modèles 48 po
seulement)
POSITIONS DE GRILLE RECOM-
MANDÉES - FOUR OU FOUR
DROIT (modèles 48 po seule-
ment)
Hamburgers HAUT 3 ou 4 4 ou 5
Steaks et côtelettes HAUT 3 ou 4 4 ou 5
Poisson BAS 3 ou 4 (1/2 po d’épaisseur ou
moins) 2 ou 3 (>1/2 po)
4 ou 5 (1/2 po d’épaisseur
ou moins)
3 ou 4 (>1/2 po)
Poitrines, cuisses,
pilons de poulet non
désossés
BAS 2 2 ou 3
Poitrines de poulet
désossées
BAS 2 2 ou 3
Légumes BAS 2 ou 3 3 ou 4

32 49-2000877 Rev. 4
UTILISATION DE LA CUISINIÈRE
TENUE AU CHAUD (WARM)
Le mode de tenue au chaud est destiné à garder les aliments qui
viennent d’être cuits au chaud. Recouvrez les aliments qu’il faut
maintenir humides sauf ceux que l’on souhaite croustillants. Le
préchauffage n’est pas nécessaire. N’utilisez pas ce mode pour
réchauffer les aliments froids à l’exception des craquelins, des
croustilles et des céréales sèches. On recommande aussi de ne
pas garder les aliments au chaud durant plus de 2 heures.
Comment régler le four pour la tenue au chaud
1. Pour utiliser ce mode, pressez WARM (tenue au chaud) sur
le menu principal et pressez START/OFF (démarrer/arrêt)
pour allumer le four.
2. Lorsque la tenue au chaud est terminée, pressez START/OFF
pour éteindre le four.
FERMENTATION (PROOF)
Le mode de fermentation maintient une chaleur suffisante pour faire lever la pâte à la levure. Pour les meilleurs résultats, recouvrez la
pâte durant la fermentation et vérifiez tôt afin d'éviter de trop fermenter.
Comment régler le four sur la levée
Utilisez la position de grille 2 ou 3 dans le four (four droit sur
modèles 48 po). Utilisez la position de grille 2 dans le four
gauche.
1. Pour utiliser ce mode, pressez PROOF (fermentation) sur le
menu principal et pressez START/OFF pour allumer le four.
L’écran affichera le message « PROOF ». Le mode PROOF
(Levée) ne fonctionnera pas lorsque la temperature du four est
supérieure à 125°F (51°C). Le message « too hot to proof »
(trop chaud pour fermenter) défilera sur l’écran. Laissez le four
refroidir.
2. Une fois la fermentation terminée, pressez START/OFF pour
éteindre le four.
ATTENTION
N’utilisez pas le mode levée pour réchauffer
des plats ou les maintenir au chaud. La température de levée
n’est pas suffisamment élevée pour garder les plats au chaud.
CUISSON DE PRÉCISION (Precision Cooking)
Ces modes procurent une orientation ou des algorithmes de
cuisson prédéfinis pour assister l’utilisateur dans la cuisson de
divers types d’aliments. La sélection que vous faites dans le
menu Precision Cooking vous aidera à entrer les informations
qui contribueront à bien cuire vos aliments. À la fin du temps
de cuisson estimé, vérifiez les aliments pour voir s’ils sont cuits
à votre satisfaction. Notez les différences dans la forme et la
préparation des aliments ainsi que vos préférences quant au
degré de cuisson de ceux-ci.
Certains cycles nécessitent l’utilisation de la sonde de
température des aliments fournie avec votre four. La température
cible de la sonde est basée automatiquement sur les sélections
faites pour chaque aliment. Vérifiez toujours la température
avec un autre thermomètre pour aliments étant donné que
l’insertion de la sonde peut avoir un impact sur la température
mesurée. Voyez la section sur la sonde de température pour plus
d’informations.
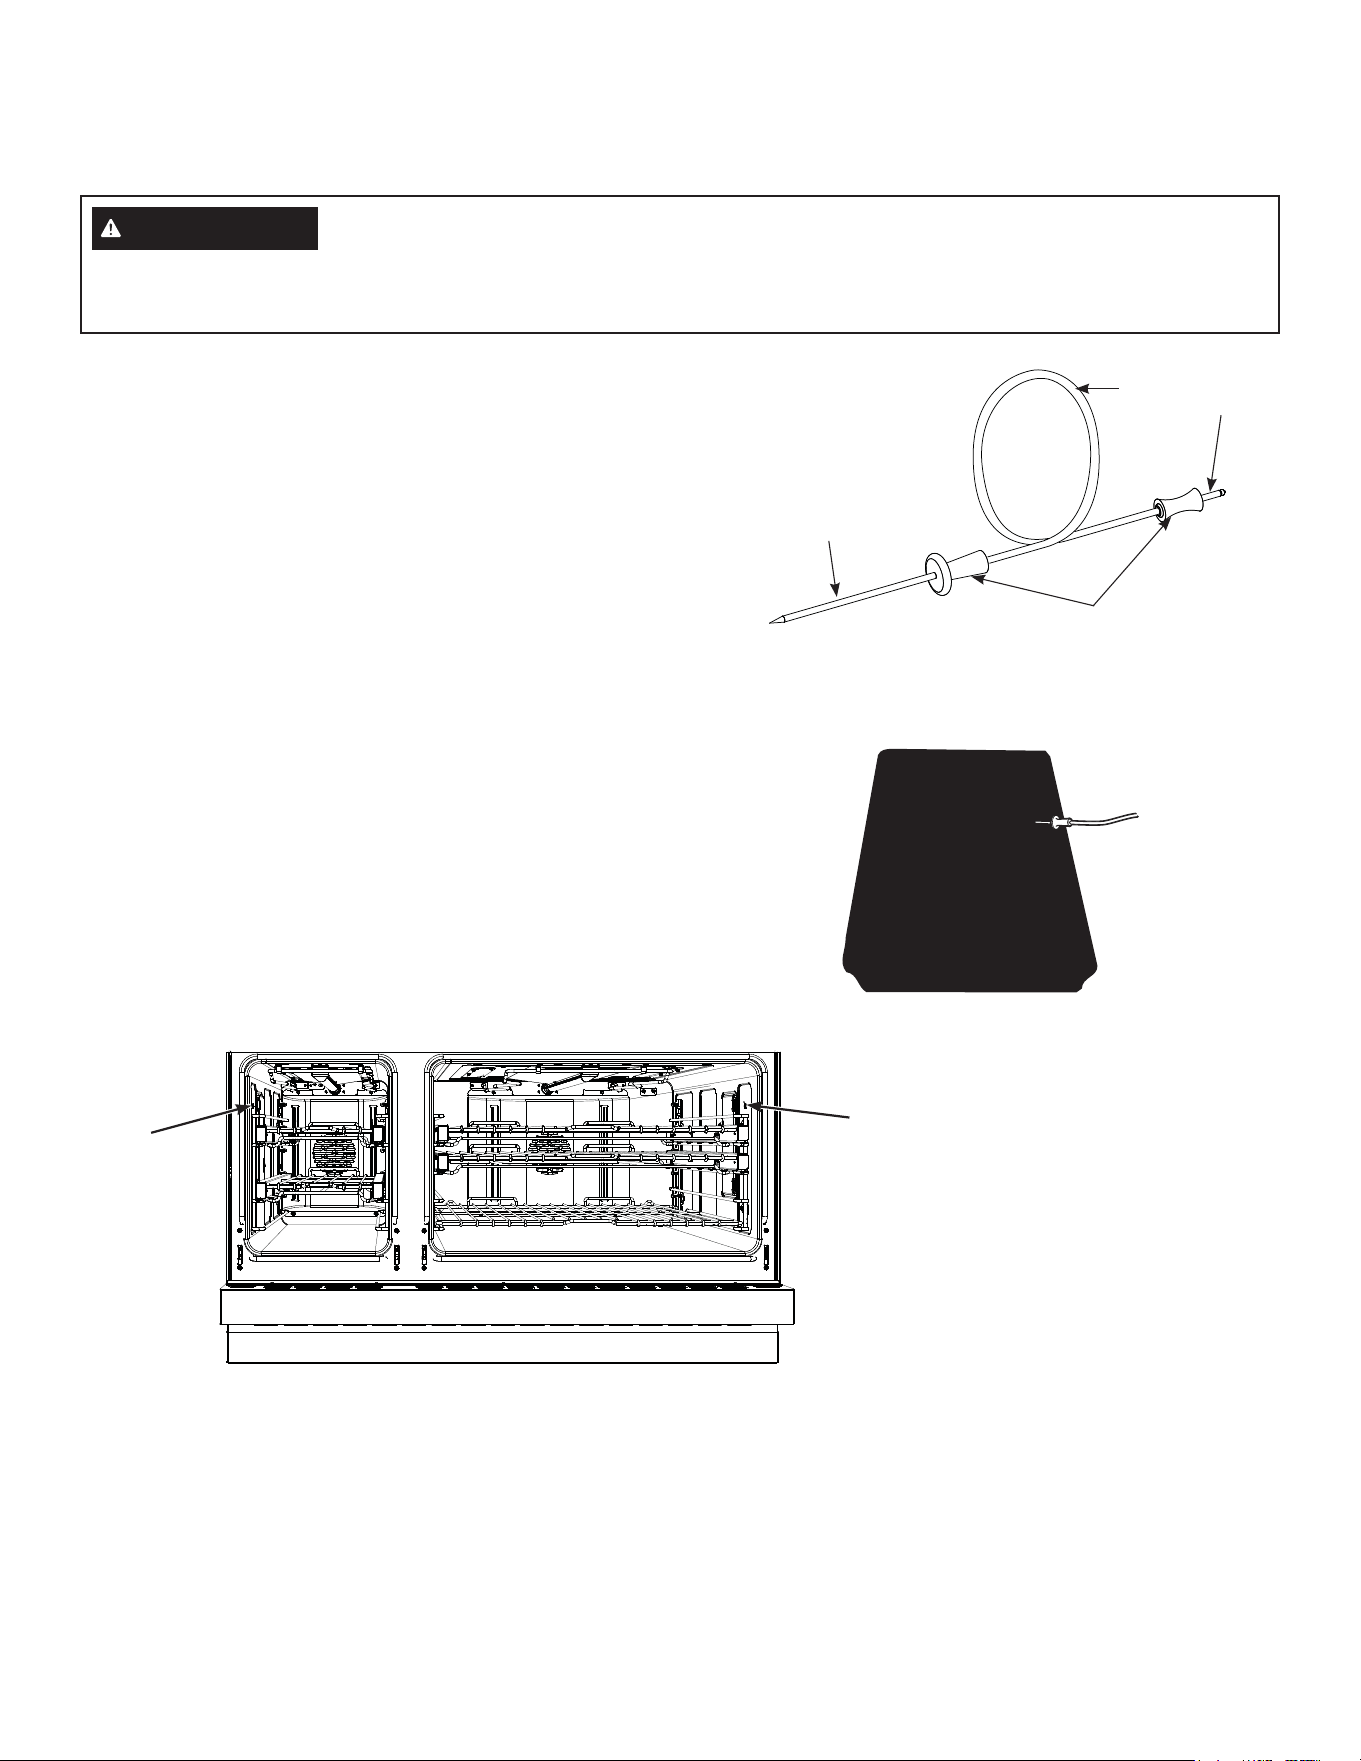
49-2000877 Rev. 4 33
UTILISATION DE LA CUISINIÈRE
SONDE DE TEMPÉRATURE
Connecteur
de la sonde
Connecteur
de la sonde
Insertion correcte de la sonde
Une fois la viande préparée et placée sur le récipient de
cuisson, suivez les instructions suivantes pour insérer la sonde
correctement.
Ŷ,QVpUH]ODVRQGHGHIDoRQTXHVDSRLQWHVHSODFHGDQVOH
centre de la partie la plus épaisse de l’aliment. Pour les
meilleurs résultats, la sonde doit être insérée à fond dans
l’aliment. Si la sonde n'est pas placée correctement, elle
pourrait manquer de mesurer précisément la température
de la partie la plus froide de l’aliment. Certains aliments, en
particulier de petite taille, ne conviennent pas bien à la cuisson
avec sonde en raison de leur forme ou leurs dimensions.
Ŷ/DVRQGHQHGRLWSDVWRXFKHUjO¶RVDXJUDVRXDX[QHUIV
Ŷ3RXUODYRODLOOHHQWLqUHLQVpUH]ODVRQGHGDQVODSDUWLHODSOXV
épaisse de la poitrine.
Ŷ3RXUOHVU{WLVGpVRVVpVLQVpUH]ODVRQGHGDQVOHFHQWUHGHOD
viande.
Ŷ3RXUOHMDPERQRXO¶DJQHDXQRQGpVRVVpVLQVpUH]ODVRQGH
dans le centre de l’articulation ou du muscle le plus bas et le
plus volumineux.
Ŷ3RXUOHVFDVVHUROHVRXOHVSODWVGXJHQUHSDLQGHYLDQGH
insérez la sonde dans le centre du récipient.
Ŷ3RXUOHSRLVVRQLQVpUH]ODVRQGHMXVWHDXGHVVXVGHV
branchies dans la partie la plus en chair, parallèlement à
l’épine dorsale.
La sonde de température est dotée d’une sonde en forme
de brochette sur une extrémité et une prise sur l’autre qui
s’introduit dans la prise de sortie du four.
Câble
Fiche
Sonde
Poignées
AVERTISSEMENT
La consommation d’aliments insuffisamment cuits pose un risque de maladies d’origine
alimentaire. Utilisez la sonde selon les instructions suivantes pour faire en sorte que toutes les parties des aliments
atteignent les températures sécuritaires de cuisson minimales. On peut trouver des recommandations de températures
sécuritaires de cuisson minimales sur les sites foodsafety.gov ou IsItDoneYet.gov.

34 49-2000877 Rev. 4
UTILISATION DE LA CUISINIÈRE
SONDE DE TEMPÉRATURE (suirte)
Utilisation de la sonde
Pour utiliser la sonde sans préchauffage :
1. Insérez la sonde dans l’aliment (voyez Insertion correcte de la
sonde).
2. Placez l’aliment dans le four et connectez la sonde dans la
prise de sonde dans le four.
3. Sélectionnez le mode et la température de cuisson désirés.
Avant de presser Start, pressezO¶LF{QHGHODVRQGH dans la
partie inférieure gauche de l’écran. La fenêtre de réglage de la
sonde apparaîtra. Entrez le température d’aliment désirée et
pressez Start. Vous pouvez régler la température de la sonde
entre 100°F et 200°F.
Pour utiliser la sonde avec préchauffage :
1. Pressez la touche du mode de cuisson désiré (Traditional
Bake, Convection Bake ou Convection Roast) et entrez la
température de cuisson désirée.
2. Insérez la sonde dans l’aliment (voyez Insertion correcte de la
sonde).
3. Une fois le four préchauffé, placez l’aliment dans le four
et connectez la sonde dans sa prise en vous assurant de
l’insérer à fond. Usez de prudence, les parois du four et la
sortie de la sonde sont chaudes.
4. Le four va détecter que la sonde est insérée et la fenêtre
de réglage de la sonde apparaîtra. Entrez le température
d’aliment désirée et pressez Start. Vous pouvez régler la
température de la sonde entre 100°F et 200°F.
Directives concernant l’entretien de la
sonde
Ŷ/¶XWLOLVDWLRQGHVRQGHVGLႇpUHQWHVGHFHOOHIRXUQLHDYHFFHSUR-
duit risque d’endommager le connecteur de la sonde.
Ŷ8WLOLVH]ODSRLJQpHGHODVRQGHHWGHOD¿FKHSRXUOHVLQVpUHURX
retirer de la viande ou du connecteur.
Ŷ3RXUpYLWHUG¶HQGRPPDJHUODVRQGHQ¶XWLOLVH]SDVGHSLQFHV
pour tirer sur le cordon lors du retrait.
Ŷ3RXUpYLWHUG¶HQGRPPDJHUODVRQGHDVVXUH]YRXVTXHOHVDOL-
ments sont complètement décongelés avant d’insérer la sonde.
Ŷ$¿QGHSUpYHQLUG¶pYHQWXHOOHVEUOXUHVDWWHQGH]TXHODVRQGH
s’est refroidie avant de débrancher la sonde du connecteur.
Ŷ1HODLVVH]MDPDLVODVRQGHjO¶LQWpULHXUGXIRXUGXUDQWXQF\FOH
de rôtissage ou de nettoyage à la vapeur.
Ŷ Ne rangez pas la sonde dans le four.
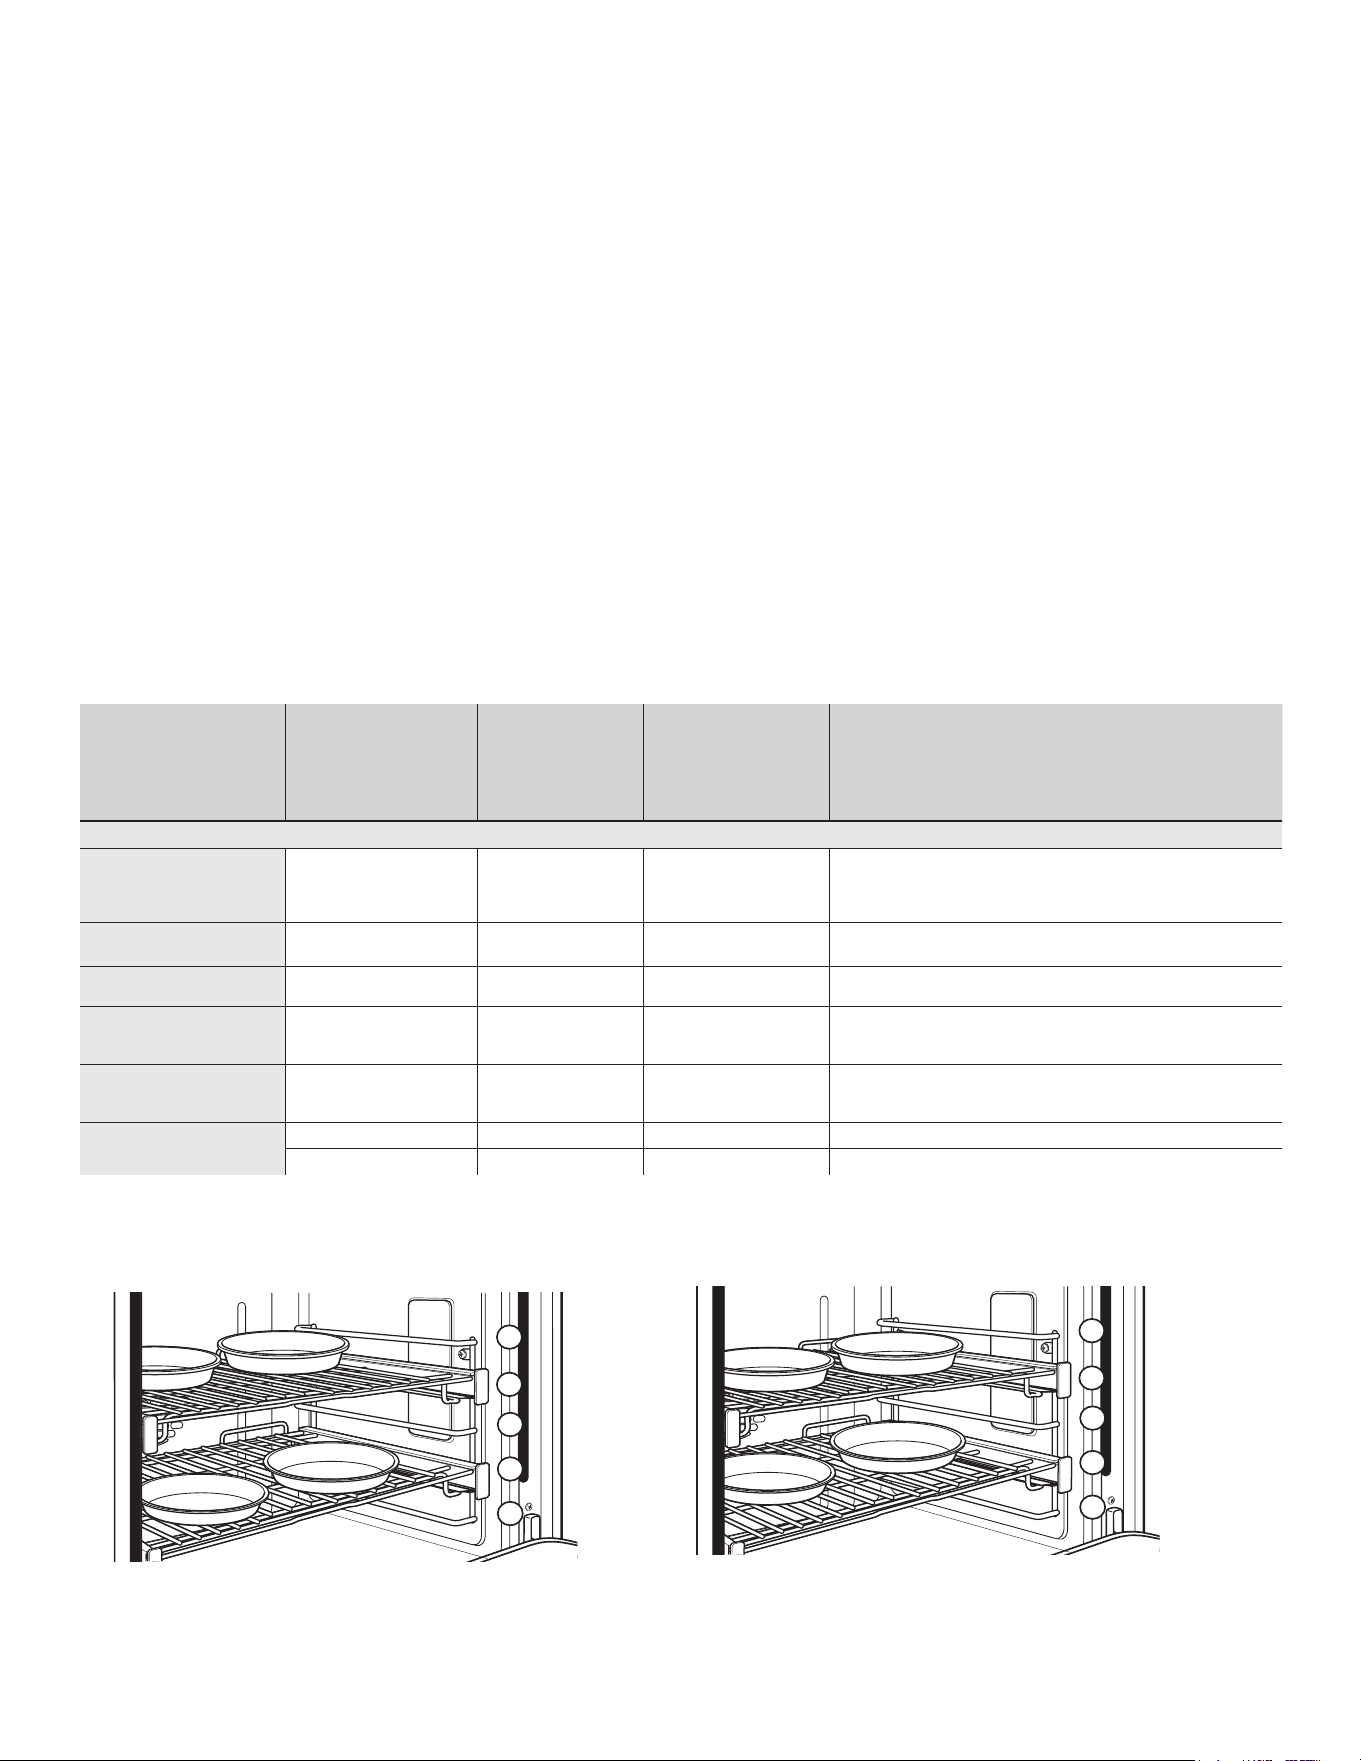
49-2000877 Rev. 4 35
GUIDE DE CUISSON AU FOUR
Cuisez les aliments complètement pour vous prémunir contre les maladies d’origine alimentaire. On peut trouver des
recommandations de températures minimales sécuritaires pour la cuisson des aliments sur le site IsItDoneYet.gov. Utilisez un
thermomètre pour aliments pour mesurer les températures.
CONSEILS SUR LES RÉCIPIENTS DE CUISSON AU FOUR
La matière, la finition et la taille des récipients ont un effet sur les
résultats de la cuisson.
Les casseroles foncées et enrobées absorbent la chaleur plus
rapidement que celles qui sont pâles ou luisantes. Les casseroles
qui absorbent davantage peuvent produire une croûte plus
foncée, croustillante et épaisse. Si vous utilisez des récipients
foncés et enrobés, vérifiez les aliments plus tôt que le temps de
cuisson minimal. Si des résultats indésirables sont obtenus avec
ce type de récipients, envisagez de réduire la température du
four de 25 ºF la prochaine fois.
Les casseroles luisantes peuvent cuire les aliments plus
uniformément, par exemple pour les gâteaux ou les biscuits.
Les casseroles en verre ou en céramique chauffent lentement
mais retiennent bien la chaleur. Ces types de casseroles
conviennent bien aux tartes et aux crèmes pâtissières.
Les casseroles isolées à l’air chauffent lentement et peuvent
réduire le brunissement du fond.
Gardes les récipients de cuisson propres pour favoriser un
chauffage uniforme.
Les récipients en grès chauffent lentement et retiennent bien la
chaleur. On recommande de préchauffer ce type de récipient si
c’est possible. Un temps de cuisson supplémentaire peut s’avérer
nécessaire.
Les récipients utilisés pour les modes de grillage (Broil) doivent
convenir à cette méthode de cuisson.
3
4
2
1
5
*Pour les meilleurs résultats lorsque vous cuisez un gâteau à 4 étages, placez quatre moules en utilisant les grilles 2 et 4. Positionnez les moules
de façon qu’aucun ne se trouve directement au-dessus d’un autre, comme illustré.
Positions de grille pour 4 étages de gâteau à la fois
Position des grilles pour la cuisson par
convection de 4 étages de gâteau à la fois.
Centrer les moules sur les grilles tel qu’illustré.
3
4
2
1
5
TYPE D’ALIMENT
MODE(S)
RECOMMANDÉ(S)
POSITIONS
DE GRILLE
RECOMMANDÉES
- FOUR GAUCHE
(modèles 48 po
seulement)
POSITIONS DE
GRILLE RECOM-
MANDÉES - FOUR
OU FOUR DROIT
(modèles 48 po
seulement)
SUGGESTIONS SUPPLÉMENTAIRES
Boulangerie
Gâteaux étagés, gâteaux
plaques, gâteaux Bundt,
muffins, pains éclairs sur
une seule grille
Cuisson au four (Bake)
22 or 3 Utiliser des récipients de cuisson brillants
Gâteaux étagés sur
plusieurs grilles*
Cuisson au four (Bake)
Convection Bake
- 2 and 4 Assurer une bonne circulation d’air (voir illustration ci-dessous).
Gâteaux mousselines
(gâteaux des anges)
Cuisson au four (Bake)
11 Utiliser des récipients de cuisson brillants
Biscuits, petits gâteaux
secs, scones sur une
seule grille
Cuisson au four (Bake)
22 or 3 Utiliser des récipients de cuisson brillants
Biscuits, petits gâteaux
secs, scones sur plusieurs
grilles
Cuisson par convection
- Multi
2 and 3
2 and 4
1, 3, and 5
Assurer une bonne circulation d’air.
Pains à la levure
Fermentation (Proof)
1 or 2 2 or 3 Recouvrir la pâte lâchement.
Cuisson au four (Bake)
22 or 3
Suite à la page suivante
36 49-2000877 Rev. 4
GUIDE DE CUISSON AU FOUR
Cuisez les aliments complètement pour vous prémunir contre les maladies d’origine alimentaire. On peut trouver des
recommandations de températures minimales sécuritaires pour la cuisson des aliments sur le site IsItDoneYet.gov. Assurez-vous
d’utiliser un thermomètre pour aliments pour mesurer les températures.
TYPE D’ALIMENT MODE(S) RECOMMANDÉ(S)
POSITIONS
DE GRILLE
RECOMMANDÉES
- FOUR GAUCHE
(modèles 48 po
seulement)
POSITIONS DE
GRILLE RECOM-
MANDÉES - FOUR
OU FOUR DROIT
(modèles 48 po seu-
lement) SUGGESTIONS SUPPLÉMENTAIRES
Bœuf et porc
Hamburgers
Grillage maximal (Broil High)
Grillage par convection maximal
(Convection Broil High)
3 ou 4 4 ou 5
Utiliser une lèchefrite; placer plus bas pour une viande
saignante ou moins la saisir. Surveiller les aliments
étroitement lors du grillage. Pour un meilleur résultat centrer
l’aliment sous l’élément de grillage.
Steaks et côtelettes
Grillage maximal (Broil High)
Grillage par convection maximal
(Convection Broil High)
3 ou 4 4 ou 5
Utiliser une lèchefrite; placer plus bas pour une viande
saignante ou moins la saisir. Surveiller les aliments
étroitement lors du grillage. Pour un meilleur résultat centrer
l’aliment sous l’élément de grillage.
Rôtis
Cuisson au four (Bake)
Rôtissage par convection (Conv
Roast)
22 ou 3
Utiliser un récipient à côtés bas tel qu’une lèchefrite. Le
préchauffage n’est pas nécessaire.
Casseroles Cuisson au four (Bake)
2 ou 3 2 ou 3
Poisson
Grillage minimal (Broil Low)
Grillage par convection minimal
(Convection Broil Low)
3 ou 4 (1/2 po
d’épaisseur ou moins)
2 or 3 (>1/2 po)
4 ou 5 (1/2 po d’épaisseur
ou moins)
3 or 4 (>1/2 po)
Baisser l’aliment pour moins saisir la viande ou obtenir une
cuisson saignante.
Surveiller les aliments étroitement lors
du grillage. Pour un meilleur résultat centrer l’aliment sous
l’élément de grillage.
Aliments prêt-à-servir congelés
Pizza sur une seule grille Cuisson au four (Bake)
2 2 ou 3 Ne pas préchauffer.
Pizzas sur plusieurs
grilles
Cuisson par convection - Multi - 2 et 4
Espacer les pizzas de gauche à droite, ne pas les placer
directement au-dessus de l’autre.
Produits à base de
pommes de terre, poulet,
croquettes, hors-d'œuvre
sur une seule grille
Cuisson au four (Bake)
Rôtissage par convection (Conv
Roast)
22 ou 3
Ne pas préchauffer. Utiliser des récipients de cuisson foncés
pour augmenter le brunissement ou le croustillant; ou des
récipients brillants pour moins de brunissement.
Produits à base de
pommes de terre, poulet,
croquettes, hors-d'œuvre
sur plusieurs grilles
Cuisson par convection - Multi 2 et 3 2 et 4
Utiliser des récipients de cuisson foncés pour augmenter le
brunissement ou le croustillant; ou des récipients brillants
pour moins de brunissement.
Volaille
Poulet entier
Cuisson au four (Bake)
Rôtissage par convection (Conv
Roast)
22 ou 3Utiliser un récipient à côtés bas tel qu’une lèchefrite.
Poitrines, cuisses, pilons
non désossés
Grillage minimal (Broil Low)
Grillage par convection minimal
(Convection Broil Low)
Cuisson au four (Bake)
2 2 ou 3
Si pané ou enrobé de sauce, éviter les modes à grillage
maximal (Broil High). Griller avec le côté peau vers le bas en
premier. Surveiller les aliments étroitement lors du grillage.
Pour les meilleurs résultats, centrer l’aliment sous l’élément
de grillage.
Poitrines de poulet
désossées
Grillage minimal (Broil Low)
Grillage par convection minimal
(Convection Broil Low)
Cuisson au four (Bake)
2 2 ou 3
Baisser l’aliment pour moins saisir la viande ou obtenir une
cuisson saignante, et le monter pour saisir davantage la
viande et augmenter le brunissage lors du grillage. Pour les
meilleurs résultats, centrer l’aliment sous l’élément de grillage
ou le brûleur.
Dinde entière
Cuisson au four (Bake)
Rôtissage par convection (Conv
Roast)
-1 ou 2Utiliser un récipient à côtés bas tel qu’une lèchefrite.
Poitrine de dinde
Cuisson au four (Bake)
Rôtissage par convection (Conv
Roast)
-2Utiliser un récipient à côtés bas tel qu’une lèchefrite.
Légumes
Cuisson au four (Bake)
Rôtissage par convection (Conv
Roast)
Grillage minimal (Broil Low)
Grillage par convection minimal
(Convection Broil Low)
2 ou 3 3
Utiliser des récipients de cuisson foncés pour augmenter le
brunissement ou le croustillant; ou des récipients brillants
pour moins de brunissement.
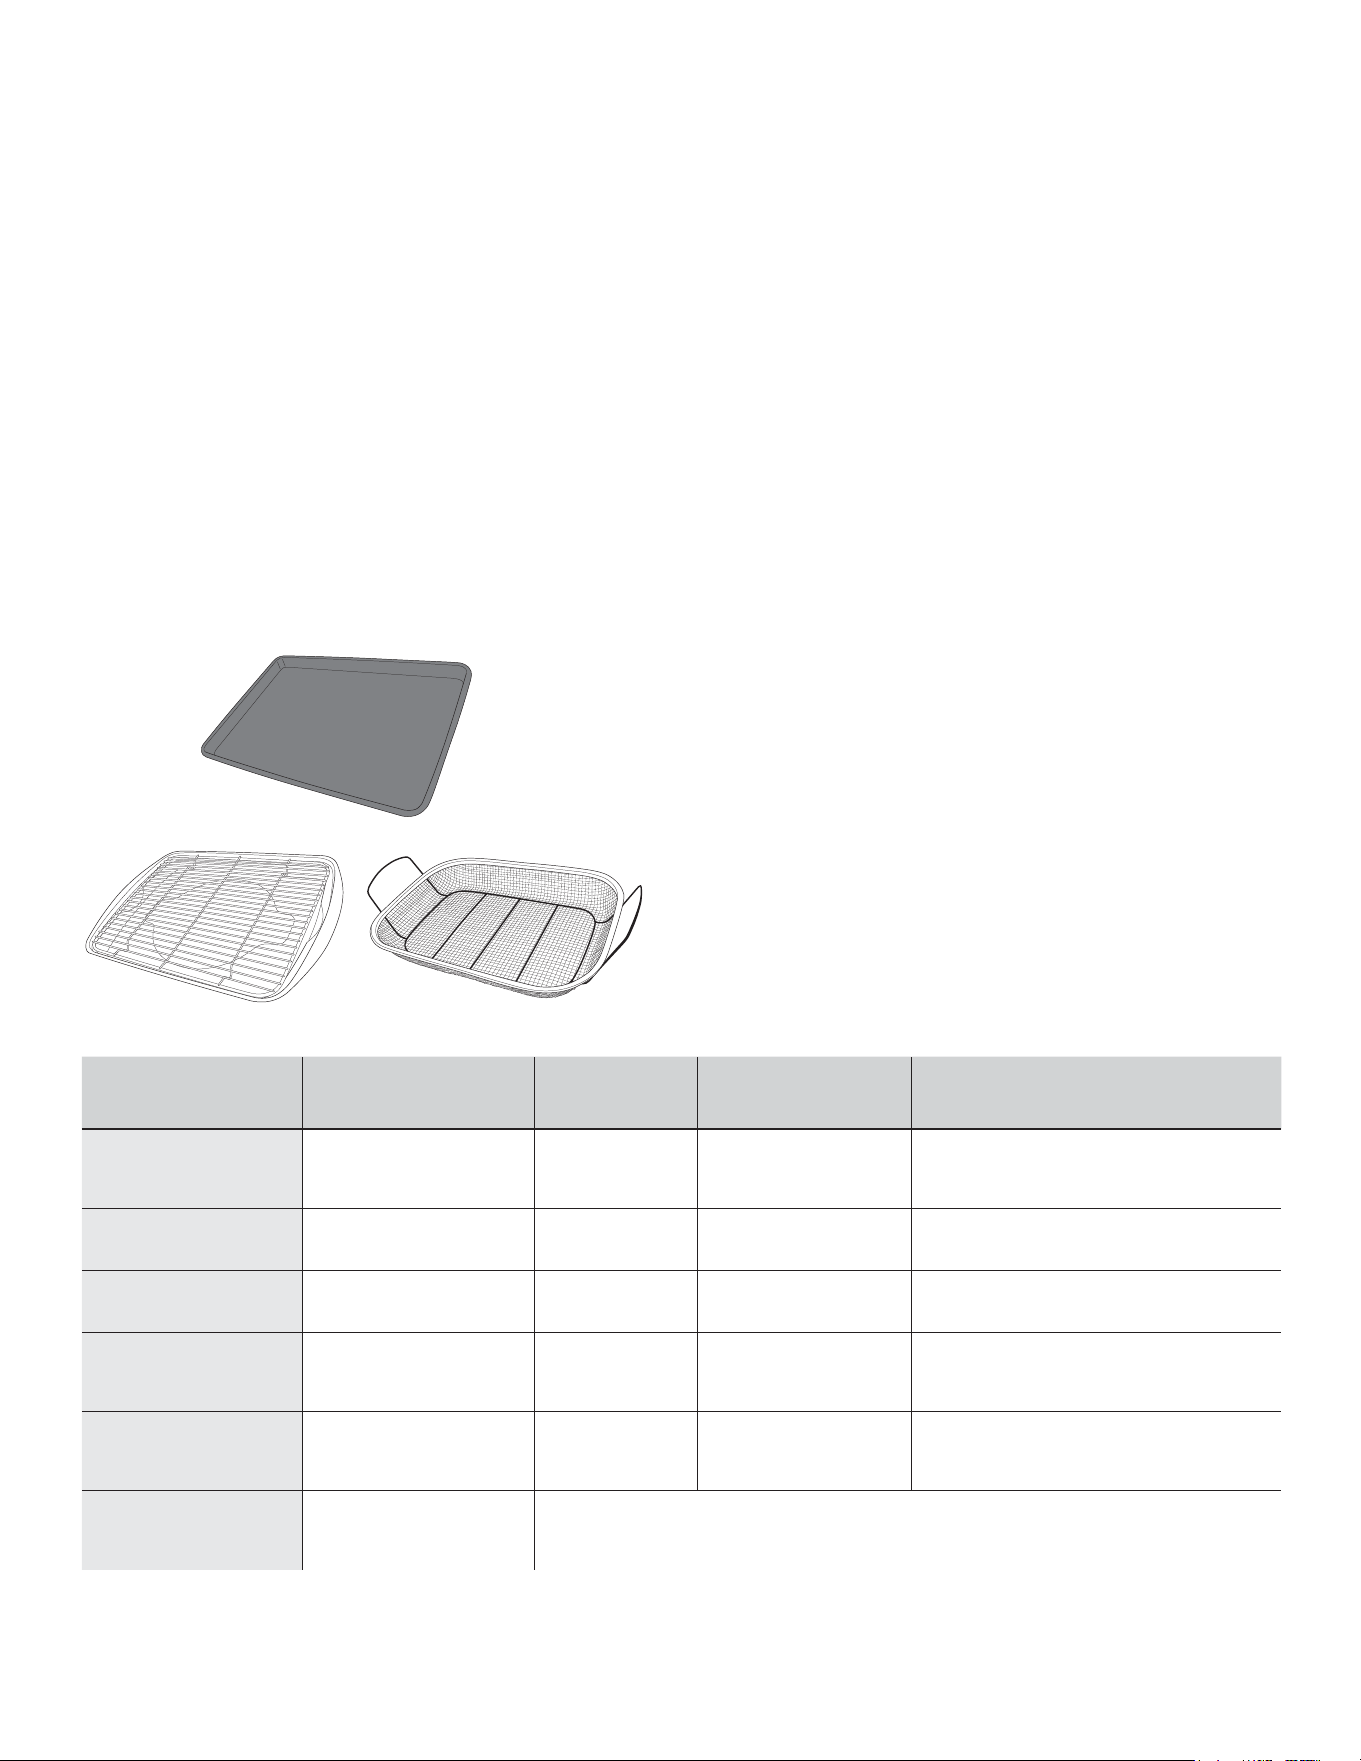
49-2000877 Rev. 4 37
GUIDE DE CUISSON AU FOUR
GUIDE DE CUISSON POUR LA FRITURE À AIR CHAUD
La friture à air chaud (Air Fry) est un mode de cuisson spécial,
sans préchauffage, conçu donner aux aliments un surface
extérieure plus croustillante que la cuisson au four régulière.
Sélectionnez Air Fry, puis réglez la température désirée et
pressez Start. Vous pouvez régler la température entre 300°F et
500°F. .
Conseils pour les récipients de friture à air
chaud
• Utilisez seulement des récipients qui supportent la cuisson sous
l’élément de grillage (Broil).
• Une plaque à pâtisserie foncée est recommandée. Une plaque
foncée améliore le brunissement et la croustillance de l’aliment.
• Vous pouvez aussi utiliser des paniers et des grilles de cuisson
au four. Une plaque à pâtisserie doit être placée sur la grille en
dessous des aliments pour recueillir les égouttements si vous
utilisez un panier de cuisson.
Conseils généraux pour le mode de friture à
air chaud (Air Fry)
• Le mode Air Fry est conçu pour la cuisson sur une seule grille.
• Le mode Air Fry est conçu pour une cuisson sans préchauffage.
• Les aliments peuvent cuire plus rapidement que prévu si le four
est déjà chaud au moment de les placer.
• Pour frire à l’air chaud des aliments avec sauce, on
recommande d’ajouter celle-ci à la fin de la cuisson.
• Si les aliments brunissent trop rapidement, placez-les à une
position de grille inférieure ou réduisez la température du four.
• Pour les aliments emballés, suivez les instructions de cuisson
au four traditionnelle pour régler la température et déterminer le
temps de cuisson.
• Il n’est pas nécessaire de retourner ou brasser les aliments
pendant la cuisson.
• Disposez les aliments en une seule couche sur la plaque sans
surcharger celle-ci.
• Vérifiez toujours la température interne des aliments pour
confirmer que la température minimale sécuritaire a été atteinte.
On peut trouver des recommandations de températures
minimales sécuritaires pour la cuisson des aliments sur le site
IsItDoneYet.gov.
TYPE D’ALIMENT
POSITION(S) DE GRILLE
RECOMMANDÉE(S)
TEMPÉRATURE
RECOMMANDÉE
(ºF)
TEMPS DE CUISSON
RECOMMANDÉ (MIN) REMARQUES
Pièces de poisson ou de
volaille fraîches désossées,
pannées telles que
croquettes, filets
3 pour le four ou le four droit
2 pour le four gauche (cuisinière
48 po seulement)
375-400 15-30
Réduire la température pour les grandes pièces.
Utiliser des récipients de cuisson luisants.
Ailes de poulet fraîches non
désossées
3 pour le four ou le four droit
2 pour le four gauche (cuisinière
48 po seulement)
375-400 25-40
Saler les ailes ou enrober d’épices à frotter, si l’on
XWLOLVH XQH VDXFH OD YHUVHU YHUV OD ¿Q GH OD FXLVVRQ RX
après.
Pilons ou cuisses de poulet
frais non désossés
3 pour le four ou le four droit
2 pour le four gauche (cuisinière
48 po seulement)
375-400 30-55 Réduire la température pour les grandes pièces.
Frites fraîches, minces
(<1/2 po)
3 pour le four ou le four droit
2 pour le four gauche (cuisinière
48 po seulement)
400-425 15-30
Le papier sulfurisé (parchemin) est recommandé
pour préparer des frites fraîches. Pour des frites plus
croustillantes, les brasser dans l'amidon de maïs ou la
farine de riz avant la cuisson.
Frites fraîches, minces
(>1/2 po)
3 pour le four ou le four droit
2 pour le four gauche (cuisinière
48 po seulement)
375-400 20-35
Le papier sulfurisé (parchemin) est recommandé
pour préparer des frites fraîches. Pour des frites plus
croustillantes, les brasser dans l'amidon de maïs ou la
farine de riz avant la cuisson.
Aliments emballés, congelés
3 pour le four ou le four droit
2 pour le four gauche (cuisinière
48 po seulement)
Suivez les instructions de cuisson au four traditionnelle (et non celles pour Air Fry) pour vous guider dans le
réglage de la température et du temps de cuisson. Un temps de cuisson plus long que celui recommandé sur
l'emballage peut être nécessaire pour certains aliments. Si le four est chaud au démarrage, l’aliment peut cuire en
moins de temps que le minimum indiqué sur l’emballage.
Récipient principal recommandé
Autres choix de récipients de cuisson
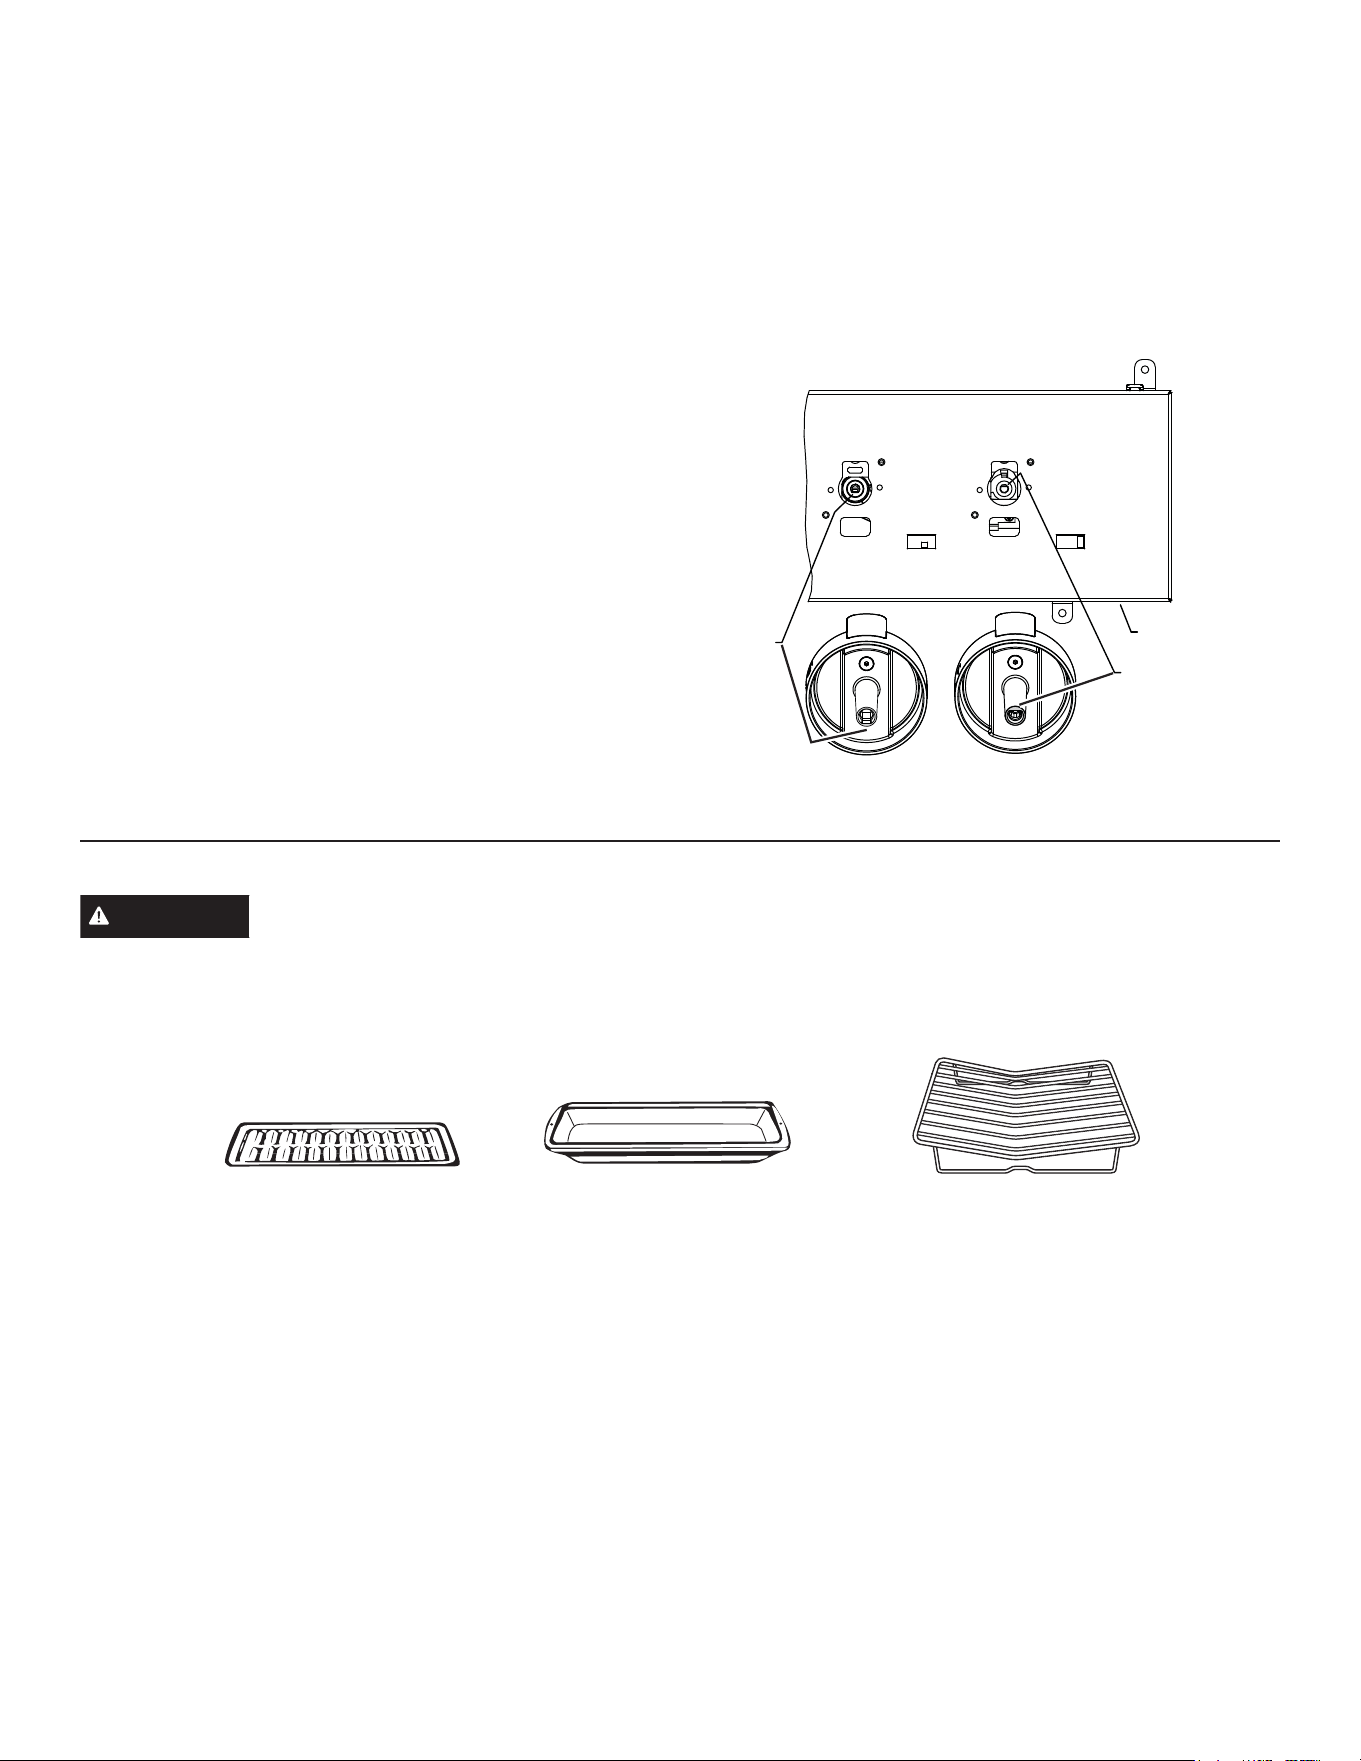
38 49-2000877 Rev. 4
ENTRETIEN ET NETTOYAGE
LÈCHEFRITE, TÔLE PERFORÉE ET GRILLE DE RÔTISSAGE
ATTENTION
Ne nettoyez pas la lèchefrite, la tôle perforée
ni la grille de rôtissage dans un four à autonettoyage.
Le moule à cuisson, la grille et la grille de rôtissage sont lavables
au lave-vaisselle. Toutefois, les plats cuits doivent être lavés à la
main à l’aide d’un nettoyant de four ou d’un détergent abrasif.
Ne rangez pas moule à cuisson ou de grille sale dans le four.
Éliminez toujours tout excès de graisse.
Tôle perforée
Grille de rôtissage
Moule à cuisson
Assurez-vous que l’alimentation électrique est coupée (OFF) et que toutes les surfaces sont refroidies avant de nettoyer une partie
quelconque de la cuisinière.
PANNEAU DE COMMANDE ET BOUTONS
Il est préférable d’essuyer le panneau de commande après
chaque utilisation. Nettoyez-le avec du savon doux et de l’eau,
ou du vinaigre et de l’eau, rincez à l'eau claire et séchez en
polissant avec un linge doux. N’utilisez pas des nettoyants
abrasifs, des nettoyants liquides corrosifs, des tampons à récurer
en plastique ni des nettoyants pour le four sur votre panneau de
commande car ils endommageront son fini.
Pour faciliter le nettoyage et à condition qu’ils soient à la position
d’arrêt (OFF), vous pouvez retirer les boutons de commande en
les tirant directement vers l’extérieur . Ne tirez pas les boutons
vers le haut ou le bas, et ne suspendez d’objets sur eux. Cela
pourrait endommager l’arbre de la soupape de gaz. Voyez
la section Brûleurs de surface pour une vue détaillée de ces
boutons. Vous pouvez laver les boutons à la main avec de l'eau
savonneuse.
Mémorisez la position des boutons des brûleurs lorsque vous
les retirez. Les boutons ne sont pas interchangeables, il faut les
placer à la même position après le nettoyage. Voyez la section
Brûleurs de surface pour une vue détaillée de ces boutons. Pour
remettre les boutons en place après le nettoyage, alignez le bas
du bouton selon la figure ci-dessous. Poussez le bouton jusqu’à
ce qu’il soit bien en place.
Utilisez un linge doux non abrasif pour nettoyer l’intérieur du
bezel. Ne retirez pas le film du diffuseur. Ne l’exposez pas au
risque d’endommager l’électronique de l'éclairage.
REMARQUE : Le mini-bouton n’est pas amovible.
Plaque
FKDXႇDQWH
Avant
Panneau de
commande
Côté plat
Côté
plat
OFFOFF
Boutons de brûleurs

49-2000877 Rev. 4 39
ENTRETIEN ET NETTOYAGE
INTÉRIEUR DU FOUR
L’intérieur de votre nouveau four doit être nettoyé manuellement
ou par le mode de nettoyage à la vapeur (Steam Clean). Les
renversements de marinades, de jus de fruits, de sauce tomate et
de liquides d’arrosage contenant des acides peuvent causer de
la décoloration et doivent être essuyés immédiatement. Laissez
refroidir les surfaces chaudes, puis nettoyez et rincez.
Nettoyage manuel
N’utilisez pas des nettoyants pour le four (sauf si certifié pour four
à autonettoyage) des nettoyants liquides corrosifs, de la laine
d’acier ni des tampons à récurer sur l’intérieur du four. Nettoyez
avec de l’eau savonneuse ou une solution d'eau et de vinaigre.
Rincez à l’eau claire et séchez avec un linge doux. Assurez-vous
que les surfaces sont à température ambiante lorsque vous les
nettoyez.
Mode de nettoyage à la vapeur (Steam Clean)
La fonction Steam Clean (nettoyage à la vapeur) sert à nettoyer
les salissures légères de votre four à des températures plus
basses que celles de l’autonettoyage (Self Clean).
Pour utiliser la fonction Steam Clean :
1. Commencez par le four à température ambiante.
2. Essuyez la graisse et les salissures excédentaires du four.
3. Versez une tasse d'eau dans le fond du four.
4. Fermez la porte.
N’ouvrez pas la porte durant les 30 minutes du cycle Steam
Clean. À la fin du cycle Steam Clean, absorbez l’eau résiduelle
et essuyez la saleté des parois et de la porte du four qui a été
ramollie par la vapeur.
EXTÉRIEUR DU FOUR
N’utilisez pas des nettoyants pour le four, des nettoyants
abrasifs, des nettoyants liquides corrosifs, de la laine d’acier, des
tampons à récurer ou des poudres de nettoyage sur l’intérieur
ou l’extérieur du four. Nettoyez avec du savon doux et de l’eau,
ou une solution d'eau et de vinaigre. Rincez à l’eau claire et
séchez avec un linge doux. Assurez-vous que les surfaces sont
à température ambiante et à l’écart des rayons directs du soleil
lorsque vous les nettoyez.
Si une tache persiste sur la garniture de l’évent de la porte,
utilisez un nettoyant abrasif doux et une éponge à récurer pour
de meilleurs résultats. Les renversements de marinades, de jus
de fruits, de sauce tomate et de liquides d’arrosage contenant
des acides peuvent causer de la décoloration et doivent être
essuyés immédiatement. Laissez refroidir les surfaces chaudes,
puis nettoyez et rincez.
Surfaces peintes
Les surfaces peintes peuvent comprendre la porte et les
garnitures autour du panneau de commande. Nettoyez-les
avec de l’eau savonneuse ou une solution d'eau et de vinaigre.
N’utilisez pas des nettoyants pour four du commerce, des
nettoyants en poudre, de la laine d’acier ou des abrasifs durs sur
une surface peinte.
Acier inoxydable
N’utilisez pas de tampon à récurer en acier car ils rayeront la
surface. Pour nettoyer la surface en acier inoxydable, utilisez
une eau tiède savonneuse ou un nettoyant ou poli pour acier
inoxydable. Frottez toujours la surface dans la direction du grain.
Suivez les instructions du fabricant du nettoyant pour acier
inoxydable. Les nettoyants qui contiennent de l’acide oxalique
tels que Bar Keepers Friend Soft Cleanser™ vont éliminer la
rouille, le ternissement et les petites taches. Utilisez uniquement
un nettoyant liquide exempt d'abrasif et frottez dans la direction
des lignes de brosse à l'aide d'une éponge douce et humide.
Pour vous renseigner sur l’achat de produits de nettoyage y
compris ceux pour électroménagers en acier inoxydable, voyez la
section Soutien au consommateur pour plus d’informations.
NETTOYAGE À LA VAPEUR DU FOUR
Pour utiliser la fonction Steam Clean :
1. Sélectionnez CLEAN sur le menu principal, puis sélectionnez
STEAM CLEAN.
La commande règle automatiquement la durée du cycle de
nettoyage recommandée.
2. Pressez le bouton START/OFF pour démarrer le cycle STEAM
CLEAN. Si « CLOSE door » défile sur l’écran, le cycle a été
sélectionné mais la porte n’est pas fermée. Fermez la porte du
four.
Pour interrompre un cycle de nettoyage, pressez START/OFF.

40 49-2000877 Rev. 4
ENTRETIEN ET NETTOYAGE
FOUR AUTONETTOYANT
Sécurité
La fonction d’autonettoyage du four a été conçue pour faciliter le
nettoyage de l’intérieur du four en utilisant des températures très
élevées pour brûler les résidus de nourriture.
AVERTISSEMENT
Essuyez l’excès de graisse et les
autres résidus d’aliments à l’aide d’un chiffon humide. Les résidus
de nourriture risquent prendre feu, au risque de provoquer des
dommages liés à la fumée et à la chaleur.
Ŷ Ne nettoyez pas les joints du four au risque de provoquer des
dommages.
Ŷ Retirez les ustensiles, la lèchefrite, la grille, la sonde et toute
feuille d’aluminium du four.
Ŷ Assurez-vous que la lentille de la lumière du four et le cadre de
la lentille soient bien à leur place.
Ŷ N’utilisez pas de nettoyants pour four, d’abrasifs ou de
protecteurs à proximité ou dans le four en cours de nettoyage.
Ŷ Nous recommandons d’aérer votre cuisine en ouvrant une
fenêtre ou via une hotte de ventilation ou un ventilateur
pendant le nettoyage.
Ŷ Nettoyez les résidus du cadre et autour dela porte du four, à
l’extérieur des joints du four. Ces zones doivent être nettoyées
à la main.
Ŷ Les plateaux du four doivent être laissés à l’intérieur pendant le
nettoyage.
IMPORTANT : Certains oiseaux sont très sensibles aux
émanations résultant du cycle de nettoyage automatique d’un
four. Installez les oiseaux dans une autre pièce parfaitement
ventilée.
REMARQUE : Durant le cycle d’autonettoyage, la plaque de
cuisson sera verrouillée et non fonctionnelle. Si un brûleur de
surface est allumé après le début du cycle d’autonettoyage,
l’avertissement “err turn surf frnr off” sera affiché sur l’écran du
four et un bip se fera entendre.
REMARQUE : Le nettoyage automatique ne fonctionnera pas si
la sonde de température est insérée.
Sur les modèles à four double, vous ne pouvez pas activer des
modes d’autonettoyage (Self Clean) dans les deux fours en
même temps. Vous ne pouvez pas non plus activer une fonction
de cuisinière lorsqu’un four est en mode d’autonettoyage. Le four
qui n’est pas en autonettoyage ne pourra pas activer un autre
mode de four. Si le brûleur de la table de cuisson est allumé, un
message à l’écran demandera à l’utilisateur d’éteindre le brûleur
ou l’autonettoyage sera automatiquement annulé.
Comment régler le four sur le nettoyage
1. Éteignez tous les brûleurs de surface. (Le cycle CLEAN
(Nettoyage) ne démarrera que lorsque tous les brûleurs de
surface auront été éteints.)
2. Fermez la porte.
3. Sélectionnez l’option More, puis sélectionnez Self Clean.
4. La commande est réglée automatiquement sur la durée de
nettoyage recommandée (5 heures). La durée de nettoyage
peut être ajustée sur 3 à 5 heures. L’écran affichera le temps
restant.
5. Poussez le bouton d’affichage du four (START/OFF) pour
démarrer le cycle SELF CLEAN (autonettoyage).
Le symbole
clignotera lorsque la porte du four est bloquée.
Il ne sera pas possible d’ouvrir la porte pendant le nettoyage.
6. Une fois le programme de nettoyage terminé et le four refroidi,
le
s’éteindra. Pressez le bouton B
Pour interrompre un cycle d’autonettoyage, pressez le bouton
START/OFF Lorsque le four a suffisamment refroidi pour ne
plus présenter de risque, le symbole
s’éteindra indiquant
que la porte est peut-être ouverte.
Un programme interrompu ne peut pas être redémarré avant
que le four ne soit suffisamment froid de sorte que la porte se
débloque.
Après un cycle d’autonettoyage
Vous remarquerez la présence de cendre blanche à l’intérieur
du four. Essuyez-la à l’aide d’un chiffon humide après
refroidissement du four.
Si les traces blanches persistent, retirez-les à l’eau chaude
savonneuse et rincez-les avec un mélange de vinaigre et d’eau.
Ces dépôts sont en général des restes de sel que le programme
de nettoyage automatique ne peut éliminer.
Si le four est encore sale après un programme, répétez le
programme.
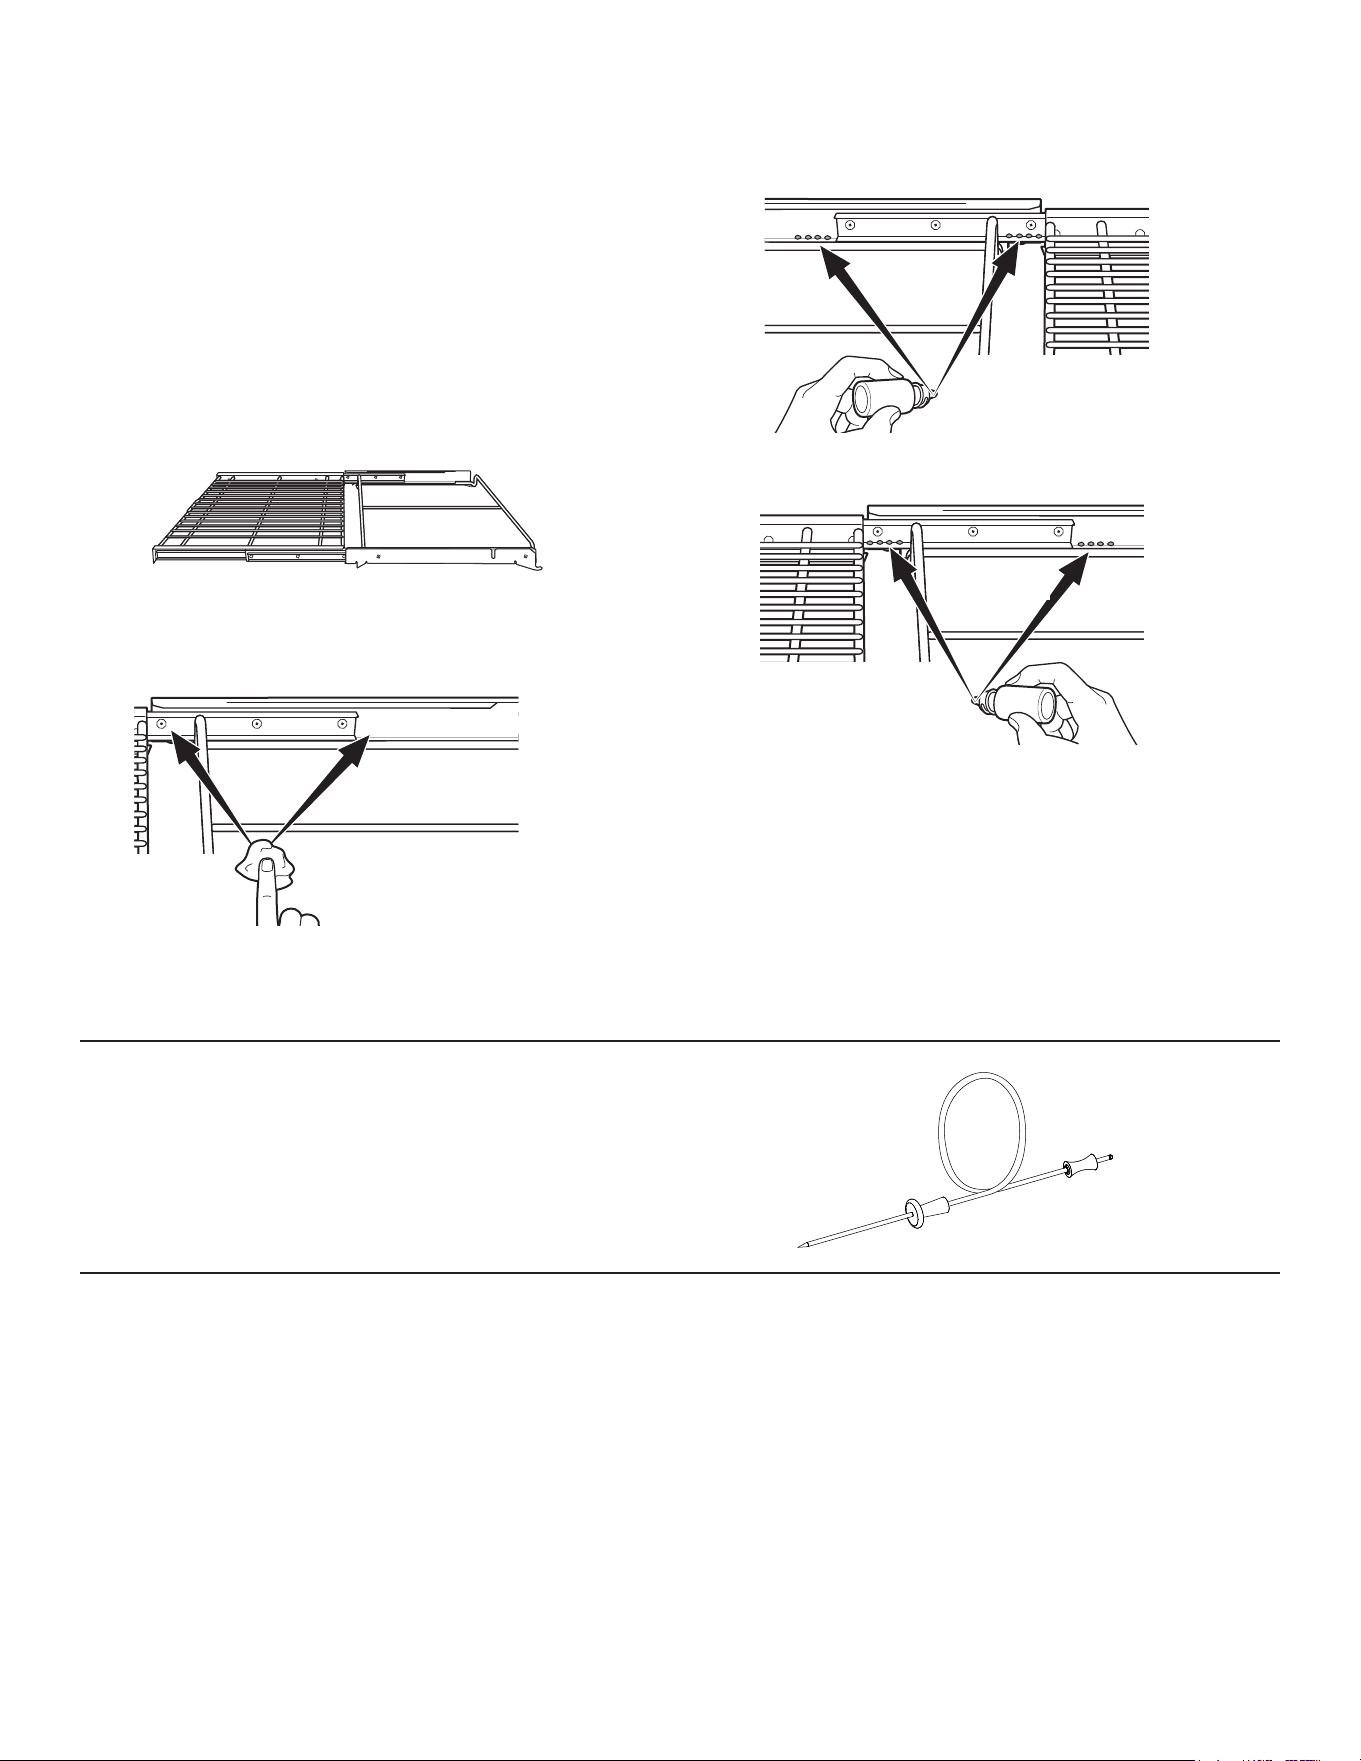
49-2000877 Rev. 4 41
ENTRETIEN ET NETTOYAGE
GRILLES DE FOUR
Périodiquement, les grilles du four devront être lubrifiées à
l’aide du lubrifiant au graphite livré avec votre cuisinière.
Pour
commander une graisse Graphite supplémentaire, appelez notre
centre de pièces au 800.561.3344 et mentionnez la référence
WB02T10303.
1. Retirez la grille du four. Voir la section Grilles de four
extensibles.
2. Dépliez totalement la grille sur la table ou le plan de travail.
Nous vous recommandons de placer du papier journal sous
la grille pour faciliter le nettoyage.
3. Si vous constatez la présence de résidus sur les barres
coulissantes, éliminez-les à l’aide d’une serviette en papier.
REMARQUE : Tout lubrifiant graphite essuyé doit être
réappliqué.
4. Secouez le lubrifiant graphite avant de l’ouvrir. En commençant
par le mécanisme coulissant gauche de la grille, appliquez
quatre (4) goutelettes de lubrifiant sur les deux (2) chenilles du
mécanisme coulissant à proximité des porte-roulements.
5. Faites de même pour le mécanisme coulissant droit.
6. Ouvrez et fermez la grille plusieurs fois pour étaler le lubrifiant.
7. Replacez le bouchon du lubrifiant et secouez-le à nouveau.
Retournez la grille et répétez les étapes 3, 4, 5 et 6.
8. Fermez la grille, placez la grille avec le côté droit à la verticale
et introduisez-la dans le four. Voir la section Grilles de cuisson
extensibles.
9. Répétez les étapes ci-dessus pour chaque grille.
REMARQUE : N’utilisez pas pulvérisateur pour huiles de cuisson
ou tout autre aérosol de lubrifiant sur les glissières.
Côté gauche
Côté droit de la
grille vers le haut
SONDE DE TEMPÉRATURE
Laissez la sonde de température refroidir avant de procéder au
nettoyage.
Il est recommandé de nettoyer la sonde au savon et à l’eau à la
main.
Ne plongez pas la sonde de température dans l’eau.
Ne rangez pas la sonde de température dans le four.
BAS DU FOUR
Le bas du four est doté d’un fini en porcelaine émaillée.
Pour faciliter le nettoyage, protégez le bas du four contre les
débordements excessifs. Vous pouvez utiliser une feuille ou
une plaque en aluminium pour recueillir les débordements en la
plaçant sur la grille en dessous de celle sur laquelle vous cuisez.
Cela est particulièrement important lorsque vous cuisez une
tarte aux fruits ou d’autres aliments très acides. Les garnitures
de fruits ou d’autres aliments très acides (tels que tomates,
choucroute et sauces avec vinaigre ou jus de citron) peuvent
causer une corrosion par piquage qui endommage la surface
en porcelaine, et ces débordements doivent être nettoyés
immédiatement.
Ne recouvrez jamais complètement une grille avec du papier
aluminium. Cela va gêner la circulation de la chaleur et produira
une cuisson médiocre.
Pour nettoyer les débordements, utilisez de l’eau savonneuse, un
nettoyant abrasif ou un tampon à récurer rempli de savon. Rincez
bien pour retirer le savon avant l’autonettoyage.
Côté droit
de la grille
vers le haut
Côté droit