
*Select Models Only
SAFETY INFORMATION .....3
OPERATING INSTRUCTIONS
Features ..........................6
Controls ..........................9
Dispenser* ....................... 13
Autofill* ......................... 14
Single Serve Brewer* .............. 15
About Appliance Communication . . . 16
Water Filter ...................... 17
Fresh Food Storage Options ....... 18
Climate Zone & Temperature
Controlled Drawer ................20
Freezer ..........................22
Automatic Ice maker ..............23
CARE AND CLEANING ..... 24
Replacing the Lights ..............25
INSTALLATION INSTRUCTIONS
Preparing to Install the
Refrigerator ......................26
Installing the Refrigerator ..........28
Installing the Water Line ........... 41
TROUBLESHOOTING TIPS . . 46
Normal Operating Conditions ......45
Truth or Myth ....................49
LIMITED WARRANTY ....... 51
CONSUMER SUPPORT
RPWFE Water Filter Cartridge
Limited Warranty ................52
Performance Data Sheet ...........53
Consumer Support ................54
ENGLISH/FRANÇAIS/
ESPAÑOL
Write the model and serial
numbers here:
Model # _________________
Serial # _________________
Find these numbers on a label
on the left side, near the middle
of the refrigerator compartment.
49-60792 Rev. 3 01-19 GEA
GE Profile™ Models
Models that start with DFE, GFE,
GFS, GNE, PFH, PFE, PFD and
GFD are Standard Depth
Models (SD)
Models that start with GYE, GYS,
PYE, DYE, PWE, ZWE and PYD
are Counter Depth Models (CD)
OWNER’S MANUAL &
INSTALLATION
INSTRUCTIONS
REFRIGERATORS
Bottom Freezer
GE is a trademark of the General Electric Company. Manufactured under trademark license.

2 49-60792 Rev. 3
THANK YOU FOR MAKING GE APPLIANCES A PART OF YOUR HOME.
Whether you grew up with GE Appliances, or this is your first, we’re happy to have you in the family.
We take pride in the craftsmanship, innovation and design that goes into every GE Appliances
product, and we think you will too. Among other things, registration of your appliance ensures that we
can deliver important product information and warranty details when you need them.
Register your GE appliance now online. Helpful websites and phone numbers are available in the
Consumer Support section of this Owner’s Manual. You may also mail in the pre-printed registration
card included in the packing material.
49-60792 Rev. 3 3
CAUTION
To reduce the risk of injury when using your refrigerator, follow these basic safety
precautions.
Ŷ 'RQRWFOHDQJODVVVKHOYHVRUFRYHUVZLWKZDUP
water when they are cold. Glass shelves and
covers may break if exposed to sudden temperature
changes or impact, such as bumping or dropping.
Tempered glass is designed to shatter into many
small pieces if it breaks.
Ŷ .HHSILQJHUVRXWRIWKH³SLQFKSRLQW´DUHDV
clearances between the doors and between the
doors and cabinet are necessarily small. Be careful
closing doors when children are in the area.
Ŷ 'RQRWWRXFKWKHFROGVXUIDFHVLQWKHIUHH]HU
compartment when hands are damp or wet, skin
may stick to these extremely cold surfaces.
Ŷ 'RQRWUHIUHH]HIUR]HQIRRGVZKLFKKDYHWKDZHG
completely.
Ŷ ,QUHIULJHUDWRUVZLWKDXWRPDWLFLFHPDNHUVDYRLG
contact with the moving parts of the ejector
mechanism, or with the heating element that
UHOHDVHVWKHFXEHV'RQRWSODFHILQJHUVRUKDQGV
on the automatic ice making mechanism while the
refrigerator is plugged in.
SAFETY INFORMATION
READ AND SAVE THESE INSTRUCTIONS
IMPORTANT SAFETY INFORMATION
READ ALL INSTRUCTIONS BEFORE USING THE APPLIANCE
INSTALLATION
WARNING
EXPLOSION HAZARD
.HHSIODPPDEOHPDWHULDOVDQGYDSRUVVXFKDVJDVROLQHDZD\IURPUHIULJHUDWRU)DLOXUHWRGRVRFDQUHVXOWLQILUH
explosion, or death.
WARNING
TIP OVER HAZARD.
%XLOWLQVW\OHPRGHOVPRGHO3<(*<(*<63:(3<'DQG=:(DUHWRSKHDY\HVSHFLDOO\ZLWKDQ\GRRUV
open. These models must be secured with the anti-tip floor bracket to prevent tipping forward, which could result
in death or serious injury. Read and follow the entire installation instructions for installing the anti-tip floor bracket
packed with your refrigerator.
WARNING
To reduce the risk of fire, explosion, electric shock, or injury when using your
refrigerator, follow these basic safety precautions:
Ŷ 7KLVUHIULJHUDWRUPXVWEHSURSHUO\LQVWDOOHG
DQGORFDWHGLQDFFRUGDQFHZLWKWKH,QVWDOODWLRQ
,QVWUXFWLRQVEHIRUHLWLVXVHG
Ŷ 8QSOXJWKHUHIULJHUDWRUEHIRUHPDNLQJUHSDLUV
replacing a light bulb, or cleaning.
NOTE: Power to the refrigerator cannot be
disconnected by any setting on the cont rol panel.
NOTE: Repairs must be performed by a qualified
Service Professional.
Ŷ 5HSODFHDOOSDUWVDQGSDQHOVEHIRUHRSHUDWLQJ
Ŷ 'RQRWXVHDQH[WHQVLRQFRUG
Ŷ 'RQRWVWRUHRUXVHJDVROLQHRURWKHUIODPPDEOH
vapors and liquids in the vicinity of this or any other
appliance.
Ŷ 'RQRWVWRUHH[SORVLYHVXEVWDQFHVVXFKDVDHURVRO
cans with a flammable propellant in this appliance.
Ŷ 7RSUHYHQWVXIIRFDWLRQDQGHQWUDSPHQWKD]DUGV
WRFKLOGUHQUHPRYHWKHIUHVKIRRGDQGIUHH]HU
doors from any refrigerator before disposing of it or
discontinuing its use.
Ŷ 7RDYRLGVHULRXVLQMXU\RUGHDWKFKLOGUHQVKRXOGQRW
stand on, or play in or with the appliance.
Ŷ &KLOGUHQDQGSHUVRQVZLWKUHGXFHGSK\VLFDOVHQVRU\
or mental capabilities or lack of experience and
knowledge can use this appliance only if they are
supervised or have been given instructions on safe
XVHDQGXQGHUVWDQGWKHKD]DUGVLQYROYHG
Ŷ 7KLVDSSOLDQFHLVLQWHQGHGWREHXVHGLQKRXVHKROG
and similar applications such as: staff kitchen areas
LQVKRSVRIILFHVDQGRWKHUZRUNLQJHQYLURQPHQWV
IDUPKRXVHVE\FOLHQWVLQKRWHOVPRWHOVEHG
EUHDNIDVWDQGRWKHUUHVLGHQWLDOHQYLURQPHQWV
catering and similar non-retail applications.
Ŷ 'RQRWDSSO\KDUVKFOHDQHUVWRWKHUHIULJHUDWRU
Certain cleaners will damage plastic which may
cause parts such as the door or door handles to
detach unexpectedly. See the Care and Cleaning
section for detailed instructions.
Ŷ &RQQHFWWRSRWDEOHZDWHUVXSSO\RQO\ZLWKZDWHU
SUHVVXUHPD[LPXPRISVLNLORSDVFDOV
4 49-60792 Rev. 3
SAFETY INFORMATION
IMPORTANT SAFETY INFORMATION
READ ALL INSTRUCTIONS BEFORE USING THE APPLIANCE
READ AND SAVE THESE INSTRUCTIONS
PROPER DISPOSAL OF YOUR OLD REFRIGERATOR
Do not, under any circumstances, cut or remove the third (ground) prong from the power cord. For
personal safety, this appliance must be properly grounded.
The power cord of this appliance is equipped with a
SURQJJURXQGLQJSOXJZKLFKPDWHVZLWKDVWDQGDUG
SURQJJURXQGLQJZDOORXWOHWWRPLQLPL]HWKH
SRVVLELOLW\RIHOHFWULFVKRFNKD]DUGIURPWKLVDSSOLDQFH
Have the wall outlet and circuit checked by a qualified
electrician to make sure the outlet is properly
grounded.
Where a standard 2-prong wall outlet is encountered, it
is your personal responsibility and obligation to have it
replaced with a properly grounded 3-prong wall outlet.
'RQRWXVHDQDGDSWHU
The refrigerator should always be plugged into its own
individual electrical outlet which has a voltage rating
that matches the rating plate.
$9ROW$&+]RUDPSIXVHGJURXQGHG
electrical supply is required. This provides the best
performance and also prevents overloading house
ZLULQJFLUFXLWVZKLFKFRXOGFDXVHDILUHKD]DUGIURP
overheated wires.
Never unplug your refrigerator by pulling on the power
cord. Always grip plug firmly and pull straight out from
the outlet.
,PPHGLDWHO\GLVFRQWLQXHXVHRIDGDPDJHGVXSSO\
FRUG,IWKHVXSSO\FRUGLVGDPDJHGLWPXVWEH
replaced by a qualified service professional with an
DXWKRUL]HGVHUYLFHSDUWIURPWKHPDQXIDFWXUHU
When moving the refrigerator away from the wall, be
careful not to roll over or damage the power cord.
CONNECTING ELECTRICITY
WARNING
ELECTRICAL SHOCK HAZARD
Plug into a grounded 3-prong outlet
'RQRWUHPRYHWKHJURXQGSURQJ
'RQRWXVHDQDGDSWHU
'RQRWXVHDQH[WHQVLRQFRUG
)DLOXUHWRIROORZWKHVHLQVWUXFWLRQVFDQUHVXOWLQGHDWKILUHRUHOHFWULFDOVKRFN
WARNING
SUFFOCATION AND ENTRAPMENT HAZARD
)DLOXUHWRIROORZWKHVHGLVSRVDOLQVWUXFWLRQVFDQUHVXOWLQGHDWKRUVHULRXVLQMXU\
IMPORTANT: Child entrapment and suffocation
are not problems of the past. Junked or abandoned
refrigerators are still dangerous even if they will sit
IRU³MXVWDIHZGD\V´,I\RXDUHJHWWLQJULGRI\RXUROG
refrigerator, please follow the instructions below to help
prevent accidents.
Before You Throw Away Your Old Appliance
Ŷ7DNHRIIWKHIUHVKIRRGDQGIUHH]HUGRRUV
Ŷ Leave the shelves in place so that children may not
easily climb inside.
Refrigerant and Foam Disposal:
'LVSRVHRIDSSOLDQFHLQDFFRUGDQFHZLWK)HGHUDODQG/RFDO5HJXODWLRQV)ODPPDEOHLQVXODWLRQPDWHULDOXVHG
requires special disposal procedures. Contact your local authorities for the environmentally safe disposal of your
appliance.

49-60792 Rev. 3 5
IMPORTANT SAFETY INFORMATION
READ ALL INSTRUCTIONS BEFORE USING THE APPLIANCE
SAFETY INFORMATION
READ AND SAVE THESE INSTRUCTIONS
WARNING
Scalding Hazard.
The hot water dispenser is capable of heating water to a temperature of approximately 185°)°&:DWHU
temperatures above 125°)°&FDQFDXVHVHYHUHEXUQVRUGHDWKIURPVFDOGLQJ&KLOGUHQWKHGLVDEOHGDQGWKH
elderly are at highest risk of being scalded.
HOT WATER DISPENSER
Use this appliance only for its intended purpose as described in this Owner’s Manual. To reduce the risk of
severe burns, scald injuries, or death when using your hot water dispenser, the instructions below must be
followed:
Ŷ 'RQRWOHDYHFRQWDLQHUXQDWWHQGHGDURXQGFKLOGUHQ
during or after hot water dispense.
Ŷ'RQRWSHUPLWFKLOGUHQWRXVHWKHKRWZDWHUGLVSHQVHU
Ŷ The hot water dispensing knob requires both twist and
push motions in order to reduce the risk of hot water
being dispensed unintentionally or by small children.
'RQRWWDPSHUZLWKRUPRGLI\WKHKRWZDWHUGLVSHQVLQJ
knob.
Ŷ The water coming from the dispenser is very hot.
8VHH[WUHPHFDXWLRQZKHQGLVSHQVLQJDQGGULQNLQJ
water. Allow water to cool to a drinkable temperature
before drinking. Your container should be close to
WKHGLVSHQVLQJSRLQWWRPLQLPL]HWKHVSODVKLQJRIKRW
water.
Ŷ When dispensing hot water, the container can become
YHU\KRW8VHDWHPSHUDWXUHLQVXODWLQJFRQWDLQHUVXFK
DVFHUDPLFRUIRDP8VLQJFRQWDLQHUPDWHULDOVVXFKDV
paper or plastic may result in a burn while holding the
FXS'RQRWXVHJODVVFRQWDLQHUVDVWKHUPDOVKRFN
can cause the container to break and may result in
scalding or lacerations.
Ŷ Always follow the formula manufacturer’s instructions
for preparation of baby formula. When dispensing
ZDWHUEHORZÛ)FPDOZD\VWHVWWKH
temperature of the water before drinking.
Ŷ The first time the hot water feature is used, confirm if
\RXOLYHDERYHIHHWPHWHUVKLJKDOWLWXGH
This limits the temperature of the hot water system to
avoid boiling. To access the high altitude selection, go
to the settings menu if available or for other models
press Fridge and Door Alarm together to cycle from
Hi AL to Lo ALKLJKDOWLWXGHWRORZDOWLWXGH
Ŷ A newly installed water filter cartridge will cause water
WRVSXUWIURPWKHGLVSHQVHU5XQJDOORQVOLWHUV
of water through the cold water dispenser (about 5
PLQXWHVWRUHPRYHDLUIURPWKHV\VWHP8QWLOWKLVDLU
is removed from the system through the cold water
GLVSHQVHU'2127XVHWKHKRWZDWHUGLVSHQVHUDV
it may result in spurting of hot water and lead to hot
water scalding.
Ŷ'RQRWXVHZLWKZDWHUWKDWLVPLFURELRORJLFDOO\XQVDIH
or of unknown quality.
Ŷ The hot water dispenser is designed to only dispense
ZDWHU'RQRWDWWHPSWWRKHDWRUGLVSHQVHDQ\WKLQJ
RWKHUWKDQZDWHU'RQRWDWWHPSWWRGLVDVVHPEOHRU
clean the tank.
Ŷ'RQRWPRGLI\WKHKRWZDWHUV\VWHP6HUYLFHZLWK
factory replacement part only.
6 49-60792 Rev. 3
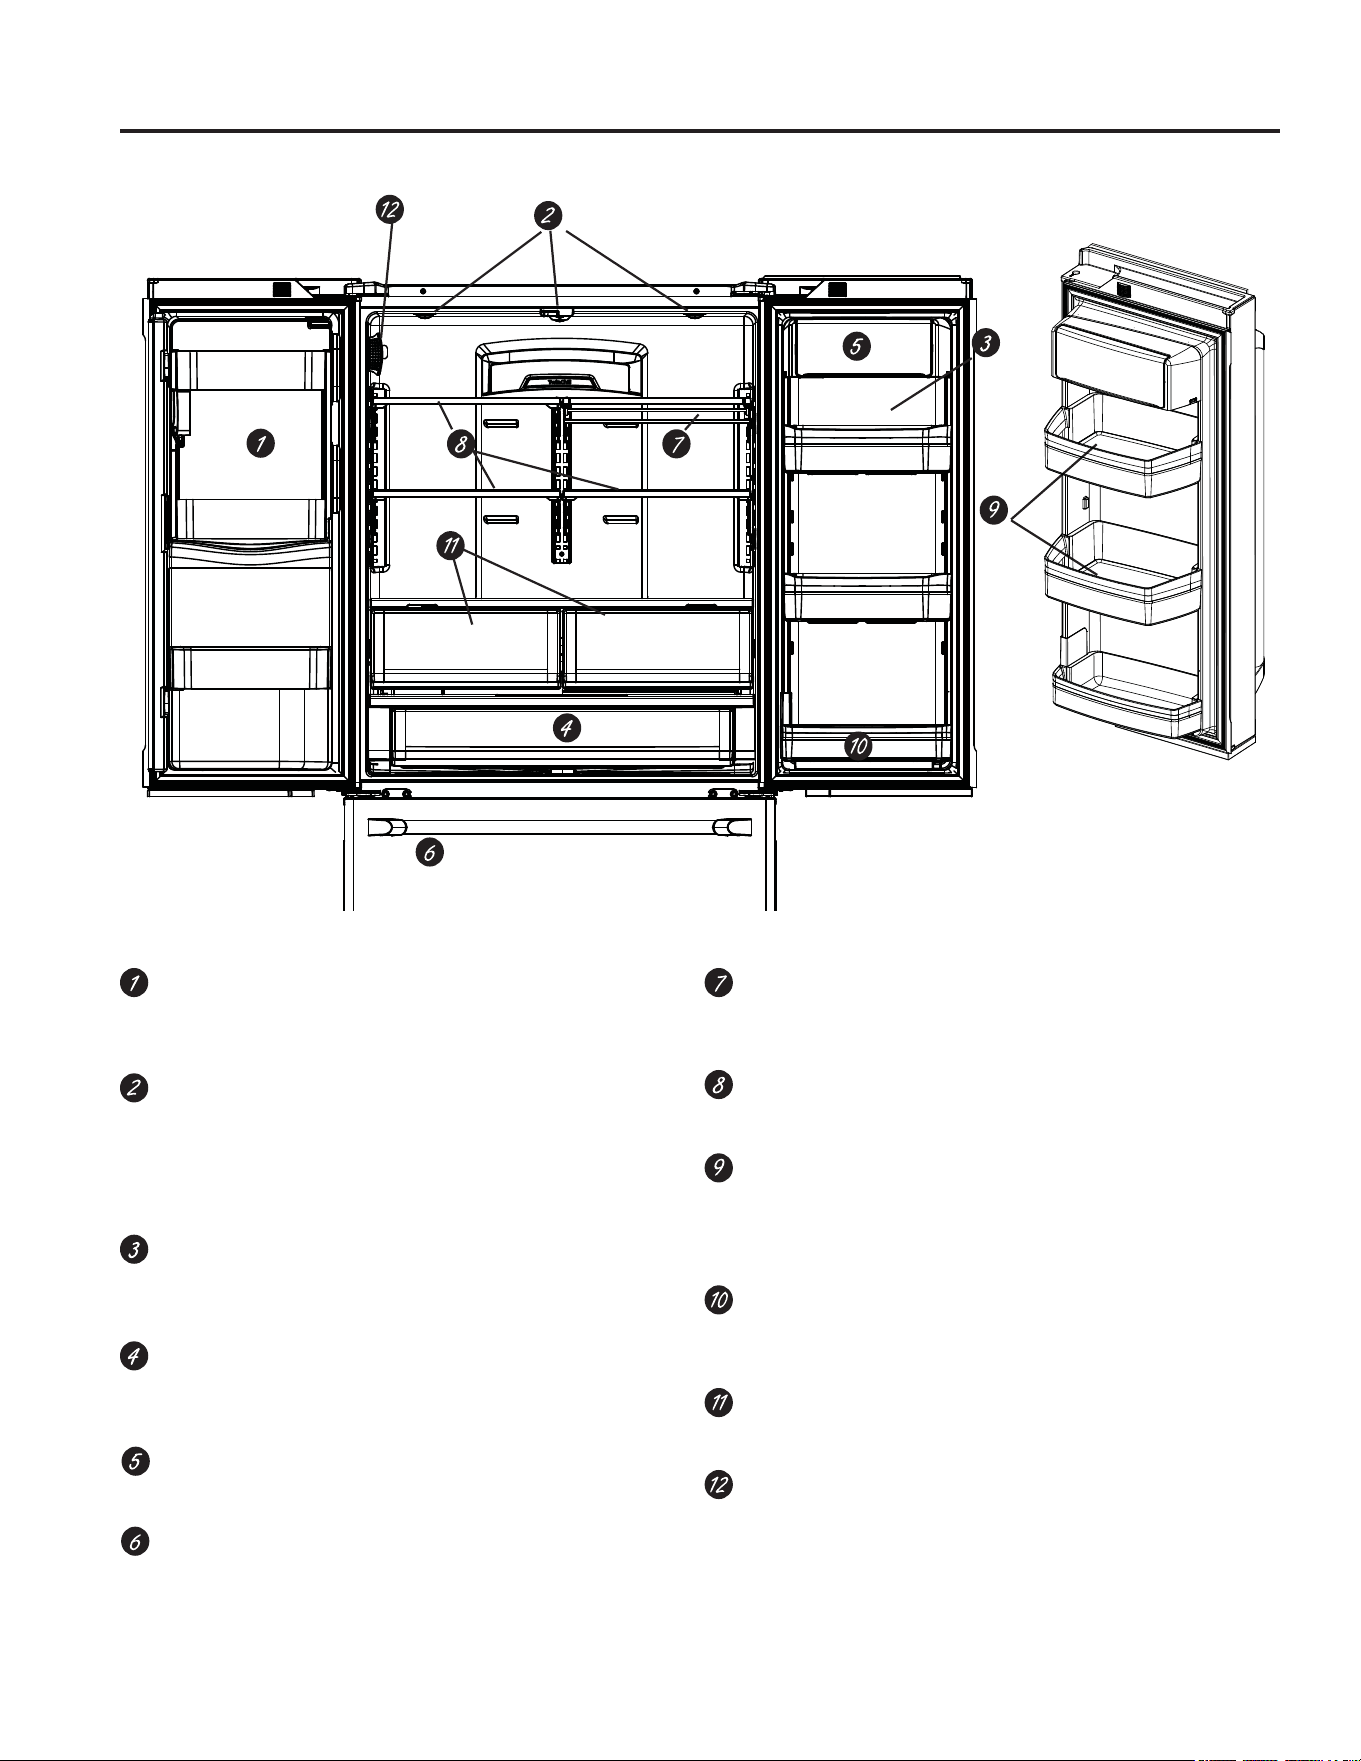
Space-saving ice maker*
,FHPDNHUDQGELQDUHORFDWHGRQWKHGRRUFUHDWLQJ
more usable storage space.
Showcase LED lighting
/('OLJKWLQJLVSRVLWLRQHGWKURXJKRXWWKHLQWHULRUWR
VSRWOLJKWDUHDVLQWKHUHIULJHUDWRU/('VDUHORFDWHG
XQGHUWKHIUHVKIRRGGRRUWROLJKWWKHIUHH]HUZKHQ
opened.
Drop-down tray*
Allows for extra door storage when you need it and
tucks away when you don’t.
Full-width temperature controlled drawer
Adjustable temperature control bin that can
accommodate larger items.
Dairy bin
Separate compartment for your items.
Ice bin/Ice maker*
,FHPDNHUZLWKLFHVWRUDJHELQV
QuickSpace™ shelf*
)XQFWLRQVDVDQRUPDOIXOOVL]HGVKHOIZKHQQHHGHG
and easily slides back to store tall items below.
Spillproof shelves
'HVLJQHGWRFDSWXUH\RXUVSLOOVIRUHDVLHUFOHDQXS
Anti-slip Mat
Liner that captures spills, keeps containers from
shifting when the door is opened and is easily
removable for cleaning.
Removable door bin
Can be removed for those with a wall limiting the door
opening.
Climate zone bin
Separate bins for produce storage.
Water filter
)LOWHUVZDWHUDQGLFH
* Select models only.
Features
USING THE REFRIGERATOR:)HDWXUHV
49-60792 Rev. 3 7
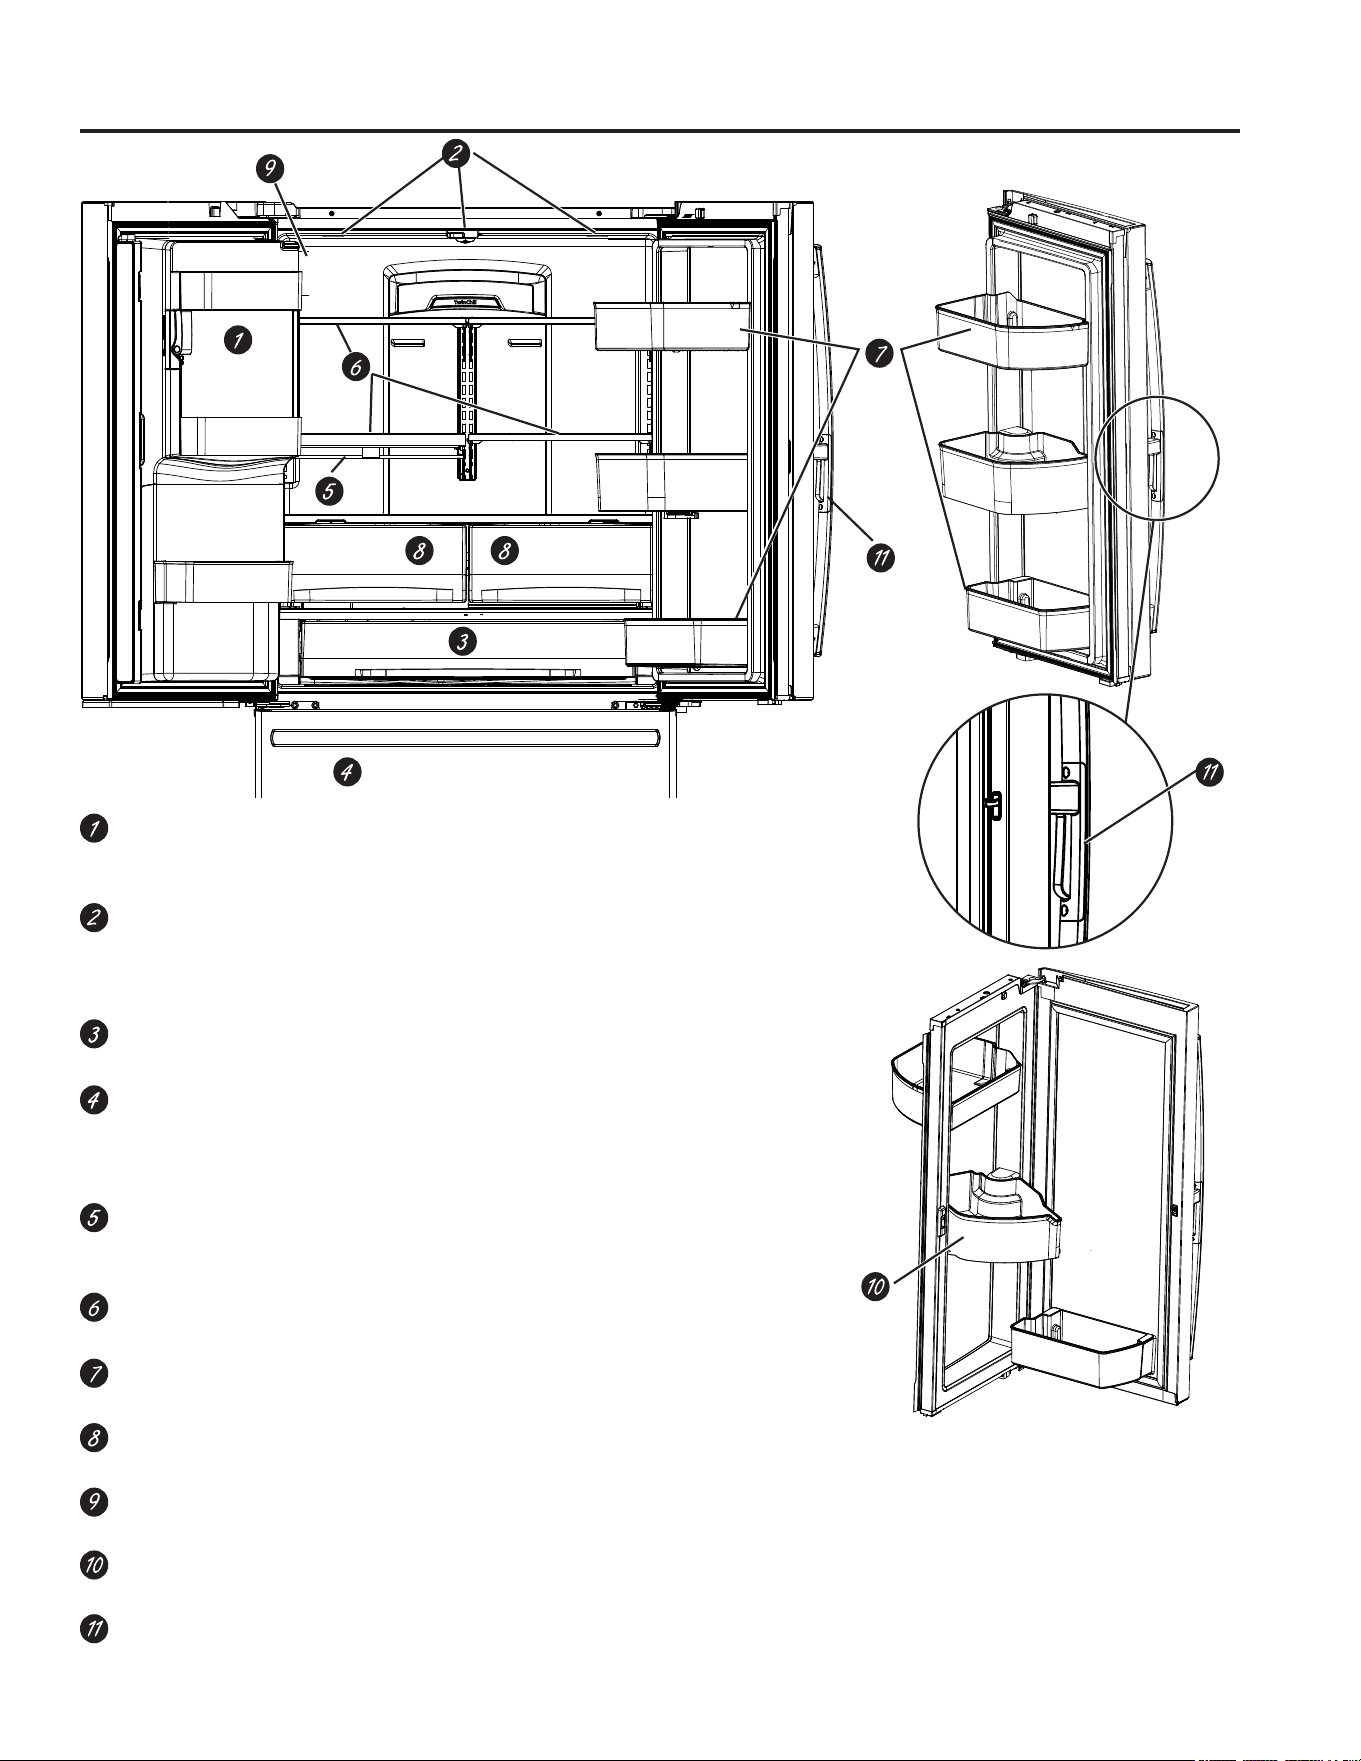
Space-saving ice maker*
,FHPDNHUDQGELQDUHORFDWHGRQWKHGRRUFUHDWLQJPRUHXVDEOHVWRUDJH
space.
Showcase LED lighting
/('OLJKWLQJLVSRVLWLRQHGWKURXJKRXWWKHLQWHULRUWRVSRWOLJKWDUHDVLQWKH
UHIULJHUDWRU/('VDUHORFDWHGXQGHUWKHIUHVKIRRGGRRUWROLJKWWKHIUHH]HU
when opened.
Full-width temperature controlled drawer
Adjustable temperature control bin that can accommodate larger items.
Freezer Ice maker/Ice Bin*
An ice maker in both compartments give you more ice whenever you need
LW$YDLODEOHRQ1RQ'LVSHQVHPRGHOVDOVRDYDLODEOHDVDNLWIRUVRPH
models.
QuickSpace™ shelf*
)XQFWLRQVDVDQRUPDOIXOOVL]HGVKHOIZKHQQHHGHGDQGHDVLO\VOLGHVEDFN
to store tall items below.
Spillproof shelves
'HVLJQHGWRFDSWXUH\RXUVSLOOVIRUHDVLHUFOHDQXS
Removable door bin
Can be removed for those with a wall limiting the door opening.
Climate zone bin
Separate bins for produce storage.
Water filter
)LOWHUVZDWHUDQGLFH
Rotating Bin*
Can be rotated out for easy access.
Door in Door Latch*
6TXHH]HWKHODWFKRQWKHXQGHUVLGHRIWKHKDQGOHWRRSHQWKHRXWHUGRRU
* Select models only.
Features
USING THE REFRIGERATOR:)HDWXUHV
8 49-60792 Rev. 3
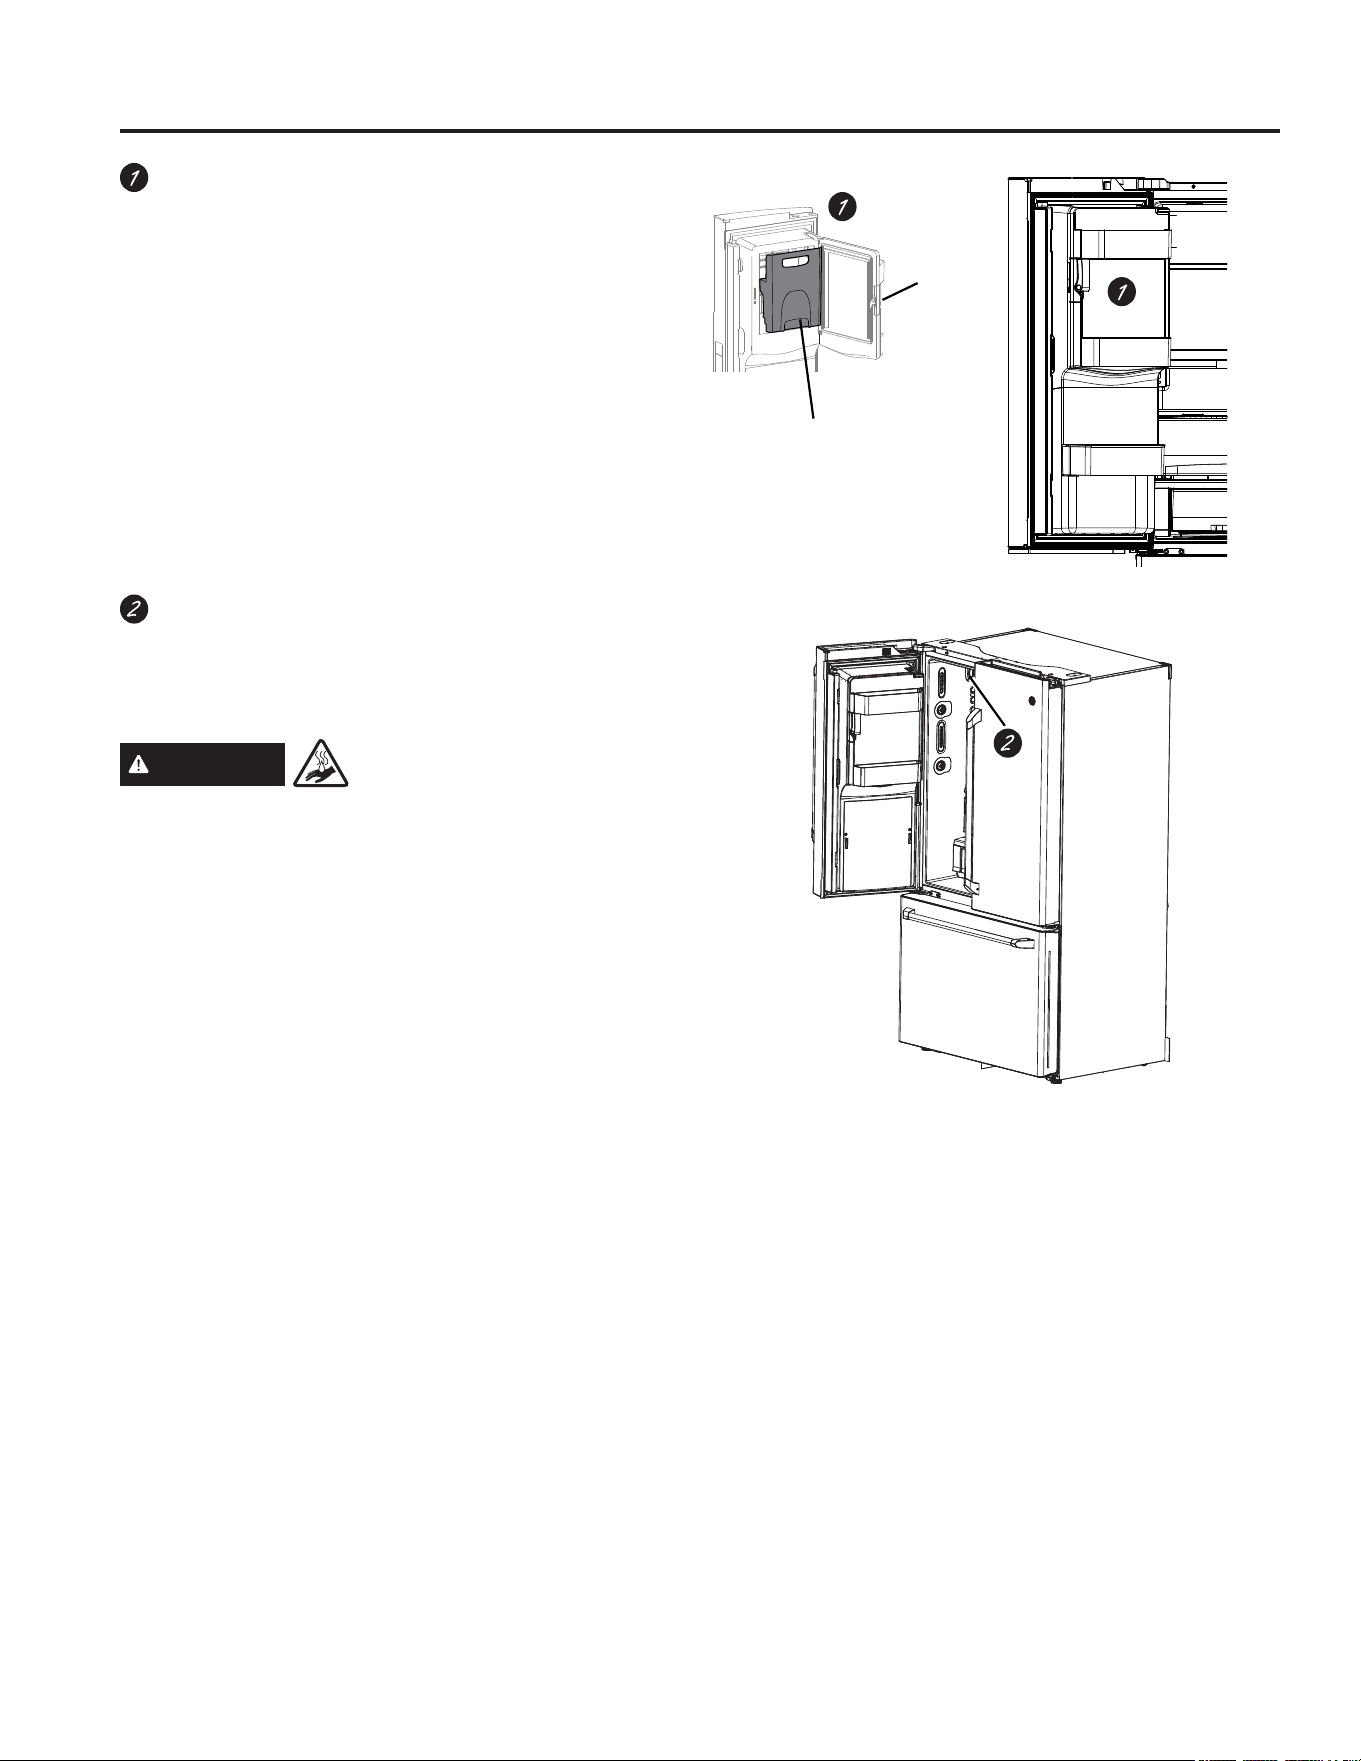
Door ice bin*
1. Open left fresh food door.
2. Pull down latch to release bin door.
8VLQJKDQGKROGOLIWLFHEXFNHWXSDQGRXWWRFOHDU
locators in bottom of bin.
4. To replace the ice bucket, set it on the guide
brackets and push until the ice bucket seats
properly.
,IEXFNHWFDQQRWEHUHSODFHGURWDWHWKH,FH%XFNHW
)RUNWXUQFORFNZLVH
Ice/water filter
Certified to reduce chlorine-resistant cysts, lead,
VHOHFWSKDUPDFHXWLFDOVDQGPRUH)RUHDV\ILOWHU
replacement instructions see page 17.
WARNING
Scalding Hazard.*
8VHRIWKHKRWZDWHUGLVSHQVHUSULRUWRSXUJLQJDLUIURP
the system may result in spurting of hot water and lead
WRKRWZDWHUVFDOGLQJ)ROORZWKHLQVWUXFWLRQVIRU³:DWHU
)LOWHU6WHS´RQSDJHWRSXUJHDOODLUIURPWKH
system through the cold water dispenser prior to using
the hot water dispenser.
The first time the hot water feature is used, confirm if
you live above 5000 feet (1524 meters) (high altitude).
This limits the temperature of the hot water system to
avoid boiling. To access the high altitude selection,
see Controls.
*Select Models Only
Features
USING THE REFRIGERATOR:)HDWXUHV
,FHEXFNHW
Latch
49-60792 Rev. 3 9
USING THE REFRIGERATOR: Controls
7KHWHPSHUDWXUHFRQWUROVDUHSUHVHWLQWKHIDFWRU\DW)IRUWKHUHIULJHUDWRUFRPSDUWPHQWDQG)IRUWKHIUHH]HU
FRPSDUWPHQW$OORZKRXUVIRUWKHWHPSHUDWXUHWRVWDELOL]HWRWKHSUHVHWUHFRPPHQGHGVHWWLQJV
Control Style D: The temperature controls can display both the SET temperature as well as the actual temperature
LQWKHUHIULJHUDWRUDQGIUHH]HU7KHDFWXDOWHPSHUDWXUHPD\YDU\VOLJKWO\IURPWKH6(7WHPSHUDWXUHEDVHGRQXVDJH
DQGRSHUDWLQJHQYLURQPHQW3:(DQG*1(RQO\
NOTE: The refrigerator is shipped with protective film covering the temperature controls.
,IWKLVILOPZDVQRWUHPRYHGGXULQJLQVWDOODWLRQUHPRYHLWQRZ
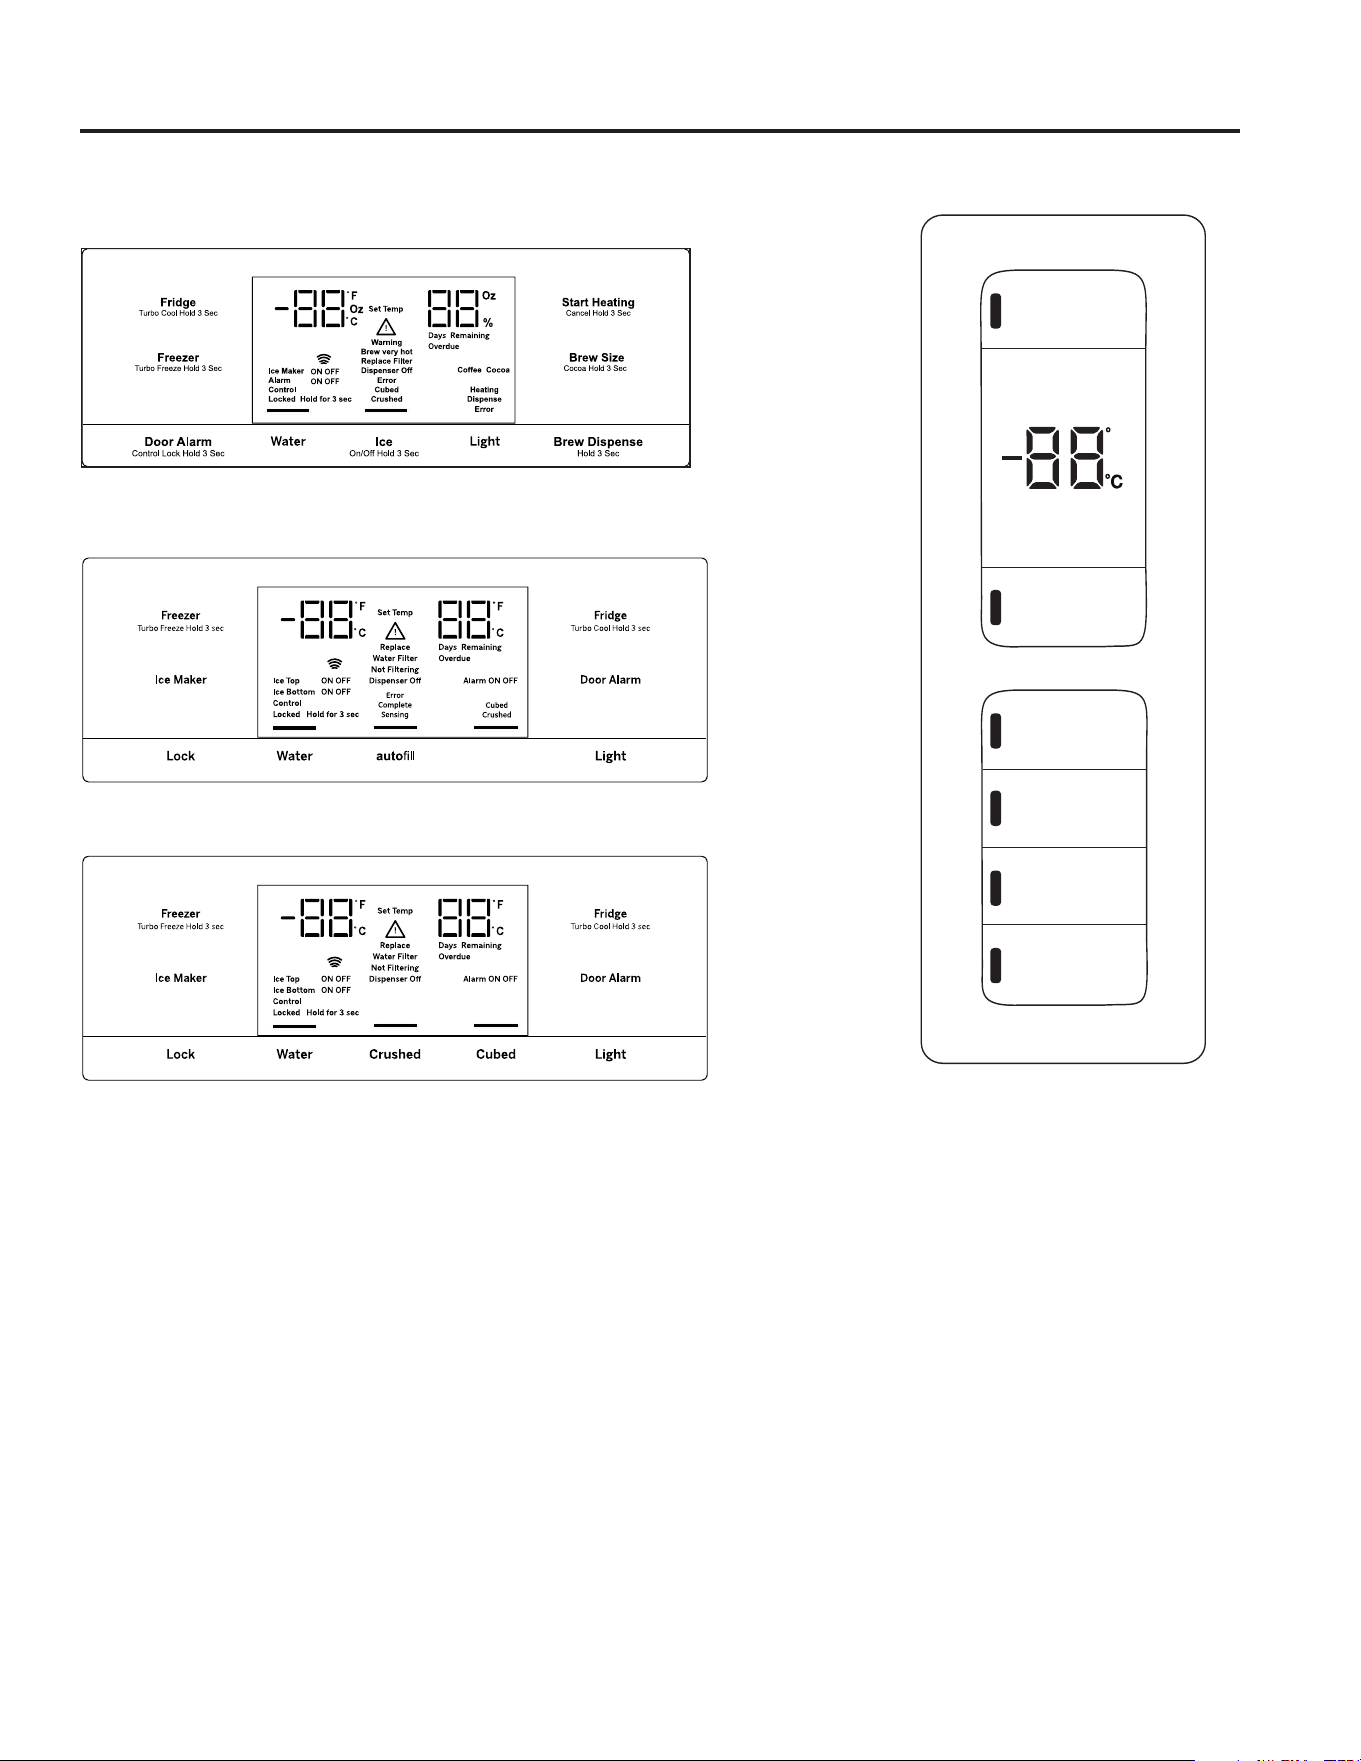
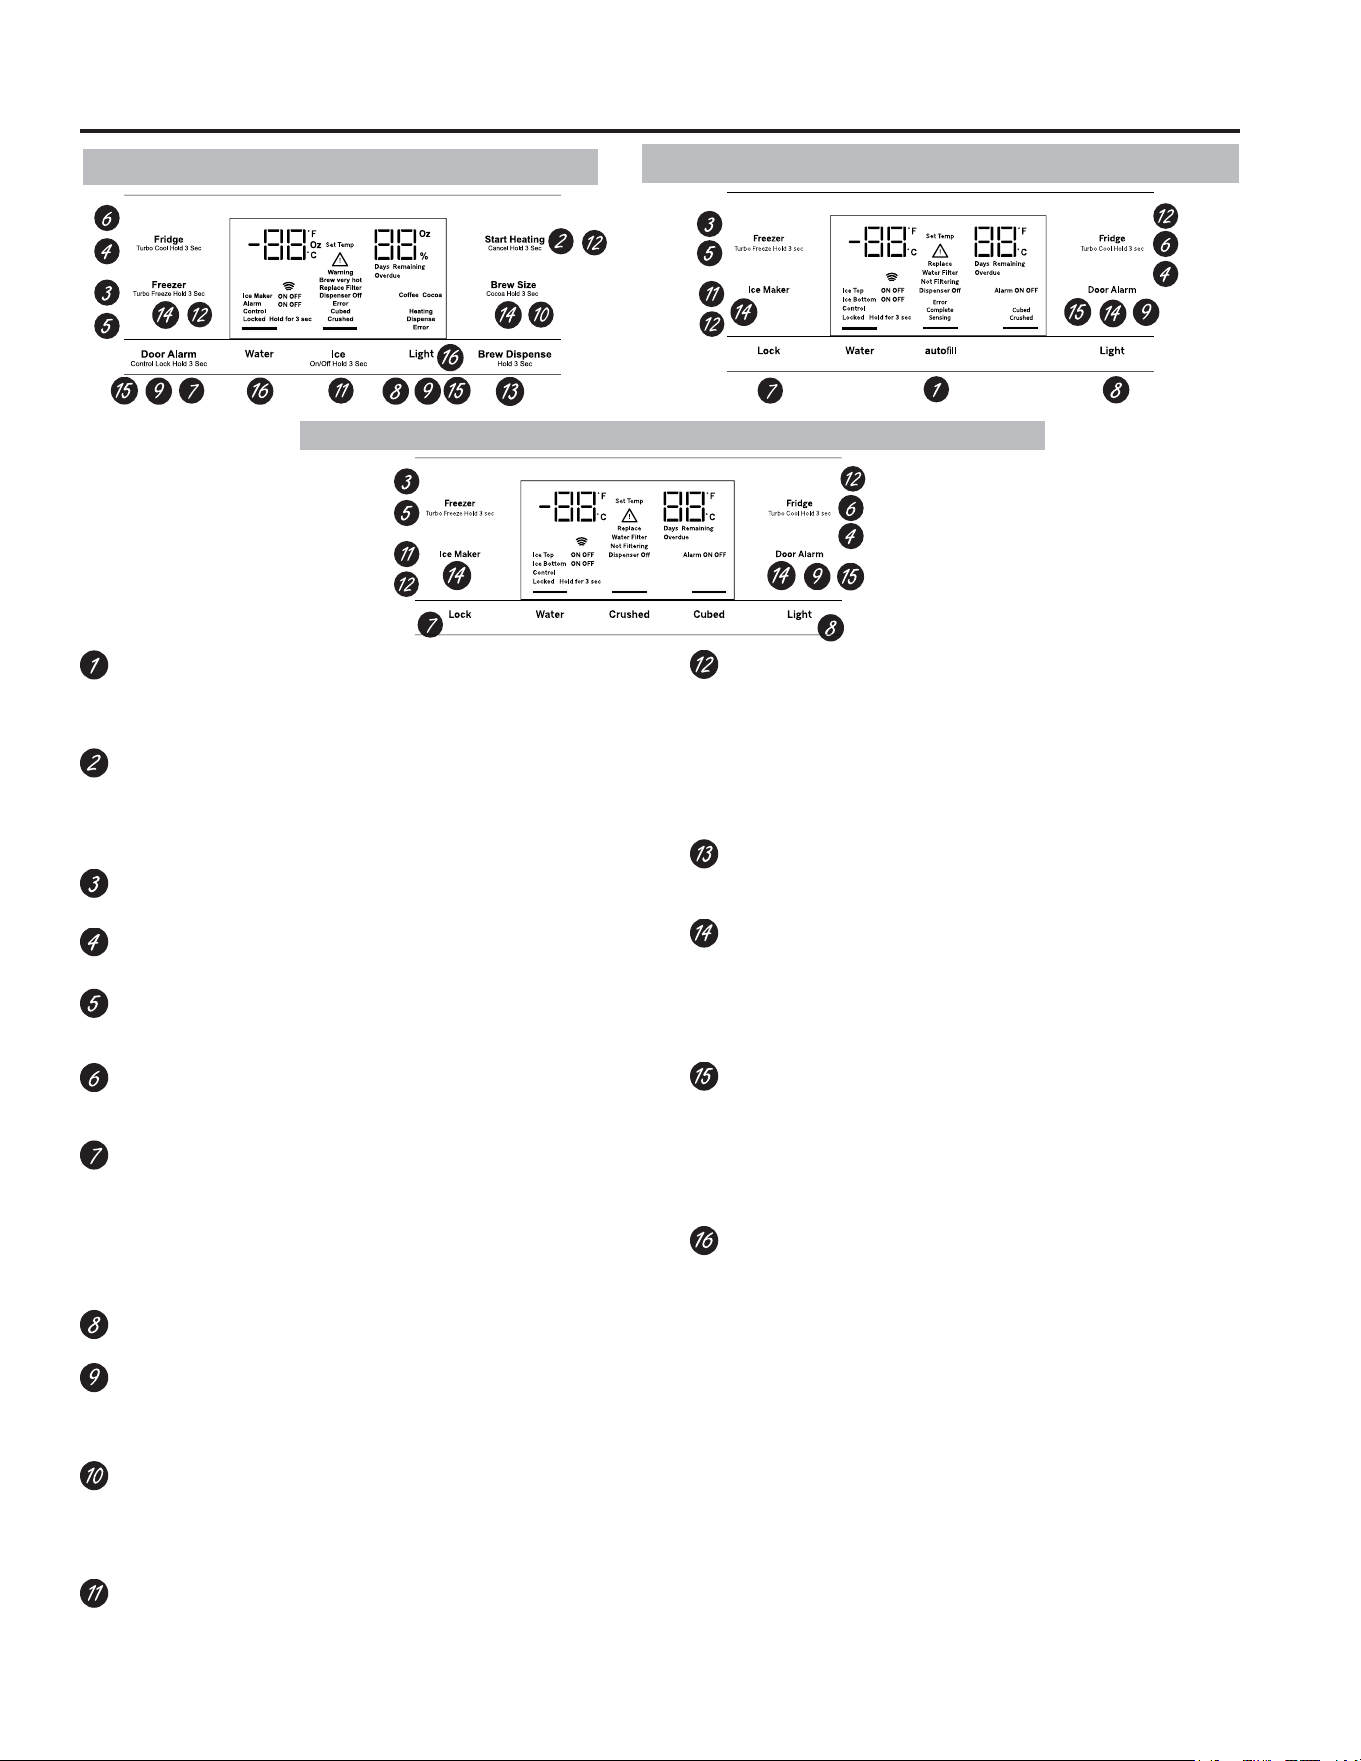
PFE28P, PYE22P Control Style A, Single Serve Models
PFH28, PFE28K, DFE28, PFD28, PYE22K, PYD22, DYE22
&RQWURO6W\OH%$XWR)LOO0RGHOV
GFD28, GFE28, GFE26, GFS26, GYS22, GYE22 Control Style C, GE Models
GNE29, PWE23&RQWURO6W\OH'1RQ'LVSHQVH&RQWURO
Refrigerator
Hold 3 Sec for °F/°C
Hold 3 Seconds
Hold 3 Seconds
Recommended: 37 °F
Actual Set
Freezer
Door Alarm
Ice Maker
Lock Controls
Reset Filter
Recommended: 0°F
F
Ice
Error
Complete
Sensing
Cubed
Crushed
Controls

10 49-60792 Rev. 3
NOTE: )RURSWLPDOWHPSHUDWXUHSHUIRUPDQFHZHUHFRPPHQGWRDYRLGSODFLQJIRRGLWHPVGLUHFWO\DWWKHDLUIORZYHQWV
of the fresh food air tower and thus blocking the air flow.
Changing the Temperature for Control Style A
To Change the Refrigerator Temperature:
Press the Fridge button and current set temperature
will display. Pressing and releasing the button will cycle
through the available temperature settings. Press and
hold button for Turbo Cool feature. The display will show
tC.
To Change the Freezer Temperature:
Press the Freezer button and current set temperature
will display. Pressing and releasing the button will cycle
through the available temperature settings. Press and
hold button for Turbo Freeze feature. The display will
show tF.
Cooling system can be turned off by pressing and holding
Freezer and Start Heating. OFF will be displayed. To
turn on, press Fridge or Freezer. ON will be displayed.
Turning the cooling system off stops the cooling to the
refrigerator, but it does not shut off the electrical power.
Changing the Temperature for Control Styles B and C
To change the temperature, press and release the
Freezer or Fridge pad. The display will show the set
temperature. To change the temperature, press either the
Freezer or Fridge pad until the desired temperature is
displayed. Press and hold button for Turbo Cool feature.
The display will show tC. Press and hold button for Turbo
Freeze feature. The display will show tF.
To turn off the cooling system press and hold the Fridge
and Ice Maker buttons. To turn on, press Fridge or
Freezer.
Turning the cooling system off stops the cooling to the
refrigerator, but it does not shut off the electrical power.
Changing Temp. for Control Style D
7HPSHUDWXUH'LVSOD\LVORFDWHGRQLQVLGHRIOHIWKDQG
refrigerator door. To change the temperature, press
and release the REFRIGERATOR or FREEZER
pad. The ACTUAL TEMP light will come on and the
display will show the actual temperature. To change
the temperature, tap either the REFRIGERATOR or
FREEZER pad until the desired temperature is displayed.
To turn OFF cooling system, press and hold the
REFRIGERATOR and FREEZER pads simultaneously
for 3 seconds. When cooling system is OFF the display
should read OF. To turn ON cooling system, press either
REFRIGERATOR or FREEZER pad. The display will
show the preset temperature settings of 37°F (3Û& for
refrigerator and 0°F (-18Û& IRUIUHH]HU
Turning the cooling system off stops the cooling to
refrigerator, but it does not shut off the electrical power.
Controls
USING THE REFRIGERATOR: Controls
49-60792 Rev. 3 11
USING THE REFRIGERATOR: Controls
Controls
Ice
Hands-free Autofill*
Hands-free Autofill uses sensors to monitor container
height to automatically dispense filtered water without
having to activate the paddle.
Start Heating*
The Start Heating button is used to initiate the water
heating for the Single Serve feature. To abort the Start
Heating feature, press and hold the Start Heat button for
3 seconds.
Freezer temp control
$GMXVWIUHH]HUFRPSDUWPHQWWHPSHUDWXUH
Fresh food temp control
Adjust fresh food compartment temperature.
TurboFreeze™ setting
Activate TurboFreezeWRTXLFNO\UHVWRUHIUHH]HU
temperatures after frequent door openings.
TurboCool™ setting
Activate TurboCool to quickly restore fresh food
temperature after frequent door openings.
Lock Controls
Control Style A - Press and hold the Door Alarm pad
for 3 seconds to lock out ice and water dispenser and all
feature and temperature buttons.
Control Styles B & C - Press Lock pad and hold 3
seconds to lock out ice and water dispenser and all
feature and temperature buttons.
Dispenser light
/LJKWLQJWKDWFDQEHWXUQHGRQRIIWROLJKW\RXUGLVSHQVHU
Door Alarm
6RXQGVWRDOHUWZKHQWKHIUHH]HURUIUHVKIRRGGRRUVKDYH
been left open. Press and hold Door
Alarm pad and it will
toggle the sound between low, high, and off.
Brew Size*
7KH%UHZ6L]HEXWWRQLVXVHGWRVHOHFWWKHGHVLUHGFXS
VL]HIRUVLQJOHVHUYH3UHVVDQGKROGWKHEXWWRQIRU
seconds to toggle the brew type between Coffee and
Cocoa.
Ice maker setting
7XUQ\RXULFHPDNHUVRQRII
Cooling system On/Off
Control Style A - Press and hold Freezer and Start
Heating simultaneously to turn cooling system off. To turn
cooling system on press either the Fridge or Freezer.
Control Style B & C - Press and hold Fridge and Ice
Maker simultaneously for 3 seconds to turn the cooling
system off. To turn cooling system on press either the
Fridge or Freezer.
Brew Dispense
Press and hold Brew Dispense button for 3 seconds, but
no longer than 6 seconds, to dispense coffee or cocoa.
F°/C°
Control Style A - Press and hold Freezer and Brew Size
WRVZLWFKEHWZHHQ)&
Control Style B & C - Press and hold Ice Maker and
Door Alarm simultaneously for 3 seconds to switch
EHWZHHQ)&
Sound Control for pad chimes
Control Style A - Press and hold the Light pad: Once for
High to Off, twice for Off to Low and three times for Low
to High.
Control Styles B & C - Press and hold the Door Alarm
pad: Once for High to Off, twice for Off to Low and three
times for Low to High.
High Altitude
Control Style A (PYE and PFE only) - Press and hold
Fridge and Door Alarm for to toggle between Hi Al and
Lo AL for high altitude and low altitude.
Additional settings:
• &RQQHFWHG+RPHUHDG\3)(33<(33)+RQO\
• :DWHU)LOWHU - An indicator will illuminate when the filter
needs to be replaced. When a new filter is installed the
indicator will go off.
Additional Mode:
• Sabbath Mode
Control Style A - Press and hold Alarm and Light
VLPXOWDQHRXVO\IRUVHFRQGVWRHQWHUH[LW6DEEDWKPRGH
Control Style B & C - Press and hold Lock and Light
VLPXOWDQHRXVO\IRUVHFRQGVWRHQWHUH[LW6DEEDWKPRGH
Sabbath Mode will turn off or dim interior lights, temperature
control and advanced features. Compressor will run on a
timed defrost when in Sabbath mode.
Control Style A, External Controls 3)(33<(3
Control Style B, External Controls
3)+3)(.')(3)'
3<(.3<''<(
Control Style C, External Controls *)'*)(*)(*)6GYE22, GYS22
*Select Models Only
Error
Complete
Sensing
Cubed
Crushed

12 49-60792 Rev. 3
Refrigerator
Hold 3 Sec for °F/°C
Hold 3 Seconds
Hold 3 Seconds
Recommended: 37 °F
Actual Set
Freezer
Door Alarm
Ice Maker
Lock Controls
Reset Filter
Recommended: 0°F
F
Controls Style D, Internal Controls GNE29, PWE23
Door Alarm
6RXQGVWRDOHUWZKHQWKHIUHH]HURUIUHVKIRRGGRRUV
have been left open.
Reset Filter
Hold for 3 seconds after replacing filter.
Lock Controls
Press and hold 3 seconds to lock out ice and water
dispenser and all feature and temperature buttons.
Freezer temp control
$GMXVWIUHH]HUFRPSDUWPHQWWHPSHUDWXUH
Refrigerator temp control
Adjust fresh food compartment temperature
Ice maker setting
7XUQ\RXULFHPDNHURQRII
Additional Mode:
• Sabbath Mode
Press and hold Door Alarm and Ice Maker
VLPXOWDQHRXVO\IRUVHFRQGVWRHQWHUH[LW6DEEDWKPRGH
Controls
USING THE REFRIGERATOR: Controls
49-60792 Rev. 3 13
USING THE REFRIGERATOR: 'LVSHQVHU
'LVSHQVHU7UD\
Important Facts About Your Dispenser
Ŷ'RQRWDGGLFHIURPWUD\VRUEDJVWRWKHGRRULFH
PDNHUEXFNHW,WPD\QRWFUXVKRUGLVSHQVH
Ŷ Avoid overfilling glass with ice and use of narrow
glasses. Backed-up ice can jam the chute or cause the
GRRULQWKHFKXWHWRIUHH]HVKXW,ILFHLVEORFNLQJWKH
chute remove the ice bucket, poke it through with a
wooden spoon.
Ŷ Beverages and foods should not be quick-chilled in the
door ice maker bin. Cans, bottles or food packages in
the storage drawer may cause the ice maker or auger
to jam.
Ŷ To keep dispensed ice from missing the glass, put the
glass close to, but not touching, the dispenser opening.
Ŷ Some crushed ice may be dispensed even though you
selected CUBED ICE. This happens occasionally when
a few cubes accidentally get directed to the crusher.
Ŷ After crushed ice is dispensed, some water may drip
from the chute.
Ŷ Sometimes a small mound of snow will form on the
door in the ice chute. This condition is normal and
usually occurs when you have dispensed crushed ice
repeatedly. The snow will eventually evaporate.
,IQRZDWHULVGLVSHQVHGZKHQWKHUHIULJHUDWRULVILUVW
installed, there may be air in the water line system. Press
the dispenser paddle for at least five minutes to remove
trapped air from the water line and to fill the water
system. To flush out impurities in the water line, throw
away the first six full glasses of water.
To remove Dispenser Tray (Type A and B Only)
Ŷ3XOO'LVSHQVHU7UD\RXWXQWLOLWVWRSV
Ŷ Locate tab in the center on the bottom and push up.
Ŷ3XOO'LVSHQVHU7UD\DVVHPEO\RXW
Ŷ/LIW'LVSHQVHU7UD\RXWDWFHQWHUQRWFKWRFOHDQ
To remove Dispenser Tray (Type C Only)
*UDVS'LVSHQVHU7UD\DQGSXOOILUPO\XQWLOLWFRPHVRXW
To reinstall Dispenser Tray (Type A and B Only)
Ŷ
3ODFHWKH'LVSHQVHU7UD\FRYHURQWRSRIFDWFKWUD\
and position under the two plastic retainers on either
side.
Ŷ&HQWHU'LVSHQVHUWUD\DQGDOLJQZLWKFHQWHUJXLGHV
Ŷ Push in until it locks firmly in place.
To reinstall Dispenser Tray (Type C Only)
Line up the guide on tray bottom with track on dispenser
and slide it in until it stops against the back of the
dispenser.
Water & Ice Dispenser
(See About the controls
with temperature settings
& About the control
IHDWXUHV
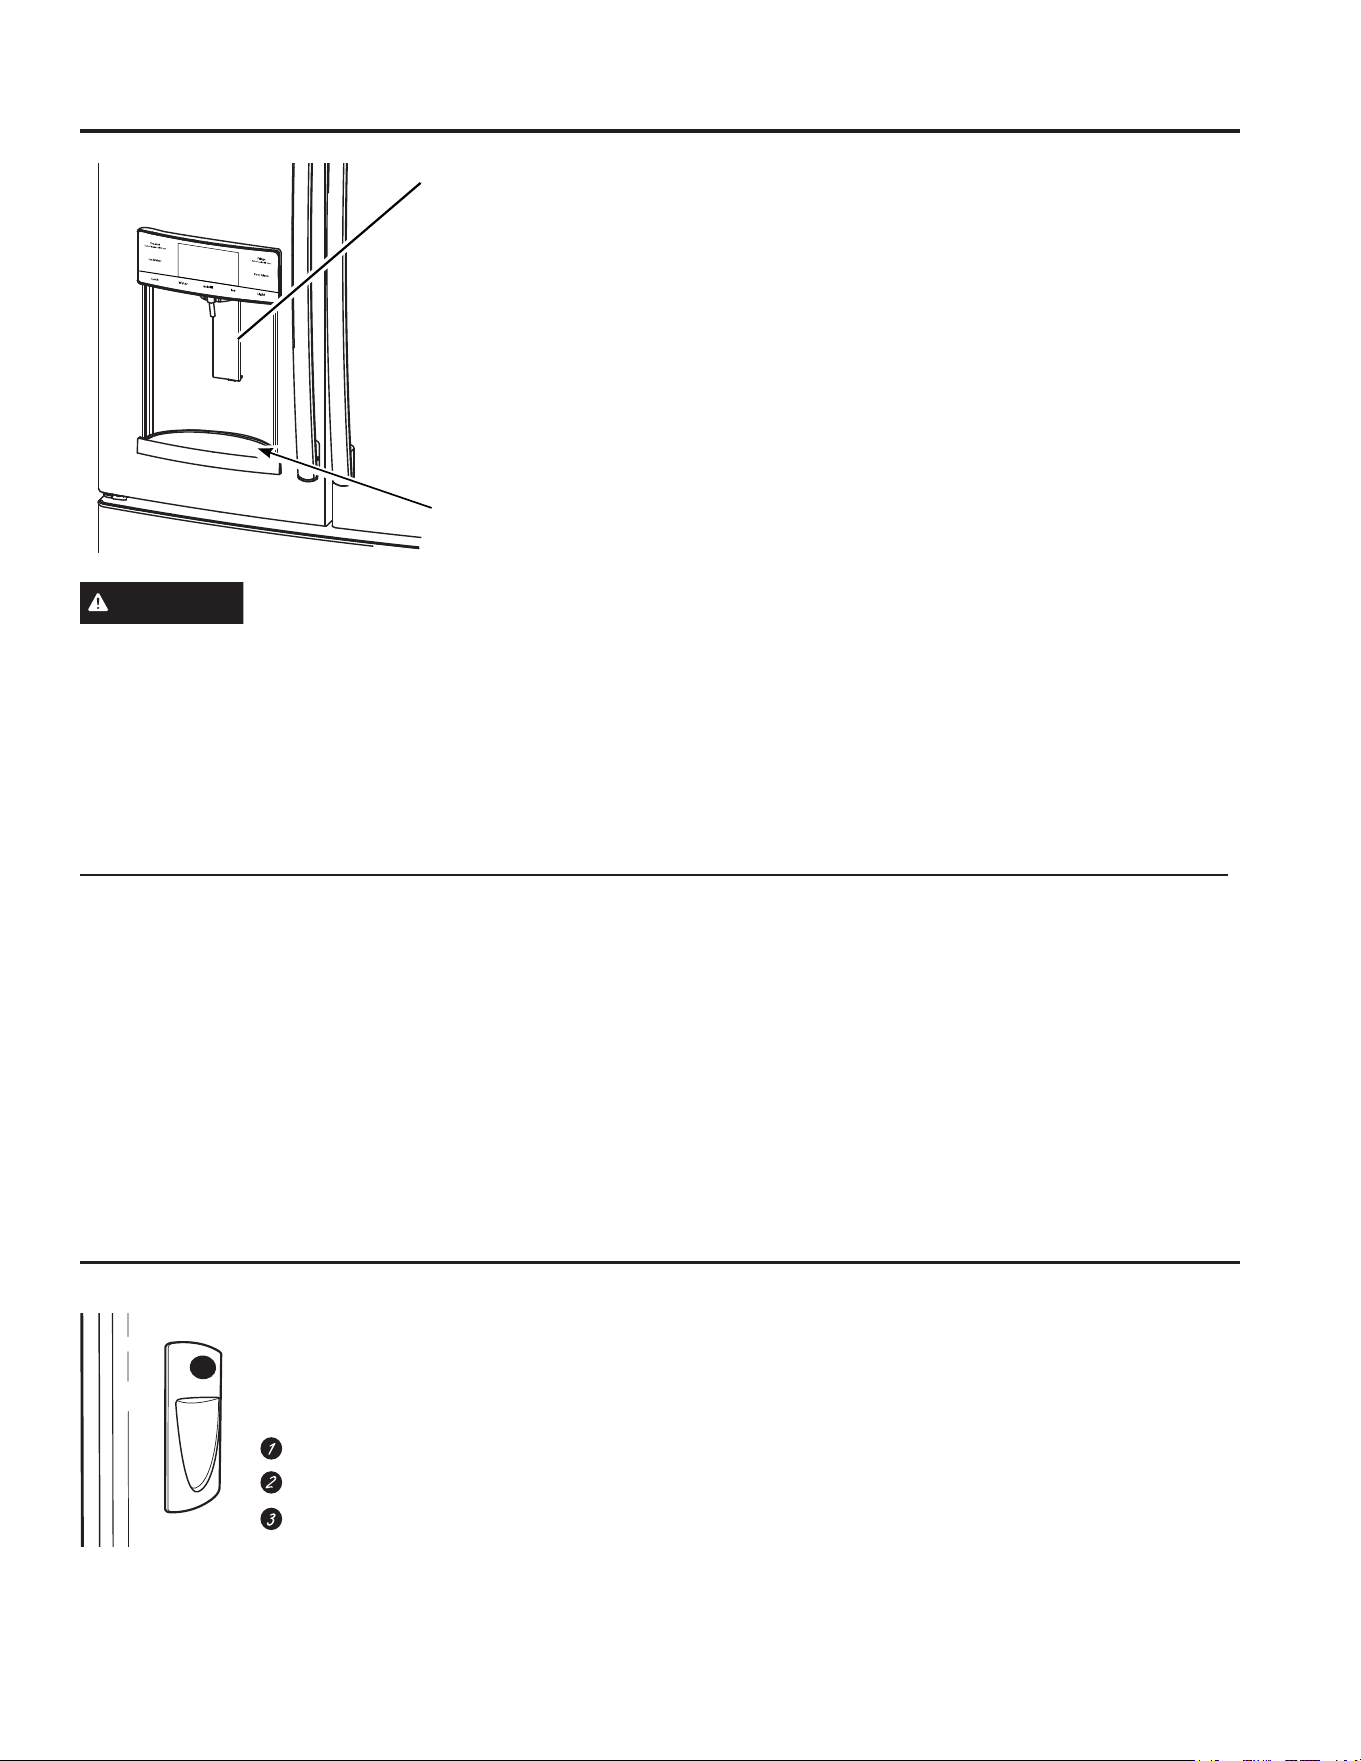
To Use the Internal Water Dispenser*
The water dispenser is located on
the left wall inside the refrigerator
compartment.
To dispense water:
Hold the glass against the recess.
Push the water dispenser button.
Hold the glass underneath the
dispenser for 2–3 seconds after
releasing the dispenser button.
Water may continue to dispense
after the button is released.
,IQRZDWHULVGLVSHQVHGZKHQWKHUHIULJHUDWRULVILUVW
installed, there may be air in the water line system. Press
the dispenser button for at least 5 minutes to remove
trapped air from the water line and to fill the water
V\VWHP'XULQJWKLVSURFHVVWKHGLVSHQVHUQRLVHPD\EH
loud as the air is purged from the water line system. To
flush out impurities in the water line, throw away the first
6 glassfuls of water.
NOTE: To avoid water deposits, the dispenser should
be cleaned periodically by wiping with a clean cloth or
sponge.
WARNING
Laceration Hazard
Ŷ Never put fingers or any other object into ice crusher
GLVFKDUJHRSHQLQJ'RLQJVRFDQUHVXOWLQFRQWDFWLQJ
the ice crushing blades and lead to serious injury or
amputation
Ŷ8VHDVWXUG\JODVVZKHQGLVSHQVLQJLFH$GHOLFDWH
glass may break and result in personal injury.
*Select Models Only
Dispenser*
14 49-60792 Rev. 3
To Use HANDS FREE AUTOFILL:
Ŷ &HQWHUFRQWDLQHURQ5HFHVV'LVSHQVHU7UD\DVIDU
back as possible without activating paddle and remove
hand from container
Ŷ Press AUTOFILL
To Stop AUTOFILL
Ŷ Press AUTOFILL to stop.
Important Facts about AUTOFILL
Ŷ)RURSWLPXPUHVXOWVXVHDXQLIRUPFRQWDLQHUEHWZHHQ
´FPWDOODQG´FPZLGH
Ŷ)LOOOHYHODQGIXQFWLRQDOLW\PD\YDU\RQFRQWDLQHUVWDOOHU
WKDQ´FPRUZLGHUWKDQ´FP
Ŷ&RQWDLQHUYROXPHVPD\YDU\LIHUURUPHVVDJH³1RW
)RXQG´LVJLYHQWU\DGLIIHUHQWFRQWDLQHU
Ŷ$872),//ZLOOWLPHRXW
Ŷ Handles, straws, and garnishes on the rim of the
container my cause overfilling or variation in fill
volumes.
Ŷ Splashing may occur depending on the location of the
container, water flow rate, container shape, and ice
cubes.
Ŷ.HHSVHQVRUVFOHDQZLWKDFOHDQGDPSFORWKDQGGR
not spray liquid or cleaners directly on sensors
Ŷ$872),//ZRUNVEHVWZLWKKRXVHKROGZDWHUSUHVVXUH
RIWRSVLWRN3D
Ŷ,FHLQFRQWDLQHUPD\DIIHFWILOOYROXPH,ILVVXHVDUH
experienced, use less ice.
Sensors
*Select Models Only
Single Serve Keurig K-Cup Brewer*
WARNING
Scalding Hazard.
Ŷ The water coming from the dispenser is very hot and
can cause scalds or burns. Read all warnings on
page 5 prior to use.
Ŷ'RQRWSHUPLWFKLOGUHQWRXVHWKHEUHZHU
Ŷ Always use a container that is suitable for hot liquids
FHUDPLFIRDPHWF
Ŷ'RQRWEUHZLQWRDPXJPDGHRIJODVV'RLQJVRPD\
cause the glass to crack or break.
Ŷ,I\RXOLYHDERYHIHHWPHWHUVSUHVV
Fridge and Door Alarm and control will cycle from
/RZ$OWLWXGH/R$/WR+LJK$OWLWXGH+L$/
Ŷ DO NOT use the hot water dispenser immediately after
installing a new water filter as it may result in spurting
RIKRWZDWHU'LVSHQVHFROGZDWHUIRUDERXWPLQXWHV
to purge air from the system prior to dispensing hot
water.
Important Facts about HOT WATER
AUTOFILL*
USING THE REFRIGERATOR:$872),//.HXULJ.&XS%UHZHU
49-60792 Rev. 3 15
USING THE REFRIGERATOR: .HXULJ.&XS%UHZHU
*Select Models Only
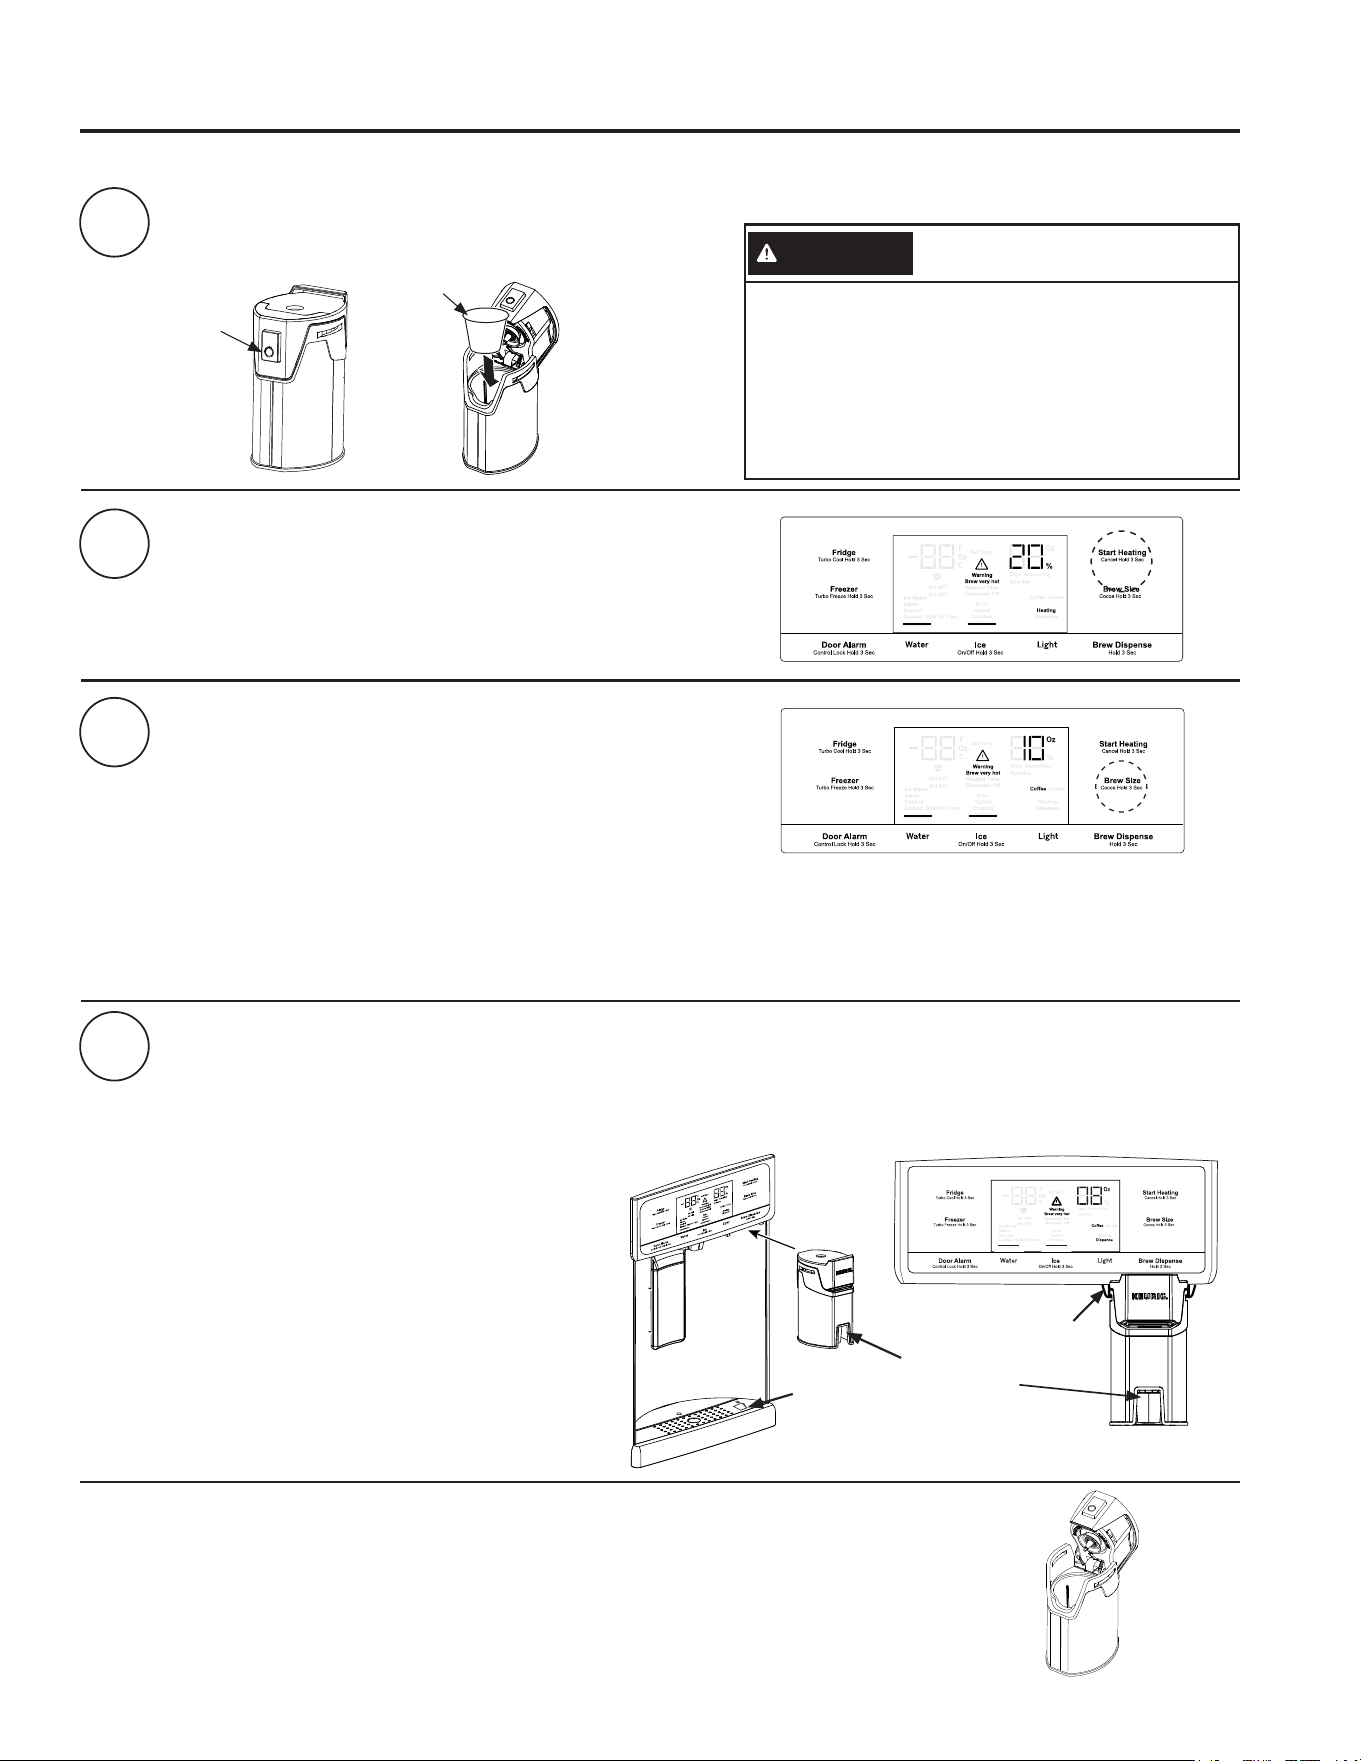
Push to
open
1
2
3
Load the K-Cup Brewer
,QVHUWD.HXULJ.&XSSRGLQWRWKHEUHZHUDQGSUHVVGRZQ
ILUPO\\RXZLOOKHDUDSRSSLQJVRXQG
Two Ways To Brew
1. Press the Start Heating button.
OR
,QLWLDWHKHDWLQJZLWKWKH*(.LWFKHQ$SS'RZQORDGWKH
$SS³*(.LWFKHQ´9LVLWGEAppliances.com/connect for
more information.**
CAUTION
Cut/Puncture Hazard.
• There are two sharp needles located inside the
.&XSEUHZHU7RDYRLGULVNRILQMXU\GRQRW
SXW\RXUILQJHUVLQVLGHWKHEUHZHU8VHFDXWLRQ
when cleaning.
• .HHSWKH.&XSEUHZHURXWRIWKHUHDFKRI
children, as they may be injured in using the
.&XSEUHZHULQFRUUHFWO\
4
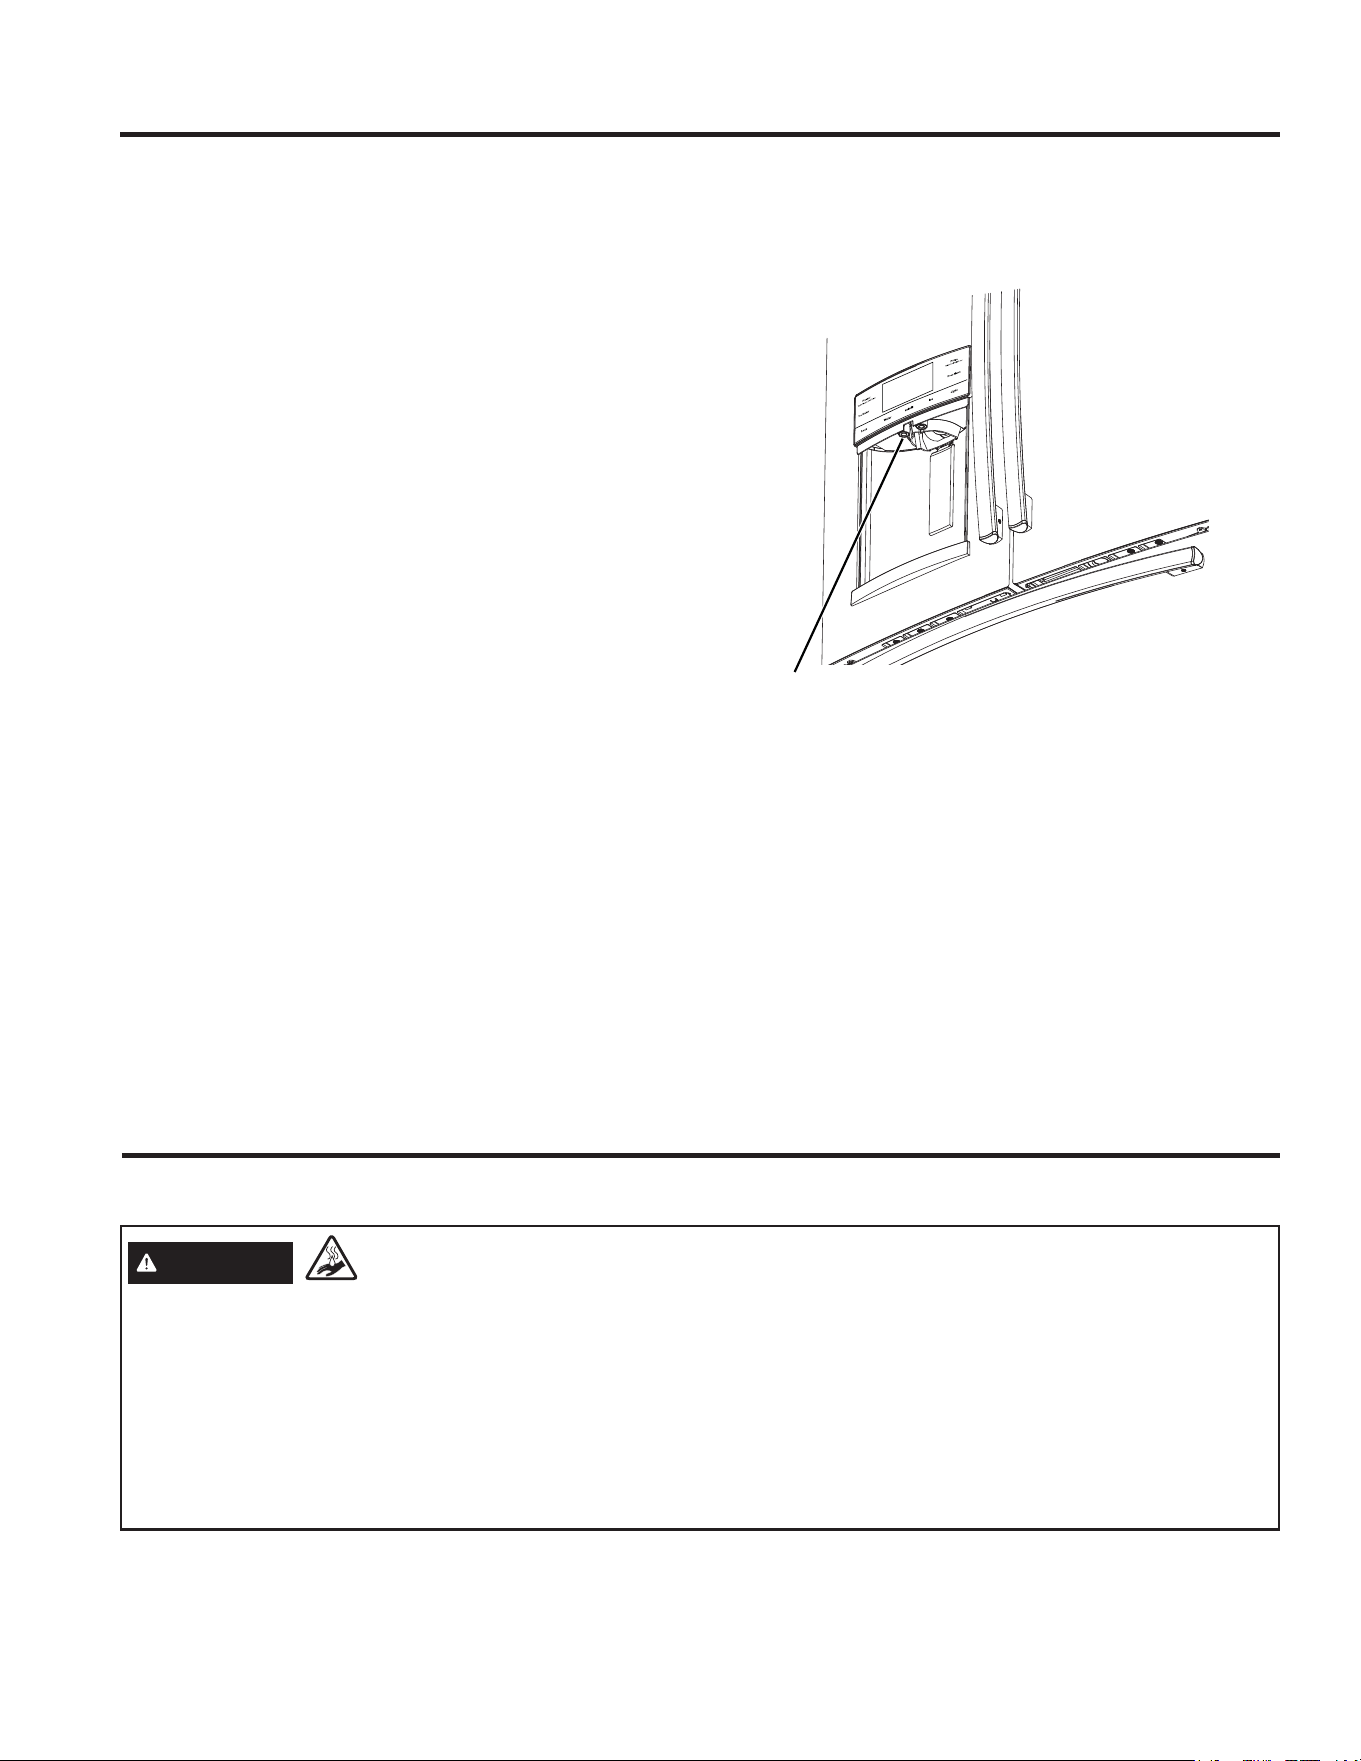
Dispense
2QFHWKHKHDWLQJSURFHVVLVFRPSOHWHWKH'LVSHQVHOLJKWRQWKHGLVSOD\ZLOOIODVK
To dispense, slide the brewer into the rails. Make sure the brewer is pushed all the way into the bracket.
Place your mug on the drip tray mug icon, under the red brew spout. Press and hold Brew Dispense for 3
seconds until you hear the dispenser engage.
Cleaning the brewer
Ŷ
7KH.&XSEUHZHULVWRSUDFNGLVKZDVKHUVDIH
Ŷ
,WLVUHFRPPHQGHGWRULQVHLWWKRURXJKO\DIWHUZDVKLQJWRUHPRYHDOOVRDSUHVLGXH
Ŷ
Periodic cleaning of dispenser recess area is recommended as staining may occur with usage
RIWKH.&XSEUHZHU
.&XS
Close the
brewer.
Lid will
click when
secure.
Change Brew Size
Press the Brew Size button any time during the heating cycle to
FKRRVHRUR]7KHGHIDXOWVL]HLVR](QVXUHWKHPXJ
EHLQJXVHGLVODUJHHQRXJKIRUWKHVL]HVHOHFWHG
NOTE: Press and hold the Brew Size button for 3 seconds to
toggle between Coffee and Cocoa. The default is Coffee.
NOTE: To abort the heating cycle, press and hold the Start Heating button for 3
seconds. To abort the brew dispense cycle, press and hold the Start Heating button
for 3 seconds, press the paddle, press any button on the display besides Brew Size or
Brew Dispense, or open the right fresh food door.
Red brew
spout for mug
alignment
Mug icon for
placement
Rails for
the brewer
)RU86DQG867HUULWRULHV2QO\
How to use the single serve dispenser
Single Serve Keurig K-Cup Brewer* (Cont.)
16 49-60792 Rev. 3
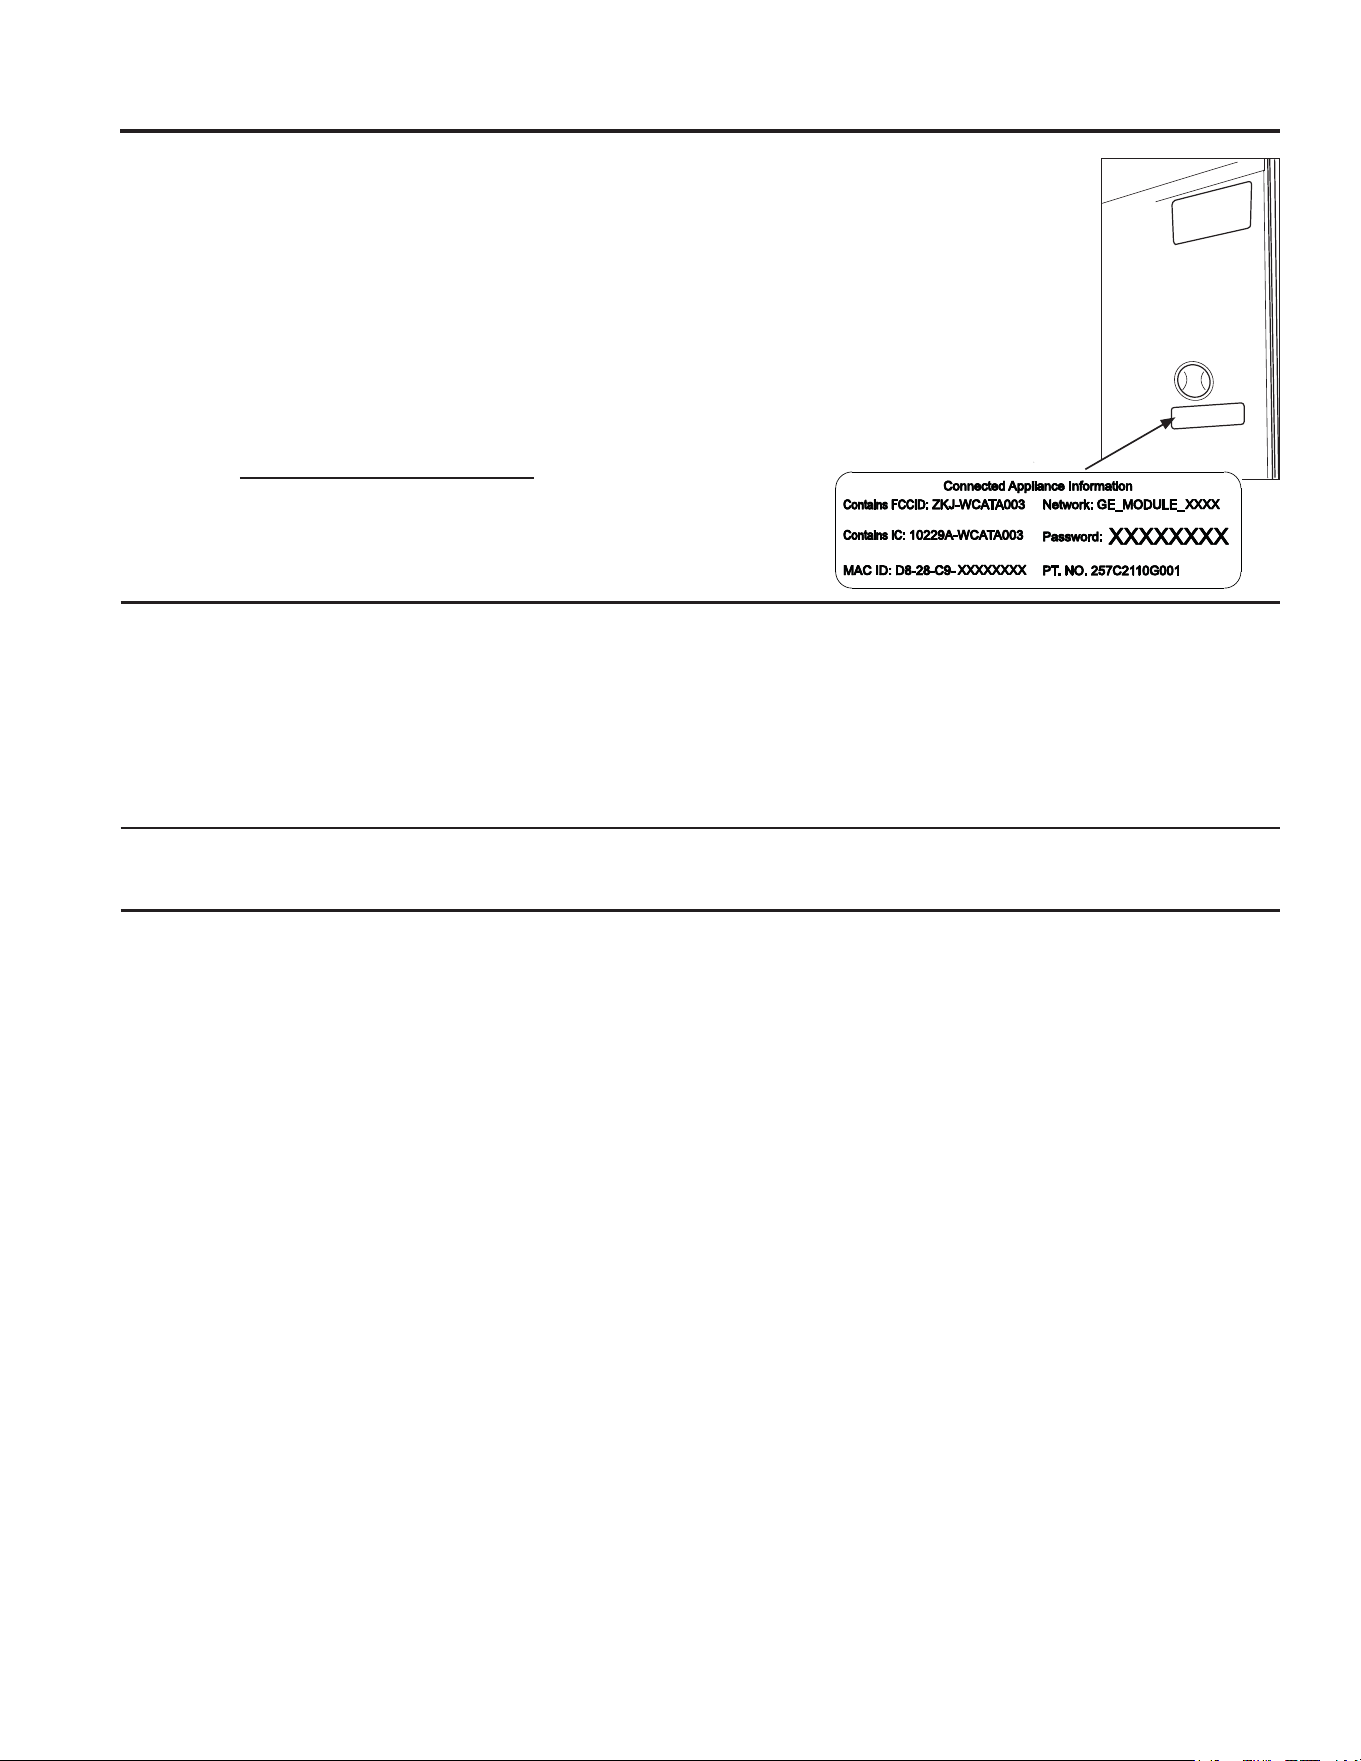
GE WiFi Connect**
(for customers in the United States, its territories, and Canada)
GE WiFi Connect Enabled* (PFE28P, PFD28, PYD22,
PYE22P, PFH models only)
,I\RXUUHIULJHUDWRUKDVD&RQQHFWHG$SSOLDQFHLQIRUPDWLRQODEHOORFDWHGRQWKHLQVLGHDVVKRZQ
\RXUUHIULJHUDWRUFDQEHFRQQHFWHGWR\RXU:L)LQHWZRUNDOORZLQJLWWRFRPPXQLFDWHZLWK\RXU
VPDUWSKRQHIRUUHPRWHPRQLWRULQJFRQWURODQGQRWLILFDWLRQV'HSHQGLQJRQWKHUHIULJHUDWRU
PRGHO\RXKDYH\RXHLWKHUKDYHD:L)LFRPPXQLFDWLRQFDUGEXLOWLQWRWKHSURGXFWRUDSRUWIRU
DQH[WHUQDO:L)L&RQQHFW3OXV0RGXOHVROGVHSDUDWHO\
Please visit GEAppliances.com/connect to learn more about
connected appliance features, and to learn what connected appliance
apps will work with your Smart Phone.**
7RXVH\RXU:L)LSUHVVWater and Light on the control panel.
REGULATORY INFORMATION
FCC/IC Compliance Statement:
7KLVGHYLFHFRPSOLHVZLWK3DUWRIWKH)&&5XOHV2SHUDWLRQLVVXEMHFWWRWKHIROORZLQJWZRFRQGLWLRQV
1. This device may not cause harmful interference.
2. This device must accept any interference received, including interference that may cause undesired operation.
This equipment has been tested and found to comply with the limits for a Class B digital device, pursuant to Part
RIWKH)&&5XOHV7KHVHOLPLWVDUHGHVLJQHGWRSURYLGHUHDVRQDEOHSURWHFWLRQDJDLQVWKDUPIXOLQWHUIHUHQFHLQD
residential installation. This equipment generates uses and can radiate radio frequency energy and, if not installed
and used in accordance with the instructions, may cause harmful interference to radio communications. However,
WKHUHLVQRJXDUDQWHHWKDWLQWHUIHUHQFHZLOOQRWRFFXULQDSDUWLFXODULQVWDOODWLRQ,IWKLVHTXLSPHQWGRHVFDXVHKDUPIXO
interference to radio or television reception, which can be determined by turning the equipment off and on, the user
is encouraged to try to correct the interference by one or more of the following measures:
• Reorient or relocate the receiving antenna.
,QFUHDVHWKHVHSDUDWLRQEHWZHHQWKHHTXLSPHQWDQGUHFHLYHU
• Connect the equipment into an outlet on a circuit different from that to which the receiver is connected.
&RQVXOWWKHGHDOHURUDQH[SHULHQFHGUDGLRWHOHYLVLRQWHFKQLFLDQIRUKHOS
Labelling: Changes or modifications to this unit not expressly approved by the manufacturer could void the user’s
authority to operate the equipment.
ConnectPlus module only (or similar communication module)
RF Exposure -7KLVGHYLFHLVRQO\DXWKRUL]HGIRUXVHLQDPRELOHDSSOLFDWLRQ$WOHDVWFPRIVHSDUDWLRQGLVWDQFH
between the ConnectPlus device and the user’s body must be maintained at all times.
GE WiFi Connect Optional *
You refrigerator is GE WiFi Connect compatible using the GE ConnectPlus module that is provided with your
refrigerator. To connect this appliance to the internet you will need to attach the module to your appliance through
the communication port in the appliance. The GE ConnectPlus will allow your appliance to communicate with your
smart phone for remote appliance monitoring, control and notifications. Please visit GEAppliances.com/connect to
learn more about connected appliance features, to learn what connected appliance App’s will work with your Smart
Phone and to learn where you can purchase a GE ConnectPlus.**
:L)L&RQQHFWLYLW\)RUDVVLVWDQFHZLWKWKHDSSOLDQFHRUWKHConnectPlus network connectivity (for models that are
:L)LHQDEOHGRU:L)LRSWLRQDOSOHDVHFDOO1-800-220-6899.
)RU86867HUULWRULHVDQG&DQDGD2QO\
Appliance Communication
*Select Models Only
USING THE REFRIGERATOR: Appliance Communication
49-60792 Rev. 3 17
USING THE REFRIGERATOR::DWHU)LOWHU&DUWULGJH53:)(
WARNING
To reduce the risk associated with choking, do not allow children under 3 years of age to have
access to small parts during the installation of this product. The disposable filter cartridge should be replaced every
6 months at the rated capacity, or sooner if a noticeable reduction in flow rate occurs.
)RUWKHPD[LPXPEHQHILWRI\RXUILOWUDWLRQV\VWHP*($SSOLDQFHVD+DLHUFRPSDQ\UHFRPPHQGVWKHXVHRI*(
$SSOLDQFHVEUDQGHGILOWHUVRQO\8VLQJ*($SSOLDQFHVEUDQGHGILOWHUVLQ*($SSOLDQFHVUHIULJHUDWRUVSURYLGHVRSWLPDO
SHUIRUPDQFHDQGUHOLDELOLW\2XUILOWHUVPHHWULJRURXVLQGXVWU\16)VWDQGDUGVIRUVDIHW\DQGTXDOLW\WKDWDUHLPSRUWDQW
for products that are filtering your water. There is no assurance that brands other than GE Appliances filters meet our
standards for quality, performance and reliability.
If you have questions, or to order additional filter cartridges, visit gewaterfilters.com. ,Q&DQDGDYLVLW
cafeappliances.ca/service or consult the yellow pages for the nearest Camco Service Center.
Water Filter Cartridge - RPWFE
Water Filter Cartridge
The water filter cartridge is located in the fresh food
interior on the left side wall, near the top.
6HOHFWPRGHOVXVHUDGLRIUHTXHQF\LGHQWLILFDWLRQ5),'
WRGHWHFWOHDNVDQGPRQLWRUILOWHUVWDWXV7KH5),'
WHFKQRORJ\LVFHUWLILHGE\WKH)&&
When to Replace the Filter Cartridge
The filter cartridge should be replaced every six months
RUHDUOLHULIJDOORQVOLWHUVRIZDWHUKDV
been dispensed or the flow of water to the dispenser or
icemaker decreases.
Touch Screen Models: A filter status message will
appear on the screen when the water filter needs to be
replaced. The filter status will automatically update when
the filter is replaced.
Non-touch Screen Models: A filter indicator light will
illuminate on the screen when the water filter needs to
be replaced.
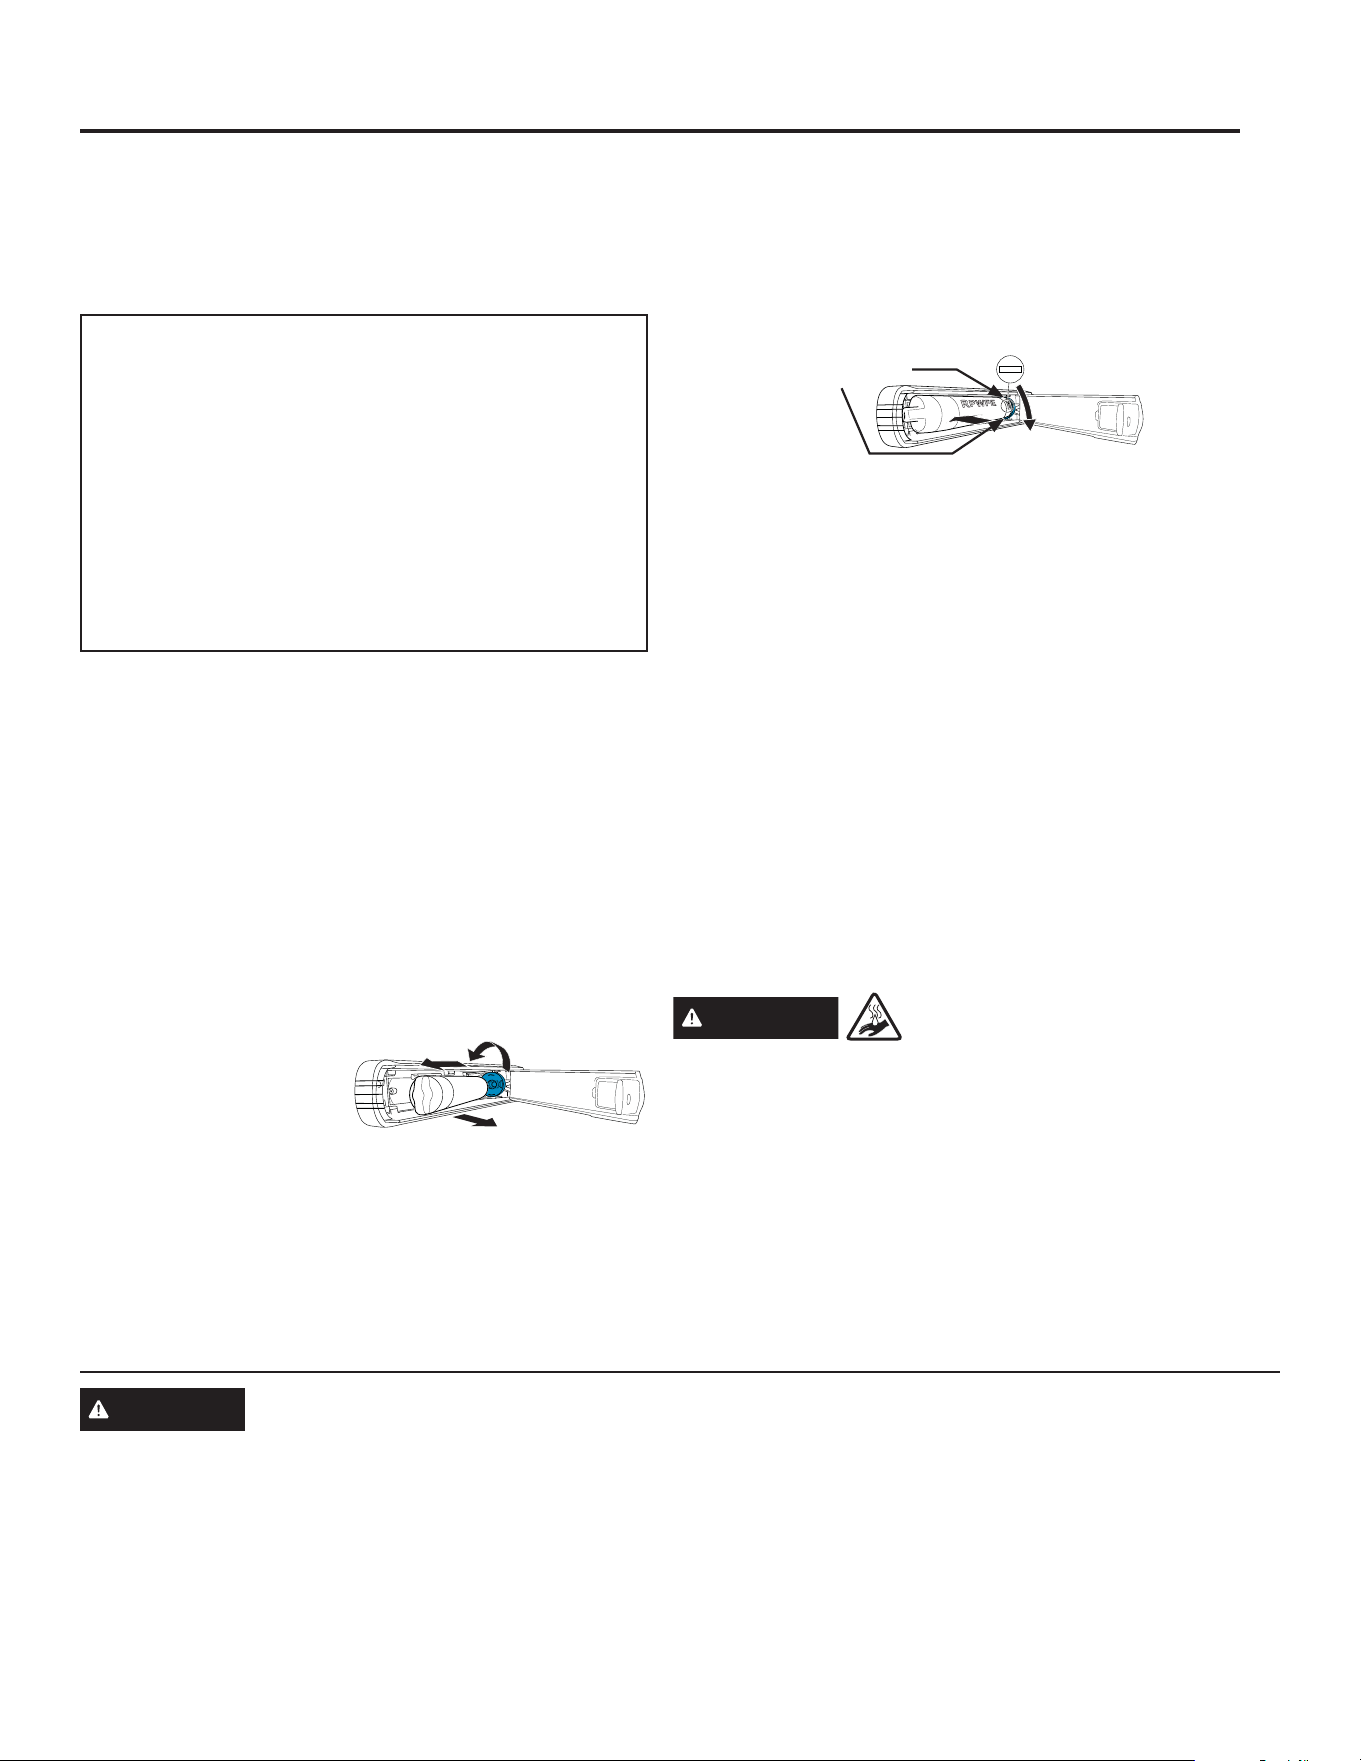
Removing the Filter Cartridge/Bypass Plug
1. Remove the old
cartridge or bypass plug
by opening the filter
door and pulling on the
ERWWRPRIWKHFDUWULGJH
bypass plug to disengage it from the filter clips. Swing
WKHFDUWULGJHE\SDVVSOXJRXWZDUGXQWLO\RXKHDU
the 'click' of the cartridge holder engaging with the
bracket.
7ZLVWWKHFDUWULGJHE\SDVVSOXJRQHTXDUWHUWXUQ
FRXQWHUFORFNZLVH$IWHUWZLVWLQJUHPRYHWKHFDUWULGJH
bypass plug by pulling it away from the cartridge
holder. A small amount of water may drip out.
Installing the Filter Cartridge/Bypass Plug
$OLJQWKHILOWHUFDUWULGJHE\SDVVSOXJZLWKWKHFDUWULGJH
KROGHUZLWKWKHZRUG)5217IDFLQJWKHWRSRIWKH
XQLW3XVKWKHFDUWULGJHE\SDVVSOXJWRZDUGWKHUHDURI
WKHXQLWXQWLOLWLVIXOO\VHDWHG7ZLVWWKHILOWHUFDUWULGJH
bypass plug clockwise one-quarter turn, until the word
)5217LVIDFLQJRXWZDUG
:KLOHFRQWLQXLQJWRHQVXUHFDUWULGJHE\SDVVSOXJLV
fully seated in the holder, gently swing the filter inward
XQWLOLWLVLQSRVLWLRQ,IILOWHUZLOOQRWVZLQJHDVLO\FKHFN
to ensure filter is properly aligned and fully seated
ZLWKLQWKHFDUWULGJHKROGHU7KH5('LQGLFDWRUVVKRXOG
not be visible.
NOTE: ,WLVQRUPDOIRUZDWHUWRDSSHDUGLVFRORUHGGXULQJ
the initial system flush. Water color will return to normal
after first few minutes of dispensing.
Filter Bypass Plug
To reduce the risk of property damage due to water
leakage, you MUST use the filter bypass plug when
a replacement filter cartridge is not available. Some
models do not come equipped with the filter bypass
plug. To obtain a free bypass plug, visit us on-line at
JHDSSOLDQFHVFRPVHUYLFH,Q&DQDGDYLVLW
JHDSSOLDQFHVFDVHUYLFH7KHGLVSHQVHUDQGLFHPDNHU
will not operate without either the filter or the bypass plug
installed. The bypass plug is installed in the same way
DVDILOWHUFDUWULGJH´
WARNING
SCALDING HAZARD.*
8VHRIWKHKRWZDWHUGLVSHQVHUSULRUWRSXUJLQJDLUIURP
the system may result in spurting of hot water and lead
WRKRWZDWHUVFDOGLQJ)ROORZWKHLQVWUXFWLRQVDERYHWR
purge all air from the system through the cold water
dispenser prior to using the hot water dispenser.
FCCID: ZKJ-EBX1532P001 ICID:
10229A-EBX1532P001
“This device complies with part 15 of the FCC Rules.
Operation is subject to the following two conditions:
(1) This device may not cause harmful interference, and
(2) this device must accept any interference received,
including interference that may cause undesired
operation.”
“This device complies with Industry Canada licence-
exempt RSS standard(s). Operation is subject to the
following two conditions: (1) this device may not cause
interference, and (2) this device must accept any
interference, including interference that may cause
undesired operation of the device.”
FRONT
3
4
Red indicators
should not be
visible
1
2
*Select Models Only

18 49-60792 Rev. 3
*Select Models Only
Fresh Food Storage Options
Rearranging the Shelves
Shelves in the refrigerator compartment are adjustable.
To remove:
Remove all items from the shelf.
Tilt the shelf up at the front.
Lift the shelf up at the back and bring the shelf out.
To replace:
While tilting the shelf up, insert the top hook at the
back of the shelf in a slot on the track.
Lower the front of the shelf until the bottom of the
shelf locks into place.
Spillproof Shelves
Spillproof shelves have special edges to help prevent
spills from dripping to lower shelves.
Quick Space Shelf *
This shelf splits in half and slides under itself for storage of
tall items on the shelf below.
This shelf can be removed and replaced or relocated (just
OLNHVSLOOSURRIVKHOYHV
NOTE: The back half of the Quick Space Shelf is not
adjustable.
USING THE REFRIGERATOR: )UHVK)RRG6WRUDJH2SWLRQV
49-60792 Rev. 3 19
USING THE REFRIGERATOR: &OLPDWH=RQH7HPSHUDWXUH&RQWUROOHG'UDZHU
*Select Models Only
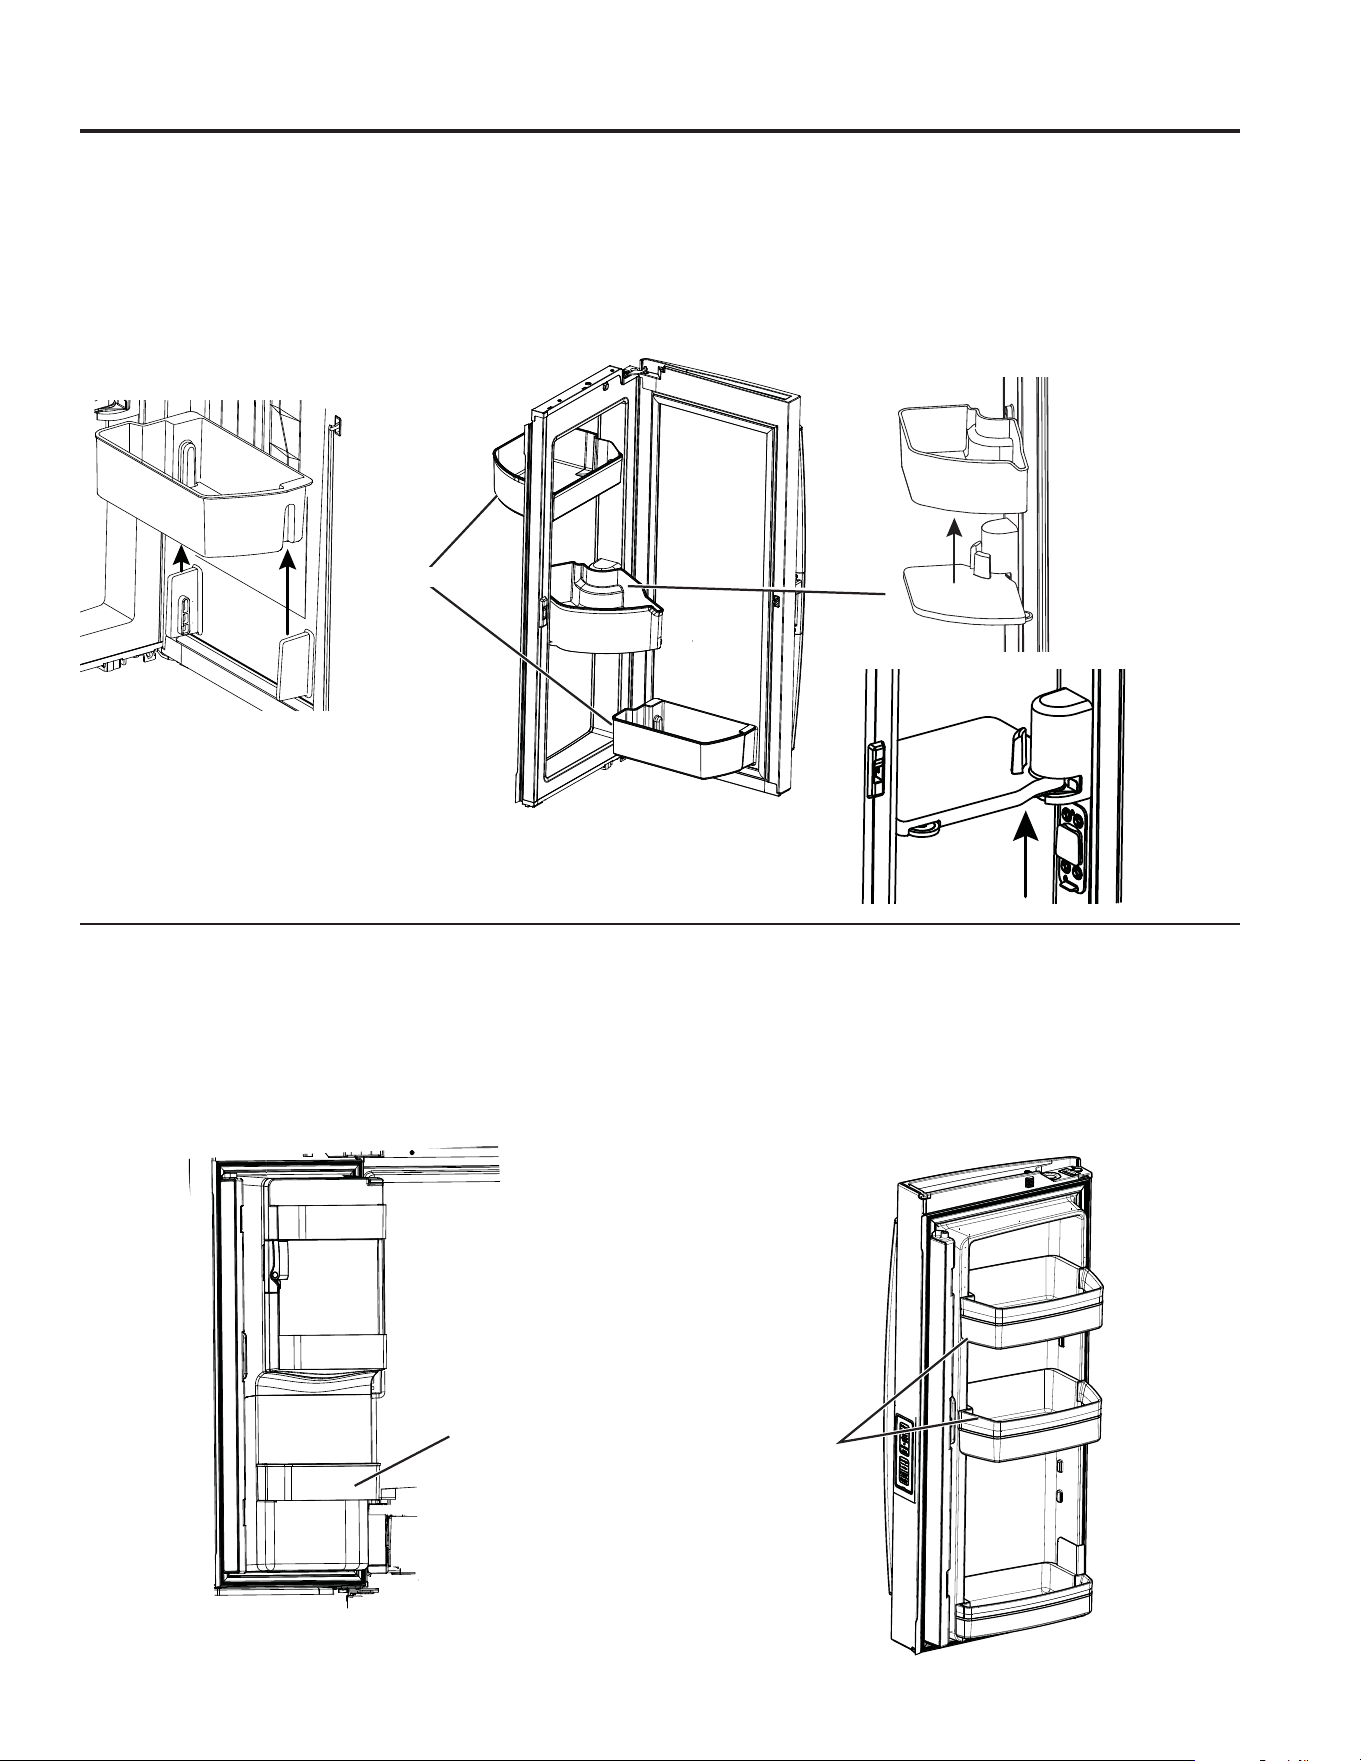
Fresh Food Storage Options
Left Door Bins
DISPENSER MODELS - FIXED BIN*
To remove: Lift the bin straight up, then pull out.
The ice maker door bins are not interchangeable, note the
location upon removal and replace the bin in its proper
location.
NON-DISPENSER MODELS - ADJUSTABLE BINS*
Adjustable bins can easily moved up or down the inside
of the door to give better flexibility for storage.
To remove: Lift bin straight up, then pull out.
Right Door Bins
FIXED BINS can easily be carried from refrigerator to
work area.
To remove: Lift bin straight up, then pull out.
ROTATING BIN:
To remove: Rotate bin outward then lift straight up. To
remove Place hand under metal base and lift up.
To remove Metal Base: Place hand under metal base
and lift up.
)L[HG%LQV
)L[HG%LQ
Adjustable Bins
Remove
Rotating Bin
5HPRYH)L[HG%LQV
Remove
Metal Base
20 49-60792 Rev. 3
C
Fruits Vegetables
F
C
M
EAT
DELI
P
R
ODU
C
E
C
H
E
ESE
CI
TRU
S
SELEC
T
ClimateZone
Fruits Vegetables
Fruits Vege
D
*Select Models Only
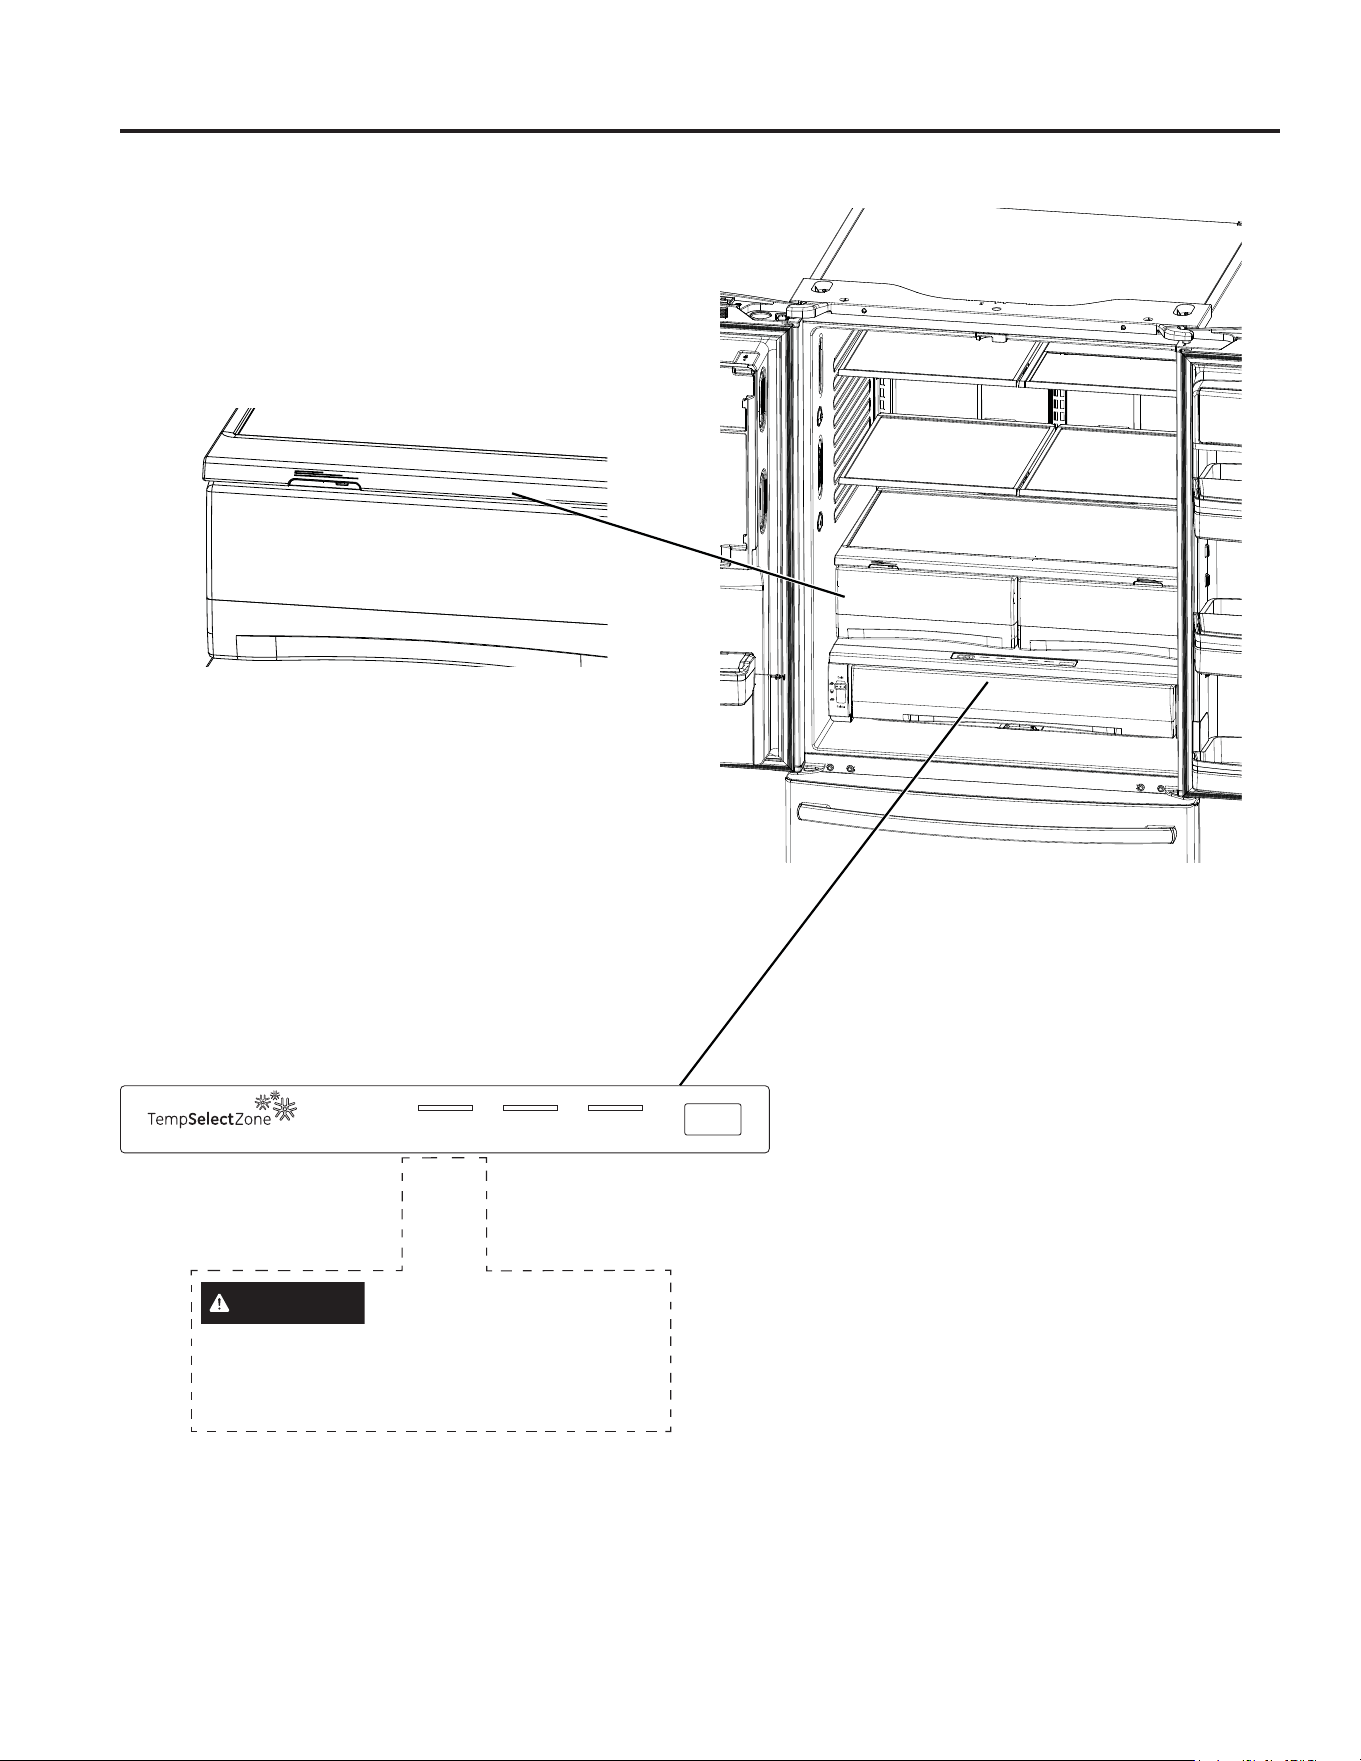
Climate Zone & Temperature Controlled Drawer
32° 34° 38°
Note: Temperatures indicate the appropriate
temperatures for the food and actual
temperatures may vary based on normal
operation and other factors such as door
openings and fresh food set point.
CAUTION
Laceration Hazard.
'RQRWVWRUHJODVVERWWOHVDWWKLVVHWWLQJ,I
WKH\DUHIUR]HQWKH\FDQEUHDNDQGUHVXOWLQ
personal injury.
Meat Beverage Deli
Select
ClimateZone
.HHSIUXLWVDQGYHJHWDEOHVRUJDQL]HGLQVHSDUDWH
compartments for easy access.
Excess water that may accumulate in the bottom of the
drawers or under the drawers should be wiped dry.
Temperature Controlled Drawer*
7KH7HPSHUDWXUH&RQWUROOHG'UDZHULVDIXOOZLGWK
drawer with adjustable temperature control. This drawer
can be used for large miscellaneous items.
To change setting, press select button.
USING THE REFRIGERATOR: &OLPDWH=RQH7HPSHUDWXUH&RQWUROOHG'UDZHU
49-60792 Rev. 3 21
USING THE REFRIGERATOR:&OLPDWH=RQH7HPSHUDWXUH&RQWUROOHG'UDZHU
'LYLGHU
*Select Models Only
Climate Zone & Temperature Controlled Drawer
How to Remove and Replace Drawer
To remove:
Pull the drawer out to the stop position.
Lift the front of the drawer up and out.
To replace:
Pull left and right slides until fully extended.
Place drawer back in first and rotate drawer front down
to seat on slide.
Push the drawer in to closed position.
How to Remove and Replace Drawer
Divider*
To remove:
Pull the drawer out to the stop position.
Raise the front side of the divider to unhook it from
the rear wall of the drawer.
To replace:
Hook the back of the divider over the rear wall of the
drawer.
Push the divider down.

22 49-60792 Rev. 3
Freezer Basket and Drawer
Basket.
'UDZHU
,FH%XFNHW$YDLODEOHRQ1RQ'LVSHQVHPRGHOV
RQO\$YDLODEOHDVD,0.LWRQVRPHPRGHOV
Non-Adjustable Bin in the Freezer*
To remove:
Push in plastic tab on either left or right side
To replace:
Slide bin into location until it locks into place.
Basket Removal
To remove, standard depth models only:
2SHQIUHH]HUGRRUWRWKHVWRSSRVLWLRQ
5HPRYHIUHH]HUGRRUELQE\SXVKLQJSODVWLFWDERQ
either left or right side to release bin hinge pin.
5HPRYHIUHH]HUEDVNHWE\OLIWLQJXSWKHUHDURIWKH
basket and moving basket rearward until the front of
the basket can be rotated upward and out.
4. Lift it out to remove.
To remove, counter depth models only:
1. Open fresh food doors.
2SHQIUHH]HUGRRUWRWKHVWRSSRVLWLRQ
5HPRYHIUHH]HUEDVNHWE\OLIWLQJXSWKHUHDURIWKH
basket and rotate it upward.
4. Lift it out to remove.
To replace:
Reverse step 1 through 4 to replace.
*Select Models Only
Baskets, Drawers, and Bins
Plastic Tabs
USING THE REFRIGERATOR:%DVNHWV'UDZHUVDQG%LQV
49-60792 Rev. 3 23
USING THE FREEZER:$XWRPDWLF,FH0DNHU
'LVSOD\7\SH
6HH3DJH
Model # +RZWRWXUQWKHLFHPDNHURQRII
Control Style A 3)(33<(3 8VHWKH³,&(´EXWWRQRQWKHFRQWURO6HHControls,
pages 10 & 11.
Control Style B, C 3)+3)(.3)'')(
*)(*)'*)(*)63<'
3<(.'<(.*<(*<6
8VHWKH³,&(0$.(5´EXWWRQRQWKHFRQWURO6HH
Controls, pages 10 & 11.
&RQWURO6W\OH' GNE29, PWE23 8VHWKH³,&(0$.(5´EXWWRQRQWKHFRQWURO6HH
Controls, pages 10 & 11.
How to Turn the Ice Maker On/Off
Lift and pull
,FH%R[
'RRU
Ice Bucket and Dispenser*
• Open the ice box door on inside of the left door.
• Pull up and out on the ice bucket in the left hand door
to remove it from the compartment .
• To replace the ice bucket, set it on
the guide brackets and push until
the ice bucket seats properly.
,IEXFNHWFDQQRWEHUHSODFHG
URWDWHWKHLFHEXFNHWIRUNWXUQ
clockwise.
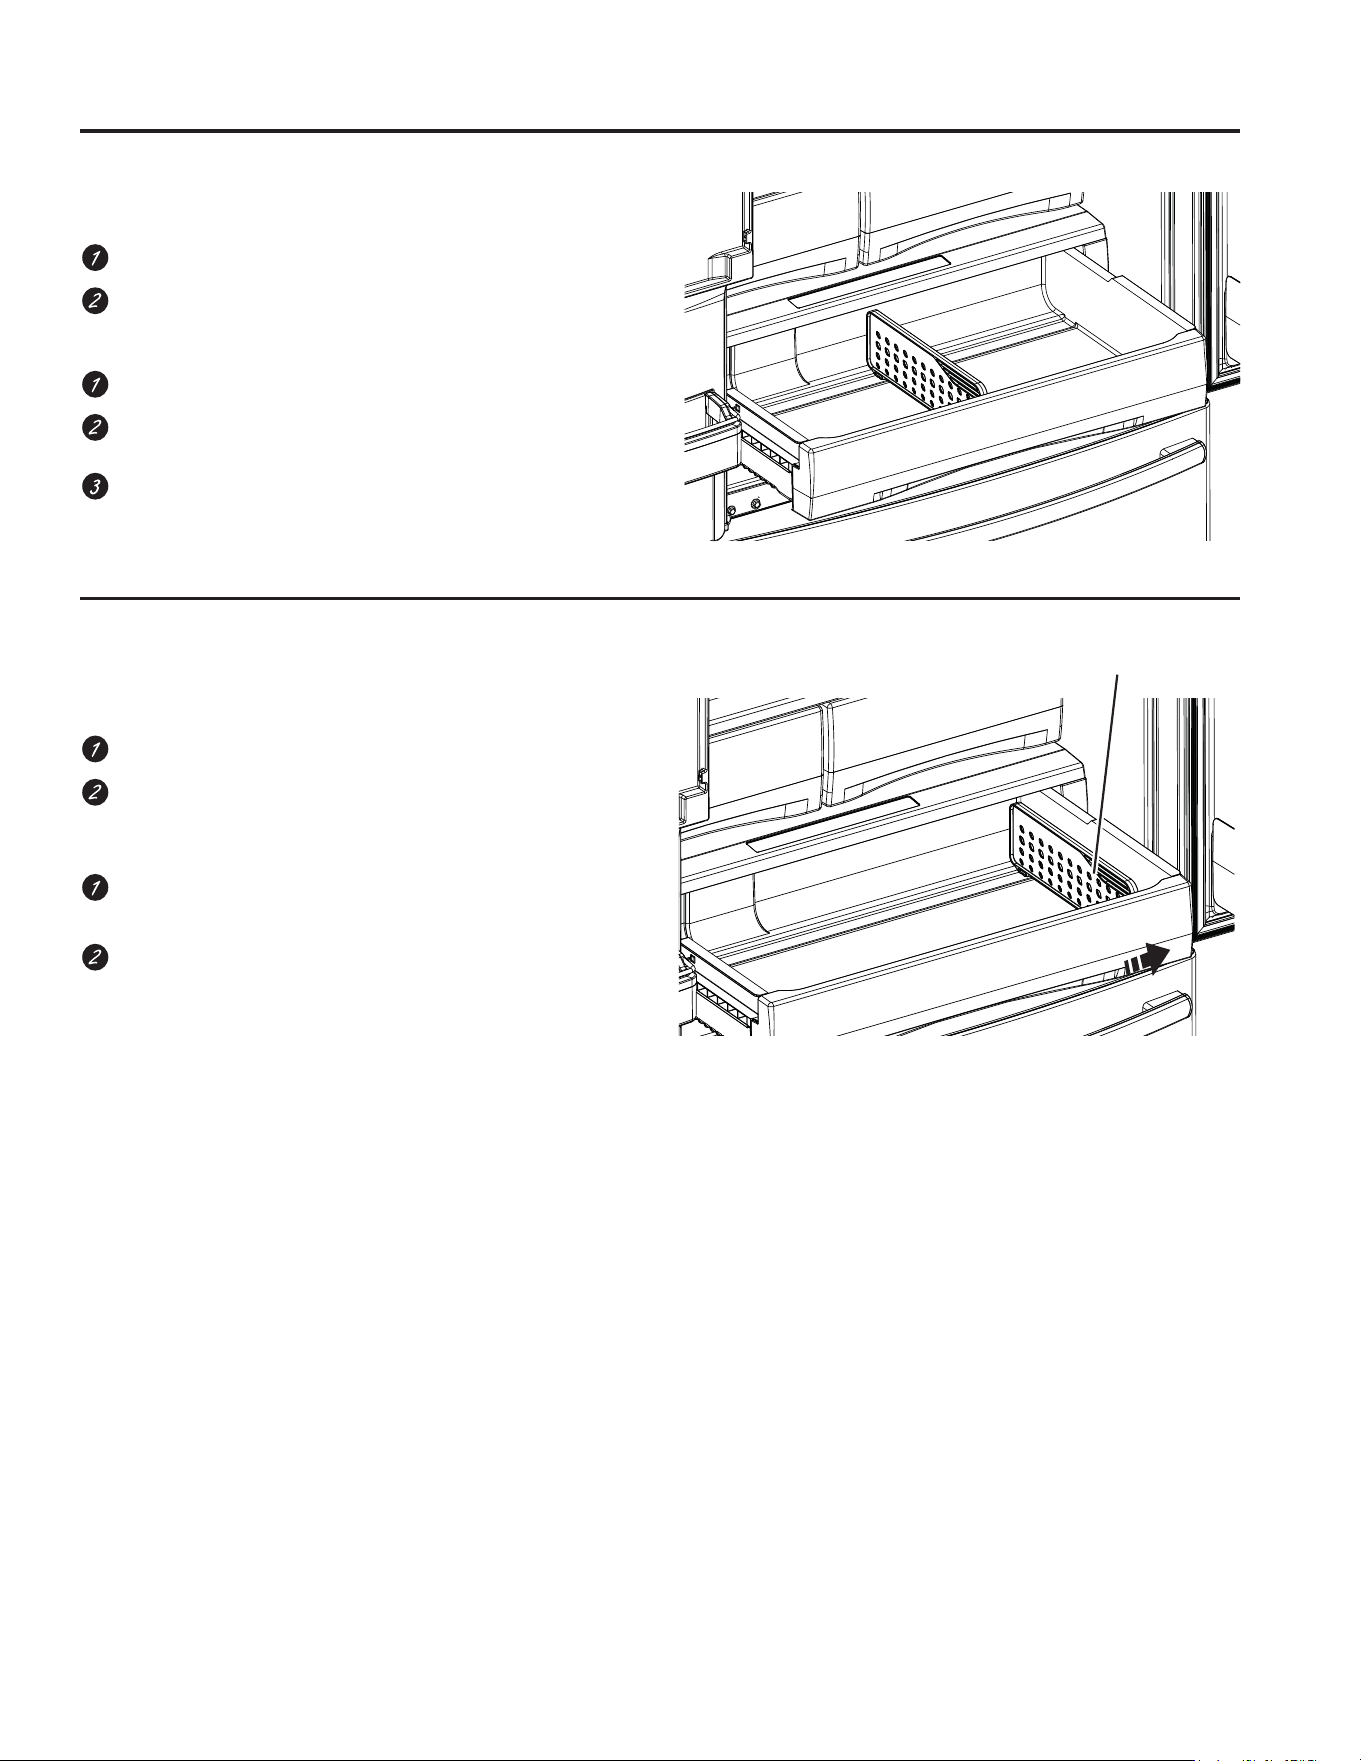
Ice Maker (Available on Non Dispense models,
also available as IM Kit for some models)
7KHUHLVDGGLWLRQDOLFHVWRUDJHLQWKHIUHH]HUFRPSDUWPHQW
drawer.
2SHQWKHIUHH]HUGUDZHU
• The ice bucket
is located on
the left side
of the upper
basket.
• Pull the upper
basket forward
to remove the
ice bucket.
)UHH]HU
,FH
Bucket
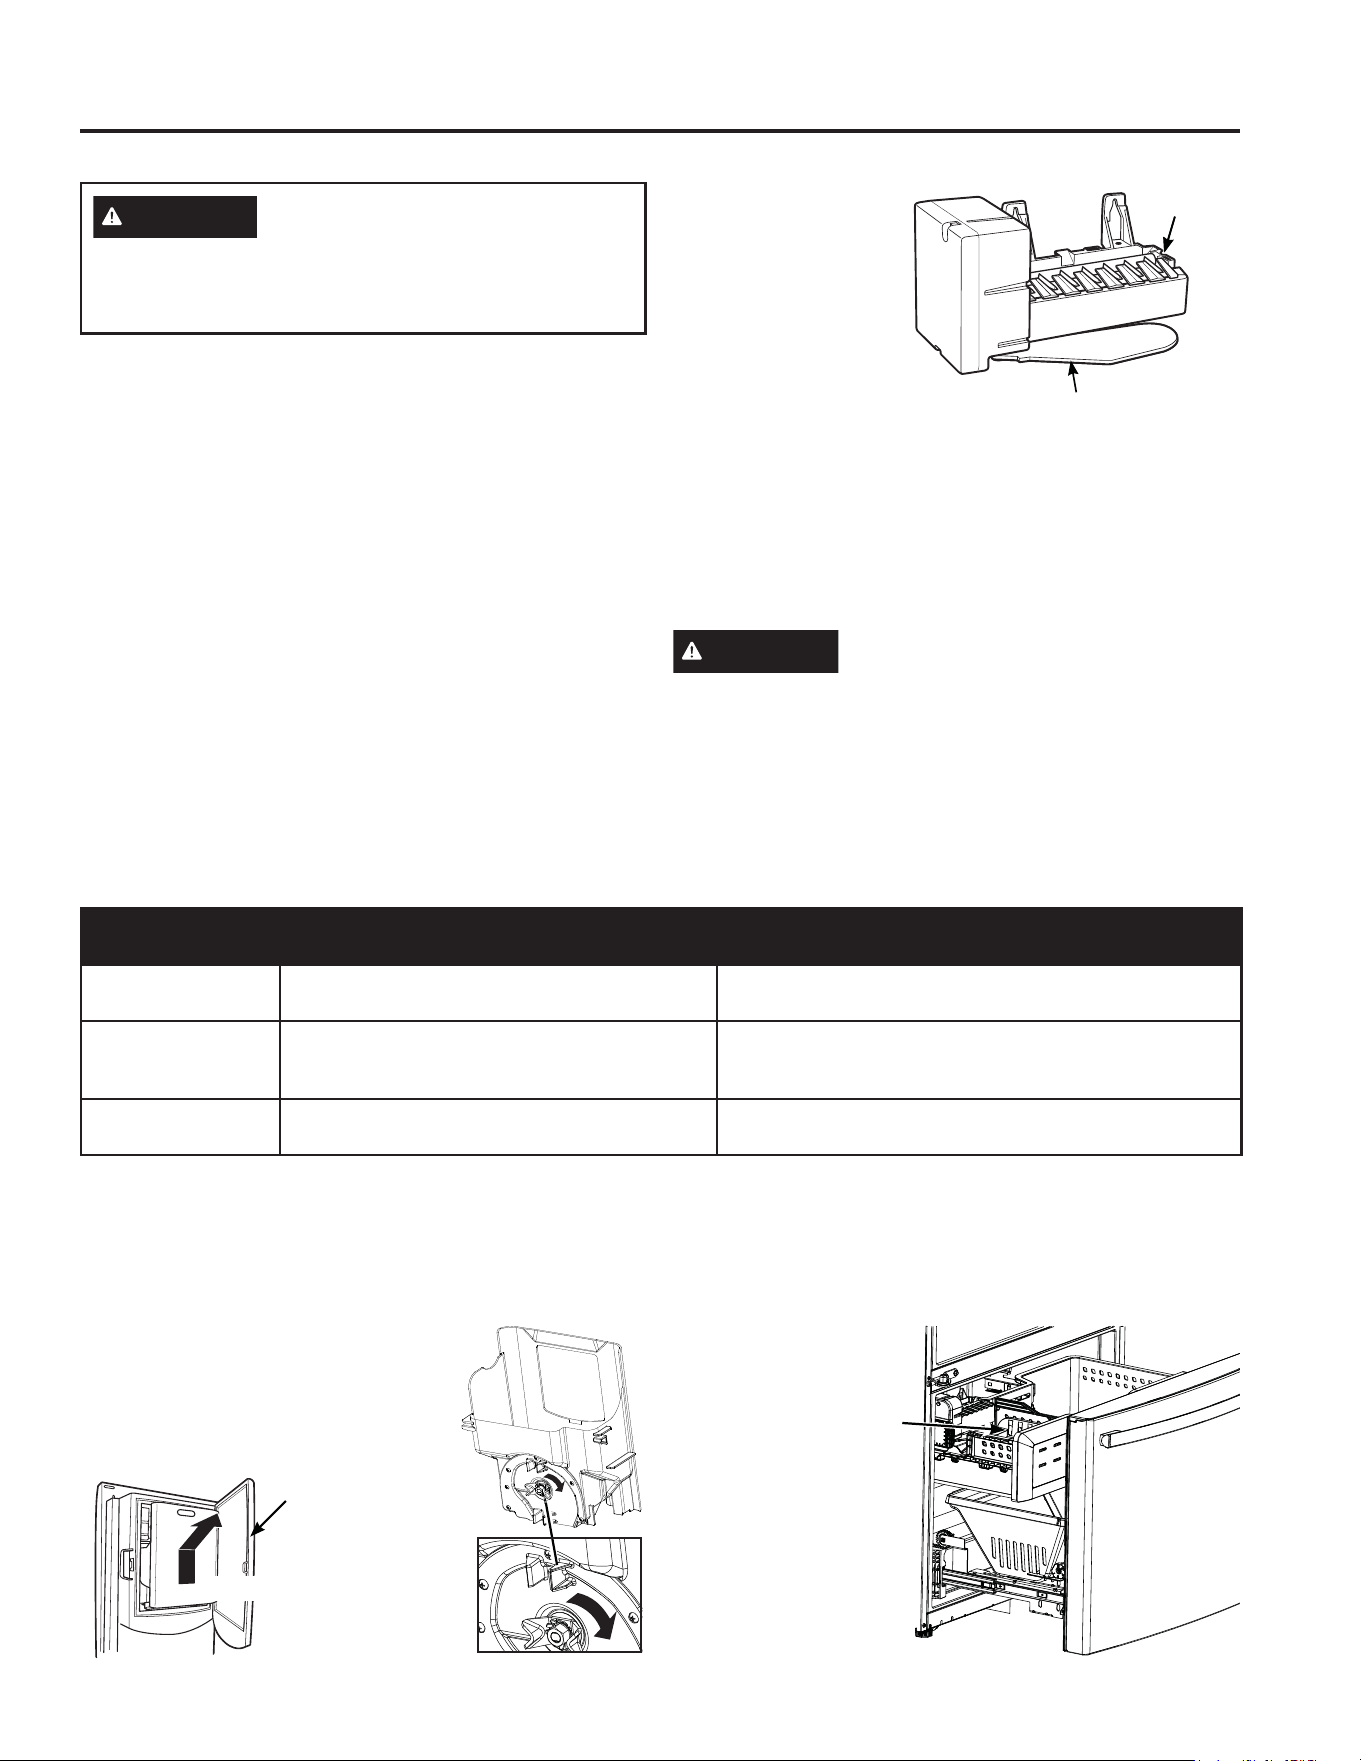
Automatic Ice Maker
A newly installed refrigerator may take 12 to 24 hours to begin making ice.
Automatic Ice maker*
The ice maker will produce seven cubes per cycle
approximately 100–130 cubes in a 24-hour period,
GHSHQGLQJRQIUHH]HUFRPSDUWPHQWWHPSHUDWXUHURRP
temperature, number of door openings and other use
conditions.
7KHLFHPDNHUZLOOILOOZLWKZDWHUZKHQLWFRROVWR)
&$QHZO\LQVWDOOHGUHIULJHUDWRUPD\WDNHWR
hours to begin making ice cubes.
,IWKHUHIULJHUDWRULVRSHUDWHGEHIRUHWKHZDWHUOLQH
connection is made to the unit or if the water supply to
an operating refrigerator is turned off, make sure that
the ice maker is turned off. Once the water has been
connected to the refrigerator, the ice maker may be
turned on. See the table below for details.
<RXPD\KHDUDEX]]LQJVRXQGHDFKWLPHWKHLFHPDNHU
fills with water.
Throw away the first
few batches of ice to
allow the water line to
clear.
Be sure nothing
interferes with the
sweep of the feeler arm.
When the bin fills to the
level of the feeler arm,
WKHLFHPDNHUZLOOVWRSSURGXFLQJLFH,WLVQRUPDOIRU
several cubes to be joined together.
,ILFHLVQRWXVHGIUHTXHQWO\ROGLFHFXEHVZLOOEHFRPH
cloudy, taste stale and shrink.
NOTE: ,QKRPHVZLWKORZHUWKDQDYHUDJHZDWHU
pressure, you may hear the ice maker cycle multiple
times when making one batch of ice.
CAUTION
7RPLQLPL]HWKHULVNRISHUVRQDOLQMXU\
avoid contact with the moving parts of the ejector
mechanism, or with the heating element that releases
WKHFXEHV'RQRWSODFHILQJHUVRUKDQGVRQWKH
automatic ice making mechanism while the refrigerator is
plugged in.
)HHOHU$UP
,FH
maker
*Select Models Only
WARNING
Connect to potable water supply
only.
A cold water supply is required for automatic icemaker
operation. The water pressure must be between 40
DQGSVLNLORSDVFDOV
24 49-60792 Rev. 3
Care and Cleaning
Cleaning the Outside
Cleaning the Inside
To help prevent odors, leave an open box of baking
VRGDLQWKHUHIULJHUDWRUDQGIUHH]HUFRPSDUWPHQWV
Unplug the refrigerator before cleaning.
,IWKLVLVQRWSUDFWLFDOZULQJH[FHVVPRLVWXUHRXWRI
sponge or cloth when cleaning around switches, lights or
controls.
8VHDQDSSOLDQFHZD[SROLVKRQWKHLQVLGHVXUIDFH
between the doors.
8VHZDUPZDWHUDQGEDNLQJVRGDVROXWLRQ²DERXWD
WDEOHVSRRQPORIEDNLQJVRGDWRDTXDUWOLWHURI
ZDWHU7KLVERWKFOHDQVDQGQHXWUDOL]HVRGRUV5LQVHDQG
wipe dry.
To clean the inside metal panel*, open the outer door
XVLQJWKH'RRULQ'RRU/DWFK&OHDQWKHSDQHOZLWKD
PLOGGHWHUJHQWDQGWKHQZLSHGU\ZLWKDVRIWFORWK'RQRW
use any stainless steel cleaner on the panel as it may
damage the surrounding plastic.
CAUTION
'RQRWFOHDQJODVVVKHOYHVRU
coverswith warm water when they are cold. Glass
shelves and covers may break if exposed to sudden
temperature changes or impact such as bumping or
dropping. Tempered glass is designed to shatter into
many small pieces if it breaks.
'RQRWZDVKDQ\SODVWLFUHIULJHUDWRUSDUWVLQWKH
dishwasher.
Behind the Refrigerator
Be careful when moving the refrigerator away from
the wall. All types of floor coverings can be damaged,
particularly cushioned coverings and those with
embossed surfaces.
Raise the leveling legs located at the bottom front of the
refrigerator.
Pull the refrigerator straight out and return it to position
by pushing it straight in. Moving the refrigerator in a side
direction may result in damage to the floor covering or
refrigerator.
Lower the leveling legs until they touch the floor.
WARNING
ELECTRICAL SHOCK HAZARD
When pushing the refrigerator back, make sure you
don’t roll over the power cord or water supply line.
*Select Models Only
CARE AND CLEANING
Directions for Cleaning Outside Surfaces, Door Handles, and Trim
DO USE DO NOT USE
Soft, clean cloth or sponge Abrasive cloths, scrubbing sponges, scouring or steel
wool pads
Mild detergent mixed with warm water
$SSURYHGVWDLQOHVVVWHHOFOHDQHUV9LVLWWKH*(
Appliances parts store for approved stainless steel
cleaners: GEAppliancesparts.com or call 877.959.8688
&OHDQHUVZLWKR[DOLFDFLGVXFKDV%DU.HHSHUV)ULHQG6RIW
Cleanser™ can be used to remove surface rust, tarnish
and small blemisheson stainless steel surfaces only.
Abrasive powders or sprays
Window Sprays or Ammonia
Citrus or plant oil-based cleaners
Acidic or vinegar-based cleaners
Oven cleaners
&OHDQHUVFRQWDLQLQJDFHWRQHSURSDQRQH
$Q\FOHDQHUZLWK:$51,1*DERXWSODVWLFFRQWDFW
NOTE: DO NOT allow stainless steel cleaner to come in contact with any plastic parts such as trim pieces, handle
KDUGZDUHDQGOLQHUV,IXQLQWHQWLRQDOFRQWDFWRIFOHDQHUVZLWKSODVWLFSDUWVGRHVRFFXUFOHDQSODVWLFSDUWZLWKD
sponge and mild detergent mixed with warm water.
49-60792 Rev. 3 25
CARE AND CLEANING
Preparing for Vacation
)RUORQJYDFDWLRQVRUDEVHQFHVUHPRYHIRRGDQG
unplug the refrigerator. Clean the interior with a baking
VRGDVROXWLRQRIRQHWDEOHVSRRQPORIEDNLQJVRGD
WRRQHTXDUWOLWHURIZDWHU/HDYHWKHGRRUVRSHQ
,IWKHWHPSHUDWXUHFDQGURSEHORZIUHH]LQJKDYHD
qualified service technician drain the water supply
system to prevent serious property damage due to
flooding.
1. Turn refrigerator off or unplug the refrigerator.
2. Empty ice bucket
3. Turn water supply off
If you cut the water supply off, turn off the ice
maker.
8SRQUHWXUQLQJIURPYDFDWLRQ
1. Replace the water filter.
5XQJDOORQVOLWHUVRIZDWHUWKURXJKWKHFROG
ZDWHUGLVSHQVHUDERXWPLQXWHVWRIOXVKWKHV\VWHP
Preparing to Move
Secure all loose items such as shelves and drawers by
taping them securely in place to prevent damage.
When using a hand truck to move the refrigerator, do not
rest the front or back of the refrigerator against the hand
truck. This could damage the refrigerator.
Handle only from the sides of the refrigerator.
Be sure the refrigerator stays in an upright position
during moving.
Care and Cleaning
Replacing the Lights
Refrigerator Lights (LEDs)
Appearance may vary by model.
7KHUHLV/('OLJKWLQJLQIUHVKIRRGFRPSDUWPHQWDQGRQ
WKHERWWRPRIWKHIUHVKIRRGGRRUVWROLJKWWKHIUHH]HU
compartment.*
$QDXWKRUL]HGWHFKQLFLDQZLOOQHHGWRUHSODFHWKH/('
light.
,IWKLVDVVHPEO\QHHGVWREHUHSODFHGFDOO*(
$SSOLDQFHV6HUYLFHDWLQWKH8QLWHG
States or 1.800.561.3344 in Canada.
/('/LJKWV
*Select Models Only
26 49-60792 Rev. 3
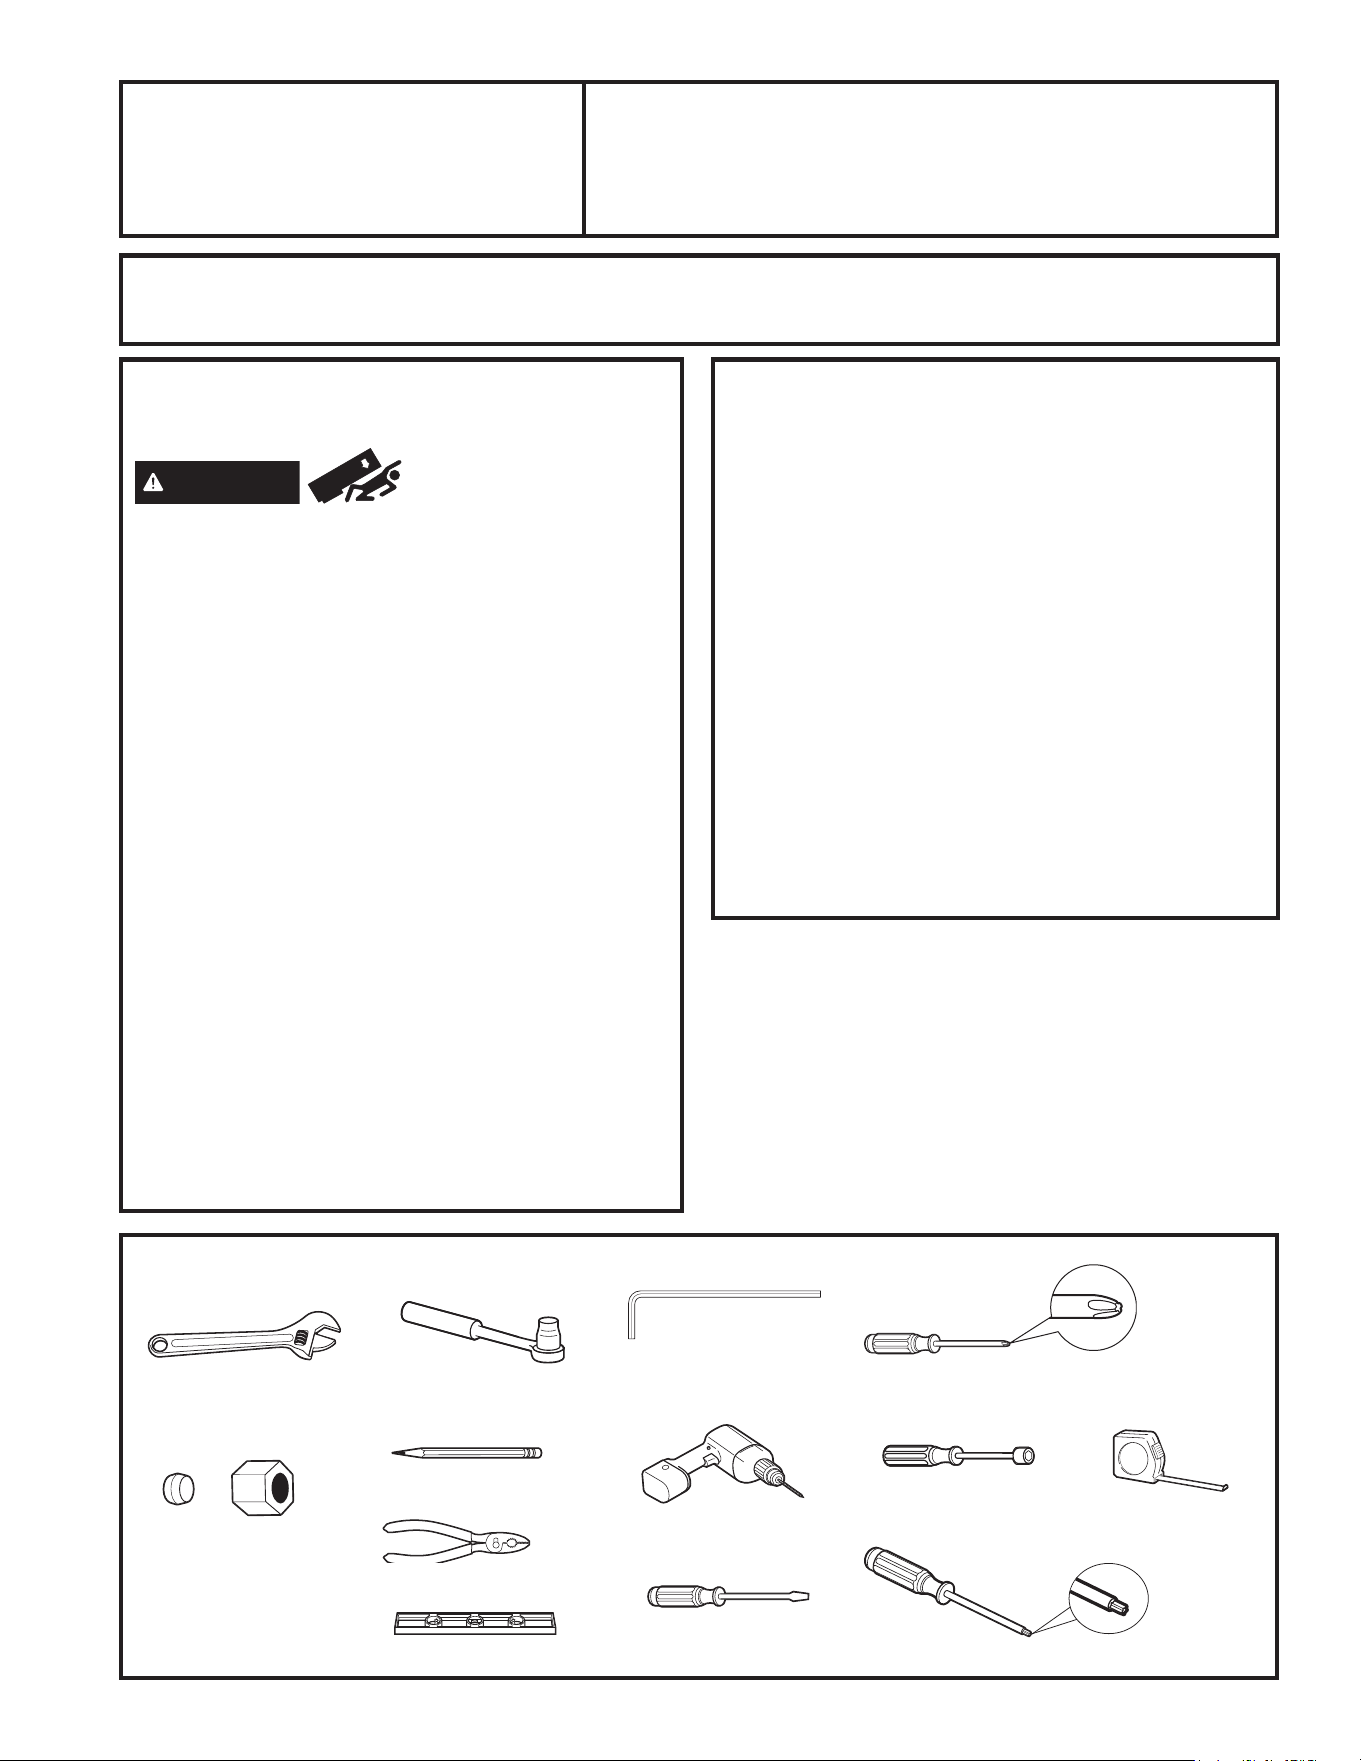
TOOLS YOU MAY NEED
BEFORE YOU BEGIN
Read these instructions completely and carefully.
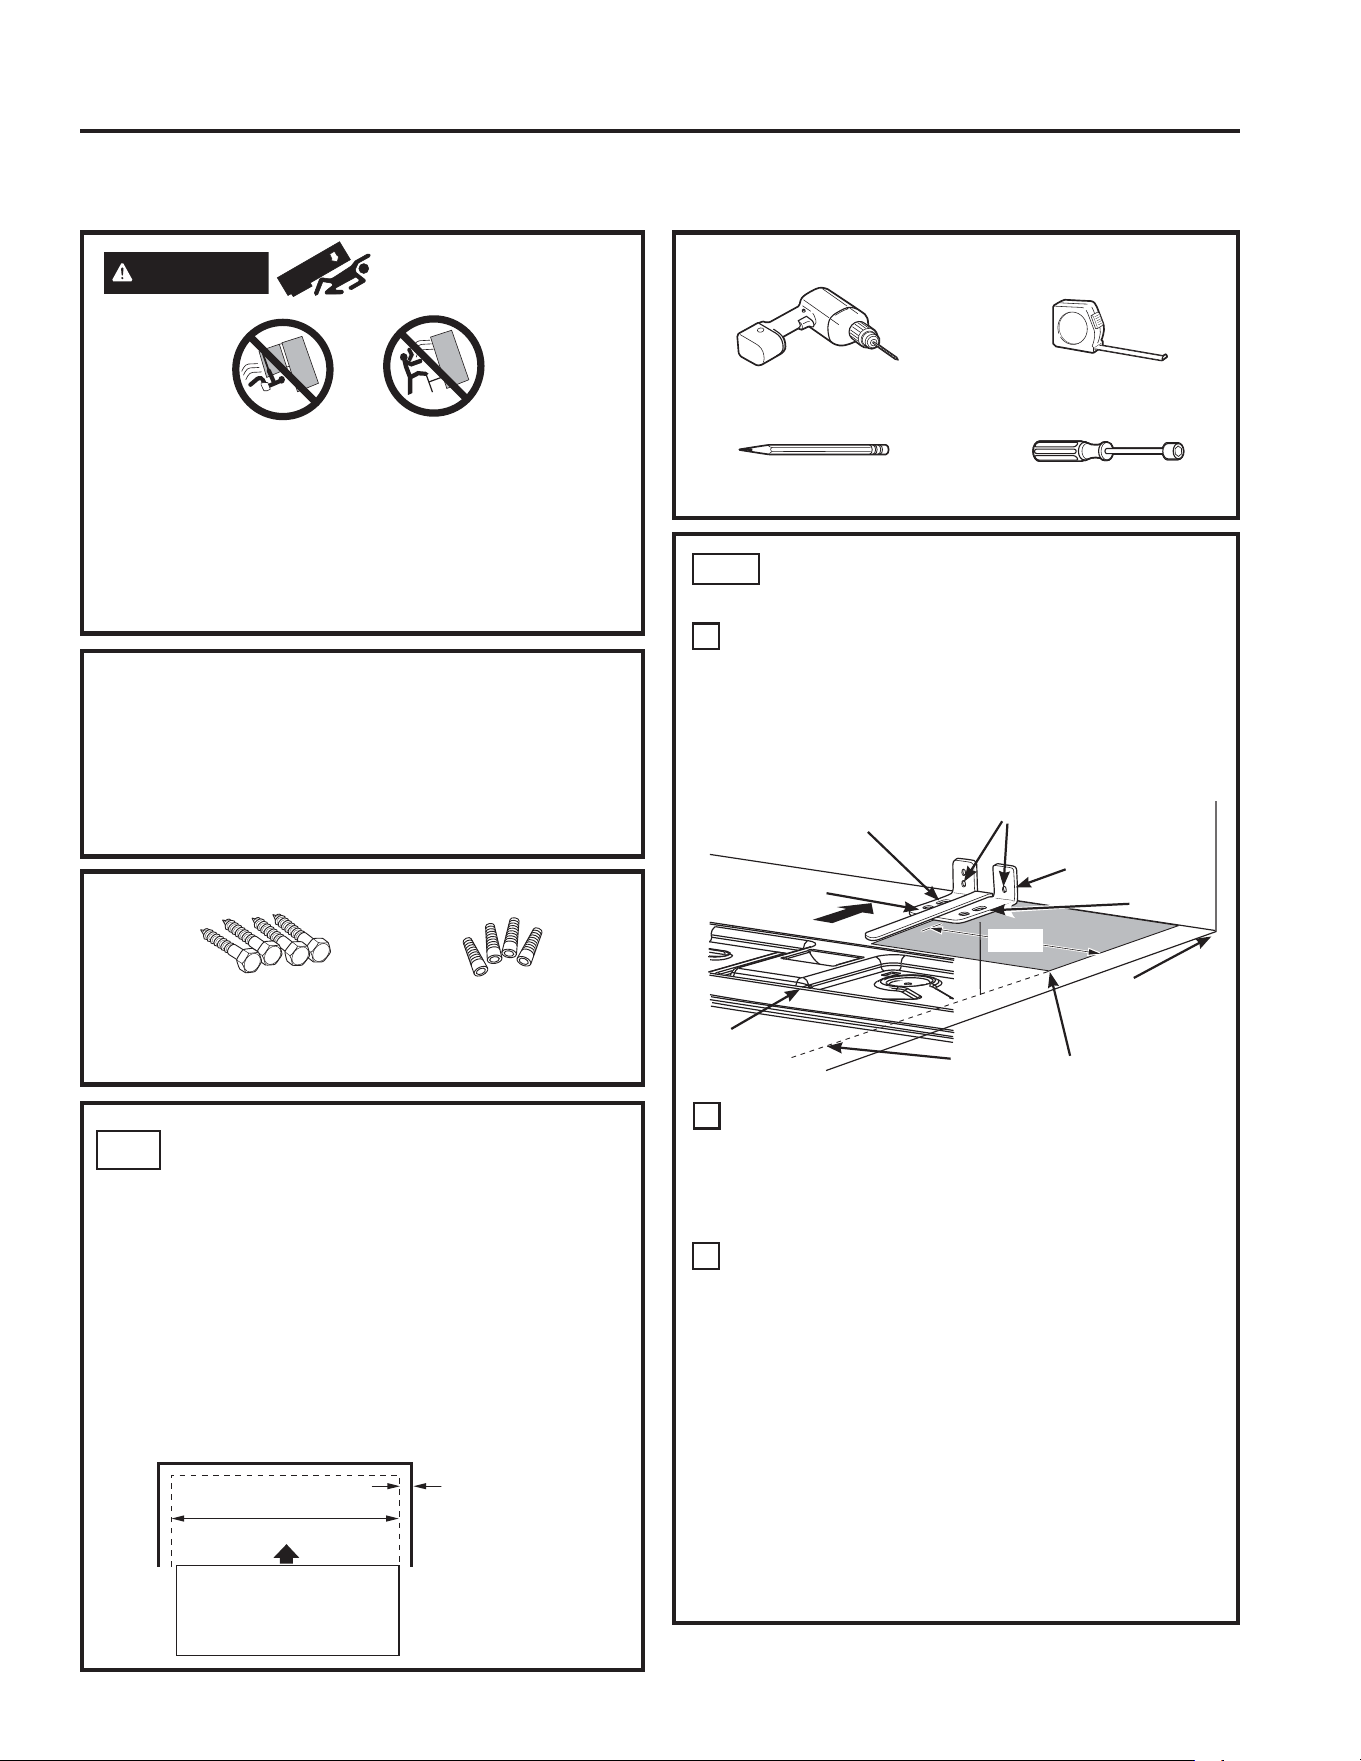
WARNING
Tip Over Hazard.
Built-in style models (model PYE, GYE, GYS, PWE,
DQG=:(DUHWRSKHDY\HVSHFLDOO\ZLWKDQ\GRRUV
open. These models must be secured with the anti-tip
floor bracket to prevent tipping forward, which could
result in death or serious injury. Read and follow the
entire installation instructions for installing the anti-tip
floor bracket packed with your refrigerator.
•
IMPORTANT — Observe all governing codes
and ordinances. Save these instructions for local
inspector’s use.
• Note to Installer – Be sure to leave these
instructions with the Consumer.
• Note to Consumer –.HHSWKHVHLQVWUXFWLRQVIRU
future reference.
• Skill level – ,QVWDOODWLRQRIWKLVDSSOLDQFHUHTXLUHV
basic mechanical skills.
• Completion time –5HIULJHUDWRU,QVWDOODWLRQ
can vary
:DWHU/LQH,QVWDOODWLRQ
30 minutes
• Proper installation is the responsibility of the
installer.
• Product failure due to improper installation is not
covered under the Warranty.
PREPARATION
MOVING THE REFRIGERATOR INDOORS
,IWKHUHIULJHUDWRUZLOOQRWILWWKURXJKDGRRUZD\WKH
UHIULJHUDWRUGRRUDQGIUHH]HUGUDZHUFDQEHUHPRYHG
7RUHPRYHWKHUHIULJHUDWRUGRRUVHHWKH,QVWDOOLQJ
the Refrigerator section.
7RUHPRYHWKHIUHH]HUGUDZHUVHHWKH5HPRYLQJ
WKH)UHH]HU'UDZHUVHFWLRQ
WATER SUPPLY TO THE ICE MAKER AND
DISPENSER
,IWKHUHIULJHUDWRUKDVDQLFHPDNHULWZLOOKDYH
to be connected to a cold water line. A GE
Appliances water supply kit (containing tubing, shutoff
YDOYHILWWLQJVDQGLQVWUXFWLRQVLVDYDLODEOHDWH[WUD
cost from your dealer, by visiting our website at
GEAppliances.com (in Canada at
GEAppliances.caRUIURP3DUWVDQG$FFHVVRULHV
LQ&DQDGD
Adjustable Wrench
´2XWHU'LDPHWHU
Compression Nut
DQG)HUUXOHVOHHYH
Phillips-Head Screwdriver
Ǫ´6RFNHW5DWFKHW'ULYHU
´´´& ´
Allen Wrenches
Pencil
´'ULOO%LWDQG
(OHFWULFRU+DQG'ULOO
Tape Measure
´1XW'ULYHU
Pliers
Level
)ODW+HDG6FUHZGULYHU
Torx T20, T25
Installation
Instructions
Refrigerator
GE and GE Profile™ models
Questions? Call 800.GE.CARES (800.432.2737) or visit our Website at: GEAppliances.com
In Canada, call 1.800.561.3344 or visit our Website at: GEAppliances.ca
INSTALLATION INSTRUCTIONS
49-60792 Rev. 3 27
INSTALLATION INSTRUCTIONS
MOVING THE REFRIGERATOR
8VLQJWKHFKDUWEHORZGHWHUPLQHLIWKHZLGWKRI\RXUSDVVDJHZD\FDQDFFRPPRGDWHWKHGHSWKRIWKH
refrigerator. Ensure you have clearance to prevent damage to the refrigerator before safely moving it to the final
location.
,ISDVVDJHZD\VDUHODUJHHQRXJKWRDFFRPPRGDWHWKHUHIULJHUDWRUZLWKRXWUHPRYLQJWKHKDQGOHVVNLSWR6WHS
Leave tape, film and all packaging on doors until the refrigerator is in the final location.
• NOTE: Use a padded hand truck or moving straps to move this refrigerator. Place the refrigerator on the
hand truck with a side against the truck. We strongly recommend that two people move and complete
this installation.
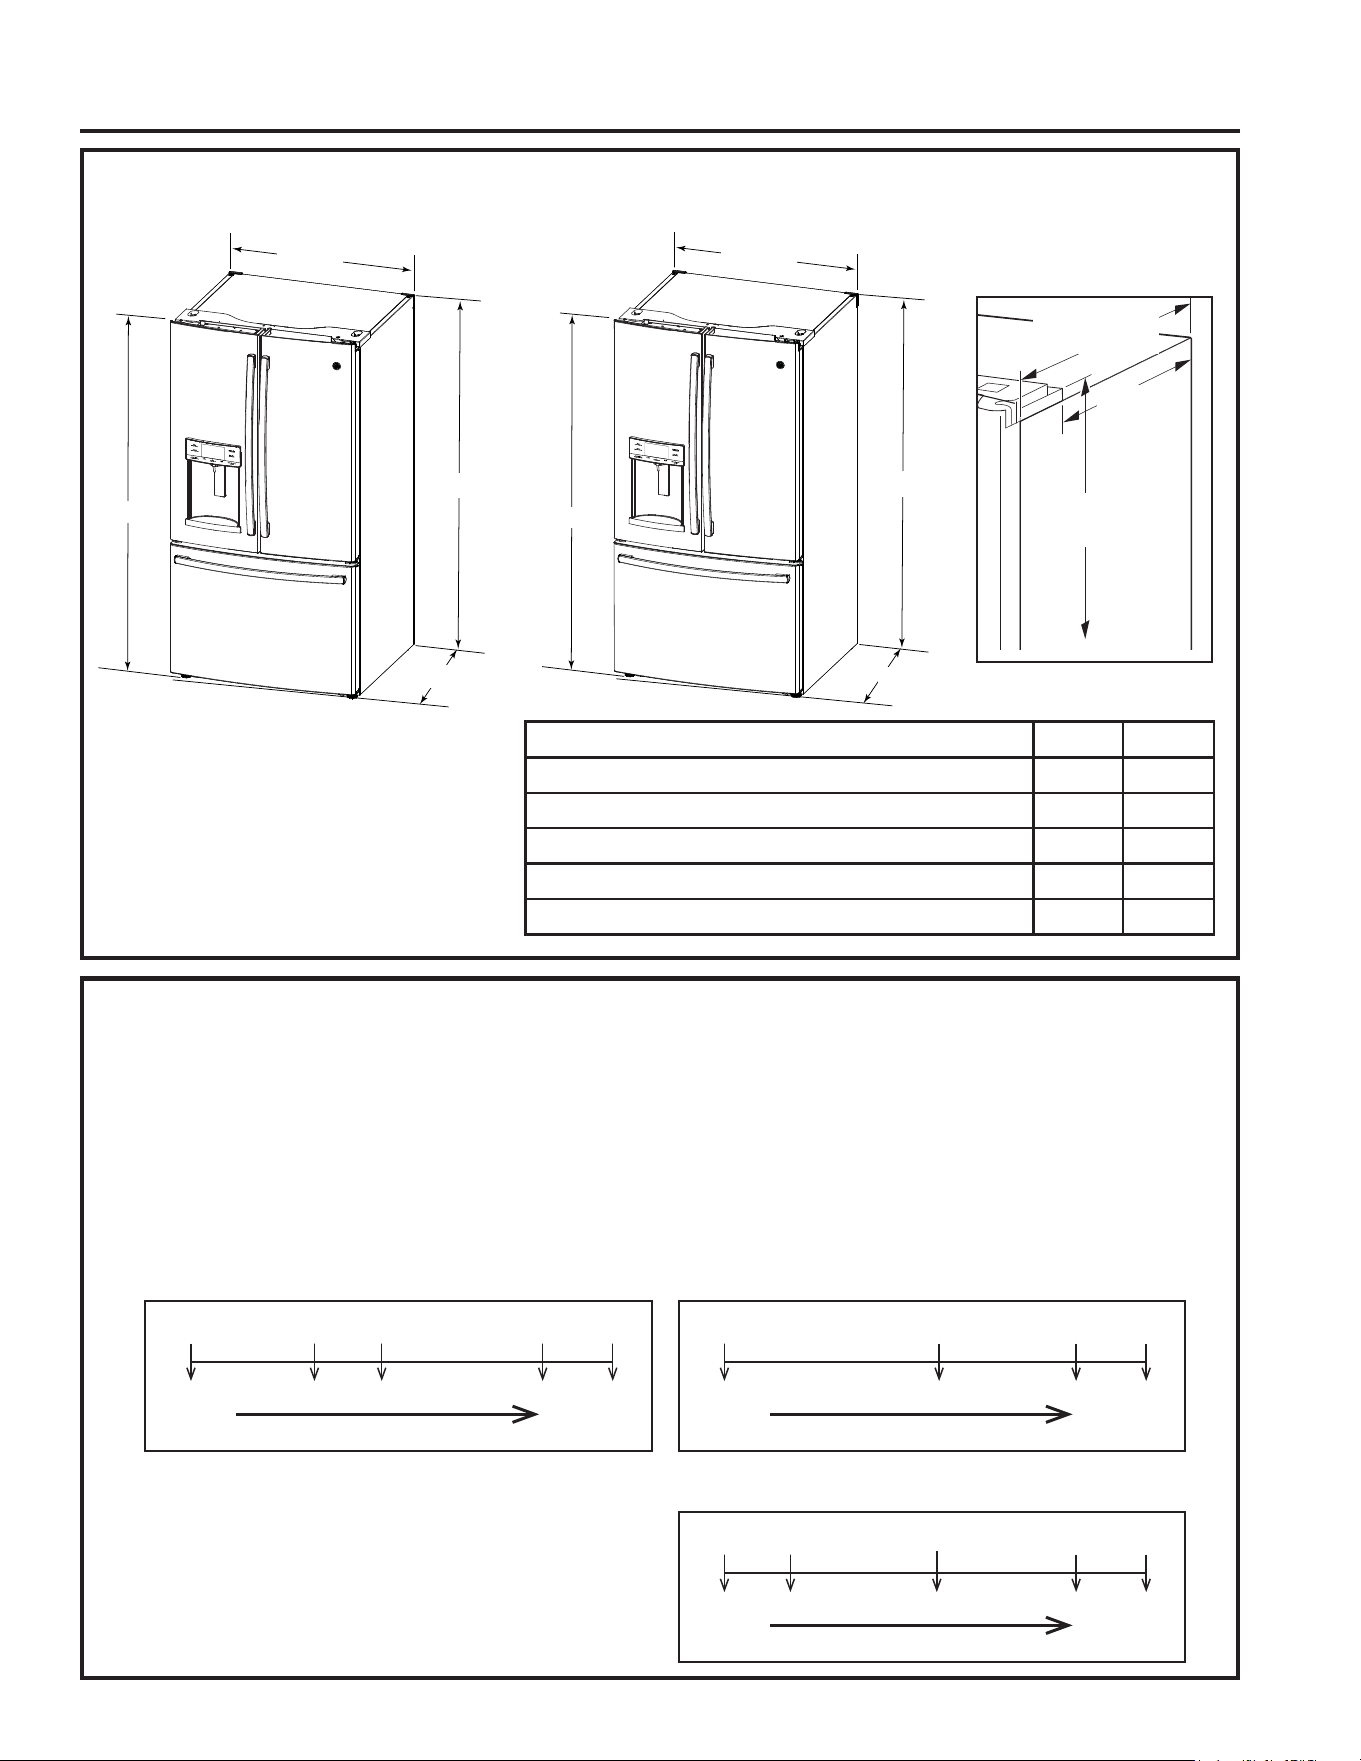
DIMENSIONS
All measurements are given with leveling leg fully retracted.
SD CD
Overall Height to Top of Hinge Cover
69´ 69´
Height to Top of Cabinet
69´ 69´
Case Depth without Doors
29
´ 24
´
Overall Exterior Case Width
´ ´
Overall Exterior Depth Doors/Drawers with Handles
36
´ 31
´
6WDQGDUG'HSWK6'0RGHOV2QO\&RXQWHU'HSWK&'0RGHOV2QO\
&DVH'HSWKZR
'RRUV´6'
´&'
Height from floor
to hinge cover top
´
$GGLWLRQDO'LPHQVLRQV
´6'
´&'
´
´
´
´
´
´
´
´
Fully
Assembled
36.375” 34.375” 34” 30.5” 29.625”
Remove door parts in order until dimension is less than opening
Removing
Handles
Removing
LH Door
Case w/
Fz Slides
Case only
(no hinges)
If your model number starts with PFE, PFH, PFD, GFD,
GFE, GFS, DFE (SD)
Fully
Assembled
36.275” 33.75” 30.5” 29.625”
Remove door parts in order until dimension is less than opening
Removing
Handles
Case w/
Fz Slides
Case only
(no hinges)
If your model number starts with GNE (SD)
Fully
Assembled
31.375” 29.375” 25.875” 24.625”
Remove door parts in order until dimension is less than opening
Removing
Handles
Removing
LH Door
Case w/
Fz Slides
Case only
(no hinges)
28.875”
If your model number starts with DYE, GYE, GYS, PYE,
PYD, PWE (CD)
Installation Instructions
28 49-60792 Rev. 3
Installation Instructions
INSTALLING THE REFRIGERATOR
REFRIGERATOR LOCATION
Ŷ'RQRWLQVWDOOWKHUHIULJHUDWRUZKHUHWKH
WHPSHUDWXUHZLOOJREHORZ)&EHFDXVH
it will not run often enough to maintain proper
temperatures.
Ŷ'RQRWLQVWDOOWKHUHIULJHUDWRUZKHUHWKH
WHPSHUDWXUHZLOOJRDERYH)&EHFDXVH
it will not perform properly.
Ŷ 'RQRWLQVWDOOWKHUHIULJHUDWRULQDORFDWLRQH[SRVHG
WRZDWHUUDLQHWFRUGLUHFWVXQOLJKW
Ŷ,QVWDOOLWRQDIORRUVWURQJHQRXJKWRVXSSRUWLWIXOO\
loaded.
CLEARANCES
Allow the following clearances for ease of
installation, proper air circulation and plumbing and
electrical connections.
6LGHV ´PP
7RS ´PP&DELQHW+LQJH&RYHU
%DFN ´PP
REMOVING THE REFRIGERATOR
DOORS
Ŷ IMPORTANT NOTE: This refrigerator is 36
1
4´GHHS
(31
1
4´IRU&'PRGHOV'RRUVDQGSDVVDJHZD\V
leading to the installation location must be at least
36
1
4´ZLGHLQRUGHUWROHDYHWKHGRRUVDQGKDQGOHV
attached to the refrigerator while transporting it into
WKHLQVWDOODWLRQORFDWLRQ,ISDVVDJHZD\VDUHOHVV
than 36
1
4´WKHUHIULJHUDWRUGRRUVDQGKDQGOHVFDQ
easily be scratched and damaged. The top cap and
doors can be removed to allow the refrigerator to be
VDIHO\PRYHGLQGRRUV,ISDVVDJHZD\VDUHOHVVWKDQ
31
1
4´VWDUWZLWK6WHS
Ŷ,ILWLVQRWQHFHVVDU\WRUHPRYHGRRUVVNLSWR6WHS
11. Leave tape and all packaging on doors until the
refrigerator is in the final location.
Ŷ NOTE:8VHDSDGGHGKDQGWUXFNWRPRYHWKLV
refrigerator. Place the refrigerator on the hand
truck with a side against the truck. We strongly
recommend that TWO PEOPLE move and complete
this installation.
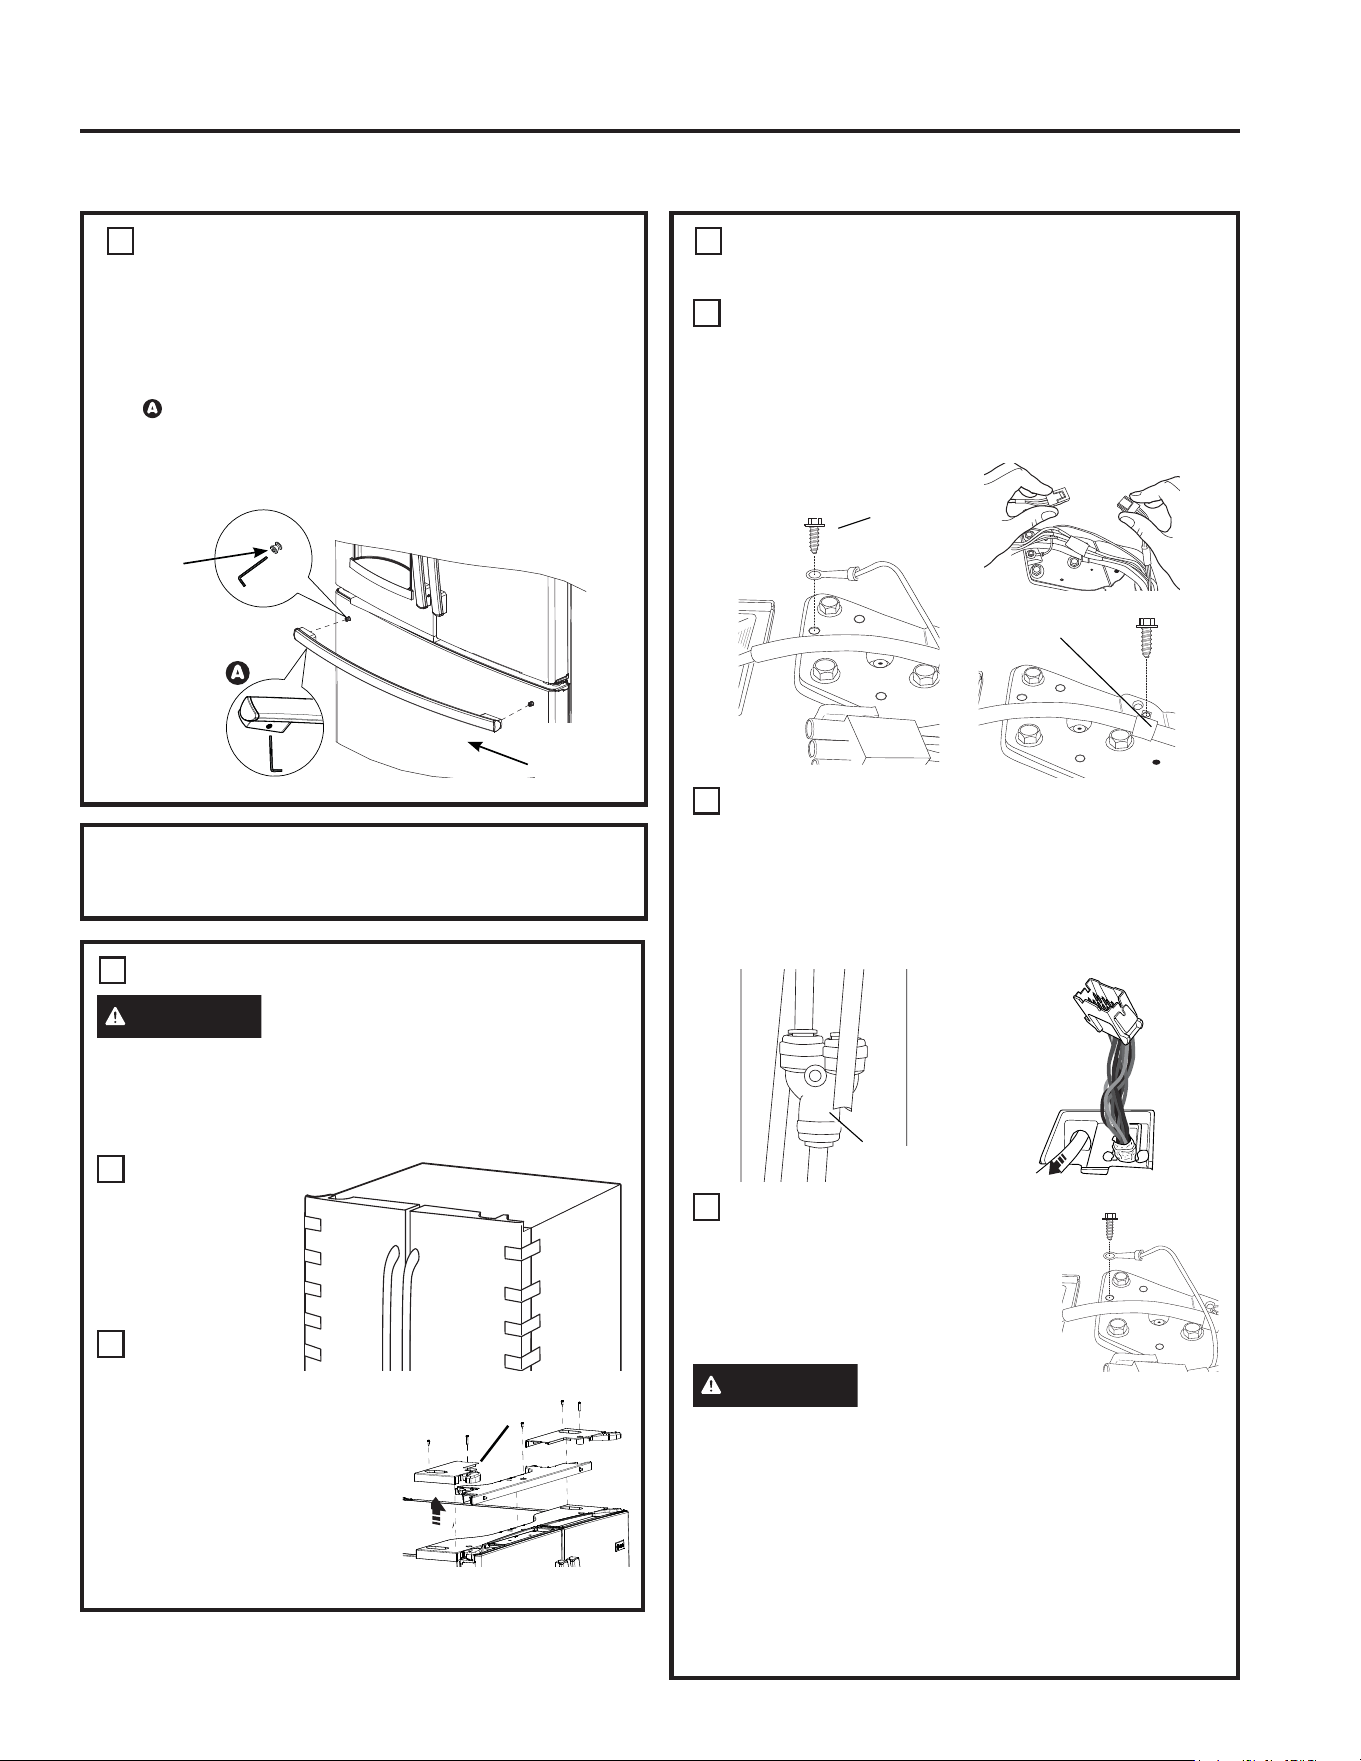
REMOVE THE FRESH FOOD
DOOR HANDLE
+DQGOH'HVLJQYDULHVEDVHGRQPRGHOVKRZHYHU
,QVWDOODWLRQLVVDPH
Stainless steel and plastic handles:
/RRVHQWKHVHWVFUHZVZLWKWKH´$OOHQ
wrench and remove the handle.
NOTE: ,IWKHKDQGOHPRXQWLQJIDVWHQHUVQHHG
WREHWLJKWHQHGRUUHPRYHGXVHD´ Allen
wrench.
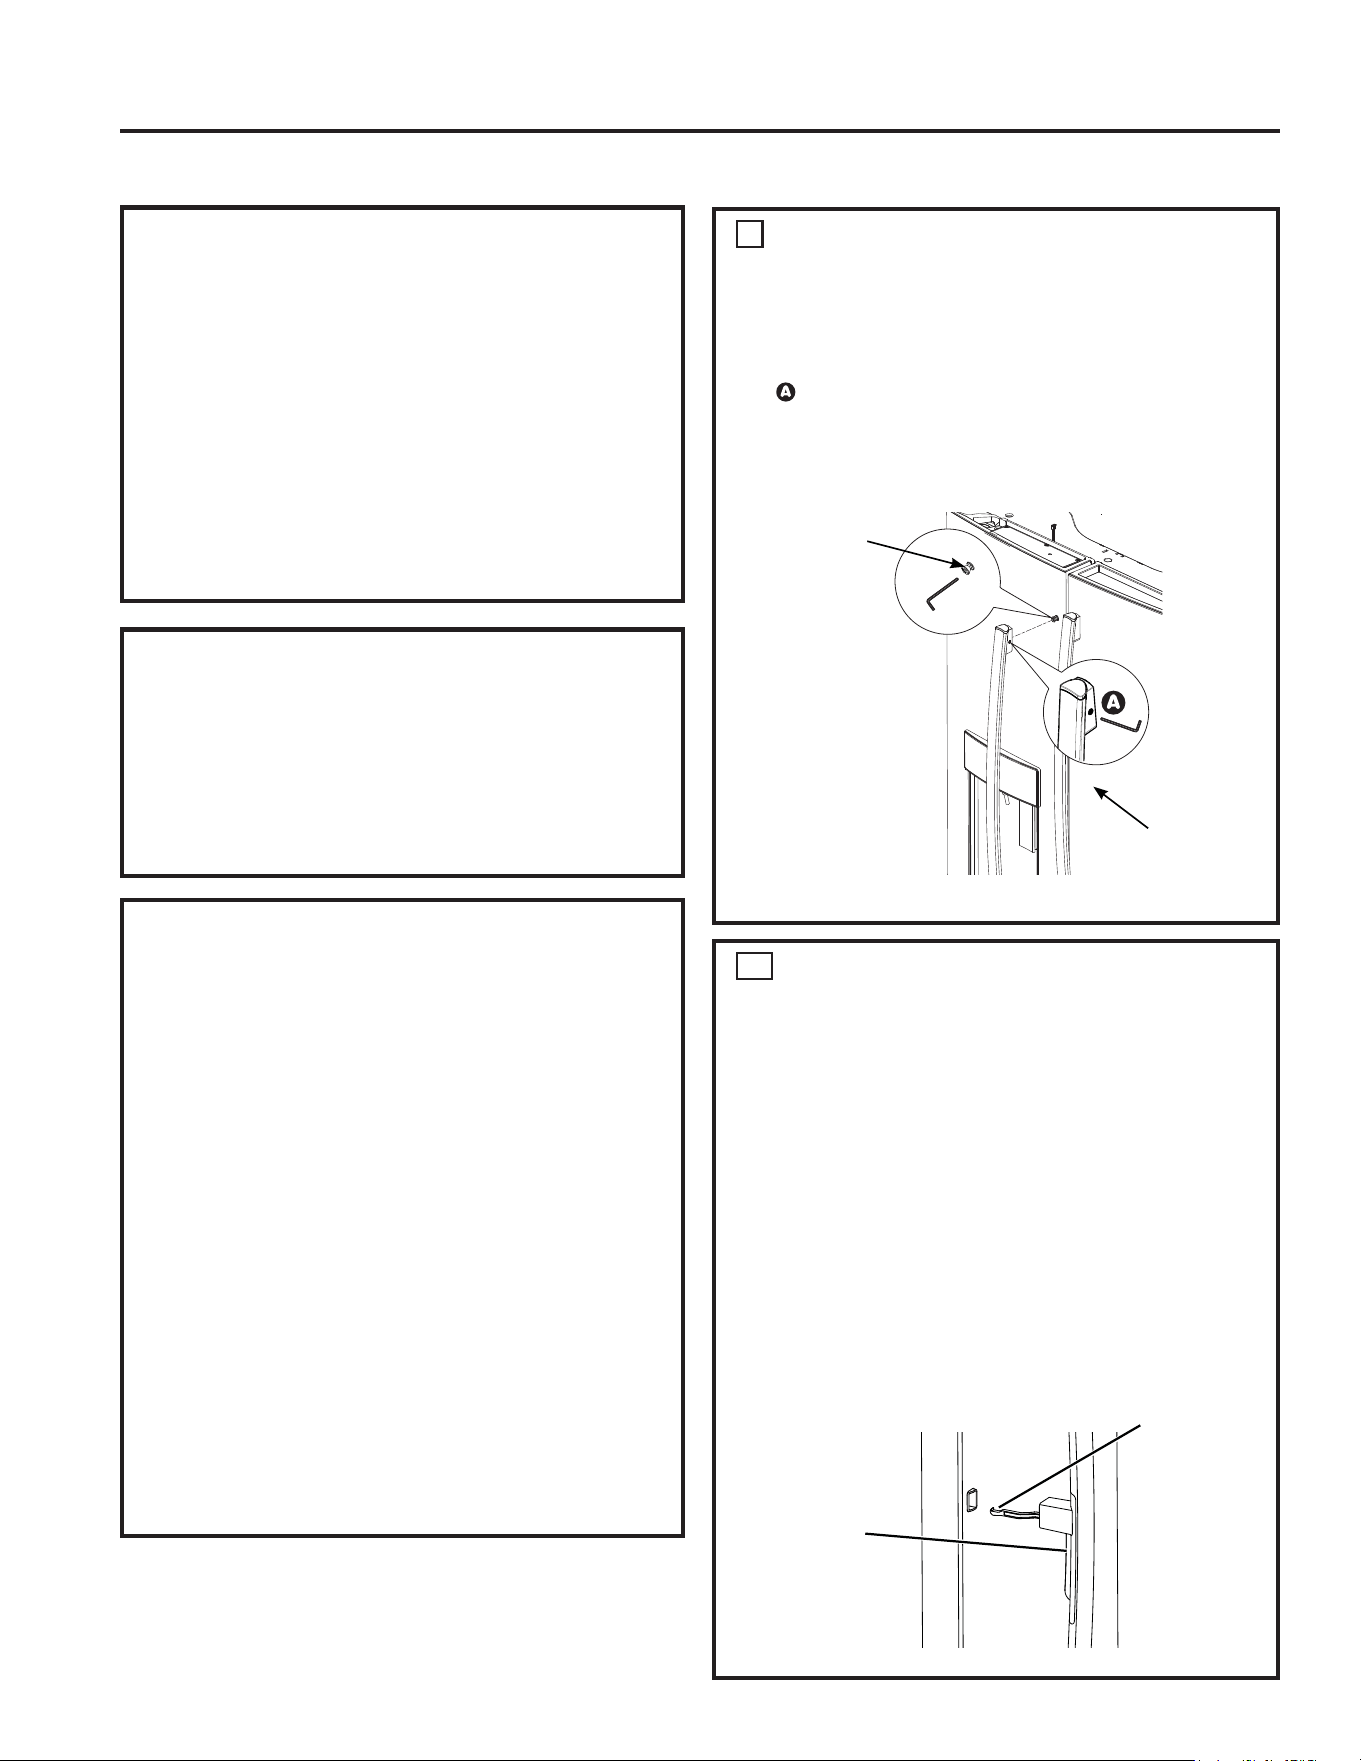
FOR DOOR IN DOOR MODELS
ONLY
To Remove the Handle:
Ŷ2SHQWKHRXWHUGRRUE\SUHVVLQJWKH'RRULQ
'RRUODWFK
Ŷ Loosen the set screws as shown in Step 1.
To Install the Handle:
Ŷ Align the lever with the opening on the outer
door. Make sure the hook is pointed up.
Ŷ,QVHUWWKHODWFKOHYHULQWRWKHRSHQLQJDQG
align the handle with the mounting fasteners.
Ŷ Once the handle is flush with the outer door,
tighten the set screws.
'RQRWUHPRYHWDSHIURPGRRUXQWLOKDQGOHLV
installed
1
1a
Mounting
)DVWHQHUV
Leave film
on until after
installation
INSTALLATION INSTRUCTIONS
'RRULQGRRU
Latch
Latch Lever
with Hook
facing up.
49-60792 Rev. 3 29
INSTALLATION INSTRUCTIONS
3
REMOVE THE REFRIGERATOR
DOORS (cont)
C
'LVFRQQHFWHOHFWULFDOFRQQHFWRUVFRPLQJIURPHDFK
door located under the hinge covers.
5HPRYHWKH´KH[KHDGVFUHZWRGLVFRQQHFWWKH
ground wire from the hinge.
5HPRYHWKH´KH[KHDGVFUHZWRUHPRYHWKH
strain relief from the water line.
'
'LVFRQQHFWWKHZDWHUOLQHIURPWKHEDFNRIWKHXQLW
by pressing down on the dark grey collar while
pulling up on the water line.Pull water line through
case conduit from the top to free the line for door
removal. The water line is more than 4’ long and
PD\QHHGWREHWDSHGWR'RRUIRUDFFHVVLELOLW\
when reinstalling.
E
8VLQJD´VRFNHWUDWFKHWGULYHU
remove the screws securing the
top hinge to the cabinet, then lift
the hinge straight up to free the
hinge pin from the location in the
top of the door.
CAUTION
Lifting Hazard
Single person lift could cause injury. Use
assistance when handling, moving or lifting the
doors.
NOTE: when removing door, to prevent damage to
door and electronics, carefully place the door in a
proper location.
NOTE: The lower door hinge pin and hinge are keyed
and must be matched correctly for the door to self
close properly. Please follow the directions carefully.
2
REMOVE THE FREEZER DOOR
HANDLE
+DQGOH'HVLJQYDULHVEDVHGRQPRGHOVKRZHYHU
,QVWDOODWLRQLVVDPH
Stainless steel and plastic handles:
/RRVHQWKHVHWVFUHZVZLWKWKH´$OOHQ
wrench and remove the handle.
NOTE: ,IWKHKDQGOHPRXQWLQJIDVWHQHUVQHHGWR
EHWLJKWHQHGRUUHPRYHGXVHD´ Allen wrench.
Reinstall the handles using the same procedure as
removing.
Mounting
)DVWHQHUV
Leave film
on until after
installation
Installation Instructions
INSTALLING THE REFRIGERATOR (Cont.)
3
REMOVE REFRIGERATOR DOORS
WARNING
)ROORZDOOVWHSVIRUUHPRYLQJ
DQGUHLQVWDOOLQJWKHGRRU)DLOXUHWRIROORZWKHVH
instructions, leaving off parts, or overtightening screws,
can lead to the door falling off and result in injury and
property damage.
A
Securely tape the
door shut with
masking tape or
have a second
person support
the door.
B
Start with
left-hand door
first: Remove the hinge
cover on top of the left
refrigerator door by
removing all hex screws
DQGSXOOLQJLWXS'RWKH
same for the right-hand
door and the middle cover.
Hinge
Cover
Ground
screw
Strain
Relief
Y or Straight
Connector
30 49-60792 Rev. 3
REINSTALLING THE
REFRIGERATOR DOORS
Reverse steps 1 through 4 to reinstall refrigerator
doors, follow details below for critical alignments.
A
Reinstall center hinge first
and torque the screws to 65
in-lbs (7.34 N-m). With the LH
door at 90º to the front of the
case, lower the refrigerator
door onto the center hinge.
Ensure that the door and hinge align correctly.
B
Rotate doors closed and make sure moveable
center sealing portion of the door aligns with the
VWULNHU,IWKHGRRUZLOOQRWVHOIFORVHDIWHU
reinstalling, remove door, turn door upside down,
FKHFNDOLJQPHQWPDUNDQGDUURZWKHUHLVDQ
DOLJQPHQWPDUNRQWKHGRRUFORVXUHPHFKDQLVP,W
corresponds to an alignment arrow on the plastic
ring. Rotate door closure mechanism to align mark
DQGDUURZUHLQVWDOOGRRU'RRULQ'RRUPRGHOVGR
not have the same closure mechanism on the right
hand door. You may notice a difference in closure.
Securely tape the door shut with masking tape or
have a second person support the door. Reinstall
the top hinge and torque the screws to 65 in-lbs
(7.34 N-m).
C
Be sure to reinstall the ground wire and strain
relief to the top hinge.
'
Reinstall hinge cover. NOTE: Ensure wires are not
pinched or under screw bosses before tightening
screws.
3
REMOVE THE REFRIGERATOR
DOORS (cont)
Note: For proper installation later, please follow
the next step carefully.
)
Remove the tape and keeping the door as
straight as possible, open the door to 90º then lift
straight up to remove it.
REMOVE OPPOSITE DOOR
)ROORZWKHVDPHSURFHGXUHRQWKHRSSRVLWHGRRU
There are no water lines on the opposite side.
For Door in Door Models: Securely tape the
inner and outer doors before installing or removing.
90º door alignment not required during installation
or removal for these models.
4
REMOVE CENTER HINGE (if necessary)
5HPRYHWKHƎVFUHZVVHFXULQJWKHFHQWHUKLQJH
to the cabinet.
8VH7GULYHUWRUHPRYHRXWERDUGVFUHZ
5
Remove
center screw
Lift up & off
center hinge
2SHQ'RRUWR
Align flats with tab.
8QGHUVLGHRI
)UHVK)RRG'RRU
If door cannot be installed at 90° follow steps below:
,QVWDOOGRRUDWWRFDVHIURQW
,IVSDFHOLPLWVRSHQLQJGRRUWROHVVWKDQWKHQ
D5HPRYHGRRUFDUHIXOO\WXUQGRRUXSVLGHGRZQ
E&KHFNDOLJQPHQWRIGRRUFORVXUHPHFKDQLVPVKDIW
on underside of door. The flats on the shaft should
correspond to alignment tab on plastic ring or
mark on bottom end cap.
F,IVKDIWLVQRWDOLJQHGWRWDEPDUNXVLQJ´
Allen wrench, rotate door closure mechanism
shaft counterclockwise for right door and clock-
ZLVHIRUOHIWGRRU7KHQDOLJQIODWZLWKWDEPDUN
G,QVWDOOWKHGRRUDW
Loosen outer
screws
Installation Instructions
INSTALLING THE REFRIGERATOR (Cont.)
INSTALLATION INSTRUCTIONS

49-60792 Rev. 3 31
INSTALLATION INSTRUCTIONS
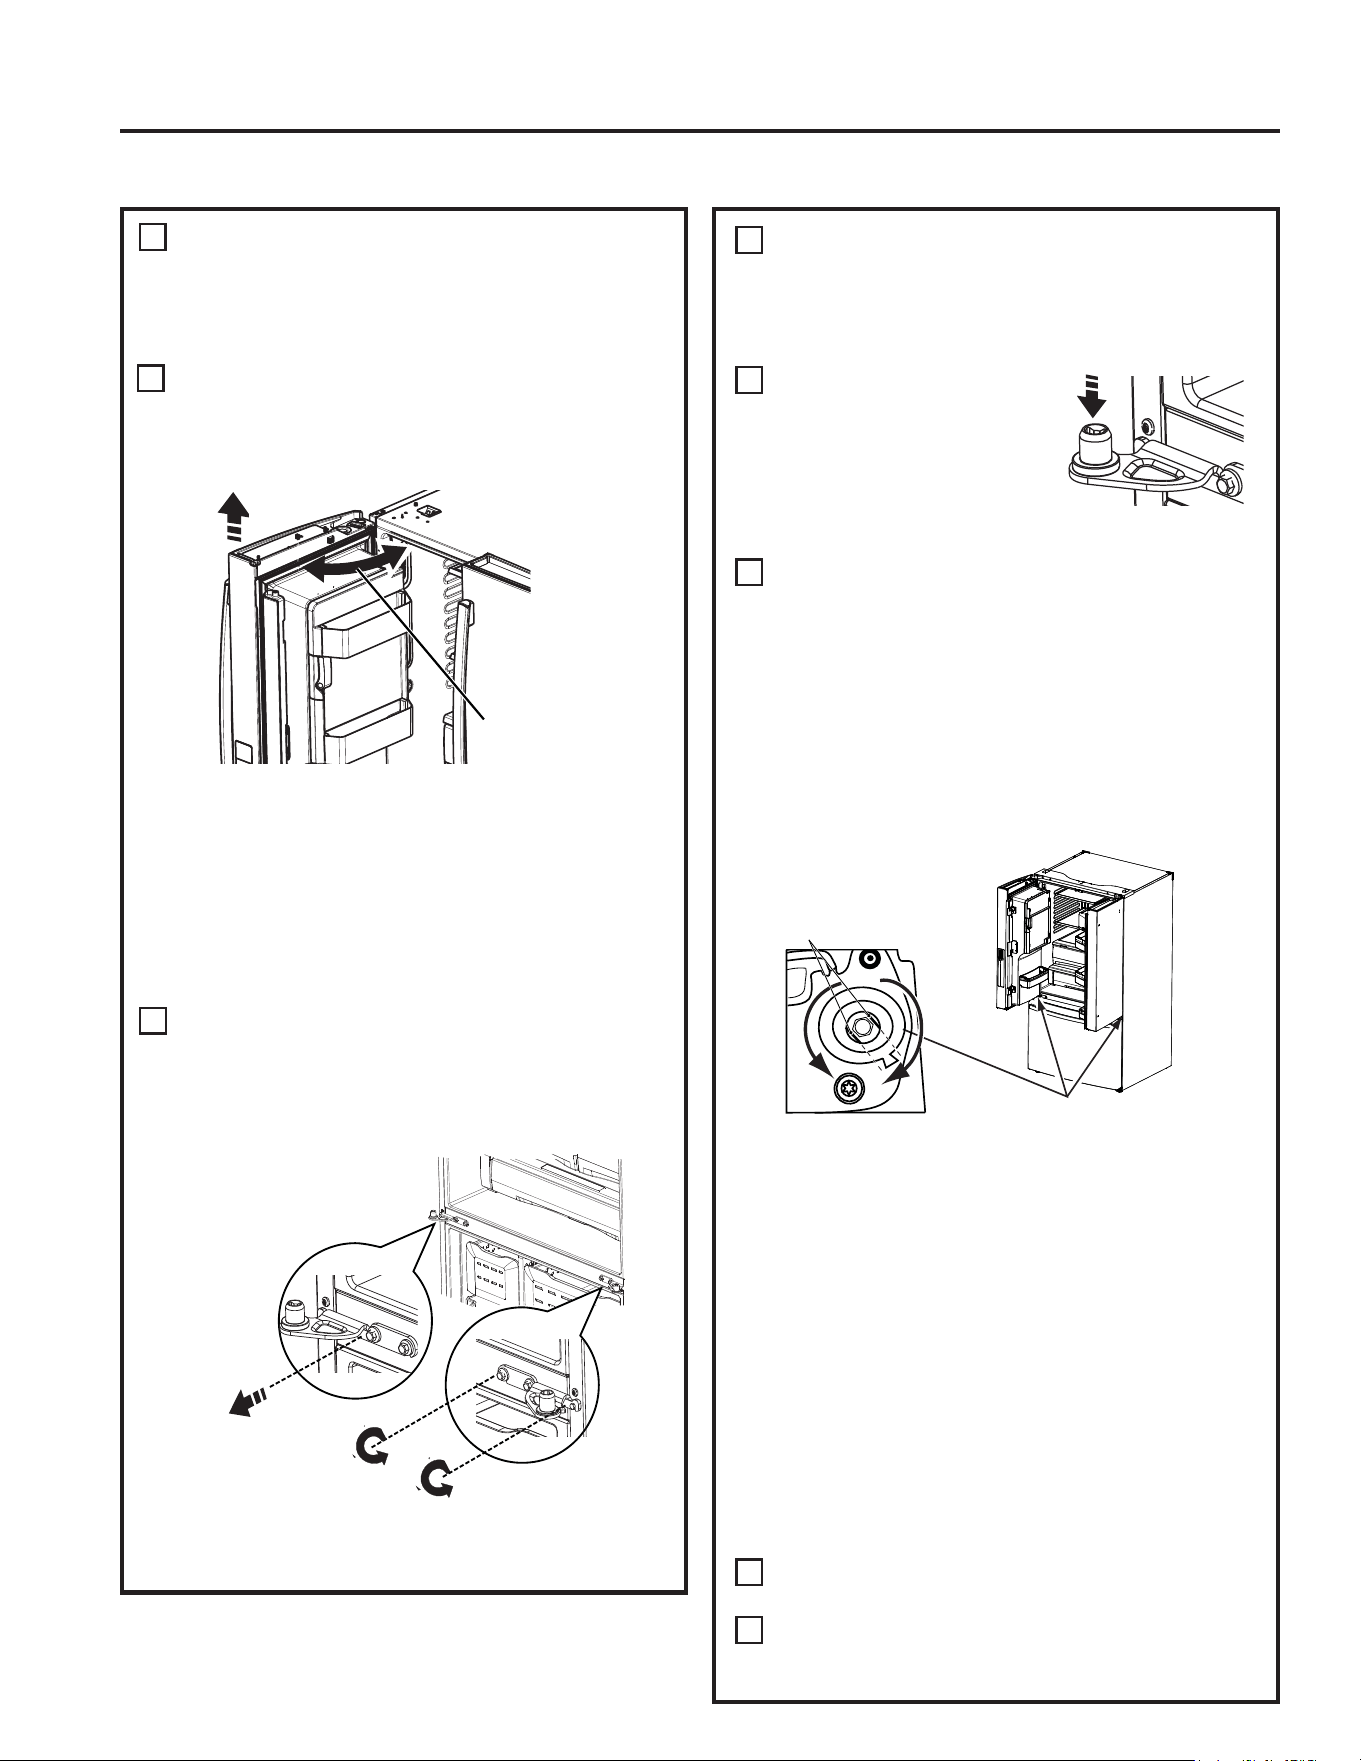
REMOVE THE FREEZER DOOR
3XOOWKHIUHH]HUGRRURSHQWRIXOOH[WHQVLRQ
Remove 3 attachment screws, located at the
ERWWRPRQHDFKVLGHRIWKHIUHH]HUGRRUXVLQJ
´KH[VRFNHWGULYHU
CAUTION
Lifting Hazard
Freezer door is heavy Use both hands to
secure the door before lifting.
/LIWWKHIUHH]HUGRRU
to disengage it from
the slide mechanism
The door can safely
rest on the bottom.
'RQRWUHVWWKH
door on any other
surfaces to avoid
scratches.
REMOVE THE FREEZER
BASKET SLIDES
7KHIUHH]HUEDVNHWVOLGHVFDQEHUHPRYHGWR
JDLQDQRWKHU´FPFOHDUDQFHWKURXJK
a doorway.
5HPRYHIUHH]HUGRRUDVVKRZQLQ6WHS
Remove the upper and lower baskets as shown
in Step 7.
Remove the clip on the crossbar
located along the right hand
side of the rack and pinion gear
assembly by sliding forward.
Remove crossbar by sliding to the
right, then pull out and to the left.
5HPRYHWKHIRXU´KH[KHDGEROWVSHUVLGH
and remove side supports.
Reverse the steps to assemble. When installing
the crossbar, always put the hole on the right
hand side. Align the left and
right gears with the timing
marks on the gears when
inserting the crossbar. Always
insert the crossbar in the right
hang gear first and then the
left hand gear.
,QVHWWKHFOLSLQWRWKHFURVVEDUKROHORFDWHGRQ
the right hand side.
A
A
B
B
C
C
6
8
3 Screws
REMOVE FREEZER BASKET
Pull the lower basket and slide mechanism to
full extension using both hands.
Remove the top
IUHH]HUGUDZHUE\
fully extending the
drawer then lifting
up and out.
Remove the basket
resting on the
slides.
Push the bottom
basket slides back
until the slide mechanism self retracts.
7
A
B
C
'
'
E
)
G
Installation Instructions
INSTALLING THE REFRIGERATOR (Cont.)
1
2
1
2
Hex head
bolts
Clip
Hole for clip
Timing
mark
Clip
32 49-60792 Rev. 3
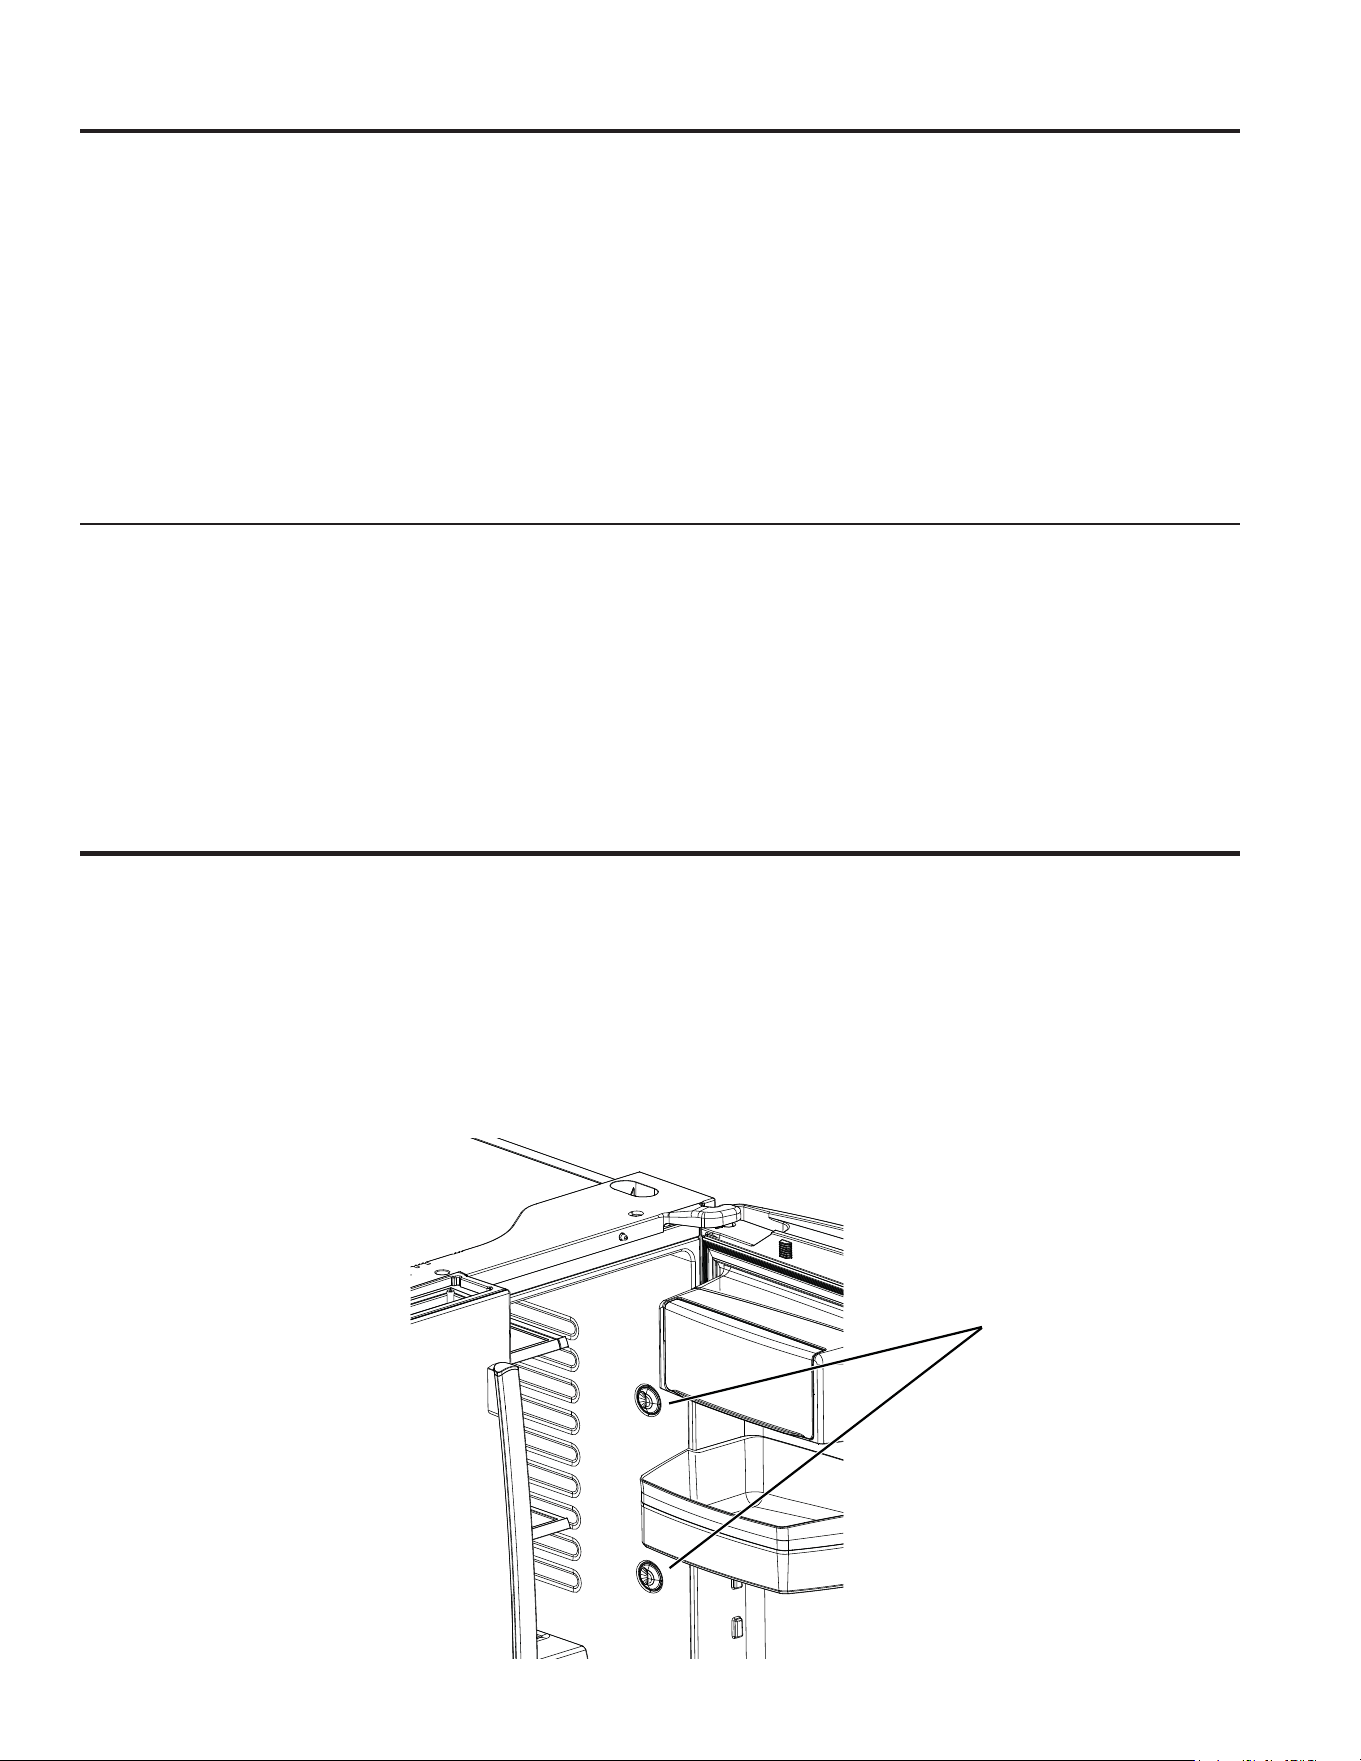
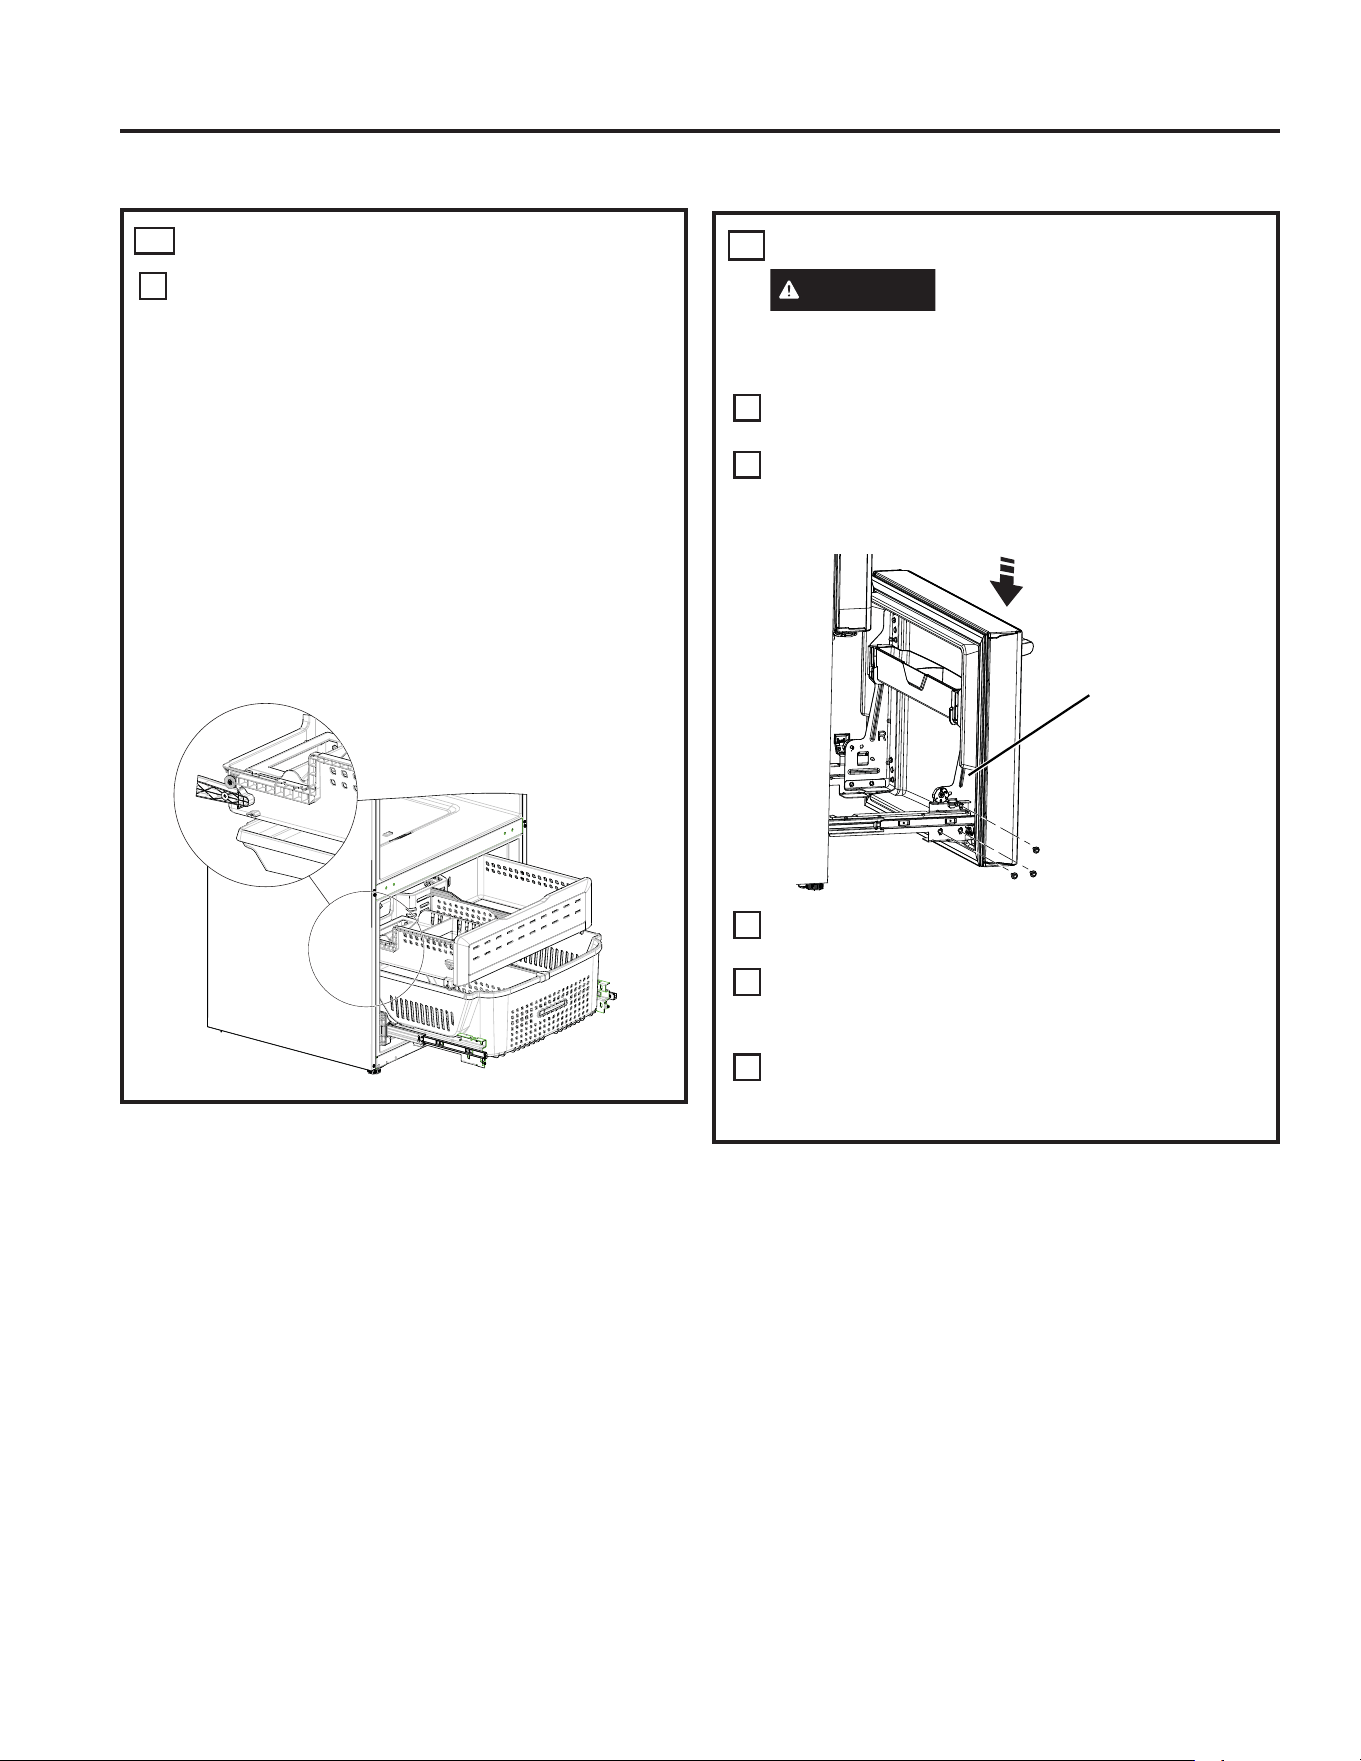
RE-INSTALL FREEZER DRAWER
5HLQVWDOOIUHH]HUGUDZHUE\SODFLQJWKHGUDZHU
wheels onto the top of the track mounted to the
VLGHRIWKHIUHH]HUZDOOV7KHZKHHOVRQWKH
IUHH]HUGUDZHUVKRXOGEHRQWRSRIWKHERWWRP
basket sides.
ON MODELS EQUIPPED WITH ICE MAKER
IN THE FREEZER: Place the ice bucket in the
GUDZHUDQGSXVKWKHGUDZHULQWRWKHIUHH]HUZLWK
the front of the bucket to the front of the basket,.
Make sure:
- The ice bucket does not hit the icemaker arm
DQGWKHIUHH]HUGUDZHUUHWUDFWVFRPSOHWHO\LQWR
WKHIUHH]HUFRPSDUWPHQW
- The fill tube extends into the fill cup opening at
the back of the icemaker.
9
A
Installation Instructions
INSTALLING THE REFRIGERATOR (Cont.)
INSTALLATION INSTRUCTIONS
REPLACE FREEZER DOOR
CAUTION
Lifting Hazard
Freezer door is heavy Use both hands to
secure the door before lifting.
Pull the lower basket slide mechanism to full
extension with both hands.
/LIWWKHIUHH]HUGRRUDQGDOLJQWKHWDEVRQWKH
door bracket sides with the square holes in slide
mechanisms.
Replace the attachment screws and torque the
VFUHZVWRLQOE1P
)RUDGMXVWLQJIUHH]HUGRRUJDSVIROORZWKH
instructions on page 30 or in the Owner’s
Manual.
5HSODFHIUHH]HUEDVNHWRQWRWKHVOLGHEUDFNHWV
DQGPDNHVXUHWKHIUHH]HUGRRURSHUDWHVDQG
closes freely.
10
Align and insert
WDERQ)UHH]HU
'RRU%UDFNHWZLWK
VORWRQ)UHH]HU
Slide Bracket.
NOTE: Place one
side in first and
then align the
other side.
A
B
C
'
E

49-60792 Rev. 3 33
INSTALLATION INSTRUCTIONS
IMPORTANT!
The 6 mounting screws (3 on each side) are NOT interchangeable with the center or top hinge screws.
Drawer screws have flat washer heads, and other screws have lines/ribs on washer heads.
$IWHULQVWDOODWLRQRIWKHIUHH]HUGRRUFKHFNIRUXQLIRUPJDSVWRSDQGERWWRPRIULJKWDQGOHIWKDQGVLGHZLWKWKH
template provided.
,QWKHHYHQWRIH[FHVVLYHJDSVXVHWKHIROORZLQJVWHSVWRDGMXVWWKHIUHH]HUGRRU
Step 1 /RRVHQWKHVFUHZVRQHDFKVLGHULJKWDQGOHIWRIWKHIUHH]HUGRRU
Step 2 -$GMXVWVHWVFUHZFORFNZLVHLIJDSDWWKHWRSLVWRRELJVHHWHPSODWH7XUQWKHVHWVFUHZXVLQJ´KH[
key clockwise by quarter to half a rotation
Step 3 -$GMXVWVHWVFUHZFRXQWHUFORFNZLVHLIJDSDWWKHERWWRPLVWRRELJVHHWHPSODWHTurn the set screw using
´KH[NH\FRXQWHUFORFNZLVHE\TXDUWHUWRKDOIDURWDWLRQ
Step 4 -7LJKWHQWKHVFUHZVRQHDFKVLGHULJKWDQGOHIW
Step 5 - Re-check the gaps using the template and repeat steps 1 to 4 if required and complete with step 5.
Instructions for adjusting freezer door gaps:
Fold here for using template
FP
´
Template for checking gaps.
*DSVKRXOGEH´RUEHORZ
Gabarit pour vérifier les écarts.
L’écart doit être de 0,6 po (1,5
FPRXPRLQV
Plantilla para el control de
espacios. El espacio debería
VHUGH´RLQIHULRU
Step 1
Étape 1
Paso 1
Step 4
Étape 4
Paso 4
Set Screw
Vis d’ajustement
Tornillo del Set
Step 3
Étape 3
Paso 3
Step 2
Étape 2
Paso 2
Plier ici pour utiliser le gabarit Dóblelo aquí para usar la plantilla
Installation Instructions
INSTALLING THE REFRIGERATOR (Cont.)
34 49-60792 Rev. 3
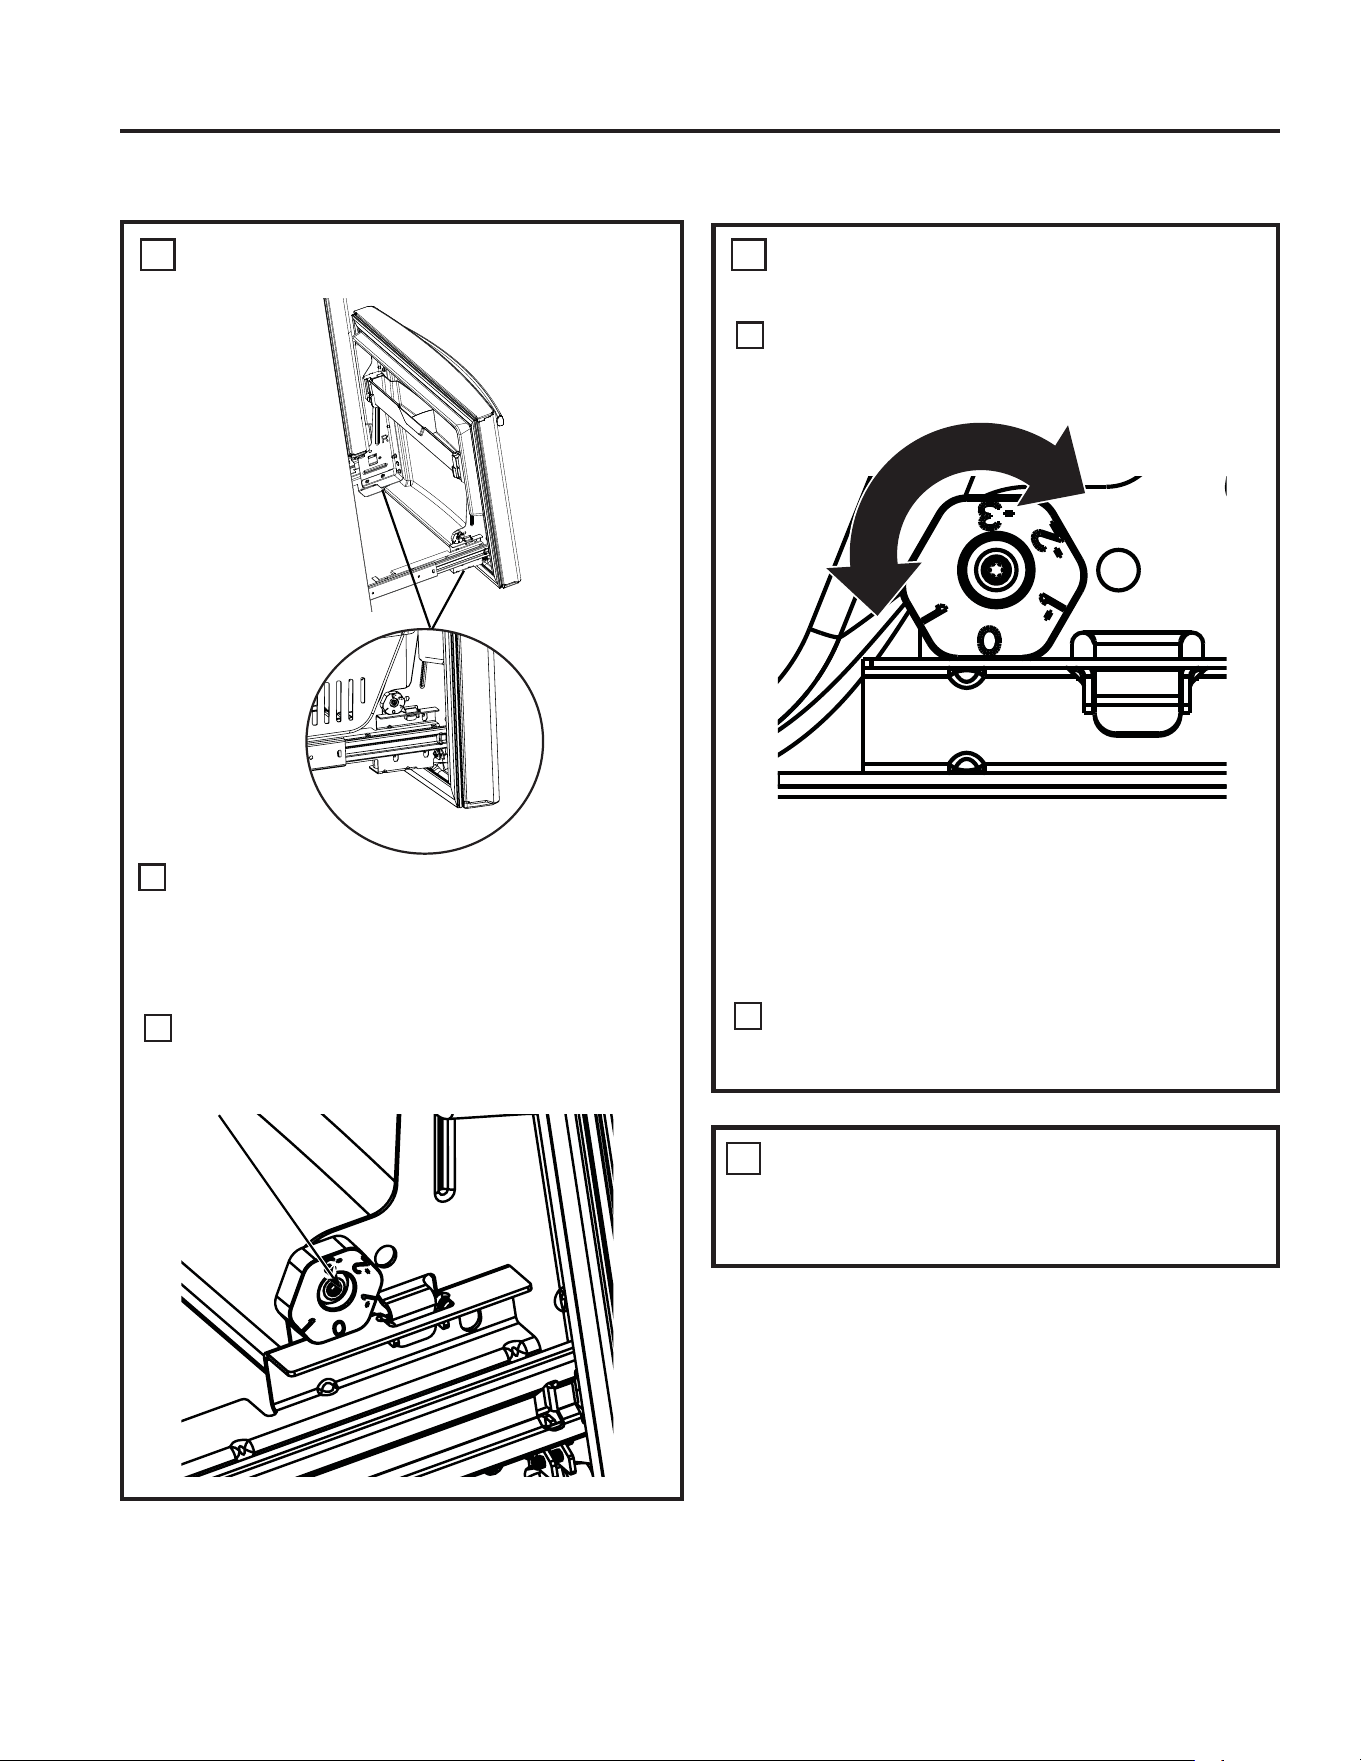
LEVEL THE FREEZER DOOR
Locate the height adjuster cam in the
IUHH]HUGRRU6OLJKWO\ORRVHQWKHWKUHHGRRU
attachment screws on both sides using a
´KH[VRFNHWGULYHU
Locate and loosen the cam screw using the
T-27 screw driver.
10
A
B
REMOVE PACKAGING
Remove all tape, foam and protective
packing from shelves and drawers.
11
LEVEL THE FREEZER DOOR
(cont.)
Lift the door on the side requiring
adjustment, rotate the cam to required
position.
After adjustment tighten the 3 attachment
VFUHZVXVLQJWRLQOE1P
10
,QLWLDOSRVLWLRQ
/LIWE\´FP
/RZHUE\´FP
/RZHUE\´FP
/RZHUE\´FP
A
B
Installation Instructions
INSTALLING THE REFRIGERATOR (Cont.)
INSTALLATION INSTRUCTIONS
49-60792 Rev. 3 35
INSTALLATION INSTRUCTIONS
MEASURE CABINET
OPENING AVAILABLE VS.
REFRIGERATOR WIDTH
Measure width of cabinet opening where
refrigerator will be placed, W.
Be sure to account for any countertop overhang,
baseboard thickness and any clearance desired.
:LGWK:VKRXOGQRWEHOHVVWKDQ´7KH
refrigerator will be placed approximately in the
middle of this opening.
MATERIALS YOU MAY NEED QRWLQFOXGHG
TOOLS YOU WILL NEED
Pencil
´PP'ULOO%LWDQG
(OHFWULFRU+DQG'ULOO
Tape measure
´PP1XW'ULYHU
Lag Bolts
´PP[´PP
Anchor Sleeves
´PP2'
)RU$QWL7LS%UDFNHW0RXQWHGRQ&21&5(7()ORRUV2QO\
'ULOO%LW$SSURSULDWHIRU$QFKRUV
AT-1
LOCATING THE ANTI-TIP
FLOOR BRACKET
Place the anti-tip floor bracket locator template
LQFOXGHGLQVLGHWKHDQWLWLSNLWRQWRWKHIORRU
up against the rear wall, within W, and in line
with the desired location of the RH side of the
UHIULJHUDWRUVHH)LJXUH
Place the anti-tip floor bracket onto the locator
template with its RH floor holes lined up with
the floor holes indicated on the template sheet,
DSSUR[LPDWHO\ó´FPIURPWKHHGJH
of the sheet or the RH side of the refrigerator.
Hold down in position and use the anti-tip floor
bracket as a template for marking the holes
based upon your configuration and type of
construction as shown in Step 3. Mark the hole
locations with a pencil, nail or awl.
NOTE:
,WLV5(48,5('WRXVHDWOHDVWVFUHZVWR
mount the floor bracket (one on each side of
WKHDQWLWLSIORRUEUDFNHW%RWKPXVWEHLQWR
HLWKHUWKHZDOORUWKHIORRU)LJXUHLQGLFDWHV
all the acceptable mounting configurations for
VFUHZV,GHQWLI\WKHVFUHZKROHVRQWKHDQWLWLS
floor bracket for your configuration.
AT-2
A
B
C
Baseboard
Thickness or
Countertop
Overhang
:KLFKHYHU,V
/DUJHU3OXV
$Q\'HVLUHG
Clearance
Rear Wall
)URQW
RH Side
W
5()5,*(5$725
)LJXUH± ,QVWDOODWLRQ2YHUYLHZ
Base Bracket
on the
Refrigerator
2 Wall Holes
RH Side of
Refrigerator
)ORRU±&RQFUHWH
+ROHV
)ORRU±:RRG
+ROHV
ó´
Locator
Template Sheet
)ORRU%UDFNHW
WR,QVWDOO
RH Holes
Rear RH
Corner of
Cabinet Wall
WARNING
Tip Over Hazard.
Built-in style models (model PYE, GYE, GYS, PWE,
DQG=:(DUHWRSKHDY\HVSHFLDOO\ZLWKDQ\GRRUV
open. These models must be secured with the anti-tip
floor bracket to prevent tipping forward, which could
result in death or serious injury. Read and follow the
entire installation instructions for installing the anti-tip
floor bracket packed with your refrigerator.
NOTE:
,I\RXGLGQRWUHFHLYHDQDQWLWLSEUDFNHWZLWK\RXU
purchase, call 1.800.626.8774 to receive one at no
FRVW,Q&DQDGDFDOO
)RULQVWDOODWLRQLQVWUXFWLRQVRIWKHEUDFNHWYLVLW
GEAppliances.com.
,Q&DQDGDGEAppliances.ca.
Installation Instructions
INSTALLING THE REFRIGERATOR (Cont.)
Anti-Tip Floor Bracket Installation
(Models PYE, GYE, GYS, DYE, PWE, and ZWE only)
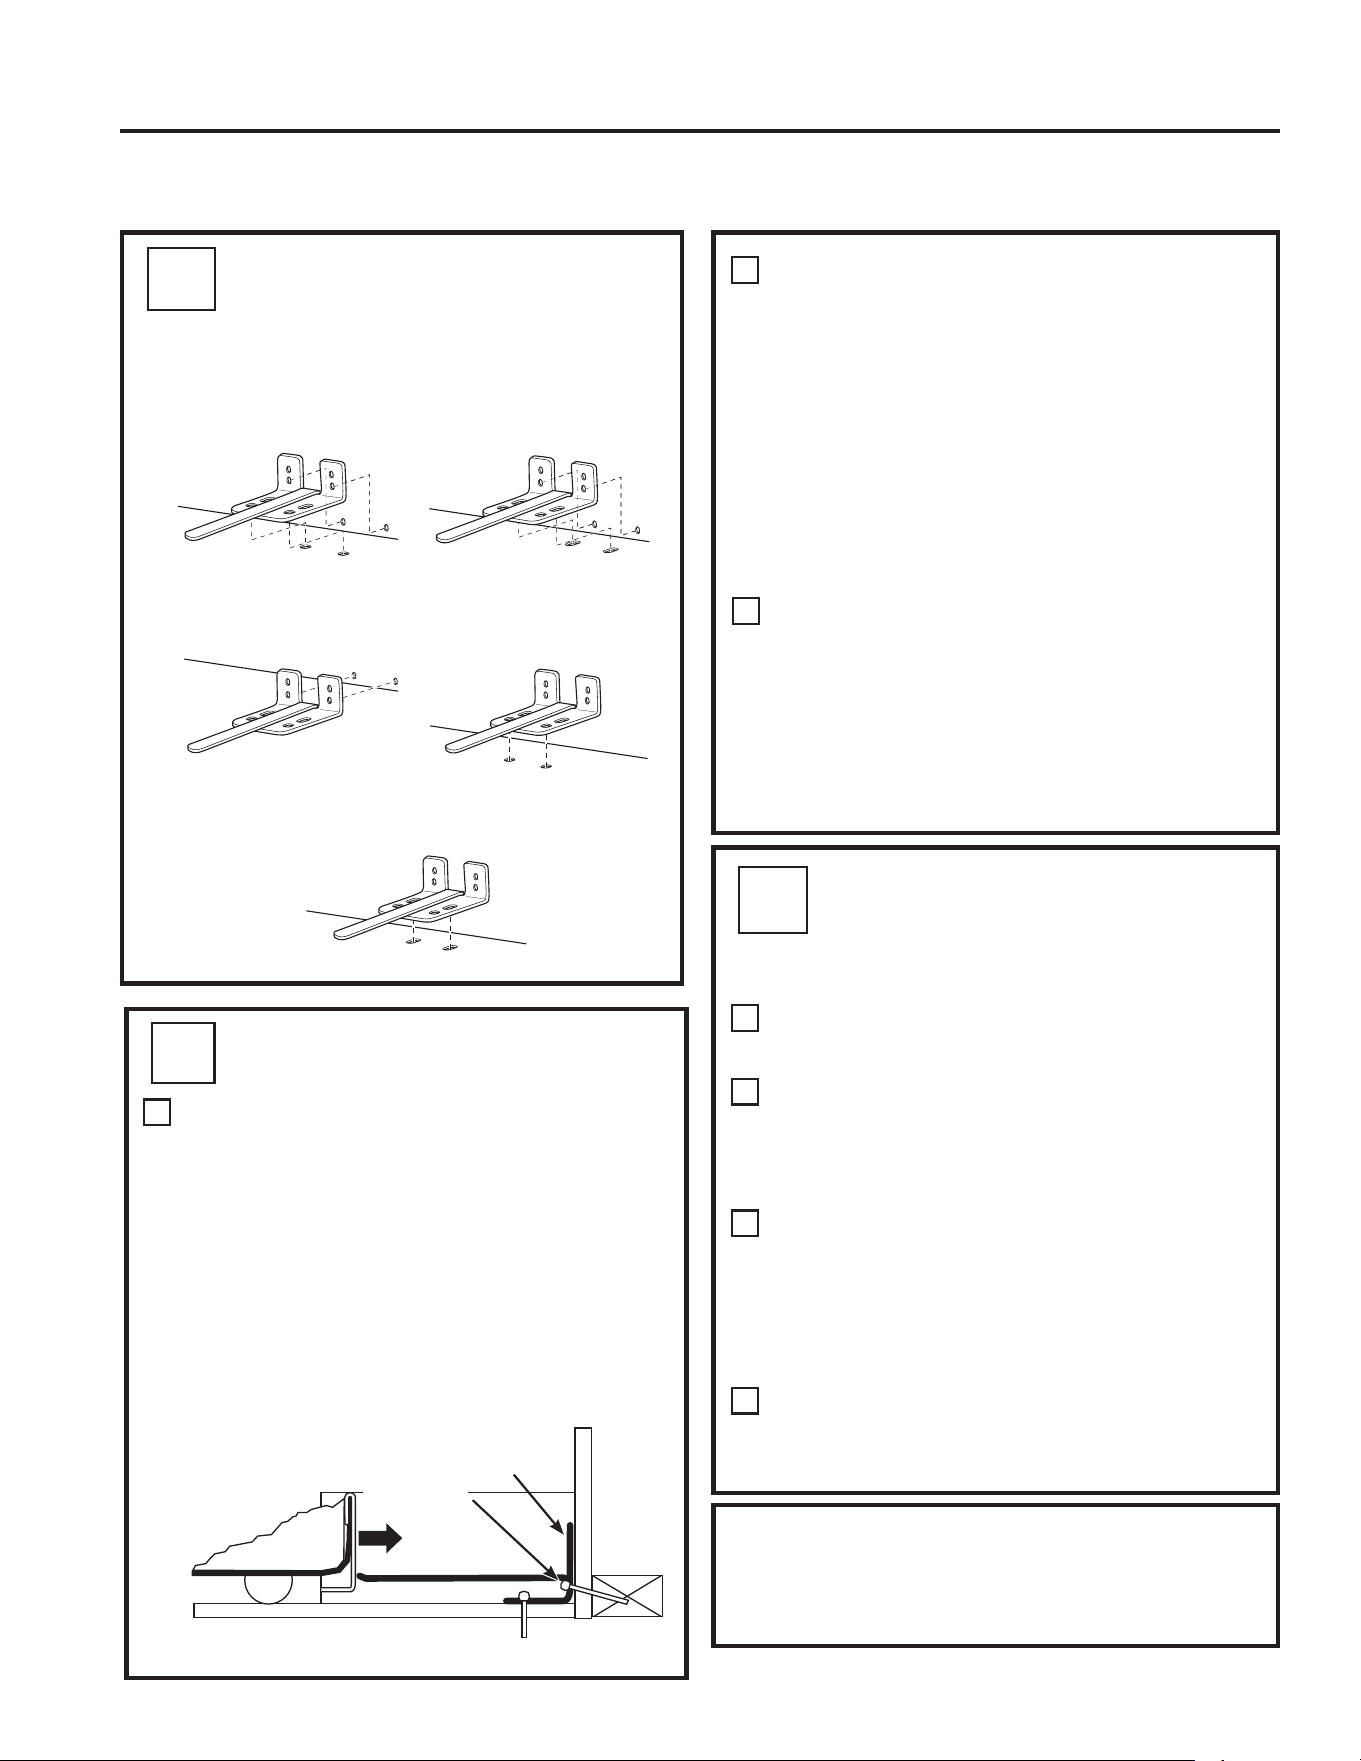
36 49-60792 Rev. 3
AT-2
LOCATING THE ANTI-TIP
FLOOR BRACKET (cont.)
5HFRPPHQGHG,QVWDOODWLRQ
– Wood
5HFRPPHQGHG,QVWDOODWLRQ
– Concrete
Minimum Acceptable #1 –
Wall Plate Stud
Minimum Acceptable #2
±:RRG)ORRU
Minimum Acceptable #3
±&RQFUHWH)ORRU
)LJXUH± $FFHSWDEOH6FUHZ3ODFHPHQW
Locations
&21&5(7(:DOODQG)ORRU&RQVWUXFWLRQ
$QFKRUVUHTXLUHGQRWSURYLGHG
HDFK´PP[´PPODJEROWV
HDFK´PP2'VOHHYHDQFKRUV
'ULOOWKHUHFRPPHQGHGVL]HKROHVIRUWKH
anchors into the concrete at the center of the
holes marked in Step 2.
•
,QVWDOOWKHVOHHYHDQFKRUVLQWRWKHGULOOHGKROHV
Place the anti-tip floor bracket as indicated in Step
2. Remove the locator template from the floor.
,QVWDOOWKHODJEROWVWKURXJKWKHDQWLWLSIORRU
bracket and tighten appropriately.
:22':DOODQG7,/()ORRU&RQVWUXFWLRQ
)RUWKLVVSHFLDOFDVHORFDWHWKHZDOOKROHV
LGHQWLILHGLQ)LJ'ULOODQDQJOHG´PP
SLORWKROHDSSUR[DVVKRZQLQ)LJLQWKH
center of each hole.
• Mount the anti-tip floor bracket using the
0LQLPXP$FFHSWDEOH,QVWDOODWLRQDV
LOOXVWUDWHGLQ)LJ
C
B
AT-3
ANTI-TIP BRACKET
INSTALLATION
:22':DOODQG)ORRU&RQVWUXFWLRQ
'ULOOWKHDSSURSULDWHQXPEHURI´PP
pilot holes in the center of each floor bracket
hole being used (a nail or awl may be used if
DGULOOLVQRWDYDLODEOH$1'UHPRYHWKHORFDWRU
template from the floor.
• Mount the anti-tip floor bracket by fastening the
2, or recommended 4, #10-16 hex-head screws
WLJKWO\LQWRSODFHDVLOOXVWUDWHGLQ)LJXUH
A
AT-4
POSITIONING THE
REFRIGERATOR TO ENGAGE
THE ANTI-TIP FLOOR AND
BASE BRACKETS
Before pushing the refrigerator into the opening,
plug the power cord into the receptacle and
FRQQHFWZDWHUOLQHLIHTXLSSHG&KHFNIRUOHDNV
Locate the refrigerator’s RH side and move back
approximately in line with the RH side of the
cabinet opening, W. This should position the
anti-tip floor bracket to engage the anti-tip base
bracket on the refrigerator.
Gently roll the refrigerator back into the cabinet
opening until it comes to a complete stop.
Check to see if the refrigerator front lines up
ZLWKWKHFDELQHWIURQWIDFH,IQRWFDUHIXOO\URFN
the refrigerator forward and backward until
engagement occurs and you notice that the
refrigerator is fully pushed up against the rear wall.
If Applicable:$GMXVWWKHUHDUDQGIURQWZKHHO
height settings to fully engage the rear anti-tip
brackets, while also aligning the refrigerator
front with the cabinet front face.
A
C
B
'
)LJXUH± $WWDFKPHQWWR:DOODQG)ORRU
NOTE:,I\RXSXOOWKHUHIULJHUDWRURXWDQG
away from the wall for any reason, make sure
the anti-tip floor bracket is engaged when the
refrigerator is pushed back against the rear wall.
Rear RH Corner
of the Refrigerator
)ORRU
Wall
Plate
Stud
)ORRU
Bracket
2 Screws
Must Enter
Wood or
Metal Stud
Wall
Installation Instructions
INSTALLING THE REFRIGERATOR (Cont.)
Anti-Tip Floor Bracket Installation
(Models PYE, GYE, GYS, DYE, PWE, and ZWE only)
INSTALLATION INSTRUCTIONS
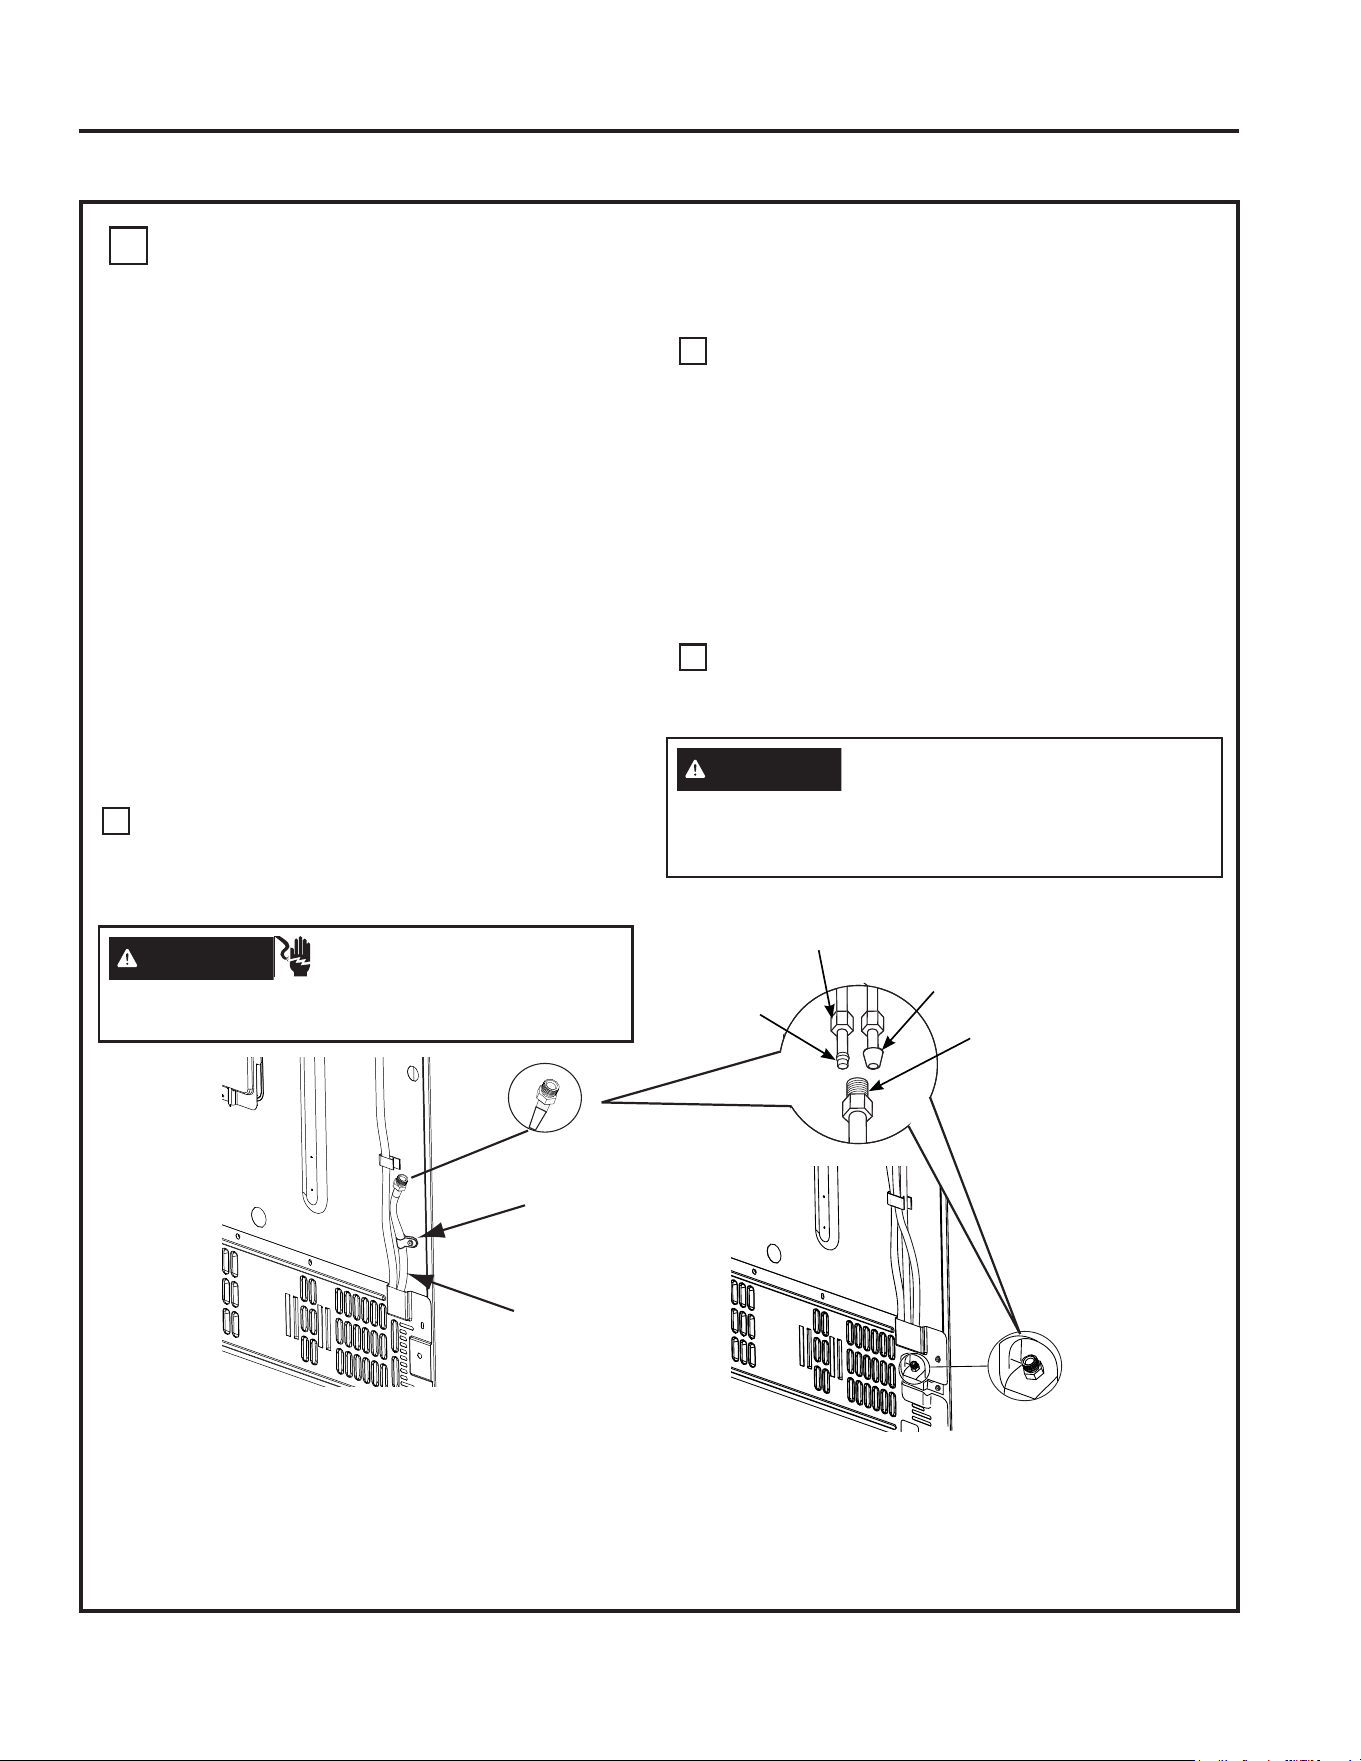
49-60792 Rev. 3 37
INSTALLATION INSTRUCTIONS
11
CONNECTING THE REFRIGERATOR TO THE HOUSE WATER LINE
A cold water supply is required for automatic
LFHPDNHURSHUDWLRQ,IWKHUHLVQRWDFROGZDWHU
supply, you will need to provide one. See
,QVWDOOLQJWKH:DWHU/LQHVHFWLRQ
NOTES:
• Before making the connection to the
refrigerator, be sure the refrigerator power
cord is not plugged into the wall outlet.
,I\RXUUHIULJHUDWRUGRHVQRWKDYHDZDWHU
filter, we recommend installing one if your
water supply has sand or particles that
could clog the screen of the refrigerator’s
ZDWHUYDOYH,QVWDOOLWLQWKHZDWHUOLQHQHDU
WKHUHIULJHUDWRU,IXVLQJ6PDUW&RQQHFW
™
5HIULJHUDWRU7XELQJ.LW\RXZLOOQHHGDQ
DGGLWLRQDOWXEH:;;WRFRQQHFWWKH
ILOWHU'RQRWFXWSODVWLFWXEHWRLQVWDOOILOWHU
• Before connecting the water line to the house,
purge the house line for at least 2 minutes.
,I\RXDUHXVLQJFRSSHUWXELQJSODFHD
FRPSUHVVLRQQXWDQGIHUUXOHVOHHYHRQWRWKH
end of the tubing coming from the house cold
water supply.
,I\RXDUHXVLQJWKH6PDUW&RQQHFW
™
tubing, the
nuts are already assembled to the tubing.
,I\RXDUHXVLQJFRSSHUWXELQJLQVHUWWKHHQG
of the tubing into the refrigerator connection, at
the back of the refrigerator, as far as possible.
While holding the tubing, tighten the fitting.
,I\RXDUHXVLQJ6PDUW&RQQHFW
™
tubing,
insert the molded end of the tubing into the
refrigerator connection, at the back of the
refrigerator, and tighten the compression nut
until it is hand tight. Then tighten one additional
turn with a wrench. Over tightening may cause
leaks.
)DVWHQWKHWXELQJLQWRWKHFODPSSURYLGHGWR
hold it in position. You may need to pry open
the clamp.
A
B
C
Installation Instructions
INSTALLING THE REFRIGERATOR (Cont.)
” Compression
Nut
)HUUXOH
VOHHYH
SmartConnect
™
Tubing
Refrigerator
Connection
1/4” Tubing
Tuyau de 1/4 po
Tubería de 1/4“
Tubing Clamp
Bride
Abrazadera del tubo
OR
Tubing Clamp
´7XELQJ
WARNING
Electrical Shock Hazard.
$WWDFKWXELQJFODPSXVLQJH[LVWLQJKROHRQO\'2
NOT drill into the refrigerator.
WARNING
Connect to potable water supply
only. A cold water supply is required for automatic
icemaker operation. The water pressure must be
EHWZHHQDQGSVLNLORSDVFDOV
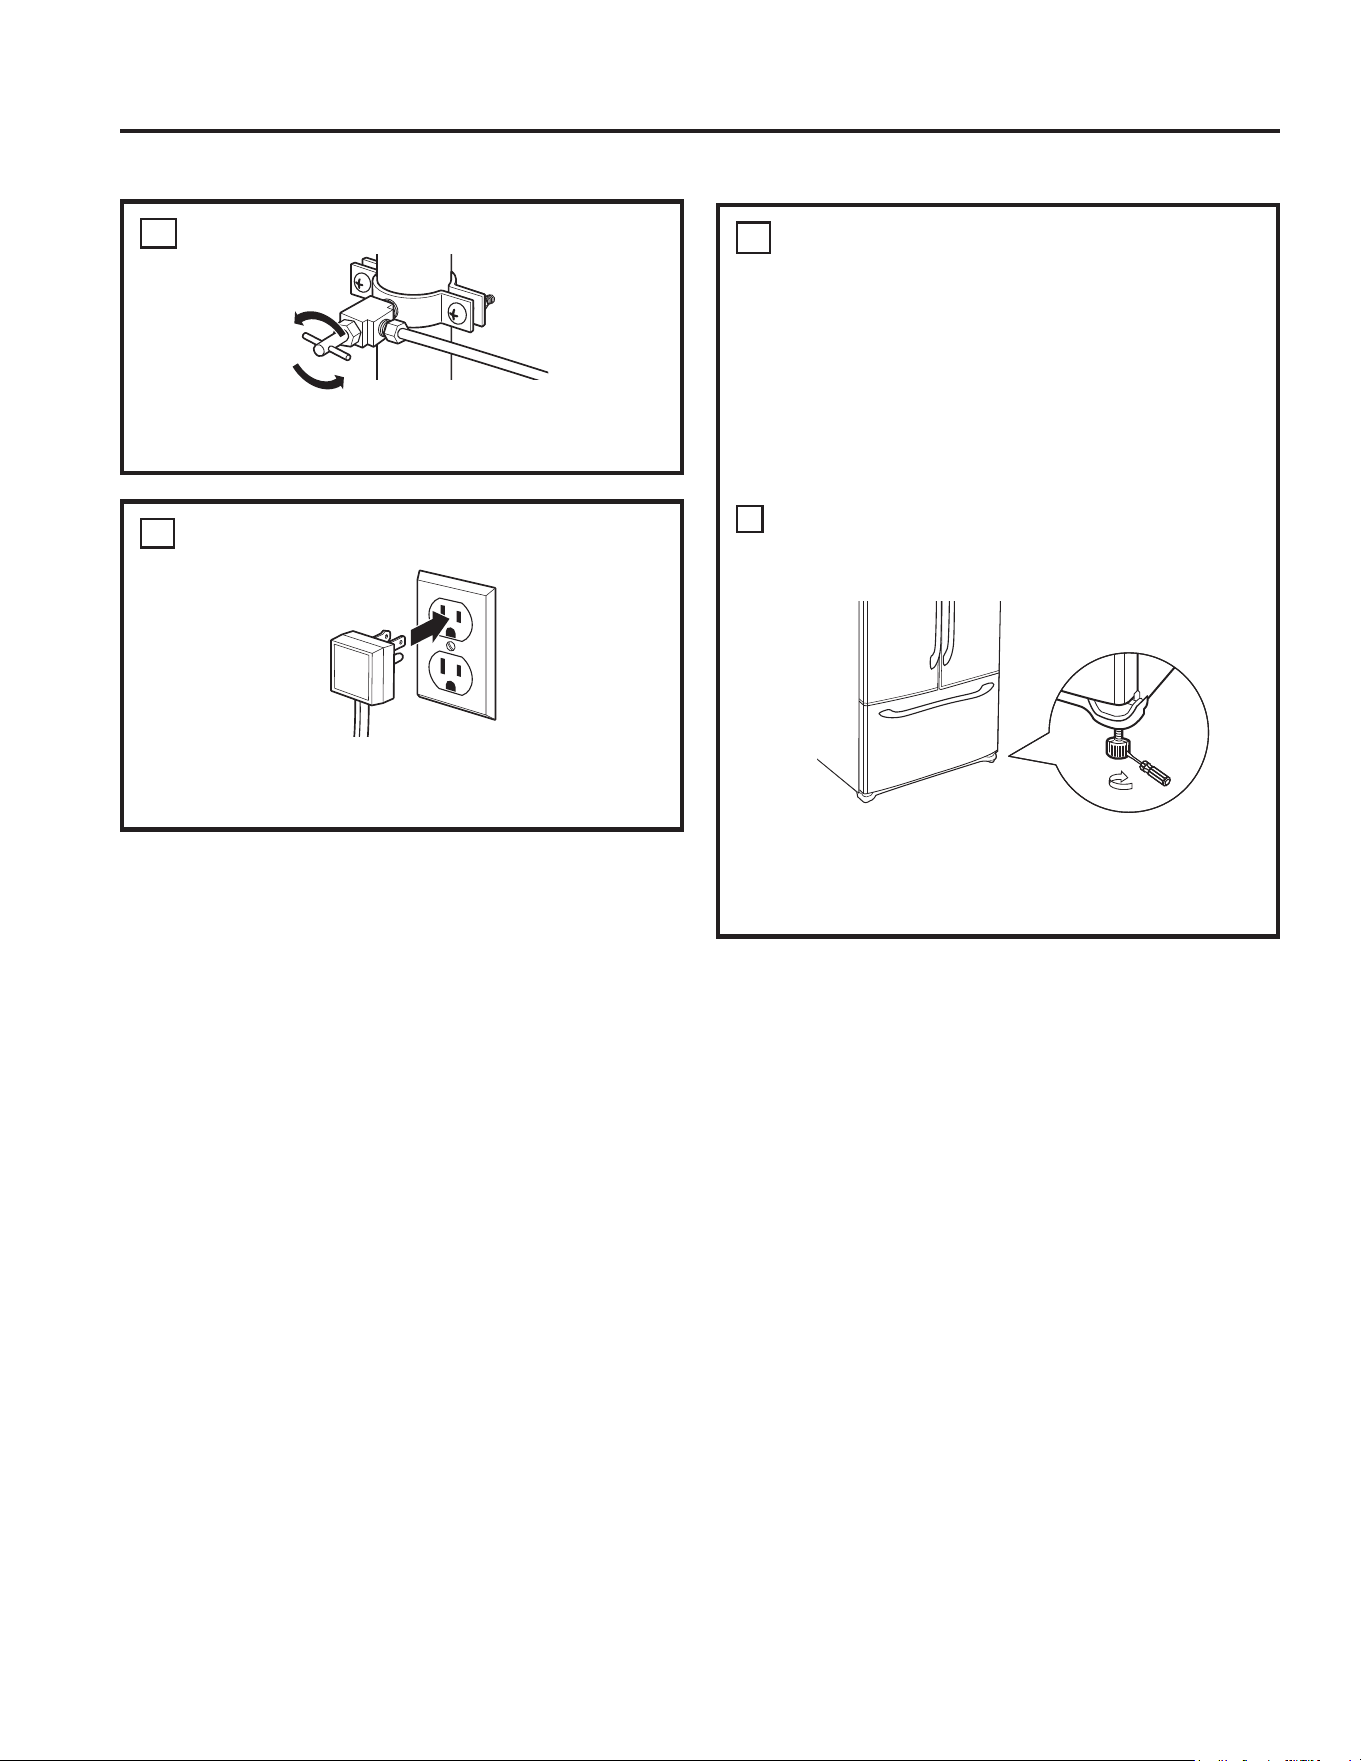
38 49-60792 Rev. 3
TURN ON THE WATER SUPPLY
Turn the water on at the shutoff valve (house
ZDWHUVXSSO\DQGFKHFNIRUDQ\OHDNV
12
PLUG IN THE REFRIGERATOR
See the grounding information attached to the
power cord.
13
LEVEL THE REFRIGERATOR
The leveling legs have 2 purposes:
1. Leveling legs adjust so the refrigerator is
firmly positioned on the floor and does not
wobble.
/HYHOLQJOHJVVHUYHDVDVWDELOL]LQJEUDNH
to hold the refrigerator securely in position
during operation and cleaning. The leveling
legs also prevent the refrigerator from tipping.
Turn the leveling legs clockwise to raise the
refrigerator, counterclockwise to lower it.
NOTICE: To avoid possible property damage,
the leveling legs must be firmly touching the
floor.
14
A
)ODW+HDG6FUHZGULYHU
Raise
Installation Instructions
INSTALLING THE REFRIGERATOR (Cont.)
INSTALLATION INSTRUCTIONS
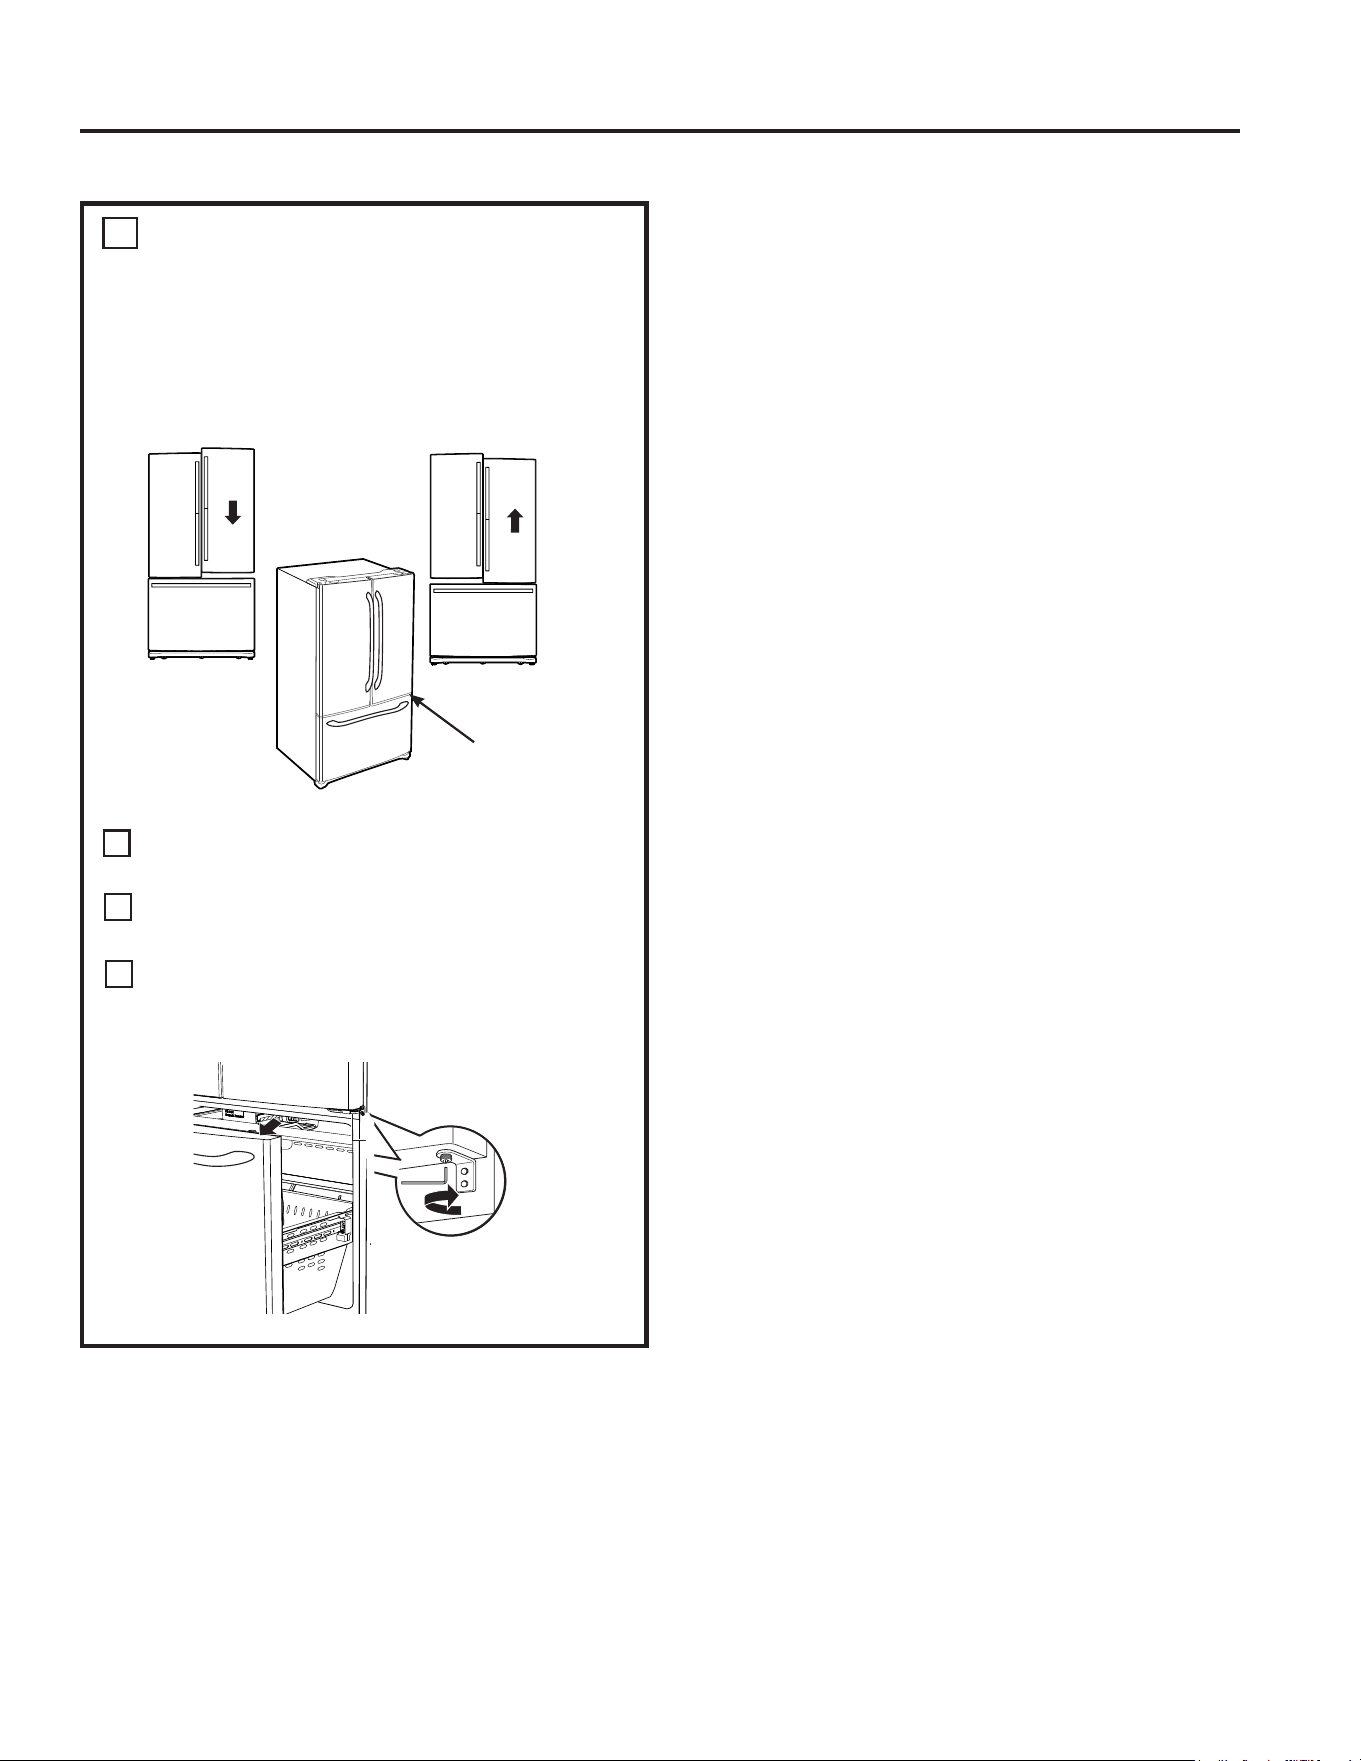
49-60792 Rev. 3 39
INSTALLATION INSTRUCTIONS
LEVEL THE REFRIGERATOR
DOORS
Remember a level refrigerator is necessary for
JHWWLQJWKHGRRUVSHUIHFWO\HYHQ,I\RXQHHG
help, review the previous section on leveling the
refrigerator.
,I\RXRSHQWKHIUHH]HUGRRU\RXFDQVHH
the center hinge.
,QVHUW´$OOHQZUHQFKLQWRWKHVKDIWRIWKH
center hinge.
Adjust the height by turning clockwise
or counterclockwise. When you turn
counterclockwise, the door will move up.
15
A
B
When
the left
door is
lower than
the right
door.
When
the left
door is
higher
than
the right
door.
Adjustment
point
C
RAISE
Installation Instructions
INSTALLING THE REFRIGERATOR (Cont.)
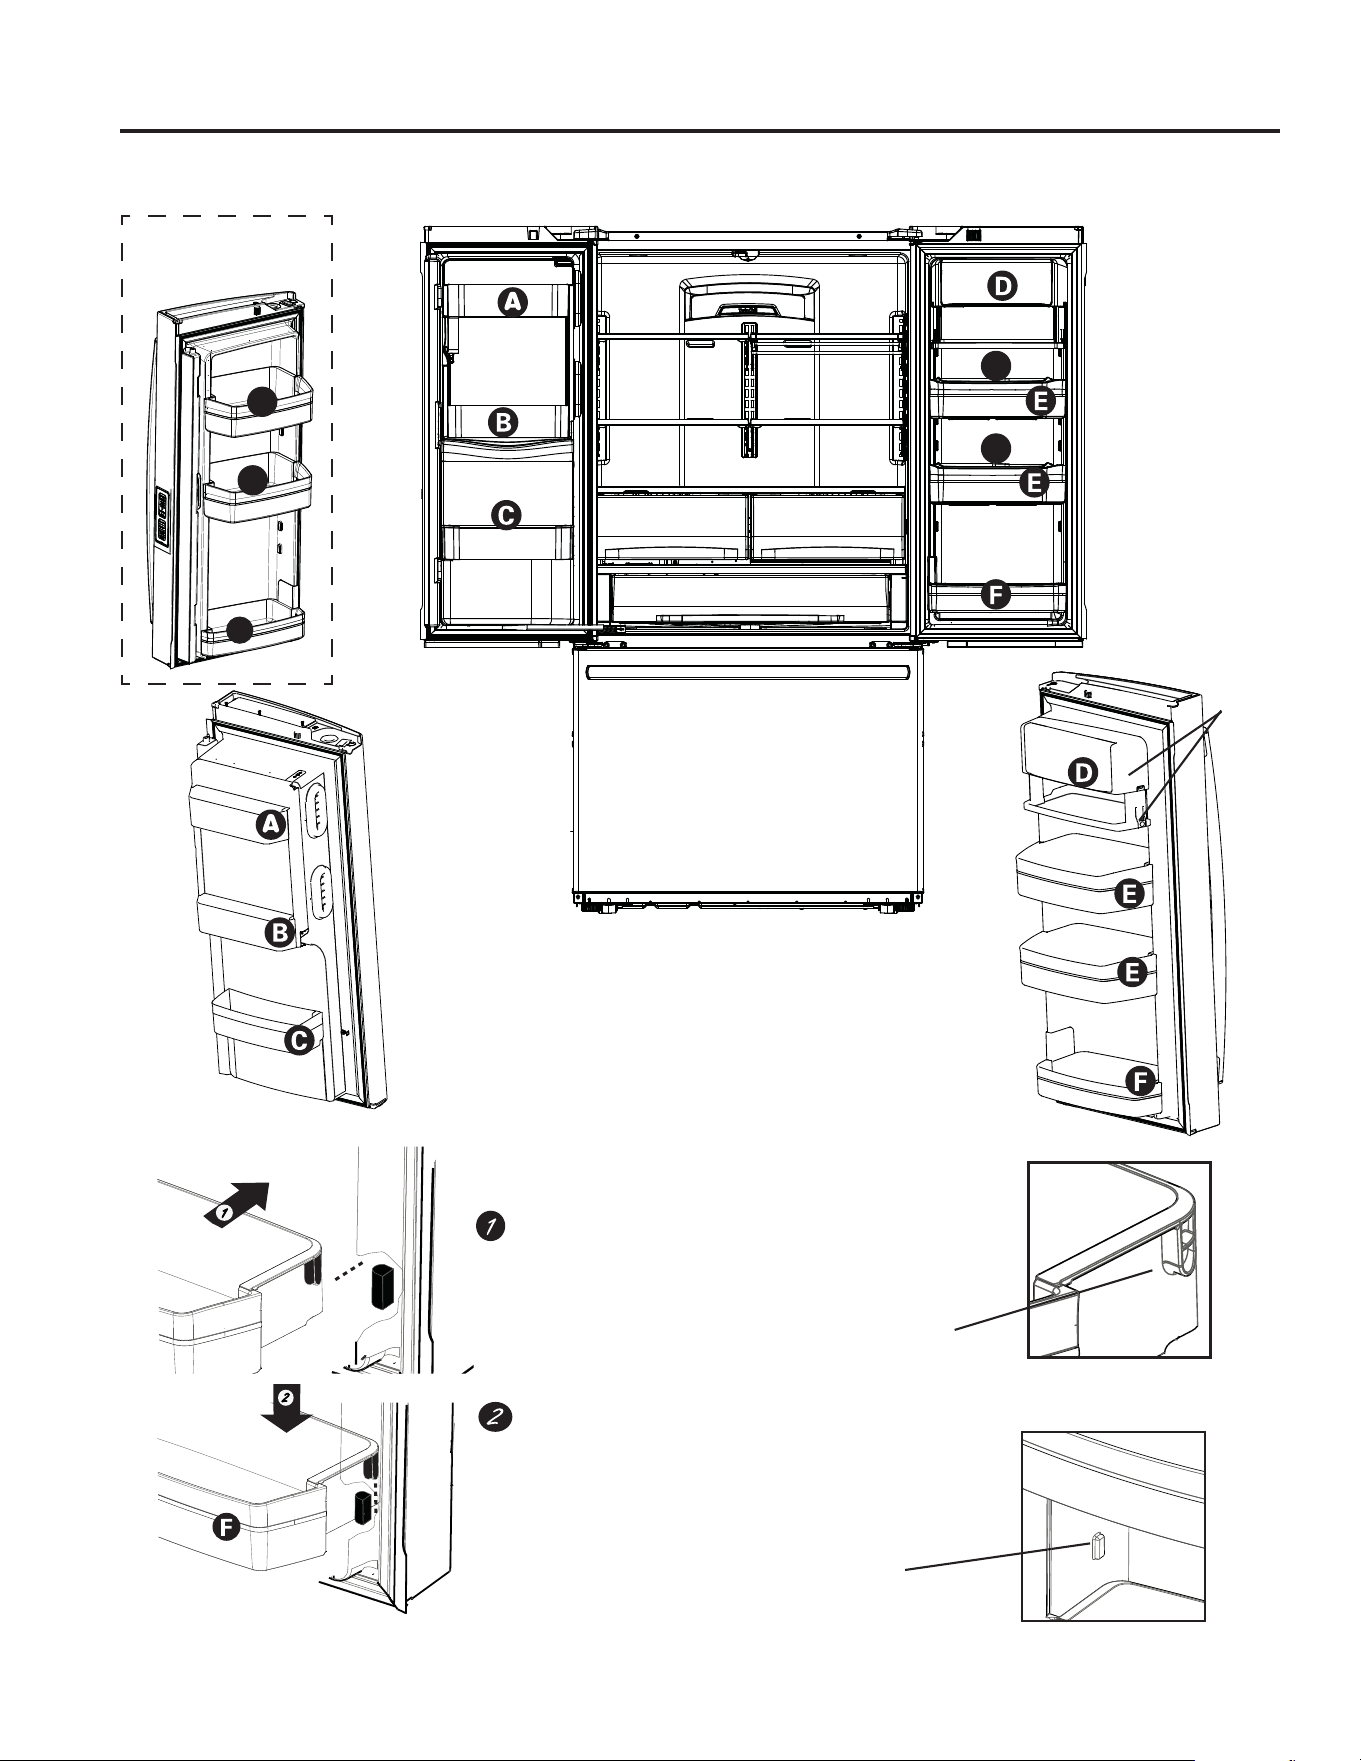
40 49-60792 Rev. 3
To place bins into doors:
Match your bin with the letter shown.Position
the bin hooks over the bin locator and push
forward until inserted fully.
Bin locator
each side
Bin hook
rear each side
Push bin down until locked into position.
J
H
H
(Select
models
RQO\
1RQ'LVSHQVH
Models
INSTALLING THE REFRIGERATOR (Cont.)
Installation Instructions
G
G
,FHPDNHULQIUHH]HU
available on Non-
'LVSHQVHPRGHOVDQG
DYDLODEOHDV,0.LWIRU
some models.
INSTALLATION INSTRUCTIONS
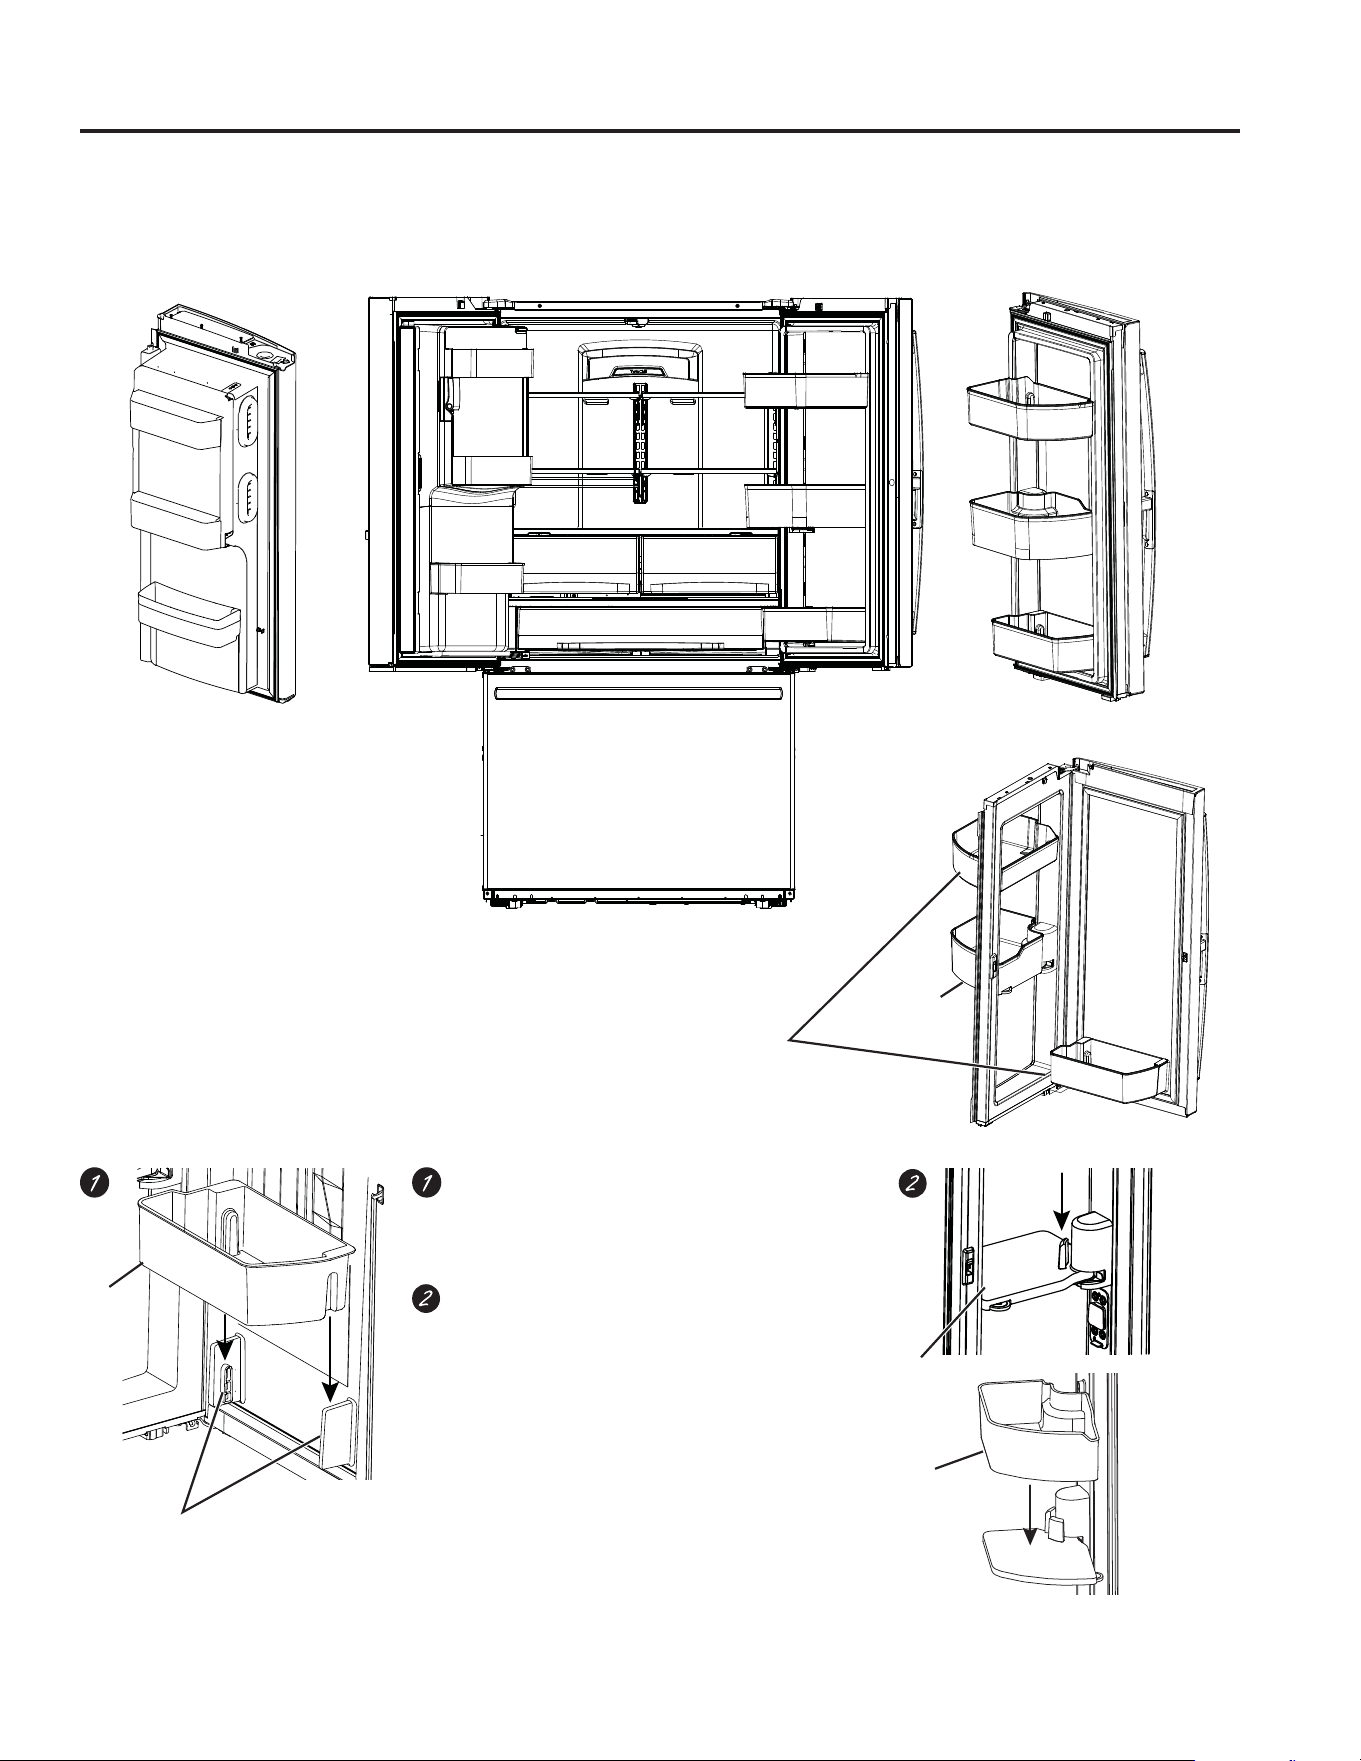
49-60792 Rev. 3 41
INSTALLATION INSTRUCTIONS
To place rotating bin into door:
1. Slide bin base assembly onto the bracket on
the door.
2. Slide the bin onto the bin base
To place adjustable bins into door:
Position the bins over the bin locators and
push down until locked in position.
Installation Instructions
INSTALLING THE REFRIGERATOR (Cont.)
Bin
Bin
base
,QVWDOO
metal
base
Bin
Bin locators
Adjustable
bins
Rotating
bin
Models PFD, PYD, GFD
42 49-60792 Rev. 3
Recommended copper water supply kits are WX8X2,
WX8X3 or WX8X4, depending on the amount of
tubing you need. Approved plastic water supply
lines are SmartConnect
™
Refrigerator Tubing
:;;:;;DQG:;;
When connecting your refrigerator to a GE
Appliances Reverse Osmosis Water System, the only
DSSURYHGLQVWDOODWLRQLVZLWKD*($SSOLDQFHV59.LW
)RURWKHUUHYHUVHRVPRVLVZDWHUV\VWHPVIROORZWKH
manufacturer’s recommendations.
,IWKHZDWHUVXSSO\WRWKHUHIULJHUDWRULVIURPD
5HYHUVH2VPRVLV52:DWHU)LOWUDWLRQ6\VWHP
$1'WKHUHIULJHUDWRUDOVRKDVDZDWHUILOWHUXVH
WKHUHIULJHUDWRU¶VILOWHUE\SDVVSOXJ8VLQJWKH
refrigerator’s water filtration cartridge in conjunction
with the RO water filter can result in hollow ice cubes.
Some models do not come equipped with the filter
bypass plug. To obtain a free bypass plug, call 800.
*(&$5(6,Q&DQDGDFDOO
This water line installation is not warranted by the
UHIULJHUDWRURULFHPDNHUPDQXIDFWXUHU)ROORZWKHVH
LQVWUXFWLRQVFDUHIXOO\WRPLQLPL]HWKHULVNRIH[SHQVLYH
water damage.
:DWHUKDPPHUZDWHUEDQJLQJLQWKHSLSHVLQKRXVH
plumbing can cause damage to refrigerator parts and
lead to water leakage or flooding. Call a qualified
plumber to correct water hammer before installing the
water supply line to the refrigerator.
To prevent burns and product damage, do not hook
up the water line to the hot water line.
,IWKHUHIULJHUDWRULVRSHUDWHGEHIRUHWKHZDWHU
connection is made to the ice maker, see Controls
section on page 9 to turn ice maker off.
'RQRWLQVWDOOWKHLFHPDNHUWXELQJLQDUHDVZKHUH
WHPSHUDWXUHVIDOOEHORZIUHH]LQJ
When using any electrical device (such as a power
GULOOGXULQJLQVWDOODWLRQEHVXUHWKHGHYLFHLVGRXEOH
insulated or grounded in a manner to prevent the
KD]DUGRIHOHFWULFVKRFNRULVEDWWHU\SRZHUHG
All installations must be in accordance with local
plumbing code requirements.
BEFORE YOU BEGIN
WHAT YOU WILL NEED
• Copper or SmartConnect
™
Refrigerator Tubing kit,
´RXWHUGLDPHWHUWRFRQQHFWWKHUHIULJHUDWRUWRWKH
ZDWHUVXSSO\,IXVLQJFRSSHUEHVXUHERWKHQGVRI
the tubing are cut square.
To determine how much tubing you need: measure
the distance from the water valve on the back of the
refrigerator to the water supply pipe. Be sure there
is sufficient extra tubing to allow the refrigerator to
move out from the wall after installation.
SmartConnect
™
5HIULJHUDWRU7XELQJ.LWVDUHDYDLODEOH
in the following lengths:
¶P ±:;;
¶P ±:;;
¶P ±:;;
Installation Instructions
INSTALLING THE WATER LINE
WARNING
Connect to potable water supply only.
A cold water supply is required for automatic icemaker
operation. The water pressure must be between 40
DQGSVLNLORSDVFDOV
INSTALLATION INSTRUCTIONS
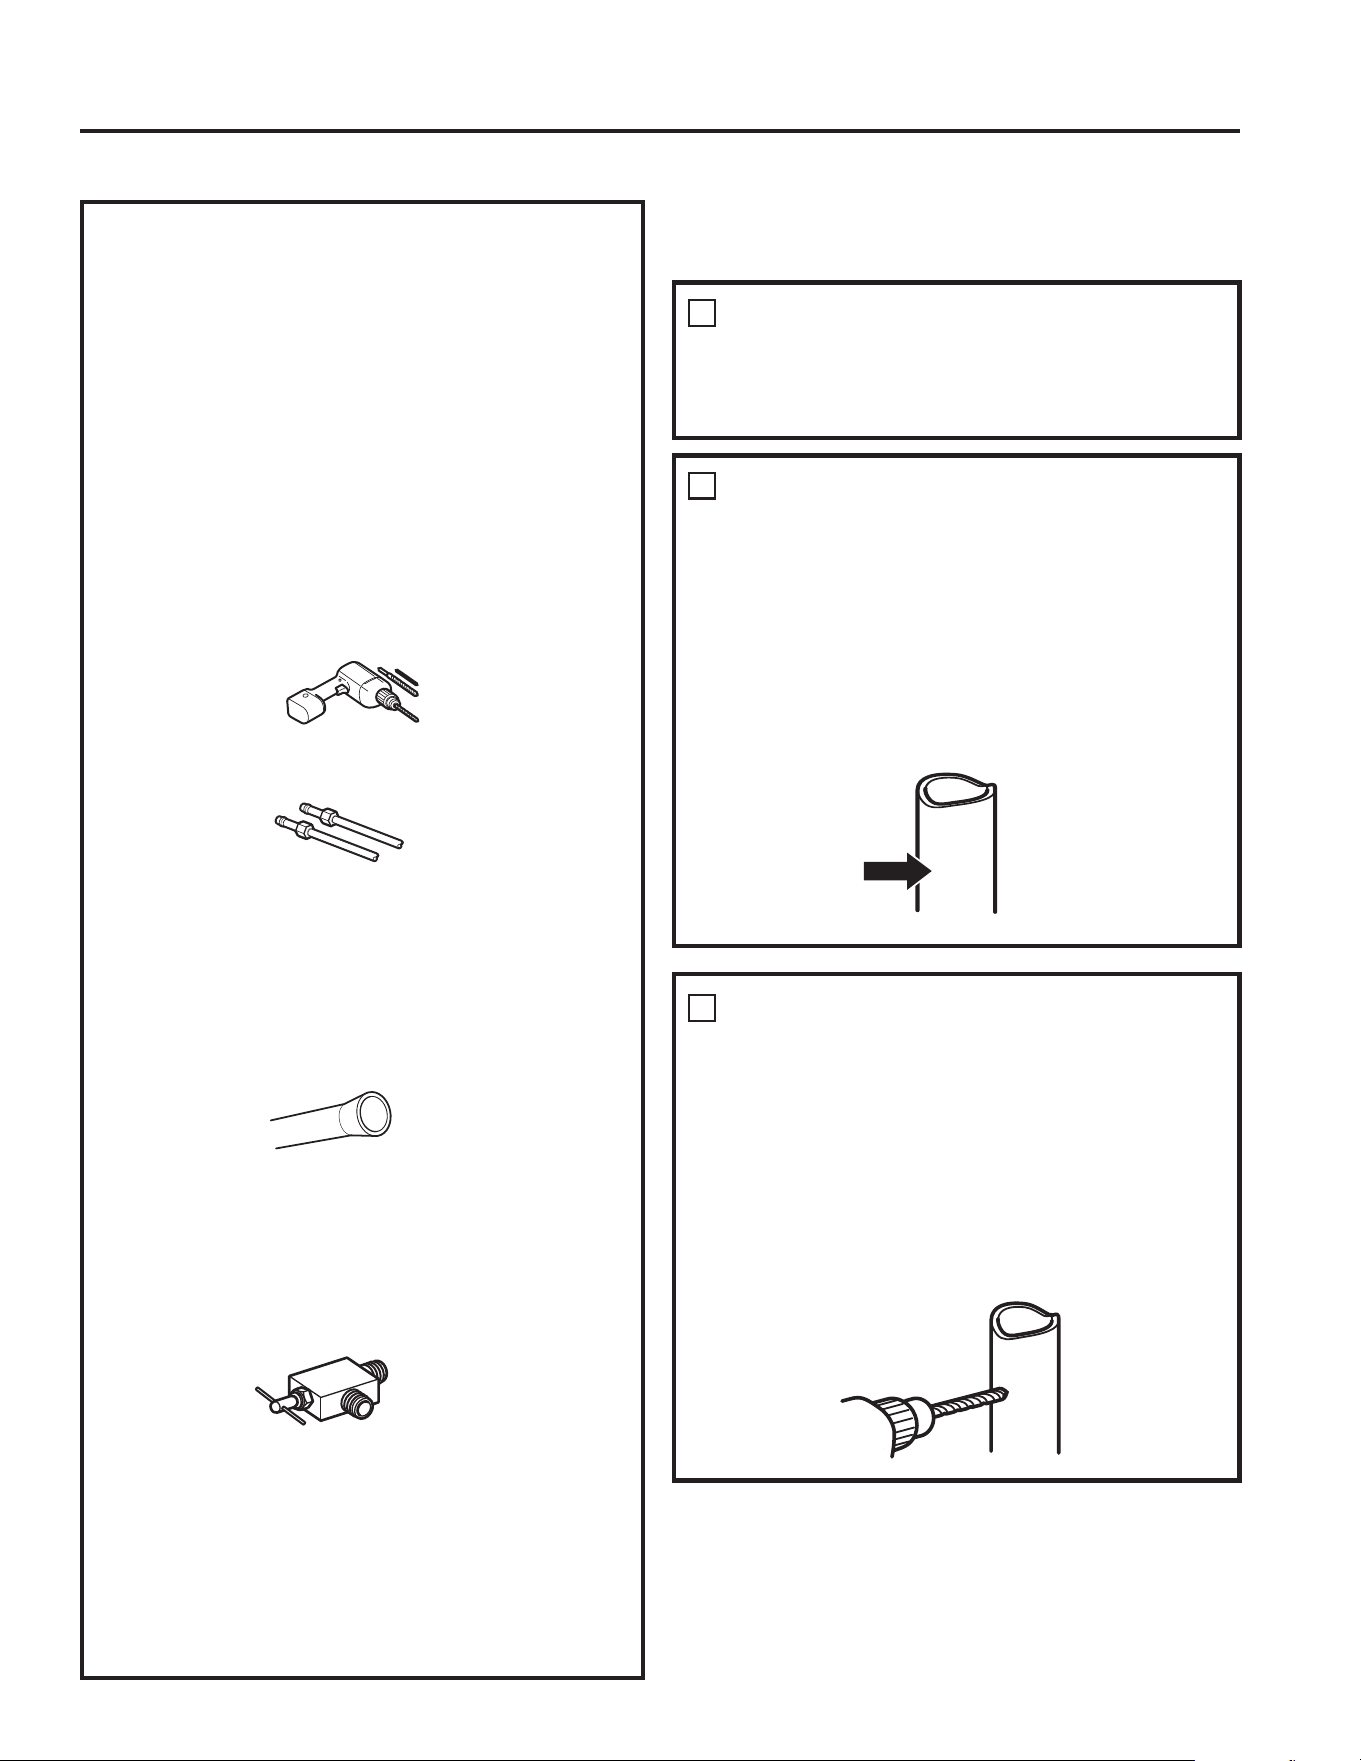
49-60792 Rev. 3 43
INSTALLATION INSTRUCTIONS
NOTE: The only GE Appliances approved
plastic tubing is that supplied in SmartConnect
™
5HIULJHUDWRU7XELQJNLWV'RQRWXVHDQ\RWKHU
plastic water supply line because the line is under
pressure at all times. Certain types of plastic will
crack or rupture with age and cause water damage
to your home.
• A GE Appliances water supply kit (containing
WXELQJVKXWRIIYDOYHDQGILWWLQJVOLVWHGEHORZLV
available at extra cost from your dealer or from
Parts and Accessories, 877-959-8688 (in Canada
• A cold water supply. The water pressure must be
EHWZHHQDQGSVL±EDU
• Power drill.
´RUDGMXVWDEOHZUHQFK
• Straight and Phillips blade screwdriver.
7ZR´RXWHUGLDPHWHUFRPSUHVVLRQQXWV
DQGIHUUXOHVVOHHYHV²WRFRQQHFWWKHFRSSHU
tubing to the shutoff valve and the refrigerator
water valve.
OR
,I\RXDUHXVLQJD6PDUW&RQQHFW
™
Refrigerator
Tubing kit, the necessary fittings are preassembled
to the tubing.
,I\RXUH[LVWLQJFRSSHUZDWHUOLQHKDVDIODUHGILWWLQJ
at the end, you will need an adapter (available
DWSOXPELQJVXSSO\VWRUHVWRFRQQHFWWKHZDWHU
line to the refrigerator OR you can cut off the
flared fitting with a tube cutter and then use a
FRPSUHVVLRQILWWLQJ'RQRWFXWIRUPHGHQGIURP
SmartConnect
™
Refrigerator tubing.
• Shutoff valve to connect to the cold water line.
The shutoff valve should have a water inlet
ZLWKDPLQLPXPLQVLGHGLDPHWHURI´DWWKH
SRLQWRIFRQQHFWLRQWRWKH&2/':$7(5/,1(
Saddle-type shutoff valves are included in many
water supply kits. Before purchasing, make sure
a saddle-type valve complies with your local
plumbing codes.
SHUT OFF THE MAIN WATER
SUPPLY
Turn on the nearest faucet long enough to clear
the line of water.
,QVWDOOWKHVKXWRIIYDOYHRQWKHQHDUHVWIUHTXHQWO\
used drinking water line.
1
Choose a location for the valve that is easily
DFFHVVLEOH,WLVEHVWWRFRQQHFWLQWRWKHVLGHRI
a vertical water pipe. When it is necessary to
FRQQHFWLQWRDKRUL]RQWDOZDWHUSLSHPDNHWKH
connection to the top or side, rather than at the
bottom, to avoid drawing off any sediment from
the water pipe.
CHOOSE THE VALVE LOCATION
2
DRILL THE HOLE FOR THE
VALVE
3
'ULOOD´KROHLQWKHZDWHUSLSHHYHQLIXVLQJ
DVHOISLHUFLQJYDOYHXVLQJDVKDUSELW5HPRYH
any burrs resulting from drilling the hole in the
pipe.
Take care not to allow water to drain into the drill.
)DLOXUHWRGULOOD´KROHPD\UHVXOWLQUHGXFHG
ice production or smaller cubes.
Installation Instructions
INSTALLING THE WATER LINE (Cont.)
WHAT YOU WILL NEED (Cont.)
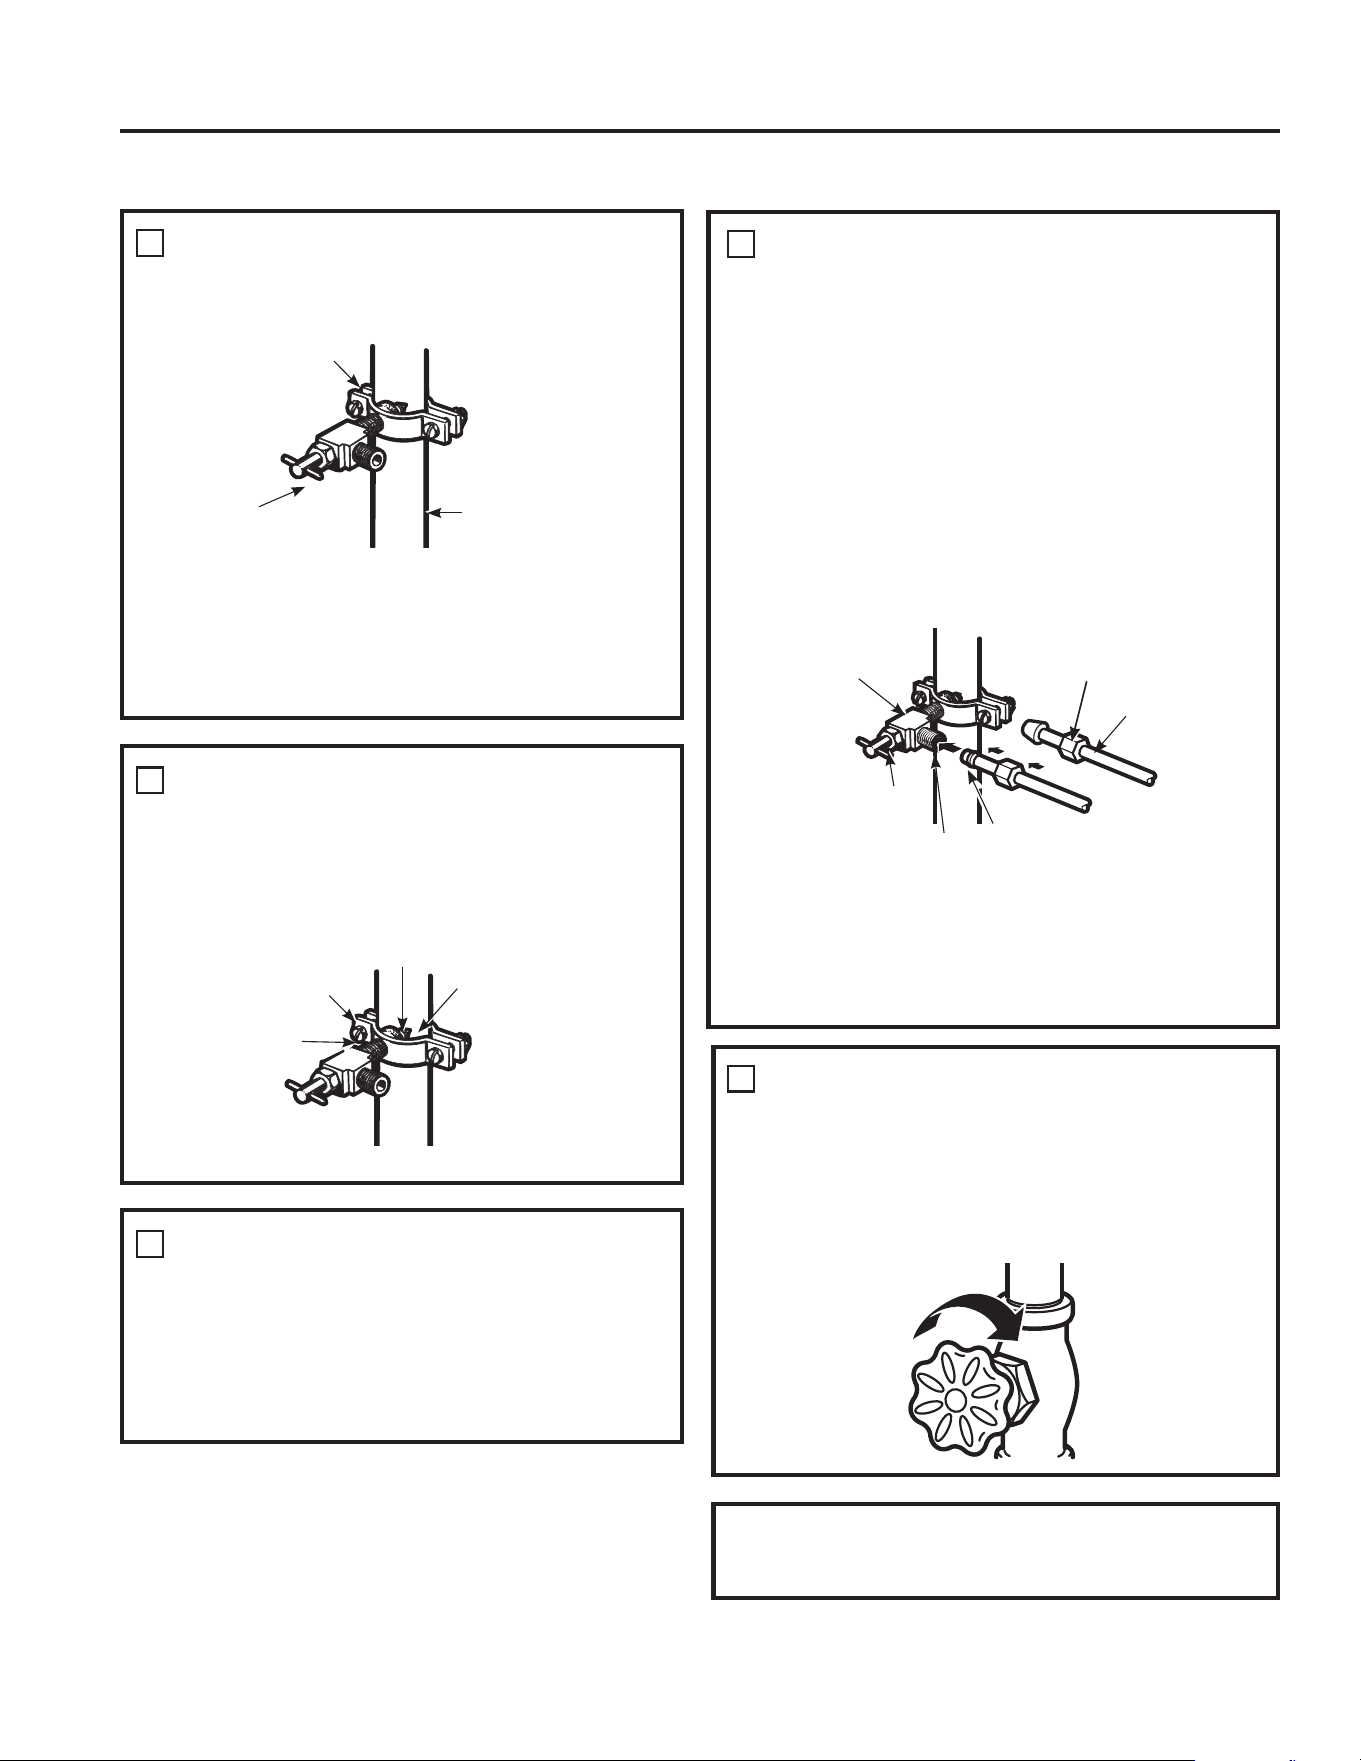
44 49-60792 Rev. 3
3ODFHWKHFRPSUHVVLRQQXWDQGIHUUXOHVOHHYH
for copper tubing onto the end of the tubing and
connect it to the shutoff valve.
Make sure the tubing is fully inserted into the valve.
Tighten the compression nut securely.
)RUSODVWLFWXELQJIURPD6PDUW&RQQHFW
™
Refrigerator Tubing kit, insert the molded end
of the tubing into the shutoff valve and tighten
compression nut until it is hand tight, then tighten
one additional turn with a wrench. Over tightening
may cause leaks.
NOTE: Commonwealth of Massachusetts
Plumbing Codes 248CMR shall be adhered to.
Saddle valves are illegal and use is not permitted
in Massachusetts. Consult with your licensed
plumber.
CONNECT THE TUBING TO THE
VALVE
7
Turn the main water supply on and flush out the
tubing until the water is clear.
Shut the water off at the water valve after about
RQHTXDUWOLWHURUPLQXWHVRIZDWHUKDVEHHQ
flushed through the tubing.
FLUSH OUT THE TUBING
8
Saddle-Type
Shutoff Valve
Compression Nut
Packing Nut
Outlet Valve
)HUUXOHVOHHYH
SmartConnect
™
Tubing
)DVWHQWKHVKXWRIIYDOYHWRWKHFROGZDWHUSLSH
with the pipe clamp.
NOTE: Commonwealth of Massachusetts
Plumbing Codes 248CMR shall be adhered to.
Saddle valves are illegal and use is not permitted
in Massachusetts. Consult with your licensed
plumber.
FASTEN THE SHUTOFF VALVE
4
Tighten the clamp screws until the sealing washer
begins to swell.
NOTE:'RQRWRYHUWLJKWHQRU\RXPD\FUXVK
the tubing.
TIGHTEN THE PIPE CLAMP
5
Pipe Clamp
Vertical Cold
Water Pipe
Saddle-Type
Shutoff Valve
Washer
,QOHW(QG
Pipe Clamp
Clamp
Screw
Route the tubing between the cold water line and
the refrigerator.
Route the tubing through a hole drilled in the wall
or floor (behind the refrigerator or adjacent base
FDELQHWDVFORVHWRWKHZDOODVSRVVLEOH
ROUTE THE TUBING
6
To complete the installation of the refrigerator, go
EDFNWR6WHSLQ,QVWDOOLQJWKH5HIULJHUDWRU
Installation Instructions
INSTALLING THE WATER LINE (Cont.)
INSTALLATION INSTRUCTIONS
49-60792 Rev. 3 45
Newer refrigerators sound different from older refrigerators.
Modern refrigerators have more features and use newer technology.
HUMMM...
WHOOSH...
Ŷ The new high efficiency compressor may run faster
and longer than your old refrigerator and you may
hear a high-pitched hum or pulsating sound while it
is operating.
Ŷ <RXPD\KHDUDZKRRVKLQJVRXQGZKHQWKHGRRUV
FORVH7KLVLVGXHWRSUHVVXUHHTXDOL]LQJZLWKLQWKH
refrigerator.
Ŷ $IWHUGLVSHQVLQJLFHDPRWRUZLOOFORVHWKHLFHFKXWH
to keep warn room air from entering the ice bucket,
PDLQWDLQLQJLFHDWDIUHH]LQJWHPSHUDWXUH
The hum of the motor closing the ice chute is
normal, shortly after dispensing ice.
Ŷ
You may hear the fans spinning at high speeds.
This happens when the refrigerator is first plugged
in, when the doors are opened frequently or when
a large amount of food is added to the refrigerator
RUIUHH]HUFRPSDUWPHQWV7KHIDQVDUHKHOSLQJWR
maintain the correct temperatures.
Ŷ
The fans change speeds in order to provide optimal
cooling and energy savings.
CLICKS, POPS,
CRACKS and SNAPS
Ŷ You may hear cracking or popping sounds when
the refrigerator is first plugged in. This happens as
the refrigerator cools to the correct temperature.
Ŷ The compressor may cause a clicking or chirping
sound when attempting to restart (this could take
XSWRPLQXWHV
Ŷ Expansion and contraction of cooling coils during
and after defrost can cause a cracking or popping
sound.
Ŷ On models with an ice maker, after an ice making
cycle, you may hear the ice cubes dropping into the
ice bucket.
Ŷ After dispensing ice, a motor will close the ice chute
to keep warm room air from entering the ice bucket,
PDLQWDLQLQJLFHDWDIUHH]LQJWHPSHUDWXUH
WATER SOUNDS
Ŷ The flow of refrigerant through the cooling coils may
make a gurgling noise like boiling water.
Ŷ Water dropping on the defrost heater can cause
DVL]]OLQJSRSSLQJRUEX]]LQJVRXQGGXULQJWKH
defrost cycle.
Ŷ A water dripping noise may occur during the defrost
cycle as ice melts from the evaporator and flows
into the drain pan.
Ŷ Closing the door may cause a gurgling sound due to
SUHVVXUHHTXDOL]DWLRQ
Do you hear what I hear? These conditions are normal.
START UP COOLING
,WFDQWDNHXSWRKRXUVIRUWKHUHIULJHUDWRUDQG
IUHH]HUWHPSHUDWXUHVWRPDWFKWKHGLVSOD\'XULQJWKDW
WLPHUHIULJHUDWRUDQGIUHH]HUGRRURSHQLQJVVKRXOGEH
PLQLPL]HG
TIPS
Ŷ )UHH]HUFRROVILUVW
Ŷ 5HIULJHUDWRUFRPSDUWPHQWFRROVODVWLWPD\WDNH
VHYHUDOKRXUVDIWHUWKHIUHH]HU
Ŷ 7XUQLQJRIILFHPDNHUPDNHVERWKIUHVKIRRGDQG
IUHH]HUIRRGFRROIDVWHU
Normal Operating Conditions.
TROUBLESHOOTING TIPS: Normal Operating Conditions
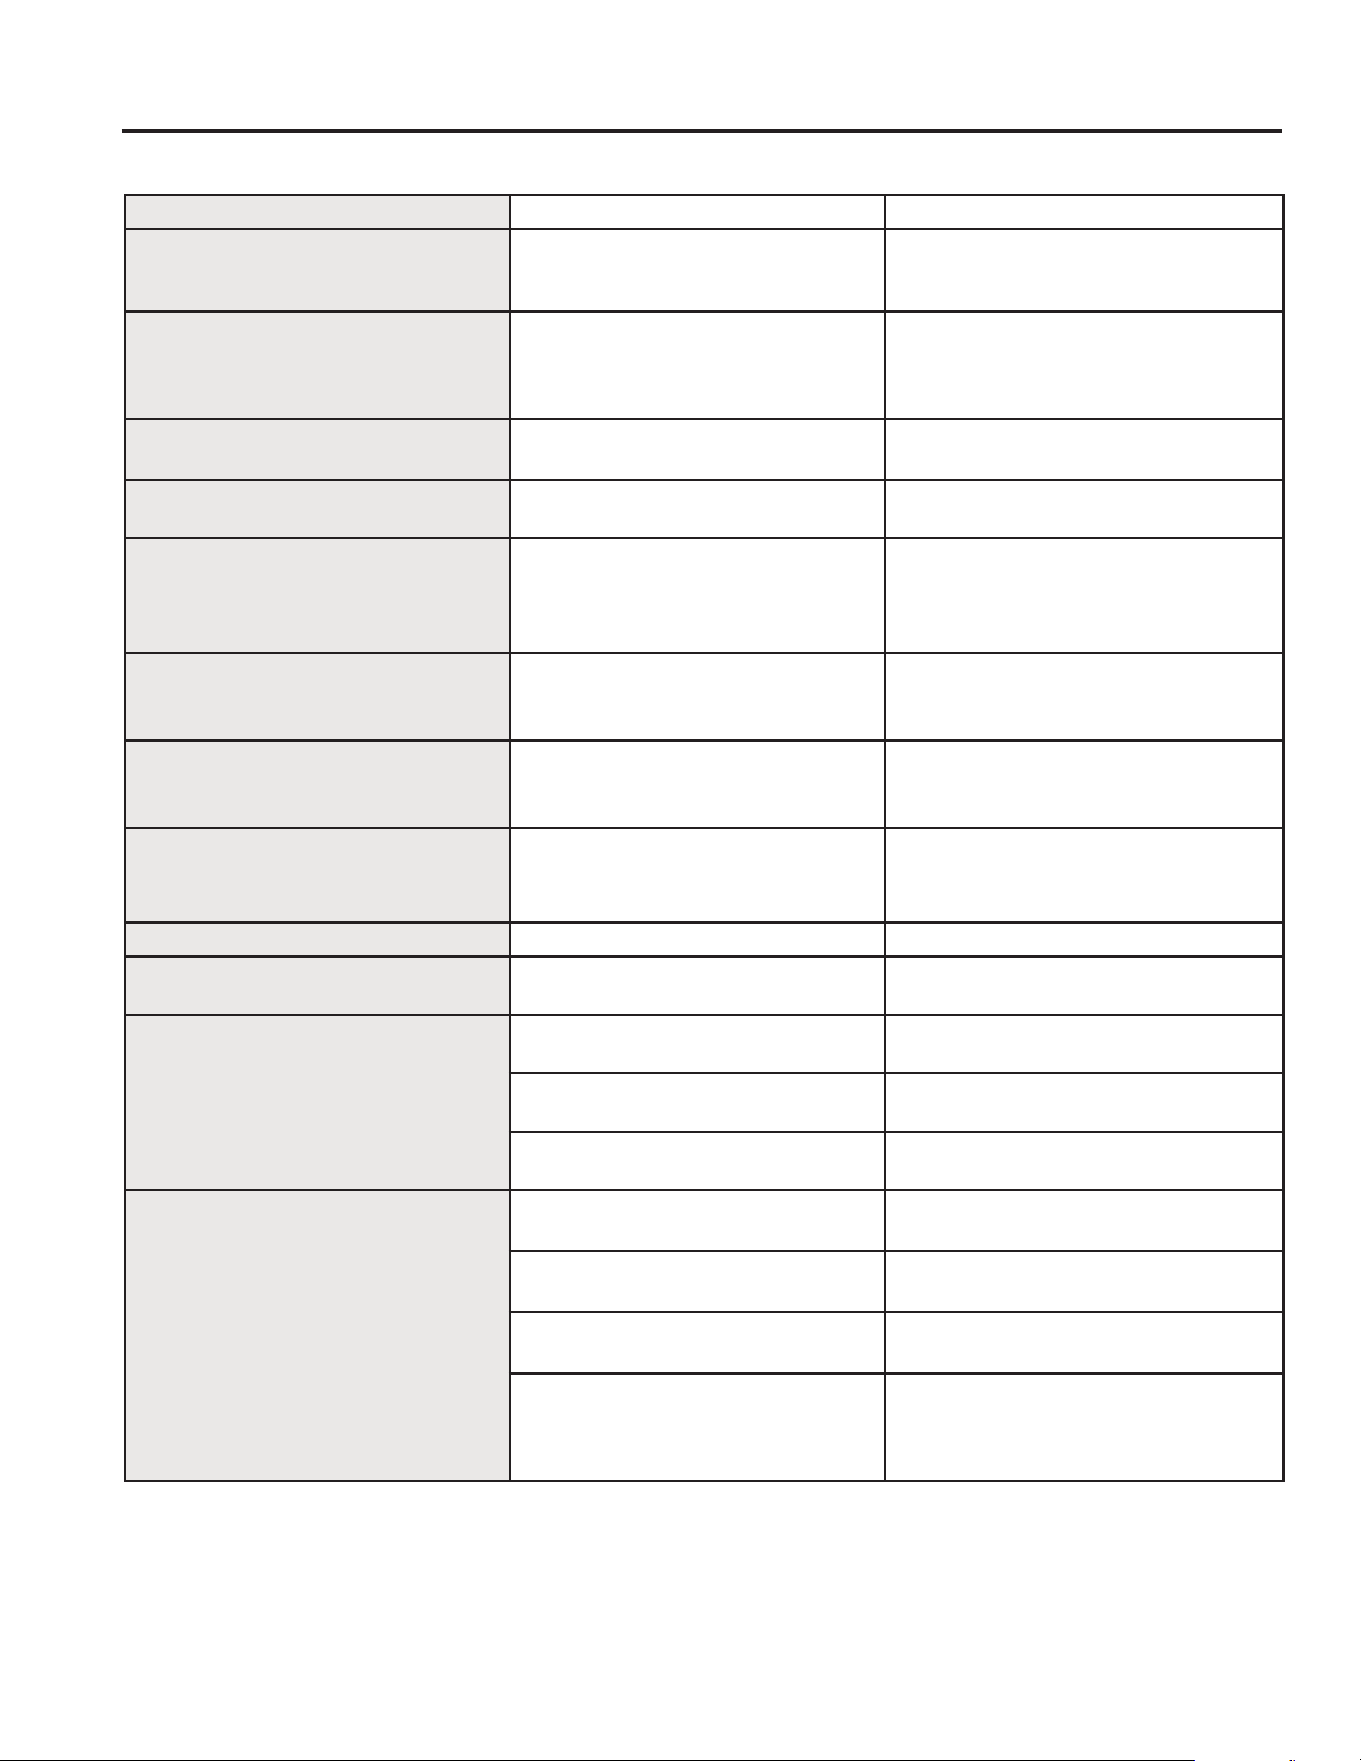
46 49-60792 Rev. 3
Problem Possible Causes What to Do
Water filter indicated as installed
incorrectly or a leak is present on
cap control panel.
Water filter installed backward or is
leaking.
&KHFNIRUOHDN,IQROHDNLVSUHVHQW
UHPRYHILOWHUE\SDVVSOXJURWDWH
180° and reinstall.
³:DUQLQJ7ULDQJOH´LVOLW
5HSODFH)LOWHU5HSODFH:DWHU)LOWHU
is lit
2YHU'XHOLJKWLVOLW
Water filter leaking or needs
replacing
Water filter backwards
Replace water filter, check for leak
Remove filter, rotate 180° and reinstall
'LVSHQVHU2IILVOLW Control A, B & C
Wrong filter installed
Replace filter with proper filter
Remove filter, rotate 180° and reinstall
Not filtering )LOWHUE\SDVVLQVWDOOHG&RQWUROV%
C
,QVWDOOFRUUHFWZDWHUILOWHU
5HVHW)LOWHULVOLW Water filter leaking or needs
replacing
Replace water filter, or install filter
bypass **
3UHVVDQGKROG5HVHW)LOWHUIRU
VHFRQGVWRUHVHW&RQWURO'RQO\
Water filter indicator light is not lit This is normal. This indicator will
turn on to tell you that you need to
replace the filter soon.
See About the Water Filter for more
information.
+DQGOHLVORRVHKDQGOHKDVDJDS Handle needs adjusting See Attach Fresh Food Handle and
$WWDFKWKH)UHH]HU+DQGOHVHFWLRQVIRU
detailed instructions.
Refrigerator beeping This is door alarm -Turn off or disable with door closed
,IGRRURSHQDQGDODUPLVVRXQGLQJ
\RXFDQRQO\VQRR]HWKHDODUP
Not cooling The cooling system is off See About Controls.
:DWHUKDVSRRUWDVWHRGRU Water dispenser has not been used
for a long time
'LVSHQVHZDWHUXQWLODOOZDWHULQ
system is replenished.
Water in glass is warm* Normal when refrigerator is first
installed
Wait 24 hours for the refrigerator to
completely cool down.
Water dispenser has not been used
for a long time
'LVSHQVHZDWHUXQWLODOOZDWHULQ
system is replenished
Water system has drained Allow several hours for replenished
supply to chill
Water dispenser does not work* Water supply line turned off or not
connected
See Installing the Water Line
:DWHUILOWHUFORJJHGRUILOWHUE\SDVV
plug not installed
Replace filter cartridge or remove filter
and install bypass plug**
Air may be trapped in the water
system
Press the dispenser arm for at least 5
minutes.
:DWHULQUHVHUYRLULVIUR]HQEHFDXVH
the controls are set too cold
Set the refrigerator control to a warmer
VHWWLQJDQGZDLWKRXUV,IWKHZDWHU
does not dispense after 24 hours, call
for service
*Select Models Only
6RPHPRGHOVGRQRWFRPHHTXLSSHGZLWKWKHILOWHUE\SDVVSOXJ7RREWDLQDIUHHE\SDVVSOXJFDOO*(&$5(6,Q&DQDGDFDOO
Troubleshooting Tips... Before you call for service
Save time and money! Review the charts on the following pages first and you may not need to call for service.
TROUBLESHOOTING TIPS
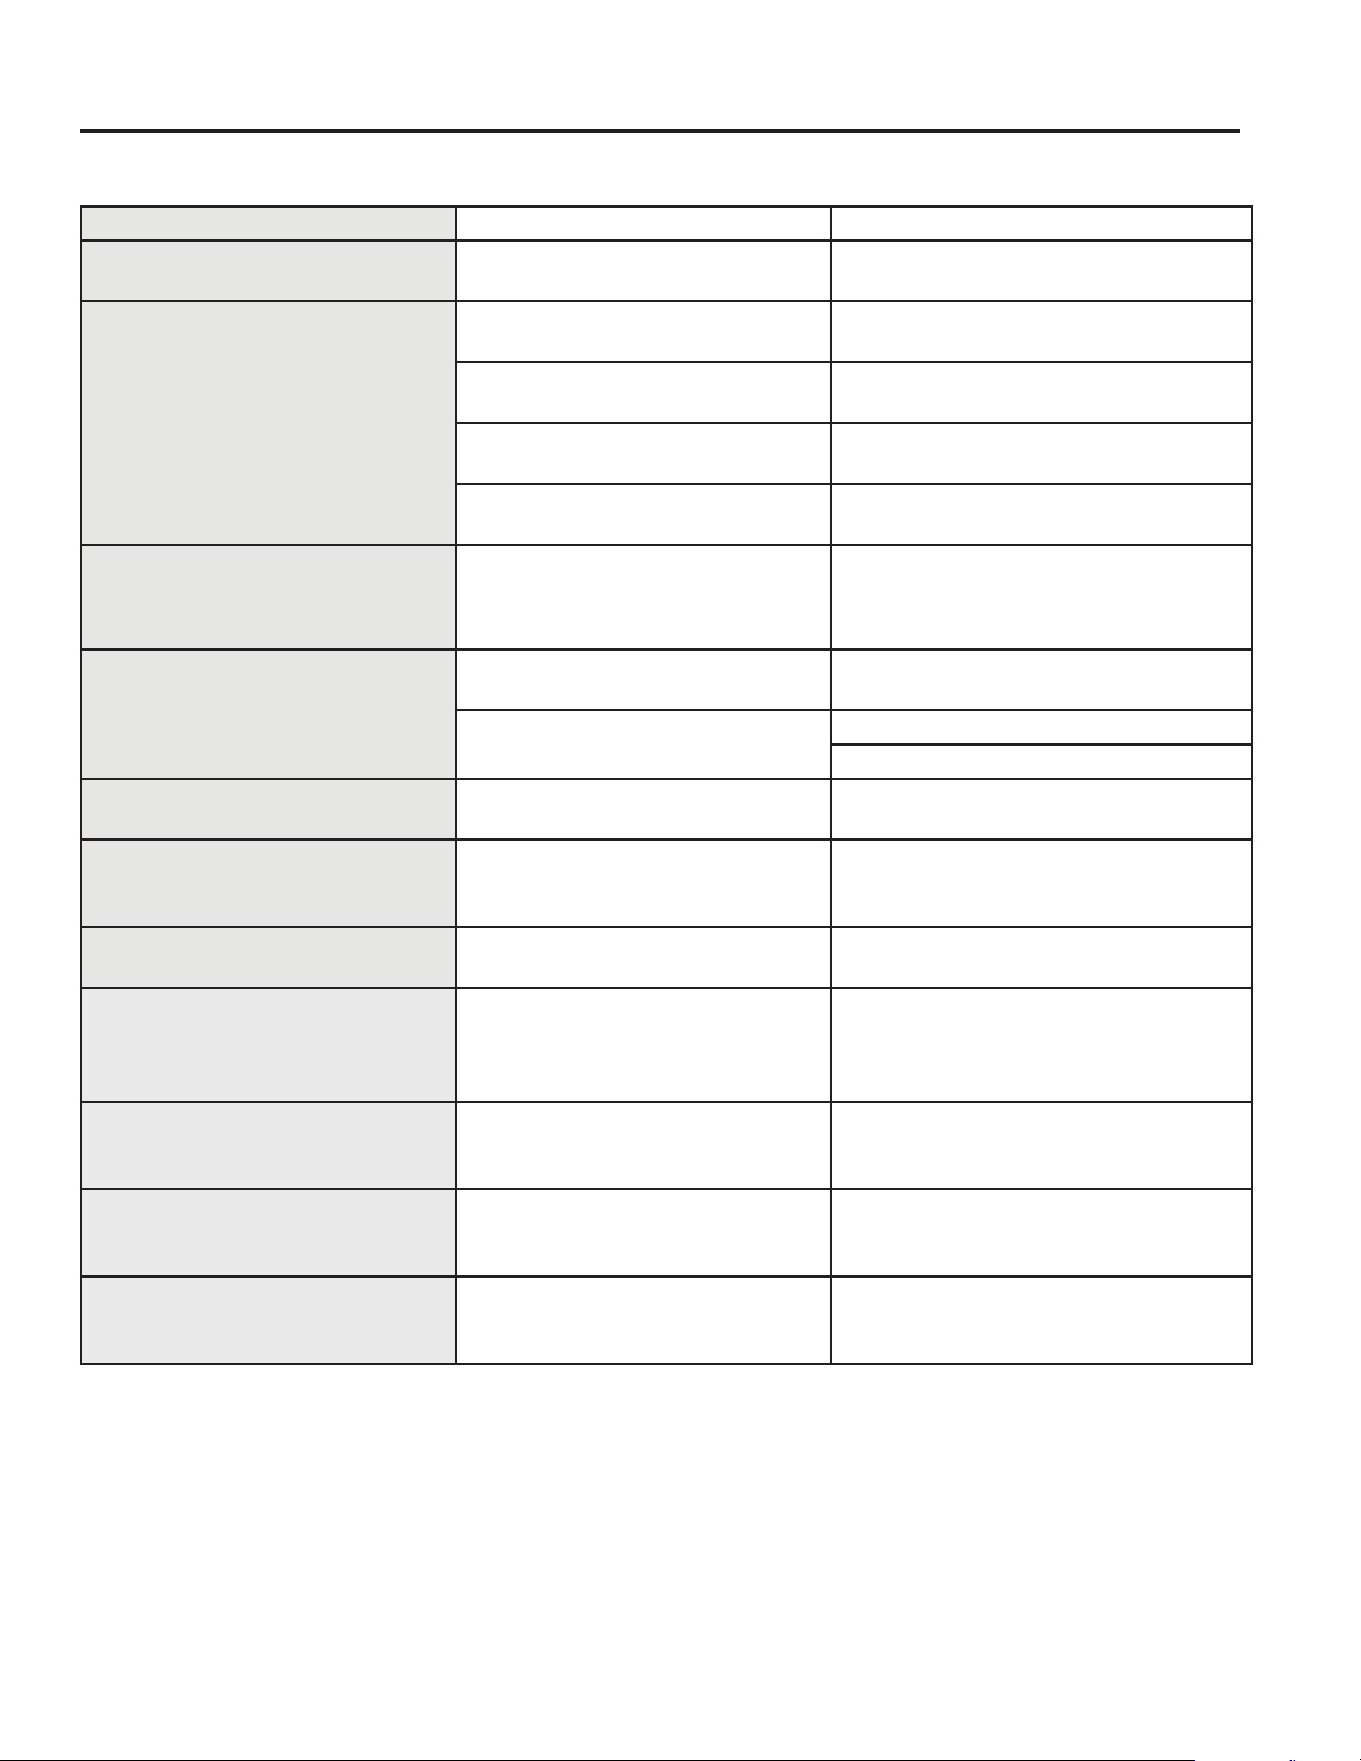
49-60792 Rev. 3 47
TROUBLESHOOTING TIPS
*Select Models Only
6RPHPRGHOVGRQRWFRPHHTXLSSHGZLWKWKHILOWHUE\SDVVSOXJ7RREWDLQDIUHHE\SDVVSOXJFDOO*(&$5(6,Q&DQDGDFDOO
Problem Possible Causes What to Do
Water spurting from dispenser* Newly installed filter cartridge Run water from the dispenser for 5
PLQXWHVDERXWJDOORQV
No water or ice cube production* Supply line or shutoff valve is
clogged
Call a plumber
Water filter is clogged Replace filter cartridge or remove filter
and install bypass plug**
)LOWHUFDUWULGJHQRWSURSHUO\LQVWDOOHG Remove and reinstall filter cartridge,
being certain that it locks in place.
,FHPDNHULVWXUQHGRII Check that the ice maker is turned on.
See About the Automatic Ice Maker.
Water is leaking from dispenser* Air may be present in the water line
system, causing water to drip after
being dispensed
'LVSHQVHZDWHUIRUDWOHDVWPLQXWHVWR
remove air from system
AUTO FILLXQGHUILOOQRILOO Not all containers work with
AUTOFILL
Try different container
Error message See page 14
Clean sensor. See page 14.
AUTO FILL overfills* Not all containers work with
AUTO FILL
Try different container
)UHH]HUFRROLQJIUHVKIRRGQRW
cooling
Normal, when refrigerator first
plugged in or after extended power
outage
Wait 24 hours for temperature in both
compartments to reach selected
temperatures.
,FHGLVSHQVHURSHQVDIWHUFORVLQJ
IUHH]HUGUDZHU
Normal The ice dispenser door may open after
FORVLQJIUHH]HUGRRUWRDOORZDFFHVV
Low brewing flow rate There may have been a dent at the
ERWWRPRI.&XSFDXVLQJWKHSLQ
to pierce the filter allowing coffee
grounds clogging the bottom pin
$YRLGXVLQJGDPDJHGGHQWHG.FXSV
and clean the lower needle before next
brew
/RZEUHZLQJIORZUDWHZDWHUGULSV
from inner door
Top needle of the brewer clogged 8QFORJWKHWRSQHHGOHKROHVXVLQJD
paper clip and rinse brewer. Rinse
brewer after every use.
Brewer is not detected or hot water
leaking from top of the brewer
,QFRUUHFWDVVHPEO\RIEUHZHULQWKH
bracket
0DNHVXUHWKH.HXULJ/RJRLVLQWKH
front. Push brewer all the way in the
brackets
Coffee dispensed with splash or
bubble bursting
Blocked vent hole in the brewer Make sure the vent hole at the bottom
of the brewer is clear from food or any
other contamination
Troubleshooting Tips... Before you call for service
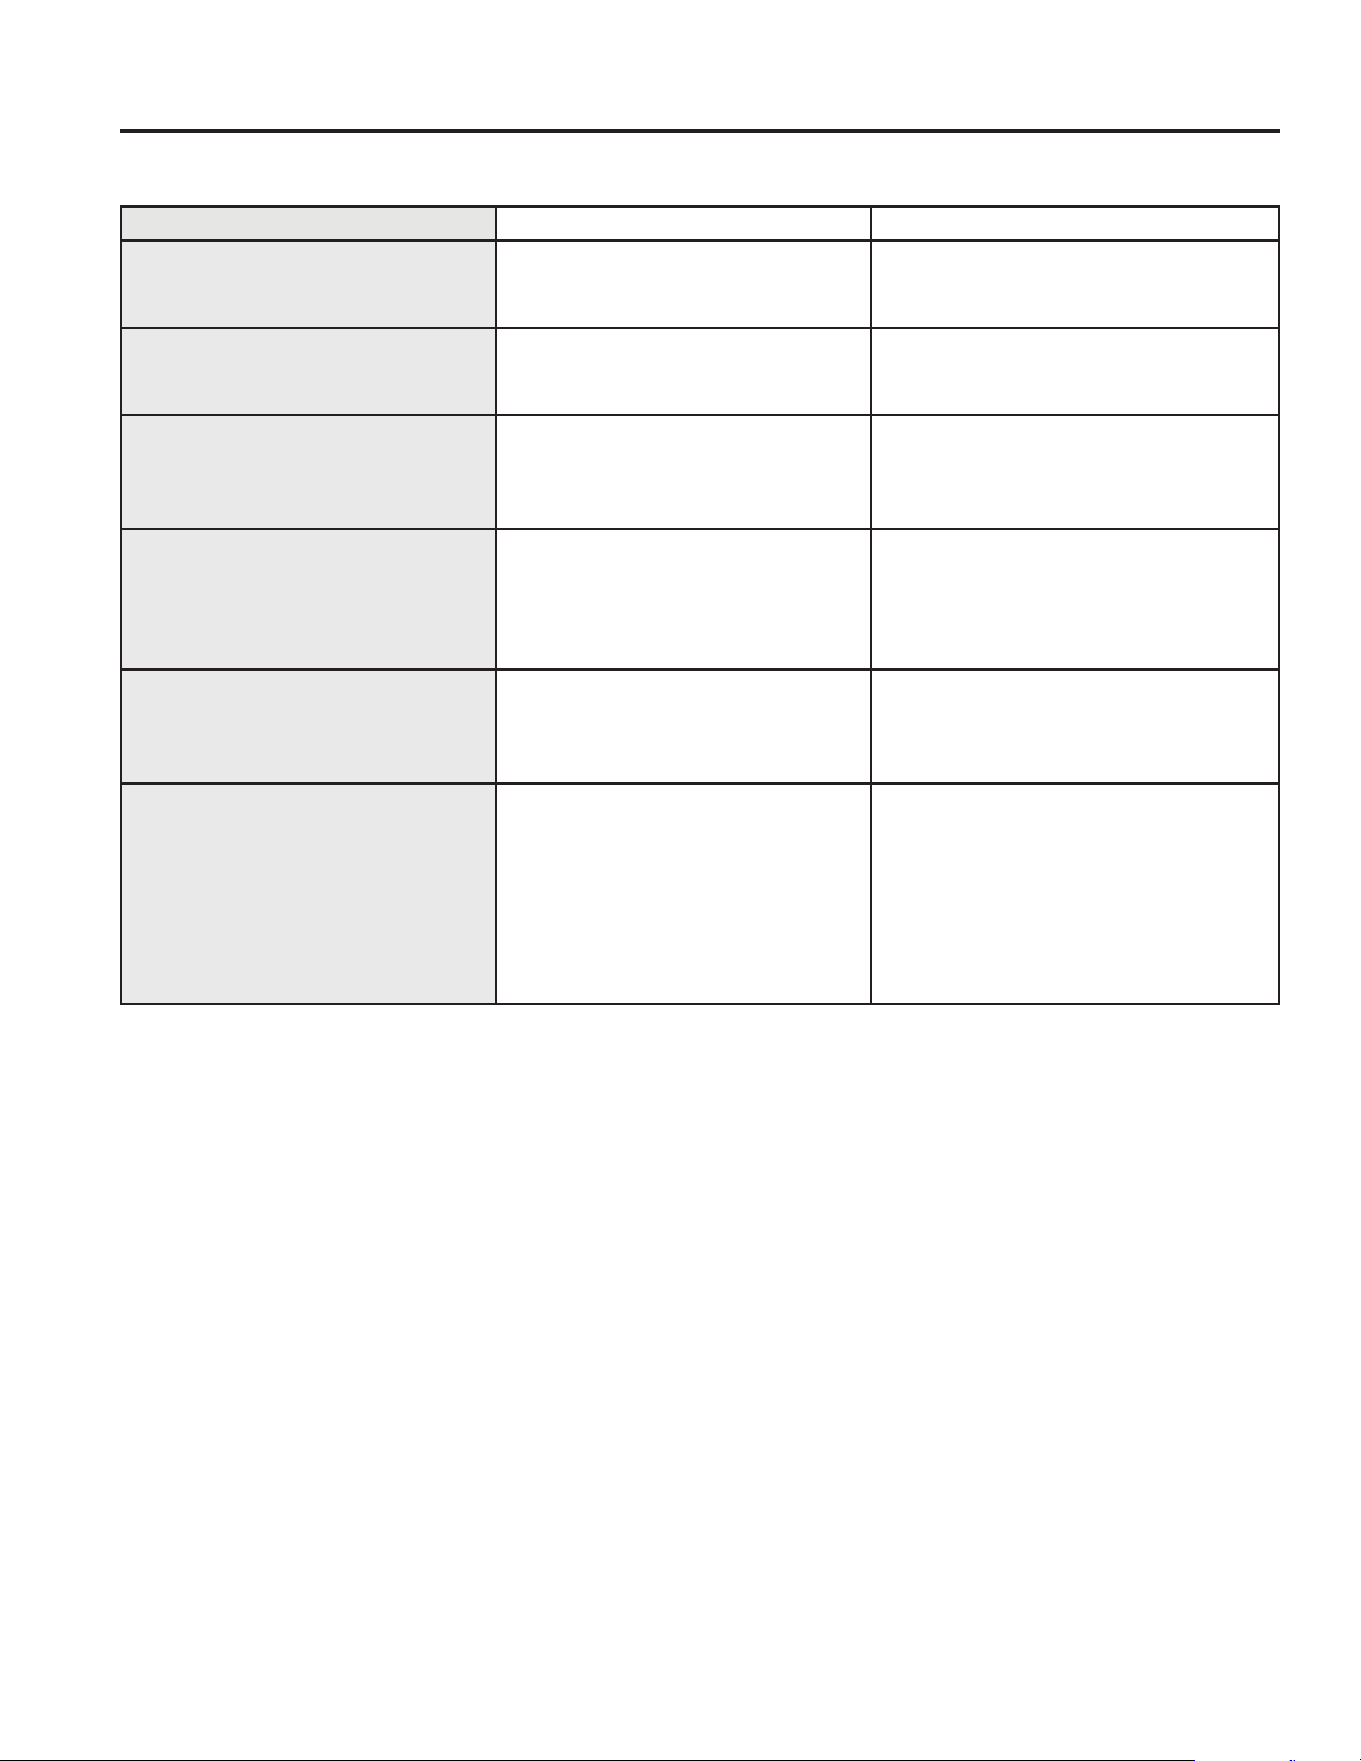
48 49-60792 Rev. 3
*Select Models Only
6RPHPRGHOVGRQRWFRPHHTXLSSHGZLWKWKHILOWHUE\SDVVSOXJ7RREWDLQDIUHHE\SDVVSOXJFDOO*(&$5(6,Q&DQDGDFDOO
Problem Possible Causes What to Do
Beverage quality not as expected You may be using non-standard or
RXWGDWHG.&XSV
5HFRPPHQGXVLQJRIILFLDO.HXULJ
.FXSVWKDWDUHQRWSDVWH[SLUDWLRQDQG
have not been damaged
Liquid drips from the brewer after
brewer cycle is completed and the
brewer is removed from the bracket
,WLVSRVVLEOHIRUOLTXLGVWREH
retained by the brewer and drip
when it is removed
8VHDFORWKRUFRQWDLQHUWRFDSWXUHWKH
drips when brewer is removed
'HOD\ZKHQXVLQJ.HXULJ.FXS3RG
dispenser
To ensure a quality beverage is
delivered, a short delay is required
to ensure the refrigerator is
operating correctly
Ensuring consistent, quality operation
requires the refrigerator to delay
dispense for a short period of time
After brewing, my powdered
beverage is not fully cleared from
the used pod
'HSHQGLQJRQVL]HVHOHFWHGWKH
powder may not dissolve fully.
Some powdered beverages develop
into ‘clumps’ when left sitting for
some time
Shake the powdered pods before
brewing to break up these clumps and
DOORZEHWWHUFOHDULQJ)RUSRZGHUHG
beverage with no filter, use the Cocoa
cycle selection
Brewer lid is difficult to close .FXSLVQRWIXOO\VHDWHG 3UHVV.FXSDOOWKHZD\GRZQLQWRWKH
brewer prior to closing the lid. Lower
QHHGOHPXVWSXQFWXUH.FXSEIRUH
closing the brewer lid
Brewer leaks during the brew cycle Trouble in closing brewer lid or
GDPDJHG.FXS
3UHVV.FXSDOOWKHZD\GRZQLQWRWKH
brewer prior to closing the lid. Lower
QHHGOHPXVWSXQFWXUH.FXSEIRUH
closing the brewer lid. Recommend
XVLQJRIILFLDO.HXULJ.FXSVWKDWKDYH
not been damaged and have a good
seal between the top cover and plastic
bottom
Troubleshooting Tips... Before you call for service
TROUBLESHOOTING TIPS

49-60792 Rev. 3 49
TROUBLESHOOTING TIPS/TRUTH OR MYTH
Truth or Myth? Answer Explanation
The refrigerator water filter may require
replacement prior to six months
758( The water filter indicator will indicate the need to replace the water
filter every six months or 170 gallons of water dispensed (select
PRGHOVRQO\:DWHUTXDOLW\YDULHVIURPFLW\WRFLW\,IZDWHUIORZIURP
the dispenser slows, or ice production decreases, the water filter
should be replaced, even though the filter indicator may not indicate
the need for replacement.
The automatic ice maker in my refrigerator will
produce ice when the refrigerator is plugged
into a power receptacle.
MYTH The refrigerator must be connected to water, and the ice maker
must be turned on. Make sure the ice maker is turned on, only after
the water line is connected and water is turned on. The ice maker
can be turned onoff from the controls and ensure the ice maker
is on, as indicated on the refrigerator control panel. See About the
Automatic Ice Maker.
After the refrigerator has been plugged in and
FRQQHFWHGWRZDWHU,ZLOOLPPHGLDWHO\KDYH
unlimited chilled water available from the
water dispenser.
MYTH The water dispenser tank located inside the refrigerator stores water
for dispensing. The water in this tank requires 24 hours to chill after
installation. High usage conditions will not allow time for the water
to chill.
After water dispenses, a few drops of water
are normal.
758( A few drops of water may fall from the dispenser, after the dispenser
SDGGOHKDVEHHQUHOHDVHG7RPLQLPL]HWKHGURSVUHPRYHWKHJODVV
slowly from the dispenser.
,ZLOOQHYHUVHHIURVWLQVLGHWKHIUHH]HU
compartment.
MYTH )URVWLQVLGHWKHIUHH]HUW\SLFDOO\LQGLFDWHVWKDWWKHGRRULVQRW
SURSHUO\VHDOHGRUKDVEHHQOHIWRSHQ,IIURVWLVIRXQGFOHDUWKH
frost using a plastic spatula and towel, then check to ensure that no
IRRGSDFNDJHVRUFRQWDLQHUVDUHSUHYHQWLQJWKHIUHH]HUGRRUIURP
closing. Check the refrigerator control panel to ensure the door
alarm is on.
When the refrigerator is installed, or after
UHSODFLQJWKHZDWHUILOWHU,PXVWGLVSHQVH
water for five minutes.
758(
A newly installed refrigerator or water filter contains air in the water
lines. Press the dispenser paddle and dispense cold water for at
least 5 minutes to remove air from the water line, and flush the filter.
To fill the ice bucket to the maximum capacity,
,VKRXOGGLVSHQVHDQGKRXUVDIWHU
installation.
758( 'LVSHQVLQJFXEHVKRXUVDQGKRXUVDIWHULQVWDOODWLRQ
allows ice to disperse within the ice bucket, which in turns calls on
the ice maker to produce additional ice. Normal ice production =
100 cubes in 24 hours.
,FDQXVHWKHZDWHUILOWHUE\SDVVSOXJWR
determine if the filter requires replacement.
758( 'HFUHDVHLQIORZIURPWKHZDWHUGLVSHQVHURUGHFUHDVHGLFH
SURGXFWLRQPD\LQGLFDWHWKHQHHGWRUHSODFHWKHZDWHUILOWHU,QVWDOO
the water filter bypass plug (provided with the refrigerator on some
PRGHOVDQGFKHFNIORZIURPWKHGLVSHQVHU,IZDWHUIORZUHWXUQVWR
normal with the bypass plug in place, replace the water filter.
The top of the refrigerator doors will always be
aligned.
MYTH Several things can affect the fresh food door alignment, including
WKHIORRUWKHUHIULJHUDWRULVLQVWDOOHGRQDQGORDGLQJRIGRRUV,IWKH
WRSRIWKHIUHVKIRRGGRRUVDUHQRWDOLJQHGXVHD´DOOHQZUHQFK
WRDGMXVWWKHULJKWOHIWKDQGGRRU7KHDGMXVWPHQWVFUHZLVORFDWHG
RQWKHERWWRPULJKWRUOHIWKDQGVLGHRIWKHGRRURSHQWKHIUHH]HU
door to access the screw.
Refrigerator door handles can be easily
tightened.
758( ,IGRRUKDQGOHVDUHORRVHRUKDYHDJDSWKHKDQGOHFDQEHDGMXVWHG
XVLQJD´DOOHQZUHQFKRQVHWVFUHZVORFDWHGRQWKHHQGVRIWKH
handles.
There may be odor and taste problems with
your ice.
758( After starting the ice maker, throw away 24 hours of ice production
to avoid odor and taste problems.
,FDQPDNHILQHDGMXVWPHQWVWRWKHIUHVKIRRG
doors to align them.
758( ,IWKHIUHVKIRRGGRRUVDUHQRWDOLJQHGXVHD´$OOHQZUHQFKWR
adjust the right hand door. The adjustment screw is located on the
ERWWRPRIWKHULJKWOHIWKDQGGRRU2SHQWKHIUHH]HUGRRUWRDFFHVV
Truth or Myth
Truth or Myth
SERVICE
Before you call for service, review the detailed troubleshooting tips in the Owner’s manual.
,IQHHGHGVHUYLFHFDQEHVFKHGXOHGE\YLVLWLQJXVRQOLQHGEAppliances.com or calling
800.GE.CARES 800.432.2737. ,Q&DQDGDYLVLWGEAppliances.ca or call 800.561.3344.
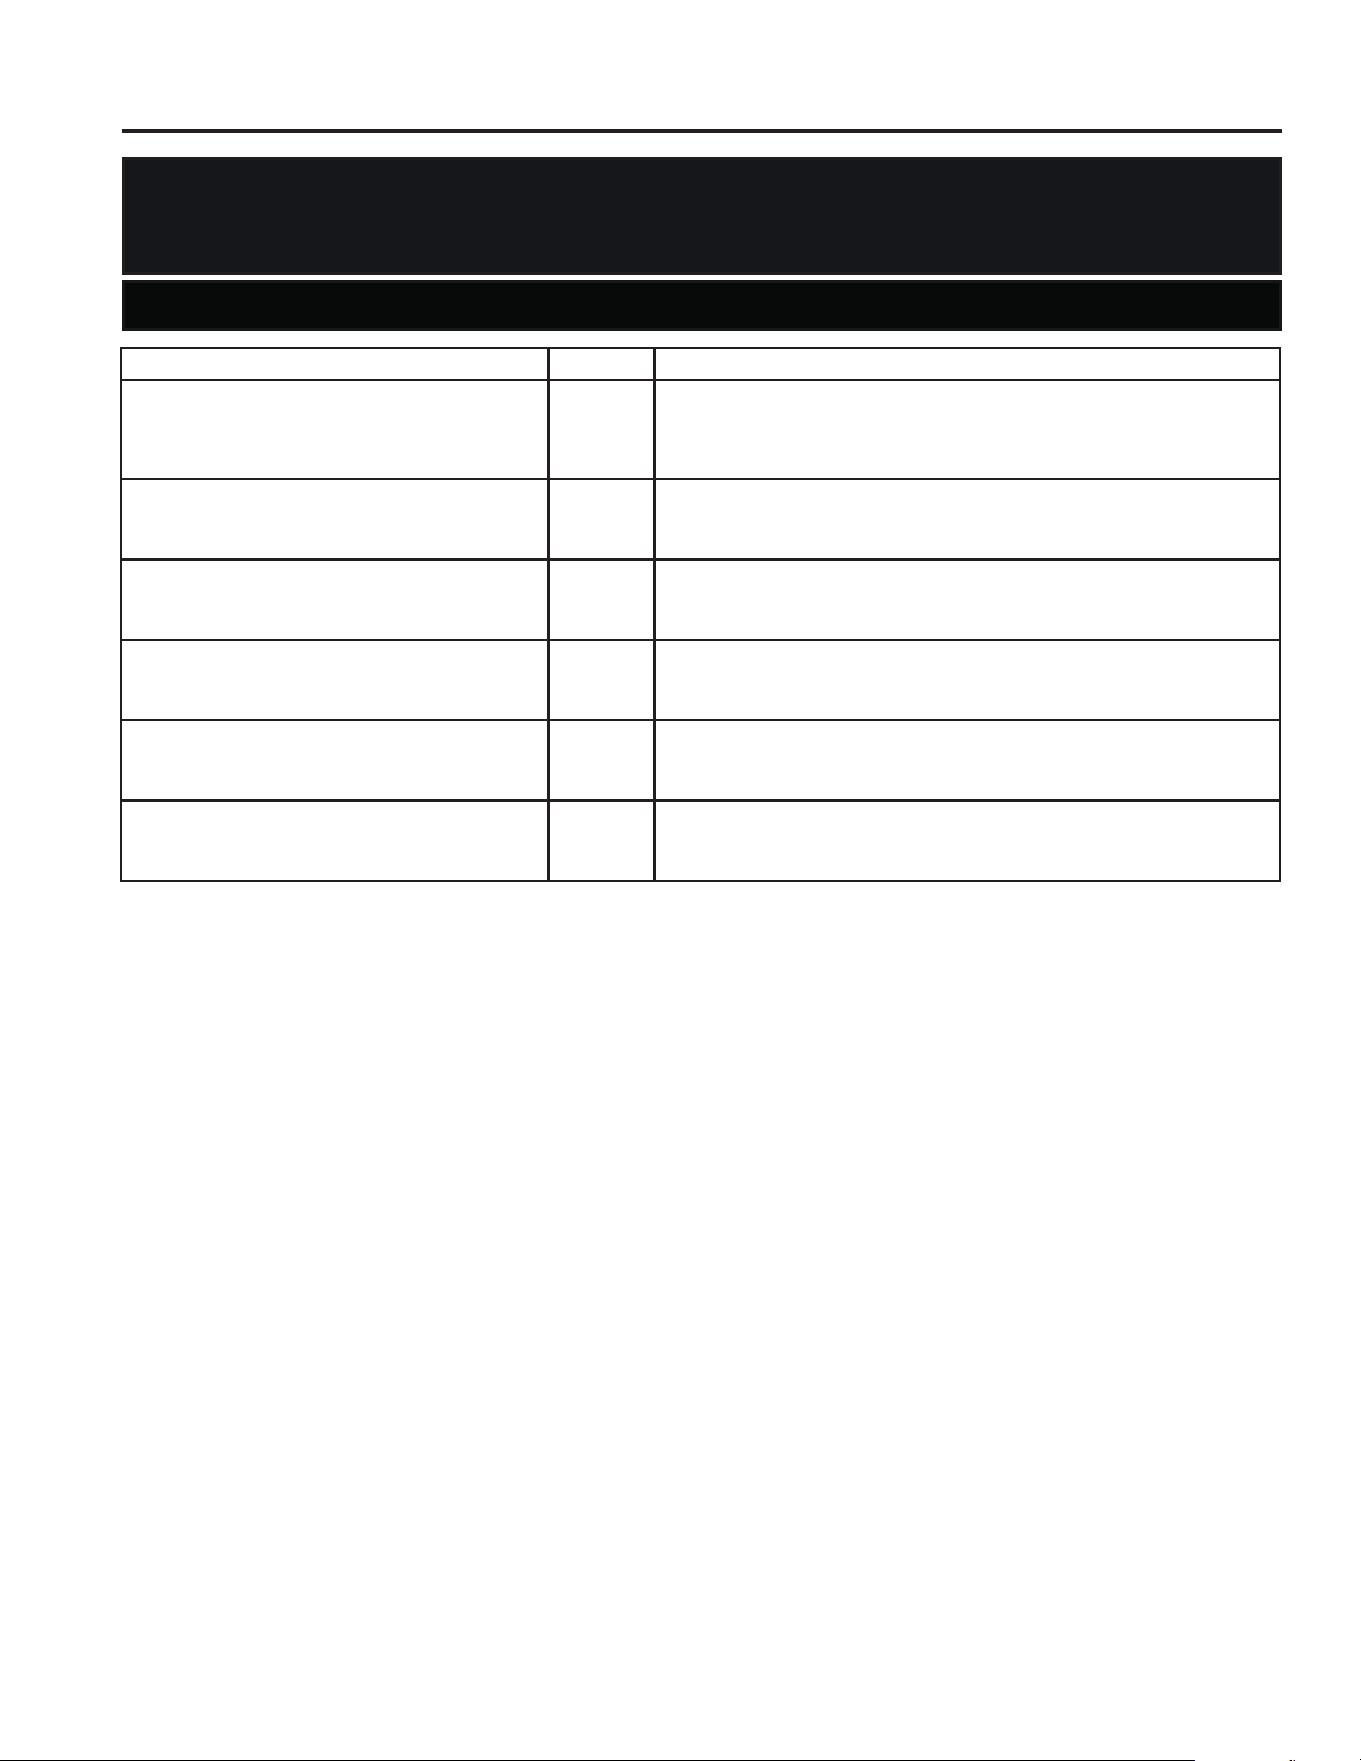
50 49-60792 Rev. 3
Truth or Myth? Answer Explanation
'RRUKDQGOHVVKRXOGDOZD\VEHUHPRYHGIRU
installation.
MYTH ,IWKHGRRUVPXVWEHUHPRYHGGRQRWUHPRYHWKHKDQGOHVRULIWKH
refrigerator will fit easily through the passage way opening. Adjust
KDQGOHVWKDWDUHORRVHRUKDYHDJDSE\DGMXVWLQJ´VHWVFUHZV
on either end of handles.
'RRUUHPRYDOLVDOZD\VUHTXLUHGIRU
installation.
MYTH &KHFNFKDUWRQUHYHUVHVLGHRIWKLVLQVWUXFWLRQ'RRUVVKRXOGRQO\EH
removed when necessary to prevent damage from passage way or
access to final location.
Refrigerator doors that won’t close after
installation, can be adjusted to close properly.
758( 'RRUPHFKDQLVPZRUNVEHVWLILQVWDOOHGDW,ILQVWDOOHGDW
remove the door from the mid hinge, and swing the door 180° before
reinstalling. See Reinstalling the Refrigerator Doors.
There is an adjustment to rear wheels. MYTH )URQWOHYHOLQJOHJVDUHDGMXVWDEOHDQGVKRXOGEHXVHGWREDODQFHWKH
refrigerator. Leveling legs are used to make initial fresh food door
adjustment.
Check for leaks after all water connections
are made.
758( While purging the air from the water system, check all water line
connections for leaks. Check the connection to the household water
supply at back of refrigerator, and door water line connect.
Any packaging residue can be cleaned off the
refrigerator using any cleaner.
MYTH 'RQRWXVHZD[SROLVKEOHDFKRURWKHUSURGXFWVFRQWDLQLQJFKORULQH
on Stainless Steel panels, door handles and trim. Check this
LQVWUXFWLRQXQGHU³&OHDQLQJWKH2XWVLGH´IRUIXOOGHWDLOV
6RPHPRGHOVGRQRWFRPHHTXLSSHGZLWKWKHILOWHUE\SDVVSOXJ7RREWDLQDIUHHE\SDVVSOXJFDOO*(&$5(6,Q&DQDGDFDOO
Truth or Myth
Truth or Myth
SERVICE
Before you call for service, review the detailed troubleshooting tips in the Owner’s manual.
,IQHHGHGVHUYLFHFDQEHVFKHGXOHGE\YLVLWLQJXVRQOLQHGEAppliances.com or calling
800.GE.CARES 800.432.2737. ,Q&DQDGDYLVLWGEAppliances.ca or call 800.561.3344.
TROUBLESHOOTING TIPS/TRUTH OR MYTH
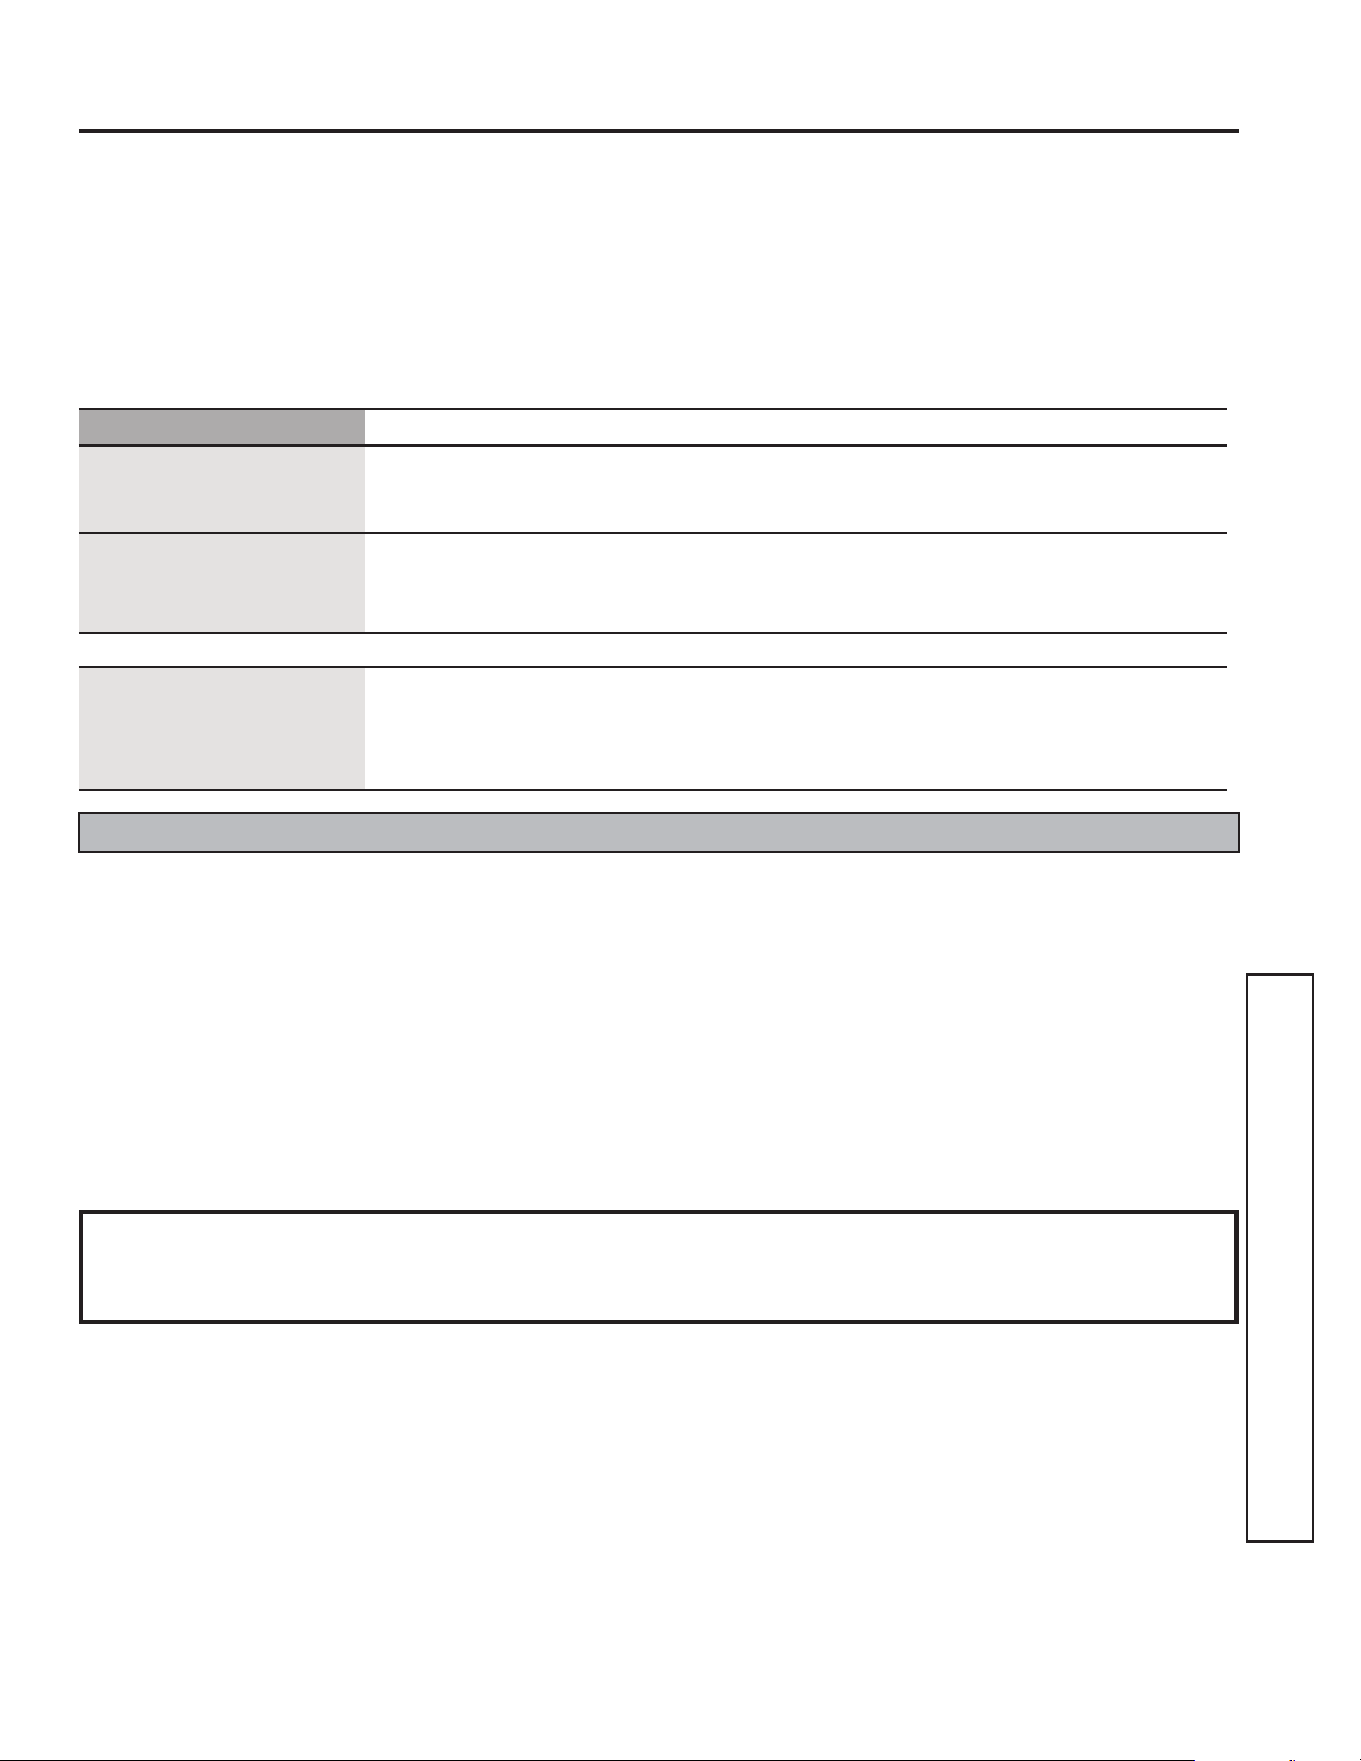
49-60792 Rev. 3 51
Ŷ Service trips to your home to teach you how to use
the product.
Ŷ,PSURSHULQVWDOODWLRQGHOLYHU\RUPDLQWHQDQFH
Ŷ)DLOXUHRIWKHSURGXFWLILWLVDEXVHGPLVXVHGRU
used for other than the intended purpose or used
commercially.
Ŷ/RVVRIIRRGGXHWRVSRLODJH
Ŷ5HSODFHPHQWRIKRXVHIXVHVRUUHVHWWLQJRIFLUFXLW
breakers.
Ŷ'DPDJHWRILQLVKVXFKDVVXUIDFHUXVWWDUQLVKRU
small blemishes not reported within 48 hours of
delivery.
Ŷ5HSODFHPHQWRIWKHZDWHUILOWHUFDUWULGJHLI
included, due to water pressure that is outside
the specified operating range or due to excessive
sediment in the water supply.
Ŷ5HSODFHPHQWRIWKHOLJKWEXOEVLILQFOXGHGRU
water filter cartridge, if included, other than as
noted above.
Ŷ'DPDJHWRWKHSURGXFWFDXVHGE\DFFLGHQWILUH
floods or acts of God.
Ŷ,QFLGHQWDORUFRQVHTXHQWLDOGDPDJHFDXVHGE\
possible defects with this appliance.
Ŷ3URGXFWQRWDFFHVVLEOHWRSURYLGHUHTXLUHGVHUYLFH
Ŷ'DPDJHFDXVHGE\DQRQ*($SSOLDQFHV%UDQG
water filter.
What GE Appliances Will Not Cover:
For the Period of: GE Appliances Will Replace
One Year
)URPWKHGDWHRIWKH
original purchase
Any part of the refrigerator which fails due to a defect in materials or workmanship.
'XULQJWKHlimited one-year warranty, GE Appliances will also provide, free of
charge, all labor and related service to replace the defective part.
Thirty Days
:DWHUILOWHULILQFOXGHG
)URPWKHRULJLQDOSXUFKDVH
date of the refrigerator
Any part of the water filter cartridge which fails due to a defect in materials or
ZRUNPDQVKLS'XULQJWKLV limited thirty-day warranty, GE Appliances will also
provide, free of charge, a replacement water filter cartridge.
GE PROFILE™ MODELS ONLY
Five Years
)URPWKHGDWHRIWKH
purchase
Any part of the sealed refrigerating system (the compressor, condenser, evaporator
DQDOOFRQQHFWLQJWXELQJZKLFKIDLOVGXHWRDGHIHFWLQPDWHULDOVRUZRUNPDQVKLS
'XULQJWKLVOimited five-year sealed refrigerating system warranty, GE Appliances
will also provide, free of charge, all labor and related service to replace the defective
part in the sealed refrigerating system.
GEAppliances.com
For US Customers, DOOZDUUDQW\VHUYLFHLVSURYLGHGE\RXU)DFWRU\6HUYLFH&HQWHUVRUDQDXWKRUL]HG&XVWRPHU
Care
®
technician. To schedule service online, visit us at geappliances.com, or call GE Appliances at 800.GE.CARES
3OHDVHKDYH\RXUVHULDOQXPEHUDQG\RXUPRGHOQXPEHUDYDLODEOHZKHQFDOOLQJIRUVHUYLFH
In Canada, call 800.661.1616.
GE Appliances Refrigerator Limited Warranty
EXCLUSION OF IMPLIED WARRANTIES
Your sole and exclusive remedy is product repair as provided in this Limited Warranty. Any implied warranties,
including the implied warranties of merchantability or fitness for a particular purpose, are limited to one year or the
shortest period allowed by law.
For US Customers: This limited warranty is extended to the original purchaser and any succeeding owner for products
SXUFKDVHGIRUKRPHXVHZLWKLQWKH86$,IWKHSURGXFWLVORFDWHGLQDQDUHDZKHUHVHUYLFHE\D*($SSOLDQFHV$XWKRUL]HG
Servicer is not available, you may be responsible for a trip charge or you may be required to bring the product to an
$XWKRUL]HG*($SSOLDQFHV6HUYLFHORFDWLRQIRUVHUYLFH,Q$ODVNDWKHOLPLWHGZDUUDQW\H[FOXGHVWKHFRVWRIVKLSSLQJRU
service calls to your home.
Some states do not allow the exclusion or limitation of incidental or consequential damages. This warranty gives you
specific legal rights, and you may also have other rights which vary from state to state. To know what your legal rights
are, consult your local or state consumer affairs office or your state’s Attorney General.
Warrantor: GE Appliances, a Haier company
Louisville, KY 40225
For Customers in Canada: This
limited warranty is extended to the original purchaser and any succeeding owner
IRUSURGXFWVSXUFKDVHGLQ&DQDGDIRUKRPHXVHZLWKLQ&DQDGD,QKRPHZDUUDQWVHUYLFHZLOOEHSURYLGHGLQDUHDV
where it is available and deemed reasonable by Mabe to provide.
Warrantor Canada: MC Commercial, Inc., Burlington, Ontario, L7R 5B6
Servicing your refrigerator may require the use of the onboard data port for diagnostics. This gives a GE
Appliances Factory Service technician the ability to quickly diagnose any issues with your appliance and
helps GE Appliances improve its products by providing GE Appliances with information on your appliance.
If you do not want your appliance data to be sent to GE Appliances, please advise your technician NOT to
submit the data to GE Appliances at the time of service.
Staple your receipt here. Proof of the original purchase
date is needed to obtain service under the warranty.
LIMITED WARRANTY
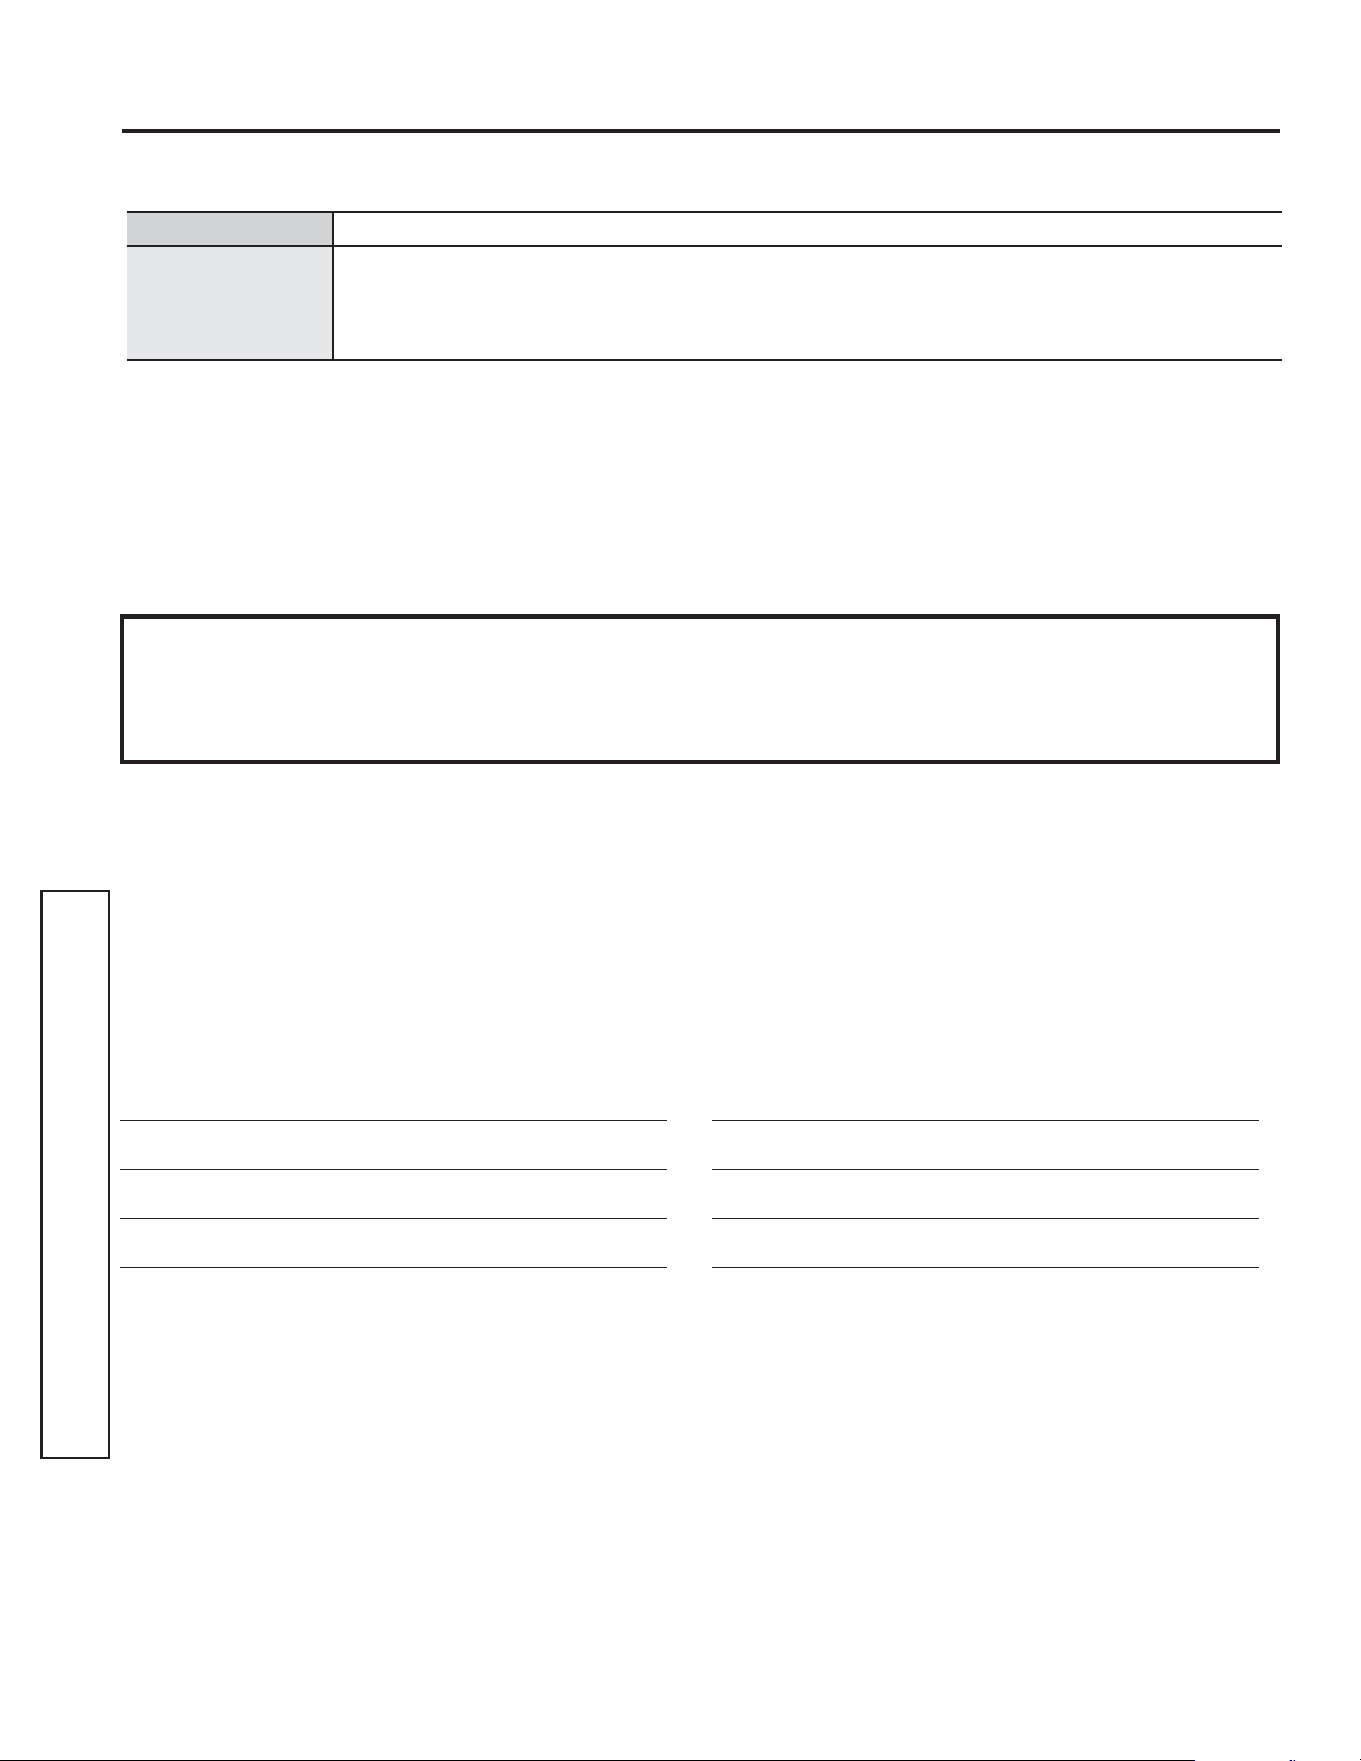
52 49-60792 Rev. 3
,I\RXU*($SSOLDQFHVSDUWIDLOVEHFDXVHRIDPDQXIDFWXULQJGHIHFWZLWKLQWKLUW\GD\VIURPWKHGDWHRIRULJLQDOSXUFKDVHIRUXVHZHZLOOJLYH\RX
a new or, at our option, a rebuilt part without charge. Return the defective part to the parts supplier from whom it was purchased together with a
FRS\RIWKH³SURRIRISXUFKDVH´IRUWKHSDUW,IWKHSDUWLVGHIHFWLYHDQGVKRZVQRVLJQVRIDEXVHLWZLOOEHH[FKDQJHG7KHZDUUDQW\GRHVQRW
FRYHUWKHIDLOXUHRISDUWVZKLFKDUHGDPDJHGZKLOHLQ\RXUSRVVHVVLRQDUHDEXVHGRUKDYHEHHQLQVWDOOHGLPSURSHUO\,WGRHVQRWFRYHUWKHFRVW
RIUHWXUQLQJWKHSDUWWRWKHVXSSOLHUIURPZKRPLWZDVSXUFKDVHGQRUGRHVLWFRYHUWKHFRVWRIODERUWRUHPRYHRULQVWDOOLWWRGLDJQRVHWKHIDXOW,W
GRHVQRWFRYHUSDUWVXVHGLQSURGXFWVLQFRPPHUFLDOXVHH[FHSWLQWKHFDVHRIDLUFRQGLWLRQLQJHTXLSPHQW,QQRHYHQWVKDOO*($SSOLDQFHVEH
liable for consequential damages.
Warrantor: GE Appliances, a Haier company
/RXLVYLOOH.<
Seller:
Name
Address
City State =LS
Signature 'DWH
Buyer:
Name
Address
City State =LS
Signature 'DWH
Staple your receipt here. Proof of the original purchase
date is needed to obtain service under the warranty.
What GE Appliances will not cover:
Ŷ Service trips to your home to teach you how to use
the product.
Ŷ ,PSURSHULQVWDOODWLRQ
Ŷ )DLOXUHRIWKHSURGXFWLILWLVDEXVHGPLVXVHGXVHGIRU
other than the intended purpose or used commercially.
Ŷ Replacement of house fuses or resetting of circuit
breakers.
Ŷ Replacement of the water filter cartridge due to water
pressure that is outside the specified operating range
or due to excessive sediment in the water supply.
Ŷ 'DPDJHWRWKHSURGXFWFDXVHGE\DFFLGHQWILUH
floods, or acts of God.
Ŷ ,QFLGHQWDORUFRQVHTXHQWLDOGDPDJHFDXVHGE\
possible defects with this appliance.
RPWFE Water Filter Cartridge Limited Warranty
This warranty is extended to the original purchaser and any succeeding owner for products purchased for home use
ZLWKLQWKH86$,Q$ODVNDWKHZDUUDQW\H[FOXGHVWKHFRVWRIVKLSSLQJRUVHUYLFHFDOOVWR\RXUKRPH
Some states do not allow the exclusion or limitation of incidental or consequential damages. This warranty gives you
specific legal rights, and you may also have other rights which vary from state to state. To know what your legal rights
are, consult your local or state consumer affairs office or your state’s Attorney General.
For Purchases Made In Iowa: This form must be signed and dated by the buyer and seller prior to the
consummation of this sale.
This form should be retained on file by the seller for a minimum of two years.
For the period of GE Appliances will replace
Thirty Days
)URPWKHGDWH
of the original
purchase
Any part of the water filter cartridge which fails due to a defect in materials
or workmanship during this limited thirty-day warranty.*
Contact us at geapplianceparts.com, or call 800.GE.CARES.
EXCLUSION OF IMPLIED WARRANTIES
Your sole and exclusive remedy is part exchange as provided in this Limited Warranty. Any implied warranties,
including the implied warranties of merchantability or fitness for a particular purpose, are limited to six months or
the shortest period allowed by law.
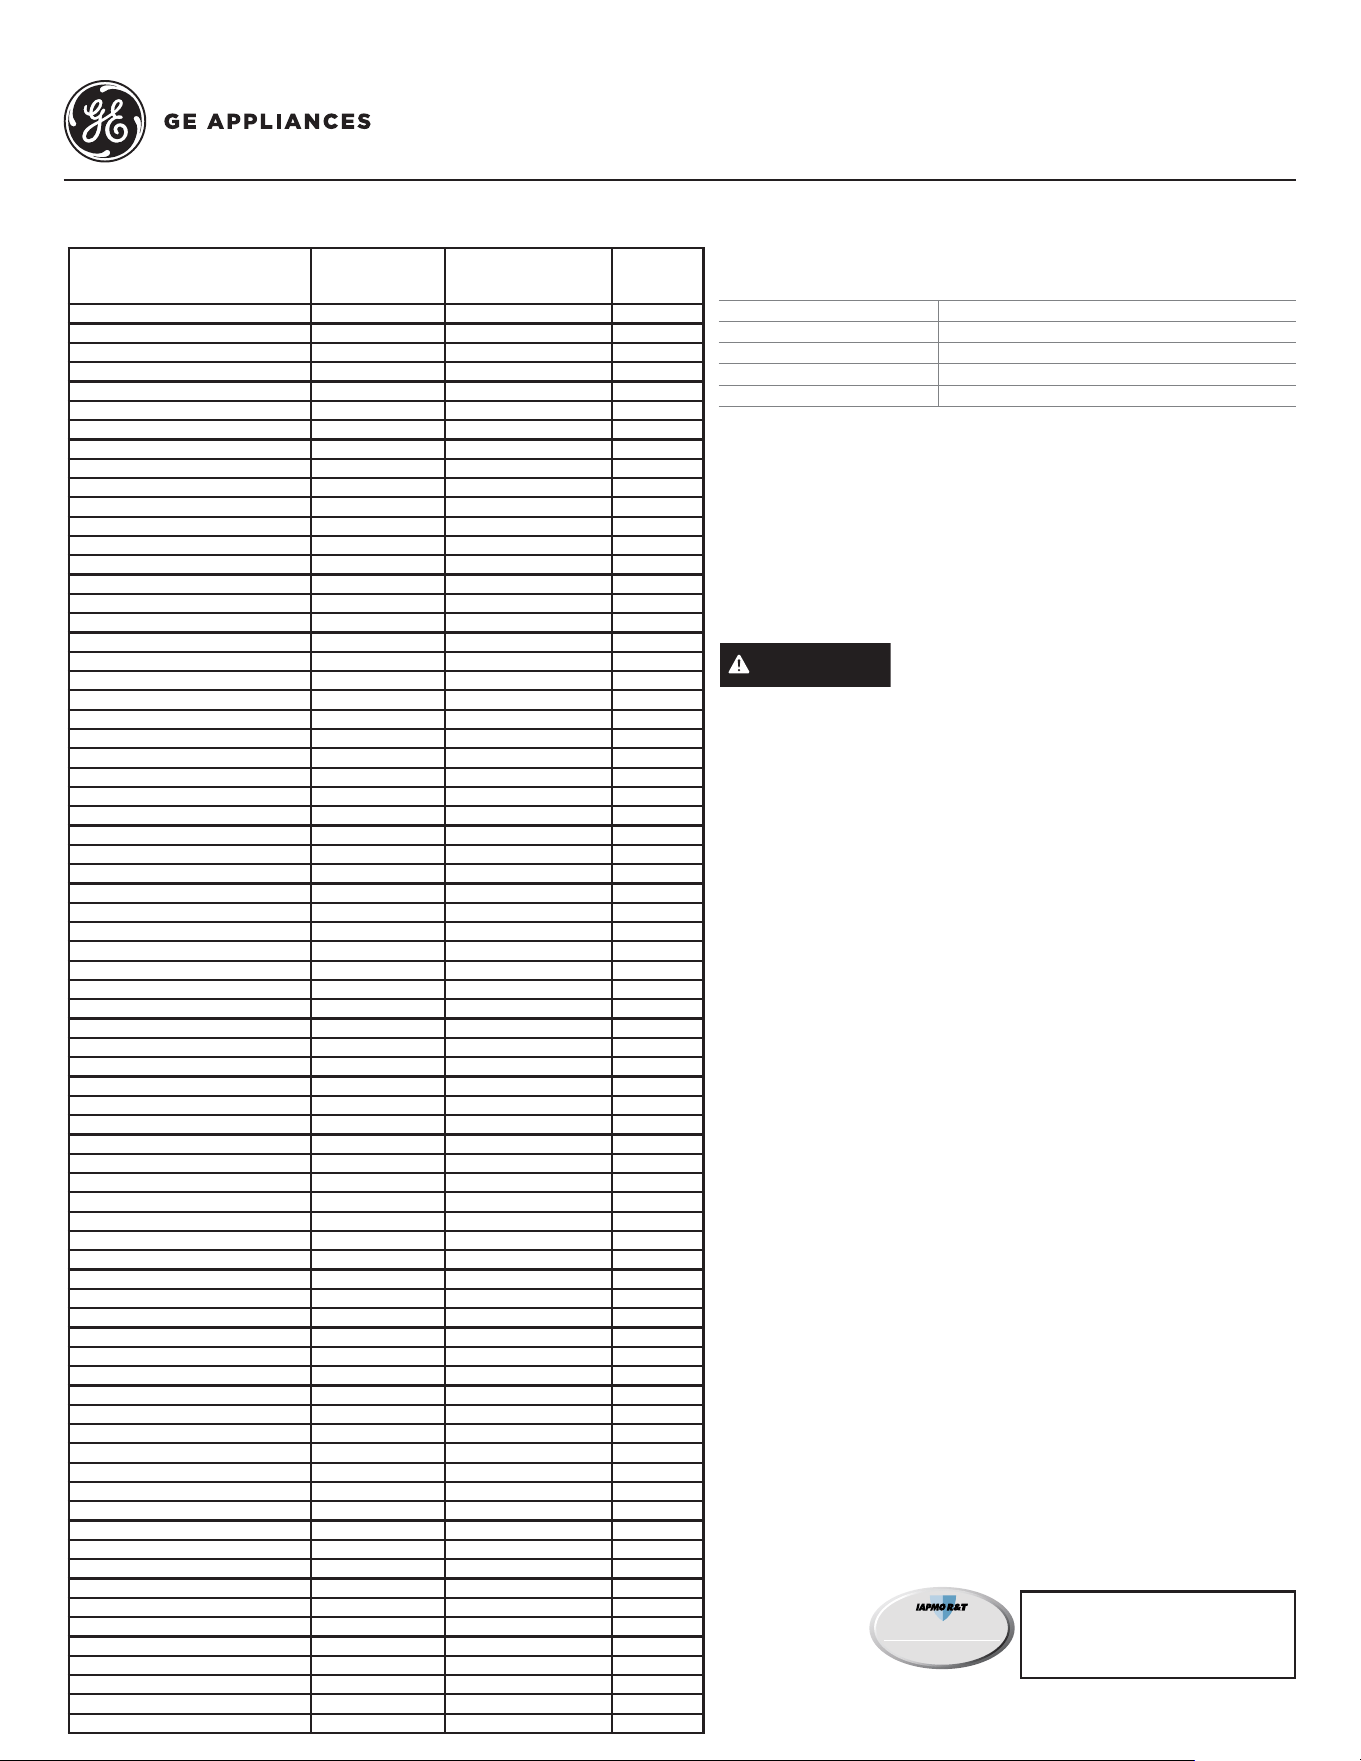
49-60792 Rev. 3 53
Performance Data Sheet
Model: GE Appliances RPWFE
Ŷ6\VWHPFHUWLILHGE\,$30257DJDLQVW16)$16,6WDQGDUGVDQG3IRUWKHUHGXFWLRQRIFODLPVVSHFLILHGRQWKHSHUIRUPDQFH
data sheet and at iapmort.org.
Ŷ$FWXDOSHUIRUPDQFHPD\YDU\ZLWKORFDOZDWHUFRQGLWLRQV
,WLVHVVHQWLDOWKDWWKHPDQXIDFWXUHU¶VUHFRPPHQGHGLQVWDOODWLRQ
maintenance and filter replacement requirements be carried out for the
SURGXFWWRSHUIRUPDVDGYHUWLVHG6HH,QVWDOODWLRQ0DQXDOIRU:DUUDQW\
information.
Application Guidelines/Water Supply Parameters
6HUYLFH)ORZ JSPOSP
Water Supply Potable Water
Water Pressure SVLN3D
Water Temperature ))&&
Capacity JDOORQVOLWHUV
Substance Tested for Reduction
,QIOXHQWFKDOOHQJH
concentration
PJ/
Maximum permissible
product water
FRQFHQWUDWLRQPJ/
Avg %
Reduction
Chlorine Taste and Odor PJ/ 1$ > 99
Chloramine Taste and Odor PJ/ 0.5 > 99
3DUWLFXODWH&ODVV, $WOHDVWP/ 1$ 91.4
Cysts / 1$ > 99.99
Lead 0.15 0.01 98.85
Mercury 0.006 0.002 96.95
Asbestos WRILEHUV/ 1$ > 99
Toxaphene 0.003 86.95
92&&KORURIRUPVXUURJDWHFKHPLFDO 0.300 0.015 > 99
Alachlor 0.050 0.001 > 98
$WUD]LQH 0.100 0.003 > 97
%HQ]HQH 0.081 0.001 > 99
Carbofuran 0.190 0.001 > 99
carbon tetrachloride 0.078 0.0018 98
FKORUREHQ]HQH 0.077 0.001 > 99
chloropicrin 0.015 0.0002 99
' 0.110 0.0017 98
GLEURPRFKORURSURSDQH'%&3 0.052 0.00002 > 99
R'LFKORUREHQ]HQH 0.08 0.001 > 99
S'LFKORUREHQ]HQH 0.040 0.001 > 98
1,2-dichloroethane 0.088 0.0048 95
1,1-dichloroethylene 0.083 0.001 > 99
cis-1,2-dichloroethylene 0.170 0.0005 > 99
trans-1,2-dichloroethylene 0.086 0.001 > 99
1,2-dichloropropane 0.080 0.001 > 99
cis-1,3-dichloropropylene 0.079 0.001 > 99
dinoseb 0.170 0.0002 99
Endrin 0.053 0.00059 99
(WK\OEHQ]HQH 0.088 0.001 > 99
HWK\OHQHGLEURPLGH('% 0.044 0.00002 > 99
bromochloroacetonitrile 0.022 0.0005 98
dibromoacetonitrile 0.024 0.0006 98
dichloroacetonitrile 0.0096 0.0002 98
trichloroacetonitrile 0.015 0.0003 98
1,1-dichloro-2-propanone 0.0072 0.0001 99
1,1,1-trichloro-2-propanone 0.0082 0.0003 96
KHSWDFKORU++HSWR[ 0.025 0.00001 > 99
heptachlor epoxide 0.0107 0.0002 98
hexachlorobutadiene 0.044 0.001 > 98
hexachlorocyclopentadiene 0.060 0.000002 > 99
Lindane 0.055 0.00001 > 99
methoxychlor 0.050 0.0001 > 99
pentachlorophenol 0.096 0.001 > 99
VLPD]LQH 0.120 0.004 > 97
Styrene 0.150 0.0005 > 99
1,1,2,2-tetrachloroethane 0.081 0.001 > 99
Tetrachloroethylene 0.081 0.001 > 99
Toluene 0.078 0.001 > 99
73VLOYH[ 0.270 0.0016 99
tribromoacetic acid 0.042 0.001 > 98
7ULFKORUREHQ]HQH 0.160 0.0005 > 99
1,1,1-trichloroethane 0.084 0.0046 95
1,1,2-trichloroethane 0.150 0.0005 > 99
trichloroethylene 0.180 0.0010 > 99
bromoform 0.300 0.015 95
bromodichloromethane 0.300 0.015 95
chlorodibromomethane 0.300 0.015 95
xylenes 0.070 0.001 > 99
Meprobamate 60 > 99
Atenolol 30 > 99
&DUEDPD]HSLQH 200 > 99
'((7 200 > 99
Metolachlor 200 > 99
Trimethoprim 20 > 99
Linuron 20 > 99
TCEP 700 > 99
TCPP 700 > 99
Phenytoin 30 > 99
,EXSURIHQ 60 > 99
Naproxen 20 > 99
Estrone 20 > 99
Bisphenol A 300 > 99
Nonyl phenol 200 > 99
3)2$3)26 PJ/ 0.07 99.25
NOTE: While the testing was performed under standard
laboratory conditions, actual performance may vary.
5HSODFHPHQW&DUWULGJH53:)()RUHVWLPDWHGFRVWVRI
replacement elements please call 1.877.959.8688 or visit our
website at gewaterfilters.com.
WARNING
To reduce the risk associated with
ingestion of contaminants:
• Do not use with water that is microbiologically unsafe or of
unknown quality without adequate disinfection before and
after the system. Systems certified for cyst reduction may be
used on disinfected water that may contain filterable cysts.
NOTICE
To reduce the risk of water leakage or flooding, and to
ensure optimal filter performance:
• Read and follow use instructions before installation and use of
this system.
,QVWDOODWLRQDQGXVHMUST comply with all state and local
plumbing codes.
• Do notLQVWDOOLIZDWHUSUHVVXUHH[FHHGVSVLN3D
,I\RXUZDWHUSUHVVXUHH[FHHGVSVL\RXmust install a
pressure-limiting valve. Contact a plumbing professional if you
are uncertain how to check your water pressure.
• Do notLQVWDOOZKHUHZDWHUKDPPHUFRQGLWLRQVPD\RFFXU,I
water hammer conditions exist you must install a water hammer
arrester. Contact a plumbing professional if you are uncertain
how to check for this condition.
• Do not install on hot water supply lines. The maximum
RSHUDWLQJZDWHUWHPSHUDWXUHRIWKLVILOWHUV\VWHPLV)
&
• Protect filter from freezing. 'UDLQILOWHUZKHQWHPSHUDWXUHV
GURSEHORZ)&
• Change the disposable filter cartridge every six months or
sooner if you observe a noticeable reduction in water flow rate.
)DLOXUHWRUHSODFHWKHGLVSRVDEOHILOWHUFDUWULGJHDW
recommended intervals may lead to reduced filter performance
and cracks inthe filter housing, causing water leakage or
flooding.
7KLV6\VWHPKDVEHHQWHVWHGDFFRUGLQJWR16)$16,
401 and P473 for the reduction of the substances listed below.
The concentration of the indicated substances in water entering
the system was reduced to a concentration less than or equal to
the permissible limit for water leaving the system, as specified in
16)$16,DQG3
53:)(6\VWHPLVFHUWLILHGE\,$302
57DJDLQVW16)$16,6WDQGDUGV
53, 401, and P473 for the reduction of
claims specified on the performance
data sheet and at iapmort.org.
PLATINUM SEAL
WATER QUALITY
I
A
P
M
O
R
E
S
E
A
R
C
H
A
N
D
T
E
S
T
I
N
G
™

54 49-60792 Rev. 3
3ULQWHGLQ8QLWHG6WDWHV
Consumer Support
CONSUMER SUPPORT
GE Appliances Website
Have a question or need assistance with your appliance? Try the GE Appliances Website 24 hours a day, any day of the year!
You can also shop for more great GE Appliances products and take advantage of all our on-line support services designed for
\RXUFRQYHQLHQFH,QWKH86GEAppliances.com ,Q&DQDGDGEAppliances.ca
Register Your Appliance
Register your new appliance on-line at your convenience! Timely product registration will allow for enhanced communication and
prompt service under the terms of your warranty, should the need arise. You may also mail in the pre-printed registration card
included in the packing material.
,QWKH86GEAppliances.com/register
,Q&DQDGDProdsupport.mabe.ca/crm/Products/ProductRegistration.aspx
Schedule Service
Expert GE Appliances repair service is only one step away from your door. Get on-line and schedule your service at your
FRQYHQLHQFHDQ\GD\RIWKH\HDU,QWKH86GEAppliances.com/service or call 800.432.2737 during normal business hours.
,Q&DQDGDGEAppliances.ca/en/support/service-request or call 800.561.3344
Extended Warranties
Purchase a GE Appliances extended warranty and learn about special discounts that are available while your warranty is still
LQHIIHFW<RXFDQSXUFKDVHLWRQOLQHDQ\WLPH*($SSOLDQFHV6HUYLFHVZLOOVWLOOEHWKHUHDIWHU\RXUZDUUDQW\H[SLUHV,QWKH86
GEAppliances.com/extended-warranty or call 800.626.2224 during normal business hours.
,Q&DQDGDGEAppliances.ca/en/support/purchase-extended-warranty or call 866.277.9842.
Parts and Accessories
,QGLYLGXDOVTXDOLILHGWRVHUYLFHWKHLURZQDSSOLDQFHVFDQKDYHSDUWVRUDFFHVVRULHVVHQWGLUHFWO\WRWKHLUKRPHV
9,6$0DVWHU&DUGDQG'LVFRYHUFDUGVDUHDFFHSWHG2UGHURQOLQHWRGD\KRXUVHYHU\GD\
,QWKH86GEApplianceparts.com or by phone at 877.959.8688 during normal business hours.
Instructions contained in this manual cover procedures to be performed by any user. Other servicing generally should
be referred to qualified service personnel. Caution must be exercised, since improper servicing may cause unsafe
operation.
Customers in Canada should consult the yellow pages for the nearest Mabe service center, visit our website at
GEAppliances.ca/en/products/parts-filters-accessories or call 800.661.1616.
Contact Us
,I\RXDUHQRWVDWLVILHGZLWKWKHVHUYLFH\RXUHFHLYHIURP*($SSOLDQFHVFRQWDFWXVRQRXU:HEVLWHZLWKDOOWKHGHWDLOVLQFOXGLQJ
your phone number, or write to:
,QWKH86*HQHUDO0DQDJHU&XVWRPHU5HODWLRQV_*($SSOLDQFHV$SSOLDQFH3DUN_/RXLVYLOOH.<
GEAppliances.com/contact
,Q&DQDGD'LUHFWRU&RQVXPHU5HODWLRQV0DEH&DQDGD,QF_6XLWH)DFWRU\/DQH_0RQFWRQ1%(&0
GEAppliances.ca/en/contact-us

49-60792 Rev. 3 01-19 GEA
*Certains modèles seulement
Inscrivez ici les numéros de modèle
et de série :
Modèle # ________________
Numéro de Série # _______
Vous trouverez ces numéros
sur l’étiquette apposée sur le
côté gauche à mi-hauteur du
compartiment de réfrigération.
MANUEL
D’UTILISATION ET
INSTRUCTIONS
D’INSTALLATION
RÉFRIGÉRATEUR
Congélateur au bas
GE est une marque déposée de General Electric Company. Fabriqué sous licence de marque.
MESURES DE SÉCURITÉ .........3
CONSIGNES D’UTILISATION
Fonctions ..........................6
Commandes ..........................9
Distributeur* ......................... 13
Remplissage automatique* .............14
Infuseur une tasse* .................... 15
Communication avec
l’électroménager ...................16
Filtre à eau .......................... 17
Options de stockage des
produits frais ........................18
Zone climatisée & Tiroir à
température contrôlée ..............20
Congélateur ..........................22
Machine à glaçons automatique ........23
ENTRETIEN ET NETTOYAGE . . 24
Remplacement des ampoules ..........25
INSTALLATION
Préparation avant installation
du réfrigérateur ....................26
Installation du réfrigérateur ............28
Installation de l’alimentation
en eau ............................41
CONSEILS DE DÉPANNAGE ....45
Fonctionnement normal ...............44
Entretien - Mythe ou réalité ............48
GARANTIE LIMITÉE. .............50
ASSISTANCE À LA CLIENTÈLE
Certificat de garantie du filtre à eau
à cartouche RPWFE ................. 51
Données de performance ..............52
Assistance à la clientèle ...............54
Modèles GE Profile ™
Les numéros de modèle
commençant par DFE, GFE,
GFS, GNE, PFH, PFE, PFD
et GFD sont des modèles de
profondeur normale (PN).
Les numéros de modèle
commençant par GYE, GYS,
PYE, DYE, PWE, ZWE et PYD
sont des modèles de profondeur
de comptoir (PC).

2 49-60792 Rev. 3
NOUS VOUS REMERCIONS D’ACCUEILLIR GE APPLIANCES CHEZ VOUS
Que vous ayez grandi avec GE Appliances ou qu’il s’agisse de votre première acquisition, nous
sommes heureux de vous accueillir dans notre famille.
Nous sommes fiers du savoir-faire, de l’innovation et de l’esthétique qui composent chaque appareil
GE Appliances, et nous pensons que vous le serez aussi. Dans cette optique, nous vous rappelons
que l’enregistrement de votre électroménager vous assure la communication de renseignements
importants sur le produit et la garantie lorsque vous en avez besoin.
Enregistrez votre électroménager GE en ligne dès maintenant. Des sites Web et des numéros de
téléphone utiles figurent dans la section Soutien au consommateur de ce manuel d’utilisation.
Vous pouvez aussi poster la fiche de garantie pré-imprimée incluse dans l’emballage.
49-60792 Rev. 3 3
ATTENTION
Pour réduire le risque de blessures lorsque vous utilisez votre réfrigérateurde , veuillez suivre ces
consignes de sécurité.
Ŷ 1HQHWWR\H]SDVOHVFOD\HWWHVRXOHVFRXYHUFOHVHQYHUUH
avec de l’eau tiède quand ceux-ci sont froids. Les clayettes
et couvercles en verre peuvent se casser s’ils sont
exposés à des changements soudains de température ou
si vous les cognez ou les faites tomber. Le verre trempé
est conçu pour se briser en petits morceaux en cas de
casse
Ŷ eORLJQH]OHVGRLJWVGHVSDUWLHVGXFRQJpODWHXURO¶RQ
peut facilement se pincer : les espaces entre les portes,
et entre les portes et les placards sont toujours étroits.
Soyez prudent lorsque vous fermez les portes en présence
d’enfants.
Ŷ 1HWRXFKH]SDVOHVVXUIDFHVIURLGHVGXFRQJpODWHXU
lorsque vous avez les mains humides ou mouillées. La
peau risque d’adhérer à ces surfaces extrêmement froides.
Ŷ 1HUHFRQJHOH]SDVOHVDOLPHQWVVXUJHOpVTXLRQW
complètement dégelé.
Ŷ 6LYRWUHUpIULJpUDWHXUHVWGRWpG¶XQHPDFKLQHjJODoRQV
automatique, évitez le contact avec les pièces mobiles du
mécanisme éjecteur, ou avec l’élément chauffant qui libère
les glaçons. Ne posez pas les doigts ou les mains sur le
mécanisme de la machine à glaçons automatique pendant
que le réfrigérateur est branché.
INFORMATION DE SÉCURITÉ
LIRE ET CONSERVER CES INSTRUCTIONS
INSTALLATION
AVERTISSEMENT
RISQUE D’EXPLOSION
Conservez les matériaux et vapeurs inflammables tels que l’essence à l’écart de votre réfrigérateur. Une explosion, un
incendie voire la mort pourrait en résulter.
AVERTISSEMENT
RISQUE DE BASCULEMENT
Les modèles encastrés (modèles PYE, GYE, GYS, PWE et ZWE) sont plus lourds au niveau de leur partie supérieure, surtout
avec les portes ouvertes. Ces modèles doivent être fixés à l’aide du système anti-basculement par fixation au sol pour éviter que
l’appareil ne bascule vers l’avant, ce qui pourrait entraîner des blessures graves, voire mortelles. Lisez et suivez les instructions
d’installation complètes pour l’installation du système anti-basculement par fixation au sol livré avec votre réfrigérateur.
INFORMATION DE SÉCURITÉ IMPORTANTES
LISEZ TOUTES LES DIRECTIVES AVANT D'UTILISER L'APPAREIL
AVERTISSEMENT
Pour réduire le risque d’incendie, d’explosion, de choc électrique ou de blessures lorsque vous
utilisez votre réfrigérateurde , veuillez suivre ces consignes de sécurité :
Ŷ &HUpIULJpUDWHXUGRLWrWUHFRUUHFWHPHQWLQVWDOOp
conformément aux Consignes d’Installation avant toute
utilisation.
Ŷ 'pEUDQFKH]OHUpIULJpUDWHXUDYDQWG¶HIIHFWXHUXQH
réparation, de remplacer une ampoule ou de le nettoyer.
Remarque : L’alimentation du réfrigérateur ne peut être
déconnectée par aucune des fonctions sur le panneau de
commande.
Remarque : Les réparations doivent être effectuées par
un professionnel qualifié.
Ŷ 5HPHWWH]WRXWHVOHVSLqFHVHWSDQQHDX[HQSODFHDYDQW
d’utiliser l’appareil.
Ŷ N’utilisez pas un cordon de rallonge.
Ŷ$EVWHQH]YRXV
G¶HQWUHSRVHURXG¶XWLOLVHUGHO¶HVVHQFHRX
d’autres vapeurs et liquides inflammables aux alentours de
cet électroménager ou d’autres appareils.
Ŷ1¶HQWUHSRVH]SDVGDQVFHWpOHFWURPpQDJHUGHVVXEVWDQFHV
explosives telles que des bombes aérosols qui contiennent
un gaz propulseur.
Ŷ 3RXUpYLWHUOHVULVTXHVG¶DVSK\[LHHWG¶HQIHUPHPHQWSRXU
les enfants. Démontez les portes du congélateur et du
compartiment de réfrigération avant de le mettre au rebut
ou d’interrompre son utilisation.
Ŷ/HVHQIDQWVHWOHVSHUVRQQHVGRQWOHVFDSDFLWpVVRQW
réduites sur le plan physique, sensoriel ou mental, ou qui
manquent d’expérience ou de connaissances, peuvent
utiliser cet électroménager seulement si elles sont
surveillées ou ont reçues des consignes de sécurité sur
son usage et les risques y sont associés.
Ŷ&HWpOHFWURPpQDJHUHVWFRQoXSRXUXQHXWLOLVDWLRQ
domestique et applications similaires : salle du personnel
dans une usine, un bureau ou d’autres lieux de travail;
maison de ferme; clients dans un hôtel, un motel, un gîte
touristique et d’autres lieux résidentiels; approvisionnement
et applications similaires non reliées au commerce de
détail.
Ŷ 1¶DSSOLTXH]SDVGHQHWWR\DQWVFRUURVLIVVXUOHUpIULJpUDWHXU
Certains nettoyants endommagent le plastique et peuvent
ainsi causer le détachement inopiné de pièces telles que
porte ou poignées de porte. Voyez la section Entretien et
nettoyage pour des instructions détaillées.
Ŷ &RQQHFWH]YRXVjO¶DOLPHQWDWLRQHQHDXSRWDEOH
uniquement avec une pression d’eau maximale de 120 psi
(827 kilopascals).
4 49-60792 Rev. 3
INFORMATION DE SÉCURITÉ
LIRE ET CONSERVER CES INSTRUCTIONS
INFORMATION DE SÉCURITÉ IMPORTANTES
LISEZ TOUTES LES DIRECTIVES AVANT D'UTILISER L'APPAREIL
Ne coupez pas ou n’enlevez pas, sous aucun prétexte, la troisième broche de mise à la terre du cordon
d’alimentation. Pour des raisons de sécurité, cet appareil doit être correctement mis à la terre.
Le cordon d’alimentation de cet appareil est équipé d’une
fiche à trois broches (pour une mise à la terre) qui s’adapte à
la prise de courant standard à 3 broches (pour une mise à la
terre) pour minimiser les risques de chocs électriques par cet
appareil.
Faites vérifier la prise murale et le circuit électrique par
un électricien qualifié pour s’assurer que le système est
correctement mis à la terre.
Dans le cas d’une prise biphasée, l’installateur a la
responsabilité et l’obligation de la remplacer par une prise
triphasée correctement mise à la terre. N’utilisez pas
d’adaptateur.
Le réfrigérateur doit toujours être branché à sa propre prise
électrique d’une tension nominale correspondant à celle
indiquée sur sa plaque signalétique.
Une alimentation électrique à 115 volts CA, 60 Hz, avec
un fusible de 15 ou 20 ampères et une mise à la terre est
nécessaire. Ceci permet d’obtenir un meilleur rendement et
évite de surcharger les circuits électriques du domicile qui
risque d’occasionner un incendie en surchauffant.
Ne débranchez jamais le réfrigérateur en tirant sur le cordon
d’alimentation. Prenez toujours fermement la fiche en main et
tirez pour la sortir de la prise.
5pSDUH]RXUHPSODFH]LPPpGLDWHPHQWWRXWFRUGRQpOHFWULTXH
usé ou endommagé. N’utilisez pas un cordon fissuré ou
présentant des dommages dus aux frottements soit sur sa
longueur ou aux extrémités.
Lorsque vous éloignez votre réfrigérateur du mur, faites
attention à ne pas le faire rouler sur le cordon d’alimentation
afin de ne pas l’endommager.
BRANCHEMENTS ÉLECTRIQUES
AVERTISSEMENT
RISQUE DE CHOC ÉLECTRIQUE
Branchez l’appareil dans une prise triple avec terre.
Ne retirez pas la broche de terre.
N’utilisez pas d’adaptateur.
N’utilisez pas un cordon de rallonge.
Le non-respect de ces instructions peut entraîner des risques d’incendies, des chocs électriques ou la mort.
MISE AU REBUT APPROPRIÉE DE VOTRE ANCIEN RÉFRIGÉRATEUR
AVERTISSEMENT
RISQUE DE SUFFOQUER OU D’Y ÊTRE EMPRISONNÉ
Le non-respect de ces instructions d'élimination peut entraîner la mort ou des blessures graves.
IMPORTANT: Les enfants pris au piège ou morts d’asphyxie
sont toujours d’actualité. Les réfrigérateurs et congélateurs
abandonnés sont toujours aussi dangereux, même si on
n’attend que «quelques jours» pour s’en débarrasser. Si vous
ne gardez pas votre ancien réfrigérateur ou congélateur,
veuillez suivre les directives ci-dessous afin de prévenir les
accidents.
Avant de vous débarrasser de votre ancien appareil :
Ŷ'pPRQWH]OHVSRUWHVGXFRPSDUWLPHQWGHUpIULJpUDWLRQHWGX
compartiment de congélation.
Ŷ Laissez les clayettes en place afin d’empêcher les enfants
de grimper à l’intérieur.
Mise au rebut des produits réfrigérants et en mousse
Mettez l’électroménager au rebut conformément à la réglementation fédérale et locale. Les matières isolantes inflammables
utilisées exigent des procédures de mise au rebut spéciales. Communiquez avec les autorités locales pour connaître la façon
de mettre votre électroménager au rebut qui soit respectueuse de l’environnement.
49-60792 Rev. 3 5
INFORMATION DE SÉCURITÉ
LIRE ET CONSERVER CES INSTRUCTIONS
INFORMATION DE SÉCURITÉ IMPORTANTES
LISEZ TOUTES LES DIRECTIVES AVANT D'UTILISER L'APPAREIL
Utilisez uniquement cet appareil pour l’usage auquel il est destiné tel que décrit dans le manuel d’utilisation. Pour
réduire le risque de brûlures graves, de blessures par ébouillantement voire la mort lors de l’utilisation de votre
distributeur d’eau chaude, veuillez suivre les consignes suivantes :
Ŷ Ne laissez pas le contenant sans surveillance en présence
d’enfants
pendant et après la distribution d’eau chaude.
Ŷ Ne
laissez pas les enfants utiliser le distributeur d’eau
chaude.
Ŷ Il est nécessaire de faire pivoter et d’enfoncer le bouton de
distribution d’eau chaude. Ces deux mouvements réduisent
les risques de faire couler l’eau chaude involontairement
ou de permettre à de jeunes enfants de se servir. N’altérez
pas ou ne modifiez pas le bouton de distribution d’eau
chaude.
Ŷ L’eau provenant du distributeur est très chaude. Soyez
extrêmement prudent lors de la distribution et de l’utilisation
de l’eau. Laissez refroidir l’eau à une température
appropriée à sa consommation avant de la boire. Tenez
votre tasse ou votre récipient à côté de la sortie d’eau
chaude pour éviter que l’eau chaude n’éclabousse votre
main.
Ŷ Lors de la distribution d’eau chaude, le récipient peut
devenir très chaud. Utilisez un récipient isolant thermique,
tel que la céramique ou la mousse de polystyrène.
L’utilisation d’un récipient en papier ou plastique peut
provoquer des brûlures tout en tenant la tasse. N’utilisez
pas de récipients en verre. Il pourrait se casser en raison
d’un choc thermique ce qui pourrait entraîner des brûlures
ou des coupures.
Ŷ Veuillez toujours suivre les consignes du fabricant pour la
préparation du lait maternisé. Lors de la distribution d’eau
à une température inférieure à 125°F (52°C), veuillez
toujours vérifier la température de l’eau avant de la boire.
Ŷ Lors de la première utilisation du distributeur d’eau chaude,
vérifiez si vous vivez à une altitude supérieure à 1524
mètres (5000 pieds / haute altitude). Cette altitude limite
la température du dispositif d’eau chaude pour éviter
l’ébullition. Pour accéder à la sélection de haute altitude,
allez dans le menu Settings (paramètres) s’il est présent ou
pour les autres modèles, appuyez sur Fridge (réfrigérateur)
et Door Alarm (alarme de porte) simultanément pour
alterner entre Hi Al et Lo AL (haute altitude et basse
altitude).
Ŷ Une cartouche de filtre à eau nouvellement installée peut
provoquer des éclaboussures en sortie du distributeur.
Faites passer 2 gallons (7,5 litres) d’eau dans le
distributeur d’eau froide (pendant environ 5 minutes) pour
purger l’air du système. Tant que l’air dans le système n’a
pas été purgé par le distributeur d’eau froide, N’utilisez
PAS le distributeur d’eau chaude. L’air dans le circuit
pourrait provoquer des éclaboussures d’eau chaude et
donc provoquer des brûlures.
Ŷ N’utilisez pas une eau qui est microbiologiquement
insalubre ou de qualité inconnue.
Ŷ Le distributeur d’eau chaude est conçu pour distribuer
uniquement de l’eau. N’essayez pas de réchauffer ou de
verser un autre liquide que de l’eau. Ne tentez pas de
démonter ou de nettoyer le réservoir.
Ŷ Ne modifiez pas le système d’eau chaude. Les réparations
doivent
s’effectuer avec des pièces de rechange d’usine
seulement.
DISTRIBUTEUR D’EAU CHAUDE
AVERTISSEMENT
Risque de brûlures.
Le distributeur d’eau chaude peut chauffer l’eau jusqu’à une température d’environ 185°F (85°C). Une eau à une
température dépassant 125°F (52°C) peut provoquer des brûlures graves ou la mort par ébouillantement. Les enfants, les
personnes handicapées et les personnes âgées sont plus à risque de se brûler.

6 49-60792 Rev. 3
Fonctions
UTILISATION DU RÉFRIGÉRATEUR: FonctionsUTILISATION DU RÉFRIGÉRATEUR: Fonctions
*Certains modèles seulement
Machine à glaçons à faible encombrement *
La machine à glaçons et son bac sont situés sur la porte
permettant d’avoir un espace de stockage plus spacieux.
Éclairage à DEL
L’éclairage à DEL est placé dans tout le compartiment
pour éclairer différentes zones du réfrigérateur. Des DEL
sont situées sous la porte du réfrigérateur pour éclairer le
congélateur lorsque celui-ci est ouvert.
Plateau rabattable*
Permet un espace de stockage dans la porte en cas de
besoin. Il se replie lorsqu’il ne sert pas.
Tiroir de pleine largeur à température contrôlée*
Bac à température contrôlée qui peut accueillir les produits
les plus volumineux.
Bac à produits laitiers*
Compartiment séparé pour vos produits.
Machine à glaçons congélateur / bac d’appoint*
Une machine à glace pour chacun des deux compartiments
vous permettra d’avoir une plus grande réserve de glace
sous la main. Offert pour les modèles sans distributeur,
aussi en ensemble prêt-à-monter pour certains modèles.
Clayette QuickSpace™ *
Elle s’utilise comme une clayette normale de pleine largeur.
Elle se glisse vers l’arrière pour stocker des produits hauts.
Clayettes anti-débordements
Conçues pour empêcher les aliments renversés de couler et
permettre ainsi un nettoyage facile.
Tapis antidérapant*
Doublure qui recueille les renversements, empêche les
contenants de bouger à l’ouverture de la porte et se retire
aisément pour le nettoyage.
Bac amovible à condiments
Bac séparé conçu pour faciliter le retrait et le stockage.
Bac climatisé
Bacs séparés pour le stockage des produits.
Filtre à eau
Filtre l’eau et l’eau destinée à se transformer en glace.

49-60792 Rev. 3 7
Machine à glaçons à faible encombrement *
La machine à glaçons et son bac sont situés sur la porte permettant d’avoir un
espace de stockage plus spacieux.
Éclairage à DEL
L’éclairage à DEL est placé dans tout le compartiment pour éclairer différentes
zones du réfrigérateur. Des DEL sont situées sous la porte du réfrigérateur pour
éclairer le congélateur lorsque celui-ci est ouvert.
Tiroir de pleine largeur à température contrôlée
Bac à température contrôlée qui peut accueillir les produits les plus volumineux.
.
Machine à glaçons/bac à glaçons du congélateur*
Une machine à glaçons dans les deux compartiments vous procure des glaçons
dès que vous en avez besoin. Offertes sur les modèles sans distributeur, aussi en
nécessaire prêt-à-monter pour certains modèles.
Clayette QuickSpace™ *
Elle s’utilise comme une clayette normale de pleine largeur. Elle se glisse vers
l’arrière pour stocker des produits hauts.
Clayettes anti-débordements
Conçues pour empêcher les aliments renversés de couler et permettre ainsi un
nettoyage facile.
Bac amovible à condiments
Bac séparé conçu pour faciliter le retrait et le stockage.
Bac climatisé
Bacs séparés pour le stockage des produits.
Filtre à eau
Filtre l’eau et l’eau destinée à se transformer en glace.
Bac pivotant*
Ce bac pivote vers l’extérieur pour faciliter l’accès.
Verrou entre les portes extérieure et intérieure*
Pressez le verrou sur le dessous de la poignée pour ouvrir la porte
extérieure.
*Certains modèles seulement
Fonctions
UTILISATION DU RÉFRIGÉRATEUR: Fonctions
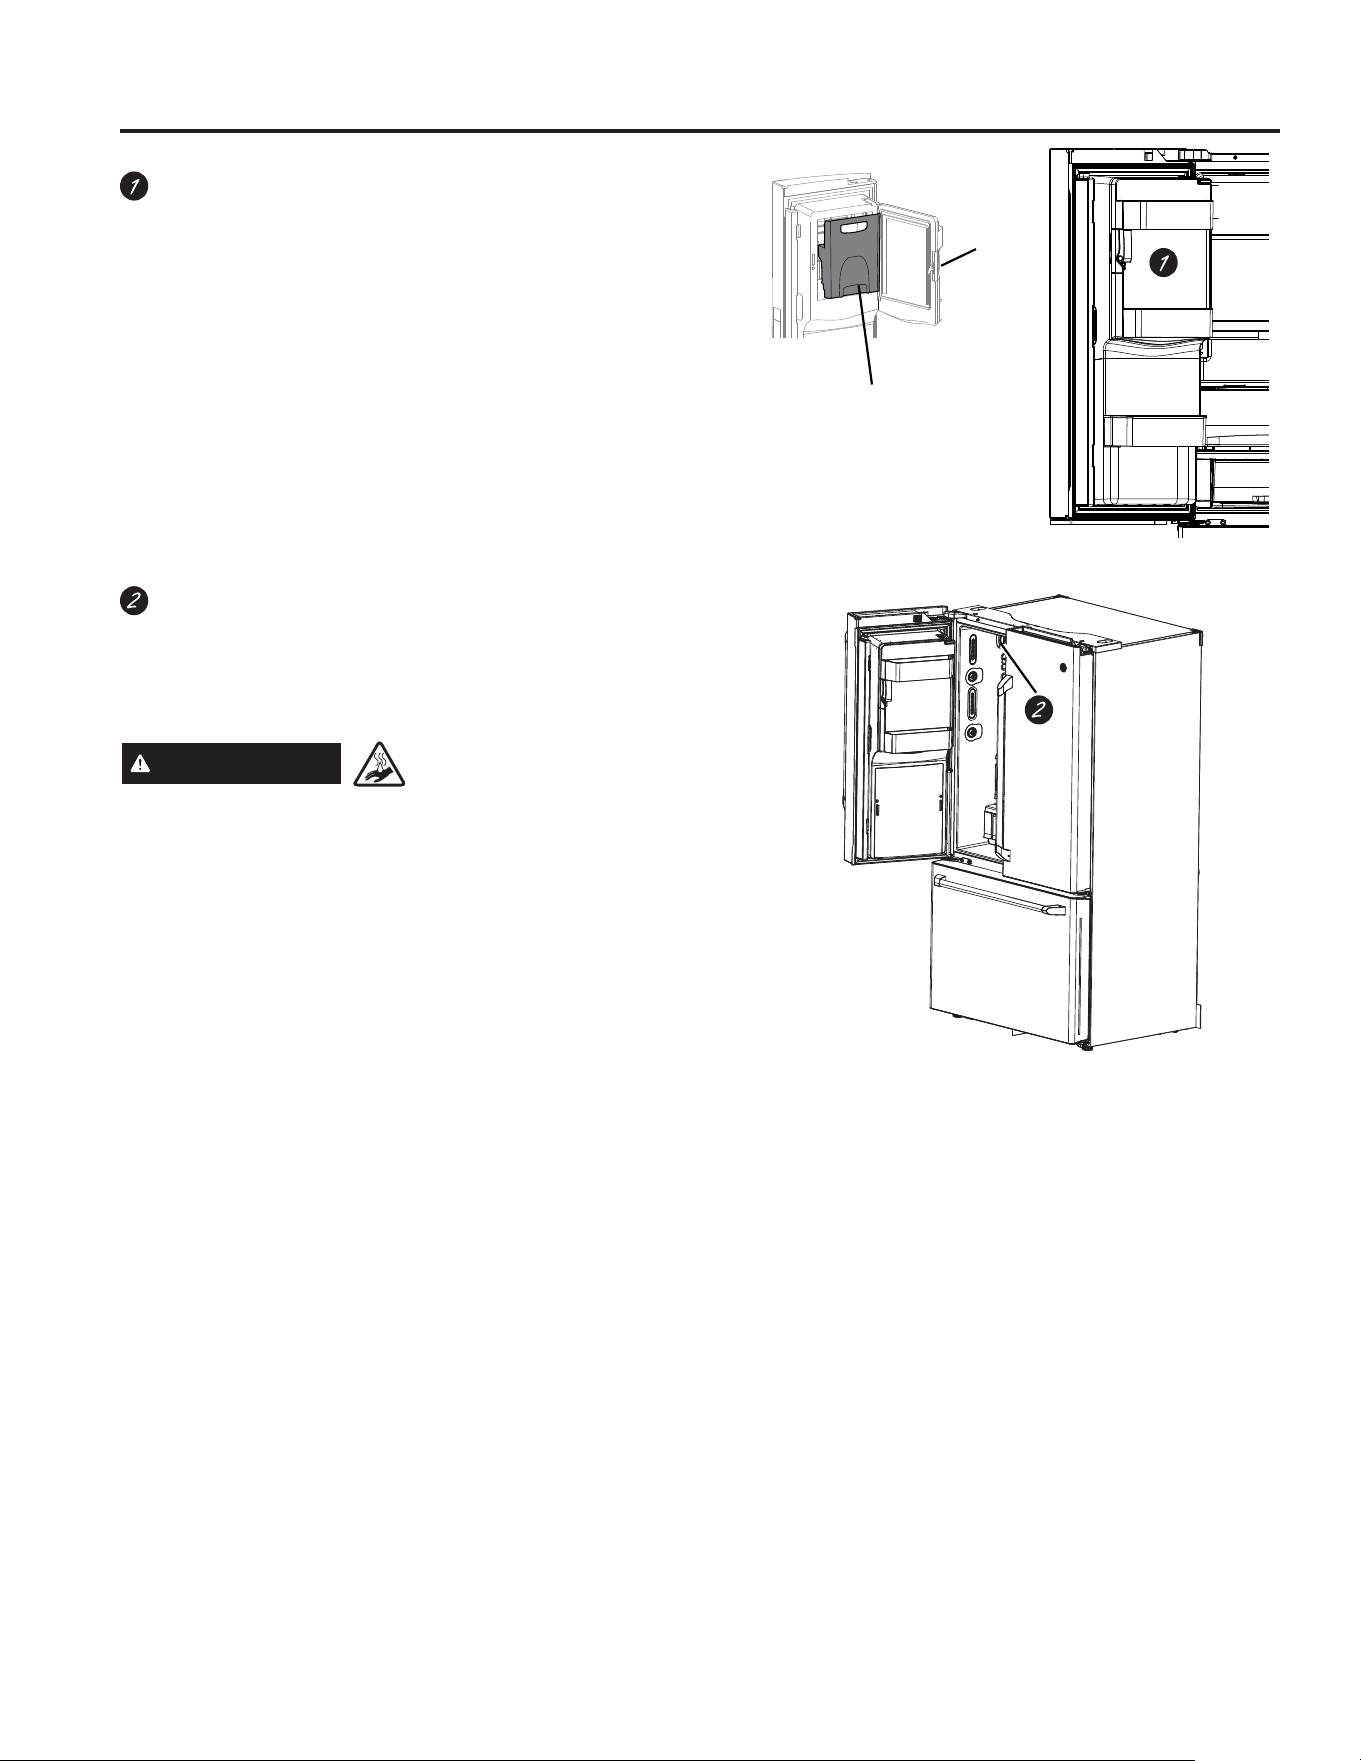
8 49-60792 Rev. 3
*Certains modèles seulement
Fonctions
UTILISATION DU RÉFRIGÉRATEUR: Fonctions
Bac à glace de porte*
1. Ouvrez la porte gauche du compartiment de réfrigération.
2. Tirez le loquet vers le bas pour ouvrir la porte du bac.
3. A l’aide de la poignée, soulevez le seau à glace pour
libérer les repères au fond du bac.
4. Pour remettre le seau à glace, placez-le sur les guides et
enfoncez-le jusqu’à ce qu’il soit correctement en place.
5. Si vous n’arrivez pas à le remettre, faites tourner la
fourche d’1/4 de tour dans le sens des aiguilles d’une
montre.
Filtre à eau/à glace
Certifié pour la réduction des oocystes résistants au chlore,
du plomb, de produits pharmaceutiques choisis et plus. Pour
des instructions sur le remplacement aisé du filtre, voyez la
page 11.
Seau à glace
Loquet
AVERTISSEMENT
Risque d’ébouillantement.*
L’utilisation du distributeur d’eau chaude avant l’évacuation
de l’air du système peut provoquer un jaillissement d’eau très
chaude causant des brûlures.Suivez les instructions sous « Filtre
jHDX±eWDSHªjODSDJHSRXUH[SXOVHUO¶DLUGXV\VWqPH
par le distributeur d’eau froide avant d’utiliser le distributeur d’eau
chaude.
À la première utilisation de la fonction d’eau chaude,
indiquez si vous vivez au-dessus de 1524 mètres (5000 pieds
– haute altitude). Cela limite la température du système d’eau
chaude afin de prévenir l’ébullition. Pour accéder à l’option
de haute altitude, reportez-vous à la section Commandes.

49-60792 Rev. 3 9
UTILISATION DU RÉFRIGÉRATEUR: Commandes
Commandes
Les commandes de températures sont préréglées en usine à 37°F (3°C) pour le compartiment réfrigérateur et à 0°F (-18°C) pour
le compartiment congélateur. Veuillez attendre 24 heures pour que la température se stabilise au préréglage recommandé.
Style de contrôle D : Les commandes de températures peuvent afficher les températures SET (fixées) ainsi que les
températures réelles à l’intérieur du réfrigérateur et du congélateur. La température actuelle peut légèrement varier de la
température SET (fixée) suivant les conditions d’utilisation et de fonctionnement (PWE23 et GNE29 only).
REMARQUE: Le réfrigérateur est livré avec un film protecteur sur les commandes de températures. Si le film n’a pas été retiré
pendant l’installation, retirez-le maintenant.
PFE28P, PYE22P Style de contrôle A,modèles à une tasse
PFH28, PFE28K, DFE28, PFD28, PYE22K, PYD22, DYE22
Style de contrôle B, modèles à remplissage automatique
GFD28, GFE28, GFE26, GFS26, GYE22, GYS22 Style de contrôle C,
modèles GE Appliances
GNE29, PWE23 Style de contrôle D, modèle sans distributeur
Refrigerator
Hold 3 Sec for °F/°C
Hold 3 Seconds
Hold 3 Seconds
Recommended: 37 °F
Actual Set
Freezer
Door Alarm
Ice Maker
Lock Controls
Reset Filter
Recommended: 0°F
F
Ice
Error
Complete
Sensing
Cubed
Crushed

10 49-60792 Rev. 3
UTILISATION DU RÉFRIGÉRATEUR: Commandes
REMARQUE : Pour une température optimale, il est recommandé d’éviter de placer la nourriture ou d’autres produits directement
devant les bouches de circulation d’air ou devant la tour de ventilation autour des aliments frais, empêchant ainsi le flux d’air.
Modification de la température pour un style de contrôle A
Pour modifier la température du réfrigérateur :
Pressez le bouton Fridge pour afficher le réglage de
température actuel. Presser et relâcher le bouton fera défiler les
réglages de température disponibles. Maintenez une pression
sur le bouton pour la fonction Turbo Cool. L’affichage
indiquera tC.
Pour changer la température du congélateur :
Pressez le bouton Freezer pour afficher le réglage de
température actuel. Presser et relâcher le bouton fera défiler les
réglages de température disponibles. Maintenez une pression
sur le bouton pour la fonction Turbo Freeze. L’affichage
indiquera tF.
On peut désactiver le système de refroidissement en
maintenant une pression sur Freezer et Start Heating. OFF
s’affichera. Pour activier, pressez Fridge ou Freezer. ON
s’affichera.
Désactiver le système de refroidissement arrête le
refroidissement au réfrigérateur, mais il ne coupe pas le courant
électrique.
Modification de la température pour un style de contrôles B et C
Pour changer la température, pressez et relâchez la touche
Congélateur ou Réfrigérateur. L’affichage indiquera la
tempéture réglée. Pour changer la température, pressez
la touche Congélateur ou Réfrigérateur jusqu’à ce que la
température désirée soit affichée. Maintenez une pression sur
le bouton pour la fonction Turbo Cool. L’affichage indiquera tC.
Maintenez une pression sur le bouton pour la fonction Turbo
Freeze. L’affichage indiquera tF.
Pour Désactiver le système de refroidissement, maintenez une
pression sur les touches Réfrigérateur et Machine À Glaçons
pendant. Pour activer, pressez Fridge ou Freezer.
Désactiver le système de refroidissement arrête le
refroidissement au réfrigérateur, mais il ne coupe pas le courant
électrique.
Modification de la température pour un style de contrôle D
L’affichage de la température est situé à l’intérieur de la porte
du réfrigérateur à gauche. Pour changer la température,
appuyez et relâchez la languette Réfrigerateur ou
Congélateur. Le voyant lumineux Temp. Actuelle sera activé
et l’écran affichera la température réelle. Pour modifier la
température, appuyez soit sur Réfrigérateur ou Congélateur
jusqu’à ce que la température souhaitée soit affichée.
Pour Désactiver le système de refroidissement, appuyez
sur la languette Réfrigerateur ou Congélateur pendant 3
seconds. Lorsque le système de refroidissement est Désactivé
l’affichage doit indiquer Désactivé.
Pour Activer le système de refroidissement, appuyez sur la
languette Réfrigerateur ou Congélateur. L’écran affiche les
réglages de température préréglés de 3°C (37°F) pour un
réfrigérateur et -18°C (0°F) pour un congélateur.
Désactiver le système de refroidissement arrête le
refroidissement au réfrigérateur, mais il ne coupe pas le courant
électrique.
Commandes

49-60792 Rev. 3 11
Commandes
Style de commandes A,
Commandes externes
PFE28P,
PYE22P
Style de commandes B,
Commandes externes
PFH28, PFE28K, DFE28,
PFD28, PYE22K, PYD22, DYE22
Style de commandes C, Commandes externes
GFD28, GFE28, GFE26, GFS26, GYE22, GYS22
Remplissage automatique mains libres*
Le remplissage automatique mains libres fonctionne
avec des capteurs qui contrôlent le remplissage du bac,
distribuant l’eau filtrée automatiquement sans avoir à être
activé manuellement.
Start Heating* (Démarrer le chauffage)
Le bouton Start Heating est utilisé pour démarrer le
chauffage de l’eau avec la fonction Single Serve. Pour
interrompre la fonction Start Heating, maintenez une
pression sur le bouton Start Heat durant 3 secondes
Commande Freezer temp (Température du congélateur)
5qJOHODWHPSpUDWXUHGXFRPSDUWLPHQWFRQJpODWHXU
Gestion de la température du compartiment pour les
aliments frais
Ajuster la température du compartiment pour les aliments
frais.
Réglage du TurboFreeze
MC
Activer le TurboFreeze pour une restauration rapide de la
température du congélateur après que la porte ait
fréquemment été ouverte.
Réglage du TurboCool
MC
Activer le TurboCool pour une restauration rapide de la
température du compartiment pour les aliments frais après
que la porte ait fréquemment été ouverte.
Commandes de verrouillage
Style de contrôle A – Maintenez une pression sur la
touche Door Alarm durant 3 secondes pour verrouiller le
distributeur de glace et d’eau ainsi que toutes les boutons
de fonction et de température.
Styles de contrôle B et C – Maintenez une pression
sur la touche Lock durant 3 secondes pour verrouiller le
distributeur de glace et d’eau ainsi que toutes les boutons
de fonction et de température.
Lumière du distributeur
Lumière qui peut être allumée pour éclairer votre
distributeur.
Commandes de verrouillage
ePHWXQHVRQQHULHG¶DOHUWHORUVTX¶XQHSRUWHGXFRQJpODWHXU
ou du réfrigérateur a été laissée ouverte. Maintenez une
pression sur la touche Door Alarm et le volume de la
sonnerie défilera entre faible, élevé et désactivé.
Brew Size* (Quantité à infuser)
Le bouton Brew Size est utilisé pour sélectionner la quantité
à infuser pour une tasse. Maintenez une pression sur le
bouton durant 3 secondes pour basculer le type d’infusion
entre Coffee et Cocoa.
Réglage de la machine à glaçons
Mettre en marche ou éteindre vos machines à glaçons.
Activation/Désactivation du système de refroidissement
Style de commandes A - Maintenez une pression sur
Freezer et Start Heating simultanément pour désactiver
le système de refroidissement. Pour activer ce système,
pressez Fridge ou Freezer.
Style de commandes B et C - Maintenez une pression sur
OHVWRXFKHV5e)5,*e5$7(85HW0$&+,1(¬*/$d216
simultanément pendant 3 secondes pour activer ou
désactiver le système de refroidissement. Pour activer le
système de refroidissement, pressez Fridge ou Freezer.
Brew Dispense (Distribution du breuvage)
Maintenez une pression sur le bouton Brew Dispense
durant 3 secondes, sans dépasser 6 secondes, pour
distribuer le café ou le cacao.
F°/C° Style de commandes A - Maintenez une pression
sur Freezer et Brew Size pour basculer entre F° et C°.
Style de commandes B et C - Maintenez une pression
sur Ice Maker et Door Alarm simultanément durant 3
secondes pour basculer entre F° et C°.
Contrôle de volume pour la tonalité des touches
Style de contrôle A – Maintenez une pression sur la
touche Light : une seule fois pour passer de High à Off,
deux fois de Off à Low, et trois fois de Low à High.
Styles de contrôle B et C – Maintenez une pression sur la
touche Door Alarm : une seule fois pour passer de High à
Off, deux fois de Off à Low, et trois fois de Low à High.
High Altitude (Haute altitude)
Style de contrôle A (PYE et PFE seulement) – Maintenez
une pression sur Fridge et Door Alarm pour basculer entre
Hi Al et Lo AL pour la haute altitude et la basse altitude
respectivement.
Réglages additionnels :
• Prêt pour connexion à la maison* (PFE28P
, PYE22P, PFH
seulement)
• Water Filter* (Filtre à eau) – Un voyant s’allume lorsque le
filtre doit être remplacé. Une fois le nouveau filtre installé, le
voyant s’éteint.
Modes additionnels :
• Mode Sabbath
Style de commandes A - Maintenez une pression sur Alarm
et Light simultanément durant 3 secondes pour entrer dans le
mode Sabbath ou le quitter
Style de commandes B et C - Appuyer simultanément
pendant trois secondes sur le bouton de verrouillage et sur
celui de la lumière pour activer ou désactiver le mode Sabbath.
Le mode Sabbath éteindra les lampes intérieures (ou réduira
leur éclairage) et désactivera le contrôle de la température et
les fonctions avancées. Lorsqu’il sera en mode Sabbath, le
compresseur sera alimenté par une décongélation programmé
Ice
Error
Complete
Sensing
Cubed
Crushed
*Certains modèles seulement
UTILISATION DU RÉFRIGÉRATEUR: Commandes
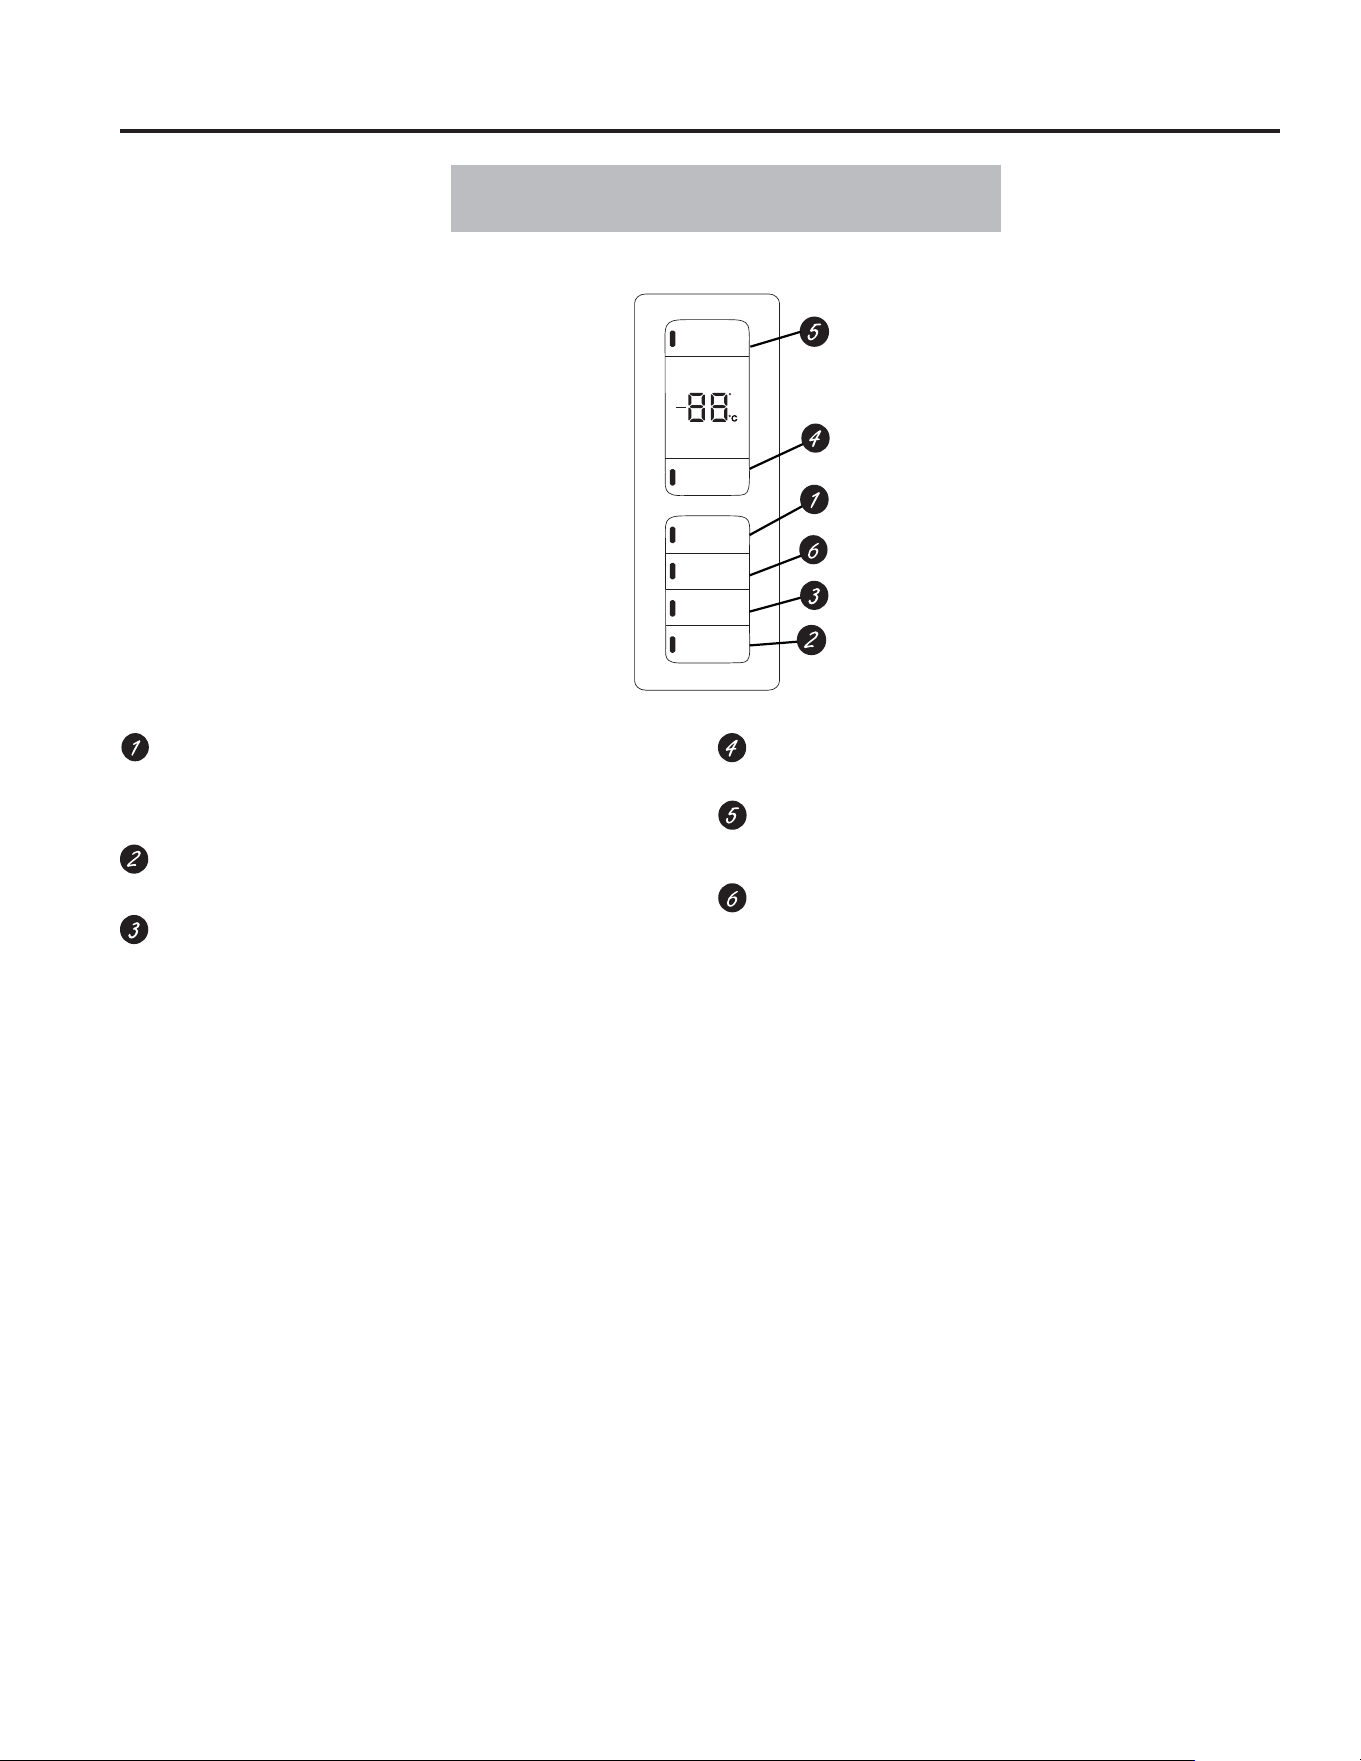
12 49-60792 Rev. 3
Commandes
Style de commandes D,
Commandes internes
GNE29, PWE23
Avertisseur sonore de la porte
Vous entendrez un avertissement sonore lorsque la porte
du congélateur ou celle du compartiment pour les aliments
frais aurait été laissée ouverte.
Réinstallation du filtre
Appuyer pendant 3 secondes après avoir replacé le filtre.
Commandes de verrouillage
Appuyer pendant 3 secondes pour verrouiller le
distributeur de glace et d’eau ainsi que tous les boutons de
commandes et de température.
Gestion de la température du congélateur
Ajuster la température du compartiment congélateur.
Gestion de la température du réfrigérateur
Ajuster la température du compartiment pour les aliments
frais.
Réglage de la machine à glaçons
Mettre en marche ou éteindre vos machines à glaçons.
Modes additionnels :
• Mode Sabbath
Maintenez une pression sur Door
Alarm et Ice Maker
simultanément durant 3 secondes pour entrer dans le
mode Sabbath ou le quitter
Refrigerator
Hold 3 Sec for °F/°C
Hold 3 Seconds
Hold 3 Seconds
Recommended: 37 °F
Actual Set
Freezer
Door Alarm
Ice Maker
Lock Controls
Reset Filter
Recommended: 0°F
F
UTILISATION DU RÉFRIGÉRATEUR: Commandes
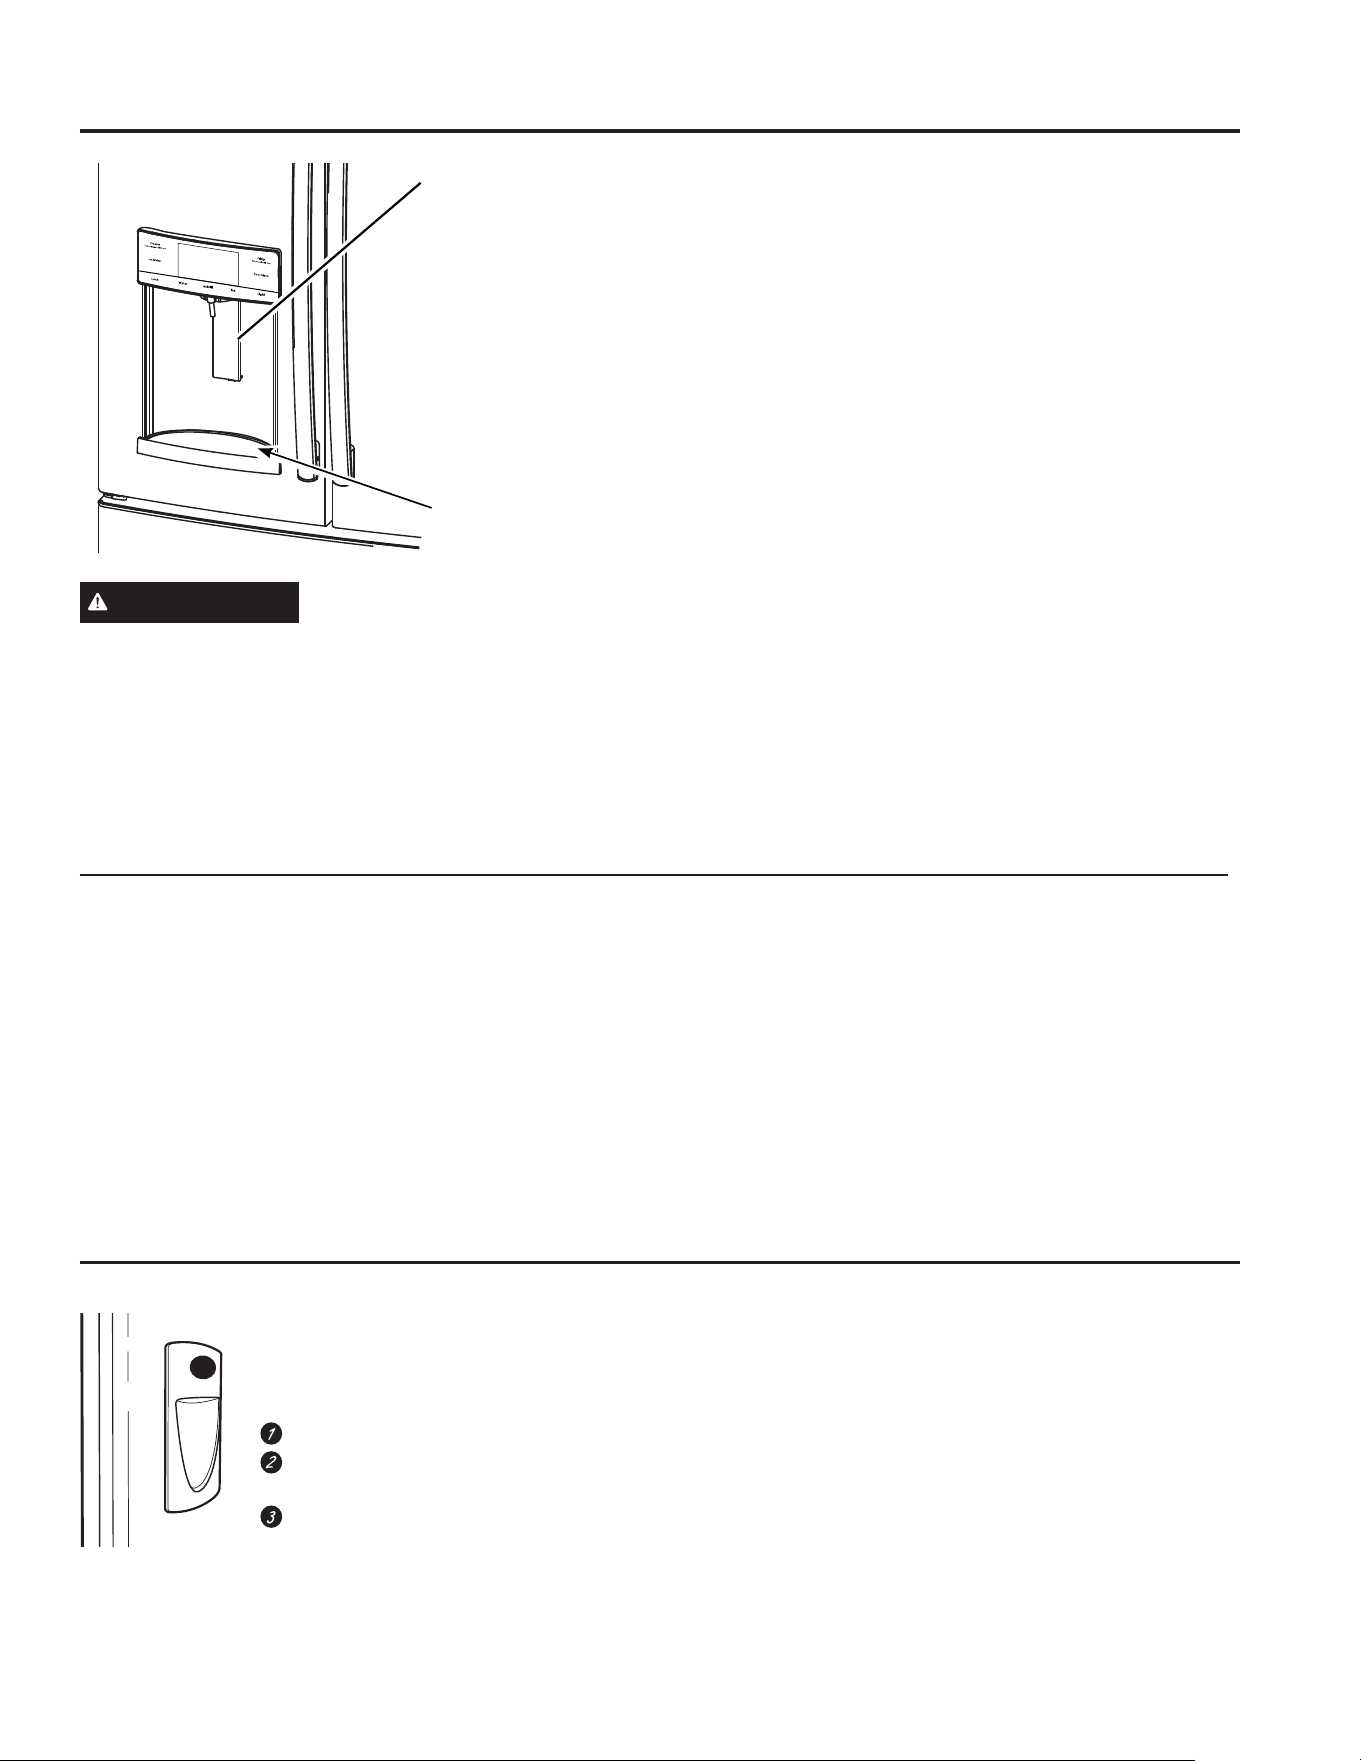
49-60792 Rev. 3 13
UTILISATION DU RÉFRIGÉRATEUR: Distributeur
Grille du distributeur
Informations importantes concernant votre distributeur
Ŷ N’ajoutez pas de glaçons provenant des bacs ou de sac à
glaçons au seau de la machine à glaçons de la porte. Ils
peuvent être difficile à piler ou à distribuer.
ŶeYLWH]GHWURSUHPSOLUOHVYHUUHVGHJODoRQVHWG¶XWLOLVHUGHV
verres étroits. La glace accumulée peut bloquer le conduit
ou peut geler le volet en position fermée. Si des glaçons
bloquent le conduit, retirer le seau à glace et faites-les
passer à l’aide d’une cuillère en bois.
Ŷ Ne placez pas de boisson ou d’aliment dans le bac de
la machine à glaçons pour les refroidir rapidement. Les
canettes, bouteilles et paquets alimentaires peuvent bloquer
la machine à glaçons ou la vis sans fin.
Ŷ Pour éviter que la glace distribuée ne manque le verre,
placez ce dernier à proximité de l’ouverture du distributeur,
mais sans la toucher.
Ŷ Il est possible que de la glace pilée soit distribuée même
si vous avez choisi CUBED ICE (glaçons). Cela se
produit de temps à autre lorsque plusieurs glaçons sont
accidentellement acheminés vers le broyeur.
Ŷ Après distribution de glace pilée, de l’eau peut s’écouler du
conduit.
Ŷ Parfois, un peu de givre se forme sur le volet du conduit à
glace. Ce phénomène est normal et se produit en général
après des distributions répétées de glace pilée. Le givre va
éventuellement s’évaporer.
Si l’eau n’est pas distribuée lorsque le réfrigérateur vient d’être
installé, il y a peut-être de l’air dans le conduit d’eau. Appuyez
sur le bras du distributeur pendant au moins cinq minutes pour
purger l’air contenu dans le conduit d’alimentation en eau et
ainsi remplir ce dernier d’eau. Afin d’éliminer les impuretés du
système, jetez les six premiers verres d’eau.
Pour retirer la grille du distributeur (Type A et B
seulement)
Ŷ Tirez la grille du distributeur vers vous jusqu’à la butée.
Ŷ Localisez la languette centrale sur le fond de la grille et
appuyez.
Ŷ Tirez l’ensemble de la grille du distributeur vers vous..
Ŷ Sortez la grille du distributeur en la levant à l’encoche
centrale pour la nettoyer.
Pour retirer la grille du distributeur (Type C seulement)
Saisissez la grille du distributeur et tirez-la fermement jusqu’à
la sortir.
Pour remettre la grille du distributeur (Type A et B seulement)
Ŷ Placez le couvercle de la grille du distributeur sur le dessus
de la clayette de récupération et placez-le sous les deux
pattes en plastique de chaque côté.
Ŷ Centrez la grille du distributeur et alignez-la à l’aide des
guides centraux.
Ŷ Poussez jusqu’à ce qu’elle soit bien en place.
Pour remettre la grille du distributeur
Alignez
le guide du bas de la grille sur le rail du distributeur
et glissez la grille jusqu’à ce qu’elle s’immobilise à l’arrière du
distributeur.
Distributeur d’eau et de
glace
(Consulter la section sur les
paramètres de température
et les fonctions de contrôle)
Pour utiliser le distributeur d’eau interne*
Le distributeur d’eau est situé sur le
mur intérieur gauche du compartiment
réfrigérateur.
Pour la distribution d’eau :
Placer le verre contre la cavité.
Appuyer sur le bouton du distributeur
d’eau.
Tenir le verre sous le distributeur
pendant 2 ou 3 secondes après avoir
relâché le bouton du distributeur. L’eau
pourrait continuer à couler après que le
bouton ait été relâché.
Si l’eau ne coule pas lorsque le distributeur est utilisé pour la
première fois, il se pourrait qu’il y ait de l’air dans le système de
conduites d’eau. Appuyez sur le bouton du distributeur pendant
au moins 5 minutes pour permettre à l’air emprisonné de sortir
des conduites et pour permettre à l’eau de les remplir. Il se
pourrait que le distributeur émette beaucoup de bruit pendant
le processus; ce bruit sera provoqué par la sortie de l’air des
conduites d’eau. Afin de nettoyer les conduites d’eau de toute
impureté, jetez les 6 premiers verres d’eau qui sortiront du
distributeur.
Note : Pour éviter l’accumulation d’eau, le distributeur devrait
être essuyé de temps à autre à l’aide d’un chiffon ou d’une
éponge propre.
AVERTISSEMENT
Risque de lacération
Ŷ N’introduisez jamais les doigts ou tout autre objet dans
l’ouverture de sortie du broyeur de glace. Vous risqueriez
de toucher les lames du broyeur de glace et entraîner des
blessures graves, voire une amputation.
Ŷ Utilisez un verre robuste lorsque vous prenez les glaçons.
Un verre fragile pourrait se casser et occasionner une
blessure.
*Certains modèles seulement
Distributeur
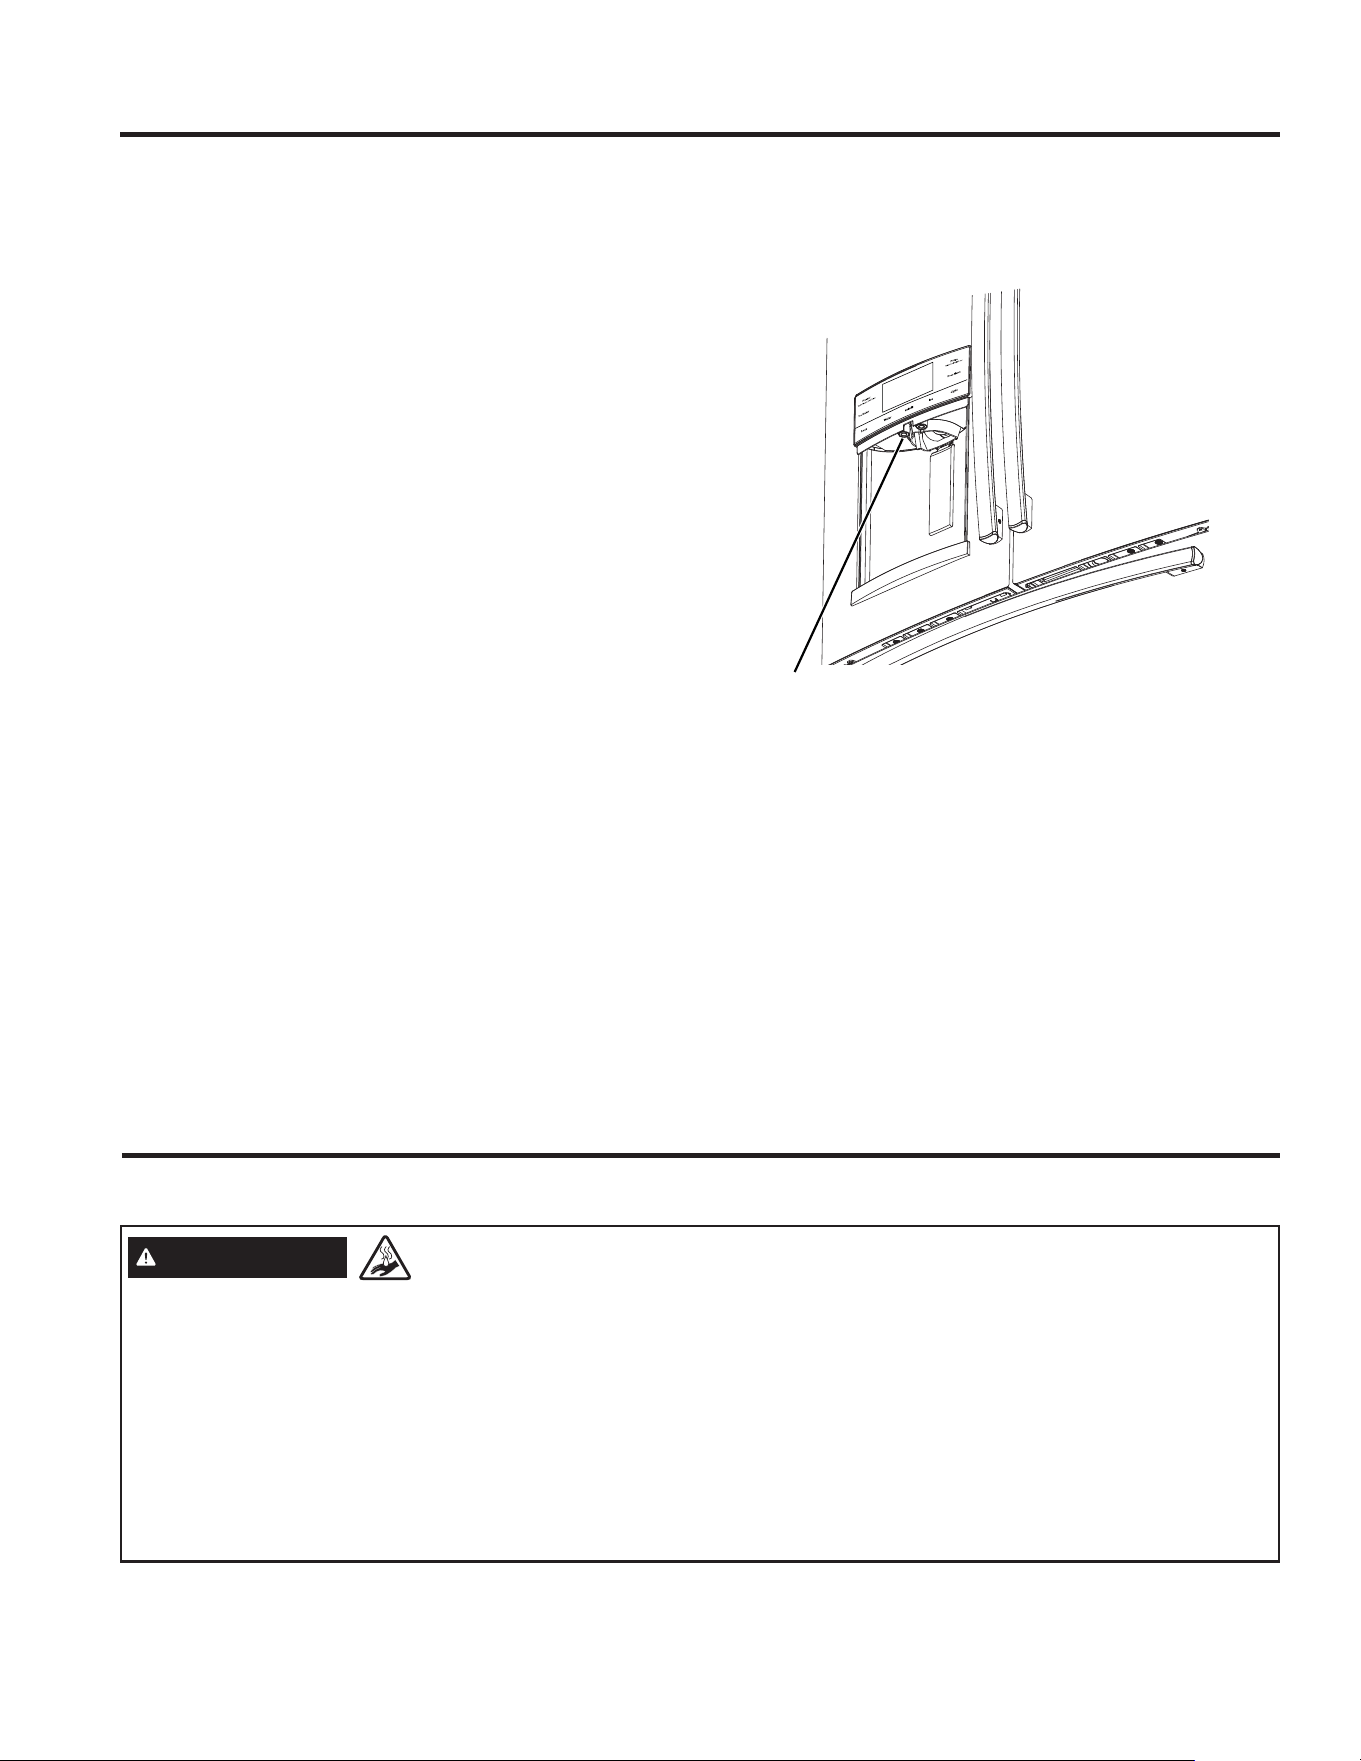
14 49-60792 Rev. 3
Pour utiliser le remplissage automatique mains libres :
• Centrez le récipient sur la grille du distributeur aussi loin que
possible sans activer le bras palpeur, puis retirez la main du
récipient.
• Appuyer sur AUTOFILL
Pour arrêter le Remplissage automatique
• Pressez AUTOFILL pour arrêter.
Faits importants à propos du AUTOFILL
(Remplissage automatique)
• Pour obtenir des résultats optimaux, utiliser un récipient
uniforme d’une hauteur de 10 à 20 cm (4 à 8 po.) et d’une
largeur de 5 à 15 cm (2 à 6 po.)
• Le niveau de remplissage et la fonctionnalité peuvent varier
dans le cas de récipients dont la longueur excède 20 cm (8
po) ou la largeur, 15 cm (6 po).
• Le volume des récipients pourrait également varier; si vous
UHFHYH]OHPHVVDJHG¶HUUHXU©5pFLSLHQWLQWURXYDEOHª
essayez avec un récipient différent.
• Le remplissage automatique prendra fin automatiquement
après un certain temps.
• Une poignée, des pailles, ou d’autres garnitures sur le rebord
du récipient pourraient entraîner un débordement ou des
variations du volume de remplissage.
• Des éclaboussures pourraient se produire selon la position
du récipient, le débit d’eau, la forme du récipient et la
présence de glaçons
• Nettoyer les capteurs régulièrement à l’aide d’un chiffon
propre et humide, et ne pas vaporiser de liquide ni de
nettoyant directement sur les capteurs.
• Le remplissage automatique fonctionne mieux si la pression
d’eau de la résidence se trouve entre 414 et 689 kPa (60 et
100 psi).
• La glace dans le récipient peut influencer le volume de
remplissage. En cas de problème, utilisez moins de glace.
Sensors
*Certains modèles seulement
Système d’infusion K-Cup *
AVERTISSEMENT
Risque de brûlures.
• L’eau délivrée par le distributeur est très chaude et peut
provoquer des brûlures et des échaudures. Veuillez lire
tous les avertissements avant utilisation. (Voir page 5).
• Ne permettez pas aux enfants d’utiliser l’infuseur.
• Veuillez toujours utiliser un récipient qui est adapté aux
liquides chauds (céramique, mousse de polystyrène
expansé, etc.)
• N’infusez pas dans un récipient en verre car il risquerait de
se fissurer ou d’éclater.
• Si vous vivez à une altitude supérieure à 1525 mètres (5000
pieds), pressez les touches Fridge5pIULJpUDWHXUHWDoor
Alarm (Alarme de porte) afin que la commande puisse
passer de Low Altitude (Lo AL / Basse altitude) à High
Altitude (Hi AL / Haute altitude).
• N’utilisez PAS le distributeur d’eau chaude immédiatement
après l’installation d’un nouveau filtre à eau car de l’eau très
chaude pourrait en jaillir. Distribuez de l’eau froide durant
environ 5 minutes pour évacuer l’air du système avant de
distribuer l’eau chaude.
Informations importantes concernant l’eau chaude
AUTOFILL (Remplissage Automatique)
UTILISATION DU RÉFRIGÉRATEUR:
AUTOFILL/ Système d’infusion Keurig K-
Cup*
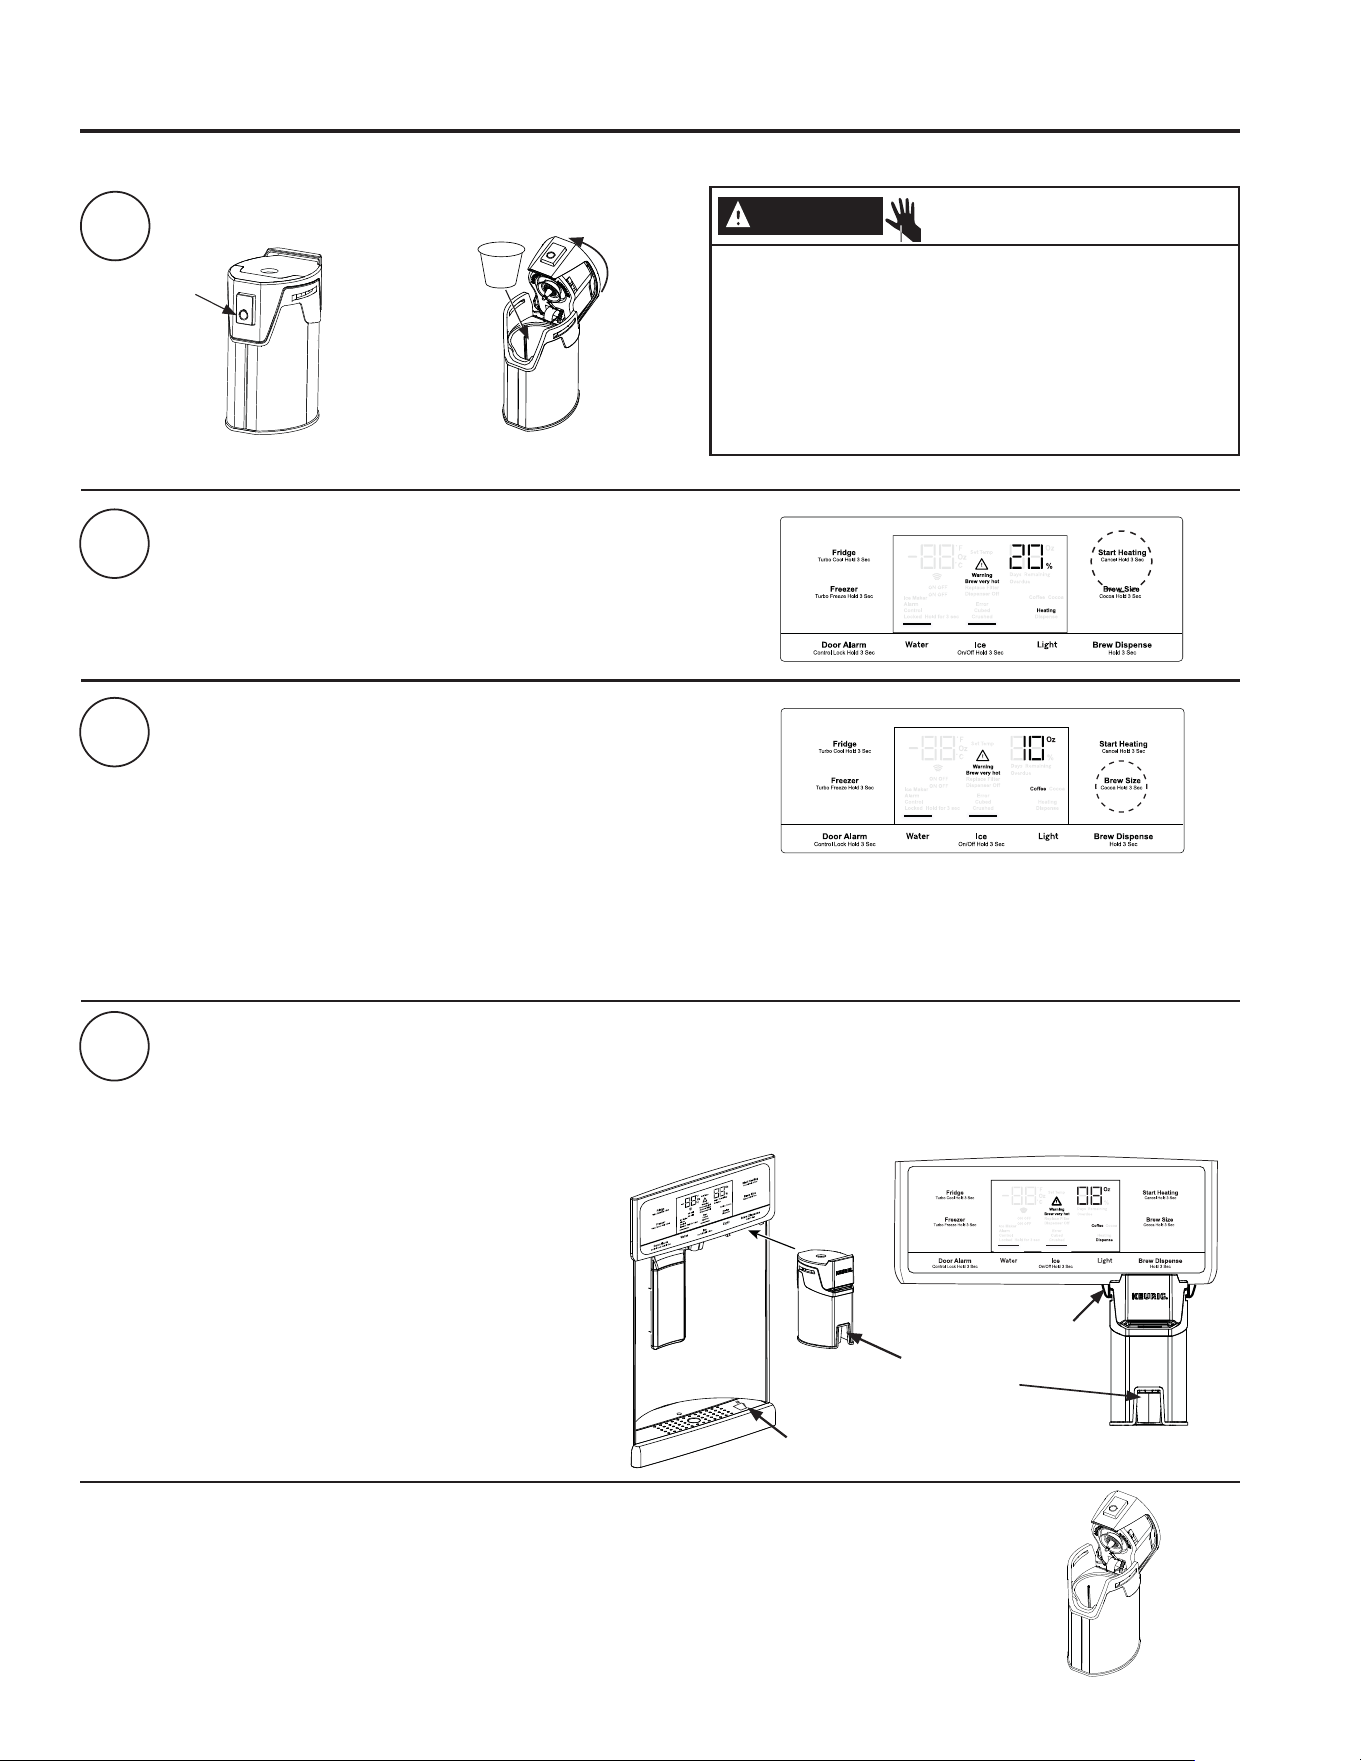
49-60792 Rev. 3 15
USING THE REFRIGERATOR: Système d’infusion Keurig K-Cup*
&HUWDLQVPRGqOHVVHXOHPHQW3RXUOHVeWDWV8QLVHWOHXUVWHUULWRLUHV
2
3
Deux façons d’infuser :
1. Pressez le bouton Start Heating (Démarrer le chauffage).
OU
2. Démarrez le chauffage à l’aide de l’application GE Kitchen.
Téléchargez l’application « GE Kitchen ». Visitez
GEAppliances.com/connect pour plus d’informations.**
4
Distribution
Une fois la phase de chauffage terminée, le voyant Dispense (Distribuer) clignotera sur l’affichage.
Pour distribuer le breuvage, glissez l’infuseur sur les rails. Assurez-vous que l’infuseur est poussé à fond dans le support.
Placez votre tasse sur l’icône du plateau d’égouttage qui représente une tasse, sous le bec verseur rouge. Maintenez
une pression sur le bouton Brew Dispense (Distribuer le café) durant 3 secondes jusqu’à entendre l’enclenchement du
distributeur.
Nettoyage de l’infuseur
Ŷ
L’infuseur K-Cup va au lave-vaisselle sur le panier supérieur.
Ŷ
Nous recommandons de rincer votre infuseur à fond après le lavage afin d’enlever tous les résidus de savon.
Ŷ
Un nettoyage périodique de l’intérieur du distributeur est recommandé pour éviter les taches causées par
l’utilisation des dosettes K-Cup.
Changer la quantité à infuser
Pressez le bouton Brew Size (Quantité à infuser) à n’importe quel
moment pendant le cycle de chauffage pour choisir une quantité de
6, 8 ou 10 oz. La quantité par défaut est 8 oz. Assurez-vous que la
tasse puisse contenir la quantité sélectionnée.
REMARQUE : Maintenez une pression sur le bouton Brew Size
durant 3 secondes pour basculer entre Coffee (Café) et Cocoa
(Cacao). Le réglage par défaut est Coffee.
REMARQUE : Pour annuler le cycle de chauffage, pressez et maintenez le bouton Start Heating pendant 3
secondes. Pour annuler le cycle de distribution de café, pressez et maintenez le bouton Start Heating enfoncé
pendant 3 secondes, pressez sur le levier, pressez sur l’un des boutons de l’afficheur, autres que Brew Size ou
Brew Dispense, ou ouvrir la porte du compartiment d’aliments frais droite.
Bec verseur
rouge pour
l’alignement
|de la tasse
Icône de tasse pour
le positionnement
5DLOVSRXU
l’infuseur
Comment utiliser le distributeur à dose unique
Infuseur à dose unique K-Cup de Keurig*
Poussez
pour ouvrir
Fermez
l’infuseur. Le
couvercle fera
entendre un
clic s’il est bien
fermé.
1
Insérez la dosette K-Cup de Keurig dans l’infuseur.
Laissez tomber
la dosette
K-Cup dans
l’infuseur et
poussez-la
fermement.
ATTENTION
Risque de coupure ou de piqûre.
•
Deux aiguilles acérées se trouvent à l’intérieur de
l’infuseur K-Cup. Pour prévenir les blessures, ne
mettez pas vos doigts à l’intérieur de l’infuseur.
Usez de précaution lors du nettoyage
• Gardez l’infuseur K-Cup à l’écart des enfants car
ils peuvent se blesser suite à son utilisation
incorrecte.

16 49-60792 Rev. 3
*Certains modèles seulement **3RXUOHVeWDWV8QLVOHXUVWHUULWRLUHVHW&DQDGDVHXOHPHQW
GE WiFi Connect**
(clients des États-Unis, leurs territoires, et Canada)
GE WiFi Connect Enabled* (modèles PFE28P, PFD28, PYD22,
PYE22P, PFH, seulement)
Si l’intérieur de votre réfrigérateur affiche une étiquette d’information intitulée Connected Appliance
Information tel qu’illustré, vous pouvez alors le connecter à votre réseau WiFi et communiquer avec lui
par téléphone intelligent à des fins de surveillance, de commande et de notification. Selon le modèle
que vous possédez, votre réfrigérateur est doté soit d’une carte de communication WiFi intégrée, soit
d’un port pour module externe WiFi ConnectPlus (vendu séparément). Veuillez visiter GEAppliances.
com /connect pour obtenir plus d’informations sur les fonctions de connexion
pour électroménagers et les applications compatibles avec votre téléphone
intelligent.**
Pour utiliser votre connexion WiFi, pressez Water et Light sur le panneau de
commande.
RENSEIGNEMENTS RÉGLEMENTAIRES
Déclaration de conformité de la FCC/IC :
Cet appareil est conforme aux prescriptions de la partie 15 des règles de la FCC. Le fonctionnement de cet équipement est
assujetti aux deux conditions suivantes :
1. Cet appareil ne doit pas causer de brouillage préjudiciable.
2. Cet appareil doit accepter tout brouillage qu’il reçoit, y compris celui pouvant entraîner un fonctionnement indésirable.
Cet équipement a été testé et déclaré conforme aux limites imposées pour un appareil numérique de Classe B, conformément
à la partie 15 de la réglementation FCC. Ces limites sont définies afin d’assurer une protection raisonnable contre le brouillage
nuisible dans une installation résidentielle. Cet équipement génère, utilise et émet des fréquences radio qui, en cas d’une
installation erronée ou d’une utilisation non-conforme aux instructions de ce manuel d’utilisation peuvent causer un brouillage
nuisible aux communications radio. Il n’y a cependant aucune garantie qu’un brouillage nuisible ne se produira pas dans une
installation donnée. Si cet équipement cause un brouillage nuisible sur votre poste radio ou de télévision, ce que vous pouvez
déterminer en éteignant et en rallumant votre équipement, il est conseillé à l’utilisateur d’essayer de pallier à ce brouillage nuisible
en prenant l’une ou l’autre des mesures suivantes :
5pRULHQWHURXUHSRVLWLRQQHUO¶DQWHQQHGHUpFHSWLRQ
• Augmenter la distance entre l’équipement et le récepteur.
• Brancher l’équipement dans une prise d’un circuit qui diffère de celui auquel le récepteur est branché.
• Consulter le revendeur ou un technicien en radio-télévision pour obtenir de l’aide.
Étiquetage : Les modifications non explicitement approuvées par le fabricant peuvent annuler le droit de l’utilisateur
de se servir de cet équipement.
Module ConnectPlus seulement (ou module de communication similaire)
Exposition aux radio-fréquences - Cet appareil n’est autorisé qu’à des fins d’application mobile. Une distance d’au moins 20 cm
entre le module ConnectPlus et le corps de l’utilisateur doit être maintenue en tout temps.
GE WiFi Connect en option*
Le module GE ConnectPlus livré avec votre réfrigérateur le rend compatible avec la technologie GE WiFi Connect. Pour la
connexion à Internet, vous devez fixer le module par le port de communication de l’électroménager. Le module GE ConnectPlus
vous permet de communiquer avec votre électroménager par téléphone intelligent à des fins de surveillance, de commande et
de notification. Veuillez visiter GEAppliances.com /connect pour obtenir plus d’informations sur les fonctions de connexion
pour électroménagers, les applications compatibles avec votre téléphone intelligent et les points de vente du module GE
ConnectPlus.**
Connectivité WiFi : Pour obtenir de l’assistance concernant votre électroménager ou la connectivité en réseau ConnectPlus
(pour modèles à fonctionnalité WiFi intégrée ou optionnelle), veuillez composer le 1-800-220-6899.
Communications des électroménagers
(pour les clients des États-Unis et leurs
territoires)
UTILISATION DU RÉFRIGÉRATEUR: Communications des électroménagers
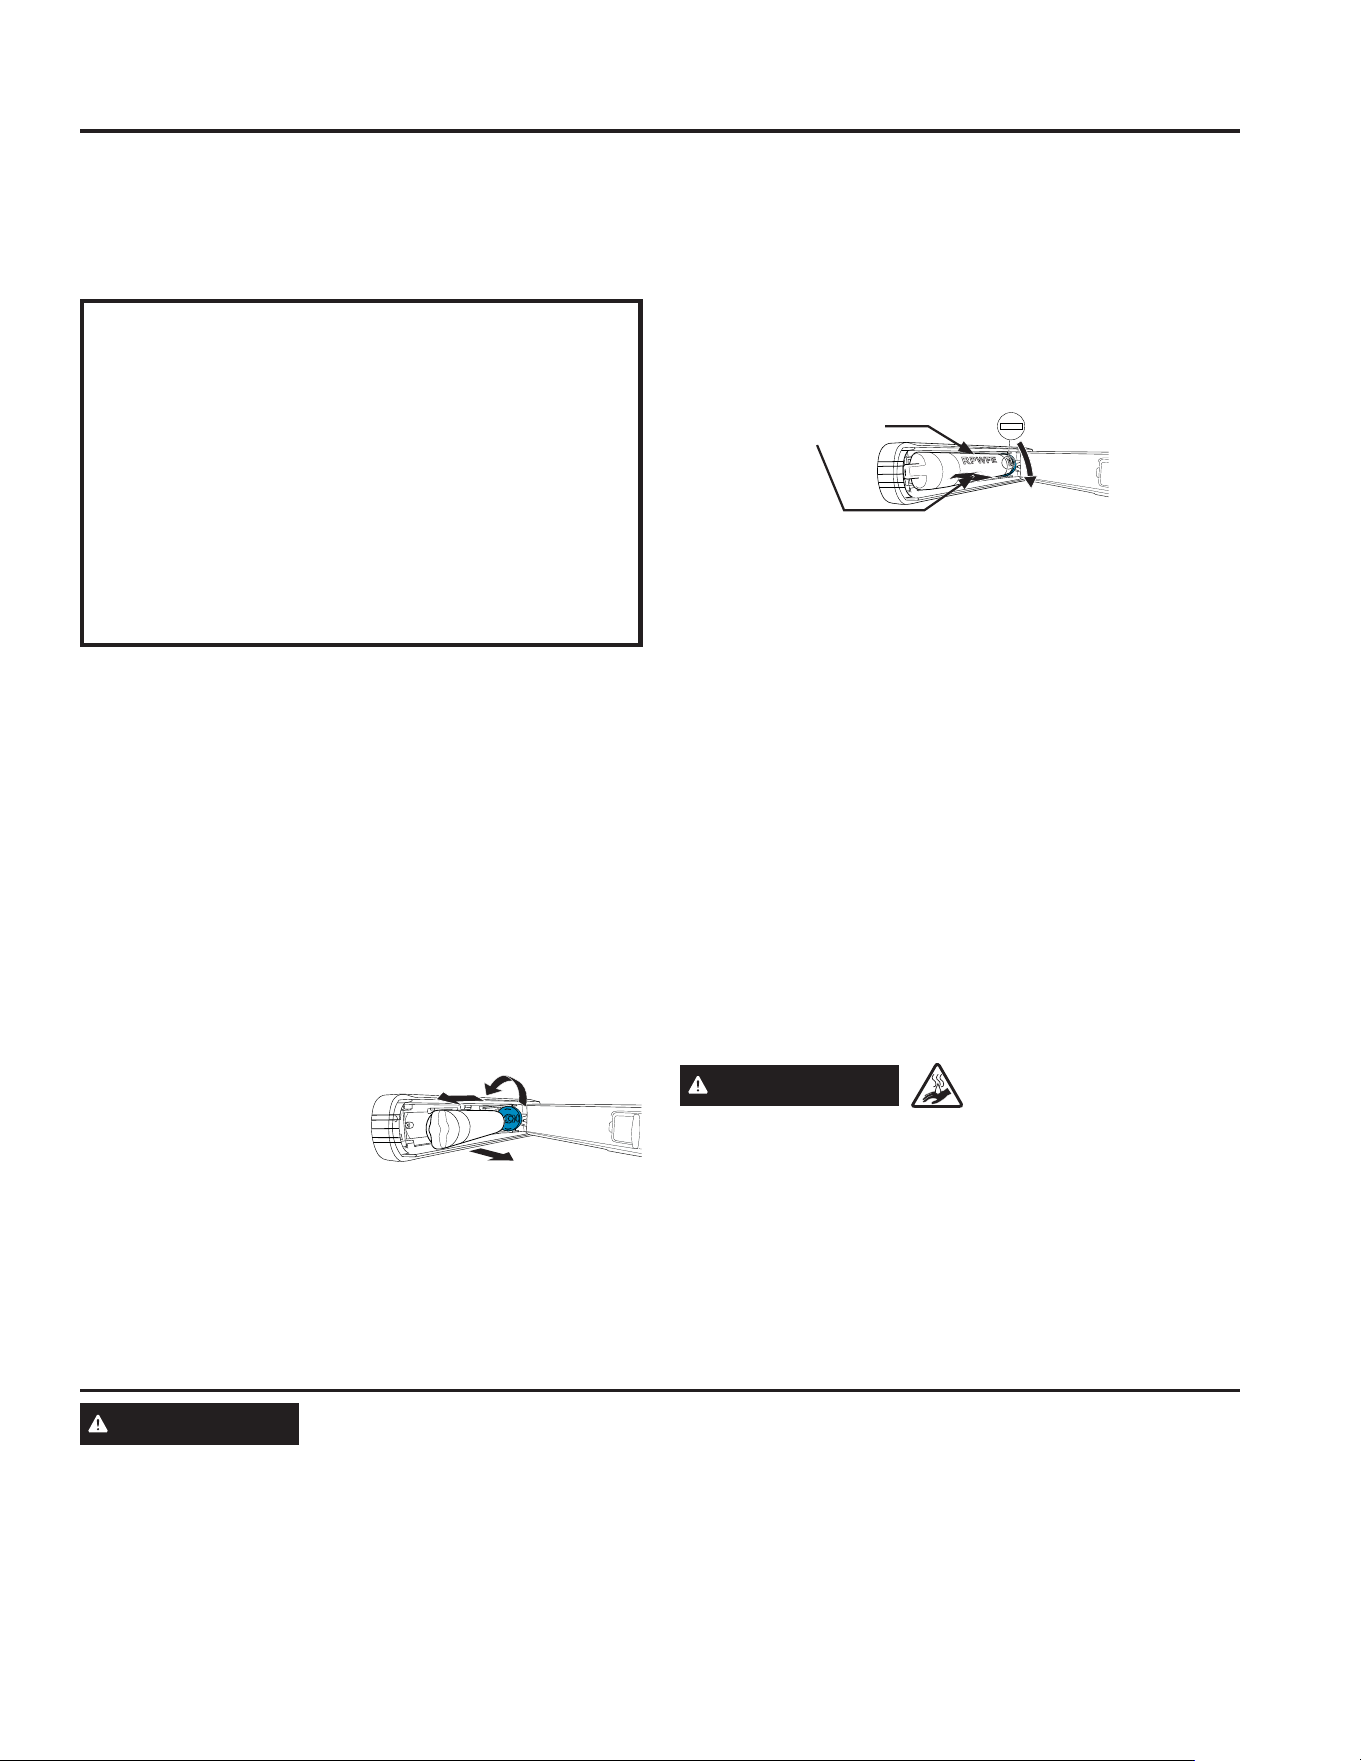
49-60792 Rev. 3 17
UTILISATION DU RÉFRIGÉRATEUR:&DUWRXFKH53:)(GXILOWUH
Cartouche RPWFE du filtre
Cartouche filtrante à eau
La cartouche filtrante à eau est située sur la paroi gauche de
l’intérieur du compartiment réfrigérateur, dans le haut.
Certains modèles utilisent l’identification par radiofréquence
,5)SRXUGpWHFWHUOHVIXLWHVHWFRQWU{OHUO¶pWDWGXILOWUH/D
WHFKQRORJLH,5)HVWKRPRORJXpHSDUOD)&&
À quel moment remplacer la cartouche filtrante
La cartouche filtrante doit être remplacée tous les 6 mois ou
plus tôt si 644 litres (170 gallons) d’eau ont été distribués ou
si le débit d’eau du distributeur ou de la machine à glaçons
diminue.
Modèles à écran tactile : Un message d’état du filtre
apparaîtra à l’écran lorsqu’il faudra remplacer le filtre à eau.
L’état du filtre sera mis à jour dès le remplacement du filtre.
Modèles sans écran tactile : Un témoins lumineux s’allumera
sur l’écran lorsqu’il faudra remplacer le filtre à eau.
Retrait de la cartouche filtrante ou du bouchon de
dérivation
5HWLUH]ODFDUWRXFKHRXOHERXFKRQGHGpULYDWLRQXVpV
en ouvrant le panneau de filtre et tirant sur le bas de la
cartouche ou du bouchon afin de les dégager des attaches
de filtre. Pivotez la cartouche
ou le bouchon vers
l’extérieur jusqu’à entendre
le clic du porte-cartouche qui
s’encliquète dans le support.
2. Pivotez la cartouche ou le bouchon d’un quart de tour dans
le sens contraire des aiguilles. Ensuite, retirez la cartouche
ou le bouchon en les tirant à l’écart du porte-cartouche. Une
petite quantité d’eau peut dégoutter.
Installation de la cartouche filtrante ou du
bouchon de dérivation
1. Alignez la cartouche ou le bouchon sur le porte-cartouche
DYHFOHPRW)5217GHYDQWRULHQWpYHUVOHKDXWGH
l’appareil. Poussez la cartouche ou le bouchon vers l’arrière
de l’appareil jusqu’à qu’ils reposent à fond. Pivotez la
cartouche ou le bouchon dans le sens des aiguilles d’un
TXDUWGHWRXUMXVTX¶jFHTXHOHPRW)5217GHYDQW
s’oriente vers l’extérieur.
2. Tout en vous assurant que la cartouche ou le bouchon
reposent à fond dans le porte-cartouche, pivotez
délicatement le filtre vers l’intérieur jusqu’à ce qu’il soit en
position. Si le filtre ne pivote pas facilement, assurez-vous
qu’il est bien aligné et à fond dans le porte-cartouche. Les
YR\DQWV528*(6QHGRLYHQWSDVrWUHYLVLEOHV
NOTA :
Il est normal d’apercevoir un changement de la
couleur de l’eau lors de la purge initiale du système. La
couleur de l’eau reviendra à la normale après quelques
minutes d’écoulement.
Bouchon de dérivation du filtre
Pour réduire le risque de dommage à la propriété en raison
de fuites d’eau, vous DEVEZ utiliser un bouchon de dérivation
du filtre lorsqu’une cartouche filtrante de rechange n’est
pas disponible. Certains modèles ne sont pas équipés
d’un bouchon de dérivation de filtre. Pour en obtenir un
JUDWXLWHPHQWFRPSRVH]OH*(&$5(6$X&DQDGD
composez le 800.561.3344. Le distributeur et la machine à
glaçons ne fonctionneront pas sans que ne soient installés le
filtre ou le bouchon de dérivation. Le bouchon de dérivation
s’installe de la même manière que la cartouche filtrante.
AVERTISSEMENT
Risque
d’ébouillantement.*
L’utilisation du distributeur d’eau chaude avant l’évacuation
de l’air du système peut provoquer un jaillissement d’eau
très chaude causant des brûlures. Veiller à observer les
instructions ci-dessus pour évacuer la totalité de l’air du
système par le distributeur d’eau froide avant d’utiliser le
distributeur d’eau chaude.
AVERTISSEMENT
Pour réduire le risque d’étouffement pendant l’installation de ce produit, ne pas laisser les petites pièces à la portée des
enfants âgés de moins de 3 ans. La cartouche de filtre jetable doit être remplacée tous les 6 mois, si sa capacité nominale est
atteinte ou si une réduction notable du débit est observée.
Pour les meilleurs résultats de votre système de filtration, GE Appliances, a Haier company, recommande l’utilisation de filtres
de marque GE Appliances seulement. L’utilisation de filtres de marque GE Appliances dans les réfrigérateurs
GE Appliances
procure les meilleurs rendement et fiabilité. Les filtres notre satisfont aux rigoureuses normes NSF de l’industrie relatives à la
sûreté et la qualité, facteur important pour les produits qui filtrent votre eau. Il
n’y a pas de certitude que les marques de filtre
autres GE Appliances satisferont nos normes de qualité, de rendement et de fiabilité.
Pour toute question ou pour commander des cartouches filtrantes
de rechange, visitez notre site Web au
geappliances.ca/service ou consulter les pages jaunes pour connaître le centre de service Camco
le plus proche.
FRONT
3
4
Les voyants rouges
ne doivent pas être
visibles
1
2
*Certains modèles seulement
FCCID: ZKJ-EBX1532P001 ICID: 10229A-EBX1532P001
« Cet appareil est conforme aux prescriptions de la
partie 15 des règles de la FCC. Le fonctionnement de cet
équipement est assujetti aux deux conditions suivantes
: (1) Cet appareil ne doit pas causer de brouillage
préjudiciable; et (2) cet appareil doit accepter tout
brouillage qu’il reçoit, y compris celui pouvant entraîner
un fonctionnement indésirable. »
« Cet appareil est conforme aux normes RSS d’Industrie
Canada relatives aux dispositifs exempts de licence.
Le fonctionnement de cet équipement est assujetti aux
deux conditions suivantes : (1) Cet appareil ne doit pas
causer de brouillage; et (2) cet appareil doit accepter
tout brouillage, y compris celui pouvant entraîner un
fonctionnement indésirable. »
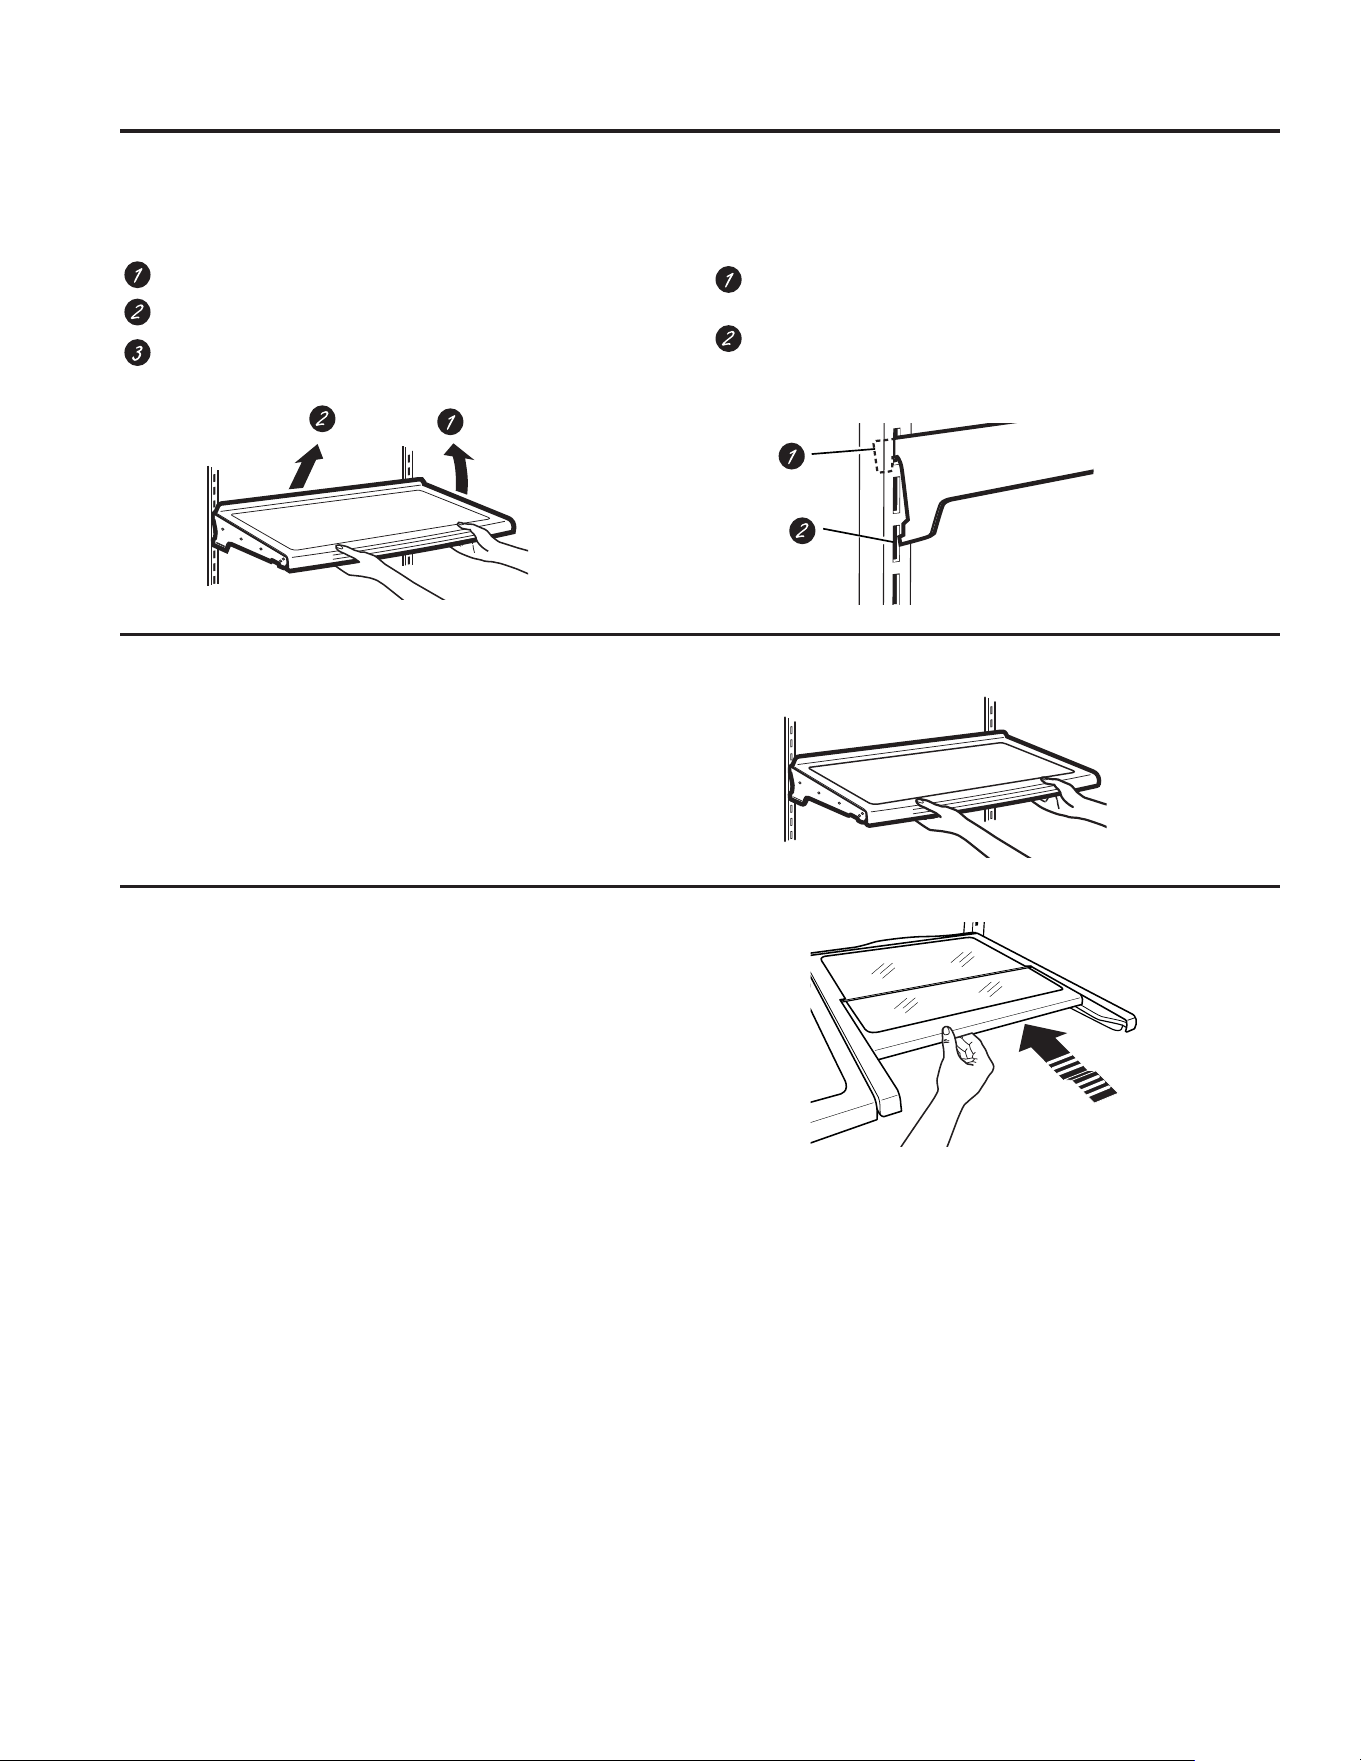
18 49-60792 Rev. 3
*Select Models Only
Réorganisation des clayettes
Les clayettes du réfrigérateur sont réglables.
Pour les retirer :
5HWLUH]WRXVOHVDOLPHQWVGHODFOD\HWWH
Soulevez l’avant de la clayette.
Soulevez l’arrière de la clayette et sortez-la du
réfrigérateur.
Pour le remettre en place :
Tout en inclinant la clayette, insérez le crochet supérieur à
l’arrière de cette même clayette dans une fente du rail.
Abaissez l’avant de la clayette jusqu’à ce que le bas de
celle-ci se positionne correctement.
Clayettes anti-déversement
Les clayettes anti-déversement ont des bords adaptés pour
éviter que les déversements ne s’écoulent sur les clayettes
inférieures.
Clayette QuickSpace*
Cette clayette se partage en deux avec une partie qui s’escamote
sous l’autre pour permettre le stockage des articles de grande taille
posés sur la clayette inférieure.
Cette clayette peut être retirée et remplacée ou déplacée (tout
comme les clayettes anti-déversement).
REMARQUE : La partie arrière de la clayette QuickSpace n’est
pas réglable.
Stockage des produits frais
UTILISATION DU RÉFRIGÉRATEUR: Stockage des produits frais
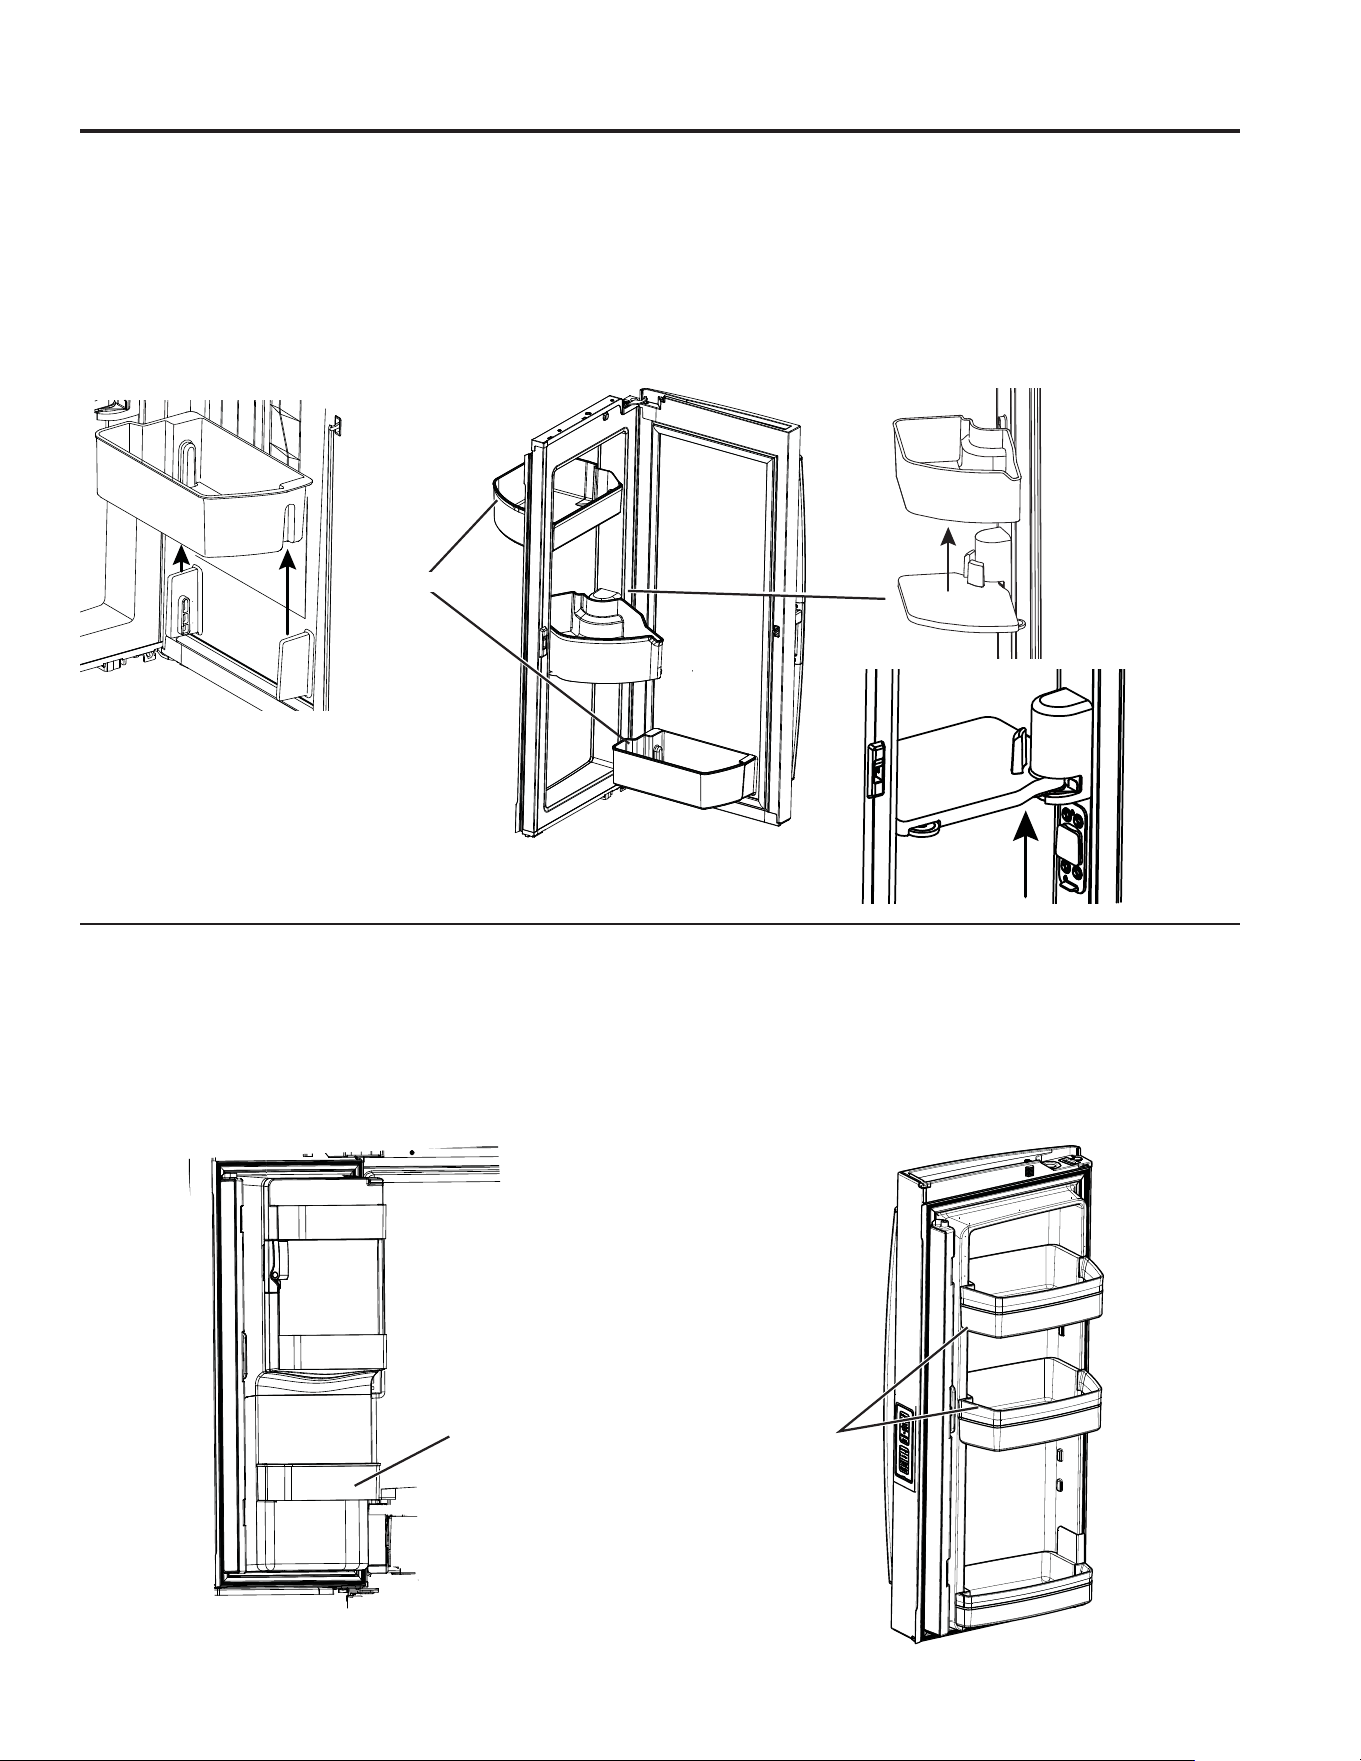
49-60792 Rev. 3 19
UTILISATION DU RÉFRIGÉRATEUR: Stockage des produits frais
*Certains modèles seulement
Bacs de la porte gauche
MODÈLES AVEC DISTRIBUTEUR – BAC FIXE*
Pour les retirer : Tirez le bac vers le haut, puis retirez-le.
Les bacs de porte de machine à glaçons ne sont pas
interchangeables, notez leur emplacement au moment de les
retirer afin de les replacer au bon endroit.
MODÈLES SANS DISTRIBUTEUR –
BACSRÉGLABLES*
Les bacs sont réglables en hauteur sur l’intérieur de la
porte pour une meilleure flexibilité de rangement.
Pour les retirer : Tirez le bac vers le haut, puis retirez-le.
Bacs de la porte droite
Les BACS FIXES peuvent aisément être transportés du
réfrigérateur au plan de travail.
Pour les retirer : Tirez
le bac vers le haut, puis retirez-le.
BAC PIVOTANT :
Pour retirer : Faites pivoter le bac vers l’extérieur puis levez-le
en ligne droite. Pour le retirer, placez la main sous la base
métallique et levez.
Pour retirer la base métallique : Placez la main sous la base
métallique et levez.
Bacs fixes
Bac fixe
Bacs réglables
5HWLUHUOH
bac pivotant
5HWLUHUOHVEDFVIL[HV
5HWLUHU
la base
métallique
Stockage des produits frais
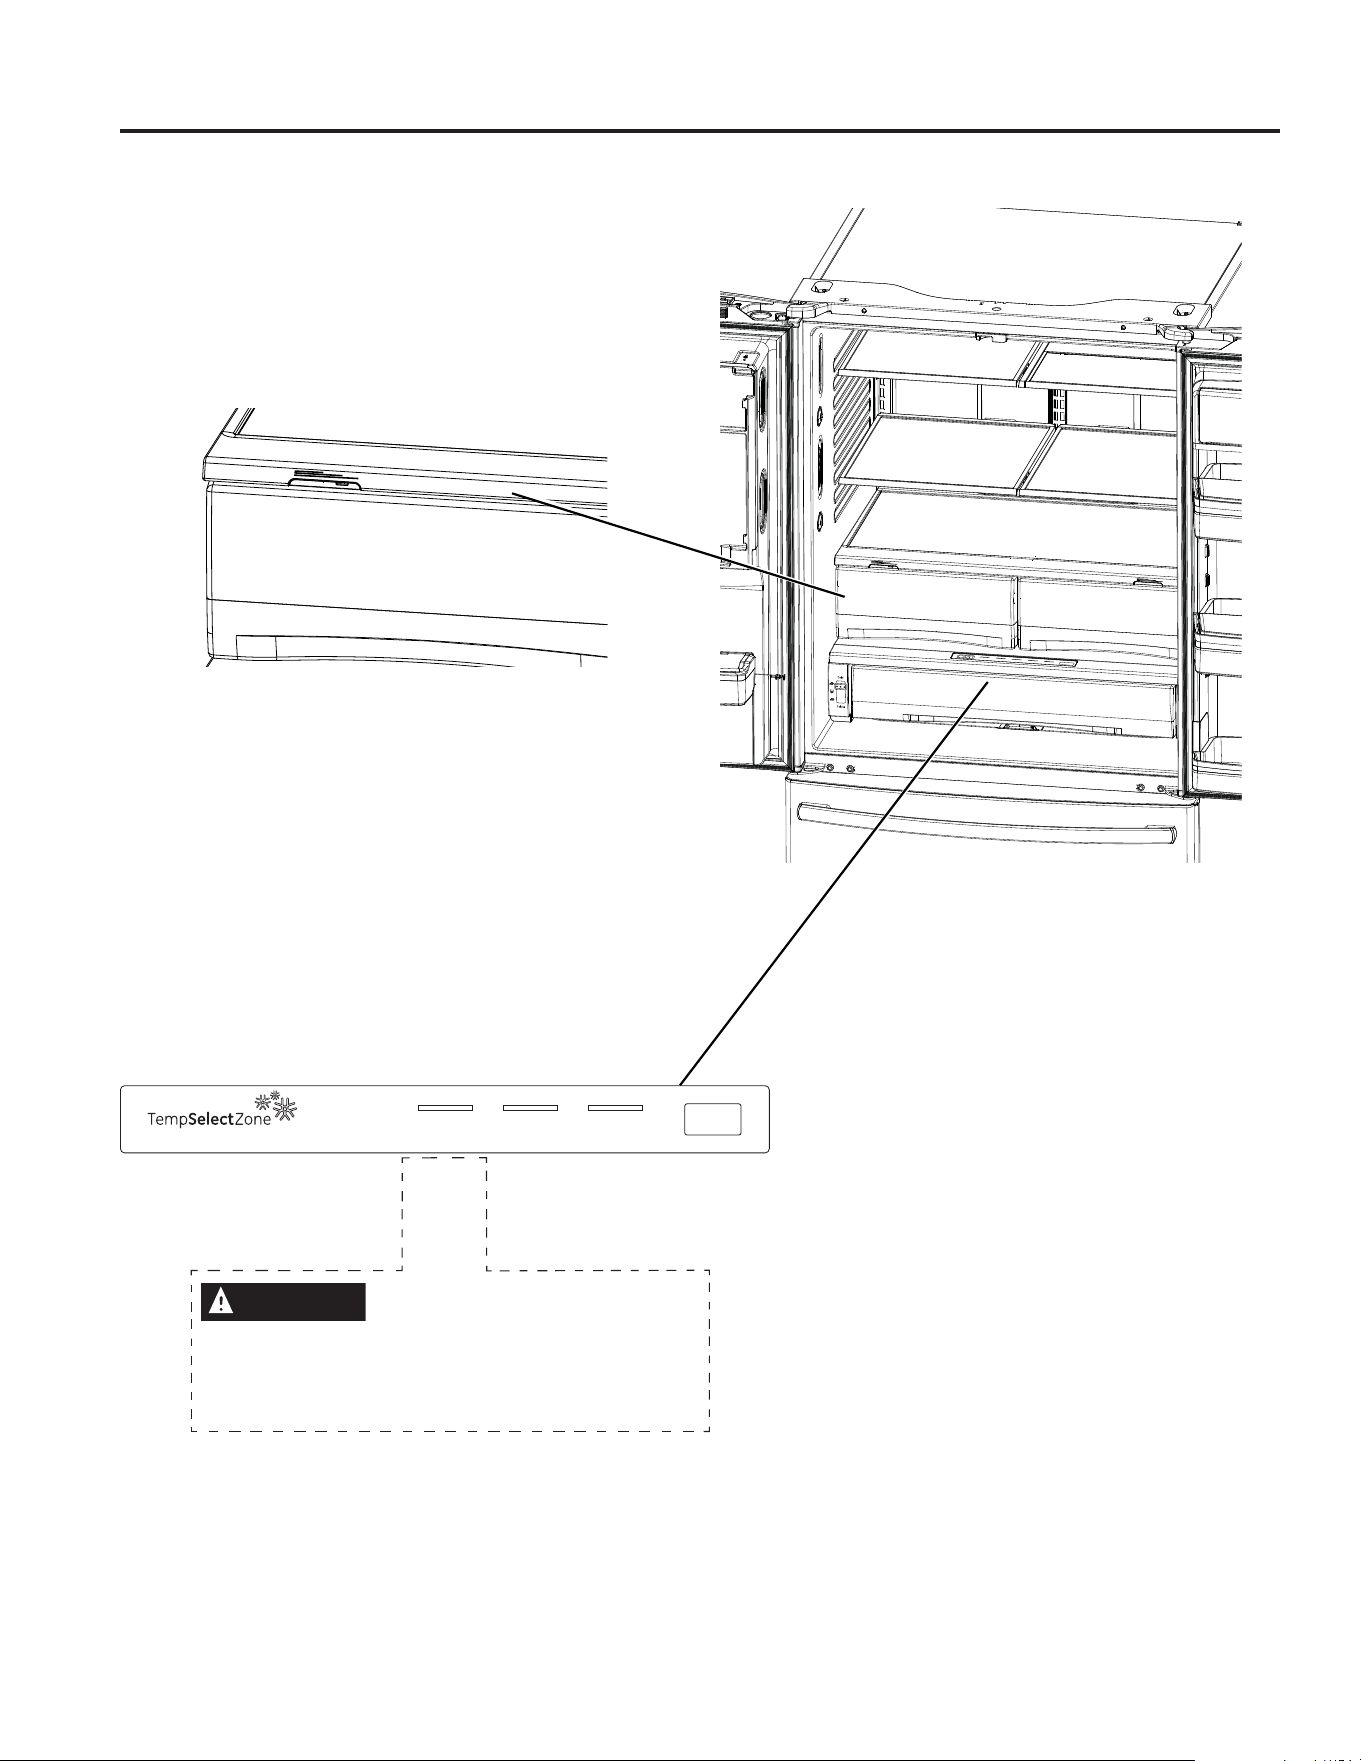
20 49-60792 Rev. 3
*Certains modèles seulement
Zone climatisée & du tiroir à température contrôlée
C
Fruits Vegetables
F
C
M
EAT
DELI
P
R
ODU
C
E
C
H
E
ESE
CI
TRU
S
SELEC
T
ClimateZone
Fruits Vegetables
Fruits Vege
D
32° 34° 38°
Remarque : Les températures indiquent les
températures appropriées pour la conservation des
aliments, les températures réelles peuvent varier en
fonction de l’utilisation du réfrigérateur et d’autres
facteurs tels que les ouvertures de portes et du réglage
de la température selon les aliments.
ATTENTION
Risque de lacération.
Ne stockez pas les bouteilles en verre lorsque cette
fonction est sélectionnée. Si de la glace se forme, les
bouteilles peuvent se briser et causer des blessures
corporelles.
Meat Beverage Deli
Select
Tiroir à température contrôlée*
Le tiroir à température contrôlée est un tiroir de pleine largeur
équipé d’un contrôle de la température. Ce tiroir peut être
utilisé pour les produits divers de grande taille.
Pour modifier les paramètres, appuyez sur bouton de sélection.
Zone climatisée
Conservez les fruits et les légumes dans des compartiments
séparés pour un accès facile.
Essuyez l’eau accumulée dans le fond ou en dessous des
bacs.
UTILISATION DU RÉFRIGÉRATEUR: Zone climatisée & du tiroir à température contrôlée
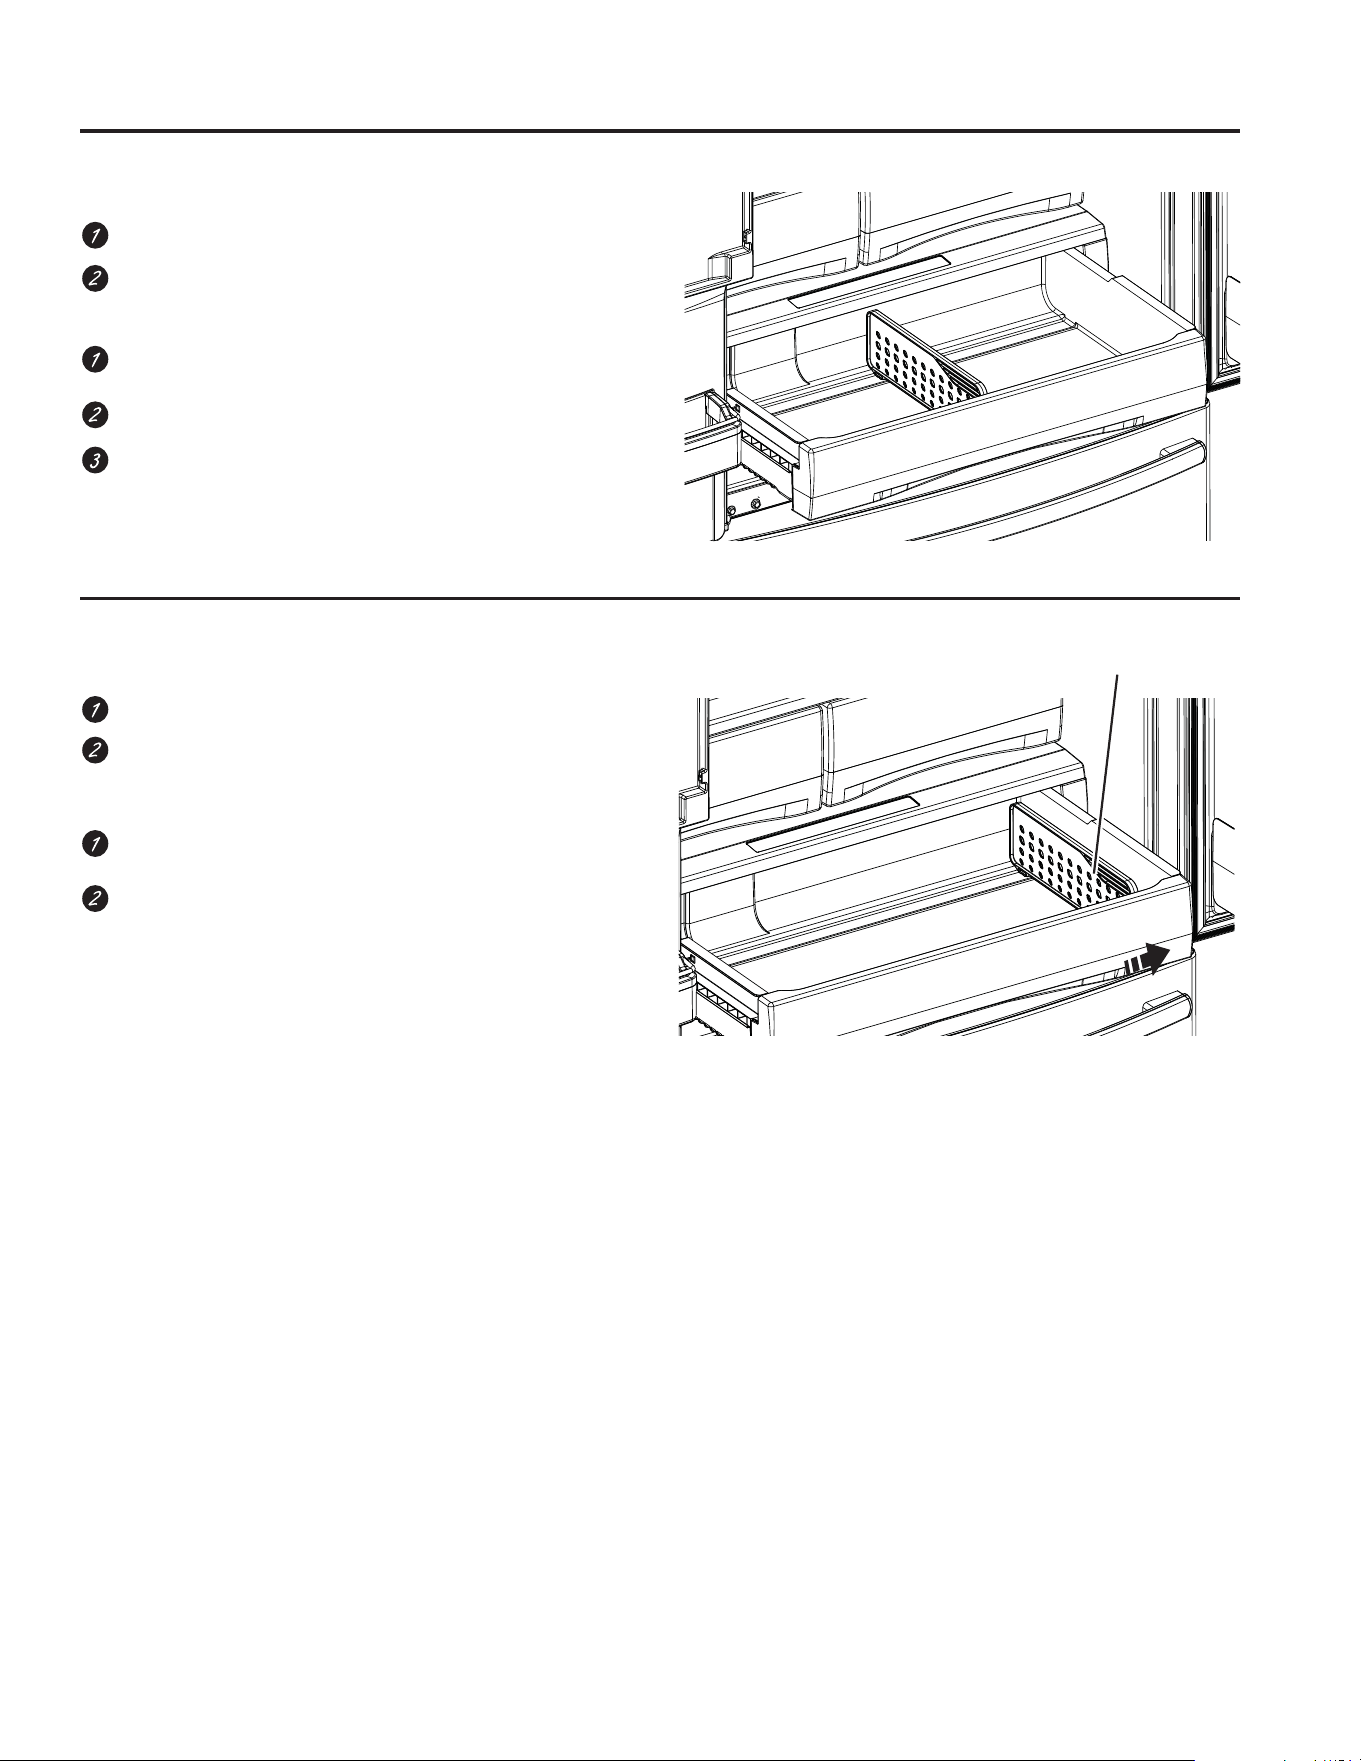
49-60792 Rev. 3 21
UTILISATION DU RÉFRIGÉRATEUR: Zone climatisée & du tiroir à température contrôlée
Comment retirer le séparateur du tiroir et le remettre en place*
Pour le retirer :
Tirez le tiroir jusqu’à la butée.
Soulevez le côté avant du séparateur pour le décrocher de
la paroi arrière du tiroir.
Pour le remettre en place :
Accrochez l’arrière du séparateur sur la paroi arrière du
tiroir.
Poussez le séparateur vers le bas.
Retrait et remise en place du tiroir à charcuterie/à produits frais réglable
Pour le retirer :
Tirez le tiroir jusqu’à la butée.
Soulevez l’avant du tiroir puis faites le sortir en tirant.
Pour le remettre en place :
Tirez les glissières gauche et droite jusqu’à ce qu’elles soient
complètement sorties.
Placez l’arrière du tiroir en premier, puis faites pivoter l’avant
du tiroir vers le bas pour que celui-ci repose sur les glissières.
Poussez le tiroir jusqu’à sa position fermée.
Séparateur
*Certains modèles seulement
Zone climatisée & du tiroir à température contrôlée
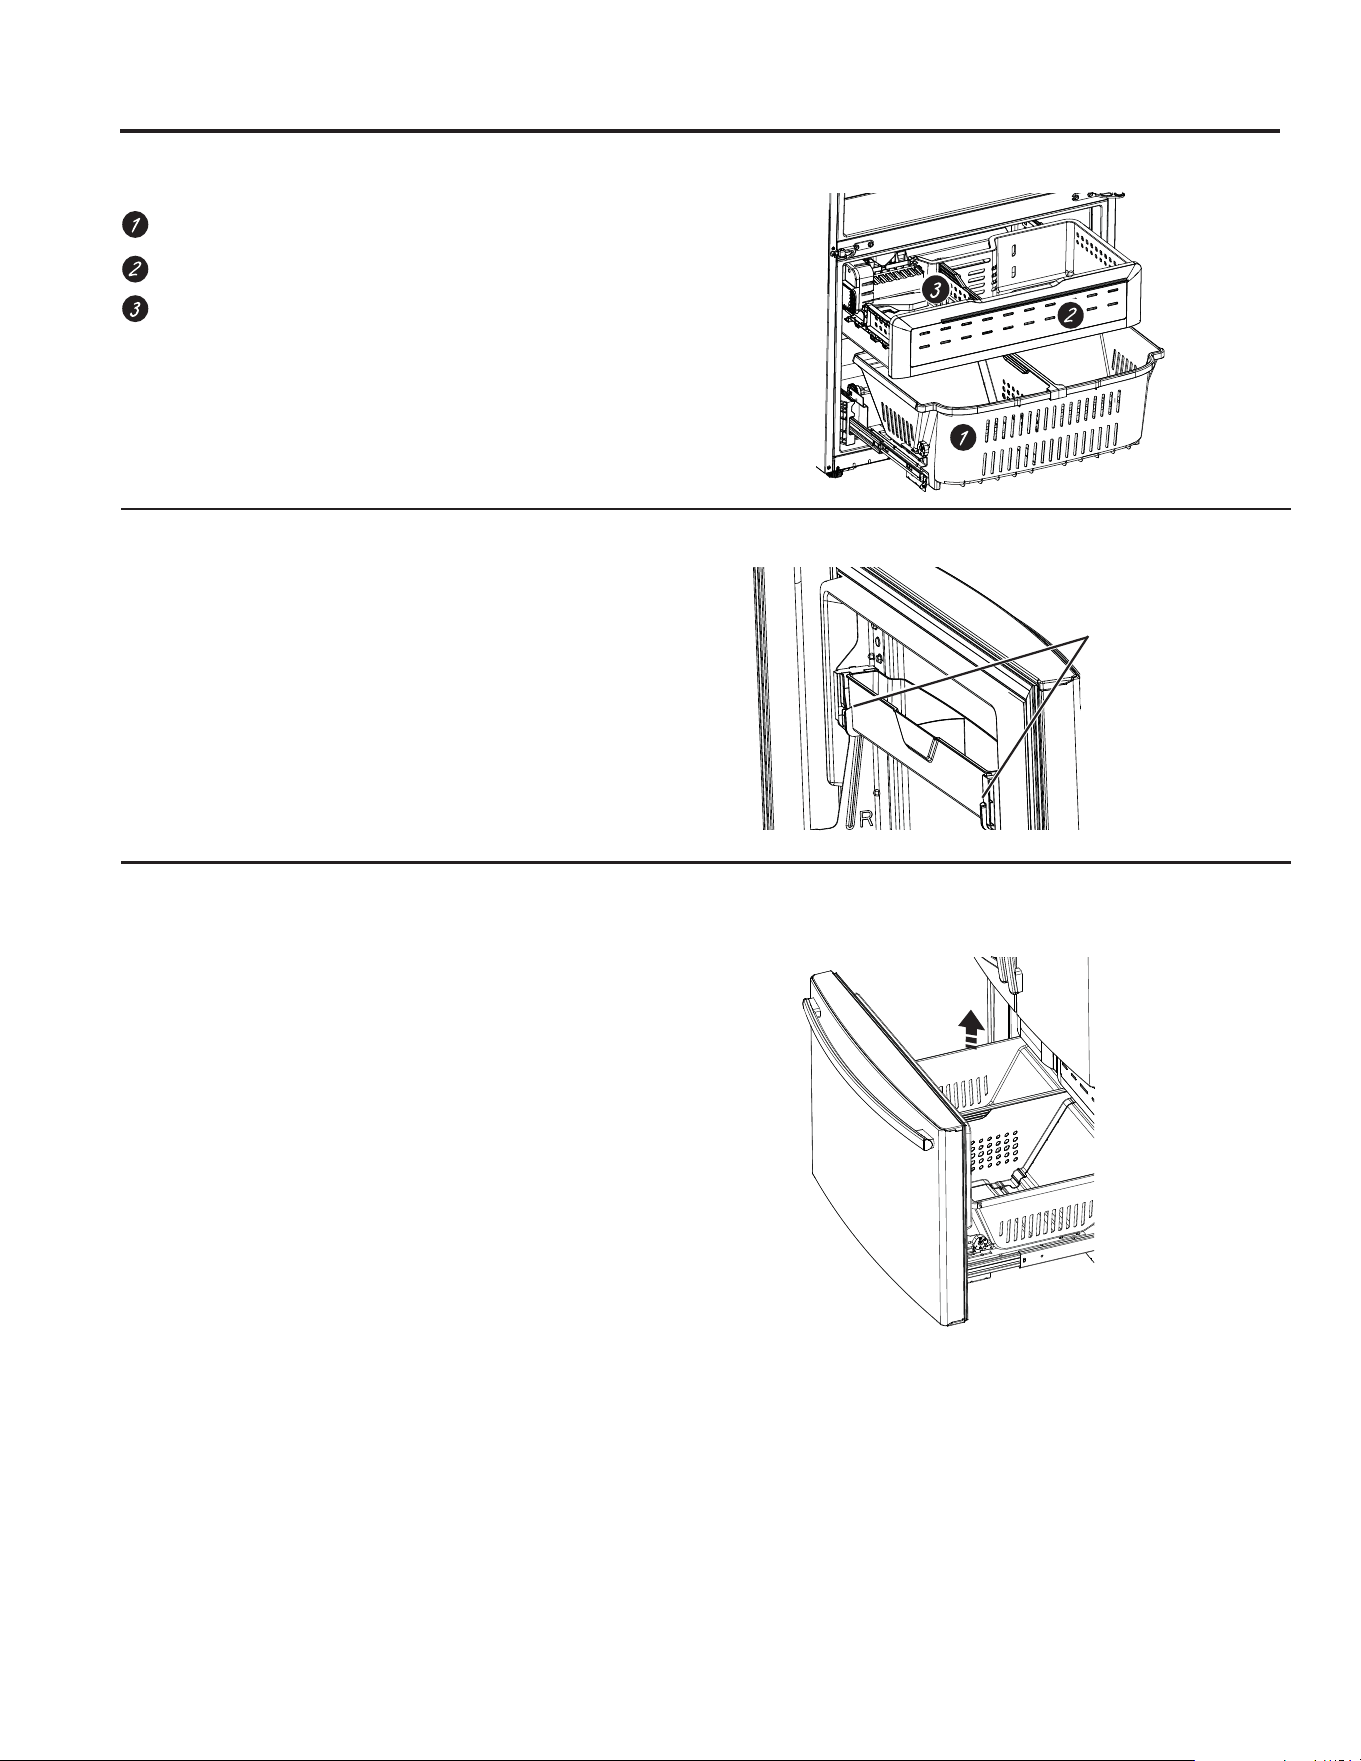
22 49-60792 Rev. 3
*Certains modèles seulement
Panier et tiroir du congélateur
Panier.
Tiroir
Seau à glaçons * (Offert avec les modèles sans distributeur
seulement. Offert en ensemble prêt-à-monter IM avec
certains modèles)
Bac non réglable dans le congélateur*
Pour le retirer : Enfoncez la languette en plastique de chaque
côté.
Pour le remettre en place : Faites glisser le bac dans la
position souhaitée jusqu’à encastrement.
Retrait d’un panier
Pour le retirer, modèles à profondeur standard seulement :
1. Ouvrez la porte du congélateur jusqu’à la position d’arrêt.
5HWLUH]OHEDFGHODSRUWHGXFRQJpODWHXUHQSRXVVDQWOD
languette de plastique du côté droit ou gauche afin de libérer
l’axe de charnière du bac.
5HWLUH]OHSDQLHUGXFRQJpODWHXUHQOHVRXOHYDQWjO¶DUULqUHHW
en le déplaçant vers l’arrière jusqu’à ce que l’avant du panier
puisse pivoter vers le haut et sortir.
4. Soulevez-le pour le sortir du congélateur.
Pour le retirer, modèles à profondeur de comptoir
seulement :
1. Ouvrez les portes de la section réfrigérateur.
2. Ouvrez la porte du congélateur jusqu’à la position d’arrêt.
5HWLUH]OHSDQLHUGXFRQJpODWHXUHQOHVRXOHYDQWjO¶DUULqUHHW
en le faisant pivoter vers le haut.
4. Soulevez-le pour le sortir du congélateur.
Pour le remettre en place :
Procéder en sens inverse pour remettre le bac en place.
Paniers, tiroirs et bacs
Languettes en plastique
USING THE FREEZER: Paniers, tiroirs et bacs
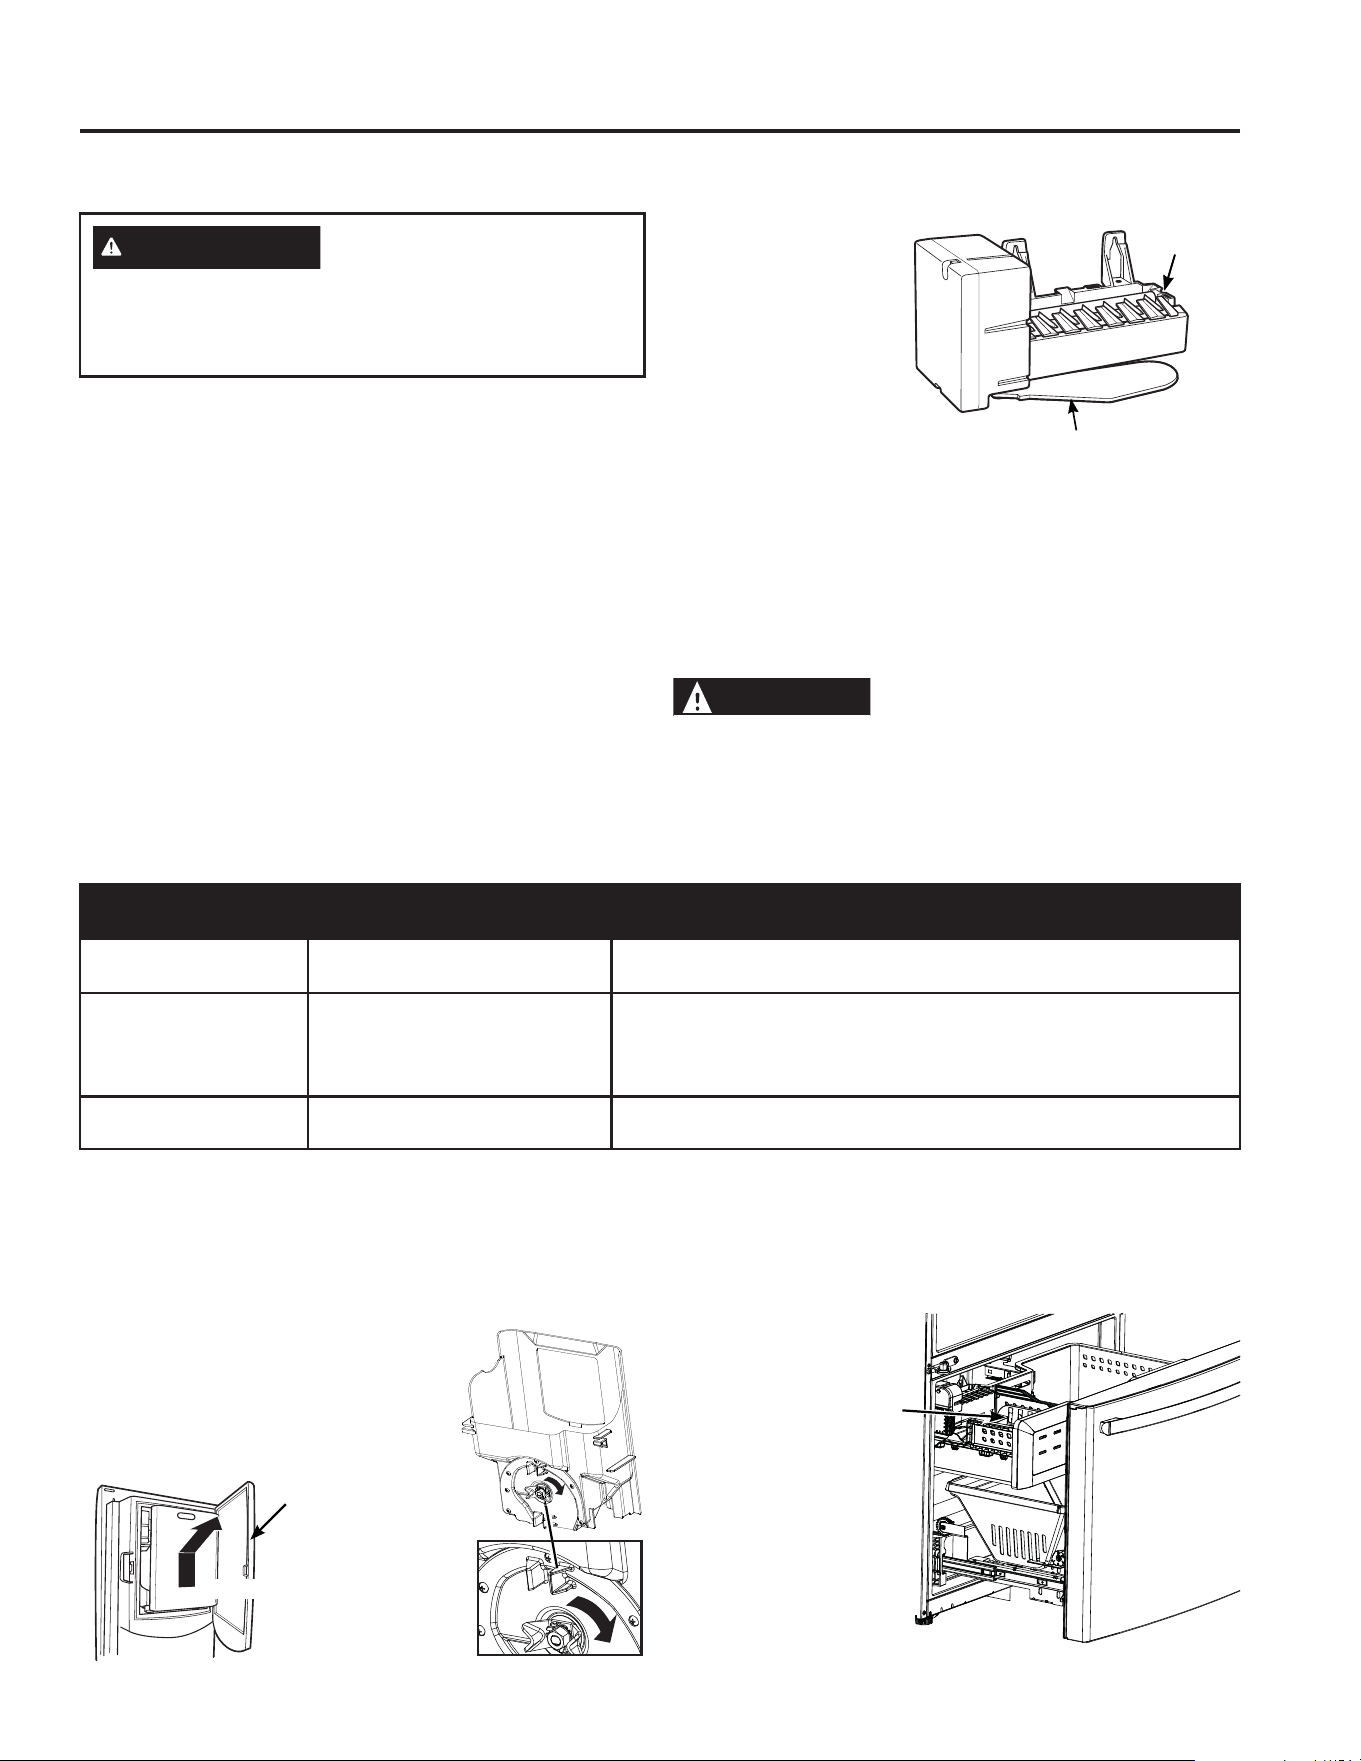
49-60792 Rev. 3 23
UTILISATION DU CONGÉLATEUR: Machine à glaçons automatique
Type d’affichage (voir
page 8)
Numéro de modèle # Comment allumer ou éteindre la machine à glaçons ?
Style de commandes A PFE28P, PYE22P Utilisez le bouton ICE sur la commande. Voir la section Commandes,
pages 10 & 11.
Style de commandes
B, C
PFH28, PFE28K, PFD28,
DFE28, GFE28, GFD28, GFE26,
GFS26, PYD22, PYE22K,
DYE22K, GYE22, GYS22
Utiliser le bouton « Machine à glaçons » Utiliser le bouton « Machine
à glaçons » Voir la section Commandes, pages 10 & 11.
Style de commande D GNE29, PWE23 Utiliser le bouton « Machine à glaçons » Utiliser le bouton « Machine
à glaçons » Voir la section Commandes, pages 10 & 11.
Comment allumer ou éteindre la machine à glaçons ?
*Certains modèles seulement
Soulevez et tirez
Porte du
bac à
glace
Seau à glaçons et distributeur*
• Ouvrez la porte du bac à glace à l’intérieur de la porte de
gauche.
• Tirez le seau à glaçons vers le haut dans la porte de gauche
pour le sortir du compartiment.
• Pour remettre le seau à glace, placez-le
sur les guides et enfoncez-le jusqu’à ce
qu’il soit correctement en place.
• Si vous n’arrivez pas à le remettre,
faites tourner la fourche d’1/4 de tour
dans le sens des aiguilles d’une montre.
Machine à glaçons (Offerte avec les modèles
sans distributeur, aussi offerte en ensemble
prêt-à-porter IM avec certains modèles)
Un bac de stockage supplémentaire est fourni dans le tiroir de
congélation.
• Ouvrez le
tiroir de
congélation.
• Le seau à
glaçons est
situé sur le
côté gauche
sous panier
supérieur.
• Tirez le panier
supérieur vers
vous pour
enlever le
seau à glaçons.
Seau à
glaçons du
congélateur
Machine à glaçons automatique
Il faut prévoir entre 12 et 24 heures avant qu’un réfrigérateur nouvellement installé commence à produire des
glaçons.
Machine à glaçons automatique *
La machine à glaçons produit sept glaçons par cycle - environ
100–130 cycles par 24 heures, selon la température du
compartiment de congélation, la température de la pièce,
le nombre d’ouverture de porte et les autres conditions
d’utilisation.
La machine à glaçons se remplit d’eau lorsque sa température
atteint 15°F (-10°C). Il faut prévoir entre 12 et 24 heures avant
qu’un réfrigérateur nouvellement installé commence à produire
des glaçons.
Si le réfrigérateur est mis en marche avant que la machine
à glaçons ne soit raccordée à l’alimentation en eau ou si
l’alimentation en eau du réfrigérateur est fermée, assurez-vous
que la machine à glaçons est éteinte. Une fois que l’eau a été
raccordée au réfrigérateur, la machine à glaçons peut être
PLVHHQPDUFKH5pIpUH]YRXVDXWDEOHDXFLGHVVRXVSRXUGH
plus amples informations.
Vous entendrez un bourdonnement à chaque fois que la
machine à glaçons se
remplit d’eau.
Jetez les premiers bacs de
glaçons pour bien nettoyer
le conduit d’eau.
Vérifiez que rien n’interfère
avec le déplacement du
bras de détection.
Quand le bac se remplit
jusqu’au niveau du bras
de détection, la machine
à glaçons s’arrête de produire des glaçons. Il est normal de
trouver des glaçons qui soient soudés ensemble.
Si vous n’utilisez pas souvent vos glaçons, les vieux glaçons
deviennent opaques, prennent un mauvais goût et rétrécissent.
REMARQUE : Dans les maisons qui ont une pression d’eau
plus faible que la moyenne, vous entendrez peut-être la
machine à glaçons recommencer plusieurs fois son cycle pour
produire un lot de glaçons.
ATTENTION
Pour minimiser les risques de blessures,
évitez le contact avec les pièces mobiles du mécanisme
éjecteur, ou avec l’élément chauffant qui libère les glaçons.
Ne posez pas les doigts ou les mains sur le mécanisme de la
machine à glaçons automatique pendant que le réfrigérateur
est branché.
Bras de détection
Machine
à glaçons
AVERTISSEMENT
5DFFRUGH]O¶DSSDUHLOjXQH
alimentation d’eau potable seulement. Une alimentation
d’eau froide est requise pour faire fonctionner la machine à
glaçons et le pichet à remplissage automatique. La pression
d’eau doit se situer entre 40 et 120 psi. (275 à 827 kPa).
24 49-60792 Rev. 3
Entretien et nettoyage
Nettoyage de l’extérieur
Nettoyage de l’intérieur
Pour prévenir les odeurs, laissez ouverte une boîte de
bicarbonate de soude dans les compartiments réfrigérateur et
congélateur.
Débranchez l’appareil avant de le nettoyer.
S’il est trop difficile de débrancher l’appareil, essorez bien votre
chiffon ou votre éponge pour enlever l’excès d’eau lorsque
vous nettoyez autour des interrupteurs, des lampes ou des
commandes. Utilisez une cire pour appareil ménager sur la
surface intérieure entre les portes.
Utilisez une solution d’eau tiède et de bicarbonate de soude
(environ une cuillère à soupe (15 ml) de bicarbonate de soude
dans un litre d’eau) afin de nettoyer tout en neutralisant les
RGHXUV5LQFH]HWVpFKH]
Pour nettoyer le panneau métallique intérieur*, ouvrez la porte
extérieure à l’aide du verrou entre les portes extérieure et
intérieure. Nettoyez le panneau à l’aide d’un détergent doux
puis essuyez avec un chif
fon souple pour sécher. N’utilisez pas
un nettoyant pour acier inoxydable sur le panneau car il pourrait
endommager le plastique du pourtour.
ATTENTION
Ne nettoyez pas les clayettes ou les
couvercles en verre avec de l’eau tiède quand ceux-ci sont
froids. Les clayettes et couvercles en verre peuvent se casser
s’ils sont exposés à des changements soudains de
température ou si vous les cognez ou les faites tomber. Le
verre trempé est conçu pour se briser en petits morceaux en
cas de casse.
Ne lavez aucune pièce en plastique du réfrigérateur au lave-
vaisselle.
Derrière le réfrigérateur
Soyez prudent lorsque vous éloignez votre réfrigérateur du
mur. Tous les types de revêtements de sol peuvent être
endommagés, en particulier les revêtements matelassés et
ceux dont la surface est gaufrée.
5HOHYH]OHVSLHGVGHPLVHjQLYHDXVLWXpVVXUODSDUWLH
inférieure avant du réfrigérateur.
Tirez le réfrigérateur en ligne droite et lorsque vous le
remettez en place, poussez-le vers le mur en ligne droite. Les
déplacements latéraux du réfrigérateur pourraient endommager
le revêtement de sol ou le réfrigérateur.
Abaissez les pieds de mise à niveau jusqu’à ce qu’ils touchent
le sol.
AVERTISSEMENT
RISQUE DE CHOC
ÉLECTRIQUE Lorsque vous remettez le réfrigérateur en
place en le poussant, veillez à ne pas le faire rouler sur le
cordon d’alimentation.
ENTRETIEN ET NETTOYAGE
*Certains modèles seulement
Directives pour nettoyer les surfaces extérieures, les poignées de porte et les garnitures
UTILISER NE PAS UTILISER
Linge ou éponge doux et propres Linges abrasifs, éponges à récurer, tampons à récurer ou en
laine d’acier.
Détergent doux dans eau chaude.
Nettoyants pour acier inoxydable approuvés; visitez la boutique
de pièces GE Appliances pour des nettoyants pour acier
inoxydable approuvés : Electromenagersge.ca/fr/produits/
filtres-et-accessoires ou appeler 800.661.1616
On peut utiliser des nettoyants à base d’acide oxalique tels que
Bar Keepers Friend Soft Cleanser™ pour éliminer la rouille de
surface, le ternissement et les petites taches sur les surfaces
en acier inoxydable seulement.
Poudres ou vaporisateurs abrasifs.
V
aporisateurs pour fenêtres ou ammoniac.
Nettoyants à base d’agrumes ou de plantes.
Nettoyants acides ou à base de vinaigre.
Nettoyants pour le four.
Nettoyants qui contiennent de l’acétone (propanone).
7RXWQHWWR\DQWDYHF$9(57,66(0(17UHODWLIDXFRQWDFWGX
plastique.
REMARQUE : Ne laissez PAS un nettoyant pour acier inoxydable venir au contact de pièces en plastique telles que garnitures,
quincaillerie de poignée ou doublures. Si un contact non intentionnel d’un nettoyant avec une pièce en plastique survient,
nettoyez la pièce en plastique avec une éponge et un détergent doux mélangé dans l’eau chaude.
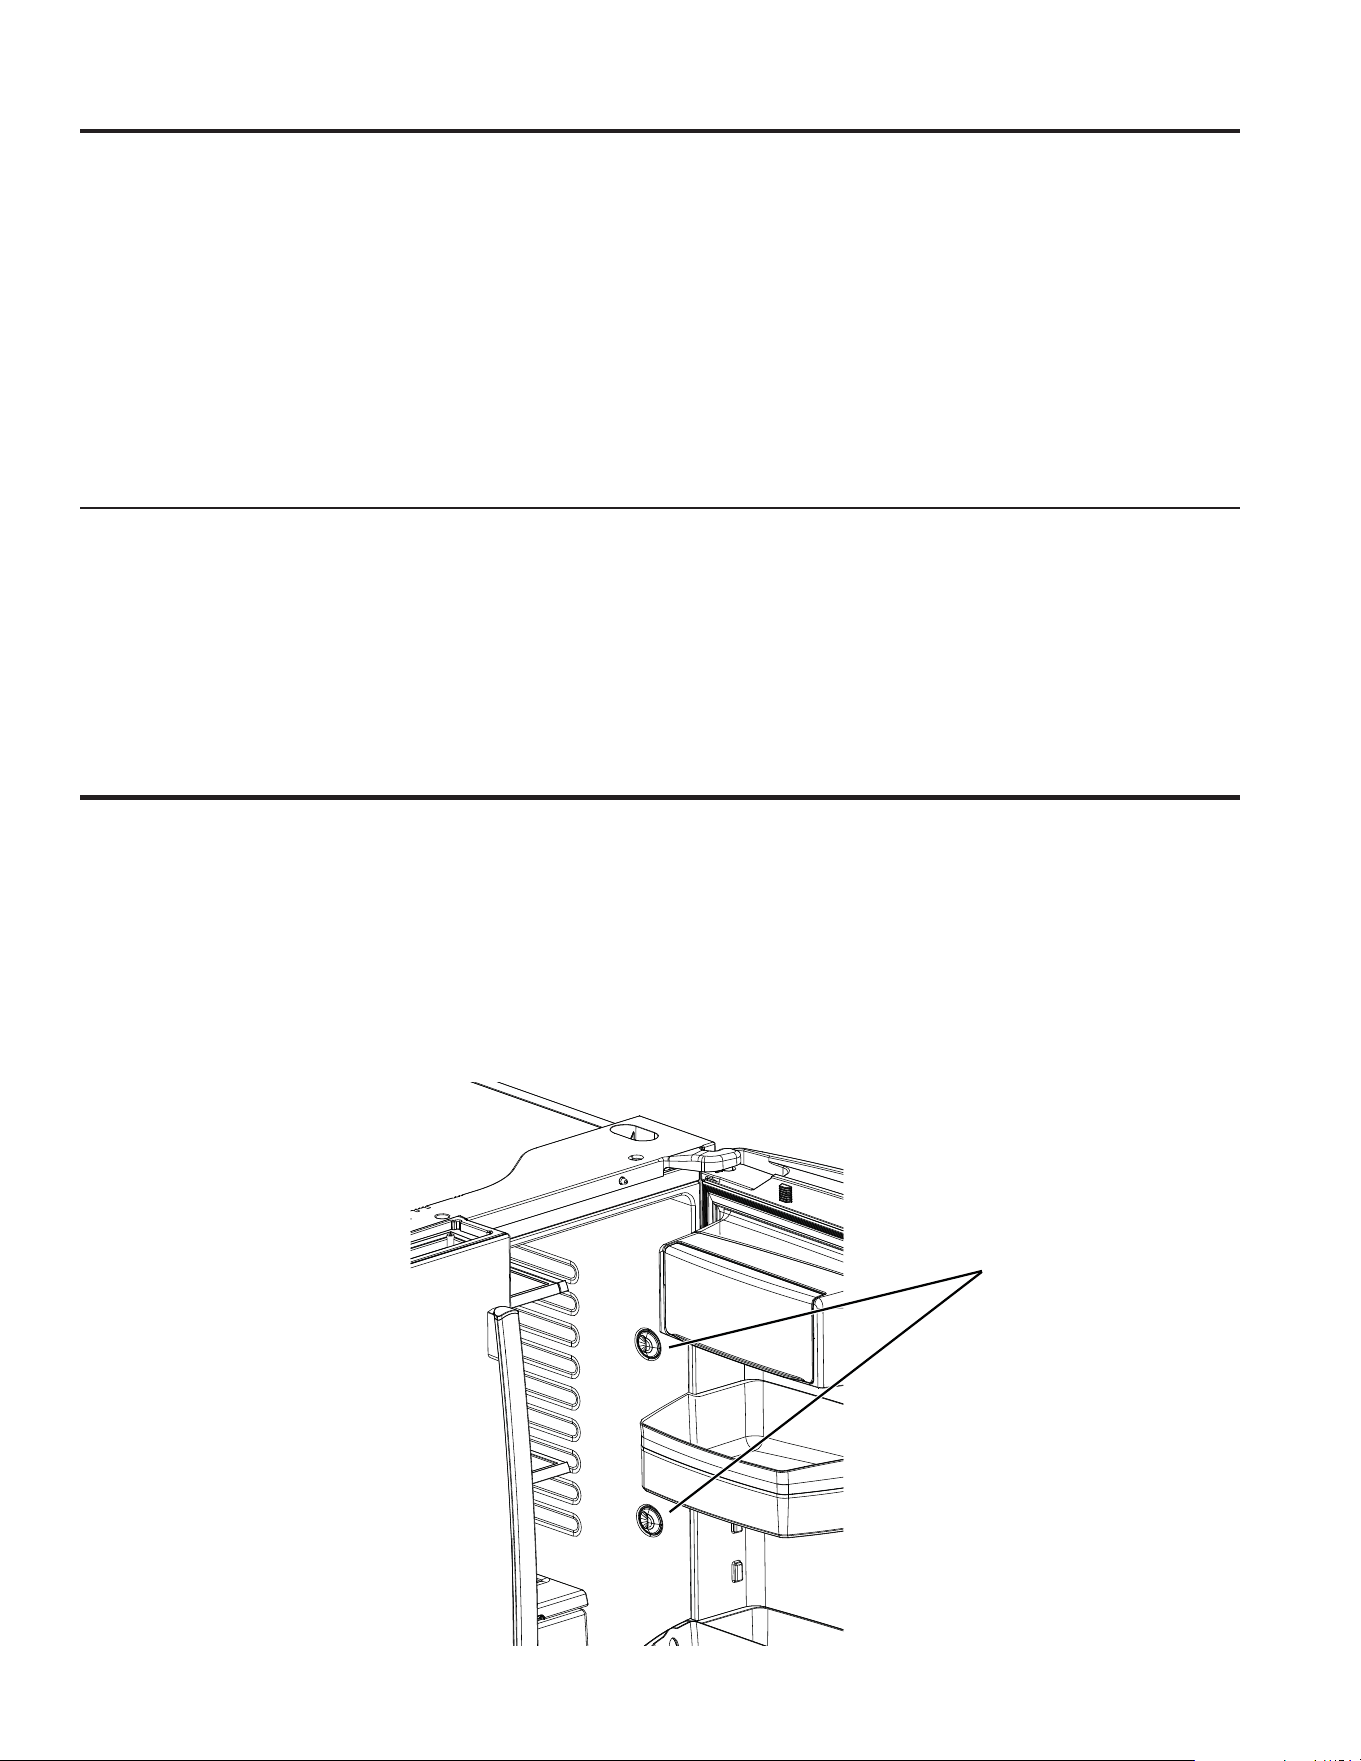
49-60792 Rev. 3 25
Départ en vacances
Encas d’absences ou de vacances prolongées, retirez tous les
aliments du réfrigérateur et débranchez-le. Nettoyez l’intérieur
avec une solution de bicarbonate de soude (environ une
cuillère à soupe (15 ml) de bicarbonate de soude dans un litre
d’eau). Laissez les portes ouvertes.
Modèles avec affichage LCD : eWHLQGUHOHUpIULJpUDWHXUDX
niveau des commandes (page 9).
'DQVOHFDVRODWHPSpUDWXUHSRXUUDLWGHVFHQGUHHQGHVVRXV
de zéro, demandez à un technicien qualifié de vidanger le
système d’alimentation en eau pour éviter les dégâts des eaux.
eWHLJQH]RXGpEUDQFKH]OHUpIULJpUDWHXUS
2) Videz le seau à glaçons.
3) Fermez l’arrivée d’eau
Si vous fermez l’alimentation en eau, éteignez la machine à
glaçons (p. 21).
Retour de vacances :
5HPHWWH]OHILOWUHjHDX
2) Faites passer 2 gallons (7,5 litres) d’eau dans le distributeur
d’eau froide (pendant environ 5 minutes) pour purger le
système.
3) Faites couler de l’eau à 185°F (85°C) à 3 reprises (10 onces
à chaque fois) pour vidanger le système.
ENTRETIEN ET NETTOYAGE/ REMPLACEMENT DES AMPOULES
*Certains modèles seulement
Déménagement
Immobilisez toutes les pièces amovibles, telles que les
clayettes et les bacs, à l’aide de ruban gommé pour éviter de
les endommager.
Lorsque vous utilisez un diable pour déplacer le réfrigérateur,
ne faites pas reposer le devant ou l’arrière du réfrigérateur
contre le diable, sous peine d’endommager votre réfrigérateur.
Ne le manipulez que par les côtés.
Assurez-vous que le réfrigérateur reste en position verticale
pendant son déménagement.
Entretien et nettoyage
Remplacement des ampoules
Ampoules du réfrigérateur (DEL)
L’aspect peut varier selon le modèle.
Le compartiment de réfrigération est équipé d’un éclairage à
DEL. De plus, le bas de la porte du compartiment réfrigérateur
est également équipé de DEL pour éclairer le compartiment de
congélation.*
Le remplacement des ampoules à DEL doit être effectué par
un technicien autorisé.
Si cet ensemble doit être remplacé, contactez le service
*($SSOLDQFHVDXDX[eWDWV8QLVRXDX
1.800.561.3344 au Canada.
DEL Lumières
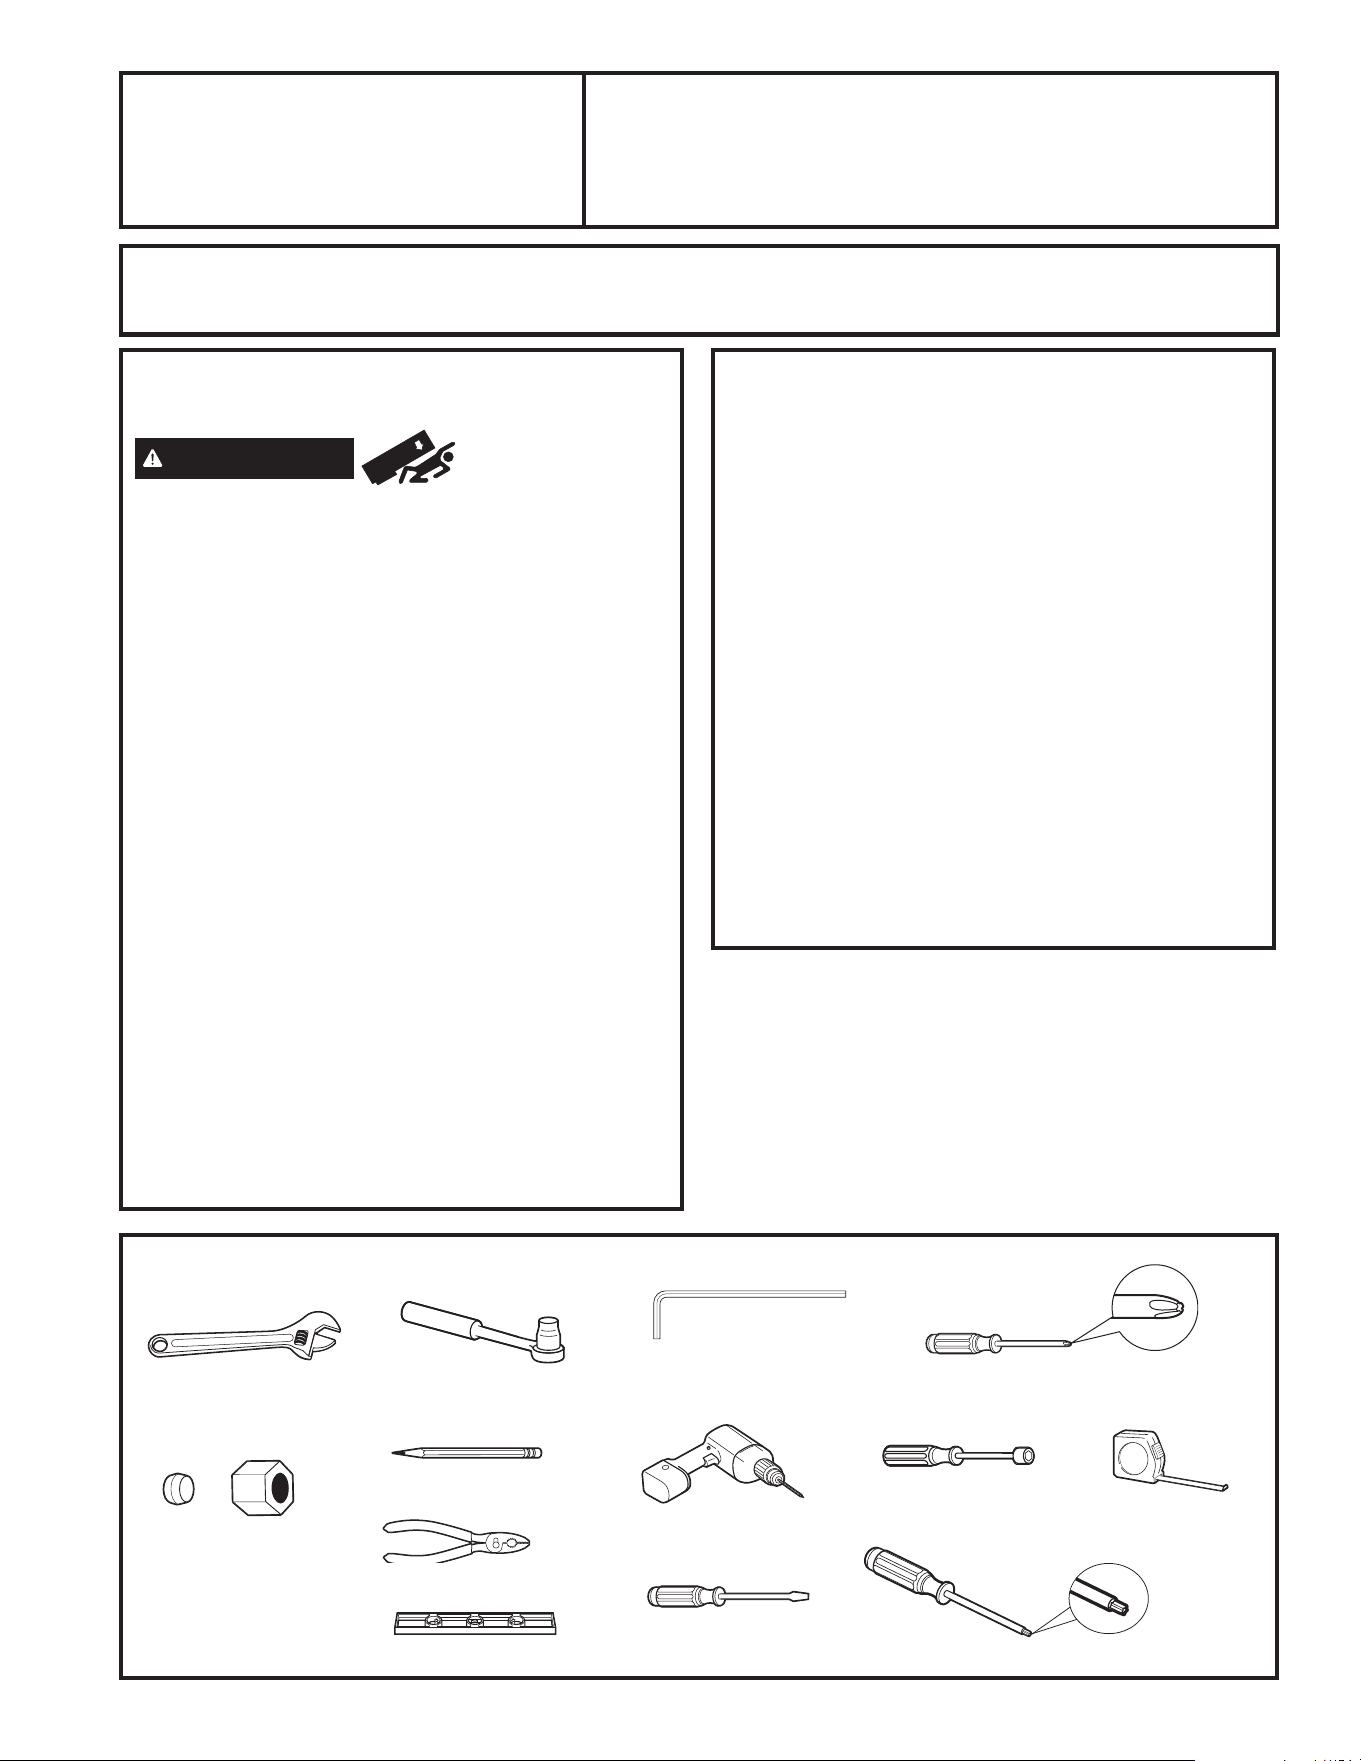
26 49-60792 Rev. 3
OUTILLAGE DONT VOUS POUVEZ AVOIR BESOIN
AVANT DE COMMENCER
Lisez ces instructions entièrement et attentivement.
AVERTISSEMENT
Risque de
basculement
Les modèles encastrés (modèles PYE, GYE, GYS, PWE, et
ZWE) sont plus lourds au niveau de leur partie supérieure,
surtout avec les portes ouvertes. Ces modèles doivent être
fixés à l’aide du système anti-basculement par fixation au
sol pour éviter que l’appareil ne bascule vers l’avant, ce qui
pourrait entraîner des blessures graves, voire mortelles.
Lisez et suivez les instructions d’installation complètes pour
l’installation du système anti-basculement par fixation au
sol livré avec votre réfrigérateur.
•
IMPORTANT — 5HVSHFWH]WRXVOHVFRGHVHW
règlements en vigueur. Conservez ces instructions pour
l’inspecteur local.
5HPDUTXHSRXUO¶,QVWDOODWHXU±$VVXUH]YRXVGHUHPHWWUH
ces instructions à l’utilisateur.
5HPDUTXHSRXUO¶XWLOLVDWHXU&RQVHUYH]FHVLQVWUXFWLRQV
pour toute référence future.
• Niveau de compétence - L’installation de cet appareil
demande des connaissances de base en mécanique.
• Délai d’exécution– Variable pour l’installation du
réfrigérateur
30 minutes pour l’installation de
l’alimentation en eau
• L’installateur est responsable de l’installation correcte de
l’appareil.
• La panne de l’appareil due à une mauvaise installation
n’est pas couverte par la garantie.
PRÉPARATION
DÉPLACEMENT DU RÉFRIGÉRATEUR À L’INTÉRIEUR
DE LA MAISON
Si le réfrigérateur ne peut pas passer par la porte, vous
pouvez enlever la porte du compartiment de réfrigération et
le tiroir du compartiment de congélation.
• Pour enlever la porte du compartiment de réfrigération,
consultez la section « Installation du réfrigérateur »
• Pour enlever la porte du compartiment de congélation,
FRQVXOWH]ODVHFWLRQ©5HWUDLWGXWLURLUGHFRQJpODWLRQª
ALIMENTATION EN EAU DE LA MACHINE À GLAÇONS
ET DU DISTRIBUTEUR
Si le réfrigérateur est équipé d’une machine à glaçons,
il devra être branché à une alimentation en eau froide.
Vous pouvez vous procurer une trousse GE Appliances
de branchement à l’alimentation d’eau (contenant
tuyau, robinet, raccords et instructions) auprès de votre
fournisseur, en consultant notre site internet
GEAppliances.com (au Canada par le site
electromenagersge.ca), ou au Centre de Pièces
Détachées et d’Accessoires, au 877.959.8688 (au Canada,
1.800.661.1616).
Clé à molette
eFURXjFRPSUHVVLRQGH
diamètre externe d’¼ po
et d’une bague
Tournevis cruciforme
Tournevis à cliquet
de 3/8 po
Clé hexagonale de type
Allen de 1/8 po, 3/32 po, ¼
po et de 5/32 po
Crayon
Mèche de 1/8 po et Perceuse
manuelle ou électrique
Mètre
Tournevis à tête plate
Pinces
Niveau
Tournevis à tête plate
Tournevis Torx T20, T25
Instructions
d’installation
Réfrigérateur
Modèles GE and GE Profile™
Des Questions ? Appelez 800.GE.CARES (800.432.2737) ou consultez notre site internet : GEAppliances.com
Au Canada, appelez le 1.800.561.3344 ou consultez notre site internet : electromenagersge.ca
INSTRUCTIONS D’INSTALLATION
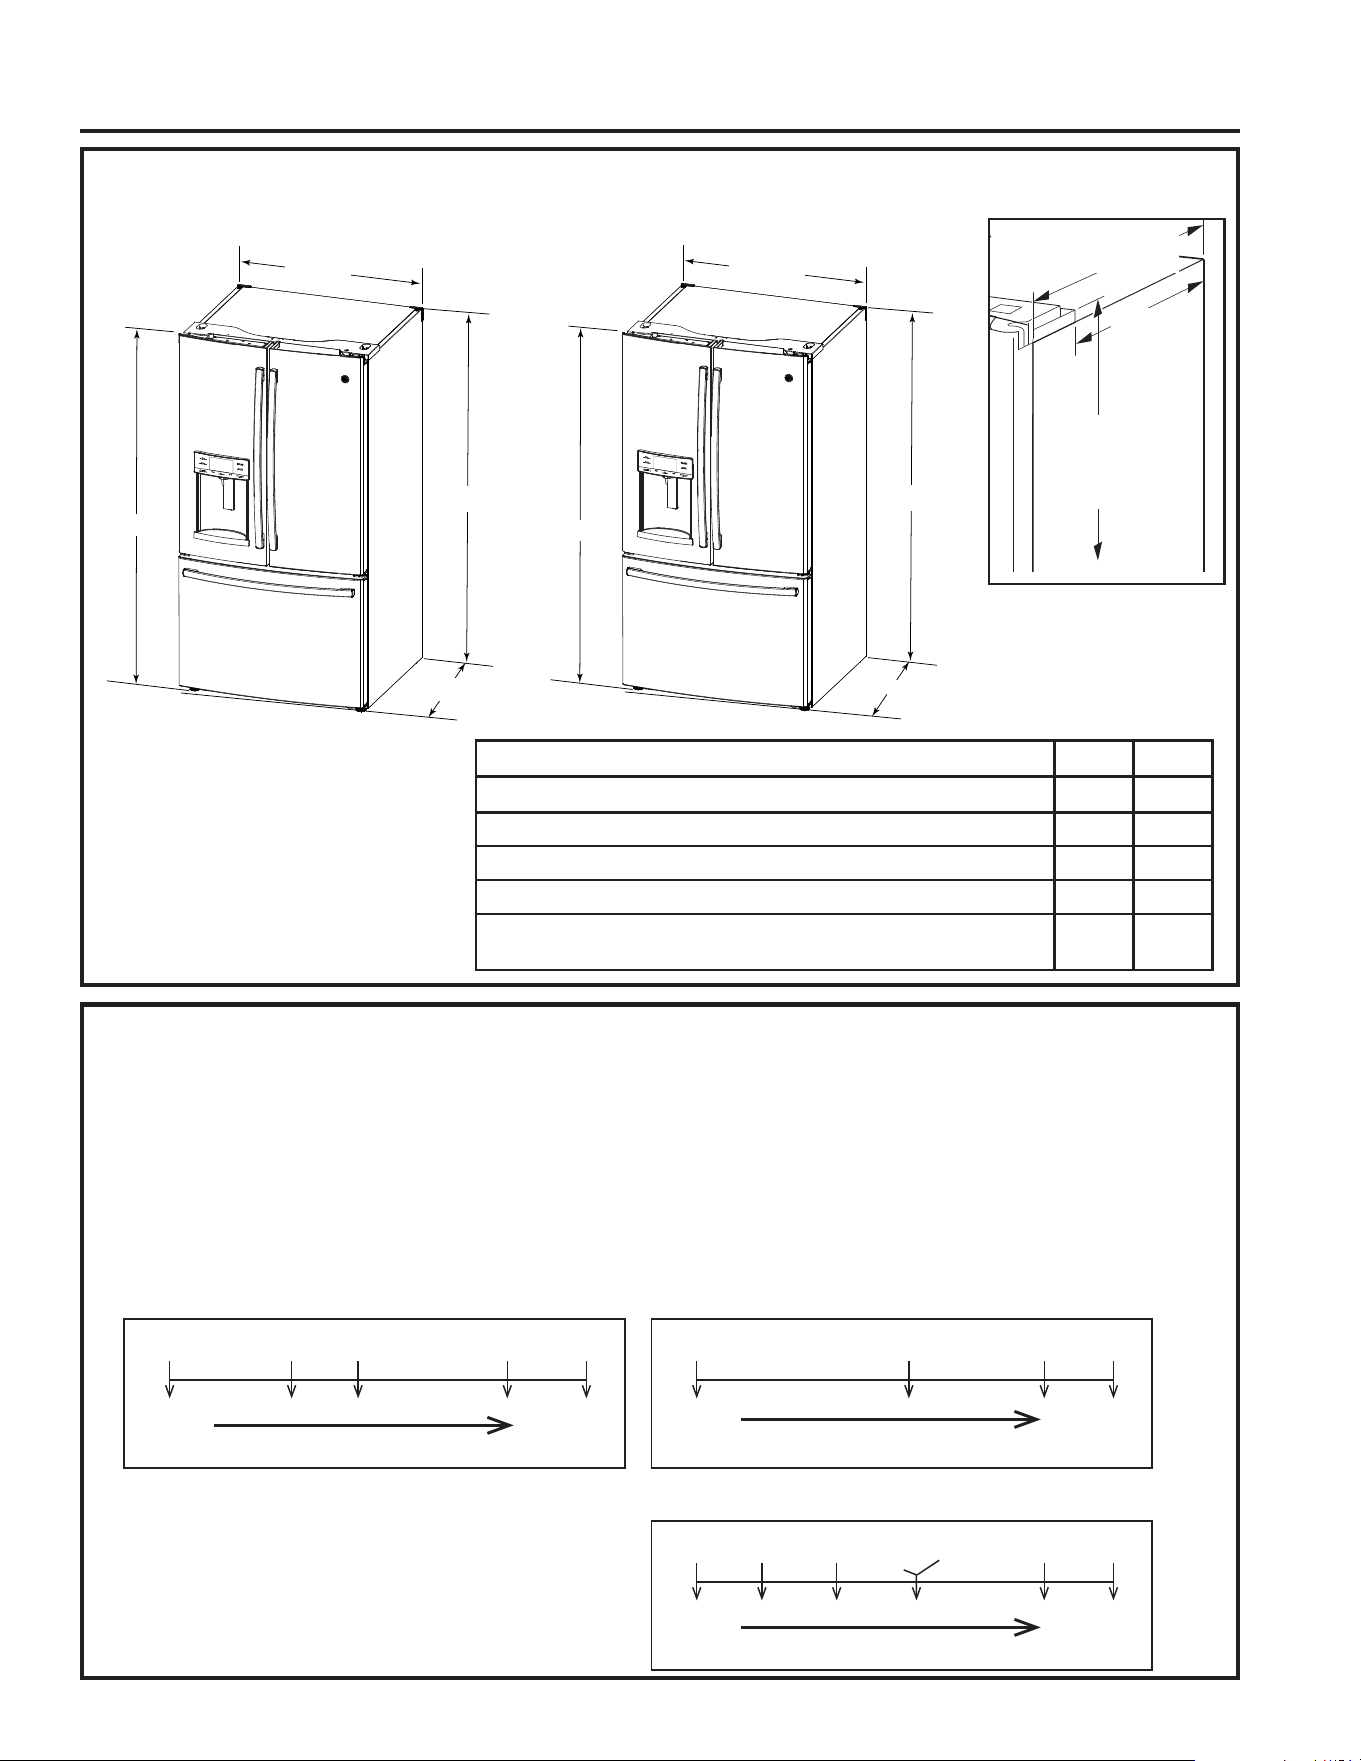
49-60792 Rev. 3 27
INSTRUCTIONS D’INSTALLATION
Instructions d’installation
DIMENSIONS
Profondeur du réfrigérateur
sans les portes 29
3
»8
” PN
24
3
»8
” PC
Hauteur entre le
sol et la partie
supérieure du
cache de la
charnière 69
7
»8”
Dimensions
supplémentaires
23
1
»4” PN
18
1
»4” PC
Toutes les mesures sont données avec les pieds de mise à niveau escamotés.
PN PC
Hauteur hors tout du haut du cache de la charnière
69
7
»8
”69
7
»8
”
Hauteur du haut du réfrigérateur
69” 69”
Profondeur du réfrigérateur sans les portes 29
3
»8
”24
3
»8
Largeur hors tout du réfrigérateur
35
3
»4”35
3
»4”
Profondeur hors tout du réfrigérateur avec les portes et les
tiroirs équipés de leurs poignées
36¼” 31¼”
• En utilisant le tableau ci-dessous, déterminez si la largeur de votre couloir et embrasures de porte peuvent accommoder
la profondeur du réfrigérateur. Assurez-vous d’avoir assez d’espace pour éviter d’endommager le réfrigérateur avant de le
déplacer en toute sécurité vers son emplacement final.
• Si votre couloir et embrasures de porte sont assez large pour laisser passer le réfrigérateur sans enlever les poignées,
passez directement à l’étape 6. Laisser les bandes adhésives, le film et tous les emballages sur les portes jusqu’à ce que le
réfrigérateur soit dans sa position finale.
• REMARQUE : Utilisez un diable rembourré ou des sangles de déménagement pour déplacer ce réfrigérateur. Placez
le réfrigérateur sur le diable en appuyant un des côtés contre le diable. Il est fortement recommandé que DEUX
PERSONNES déplacent le réfrigérateur et effectuent cette installation.
DÉPLACEMENT DU RÉFRIGÉRATEUR
Modèle profondeur normale (PN) seulementModèle profondeur du comptoir (PC) seulement
35-3/4”
69”
31-1/4”
69-7/8
”
35-3/4”
69”
36-1/4”
69-7/8
”
36.375” 34.5” 34” 30.25” 29.375” 36.275” 33.75” 30.25” 29.375”
31.25” 30.25” 29.75” 25.25” 24.375”28.75”
Boitier avec
lamelles Fz
Complétement
Assemblé
Retirer
Poigné
Boitier seulement
(sans charnière)
Retirer les portes
gauches
Si votre numéro de modèle commence par PFE, PFH, PFD, GFD,
GFE, GFS, DFE (PN)
Retirez les composants des portes dans l’ordre jusqu’à ce que
dimension soit inférieure à l’ouverture
Si votre numéro de modèle commence par
GNE (PN)
Retirez les composants des portes dans l’ordre jusqu’à ce que
dimension soit inférieure à l’ouverture
Complétement
Assemblé
Retirer
Poigné de la
porte gauche
Boitier avec
lamelles Fz
Boitier seulement
(sans charnière)
Retirer Plateau
d’égouttement
(Modèle PYE
seulement)
(Modèle PWE
seulement)
Si votre numéro de modèle commence par DYE, GYE, GYS, PYE,
PYD, PWE (PC)
Retirez les composants des portes dans l’ordre jusqu’à ce que
dimension soit inférieure à l’ouverture
Complétement
Assemblé
Retirer
Poigné
Boitier avec
lamelles Fz
Retirer la
porte gauche
Retirer Poigné de
la porte gauche
Boitier seulement
(sans charnière)

28 49-60792 Rev. 3
Instructions d’installation
INSTALLATION DU RÉFRIGÉRATEUR
RETRAIT DES PORTES DU
RÉFRIGÉRATEUR
• REMARQUE IMPORTANTE : La profondeur de
ce réfrigérateur est de 36 ¼ po (31 ¼ po pour les
modèles PC). Les portes et les passages qui mènent
à l’emplacement d’installation doivent avoir une largeur
d’au moins 36 ¼ po si vous souhaitez les portes et les
poignées sur le réfrigérateur lors de son déplacement.
Si la largeur des passages est inférieure à 36 ¼ po,
les portes et les poignées du réfrigérateur peuvent être
facilement rayées et endommagées. Le cache supérieur
et les portes peuvent être retirés pour permettre de
déplacer le réfrigérateur à l’intérieur en toute sécurité.
Si la largeur des passages est inférieure à 31 ¼ po,
commencez par l’étape 1.
• S’il n’est pas nécessaire de retirer les portes, passez
directement à l’étape 11. Laisser les bandes adhésives
et tous les emballages sur les portes jusqu’à ce que le
réfrigérateur soit dans sa position finale.
• REMARQUE : Utilisez un diable rembourré pour déplacer
ce réfrigérateur. Placez le réfrigérateur sur le diable en
appuyant un des côtés contre le diable. Il est fortement
UHFRPPDQGpTXH'(8;3(56211(6GpSODFHQWOH
réfrigérateur et effectuent cette installation.
RETRAIT DES POIGNÉES DE
PORTE DU COMPARTIMENT DE
RÉFRIGÉRATION
La conception des poignées varie en fonction des
modèles, mais l’installation reste la même.
Poignées en acier inoxydable et en plastique :
Desserrez les vis de réglage avec la clé Allen
d’1/8 po et retirez la poignée.
REMARQUE : Si les fixations de la poignée ont
besoin d’être resserrées ou enlevées, utilisez une
clé Allen d’1/4 po.
1
Fixations
Ne retirez le
film qu’après
installation
EMPLACEMENT DU
RÉFRIGÉRATEUR
1¶LQVWDOOH]SDVOHUpIULJpUDWHXUGDQVXQHSLqFHROHV
températures descendent en-dessous de 60°F (16°C)
parce qu’il serait difficile d’y maintenir une température
correcte.
1¶LQVWDOOH]SDVOHUpIULJpUDWHXUGDQVXQHQGURLWROD
température ambiante sera supérieure à 37°C, il ne
fonctionnera pas correctement.
• N’installez pas le réfrigérateur dans un endroit exposé
à l’eau (pluie, etc.) ou directement aux rayons solaires.
• Il doit être installé sur une surface suffisamment solide
pour supporter le poids d’un réfrigérateur rempli.
DÉGAGEMENTS
Prévoyez les dégagements suivants pour faciliter
l’installation, la circulation d’air et les raccordements
hydrauliques et électriques.
Côtés 1/8 po (3 mm)
Dessus 1 po (25mm) corps du réfrigérateur/
cache de charnière
Arrière 2 po (50 mm)
INSTRUCTIONS D’INSTALLATION
MODÈLES À PORTES
EXTÉRIEURE ET INTÉRIEURE
Pour retirer la poignée :
Ŷ Ouvrez la porte extérieure en pressant le verrou
entre les portes extérieure et intérieure.
Ŷ Desserrez les vis de serrage comme illustré à
l’étape 1.
Pour poser la poignée :
Ŷ Alignez le levier sur l’orifice de la porte extérieure.
Assurez-vous que le crochet pointe vers le haut.
Ŷ Insérez le levier de verrou dans l’orifice et alignez
la poignée sur les fixations de montage.
Ŷ Une fois la poignée à égalité avec la porte
extérieure, serrez les vis de serrage.
Ne retirez le ruban de la porte qu’une fois la poignée
posée.
1a
Verrou entre
les portes
Levier de
verrou avec
crochet
pointant vers
le haut

49-60792 Rev. 3 29
RETRAIT DES POIGNÉES DE
PORTE DU COMPARTIMENT DE
CONGÉLATION
La conception des poignées varie en fonction des
modèles, mais l’installation reste la même.
Poignées en acier inoxydable et en plastique :
Desserrez les vis de réglage avec la clé Allen d’1/8
po et retirez la poignée.
REMARQUE : Si les fixations de la poignée ont besoin
d’être resserrées ou enlevées, utilisez une clé Allen
d’1/4 po.
2
5pLQVWDOOH]OHVSRLJQpHVHQXWLOLVDQWODPrPHSURFpGXUH
que pour les retirer.
Fixations
Ne retirez le
film qu’après
installation
INSTALLATION DU RÉFRIGÉRATEUR (suite)
INSTRUCTIONS D’INSTALLATION
Instructions d’installation
RETRAIT DES PORTES DU
RÉFRIGÉRATEUR
AVERTISSEMENT
Suivez toutes les étapes pour
enlever et réinstaller la porte. La porte risque de tomber en
plus
de causer des blessures ou des dommages si vous
ne respectez pas ces instructions, oubliez des pièces ou
effectuez un serrage excessif des vis.
Maintenez la porte
bien fermée à l’aide
de ruban-cache ou
demandez à une
deuxième personne de
maintenir la porte.
Commencez par la
SRUWHGHJDXFKH5HWLUH]
le cache de la charnière
supérieure de la porte
gauche du réfrigérateur en
retirant les vis cruciformes
et en le tirant vers le haut.
Faites de même pour la
porte de droite et le cache
central.
3
Cache de
charnière
B
3
REMOVE THE REFRIGERATOR
DOORS (cont)
C
Débranchez les connecteurs électriques provenant de
chaque porte, situés sous les caches de charnière.
5HWLUH]
ODYLVjWrWHKH[DJRQDOHGHóSRSRXU
débrancher le fil de masse de la charnière.
5HWLUH]ODYLVjWrWHKH[DJRQDOHGHóSRSRXU
débrancher réducteur de tension du tuyau d’alimentation
en eau.
D
Débranchez l’alimentation en eau à l’arrière de
l’appareil en appuyant sur le collier gris foncé tout en
tirant le tuyau d’alimentation en eau vers le haut.
Faites passer le tuyau d’alimentation en eau à travers le
passage prévu à cet effet pour libérer le tuyau avant de
retirer la porte. La longueur du tuyau d’alimentation en
eau est supérieure à 4 pi. Celui-ci doit être fixé à l’aide
de ruban adhésif à la porte pour y accéder facilement
lors de la réinstallation de la porte
E
A l’aide d’un tournevis à cliquet de 3/8
po, retirez les vis de fixation de la
charnière supérieure au corps du
réfrigérateur, puis soulevez la
charnière vers le haut pour dégager
l’axe de la charnière de son
emplacement dans le haut de la porte.
ATTENTION
Risque lors du
levage de charge
Une seule personne soulevant ces charges pourrait se
blesser. Demandez l’aide d’une autre personne pour
manipuler, déplacer ou lever les portes du réfrigérateur.
Remarque : lorsque vous retirez la porte, pour éviter
d’endommager celle-ci ainsi que les composants
électroniques qu’elle contient, placez-la soigneusement
dans un endroit approprié.
Remarque : La charnière inférieure et son axe sont
numérotés. Ils doivent donc être associés pour que la porte
se ferme correctement de façon automatique. Veuillez
suivre les instructions scrupuleusement.
Connecteur
en Y ou droit
A
Vis de
Terre
5pGXFWHXU
de Tension
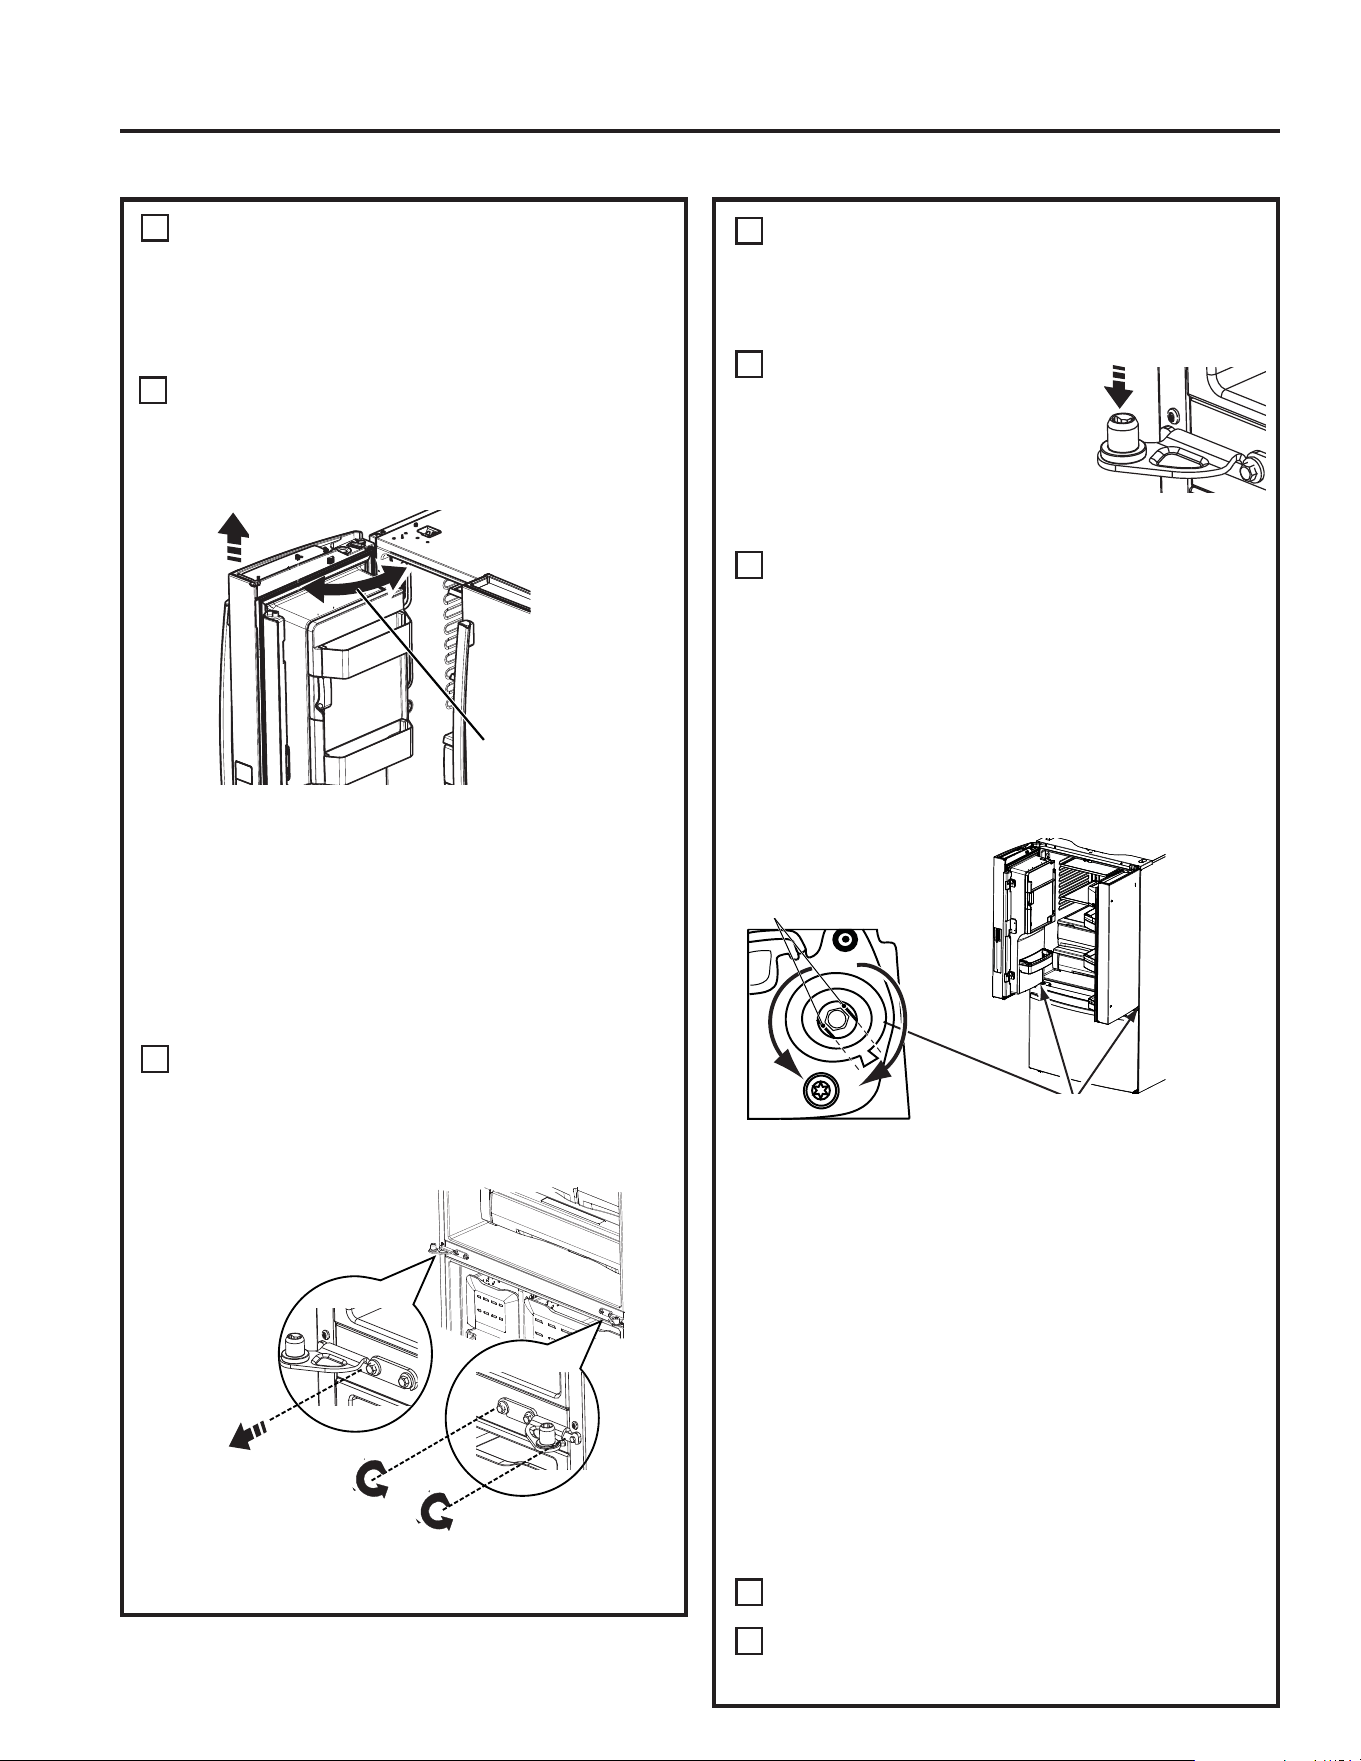
30 49-60792 Rev. 3
REINSTALLATION DES PORTES
DU RÉFRIGÉRATEUR
Inverser en sens inverse, étapes 4 à 1, pour réinstaller les
portes du réfrigérateur. Suivez les instructions suivantes
pour les alignements critiques.
A
Réinstallez la charnière centrale
d’abord, puis serrez les vis à un
couple de 7,34 N-m (65 po-lb).
Avec la porte gauche à 90° par
rapport à la façade du
réfrigérateur, abaissez la porte du
réfrigérateur sur la charnière
centrale. Assurez-vous que la porte et la charnière
s’alignent correctement.
B
Fermez les portes et assurez-vous que la partie mobile
d’étanchéité de la porte soit alignée avec la gâche. Si la
porte ne se ferme pas automatiquement après la
réinstallation, retirez la porte, retournez-la, vérifiez le
repère d’alignement et la flèche (il y a un repère
d’alignement sur le mécanisme de fermeture de la
porte. Celui-ci correspond à un repère d’alignement sur
le cache inférieur. Faites pivoter le mécanisme de
fermeture de la porte pour aligner le repère et la flèche.
5pLQVWDOOH]HQVXLWHODSRUWH.Les modèles avec portes
extérieure
et intérieure ne disposent pas du même
mécanisme de fermeture sur la porte droite. Vous
pouvez percevoir une différence dans la fermeture.
Maintenez la porte bien fermée à l’aide de ruban-cache
ou
demandez à une deuxième personne de maintenir la
porte. Réinstallez la charnière supérieure d’abord, puis
serrez les vis à un couple de 7,34 N-m (65 po-lb).
C
Assurez-vous d’avoir remis le fil de terre et le réducteur
de tension au niveau de la charnière supérieure.
D
5pLQVWDOOH]OHFDFKHGHODFKDUQLqUH5HPDUTXH
Assurez-vous que les fils ne sont pas pincés ou sous
des emplacement de vis avant de serrer ces dernières.
3
RETRAIT DES PORTES DU
RÉFRIGÉRATEUR (suite)
Remarque : pour que l’installation se fasse
correctement plus tard, veuillez suivre attentivement la
prochaine étape.
F
5HWLUH]OHUXEDQHWPDLQWHQH]ODSRUWHDXVVLGURLWHTXH
possible, ouvrez la porte à 90° puis soulevez-la en ligne
droite pour la dégager.
RETRAIT DE LA PORTE OPPOSÉE
Effectuez la même procédure sur la porte du côté
opposé. Il n’y a pas de tuyau d’alimentation en eau sur
la porte du côté opposé.
Modèles avec portes extérieure et intérieure : Avec
du ruban, attachez sûrement les portes intérieure et
extérieure avant l’installation ou le retrait. L’alignement
de porte à 90° n’est pas nécessaire pour l’installation
ou le retrait de ces modèles.
4
RETRAIT DE LA CHARNIÈRE
CENTRALE (si nécessaire)
5HWLUH]OHVYLVGHSRPDLQWHQDQWODFKDUQLqUH
centrale au corps du réfrigérateur.
Utilisez le tournevis T20 pour retirer la vis extérieure.
5
5HWLUH]ODYLV
centrale
Soulevez et retirez la
charnière centrale
Ouvrez la porte à 90°
Desserrez les
vis extérieures
Instructions d’installation
INSTALLATION DU RÉFRIGÉRATEUR (suite)
Align flats with tab.
Si la porte ne peut pas être installé à 90°, suivez les
étapes ci-dessous :
1. Installer la porte à 180º du devant du boîtier.
2. Si l’espace disponible ou le modèle limite l’ouverture de la
porte à moins de 180°, alors :
a) Enlevez la porte, retournez-la doucement.
b) Vérifier l’alignement de l’axe du mécanisme de fermeture de
la porte sur le dessous de la porte. Les parties planes sur
l’axe correspondent au repère d’alignement sur l’anneau en
plastique ou au repère sur le cache inférieur
c) Si l’axe n’est pas aligné sur le repère, à l’aide d’une clé Allen
de 5/32 po, faites pivoter l’axe du mécanisme de fermeture
de la porte dans le sens inverse des aiguilles d’une montre
pour la porte droite, et dans le sens des aiguilles d’une
montre pour la porte gauche. Ensuite, alignez les parties
planes avec le repère.
d) Installez la porte à 90°.
Dessous de la porte du comparti-
ment de réfrigération.
Alignez les repères
INSTRUCTIONS D’INSTALLATION

49-60792 Rev. 3 31
INSTRUCTIONS D’INSTALLATION
RETRAIT DE LA PORTE DU
CONGÉLATEUR
Tirez sur la porte du congélateur jusqu’à ce qu’elle
soit complètement ouverte.
5HWLUH]OHVYLVGHIL[DWLRQVLWXpHVDXEDVGH
chaque côté de la porte du congélateur en utilisant le
tournevis à cliquet hexagonal de 3/8 po.
ATTENTION
Risque lors du levage de
charge
La porte du congélateur est lourde. Utilisez les
deux mains pour maintenir la porte avant de la
soulever.
Soulevez la porte
du congélateur
et placez-la sur
le mécanisme à
glissières.
La porte peut reposer
en toute sécurité sur
le fond. Ne posez pas
la porte sur toute autre
surface pour éviter les
rayures.
A
B
C
6
3 vis
RETRAIT DU PANIER DU
CONGÉLATEUR
Tirez le panier inférieur et glissez le mécanisme à
glissières jusqu’au bout avec les deux mains.
5HWLUH]OHWLURLU
supérieur du
congélateur en le
tirant jusqu’au bout,
puis soulevez-le
et tirez-le vers
l’extérieur.
5HWLUH]OHSDQLHU
qui repose sur les
glissières.
5HSRXVVH]OHV
glissières du panier inférieur jusqu’à ce que le
mécanisme se rétracte de lui-même.
7
A
B
C
D
Instructions d’installation
INSTALLATION DU RÉFRIGÉRATEUR (suite)
RETRAIT
DES GLISSIÈRES DE
PANIER DE CONGÉLATEUR
Il est possible de retirer les glissières de panier
de congélateur pour gagner un dégagement
supplémentaire de 1.90 cm (3/4 po) dans
l’embrasure de porte.
5HWLUH]ODSRUWHGXFRQJpODWHXUFRPPHLQGLTXpj
l’étape 6.
5HWLUH]OHVSDQLHUVVXSpULHXUHW
inférieur comme indiqué à l’étape 7.
5HWLUH]O¶DJUDIHVXUODWUDYHUVHVLWXpH
le long du côté droit de l’assemblage
d’engrenages à crémaillère en la
glissant vers l’avant.
5HWLUH]ODWUDYHUVHHQODJOLVVDQWYHUVODGURLWH
tirez-la vers vous puis vers la gauche.
5HWLUH]OHVTXDWUHERXORQVKH[DJRQDX[óSRSDU
côté et retirez les supports latéraux.
Inversez les étapes
d’assemblage. En installant
la traverse, placez toujours
le trou du côté droit. Alignez
les engrenages gauche
et droit sur les repères
de synchronisation des
engrenages au moment
d’insérer la traverse. Insérez
toujours la traverse dans
l’engrenage droit en premier puis dans celui de
gauche.
Insérez l’agrafe dans le trou de
traverse situé du côté droit.
A
B
C
8
D
E
F
G
1
2
1
2
Boulons
hexagonaux
Agrafe
Trou pour agrafe
5HSqUHGH
synchronisation
Agrafe
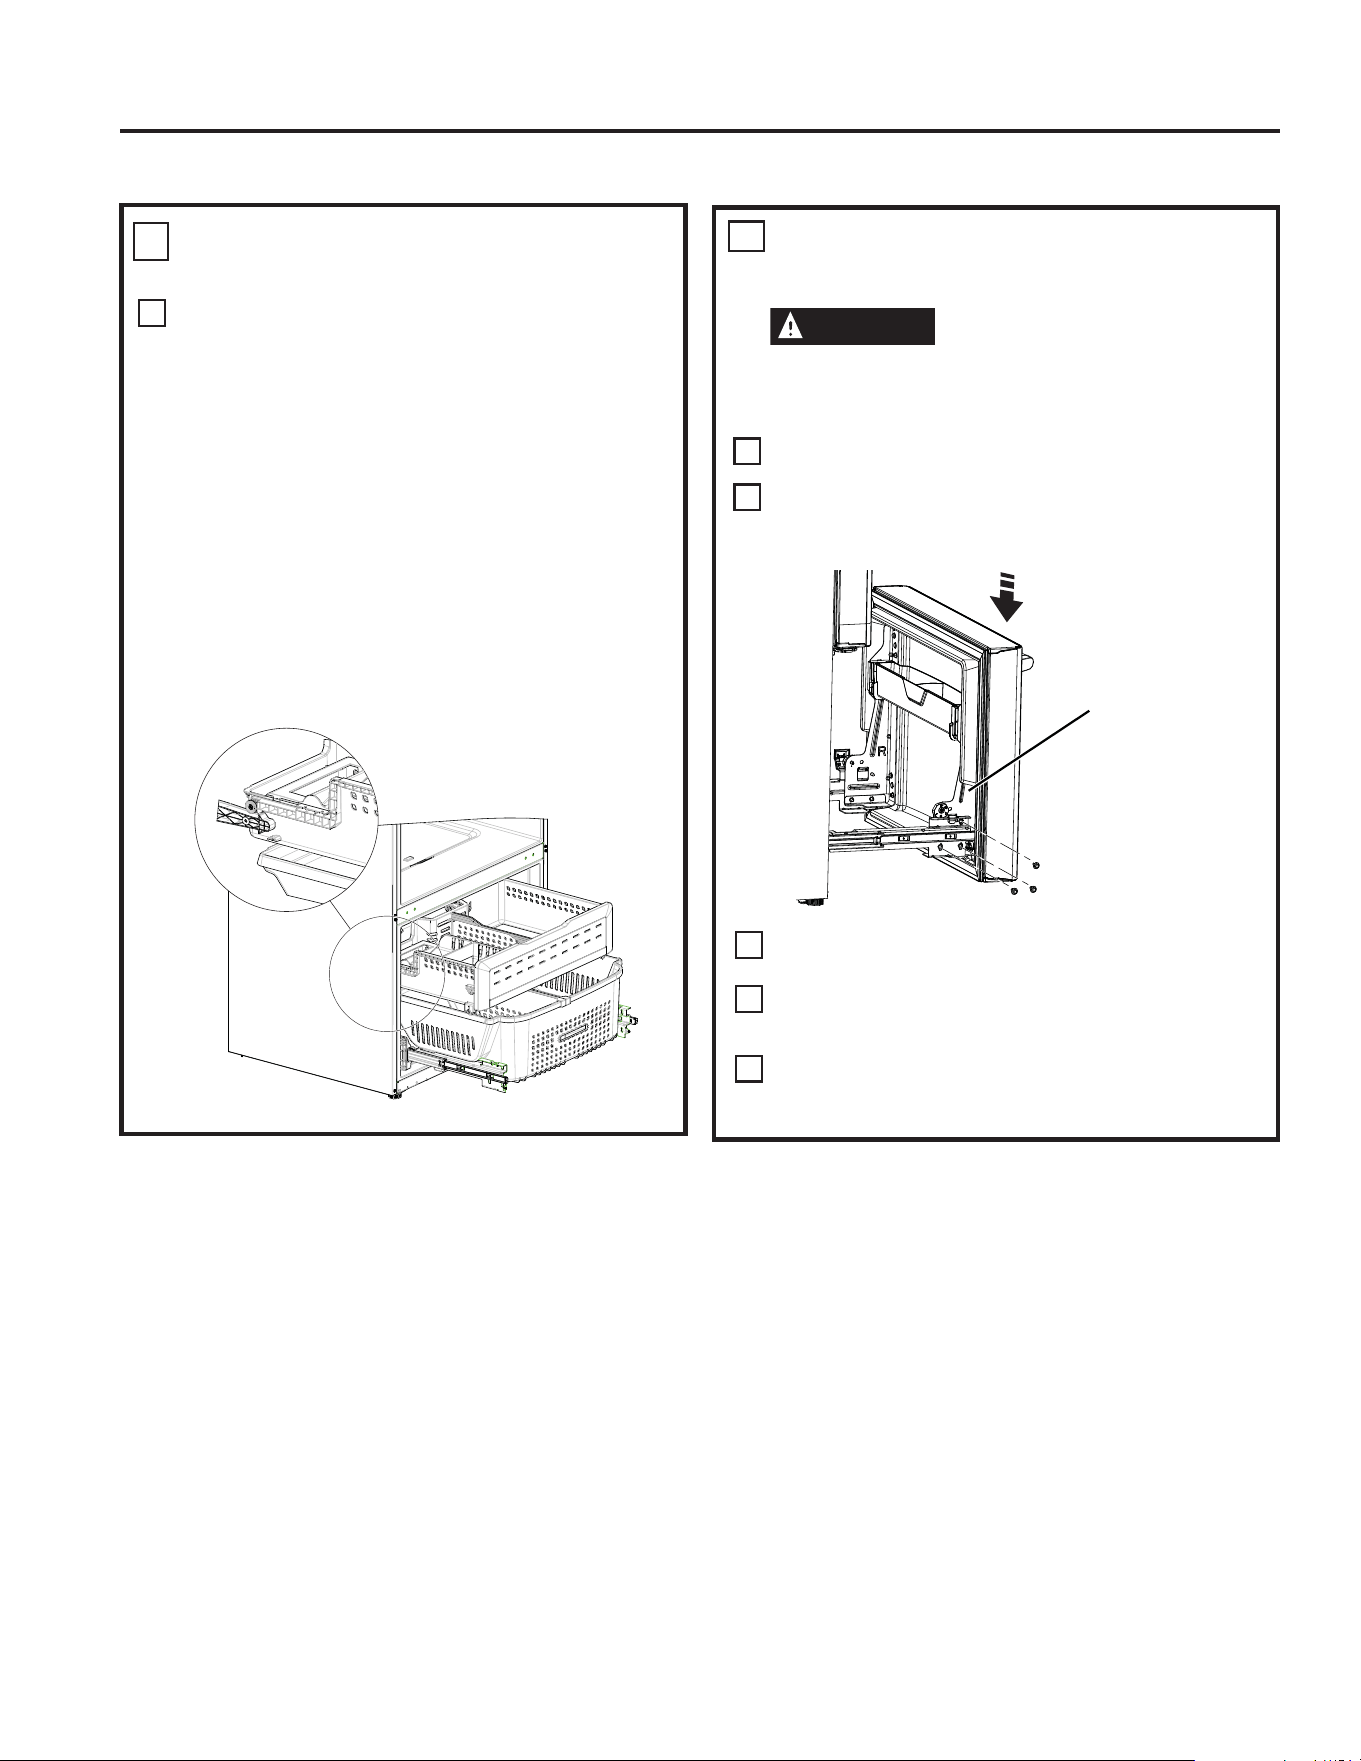
32 49-60792 Rev. 3
RÉINSTALLATION DU TIROIR DU
CONGÉLATEUR
5pLQVWDOOH]OHWLURLUGXFRQJpODWHXUHQSODoDQWVHV
roulettes sur le dessus du rail monté sur le côté des
parois du congélateur. Les roulettes du tiroir doivent
se trouver sur le dessus des côtés du panier inférieur.
MODÈLES ÉQUIPÉS D’UNE MACHINE À
GLAÇONS DANS LE CONGÉLATEUR : Placez le
seau à glace dans le tiroir et poussez celui-ci dans le
congélateur, devant du seau vers le devant du panier.
Assurez-vous que :
- le seau à glace ne percute pas le bras de la
machine à glaçons et que le tiroir du congélateur
se rétracte complètement dans le compartiment
congélateur;
- le tube de remplissage se prolonge dans l’ouverture
du godet de remplissage à l’arrière de la machine à
glaçons.
9
A
Instructions d’installation
INSTALLATION DU RÉFRIGÉRATEUR (suite)
INSTRUCTIONS D’INSTALLATION
REINSTALLATION DE LA PORTE
DU CONGÉLATEUR
ATTENTION
Risque lors du levage de
charge
La porte du congélateur est lourde. Utilisez les
deux mains pour maintenir la porte avant de la
soulever.
Tirez le mécanisme à glissières du panier inférieur
jusqu’au bout avec les deux mains.
Soulevez la porte du congélateur et alignez les
languettes des côtés du support de porte sur les
orifices carrés des mécanismes à glissières.
5HSODFH]OHVYLVGHIL[DWLRQHWVHUUH]DXFRXSOHGH
7,34 N-m (65 po-lb).
Pour ajuster le jeu de la porte du congélateur, suivez
les instructions de la page 80 ou celles du manuel de
l’utilisateur.
5HSODFH]OHSDQLHUVXUOHVVXSSRUWVGHVJOLVVLqUHVHW
assurez-vous que la porte du congélateur s’ouvre et
se ferme librement.
10
Alignez et insérez
la languette du
support de porte du
congélateur dans
la fente du support
des glissières.
REMARQUE :
Placez un côté en
premier puis alignez
l’autre côté.
A
B
C
D
E

49-60792 Rev. 3 33
INSTRUCTIONS D’INSTALLATION
IMPORTANT!
Les 6 vis de montage (3 de chaque côté) ne sont PAS interchangeables avec les vis de la charnière centrale ou
supérieure. Après l’installation de la porte du congélateur, vérifiez que les écarts sont uniformes (le haut et le bas des
côtés gauche et droit) à l’aide du gabarit fourni.
Si des écarts trop importants sont observés, suivez les étapes suivantes pour ajuster la porte du congélateur.
Étape 1 - Desserrez les 3 vis de chaque côté (droit et gauche) de la porte du congélateur.
Étape 2 - 7RXUQH]ODYLVG¶DMXVWHPHQWGDQVOHVHQVGHVDLJXLOOHVVLO¶pFDUWGDQVOHKDXWHVWWURSLPSRUWDQWYRLUOHJDEDULW¬O¶DLGH
d’une clé hexagonale de 3/32 po, tournez la vis d’ajustement dans le sens des aiguilles sur un quart à un demi- tour.
Étape 3 - Tournez la vis d’ajustement dans le sens contraire des aiguilles si l’écart dans le bas est trop important (voir le gabarit).
¬O¶DLGHG¶XQHFOpKH[DJRQDOHGHSRWRXUQH]ODYLVG¶DMXVWHPHQWGDQVOHVHQVFRQWUDLUHGHVDLJXLOOHVVXUXQTXDUWjXQGHPL
tour.
Étape 4 - Serrez les 3 vis de chaque côté (droit et gauche).
Étape 5 - Vérifiez les écarts de nouveau à l’aide du gabarit et répétez les étapes 1 à 4 s’il y a lieu et terminez par l’étape 5.
Instructions concernant l’ajustement des écarts de la porte du congélateur :
(0,6 po)
1,5 cm
Gabarit pour vérifier les écarts.
L’écart doit être de 0,6 po (1,5
cm) ou moins.
eWDSH
eWDSH
Vis d’ajustement
eWDSH
eWDSH
Plier ici pour utiliser le gabarit
Instructions d’installation
INSTALLATION DU RÉFRIGÉRATEUR (suite)
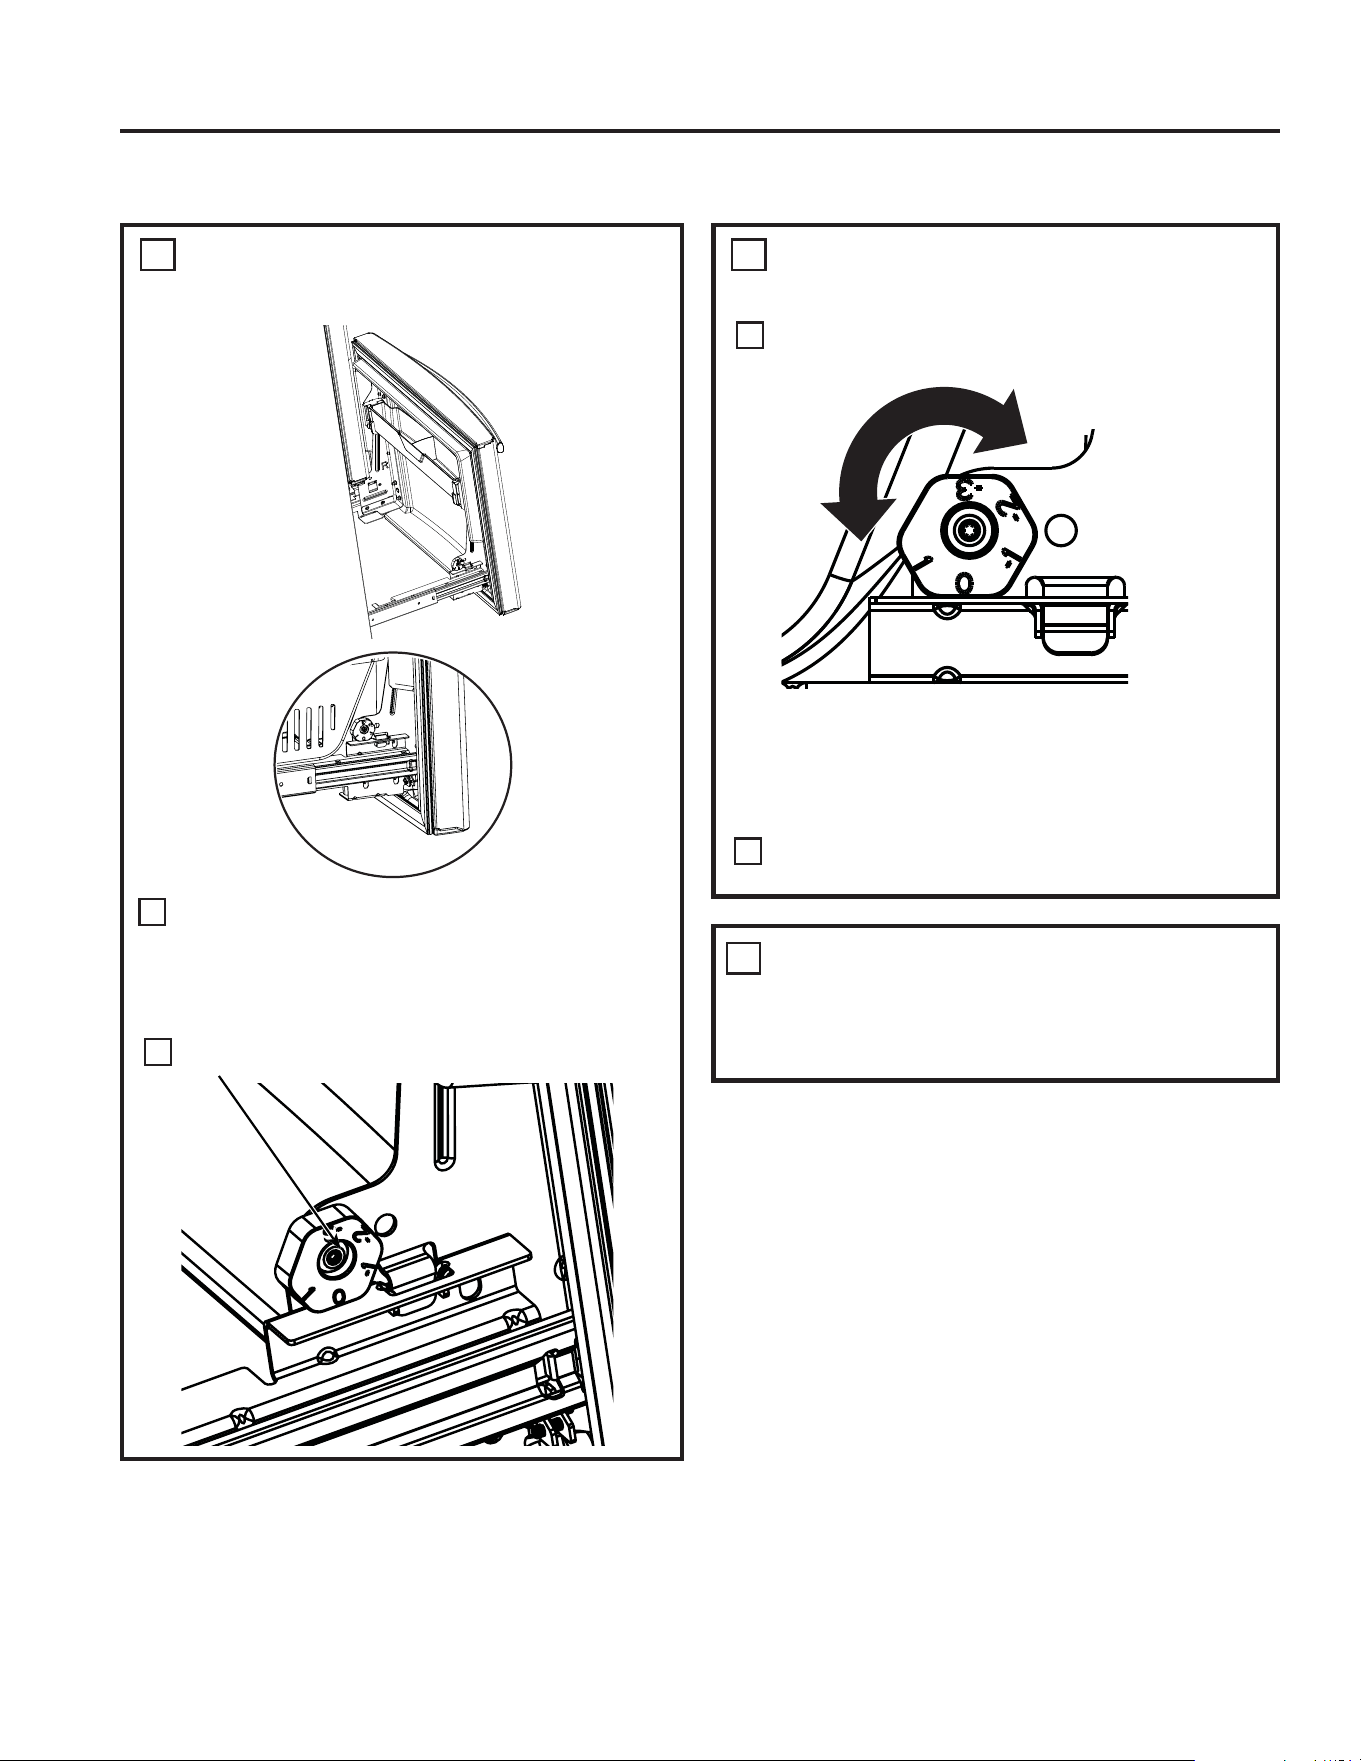
34 49-60792 Rev. 3
MISE À NIVEAU DE LA PORTE
DU CONGÉLATEUR
Localisez la came de réglage de la hauteur dans
la porte du congélateur. Desserrez les trois vis de
fixation de la porte sur les deux glissières à l’aide
d’un tournevis à cliquet hexagonal de 3/8 po.
Localisez et desserrez la vis à came en utilisant le
tournevis T-27.
10
A
B
Instructions d’installation
INSTALLATION DU RÉFRIGÉRATEUR (suite)
RETRAIT DE L’EMBALLAGE
A) 5HWLUH]OHVEDQGHVDGKpVLYHVOHVHPEDOODJHVHQ
mousse et les protections des clayettes et des
tiroirs.
10
MISE À NIVEAU DE LA PORTE DU
CONGÉLATEUR (suite)
Soulevez la porte sur le côté nécessitant un réglage,
faites tourner la came jusqu’à la position requise.
Après le réglage, serrez les 3 vis de fixation au
couple de 65 lb-po (7,34 N.m).
9
0 – Position initiale
1 – Lever de 0,127 cm (0,050 po)
-1 – Abaisser de 0,050 cm (0,050 po)
-2 - Abaisser de 0,254 cm (0,100 po)
-3 - Abaisser de 0,381 cm (0,150 po)
A
B
INSTRUCTIONS D’INSTALLATION
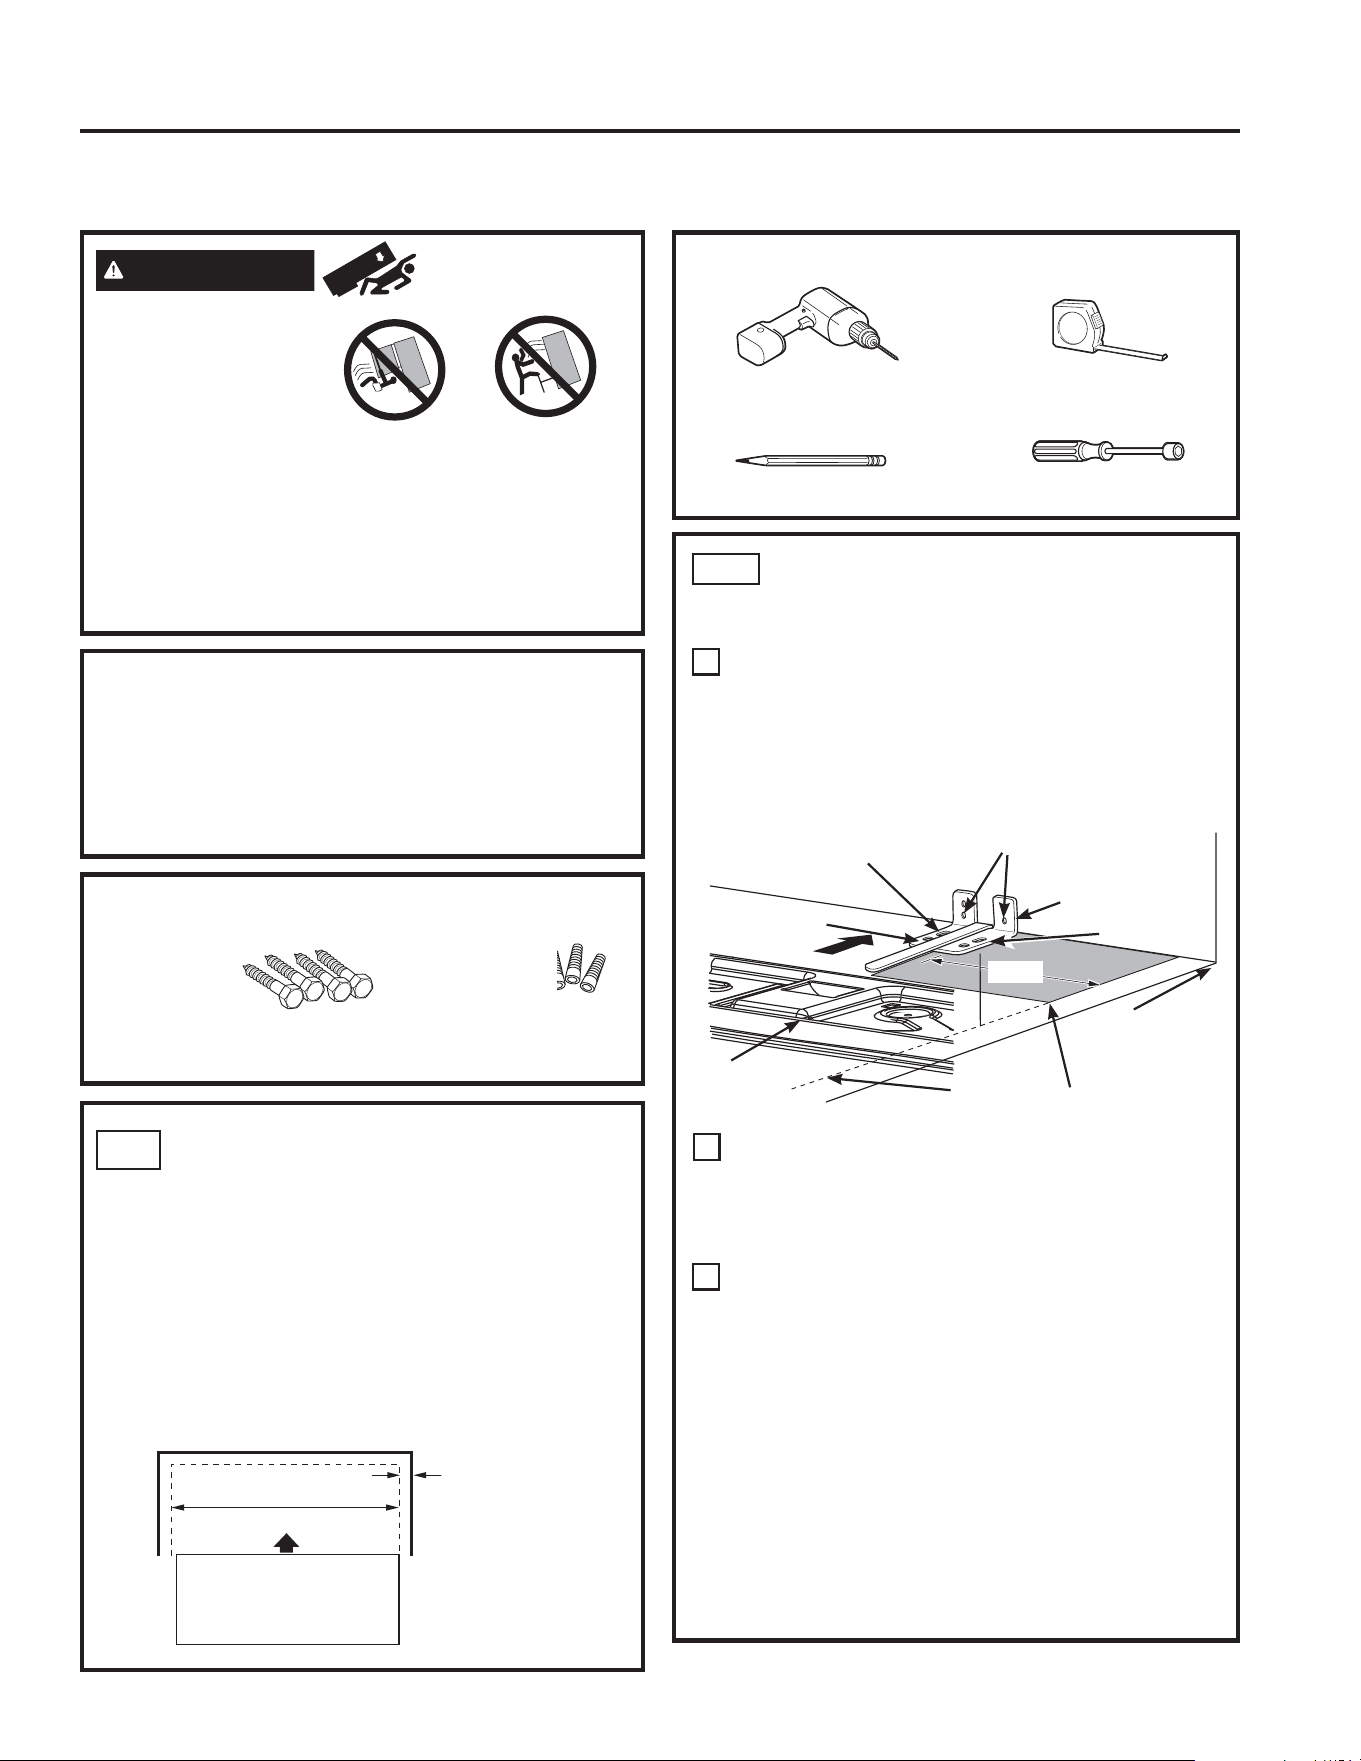
49-60792 Rev. 3 35
INSTRUCTIONS D’INSTALLATION
MESURE DE L’OUVERTURE
DISPONIBLE COMPARÉE
A LA LARGEUR DU
RÉFRIGÉRATEUR
Mesurez W, la largeur de l’ouverture dans laquelle
vous voulez mettre votre réfrigérateur.
Assurez-vous de tenir compte de tout surplomb
du comptoir, de l’épaisseur de la plinthe et de tout
espace libre désiré. La largeur W doit être supérieure
à 36 pouces. Vous devez placer le réfrigérateur
approximativement au milieu de cette ouverture.a
MATÉRIEL DONT VOUS POUVEZ
AVOIR BESOIN (non inclus)
OUTILLAGE NÉCESSAIRE
Crayon
Mèche de 1/8 po (3 mm)
et Perceuse manuelle ou
électrique
Mètre
Tournevis à douille
5/16 po (8 mm)
Tire-fond ¼ po
(6 mm) x 1 ½ po
(38 mm)
Manchons
d’ancrage ½ po
(12 mm) de
diamètre externe
Uniquement pour les systèmes anti-basculement par fixation
DXVROHQ%e721
Mèche adaptée aux ancrages
AT-1
POSITIONNEMENT DU
SYSTÈME ANTI-BASCULEMENT
PAR FIXATION AU SOL
Placez le gabarit de positionnement du système
anti-basculement par fixation au sol (fourni dans
la trousse anti-basculement) sur le sol contre le
mur arrière, à l’intérieur de W, et en ligne avec
l’emplacement souhaité pour le côté droit du
réfrigérateur (voir figure 1).a
Placez le système anti-basculement par fixation au
sol sur le gabarit de positionnement avec ses trous
au sol de droite alignés aux trous au sol indiqués sur
le gabarit, à approximativement 38,73 cm (15,25 po)
du bord du gabarit ou du côté droit du réfrigérateur.
Maintenez en position et utilisez le système anti-
basculement par fixation au sol comme gabarit
pour marquer les trous en vous basant sur votre
configuration et la catégorie de construction indiquée
dans l’étape 3. Marquez l’emplacement des trous
avec un crayon, un clou ou un poinçon.
REMARQUE :
,OHVW2%/,*$72,5(G¶XWLOLVHUDXPRLQVYLVSRXU
fixer le système de fixation au sol (un de chaque
côté du système anti-basculement par fixation au
sol). Les deux doivent entrer dans le mur ou dans
le sol. La figure 2 indique toutes les configurations
acceptables de montage pour ces vis. Identifiez les
trous de vis sur le système anti-basculement par
fixation au sol pour votre configuration.
AT-2
A
B
C
eSDLVVHXUGH
la plinthe ou
surplomb du
comptoir (la
mesure la plus
grande) plus
tout espace libre
désiré
Mur arrière
Avant
Côté droit du
réfrigérateur
W
5e)5,*e5$7(85
Figure 1 – – Vue d’ensemble de l’installation
Support de
base sur le
réfrigérateur
2 trous dans le mur
Côté droit du
réfrigérateur
Sol - Béton
(2 trous)
Sol - Bois
(2 trous)
15 ¼”
Gabarit de
positionnement
Système de
fixation au sol à
installer
Trous à droite
Coin arrière
gauche du mur
du placard
AVERTISSEMENT
Risque de
basculement
Les modèles encastrés
(modèles PYE, GYE,
GYS, PWE, et ZWE)
sont plus lourds au
niveau de leur partie supérieure, surtout avec les portes
ouvertes. Ces modèles doivent être fixés à l’aide du
système anti-basculement par fixation au sol pour éviter
que l’appareil ne bascule vers l’avant, ce qui pourrait
entraîner des blessures graves, voire mortelles. Lisez
et suivez les instructions d’installation complètes pour
l’installation du système anti-basculement par fixation au
sol livré avec votre réfrigérateur.
REMARQUE :
Si vous n’avez pas reçu de système anti-basculement par
fixation au sol avec votre achat, appelez le 1.877.432.2737
pour en recevoir un gratuitement. (Au Canada, appelez le
1.800.561.3344).
Pour les instructions d’installation du système consultez le
site : GEAppliances.com.
(Au Canada, electromenagersge.ca)
Instructions d’installation
INSTALLATION DU RÉFRIGÉRATEUR (suite)
Installation du support
anti-basculement par fixation au sol (Modèles PYE, GYE, GYS, DYE, PWE, et ZWE seulement)
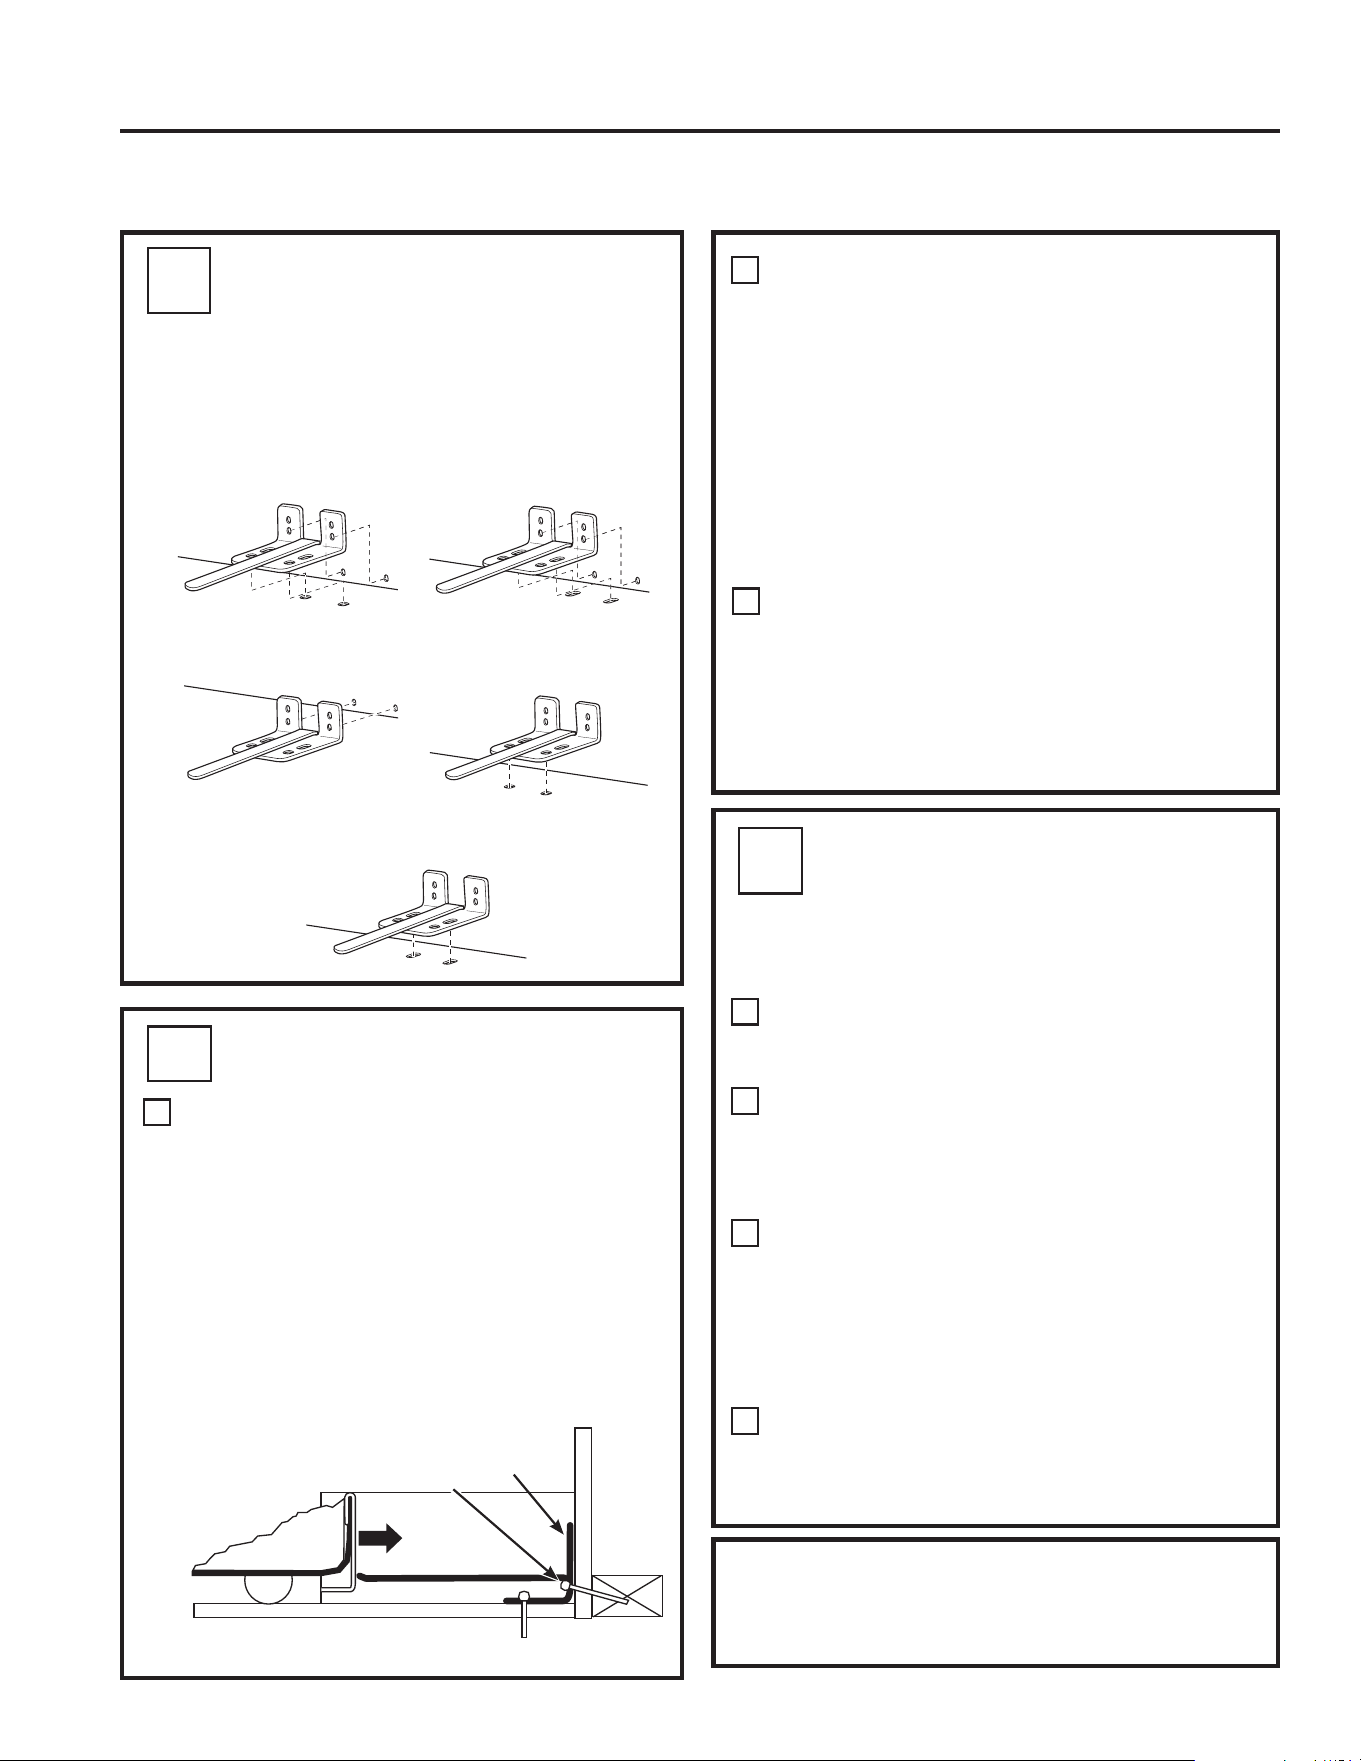
36 49-60792 Rev. 3
AT-2
POSITIONNEMENT DU
SYSTÈME ANTI-
BASCULEMENT PAR
FIXATION AU SOL (suite)
Installation recommandée
- Bois
Installation recommandée
- Béton
Minimum Acceptable #1 –
Montant de poutre
Minimum Acceptable #2 –
Plancher en bois
Minimum Acceptable #3 –
Sol en béton
Figure 2 – Emplacements acceptables pour les vis
Mur et plancher en BETON :
• Ancrages nécessaires (non fourni) :
4 tire-fond d’ ¼ po (6 mm) x 1- ½ po (38 mm) 4
manchons d’ancrage d’ ½ po (12 mm) de diamètre
externe
• Percez les trous de taille recommandées pour
les ancrages dans le béton au centre des trous
marqués dans l’étape 2.
• Placez les manchons d’ancrage dans les trous
percés. Placez la fixation de sol anti-basculement
FRPPHLQGLTXpHjO¶pWDSH5HWLUH]OHJDEDULWGH
positionnement du sol.
• Installez les tire-fond à travers la fixation de sol
anti-basculement et serrez correctement.
0XUHQ%2,6HWVRO&$55(/(
• Pour ce cas particulier, localisez les 2 trous sur le
mur identifié dans la figure 2. Percez diagonalement
un trou de guidage de 1/8 po (3 mm) au centre de
chaque trou (comme indiqué à la Fig. 3).
• Installez la fixation de sol anti-basculement en
utilisant le Minimum Acceptable #1, comme illustré
dans la Fig. 2.
C
B
AT-3
INSTALLATION DU SYSTÈME
ANTI-BASCULEMENT
Mur et plancher en BOIS :
• Percez le nombre approprié de trous de guidage
de 1/8 po au centre de chaque trou pour la fixation
de sol utilisé (vous pouvez utiliser un clou ou
un poinçon si vous n’avez pas de perceuse) ET
enlevez le gabarit du sol.
• Montez la fixation de sol anti-basculement en
vissant fermement les 2 ou 4 (recommandé) vis
à tête hexagonale, n ° 10-16 comme illustré à la
figure 3.
A
AT-4
POSITIONNEMENT DU
RÉFRIGÉRATEUR POUR
L’ENGAGER DANS LE
SYSTEME ANTI-
BASCULEMENT
Avant de mettre le réfrigérateur dans son
emplacement final, branchez le cordon d’alimentation
dans la prise de courant et raccorder l’eau (si
nécessaire). Vérifiez qu’il n’y a pas de fuite.
Trouvez le côté droit du réfrigérateur et faites le
reculer jusqu’à ce qu’il soit approximativement aligné
avec le côté droit de l’ouverture W. Cette manœuvre
devrait positionner le système anti-basculement pour
que celui-ci s’accroche à la base anti-basculement du
réfrigérateur
Faites doucement rouler le réfrigérateur dans
l’ouverture jusqu’à ce qu’il s’arrête. Vérifiez que
l’avant du réfrigérateur s’aligne avec la façade des
placards. Dans le cas contraire, faites délicatement
basculer le réfrigérateur vers l’avant et vers l’arrière
jusqu’à ce que le système anti-basculement soit
engagé et que vous remarquez que le réfrigérateur
est complètement poussé contre le mur du fond
Si nécessaire : 5pJOH]ODKDXWHXUGHVURXOHWWHV
arrière (et avant) de manière à engager
complètement le système anti-basculement, tout
en alignant l’avant du réfrigérateur à l’avant des
placards.
A
C
B
D
Figure 3 – Fixation au mur et au sol
REMARQUE : Si vous faites sortir le réfrigérateur en le
tirant et l’écartez du mur pour une raison quelconque,
assurez-vous de bien engager le système anti-
basculement quand vous repoussez le réfrigérateur
contre le mur du fond.
Coin arrière droit
du réfrigérateur
Sol
Montant
du mur
Système
de fixation
au sol
2 Vis doivent
pénétrer dans
le montant
en bois ou en
métal du mur
Mur
Instructions d’installation
INSTALLATION DU RÉFRIGÉRATEUR (suite)
Installation du support
anti-basculement par fixation au sol (Modèles PYE, GYE, GYS, DYE, PWE, et ZWE seulement)
INSTRUCTIONS D’INSTALLATION
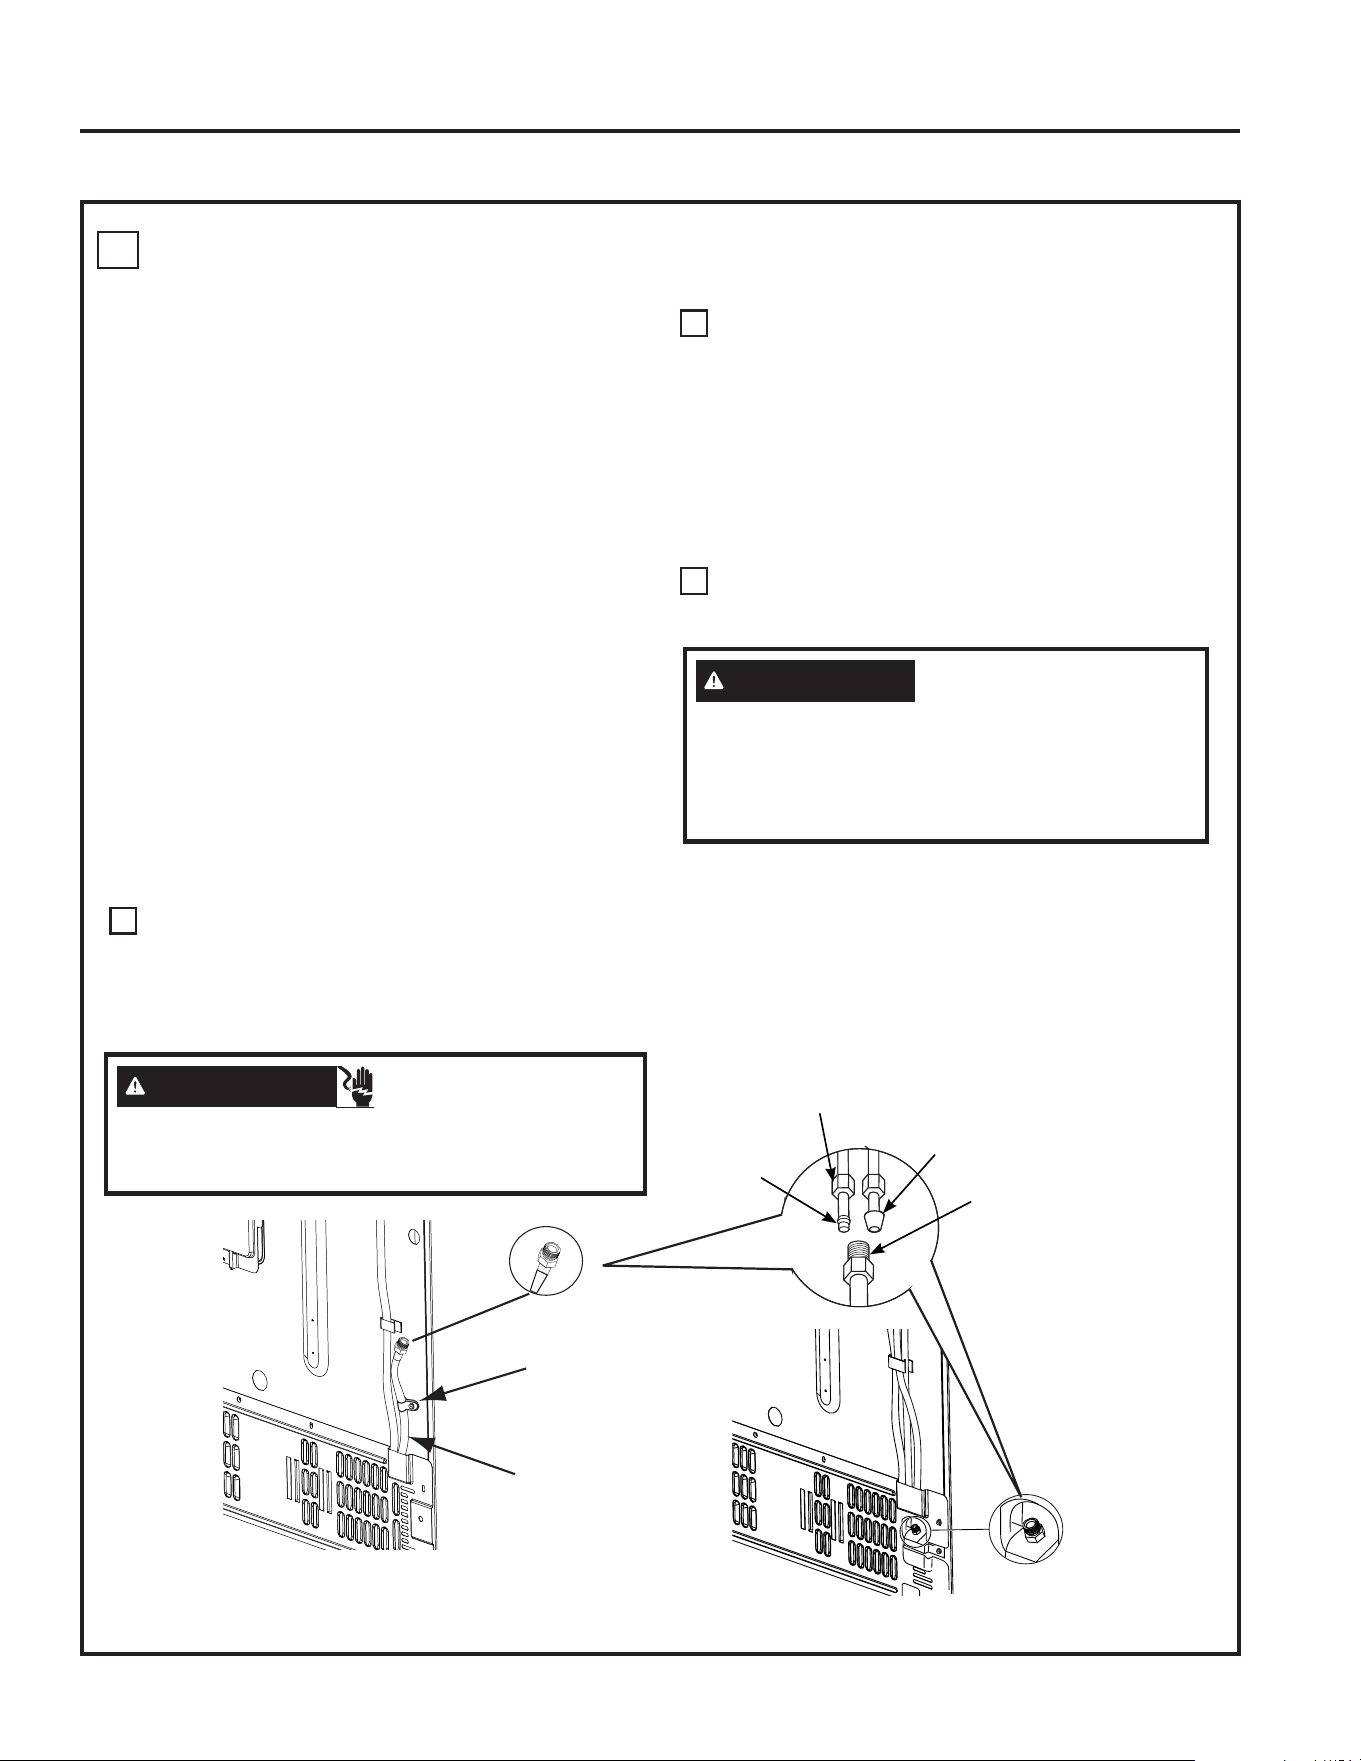
49-60792 Rev. 3 37
INSTRUCTIONS D’INSTALLATION
RACCORDEMENT DU RÉFRIGÉRATEUR À LA CONDUITE D’EAU DE LA
MAISON
Une alimentation d’eau froide est requise pour faire
fonctionner la machine à glaçons automatique.
Vous devrez en fournir une si elle n’existe pas.
Consultez la section « Installation de l’alimentation
en eau ».
REMARQUES :
• Avant de raccorder la conduite d’eau au
réfrigérateur, assurez-vous que le cordon
d’alimentation électrique du réfrigérateur n’est pas
branché à la prise murale.
• Si votre réfrigérateur n’est pas équipé de filtre
à eau, nous recommandons d’en monter un si
votre alimentation d’eau contient du sable ou des
particules qui peuvent boucher la grille du robinet
d’eau du réfrigérateur. Installez le dans la conduite
d’alimentation d’eau froide près du réfrigérateur.
Si vous utilisez une trousse SmartConnect™
5HIULJHUDWRU7XELQJYRXVDXUH]EHVRLQG¶XQWX\DX
supplémentaire (WX08X10002) pour brancher le
filtre. Ne coupez pas le tuyau en plastique pour
installer le filtre.
• Avant de raccorder la conduite d’eau à la maison,
purgez la ligne de la maison pendant au moins 2
minutes.
Si vous utilisez un tuyau de cuivre, placez un
écrou de compression et une bague (manchon)
à l’extrémité du tuyau qui vient de l’alimentation
d’eau froide de la maison. Si vous utilisez le tuyau
SmartConnect™, les écrous sont déjà assemblés au
tuyau.
Si vous utilisez un tuyau de cuivre, insérez aussi loin
que possible l’extrémité du tuyau dans le raccord
à l’arrière du réfrigérateur. Tout en tenant le tuyau,
serrez le raccord.
Si vous utilisez un tuyau SmartConnect™, insérez
l’extrémité moulée du tuyau dans le raccord à
l’arrière du réfrigérateur, puis serrez l’écrou à
compression à la main. Serrez ensuite d’un autre
tour à l’aide d’une clé. Des fuites peuvent survenir si
l’écrou est trop serré.
Fixez le tuyau dans le collier de serrage fourni pour
le maintenir en position. Vous aurez peut être besoin
d’écarter la bride.
11
A
B
C
Instructions d’installation
INSTALLATION DU RÉFRIGÉRATEUR (suite)
eFURXGH
compression d’1/4 po
Embout
(manchon)
Tuyau
SmartConnect™
5DFFRUGGX
réfrigérateur
1/4” Tubing
Tuyau de 1/4 po
Tubería de 1/4“
Tubing Clamp
Bride
Abrazadera del tubo
OR
Bribe
Tuyau de 1/4 po
AVERTISSEMENT
RISQUE DE DÉCHARGE
ÉLECTRIQUE
Fixez le collier de serrage dans le trou présent
VHXOHPHQW1(3(5&(=3$6GDQVOHUpIULJpUDWHXU
AVERTISSEMENT
5DFFRUGH]YRXVjXQHDOLPHQWDWLRQHQHDXSRWDEOH
seulement.
Une alimentation en eau potable est requise pour le
fonctionnement de la machine à glaçons. La pression d’eau
doit se situer entre 40 et 120 psi (275 à 827 kilopascals).
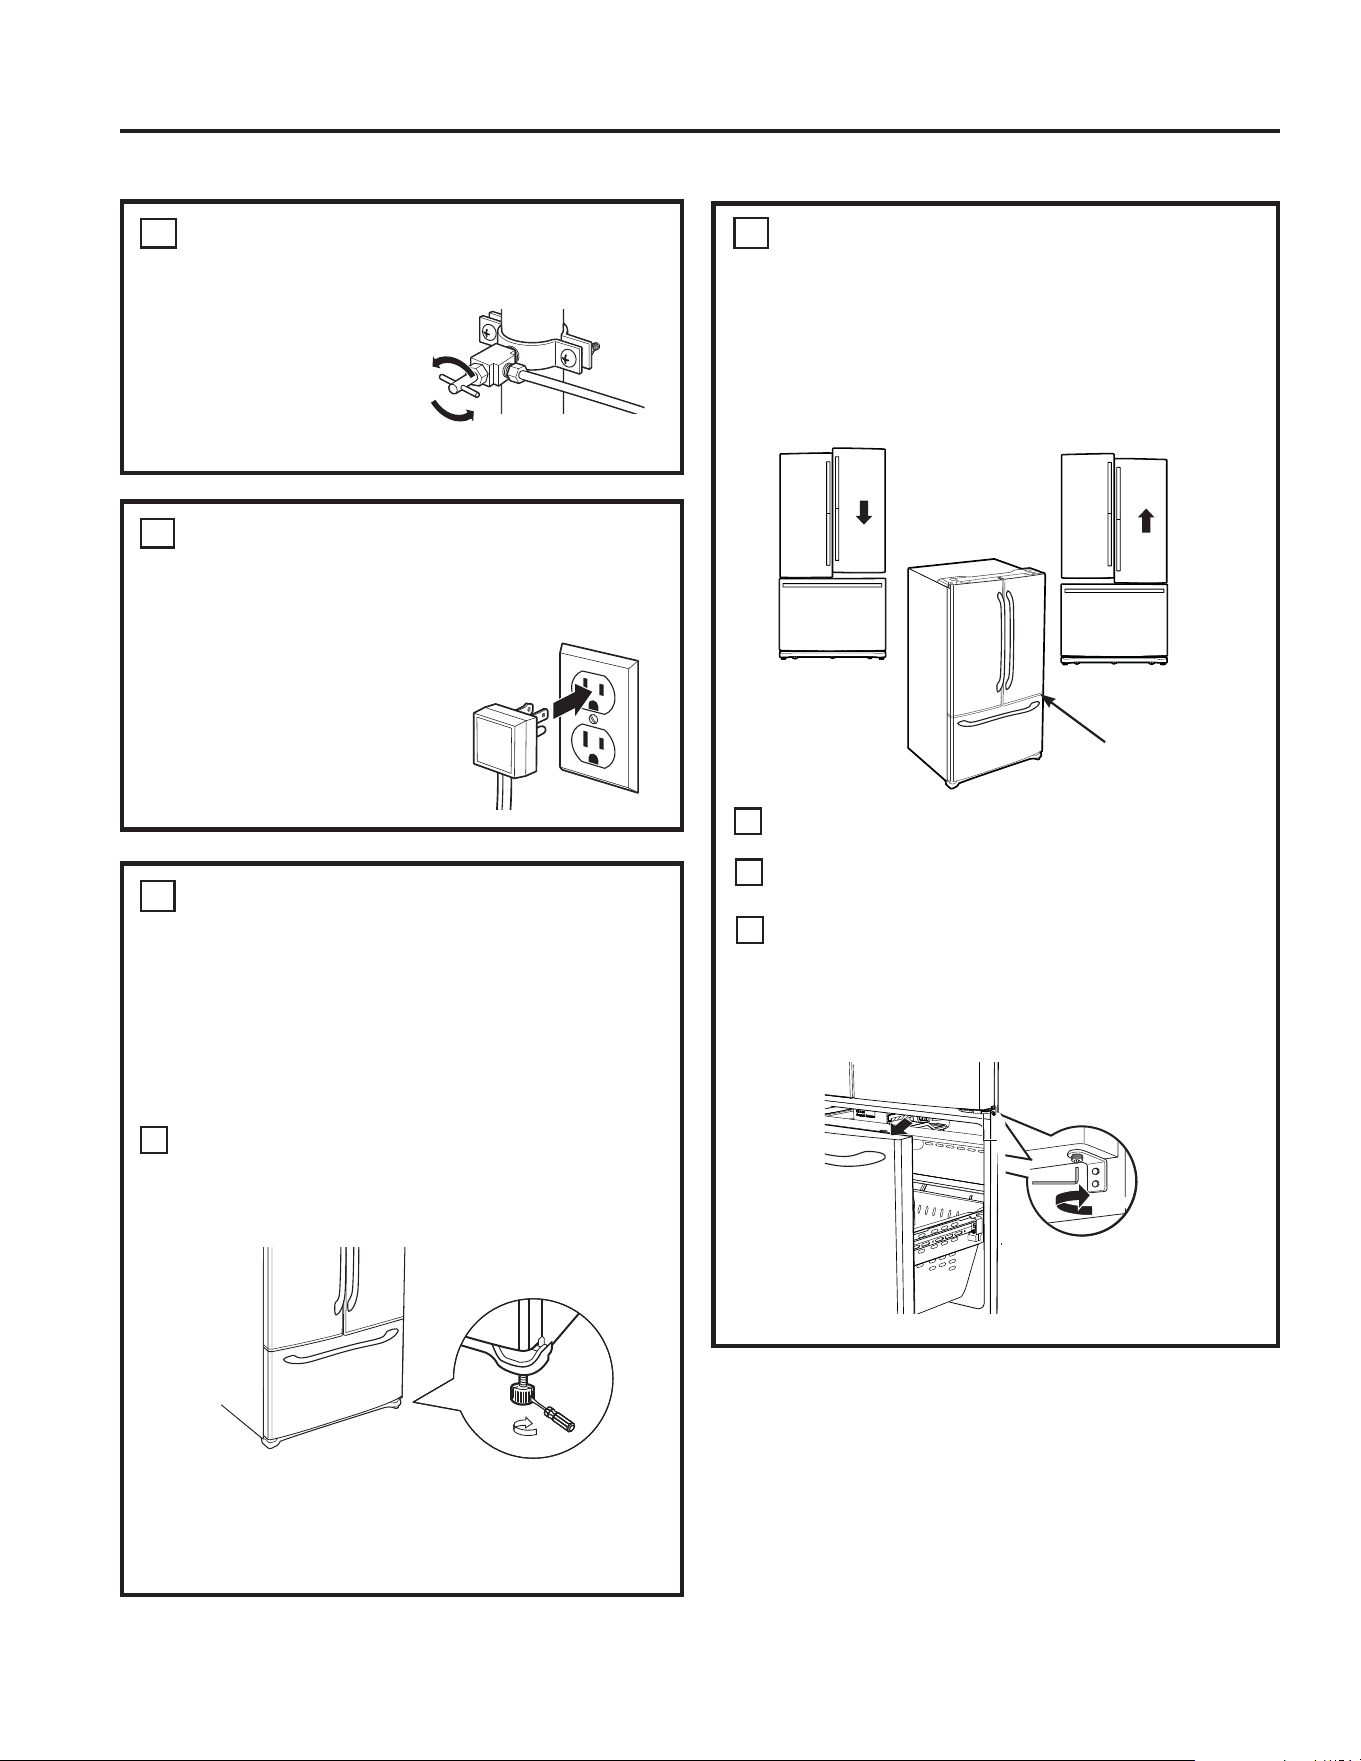
38 49-60792 Rev. 3
OUVRIR L’ALIMENTATION EN
EAU
Ouvrez l’alimentation
d’eau au niveau
du robinet d’arrêt
(alimentation en eau de
la maison) et vérifiez
qu’il n’y a pas de fuite.
12
BRANCHEMENT DU CORDON
D’ALIMENTATION DU
RÉFRIGÉRATEUR
Veuillez lire les informations
de mise à la terre fixées au
cordon d’alimentation.
13
MISE À NIVEAU DU
RÉFRIGÉRATEUR
Les pieds de mise à niveau servent :
1. à ajuster le réfrigérateur pour que celui-ci soit
correctement positionné sur le sol et ne vacille pas
2. de frein pour stabiliser le réfrigérateur pendant
son utilisation et son nettoyage. Les pieds de
mise à niveau permettent aussi d’empêcher le
réfrigérateur de basculer.
Tournez les pieds de mise à niveau dans le sens des
aiguilles d’une montre pour relever le réfrigérateur et
dans le sens inverse des aiguilles d’une montre pour
l’abaisser.
REMARQUE : Pour éviter tout dommage matériel,
les pieds de mise à niveau doivent bien reposer sur
le sol.
14
A
Tournevis à tête plate
Monter
MISE À NIVEAU DES PORTES
DU RÉFRIGÉRATEUR
5DSSHOH]YRXVTX¶LOHVWQpFHVVDLUHTXHOHUpIULJpUDWHXU
soit de niveau pour que les portes soient parfaitement de
niveau. Si vous avez besoin d’aide, consultez la section
précédente sur la mise à niveau du réfrigérateur.
Si vous ouvrez la porte du congélateur, vous verrez la
charnière centrale.
Insérez une clé Allen d’¼ po dans l’axe de la
charnière centrale.
Ajustez la hauteur en tournant dans le sens des
aiguilles d’une montre ou dans le sens inverse des
aiguilles d’une montre. Lorsque vous tournez dans le
sens inverse des aiguilles d’une montre, la porte se
déplace vers le haut.
15
A
B
Lorsque la
porte de
gauche est
plus basse
que la porte
de droite.
Lorsque
la porte
de
gauche
est plus
haute que
la porte
de droite.
Point de
réglage
C
RAISE
Instructions d’installation
INSTALLATION DU RÉFRIGÉRATEUR (suite)
Lever
INSTRUCTIONS D’INSTALLATION
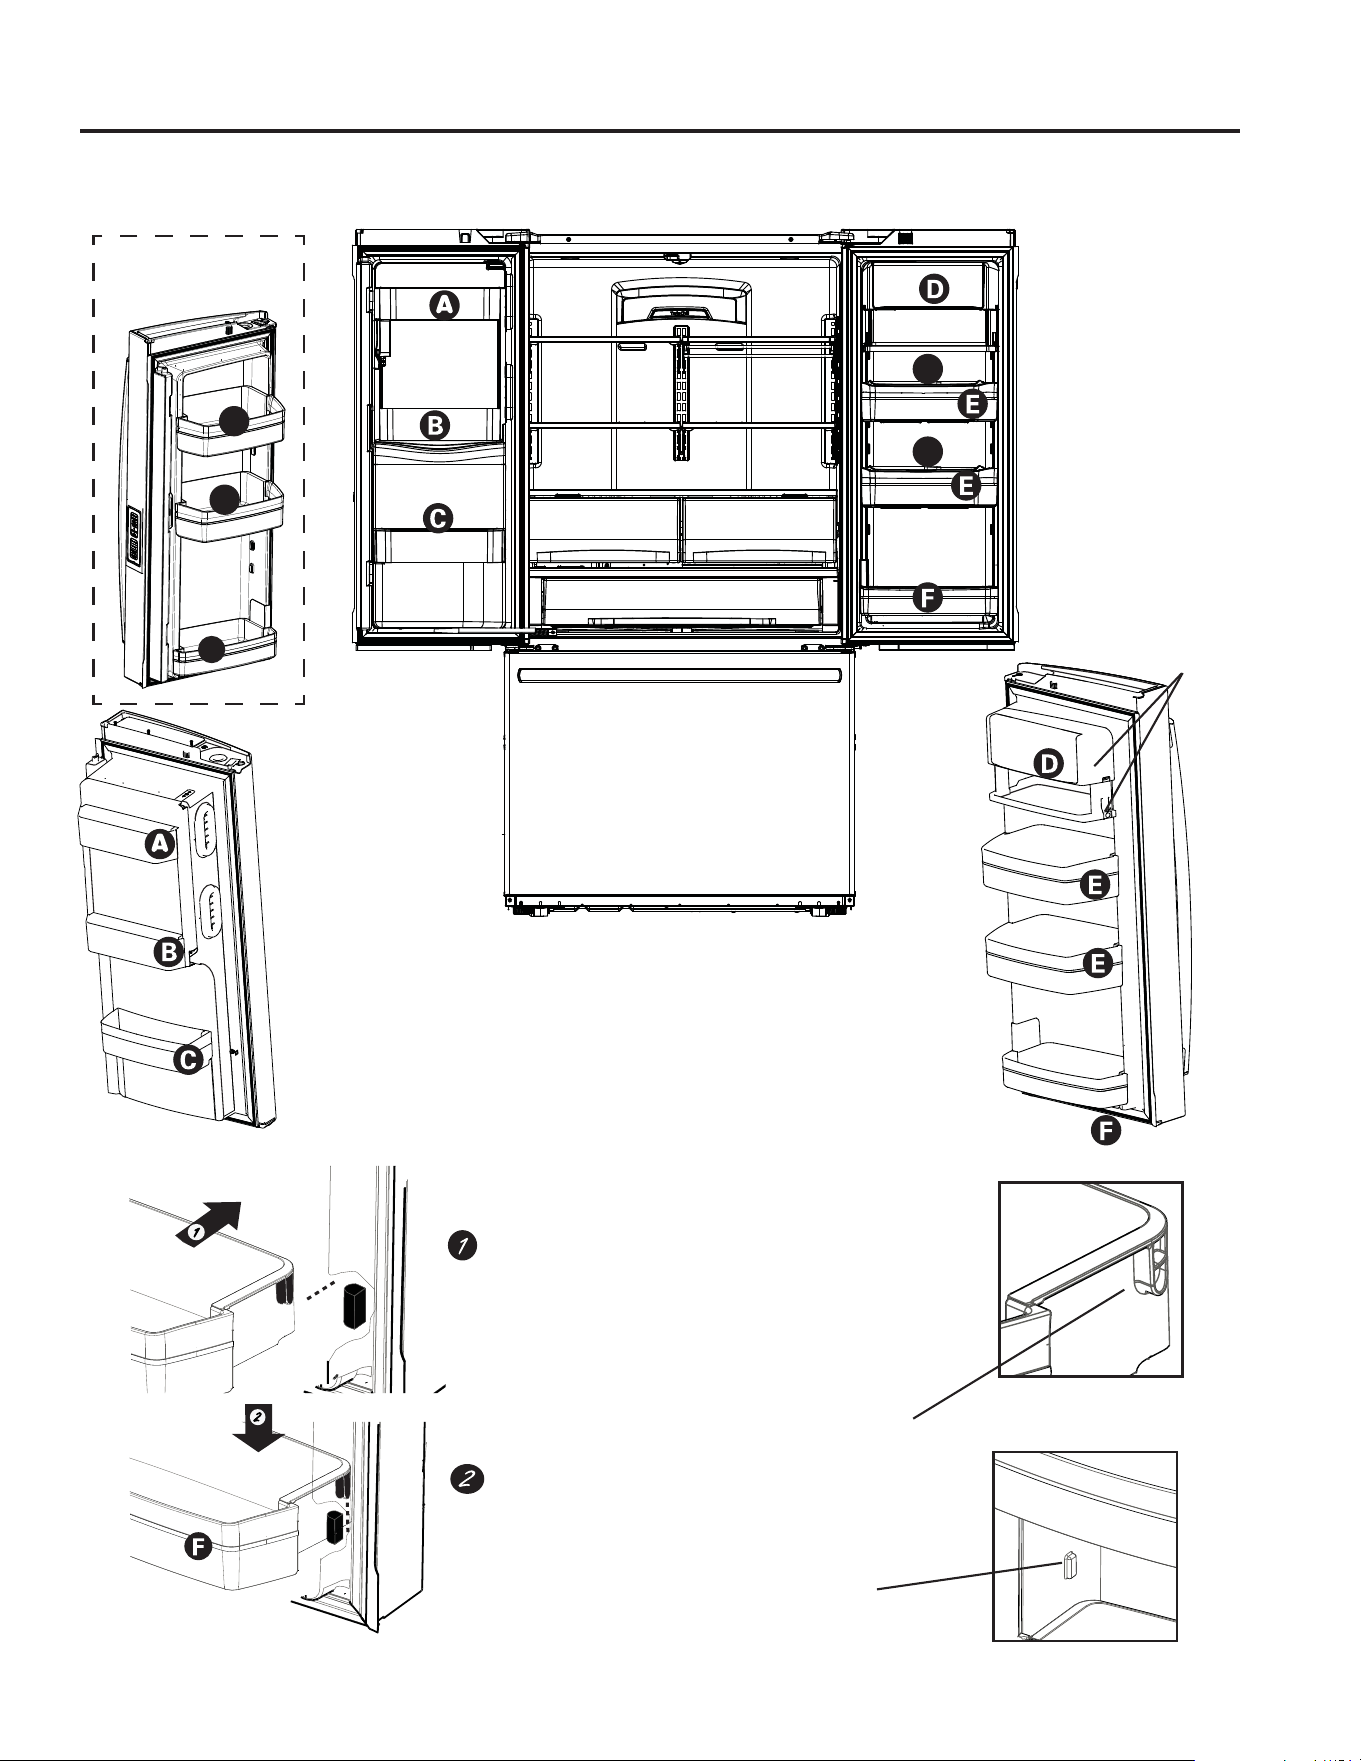
49-60792 Rev. 3 39
INSTRUCTIONS D’INSTALLATION
Instructions d’installation
INSTALLATION DU RÉFRIGÉRATEUR (suite)
J
H
H
(sur certains
modèles
uniquement)
Pour positionner les bacs dans les portes :
Faites correspondre votre bac avec la lettre
indiquée. Positionnez les crochets du bac sur le
repère et le pousser en avant jusqu’à insertion
complète.
5HSqUHGXEDF
de chaque côté
Crochet de bac
arrière de chaque
côté
Appuyez sur le bac jusqu’à ce qu’il soit bien
encastré dans sa position finale.
Modèles sans
distributeur
Machine à glaçons dans le
congélateur
, offerte avec les
modèles sans distributeur
et aussi en ensemble prêt-
à-monter IM avec certains
modèles.
G
G
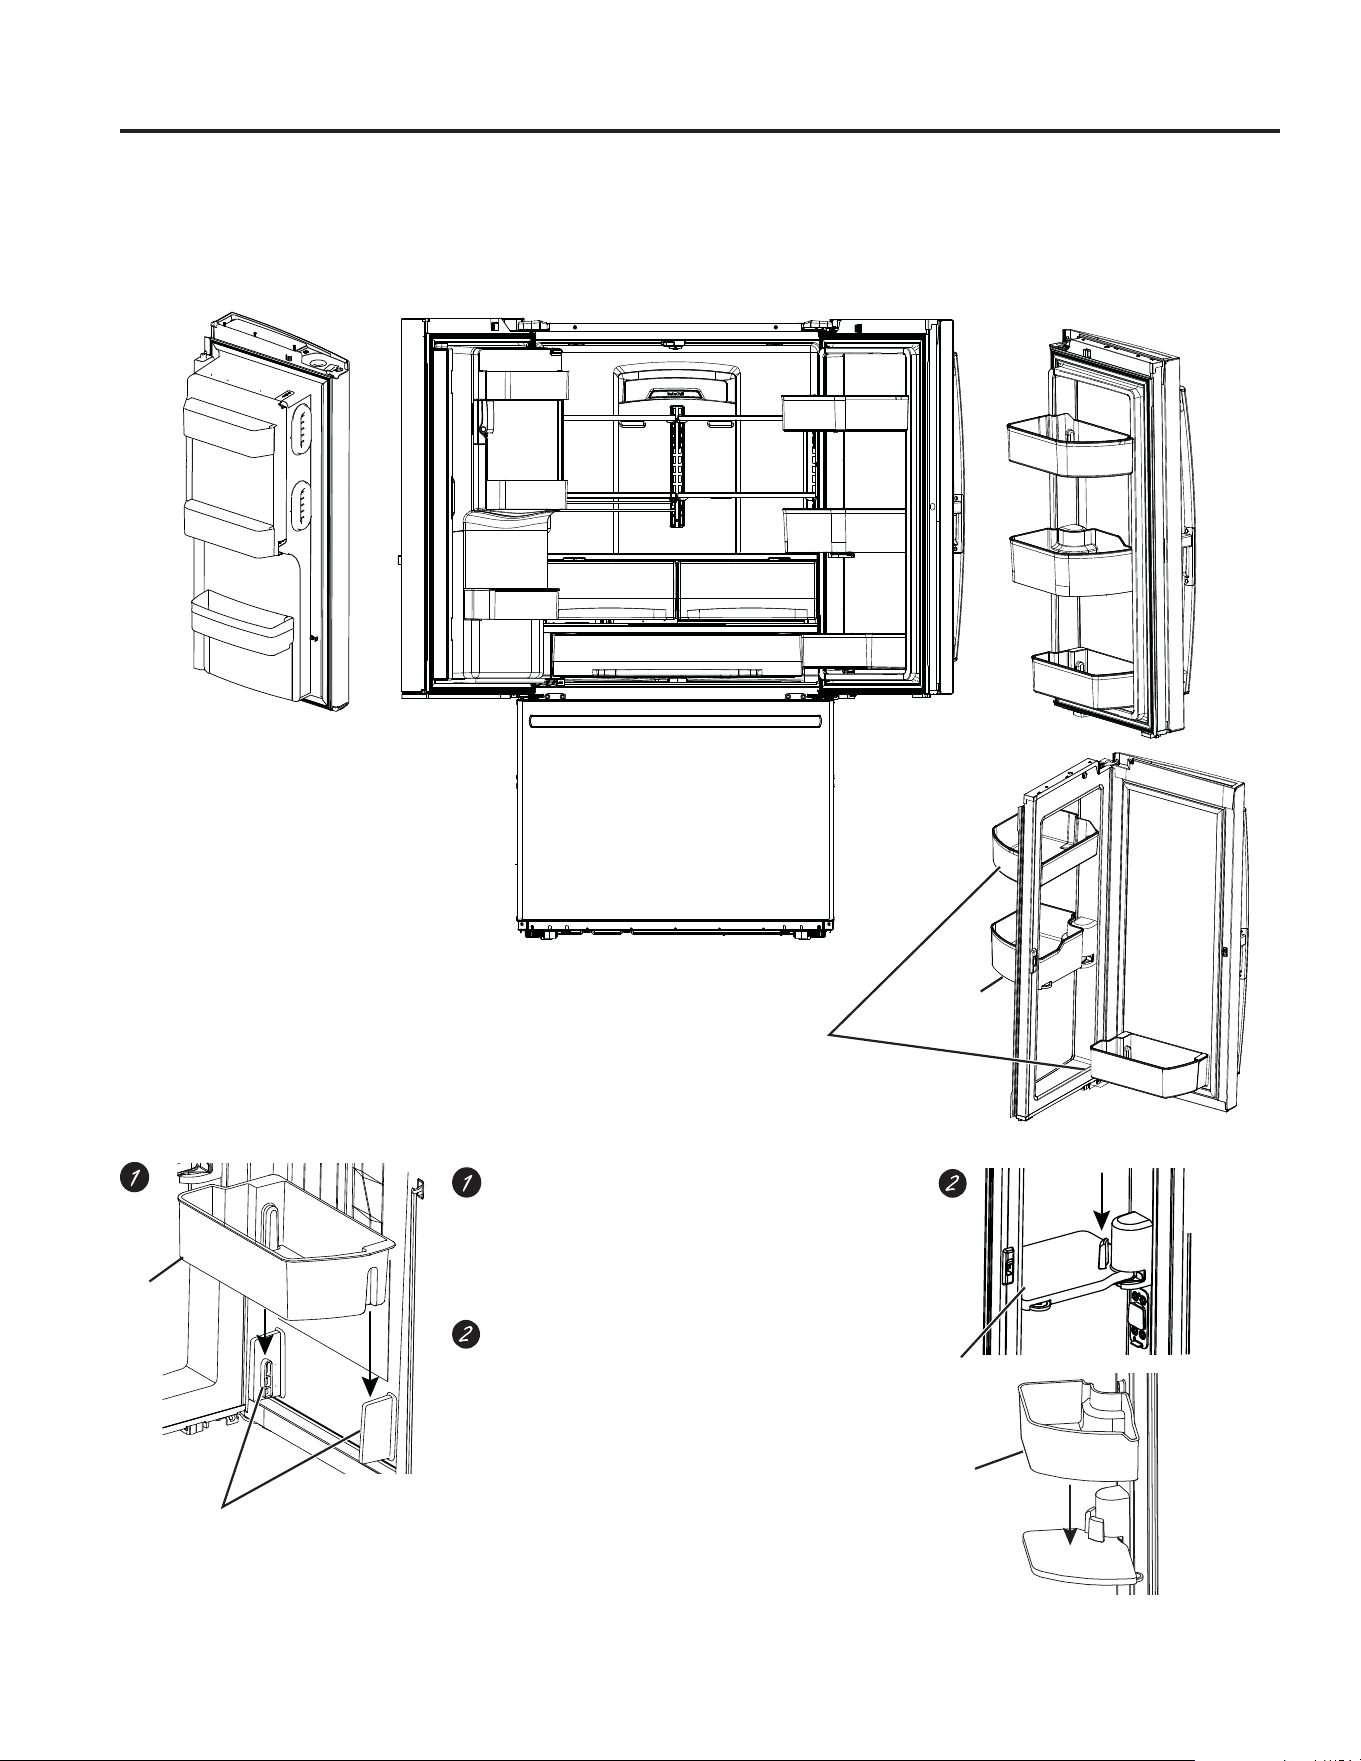
40 49-60792 Rev. 3
Instructions d’installation
INSTRUCTIONS D’INSTALLATION
INSTALLATION DU RÉFRIGÉRATEUR (suite)
Modèles PFD, PYD et GFD
Bac
Supports de
position
Bacs
réglables
Bac
pivotant
Pour placer le bac pivotant dans la
porte :
1. Glissez la base du bac sur le support de la
porte.
2. Glissez le bac sur sa base.
Pour placer les bacs réglables dans la
porte :
Placez les bacs au dessus des supports de
position et poussez vers le bas jusqu’à ce
qu’ils se verrouillent en position.
Bac
Base
du bac
Installer
la base
métallique
49-60792 Rev. 3 41
Nous recommandons les trousses d’alimentation d’eau
en cuivre WX8X2, WX8X3, WX8X4, selon la longueur
de tuyau dont vous avez besoin. Nous approuvons les
conduites d’eau en matière plastique SmartConnect™
5HIULJHUDWRU7XELQJ:;;:;;HW
WX08X10025).
Si vous installez un système d’eau à osmose inverse
GE Appliances dans votre réfrigérateur, la trousse GE
$SSOLDQFHV59.,7HVWODVHXOHLQVWDOODWLRQDSSURXYpH
Pour les autres systèmes à osmose inverse, suivez les
recommandations du fabricant.
Si l’alimentation d’eau du réfrigérateur provient d’un
système de filtration de l’eau par osmose inverse (OI) ET
si votre réfrigérateur est équipé d’un filtre à eau, utilisez
le bouchon de dérivation du filtre du réfrigérateur. En
cas d’utilisation de la cartouche de filtration d’eau du
réfrigérateur associée à un filtre à OI peut produire des
glaçons creux. Certains modèles ne sont pas équipés
d’un bouchon de dérivation de filtre. Pour en obtenir un
JUDWXLWHPHQWFRPSRVH]OH*(&$5(6$X&DQDGD
composez le 800.561.3344.
L’installation de cette conduite d’eau n’est pas garantie par
le fabricant du réfrigérateur ou de la machine à glaçons.
Suivez attentivement ces instructions afin de minimiser le
risque de fuite d’eau et de dommages onéreux.
Les coups de bélier (coups dans les tuyaux) dans la
tuyauterie de la maison peuvent endommager les pièces
de votre réfrigérateur et provoquer des fuites d’eau ou des
inondations. Appelez un plombier certifié pour corriger les
coups de bélier avant de brancher l’alimentation en eau au
réfrigérateur.
Pour prévenir les brûlures et éviter d’endommager votre
produit, ne branchez pas le tuyau d’eau à une conduite
d’eau chaude.
Si le réfrigérateur est mis en marche avant le raccordement
de l’alimentation d’eau à la machine à glaçons, voir la
section Commandes de la page 59 pour la désactivation de
la machine à glaçons.
Ne pas installer la tubulure de la machine à glaçons à
GHVHQGURLWVRODWHPSpUDWXUHEDLVVHVRXVOHSRLQWGH
congélation.
Lors de l’utilisation d’un appareil électrique (tel qu’une
perceuse) durant l’installation, s’assurer que celui-ci est
doublement isolé et qu’il est mis à la terre de façon à
prévenir les chocs électriques, ou qu’il est alimenté par
batterie.
Toutes les installations doivent être conformes aux codes
de plomberie locaux.
BEFORE YOU BEGIN
PIÈCES NÉCESSAIRES
7X\DX[HQFXLYUHRXWURXVVH6PDUW&RQQHFW5HIULJHUDWRU
Tubing, diamètre extérieur d’¼ po pour brancher le
réfrigérateur à l’alimentation d’eau. Si vous utilisez un
tuyau en cuivre, les deux extrémités du tuyau doivent être
coupées bien droit.
Pour déterminer la longueur de tuyau dont vous avez
besoin : mesurez la distance entre le robinet d’eau à
l’arrière du réfrigérateur et le tuyau d’alimentation en eau.
Assurez-vous d’avoir une longueur de tuyau suffisante
pour permettre d’éloigner le réfrigérateur du mur après
l’installation.
Les trousses de tuyauterie pour réfrigérateur
SmartConnect™ sont disponibles dans les longueurs
suivantes :
8 pi (2,4 m) - WX08X10006
15 pi (4,6 m) - WX08X10015
25 pi (7,6 m) - WX08X10025
Instructions d’installation
INSTALLATION DE LA CONDUITE D’EAU
INSTRUCTIONS D’INSTALLATION
AVERTISSEMENT
5DFFRUGH]YRXVjXQHDOLPHQWDWLRQHQHDXSRWDEOHVHXOHPHQW
Une alimentation en eau potable est requise pour le
fonctionnement de la machine à glaçons. La pression d’eau doit
se situer entre 40 et 120 psi (275 à 827 kilopascals).
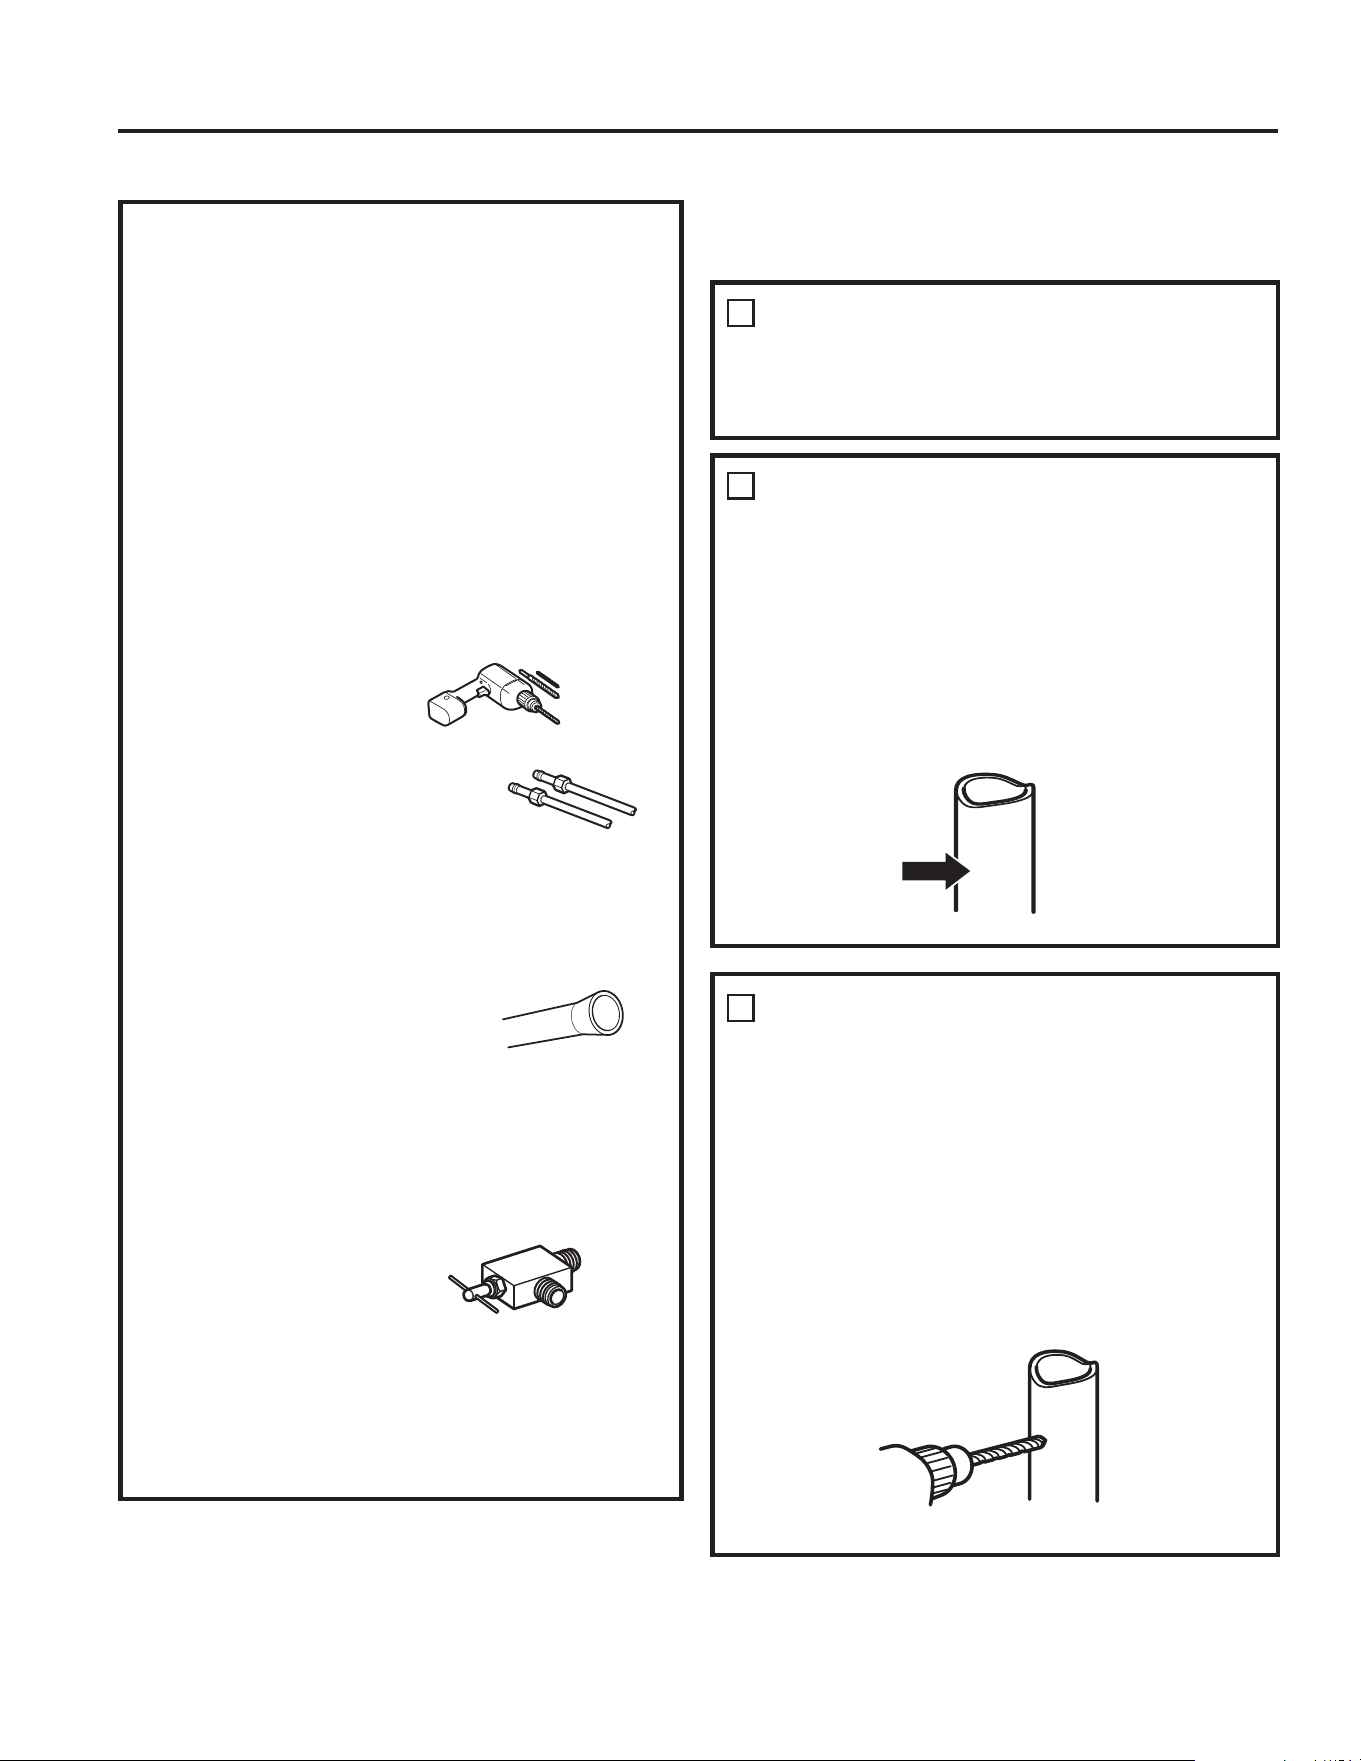
42 49-60792 Rev. 3
REMARQUE : Les seuls tuyaux en plastique autorisés
par GE Appliances sont fournis avec la trousse
6PDUW&RQQHFW5HIULJHUDWRU7XELQJ1¶XWLOLVH]SDV
d’autres tuyaux d’alimentation d’eau en plastique, cette
ligne étant sous pression en permanence. Certains types
de plastique peuvent se fissurer ou se rompre avec le
vieillissement et causer des dégâts d’eau dans votre
maison.
• Vous pouvez vous procurer une trousse GE Appliances
de branchement à l’alimentation d’eau (contenant
tuyau, robinet, raccords et instructions) auprès de
votre fournisseur ou au Centre de Pièces Détachées
et d’Accessoires, au 877.959.8688 (au Canada,
1.800.661.1616).
• Alimentation en eau froide La pression de l’alimentation
d’eau doit être entre 20 et 120 psi (1,4 à 8,1 bar).
• Perceuse électrique.
• Clé d’½ po ou clé réglable
• Un tournevis à tête plate et un tournevis cruciforme.
• Deux écrous à compression d’un
diamètre extérieur de ¼ po et deux
bagues (manchons)—pour brancher
le tuyau en cuivre au robinet d’arrêt
et au robinet d’eau du réfrigérateur.
OU
6LYRXVXWLOLVH]XQHWURXVVH6PDUW&RQQHFW5HIULJHUDWRU
Tubing, les raccords nécessaires sont déjà assemblés
au tuyau.
• Si votre canalisation d’eau
actuelle en cuivre est équipée
d’un raccord évasé à une
extrémité, vous aurez besoin d’un adaptateur (que vous
trouverez dans votre magasin de matériel de plomberie)
pour brancher le tuyau d’eau au réfrigérateur, OU BIEN
vous pouvez couper le raccord évasé à l’aide d’un
coupe-tube, puis utiliser un raccord à compression. Ne
coupez jamais l’extrémité finie d’un tuyau de la trousse
6PDUW&RQQHFW5HIULJHUDWRU7XELQJ
5RELQHWG¶DUUrWSRXU
brancher le tuyau d’eau
froide. Le robinet d’arrêt doit
avoir une entrée d’eau avec
un diamètre intérieur minimal de 5/32 po au point de
MRQFWLRQDYHFOH78<$8'¶($8)52,'('HVURELQHWV
d’arrêt de type vanne à étrier sont souvent inclus dans
les trousses d’alimentation d’eau. Avant d’en acheter,
assurez-vous que ce type de robinet est conforme à vos
codes de plomberie locaux.
FERMETURE DE L’ALIMENTATION
D’EAU PRINCIPALE
Ouvrez le robinet le plus proche pour purger l’eau des
tuyauteries.
Installez le robinet d’arrêt sur la canalisation d’eau potable la
plus proche.
1
Choisissez un emplacement pour le robinet qui soit
facilement accessible. Il est préférable de se connecter
sur le côté d’un tuyau vertical. Si vous devez vous
connecter à un tuyau horizontal, faites le branchement
vers le haut ou sur le côté, plutôt qu’en bas du tuyau
pour éviter de recevoir des sédiments provenant de la
conduite d’eau.
CHOISISSEZ L’EMPLACEMENT
DU ROBINET
2
PERCAGE D’UN TROU POUR LE
ROBINET
3
Percez un trou de 1/4 po dans le tuyau d’eau, à l’aide
d’un foret dur, même si vous utilisez un robinet auto-
forant. Enlevez toutes les bavures dues au perçage du
trou dans le tuyau.
Veillez à ne pas laisser l’eau couler dans votre
perceuse.
Si vous ne percez un trou d’ ¼ po, votre production de
glace ainsi que la taille des glaçons seront réduites.
Instructions d’installation
INSTALLATION DE LA CONDUITE D’EAU (suite)
PIÈCES NÉCESSAIRES (suite)
INSTRUCTIONS D’INSTALLATION
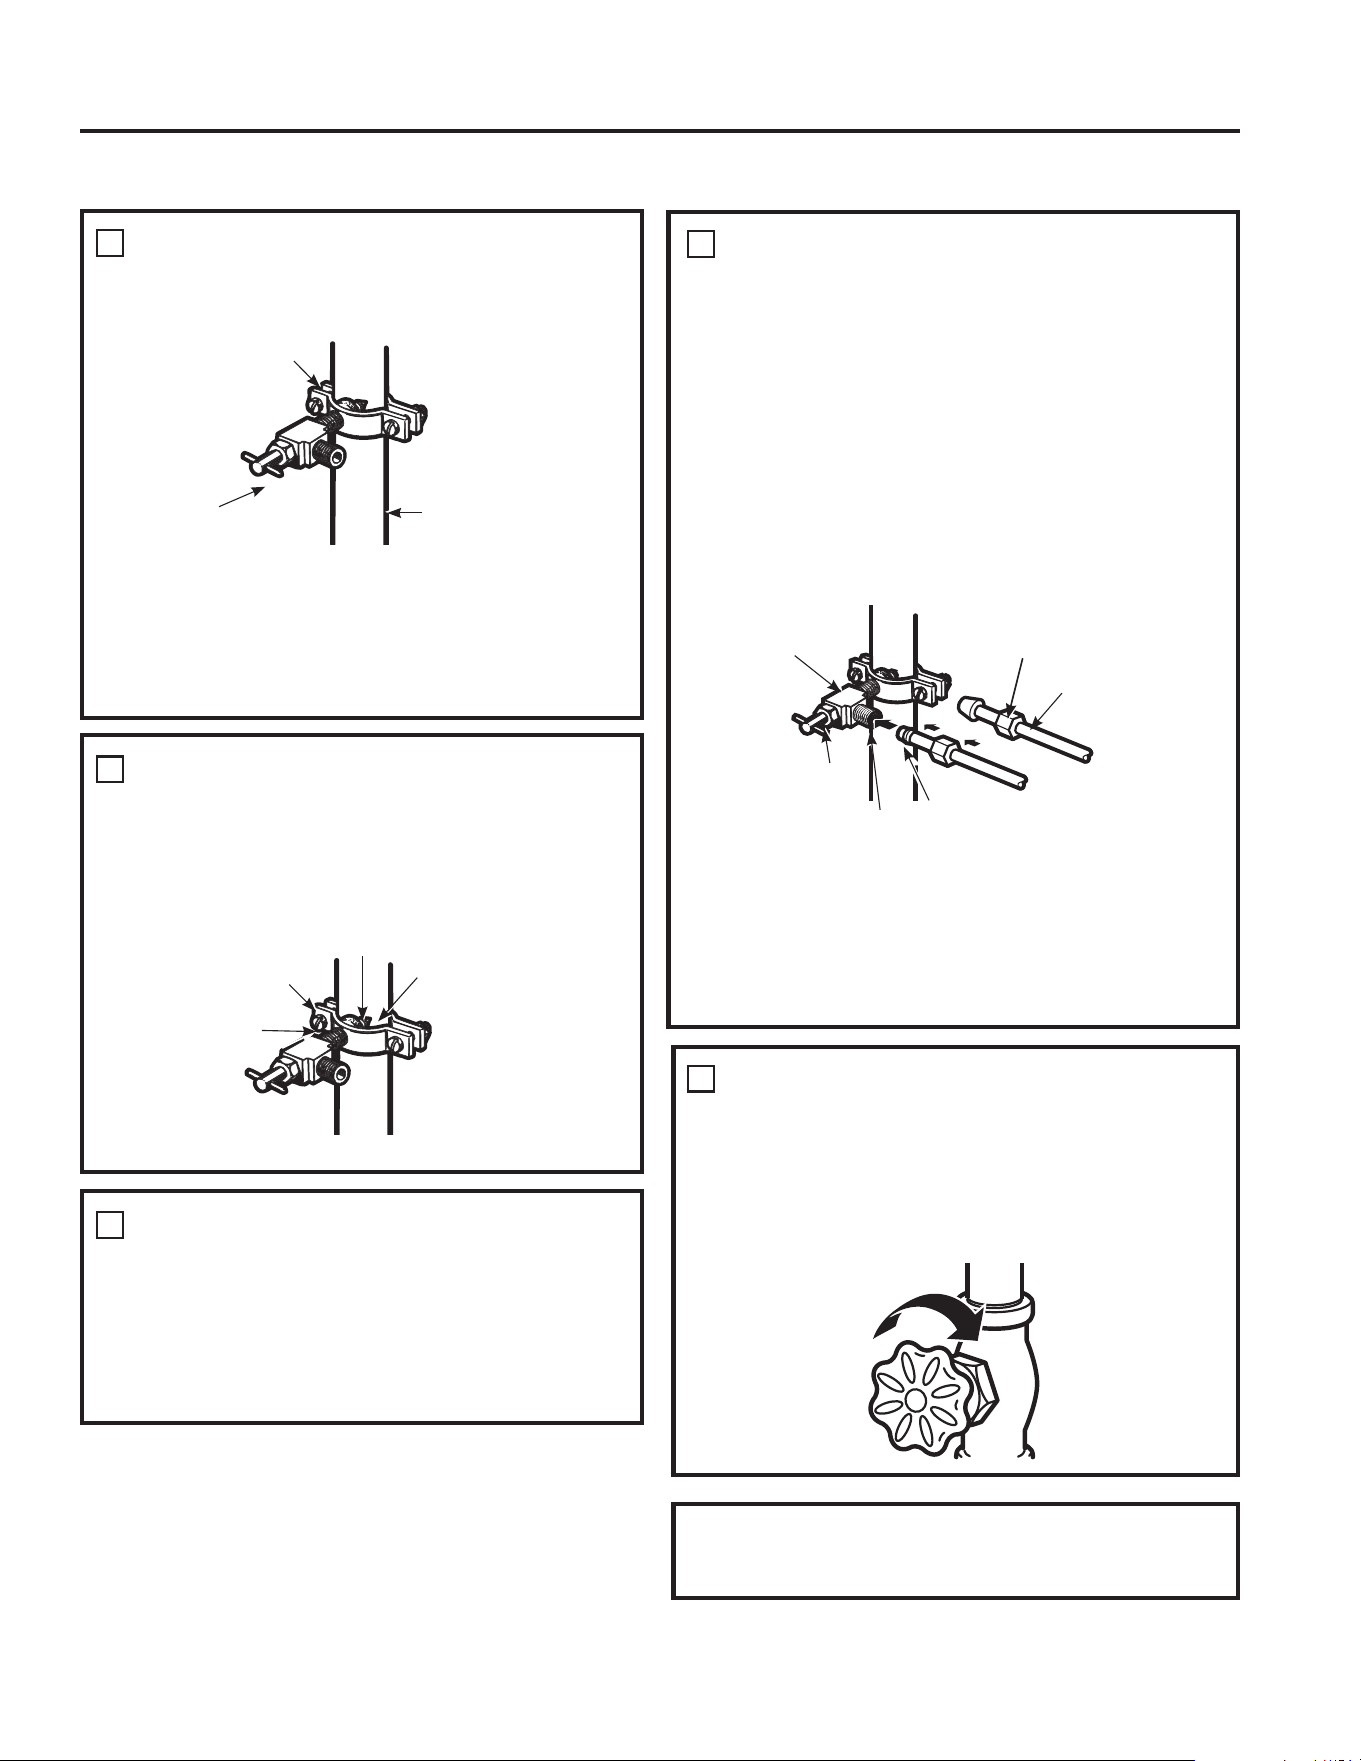
49-60792 Rev. 3 43
Placez un écrou de compression et une bague
(manchon) à l’extrémité du tuyau et branchez-les au
robinet d’arrêt.
Assurez-vous que le tuyau soit bien inséré dans le
robinet. Serrez bien l’écrou de compression.
Pour le tuyau en matière plastique d’une trousse
6PDUW&RQQHFW5HIULJHUDWRU7XELQJLQVpUH]O¶H[WUpPLWp
moulée du tuyau dans le robinet d’arrêt et serrez
l’écrou de compression à la main, puis serrez d’un
tour supplémentaire avec une clé. Des fuites peuvent
survenir si l’écrou est trop serré.
REMARQUE : L’installation sera conforme aux
FRGHVGHSORPEHULH&05GX&RPPRQZHDOWKGX
Massachusetts. L’utilisation de robinets-vannes à étrier
sont interdites au Massachusetts. Demandez l’avis de
votre plombier qualifié.
BRANCHEMENT DU TUYAU AU
ROBINET
7
Ouvrez le robinet d’alimentation principale d’eau et
purgez le tuyau jusqu’à ce que l’eau soit claire.ear.
Fermez l’eau au niveau du robinet d’eau après
écoulement d’environ 1 litre (1 quart) d’eau par le tuyau
ou au bout de 2 minutes.
PURGE DU TUYAU
8
5RELQHWG¶DUUrWGH
type vanne à étrier
eFURXGHFRPSUHVVLRQ
Presse-joint
5RELQHWGHVRUWLH
Bague (manchon)
Tuyau
SmartConnect™
Fixez le robinet d’arrêt à la canalisation d’eau froide à
l’aide du collier de serrage.
REMARQUE : L’installation sera conforme aux
FRGHVGHSORPEHULH&05GX&RPPRQZHDOWKGX
Massachusetts. L’utilisation de robinets-vannes à étrier
sont interdites au Massachusetts. Demandez l’avis de
votre plombier qualifié.
FIXATION DU ROBINET D’ARRÊT
4
Serrez les vis du collier jusqu’à ce que la rondelle
d’étanchéité commence à enfler.
REMARQUE : Ne serrez pas trop, vous risquez
d’écraser le tuyau.
SERRAGE DU COLLIER
5
Collier de serrage
Tuyau vertical
d’eau froide
5RELQHWG¶DUUrWGH
type vanne à étrier
5RQGHOOH
Entrée
Collier de serrage
Vis du
collier
Faites passer le tuyau entre la conduite d’eau froide et
le réfrigérateur.
Faites passer le tuyau par un trou percé dans le mur
ou le plancher (derrière le réfrigérateur ou au niveau
du placard adjacent) aussi près du mur que possible.
PASSAGE DU TUYAU
6
Instructions d’installation
INSTALLATION DE LA CONDUITE D’EAU (suite)
Pour terminer l’installation du réfrigérateur, retournez à
l’étape 11 de la section Installation du réfrigérateur.
CONSEILS DE DÉPANNAGE : Conditions normaux de fonctionnement
44 49-60792 Rev. 3
Les réfrigérateurs plus récents font des bruits différents de ceux des anciens.
Les réfrigérateurs modernes proposent plus de fonctions et sont plus avancés sur le plan technologique.
HUMMM...
WHOOSH...
Ŷ /HQRXYHDXFRPSUHVVHXUjUHQGHPHQWpOHYpSHXW
fonctionner plus longtemps et plus vite que votre ancien
réfrigérateur et vous pouvez entendre un son modulé ou
un ronflement aigu pendant son fonctionnement.
Ŷ 9RXVHQWHQGUH]SHXWrWUHXQVLIIOHPHQWORUVTXHOHVSRUWHV
se ferment.
Ŷ &HFLHVWGjO¶pTXLOLEUDJHGHODSUHVVLRQGDQVOH
réfrigérateur. Après distribution de glace, un moteur ferme
la goulotte de glace pour empêcher l’air tiède ambiant
d’entrer dans le seau à glace, permettant ainsi de
maintenir la glace à une température en dessous de zéro.
Le ronronnement du moteur fermant la goulotte de glaçons
est normal, quelques instants après la distribution de glace.
Ŷ
Vous pouvez entendre les ventilateurs tourner à
hautes vitesses. Cela se produit lorsque le réfrigérateur
vient d’être branché, lorsque les portes sont ouvertes
fréquemment ou lors de l’ajout d’une grande quantité
d’aliments dans le réfrigérateur ou le congélateur.
Les ventilateurs permettent de maintenir les bonnes
températures.
Ŷ La vitesse des ventilateurs varie pour fournir un
refroidissement et une économie d’énergie optimum.
CLICS, CRAQUEMENTS ET
CLAQUEMENTS
Ŷ Vous entendrez peut-être des craquements ou des bruits
secs lorsque le réfrigérateur vient d’être branché. Ceci se
produit lorsque le réfrigérateur se refroidit pour atteindre
la bonne température.
Ŷ L’expansion et la contraction des serpentins de
refroidissement pendant et après le dégivrage peuvent
provoquer des craquements ou des claquements.
Ŷ Sur les modèles équipés d’une machine à glaçons, après
un cycle de fabrication de glaçons, vous entendrez les
glaçons tomber dans le seau à glace.
Ŷ Sur les modèles équipés d’un distributeur, au cours
de la distribution d’eau, vous entendrez peut-être le
déplacement des tuyaux d’eau au début de la distribution
et après avoir relâché le bouton du distributeur.
Ŷ Ceci est dû à l’équilibrage de la pression dans le
réfrigérateur. Après distribution de glace, un moteur
ferme la goulotte de glace pour empêcher l’air tiède
ambiant d’entrer dans le seau à glace, permettant ainsi
de maintenir la glace à une température en dessous de
zéro.
BRUITS D’EAU
Ŷ La circulation du liquide frigorigène dans le système
provoque parfois des gargouillements comme de l’eau en
ébullition.
Ŷ L’eau qui tombe sur le chauffage de dégivrage peut
parfois provoquer des crépitements, des bourdonnements
pendant le cycle de dégivrage.
Ŷ Vous entendrez peut-être des bruits de ruissellement
pendant le cycle de dégivrage quand la glace sur
l’évaporateur fond et coule dans le bac collecteur.
Ŷ La fermeture de la porte peut provoquer un
gargouillement dû à l’équilibrage de la pression.
Entendez-vous ce que j’entends ? Ces conditions sont normaux.
REFROIDISSEMENT AU
DÉMARRAGE
24 heures peuvent être nécessaires pour que les
températures dans le réfrigérateur et le congélateur
correspondent à celles affichées à l’écran. Pendant ce
temps, il est préférable de réduire au maximum l’ouverture
des portes du réfrigérateur et du congélateur.
CONSEILS
Ŷ /HFRQJpODWHXUVHUHIURLGLWHQSUHPLHU
Ŷ /HFRPSDUWLPHQWGHUpIULJpUDWLRQVHUHIURLGLWHQGHUQLHU
cela peut prendre plusieurs heures après le congélateur.
Ŷ (QpWHLJQDQWODPDFKLQHjJODoRQVOHVDOLPHQWVGDQV
le congélateur et le réfrigérateur se refroidissent plus
rapidement.aa
Conditions normaux de fonctionnement
INSTRUCTIONS D’INSTALLATION
49-60792 Rev. 3 45
Problème Causes Possibles Solution
Message d’installation incorrecte
du filtre à eau ou fuite présente sur
panneau de commande.
Le filtre à eau installé à l’envers ou fuit. Vérifiez qu’il n’y a pas de fuite. Si aucune
fuite n’est détectée, retirez le filtre/le
bouchon** de dérivation, retournez le filtre
(rotation à 180°) et réinstallez le.
Le « triangle d’avertissement » est
allumé
Le voyant Remplacer le filtre/
Remplacer le filtre à eau est allumé
Le voyant En retard est allumé
Le filtre à eau fuit ou doit être remplacé
Le filtre à eau est installé à l’envers
5HPSODFH]OHILOWUHjHDXYpULILH]ODSUpVHQFH
de fuite.
5HWLUH]OHILOWUHWRXUQH]OHGHHW
réinstallez-le.
Le voyant Distributeur désactivé
est allumé
Contrôles A, B et C
Un filtre inapproprié a été installé
5HPSODFH]OHILOWUHSDUXQPRGqOHDSSURSULp
5HWLUH]OHILOWUHWRXUQH]OHGHHW
réinstallez-le
Il n’y a pas de filtrage Le bouchon de filtration du filtre est
installé Contrôles B et C
Installez un filtre à eau approprié
Le voyant Réinitialiser le filtre est
allumé.
Le filtre à eau fuit ou doit être remplacé. 5HPSODFH]OHILOWUHjHDXRXLQVWDOOH]OH
bouchon de dérivation**.
0DLQWHQH]XQHSUHVVLRQVXUODWRXFKH5HVHW
Filter durant 3 secondes pour réinitialiser
(contrôle D seulement).
Le voyant lumineux du filtre à eau
reste allumé après le remplacement
du filtre
L
’indicateur de filtre à eau doit être
réinitialisé
Sélectionnez SETTINGS (Paramètres) à
O¶pFUDQ/&'SXLV:$7(5),/7(5)LOWUHj
HDX6pOHFWLRQQH]5(6(75pLQLWLDOLVHU
Le voyant lumineux du filtre à eau
est éteint
Ceci est normal. Ce voyant s’allume
pour vous signaler que le filtre devra
bientôt être remplacé.
Consultez la section A propos du Filtre à Eau
pour de plus amples informations.
La poignée est lâche/Il y a un
espace vide au niveau de la
poignée.
La poignée doit être ajustée.
Consultez les sections Fixation de la Poignée
GX&RPSDUWLPHQWGH5pIULJpUDWLRQHW)L[DWLRQGH
la Poignée du Congélateur pour des instructions
détaillées.
Le réfrigérateur bipe Il s’agit de l’alarme de la porte Arrêtez-la ou désactivez-la avec la porte
fermée. Si la porte est ouverte et l’alarme
retentit, vous ne pouvez qu’arrêter l’alarme.
Pas de refroidissement Le système de refroidissement est
éteint
Consultez la section A propos des
commandes
L’eau a un mauvais goût ou une
mauvaise odeur*
Le distributeur d’eau n’a pas été utilisé
pendant une longue période.
Tirez de l’eau jusqu’à ce que toute l’eau du
système soit remplacée.
L’eau dans le verre est tiède* Ceci est normal lorsque le réfrigérateur
vient d’être branché
Attendez 24 heures pour que le réfrigérateur
refroidisse complètement
Le distributeur d’eau n’a pas été utilisé
pendant une longue période
Tirez de l’eau jusqu’à ce que toute l’eau du
système soit remplacée.
Le système d’eau a été vidangé Attendez quelques heures pour que l’eau se
refroidisse.
Le distributeur d’eau ne fonctionne
pas*
Le robinet d’eau est fermé ou n’est pas
branché.
Consultez la section Installation de la
conduite d’eau
Le filtre à eau est bouché ou le filtre/le
bouchon de dérivation n’est pas installé
5HPSODFH]ODFDUWRXFKHGHILOWUHRXUHWLUH]OHILOWUH
et installez le bouchon de dérivation**.
De l’air peut être piégé dans le système
d’eau.
Appuyez sur le bras de distribution pendant
au moins 5 minutes.
L’eau dans le réservoir est gelée parce
que les commandes sont réglées sur
une température trop froide.
5pJOH]ODFRPPDQGHGXUpIULJpUDWHXUVXU
une température plus élevée et attendez
24 heures. Si le distributeur ne donne pas
d’eau au bout de 24 heures, contactez un
réparateur
Conseils de dépannage... Avant de faire un appel de service
eFRQRPLVH]WHPSVHWDUJHQW&RQVXOWH]G¶DERUGOHVWDEOHDX[GHVSDJHVVXLYDQWHVHWYRXVSRXUULH]YRXVpYLWHUXQ
appel de service.
*Certains modèles seulement
**Certains modèles ne sont pas équipés d’un bouchon de dérivation de filtre. Pour en obtenir un gratuitement,
FRPSRVH]OH*(&$5(6$X&DQDGDFRPSRVH]OH
CONSEILS DE DÉPANNAGE
46 49-60792 Rev. 3
Problème Causes Possibles Solution
L’eau jaillit du distributeur* La cartouche du filtre vient d’être
installée
Faites couler l’eau du distributeur
pendant 5 minutes (environ 2 gallons ou
7,5 litres).
Pas de production d’eau ou de
glaçons *
La ligne d’alimentation ou le robinet
d’arrêt est bouché
Appelez un plombier
Le filtre à eau est bouché 5HPSODFH]ODFDUWRXFKHGHILOWUHRX
retirez le filtre et installez le bouchon de
dérivation**.
La cartouche du filtre n’est pas
correctement installée
5HWLUH]HWUpLQVWDOOH]ODFDUWRXFKHGH
filtre, en étant certain qu’elle est bien
verrouillée
La machine à glaçons est
éteinte
Vérifier que la machine à glaçons est en
marche Consultez la section À propos
de la machine à glaçons automatique
L’eau jaillit du distributeur* L’air est peut être présent dans le
système d’alimentation en eau,
amenant l’eau à goutter après
distribution
Distribuez de l’eau pendant au moins 5
minutes pour éliminer l’air du système
AUTO FILL (Remplissage
automatique) : Remplissage
manquant/Pas de remplissage*
T
out récipient ne peut pas servir
pour le AUTO FILL (remplissage
automatique).
Essayer un récipient différent
Message d’erreur. Voir p.14
Nettoyez le capteur. Voir p.14
Débordements dus au AUTO
FILL (remplissage automatique) *
Tout récipient ne peut pas servir
pour le AUTO FILL (remplissage
automatique).
Essayer un récipient différent
Le congélateur refroidit mais pas
le compartiment de réfrigération
Ceci est normal lorsque le
réfrigérateur vient d’être branché ou
après une panne d’électricité d’une
longue durée.
Attendez 24 heures pour que
la température dans les deux
compartiments atteigne les
températures sélectionnées.
Le distributeur de glace s’ouvre
après la fermeture du tiroir du
congélateur*
Normal
La porte du distributeur de glace peut
s’ouvrir après la fermeture de la porte
du congélateur pour permettre l’accès
Low brewing flow rate There may have been a dent at the
bottom of K-Cup causing the pin
to pierce the filter allowing coffee
grounds clogging the bottom pin
Avoid using damaged/dented K-cups,
and clean the lower needle before next
brew
Low brewing flow rate / water
drips from inner door
Top needle of the brewer clogged Unclog the top needle holes using a
SDSHUFOLSDQGULQVHEUHZHU5LQVH
brewer after every use.
L’infuseur n’est pas détecté ou
de l’eau chaude fuit sur le dessus
de l’infuseur
.
Installation incorrecte de l’infuseur
dans son support.
Assurez-vous que le logo Keurig se
trouve sur le devant.
Poussez l’infuseur jusqu’au bout dans
son support.
Des éclaboussements ou
des éclatements de bulles se
produisent en servant le café.
L’orifice de ventilation est obstrué
dans l’infuseur.
Assurez-vous que l’orifice de ventilation
dans le bas de l’infuseur soit exempt
de nourriture ou de toute autre
contamination.
*Certains modèles seulement
**Certains modèles ne sont pas équipés d’un bouchon de dérivation de filtre. Pour en obtenir un gratuitement,
FRPSRVH]OH*(&$5(6$X&DQDGDFRPSRVH]OH
Conseils de dépannage... Avant de faire un appel de service
CONSEILS DE DÉPANNAGE

49-60792 Rev. 3 47
Problème Causes Possibles Solution
La qualité du breuvage ne répond
pas aux attentes.
V
ous utilisez peut-être des dosettes
K-Cups non standard ou périmées.
Nous recommandons d’utiliser des
dosettes Keurig K-cups véritables qui
ne sont ni périmées, ni endommagées.
Du liquide dégoutte de l’infuseur
après le cycle d’infusion et
lorsque l’infuseur est retiré de
son support.
Il est possible que du liquide soit
retenu par l’infuseur et dégoutte lors
du retrait.
Utilisez un linge ou un récipient pour
recueillir les gouttes lors de l’infusion.
Présence d’un délai lors de
l’utilisation du distributeur pour
dosettes Keurig K-cups.
Pour garantir la distribution d’un
breuvage de qualité, un court délai
est nécessaire pour faire en sorte
que le réfrigérateur fonctionne
correctement.
Un fonctionnement constant et de
qualité exige que le réfrigérateur
diffère la distribution durant une courte
période de temps.
Après l’infusion, mon breuvage
en poudre n’est pas totalement
dégagé de la dosette utilisée.
Selon la quantité sélectionnée, la
poudre peut ne pas se dissoudre
complètement. Certains breuvages
en poudre développent des «
mottes » s’ils reposent depuis un
certain temps.
Secouez les dosettes de poudre
avant l’infusion afin de défaire ces
mottes et faciliter la dissolution. Pour
les breuvages en poudre sans filtre,
sélectionnez le cycle Cacao.
Le couvercle de l’infuseur est
difficile à fermer.
La dosette K-cup ne repose pas à
fond.
Poussez la dosette K-cup jusqu’au
bout dans l’infuseur avant de fermer
le couvercle. L’aiguille inférieure doit
percer la dosette avant la fermeture du
couvercle.
L’infuseur fuit pendant le cycle
d’infusion.
La fermeture du couvercle de
l’infuseur pose problème ou la
dosette K-cup est endommagée.
Poussez la dosette K-cup jusqu’au
bout dans l’infuseur avant de fermer
le couvercle. L’aiguille inférieure doit
percer la dosette avant la fermeture
du couvercle. Nous recommandons
d’utiliser des dosettes Keurig K-cups
véritables, non endommagées et qui
présentent une bonne étanchéité entre
le dessus et le fond en plastique.
*Certains modèles seulement
**Certains modèles ne sont pas équipés d’un bouchon de dérivation de filtre. Pour en obtenir un gratuitement,
FRPSRVH]OH*(&$5(6$X&DQDGDFRPSRVH]OH
Conseils de dépannage... Avant de faire un appel de service
CONSEILS DE DÉPANNAGE

48 49-60792 Rev. 3
Mythe ou réalité ? Réponse Explication
Le filtre à eau du réfrigérateur peut nécessiter un
remplacement en-deçà de six mois.
95$, Le voyant du filtre à eau indiquera la nécessité de remplacer le filtre tous
les six mois, ou suite à la distribution de 644 litres (170 gallons) d’eau
(certains modèles seulement). Si le débit d’eau du distributeur ralentit ou si
la production de glace diminue, le filtre à eau doit être remplacé, même si
l’indicateur de filtre peut ne pas indiquer la nécessité d’un remplacement.
La machine à glaçons automatique dans mon
réfrigérateur produira de la glace lorsque le
réfrigérateur est branché à une prise secteur.
MYTHE Le réfrigérateur doit être raccordé à une alimentation en eau et la machine
à glaçons doit être allumée. Assurez-vous que la machine à glaçons est en
marche, mais seulement après avoir raccordé le système à l’alimentation en
eau et que celle-ci est ouverte. La machine à glaçons peut être allumée ou
éteinte à partir des commandes. Veillez à ce que la machine à glaçons soit
en marche, comme indiqué sur le panneau de commande du réfrigérateur.
Consultez la section À propos de la machine à glaçons automatique.
Une fois que le réfrigérateur est branché à une
prise électrique et raccordé à une alimentation en
eau, j’aurai immédiatement des quantités illimitées
d’eau glacée disponibles au distributeur d’eau.
MYTHE Le bac du distributeur d’eau situé à l’intérieur du réfrigérateur sert à stocker
l’eau à distribuer. 24 heures sont nécessaires pour que l’eau de ce réservoir
soit refroidie après l’installation. Une utilisation trop importante ne permet
pas à l’eau de se refroidir.
Après distribution d’une quantité d’eau, la présence
de quelques gouttes d’eau est normale.
95$, Quelques gouttes d’eau peuvent tomber du distributeur après que le bras de
distribution ait été relâché. Pour minimiser les pertes, retirez lentement votre
verre du distributeur.
Il n’y aura jamais de givre dans le compartiment de
congélation.
MYTHE La présence de givre dans le congélateur indique généralement que la porte
n’est pas bien fermée ou a été laissée ouverte. En cas de givre, éliminez
le l’aide d’une spatule en plastique et d’un torchon. Puis vérifiez qu’aucun
aliment ou conteneur empêche la fermeture de la porte du congélateur.
Vérifiez sur le panneau de contrôle du réfrigérateur si l’alarme de la porte est
activée.
Après installation du réfrigérateur ou après le
remplacement de la cartouche filtrante, je dois tirer
de l’eau pendant cinq minutes.
95$,
Un réfrigérateur ou un filtre à eau nouvellement installé contient de l’air dans
les tuyaux d’eau. Appuyez sur le bras du distributeur pour tirer de l’eau froide
pendant au moins 5 minutes pour éliminer l’air du tuyau d’alimentation en eau
et rincer le filtre.
Pour remplir le seau à glace jusqu’à sa capacité
maximale, je dois distribuer des glaçons environ 12
à 18 heures après l’installation.
95$, La distribution de 3 ou 4 glaçons, entre 12 heures et 18 heures après
l’installation, permet à la glace de se disperser dans le seau à glace. Celui-ci
indique à la machine à glaçons de produire des glaçons supplémentaires.
Production normale de glaçons = 100 glaçons en 24 heures.
Je peux utiliser le bouchon de dérivation du filtre à
eau pour déterminer si le filtre doit être remplacé.
95$, La réduction de débit du distributeur d’eau ou de la production de glace peut
indiquer la nécessité de remplacer le filtre à eau. Installez le bouchon de
dérivation du filtre à eau (fourni avec le réfrigérateur sur certains modèles),
et vérifiez le débit au niveau du distributeur. Si le débit d’eau revient à la
normale avec le bouchon de dérivation en place, remplacez le filtre à eau.
La partie supérieure de la porte du réfrigérateur
sera toujours alignée.
MYTHE Plusieurs facteurs peuvent affecter l’alignement des portes du compartiment
de réfrigération, y compris le sol sur lequel le réfrigérateur est installé et la
quantité d’aliment (charge) dans les portes. Si les parties supérieures des
portes du compartiment de réfrigération ne sont pas alignées, utilisez une clé
Allen de 6,3 mm (1/4 po) pour ajuster les portes gauche et droite. La vis de
réglage se trouve sur le côté inférieur gauche ou droit de la porte. Ouvrez la
porte du congélateur pour accéder à cette vis.
Les poignées de porte du réfrigérateur peuvent être
facilement resserrées.
95$, Si les poignées de porte sont lâches ou s’il y a un espace vide au niveau de
la poignée, celle-ci peut être ajustée à l’aide d’un clé Allen d’ 1/8 po sur les
vis de réglage situées sur les extrémités des poignées.
Il peut y avoir des problèmes d’odeur et de goût
avec votre glace.
95$, Après la mise en marche de la machine à glaçons, jetez les premières 24
heures de production de glace pour éviter tous problème d’odeur et de goût.
Je peux effectuer des réglages précis des portes du
compartiment de réfrigération pour les aligner.
95$, Si les portes du compartiment de réfrigération ne sont pas alignées, utilisez
une clé Allen d’ ¼ po pour ajuster la porte de droite. La vis de réglage est
située au bas de les portes gauche et droite. Ouvrez la porte du congélateur
pour y accéder.
Mythe ou réalité
Mythe ou réalité
ENTRETIEN
Avant de faire appel à un technicien, parcourez les conseils de dépannage donnés dans
ce manuel. Si nécessaire, une visite par un technicien de service peut être prévue en
nous contactant en ligne sur electromenagersge.ca ou par téléphone au 800.561.3344.
MYTHE OU RÉALITÉ
49-60792 Rev. 3 49
Mythe ou réalité ? Réponse Explication
Les poignées de porte doivent toujours être retirées
pour l’installation.
MYTHE Si les portes doivent être retirées ou si le réfrigérateur passe facilement dans
les ouvertures, ne retirez pas les poignées. Ajustez les poignées qui sont
lâches ou s’il y a un espace vide au niveau de celles-ci, en ajustant les vis de
réglage à chaque extrémité des poignées.
Les portes doivent toujours être retirées pour
l’installation.
MYTHE Consultez le tableau au verso de ces instructions. Les portes doivent
uniquement être enlevées lorsque cela est nécessaire pour prévenir les
dommages provoqués par des ouvertures trop étroites ou pour accéder à
l’emplacement final.
Les portes du réfrigérateur qui ne ferment pas
après l’installation peuvent être ajustées pour
qu’elles ferment correctement.
95$, Le mécanisme de la porte fonctionne mieux si celle-ci est installée à 90°+.
Si elle est installée à 180°, retirez la porte à partir de la charnière centrale
puis ouvrez la porte à 180° avant de la réinstaller. Consultez la section
Réinstallation des portes du réfrigérateur
Les roues arrière peuvent être ajustées. MYTHE Lorsque vous purgez l’air du système, vérifiez l’absence de fuites au niveau
de toutes les connexions. Vérifiez la connexion à l’alimentation en eau du
domicile à l’arrière du réfrigérateur ainsi que la connexion de ce tuyau au
niveau de la porte.
Vérifiez l’absence de fuites d’eau après avoir
effectué tous les raccordements.
95$, Si le réfrigérateur a été stocké dans un environnement froid, il est possible
que l’écran LCD mette un certain temps avant de donner un affichage
correct. Laissez assez de temps pour que le réfrigérateur atteigne une
température normale, l’affichage devrait alors être correct.
Tout résidu d’emballage peut être nettoyé à l’aide
de n’importe quel détergent.
MYTHE N’utilisez pas de cire, de javellisant ou de tout autre produit contenant du
chlore sur les panneaux, les poignées de porte et les garnitures en acier
inoxydable. Vérifiez ces instructions dans la section Nettoyage de l’extérieur
du réfrigérateur pour plus de détails.
&HUWDLQVPRGqOHVQHVRQWSDVpTXLSpVG¶XQERXFKRQGHGpULYDWLRQGHILOWUH3RXUHQREWHQLUXQJUDWXLWHPHQWFRPSRVH]OH*(&$5(6$X
Canada, composez le 800.561.3344.
Mythe ou réalité
Mythe ou réalité
ENTRETIEN
Avant de faire appel à un technicien, parcourez les conseils de dépannage donnés dans
ce manuel. Si nécessaire, une visite par un technicien de service peut être prévue en
nous contactant en ligne sur electromenagersge.ca ou par téléphone au 800.561.3344.
MYTHE OU RÉALITÉ
50 49-60792 Rev. 3
GARANTIE LIMITÉE
Pour bénéficier du service de réparation sous garantie,
une preuve de la date d’achat initial est nécessaire.
Ŷ Les déplacements à votre domicile pour vous expliquer
l’utilisation de ce produit
Ŷ8QHLQVWDOODWLRQOLYUDLVRQRXPDLQWHQDQFHGpIHFWXHXVH
Ŷ8QHSDQQHGXSURGXLWSDUDEXVG¶XWLOLVDWLRQSDU
mauvaise utilisation, par modification ou s’il a été utilisé
dans un but autre que celui pour lequel il a été fabriqué.
Ŷ'pWpULRUDWLRQGHVDOLPHQWV
Ŷ/HUHPSODFHPHQWGHVIXVLEOHVRXOHUpHQFOHQFKHPHQWGX
disjoncteur du domicile.
Ŷ/HVGRPPDJHVjODILQLWLRQWHOVTXHURXLOOHGHVXUIDFH
ternissement ou petites taches, non signalés dans un
délai de 48 heures suivant la livraison.
Ŷ/HUHPSODFHPHQWGHODFDUWRXFKHILOWUDQWHVLLQFOXVH
à cause d’une pression d’eau en dehors de la gamme
de fonctionnement recommandée ou à cause d’une
concentration excessive de sédiments dans l’eau
d’alimentation.
Ŷ/HUHPSODFHPHQWGHVDPSRXOHVVLLQFOXVHVRXOD
cartouche filtrante, si incluse, et dans des conditions
autres que celles susmentionnées.
Ŷ7RXWGRPPDJHFDXVpSDUDFFLGHQWLQFHQGLHLQRQGDWLRQ
ou une catastrophe naturelle.
Ŷ7RXWGRPPDJHIRUWXLWRXLQGLUHFWFDXVpSDUGHVGpIDXWV
éventuels de cet appareil.
Ŷ/HVHUYLFHV¶LOHVWLPSRVVLEOHG¶DYRLUDFFqVDXSURGXLW
Ŷ'RPPDJHVFDXVpVSDUO¶XWLOLVDWLRQG¶XQILOWUHTXLQ¶HVW
pas de marque GE Appliances.
Ce qui n’est pas couvert par GE Appliances :
Pendant la période de
garantie de : GE Appliances remplacera :
Un An
A compter de la date d’achat
initial
Toute pièce du réfrigérateur qui s’avère défectueuse en raison d’un défaut de matériau ou de fabrication.
Pendant la validité de la présente garantie limitée d’un an, GE Appliances fournira également
gratuitement la main d’œuvre et le service pour réparer la pièce défectueuse.
Trente jours
(
filtre à eau, si inclus) A compter
de la date d’achat initial
Toute pièce de la cartouche filtrante qui ne fonctionne pas à cause d’un vice de matériau ou de main
d’œuvre. Pendant la validité de la présente garantie limitée de 30 jours, GE Appliances fournira
gratuitement une cartouche filtrante de remplacement.
SEULEMENT MODÈLES GE PROFILE™
Cinq Ans
A compter de la date
d’achat
Toute pièce du système fermé du réfrigérateur (compresseur, condenseur, évaporateur et tous les tuyaux
de raccordement) qui s’avère défectueuse en raison d’un défaut de matériau ou de fabrication. Pendant
la validité de la présente garantie limitée de cinq an, GE Appliances fournira également gratuitement la
main d’œuvre et le service pour réparer la pièce défectueuse dans le système fermé du réfrigérateur.
electromenagersge.ca
Toutes les réparations en vertu de la garantie sont fournis par nos Centre de Service d’Usine ou par un technicien autorisé Customer
Care®. Pour prévoir une réparation, consultez notre site electromenagersge.ca/fr/soutien/demande-de-service ou appelez le
800.661.1616. Veuillez avoir votre numéro de série et votre numéro de modèle à portée de main lorsque vous appelez pour obtenir un
service.
GE Appliances Garantie Limitée du Réfrigérateur
EXCLUSION DES GARANTIES TACITES
Votre recours exclusif est l’échange du produit suivant les modalités de la Garantie Limitée. Toutes garanties
tacites, y compris les garanties de valeurs marchandes ou d’adéquation à des fins particulières, sont limitées à une
durée d’un an ou à la durée la plus courte autorisée par la loi.
Pour les clients des États-Unis : Cette garantie limitée est étendue à l’acheteur d’origine et aux propriétaires suivants
SRXUWRXWSURGXLWDFKHWpSRXUXQHXWLOLVDWLRQGRPHVWLTXHDX[eWDWV8QLV6LOHSURGXLWHVWLQVWDOOpGDQVXQHUpJLRQRQH
se trouve aucun réparateur autorisé GE Appliances, vous devrez peut-être assumer les frais de transport ou apporter
l’appareil à un centre de service autorisé GE Appliances. En Alaska, cette garantie limitée exclut le coût d’expédition ou
de dépannage à votre domicile.
Certains états n’acceptent pas d’exclusion ou de limites aux dommages indirects consécutifs. Certains droits particuliers
vous sont dévolus en vertu de la présente garantie et peuvent s’accompagner d’autres droits qui varient selon votre lieu
de résidence. Pour connaître vos droits juridiques, veuillez consulter le bureau local ou le bureau d’état des affaires aux
consommateurs ou le Procureur Général de votre état.
Garant : États-Unis : GE Appliances, a Haier company
Louisville, KY 40225
Cette garantie limitée est étendue à l’acheteur d’origine et aux propriétaires suivants pour tout produit acheté aux Canada
SRXUXQHXWLOLVDWLRQGRPHVWLTXHDX[&DQDGD/HVHUYLFHjGRPLFLOHHQYHUWXGHODJDUDQWLHVHUDIRXUQLGDQVOHVUpJLRQVR
LOHVWGLVSRQLEOHHWR0DEHHVWLPHUDLVRQQDEOHGHOHIRXUQLU
Garant Canada: MC Commercial, Burlington, Ontario, L7R 5B6
Pour le diagnostic, la réparation de votre réfrigérateur peut nécessiter l’utilisation du port de données embarqué. Celui-ci
permet au technicien de réparation GE Appliances de diagnostiquer rapidement des problèmes avec votre appareil. Il
permet également à GE Appliances d’améliorer ses produits en fournissant à ces derniers des informations sur votre
appareil. Si vous ne voulez pas que les données de votre appareil soient envoyées à GE Appliances, veuillez demander à
votre technicien de NE PAS soumettre les données à GE Appliances pendant la réparation.
49-60792 Rev. 3 51
*Si votre pièce GE Appliances s’avère défectueuse en raison d’un vice de fabrication durant la période de trente jours suivant la date d’achat
G¶RULJLQHQRXVYRXVRIIULURQVjQRWUHGLVFUpWLRQHWVDQVIUDLVXQHSLqFHQHXYHRXUHFRQVWUXLWH5HWRXUQH]ODSLqFHGpIHFWXHXVHDXIRXUQLVVHXU
RV¶HVWHIIHFWXpO¶DFKDWDFFRPSDJQpHG¶XQHFRSLHGHODSUHXYHG¶DFKDWGHODSLqFH6LODSLqFHV¶DYqUHGpIHFWXHXVHHWTX¶HOOHQHSUpVHQWHDXFXQ
signe d’usage abusif, elle sera remplacée. La garantie ne couvre pas la défectuosité de pièces qui ont été endommagées alors qu’elles étaient
en votre possession, dont l’usage a été abusif, ou dont l’installation est incorrecte. Elle ne couvre pas les frais de retour de la pièce au
IRXUQLVVHXURO¶DFKDWDHXOLHXQLOHVFRWVGHPDLQG¶°XYUHSRXUODUHWLUHURXO¶LQVWDOOHUDILQGHGLDJQRVWLTXHUODGpIHFWXRVLWp(OOHQHFRXYUHSDV
les pièces dont l’usure découle d’une utilisation commerciale, à l’exception des équipements de climatisation. En aucune circonstance GE
Appliances ne sera tenue responsable des dommages indirects.
Débiteur de la garantie : GE Appliances, a Haier company
Louisville, KY 40225
Brochez votre reçu ici. La preuve d’achat d’origine est
obligatoire pour obtenir le service en vertu de la garantie.
Ce que la garantie ne couvre pas :
Ŷ Déplacement d´un technicien au domicile pour des
explications sur le produit.
Ŷ Installation incorrecte.
Ŷ La défectuosité du produit s’il a été utilisé abusivement, a été
mal utilisé ou utilisé à d’autres fins que celle prévues ou à
des fins commerciales.
Ŷ Le remplacement des fusibles ou le réenclenchement du
disjoncteur du domicile.
Ŷ 5HPSODFHPHQWGHODFDUWRXFKHGHILOWUHjHDXHQUDLVRQ
d’une pression d’eau à l’extérieur de la plage des pressions
de service spécifiées ou d’une teneur en sédiments
excessive dans l’alimentation d’eau.
Ŷ'pWpULRUDWLRQGXSURGXLWLPSXWDEOHjDFFLGHQWLQFHQGLH
inondation ou catastrophe naturelle.
Ŷ'RPPDJHVDFFHVVRLUHVRXLQGLUHFWVUpVXOWDQWGHSRVVLEOHV
défectuosités de cet appareil.
Garantie limitée de la cartouche filtrante d’eau RPWFE
Pendant une
période de :
GE Appliances remplacera :
Trente jours
¬SDUWLUGHODGDWH
d’achat d’origine
Toute pièce défectueuse de la cartouche filtrante en raison d’un vice de matière ou de fabrication
durant cette garantie limitée de trente jours.*
Contactez-nous au Electromenagersge.ca/fr/produits/filtres-et-accessoires, ou en composant 800.661.1616.
EXCLUSION DES GARANTIES IMPLICITES
Votre seul et unique recours consiste dans le remplacement de la pièce telle que décrite dans cette Garantie
limitée. Toute garantie implicite, y compris les garanties relatives à la qualité marchande ou à l’adéquation à un
usage particulier, est limitée à six mois ou à la période la plus courte autorisée par la loi.
Vendeur :
Nom
Adresse
Ville eWDW Code postal
Signature Date
Acheteur :
Nom
Adresse
Ville eWDW Code postal
Signature Date
Cette garantie est destinée à l’acheteur d’origine et à tout propriétaire subséquent pour les produits acquis à des fins
G¶XWLOLVDWLRQGRPHVWLTXHjO¶LQWpULHXUGHVeWDWV8QLV(Q$ODVNDODJDUDQWLHH[FOXWOHVIUDLVGHOLYUDLVRQHWOHVDSSHOV
de service depuis votre domicile.
&HUWDLQVeWDWVQ¶DXWRULVHQWSDVO¶H[FOXVLRQRXODOLPLWDWLRQGHVGRPPDJHVDFFHVVRLUHVRXLQGLUHFWV&HUWDLQVGURLWV
particuliers vous sont dévolus en vertu de la présente garantie et peuvent s’accompagner d’autres droits qui
YDULHQWG¶XQeWDWjO¶DXWUH3RXUFRQQDvWUHYRVGURLWVFRQVXOWH]O¶DXWRULWpORFDOHRXGHO¶eWDWHQPDWLqUHGHGURLWVGHV
FRQVRPPDWHXUVRXHQFRUHOH3URFXUHXUJpQpUDOGHYRWUHeWDW
Achats effectués en Iowa : Ce formulaire doit être signé et daté par l’acheteur et le vendeur avant la consommation
du produit.
Ce formulaire doit être conservé dans les dossiers du vendeur pendant un minimum de deux ans.
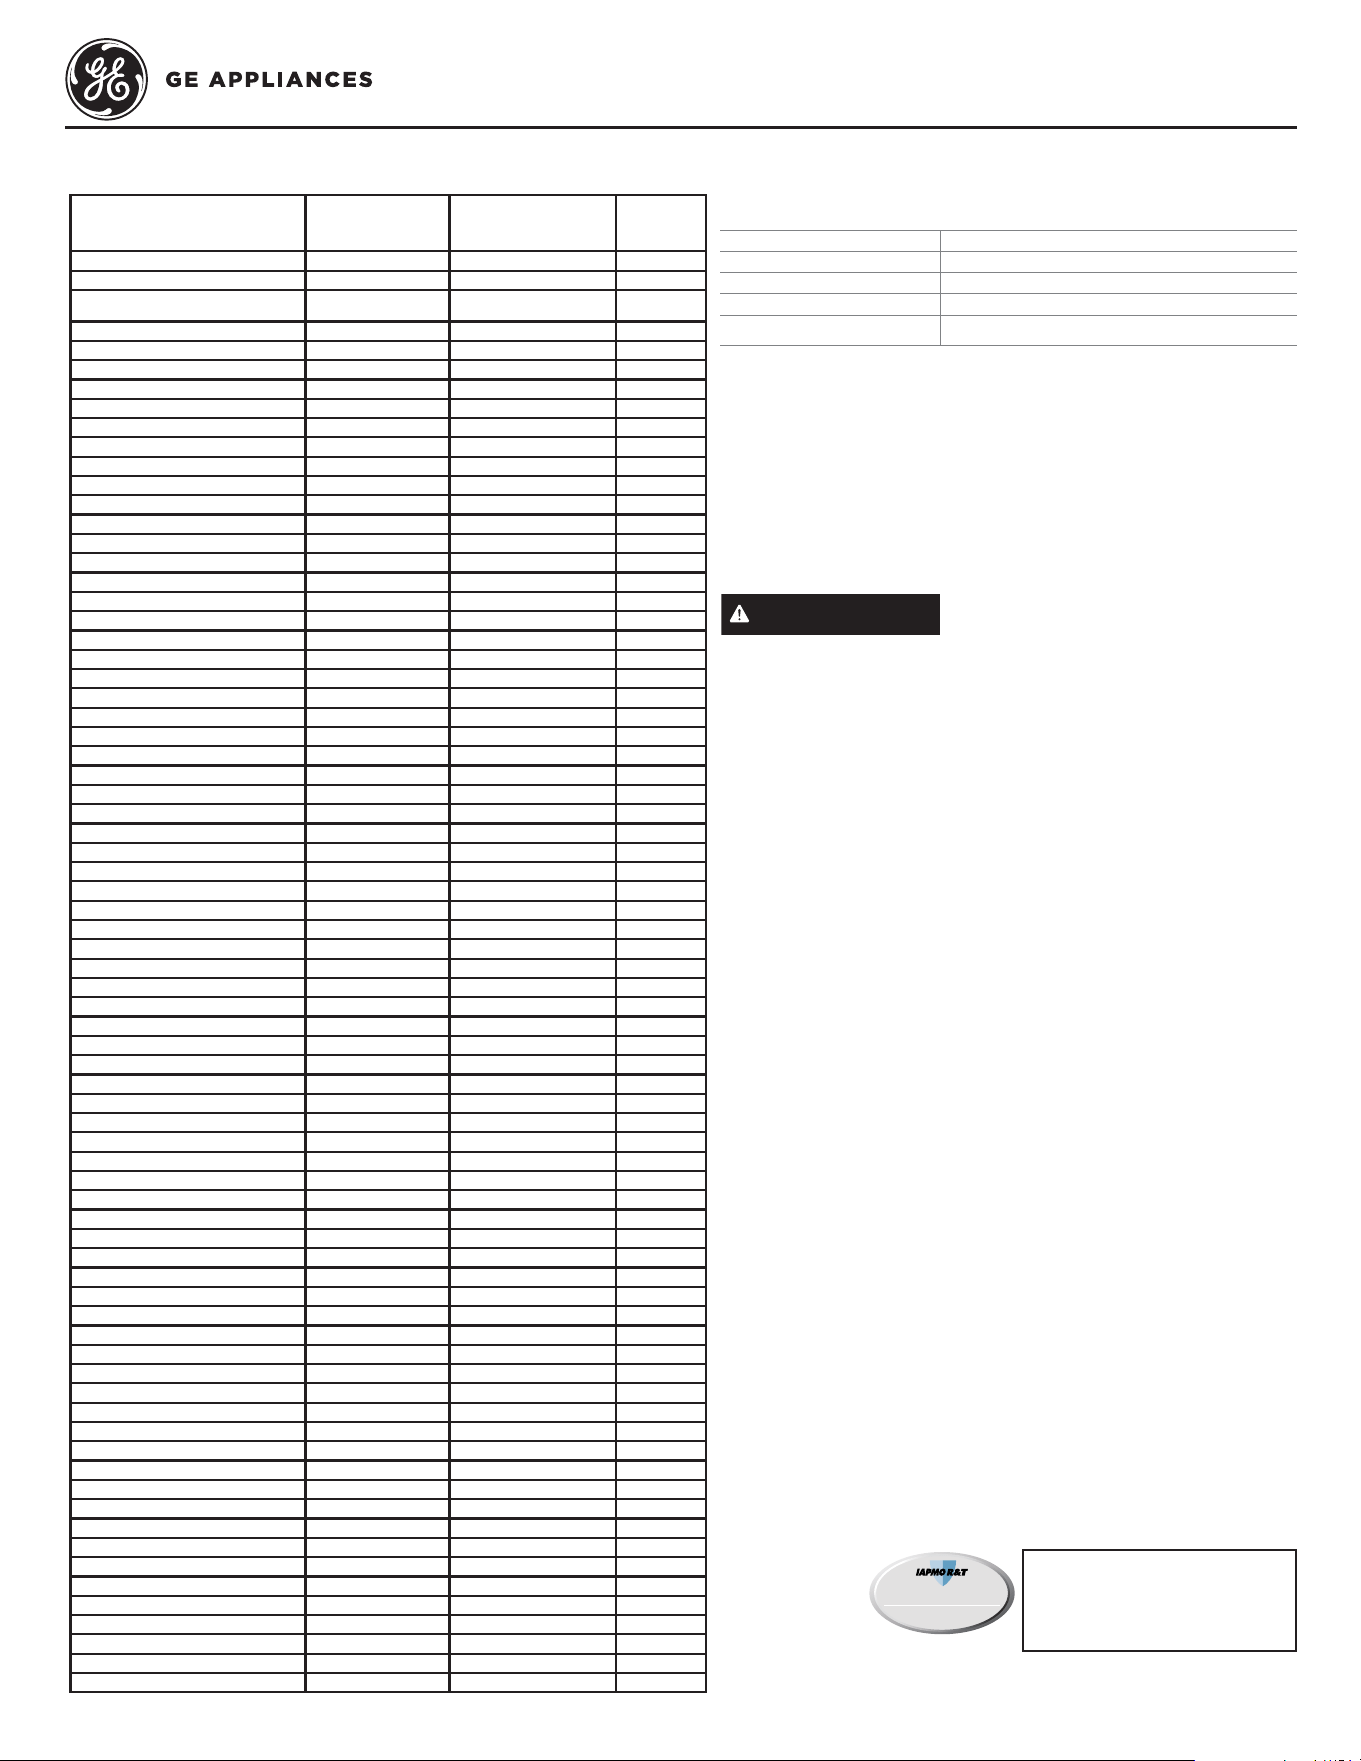
52 49-60792 Rev. 3
Fiche technique de performance
Modèle: Cartouche RPWFE de GE Appliances
Ŷ6\VWqPHFHUWLILpSDUO¶,$30257HQYHUWXGHVQRUPHV 42, 53, 401, et P473 de la NSF/ANSI relatives à la réduction des allégations spécifiées sur la fiche
technique de rendement et le site iapmort.org.
Ŷ/HUHQGHPHQWUpHOSHXWYDULHUVHORQOHVFRQGLWLRQVORFDOHVGHO¶HDX
Il est impératif que les méthodes d’installation, d’entretien et de
remplacement du filtre recommandées par le fabricant de ce produit
soient respectées. Consultez le manuel d’installation pour connaître les
renseignements de la garantie.
Directives et paramètres de l’alimentation en eau
Débit fourni 0.5 gpm (1.89 lpm)
Alimentation en eau Eau potable
Pression d’eau 25-120 psi (172-827 kPa)
Température de l’eau 33°F-100°F (0.6°C-38°C)
Capacité 170 gallons (643,5 litres)
Substance analysée pour la
réduction
Concentration
d’essai de l’influent
(ng/L)
Concentration max.
admissible dans l’eau
du produit (ng/L)
5pGXFWLRQ
moy
. (%)
Goût et ordeur de chlore 2.0 ng/L +/- 10% N/A > 99
Goût et odeur chloramine 3.0 ng/L +/- 10% 0.5 > 99
Particules, Classe I Au moins 10 000
particules/mL
N/A 91.4
Kystes* 50,000/L N/A > 99.99
Plomb 0.15 0.01 98.85
Mercure 0.006 0.002 96.95
Amiante 107 to 108 fibers/ L N/A > 99
Toxaphène 0.015 ng/L +/- 10% 0.003 86.95
SCC (substitut de chloroforme C 0.300 0.015 > 99
Alachlore 0.050 0.001 > 98
Atrazine 0.100 0.003 > 97
Benzène 0.081 0.001 > 99
Carbofuran 0.190 0.001 > 99
tétrachlorure de carbone 0.078 0.0018 98
chlorobenzène 0.077 0.001 > 99
chloropicrine 0.015 0.0002 99
2,4-D 0.110 0.0017 98
dibromochloropropane (DBCP) 0.052 0.00002 > 99
o-Dichlorobenzene 0.08 0.001 > 99
P-dichlorobenzène 0.040 0.001 > 98
1,2-dichloroéthane 0.088 0.0048 95
1,1-dichloroéthylène 0.083 0.001 > 99
cis-1,2-dichloroéthylène 0.170 0.0005 > 99
trans-1,2-dichloroéthylène 0.086 0.001 > 99
1,2-dichloropropane 0.080 0.001 > 99
cis-1,3-dichloropropylène 0.079 0.001 > 99
dinosèbe 0.170 0.0002 99
Endrine 0.053 0.00059 99
eWK\OEHQ]qQH 0.088 0.001 > 99
éthylène dibromide (EDB) 0.044 0.00002 > 99
bromochloroacétonitrile 0.022 0.0005 98
dibromoacétonitrile 0.024 0.0006 98
dichloroacétonitrile 0.0096 0.0002 98
trichloroacétonitrile 0.015 0.0003 98
1,1-dichloro-2-propanone 0.0072 0.0001 99
1,1,1-trichloro-2-propanone 0.0082 0.0003 96
heptachlore (H-34, Heptox) 0.025 0.00001 > 99
heptachloreépoxide 0.0107 0.0002 98
hexachlorobutadiène 0.044 0.001 > 98
hexachlorocyclopentadiène 0.060 0.000002 > 99
Lindane 0.055 0.00001 > 99
méthoxychlore 0.050 0.0001 > 99
pentachlorophénole 0.096 0.001 > 99
simazine 0.120 0.004 > 97
Styrène 0.150 0.0005 > 99
1,1,2,2-tétrachloroéthane 0.081 0.001 > 99
Tétrachloréthylène 0.081 0.001 > 99
Toluène 0.078 0.001 > 99
2,4,5-TP (silvex) 0.270 0.0016 99
Acide tribromoacétique 0.042 0.001 > 98
1,2,4-Trichlorobenzène 0.160 0.0005 > 99
1,1,1-trichloroéthane 0.084 0.0046 95
1,1,2-trichloroéthane 0.150 0.0005 > 99
trichloroéthylène 0.180 0.0010 > 99
bromoforme 0.300 0.015 95
bromodichlorométhane 0.300 0.015 95
chlorodibromométhane 0.300 0.015 95
xylènes 0.070 0.001 > 99
Méprobamate 400 +/- 20% 60 > 99
Aténolol 200 +/- 20% 30 > 99
Carbamazépine 1400 +/- 20% 200 > 99
diéthyltoluamide (DEET) 1400 +/- 20% 200 > 99
Métolachlore 1400 +/- 20% 200 > 99
Triméthoprime 140 +/- 20% 20 > 99
Linuron 140 +/- 20% 20 > 99
TCEP 5000 +/- 20% 700 > 99
TCPP 5000 +/- 20% 700 > 99
Phénytoïne 200 +/- 20% 30 > 99
Ibuprofène 400 +/- 20% 60 > 99
Naproxène 140 +/- 20% 20 > 99
Estrone 140 +/- 20% 20 > 99
Bisphénol A 2000 +/- 20% 300 > 99
Nonylphénol 1400 +/- 20% 200 > 99
PFOA/PFOS 1.5 ng/L +/- 10% 0.07 99.25
REMARQUE : Bien que les essais aient été effectués dans des
conditions normales de laboratoire, la performance actuelle peut
varier.
&DUWRXFKHGHUHFKDQJH53:)(3RXUFRQQDvWUHOHVFRWVpYDOXpV
des articles de rechange, veuillez appeler au 1.877.959.8688 ou
visitez notre site internet au gewaterfilters.com.
AVERTISSEMENT
Pour réduire le risqué associé à
l’ingestion de contaminants :
• N’utilisez pas l’eau dont la salubrité microbiologique
est inconnue ou dangereuse sans avoir effectué une
désinfection des composants d’arrivée et de sortie du
système. Les systèmes certifiés pour la réduction de kystes
peuvent être utilisés pour de l’eau désinfectée contenant des
kystes filtrables.
AVIS
Pour réduire le risque associé aux dommages matériels causés
par des fuites d’eau :
• Lisez et suivez les instructions avant de procéder à l’installation et
d’utiliser votre système.
• L’installation et l’utilisation DOIVENT être conformes à tous les
codes locaux et nationaux de plomberie.
• Ne procédez pas à l’installation si la pression de l’eau dépasse
120 lb/po² (8,2 bars). Si votre pression d’eau dépasse 80 lb/po²
(5.5 bar), il est nécessaire d’installer un système de limitation de
pression. Communiquez avec un plombier professionnel si vous
n’êtes pas sûr de la méthode de vérification de la pression d’eau.
• N’installez pas le système s’il y a des possibilités de coups de
bélier. En cas de coup de bélier, vous devez installer un dispositif
anticoup de bélier. Communiquez avec un plombier professionnel si
n’êtes pas sûr de la méthode permettant de vérifier cette condition.
• Ne raccordez pas le système à des conduites d’alimentation d’eau
chaude. La température de service maximale de ce système de
filtre est de 38 °C (100 °F).
• Protégez le filtre contre le gel. Vidangez l’eau du filtre lorsque la
température se situe sous 0,6 °C (33 °F).
5HPSODFH]ODFDUWRXFKHILOWUDQWHMHWDEOHWRXVOHVVL[PRLVRX
plus tôt si vous vous constatez une réduction appréciable du
débit d'eau.
• L'omission de remplacer la cartouche filtrante jetable aux
intervalles recommandés peut mener à une réduction du
rendement du filtre et au fendillement du boîtier du filtre,
entraînant ainsi des fuites ou l'inondation.
• Ce système a été mis à l'essai conformément aux normes
42, 53, 401 et P473 de la NSF/ANSI relatives à la réduction
des substances énumérées ci-dessous. La concentration des
substances mentionnées dans l'eau entrant dans le système
a été réduite à une valeur inférieure ou égale à la limite
admissible pour l'eau quittant le système, tel que stipulé dans
les normes 42, 53, 401 et P473.
/HV\VWqPH53:)(HVWFHUWLILpSDU
O¶,$30257HQYHUWXGHVQRUPHV
42, 53, 401, et P473 de la NSF/ANSI
relatives à la réduction des allégations
spécifiées sur la fiche technique de
rendement et le site iapmort.org.
PLATINUM SEAL
WATER QUALITY
I
A
P
M
O
R
E
S
E
A
R
C
H
A
N
D
T
E
S
T
I
N
G
™

49-60792 Rev. 3 53
NOTES
Notes

54 49-60792 Rev. 3
,PSULPpDX[eWDWV8QLV
SOUTIEN AU CONSOMMATEUR
Soutien au consommateur
Site Web de GE Appliances
Vous avez une question ou vous avez besoin d’aide pour votre appareil électroménager? Visitez le site Web de GE Appliances
KHXUHVSDUMRXUWRXVOHVMRXUVGHO¶DQQpH9RXVSRXYH]DXVVL\WURXYHUG¶DXWUHVIRUPLGDEOHVSURGXLWV*($SSOLDQFHVHWWLUHU
DYDQWDJHGHWRXVQRVVHUYLFHVG¶DVVLVWDQFHHQOLJQH$X[eWDWV8QLVGEAppliances.com
Au Canada : Electromenagersge.ca
Enregistrez votre électroménager
(QUHJLVWUH]YRWUHQRXYHODSSDUHLOHQOLJQHDXPRPHQWTXLYRXVFRQYLHQWOHPLHX[/¶HQUHJLVWUHPHQWGHYRWUHSURGXLWGDQVOHV
délais prescrits permet une meilleure communication et un service rapide, selon les modalités de votre garantie, si besoin est.
Vous pouvez également envoyer par courrier la carte d’enregistrement pré-imprimée qui se trouve dans l’emballage de votre
appareil.
$X[eWDWV8QLVGEAppliances.com/register
Au Canada : Prodsupport.mabe.ca/crm/Products/ProductRegistration.aspx
Service de réparation
8QVHUYLFHGHUpSDUDWLRQH[SHUW*($SSOLDQFHVVHWURXYHjTXHOTXHVSDVGHFKH]YRXV5HQGH]YRXVVXUQRWUHVLWHHW
programmez, à votre convenance, une visite de réparation à n’importe quel jour de l’année.
$X[eWDWV8QLVGEAppliances.com//service ou composez le 800.432.2737 durant les heures normales de bureau.
Au Canada : Electromenagersge.ca/fr/soutien.demande-de-service ou composez le 800.561.3344
Prolongation de garantie
Procurez-vous une prolongation de garantie GE Appliances et informez-vous des rabais spéciaux en vigueur pendant la durée
de votre garantie. Vous pouvez vous la procurer en ligne en tout temps. Les services GE Appliances seront toujours disponibles
DSUqVO¶H[SLUDWLRQGHODJDUDQWLH$X[eWDWV8QLV
GEAppliances.com/extended-warranty ou composez le 800.626.2224 durant les heures normales de bureau.
Au Canada : Electromenagersge/fr/soutien/achat-d-une-garantie-prolongee ou composez le 866.277.9842
Pièces et accessoires
Les personnes ayant les compétences requises pour réparer elles-mêmes leurs appareils peuvent recevoir directement à la
maison des pièces ou accessoires (les cartes VISA, MasterCard et Discover sont acceptées). Commandez en ligne 24 heures par
jour.
$X[eWDWV8QLVGEApplianceparts.com ou par téléphone au 877.959.8688 durant les heures normales de bureau.
Les instructions contenues dans le présent manuel comportent des procédures que tout utilisateur peut effectuer. Les
autres types de réparation doivent généralement être confiés à un technicien qualifié. Usez de prudence : une réparation
ou un entretien mal effectués peuvent rendre l’utilisation de l’appareil dangereuse.
Les consommateurs au Canada doivent consulter les pages jaunes pour connaître le centre de service Mabe le plus proche,
visiter notre site Web au Electromenagersge/fr/produits/filtres-et-accessoiires ou composer le 1.800.661.1616.
Communiquez avec nous
Si vous n’êtes pas satisfait du service après-vente de GE Appliances, communiquez avec nous depuis notre site Web en fournissant
tous les détails dont votre numéro de téléphone, ou écrivez à :
$X[eWDWV8QLV*HQHUDO0DQDJHU&XVWRPHU5HODWLRQV_*($SSOLDQFHV$SSOLDQFH3DUN_/RXLVYLOOH.<
GEAppliances.com/contact
$X&DQDGD'LUHFWRU&RQVXPHU5HODWLRQV0DEH&DQDGD,QF_6XLWH)DFWRU\/DQH_0RQFWRQ1%(&0
Electromenagersge/fr/contactez-nous

*Modelos Selectos Únicamente
INSTRUCCIONES
DE SEGURIDAD .............. 3
INSTRUCCIONES
DE FUNCIONAMIENTO
Funciones .......................... 6
Controles ........................... 9
Dispensador ........................13
Autollenado* ........................14
Cafetera Personal* ...................15
Acerca de la Comunicación
del Electrodoméstico ..............16
Filtro de Agua .......................17
Opciones de Almacenamiento
de Comidas Frescas ...............18
Climate Zone y Cajón
de Temperatura Controlada .......20
Freezer ............................ 22
Máquina de Hacer Hielo Automática . . 23
CUIDADO Y LIMPIEZA ........ 24
Reemplazo de las Luces ............. 25
INSTRUCCIONES DE INSTALACIÓN
Preparación para Instalar
el Refrigerador ................... 26
Instalación del Refrigerador .......... 28
Instalación del Suministro de Agua ....41
CONSEJOS PARA LA SOLUCIÓN
DE PROBLEMAS ............45
Condiciones de Funcionamiento
Normal ..........................44
Servicio Técnico – Verdad o Mito .....48
GARANTÍA LIMITADA ........50
SOPORTE AL CLIENTE
Certificado Limitado del Dispositivo del
Cartucho del Filtro de Agua RPWFE . . .51
Ficha Técnica de Rendimiento ........ 52
Soporte al Cliente ..................56
Escriba los números de modelo y
de serie aquí:
Nº de Modelo ____________
Nº de Serie ______________
Busque estos números en una
etiqueta del lado izquierdo,
cerca de la parte intermedia del
compartimiento del refrigerador.
MANUAL DEL
PROPIETARIO E
INSTRUCCIONES
DE INSTALACIÓN
REFRIGERADORES
Congelador Inferior
GE es una marca registrada de General Electric Company. Fabricado bajo licencia de marca.
Modelos GE Profile™
Los modelos que comienzan con
las letras DFE, GFE, GFS, GNE, PFH,
PFE, PFD y GFD son Modelos con
Profundidad Estándar (SD)
Los modelos que comienzan con
las letras GYE, GYS, PYE, DYE,
PWE, ZWE y PYD son Modelos con
Profundidad de Mesada (CD)
49-60792 Rev. 3 01-19 GEA

2 49-60792 Rev. 3
GRACIAS POR HACER QUE GE APPLIANCES SEA PARTE DE SU HOGAR.
Ya sea que haya crecido usando GE Appliances, o que ésta es su primera vez, nos complace
tenerlo en la familia.
Sentimos orgullo por el nivel de arte, innovación y diseño de cada uno de los electrodomésticos de
GE Appliances, y creemos que usted también. Entre otras cosas, el registro de su electrodoméstico
asegura que podamos entregarle información importante del producto y detalles de la garantía
cuando los necesite.
Registre su electrodoméstico GE ahora a través de Internet. Sitios Web y números telefónicos útiles
están disponibles en la sección de Soporte para el Consumidor de este Manual del Propietario.
También puede enviar una carta en la tarjeta de inscripción preimpresa que se incluye con
el material embalado.
49-60792 Rev. 3 3
PRECAUCIÓN
A fin de reducir el riesgo de lesiones al usar el refrigerador, siga estas precauciones
básicas.
Ŷ 1ROLPSLHHVWDQWHVGHYLGULRQLWDSDVFRQDJXDFDOLHQWH
cuando estén fríos. Los estantes de vidrio y las tapas
se pueden romper si son expuestos a cambios de
temperatura repentinos o impactos, tales como sacudones
o caídas. El vidrio templado está diseñado para destruirse
en pequeñas piezas en caso de rotura.
Ŷ 0DQWHQJDORVGHGRVIXHUDGHORVHVSDFLRVGH³ULHVJRGH
lastimaduras”; los despejes entre las puertas y entre las
puertas y el gabinete son necesariamente pequeños.
Tenga el cuidado de cerrar las puertas cuando los niños
se encuentren en el área.
Ŷ 1RWRTXHODVVXSHUILFLHVIUtDVGHOFRPSDUWLPLHQWRGHO
freezer cuando las manos estén húmedas o mojadas,
ya que la piel se podrá adherir a estas superficies
extremadamente frías.
Ŷ 1RYXHOYDDFRQJHODUFRPLGDVTXHKD\DQHVWDGR
totalmente congeladas en forma previa.
Ŷ (QUHIULJHUDGRUHVFRQPiTXLQDVGHKDFHUKLHOR
automáticas, evite el contacto con las partes móviles del
mecanismo eyector o con el elemento de calefacción que
OLEHUDORVFXERV1RFRORTXHORVGHGRVQLODVPDQRVHQHO
mecanismo de la máquina de hielo automática mientras el
refrigerador esté enchufado.
INFORMACIÓN DE SEGURIDAD
LEA Y GUARDE ESTAS INSTRUCCIONES
INFORMACIÓN IMPORTANTE DE SEGURIDAD
LEA TODAS LAS INSTRUCCIONES ANTES DE USAR
INSTALACIÓN
ADVERTENCIA
RIESGO DE EXPLOSIÓN
Mantenga cualquier material y vapores inflamables, tales como gasolina, alejados del refrigerador. Si no se cumple con esto
se podrá producir una explosión, incendio o la muerte.
ADVERTENCIA
RIESGO DE CAÍDA
Los modelos con estilo incorporado (modelo PYE, GYE, GYS, PWE, PYD, y ZWE son inestables, especialmente con las
puertas abiertas. Estos modelos deben ser asegurados con el soporte anti-volcaduras, a fin de evitar caídas hacia adelante,
que podrían resultar en la muerte o lesiones graves. Lea y siga las instrucciones de instalación en su totalidad, a fin de instalar
el soporte de piso anti-volcaduras embalado con su refrigerador.
ADVERTENCIA
A fin de reducir el riesgo de incendio, explosión, descargas eléctricas o lesiones al usar
su refrigerador, siga estas precauciones básicas de seguridad:
Ŷ (VWHUHIULJHUDGRUVHGHEHUiLQVWDODU\XELFDU
adecuadamente de acuerdo con las Instrucciones de
Instalación antes de ser usado.
Ŷ 'HVHQFKXIHHOUHIULJHUDGRUDQWHVGHKDFHUUHSDUDFLRQHVR
hacer una limpieza.
Nota: La corriente que va al refrigerador no puede ser
desconectada por ninguna configuración del panel de
control.
Nota: Las reparaciones deberán ser realizadas por un
Profesional del Servicio Técnico calificado.
Ŷ 5HHPSODFHWRGDVODVSLH]DV\SDQHOHVDQWHVGHOXVR
Ŷ 1RXVHH[WHQVLRQHVHOpFWULFDVSDUDFRQHFWDUVXDSDUDWR
Ŷ 1RJXDUGHQLXVHJDVROLQDXRWURVYDSRUHV\OtTXLGRV
inflamables cerca de este ni de otro electrodoméstico.
Ŷ 1RJXDUGHVXVWDQFLDVH[SORVLYDVWDOHVFRPRODWDV
de aerosoles con propelentes inflamables en este
electrodoméstico.
Ŷ $ILQGHHYLWDUULHVJRVGHTXHORVQLxRVTXHGHQDWUDSDGRV
y sufran asfixia, retire las puertas de alimentos frescos
y del congelador de cualquier refrigerador antes de
deshacerse o dejar de usar el mismo.
Ŷ /RVQLxRV\ODVSHUVRQDVFRQFDSDFLGDGItVLFD
sensorial o mental reducida o con falta de experiencia y
conocimiento podrán usar este electrodoméstico sólo si
son supervisados o les fueron dadas instrucciones sobre
un uso seguro y entienden los riesgos involucrados.
Ŷ (VWHHOHFWURGRPpVWLFRIXHGLVHxDGRSDUDXVRKRJDUHxR\
para aplicaciones similares tales como: áreas de personal
de cocina en tiendas, oficinas y otros espacios laborales;
casas de campo; por clientes en hoteles, moteles,
hostales y otros espacios residenciales, servicio de
comidas.
Ŷ (VWHHOHFWURGRPpVWLFRIXHGLVHxDGRSDUDXVRKRJDUHxR
y para aplicaciones similares tales como: áreas de
personal de cocina en tiendas, oficinas y otros espacios
laborales; casas de campo; por clientes en hoteles,
moteles, hostales y otros espacios residenciales, catering
y aplicaciones no minoristas similares.
Ŷ &RQHFWHDOVXPLQLVWURGHDJXDSRWDEOHVRORFRQXQD
presión de agua máxima de 120 psi (827 kilopascales).
4 49-60792 Rev. 3
INFORMACIÓN DE SEGURIDAD
INFORMACIÓN IMPORTANTE DE SEGURIDAD
LEA TODAS LAS INSTRUCCIONES ANTES DE USAR
LEA Y GUARDE ESTAS INSTRUCCIONES
CONEXIÓN DE LA ELECTRICIDAD
Nunca, bajo ninguna circunstancia, corte o elimine el tercer cable (tierra) del cable de corriente. Para su seguridad
personal, este electrodoméstico debe estar adecuadamente conectado a tierra.
El cable de corriente de este electrodoméstico contiene un
enchufe de 3 cables (conexión a tierra) que se conecta a un
tomacorriente de pared estándar de 3 cables (conexión a
tierra) para minimizar la posibilidad de riesgos de descargas
eléctricas por parte del mismo.
Contrate a un electricista calificado para que controle el
tomacorriente y el circuito eléctrico, a fin de asegurar que el
enchufe esté correctamente conectado a tierra.
En caso de contar con un tomacorriente de pared de 2
cables, es su responsabilidad y obligación reemplazarlo
por un tomacorriente de pared de 3 cables correctamente
FRQHFWDGRDWLHUUD1RXVHXQDGDSWDGRU
El refrigerador debería estar siempre conectado a un enchufe
específico con un índice de voltaje equivalente al que figura
en su etiqueta de características técnicas.
Se requiere un suministro eléctrico con fusible y conexión
a tierra de 115 voltios de CA, 60 Hz, 15 o 20 amperes.
Esto garantiza el mejor funcionamiento y además previene
la sobrecarga de los circuitos del hogar, lo cual podría
ocasionar riesgos de incendio debido al recalentamiento de
cables.
1XQFDGHVHQFKXIHHOUHIULJHUDGRUWLUDQGRGHOFDEOHGH
corriente. Siempre tome su enchufe firmemente y empuje el
mismo hacia afuera para retirarlo.
Repare o reemplace de inmediato todos los cables de
FRUULHQWHSHODGRVRFRQFXDOTXLHUWLSRGHGDxR1RXVH
un cable con cortaduras o abrasión sobre su extensión o
extremos.
Al alejar el refrigerador de la pared, se deberá tener cuidado
de que no ruede sobre ni dañe el cable de corriente.
ADVERTENCIA
RIESGO DE DESCARGA ELÉCTRICA
Enchufe en un tomacorriente con conexión a tierra de 3 cables.
1RHOLPLQHHOFDEOHGHFRQH[LyQDWLHUUD
1RXVHXQDGDSWDGRU
1RXVHXQSURORQJDGRU
Si no se siguen estas instrucciones se podrá producir a muerte, incendios o descargas eléctricas.
ADVERTENCIA
PELIGRO DE SUFFOCATION Y ENTRAPMENT
El incumplimiento de estas instrucciones de eliminación puede causar la muerte o lesiones graves.
IMPORTANTE: Que un niño quede atrapado o que sufra
una asfixia no son problemas del pasado. Los refrigeradores
antiguos o abandonados aún son peligrosos, incluso aunque
VHFRQVHUYHQSRU³VyORXQRVSRFRVGtDV´6LVHGHVKDUiGHVX
antiguo refrigerador, siga las siguientes instrucciones a fin de
evitar accidentes.
Antes de Descartar su Antiguo Aparato:
Ŷ Retire las puertas de comidas frescas y del freezer.
Ŷ Deje los estantes en su lugar de modo que los niños no
puedan trepar dentro con facilidad.
Cómo Eliminar Refrigerantes y Gomaespumas:
Descarte el electrodoméstico de acuerdo con las Regulaciones Federales y Locales. El material aislante inflamable usado
requiere procedimientos de descarte especiales. Comuníquese con las autoridades locales para descartar su electrodoméstico
de forma ambientalmente segura.
49-60792 Rev. 3 5
DISPENSADOR DE AGUA CALIENTE
INFORMACIÓN IMPORTANTE DE SEGURIDAD
LEA TODAS LAS INSTRUCCIONES ANTES DE USAR
INFORMACIÓN DE SEGURIDAD
LEA Y GUARDE ESTAS INSTRUCCIONES
Use este electrodoméstico sólo para su propósito original, como se describe en el Manual del
Propietario. A fin de reducir el riesgo de quemaduras severas, lesiones por escaldadura, o la muerte al
usar el dispensador de agua caliente, se deberán seguir las siguientes instrucciones:
Ŷ1RGHMHHOUHFLSLHQWHVLQVXSHUYLVLyQHQFHUFDQtDGHQLxRV
durante o despuésde dispensar agua caliente.
Ŷ1RSHUPLWDTXHORVQLxRVXVHQHODJXDFDOLHQWHGHO
dispensador.
Ŷ/DSHULOODSDUDGLVSHQVDUDJXDFDOLHQWHUHTXLHUH
movimientos de giro y empuje, a fin de reducir el riesgo de
que se dispense agua caliente de forma no intencional o
SRUSDUWHGHQLxRVSHTXHxRV1RPDQLSXOHLQGHELGDPHQWH
ni modifique la perilla para dispensar agua caliente.
Ŷ(ODJXDSURYHQLHQWHGHOGLVSHQVDGRUHVWiPX\FDOLHQWH
Tenga extremo cuidado al dispensar y beber agua. Espere
a que el agua se enfríe hasta que sea posible beberla
antes de tomarla. Mantenga la taza o el recipiente cerca
del punto desde donde se dispensa, a fin de minimizar
salpicaduras de agua caliente que podrían tomar contacto
con su mano.
Ŷ$OGLVSHQVDUDJXDFDOLHQWHHOUHFLSLHQWHSXHGHDOFDQ]DU
una temperatura muy alta. Use un recipiente con aislante
de temperatura tal como cerámica o gomaespuma. El
uso de materiales para envases tales como el papel o el
plástico pueden resultar en una quemadura al sostener
ODWD]D1RXVHHQYDVHVGHYLGULR\DTXHORVFDPELRV
de temperatura pueden hacer que el envase se rompa y
produzca escaldaduras o laceraciones.
Ŷ6LHPSUHVLJDODVLQVWUXFFLRQHVGHOIDEULFDQWHSDUDOD
preparación de fórmula de bebé. Al dispensar agua
por debajo de los 51.67°C (125ºF), siempre controle la
temperatura del agua antes de beber la misma.
Ŷ$OXVDUODIXQFLyQGHDJXDFDOLHQWHSRUSULPHUDYH]
confirme si vive por encima de los 1524 metros (5000 pies)
(altitud alta). Esto limita la temperatura del sistema de agua
caliente a fin de evitar el hervor. Para acceder a la sección
de
altitud elevada, vaya a al menú de configuraciones
(parámetros) si éste se encuentra presente o en otros
modelos presiones Fridge (Refrigerador) y Door Alarm
(Alarma de la Puerta) de forma simultánea para pasar de
Hi AL a Lo AL (altitud elevada a altitud baja).
Ŷ8Q
FDUWXFKRGHOILOWURGHDJXDLQVWDODGRHQIRUPDUHFLHQWH
hará que chorree agua del dispensador. Deje correr 2
galones (7.57 litros) de agua a través del dispensador de
agua fría (aproximadamente 5 minutos) a fin de eliminar
el aire del sistema. Hasta que el aire sea eliminado del
VLVWHPDDWUDYpVGHOGLVSHQVDGRUGHDJXDIUtD12XVH
el dispensador de agua caliente ya que puede hacer que
chorree agua caliente y ocasionar escaldaduras con agua
caliente.
Ŷ1RXVHFRQDJXDTXHQRVHDVHJXUDDQLYHOPLFURELROyJLFR
o de calidad desconocida.
Ŷ(OGLVSHQVDGRUGHDJXDFDOLHQWHHVWiGLVHxDGRSDUD
GLVSHQVDUDJXD~QLFDPHQWH1RLQWHQWHFDOHQWDUR
GLVSHQVDUQLQJXQDRWUDFRVDTXHQRVHDDJXD1RLQWHQWH
desensamblar o limpiar el tanque.
Ŷ1RPRGLILTXHHOVLVWHPDGHDJXDFDOLHQWH(IHFW~HHO
mantenimiento sólo con piezas de repuesto especificadas
de fábrica.
ADVERTENCIA
RIESGO DE ESCALDADURA
El dispensador de agua caliente puede calentar agua a una temperatura de aproximadamente 185ºF (85ºC). Las
temperaturas del agua superiores a los 125º F (52º C) pueden ocasionar quemaduras graves o la muerte por escaldadura.
Los niños, las personas incapacitadas y los mayores presentan el mayor riesgo de sufrir escaldaduras.

6 49-60792 Rev. 3
Funciones
OPERACIÓN DEL REFRIGERADORE: Funciones
Máquina de hacer hielo con ahorro de espacio*
La máquina de hacer hielo y el recipiente están ubicados
en la puerta, creando un espacio de almacenamiento con
mayor uso.
Luz LED de exhibición
La luz LED está posicionada a través del interior para
iluminar áreas del refrigerador. Las luces LED están
ubicadas debajo de la puerta de comidas frescas para
iluminar el freezer cuando se abra.
Bandeja desplegable*
Permite un almacenamiento adicional en la puerta cuando
lo necesite y se guarda cuando no.
Cajón con control de temperatura electrónica de ancho
completo (en algunos modelos)
Recipiente con control de temperatura ajustable que puede
ubicar artículos más grandes.
Recipiente de lácteos
Compartimiento aparte para sus productos.
Cubo de hielo/ Máquina de hielos*
Máquina de hielos con cubos de almacenamiento de
hielo..
Estante de QuickSpaceT™ *
Funciona como un estante normal de tamaño completo
cuando lo necesite y se desliza fácilmente hacia adentro
para guardar artículos altos en la parte inferior.
Estantes a prueba de derrames
Diseñados para capturar derrames y permitir una limpieza
más fácil.
Tapete Antideslizante
Revestimiento que captura los derrames, evita el
desplazamiento de los envases cuando la puerta es
abierta y se puede retirar fácilmente para su limpieza.
Recipiente con puerta desmontable
Puede ser retirado cuando haya una pared que limite la
apertura de la puerta.
Recipiente de Climate zone (área climática)
Recipientes aparte para almacenar productos alimenticios.
Filtro de agua
Filtra agua y hielo
*Modelos Selectos Únicamente
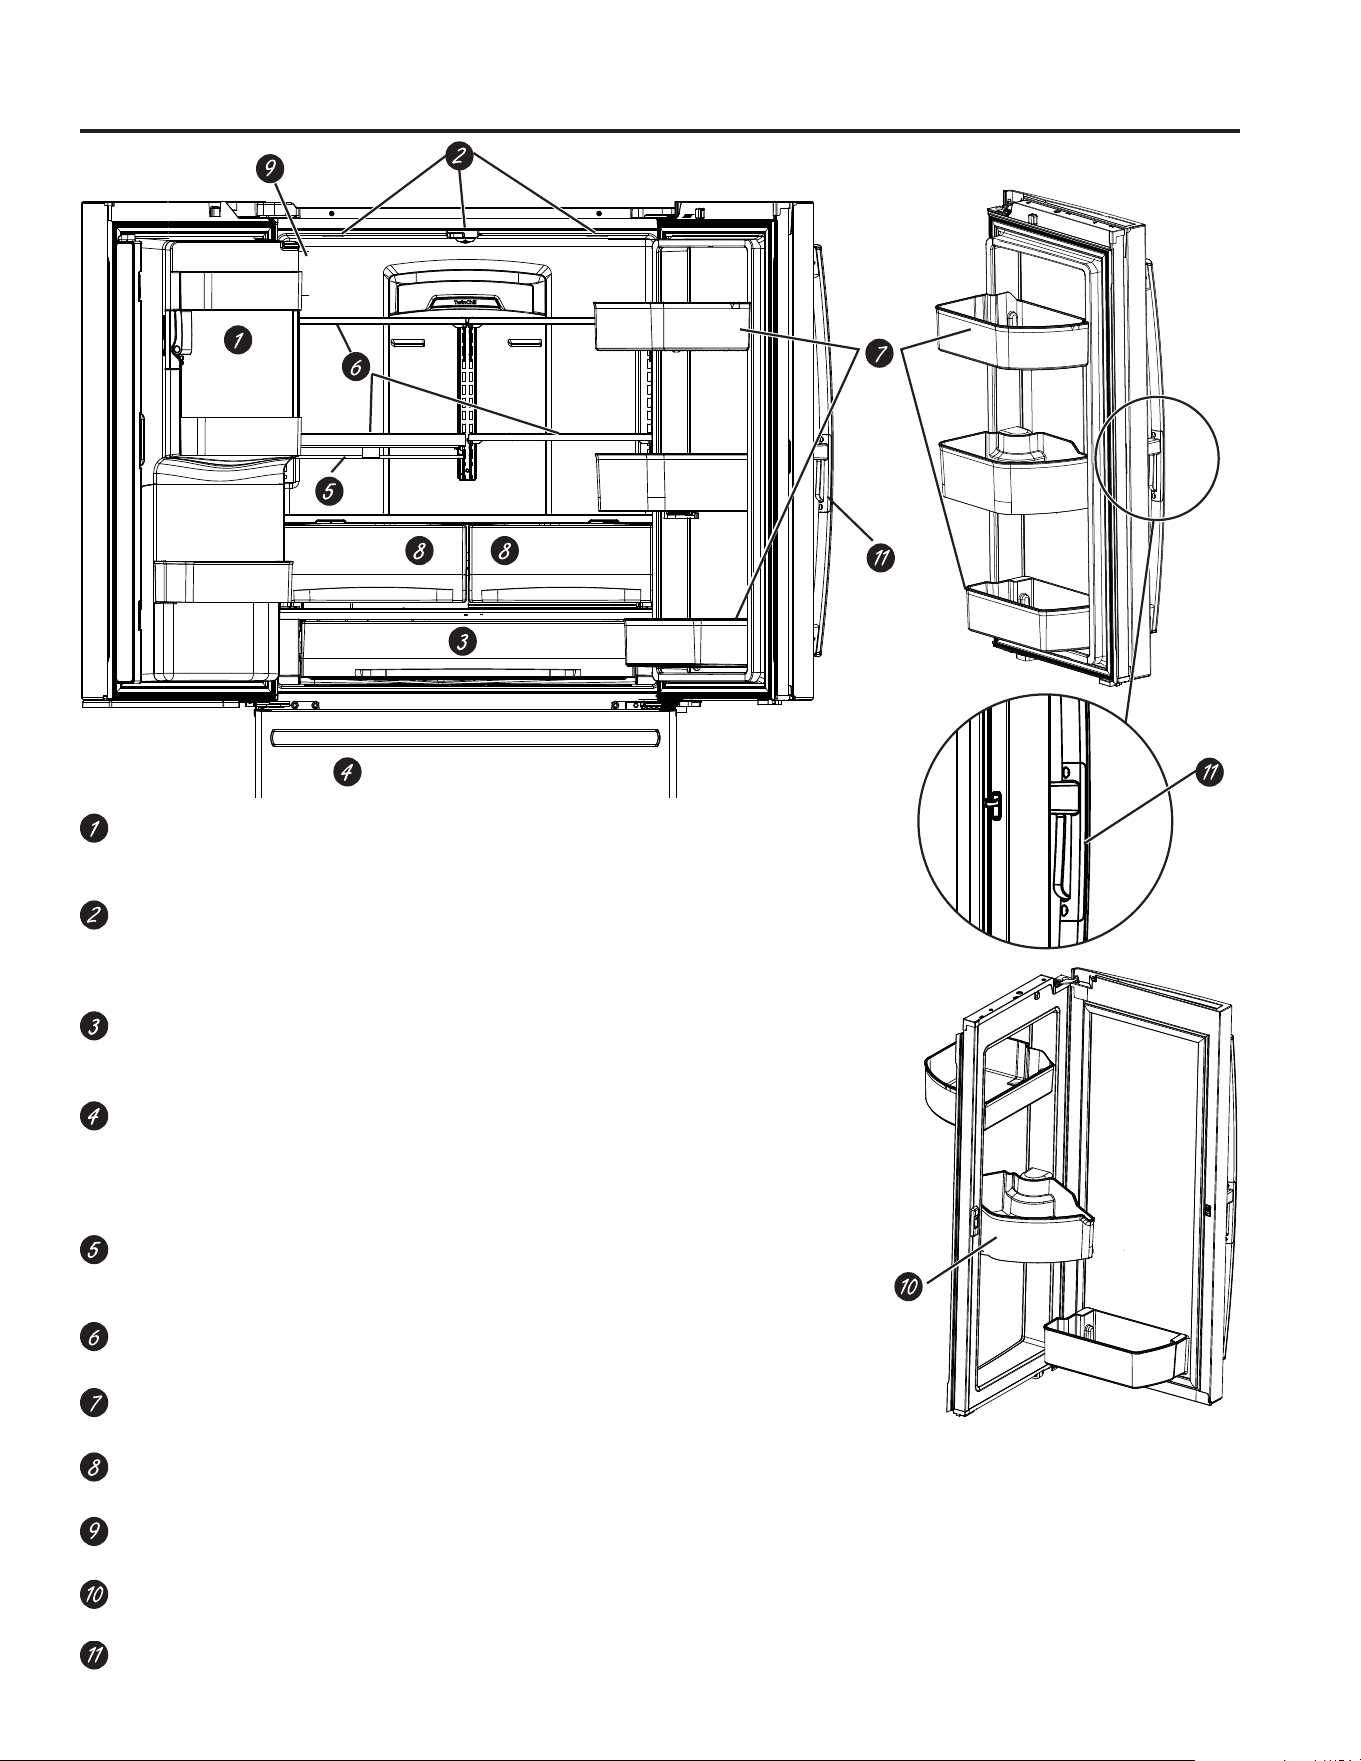
49-60792 Rev. 3 7
*Modelos Selectos Únicamente
Funciones
OPERACIÓN DEL REFRIGERADORE: Funciones
Máquina de hacer hielo con ahorro de espacio*
La máquina de hacer hielo y el recipiente están ubicados en la puerta, creando un
espacio de almacenamiento con mayor uso.
Luz LED de exhibición
La luz LED está posicionada a través del interior para iluminar áreas del refrigerador.
Las luces LED están ubicadas debajo de la puerta de comidas frescas para iluminar
el freezer cuando se abra.
Cajón con control de temperatura electrónica de ancho completo
Recipiente con control de temperatura ajustable que puede ubicar artículos más
grandes.
Máquina de Hielos/ Hielera del Freezer*
Una máquina de hielos en ambos compartimientos le brinda más hielo cuando usted
lo necesite.
Disponible en modelos Sin Dispensador; también disponible como un kit en algunos
modelos.
Estante de QuickSpaceT™ *
Funciona como un estante normal de tamaño completo cuando lo necesite y se
desliza fácilmente hacia adentro para guardar artículos altos en la parte inferior.
Estantes a prueba de derrames
Diseñados para capturar derrames y permitir una limpieza más fácil.
Recipiente con puerta desmontable
Puede ser retirado cuando haya una pared que limite la apertura de la puerta.
Recipiente de Climate zone
Recipientes aparte para almacenar productos alimenticios.
Filtro de agua
Filtra agua y hielo
Bandeja Giratoria*
Puede ser rotada para un fácil acceso.
Traba para Puerta en la Puerta*
Presione la traba desde el lado inferior de la manija para abrir la puerta externa.
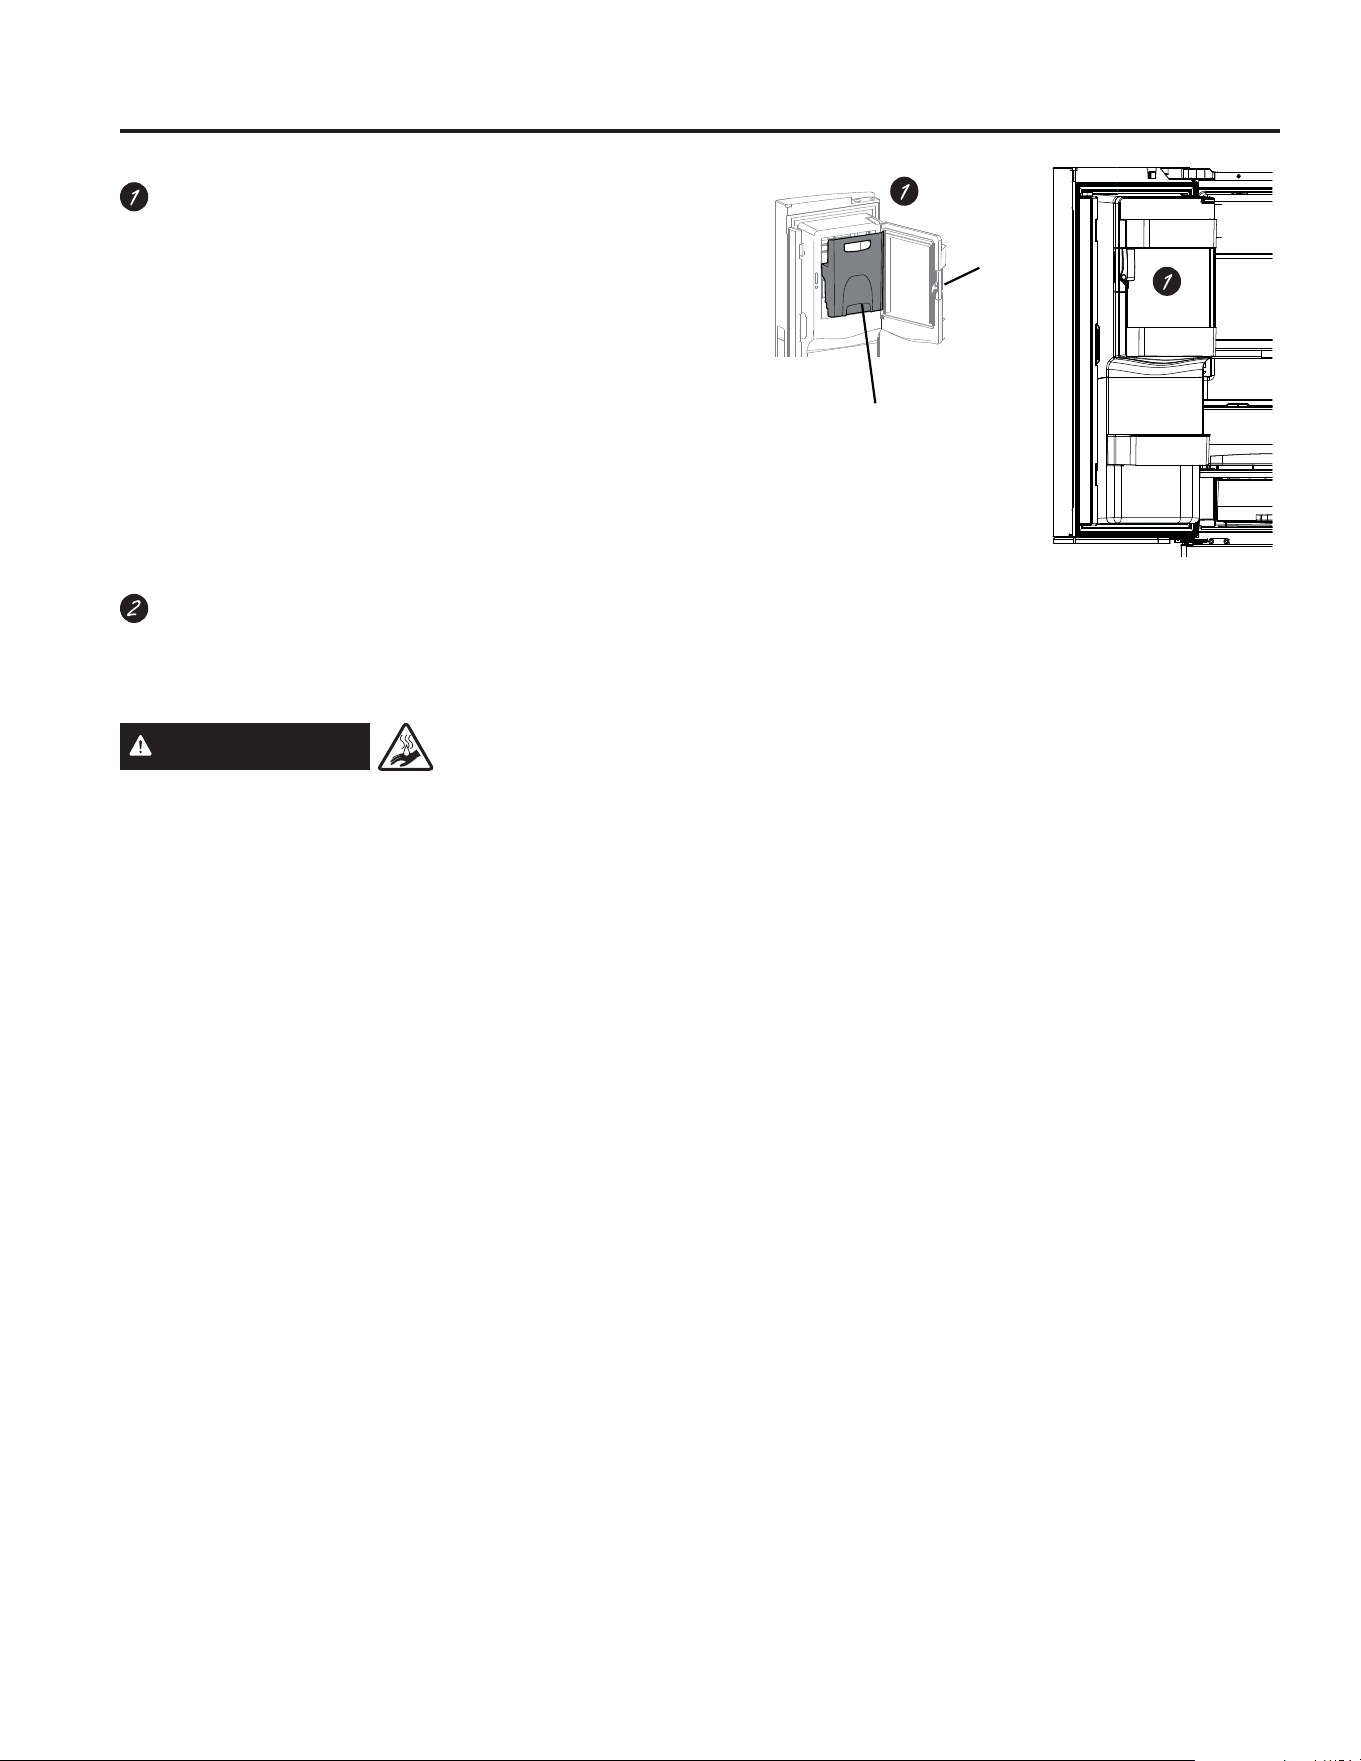
8 49-60792 Rev. 3
*Modelos Selectos Únicamente
Funciones
OPERACIÓN DEL REFRIGERADORE: Funciones
Recipiente de hielo en la puerta*
1. Abra la puerta izquierda de comidas frescas.
2. Baje la traba para abrir la puerta del recipiente.
3. Uso del recipiente con sujeción manual hacia arriba y
afuera para despejar los localizadores en la parte inferior
del recipiente.
4. Para reemplazar la hielera, ajuste la misma a los soportes
de la guía y empuje hasta que la misma se ubique
correctamente.
5. Si la hielera no se puede reemplazar, gire la Horquilla de
la Hielera ¼ en dirección de las agujas del reloj.
Hielo/ filtro de agua
Se certifica que reduce quistes resistentes al cloro, plomo,
ciertos productos farmacéuticos y más. Para un reemplazo
sencillo del filtro, ver la página 11.
ADVERTENCIA
RIESGO
DE ESCALDADURA *
El uso de distribuidor agua caliente antes de la evacuación de
aire del sistema puede causar quemaduras que causan intrusión
de agua caliente. 6LJDODVLQVWUXFFLRQHVSDUDHO³)LOWURGH$JXD
– Paso 3” en la página 16 para purgar todo el aire del sistema, a
través del dispensador de agua fría antes de usar el dispensador
de agua caliente.
Al usar la función de agua caliente por primera vez, confirme
si vive por encima de los 5000 pies (1524 metros) (altitud
elevada). Esto limita la temperatura del sistema de agua
caliente a fin de evitar el hervor. Para acceder a la sección de
altitud elevada, consulte la sección Acerca de los controles-
funciones.
Hielera
Traba

49-60792 Rev. 3 9
OPERACIÓN DEL REFRIGERADORE: Controles
Los controles de temperatura fueron configurados previamente en la fábrica en 37°F para el compartimiento del refrigerador
y en 0°F para el compartimiento del freezer. Espere 24 horas hasta que la temperatura se estabilice hasta los ajustes de
preconfiguración recomendados.
Estilo de Control D: Es posible que los controles de temperatura muestren la temperatura en SET (Ajustada), como también
la temperatura real en el refrigerador y en el freezer. La temperatura real puede variar levemente de la temperatura en SET
$MXVWDGDHQEDVHDOXVR\DODPELHQWHGRQGHVHXVD3:(\*1(RQO\
NOTA: El refrigerador se envía con una envoltura que protege los controles de temperatura. Si esta envoltura no fue retirada
durante la instalación, retire la misma ahora.
PFE28P, PYE22P Estilo de Control A, Modelos Personales
PFH28, PFE28K, DFE28, PFD28, PYE22K, PYD22, DYE22
Estilo de Control B, Modelos con AutoFill (Llenado Automático)
GFD28, GFE28, GFE26, GFS26, GYE22, GYS22
Estilo de Control C, Modelos de GE Appliances
GNE29, PWE23 Estilo de Control D, Control Sin Dispensador
Refrigerator
Hold 3 Sec for °F/°C
Hold 3 Seconds
Hold 3 Seconds
Recommended: 37 °F
Actual Set
Freezer
Door Alarm
Ice Maker
Lock Controls
Reset Filter
Recommended: 0°F
F
Ice
Error
Complete
Sensing
Cubed
Crushed
Controles

10 49-60792 Rev. 3
NOTA: Para un rendimiento óptimo de la temperatura, es recomendable evitar colocar comida u otros productos directamente en
las ventilaciones de aire o en la torre de aire de comidas frescas, bloqueando de este modo el flujo de aire.
Cambio de la Temperatura para el Estilo de Control A
Para Cambiar la Temperatura del Refrigerador:
Presione el botón Fridge (Refrigerador) y se mostrará la
temperatura configurada actualmente. Presionando y liberando
el botón, se realizará un ciclo a través de las configuraciones
de temperatura disponibles. Mantenga presionado el botón
para la función Turbo Cool (Frío con Turbo). La pantalla
mostrará tC.
Para Cambiar la Temperatura del Freezer:
Presione el botón Freezer (Freezer) y se mostrará la
temperatura configurada actualmente. Presionando y liberando
el botón, se realizará un ciclo a través de las configuraciones
de temperatura disponibles. Mantenga presionado el botón
para la función Turbo Freeze (Congelación con Turbo). La
pantalla mostrará tF.
El sistema de enfriamiento puede ser apagado manteniendo
presionado Freezer (Freezer) y Start Heating (Comenzar
D&DOHQWDU6HPRVWUDUi2))$SDJDGR3DUDHQFHQGHUOR
presione Fridge (Refrigerador) o Freezer (Freezer). Se
mostrará ON (Encendido).
Apagar el sistema de refrigeración detiene el enfriamiento del
refrigerador, pero no corta la corriente eléctrica.
Cambio de la Temperatura para el Estilo de los Controles B y C
Para cambiar la temperatura, presione y libere las teclas
Freezer (Freezer) o Fridge (Refrigerador). La pantalla mostrará
la temperatura configurada. Para cambiar la temperatura,
presione la tecla Freezer (Freezer) o Fridge (Refrigerador)
hasta que se muestre la temperatura deseada. Mantenga
presionado el botón para la función Turbo Cool (Frío Turbo).
La pantalla mostrará tC. Mantenga presionado el botón para
la función Turbo Freeze (Congelación con Turbo). La pantalla
mostrará tF.
Para colocar el sistema de refrigeración en OFF (Apagar),
mantenga presionadas las teclas Fridge (Refrigerador) y
Ice Maker (Máquina de Hielos) de forma. Para encenderlo,
presione Fridge (Refrigerador) o Freezer (Freezer).
Apagar el sistema de refrigeración detiene el enfriamiento del
refrigerador, pero no corta la corriente eléctrica.
Cambio de Temperatura para el Estilo de Control D
La Pantalla de Temperatura está ubicada en la parte interior
de la puerta izquierda del refrigerador. Para cambiar la
temperatura, presione y libere las teclas Refrigerator
(Refrigerador) o Freezer (Freezer). La luz de Actual Temp
(Temperatura Real) se encenderá y la pantalla mostrará la
temperatura real. Para cambiar la temperatura, presione
ligeramente la tecla Refrigerator (Refrigerador) o Freezer
(Freezer) hasta que se muestre la temperatura deseada.
Para apagar el sistema de refrigeración, mantenga presionadas
las teclas Refrigerator (Refrigerador) y Freezer (Freezer)
de forma simultánea por 3 segundos. Cuando el sistema de
UHIULJHUDFLyQHVWpHQ2))$SDJDGRHQODSDQWDOODVHGHEHUtD
leer Off (Apagado).
Para encender el sistema de refrigeración, presione tanto
las teclas Refrigerator (Refrigerador) o Freezer (Freezer).
La pantalla mostrará la configuración de la temperatura
programada de 3ºC (37ºF) para el refrigerador y -18ºC (0ºF)
para el freezer.
Apagar el sistema de refrigeración detiene el enfriamiento del
refrigerador, pero no corta la corriente eléctrica.
Controles
OPERACIÓN DEL REFRIGERADORE: Controles
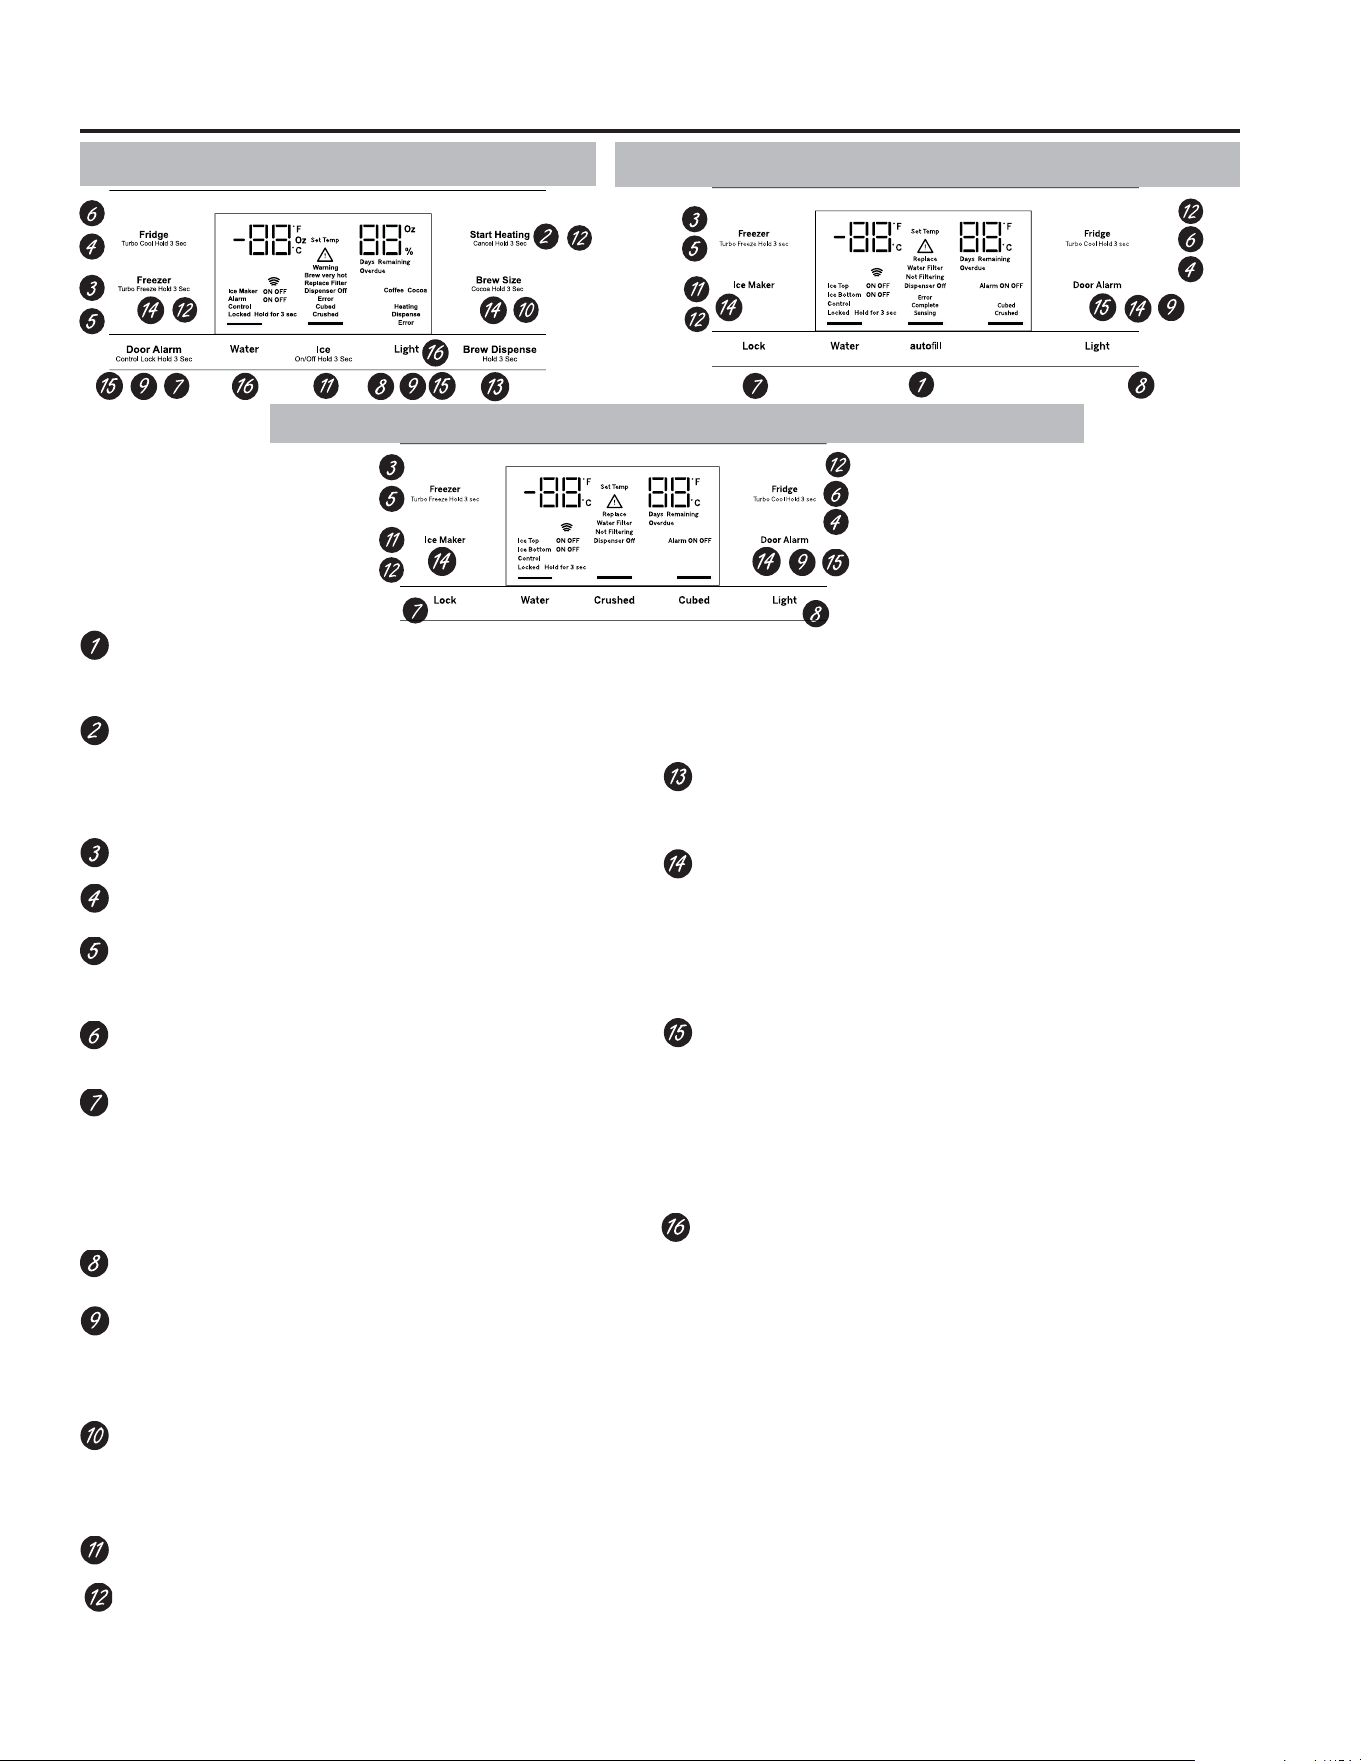
49-60792 Rev. 3 11
OPERACIÓN DEL REFRIGERADORE: Controles
Ice
Estilo de Control A, Controles Externos
Control Style B, External Controls
PFH28, PFE28K, DFE28, PFD28,
PYE22K, PYD22, DYE22
Estilo de Control C, Controles Externos GFD28, GFE28, GFE26, GFS26, GYE22, GYS22
*Modelos Selectos Únicamente
Error
Complete
Sensing
Cubed
Crushed
Controles
PFE28P,
PYE22P
Llenado Automático con Manos Libres*
El llenado automático sin manos utiliza sensores para
monitorear el peso de un envase a fin de dispensar de forma
automática agua filtrada sin tener que activar la paleta.
Comenzar a Calentar*
El botón Start Heating (Comenzar a Calentar) se utiliza para
iniciar el calentamiento del agua para la función Single Serve
(Individual). Para abortar la función Start Heating (Comenzar a
Calentar), mantenga presionado el botón Start Heat (Comenzar
a Calentar) durante 3 segundos
Control de temperatura del freezer
Ajuste la temperatura del compartimiento del freezer.
Control de temperatura de comida fresca
Ajusta la temperatura del compartimiento de alimentos frescos.
Configuración de TurboFreeze™
Active TurboFreeze para restaurar rápidamente las
temperaturas del freezer luego de aperturas de puerta
frecuentes.
Configuración TurboCool™
Activa TurboCool rápidamente para recuperar la temperatura
de las comidas frescas luego de aperturas de puerta frecuentes.
Controles de bloqueo
Estilo de Control A – Mantenga presionada la tecla Alarm
(Alarma) durante 3 segundos para bloquear el dispensador de
hielo y agua y todos los botones de funciones y temperatura.
Estilos de Control B y C – Mantenga presionada la tecla Lock
(Bloquear) durante 3 segundos para bloquear el dispensador de
hielo y agua y todos los botones de funciones y temperatura.
Luz del dispensador
La Luz puede ser encendida/ apagada para iluminar el
dispensador.
Alarma de la Puerta
Suena para alertarlo cuando las puertas del freezer o de
comidas frescas se hayan dejado abiertas. Mantenga
presionada la tecla Door Alarm (Alarma de la Puerta) y esto
alternará el sonido entre bajo, alto y apagado.
Tamaño de la Preparación*
El botón Brew Size (Tamaño de la Preparación) se utiliza
para seleccionar el tamaño de la taza individual. Mantenga
presionado el botón durante 3 segundos para variar el tipo de
preparación entre Coffee (Café) y Cocoa (Cacao).
Configuración de la máquina de hacer hielo
Enciende/ apaga sus máquinas de hacer hielo.
Sistema de enfriamiento Encendido/Apagado
Estilo de control A - Mantenga presionadas las teclas Freezer
(Freezer) y Start Heating (Comenzar a Calentar) de forma
simultánea para apagar el sistema de enfriamiento. Para
encender el sistema de enfriamiento, presione la tecla Fridge
(Refrigerador) o la tecla Freezer (Freezer).
Estilo de control B y C - Mantenga presionadas las teclas
Fridge (Refrigerador) y Ice Maker (Máquina de Hielos) de forma
simultánea por 3 segundos, para encender o apagar el sistema
de enfriamiento. Para encender el sistema de enfriamiento,
presione la tecla Fridge (Refrigerador) o la tecla Freezer
(Freezer).
Dispensar la Preparación
Mantenga presionado el botón Brew Dispense (Dispensar la
Preparación) durante 3 segundos, pero no más de 6 segundos, para
dispensar café o cacao.
F°/C°
Estilo de control A - Mantenga presionadas las teclas Freezer
(Freezer) y Brew Size (Tamaño de la Preparación) para variar
entre Fº y Cº.
Estilo de control B y C - Mantenga presionadas las teclas Ice
Maker (Máquina de hacer hielo) y Door Alarm (Alarma de la
Puerta) de forma simultánea durante 3 segundos, para cambiar
entre Fº y Cº.
Control de Sonido sobre los tonos de las teclas.
Estilo de Control A – Mantenga presionada la tecla Light
/X]XQDYH]SDUD+LJK$OWRD2II$SDJDUGRVYHFHVSDUD
2II$SDJDUD/RZ%DMR\WUHVYHFHVSDUD/RZ%DMRD+LJK
(Alto).
Estilos de Control B y C – Mantenga presionada la tecla
'RRU$ODUP$ODUPDGHOD3XHUWDXQDYH]SDUD+LJK$OWRD2II
$SDJDUGRVYHFHVSDUD2II$SDJDUD/RZ%DMR\WUHVYHFHV
para Low (Bajo) a High (Alto).
Altitud Elevada
Estilo de Control A (sólo PYE y PFE) – Mantenga
presionada la tecla Fridge (Refrigerador) y Door Alarm (Alarma
de la Puerta) para alternar entre Hi AL (Alt. Elevada) y Lo AL
(Alt. Baja) para altitudes elevadas y altitudes bajas.
Configuraciones adicionales:
• Connected Home (Hogar Conectado) está listo* (PFE28P,
PYE22P, PFH solamente)
• Filtro de Agua * - Un indicador se iluminará cuando sea
necesario reemplazar el filtro. Cuando un nuevo filtro sea
instalado, el indicador se apagará.
Modos Adicionales:
• Modo Sabático
Estilo de control A - Mantenga presionadas las teclas
Alarm (Alarma) y Light (Luz) de forma simultánea durante 3
segundos para entrar/ salir de Sabbath Mode (Modo Sabático).
Estilo de control B y C - Mantenga presionado el bloqueo y
la luz de forma simultánea por 3 segundos para entrar/ salir
del modo Sabático. Sabbath Mode (Modo Sabático) apagará
o atenuará las luces internas, el control de temperatura y
las funciones avanzadas. El compresor funcionará con una
descongelación por tiempo cuando esté en modo Sabático.
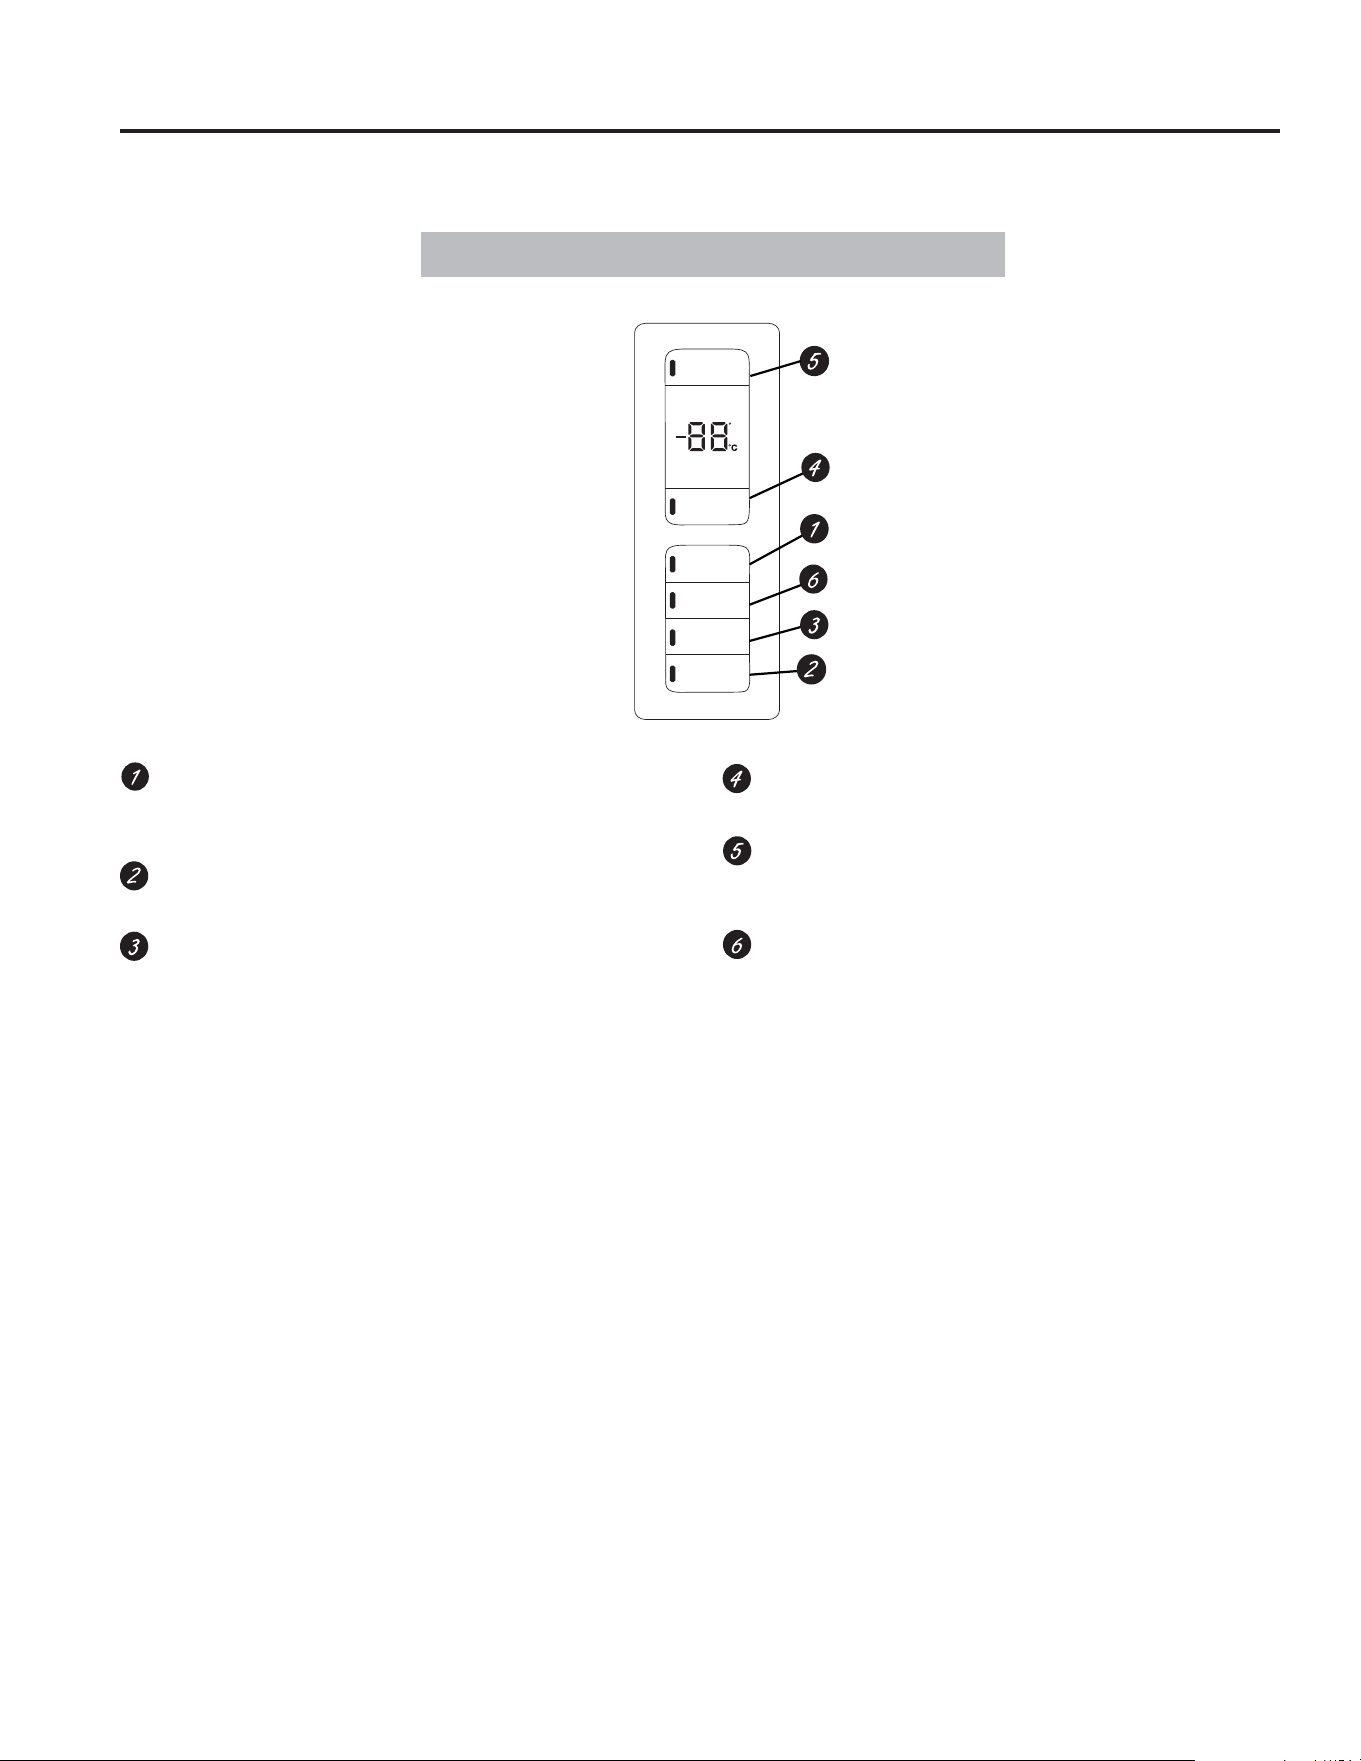
12 49-60792 Rev. 3
Refrigerator
Hold 3 Sec for °F/°C
Hold 3 Seconds
Hold 3 Seconds
Recommended: 37 °F
Actual Set
Freezer
Door Alarm
Ice Maker
Lock Controls
Reset Filter
Recommended: 0°F
F
Estilo de Control D, Controles Internos *1(3:(
Alarma de la Puerta
Suena para alertarlo cuando las puertas del freezer o de
comidas frescas se hayan dejado abiertas.
Reinicio del Filtro*
Espere 3 segundos luego de reemplazar el filtro.r.
Controles de Bloqueo
Mantenga presionado por 3 segundos para bloquear
el dispensador de hielo y agua y todos los botones de
funciones y temperatura
Control de temperatura del freezer
Ajusta la temperatura del compartimiento del freezer.
Control de temperatura del refrigerador
Ajuste la temperatura del compartimiento del comidas
frescas.
Configuración de la máquina de hacer hielo
Enciende/ apaga sus máquinas de hacer hielo
Modos Adicionales:
• Modo Sabático
Mantenga presionadas las teclas Door Alarm (Alarma de la
Puerta) y Ice Maker (Configuración de la máquina de hacer
hielo) de forma simultánea durante 3 segundos para entrar/
salir de Sabbath Mode (Modo Sabático).
Controles
OPERACIÓN DEL REFRIGERADORE: Controles
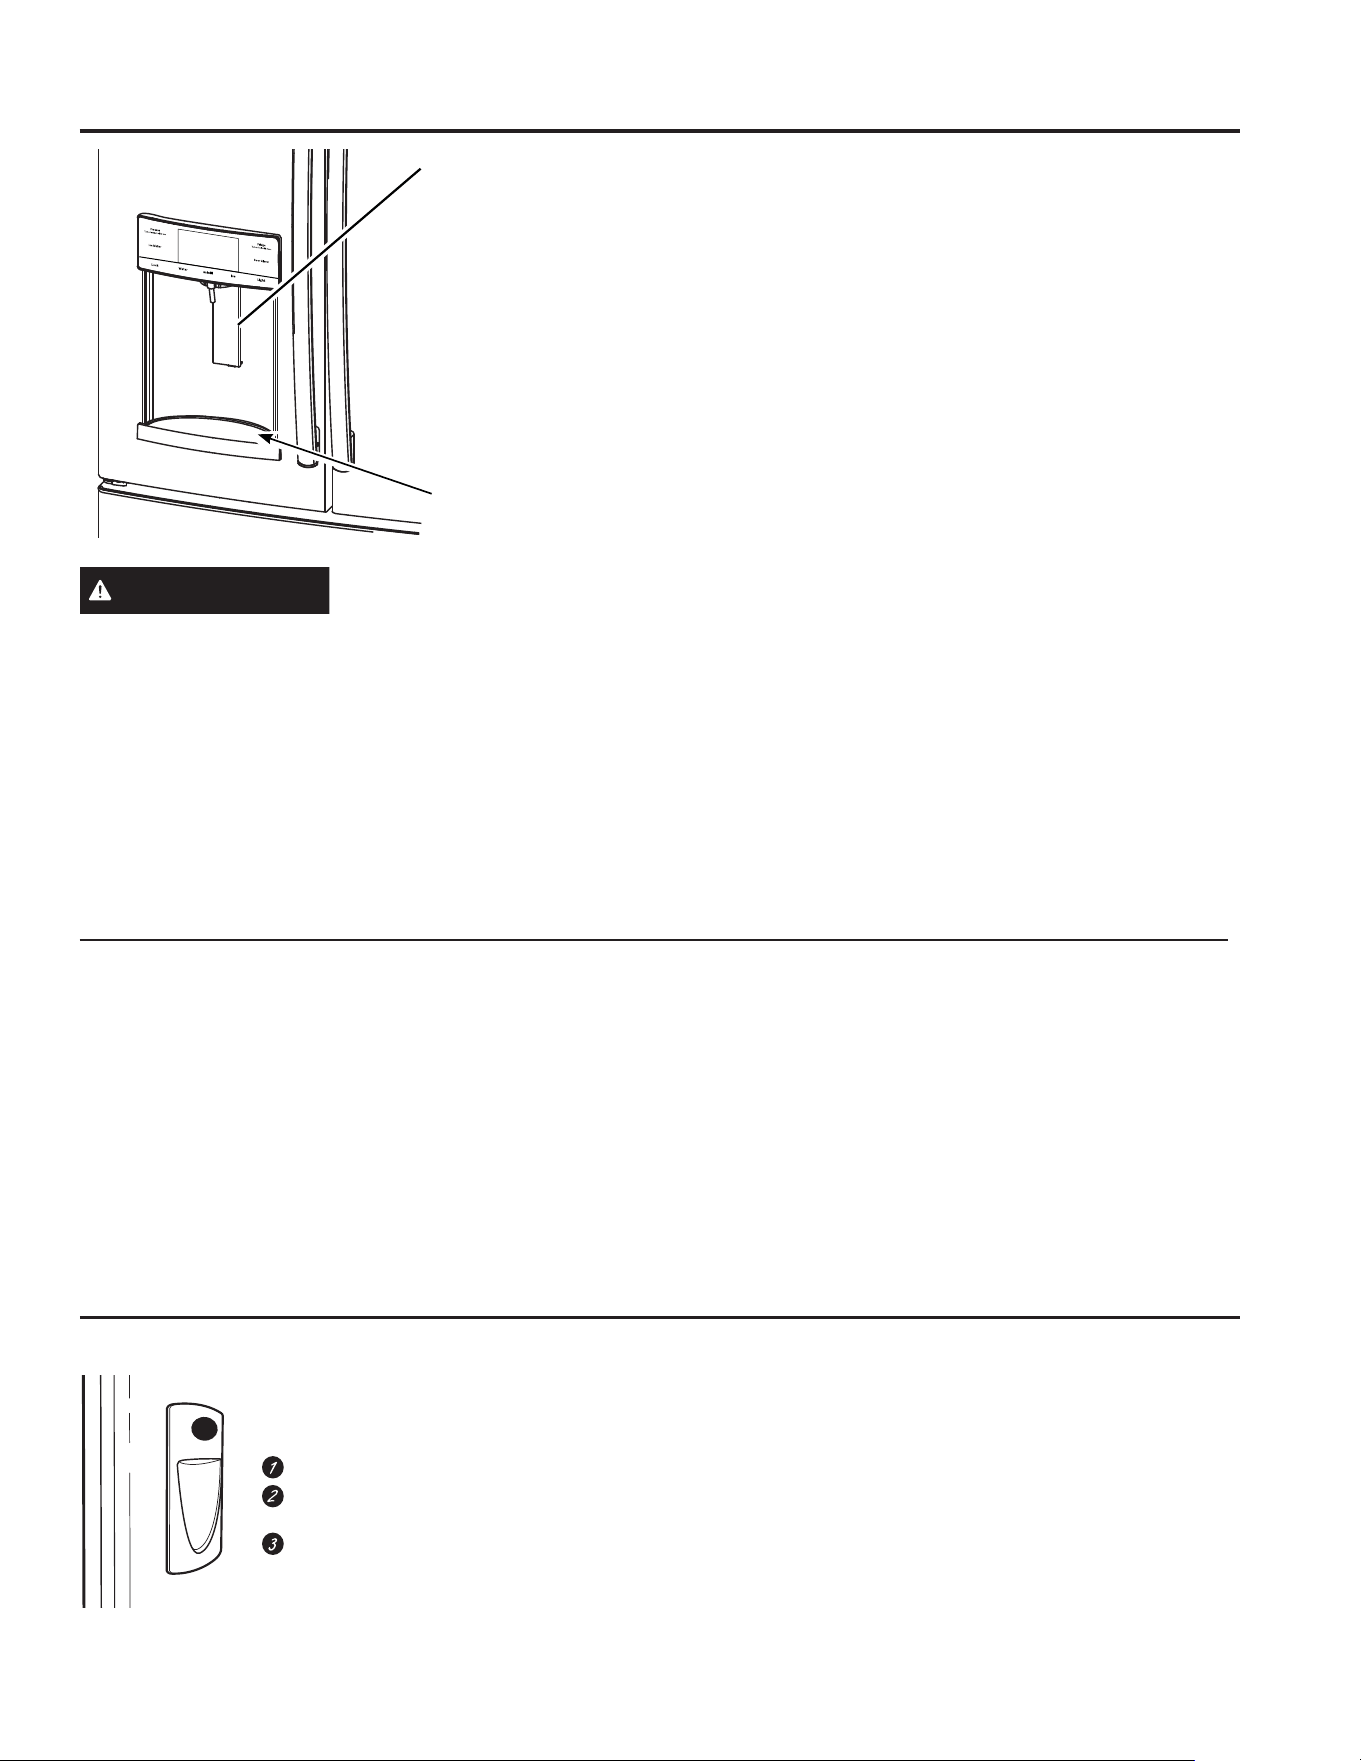
49-60792 Rev. 3 13
OPERACIÓN DEL REFRIGERADORE: Dispensador
Dispenser tray
Hechos Importantes sobre Su Dispensador
Ŷ1RDJUHJXHKLHORGHEDQGHMDVREROVDVDODKLHOHUDGHOD
máquina de hacer hielo de la puerta. Es posible que no lo
pique o vierta correctamente.
Ŷ Evite llenar el vaso con hielo de forma excesiva y use
vasos angostos. El hielo estancado puede trabar el vertedor
o hacer que la puerta del vertedor quede cerrada por
congelación. Si el hielo bloquea el vertedor, retire la hielera y
desbloquee el mismo con una cuchara de madera.
Ŷ Las bebidas y las comidas no se deberán enfriar de
forma rápida en el cajón de almacenamiento de hielo.
Las latas, botellas o paquetes de comida en el cajón de
almacenamiento pueden hacer que la máquina de hacer
hielo o el taladro se bloqueen.
Ŷ Para que el hielo dispensado no caiga afuera del vaso,
coloque el vaso cerca de, pero sin que tenga contacto con,
la abertura del dispensador.
Ŷ Es posible que cierta cantidad de hielo picado sea
dispensada incluso aunque haya seleccionado CUBED
ICE (Hielo en Cubos). Esto sucede ocasionalmente cuando
algunos cubos son dirigidos accidentalmente a la picadora.
Ŷ Una vez que el hielo picado es dispensado, es posible que
parte del agua gotee del vertedor.
Ŷ A veces se formará una pequeña cantidad de nieve en la
puerta del vertedor de hielo. Esta condición es normal y
habitualmente sucede cuando se dispensó hielo picado en
forma repetida. La nieve finalmente se evaporará.
Si no se dispensa agua cuando el refrigerador se instala por
primera vez, es posible que la tubería de agua posea aire.
Presione la paleta dispensadora durante por lo menos cinco
minutos para eliminar el aire atrapado de la tubería de agua y
para llenar el sistema de agua. A fin de limpiar las impurezas en
la tubería de agua, descarte los seis primeros vasos de agua.
A fin de eliminar la Bandeja del Dispensador (Tipo A et B
Únicamente)
Ŷ Saque la Bandeja del Dispensador hasta que se detenga.
Ŷ Ubique la lengüeta en el centro sobre la parte inferior y
empuje hacia adentro.
Ŷ Empuje el ensamble de la Bandeja del Dispensador hacia
afuera.
Ŷ Levante la Bandeja del Dispensador hacia afuera desde la
ranura central para limpiar.
A fin de eliminar la Bandeja del Dispensador (Tipo C
Únicamente)
Tome la Bandeja del Dispensador y empuje la misma de
manera
firme hacia usted hasta que salga.
Para reinstalar la Bandeja del Dispensador (Tipo A et B
Únicamente)
Ŷ
Coloque la tapa de la Bandeja del Dispensador sobre la
bandeja de agarre y posicione la misma debajo de los dos
tensores sobre cada lado.
Centre la bandeja del dispensador y alinee la misma con las
guías centrales.
Empuje hacia adentro hasta que esté firmemente en su
lugar.
Para reinstalar la Bandeja del Dispensador (Tipo C Únicamente)
Alinee
la guía sobre la bandeja inferior con el riel sobre el
dispensador y deslice el mismo hasta que se detenga contra la
parte trasera del dispensador.
Water & Ice Dispenser
(See About the controls
with temperature settings
& About the control
features)
Para Usar el Dispensador de Agua Interno*
El dispensador de agua está ubicado en la
pared izquierda dentro del compartimiento
del refrigerador.
Para dispensar agua:
Sostenga el vaso contra el hueco.
Presione el botón dispensador
de agua.
Sostenga el vaso debajo del
dispensador entre 2 y 3 segundos
luego de liberar el botón del
dispensador. Es posible que continúe
dispensando agua luego de que el
botón fue liberado.
Si no se dispensa agua cuando el refrigerador se instala por
primera vez, es posible que la cañería de agua posea aire.
Presione el botón dispensador durante por lo menos 5 minutos
para eliminar el aire atrapado de la cañería de agua y para
llenar el sistema de agua. Durante este proceso, es posible
que el dispensador produzca un ruido fuerte a medida que
se elimina el aire de la cañería de agua. A fin de limpiar las
impurezas en la cañería de agua, descarte los seis primeros
vasos de agua.
NOTA: A fin de evitar depósitos de agua, el dispensador debe
ser limpiado en forma periódica con un paño limpio o una
esponja.
ADVERTENCIA
RIESGO DE LACERACIÓN
Ŷ1XQFDFRORTXHORVGHGRVRFXDOTXLHURWURREMHWRHQOD
abertura de descarga de la picadora de hielo. Hacer esto
puede resultar en el contacto entre los filos de la picadora
de hielo y ocasionar lesiones graves o una amputación.
Ŷ8VHXQYLGULRUHVLVWHQWHDOGLVSHQVDUKLHOR8QYLGULRQR
resistente se podrá romper y ocasionar lesiones personales.
*Modelos Selectos Únicamente
Dispensador
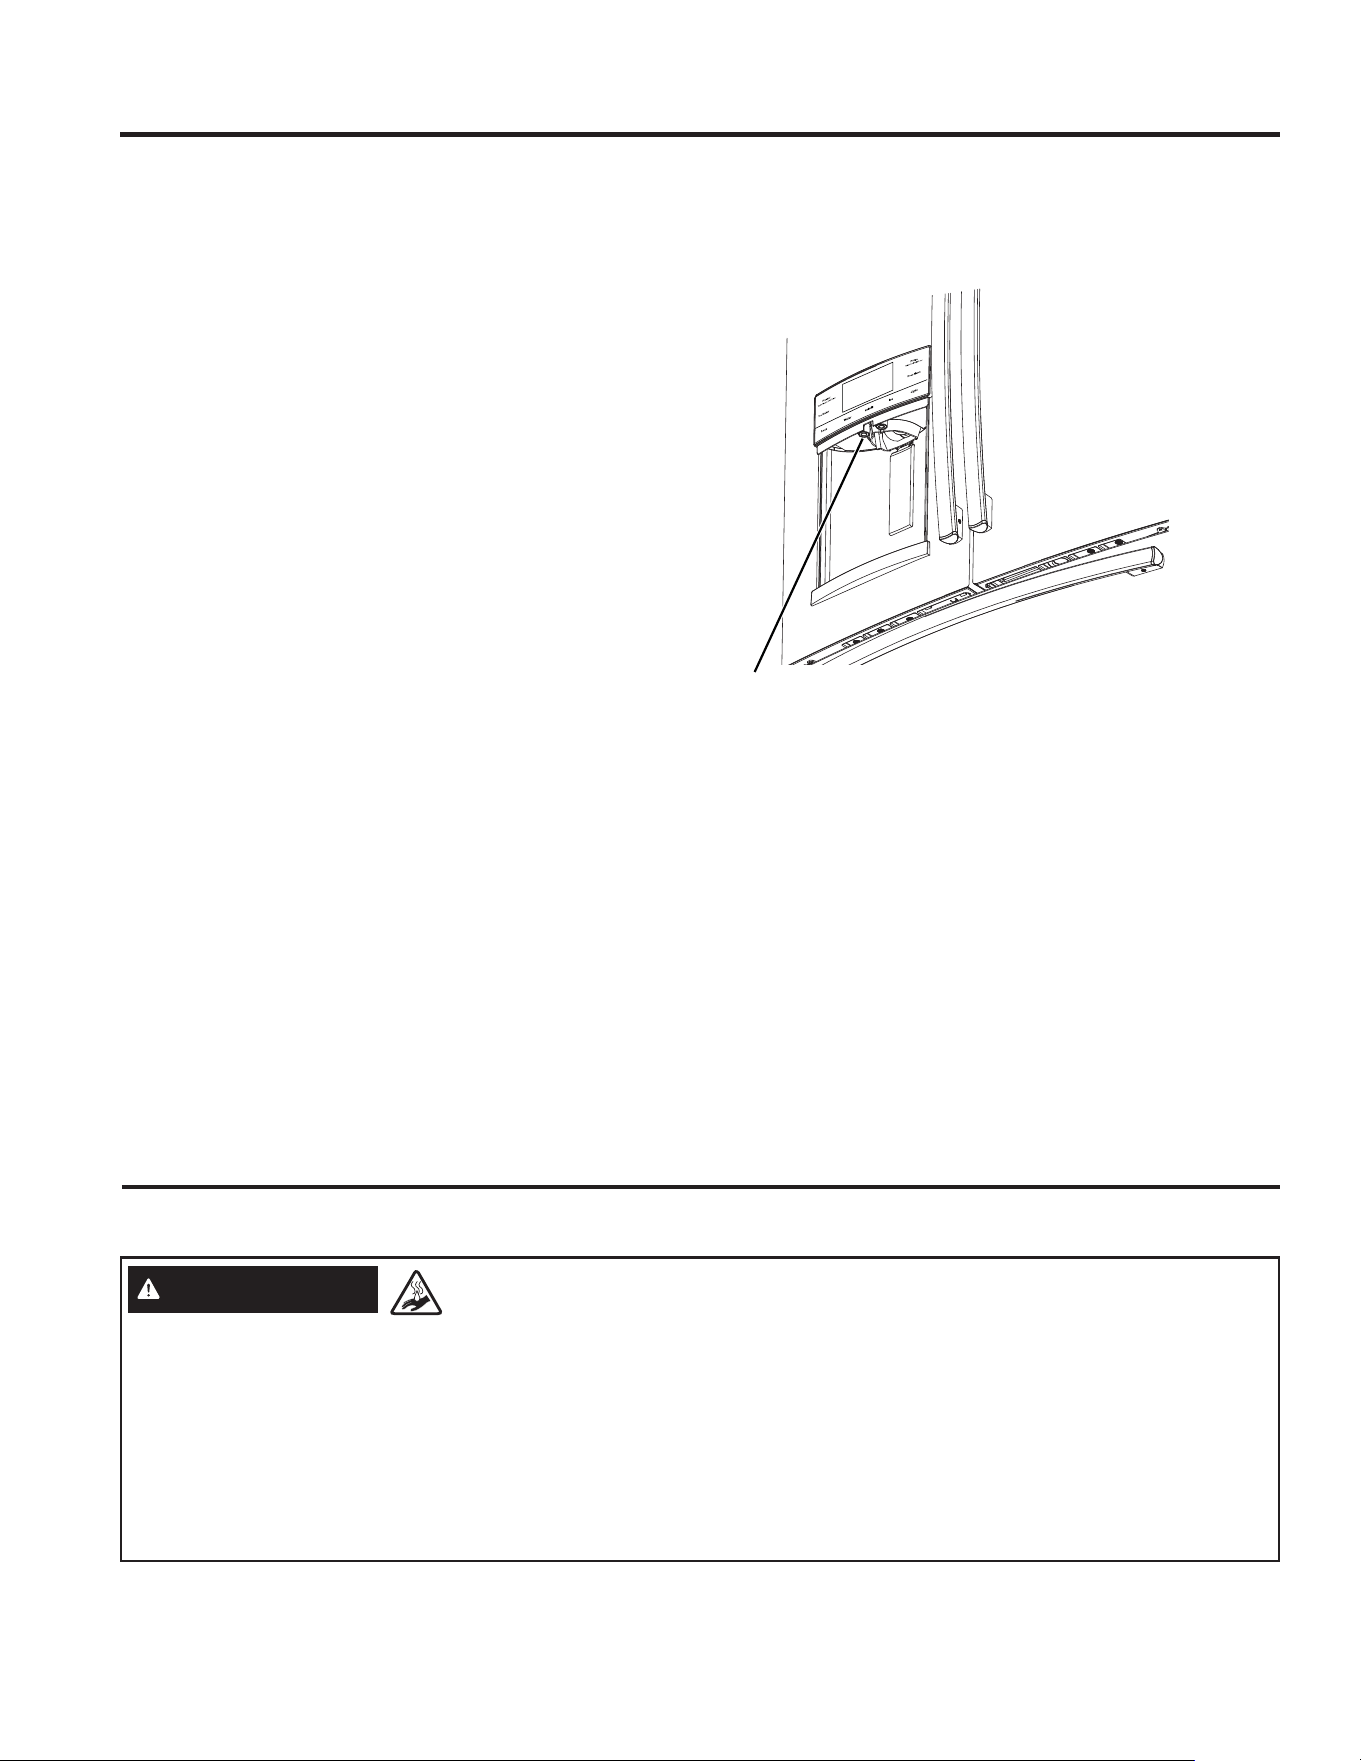
14 49-60792 Rev. 3
Para Usar LLENADO AUTOMÁTICO CON MANOS LIBRES:
• Centre el envase en la Bandeja del Dispensador con la
Depresión tan atrás como sea posible, sin activar la paleta, y
retire la mano del envase.
• Presione AUTO FILL//(1$'2$8720È7,&2
Para Detener AUTO FILL (LLENADO
AUTOMÁTICO)
• 3UHVLRQH$872),///OHQDGR$XWRPiWLFRKDVWDTXHVH
detenga.
Factor Importante acerca del LLENADO
AUTOMÁTICO
• Para obtener resultados óptimos, use un envase uniforme
entre 10-20 cm (4 y 8”) de alto y entre 5-15 cm (2 y 6”) de
ancho. El envase ser tan alto como los sensores inferiores.
• El nivel y funcionalidad del llenado pueden variar en envases
más altos que 20 cm (8”) o más anchos que 15 cm (6”).
• Los volúmenes de los envases podrán variar; si aparece el
PHQVDMHGHHUURU(QYDVH1R(QFRQWUDGR´LQWHQWHXVDUXQ
envase diferente.
• El tiempo de AUTO FILL//(1$'2$8720È7,&2
concluirá.
• Las manijas, sorbete y decoraciones sobre el borde del
envase podrán ocasionar desbordes o variaciones en los
volúmenes de llenado.
• Se podrán producir salpicaduras dependiendo de la
ubicación del envase, el nivel de flujo del agua, la forma del
envase, y los cubos de hielo.
• Conserve los sensores limpios con una tela húmeda y
limpia, y no rocíe líquido ni limpiadores directamente sobre
los sensores.
• AUTO FILL//(1$'2$8720È7,&2IXQFLRQDPHMRUFRQ
una presión de agua del hogar de 414 a 689 kPa (40 a 100
psi).
• El hielo en el envase puede afectar el volumen de llenado.
Si se experimentan problemas, use menos hielo
Sensores
*Modelos Selectos Únicamente
Una Sola Cápsula Keurig*
ADVERTENCIA
Riesgo de Escaldadura.
• El agua proveniente del dispensador es muy caliente y
puede ocasionar escaldaduras o quemaduras. Lea todas las
advertencias antes del uso. (Lea la página 5).
1RSHUPLWDTXHORVQLxRVXVHQODFDIHWHUD
• Siempre use un recipiente adecuado para líquidos calientes
(cerámica, gomaespuma, etc.)
1RUHDOLFHODHODERUDFLyQHQXQDWD]DGHYLGULR(VWRSRGUi
hacer que el vidrio se fisure o rompa.
• Si vive a más de 5000 pies (1524 litos), presione Fridge
(Refrigerador) y Door Alarm (Alarma de la Puerta) y el
control realizará ciclos desde Altitud Baja (Lo AL) a Altitud
Elevada (Hi AL).
12XVHHOGLVSHQVDGRUGHDJXDFDOLHQWHGHIRUPDLQPHGLDWD
luego de instalar un nuevo filtro de agua, ya que esto puede
hacer que el agua caliente se chorree. Dispense agua fría
durante aproximadamente 5 minutos para purgar el aire del
sistema antes de dispensar agua caliente.
Hechos Importantes sobre el AGUA CALIENTE
AUTOFILL (Llenado Automático)*
OPERACIÓN DEL REFRIGERADORE:$872),//8QD6ROD&iSVXOD.HXULJ
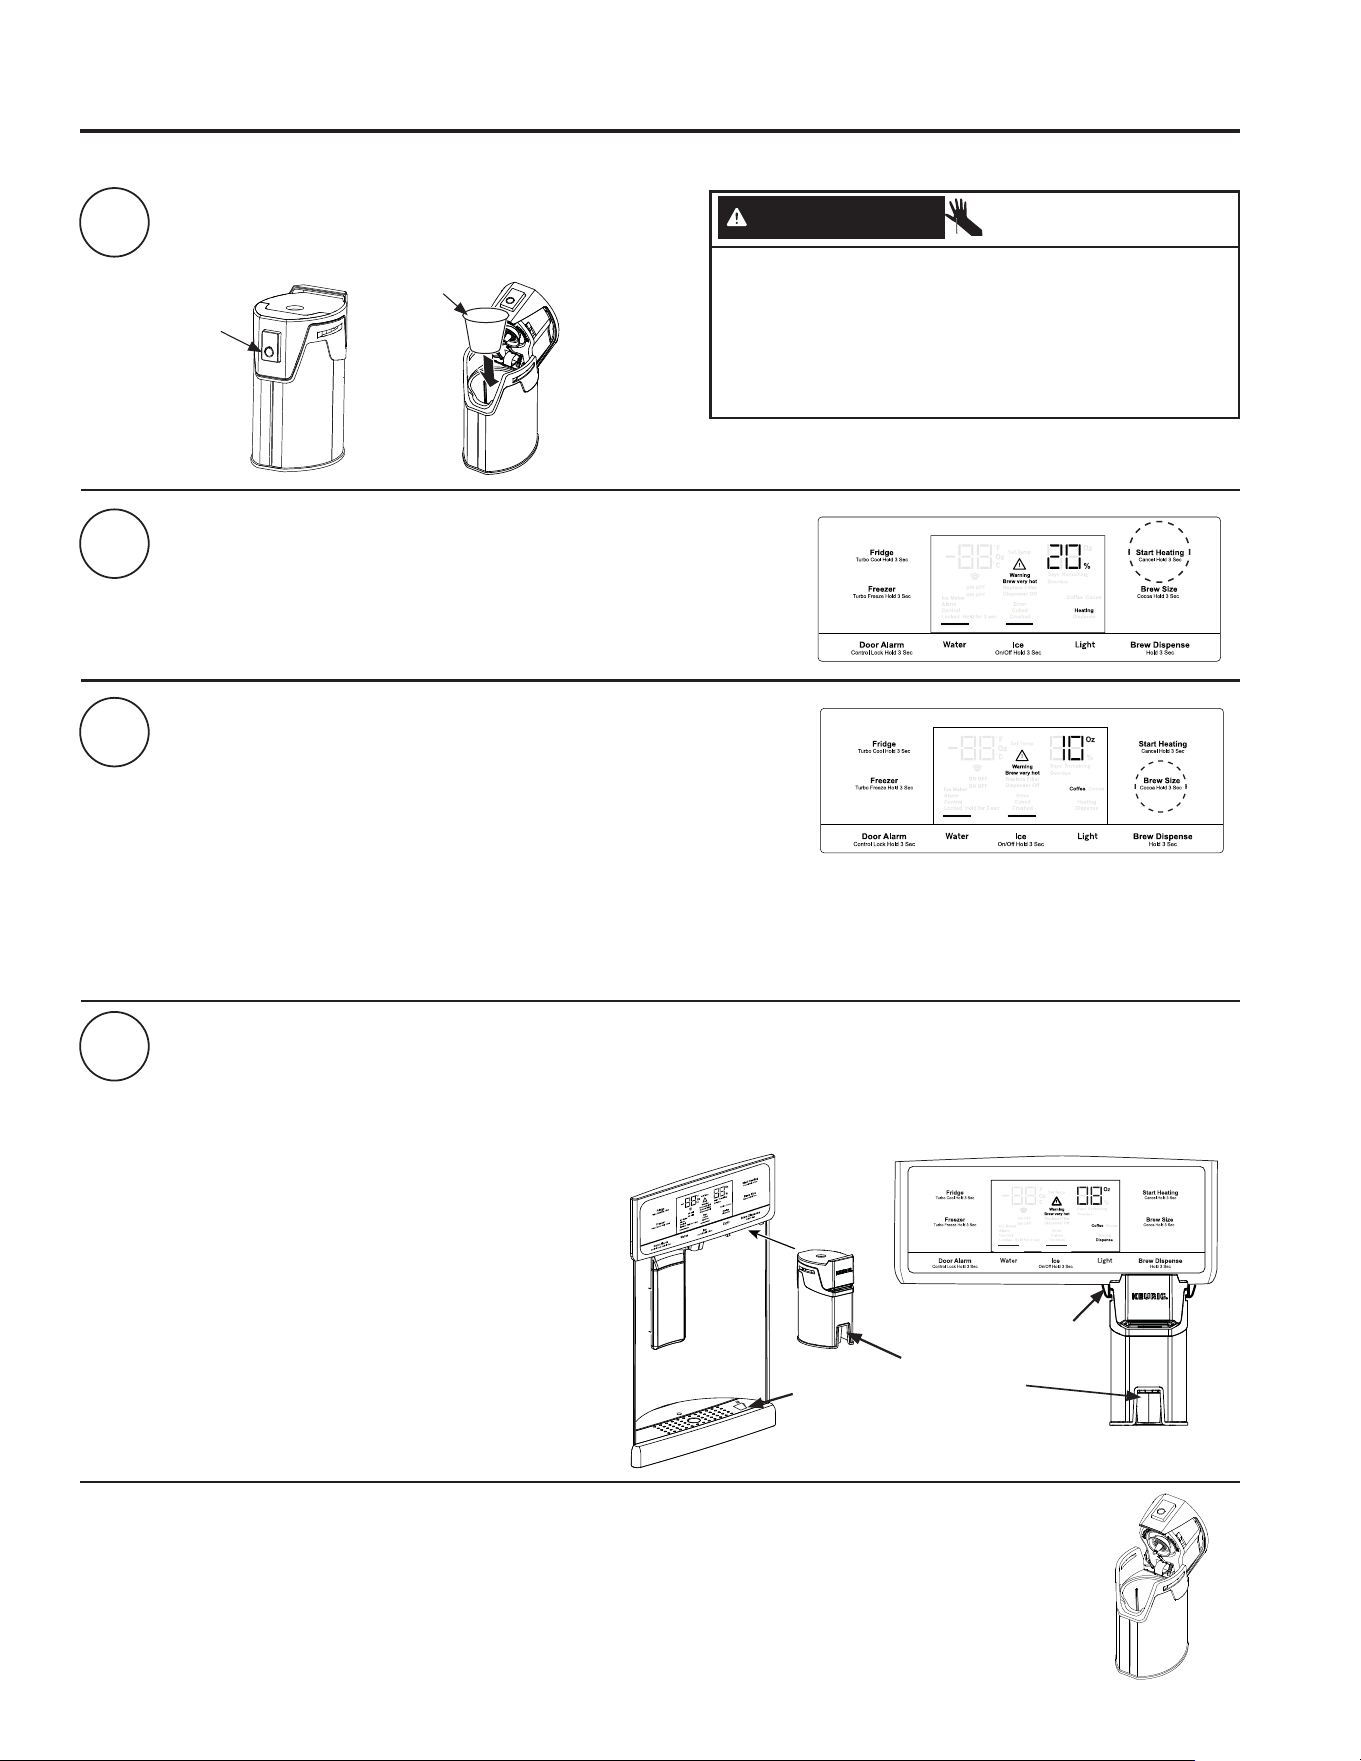
49-60792 Rev. 3 15
OPERACIÓN DEL REFRIGERADORE: Una Sola Cápsula Keurig*
*Modelos Selectos Únicamente
Presione
para abrir
1
2
3
Cargue la Cápsula K.
Inserte la Cápsula Keurig en la cafetera y presione hacia
abajo de manera firme (escuchará un sonido de estallido).
Dos Formas de Preparación
1. Presione el botón Start Heating (Comenzar a Calentar).
2
2. Inicie el calentamiento con la Aplicación GE Kitchen. Descargue
OD$SOLFDFLyQ³*(.LWFKHQ´3DUDPiVLQIRUPDFLyQYLVLWHZZZ
GEAppliances.com/connect.**
4
Dispensar
Una vez que el proceso se haya completado, la luz de Dispense (Dispensar) titilará en la pantalla.
Para dispensar, deslice la cafetera sobre los rieles. Asegúrese de que la cafetera sea empujada totalmente dentro
del soporte. Coloque el tazón en el ícono del tazón en la bandeja de goteo, debajo de la boca de preparación roja.
Mantenga presionado el botón Brew Dispense (Dispensar la Preparación) durante 3 segundos hasta que escuche que
el dispensador se activa.
Limpieza de la cafetera
Ŷ
La cafetera para cápsulas K es de uso seguro en el estante superior del lavavajillas.
Ŷ
Se recomienda enjuaguar la misma completamente luego del lavado, a fin de eliminar todos los residuos de jabón.
Ŷ
Se recomienda la limpieza periódica del área de separación entre el dispensador y los muebles, ya que se pueden
producir manchas por el uso de la cafetera con cápsulas.
K-Cup
Cierre la cafe-
tera.
La tapa hará
clic cuando esté
asegurada.
Cambie el Tamaño de la Preparación
Presione el botón Brew Size (Tamaño de la Preparación) en cualquier
momento durante el ciclo de calentamiento, para elegir entre 6, 8 y 10
onzas. El tamaño por omisión es de 8 onzas. Asegúrese de que la taza
usada sea lo suficientemente grande para el tamaño seleccionado.
NOTA: Mantenga presionado el botón Brew Size (Tamaño de la
Preparación) durante 3 segundos para variar entre Coffee (Café) y
Cocoa (Cacao). La función por omisión es Coffee (Café).
NOTA: Para abortar el ciclo de calentamiento, mantenga presionado el botón Start Heating (Iniciar Calentamiento)
durante 3 segundos. Para abortar el ciclo para dispensar la preparación, mantenga presionado el botón Start Heating
(Iniciar Calentamiento) durante 3 segundos, presione la paleta, presione cualquier botón de la pantalla además de Brew
Size (Tamaño de la Preparación) o Brew Dispense (Dispensar la Preparación), o abra la puerta de comidas frescas
derecha.
Boca de
preparación
roja para
alinear la taza
Ícono de la
taza para
su ubica-
ción
Rieles de
la cafetera
** Para clientes en Estados Unidos y sus territorios
Uso del dispensador para servir de forma individual
Elaboración con Una Sola Cápsula Keurig*
PRECAUCIÓN
Riesgo de Corte/ Punción
• Dentro de la cafetera con cápsulas hay dos agujas
filosas. A fin de evitar riesgos de lesiones, no coloque
los dedos dentro de la cafetera. Tenga cuidado al
realizar la limpieza.
• Mantenga la cafetera con cápsula fuera del alcance
de los niños, ya que podrán sufrir lesiones al usar la
misma de forma incorrecta.

16 49-60792 Rev. 3
GE WiFi Connect **
(Para EE.UU., Territorios de EE.UU., y Canadá Únicamente)
GE WiFi Connect Permitido* (sólo los modelos PFE28P, PFD28,
PYD22, PYE22P, PFH)
Si su refrigerador cuenta con una etiqueta con información del Electrodoméstico Conectado ubicada
en la parte interior como se muestra, su refrigerador puede ser conectado a su red Wifi, permitiendo
que se comunique a su teléfono inteligente para realizar monitoreo remoto, control y notificaciones.
Dependiendo de cuál sea el modelo de su refrigerador, también puede contar con una tarjeta de
comunicación Wifi incorporada en el producto, o un puerto para el Módulo Wifi ConnectPlus externo
(se vende por separado). Para conocer más sobre las funciones del electrodoméstico conectado,
visite www.GEAppliances.com/connect, y para saber qué aplicaciones de
electrodomésticos conectados funcionarán con su Teléfono Inteligente. **
Para usar su WiFi, presione Water (Agua) y Light (Luz) en el panel de control.
INFORMACIÓN REGULATORIA
Declaración de Cumplimiento con FCC/IC:
(VWHGLVSRVLWLYRFXPSOHFRQOD3DUWHGHOD1RUPDWLYDGHOD)&&6XIXQFLRQDPLHQWRHVWiVXMHWRDODVGRVFRQGLFLRQHV
siguientes:
1. Este dispositivo no podrá causar interferencias perjudiciales.
2. Este dispositivo debe aceptar cualquier interferencia recibida, incluidas las interferencias que puedan provocar un
funcionamiento no deseado.
Este equipo fue probado y cumple con los límites establecidos para un dispositivo digital de clase B, según la parte 15 de la
1RUPDWLYDGHOD)&&(VWHSURGXFWRIXHSUREDGR\FXPSOHFRQORVOtPLWHVHVWDEOHFLGRVSDUDXQGLVSRVLWLYRGLJLWDOGH&ODVH
%VHJ~QODSDUWHGHOD1RUPDWLYDGHOD)&&(VWHHTXLSRJHQHUDXVD\SXHGHHPLWLUHQHUJtDGHUDGLRIUHFXHQFLD\VLQR
se instala y utiliza de acuerdo con las instrucciones, puede ocasionar interferencias perjudiciales sobre las comunicaciones
radiales. Sin embargo, no se garantiza que no se presenten interferencias en una instalación en particular. Si el equipo provoca
interferencias perjudiciales para la recepción de radio o televisión, lo que puede comprobar encendiendo y apagando el equipo,
se aconseja al usuario que intente corregir la interferencia a través de una de las siguientes medidas:
• Reoriente o reubique la antena receptora.
• Aumente la separación entre el equipo y el receptor.
• Conecte el equipo a un tomacorriente de un circuito diferente al tomacorriente al cual se encuentra conectado el receptor.
• Para solicitar ayuda, consulte al proveedor minorista o a un técnico experimentado de radio/ TV.
Etiqueta: Las modificaciones sobre esta unidad no aprobadas expresamente por parte del fabricante podrían anular la autoridad
del usuario para utilizar el equipo.
Sólo el módulo ConnectPlus (o un módulo de comunicación similar)
Exposición a RF – Sólo se autoriza el uso de este dispositivo a través de una aplicación móvil. Se deberá mantener en todo
momento una distancia de separación mínima de 20 cm. entre el dispositivo ConnectPlus y el cuerpo del usuario.
GE WiFi Connect Opcional*
Su refrigerador es compatible con GE WiFi Connect usando el módulo GE ConnectPlus provisto con su refrigerador. Para
conectar este electrodoméstico a Internet, es necesario que conecte el módulo a su electrodoméstico a través del puerto de
comunicación del electrodoméstico. El GE ConnectPlus permitirá que su electrodoméstico tenga comunicación con su teléfono
inteligente para un monitoreo remoto, control y notificaciones. Para aprender más sobre las funciones del electrodoméstico
conectado, para saber qué aplicaciones del electrodoméstico conectado funcionarán con su teléfono inteligente y para saber
dónde puede adquierir un GE ConnectPlus, visite www.GEAppliances.com/connect.**
Conectividad WiFi: Para solicitar asistencia en relación a su electrodoméstico o sobre la conectividad de red ConnectPlus (para
modelos con WiFi permitido o Wifi opcional), comuníquese al 1-800-220-6899.
Comunicación del Electrodoméstico
*Modelos Selectos Únicamente **Para EE.UU., Territorios de EE.UU., y Canadá Únicamente
(Para clientes en Estados
Unidos y sus territorios)
OPERACIÓN DEL REFRIGERADORE: Comunicación del Electrodoméstico

49-60792 Rev. 3 17
OPERACIÓN DEL REFRIGERADORE: Cartucho del Filtro de Agua - RPWFE
Cartucho del Filtro de Agua - RPWFE
Cartucho del Filtro de Agua
El cartucho del filtro de agua está ubicado en el interior de los
alimentos frescos en la pared del lado izquierdo, cerca de la
parte superior.
Modelos selectos utilizan identificación por frecuencia radial
(RFID, según sus siglas en inglés) para detectar goteras
y monitorear el estado del filtro. La tecnología RFID está
certificada por la FCC.
Cuándo es necesario reemplazar el cartucho del filtro
El cartucho del filtro se debe reemplazar cada seis meses
o antes si 170 galones (643.52 litros) de agua fueron
dispensados o el flujo de agua al dispensador o la máquina de
hielos se ve reducido.
Modelos con Pantalla Táctil: Un mensaje del estado del filtro
aparecerá en la pantalla cuando sea necesario reemplazar
el filtro de agua. El estado del filtro se actualizará de forma
automática cuando el filtro sea reemplazado.
Modelos sin Pantalla Táctil: Una luz del indicador del filtro se
iluminará en la pantalla cuando sea necesario reemplazar el
filtro de agua.
Cómo quitar el cartucho del filtro/tapón de
bypass
1. Quite el cartucho antiguo o el tapón de bypass abriendo la
tapa del filtro y jalando de
la base del cartucho/tapón
de bypass para destrabarlo
de los ganchos del filtro.
Jale el cartucho/tapón de
bypass hacia afuera hasta
oír el ‘click’ del soporte del cartucho enganchándose con el
soporte.
2. Gire el cartucho/tapón de bypass en un cuarto de giro en
sentido contrario a las agujas del reloj. Después de girar,
quite el cartucho/tapón de bypass tirándolo en sentido
contrario del soporte del cartucho. Puede chorrear una
pequeña cantidad de agua.
Cómo instalar el cartucho del filtro/tapón de
bypass
1. Alinee el cartucho del filtro/tapón de bypass con el soporte
GHOFDUWXFKRFRQODSDODEUD³)5217´RULHQWDGDKDFLDOD
parte superior de la unidad. Empuje el cartucho/tapón de
bypass hacia la parte trasera de la unidad hasta que quede
bien en su lugar. Gire el cartucho del filtro/tapón de bypass
en un cuarto de giro en sentido de las agujas del reloj, hasta
TXHODSDODEUD³)5217´TXHGHRULHQWDGDKDFLDDIXHUD
2. Mientras verifica que el cartucho/tapón de bypass esté bien
instalado en el soporte, desplace suavemente el filtro hacia
adentro hasta que quede en su posición. Si el filtro no se
desplaza fácilmente, verifique que el filtro esté alineado
correctamente y bien colocado dentro del soporte del
FDUWXFKR/RVLQGLFDGRUHV52-26QRGHEHQYHUVH
NOTA: Es
normal que el agua se vea descolorida durante
el flujo inicial del sistema. El color del agua regresará a su
estado normal luego de unos pocos minutos de comenzar a
dispensar.
Tapón de Bypass del Filtro
A fin de reducir el riesgo de daños sobre la propiedad debido a
SpUGLGDVGHDJXDXVWHG'(%(5ÈXVDUHOWDSyQGHOE\SDVVGHO
filtro cuando no se disponga de un reemplazo del cartucho del
filtro. Algunos modelos no vienen equipados con el tapón del
filtro del bypass. A fin de obtener un tapón del filtro del bypass,
comuníquese al 800-GECARES. En Canadá, comuníquese
al 800.561.3344. El dispensador y la máquina de hielos no
funcionarán si el filtro o el tapón del bypass del filtro no están
instalados. El tapón del bypass se instala del mismo modo que
un cartucho del filtro.
ADVERTENCIA
RIESGO
DE ESCALDADURA.**
Usar el dispensador de agua caliente antes de purgar el
aire del sistema podrá generar chorreos de agua caliente
y ocasionar escaldaduras con agua caliente. Siga las
instrucciones anteriores sobre cómo purgar todo el aire del
sistema, a través del dispensador de agua fría antes de usar el
dispensador de agua caliente.
ADVERTENCIA
A fin de reducir el riesgo asociado con asfixia, no permita que los niños menores de 3 años
tengan acceso a las partes pequeñas durante la instalación de este producto. El cartucho del filtro descartable deberá
ser reemplazado cada 6 meses luego de agotar su capacidad, o antes si se produce una reducción notoria en el caudal.
Para obtener el máximo beneficio de su sistema de filtrado, GE Appliances, a Haier company, recomienda el uso de los filtros
de la marca GE Appliances únicamente. El uso de filtros de la marca GE Appliances en refrigeradores CAFÉ brinda un óptimo
IXQFLRQDPLHQWR\FRQILDELOLGDG/RVILOWURVQXHVWUDFXPSOHQFRQULJXURVRVHVWiQGDUHV16)GHODLQGXVWULDVREUHVHJXULGDG\
calidad, que son importantes para los productos que están filtrando su agua. 1RJDUDQWL]DPRVTXHORVILOWURVGHRWUDVPDUFDVTXH
no
sean de GE Appliances cumplan con nuestras normas de calidad, desempeño y confiabilidad.
Ante cualquier consulta, o para ordenar cartuchos de filtros adicionales,
visite nuestro sitio Web en cafeappliances.com/
service. Los clientes de Canadá deberán visite nuestro sitio Web en cafeappliances.ca/service o buscar el Centro de
Servicio Técnico Camco en las páginas amarillas.
FRONT
3
4
Los indicadores
rojos no deben
verse
1
2
*Modelos Selectos Únicamente
FCCID: ZKJ-EBX1532P001 ICID: 10229A-EBX1532P001
“Este dispositivo cumple con la Parte 15 de la Normativa de
la FCC. Su funcionamiento está sujeto a las dos condiciones
siguientes:. (1) Este dispositivo no podrá ocasionar
interferencias nocivas, y (2) este dispositivo debe aceptar
cualquier interferencia recibida, incluyendo interferencias que
puedan ocasionar un funcionamiento no deseado”.
“Este dispositivo cumple el estándar(es) de exención
de licencia de la RSS de la Industria de Canadá. Su
funcionamiento está sujeto a las dos condiciones siguientes:
(1) Este dispositivo no podrá ocasionar interferencias, y
(2) este dispositivo debe aceptar cualquier interferencia
recibida, incluyendo interferencias que puedan ocasionar un
funcionamiento no deseado”.
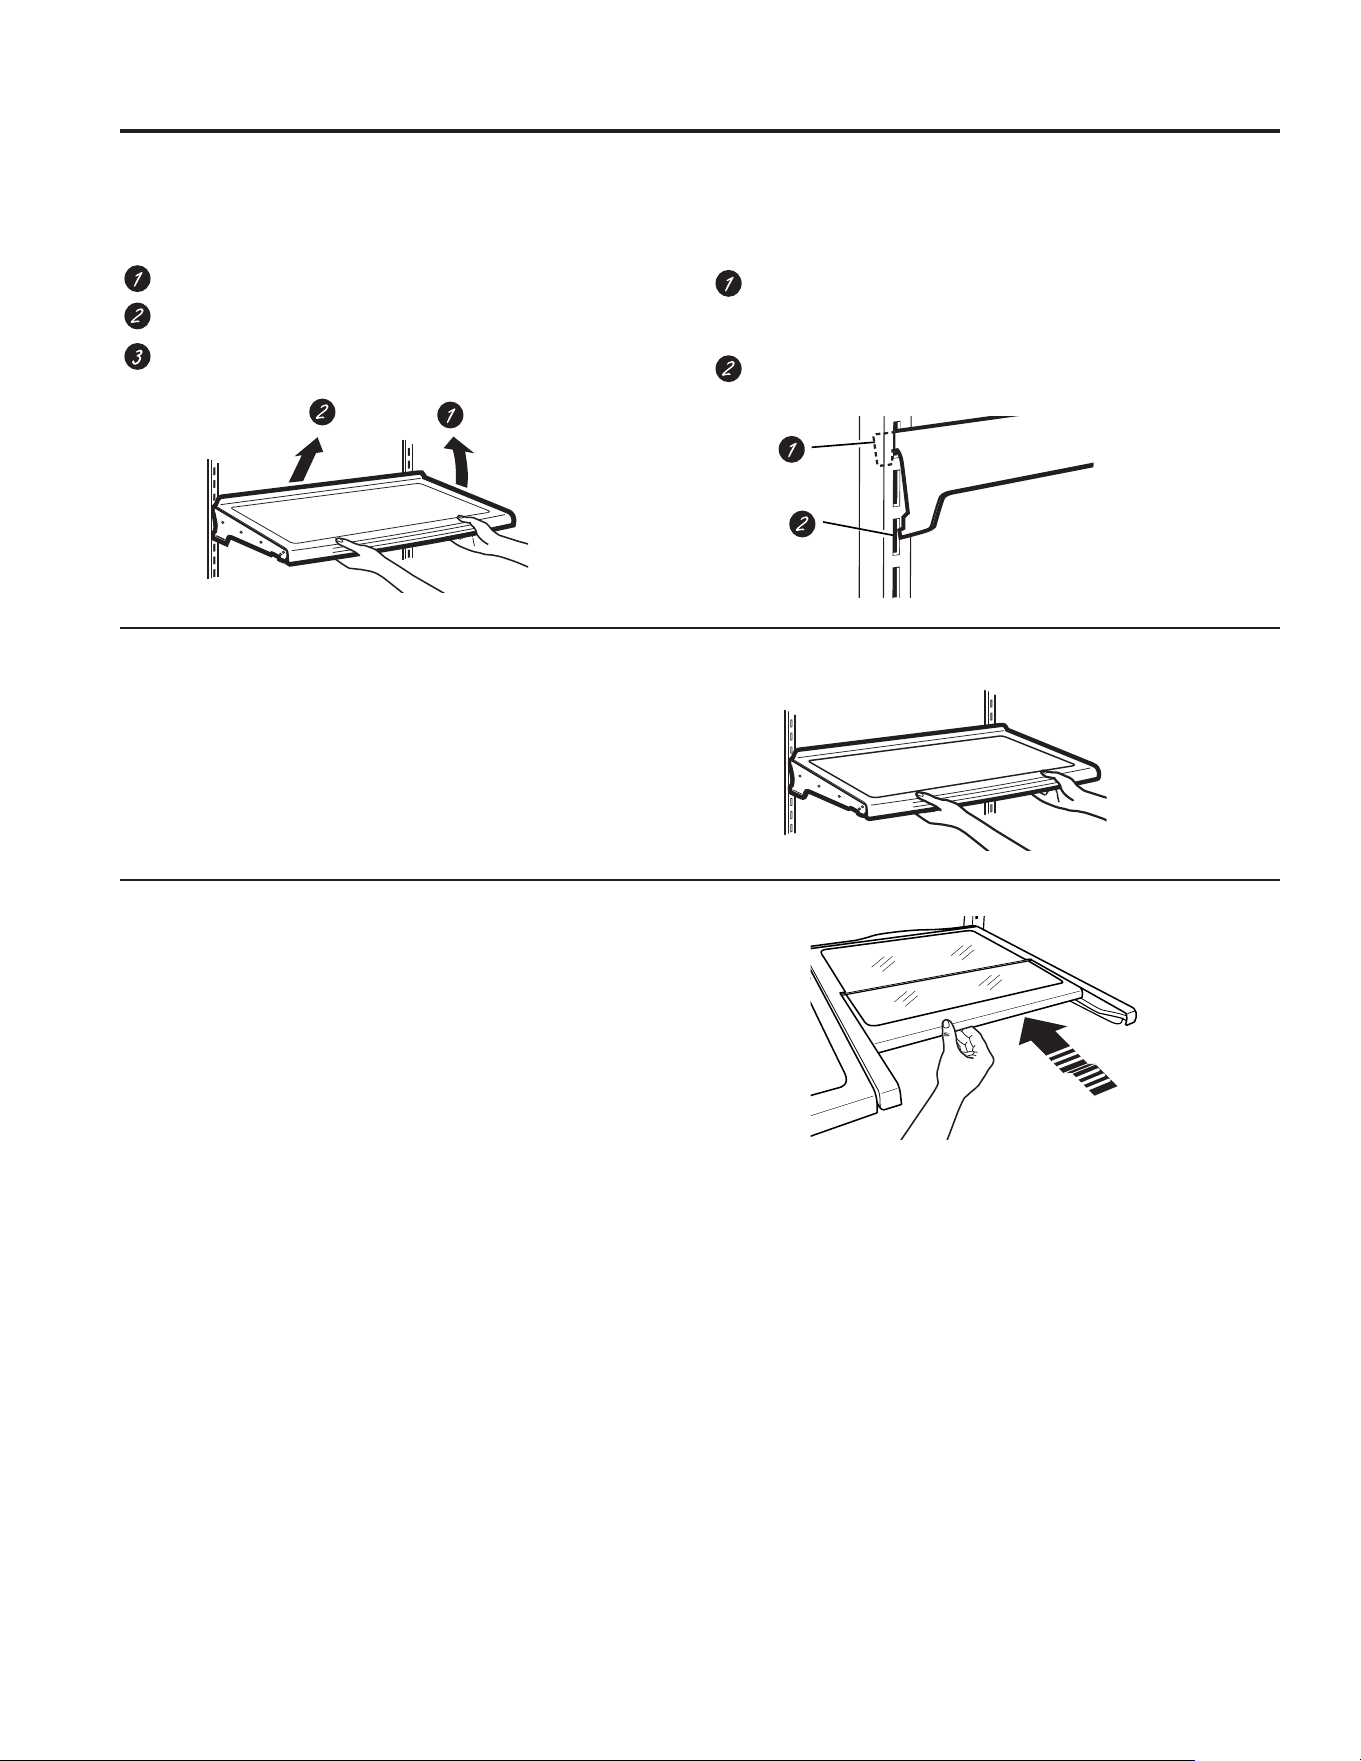
18 49-60792 Rev. 3
Opciones de almacenamiento de comidas frescas
Cómo Reorganizar los Estantes
Los estantes del compartimiento del refrigerador son ajustables.
Para retirar:
Retire todos los artículos del estante.
Incline el estante hacia arriba en la parte frontal.
Levante el estante hacia arriba desde la parte trasera y
retire el mismo.
Para reemplazar:
Al inclinar el estante hacia arriba, inserte el gancho
superior en la parte trasera del estante en una ranura del
soporte.
Incline hacia abajo la parte frontal del estante, hasta que
la parte inferior del mismo quede bloqueada.
Estantes a Prueba de Derrames
Los estantes a prueba de derrames poseen extremos
especiales que ayudan a evitar derrames sobre estantes
inferiores.
Estante Quick Space*
Este estante se divide a la mitad y se desliza por debajo de sí
mismo para almacenar productos altos en el estante de abajo.
Este estante puede ser retirado y reemplazado o reubicado (al
igual que los estantes a prueba de derrames).
NOTA: La mitad trasera del Estante Quick Space no es ajustable.
*Modelos Selectos Únicamente
OPERACIÓN DEL REFRIGERADORE:2SFLRQHVGHDOPDFHQDPLHQWR
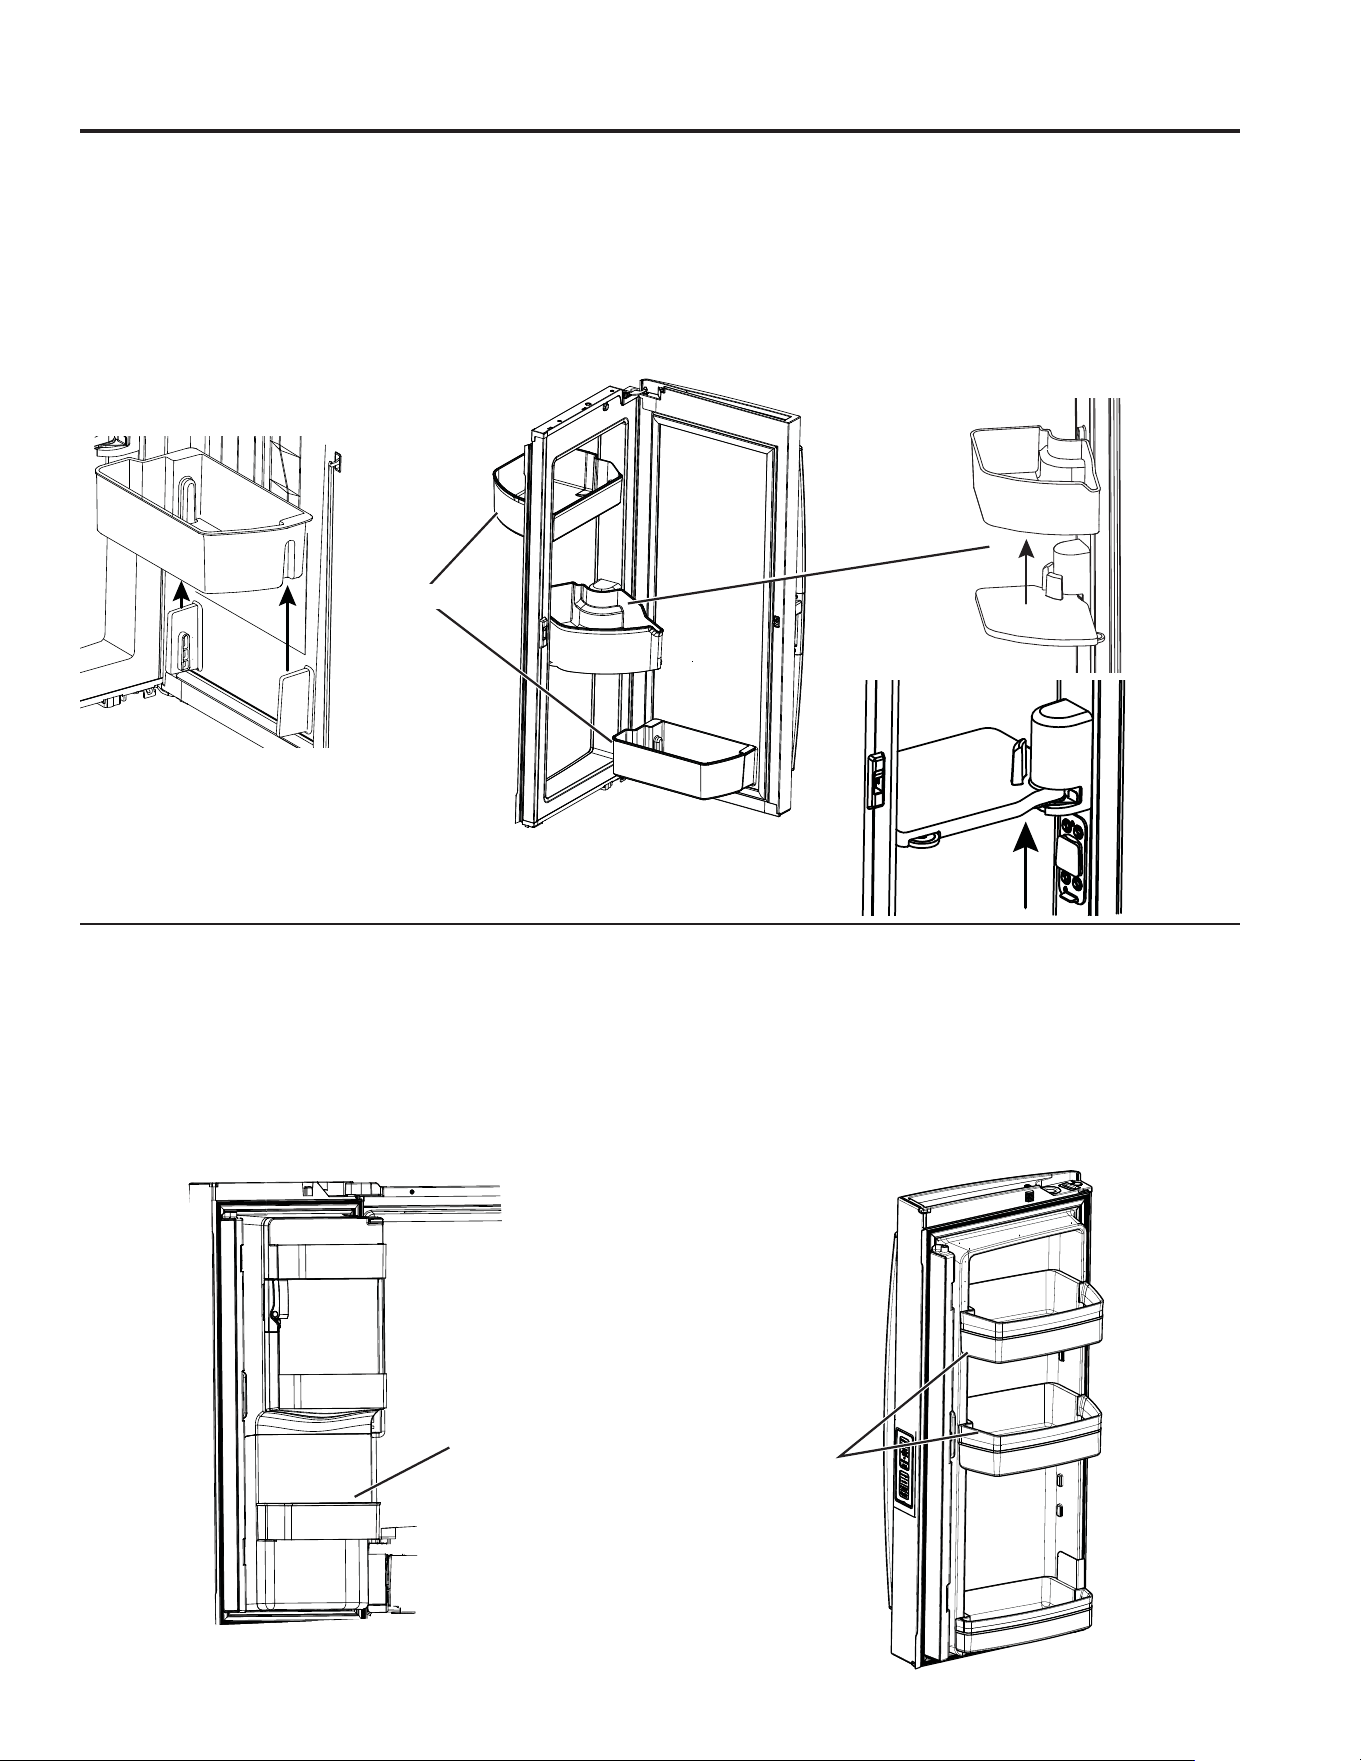
49-60792 Rev. 3 19
OPERACIÓN DEL REFRIGERADORE:2SFLRQHVGHDOPDFHQDPLHQWR
*Modelos Selectos Únicamente
Opciones de almacenamiento de comidas frescas
Bandejas de la Puerta Izquierda
MODELOS CON DISPENSADOR – BANDEJA FIJA*
Para retirar el mismo: Levante el recipiente de forma recta y
luego empuje hacia afuera.
Las bandejas de la puerta de la máquina de hielos no son
intercambiables; observe la ubicación al retirar el mismo y
reemplace la bandeja en su ubicación correcta.
MODELOS SIN DISPENSADOR – BANDEJAS
AJUSTABLES*
Las bandejas ajustables se pueden mover fácilmente hacia
arriba o hacia abajo dentro de la puerta, para dar mayor
flexibilidad al almacenamiento.
Para retirar el mismo: Levante
el recipiente de forma recta y
luego empuje hacia afuera.
Bandejas de la Puerta Derecha
Las BANDEJAS FIJAS pueden ser llevadas fácilmente del
refrigerador al área de trabajo.
Para retirar el mismo: Levante el recipiente de forma recta y
luego empuje hacia afuera.
BANDEJA GIRATORIA:
Para retirar: Gire la bandeja hacia afuera y luego levante la
misma de forma recta. Para retirar, coloque la mano debajo de
la base metálica y levante la misma.
Para retirar la Base Metálica: Coloque la mano debajo de la
base metálica y levante la misma.
Bandejas Fijas
Bandeja Fija
Bandejas Ajustables
Retire la
Bandeja
Giratoria
Retire las Bandejas Fijas
Retire
la Base
Metálica
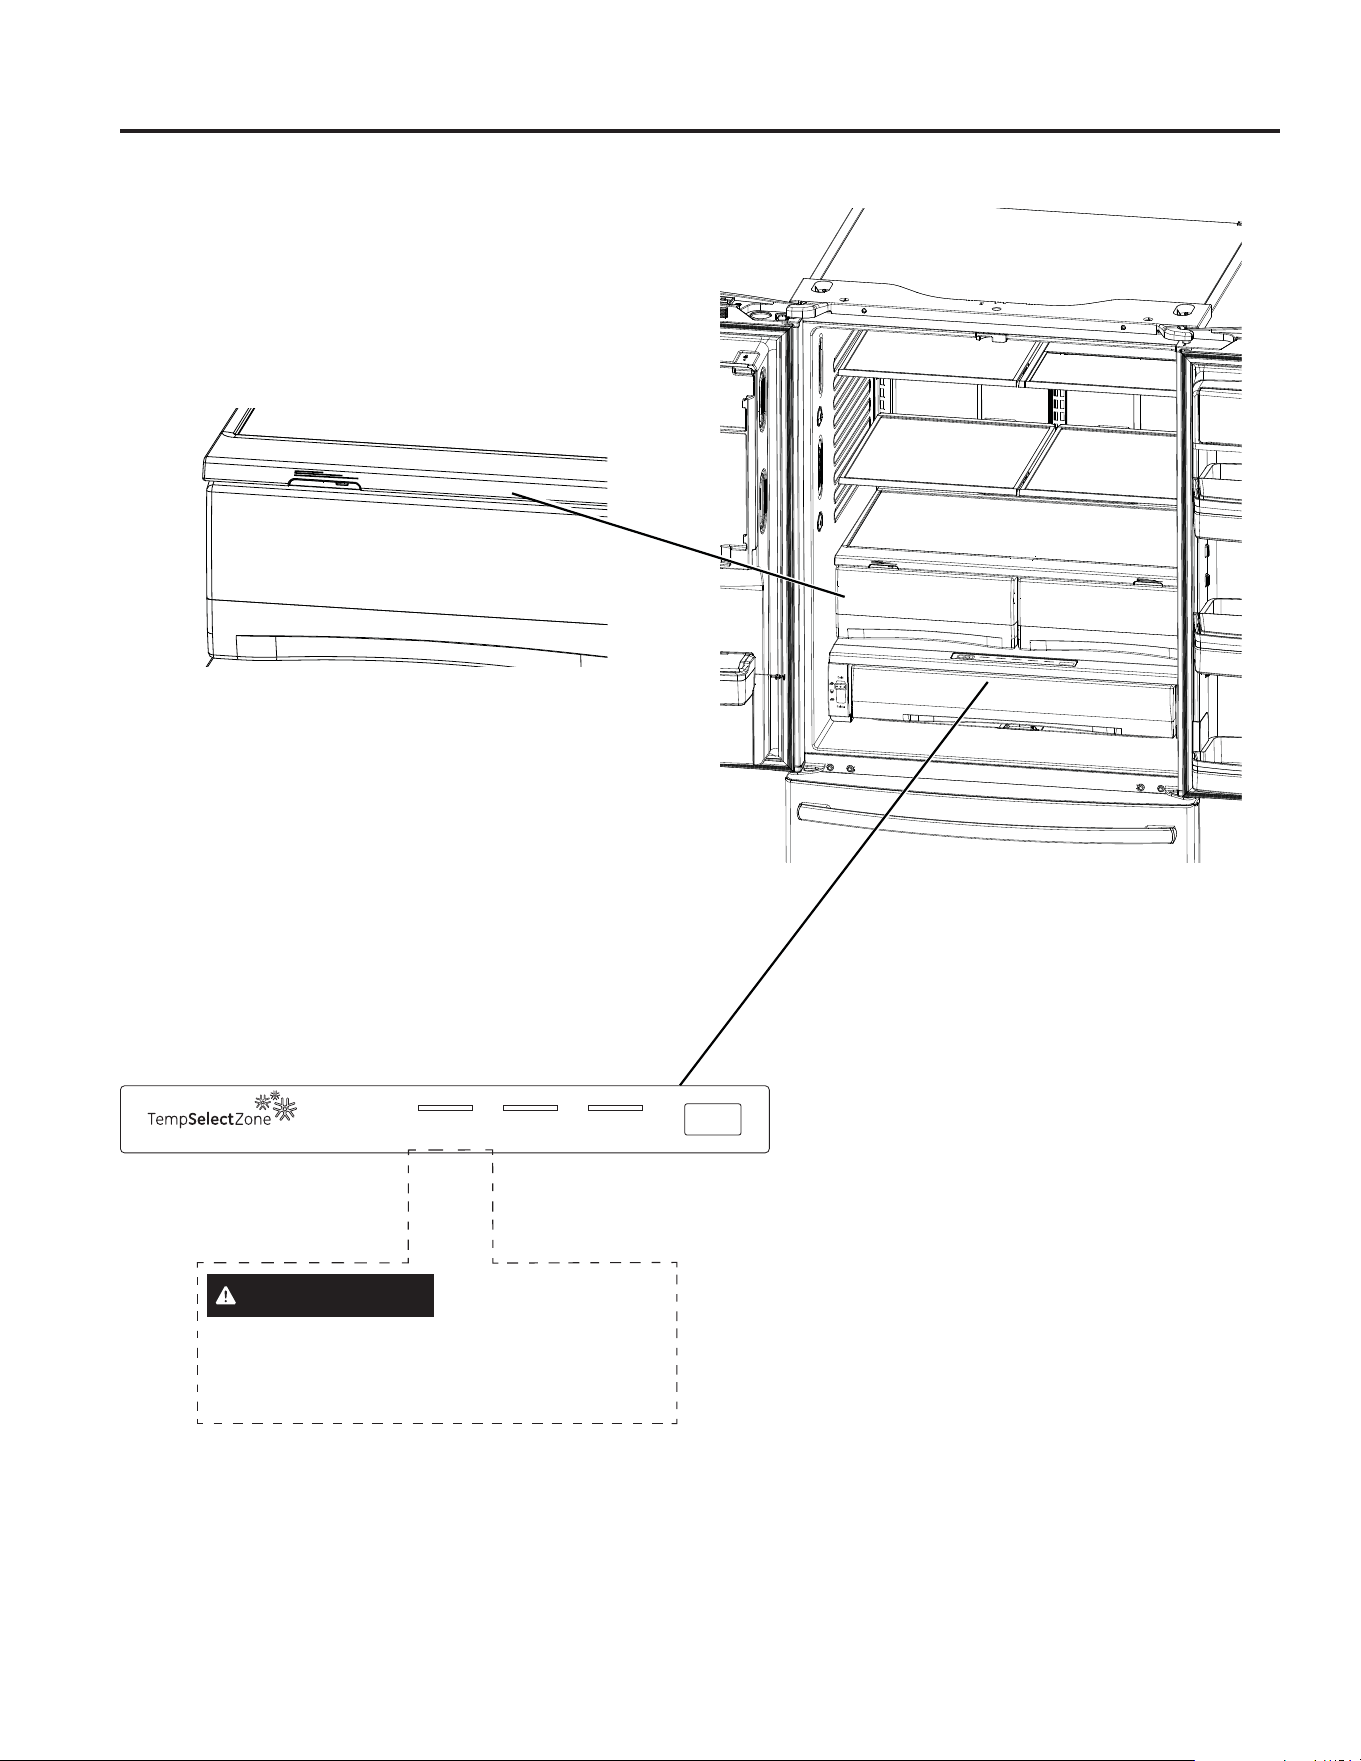
20 49-60792 Rev. 3
C
Fruits Vegetables
F
C
M
EAT
DELI
P
R
ODU
C
E
C
H
E
ESE
CI
TRU
S
SELEC
T
ClimateZone
Fruits Vegetables
Fruits Vege
D
*Modelos Selectos Únicamente
32° 34° 38°
Nota: Las temperaturas indican las temperaturas
adecuadas para la comida y la temperatura real
puede variar de acuerdo con el funcionamiento
normal y otros factores tales como aperturas de
puertas y el punto de configuración de comidas
frescas.
Meat Beverage Deli
Select
Climate Zone & Cajón con Control de Temperatura
ClimateZone
Mantenga las frutas y verduras organizadas en
compartimientos separados para un fácil acceso.
El exceso de agua que se puede acumular en la parte inferior
de los cajones o debajo de los mismos se deberá limpiar.
Cajón con Control de Temperatura*
El Cajón con Control de Temperatura es un cajón de anchura
completa con control de temperatura ajustable. Este cajón
puede ser usado para productos grandes de tipos variados.
Para cambiar la configuración, presione el botón de selección.
PRECAUCIÓN
Riesgo de Laceración.
1RJXDUGHERWHOODVGHYLGULRHQHVWDXELFDFLyQ6L
están congeladas, se podrán romper y producir
lesiones personales.
OPERACIÓN DEL REFRIGERADORE: Climate Zone & Cajón

49-60792 Rev. 3 21
OPERACIÓN DEL REFRIGERADORE: Climate Zone & Cajón
Divisor
*Modelos Selectos Únicamente
Cómo Retirar y Reemplazar el Cajón Ajustable
Para retirar:
Empuje el cajón fuera de su posición final.
Levante la parte frontal del cajón hacia arriba y hacia afuera.
Para reemplazar:
Empuje los costados izquierdo y derecho hasta que estén
completamente extendidos.
Primero vuelva a colocar el cajón nuevamente y gire el mismo
del frente hacia abajo para que se apoye en el deslizador.
Empuje el cajón hacia adentro hasta la posición cerrada.
Cómo Retirar y Reemplazar el Divisor
del Cajón*
Para retirar:
Empuje el cajón fuera de su posición final.
Levante el lado frontal del divisor para desenganchar
el mismo de la pared trasera del cajón.
Para reemplazar:
Enganche la parte trasera del divisor a la pared
trasera del cajón.
Empuje el divisor hacia abajo.
Climate Zone & Cajón con Control de Temperatura

22 49-60792 Rev. 3
Canasta y Cajón del Freezer
Canasta.
Cajón
Hielera * (Disponible para modelos Sin Dispensador
únicamente). Disponible como Kit IM en algunos modelos).
Recipiente No Ajustable en el
Freezer*
Para retirar: Empuje hacia adentro la lengüeta plástica, ya sea
hacia la izquierda o la derecha.
Para reemplazar: Deslice el recipiente en la ubicación hasta
que quede bloqueado.
Retiro de la Cesto
Para retirar , modelos con profundidad estándar:
1. Abra la puerta del freezer hasta la posición de detención.
2. Retire el cubo de la puerta del freezer empujando la
lengüeta de plástico tanto hacia la derecha como hacia la
izquierda para liberar el perno de las bisagras del cubo.
3. Retire la canasta del freezer levantando su parte trasera y
moviendo la misma hacia atrás hasta que el frente se pueda
rotar hacia arriba y afuera.
4. Levante hacia afuera para retirar la misma.
Para retirar los modelos con profundidad de mesada:
1. Abra las puertas de alimentos frescos.
2. Abra la puerta del freezer hasta la posición de detención.
3. Retire la canasta del freezer levantando la parte trasera de
la canasta y rotando la misma hacia arriba.
4. Levante hacia afuera y retire la misma.
Para reemplazarla:
Invierta el paso 1 al 4 para reemplazarla.
*Modelos Selectos Únicamente
Cestos, Cajones y Cubos
Lengüeta plástica
OPERACIÓN DEL FREEZER: Cestos, Cajones y Cubos
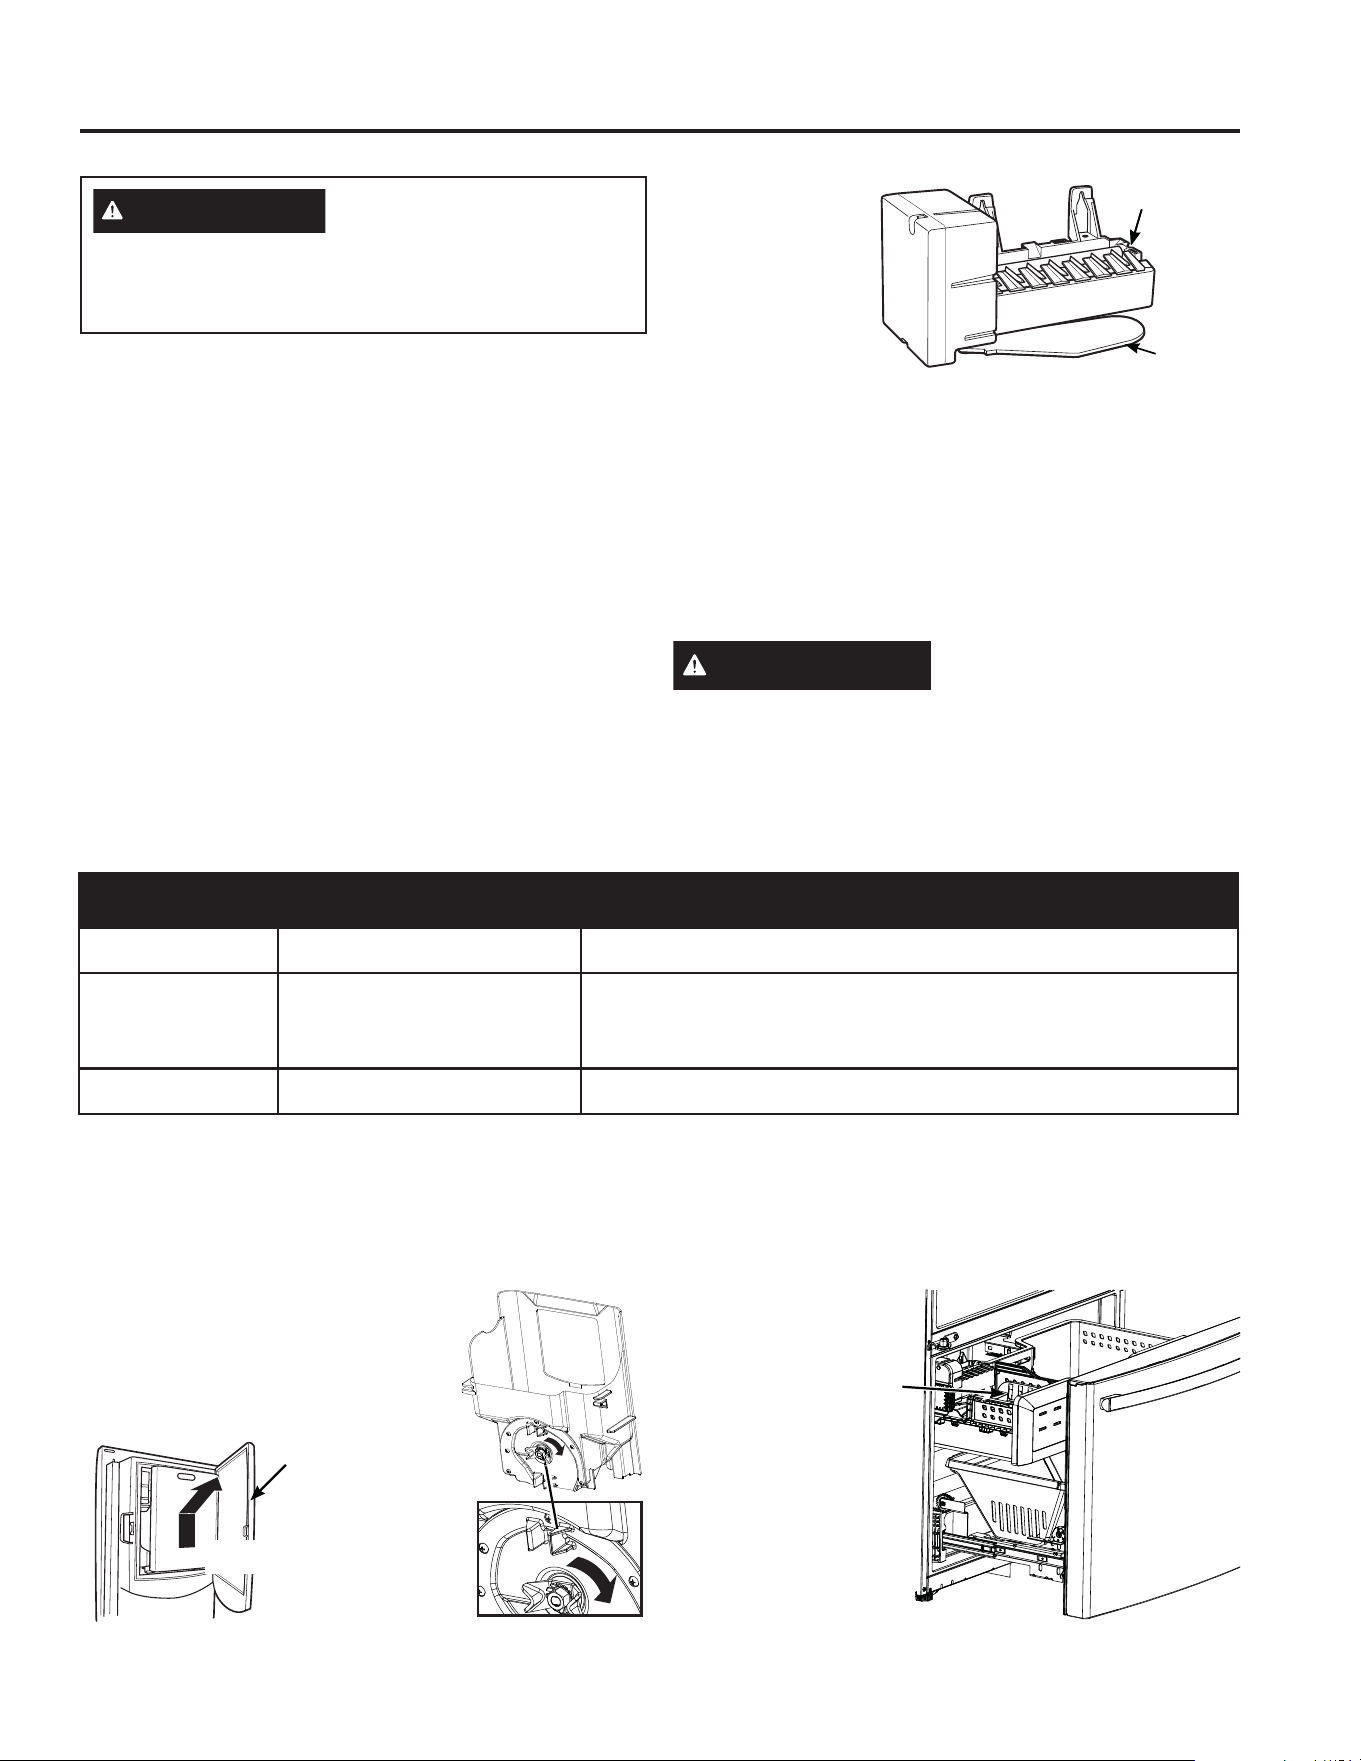
49-60792 Rev. 3 23
OPERACIÓN DEL FREEZER: Hacer Hielo Automática
Tipo de Pantalla
(Lea la Página 8)
1GH0RGHOR Cómo Encender/ Apagar la Máquina de Hacer Hielo
Estilo de Control A PFE28, PYE22P 8VHHOERWyQ³,&(´+LHORHQHOFRQWURO/HDVREUHORV&RQWUROHVHQODV
páginas 10 y 1
1.
Estilo de Control B PFH28, PFE28K, PFD28,
DFE28, GFE28, GFD28, GFE26,
GFS26, PYD22, PYE22K,
DYE22K, GYE22, GYS22
8VHHOERWyQ³,&(0$.(5´+LHOHUDHQHOFRQWURO
Lea sobre los Controles, en las páginas 10 y 11.
Estilo de Control C *1(3:(
8VHHOERWyQ³,&(0$.(5´+LHOHUDHQHOFRQWUROLea sobre los Controles, en
las páginas 10 y 11.
Cómo Encender/ Apagar la Máquina de Hacer Hielo
*Modelos Selectos Únicamente
Levante y empuje
Puerta de
la Caja
de Hielo
Hielera y Dispensador*
• Abra la puerta de la caja de hielos dentro de la puerta
izquierda.
• Empuje hacia arriba y afuera la hielera en la puerta del lado
izquierdo para retirar la misma del compartimiento.
• Para reemplazar la hielera, ajuste la
misma a los soportes de la guía y
empuje hasta que la hielera se ubique
correctamente.
• Si la hielera no se puede reemplazar,
gire la horquilla de la hielera ¼ en
dirección de las agujas del reloj.
Máquina de hacer hielo (Disponible
en modelos sin dispensador; también
disponible como Kit IM para algunos
modelos.)
El cajón del compartimiento del freezer cuenta con
almacenamiento de
hielo adicional.
• Abra el cajón de
freezer.
• La hielera se
encuentra
ubicada en el
lado izquierdo
de la canasta
superior.
• Empuje la
canasta superior
hacia adelante
para retirar la
hielera.
Freezer
Ice
Bucket
Hacer Hielo Automática
Puede llevar entre 12 y 24 horas que un refrigerador recién instalado comience a fabricar hielo.
Máquina de Hacer Hielo Automática*
La máquina de hacer hielo producirá siete cubos por ciclo, y
aproximadamente entre 100 y 130 cubos en un período de 24
horas, dependiendo de la temperatura del compartimiento del
freezer, la temperatura ambiente, la cantidad de veces que se
abra la puerta y otras condiciones de uso.
La máquina de hacer hielo se llenará de agua cuando se enfríe
y llegue a los 15°F (–10°C). Puede llevar entre 12 y 24 horas
que un refrigerador recién instalado comience a fabricar hielo.
Si el refrigerador es utilizado antes de realizar las conexiones
de la tubería de agua a la unidad o si el suministro de agua a
un refrigerador en funcionamiento es apagado, asegúrese de
que la máquina de hacer hielo esté apagada. Una vez que el
agua haya sido conectada al refrigerador, la máquina de hacer
hielo podrá ser encendida. Para más detalles, lea la tabla que
aparece más abajo.
Es posible que escuche un zumbido cada vez que la máquina
de hacer hielo se llene de agua.
Descarte las primeras
cantidades de hielo
para permitir que el
suministro de agua se
despeje.
Asegúrese de que
nada interfiera con la
extensión del brazo
indicador.
Cuando el cubo se
llene hasta el nivel del interruptor de energía, la máquina de
hacer hielo dejará de producir hielo. Es normal que varios
cubos queden juntos.
Si el hielo no se usa con frecuencia, los cubos de hielo viejos
se volverán turbios, con sabor rancio y su tamaño se reducirá.
NOTA: En hogares con un nivel de presión inferior a la normal,
es posible que escuche que la válvula de agua de la máquina
de hacer hielo realice varios ciclos para producir una cantidad
de hielo.
PRECAUCIÓN
Para minimizar el riesgo de
lesiones personales, evite el contacto con las partes móviles
del mecanismo eyector o con el elemento de calefacción que
OLEHUDORVFXERV1RFRORTXHORVGHGRVQLODVPDQRVHQHO
mecanismo de la máquina de hielo automática mientras el
refrigerador esté enchufado.
Interruptor
de Energía
Máquina de
hacer hielo
ADVERTENCIA
Realice la conexión a un
suministro de agua potable únicamente. Se requiere
un suministro de agua fría para el funcionamiento de la
máquina de hielos automática. La presión del agua deberá
estar entre 40 y 120 psi (275-827 kilopascales).
24 49-60792 Rev. 3
Cuidado y Limpieza
Limpieza de la Parte Interior
Para evitar olores, deje abierta una caja de bicarbonato de
sodio en los compartimientos del refrigerador y del freezer.
Desenchufe el refrigerador antes de limpiar.
Si esto no resulta práctico, estruje el exceso de humedad
para eliminarlo de la esponja o tela al limpiar alrededor de los
interruptores, luces o controles.
Use un pulidor de cera para electrodomésticos en la superficie
interior entre las puertas.
Use agua caliente y solución de bicarbonato de sodio —
aproximadamente una cuchara sopera (15 ml) de bicarbonato
de sodio para un cuarto de galón (1 litro) de agua. Esto limpia y
neutraliza los olores. Enjuague y seque.
Para limpiar el panel metálico interno*, abra la puerta externa
usando la
Traba de Puerta en Puerta. Limpie el panel con un
GHWHUJHQWHVXDYH\OXHJRVHTXHFRQXQDWHODVXDYH1RXVH
ningún limpiador de acero inoxidable sobre el panel, ya que
estos podrán dañar el plástico circundante.
PRECAUCIÓN
1ROLPSLHHVWDQWHVGHYLGULRQLWDSDV
con agua caliente cuando estén fríos. Los estantes de vidrio
y las tapas se pueden romper si son expuestos a cambios de
temperatura repentinos o impactos tales como sacudones o
caídas. El vidrio templado está diseñado para destruirse en
pequeñas piezas en caso de rotura.
1RODYHQLQJXQDSDUWHSOiVWLFDGHOUHIULJHUDGRUHQODODYDGRUD
de platos.
Limpieza de la Parte Exterior
Detrás del Refrigerador
Tenga cuidado al alejar el refrigerador de la pared. Cualquie
tipo de cobertura de piso puede ser dañada, particularmente
las coberturas acolchonadas y aquellas con superficies con
relieves.
Levante las patas niveladoras ubicadas en la parte frontal
interior del refrigerador.
Empuje el refrigerador hacia afuera de forma recta y regrese
el mismo a su posición empujándolo hacia adentro. Mover el
refrigerador hacia una ubicación lateral podrá ocasionar daños
sobre la cobertura del piso o el refrigerador.
Baje las patas niveladoras hasta que toquen el piso.
ADVERTENCIA
RIESGO DE
DESCARGA ELÉCTRICA Al volver a empujar el
refrigerador, asegúrese de que no atraviese el cable de
corriente ni la tubería de suministro de agua.
CUIDADO Y LIMPIEZA
*Modelos Selectos Únicamente
Instrucciones para la Limpieza de Superficies Exteriores, Manijas de Puertas y Bordes
USE NO USE
Telas suaves y limpias o esponjas Telas abrasivas, esponjas de fregar, almohadillas de estropajo
o de lana de acero
Detergente suave mezclado con agua caliente
Limpiadores de acero inoxidable aprobados. Visite la tienda
de piezas de GE Appliances para acceder a limpiares de
acero inoxidable aprobados: GEApplianceparts.com o
comuníquese al 877.959.8688
Los limpiadores con ácido oxálico tales como Bar Keepers
Friend Soft Cleanser™ podrán ser usados para eliminar el
óxido, deslustres y pequeñas manchas de las superficies de
acero inoxidable únicamente.
Polvos o rociadores abrasivos
Rociadores de Ventana o Amoníaco
Limpiadores a base de cítrico o aceite vegetal
Limpiadores ácidos o a base de vinagre
Limpiadores de horno
Limpiadores que contengan acetona (propanona)
&XDOTXLHUOLPSLDGRUFRQ$'9(57(1&,$6VREUHHOFRQWDFWR
con el plástico
NOTA: 12
SHUPLWDTXHHOOLPSLDGRUGHDFHURLQR[LGDEOHHQWUHHQFRQWDFWRFRQFXDOTXLHUSDUWHSOiVWLFDWDOFRPRSDUWHVGHERUGHV
materiales de manijas y cobertores. Si se produce un contacto no intencional de los limpiadores con las partes plásticas, limpie
estas últimas con una esponja y un detergente suave mezclado con agua caliente.
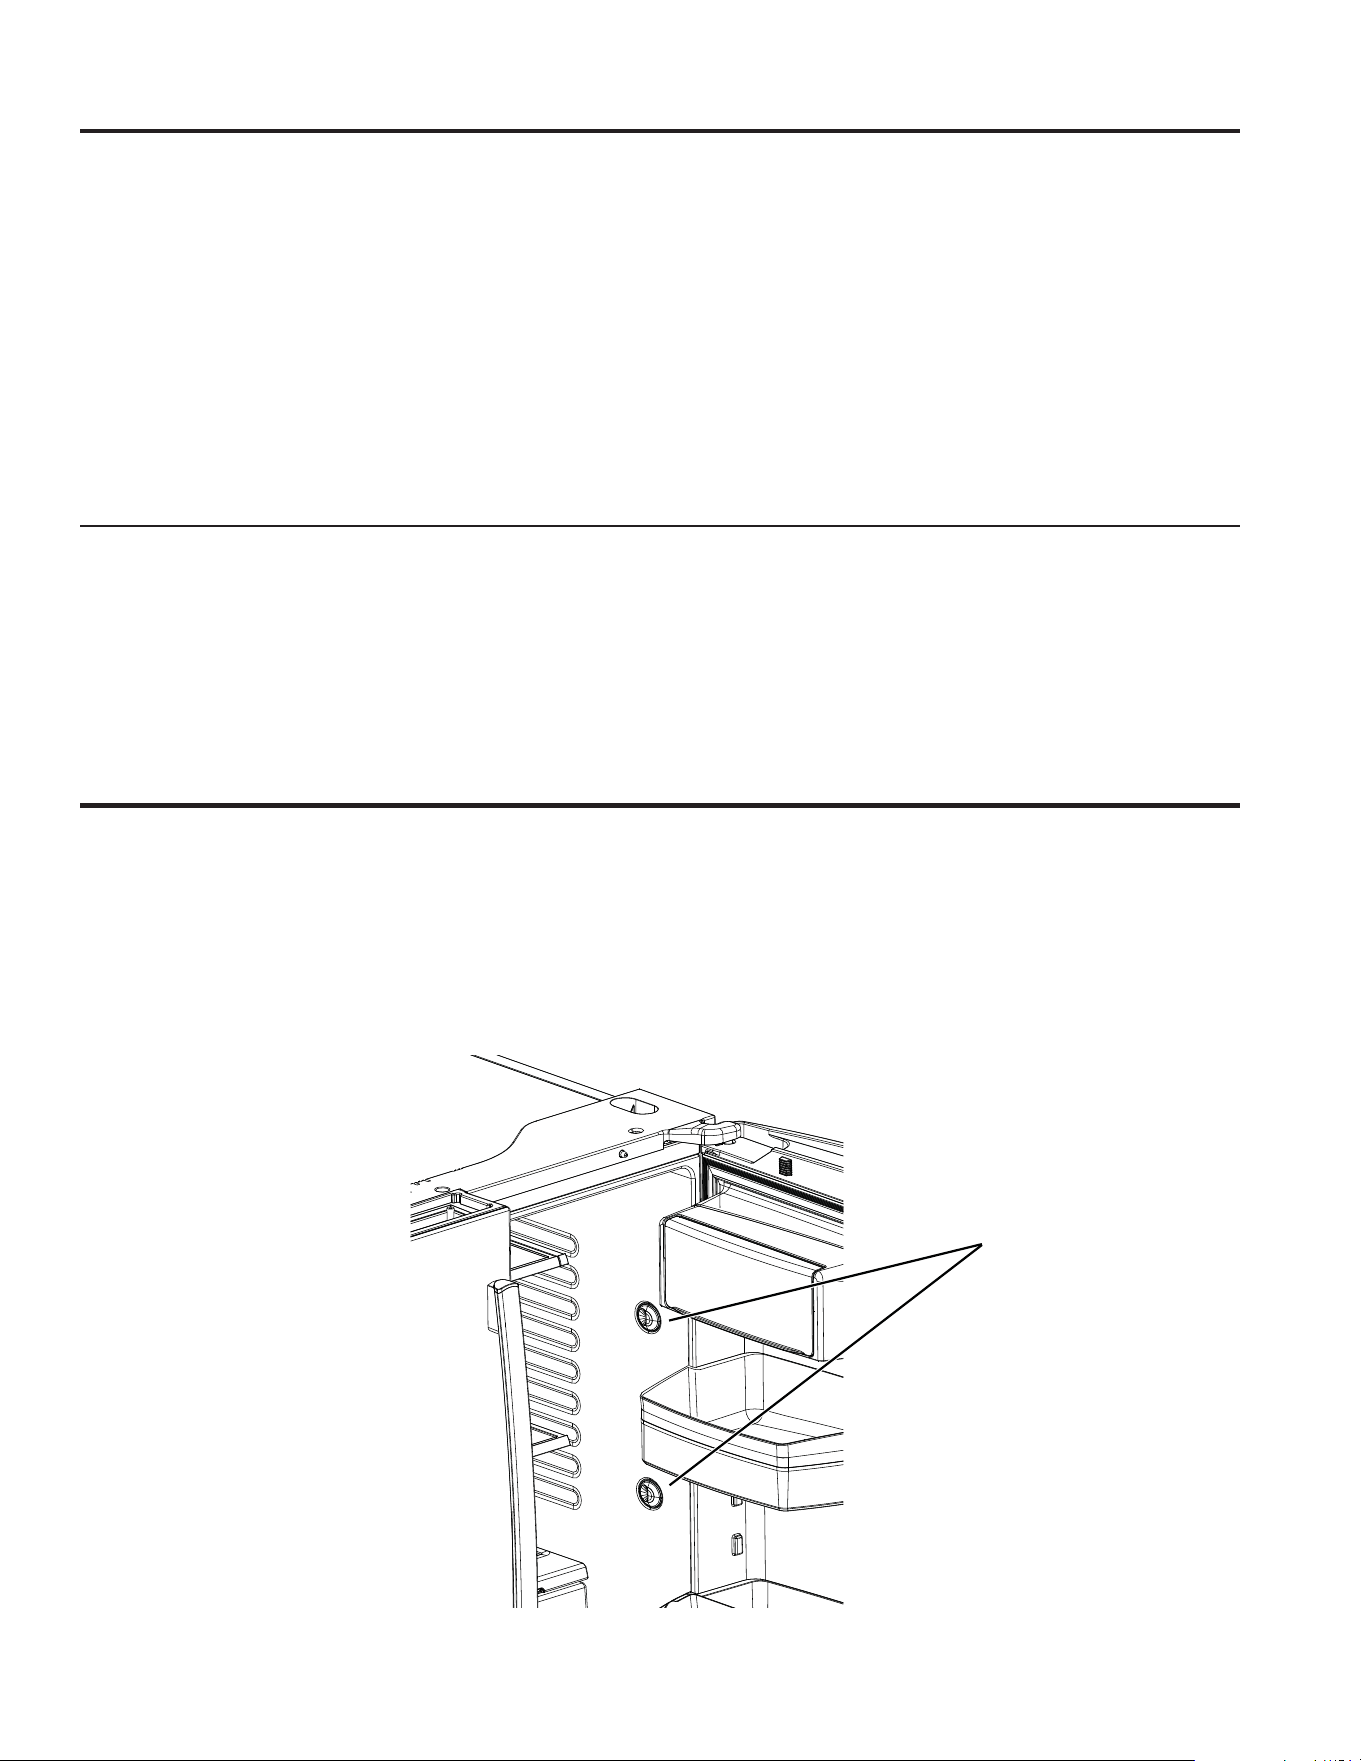
49-60792 Rev. 3 25
CUIDADO Y LIMPIEZA / REEMPLAZO DE LAS LUCES
Preparación para las vacaciones
Si estará de vacaciones o ausente por tiempo prolongado,
retire la comida y desenchufe el refrigerador. Limpie el interior
con una solución de bicarbonato de sodio de una cuchara
sopera (15 ml) de bicarbonato de sodio para un cuarto de
galón (1 litro) de agua. Deje las puertas abiertas.
Modelos con LCD: Apague el refrigerador del control (pág. 9).
Si la temperatura puede llegar a estar por debajo de la
congelación, solicite a un técnico calificado que drene el
sistema de suministro de agua a fin de prevenir daños graves
sobre la propiedad debido a una inundación.
1) Apague el refrigerador (pág. 9) o desenchufe el refrigerador.
2) Vacíe la hielera
3) Cierre el suministro de agua
Si cierra el suministro de agua, apague la máquina de hacer
hielo (pág. 21).
Al regresar de sus vacaciones:
1) Reemplace el filtro de agua.
2) Deje correr 7.57 litros (2 galones) de agua a través del
dispensador de agua fría (aproximadamente 5 minutos) a fin
de eliminar el aire del sistema.
3) Dispense agua caliente a 185ºF 3 veces (10 onzas cada
vez) para eliminar el aire del sistema.
*Modelos Selectos Únicamente
Reemplazo de las luces
Luces del Refrigerador (LEDs)
El aspecto puede variar dependiendo del modelo.
Hay una luz LED en el compartimiento de comidas frescas
y en la parte inferior de las puertas de comidas frescas para
iluminar el compartimiento del freezer.*
Será necesario que un técnico autorizado reemplace las
luces LED.
En caso de ser necesario un reemplazo de este ensamble,
llame al Servicio Técnico de GE Appliances al 1.800.432.2737
en Estados Unidos o al 1.800.561.3344 en Canadá.
Luces LED.
Cuidado y Limpieza
Preparación para la mudanza
Asegure todos los ítems tales como estantes y cajones,
pegando los mismos de forma segura en sus respectivos
lugares a fin de evitar daños.
Al usar un carro manual para mover el refrigerador, no deje
que la parte frontal ni la parte trasera descansen contra el
carro manual. Esto podría dañar el refrigerador.
Lleve el mismo sólo sobre los costados del refrigerador.
Asegúrese de que el refrigerador permanezca en una posición
erguida durante el movimiento.
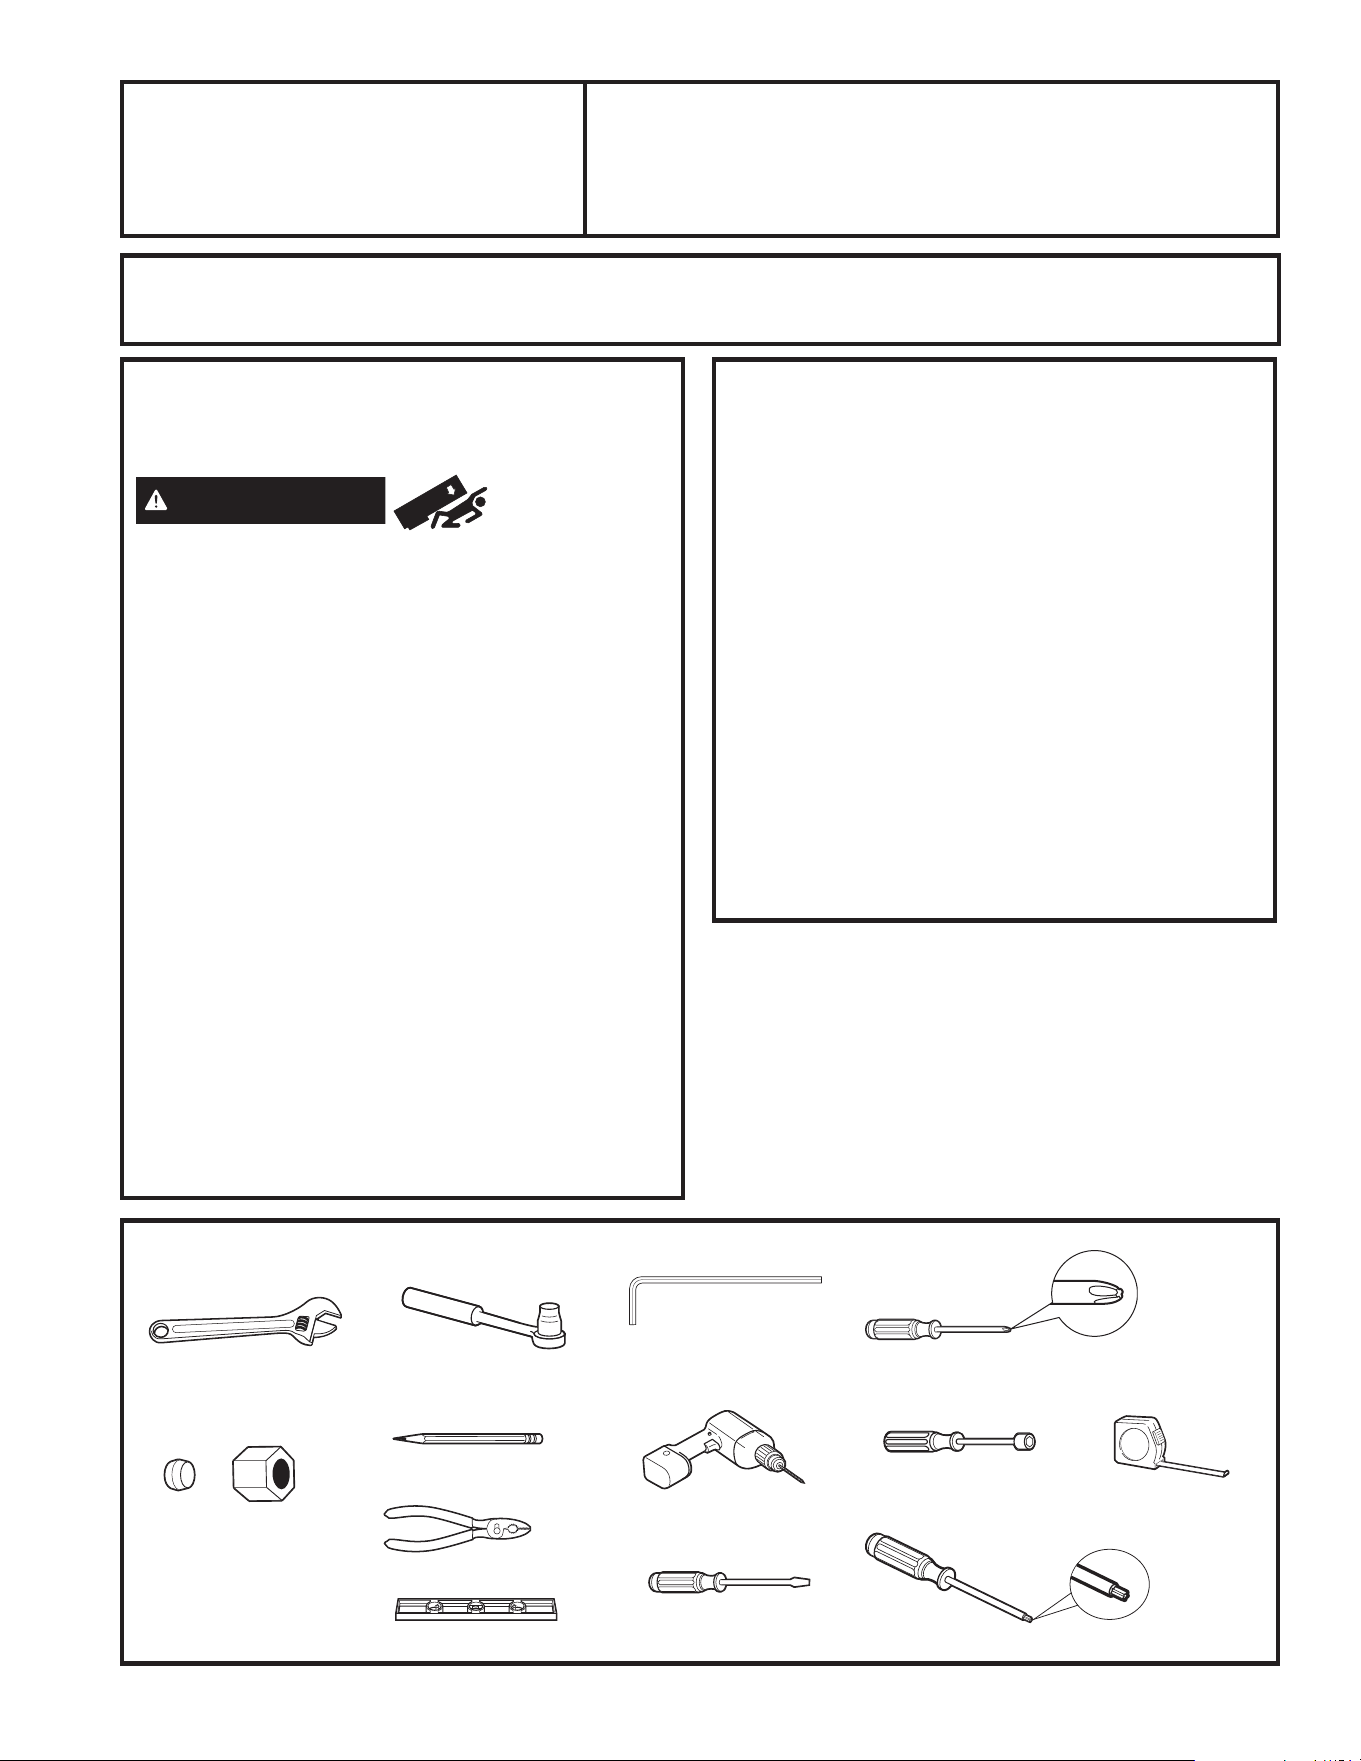
26 49-60792 Rev. 3
HERRAMIENTAS QUE PUEDE NECESITAR
ANTES DE COMENZAR
Lea estas instrucciones en su totalidad y
atentamente.
ADVERTENCIA
Riesgo de
Caída.
Los modelos con estilo incorporado (modelo PYE, GYE,
GYS y PWE) son inestables, especialmente con las
puertas abiertas. Estos modelos deben ser asegurados
con el soporte anti-volcaduras, a fin de evitar caídas hacia
adelante, que podrían resultar en la muerte o lesiones
graves. Lea y siga las instrucciones de instalación en su
totalidad, a fin de instalar el soporte de piso anti-volcaduras
embalado con su refrigerador.
•
IMPORTANTE — Cumpla con todos los
códigos y ordenanzas gubernamentales. Conserve estas
instrucciones para uso del inspector local.
1RWDSDUDHO,QVWDODGRU±$VHJ~UHVHGHTXHHO
Consumidor conserve estas instrucciones.
1RWDSDUDHO&RPSUDGRU±&RQVHUYHHVWDVLQVWUXFFLRQHV
para referencia futura.
1LYHOGHKDELOLGDG±/DLQVWDODFLyQGHHVWH
electrodoméstico requiere un nivel básico de habilidades
mecánicas.
• Tiempo de Instalación – La instalación del refrigerador
puede variar de acuerdo con la Instalación de la Tubería
de Agua en unos 30 minutos
• La correcta instalación del producto es responsabilidad
del instalador.
• Si se producen fallas en el producto debido a una
instalación inadecuada la Garantía no cubrirá las
mismas.
PREPARACIÓN
CÓMO MOVER EL REFRIGERADOR EN UN
ESPACIO INTERNO
Si el refrigerador no pasa por una puerta, la puerta del
refrigerador y el cajón del freezer podrán ser retirados.
• Para retirar la puerta del refrigerador, consulte la sección
Cómo Instalar el Refrigerador.
• Para retirar el cajón del freezer, consulte la sección Cómo
Retirar el Cajón del Freezer.
SUMINISTRO DE AGUA A LA MAQUINA DE
HACER HIELO Y EL DISPENSADOR
Si el refrigerador cuenta con una máquina de hacer hielo,
deberá ser conectada al suministro de agua fría. Un kit
de suministro de agua de GE Appliances (que contenga
tubería, válvula de cierre, uniones e instrucciones) está
disponible por un costo adicional a nivel minorista, visitando
nuestro sitio web en GEAppliances.com (en Canadá en
www.geappliances.ca) o en Parts and Accessories (Piezas
y Accesorios), 877.959.8688 (en Canadá 1.800.661.1616).
Llave Ajustable
Tuerca de Compresión
de Diámetro Externo y
Abrazadera de Refuerzo
(manga) de ¼”
Destornillador con Cabeza Phillips
Trinquete / Destornillador
de 3/8”
Llaves Allen de 1/8”, 3/32”,
¼” y 5/32”
Lápiz
Broca y Taladro Eléctrico o
Manual de 1/8”
Cinta métrica
Llave de Tuercas de ¼”
Pinzas
1LYHO
Destornillador con cabeza
aplanada
Llave Torx T20, T25
Instrucciones
de Instalación
Refrigerador
Modelos GE y GE Profile™
¿Preguntas? Llame a 800.GE.CARES (800.432.2737) o visite nuestro sitio web en: GEAppliances.com
En Canadá, llame al 1.800.561.3344 o visite nuestro Sitio Web en: www.GEAppliances.ca
INSTRUCCIONES DE INSTALACIÓN
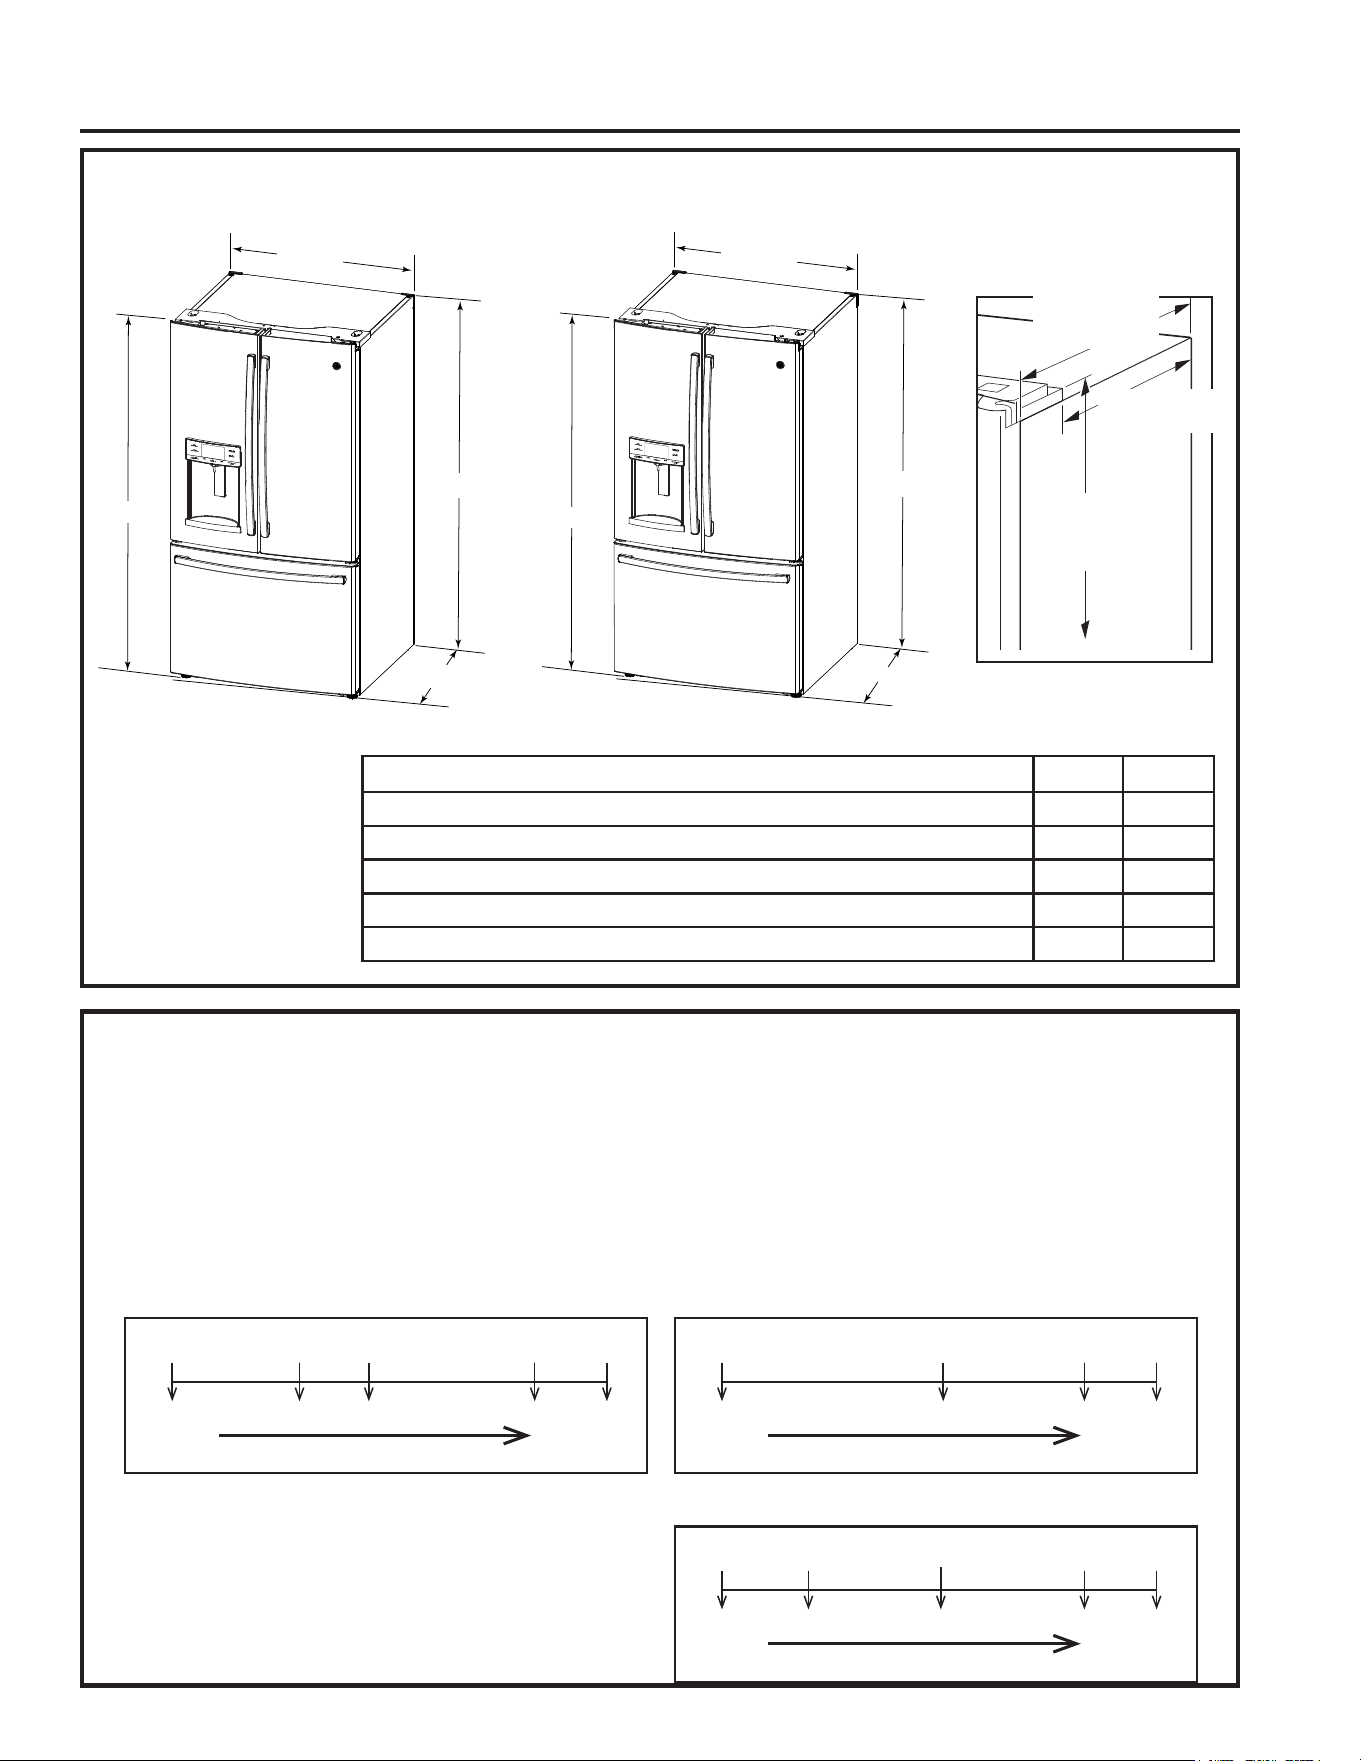
49-60792 Rev. 3 27
INSTRUCCIONES DE INSTALACIÓN
CÓMO MOVER EL REFRIGERADOR
• Usando el siguiente cuadro, determine si el ancho de su pasillo es suficiente para la profundidad del refrigerador.
Asegúrese de contar con espacio para evitar daños sobre el refrigerador antes de moverlo de forma segura hasta su
ubicación final.
• Si los pasillos son los suficientemente grandes como para ubicar el refrigerador sin retirar las manijas, continúe con el
Paso 6. Deje la cinta, la envoltura y todo el embalaje en las puertas hasta que el refrigerador se encuentre en la ubicación
final.
• NOTA: Use un carro manual con almohadillas o correas móviles para transportar el refrigerador. Coloque el refrigerador
en el carro manual, apoyando un costado contra este último. Recomendamos enfáticamente que dos personas realicen el
traslado y completen la instalación.
DIMENSIONES
Todas las medicion es se dan con la pata niveladora completamente replegada.
SD CD
Altura General a la Parte Superior de la Tapa de la Bisagra 69-7/8” 69-7/8”
Altura hasta la Parte Superior del Gabinete
69” 69”
Profundidad de la Caja sin Puerta
29-5/8” 24-5/8”
Ancho General de la Caja Exterior
35-3/4” 35-3/4”
Profu ndidad Exterior General de las Puertas/Cajones con Manijas
36-3/8” 31-3/8”
Profundidad de
Caja sin Puertas
de 29-5/8” SD
24-5/8” CD
Altura del suelo a la
parte superior de la
tapa de bisagra de
»´
Dimensiones Adicionales
23-1/4” SD
18-1/4” CD
35-3/4”
69”
31-3/8”
69-7/8
”
35-3/4”
69”
36-3/8”
69-7/8
”
Totalmente
Ensamblado
36.375” 34.375” 34” 30.5” 29.625”
Retire las partes de la puerta en orden hasta que su dimensión
sea inferior que la abertura
Retire las partes de la puerta en orden hasta que su dimensión
sea inferior que la abertura
Retire las partes de la puerta en orden hasta que su dimensión
sea inferior que la abertura
Retiro
de las Manijas
Retiro de la
Puerta del
Lado Izq.
Caja con
Manijas
del Fz
Solo la caja
(sin manijas)
Si su número de modelo comienza con PFE, PFH, PFD, GFD, GFE,
GFS, DFE (SD)
Totalmente
Ensamblado
36.275” 33.75” 30.25” 29.625”
Retiro
de las Manijas
Caja con
Manijas
del Fz
Solo la caja
(sin manijas)
Si su número de modelo comienza con GNE (SD)
Totalmente
Ensamblado
31.375” 29.375” 25.875” 24.625”
Retiro de
las Manijas
Retiro de la Puerta
del Lado Izq.
Caja con
Manijas
del Fz
Solo la caja
(sin manijas)
28.875”
Si su número de modelo comienza con DYE, GYE, GYS, PYE, PYD,
PWE (CD)
Instrucciones de Instalación
Modelos con Profunidad Estándar (SD) Únicamente
Modelos con Profunidad de Mesada (CD) Únicamente
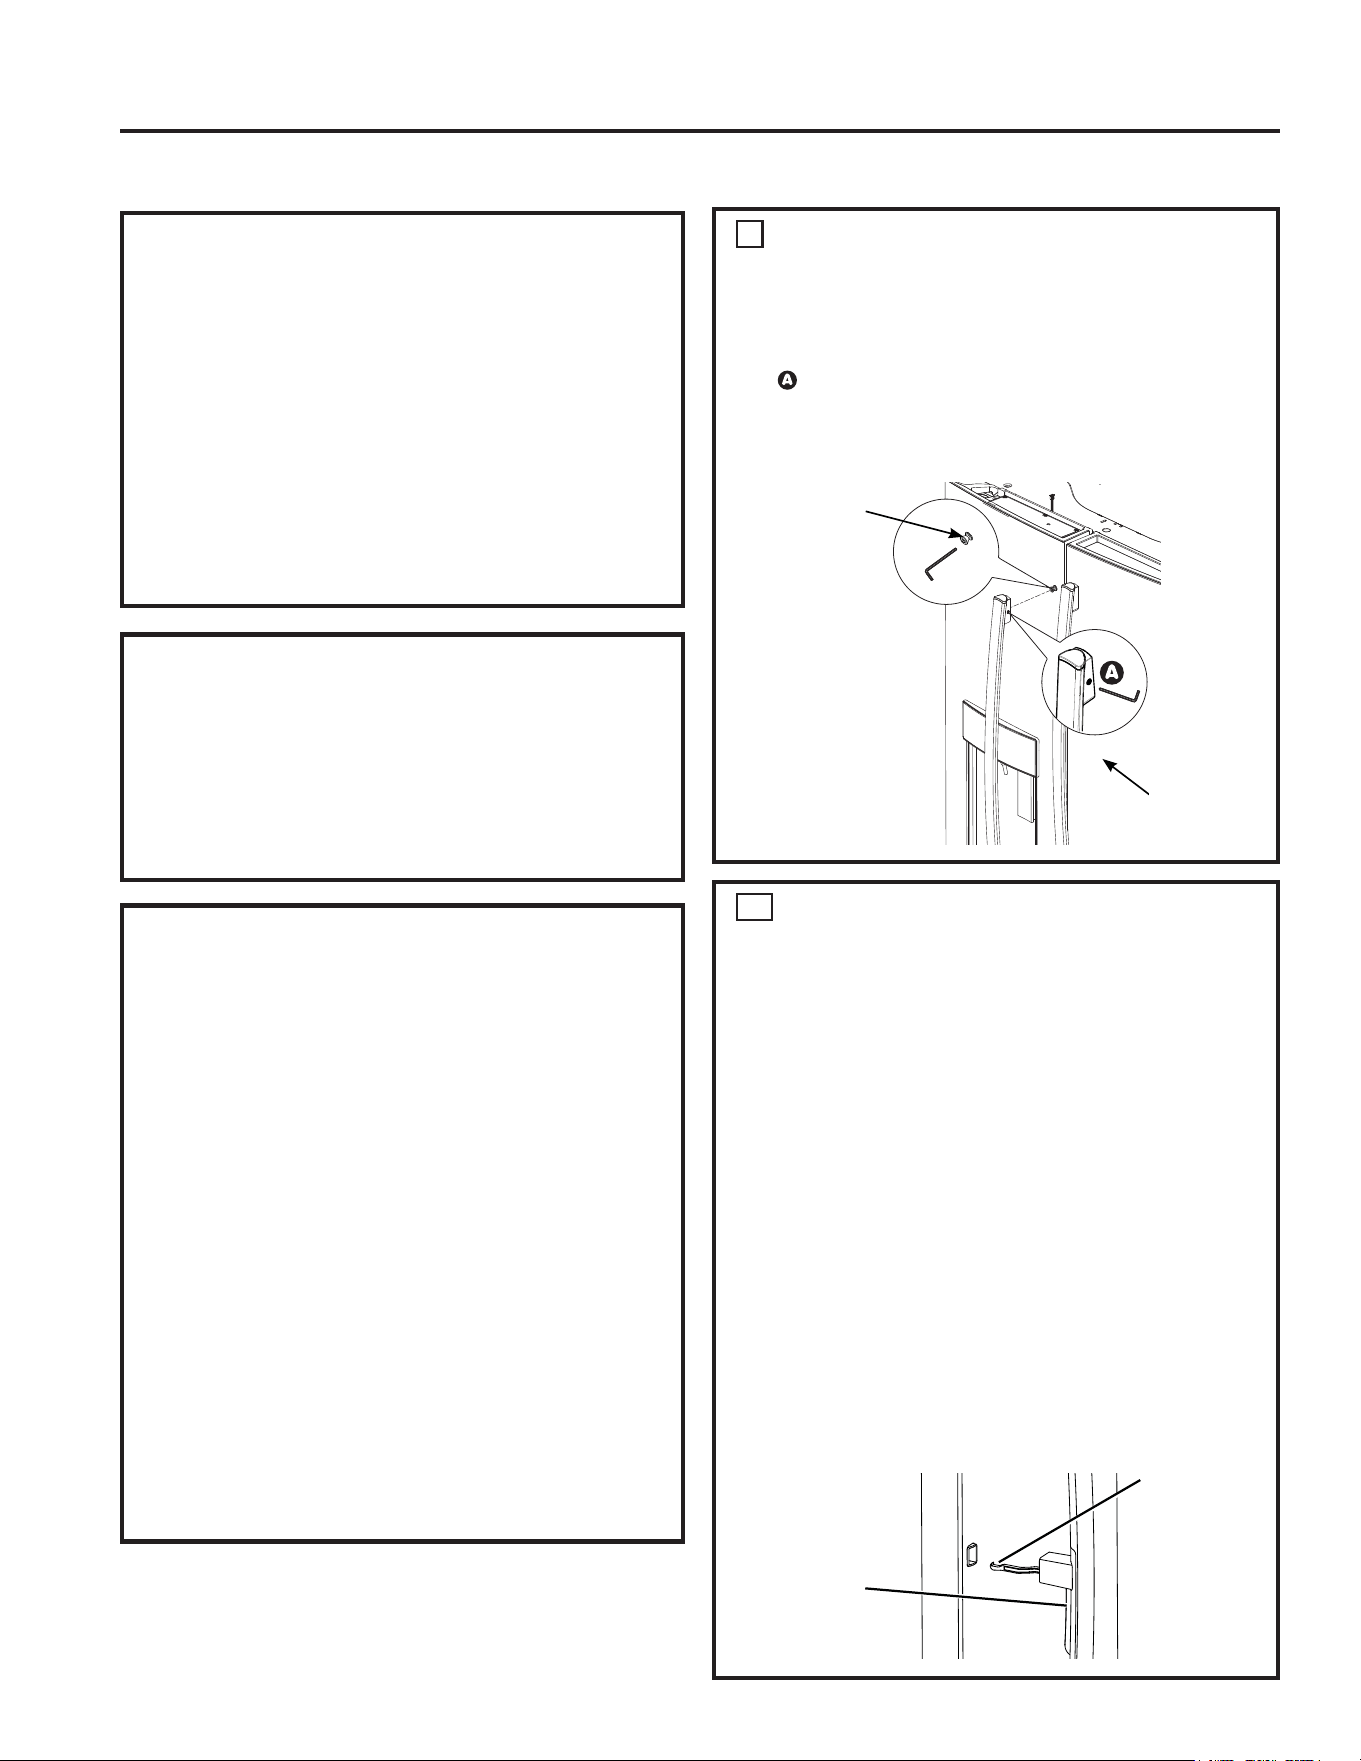
28 49-60792 Rev. 3
CÓMO INSTALAR EL REFRIGERADOR
RETIRE LA MANIJA DE LA
PUERTA DE COMIDAS FRESCAS
El diseño del mango varía dependiendo de los
modelos; sin embargo, la instalación es igual.
Manijas de acero inoxidable y de plástico:
Afloje el conjunto de tornillos con la llave Allen de
1/8” y retire la manija.
NOTA: Si es necesario ajustar o retirar los tensores
de montaje de la manija, use una llave Allen de ¼”.
1
Tensores
de Montaje
Deje la
película puesta
hasta finalizar
la instalación
Instrucciones de Instalación
CÓMO INSTALAR EL
REFRIGERADOR
Ŷ1RLQVWDOHHOUHIULJHUDGRUGRQGHODWHPSHUDWXUDOOHJXHD
ser inferior a los 60ºF (16ºC), ya que no se activará con
la frecuencia necesaria para mantener las temperaturas
apropiadas.
Ŷ1RLQVWDOHHOUHIULJHUDGRUGRQGHODWHPSHUDWXUDVHD
superior a los 100ºF (37ºC), ya que no funcionará de
forma correcta.
Ŷ1RLQVWDOHHOUHIULJHUDGRUHQXQDXELFDFLyQH[SXHVWDDO
agua (lluvia, etc.) o en contacto directo con la luz solar.
Ŷ Instale el mismo en un piso lo suficientemente fuerte
como para soportarlo completamente cargado.
ESPACIO NECESARIO
Deje el siguiente espacio para facilitar la instalación, una
adecuada circulación de aire y plomería y conexiones
eléctricas.
Costados 1/8” (3 mm)
Parte superior Gabinete/ Tapa de la Bisagra de 1” (25 mm)
Parte trasera 2” (50 mm)
CÓMO RETIRAR LAS PUERTAS
DEL REFRIGERADOR
Ŷ NOTA IMPORTANTE: Este refrigerador posee una
profundidad de 36 ¼” (31 ¼” para los modelos CD). Las
puertas y pasillos que conducen a la ubicación de la
instalación deberán tener por lo menos 36 1/4” de ancho,
a fin de poder dejar las puertas y manijas adheridas al
refrigerador mientras se lo transporta hasta la ubicación
de la instalación. Si los pasillos poseen menos de 36 ¼”,
las puertas y las manijas del refrigerador se podrán rayar
y dañar fácilmente. La tapa superior y las puertas podrán
ser retiradas, a fin de permitir que el refrigerador sea
movido de forma segura en áreas interiores. Si los pasillos
poseen menos de 31 ¼”, comience por el Paso 1.
Ŷ Si no es necesario retirar las puertas, continúe con el
Paso 11. Deje la cinta y todo el embalaje en las puertas
hasta que el refrigerador se encuentre en su ubicación
final.
Ŷ NOTA: Use un carro manual para transportar el
refrigerador. Coloque el refrigerador en el carro manual,
apoyando un costado contra este último. Recomendamos
HQIiWLFDPHQWHTXH'263(5621$6UHDOLFHQHOWUDVODGR\
completen la instalación.
INSTRUCCIONES DE INSTALACIÓN
PARA MODELOS DE PUERTA
EN PUERTA ÚNICAMENTE
Para Retirar la Manija:
Ŷ Abra la puerta externa presionando la traba
de Puerta en Puerta.
Ŷ Afloje los tornillos como se muestra en el
Paso 1.
Para Instalar la Manija:
Ŷ Alinee la palanca con la abertura sobre la
puerta externa. Asegúrese de que el gancho
apunte hacia arriba.
Ŷ Inserte la palanca de la traba en la aperture
y alinee la manija con los tensores de
montaje.
Ŷ Una vez que la manija está alineada con la
puerta externa, ajuste los tornillos.
1RUHWLUHODFLQWDGHODSXHUWDKDVWDTXHOD
manija esté instalada.
1a
Traba para
Puerta en la
Puerta
Trabe la Pa-
lanca con el
Gancho hacia
arriba
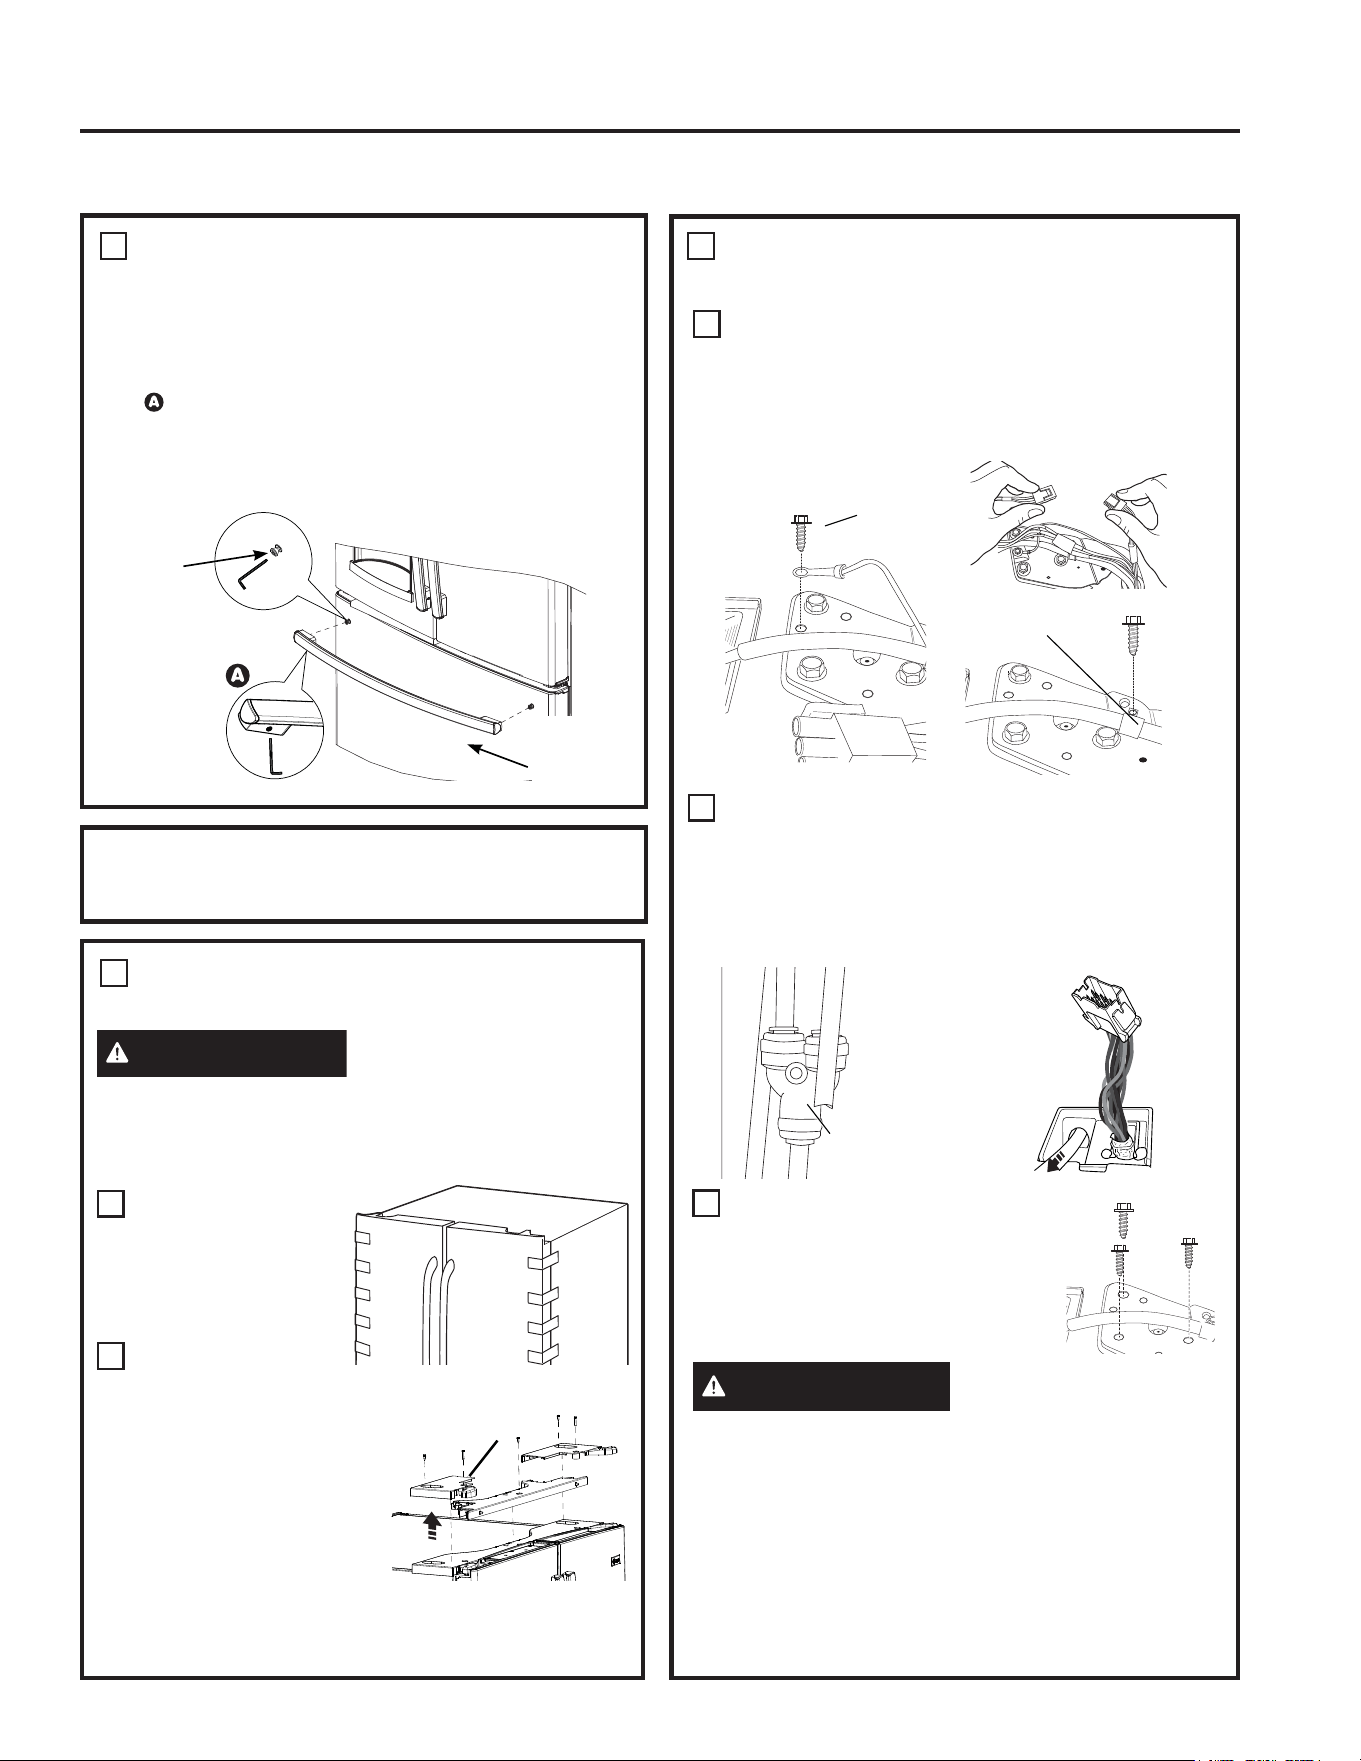
49-60792 Rev. 3 29
RETIRE LA MANIJA DE LA
PUERTA DEL FREEZER
El Diseño del Mango varía dependiendo de los
modelos; sin embargo, la instalación es igual.
Manijas de acero inoxidable y de plástico:
Afloje el conjunto de tornillos con la llave Allen de
1/8” y retire la manija.
NOTA: Si es necesario ajustar o retirar los tensores de
montaje de la manija, use una llave Allen de ¼”.
2
Vuelva a instalar las manijas usando el procedimiento que
usó para retirar las mismas.
Tensores
de Montaje
Deje la
película
puesta hasta
finalizar la
instalación
INSTRUCCIONES DE INSTALACIÓN
Instrucciones de Instalación
CÓMO INSTALAR EL REFRIGERADOR (Cont.)
RETIRE LAS PUERTAS DEL
REFRIGERADOR
ADVERTENCIA
Siga todos los pasos para
retirar y volver a instalar la puerta. Si no se siguen estas
instrucciones, dejando piezas sin uso o ajustando tornillos
en exceso, esto podrá hacer que la puerta se caiga y
producir lesiones y daños sobre la propiedad.
A
De forma segura
encinte el cierre de la
puerta con cinta de
mascarar o pida a otra
persona que sostenga
la puerta.
B
Comience por la puerta
del lado izquierdo:
Retire la tapa de la bisagra
en la parte superior de la
puerta izquierda del
refrigerador, retirando todos
los tornillos hexagonales y
empujando la misma hacia
arriba. Haga lo mismo en la
puerta derecha y en la tapa
intermedia.
3
Tapa de la
Bisagra
RETIRE LAS PUERTAS DEL
REFRIGERADOR (cont)
C
Desconecte los conectores eléctricos provenientes de
cada puerta ubicados debajo de los cobertores de las
bisagras. Retire el tornillo de cabeza hexagonal de ¼”
para desconectar el cable a tierra de la bisagra. Retire
el tornillo de cabeza hexagonal de ¼” para retirar el
amortiguador de refuerzo de la tubería de agua.
Desconecte la tubería de agua de la parte trasera de
la unidad, presionando hacia abajo el collar gris oscuro
mientras levanta la tubería de agua. Coloque la línea
de agua a través del conducto de la caja desde la parte
superior para liberar la línea para el retiro de la puerta.
La línea de agua tiene una longitud superior a 4” y es
posible que se deba encintar a la Puerta para que esté
accesible al reinstalar.
Usando un trinquete/ destornillador
de 3/8”, retire los tornillos asegurando
la bisagra superior al gabinete, luego
levante la bisagra hacia arriba para
liberar el perno de la bisagra desde
la ubicación en la parte superior de la
puerta.
PRECAUCIÓN
Riesgo al levantar la
puerta.
Si es levantada por una sola persona, podrían
ocasionarse lesiones. Solicite ayuda al sostener, mover
o levantar las puertas del refrigerador.
Nota: Al retirar la puerta, a fin de evitar daños sobre la
puerta y la parte electrónica, coloque con cuidado la puerta
en una ubicación adecuada.
Nota: El perno de la bisagra inferior de la puerta y la
bisagra poseen tamaños proporcionales y se los debe
hacer coincidir correctamente para que la puerta se cierre
sola. Siga las instrucciones detenidamente.
3
E
D
Conector en Y
o Recto
Tornillo de
conexión
a tierra
Amortiguador
de Refuerzo
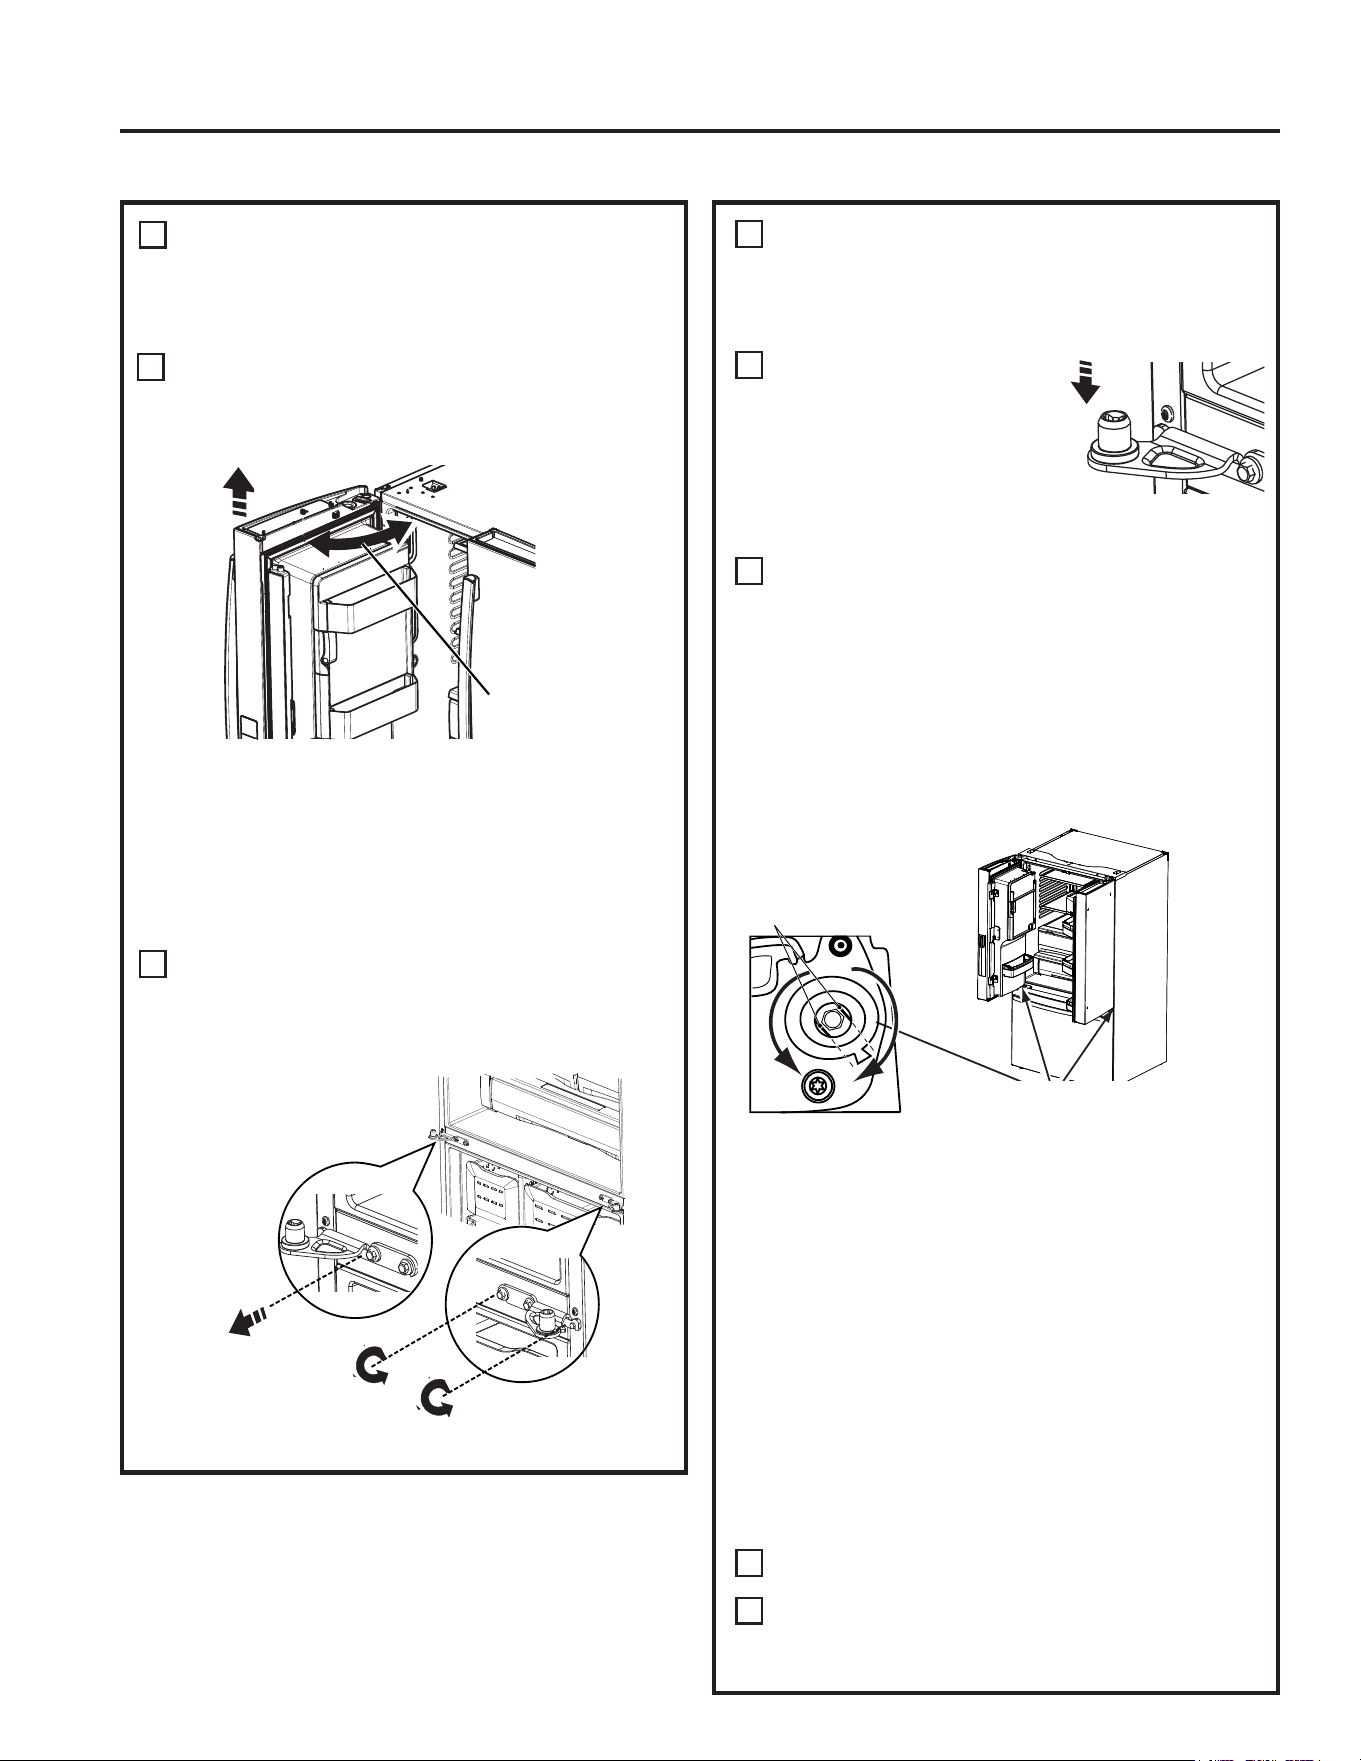
30 49-60792 Rev. 3
REINSTALACIÓN DE LAS
PUERTAS DEL REFRIGERADOR
Invierta los pasos 1 a 4 para reinstalar el refrigerador, siga
los detalles que figuran a continuación para conocer las
alineaciones críticas.
A
Reinstale la bisagra central
primero y ajuste los tornillos
con giros de torsión de 7.34
N-m (65 libras pulgada). Con la
puerta del lado izquierdo a más
de 90º hacia el frente de la caja,
baje la puerta del refrigerador
sobre la bisagra central. Asegúrese de que la puerta y la
bisagra se alineen correctamente.
B
Gire las puertas hasta cerrarlas y asegúrese de que la
posición de sellado del centro móvil de la puerta se alinee
con el cerradero. Si la puerta no se cierra sola luego de la
reinstalación, retire la puerta, dé vuelta la misma, controle
la marca y la flecha de alineación; (hay una marca de
alineación en el mecanismo de cierre de la puerta.
Corresponde a una marca de alineación en la tapa del
extremo inferior. Gire el mecanismo de cierre de la puerta
para alinear la marca y la flecha, reinstale la puerta). L
os
modelos de Puerta en Puerta no poseen el mismo
mecanismo de cierre en la puerta para la mano derecha.
Es posible que observe una diferencia en el cierre.
De forma segura encinte el cierre de la puerta con cinta
de
mascarar o pida a otra persona que sostenga la
puerta. Reinstale la bisagra sus tornillos con giros de
torsión de 7.34 N-m (65 libras pulgada).
C
Asegúrese de reinstalar el cable a tierra y el
amortiguador de refuerzo a la bisagra superior.
D
Vuelva a instalar la tapa de la bisagra. Nota: Asegúrese
de que los cables no sufran cortes ni queden debajo de
tornillos antes de ajustar estos últimos.
3
RETIRE LAS PUERTAS DEL
REFRIGERADOR (cont)
Nota: Para una instalación posterior adecuada, siga el
siguiente paso de forma cuidadosa.
F
Las puertas de comidas frescas se deben RETIRAR e
,167$/$5DELHUWDVDFRQODFDMDKDFLDHOIUHQWH
RETIRE LA PUERTA OPUESTA
Siga el mismo procedimiento en la puerta opuesta. 1R
hay
tuberías de agua del otro lado.
PARA
MODELOS DE PUERTA EN PUERTA De forma
segura, encinte las puertas interna y externa antes de su
LQVWDODFLyQRUHWLUR1RVHUHTXLHUHXQDDOLQHDFLyQGH
durante la instalación y el retiro en estos modelos.
4
RETIRE LA BISAGRA CENTRAL (si es necesario)
Retire los tornillos de 3/8” asegurando la bisagra central
al gabinete. Use un destornillador T20 para retirar el
tornillo externo.
5
Retire el torni-
llo central
Levante la bisagra
central hacia ar-
riba y afuera
Abra la Puerta a 90º
Afloje los
tornillos exte-
riores
Instrucciones de Instalación
CÓMO INSTALAR EL REFRIGERADOR (Cont.)
Align flats with tab.
Lado inferior de la puerta
de comidas frescas
Si la puerta no puede ser instalada a 90º, siga estos
próximos pasos.
1. Instale la puerta a 180º del frente de la caja.
2. Si el espacio o el modelo limitan la apertura de la puerta
a menos de 180º, entonces:
a) Retire la puerta, y con cuidado dé vuelta la misma.
b) Controle la alineación del hueco del mecanismo de cierre de
la puerta en la parte trasera de la misma. Las partes
planas del hueco deberían corresponder con la lengüeta de
alineación en el anillo plástico o con la marca en la tapa del
extremo inferior.
c) Si el hueco no está alineado con la lengüeta/ marca, usando
una llave Allen de 5/32”, rote el hueco del mecanismo de
cierre de la puerta en contra de las agujas del reloj para
la puerta derecha y a favor de las agujas del reloj para
la puerta izquierda. Luego alinee la parte plana con la
lengüeta/ marca.
d) Instale la puerta a 90º.
Marcas
de alineación
INSTRUCCIONES DE INSTALACIÓN
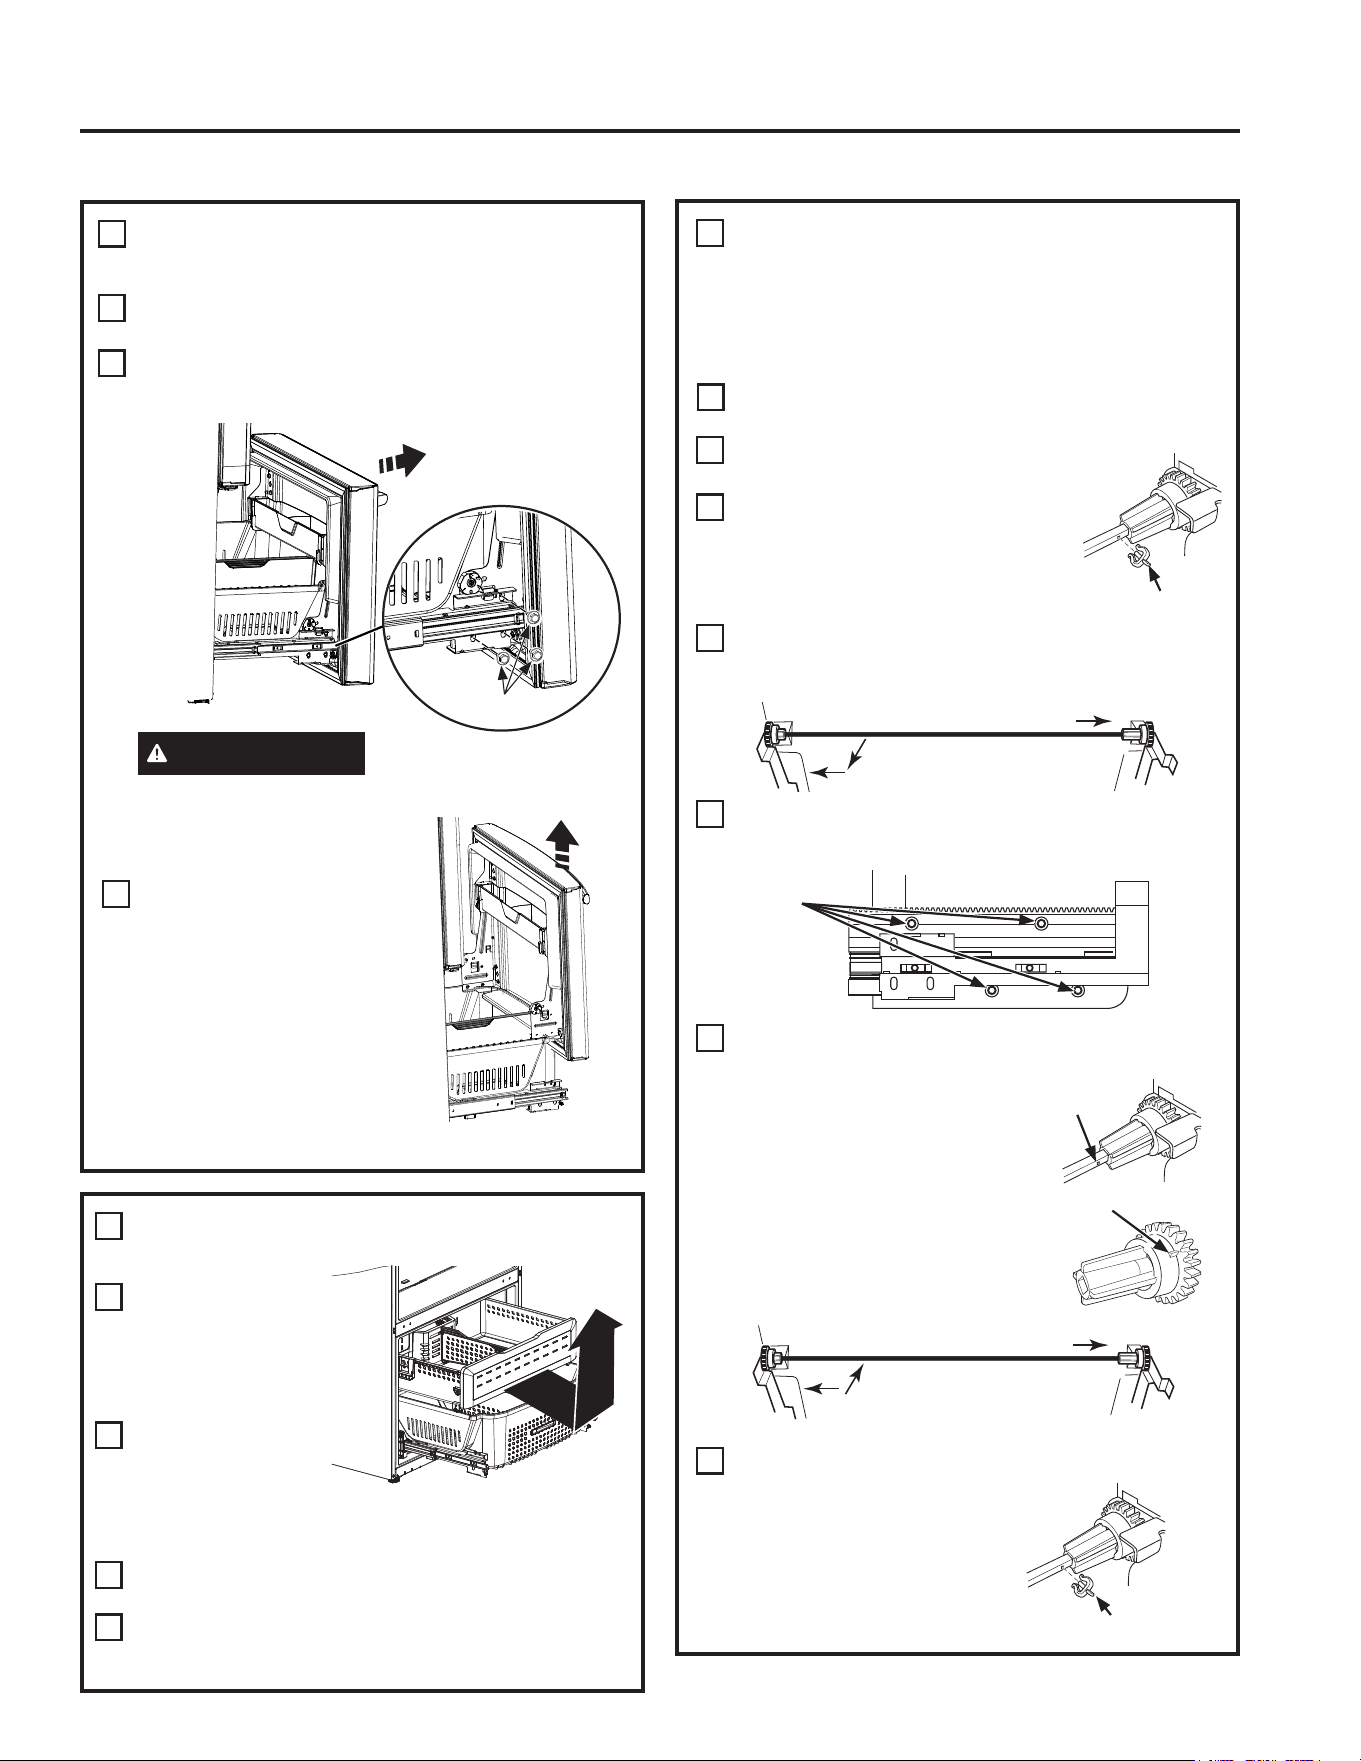
49-60792 Rev. 3 31
INSTRUCCIONES DE INSTALACIÓN
RETIRE LA PUERTA DEL
FREEZER
Abra la puerta del freezer hasta su extensión
completa.
Retire los 3 tornillos adheridos, ubicados en la parte
inferior a cada lado de la puerta del freezer usando un
destornillador con cabeza hueca hexagonal de 3/8”.
PRECAUCIÓN
Riesgo al levantar la
puerta La puerta del freezer es pesada. Use ambas
manos para asegurar
la puerta antes de
levantar la misma.
Levante la puerta
del freezer para
desconectarla del
mecanismo de
deslizamiento.
La puerta puede
descansar de forma
segura en la parte
LQIHULRU1RDSR\HOD
puerta sobre ninguna
otra superficie a fin de
evitar rayones.
A
B
C
6
3 Tornillos
RETIRE LA CANASTA DEL
FREEZER
Empuje la canasta
inferior y deslice el
mecanismo hasta su
extensión completa
usando ambas
manos.
Retire el cajón del
freezer superior
extendiendo
completamente
el cajón, y luego
levantando el mismo hacia arriba y afuera.
Retire la canasta que se apoya sobre los
deslizadores.
Presione los deslizadores de la canasta inferior
nuevamente hasta que el mecanismo de
deslizamiento se repliegue.
7
A
B
C
D
Instrucciones de Instalación
CÓMO INSTALAR EL REFRIGERADOR (Cont.)
RETIRE
LAS CORREDERAS DE
LA CANASTA DEL FREEZER
Las correderas de la canasta del freezer pueden ser
retiradas para ganar otro espacio de 1.90 cm (3/4”)
a través de la puerta.
Retire la puerta del freezer como se muestra en el
Paso 6.
Retire las canastas superior e inferior
como se muestra en el Paso 7.
Retire el sujetador del travesaño
ubicado a lo largo del lado derecho
del ensamble del sistema de piñón
y cremallera, deslizando el mismo
hacia adelante.
Retire el travesaño deslizando el mismo hacia la
derecha, y luego empuje hacia afuera y hacia la
izquierda.
Retire los cuatro tornillos de ¼” con cabeza
hexagonal por lado y retire los soportes laterales.
Invierta los pasos para realizar el ensamble. Al
instalar el travesaño, siempre coloque el agujero
del lado derecho. Alinee los
sistemas izquierdo y derecho
con las marcas de tiempo
sobre los sistemas, al insertar
el travesaño. Siempre inserte
el travesaño en el sistema del
lado derecho primero y luego el
sistema del lado izquierdo.
Inserte el sujetador en el agujero del travesaño
ubicado del lado derecho.
A
B
C
8
D
E
F
G
1
2
1
2
Tornillos
con cabeza
hexagonal
Sujetador
Agujero para
el sujetador
Marca
de tiempo
Sujetador

32 49-60792 Rev. 3
VUELVA A INSTALAR LOS
CAJONES DEL FREEZER
Vuelva a instalar el cajón del freezer colocando las
ruedas del cajón en la parte superior del riel montado
sobre el costado de las paredes del freezer. Las
ruedas del cajón del freezer deben estar sobre los
costados de la canasta inferior.
EN MODELOS EQUIPADOS CON MÁQUINA DE
HACER HIELO EN EL FREEZER: Coloque la hielera
en el cajón y empuje este último en el freezer con el
frente de la hielera hacia el frente de la canasta.
Asegúrese de que:
- La hielera no golpee el brazo de la máquina de
hacer hielo y que el cajón del freezer se repliegue
completamente en el compartimiento del freezer.
- El tubo de llenado se extiende en la abertura de la
taza de llenado en la parte trasera de la máquina de
hacer hielo.
10
A
Instrucciones de Instalación
CÓMO INSTALAR EL REFRIGERADOR (Cont.)
INSTRUCCIONES DE INSTALACIÓN
REEMPLAZO DE LA PUERTA DEL
FREEZER
PRECAUCIÓN
Riesgo al levantar la
puerta
La puerta del freezer es pesada. Use ambas manos para
asegurar la puerta antes de levantar la misma.
Empuje el mecanismo de deslizamiento de la canasta
inferior hasta su máxima extensión usando ambas
manos.
Levante la puerta del freezer y alinee las lengüetas
sobre los costados de los soportes de la puerta
con los agujeros cuadrados en los mecanismos de
deslizamiento.
Reemplace los tornillos adheridos y ajuste los tornillos
FRQJLURVGHWRUVLyQGH1POLEUDVSXOJDGD
Para ajustar las brechas de la puerta del freezer, siga
las instrucciones que figuran en la página 130 del
Manual del Propietario.
Reemplace la canasta del freezer en los soportes
de deslizamiento y asegúrese de que la puerta del
freezer funcione y se cierre libremente.
9
Alinee e inserte
la lengüeta en
el soporte de la
puerta del freezer
con la ranura
sobre el soporte
de deslizamiento
del freezer.
NOTA: Coloque
un lado hacia
adentro primero
y luego alinee el
otro lado.
A
B
C
D
E

49-60792 Rev. 3 33
INSTRUCCIONES DE INSTALACIÓN
¡IMPORTANTE!
Los 6 tornillos de montaje (3 en cada lado) NO son intercambiables con los tornillos de la bisagra central o superior.
Luego de la instalación de la puerta del freezer, controle que los espacios sean uniformes (la parte superior e inferior del lado
derecho e izquierdo) con la plantilla provista.
En caso de espacios excesivos siga los siguientes pasos para ajustar la puerta del freezer.
Paso 1 – Afloje los 3 tornillos a cada lado (derecha e izquierda) de la puerta del freezer.
Paso 2 – Ajuste el tornillo del set en dirección de las agujas del reloj si el espacio en la parte superior es demasiado grande (vea
la plantilla). Gire el tornillo del set usando una llave hexagonal de 3/32” en dirección de las agujas del reloj con una rotación de
un cuarto hasta la mitad.
Paso 3 – Ajuste el tornillo del set en dirección contraria a las agujas del reloj si el espacio en la parte inferior es demasiado
grande (vea la plantilla). Gire el tornillo del set usando una llave hexagonal de 3/32” en dirección contraria a las agujas del reloj
con una rotación de un cuarto hasta la mitad.
Paso 4 – Ajuste los 3 tornillos a cada lado (derecha e izquierda).
Paso 5 – Vuelva a controlar los espacios usando la plantilla y repita los pasos 1 a 4 si se requiere y complete con el paso 5.
Instrucciones para ajustar los espacios de la puerta del freezer:
(0.600”)
1.5 cm
Plantilla para el control de
espacios. El espacio debería
ser de 1.5 cm (0.6”) o inferior.
Paso 1
Paso 4
Tornillo del Set
Paso 3
Paso 2
Dóblelo aquí para usar la plantilla
Instrucciones de Instalación
CÓMO INSTALAR EL REFRIGERADOR (Cont.)
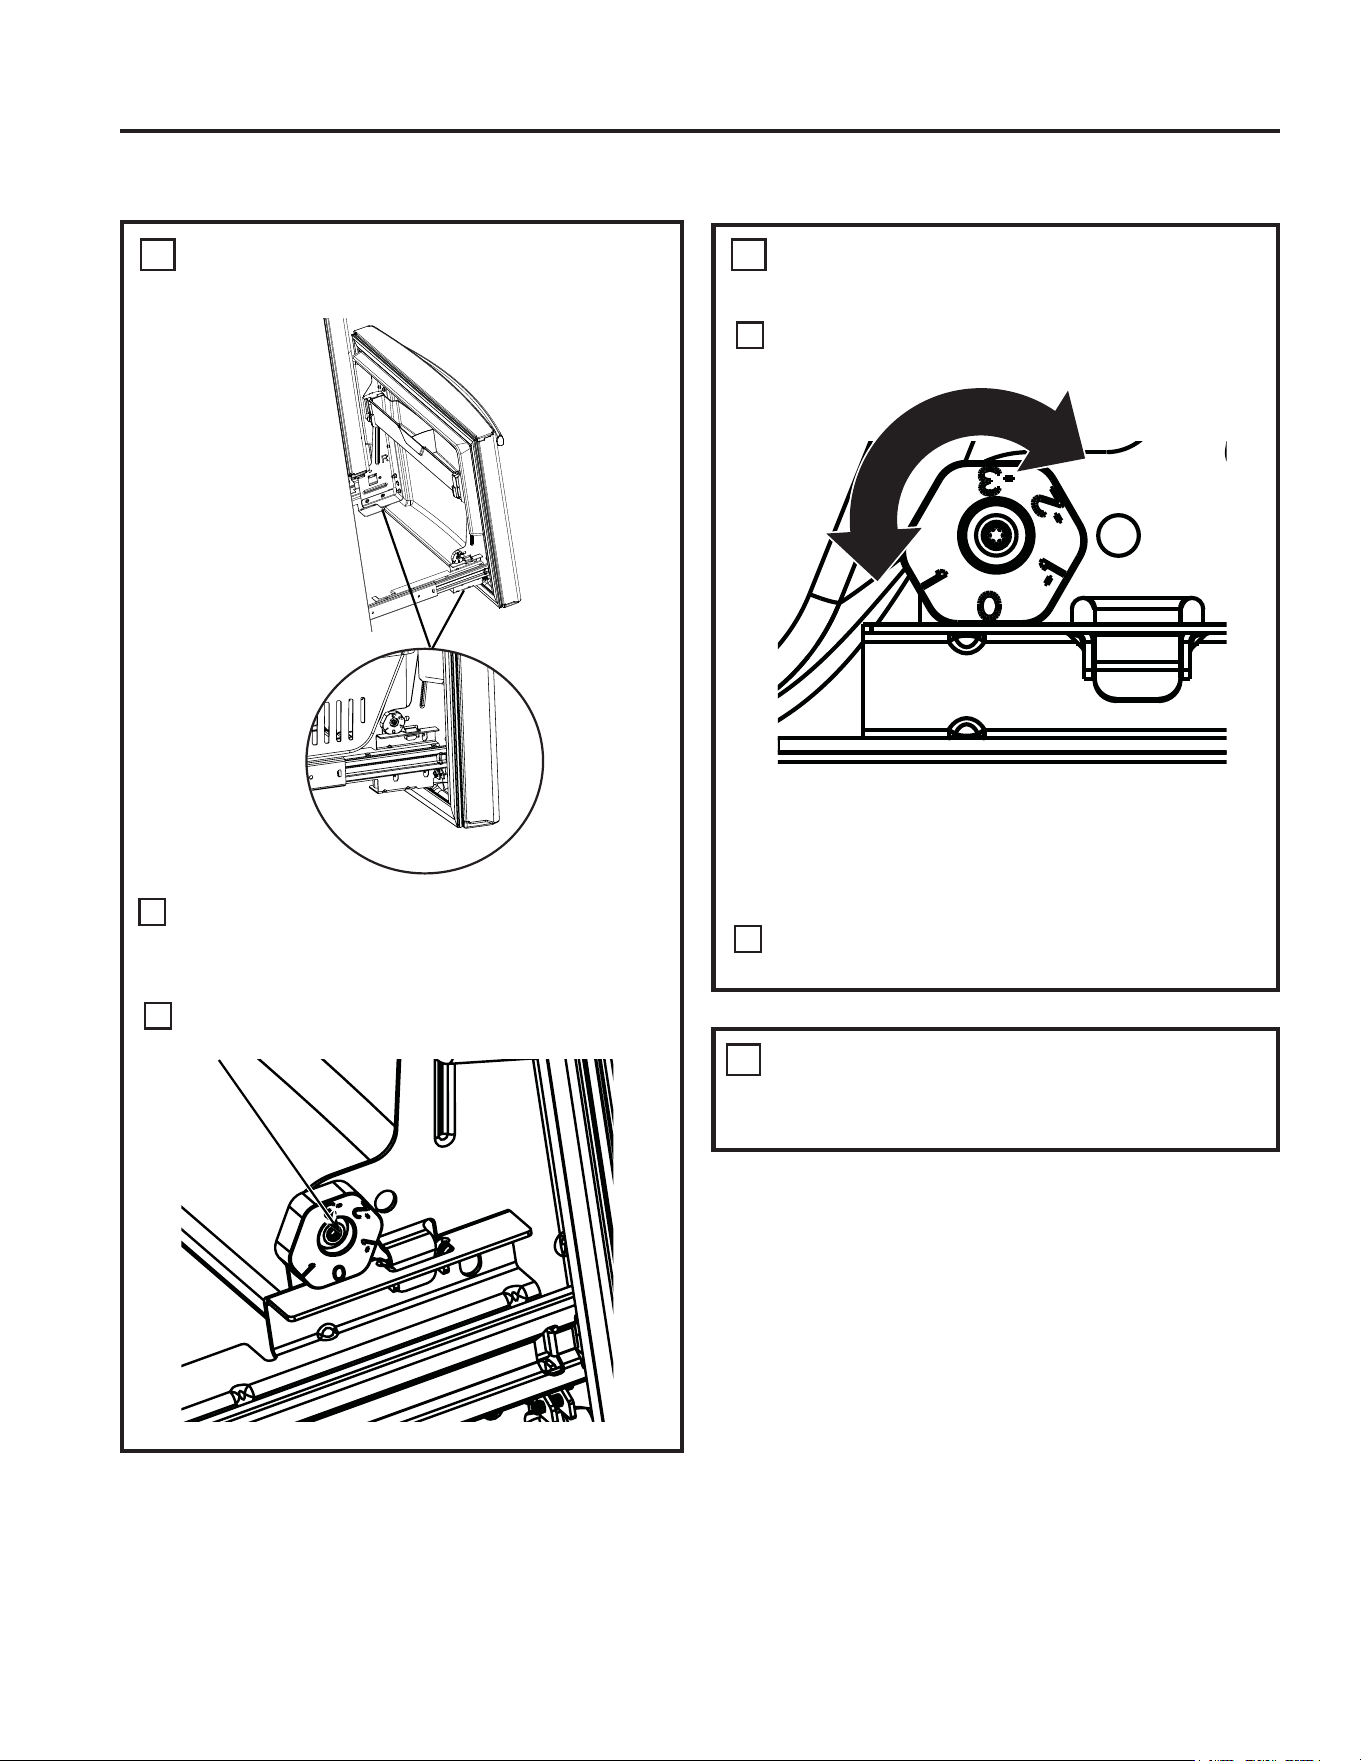
34 49-60792 Rev. 3
NIVELACIÓN DE LA PUERTA
DEL FREEZER
Ubique la leva de ajuste de altura en la puerta del
freezer. Lentamente afloje los tres tornillos de ajuste
de la puerta a ambos lados usando un destornillador
con cabeza hueca hexagonal de 3/8”.
Ubique y afloje el tornillo de leva usando un
destornillador T-27.
10
A
B
RETIRE EL EMBALAJE
Retire toda la cinta, gomaespuma y embalajes
protectores de los estantes y cajones.
11
NIVELACIÓN DE LA PUERTA DEL
FREEZER (cont.)
Levante la puerta del lado que requiera ajustes, gire
la leva hacia la posición requerida.
Luego del ajuste tense los 3 tornillos de ajuste
XVDQGRKDVWD1POLEUDVSXOJDGD
10
A
B
Instrucciones de Instalación
CÓMO INSTALAR EL REFRIGERADOR (Cont.)
0 - Initial position
1 - Levante de a 0.127 cm (0.050”)
-1 - Baje de a 0.127 cm (0.050”)
-2 - Baje de a 0.254 cm (0.100”)
-3 - Baje de a 0.381 cm (0.150”)
INSTRUCCIONES DE INSTALACIÓN
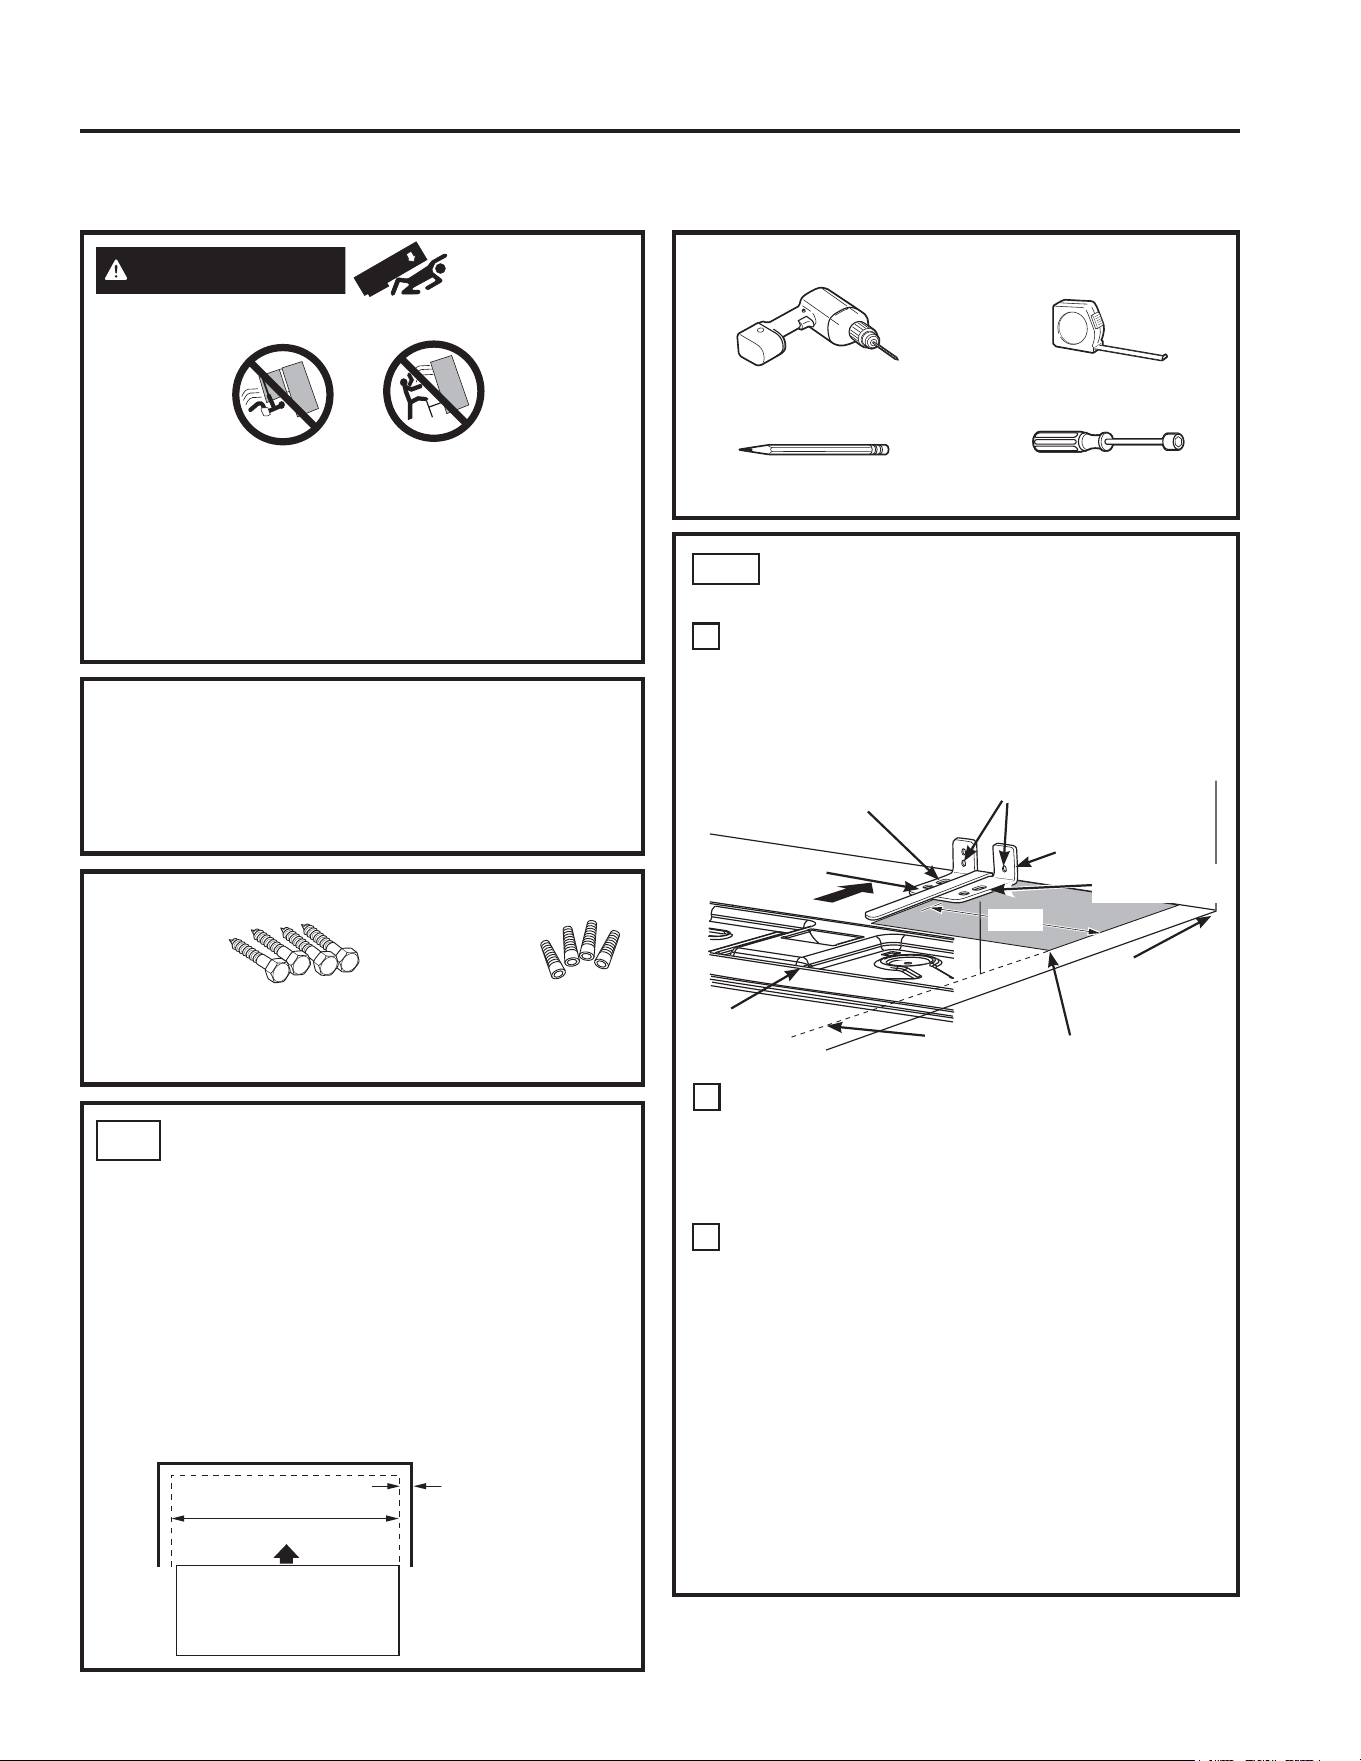
49-60792 Rev. 3 35
INSTALLATION INSTRUCTIONS
MIDA LA ABERTURA DEL
GABINETE DISPONIBLE VS. EL
ANCHO DEL REFRIGERADOR
Mida el ancho de la abertura del gabinete donde será
ubicado el refrigerador, W.
Asegúrese de contar con espacio por encima de la
mesada, grosor en el rodapié y cualquier despeje
deseado. El ancho, W, no debería ser inferior a 36”.
El refrigerador será ubicado aproximadamente en el
medio de esta abertura.approximately in the middle of
this opening.
MATERIALES QUE PUEDE NECESITAR
(not included)
HERRAMIENTAS NECESARIAS
Lápiz
Broca y Taladro Eléctrico
o Manual de 1/8” (3 mm)
Cinta métrica
Llave de tuercas de
5/16” (8 mm)
Tirafondos
1/4” (6 mm) x 1-1/2” (38 mm)
Casquillos de
Anclaje
1/2” (12 mm) Diámetro Exterior
Para Soporte Anti-Volcaduras Montado en Pisos de
Concreto Únicamente
Broca para Taladro Apropiada para Anclajes
AT-1
UBICACIÓN DEL SOPORTE DE
PISO ANTI-VOLCADURAS
Coloque la plantilla de ubicación del soporte de
piso anti-volcaduras (incluido dentro del kit anti-
volcaduras) sobre el piso contra la pared trasera,
dentro de W, y alineado con la ubicación deseada del
lado derecho del refrigerador (vea la Figura 1).
Coloque el soporte para piso anti-volcaduras en la
plantilla de ubicación con sus agujeros para piso
del lado derecho alineado con los agujeros del piso
indicados en la hoja de la plantilla, aproximadamente
38.73 cm (15 1/4”) desde el extremo de la hoja o del
lado derecho del refrigerador.
Sostenga en la posición y use el soporte para piso
anti-volcaduras como una plantilla para hacer los
agujeros, basados en su configuración y tipo de
construcción como se muestra en el Paso 3. Marque
las ubicaciones de los agujeros con un lápiz, clavo o
punzón.
NOTA:
• Se REQUIERE el uso de por lo menos 2 tornillos
para montar el soporte (uno a cada lado del soporte
para piso anti-volcaduras). Ambos deben estar en
la pared o en el piso. La figura 2 indica todas las
configuraciones de montaje aceptables para los
tornillos. Identifique los agujeros de los tornillos
en el soporte para piso anti-volcaduras para su
configuración.
AT-2
A
B
C
El Grosor del
Rodapié o el
Espacio Encima
de la Mesada
(Cualquiera Sea
Más Grande)
Además de
Cualquier
Despeje
Deseado
Pared Trasera
Frente
Lado Derecho
W
5()5,*(5$'25
Figura 1 – Visión General de Instalación
Soporte de
Base en el
Refrigerador
2 Agujeros en la Pared
Piso - Concreto
(2 Agujeros)
Piso - Madera
(2 Agujeros)
15 ¼”
Hoja de la Plantilla
de Ubicación
Soporte de
Piso para
Instalar
Esquina Trasera
Derecha de la
Pared del Gabinete
Agujeros del
Lado Derecho
Lado
Derecho del
Refrigerador
ADVERTENCIA
Riesgo de
Caída.
Los modelos con estilo incorporado (modelo PYE, GYE,
GYS, PWE, y ZWE) son inestables, especialmente con las
puertas abiertas. Estos modelos deben ser asegurados
con el soporte anti-volcaduras, a fin de evitar caídas hacia
adelante, que podrían resultar en la muerte o lesiones
graves. Lea y siga las instrucciones de instalación en su
totalidad, a fin de instalar el soporte de piso anti-volcaduras
embalado con su refrigerador.
NOTA:
Si no recibió el soporte anti-volcaduras con su compra,
llame al 1.800.432.2737 para recibir uno sin costo. (En
Canadá, llame al 1.800.561.3344).
Para acceder a instrucciones sobre el soporte, visite:
www.GEAppliances.com.
Instrucciones de Instalación
CÓMO INSTALAR EL REFRIGERADOR (Cont.)
SOPORTE DE PISO ANTI-VOLCADURAS (Modelos de PYE, GYE, GYS, DYE, PWE, y ZWE sólo )
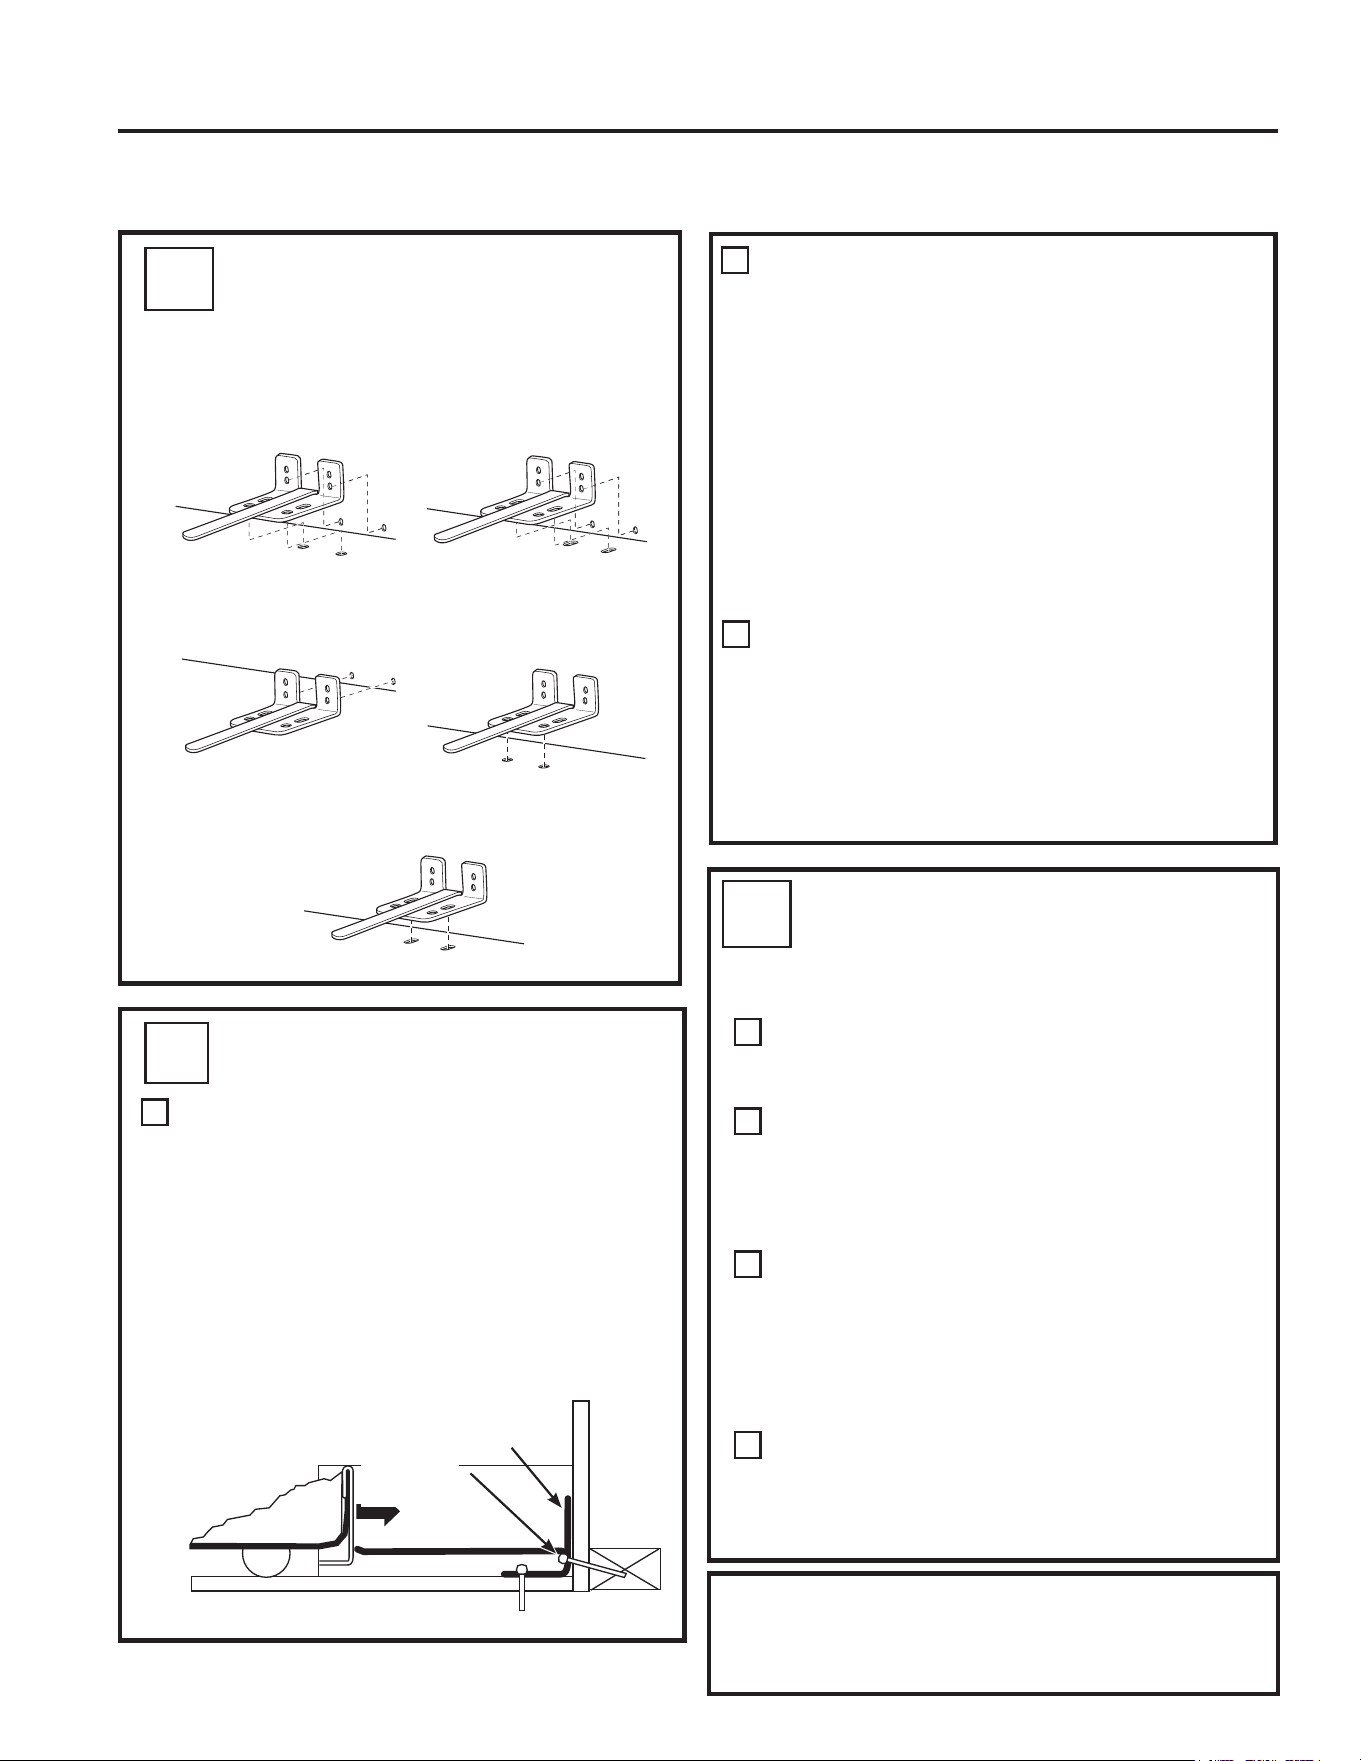
36 49-60792 Rev. 3
CÓMO POSICIONAR EL
REFRIGERADOR PARA ADHERIR
LOS SOPORTES DEL PISO ANTI-
VOLCADURAS Y DE LA BASE
Antes de empujar el refrigerador hacia la abertura,
enchufe el cable de corriente en el receptáculo y
conecte el suministro de agua (si está equipado).
Controle que no haya pérdidas.
Ubique el lado derecho del refrigerador y mueva
el mismo hacia atrás aproximadamente en línea
con el lado derecho de la abertura del gabinete,
W. Esto debería posicionar el soporte del piso anti-
volcaduras, a fin de adherir la base anti-volcaduras
con el refrigerador.
De forma suave haga girar el refrigerador
nuevamente hacia el gabinete, abriendo el mismo
hasta que se detenga completamente. Controle que
el frente del refrigerador se alinee con la cara frontal
del gabinete. Si no es así, con cuidado mueva el
refrigerador hacia adelante y atrás hasta que se
produzca la adherencia y observe que el refrigerador
esté completamente apoyado sobre la pared trasera.
Si Corresponde: Realice los ajustes de altura
de las ruedas traseras (y frontales) para adherir
completamente los soportes anti-volcaduras
traseros, mientras también alinea el frente del
refrigerador con la cara frontal del gabinete.
Construcción del Piso y la Pared de CONCRETO:
• Se requiere el uso de anclajes (no provistos):
4 tirafondos cada uno de ¼” (6 mm) x 1-1/2” (38
mm) 4 sujetadores de manga cada uno de ½” (12
mm) de diámetro exterior
• Realice los agujeros usando los tamaños
recomendados para los anclajes en el concreto
sobre el centro de los agujeros marcados en el
Paso 2.
• Instale los sujetadores de mangas en los agujeros
perforados. Coloque el soporte de piso anti-
volcaduras como se indica en el Paso 2. Retire la
plantilla de ubicación desde el piso.
• Instale los tirafondos a través del soporte para
piso anti-volcaduras y ajuste los mismos de forma
apropiada.
Construcción del Piso de MOSAICO y la Pared de
MADERA::
• For this special case, locate the 2 wall holes
identified in Fig. 2. Drill an angled 1/8” (3 mm) pilot
hole (approx. as shown in Fig. 3) in the center of
each hole.
• Monte el soporte para piso anti-volcaduras usando
la Instalación Mínima Aceptable nº 1, como se
ilustra en la Figura 2.
AT-2
UBICACIÓN DEL SOPORTE DE
PISO ANTI-VOLCADURAS
(cont.)
Instalación Recomendada
- Madera
Instalación Recomendada
- Concreto
0tQLPR$FHSWDEOH1±
Piso de Madera
0tQLPR$FHSWDEOH1±
Piso de Madera
0tQLPR$FHSWDEOH1±
Piso de Madera
Figura 2 – Ubicaciones Aceptables para la
Colocación de Tornillos
C
B
AT-3
INSTALACIÓN DEL SOPORTE
ANTI-VOLCADURAS
Construcción del Piso y la Pared de MADERA:
• Realice la cantidad apropiada de agujeros de
prueba de 1/8” (3 mm) en el centro de cada agujero
de soporte del piso que se usará (se podrá usar un
clavo o punzón si no se cuenta con una broca) Y
retire la plantilla de ubicación del piso.
• Monte el soporte para piso anti-volcaduras
ajustando los 2, o se recomienda 4, tornillos de
cabeza hexagonal nº 10-16 de forma ajustada en
cada lugar como se ilustra en la Figura 3.
A
A
C
B
D
Figura 3 – Ajuste a la Pared y el Piso
NOTA: Si empuja el refrigerador hacia afuera y lo aleja de la
pared por alguna razón, asegúrese de que el soporte para
piso anti-volcaduras esté adherido cuando el refrigerador es
empujado hacia atrás contra la pared trasera.
Esquina Trasera
del Lado Derecho
del Refrigerador
Piso
Perno de
la Placa
de Pared
Soporte
del Piso
2 Tornillos
Deben
Entrar en la
Madera o
la Tachuela
de Metal
Pared
Instrucciones de Instalación
CÓMO INSTALAR EL REFRIGERADOR (Cont.)
SOPORTE DE PISO ANTI-VOLCADURAS (Modelos de PYE, GYE, GYS, DYE, PWE, y ZWE sólo )
AT-4
INSTRUCCIONES DE INSTALACIÓN
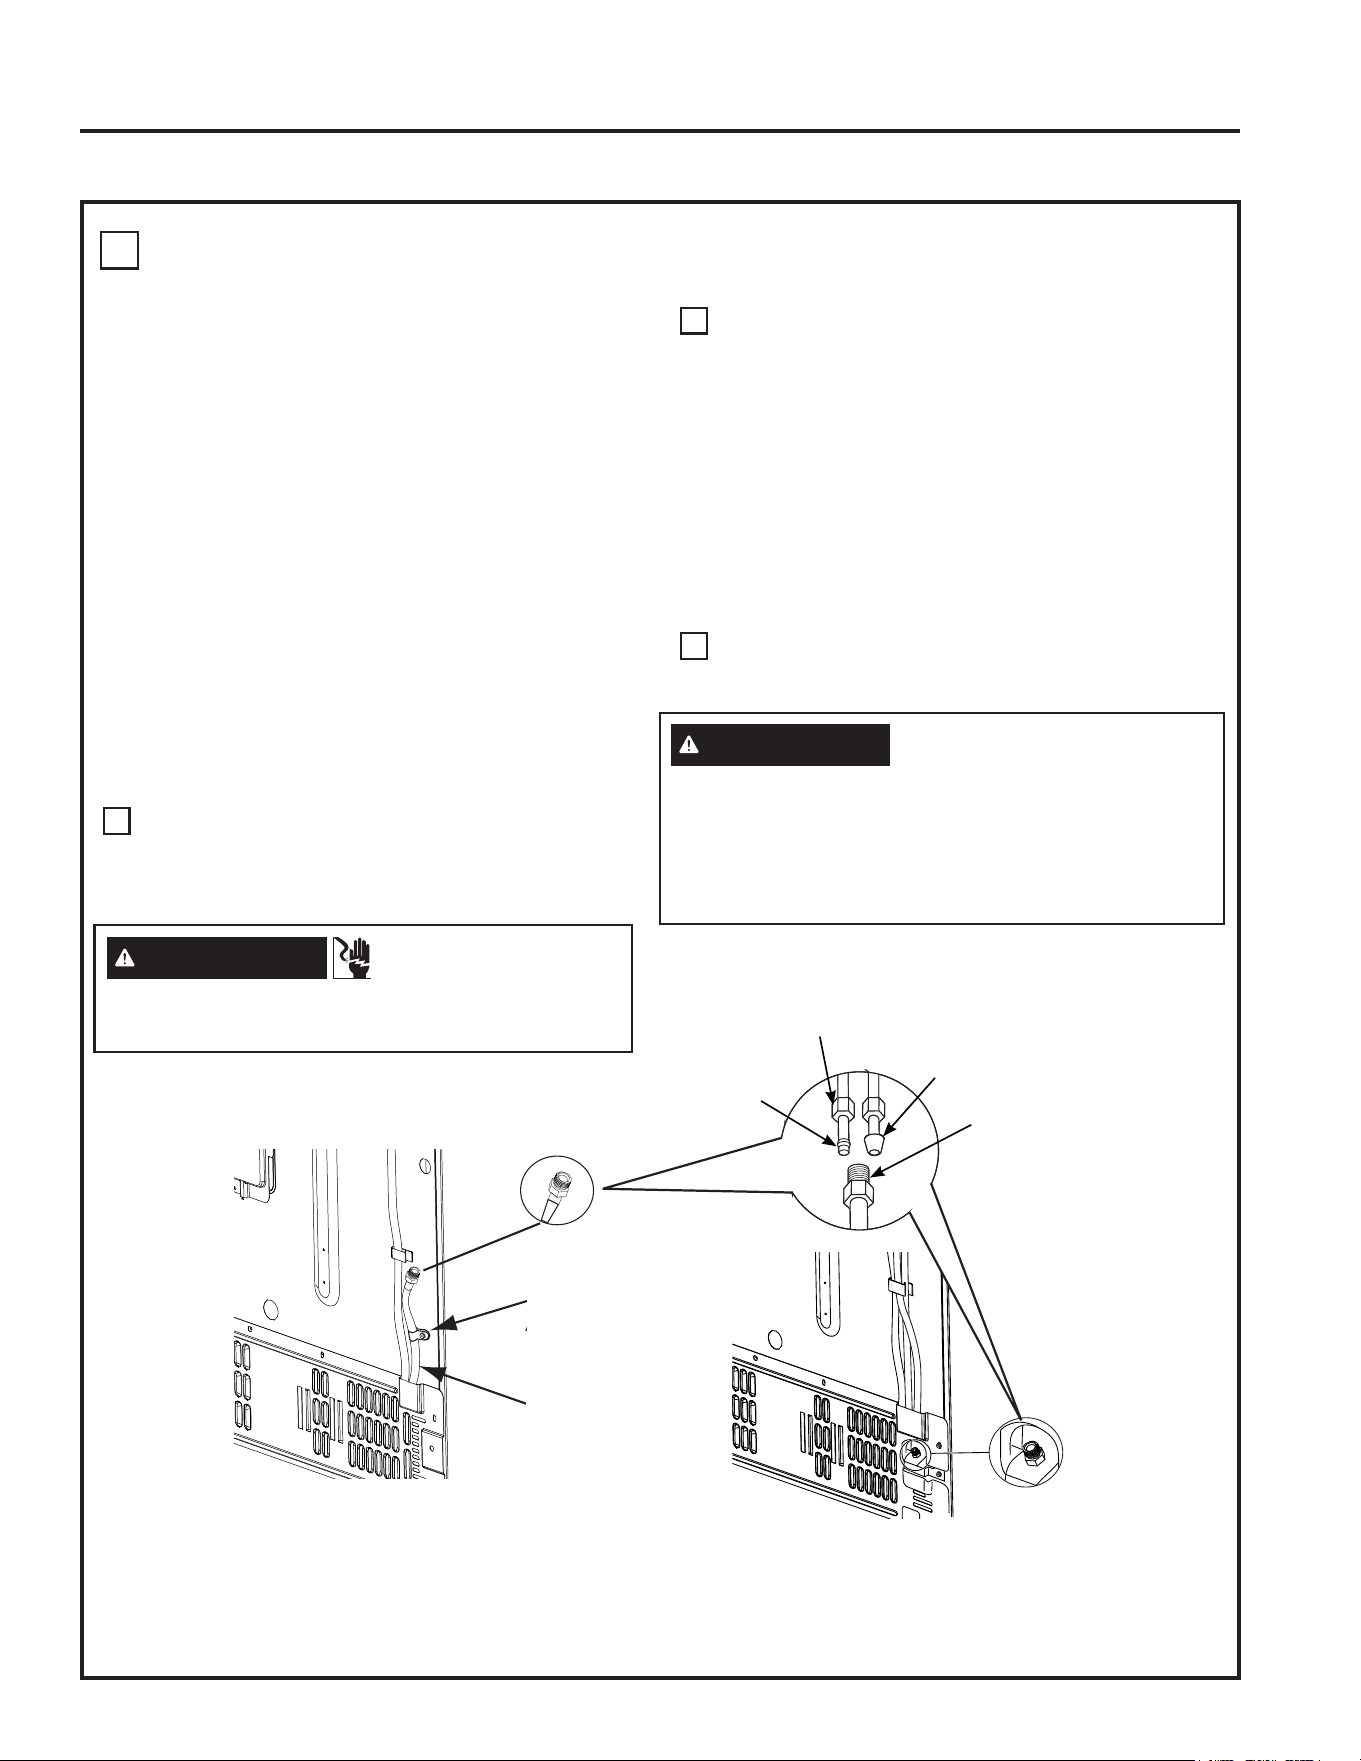
49-60792 Rev. 3 37
INSTRUCCIONES DE INSTALACIÓN
CÓMO CONECTAR EL REFRIGERADOR AL SUMINISTRO DE AGUA DEL
HOGAR
Se requiere un suministro de agua fría para el
funcionamiento de la máquina de hielo automática.
Si no se cuenta con un suministro de agua fría,
deberá proveer uno. Consulte la sección sobre
Cómo Instalar el Suministro de Agua.
NOTAS:
• Antes de realizar la conexión al refrigerador,
asegúrese de que el cable de corriente del mismo
no se encuentre enchufado al tomacorriente.
• Si su refrigerador no cuenta con un filtro de
agua, le recomendamos que instale uno si el
suministro de agua posee arena o partículas que
podrían atascar la rejilla de la válvula de agua del
refrigerador. Instale el mismo en la tubería de agua
más cercana al refrigerador. Si usará el Kit de
Tuberías para Refrigeradores de SmartConnect™,
necesitará una tubería adicional (WX08X10002)
SDUDUHDOL]DUODFRQH[LyQDOILOWUR1RFRUWHOD
tubería de plástico para instalar el filtro.
• Antes de conectar la tubería de agua al hogar,
purgue la cañería del hogar durante por lo menos
2 minutos.
Si usará una tubería de cobre, coloque una tuerca
de compresión y una abrazadera de refuerzo
(mango) en el extremo de la tubería proveniente del
suministro de agua fría del hogar.
Si usará tuberías de SmartConnect™, las tuercas ya
están ensambladas en la tubería.
Si usará tuberías de cobre, inserte el extremo de la
tubería en la conexión del refrigerador, en la parte
trasera del refrigerador, lo más lejos posible. Al
sostener la tubería, ajuste la unión.
Si usará tuberías de SmartConnect™ , inserte el
extremo moldeado de la tubería en la conexión del
refrigerador, en la parte trasera del refrigerador, y
ajuste la tuerca de compresión hasta que quede
ajustada manualmente. Luego realice un ajuste
adicional con un giro de llave. Un ajuste excesivo
podrá ocasionar pérdidas.
Ajuste la tubería en la abrazadera provista para
sostener la misma en la posición correcta. Será
necesario que abra la abrazadera haciendo palanca.
11
A
B
C
Instrucciones de Instalación
CÓMO INSTALAR EL REFRIGERADOR (Cont.)
Tuerca de
Compresión de ¼”
Ferrule
(sleeve)
Tubería de
SmartConnect™
Conexión del
Refrigerador
1/4” Tubing
Tuyau de 1/4 po
Tubería de 1/4“
Tubing Clamp
Bride
Abrazadera del tubo
O
Abrazadera
del Tubo
Tubería de ¼”
ADVERTENCIA
PELIGRO DE
DESCARGA ELÉCTRICA
Adhiera la abrazadera de la tubería usando el agujero
H[LVWHQWH~QLFDPHQWH12SHUIRUHHOUHIULJHUDGRU
ADVERTENCIA
Realice la conexión a un suministro de agua potable
únicamente.
Se requiere un suministro de agua fría para el
funcionamiento de la máquina de hielos automática. La
presión del agua deberá estar entre 40 y 120 psi (275-827
kilopascales).

38 49-60792 Rev. 3
ABRA EL SUMINISTRO DE
AGUA
Abra el suministro
de agua usando la
válvula de cierre
(suministro de agua
hogareño) y controle
que no haya pérdidas.
12
ENCHUFE EN EL
REFRIGERADOR
Consulte la información de
conexión a tierra adjunta con
el cable de corriente.
13
NIVELACIÓN DEL
REFRIGERADOR
Las patas niveladoras poseen 2 propósitos:
1) Las patas niveladoras se ajustan de modo que el
refrigerador quede posicionado de manera firme
en el piso y no se tambalee.
2) Las patas niveladoras sirven como freno
estabilizador para sostener el refrigerador
de forma segura en su posición durante
el funcionamiento y la limpieza. Las patas
niveladoras también evitan la caída del
refrigerador.
Gire las patas niveladoras en dirección de las agujas
del reloj para levantar el refrigerador, en contra de
las agujas del reloj para bajarlo.
AVISO: A fin de evitar posibles daños sobre la
propiedad, las patas niveladoras deberán estar
tocando el piso de manera firme.
14
A
Destornillador con
cabeza aplanada
Levantar
NIVELACIÓN DE LAS PATAS
DEL REFRIGERADOR
Recuerde que es necesario que el refrigerador esté
nivelado para que las puertas estén perfectamente
apoyadas. Si necesita ayuda, revise la sección previa
sobre nivelación del refrigerador.
Si abre la puerta del freezer, podrá ver la bisagra
central.
Inserte una llave Allen de ¼” en el hueco de la
bisagra central.
Ajuste la altura girando en dirección a favor o en
contra de las agujas del reloj. Al girar en contra de
las agujas del reloj, la puerta se moverá.
15
A
B
Cuando
la puerta
izquierda está
más baja
que la puerta
derecha.
Cuando
la puerta
izquierda
está más
alta que
la puerta
derecha.
Punto de ajuste
C
RAISE
Instrucciones de Instalación
INSTRUCCIONES DE INSTALACIÓN
CÓMO INSTALAR EL REFRIGERADOR (Cont.)

49-60792 Rev. 3 39
J
H
H
INSTRUCCIONES DE INSTALACIÓN
INSTRUCCIONES DE INSTALACIÓN
Instrucciones de Instalación
Coloque los recipientes en las puertas:
Enlace su recipiente con la letra mostrada.
Posicione los ganchos del recipiente sobre el
ubicador del recipiente y empuje hacia adelante
hasta que se inserte completamente.
Ubicador del
recipiente a cada
lado
Parte trasera del
gancho del recipien-
te a cada lado
Empuje el recipiente hacia abajo hasta que se
bloquee en su posición.
Máquina de Hacer Hielo en
el Freezer, disponible en
modelos Sin Dispensador y
disponible como Kit IM para
algunos modelos.
(modelos
selectos
únicamente)
Modelos sin
Dispensión
G
G
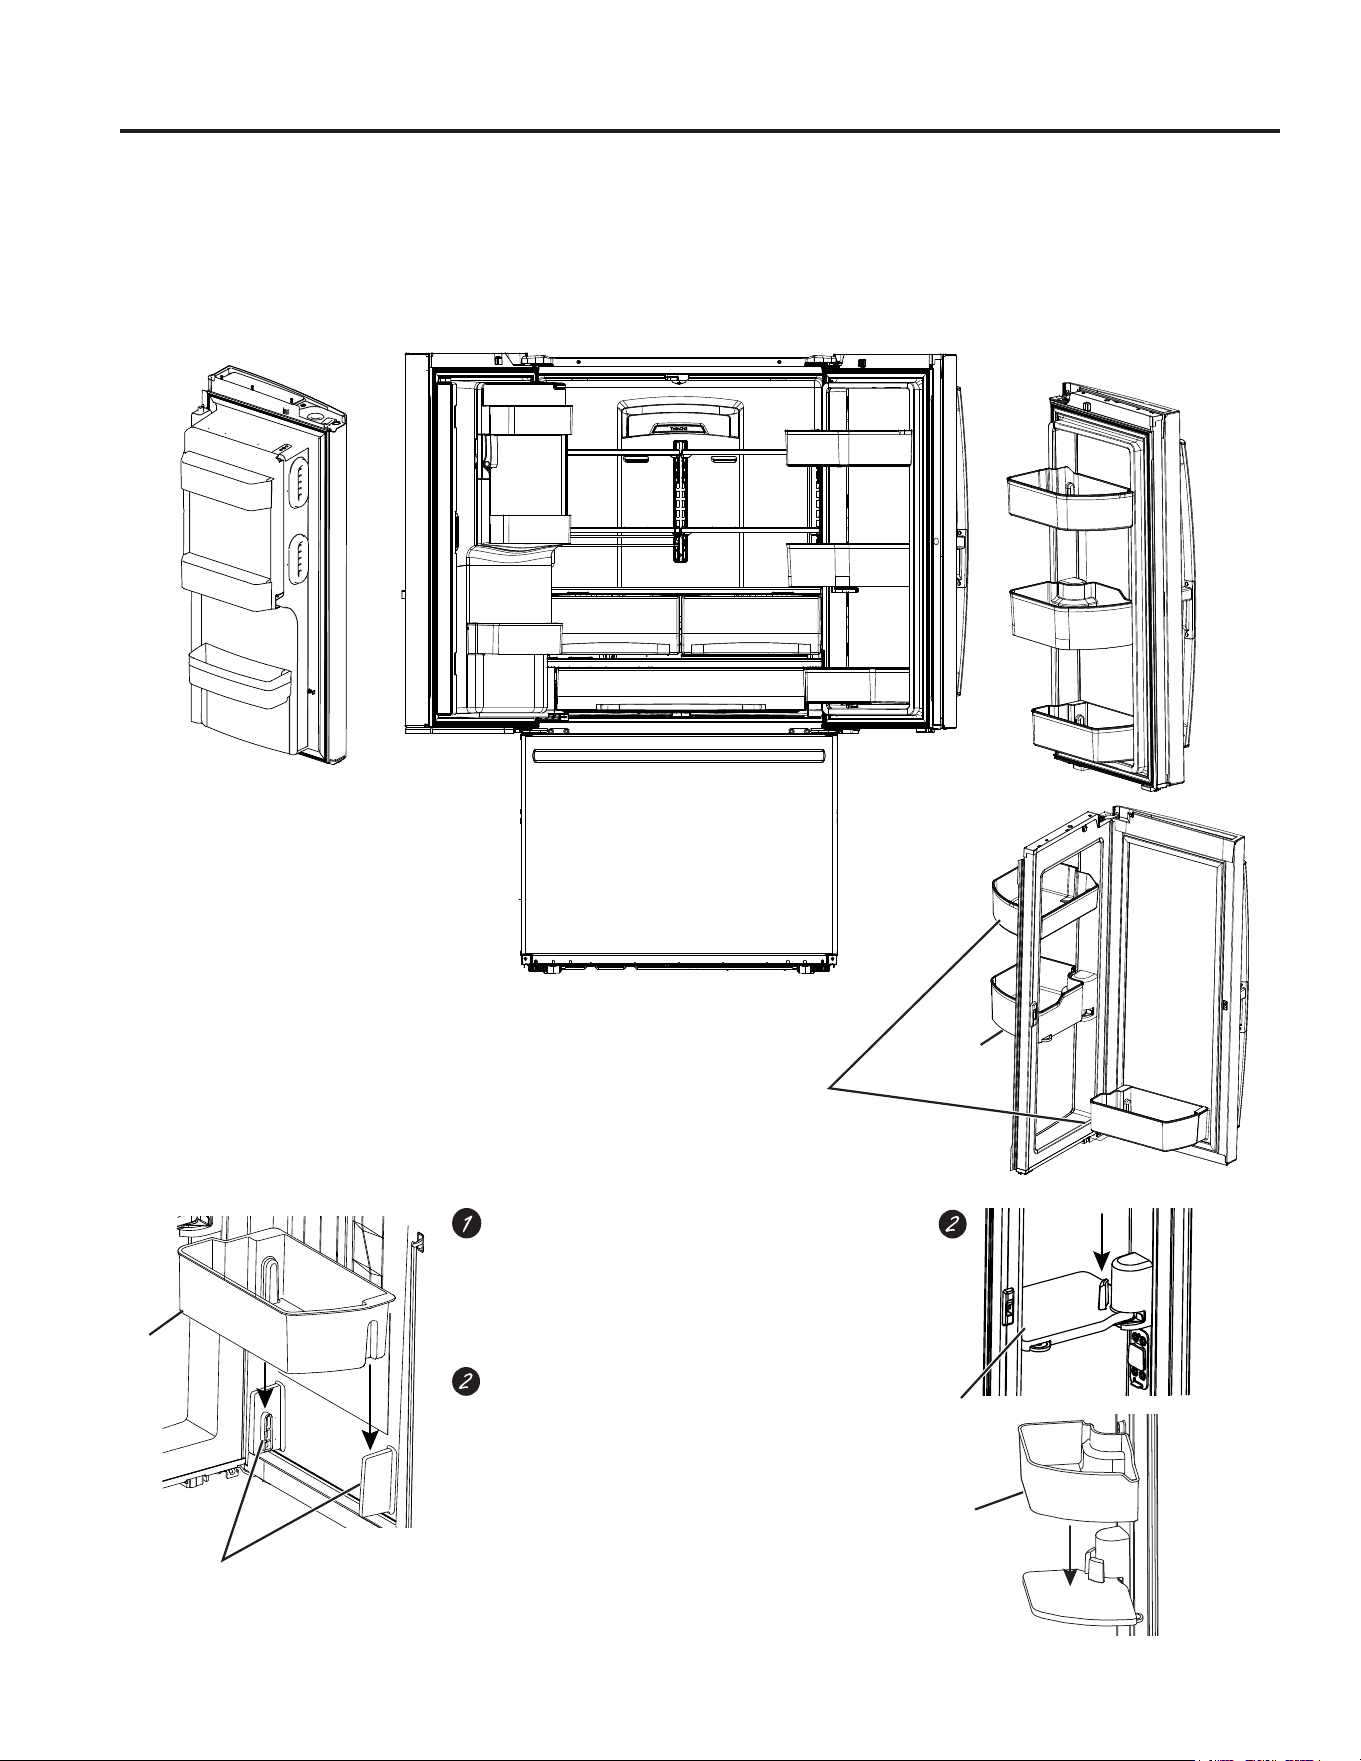
40 49-60792 Rev. 3
INSTRUCCIONES DE INSTALACIÓN
Instrucciones de Instalación
CÓMO INSTALAR EL REFRIGERADOR (Cont.)
Porta
bandejas
Bandejas
ajustables
Bandeja
giratoria
Modelos PFD, PYD, GFD
Para colocar la bandeja giratoria en la
puerta:
1. Deslice el ensamble de la base de la bandeja
en el soporte de la puerta.
2. Deslice la bandeja sobre la base de la
bandeja.
Para colocar las bandejas ajustables
en la puerta:
Posicione las bandejas sobre los porta
bandejas y empuje hacia abajo hasta que se
ajusten en sus posiciones.
Bin
Bin
Base
de la
bandeja
Instale
la base
metálica

49-60792 Rev. 3 41
Los kits de suministro de agua de cobre recomendados son
WX8X2, WX8X3 o WX8X4, dependiendo de la cantidad
de tubería necesaria. Las tuberías de suministro de agua
de plástico aprobadas son las Tuberías para Refrigerador
de SmartConnect™ (WX08X10006, WX08X10015 y
WX08X10025).
Al conectar su refrigerador a un Sistema de Agua por
Ósmosis Inversa de GE Appliances, la única instalación
aprobada es con el Kit GE Appliances RV. Con otros
sistemas de agua por ósmosis inversa, siga las
recomendaciones del fabricante.
Si el suministro de agua al refrigerador es de un Sistema
GH)LOWUDFLyQGH$JXDSRUÏVPRVLV,QYHUVD52<HO
refrigerador también cuenta con un filtro de agua, use el
tapón del bypass del filtro del refrigerador. Cómo usar
el tapón del bypass del filtro del Refrigerador. El uso del
cartucho de filtración de agua del refrigerador junto con un
ILOWURGHDJXD52SRGUiSURGXFLUFXERVGHKLHORKXHFRV
Algunos modelos no están equipados con el tapón del
bypass del filtro. Para obtener un tapón del bypass del
filtro, llame al 800-GECARES. En Canadá, llame
al 800.561-3344.
Esta instalación de la tubería de agua no posee garantía
del fabricante del refrigerador o de la máquina de hacer
hielo. Siga estas instrucciones con cuidado, a fin de
minimizar el riesgo de daños caros sobre el agua.
Los golpes de ariete (agua que golpea las tubería) en
la plomería del hogar pueden ocasionar daños sobre
las piezas del refrigerador y generar pérdidas de agua o
inundación. Llame a un plomero calificado para corregir los
golpes de ariete antes de instalar la tubería de suministro
de agua al refrigerador.
A fin de evitar quemaduras y daños sobre los productos, no
adhiera la tubería de agua a la tubería de agua caliente.
Si el refrigerador es utilizado antes de haber realizado la
conexión de agua a la máquina de hacer hielo,consulte
la sección de Controles en la página 109 para apagar la
máquina de hacer hielo.
1RLQVWDOHODWXEHUtDGHODPiTXLQDGHKDFHUKLHORHQiUHDV
donde las temperaturas lleguen a estar bajo cero.
Al usar un dispositivo eléctrico (tal como un taladro
eléctrico) durante la instalación, asegúrese de que
el dispositivo cuente con doble aislación o que esté
conectado a tierra de modo que se eviten riesgos de
descargas eléctricas, o que sea cargados a través del uso
de una batería.
Todas las instalaciones de deben realizar de acuerdo con
los requisitos indicados en el código local de plomería.
ANTES DE COMENZAR LO QUE NECESITARÁ
• Kit de Tubería para Refrigerador de Cobre o
SmartConnect™ de ¼” de diámetro externo para
conectar el refrigerador al suministro de agua. Si usará
cobre, asegúrese de que ambos extremos de la tubería
hayan sido cortados de forma recta.
A fin de determinar cuánta tubería es necesaria: mida
la distancia desde la válvula de agua en la parte trasera
del refrigerador hasta la tubería del suministro de agua.
Asegúrese de que haya suficiente tubería adicional para
permitir que el refrigerador pueda ser retirado de la pared
luego de la instalación.
Los Kits de Tuberías para Refrigerador de
SmartConnecté™ están disponibles en las siguientes
longitudes:
8’ (2.4 m) – WX08X10006
15’ (4.6 m) – WX08X10015
25’ (7.6 m) – WX08X10025
Instrucciones de Instalación
CÓMO INSTALAR LA TUBERÍA DE AGUA
INSTRUCCIONES DE INSTALACIÓN
ADVERTENCIA
Realice la conexión a un suministro de agua potable
únicamente.
Se requiere un suministro de agua fría para el
funcionamiento de la máquina de hielos automática. La
presión del agua deberá estar entre 40 y 120 psi (275-827
kilopascales).
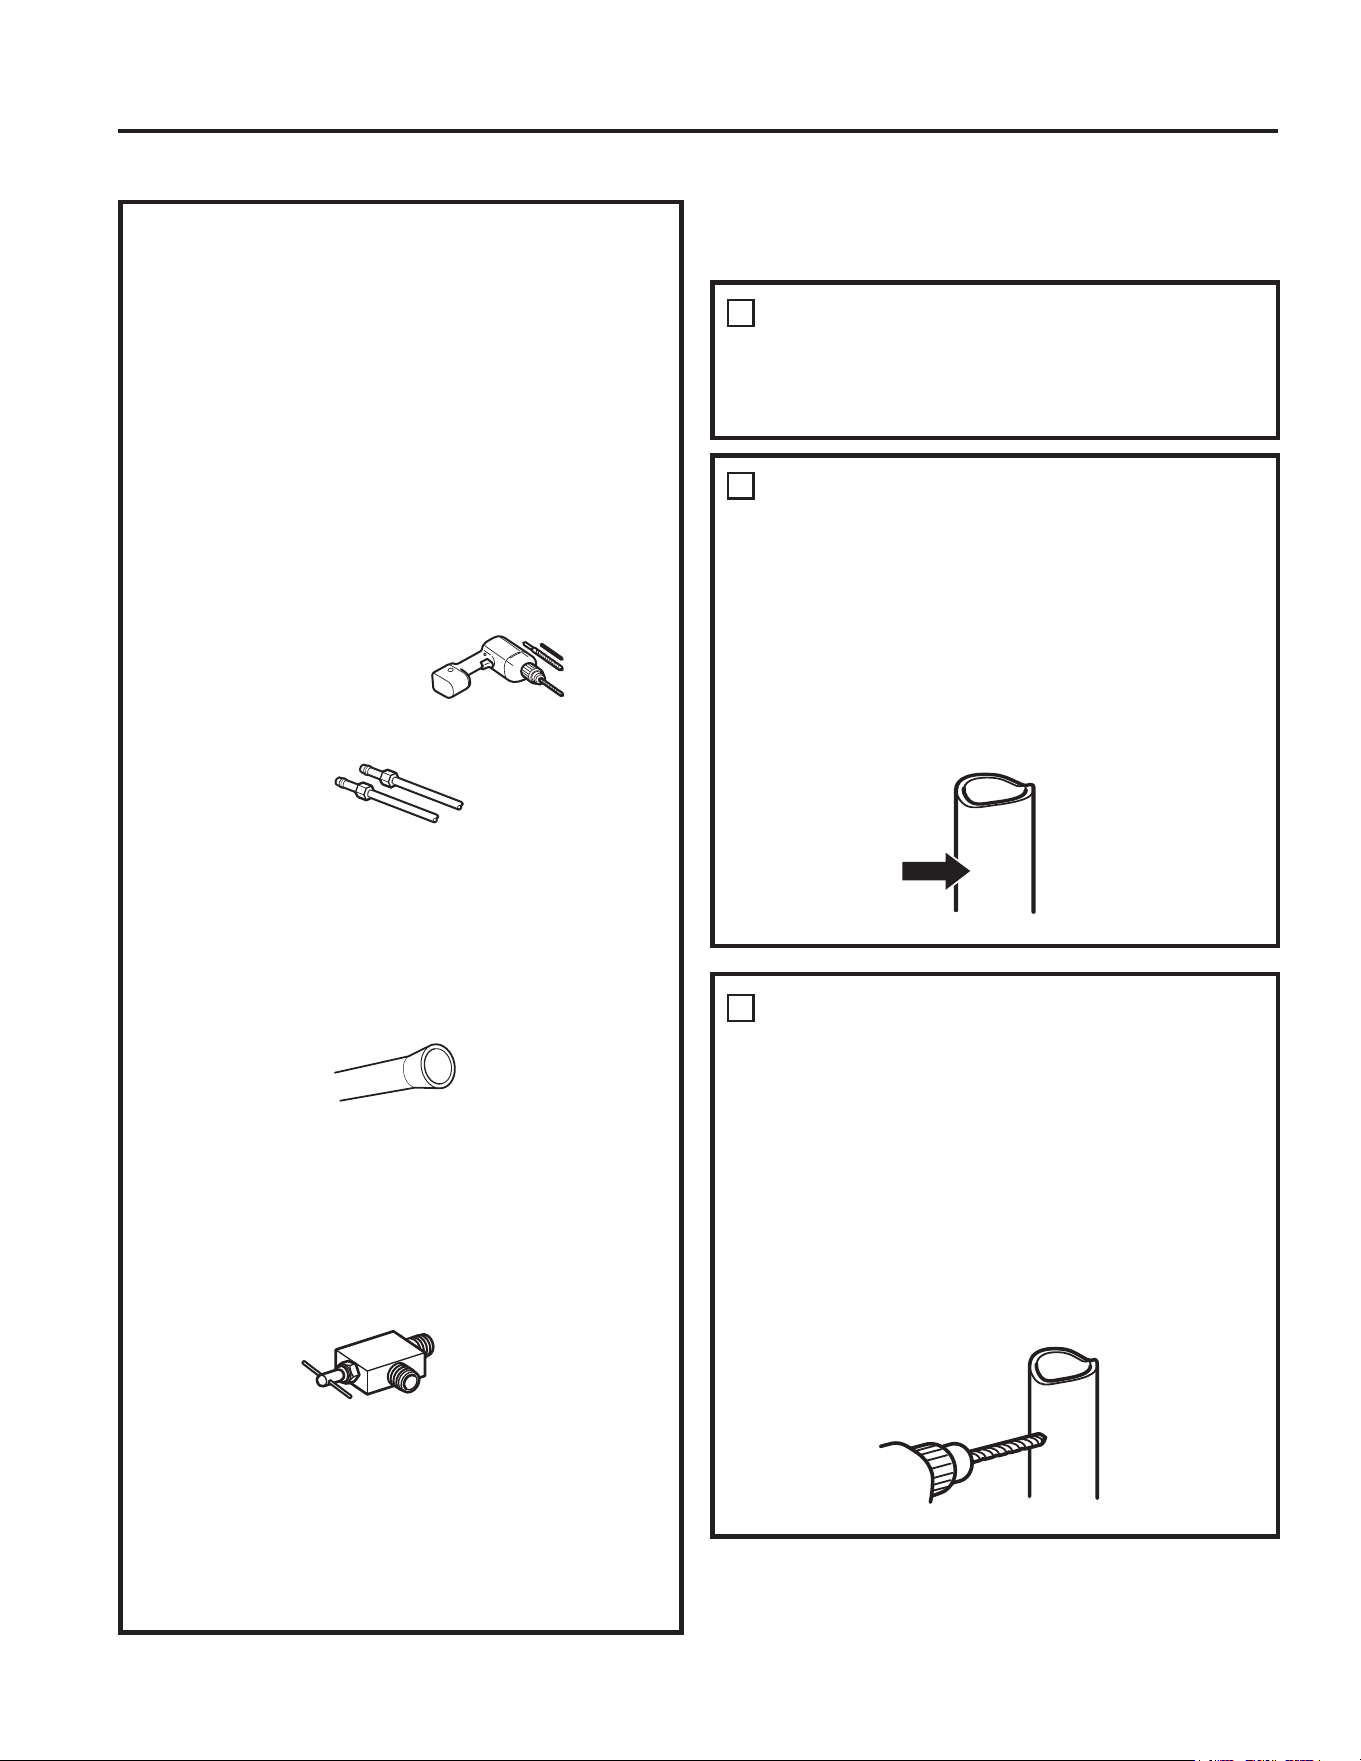
42 49-60792 Rev. 3
NOTA: La única tubería plástica aprobada es aquella
provista con los Kits de Tuberías para Refrigerador de
6PDUW&RQQHFW1RXVHQLQJ~QRWURVXPLQLVWURGHDJXD
plástico, ya que el suministro se encuentra bajo presión
en todo momento. Ciertos tipos de plásticos podrán sufrir
fisuras o roturas con el paso del tiempo y ocasionar
problemas con el agua en su hogar.
• Un kit de suministro de agua de GE Appliances (el
cual contiene tubería, válvula de cierre y uniones que
figuran en la lista siguiente) está disponible por un costo
adicional a través de su vendedor minorista o de Parts
and Accessories (Piezas y Accesorios), 877.959.8688
(En Canadá 1.800.661.1616).
• Un suministro de agua fría. La presión del agua deberá
estar entre 20 y 120 p.s.i. (barra 1.4-8.1).
• Taladro eléctrico.
• 1/2” o llave ajustable.
• Destornillador de punta
plana o Phillips.
• 2 abrazaderas de compresión (mangas) y dos tuercas
de compresión de ¼” de diámetro externo – para
conectar la tubería de cobre a la válvula de cierre y a la
válvula de agua del refrigerador.
2
• Si usará un kit de Tuberías para Refrigerador de
SmartConnect™, las uniones necesarias están
preensambladas a la tubería.
• Si su tubería de agua de cobre existente posee una
unión con avellanado en su extremo, necesitará un
adaptador (disponible en las tiendas de suministros)
SDUDFRQHFWDUODWXEHUtDGHDJXDDOUHIULJHUDGRU2SXHGH
cortar la unión con avellanado con un cortador de tubo
\OXHJRXVDUXQDXQLyQGHFRPSUHVLyQ1RFRUWHORV
extremos con forma de la tubería para refrigerador de
SmartConnect™.
• Cierre la válvula para conectar a la tubería de agua fría.
La válvula de cierre debería tener una entrada de agua
con un diámetro interior mínimo de 5/32” en el punto de
conexión a la TUBERÍA DE AGUA FRÍA. Las válvulas
de cierre tipo montura están incluidas en muchos kits de
suministro de agua. Antes de su adquisición, asegúrese
de que la válvula tipo montura cumpla con los códigos
de plomería locales.
CIERRE EL SUMINISTRO DE
AGUA PRINCIPAL
Encienda la canilla más cercana que sea lo
suficientemente larga para despejar la tubería de agua.
Instale la válvula de cierre en la tubería de agua potable de
uso frecuente más cercana.
1
Elija una ubicación para la válvula que sea de fácil
acceso. Es mejor conectar la misma en el lateral de
una tubería de agua vertical. Cuando sea necesario
conectarla en una tubería de agua horizontal, realice
la conexión a la parte superior o lateral, en vez de la
parte inferior, a fin de evitar el drenaje de cualquier
sedimento de la tubería de agua.
ELIJA LA UBICACIÓN DE LA
VÁLVULA
2
TALADRE EL AGUJERO DE LA
VÁLVULA
3
Taladre un agujero de ¼” en la tubería de agua (incluso
si usará una válvula auto-perforante), usando una punta
afilada. Elimine cualquier zumbido que resulte de haber
taladrado el agujero en la tubería.
Tenga cuidado de no permitir que el agua se drene en
el taladro.
Si no se taladra un agujero de ¼” se podrá ver reducida
la producción de hielo o los cubos de hielo podrán ser
más pequeños.
Instrucciones de Instalación
CÓMO INSTALAR LA TUBERÍA DE AGUA (Cont.)
LO QUE NECESITARÁ (CONT.)
INSTRUCCIONES DE INSTALACIÓN

49-60792 Rev. 3 43
INSTRUCCIONES DE INSTALACIÓN
Coloque la tuerca de compresión y la abrazadera de
refuerzo (manga) para colocar la tubería de cobre en el
extremo de la tubería y conecte la misma a la válvula de
cierre.
Asegúrese de que la tubería esté completamente
insertada en la válvula. Ajuste la tuerca de compresión
de forma segura.
Para usar una tubería de plástico del kit de Tuberías
para Refrigerador SmartConnect™, inserte el extremo
moldeado de la tubería en la válvula de cierre y ajuste
la tuerca de compresión hasta que quede ajustada
manualmente, y luego dé un giro de ajuste adicional con
una llave. Un ajuste excesivo podrá ocasionar pérdidas.
NOTA: Se deberá cumplir con los Códigos de Plomería
del Commonwealth de Massachusetts 248CMR.
Las válvulas tipo montura son ilegales y su uso está
prohibido en Massachusetts. Consulte a un plomero
matriculado.
CONECTE LA TUBERÍA A LA
VÁLVULA
7
Abra el suministro de agua principal y despeje la tubería
hasta que el agua esté limpia.
Cierre el agua usando la válvula de agua luego de haber
dejado correr aproximadamente un galón (1 litro), o 2
minutos, de agua a través de la tubería.
DESPEJE LA TUBERÍA
8
Válvula de Cierre
Tipo Montura
Tuerca de Compresión
Tuerca de
Embalaje
Válvula de Salida
Abrazadera de refuerzo
(manga)
Tubería de
SmartConnect™
Ajuste la válvula de cierre de la tubería de agua fría
con la abrazadera de la tubería.
NOTA: Se deberá cumplir con los Códigos de
Plomería del Commonwealth de Massachusetts
248CMR. Las válvulas tipo montura son ilegales y su
uso está prohibido en Massachusetts. Consulte a un
plomero matriculado.
AJUSTE LA VÁLVULA DE
CIERRE
4
Ajuste los tornillos de la abrazadera hasta que la
arandela de sellado comience a hincharse.
NOTA: 1RDMXVWHHQH[FHVRRVHSRGUiURPSHUOD
tubería.
AJUSTE LA ABRAZADERA DE
LA TUBERÍA
5
Abrazadera
de la tubería
Tubería de Agua
Fría Vertical
Válvula de Cierre
Tipo Montura
Lavadora
Extremo de
la Entrada
Abrazadera de la
tubería
Tornillos con
Abrazadera
Enrute la tubería entre la entrada de agua fría y el
refrigerador.
Enrute la tubería a través de un agujero perforado
en la pared o el piso (detrás del refrigerador o del
gabinete con base adyacente) tan cerca a la pared
como sea posible.
ENRUTE LA TUBERÍA
6
Para completar la instalación del refrigerador, vuelva al
Paso 11 en Cómo Instalar el Refrigerador.
Instrucciones de Instalación
CÓMO INSTALAR LA TUBERÍA DE AGUA (Cont.)
44 49-60792 Rev. 3
CONDICIONES DE FUNCIONAMIENTO NORMAL
El sonido de los refrigeradores nuevos es diferente al de aquellos más antiguos.
Los refrigeradores modernos cuentan con más funciones y utilizan una tecnología más nueva.
HUMMM...
WHOOSH...
Ŷ Es posible que el nuevo compresor de alta efectividad
funcione más rápido y por más tiempo que aquel de
su refrigerador antiguo, y es posible que escuche un
zumbido o sonido de pulsación en un tono alto mientras
está funcionando.
Ŷ Es posible que escuche gorgoteos al cerrar la puerta.
Esto se debe al equilibrio de la presión dentro del
refrigerador.
Ŷ Luego de dispensar hielo, un motor cerrará el vertedor
de hielo para evitar que entre aire caliente en el cubo
de hielo, manteniendo el hielo en una temperatura de
congelamiento.
El zumbido del motor al cerrar el cubo de hielo es normal,
poco después de dispensar hielo.
Ŷ
Es posible que escuche los ventiladores girar en altas
velocidades. Esto sucede cuando el refrigerador se
enchufa por primera vez, cuando las puertas se abren
con frecuencia o cuando una gran cantidad de comida
es agregada a los compartimientos del refrigerador o del
freezer. Los ventiladores están ayudando a mantener las
temperaturas correctas.
Ŷ Los ventiladores cambian de velocidad a fin de proveer
un enfriamiento óptimo y ahorros de energía.
SONIDOS DE CLIC, ESTALLIDOS
ROTURAS y CHASQUIDOS
Ŷ Es posible que escuche sonidos de roturas o estallidos
cuando se enchufe el refrigerador por primera vez.
Esto sucede mientras el refrigerador se enfría hasta la
temperatura correcta.
Ŷ El compresor puede causar un sonido de chasquido o
chirrido
al intentar reiniciar (esto podría tomar hasta 5
minutos).
Ŷ La
expansión y contracción de las bobinas de
enfriamiento durante y después de la descongelación
pueden producir sonidos de roturas o estallidos.
Ŷ En los modelos con máquina de hacer hielo, luego de un
ciclo de producción de hielo, es posible que escuche los
cubos de hielo caer al recipiente del hielo.
Ŷ En los modelos con dispensador, cuando se dispense
el agua es posible que escuche el movimiento de las
tuberías de agua al iniciar el proceso y luego de que el
botón del dispensador sea liberado.
SONIDOS DEL AGUA
Ŷ Es posible que el flujo de refrigerante a través de las
bobinas de enfriamiento produzca un gorgoteo similar a
agua hirviendo.
Ŷ – El agua que cae sobre el calentador de
descongelamiento puede producir un chisporroteo,
estallido o zumbido durante el ciclo de descongelamiento.
Ŷ Es posible que se escuche un sonido de goteo durante el
ciclo de descongelación, a medida que el hielo se derrite
desde el evaporador y fluye hasta la olla de drenaje.
Ŷ Cerrar la puerta podrá provocar un sonido de burbujeo
debido a la igualación de la presión.
¿Escuchas lo que yo escucho? Estos condiciones son normales.
COMIENZO DEL ENFRIAMIENTO
Es posible que pasen hasta 24 horas para que las
temperaturas del refrigerador y del freezer igualen la
pantalla. Durante dicho tiempo, se deberían minimizar las
aperturas de las puertas del refrigerador y del freezer.
CONSEJOS
Ŷ (OIUHH]HUVHHQIUtDSULPHUR
Ŷ (OFRPSDUWLPLHQWRGHOUHIULJHUDGRUVHHQIUtDHQ~OWLPR
lugar; es posible que alcance el nivel de frío luego de
varias horas después que el freezer.
Ŷ $SDJDUODPiTXLQDGHKDFHUKLHORSHUPLWHTXHWDQWROD
comida fresca como la comida del freezer se enfríen con
mayor rapidez.
Condiciones de Funcionamiento Normal
49-60792 Rev. 3 45
Problema Causas Posibles Qué Hacer
Se indicó que el filtro de agua se instaló
de forma incorrecta o que hay una
pérdida presente en el panel de control
de la tapa.
El filtro de agua se instaló al revés o
tiene una pérdida.
Controle que no haya pérdidas. Si no hay
pérdidas presentes**, retire el filtro/ tapón
del bypass**, gire 180º y reinstale.
(O³7ULiQJXORGH$GYHUWHQFLD´HVWi
encendido.
Replace Filter (Reemplace el Filtro)/
Replace W
ater Filter (Reemplace el Filtro
de Agua) está encendido.
/D/X]2YHU'XH5HWUDVRHVWi
encendida.
El filtro de agua está goteando o debe
ser reemplazado.
Filtro de agua en reverso.
Reemplace el filtro de agua, controle que
no haya goteos.
Retire el filtro, gírelo 180º y vuelva a
instalarlo.
'LVSHQVHU2II'LVSHQVDGRU$SDJDGR
está encendido.
Control
A, B y C.
Se instaló el filtro equivocado.
Reemplace por el filtro adecuado.
Retire el filtro, gírelo 180º y vuelva a
instalarlo.
1RHVWiILOWUDQGR Bypass del filtro instalado en los
Controles B y C
Instale el filtro de agua correcto.
Reset Filter (Reiniciar Filtro) está
encendido
El filtro de agua está goteando o debe
ser reemplazado
Reemplace el filtro de agua, o instale el
bypass del filtro**
Mantenga presionado Reset Filter
(Reiniciar Filtro) durante 3 segundos para
reiniciar (control D únicamente)
La luz del indicador del filtro de agua no
está iluminada
Esto es normal. Este indicador se
encenderá para indicarle que es
necesario reemplazar el filtro de forma
rápida.
Para más información, consulte Acerca del
Filtro de
Agua.
La manija está floja/ la manija tiene un
espacio de separación.
Es necesario ajustar la manija Para acceder a instrucciones detalladas,
consulte las secciones Cómo Ajustar
la Manija de Comidas Frescas y Cómo
Ajustar la Manija del Freezer.
Pitido del refrigerador Se trata de la alarma de la puerta Apague o desactive la misma con la puerta
cerrada**. Si la puerta está abierta y la
alarma está sonando, sólo podrá detener
la alarma.
1RHQIUtD Consulte Acerca de los Controles. Consulte Acerca de los Controles
El agua tiene mal gusto/ olor* El dispensador de agua no fue usado
durante un tiempo prolongado
Dispense agua hasta que toda el agua en
el sistema sea repuesta.
El agua en el vaso está caliente* Es normal cuando el refrigerador es
usado por primera vez luego de su
instalación
Espere 24 horas hasta que el refrigerador
se enfríe completamente.
El dispensador de agua no fue usado
durante un tiempo prolongado
Dispense agua hasta que toda el agua en
el sistema sea repuesta.
El sistema de agua fue drenado Espere varias horas hasta que el
suministro repuesto se haya enfriado.
El dispensador de agua no funciona* El suministro de agua está apagado o
no está conectado
Consulte Cómo Instalar el Suministro de
Agua.
El filtro de agua está atascado o
el enchufe del filtro/ bypass no fue
instalado
Reemplace el cartucho del filtro o retire el
filtro e instale el tapón del bypass**.
Es posible que haya aire atrapado en el
sistema de agua
Presione el brazo dispensador durante por
lo menos 5 minutos.
El agua en la reserva está congelada
debido a que los controles están
configurados en una temperatura
demasiado fría
Configure el control del refrigerador en una
configuración más caliente y espere 24
horas. Si el agua no es dispensada luego
de 24 horas, comuníquese al servicio
técnico.
*Modelos Selectos Únicamente
**Algunos modelos no vienen equipados con el tapón del filtro del bypass. A fin de obtener un tapón del filtro del bypass,
comuníquese al 800-GECARES. En Canadá, comuníquese al 800.561.3344.
Consejos para la Solución de Problemas... Antes de solicitar el servicio técnico
¡Ahorre tiempo y dinero! Primero revise los cuadros que aparecen en las siguientes páginas y es posible que no necesite solicitar
reparaciones.
CONSEJOS PARA LA SOLUCIÓN DE PROBLEMAS
46 49-60792 Rev. 3
Problema Causas Posibles Qué hacer
Chorrea agua del dispensador* El cartucho del filtro fue instalado en
forma reciente
Deje correr agua del dispensador durante 5
minutos (aproximadamente 2 galones).
1RKD\SURGXFFLyQGHDJXDQLGHFXERV
de hielo*
La línea de suministro o la válvula de
cierre están atascadas
Llame a un plomero
El filtro de agua está atascado Reemplace el cartucho del filtro o retire el
filtro e instale el tapón del bypass**.
El cartucho del filtro no está instalado
de forma apropiada
Retire y vuelva a instalar el cartucho del
filtro, asegurándose de que se puede
bloquear correctamente en su lugar.
La máquina de hacer hielo está
apagada
Controle que la máquina de hacer hielo esté
encendida. Consulte Acerca de la Máquina
de Hacer Hielo Automática.
Gotea agua desde el dispensador* Puede haber aire presente en
el sistema de entrada de agua,
haciendo que gotee agua luego de ser
dispensada
Dispense agua durante por lo menos 5
minutos para eliminar el aire del sistema
AUTO FILL (LLENADO
AUT
OMÁTICO) bajo llenado/ sin
llenado*
1RWRGRVORVHQYDVHVIXQFLRQDQFRQ
AUTO FILL (Llenado Automático)
Intente con un envase diferente
Mensaje de error Consulte la pág. 14
Sensor de limpieza. Consulte la pág. 14
AUTO FILL (Llenado Automático) se
desborda*
1RWRGRVORVHQYDVHVIXQFLRQDQFRQ
AUTO FILL (Llenado Automático)
Intente con un envase diferente
Enfriamiento del freezer, la comida
fresca no se enfría
Es normal, cuando el refrigerador se
enchufa por primera vez o luego de un
corte de energía prolongado
Espere 24 horas para que la temperatura
en ambos compartimiento alcance las
temperaturas seleccionadas.
El dispensador de hielo se abre luego
de cerrar el cajón del freezer*
1RUPDO La puerta del dispensador de agua se podrá
abrir luego de cerrar la puerta del freezer
para permitir el acceso
Flujo de producción bajo Es posible que la parte inferior de la
cápsula se haya abollado, haciendo que
el punzón perfore el filtro y haciendo
que el café molido atasque el punzón
inferior
Evite usar cápsulas dañadas/ abolladas, y
limpie la aguja inferior antes de la próxima
producción
Flujo de producción bajo/ gotea agua
desde la puerta interna
La aguja superior de la cafetera se
atascó
Desatasque los agujeros de la aguja
superior
, usando un gancho de papel y
enjuague la cafetera. Enjuague la misma
luego de cada uso.
La cafetera no es detectada o hay un
goteo de agua caliente desde la parte
superior de la misma.
Ensamble incorrecto de la cafetera en
el soporte
Asegúrese de que el Logo de Keurig
esté en el frente. Presione la cafetera
completamente dentro de los soportes.
El café es dispensado con salpicaduras
o con burbujas que revientan.
Agujero de ventilación bloqueado en la
cafetera
Asegúrese de que el agujero de ventilación
en la parte inferior de la cafetera esté
despejado de comida o de cualquier otro
tipo de contaminación.
Consejos para la Solución de Problemas... Antes de solicitar el servicio técnico
CONSEJOS PARA LA SOLUCIÓN DE PROBLEMAS
*Modelos Selectos Únicamente
**Algunos modelos no vienen equipados con el tapón del filtro del bypass. A fin de obtener un tapón del filtro del bypass,
comuníquese al 800-GECARES. En Canadá, comuníquese al 800.561.3344.
49-60792 Rev. 3 47
CONSEJOS PARA LA SOLUCIÓN DE PROBLEMAS
Problema Causas Posibles Qué hacer
La calidad de la bebida no es la
esperada.
Es posible que esté usando Cápsulas K
no estándares o vencidas.
Se recomienda el uso de las cápsulas K de
Keurig oficiales que no estén vencidas ni
dañadas.
Gotea líquido de la cafetera una vez
completado el ciclo y luego de haber
retirado la misma del soporte.
Es posible que queden líquidos
retenidos por la cafetera y que goteen
cuando ésta sea retirada.
Use una tela o envase para capturar los
goteos al retirar la cafetera.
Retraso al usar el dispensador de la
Cápsula de Keurig
Para asegurar que se sirva una
bebida de calidad, se requiere un
pequeño retraso a fin de asegurar
que el refrigerador está funcionando
correctamente
Asegurar un funcionamiento consistente
y de calidad requiere que el refrigerador
se retrase al dispensar por un período de
tiempo corto
Una vez servida, mi bebida en polvo
no salió completamente de la cápsula
usada.
Dependiendo del tamaño seleccionado,
es posible que el polvo no sea disuelto
completamente.
Algunas bebidas en
SROYRGHVDUUROODQ³JUXPR´DOVHUGHMDGDV
colocadas durante cierto tiempo.
Sacuda las cápsulas de polvo antes de la
preparación, a fin de deshacer el grumo y
permitir un mejor uso. Para aquellas bebidas
en polvo sin filtro, use la selección del ciclo
Cocoa (Cacao).
Es difícil cerrar la tapa del dispositivo de
preparación.
La cásula K no está completamente
apoyada.
Presione la cápsula K hasta el fondo de la
cafetera antes de cerrar la tapa. La aguja
inferior debe perforar la cápsula K antes del
cierre de la tapa de la cafetera.
La cafetera gotea durante el ciclo de
preparación
Problemas al cerrar la tapa de la
cafetera o la cápsula K está dañada
Presione la cápsula K hasta el fondo de la
cafetera antes de cerrar la tapa. La aguja
inferior debe perforar la cápsula K antes
del cierre de la tapa de la cafetera. Se
recomienda usar cápsulas K oficiales de
Keurig que no hayan sido dañadas y que
cuenten con un buen sellado entre la tapa
superior y el fondo de plástico.
Consejos para la Solución de Problemas... Antes de solicitar el servicio técnico
*Modelos Selectos Únicamente
**Algunos modelos no vienen equipados con el tapón del filtro del bypass. A fin de obtener un tapón del filtro del bypass,
comuníquese al 800-GECARES. En Canadá, comuníquese al 800.561.3344.

48 49-60792 Rev. 3
Verdad o Mito? Respuesta Explicación
Es posible que se requiera un cambio
del filtro de agua del refrigerador antes
de los seis meses.
9(5'$'(52 El indicador del filtro de agua indicará la necesidad de reemplazar
el filtro de agua cada seis meses o que se dispensen 170 galones
(643.52 litros) de agua (modelos selectos únicamente). La calidad
del agua varía de una ciudad a otra; si el flujo del agua del
dispensador disminuye, o la producción de hielo decrece, el filtro de
agua debería ser reemplazado, incluso aunque el indicador del filtro
no indique la necesidad del reemplazo
La máquina de hacer hielo automática
de mi refrigerador produce hielo cuando
el refrigerador se encuentra enchufado
a un receptáculo de corriente.
0,72 El refrigerador debe ser conectado al agua, y la máquina de hacer
hielo debe ser encendida. Asegúrese de que la máquina de hacer
hielo esté encendida, sólo después de que la cañería de agua esté
conectada y que el agua esté abierta. La máquina de hacer hielo
puede ser encendida/ apagada desde los controles y asegurar que
la misma está encendida, como se indica en el panel de control
del refrigerador. Consulte Acerca de la Máquina de Hacer Hielo
Automática.
Luego de que el refrigerador haya sido
enchufado y conectado al agua, tendré
inmediatamente agua fría disponible
desde el dispensador de agua.
0,72 El tanque del dispensador de agua ubicado dentro del refrigerador
guarda agua para dispensar. El agua del tanque necesita 24 horas
para enfriarse luego de la instalación. Las altas condiciones de uso
no permitirán que haya tiempo para que el agua se enfríe.
Luego de dispensar agua, es normal
que caigan unas pocas gotas de agua. .
9(5'$'(52 Es posible que caigan unas pocas gotas de agua del dispensador,
luego de que la paleta del mismo se haya liberado. A fin de minimizar
los goteos, retire el vidrio lentamente del dispensador.
1XQFDYHUpHVFDUFKDGHQWURGHO
compartimiento del freezer.
0,72 La escarcha dentro del freezer típicamente indica que la puerta
no está correctamente sellada, o se dejó abierta. Si se encuentra
escarcha, despeje la misma utilizando una espátula de plástico y
una toalla, luego asegúrese de que no haya paquetes ni envases de
comida que impidan que la puerta del freezer se cierre. Controle el
panel de control del refrigerador para asegurar que la alarma de la
puerta esté activada.
Cuando se instala el refrigerador, o
luego de reemplazar el filtro de agua,
debo dispensar agua por cinco minutos.
9(5'$'(52
Un refrigerador o filtro de agua instalado en forma reciente contiene
aire en las cañerías de agua. Presione la paleta del dispensador y
dispense agua durante por lo menos 5 minutos para eliminar el aire
de la cañería de agua y despejar el filtro.
Para llenar la hielera hasta su
capacidad máxima, debería dispensar
entre 12 y 18 horas después de la
instalación.
9(5'$'(52 Dispensar 3 o 4 cubos entre 12 y 18 horas luego de la instalación
permite que el hielo se dispense dentro de la hielera, que a su vez
requiere de la máquina de hacer hielo para producir hielo adicional.
Producción normal de hielo = 100 cubos en 24 horas.
Puede usar el tapón del bypass del
filtro de agua para determinar si el filtro
requiere un reemplazo.
9(5'$'(52 Una reducción en el flujo del dispensador de agua o una reducción
en la producción de hielo podrán indicar la necesidad de reemplazar
el filtro de agua. Instale el tapón del bypass del filtro de agua
(provisto con el refrigerador en algunos modelos), y controle el flujo
desde el dispensador. Si el flujo de agua regresa a la normalidad con
la colocación del tapón del bypass, reemplace el filtro de agua.
La parte superior de las puertas del
refrigerador siempre estará alineada.
0,72 Varias cosas pueden afectar la alineación de la puerta de alimentos
frescos, incluyendo el piso sobre el cual el refrigerador está
instalado, y la carga de las puertas. Si la parte superior de las
puertas de alimentos frescos no están alineadas, use una llave Allen
de ¼” para ajustar la puerta derecha o izquierda. El tornillo de ajuste
está ubicado en el costado inferior derecho o izquierdo de la puerta;
abra la puerta del freezer para acceder al tornillo.
Las manijas de la puerta del refrigerador
se pueden ajustar fácilmente.
9(5'$'(52 Si las manijas de la puerta están flojas o tienen una separación con
la puerta, se podrán ajustar usando una llave Allen de 1/8”, sobre los
tornillos ubicados en los extremos de las manijas.
Es posible que el hielo presente
problemas con su olor y sabor.
9(5'$'(52 Luego de iniciar la máquina de hacer hielo, deshágase de 24 horas
de producción de hielo para evitar problemas de olor y sabor.
Puedo hacer ajustes finos sobre las
puertas de alimentos frescos para
alinearlas.
9(5'$'(52 Si las puertas de alimentos frescos no están alineadas, use una llave
Allen de ¼” para ajustar la puerta de la derecha / izquierda. El tornillo
de ajuste está ubicado en la parte inferior de la puerta derecha o
izquierda. Abra la puerta del freezer para tener acceso.
Verdad o Mito
Verdad o Mito
SERVICIO
Antes de solicitar el servicio técnico, revise los consejos para la solución de problemas de forma de-
tallada en el Manual del Propietario. En caso de ser necesario, se podrá programar el servicio técnico
visitándonos a través de Internet en GEAppliances.com o llamando al 800.GE.CARES 800.432.2737.
CONSEJOS PARA LA SOLUCIÓN DE PROBLEMAS/VERDAD O MITO
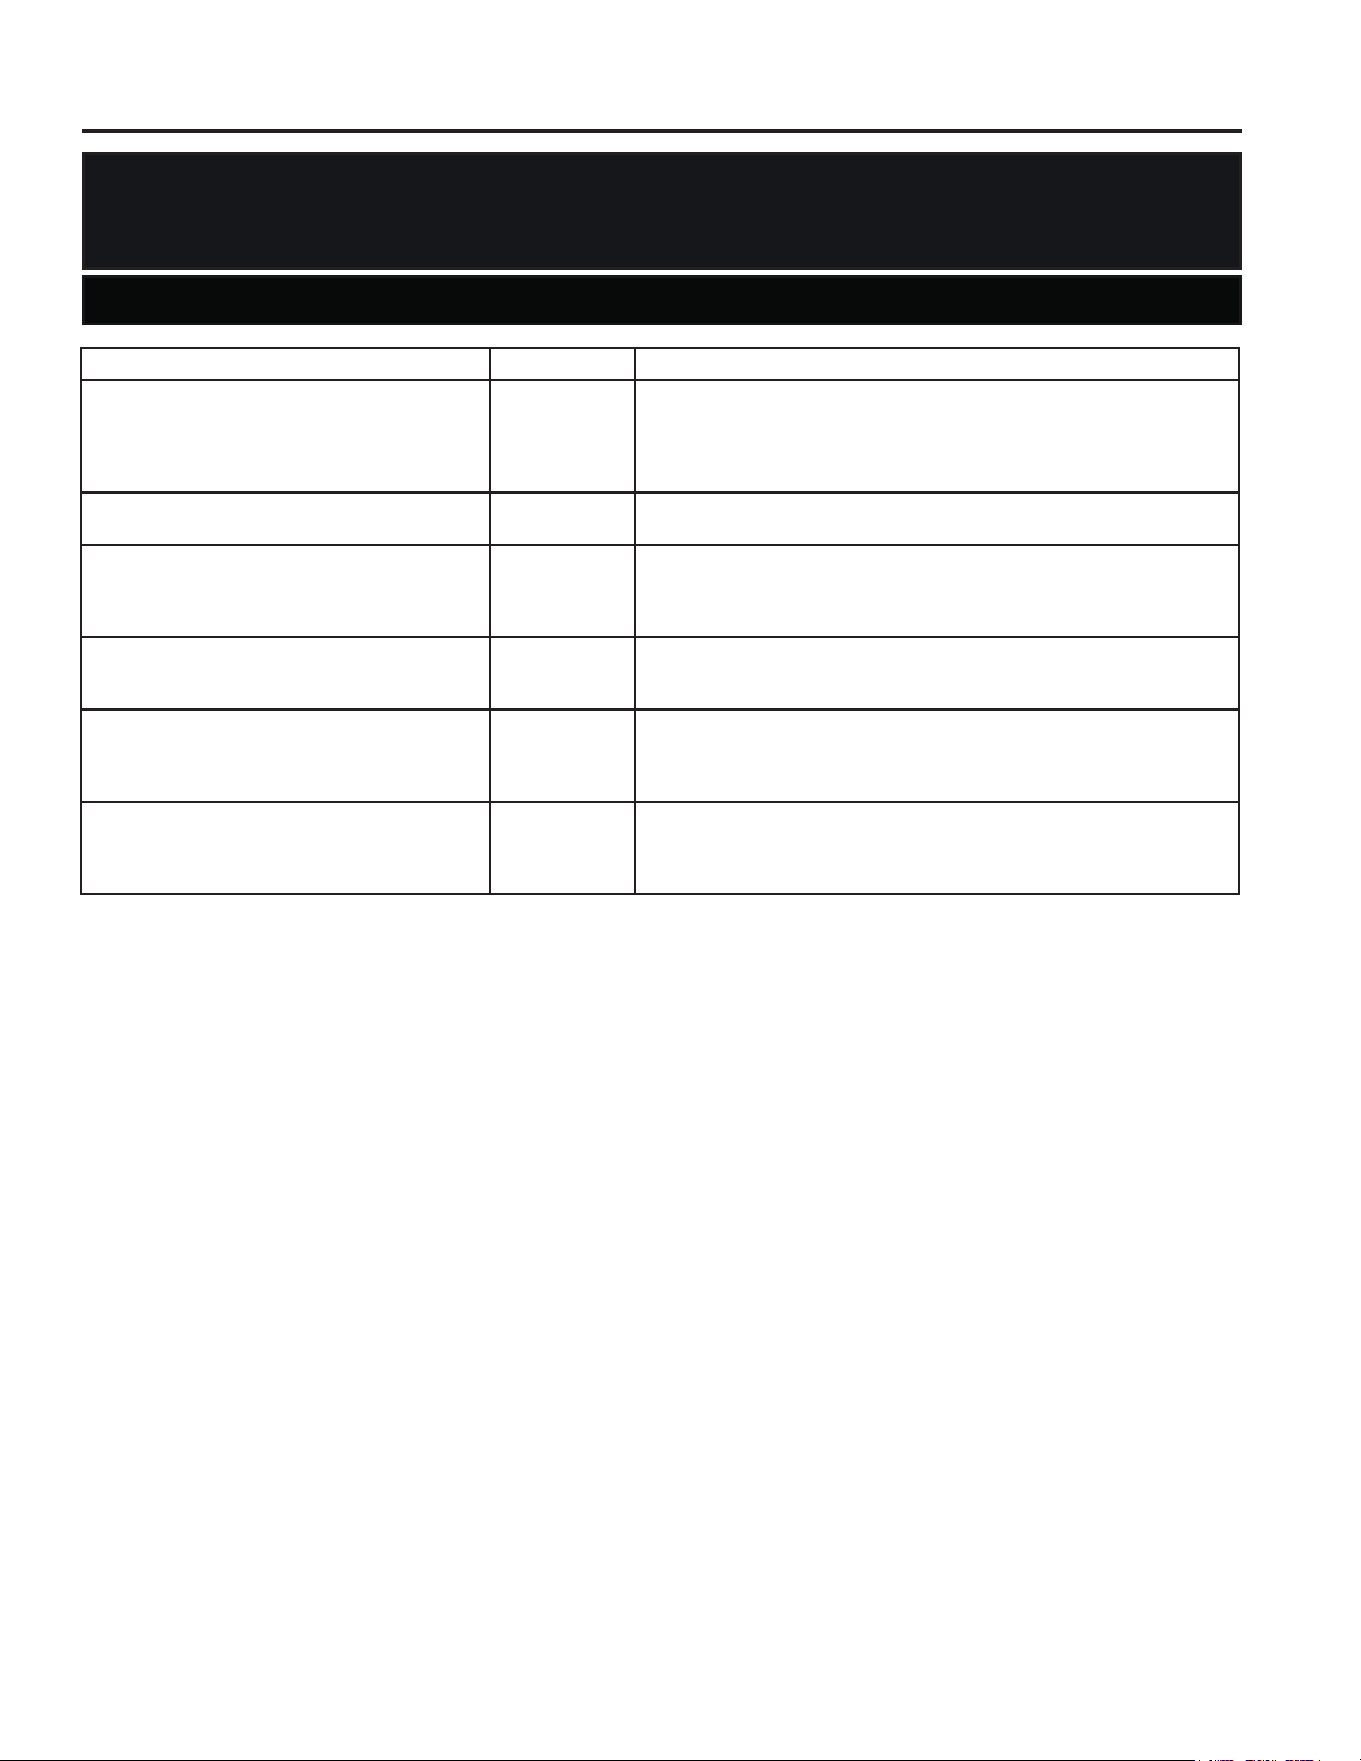
49-60792 Rev. 3 49
CONSEJOS PARA LA SOLUCIÓN DE PROBLEMAS/VERDAD O MITO
Verdad o Mito? Respuesta Explicación
Las manijas de la puerta siempre se deben
retirar para la instalación.
0,72 Controle el cuadro sobre el lado inverso de esta instrucción. Si las
puertas se deben retirar, no retire las manijas, o si el refrigerador
cabe cómodamente a través de la abertura del pasillo. Ajuste las
manijas que estén flojas o que posean un espacio, ajustando el
conjunto de tornillos de 1/8” en cada extremo de las manijas.
Siempre se requiere el retiro de la puerta
para la instalación.
0,72 Las puertas sólo se deben retirar cuando sea necesario para
evitar daños en el pasillo o en el acceso hasta la ubicación final.
Las puertas del refrigerador que no cierren
luego de la instalación se podrán ajustar
para que cierren de forma correcta.
9(5'$'(52 El mecanismo de la puerta funciona mejor si se instala a más
de 90º. Si se instala a 180º, retire la puerta de la bisagra media,
y balancee la puerta 180º antes de reinstalarla. Lea Cómo
Reinstalar las Puertas del Refrigerador.
Hay un ajuste sobre las ruedas traseras. 0,72 Las patas niveladoras frontales son ajustables y se deberían usar
para equilibrar el refrigerador. Las patas niveladoras se usan para
hacer el ajuste inicial de la puerta de alimentos frescos.
Controle pérdidas una vez realizadas todas
las conexiones del agua.
9(5'$'(52 Al purgar el aire del sistema de agua, controle pérdidas en todas
las conexiones de las cañerías de agua. Controle la conexión
con el suministro de agua del hogar en la parte trasera del
refrigerador, y en la conexión de la tubería de agua de la puerta.
Cualquier residuo del embalaje se podrá
eliminar del refrigerador con un limpiador.
0,72 1RXVHFHUDSXOLGRUEODQTXHDGRUXRWURVSURGXFWRVTXH
contengan cloro sobre los paneles de Acero Inoxidable, manijas
de puertas y componentes. Para acceder a detalles completos,
FRQWUROHHVWDVLQVWUXFFLRQHVHQ³/LPSLH]DGHOD3DUWH([WHULRU´
Algunos modelos no están equipados con el tapón del bypass del filtro. Para obtener un tapón del bypass del filtro, llame al 800-GECARES. En
Canadá, llame al 800.561-3344.
Verdad o Mito
Verdad o Mito
SERVICIO
Antes de solicitar el servicio técnico, revise los consejos para la solución de problemas de forma de-
tallada en el Manual del Propietario. En caso de ser necesario, se podrá programar el servicio técnico
visitándonos a través de Internet en GEAppliances.com o llamando al 800.GE.CARES 800.432.2737.
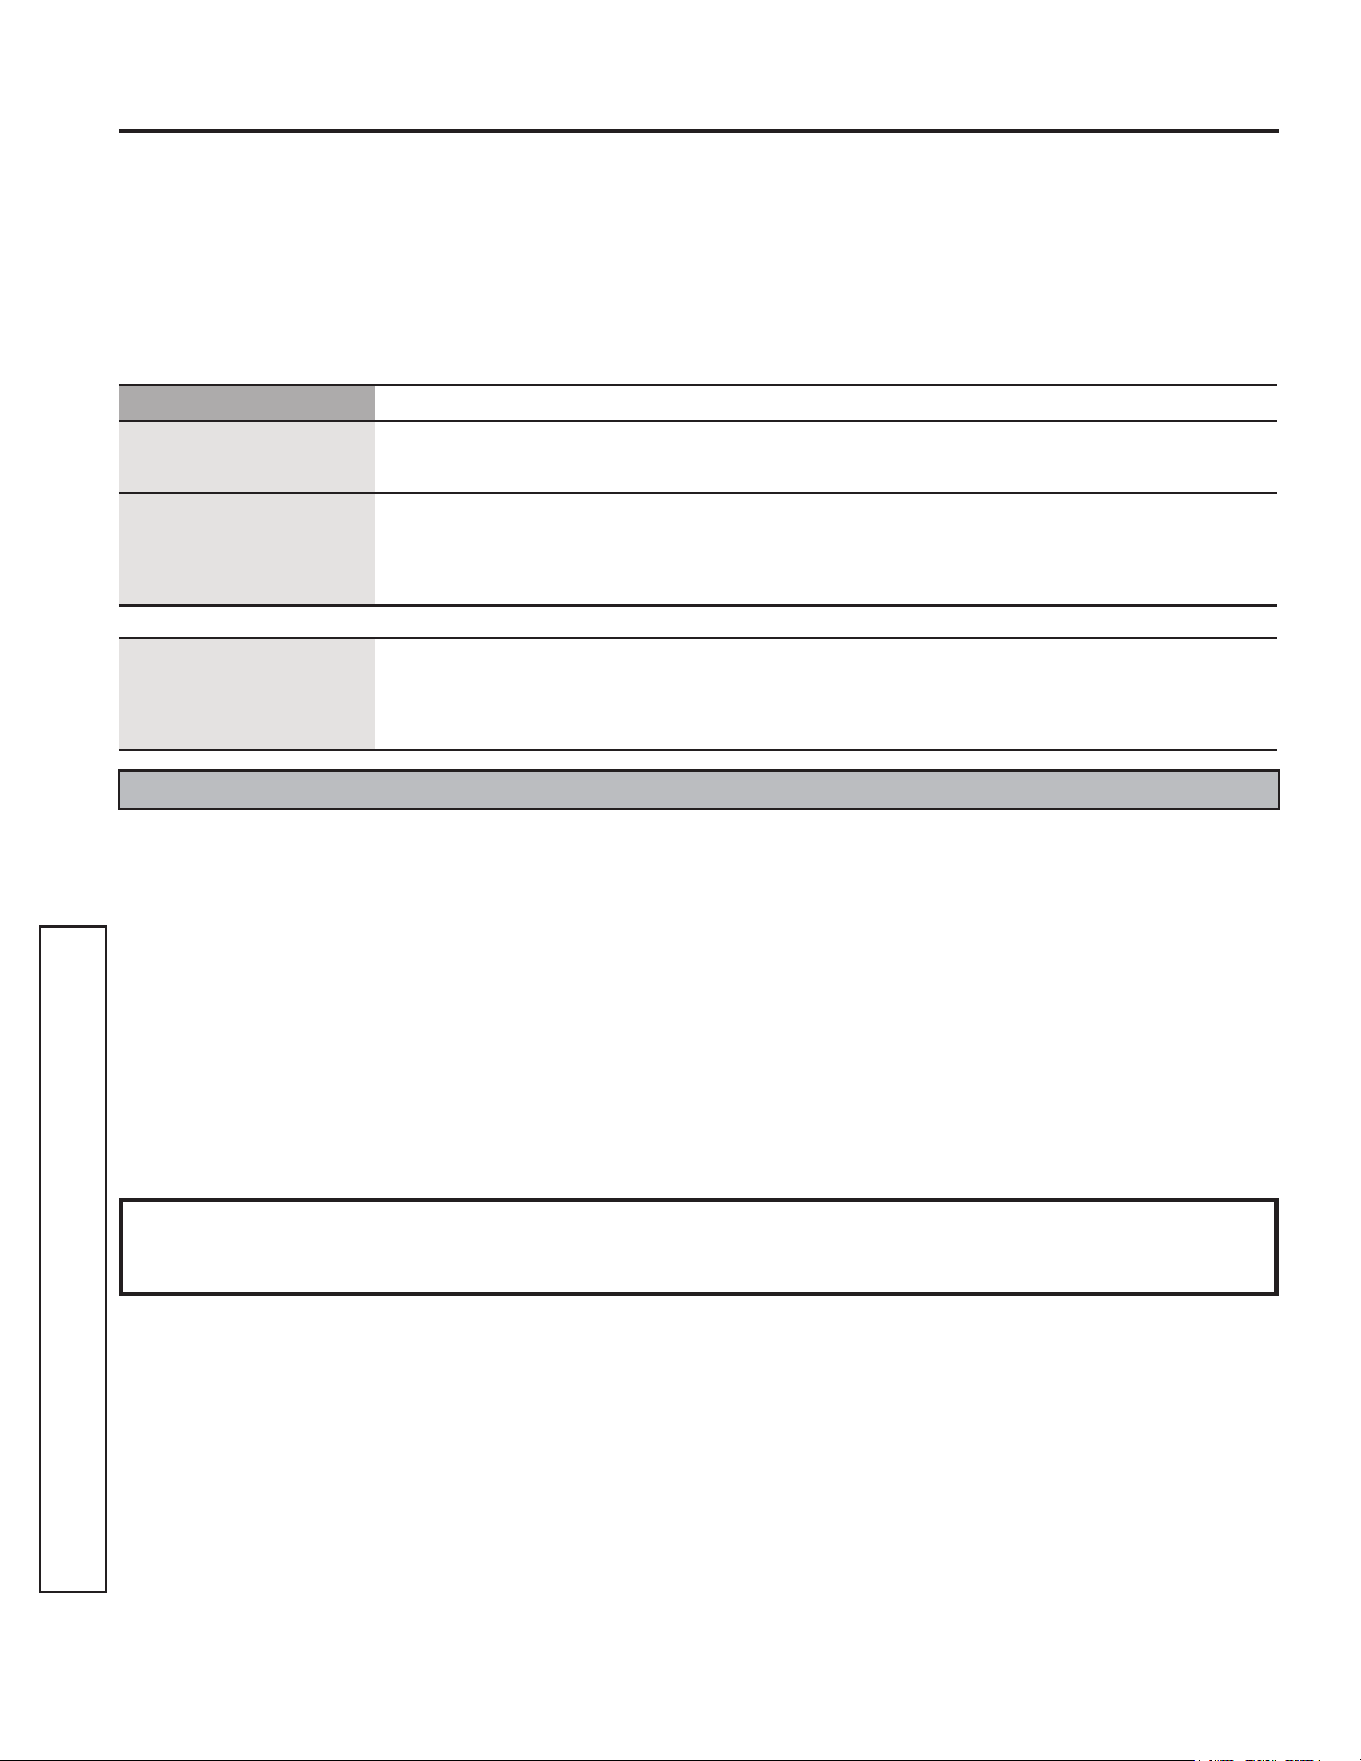
50 49-60792 Rev. 3
GE Appliances Garantía Limitada del Refrigerador
Abroche su recibo aquí. Para acceder al servicio técnico de acuerdo con
la garantía deberá contar con la prueba de la fecha original de compra.
GARANTÍA LIMITADA
Ŷ Viajes del técnico del servicio a su hogar para enseñarle
sobre cómo usar el producto.
Ŷ,QVWDODFLyQHQWUHJDRPDQWHQLPLHQWRLQDGHFXDGRV
Ŷ)DOODVGHOSURGXFWRHQFDVRGHDEXVRPDOXVRRXVR
para propósitos diferentes al original o uso comercial.
Ŷ3pUGLGDGHDOLPHQWRVSRUPDOHVWDGR
Ŷ5HHPSOD]RGHIXVLEOHVGHODFDVDRUHLQLFLRGH
disyuntores.
Ŷ'DxRVVREUHHODFDEDGRWDOHVFRPRy[LGRVREUH
la superficie, deslustres o manchas pequeñas no
informadas dentro de las 48 horas luego de la entrega.
Ŷ5HHPSOD]RGHOFDUWXFKRGHOILOWURGHDJXDVLVHLQFOX\H
debido a la presión del agua que está fuera del rango
de funcionamiento específico o debido a exceso de
sedimentos en el suministro de agua.
Ŷ5HHPSOD]RGHERPELOODVGHOX]VLVHLQFOX\HQRGHO
cartucho del filtro de agua, si se incluye, a diferencia de
lo detallado anteriormente.
Ŷ'DxRVRFDVLRQDGRVVREUHHOSURGXFWRSRUDFFLGHQWH
incendio, inundaciones o catástrofes naturales.
Ŷ'DxRVFRQVHFXHQWHVRLQFLGHQWDOHVFDXVDGRVSRU
posibles defectos de este producto.
Ŷ3URGXFWRQRDFFHVLEOHSDUDEULQGDUHOVHUYLFLRUHTXHULGR
Ŷ'DxRRFDVLRQDGRSRUXQILOWURGHDJXDGHXQDPDUFDTXH
no es GE Appliances.
What GE Appliances Will Not Cover:
Por el período de GE Appliances reemplazará:
Un Año
Desde la fecha de la
compra original
Cualquier parte del refrigerador que falle debido a un defecto en los materiales o la fabricación. Durante
esta garantía limitada de un año, GE Appliances también proveerá, sin costo, todo el trabajo y el
servicio relacionado con el reemplazo de la parte que presente defectos.
Treinta Días
(Filtro de Agua, si está
incluido) Desde la fecha
de la compra original del
refrigerador
Cualquier parte del cartucho del filtro de Agua que falle debido a un defecto en los materiales o la
fabricación. Durante la garantía limitada por treinta días, GE Appliances también le brindará, sin costo,
el reemplazo de un cartucho del filtro de agua.
Sólo Modelos GE PROFILE™
Cinco Años
Desde la fecha de la
compra original
Cualquier parte del sistema de refrigeración sellado (el compresor, condensador, evaporador
y todas las tuberías de conexión) que falle debido a un defecto en los materiales o la fabricación.
Durante esta garantía de cinco años del sistema de refrigeración sellado, GE Appliances
también proveerá, sin costo, todo el trabajo y el servicio relacionado con el reemplazo de la parte
que presente defectos en el sistema de refrigeración sellado.
GEAppliances.com
Todo el servicio de garantía limitada es provisto por nuestros Centros de Servicio de Fabricación, o un técnico autorizado de Servicio
al Cliente (Customer Care®). Para programar una visita del servicio técnico, visítenos en GEAppliances.com, o comuníquese al 800.
GE.CARES (800.432.2737). Cuando llame para solicitar el servicio, tenga los números de serie y modelo disponibles.
EXCLUSIÓN DE GARANTÍAS IMPLÍCITAS—Su única y exclusiva alternativa es la reparación del producto, como
se indica en la Garantía Limitada. Las garantías implícitas, incluyendo garantías implícitas de comerciabilidad o
conveniencia sobre un propósito particular, se limitan a un año o al período más corto permitido por la ley.
Esta garantía limitada se extiende al comprador original y a cualquier dueño subsiguiente de productos comprados para uso hogareño
dentro de EE.UU. Si el producto está en un área donde no se encuentra disponible un Proveedor Autorizado del Servicio Técnico de
GE Appliances, usted será responsable por el costo de un viaje o se podrá requerir que traiga el producto a una ubicación del Servicio
Técnico de GE Appliances Autorizado para recibir el servicio. En Alaska, la garantía limitada excluye el costo de envío o llamadas del
servicio a su hogar.
Algunos estados no permiten la exclusión o limitación de daños fortuitos o consecuentes. Esta garantía le da derechos legales
específicos y es posible que tenga otros derechos legales que varían entre un estado y otro. Para conocer cuáles son sus
derechos legales, consulte a la oficina de asuntos del consumidor local o estatal o al Fiscal de su estado.
Warrantor: GE Appliances, a Haier company
Louisville, KY 40225
Para los clientes de Canadá : Esta
garantía
limitada
se extiende al comprador original y cualquier comprador posterior de
productos comprados en Canadá para uso residencial dentro de Canadá. El servicio a domicilio warrant será proporcionado en
las áreas donde está disponible y que se considere razonable por Mabe para ofrecer.
Warrantor Canada: MC Commercial, Burlington, Ontario, L7R 5B6
Para realizar el servicio técnico de su refrigerador se podrá requerir el uso de datos del puerto de abordaje para su diagnóstico. Esto da al
técnico del Servicio de Fábrica de GE Appliances la habilidad de diagnosticar de forma rápida cualquier problema con su electrodoméstico,
y de ayudar a GE Appliances a mejorar sus productos al brindarle a GE Appliances la información sobre su electrodoméstico. Si no desea
que los datos de su electrodoméstico sean enviados a GE Appliances, solicitamos que le indique a su técnico NO entregar los datos a GE
Appliances en el momento del servicio.
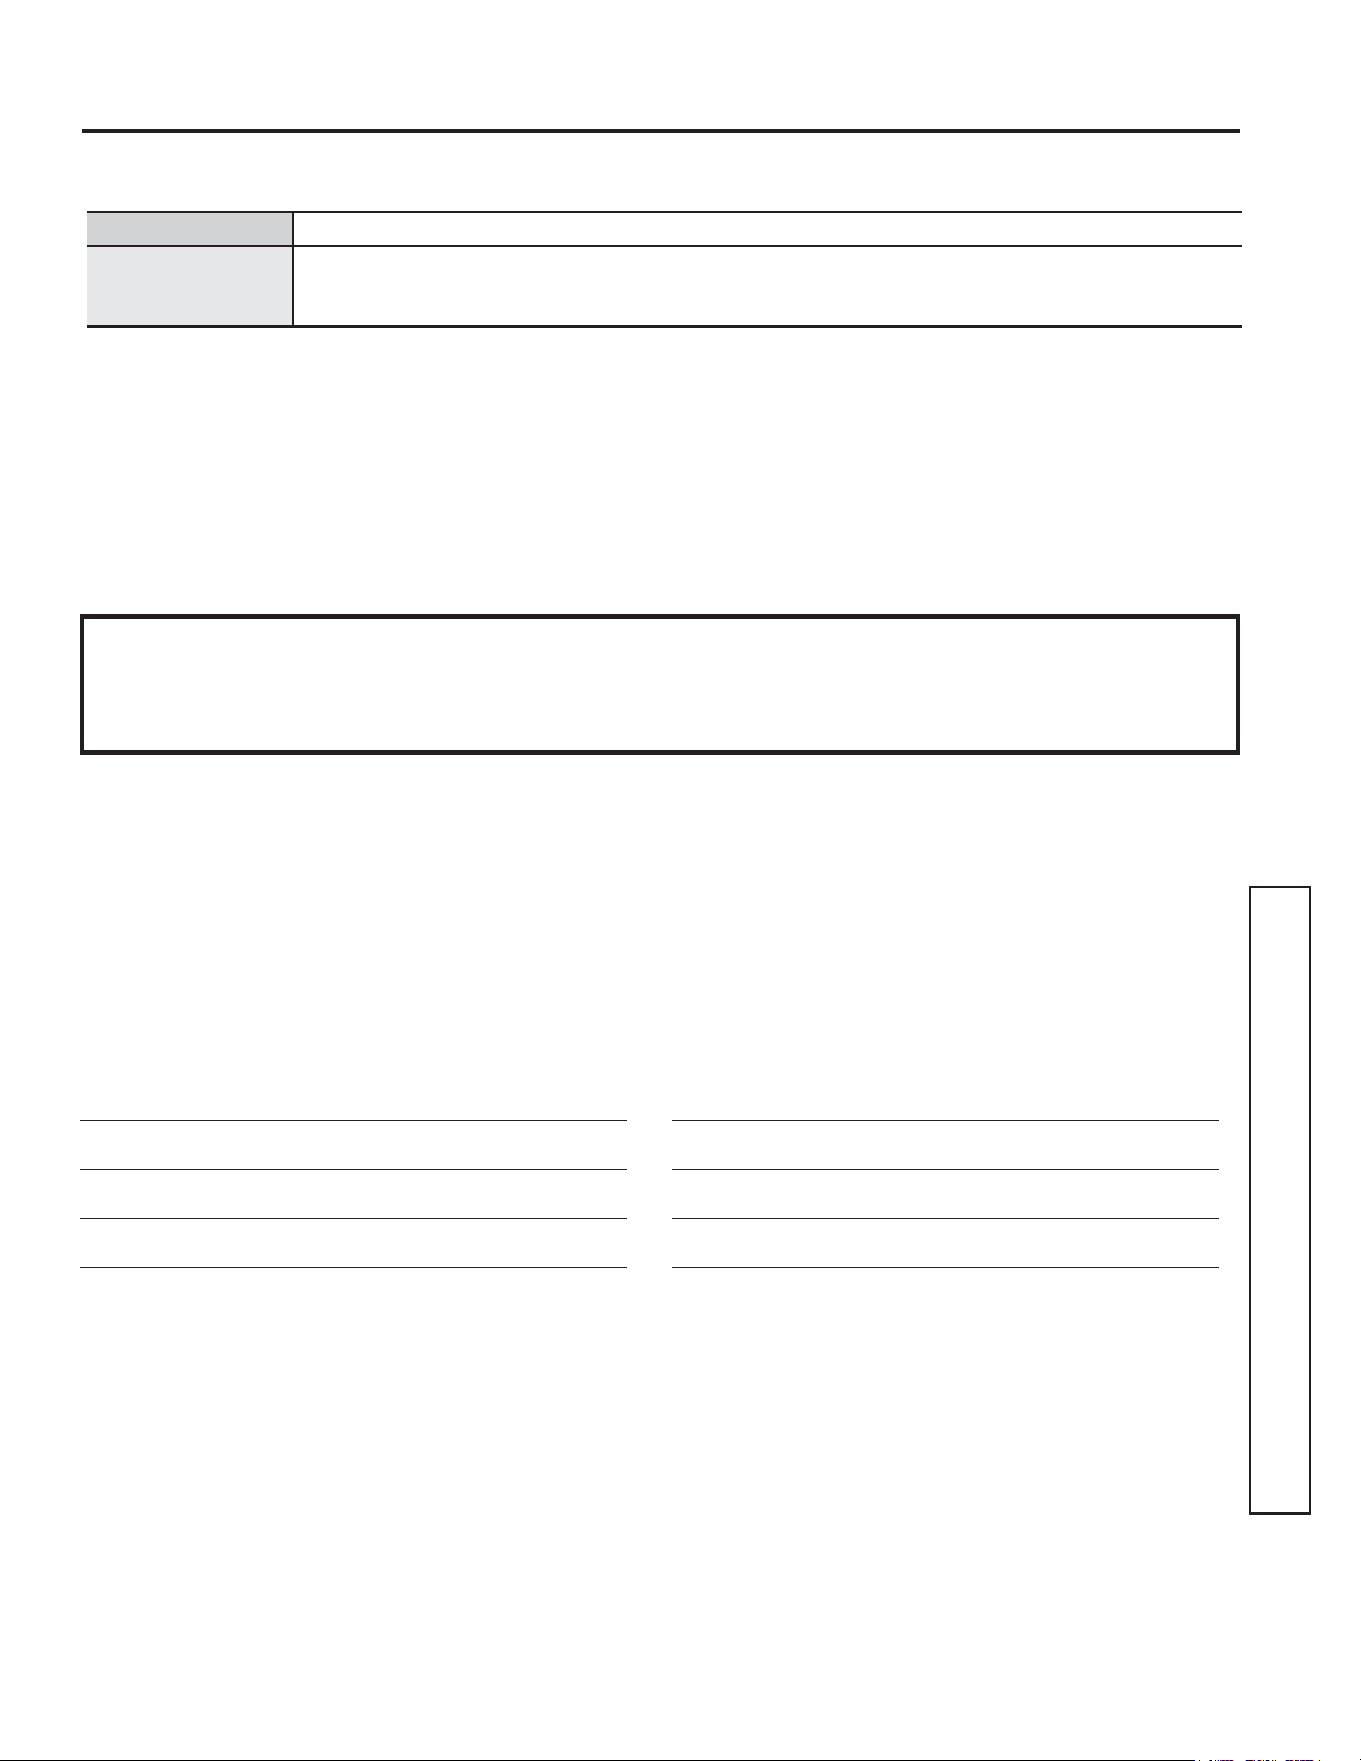
49-60792 Rev. 3 51
Qué No Está Cubierto:
Ŷ Viajes del técnico del servicio a su hogar para
enseñarle sobre cómo usar el producto.
Ŷ Instalación inadecuada.
Ŷ Fallas del producto en caso de abuso, mal uso, o uso
para propósitos diferentes a l original o uso comercial
Ŷ Reemplazo de fusibles de la casa o reinicio de
disyuntores.
Ŷ Reemplazo del cartucho del filtro de agua debido
a la presión del agua que está fuera del rango de
funcionamiento específico o debido a exceso de
sedimentos en el suministro de agua
Ŷ Daños ocasionados sobre el producto por accidente,
incendio, inundaciones o catástrofes naturales.
Ŷ Daños consecuentes o incidentales causados por
posibles defectos de este producto.
Garantía Limitada del Cartucho del Filtro de Agua RPWFE
Esta garantía se extiende al comprador original y a cualquier dueño subsiguiente de productos adquiridos para uso hogareño
dentro de EE.UU. En Alaska, la garantía excluye el costo de envío o llamadas al servicio técnico desde su hogar.
Algunos estados no permiten la exclusión o limitación de daños fortuitos o consecuentes. Esta garantía le da derechos legales
específicos y es posible que tenga otros derechos legales que varían entre un estado y otro. Para conocer cuáles son sus
derechos legales, consulte a la oficina de asuntos del consumidor local o estatal o al Fiscal de su estado.
Para Adquisiciones Realizadas en Iowa: Este formulario debe poseer la firma y fecha del comprador y del vendedor
antes de la consumación de esta venta.
Este formulario debería ser retenido por el vendedor en un archivo durante un mínimo de dos años.
Por el Período de: Reemplazaremos, Sin Costo:
Treinta Días Desde
la fecha de compra
original.
Cualquier parte del cartucho del filtro de agua que falle debido a un defecto en los materiales o la
fabricación durante esta garantía limitada de treinta días.*
Comuníquese con nosotros en geapplianceparts.com, o llame al 800.GE.CARES.
EXCLUSIÓN DE GARANTÍAS IMPLÍCITAS:
Su única y exclusiva alternativa es el cambio de la pieza, como se indica en esta Garantía Limitada. Las garantías implícitas,
incluyendo garantías implícitas de comerciabilidad o conveniencia sobre un propósito particular, se limitan a seis meses o al
período más corto permitido por la ley.
* Si su pieza de GE Appliances falla debido a un defecto en la fabricación dentro de los treinta días desde la fecha de compra original, le
entregaremos una pieza nueva o, a su elección, una pieza reconstruida sin cargo. Devuelva la pieza defectuosa al proveedor de piezas a quien
OHUHDOL]yODFRPSUDMXQWRFRQXQDFRSLDGHOD³SUXHEDGHFRPSUD´GHODSLH]D6LODSLH]DHVGHIHFWXRVD\QRPXHVWUDVLJQRVGHDEXVRVHUi
cambiada. La garantía no cubre la falla de las piezas que están dañadas mientras están en su posesión, si son abusadas, o si fueron instaladas
GHIRUPDLQFRUUHFWD1RFXEUHHOFRVWRGHUHJUHVDUODSLH]DDOSURYHHGRUDTXLHQOHUHDOL]yODFRPSUDQLFXEUHHOFRVWRGHOWUDEDMRSDUDUHWLUDUR
LQVWDODUODPLVPDDILQGHGLDJQRVWLFDUODIDOOD1RFXEUHODVSLH]DVXVDGDVHQSURGXFWRVGHXVRFRPHUFLDOH[FHSWRHQHOFDVRGHHTXLSRV
acondicionadores de aire. En ningún caso GE Appliances será responsable por daños consecue ntes.
Garante: GE Appliances, a Haier company
Louisville, KY 40225
Vendedor:
1RPEUH
Domicilio
Ciudad Estado Código
Postal
Firma Date
Comprador:
1RPEUH
Domicilio
Ciudad Estado Código
Postal
Firma Fecha
Abroche su recibo aquí. Para acceder al servicio técnico de acuerdo con la
garantía deberá contar con la prueba de la fecha original de compra.
52 49-60792 Rev. 3
Ficha Técnica de Funcionamiento
de Modelo: RPWFE de GE Appliances
Ŷ6LVWHPDFHUWLILFDGRSRU,$30257FRQWUDORV(VWiQGDUHV\3GH16)$16,SDUDODUHGXFFLyQGHGHPDQGDVHVSHFLILFDGDVHQODILFKD
técnica de rendimiento y en iapmort.org.
ŶEl rendimiento real podrá variar en relación a las condiciones locales del agua.
Es esencial que se cumpla con los requisitos de instalación, mantenimiento
y reemplazo de filtros recomendados por el fabrican te, a fin de que el
producto funcione de acuerdo a como fue promocionado. Para acceder a
información sobre la Garantía, consulte el Manual de Instalación.
Pautas de Aplicación/ Parámetros de Suministro de Agua
Flujo de Servicio 0.5 gpm (1.89 lpm)
Suministro de Agua Agua Potable
Presión del Agua 25-120 psi (172-827 kPa)
Temperatura del agua 33°F-100°F (0.6°C-38°C)
Capacidad 170 galones (643.5 litros)
Sustancia Evaluada
para la Reducción
Concentración del
peligro de intrusión
(mg/L)
Concentración de aguas
máximas permitidas sobre
el producto (mg/L)
% Promedio
de Reducción
*XVWR\2ORUD&ORUR 2.0 mg/L +/- 10% 1$ > 99
*XVWR\2ORUD&ORUDPLQD 3.0 mg/L +/- 10% 0.5 > 99
Partícula, Clase I Por lo menos 10,000
partículas/mL
1$ 91.4
Partícula, Clase I 50,000/L 1$ > 99.99
Plomo 0.15 0.01 98.85
Mercurio 0.006 0.002 96.95
Mercurio 107 to 108 fibras/ L 1$ > 99
Toxafeno 0.015 +/- 10% 0.003 86.95
92&TXtPLFRVXVWLWXWRGHOFORURIRUPR 0.300 0.015 > 99
Alacloro 0.050 0.001 > 98
Atrazina 0.100 0.003 > 97
Benceno 0.081 0.001 > 99
Carbofurano 0.190 0.001 > 99
Tetracloruro de carbono 0.078 0.0018 98
Clorobenceno 0.077 0.001 > 99
Cloropincrina 0.015 0.0002 99
2,4-D 0.110 0.0017 98
Dibromocloropropano (DBCP) 0.052 0.00002 > 99
o-Diclorobenceno 0.08 0.001 > 99
P-Diclorobenceno 0.040 0.001 > 98
1,2-dicloroetano 0.088 0.0048 95
1,2-dicloroetano 0.083 0.001 > 99
Cis-1,2-dicloroetileno 0.170 0.0005 > 99
Trans-1,2-dicloroetileno 0.086 0.001 > 99
1,2-dicloropropano 0.080 0.001 > 99
cis-1,3-dicloropropileno 0.079 0.001 > 99
Dinoseb 0.170 0.0002 99
Endrina 0.053 0.00059 99
Etilbenceno 0.088 0.001 > 99
Dibromuro de etileno (EDB) 0.044 0.00002 > 99
Bromocloroacetonitrilo 0.022 0.0005 98
Dibromoacetonitrilo 0.024 0.0006 98
dichloroacetonitrile 0.0096 0.0002 98
Dicloroacetonitrilo 0.015 0.0003 98
1,2-dicloro-2-propanona 0.0072 0.0001 99
1,1,1-trichloro-2-propanona 0.0082 0.0003 96
Heptacloro (H-34, Heptox) 0.025 0.00001 > 99
Epóxido de heptacloro 0.0107 0.0002 98
Hexaclorociclopentadieno 0.044 0.001 > 98
Hexaclorociclopentadieno 0.060 0.000002 > 99
Lindano 0.055 0.00001 > 99
Metoxicloro 0.050 0.0001 > 99
Pentaclorofenol 0.096 0.001 > 99
Simazina 0.120 0.004 > 97
Styrene 0.150 0.0005 > 99
1,1,2,2-Tetracloroetileno 0.081 0.001 > 99
Tetracloroetileno 0.081 0.001 > 99
Tolueno 0.078 0.001 > 99
2,4,5-TP (silvex) 0.270 0.0016 99
ÈFLGRWULEURPRDFpWLFR 0.042 0.001 > 98
1,2,4-Triclorobenceno 0.160 0.0005 > 99
1,1,1-tricloroetano 0.084 0.0046 95
1,1,2-tricloroetano 0.150 0.0005 > 99
Tricloroetileno 0.180 0.0010 > 99
Bromoformo 0.300 0.015 95
Bromodiclorometano 0.300 0.015 95
clorodibromometano 0.300 0.015 95
Xileno 0.070 0.001 > 99
Meprobamato 400 +/- 20% 60 > 99
Atenolol 200 +/- 20% 30 > 99
carbamazepina 1400 +/- 20% 200 > 99
DEET 1400 +/- 20% 200 > 99
Metolacloro 1400 +/- 20% 200 > 99
Trimetoprima 140 +/- 20% 20 > 99
Linuron 140 +/- 20% 20 > 99
TCEP 5000 +/- 20% 700 > 99
TCPP 5000 +/- 20% 700 > 99
Fenitoína 200 +/- 20% 30 > 99
Ibuprofen 400 +/- 20% 60 > 99
1DSUR[HQR 140 +/- 20%
20 > 99
Estrona 140 +/- 20% 20 > 99
Bisfenol A 2000 +/- 20% 300 > 99
1RQ\OSKHQRO 1400 +/- 20%
200 > 99
3)2$3)26 1.5 mg/L +/- 10% 0.07 99.25
NOTA:2EVHUYHTXHDXQTXHODHYDOXDFLyQVHUHDOL]yGHDFXHUGRFRQ
condiciones estándares de laboratorio, el desempeño puede variar.
Reemplazo del Cartucho: RPWFE. Para conocer los costos estimados
de los elementos de reemplazo, llame al 1.877.959.8688 o visite
nuestro sitio Web en gewaterfilters.com.
ADVERTENCIA
A fin de reducir el riesgo asociado con
la ingestión de contaminantes:
• No se deben usar con agua que no sea microbiológicamente
segura o de calidad desconocida sin una desinfección adecuada,
antes o después, del sistema. Los sistemas certificados para la
reducción de quistes se podrían usar en aguas desinfectadas que
puedan contener quistes filtrables.
AVISO
A fin de reducir el riesgo de pérdidas de agua o inundación, y para
asegurar un rendimiento óptimo del filtro:
• Lea y siga las Instrucciones de uso antes de la instalación y uso de
este sistema.
• La instalación y uso DEBERÁN cumplir con todos los códigos estatales
y locales de plomería
• No se deberá instalar si la presión del agua supera los 120 psi (827
kPa). Si la presión del agua es superior a los 80 psi (552 kPa), deberá
instalar una válvula limitadora de presión. Si no está seguro sobre
cómo controlar la presión del agua, comuníquese con un plomero
profesional.
• No instale cuando se puedan producir condiciones de golpe de ariete.
Si existen condiciones de golpe de ariete, deberá instalar un suspensor
de golpes de ariete. Si no está seguro sobre cómo controlar esta
condición, comuníquese con un plomero profesional.
• No instale en líneas de suministro de agua caliente. La temperatura
máxima de funcionamiento del agua para este sistema de filtro es de
100°F (37.8°C).
• Proteja el filtro de heladas. Drene el filtro cuando las temperaturas sean
inferiores a 33ºF (0.6ºC).
• Cambie el cartucho del filtro descartable cada seis meses o antes, si
observa una reducción notoria en el promedio del flujo de agua.
• Si no se reemplaza el cartucho del filtro descartable en intervalos
recomendados, se podrá producir un rendimiento inferior del filtro
y quebraduras en el espacio de colocación del filtro, ocasionando
pérdidas de agua o inundación.
(VWHVLVWHPDIXHHYDOXDGRGHDFXHUGRFRQ16)$16,\
P473 para la reducción de las sustancias que figuran a continuación.
La concentración de las sustancias indicadas en agua que ingresa
al sistema fue reducida a una concentración inferior o igual al límite
permitido de agua que deja el sistema, de acuerdo con lo especificado
HQ16)$16,X3
6LVWHPD53:)(FHUWLILFDGRSRU,$302
R&T contra los Estándares 42, 53, 401,
\3GH16)$16,SDUDODUHGXFFLyQ
de demandas especificadas en la ficha
técnica de rendimiento en iapmort.org.
PLATINUM SEAL
WATER QUALITY
I
A
P
M
O
R
E
S
E
A
R
C
H
A
N
D
T
E
S
T
I
N
G
™

49-60792 Rev. 3 53
NOTAS
Notas

54 49-60792 Rev. 3
Notas

49-60792 Rev. 3 55
Notas

56 49-60792 Rev. 3
Impreso en Estados Unidos
Soporte para el Consumidor
SOPORTE PARA EL CONSUMIDOR
Sitio Web de GE Appliances
¿Desea realizar una consulta o necesita ayuda con su electrodoméstico? ¡Intente a través del Sitio Web de GE Appliances las
24 horas del día, cualquier día del año! Usted también puede comprar más electrodomésticos maravillosos de GE Appliances y
aprovechar todos nuestros servicios de soporte a través de Internet, diseñados para su conveniencia.
En EE.UU.: GEAppliances.com
Registre su Electrodoméstico
¡Registre su electrodoméstico nuevo a través de Internet, según su conveniencia! Un registro puntual de su producto permitirá
una mejor comunicación y un servicio más puntual de acuerdo con los términos de su garantía, en caso de surgir la necesidad.
También puede enviar una carta en la tarjeta de inscripción preimpresa que se incluye con el material embalado.
En EE.UU.: GEAppliances.com/register
Servicio Programado
El servicio de reparación de expertos de GE Appliances está a sólo un paso de su puerta. Conéctese a través de Internet y programe
su servicio a su conveniencia cualquier día del año. En EE.UU.: GEAppliances.com/service
o comuníquese al 800.432.2737 durante el horario de atención comercial.
Garantías Extendidas
Adquiera una garantía extendida de GE Appliances y conozca los descuentos especiales que están disponibles mientras su
garantía aún está vigente. La puede adquirir en cualquier momento a través de Internet. Los servicios de GE Appliances aún
estarán allí cuando su garantía caduque.
En EE.UU.: GEAppliances.com/extended-warranty o comuníquese al 800.626.2224 durante el horario de atención comercial.
Piezas y Accesorios
Aquellos individuos calificados para realizar el servicio técnico de sus propios electrodomésticos podrán solicitar el envío de
SLH]DVRDFFHVRULRVGLUHFWDPHQWHDVXVKRJDUHVVHDFHSWDQODVWDUMHWDV9,6$0DVWHU&DUG\'LVFRYHU2UGHQHKR\DWUDYpVGH
Internet durante las 24 horas, todos los días. En EE.UU.: GEApplianceparts.com o de forma telefónica al 877.959.8688 durante
el horario de atención comercial.
Las instrucciones que figuran en este manual cubren los procedimientos que serán realizados por cualquier usuario.
Otros servicios técnicos generalmente deben ser derivados a personal calificado del servicio. Se deberá tener cuidado,
ya que una reparación indebida podrá hacer que el funcionamiento no sea seguro.
Contáctenos
Si no se encuentra satisfecho con el servicio que recibió de GE Appliances, comuníquese con nosotros a través de nuestro sitio
Web con todos los detalles, incluyendo su número telefónico, o escriba a:
En EE.UU.: General Manager, Customer Relations | GE Appliances, Appliance Park | Louisville, KY 40225
GEAppliances.com/contact