Operating Instructions Cordless Telephone with Digital Answering Machine
Introduction
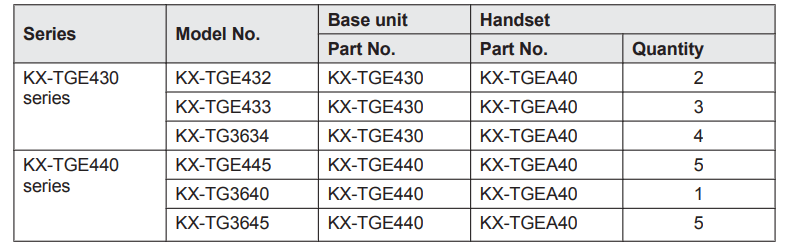
Model composition
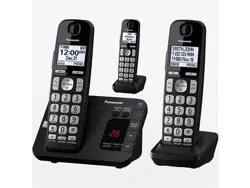
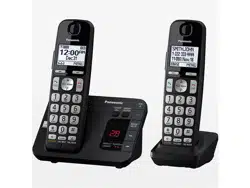
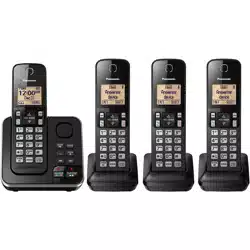
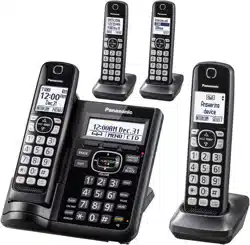
KX-TGE430 series
Model shown is KX-TGE432
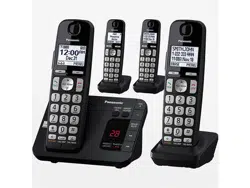
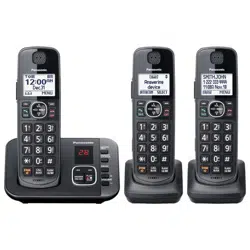
KX-TGE440 series
Model shown is KX-TGE445.
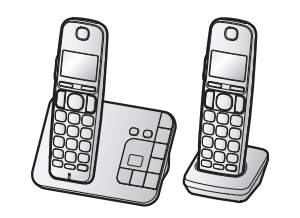
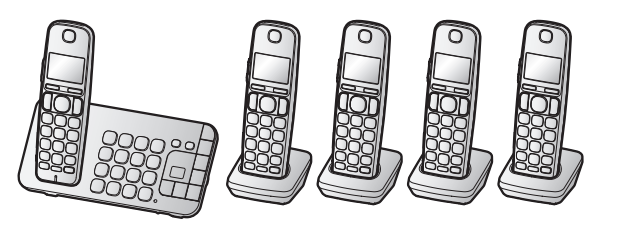
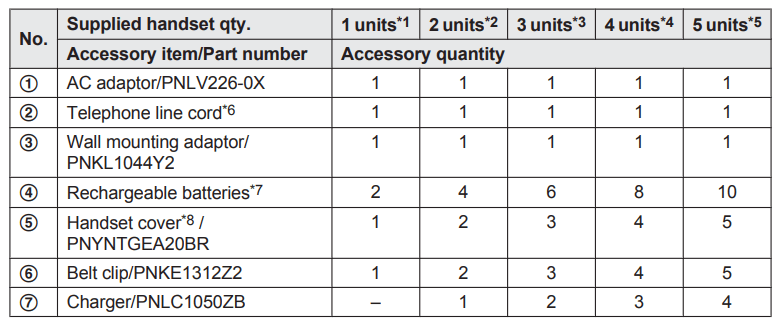
Accessory information
Supplied accessories
- KX-TG3640
- KX-TGE432
- KX-TGE433
- KX-TG3634
- KX-TGE445/KX-TG3645
- PQJA10075Y (Black cord), PQJA10075Z (Transparent cord)
- See page 4 for replacement battery information.
- The handset cover comes attached to the handset.

Additional/replacement accessories
Please contact your nearest Panasonic dealer for sales information (page 65).
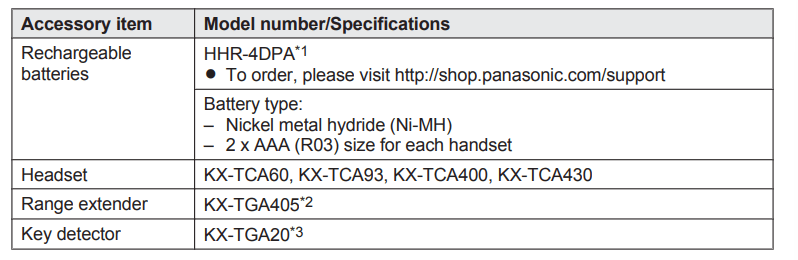
- Replacement batteries may have a different capacity from that of the supplied batteries.
- By installing this unit, you can extend the range of your phone system to include areas where reception was previously not available. This product can be purchased online. Please visit our Web site: http://shop.panasonic.com/support
- By registering the key detector (4 max.) to a Panasonic Digital Cordless Phone and attaching it to an easy-to-lose item in advance, you can locate and find the mislaid item to which the key detector is attached.
Other information
- Design and specifications are subject to change without notice.
- The illustrations in these instructions may vary slightly from the actual product.
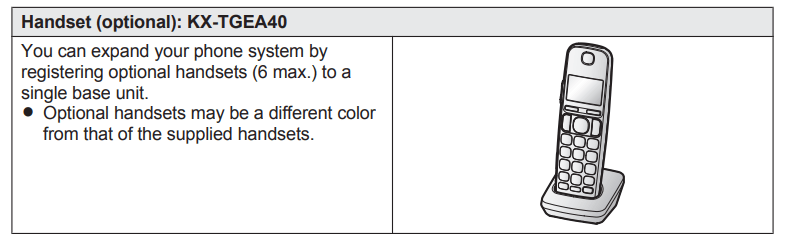
Expanding your phone system
Getting Started
Setting up
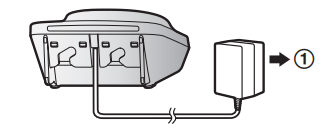
Connections
- Connect the AC adaptor to the unit by pressing the plug firmly.
- Fasten the cord by hooking it.
- Connect the AC adaptor to the power outlet.
- Connect the telephone line cord to the unit, then to the single-line telephone jack (RJ11C) until you hear a click.
- A DSL/ADSL filter (not supplied) is required if you have a DSL/ADSL service.
Note:
- Use only the supplied Panasonic AC adaptor PNLV226.
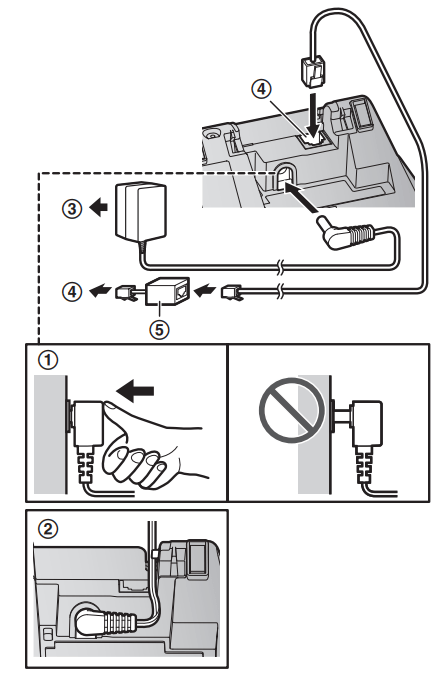
- Connect the AC adaptor to the power outlet.
Battery installation
- USE ONLY rechargeable Ni-MH batteries AAA (R03) size (
 ).
).
- Do NOT use alkaline/manganese/Ni-Cd batteries.
- Confirm correct polarities (
 ,
,  ).
).
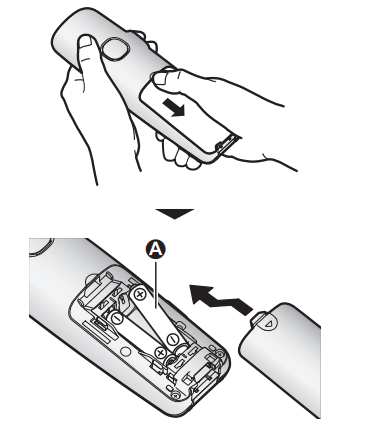
- Follow the directions on the display to set up the unit.
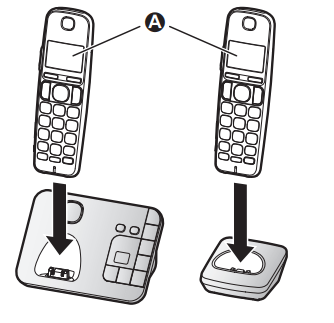
Battery charging
Charge for about 7 hours.
- Confirm “Charging” is displayed (
 ).
).
- When the batteries are fully charged, “Fully charged” is displayed.
Note when setting up
Note for connections
- The AC adaptor must remain connected at all times. (It is normal for the adaptor to feel warm during use.)
- The AC adaptor should be connected to a vertically oriented or floor-mounted AC outlet. Do not connect the AC adaptor to a ceiling-mounted AC outlet, as the weight of the adaptor may cause it to become disconnected.
Note for battery installation
Use the supplied rechargeable batteries. For replacement, we recommend using the Panasonic rechargeable batteries noted on page 4, 7.
Note for battery charging
- It is normal for the handset to feel warm during charging.
- Clean the charge contacts of the handset, base unit, and charger with a soft and dry cloth once a month. Before cleaning the unit, disconnect from power outlets and any telephone line cords. Clean more often if the unit is exposed to grease, dust, or high humidity.
Battery level

Panasonic Ni-MH battery performance (supplied batteries)
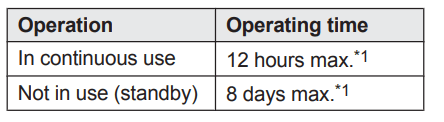
*1 If eco mode is on.
Note:
- Actual battery performance depends on usage and ambient environment.
Intelligent eco mode
This feature automatically reduces handset power consumption by suppressing handset transmission power when the handset is close to the base unit.
- When this feature is activated,
 is displayed.
- Eco mode is turned off when the clarity booster is activated (page 18).
Controls
Handset
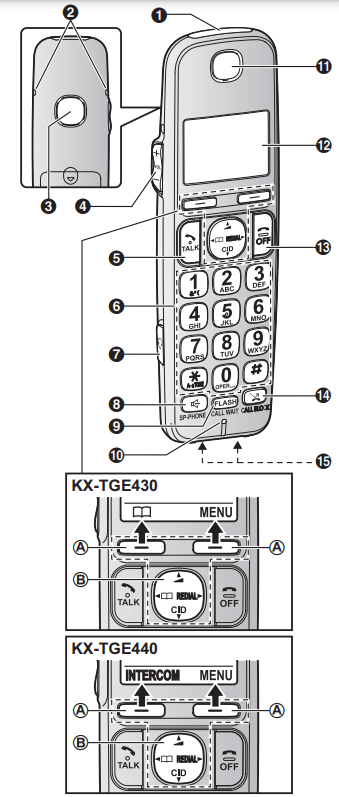
- Ringer indicator
Message indicator
- Belt clip holes
- Speaker
 (VOL.: Volume up/down)
 (TALK)
- Dial keypad (
 : TONE)
- Headset jack
 (SP-PHONE: Speakerphone)
- Microphone
- Receiver
- Display


- Charge contacts
 Soft keys
By pressing a soft key, you can select the feature shown directly above it on the display.
 Navigator key
–  : Scroll through various lists and items.
–  : Adjust the receiver or speaker volume while talking.
–  : View the phonebook entry.
–  : View the redial list.
–  (Caller ID): View the caller list.
Base unit
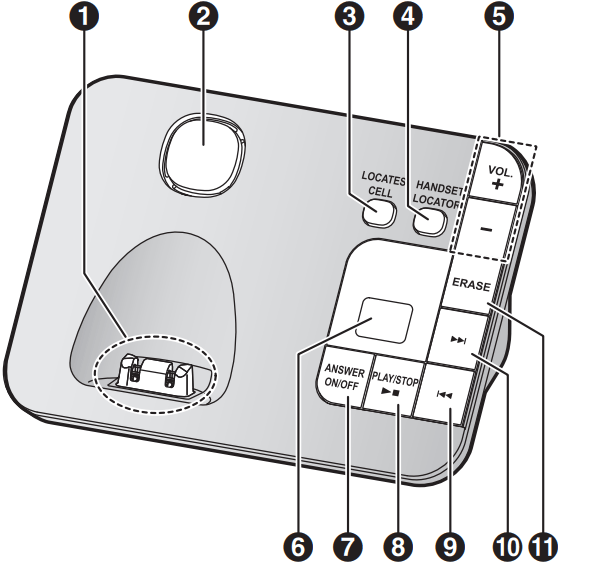
- Charge contacts
- Speaker


 (VOL.: Volume up/down)
- Message counter

 (PLAY/STOP) Message indicator
 (Repeat)
 (Skip)

- Charge contacts
- Speaker


 (SP-PHONE: Speakerphone) SP-PHONE indicator
- Message counter
 (PLAY/STOP) Message indicator


 (VOL.: Volume up/down)
 (Skip)
 (Repeat)
- Microphone
- Dial keypad (
 : TONE)
Display icons
Handset display items

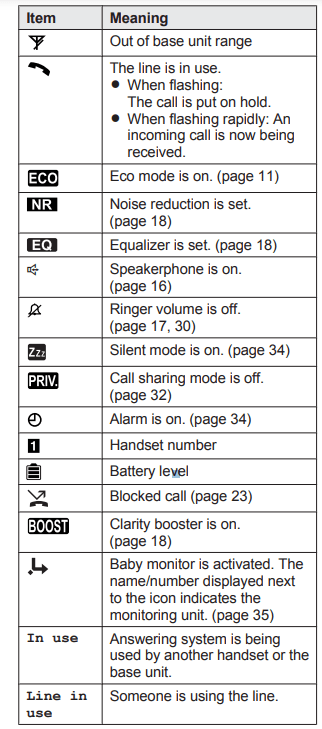
Base unit display item
Language settings
Display language


Voice announcement language
You can select the language used for the following features.
– Answering system guidance
– Talking Caller ID


Date and time

- Enter the current month, date, and year by selecting 2 digits for each.
Example: July 12, 2016


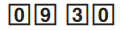
- Enter the current hour and minute (12-hour clock format) by selecting 2 digits for each. Example: 9:30


Note:
- When English is selected as the display language, 12-hour clock format is used. When Spanish is selected, 24-hour clock format is used.
Recording your greeting message
You can record your own greeting message instead of using a pre-recorded greeting message. See page 41 for details.


Other settings
Dialing mode
If you cannot make calls, change this setting according to your telephone line service. The default setting is “Tone”.
“Tone”: For tone dial service.
“Pulse”: For rotary/pulse dial service


Programming
Menu list
To access the features, there are 2 methods.
- Scrolling through the display menus

- Press
 or
or  to select the desired main menu.
- Press
 or
or  to select the desired item from the next sub-menus.
- Press
 or
or  to select the desired setting.
- Using the direct command code
 -> Enter the desired code.
Example: Press 
- Select the desired setting.

Note:
- To exit the operation, press
 .
.
- In the following table, < > indicates the default settings.
- In the following table,
 indicates the reference page number.
- Display menu order and sub-menu may vary depending on your model.
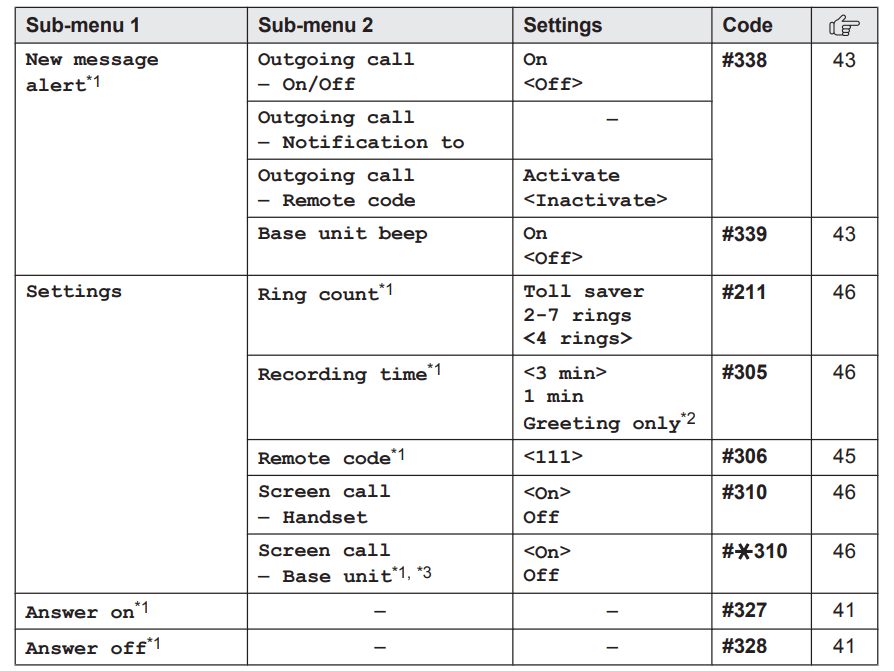
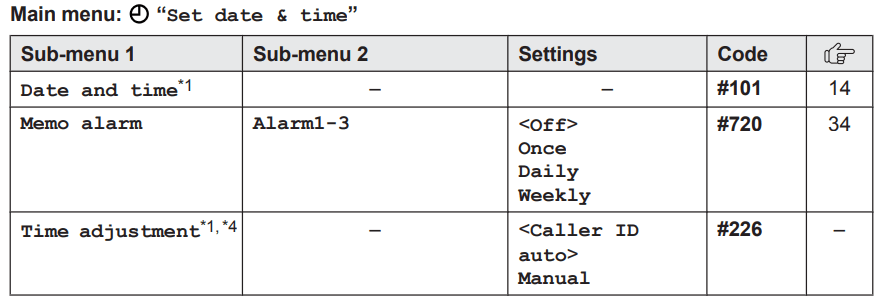
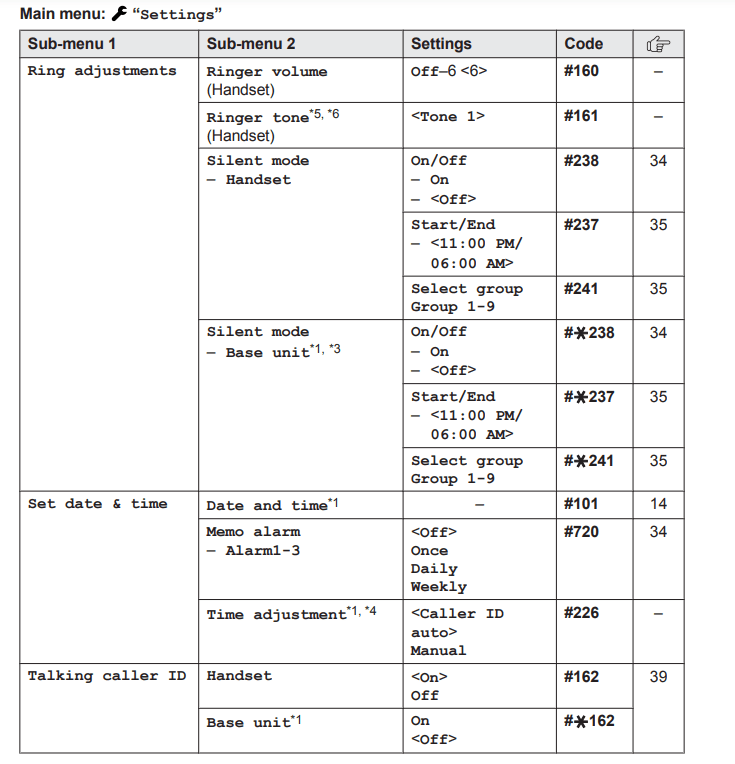
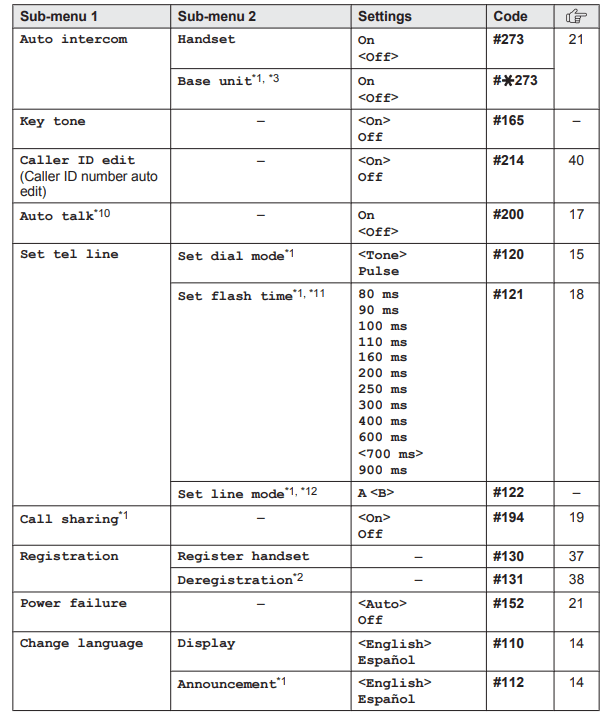
Display menu tree and direct command code table


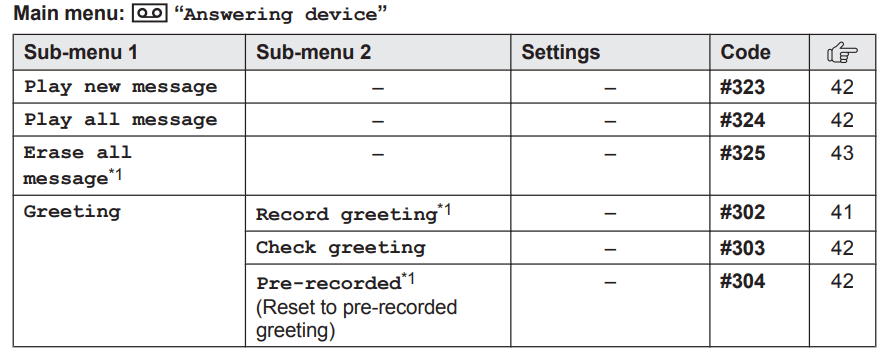


*1 If you program these settings using one of the units, you do not need to program the same item using another unit.
*2 This menu is not displayed when scrolling through the display menus. It is only available in direct command code.
*3 KX-TGE440 series: page 3
*4 This feature allows the unit to automatically adjust the date and time each time caller information including date and time is received. To turn this feature on, select “Caller ID auto”. To turn this feature off, select “Manual”. (Caller ID subscribers only) To use this feature, set the date and time first (page 14).
*5 If you subscribe to a distinctive ring service (such as IDENTA-RING), select a tone (tone 1 to 2). If you select a melody, you cannot distinguish lines by their ringers.
*6 The preset melodies in this product (“Tone 3” - “Melody 10”) are used with permission of © 2004 - 2013 Copyrights Vision Inc.
*7 This setting is available when you have the key detector (KX-TGA20). Read the installation manual for more information on the key detector.
*8 For models with supplied key detectors, the display shows “1: Detector1”.
*9 If you register 2 or more key detectors.
*10 If you subscribe to a Caller ID service and want to view the caller’s information after lifting up the handset to answer a call, turn off this feature.
*11 The flash time depends on your telephone exchange or host PBX. Contact your PBX supplier if necessary. The setting should stay at “700 ms” unless pressing  fails to pick up the waiting call.
*12 Generally, the line mode setting should not be changed. This setting automatically maintains receiver volume at the proper level depending on the current telephone line condition. Set the line mode to “A” if telephone line condition is not good.
Alarm
An alarm sounds at the set time for 1 minute and is repeated 5 times at 5 minute intervals (snooze function). A text memo can also be displayed for the alarm. A total of 3 separate alarm times can be programmed for each handset. You can set one of 3 different alarm options (once, daily, or weekly) for each alarm time.
Important:
- Make sure the unit’s date and time setting is correct (page 14).


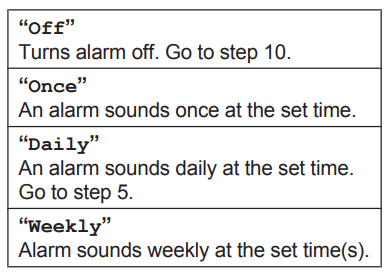
- Proceed with the operation according to your selection in step 3.
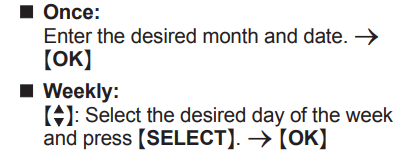
- Set the desired time.


- We recommend selecting a different ringer tone from the one used for outside calls.


Note:
- Press
 to stop the alarm completely.
- When the handset is in use, the alarm will not sound until the handset is in standby mode.
- Press any dial key or
 to stop the sound but keep the snooze function activated.
- If you want to make an outside call when the snooze function is activated, please stop the snooze function before making the call.
Silent mode
Silent mode allows you to select a period of time during which the handset and/or base unit will not ring for outside calls. This feature is useful for time periods when you do not want to be disturbed, for example, while sleeping. Silent mode can be set for each unit. Using the phonebook’s group feature (page 25), you can also select groups of callers whose calls override silent mode and ring the unit (Caller ID subscribers only).
Important:
- Make sure the unit’s date and time setting is correct (page 14).
- We recommend turning the base unit ringer off (page 17) in addition to turning the silent mode on. (KX-TGE430 series: page 3)
- If you have set the alarm, the alarm sounds even if the silent mode is turned on.
Turning silent mode on/off


If you select “Off”, press OFF to exit.- Enter the desired hour and minute you wish to start this feature.
- Enter the desired hour and minute you wish to end this feature.

*1 KX-TGE440 series: page 3
Changing the start and end time
- Continue from step 3, “Turning silent mode on/off”, page 34.
*1 KX-TGE440 series: page 3
Selecting groups to bypass silent mode

- “  ” is displayed next to the selected group numbers.
- To cancel the selected group:
 : Select the group. -> Press SELECT again. “
 ” disappears.
*1 KX-TGE440 series: page 3
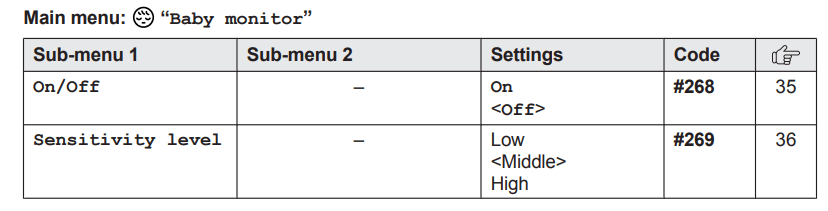
Baby monitor
This feature allows you to listen in on a room where another handset is located, allowing you to easily monitor from different areas of the house or even while away from home. The monitored handset (placed in a baby’s room, for example) will automatically call the monitoring handset, base unit, or the phone number stored when it detects sound.
Important:
- Before using this feature, we recommend that you test this feature and adjust the baby monitor sensitivity as needed, especially if you plan to monitor from outside.
- This feature should not be used as a substitute for a medical or caregiver’s supervision. It is the caregiver’s responsibility to stay close enough to handle any eventuality.
Note:
- If the unit is connected to a PBX system, you cannot set the baby monitor.
- During the monitoring mode, battery consumption is faster than usual. We recommend leaving the monitored handset on the base unit or charger.
- The monitored handset never rings while it is being monitored. If the base unit is placed near the monitored handset, we recommend turning off the base unit ringer volume (page 17).
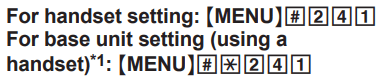
Setting the baby monitor
Perform the setting operation with the handset to be monitored (for example, the handset placed in a baby’s room).
To monitor with a unit
The internal baby monitor feature is available:
– between handsets '– between a handset and the base unit*1
*1 KX-TGE440 series: page 3


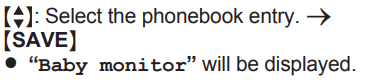
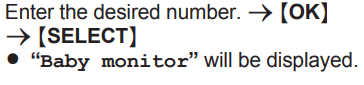
- “Baby monitor” will be displayed.
- The registered unit’s name/number is displayed.
Note:
- When this feature is on, another handset or the base unit can hear the monitored handset by making an intercom call.
To monitor from outside
If you enable this feature, the unit will call a pre-programmed phone number when the handset detects sound. After you answer the call, you can listen in on the room where the handset is located.


Note:
- If you edit a phonebook entry which is assigned for monitoring, the edited entry does not transfer to the monitor.
- By entering phone numbers:


Note:
- The registered name/number is displayed.
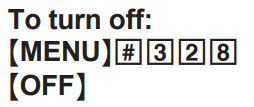
Turning off the baby monitor
The monitored handset cannot be used while baby monitor is set to “On”.


Editing an outside monitoring number


Erasing an outside monitoring number


Baby monitor sensitivity
You can adjust the sensitivity of the baby monitor. Increase or decrease the sensitivity to adjust the sound level needed to trigger the baby monitor feature.
- This feature cannot be set during a monitoring call.


Answering the baby monitor
When monitoring with a unit:
Handset: Press  to answer a call.
Base unit: Press  to answer a call*1.
*1 KX-TGE440 series: page 3
If you want to respond from the monitoring unit, press  .
.
- The monitoring unit will answer calls automatically when the auto intercom feature is set to “On” (page 21).
Note:
- If you receive an outside call when communicating with the monitored handset, the interrupt tone sounds.
– To answer the call with the handset, press  , then press
  .
.
– To answer the call with the base unit, press  3 times.*1
*1 If  is pressed, press
  2 times.
When monitoring from outside:
Answer the call.
If you want to respond from your monitoring phone, press  using tone dialing. You can turn off the baby monitor feature by pressing
  .
.
Note:
- The unit disconnects the call automatically after 2 minutes.
Other programming
Changing the handset name
The default handset name is “Handset 1” to “Handset 6”. You can customize the name of each handset (“Bob”, “Kitchen”, etc.). This is useful when you make intercom calls between handsets. To display the handset name in standby mode, turn on the handset name display feature (page 37).


Displaying the handset name
You can select whether or not the handset name is displayed in standby mode. The default setting is “Off”.


Registering a unit
Operating additional units
Additional handsets
Up to 6 handsets can be registered to the base unit.
Important:
- See page 5 for information on the available model.
Registering a handset to the base unit
The supplied handset and base unit are pre-registered. If for some reason the handset is not registered to the base unit, re-register the handset.


Deregistering a handset
A handset can cancel its own registration to the base unit, or other handsets registered to the same base unit. This allows the handset to end its wireless connection with the system.


Answering system
Answering system
The answering system can answer and record calls for you when you are unavailable to answer the phone. You can also set the unit to play a greeting message but not to record caller messages by selecting “Greeting only” as the recording time setting (page 46).
Important:
- Make sure the unit’s date and time setting is correct (page 14).
Memory capacity (including your greeting message)
The total recording capacity is about 17 minutes. A maximum of 64 messages can be recorded.
Note:
When message memory becomes full:
– “Messages full” is shown on the handset display.
– The message counter on the base unit flashes if the answering system is turned on.
– If you use the pre-recorded greeting message, the unit automatically switches to another pre-recorded greeting message asking callers to call again later.
– If you recorded your own greeting message, the same message is still announced to callers even though their messages are not recorded.
Turning the answering system on/off
Base unit
Press  to turn on/off the answering system.
Handset

Note for base unit and handset:
- When the answering system is turned on, the message counter on the base unit displays the total number of messages (old and new).
Greeting message
When the unit answers a call, a greeting message is played to callers.
You can use either:
– your own greeting message
– a pre-recorded greeting message
Recording your greeting message


- After a beep sounds, hold the handset about 20 cm (8 inches) away and speak clearly into the microphone (2 minutes max.).

Using a pre-recorded greeting message
The unit provides 2 pre-recorded greeting messages:
– If you reset to pre-recorded greeting or do not record your own greeting message, the unit plays a pre-recorded greeting asking callers to leave a message.
– If the message recording time (page 46) is set to “Greeting only”, callers’ messages are not recorded and the unit plays a different pre-recorded greeting message asking callers to call again.
Resetting to a pre-recorded greeting message
Use this procedure to erase your greeting message and use a pre-recorded one.


Playing back the greeting message


Listening to messages
Important:
- When using the base unit or handset to listen to messages, the noise reduction feature (page 18) is activated automatically in spite of the setting (
 is not displayed).
Using the base unit
When new messages have been recorded,  on the base unit flashes. Press (PLAY).
- During playback,
 on the base unit lights.
- If new messages have been recorded, the base unit plays back new messages.
- If there are no new messages, the base unit plays back all messages.
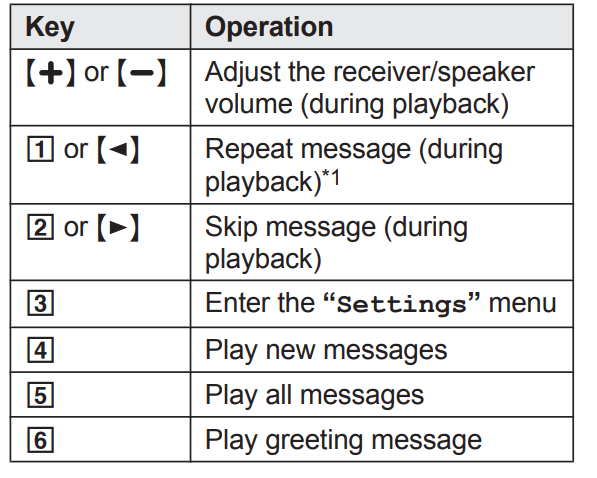
Operating the answering system during playback
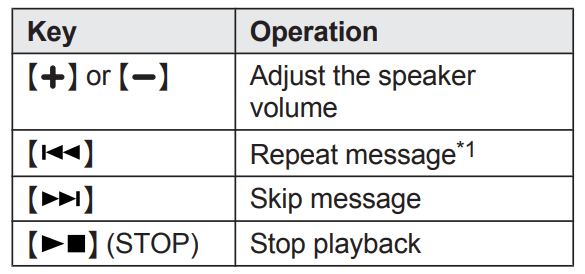
*1 If pressed within the first 5 seconds of a message, the previous message is played.
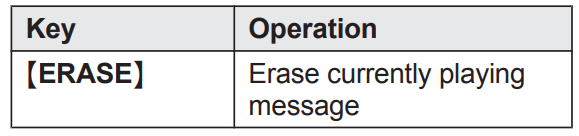
Erasing all messages
Press ERASE 2 times while the unit is not in use.
Using the handset
When new messages have been recorded:
– “New message” is displayed.
– The message indicator on the handset flashes slowly if the message indicator is turned on (page 46).


Note:
- To switch to the receiver, press
 .
.
- You can also use the PLAY soft key, if displayed, to play new messages.
Operating the answering system

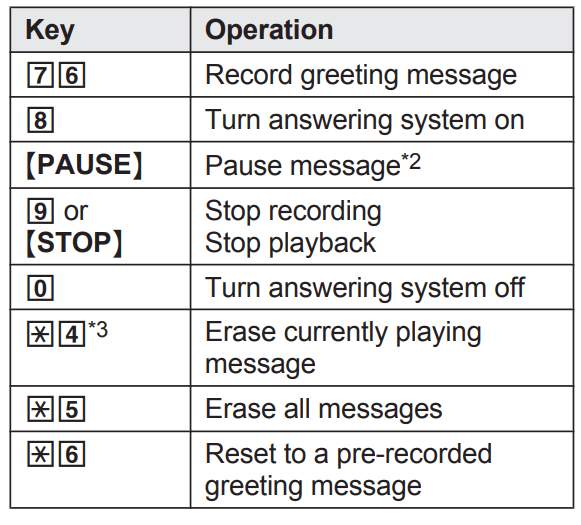
*1 If pressed within the first 5 seconds of a message, the previous message is played.
*2

*3
Calling back (Caller ID subscribers only)


Editing the number before calling back


Erasing all messages


Advanced new message alerting features
Audible message alert
This feature allows the base unit to beep to inform you of a new message arrival when new messages are recorded. The base unit beeps 2 times every minute until you listen to the messages, if the “Base unit beep” setting is turned on. The default setting is “Off”.


New message alert by a call
This feature allows you to receive a notification by phone when new messages are recorded. The base unit calls a phone number you specify. You can then operate the answering system remotely to listen to the new message.
To use this feature, you must:
– store a phone number to which the unit makes the call to.
– turn on the new message alert setting. After you answer the new message alert call, you can listen to messages from that call (page 44).
Important:
- A new message alert is stopped 1 minute after the unit starts to call. The unit will not retry the call even if the call is not answered.
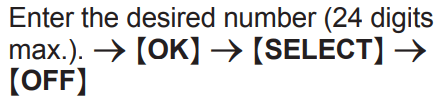
Storing a phone number to which the unit makes an alert call


- By entering a phone number:


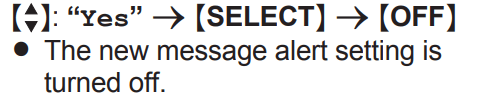
Turning on/off the new message alert setting


Editing the set phone number


Erasing the set phone number


Activating/inactivating the remote access code to play messages
If you activate this feature, you must enter the remote access code (page 45) to play the new message from the new message alert call. This is so that unauthorized parties cannot listen to your messages. The default setting is “Inactivate”.
– “Inactivate”: You can listen to the message by pressing 4 to play new messages (without entering the remote access code).
– “Activate”: You must enter your remote access code and then press 4 to play new message.


Listening to messages
After you answer the new message alert, you can listen to the messages as follows.
- When the remote access code is set to “Inactivate”: Press 4 to play the new message during the announcement.
- When the remote access code is set to “Activate”:
1 Enter the remote access code (page 45) during the announcement.
2 Press 4 to play the new message.
Note:
- Within 10 seconds after listening to new messages, you can press
 during the call to turn off the new message alert by a call feature.
- Even if the unit makes a new message alert call, the handset redial list does not show the record.
Remote operation
Using a touch-tone phone, you can call your phone number from outside and access the unit to listen to messages or change answering system settings. The unit’s voice guidance prompts you to press certain dial keys to perform different operations.
Remote access code
A 3-digit remote access code must be entered when operating the answering system remotely. This code prevents unauthorized parties from listening to your messages remotely. The default setting is “111”.
Important:
- To prevent unauthorized access to this product, we recommend that you regularly change the remote code.


Deactivating remote operation
Press  in step 2 on “Remote access code”, page 45.
- The entered remote access code is deleted.
Using the answering system remotely
- Dial your phone number from a touch-tone phone.
- After the greeting message starts, enter your remote access code.
- Follow the voice guidance prompts as necessary or control the unit using remote commands (page 45).
- When finished, hang up.
Voice guidance
- When the English voice guidance is selected During remote operation, the unit’s voice guidance starts and prompts you to press
1 to perform a specific operation, or press
2 to listen to more available operations.
- When the Spanish voice guidance is selected
To start the voice guidance, press 9. The voice guidance announces the available remote commands (page 45).
Note:
- If you do not press any dial keys within 10 seconds after a voice guidance prompt, the unit disconnects your call.
Remote commands
You can press dial keys to access certain answering system functions without waiting for the voice guidance to prompt you.

*1 If pressed within the first 5 seconds of a message, the previous message is played.
*2 For English voice guidance only
*3 For Spanish voice guidance only
Turning on the answering system remotely
- Dial your phone number from a touch-tone phone.
- Let the phone ring 15 times.
- A long beep is heard.
- Enter your remote access code within 10 seconds after the long beep.
- The greeting message is played back.
- You can either hang up, or enter your remote access code again and begin remote operation (page 44).
Answering system settings
Call screening
Handset / Base unit
While a caller is leaving a message, you can listen to the call through the unit’s speaker. To adjust the speaker volume, press  or
or  repeatedly. You can answer the call by pressing
  on the handset or
  on the base unit*1. Call screening can be set for each unit. The default setting is “On”.


*1 KX-TGE440 series: page 3
Number of rings before the unit answers a call
You can change the number of times the phone rings “Ring count” before the unit answers calls. You can select 2 to 7 rings, or “Toll saver”.
The default setting is “4 rings”. “Toll saver”: The unit’s answering system answers at the end of the 2nd ring when new messages have been recorded, or at the end of the 5th ring when there are no new messages. If you call your phone from outside to listen to new messages (page 45), you know that there are no new messages when the phone rings for the 3rd time. You can then hang up without being charged for the call.


Caller’s recording time
You can change the maximum message recording time allowed for each caller. The default setting is “3 min”.


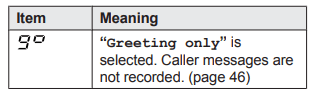
Selecting “Greeting only”
You can select “Greeting only” which sets the unit to announce a greeting message to callers but not record messages. Select “Greeting only” in step 2 on “Caller’s recording time”, page 46.
Note:
- When you select “Greeting only”:
– If you do not record your own message, the unit will play the pre-recorded greeting-only message asking callers to call again later.
– If you use your own message, record the greeting-only message asking callers to call again later (page 41).
Handset message indicator
You can select whether or not the message indicator on the handset flashes slowly when new messages are recorded. The default setting is “On”.
Important:
- If you stored the voicemail access number (page 47), the message indicator also flashes for newly recorded voicemail messages (page 48).


Note:
- While message indicator is on, battery operating time is shortened (page 11).
Error messages
| Display message |
Cause/solution |
| Ask phone company for VM access # |
- You have not stored the voicemail access number. Store the number (page 47).
|
| Base no power or No link. Reconnect base AC adaptor. or No link. |
- Confirm the base unit’s AC adaptor is connected to the unit and the power outlet correctly.
- The handset has lost communication with the base unit. Move closer to the base unit and try again.
- Unplug the base unit’s AC adaptor to reset the unit. Reconnect the adaptor and try again.
- The handset’s registration may have been canceled. Re-register the handset (page 37).
- When “No link.” is displayed during a power failure, place a handset on the base unit to supply power to the base unit.
|
| Busy |
- The called unit is in use.
- Other units are in use and the system is busy. Try again later.
- The handset you are using is too far from the base unit. Move closer and try again.
|
| Check tel line |
- The supplied telephone line cord has not been connected yet or not connected properly. Check the connections (page 10).
|
| Error!! |
- Recording was too short. Try again
|
| Invalid |
- There is no handset registered to the base unit matching the handset number you entered.
- The handset is not registered to the base unit. Register the handset (page 37).
|
| Requires subscription to Caller ID. |
- You must subscribe to a Caller ID service. Once you receive caller information after subscribing to a Caller ID service, this message will not be displayed.
|
| Use rechargeable battery. |
- A wrong type of battery such as alkaline or manganese was inserted. Use only the rechargeable Ni-MH batteries noted on page 4, 7.
|
Troubleshooting
If you still have difficulties after following the instructions in this section, disconnect the base unit’s AC adaptor, then reconnect the base unit’s AC adaptor. Remove the batteries from the handset, and then insert them into the handset again.
General use
| Problem |
Cause/solution |
| The handset does not turn on even after installing charged batteries. |
- Place the handset on the base unit or charger to turn on the handset.
|
| The unit does not work |
- Make sure the batteries are installed correctly (page 10).
- Fully charge the batteries (page 11).
- Check the connections (page 10).
- Unplug the base unit’s AC adaptor to reset the unit. Reconnect the adaptor and try again.
- The handset has not been registered to the base unit. Register the handset (page 37).
|
| I cannot hear a dial tone. |
- The base unit’s AC adaptor or telephone line cord is not connected. Check the connections.
- Disconnect the base unit from the telephone line and connect the line to a known working telephone. If the working telephone operates properly, contact our service personnel to have the unit repaired. If the working telephone does not operate properly, contact your phone service provider.
|
| The indicator on the handset flashes slowly. |
- New messages have been recorded. Listen to the new messages (page 42).
- New voicemail messages have been recorded. Listen to the new voicemail messages (page 48).
|
| The base unit beeps. |
- New messages have been recorded. Listen to the new messages (page 42).
|
Menu list
| Problem |
Cause/solution |
| The display is in a language I cannot read. |
- Change the display language (page 14).
|
| I cannot register a handset to a base unit. |
- The maximum number of handsets (6) is already registered to the base unit. Cancel unused handset registrations from the base unit (page 38).
|
Battery recharge
| Problem |
Cause/solution |
The handset beeps and/or  flashes. flashes. |
- Battery charge is low. Fully charge the batteries (page 11).
|
|
I fully charged the batteries, but
–  still flashes, still flashes,
–  is displayed, or is displayed, or
– the operating time seems to be shorter.
|
- Clean the battery ends (
 , ,  ) and the charge contacts with a dry cloth and charge again. ) and the charge contacts with a dry cloth and charge again.
- It is time to replace the batteries (page 10).
|
Making/answering calls, intercom
| I cannot use voice paging. |
- You cannot use voice paging if other units are in use.
- Voice paging is not available when a range extender (KX-TGA405) is registered to the base unit.
|
 is displayed. is displayed. |
- The handset is too far from the base unit. Move closer.
- The base unit’s AC adaptor is not properly connected. Reconnect AC adaptor to the base unit.
- The handset is not registered to the base unit. Register it (page 37).
|
| Noise is heard, sound cuts in and out. |
- You are using the handset or base unit in an area with high electrical interference. Re-position the base unit and use the handset away from sources of interference.
- Move closer to the base unit.
- If you use a DSL/ADSL service, we recommend connecting a DSL/ADSL filter between the base unit and the telephone line jack. Contact your DSL/ADSL provider for details.
|
| The handset does not ring |
- The ringer volume is turned off. Adjust the ringer volume (page 17, 30).
- Silent mode is turned on. Turn it off (page 34).
|
| The base unit does not ring. |
- The ringer volume is turned off. Adjust the ringer volume (page 17).
- Silent mode is turned on. Turn it off (page 34)
|
| I cannot make a call. |
- The dialing mode may be set incorrectly. Change the setting (page 15).
|
| I cannot make or answer a call. |
- An outside line is being used after a cell locator feature is used.
– KX-TGE430 series: To end the call, press LOCATES CELL on the base unit.
– KX-TGE440 series: To end the call if someone answers using the cellular phone, press  on the base unit. on the base unit.
|
| I cannot make long distance calls |
- Make sure that you have long distance service.
|
Caller ID/Talking Caller ID
| Problem |
Cause/solution |
| Caller information is not displayed. |
- You must subscribe to Caller ID service. Contact your phone service provider for details.
- If your unit is connected to any additional telephone equipment such as a Caller ID box or cordless telephone line jack, plug the unit directly into the wall jack.
- If you use a DSL/ADSL service, we recommend connecting a DSL/ADSL filter between the base unit and the telephone line jack. Contact your DSL/ADSL provider for details.
- The name display service may not be available in some areas. Contact your phone service provider for details.
- Other telephone equipment may be interfering with this unit. Disconnect the other equipment and try again.
|
| Caller information is displayed or announced late. |
- Depending on your phone service provider, the unit may display or announce the caller’s information at the 2nd ring or later.
- Move closer to the base unit.
|
| Caller information is not announced. |
- The handset or base unit’s ringer volume is turned off. Adjust it (page 17, 30).
- The Talking Caller ID feature is turned off. Turn it on (page 30).
- The number of rings for the answering system is set to “2 rings” or “Toll saver”. Select a different setting (page 46).
- If the base unit and another handset are having an intercom call, your handset does not announce caller information.
|
| The caller list/incoming phone numbers are not edited automatically. |
- The Caller ID number auto edit feature is turned off. Turn it on and try again (page 32).
- You need to call back the edited number to activate Caller ID number auto edit.
|
| I cannot dial the phone number edited in the caller list. |
- The phone number you dialed might have been edited incorrectly (for example, the long distance “1” or the area code is missing). Edit the phone number with another pattern (page 40).
|
| Time on the unit has shifted. |
- Incorrect time information from incoming Caller ID changes the time. Set the time adjustment to “Manual” (off) (page 30).
|
| The 2nd caller’s information is not displayed during an outside call. |
- In order to use Caller ID, call waiting, or Call Waiting Caller ID (CWID), you must first contact your phone service provider and subscribe to the desired service. After subscribing, you may need to contact your phone service provider again to activate this specific service, even if you already subscribed to both Caller ID and Call Waiting with Caller ID services (CWID).
|
Answering system
| Problem |
Cause/solution |
| The unit does not record new messages. |
- The answering system is turned off. Turn it on (page 41).
- The message memory is full. Erase unnecessary messages (page 42, 43). R The recording time is set to “Greeting only”. Change the setting (page 46).
- Your phone service provider’s voicemail service may be answering your calls before the unit’s answering system can answer your calls. Change the unit’s number of rings setting (page 46) to a lower value, or contact your phone service provider.
- The answering system will not answer incoming calls while the other devices such as handsets are engaged in a call.
|
| I cannot operate the answering system remotely. |
- The remote access code is not set. Set the remote access code (page 45).
- You are entering the wrong remote access code. If you have forgotten your remote access code, enter the remote access code setting to check your current code (page 45).
- The answering system is turned off. Turn it on (page 45)
|
| The unit does not emit the specified number of rings. |
- If the first ring is turned off (“No”) (page 24), the number of rings decreases by 1 from the specified number of rings.
|
Voicemail
| Problem |
Cause/solution |
| “Voicemail msg. via phone co.” is shown on the handset display. How do I remove this message from the display? |
- This notification is displayed when your phone service provider’s voicemail service (not the unit’s answering system) has recorded a message for you. Typically you can remove this notification from the display by listening to the message. To listen to the message, dial the voicemail number provided by your phone service provider (for most cases, this will be your own phone number), and follow the voice instructions. Depending on your phone service provider, you may need to remove all messages from your voice mailbox to remove the notification. You can also remove this notification by pressing and holding # until the unit beeps
|
Liquid damage
| Problem |
Cause/solution |
| Liquid or other form of moisture has entered the handset/base unit. |
- Disconnect the AC adaptor and telephone line cord from the base unit. Remove the batteries from the handset and leave to dry for at least 3 days. After the handset/base unit are completely dry, reconnect the AC adaptor and telephone line cord. Insert the batteries and charge fully before use. If the unit does not work properly, contact an authorized service center.
|
Caution:
- To avoid permanent damage, do not use a microwave oven to speed up the drying process.