* These special features depend on the model and may vary or may not be available on your vacuum cleaner.
Caring for the environment
Disposing of sales packaging
The packaging material protects the robot vacuum cleaner from transport damage. The packaging materials used are selected from materials which are environmentally friendly for disposal and can therefore be recycled. Recycling the packaging material reduces the use of raw materials in the manufacturing process and also reduces the amount of waste in landfill sites. Make sure the packaging is disposed of in the proper manner for your area.
Disposing of the FilterBags and filters
Filterbags and filters are made from environmentally friendly materials, and can be disposed of with the normal household waste, as long as they have been used exclusively for general household dust.
Disposing of your old appliance
Before disposing of your old appliance remove the FilterBag and filters and dispose of them with your household waste.
Electronic and electrical appliances contain many valuable materials. They also contain certain materials, compounds and components which were essential for their correct functioning and safety. These could be hazardous to your health and to the environment if disposed of with general waste or if handled incorrectly. Please do not, therefore, dispose of your old appliance with general waste.
Instead, please make use of officially designated collection and disposal points to dispose of and recycle electrical and electronic appliances. By law, you are solely responsible for deleting any personal data from the appliance prior to disposal. Please ensure that your old appliance poses no risk to children while being stored for disposal.
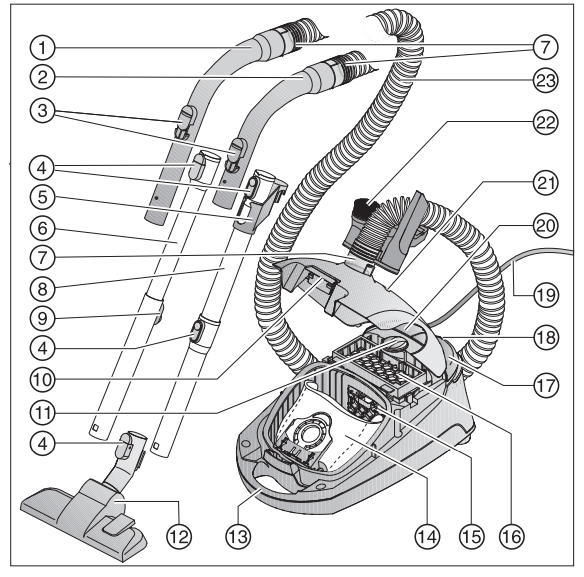
References to illustrations
The illustrations referred to in the text are shown on the fold-out pages at the end of these Operating Instructions.
Connection
Attaching the suction hose (Fig. 01)
Insert one connector into the suction socket on the vacuum cleaner until it clicks into position.
If you want to separate the pieces again, press the release buttons at the side of the connector and pull the connector out of the suction socket.
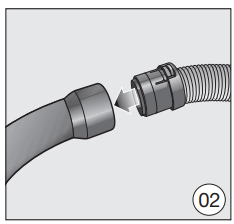
Connecting the suction hose to the handle (Fig. 02)
Insert the connector at the other end of the suction hose into the handle until it clicks into position.
Your vacuum cleaner is fitted with one of the following suction wands, depending on model.
- EasyLock suction wand
- Comfort telescopic suction wand
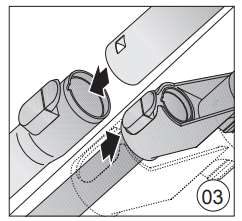
Assembling the EasyLock suction wand (Fig. 03)
Hold the suction wand by the connection piece and push it into the second suction wand, turning it clockwise or counterclockwise until it clicks into position.
Slide the connection piece upwards until it clicks into position.
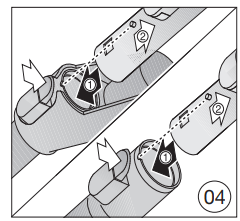
Connecting the handle to the suction wand (Fig. 04)
Insert the handle into the suction wand until it clicks into position. To do this, line up the guides on the two pieces.
To release the handle from the suction wand, press the release button and pull the handle out of the wand, twisting it slightly as you do so.
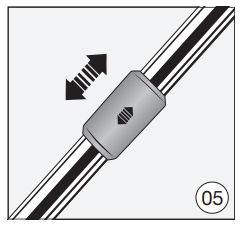
Adjusting the telescopic suction wand (Fig. 05)
One part of the telescopic suction wand is packed inside the other, and it can be adjusted to suit your height for comfortable vacuuming.
Grasp the release mechanism and adjust the telescopic suction wand to the required length.
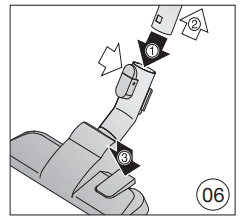
Connecting the suction wand to the floorhead (Fig. 06)
Push the suction wand into the floorhead and turn it clockwise or counterclockwise until it clicks into position.
To separate the suction wand from the floorhead, press the release button and pull the suction wand away from the floorhead, twisting it slightly as you do so. Adjusting the floorhead (Fig. 06) (only for models with an adjustable floorhead included in the standard version) This vacuum cleaner can be used for daily cleaning of carpets, rugs, and robust hard flooring. Miele offers a range of other floorheads, brushes, and accessories for other types of flooring and special applications (see “Optional accessories”). Please observe the flooring manufacturer’s cleaning and care instructions.
Clean even hard floors which are not susceptible to scratching, as well as flooring with gaps or deep crevices in it, with the brush protruding: Press the foot switch . Vacuum carpets and rugs with the brush retracted: Press the foot switch .
Activating the TimeStrip® exhaust filter change indicator on the exhaust filter
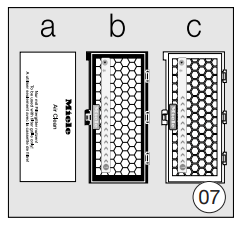
Depending on the model, your vacuum cleaner will be equipped as standard with one of the following exhaust filters (Fig. 07):
a AirClean
b Active AirClean 30 (black)
c HEPA AirClean 30 (white)
If your vacuum cleaner is equipped with exhaust filter b or c, you need to activate the TimeStrip® exhaust filter change indicator.
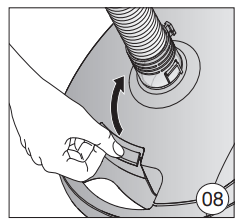
Pull the release button for the dust compartment lid upwards and open the lid as far as it will go (Fig. 08).
Remove the indicator strip (Fig. 09).
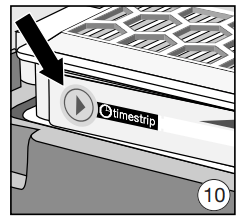
Press the TimeStrip® exhaust filter change indicator (Fig. 10).
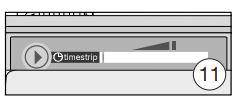
After approx. 10–15 seconds a thin red line will appear in the left-hand side of the display (Fig. 11).
Close the dust compartment lid securely, making sure it clicks into position. Take care not to trap the FilterBag when doing so.
The TimeStrip® exhaust filter change indicator shows the remaining functional life of the exhaust filter. After approx. 50 operating hours the display will be completely filled with red (Fig. 12). 50 operating hours equates to approximately one year of use.
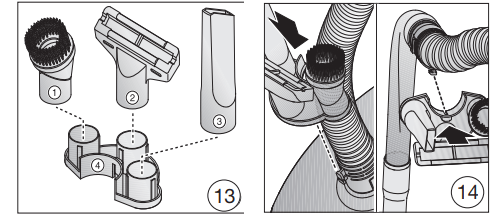
Using the accessories supplied (Figs. 13 + 14)
Dusting brush
Upholstery nozzle
Crevice nozzle
Accessory holder for the three accessories supplied
Symbols on the holder show where to attach the different accessories.
Attach the accessories holder to the hose connector socket at the top or bottom of the suction hose. Make sure it clicks into position.
Adjustable floorhead (Fig. 15)
The adjustable floorhead can also be used for vacuuming the stairs.
WARNING: Risk of injury caused by falling vacuum cleaner. You may be injured if the vacuum cleaner should fall from the stairs. When vacuuming stairs, it is best to start at the bottom of the stairs and move up.
Parquet floorbrush (SBB Parquet-3) (included as standard depending on model)
This brush has natural bristles and is designed for use on smooth floors that are susceptible to scratching.
Use
Power cord
WARNING: Unwind the cord completely to aid the vacuum in dissipating heat. Do not pull or carry by the cord, use the cord as a handle, close a door on the cord, or pull the cord around sharp edges or corners. Do not run the appliance over the cord. Keep the cord away from heated surfaces. Do not unplug by pulling the cord. To unplug grasp the plug, not the cord. This appliance is equipped with a power cord reel. Hold the plug when rewinding onto cord reel. Do not allow plug to whip when rewinding.
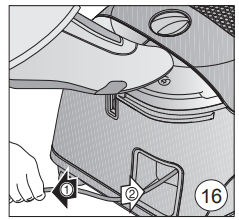
Unwinding the power cord (Fig. 16)
Pull the power cord out to the required length. WARNING: Risk of damage due to overheating. The power cord may overheat after a long period of use. If vacuuming for longer than 30 minutes, the power cord must be pulled out all the way. Rewinding the cord Remove the plug from the socket.
Press the rewind foot control. The cord will rewind automatically.
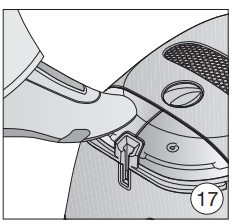
Switching on and off (Fig. 17)
Press the On/Off foot switch .
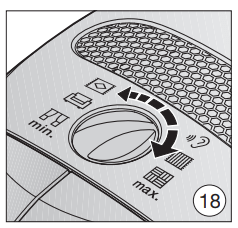
Regulating the suction power (Fig. 18)
The suction power can be regulated to suit the type of flooring being cleaned. Reducing the suction power reduces the amount of effort required to maneuver the floorhead.
The vacuum cleaner has symbols on the controls which indicate the type of use the settings are suitable for.
Curtains, fabrics
Upholstery, cushions
Deep-pile carpets, rugs, and runners
Energy-saving normal vacuuming with low noise
Low-pile carpet and rugs
Hard flooring and heavily soiled carpets and rugs
Turn the suction power selector manually to the suction power setting you require.
Opening the air inlet valve (Fig. 19)
It is easy to reduce the suction power for a short time, e.g., to prevent rugs or other objects being sucked into the vacuum cleaner.
Open the air inlet valve on the handle far enough to reduce the suction power.
The floorhead will be easier to maneuver.
Setting down and storing the vacuum cleaner
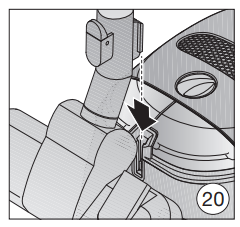
Park system for pauses during vacuuming (Fig. 20)
The park system allows you to conveniently park the suction wand and floorhead during pauses.
Slot the floorhead into the parking attachment on the vacuum cleaner.
If your vacuum cleaner is on a sloping surface, e.g., a ramp:
– Retract the telescopic suction wand fully.
– Do not use the park system if your vacuum cleaner has an EasyLock suction wand.
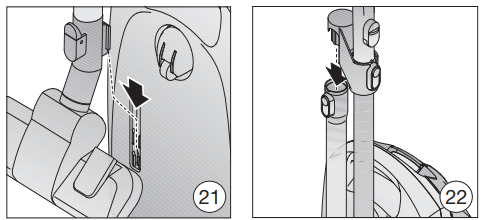
Park system for storage (Figs. 21 + 22)
WARNING: Risk of electric shock from voltage. The supply voltage is applied to the appliance even if it is switched off. After use, unplug the appliance from the electrical socket.
Stand the vacuum cleaner upright.
If your vacuum cleaner has a telescopic suction wand, retract the parts fully so that it takes up less room for storage.
Slot the floorhead downwards into the parking attachment.
If your vacuum cleaner has an EasyLock suction wand, you can detach this so that the vacuum cleaner requires less storage space.
Press the release button on the lower suction wand section and pull the top section out.
Push the connection piece attached to the upper suction wand section into the lower section.
Maintenance
WARNING: Risk of electric shock from voltage. The supply voltage is applied to the appliance even if it is switched off. Before carrying out any maintenance work, unplug the appliance from the electrical socket.
The Miele Filtration System consists of 3 accessories:
- original Miele FilterBag (type GN)
- motor protection filter
- original Miele Exhaust Filter
These accessories will need to be replaced from time to time to ensure that your vacuum cleaner performs efficiently.
It is recommended to use only genuine Miele accessories bearing the “ORIGINAL Miele” logo on the packaging. Only these will guarantee the optimum performance of your vacuum cleaner and the best possible cleaning results.
FilterBags with the “ORIGINAL Miele” logo on the packaging are not made from paper or paper-based materials and nor do they have a cardboard collar. This is why Miele FilterBags are particularly long-lasting and reliable.
Please note that faults and damage caused by use of accessories which do not bear the “ORIGINAL Miele” logo on the packaging are not covered by the vacuum cleaner warranty.
Purchasing FilterBags and filters
Original Miele FilterBags and Filters are available from the Miele web store, Miele Customer Service, and your Miele dealer.
Original Miele FilterBags and Filters are identified by the “ORIGINAL Miele” logo on the packaging.
Every packet of original Miele FilterBags contains 4 bags, one AirClean Exhaust Filter, and one motor protection filter. Original Miele multipacks contain 16 FilterBags, 4 AirClean Exhaust Filters, and 4 motor protection filters.
Original Miele Exhaust Filters can also be purchased separately from Miele Customer Service or your Miele dealer. Please quote the model number of your vacuum cleaner when ordering to make sure you get the correct filter. You can also order these exhaust filters via the Miele web store.
FilterBag change indicator (Fig. 23)
Change the FilterBag when the color marker in the FilterBag change indicator turns red.
Blocked pores reduce the efficiency of the vacuum cleaner. Dispose of the FilterBag when it is full. Do not attempt to re-use the FilterBag.
Checking the FilterBag change indicator
Attach the adjustable floorhead or the floorbrush to the vacuum cleaner (included as standard depending on model).
Switch the vacuum cleaner on and select the highest power setting.
Lift the adjustable floorhead/floorbrush off the floor a little.
How the FilterBag change indicator works
The FilterBag change indicator is designed for normal household dust. This generally contains a mixture of dust, hair, threads, carpet fluff, grit, etc.
However, if the vacuum cleaner has been used to vacuum up fine dust, such as drilling dust, sand, plaster dust, or flour, the pores of the FilterBag will become blocked very quickly. The indicator will indicate that the bag is “full” even when it is not. The FilterBag must be replaced if this is the case.
If, on the other hand, you vacuum up a significant amount of hair, carpet lint, etc., the FilterBag will be full to bursting before the indicator reacts.
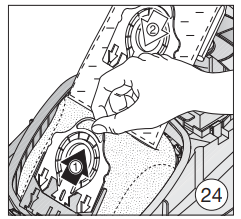
Replacing the FilterBag (Fig. 24)
Press both release buttons at the side of the hose connector, and lift the hose from the socket (Fig. 01).
Pull the release button for the dust compartment lid upwards and open the lid as far as it will go.
The FilterBag has a flap which closes automatically when the dust compartment lid is raised to prevent any dust escaping.
Pull the FilterBag out by the grip on the collar.
Insert the new FilterBag into the holder as far as it will go. Leave the FilterBag folded up when you take it out of the box.
Close the dust compartment lid securely, making sure it clicks into position. Take care not to trap the FilterBag when doing so.
An empty operation lock prevents the dust compartment lid from closing without a FilterBag in place. Do not force it.
Insert the hose connector into the suction socket on the vacuum cleaner until it clicks into position.
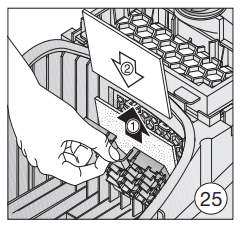
Replacing the motor protection filter (Fig. 25)
Replace the motor protection filter whenever you start a new packet of FilterBags.
Every packet of original Miele FilterBags contains a motor protection filter. Multipacks contain 4 motor protection filters.
Open the dust compartment lid.
Pull the FilterBag out by the grip on the collar.
Unclip the filter frame and replace the motor protection filter.
Close the filter frame.
Insert the FilterBag into the holder as far as it will go.
Close the dust compartment lid.
Replacing the AirClean Exhaust Filter (Fig. 26)
Do not use more than one exhaust filter at a time.
Replace this exhaust filter every time you start a new packet of Miele FilterBags. Every packet of original Miele FilterBags contains one AirClean Exhaust Filter. Multipacks contain 4 AirClean Exhaust Filters.
Open the dust compartment lid.
Release the filter grille and raise it upwards. Grasp the used AirClean Exhaust Filter by the clean, unsoiled section (see arrow) and take it out.
Replace it with a new AirClean Exhaust Filter.
If you wish to install an Active AirClean 30 or HEPA AirClean 30 Exhaust Filter, see “Replacing one type of exhaust filter with another”.
Close the filter grille.
Close the dust compartment lid.
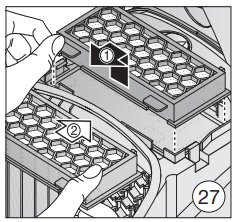
Replacing the Active AirClean 30/ HEPA AirClean 30 Exhaust Filter (Fig. 27)
Do not use more than one exhaust filter at a time.
Replace these exhaust filters if the TimeStrip® exhaust filter change indicator is completely red (Fig. 12). The display will be completely filled with red after approximately 50 operating hours; this corresponds to approximately one year of average use. You can continue vacuuming in this case. However, the suction power will be reduced as will the effectiveness of the filter.
Open the dust compartment lid.
Lift the exhaust filter and remove it.
Insert a new exhaust filter, making sure it goes in properly, then push it down into position.
Press the TimeStrip® exhaust filter change indicator.
After approx. 10–15 seconds a thin red line will appear in the left-hand side of the display.
If you wish to install an AirClean Exhaust Filter, see “Replacing one type of exhaust filter with another”.
Close the dust compartment lid.
Replacing one type of exhaust filter with another
Depending on the model, your vacuum cleaner will be equipped as standard with one of the following exhaust filters:
a AirClean
b Active AirClean 30 (black)
c HEPA AirClean 30 (white)
Do not use more than one exhaust filter at a time.
When changing the filter please note
If you wish to replace exhaust filter a with filter b or c, you must completely remove the filter grille before you install the new exhaust filter. You must also activate the TimeStrip® exhaust filter change indicator.
If you wish to replace exhaust filter b or c with exhaust filter a, it is essential that you also install the filter grille* (Fig. 26). * Filter grille – see “Optional accessories”
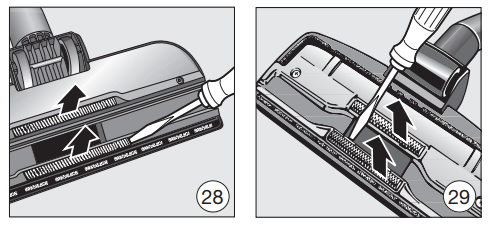
Replacing the thread catchers (Figs. 28 + 29) (only possible for models with an adjustable floorhead included as standard)
The thread catchers on the suction inlet to the floorhead can be replaced. Replace the thread catchers if the pile has worn down.
Lift the thread catchers from the slots. To do so use a suitable tool, e.g., a flat-head screwdriver.
Install new thread catchers.
Replacement parts are available from your Miele dealer or through Miele Service.
Cleaning and care
WARNING: Risk of electric shock from voltage. The supply voltage is applied to the appliance even if it is switched off. Before cleaning, unplug the appliance from the electrical socket.
Vacuum cleaner and accessories
WARNING: Risk of electric shock from voltage. If moisture gets into the vacuum cleaner, there is a risk of electric shock. Do not let the vacuum cleaner get wet.
The vacuum cleaner and all plastic accessories can be cleaned with a commercially available cleaner suitable for plastic.
WARNING: Damage due to unsuitable cleaning agents. All surfaces are susceptible to scratching. Contact with unsuitable cleaning agents can alter or discolor the external surfaces. Do not use abrasive cleaning agents, glass cleaning agents, all-purpose cleaners, or oil-based conditioning agents.
Dust compartment
The dust compartment can, if necessary, be cleaned using a dry duster, brush or, if available, a second vacuum cleaner to vacuum the dust out.
Frequently Asked Questions
With the help of the following guide minor faults in the performance of the machine, some of which may result from incorrect operation, can be remedied without contacting the Service Department. This guide may help you to find the reason for the fault, and how to correct it.
WARNING: Risk of electric shock from voltage. The supply voltage is applied to the appliance even if it is switched off. Before dealing with any problems, unplug the appliance from the electrical socket.
Problem
Possible cause and solution
The vacuum cleaner turns off automatically.
A temperature limiter switches the vacuum cleaner off automatically if it gets too hot. This can occur if, for instance, large objects block the suction wand or when the FilterBag is full or contains particles of fine dust. A heavily soiled motor protection filter or exhaust filter can also be the cause of overheating.
Switch the vacuum cleaner off immediately using the On/Off foot switch . Unplug from the electrical socket.
After removing the cause of the fault, wait for approximately 20–30 minutes to allow the vacuum cleaner to cool down. It can then be turned on again.
I bought this and love it, but the wonderful suction makes it a real workout on your carpets. I have mine on Maximum suction for carpeting, so perhaps it is less of a workout if you lessen the suction level. It is SO much better than my Dysons for pulling up everything in the carpet, but it is like trying to shove a 25 pound weight across the floor. The reason the C1 is cheaper is that the hose is not electrified. Therefore, even if you purchase the beater bar attachment, it will only spin due to the suction and is not motor driven.
#2 Is this particular unit made in Germany or China?
They used to be, but a shift in the past couple of years to Chinese made units started happening. Very sad. But i guess American shoppers want the most with the least expense, so there you go.
#3 What is the difference between this one and the complete c3 cat & dog canister vacuum? the complete c3 cost quite a bit more.
This is NOT a sealed system like the C3 is which means the filtration is even better with the C3, the C3 also has a 36' cleaning radius and the c1 only has a 29.5' cleaning radius. The C3 also has a one touch comfort cord rewind where you push the retract button once and the cord retracts all the way, the C1 you have to hold the retract pedal in until the cord is fully retracted. C1 was has a rotary speed control where you turn the nob to decrease or increase the suction where the C3 had the plus and minus button with the suction control screen. Have a wonderful day
This unit cannot use the powerhead. You would need a powerhead vacuum which has the powerhead, electric hose and electric wand. You can use the Turbo brush which is best for low to medium pile carpet.
 foot switch
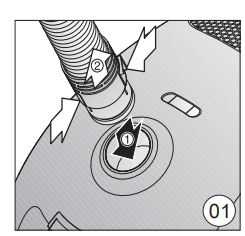
 .
. .
.


 .
.
 Curtains, fabrics
 Upholstery, cushions
 Deep-pile carpets, rugs, and runners
 Energy-saving normal vacuuming with low noise
 Low-pile carpet and rugs
 Hard flooring and heavily soiled carpets and rugs
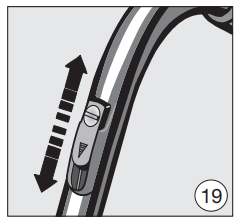


 . Unplug from the electrical socket.