Loading ...
Loading ...
Loading ...
3
EN
What is included in the box
Supply of this TV includes following parts:
• 1x TV • 1x TV stand installation packet
• 1x Remote control • 1x Quick Start Quide
• 2x AAA batteries • 1x Wall mount set (4x M6x35
screw and 4x plastic spacer)*
* - Available only for 50" models
Attaching the Stand
Please follow the instructions in Technical lea et, located in the
accessories bag.
Wall mounting the TV
1. Remove the four screws that are supplied in the wall mounting holes.
2. The wall mount can now be easily attached to the mounting holes on
the rear of the TV.
3. Install the wall mounting bracket to the television as advised by the
bracket manufacturer.
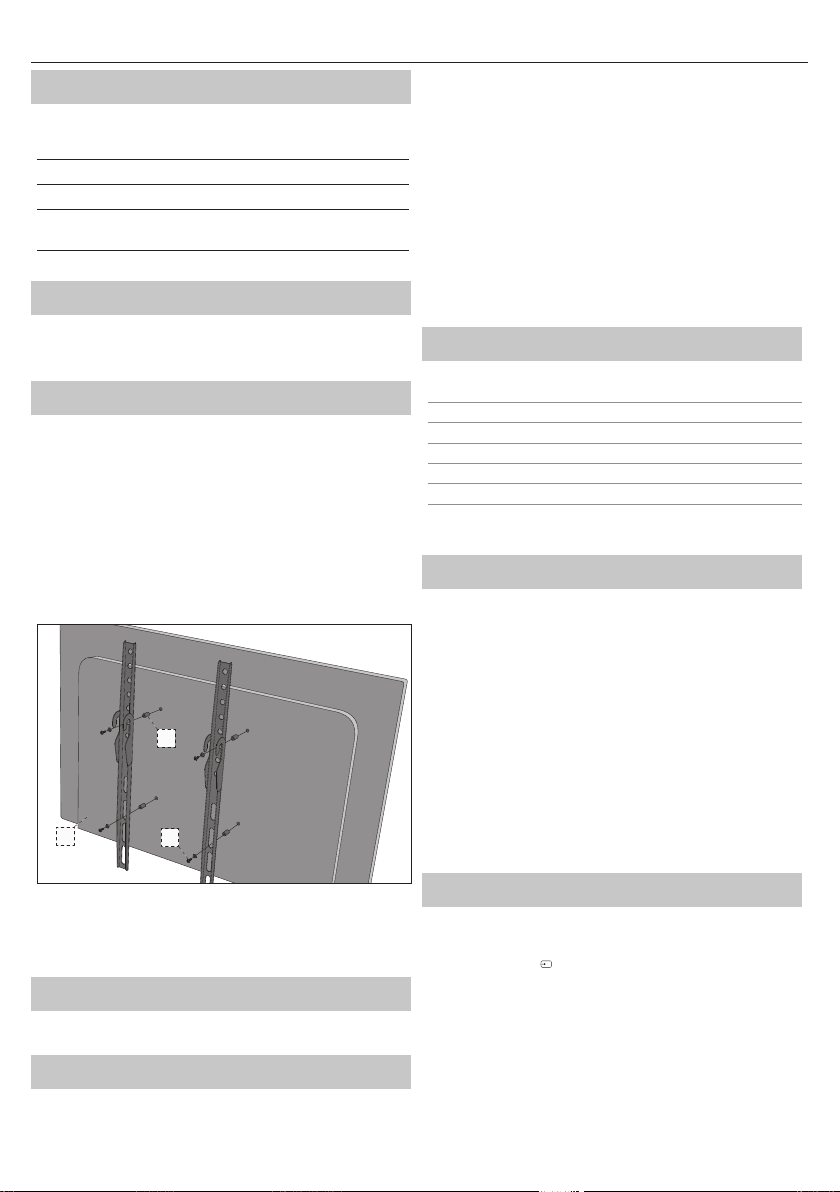
When attaching wall mount brackets on 50" model, instead of screws
provided in TV wall mounting holes, we recommend the use of longer
screws and spacers included in the accessory pack. Please put spacers
into TV wall mounting holes, located on the back of the TV, then put wall
brackets onto them. Attach brackets and spacers to TV using longer screws
as shown below:
1
3
2
1. TV
2. SPACER
3. SCREW
NOTE: TV and the wall bracket type shown in the
diagram is for illustration purposes only.
Connections
Connecting external devices see last page in this IM.
Getting started - initial set up
1. Using the RF cable, connect the TV to the TV Aerial wall socket.
2. For connecting to the Internet with a wired connection connect a
Cat 5/Ethernet cable (not included) from the TV to your broadband
modem/router.
3. Insert the batteries supplied into the Remote control.
4. Connect the power cable to the Electrical outlet.
5. Then press Standby button to power on TV.
6. After turning the TV on, you will be welcomed by the First Time
Installation menu.
If it does not appear, on the remote control, please press [MENU] then
8-8-8-8 and the menu will appear.
If you wish to make changes to any of the default settings, use the
scroll ▲/▼/◄/► buttons. To exit this menu at anytime, press [EXIT]
button.
7. Please set desired settings in FIRST TIME INSTALLATION screen.
TV buttons*
Vol+ Volume up and menu right
Vol- Volume down and menu left
CH+ Programme/Channel up and menu up
CH- Programme/Channel down and menu down
MENU Displays Menu/OSD
SOURCE Displays the input source menu
STANDBY Standby Power On/O
* - for TV with buttons
TV Control Stick*
TV control stick is located on the lower left corner of back side of the TV.
You can use it instead of remote control to control most of the functions
of your TV.
While TV is in standby mode:
• short press of control stick - Power On
While watching TV:
• RIGHT/LEFT – volume up/volume down
• UP/DOWN – changes channel up/down
• short press – Displays Menu
• long press – Standby Power O
While in menu:
• RIGHT/LEFT/UP/DOWN – navigation of cursor in on-screen menus
• short press – OK/Con rm selected item
• long press – Back to previous menu
* - for TV with control stick
Choosing Mode Input/Source
To switch between the di erent input/connections.
a) Using the buttons on the remote control:
1. Press [SOURCE/
] - The source menu will appear.
2. Press [◄] or [►] to select the input you require.
3. Press [OK].
b1) Using the buttons* on the Television:
1. Press [SOURCE].
2. Scroll up/down using VOL+ /VOL- buttons to the input/source you
require.
3. Press [SOURCE] to change input/source to the one selected.
b2) Using the TV control stick*:
1. Shortly press control stick to enter menu.
2. Press control stick down and navigate cursor to SOURCES menu.
Loading ...
Loading ...
Loading ...