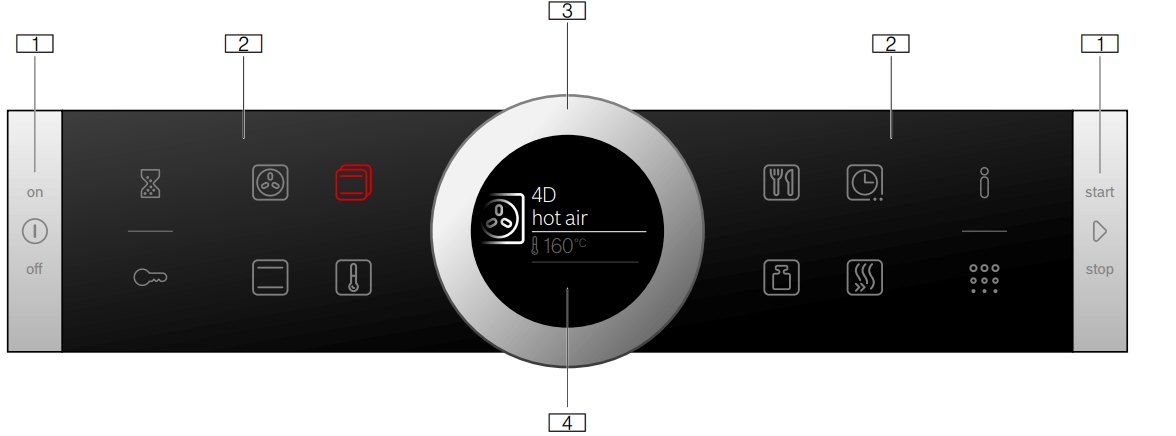
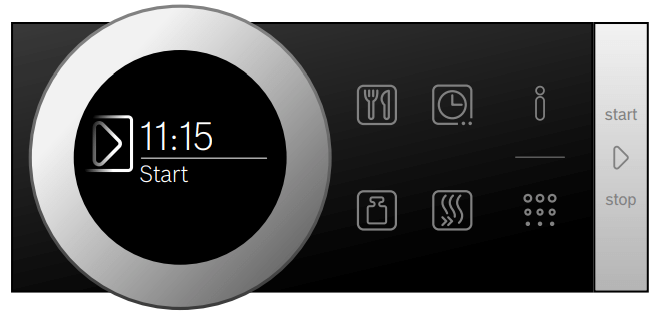
In the control panel, you can use the various buttons, touch fields and the rotary selector to set the different appliance functions. The current settings are shown on the display.
The overview shows the control panel when the appliance is switched on with a selected heating type.
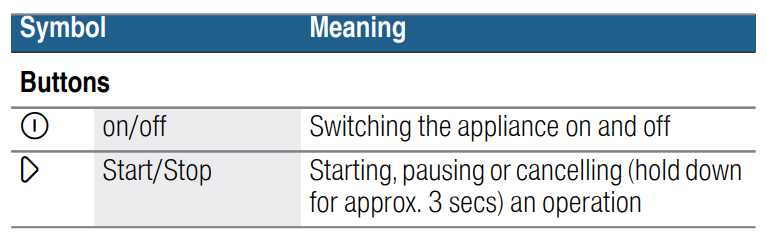
1.Buttons
The buttons on the left- and right-hand side of the control panel have a pressure point. Press these buttons to activate them.
For appliances that do not have a stainless steel front, these two button touch fields do not have a pressure point.
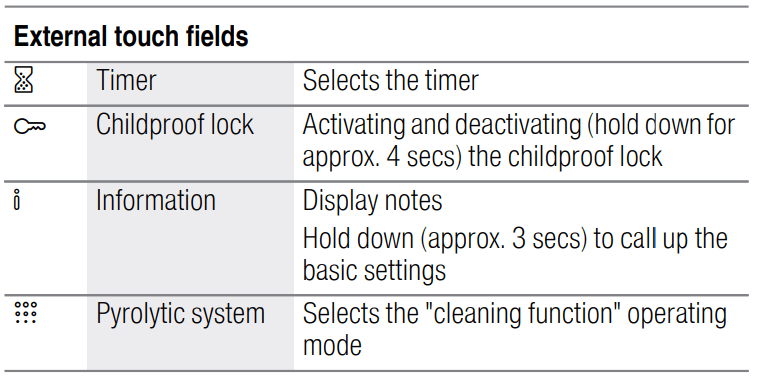
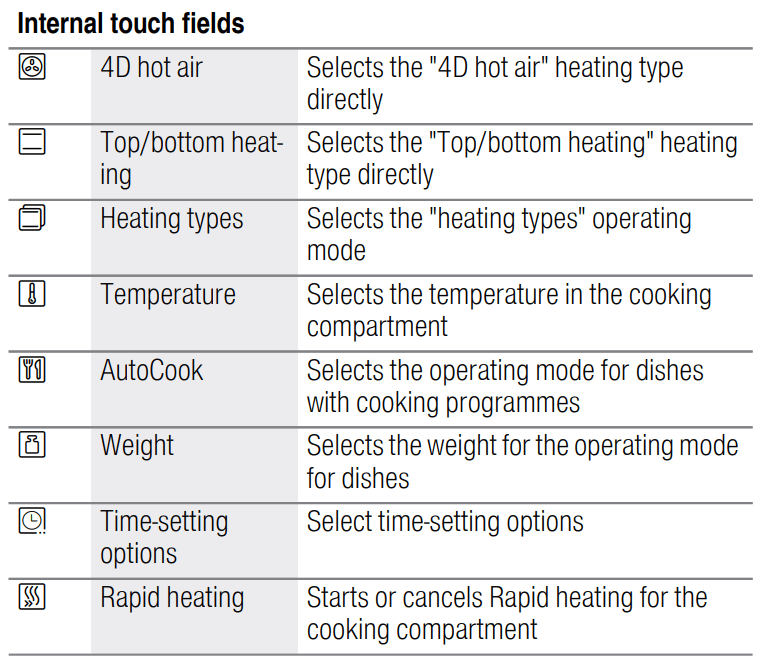
2. Touch fields
There are sensors under the touch fields. Simply touch the respective symbol to select the function.
3. Rotary selector
The rotary selector is fitted so that you can turn it indefinitely to the left or right. Press it lightly and move it in the direction required using your finger.
4. Display
You can see the current adjustment values, options or notes in the display
Controls
The individual controls are adapted for the various functions of your appliance. You can set your appliance simply and directly.
Buttons and touch fields
Here you can find a short explanation of the various buttons and touch fields.
The touch field, which has a value on the display that can be changed or displayed in the foreground, lights up red.
Rotary selector
You can use the rotary selector to change the adjustment values shown on the display.
In most selection lists, such as the temperature, you have to turn the rotary selector back the other way if you reach the minimum or maximum value. However, for the heating types for example, the first selection follows the last.
Display
The display is structured so that the information can be read at a glance in any situation.
The value that you can currently set is in focus. It is displayed in white lettering and underlined in white. The value in the background is displayed in grey
Focus
The value in focus can be changed directly without first being selected.
After starting an operation, either the temperature or the level is always in focus. At the same time, the white line is the heating line and gradually turns red.
Enlargement
As you change the value in focus using the rotary selector, only this value is displayed larger
Display ring
The display ring can be found around the outside of the display.
If you change a value, the display ring shows you where you are in the selection list. Depending on the settings area and length of the selection list, the display ring may be continuous or divided into segments.
During operation, the display ring turns red at secondlong intervals. After every full minute, the segments turn red again from the beginning. As the cooking time counts down, one segment disappears every second.
Temperature display
After the operation has started, the current cooking compartment temperature is displayed graphically on the display.
Heating line
The white line under the temperature turns red from left to right as the cooking compartment heats up. When you are preheating the appliance, the optimal time to place the food in the cooking compartment is when the line has completely turned red.
For set levels, e.g. the grill setting, the heating line turns red immediately
Residual heat indicator
When the appliance is switched off, the display ring shows the residual heat in the cooking compartment. As the residual heat cools down, the display ring becomes darker and disappears completely at some point.
Operating modes
Your appliance has various operating modes which make your appliance easier to use.
You can find more precise descriptions of these in the corresponding sections.
Operating mode
Use
Heating types ~ "Operating the appliance" on page 13
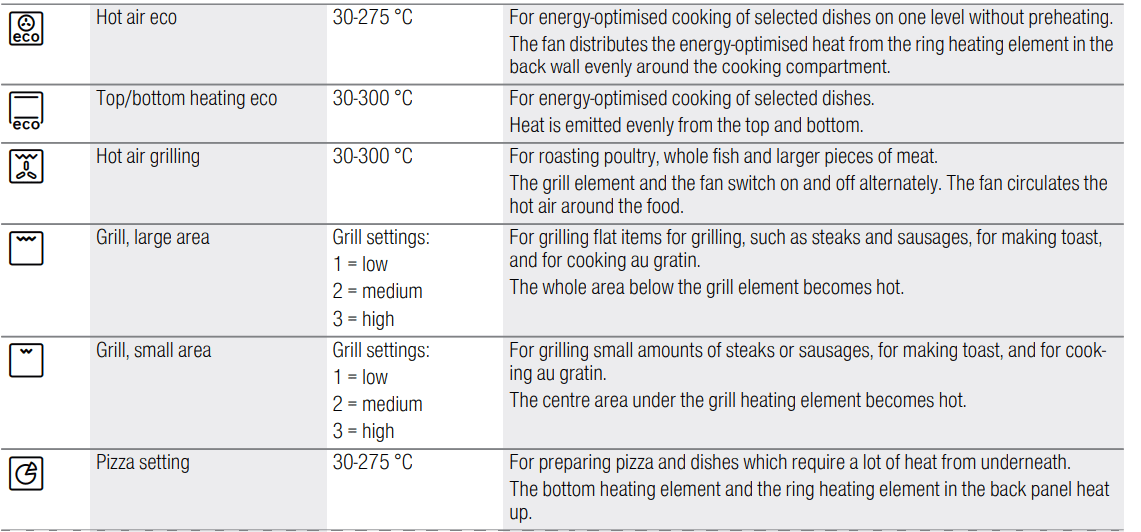
There are various finely tuned heating types for the optimal preparation of your food.
AutoCook ~ "Dishes" on page 27
There are preprogrammed setting values which are suitable for many dishes.
Pyrolytic system ~ "Cleaning function" on page 20
The cleaning function cleans the cooking compartment almost by itself.
Types of heating
To enable you to find the correct type of heating for your dish, we have explained the differences and scopes of application here.
The symbols for each type of heating help you to remember them.
When cooking at very high temperatures, the appliance lowers the temperature slightly after an extended period.
Operating the appliance
Switching the appliance on and off
Before you are able to set the appliance, you must switch it on.
Note: The childproof lock and the timer can also be set when the appliance is switched off. Certain displays and notes, such as those relating to the residual heat in the cooking compartment, remain visible on the display after the appliance has been switched off.
Switch off your appliance when you do not need to use it. If no settings are applied for a long time, the appliance switches itself off automatically
Switching on the appliance
Press the On/Off button to switch on the appliance.
All touch fields light up red. The Bosch logo appears on the display, and then the first heating type in the selection list.
Switching off the appliance
Press the On/Off button to switch off the appliance.
Any functions that may be running are cancelled.
The time, or if applicable, the residual heat indicator, appears on the display.
Starting the operation
You must press the Start/Stop button to start each operation.
After starting the appliance, the time display is shown on the display along with the settings. The display ring and the heating line also appear.
Pausing the operation
You can also interrupt and then continue an operation using the Start/Stop button.
If you press and hold the Start/Stop button for approx. 3 seconds, the operation is cancelled and all settings are reset.
Selecting an operating mode
Once the appliance is switched on, the default operating mode is displayed. You can start this setting immediately using the Start/Stop button.
If you want to select a different operating mode, you can find detailed descriptions of these modes in the relevant chapters.
The following always applies:
Touch the appropriate field. The symbol lights up red.
Turn the rotary selector to change the highlighted selection.
If necessary, apply other settings. To do this, touch the appropriate field and change the value using the rotary selector.
Press the Start/Stop button to start.
The appliance starts the operation.
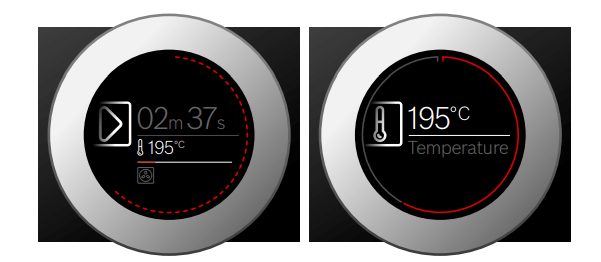
Setting the type of heating and temperature
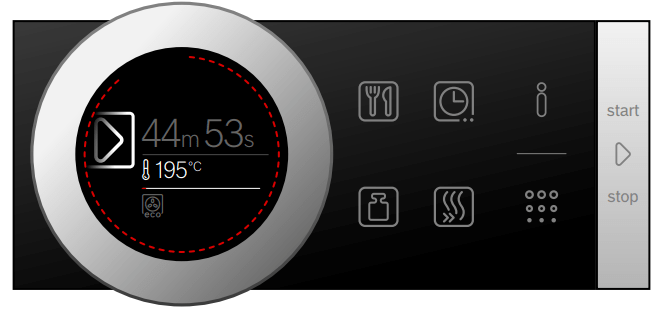
If the "Types of heating" operating mode has not been selected, touch the field. The symbol lights up red and the first type of heating with the default temperature appears on the display.
Example in the picture: Hot air eco at 195 °C.
1. Set the type of heating using the rotary selector.
2. Touch the field. The temperature is highlighted white in the display.
3. Set the temperature using the rotary selector.
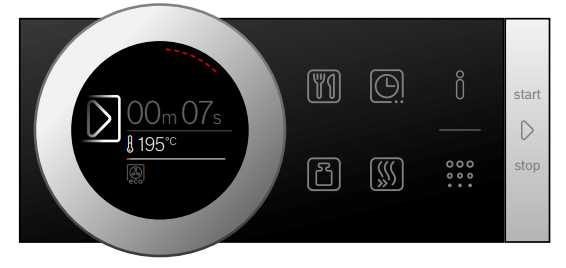
4. Press the Start/Stop button to start. The time on the display shows how long the operation has already been running.
The appliance begins to heat up.
When your dish is ready, switch off the appliance using the On/Off button.
Changing
After starting the appliance, the temperature is highlighted. When you move the rotary selector, the temperature is changed and applied immediately.
To change the type of heating, first press the Start/ Stop button to interrupt the operation and then touch the field. The first type of heating appears with the corresponding default temperature. Use the rotary selector to change the type of heating.
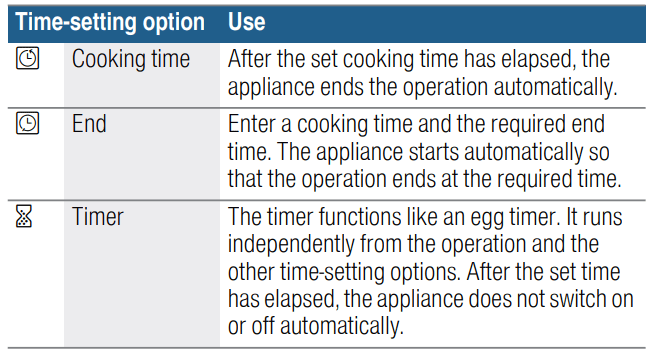
Time-setting options
Your appliance has different time-setting options.
You can call up the cooking time and the end time after setting a operation using the field. The timer has a separate field and can be adjusted at any time.
A signal sounds after a cooking time or timed period has elapsed. You can cancel the signal early by touching the field.
Setting the cooking time
You can set the cooking time for your dish on the appliance. This means that the cooking time is not unintentionally exceeded and you do not need to interrupt other work in order to end the operation.
Applying settings
Depending on which direction you turn the rotary selector first, the cooking time starts at a particular default value: Left = 10 minutes, right = 30 minutes.
The cooking time can be set in one-minute increments up to one hour, and then in five-minute increments.
The maximum setting is 23 hours and 59 minutes.
Example in the picture: Cooking time of 45 minutes.
1. Set the operating mode, and temperature or level.
2. Touch the field before starting. The cooking time is highlighted white in the display.
3. Turn the rotary selector to set the cooking time.
The value is applied after a few seconds, or touch the field twice. The cooking time is shown on the display under the operating mode and temperature or level.
4. Press the Start/Stop button to start. The cooking time counts down on the display.
The appliance begins to heat up.
Once the cooking time has elapsed, an audible signal sounds. The appliance stops heating. The cooking time 00 m 00 s is shown on the display.
You can set another cooking time using the field, or continue the operation without a cooking time using the Start/Stop button. When your dish is ready, switch the appliance off using the On/Off button.
Changing and cancelling
To change the cooking time, touch the s field. The cooking time is highlighted white and can be changed using the rotary selector. Use the field to accept the change.
If you want to cancel the cooking time, reset the cooking time to zero. After the change has been applied, you can continue the operation without a cooking time using the Start/Stop button.
Setting the end time
You can delay the time that the cooking time ends. You can, for example, put your dish in the cooking compartment in the morning and set the cooking time so that it is ready at lunch time.
Notes
■ Ensure that food is not left in the cooking compartment for too long as it may spoil.
■ Do not adjust the end time once the operation has started. The cooking result would no longer be satisfactory
Applying settings
The end of the cooking time can be delayed by a maximum of 23 hours and 59 minutes.
Example in the picture: The set cooking time is 45 minutes and the dish should be ready at 12:00.
1. Set the operating mode, and temperature or level.
2. Set the cooking time.
3. Before starting, touch the field again once. The end time is highlighted white in the display.
4. Set a later end time using the rotary selector.
The value is applied after a few seconds, or touch the field again. The end time is shown in the display under the operating mode and temperature or level.
5. Press the Start/Stop button to start. The time at which the appliance will start is shown in the display.
The appliance is in standby mode. When the appliance starts, the cooking time counts down on the display.
Once the cooking time has elapsed, an audible signal sounds. The appliance stops heating. The cooking time 00 m 00 s is shown on the display.
You can set another cooking time using the field, or continue the operation without a cooking time using the Start/Stop button.
When your dish is ready, switch the appliance off using the On/Off button.
Changing and cancelling
To change the end time, interrupt the operation using the Start/Stop button and then touch the field twice. The end time is highlighted white and can be changed using the rotary selector. Continue the operation using the Start/Stop button.
If you want to cancel the end time, reset the end time to zero. You can start the set cooking time immediately using the Start/Stop button.
Note: The end time can only be changed if the cooking time has not elapsed. Otherwise the cooking result would no longer be satisfactory
Setting the timer
The timer runs alongside other settings. You can set it at any time, even if the appliance is switched off. It has its own audible signal so that you can tell whether it is the timer or a cooking time which has elapsed.
Adjusting settings
The timer duration always starts at zero minutes.
The higher the value, the greater the time steps when setting the timer.
The maximum setting is 24 hours
1. Touch the field. The symbol lights up red. On the display, the timer duration is shown in white and in focus.
2. Set the timer duration using the rotary selector.
3. Press the field to start.
Note: After a few seconds, the timer also starts automatically.
The timer duration counts down.
The timer remains visible on the display if the appliance is switched off. When an operation is running, the settings for this operation are shown in the foreground. When you touch the field, the timer duration is displayed for a few seconds.
When the timer duration comes to an end, an audible signal sounds and a note appears on the display. The symbol is no longer lit up.
Tip: If the set timer duration relates to the appliance operation, use the cooking time. The time is visible in the foreground and the appliance switches off automatically
Changing and cancelling
To change the timer duration, touch the field. The timer duration is displayed in white and in focus, and can be changed by using the rotary selector.
If you want to cancel the timer, reset the timer duration to zero. Once the change has been applied, the symbol is no longer lit up.
Childproof lock
Your appliance is equipped with a childproof lock so that children cannot switch it on accidentally or change any settings.
The control panel is locked and no settings can be made. The appliance can only be switched off using the On/Off button.
Activating and deactivating
You can activate and deactivate the childproof lock when the appliance is switched on or off.
In each case, press the field for approx. 4 seconds. A confirmation note appears on the display
The field lights up red when the appliance is switched on. The field does not light up when the appliance is switched off.
Sabbath mode
With the Sabbath mode, a cooking time of up to 74 hours can be set. You can keep the food in the cooking compartment warm without having to switch the oven on or off.
Starting Sabbath mode
Before you are able to use the Sabbath mode, you must activate it in the basic settings. ~ "Basic settings" on page 17
When the basic setting has been changed accordingly, Sabbath mode is listed with the types of heating as the last type of heating.
The appliance heats up with top/bottom heating. You can set a temperature between 85 °C and 140 °C.
1. Set the Sabbath mode type of heating using the rotary selector.
2. Touch the field. The temperature is highlighted white in the display.
3. Set the required temperature using the rotary selector.
4. Touch the field before starting. The cooking time is highlighted white in the display.
5. Set the required cooking time using the rotary selector. Note: The end time cannot be delayed.
6. Press the Start/Stop button to start. The cooking time counts down on the display
The appliance begins to heat up.
When the cooking time for Sabbath mode has ended, an audible signal sounds. The appliance stops heating. The cooking time 00 m 00 s is shown on the display.
Press the On/Off button to switch off the appliance.
Note: The operation is not interrupted if you open the appliance door.
Changing and cancelling
After starting the appliance, the settings can no longer be changed.
If you would like to cancel Sabbath mode, switch the appliance off using the On/Off button. You can no longer pause the operation using the Start/Stop button.
Cleaning agent
With good care and cleaning, your appliance will retain its appearance and remain fully functioning for a long time to come. We will explain here how you should correctly care for and clean your appliance.
Suitable cleaning agents
To ensure that the different surfaces are not damaged by using the wrong cleaning agent, observe the information in the table. Depending on the appliance model, not all of the areas listed may be on/in your appliance.
Caution! Risk of surface damage Do not use:
■ Harsh or abrasive cleaning agents,
■ Cleaning agents with a high alcohol content,
■ Hard scouring pads or cleaning sponges,
■ High-pressure cleaners or steam cleaners,
■ Special cleaners for cleaning the appliance while it is hot.
Wash new sponge cloths thoroughly before use.
Tip: Highly recommended cleaning and care products can be purchased through the after-sales service. Observe the respective manufacturer's instructions.
Area
Cleaning
Appliance exterior
Stainless steel front
Hot soapy water:
Clean with a dish cloth and then dry with a soft cloth.
Remove flecks of limescale, grease, starch and albumin (e.g. egg white) immediately. Corrosion can form under such flecks.
Special stainless steel cleaning products suitable for hot surfaces are available from our after-sales service or from specialist retailers. Apply a very thin layer of the cleaning product with a soft cloth.
Plastic
Hot soapy water:
Clean with a dish cloth and then dry with a soft cloth.
Do not use glass cleaner or a glass scraper.
Painted surfaces
Hot soapy water:
Clean with a dish cloth and then dry with a soft cloth.
Control panel
Hot soapy water:
Clean with a dish cloth and then dry with a soft cloth.
Do not use glass cleaner or a glass scraper.
Door panels
Hot soapy water:
Clean with a dish cloth and then dry with a soft cloth.
Do not use a glass scraper or a stainless steel scouring pad.
Door handle
Hot soapy water:
Clean with a dish cloth and then dry with a soft cloth.
If descaler comes into contact with the door handle, wipe it off immediately. Otherwise, any stains will not be able to be removed.
Appliance exterior
Enamel surfaces
Hot soapy water or a vinegar solution:
Clean with a dish cloth and then dry with a soft cloth.
Soften baked-on food residues with a damp cloth and soapy water. If there are heavy deposits of dirt, use a stainless steel scouring pad or oven cleaner.
Leave the cooking compartment open to dry after cleaning.
It is best to use the cleaning function. ~ "Cleaning function" on page 20
Glass cover for the interior lighting
Hot soapy water:
Clean with a dish cloth and then dry with a soft cloth.
If the cooking compartment is heavily soiled, use oven cleaner.
Stainless steel door cove
Stainless steel cleaner:
Observe the manufacturer's instructions.
Do not use stainless steel care products.
Remove the door cover for cleaning.
Rails
Hot soapy water:
Soak and clean with a dish cloth or brush.
Pull-out system
Hot soapy water:
Clean with a dish cloth or a brush.
Do not remove the lubricant while the pull-out rails are pulled out – it is best to clean them when they are pushed in. Do not clean in the dishwasher.
Accessories
Hot soapy water:
Soak and clean with a dish cloth or brush.
If there are heavy deposits of dirt, use a stainless steel scouring pad.
Keeping the appliance clean
Always keep the appliance clean and remove dirt immediately so that stubborn deposits of dirt do not build up.
Tips
■ Clean the cooking compartment after each use. This will ensure that dirt cannot be baked on.
■ Always remove flecks of limescale, grease, starch and albumin (e.g. egg white) immediately.
■ Use the universal pan for baking very moist cakes.
■ Use suitable ovenware for roasting, e.g. a roasting dish.
Cleaning function
i t cnu f gn i nae lCThe cooking compartment can be cleaned effortlessly with the “Pyrolytic system” cleaning function. The cooking compartment is heated to an extremely high temperature. This burns off residues from roasting, grilling and baking.
You can choose from three cleaning settings.
The dirtier the cooking compartment and the longer the dirt has been there, the higher the cleaning setting should be. It is sufficient to clean the cooking compartment every two to three months. If required, you can clean the oven more frequently. A cleaning cycle requires only approx. 2.5 – 4.7 kilowatt hours.
Prior to initiating the cleaning function
While cleaning is in progress, you can clean an accessory at the same time, e.g. the universal pan or the baking tray. Before cleaning is started, remove the worst dirt. Slide the accessory in at level 2. Clean the inside of the appliance door and along the surface edges of the cooking compartment in the area around the seal. Do not scrub the seal.
Note: When using the cleaning function, you can clean the enamel accessory provided at the same time. You cannot clean any of the wire racks when using the cleaning function. The wire racks are not suitable for cleaning using the cleaning function; this will discolour them. Further accessories suitable for cleaning using the cleaning function are listed in the table for special accessories. ~ "Accessories" on page 10
Setting the cleaning function
Before setting the cleaning function, ensure that you have followed all instructions for preparation.
The duration of each cleaning setting is preset and cannot be changed.
Touch the field. The cleaning setting is highlighted in white in the display
Turn the rotary selector to set the cleaning setting.
Confirm using the Start/Stop button. A note appears relating to the preparations required for the cleaning function.
Press the Start/Stop button to start. The duration counts down in the display. The heating line does not appear for the cleaning function.
The cleaning function starts.
Ventilate the kitchen when the cleaning function is running.
The appliance door locks shortly after the function starts running. A message and the symbol appear on the display.
When the cleaning function has ended, an audible signal sounds. The duration 00 m 00 s is shown in the display. Press the On/Off button to switch off the appliance.
The appliance door cannot be reopened until the symbol for the locking mechanism goes out.
Setting a later end time
You can set a later end time. Before starting the appliance, touch the field and set a later end time using the rotary selector. The appliance switches to standby after it is started.
The end time can no longer be changed.
Changing and cancelling
After starting the appliance, the cleaning setting can no longer be changed.
If you would like to cancel the cleaning function, switch the appliance off using the On/Off button. You can no longer pause the operation using the Start/Stop button.
The appliance door remains locked until the symbol for the locking mechanism on the display goes out.
Once the cleaning function has ended
Once the cooking compartment has cooled down, wipe off the ash that has been left behind in the cooking compartment and around the appliance door with a damp cloth.
Trouble shooting
If a fault occurs, there is often a simple explanation. Before calling the after-sales service, please refer to the fault table and attempt to correct the fault yourself.
Rectifying faults yourself
You can often easily rectify technical faults on the appliance yourself.
If a dish does not turn out exactly as you wanted, you can find many tips and instructions for preparation at the end of the operating manual. ~ "Tested for you in our cooking studio" on page 28
Fault
Possible cause
Notes/remedy
The appliance does not work.
Faulty fuse.
Check the circuit breaker in the fuse box.
Power cut
Check whether the kitchen light or other kitchen appliances are working.
"Sprache Deutsch" appears on the display.
Power cut
Reset the language and the time.
The time does not appear when the appliance is switched off.
Basic setting is changed.
Change the basic setting for the clock display.
The appliance door cannot be opened.
The appliance door is locked with the childproof lock.
Deactivate the childproof lock by pressing the field for approx. 4 seconds. The lock can be switched off in the basic settings.
The appliance door cannot be opened; the symbol lights up on the display.
The appliance door is locked due to the cleaning function.
Wait until the cooking compartment has cooled and the symbol goes out.
The appliance does not heat up; the symbol lights up on the display.
Demo mode is activated in the basic settings.
Briefly disconnect the appliance from the mains (switch off the circuit breaker in the fuse box) and then deactivate demo mode in the basic settings within 3 minutes.
The rotary selector has fallen out of the support in the control panel.
The rotary selector has been accidentally disengaged.
The rotary selector can be removed. Simply place the rotary selector back in its support in the control panel and push it in so that it engages and can be turned as usual.
The rotary selector can no longer be turned easily
There is dirt under the rotary selector.
The rotary selector can be removed. To disengage the rotary selector, simply remove it from the support. Alternatively, press on the outer edge of the rotary selector so that it tips and can be picked up easily.
Carefully clean the rotary selector and its support on the appliance using a cloth and soapy water. Dry with a soft cloth. Do not use any sharp or abrasive materials. Do not soak or clean in the dishwasher.
Do not remove the rotary selector too often so that the support remains stable.
Error messages on the display
When an error message appears on the display with "D" or "E", e.g. D0111 or E0111, switch the appliance off and on again using the On/Off button. If it was a one-off error, the display goes out.
If the error message appears again, call the after-sales service and quote the exact error message.
Maximum operating time
If you do not change the settings on your appliance for several hours, the appliance stops heating up automatically. This prevents unwanted continuous operation.
The respective settings for the operating mode govern when the maximum operating time is reached.
Maximum operating time reached
A note appears on the display confirming that the maximum operating time has been reached.
To continue operation, touch any field or turn the rotary selector.
Switch the appliance off using the On/Off button if you do not need to use it.
Tip: Set a cooking time so that the appliance does not switch off when you do not want it to, e.g. with an extremely long preparation time. The appliance heats up until the set cooking time has elapsed.
Replacing the bulb in the top of the cooking compartment
If the cooking compartment light bulb fails, it must be replaced. Heat-resistant, 40 watt, 230 V halogen bulbs are available from the after-sales service or specialist retailers.
When handling the halogen bulb, use a dry cloth. This will increase the service life of the bulb. Only use these bulbs.
Warning – Risk of electric shock! When replacing the cooking compartment bulb, the bulb socket contacts are live. Before replacing the bulb, unplug the appliance from the mains or switch off the circuit breaker in the fuse box
Warning – Risk of burns! The appliance becomes very hot. Never touch the interior surfaces of the cooking compartment or the heating elements. Always allow the appliance to cool down. Keep children at a safe distance.
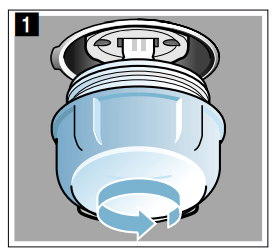
1. Place a tea towel in the cold cooking compartment to prevent damage.
2. Turn the glass cover anti-clockwise to remove it (figure 1).
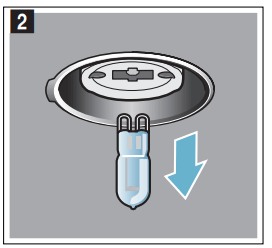
3. Pull out the bulb – do not turn it (figure 2). Insert the new bulb, making sure that the pins are in the correct position. Push the bulb in firmly
4. Screw the glass cover back in.
5. Remove the tea towel and switch on the circuit breaker.
Glass cover
If the glass cover of the halogen bulb is damaged, it must be replaced. You can obtain a new glass cover from the after-sales service. Please specify the E number and FD number of your appliance.


 On/Off button to switch on the appliance.
 Start/Stop button to start each operation.
 field. The symbol lights up red and the first type of heating with the default temperature appears on the display.
 at 195 °C.
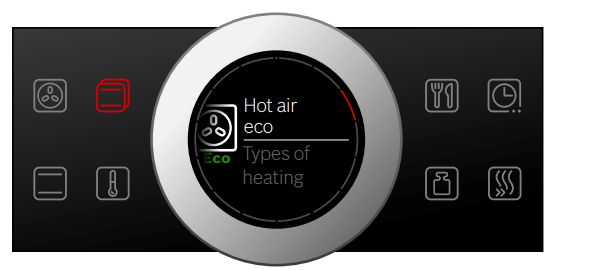
 field. The temperature is highlighted white in the display.
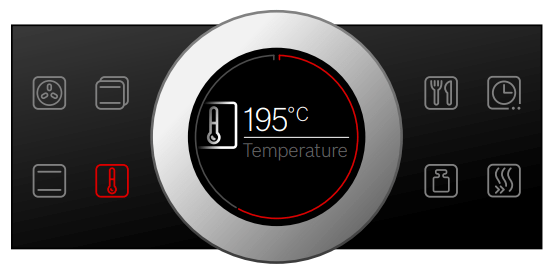
 field. The timer has a separate
 field and can be adjusted at any time.
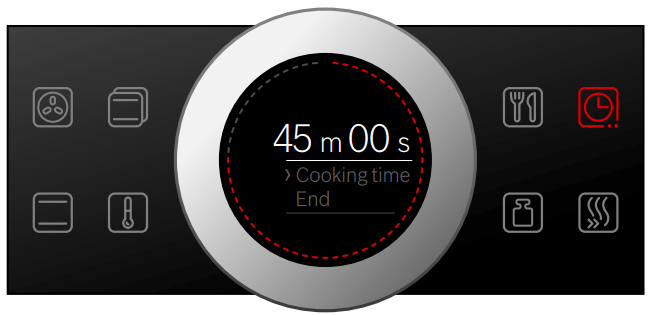
 On/Off button.
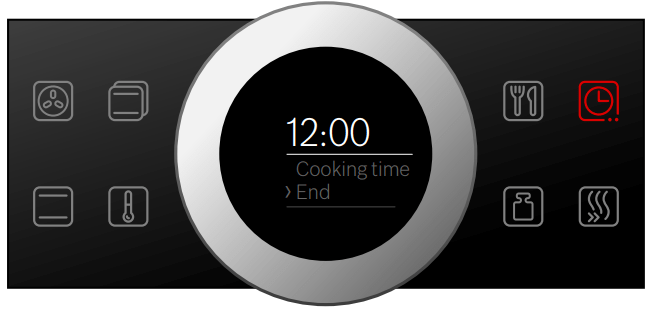
 field. The symbol lights up red. On the display, the timer duration is shown in white and in focus.
  field for approx. 4 seconds. A confirmation note appears on the display
 Sabbath mode type of heating using the rotary selector.
  field. The temperature is highlighted white in the display.
  field before starting. The cooking time is highlighted white in the display.
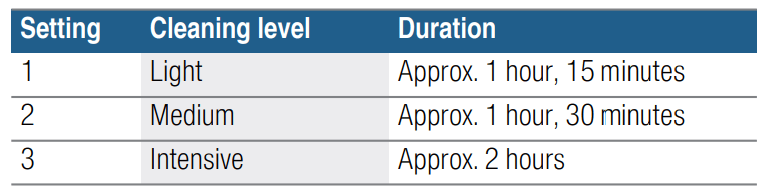
 field. The cleaning setting is highlighted in white in the display
 symbol appear on the display.
 field and set a later end time using the rotary selector. The appliance switches to standby after it is started.
 field for approx. 4 seconds. The lock can be switched off in the basic settings.
 symbol lights up on the display.
 symbol lights up on the display.
 On/Off button. If it was a one-off error, the display goes out.