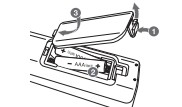
Remove the battery cover on the rear of the remote control, and insert the battery with and matched correctly
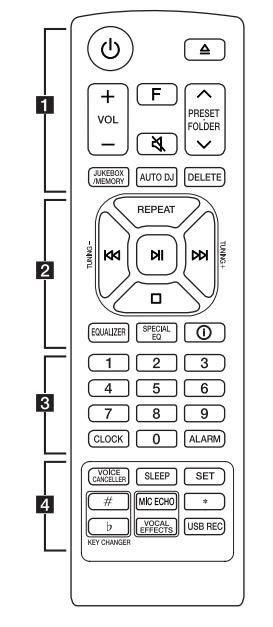
(Standby) : Turns the power on or off.
(Open/Close) : Opens and closes the disc tray.
VOL (Volume) +/- : Adjusts speaker volume.
F (Function) : Selects the function and input source.
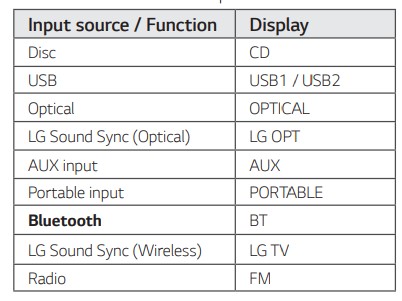
Input source / Function
Display
Disc
CD
USB
USB1 / USB2
Optical
OPTICAL
LG Sound Sync (Optical)
LG OPT
AUX input
AUX
Portable input
PORTABLE
Bluetooth
BT
LG Sound Sync (Wireless)
LG TV
Radio
FM
{Mute):
Mutes the sound.
Controls this unit using TV remote. (Page 35)
PRESET·FOLDER :
Chooses a preset number for a radio station. Page 29)
Searches for a folder of MP3/WMA files. When a CD/USB containing MP3/WMA files in several folders is being played, press PRESET·FOLDER to select the folder you want to play.
JUKEBOX/MEMORY :
Stores radio stations. (Page 29)
Selects JUKE BOX mode. (Page 33)
Makes JUKE BOX list.
AUTO DJ : Selects the AUTO DJ mode. (Page 22)
DELETE :
Deletes MP3/WMA files. (USB only). (Page 21)
Deletes a song on the JUKE BOX list.
Deletes all the saved stations.
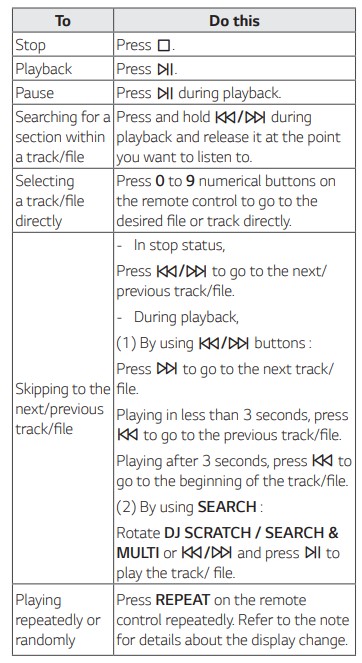
REPEAT : Listens to your tracks/files repeatedly or randomly.
TUNING-/+ : Selects the radio stations.
(Skip/Search) :
Skips backward or forward.
Searches for a section within a track/file.
(Play/Pause) :
Starts or pauses playback.
Selects stereo/mono.
(Stop) :
Stops playback.
Cancels DELETE function.
EQUALIZER : Chooses sound impressions.
SPECIAL EQ : Chooses special equalizer.
(Information) :
Sees information about your music. An MP3 file often come with ID3 tag. The tag gives the Title,
Artist, Album or Time information.
Sees optical source information in OPTICAL mode.
Sees Bluetooth device name of the unit in BT READY.
Sees the name of connected all Bluetooth device in Bluetooth mode.
When these units are successfully connected each other in WIRELESS PARTY LINK mode, each of connected device names appears in the each unit.
0 to 9 numerical buttons : Selects numbered tracks, files, or preset number.
CLOCK : Sets a clock and checks a time.
ALARM : With the ALARM function you can turn on CD, USB play and tuner reception at a desired time. d • • • • • • • • • • • • •
VOICE CANCELLER : You can reduce the vocal tones during music playback from various input sources.
SLEEP : Sets the system to turn off automatically at a specified time.
(Dimmer : The display window will be darkened by half.)
SET : Confirms the setting.
KEY CHANGER () : Changes the key to suit your vocal range.
MIC ECHO : Selects ECHO mode.
This button is not available.
VOCAL EFFECTS : Selects various vocal effects mode.
USB REC :
Records to USB.
To stop Recording, press and hold for 3 seconds.
Top panel
(Standby) Turns the power on or off.
USB REC / DEMO
Records to USB.
To stop Recording, press and hold for 3 seconds.
In power off status, if you press USB REC / DEMO, show demo mode.
USB 1 Port You can play sound files by connecting the USB device.
Display window
PARTY ACCELERATOR lever Slide the lever to create a party atmosphere.
USB 2 Port You can play sound files by connecting the USB device.
(Function) Selects the function and input source.
WIRELESS LINK
Selects MAIN or OTHER on WIRELESS PARTY LINK mode.
Enable or disable WIRELESS PARTY LINK mode.
MASTER VOL. (Volume) -/+ Adjusts speaker volume.
(Skip/Search) - Skips backward. - Searches for a section within a track/file. - Selects the radio stations. (Play/Pause) - Starts or pauses playback. - Selects stereo/mono. (Skip/Search) - Skips forward. - Searches for a section within a track/file. - Selects the radio stations. (Stop) - Stops playback or cancels DELETE function. (Open/Close) - Opens and closes the disc tray.
DJ SCRATCH / SEARCH & MULTI
Turns clockwise or counterclockwise to make scratch sound.
Searches a folder or a file
SPECIAL EQ / BASS BLAST (or BASS BLAST+)
Chooses special equalizer.
Press and hold to select BASS (or BASS+) effect directly.
SEARCH
Moves to folder or file in selection mode.
OK
Selects a folder when searching a file.
PARTY STARTER
In power off state, this function turns on the unit with Party Kick Starter sound.
In power on state, this function mixes the music with Party Kick Starter sound.
CLUB, DRUM, USER (DJ PAD) Selects CLUB, DRUM or USER sound effect to mix. 9If you want to use USER, you have to register a source with “Music Flow Bluetooth” app.)
1,2, 3 (DJ PAD) Press a desired sound pad.
DJ EFFECT - Selects a desired DJ effect. USER EQ - Selects the equalizer created by your own. (Page 30) LIGHTING - Selects the lighting mode.
DJ SCRATCH / LEVEL CONTROL
Turns clockwise or counterclockwise to make scratch sound.
Turns clockwise or counterclockwise to control the USER EQ level.
Adjust DJ EFFECT level.
Selects the vocal effects.
Selects the lighting effects.
PARTY ACCELERATOR MODE - Selects PARTY ACCELERATOR MODE. DJ LOOP - Selects DJ LOOP mode. - DJ LOOP mode can use during CD/USB playback.)
KEY CHANGER (l/L) Changes the key to suit your vocal range. VOICE CANCELLER You can reduce the vocal tones during music playback from various input sources. VOCAL EFFECTS Selects VOCAL EFFECTS mode. MIC ECHO Selects ECHO mode.
MIC VOL. (Microphone Volume)-/+ Adjust microphone volume.
Front panel / Rear panel
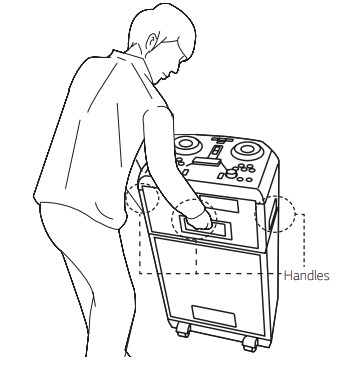
Carrying the unit
The unit has wheels and handles so you can easily move the unit.
Useful functions for using the unit
Connecting
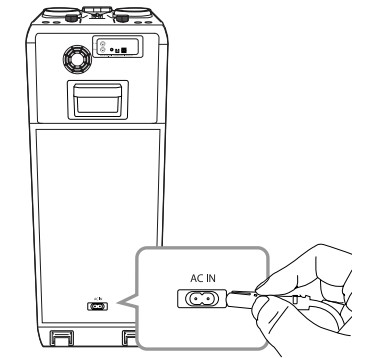
AC Power Cord Connection
Connect one end of the AC power cord (included) to the AC IN socket.
Plug the other end into the wall outlet
Optional Equipment Connection
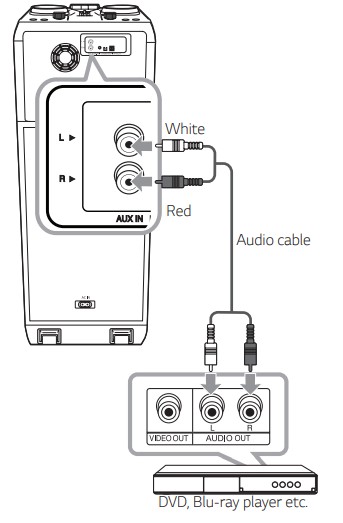
AUX IN Connection
Connect an output of auxiliary device (Camcorder, TV, Player, etc) to the AUX IN (L/R) connector. If your device has only one output for audio (mono), connect it to the left(white) audio jack on the unit.
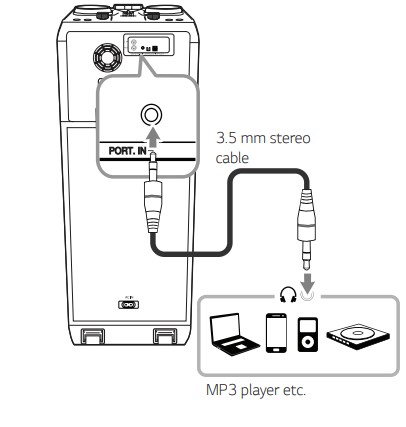
PORT. IN Connection
Connect an output (earphone or line out) of portable device (MP3 or PMP etc) to the PORT. IN (3.5 mm) connector
Listening to music from your portable player or external device
The unit can be used to play the music from many types of portable player or external device.
Connect the portable player to the PORT. IN connector of the unit. Or Connect the external device to the AUX IN connector of the unit.
Turn the power on by pressing .
Press F to select AUX or PORTABLE function.
Turn on the portable player or external device and start it playing.
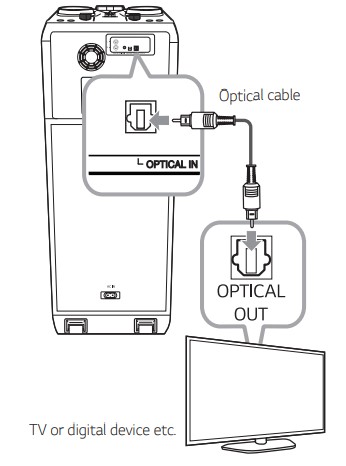
OPTICAL IN Connection
Connect an optical output jack of external devices to the OPTICAL IN jack
Press F until OPTICAL function is selected.
LG Sound Sync
You can control some functions of this unit by your TV’s remote control with LG Sound Sync. It is compatible with LG TV that supports LG Sound Sync.
Make sure your TV has the LG Sound Sync logo. Controllable function by LG TV’s remote control : Volume up/down, mute Refer to the TV’s instruction manual for the details of LG Sound Sync.
LG Sound Sync with wired connection
Connect your LG TV to the unit by using an optical cable.
Set up the sound output of TV to listen to the sound through this unit : TV setting menu [ [Sound] > [ [TV Sound output] > [ [LG Sound Sync (Optical)]
Turn on the unit by pressing
Press F until OPTICAL function is selected. You can see “LG OPT” on the display window if connecting normally between this unit and your TV.
LG Sound Sync with wireless connection
Turn on the unit by pressing .
Press F until LG TV function is selected.
Set up the sound output of TV to listen to the sound through this unit : TV setting menu [Sound] > [TV Sound output] >LG Sound Sync (Wireless)] PAIRED” appears on the display window for about 3 seconds and then you can see “LG TV” on the display window if the TV and this unit are connected normally
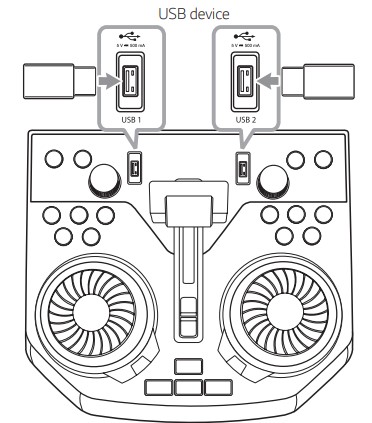
USB Connection
Connect a USB device (or MP3 player, etc.) to the USB ports on the unit.
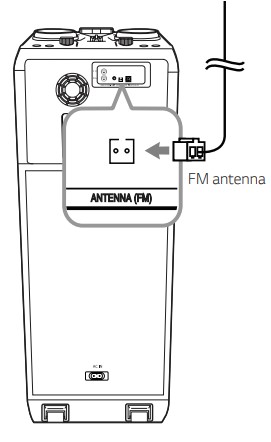
Antenna Connection
Connect the supplied FM antenna for listening to the radio.
Operating
Basic Operations
CD/USB Operations
Insert the disc by pressing . Or connect the USB device to the USB port.
Select CD or USB function by pressing F.
Auto Play
AUDIO/MP3/WMA CD is played automatically after disc tray is open and then closed.
Automatically switches to the CD function if disc tray is open and then closed even when there is no disc in disc tray
Selecting a folder and an MP3/WMA file
On the unit
Press SEARCH and rotate DJ SCRATCH / SEARCH & MULTI or until a desired file appears. You can also search a folder if you press SEARCH again.
Press OK or to play the selected file. When you search a folder, press OK to select a file in the folder, then press OK or again. The selected file is played.
On the remote control
Press PRESET·FOLDER or repeatedly until a desired folder appears.
Press N to play it. The first file of folder will be played.
Note:
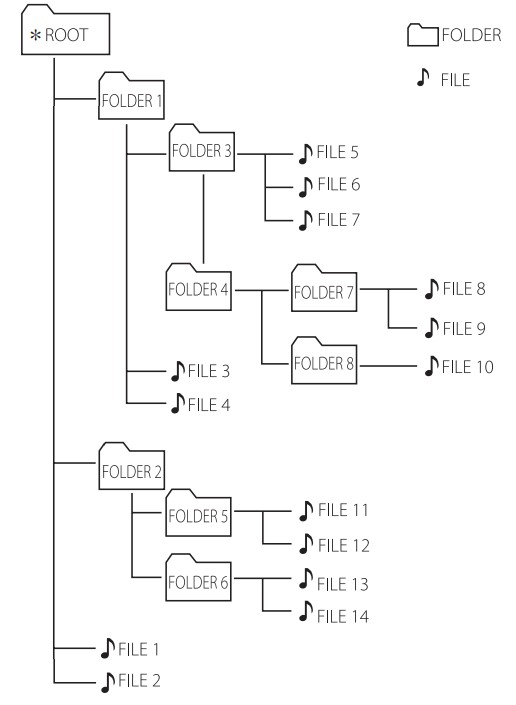
CD / USB Folders/Files are recognized as below.
If there is no file in a folder, the folder will not appear. y Folders will be presented as the following order; ROOT> FOLDER 1 >FOLDER 3 >FOLDER 7 >FOLDER 8> FOLDER 5>FOLDER 6
File will be played from file No.1 to file No.14 one by one.
Files and folders will be presented in order recorded and may be presented differently according to the record circumstances.
*ROOT : The first screen you can see when a computer recognize the CD/USB is “ROOT”.
Deleting a file/folder or format
You can delete file, folder on your USB or format the USB.
Select USB function by pressing F.
Press DELETE on the remote control repeatedly, the display changes as followings. DEL FILE > DEL DIR >FORMAT
On Display
Description
DEL FILE
Select the file you want to delete
DEL DIR
Select the folder you want to delete
FORMAT
Select to format the USB device.
If you want to exit the current mode, press .
To delete file/folder or format, press and hold DELETE on the remote control.
Playback Effect
The unit supports various sound and playback effects DJ EFFECT, DJ SCRATCH, DJ PAD, AUTO DJ, DJ LOOP,PARTY ACCELERATOR, PARTY KICK STARTER.
DJ EFFECT
It allows you to enjoy DJ EFFECT such as Flanger/
Phaser/Wah/Delay sound effect.
Press DJ EFFECT on the unit to select a desired DJ EFFECT (FLANGER, PHASER, WAH, DELAY,OFF).
Turn DJ SCRATCH / LEVEL CONTROL on the unit clockwise or counterclockwise to adjust the DJ EFFECT level between 0 to 15
DJ SCRATCH
You can output and mix the sound effects of the DJ SCRATCH.
Rotating DJ SCRATCH / SEARCH & MULTI or DJ SCRATCH / LEVEL CONTROL on the unit to mix the scratch sound.
You can hear effect of scratch sound depending on the direction in which you rotate DJ SCRATCH SEARCH & MULTI or DJ SCRATCH / LEVEL CONTROL on the unit.
AUTO DJ
Auto DJ blends the end of one song into the beginning of another for seamless playback. It equalizes volume across tracks/files for uninterrupted playback.
Press AUTO DJ on the remote control repeatedly, the display changes as followings.
SHUFFLE >SEQUENTIAL >OFF
On Display
Description
OFF
SHUFFLE
The music is played randomly on this mode.
SEQUENTIAL
The music is played repeatedly on this mode.
DJ PAD
It allows you to mix CLUB, DRUM or USER sound effect. Each mode has up to 3 sounds effect.
Press and hold DJ PAD (CLUB, DRUM or USER) on the unit to select a desired DJ PAD sound effect.
Press a DJ PAD Pad (1, 2, 3) of desired sound on the unit.
DJ LOOP
The certain section (about 1 sec) of sound is repeatedly played. (CD, USB Only)
During playback, press and hold DJ LOOP on the unit at the point you want. And you can cancel DJ LOOP function by releasing it.
PARTY ACCELERATOR
It allows you to create a party atmosphere.
Select the mode by pressing PARTY ACCELERATOR MODE on the unit. The sound effect will react differently according to the mode. MODE 1 >MODE 2 >MODE 3
After selecting the mode, slide up the lever of PARTY ACCELERATOR on the unit to create a party atmosphere. The lighting on the speakers, the LED lighting and the sound effect will react according to moving the lever of PARTY ACCELERATOR on the unit. OFF >ACCEL 1 >ACCEL 2 >CLIMAX
PARTY KICK STARTER
In power off state, thixs function turns on the unit with Party Kick Starter sound.
In power on state, this function mixes the music with Party Kick Starter sound.
In the power off state
Press PARTY STARTER on the unit
COME ON” appears on the display window with Party Kick Starter sound. Then volume level and function will appear before the power off.
In the power on state
Press PARTY STARTER on the unit
COME ON” appears on the display window with Party Kick Starter sound.
Using BLUETOOTH® wireless technology
About Bluetooth
Bluetooth is wireless communication technology for short range connection. The sound may be interrupted when the connection interfered by the other electronic wave or you connect the Bluetooth in the other rooms.
Connecting individual devices under Bluetooth wireless technology does not incur any charges. A mobile phone with Bluetooth wireless technology can be operated via the Cascade if the connection was made via Bluetooth wireless technology.
Available Devices : Smart phone, MP3, Notebook, etc.
Version : 4.0
Codec : SBC, AAC
Bluetooth Profiles
In order to use Bluetooth wireless technology, devices must be able to interpret certain profiles. This unit is compatible with following profile. A2DP (Advanced Audio Distribution Profile)
Listening to music stored on the Bluetooth devices
Pairing your unit and Bluetooth device Before you start the pairing procedure, make sure the Bluetooth feature is activated on your Bluetooth device. Refer to your Bluetooth device’s user guide. Once a pairing operation is performed, it does not need to be performed again.
Turn on the unit
Operate the Bluetooth device and perform the pairing operation. When searching for this unit with the Bluetooth device, a list of the devices found may appear in the Bluetooth device display depending on the type of Bluetooth device. Your unit appears as “LG OK99 (XX)”
When this unit is successfully connected with your Bluetooth device, “PAIRED” appears on the display window and change to Bluetooth device name soon. Then “BT” will appear on the display window
Listen to music. To play a music stored on your Bluetooth device, refer to your Bluetooth device’s user guide
Controls connected
Bluetooth device You can control connected Bluetooth device by the unit; play, pause, stop, skip
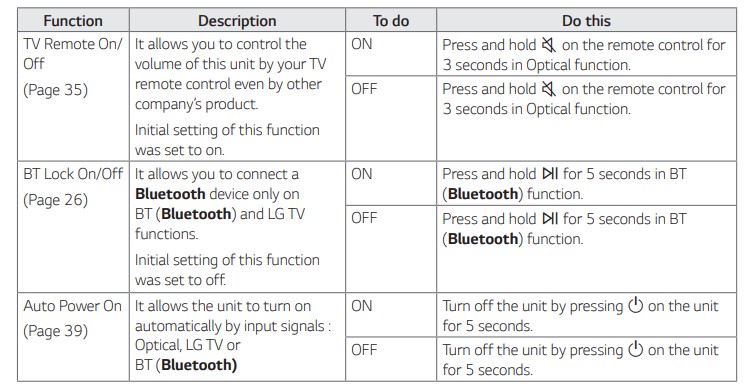
Bluetooth connection lock (BT LOCK)
You can limit Bluetooth connection to only BT (Bluetooth) and LG TV function to prevent unintended Bluetooth connection. To turn on this function, press and hold N for about 5 seconds in BT (Bluetooth) function. “ON-BT LOCK” appears then you can limit Bluetooth connection. To turn off this function, press and hold N for about 5 seconds in BT (Bluetooth) function. “OFF-BT LOCK” appears.
Using the Music Flow Bluetooth App
About “Music Flow Bluetooth” App “
Music Flow Bluetooth” app brings a suite of new features to this unit. To enjoy more features, you are recommended to download and install free “Music Flow Bluetooth” app. Here is introduce a few of the many features of “Music Flow Bluetooth” app. Multi Juke box : Your entertainment increases three fold when you connect up to 3 Bluetooth phones at the same time. Play music from all three phone and create a customized playlist from all the phones. Sampler Creator : Record effects on your smartphone and very simply sync them via Bluetooth to the system. Be as creative as you can be.
Install “Music Flow Bluetooth” App onto Your Bluetooth Device
There are two ways to install “Music Flow Bluetooth” App onto Your Bluetooth Device. Install “Music Flow Bluetooth” App through QR code
Install “Music Flow Bluetooth” app through QR code. Use the scanning software to scan the QR code.
Tap an icon for installation.
Install “Music Flow Bluetooth” App through “Google Android Market (Google Play Store)”
Tap the “Google Android Market (Google Play Store)” icon.
In the search bar, type in the “Music Flow Bluetooth” and search it.
In the search result list, find and tap “Music Flow Bluetooth” to start downloading Bluetooth app.
Tap an icon for installation.
Tap an icon for downloading
Activate Bluetooth with “Music Flow Bluetooth” App
“Music Flow Bluetooth” app helps to connect your Bluetooth device to this unit.
Tap “Music Flow Bluetooth” app icon on the home screen to open “Music Flow Bluetooth” app, and go to the main menu.
If you want to get more information to operate, tap [Setting] and tap [Help] menu.
Radio Operations
Be sure that FM antenna is connected. (Page 18)
Listening to the radio
Press F until FM appears in the display window. The last received station is tuned in.
Auto tuning :Press and hold TUNING-/+ on the remote control or on th e unit for about two seconds until the frequency indication starts to change, then release. Scanning stops when the unit tunes in a station. Manual tuning : Press TUNING-/+ on the remote control or on the unit repeatedly.
Adjust the volume by pressing VOL +/- on the remote control or by rotating MASTER VOL. +/- knob on the unit repeatedly.
Improving poor FM reception
Press This will change the tuner from stereo to mono and usually improve the reception.
Presetting the Radio Stations
You can preset 50 stations for FM.
Before tuning, make sure to turn down the volume.
Press F until FM appears in the display window.
Select the desired frequency by pressing TUNING -/+ on the remote control or on the unit.
Press JUKEBOX/MEMORY on the remote control. A preset number will blink in the display window.
Press PRESET·FOLDER on the remote control to select the preset number you want.
Press JUKEBOX/MEMORY on the remote control. The station is stored.
Repeat steps 2 to 5 to store other stations.
To listen a preset station, press PRESET·FOLDER or 0 to 9 numerical buttons on the remote control.
Deleting all the saved stations
Press DELETE on the remote control. DEL ALL” will flash up on the display window
Press DELETE on the remote control to erase all the saved radio stations. DELETED ALL” will scroll on the display window.
Sound adjustment
Setting the sound mode
This system has a number of pre-set surround sound fields. The displayed items for the equalizer may be different depending on sound sources and effects. You can select a desired sound mode by using EQUALIZER on the remote control.
On Display
Description
BASS (BASS BLAST) or BASS+ (BASS BLAST+
Reinforces the bass and powerful sound.
POP CLASSIC ROCK JAZZ
This program lends an enthusiastic atmosphere to the sound, giving you the feeling you are at an actual rock, pop, jazz or classic concert
FOOTBALL
You can enjoy the equalizer FOOTBALL STADIUM.
STANDARD
You can enjoy optimized sound.
You can select a desired sound mode by using SPECIAL EQ on the remote control or SPECIAL EQ / BASS BLAST (or BASS BLAST+) on the unit.
Optimized equalizer for the music genre prefered in each region.
ARABIC
Middle East
DANGDUT
Indonesia
AFRO
Africa
INDIA
India
Setting the USER EQ
You can adjust the sound level of Bass, Middle and Treble as your preference.
Press USER EQ on the unit. “USER EQ” is displayed.
Press USER EQ on the unit repeatedly until desired setting appears in the display window.
Rotate DJ SCRATCH / LEVEL CONTROL on the unit to adjust the value.
Advanced Operations
Recording to USB
You can record a various sound source to USB. CD, USB1, AUX, PORTABLE, FM)
Connect the USB device to the unit.
Press F to select a function you want to record.
Start the recording by pressing USB REC on the remote control or USB REC / DEMO on the unit
Function
Status
Result
CD, USB
Play/Pause
Recorded until stop
Resume stop (Page 35)
Quick recorded the latest song
Full stop
Quick recorded All songs In case below, scope is limited.
- After File search (Page 20), quick recorded an indexed song
- Only while the Folder name is displayed on the display window, quick recording All songs on Folder. (Folder Search Mode is released when there is no button input for a few seconds after entering the folder search mode.) (Page 20)
- After JUKE BOX On (Page 33), quick recorded All songs of JUKE BOX
AUX, PORTABLE, FM
-
Recorded until stop
If you connect both USB1 and USB2, press USB REC on the remote control or USB REC / DEMO on the unit when USB1 or USB2 which you want to record blinks in the display window.
To stop recording
To stop recording, press and hold USB REC on the remote control or USB REC / DEMO on the unit for 3 seconds. Otherwise, the recording continues.
Pausing recording
During CD/USB playback or pause, or external sound source recording, press USB REC on the remote control or USB REC / DEMO on the unit to pause recording. Press it again to restart recording.
To select recording bit rate
Press and hold USB REC on the remote control or USB REC / DEMO on the unit for 3 seconds.
Press C/V to select a bit rate.
Press USB REC on the remote control or USB REC / DEMO on the unit to finish the setting
NOTE:
For stable recording, the output sound level goes down on its own when you record music from CD to USB.
You can only change volume level between MIN and 30 during recording. (Only CD function)
When you stop recording, the file that has been recorded at that time will be stored. (Except when recording MP3/ WMA files that are in stop status.)
Do not remove the USB device or turn off the unit during USB recording. If does not, an incomplete file may be made and not deleted on PC.
If USB recording does not work, the message like “NO USB”, “ERROR”, “USB FULL”, “NOT SUPPORT” or “FILE MAX” is displayed on the display window.
Multi card reader device or external HDD can not be used for USB recording.
A file is recorded by about 512 Mbyte when you record for a long term.
JUKE BOX Playback
JUKE BOX function enables you to make a playlist of your favorite tracks/files from a disc or USB device. A playlist of up to 100 tracks/files can be entered.
Making JUKE BOX list
Press and hold JUKEBOX / MEMORY on the remote control to enter the edit mode. Playing will be stopped when you press JUKEBOX/MEMORY on the remote control.)
Select a track/file by pressing on the remote control.
Press JUKEBOX/MEMORY on the remote control to save the track/file.
Repeat steps 2 - 3 to store other tracks/files. You can modify the list by pressing PRESET·FOLDER on the remote control to select the JUKE BOX program number.)
Press JUKEBOX/MEMORY on the remote control once again.
To play the JUKE BOX list, press on the remote control after you make the list.
Enjoying JUKE BOX
Press JUKEBOX/MEMORY on the remote control once. “ON - JUKE BOX” appears on the display window.
To play JUKE BOX list, press on the remote control.
To cancel it, press JUKEBOX/MEMORY on the remote control once. “OFF - JUKE BOX” appears on the display window.
Editing JUKE BOX
Press and hold JUKE BOX / MEMORY on the unit to enter the edit mode. Playing will be stopped when you press JUKEBOX/MEMORY on the remote control.)
Press PRESET·FOLDER W/S on the remote control to select a track/file to edit.
Press C/V on the remote control.
Press JUKEBOX/MEMORY on the remote control.
Repeat 2 to 4 to store the other tracks/files.
Press JUKEBOX/MEMORY on the remote control once again.
To play the JUKE BOX list, press on the remote control after you edit the list.
Deleting JUKE BOX list
Deleting function only works in the edit mode.
Press and hold JUKEBOX/MEMORY on the remote control to enter the edit mode. Press DELETE on the remote control while JUKE BOX is played to enter the edit mode.
Select a song by pressing PRESET·FOLDER on the remote control repeatedly.
Press DELETE on the remote control while a song is selected.
Other Operations
Turn off the sound temporarily
Press on the remote control to mute your sound. You can mute your unit, for example, to answer the telephone, the “MUTE” will appear in the display window. To cancel it, press on the remote control again or change the volume level.
DRC (Dynamic range control)
Make the sound clear when the volume is turned down and prevent a sudden sound increase (Dolby Digital only). Press in OPTICAL function to turns on or off this function.
CHILDSAFE Mode
This function helps to prevent you from being surprised when you turn on the unit in case that the volume of the unit is set at a high level. To turn on CHILDSAFE mode, press and hold OK on the unit when the volume of the unit is “MIN”. In CHILDSAFE mode, the volume increase gradually. To turn off CHILDSAFE mode, press and hold OK on the unit when the volume of the unit is “MIN” and this mode is turned on.
DEMO
In the power off state, press USB REC / DEMO on the unit once. The unit will power on and display the each of functions with demo sound in the display window. To cancel the DEMO function, press USB REC / DEMO on the unit once more
Resume stop
The unit records the point where you pressed Z depending on the disc or USB. If you press Z twice, the unit will clear the stopped point.
Using your TV remote control
You can control some functions of this unit by your TV remote control even by other company’s product. Controllable functions are volume up/down and mute. Press and hold on the remote control for about 3 seconds in OPTICAL function to turn on or off this function.
On Display
Description
ON-TV REMOTE
TV REMOTE function is turned on.
OFF-TV REMOTE
TV REMOTE function is turned off
Note
Supported TV brands
LG
Panasonic
Philips
Samsung
Sharp
Sony
Toshiba
Vizio
Make sure that the sound output of your TV is set to [External speaker].
Depending on the remote control, this function may not work well.
This function does not operate on LG TV's magic remote control.
This function only operates on the OPTICAL function.
Using Microphone
Connect your microphone to the MIC jack.
Play the music you want.
Sing along with the accompaniment. Adjust the microphone volume by rotating MIC VOL. -/+ clockwise or counterclockwise on the unit.
VOICE CANCELLER
You can reduce the vocal tones during music playback from various input sources.
Press the VOICE CANCELLER and “ON” will appear in display window.
To cancel it, press VOICE CANCELLER again. The quality of the VOICE CANCELLER may be different depending on the recording conditions of music files.
KEY CHANGER
You can adjust the key to 9 steps (4 steps higher, 4 steps lower and the original key).
To sharp the key one by one, press the KEY CHANGER(#) repeatedly during playback.
To flatten the key one by one, press the KEY CHANGER(b) repeatedly during playback.
VOCAL EFFECTS
When you connect your microphone to the MIC jack, you can enjoy karaoke function by changing voice in the various source. To select various mode, pressing VOCAL EFFECTS repeatedly or pressing VOCAL EFFECTS and then turning DJ SCRATCH / LEVEL CONTROL on the unit when vocal effects mode appears in the display window.
When you connect your microphone to the MIC jack, you can give an echo effect to the sound from the microphones by pressing MIC ECHO.
ECHO 1 >ECHO 2 >ECHO OFF
LIGHTING
This function offers a party atmosphere by operating the lighting on the unit. Press LIGHTING on the unit repeatedly or press LIGHTING on the unit and then turn DJ SCRATCH / LEVEL CONTROL on the unit.
Press SLEEP on the remote control repeatedly to select delay time between 10 and 180 minutes. After the delay time, the unit will be turned off. To cancel the sleep function, press SLEEP on the remote control repeatedly until “OFF” appears.
Dimmer
Press SLEEP on the remote control once. The display window will be darkened by half. To cancel it, press SLEEP on the remote control repeatedly until “OFF” appears.
Auto power down
This unit will turn itself off to save electricity in the case were the main unit is not connected to an external device and is not used for 15 minutes. The unit will also turn itself off after six hours if the main unit has been connected to another device using the analog inputs. Auto power down function is applied to only MAIN unit in case of WIRELESS PARTY LINK connection. In case of OHTER unit, Auto power down is available after disconnection OHTER unit and MAIN unit.
AUTO POWER On
This unit automatically turns on by an input source : LG TV, Bluetooth or Optical. When you turn on your TV connected to this unit, this unit recognizes the input signal and selects the suitable function. You can hear the sound from the unit. If you try to connect your Bluetooth device, this unit turns on and connects your Bluetooth device. You can play your music. When you turn off this unit by pressing on the unit for 5 seconds each time, you can turn on or off the AUTO POWER function
On Display
Description
ON-AUTO POWER
AUTO POWER function is turned on.
OFF-AUTO POWER
AUTO POWER function is turned off
Note:
Depending on the connected device, this function may not operate.
Depending on the connected device, the unit turns on but Bluetooth function may not be connected.
If you disconnect Bluetooth connection by this unit, some Bluetooth devices try to connect to the unit continually. Therefore it is recommended to disconnect the connection before turning off the unit.
If you try to connect to the “Music Flow Bluetooth” app, Bluetooth function of this unit is turned on.
If you turn on the unit using LG TV or Bluetooth function, proper function of this unit is turned on.
If you have already paired with this unit, automatically this unit can turn on by an input source when this unit is turned off.
If you turned off the unit directly, it cannot be turned on automatically by AUTO POWER function. However the unit can be turned on by AUTO POWER function when optical signal comes in after 5 seconds of no signal.
Auto function change
This unit recognizes input signals such as Optical, Bluetooth, LG TV and Portable and then changes to the suitable function automatically.
When you try to connect Bluetooth device
When you try to connect your Bluetooth device to this unit, Bluetooth function is selected. Play your music on the Bluetooth device.
When 3.5 mm stereo cable is connected
When you connect the portable device to the PORT.IN connector, PORTABLE function is selected. Play your music on the portable device.
When optical signal comes in
When you turn on the external device connected to this unit by an optical cable, this unit changes the function to optical. You can hear the sound from your device.
When LG TV signal comes in
When you turn on your LG TV connected by LG Sound Sync (Wireless connection), this unit changes the function to LG TV. You can hear the sound from your TV
Setting the Clock
Turn the unit on.
Press and hold CLOCK on the remote control.
Select time mode by pressing on the remote control. - AM 12:00 (for an AM and PM display) or 0:00 (for a 24 hour display)
Press SET on the remote control to confirm your selection.
Select the hours by pressing on the remote control.
Press SET on the remote control.
Select the minutes by pressing on the remote control.
Press SET on the remote control.
Setting the Clock through “Music Flow Bluetooth” App
Install “Music Flow Bluetooth” app on your Android device. (Page 27-28) Your unit’s clock will be automatically synchronized with your device by activating Bluetooth connection through “Music Flow Bluetooth” app.
Using your player as an alarm clock
Turn the unit on.
Press and hold ALARM on the remote control.
Presson the remote control to change the hours and minutes and press SET on the remote control to save.
Press on the remote control to select function and press SET on the remote control to save. - Press C/V on the remote control to select a preset number when you select tuner and then, press SET on the remote control. If there is no preset number, this step is skipped.
Press on the remote control to change the volume and press SET on the remote control to save
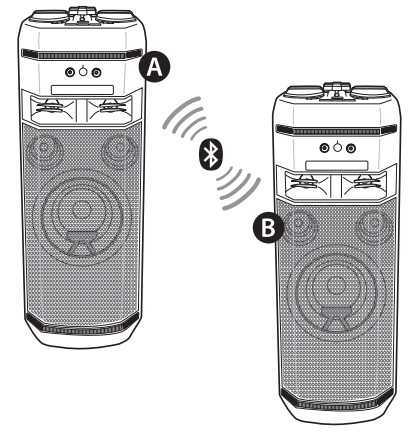
WIRELESS PARTY LINK
Connection
The output sound of A (MAIN) unit is expanded to B (OTHER) unit.
It is compatible with unit that supports WIRELESS PARTY LINK. The name of function about sound expansion between the compatible products wirelessly was changed to WIRELESS PARTY LINK.
Press WIRELESS LINK on the unit. PARTY LINK MODE SELECT appears in the display window.
Press WIRELESS LINK on the unit to select MAIN or OTHER. -A unit : Selects MAIN. - B unit : Selects OTHER. Two units try to connect with each other.
When these units are successfully connected each other, each of connected device names appears in the each unit.
Troubleshooting
General
Problem
Cause & Solution
The unit does not work properly
Turn off the power of this unit and the connected external device (TV, Woofer,
DVD-player, Amplifier, etc.) and turn them on again. y Disconnect the power cord of this unit and the connected external device (TV,
Woofer, DVD-player, Amplifier, etc.) and then try connecting again. y Previous setting may not be saved when device power is shut off.
No Power
The power cord is not plugged in. Plug in the power cord.
Check whether electricity failed.
Check the condition by operating other electronic devices.
No sound.
Check whether you select right function. Press function button and check the selected function
The unit does not start playback
An unplayable disc is inserted. Check the playable disc.
No disc is inserted. Insert a disc.
The disc is dirty. Clean the disc. (Page 48)
The disc is inserted upside down.
Place the disc with the label or printed side facing upwards.
Radio stations cannot be tuned in properly
The antenna is positioned or connected poorly.
Connect the antenna securely.
The signal strength of the radio station is too weak.
Tune to the station manually.
No stations have been preset or preset stations have been cleared (when tuning by scanning preset channels).
Preset some radio stations, see page 29 for details.
The remote control does not work properlyThe remote control does not work properly
The remote control is too far from the unit. Operate the remote control within about 7 m (23 feet).
There is an obstacle in the path of the remote control and the unit. Remove the obstacle.
The batteries in the remote control are exhausted. Replace the batteries with new ones.
No speaker light
Check the light effects by pressing LIGHTING (Page 38).
LG Sound Sync does not work
Check whether your LG TV supports LG Sound Sync. y Check connection of LG Sound Sync. y Check sound setting of your TV and this unit.
 and
and  matched correctly
 (Standby) : Turns the power on or off.
 (Open/Close) : Opens and closes the disc tray.
 {Mute):
 :
: (Skip/Search) :
 (Play/Pause) :
 (Stop) :
 (Information) :
 ) : Changes the key to suit your vocal range.
 This button is not available.
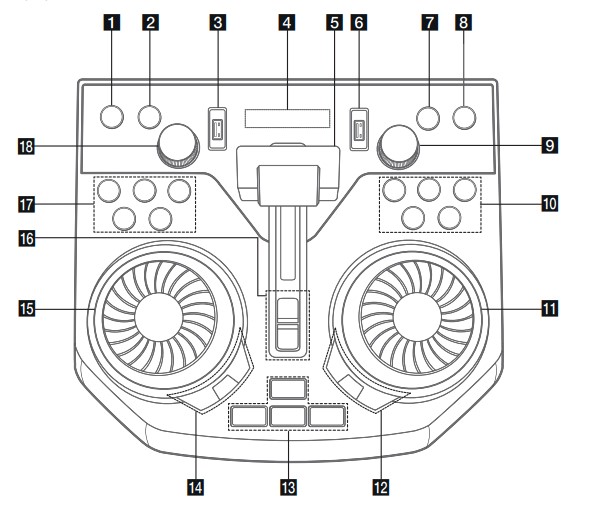
 WIRELESS LINK
  (Skip/Search)
 (Play/Pause)
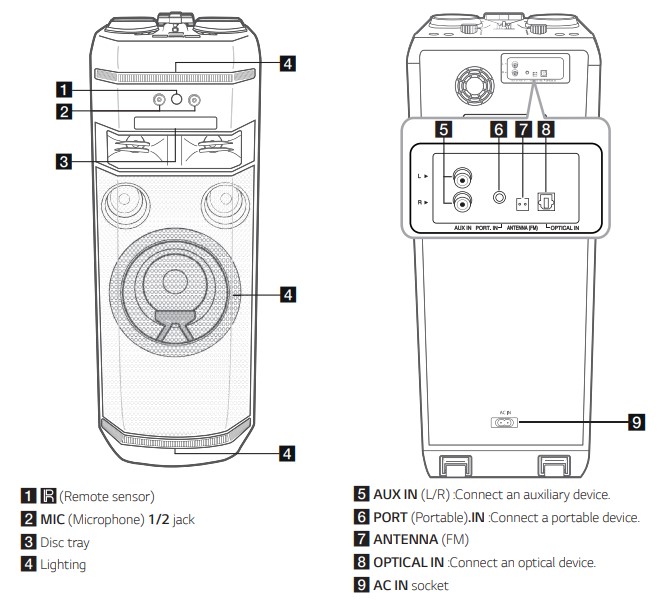

 file No.1 to