
EN

SPECIAL MESSAGE SECTION
PRODUCT SAFETY MARKINGS: Yamaha electronic
products may have either labels similar to the graphics
shown below or molded/stamped facsimiles of these graph-
ics on the enclosure. The explanation of these graphics
appears on this page. Please observe all cautions indicated
on this page and those indicated in the safety instruction sec-
tion.
The exclamation point within the equi-
lateral triangle is intended to alert the
user to the presence of important operat-
ing and maintenance (servicing) instruc-
tions in the literature accompanying the
product.
The lightning flash with arrowhead sym-
bol, within the equilateral triangle, is
intended to alert the user to the presence
of uninsulated “dangerous voltage”
within the product’s enclosure that may
be of sufficient magnitude to constitute a
risk of electrical shock.
IMPORTANT NOTICE: All Yamaha electronic products
are tested and approved by an independent safety testing
laboratory in order that you may be sure that when it is prop-
erly installed and used in its normal and customary manner,
all foreseeable risks have been eliminated. DO NOT modify
this unit or commission others to do so unless specifically
authorized by Yamaha. Product performance and/or safety
standards may be diminished. Claims filed under the
expressed warranty may be denied if the unit is/has been
modified. Implied warranties may also be affected.
SPECIFICATIONS SUBJECT TO CHANGE: The
information contained in this manual is believed to be cor-
rect at the time of printing. However, Yamaha reserves the
right to change or modify any of the specifications without
notice or obligation to update existing units.
ENVIRONMENTAL ISSUES: Yamaha strives to produce
products that are both user safe and environmentally
friendly. We sincerely believe that our products and the pro-
duction methods used to produce them, meet these goals. In
keeping with both the letter and the spirit of the law, we
want you to be aware of the following:
Battery Notice: This product MAY contain a small non-
rechargeable battery which (if applicable) is soldered in
place. The average life span of this type of battery is approx-
imately five years. When replacement becomes necessary,
contact a qualified service representative to perform the
replacement.
Warning: Do not attempt to recharge, disassemble, or
incinerate this type of battery. Keep all batteries away from
children. Dispose of used batteries promptly and as regu-
lated by applicable laws. Note: In some areas, the servicer is
required by law to return the defective parts. However, you
do have the option of having the servicer dispose of these
parts for you.
Disposal Notice: Should this product become damaged
beyond repair, or for some reason its useful life is consid-
ered to be at an end, please observe all local, state, and fed-
eral regulations that relate to the disposal of products that
contain lead, batteries, plastics, etc.
NOTICE: Service charges incurred due to lack of knowl-
edge relating to how a function or effect works (when the
unit is operating as designed) are not covered by the manu-
facturer’s warranty, and are therefore the owners responsi-
bility. Please study this manual carefully and consult your
dealer before requesting service.
NAME PLATE LOCATION: The graphic below indicates
the location of the name plate. The model number, serial
number, power requirements, etc., are located on this plate.
You should record the model number, serial number, and the
date of purchase in the spaces provided below and retain this
manual as a permanent record of your purchase.
Model
Serial No.
Purchase Date
CAUTION
RISK OF ELECTRIC SHOCK
DO NOT OPEN
CAUTION: TO REDUCE THE RISK OF ELECTRIC SHOCK.
DO NOT REMOVE COVER (OR BACK).
NO USER-SERVICEABLE PARTS INSIDE.
REFER SERVICING TO QUALIFIED SERVICE PERSONNEL.
92-469- 1 (rear)

CP300 Owner’s Manual
7
Introduction
Supplied Accessories
• Power cord
• Foot pedal (FC3)
• Owner’s Manual
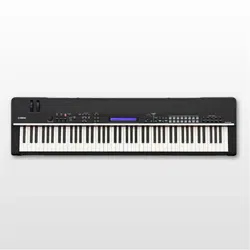
Main Features
The CP300 gives you the ultimate acoustic grand piano sound—utilizing three-stage dynamic sampling,
providing the ability to change tone with the sustain pedal, and adding a subtle, authentic release sound when
you lift your fingers from the keys.
Among the advanced features are:
• 88-key “Graded Hammer” keyboard with action that is virtually indistinguishable from an actual acoustic
piano.
•Sophisticated AWM synthesis engine and tone generation system, with a maximum polyphony of 128 notes.
Using AWM, the CP300 has 50 original Voices—including a variety of ultra-realistic piano and other
keyboard Voices, plus a wealth of authentic sounds of virtually every instrument type.
•High-grade five-band Master EQ, which enables you to control the tone intuitively using sliders on the
panel.
•Luscious reverb and chorus effects, plus an enormous variety of other effects that add extraordinary depth
and expression to your sound.
• Comprehensive MIDI functions for use with other devices and in larger music production systems.
•Four pedal connectors for maximum expressive capabilities—especially ideal for live performance—and
built-in high-quality stereo speakers.
•A powerful, versatile Performance function, which lets you store and instantly recall your custom CP300
settings, including Dual/Split configurations, Voice and effect parameters, MIDI transmit/receive channel
values and Master Edit settings.
•Built-in 16-track sequencer for recording and playing back your keyboard performance, as well as for
creating complex multi-instrument arrangements and Songs—up to a maximum 16 parts.
•Master mode, which allows you to independently control up to four external tone generators.
• Comprehensive selection of inputs/outputs and interfaces—including two separate stereo output pairs,
stereo inputs, MIDI terminals, and a USB connector.

Before Using the CP300
CP300 Owner’s Manual
12
Introduction
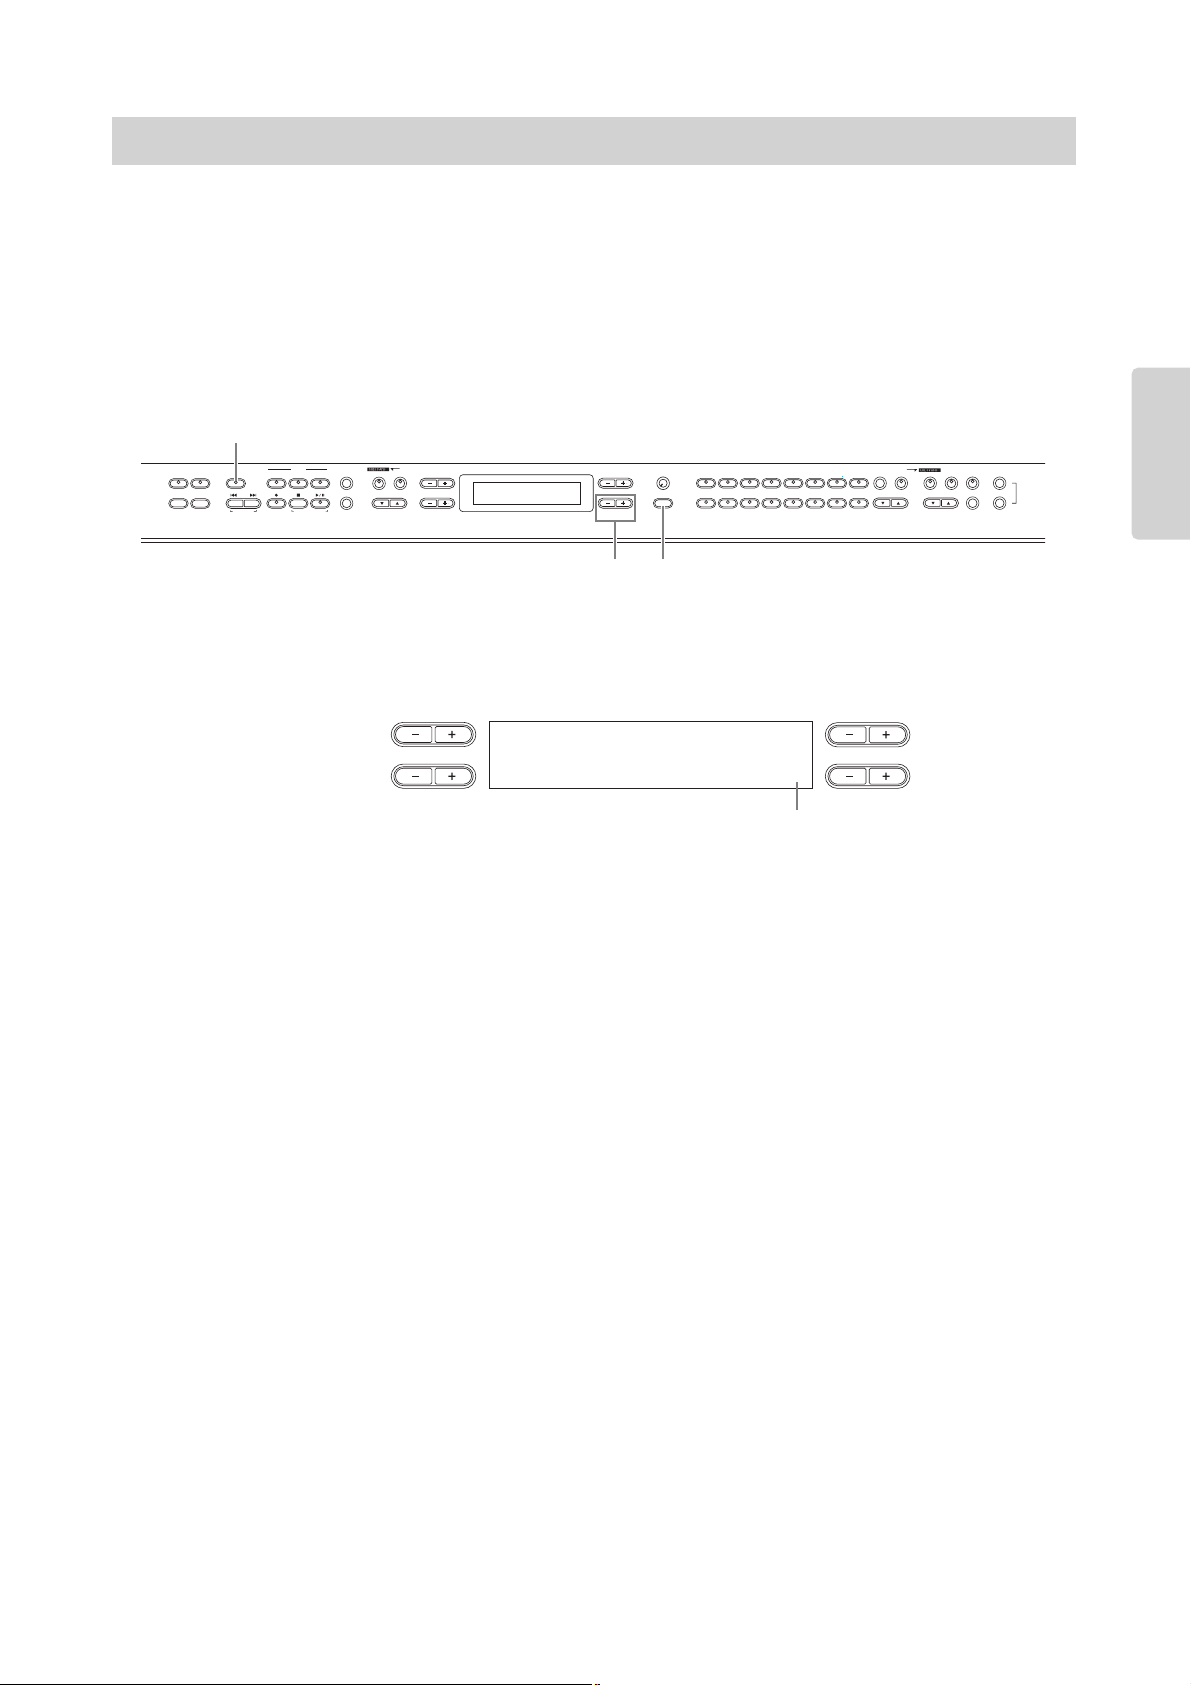
If you are using a set of headphones, connect them to the [PHONES] jack.
Do not use headphones at a high volume for an extended period of time. Doing so may cause hearing loss.
n If the [SPEAKER] button is lit, this indicates that the built-in speakers sound normally when using the
headphones.
Make sure the volume setting of the CP300 and external devices are turned down to the minimum.
Press the [POWER] switch to turn the power on.
The display located in the center of the front panel lights up.
Press the [POWER] switch again to turn off the power to the CP300.
The display will disappear.
Using Headphones
Tur ning the Power On
PHONES jack
CAUTION
POWER
ON
OFF
MIN MAX
MASTER VOLUME
POWER
ON!
****** PleaseWait ******
****** YAMAHA ******
NO YES
A
B
D
C
Grand Piano 1
NO YES
A
B
D
C

Before Using the CP300
CP300 Owner’s Manual
13
Introduction
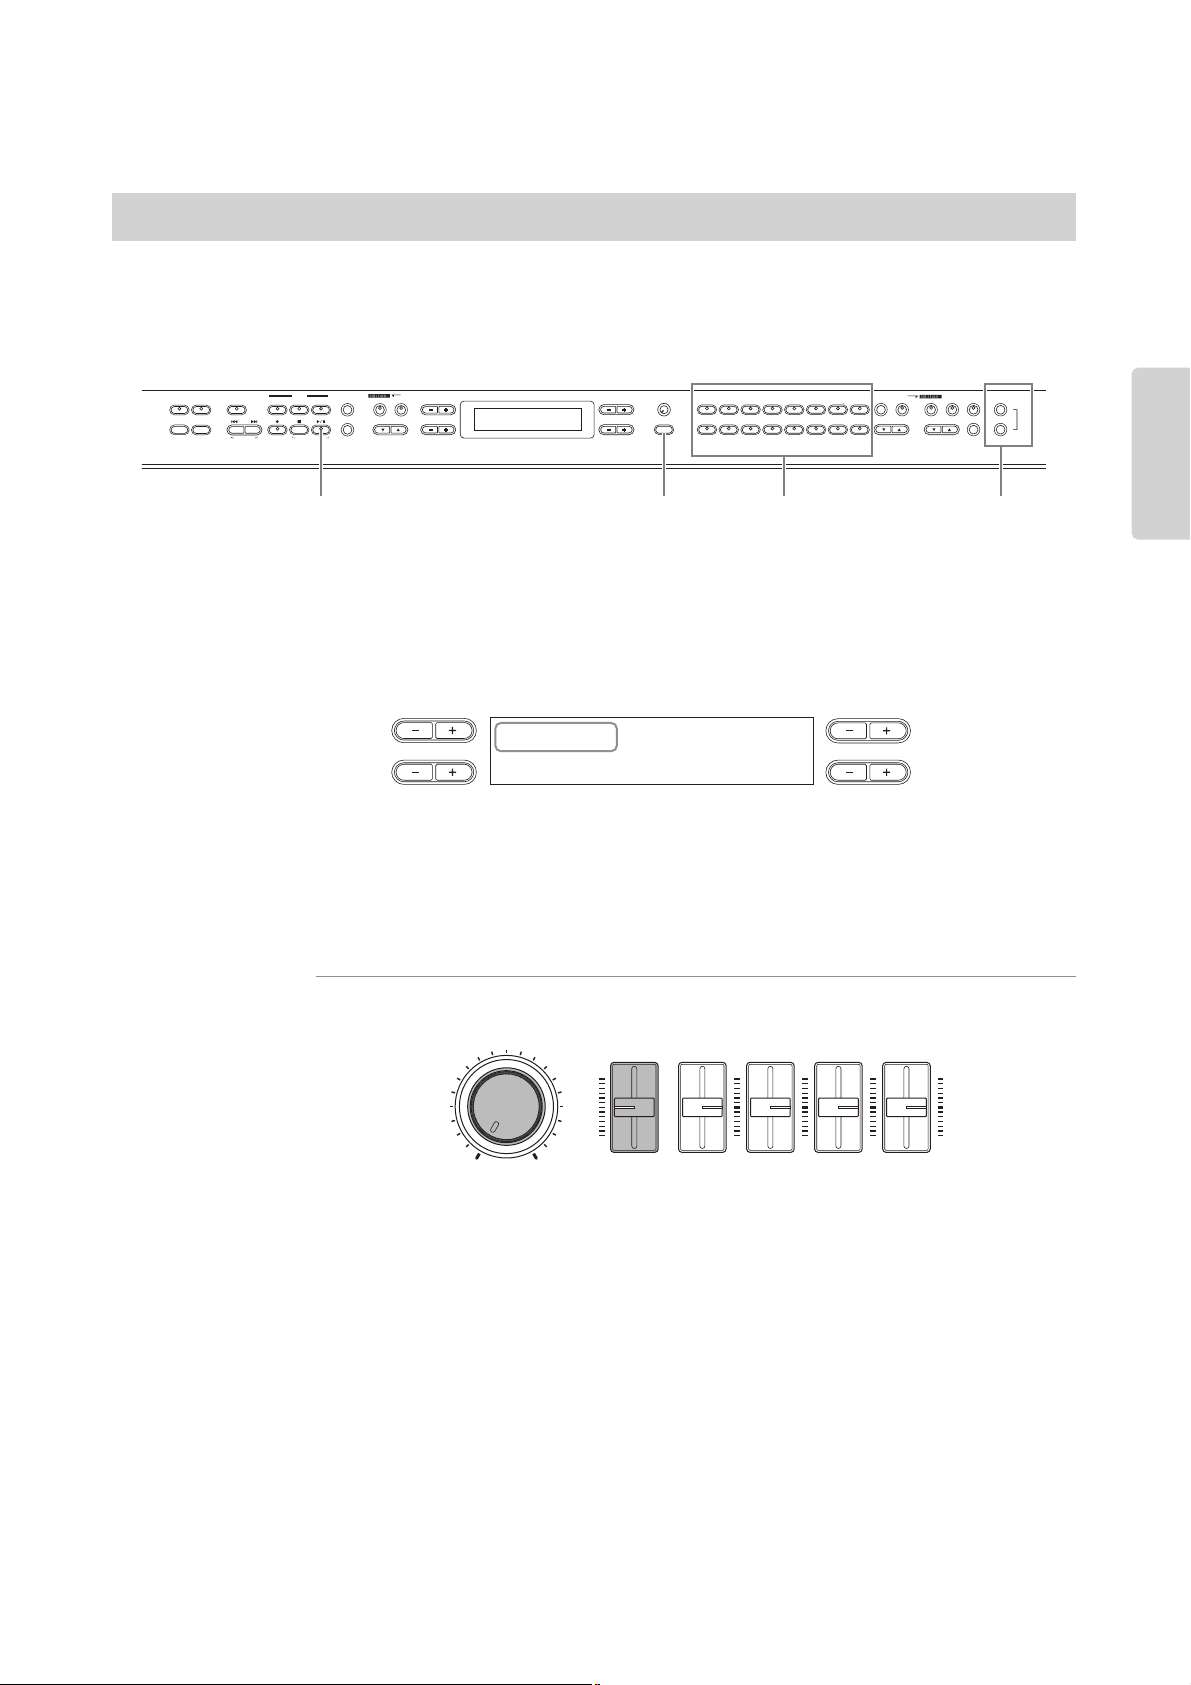
You can adjust the contrast of the display by turning the [CONTRAST] knob located to the right of the LCD.
To adjust the volume, use the [MASTER VOLUME] dial located at the left of the panel. When you start
playing, re-adjust the [MASTER VOLUME] dial to the most comfortable listening level.
n The [MASTER VOLUME] dial also controls the volume of the headphones.
Adjusting the Brightness of the Display
Setting the Volume
Terminology
Master Volume: The volume level of the entire keyboard sound.
EXIT
CONTRAST
Grand Piano 1
NO YES
A
B
D
C
MIN MAX
MASTER VOLUME
The level
decreases.
The level
increases.

CP300 Owner’s Manual
14
Introduction
Playing the keyboard
Tr y playing some of the realistic and dynamic CP300 sounds from the keyboard now.
When you turn the power on following the directions in “Power Supply Connections” (pages 11 and 12), the
display below appears.
In this condition, you can play the keyboard and hear the sound of the selected “Grand Piano 1” Voice.
To change the Voice, press any one of the Voice group buttons located at the right of the panel.
Play the keyboard and enjoy the sound.
Playing the Sounds
Grand Piano 1
NO YES
A
B
D
C
GRAND
PIANO 1
GRAND
PIANO 2
MONO
PIANO
E. PIANO 1 E. PIANO 2 E. PIANO 3
CLAVI.
VIBES
ORGAN 1 ORGAN 2 HARPSI. STRINGS CHOIR/PAD
GUITAR
BASS
XG
12345678
910111213141516
VOICE/PERFORMANCE
Voice group buttons

Basic Operation
CP300 Owner’s Manual
16
Introduction
The CP300 has a Factory Set function for restoring your CP300’s memory to the factory default settings.
This lets you restore the CP300’s default Voices and Performances, as well as its System and other settings.
Refer to “Factory Setting List” on page 101.
There are two ways you can restore the CP300’s memory to the factory default settings: 1) Set the “Factory Set”
parameter in the Other Settings menu, or 2) Turn the power off and turn the power on again while holding the
C7 key (rightmost key on the keyboard).
Method 1
1 Press the [OTHER SETTING] button to access the Other Settings menu.
2 Press the [OTHER SETTING] button repeatedly or use the A [–][+] buttons to call up
“Factory Set” in the display.
3 Use the D [–][+] buttons to select either “Memory File Excluded” or “Memory File
Included.”
Storage memory selections:
Memory File Excluded.......................Memory files are maintained.
Memory File Included .......................Memory files are erased.
n The “Character Code” parameter in the Song File menu does not change (page 84).
Restoring the Factory-programmed Settings of the CP300
OTHER SETTING
FactorySet Execute?-->
MemoryFileExcluded
NO YES
A
B
D
C
FactorySet Execute?-->
MemoryFileExcluded
NO YES
A
B
D
C
FactorySet Execute?-->
MemoryFileIncluded
NO YES
A
B
D
C
Indicates memory files are maintained.
Indicates memory files are erased.
Basic Operation
CP300 Owner’s Manual
17
Introduction
4 Press the B [+ (YES)] button to execute the job.
After the job has been completed, a “Completed” message appears and operation returns to the original
display.
For Factory Set operations that take longer to process, you will see the message “Executing” during processing.
Do not switch the power off while this message is on the display. Turning the power off in this state may cause the
system to freeze.
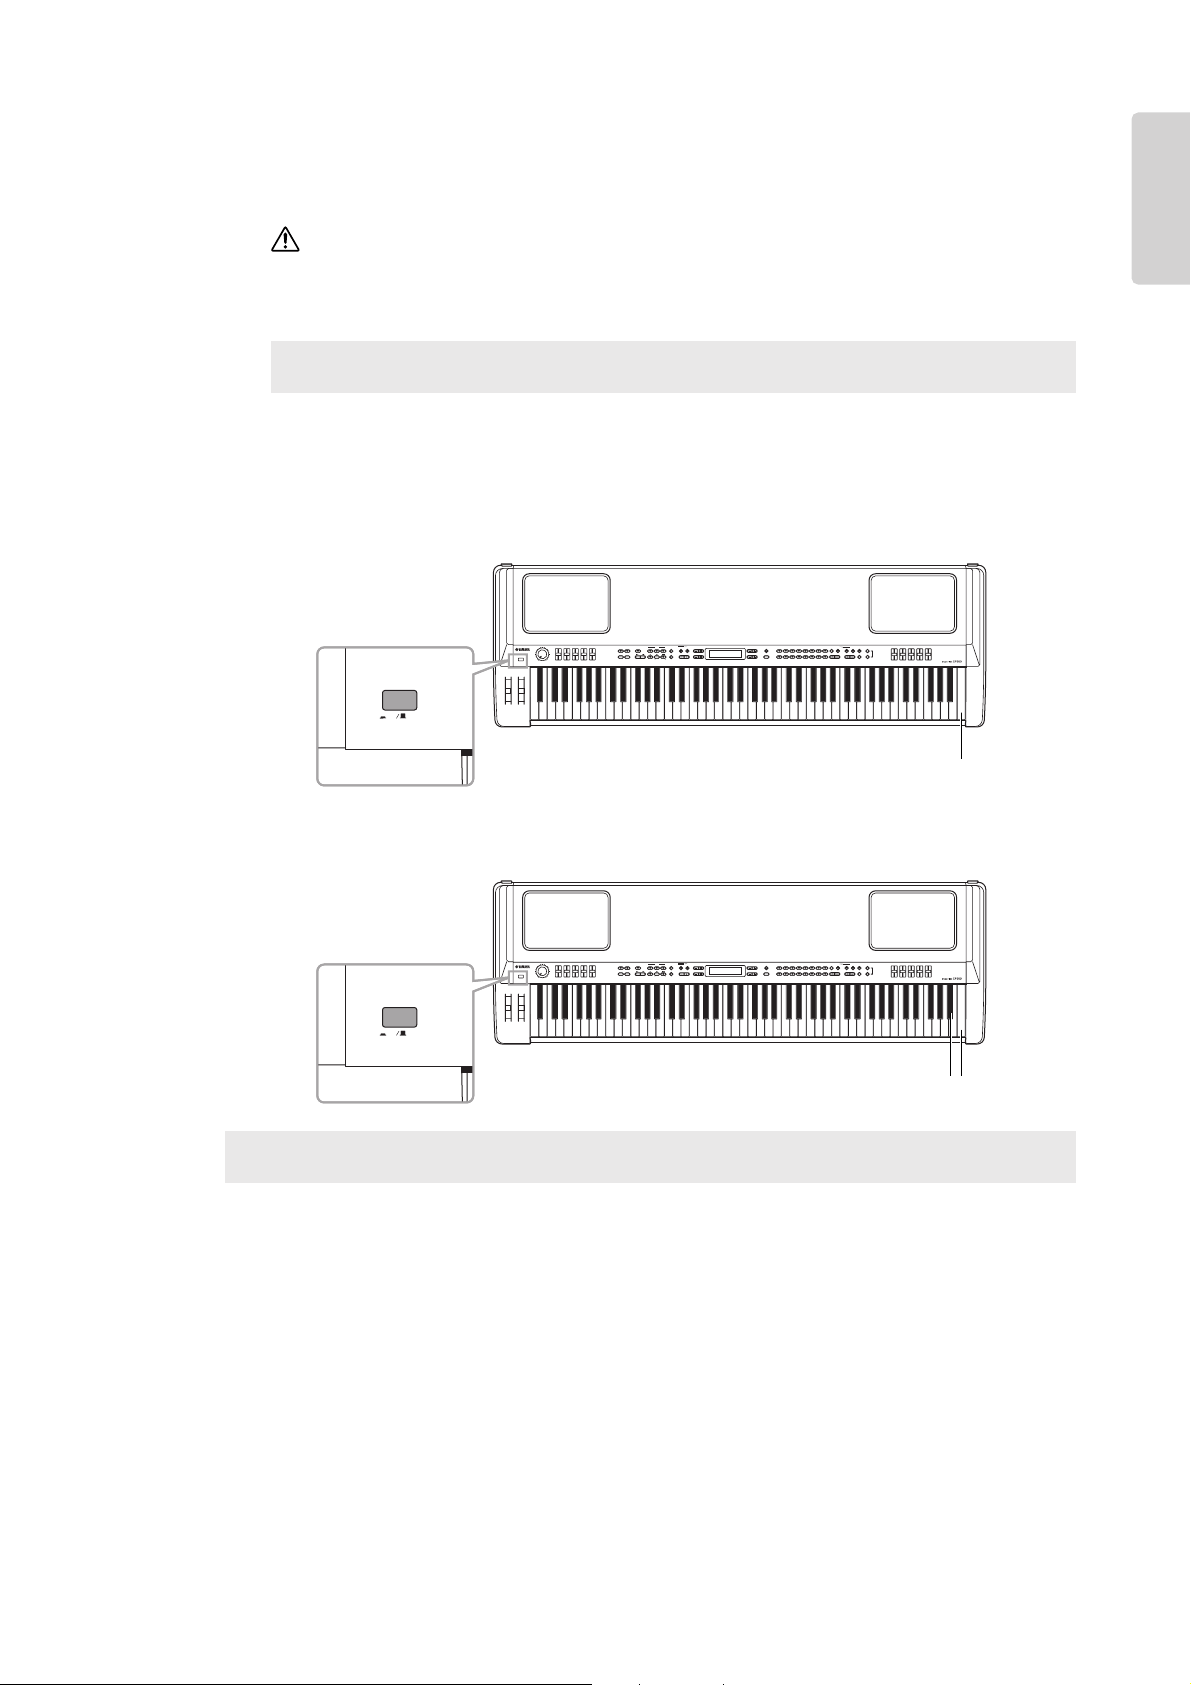
Method 2
Simultaneously hold down the white key on the right end of the keyboard (C7), and press the [POWER]
switch to turn on the power to the CP300.
In this case, the Memory files saved in the storage memory are not erased.
If you wish to erase Memory files at this time, simultaneously hold down the rightmost white key (C7) and
black key (Bb6) together and press the [POWER] switch to turn on the power to the CP300.
Terminology
File: A file contains various data in a group. A file includes both Performance data and Song data (pages 73, 81).
Terminology
Storage memory: This memory area enables you to save Performance files and recorded Songs.
CAUTION
POWER
ON
OFF
C7
POWER
ON
OFF
B
b
6
C7
CP300 Owner’s Manual
18
Introduction
ON
OFF
POWER
ON!
GRAND
PIANO 1
GRAND
PIANO 2
MONO
PIANO
E. PIANO 1 E. PIANO 2 E. PIANO 3
CLAVI.
VIBES
ORGAN 1 ORGAN 2 HARPSI. STRINGS CHOIR/PAD
GUITAR
BASS
XG
12345678
910111213141516
M
U
S
IC
P
R
O
D
U
C
T
I
O
N
S
Y
N
T
H
E
S
IZ
E
R
VOICE/PERFORMANCE
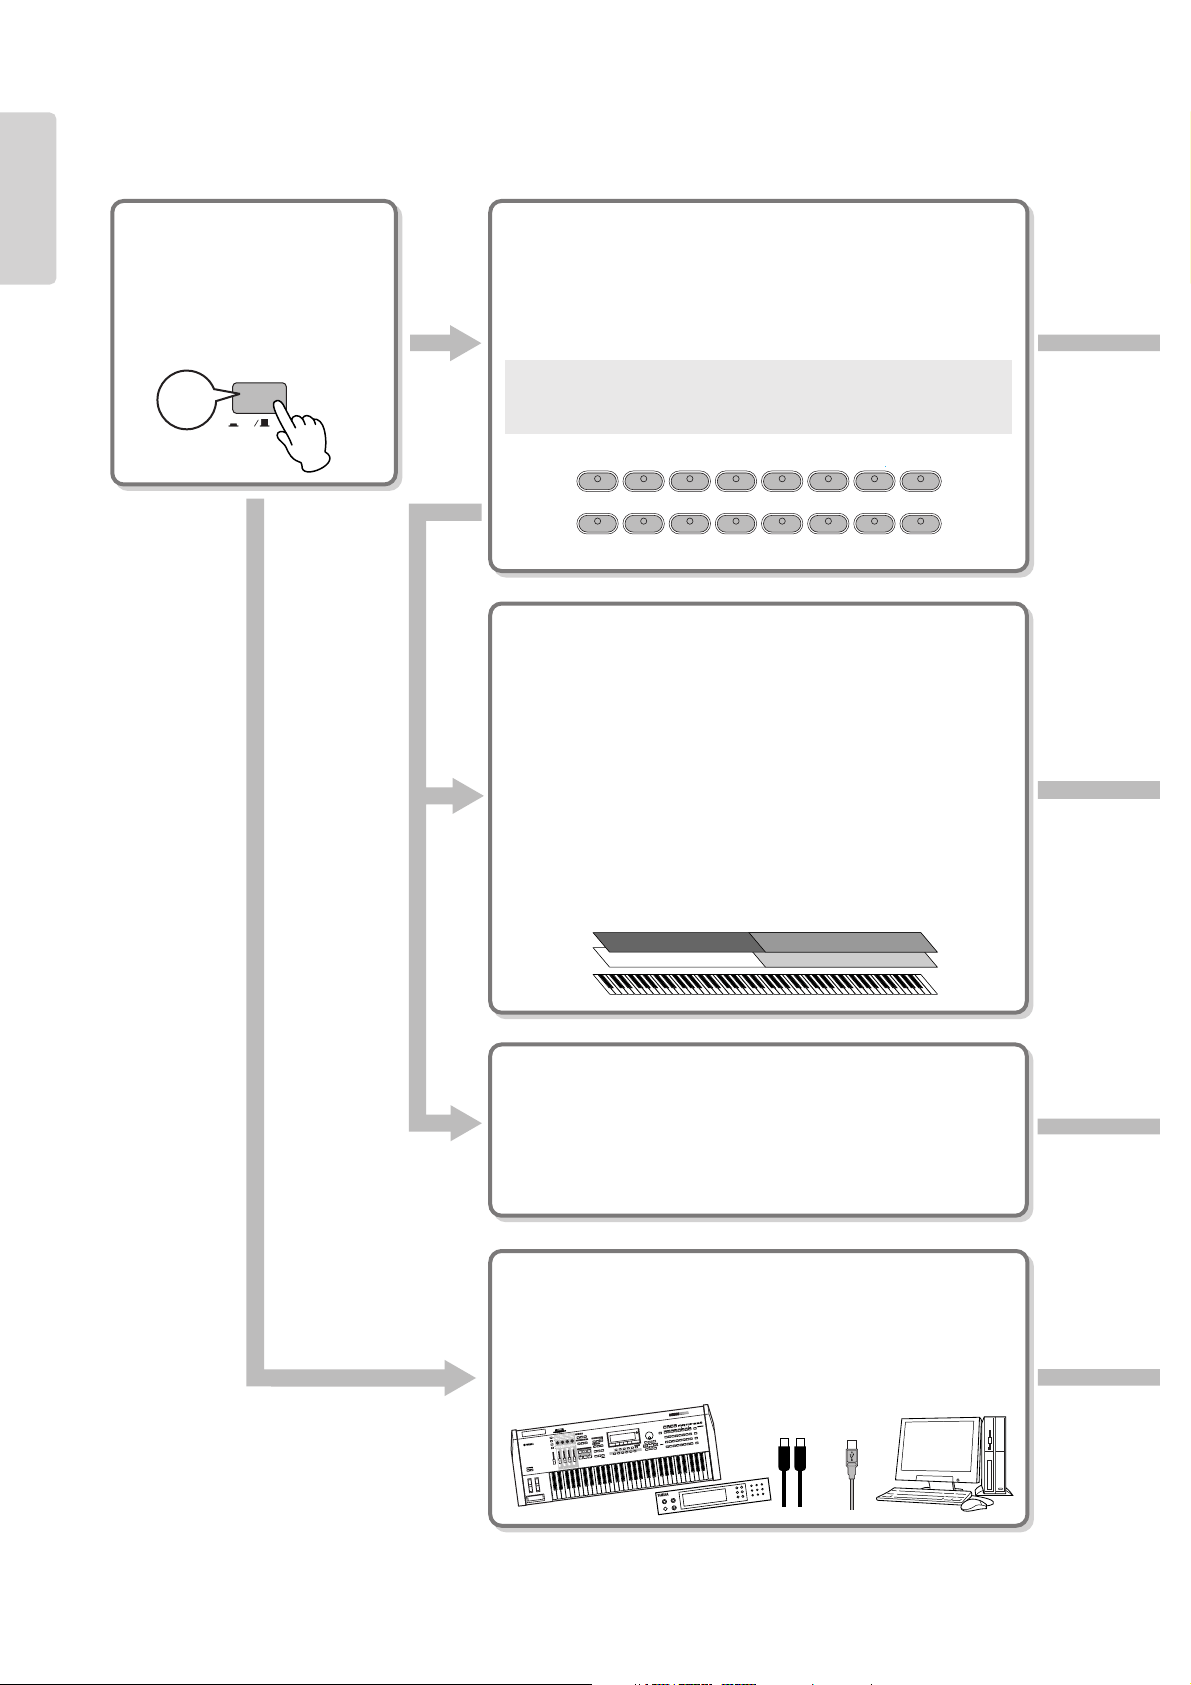
Basic Instructions
Turning the Power On
First, turn the power on and set
up the keyboard before playing.
• Before Using the CP300 (pages 11
and 12)
Selecting and Playing a Voice
The CP300 features an exceptionally wide variety of Preset Voices
for playing in virtually any musical style. Try searching through
the Voices to find your favorites.
• Selecting a Voice (page 25)
Terminology
Preset: Refers to data loaded to the internal memory of the CP300
before being shipped from the factory.
Combining Voices and Playing Them on the
Keyboard
The CP300 allows you to play several different Voices together in
a layer, or play one Voice with your left hand while you play a
different Voice (or even two layered Voices!) with your right. Try
out some of the variations and experiment with your own Voice
combinations.
• Playing Different Voices Simultaneously (page 27)
• Combining Voices—Dual (page 29)
• Playing Different Voices with the Left and Right Hands—Split
(page 31)
Create Your Own Original Voices
Once you’ve explored your favorite Voices and feel comfortable
with them, try branching out creatively and use the editing
features to make your own original Voices.
• Detailed Settings for the Voices—Voice Edit (page 56)
Connecting to a Computer and MIDI devices
• Connecting to External Audio Equipment (page 88)
• Connecting to External MIDI Equipment (page 90)
• Connecting to a Computer (page 92)
CP300 Owner’s Manual
23
Basic Operation
Quick Guide
The CP300 has a variety of specially recorded Demo Songs that effectively showcase each of the instrument’s
Voice groups. Listen to some of these Demo Songs now and hear the wide-ranging capabilities of the CP300.
n Make sure the CP300 is ready for playback. Details are given in the section “Before Using the CP300” on page 11.
1 Simultaneously press both the [MIDI SETTING] button and the [OTHER SETTING]
button.
The Voice group button indicators will flash in sequence.
The “Voice Demo” message appears in the display.
2 Press one of the Voice group buttons to listen to the Demo Songs.
The corresponding Voice button indicator lights up and playback starts. Demo Songs provided for each
Voice group will play back in sequence until you press the [STOP] button.
Adjusting the Volume
To adjust the volume level of the Demo Songs, use the [MASTER VOLUME] dial or [SONG VOLUME]
slider.
n Make sure that the [SONG VOLUME] slider is set appropriately. If the [SONG VOLUME] slider is set to
minimum, no sound can be heard.
3 Press the button of the Voice group currently being played or the [PLAY/PAUSE]
button to stop the Voice demo.
4 Press the [EXIT] button to exit the Demo selection display.
Listening to the Demo Songs
NO YES
EXIT
MASTER
PERFORMANCE
MASTER EDIT
PERFORM.FILE
TRANSPOSE
SONG SELECT
NEW SONG
REC
STOP
PLAY/PAUSE
SYNCHRO START
SONG VOICE/PERFORMANCE
12
3-16
TRACK
SONG FILE
SONG SETTING
MIDI OUT PANEL LOCK
DOWN UP
TEMPO
A
B
D
C
CONTRAST
GRAND
PIANO 1
GRAND
PIANO 2
MONO
PIANO
E. PIANO 1 E. PIANO 2 E. PIANO 3
CLAVI.
VIBES
ORGAN 1 ORGAN 2 HARPSI. STRINGS CHOIR/PAD
GUITAR
BASS
XG
12345678
910111213141516
VOICE EDIT
SPLIT
VARIATION
REVERB
CHORUS SPEAKER MI DI SETTING
MASTER EQ EDIT
CLICK
OTHER SETTING
DEMO
3 4 12
VoiceDemo
SelectVoiceButton
NO YES
A
B
DC
MIN MAX
MASTER VOLUME
SONG
VOLUME
ZONE CONTROL
ZONE 1 ZONE 2 ZONE 3 ZONE 4

Quick Guide
CP300 Owner’s Manual
34
Basic Operation
Use the Pitch Bend wheel to bend notes up (roll the wheel away from you) or down (roll the wheel toward you)
while playing the keyboard. This wheel is self-centering and will automatically return to normal pitch when
released. Try out the Pitch Bend wheel while pressing a note on the keyboard.
n The bend range can be adjusted via the “Pitch Bend Range” parameter in the Other Settings menu (page 70).
The Modulation wheel applies vibrato to the sound. The more you move this wheel up, the greater the effect
that is applied to the sound. Try out the Modulation wheel with various Preset Voices while playing the
keyboard.
n Keep in mind that many of the Preset Voices are not set with a Modulation effect. (This is to ensure the most
natural sound on these acoustic instrument Voices.) However, the Modulation wheel can be effectively used to
control user-programmable effects, as well as alter the sounds of a connected MIDI tone generator.
n Various functions can be assigned to the Modulation Wheel. Refer to the “Modulation” parameter in the Voice
Edit menu (page 62).
n To avoid accidentally applying Modulation or other effects to the current Voice, make sure the Modulation Wheel
is set to minimum before you start playing.
Bending Notes—Pitch Bend Wheel
Adding a Vibrato Effect to the Sound—Modulation Wheel
Raises the pitch
Lowers the pitch
Pitch Bend wheel
Maximum
Minimum
Modulation wheel
Quick Guide
CP300 Owner’s Manual
37
Basic Operation
The CP300’s Transpose function makes it possible to shift the pitch of the entire keyboard up or down in
semitone intervals to facilitate playing in difficult key signatures, and to let you easily match the pitch of the
keyboard to the range of a singer or other instruments. For example, if you set the transposition amount to
“+5,” playing a C key produces a pitch of F. In this way, you can play a Song as though it were in C major, and
the CP300 will transpose it to the key of F.
Press the [TRANSPOSE] button to transpose the entire keyboard. With just the press of a button, you can
reconfigure the transpose setting. For details about setting the amount of transposition, see below. The
indicator will light when a transpose setting other than “0” is selected.
1 Press the [TRANSPOSE] button.
The amount of transposition in semitone units appears in the display.
2 Press the D [–][+] button to transpose down or up as required.
You can set the range from -12 semitones (down one octave) to 12 semitones (up one octave) in semitone
steps.
Transposing shifts the pitch of the entire keyboard.
The transposition range:
-12: -12 semitones (down one octave), 0: normal pitch, 12: 12 semitones (up one octave)
n You can set the keyboard’s Transpose via the “Transpose” parameter in the Other Settings menu, when the
[TRANSPOSE] button is turned on (page 69).
n The Transpose setting affects transmitted MIDI data.
3 Press the [EXIT] button to exit the Transpose setting.
n The edited Transpose settings will be erased after you turn off the power to the CP300. If you set the Memory
Backup’s Transpose setting to On in the Other Settings menu, the current Transpose setting will remain in effect
when you turn the power off and back on again (page 71).
Key Transposition—Transpose
NO YES
EXIT
MASTER
PERFORMANCE
MASTER EDIT
PERFORM.FILE
TRANSPOSE
SONG SELECT
NEW SONG
REC
STOP
PLAY/PAUSE
SYNCHRO START
SONG VOICE/PERFORMANCE
12
3-16
TRACK
SONG FILE
SONG SETTING
MIDI OUT PANEL LOCK
DOWN UP
TEMPO
A
B
D
C
CONTRAST
GRAND
PIANO 1
GRAND
PIANO 2
MONO
PIANO
E. PIANO 1 E. PIANO 2 E. PIANO 3
CLAVI.
VIBES
ORGAN 1 ORGAN 2 HARPSI. STRINGS CHOIR/PAD
GUITAR
BASS
XG
12345678
910111213141516
VOICE EDIT
SPLIT
VARIATION
REVERB
CHORUS SPEAKER MI DI SETTI NG
MASTER EQ EDIT
CLICK
OTHER SETTING
DEMO
1
2
3
[TRANSPOSE] button
Transpose
Keyboard 0
NO YES
A
B
DC
Amount of transposition

CP300 Owner’s Manual
40
Basic Operation
Selecting a Performance
All settings of the entire CP300 can be saved together in a group, referred to as a “Performance.” A Performance includes
Dual/Split settings, Voice and effect parameters, MIDI transmit/receive channel settings and Master Edit settings. For details
on Performance settings, refer to page 73.
A total of 64 Preset Performances are supplied with the CP300. The Preset Performances consist of 32 Yamaha original Voices
and 32 default Performances (Grand Piano Voices). Try some of the Preset Performances and listen to the sound.
n Refer to the “Preset Performance List” on page 106 for more information on the characteristics of each Preset Performance.
1 Press the [PERFORMANCE] button to enter the Performance mode.
The [PERFORMANCE] button flashes.
2 Choose a Performance by pressing one of the Voice group buttons.
Playing the keyboard sounds the Performance indicated in the display. The parameters shown in the
Performance Play display are briefly explained below.
3 Press the VARIATION [▼][▲] buttons to select one of the Performance variations,
A to D.
A single Performance can include up to four different Performances (A to D). “A” and “B” features the
Yamaha original Voices. “C” and “D” contains the default Performances (Grand Piano Voices).
4 Play the keyboard.
5 Press the [PERFORMANCE] button to exit the Performance Play mode.
The [PERFORMANCE] button lamp turns off. The Voice selection will return to the Voice selected
before entering the Performance.
You can exit the Performance yet keep the current Voice used in the Performance by simultaneously
holding down the B [– (NO)] button and pressing the [PERFORMANCE] button.
Terminology
Preset Performance file: A single file that includes data of 64 different Preset Performances.
NO YES
EXIT
MASTER
PERFORMANCE
MASTER EDIT
PERFORM.FILE
TRANSPOSE
SONG SELECT
NEW SONG
REC
STOP
PLAY/PAUSE
SYNCHRO START
SONG VOICE/PERFORMANCE
12
3-16
TRACK
SONG FILE
SONG SETTING
MIDI OUT PANEL LOCK
DOWN UP
TEMPO
A
B
D
C
CONTRAST
GRAND
PIANO 1
GRAND
PIANO 2
MONO
PIANO
E. PIANO 1 E. PIANO 2 E. PIANO 3
CLAVI.
VIBES
ORGAN 1 ORGAN 2 HARPSI. STRINGS CHOIR/PAD
GUITAR
BASS
XG
12345678
910111213141516
VOICE EDIT
SPLIT
VARIATION
REVERB
CHORUS SPEAKER MI DI SETTING
MASTER EQ EDIT
CLICK
OTHER SETTING
DEMO
21, 5 2
3
A01.Piano+Pad
GrandPiano1 WarmPad
NO YES
A
B
DC
A01.Piano+Pad
Voice names (Main and Layer only)
Hold this down to view
all Voices of the parts
Hold this down to view
the Performance file name
Number
(Select the number by pressing
one of the Voice group buttons.)
Performance name
A to D
(Select “A” to “D” by pressing the
VARIATION [▼][▲] buttons.)

Recording Your Performance
CP300 Owner’s Manual
45
Basic Operation
Data Recorded to User Songs
Data recorded to individual tracks:
• Notes played
• Voice selection
• Pitch Bend
• Pedal/Modulation wheel ON/OFF
• Reverb depth (Reverb Send)
• Chorus depth (Chorus Send)
• Insertion effect depth (Dry/Wet Balance)
• Sound brightness (Brightness)
• Resonance effect setting (Harmonic Content)
• Equalizer’s low-range frequency setting (EQ Low Freq.)
• Equalizer’s low-range gain setting (EQ Low Gain)
• Equalizer’s high-range frequency setting (EQ High Freq.)
• Equalizer’s high-range gain setting (EQ High Gain)
• Voice octave setting (Octave)
• Voice volume level (Volume)
• Stereo image of each Voice (Pan)
• Fine tuning of the pitch of two Voices in Dual mode (Detune)
• Volume level changes for each Voice with response to the way you play (Touch Sense)
• Voice Transpose (Transpose)
• Scale (Scale)
• Depth of Soft pedal effect (Soft Pedal Depth)
• Depth of string resonance (String Resonance Depth)
• Depth of sustain sampling (Sustain Sampling Depth)
• Volume of the key-off sound (Key-off Sampling Depth)
• Modulation (Modulation)
• Pitch Bend range (Pitch Bend Range)
Data recorded globally to all tracks:
• Tempo
• Time signature (beat)
• Reverb type
• Chorus type
• Insertion effect type
n You can change any of the settings with the exception of note data (including the Octave and Transpose setting)
after recording.
n You can change the time signature at the beginning of the Song, or at a specific position in the Song, by using the
B [– (NO)][+ (YES)] buttons while the Song is stopped.
n When you record in the Dual or Split mode, the CP300 records each Voice onto a separate track. For details, refer
to page 48.

Convenient Functions
CP300 Owner’s Manual
52
Basic Operation
This function serves as a convenient MIDI “panic” switch during performance when using a connected
external tone generator. If the connected tone generator continues to sound (stuck notes, etc.) even after you’ve
released the keys of the CP-300, using this MIDI Panic control transmits the necessary messages to stop the
tone generator from sounding continuously.
Press the [REVERB] button while holding the [MIDI OUT] button.
A “MIDI PANIC SEND” message appears in the display.
n Keep in mind that MIDI Panic transmission will not function if MIDI transmission is set to Off (page 51).
MIDI Panic messages: All Note Off, All Sound Off, Reset All Controllers, Sustain Off, Sostenuto Off, Modulation
Depth Off, Pitch Bend Center, Channel Pressure Off
This parameter specifies whether the CP300’s built-in speakers produce sound (On) or not (Off).
Pressing the [SPEAKER] button alternates between On and Off. The built-in speakers produce sound if the
lamp is lit, and do not sound if the lamp is off.
n If the [SPEAKER] button is lit, the built-in speakers sound normally even when using the headphones.
MIDI Panic Control
Built-in Speakers On/Off
MIDI OUT PANEL LOCK
REVERB
CHORUS
*** MIDI PANIC SEND ***
NO YES
A
B
DC
SPEAKER MIDI SETTING
CLICK
OTHER SETTING
DEMO
SPEAKER MIDI SETTING
CLICK
OTHER SETTING
DEMO
Lit: Speaker sounds normally. Off: Speakers do not sound.

Master Settings—Master Edit
CP300 Owner’s Manual
55
Reference
The pitch of a note can be shifted upward or downward in
steps of an octave in each zone. You can adjust the offset up
or down over a maximum range of two octaves.
Setting targets: Zone 1, Zone 2, Zone 3, Zone 4
Setting range: -2 – 0 – +2
-2 (two octaves lower), 0 (no pitch shift), +2 (two octaves higher)
Default setting: 0
The Octave setting is effective when the [MASTER] button is on.
It also affects the following settings:
Internal: [VOICE EDIT] Octave setting for each Voice
MIDI Output: [MASTER EDIT] Octave setting for each zone
When the [MASTER] button is off, Octave affects the following:
Internal and MIDI Output: [VOICE EDIT] Octave setting for each
Voice
Turns the sound from the internal tone generator on or off
for each part.
Setting targets: Zone 1, Zone 2, Zone 3, Zone 4
Settings: On/Off
Default setting: On
Specifies the channels over which the CP300 transmits
MIDI data from each zone.
Setting targets: Zone 1, Zone 2, Zone 3, Zone 4
Setting range: Ch 1 – Ch 16, Off
Default settings:
n When the [MASTER] button is turned off, the “MIDI
Out Channel” setting in the MIDI Settings menu is used
for MIDI channel assignments.
Octave Setting for Connected External Tone
Generator
Internal Tone Generator On/Off Status
Octave
Zone 1 0
NO YES
A
B
DC
InternalTG
Zone 1 On
NO YES
A
B
DC
MIDI Transmission Channel for Master Mode
Zone 1 Ch 1
Zone 2 Ch 2
Zone 3 Ch 3
Zone 4 Ch 4
MidiOutChannel
Zone 1 Ch1
NO YES
A
B
DC

Detailed Settings for the Voices—Voice Edit
CP300 Owner’s Manual
61
Reference
This allows you to adjust the high-range frequency of the
part EQ.
Setting range: 500 Hz – 16 kHz
This allows you to adjust the high-range gain (amount of
boost/cut of the high frequencies) of the part EQ.
Setting range: -12 dB – +12 dB
This allows you to determine the manner and degree to
which the volume level changes in response to your touch
on the keyboard (how hard you play). Since the volume
level of actual harpsichords and pipe organs does not
change regardless of how you play the keyboard, the normal
setting for these Voices is 127. (See the setting range below.)
Setting range: 0 – 64 – 127
0: Softest level
64: Normal touch response; optimum dynamic range
127: Loudest level; fixed (no change in response to touch)
This allows you to assign a specific function to the pedal
connected to the [1 SUSTAIN] jack.
Settings:
*For best results, use an optional Yamaha FC7 Foot Controller.
This allows you to assign a specific function to the pedal
connected to the [2 SOSTENUTO] jack.
Setting range: same as “Pedal 1” (above)
This allows you to assign a specific function to the pedal
connected to the [3 SOFT] jack.
Setting range: same as “Pedal 1” (above)
EQ High Frequency*
EQ High Gain*
Touch Sensitivity (Touch Sense)*
Main Set?-->
EQ HighFreq. 4.0k
NO YES
A
B
DC
Main Set?-->
EQ HighGain 0
NO YES
A
B
DC
Main Set?-->
TouchSense 64
NO YES
A
B
DC
Assigning the Pedal 1 Function
Sustain On/Off switch-type damper (page 33).
SustainCont Damper function that sustains the sound longer
the further down you press the pedal (page 33)
Sostenuto Sostenuto pedal (page 33)
Soft Soft pedal (page 33)
Expression* Makes the sound softer or louder
Off No function is assigned
Assigning the Pedal 2 Function
Assigning the Pedal 3 Function
Main Set?-->
Pedal 1 SustainCont
NO YES
A
B
DC
Main Set?-->
Pedal 2 Sostenuto
NO YES
A
B
DC
Main Set?-->
Pedal 3 Soft
NO YES
A
B
DC

CP300 Owner’s Manual
63
Reference
Detailed Settings for MIDI Operations—MIDI Settings
Here you can make settings for MIDI applications, such as MIDI receive/transmit channels and other settings necessary when
using the CP300 with other MIDI devices.
n These settings will be retained even if you turn off the power to the CP300. If you set the Memory Backup’s MIDI Setting to Off in
the Other Settings menu, the MIDI Settings will return to the default (initial) values when you turn on the power next time
(page 71).
n While the Master mode is turned on, the “MIDI Out Channel” parameter and “MIDI Out Select” parameter in the MIDI Settings
menu are not effective.
MIDI (Musical Instrument Digital Interface) is a standard format for data transmission/reception. It enables
the transfer of performance data and commands between MIDI devices and personal computers. Using MIDI,
you can control a connected MIDI device from the CP300, or control the CP300 from a connected MIDI
device or computer.
MIDI Channels
MIDI data is transferred over 16 channels numbered from 1 through 16. Using these channels, 1 – 16, the
performance data for sixteen different instrument parts can be simultaneously sent over one MIDI cable.
Think of the MIDI channels as TV channels. Each TV station transmits its broadcasts over a specific channel.
Your home TV set receives many different programs simultaneously from several TV stations and you select the
appropriate channel to watch the desired program.
MIDI operates on the same basic principle. The transmitting instrument sends MIDI data on a specific MIDI
channel (MIDI Transmit Channel) via a single MIDI cable to the receiving instrument. If the receiving
instrument’s MIDI channel (MIDI Receive Channel) matches the Transmit Channel, the receiving instrument
will sound according to the data sent by the transmitting instrument.
For detailed information on how to set the MIDI transmit channel and the MIDI receive channel, refer to
page 65.
About MIDI
1
Weather Report
News
2
2
News
MIDI Transmit channel 2 MIDI Receive channel 2
MIDI
cable

CP300 Owner’s Manual
73
Reference
Using the Performance Functions
The Performance functions allow you to store edited Voices, including Dual/Split settings, Voice and effect parameters, MIDI
transmit/receive channel settings and Master Edit settings, to the VOICE/PERFORMANCE [1] – [16] buttons. Once they
have been saved, the Performances can instantly be recalled from the panel. Refer to the section “Handling Performance Files”
on page 76.
You can save up to a total of 64 Performances to the VOICE/PERFORMANCE [1] – [16] buttons. A single button can
contain four different Performances, A – D.
To select the desired Performance (A – D), use the VARIATION [▼][▲] buttons.
Performance file
A Performance file is a single file that includes the data of 64 Performances.
The current Performance, along with data of 64 Performances, is saved to the storage memory. For details
about recalling a Performance file from storage memory, refer to page 79.
Terminology
Storage memory: This memory area enables you to save Performance files and recorded Songs.
GRAND
PIANO 1
GRAND
PIANO 2
MONO
PIANO
E. PIANO 1 E. PIANO 2 E. PIANO 3
CLAVI.
VIBES
ORGAN 1 ORGAN 2 HARPSI. STRINGS CHOIR/PAD
GUITAR
BASS
XG
12345678
910111213141516
VARIATION
GRAND
PIANO 1
GRAND
PIANO 2
MONO
PIANO
E. PIANO 1 E. PIANO 2 E. PIANO 3
CLAVI.
VIBES
ORGAN 1 ORGAN 2 HARPSI. STRINGS CHOIR/PAD
GUITAR
BASS
XG
12345678
910111213141516
VOICE/PERFORMANCE
Performance
• Dual/Split settings
•Voice and effect parameters
• MIDI transmit/receive channel
settings
• Master Edit settings
Switch the Performance
(A – D)
Performance file = 64 Performances
Performance D (16 Performances)
Performance C (16 Performances)
Performance B (16 Performances)
Performance A (16 Performances)
GRAND
PIANO 1
GRAND
PIANO 2
MONO
PIANO
E. PIANO 1 E. PIANO 2 E. PIANO 3
CLAVI.
VIBES
ORGAN 1 ORGAN 2 HARPSI. STRINGS CHOIR/PAD
GUITAR
BASS
XG
12345678
910111213141516
A01
GRAND
PIANO 1
GRAND
PIANO 2
MONO
PIANO
E. PIANO 1 E. PIANO 2 E. PIANO 3
CLAVI.
VIBES
ORGAN 1 ORGAN 2 HARPSI. STRINGS CHOIR/PAD
GUITAR
BASS
XG
12345678
910111213141516
Performance A
Performance B
Performance C
Performance D
GRAND
PIANO 1
GRAND
PIANO 2
MONO
PIANO
E. PIANO 1 E. PIANO 2 E. PIANO 3
CLAVI.
VIBES
ORGAN 1 ORGAN 2 HARPSI. STRINGS CHOIR/PAD
GUITAR
BASS
XG
12345678
910111213141516
Performance A
Performance B
Performance C
Performance D
GRAND
PIANO 1
GRAND
PIANO 2
MONO
PIANO
E. PIANO 1 E. PIANO 2 E. PIANO 3
CLAVI.
VIBES
ORGAN 1 ORGAN 2 HARPSI. STRINGS CHOIR/PAD
GUITAR
BASS
XG
12345678
910111213141516
Performance A
Performance B
Performance C
Performance D
VOICE/PERFORMANCE
Select the button
to save
Performance
Recalling a Performance file
from storage memory
Storage memory
Preset Performance file
= 64 Performances
Performance file
= 64 Performances
Performance file
= 64 Performances

Handling Performance Files
CP300 Owner’s Manual
78
Reference
Renaming a Performance—Perf. Name
This allows you to rename the Performance.
For basic operation instructions, refer to page 76.
The following steps are detailed instructions for Step 4 (in the Basic Operation above).
4-1 Renaming a Performance.
To move the cursor (small underline), use the C [–][+] buttons.
To insert a space, press the C [–][+] buttons simultaneously.
To select a character on the cursor, use the D [–][+] buttons.
To delete a character, press the D [–][+] buttons simultaneously.
You can use up to 20 characters for a Performance name.
You can change the type of characters on the display using the “Character Code” parameter in the Song
File menu.
4-2 Press the B [+ (YES)] button to execute the job.
An “Executing” message appears and the data is saved. When the operation is complete, a “Completed”
message appears briefly, then returns to the previous display.
Never attempt to turn the [POWER] switch OFF while the “Executing” message is shown in the display. Turning
the power off in this state may cause the Performance file to be deleted.
Perf.Name Set?-->
A01.Piano+Pad
NO YES
A
B
DC
CAUTION

Handling Performance Files
CP300 Owner’s Manual
79
Reference
Saving as a Performance File—Save As
This allows you to save the Performance file as another file, under another file name.
For basic operation instructions, refer to page 76.
The following steps are detailed instructions for Step 4 (in the Basic Operation above).
4-1 Name the Performance as described in the “Perf.Name” section (page 78).
4-2 Press the B [+ (YES)] button to execute the job.
Press the B [+ (YES)] button to display the confirmation prompt (“Sure?”).
To proceed, press the B [+ (YES)] button again. An “Executing” message appears and the data is saved.
When the operation is complete, a “Completed” message appears briefly, then returns to the previous
display.
To cancel the operation, press the B [– (NO)] button instead of the B [+ (YES)] button.
If storage memory contains one or more Performance files, and you save a Performance file, the CP300
automatically sorts the Songs alphabetically and renumbers them.
Never attempt to turn the [POWER] switch OFF while the “Executing” message is shown in the display. Turning
the power off in this state may cause the Performance file to be deleted.
Recalling the Performance File from the Storage Memory—Load From Memory
This allows you to recall the Performance file from storage memory. A single Performance file consists of 64
separate Performances. The Performance file in the current memory will be replaced with the selected
Performance file in the storage memory.
For basic operation instructions, refer to page 76.
The following steps are detailed instructions for Step 4 (in the Basic Operation above).
4-1 Use the C [–][+] buttons to select the desired Performance file to be loaded.
4-2 Press the B [+ (YES)] button to execute the job.
Press the B [+ (YES)] button to display the confirmation prompt (“Sure?”).
To proceed, press the B [+ (YES)] button again. An “Executing” message appears and the data is saved.
When the operation is complete, a “Completed” message appears briefly, then returns to the previous
display.
To cancel the operation, press the B [– (NO)] button instead of the B [+ (YES)] button.
Never attempt to turn the [POWER] switch OFF while the “Executing” message is shown in the display. Turning
the power off in this state may cause the Performance file to be deleted.
n The Performance file loaded from the storage memory is effective after restarting the CP300.
SaveAs Execute?-->
001.PresetPerformance
NO YES
A
B
DC
CAUTION
LoadFromMem. Execute?-->
001.PresetPerformance
NO YES
A
B
DC
CAUTION

Handling Performance Files
CP300 Owner’s Manual
80
Reference
Deleting a Performance File—Delete File
This allows you to delete a Performance file from the CP300’s storage memory. It is not possible to delete a
Preset Performance file and current Performance file.
For basic operation instructions, refer to page 76.
The following steps are detailed instructions for Step 4 (in the Basic Operation above).
4-1 Use the C [–][+] buttons to select the Performance file to be deleted.
4-2 Press the B [+ (YES)] button to execute the job.
Press the B [+ (YES)] button to display the confirmation prompt (“Sure?”).
To proceed, press the B [+ (YES)] button again. An “Executing” message appears and the data is saved.
When the operation is complete, a “Completed” message appears briefly, then returns to the previous
display.
To cancel the operation, press the B [– (NO)] button instead of the B [+ (YES)] button.
Never attempt to turn the [POWER] switch OFF while the “Executing” message is shown in the display. Turning
the power off in this state may damage the data of the Performance.
n The Performance file in the current memory cannot be deleted. After you delete a Performance file, the CP300
automatically updates the Performance file numbers.
Renaming a Performance File—Rename File
You can rename a Performance file in the storage memory. You cannot change the Preset Performance file.
For basic operation instructions, refer to page 76.
The following steps are detailed instructions for Step 4 (in the Basic Operation above).
4-1 Name the Performance file as described in the “Perf.Name” section (page 78).
4-2 Press the B [+ (YES)] button to execute the job.
After you rename a Performance, the CP300 sorts Performance files alphabetically and renumbers them.
Never attempt to turn the [POWER] switch OFF while the “Executing” message is shown in the display. Turning
the power off in this state may cause the Performance file to be deleted.
DeleteFile Execute?-->
001.MyPerformance.PER
NO YES
A
B
DC
CAUTION
RenameFile Execute?-->
001.MyPerformance.PER
NO YES
A
B
DC
CAUTION

CP300 Owner’s Manual
81
Reference
Handling Song Files
File displays (accessed via the [SONG FILE] button) enable you to handle and organize files (e.g., save, delete and rename
Song files) and change characters from the display.
A message (information or confirmation prompt) sometimes appears on the display to facilitate operation.
Refer to the “Message List” on page 94 for an explanation of each message, along with troubleshooting
information and the appropriate actions to take.
1 Prepare the file(s) for handling.
When using the Save To Memory, Rename Song and Delete Song parameters:
Use the SONG SELECT [N] [O] buttons to select the target Song.
When using the Character Code parameter:
No operations necessary; go on to Step 2 below.
2 Press the [SONG FILE] button to access the Song File settings.
3 Select the desired item by pressing the [SONG FILE] button or by using the A [–][+]
buttons.
To close the Song File menu, press the [EXIT] button once or twice.
4 Press the B [– (NO)][+ (YES)] to D [–][+] button to execute the job or change the value.
For details about each operation, refer to pages 82 – 84.
5 Press the [EXIT] button to exit the Song File settings.
Setting Parameter name Page
Saving recorded Songs to the CP300’s storage memory SaveToMemory 82
Deleting a Song from the CP300’s storage memory DeleteSong 83
Renaming Song files RenameSongs 83
Changing the type of characters in display CharacterCode 84
Terminology
Song file: On the CP300, a Song file includes both Song data and a Song number.
Song File—Basic Operation
NO YES
EXIT
MASTER
PERFORMANCE
MASTER EDIT
PERFORM.FILE
TRANSPOSE
SONG SELECT
NEW SONG
REC
STOP
PLAY/PAUSE
SYNCHRO START
SONG VOICE/PERFORMANCE
12
3-16
TRACK
SONG FILE
SONG SETTING
MIDI OUT PANEL LOCK
DOWN UP
TEMPO
A
B
D
C
CONTRAST
GRAND
PIANO 1
GRAND
PIANO 2
MONO
PIANO
E. PIANO 1 E. PIANO 2 E. PIANO 3
CLAVI.
VIBES
ORGAN 1 ORGAN 2 HARPSI. STRINGS CHOIR/PAD
GUITAR
BASS
XG
12345678
910111213141516
VOICE EDIT
SPLIT
VARIATION
REVERB
CHORUS SPEAKER MI DI SETTI NG
MASTER EQ EDIT
CLICK
OTHER SETTING
DEMO
2, 3 3
1 4
4
45
RenameSong Execute?-->
M-001:NewSong.MID
NO YES
A
B
DC

Handling Song Files
CP300 Owner’s Manual
83
Reference
Deleting a Song from the CP300’s Storage Memory—Delete Song
This allows you to delete a Song from the CP300’s storage memory. It is not possible to delete a Preset Song.
For basic operation instructions, refer to page 85.
The following steps are detailed instructions for Step 4 (in the Basic Operation above).
4-1 Use the C [–][+] buttons to select a Song to delete.
4-2 Press the B [+ (YES)] button to execute the job.
Press the B [+ (YES)] button to display the confirmation prompt (“Sure?”).
To proceed, press the B [+ (YES)] button again. An “Executing” message appears and the data is saved.
When the operation is complete, a “Completed” message appears briefly, then returns to the previous
display.
Never attempt to turn the [POWER] switch OFF while the “Executing” message is shown in the display. Turning
the power off in this state may damage the data of the recorded Song.
n After you delete a Song, the CP300 automatically updates the Song numbers.
Renaming Song Files—Rename Song
This allows you to rename Song files. The titles of any Songs can be changed, with the exception of the Preset
Songs and “P-000:NewSong.”
For basic operation instructions, refer to page 81.
The following steps are detailed instructions for Step 4 (in the Basic Operation above).
4-1 Name the Song as described in the Save To Memory operation (page 82).
4-2 Press the B [+ (YES)] button to execute the job.
After you rename a Song, the CP300 sorts all Songs alphabetically and renumbers them.
Never attempt to turn the [POWER] switch OFF while the “Executing” message is shown in the display. Turning
the power off in this state may cause the recorded Song to be deleted.
DeleteSong Execute?-->
M-001:NewSong.MID
NO YES
A
B
DC
CAUTION
RenameSong Execute?-->
M-001:NewSong.MID
NO YES
A
B
DC
CAUTION

Settings for Song Recording and Playback—Song Settings
CP300 Owner’s Manual
87
Reference
n Channels that do not contain any data are not displayed.
However, for some Songs, all channels (including the
channels that contain no data) may be displayed.
n When you clear all channels using the “ALL” parameter,
you can overwrite the Song. In this case, an empty Song
file having no channel data is saved.
This allows you to specify a section within a Song and play
it back repeatedly. The section can be specified freely (in
measures/beats), and playback repeats after it reaches the
point just prior to the beat specified as the end point.
If you start playing back a Song with “Repeat On” selected,
a lead-in count starts, followed by the repeated playback of
the specified part until you press the [STOP] button. If you
select “Repeat Off,” normal playback starts.
Settings: RepeatOn, RepeatOff
Default setting: RepeatOff
If you select “Repeat On,” use the C [–][+] and D [–][+] buttons
to specify the range to be repeated during Song playback.
n When you select another Song, the specified range is
automatically cancelled and the Repeat function is turned
off.
This allows you to repeatedly play back all Songs or a single
Song selected from storage memory.
When you start playback, the CP300 plays the Song you
selected from the front panel, then starts repeat playback of
the specified Songs until you press the [STOP] button.
Press the [STOP] button to return to the top of the Song.
Settings:
Default setting: PresetSongs
This allows you to set the time signature of the click.
Specify the numerator of the time signature by using the
C [–][+] buttons and specify the denominator by using the
D [–][+] buttons. For example, to specify 3/4 time, use the
C [–][+] buttons to select “3” and the D [–][+] buttons to
select “4.”
Setting range for the numerator: 1 – 16
Setting options for the denominator: 2, 4, 8
Default setting: 4/4
This allows you to set volume of the click sound.
Setting range: 0 – 127
Default setting: 100
This allows you to select whether the click sound has a bell
accent, or plays only a click sound.
Setting range:
Default setting: BellOff
From/To Repeat
Song Repeat
PresetSongs All Preset Songs
All All Memory Songs and Preset Songs
OneSong One Song selected from the front panel
MemorySongs All recorded Songs
FromToRepeat RepeatOff
From 001:001 To 002:001
NO YES
A
B
DC
SongRepeat Off
PresetSongs
NO YES
A
B
DC
Time Signature
Click Volume
Click Type
BellOff Click (standard click sound)
BellOn Click and bell
TimeSignature
4/ 4
NO YES
A
B
DC
ClickVolume
100
NO YES
A
B
DC
ClickType
BellOff
NO YES
A
B
DC
Connecting to a Computer and Other MIDI Devices
CP300 Owner’s Manual
89
Reference
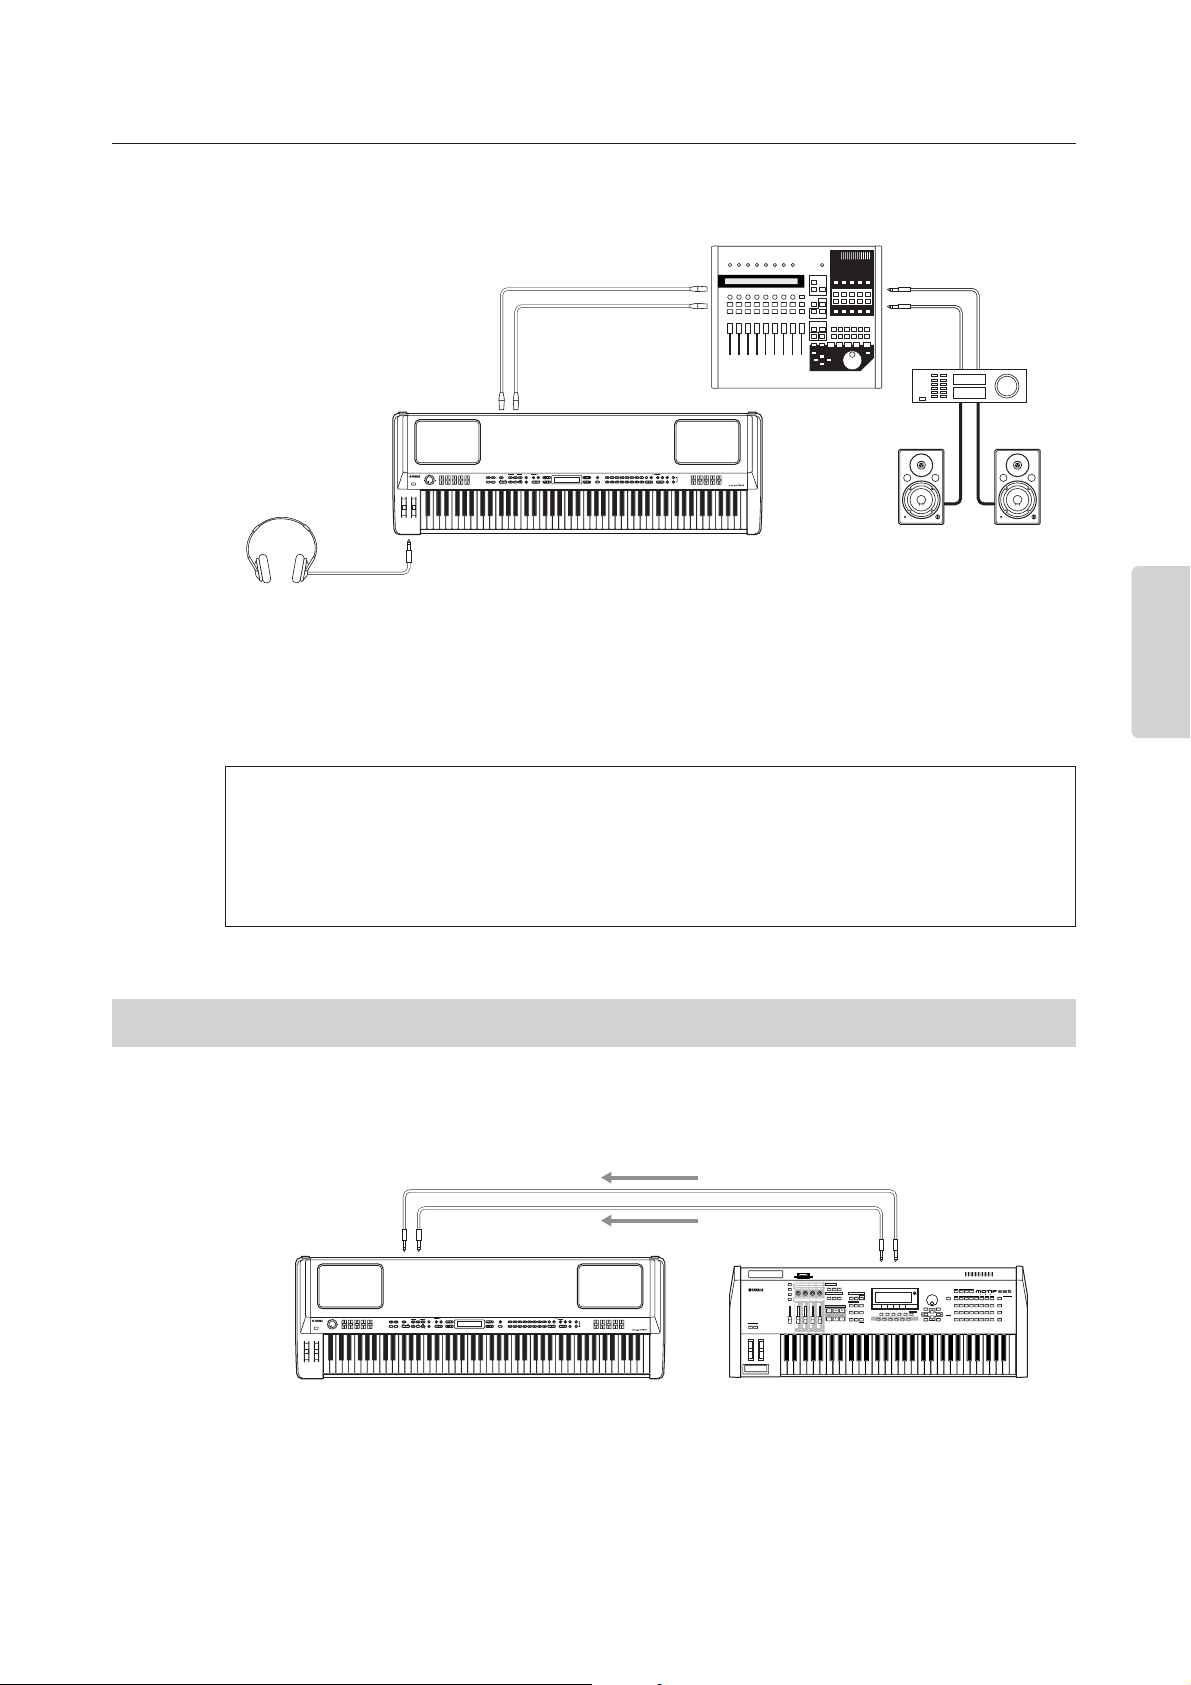
Connecting to a Mixer
These are extra audio outputs in addition to the main OUTPUT L/R jacks.
The CP300 also features professional-use balanced XLR connectors for the OUTPUT L/R jacks. This type of
connector is used in professional studio equipment and installations.
n • Connecting a pair of headphones does not affect audio output from the OUTPUT L/R and OUTPUT L/
MONO, R jacks. You can adjust the volume of the external audio equipment, built-in speakers or headphones
with the [MASTER VOLUME] dial.
• The sound monitored through the headphones is identical to the sound of the OUTPUT L/R and OUTPUT L/
MONO, R jacks.
The CP300 also features a set of INPUT jacks. The stereo outputs from another instrument can be connected
to these jacks, allowing you to play the sound of an external instrument through the CP300’s speakers.
Connect the outputs from the other instrument to the INPUT L/MONO and R jacks on the rear panel.
The sound of an instrument connected to these INPUT jacks cannot be adjusted from the CP300. Any level
adjustments must be done from the instrument itself.
About the OUTPUT L/R jacks
These XLR connectors carry a balanced signal output, and are intended for use in professional studios
and installations. If the corresponding circuitry is designed properly, however, XLR-type connectors will
also handle unbalanced signals with no problem. Microphone cables usually have this type of connector,
as do the inputs and outputs of most professional audio gear.
Connecting to External Equipment
OUTPUT L
OUTPUT R
CP300
Powered
speaker
(Left)
Powered
speaker
(Right)
Headphones
OUTPUT L jack OUTPUT R jack
PHONES
jack
Mixer
Amplifier
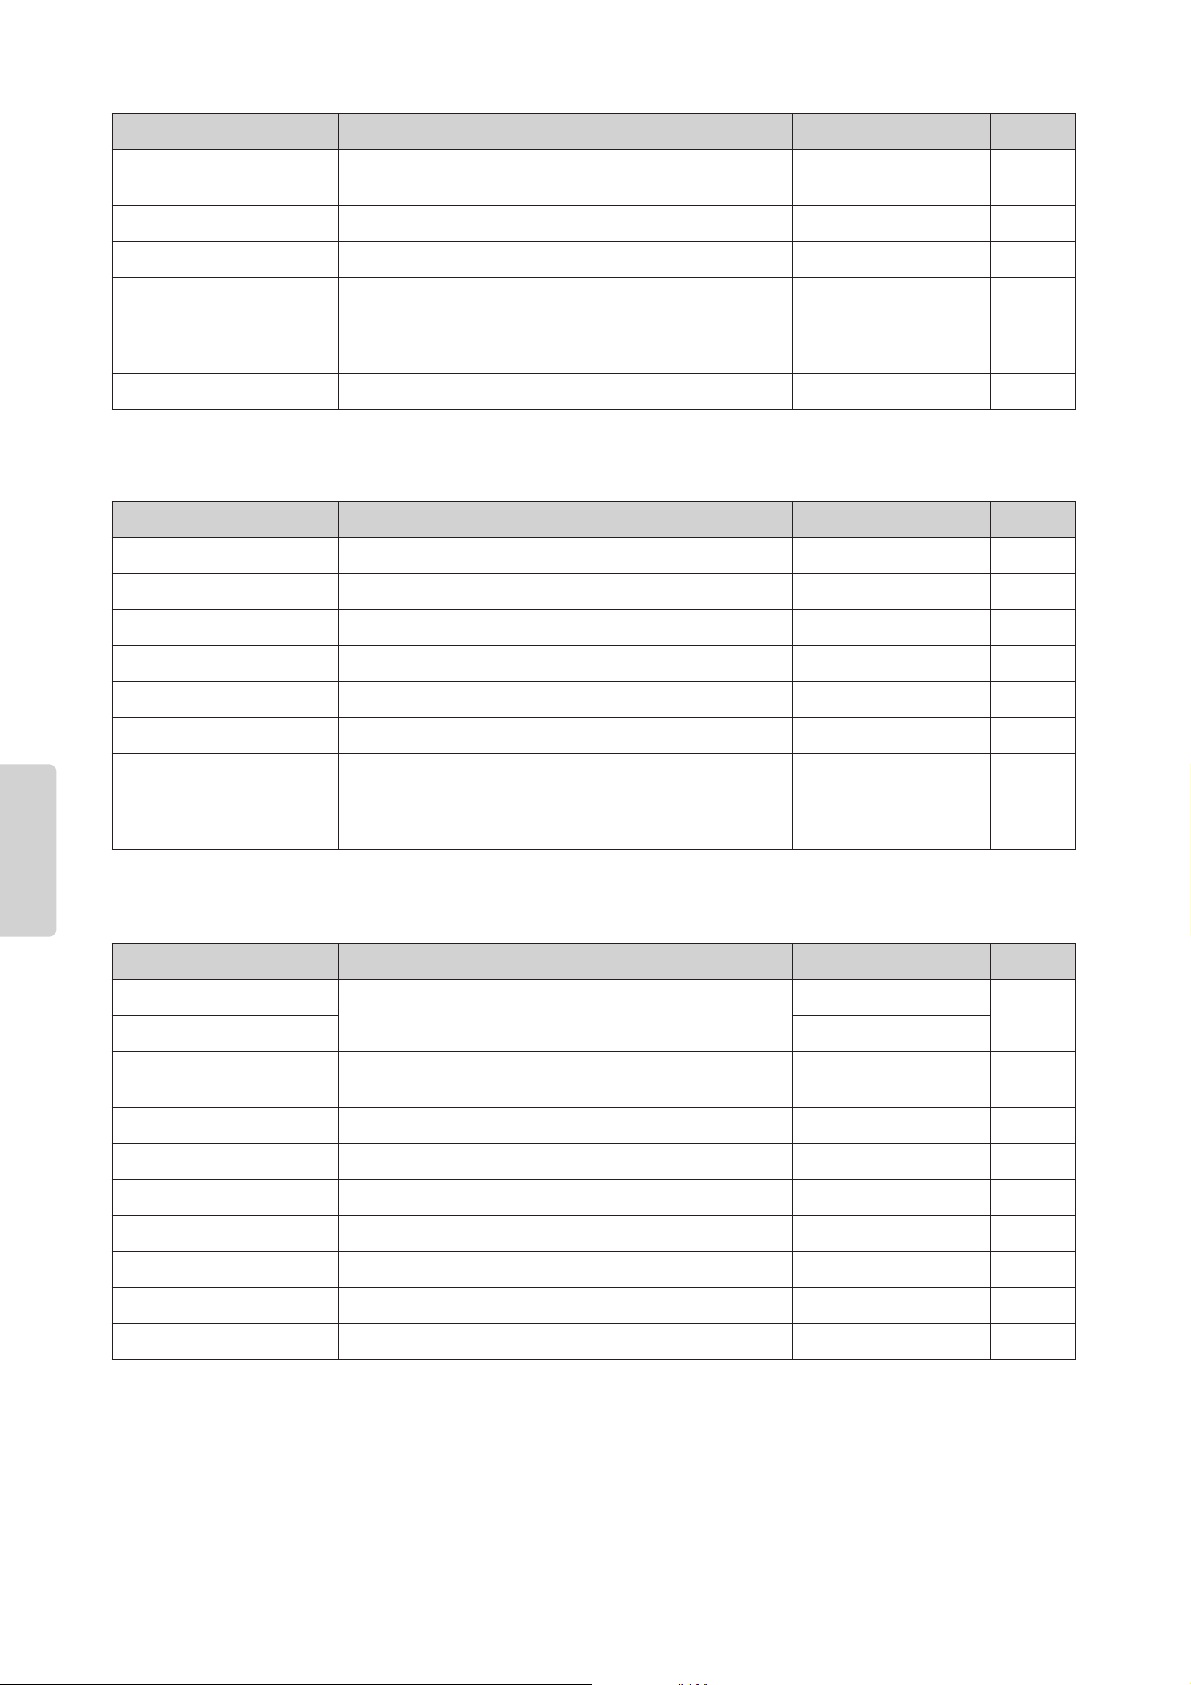
MUSIC PRODUCTION SYNTHESIZER
CP300
External MIDI synthesizer/tone generator
OUTPUT L/MONO jack OUTPUT R jack
INPUT L/MONO jack INPUT R jack

Message List
CP300 Owner’s Manual
94
Appendix
Appendix
Message List
The messages are listed in alphabetical order.
Message Description
Bulk data reception has been completed.
This is shown following the “Bulk Data Receiving Voice” message. This indicates that the
instrument finished receiving bulk data, and that you can go on to the next step.
Bulk data reception has failed.
Check that the cable connection is secure and try again.
The instrument is receiving bulk data while this message is displayed.
Wait until the message closes, then go on to the next step.
The instrument failed to transmit the bulk data.
If this message appears, make sure that the power of your computer has not been turned
off, that the cable is connected correctly, and that the driver on your computer is functioning
correctly. Then try transmitting the data once again.
This is shown when the operation has been canceled.
The operation is completed.
This is shown following the “Executing” message. The instrument’s internal processing is
complete. You can go on to the next step.
The file format is invalid.
This message appears when the Performance file selected via “Load From Mem.” (page 79)
is invalid and cannot be called up.
The Song name or Performance name is duplicated.
You tried to save a Song file after changing its name using the “Rename Song” (page 83), or
a Performance file after changing its name using the “Rename File” (page 80) parameter,
but a Song or Performance with the same name already exists in memory. The instrument
returns to the previous display after three seconds. Rename the Song correctly.
Do you wish to execute the operation?
This message prompts you to execute a file-related operation. Press the B [+ (YES)] button
to save the settings. Press the B [– (NO)] or [EXIT] button to cancel.
The instrument is processing the data internally.
Wait until the message closes, then proceed to the next step.
The factory default settings, excepting files stored to storage memory (refer to
“Factory Set” on page 71), have been restored.
This message also appears if you press and hold down the C7 key and turn on the power to
the instrument (page 17).
The factory default settings, including files stored to storage memory (refer to
“Factory Set” on page 71), have been restored.
This message also appears if you press and hold down the C7 and Bb6 keys and turn on the
power to the instrument (page 17).
BulkDataReceiving
Completed
BulkDataReceiving
Error
BulkDataReceiving
BulkDump Error
Canceled
Completed
DataFmtErr
DuplicatedName
Execute?-->
Executing
FactorySet Completed
MemoryFileExcluded
FactorySet Completed
MemoryFileIncluded

Message List
CP300 Owner’s Manual
95
Appendix
The instrument’s flash memory (storage memory) has expired.
Consult your Yamaha dealer. If this message appears, the instrument will not be able to back
up the Songs, Performance files and settings in memory. Press the [EXIT] button to return to
the original display.
There is a problem with the USB connector.
The power to the computer is turned off, the cables are connected incorrectly, or the driver
or MIDI application on the computer is working incorrectly. In this situation, turn the power off
to both the instrument and the computer, and check the cable connection. Then, turn on the
power to the computer and the instrument in this order and check to see if the driver and
MIDI application on the computer work properly.
This message is also shown if the USB cable is connected to the instrument without being
connected to your computer. When you wish to use the instrument alone, turn off the power
of the instrument, disconnect the USB cable from the instrument, then turn the power on
again. If the cable is left connected in this condition, the instrument may not function
properly.
The power was incorrectly turned off the previous time. The instrument is
checking the internal memory.
You turned off the power to the instrument while it was writing data to storage memory. This
message appears next time you turn on the power. The internal memory is being checked
while this message is displayed. If it has been confirmed that any files in the storage
memory are corrupted, all the files will be deleted.
Some files in the storage memory have been restored.
This message appears following the message “Last Power Off Illegal / Memory File
Checking,” indicating that the instrument recovered as much data in the storage memory as
possible.
Files on the storage memory have been deleted.
This message appears following the message “Last Power Off Illegal / Memory File
Checking,” indicating that the instrument could not recover data in the storage memory and
that all memory files were deleted.
A memory problem has occurred.
While a Song or a Performance file was being loaded, the instrument detected defects in
memory. Reset the instrument to its normal (factory default) settings with “Memory File
Included” (page 71) after you back up all Song data.
There may be a memory problem.
1. This message indicates that there may be a problem with the memory when selecting a
Song or Performance file. If the message appears repeatedly when you continue using
the instrument, back up the Song data, then restore the default setting by using “Memory
File Included” in “Factory Set” (page 71).
2. This message will appear if a different “Character Code” (page 84) is selected than was
when you assigned the Performance file name. In this case, switch the “Character
Code,” re-select the Performance file.
There is no more available space in storage memory.
There is not enough memory space left and you cannot save any more Songs or
Performance files. Delete some Songs or Performance files in the storage memory (pages
80, 83), then save the new data to memory.
There is no Song to be saved.
This message will appear if there is no Song for the “Save To Memory” (page 82) operation
to save. In this case, no Song will be saved.
There is no file to be deleted.
You tried to delete a file that does not exist in the storage memory. You cannot delete the file.
There is no Song to be deleted.
You tried to delete a Song that does not exist in the storage memory. The Song cannot be
deleted.
Message Description
FlashMemoryLifeTime
Exit-->
HostError
LastPowerOffIllegal
MemoryFileChecking
LastPowerOffIllegal
MemoryFileErrorRecovered
LastPowerOffIllegal
MemoryFileErased
MemoryError
MemoryError
MemoryFull
NoSong
NoFileToDelete
NoSongToDelete

Troubleshooting
CP300 Owner’s Manual
99
Appendix
The sound sustains and does not
decay while pressing the pedal to
which the sostenuto function is
assigned.
For Voices in the ORGAN, STRINGS,
CHOIR, PAD, and XG groups, the sound
continues sustaining while you are holding
down the sostenuto pedal.
This is normal.
Higher or lower notes do not sound
correctly when the transpose or
octave setting is made.
The setting range for the transposition and
octave setting is C-2 – G8. (With the normal
setting, the 88 keys of this instrument cover
the range of A-1 – C7.) If the lowest key is
set to a note lower than C-2, it will produce a
sound one octave higher. If the highest key
is set to a note higher than G8, it will
produce a sound one octave lower.
This is normal.
The tempo does not change even
though the Song was recorded with
tempo changes.
Depending on the timing of tempo changes,
the tempo change may not have been
recorded. In this case, the recording will be
played back at the original tempo. Make
tempo changes when the recording track is
selected and a red track indicator is
flashing. The same method applies to
editing the tempo after recording.
This is normal. Check the location of the
tempo change.
Performance in Dual or Split mode
is not recorded, and one or more
tracks have been unexpectedly
deleted.
For Dual or Split mode recording, the
recording track for the Layer part Voice or
the Left part Voice is automatically assigned
(page 48). Therefore, if the track already has
data, the data will be overwritten during
recording. Also, the actual process of
switching to Dual mode or Split mode in the
middle of the Song is not recorded.
Therefore, the notes you played with the
Layer part Voice or the Left part Voice are
not recorded.
This is normal.
Cannot change the time signature in
the Song after recording.
The time signature cannot be changed in
the middle of the measure.
Press the [STOP] button to locate the top of
the Song, use the B [– (NO)][+ (YES)]
buttons to locate the measure in which you
wish to change the time signature, and then
change it.
The Song title is not correct. The “Character Code” setting may be
different than that used when you named the
Song.
Use the “Character Code” parameter
(page 84) in the [SONG FILE] button to
change the setting.
The Performance title is not correct. The “Character Code” parameter setting
(page 84) has been changed from the one
set when naming the Performance file.
Make sure that the “Character Code”
parameter is set to the same one as set
when the Performance file was named.
Problem Possible causes Solution

CP300 Owner’s Manual
100
Appendix
MIDI Data Compatibility
The data and the MIDI device must match in regards to the items below.
Voice allocation format
With MIDI, Voices are assigned to specific numbers, called “program numbers.” The numbering standard
(order of Voice allocation) is referred to as the “Voice allocation format.” Voices may not play back as expected
unless the Voice allocation format of the Song data matches that of the compatible MIDI device used for
playback.
GM System Level 1
This is one of the most common Voice allocation formats. Many MIDI devices are compatible with GM
System Level 1. Most commercially available music data is created as Format 0 “GM System Level 1.”
XG
XG is a major enhancement of the GM System Level 1 format, and was developed by Yamaha specifically
to provide more Voices and variations, as well as greater expressive control over Voices and effects, and to
ensure compatibility of data well into the future. Song data recorded on the instrument using Voices in
the XG category is XG-compatible.
Factory Setting List
CP300 Owner’s Manual
102
Appendix
Master settings [MASTER EDIT]
Settings for Song recording and playback [SONG SETTING]
HalfPedalPoint Setting the point at which the sustain pedal starts to affect
the sound
070
PitchBendRange Setting the Pitch Bend range 2 70
EqualizerLock Locking the Master Equalizer settings On 71
MemoryBackUp Selecting items saved at shutdown Transpose,
Main/Left Layer,
OtherSetting: Off,
Others: On
71
FactorySet Restoring the default settings MemoryFileExcluded 71
Parameter name Settings Value Page
Slider Assigning a function to the [ZONE CONTROL] slider VOLUME 54
SendBankMsb Setting the MSB of the Send Bank Select message 0 54
SendBankLsb Setting the LSB of the Send Bank Select message 0 54
SendPG# Setting the Program Change message 1 54
Octave Setting the octave of the external tone generator 0 55
InterITG Turning the internal tone generator on/off On 55
MidiOutChannel Setting the MIDI transmit channel when the Master mode is
turned on
Zone 1: Ch 1,
Zone 2: Ch 2,
Zone 3: Ch 3,
Zone 4: Ch 4
55
Parameter name Settings Value Page
Quantize Correcting note timing.
Determining how strongly the notes will be quantized.
Off 86
SwingRate 50%
QuickPlay Specifying whether playback starts immediately along with
the first voicing
On 86
ChannelListen Auditioning the channels Ch 1 86
ChannelClear Deleting data from each channel Ch 1 86
FromToRepeat Specifying the range and playing back repeatedly RepeatOff 87
SongRepeat Playing back a Song/all Songs repeatedly PresetSongs 87
TimeSignature Setting the Click time signature 4/4 87
ClickVolume Setting the Click volume level 100 87
ClickType Setting the Click bell sound BellOff 87
Parameter name Settings Value Page

Preset Performance List
CP300 Owner’s Manual
107
Appendix
The 32 Performances in variations C, D use the Grand Piano 1 Voice.
B07 Organ Upper/Lower Dual+Split JazzOrgan SoloSine Jazz Organ Simulates a dual-manual organ.
Play chords in the left hand, and
solo with the right.
B08 E.Piano/GrandPiano Split GrandPiano1 Phaser E.Piano Play chords in the left hand on
an electric piano with phaser
applied, and piano solo in the
right.
B09 JazzOrg/GrandPiano Split GrandPiano1 Jazz Organ Play organ backing in the left
hand, and piano solo in the
right.
B10 SynBass/SynBrass Dual+Split SynBrss1 SynBrss1
SynBass1Dark
Play synth bass in the left hand,
and bright synth brass in the
right.
B11 Delay E.Piano Single
Standard
E.Piano
Electric piano with delay
applied to create a sense of
space.
B12 Room Piano Single GrandPiano1 Piano that sounds as if heard at
a distance in a spacious room.
B13 Old piano Single GrandPiano2 Simulation of a piano sound
heard on an old record. Distorts
slightly as you play harder.
B14 Baroque Ensemble Dual+Split Hc8'+4' PipeOrganP Strings Choir Play strings and chorus in the
left hand, and harpsichord and
pipe organ in the right.
B15 AOR Split Dual+Split GrandPiano2 SynthPad1 E.Bass MuteGtr Rich sound that lets you play
muted guitar and bass in the left
hand, and piano and pad in the
right.
B16 Drum Kit Drm StandardKit1 The CP300 provides high-
quality drum sounds as well as
piano sounds. Try out your
drumming skills!
Number Performance name Type Voices used Performance discription
Main Layer Left Left Layer
CP300 Owner’s Manual
108
Appendix
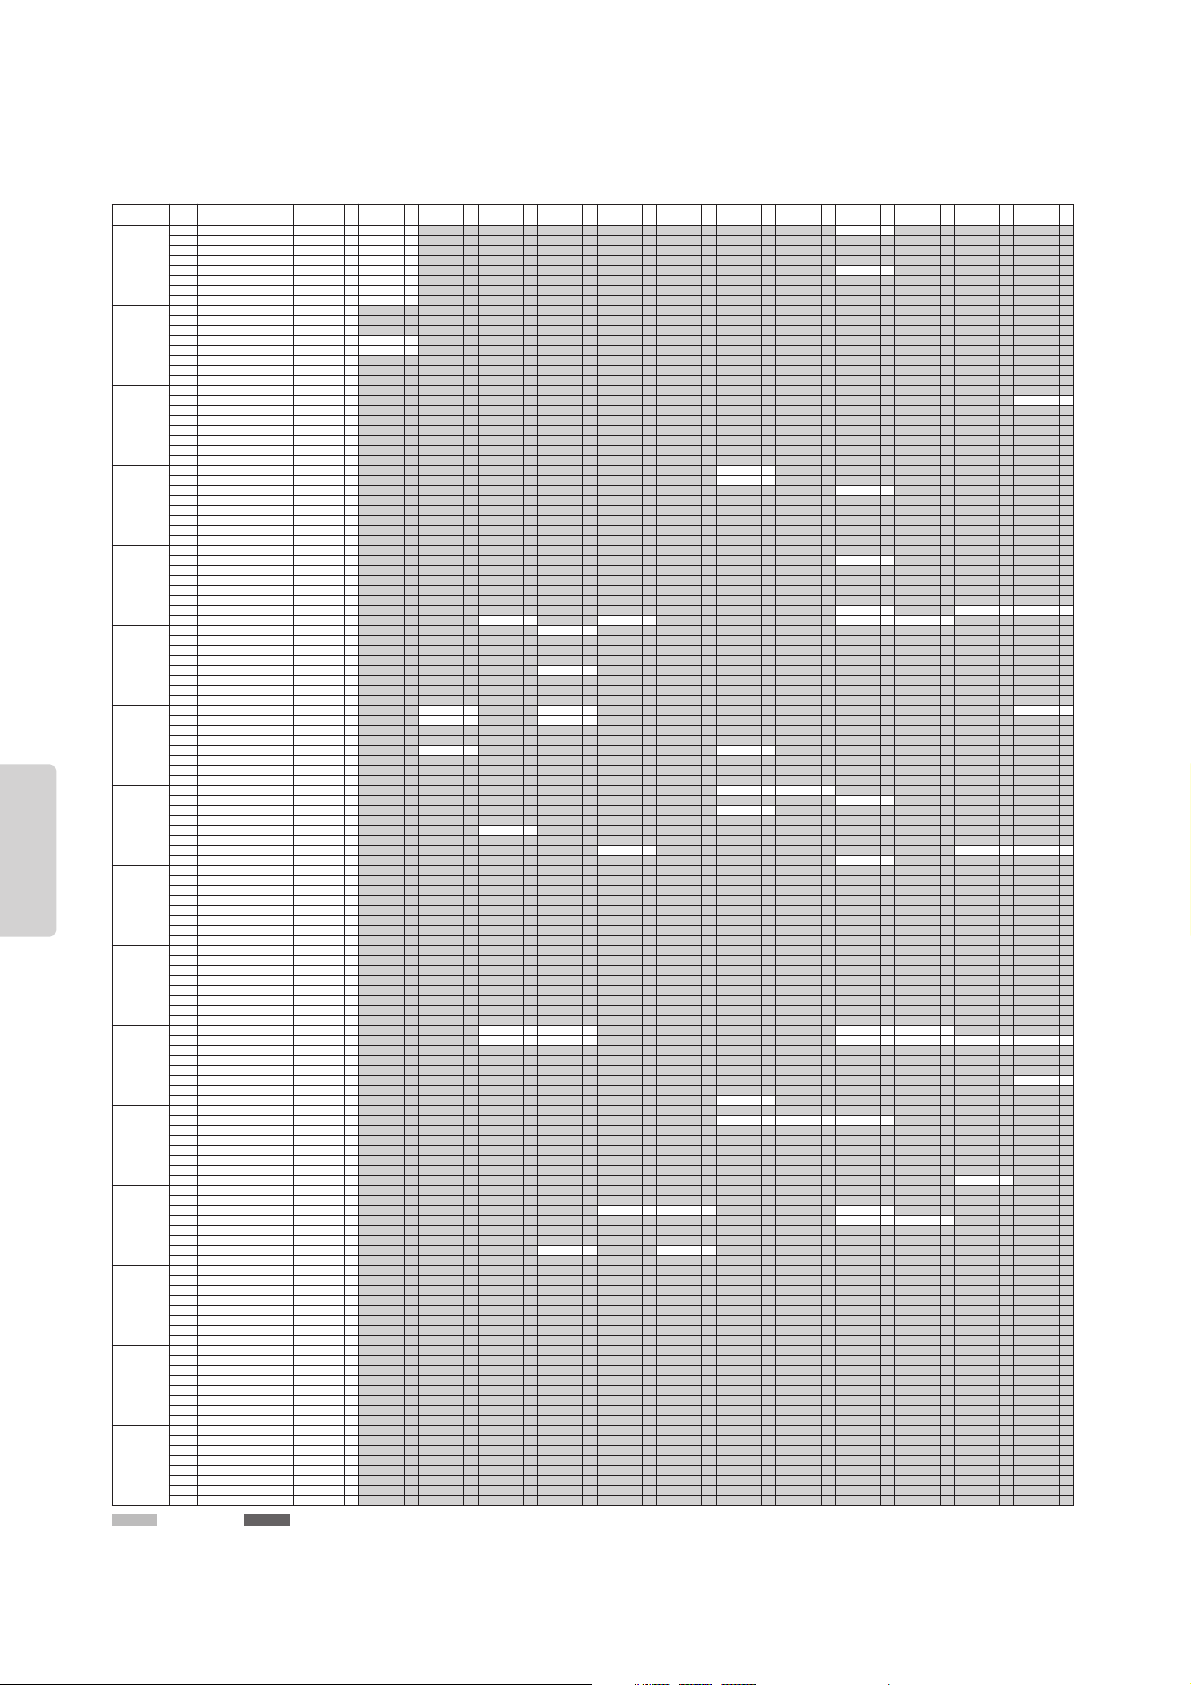
XG Voice List
Bank Select MSB=00
KSP Stereo Single Slow Fast Decay Double Attack Bright Dark Resonant Attack
Instrument
Group
Pgm#
Bank 0
Bank Select LSB=00
Bank 0 E Bank 1 E Bank 3 E Bank 6 E Bank 8 E Bank 12 E Bank 14 E Bank 16 E Bank 17 E Bank 18 E Bank 19 E Bank 20 E Bank 24 E
Piano 1 Acoustic Grand Piano GrandPno 2 GrndPnoK 1 MelloGrP 2
2 Bright Acoustic Piano BritePno 2 BritPnoK 1
3 Electric Grand Piano El.Grand 2 ElGrPnoK 2
4 Honky-tonk Piano HnkyTonk 2 HnkyTnkK 2
5 Electric Piano 1 E.Piano1 2 El.Pno1K 1 MelloEP1 2
6 Electric Piano 2 E.Piano2 2 El.Pno2K 1
7 Harpsichord Harpsi. 1 Harpsi.K 1
8 Clavi Clavi. 2 Clavi K 1
Chromatic
Percussion
9 Celesta Celesta 1
10 Glockenspiel Glocken 1
11 Music Box MusicBox 2
12 Vibraphone Vibes 1 Vibes K 1
13 Marimba Marimba 1 MarimbaK 1
14 Xylophone Xylophon 1
15 Tubular Bells TubulBel 1
16 Dulcimer Dulcimer 1
Organ 17 Drawbar Organ 1 DrawOrgn 1
18 Percussive Organ PercOrgn 1 70sPcOr1 2
19 Rock Organ RockOrgn 2
20 Church Organ 1 ChrchOrg 2
21 Reed Organ ReedOrgn 1
22 Accordion Acordion 2
23 Hamonica Harmnica 1
24 Tango Accordion TangoAcd 2
Guitar 25 Acoustic Guitar (nylon) 1 NylonGtr 1 NylonGt2 1
26 Acoustic Guitar (steel) SteelGtr 1 SteelGt2 1
27 Electric Guitar (jazz) Jazz Gtr 1 MelloGtr 1
28 Electric Guitar (clean) CleanGtr 1
29 Electric Guitar (muted) Mute.Gtr 1
30 Overdriven Guitar Ovrdrive 1
31 Distortion Guitar Dist.Gtr 1
32 Guitar Harmonics GtrHarmo 1
Bass 33 Acoustic Bass Aco.Bass 1
34 Electric Bass (finger) FngrBass 1 FingrDrk 2
35 Electric Bass (pick) PickBass 1
36 Fretless Bass Fretless 1
37 Slap Bass 1 SlapBas1 1
38 Slap Bass 2 SlapBas2 1
39 Synth Bass 1 SynBass1 1 SynBa1Dk 1 FastResB 1 AcidBass 1
40 Synth Bass 2 SynBass2 2 MelloSBa 1 Seq Bass 2 ClkSynBa 2 SynBa2Dk 1
Strings 41 Violin Violin 1 Slow Vln 1
42 Viola Viola 1
43 Cello Cello 1
44 Contrabass Contrabs 1
45 Tremolo Strings Trem.Str 1 SlwTrStr 1
46 Pizzicato Strings Pizz.Str 1
47 Orchestral Harp Harp 1
48 Timpani Timpani 1
Ensemble 49 String Ensemble 1 Strings1 1 S.Strngs 2 Slow Str 1 Arco Str 2
50 String Ensemble 2 Strings2 1 S.SlwStr 2 LegatoSt 2
51 Synth Strings 1 Syn.Str1 2
52 Synth Strings 2 Syn.Str2 2
53 Choir Aahs ChoirAah 1 S.Choir 2 Ch.Aahs2 2
54 Voice Oohs VoiceOoh 1
55 Synth Voice SynVoice 1
56 Orchestra Hit Orch.Hit 2
Brass 57 Trumpet Trumpet 1 Trumpet2 1 BriteTrp 2
58 Trombone Trombone 1 Trmbone2 2
59 Tuba Tuba 1 Tuba 2 1
60 Muted Trumpet Mute.Trp 1
61 French Horn Fr. Horn 2 FrHrSolo 1
62 Brass Section 1 BrasSect 1
63 Synth Brass 1 SynBrss1 2 Quack Br 2 RezSynBr 2 PolyBrss 2
64 Synth Brass 2 SynBrss2 1 Soft Brs 2
Reed 65 Soprano Sax SprnoSax 1
66 Alto Sax Alto Sax 1
67 Tenor Sax TenorSax 1
68 Baritone Sax Bari.Sax 1
69 Oboe Oboe 2
70 English Horn Eng.Horn 1
71 Bassoon Bassoon 1
72 Clarinet Clarinet 1
Pipe 73 Piccolo Piccolo 1
74 Flute Flute 1
75 Recorder Recorder 1
76 Pan Flute PanFlute 1
77 Blown Bottle Bottle 2
78 Shakuhachi Shakhchi 2
79 Whistle Whistle 1
80 Ocarina Ocarina 1
Synth Lead 81 Lead 1 (square) SquareLd 2 SquarLd2 1 LMSquare 2 Hollow 1 Shroud 2
82 Lead 2 (sawtooth) Saw Ld 2 Saw Ld 2 1 ThickSaw 2 Dyna Saw 1 Digi Saw 2 Big Lead 2 HeavySyn 2
83 Lead 3 (calliope) CaliopLd 2
84 Lead 4 (chiff) Chiff Ld 2
85 Lead 5 (charang) CharanLd 2
86 Lead 6 (voice) Voice Ld 2 SynthAah 2
87 Lead 7 (fifths) Fifth Ld 2
88 Lead 8 (bass+lead) Bass&Ld 2 Big&Low 2
Synth Pad 89 Pad 1 (new age) NewAgePd 2
90 Pad 2 (warm) Warm Pad 2 ThickPad 2 Soft Pad 2 Sine Pad 2
91 Pad 3 (polysynth) PolySyPd 2
92 Pad 4 (choir) ChoirPad 2
93 Pad 5 (bowed) BowedPad 2
94 Pad 6 (metallic) MetalPad 2
95 Pad 7 (halo) Halo Pad 2
96 Pad 8 (sweep) SweepPad 2 Shwimmer 2
Synth Effects 97 FX 1 (rain) Rain 2
98 FX 2 (soundtrack) SoundTrk 2
99 FX 3 (crystal) Crystal 2 SynDrCmp 2 Popcorn 2 TinyBell 2
100 FX 4 (atmosphere) Atmosphr 2 WarmAtms 2 HollwRls 2
101 FX 5 (brightness) Bright 2
102 FX 6 (goblins) Goblins 2
103 FX 7 (echoes) Echoes 2 Echoes 2 2 Echo Pan 2
104 FX 8 (sci-fi) Sci-Fi 2
Ethnic 105 Sitar Sitar 1
106 Banjo Banjo 1
107 Shamisen Shamisen 1
108 Koto Koto 1
109 Kalimba Kalimba 1
110 Bagpipe Bagpipe 2
111 Fiddle Fiddle 1
112 Shanai Shanai 1
Percussive 113 Tinkle Bell TnklBell 2
114 Agogo Agogo 2
115 Steel Drums SteelDrm 2
116 Woodblock Woodblok 1
117 Taiko Drum TaikoDrm 1
118 Melodic Tom 1 MelodTom 2
119 Synth Drum Syn Drum 1
120 Reverse Cymbal RevCymbl 1
Sound Effects 121 Guitar Fret Noise FretNoiz 2
122 Breath Noise BrthNoiz 2
123 Seashore Seashore 2
124 Bird Tweet Tweet 2
125 Telephone Ring Telphone 1
126 Helicopter Helicptr 1
127 Applause Applause 1
128 Gunshot Gunshot 1
: Same as Bank 0 : No sound E: Element number

XG Voice List
CP300 Owner’s Manual
109
Appendix
Release Rezo Sweep Muted Detune 1 Detune 2 Detune 3 Octave 1 Octave 2 5th 1 5th 2 Bend Tutti
Instrument
Group
Pgm#
Bank 0
Bank Select LSB=00
Bank 0 E Bank 25 E Bank 27 E Bank 28 E Bank 32 E Bank 33 E Bank 34 E Bank 35 E Bank 36 E Bank 37 E Bank 38 E Bank 39 E Bank 40 E
Piano 1 Acoustic Grand Piano GrandPno 2 PianoStr 2
2 Bright Acoustic Piano BritePno 2
3 Electric Grand Piano El.Grand 2 Det.CP80 2 LayerCP1 2
4 Honky-tonk Piano HnkyTonk 2
5 Electric Piano 1 E.Piano1 2 Chor.EP1 2 HardEl.P 2
6 Electric Piano 2 E.Piano2 2 Chor.EP2 2 DX Hard 2 DXLegend 2 DX Phase 2
7 Harpsichord Harpsi. 1 Harpsi.2 2 Harpsi.3 2
8 Clavi Clavi. 2 ClaviWah 2
Chromatic
Percussion
9 Celesta Celesta 1
10 Glockenspiel Glocken 1
11 Music Box MusicBox 2
12 Vibraphone Vibes 1
13 Marimba Marimba 1
14 Xylophone Xylophon 1
15 Tubular Bells TubulBel 1
16 Dulcimer Dulcimer 1 Dulcimr2 2
Organ 17 Drawbar Organ 1 DrawOrgn 1 DetDrwOr 2 60sDrOr1 2 60sDrOr2 2 70sDrOr1 2 DrawOrg2 2 60sDrOr3 2 Even Bar 2 16+2"2/3 2
18 Percussive Organ PercOrgn 1
DetPrcOr 2 Lite Org 2 PercOrg2 2
19 Rock Organ RockOrgn 2
20 Church Organ 1 ChrchOrg 2 ChurOrg3 2 ChurOrg2 2 NotreDam 2
21 Reed Organ ReedOrgn 1
Puff Org 2
22 Accordion Acordion 2 AccordIt 2
23 Hamonica Harmnica 1 Harmo. 2 2
24 Tango Accordion TangoAcd 2
Guitar 25 Acoustic Guitar (nylon) 1 NylonGtr 1 NylonGt3 2
26 Acoustic Guitar (steel) SteelGtr 1 12StrGtr 2 Nyln&Stl 2
27 Electric Guitar (jazz) Jazz Gtr 1
Jazz Amp 2
28 Electric Guitar (clean) CleanGtr 1 ChorusGt 2
29 Electric Guitar (muted) Mute.Gtr 1 FunkGtr1 2
30 Overdriven Guitar Ovrdrive 1
31 Distortion Guitar Dist.Gtr 1 FeedbkGt 2
32 Guitar Harmonics GtrHarmo 1
Bass 33 Acoustic Bass Aco.Bass 1 JazzRthm 2
34 Electric Bass (finger) FngrBass 1
FlangeBa 2 Ba&DstEG 2
35 Electric Bass (pick) PickBass 1 MutePkBa 1
36 Fretless Bass Fretless 1 Fretles2 2 Fretles3 2 Fretles4 2
37 Slap Bass 1 SlapBas1 1 ResoSlap 1 PunchThm 2
38 Slap Bass 2 SlapBas2 1
39 Synth Bass 1 SynBass1 1 Clv Bass 2 TechnoBa 2
40 Synth Bass 2 SynBass2 2 SmthSynB 2 ModulrBa 2
Strings 41 Violin Violin 1
42 Viola Viola 1
43 Cello Cello 1
44 Contrabass Contrabs 1
45 Tremolo Strings Trem.Str 1 Susp.Str 2
46 Pizzicato Strings Pizz.Str 1
47 Orchestral Harp Harp 1 YangChin 2
48 Timpani Timpani 1
Ensemble 49 String Ensemble 1 Strings1 1 60sStrng 2 Orchestr 2
50 String Ensemble 2 Strings2 1 Warm Str 2
51 Synth Strings 1 Syn.Str1 2 Reso Str 2
52 Synth Strings 2 Syn.Str2 2
53 Choir Aahs ChoirAah 1 MelChoir 2 ChoirStr 2
54 Voice Oohs VoiceOoh 1
55 Synth Voice SynVoice 1 SyVoice2 2
56 Orchestra Hit Orch.Hit 2 OrchHit2 2
Brass 57 Trumpet Trumpet 1 Warm Trp 2
58 Trombone Trombone 1
59 Tuba Tuba 1
60 Muted Trumpet Mute.Trp 1
61 French Horn Fr. Horn 2 FrHorn 2 1 HornOrch 2
62 Brass Section 1 BrasSect 1 Tp&TbSec 2 BrssSec2 2
63 Synth Brass 1 SynBrss1 2 SynBrss3 2 JumpBrss 2
64 Synth Brass 2 SynBrss2 1 SynBrss4 2
Reed 65 Soprano Sax SprnoSax 1
66 Alto Sax Alto Sax 1 Sax Sect 2
67 Tenor Sax TenorSax 1 BrthTnSx 2
68 Baritone Sax Bari.Sax 1
69 Oboe Oboe 2
70 English Horn Eng.Horn 1
71 Bassoon Bassoon 1
72 Clarinet Clarinet 1
Pipe 73 Piccolo Piccolo 1
74 Flute Flute 1
75 Recorder Recorder 1
76 Pan Flute PanFlute 1
77 Blown Bottle Bottle 2
78 Shakuhachi Shakhchi 2
79 Whistle Whistle 1
80 Ocarina Ocarina 1
Synth Lead 81 Lead 1 (square) SquareLd 2
82 Lead 2 (sawtooth) Saw Ld 2 WaspySyn 2 PulseSaw 2
83 Lead 3 (calliope) CaliopLd 2
84 Lead 4 (chiff) Chiff Ld 2
85 Lead 5 (charang) CharanLd 2
86 Lead 6 (voice) Voice Ld 2
87 Lead 7 (fifths) Fifth Ld 2 Big Five 2
88 Lead 8 (bass+lead) Bass&Ld 2
Synth Pad 89 Pad 1 (new age) NewAgePd 2
90 Pad 2 (warm) Warm Pad 2
91 Pad 3 (polysynth) PolySyPd 2
92 Pad 4 (choir) ChoirPad 2
93 Pad 5 (bowed) BowedPad 2
94 Pad 6 (metallic) MetalPad 2
95 Pad 7 (halo) Halo Pad 2
96 Pad 8 (sweep) SweepPad 2 Converge 2
Synth Effects 97 FX 1 (rain) Rain 2
98 FX 2 (soundtrack) SoundTrk 2 Prologue 2
99 FX 3 (crystal) Crystal 2 RndGlock 2 GlockChi 2
100 FX 4 (atmosphere) Atmosphr 2 Nylon EP 2
101 FX 5 (brightness) Bright 2
102 FX 6 (goblins) Goblins 2
103 FX 7 (echoes) Echoes 2
104 FX 8 (sci-fi) Sci-Fi 2
Ethnic 105 Sitar Sitar 1 DetSitar 2 Sitar 2 2
106 Banjo Banjo 1 MuteBnjo 1
107 Shamisen Shamisen 1
108 Koto Koto 1
109 Kalimba Kalimba 1
110 Bagpipe Bagpipe 2
111 Fiddle Fiddle 1
112 Shanai Shanai 1
Percussive 113 Tinkle Bell TnklBell 2
114 Agogo Agogo 2
115 Steel Drums SteelDrm 2
116 Woodblock Woodblok 1
117 Taiko Drum TaikoDrm 1
118 Melodic Tom 1 MelodTom 2
119 Synth Drum Syn Drum 1
120 Reverse Cymbal RevCymbl 1
Sound Effects 121 Guitar Fret Noise FretNoiz 2
122 Breath Noise BrthNoiz 2
123 Seashore Seashore 2
124 Bird Tweet Tweet 2
125 Telephone Ring Telphone 1
126 Helicopter Helicptr 1
127 Applause Applause 1
128 Gunshot Gunshot 1
: Same as Bank 0 : No sound E: Element number

XG Drum Kit List
CP300 Owner’s Manual
113
Appendix
Bank Select MSB (0-127)
127 127 127 126 126
Bank Select LSB (0-127)
00000
Program Change (1-128)
33 41 49 1 2
MIDI
Key
Off
Alternate
Group
Jazz Kit Brush Kit Symphony Kit SFX Kit1 SFX Kit2
Note# Note
13 C#-1 3
14 D-1 3
15 D#-1
16 E-1
17 F-1 4
18 F#-1 4
19 G-1
20 G#-1
21 A-1
22 A#-1
23 B-1
24 C0
25 C#0
26 D0 O
27 D#0
28 E0 O
29 F0 O
30 F#0
31 G0 Snare Jazz H Brush Slap 2
32 G#0
33 A0 Kick Soft 2
34 A#0 Open Rim Shot Light
35 B0 Gran Cassa
36 C1 Kick Jazz Kick Jazz Gran Cassa Mute Cutting Noise Phone Call
37 C#1 Side Stick Light Side Stick Light Cutting Noise 2 Door Squeak
38 D1 Snare Jazz L Brush Slap 3 Band Snare Door Slam
39 D#1 String Slap Scratch Cut
40 E1 Snare Jazz M Brush Tap 2 Band Snare 2 Scratch H 3
41 F1 Tom Brush 1 Wind Chime
42 F#1 1 Telephone Ring 2
43 G1 Tom Brush 2
44 G#1 1
45 A1 Tom Brush 3
46 A#1 1
47 B1 Tom Brush 4
48 C2 Tom Brush 5
49 C#2 Hand Cymbal
50 D2 Tom Brush 6
51 D#2 Hand Cymbal Short
52 E2 Flute Key Click Car Engine Ignition
53 F2 Car Tires Squeal
54 F#2 Car Passing
55 G2 Car Crash
56 G#2 Siren
57 A2 Hand Cymbal 2 Train
58 A#2 Jet Plane
59 B2 Hand Cymbal 2 Short Starship
60 C3 Burst
61 C#3 Roller Coaster
62 D3 Submarine
63 D#3
64 E3
65 F3
66 F#3
67 G3
68 G#3 Shower Laugh
69 A3 Thunder Scream
70 A#3 Wind Punch
71 B3 O Stream Heart Beat
72 C4 O
Bubble Foot Steps
73 C#4
Feed
74 D4 O
75 D#4
76 E4
77 F4
78 F#4
79 G4
80 G#4 2
81 A4 2
82 A#4
83 B4
84 C5 Dog Machine Gun
85 C#5
Horse Laser Gun
86 D5
Bird Tweet 2 Explosion
87 D#5 Firework
88 E5
89 F5
90 F#5 Ghost
91 G5 Maou

CP300 Owner’s Manual
115
Appendix
Effect Parameter List
Items with a dot indicator (●) in the Control column are parameters that can be controlled via assignable controllers.
Note that this is applicable to the Variation effects (while Insertion is selected) and to the Insertion effects.
HALL 1, HALL 2, HALL M, HALL L
ROOM 1, ROOM 2, ROOM 3, ROOM S, ROOM M, ROOM L
STAGE 1, STAGE 2
PLATE (Reverb, Variation, Insertion block)
HALL 3
HALL 4
ROOM 4
STAGE 3
PLATE 2 (Reverb)
DELAY L, C, R 1
DELAY L, C, R 2 (Variation, Insertion block)
DELAY L, R (Variation, Insertion block)
ECHO (Variation, Insertion block)
CROSS DELAY (Variation, Insertion block)
EARLY REF 1, EARLY REF 2 (Variation, Insertion block)
No. Parameter Display Value See Table Control
1 Reverb Time 0.3 – 30.0s 0 – 69 table #4
2 Diffusion 0 – 10 0 – 10
3 Initial Delay 0.1mS – 200.0mS (Rev)
0.1mS – 99.3mS (Var/Ins)
0 – 127
0 – 63
table #5
4 HPF Cutoff Thru – 8.0kHz 0 – 52 table #3
5 LPF Cutoff 1.0k – Thru 34 – 60 table #3
6
7
8
9
10 Dry/Wet D63>W – D=W – D<W63 1 – 127 (table #15) ●
11 Rev Delay 0.1mS – 200.0mS (Rev)
0.1mS – 99.3mS (Var/Ins)
0 – 127
0 – 63
table #5
12 Density 0 – 4 0 – 4
13 Er/Rev Balance E63>R – E=R – E<R63 1 – 127
14 High Damp 0.1 – 1.0 1 – 10
15 Feedback Level -63 – +63 1 – 127 (table #16)
16
No. Parameter Display Value See Table Control
1 Reverb Time 0.3 – 30.0s 0 – 69 table #4
2 Diffusion 0 – 10 0 – 10
3 Initial Delay 0.1mS – 99.3mS 0 – 63 table #5
4 HPF Cutoff Thru – 8.0kHz 0 – 52 table #3
5 LPF Cutoff 1.0k – Thru 34 – 60 table #3
6
7
8
9
10 Dry/Wet D63>W – D=W – D<W63 1 – 127 (table #15) ●
11
12
13
14 High Damp 0.1 – 1.0 1 – 10
15
16
No. Parameter Display Value See Table Control
1 Lch Delay 0.1 – 1638.3ms 1 – 16383
2 Rch Delay 0.1 – 1638.3ms 1 – 16383
3 Cch Delay 0.1 – 1638.3ms 1 – 16383
4 Feedback Delay 0.1 – 1638.3ms 1 – 16383
5 Feedback Level -63 – +63 1 – 127
6 Cch Level 0 – 127 0 – 127
7 High Damp 0.1 – 1.0 1 – 10
8
9
10 Dry/Wet D63>W – D=W – D<W63 1 – 127 ●
11
12
13 EQ Low Frequency 32Hz – 2.0kHz 4 – 40 table #3
14 EQ Low Gain -12 – +12dB 52 – 76
15 EQ High Frequency 500Hz – 16.0kHz 28 – 58 table #3
16 EQ High Gain -12 – +12dB 52 – 76
No. Parameter Display Value See Table Control
1 Lch Delay 0.1 – 1638.3ms 1 – 16383
2 Rch Delay 0.1 – 1638.3ms 1 – 16383
3 Feedback Delay 1 0.1 – 1638.3ms 1 – 16383
4 Feedback Delay 2 0.1 – 1638.3ms 1 – 16383
5 Feedback Level -63 – +63 1 – 127
6 High Damp 0.1 – 1.0 1 – 10
7
8
9
10 Dry/Wet D63>W – D=W – D<W63 1 – 127 ●
11
12
13 EQ Low Frequency 32Hz – 2.0kHz 4 – 40 table #3
14 EQ Low Gain -12 – +12dB 52 – 76
15 EQ High Frequency 500Hz – 16.0kHz 28 – 58 table #3
16 EQ High Gain -12 – +12dB 52 – 76
No. Parameter Display Value See Table Control
1 Lch Delay1 0.1 – 1486.0ms 1 – 14860
2 Lch Feedback Level -63 – +63 1 – 127
3 Rch Delay1 0.1 – 1486.0ms 1 – 14860
4 Rch Feedback Level -63 – +63 1 – 127
5 High Damp 0.1 – 1.0 1 – 10
6 Lch Delay2 0.1 – 1486.0ms 1 – 14860
7 Rch Delay2 0.1 – 1486.0ms 1 – 14860
8 Delay2 Level 0 – 127 0 – 127
9
10 Dry/Wet D63>W – D=W – D<W63 1 – 127 ●
11
12
13 EQ Low Frequency 32Hz – 2.0kHz 4 – 40 table #3
14 EQ Low Gain -12 – +12dB 52 – 76
15 EQ High Frequency 500Hz – 16.0kHz 28 – 58 table #3
16 EQ High Gain -12 – +12dB 52 – 76
No. Parameter Display Value See Table Control
1L –>R Delay 0.1 – 1486.0ms 1 – 14860
2R –>L Delay 0.1 – 1486.0ms 1 – 14860
3 Feedback Level -63 – +63 1 – 127
4 Input Select L, R, L&R 0 – 2
5 High Damp 0.1 – 1.0 1 – 10
6
7
8
9
10 Dry/Wet D63>W – D=W – D<W63 1 – 127 ●
11
12
13 EQ Low Frequency 32Hz – 2.0kHz 4 – 40 table #3
14 EQ Low Gain -12 – +12dB 52 – 76
15 EQ High Frequency 500Hz – 16.0kHz 28 – 58 table #3
16 EQ High Gain -12 – +12dB 52 – 76
No. Parameter Display Value See Table Control
1Type S-H, L-H, Rdm, Rvs, Plt, Spr 0 – 5
2 Room Size 0.1 – 7.0 0 – 44 table #6
3 Diffusion 0 – 10 0 – 10
4 Initial Delay 0.1ms – 200.0ms 0 – 127 table #5
5 Feedback Level -63 – +63 1 – 127
6 HPF Cutoff Thru – 8.0kHz 0 – 52 table #3
7 LPF Cutoff 1.0k – Thru 34 – 60 table #3
8
9
10 Dry/Wet D63>W – D=W – D<W63 1 – 127 ●
11 Liveness 0 – 10 0 – 10
12 Density 0 – 3 0 – 3
13 High Damp 0.1 – 1.0 1 – 10
14
15
16

Effect Parameter List
CP300 Owner’s Manual
117
Appendix
SYMPHONIC 1, 2 (Chorus, Variation, Insertion block)
ROTARY SPEAKER 2 (Variation, Insertion block)
DISTORTION+ROTARY SPEAKER
OVERDRIVE+ROTARY SPEAKER (Variation, Insertion block)
AMP SIM.+ROTARY SPEAKER (Variation, Insertion block)
TREMOLO 1, 2, 3 (Variation, Insertion block)
AUTO PAN 1, 2, 3 (Variation, Insertion block)
PHASER 1, 3 (Chorus, Variation, Insertion block)
PHASER 2 (Chorus, Variation, Insertion block)
No. Parameter Display Value See Table Control
1 LFO Frequency 0.00Hz – 39.7Hz 0 – 127 table #1
2 LFO Depth 0 – 127 0 – 127
3 Delay Offset 0.0ms – 50ms 0 – 127 table #2
4
5
6 EQ Low Frequency 32Hz – 2.0kHz 4 – 40 table #3
7 EQ Low Gain -12 – +12dB 52 – 76
8 EQ High Frequency 500Hz – 16.0kHz 28 – 58 table #3
9 EQ High Gain -12 – +12dB 52 – 76
10 Dry/Wet D63>W – D=W – D<W63 1 – 127 ●
11 EQ Mid Frequency
(variation block)
100Hz – 10.0kHz 14 – 54 table #3
12 EQ Mid Gain
(variation block)
-12 – +12dB 52 – 76
13 EQ Mid Width
(variation block)
1.0 – 12.0 10 – 120
14
15
16
No. Parameter Display Value See Table Control
1 LFO Frequency 0.00Hz – 39.7Hz 0 – 127 table #1 ●
2 LFO Depth 0 – 127 0 – 127
3
4
5
6 EQ Low Frequency 32Hz – 2.0kHz 4 – 40 table #3
7 EQ Low Gain -12 – +12dB 52 – 76
8 EQ High Frequency 500Hz – 16.0kHz 28 – 58 table #3
9 EQ High Gain -12 – +12dB 52 – 76
10 Dry/Wet D63>W – D=W – D<W63 1 – 127
11 EQ Mid Frequency
(variation block)
100Hz – 10.0kHz 14 – 54 table #3
12 EQ Mid Gain
(variation block)
-12 – +12dB 52 – 76
13 EQ Mid Width
(variation block)
1.0 – 12.0 10 – 120
14
15
16
No. Parameter Display Value See Table Control
1 LFO Frequency 0.00Hz – 39.7Hz 0 – 127 ●
2 LFO Depth 0 – 127 0 – 127
3
4
5
6 EQ Low Frequency 32Hz – 2.0kHz 4 – 40
7 EQ Low Gain -12 – +12dB 52 – 76
8 EQ High Frequency 500 – 16.0kHz 28 – 58
9 EQ High Gain -12 – +12dB 52 – 76
10 Dry/Wet D63>W – D=W – D<W63 1 – 127
11
12
13
14 Drive 0 – 127 0 – 127
15 LPF Cuttoff 1kHz – Thru 34 – 60
16 Output Level 0 – 127 0 – 127
No. Parameter Display Value See Table Control
1 LFO Frequency 0.00Hz – 39.7Hz 0 – 127 ●
2 LFO Depth 0 – 127 0 – 127
3AMP Type Off, Stack, Combo, Tube 0 – 3
4
5
6 EQ Low Frequency 32Hz – 2.0kHz 4 – 40
7 EQ Low Gain -12 – +12dB 52 – 76
8 EQ High Frequency 500Hz – 16.0kHz 28 – 58
9 EQ High Gain -12 – +12dB 52 – 76
10 Dry/Wet D63>W – D=W – D<W63 1 – 127
11
12
13
14 Drive 0 – 127 0 – 127
15 LPF Cuttoff 1kHz – Thru 34 – 60
16 Output Level 0 – 127 0 – 127
No. Parameter Display Value See Table Control
1 LFO Frequency 0.00Hz – 39.7Hz 0 – 127 table #1 ●
2AM Depth 0 – 127 0 – 127
3 PM Depth 0 – 127 0 – 127
4
5
6 EQ Low Frequency 32Hz – 2.0kHz 4 – 40 table #3
7 EQ Low Gain -12 – +12dB 52 – 76
8 EQ High Frequency 500Hz – 16.0kHz 28 – 58 table #3
9 EQ High Gain -12 – +12dB 52 – 76
10
11 EQ Mid Frequency
(variation block)
100Hz – 10.0kHz 14 – 54 table #3
12 EQ Mid Gain
(variation block)
-12 – +12dB 52 – 76
13 EQ Mid Width
(variation block)
1.0 – 12.0 10 – 120
14 LFO Phase
Difference
-180 – +180deg
(resolution=3deg.)
4 – 124
15 Input Mode mono/stereo 0 – 1
16
No. Parameter Display Value See Table Control
1 LFO Frequency 0.00Hz – 39.7Hz 0 – 127 table #1 ●
2 L/R Depth 0 – 127 0 – 127
3 F/R Depth 0 – 127 0 – 127
4PAN Direction L <–> R, L –> R, L <– R,
Lturn, Rturn, L/R
0 – 5
5
6 EQ Low Frequency 32Hz – 2.0kHz 4 – 40 table #3
7 EQ Low Gain -12 – +12dB 52 – 76
8 EQ High Frequency 500Hz – 16.0kHz 28 – 58 table #3
9 EQ High Gain -12 – +12dB 52 – 76
10
11 EQ Mid Frequency
(variation block)
100Hz – 10.0kHz 14 – 54 table #3
12 EQ Mid Gain
(variation block)
-12 – +12dB 52 – 76
13 EQ Mid Width
(variation block)
1.0 – 12.0 10 – 120
14
15
16
No. Parameter Display Value See Table Control
1 LFO Frequency 0.00Hz – 39.7Hz 0 – 127 table #1
2 LFO Depth 0 – 127 0 – 127
3 Phase Shift Offset 0 – 127 0 – 127
4 Feedback Level -63 – +63 1 – 127
5
6 EQ Low Frequency 32Hz – 2.0kHz 4 – 40 table #3
7 EQ Low Gain -12 – +12dB 52 – 76
8 EQ High Frequency 500Hz – 16.0kHz 28 – 58 table #3
9 EQ High Gain -12 – +12dB 52 – 76
10 Dry/Wet D63>W – D=W – D<W63 1 – 127 ●
11 Stage 4 – 22 (chorus, variation
block)
4 – 22
4 – 12 (insertion block) 4 – 12
12 Diffusion mono/stereo 0 – 1
13
14
15
16
No. Parameter Display Value See Table Control
1 LFO Frequency 0.00Hz – 39.7Hz 0 – 127 table #1
2 LFO Depth 0 – 127 0 – 127
3 Phase Shift Offset 0 – 127 0 – 127
4 Feedback Level -63 – +63 1 – 127
5
6 EQ Low Frequency 32Hz – 2.0kHz 4 – 40 table #3
7 EQ Low Gain -12 – +12dB 52 – 76
8 EQ High Frequency 500Hz – 16.0kHz 28 – 58 table #3
9 EQ High Gain -12 – +12dB 52 – 76
10 Dry/Wet D63>W – D=W – D<W63 1 – 127 ●
11 Stage 3 – 11 3 – 6
12
13 LFO Phase
Difference
-180deg – +180deg
(resolution=3deg.)
4 – 124
14
15
16

Effect Parameter List
CP300 Owner’s Manual
119
Appendix
AUTO WAH+DIST
AUTO WHA+ODRV (Variation, Insertion block)
PITCH CHANGE 1 (Variation, Insertion block)
PITCH CHANGE 2 (Variation, Insertion block)
HARMONIC ENHANCER (Variation, Insertion block)
TOUCH WAH 1
TOUCH WAH+DIST (Variation, Insertion block)
TOUCH WAH 2
TOUCH WAH+ODRV (Variation, Insertion block)
COMPRESSOR 1, 2 (Variation, Insertion block)
NOISE GATE (Variation, Insertion block)
No. Parameter Display Value See Table Control
1 LFO Frequency 0.00Hz – 39.7Hz 0 – 127 table #1
2 LFO Depth 0 – 127 0 – 127
3 Cutoff Frequency
Offset
0 – 127 0 – 127 ●
4 Resonance 1.0 – 12.0 10 – 120
5
6 EQ Low Frequency 32Hz – 2.0kHz 4 – 40 table #3
7 EQ Low Gain -12 – +12dB 52 – 76
8 EQ High Frequency 500Hz – 16.0kHz 28 – 58 table #3
9 EQ High Gain -12 – +12dB 52 – 76
10 Dry/Wet D63>W – D=W – D<W63 1 – 127
11 Drive 0 – 127 0 – 127
12 EQ Low Gain
(distortion)
-12 – +12dB 52 – 76
13 EQ Mid Gain
(distortion)
-12 – +12dB 52 – 76
14 LPF Cutoff 1.0kHz – thru 34 – 60 table #3
15 Output Level 0 – 127 0 – 127
16
No. Parameter Display Value See Table Control
1 Pitch -24 – +24 40 – 88
2 Initial Delay 0.1ms – 400.0ms 0 – 127 table #7
3 Fine 1 -50 – +50 14 – 114
4 Fine 2 -50 – +50 14 – 114
5 Feedback Level -63 – +63 1 – 127
6
7
8
9
10 Dry/Wet D63>W – D=W – D<W63 1 – 127 ●
11 Pan 1 L63 – R63 1 – 127
12 Output Level 1 0 – 127 0 – 127
13 Pan 2 L63 – R63 1 – 127
14 Output Level 2 0 – 127 0 – 127
15
16
No. Parameter Display Value See Table Control
1 Pitch -24 – +24 40 – 88
2 Initial Delay 0.1ms – 400.0ms 0 – 127 table #7
3 Fine 1 -50 – +50cent 14 – 114
4 Fine 2 -50 – +50cent 14 – 114
5 Feedback Level -63 – +63 1 – 127
6
7
8
9
10 Dry/Wet D63>W – D=W – D<W63 1 – 127 ●
11 Pan 1 L63 – R63 1 – 127
12 Output Level 1 0 – 127 0 – 127
13 Pan 2 L63 – R63 1 – 127
14 Output Level 2 0 – 127 0 – 127
15
16
No. Parameter Display Value See Table Control
1 HPF Cutoff 500Hz – 16.0kHz 28 – 58
2 Drive 0 – 127 0 – 127
3Mix Level 0 – 127 0 – 127
4
5
6
7
8
9
10
11
12
13
14
15
16
No. Parameter Display Value See Table Control
1 Sensitive 0 – 127 0 – 127
2 Cutoff Frequency
Offset
0 – 127 0 – 127 ●
3 Resonance 1.0 – 12.0 10 – 120
4
5
6 EQ Low Frequency 32Hz – 2.0kHz 4 – 40 table #3
7 EQ Low Gain -12 – +12dB 52 – 76
8 EQ High Frequency 500Hz – 16.0kHz 28 – 58 table #3
9 EQ High Gain -12 – +12dB 52 – 76
10 Dry/Wet D63>W – D=W – D<W63 1 – 127
11
Drive (variation block)
0 – 127 0 – 127
12 EQ Low Gain
(variation block)
(distortion)
-12 – +12dB 52 – 76
13 EQ Mid Gain
(variation block)
(distortion)
-12 – +12dB 52 – 76
14 LPF Cutoff (variation
block)
1.0kHz – thru 34 – 60 table #3
15 Output Level
(variation block)
0 – 127 0 – 127
16 Release (variation
block)
10 – 680ms 52 – 67 table #12
No. Parameter Display Value See Table Control
1 Attack 1 – 40ms 0 – 19 table #8
2 Release 10 – 680ms 0 – 15 table #9
3 Threshold -48 – -6dB 79 – 121
4 Ratio 1.0 – 20.0 0 – 7 table #10
5 Output Level 0 – 127 0 – 127
6
7
8
9
10
11
12
13
14
15
16
No. Parameter Display Value See Table Control
1 Attack 1 – 40ms 0 – 19 table #8
2 Release 10 – 680ms 0 – 15 table #9
3 Threshold -72 – -30dB 55 – 97
4 Output Level 0 – 127 0 – 127
5
6
7
8
9
10
11
12
13
14
15
16

Effect Parameter List
CP300 Owner’s Manual
121
Appendix
DIST+DELAY
OVERDRIVE+DELAY (Variation, Insertion block)
COMP+DIST+DELAY
COMP+OVERDRIVE+DELAY (Variation, Insertion block)
WAH+DIST+DELAY
WAH+OVERDRIVE+DELAY (Variation, Insertion block)
V DISTORTION HARD
V DISTORTION SOFT (Variation, Insertion block)
V DISTORTION HARD+DELAY
V DISTORTION SOFT+DELAY (Variation, Insertion block)
DUAL ROTOR SPEAKER1, 2 (Variation, Insertion block)
DIST+TEMPO DELAY
OVERDRIVE+TEMPO DELAY (Variation, Insertion block)
COMP+DIST+TEMPO DELAY
COMP+OD+TEMPO DELAY (Variation, Insertion block)
No. Parameter Display Value See Table Control
1 Lch Delay Time 0.1 – 1638.3ms 1 – 16383
2 Rch Delay Time 0.1 – 1638.3ms 1 – 16383
3 Delay Feedback
Time
0.1 – 1638.3ms 1 – 16383
4 Delay Feedback
Level
-63 – +63 1 – 127
5 Delay Mix 0 – 127 0 – 127
6 Dist Drive 0 – 127 0 – 127
7 Dist Output Level 0 – 127 0 – 127
8 Dist EQ Low Gain -12 – +12dB 52 – 76
9 Dist EQ Mid Gain -12 – +12dB 52 – 76
10 Dry/Wet D63>W – D=W – D<W63 1 – 127 ●
11
12
13
14
15
16
No. Parameter Display Value See Table Control
1 Delay Time 0.1 – 1638.3ms 1 – 16383
2 Delay Feedback
Level
-63 – +63 1 – 127
3 Delay Mix 0 – 127 0 – 127
4 Dist Drive 0 – 127 0 – 127
5 Dist Output Level 0 – 127 0 – 127
6 Dist EQ Low Gain -12 – +12dB 52 – 76
7 Dist EQ Mid Gain -12 – +12dB 52 – 76
8
9
10 Dry/Wet D63>W – D=W – D<W63 1 – 127 ●
11 Comp. Attack 1ms – 40ms 0 – 19 table #8
12 Comp. Release 10ms – 680ms 0 – 15 table #9
13 Comp. Threshold -48dB – -6dB 79 – 121
14 Comp. Ratio 1.0 – 20.0 0 – 7 table #10
15
16
No. Parameter Display Value See Table Control
1 Delay Time 0.1 – 1638.3ms 1 – 16383
2 Delay Feedback
Level
-63 – +63 1 – 127
3 Delay Mix 0 – 127 0 – 127
4 Dist Drive 0 – 127 0 – 127
5 Dist Output Level 0 – 127 0 – 127
6 Dist EQ Low Gain -12 – +12dB 52 – 76
7 Dist EQ Mid Gain -12 – +12dB 52 – 76
8
9
10 Dry/Wet D63>W – D=W – D<W63 1 – 127 ●
11 Wah Sensitive 0 – 127 0 – 127
12 Wah Cutoff Freq
Offset
0 – 127 0 – 127
13 Wah Resonance 1.0 – 12.0 10 – 120
14 Wah Release 10 – 680ms 52 – 67 table #12
15
16
No. Parameter Display Value See Table Control
1 Overdrive 0 – 100% 0 – 100
2 Device Transistor/Vintage Tube/
Dist1/Dist2/Fuzz
0 – 4
3 Speaker Flat/Stack/Combo/Twin/
Radio/Megaphone
0 – 5
4Presence 0 – 20 0 – 20
5 Output Level 0 – 100% 0 – 100
6
7
8
9
10 Dry/Wet Balance D63>W – D=W – D<W63 1 – 127 ●
11
12
13
14
15
16
No. Parameter Display Value See Table Control
1 Overdrive 0 – 100% 0 – 100
2 Device Transistor/Vintage Tube/
Dist1/Dist2/Fuzz
0 – 4
3 Speaker Flat/Stack/Combo/Twin/
Radio/Megaphone
0 – 5
4Presence 0 – 20 0 – 20
5 Output Level 0 – 100% 0 – 100
6 Delay Time L 0.1ms – 1486.0ms 1 – 14860
7 Delay Time R 0.1ms – 1486.0ms 1 – 14860
8 Delay Feedback
Time
0.1ms – 1486.0ms 1 – 14860
9 Delay Feedback
Level
-63 – +63 1 – 127
10 Dry/Wet Balance D63>W – D=W – D<W63 1 – 127 ●
11 Delay Mix 0 – 127 0 – 127
12
13
14
15
16
No. Parameter Display Value See Table Control
1 Rotor Speed Slow 0.0 – 2.65Hz 0 – 63 table #1
2 Horn Speed Slow 0.0 – 2.65Hz 0 – 63 table #1
3 Rotor Speed Fast 2.69 – 39.7Hz 64 – 127 table #1
4 Horn Speed Fast 2.69 – 39.7Hz 64 – 127 table #1
5 Slow-Fast Time of R 0 – 127 0 – 127
6 Slow-Fast Time of H 0 – 127 0 – 127
7 Drive Low 0 – 127 0 – 127
8 Drive High 0 – 127 0 – 127
9 Low/High Balance L63>H – L=H – L<H=63 1 – 127
10
11 EQ Low Frequency 32Hz – 2.0kHz 4 – 40 table #3
12 EQ Low Gain -12 – +12dB 52 – 76
13 EQ High Frequency 500Hz – 16.0kHz 28 – 58 table #3
14 EQ High Gain -12 – +12dB 52 – 76
15 Mic L-R Angle 0 – 180deg 0 – 60
16 Speed Control Slow/Fast 0/1 ●
No. Parameter Display Value See Table Control
1 Delay Time 64th/3 – 4thx6 0 – 19 table #14
2 Delay Feedback
Level
-63 – +63 1 – 127
3 Delay Mix 0 – 127 0 – 127
4 Dist Drive 0 – 127 0 – 127
5 Dist Output Level 0 – 127 0 – 127
6 Dist EQ Low Gain -12 – +12dB 52 – 76
7 Dist EQ High Gain -12 – +12dB 52 – 76
8 L/R Diffusion 1 (-63ms) – 64 (0ms) –
127 (63ms)
1 – 127
9 Lag 1 (-63ms) – 64 (0ms) –
127 (63ms)
1 – 127
10 Dry/Wet D63>W – D=W – D<W63 1 – 127 ●
11
12
13
14
15
16
No. Parameter Display Value See Table Control
1 Delay Time 64th/3 – 4thx6 0 – 19 table #14
2 Delay Feedback
Level
-63 – +63 1 – 127
3 Delay Mix 0 – 127 0 – 127
4 Dist Drive 0 – 127 0 – 127
5 Dist Output Level 0 – 127 0 – 127
6 Dist EQ Low Gain -12 – +12dB 52 – 76
7 Dist EQ High Gain -12 – +12dB 52 – 76
8 L/R Diffusion 1 (-63ms) – 64 (0ms) –
127 (63ms)
1 – 127
9 Lag 1 (-63ms) – 64 (0ms) –
127 (63ms)
1 – 127
10 Dry/Wet D63>W – D=W – D<W63 1 – 127 ●
11 Comp. Attack 1ms – 40ms 0 – 19
12 Comp. Release 10ms – 680ms 0 – 15
13 Comp. Threshold -48dB – -6dB 79 – 121
14 Comp. Ratio 1.0 – 20.0 0 – 7
15
16

CP300 Owner’s Manual
125
Appendix
MIDI Data Format
Many MIDI messages listed in the MIDI Data Format are expressed in decimal numbers, binary numbers and hexadecimal numbers.
Hexadecimal numbers may include the letter “H” as a suffix.
Also, "n" can freely be defined as any whole number. To enter data/values, refer to the table below.
• Except the table above, for example 144-159 (decimal)/9nH/1001 0000-1001 1111 (binary) denotes the Note On Message for each channel
(1-16). 176-191/BnH/1011 0000-1011 1111 denotes the Control Change Message for each channel (1-16). 192-207/CnH/1100 0000-1100
1111 denotes the Program Change Message for each channel (1-16). 240/FOH/1111 0000 denotes the start of a System Exclusive Message.
247/F7H/1111 0111 denotes the end of a System Exclusive Message.
• aaH (hexidecimal)/0aaaaaaa (binary) denotes the data address. The address contains High, Mid, and Low.
• bbH/0bbbbbbb denotes the byte count.
• ccH/0ccccccc denotes the check sum.
• ddH/0ddddddd denotes the data/value.
Decimal Hexa-
decimal
Binary Decimal Hexa-
decimal
Binary Decimal Hexa-
decimal
Binary Decimal Hexa-
decimal
Binary
0000000 0000 32 20 0010 0000 64 40 0100 0000 96 60 0110 0000
1010000 0001 33 21 0010 0001 65 41 0100 0001 97 61 0110 0001
2020000 0010 34 22 0010 0010 66 42 0100 0010 98 62 0110 0010
3030000 0011 35 23 0010 0011 67 43 0100 0011 99 63 0110 0011
4040000 0100 36 24 0010 0100 68 44 0100 0100 100 64 0110 0100
5050000 0101 37 25 0010 0101 69 45 0100 0101 101 65 0110 0101
6060000 0110 38 26 0010 0110 70 46 0100 0110 102 66 0110 0110
7070000 0111 39 27 0010 0111 71 47 0100 0111 103 67 0110 0111
8080000 1000 40 28 0010 1000 72 48 0100 1000 104 68 0110 1000
9090000 1001 41 29 0010 1001 73 49 0100 1001 105 69 0110 1001
10 0A 0000 1010 42 2A 0010 1010 74 4A 0100 1010 106 6A 0110 1010
11 0B 0000 1011 43 2B 0010 1011 75 4B 0100 1011 107 6B 0110 1011
12 0C 0000 1100 44 2C 0010 1100 76 4C 0100 1100 108 6C 0110 1100
13 0D 0000 1101 45 2D 0010 1101 77 4D 0100 1101 109 6D 0110 1101
14 0E 0000 1110 46 2E 0010 1110 78 4E 0100 1110 110 6E 0110 1110
15 0F 0000 1111 47 2F 0010 1111 79 4F 0100 1111 111 6F 0110 1111
16 10 0001 0000 48 30 0011 0000 80 50 0101 0000 112 70 0111 0000
17 11 0001 0001 49 31 0011 0001 81 51 0101 0001 113 71 0111 0001
18 12 0001 0010 50 32 0011 0010 82 52 0101 0010 114 72 0111 0010
19 13 0001 0011 51 33 0011 0011 83 53 0101 0011 115 73 0111 0011
20 14 0001 0100 52 34 0011 0100 84 54 0101 0100 116 74 0111 0100
21 15 0001 0101 53 35 0011 0101 85 55 0101 0101 117 75 0111 0101
22 16 0001 0110 54 36 0011 0110 86 56 0101 0110 118 76 0111 0110
23 17 0001 0111 55 37 0011 0111 87 57 0101 0111 119 77 0111 0111
24 18 0001 1000 56 38 0011 1000 88 58 0101 1000 120 78 0111 1000
25 19 0001 1001 57 39 0011 1001 89 59 0101 1001 121 79 0111 1001
26 1A 0001 1010 58 3A 0011 1010 90 5A 0101 1010 122 7A 0111 1010
27 1B 0001 1011 59 3B 0011 1011 91 5B 0101 1011 123 7B 0111 1011
28 1C 0001 1100 60 3C 0011 1100 92 5C 0101 1100 124 7C 0111 1100
29 1D 0001 1101 61 3D 0011 1101 93 5D 0101 1101 125 7D 0111 1101
30 1E 0001 1110 62 3E 0011 1110 94 5E 0101 1110 126 7E 0111 1110
31 1F 0001 1111 63 3F 0011 1111 95 5F 0101 1111 127 7F 0111 1111

MIDI Data Format
CP300 Owner’s Manual
129
Appendix
TOTAL SIZE 0F
TOTAL SIZE 06
TOTAL SIZE 21
TOTAL SIZE 06
Address
(H)
Size
(H)
Data
(H)
Parameter Description
XG Default
(H)
MIDI Reception (respond/ignore) MIDI Transmission (generated data)
REC
Song
Main
Layer
Left
Left Layer
Keyboard
Panel
(main generation
method)
Song Midi
Recorded
from
panel
02 01 20 2
00-7F
00-7F
CHORUS TYPE MSB
CHORUS TYPE LSB
Refer to Effect Parameter List
:
41 (=CHORUS1)
00
Ø
Ø
(VOICE EDIT)
Ø˛ Ø
22 1 00-7F CHORUS PARAMETER 1 :
Depends on
Chorus Type
Ø
(*Depends on Chorus Type)
˛Ø˛˛
23 1 00-7F CHORUS PARAMETER 2 :
Depends on
Chorus Type
Ø
(*Depends on Chorus Type)
˛Ø˛˛
24 1 00-7F CHORUS PARAMETER 3 :
Depends on
Chorus Type
Ø
(*Depends on Chorus Type)
˛Ø˛˛
25 1 00-7F CHORUS PARAMETER 4 :
Depends on
Chorus Type
Ø
(*Depends on Chorus Type)
˛Ø˛˛
26 1 00-7F CHORUS PARAMETER 5 :
Depends on
Chorus Type
Ø
(*Depends on Chorus Type)
˛Ø˛˛
27 1 00-7F CHORUS PARAMETER 6 :
Depends on
Chorus Type
Ø
(*Depends on Chorus Type)
˛Ø˛˛
28 1 00-7F CHORUS PARAMETER 7 :
Depends on
Chorus Type
Ø
(*Depends on Chorus Type)
˛Ø˛˛
29 1 00-7F CHORUS PARAMETER 8 :
Depends on
Chorus Type
Ø
(*Depends on Chorus Type)
˛Ø˛˛
2A 1 00-7F CHORUS PARAMETER 9 :
Depends on
Chorus Type
Ø
(*Depends on Chorus Type)
˛Ø˛˛
2B 1 00-7F CHORUS PARAMETER 10 :
Depends on
Chorus Type
Ø
(*Depends on Chorus Type)
˛Ø˛˛
2C 1 00-7F CHORUS RETURN -∞dB...0dB...+6dB (0...64...127) 40 Ø ˛ Ø ˛ ˛
2D 1 01-7F CHORUS PAN L63...C...R63 40 Ø ˛ Ø ˛ ˛
2E 1 00-7F
SEND CHORUS TO REVERB
-∞dB...0dB...+6dB (0...64...127) 00 Ø ˛ Ø ˛ ˛
02 01 30 1 00-7F CHORUS PARAMETER 11 Refer to Effect Parameter List
Depends on
Chorus Type
Ø
(*Depends on Chorus Type)
˛Ø˛˛
31 1 00-7F CHORUS PARAMETER 12 :
Depends on
Chorus Type
Ø
(*Depends on Chorus Type)
˛Ø˛˛
32 1 00-7F CHORUS PARAMETER 13 :
Depends on
Chorus Type
Ø
(*Depends on Chorus Type)
˛Ø˛˛
33 1 00-7F CHORUS PARAMETER 14 :
Depends on
Chorus Type
Ø
(*Depends on Chorus Type)
˛Ø˛˛
34 1 00-7F CHORUS PARAMETER 15 :
Depends on
Chorus Type
Ø
(*Depends on Chorus Type)
˛Ø˛˛
35 1 00-7F CHORUS PARAMETER 16 :
Depends on
Chorus Type
Ø
(*Depends on Chorus Type)
˛Ø˛˛
Address
(H)
Size
(H)
Data
(H)
Parameter Description
XG Default
(H)
MIDI Reception
(respond/ignore)
MIDI Transmission
(generated data)
REC
Song
Main
Layer
Left
Left Layer
Keyboard
Panel (main
generation
method)
Song Midi
Recorded
from
panel
02 01 40 2 00-7F VARIATION TYPE MSB Refer to Effect Parameter List
05 (=DELAY L,
C, R)
Ø˛Ø˛˛
00-7F VARIATION TYPE LSB : 00
42 2
00-7F
00-7F
VARIATION PARAMETER 1 MSB
VARIATION PARAMETER 1 LSB
:
:
Depends on
Variation Type
Ø
(*Depends on Variation Type)
˛Ø˛˛
44 2
00-7F
00-7F
VARIATION PARAMETER 2 MSB
VARIATION PARAMETER 2 LSB
:
:
Depends on
Variation Type
Ø
(*Depends on Variation Type)
˛Ø˛˛
46 2
00-7F
00-7F
VARIATION PARAMETER 3 MSB
VARIATION PARAMETER 3 LSB
:
:
Depends on
Variation Type
Ø
(*Depends on Variation Type)
˛Ø˛˛
48 2
00-7F
00-7F
VARIATION PARAMETER 4 MSB
VARIATION PARAMETER 4 LSB
:
:
Depends on
Variation Type
Ø
(*Depends on Variation Type)
˛Ø˛˛
4A 2
00-7F
00-7F
VARIATION PARAMETER 5 MSB
VARIATION PARAMETER 5 LSB
:
:
Depends on
Variation Type
Ø
(*Depends on Variation Type)
˛Ø˛˛
4C 2
00-7F
00-7F
VARIATION PARAMETER 6 MSB
VARIATION PARAMETER 6 LSB
:
:
Depends on
Variation Type
Ø
(*Depends on Variation Type)
˛Ø˛˛
4E 2
00-7F
00-7F
VARIATION PARAMETER 7 MSB
VARIATION PARAMETER 7 LSB
:
:
Depends on
Variation Type
Ø
(*Depends on Variation Type)
˛Ø˛˛
50 2
00-7F
00-7F
VARIATION PARAMETER 8 MSB
VARIATION PARAMETER 8 LSB
:
:
Depends on
Variation Type
Ø
(*Depends on Variation Type)
˛Ø˛˛
52 2
00-7F
00-7F
VARIATION PARAMETER 9 MSB
VARIATION PARAMETER 9 LSB
:
:
Depends on
Variation Type
Ø
(*Depends on Variation Type)
˛Ø˛˛
54 2
00-7F
00-7F
VARIATION PARAMETER 10 MSB
VARIATION PARAMETER 10 LSB
:
:
Depends on
Variation Type
Ø
(*Depends on Variation Type)
˛Ø˛˛
56 1 00-7F VARIATION RETURN -∞dB...0dB...+6dB (0...64...127) 40 Ø ˛ Ø ˛ ˛
57 1 01-7F VARIATION PAN L63...C...R63 40 Ø ˛ Ø ˛ ˛
58 1 00-7F SEND VARIATION TO REVERB -∞dB...0dB...+6dB (0...64...127) 00 Ø ˛ Ø ˛ ˛
59 1 00-7F SEND VARIATION TO CHORUS -∞dB...0dB...+6dB (0...64...127) 00 Ø ˛ Ø ˛ ˛
5A 1 00-01 VARIATION CONNECTION INSERTION, SYSTEM 00 Ø ˛ Ø ˛ ˛
5B 1 00-7F VARIATION PART NUMBER
Reception: Part1...16 (0...15)
Transmission:
Part1...16 (0...15)
OFF (127)
7F Ø ˛ Ø ˛ ˛
5C 1 00-7F MW VARIATION CONTROL DEPTH -64...0...+63 40 Ø ˛ Ø ˛ ˛
5D 1 00-7F BEND VARIATION CONTROL DEPTH -64...0...+63 40 Ø ˛ Ø ˛ ˛
5E 1 00-7F CAT VARIATION CONTROL DEPTH -64...0...+63 40 Ø ˛ Ø ˛ ˛
5F 1 00-7F AC1 VARIATION CONTROL DEPTH -64...0...+63 40 Ø ˛ Ø ˛ ˛
60 1 00-7F AC2 VARIATION CONTROL DEPTH -64...0...+63 40 Ø ˛ Ø ˛ ˛
02 01 70 1 00-7F VARIATION PARAMETER 11 Refer to Effect Parameter List
Depends on
Variation Type
Ø
(*Depends on Variation Type)
˛Ø˛˛
71 1 00-7F VARIATION PARAMETER 12 :
Depends on
Variation Type
Ø
(*Depends on Variation Type)
˛Ø˛˛
72 1 00-7F VARIATION PARAMETER 13 :
Depends on
Variation Type
Ø
(*Depends on Variation Type)
˛Ø˛˛
73 1 00-7F VARIATION PARAMETER 14 :
Depends on
Variation Type
Ø
(*Depends on Variation Type)
˛Ø˛˛
74 1 00-7F VARIATION PARAMETER 15 :
Depends on
Variation Type
Ø
(*Depends on Variation Type)
˛Ø˛˛
75 1 00-7F VARIATION PARAMETER 16 :
Depends on
Variation Type
Ø
(*Depends on Variation Type)
˛Ø˛˛
CP300 Owner’s Manual
137
Appendix
TransmittedFunction... Recognized Remarks
Basic
Channel
Note
Number : True voice
Velocity
After
Touch
Pitch Bend
Control
Change
Prog
Change : True #
System Exclusive
Common : Song Pos.
: Song Sel.
: Tune
System : Clock
Real Time : Commands
: All Sound Off
Aux :
Reset
All
Cntrls
: Local ON/OFF
Mes- : All Notes OFF
sages: Active Sense
: Reset
Note :
Mode
Default
Changed
Note ON
Note OFF
Key's
Ch's
0,32
1
5
7,10,11
6,38
64,66,67
65
71,74
72,73
84,94
91,93
96-97
98-99
100-101
1-119
1 - 16
1 - 16
Ø 9nH,v=1-127
˛ 9nH,v=0
˛
˛
Ø
Ø
˛
Ø
Ø
Ø
˛
Ø
˛
˛
Ø
˛
˛
Ø
Ø (Assignable)
Ø
Ø
Ø
Ø
Ø
Ø
Ø
Ø
Ø
Ø
Ø
Ø
Ø
Ø
˛
Ø
0 - 127
**************
˛
˛
˛
Ø
Ø
˛
˛
˛
˛
Ø
˛
3
˛
**************
0 - 127
**************
Ø
Mode 1 : OMNI ON , POLY Mode 2 : OMNI ON ,MONO
Mode 3 : OMNI OFF, POLY Mode 4 : OMNI OFF,MONO
Ø Ø 0 - 24 semi
1 - 16
1 - 16
Ø 9nH,v=1-127
˛
Ø
Ø
˛
˛
˛
˛
Ø
Ø (120,126,127)
Ø (121)
˛ (122)
Ø (123-125)
Ø
˛
3
˛
˛
0 - 127
0 - 127
Ø
Ø : Yes
˛ : No
Default
Messages
Altered
YAMAHA [ Stage Piano ] Date :1-NOV-2005
CP300 MIDI Implementation Chart
Version : 1.0
Bank Select
Modulation
Portamento Time
Data Entry
Portamento
Sound Controller
Sound Controller
RPN Inc,Dec
NRPN LSB,MSB
RPN LSB,MSB
*1
Ø 0 - 127
*1= Transmission only
MIDI Implementation Chart

CP300 Owner’s Manual
139
Appendix
Index
Numerics
[1] – [16] buttons .......................................................... 73
A
A [–][+] buttons ............................................................ 15
[AC INLET] jack ............................................................ 11
Application Index .......................................................... 10
[ASSIGNABLE FOOT PEDAL] jacks ............................. 11
[AUX] jack ..................................................................... 33
AUX pedal ....................................................................33
B
B [– (NO)][+(YES)] buttons ........................................... 15
Bar ................................................................................ 42
Basic operation ............................................................. 15
Bulk Dump .................................................................... 66
C
C [–][+] button .............................................................. 15
Character Code ............................................................ 84
Chorus .......................................................................... 35
[CHORUS] button ......................................................... 35
Click .............................................................................. 38
[CLICK] button .............................................................. 38
Connections
computer ................................................................ 92
external audio equipment ...................................... 88
external instrument ................................................89
external MIDI keyboard ......................................... 90
[CONTRAST] knob ....................................................... 13
Current memory ............................................................ 82
D
D [–][+] buttons ............................................................ 15
Delete
Performance file ..................................................... 80
Song file ................................................................. 83
Demo Songs ................................................................. 23
Display
adjust the brightness ............................................. 13
settings .................................................................. 15
Dual .............................................................................. 29
E
Effect Data Assign Table ............................................ 123
Effect Parameter List ..................................................115
Effect Type List ........................................................... 114
Equalizer (EQ) .............................................................. 36
[EXIT] button ................................................................. 15
F
Factory Set .............................................................. 16, 71
Factory Setting List .....................................................101
Factory-programmed settings ......................................16
Fast Forward ................................................................. 50
Fast Rewind ..................................................................50
File ................................................................................17
G
GM System Level 1 .....................................................100
H
Headphones .................................................................12
I
INPUT [L/MONO][R] jack .............................................. 89
Insertion effect ..............................................................35
K
Keyboard part combinations ........................................27
L
Layer part ......................................................................27
Left Layer part ...............................................................27
Left part .........................................................................27
List
Effect Parameter List ............................................115
Effect Type List .................................................... 114
Factory Setting List .............................................. 101
Master Settings ....................................................102
Message List ..........................................................94
MIDI Settings ........................................................101
Other Settings ......................................................101
Preset Performance List .......................................106
Program Change List ........................................... 105
Song Settings .......................................................102
Voice List ..............................................................103
XG Drum Kit List ................................................... 112
XG Voice List ........................................................108
Load From Memory ....................................................... 79
M
Main part .......................................................................27
[MASTER] button ..........................................................39
[MASTER EDIT] button ................................................. 53
Master EQ ..................................................................... 36
MASTER EQ EDIT [▼][▲] buttons ................................72
Master Equalizer settings ............................................. 72
[MASTER EQUALIZER] sliders ..................................... 36
Master mode .................................................................39
Master settings ............................................................. 53
Master Volume .............................................................. 13
[MASTER VOLUME] dial ...............................................13
Memory .........................................................................49
Memory Backup ............................................................71

Index
CP300 Owner’s Manual
140
Appendix
Message List ................................................................94
MIDI [IN][OUT][THRU] connectors .............................. 90
MIDI channel ................................................................63
MIDI data compatibility ............................................... 100
MIDI Data Format .......................................................125
MIDI Implementation Chart ......................................... 137
[MIDI OUT] button ........................................................ 51
MIDI Panic .................................................................... 52
[MIDI SETTING] button ................................................. 64
MIDI Settings ................................................................ 63
Modulation wheel .......................................................... 34
O
[OTHER SETTING] button ............................................ 67
Other Settings ............................................................... 67
OUTPUT [L/MONO][R] jacks ........................................ 88
OUTPUT [L][R] jacks .................................................... 89
P
Panel Lock .................................................................... 51
[PANEL LOCK] button .................................................. 51
Parameter
Master Edit ............................................................. 54
MIDI Settings .........................................................65
Other Settings ........................................................ 68
Song Settings ......................................................... 86
Voice Edit ............................................................... 58
Part EQ .........................................................................36
Pedal ............................................................................. 33
Pedal functions ....................................................... 61, 62
Perf. Name .................................................................... 78
[PERFORM.FILE] button ............................................... 76
Performance ................................................................. 77
rename ................................................................... 78
save to a button ..................................................... 77
[PERFORMANCE] button ............................................. 40
Performance file
basic operation ...................................................... 76
defined ................................................................... 73
delete ..................................................................... 80
recall from the storage memory ............................. 79
rename ................................................................... 80
save as ................................................................... 79
Performance functions .................................................. 73
Performance parameters .............................................. 74
[PHONES] jack ............................................................. 12
Pitch Bend wheel .......................................................... 34
[POWER] switch ..................................................... 11, 12
Precautions ..................................................................... 4
Preset ...................................................................... 18, 49
Preset Performance file ................................................ 40
Preset Performance List .............................................106
Program Change List .................................................. 105
Q
Quantize ....................................................................... 86
R
[REC] button .................................................................42
Recording
Dual mode ..............................................................48
live performance ..............................................41, 42
Split mode .............................................................. 48
Recording Techniques
adding data ............................................................46
changing Tempo after recording ........................... 46
changing Voice after recording .............................46
overwriting ..............................................................46
re-recording parts .................................................. 44
Recording track ............................................................42
Rename
Performance ...........................................................78
Performance file ..................................................... 80
Song file .................................................................83
Rename File .................................................................. 80
Rename Song ...............................................................83
Reverb ..........................................................................35
[REVERB] button ........................................................... 35
S
Save
Performance ...........................................................77
Performance file ..................................................... 79
Recorded Song ......................................................82
Save As .........................................................................79
Save To Memory ........................................................... 82
Scale .............................................................................68
[SOFT] jack ................................................................... 33
Soft pedal ......................................................................33
Song ..............................................................................41
Song file
basic operation ......................................................81
defined ...................................................................81
delete .....................................................................83
rename ...................................................................83
save to memory ......................................................82
Song playback ..............................................................49
Song Repeat ................................................................. 87
SONG SELECT [N][O] buttons .........................42, 49
Song Settings ................................................................85
[SONG VOLUME] slider ................................................ 47
[SOSTENUTO] jack ....................................................... 33
Sostenuto pedal ............................................................33
[SPEAKER] button ........................................................ 52
Speakers (built-in) On/Off ............................................. 52
Specifications .............................................................138
Split ...............................................................................31
[SPLIT] button ............................................................... 31
Split Point ................................................................ 32, 69
Storage memory ............................................... 17, 73, 82
[SUSTAIN] jack ............................................................. 33
Sustain pedal ................................................................ 33
Synchro Start ................................................................ 50
System effect ................................................................35