USER GUIDE
Before using your new product, please read these instructions to prevent any damage.
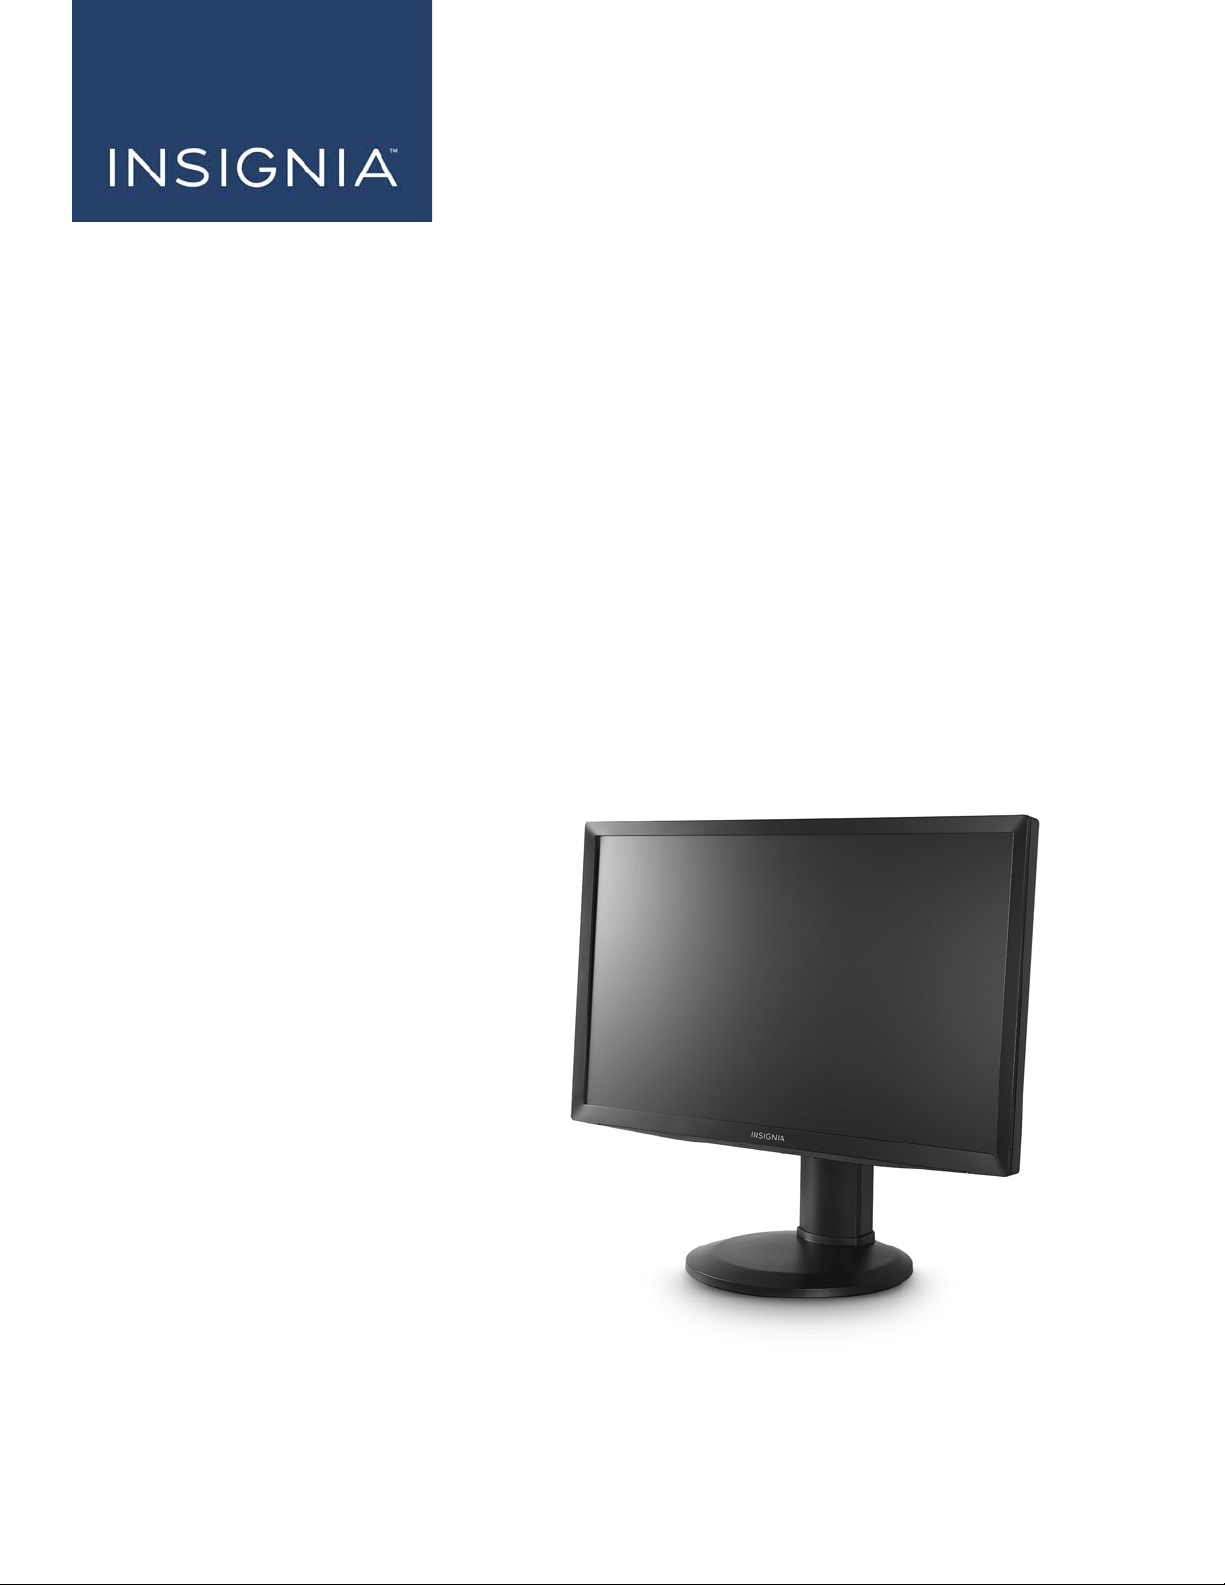
24" FHD LED Backlit
Gaming Monitor
NS-PMG248

2
www.insigniaproducts.com
Contents
CHILD SAFETY . . . . . . . . . . . . . . . . . . . . . . . . . . . . . . . . . . . . . . . . . . . . . . . . . . . . . . . . . . . . . . . . . . . . . . . . . . . . . 3
Important Safety Instructions . . . . . . . . . . . . . . . . . . . . . . . . . . . . . . . . . . . . . . . . . . . . . . . . . . . . . . . . . . . . . . 4
Introduction . . . . . . . . . . . . . . . . . . . . . . . . . . . . . . . . . . . . . . . . . . . . . . . . . . . . . . . . . . . . . . . . . . . . . . . . . . . . . . . 6
System requirements for optimal performance . . . . . . . . . . . . . . . . . . . . . . . . . . . . . . . . . . . . . . . . . . . . . . . . . . . . . . . 6
Installing the stand or wall-mount bracket . . . . . . . . . . . . . . . . . . . . . . . . . . . . . . . . . . . . . . . . . . . . . . . . . 7
Installing the stand . . . . . . . . . . . . . . . . . . . . . . . . . . . . . . . . . . . . . . . . . . . . . . . . . . . . . . . . . . . . . . . . . . . . . . . . . . . . . . . . . . 7
Installing a wall-mount bracket . . . . . . . . . . . . . . . . . . . . . . . . . . . . . . . . . . . . . . . . . . . . . . . . . . . . . . . . . . . . . . . . . . . . . . 8
Monitor components . . . . . . . . . . . . . . . . . . . . . . . . . . . . . . . . . . . . . . . . . . . . . . . . . . . . . . . . . . . . . . . . . . . . .10
Package contents . . . . . . . . . . . . . . . . . . . . . . . . . . . . . . . . . . . . . . . . . . . . . . . . . . . . . . . . . . . . . . . . . . . . . . . . . . . . . . . . . . 10
Front controls . . . . . . . . . . . . . . . . . . . . . . . . . . . . . . . . . . . . . . . . . . . . . . . . . . . . . . . . . . . . . . . . . . . . . . . . . . . . . . . . . . . . . . 10
Back ports . . . . . . . . . . . . . . . . . . . . . . . . . . . . . . . . . . . . . . . . . . . . . . . . . . . . . . . . . . . . . . . . . . . . . . . . . . . . . . . . . . . . . . . . . 11
Making connections . . . . . . . . . . . . . . . . . . . . . . . . . . . . . . . . . . . . . . . . . . . . . . . . . . . . . . . . . . . . . . . . . . . . . .12
Connecting a device using the HDMI port . . . . . . . . . . . . . . . . . . . . . . . . . . . . . . . . . . . . . . . . . . . . . . . . . . . . . . . . . . . 12
Connecting a device using the Displayport . . . . . . . . . . . . . . . . . . . . . . . . . . . . . . . . . . . . . . . . . . . . . . . . . . . . . . . . . . 12
Connecting the USB ports. . . . . . . . . . . . . . . . . . . . . . . . . . . . . . . . . . . . . . . . . . . . . . . . . . . . . . . . . . . . . . . . . . . . . . . . . . . 13
Connecting headphones. . . . . . . . . . . . . . . . . . . . . . . . . . . . . . . . . . . . . . . . . . . . . . . . . . . . . . . . . . . . . . . . . . . . . . . . . . . . 13
Connecting the power cable . . . . . . . . . . . . . . . . . . . . . . . . . . . . . . . . . . . . . . . . . . . . . . . . . . . . . . . . . . . . . . . . . . . . . . . . 14
Using your monitor . . . . . . . . . . . . . . . . . . . . . . . . . . . . . . . . . . . . . . . . . . . . . . . . . . . . . . . . . . . . . . . . . . . . . . .15
Turning your monitor on and off . . . . . . . . . . . . . . . . . . . . . . . . . . . . . . . . . . . . . . . . . . . . . . . . . . . . . . . . . . . . . . . . . . . . 15
Adjusting the viewing angle . . . . . . . . . . . . . . . . . . . . . . . . . . . . . . . . . . . . . . . . . . . . . . . . . . . . . . . . . . . . . . . . . . . . . . . . 15
Adjusting the resolution and refresh rate . . . . . . . . . . . . . . . . . . . . . . . . . . . . . . . . . . . . . . . . . . . . . . . . . . . . . . . . . . . . 16
Adjusting menu options . . . . . . . . . . . . . . . . . . . . . . . . . . . . . . . . . . . . . . . . . . . . . . . . . . . . . . . . . . . . . . . . . . . . . . . . . . . . 16
Menus, options, and reset values . . . . . . . . . . . . . . . . . . . . . . . . . . . . . . . . . . . . . . . . . . . . . . . . . . . . . . . . . . . . . . . . . . . . 17
Locking or unlocking the menu . . . . . . . . . . . . . . . . . . . . . . . . . . . . . . . . . . . . . . . . . . . . . . . . . . . . . . . . . . . . . . . . . . . . . 18
Maintaining . . . . . . . . . . . . . . . . . . . . . . . . . . . . . . . . . . . . . . . . . . . . . . . . . . . . . . . . . . . . . . . . . . . . . . . . . . . . . .18
Cleaning your monitor cabinet . . . . . . . . . . . . . . . . . . . . . . . . . . . . . . . . . . . . . . . . . . . . . . . . . . . . . . . . . . . . . . . . . . . . . 18
Cleaning your monitor screen . . . . . . . . . . . . . . . . . . . . . . . . . . . . . . . . . . . . . . . . . . . . . . . . . . . . . . . . . . . . . . . . . . . . . . 18
Troubleshooting . . . . . . . . . . . . . . . . . . . . . . . . . . . . . . . . . . . . . . . . . . . . . . . . . . . . . . . . . . . . . . . . . . . . . . . . .19
Error messages . . . . . . . . . . . . . . . . . . . . . . . . . . . . . . . . . . . . . . . . . . . . . . . . . . . . . . . . . . . . . . . . . . . . . . . . . . . . . . . . . . . . . 20
Specifications . . . . . . . . . . . . . . . . . . . . . . . . . . . . . . . . . . . . . . . . . . . . . . . . . . . . . . . . . . . . . . . . . . . . . . . . . . . .21
Factory preset timing table . . . . . . . . . . . . . . . . . . . . . . . . . . . . . . . . . . . . . . . . . . . . . . . . . . . . . . . . . . . . . . . . . . . . . . . . . 22
Legal notices . . . . . . . . . . . . . . . . . . . . . . . . . . . . . . . . . . . . . . . . . . . . . . . . . . . . . . . . . . . . . . . . . . . . . . . . . . . . .23
ONE-YEAR LIMITED WARRANTY . . . . . . . . . . . . . . . . . . . . . . . . . . . . . . . . . . . . . . . . . . . . . . . . . . . . . . . . . . .24

3
https://www.cta.tech/Consumer-Resources.aspx
CHILD SAFETY
PROPER MONITOR PLACEMENT MATTERS
THE CONSUMER ELECTRONICS INDUSTRY CARES
• Manufacturers, retailers, and the rest of the consumer electronics industry are
committed to making home entertainment safe and enjoyable.
• As you enjoy your monitor, please note that all monitors - new and old - must be
supported on proper stands or installed according to the manufacturer's
recommendations. Monitors that are inappropriately situated on dressers, bookcases,
shelves, desks, speakers, chests, carts, etc., may fall over, resulting in injury.
TUNE IN TO SAFETY
• ALWAYS follow the manufacturer’s recommendations for the safe installation of your
monitor.
• ALWAYS read and follow all instructions for proper use of your monitor.
• NEVER allow children to climb on or play on the monitor or the furniture on which the
monitor is placed.
• NEVER place the monitor on furniture that can easily be used as steps, such as a chest of
drawers.
• ALWAYS install the monitor where it cannot be pushed, pulled over or knocked down.
• ALWAYS route cords and cables connected to the monitor so that they cannot be
tripped over, pulled or grabbed.
WALL OR CEILING MOUNT YOUR MONITOR
• ALWAYS contact your retailer about professional installation if you have any doubts
about your ability to safely mount your monitor.
Mout is included with monitor. Should this bullet be deleted?
• ALWAYS use a mount that has been recommended by the monitor manufacturer and
has a safety certification by an independent laboratory (such as UL, CSA, ETL).
• ALWAYS follow all instructions supplied by the monitor and mount manufacturers.
• ALWAYS make sure that the wall or ceiling where you are mounting the monitor is
appropriate. Some mounts are not designed to be mounted to walls and ceilings with
steel studs or cinder block construction. If you are unsure, contact a professional
installer.
• Monitors can be heavy. A minimum of two people is required for a wall or ceiling mount
installation.
MOVING AN OLDER MONITOR TO A NEW PLACE IN YOUR
HOME
• Many new monitor buyers move their older CRT monitors into a secondary room after
the purchase of a flat-panel monitor. Special care should be made in the placement of
older CRT monitors.
• ALWAYS place your older CRT monitor on furniture that is sturdy and appropriate for its
size and weight.
• NEVER place your older CRT monitor on a dresser where children may be tempted to
use the drawers to climb.
• ALWAYS make sure your older CRT monitor does not hang over the edge of your
furniture.

4
NS-PMG248
www.insigniaproducts.com
Important Safety Instructions
1 Read these instructions.
2 Keep these instructions.
3 Heed all warnings.
4 Follow all instructions.
5 Do not use this apparatus near water.
6 Clean only with a dry cloth.
7 Do not block any ventilation openings. Install in
accordance with the manufacturer's instructions.
8 Do not install near any heat sources such as
radiators, heat registers, stoves, or other apparatus
(including amplifiers) that produce heat.
9 Do not defeat the safety purpose of the polarized
or grounding-type plug. A polarized plug has two
blades with one wider than the other. A grounding
type plug has two blades and a third grounding
prong. The wide blade or the third prong are
provided for your safety. If the provided plug does
not fit into your outlet, consult an electrician for
replacement of the obsolete outlet.
10 Protect the power cord from being walked on or
pinched particularly at plugs, power outlets, and
the point where they exit from the apparatus.
11 Only use attachments/accessories specified by the
manufacturer.
12 Use only with the cart, stand, tripod,
bracket, or table specified by the
manufacturer, or sold with the
apparatus. When a cart is used, use
caution when moving the
cart/apparatus combination to
avoid injury from tip-over.
13 Unplug this apparatus during lightning storms or
when unused for long periods of time.
14 Refer all servicing to qualified service personnel.
Servicing is required when the apparatus has been
damaged in any way, such as power-supply cord
or plug is damaged, liquid has been spilled or
objects have fallen into the apparatus, the
apparatus has been exposed to rain or moisture,
does not operate normally, or has been dropped.
15 The wall plug is the disconnecting device. The plug
must remain readily operable.
16 The apparatus should not be exposed to dripping
or splashing, and no objects filled with liquids,
such as vases, should be placed on the apparatus.
17 Do not overload power strips and extension cords.
Overloading can result in fire or electric shock.
18 Never push any object into the slot on the monitor
cabinet. It could short circuit parts causing a fire or
electric shock. Never spill liquids on the monitor.
19 To ensure satisfactory operation, use the monitor
only with UL listed computers which have
appropriate configured receptacles marked
between 100 - 240V AC, Min. 5A.
WARNING
Electric shock hazard
To reduce the risk of fire or electric shock, do not
remove any cover or expose the device to rain or
moisture. No user-serviceable parts are inside. Refer
servicing to qualified service technicians.
Lightning
For added protection for your device receiver during a
lightning storm, or when it is left unattended and
unused for long periods of time, unplug it from the
power outlet. This helps prevent property damage
from power line surges.
Handling the LCD panel
• Do not drop your monitor or hit, jolt, or press hard
against the LCD panel. If the screen breaks, be
careful of broken glass.
• If the LCD panel is broken, make absolutely sure that
you do not touch the liquid in the panel. This may
cause skin inflammation.
• If the liquid gets in your mouth, immediately gargle,
rinse, and consult with your doctor. Also, if the liquid
gets in your eyes or touches your skin, consult with
your doctor after rinsing for at least 15 minutes or
longer in clean water.
Replacement parts
When replacement parts are required, make sure that
the service technician uses replacement parts
specified by the manufacturer that have the same
characteristics as the original part. Unauthorized
substitutions may result in fire, electric shock,
personal injury, or other hazards.
Safety check
After completing any service or repair to this device,
ask the service technician to perform routine safety
checks to determine that your monitor is in correct
operating condition.
Power source
Operate your monitor only from the type of power
source indicated on the marking label. If you are not
sure of the type of power supplied to your home,
consult an electrician or your local power company.
Servicing
These servicing instructions are for use by qualified
service personnel only. To reduce the risk of electric
shock, do not perform any servicing other than that
contained in the operating instructions unless you are
qualified to do so.
CAUTION
Damage requiring service
Unplug this monitor from the power outlet and refer
servicing to qualified service personnel under the
following conditions:
• When the power supply cord or plug is damaged or
frayed.
• If liquid has been spilled or objects have fallen into
your monitor.

5
www.insigniaproducts.com
• If your monitor has been exposed to rain or water.
• If your monitor does not operate normally by
following the operating instructions. Adjust only
those controls covered by the operating
instructions because incorrect adjustment of other
controls may result in damage and will often require
extensive work by a qualified technician to restore
your monitor to its normal operation.
• If your monitor has been dropped or damaged in
any way.
• When your monitor exhibits a distinct change in
performance.
End of life directives
Your monitor may contain materials that are
regulated for environmental reasons. Your monitor
also contains materials that can be recycled and
reused. To help protect the environment, contact your
local authorities for information about disposal or
recycling and about finding a recycler in your area
before you dispose of your monitor.
Special notes on LCD monitors
The following symptoms are normal with LCD
monitors and do not indicate a problem.
• Due to the nature of the fluorescent light, the screen
may flicker during initial use. Turn off your monitor,
then turn it on again to make sure the flicker
disappears.
• You may find slightly uneven brightness on the
screen depending on the display properties you
use.
• The LCD screen has effective pixels of 99.99% or
more. It may include blemishes of 0.01% or less such
as a missing pixel or a pixel lit all of the time.
• Due to the nature of the LCD screen, an afterimage
of the previous screen may remain after switching
the image when the same image has been
displayed for a long time. Your monitor will slowly
recover from this.
• When the screen becomes black or flashing, or
cannot illuminate any more, contact your dealer or
service center to replace parts. Don’t repair the
screen by yourself.

6
NS-PMG248
www.insigniaproducts.com
24" FHD LED Backlit Gaming Monitor
Introduction
Congratulations on your purchase of a high-quality Insignia product. Your NS-PMG248 represents the state of the art in
gaming monitor technology and is designed for reliable and trouble-free performance.
• 24" FHD LED Backlit Gaming Monitor
• Crisp, clear display for Windows®
• Recommend resolution: 1920 x 1080 @120Hz
• 1ms response time
• 144Hz maximum refresh rate when using the Displayport and a computer with an AMD or NVIDIA graphics card
• Ergonomic design
• Space saving, compact case design
• Fully Plug & Play using the DDC2B
System requirements for optimal performance
• A dedicated graphics card that supports the resolution/refresh rate of the monitor
• A Displayport
• At least 8 GB, 16 GB OF RAM
• A i5/i7 CPU (four threads on at least two cores)
7
24" FHD LED Backlit Gaming Monitor
www.insigniaproducts.com
Installing the stand or wall-mount bracket
• If you want to place your monitor on a table or in an entertainment center, go to Installing the stand.
• If you want to mount your monitor on a wall, go to Installing a wall-mount bracket.
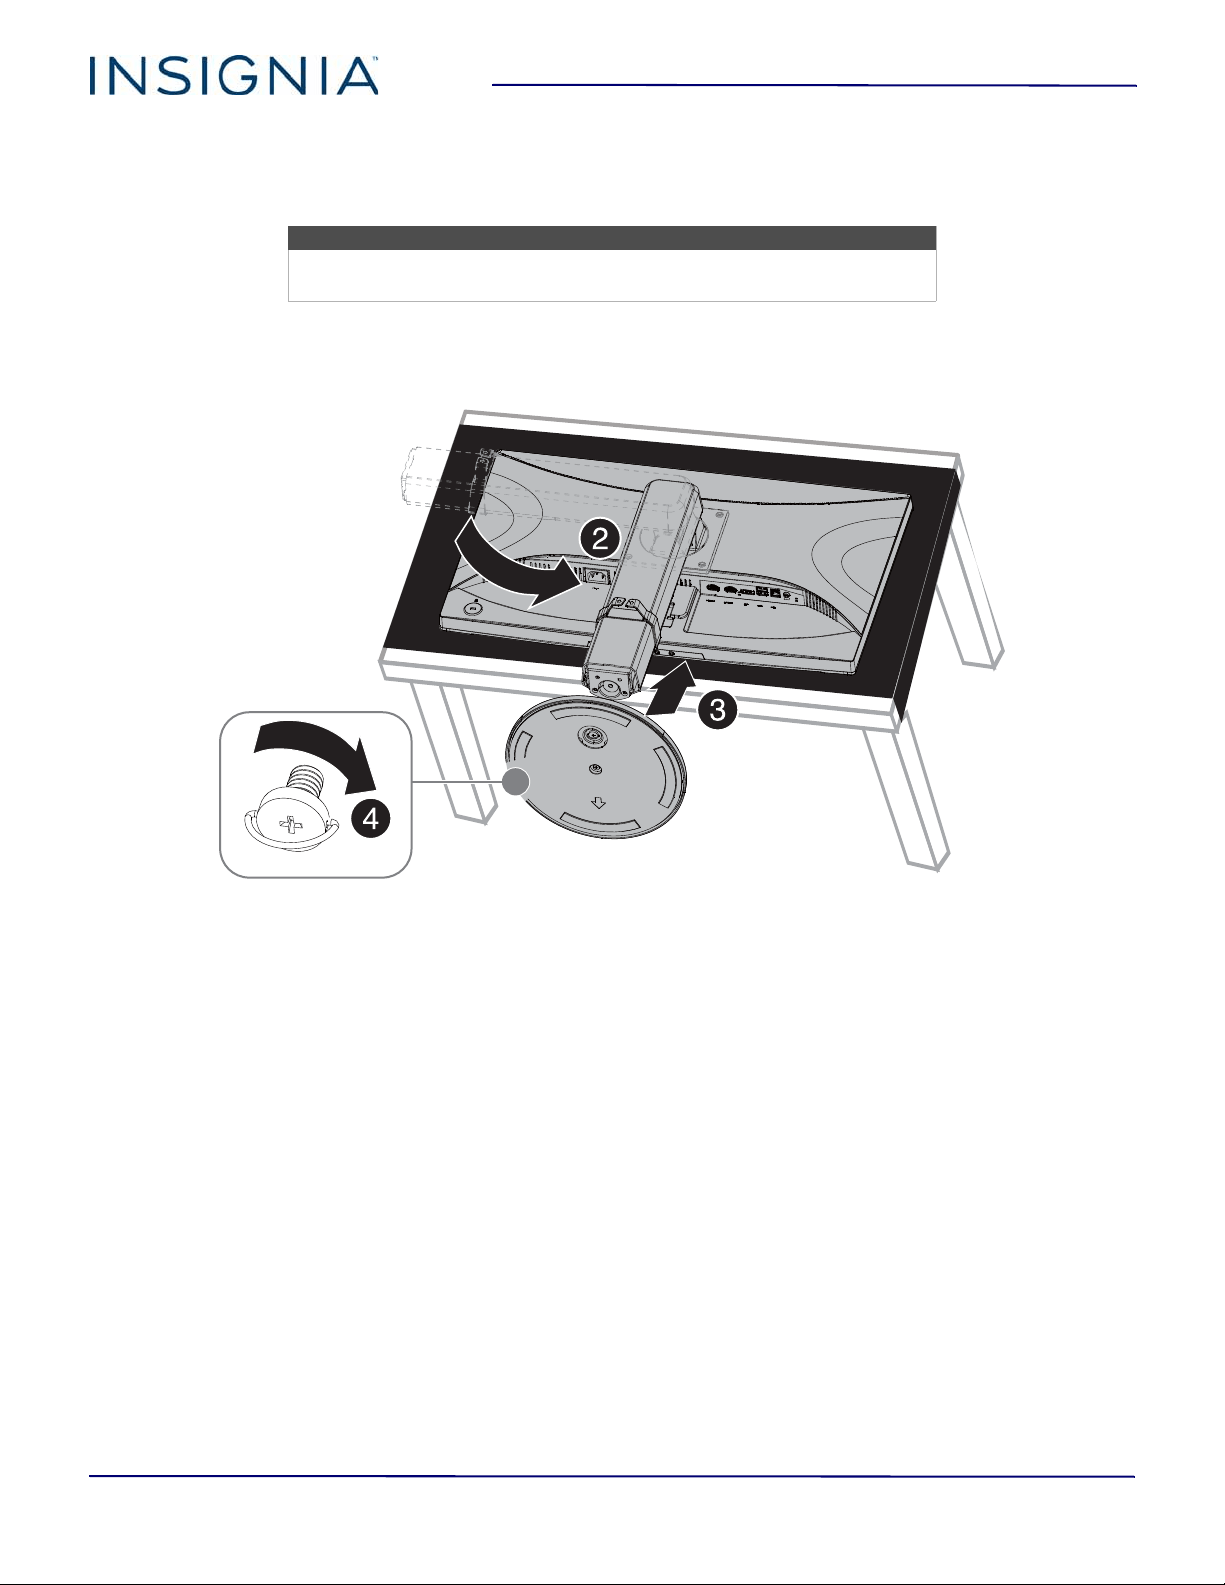
Installing the stand
1 Place the monitor screen face down on a cushioned, clean surface with the bottom edge hanging over the edge of
the surface.
2 Rotate the monitor stand down until it locks into place
3 Slide the stand into the indentation on the stand base, then push the stand base onto the stand.
4 Tighten the screw to secure your monitor to the base.
Notes
• If you plan to wall-mount your monitor, do not install the stand.
• Store the stand in case you decide to use it in the future.
8
NS-PMG248
www.insigniaproducts.com
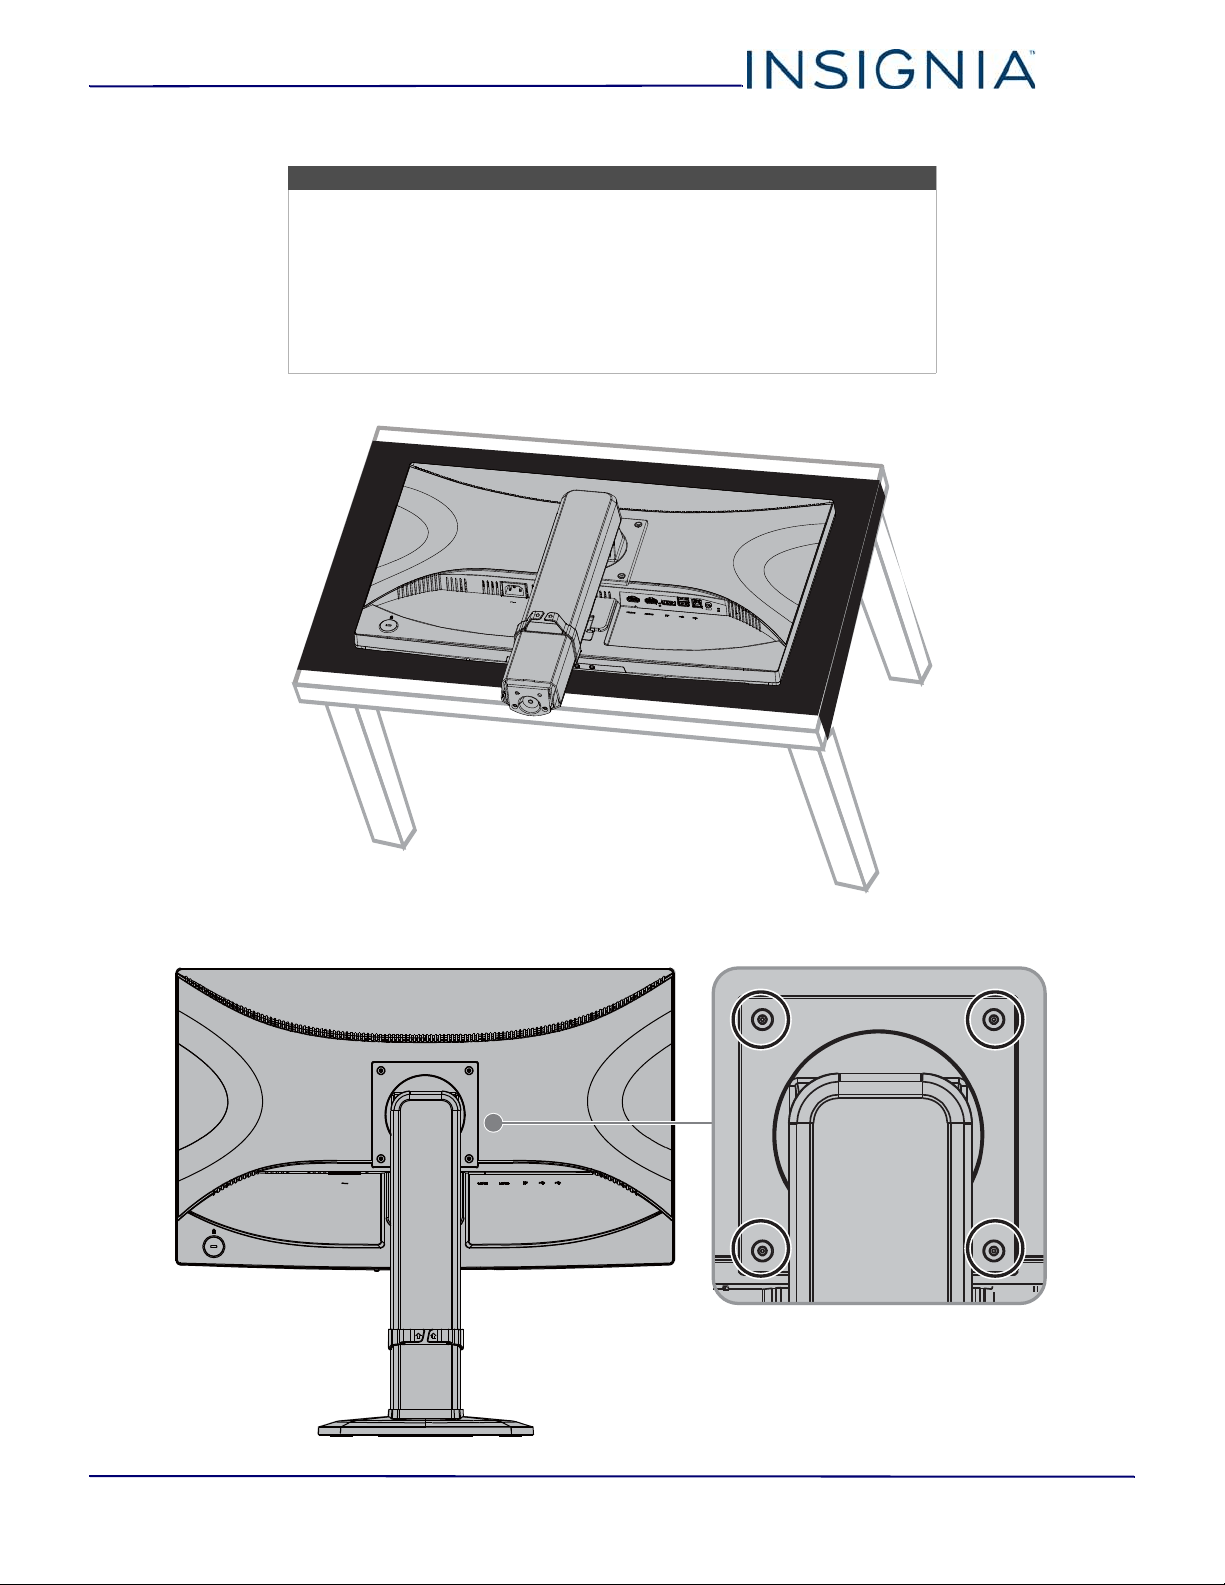
Installing a wall-mount bracket
1 Carefully place your monitor face-down on a cushioned, clean surface to protect the screen.
2 Remove the four screws that secure the stand to the back of your monitor.
Warnings
• Your monitor has four VESA mounting holes on the back. If you attach a
wall-mount bracket to the back of your monitor, the bracket must be
securely attached, using all four holes. If you do not use all four
mounting holes, your monitor may fall and cause property damage or
personal injury. See the documentation that came with your wall mount
for complete mounting instructions.
• Your monitor is intended to be supported by a UL Listed wall mount
bracket with suitable weight/load.
9
24" FHD LED Backlit Gaming Monitor
www.insigniaproducts.com
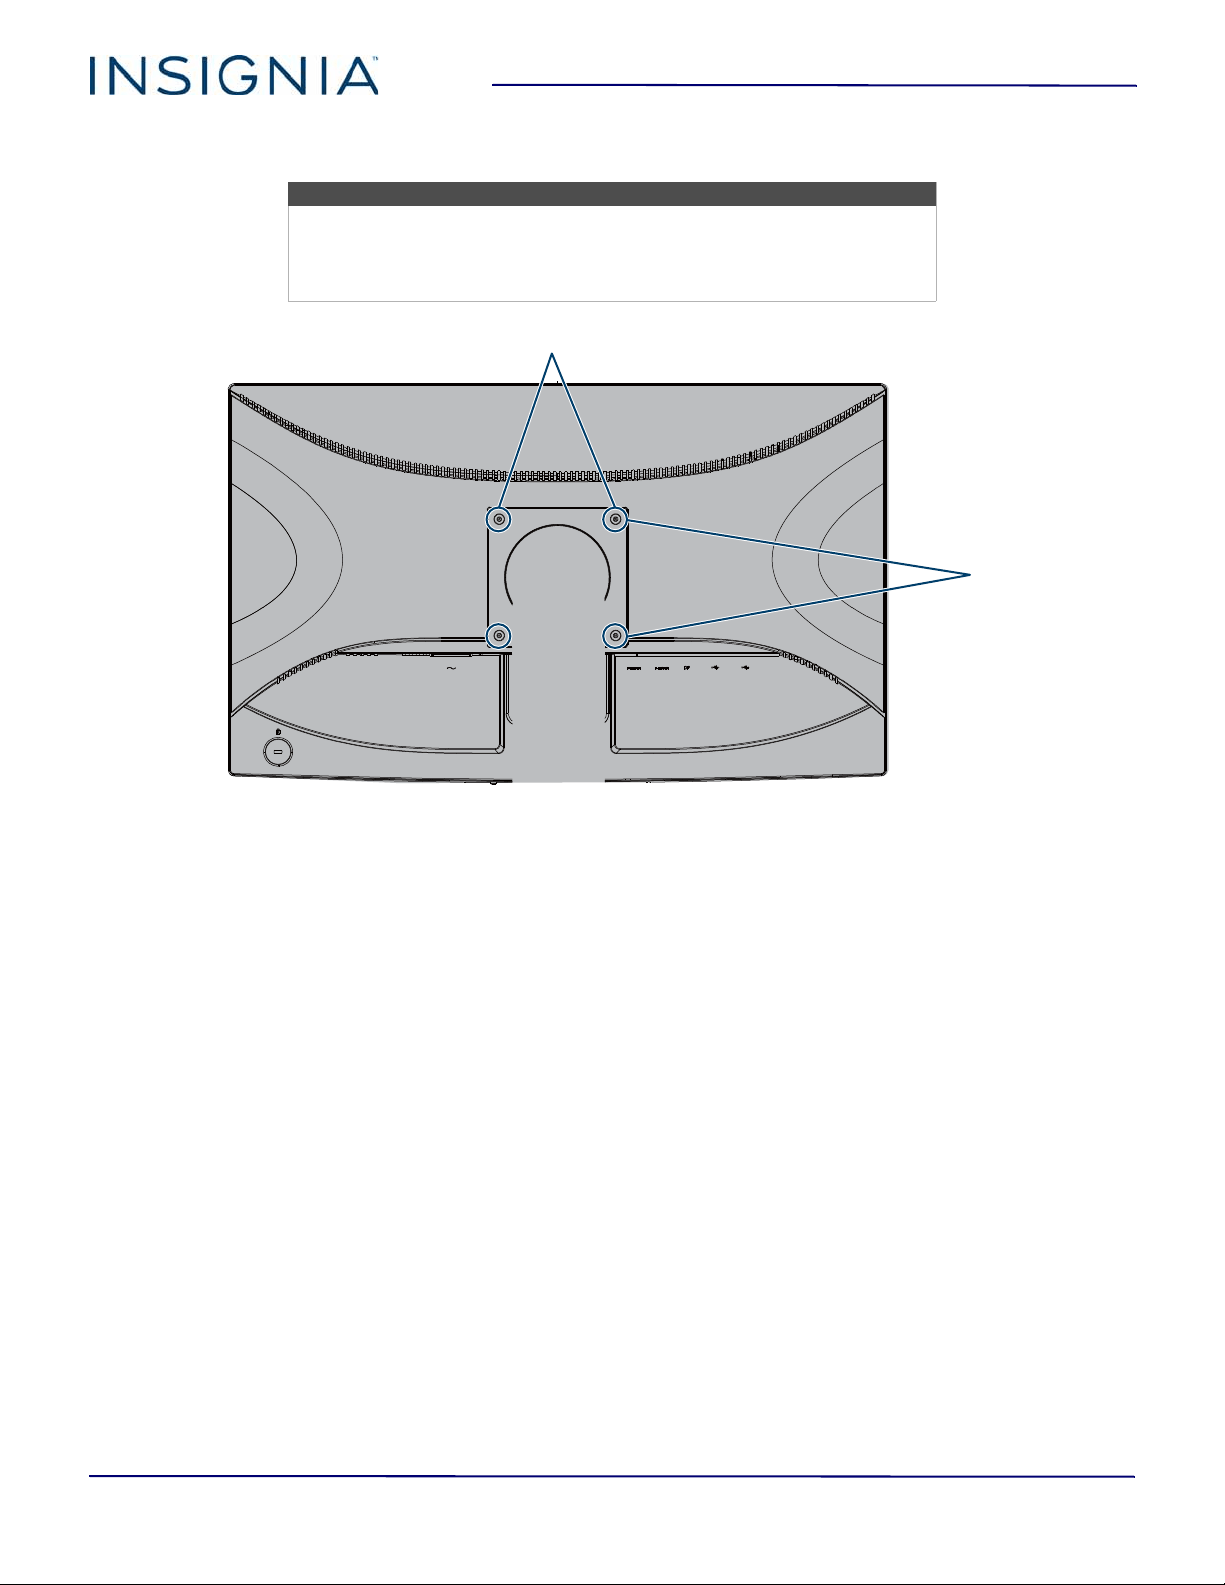
3 Attach the wall-mount bracket to your monitor using the mounting holes on the back of your monitor. See the
instructions that came with the wall-mount bracket for information about how to correctly hang your monitor.
Notes
• The length of the wall-mount screws vary depending on the wall-mount
bracket you purchased. See the instructions that came with the
wall-mount bracket for screw lengths.
• The mounting holes on the back of your monitor take type M4 screws.
3.9 in. (100 mm)
3.9 in. (100 mm)
10
NS-PMG248
www.insigniaproducts.com
Monitor components
This section contains information about:
• Package contents
• Front controls
•Back ports
Package contents
• 24" FHD LED Backlit Gaming Monitor
• Monitor stand base
• Displayport cable
•HDMI cable
•Power cord
•Quick Setup Guide
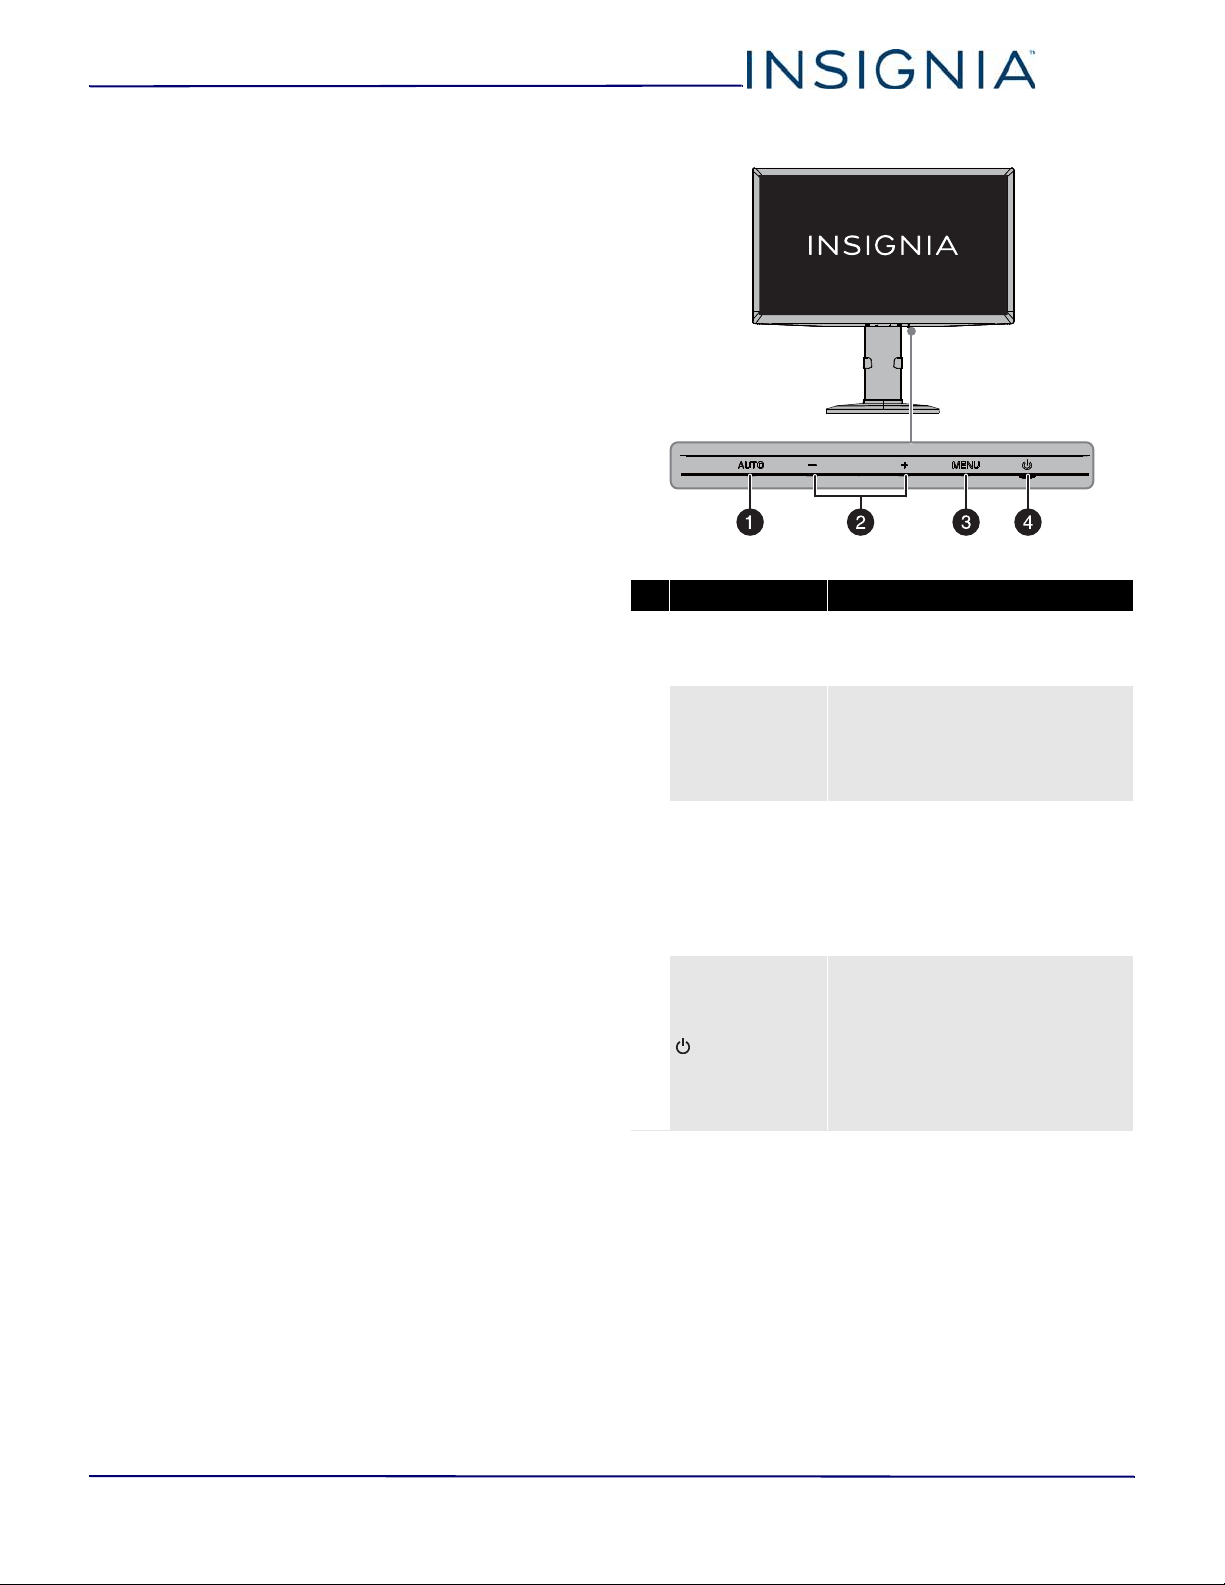
Front controls
# Button Press to...
1 AUTO
• Select the video input source.
• Close the menu when it is
open.
2
– and +
• Navigate in the menu
options.
• Decrease or increase the
setting when a menu option
is selected.
3 MENU
•Open the menu.
• Confirm selections when the
menu is open.
• Turns the OSD lock on or off.
For more information, see
Locking or unlocking the
menu on page 18.
4
(power)
Turn your monitor on or off.
The power indicator:
• Lights blue when your
monitor is on
• Lights orange when your
monitor is in standby mode.
• Turns off when your monitor
is off.
11
24" FHD LED Backlit Gaming Monitor
www.insigniaproducts.com
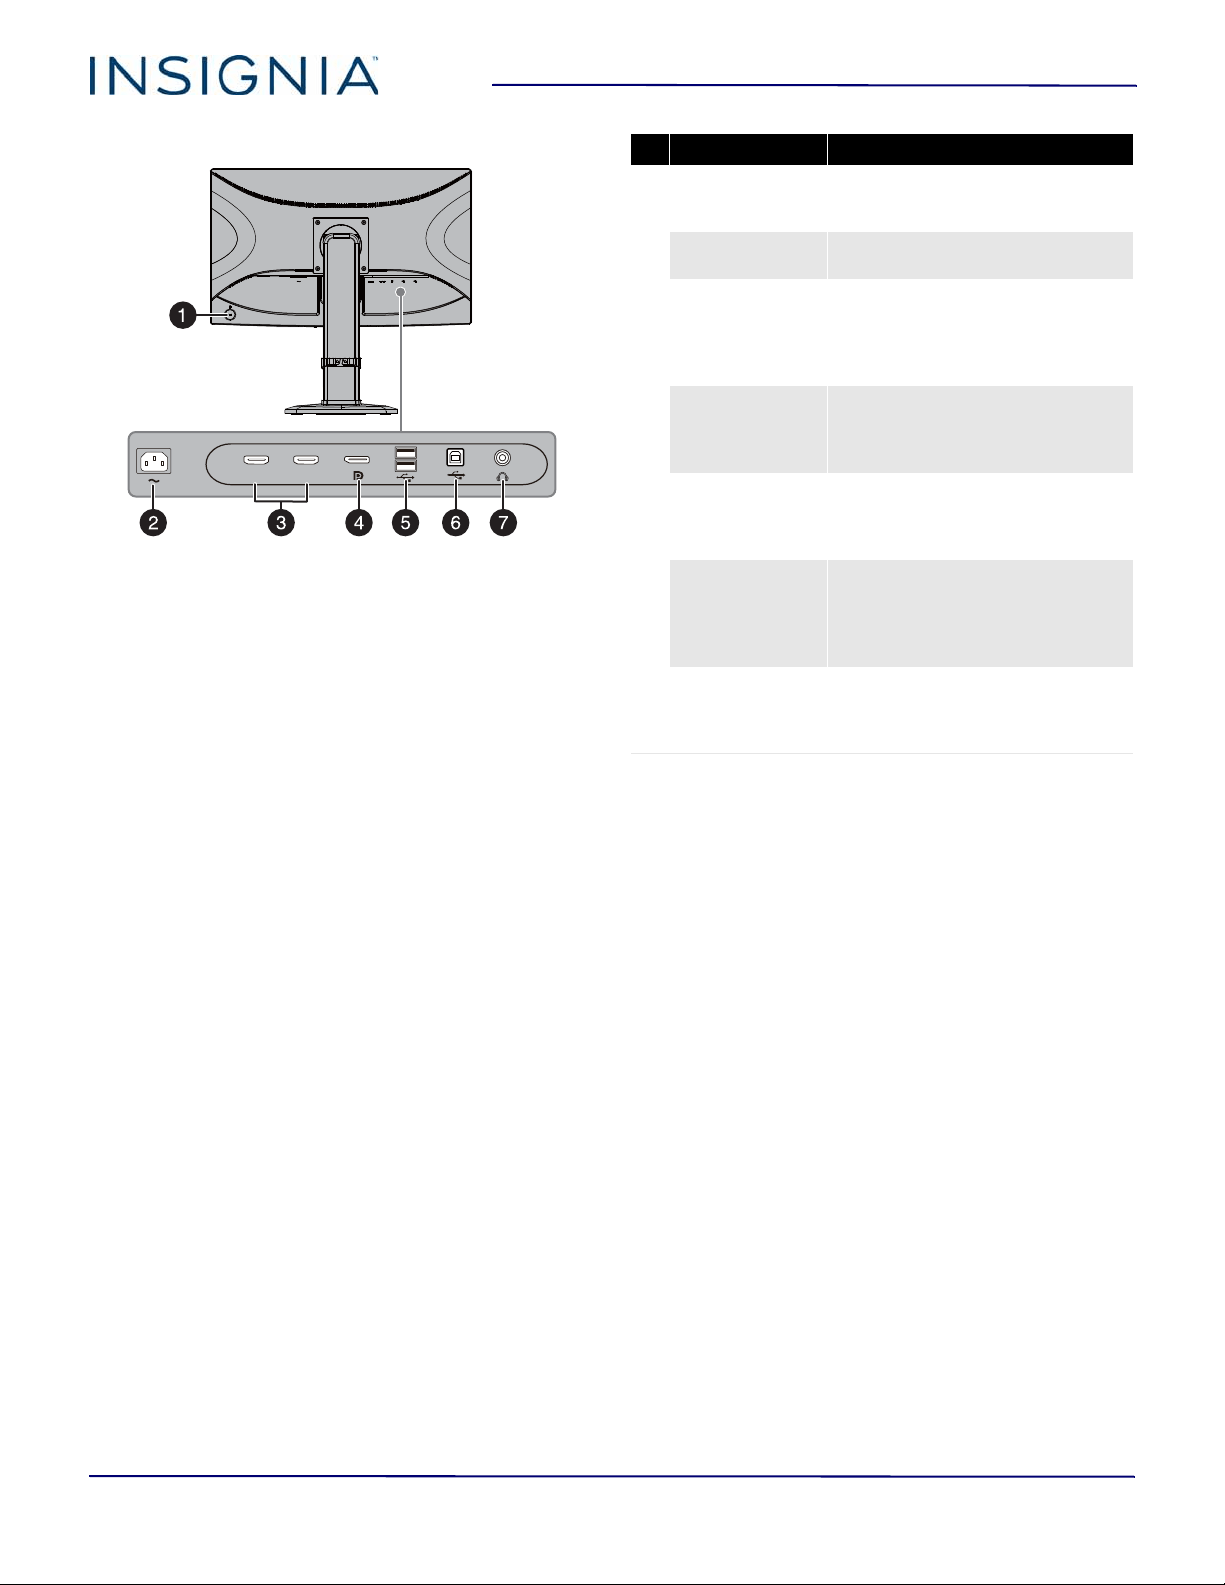
Back ports
HDMI2
HDMI1
# Item Description
1 Cable lock slot
Slide a lock cable through this slot
to secure your monitor to another
object.
2
Power
Plug the power cord into this
connector and into a power outlet.
3
HDMI1 and
HDMI2
Connect a computer or game
controller with an HDMI jack to one
of these ports. See Connecting a
device using the HDMI port on
page 12.
4
Displayport
Connect a computer with a
Displayport to this port. See
Connecting a device using the
Displayport on page 12.
5
USB downstream
port
Connect USB devices such as a
mouse and keyboard to these ports.
See Connecting the USB ports on
page 13.
6
USB upstream
port
Connect one end of the USB
upstream cable to this port, then
connect the other end to a USB port
on your computer. See Connecting
the USB ports on page 13.
7 Headphone
Connect headphones to this jack.
For more information, see
Connecting headphones on
page 13.
12
NS-PMG248
www.insigniaproducts.com
Making connections
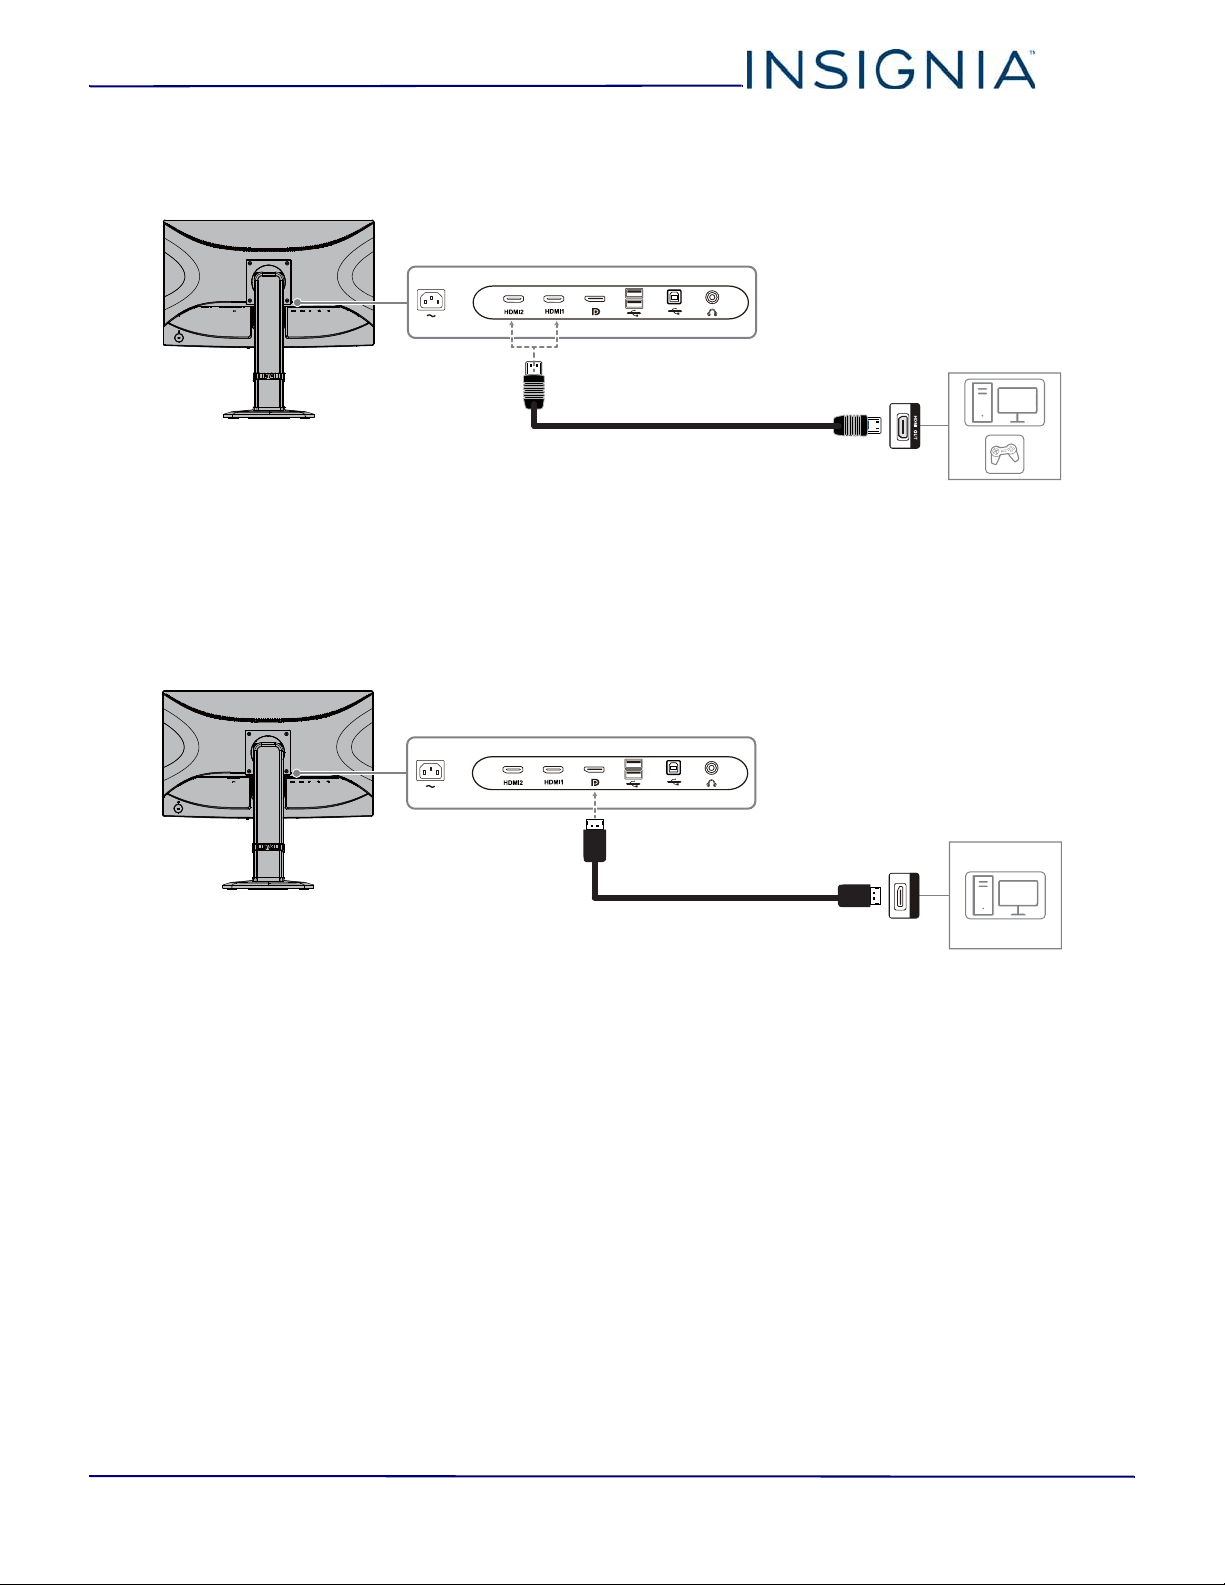
Connecting a device using the HDMI port
1 Plug the included HDMI cable into one of the HDMI jacks on the back of your monitor and into an HDMI jack on a
device.
2 Turn on the connected device, then press AUTO. The video input menu opens.
3 Press + or – to highlight HDMI1 or HDMI2, then press MENU. If the connected device is on and sending a video
signal, the picture appears on your monitor’s screen.
Connecting a device using the Displayport
1 Plug the included Displayport (DP) cable into the DP port on the back of your monitor and into a DP port on a
computer.
2 Turn on your computer, then press AUTO. The video input menu opens.
3 Press + or – to highlight Displayport, then press MENU. If the connected device is on and sending a video signal,
the picture appears on your monitor’s screen.
DisplayPort
13
24" FHD LED Backlit Gaming Monitor
www.insigniaproducts.com
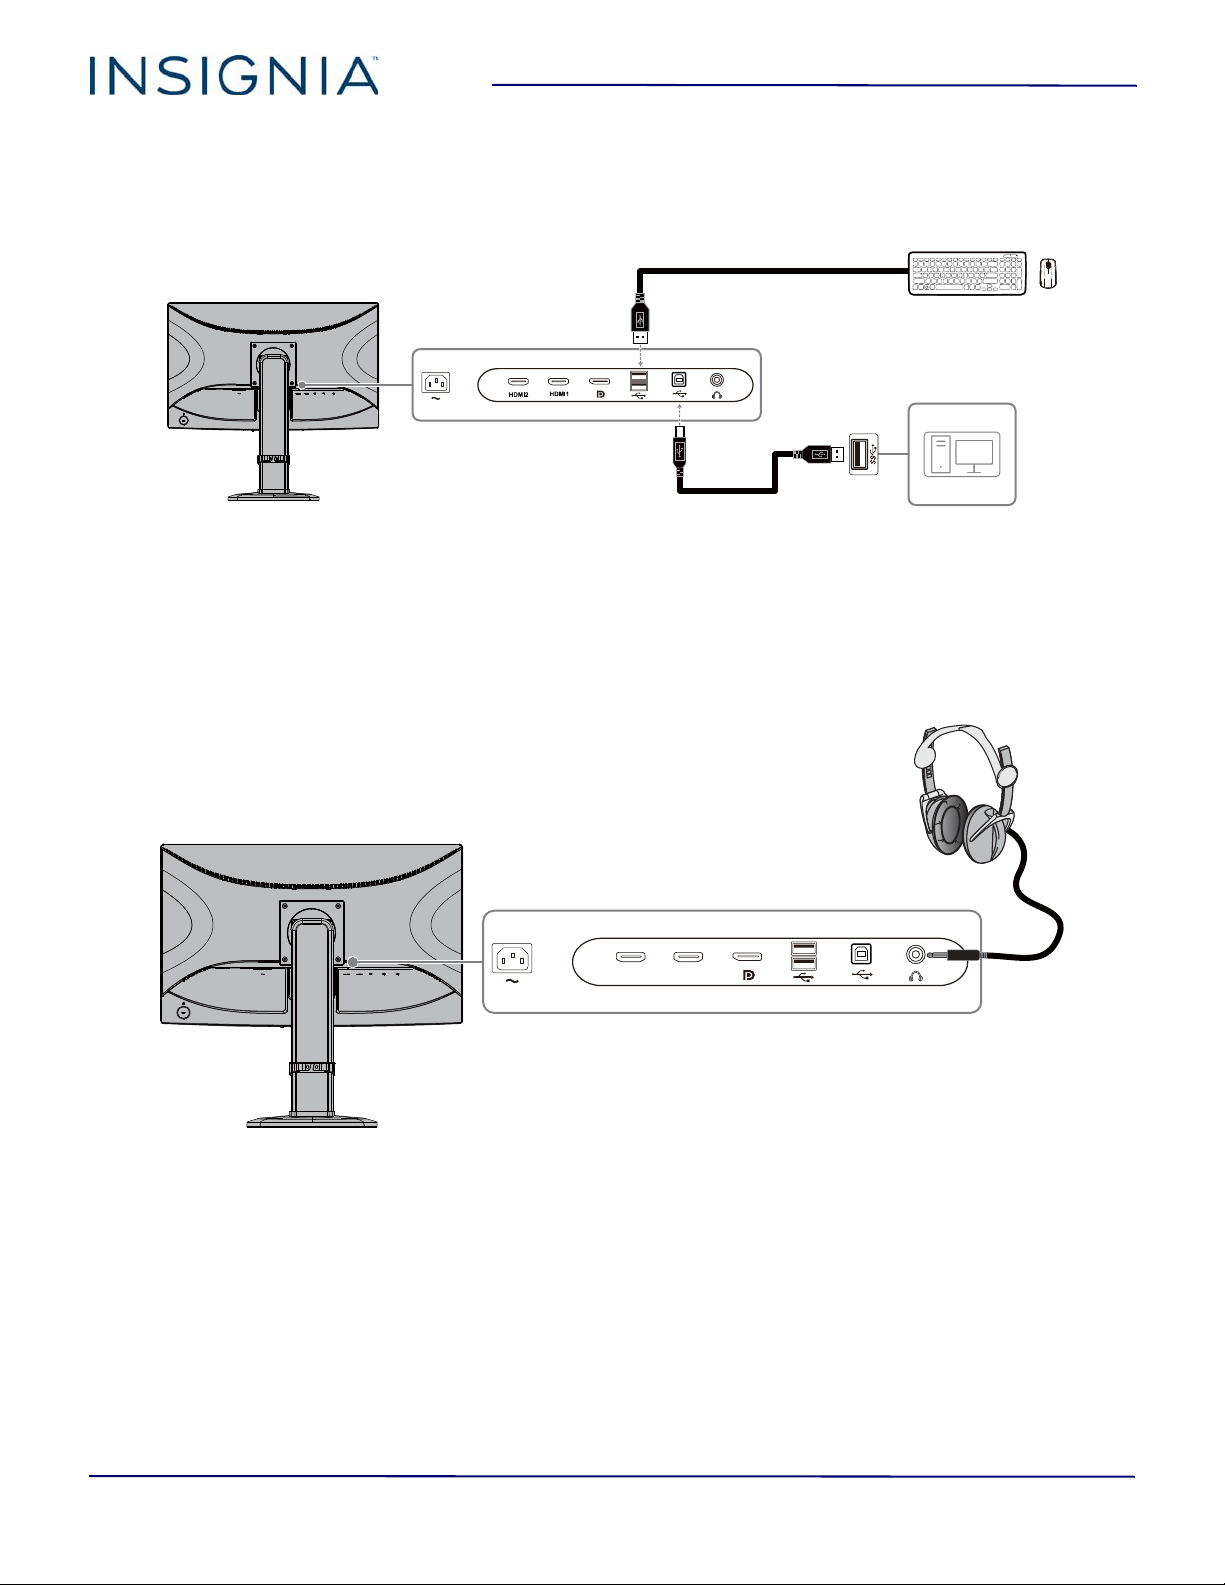
Connecting the USB ports
You can connect your computer or a video game console to the USB upstream port using a USB cable with a Type B
connector on one end and a Type A connector on the other end.
You can connect USB devices, such as a keyboard and mouse, to the USB downstream ports.
1 To connect your computer to the USB upstream port, plug the Type B connector on a USB cable into the USB
upstream port on back of your monitor, then connect the Type A cable connector to the downstream port on your
computer.
2 To connect a USB device, connect it to one of the USB downstream ports on the back of your monitor and a USB port
on the device.
Connecting headphones
1 Plug headphones into the headphone jack on the back on your monitor.
2 Make sure that sound is turned on for your connected devices.
3 If the headphones are not working, make sure that your monitor is selected as the default audio device on the
computer. See the documentation that came with the computer or the operating system.
Type A USB cable
Type A/B USB cable
HDMI2
HDMI1
14
NS-PMG248
www.insigniaproducts.com
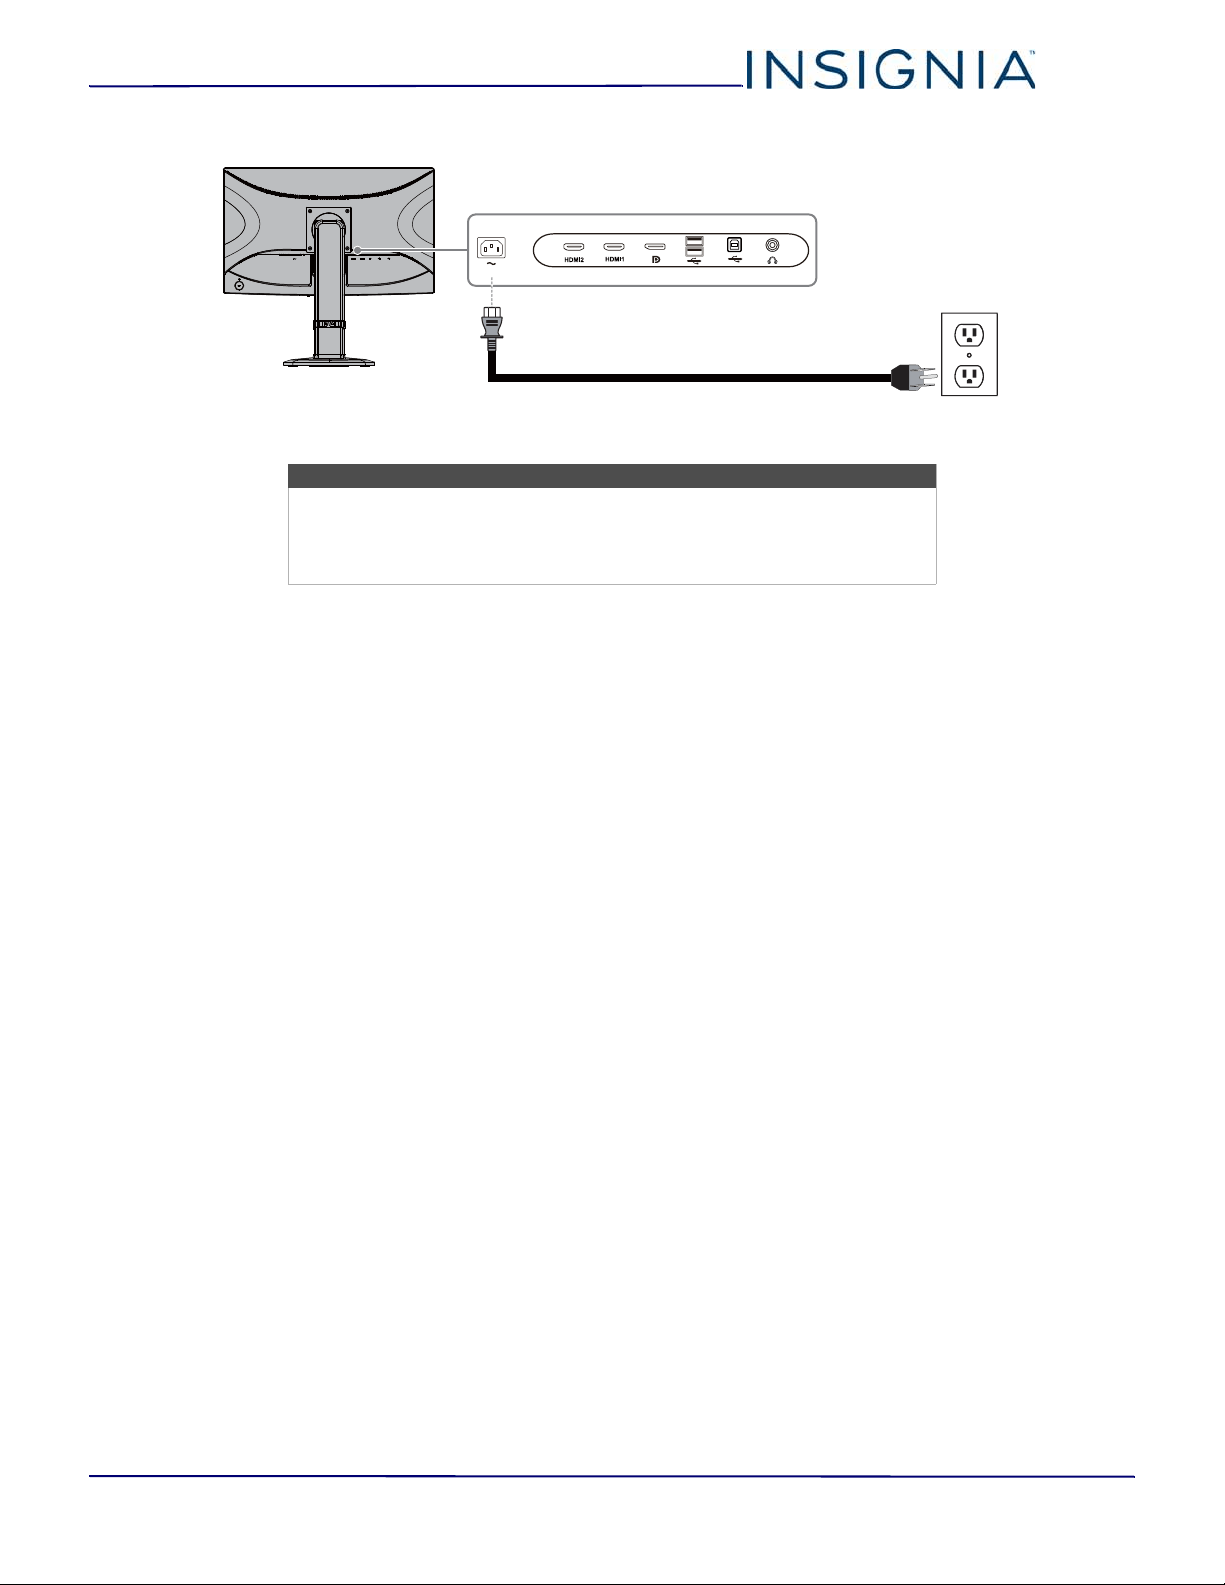
Connecting the power cable
• Plug the power cord into the power connector on the back of your monitor and into a three-prong power outlet.
Caution
• Your monitor should only be operated from the power source indicated
on the label.
• Always unplug the power cord from the power outlet when you will not
be using your monitor for an extended period of time.
15
24" FHD LED Backlit Gaming Monitor
www.insigniaproducts.com
Using your monitor
Turning your monitor on and off
1 Press (power). Your monitor turns on and the
power indicator lights blue.
2 Press (power) again. Your monitor turns off and
the power indicator turns off.
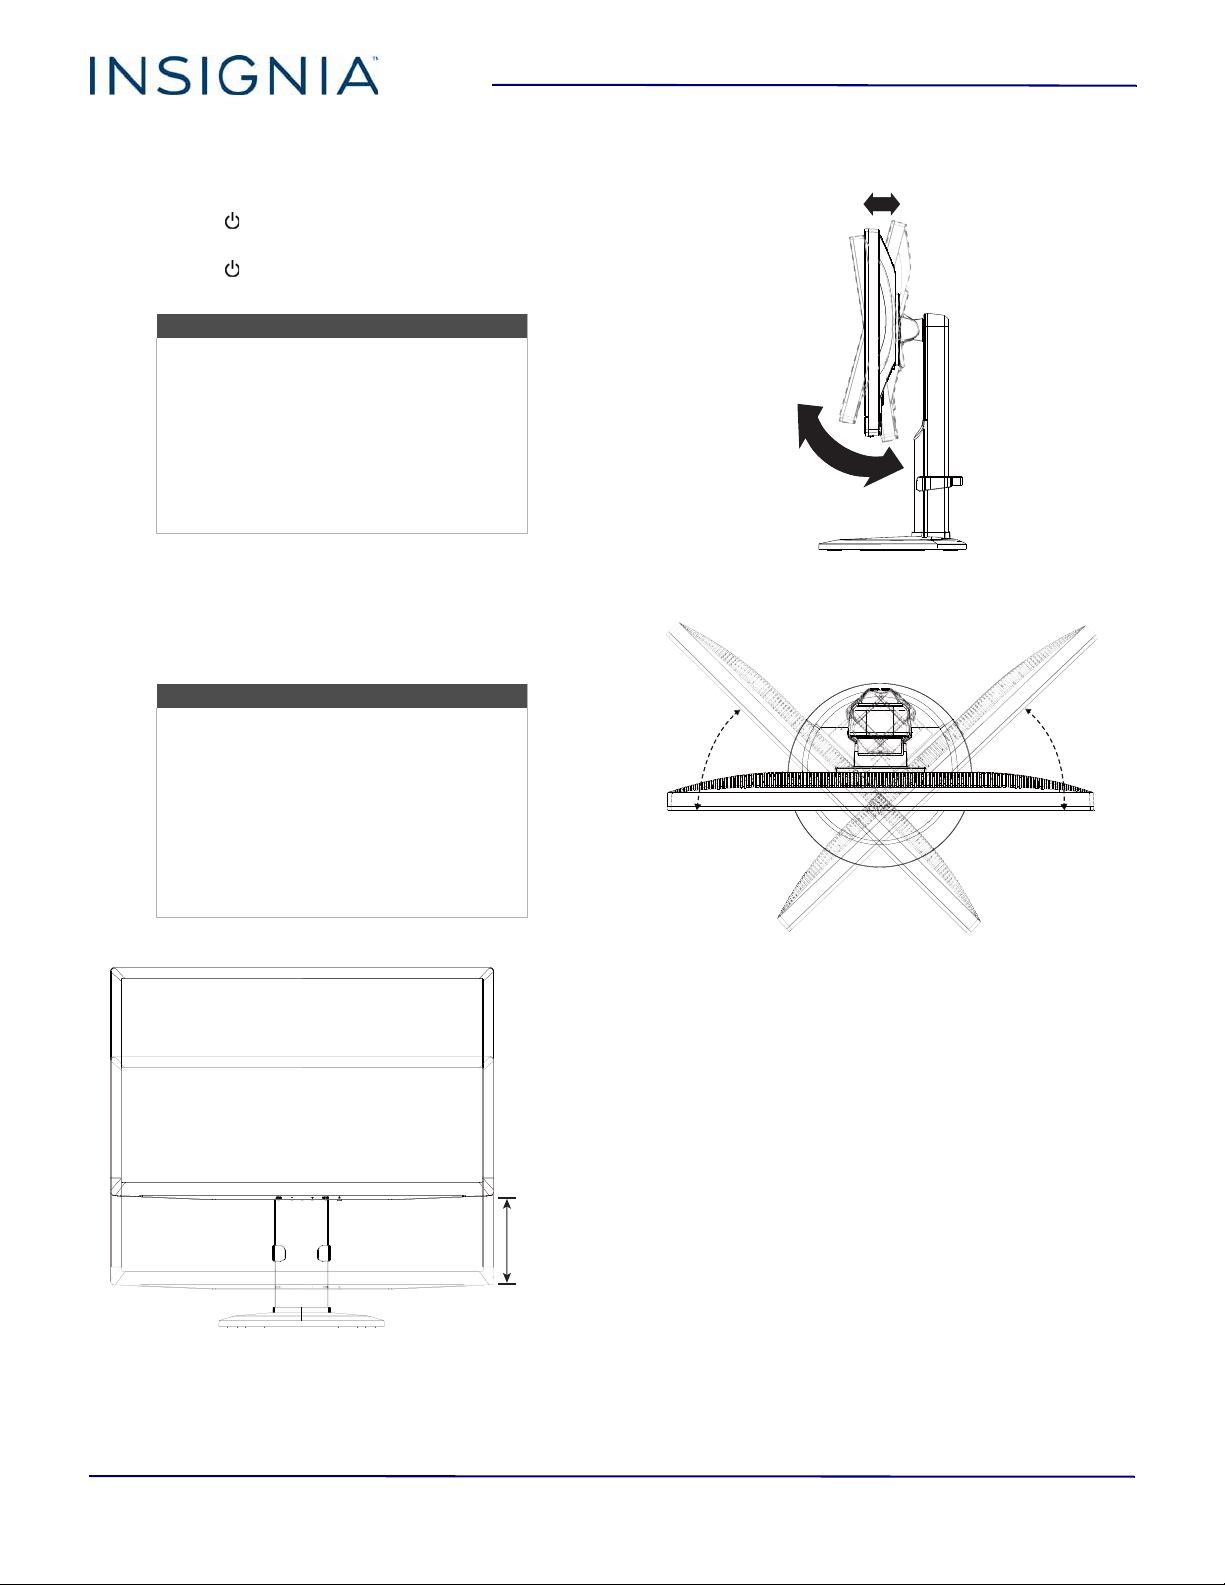
Adjusting the viewing angle
You can:
• Raise or lower the screen
• Tilt the screen forward or backward
• Rotate the screen left or right.
Raise or lower
Tilt forward or backward
Rotate left or right
Note
If your monitor does not receive a video
signal within seven seconds, your monitor
goes into standby mode. In standby mode,
the screen turns off to save power and the
power indicator lights orange.
To “wake” your monitor, press any key on
the connected computer keyboard or
move the mouse or move a control on the
connected game controller.
Note
When adjusting the viewing angle:
• Look at the full face of the screen.
• Hold the stand base to avoid tipping
over your monitor.
• Do not touch the screen while making
adjustments. You may damage or break
the screen.
• Make sure that you do not pinch your
fingers.
5.1 in ± .2 in.
(130 mm ± 5 mm)
-5° to 23°
70° 70°
16
NS-PMG248
www.insigniaproducts.com
Adjusting the resolution and refresh rate
You can adjust the monitor’s resolution and refresh rate to improve the quality of the screen display.
To set the refresh rate in Windows®:
1 Right-click the desktop, then click Display Settings.
2 Open the Resolution list, then select a resolution.
3 Click Display adapter properties.
4 On the Monitor tab, open the Screen refresh rate list, select a resolution, then click OK.
To set the refresh rate in Windows®7 or Windows® 8, or Windows® 8.1:
1 Open the Control Panel.
2 Click Adjust Screen Resolution under Appearance and Personalization.
3 Open the Resolution list, move the slider to select a resolution, then click Apply.
4 Click the Advanced settings link.
5 Click the Monitor tab, then select a refresh rate.
6 Click Apply to save the changes, then click OK to close the window.
See the documentation that came with the computer or the computer’s operating system.
The available resolutions and refresh rates are listed in Factory preset timing table on page 22.
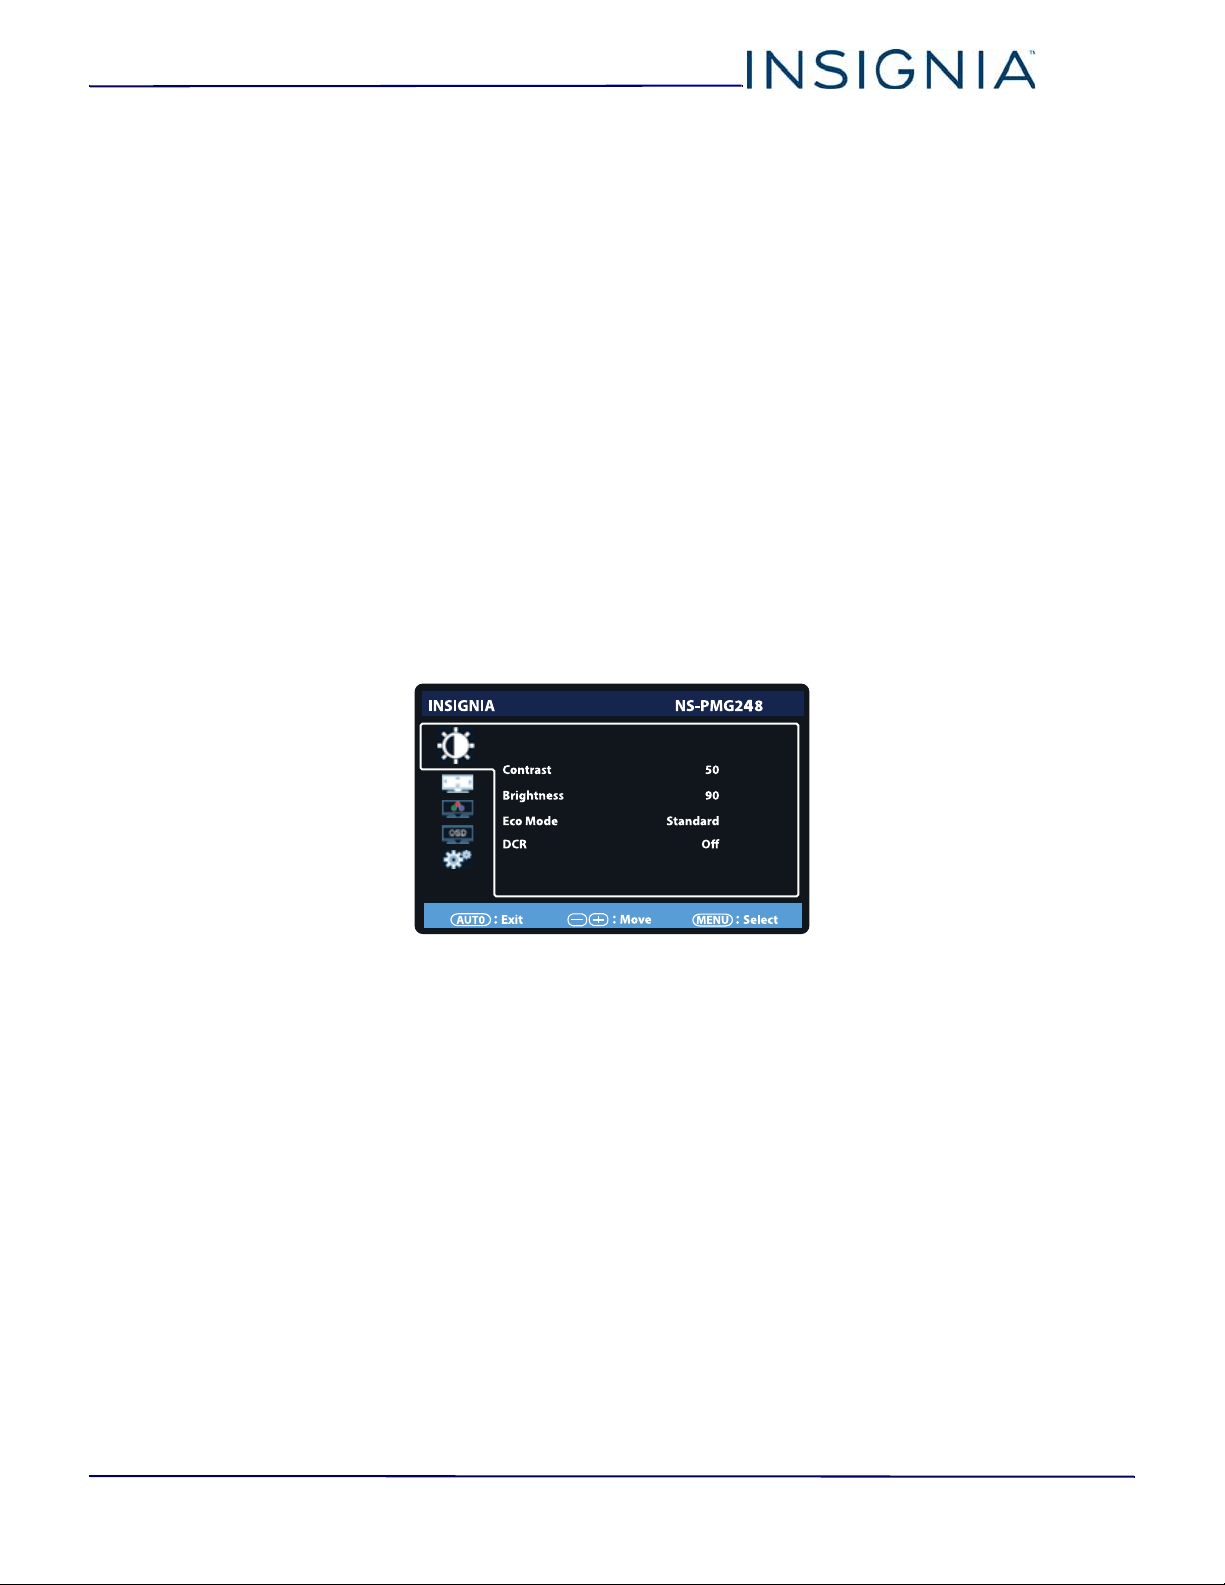
Adjusting menu options
You can adjust the monitor’s screen to get the best picture display.
1 Make sure that your monitor is on, then press MENU. The monitor menu is displayed.
2 Press + or – to highlight a menu icon, then press MENU.
3 Press + or – to highlight an option, then press MENU.
4 Press + or – to adjust the setting, then press MENU.
5 If the option has sub-options, press + or – to highlight an sub-option, then press MENU.
6 Press + or – to adjust the setting, then press MENU.
7 Press AUTO to return to the previous option or menu or to close the menu.

17
24" FHD LED Backlit Gaming Monitor
www.insigniaproducts.com
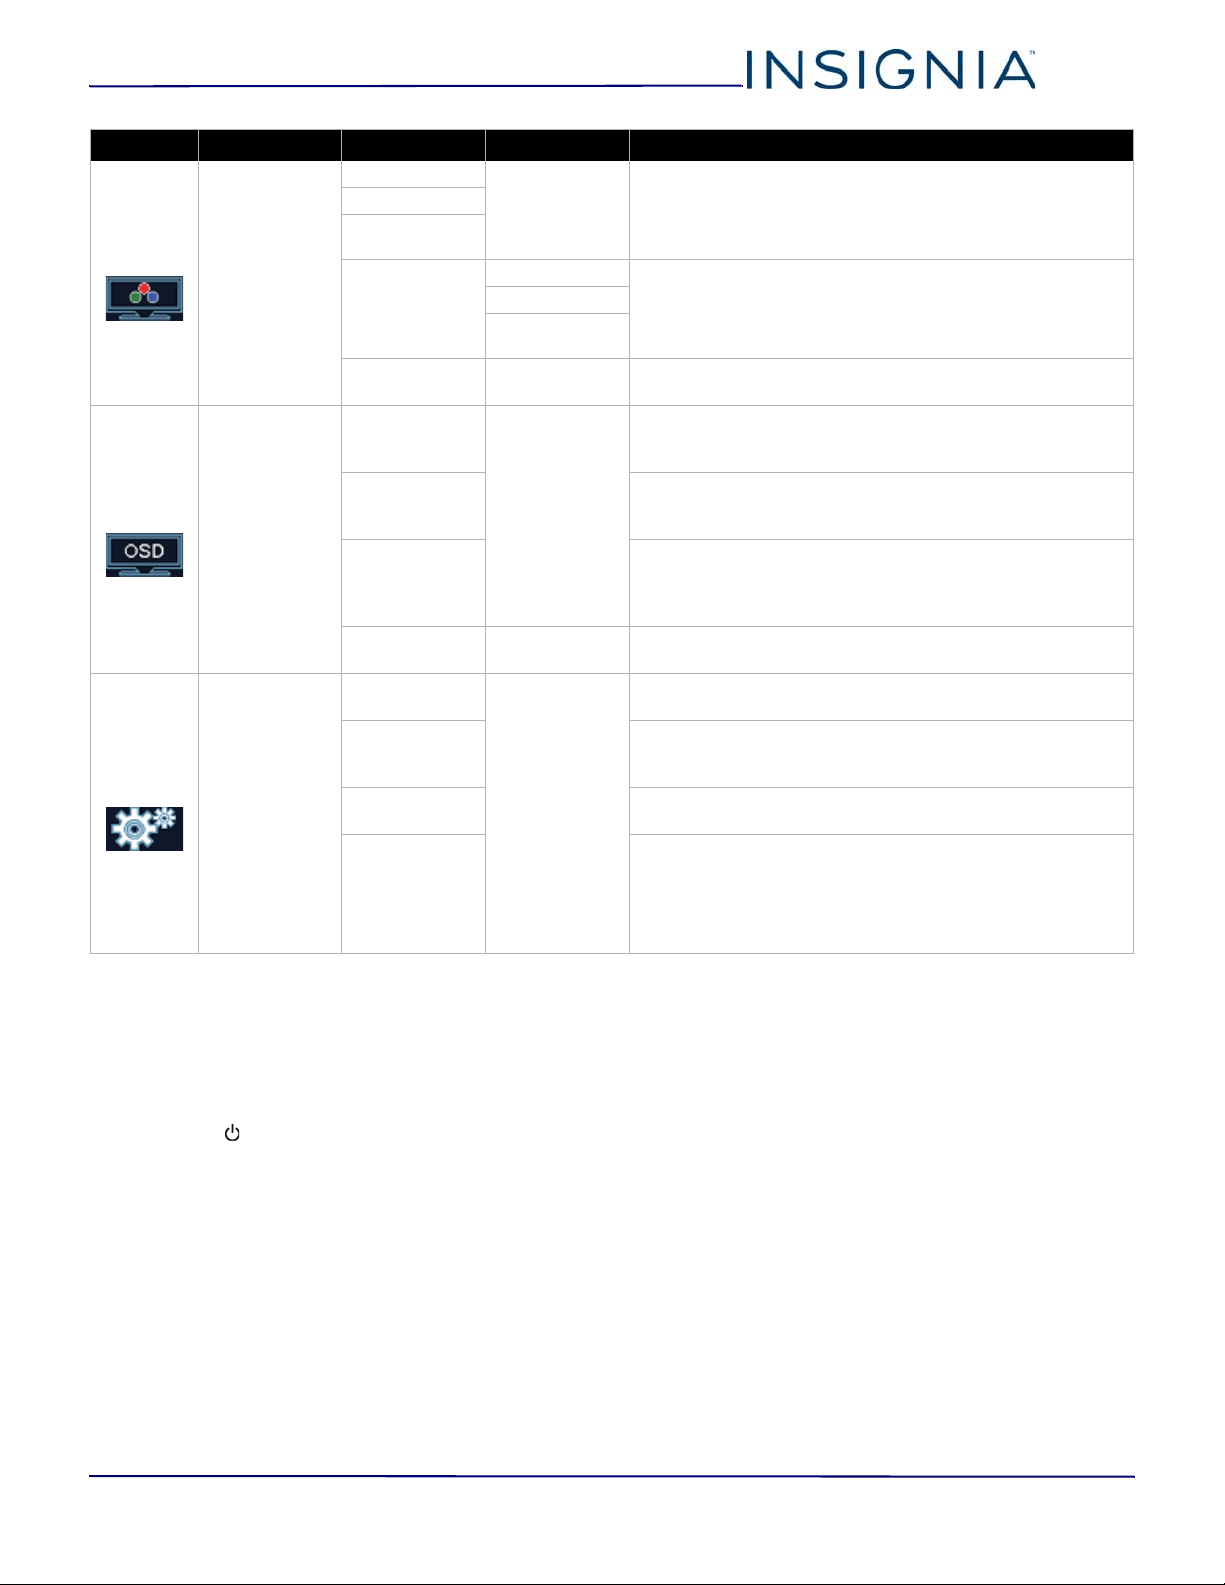
Menus, options, and reset values
Icon Menu Option Sub option Settings
Luminance
Contrast Adjusts the brightness of the light areas of the picture. You
can adjust the value from 0 to 100 by pressing + or –. The
reset value is 50.
Brightness Adjusts the brightness of the dark areas of the picture. You
can adjust the value from 0 to 100 by pressing + or –. The
reset value is 90.
Eco Mode
(picture mode)
Standard
Brightness is set to 90.
Contrast is set to 50.
Brightness and Contrast are adjustable.
The reset value is Standard Mode.
Tex t
Brightness is set to 20.
Contrast is set to 50.
Brightness and Contrast are grayed and not adjustable.
The reset value is Standard Mode
Internet
Brightness is set to 40.
Contrast is set to 50.
Brightness and Contrast are grayed and not adjustable.
The reset value is Standard Mode.
Game
Brightness is set to 60.
Contrast is set to 50.
Brightness and Contrast are grayed and not adjustable.
The reset value is Standard Mode.
Movie
Brightness is set to 80.
Contrast is set to 50.
Brightness and Contrast are grayed and not adjustable.
The reset value is Standard Mode.
Sports
Brightness is set to 100.
Contrast is set to 50.
Brightness and Contrast are grayed and not adjustable.
The reset value is Standard Mode.
DCR (Dynamic
Contrast Ratio)
Enhances the contrast ratio between the light and dark
areas of the picture. You can select On or Off. The reset
value is Off.
Display Settings
Image Ratio Adjusts how the picture fills the screen (aspect ratio). You
can select Wide (16:9) or 4:3 (full-screen). The reset value is
Wide.
Free Sync
Reduces visual artifacts (screen tearing) that occur when
the frame rate and the response time are not in sync. You
can select On or Off. The reset value is On.
FreeSync™ only works with AMD graphics cards.
Response Time Adjusts the response time to reduce smear or blur around
fast moving objects. You can select Fast, Normal, or Off.
The reset value is Normal.
DP 1.2 Turns the DP 1.2 (Displayport 1.2) on your monitor on of off.
You can select Enable or Disable. The reset value is Enable.
18
NS-PMG248
www.insigniaproducts.com
Locking or unlocking the menu
You can lock your monitor’s menu so that options
cannot be accidentally changed.
1 Make sure that your monitor is turned off.
2 Press and hold MENU.
3 Press (power) to turn on your monitor.
4 To unlock the menu, repeat Steps 1 through 3.
Maintaining
Cleaning your monitor cabinet
Clean the cabinet with a soft, lint-free cloth. If the
cabinet is especially dirty, moisten a soft, lint-free
cloth in a weak detergent solution, squeeze the
excess moisture from the cloth, then wipe the cabinet
with the cloth. Use a clean cloth to dry the cabinet.
Cleaning your monitor screen
Clean the screen with a soft, lint-free cloth.
Color Temp.
Warm Warm enhances the reds.
Normal does not enhance colors.
Cool enhances the blues.
The default value is Warm.
Normal
Cool
User Red
Adjusts the colors in the image. You can adjust each color
from 0 to 100 by pressing + or –. The default value for each
color is 50.
If you reset your monitor, the values you set do not change.
Green
Blue
sRGB Reset the red, green, and blue color values to the default
setting of sRGB.
OSD Setup
H.Position Adjusts the horizontal position of the menu on the screen.
You can adjust the position in 5-step increments from 0 to
100 by pressing + or –. The reset value is 50.
V.Position Adjusts the vertical position of the menu on the screen. You
can adjust the position in 5-step increments from 0 to 100
by pressing + or –. The reset value is 50.
Timeout Adjusts the amount of time the menu stays open before it
automatically closes. You can adjust the time in 5-step
increments from 5 seconds to 100 seconds by pressing +
or –. The reset value is 10 seconds.
Language Selects the menu language. The default language is
English.
Extra
Input Select Selects the video input source. You can select AUTO,
Displayport, HDMI1, or HDMI2. The reset value is AUTO.
DDC/CI Allows your monitor to control the graphics card in your
computer. You can select On or Off. Turning on this option
makes your monitor Plug & Play. The reset value is On.
Reset Resets all menu options to the factory defaults. You can
select Ye s or No. The reset value is No.
Information Shows the vertical and horizontal resolution and all the
video timing for the main picture. For example:
1920(H)x1080(V)
45KHz
60Hz
Icon Menu Option Sub option Settings

19
24" FHD LED Backlit Gaming Monitor
www.insigniaproducts.com
Troubleshooting
Warning
Do not try to repair your monitor yourself. Contact authorized service
personnel.
Note
If the problem is not solved by using these troubleshooting instructions,
turn off your monitor, then turn it on again.
Symptom Solution
The power indicator is not on.
• Make sure that the power cord is connected to your monitor
and to a power outlet. See Connecting the power cable on
page 14.
• Make sure that your monitor is turned on. See Turning your
monitor on and off on page 15.
The power indicator is orange but
there is no picture.
• Your monitor may be in standby mode. Press any keyboard key
or move the mouse on the connected computer or move a
control on the connected game controller.
• Make sure that the computer is turned on.
• Make sure that the computer is working correctly. Press the
Caps Lock key. The Caps Lock indicator on the keyboard
should turn on or off.
• Make sure that the video cable is correctly connected to your
monitor and computer. See Connecting a device using the
HDMI port or page 12 or Connecting a device using the
Displayport on page 12.
• Make sure that no pins on the video cable are bent.
• Make sure that the graphics card in the computer is correctly
installed.
The Plug & Play feature is not working.
• Make sure that the computer operating system supports
Plug & Play.
• Make sure that the computer’s graphics card supports
Plug & Play.
• Make sure that no pins on the video cable are bent.
The picture is fuzzy.
•Adjust the Brightness and Contrast options on the Luminance
menu. See Adjusting menu options on page 16.
The picture flickers or intermittently
displays a black screen.
• Make sure that you set both the resolution and refresh rate on
your computer.
• Make sure that the video cable or port on the computer is
working correctly.
• Move nearby electronic devices. They may be interfering with
the video signal.
• Some graphics cards do not support the DP 1.2 monitor
setting. On your monitor, open the Display Settings menu, then
turn off the DP 1.2 option. See Adjusting menu options on
page 16.
• Your system may be taxing the graphics card. Try adjusting
Performance Options. On a Windows®-based system, open the
Control Panel, then select System and Security > System >
Advanced system settings. On the Advanced tab, select
Settings, then adjust Performance Options.
• To use the 1920 × 1080 @ 144Hz resolution and refresh rate,
make sure that your computer is connected to the Displayport
(DP) on your monitor.
• The 1920 × 1080 @ 144Hz resolution refresh rate is only
supported by AMD or NVIDIA dedicated graphics cards.
Intel HD integrated graphics does not support the 144 Hz
refresh rate.
20
NS-PMG248
www.insigniaproducts.com
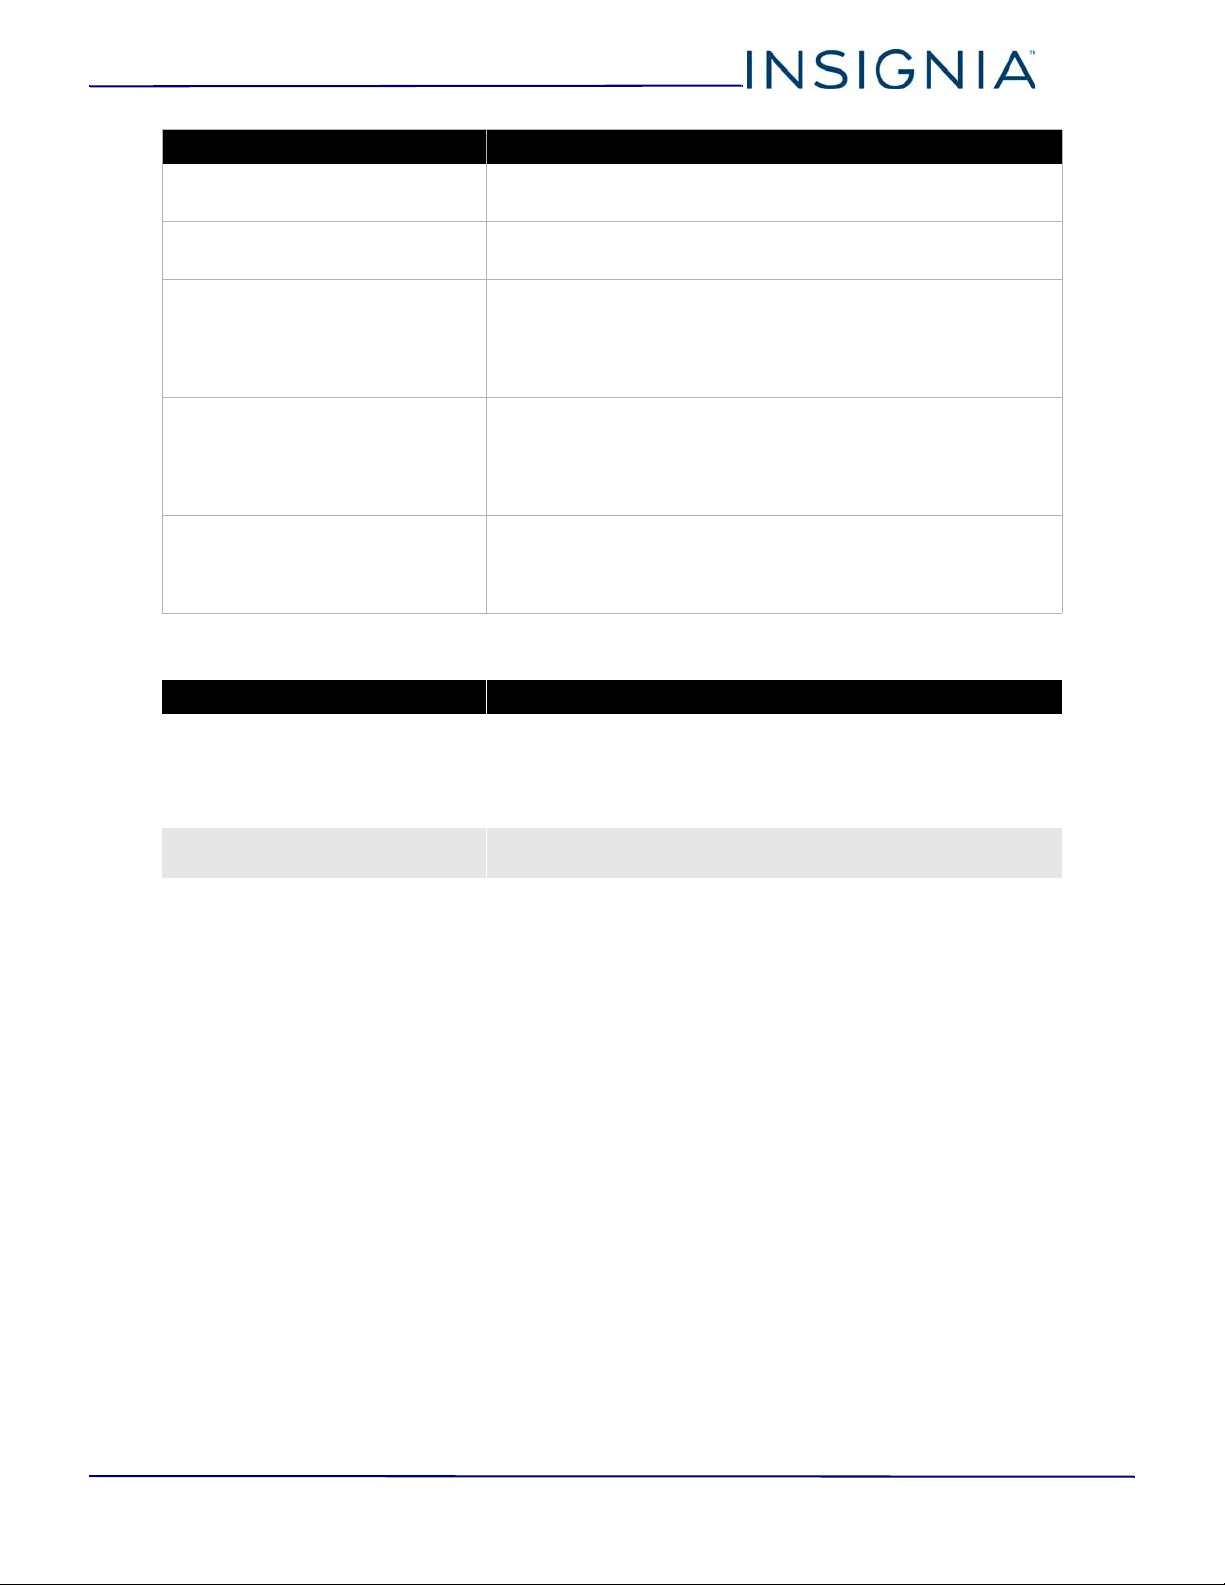
Error messages
The picture bounces or has wave
patterns.
• Move electrical devices that may cause electrical interference
away from your monitor.
One of the primary colors (red, green,
or blue) are missing.
• Make sure that no pins on the video cable are bent.
Colors do not look right (white does
not look white).
• Select a color temperature setting on the Color Temperature
menu. See Adjusting menu options on page 16.
• Select the sRGB option on the Color Temperature menu to
automatically adjust the color. See Adjusting menu options on
page 16.
The brightness or contrast are poor.
•Adjust the Brightness or Contrast options on the Luminance
menu. See Adjusting menu options on page 16.
•If adjusting the Brightness or Contrast option does not solve
the problem, contact Insignia Support or take your monitor to
an authorized service repair center.
The connected headphones are not
working.
• Make sure that sound is turned on the connected device.
• Make sure that your monitor is selected as the default audio
device on the computer. See the documentation that came
with the computer.
Symptom Solution
NO SIGNAL
Your monitor is not receiving a video signal.
• Make sure that you have selected the correct video input.
• Make sure that the video cable is connected correctly and
securely.
• Make sure that no pins on the video cable are bent.
INPUT NOT SUPPORT
The computer has been set to an unsuitable display mode. Make sure
that the display mode is set to the correct display mode.
Symptom Solution
21
24" FHD LED Backlit Gaming Monitor
www.insigniaproducts.com
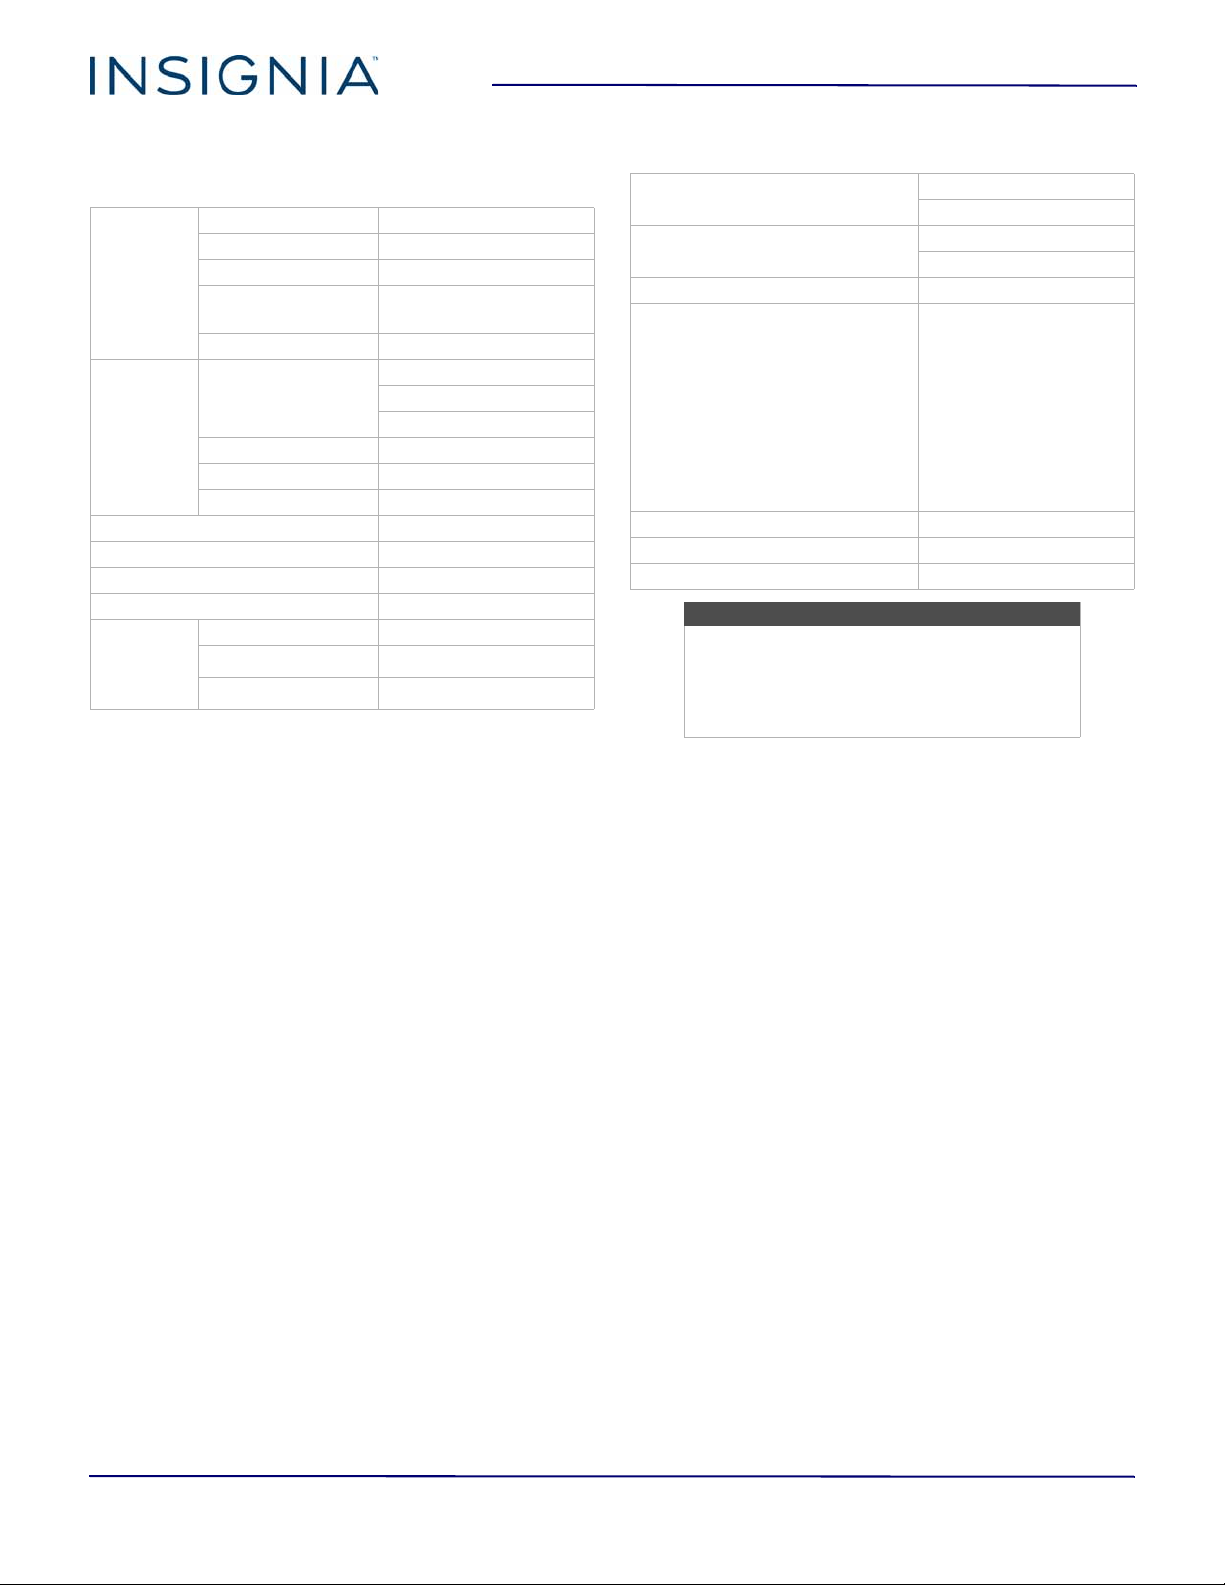
Specifications
Specifications are subject to change without notice.
LCD panel
Panel LCD
Panel backlight LED
Diagonal size 24 in. (61 cm)
Maximum size H × V
20.9 × 11.8 in.
(53.2 cm × 30 cm)
Pixel pitch .27675 mm × .27675 mm
Input
Video
R, G, B analog interface
Digital
HDMI1.4 x 2 ,DP1.2 x 1
Separate Sync. H/V
H-Frequency 24kHz – 180kHz
V-Frequency 40Hz – 124Hz
Display colors 16.7M colors
Dot clock 340MHz
Max. Resolution 1920 × 1080 @ 120Hz
Plug & Play Plug & Play
Power
Consumption
On ≤ 58W
Standby
≤
0.5W
Off
≤ 0.5W
Input connector
DP 20 pin
HDMI 19 pin
Video input signal
DP
HDMI
Power source 100~240VAC, 50/60Hz
Environmental Considerations
Operating Temp: 32° to 95°F
(0° to 35°C)
Operating Humidity: 10% to 80%
Operating Height: 0 to 12,000 ft. (0 to
3,658 m)
Storage Temp.: -4° to 140°F (-20°C to
60°C)
Storage Humidity: 5% to 90%
Storage Height: 0 to 40,0000 ft. (0 to
12,192 m)
OSD languages English, French, Spanish
VESA mount (H × V) 100 × 100 mm
VESA mount screws M4
Note
The length of the wall-mount screws vary
depending on the wall-mount bracket you
purchased. See the instructions that came
with the wall-mount bracket for screw
lengths.
22
NS-PMG248
www.insigniaproducts.com
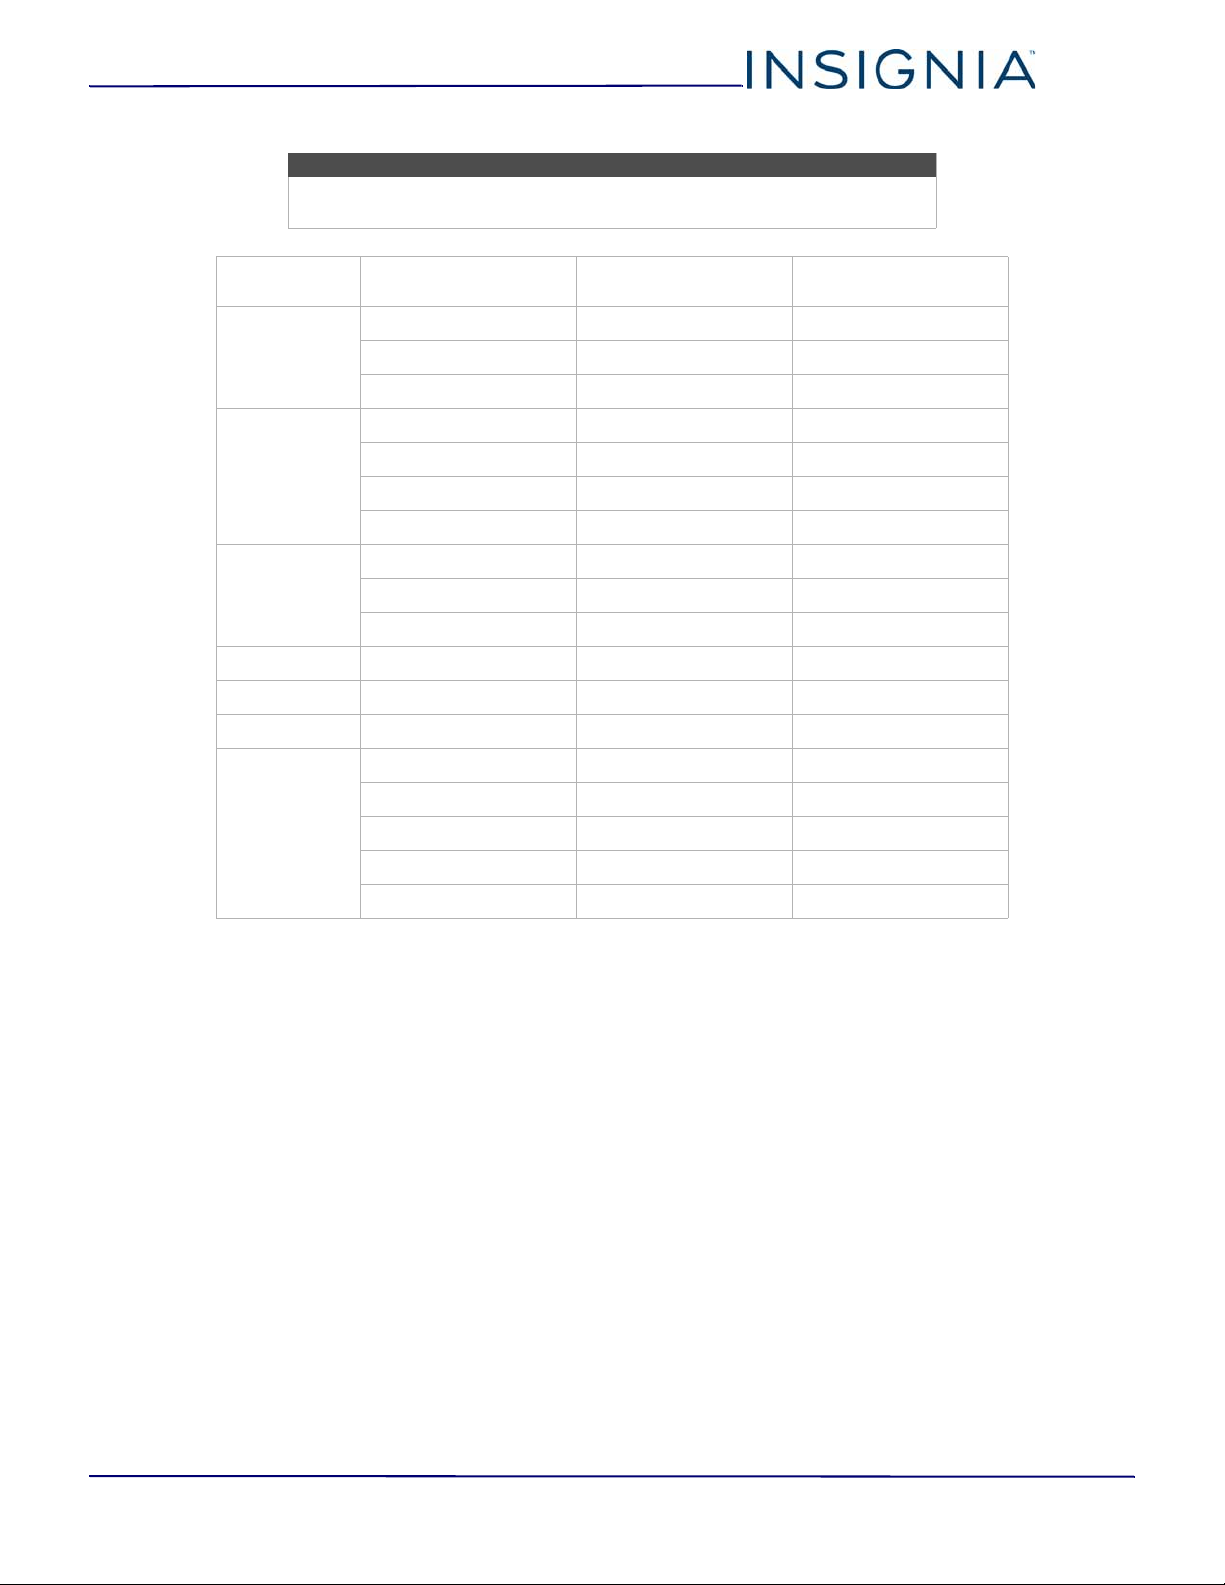
Factory preset timing table
Note
Select both the resolution and refresh rate on your computer. See the
documentation that came with your computer’s operating system.
Mode Resolution
H. Frequency
± 0.5kHz
V. Frequency
± 1Hz
VGA
640 × 480 @ 60Hz 31.469 59.94
640 × 480 @ 72Hz 35.748 71.927
640 × 480 @ 75Hz 37.5 75
SVGA
800 × 600 @ 56Hz 35.156 56.25
800 × 600 @ 60Hz 37.879 60.317
800 × 600 @ 72Hz 48.077 72.188
800 × 600 @ 75Hz 46.875 75
XGA
1024 × 768 @ 60Hz 48.363 60.004
1024 × 768 @ 70Hz 56.476 70.069
1024 × 768 @ 75Hz 60.023 75.029
WXGA+ 1440 × 900 @ 60Hz 55.935 55.887
UXGA 1600 × 1200 @ 60Hz 75 60
WSXGA+ 1680 × 1050 @ 60Hz 65.29 59.95
Full HD
1920 × 1080 @ 60Hz 66.587 59.934
1920 × 1080 @ 60Hz 67.5 60
1920 × 1080 @ 100Hz 113.187 99.9
1920 × 1080 @ 120Hz 137.143 119.88
1920 × 1080 @ 144Hz 166.442 143.856

23
24" FHD LED Backlit Gaming Monitor
www.insigniaproducts.com
Legal notices
FCC Statement
Note: This equipment has been tested and found to comply with
the limits for a class B digital device, pursuant to part 15 of the FCC
Rules. These limits are designed to provide reasonable protection
against harmful interference in a residential installation. This
equipment generates, uses and can radiate radio frequency energy
and, if not installed and used in accordance with the instructions,
may cause harmful interference to radio communications.
However, there is no guarantee that interference will not occur in a
particular installation. If this equipment does cause harmful
interference to radio or television reception, which can be
determined by turning the equipment off and on, the user is
encouraged to try to correct the interference by one or more of the
following measures:
• Reorient or relocate the receiving antenna.
• Increase the separation between the equipment and the
receiver.
• Connect the equipment into an outlet on a circuit different
from that to which the receiver is connected.
• Consult the dealer or an experienced radio/TV technician for
help.
Warning
Changes or modifications not expressly approved by the party
responsible for compliance could void the user's authority to
operate the equipment.
Cables
Connections to this device must be made with shielded cables with
metallic RF/EMI connector hoods to maintain compliance with FCC
Rules and Regulations.
HDMI®
The terms HDMI and HDMI High-Definition
Multimedia Interface, and the HDMI Logo are
trademarks or registered trademarks of HDMI
Licensing LLC in the United States and other
countries.
Windows®
Windows® is a registered trademark of Microsoft Corporation in the
United States and other countries.

24
NS-PMG248
www.insigniaproducts.com
ONE-YEAR LIMITED WARRANTY
Definitions:
The Distributor* of Insignia branded products warrants to you, the
original purchaser of this new Insignia-branded product
("Product"), that the Product shall be free of defects in the original
manufacturer of the material or workmanship for a period of one
(1) year from the date of your purchase of the Product ("Warranty
Period").
For this warranty to apply, your Product must be purchased in the
United States or Canada from a Best Buy branded retail store or
online at www.bestbuy.com or www.bestbuy.ca and is packaged
with this warranty statement.
How long does the coverage last?
The Warranty Period lasts for 1 year (365 days) from the date you
purchased the Product. Your purchase date is printed on the receipt
you received with the Product.
What does this warranty cover?
During the Warranty Period, if the original manufacture of the
material or workmanship of the Product is determined to be
defective by an authorized Insignia repair center or store personnel,
Insignia will (at its sole option): (1) repair the Product with new or
rebuilt parts; or (2) replace the Product at no charge with new or
rebuilt comparable products or parts. Products and parts replaced
under this warranty become the property of Insignia and are not
returned to you. If service of Products or parts are required after the
Warranty Period expires, you must pay all labor and parts charges.
This warranty lasts as long as you own your Insignia Product during
the Warranty Period. Warranty coverage terminates if you sell or
otherwise transfer the Product.
How to obtain warranty service?
If you purchased the Product at a Best Buy retail store location or
from a Best Buy online website (www.bestbuy.com or
www.bestbuy.ca), please take your original receipt and the Product
to any Best Buy store. Make sure that you place the Product in its
original packaging or packaging that provides the same amount of
protection as the original packaging.
To obtain warranty service, in the United States call 1-888-BESTBUY
or in Canada call 1-866-BESTBUY. Call agents may diagnose and
correct the issue over the phone.
Where is the warranty valid?
This warranty is valid only in the United States and Canada at Best
Buy branded retail stores or websites to the original purchaser of
the product in the county where the original purchase was made.
What does the warranty not cover?
This warranty does not cover:
• Customer instruction/education
•Installation
•Set up adjustments
• Cosmetic damage
• Damage due to weather, lightning, and other acts of God,
such as power surges
• Accidental damage
•Misuse
•Abuse
•Negligence
• Commercial purposes/use, including but not limited to use in
a place of business or in communal areas of a multiple
dwelling condominium or apartment complex, or otherwise
used in a place of other than a private home.
• Modification of any part of the Product, including the antenna
• Display panel damaged by static (non-moving) images
applied for lengthy periods (burn-in).
• Damage due to incorrect operation or maintenance
• Connection to an incorrect voltage or power supply
• Attempted repair by any person not authorized by Insignia to
service the Product
• Products sold "as is" or "with all faults"
• Consumables, including but not limited to batteries (i.e. AA,
AAA, C etc.)
• Products where the factory applied serial number has been
altered or removed
• Loss or Theft of this product or any part of the product
• Display panels containing up to three (3) pixel failures (dots
that are dark or incorrectly illuminated) grouped in an area
smaller than one tenth (1/10) of the display size or up to five
(5) pixel failures throughout the display. (Pixel based displays
may contain a limited number of pixels that may not function
normally.)
• Failures or Damage caused by any contact including but not
limited to liquids, gels or pastes.
REPAIR REPLACEMENT AS PROVIDED UNDER THIS WARRANTY IS
YOUR EXCLUSIVE REMEDY FOR BREACH OF WARRANTY. INSIGNIA
SHALL NOT BE LIABLE FOR ANY INCIDENTAL OR CONSEQUENTIAL
DAMAGES FOR THE BREACH OF ANY EXPRESS OR IMPLIED
WARRANTY ON THIS PRODUCT, INCLUDING, BUT NOT LIMITED TO,
LOST DATA, LOSS OF USE OF YOUR PRODUCT, LOST BUSINESS OR
LOST PROFITS. INSIGNIA PRODUCTS MAKES NO OTHER EXPRESS
WARRANTIES WITH RESPECT TO THE PRODUCT, ALL EXPRESS AND
IMPLIED WARRANTIES FOR THE PRODUCT, INCLUDING BUT NOT
LIMITED TO ANY IMPLIED WARRANTIES OF AND CONDITIONS OF
MERCHANTABILITY AND FITNESS FOR A PARTICULAR PURPOSE, ARE
LIMITED IN DURATION TO THE WARRANTY PERIOD SET FORTH
ABOVE AND NO WARRANTIES, WHETHER EXPRESS OR IMPLIED,
WILL APPLY AFTER THE WARRANTY PERIOD. SOME STATES,
PROVINCES AND JURISDICTIONS DO NOT ALLOW LIMITATIONS ON
HOW LONG AN IMPLIED WARRANTY LASTS, SO THE ABOVE
LIMITATION MAY NOT APPLY TO YOU. THIS WARRANTY GIVES YOU
SPECIFIC LEGAL RIGHTS, AND YOU MAY ALSO HAVE OTHER RIGHTS,
WHICH VARY FROM STATE TO STATE OR PROVINCE TO PROVINCE.
Contact Insignia:
1-877-467-4289
www.insigniaproducts.com
INSIGNIA is a trademark of Best Buy and its affiliated companies.
*Distributed by Best Buy Purchasing, LLC
7601 Penn Ave South, Richfield, MN 55423 U.S.A.
©2017 Best Buy. All rights reserved.
Made in China

V2 ENGLISH
17-0898
For product inquiries, please contact us with the information below:
1-877-467-4289
www.insigniaproducts.com
INSIGNIA is a trademark of Best Buy and its affiliated companies.
Distributed by Best Buy Purchasing, LLC
7601 Penn Ave South, Richfield, MN 55423 U.S.A.
©2017 Best Buy. All rights reserved.
Made in China