This section includes useful information about oven operation.
Plug power supply cord into a standard 3-pronged 13 Amp, 120V AC 60Hz power outlet.
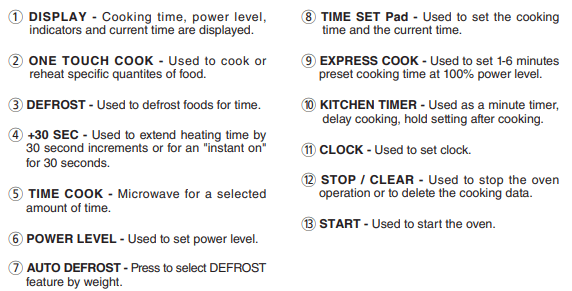
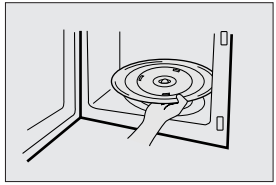
After placing the food in a suitable container, open the oven door and put it on the glass tray. The glass tray and roller guide must always be in place during cooking.
Close the door. Make sure that it is firmly closed.
The oven light is on when the microwave oven is operating.
The oven door can be opened at any time during operation by pushing the door open button of control panel. The oven will automatically shut off.
Each time a pad is pressed, a BEEP will sound to acknowledge the press.
The oven automatically cooks on full power unless set to a lower power level.
The display will show “ : 0” when the oven is plugged in.
Time clock returns to the present time when the cooking time ends.
When the STOP/CLEAR pad is pressed during the oven operation, the oven stops cooking and all information retained. To erase all information(except the present time), press the STOP/CLEAR pad once more. If the oven door is opened during the oven operation, all information is retained.
If the START pad is pressed and the oven does not operate, check the area between the door and door seal for obstructions and make sure the door is closed securely. The oven will not start cooking until the door is completely closed or the program has been reset.
Make sure the oven is properly installed and plugged into the electrical outlet.
WATTAGE OUTPUT CHART
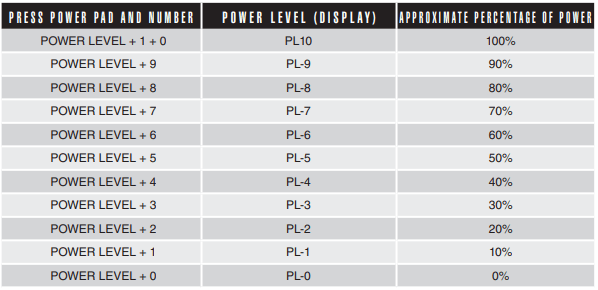
The power-level is set by pressing the Power Level pad and number pad. If you wish to use a different power level, press the POWER LEVEL pad before pressing START pad. Enter the power level desired by pressing the appropriate number pad. The chart shows the display, the power level and the percentage of power. (See TIME COOK Cooking Guide)
NOTE: If “PL-0” is selected, the oven will work with the fan but no power. You can use this level to remove odors.
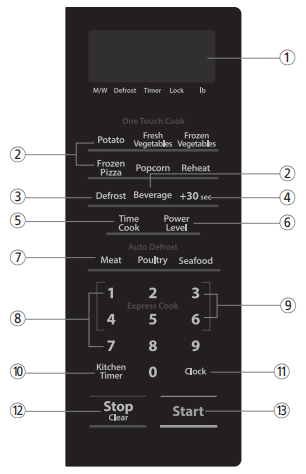
CONTROLS
SETTING THE CLOCK
When the oven is first plugged in, the display will show “:0” and a tone will sound. If the AC power ever goes off, the display show “ : 0” when the power comes back on.
Press the CLOCK pad. This is a 12 hour clock system.
Press the CLOCK pad once more. This is a 24 hour clock system.
Enter the correct time of day by pressing the TIME SET pads in sequence.
Press the CLOCK pad.
NOTE: This oven has multiple clock systems. If you want 12 hour clock system, omit this step.
The display stops blinking, and the colon starts blinking. If you selected 12 hour clock system, this digital clock allows you to set from 1:00 to 12:59. If you selected 24 hour clock system, this digital clock allows you to set from 0:00 to 23:59.
NOTE: If you attempt to enter an incorrect time, the time will not be set and a error signal tone will sound. Press the CLOCK pad and re-enter the time.
KITCHEN TIMER MODE
Timer operates as a minute timer.
Timer operates without microwave energy
HOW TO USE AS A MINUTE TIMER
1. Press KITCHEN TIMER pad.
The TIMER indicator lights and “ : 0” is displayed.
2. Press the amount of time you want to count down.
The display will show what you pressed.
3. Press START pad.
The TIMER indicator starts blinking and the display counts down the time remaining in KITCHEN TIMER mode. When KITCHEN TIMER mode ends, you will hear 3 beeps.
HOW TO USE TO DELAY THE START OF COOKING
1. Press KITCHEN TIMER pad.
The TIMER indicator lights and “ : 0” is displayed.
2. Press the amount of time you want to delay.
The display will show what you pressed.
3. Program the desired cooking time and power level for food to be cooked.
The M/W indicator lights and the selected cooking time and power level are displayed.
4. Press START pad.
When you press START pad, the TIMER indicator starts blinking and the display counts down the time remaining in KITCHEN TIMER mode. When KITCHEN TIMER mode ends, the oven will beep. The TIMER indicator goes off and M/ W indicator starts blinking. The display counts down the time remaining in M/W mode. When M/W cook ends, you will hear 3 beeps.
HOW TO USE TO SET A HOLDING TIME
1. Program the desired cooking time.
The M/W indicator lights and the selected time is displayed.
2. Press KITCHEN TIMER pad.
The TIMER indicator lights and “ : 0” is displayed.
3. Press the amount of time you want the oven to hold.
The display will show what you pressed.
4. Press START pad.
The M/W indicator starts blinking and the display counts down the time remaining in M/W mode. When the M/W cook ends, the oven will beep. The M/W indicator goes off and TIMER indicator starts blinking. The display counts down the time remaining in KITCHEN TIMER mode. When the KITCHEN TIMER mode ends, you will hear 3 beeps.
NOTE: Your oven can be programmed for 59 minutes 99 seconds. (59 : 99)
AUTO DEFROSTING
AUTO DEFROST lets you easily defrost food by eliminating guesswork in determining defrosting time. Follow the steps below for easy defrosting.
1. Press MEAT pad.
The lb indicator light and “ 1.0 ” is displayed.
2.Select the desired defrosting weight. (Refer to the auto defrost chart below.)
The display will show what you pressed.
3. Press START pad. The lb indicator light and “ 1.0 ” is displayed. The display will show what you pressed.
MEAT DEFROSTING begins.
1. Press POULTRY pad.
The lb indicator light and “ 1.5 ” is displayed.
2.Select the desired defrosting weight. (Refer to the auto defrost chart below.)
The display will show what you pressed.
3. Press START pad.
POULTRY DEFROSTING begins.
1. Press SEAFOOD pad.
The lb indicator light and “ 0.5 ” is displayed.
2. Select the desired defrosting weight. (Refer to the auto defrost chart below.)
The display will show what you pressed.
3. Press START pad.
SEAFOOD DEFROSTING begins.
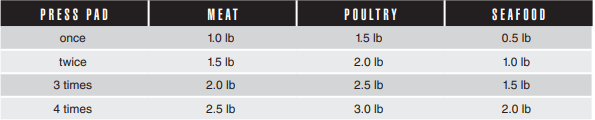
AUTO DEFROST CHART
The defrosting time is automatically determined by the weight selected.
When you press START pad, the lb indicator goes off and the Defrost indicator blinks and the defrosting time counts down in the display window. The oven beeps during the defrosting cycle to signal that the food needs to be turned or rearranged. When the defrosting time ends, you will hear 3 beeps.
TIME DEFROSTING
When TIME DEFROST is selected, the automatic cycle divides the defrosting time into periods of alternating defrost and stand times by cycling on and off.
1. Press DEFROST pad.
The Defrost indicator lights and “ : 0” is displayed.
2. Press number pads for the desired defrosting time.
The display will show what you pressed.
3. Press START pad.
NOTE: Your oven can be programmed for 59 minutes 99 seconds. (59 : 99)
When you press START pad, the Defrost indicator starts blinking to show the oven is in the TIME DEFROST mode. The display counts down the time to show you how much defrosting time is left in the TIME DEFROST mode. The oven beeps during the defrosting cycle to signal that the food needs to be turned or rearranged. When the defrosting time ends, you will hear 3 beeps.
TIME COOK
1. Press TIME COOK pad.
The M/W indicator lights.
2. Press number pads for the cooking time.
The display will show what you pressed.
3. Press POWER LEVEL pad.
The display will show PL10 for 100% power.
4. Press number pads for power level (0~10)
The display will show PL-0 ~ PL10
5. Press START pad.
If you skip 3 and 4 step, 100% power is automatic.
NOTE: Your oven can be programmed for 59 minutes 99 seconds. (59:99)
When you press START pad, the M/W indicator starts blinking to show the oven is cooking.
The display counts down the time to show how much cooking time is left. When the cooking time ends, you will hear 3 beeps.
NOTE: Using lower power levels increases the cooking time which is recommended for foods such as cheese, milk and slow cooking of meats.
COOKING IN TWO STAGES
All recipes require the frozen foods to be defrosted fully before cooking.
This oven can be programmed to automatically defrost foods before cooking.
1. Press DEFROST pad.
The Defrost indicator lights and “ : 0” is displayed.
2. Press number pads for the defrosting time you want.
The display will show what you pressed.
3. Press TIME COOK pad.
The M/W indicator lights.
4. Press number pads for the cooking time.
The display will show what you pressed.
5. Press POWER LEVEL pad.
The display will show PL10 for 100% power.
6. Press number pads for power level (0~10)
The display will show PL-0 ~ PL10
7. Press START pad.
If you skip 3 and 4 step, 100% power is automatic.
NOTE: Your oven can be programmed for 59 minutes 99 seconds. (59:99)
When you press START pad, the Defrost and M/W indicators come on to confirm the power levels selected. The Defrost indicator starts blinking to show you that the oven is in DEFROST mode.
The display counts down the time remaining in DEFROST mode. When the oven beeps, turn over, break apart and/or redistribute the food. At the end of DEFROST mode, the oven will beep and start M/W cook.
The Defrost indicator goes off and the M/W indicator starts blinking. The display counts down the time remaining in M/W mode. When M/W cook ends, you will hear 3 beeps.
+30 SEC
+30 sec allows you to reheat for 30 seconds at 100% (full power) by simply pressing the +30 sec pad. By repeatedly pressing the +30 sec pad, you can also extend reheating time to 59 minutes 59 seconds by 30 second increments.
1. Press the +30 sec pad.
When you press the +30 sec pad, “:30” is displayed. The oven starts reheating.
NOTE: +30 SEC cannot be used with TIME DEFROST, AUTO DEFROST, POPCORN.
EXPRESS COOK
Express Cook is a quick way to set cooking time from 1-6 minutes at 100% (full power).
1. Press one of the Express Cook pads (from 1-6) for 1-6 minutes of cooking at 100% (full power).
The display will show what you pressed. After 1.5 seconds, the display is changed into cooking time and the oven starts cooking.
ONE TOUCH COOK
One touch cooking allows you to cook or reheat many of your favorite foods by pressing just one pad. To increase quantity, press the chosen pad until the number in the display is same as desired quantity to cook.
1. Press BEVERAGE pad once for 1 cup, twice for 2 cups or three times for 3 cups.
When you press BEVERAGE pad once, “ 1 ” is displayed.
After 1.5 seconds, the display is changed into cooking time and the oven starts cooking.
* BEVERAGE * : 7 oz/cup(mug)
• 1 cup (7 oz total volume) : Press BEVERAGE once.
• 2 cups(14 oz total volume) : Press BEVERAGE twice within 1.5 seconds.
• 3 cups(20 oz total volume) : Press BEVERAGE three times within 1.5 seconds.
1. Press FROZEN PIZZA pad once for 7 oz pizza or twice for 14 oz pizza.
When you press FROZEN PIZZA pad once, “ 7 ” is displayed.
After 1.5 seconds, the display is changed into the cooking time and the oven starts cooking.
* FROZEN PIZZA *
• 7 oz: Press FROZEN PIZZA once.
• 14 oz: Press FROZEN PIZZA twice within 1.5 seconds.
NOTE:
Use only one frozen pizza at a time
Use only frozen pizza made for microwave ovens.
If the cheese of frozen pizza does not melt sufficiently, cook a few seconds longer.
Some brands of frozen pizza may require more or less cooking time.
1. Press REHEAT pad once for 12 oz of reheating or twice for 15 oz of reheating.
When you press REHEAT pad once, “12” is displayed.
After 1.5 seconds, the display is changed into cooking time and the oven starts cooking.
* REHEAT *
• 12 oz : Press REHEAT pad once.
• 15 oz : Press REHEAT pad twice within 1.5 seconds.
1. Press the POPCORN pad 1 time for an individual bag of Orville Redenbacher’s® Microwave Popcorn, Classic size bag (3.3 oz)
2. Press the POPCORN pad 2 times for an individual bag of Orville Redenbacher’s® Microwave Popcorn, Single Serve size bag (1.16 oz)
NOTE:
Press STOP button when popping slows to 1-2 seconds between pops. Overcooking will cause scorching and burning. Open bag carefully. Bag and contents are very hot. Children should not prepare without adult supervision.
For other brands of popcorn bags or if you are using different weights or sizes of Orville Redenbacher’s® popcorn bags, please follow the instructions on the popcorn bag and use the Time Cook button for manual time setting as instructed on the popcorn bag.
NOTE:
Use prepackaged room-temperature microwave popcorn.
Place bag in oven according to manufacturer’s directions.
Pop only one bag at a time.
After popping, open bag carefully: popcorn and steam are extremely hot.
Do not reheat unpopped kernels or reuse bag.
Do not leave oven unattended while popping popcorn.
CAUTION: If prepackaged popcorn is of a different weight than the recommended weight, do not use the popcorn pad. Follow the manufacturer instruction.
CHILD SAFETY LOCK
Child safety lock feature may lock the control panel to prevent the oven from being accidentally started or used by children. To lock, press and hold Stop/Clear pad for 3 seconds. A beep sounds and the Lock indicator lights, and "Loc" will be displayed for 3 seconds.
To unlock, press and hold Stop/Clear pad for 3 seconds. A beep sounds and the Lock indicator will be turned off.
NOTE:
When the control panel is locked, the Lock indicator’s light is always on.
While the Child Lock is active, only the Stop/Clear pad works to unlock it.
Microwave oven cannot be used while Child Lock is activated.
TO STOP THE OVEN WHILE THE OVEN IS OPERATING
1. Press the STOP/CLEAR pad.
You can restart the oven by pressing the START pad.
Press the STOP/CLEAR pad onㅁce more to erase all instructions.
You must enter in new instructions.
2.Open the door.
You can restart the oven by closing the door and pressing the START pad.
NOTE: Oven stops operating when door is opened.
CARE OF YOUR MICROWAVE OVEN
The oven should be cleaned regularly and any food deposits removed.
Failure to maintain the oven in a clean condition could lead to deterioration of the surface that could adversely affect the life of the appliance and possibly result in a hazardous situation.
Turn the oven off before cleaning.
Keep the inside of the oven clean. When food spatters or spilled liquids adhere to oven walls, wipe with a damp cloth. Mild detergent may be used if the oven gets very dirty. The use of harsh detergent or abrasives is not recommended.
The outside oven surface should be cleaned with soap and water, rinsed and dried with a soft cloth. To prevent damage to the operating parts inside the oven, water should not be allowed to seep into the ventilation openings.
If the Control Panel becomes wet, clean with a soft, dry cloth. Do not use harsh detergents or abrasives on Control Panel.
If steam accumulates inside or around the outside of the oven door, wipe with a soft cloth. This may occur when the microwave oven is operated under high humidity conditions and in no way indicates malfunction of the unit.
It is occasionally necessary to remove the glass tray for cleaning. Wash the tray in warm sudsy water or in a dishwasher.
The roller guide and oven cavity floor should be cleaned regularly to avoid excessive noise. Simply wipe the bottom surface of the oven with mild detergent water or window cleaner and dry. The roller guide may be washed in mild sudsy water.
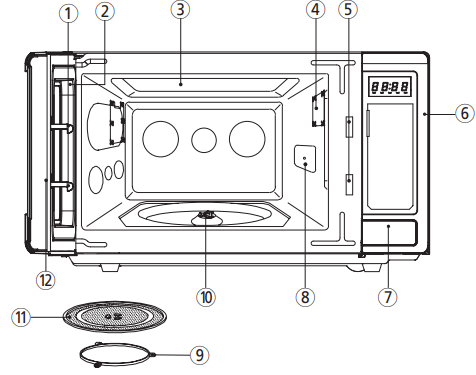
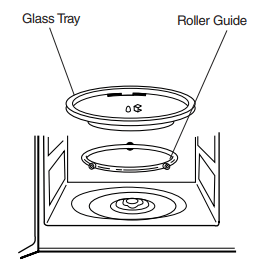
ROLLER GUIDE
The ROLLER GUIDE and oven floor should be cleaned frequently to prevent excessive noise.
The ROLLER GUIDE MUST ALWAYS be used for cooking together with the Glass Tray.
GLASS TRAY
DO NOT operate the oven without the Glass Tray in place.
DO NOT use any other Glass Tray with this oven.
If Glass Tray is hot, ALLOW TO COOL before cleaning or placing it in water.
DO NOT cook directly on the Glass Tray. (Except for popcorn)
BEFORE YOU CALL FOR SERVICE
Refer to following checklist, you may prevent an unnecessary service call.
* The oven doesn’t work :
Check that the power cord is securely plugged in.
Check that the door is firmly closed.
Check that the cooking time is set.
Check for a blown circuit fuse or tripped main circuit breaker in your house.
* Sparking in the cavity;
Check utensils. Metal containers or dishes with metal trim should not be used.
Check that metal skewers or foil does not touch the interior walls.
CARE AND CLEANING
Although your oven is provided with safety features, it is important to observe the following:
1. It is important not to defeat or tamper with safety interlocks.
2. Do not place any object between the oven front face and the door or allow residue to accumulate on sealing surfaces. Wipe the sealing area frequently with a mild detergent, rinse and dry. Never use abrasive powders or pads.
3. When opened, the door must not be subjected to strain, for example, a child hanging on an opened door or any load could cause the oven to fall forward to cause injury and also damage to the door. Do not operate the oven if it is damaged, until it has been repaired by a competent service technician. It is particularly important that the oven closes properly and that there is no damage to the:
i) Door(bent)
ii) Hinges and Hookes(broken or loosened)
iii) Door seals and sealing surfaces.
4. The oven should not be adjusted or repaired by anyone except a properly competent service technician.
5. The oven should be cleaned regularly and any food deposits removed;
6. Failure to maintain the oven in a clean condition could lead to deterioration of the surface that could adversely affect the life of the appliance and possibly result in a hazardous situation.
QUESTIONS AND ANSWERS
Q: I accidentally ran my microwave oven without any food in it. Is it damaged?
A: Running the oven empty for a short time will not damage the oven. However, it is not recommended.
Q: Can the oven be used with the glass tray or roller guide removed?
A: No. Both the glass tray and roller guide must always be used in the oven before cooking.
Q: Can I open the door when the oven is operating?
A: The door can be opened anytime during the cooking operation. Then microwave energy will be instantly switched off and the time setting will maintain until the door is closed.
Q: Why do I have moisture in my microwave oven after cooking?
A: The moisture on the side of your microwave oven is normal. It is caused by steam from cooking food hitting the cool oven surface.
Q: Does microwave energy pass through the viewing screen in the door?
A: No. The metal screen bounces back the energy to the oven cavity. The holes are made to allow light to pass through. They do not let microwave energy pass through.
Q: Why do eggs sometimes pop?
A: When baking or poaching eggs, the yolk may pop due to steam build-up inside the yolk membrane. To prevent this, simply pierce the yolk with a toothpick before cooking. Never cook eggs without piercing their shells.
Q: Why is this standing time recommended after the cooking operation has been completed?
A: Standing time is very important.
With microwave cooking, the heat is in the food, not in the oven. Many foods build up enough internal heat to allow the cooking process to continue, even after the food is removed from the oven. Standing time for joints of meat, large vegetables and cakes is to allow the inside to cook completely, without overcooking the outside.
Q: What does “standing time” mean?
A: “Standing time” means that food should be removed from the oven and covered for additional time to allow it to finish cooking. This frees the oven for other cooking.
Q: Why does my oven not always cook as fast as the microwave cooking guide says?
A: Check your cooking guide again, to make sure you’ve followed directions exactly; and to see what might cause variations in cooking time. Cooking guide times and heat settings are suggestions, to help prevent over-cooking... the most common problem in getting used to a microwave oven.
Variations in the size, shape and weights and dimensions could require longer cooking time. Use your own judgement along with the cooking guide suggestions to check whether the food has been properly cooked just as you would do with a conventional cooker.
Q: Will the microwave oven be damaged if it operates while empty?
A: Yes. Never run it empty.
Q: Can I operate my microwave oven without the turntable or turn the turntable over to hold a large dish?
A: No. If you remove or turn over the turntable, you will get poor cooking results. Dishes used in your oven must fit on the turntable.
Q: Is it normal for the turntable to turn in either direction?
A: Yes. The turntable rotates clockwise or counterclockwise, depending on the rotation of the motor when the cooking cycle begins.
Q: Can I pop popcorn in my microwave oven? How do I get the best results?
A: Yes. Pop packaged microwave popcorn following manufacture’s guidelines. Do not use regular paper bags. Use the “listening test” by stopping the oven as soon as the popping slows to a “pop” every 1 or 2 seconds. Do not repop unpopped kernels. Do not pop popcorn in glass cookware.
COOKING INSTRUCTIONS
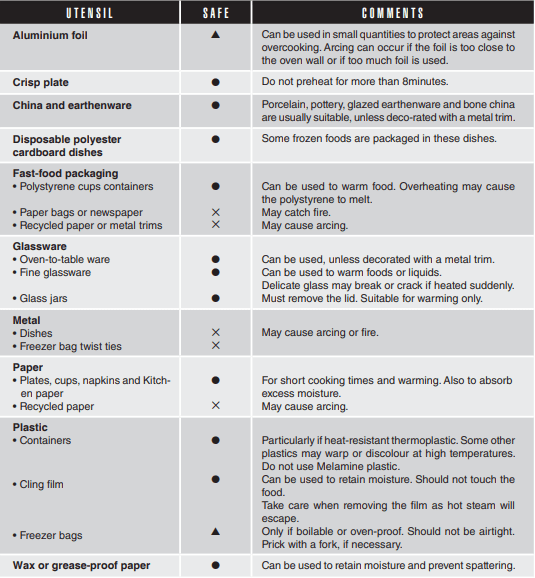
UTENSIL GUIDE
Only use utensils that are suitable for use in microwave ovens.
To cook food in the microwave oven, the microwaves must be able to penetrate the food, without being reflected or absorbed by the dish used. Care must therefore be taken choosing the utensil. If the utensil is marked microwave-safe, you do not need to worry. The following table lists various utensil and indicates whether and how they should be used in a microwave oven.
USE YOUR MICROWAVE OVEN SAFELY
General Use
Do not attempt to defeat or tamper with safety interlocks.
Do not place any object between the oven front frame and the door or allow residue to build up on sealing surfaces. Wipe with a mild detergent, rinse and dry. Never use abrasive powders or pads.
Do not subject the oven door to strain or weight such as a child hanging on an open door.
This could cause the oven to fall forward resulting in injury to you and damage to the oven.
Do not operate the oven if door seals or sealing surfaces are damaged; or if door is bent; or if hinges are loose or broken.
Do not operate the oven empty. This will damage the oven.
Do not attempt to dry clothes, newspapers or other materials in the oven. They may catch on fire.
Do not use recycled paper products as they may contain impurities which may cause sparks or fires.
Do not hit or strike the control panel with hard objects. This can damage the oven.
Food
Never use your microwave oven for home canning. The oven is not designed for proper home canning.
Improperly canned food may spoil and be dangerous to consume.
Always use the minimum recipe cooking time. It is better to undercook rather than overcook foods.
Undercooked foods can be returned to the oven for more cooking. If food is overcooked, nothing can be done.
Heat small quantities of food or foods with low moisture carefully. These can quickly dry out, burn or catch on fire.
Do not heat eggs in the shell. Pressure may build up and eggs can explode.
Potatoes, apples, egg yolks and sausages are examples of food with non-porous skins.
These must be pierced before cooking to prevent bursting.
Do not attempt to deep fat fry in your microwave oven. Always allow a standing time of at least 20 seconds after the oven has been switched off to allow the temperature to even out, stir during heating, if necessary, and ALWAYS stir after heating. To prevent eruptive boiling and possible scalding, you should put a spoon or glass stick into the beverages and stir before, during and after heating.
Do not leave the oven unattended while popping corn. Do not pop corn in a paper bag unless it is the commercially prepared Microwave Popcorn product. The kernels can overheat and ignite a brown paper bag.
Do not put packaged Microwave Popcorn bags directly on the oven tray. Place the package on a microwave safe glass or ceramic plate to avoid overheating and cracking the oven tray.
Do not exceed the Microwave Popcorn manufacturers suggested popping time.
Longer popping does not yield more popcorn but it can result in scorch, burn of fire. Remember, the Popcorn bag and tray can be too hot to handle. Remove with caution and use pot holders.
ARCING
If you see arcing, open the door and correct the problem.
Arcing is the microwave term for sparks in the oven. Arcing is caused by:
Metal or foil touching the side of the oven.
Foil not molded to food (upturned edges act like antennas).
Metal, such as twist-ties, poultry pins, or gold rimmed dishes, in the microwave.
Recycled paper towels containing small metal pieces being used in the microwave.