Loading ...
Loading ...
Loading ...
14
EN
Condensed Water Drain-out
Normally, condensed water is pumped up to the
water container where water is collected until
manually emptied. Water can also be drained
out directly to a mains drain, especially when
the dryer is stacked on top of a washing
machine. With a connecting kit for the mains
drain hose, simply change the water path and
re-route to the drainage facility as below:
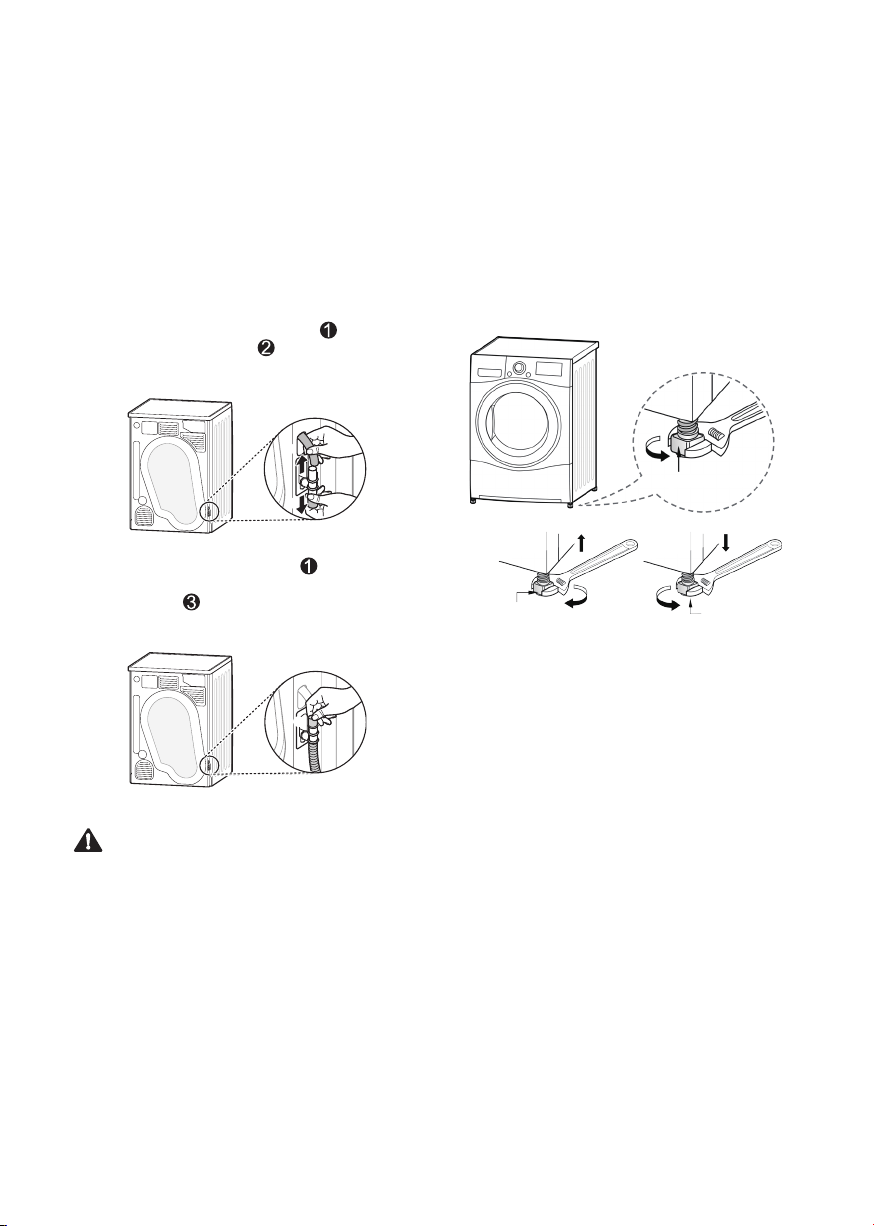
1
Separate the anti-backflow lid( ) and the
water container hose( ) from the
connecting kit.
2
Attach the anti-backflow lid( ) to the head
of the connecting kit and then connect the
drain hose( ) to the opposite side of the
connecting kit.
CAUTION
• If the hose is installed in a way that leaves it
bent or pinched, drainage may not function
properly.
Leveling the appliance
Leveling the appliance prevents unnecessary
noise and vibration. Place the appliance on a
solid, level floor.
If the appliance is not properly level, adjust the
front leveling feet as necessary.
Turn them clockwise to raise and counter-
clockwise to lower until the appliance no longer
wobbles, both front-to-back and side-to-side and
corner-to-corner.
Adjustable Feet
Adjustable Feet Adjustable Feet
Diagonal Check
• When pushing down the edges of the top
plate diagonally, the appliance should not
move up and down at all (Check both
directions). If the appliance rocks when
pushing the top plate diagonally, adjust the
feet again.
EN
Reversing the door
You can reverse the door for your convenience.
WARNING
• Do not reverse the door while the appliance is
stacked on a washing machine.
• Before removing the hinge screws, have an
assistant support the weight of the door. The
door could fall on the floor due to the weight
of the door.
• For safety reasons, two or more people need
to work together to reverse the door.
NOTE
• The appearance of the screws varies and the
screws must be inserted differently depending
on the position. Make sure the screw is
properly selected before tightening.
1
Open the door and remove 2 screws on the
door hinge. After removing the screws, put
the door down carefully with the front side
facing down to the floor.
Cabinet
Door hinge
WARNING
• Remove the lower screw first. The door may
fall on to the floor due to its weight and the
door can be damaged.
2
Remove 8 screws on the hinge assembly
from the door.
• There are 6 screws on the front and 2
screws on the side.
Hinge
assembly
3
Remove the 3 screws from the door latch
assembly which is fixed between the door
and the hinge assembly and then remove
the screw which is fixed on the door hook.
Door latch
assembly
4
Switch between the position the hinge
assembly and door latch assembly and then
tighten the screws in reverse order.
• Tighten the screw in proper position
referring from 2 to 4 steps.
Door latch
assembly
Hinge
Assembly
Loading ...
Loading ...
Loading ...