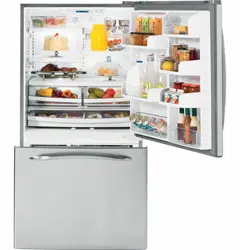
GEAppliances.com
Refrigerators
Bottom Freezer
200D9366P019 49-60609-2 04-10 GE
Safety Instructions . . . . . . . . . . .2, 3
Operating Instructions
Additional Features . . . . . . . . . . . . . . . . .8
Automatic Icemaker . . . . . . . . . . . . . . .11
Care and Cleaning . . . . . . . . . . . . .12, 13
Controls . . . . . . . . . . . . . . . . . . . . . . . . . .4, 5
Crispers and Pans . . . . . . . . . . . . . . . . . . .9
Freezer . . . . . . . . . . . . . . . . . . . . . . . . . . . .10
Replacing the Light Bulbs . . . . . . . . . .14
Shelves and Bins . . . . . . . . . . . . . . . . . .7, 8
Water Dispenser . . . . . . . . . . . . . . . . . . .11
Water Filter . . . . . . . . . . . . . . . . . . . . . . . . .6
Installation Instructions
Installing the Anti-Tip
Floor Bracket . . . . . . . . . . . . . . . . . . .18, 19
Installing the Refrigerator . . . . . .20–24
Installing the Water Line . . . . . . . .33–35
Preparing to Install
the Refrigerator . . . . . . . . . . . . . . . . . . . .17
Removing and Replacing the
Freezer Drawer . . . . . . . . . . . . . . . .25, 26
Reversing the Door Swing
(Single Door Refrigerator
Models only) . . . . . . . . . . . . . . . . . . .27–29
Removing and Replacing
the Doors (Double Door
Refrigerator Models only) . . . . . . .30–32
Trim Kits and Decorator Panels . . . .15, 16
Troubleshooting Tips . . . . . .36–40
Normal Operating Sounds . . . . . . . . . .36
Consumer Support
Consumer Support . . . . . . . .Back Cover
Performance Data Sheet . . . . . . . . . . .43
State of California Water
Treatment Device Certificate . . . . . . .44
Warranty for Canadian
Customers . . . . . . . . . . . . . . . . . . . . . . . . .42
Warranty for U.S. Customers . . . . . . .41
Réfrigérateurs
Congélateur inférieur
Refrigeradores
Congelador inferior
Write the model and serial
numbers here:
Model # ____________________
Serial #______________________
Find these numbers on a label
on the right side, near the top of the
refrigerator compartment.
Models 21 and 25
Manuel d’utilisation
et d’installation
Owner’s Manual and
Installation Instructions
Manual del propietario
y instalación
La section française commence à la page 45
La sección en español empieza en la página 89
IMPORTANT SAFETY INFORMATION.
READ ALL INSTRUCTIONS BEFORE USING.
WARNING!
Use this appliance only for its intended purpose as described in this Owner’s Manual.
SAFETY PRECAUTIONS
When using electrical appliances, basic safety precautions should be followed, including the following:
n
n This refrigerator must be properly installed
and located in accordance with the Installation
Instructions before it is used.
n
n Do not allow children to climb, stand or hang
on the shelves in the refrigerator. They could
damage the refrigerator and seriously injure
themselves.
n
n Do not touch the cold surfaces in the freezer
compartment when hands are damp or wet.
Skin may stick to these extremely cold surfaces.
n
n Do not store or use gasoline or other flammable
vapors and liquids in the vicinity of this or any other
appliance.
n
n Keep fingers out of the “pinch point” areas;
clearances between the doors and between the
doors and cabinet are necessarily small. Be careful
closing doors when children are in the area.
n
n In refrigerators with automatic icemakers, avoid
contact with the moving parts of the ejector
mechanism, or with the heating element that
releases the cubes. Do not place fingers or hands
on the automatic icemaking mechanism while the
refrigerator is plugged in.
n
n Unplug the refrigerator before cleaning and making
repairs.
NOTE: We strongly recommend that any servicing
be performed by a qualified individual.
n
n Setting either or both controls to 0 (off) does not
remove power to the light circuit.
n
n Do not refreeze frozen foods which have thawed
completely.
PROPER DISPOSAL OF THE REFRIGERATOR
Child entrapment and suffocation are not problems of
the past. Junked or abandoned refrigerators are still
dangerous…even if they will sit for “just a few days.” If
you are getting rid of your old refrigerator, please
follow the instructions below to help prevent
accidents.
Before You Throw Away Your Old
Refrigerator or Freezer:
n Take off the doors.
n Leave the shelves in place so that children may not
easily climb inside.
Refrigerants
All refrigeration products contain refrigerants,
which under federal law must be removed prior to
product disposal. If you are getting rid of an old
refrigeration product, check with the company
handling the disposal about what to do.
USE OF EXTENSION CORDS
Because of potential safety hazards under certain conditions, we strongly recommend against
the use of an extension cord.
However, if you must use an extension cord, it is absolutely necessary that it be a UL-listed (in the United
States) or a CSA certified (in Canada), 3-wire grounding type appliance extension cord having a grounding type
plug and outlet and that the electrical rating of the cord be 15 amperes (minimum) and 120 volts.
DANGER! RISK OF CHILD ENTRAPMENT
Consumer Support Troubleshooting Tips Operating Instructions Safety Instructions
Installation
Instructions
2
3
Consumer Support
Troubleshooting Tips
Operating InstructionsSafety Instructions
Installation
Instructions
GEAppliances.com
WARNING!
HOW TO CONNECT ELECTRICITY
Do not, under any circumstances, cut or remove the third (ground) prong from the power cord.
For personal safety, this appliance must be properly grounded.
The power cord of this appliance is equipped with a 3-
prong (grounding) plug which mates with a standard
3-prong (grounding) wall outlet to minimize the
possibility of electric shock hazard from this
appliance.
Have the wall outlet and circuit checked by a
qualified electrician to make sure the outlet is
properly grounded.
Where a standard 2-prong wall outlet is encountered,
it is your personal responsibility and obligation to
have it replaced with a properly grounded 3-prong
wall outlet.
The refrigerator should always be plugged into its
own individual electrical outlet which has a voltage
rating that matches the rating plate.
This provides the best performance and also prevents
overloading house wiring circuits which could cause a
fire hazard from overheated wires.
Never unplug your refrigerator by pulling on the
power cord. Always grip plug firmly and pull straight
out from the outlet.
Repair or replace immediately all power cords that
have become frayed or otherwise damaged. Do not
use a cord that shows cracks or abrasion damage
along its length or at either end.
When moving the refrigerator away from the wall, be
careful not to roll over or damage the power cord.
READ AND FOLLOW THIS SAFETY INFORMATION CAREFULLY.
SAVE THESE INSTRUCTIONS
4
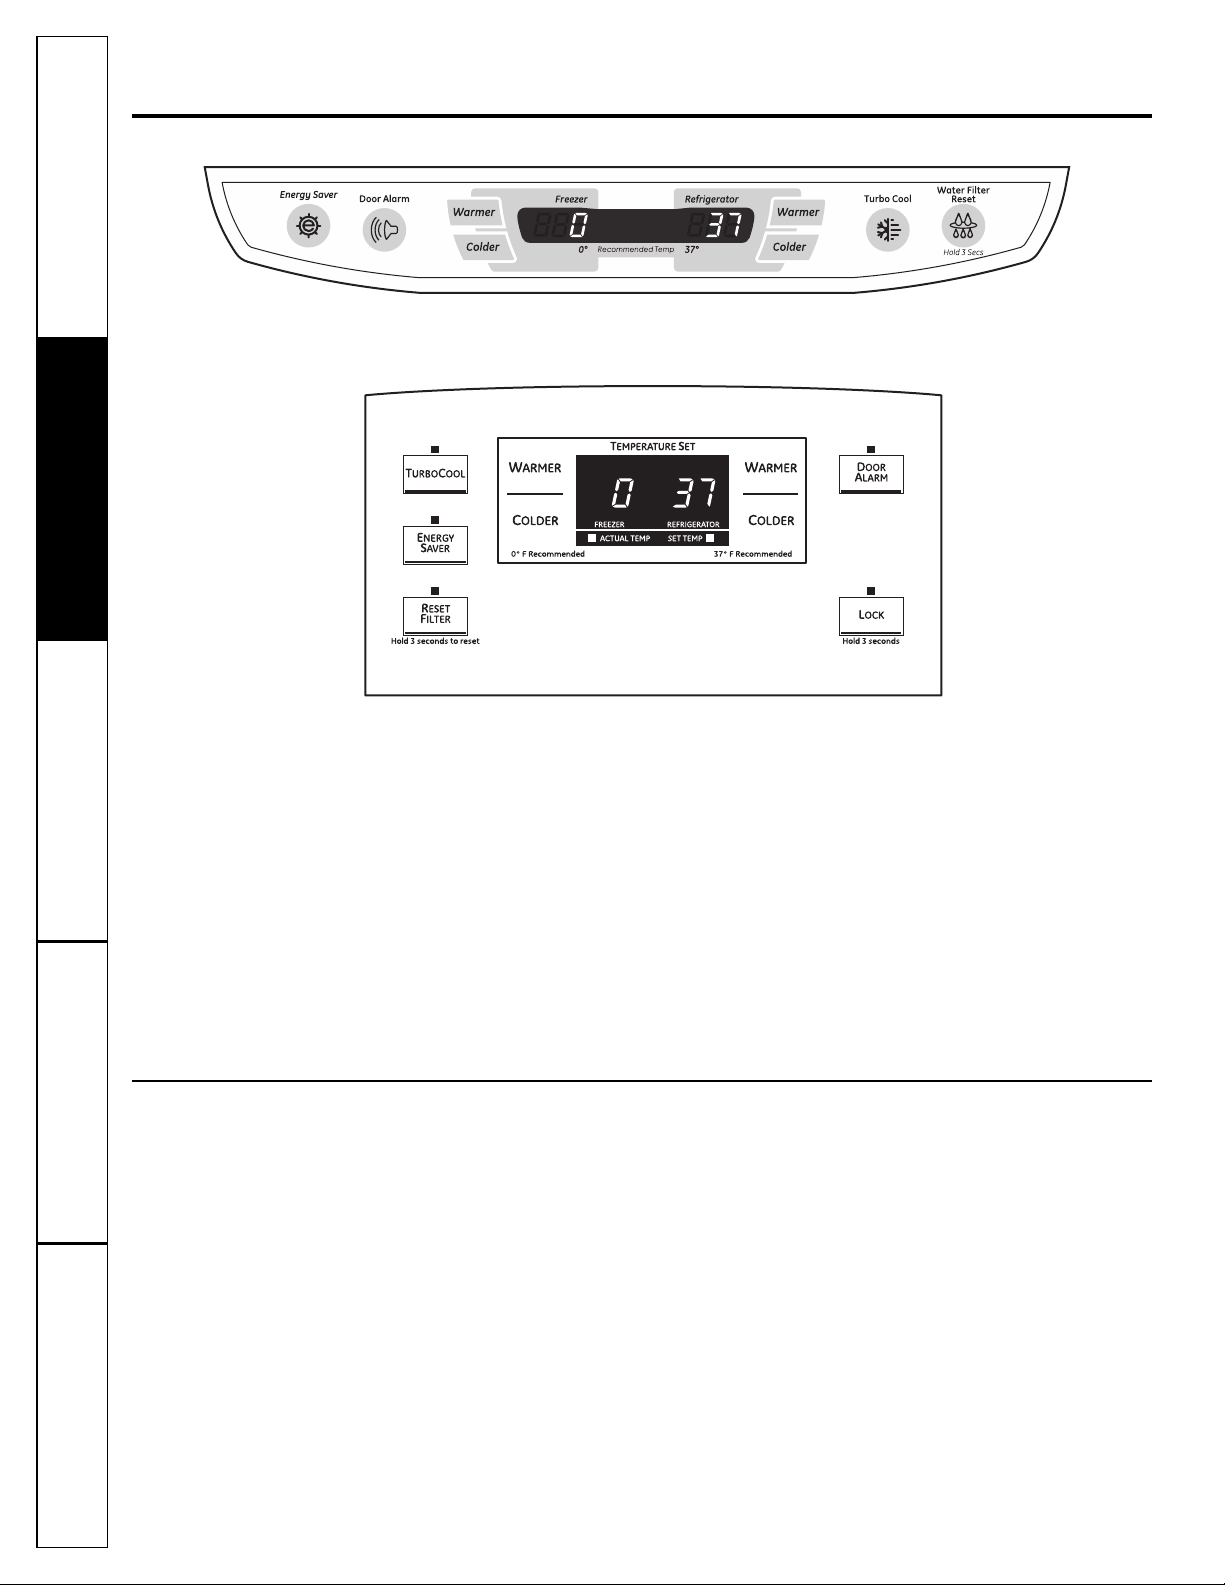
About the controls with temperature settings.
The temperature controls are preset in the factory at 37°F for the refrigerator
compartment and 0°F for the freezer compartment. Allow 24 hours for the temperature
to stabilize to the preset recommended settings.
The temperature controls can display both the SET temperature as well as the actual
temperature in the refrigerator and freezer. The actual temperature may vary slightly
from the SET temperature based on usage and operating environment.
Setting either or both controls to OFF stops cooling in both the freezer and refrigerator
compartments, but does not shut off electrical power to the refrigerator.
For Controls-on-the-Door Models:
To change the temperature, press and release the
WARMER or COLDER pad. The ACTUAL TEMP light
will come on and the display will show the actual
temperature. To change the temperature, tap either
the WARMER or COLDER pad until the desired
temperature is displayed.
For Controls Inside the Refrigerator:
Opening the door displays the actual temperature. To
change the temperature, press either the WARMER or
COLDER touch pads until the desired temperature is
displayed.
Once the desired temperature has been set,
the temperature display will return to the actual
refrigerator and freezer temperatures after 5
seconds. Several adjustments may be required. Each
time you adjust controls, allow 24 hours for the
refrigerator to reach the temperature you have set.
To turn the cooling system off, tap the WARMER pad
for either the refrigerator or the freezer until the
display shows OFF. To turn the unit back on, press
the COLDER pad for either the refrigerator or freezer.
Then press the COLDER pad again and it will go to
the preset points of 0°F for the freezer and 37°F for
the refrigerator. Setting either or both controls
to OFF stops cooling in both the freezer and
refrigerator compartments, but does not shut
off electrical power to the refrigerator.
Changing the Temperature
NOTE: The refrigerator is shipped with protective film covering the temperature controls.
If this film was not removed during installation, remove it now.
Consumer Support Troubleshooting Tips Operating Instructions Safety Instructions
Installation
Instructions
(on some models)
(on some models)

Consumer Support
Troubleshooting Tips
Operating InstructionsSafety Instructions
Installation
Instructions
5
About TurboCool.
™
(on some models) GEAppliances.com
How It Works
TurboCool rapidly cools the refrigerator
compartment in order to more quickly
cool foods. Use TurboCool when adding a
large amount of food to the refrigerator
compartment, putting away foods after they
have been sitting out at room temperature
or when putting away warm leftovers. It can
also be used if the refrigerator has been
without power for an extended period.
Once activated, the compressor will turn on
immediately and the fans will cycle on and
off at high speed as needed for eight hours.
The compressor will continue to run until the
refrigerator compartment cools to
approximately 34°F (1°C), then it will cycle on
and off to maintain this setting. After 8 hours,
or if TurboCool is pressed again, the
refrigerator compartment will return to
the original setting.
How to Use
Press TurboCool. The refrigerator
temperature display will show .
After TurboCool is complete, the
refrigerator compartment will return
to the original setting.
NOTES: The refrigerator temperature
cannot be changed during
TurboCool.
The freezer temperature is not
affected during TurboCool.
When opening the refrigerator door
during TurboCool, the fans
will continue to run if they have
cycled on.
About Door Alarm (on some models)
The door alarm will sound if any door is open
for more than 2 minutes. The beeping stops
when you close the door.
(on some models)
(on some models)
(on some models)
(on some models)
About Energy Saver (on some models)
This product is equipped with an Energy
Saver feature. The refrigerator is shipped with
the Energy Saver feature enabled.
Over time, moisture can form on the front
surface of the refrigerator cabinet and cause
rust. If moisture does appear on the front
surface of the refrigerator cabinet, turn off
the Energy Saver feature by pressing and
releasing the ENERGY SAVER pad on the
control panel.
(on some models)
(on some models)

Water Filter Cartridge
The water filter cartridge is located in the
back upper right corner of the refrigerator
compartment.
When to Replace the Filter
There is a replacement indicator light for the
water filter cartridge on the temperature
display. This light will turn orange to tell you
that you need to replace the filter soon. The
filter cartridge should be replaced when the
replacement indicator light turns red or if the
flow of water to the dispenser or icemaker
decreases.
Installing the Filter Cartridge
If you are replacing the cartridge, first
remove the old one by slowly turning it
to the left. DO NOT pull down on the
cartridge. A small amount of water may
drip down.
CAUTION: If air has been
trapped in the system, the filter cartridge may
be ejected as it is removed. Use caution when
removing.
Remove the protective foil from the end
of the cartridge.
Fill the replacement cartridge with water
from the tap to allow for better flow from
the dispenser immediately after
installation.
Lining up the arrow on the cartridge and
the cartridge holder, slowly rotate the
cartridge clockwise until it stops. When
the cartridge is properly installed, you will
feel it “click” as it locks into place. Do not
overtighten.
Run 1
1
⁄2 gallons from the dispenser to
clear the system and prevent sputtering.
See To Use the Dispenser section.
Press and hold the RESET WATER FILTER
pad for 3 seconds.
NOTE: A newly-installed water filter cartridge
may cause water to spurt from the
dispenser.
Filter Bypass Plug
You must use the filter bypass plug when a
replacement filter cartridge is not available.
The icemaker will not operate without the
filter or filter bypass plug.
Replacement Filters:
To order additional filter cartridges
in the United States, visit our Website,
GEAppliances.com, or call GE Parts and
Accessories, 800.626.2002.
Filter Model MWF
Customers in Canada should consult
the yellow pages for the nearest Mabe
Service Center.
About the water filter. (on some models)
Consumer Support Troubleshooting Tips Operating Instructions Safety Instructions
Installation
Instructions
6
(on some models)
(on some models)
Cartridge
Holder
Cartridge
Holder

7
Consumer Support
Troubleshooting Tips
Operating InstructionsSafety Instructions
Installation
Instructions
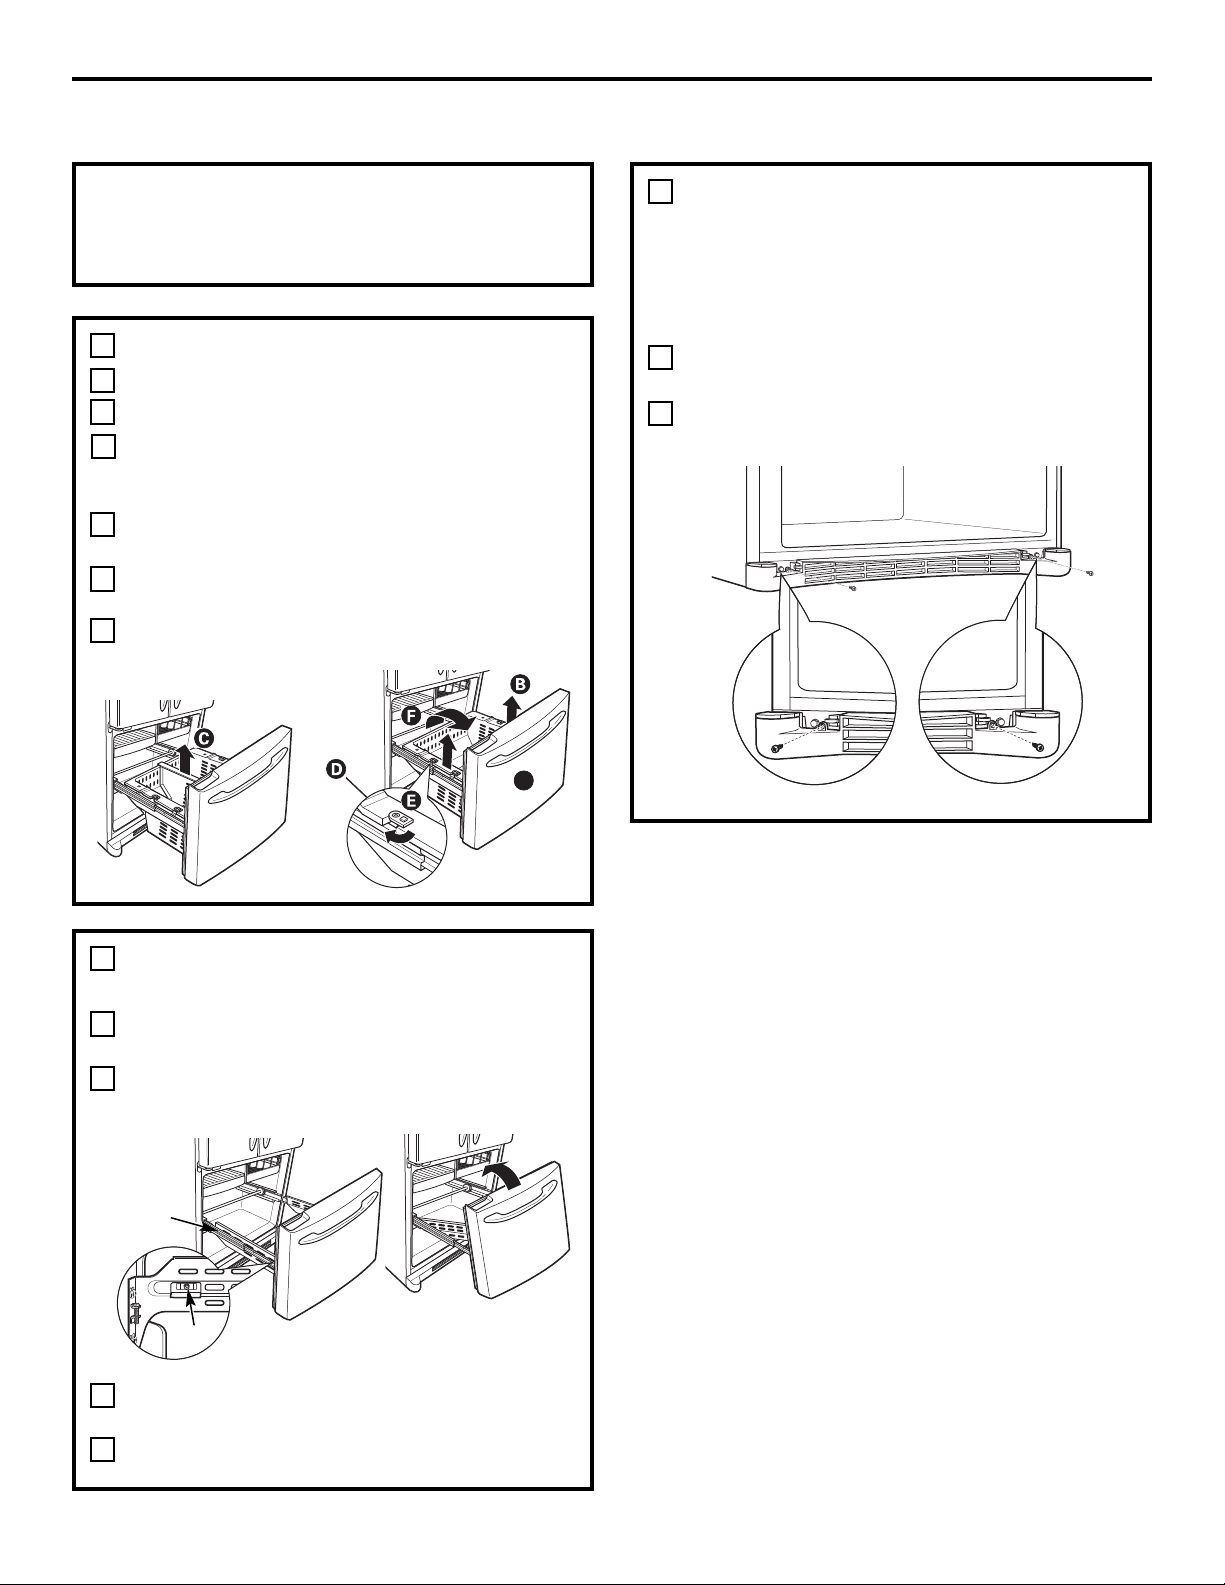
Rearranging the Shelves
To remove:
Remove all items from the shelf.
Tilt the shelf up at the front.
Lift the shelf up at the back and bring the
shelf out.
To replace:
While tilting the shelf up, insert the top
hook at the back of the shelf in a slot on
the track.
Lower the front of the shelf until the
bottom of the shelf locks into place.
Spillproof Shelves (on some models)
Spillproof shelves have special edges to help
prevent spills from dripping to lower shelves.
To remove or replace the shelves, see
Rearranging the Shelves.
About the shelves and bins. GEAppliances.com
Not all features are on all models.
Some models have wire shelves that can
be adjusted in the same manner.
Shelves in the refrigerator compartment are adjustable.
Refrigerator Compartment
Slide-Out Spillproof Shelf (on some models)
The slide-out spillproof shelf allows you
to reach items stored behind others. The
special edges are designed to help prevent
spills from dripping to lower shelves.
To remove:
Remove all items from shelf.
Slide the shelf out until it stops.
Lift the front edge of the shelf until the
central tabs are above the front bar.
Continue pulling the shelf forward
until it can be removed.
To replace:
Place the rear shelf tabs just in front of
the central notches on the shelf frame.
Slide the shelf in until the central tabs are
slightly behind the front bar.
Lower the shelf into place until it is
horizontal and slide the shelf in.
Make sure that the shelf sits flat after
reinstallation and doesn’t move freely from
side to side.
Make sure you push the shelves all the way in
before you close the door.
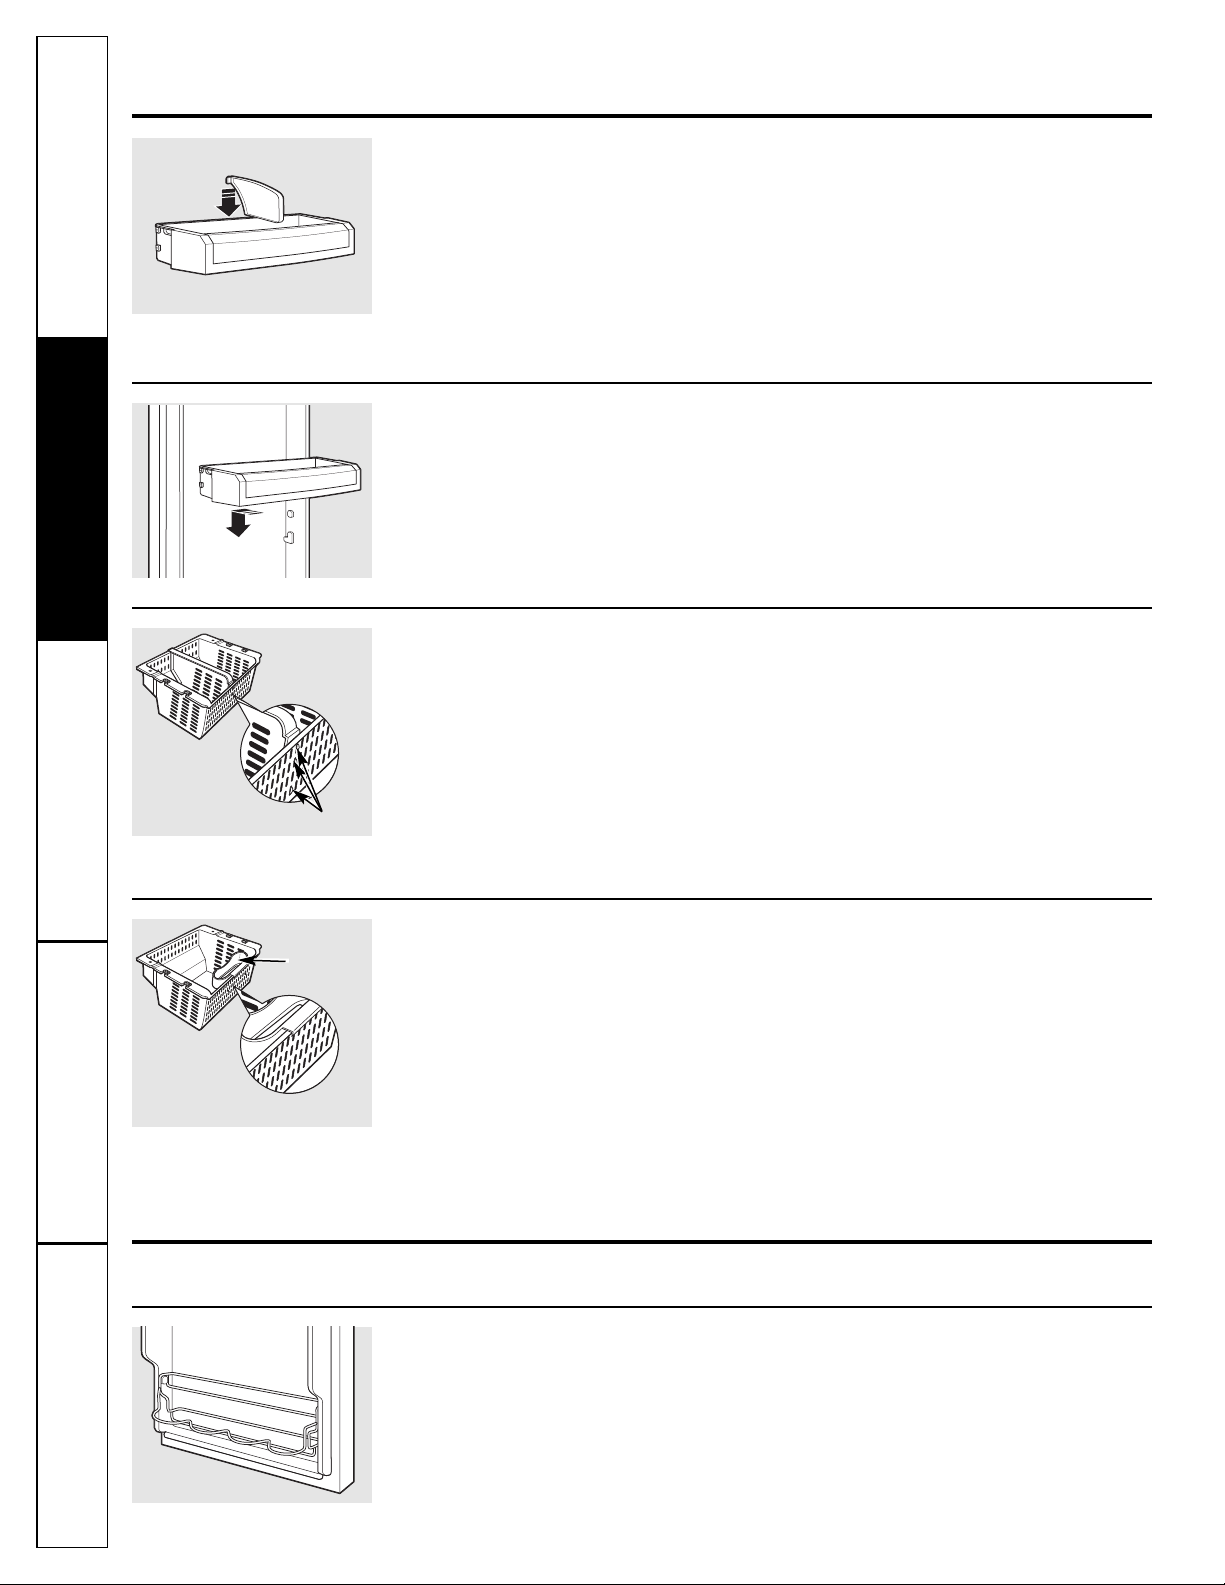
Non-Adjustable Bins on the Door
To remove: Lift the bin straight up, then
pull out.
To replace: Engage the bin in the molded
supports on the door and push down.
It will lock in place.
Adjustable Bins on the Door
Adjustable bins can easily be carried from
refrigerator to work area.
To remove: Lift bin straight up, then
pull out.
To replace or relocate: Slide in the bin just
above the molded door supports, and push
down. The bin will lock in place.
The snugger helps prevent tipping, spilling
or sliding of small items stored on the door
shelf. Grip the finger hold near the rear of the
snugger and move it to fit your needs.
About the additional features.
Not all features are on all models.
Non-Adjustable Beverage Rack
To remove: Lift the rack straight up, then pull
out.
To replace: Engage the rack in the molded
supports on the door and push down.
It will lock in place.
About the shelves and bins.
Consumer Support Troubleshooting Tips Operating Instructions Safety Instructions
Installation
Instructions
8
Adjustable Divider in Freezer Basket
The freezer basket has a divider that can be
both repositioned or removed.
To remove: Pull the divider forward until the
rear locating tabs are out of the slots. Turn
the divider slightly to the side to release the
front locating tabs and lift out.
To replace: Turn the divider slightly to one
side so the tabs on the front fit into the vent
slots on the basket. Position the divider so
the back locating tabs snap into place in the
back vent slots.
To reposition: Remove the divider. Slide the
divider left or right to the desired location and
replace as instructed above.
Optional Freezer Caddy
The optional freezer caddy fits over the front
edge of the bottom freezer basket and can
be removed or added as needed.
To remove: Lift the freezer caddy up.
To replace: Lower the freezer Caddy ensuring
the hook fits over the front edge of the
bottom freezer basket. Push down to secure.
Tabs
Caddy

9
Consumer Support
Troubleshooting Tips
Operating InstructionsSafety Instructions
Installation
Instructions
About the crispers and pans. GEAppliances.com
Not all features are on all models.
Fruit and Vegetable Crisper
Excess water that may accumulate in the
bottom of the drawers or under the drawers
should be wiped dry.
Adjustable Humidity Crisper (on some models)
Slide the control all the way to the
HIGH setting to provide high humidity
recommended for most vegetables.
Slide the control all the way to the LOW
setting to provide lower humidity levels
recommended for most fruits.
Adjustable Temperature Deli Pan (on some models)
Slide the control all the way to the left for the
coldest temperature.
To remove:
Remove the fruit and vegetable drawers.
Pull the drawer out to the stop position.
Lift the lid to access the 4 swing locks.
Rotate all four swing locks to the unlock
position.
Lift the front of the drawer up and out.
To replace:
Make sure all four swing locks are in the
unlock position.
Place the sides of the drawer into the
drawer supports, making sure the swing
locks fit on the drawer slots.
Lock all four swing locks by rotating them
to the lock position.
Lower the lid and slide in the drawer.
Replace the fruit and vegetable drawers.
How to Remove and Replace the Deli Pan
Swing Locks
10
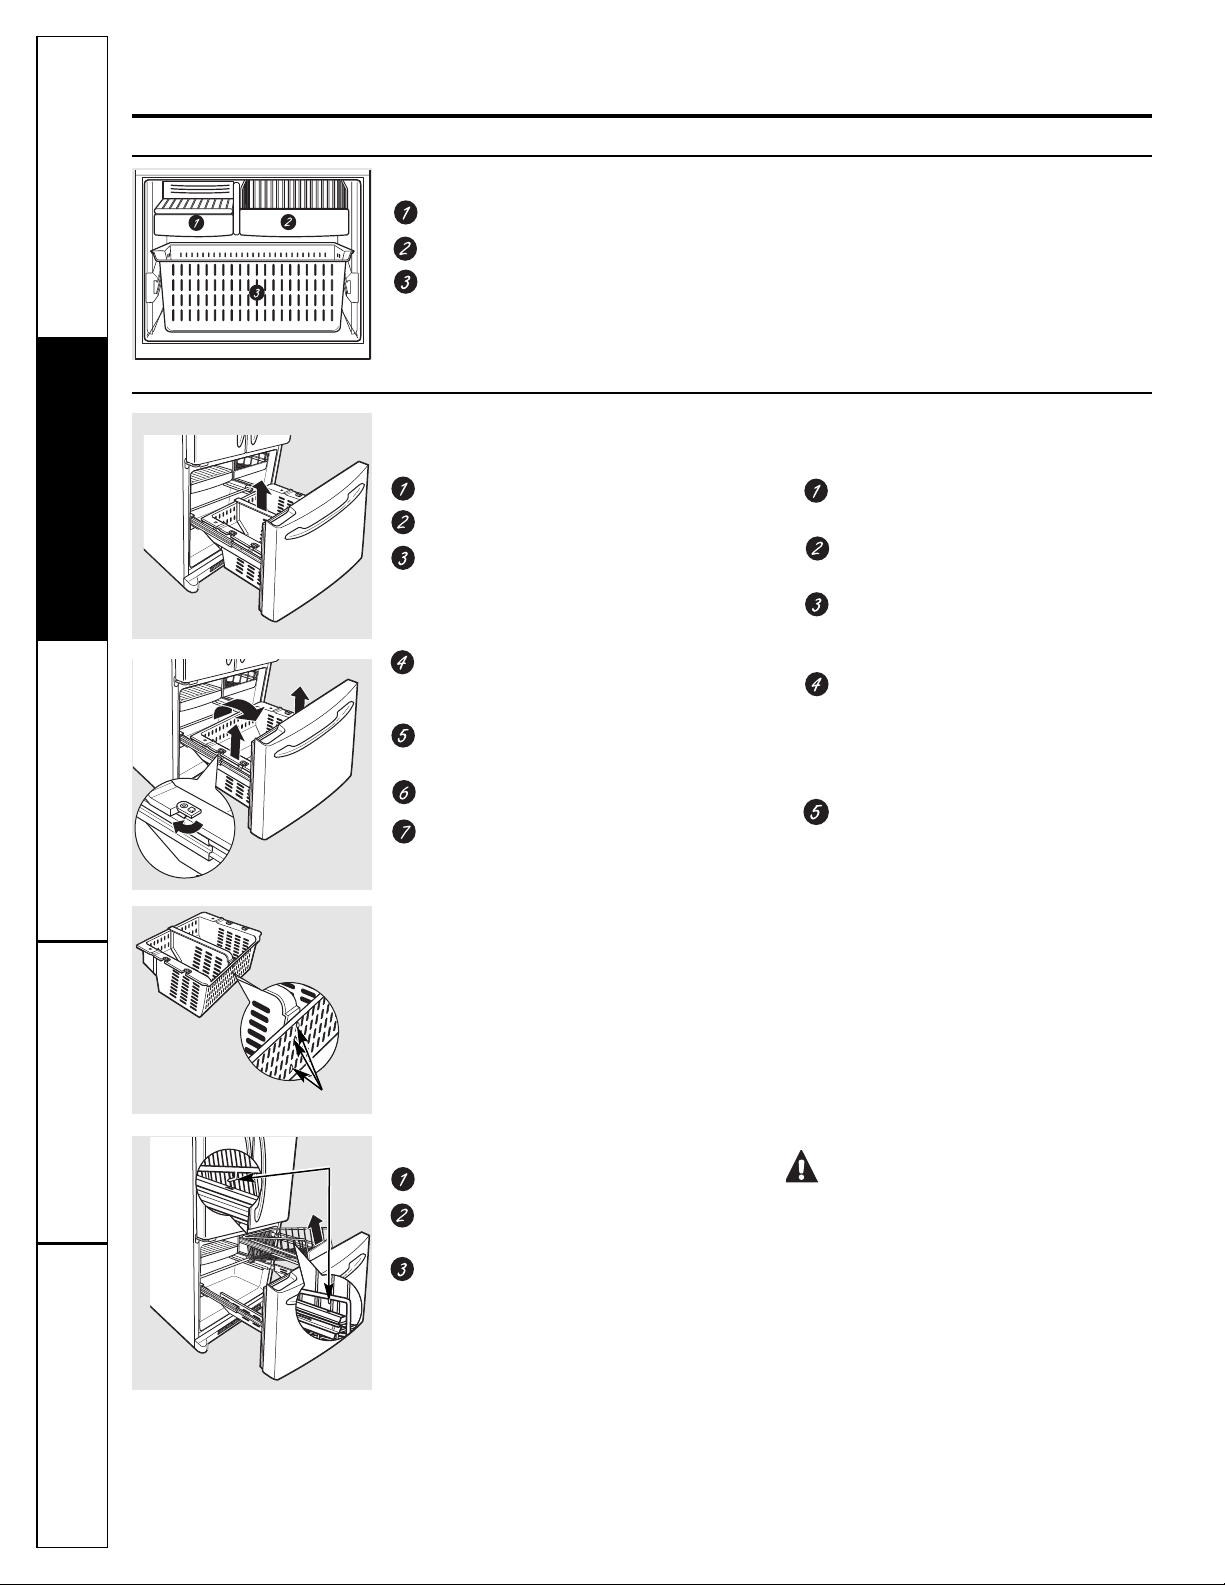
Freezer Shelves and Baskets
A shelf above the ice storage bin
A half-width basket
A deep full-width basket with divider
Basket Removal
To remove the deep full-width basket:
Open the freezer drawer until it stops.
Lift the freezer caddy up.
Pull the divider forward until the rear
locating tabs are out of the slots. Turn the
divider slightly to the side to release the
front locating tabs and lift out.
The freezer basket rests on the metal slide
brackets and is held in place with swing
locks.
Turn the swing locks from verticall to
horizontal position.
Open the refrigerator doors.
Lift the basket up and rotate it toward you.
Slide out from the side of the drawer.
When replacing the deep full-width basket:
Tilt the basket toward you and lower it into
the drawer.
Place the basket onto the metal slide
brackets and over the swing locks.
Turn the swing locks from horizontal to
vertical position to lock the basket
in place.
Turn the divider slightly to one side so the
tabs on the front fit into the vent slots on
the basket. Position the divider so the back
locating tabs snap into place in the back
vent slots.
Lower the freezer caddy ensuring the hook
fits over the front edge of the bottom
freezer basket. Push down to secure.
To remove the half-width basket:
Pull the basket out to the stop location.
Lift the basket up at the front to release it
from the slides.
Lift the back up and out of the slide.
CAUTION:Always be sure to
fully close this basket.
When replacing the basket, make sure that
the wire tabs and wire hooks on the sides
of the basket go into the slots in the top
of the upper basket slides.
About the freezer.
Not all features are on all models.
Appearance and features may vary
Appearance may vary
Consumer Support Troubleshooting Tips Operating Instructions Safety Instructions
Installation
Instructions
Tabs
Tabs
Consumer Support
Troubleshooting Tips
Operating InstructionsSafety Instructions
Installation
Instructions
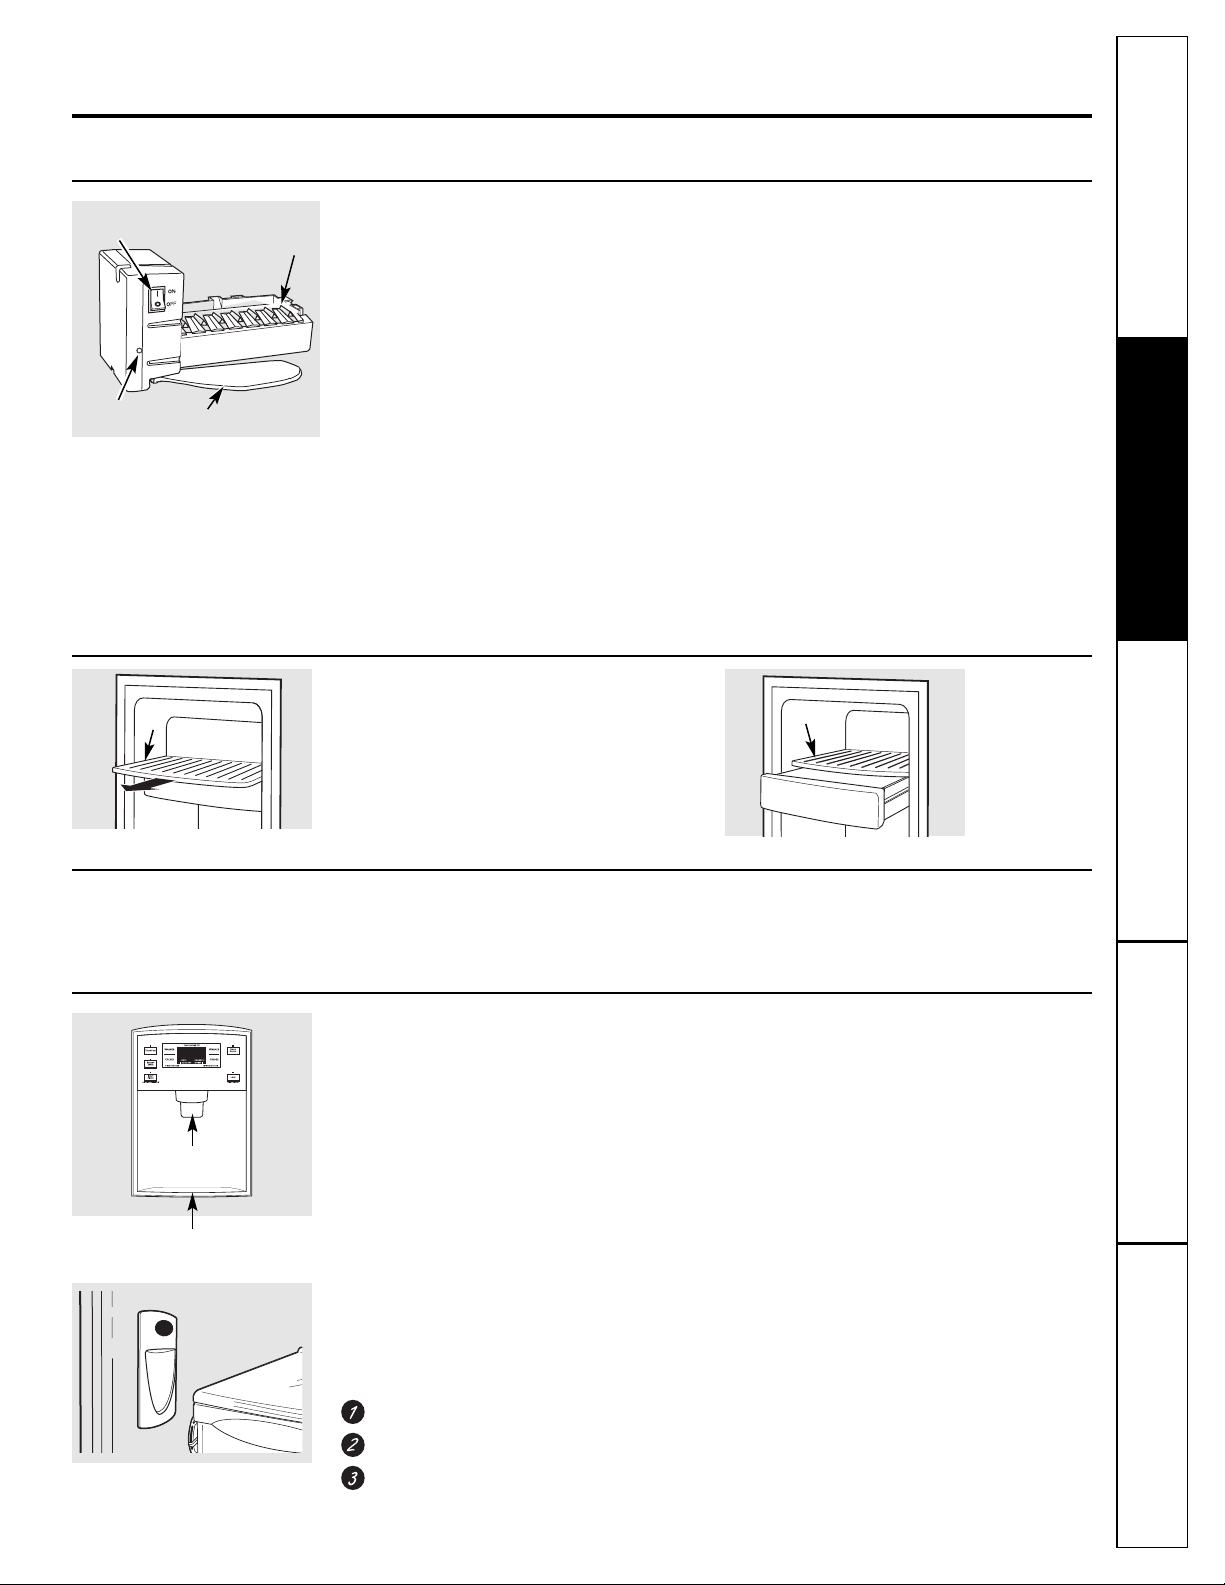
About the automatic icemaker. GEAppliances.com
Automatic Icemaker (on some models)
The icemaker will produce seven cubes per cycle—
approximately 100–130 cubes in a 24-hour period,
depending on freezer compartment temperature,
room temperature, number of door openings and
other use conditions.
See below for how to access ice and reach the
power switch.
If the refrigerator is operated before the water
connection is made to the icemaker, set the power
switch in the O (off) position.
When the refrigerator has been connected to the
water supply, set the power switch to the l (on)
position. The icemaker power light will turn green
when the freezer light switch is pressed in or when
the freezer door is closed.
The icemaker will fill with water when it cools to
15°F (–10°C). A newly installed refrigerator may take
12 to 24 hours to begin making ice cubes.
You will hear a buzzing sound each time
the icemaker fills with water.
Throw away the first few batches of ice to allow
the water line to clear.
Be sure nothing interferes with the sweep
of the feeler arm.
When the bin fills to the level of the feeler arm, the
icemaker will stop producing ice. It is normal for
several cubes to be joined together.
If ice is not used frequently, old ice cubes will
become cloudy, taste stale and shrink.
NOTE: In homes with lower-than-average water
pressure, you may hear the icemaker cycle multiple
times when making one batch of ice.
NOTE: Set the power switch to the O (off) position if
the water supply is shut off.
A newly installed refrigerator may take 12 to 24 hours to begin making ice.
Icemaker
Feeler Arm
Power
Switch
Green
Power Light
Accessing Ice and Reaching
the Power Switch
To reach the icemaker power switch, pull the
shelf above the ice bin straight out. Always be
sure to replace the shelf.
To access ice, simply pull the bin forward.
To access ice.
Shelf
Ice Bin
To reach the power switch.
Shelf
Ice Bin
Icemaker Accessory Kit
If your refrigerator did not come already equipped
with an automatic icemaker, an icemaker accessory
kit is available at extra cost.
Check the back of the refrigerator for the specific
icemaker kit needed for your model.
To Use the External Dispenser (on some models)
Press the glass gently against the top of the
dispenser cradle.
The spill shelf is not self-draining. To reduce water
spotting, the shelf should be cleaned regularly.
If no water is dispensed when the refrigerator is
first installed, there may be air in the water line
system. Press the dispenser arm and run 1
1
⁄
2
gallons
to remove trapped air from the water line and to fill
the water system. To flush out impurities in the
water line, throw away the first six glassfuls of
water.
Locking the Dispenser
Press the LOCK pad for 3 seconds to lock
the dispenser and control panel. To unlock, press
and hold the pad again for 3 seconds.
Door Alarm
To set the alarm, press the DOOR ALARM pad. The
indicator light will illuminate. This alarm will sound if
either door is open for more than 2 minutes. The
beeping stops when you close the door.
Spill Shelf
Dispenser Cradle
To Use the Internal Dispenser (on some models)
The water dispenser is located on the left wall inside
the refrigerator compartment.
To dispense water:
Hold the glass against the recess.
Push the water dispenser button.
Hold the glass underneath the dispenser for
2–3 seconds after releasing the dispenser
button. Water may continue to dispense after
the button is released.
If no water is dispensed when the refrigerator is first
installed, there may be air in the water line system.
Press the dispenser button for at least 2 minutes to
remove trapped air from the water line and to fill the
water system. During this process, the dispenser noise
may be loud as the air is purged from the water line
system. To flush out impurities in the water line, throw
away the first 6 glassfuls of water.
NOTE: To avoid water deposits, the dispenser
should be cleaned periodically by wiping with
a clean cloth or sponge.
11

Care and cleaning of the refrigerator.
Cleaning the Outside
The door handles and trim. Clean with a
cloth dampened with soapy water. Dry with
a soft cloth. Do not use wax on the door
handles and trim.
Keep the outside clean. Wipe with a clean
cloth lightly dampened with kitchen
appliance wax or mild liquid dish detergent.
Dry and polish with a clean, soft cloth.
Do not wipe the refrigerator with a soiled
dish cloth or wet towel. These may leave a
residue that can erode the paint. Do not
use scouring pads, powdered cleaners,
bleach or cleaners containing bleach
because these products can scratch and
weaken the paint finish.
The stainless steel panels and door
handles.
Stainless steel (on some models) can be
cleaned with a commercially available
stainless steel cleaner. A spray-on stainless
steel cleaner works best.
Do not use appliance wax or polish
on the stainless steel.
Silver-plated plastic parts. Wash parts with
soap or other mild detergents. Wipe clean
with a sponge, damp cloth or paper towel.
Do not scrub with steel-wool pads or other
abrasive cleaners.
Cleaning the Inside
To help prevent odors, leave an open box of
baking soda in the refrigerator and freezer
compartments.
Unplug the refrigerator before cleaning. If
this is not practical, wring excess moisture
out
of sponge or cloth when cleaning around
switches, lights or controls.
Use an appliance wax polish on the inside
surface between the doors.
Use warm water and baking soda solution—
about a tablespoon (15 ml) of baking soda to
a quart (1 liter) of water. This both cleans and
neutralizes odors. Rinse and wipe dry.
After cleaning the door gaskets, apply a thin
layer of petroleum jelly to the door gaskets at
the hinge side. This helps keep the gaskets
from sticking and bending out of shape.
Avoid cleaning cold glass shelves with hot
water because the extreme temperature
difference may cause them to break.
Handle glass shelves carefully. Bumping
tempered glass can cause it to shatter.
Do not wash any plastic refrigerator parts
in the dishwasher.
Silver-accented plastic parts. Wash parts
with soapy water. Wipe clean with a sponge,
damp cloth or paper towel.
Do not scrub with steel-wool pads or other
abrasive cleaners.
12
Consumer Support Troubleshooting Tips Operating Instructions Safety Instructions
Installation
Instructions

Consumer Support
Troubleshooting Tips
Operating InstructionsSafety Instructions
Installation
Instructions
13
For long vacations or absences, remove food
and unplug the refrigerator. Clean the interior
with a baking soda solution of one
tablespoon (15 ml) of baking soda to one
quart (1 liter) of water. Leave the doors open.
Set the icemaker power switch to the O (off)
position and shut off the water supply to
the refrigerator.
If the temperature can drop below freezing,
have a qualified servicer drain the water
supply system (on some models) to prevent
serious property damage due to flooding.
GEAppliances.com
Behind the Refrigerator
Be careful when moving the refrigerator
away from the wall. All types of floor
coverings can be damaged, particularly
cushioned coverings and those with
embossed surfaces.
Raise the leveling legs located at the bottom
front of the refrigerator.
Pull the refrigerator straight out and return it
to position by pushing it straight in. Moving
the refrigerator in a side direction may result
in damage to the floor covering or
refrigerator.
Lower the leveling legs until they touch
the floor.
When pushing the refrigerator back, make
sure you don’t roll over the power cord or
icemaker supply line (on some models) and
ensure the anti-tip bracket is engaged (if
equipped).
Preparing for Vacation
Preparing to Move
Secure all loose items such as base grille,
shelves and drawers by taping them
securely in place to prevent damage.
When using a hand truck to move the
refrigerator, do not rest the front or back
of the refrigerator against the hand truck.
This could damage the refrigerator. Handle
only from the sides of the refrigerator.
Be sure the refrigerator stays in an upright
position during moving.

14
Consumer Support Troubleshooting Tips Operating Instructions Safety Instructions
Installation
Instructions
Refrigerator Lights (on some models)
CAUTION: Light bulbs may
be hot.
Unplug the refrigerator.
To remove the light shield, grasp the
shield at the back and pull out to release
the tabs at the back.
Rotate the shield down and then forward
to release the tabs at the front of the
shield.
After replacing with an appliance bulb of
the same or lower wattage, replace the
shield.
Plug the refrigerator back in.
NOTE: Appliance bulbs may be ordered from
GE Parts and Accessories, 800.626.2002.
Freezer Light
Replacing the light bulbs.
Turning the control to the 0 (off) position does not remove power to the light circuit.
CAUTION: Light bulbs may
be hot.
Unplug the refrigerator.
Remove the freezer basket for access.
The bulb is located at the rear of the
freezer inside a light shield.
To remove, grasp the shield at the top
and pull out to release the tabs at the
bottom.
After replacing with an appliance bulb of
the same or lower wattage, replace the
shield and freezer basket.
Plug the refrigerator back in.
LED Refrigerator Lights (on some models)
An authorized technician will need to replace
the LED light.
Appearance may vary
Light
Shield

15
Consumer Support
Troubleshooting Tips
Operating InstructionsSafety Instructions
Installation
Instructions
Trim kits and decorator panels. GEAppliances.com
Read these instructions completely and carefully.
Before You Begin
Some models are equipped with trim kits that allow you to install door panels. You can order
pre-cut black or white decorator panels from GE Parts and Accessories, 800.626.2002, or you
can add wood panels to match your kitchen cabinets.
Panels less than 1/4″ (6 mm) thick
When installing wood panels less than 1/4″ (6 mm) thick, you need to create a filler panel, such as 1/8″
cardboard, that will fit between the face of the door and the wood panel. If you are installing the pre-cut
decorator panels, pre-cut filler panels are included in the kit. The combined thickness of the decorator or wood
panel and the filler panel should be 11/32″ (8.7 mm) with the panel itself being no larger than 1/4″ (6 mm).
For panel-required models
Panels 1/4″ thick or less
1/4″ max
The handle and the top and bottom trim stand in front of the surface of the door, which requires that the filler
be smaller in length and width than the panel. Use the guidelines below and tape the filler onto the back of the
panel.
Left Fresh Food Door
Freezer Door
Filler
2 1/2″ (63.5 mm)
3/4″ (19 mm)
3/4″ (19 mm)
Panel
Filler
2 1/2″ (63.5 mm)
3/4″ (19 mm)
Panel
Right Fresh Food Door
Filler
2 1/2″ (63.5 mm)
3/4″ (19 mm)
3/4″ (19 mm)
Panel

Consumer Support Troubleshooting Tips Operating Instructions Safety Instructions
Installation
Instructions
16
Trim kits and decorator panels.
Dimensions for Custom Wood Panels
3/4″ (19 mm) or Raised Panel
A raised panel design screwed or glued to a 1/4″ (6 mm) thick backing, or a 3/4″ (19 mm) routed board can be used. The raised
portion of the panel must be fabricated to permit clearances of at least 2″ (5.1 cm) from the handle side for fingertip clearance.
Panels thicker than 1/4″ (6 mm), up to 3/4″ (19 mm) max., will require that the outer 5/16″ (8 mm) of panel perimeter be no
thicker than 1/4″ (6 mm).
Weight limitations for custom panels:
Fresh Food 10 lbs. (4.5 kg) max. for each door
Freezer Door 18 lbs. (8 kg) max.
2″ (5.1 cm)
Clearance
Handle Side
Appearance
Panel
Refrigerator
Door
1/4″ (6 mm)
Thick Backing
3/4″
(19 mm)
Panels thicker than 1/4″ (6 mm)
1/4″ (6 mm) max
3/4″ (19 mm)
5/16″ (8 mm)
Right Fresh Food Door
Freezer Door
Top, right and
bottom
16 29/32″ (42.9 cm)
5/16″ (8 mm)
minimum at
1/4″ (6 mm)
thickness
Raised portion
of panel
2″ (51 mm)
minimum at
1/4″ (6 mm)
thickness
Handle side
26 3/32″
(66.3 cm)
2″ (51 mm) minimum at
1/4″ (6 mm) thickness
Handle side
Left, right and
bottom sides
5/16″ (8 mm) minimum
at 1/4″ (6 mm) thickness
35 29/32″ (91.2 cm)
Raised
portion
of panel
38 15/16″
(98.9 cm)
Left Fresh Food Door
Top, left and
bottom
16 29/32″ (42.9 cm)
5/16″ (8 mm)
minimum at
1/4″ (6 mm)
thickness
Raised portion
of panel
2″ (51 mm)
minimum at
1/4″ (6 mm)
thickness
Handle side
38 15/16″
(98.9 cm)
1/8″
(3 mm)
1/8″
(3 mm)
1/8″
(3 mm)
1/8″
(3 mm)
1/8″
(3 mm)
1/4″
(6 mm)
1/4″
(6 mm)
1/4″
(6 mm)
1/4″
(6 mm)
1/4″
(6 mm)
1/8″
(3 mm)
1/4″
(6 mm)
Installation
Refrigerator
Instructions
Models 21 and 25
Questions? Call 800.GE.CARES (800.432.2737) or visit our Website at: GEAppliances.com
In Canada, call 1.800.561.3344 or visit our Website at: www.GEAppliances.ca
BEFORE YOU BEGIN
Read these instructions completely and carefully.
•
IMPORTANT — Save these instructions for local
inspector’s use.
•
IMPORTANT — Observe all governing codes and
ordinances.
• Note to Installer – Be sure to leave these instructions with
the Consumer.
• Note to Consumer – Keep these instructions for future
reference.
• Skill level – Installation of this appliance requires basic
mechanical skills.
• Completion time – Refrigerator Installation
20 minutes
Water Line Installation
30 minutes
Anti-Tip Bracket Installation
20 minutes
• Proper installation is the responsibility of the installer.
• Product failure due to improper installation is not covered
under the Warranty.
PREPARATION
MOVING THE REFRIGERATOR INDOORS
If the refrigerator will not fit through a doorway, the
refrigerator door and freezer drawer can be removed.
• To remove the refrigerator door, see Step 1 in the
Reversing the Door Swing section.
• To remove the freezer drawer, see the Removing the
Freezer Drawer section.
WATER SUPPLY TO THE ICEMAKER AND DISPENSER
(ON SOME MODELS)
If the refrigerator has an icemaker, it will have
to be connected to a cold water line. A GE water supply kit
(containing tubing, shut-off valve, fittings and instructions) is
available at extra cost from
your dealer, by visiting our Website at GEAppliances.com (in
Canada at www.GEAppliances.ca) or from Parts and
Accessories, 800.626.2002 (In Canada 1.800.661.1616).
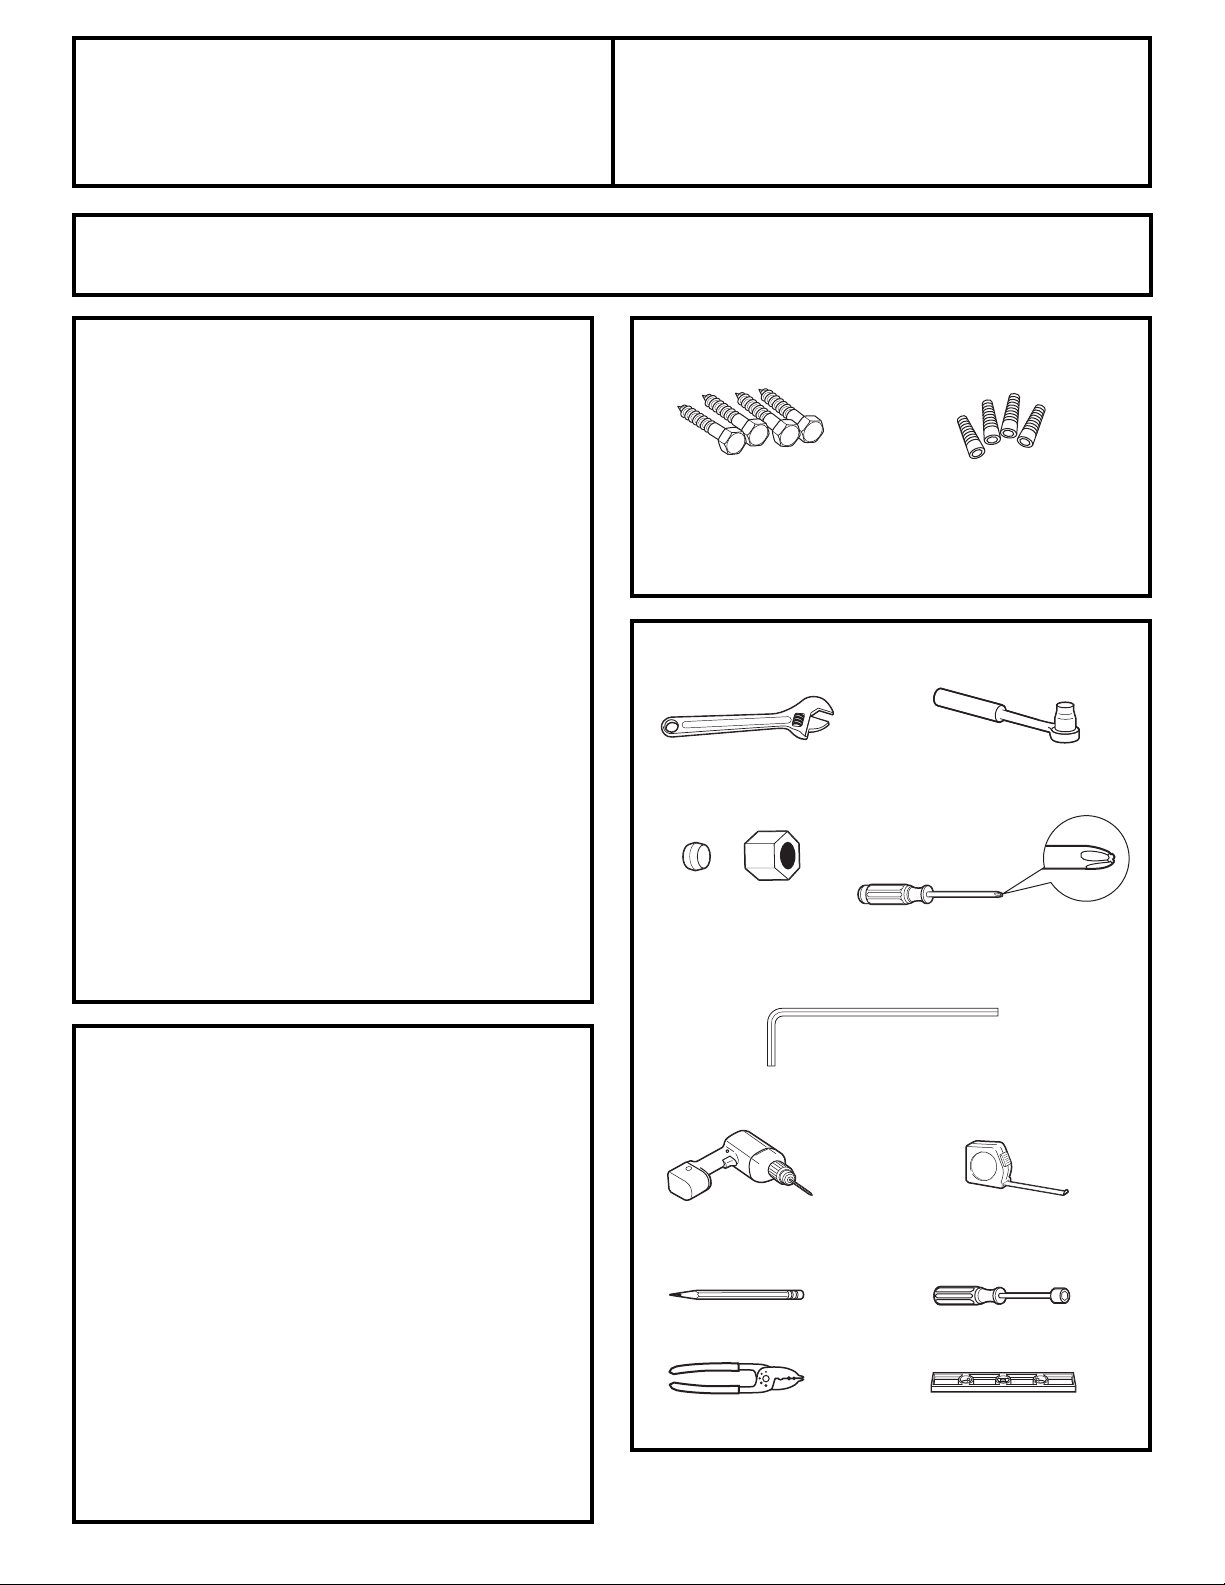
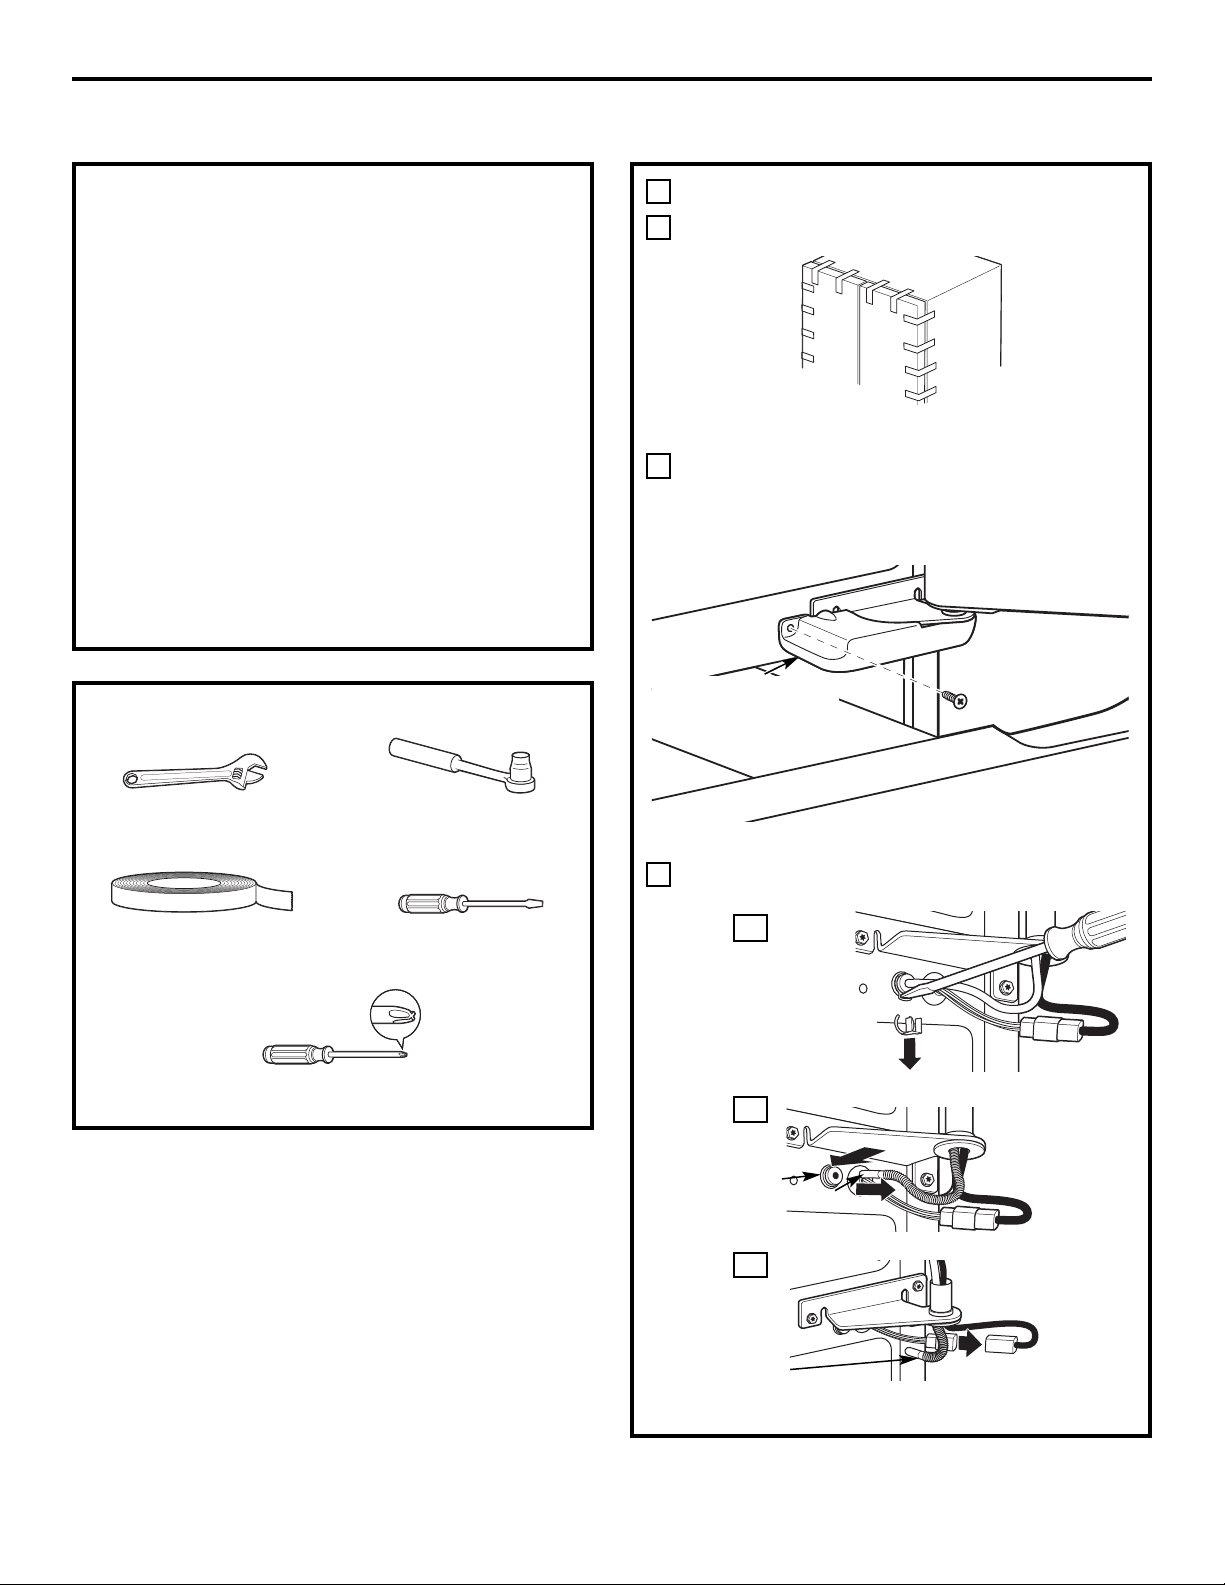
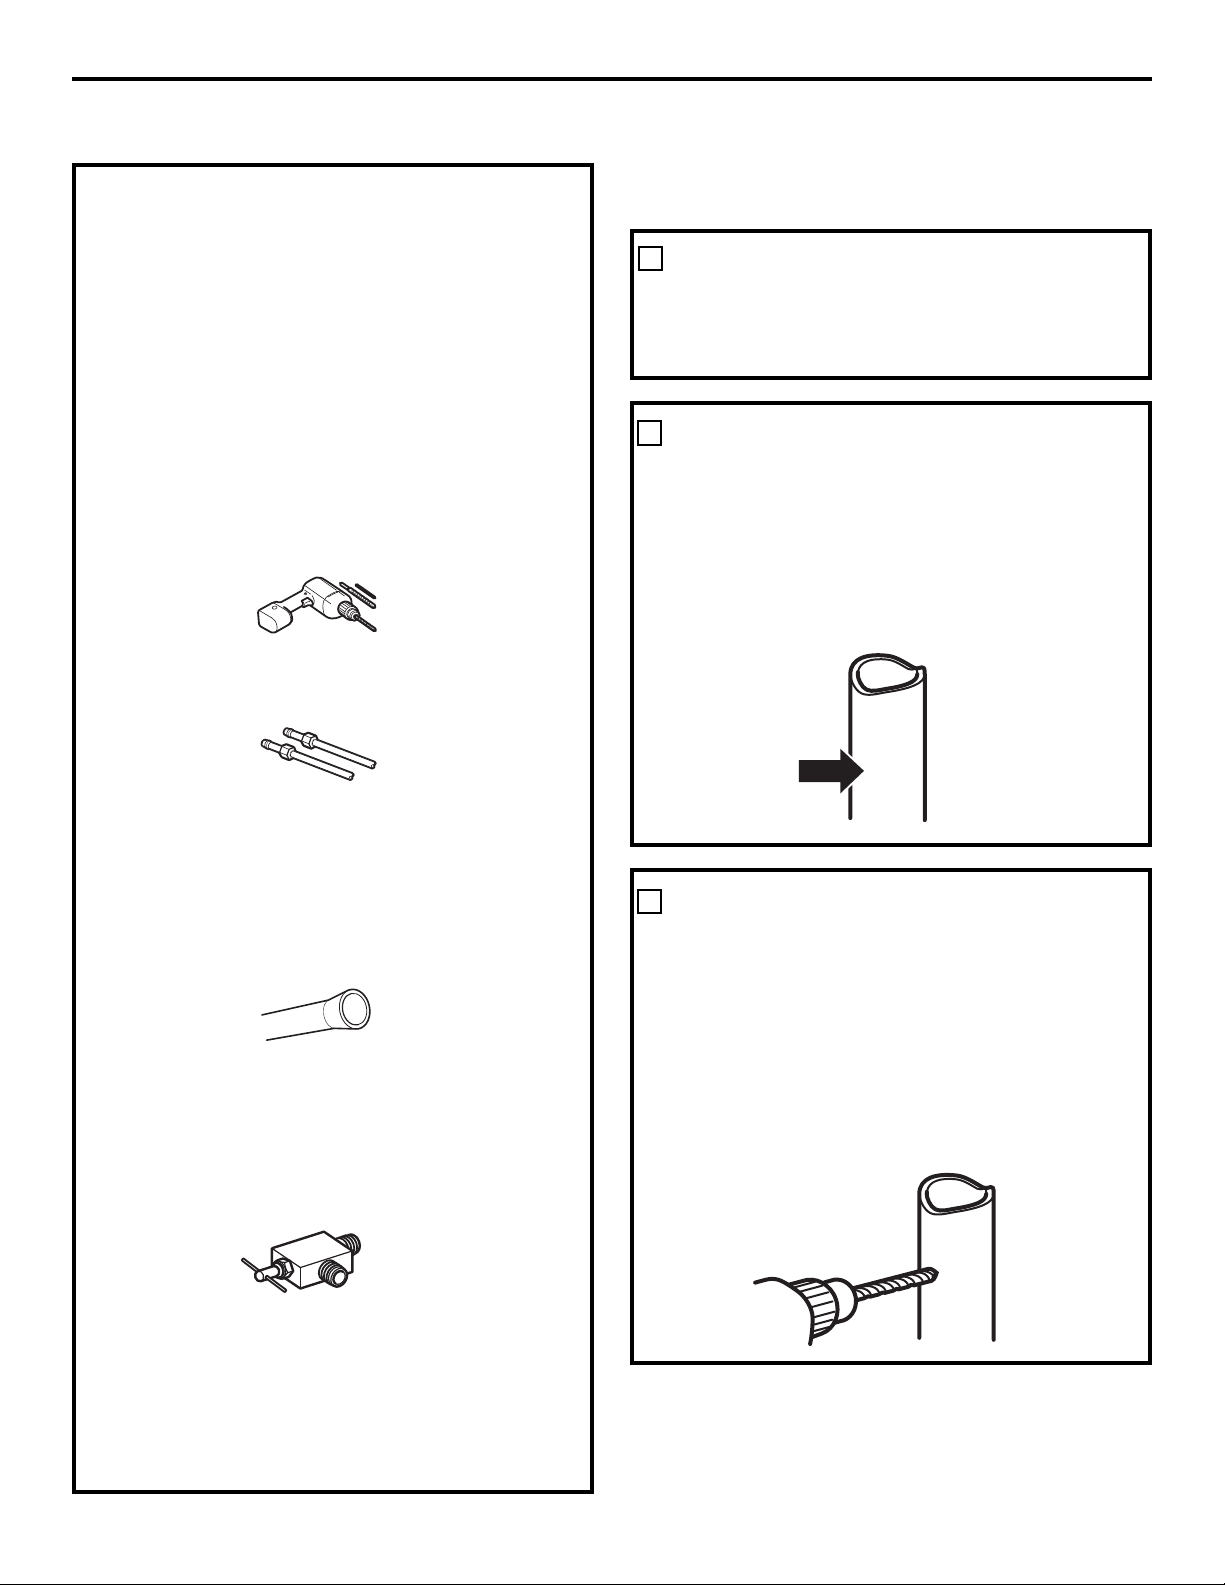
TOOLS YOU MAY NEED
Adjustable Wrench
1/4″ Outer Diameter
Compression Nut
and Ferrule (sleeve) (icemaker
models only)
Phillips-Head Screwdriver
17
3/8″ and 5/16″ Socket
Ratchet/Driver
3/32″, 1/8″ and 1/4″ Allen
wrenches
MATERIALS YOU MAY NEED (not included)
Pencil
1/8″ Drill Bit and
Electric or Hand Drill
Tape measure
1/4″ Nut Driver
Lag Bolts
Anchor Sleeves
For Anti-Tip Bracket Mounted on CONCRETE Floors Only
Drill Bit Appropriate for Anchors
Wire Cutters
Level
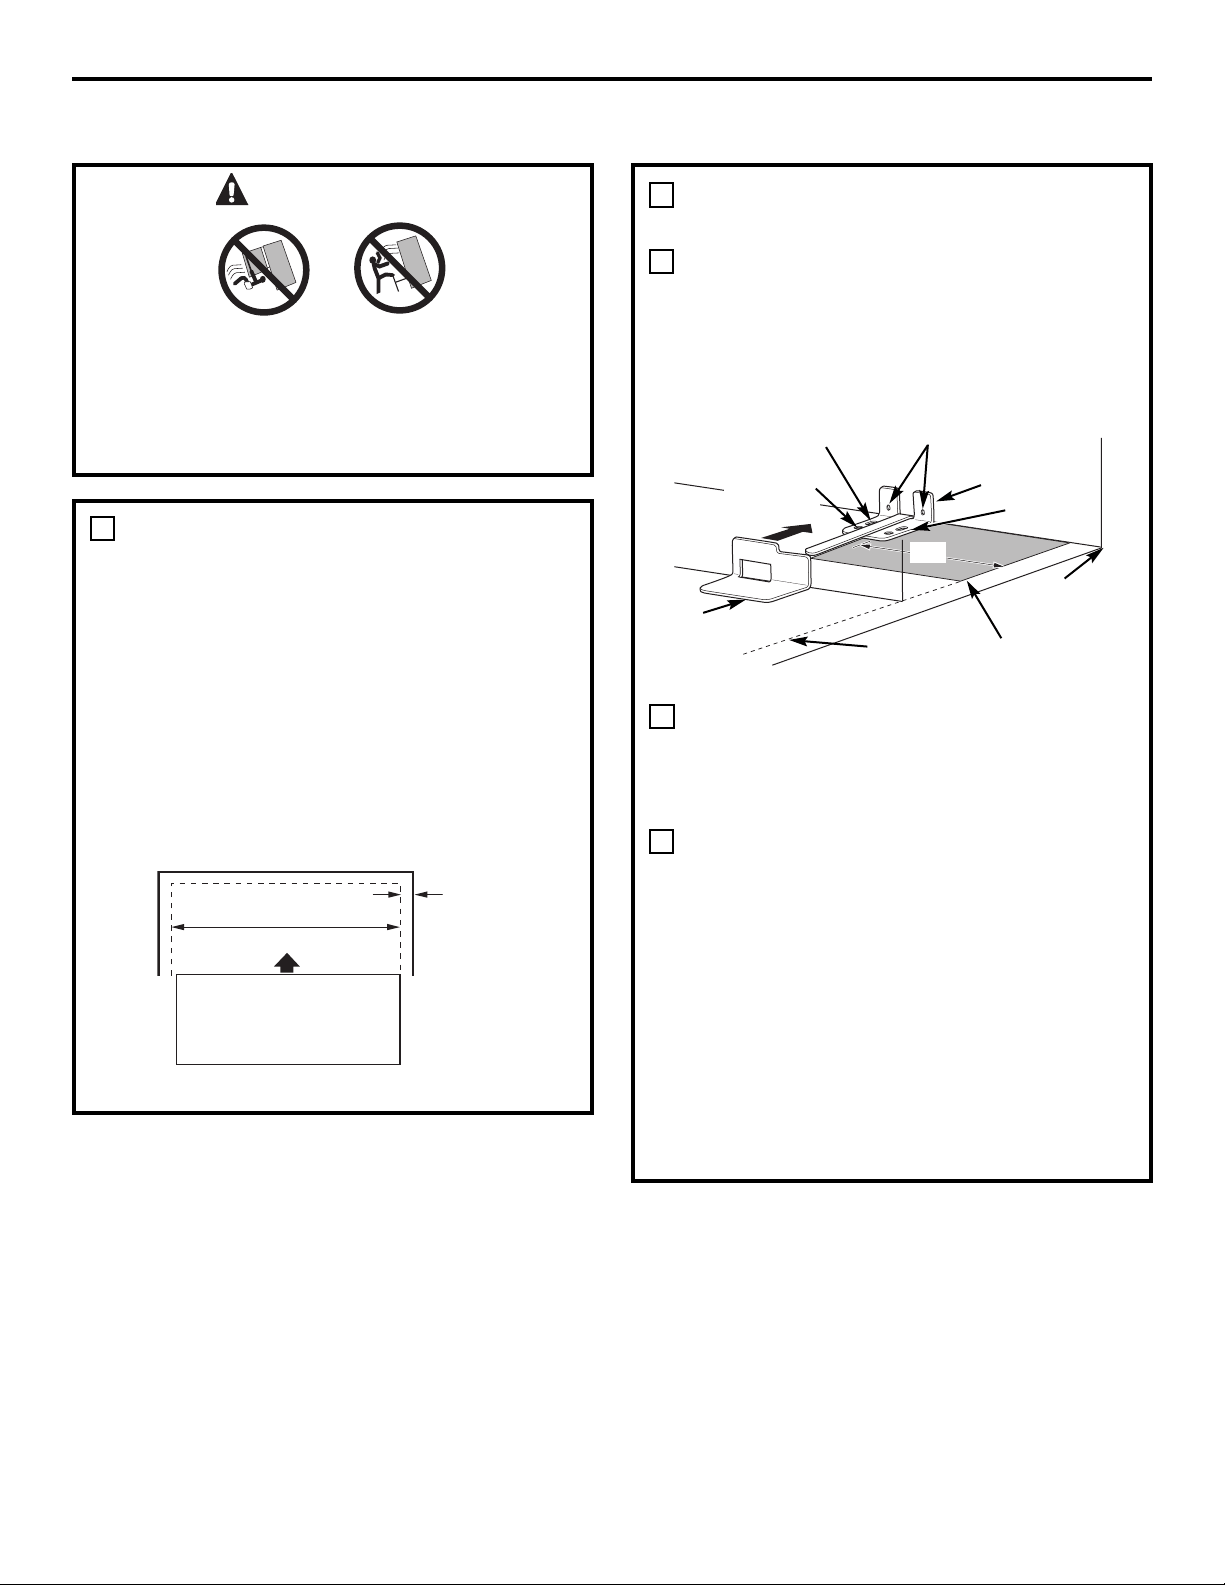
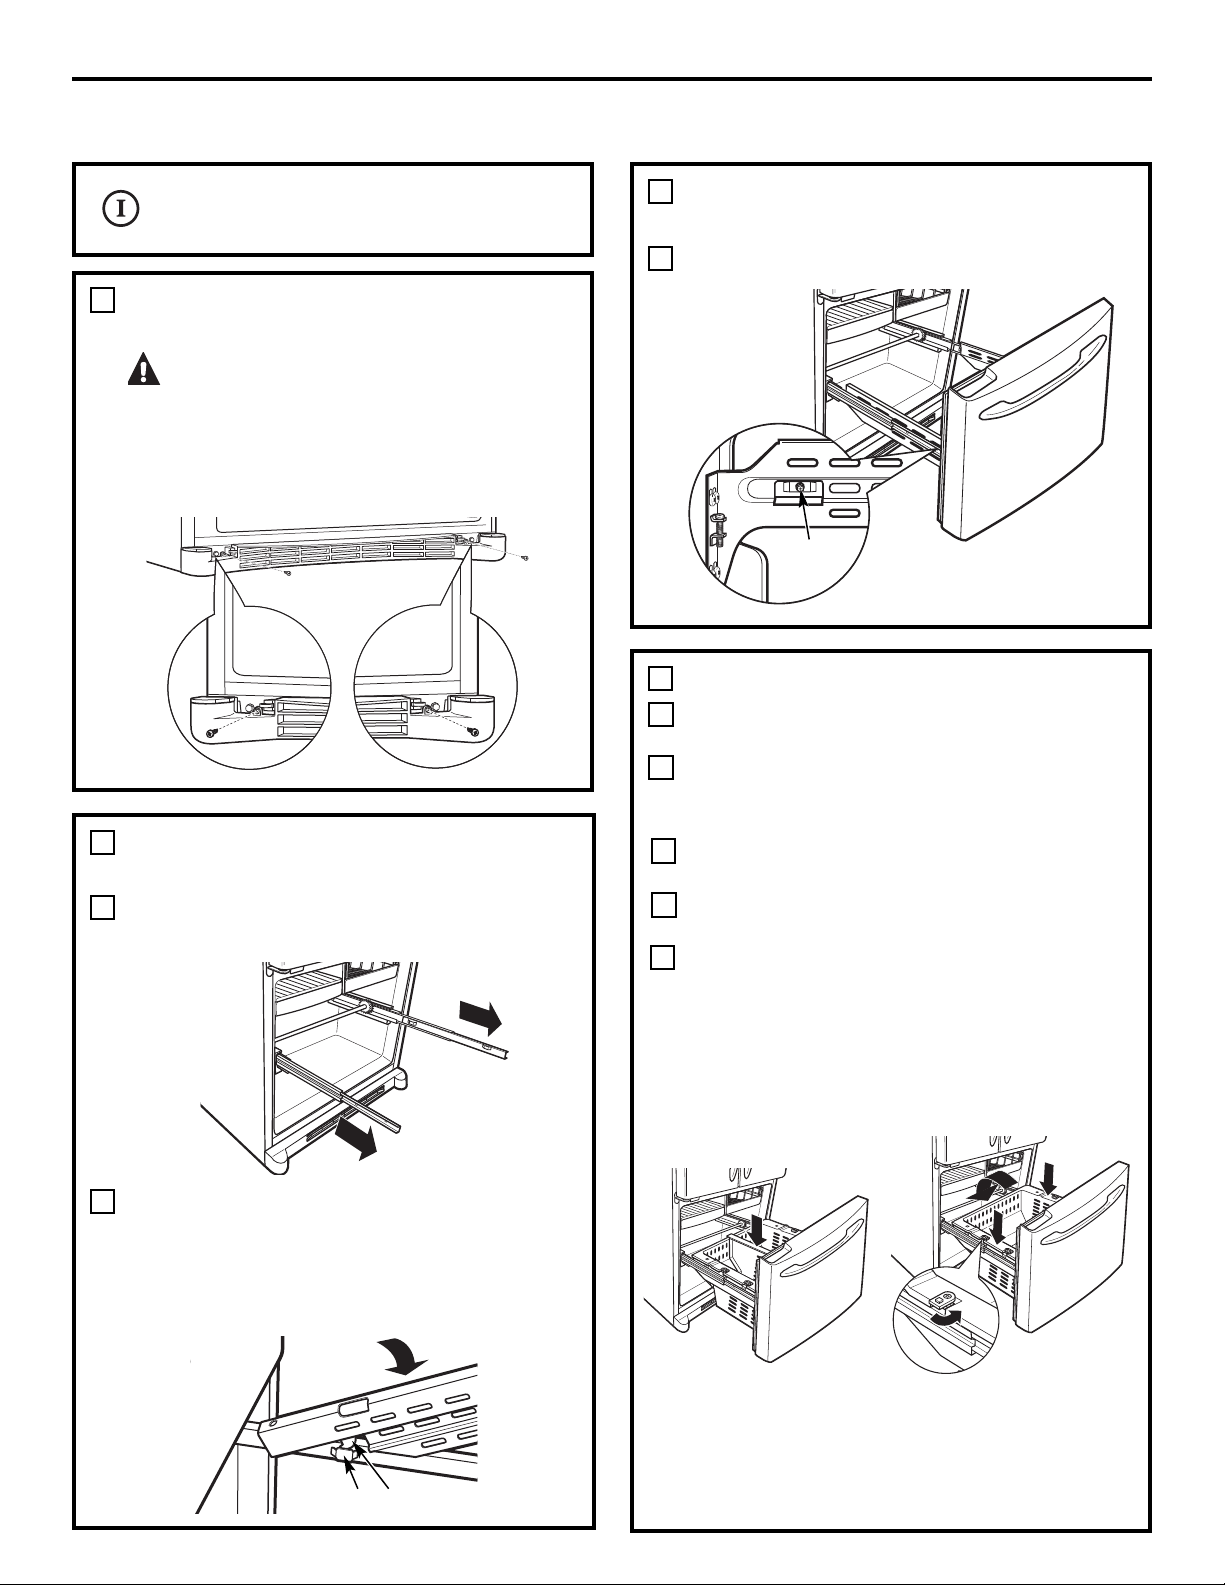
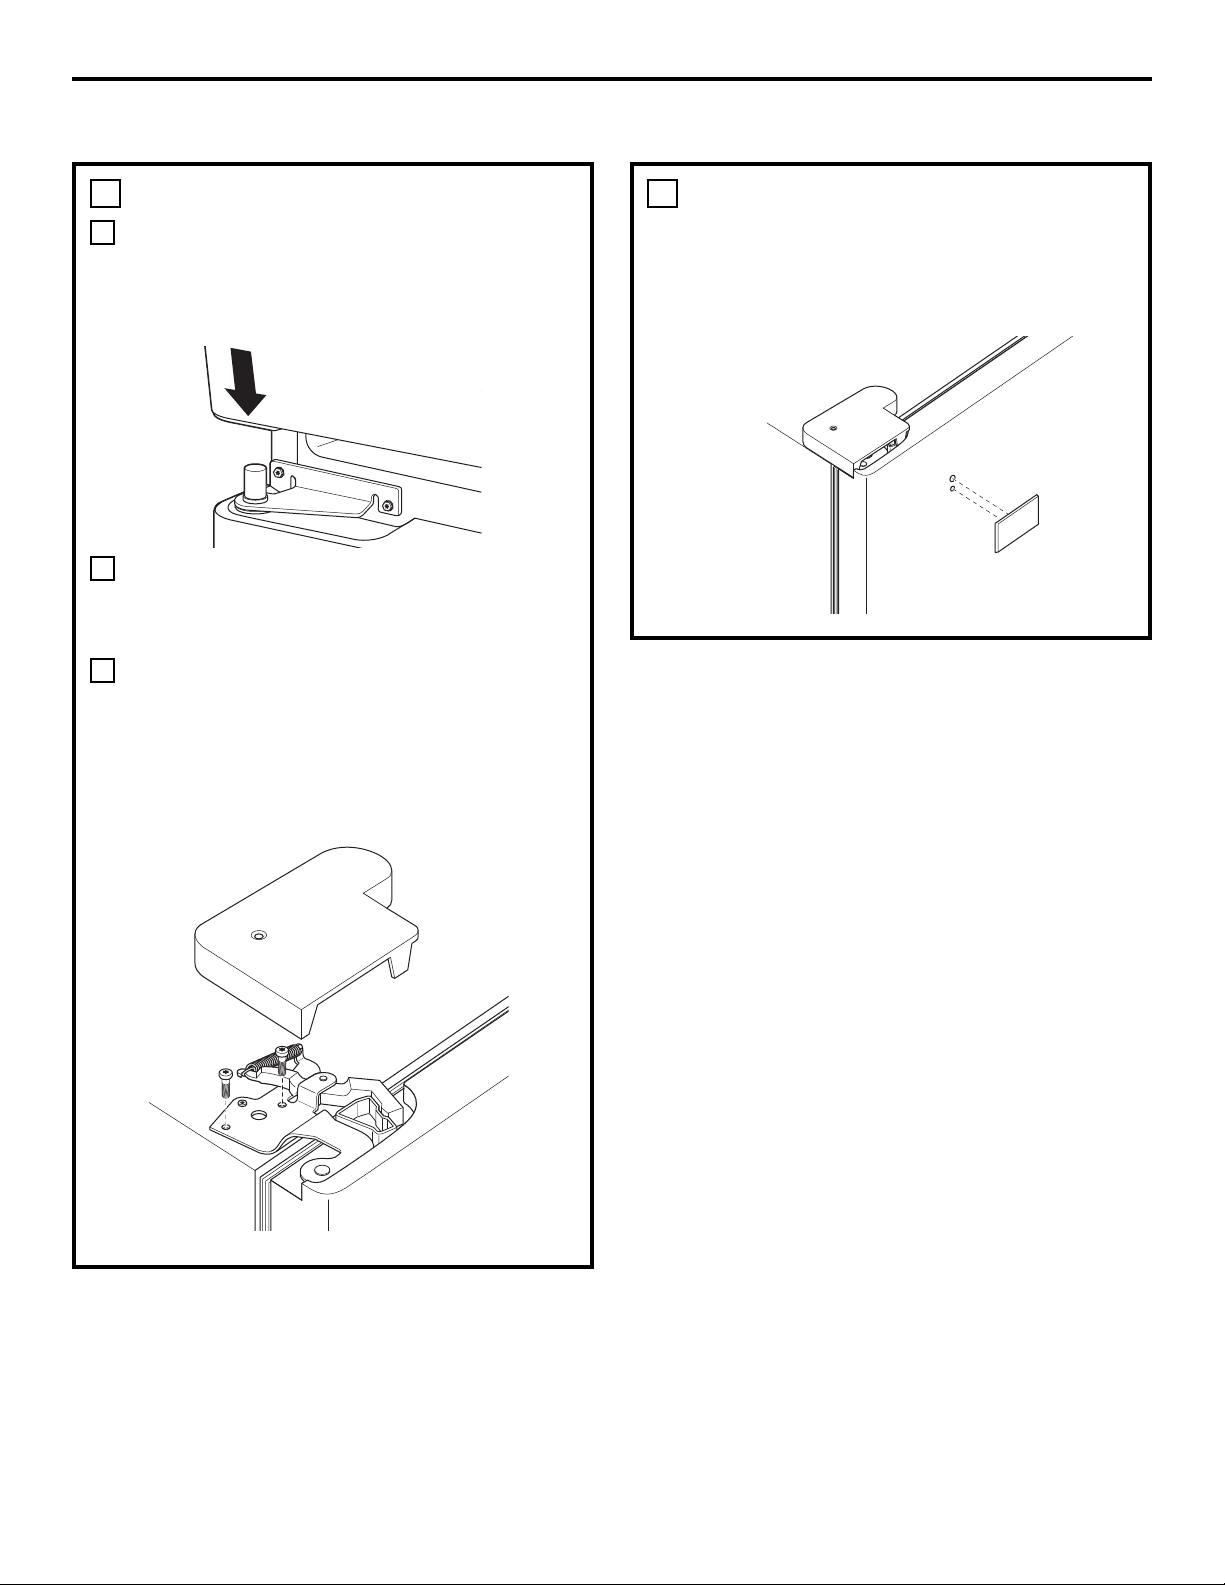
LOCATING THE ANTI-TIP
FLOOR BRACKET
Place the anti-tip floor bracket locator template
(included inside the anti-tip kit) onto the floor
up against the rear wall, within W, and in line
with the desired location of the RH side of the
refrigerator (see Figure 1).
Place the anti-tip floor bracket onto the locator
template with its RH floor holes lined up with
the floor holes indicated on the template sheet,
approximately 7
1
⁄4″ from the edge of the sheet
or the RH side of the refrigerator.
Hold down in position and use the anti-tip floor
bracket as a template for marking the holes
based upon your configuration and type of
construction as shown in Step 3. Mark the hole
locations with a pencil, nail or awl.
NOTE:
• It is REQUIRED to use at least 2 screws to
mount the floor bracket (one on each side of
the anti-tip floor bracket). Both must be into
either the wall or the floor. Figure 2 indicates
all the acceptable mounting configurations
for screws. Identify the screw holes on the
anti-tip floor bracket for your configuration.
MEASURE CABINET OPENING
AVAILABLE VS. REFRIGERATOR
WIDTH
Measure width of cabinet opening where
refrigerator will be placed, W.
Be sure to account for any countertop
overhang, baseboard thickness and any
clearance desired. Width, W, should not be less
than 36 inches. The refrigerator will be placed
approximately in the middle of this opening.
WARNING
Under certain circumstances, this refrigerator
can tip forward.
Injury to persons can result.
Install Anti-Tip Bracket packed with this
refrigerator.
1
Baseboard
Thickness
or Countertop
Overhang
(Whichever
Is Greater) Plus
Any Desired
Clearance
Rear Wall
Front
RH Side
2
A
B
C
W
Base
Bracket
on the
Refrigerator
2 Wall Holes
RH Side of
Refrigerator
Floor – Concrete
(2 Holes)
Floor – Wood
(2 Holes)
7
1
⁄4″
Locator Template
Sheet
Floor Bracket
to Install
RH Holes
Rear RH Corner
of Cabinet Wall
REFRIGERATOR
Figure 1 – Installation Overview
18
Installation Instructions
INSTALLING THE ANTI-TIP FLOOR BRACKET (on 21 ft. models)

Installation Instructions
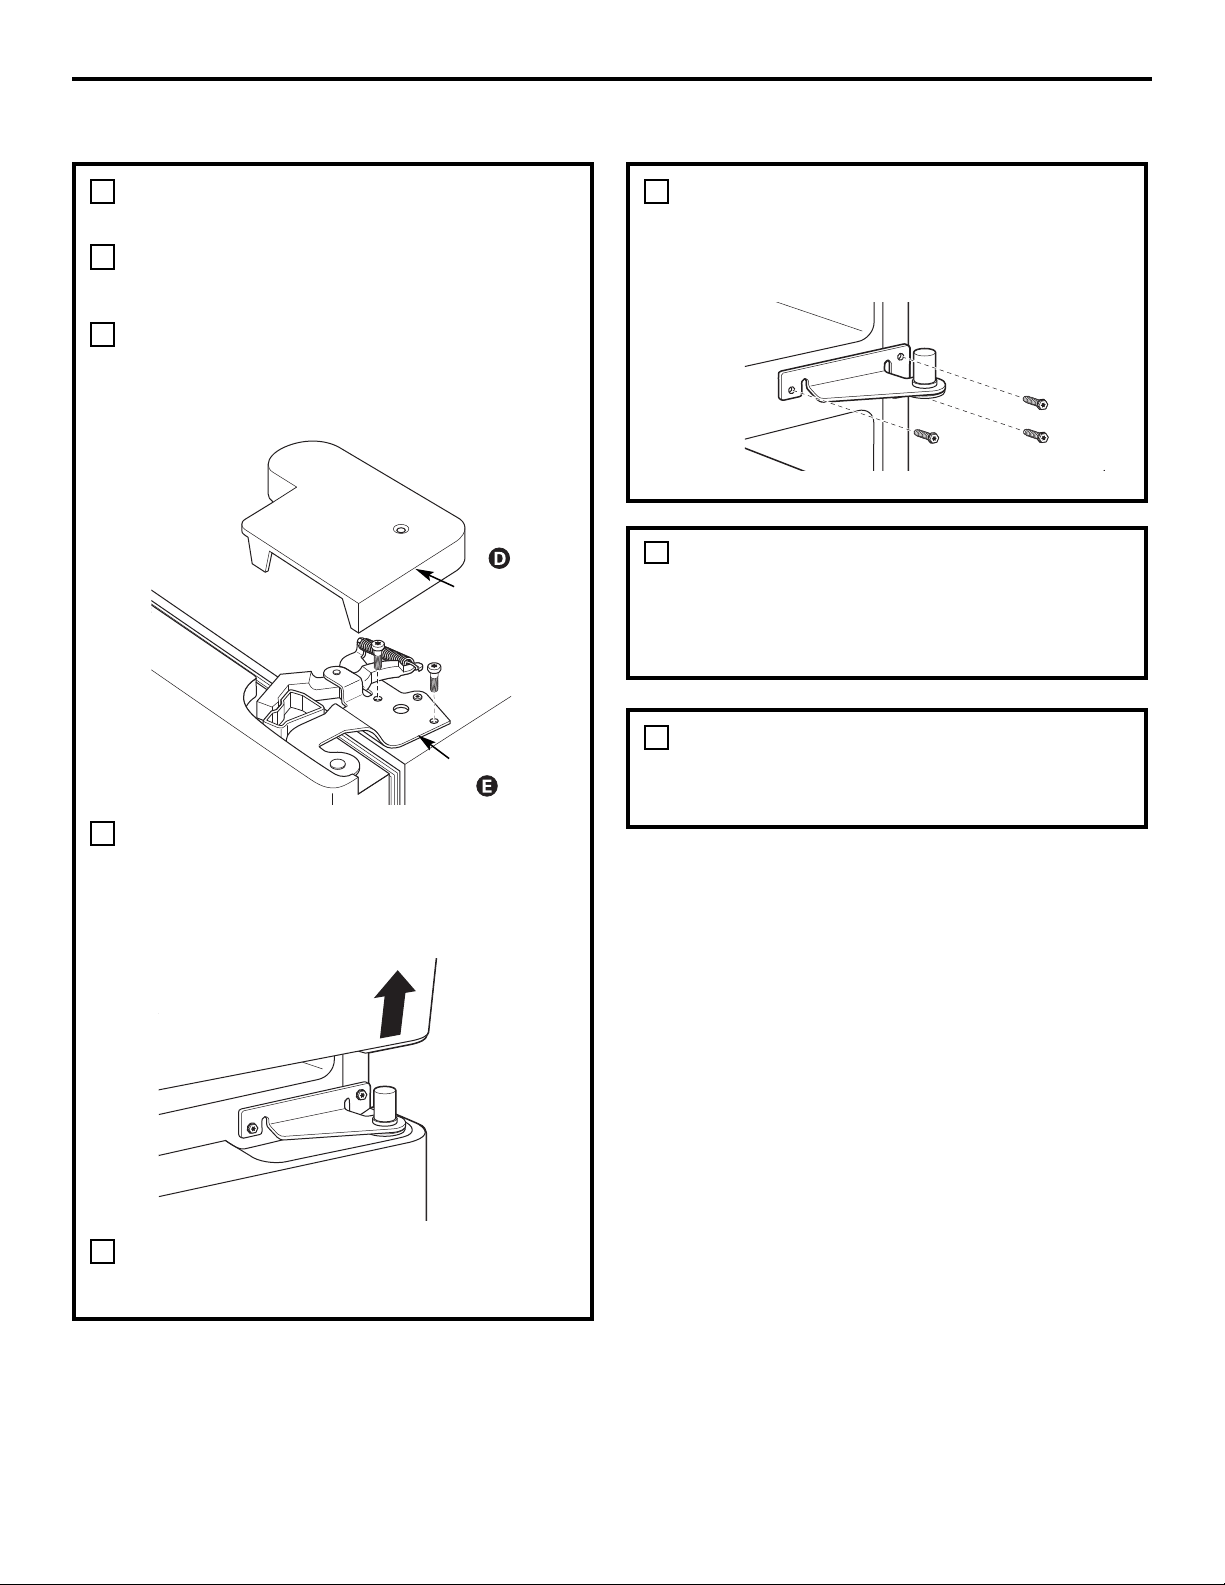
LOCATING THE ANTI-TIP
FLOOR BRACKET (cont.)
2
Preferred Installation – Wood
Preferred Installation –
Concrete
Minimum Acceptable #1 –
Wall Plate Stud
Minimum Acceptable #2 –
Wood Floor
Minimum Acceptable #3 –
Concrete Floor
Figure 2 – Acceptable Screw Placement
Locations
CONCRETE Wall and Floor Construction:
• Anchors required (not provided):
4 each 1/4” x 1 1/2” lag bolts
4 each 1/2” O.D. sleeve anchors
• Drill the recommended size holes for the
anchors into the concrete at the center of
the holes marked in Step 2.
• Install the sleeve anchors into the drilled
holes. Place the anti-tip floor bracket as
indicated in Step 2. Remove the locator
template from the floor.
• Install the lag bolts through the anti-tip floor
bracket and tighten appropriately.
WOOD Wall and TILE Floor Construction:
• For this special case, locate the 2 wall holes
identified in Fig. 1. Drill an angled 1/8” pilot
hole (approx. as shown in Fig. 3) in the center
of each hole.
• Mount the anti-tip floor bracket using the
Minimum Acceptable Installation #1, as
illustrated in Fig. 2.
C
B
ANTI-TIP BRACKET INSTALLATION
WOOD Wall and Floor Construction:
• Drill the appropriate number of 1/8” pilot
holes in the center of each floor bracket hole
being used (a nail or awl may be used if a drill
is not available) AND remove the locator
template from the floor.
• Mount the anti-tip floor bracket by fastening
the 2, or preferably 4, #10-16 hex-head
screws tightly into place as illustrated in
Figure 3.
3
A
POSITIONING THE REFRIGERATOR
TO ENGAGE THE ANTI-TIP FLOOR
AND BASE BRACKETS
Before pushing the refrigerator into the
opening, plug the power cord into the
receptacle and connect waterline (if equipped).
Check for leaks.
Locate the refrigerator’s RH side and move
back approximately in line with the RH side of
the cabinet opening, W. This should position the
anti-tip floor bracket to engage the anti-tip
base bracket on the refrigerator.
Gently roll the refrigerator back into the
cabinet opening until it comes to a complete
stop. Check to see if the refrigerator front lines
up with the cabinet front face. If not, carefully
rock the refrigerator forward and backward
until engagement occurs and you notice that
the refrigerator is fully pushed up against the
rear wall.
OPTIONAL: Adjust the rear (and front) wheel
height settings to fully engage the rear anti-tip
brackets, while also aligning the refrigerator
front with the cabinet front face.
4
A
C
B
D
Figure 3 – Attachment to
Wall and Floor
NOTE:
If you pull the refrigerator out and away from the
wall for any reason, make sure the anti-tip floor
bracket is engaged when the refrigerator is pushed
back against the rear wall.
Rear RH Corner of
the Refrigerator
Floor
Wall
Plate
Stud
Floor
Bracket
2 Screws Must
Enter Wood or
Metal Stud
Wall
19
Installation Instructions
INSTALLING THE REFRIGERATOR
REFRIGERATOR LOCATION
• Do not install the refrigerator where the temperature will
go below 60°F (16°C) because it will not run often enough
to maintain proper temperatures.
• Do not install the refrigerator where the temperature will
go above 100°F (37°C) because it will not perform properly.
• Install it on a floor strong enough to support it fully loaded.
CLEARANCES
Allow the following clearances for ease of installation, proper
air circulation and plumbing and electrical connections.
Standard Depth Counter Depth
Models Models
Sides 1/8″ (3 mm) 1/8″ (3 mm)
Top 1″ (25 mm) 1″ (25 mm)
Back 1″ (25 mm) 1/2″ (13 mm)
CONNECTING THE REFRIGERATOR TO
THE HOUSE WATER LINE
(icemaker and dispenser models)
A cold water supply is required for automatic icemaker
operation. If there is not a cold water supply, you will
need to provide one. See Installing the Water Line
section.
NOTES:
• Before making the connection to the refrigerator, be
sure the refrigerator power cord is not plugged into
the wall outlet.
• If your refrigerator does not have a water filter, we
recommend installing one if your water supply has
sand or particles that could clog the screen of the
refrigerator’s water valve. Install it in the water line
near the refrigerator. If using GE SmartConnect
™
Refrigerator Tubing Kit, you will need an additional
tube (WX08X10002) to connect the filter. Do not cut
plastic tube to install filter.
1
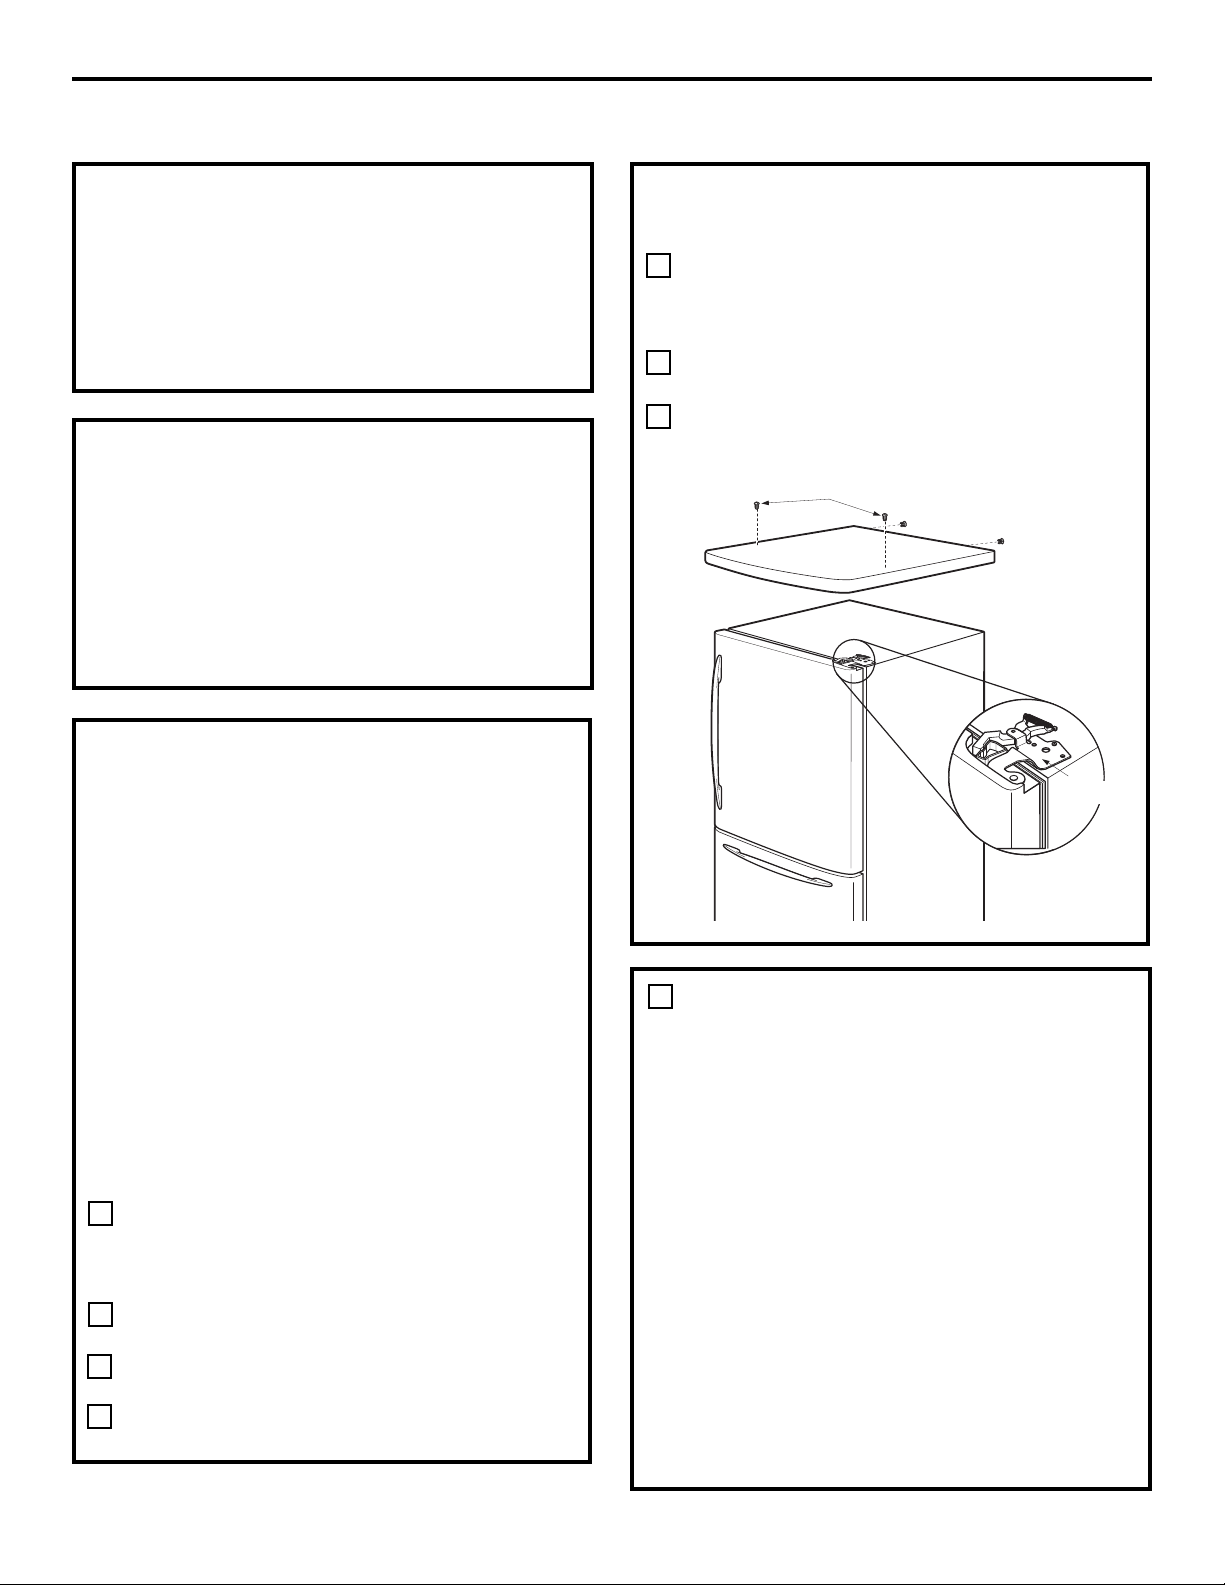
REMOVE TOP CAP (on some models)
•
IMPORTANT NOTE: This refrigerator is 34-1/2″ deep.
Doors and passageways leading to the installation
location must be at least 36″ wide in order to leave the
doors and handles attached to the refrigerator while
transporting it into the installation location. If
passageways are less than 36″, the refrigerator doors
and handles can easily be scratched and damaged.
The top cap and doors can be removed to allow the
refrigerator to be safely moved indoors. Start with Step A.
• If it is not necessary to remove doors, skip Step A. Leave
tape and all packaging on doors until the refrigerator is
in the final location.
• SKID REMOVAL: Tilt refrigerator to each side to remove
skid.
• NOTE: Use a padded hand truck to move this refrigerator.
Place the refrigerator on the hand truck with a side
against the truck. We strongly recommend that TWO
PEOPLE move and complete this installation.
Locate and remove the two Phillips head screws on the
top of the refrigerator. Remove the two screws on each
side at the rear of the top cap.
Lift off and remove top cap.
Remove the fresh-food door. Refer to Steps 1 through 3
of “Reversing the Door Swing” section.
Remove the bottom freezer drawer. Refer to “Removing
Freezer Drawer” section.
Move refrigerator to the installation location.
A
B
C
D
20
REMOVE TOP CAP (cont.) (on some models)
REINSTALL DOORS, DRAWERS AND TOP CAP
Carefully lower the door onto the center hinge. Reinstall
top hinge. NOTE: Ensure the door is properly aligned to
the case top to avoid readjustment of the door during
top cap reinstallation.
Place cap over the top of the refrigerator. Reinstall the
original screws in the top and back of the cap.
Reinstall the bottom freezer drawer. Refer to “Replacing
the Freezer Drawer” section.
E
F
G
A
Top Hinge B

CONNECTING THE REFRIGERATOR TO
THE HOUSE WATER LINE (cont.)
If you are using copper tubing, place a
compression nut and ferrule (sleeve) onto the
end of the tubing coming from the house cold
water supply.
If you are using the GE SmartConnect
™
tubing, the nuts are already assembled to
the tubing.
If you are using copper tubing, insert
the end of the tubing into the refrigerator
connection, at the back of the refrigerator, as
far as possible. While holding the tubing,
tighten the fitting.
If you are using GE SmartConnect
™
tubing,
insert the molded end of the tubing into the
refrigerator connection, at the back of the
refrigerator, and tighten the compression nut
until it is hand tight. Then tighten one
additional turn with a wrench. Overtightening
may cause leaks.
Fasten the tubing into the clamp provided to
hold it in position. You may need to pry open
the clamp.
One of the illustrations below will look like the
connection on your refrigerator.
Icemaker-Ready models
Icemaker-Installed Models
21
Installation Instructions
1
A
B
C
1/4″ Tubing
Tubing Clamp
1/4″
Compression
Nut
Ferrule
(sleeve)
SmartConnect
™
Tubing
Refrigerator
Connection
TURN ON THE WATER SUPPLY
(icemaker and dispenser models)
Turn the water on at the shut-off valve (house water
supply) and check for any leaks.
2
PLUG IN THE REFRIGERATOR
On models with an icemaker, before plugging in the
refrigerator, make sure the icemaker power switch is set
to the O (off) position.
See the grounding information attached to the power
cord.
3
PUT THE REFRIGERATOR IN PLACE
Move the refrigerator to its final location. Make sure the
back side of the refrigerator engages the anti-tip
bracket properly. The anti-tip floor bracket should line
up with the cutout in the back bottom of the
refrigerator, and fit through the cutout when the
refrigerator is pushed into position. (Refer to page 18,
Step 2A for more information.)
4
1/4″ Copper
Tubing
1/4″ Compression
Nut
Ferrule
(sleeve)
SmartConnect
™
Tubing
Refrigerator
Connection
Tubing
Clamp
LEVEL THE REFRIGERATOR
Turn the front roller adjusting
screws clockwise to raise the
refrigerator, counterclockwise
to lower it. Use a 3/8″ hex
wrench with extension, or an
adjustable wrench.
To adjust the rollers on 21
‘ Counter Depth models:
These models also have rear adjustable rollers
so you can align the refrigerator with your kitchen
cabinets. Use a 3/8″ hex wrench with extension to turn
the screws for the rear rollers—clockwise to raise the
refrigerator, counterclockwise to lower it.
5
Roller adjusting screws

Installation Instructions
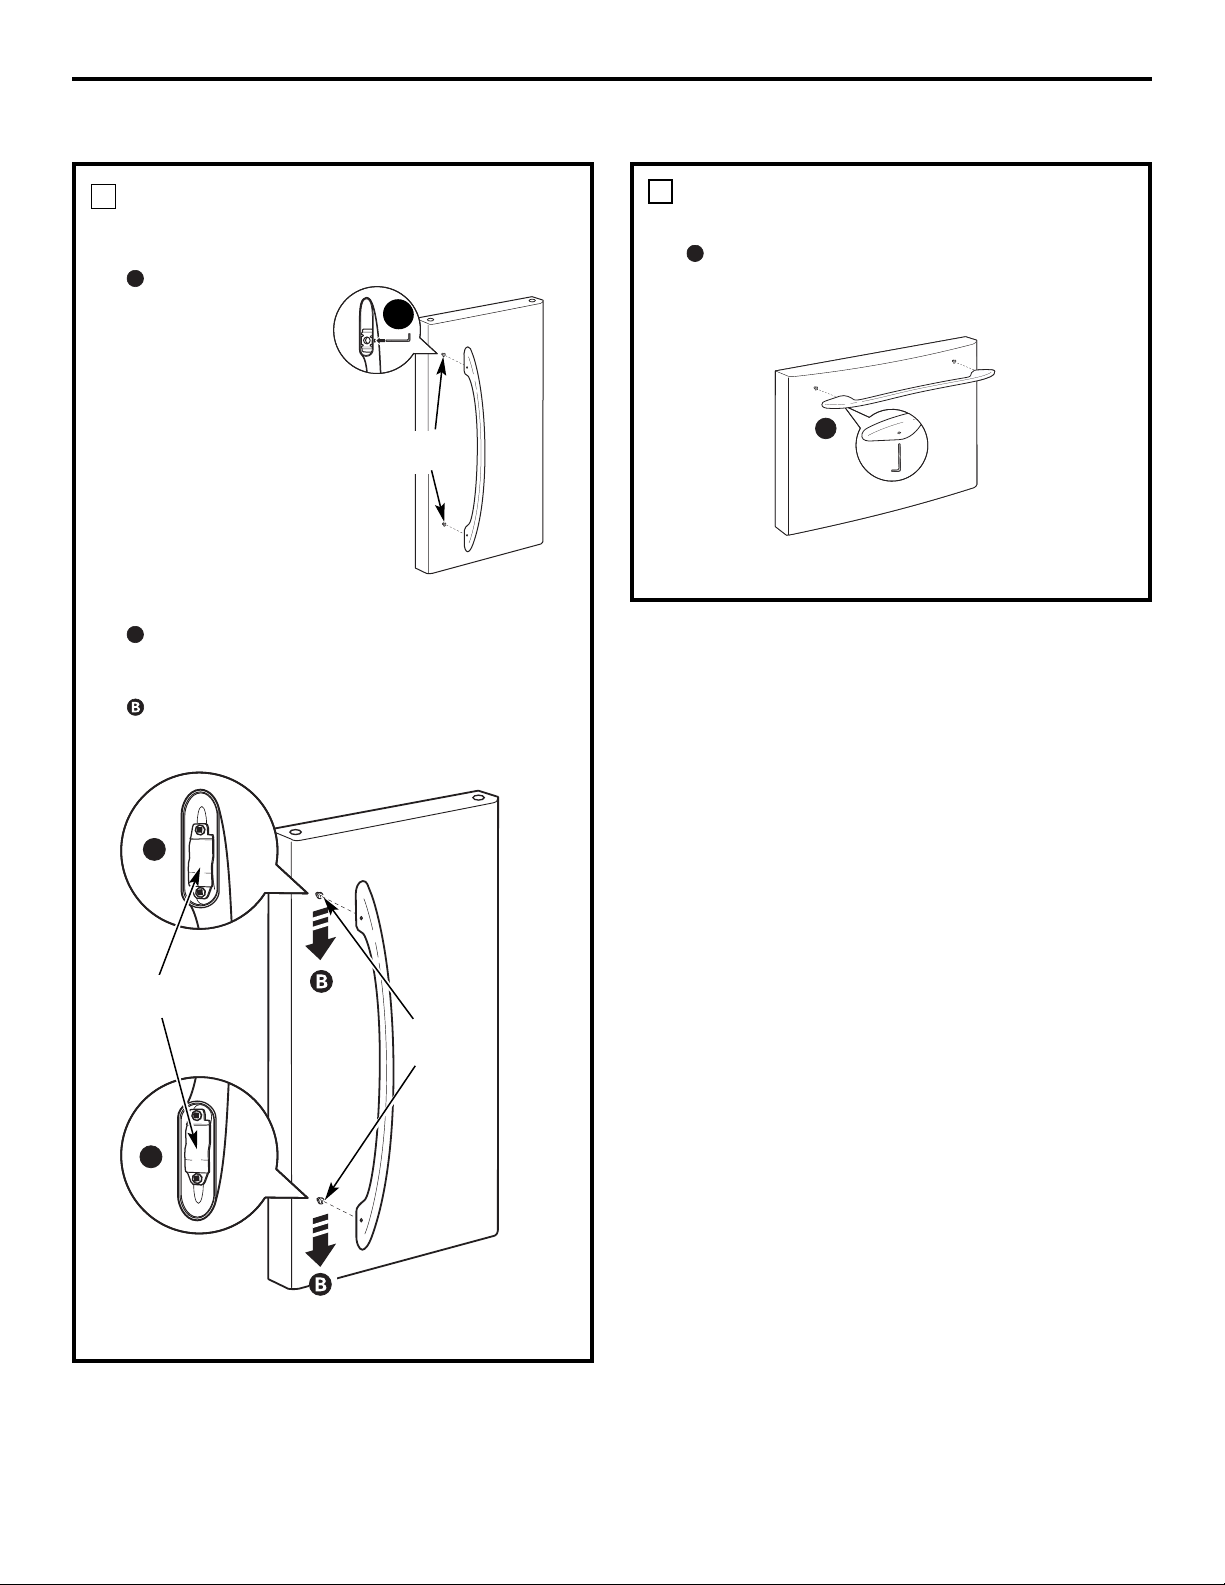
REMOVE THE FRESH FOOD
DOOR HANDLE
(For placement in the installation location or
reversal of the handles – on some models)
Stainless steel (on some models):
REMOVING
THE DOOR HANDLE:
Loosen the set screws
with the 3/32″ Allen
wrench
and remove
the handle. NOTE: For
Double Door models
follow the same
procedure on the
opposite door.
Plastic handle (on some models):
REMOVING THE DOOR HANDLE: Depress the tab on
the underside of the handle and slide the handle up
and off of the mounting fasteners.
REVERSING THE DOOR HANDLE (on some models):
• Remove
the handle
mounting
fasteners with
a 1/4″ Allen
wrench and
transfer the
handle
mounting
fasteners to the
right side.
• Remove the logo
badge.
• Remove and
transfer the
plug button to
the left side of the fresh food door. NOTE: Use a flat
plastic edge to prevent damaging the door. Remove
any adhesive on the door with a mild detergent.
Remove the paper covering on the adhesive
backing on the logo badge prior to carefully
attaching the badge to the door.
A
A
6
A
B
A
B
Mounting
Fasteners
Mounting
Fasteners
Badge
Badge
(appearance may vary)
(appearance may vary)
REMOVE THE FREEZER DOOR HANDLE
Stainless steel and plastic handles:
Loosen the set screws located on the underside of
the handle with a 1/8″ or 3/32″ Allen wrench and
remove the handle.
NOTE: If the handle mounting fasteners need to be
tightened or removed, use a 1/4″ Allen wrench.
A
7
A
22
INSTALLING THE REFRIGERATOR (cont.)
ATTACH THE FREEZER DOOR HANDLE
Stainless steel and plastic handles:
Attach the handle firmly to the mounting fasteners
and tighten the set screws on the bottom of the
handle with a 1/8″ or 3/32″ Allen wrench.
A
Installation Instructions
23
ATTACH THE FRESH FOOD
DOOR HANDLE
Stainless steel handle:
Attach the handle
to the handle
mounting fasteners
and tighten the set
screws with a 3/32″
Allen wrench.
NOTE: For Double
Door models follow
the same procedure
on the opposite
door.
Plastic handle:
Attach the handle to the handle mounting fasteners
by aligning the slots with the handle mounting
fasteners.
Slide it down until it is firmly locked into position.
A
A
8
A
Mounting
Fasteners
(appearance may vary)
(appearance may vary)
Mounting
Fasteners
Slots on back of
handle
A
A
9
A
(appearance may vary)
LEVEL THE REFRIGERATOR
The leveling legs have 2 purposes:
1) Leveling legs adjust so the refrigerator is
firmly positioned on the floor and does not
wobble.
2) Leveling legs serve as a stabilizing brake to
hold the refrigerator securely in position
during operation and cleaning. The leveling
legs also prevent the refrigerator from
tipping.
Remove the grille by removing the two Phillips-
head screws.
Turn the leveling legs clockwise to raise the
refrigerator, counterclockwise to lower it.
CAUTION: To avoid possible
personal injury or property damage, the
leveling legs must be firmly touching
the floor.
Replace the base grille by inserting the two
Phillips-head screws.
10
A
Installation Instructions
24
SET THE CONTROLS
Set the controls to the recommended setting.
11
REMOVE PACKAGING START
ICEMAKER
(icemaker models)
A) Remove all tape, foam and protective
packing from shelves and drawers.
B) Remove the tie downs from the freezer
baskets.
C) Place half width basket onto drawer slides.
See About the freezer section for
instructions.
Set the icemaker power switch to the I (on)
position. The icemaker will not begin to operate
until it reaches its operating temperature of
15°F (–9°C) or below. It will then begin operation
automatically. It will take 2–3 days to fill the
ice bin.
NOTE:
In lower water pressure conditions, the water
valve may turn on up to 3 times to deliver
enough water to the icemaker.
12
Power
switch
INSTALLING THE REFRIGERATOR (cont.)
B
C
Installation Instructions
REMOVING THE FREEZER DRAWER (on some models)
REMOVE THE BASKET
Open the freezer drawer until it stops.
Lift the freezer caddy up
.
Pull the divider forward until the rear locating tabs
are out of the slots. Turn the divider slightly to the
side to release the front locating tabs and lift out.
The freezer basket rests on the metal slide
brackets and is held in place with swing locks.
Turn the swing locks from vertical to horizontal
position. Open refrigerator doors.
Lift the basket up and rotate it toward you.
Slide out from the side of the drawer.
1
A
D
E
REMOVE THE BASE GRILLE
(if needed)
If, after removing the freezer drawer and
refrigerator door, the refrigerator will still not fit
through a doorway, the base grille can be
removed.
Remove the 2 Phillips-head screws on either
side of the base grille.
Pull the grille straight out.
3
The freezer drawer can be removed, if needed, to fit
through tight areas.
Read these instructions completely and carefully.
REMOVE THE DRAWER FRONT FROM
THE SLIDES
Remove the hex-head screw from each side
of the rail assembly.
Tilt the drawer front toward the refrigerator
and lift out.
Set the drawer front on a non-scratching
surface.
Push the rail assemblies back into the cabinet.
2
A
A
C
D
B
25
B
Rail
assembly
Screw
B
C
F
A
REPLACE THE FREEZER BASKET
Tilt the basket forward and lower it into the
drawer.
Lower the freezer caddy ensuring the hook fits over
the front edge of the bottom freezer basket. Push
down to secure.
Seat the basket onto the metal slide brackets and
over the swing locks.
Turn the swing locks from horizontal to vertical
position to lock the basket in place.
Turn the divider slightly to one side so the tabs
on the front fit into the vent slots on the basket.
Position the divider so the back locating tabs snap
into place in the back vent slots.
Installation Instructions
REPLACING THE FREEZER DRAWER (on some models)
ATTACH AND SECURE THE DRAWER
FRONT TO THE SLIDES
Pull out the rail assemblies to the full length on
each side of the cabinet.
There are two tabs on each drawer rail and two
slots on each rail assembly on the refrigerator.
Align the drawer rails with the rail assemblies,
tilt the drawer toward the refrigerator, and seat
the tabs into the slots of the rail assembly.
Lower the drawer into position.
2
A
B
3
Two people may be required to complete
this procedure.
A
B
C
Slot Tab
REPLACE THE BASE GRILLE
(if removed earlier)
CAUTION: Be careful not to
overtighten the screws since this may crack
the grille.
Align the base grille and replace the 2 Phillips-
head screws on either side of the base grille.
1
ATTACH AND SECURE THE DRAWER
FRONT TO THE SLIDES (CONT.)
Replace the hex-head screws to secure
the drawer.
2
C
Screw
26
D
E
TOOLS YOU WILL NEED
Installation Instructions
REVERSING THE DOOR SWING (Single Door Refrigerator Models only)
IMPORTANT NOTES
When reversing the door swing:
NOTE: Door swing is not reversible on stainless steel
models.
• Read the instructions all the way through before
starting.
• Parts are included in the door hinge kit.
• Handle parts carefully to avoid scratching paint.
• Set screws down by their related parts to avoid
using them in the wrong places.
• Provide a non-scratching work surface for the doors.
IMPORTANT: Once you begin, do not move the cabinet
until door-swing reversal is completed.
These instructions are for changing the hinges from
the right side to the left side—if you ever want to
change the hinges back to the right side, follow these
same instructions and reverse all references to left and
right.
• Once door swing is finalized, ensure the logo badge
is properly aligned and permanently secured to
the door by removing the adhesive cover on the
back side.
NOTE: A replacement logo badge is included in the
hinge kit.
Unplug the refrigerator from its electrical outlet.
Empty all door shelves, including the dairy
compartment.
Thin-blade Screwdriver
Masking Tape
Adjustable Wrench
5/16″ Socket Ratchet/Driver
REMOVE THE REFRIGERATOR DOOR
Tape the door shut with masking tape.
Remove the hinge cover on top of the
refrigerator door by removing the Phillips-head
screws and pulling it up.
Using a 5/16″ socket ratchet/driver, remove the
bolts securing the top hinge to the cabinet. Then
lift the hinge straight up to free the hinge pin
from the socket in the top of the door.
Remove the tape and tilt the door away from
the cabinet. Lift the door off the center hinge
pin. Ensure that the plastic hinge pin thimble
remains on the hinge pin or inside door hinge
pin hole located in the bottom of the door.
Set the door on a non-scratching surface with
the inside up.
1
A
B
C
Hinge Cover
Top Hinge
Phillips Screwdriver
27
Torx T-20 Driver
D
E
Installation Instructions
REMOVE CENTER HINGE
Using a 5/16″ socket ratchet/driver, remove the
bolts securing the center hinge to the cabinet.
Set the hinge and bolts aside.
2
28
REVERSING THE DOOR SWING (cont.)
INSTALL CENTER HINGE
Transfer the plug button and screw hole cover
in the hinge holes on the left side to the right
side.
Install the center hinge from the kit on the left
side.
NOTE: A new hinge will be required for the left side
(supplied in the door hinge kit).
3
A
B
TRANSFER REFRIGERATOR
DOOR STOP
Remove the door stop on right side of
the bottom of the refrigerator door by
removing the two screws.
Move the plastic hinge hole thimble to the
opposite hole.
Install the door stop on the left side, making
sure to line up the screw holes in the door stop
with the holes in the bottom of the door.
4
A
B
C
Bottom of
Refrigerator Door
(Right Side)
Bottom of
Refrigerator Door
(Left Side)
A
TRANSFER REFRIGERATOR DOOR
HANDLE TO RIGHT
Refer to Remove the Fresh Food Door Handle
and Attach the Fresh Food Door Handle
sections for instructions.
5
REHANG REFRIGERATOR DOOR
Lower the refrigerator door onto the center
hinge pin. Ensure that the plastic hinge pin
thimble is on the center hinge pin or inside
door hinge pin hole located in the bottom of
the door.
Insert the top hinge pin into the hinge hole on
top of the refrigerator door. Make sure the door
is aligned with the cabinet. Attach the hinge to
the top of the cabinet loosely with the bolts.
Make sure the gasket on the door is flush
against the cabinet and is not folded. Support
the door on the handle side and make sure the
door is straight and the gap between the doors
is even across the front. While holding the door
in place, tighten the top hinge bolts. Replace the
hinge cover.
6
A
B
C
Installation Instructions
29
INSTALL THE LOGO BADGE
Remove the adhesive backing paper
and align the pins on the back of the badge
with the holes in the door. Apply pressure to
the badge to ensure it sticks to the door.
7
Installation Instructions
REMOVING THE DOORS (Double Door Refrigerator Models only)
IMPORTANT NOTES
NOTE: Door swing is not reversible.
• Read the instructions all the way through before
starting.
• Handle parts carefully to avoid scratching paint.
• Set screws down by their related parts to avoid
using them in the wrong places.
• Provide a non-scratching work surface for the
doors.
IMPORTANT: Once you begin, do not move the
cabinet.
These instructions are for removing the doors.
Unplug the refrigerator from its electrical outlet.
Empty all door shelves, including the dairy
compartment.
REMOVE THE REFRIGERATOR DOORS
Tape the doors shut with masking tape.
Start with right-hand door first: Remove the
screw securing the center hinge cover, lift the
hinge cover and place to the side on top of the
refrigerator.
Remove water coupling and power coupling.
1
A
B
30
TOOLS YOU WILL NEED
Thin-blade Screwdriver
Masking Tape
Adjustable Wrench
3/8″ and 10 mm Socket
Ratchet/Driver
Phillips Screwdriver
Remove hinge cover
(1 Phillips screw)
C
Water Coupling
Remove the metal spring
clip. Use a screwdriver to
push the red plastic locking
clip down and off.
C1
Water Coupling
Push red collar
and hold.
Pull tube.
Power Coupling
Black mark
flush with
collar assembly
Pull apart power
coupling to
disconnect
C2
C3
(for water dispenser models)
(for water dispenser models)
REMOVE THE REFRIGERATOR
DOORS (cont.)
Remove the hinge cover on top of the
refrigerator door by removing the Phillips-head
screws and pulling it up.
Using a 5/16″ socket ratchet/driver, remove the
bolts securing the top hinge to the cabinet. Then
lift the hinge straight up to free the hinge pin
from the socket in the top of the door.
Remove the tape and tilt the door away from
the cabinet. Lift the door off the center hinge
pin. Ensure that the plastic hinge pin thimble
remains on the hinge pin or inside door hinge
pin hole located in the bottom of the door.
Set the door on a non-scratching surface with
the inside up.
Installation Instructions
31
REMOVE OPPOSITE DOOR
Follow the same procedure on the opposite
door. There are no wires, water lines or center
hinge covers on the opposite side.
3
REMOVE FREEZER DRAWER
Refer to the Removing the Freezer Drawer
section for instructions.
4
F
G
1
D
Hinge Cover
Top Hinge
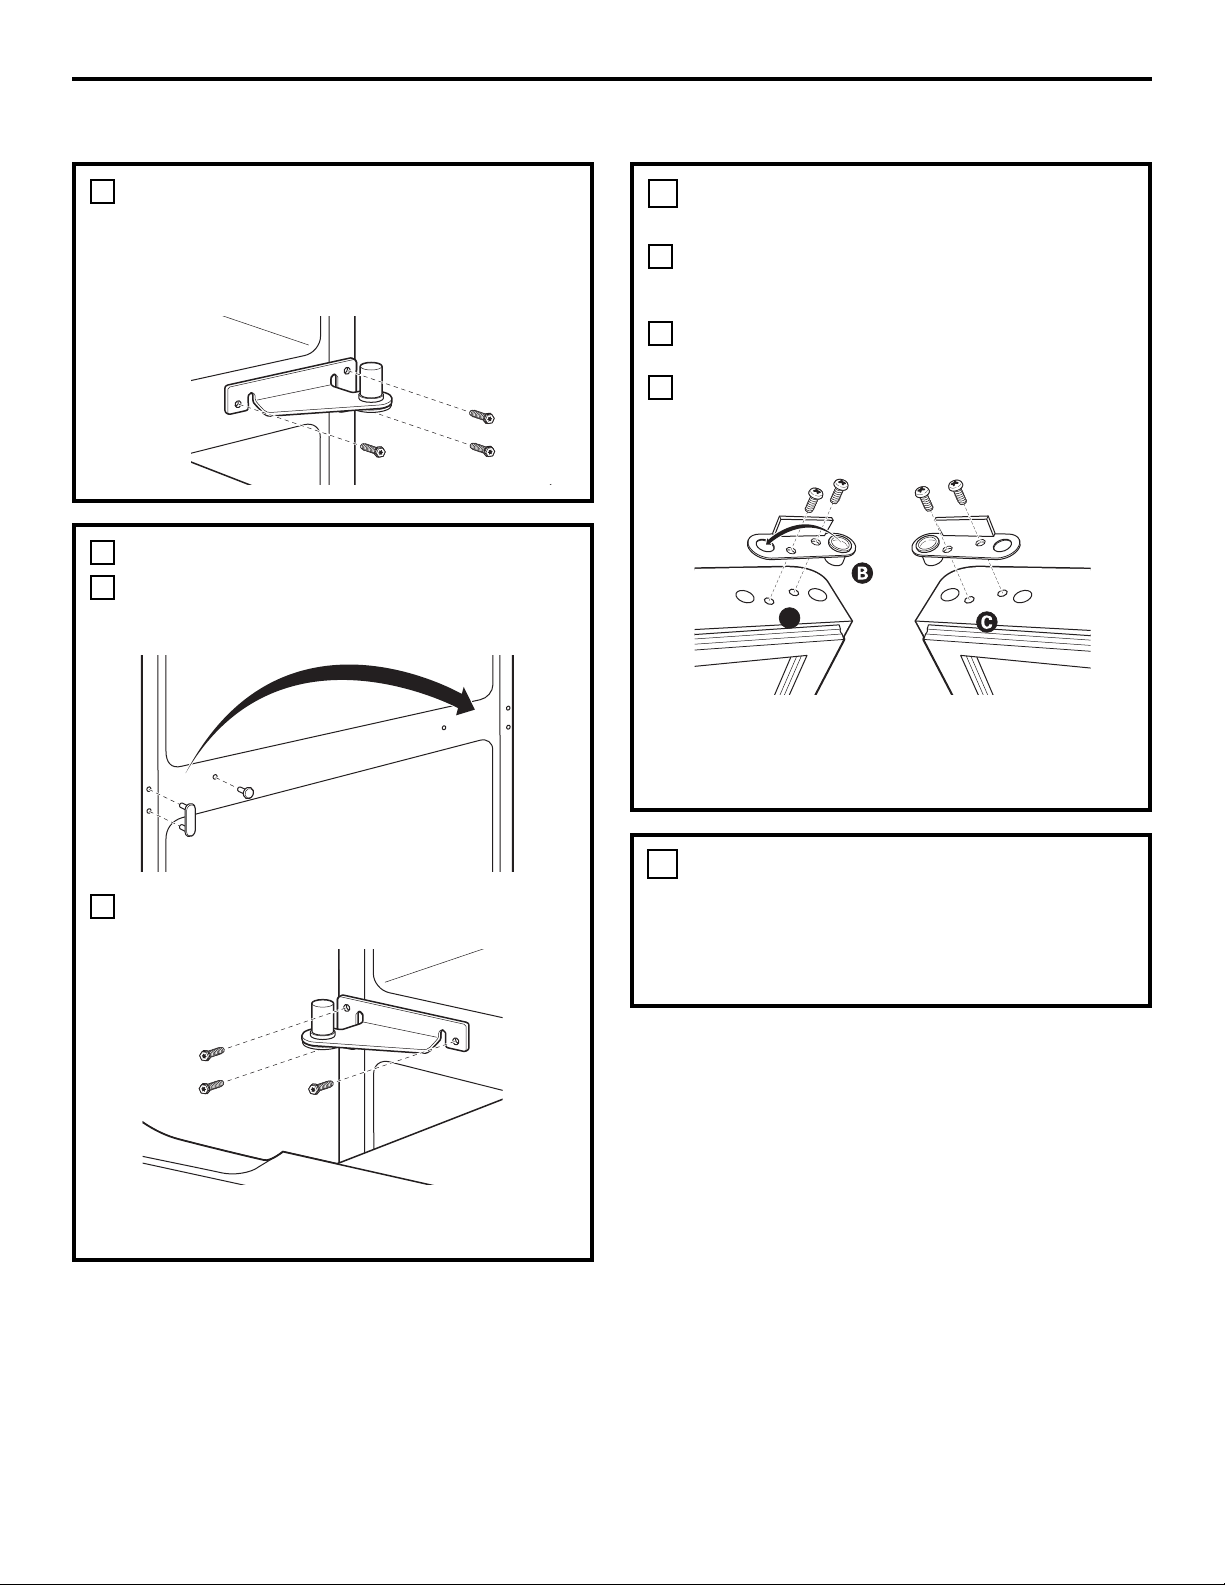
REMOVE CENTER HINGE
Using a 5/16″ socket ratchet/driver, remove the
bolts securing the center hinge to the cabinet.
Set the hinge and bolts aside.
2
E

Installation Instructions
REPLACING THE DOORS (Double Door Refrigerator Models only)
INSTALL CENTER HINGE
Install the center hinge on each side.
REHANG REFRIGERATOR DOORS
Lower the refrigerator door onto the center
hinge pin. Ensure that the plastic hinge pin
thimble is on the center hinge pin or inside
door hinge pin hole located in the bottom of
the door.
Securely tape the door shut with masking tape
or have a second person support the door.
Route wires through bottom right hinge pin slot.
Insert the top hinge pin into the hinge hole on
top of the refrigerator door. Make sure the door
is aligned with the cabinet and opposite door.
Attach the hinge to the top of the cabinet
loosely with the bolts.
On right-hand doors, pass the wires and water
line through the center hinge pin. Then connect
the water line and 4-pin connector.
A
B
REHANG REFRIGERATOR DOORS (CONT.)
Make sure the gasket on the door is flush
against the cabinet and is not folded. Make sure
the door is straight and the gap between the
doors is even across the front. While holding the
aligned door in place, tighten the top hinge bolts.
Replace the hinge cover and screw.
E
C
Hinge Pin
Bottom
Right Hinge Pin
Slot
4-Pin
Connector
Water Line
Top Hinge Bolts
Hinge Cover
ALIGN DOUBLE DOORS
If the top of the doors are uneven, first try to
raise the lowest door by turning the leveling leg
on the same side as the door until the doors are
even. If the unit rocks, re-adjust the leveling legs
to the extent that the unit is stable.
If the doors remain uneven, turn the adjustable
pin to raise, or lower, the left door to match the
right door. Use a 1/4″ Allen wrench to turn the
Adjustable pin
REPLACE FREEZER DRAWER
Refer to the Replacing the Freezer Drawer
section for instructions.
5
D
32
REPLACE OPPOSITE DOOR
Follow the same procedure on the opposite
door. There is no water line or hinge cover.
(appearance may vary)
(appearance may vary)
4
3
2
2
1
Center Hinge
Pin
Installation Instructions
33
INSTALLING THE WATER LINE (ICEMAKER MODELS)
Recommended copper water supply kits are WX8X2,
WX8X3 or WX8X4, depending on the amount of tubing
you need. Approved plastic water supply lines are GE
SmartConnect
™
Refrigerator Tubing (WX08X10006,
WX08X10015 and WX08X10025).
When connecting your refrigerator to a GE Reverse
Osmosis Water System, the only approved installation
is with a GE RVKit. For other reverse osmosis water
systems, follow the manufacturer’s recommendations.
If the water supply to the refrigerator is from a
Reverse Osmosis Water Filtration System AND
the refrigerator also has a water filter, use the
refrigerator’s filter bypass plug. Using the
refrigerator’s water filtration cartridge in
conjunction with the RO filter can result in hollow
ice cubes.
This water line installation is not warranted by the
refrigerator or icemaker manufacturer. Follow these
instructions carefully to minimize the risk of
expensive water damage.
Water hammer (water banging in the pipes) in
house plumbing can cause damage to refrigerator
parts and lead to water leakage or flooding. Call a
qualified plumber to correct water hammer before
installing the water supply line to the refrigerator.
To prevent burns and product damage, do not hook
up the water line to the hot water line.
If you use your refrigerator before connecting the
water line, make sure the icemaker power switch is
in the O (off) position.
Do not install the icemaker tubing in areas where
temperatures fall below freezing.
When using any electrical device (such as a power
drill) during installation, be sure the device is double
insulated or grounded in a manner to prevent the
hazard of electric shock, or is battery powered.
All installations must be in accordance with local
plumbing code requirements.
BEFORE YOU BEGIN
WHAT YOU WILL NEED
• Copper or GE SmartConnect
™
Refrigerator
Tubing kit, 1/4″ outer diameter to connect the
refrigerator to the water supply. If using copper,
be sure both ends of the tubing are cut square.
To determine how much tubing you need: measure
the distance from the water valve on the back of
the refrigerator to the water supply pipe. Be sure
there is sufficient extra tubing to allow the
refrigerator to move out from the wall after
installation.
GE SmartConnect
™
Refrigerator Tubing Kits are
available in the following lengths:
6’ (1.8 m) – WX08X10006
15’ (4.6 m) – WX08X10015
25’ (7.6 m) – WX08X10025
INSTALLING THE WATER LINE (CONT.)
NOTE: The only GE approved plastic tubing
is that supplied in GE SmartConnect
™
Refrigerator Tubing kits. Do not use any other
plastic water supply line because the line is
under pressure at all times. Certain types of
plastic will crack or rupture with age and cause
water damage to your home.
• A GE water supply kit (containing tubing, shut-off
valve and fittings listed below) is available at
extra cost from your dealer or from Parts and
Accessories, 800.626.2002 (in Canada
1.800.661.1616).
• A cold water supply. The water pressure must be
between 20 and 120 p.s.i. (1.4–8.1 bar).
• Power drill.
• 1/2″ or adjustable wrench.
• Straight and Phillips-blade screwdriver.
• Two 1/4 ″ outer diameter compression nuts and
2 ferrules (sleeves)—to connect the copper
tubing to the shut-off valve and the refrigerator
water valve.
OR
• If you are using a GE SmartConnect
™
Refrigerator
Tubing kit, the necessary fittings are
preassembled to the tubing.
• If your existing copper water line has a flared
fitting at the end, you will need an adapter
(available at plumbing supply stores) to connect
the water line to the refrigerator OR you can cut
off the flared fitting with a tube cutter and then
use a compression fitting. Do not cut formed end
from GE SmartConnect
™
Refrigerator tubing.
• Shut-off valve to connect to the cold water line.
The shut-off valve should have a water inlet with a
minimum inside diameter of 5/32″ at the point of
connection to the COLD WATER LINE. Saddle-type
shut-off valves are included in many water supply
kits. Before purchasing, make sure a saddle-type
valve complies with your local plumbing codes.
WHAT YOU WILL NEED (CONT.)
SHUT OFF THE MAIN WATER SUPPLY
Turn on the nearest faucet long enough
to clear the line of water.
Install the shut-off valve on the nearest frequently
used drinking water line.
1
Choose a location for the valve that is easily
accessible. It is best to connect into the side of a
vertical water pipe. When it is necessary to
connect into a horizontal water pipe, make the
connection to the top or side, rather than at the
bottom, to avoid drawing off any sediment from
the water pipe.
CHOOSE THE VALVE LOCATION
2
DRILL THE HOLE FOR THE VALVE
3
Drill a 1/4″ hole in the water pipe (even if using a
self-piercing valve), using a sharp bit. Remove
any burrs resulting from drilling the hole in the
pipe.
Take care not to allow water to drain into the
drill.
Failure to drill a 1/4″ hole may result in reduced
ice production or smaller cubes.
Installation Instructions
34
Installation Instructions
Place the compression nut and ferrule (sleeve)
for copper tubing onto the end of the tubing and
connect it to the shut-off valve.
Make sure the tubing is fully inserted into the
valve. Tighten the compression nut securely.
For plastic tubing from a GE SmartConnect
™
Refrigerator Tubing kit, insert the molded end of
the tubing into the shut-off valve and tighten
compression nut until it is hand tight, then
tighten one additional turn with a wrench.
Overtightening may cause leaks.
NOTE: Commonwealth of Massachusetts
Plumbing Codes 248CMR shall be adhered to.
Saddle valves are illegal and use is not permitted
in Massachusetts. Consult with your licensed
plumber.
CONNECT THE TUBING
TO THE VALVE
7
Saddle-Type
Shut-Off Valve
Compression Nut
Packing Nut
Outlet Valve
Ferrule (sleeve)
Turn the main water supply on and flush out the
tubing until the water is clear.
Shut the water off at the water valve after about
one quart (1 liter) of water has been flushed
through the tubing.
FLUSH OUT THE TUBING
8
SmartConnect
™
Tubing
Fasten the shut-off valve to the cold water pipe
with the pipe clamp.
NOTE: Commonwealth of Massachusetts
Plumbing Codes 248CMR shall be adhered to.
Saddle valves are illegal and use is not permitted
in Massachusetts. Consult with your licensed
plumber.
FASTEN THE SHUT-OFF VALVE
4
Tighten the clamp screws until the sealing
washer begins to swell.
NOTE: Do not overtighten or you may crush the
tubing.
TIGHTEN THE PIPE CLAMP
5
Pipe Clamp
Vertical Cold Water Pipe
Saddle-Type
Shut-Off Valve
Washer
Inlet End
Pipe Clamp
Clamp
Screw
Route the tubing between the cold water line
and the refrigerator.
Route the tubing through a hole drilled in the
wall or floor (behind the refrigerator or adjacent
base cabinet) as close to the wall as possible.
ROUTE THE TUBING
6
To complete the installation of the refrigerator, go back
to Step 1 in Installing the Refrigerator.
35

Consumer Support Troubleshooting Tips Operating Instructions Safety Instructions
Installation
Instructions
Normal operating sounds.
Before you call for service…
Troubleshooting Tips
Save time and money! Review the charts on the following
pages first and you may not need to call for service.
Newer refrigerators sound different from older refrigerators.
Modern refrigerators have more features and use newer technology.
HUMMM...
WHOOSH...
n
The new high efficiency compressor may run faster and longer
than your old refrigerator and you may hear a high-pitched hum
or pulsating sound while it is operating.
n
You may hear a whooshing sound when the doors close. This is
due to pressure equalizing within the refrigerator.
n
You may hear the fans spinning at high speeds. This happens
when the refrigerator is first plugged in, when the doors are
opened frequently or when a large amount of food is added to
the refrigerator or freezer compartments. The fans are helping to
maintain the correct temperatures.
n
The fans change speeds in order to provide optimal cooling and
energy savings.
CLICKS, POPS,
CRACKS and SNAPS
n
You may hear cracking or popping sounds when the refrigerator
is first plugged in. This happens as the refrigerator cools to the
correct temperature.
n
The freezer control will click when starting or stopping the
compressor.
n
Defrost timer snapping in and out of the defrost cycle.
n
Expansion and contraction of cooling coils during and after
defrost can cause a cracking or popping sound.
n
On models with an icemaker, after an icemaking cycle, you may
hear the ice cubes dropping into the ice bucket.
n
On models with a dispenser, during water dispense, you
may hear the water lines move at initial dispense and after
dispenser button is released.
WATER SOUNDS
n
The flow of refrigerant through the freezer cooling coils may
make a gurgling noise like boiling water.
n
Water dropping on the defrost heater can cause a sizzling,
popping or buzzing sound during the defrost cycle.
n
A water dripping noise may occur during the defrost cycle as ice
melts from the evaporator and flows into the drain pan.
n
Closing the door may cause a gurgling sound due to pressure
equalization.
Do you hear what I hear? These sounds are normal.
Problem Possible Causes What To Do
Refrigerator does not Refrigerator in defrost cycle. • Wait about 30 minutes for defrost cycle to end.
operate
Control in 0 (off) position. • Move the control to a temperature setting.
Refrigerator is unplugged. • Push the plug completely into the outlet.
The fuse is blown/circuit • Replace fuse or reset the breaker.
breaker is tripped.
Vibration or rattling Leveling legs need adjusting. • See Level the Refrigerator.
(slight vibration
is normal)
For additional information on normal
icemaker operating sounds, see the
About the automatic icemaker section.
36

GEAppliances.com
Consumer Support
Troubleshooting Tips
Operating InstructionsSafety Instructions
Installation
Instructions
Problem Possible Causes What To Do
Motor operates for Normal when refrigerator • Wait 24 hours for the refrigerator to completely
long periods or cycles is first plugged in. cool down.
on and off frequently.
Often occurs when large • This is normal.
(Modern refrigerators
amounts of food are
with more storage
placed in refrigerator.
space and a larger
Door left open. • Check to see if package is holding door open.
freezer require more
Hot weather or frequent • This is normal.
operating time. They
door openings.
start and stop often
Temperature control • See About the controls.
to maintain even
set at the coldest setting.
TurboCool function has been •This is normal when the TurboCool function is activated.
activated. See About TurboCool for more information.
Refrigerator or freezer Temperature controls not set • See About the controls.
compartment too warm cold enough.
Warm weather or frequent • Set the temperature control one step colder.
door openings. See About the controls.
Door left open. • Check to see if package is holding door open.
Frost or ice crystals Door left open. • Check to see if package is holding door open.
on frozen food
Door openings too frequent
(frost within package
or too long.
is normal)
Frequent “buzzing” Icemaker power switch is in • Set the power switch to the 0 (off) position. Keeping it
sound the I (on) position, but the in the I (on) position will damage the water valve.
water supply to the refrigerator
has not been connected.
Small or hollow cubes Water filter clogged. • Replace filter cartridge with new cartridge or with plug.
Automatic icemaker Icemaker power switch is not on. •Set the power switch to the I (on) position.
(on some models) The icemaker power light will turn green when the
does not work freezer light switch is pressed in or when the freezer
door is closed.
Water supply turned off or •See Installing the water line.
not connected.
Freezer compartment •Wait 24 hours for the refrigerator to completely
too warm. cool down.
Piled up cubes in the storage •Level cubes by hand.
bin cause the icemaker
to shut off.
Ice cubes stuck in icemaker. •Turn off the icemaker, remove cubes and turn the
(Green power light on icemaker back on.
icemaker blinking.)
Icemaker light is not lit. •This is normal when the freezer door is open. The
icemaker power light will turn green when the freezer
light switch is pressed in or when the freezer door is
closed.
temperatures.)
37

38
Consumer Support Troubleshooting Tips Operating Instructions Safety Instructions
Installation
Instructions
Before you call for service…
Troubleshooting Tips
Problem Possible Causes What To Do
Ice cubes have Food transmitting odor/taste • Wrap foods well.
odor/taste to ice cubes.
Interior of refrigerator •See Care and cleaning.
needs cleaning.
•Keep an open box of baking soda in the refrigerator;
replace every three months.
Slow ice cube freezing Door left open. • Check to see if package is holding door open.
Freezer control not set • See About the controls.
cold enough.
Refrigerator has odor Foods transmitting • Foods with strong odors should be tightly wrapped.
odor to refrigerator.
• Keep an open box of baking soda in the refrigerator;
replace every three months.
Interior needs cleaning. •See Care and cleaning.
Moisture forms on Not unusual during • Wipe surface dry and reset the refrigerator control
outside of refrigerator periods of high humidity. one setting colder.
Moisture collects inside Too frequent or too
(in humid weather, air long door openings.
carries moisture into
refrigerator when doors
are opened)
Refrigerator or freezer No power at outlet. •Replace fuse or reset the breaker.
compartment light does
Light bulb burned out or loose. •See Replacing the light bulbs.
not work
Door/drawer does not Leveling legs need adjusting. •See Installing the Refrigerator.
close by itself
Freezer door/drawer This is normal if, after popping • This indicates that there is a good seal on the freezer
pops open when open, the freezer door/drawer door/drawer. If the freezer door/drawer does not
refrigerator door closed on its own. automatically close after popping open, then see the
is closed Problem: Door/drawer does not close by itself, above.
Hot air from bottom Normal air flow cooling
of refrigerator motor. In the refrigeration
process, it is normal that
heat be expelled in the
area under the refrigerator.
Some floor coverings will
discolor at these normal
and safe temperatures.
Food freezing in Food too close to the air vent • Move the food away from the air vent.
the refrigerator at the back of the refrigerator.
Refrigerator control is set •Move the refrigerator control to a warmer
too cold. temperature setting one increment at a time.
Orange glow Defrost heater is on. • This is normal.
in the freezer

39
GEAppliances.com
Consumer Support
Troubleshooting Tips
Operating InstructionsSafety Instructions
Installation
Instructions
Problem Possible Causes What To Do
Water has poor Water dispenser has not been • Dispense water until all water in system is
taste/odor used for a long time. replenished.
Water in first glass Normal when refrigerator • Wait 24 hours for the refrigerator to completely
is warm is first installed. cool down.
Water dispenser has not been • Dispense water until all water is system is
used for a long time. replenished.
Water system has been drained. • Allow several hours for replenished supply to chill.
Water dispenser Water supply line turned off •See Installing the water line.
does not work or not connected.
Water filter clogged. •Replace filter cartridge or remove filter and install plug.
Air may be trapped in •Press the dispenser arm for at least 2 minutes.
the water system.
Water in reservoir is frozen •Set the refrigerator control to a warmer setting and wait
because the controls are set 24 hours. If water does not dispense after 24 hours, call
too cold. for service.
Water spurting from Newly-installed filter cartridge. •Run 1
1
⁄2 gallons from the dispenser to clear the system.
dispenser
No water or ice cube Supply line or shut-off valve •Call a plumber.
production is clogged.
Water filter clogged. •Replace filter cartridge or remove filter and install plug.
Filter cartridge not • Remove and reinstall filter cartridge, being certain that
properly installed. it locks into place. The blade on the end of the cartridge
should be positioned vertically.
Water is leaking from Glass not being held under • Hold the glass underneath the dispenser for 2–3 seconds
dispenser the dispenser long enough after releasing the dispenser button. Water may continue
after button is released. to dispense after the button is released.
Air may be present in the • Dispense water for at least 2 minutes to remove air
water line system, causing from system.
water to drip after being
dispensed.
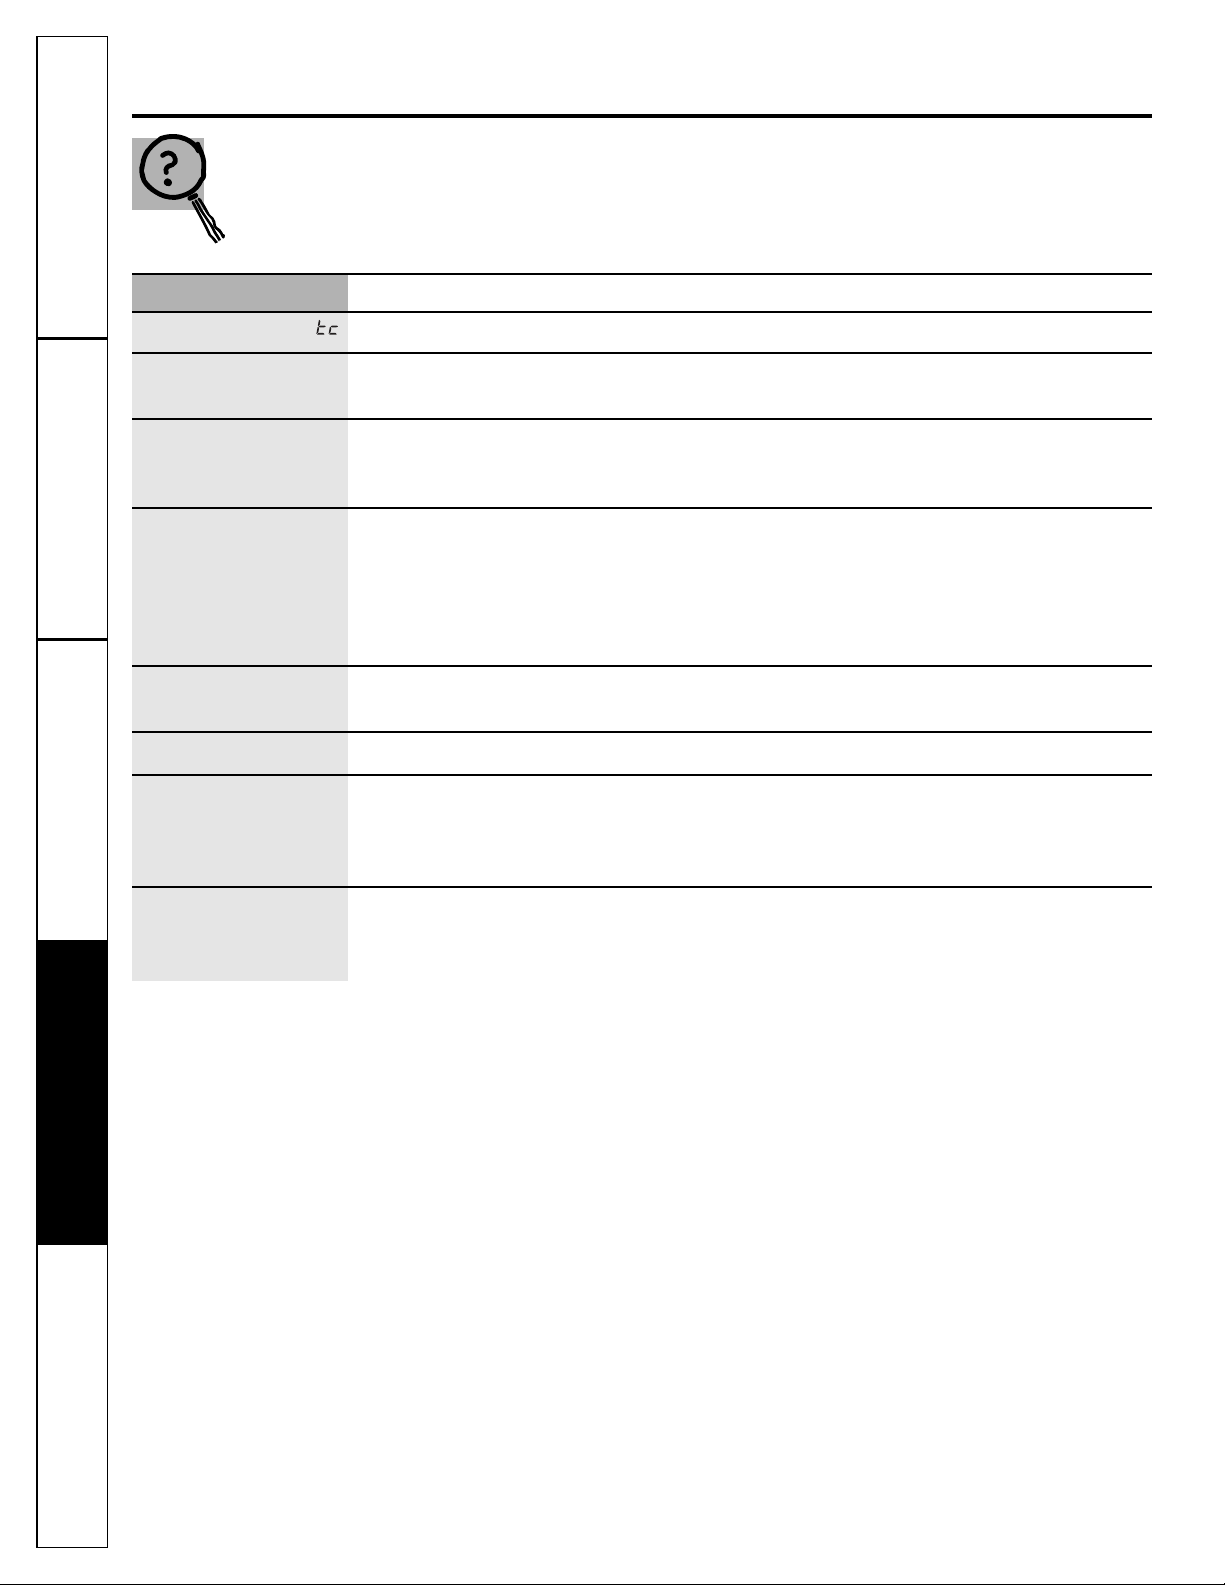
40
Before you call for service…
Troubleshooting Tips
Consumer Support Troubleshooting Tips Operating Instructions Safety Instructions
Installation
Instructions
Problem Possible Causes What To Do
My display is showing
TurboCool function is activated. • See About TurboCool for more information.
Water filter indicator light
This is normal. • See About the water filter for more information.
changed color
Water filter indicator light
Water filter indicator must •Press and hold the RESET WATER FILTER pad for
remains red even after be reset. 3 seconds. See About the water filter for more information.
replacing the water filter
Water filter indicator This is normal. This light will •See About the water filter for more information.
light is not lit turn orange to tell you that you
need to replace the filter soon.
The filter cartridge should be
replaced when the replacement
indicator light turns red.
Handle is loose / handle Handle needs adjusting. •See Attach the Fresh Food handle and Attach the
has a gap Freezer handle sections for detailed instructions.
Refrigerator beeping This is the door alarm. •Close door.
Control setting is not lit On some models, the light •If the control settings do not light up, check to see if the
bulbs at the top of the refrigerator light bulbs are burned out, and replace if necessary.
compartment light up the
temperature control settings.
Refrigerator doors are Doors need realigning. •See Align Double Doors section located under
not even (on Double Door
Replacing the Door (Double Door Refrigerator Models only).
models only)
Refrigerator Warranty. (For customers in the United States)
All warranty service provided by our Factory Service Centers
or an authorized Customer Care
®
technician. To schedule service,
on-line, visit us at GEAppliances.com, or call 800.GE.CARES
(800.432.2737). Please have serial number and model number
available when calling for service.
For The Period Of: GE Will Replace:
GE and GE PROFILE MODELS:
One Year Any part of the refrigerator which fails due to a defect in materials or workmanship.
From the date of the During this limited one-year warranty, GE will also provide, free of charge, all labor and
original purchase related service to replace the defective part.
Thirty Days Any part of the water filter cartridge which fails due to a defect in materials or workmanship.
(Water filter, if included) During this limited thirty-day warranty, GE will also provide, free of charge, a replacement water
From the original filter cartridge.
purchase date of
the refrigerator
GE PROFILE MODELS ONLY:
Five Years Any part of the sealed refrigerating system (the compressor, condenser, evaporator
(GE Profile models only) and all connecting tubing) which fails due to a defect in materials or workmanship.
From the date of the During this limited five-year sealed refrigerating system warranty, GE will also provide,
original purchase free of charge, all labor and related service to replace the defective part in the sealed
refrigerating system.
n Service trips to your home to teach you how to use
the product.
n Improper installation, delivery or maintenance.
n Failure of the product if it is abused, misused, or used for
other than the intended purpose or used commercially.
n Loss of food due to spoilage.
n Replacement of house fuses or resetting of circuit
breakers.
n Damage caused after delivery.
n Replacement of the water filter cartridge, if included, due
to water pressure that is outside the specified operating
range or due to excessive sediment in the water supply.
n Replacement of the light bulbs, if included, or water filter
cartridge, if included, other than as noted above.
n Damage to the product caused by accident, fire, floods
or acts of God.
n Incidental or consequential damage caused by possible
defects with this appliance.
n Product not accessible to provide required service.
What GE Will Not Cover:
This warranty is extended to the original purchaser and any succeeding owner for products purchased for
home use within the USA. If the product is located in an area where service by a GE Authorized Servicer is not
available, you may be responsible for a trip charge or you may be required to bring the product to an
Authorized GE Service location for service. In Alaska, the warranty excludes the cost of shipping or service calls
to your home.
Some states do not allow the exclusion or limitation of incidental or consequential damages. This warranty
gives you specific legal rights, and you may also have other rights which vary from state to state. To know
what your legal rights are, consult your local or state consumer affairs office or your state’s Attorney General.
Warrantor: General Electric Company. Louisville, KY 40225
Staple your receipt here.
Proof of the original purchase
date is needed to obtain service
under the warranty.
EXCLUSION OF IMPLIED WARRANTIES—Your sole and exclusive remedy is product repair as provided in
this Limited Warranty. Any implied warranties, including the implied warranties of merchantability or
fitness for a particular purpose, are limited to one year or the shortest period allowed by law.
Consumer Support
Troubleshooting Tips
Operating InstructionsSafety Instructions
Installation
Instructions
41
42
TERMS AND CONDITIONS:
This warranty applies only for single family domestic use in
Canada when the Refrigerator has been properly installed
according to the instructions supplied by Mabe and is
connected to an adequate and proper utility service.
Damage due to abuse, accident, commercial use, and
alteration or defacing of the serial plate cancels all
obligations of this warranty.
Service during this warranty period must be
performed by an Authorized Mabe Service Agent.
Neither Mabe nor the Dealer is liable for any claims or
damages resulting from failure of the Refrigerator or
from service delays beyond their reasonable control.
To obtain warranty service, purchaser must present the
original Bill of Sale. Components repaired or replaced are
warranted through the remainder of the original warranty
period only.
This warranty is extended to the original purchaser and
any succeeding owner for products purchased for home
use within Canada. In home warranty service will be
provided in areas where it is available and deemed
reasonable by Mabe to provide.
This warranty is in addition to any statutory warranty.
WHAT IS NOT COVERED:
• Owner is responsible to pay for service calls related to
product installation and/or teaching how to use the
product.
• Damage to finish must be reported within 48 hours
following the delivery of the appliance.
• Damage to finish after delivery.
• Improper installation—proper installation includes
adequate air circulation to the refrigeration system,
adequate electrical, plumbing and other connecting
facilities.
• Replacement of house fuses or resetting of circuit
breakers.
• Replacement of light bulbs.
• Damage to product caused by accident, fire, floods
or acts of God.
• Loss of food due to spoilage.
• Proper use and care of product as listed in the
owner’s manual, proper setting of controls.
• Product not accessible to provide required service.
• WARRANTOR IS NOT RESPONSIBLE FOR
CONSEQUENTIAL DAMAGES.
IMPORTANT
Keep this warranty and your bill of sale as proof of original purchase and purchase date.
Please have serial number and model number available when calling for service.
Mabe Service is available coast to coast. If further help is
needed concerning this warranty, contact:
Manager, Consumer Relations
Mabe Canada Inc., Consumer Service
1 Factory Lane, Suite 310
Moncton, New Brunswick E1C 9M3
1.800.561.3344
Staple your receipt here.
Proof of the original purchase
date is needed to obtain service
under the warranty.
What is covered How Long Warranted Parts Labour
(From Date of Sale) Repair or Replace
at Mabe’s Option
Compressor GE Profile: Ten (10) Years GE Profile: Ten (10) Years GE Profile: Five (5) Years
GE and All Other GE and All Other GE and All Other
Brands: One (1) Year Brands: One (1) Year Brands: One (1) Year
Sealed System (including GE Profile: Five (5) Years GE Profile: Five (5) Years GE Profile: Five (5) Years
evaporator, condenser GE and All Other GE and All Other GE and All Other
tubing and refrigerant) Brands: One (1) Year Brands: One (1) Year Brands: One (1) Year
All Other Parts One (1) Year One (1) Year One (1) Year
CUSTOMER WARRANTY
(for customers in Canada)
Your refrigerator is warranted to be free of defects in material and workmanship.
EXCLUSION OF IMPLIED WARRANTIES—Your sole and exclusive remedy is product repair as provided in this
Limited Warranty. Any implied warranties, including the implied warranties of merchantability or fitness for a
particular purpose, are limited to one year or the shortest period allowed by law.

43
Manufactured for: General Electric Company, Louisville, KY 40225
EPA EST. No. 070595-MN-001
Performance Data Sheet
SmartWater Filtration System
MWF Cartridge
This system has been tested according to NSF/ANSI 42/53 for reduction of the substances listed below.
The concentration of the indicated substances in water entering the system was reduced to a concentration
less than or equal to the permissible limit for water leaving the system, as specified in NSF/ANSI 42/53.*
(100% safety factors built in for unmetered usage)
Standard No. 42: Aesthetic Effects
Parameter USEPA Influent Influent Effluent % Reduction Min. Required
MCL Challenge Concentration Average Average Maximum Average Minimum Reduction
Chlorine — 2.0 mg/L + 10% 1.96 mg/L 0.06 mg/L 0.11 mg/L 96.77% 94.74% > 50%
T & O —— ——————
Particulate** — ≥ 10,000 particles/mL 6,400,000 #/mL 58,833 #/mL 150,000 #/mL 99.14% 97.97% ≥ 85%
Standard No. 53: Health Effects
Parameter USEPA Influent Influent Effluent % Reduction Min. Required
MCL Challenge Concentration Average Average Maximum Average Minimum Reduction
Turbidity 0.5 NTU 11 + 1 NTU*** 10.5 NTU 0.14 NTU 0.28 NTU 98.54% 97.20% 0.5 NTU
Cysts ≥ 99.95% Reduction Minimum 50,000 L 118,750 #/L < 1 #/L 4 #/L > 99.99% > 99.99% ≥ 99.95%
Asbestos ≥ 99% Reduction 10
7
to 10
8
fibers/L; > 10µm 57 MF/L 0.996 MF/L < 1 MF/L 99.60% 99.39% ≥ 99%
Lead at pH 6.5 0.015 mg/L 0.15 mg/L + 10% 0.1567 mg/L < 0.001 mg/L < 0.001 mg/L 99.36% 99.29% 0.010 mg/L
Lead at pH 8.5 0.015 mg/L 0.15 mg/L + 10% 0.1433 mg/L < 0.001 mg/L < 0.001 mg/L 99.30% 99.29% 0.010 mg/L
Mercury at pH 6.5 0.002 mg/L 0.006 mg/L + 10% 0.0059 mg/L 0.000350 mg/L 0.0007 mg/L 94.70% 87.50% 0.002 mg/L
Mercury at pH 8.5 0.002 mg/L 0.006 mg/L + 10% 0.0057 mg/L 0.000325 mg/L 0.0006 mg/L 93.20% 89.29% 0.002 mg/L
Alachlor 0.002 mg/L 0.04 mg/L + 10% 0.0367 mg/L 0.00023 mg/L 0.0004 mg/L 99.34% 98.67% 0.002 mg/L
Lindane 0.0002 mg/L 0.002 mg/L + 10% 0.0020 mg/L < 0.00002 mg/L < 0.00002 mg/L 99.00% 98.95% 0.0002 mg/L
2,4-D 0.070 mg/L 0.210 mg/L + 10% 0.2033 mg/L 0.00337 mg/L 0.011000 mg/L 98.32% 94.50% 0.070 mg/L
Toxaphene 0.003 mg/L 0.015 mg/L + 10% 0.0160 mg/L 0.00100 mg/L 0.001000 mg/L 93.44% 91.67% 0.003 mg/L
Benzene 0.005 mg/L 0.015 mg/L + 10% 0.0145 mg/L 0.000500 mg/L 0.000500 mg/L 96.51% 95.83% 0.005 mg/L
Carbofuran 0.040 mg/L 0.080 mg/L + 10% 0.0830 mg/L 0.001000 mg/L 0.001000 mg/L 98.78% 98.65% 0.04 mg/L
1,4 dichlorobenzene
0.075 mg/L 0.225 mg/L + 10% 0.2283 mg/L 0.000500 mg/L 0.000500 mg/L 99.78% 99.77% 0.075 mg/L
Atrazine 0.003 mg/L 0.009 mg/L + 10% 0.0087 mg/L < 0.0005 mg/L < 0.0005 mg/L 94.22% 93.33% 0.003 mg/L
* Tested using a flow rate of 0.50 gpm; pressure of 60 psig; pH of 7.5 ± 0.5; temp. of 68° ± 5°F (20° ± 3°C)
** Measurement in Particles/ml. Particles used were 0.5-1 microns
*** NTU=Nephelometric Turbidity units
Operating Specifications
n Capacity: certified for up to 300 gallons (1135 l); up to six months for models without a replacement filter indicator light;
up to one year for models with a replacement filter indicator light
n Pressure requirement: 40–120 psi (2.8–8.2 bar), non-shock
n Temperature: 33–100ºF (0.6–38ºC)
n Flow rate: 0.5 gpm (1.9 lpm)
General Installation/Operation/Maintenance Requirements
n Run 1
1
/2 gallons at full flow to purge out trapped air.
n Replace cartridge when the indicator light flashes or water flow rate is reduced on non-indicator units.
Special Notices
n Installation instructions, parts and service availability, and standard warranty are included with the product when shipped.
n This drinking water system must be maintained according to manufacturer’s instructions, including replacement of filter cartridges.
n Do not use with water that is microbiologically unsafe or of unknown quality without adequate disinfection before or after the
system. Systems certified for cyst reduction may be used on disinfected water that may contain filterable cysts.
n The contaminants or other substances removed or reduced by this water treatment system are not necessarily in your water.
n Check for compliance with the state and local laws and regulations.
n Note that while the testing was performed under standard laboratory conditions, actual performance may vary. Systems must
be installed and operated in accordance with manufacturer’s recommended procedures and guidelines.
NSF
®
System Tested and Certified by NSF International against ANSI/NSF Standard 42 & 53 for the reduction of:
Standard No. 42: Aesthetic Effects
Chemical Unit
Chlorine Taste and Odor
Mechanical Filtration Unit
Particulate Reduction, Class I
Standard No. 53: Health Effects
Chemical Reduction Unit
Alachlor and Atrazine Reduction
Benzene and Carbofuran Reduction
1,4 dichlorobenzene and 2,4-D Reduction
Lead and Lindane Reduction
Mercury and Toxaphene Reduction
Mechanical Filtration Unit
Turbidity Reduction
Cyst and Asbestos Reduction

44
State of California
Department of Health Services
Water Treatment Device
Certificate Number
Date Issued: February 2, 2005
Trademark/Model Designation
Replacement Elements
169805-
MWF MWF
Manufacturer: General Electric Company
The water treatment device(s) listed on this certi cate have met the testing requirements pursuant to Section
116830 of the Health and Safety Code for the following health related contaminants:
Cysts
Turbidity
Asbestos
Lead
Mercury
Alachlor
Atrazine
Benzene
Carbofuran
Lindane
Mercury
Toxaphene
1,4-dichlorobenzene
2,4-D
Microbiological Contaminants and Turbidity
Inorganic/Radiological Contaminants
Organic Contaminants
Do not use where water is microbiologically unsafe or with water of unknown quality, except that systems certi! ed for
cyst reduction may be used on disinfected waters that may contain ! lterable cysts.
300 galRated Service Capacity:
0.5 gpm
Rated Service Flow:
Conditions of Certification:

Mesures de sécurité
Fonctionnement
7G79ITG?HI?FJ;HHJEEATB;CI7?G;H
A7N;II;H;I879H
DC=TA7I;JG
CIG;I?;C;IC;IIDN7=;
:JGT<G?=TG7I;JG
';:?HIG?8JI;JG:f;7J
';<?AIG;Q;7J
';H879HQG7C=;B;CI;I879HQAT=JB;
';H9DBB7C:;H
(79>?C;Q=A7SDCH7JIDB7I?FJ;
-;BEA79;B;CI:;H7BEDJA;H
Installation
>7C=;B;CI:JH;CH
:fDJK;GIJG;:;HEDGI;H
BD:UA;H:;GT<G?=TG7I;JGH
QJC;EDGI;JC?FJ;B;CId
CAUK;B;CI:JI?GD?G
:J9DBE7GI?B;CI9DC=TA7I?DC
CAUK;B;CI;IG;B?H;;CEA79;
:;HEDGI;HBD:UA;H:;GT<G?=TG7I;JGH
Q:;JMEDGI;HJC?FJ;B;CId
CH;B8A;H:;BDJAJG;H
;I:;E7CC;7JM:T9DG7I?<H
$CHI7AA7I?DC:;A79DC:J?I;:f;7Jd
$CHI7AA7I?DC:JGT<G?=TG7I;JG d
$CHI7AA7I?DC:J HJEEDGI:;HDA
7CI?87H9JA;B;CI
+GTE7G7I?DC
-;B?H;;CEA79;:JI?GD?G
:J9DBE7GI?B;CI9DC=TA7I?DC
Conseils de dépannage d
GJ?IHCDGB7JM:;<DC9I?DCC;B;CI
Soutien au consommateur
!;J?AA;I:;:DCCT;HG;A7I?K;HQA7
E;G<DGB7C9;:;A797GIDJ9>;
"7G7CI?;EDJGA79A?;CIUA;7J7C7:7
.DJI?;C7J9DCHDBB7I;JG
Transcrivez les numéros de modèle et de série ici :
# de modèle ____________________________
# de série ______________________________
$AH<?=JG;CIHJGAfTI?FJ;II;FJ?H;IGDJK;QAf?CI;G?;JG:J
9DBE7GI?B;CIGT<G?=TG7I;JG;C>7JI;Q:GD?I;
Soutien au
consommateur
Conseils de dépannage
Fonctionnement InstallationMesures de sécurité
MESURES DE SÉCURITÉ IMPORTANTES.
LISEZ D’ABORD TOUTES LES DIRECTIVES.
AVERTISSEMENT!
!Q@?474>0D.0?H70.?=:8H9,20=<@0;:@=7Q@>,20,@<@07470>?/0>?49H.:8800B;74<@H/,9>70;=H>09?8,9@07
&(%&&E(%'E
:=><@0A:@>@?474>0D@9,;;,=047H70.?=4<@0:->0=A0D?:@5:@=>70>80>@=0>/0>H.@=4?H/0-,>0
C.:8;=4>70>>@4A,9?0>
n $CHI7AA;OA;GT<G?=TG7I;JG9DC<DGBTB;CI7JM
:?G;9I?K;H:f?CHI7AA7I?DC7K7CI:;AfJI?A?H;G
n );A7?HH;OE7HA;H;C<7CIH=G?BE;GHf7HH;D?GH;I;C?G
:;8DJIC?H;E;C:G;7JM9A7N;II;H:JGT<G?=TG7I;JG
$AHEDJGG7?;CI;C:DBB7=;GA;GT<G?=TG7I;JG;IH;
8A;HH;G=G7K;B;CI
n );IDJ9>;OE7HA;HHJG<79;H<GD?:;H:J9DC=TA7I;JG
H?KDJH7K;OA;HB7?CH>JB?:;HDJBDJ?AAT;HA7
E;7JG?HFJ;:f7:>TG;GQ9;HHJG<79;HIGUH<GD?:;H
n )f;CIG;EDH;O;ICfJI?A?H;OE7H:f;HH;C9;DJ7JIG;H
K7E;JGH;IA?FJ?:;H?C<A7BB78A;HQEGDM?B?IT:;9;I
7EE7G;?ADJ:;IDJI7JIG;7EE7G;?ATA;9IGDBTC7=;G
n .?KDIG;GT<G?=TG7I;JG;HI:DIT:fJC;B79>?C;Q
=A7SDCH7JIDB7I?FJ;TK?I;OA;9DCI79I7K;9A;H
E?U9;HBD8?A;H:JBT97C?HB;T@;9I;JGDJ7K;9
AfTATB;CI9>7J<<7CIH?IJTQA7E7GI?;?C<TG?;JG;:;A7
B79>?C;Q=A7SDCH);EDH;OE7HA;H:D?=IHDJA;H
B7?CHHJGA;BT97C?HB;:;A7B79>?C;Q=A7SDCH
E;C:7CIFJ;A;GT<G?=TG7I;JG;HI8G7C9>T
n PAD?=C;OA;H:D?=IH:;HE7GI?;H:JGT<G?=TG7I;JGDY
AfDCE;JI<79?A;B;CIH;E?C9;GA;H;HE79;H;CIG;A;H
EDGI;H;I;CIG;A;HEDGI;H;IA;HEA797G:HHDCI
IDJ@DJGHTIGD?IH.DN;OEGJ:;CIADGHFJ;KDJH<;GB;O
A;HEDGI;H:;Af7EE7G;?A;CEGTH;C9;:;H;C<7CIH
n T8G7C9>;OKDIG;GT<G?=TG7I;JG7K7CI:;A;C;IIDN;G
DJ:;A;GTE7G;G
REMARQUE : !:@>A:@>=0.:88,9/:9>A4A0809?
/0.:9140=?:@?0=H;,=,?4:9F@9?0.394.409<@,7414H
n 'DGHFJ;KDJHGT=A;OA79DBB7C:;HJG0 (arrêt)
Af7A?B;CI7I?DCTA;9IG?FJ;:;Af7BEDJA;Cf;HIE7H
9DJET;
n );G;9DC=;A;OE7HA;H7A?B;CIHHJG=;ATHFJ?DCI
9DBEAUI;B;CI:T=;AT
" !')"(&E%%&&%"!)! !'
)"'%!!%E%E%'(%
';H;C<7CIHEG?H7JE?U=;DJBDGIH:f7HE>NM?;HDCI
IDJ@DJGH:f79IJ7A?IT';HGT<G?=TG7I;JGH787C:DCCTH
HDCIIDJ@DJGH7JHH?:7C=;G;JMBVB;H?DCCf7II;C:
FJ;aFJ;AFJ;H@DJGHbEDJGHf;C:T87GG7HH;G.?KDJH
C;=7G:;OE7HKDIG;7C9?;CGT<G?=TG7I;JGK;J?AA;O
HJ?KG;A;H:?G;9I?K;H9?:;HHDJH7<?C:;EGTK;C?GA;H
799?:;CIH
Avant de vous débarrasser de votre ancien
réfrigérateur ou congélateur :
n TBDCI;OA;HEDGI;H
n '7?HH;OA;H9A7N;II;H;CEA79;7<?C:f;BEV9>;G
A;H;C<7CIH:;=G?BE;GQAf?CITG?;JG
Réfrigérants
/DJHA;H7EE7G;?AH:;GT<G?=TG7I?DC9DCI?;CC;CI
:;HGT<G?=TG7CIHFJ?9DC<DGBTB;CI7JMAD?H<T:TG7A;H
:D?K;CIVIG;;CA;KTH7K7CIIDJI;TA?B?C7I?DC:;
Af7EE7G;?A.?KDJHKDJH:T87GG7HH;O:;K?;JM7EE7G;?AH
:;GT<G?=TG7I?DCKTG?<?;O7JEGUH:;A7HD9?TITFJ?
HfD99JE;:;A;JGTA?B?C7I?DC9;FJ;KDJH:;K;O<7?G;
"%"!&#%""!'(%&
!:@>A:@>=0.:88,9/:9>1:=?0809?/090;,>@?474>0=/0.:=/:9>;=:7:92,?0@=>F.,@>0/0>=4><@0>
;:?09?407><@Q47>;=H>09?09?/,9>.0=?,490>.:9/4?4:9>
/DJI;<D?HH?KDJH:T9?:;O:fJI?A?H;GIDJI:;BVB;JC9DG:DCEGDADC=7I;JG?A;HI78HDAJB;CICT9;HH7?G;FJf?A
Hf7=?HH;:fJC9DG:DCQ<?AH7K;9B?H;QA7I;GG;EDJG7EE7G;?AHTA;9IGDBTC7=;GH>DBDAD=JT0'7JMPI7IH0C?H
DJ9;GI?<?T.7J7C7:7EDJGKJ:fJC;<?9>;;I:fJC;EG?H;B?H;HQA7I;GG;:;7BEUG;HB?C?BJB;I:;
KDAIH
DANGER! RISQUES POUR LES ENFANTS
Soutien au
consommateur
Conseils de dépannage Fonctionnement Mesures de sécuritéInstallation
Soutien au
consommateur
Conseils de dépannage
FonctionnementMesures de sécurité Installation
AVERTISSEMENT!
%"% !'E'%$(
!0.:@;0D94=0?4=0D09,@.@9.,>7,?=:4>4I80-=:.3084>0F7,?0==0/07,14.30/@.:=/:9
/Q,74809?,?4:9#:@=A:?=0>H.@=4?H.0?,;;,=047/:4?J?=0.:==0.?0809?84>F7,?0==0
';9DG:DC:f7A?B;CI7I?DC:;9;I7EE7G;?A;HIBJC?
:fJC;<?9>;Q8GD9>;HB?H;QA7I;GG;FJ?H;
8G7C9>;:7CHJC;EG?H;BJG7A;DG:?C7?G;Q7AKTDA;H
B?H;QA7I;GG;EDJGGT:J?G;7JB?C?BJBA;HG?HFJ;H
:;9>D9HTA;9IG?FJ;H
!7?I;H;M7B?C;GA7EG?H;:;9DJG7CI;IA;9?G9J?IE7GJC
TA;9IG?9?;CFJ7A?<?TEDJGKDJH7HHJG;GFJ;A7EG?H;;HI
9DGG;9I;B;CIB?H;QA7I;GG;
.?A7EG?H;BJG7A;;HI:JINE;HI7C:7G:Q7AKTDA;H?A
KDJH?C9DB8;:;A7<7?G;G;BEA79;GE7GJC;EG?H;Q
7AKTDA;H9DGG;9I;B;CIB?H;QA7I;GG;
';GT<G?=TG7I;JG:D?IIDJ@DJGHVIG;8G7C9>T:7CHH7
EGDEG;EG?H;:;9DJG7CI:DCIA7I;CH?DCCDB?C7A;;HI
?:;CI?FJ;Q9;AA;?C:?FJT;HJGA7EA7FJ;H?=C7ATI?FJ;
;II;EGT97JI?DC;HIG;9DBB7C:T;EDJG=7G7CI?GJC
G;C:;B;CIDEI?BJB;ITK?I;GJC;HJG9>7G=;:;H
9?G9J?IHTA;9IG?FJ;H:;A7GTH?:;C9;9;FJ?EDJGG7?I
9GT;GJCG?HFJ;:f?C9;C:?;E7GHJG9>7J<<;:;H<?AH
);:T8G7C9>;O@7B7?HA;GT<G?=TG7I;JG;CI?G7CIHJGA;
9DG:DC:f7A?B;CI7I?DC.7?H?HH;O<;GB;B;CIA7<?9>;:J
9DG:DC;II?G;O:GD?IEDJGA7G;I?G;G:;A7EG?H;
-TE7G;ODJG;BEA79;O?BBT:?7I;B;CIIDJI9DG:DC
;<<?AD9>TDJ;C:DBB7=T)fJI?A?H;OE7HJC9DG:DC
<;C:?AATDJEGTH;CI7CI:;HH?=C;H:fJHJG;
'DGHFJ;KDJH:TEA79;OKDIG;GT<G?=TG7I;JG:JBJG
<7?I;H7II;CI?DC:;C;E7HA;<7?G;GDJA;GHJGA;9DG:DC
:f7A?B;CI7I?DC7<?C:;C;E7HAf;C:DBB7=;G
)(+%'&()%''!') !'&
&(%&&E(%'E
CONSERVEZ CES DIRECTIVES
www.electromenagersge.ca
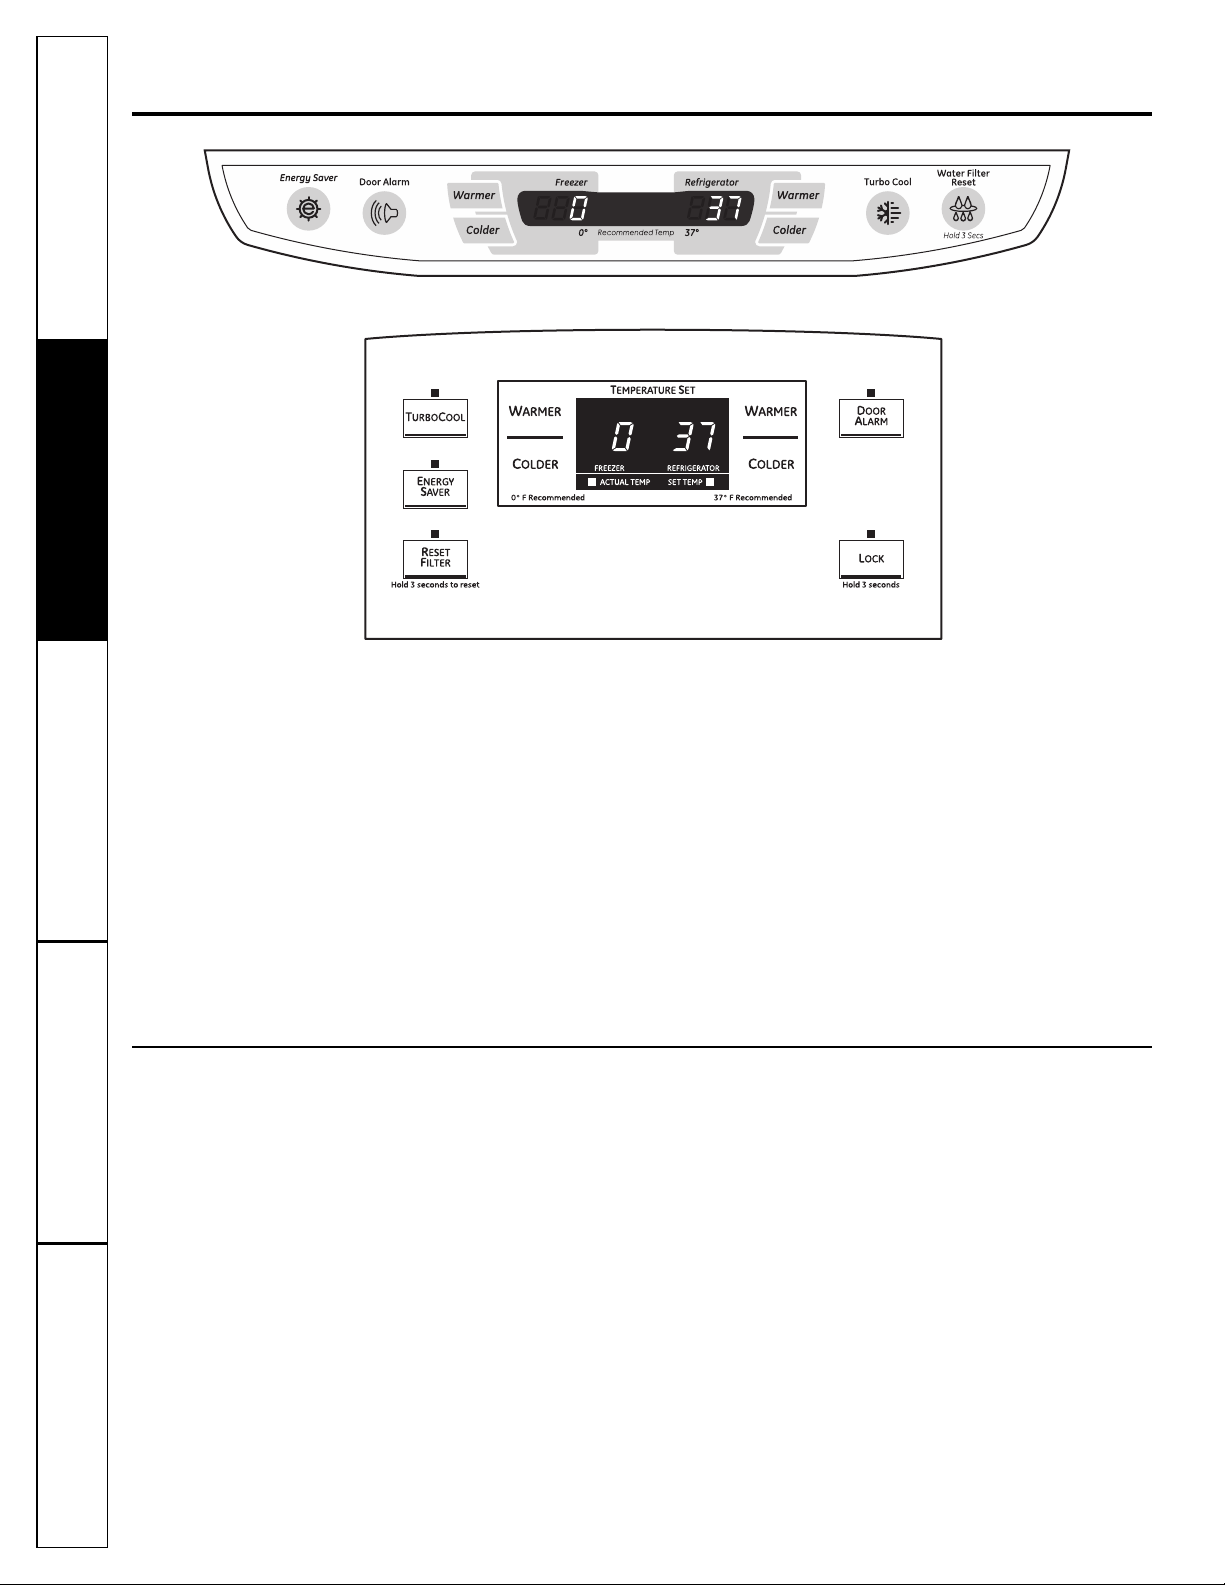
Les commandes avec réglages
de température.
;:@=70>,@?=0>8:/I70>.:9>@7?0D70>;,20>>@4A,9?0>
,?08;0=,?@=00>?;=H=H27H0F7Q@>490,@9@8H=:37° F ;:@=70.:8;,=?4809?
=H1=42H=,?0@=0?0° F ;:@=70.:8;,=?4809?.:92H7,?0@=??09/0D30@=0><@07,
?08;H=,?@=0>0>?,-474>0,@B?08;0=,?@=0>=0.:88,9/H0>;=H=H27H0>
0=H27,20/0?08;H=,?@=0;0@?49/4<@0=7,?08;H=,?@=0SET =H27H0,49>4<@07,
?08;H=,?@=0=H0770/,9>70.:8;,=?4809?=H1=42H=,?4:90?/,9>70.:8;,=?4809?
.:92H7,?4:9,?08;H=,?@=0SET =H27H0;0@?A,=40=7H2I=0809?/07,?08;H=,?@=0=H0770
>07:97Q@?474>,?4:90?70>.:9/4?4:9>/01:9.?4:990809?
0;7,.0809?/Q@90:@/0>/0@B.:88,9/0>>@=OFF ==J?,==J?070=01=:4/4>>0809?
F7,1:4>/,9>70>.:8;,=?4809?>/@=H1=42H=,?0@=0?/@.:92H7,?0@=8,4>90.:@;0;,>
7Q,74809?,?4:9H70.?=4<@0/@=H1=42H=,?0@=
Pour les modèles avec contrôles sur la porte :
Pour changer la température, 7EEJN;O;IG;AR9>;OA;
8DJIDCWARMER DJCOLDER +AJH9>7J:;I+AJH<GD?:';
KDN7CIACTUAL TEMP /;BETG7IJG;79IJ;AA;Hf7AAJB;G7;I
Af7<<?9>7=;?C:?FJ;G7A7I;BETG7IJG;79IJ;AA;+DJG9>7C=;G
A7I;BETG7IJG;7EEJN;O8G?UK;B;CIHJGA7IDJ9>;
WARMER EAJH9>7J:DJCOLDER EAJH<GD?:@JHFJfQ9;FJ;
A7I;BETG7IJG;:TH?GT;7EE7G7?HH;
Pour les contrôles à l’intérieur du réfrigérateur :
'7I;BETG7IJG;79IJ;AA;7EE7G7WIHJGAfT9G7CFJ7C:KDJH
DJKG;OA7EDGI;+DJG9>7C=;GA7I;BETG7IJG;7EEJN;OHJG
A7IDJ9>;WARMER EAJH9>7J:DJCOLDER EAJH<GD?:
@JHFJfQ9;FJ;A7I;BETG7IJG;:TH?GT;7EE7G7?HH;HJG
AfT9G7C
0C;<D?HA7I;BETG7IJG;HDJ>7?IT;7<<?9>T;7EGUH
H;9DC:;HA7I;BETG7IJG;7<<?9>T;G;IDJGC;G7Q9;AA;
:JGT<G?=TG7I;JG;I:J9DC=TA7I;JG+AJH?;JGH7@JHI;B;CIH
E;JK;CIVIG;CT9;HH7?G;H>7FJ;<D?HFJ;KDJH7@JHI;O
A;H9DBB7C:;HA7?HH;OE7HH;G>;JG;HEDJGFJ;A;
GT<G?=TG7I;JG7II;?=C;A7I;BETG7IJG;FJ;KDJH7K;O
HTA;9I?DCCT;
Pour éteindre le système de refroidissement, 7EEJN;O
8G?UK;B;CIHJGA;8DJIDCWARMER EAJH9>7J::J
GT<G?=TG7I;JGDJ:J9DC=TA7I;JG@JHFJfQ9;FJ;Af7<<?9>7=;
?C:?FJ;OFF GGVI. Pour remettre l’appareil en marche,
EDJHH;OHJGA;8DJIDCCOLDER EAJH<GD?::JGT<G?=TG7I;JG
DJ:J9DC=TA7I;JGEEJN;OQCDJK;7J;IA7I;BETG7IJG;
:;Af7EE7G;?AE7HH;G7HJGA7K7A;JGEGTGT=AT;:;0° F EDJG
A;9DC=TA7I;JG;I37° F EDJGA;GT<G?=TG7I;JG'f7<<?9>7=;
:fJCDJ:;H:;JM8DJIDCHHJGOFF GGVI7GGVI;A;
G;<GD?:?HH;B;CI:7CHA;H9DBE7GI?B;CIH:JGT<G?=TG7I;JG;I
:J9DC=TA7I;JGB7?HC;9DJE;E7HAf7A?B;CI7I?DCTA;9IG?FJ;
:JGT<G?=TG7I;JG
Changement de la température
NOTE : 0=H1=42H=,?0@=0>?0B;H/4H,A0.@90;0774.@70/0;=:?0.?4:9.:@A=,9?70>.:88,9/0>/0
?08;H=,?@=0&4.0??0;0774.@709Q,;,>H?H=0?4=H0,@.:@=>/07Q49>?,77,?4:91,4?0>708,49?09,9?
Soutien au
consommateur
Conseils de dépannage Fonctionnement Mesures de sécuritéInstallation
(Sur certains modèles)
(Sur certains modèles)

Soutien au
consommateur
Conseils de dépannage
FonctionnementMesures de sécurité Installation
Au sujet de TurboCool.
™
>@=.0=?,49>8:/I70> www.electromenagersge.ca
Fonctionnement
'79DBB7C:;TurboCool 799TAUG;
A;G;<GD?:?HH;B;CI:J9DBE7GI?B;CI
GT<G?=TG7I?DC7<?C:;G;<GD?:?GEAJHG7E?:;B;CI
A;H7A?B;CIH0I?A?H;OTurboCool FJ7C:KDJH
7@DJI;OJC;=G7C:;FJ7CI?IT:f7A?B;CIH:7CH
A;9DBE7GI?B;CIGT<G?=TG7I?DCFJ7C:KDJH
B;II;O:;9XIT:;H7A?B;CIH7EGUHA;H7KD?G
A7?HHTHG;EDH;GQA7I;BETG7IJG;:;A7E?U9;
DJFJ7C:KDJHB;II;O:;9XIT:;HG;HI;H
:f7A?B;CIH9>7J:H1DJHEDJK;OT=7A;B;CI
AfJI?A?H;G7EGUHFJ;A;GT<G?=TG7I;JGHD?IG;HIT
:T8G7C9>TE;C:7CIJC;ETG?D:;EGDADC=T;
0C;<D?H79I?KTA;9DBEG;HH;JGH;B;I
?BBT:?7I;B;CI;CGDJI;;IA;HK;CI?A7I;JGH
H;B;II;CI;CB7G9>;;IHf7GGVI;CIQ>7JI;
K?I;HH;E;C:7CI>J?I>;JG;H;CHJ?K7CIA;JG
9N9A;';9DBEG;HH;JG9DCI?CJ;QB7G9>;G
@JHFJfQ9;FJ;A;9DBE7GI?B;CIGT<G?=TG7I?DC
H;G;<GD?:?HH;Q;CK?GDC[[!EJ?H?AH;
B;I;CB7G9>;;IHf7GGVI;H;ADCHDCEGDEG;
9N9A;EDJGB7?CI;C?G9;II;I;BETG7IJG;
EGUH>;JG;HDJH?KDJHEG;HH;OQCDJK;7J
HJGA;8DJIDCTurboCoolA;9DBE7GI?B;CI
GT<G?=TG7I?DCG;K?;CIQHDCGT=A7=;DG?=?C7A
Utilisation
EEJN;OHJGA;8DJIDCTurboCool
'fT9G7C:;I;BETG7IJG;:JGT<G?=TG7I;JG
?C:?FJ;
,J7C:A79DBB7C:;TurboCool 9;HH;:;
<DC9I?DCC;GA;9DBE7GI?B;CIGT<G?=TG7I?DC
G;K?;CIQHDCGT=A7=;DG?=?C7A
NOTES : 1DJHC;EDJK;OE7H9>7C=;G
A7I;BETG7IJG;:JGT<G?=TG7I;JG
E;C:7CIFJ;A79DBB7C:;
TurboCool <DC9I?DCC;
';TurboCool Cf7E7H:f;<<;IHJG
A7I;BETG7IJG;:J9DC=TA7I;JG
,J7C:KDJHDJKG;OA7EDGI;:J
GT<G?=TG7I;JGE;C:7CIAf79I?DC
:;A79DBB7C:;TurboCoolA;H
K;CI?A7I;JGH9DCI?CJ;CIQ
<DC9I?DCC;GH?A;JG9N9A;
A;:;B7C:;
Alarme de porte &@=.0=?,49>8:/I70>
'f7A7GB;:;EDGI;HDCC;H?AfJC;:;HEDGI;H
;HIDJK;GI;E;C:7CIEAJH:;B?CJI;H
'7HDCC;G?;Hf7GGVI;FJ7C:KDJH<;GB;O
A7EDGI;
(Sur certains modèles)
(Sur certains modèles)
(Sur certains modèles)
(Sur certains modèles)
(Sur certains modèles)
(Sur certains modèles)
L’économiseur d’énergie >@=.0=?,49>8:/I70>
1DIG;7EE7G;?A;HITFJ?ET:fJCBT97C?HB;
T9DCDB?H;JG:fTC;G=?;';GT<G?=TG7I;JG;HI
A?KGT7K;99;IT9DCDB?H;JG:fTC;G=?;;C
B7G9>;
K;9A;I;BEH?AE;JIH;<DGB;G:;Af>JB?:?IT
HJGA7HJG<79;7K7CI:J9DBE7GI?B;CI
GT<G?=TG7I?DCFJ?E;JI;CIG7WC;G:;A7GDJ?AA;
.f?A7EE7G7WI:;Af>JB?:?ITHJGA7HJG<79;7K7CI
:J9DBE7GI?B;CIGT<G?=TG7I?DCTI;?=C;O
AfT9DCDB?H;JG:fTC;G=?;;C7EEJN7CI
EJ?HG;AR9>7CIA7IDJ9>;ENERGY SAVER
T9DCDB?H;JG:fTC;G=?;:JE7CC;7J
:;9DCIGXA;
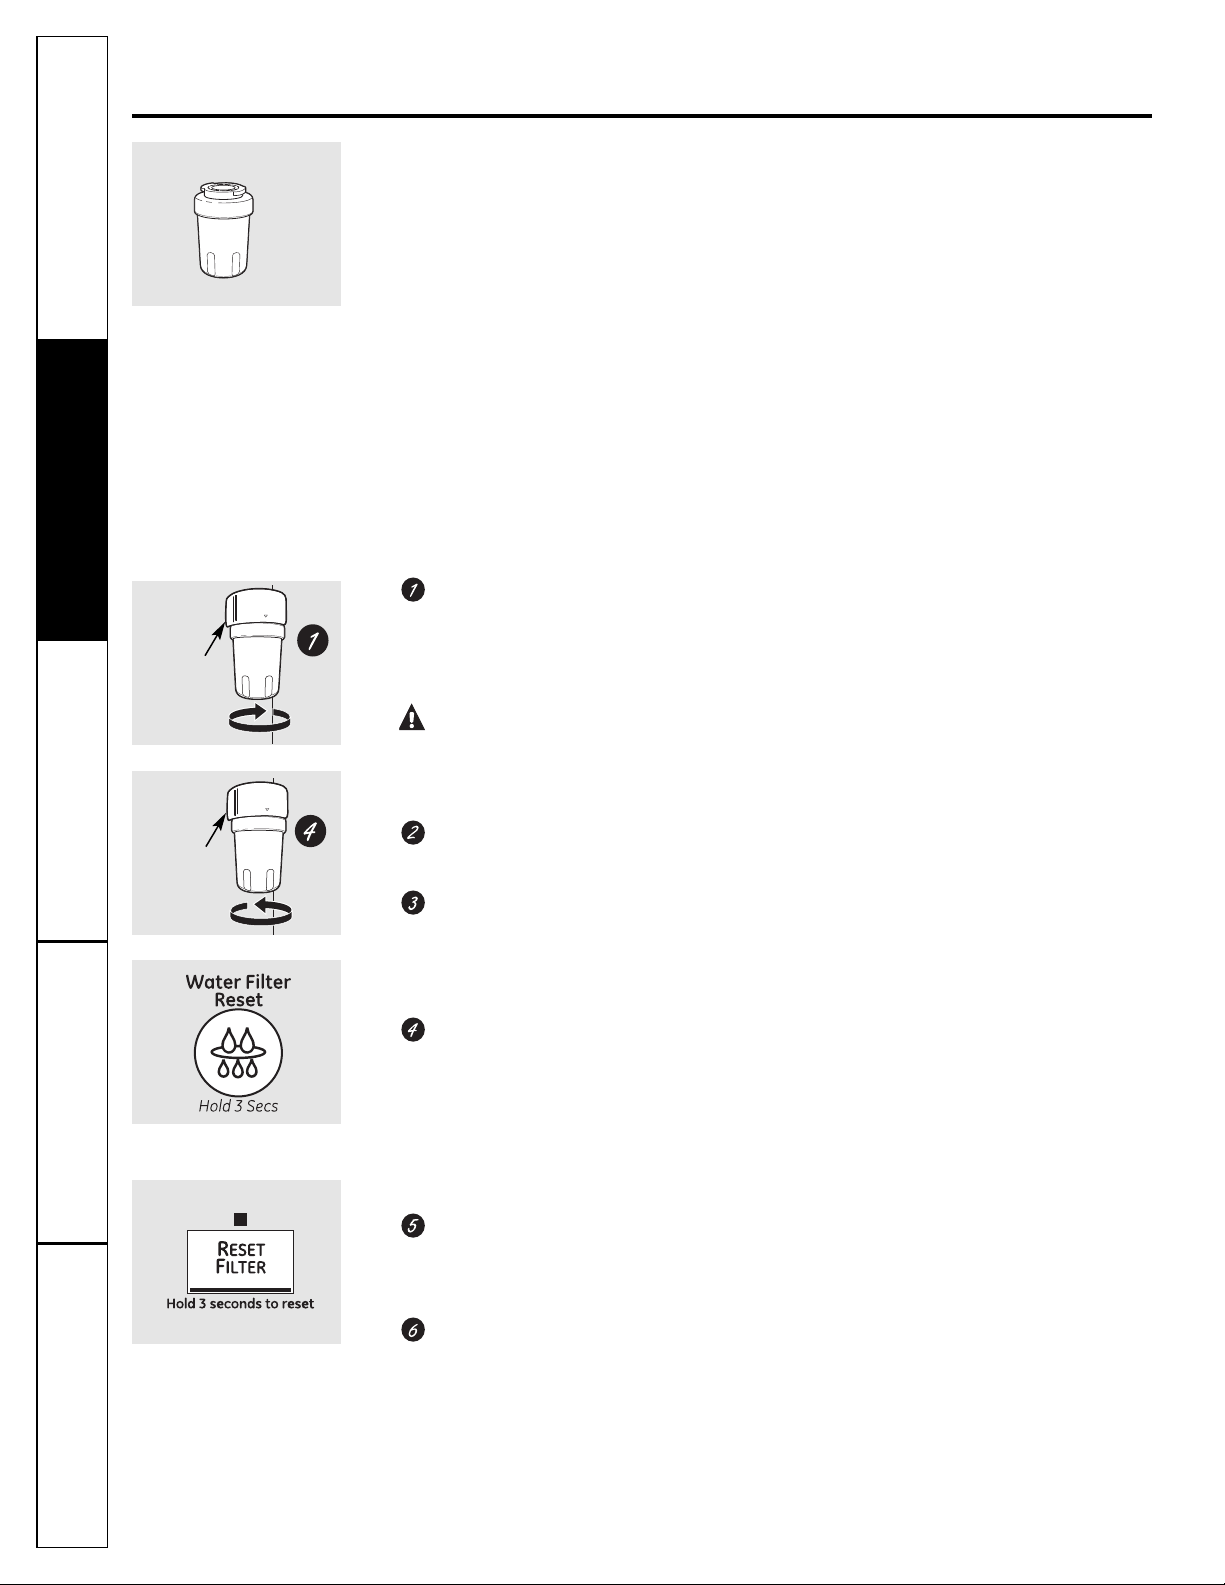
Cartouche du filtre à eau
'797GIDJ9>;:J<?AIG;Q;7JH;IGDJK;
:7CHA;9D?C:GD?I7GG?UG;HJETG?;JG:J
9DBE7GI?B;CIGT<G?=TG7I;JG
Remplacement du filtre
$AN7JCKDN7CIAJB?C;JM7K;GI?HH7CI
FJf?A<7JIG;BEA79;GA797GIDJ9>;:J<?AIG;
:f;7JHJGAf7<<?9>7=;:;I;BE;G7IJG;;II;
AJB?UG;:;K?;CIDG7C=;EDJGKDJH7K;GI?GFJ;
KDJH:;K;OG;BEA79;G8?;CIXIA;<?AIG;1DJH
:;K;OG;BEA79;GA797GIDJ9>;:;<?AIG;FJ7C:
A;KDN7CIAJB?C;JM:;K?;CIGDJ=;DJH?
A;:T8?I:;Af;7J:J:?HIG?8JI;JGDJ:;
A7B79>?C;Q=A7SDCH:?B?CJ;
Installation de la cartouche du
filtre à eau
.?KDJHG;BEA79;OA797GIDJ9>;:f78DG:
;CA;K;OA7K?;?AA;97GIDJ9>;;CIDJGC7CI
:DJ9;B;CIK;GHA7=7J9>;) I?G;O+.
A797GIDJ9>;K;GHA;87H0C;E;I?I;
FJ7CI?IT:f;7JE;JIHfT9DJA;G
MISE EN GARDE : &Q47C
,/07Q,4=;4H2H/,9>70>C>?I807,.,=?:@.30
/0147?=0;0@?J?=0H50.?H0;09/,9?<@Q07700>?
0970AH0#=:.H/0D,A0.>:49;:@=7Q0970A0=
CA;K;OA7<;J?AA;:;EGDI;9I?DC:;
Af;MIGTB?IT:;A797GIDJ9>;
-;BEA?HH;OA797GIDJ9>;:;
G;BEA79;B;CI7K;9:;Af;7J:JGD8?C;I
?BBT:?7I;B;CI7EGUHAf?CHI7AA7I?DC
EDJGE;GB;IIG;JCB;?AA;JG:T8?I
:J:?HIG?8JI;JG
C7A?=C7CIA;H<AU9>;H:;A797GIDJ9>;
;I:J8DWI?;G:;97GIDJ9>;<7?I;HIDJGC;G
:DJ9;B;CIA797GIDJ9>;:7CHA;H;CH
:;H7?=J?AA;H:fJC;BDCIG;@JHFJfQHDC
7GGVI.?A797GIDJ9>;;HI9DGG;9I;B;CI
?CHI7AAT;KDJH:;K;O;CI;C:G;JC:T9A?9
FJ7C:;AA;Hf;C=7=;;CEA79;Ne serrez
pas trop fort.
!7?I;H9DJA;GA?IG;H
i =7AADCH:J
:?HIG?8JI;JGEDJGEJG=;GA;HNHIUB;;I
;BEV9>;GA;HEJAKTG?H7I?DCHDCHJAI;O
A7H;9I?DC(?474>,?4:9/@/4>?=4-@?0@=
EEJN;OHJGA7IDJ9>;RESET WATER
FILTER (remettre à zéro le filtre d’eau) ;I
I;C;OA77EEJNT;E;C:7CIH;9DC:;H
NOTE : 0C;97GIDJ9>;:;<?AIG;Q;7J
CDJK;AA;B;CI?CHI7AAT;peut occasionner
un jet d’eau :J:?HIG?8JI;JG
Bouchon de dérivation du filtre
$A<7JIJI?A?H;GA;8DJ9>DC:;:TG?K7I?DC
:J<?AIG;ADGHFJfJC;97GIDJ9>;:;
G;BEA79;B;CICf;HIE7H:?HEDC?8A;';
:?HIG?8JI;JG;IA7B79>?C;Q=A7SDCHC;
E;JK;CIE7H<DC9I?DCC;GH7CHA;<?AIG;DJH7CH
A;8DJ9>DC:;:TG?K7I?DC:J<?AIG;
Filtres de remplacement :
Pour commander des cartouches
supplémentaires, visitez notre site Web à
l’adresse www.electromenagersge.ca, ou
appelez le Service des pièces et accessoires
au 888.261.3055.
(D:UA;:;<?AIG;(2!
';H9A?;CIH7J7C7:7:;KG7?;CI9DCHJAI;GA;H
E7=;H@7JC;HEDJG9DCC7WIG;A7HJ99JGH7A;
(78;A7EAJHEGUH
Le filtre à eau. >@=.0=?,49>8:/I70>
Soutien au
consommateur
Conseils de dépannage Fonctionnement Mesures de sécuritéInstallation
(Sur certains modèles)
(Sur certains modèles)
Porte-
cartouche
Porte-
cartouche
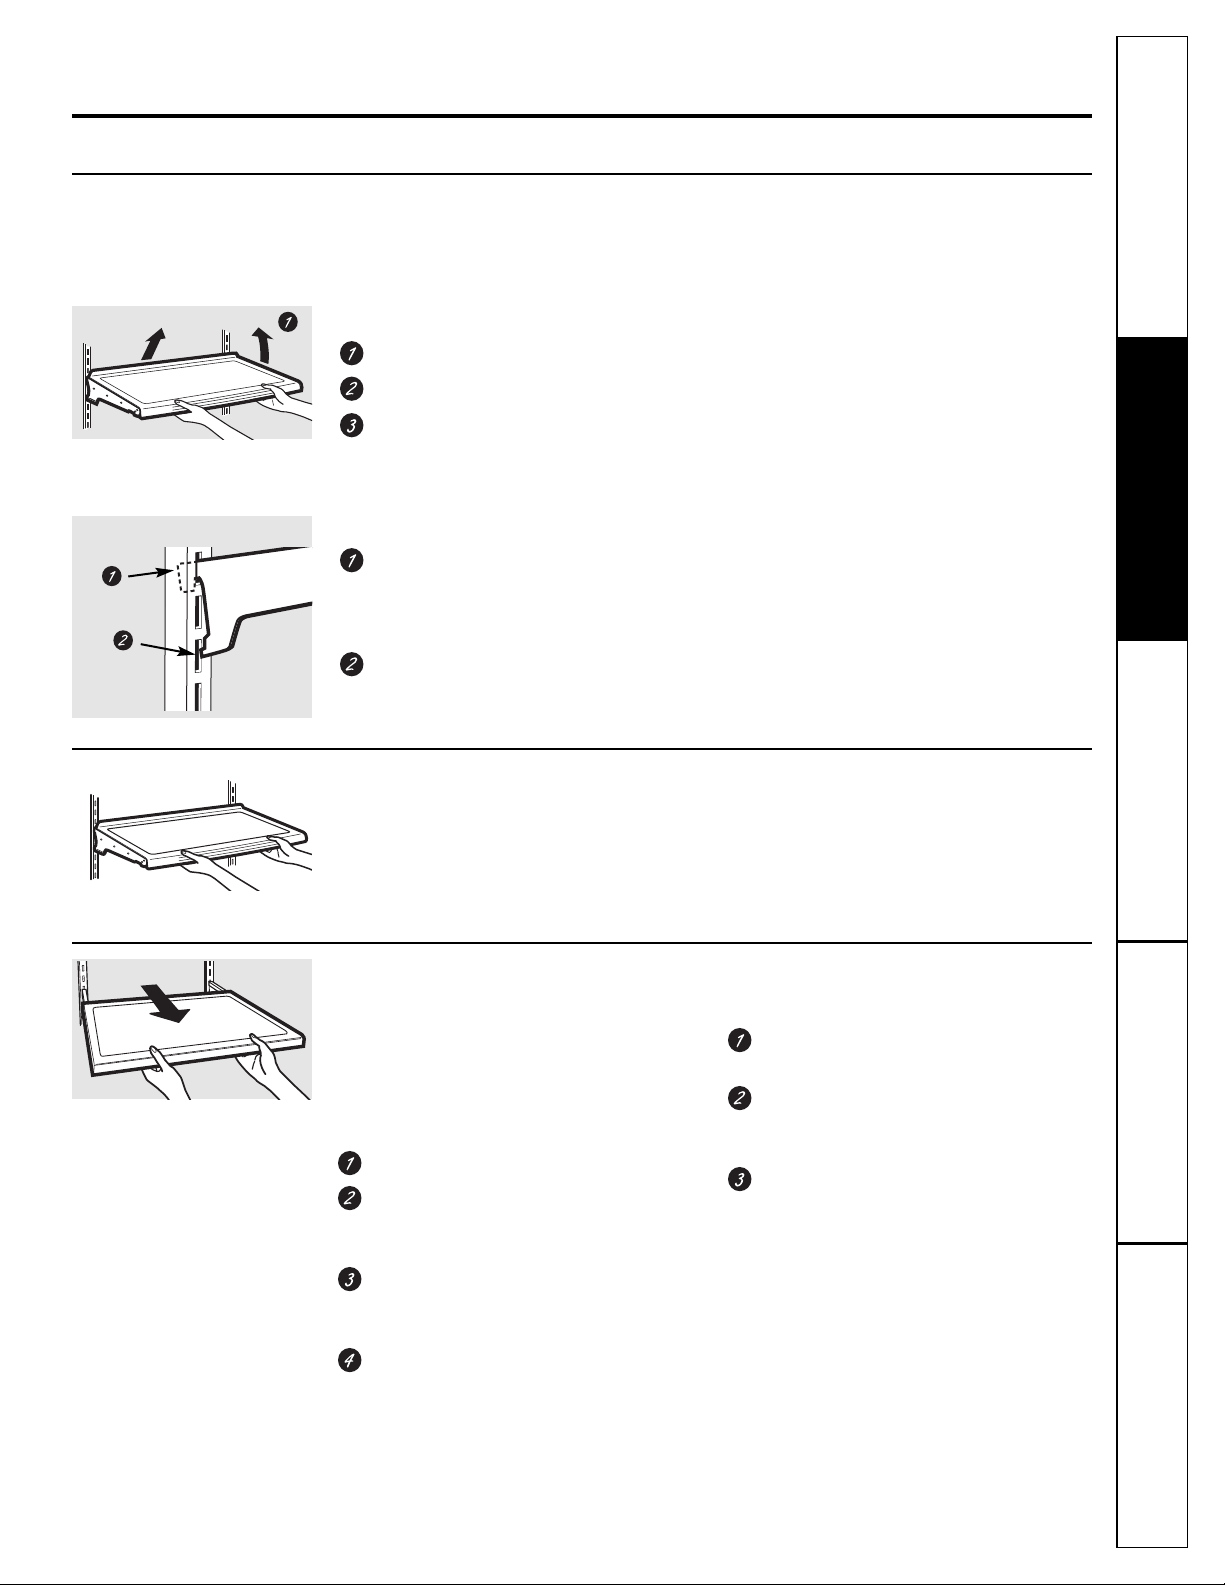
Soutien au
consommateur
Conseils de dépannage
FonctionnementMesures de sécurité Installation
Les clayettes et les balconnets. www.electromenagersge.ca
':@?0>70>.,=,.?H=4>?4<@0>90>:9?;,>/4>;:94-70>>@=?:@>70>8:/I70>
Mise en place des clayettes
';H9A7N;II;H:JGT<G?=TG7I;JGHDCIGT=A78A;H
Compartiment réfrigération
Enlèvement :
CA;K;OIDJHA;H7GI?9A;H:;A79A7N;II;
.DJA;K;OA79A7N;II;QAf7K7CI
.DJA;K;OA79A7N;II;QAf7GG?UG;;I
<7?I;HA7HDGI?G
Remise en place :
C<7?H7CI87H9JA;GA79A7N;II;K;GHA;
>7JI?CHTG;OA;9GD9>;IHJETG?;JGQ
Af7GG?UG;:;A79A7N;II;:7CHJC;<;CI;
:JG7?A
87?HH;OA;:;K7CI:;A79A7N;II;
@JHFJfQ9;FJ;A;87H:;A79A7N;II;
H;<?M;;CEA79;
Clayettes anti-déversement >@=.0=?,49>8:/I70>
';H9A7N;II;H7CI?:TK;GH;B;CIDCI:;H8DG:H
HET9?7JMEDJG;BEV9>;GIDJI:TK;GH;B;CI
7JM9A7N;II;H?C<TG?;JG;H+DJG;CA;K;GDJ
G;B;IIG;;CEA79;9;H9A7N;II;H9DCHJAI;O
4>009;7,.0/0>.7,C0??0>
Clayette coulissante anti-déversement >@=.0=?,49>8:/I70>
"GR9;QA79A7N;II;=A?HH7CI;7CI?
:TK;GH;B;CIKDJHEDJK;O7II;?C:G;:;H
7GI?9A;HEA79TH:;GG?UG;:f7JIG;H.;H8DG:H
HET9?7JMHDCI9DCSJHEDJG;BEV9>;GIDJI
:TK;GH;B;CI7JM9A7N;II;H?C<TG?;JG;H
Enlèvement :
CA;K;OIDJHA;H7GI?9A;H:;A79A7N;II;
!7?I;H=A?HH;GA79A7N;II;K;GHAf;MITG?;JG
@JHFJfQ9;FJf;AA;7II;?=C;HDCED?CI
:f7GGVI
.DJA;K;OAf7K7CI:;A79A7N;II;@JHFJfQ9;
FJ;A;HI7FJ;IH7GG?UG;HD?;CI7J:;HHJH
:;A787GG;7K7CI
DCI?CJ;OQI?G;GA79A7N;II;K;GHAf7K7CI
;I;CA;K;OA7
Remise en place :
A?=C;OA;HI7FJ;IH7GG?UG;:;A79A7N;II;
7JM<;CI;H:J9;CIG;:;HG7?AHQ9A7N;II;
!7?I;H=A?HH;GA79A7N;II;K;GHAf?CITG?;JG
@JHFJfQ9;FJ;A;HI7FJ;IH:J9;CIG;
HD?;CIJCE;J:;GG?UG;A787GG;7K7CI
87?HH;OA79A7N;II;;CEA79;@JHFJfQ9;
FJf;AA;HD?I>DG?ODCI7A;;I<7?I;HA7=A?HH;G
QAf?CITG?;JG
>>@=0DA:@><@07,.7,C0??0=0;:>0-409F
7Q3:=4D:9?,70,;=I>7Q,A:4==084>009;7,.00?
<@Q077090-:@20;,>/Q@9.K?H:@/07Q,@?=0
>>@=0DA:@>/0-409;:@>>0=70>.7,C0??0>
5@><@Q,@1:9/;:@==010=80=7,;:=?0
Certains modèles ont des clayettes en fil
de fer que vous pouvez régler de la
même manière.
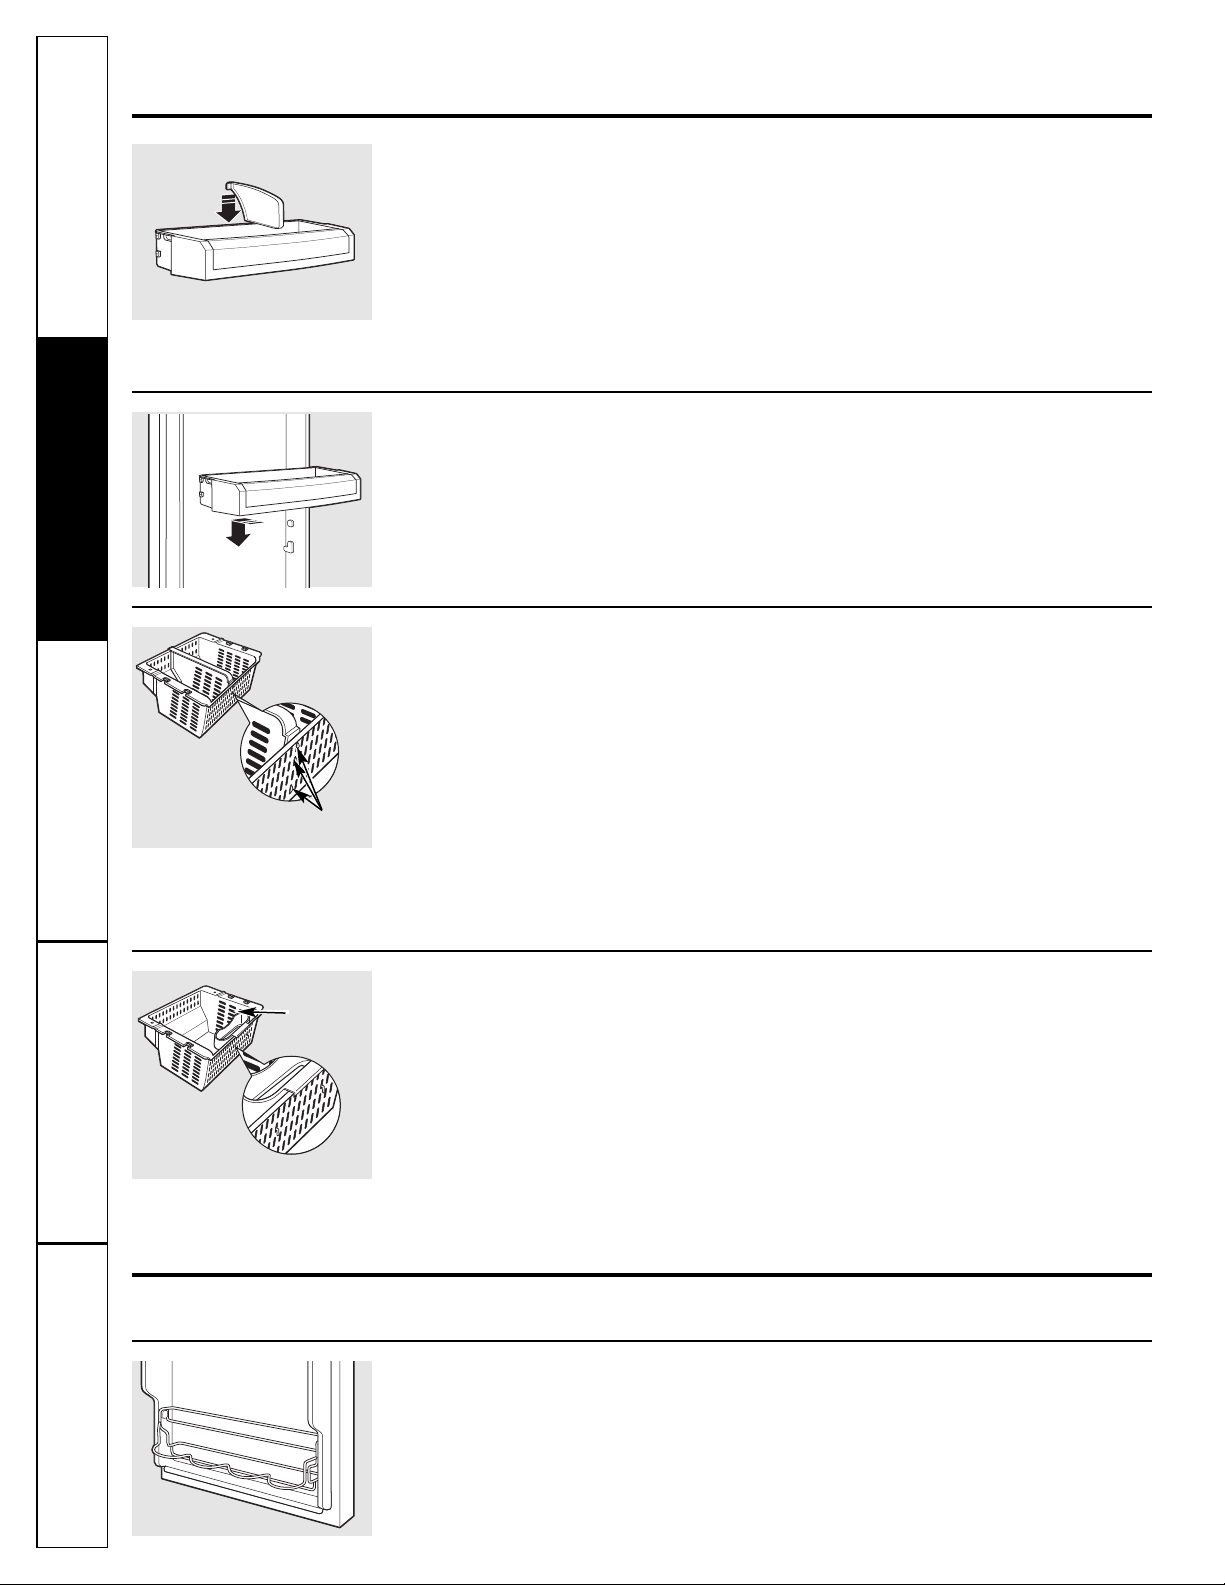
Les clayettes et les balconnets.
Bacs réglables de porte
1DJHEDJK;O<79?A;B;CIIG7CHEDGI;GA;H
879HGT=A78A;H:JGT<G?=TG7I;JGQKDIG;
HJG<79;:;IG7K7?A
Enlèvement : .DJA;K;OAf7K7CI:J879:GD?I
K;GHA;>7JIEJ?H;CA;K;O;CHDJA;K7CI
Remise en place ou changement de place :
!7?I;H=A?HH;GA;879@JHI;7J:;HHJH:;H
HDJI?;CHBDJATH:;A7EDGI;;IEDJHH;OK;GH
A;87H';879H;K;GGDJ?AA;G7;CEA79;
La séparation 7?:;Q;BEV9>;GA;HE;I?IH
7GI?9A;HFJ?H;IGDJK;CIHJGA79A7N;II;:;A7
EDGI;:;H;G;CK;GH;G:;9DJA;GDJ:;=A?HH;G
/;C;OAf7AKTDA;H;IGDJK7CIQAf7GG?UG;:;A7
HTE7G7I?DCE7GA;:D?=I;I<7?I;H8DJ=;GA7
HTE7G7I?DCH;ADCKDH8;HD?CH
Bacs non-réglables de porte
Enlèvement : .DJA;K;OA;879:GD?IK;GH
A;>7JIEJ?H;CA;K;O;CHDJA;K7CI
Remise en place : C=7=;OA;879:7CHA;H
HDJI?;CHBDJATH:;A7EDGI;;IEDJHH;OK;GH
A;87H$AH;<?M;G7;CEA79;
Caractéristiques supplémentaires.
':@>70>8:/I70>9Q:9?;,>?:@?0>.0>.,=,.?H=4>?4<@0>
Clayette non-réglable pour breuvages
Enlèvement : .DJA;K;OA79A7N;II;
:?G;9I;B;CIK;GHA;>7JIEJ?H<7?I;HA7HDGI?G
;CI?G7CI
Remise en place : !7?I;H;CIG;GA79A7N;II;
:7CHA;HHDJI?;CHBDJATH:;A7EDGI;
;IEDJHH;OK;GHA;87H'79A7N;II;
H;K;GGDJ?AA;G7;CEA79;
Soutien au
consommateur
Conseils de dépannage Fonctionnement Mesures de sécuritéInstallation
Diviseur réglable du panier du compartiment congélation
';E7C?;G:J9DBE7GI?B;CI9DC=TA7I?DC
EGTH;CI;JC:?K?H;JGFJ?E;JIVIG;
G;EDH?I?DCCTDJG;I?GT
Pour le retirer : /?G;OA7HTE7G7I?DCK;GH
KDJH@JHFJfQ9;FJ;A;HA7C=J;II;H:;
EDH?I?DCC;B;CI7GG?UG;HD?;CI;C:;>DGH
:;H<;CI;H/DJGC;OAT=UG;B;CIA7HTE7G7I?DC
HJGA;9XITEDJG:T=7=;GA;HA7C=J;II;H:;
EDH?I?DCC;B;CI7K7CI;IHDJA;K;OA7
Pour le remettre en place : /DJGC;O
AT=UG;B;CIA;:?K?H;JG:fJC9XITEDJGFJ;
A;HA7C=J;II;H:J:;K7CIHf;C9A;C9>;CI:7CH
A;H<;CI;H:fTK;CI:JE7C?;G+DH?I?DCC;O
A7HTE7G7I?DCEDJGFJ;A;HA7C=J;II;H:;
EDH?I?DCC;B;CI7GG?UG;HHf;C9A;C9>;CI:7CH
A;H<;CI;H:fTK;CI7GG?UG;
Pour le repositionner : -;I?G;OA;:?K?H;JG
"A?HH;OA;:?K?H;JGQ=7J9>;DJQ:GD?I;Q
Af;BEA79;B;CIG;9>;G9>T;IG;B;II;OA;
;CEA79;H;ADCA;H?CHIGJ9I?DCH9?:;HHJH
Languettes
Support facultatif
';H79QHJEEDGIDEI?DCC;AI?;CIHJGA;8DG:
7K7CI:JE7C?;G?C<TG?;JG:J9DBE7GI?B;CI
9DC=TA7I?DC;IE;JIVIG;G;I?GTDJ7@DJIT
H?8;HD?C
Pour le retirer : .DJA;K;OA;H79QHJEEDGI
K;GHA;>7JIH
Pour le remettre en place : 87?HH;OA;
HJEEDGI;CKDJH7HHJG7CIFJ;A;9GD9>;I;HI
8?;C?CHI7AATHJGA;8DG:7K7CI:JE7C?;G:;
9DC=TA7I;JG?C<TG?;JG
Support
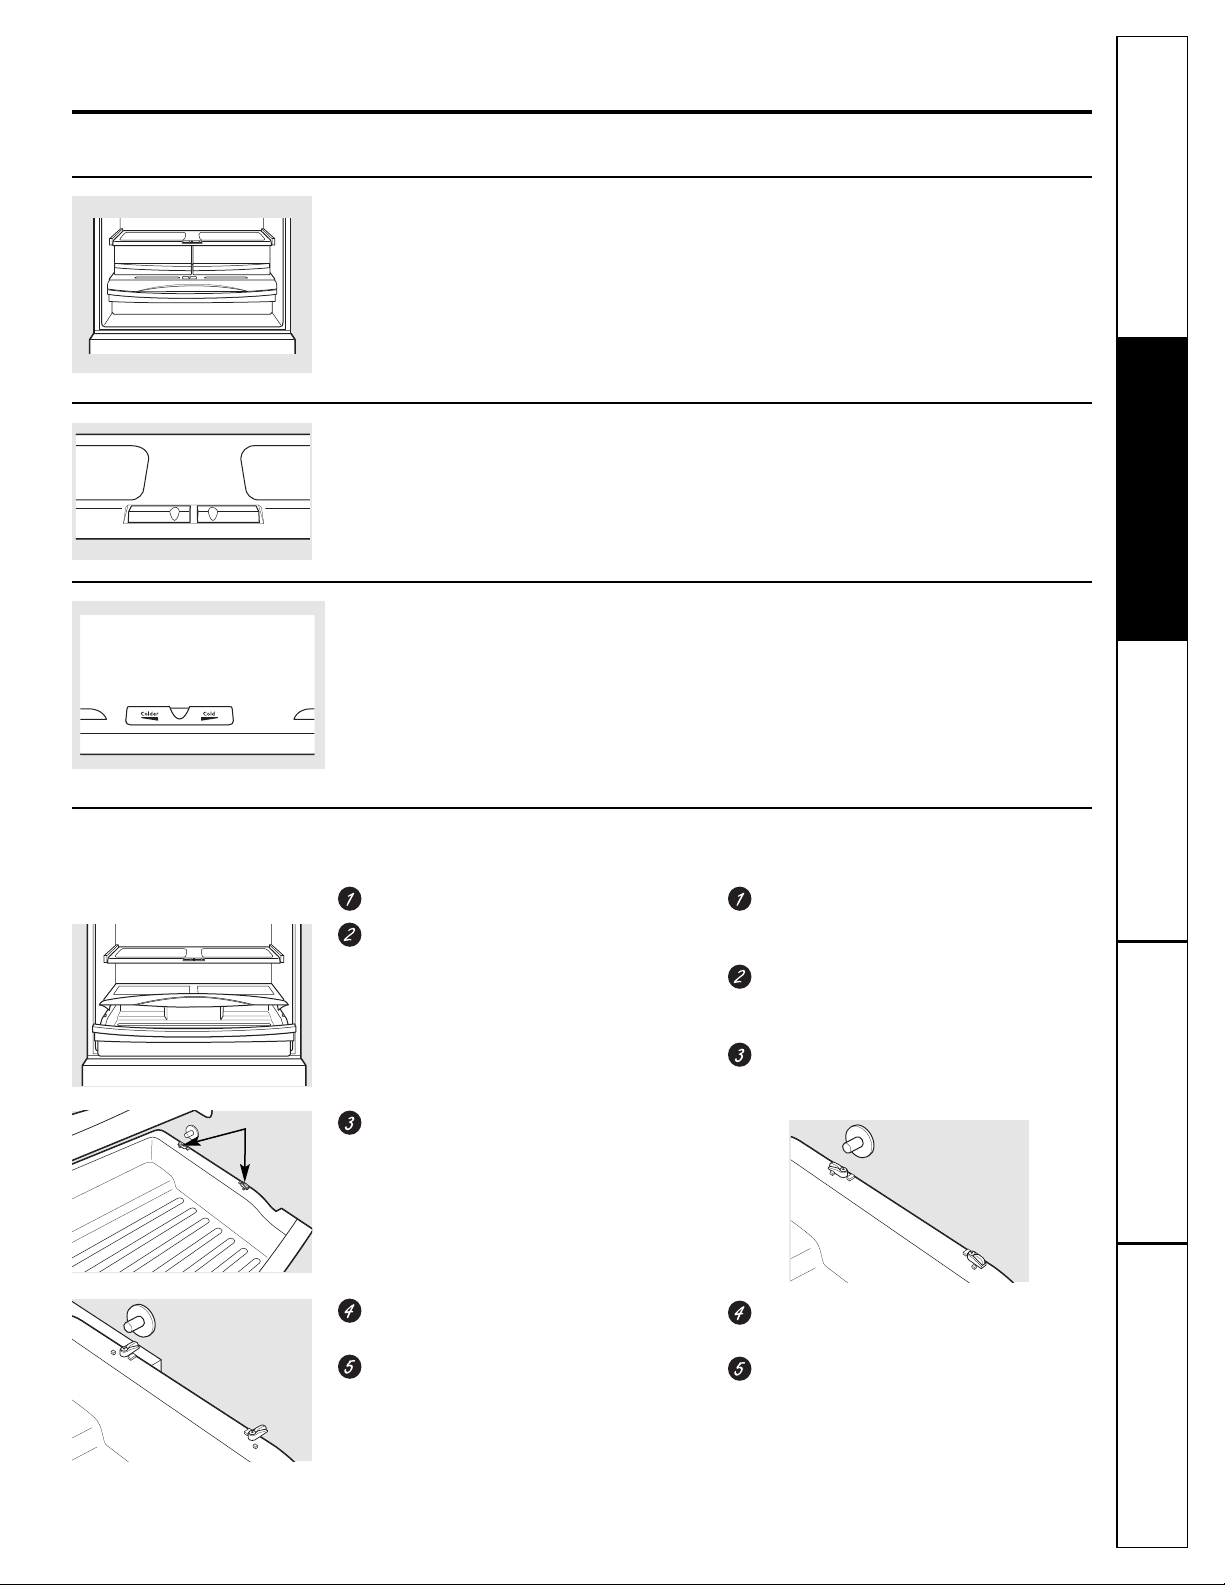
Soutien au
consommateur
Conseils de dépannage
FonctionnementMesures de sécurité Installation
Bacs à rangement et bacs à légume. www.electromenagersge.ca
':@>70>8:/I70>9Q:9?;,>?:@?0>.0>.,=,.?H=4>?4<@0>
Bacs à fruits et légumes
1DJH:;K;O8?;C;HHJN;GIDJI;;7J;C;M9UH
FJ?E;JIHf799JBJA;G7J<DC::;H879HDJ;C
:;HHDJH:;H879H
Bac à légume à humidité réglable >@=.0=?,49>8:/I70>
!7?I;H=A?HH;GA;GT=A7=;;CEDH?I?DCHIGH
(élevée) EDJGD8I;C?GAf>JB?:?ITB7M?BJB
FJ?;HIG;9DBB7C:T;EDJGA7EAJE7GI
:;HAT=JB;H
!7?I;H=A?HH;GA;GT=A7=;;CEDH?I?DCLOW
(basse) EDJGD8I;C?GAf>JB?:?ITB?C?BJBFJ?
;HIG;9DBB7C:T;EDJGA7EAJE7GI:;H<GJ?IH
Bac à charcuterie à température réglable >@=.0=?,49>8:/I70>
!7?I;H=A?HH;GA;9DCIGXA;9DBEAUI;B;CIQ
=7J9>;EDJGD8I;C?GA7I;BETG7IJG;A7EAJH
<GD?:;
Enlèvement :
CA;K;OA;HI?GD?GHQ<GJ?IH;IAT=JB;H
CA;K;OA;I?GD?G;CA;I?G7CI:;H7EDH?I?DC
:f7GGVI
.DJA;K;OA;9DJK;G9A;EDJG7KD?G799UH7JM
K;GGDJH87H9JA7CIH
!7?I;HIDJGC;GA;HFJ7IG;K;GGDJHEDJG
:TK;GGDJ?AA;G
.DJA;K;OAf7K7CI:JI?GD?GEDJGA;<7?G;HDGI?G
Remise en place :
HHJG;OKDJHFJ;A;HFJ7IG;K;GGDJH
87H9JA7CIHHDCI;CEDH?I?DC:;
:TK;GGDJ?AA7=;
+A79;OA;H9XITH:JI?GD?G:7CHA;HHDJI?;CH
:;I?GD?G;CKDJH7HHJG7CIFJ;A;HK;GGDJH
7?AA;CIHJGA;H<;CI;H:JI?GD?G
1;GGDJ?AA;OA;HFJ7IG;K;GGDJH87H9JA7CIH;C
A;H<7?H7CIIDJGC;G;CEDH?I?DC:;
K;GGDJ?AA7=;
87?HH;OA;9DJK;G9A;;I<7?I;H=A?HH;G
A;I?GD?G
-;B;II;O;CEA79;A;HI?GD?GHQ<GJ?IH;I
AT=JB;H
Enlèvement et remise en place du bac à charcuterie
Verrous basculants
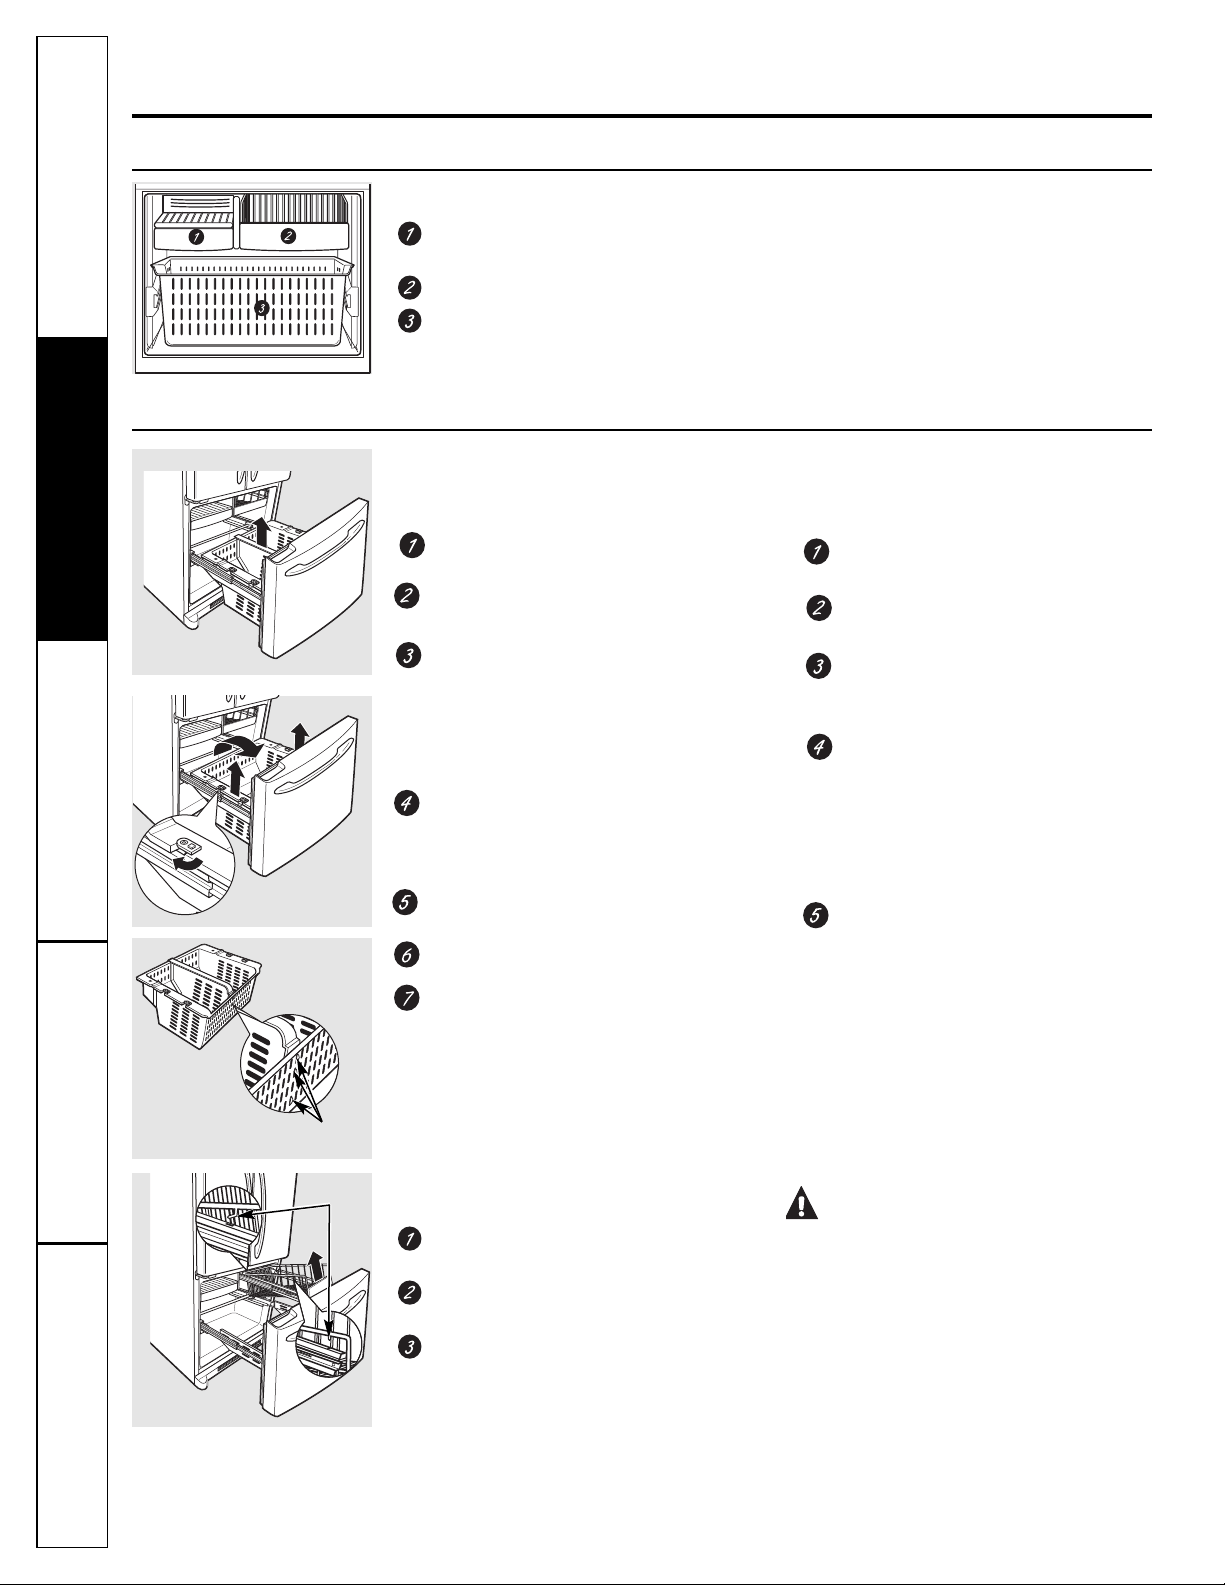
Clayettes et paniers du compartiment congélation
0C;9A7N;II;H?IJT;7J:;HHJH:J879
Q=A7SDCH
0CE7C?;GHJGA7BD?I?T:;A7A7G=;JG
0CE7C?;GEGD<DC:HJGIDJI;A7A7G=;JG
7K;9:?K?H;JG
Congélateur.
':@>70>8:/I70>9Q:9?;,>?:@?0>.0>.,=,.?H=4>?4<@0>
L’apparence et les caractéristiques
peuvent varier
Soutien au
consommateur
Conseils de dépannage Fonctionnement Mesures de sécuritéInstallation
Enlèvement du panier
Pour enlever le panier profond sur toute
la largeur :
*JKG;OA;I?GD?G:J9DBE7GI?B;CI
9DC=TA7I?DC@JHFJfQHDC7GGVI9DBEA;I
.DJA;K;OA;H79QHJEEDGI
K;GHA;>7JIH
/?G;OA7HTE7G7I?DCK;GHKDJH@JHFJfQ9;FJ;
A;HA7C=J;II;H:;EDH?I?DCC;B;CI7GG?UG;
HD?;CI;C:;>DGH:;H<;CI;H/DJGC;O
AT=UG;B;CIA7HTE7G7I?DCHJG
A;9XITEDJG:T=7=;GA;HA7C=J;II;H:;
EDH?I?DCC;B;CI7K7CI;IHDJA;K;OA7
';E7C?;G:J9DBE7GI?B;CI9DC=TA7I?DC
G;EDH;HJGA;H=A?HH?UG;HBTI7AA?FJ;H;I
;HIB7?CI;CJ;CEA79;E7G:;HK;GGDJH
87H9JA7CIH
/DJGC;OA;HK;GGDJH87H9JA7CIH:;AfK;GI?97A;
QA7>DG?ODCI7A;
*JKG;OA;HEDGI;H:JGT<G?=TG7I;JG
.DJA;K;OA;E7C?;G;IIDJGC;OA;K;GHKDJH
.DGI;OA;E7GA;9XIT:JI?GD?G
Remplacement du panier profond toute
largeur :
$C9A?C;OA;E7C?;GK;GHKDJH=A?HH;OA;E7GA;
9XIT;I787?HH;OA;:7CHA;I?GD?G
+A79;OA;E7C?;GHJGA;H=A?HH?UG;H
BTI7AA?FJ;H;IHJGA;HK;GGDJH87H9JA7CIH
/DJGC;OA;HK;GGDJH87H9JA7CIH:;
A7K;GI?97A;QAf>DG?ODCI7A;EDJG8ADFJ;G
A;E7C?;G;CEA79;
/DJGC;OAT=UG;B;CIA;:?K?H;JG:fJC
9XITEDJGFJ;A;HA7C=J;II;H:J:;K7CI
Hf;C9A;C9>;CI:7CHA;H<;CI;H:fTK;CI
:JE7C?;G+DH?I?DCC;OA7HTE7G7I?DCEDJG
FJ;A;HA7C=J;II;H:;EDH?I?DCC;B;CI
7GG?UG;HHf;C9A;C9>;CI:7CHA;H<;CI;H
:fTK;CI7GG?UG;
87?HH;OA;HJEEDGI;CKDJH7HHJG7CIFJ;A;
9GD9>;I;HI8?;C?CHI7AATHJGA;8DG:7K7CI
:JE7C?;G:;9DC=TA7I;JG?C<TG?;JG
Pour enlever le panier sur la moitié
de la largeur :
/?G;OA;E7C?;G>DGH:;HDC;BEA79;B;CI
:f7GGVI
.DJA;K;OAf7K7CI:JE7C?;GEDJG
A;A?8TG;G:;H=J?:;H
.DJA;K;OAf7GG?UG;:JE7C?;G;IHDGI;OA;
:;H=J?:;H
MISE EN GARDE :
HHJG;OKDJHIDJ@DJGH:;8?;C<;GB;G
A;E7C?;G
Quand vous remettez en place le panier,
7HHJG;OKDJHFJ;A;HI7FJ;IH;C<?A:;<;G;I
A;H9GD9>;IH;C<?A:;<;GH?IJTHHJGA;H9XITH
:JE7C?;G;CIG;CI:7CHA;H<;CI;HH?IJT;H;C
>7JI:;HG7?AH:JE7C?;G:J>7JI
L’apparence peut varier
Languettes
Languettes
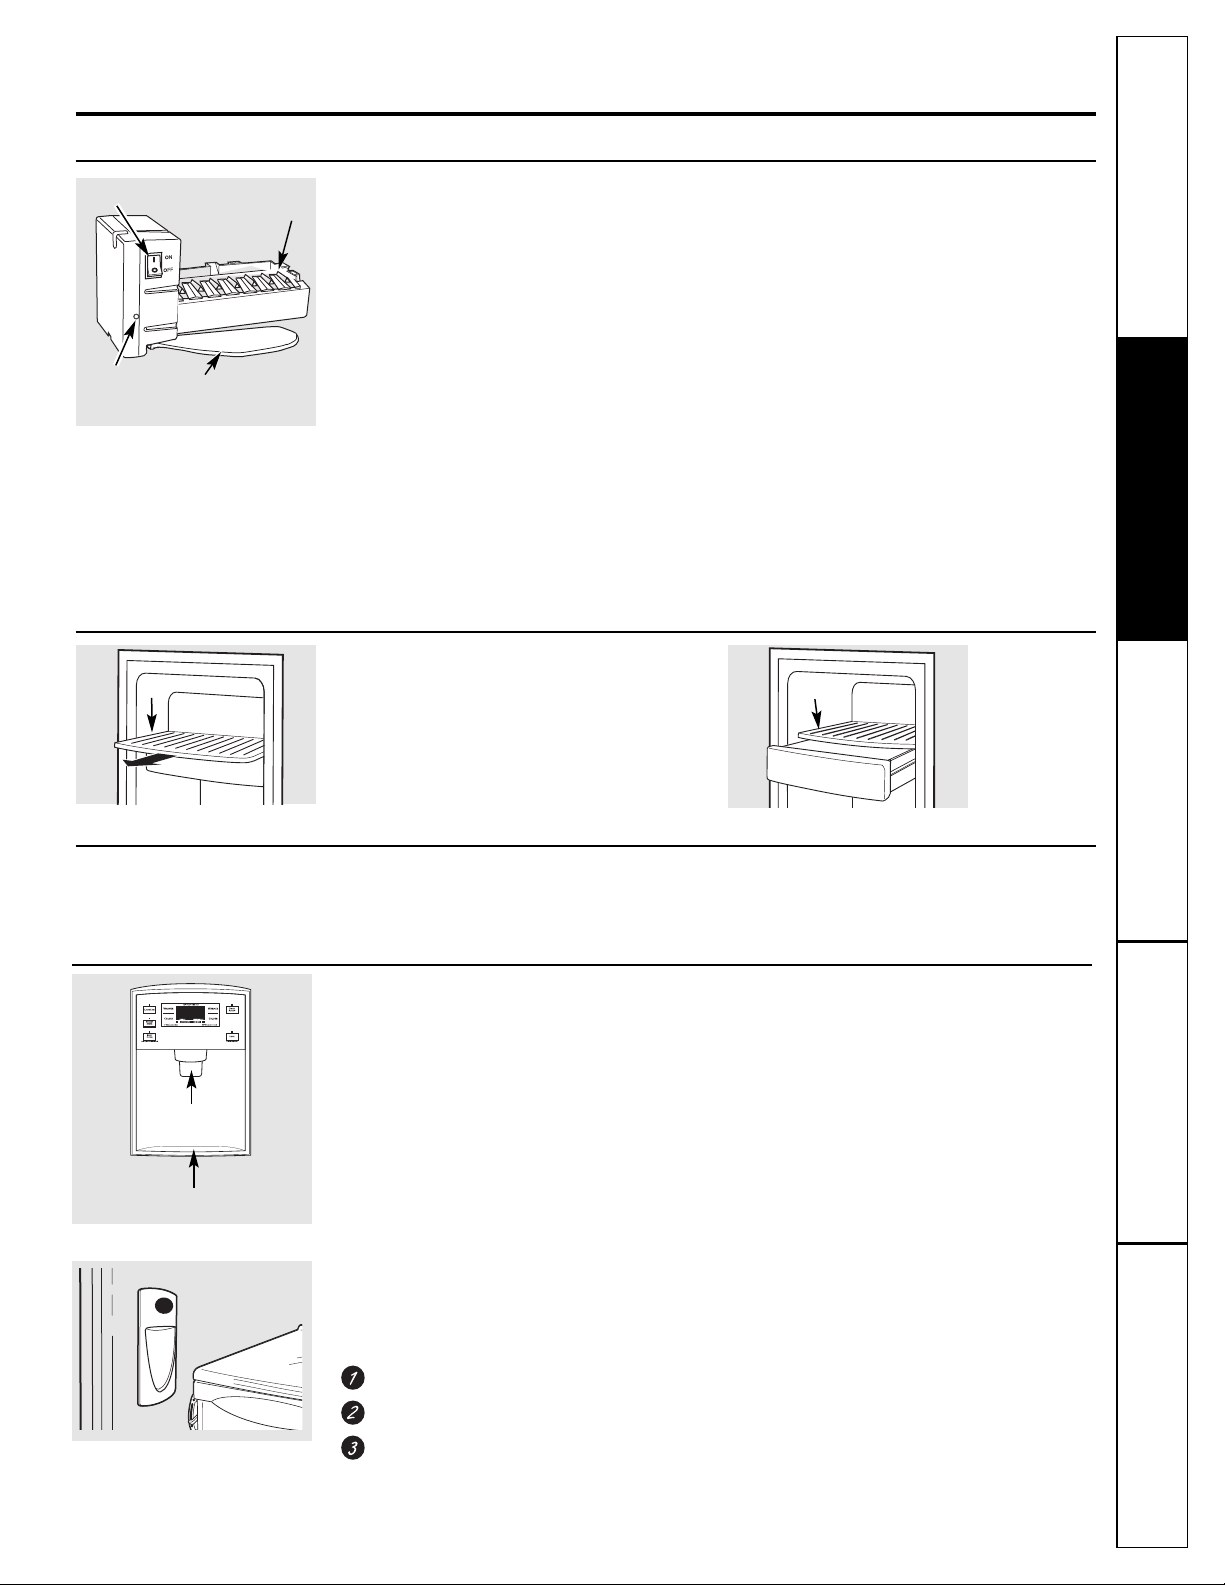
Soutien au
consommateur
Conseils de dépannage
FonctionnementMesures de sécurité Installation
71,@?;=HA:4=09?=00?30@=0>,A,9?<@Q@9=H1=42H=,?0@=9:@A0770809?49>?,77H.:8809.0F;=:/@4=0/0>27,G:9>
Machine à glaçons automatique. www.electromenagersge.ca
Machine à glaçons automatique
>@=.0=?,49>8:/I70>
'7B79>?C;Q=A7SDCHEGD:J?IH;EI=A7SDCHE7G9N9A;
HD?I;CK?GDCQ=A7SDCHE7G>;JG;HH;ADC
A7I;BETG7IJG;:J9DBE7GI?B;CI9DC=TA7I?DCA7
I;BETG7IJG;:;A7E?U9;A;CDB8G;:;<D?HFJ;A7
EDGI;;HIDJK;GI;;IA;H7JIG;H9DC:?I?DCH:fJI?A?H7I?DC
DCHJAI;O9?:;HHDJHA7B7C?UG;:f7KD?G799UH7JM
=A7SDCH;I:f7II;?C:G;A;9DBBJI7I;JG:;B7G9>;
.?KDJH<7?I;H<DC9I?DCC;GA;GT<G?=TG7I;JG7K7CI:;
G799DG:;GAf;7JQA7B79>?C;Q=A7SDCHB;II;OA;
9DBBJI7I;JG:;B7G9>;;CEDH?I?DCO (arrêt)
EGUH7KD?GG799DG:TA;GT<G?=TG7I;JGQAf7A?B;CI7I?DC
:f;7JB;II;OA;9DBBJI7I;JG:;B7G9>;;CEDH?I?DC
I (marche)';KDN7CIAJB?C;JM:;A7B79>?C;Q
=A7SDCH:;K?;CIK;GIFJ7C:A;9DBBJI7I;JG:;A7
AJB?UG;:J9DBE7GI?B;CI9DC=TA7I?DC;HIEG;HHTDJ
FJ7C:A7EDGI;:J9DBE7GI?B;CI9DC=TA7I?DC;HI
<;GBT;
'7B79>?C;Q=A7SDCHH;G;BEA?G7:f;7JH?H7I;BETG7IJG;
87?HH;Qd[[!0CGT<G?=TG7I;JGCDJK;AA;B;CI?CHI7AAT
EG;C::;Q>;JG;HEDJG9DBB;C9;GQEGD:J?G;:;H
=A7SDCH
1DJH;CI;C:G;OJC8DJG:DCC;B;CI9>7FJ;<D?HFJ;A7
B79>?C;Q=A7SDCHH;G;BEA?I:f;7J
%;I;OA;HEG;B?;GHADIH:;=A7SDCHEDJGE;GB;IIG;
QA79DC:J?I;:f;7J:;H;EJG=;G
HHJG;OKDJHFJ;G?;CC;=UC;A79DJGH;:J8G7HE7AE;JG
,J7C:A;879H;G;BEA?I@JHFJf7JC?K;7J:J8G7HE7AE;JGA7
B79>?C;Q=A7SDCHHf7GGVI;:;EGD:J?G;:;H=A7SDCH$A;HI
CDGB7A:;IGDJK;G:;H=A7SDCHFJ?HD?;CIHDJ:TH;CH;B8A;
.?KDJHCfJI?A?H;OE7HHDJK;CIKDH=A7SDCHA;HK?;JM=A7SDCH
:;K?;CC;CIDE7FJ;HEG;CC;CIJCB7JK7?H=DZI;I
GTIGT9?HH;CI
NOTE : ,9>70>8,4>:9><@4:9?@90;=0>>4:9/Q0,@;7@>
1,4-70<@07,8:C0990A:@>;:@A0D09?09/=07,8,.3490F
27,G:9>=0.:8809.0=;7@>40@=>1:4>>:9.C.70;:@=;=:/@4=0
@9074A=,4>:9/027,G:9>
NOTE : 0??0D70.:88@?,?0@=/08,=.3009;:>4?4:9O (off)
(arrêt) >47Q,74809?,?4:9/Q0,@0>?.:@;H0
Machine
à glaçons
Bras palpeur
Commutateur de marche
Lumière
verte de
fonctionnement
Accès aux glaçons et au
commutateur de marche
Pour atteindre le commutateur de marche de la
machine à glaçons, I?G;OA79A7N;II;H?IJT;7J
:;HHJH:J879Q=A7SDCH;I<7?I;HA7HDGI?GHHJG;O
KDJHIDJ@DJGH:;8?;CA7G;B;IIG;;CEA79;
Pour avoir accès aux glaçons, I?G;OH?BEA;B;CI
A;879K;GHKDJH
Pour avoir accès aux glaçons.
Clayette
Bac à glaçons
Pour atteindre le commutateur de marche.
Clayette
Bac à glaçons
Trousse accessoire de machine à glaçons
.?KDIG;GT<G?=TG7I;JGCf;HIE7H:T@QTFJ?ET:fJC;
B79>?C;Q=A7SDCH7JIDB7I?FJ;KDJHEDJK;O79>;I;G
JC;IGDJHH;799;HHD?G;:;B79>?C;Q=A7SDCH
1TG?<?;O:;GG?UG;KDIG;GT<G?=TG7I;JGA;BD:UA;:;
IGDJHH;Q=A7SDCHFJ;KDJH:;K;O79>;I;GEDJGKDIG;
GT<G?=TG7I;JG
Pour utiliser le distributeur externe >@=.0=?,49>8:/I70>
EEJN;O:DJ9;B;CIA;K;GG;9DCIG;A;>7JI:J8G7H
:;:?HIG?8JI?DC
'79A7N;II;:;IGDEEA;?CCf;HIE7HBJC?;:fJCHNHIUB;
:fT9DJA;B;CI+DJGGT:J?G;A;HI79>;H:f;7JKDJH
:;K;OC;IIDN;GGT=JA?UG;B;CIA79A7N;II;
&Q479QC,;,>/Q0,@/4>?=4-@H07:=><@070=H1=42H=,?0@=
0>?494?4,70809?49>?,77H47C,;0@?J?=0/07Q,4=/,9>
7,.:9/@4?0/Q0,@;;@C0D>@=7,.:88,9/0/0
/4>?=4-@?4:90?1,4?0>.:@70=74?=0>
R 2,77:9>;:@=
0B;@7>0=7Q,4=/07,.:9/@4?0/Q0,@0?=08;74=70=H>0=A:4=
/Q0,@149/QH748490=70>HA09?@0770>48;@=0?H>;=:A09,9?
/07,.:9/@4?0/Q0,@50?0D70>>4B;=0840=>A0==0>/Q0,@
Verrouillage du distributeur
EEJN;OHJGA7IDJ9>;LOCK K;GGDJ?AA7=;E;C:7CI
H;9DC:;HEDJGK;GGDJ?AA;GA;:?HIG?8JI;JG;IA;E7CC;7J
:;GT=A7=;+DJG:TK;GGDJ?AA;G7EEJN;OHJGA7IDJ9>;;I
I;C;OA7;C<DC9T;E;C:7CI;C9DG;H;9DC:;H
Signal sonore
+DJG8G7C9>;GAf7A7GB;7EEJN;OHJGA7IDJ9>;DOOR
ALARM 7A7GB;:;EDGI;';KDN7CIAJB?C;JM
Hf7AAJB;G7;H?=C7AHDCC;H?AfJC;:;HEDGI;HG;HI;
DJK;GI;EAJH:;B?CJI;H';H?=C7AHDCDG;Hf7GGVI;
FJ7C:KDJH<;GB;OA7EDGI;
Bac de trop-plein
Bras de distribution
Pour utiliser le distributeur interne >@=.0=?,49>8:/I70>
';:?HIG?8JI;JG:f;7J;HIH?IJTHJGA7E7GD?=7J9>;
QAf?CITG?;JG:J9DBE7GI?B;CIGT<G?=TG7I;JG
Pour distribuer de l’eau :
+A79;OA;K;GG;:7CHA;G;C<DC9;B;CI
+DJHH;OHJGA;8DJIDC:J:?HIG?8JI;JG:f;7J
/;C;OA;K;GG;HDJHA;:?HIG?8JI;JGE;C:7CI
QH;9DC:;H7EGUHA;G;AR9>;B;CI:J8DJIDC
EJ?HFJ;AfT9DJA;B;CI:;Af;7JE;JIH;EDJGHJ?KG;
FJ;AFJ;E;J
&Q479QC,;,>/Q0,@/4>?=4-@H07:=><@070=H1=42H=,?0@=0>?
494?4,70809?49>?,77H47C,;0@?J?=0/07Q,4=/,9>7,.:9/@4?0
/Q0,@;;@C0D>@=70-:@?:9/0/4>?=4-@?4:9;09/,9?/0@B
849@?0>,@84948@8;:@=0B;@7>0=7Q,4=/07,.:9/@4?0
/Q0,@0?=08;74=70=H>0=A:4=/Q0,@:=>/0.0??0
8,9:0@A=070/4>?=4-@?0@=;0@?H80??=0@9-=@4?
>@=;=09,9?F80>@=0<@07Q,4=0>?0B;@7>H0/07,.:9/@4?0
/Q0,@149/QH748490=70>HA09?@0770>48;@=0?H>;=:A09,9?
/07,.:9/@4?0/Q0,@50?0D70>>4B;=0840=>A0==0>/Q0,@
NOTE : #:@=;=HA094=70>/H;K?><@07,4>>07Q0,@
>?,29,9?090??:C0D70/4>?=4-@?0@=097Q0>>@C,9?
=H2@74I=0809?F7Q,4/0/Q@9.3411:9:@/Q@90
H;:920;=:;=0>

Entretien et nettoyage de votre réfrigérateur.
Nettoyage de l’extérieur
Les poignées de porte et les garnitures.
);IIDN;O7K;9JCA?C=;IG;BET:7CH:;Af;7J
H7KDCC;JH;.T9>;O7K;9JCA?C=;:DJM
)f7EEA?FJ;OE7H:;9?G;HJGA;HED?=CT;H;IA;H
=7GC?IJG;H:;EDGI;
Conservez l’extérieur propre. HHJN;O7K;9
JCA?C=;EGDEG;AT=UG;B;CI>JB;9IT:;9?G;
Q7EE7G;?ATA;9IGDBTC7=;GDJ:;:TI;GH?<
A?FJ?:;QK7?HH;AA;:DJM.T9>;O;IEDA?HH;O
7K;9JCA?C=;:DJMEGDEG;
!Q0>>@C0D5,8,4>A:?=0=H1=42H=,?0@=,A0.@9
?:=.3:9>,70:@@90>0=A40??08:@477H007,
;0@?7,4>>0=@9=H>4/@<@4=4><@0
/Q09/:88,20=7,;049?@=0!Q@?474>0D5,8,4>/0
?,8;:9F=H.@=0=/090??:C,9?09;:@/=0
/Q0,@/05,A07:@/0;=:/@4?90??:C,9?
.:9?09,9?@9,209?/0-7,9.34809?.,=.0>
;=:/@4?>;0@A09?=,C0=0?09/:88,20=7,
;049?@=0
Vous pouvez nettoyer les panneaux et les
poignées de porte en acier inoxydable HJG
9;GI7?CHBD:UA;H 7K;9JCC;IIDN7CI:f79?;G
?CDMN:78A;K;C:JHJGA;B7G9>T$AK7JIB?;JM
JI?A?H;GJCEGD:J?I:;C;IIDN7=;K7EDG?HTEDJG
79?;G?CDMN:78A;
)fJI?A?H;OE7H:;9?G;EDJG7EE7G;?AH
BTC7=;GHHJGAf79?;G?CDMN:78A;
Pièces en matière plastique plaquée argent.
'7K;O9;HE?U9;H7K;9:JH7KDCDJJC7JIG;
:TI;G=;CI:DJM HHJN;O7K;9JC;TEDC=;
JCA?C=;>JB?:;DJJC;H;GK?;II;;CE7E?;G
);<GDII;O@7B7?H7K;9:;HI7BEDCH;CA7?C;
:f79?;GDJ:f7JIG;HC;IIDN7CIH78G7H?<H
Nettoyage de l’intérieur
Pour aider à empêcher les odeurs, A7?HH;O
JC;8DWI;DJK;GI;:;8?97G8DC7I;:;HDJ:;
:7CHA;H9DBE7GI?B;CIHGT<G?=TG7I?DC;I
9DC=TA7I?DC
Débranchez votre réfrigérateur avant de le
nettoyer. .?9;Cf;HIE7HEG7I?FJ;;CA;K;O
IDJI;>JB?:?IT7JBDN;C:fJC;TEDC=;
DJ:fJC9>?<<DCEDJGC;IIDN;G7JIDJG:;H
9DBBJI7I;JGH:;HAJB?UG;HDJ:;HGT=A7=;H
0I?A?H;OJC;9?G;EDJG7EE7G;?AH
TA;9IGDBTC7=;GHHJGA7HJG<79;?CITG?;JG;
;CIG;A;HEDGI;H
0I?A?H;OJC;HDAJI?DC:f;7J9>7J:;;I:;
8?97G8DC7I;:;HDJ:;BA5HD?IJC;9J?AAUG;
QHDJE;;CK?GDC6:;8?97G8DC7I;:;HDJ:;
:7CHA?IG;5HD?IJC;E?CI;6:f;7J;II;
HDAJI?DCC;IID?;IDJI;CC;JIG7A?H7CIA;H
D:;JGH-?C9;O;IHT9>;O;C;HHJN7CI
EGUH7KD?GC;IIDNTA;H@D?CIH:;EDGI;
7EEA?FJ;OJC;<?C;9DJ9>;:;K7H;A?C;HJGA;H
@D?CIH:J9XIT:;H9>7GC?UG;HEDJG;BEV9>;G
A;H@D?CIH:;9DAA;G;I:;H;:T<DGB;G
EA4?0D/090??:C0=70>.7,C0??0>1=:4/0>09
A0==0F7Q0,@.3,@/0;,=.0<@Q0770>=4><@09?
/0>0.,>>0=F.,@>0/07,2=,9/0
/411H=09.0/0?08;H=,?@=0> ,94;@70D,A0.
>:49>70A0==0):@>;:@A0D-=4>0=09H.7,?>
70A0==0?=08;H097030@=?,9?
!07,A0D,@.@90;4I.0098,?4I=0;7,>?4<@0
/0A:?=0=H1=42H=,?0@=/,9>A:?=08,.3490F
7,A0=7,A,4>>0770
Pièces en matière plastique plaquée argent.
'7K;O9;HE?U9;H:7CH:;Af;7JH7KDCC;JH;
HHJN;O7K;9JC;TEDC=;JCA?C=;>JB?:;
DJJC;H;GK?;II;;CE7E?;G
);<GDII;O@7B7?H7K;9:;HI7BEDCH;CA7?C;
:f79?;GDJ:f7JIG;HC;IIDN7CIH78G7H?<H
Soutien au
consommateur
Conseils de dépannage Fonctionnement Mesures de sécuritéInstallation

Soutien au
consommateur
Conseils de dépannage
FonctionnementMesures de sécurité Installation
www.electromenagersge.ca
'DGHFJ;KDJHKDJH78H;CI;OE;C:7CIJC;
ETG?D:;EGDADC=T;K?:;O;I:T8G7C9>;O
A;GT<G?=TG7I;JG);IIDN;OAf?CITG?;JG7K;9JC;
HDAJI?DC:f;7J;I:;8?97G8DC7I;:;HDJ:;
QG7?HDCBA:fJC;9J?AAUG;QHDJE;:;
8?97G8DC7I;E7GA?IG;E?CI;:f;7J'7?HH;O
A;HEDGI;HDJK;GI;H
(;II;OAf?CI;GGJEI;JG:f7A?B;CI7I?DC:;
A7B79>?C;Q=A7SDCHQA7EDH?I?DCO (arrêt)
;I<;GB;OAf7A?B;CI7I?DC:f;7J7J
GT<G?=TG7I;JG
.?A7I;BETG7IJG;G?HFJ;:;:;H9;C:G;HDJH
A;ED?CI:;9DC=TA7I?DC:;B7C:;OQJC
GTE7G7I;JG:;K?:7C=;GA79DC:J?I;:f;7J
7<?C:fTK?I;GA;H:T=RIHHTG?;JM97JHTHE7G
A;H?CDC:7I?DCH
Derrière le réfrigérateur
+G;C;OJCHD?CE7GI?9JA?;GADGHFJ;KDJH
TAD?=C;OA;GT<G?=TG7I;JG:JBJG/DJHA;H
INE;H:;G;KVI;B;CIH:;HDAE;JK;CIVIG;
;C:DBB7=THE7GI?9JA?UG;B;CI9;JMFJ?HDCI
9DJHH?CTHDJ:DCIA7HJG<79;;HI=7J<GT;
.DJA;K;OA;HE?;:H:f?C9A?C7?HDCH?IJTH;C87H
QAf7K7CI:;KDIG;GT<G?=TG7I;JG
/?G;OA;GT<G?=TG7I;JG;CA?=C;:GD?I;
;IADGHFJ;KDJHA;G;B;II;O;CEA79;
EDJHH;OA;K;GHA;BJG;CA?=C;:GD?I;
';H:TEA79;B;CIHA7ITG7JM:JGT<G?=TG7I;JG
EDJGG7?;CI;C:DBB7=;GA;G;KVI;B;CI
:;HDADJA;GT<G?=TG7I;JG
87?HH;OA;HE?;:H:f?C9A?C7?HDC@JHFJfQ9;
FJf?AHIDJ9>;CIA;HDA
:=><@0A:@>=080??0D70=H1=42H=,?0@=09
;7,.00970;:@>>,9?A04770DF90;,>70
1,4=0=:@70=>@=70.:=/:9/Q,74809?,?4:9:@
>@=7,.:9/@4?0/Q0,@/07,8,.3490F
27,G:9>>@=.0=?,49>8:/I70>0?,>>@=0D
A:@><@070>@;;:=?/@8H.,94>80,9?4
-,>.@70809?>:4?092,2H>4A:?=0
=H1=42H=,?0@=0>?,49>4H<@4;H
Départ en vacances
Déménagement
$BBD8?A?H;OIDJHA;HTATB;CIH7BDK?8A;HI;AH
FJ;A;H9A7N;II;H;IA;H879HQAf7?:;:;
GJ87C=DBBTEDJGTK?I;G:;A;H
;C:DBB7=;G
.?KDJHJI?A?H;OJC9>7GG?DIEDJG:TBTC7=;G
A;GT<G?=TG7I;JGC;A7?HH;O@7B7?HA;:;K7CIDJ
A;:;GG?UG;:JGT<G?=TG7I;JGG;EDH;G9DCIG;A;
9>7GG?DI;A7EDJGG7?I;C:DBB7=;GA;
GT<G?=TG7I;JG);IG7CHEDGI;OA;GT<G?=TG7I;JG
FJ;E7GA;H9XITH
>>@=0DA:@><@070=H1=42H=,?0@=/080@=0
/0-:@?;09/,9?>:9/H8H9,20809?
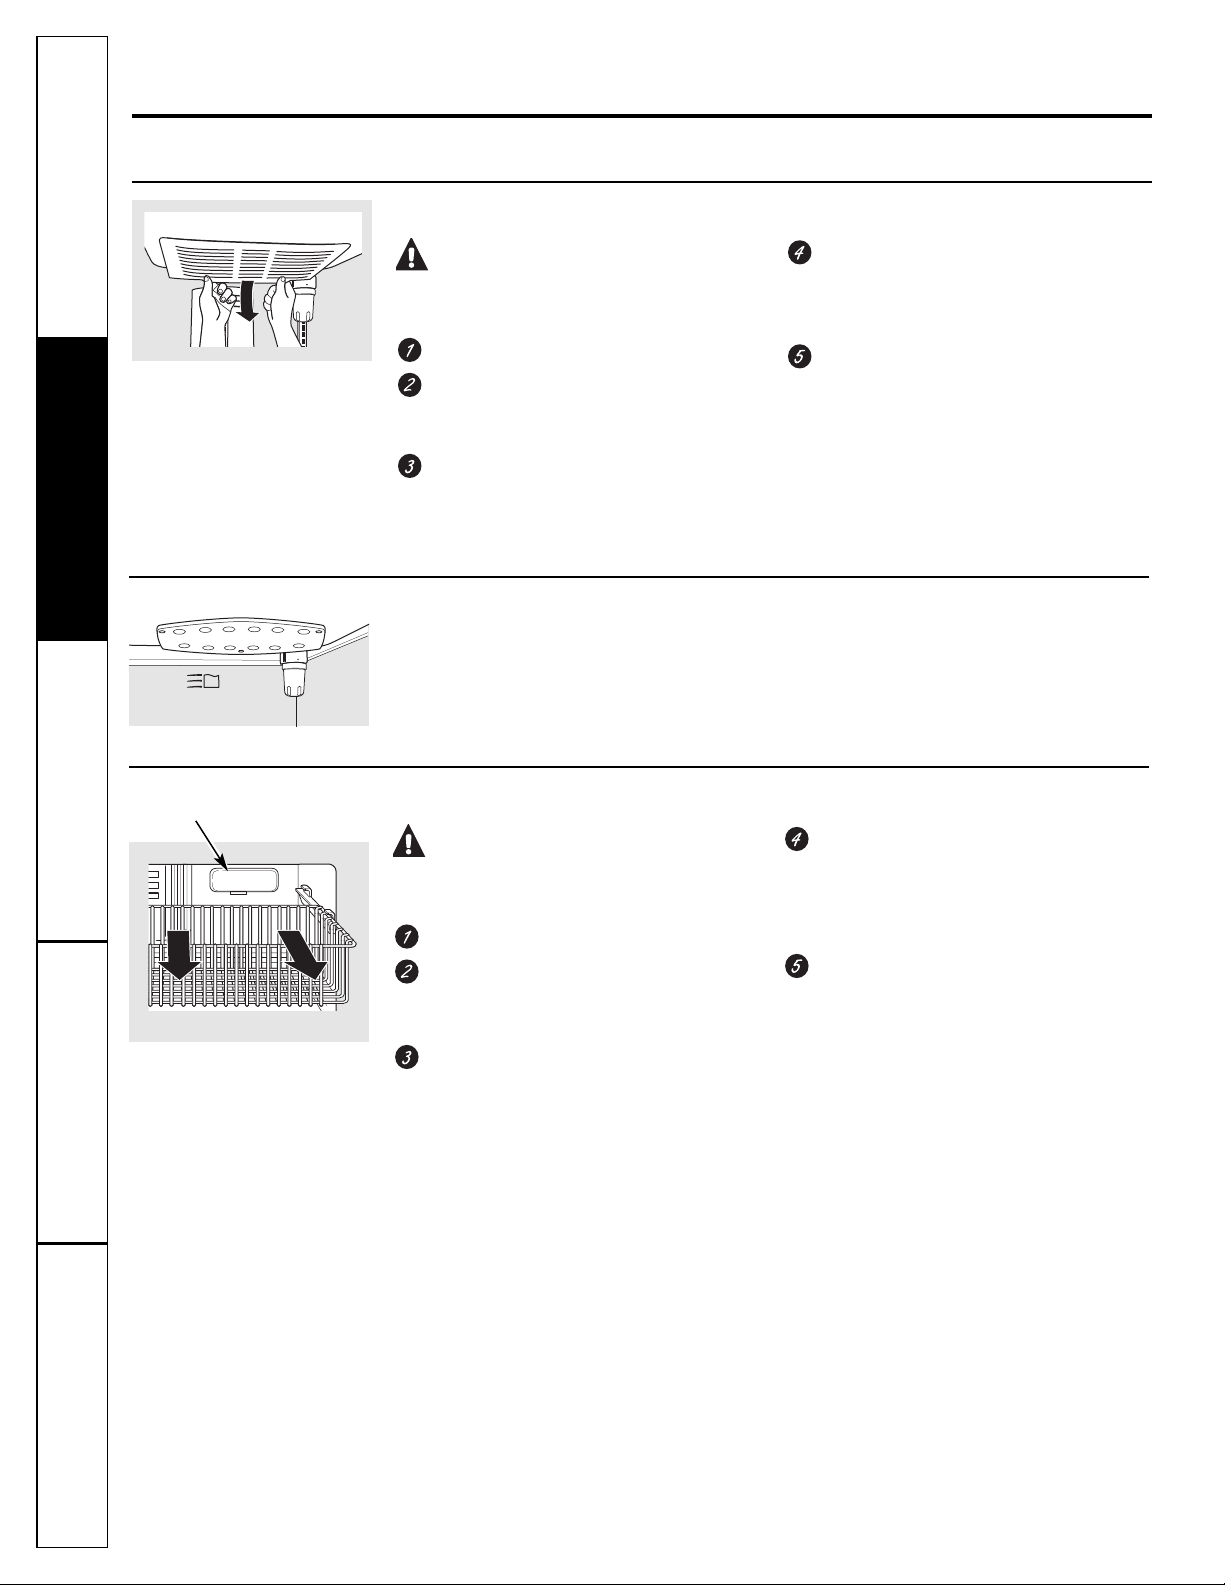
Lumière du compartiment congélation
MISE EN GARDE :
0>,8;:@70>H70.?=4<@0>;0@A09?J?=0
-=L7,9?0>
T8G7C9>;OA;GT<G?=TG7I;JG
-;I?G;OA;E7C?;G:J9DC=TA7I;JG
'f7BEDJA;;HIH?IJT;7J<DC::J
9DC=TA7I;JG:7CHJC8DWI?;GEGDI;9I;JG
+DJGA;G;I?G;G7IIG7E;OA;8DWI?;G
EGDI;9I;JGE7GA7E7GI?;HJETG?;JG;;I
I?G;OA;K;GHKDJHEDJGA?8TG;GA;H
A7C=J;II;H?C<TG?;JG;H
EGUH7KD?GG;BEA79TAf7BEDJA;E7G
JC;7BEDJA;:f7EE7G;?ATA;9IGDBTC7=;G
:;BVB;KDAI7=;DJ:fJCKDAI7=;EAJH
87HG;B;II;O;CEA79;A;E7G;AJB?UG;;I
A;E7C?;G:J9DC=TA7I;JG
-;8G7C9>;OA;GT<G?=TG7I;JG
Lumières du compartiment réfrigération >@=.0=?,49>8:/I70>
MISE EN GARDE :
0>,8;:@70>H70.?=4<@0>;0@A09?J?=0
-=L7,9?0>
T8G7C9>;OA;GT<G?=TG7I;JG
+DJG;CA;K;GA;E7G;AJB?UG;H7?H?HH;O
Af7GG?UG;:;A;E7G;AJB?UG;;II?G;OA;EDJG
A;A?8TG;G:;H;HI7FJ;IHQAf7GG?UG;
!7?I;HIDJGC;GA;E7G;AJB?UG;K;GHA;87H
EJ?HI?G;OEDJGA?8TG;GA;HI7FJ;IH
QAf7K7CI:;A;E7G;AJB?UG;
EGUH7KD?GG;BEA79TAf7BEDJA;E7GJC;
7BEDJA;:f7EE7G;?ATA;9IGDBTC7=;G:;
BVB;KDAI7=;DJ:fJCKDAI7=;EAJH87H
G;B;II;O;CEA79;A;E7G;AJB?UG;
-;8G7C9>;OA;GT<G?=TG7I;JG
NOTE : 1DJHEDJK;O9DBB7C:;G:;H
7BEDJA;HEDJG7EE7G;?AHTA;9IGDBTC7=;GH
;CITATE>DC7CI7JH;GK?9;:;E?U9;H;I
799;HHD?G;H" 7J
Remplacement des ampoules.
:=><@0A:@>=H270D70>.:88,9/0>>@=0 (OFF) ==J?7Q,74809?,?4:9H70.?=4<@0/07Q,8;:@709Q0>?;,>.:@;H0
Soutien au
consommateur
Conseils de dépannage Fonctionnement Mesures de sécuritéInstallation
Lumières LED du compartiment réfrigération
>@=.0=?,49>8:/I70>
0CI;9>C?9?;C7=GTT:;KG7G;BEA79;G
AfT9A7?G7=;Q:?D:;
Boîtier
protecteur
L’apparence peut varier
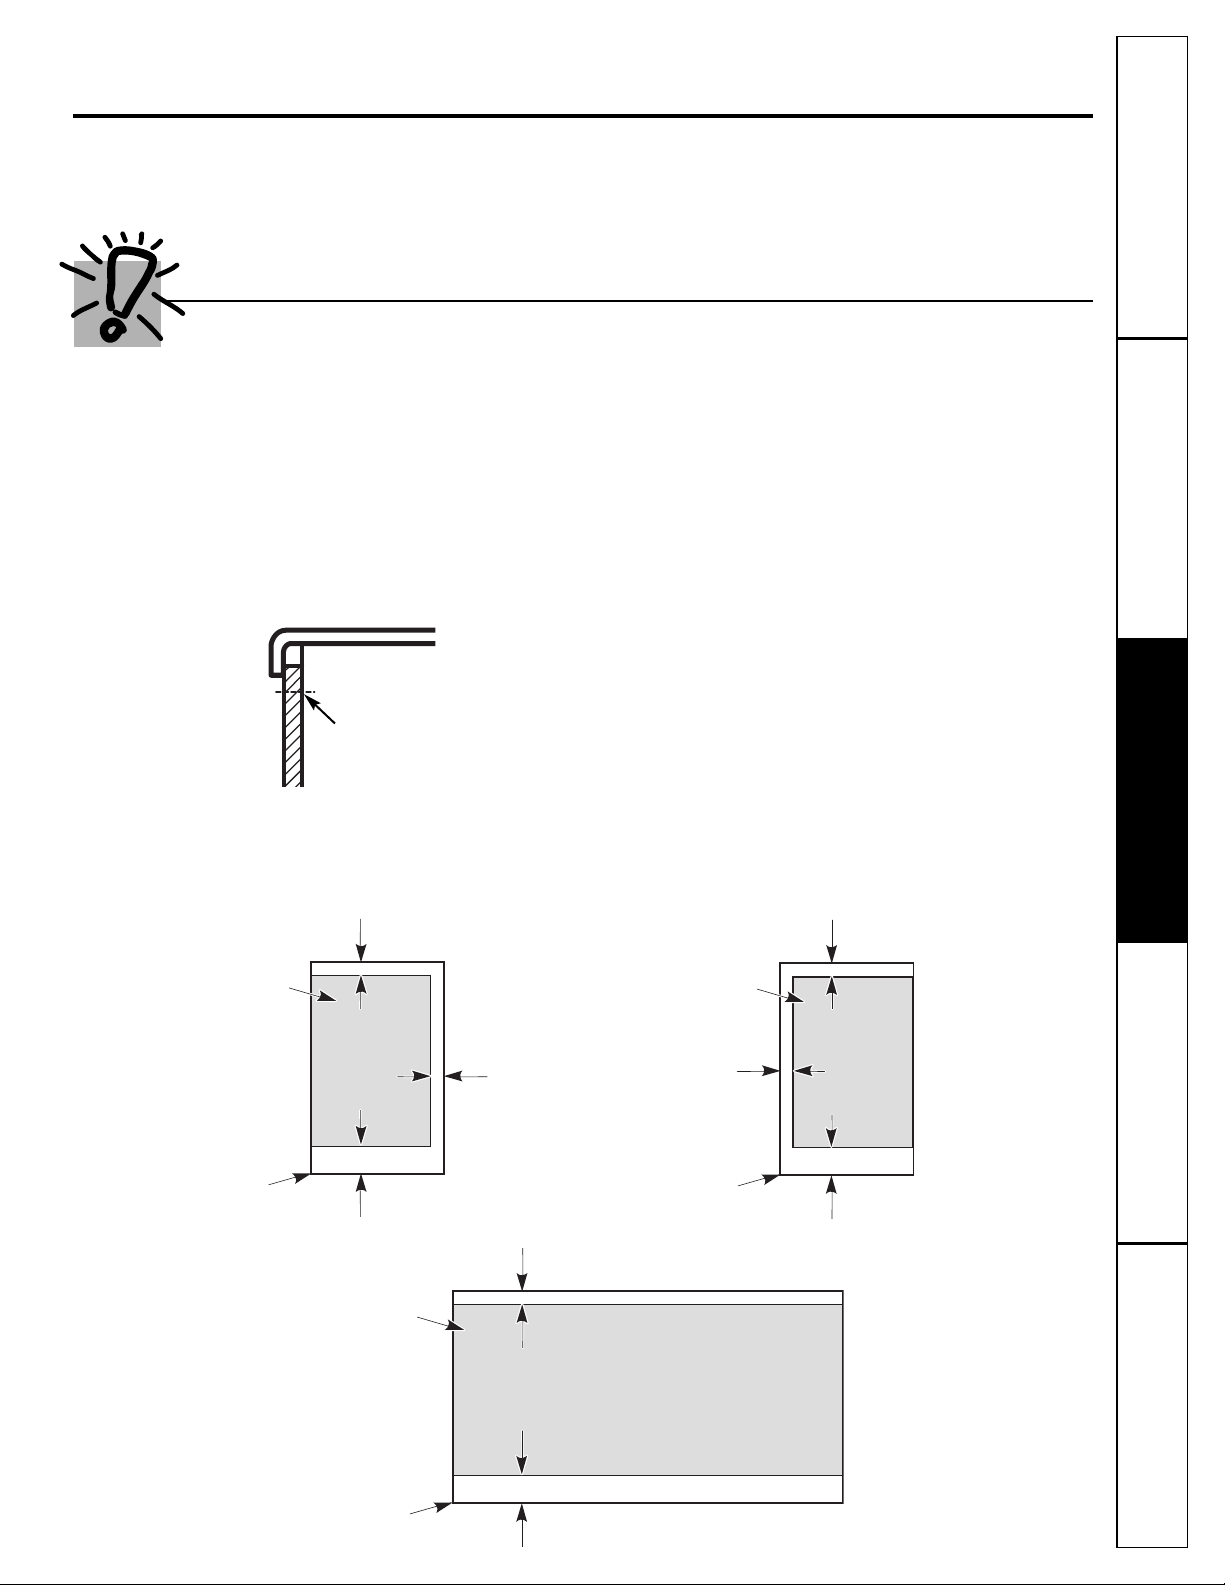
Soutien au
consommateur
Conseils de dépannage
FonctionnementMesures de sécurité Installation
Ensembles de moulures et de panneaux décoratifs.
Veuillez lire toutes les directives attentivement.
A,9?/0.:8809.0=
0=?,49>8:/I70>>:9?8@94>/02,=94?@=0><@4A:@>;0=80??09?/08:9?0=/0>;,990,@B/0;:=?0
):@>;:@A0D.:88,9/0=/0>;,990,@B/H.:=,?41>;=H/H.:@;H>-7,9.>:@9:4=>,@>0=A4.0/0;4I.0>0?
,..0>>:4=0>09?H7H;3:9,9?,@:@A:@>;:@A0D,5:@?0=/0>;,990,@B09-:4>,77,9?
,A0.70>,=8:4=0>/0A:?=0.@4>494I=0
Panneaux de moins de 6 mm (1/4 po) d’épaisseur
'DGHFJ;KDJH?CHI7AA;O:;HE7CC;7JM;C8D?H:;BD?CH:;BBEDKDJH7JG;O8;HD?C:fJCE7CC;7J:;
G;BEA?HH7=;;CIG;A7EDGI;;IA;E7CC;7J;C8D?H9DBB;E7G;M;BEA;JC97GIDC:;BBED:fTE7?HH;JG
.?KDJH?CHI7AA;OJCE7CC;7J:T9DG7I?<EGT9DJETJCE7CC;7J:;G;BEA?HH7=;EGT9DJET;HI<DJGC?:7CHA7
IGDJHH;'fTE7?HH;JGIDI7A;:JE7CC;7J:T9DG7I?<DJ:;8D?H7K;9A;E7CC;7J:;G;BEA?HH7=;:D?IVIG;:;
BBED7K;9A;E7CC;7JAJ?BVB;E7HEAJHTE7?HFJ;BBED
#:@=70>8:/I70>9H.0>>4?,9?@9;,990,@
Les panneaux qui ont moins de 6 mm (1/4 po)
6 mm (1/4 po) max
'7ED?=CT;;IA7BDJAJG;:J>7JI;I:J87HH;IGDJK;CI:;K7CIQA7HJG<79;:;A7EDGI;9;FJ?CT9;HH?I;JC
E7CC;7J:;G;BEA?HH7=;:fJC;ADC=J;JG;I:fJC;A7G=;JGEAJHE;I?I;HFJ;9;AA;H:JE7CC;7J0I?A?H;OA;H
:?G;9I?K;HHJ?K7CI;H;I9DAA;OA;E7CC;7J:;G;BEA?HH7=;7JBDN;C:;GJ87C7:>TH?<QAf7GG?UG;:JE7CC;7J
Porte de gauche du compartiment réfrigération
Porte du compartiment congélation
Panneau de
remplissage
63,5 mm (2 1/2 po)
19 mm (3/4
po
)
19 mm (3/4 po)
Panneau
Panneau de
remplissage
63,5 mm (2 1/2 po)
19 mm (3/4 po)
Panneau
Porte de droite du compartiment réfrigération
Panneau de
remplissage
63,5 mm (2 1/2 po)
19 mm (3/4
po
)
19 mm (3/4 po)
Panneau
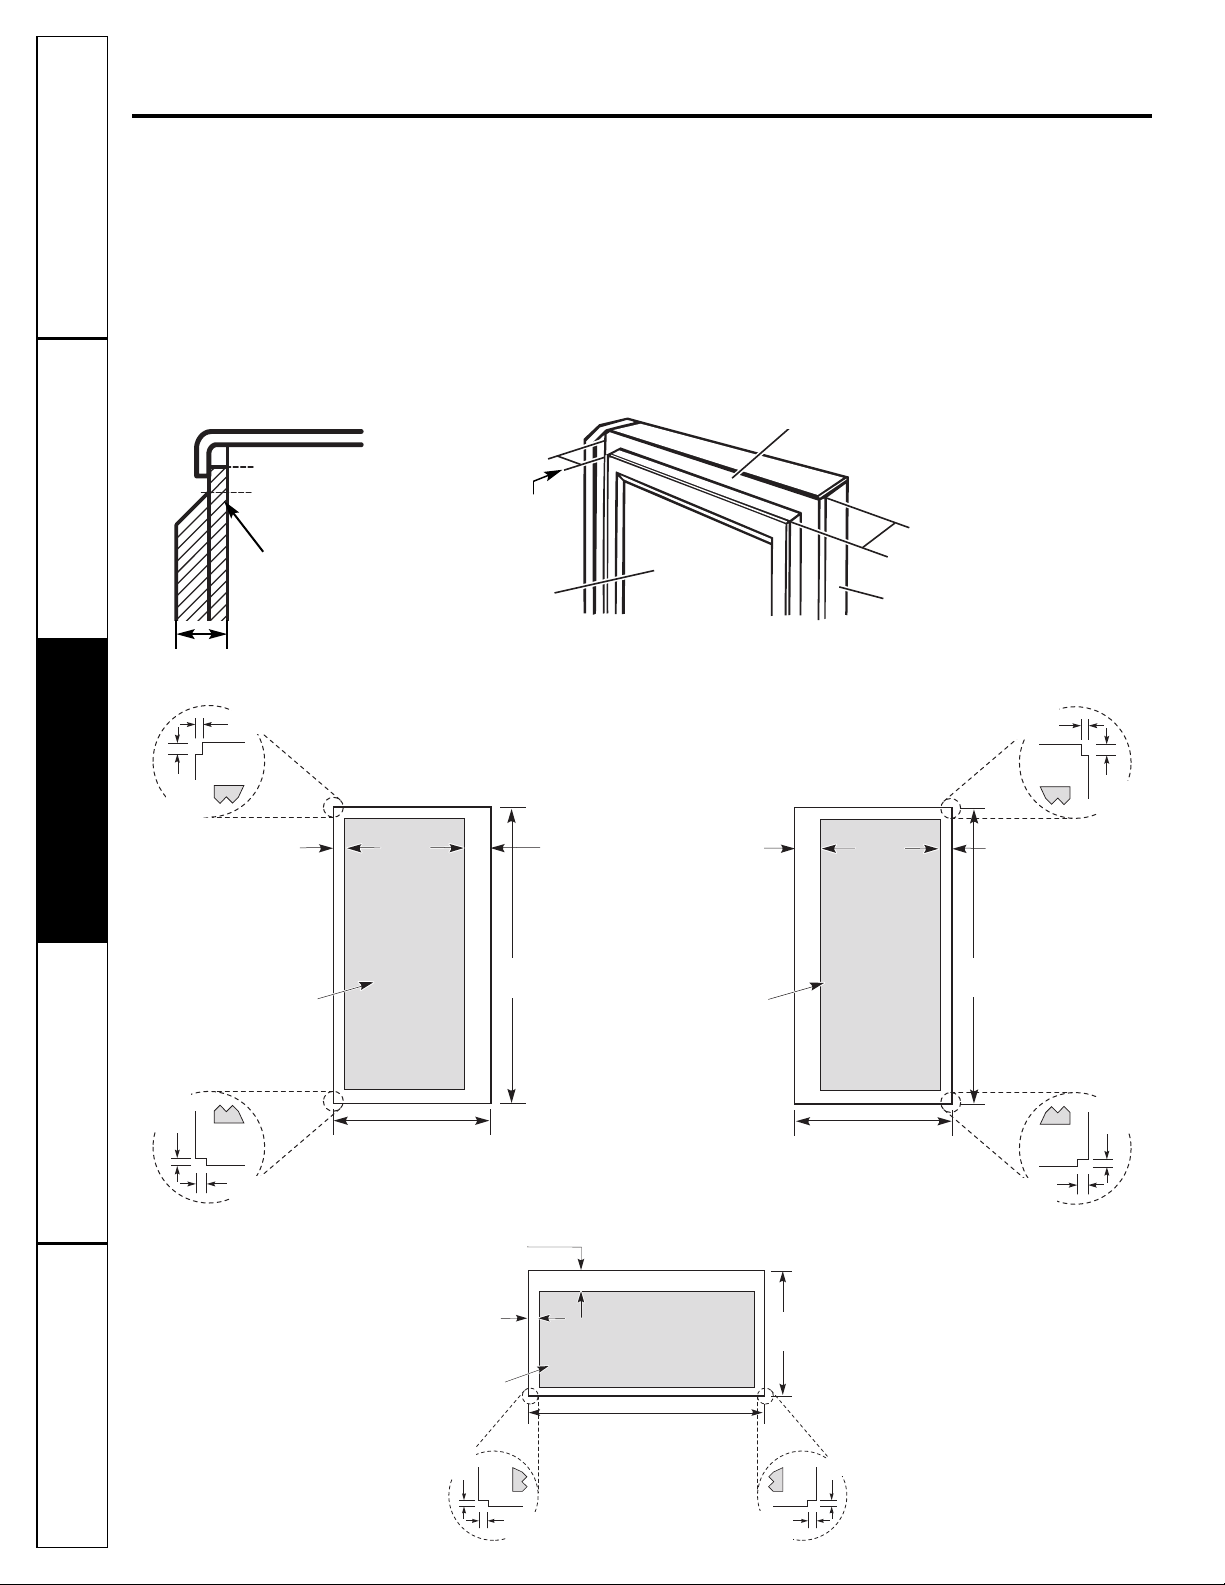
Soutien au
consommateur
Conseils de dépannage Fonctionnement Mesures de sécuritéInstallation
Ensembles de moulures et de panneaux décoratifs.
Dimensions pour les panneaux en bois sur mesure
Panneaux de 19 mm (3/4 po) ou en relief
1DJHEDJK;OJI?A?H;GJCBDI?<:;E7CC;7J;CG;A?;<K?HHTDJ9DAATQJCE7CC;7JTE7?H:;BBEDDJJCE7CC;7JIDJE?AAT
:;BBED'7E7GI?;;CG;A?;<:JE7CC;7J:D?IVIG;<78G?FJT;:;B7C?UG;QA7?HH;GJC;HE79;A?8G;:f7JBD?CH9B
ED:J9XIT:;A7ED?=CT;EDJGE;GB;IIG;7JM:D?=IH:f;CIG;G
';HE7CC;7JMEAJHTE7?HFJ;BBEDEDJK7CI7AA;G@JHFJfQJCB7M?BJB:;BBEDCT9;HH?I;GDCIFJ;
A;ETG?BUIG;;MITG?;JG:JE7CC;7J:;BBEDC;HD?IE7HEAJHTE7?HFJ;BBED
484?0>/0;:4/>;:@=70>;,990,@B>@=80>@=0
:8;,=?4809?=H1=42H=,?4:98,B627->;:@=.3,<@0;:=?0
:8;,=?4809?.:92H7,?4:98,B627->
5,1 cm (2 po)
Espace libre
côté poignée
Panneau
décoratif
Porte du compartiment
réfrigération
6 mm (1/4 po)
Envers épais
19 mm
(3/4 po)
Panneaux plus épais que 6 mm (1/4 po)
6 mm (1/4 po) max
19 mm (3/4 po)
8 mm (5/16 po)
Porte de droit du compartiment
réfrigération
Porte du compartiment
congélation
Haut, droit
et bas
42,9 cm (16 29/32 po)
Min 8 mm
(5/16 po) à
épaisseur de
6 mm (1/4 po)
Partie du
panneau en
relief
Min 51 mm
(2 po) à
épaisseur de
6 mm (1/4 po)
Côté de la poignée
66,3 cm
(26 3/32 po)
Min 51 mm (2 po) à
épaisseur de 6 mm (1/4 po)
Côté de la poignée
Haut, gauche
et bas
Min 8 mm (5/16 po) à
épaisseur de 6 mm (1/4 po)
91,2 cm (35 29/32 po)
Partie du
panneau
en relief
98,9 cm
(38 15/16 po)
Porte de gauche du
compartiment
réfrigération
Haut, gauche
et bas
42,9 cm (16 29/32 po)
Min 8 mm
(5/16 po) à
épaisseur de
6 mm (1/4 po)
Partie du panneau
en relief
Min 51 mm
(2 po) à
épaisseur de
6 mm (1/4 po)
Côté de la poignée
98,9 cm
(38 15/16 po)
3 mm
(1/8 po)
3 mm
(1/8 po)
3 mm
(1/8 po)
3 mm
(1/8 po)
3 mm
(1/8 po )
6 mm
(1/4 po)
6 mm
(1/4 po)
6 mm
(1/4 po)
3 mm
(1/8 po)
6 mm
(1/4 po)
6 mm
(1/4 po)
6 mm
(1/4 po)
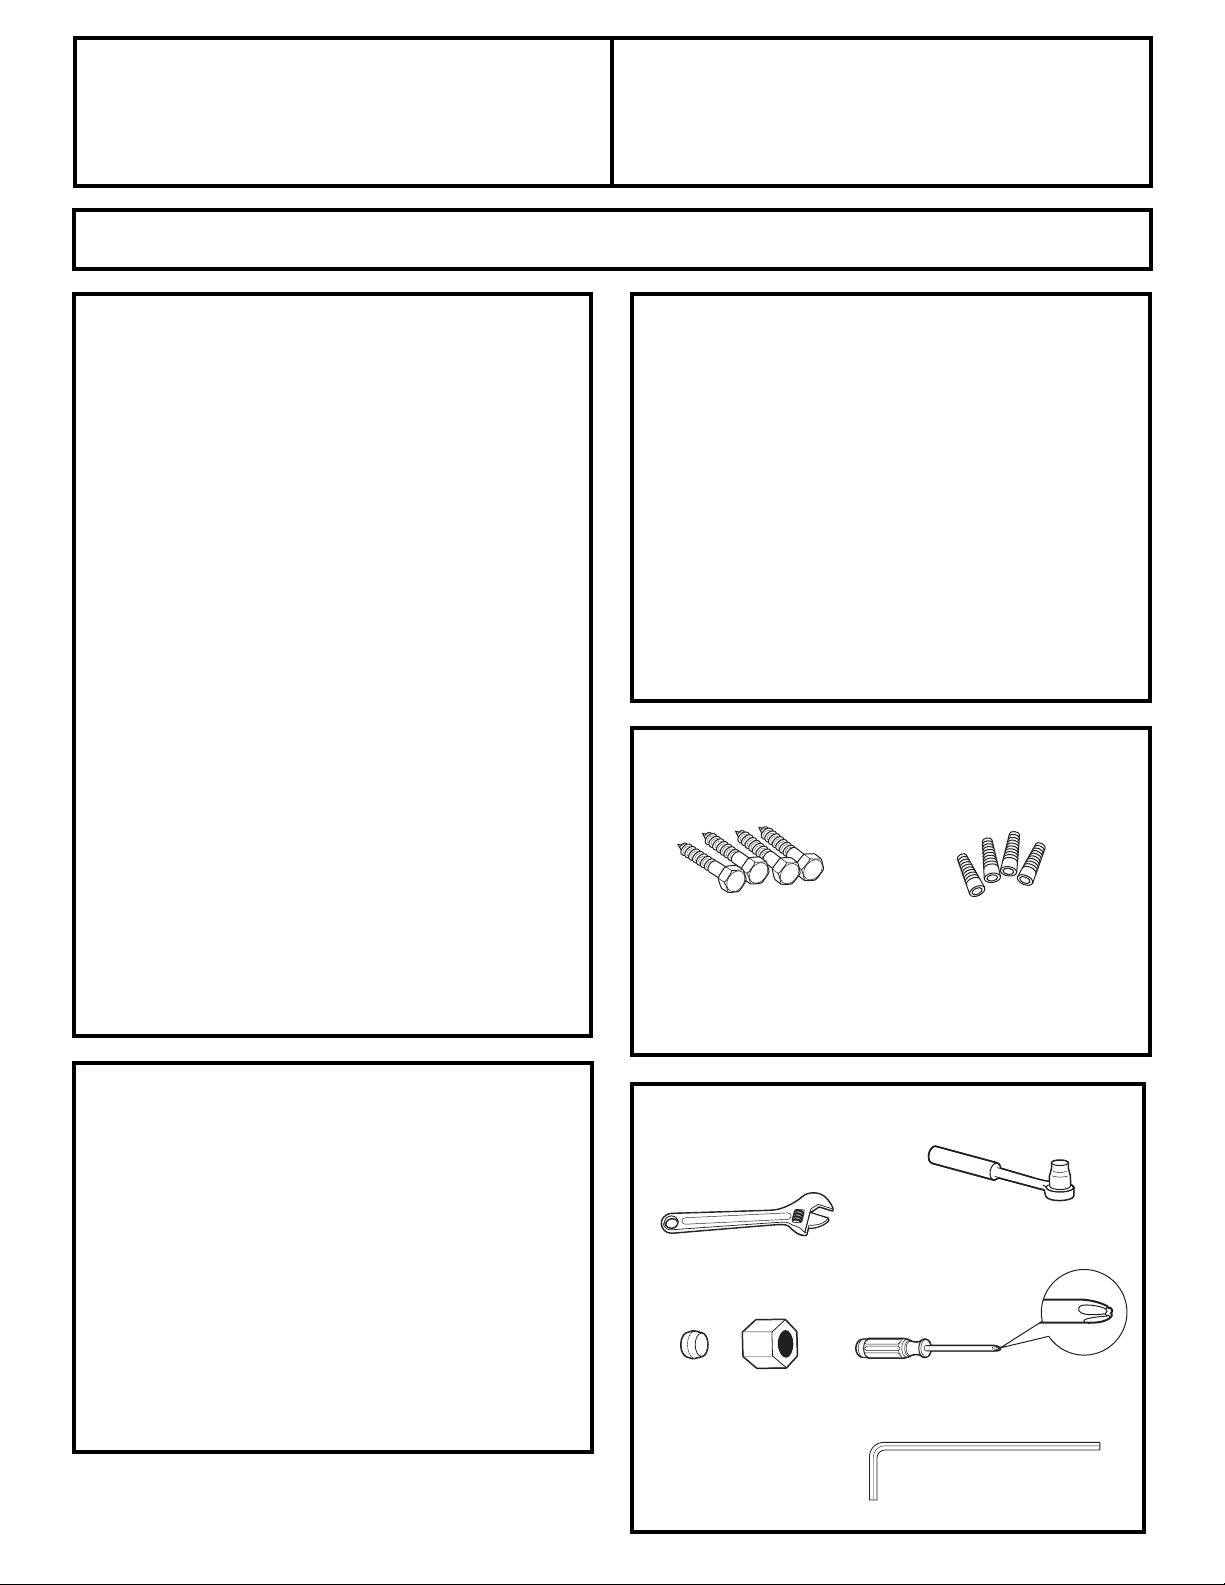
(1@5771E75=1?:@?1>71>05=1/?5A1>-??19?5A1819?
\
"!$& &U DCH;GK;O9;H?CHIGJ9I?DCH
EDJGAf?CHE;9I;JGAD97A
\
"!$& &U -;HE;9I;OIDJI;H
A;HDG:DCC7C9;H;IA;H9D:;HAD97JM
\ :?1H7V59>?-77-?1@=THHJG;OKDJH:;A7?HH;G9;H
?CHIGJ9I?DCH7J9DCHDBB7I;JG
\ :?1-@/:9>:88-?1@=TDCH;GK;O9;H
?CHIGJ9I?DCHEDJGGT<TG;C9;<JIJG;
\ 5A1-@01/:8;K?19/1T'f?CHI7AA7I?DC:;
9;I7EE7G;?ACT9;HH?I;:;H9DBETI;C9;H
BT97C?FJ;H:;87H;
\ &18;>0V59>?-77-?5:9T$CHI7AA7I?DC:JGT<G?=TG7I;JG
B?CJI;H
$CHI7AA7I?DC:;A79DC:J?I;
:f;7JB?CJI;H
$CHI7AA7I?DC:JHJEEDGI
:JBT97C?HB;7CI?
87H9JA;B;CIB?CJI;H
\ 'f?CHI7AA7I;JG;HIG;HEDCH78A;:;8?;C?CHI7AA;G9;
GT<G?=TG7I;JG
\ /DJI;E7CC;:JEGD:J?I:J;QJC;B7JK7?H;
?CHI7AA7I?DCCf;HIE7H9DJK;GI;E7GA7=7G7CI?;
#@1>?5:9>;;171E71:@A5>5?1E9:?=1>5?1)1.H7V-0=1>>1BBB171/?=:819-31=>31/-
9>?=@/?5:9>
$K2=53K=-?1@=
0V59>?-77-?5:9
:0L71>1?
( &! $
.?KDIG;GT<G?=TG7I;JG;HI:DIT:fJC;B79>?C;
Q=A7SDCHA7B79>?C;Q=A7SDCH:D?IVIG;G799DG:T;
QJC;9DC:J?I;:f;7J<GD?:;1DJHEDJK;O79>;I;G
JC;IGDJHH;:f7A?B;CI7I?DC:f;7J" 9DCI;C7CI
A7IJN7JI;G?;A;GD8?C;I:f7GGVIA;H@D?CIH;IA;H
?CHIGJ9I?DCH9>;OKDIG;G;K;C:;JGDJ;CKDJH
7:G;HH7CIQCDIG;H?I;2;8QAf7:G;HH;
BBB171/?=:819-31=>31/- DJQCDIG;H;GK?9;:;
+?U9;H;I799;HHD?G;H7JCJBTGD:;ITATE>DC;
"$"$&! >@5?1
&&! V'
SF! %&'%&$'&'$
%'$$& %!X%
"$G"$&!
G" &'$G$G$&'$SV &G$'$
%!
%571=K2=53K=-?1@=91;1@?;->;->>1=;-=7-;:=?1
A:@>;:@A1E1971A1=7-;:=?10@/:8;-=?5819?
=K2=53K=-?5:91?71?5=:5=0@/:8;-=?5819?
/:93K7-?5:9
\ +DJG;CA;K;GA7EDGI;:J9DBE7GI?B;CI
GT<G?=TG7I?DC9DCHJAI;OAfTI7E;:;A7H;9I?DC
3,920809?/0>09>/Q:@A0=?@=0/07,;:=?0
\ +DJG;CA;K;GA;I?GD?G:J9DBE7GI?B;CI
9DC=TA7I?DC9DCHJAI;OA7H;9I?DC97IA0809?/@
?4=:4=/@.:8;,=?4809?.:92H7,?4:9
&G$'*! &(!'%"!'(,(!$
%!
9DC9DBEG?H
Tire-fonds
Manchons d’ancrage
+DJGA;HJEEDGI:;BT97C?HB;7CI?87H9JA;B;CI
BDCITHJGA;HHDAH;C$( )/ JC?FJ;B;CI
Mèches de perceuse qui conviennent aux manchons d’ancrage
!'&%! &(!'%"!'(,(!$
%!
Clé réglable
Écrou à compression d’un
diamètre exterieur de 1/4 po
et bague (modèles avec
machine à glaçons
seulement)
Tournevis cruciforme
Tournevis à cliquet
de 3/8 po et de 5/16 po
Clé à six pans de 3/32 po,
1/8 po et 1/4 po
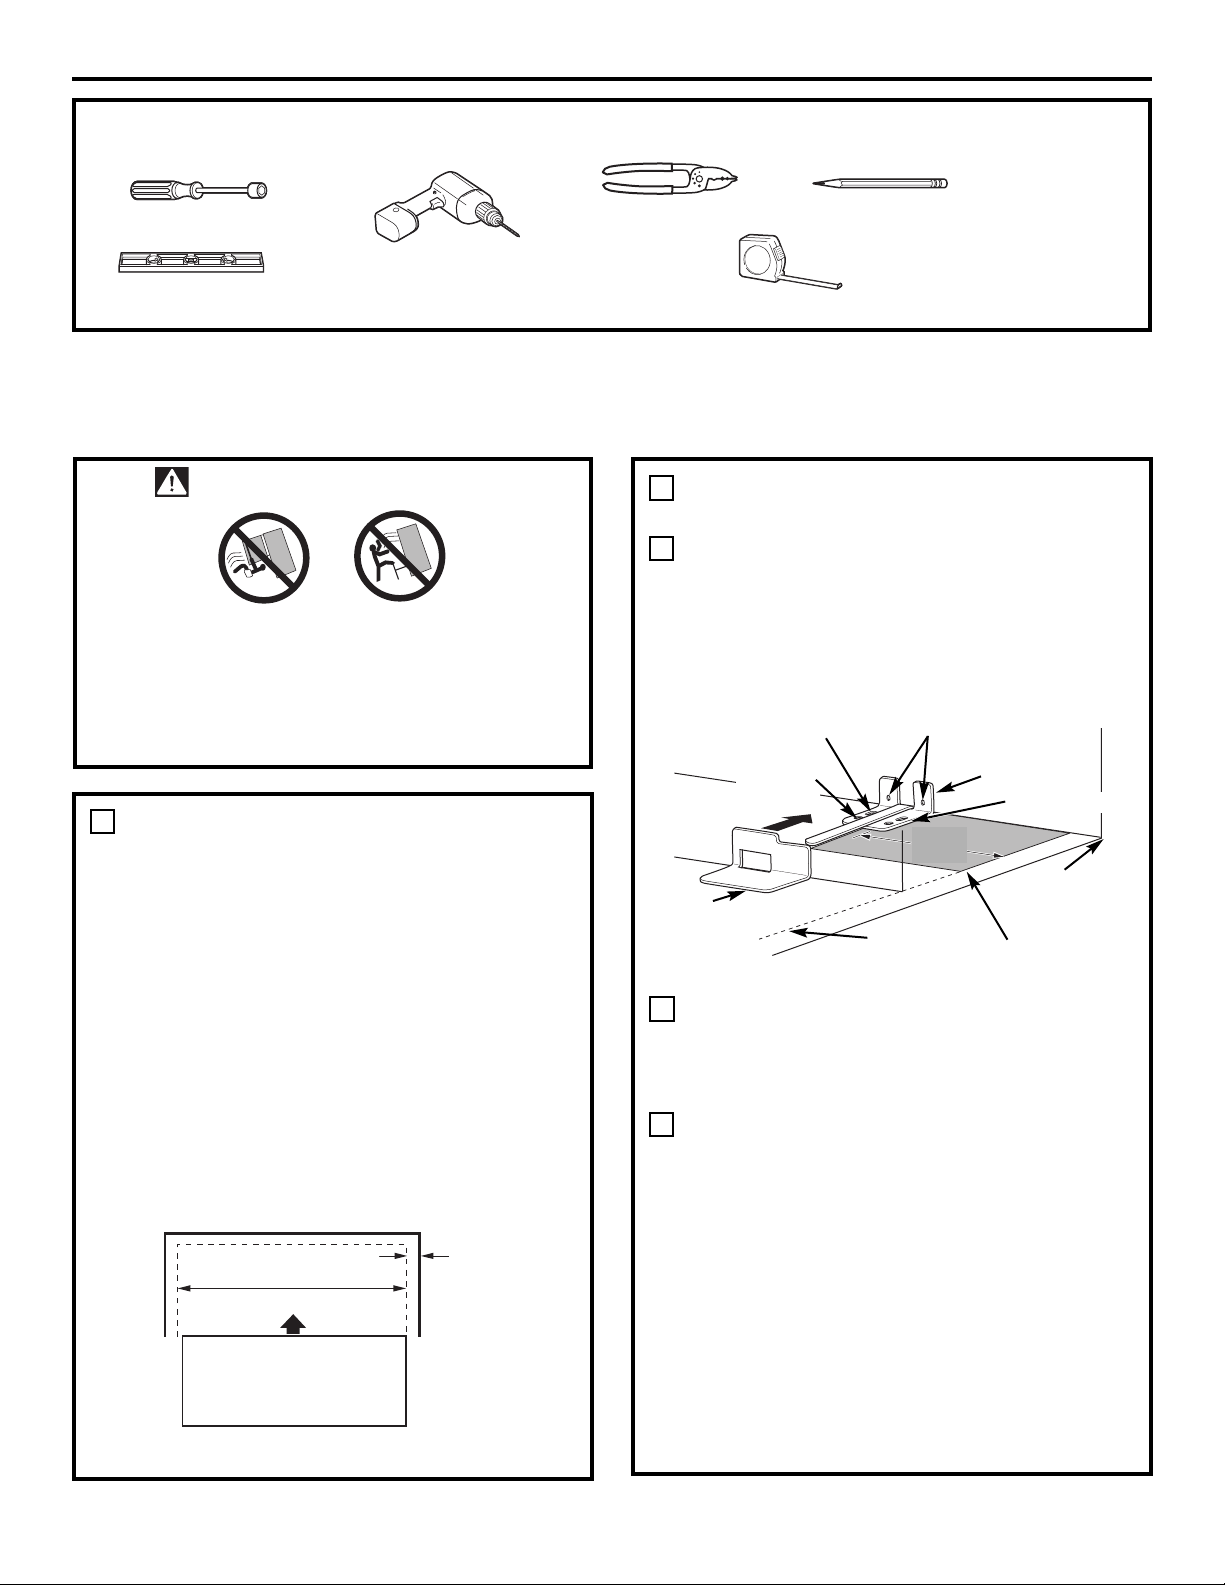
9>?=@/?5:9>0V59>?-77-?5:9
!'&%! &(!'%"!'(,(!$%! %'&
%'$,V!'($&'$%"!
%V$!$&!"$,
&&%'$S$'$'
$G$G$&'$
(;HJG;O2A7A7G=;JG:;AfDJK;GIJG;:;
Af7GBD?G;:7CHA7FJ;AA;KDJHKDJA;OB;IIG;
KDIG;GT<G?=TG7I;JG
HHJG;OKDJH:;I;C?G9DBEI;:;IDJIHJGEADB8
:J9DBEID?G:;AfTE7?HH;JG:;A7EA?CI>;;I:;
IDJI;HE79;A?8G;:TH?GT
'7A7G=;JG2:D?IVIG;HJETG?;JG;Q9B
EDJ9;H1DJH:;K;OEA79;GA;GT<G?=TG7I;JG
7EEGDM?B7I?K;B;CI7JB?A?;J:;9;II;
DJK;GIJG;
($&%% &
-9>/1=?-591>/:905?5:9>/1=K2=53K=-?1@=>;1@?
.->/@71=A1=>7V-A-9?
17-;1@?19?=-N91=01>.71>>@=1>/:=;:=1771>
9>?-771E71>@;;:=?-9?5.->/@71819?18.-77K
-A1/A:?=1=K2=53K=-?1@=
Épaisseur de la
plinthe ou
surplomb du
comptoir (la
mesure la plus
grande) plus
tout espace libre
désiré
Mur arrière
Devant
Côté droit du
réfrigérateur
"!%&! &'%'""!$&
%! &%' &
+A79;OA;=787G?I:;EDH?I?DCC;B;CI:JHJEEDGI:;HDA
7CI?87H9JA;B;CI9DBEG?HQAf?CITG?;JG:;A7IGDJHH;
7CI?87H9JA;B;CIHJGA;HDA9DCIG;A;BJG7GG?UG;Q
Af?CITG?;JG:;2;I;CA?=C;7K;9Af;BEA79;B;CI:TH?GT
:J9XIT:GD?I:JGT<G?=TG7I;JGKD?G!?=JG;
+A79;OA;HJEEDGI:;HDA7CI?87H9JA;B;CI:7CHA;
=787G?I:;EDH?I?DCC;B;CI7K;9H;HIGDJH7JHDA:;
:GD?I;7A?=CTH7JMIGDJH7JHDA?C:?FJTHHJGA;=787G?IQ
7EEGDM?B7I?K;B;CI9B
ED:;Af;MIGTB?IT:J
=787G?IDJ:J9XIT:GD?I:JGT<G?=TG7I;JG
/;C;O;CEDH?I?DC;IJI?A?H;OA;HJEEDGI:;HDA7CI?
87H9JA;B;CI9DBB;=787G?IEDJGB7GFJ;GA;HIGDJH
;CKDJH87H7CIHJGKDIG;9DC<?=JG7I?DC;IA797IT=DG?;
:;9DCHIGJ9I?DC?C:?FJT;:7CHAfTI7E;(7GFJ;O
Af;BEA79;B;CI:;HIGDJH7K;9JC9G7NDCJC9ADJ
DJJCED?CSDC
!&
\
1DJH:;K;OD8A?=7ID?G;B;CIJI?A?H;G7JBD?CHK?H
EDJGBDCI;GA;HJEEDGI:;HDAJC;:;9>7FJ;9XIT:J
HJEEDGI:;HDA7CI?87H9JA;B;CI';H:;JM:D?K;CI
;CIG;G:7CHA;BJGDJ:7CHA;HDA'7<?=JG;?C:?FJ;
IDJI;HA;H9DC<?=JG7I?DCH:;BDCI7=;799;EI78A;H
EDJG9;HK?H/GDJK;OA;HIGDJH:;K?HHJGA;HJEEDGI
:;HDA7CI?87H9JA;B;CI
W
2 trous dans mur
Côté droit du
réfrigérateur
Sol – ciment
(2 trous)
Sol – bois
(2 trous)
18,4 cm
(7
1
⁄4 po)
Gabarit de
positionnement
Support de sol
à installer
Trous à droite
Arrière à droite
de la paroi de
l’armoire
RÉFRIGÉRATEUR
Figure 1 – Vue d’ensemble de l’installation
%&&! '%'""!$&%!'G % &
%' &>@=71>8:0L71>01;5
Crayon
Perceuse à main ou électrique
et mèche de 1/8 po
Mètre
Tourne-écrou de 1/4 po
Cisaille
Niveau
Support
de base sur
le réfrigérateur
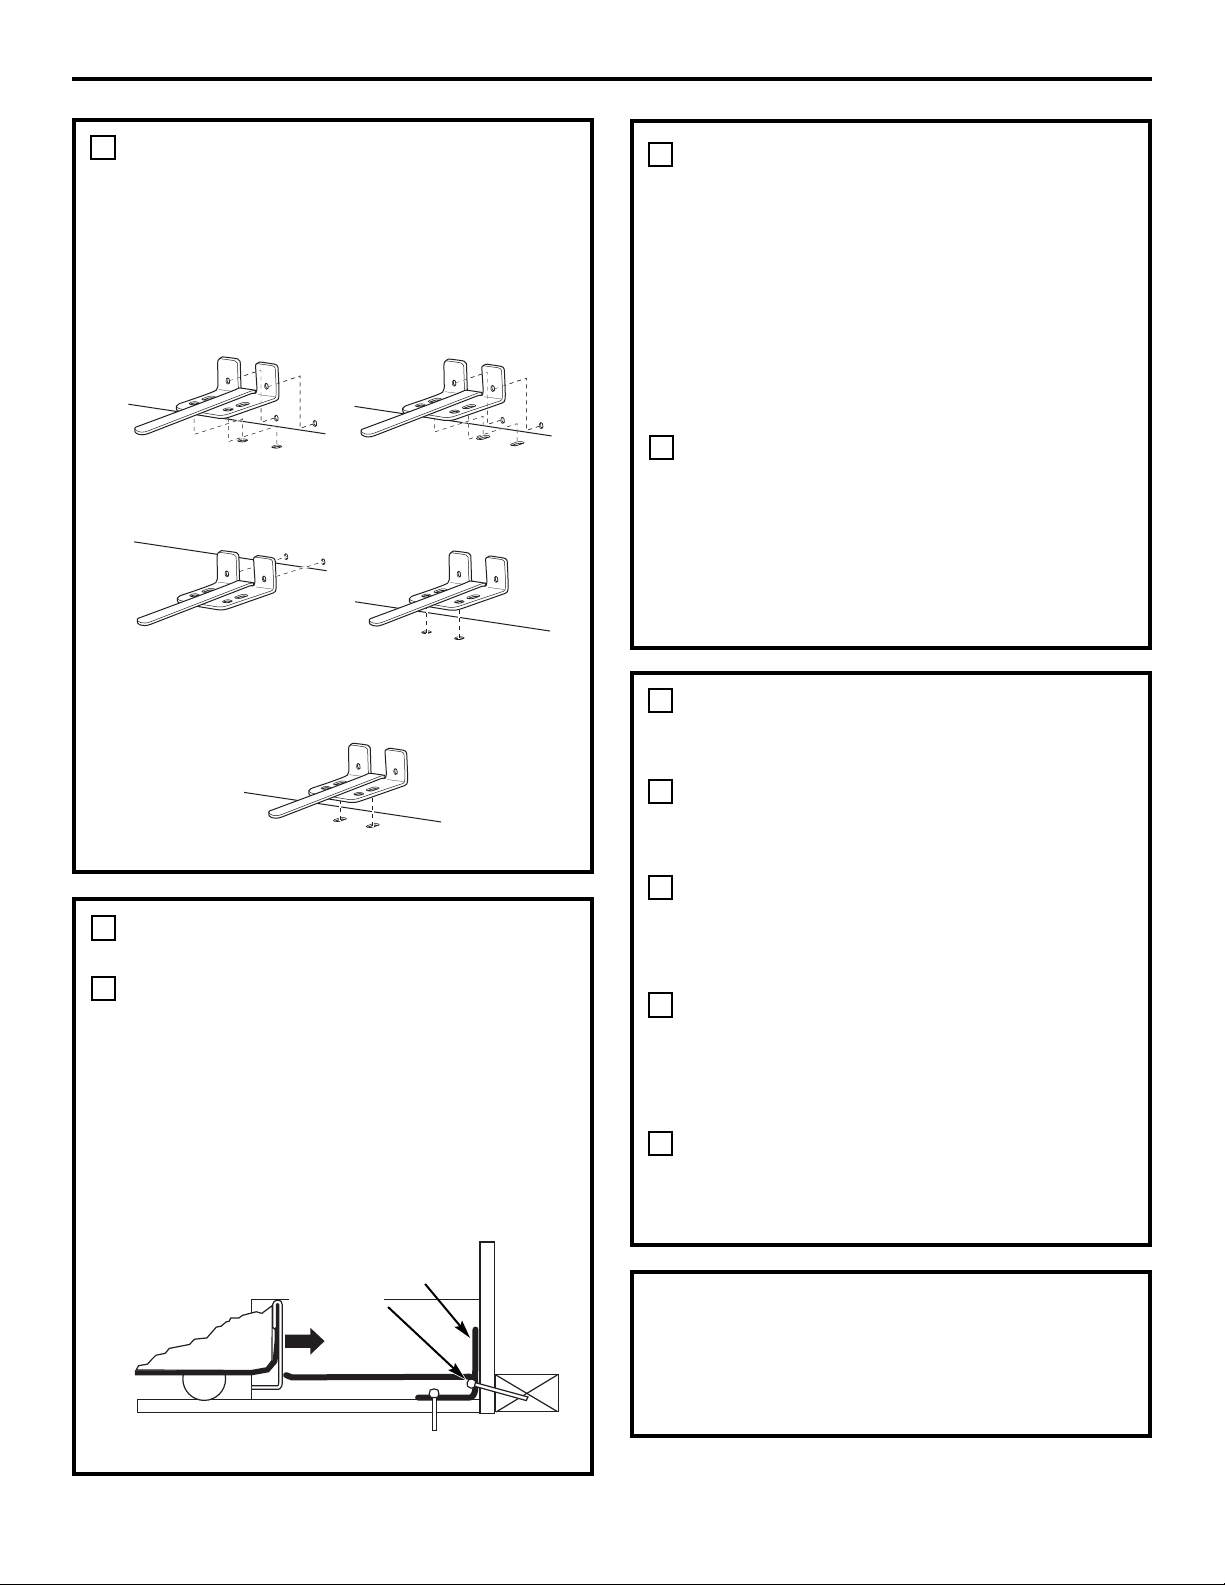
9>?=@/?5:9>0V59>?-77-?5:9
"!%&! &'%'""!$&
%! &%' & >@5?1
Installation préférée
Bois
Installation préférée Ciment
Minimum acceptable #1
Montant de poutre
Minimum acceptable #2
Plancher en bois
Minimum acceptable #3
Sol en ciment
Figure 2 – Emplacement
acceptable des vis
DCHIGJ9I?DC:;BJG;IHDA;C$( )/
\(7C9>DCH:f7C9G7=;G;FJ?HCDC<DJGC?H
I?G;<DC:HEDMED
B7C9>DCH:f7C9G7=; ED
\+;G9;OA;HIGDJH:;I7?AA;G;9DBB7C:T;EDJGA;HB7C9>DCH
:f7C9G7=;:7CHA;9?B;CI7J9;CIG;:;HIGDJHB7GFJTH
:7CHAfTI7E;
\+A79;OA;HB7C9>DCH:f7C9G7=;:7CHA;HIGDJHE;G9TH
+A79;OA;HJEEDGI:;HDA7CI?87H9JA;B;CI9DBB;Af?C:?FJ;
AfTI7E; CA;K;OA;=787G?I:;EDH?I?DCC;B;CI:JHDA
\$CHI7AA;OA;HI?G;<DC:H;CA;H<7?H7CIE7HH;GE7GA;HJEEDGI:;
HDA7CI?87H9JA;B;CI;IK?HH;O8?;C
DCHIGJ9I?DC:;BJGH;C*$. ;IHDA;C-- 03
\+DJG9;II;9DC<?=JG7I?DCHET9?7A;IGDJK;OA;H:;JMIGDJH7J
BJG?C:?FJTHQA7<?=JG;+;G9;O:?7=DC7A;B;CIJCIGDJ:;
=J?:7=;:;ED7EEGDM?B7I?K;B;CI9DBB;Af?C:?FJ;A7
<?=JG;7J9;CIG;:;9>7FJ;IGDJ
\(DCI;OA;HJEEDGI:;HDA7CI?87H9JA;B;CI;CJI?A?H7CI
Af?CHI7AA7I?DCB?C?BJB799;EI78A;9DBB;Af?C:?FJ;A7
<?=JG;
%&&! '%'""!$&
&%' &
DCHIGJ9I?DC:;BJG;IEA7C9>;G;C8D?H
\+;G9;OA;CDB8G;7EEGDEG?T:;IGDJH:;=J?:7=;:;ED
7J9;CIG;:;9>7FJ;IGDJ:JHJEEDGI:;HDAJI?A?HTKDJH
EDJK;OJI?A?H;GJC9ADJDJJCED?CSDCH?KDJHCf7K;OE7H
:;E;G9;JH; /;CA;K;OA;=787G?I:JHDA
\(DCI;OA;HJEEDGI:;HDA7CI?87H9JA;B;CI;CK?HH7CIA;H
:;JMDJ:;EGT<TG;C9;K?HQIVI;>;M7=DC7A;;I
;CA;HH;GG7CI8?;C;CEA79;9DBB;A;BDCIG;A7<?=JG;
"!%&! &'$G$G$&'$"!'$
&$$ %%%'""!$&%%!&
% &%' &
K7CI:;EDJHH;GA;GT<G?=TG7I;JG:7CHAfDJK;GIJG;8G7C9>;O
A;9DG:DC:f7A?B;CI7I?DC:7CHA7EG?H;BJG7A;;I8G7C9>;OA7
9DC:J?I;:f;7JH?KDIG;GT<G?=TG7I;JG;HI7?CH?TFJ?ET1TG?<?;O
FJf?ACfN7E7H:;<J?I;
/GDJK;OA;9XIT:GD?I:JGT<G?=TG7I;JG;I<7?I;HA;G;9JA;G
7EEGDM?B7I?K;B;CI;CA?=C;7K;9A;9XIT:GD?I:;AfDJK;GIJG;
:;Af7GBD?G;2;A7:;KG7?IB;IIG;A;HJEEDGI:;HDA7CI?
87H9JA;B;CI;CEDH?I?DCEDJG;CIG;G:7CHA;HJEEDGI:;87H;
7CI?87H9JA;B;CI:JGT<G?=TG7I;JG
!7?I;HG;9JA;GA;GT<G?=TG7I;JG;CA;GDJA7CI:DJ9;B;CI:7CH
AfDJK;GIJG;:;Af7GBD?G;@JHFJfQ9;FJf?AHf7GGVI;
9DBEAUI;B;CI1TG?<?;OFJ;Af7K7CI:JGT<G?=TG7I;JGHD?I8?;C
7A?=CTQAf7K7CI:;Af7GBD?G;JIG;B;CI87A7C9;O:DJ9;B;CI
A;GT<G?=TG7I;JG:;Af7K7CIQAf7GG?UG;@JHFJfQ9;FJf?A8DJ=;;I
FJ;KDJHIGDJK;OFJf?A;HI8?;CEDJHHT9DCIG;A;BJG7GG?UG;
)*+/$*)-T=A;OA7>7JI;JG:;HGDJA;II;H7GG?UG;;I7K7CI
:;B7C?UG;Q<7?G;;CIG;G9DBEAUI;B;CIA;HHJEEDGIH7CI?
87H9JA;B;CIIDJI;C7A?=C7CIAf7K7CI:JGT<G?=TG7I;JGQ
Af7K7CI:;Af7GBD?G;
Figure 3 – Fixation au mur et sol
!&
%5A:@>2-5?1>>:=?5=71=K2=53K=-?1@=1971?5=-9?1?7VK/-=?1E
0@8@=;:@=@91=-5>:9<@17/:9<@1->>@=1EA:@>01.5192-5=1
19?=1=71>@;;:=?01>:7-9?5.->/@71819?<@-90A:@>
=1;:@>>1E71=K2=53K=-?1@=/:9?=1718@=-==5L=1
Coin arrière droit
du réfrigérateur
Plancher
Poutre
du mur
Support
de sol
2 vis doivent
entrer dans la
poutre de bois
ou de métal
Mur
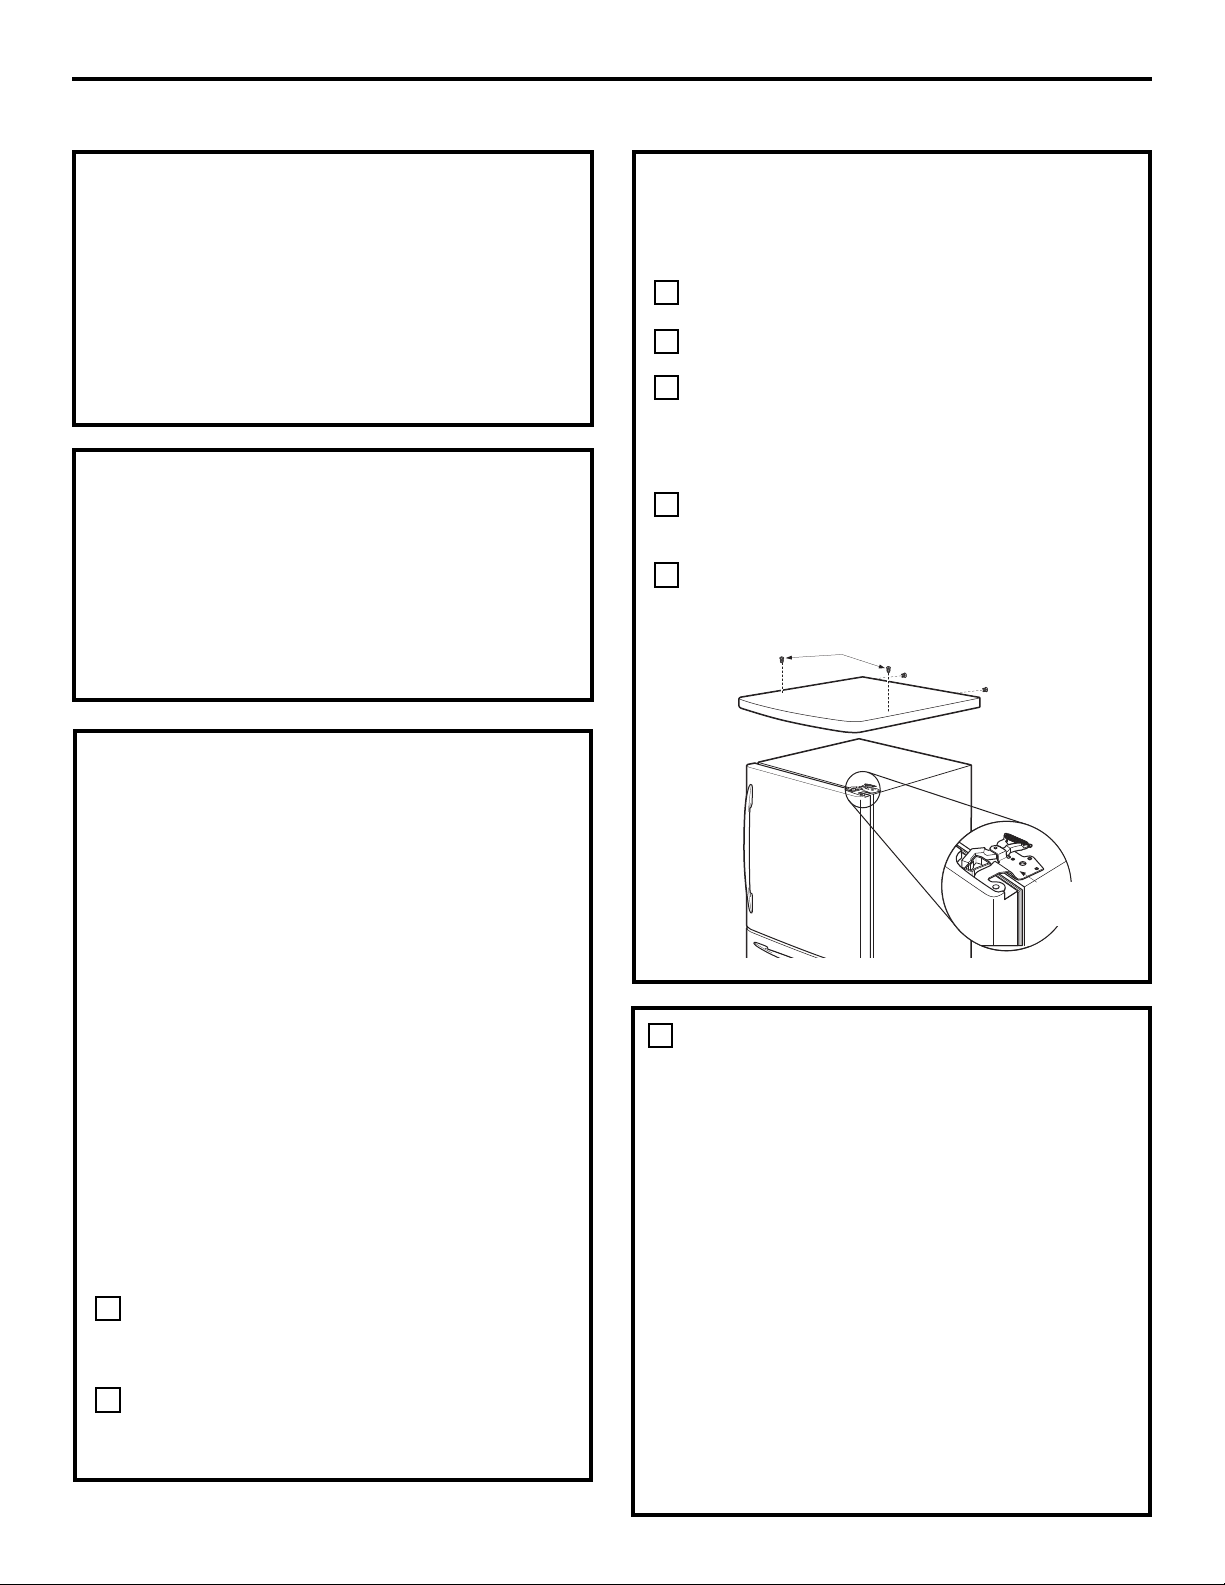
9>?=@/?5:9>0V59>?-77-?5:9
%&&! '$G$G$&'$
" &'$G$G$&'$
\)f?CHI7AA;O@7B7?HKDIG;GT<G?=TG7I;JG:7CHJC;BEA79;B;CIDYA7
I;BETG7IJG;7B8?7CI;H;G7?C<TG?;JG;Q[[!$AC;H;
B;IIG7E7H;CB7G9>;HJ<<?H7BB;CIHDJK;CIEDJGB7?CI;C?G:;H
I;BETG7IJG;H9DCK;C78A;H
\)f?CHI7AA;O@7B7?HKDIG;GT<G?=TG7I;JG:7CHJC;BEA79;B;CIDYA7
I;BETG7IJG;7B8?7CI;H;G7HJETG?;JG;Q[[!$AC;
<DC9I?DCC;G7E7H8?;C
\$CHI7AA;OKDIG;GT<G?=TG7I;JGHJGJCEA7C9>;GHJ<<?H7BB;CIHDA?:;
EDJGA;EDGI;GADGHFJf?A;HIEA;?C
G &%
+GTKDN;OA;H:T=7=;B;CIHHJ?K7CIHEDJG<79?A?I;GAf?CHI7AA7I?DCA7
8DCC;9?G9JA7I?DC:f7?G;IA;HG799DG:;B;CIH:;EADB8;G?;;I
:fTA;9IG?9?IT
:0L71>01 :0L71>01
;=:2:901@=9:=8-71 ;=:2:901@=0V-=8:5=1
O?K> BBED BBED
1>>@> BBED BBED
==5L=1 BBED BBED
$ &'$G$G$&'$
S! '&V'%!
8:0L71>-A1/8-/4591H37-J:9>1?05>?=5.@?1@=
0C;7A?B;CI7I?DC:f;7J<GD?:;;HIG;FJ?H;EDJG<7?G;
<DC9I?DCC;GA7B79>?C;Q=A7SDCH1DJH:;KG;O;C<DJGC?G
JC;H?;AA;Cf;M?HI;E7H1D?GA7H;9I?DC9>?,77,?4:9
/07,.:9/@4?0/Q0,@
!&%
\K7CI:;8G7C9>;GA79DC:J?I;7JGT<G?=TG7I;JG7HHJG;OKDJH
FJ;A;9DG:DC:f7A?B;CI7I?DCTA;9IG?FJ;Cf;HIE7H8G7C9>TQ
A7EG?H;BJG7A;
\.?KDIG;GT<G?=TG7I;JGCf;HIE7HTFJ?ET:;<?AIG;Q;7JCDJH
G;9DBB7C:DCH:f;CBDCI;GJCH?KDIG;7A?B;CI7I?DC:f;7J
9DCI?;CI:JH78A;DJ:;HE7GI?9JA;HFJ?E;JK;CI8DJ9>;G
A7=G?AA;:JGD8?C;I:f;7J:JGT<G?=TG7I;JG$CHI7AA;OA;HJG
A79DC:J?I;:f;7JEGUH:JGT<G?=TG7I;JG.?KDJHJI?A?H;OJC;
IGDJHH;" .B7GIDCC;9I
^
-;<G?=;G7IDG/J8?C=KDJH7JG;O
8;HD?C:fJCIJN7J7::?I?DCC;A233EDJG8G7C9>;G
A;<?AIG;);9DJE;OE7HA;IJN7J:;EA7HI?FJ;EDJG?CHI7AA;G
A;<?AIG;
(,"'! ''&>@5?1>@=
/1=?-59>8:0L71>
$&&, "%"!$&%%&$!$%&
"'! ''&
CA;K;OA;I?GD?G:J9DBE7GI?B;CI9DC=TA7I?DC:J87HDCHJAI;O
A7H;9I?DCa CAUK;B;CI:JI?GD?G:J9DBE7GI?B;CI9DC=TA7I?DCb
B;C;OA;GT<G?=TG7I;JG@JHFJfQAf;BEA79;B;CIDYKDJH:TH?G;O
Af?CHI7AA;G
87?HH;OHD?=C;JH;B;CIA7EDGI;:7CHA79>7GC?UG;
9;CIG7A;-;B;II;O;CEA79;A79>7GC?UG;:J>7JI
!& 1;?AA;OQ9;FJ;A7EDGI;HD?I8?;C7A?=CT;7JHDBB;I:;
Af7GBD?G;EDJGTK?I;G:;A7GT7@JHI;GE;C:7CIA7G;B?H;;CEA79;
:J97EJ9>DC:J>7JI
+A79;OA;97EJ9>DC;C>7JI:JGT<G?=TG7I;JG-;B;II;O;C
EA79;A;HK?HFJ;KDJH7K;O;CA;KT;H;C>7JI;IQAf7GG?UG;:;A7
EDGI;
-;B;II;O;CEA79;A;I?GD?G:J9DBE7GI?B;CI9DC=TA7I?DC:J
87HDCHJAI;OA7H;9I?DCa-;B?H;;CEA79;:JI?GD?G:J
9DBE7GI?B;CI9DC=TA7I?DCb
(,"'! ''&
>@=/1=?-59>8:0L71>
\ !&"!$& &1=K2=53K=-?1@=-@91;=:2:901@=01
;:1>;:=?1>1?71>;->>-31><@58L919?H7V190=:5?:P
A:@>0K>5=1E7V59>?-771E0:5A19?-A:5=@917-=31@=0@8:59>01
;:;:@=;1=81??=101?=-9>;:=?1=71=K2=53K=-?1@=6@><@VH
/1?190=:5?>-9>M?=1:.753K0V1971A1=71>;:=?1>1?71>;:539K1>
%571;->>-31-8:59><@1;:017-=31@=A:@>=5><@1E
A=-5819?01=-D1=1?0V190:88-31=71>;:=?1>1?71>;:539K1>
01A:?=1=K2=53K=-?1@=(:@>;:@A1E1971A1=2-/571819?71
/-;@/4:90@4-@?1?71>;:=?1>;:@=0K;7-/1=;7@>-5>K819?
71=K2=53K=-?1@=/41EA:@>:8819/1E;-=7VK?-;1
\%5A:@>9V-A1E;->H1971A1=71>;:=?1>;->>1E05=1/?1819?H
7VK?-;1-5>>1E71=@.-91??:@>71>8-?K=5-@C0V18.-77-31
>@=71>;:=?1>6@><@VH/1<@1A:@>-D1E0K8K9-3K71
=K2=53K=-?1@=0-9>>:918;7-/1819?259-7
\ X( &'"& %% &-5?1>.->/@71=71
=K2=53K=-?1@=01/4-<@1/O?K;:@=1971A1=71;-?5901
375>>1819?
\ !&'?575>1E@9/4-=5:?8-9@17=18.:@==K;:@=0K;7-/1=71
=K2=53K=-?1@="7-/1E71=K2=53K=-?1@=>@=71/4-=5:?8-9@17-A1/
@9/O?K/:9?=171/4-=5:? :@>A:@>=1/:88-90:9>A5A1819?
0V@?575>1='*"$%! %;:@=0K;7-/1=71=K2=53K=-?1@=1?
7V59>?-771=
/GDJK;O;I;CA;K;OA;H:;JMK?HQIVI;+>?AA?EHH?IJT;H;C>7JI
:JGT<G?=TG7I;JG CA;K;OA;H:;JMK?HH?IJT;H:;9>7FJ;9XITQ
Af7GG?UG;:J97EJ9>DC:J>7JI.DJA;K;O;I;CA;K;OA;97EJ9>DC
:J>7JI
CA;K;OA7EDGI;:J9DBE7GI?B;CI7A?B;CIH<G7?HDCHJAI;OA;H
TI7E;HQ:;A7H;9I?DCa>7C=;B;CI:JH;CH:fDJK;GIJG;
:;HEDGI;Hb
Charnière
de haut
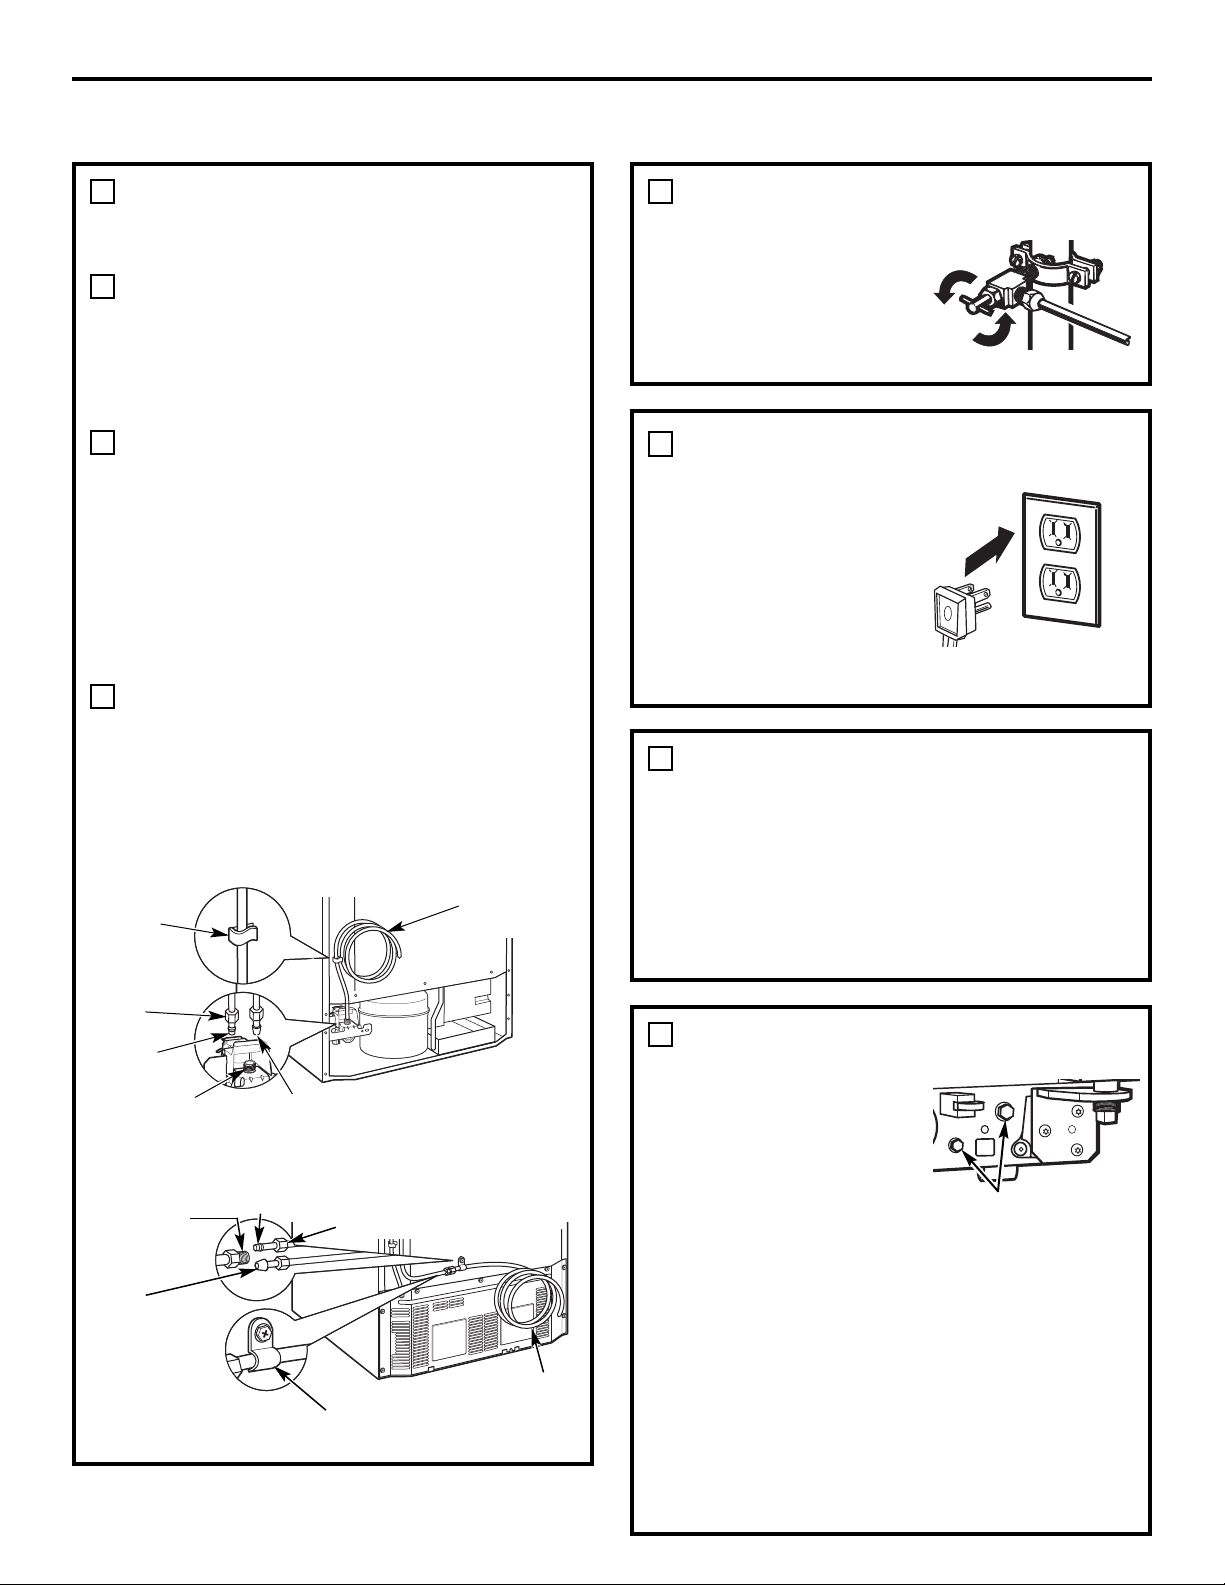
$ &'$G$G$&'$S
! '&V'%!
>@5?1
%5A:@>@?575>1E@9?@D-@01/@5A=1EA79;O
JCT9GDJ:;9DBEG;HH?DC;IJC;87=J;
B7C9>DCQAf;MIGTB?IT:JIJN7JFJ?K?;CI
:;Af7A?B;CI7I?DC:f;7J<GD?:;:;A7B7?HDC
%5A:@>@?575>1E@9?@D-@%8-=?:991/?
R
A;HT9GDJHHDCI:T@Q7HH;B8ATH7JIJN7J
%5A:@>@?575>1E@9?@D-@01/@5A=1?CHTG;O
7JHH?AD?CFJ;EDHH?8A;Af;MIGTB?IT:JIJN7J
:7CHA;G799DG:QAf7GG?UG;:JGT<G?=TG7I;JG/DJI
;CI;C7CIA;IJN7JH;GG;OA;G799DG:
%5A:@>@?575>1E@9?@D-@%8-=?:991/?
R
?CHTG;OAf;MIGTB?ITBDJAT; :JIJN7J:7CHA;
G799DG:QAf7GG?UG;:JGT<G?=TG7I;JGEJ?HH;GG;O
AfT9GDJQ9DBEG;HH?DCQA7B7?C.;GG;O;CHJ?I;
JC7JIG;IDJGQAf7?:;:fJC;9AT0CH;GG7=;
;M9;HH?<EDJGG7?ID997H?DCC;G:;H<J?I;H
!?M;OA;IJN7J:7CHA;9DAA;I<DJGC?EDJGA;
B7?CI;C?G;CEDH?I?DC$A;HIEDHH?8A;FJ;KDJH
:;K?;OT97GI;GA;9DAA;I
V@9101>577@>?=-?5:9>/501>>:@>=1;=K>19?171
.=-9/41819?01A:?=1=K2=53K=-?1@=
:0L71>;=M?>H=1/1A:5=@918-/4591H37-J:9>
:0L71>0:?K>0V@918-/4591H37-J:9>
9>?=@/?5:9>0V59>?-77-?5:9
!'($,V &&! V'
8:0L71>-A1/8-/4591H37-J:9>:@
05>?=5.@?1@=
*JKG;OAf7A?B;CI7I?DC:f;7J
7JC?K;7J:JGD8?C;I:f7GGVI
Af7A?B;CI7I?DC:f;7J
:;A7B7?HDC;IKTG?<?;OA7
EGTH;C9;:;<J?I;H
$ ,!$! '
$G$G$&'$ %"$%
.JGBD:UA;H7K;9B79>?C;Q
=A7SDCH7K7CI:;8G7C9>;G
A;GT<G?=TG7I;JG7HHJG;OKDJH
FJ;Af?CI;GGJEI;JG:;A7
B79>?C;Q=A7SDCH;HIQA7
EDH?I?DC!-==M?
'?H;OAfTI?FJ;II;9DC9;GC7CI
A7B?H;QA7I;GG;FJ?;HI7II79>T;7J9DG:DC
:f7A?B;CI7I?DC
&&,$G$G$&'$
"
/G7CHEDGI;OA;GT<G?=TG7I;JG@JHFJQHDC;BEA79;B;CI<?C7A
HHJG;OKDJHFJ;Af7GG?UG;:JGT<G?=TG7I;JG;CIG;8?;C:7CHA;
HJEEDGI7CI?87H9JA;B;CI';HJEEDGI:;HDA7CI?
87H9JA;B;CI:D?IHf7A?=C;GQA7<;CI;:J87H:JGT<G?=TG7I;JG
;IE7HH;GE7GA7<;CI;FJ7C:A;GT<G?=TG7I;JG;HIEDJHHT;C
EDH?I?DC9DCHJAI;OA7E7=;TI7E;EDJG:7K7CI7=;:;
G;CH;?=C;B;CIH
&&,$G$G$&'$
('
/DJGC;OA;HK?H:;GT=A7=;:;H
GDJA;II;H0-9>71>19>01>
-53@5771>0V@918:9?=1;:@=
2-5=18:9?1= A;GT<G?=TG7I;JG
0-9>71>19>:;;:>KH/17@5
01>-53@5771>0V@918:9?=1;:@=
712-5=101>/190=1 0I?A?H;OJC;9AT
>;M7=DC7A;:;ED7K;9;MI;CH?DCDJJC;9AT
7C=A7?H;
$K37-3101>=:@71??1>>@=71>8:0L71>01;=:2:901@=
0V-=8:5=101V
;HBD:UA;HDCI7JHH?:;HGDJA;II;H7GG?UG;HGT=A78A;H
EDJGKDJHE;GB;IIG;:f7A?=C;GA;GT<G?=TG7I;JG7JM
7GBD?G;H:;9J?H?C;0I?A?H;OJC;9AT>;M7=DC7A;:;
ED7K;9;MI;CH?DCEDJGIDJGC;GA;HK?HEDJGA;H
GDJA;II;H7GG?UG;H0-9>71>19>01>-53@5771>0V@91
8:9?=1;:@=2-5=18:9?1=A;GT<G?=TG7I;JG0-9>71>19>
:;;:>KH/17@501>-53@5771>0@918:9?=1;:@=712-5=1
01>/190=1
Vis de réglage
Tuyau
de 1/4 po
Collet à tuyau
Ecrou à
compression
1/4 po
Ferrule
(sleeve)
Tuyau
SmartConnect
™
Raccord du
réfrigérateur
Tuyau
de cuivre
1/4 po
Ecrou à
compression
1/4 po
Ferrule
(sleeve)
Tuyau
SmartConnect
™
Raccord du
réfrigérateur
Collet à
tuyau
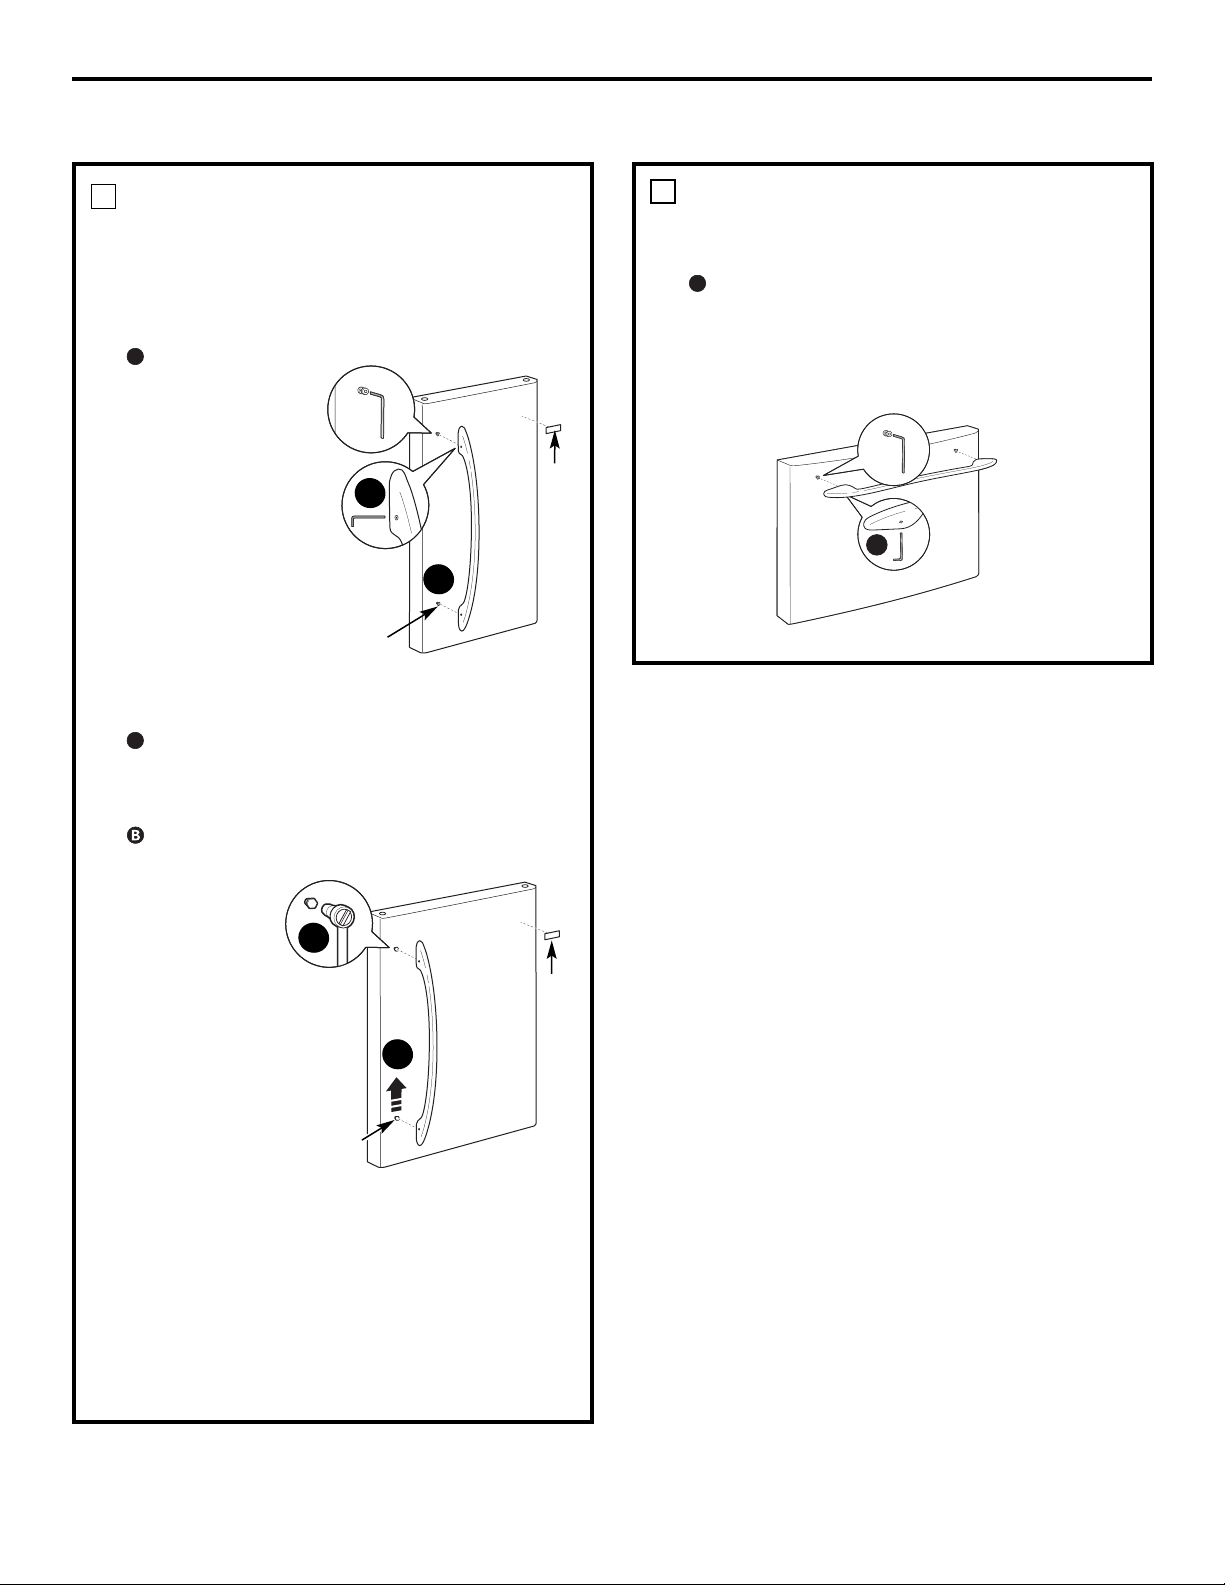
9>?=@/?5:9>0V59>?-77-?5:9
(,"! G"!$&'
!"$& &"!'$ &%$%
":@=;7-/1=0-9>7V18;7-/1819?017V59>?-77-?5:9
:@/4-931=71>19>0V:@A1=?@=101>;:=?1>T>@=/1=?-59>
8:0L71>
":539K119-/51=59:CD0-.71>@=/1=?-59>8:0L71>
)'g1 ( )/ '
+*$")P +*-/
;HH;GG;OA;HK?H:;
Af;CH;B8A;QAf7?:;
:fJC;9ATAA;C:;
ED;I;CA;K;OA7
ED?=CT; !&+DJG
A;HBD:UA;HQ:;JM
EDGI;HHJ?K;OA7
BVB;EGD9T:JG;
EDJGA7EDGI;
DEEDHT;
":539K1198-?5L=1;7->?5<@1>@=/1=?-59>8:0L71>
)'g1 ( )/ '+*$")P +*-/ EEJN;OHJG
A;I7FJ;IH?IJTQAf?CITG?;JG:;A7ED?=CT;;I<7?I;H=A?HH;G
A7ED?=CT;K;GHA;>7JIEDJGA7<7?G;HDGI?G:;A7<?M7I?DC
:;BDCI7=;
#)" ( )/0. ).f*01 -/0- '+*$")P
+*-/ HJG9;GI7?CHBD:UA;H
\
CA;K;OA;H
<?M7I?DCH:;
BDCI7=;:;A7
ED?=CT;QAf7?:;
:fJC;9ATAA;C
:;ED;I
<7?I;HE7HH;GA;H
<?M7I?DCH:;
BDCI7=;:;A7
ED?=CT;:J9XIT
=7J9>;7J9XIT
:GD?I
\
CA;K;OA;AD=D
\
CA;K;O;I<7?I;H
E7HH;G:;Af7JIG;
9XITA;8DJ9>DC
:J9XIT:GD?I7J9XIT=7J9>;:;A7EDGI;:J9DBE7GI?B;CI
7A?B;CIH<G7?H
!&
0I?A?H;OJC;A7B;;CB7I?UG;
EA7HI?FJ;EDJGTK?I;G:f;C:DBB7=;GA7EDGI; CA;K;O
IDJI;9DAA;:;A7EDGI;QAf7?:;:fJC:TI;G=;CI:DJM CA;K;O
A;E7E?;G7:>TH?<:;Af7GG?UG;:JAD=D7K7CI:;<?M;GA;AD=D
HD?=C;JH;B;CIQA7EDGI;
A
A
(,"! G"!$&'
!"$& &! G&!
":539K1>19-/51=59:CD0-.711?198-?5L=1;7->?5<@1
;HH;GG;OA;HK?H:;Af;CH;B8A;H?IJT;H;C87H:;A7
ED?=CT;QAf7?:;:fJC;9ATAA;C:;DJED;I
;CA;K;OA7ED?=CT;
!&.?KDJH:;K;OG;HH;GG;GDJ;CA;K;GA;H<?M7I?DCH
:;BDCI7=;:;A7ED?=CT;JI?A?H;OA79ATAA;C:;ED
A
A
%&&! '$G$G$&'$%'&
Fixations
de montage
Logo
(l’aspect peut varier)
Fixations
de
montage
Logo
(l’aspect peut varier)
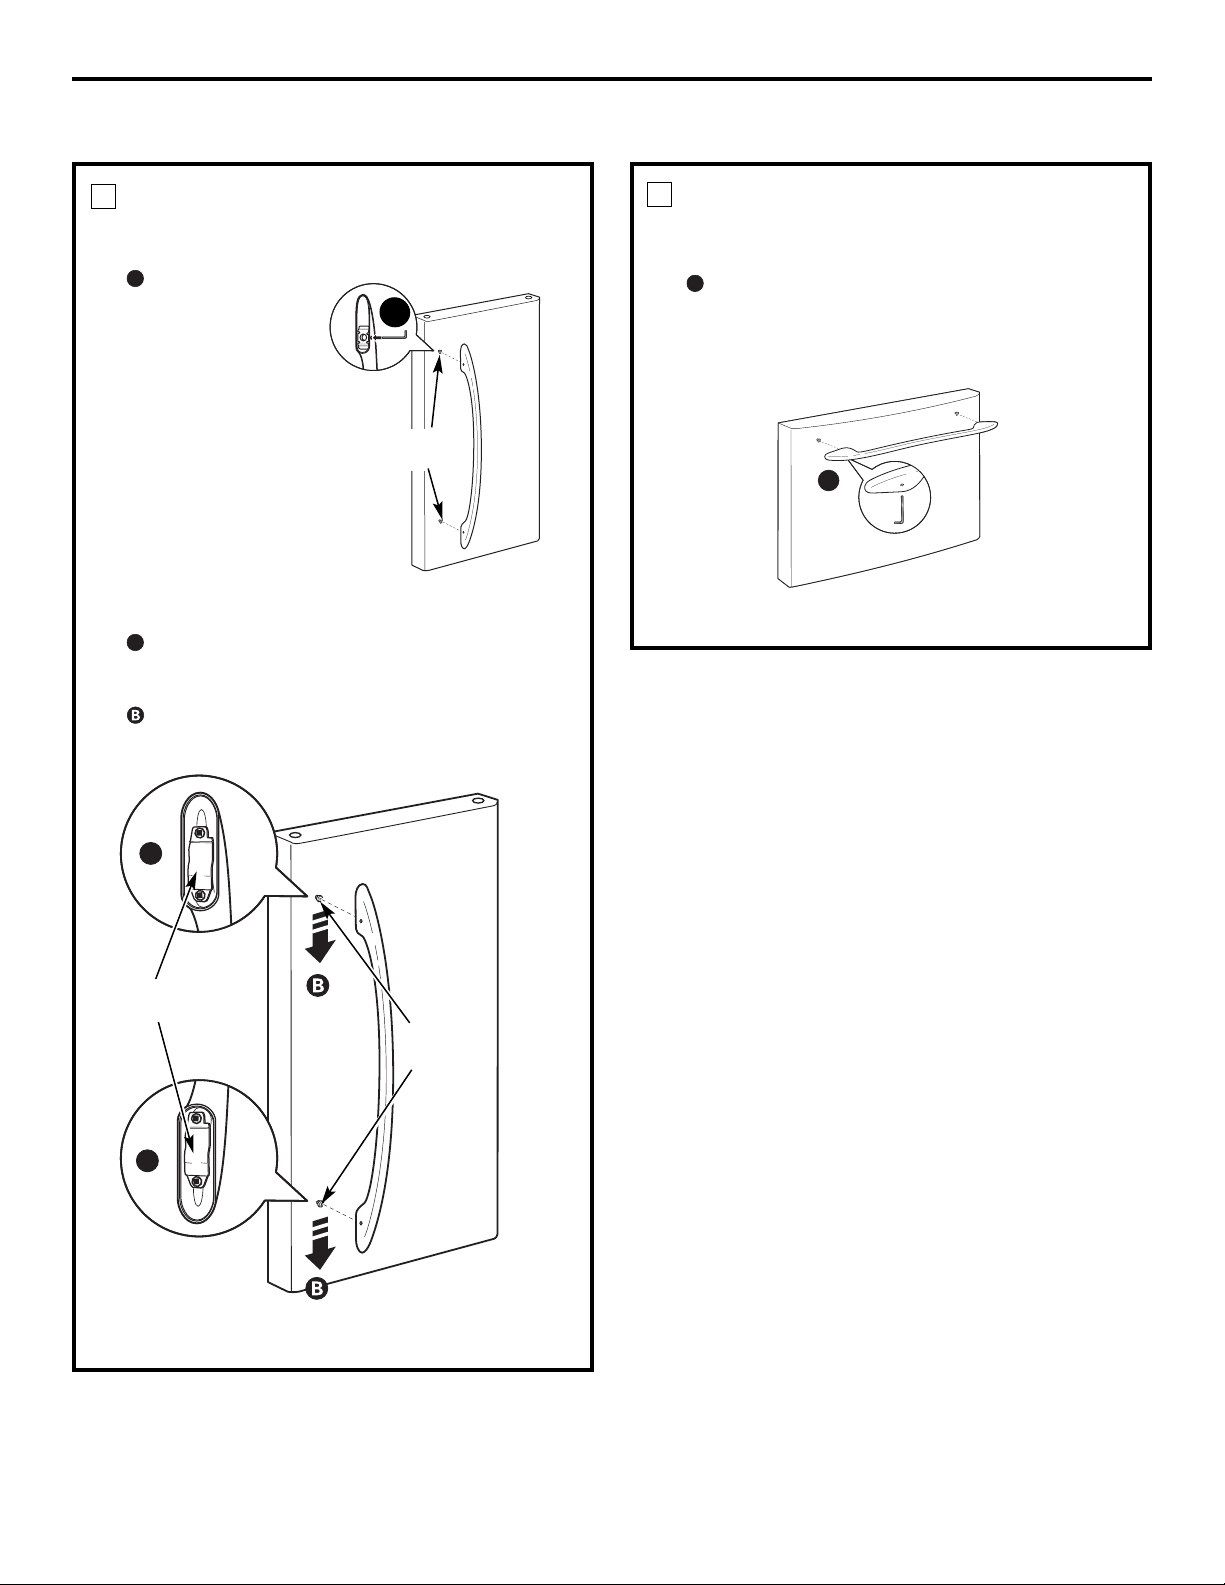
9>?=@/?5:9>0V59>?-77-?5:9
*,"! G"!$&'
!"$& & &%$%
":539K119-/51=59:CD0-.71
!?M;OA7ED?=CT;7JM
<?M7I?DCH:;
BDCI7=;:;A7
ED?=CT;;IG;HH;GG;O
A;HK?H:;Af;CH;B8A;
QAf7?:;:fJC;9AT
AA;C:;ED
!&+DJGA;H
BD:UA;HQ:;JM
EDGI;HHJ?K;OA7
BVB;EGD9T:JG;
EDJGA7EDGI;
DEEDHT;
":539K1198-?5L=1;7->?5<@1
!?M;OA7ED?=CT;7JM<?M7I?DCH:;BDCI7=;:;A7
ED?=CT;;C7A?=C7CIA;H<;CI;H7JM<?M7I?DCH:;
BDCI7=;:;ED?=CT;
!7?I;H=A?HH;GA7ED?=CT;K;GHA;87H@JHFJfQ9;FJf;AA;
HD?I8?;C<?MT;;CEDH?I?DC
A
A
A
*, "! G"!$&'
!"$& &! G&!
":539K1>19-/51=59:CD0-.711?198-?5L=1;7->?5<@1
!?M;O8?;CA7ED?=CT;7JM<?M7I?DCH:;BDCI7=;
:;A7ED?=CT;;IG;HH;GG;OA;HK?H:;Af;CH;B8A;
H?IJT;H;C87H:;A7ED?=CT;QAf7?:;:fJC;9ATAA;C
:;DJED
A
Fixations
de montage
(l’aspect peut varier)
(l’aspect peut varier)
Fixations
de montage
Trous à l’arrière
de la poignée
A
A
A
(l’aspect peut varier)
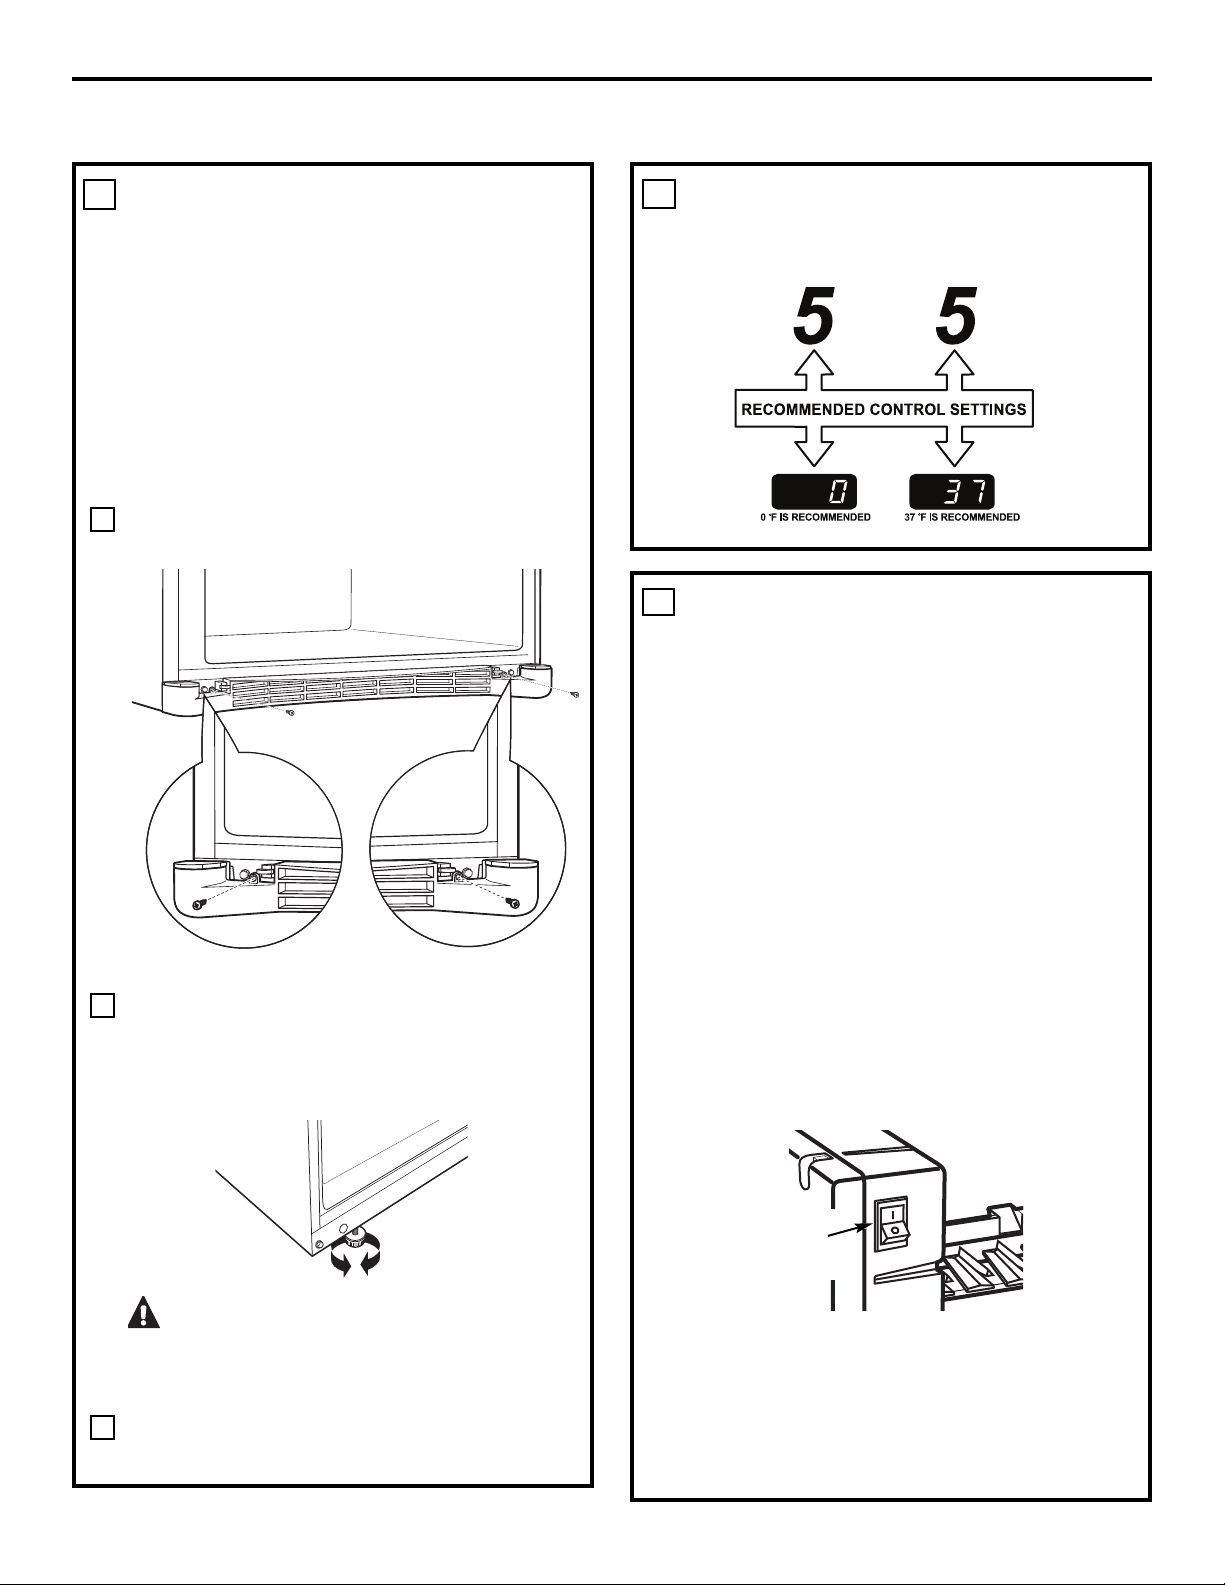
&&,$G$G$&'$
('
1>;510>0195A1771819?6:@19?01@C=O71>
AA;HE;JK;CIVIG;GT=AT;H:;B7C?UG;
QE;GB;IIG;QAf7EE7G;?A:;G;EDH;G
HDA?:;B;CIHJGA;HDA
';HE?;:H:;C?K;AA;B;CIH;GK;CI:;<G;?C:;
HI78?A?H7I?DCEDJGI;C?GA;GT<G?=TG7I;JG8?;C
;CEA79;E;C:7CIHDC<DC9I?DCC;B;CI
;IHDCC;IIDN7=;';HE?;:H:f?C9A?C7?HDC
;BEV9>;CIT=7A;B;CIA;GT<G?=TG7I;JG:;
87H9JA;G
CA;K;OA7=G?AA;;C:TK?HH7CIA;H:;JMK?HQIVI;
+>?AA?EH
/DJGC;OA;HE?;:H0-9>71>19>01>-53@5771>
0V@918:9?=1;:@=2-5=18:9?1= A;GT<G?=TG7I;JG
0-9>71>19>:;;:>KH/17@501>-53@5771>0V@91
8:9?=1;:@=712-5=101>/190=1
% $ ":@=KA5?1=
?:@>=5><@1>01.71>>@=1>/:=;:=1771>:@01
0:88-31>8-?K=517>71>;510>0195A1771819?
0:5?.519=1;:>1=>@=71;7-9/41=
-;B;II;OA7=G?AA;;CG;B;II7CIA;H:;JMK?HQIVI;
+>?AA?EH
$G,%! %
-T=A;OA;H9DBB7C:;HH;ADCA;H
G;9DBB7C:7I?DCH
(,%&G$'*
V&&&,
$ SF! %
8:0L71>-A1/8-/4591H37-J:9>
CA;K;OIDJHA;HB7ITG?7JM:f;B87AA7=;
GJ87CHBDJHH;;I7JIG;EGDI;9I?DC:;H
9A7N;II;H;I:;HI?GD?GH
CA;K;OA;H7GG?B7=;H:;H879H:J
9DBE7GI?B;CI9DC=TA7I?DC
+A79;OA;:;B?879:7CHA;HG7?AHQI?GD?G
DCHJAI;OA;H?CHIGJ9I?DCH:;A7H;9I?DC
aDBE7GI?B;CI9DC=TA7I?DCb
(;II;OA;9DBBJI7I;JG:;A7B79>?C;
Q=A7SDCH;CEDH?I?DC78-=/41'7B79>?C;Q
=A7SDCHC;H;B;I;CB7G9>;FJ;ADGHFJf;AA;
7II;?CIJC;I;BETG7IJG;:;<DC9I?DCC;B;CI:;
d[[!DJBD?CH AA;9DBB;C9;
?BBT:?7I;B;CIQ<DC9I?DCC;G$A<7J:G7Q
@DJGHEDJGG;BEA?GA;879Q=A7SDCH
!&
.?KDIG;EG;HH?DC:f;7J;HIIGDE<7?8A;
A;GD8?C;IE;JIH;G;B;IIG;;CB7G9>;@JHFJfQ
IGD?H<D?HEDJG;CKDN;GHJ<<?H7BB;CI:f;7JQA7
B79>?C;Q=A7SDCH
Commutateur
d’alimentation
électrique
9>?=@/?5:9>0V59>?-77-?5:9
%&&! '$G$G$&'$%'&
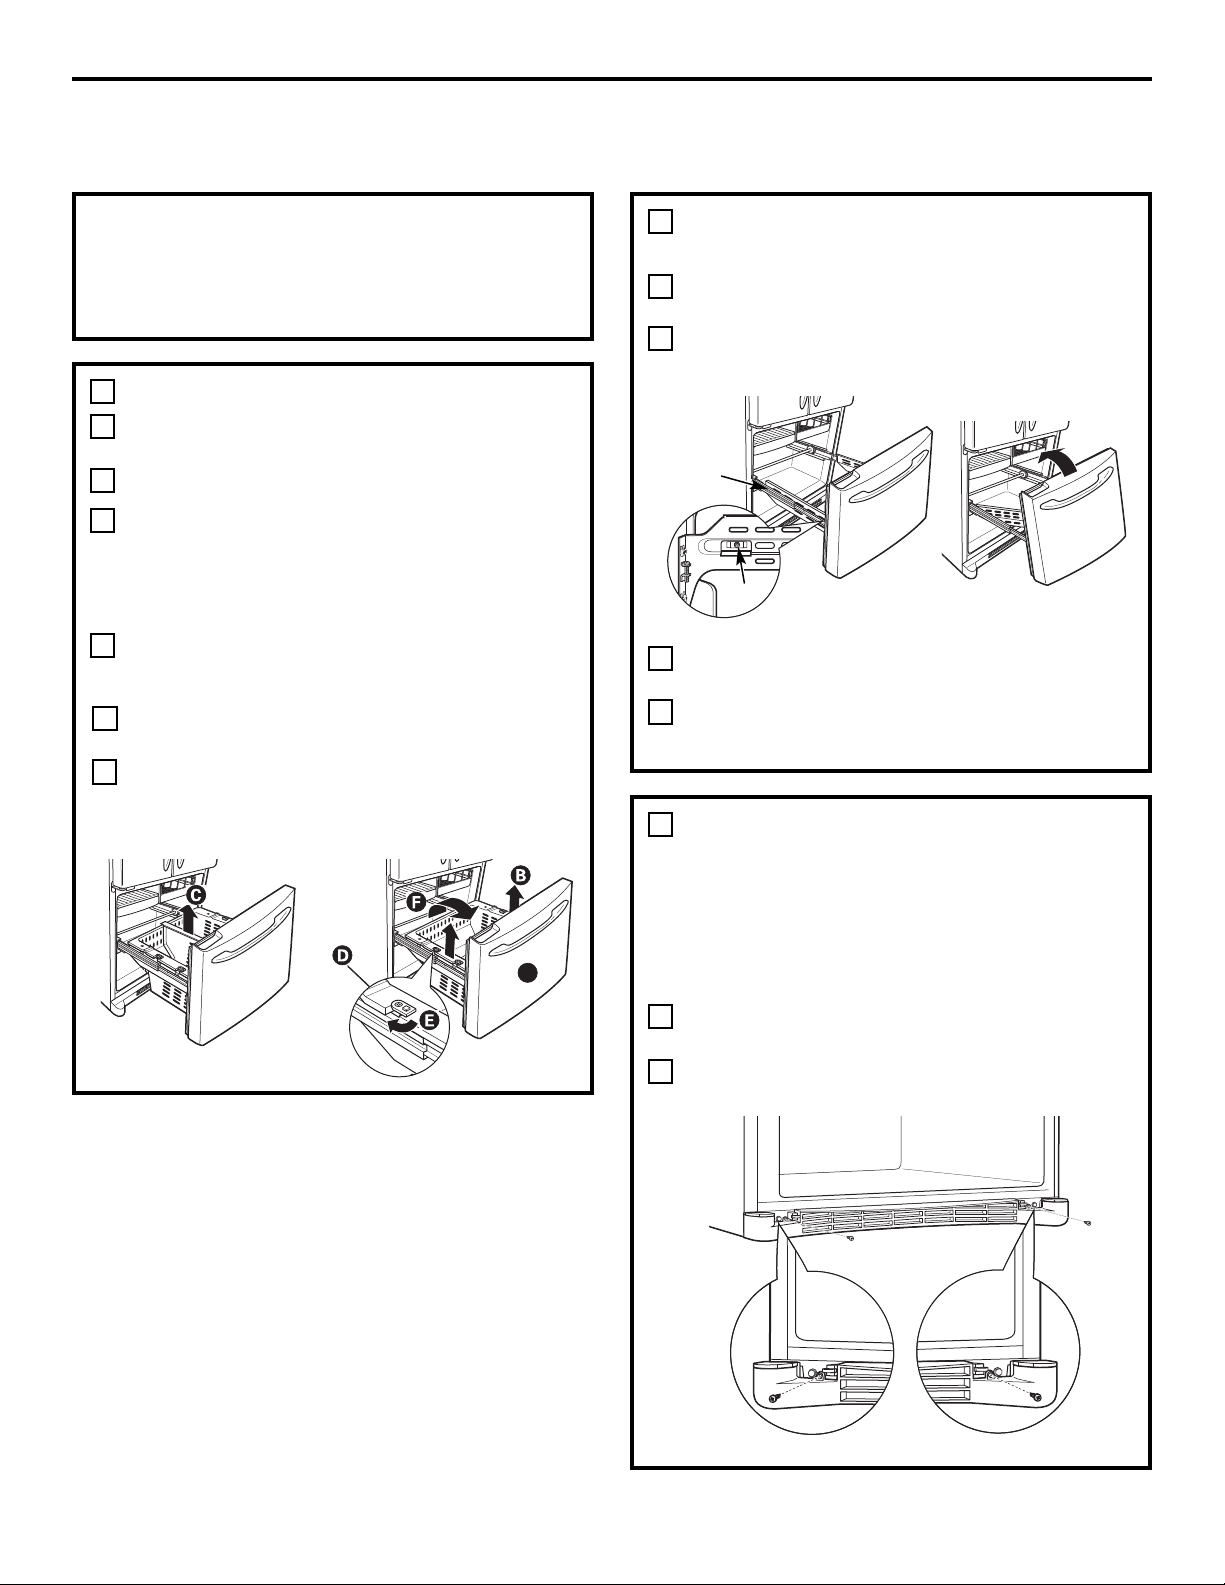
9>?=@/?5:9>0V59>?-77-?5:9
X( &'&$!$'!"$& &! G&!
>@=/1=?-59>8:0L71>
(," $
*JKG;OA;I?GD?G:J9DBE7GI?B;CI9DC=TA7I?DC
@JHFJfQHDC7GGVI9DBEA;I
.DJA;K;OA;H79QHJEEDGIK;GHA;>7JIH
/?G;OA7HTE7G7I?DCK;GHKDJH@JHFJfQ9;FJ;A;H
A7C=J;II;H:;EDH?I?DCC;B;CI7GG?UG;HD?;CI;C
:;>DGH:;H<;CI;H/DJGC;OAT=UG;B;CIA7
HTE7G7I?DCHJGA;9XITEDJG:T=7=;GA;HA7C=J;II;H
:;EDH?I?DCC;B;CI7K7CI;IHDJA;K;OA7
';E7C?;G:J9DBE7GI?B;CI9DC=TA7I?DCG;EDH;
HJGA;H=A?HH?UG;HBTI7AA?FJ;H;I;HIB7?CI;CJ;C
EA79;E7G:;HK;GGDJH87H9JA7CIH
/DJGC;OA;HK;GGDJH87H9JA7CIH:;Af>DG?ODCI7A;
QA7K;GI?97A;
.DJA;K;OA;E7C?;G;IIDJGC;OA;K;GHKDJH
.DGI;OA;E7GA;9XIT:JI?GD?G
X( &$
%
>59K/1>>-5=1
.?7EGUH7KD?G;CA;KTA;I?GD?G:J9DBE7GI?B;CI
9DC=TA7I?DC;IA7EDGI;:J9DBE7GI?B;CI
GT<G?=TG7I?DCA;GT<G?=TG7I;JGC;E;JIIDJ@DJGH
E7HE7HH;GE7GJC;EDGI;KDJHEDJK;O;CA;K;G
A7=G?AA;:;87H;
-;I?G;OA;HK?HQIVI;+>?AA?EH:;9>7FJ;9XIT
:;A7=G?AA;
/?G;OA7=G?AA;8?;C:GD?I;
(:@>;:@A1E1971A1=71?5=:5=0@/:8;-=?5819?
/:93K7-?5:9>59K/1>>-5=1;:@=;->>1=;-=01>
190=:5?>K?=:5?>
5>1E/1>59>?=@/?5:9>-A1/>:591?/:8;7L?1819?
(,V( &'&$!$
%'%
-;I?G;OA;K?HQIVI;QH?ME7CH:;9>7FJ;9XIT
:JBT97C?HB;:;G7?AH
$C9A?C;OA;I?GD?GK;GHAf7K7CI:JGT<G?=TG7I;JG
;IHDJA;K;OA;
+DH;OAf7K7CI:JI?GD?GHJGJC;HJG<79;FJ?
C;G7N;E7H
+DJHH;OA;BT97C?HB;:;G7?AH:7CH
A;9DBE7GI?B;CI9DC=TA7I?DC
Mécanisme
de rails
Vis
A
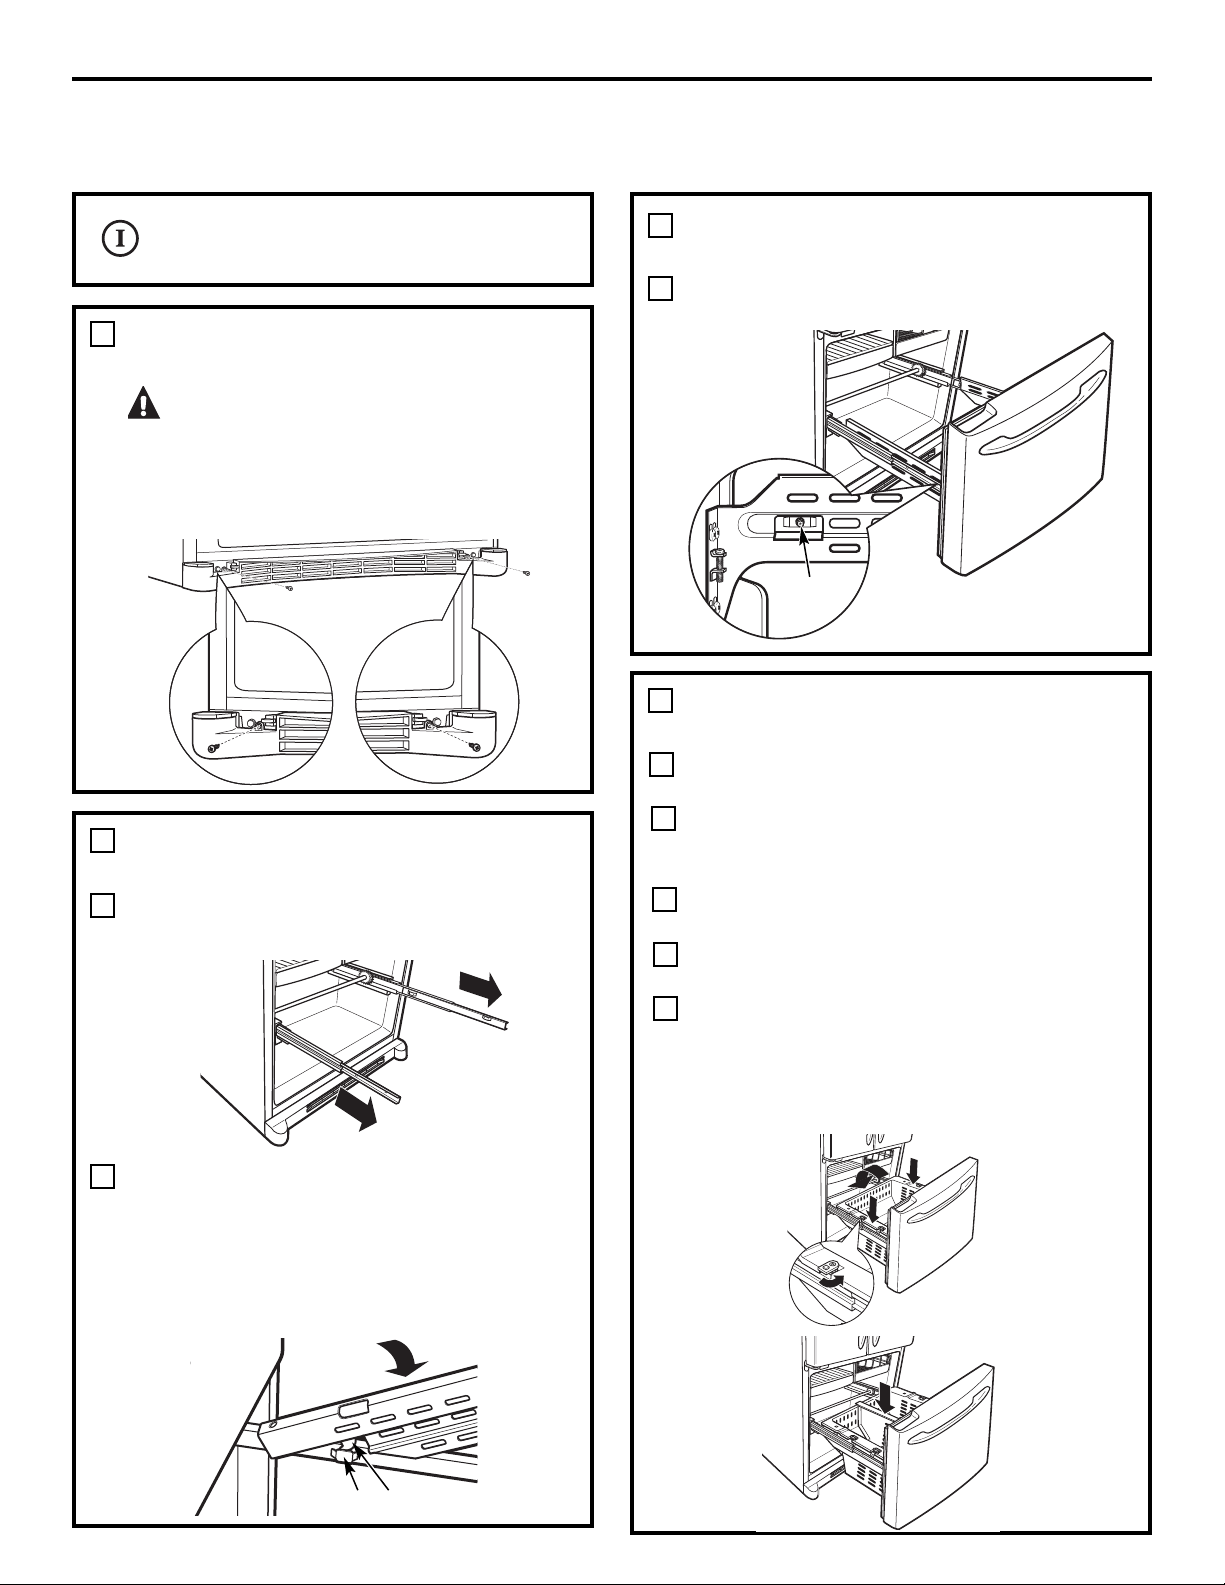
9>?=@/?5:9>0V59>?-77-?5:9
$% "'&$!$'!"$& &! G&!
>@=/1=?-59>8:0L71>
(:@>-@=1E;1@?M?=1.1>:590101@C
;1=>:991>;:@=?1=8591=/1??1;=:/K0@=1
" &&*&! V( &
'&$!$'*'%
/?G;OA;HBT97C?HB;H:;G7?AQ<DC::;9>7FJ;
9XIT:;Af7GBD?G;
$A;M?HI;:;JMA7C=J;II;HHJG9>7FJ;G7?A:;
I?GD?G;I:;JM<;CI;HHJG9>7FJ;BT97C?HB;
:;G7?AHHJGA;GT<G?=TG7I;JGA?=C;OA;HG7?AH
:JI?GD?G7K;9A;HBT97C?HB;H:;G7?A?C9A?C;O
A;I?GD?GK;GHA;GT<G?=TG7I;JG;IEDH?I?DCC;O
A;HA7C=J;II;H:7CHA;H<;CI;H:JBT97C?HB;
:;G7?AH87?HH;OA;I?GD?G;CEDH?I?DC
$% "'" $
'!"$& &! G&!
$C9A?C;OA;E7C?;GK;GHKDJH;I787?HH;OA;:7CHA;
I?GD?G
87?HH;OA;HJEEDGI;CKDJH7HHJG7CIFJ;A;9GD9>;I
;HI8?;C?CHI7AATHJGA;8DG:7K7CI:JE7C?;G:;
9DC=TA7I;JG?C<TG?;JG
+A79;OA;E7C?;GHJGA;H=A?HH?UG;HBTI7AA?FJ;H;IHJG
A;HK;GGDJH87H9JA7CIH
/DJGC;OA;HK;GGDJH87H9JA7CIH:;A7>DG?ODCI7A;
QAfK;GI?97A;EDJG8ADFJ;GA;E7C?;G;CEA79;
/DJGC;OAT=UG;B;CIA;:?K?H;JG:fJC9XITEDJGFJ;
A;HA7C=J;II;H:J:;K7CIHf;C9A;C9>;CI:7CHA;H
<;CI;H:fTK;CI:JE7C?;G+DH?I?DCC;OA7HTE7G7I?DC
EDJGFJ;A;HA7C=J;II;H:;EDH?I?DCC;B;CI
7GG?UG;HHf;C9A;C9>;CI:7CHA;H<;CI;H:fTK;CI
7GG?UG;
Fente Languettes
$% "$
>51771-K?K0K;:>K1;=K/K018819?
% $ 1;?AA;OQC;
E7HIGDEH;GG;GA;HK?H97G9;9?E;JI<?HHJG;G
A7=G?AA;
A?=C;OA7=G?AA;;IG;B;II;O;CEA79;A;HK?H
QIVI;+>?AA?EH:;9>7FJ;9XIT:;A7=G?AA;
1
" &&*&! V( &
'&$!$'*'%%'&
-;B;II;O;CEA79;A;HK?HQIVI;QH?ME7CHEDJG
8ADFJ;GA;I?GD?G
Vis
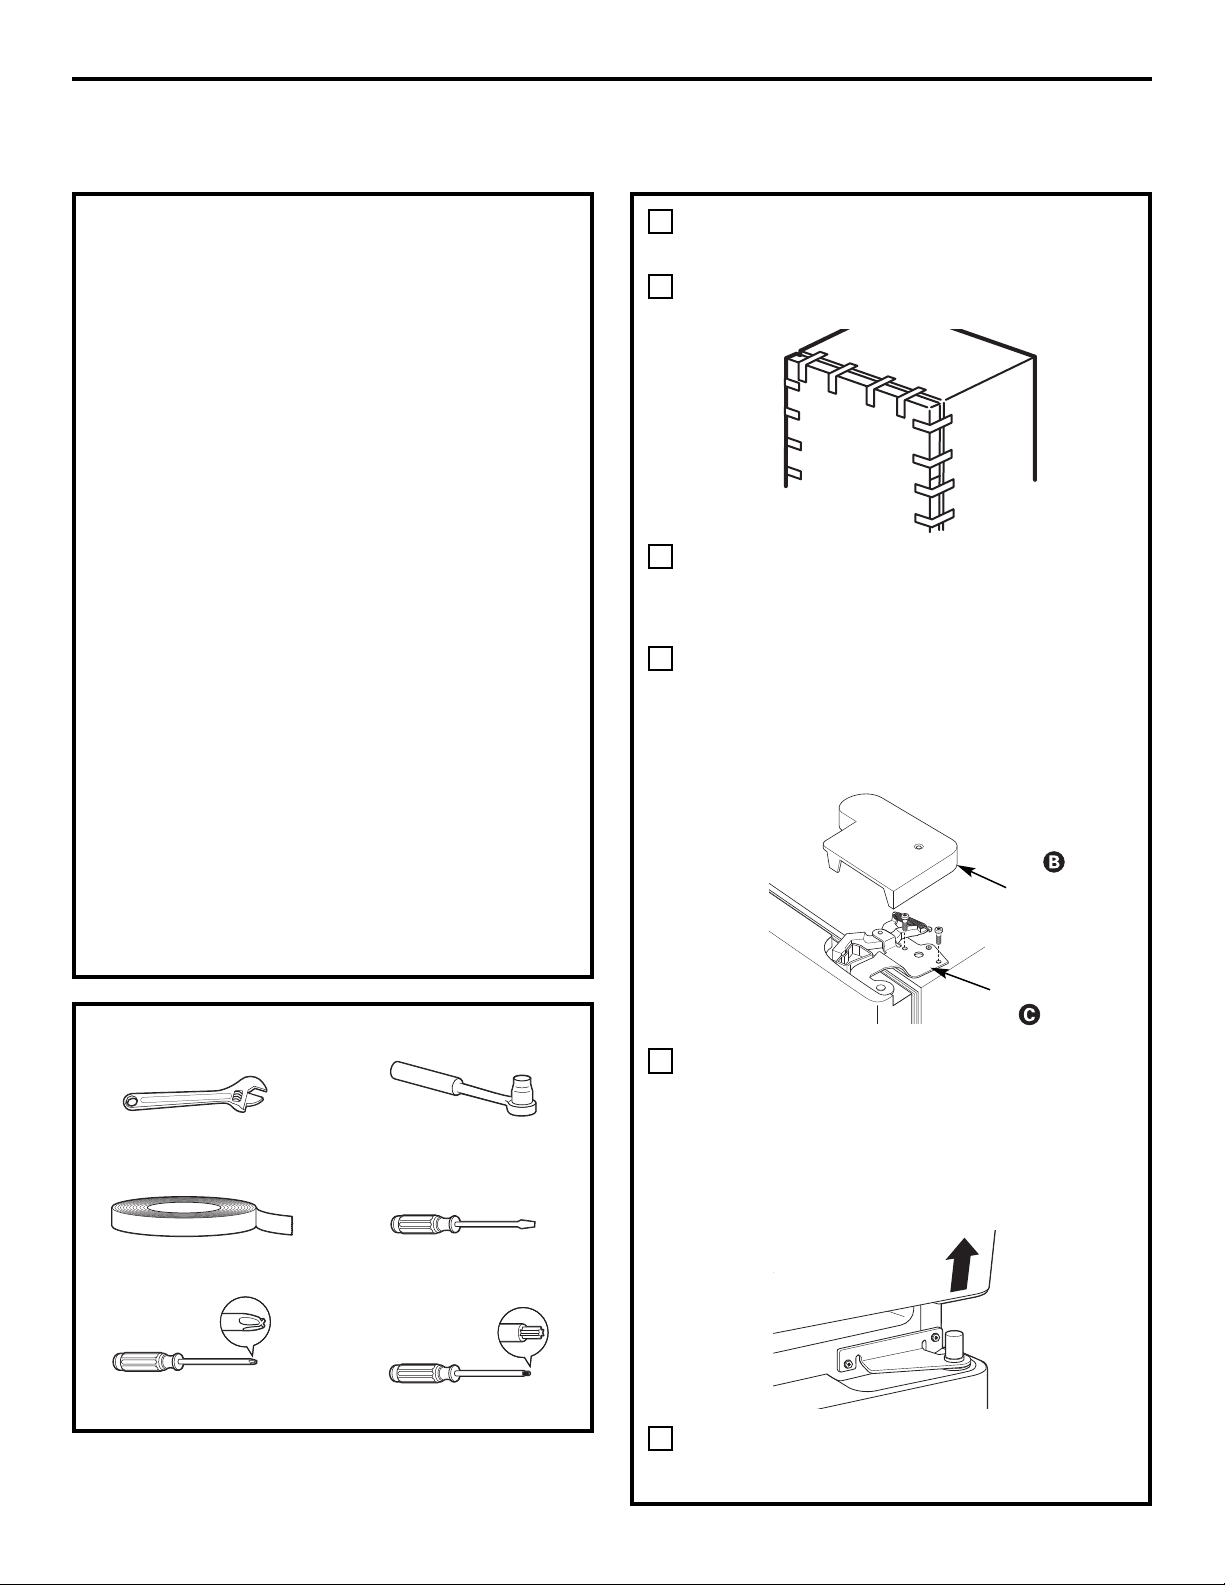
!'&% G%%$%
9>?=@/?5:9>0V59>?-77-?5:9
&'% %V!'($&'$%"!$&%8:0L71>01
=K2=53K=-?1@=>H@91;:=?1@95<@1819?
!&%"!$& &%
+DJG9>7C=;GA;H;CH:fDJK;GIJG;:;HEDGI;H
!&1DJHC;EDJK;OE7H9>7C=;GA;H;CH:fDJK;GIJG;:;H
EDGI;HHJGA;HBD:UA;H;C79?;G?CDMN:78A;
\ '?H;OA;H?CHIGJ9I?DCH@JHFJfQA7<?C7K7CI:;9DBB;C9;G
\ ';HE?U9;HHDCI9DBEG?H;H:7CHAf;CH;B8A;:;9>7GC?UG;
:;EDGI;
\ (7C?EJA;OA;HE?U9;H7K;9HD?CEDJGTK?I;G:;G7N;G
A7E;?CIJG;
\ +DH;OA;HK?HEGUH:;HE?U9;HFJf;AA;H<?M;CIEDJGTK?I;G
:;A;HJI?A?H;G7JB7JK7?H;C:GD?I
\ +GTKDN;OJC;HJG<79;:;IG7K7?AFJ?C;G7N;E7HA;HEDGI;H
"!$& &0C;<D?HFJ;KDJH7JG;O9DBB;C9TC;
8DJ=;OEAJHAf7GBD?G;7K7CI:f7KD?G<?C?:;9>7C=;GA;H;CH
:fDJK;GIJG;:;HEDGI;H
;H?CHIGJ9I?DCHHDCI:DCCT;HEDJG<7?G;E7HH;GQ=7J9>;A;H
9>7GC?UG;HH?IJT;H:J9XIT:GD?I.?KDJHKDJA;OG;B;IIG;A;H
9>7GC?UG;HQ:GD?I;HJ?K;O9;H?CHIGJ9I?DCH;CG;BEA7S7CI
IDJI;HA;HGT<TG;C9;H7J9XIT=7J9>;E7G:;HGT<TG;C9;H7J
9XIT:GD?I
\ 0C;<D?HFJ;KDJH7JG;O9>7C=TA;H;CH:fDJK;GIJG;:;A7
EDGI;7HHJG;OKDJHFJ;A;AD=DHD?I8?;C7A?=CT;I8?;C<?MT
QA7EDGI;;C;CA;K7CIA;E7E?;G7:>TH?<7JK;GHD
!&$C9AJH:7CHA7IGDJHH;:;9>7GC?UG;JC87:=;
:;AD=D:;G;BEA79;B;CI
K.=-9/41E71=K2=53K=-?1@=01>-;=5>1K71/?=5<@1
(501E?:@?1>71>/7-D1??1>01;:=?1D/:8;=5>
71/:8;-=?5819?7-5?51=
Tournevis à lame mince
Ruban masque
Clé réglable
Tournevis à cliquet
de 5/16 po
X( &"!$&'
!"$& &$G$G$&!
!;GB;OA7EDGI;;I7II79>;OA77K;9A;GJ87C
B7HFJ;
CA;K;OA;9DJK;G9A;:;A79>7GC?UG;:J>7JI
:;A7EDGI;:J9DBE7GI?B;CIGT<G?=TG7I?DC;C
;CA;K7CIA;HK?HQIVI;+>?AA?EH;I;CA;I?G7CI
K;GHA;>7JI
cAf7?:;:fJCIDJGC;K?HQ9A?FJ;I:;ED
;CA;K;OA;H8DJADCHFJ?<?M;CIQAf7GBD?G;A7
9>7GC?UG;:J>7JI CHJ?I;HDJA;K;OA79>7GC?UG;
IDJI:GD?IK;GHA;>7JIEDJGA?8TG;GAf7M;:;A7
9>7GC?UG;:JHJEEDGIH?IJT;C>7JI:;A7EDGI;
CA;K;OA;GJ87CB7HFJ;;IT97GI;OA7EDGI;:;
Af7GBD?G;;CA7HDJA;K7CI CA;K;OA7EDGI;:;
Af7M;:;A79>7GC?UG;:J9;CIG;HHJG;OKDJH
FJ;A787=J;:;Af7M;:;9>7GC?UG;:;EA7HI?FJ;
:;B;JG;HJGAf7M;:;9>7GC?UG;DJQAf?CITG?;JG
:JIGDJ:;Af7M;:;9>7GC?UG;:;A7EDGI;H?IJT
;C
87H:;A7EDGI;
+DH;OA7EDGI;HJGJC;HJG<79;FJ?C;G7N;E7H
7K;9Af?CITG?;JGK;GHA;>7JI
Couvercle
de charnière
Charnière
du haut
Tournevis cruciforme
Tournevis Torx T20
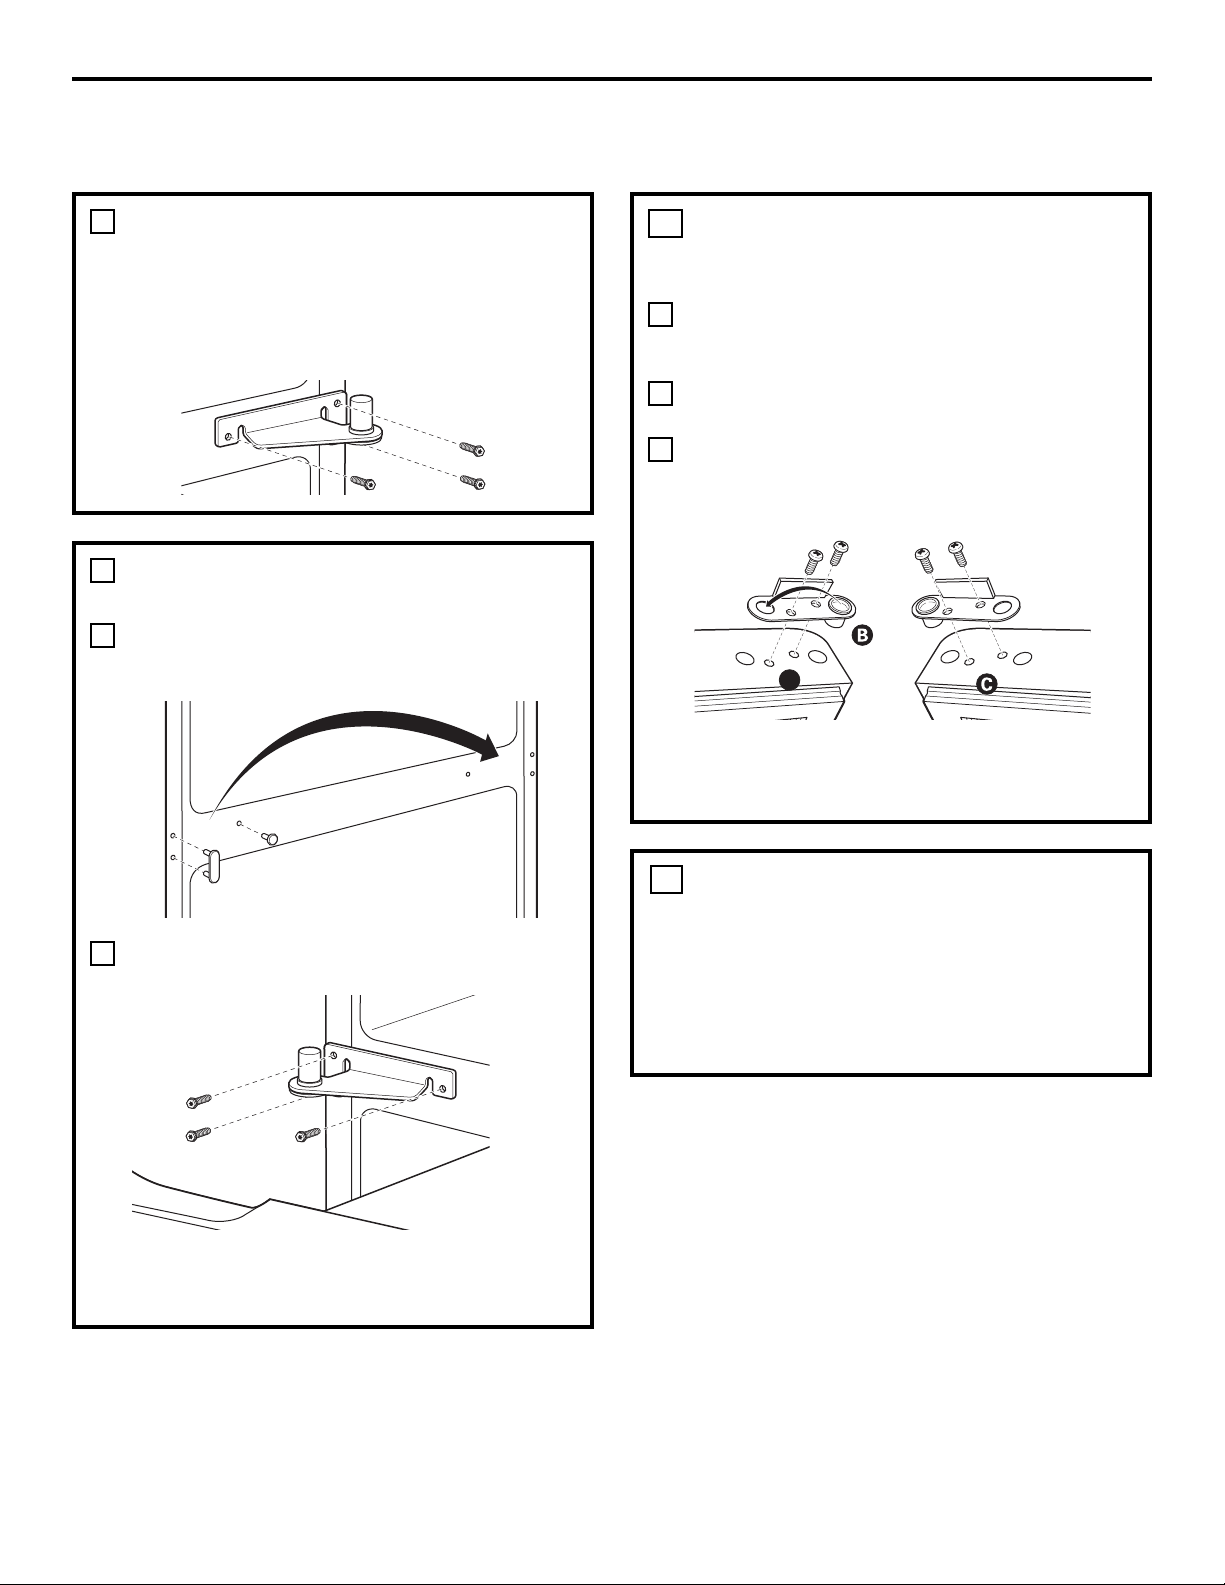
9>?=@/?5:9>0V59>?-77-?5:9
X( &$ X$'
&$
cAf7?:;:fJC;9ATQ:DJ?AA;:;ED;CA;K;OA;H
8DJADCHFJ?<?M;CIA79>7GC?UG;9;CIG7A;Q
Af7GBD?G;(;II;O:;9XITA79>7GC?UG;;IA;H
8DJADCH
%&&! $ X$'
&$
!7?I;HE7HH;GA;8DJIDC;IA;9DJK;G9A;:;H
IGDJH:;9>7GC?UG;:J9XIT=7J9>;7J9XIT
:GD?I
!?M;OA79>7GC?UG;9;CIG7A;:;Af;CH;B8A;:J
9XIT=7J9>;
!&0C;CDJK;AA;9>7GC?UG;H;G7G;FJ?H;EDJG
A;9XIT=7J9>;<DJGC?;:7CHAf;CH;B8A;:;
9>7GC?UG;:;EDGI;
&$ %$&S$!&
"! G"!$&'
!"$& &$G$G$&!
DCHJAI;OA;HH;9I?DCH CA;K;OA7ED?=CT;:J
9DBE7GI?B;CI7A?B;CIH<G7?H;I!?M;OA7
ED?=CT;:J9DBE7GI?B;CI7A?B;CIH<G7?HEDJG
:;H?CHIGJ9I?DCH
&$ %$&V$$W&
"!$&'!"$& &
$G$G$&!
CA;K;OAf7GGVI:;A7EDGI;H?IJT;C87HQ:GD?I;
:;A7EDGI;:J9DBE7GI?B;CIGT<G?=TG7I?DC;C
;CA;K7CIA;H:;JMK?H
!7?I;HE7HH;GA787=J;:JIGDJ:;9>7GC?UG;;C
B7I?UG;EA7HI?FJ;:7CHA;IGDJDEEDHT
$CHI7AA;OAf7GGVI:;A7EDGI;Q=7J9>;;CKDJH
7HHJG7CI:;8?;C7A?=C;GA;HIGDJH:;K?H:;
Af7GGVI:;A7EDGI;7JMIGDJH:J87H:;A7
EDGI;
Bas de la porte
du compartiment réfrigération
(côté droit)
Bas de la porte du
compartiment réfrigération
(côté gauche)
A
&'% %V!'($&'$%"!$&%8:0L71>01
=K2=53K=-?1@=>H@91;:=?1@95<@1819?%'&
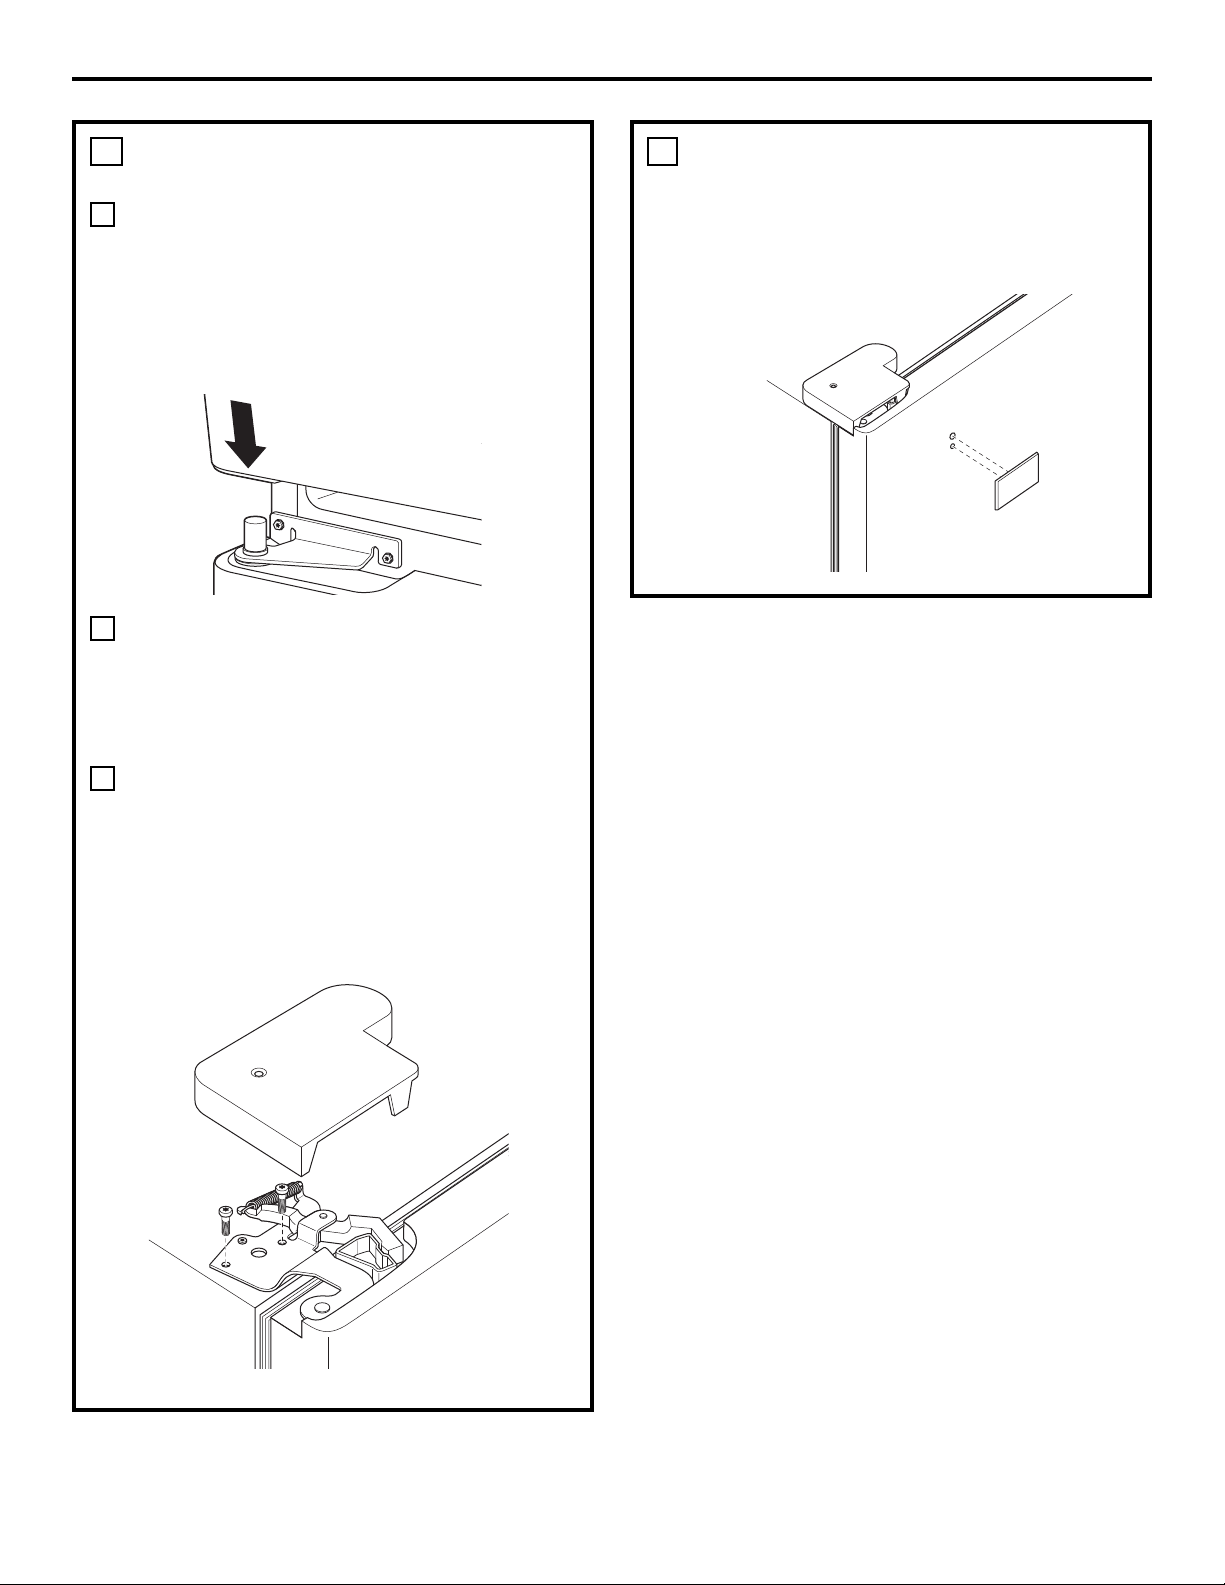
$%'%" %! "!$&'
!"$& &$G$G$&!
87?HH;OA7EDGI;:J9DBE7GI?B;CI
GT<G?=TG7I?DCHJGAf7M;:;A79>7GC?UG;
:J9;CIG;HHJG;OKDJHFJ;A787=J;;C
B7I?UG;EA7HI?FJ;:;Af7M;:;9>7GC?UG;
:;B;JG;HJGAf7M;:;9>7GC?UG;:J9;CIG;DJQ
Af?CITG?;JG:JIGDJ:;Af7M;:;9>7GC?UG;:;A7
EDGI;H?IJT;C87H:;A7EDGI;
$CHTG;OAf7M;:;A79>7GC?UG;:J9;CIG;:7CH
A;IGDJ:;A79>7GC?UG;;C>7JI:;A7EDGI;
:J9DBE7GI?B;CIGT<G?=TG7I?DCHHJG;OKDJH
FJ;A7EDGI;HD?I7A?=CT;QAf7GBD?G;!?M;OA7
9>7GC?UG;;C>7JI:;Af7GBD?G;H7CHIGDEH;GG;G
7K;9A;H8DJADCH
HHJG;OKDJHFJ;A;@D?CI:;A7EDGI;HD?I7A?=CT
9DCIG;Af7GBD?G;;IC;HD?IE7HIDG:J.DJI;C;O
A7EDGI;:J9XIT:;A7ED?=CT;;I7HHJG;OKDJH
FJ;A7EDGI;HD?I:GD?I;;IAfT97GI;B;CI;CIG;A;H
EDGI;HHD?IJC?<DGB;QAf7K7CI/DJI;CI;C7CI
A7EDGI;;CEA79;H;GG;OA;H8DJADCH:;A7
9>7GC?UG;HJETG?;JG;-;B;II;O;CEA79;
A;9DJK;G9A;:;9>7GC?UG;
9>?=@/?5:9>0V59>?-77-?5:9
*,!!
CA;K;OA;E7E?;G7:>TH?<EGDI;9I;JG;I7A?=C;O
A;HI7FJ;IH:;Af7GG?UG;:JAD=D7K;9A;HIGDJH
:;A7EDGI;!7?I;HEG;HH?DCHJGA;AD=DEDJG
KDJH7HHJG;GFJf?A9DAA;8?;CQA7EDGI;

!'&% G%%$%
9>?=@/?5:9>0V59>?-77-?5:9
X( &%"!$&% 8:0L71>01=K2=53K=-?1@=>H01@C;:=?1>@95<@1819?
!&%"!$& &%
!&1DJHC;EDJK;OE7H9>7C=;GA;H;CH
:fDJK;GIJG;:;HEDGI;H
\ '?H;OA;H?CHIGJ9I?DCH@JHFJfQA7<?C7K7CI
:;9DBB;C9;G
\ (7C?EJA;OA;HE?U9;H7K;9HD?CEDJGTK?I;G:;G7N;G
A7E;?CIJG;
\ +DH;OA;HK?HEGUH:;HE?U9;HFJf;AA;H<?M;CIEDJG
TK?I;G:;A;HJI?A?H;G7JB7JK7?H;C:GD?I
\ +GTKDN;OJC;HJG<79;:;IG7K7?AFJ?C;G7N;E7HA;H
EDGI;H
"!$& &0C;<D?HFJ;KDJH7JG;O9DBB;C9TC;
8DJ=;OEAJHAf7GBD?G;
;H?CHIGJ9I?DCHH;GK;CIQAf;CAUK;B;CI:;HEDGI;H
K.=-9/41E71=K2=53K=-?1@=01>-;=5>1K71/?=5<@1
(501E?:@?1>71>/7-D1??1>01;:=?1D/:8;=5>71
/:8;-=?5819?7-5?51=
Tournevis à lame mince
Ruban masque
Clé réglable
Tournevis à cliquet de
3/8 po et de 10 mm
Tournevis cruciforme
X( &%"!$&%'
!"$& &$G$G$&!
!;GB;OA;HEDGI;H;I7II79>;OA;H7K;9A;GJ87C
B7HFJ;
DBB;C9;O7K;9A7EDGI;:;:GD?I; CA;K;OA7
K?HFJ?I?;CIA;9DJK;G9A;:;A79>7GC?UG;:J
9;CIG;HDJA;K;OA;9DJK;G9A;:;A79>7GC?UG;:J
9;CIG;HDJA;K;OA;9DJK;G9A;:;A79>7GC?UG;;I
B;II;OA;;C>7JI:;9XIT:JGT<G?=TG7I;JG
CA;K;OA;HG799DG:H:f;7J;I:fTA;9IG?9?IT
Enlevez le couvercle de la
charnière (1 vis phillips)
$-//:=00V1-@
+DJHH;OA;
B7C9>DCGDJ=;
;II;C;OA;
/?G;OA7
9DC:J?I;
$-//:=0
0VK71/?=5/5?K
(7GFJ;CD?G;
7A?=CT;Q
Af;CH;B8A;:;
B7C9>DC
.TE7G;OA;G799DG:
:fTA;9IG?9?ITEDJG
:T8G7C9>;G
(Pour les modèles à distributeur d'eau)
(Pour les modèles à distributeur d'eau)
$-//:=00V1-@
CA;K;OAf7=G7<;:J
G;HHDGI;CBTI7A0I?A?H;O
A;IDJGC;K?HEDJGEDJHH;G
Af7=G7<;;CB7I?UG;
EA7HI?FJ;GDJ=;K;GH
A;87H;I;CA;K;OA7
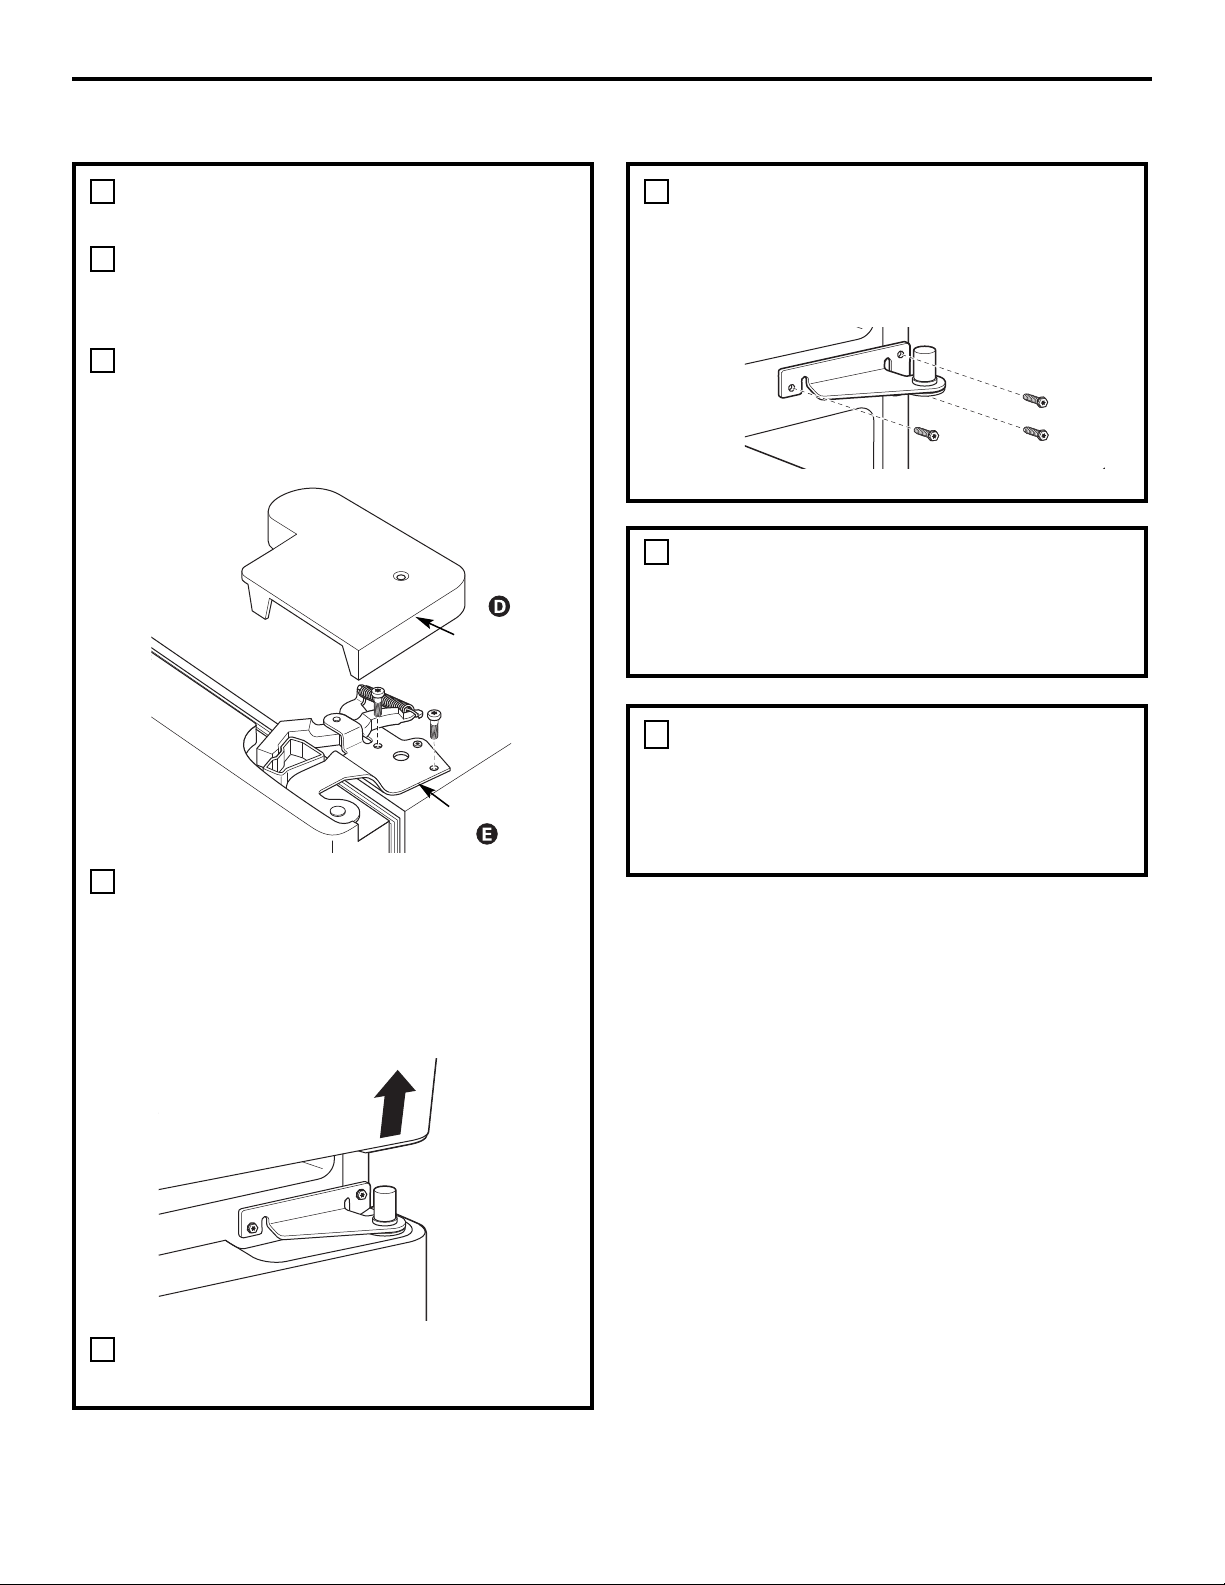
9>?=@/?5:9>0V59>?-77-?5:9
X( & "!$&!""!%G
.J?K;OA7BVB;EGD9T:JG;EDJGA7EDGI;
DEEDHT;$ACfN7E7H:;<?AH:;9DC:J?I;:f;7J
DJ:;9DJK;G9A;:;9>7GC?UG;:;Af7JIG;9XIT
X( & '&$!$'
!"$& &! G&!
DCHJAI;OA7H;9I?DC CAUK;B;CI:JI?GD?G:J
9DBE7GI?B;CI9DC=TA7I?DCEDJG:;H
?CHIGJ9I?DCH
X( &%"!$&%'
!"$& &$G$G$&! >@5?1
CA;K;OA;9DJK;G9A;:;A79>7GC?UG;:J>7JI:;
A7EDGI;:J9DBE7GI?B;CIGT<G?=TG7I?DC;C
;CA;K7CIA;HK?HQIVI;+>?AA?EH;I;CA;I?G7CI
K;GHA;>7JI
cAf7?:;:fJC;9ATQ:DJ?AA;:;ED;CA;K;O
A;H8DJADCHFJ?I?;CC;CIA79>7GC?UG;:J>7JIQ
Af7GBD?G;.DJA;K;O;CHJ?I;A79>7GC?UG;:GD?IK;GH
A;>7JIEDJGA?8TG;GAf7M;:;A79>7GC?UG;:;
HJEEDGI:J>7JI:;A7EDGI;h
CA;K;OA;GJ87C;I<7?I;H87H9JA;GA7EDGI;EDJG
AfTAD?=C;G:;Af7GBD?G;.DJA;K;OA7EDGI;EDJG
Af;CA;K;G:;Af7M;:;A79>7GC?UG;9;CIG7A;
HHJG;OKDJHFJ;A787=J;:;Af7M;:;9>7GC?UG;
;CB7I?UG;EA7HI?FJ;:;B;JG;HJGAf7M;:;A7
9>7GC?UG;DJQAf?CITG?;JG:JIGDJ:f7M;:;
9>7GC?UG;:;A7EDGI;H?IJT;C87H:;A7EDGI;
+DH;OA7EDGI;HJGJC;HJG<79;FJ?C;G7N;E7H
Af?CITG?;JGK;GHA;>7JI
Couvercle de la
charnière
Charnière
du haut
(,$ X$' &$
cAf7?:;:fJC;9ATQ:DJ?AA;:;ED;CA;K;O
A;H8DJADCHFJ?I?;CC;CIA79>7GC?UG;:J9;CIG;
QAf7GBD?G;(;II;O:;9XITA;H8DJADCH;IA7
9>7GC?UG;

9>?=@/?5:9>0V59>?-77-?5:9
$% "%"!$&% 8:0L71>01=K2=53K=-?1@=>H01@C;:=?1>@95<@1819?
%&&! $ X$
' &$
$CHI7AA;OA79>7GC?UG;:J9;CIG;:;9>7FJ;9XIT
&%'*"!$&%
.?A;>7JI:;HEDGI;HCf;HIE7H8?;C7A?=CT:f78DG:
;HH7N;O:fTA;K;GA7EDGI;A7EAJH87HH;;CIDJGC7CIA;
E?;::f?C9A?C7I?DCHJGA;BVB;9XITFJ;A7EDGI;@JHFJfQ
9;FJ;A;HEDGI;HHD?;CI8?;C7A?=CT;H.?Af7EE7G;?AG;HI;
?CHI78A;G7@JHI;OA;HE?;:H:f?C9A?C7I?DC:7CHA7B;HJG;
DYAf7EE7G7?A:;K?;CIHI78A;
.?A;HEDGI;HC;HDCIIDJ@DJGHE7HQC?K;7JIDJGC;OAf7M;
GT=A78A;EDJGHDJA;K;GDJ787?HH;GA7EDGI;:;=7J9>;
7<?CFJf;AA;HD?IQC?K;7J7K;9A7EDGI;:;:GD?I;0I?A?H;O
JC;9ATAA;C:;EDEDJGIDJGC;GAf7M;
$&&, "
&$!$'!"$& &
! G&!
DCHJAI;OA7H;9I?DC-;B?H;;CEA79;:JI?GD?G:J
9DBE7GI?B;CI9DC=TA7I?DCEDJG:;H?CHIGJ9I?DCH
$&&, " "!$&
!""!%G
.J?K;OA7BVB;EGD9T:JG;EDJGA7EDGI;DEEDHT;$ACfN
7E7H:;9DC:J?I;:f;7JDJ:;9DJK;G9A;:;9>7GC?UG;
$%'%" %! %"!$&%'
!"$& &$G$G$&!
87?HH;OA7EDGI;:J9DBE7GI?B;CIGT<G?=TG7I?DCHJG
Af7M;:;A79>7GC?UG;:J9;CIG;HHJG;OKDJHFJ;A7
87=J;;CB7I?UG;EA7HI?FJ;:;Af7M;:;9>7GC?UG;H;
IGDJK;HJGAf7M;:;9>7GC?UG;:J9;CIG;DJQAf?CITG?;JG
:JIGDJ:;Af7M;:;9>7GC?UG;:;EDGI;H?IJT;C87H
:;A7EDGI;
!;GB;OA7EDGI;;II;C;OA7<;GBT;QAf7?:;:;GJ87C
B7HFJ;DJJI?A?H;OJC;:;JM?UB;E;GHDCC;EDJG
HDJI;C?GA7EDGI;
!7?I;HE7HH;GA;H9R8A;HQIG7K;GHA7<;CI;:;Af7M;:;
9>7GC?UG;:J87HQ:GD?I;$CHTG;OAf7M;:;A79>7GC?UG;
:J>7JI:7CHA;IGDJ:;A79>7GC?UG;;C>7JI:;A7EDGI;
:J9DBE7GI?B;CIGT<G?=TG7I?DCHHJG;OKDJHFJ;A7
EDGI;HD?I7A?=CT;QAf7GBD?G;;IA7EDGI;DEEDHT;!?M;O
A79>7GC?UG;;C>7JI:;Af7GBD?G;H7CHIGDEH;GG;G7K;9
A;H8DJADCH
.JGA;HEDGI;HFJ?DJKG;CI7K;9A7B7?C:GD?I;E7HH;O
A;H<?AH;IA79DC:J?I;:f;7JE7GAf7M;:;9>7GC?UG;:J
9;CIG;G7C9>;O;CHJ?I;A79DC:J?I;:f;7J;IA;9DCI79I
QFJ7IG;8GD9>;H
Axe de
charnière
Fente de l’axe de
charnière du bas à
droite
$%'%" %! %"!$&%'!"$& &
$G$G$&! >@5?1
HHJG;OKDJHFJ;A;@D?CI:;A7EDGI;HD?I7A?=CT9DCIG;
Af7GBD?G;;IC;HD?IE7HIDG:JHHJG;OKDJHFJ;A7EDGI;
HD?I:GD?I;;IAfT97GI;B;CI;CIG;A;HEDGI;HHD?IJC?<DGB;
QAf7K7CI/DJI;CI;C7CIA7EDGI;7A?=CT;;CEA79;
H;GG;OA;H8DJADCH:;A79>7GC?UG;HJETG?;JG;-;B;II;O
;CEA79;A;9DJK;G9A;:;9>7GC?UG;;IA7K?H
Boulons
de charnière du
haut
Couvercle
de charnière
(l’aspect peut varier)
(l’aspect peut varier)
Contact à
4 broches
Conduite d’eau
Axe réglable
Axe de charnière
du centre
%&&! ! '&V'
!X%( SF! %
)DJHG;9DBB7C:DCHA;HIGDJHH;H:f7A?B;CI7I?DC:f;7J;C
9J?KG;233233233H;ADCA;BDCI7CI:;9DC:J?I;
:DCIKDJH7K;O8;HD?C)DJH7EEGDJKDCHA;H9DC:J?I;H:f;7J
;CB7I?UG;EA7HI?FJ;" .B7GIDCC;9I
^
-;<G?=;G7IDG/J8?C=
233233;I233
.?KDJH?CHI7AA;OJCHNHIUB;:f;7J" -;K;GH;*HBDH?H:7CH
KDIG;GT<G?=TG7I;JGA7H;JA;?CHI7AA7I?DC7EEGDJKT;;HI9;AA;:;
A7IGDJHH;" -1&$/+DJGA;H7JIG;HHNHIUB;H:fDHBDH;:;
Af;7JHJ?K;OA;HG;9DBB7C:7I?DCH:J<78G?97CI
.?Af7A?B;CI7I?DC:f;7JQKDIG;GT<G?=TG7I;JGK?;CI:fJC
HNHIUB;:;<?AIG7I?DC:fDHBDH;?CK;GHT; /H?KDIG;
GT<G?=TG7I;JG7T=7A;B;CIJC<?AIG;:f;7JJI?A?H;OA;8DJ9>DC
:;:TG?K7I?DC:J<?AIG;:;KDIG;GT<G?=TG7I;JG.?KDJHJI?A?H;OA7
97GIDJ9>;:;<?AIG7I?DC:;KDIG;GT<G?=TG7I;JG;C9DC@DC9I?DC
7K;9A;<?AIG;:fDHBDH;?CK;GHT;KDJHEDJK;OEGD:J?G;:;H
=A7SDCH9G;JM
;II;?CHI7AA7I?DC:;9DC:J?I;:f;7JCf;HIE7H=7G7CI?;E7G
A;<78G?97CI:;GT<G?=TG7I;JGDJ:;B79>?C;Q=A7SDCH
.J?K;OHD?=C;JH;B;CI9;H?CHIGJ9I?DCHEDJGB?C?B?H;G
A;G?HFJ;:;:DBB7=;HDCTG;JM:f?CDC:7I?DC
';H9DJEH:;8TA?;G;7JFJ?:DCC;:;H9DJEH:7CHA;H
IJN7JM:7CHA7IJN7JI;G?;:;A7B7?HDCE;JID997H?DCC;G
:;H:DBB7=;H7JME?U9;H:;KDIG;GT<G?=TG7I;JG7?CH?FJ;
:;H<J?I;HDJ:;H?CDC:7I?DCHEE;A;OJCEADB8?;G9;GI?<?T
EDJG9DGG?=;GA;H9DJEH:;8TA?;G7K7CI:f?CHI7AA;GA79DC:J?I;
:f;7J:;KDIG;GT<G?=TG7I;JG
+DJGEGTK;C?GIDJI;8GZAJG;;IIDJI:DBB7=;QKDIG;
GT<G?=TG7I;JGC;8G7C9>;O@7B7?HA79DC:J?I;:f;7JQJC;
97C7A?H7I?DC:f;7J9>7J:;
.?KDJHJI?A?H;OKDIG;GT<G?=TG7I;JG7K7CI:;8G7C9>;G
A79DC:J?I;:f;7J7HHJG;OKDJH:;A7?HH;GA;9DBBJI7I;JG
:;A7B79>?C;Q=A7SDC;CEDH?I?DC!-==M?
)f?CHI7AA;O@7B7?HA;HIJN7JM:;A7B79>?C;Q=A7SDC:7CH
:;H;C:GD?IHDYA7I;BETG7IJG;G?HFJ;:;:;H9;C:G;;C
:;HHDJH:JED?CI:;9DC=TA7I?DC
.?KDJHJI?A?H;OJCDJI?ATA;9IG?FJ;9DBB;JC;E;G9;JH;
TA;9IG?FJ;E;C:7CIAf?CHI7AA7I?DC7HHJG;OKDJHFJ;Af?HDA;B;CI
DJA;9R8A7=;:;9;IDJI?A;BEV9>;IDJI:7C=;G:;H;9DJHH;
TA;9IG?FJ;
1DJH:;K;OEGD9T:;GQIDJI;HKDH?CHI7AA7I?DCH
9DC<DGBTB;CI7JM;M?=;C9;H:;KDIG;9D:;AD97A
:;EADB8;G?;
( &! $
9>?=@/?5:9>0V59>?-77-?5:9
! &(!'%'$,%!
\ &@D-@C19/@5A=1:@?=:@>>1%8-=?:991/?
R
$12=531=-?:=&@.593 :?7BUIG;;MITG?;JG:;EDEDJG
8G7C9>;GA;GT<G?=TG7I;JGQAf7A?B;CI7I?DC:f;7J.?KDJH
JI?A?H;OJCIJN7J;C9J?KG;7HHJG;OKDJHFJ;A;H:;JM
;MIGTB?ITH:JIJN7JHD?;CI9DJET;H8?;C:GD?I
+DJGIGDJK;GA7ADC=J;JG:;IJN7J:DCIKDJH7JG;O
8;HD?CB;HJG;OA7:?HI7C9;FJ?K7:JGD8?C;I:f;7JH?IJT
:;GG?UG;A;GT<G?=TG7I;JG@JHFJf7JIJN7J:f7A?B;CI7I?DC
:f;7JHHJG;OKDJHFJf?AN7?I7HH;O:;IJN7J;CIGDE
EDJGKDJHE;GB;IIG;:;:T9DAA;GA;GT<G?=TG7I;JG:JBJG
7EGUHAf?CHI7AA7I?DC
';HIGDJHH;H" .B7GIDCC;9I
^
-;<G?=;G7IDG/J8?C=HDCI
:?HEDC?8A;H:7CHA;H:?B;CH?DCHHJ?K7CI;H
BE?d233
BE?d233
BE?d233
!&1>>1@7>?@D-@C198-?5L=1;7->?5<@1-;;=:@AK>
;-=>:9?/1@C<@52:9?2:@=95>
0-9>71>?=:@>>1>%8-=?:991/?
R
$12=531=-?:=
&@.593 V@?575>1E6-8-5>@9-@?=1?@D-@198-?5L=1
;7->?5<@1/-=71?@D-@0V-75819?-?5:90V1-@1>??:@?71
?18;>>:@>;=1>>5:91=?-591>/-?K3:=51>01?@D-@C
198-?5L=1;7->?5<@1;1@A19?01A195=/->>-9?>-A1/
7VI311?;1@A19?>12190=119://->5:99-9?01>
0:88-31>0V59:90-?5:90-9>A:?=18-5>:9
\ 1DJHEDJK;O79>;I;GJC;?=:@>>1
0V-75819?-?5:90V1-@ 9DCI;C7CIJCIJN7J;C9J?KG;
JCGD8?C;I:f7GGVI;IA;H@D?CIHTCJBTGTH9?:;HHDJH
9>;OKDIG;:?HIG?8JI;JGAD97ADJ;CA;9DBB7C:7CI7J
H;GK?9;:;E?U9;H;I799;HHD?G;H7J
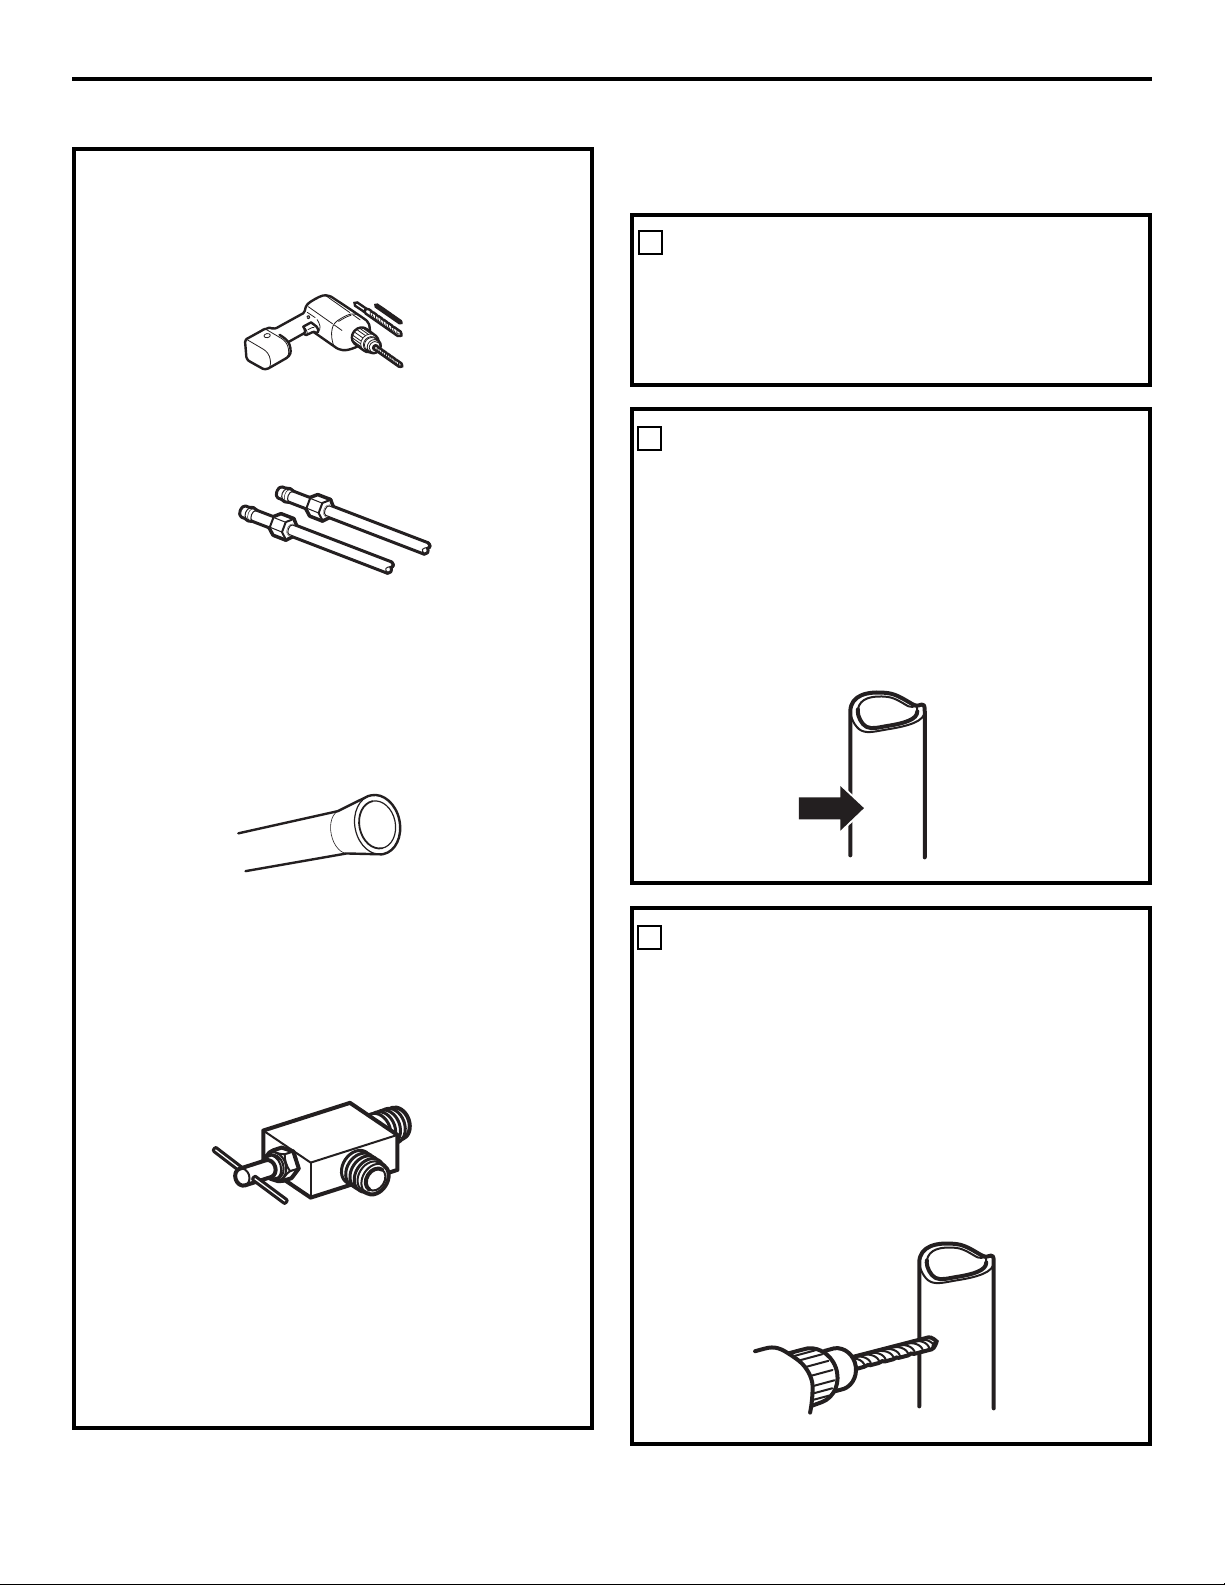
>D?H?HH;OEDJGA;GD8?C;IJC;BEA79;B;CI
<79?A;B;CI799;HH?8A;$AK7JIB?;JMA;8G7C9>;G
:;9XITQJCIJN7JK;GI?97A.?KDJH:;K;OA;
8G7C9>;GQJCIJN7J>DG?ODCI7A<7?I;HA;
8G7C9>;B;CI;C>7JIDJ:;9XITEAJIXIFJf;C
87H:JIJN7JEDJGTK?I;G:;G;9;KD?G:;H
HT:?B;CIH:JIJN7J:f7A?B;CI7I?DC:f;7J
!%%%,V" &
'$! &
9>?=@/?5:9>0V59>?-77-?5:9
$,V &&!
"$ "V'
*JKG;OA;GD8?C;IA;EAJHEGD9>;HJ<<?H7BB;CI
ADC=I;BEHEDJGEJG=;GA;IJN7J
$CHI7AA;OA;GD8?C;I:f7GGVIHJGA797C7A?H7I?DC:f;7J
EDI78A;A7EAJH<GTFJ;BB;CIJI?A?HT;
+;G9;OJCIGDJ:;ED:7CHA;IJN7J:f;7JQ
Af7?:;:fJC<DG;I:JG CA;K;OIDJI;87G8JG;:J;
7JE;GS7=;:JIGDJ:7CHA;IJN7J
-5?1>-??19?5:90191;->7-5>>1=017V1-@
/:@71=0-9>A:?=1;1=/1@>1K71/?=5<@1
.?KDJHC;E;G9;OE7HJCIGDJ:;EDKDJH
D8I?;C:G;OJC;7A?B;CI7I?DC:f;7JGT:J?I;;I:;H
=A7SDCHEAJHE;I?IH
"$,' &$!'"!'$$! &
! &(!'%'$,%! %'&
\ '91-75819?-?5:90V1-@2=:501;:?-.71 '7EG;HH?DC:;
Af;7J:D?IVIG;;CIG;;IEH?;I87G
\ '91;1=/1@>1K71/?=5<@1
\ '91/7K01;::@@91/7K=K37-.71
\ '9?:@=91A5>H7-81;7-?11?@9?:@=91A5>"45775;>
\ 1@CK/=:@>H/:8;=1>>5:90V@905-8L?=11C?K=51@=
01;:1?01@C.-3@1>8-9/4:9>UEDJG8G7C9>;G
A;IJN7J;C9J?KG;7JGD8?C;I:f7GGVI;I7JGD8?C;I:f;7J
:JGT<G?=TG7I;JG
!'
\ .?KDJHJI?A?H;OJC;IGDJHH;:f7A?B;CI7I?DC:f;7J" 7K;9
IJN7J;CB7I?UG;EA7HI?FJ;A;H=7GC?IJG;HCT9;HH7?G;H
HDCI:T@QBDCIT;H7JIJN7J
\ .?KDIG;97C7A?H7I?DC:f;7J79IJ;AA;7JCG799DG:TK7HT
QJC;;MIGTB?ITKDJH7JG;O8;HD?C:fJC-0-;?-?1@=
FJ;KDJHIGDJK;G;O:7CHKDIG;B7=7H?C:;B7ITG?;A
:;EADB8;G?;EDJG8G7C9>;GA;IJN7J:f;7J7J
GT<G?=TG7I;JG!' KDJHEDJK;O9DJE;GA;G799DG:
TK7HTQAf7?:;:fJC/:@;1[email protected]EJ?HJI?A?H;GJCG799DG:
Q9DBEG;HH?DC);9DJE;O@7B7?HAf;MIGTB?IT<?C?;:fJC
IJN7J:;A7IGDJHH;" .B7GIDCC;9I
^
-;<G?=;G7IDG
/J8?C=
\ '9=:.591?0V-==M? EDJG8G7C9>;GA;IJN7J:f;7J<GD?:;
';GD8?C;I:f7GGVI:D?I7KD?GJC;;CIGT;:f;7J7K;9JC
:?7BUIG;?CITG?;JGB?C?B7A:;ED7JED?CI:;
@DC9I?DC7K;9A;&'+'V'$!;HGD8?C;IH
:f7GGVIQTIG?;GHDCIHDJK;CI?C9AJH:7CHA;HIGDJHH;H
:f7A?B;CI7I?DC:f;7JK7CI:f79>;I;G7HHJG;OKDJH
FJ;A;GD8?C;IQTIG?;GH;9DC<DGB;QKDH9D:;H:;
EADB8;G?;AD97JM
%&&! ! '&V'%'&
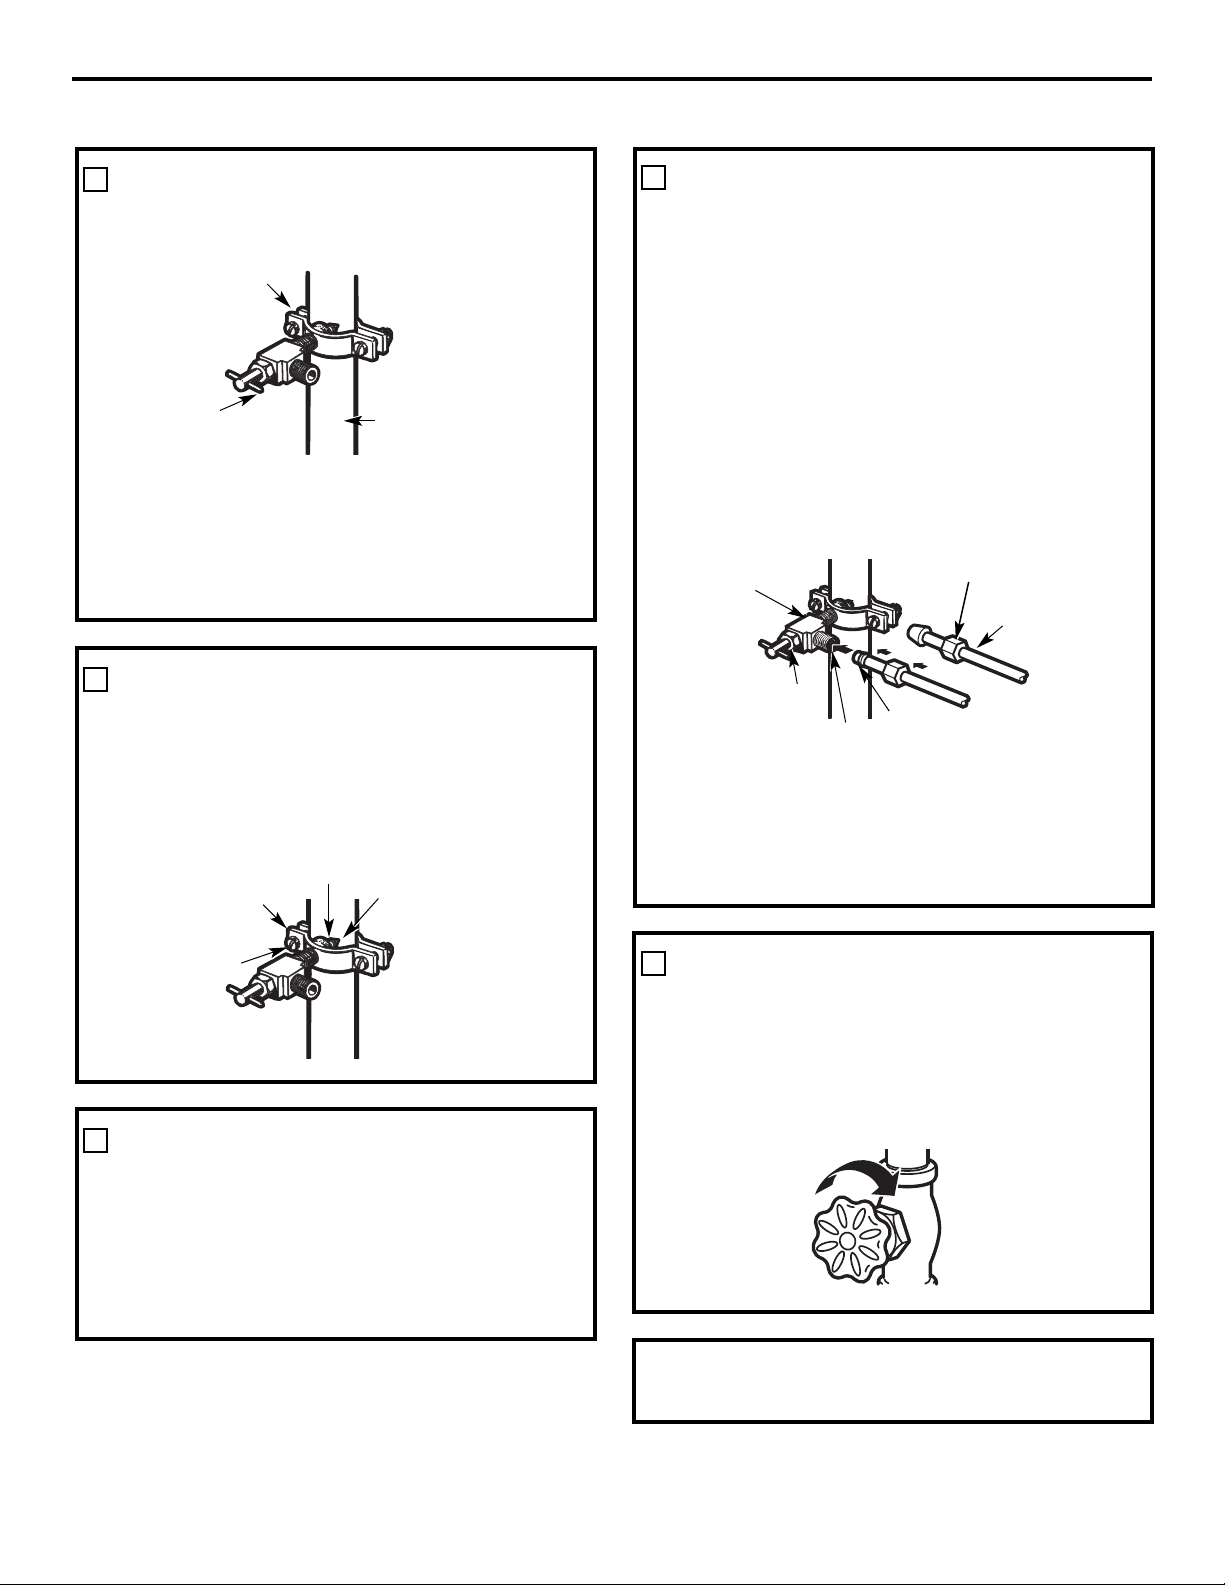
+A79;OJCT9GDJ:;9DBEG;HH?DC;IJC;87=J;
B7C9>DCQAf;MIGTB?IT:JIJN7J;I8G7C9>;O
A;H7JGD8?C;I:f7GGVI
HHJG;OKDJHFJ;A;IJN7JHD?I8?;C?CHTGT:7CH
A;GD8?C;I.;GG;O<DGIAfT9GDJ:;9DBEG;HH?DC
+DJGA;IJN7J;CB7I?UG;EA7HI?FJ;:fJC;IGDJHH;
" .B7GIDCC;9I
^
-;<G?=;G7IDG/J8?C=?CHTG;O
Af;MIGTB?ITBDJAT;:JIJN7J:7CHA;GD8?C;I
:f7GGVI;IH;GG;OAfT9GDJ:;9DBEG;HH?DCQA7
B7?CEJ?HH;GG;OJC7JIG;:;B?IDJG7K;9JC;
9AT.?KDJHH;GG;OIGDE<DGIKDJHEDJK;O
D997H?DCC;G:;H<J?I;H
!&1DJH:;K;OKDJH9DC<DGB;G7JMD:;H:;
EADB8;G?;(-:JDBBDCL;7AI>D<
(7HH79>JH;IIH';HGD8?C;IH:f7GGVIQTIG?;GHDCI
?AAT=7JM;IA;JGJI?A?H7I?DCCf;HIE7H7JIDG?HT;7J
(7HH79>JH;IIHDCHJAI;OKDIG;EADB8?;GAD97A
$ ,&'+'
'$! &
*JKG;OA;GD8?C;I:f7A?B;CI7I?DCEG?C9?E7A;:f;7J
;IEJG=;OA;IJN7J@JHFJfQ9;FJ;Af;7JHD?I
9A7?G;
!;GB;OAf;7J7JC?K;7J:JGD8?C;I:f;7J7EGUH
T9DJA;B;CI:f;CK?GDCA?IG;FJ7GI:f;7JE7G
A;IJN7J
"'$,&'+'
9>?=@/?5:9>0V59>?-77-?5:9
9>;B?C;OA;IJN7J:JIJN7J:f;7J<GD?:;7J
GT<G?=TG7I;JG
!7?I;HE7HH;GA;IJN7JE7GJCIGDJE;G9T:7CHA;
BJGDJA;EA7C9>;G:;GG?UG;A;GT<G?=TG7I;JGDJ7J
C?K;7J:;Af7GBD?G;:;9J?H?C;7:@79;CI;7JHH?EGUH
:JBJGFJ;EDHH?8A;
,&'+'
!?M;OA;GD8?C;I:f7GGVI7JIJN7J:f;7J<GD?:;Q
Af7?:;:J9DAA?;G:;H;GG7=;
!&1DJH:;K;OKDJH9DC<DGB;G7JMD:;H:;
EADB8;G?;(-:JDBBDCL;7AI>D<
(7HH79>JH;IIH';HGD8?C;IH:f7GGVIQTIG?;GHDCI
?AAT=7JM;IA;JGJI?A?H7I?DCCf;HIE7H7JIDG?HT;7J
(7HH79>JH;IIHDCHJAI;OKDIG;EADB8?;GAD97A
*,$! &V$$W&
Collier de serrage
Tuyau vertical
d’eau froide
Robinet d’arrêt
à étrier
.;GG;OA;HK?H:J9DAA?;G@JHFJfQ9;FJ;A7GDC:;AA;
:fTI7C9>T?IT9DBB;C9;Q;C<A;G
!&);H;GG;OE7HIGDE1DJHG?HFJ;O
:fT9G7H;GA;IJN7J:;9J?KG;
%$$,!$
%$$
Rondelle
Entrée
Collier de serrage
Vis du
collier
+DJG9DBEATI;GAf?CHI7AA7I?DC:JGT<G?=TG7I;JGG;IDJGC;O
QAfTI7E;:;A7H;9I?DC9>?,77,?4:9/@=H1=42H=,?0@=
Robinet d’arrêt
à étrier
Écrou de compression
Presse-joint
Robinet de sortie
Bague (manchon)
Tuyau
SmartConnect
™
Bruits de fonctionnement normaux.
Avant d’appeler un réparateur…
:9>047>/0/H;,99,20PE.:9:84>0D/@?08;>0?/07Q,=209?
:9>@7?0D/Q,-:=/70>?,-70,@B<@4>@4A09?0?A:@>;:@==0D;0@?
J?=0HA4?0=/01,4=0,;;07F@9=H;,=,?0@=
Problème Causes possibles Correctifs
Le réfrigérateur ne 1/D/71010K35A=-311>?19/:@=> •II;C:;O;CK?GDCB?CJI;HE;GB;IIG;7J9N9A;:;:T=?KG7=;
fonctionne pas :;H;I;GB?C;G
-/:88-9011>?=K37K1 • -T=A;OA79DBB7C:;:;I;BETG7IJG;HJGJCGT=A7=;
>@=0 (arrêt) :;I;BETG7IJG;
1=K2=53K=-?1@=1>?0K.=-9/4K • C<DC9;OA7<?9>;:;Af7EE7G;?A:7CHA7EG?H;BJG7A;
105>6:9/?1@=:@712@>5.71 •-;BEA79;OA;<JH?8A;DJGT;C9A;C9>;OA;:?H@DC9I;JG
;1@?-A:5=>-@?K
Vibration ou bruit 1>;510>0195A1771819? • DCHJAI;O 0??0D70=H1=42H=,?0@=/094A0,@
métallique (une légère :9?.1>:590VM?=1=K37K>
vibration est normale)
0>=H1=42H=,?0@=>;7@>=H.09?>1:9?/0>-=@4?>/411H=09?>/0.0@B/0>,9.409>0>=H1=42H=,?0@=>
8:/0=90>;=H>09?09?;7@>/01:9.?4:9>0?>:9?;7@>,A,9.H>>@=70;7,9?0.39:7:24<@0
HUMMM...
OUUCH....
n
';CDJK;7J9DBEG;HH;JGQG;C:;B;CITA;KTE;JI<DC9I?DCC;GEAJH
ADC=I;BEH;IEAJHK?I;FJ;KDIG;7C9?;CGT<G?=TG7I;JG;IKDJHEDJK;O
;CI;C:G;JCHDCBD:JATDJJCGDC<A;B;CI7?=JE;C:7CIHDC
<DC9I?DCC;B;CI
n
1DJHEDJK;O;CI;C:G;JCH?<<A;B;CIADGHFJ;A;HEDGI;HH;<;GB;CI;A7
K?;CI:;AfTFJ?A?8G7=;:;EG;HH?DC:7CHA;GT<G?=TG7I;JG
n
1DJHEDJK;O;CI;C:G;A;HK;CI?A7I;JGHIDJGC;GQ>7JI;HK?I;HH;H;A7H;
EGD:J?IADGHFJ;A;GT<G?=TG7I;JGK?;CI:fVIG;8G7C9>TADGHFJ;A;HEDGI;H
HDCIDJK;GI;H<GTFJ;BB;CIDJADGH:;Af7@DJI:fJC;=G7C:;FJ7CI?IT
:f7A?B;CIH:7CHA;H9DBE7GI?B;CIH9DC=TA7I;JGDJGT<G?=TG7I;JG';H
K;CI?A7I;JGHE;GB;II;CI:;B7?CI;C?GA;H8DCC;HI;BETG7IJG;H
n
';HK;CI?A7I;JGH9>7C=;CI:;K?I;HH;HEDJG7HHJG;G:;HT9DCDB?;H
:fTC;G=?;;IJCG;<GD?:?HH;B;CIDEI?B7JM
%1?#' &%
n
1DJHEDJK;O;CI;C:G;:;H9G7FJ;B;CIHDJ:;H9A7FJ;B;CIHADGHFJ;
A;GT<G?=TG7I;JG;HI8G7C9>TEDJGA7EG;B?UG;<D?H;A7H;EGD:J?IADGHFJ;
A;GT<G?=TG7I;JGH;G;<GD?:?IQA78DCC;I;BETG7IJG;
n
';GU=A7=;:J9DC=TA7I;JG9A?FJ;FJ7C:A;9DBEG;HH;JGH;B;I;C
B7G9>;DJHfRGG;I;
n
'7B?CJI;G?;:;:T=?KG7=;H;B;II7CI;CB7G9>;DJHfRGG;I7CIE;C:7CI
A;9N9A;:;:T=?KG7=;
n
'f;ME7CH?DC;IA79DCIG79I?DC:;HH;GE;CI?CH:;G;<GD?:?HH;B;CIE;C:7CI
;I7EGUHA;:T=?KG7=;E;JK;CI97JH;GJC9G7FJ;B;CIDJJC9A7FJ;B;CI
n
.JGA;HBD:UA;HTFJ?ETH:fJC;B79>?C;Q=A7SDCH7EGUHJC9N9A;:;
<78G?97I?DC:;=A7SDCHKDJHEDJK;O;CI;C:G;A;H=A7SDCHIDB8;G:7CH
A;879
n
.JGA;HBD:UA;HBJC?H:fJC:?HIG?8JI;JGA;BDJK;B;CI:;H9DC:J?I;H
E;JIVIG;7J:?8A;ADGH:;A7EG;B?UG;:?HIG?8JI?DC:f;7J;I7EGUHA;
G;AR9>;B;CI:J8DJIDC:J:?HIG?8JI;JG
$'&%V'
n
';E7HH7=;:;Af7=;CI<G?=DG?<?FJ;:7CHA;HH;GE;CI?CH:;G;<GD?:?HH;B;CI
:J9DC=TA7I;JGE;JIVIG;799DBE7=CT:fJC=7G=DJ?AA;B;CIH;B8A78A;
Q9;AJ?:;Af;7J;CT8JAA?I?DC
n
'f;7JIDB87CIHJGAfTATB;CI9>7J<<7CI:;:T=?KG7=;E;JI<7?G;JC8GJ?I
:;=GTH?AA;B;CI:;9A7FJ;B;CIDJ:;8DJG:DCC;B;CIE;C:7CIA;9N9A;
:;:T=?KG7=;
n
0C8GJ?I:;HJ?CI;B;CI:f;7JE;JIVIG;;CI;C:JE;C:7CIA;9N9A;:;
:T=?KG7=;ADGHFJ;A7=A79;:;AfTK7EDG7I;JG<DC:;IIDB8;:7CHA;879
:;GT9JETG7I?DC
n
!;GB;GA7EDGI;E;JI97JH;GJC=7G=DJ?AA;B;CI;CG7?HDC:;AfTFJ?A?8G7=;
:;EG;HH?DC
Entendez-vous ce que j’entends ? Ces bruits sont normaux.
OUIR !
#:@=:-?094=;7@>/Q491:=8,?4:9>@=70>
-=@4?>9:=8,@B/01:9.?4:990809?/07,
8,.3490F27,G:9>A0@4770D.:9>@7?0D7,
>0.?4:9Machine à glaçons automatique
Soutien au
consommateur
Conseils de dépannage Fonctionnement Mesures de sécuritéInstallation
Soutien au
consommateur
Conseils de dépannage
FonctionnementMesures de sécurité Installation
Problème Causes possibles Correctifs
Le moteur fonctionne 1/51>?9:=8-77:=><@171 • II;C:;O>;JG;HEDJGFJ;A;GT<G?=TG7I;JGG;<GD?:?HH;
pendant de longues =K2=53K=-?1@=A519?0VM?=1.=-9/4K 9DBEAUI;B;CI
périodes ou démarre
1/5-==5A1>:@A19?7:=><@1 • f;HICDGB7A
et s’arrête fréquemment.
@913=-901<@-9?5?K0V-75819?>
-K?K85>1-@=K2=53K=-?1@=
(Les réfrigérateurs
":=?17-5>>K1:@A1=?1 • 1TG?<?;OFJf?ACfN7E7HJCE7FJ;IFJ?;BEV9>;A7EDGI;:;<;GB;G
congélateurs étant plus
&18;>/4-@0:@:@A1=?@=1 • f;HICDGB7A
grands, leur moteur doit
2=K<@19?101>;:=?1>
fonctionner plus
1>/:88-901>01?18;K=-?@=1 • DCHJAI;O0>.:88,9/0>
longtemps. Ils démarrent
:9?K?K=K37K1>-@C?18;K=-?@=1>
et s’arrêtent afin de
71>;7@>.->>1>
-2:9/?5:9&@=.:::71>?-/?5A1 • f;HICDGB7AFJ7C:A7<DC9I?DC/JG8DDDA;HI79I?K;DCHJAI;OA7
H;9I?DC'@=-:::7 EDJG:;EAJH7BEA;H?C<DGB7I?DCH
Température trop élevée -/:88-90101?18;K=-?@=1 • DCHJAI;O0>.:88,9/0>
dans le congélateur ou 0@=K2=53K=-?1@=:@0@
le réfrigérateur /:93K7-?1@=9V1>?;->=K37K1
H@91?18;K=-?@=1->>1E.->>1
&18;>/4-@0:@:@A1=?@=1 • 87?HH;OA79DBB7C:;:;I;BETG7IJG;:fJC;EDH?I?DC
2=K<@19?101>;:=?1> DCHJAI;O0>.:88,9/0>
":=?17-5>>K1:@A1=?1 • 1TG?<?;OFJf?ACfN7E7HJCE7FJ;IFJ?;BEV9>;A7EDGI;:;<;GB;G
Givre sur les aliments ":=?17-5>>K1:@A1=?1 • 1TG?<?;OFJf?ACfN7E7HJCE7FJ;IFJ?;BEV9>;A7EDGI;:;<;GB;G
surgelés (il est normal
1>:@A1=?@=1>01;:=?1>:9?
que du givre se forme à
?=:;2=K<@19?1>:@?=:;7:93@1>
l’intérieur du paquet)
Vibration fréquente 1/:88@?-?1@=018-=/41 • (;II;OA;9DBBJI7I;JG:;B7G9>;;CEDH?I?DC0 (arrêt).
017-8-/4591H37-J:9>1>? ';GD8?C;I:f;7JH;G7;C:DBB7=TH?=7G:;OA;
19;:>5?5:9I (marche)8-5> 9DBBJI7I;JG:;B7G9>;;CEDH?I?DCI (marche).
7V-;;=:A5>5:991819?191-@0@
=K2=53K=-?1@=9V1>?;->.=-9/4K
Petits glaçons ou glaçons 1257?=1H1-@1>?.:@/4K • -;BEA79;OA797GIDJ9>;:J<?AIG;7K;9JC;CDJK;AA;
creux à l’intérieur 97GIDJ9>;DJ?CHI7AA;OA;8DJ9>DC:J<?AIG;
La machine à glaçons 1/:88@?-?1@=018-=/41 • (;II;OA;9DBBJI7I;JG:;B7G9>;;CEDH?I?DCI (marche).
automatique ne 9V1>?;->.=-9/4K ';KDN7CIAJB?C;JM:;A7B79>?C;Q=A7SDCH:;K?;CI
fonctionne pas K;GIFJ7C:A;9DBBJI7I;JG:;KDN7CIAJB?C;JM:;
(sur certains modèles) 9DBE7GI?B;CI9DC=TA7I?DC;HIEG;HHTDJFJ7C:
A7EDGI;:J9DBE7GI?B;CI9DC=TA7I?DC;HI<;GBT;
V-75819?-?5:90V1-@1>?-==M?K1 • DCHJAI;O9>?,77,?4:9/07,.:9/@4?0/Q0,@
:@9V1>?;->.=-9/4K1
1/:8;-=?5819? • II;C:;O>;JG;HFJ;A;GT<G?=TG7I;JGHD?I
/:93K7-?1@=1>??=:;/4-@0 9DBEAUI;B;CI<GD?:
'91-//@8@7-?5:90137-J:9> • P=7A?H;OA;H=A7SDCHQA7B7?C
0-9>71?5=:5=H37-J:9>;1@?
/-@>1=@9-==M?017-8-/4591
H37-J:9>
1>37-J:9>>1>:9?/:77K>0-9> • T8G7C9>;OA7B79>?C;Q=A7SDCH;CA;K;OA;H=A7SDCH
7-8-/4591H37-J:9>71A:D-9? EJ?HG;B;II;O;CB7G9>;A7B79>?C;Q=A7SDCH
7@8591@CA1=?017-8-/4591
H37-J:9>/7539:?1
1A:D-9?7@8591@C018-/4591 • f;HICDGB7AFJ7C:A7EDGI;:J9DBE7GI?B;CI9DC=TA7I?DC
H37-J:9>91>V-77@81;-> ;HIDJK;GI;';KDN7CIAJB?C;JM:;A7B79>?C;Q=A7SDCH
:;K?;CIK;GIFJ7C:A;9DBBJI7I;JG:;KDN7CIAJB?C;JM:;
9DBE7GI?B;CI9DC=TA7I?DC;HIEG;HHTDJFJ7C:A7EDGI;
:J9DBE7GI?B;CI9DC=TA7I?DC;HI<;GBT;
Le moteur fonctionne
pendant de longues
périodes ou démarre et
s’arrête fréquemment.
(Les réfrigérateurs
modernes et leurs
congélateurs étant plus
grands, leur moteur doit
fonctionner plus
longtemps. Ils démarrent et
s’arrêtent afin de maintenir
des températures
uniformes.)
www.electromenagersge.ca

Problème Causes possibles
Correctifs
Odeur/saveur 1>-75819?>:9??=-9>85>71@= • B87AA;O8?;CA;H7A?B;CIH
anormale des glaçons :01@=3:Q?-@C37-J:9>
72-@?91??:D1=7V59?K=51@=0@ • DCHJAI;O9?=0?4090?90??:C,20
=K2=53K=-?1@=
• "7G:;OJC;8D?I;:;8?97G8DC7I;:;HDJ:;DJK;GI;:7CH
KDIG;GT<G?=TG7I;JG-;BEA79;OA7IDJHA;HIGD?HBD?H
Formation lente des ":=?17-5>>K1:@A1=?1 • 1TG?<?;OFJf?ACfN7E7HJCE7FJ;IFJ?;BEV9>;A7EDGI;:;<;GB;G
glaçons
-/:88-90101?18;K=-?@=1 • DCHJAI;O0>.:88,9/0>
0@/:93K7-?1@=9V1>?;->=K37K1 H
@91?18;K=-?@=1->>1E.->>1
Odeur dans 1>-75819?>:9??=-9>85> • ';H7A?B;CIHQD:;JG<DGI;:D?K;CIVIG;;B87AATH
le réfrigérateur 71@=:01@=-@=K2=53K=-?1@= >;GBTI?FJ;B;CI
• "7G:;OJC;8DWI;DJK;GI;:;8?97G8DC7I;:;HDJ:;
:7CHA;GT<G?=TG7I;JG
72-@?91??:D1=7V59?K=51@= • DCHJAI;O9?=0?4090?90??:C,20
De la condensation 17-9V1>?;->594-.5?@17;190-9? • HHJN;O8?;CA7HJG<79;;MITG?;JG;;I787?HH;OA7
s’accumule à l’extérieur 71>;K=5:01>012:=?14@8505?K 9DBB7C:;:JGT<G?=TG7I;JG:fJC;EDH?I?DC
De l’humidité se forme (:@>:@A=1E71>;:=?1>?=:;
à l’intérieur (quand il >:@A19?:@?=:;7:93?18;>
fait humide, l’air
transporte de l’humidité
à l’intérieur du
réfrigérateur quand
vous ouvrez les portes)
La lumière de compartiment
"->0VK71/?=5/5?KH7-;=5>1 • -;BEA79;OA;<JH?8A;DJG;B;II;O;CB7G9>;
réfrigération ou congélation
A;:?H@DC9I;JG
ne s’allume pas
V-8;:@71-.=Q7K:@1771 • DCHJAI;O%08;7,.0809?/0>,8;:@70>H70.?=4<@0>
9V1>?;->A5>>K1H2:90
La porte/le tiroir (:@>01A1E-6@>?1=71>;510> • DCHJAI;O9>?,77,?4:9/@=H1=42H=,?0@=
ne ferme pas seul 0195A1771819?
La porte/le tiroir du V1>?9:=8-7>5-;=L>>VM?=1 • ;A7?C:?FJ;FJ;A7EDGI;A;I?GD?G:J9DBE7GI?B;CI9DC=TA7I?DC7
compartiment congélation :@A1=?7-;:=?171?5=:5=0@ JC8DC@D?CI.?A7EDGI;A;I?GD?G:J9DBE7GI?B;CI9DC=TA7I?DC
s’ouvre quand la porte du /:8;-=?5819?/:93K7-?5:9>1 C;H;G;<;GB;E7H7JIDB7I?FJ;B;CI7EGUHHfVIG;DJK;GI9DCHJAI;O
réfrigérateur est fermée =121=81?:@?>1@7 A7H;9I?DCProblème : ,;:=?070?4=:4=9010=80;,>>0@7 9?:;HHJH
De l’air chaud souffle V1>?9:=8-718:?1@=>1
du bas du réfrigérateur =12=:505?H7V-5=-9>71;=:/1>>@>
01=K2=53K=-?5:9571>?9:=8-7<@1
017-/4-71@=>:5?K85>119.->
0@=K2=53K=-?1@=1=?-59>
=1AM?1819?>01>:7>:9?>19>5.71>
1?/4-9319?01/:@71@=H/1>
?18;K=-?@=1>9:=8-71>1?;->
0-931=1@>1>
Les aliments gèlent 1>-75819?>>:9??=:;;=L>01 • PAD?=C;OA;H7A?B;CIH:;AfDJK;GIJG;:;9?G9JA7I?DC:f7?G
dans le compartiment 7V:@A1=?@=101/5=/@7-?5:90V-5=
réfrigération H7V-==5L=10@/:8;-=?5819?
=K2=53K=-?5:9
1=K37-3101A:?=1 • -T=A;OKDIG;GT<G?=TG7I;JGQJC;I;BETG7IJG;EAJH
=K2=53K=-?1@=1>??=:;2=:50 9>7J:;;CHTA;9I?DCC7CIJC;=G7:J7I?DCQA7<D?H
Il y a une lueur orangée 1/4-@22-310@0K35A=-31 • f;HICDGB7A
dans le compartiment 2:9/?5:991
congélation
Soutien au
consommateur
Conseils de dépannage Fonctionnement Mesures de sécuritéInstallation
Avant d’appeler un réparateur…

Soutien au
consommateur
Conseils de dépannage
FonctionnementMesures de sécurité Installation
www.electromenagersge.ca
Problème Causes possibles
Correctifs
Mauvais goût/odeur 105>?=5.@?1@=0V1-@9V-;-> •!7?I;H9DJA;GAf;7J@JHFJfQ9;FJ;Af;7J:JHNHIUB;HD?I
de l’eau K?K@?575>K01;@5>7:93?18;> G;BEA79T;E7G:;Af;7J<G7W9>;
L’eau versée dans le :=8-77:=><@171=K2=53K=-?1@= •II;C:;O>;JG;HEDJGFJ;A7I;BETG7IJG;:J
premier verre est 1>?595?5-71819?59>?-77K GT<G?=TG7I;JGH;HI78?A?H;
chaude
105>?=5.@?1@=0V1-@9V-;->K?K • !7?I;H9DJA;GAf;7J@JHFJfQ9;FJ;Af;7J:JHNHIUB;HD?I
@?575>K01;@5>7:93?18;> G;BEA79T;E7G:;Af;7J<G7W9>;
1=K>1=A:5=0V1-@A519? •II;C:;OEAJH?;JGH>;JG;HEDJGFJ;Af;7JG;<GD?:?HH;
0VM?=1A50-93K
Le distributeur d’eau V-75819?-?5:9191-@1>? •DCHJAI;O9>?,77,?4:9/07,.:9/@4?0/Q0,@
ne fonctionne pas /:@;K1:@9V1>?;->=-//:=0K1
1257?=1H1-@1>?.:@/4K • -;BEA79;OA797GIDJ9>;:J<?AIG;7K;9JC;CDJK;AA;
97GIDJ9>;DJ?CHI7AA;OA;8DJ9>DC:J<?AIG;
7D-017V-5=0-9>7-/:90@5?1 •EEJN;OHJGA;8G7H:;:?HIG?8JI?DCE;C:7CI7J
0V1-@ BD?CH:;JMB?CJI;H
V1-@0-9>71=K>1=A:5=1>?317K1 •J=B;CI;OA7I;BETG7IJG;:;GT=A7=;:;9DBE7GI?B;CI
;-=/1<@17-?18;K=-?@=101 GT<G?=TG7I?DC;I7II;C:;O>;JG;H.?Af;7JC;9DJA;E7H
=K37-311>??=:;2=:501 :J:?HIG?8JI;JGEGUH>;JG;H7EE;A;OA;H;GK?9;
L’eau jaillit du distributeur
-/-=?:@/410@257?=1A519? •!7?I;H9DJA;GA?IG;H
i =7AADCH:J:?HIG?8JI;JGEDJG
0VM?=159>?-77K1 EJG=;GA;HNHIUB;
La machine à glaçons -/:90@5?10V1-@:@71 • EE;A;OJCEADB8?;G
ne distribue ni eau =:.591?0V-==M?1>?.:@/4K
ni glaçons
1257?=1H1-@1>?.:@/4K •-;BEA79;OA797GIDJ9>;:J<?AIG;7K;9JC;CDJK;AA;
97GIDJ9>;DJ?CHI7AA;OA;8DJ9>DC:J<?AIG;
-=?:@/4101257?=1 • -;I?G;O;IGT?CHI7AA;OA797GIDJ9>;:;<?AIG;;CKDJH
8-759>?-77K1 7HHJG7CIFJf;AA;H;8ADFJ;;CEA79;'7A7B;QAf;MIGTB?IT
:;A797GIDJ9>;:D?IVIG;EDH?I?DCCT;K;GI?97A;B;CI
L’eau coule du (:@>91?191E;->71A1==1>:@> • /;C;OA;K;GG;HDJHA;:?HIG?8JI;JGE;C:7CIdH;9DC:;H
distributeur 7105>?=5.@?1@=>@225>-8819? 7EGUH7KD?GG;AR9>TA;8DJIDC:J:?HIG?8JI;JG'f;7JE;JI
7:93?18;>-;=L>-A:5==17I/4K 9DCI?CJ;GQ9DJA;G7EGUHFJ;KDJH7N;OG;AR9>TA;8DJIDC
71.:@?:9
17V-5=;1@?>1?=:@A1=0-9> •!7?I;HT9DJA;GAf;7JE;C:7CI7JBD?CHB?CJI;H
71>/:90@5?1>0V1-@/-@>-9? EDJG;MEJAH;GAf7?G:JHNHIUB;
7VK3:@??1819?-;=L>@91
05>?=5.@?5:90V1-@
Problème Causes possibles
Correctifs
Mon écran indique -2:9/?5:9&@=.:::71>?-/?5A1 •DCHJAI;OA7H;9I?DC'@=-:::7 EDJG:;EAJH7BEA;H
?C<DGB7I?DCH
Le voyant lumineux du V1>?9:=8-7 •DCHJAI;OA7H;9I?DC47?=0/Q0,@ EDJG:;EAJH7BEA;H
filtre d’eau a changé de ?C<DGB7I?DCH
couleur
Le voyant lumineux de 72-@?=181??=1HEK=: •EEJN;OHJGA7IDJ9>;RESET WATER FILTER (remise à
filtre d’eau demeure rouge
7V5905/-?1@=01257?=10V1-@ zéro du filtre d’eau) ;II;C;OA77EEJNT;E;C:7CI
après un remplacement H;9DC:;HDCHJAI;OA7H;9I?DC47?=0/Q0,@ EDJG
du filtre d’eau :;EAJH7BEA;H?C<DGB7I?DCH
Le voyant lumineux V1>?9:=8-71A:D-9?01A519? •DCHJAI;OA7H;9I?DC47?=0/Q0,@ EDJG:;EAJH7BEA;H
de filtre d’eau ne :=-931;:@=A:@>05=1<@1A:@> ?C<DGB7I?DCH
s’allume pas -A1E.1>:5901=18;7-/1=71257?=1
.519?O?(:@>01A1E=18;7-/1=71
257?=1<@-9071A:D-9?5905/-?1@=
01=18;7-/1819?0@257?=101A519?
=:@31
La poignée est lâche/ (:@>01A1E-6@>?1=7-;:539K1 •DCHJAI;OA;HH;9I?DCH4B0D7,;:429H0/@.:8;,=?4809?
Il y a un espace vide pour 01;:=?1 ,74809?>1=,4> ;I4B0D7,;:429H0/@.:8;,=?4809?
la poignée .:92H7,?4:9 EDJG:;H?CHIGJ9I?DCH:TI7?AAT;H
Son du réfrigérateur V1>?7V-7-=8101;:=?1 •!;GB;OA7EDGI;
Le réglage de contrôles %@=/1=?-59>8:0L71> •.?A;HGT=A7=;H:;9DCIGXA;C;Hf7AAJB;CIE7HKTG?<?;O
n’est pas allumé 71>-8;:@71>K71/?=5<@1>>5?@K1> FJ;A;H7BEDJA;HTA;9IG?FJ;HC;HD?;CIE7H8GZAT;H;I
194-@?0@/:8;-=?5819? G;BEA79;OA;HA;97HT9>T7CI
=K2=53K=-?5:9-77@819?71>=K37-31>
01/:9?=O71017-?18;K=-?@=1
Les portes ne sont pas 72-@?=K-75391=71>;:=?1> •DCHJAI;OA7H;9I?DC74290809?/0>/0@B;:=?0> H?IJT;
bien alignées (Uniquement
:7CHA7H;9I?DC%084>009;7,.0/0>;:=?0> 8:/I70>/0
sur les modèles à deux =H1=42H=,?0@=>F/0@B;:=?0>@94<@0809?
portes)
Soutien au
consommateur
Conseils de dépannage
Fonctionnement
Mesures de sécurité
Installation
Avant d’appeler un réparateur…

Notes. www.electromenagersge.ca
Soutien au
consommateur
Conseils de dépannage
FonctionnementMesures de sécurité Installation
$ &' &
EDJGA79A?;CIUA;7J7C7:7
1DIG;GT<G?=TG7I;JG;HI=7G7CI?9DCIG;IDJI:T<7JI:;B7ITG?7J;I:;<78G?97I?DC
;FJ;9;II; JGT;:;=7G7CI?; +?U9;H (7?C:fD;JKG;
=7G7CI?;9DJKG; QE7GI?G:;A7 -TE7G7I?DCDJ
:7I;:f79>7I G;BEA79;B;CI7J
9>D?M:;(78;
DBEG;HH;JG " +GD<?A;?M7CH " +GD<?A;?M7CH " +GD<?A;?CF7CH
" ;IIDJI;H7JIG; " ;IIDJI;H7JIG; " ;IIDJI;H7JIG;
B7GFJ;H0C7C B7GFJ;H0C7C B7GFJ;H0C7C
.NHIUB;H9;AATN " +GD<?A;?CF7CH " +GD<?A;?CF7CH " +GD<?A;?CF7CH
9DBEG?HAfTK7EDG7I;JGA7 " ;IIDJI;H7JIG; " ;IIDJI;H7JIG; " ;IIDJI;H7JIG;
IJN7JI;G?;:J9DC:;CH;JG B7GFJ;H0C7C B7GFJ;H0C7C B7GFJ;H0C7C
;IA;<G?=DG?=UC;
/DJI;HA;H7JIG;HE?U9;H 0C7C 0C7C 0C7C
"!$& &
-=01E/1??13-=-9?511?A:?=12-/?@=1:=5359-71/:881;=1@A10V-/4-?1?;=1@A1
017-0-?10V-/4-?
(78;KDJHD<<G;H;HH;GK?9;H:7CHIDJIA;E7NH+DJG:;EAJH7BEA;H
G;CH;?=C;B;CIHHJGA7EGTH;CI;=7G7CI?;K;J?AA;OEG;C:G;9DCI79I7K;9
?G;9I;JG-;A7I?DCH7K;9A;H9DCHDBB7I;JGH(78;7C7:7$C9
JG;7J!79IDGN'7C;(DC9IDC) (
2=,;30DA:?=0=0G@4.4
):@>/0A0D1:@=94=7,;=0@A0/0
7Q,.3,?:=4249,7;:@=:-?094=/0>
>0=A4.0>09A0=?@/07,2,=,9?40
EXCLUSION DE GARANTIES IMPLICITES—Votre seul et unique recours est la réparation du produit selon les dispositions de
cette Garantie limitée. Toutes les garanties implicites, incluant les garanties de commercialité et d’adéquation à un usage
spécifique, sont limitées à une année ou à la période la plus courte autorisée par la législation.
&$%&! &! %
'7EGTH;CI;=7G7CI?;C;Hf7EEA?FJ;FJfQAfJI?A?H7I?DC
:DB;HI?FJ;E7GJC;H;JA;<7B?AA;7J7C7:7ADGHFJ;
A;GT<G?=TG7I;JG7TIT?CHI7AAT9DC<DGBTB;CI7JM
?CHIGJ9I?DCH<DJGC?;HE7G(78;;I;HI7A?B;CIT
9DGG;9I;B;CI;C;7J;I;CTA;9IG?9?IT
';H:DBB7=;H:ZHQJC;JI?A?H7I?DC78JH?K;JC
799?:;CIJC;;MEAD?I7I?DC9DBB;G9?7A;7?CH?FJ;A7
BD:?<?97I?DCAf;CAUK;B;CIDJAf7AITG7I?DC:;A7EA7FJ;
H?=C7ATI?FJ;7CCJA;CIA7EGTH;CI;=7G7CI?;
'f;CIG;I?;C;<<;9IJT:7CHA;97:G;:;A7EGTH;CI;
=7G7CI?;:D?IAfVIG;E7GJCGTE7G7I;JG7=GTT(78;
(78;;IA;B7G9>7C:C;E;JK;CIVIG;I;CJHEDJG
G;HEDCH78A;H;C97H:;GT9A7B7I?DCHDJ:DBB7=;H
GTHJAI7CI:;IDJI;E7CC;:JGT<G?=TG7I;JGDJ:fJC
;CIG;I?;CG;I7G:TEDJG:;HG7?HDCHFJ?G7?HDCC78A;B;CI
T9>7EE;CIQA;JG9DCIGXA;
'f79>;I;JG:D?IEDJGD8I;C?GJCH;GK?9;:7CHA;97:G;:;
A7=7G7CI?;EGTH;CI;GA7<79IJG;DG?=?C7A;';HTATB;CIH
GTE7GTHDJG;BEA79THC;HDCI=7G7CI?HFJ;E;C:7CIA;
G;HI7CI:;A7ETG?D:;:;=7G7CI?;?C?I?7A;
;II;=7G7CI?;;HID<<;GI;QAf79>;I;JG?C?I?7A7?CH?FJfQ
IDJIEGDEG?TI7?G;HJ8HTFJ;CI:fJCEGD:J?I79>;IT;CKJ;
:fJC;JI?A?H7I?DC:DB;HI?FJ;7J7C7:7';H;GK?9;Q
:DB?9?A;;CK;GIJ:;A7=7G7CI?;H;G7<DJGC?:7CHA;H
GT=?DCHDY?A;HI:?HEDC?8A;;IDY(78;;HI?B;
G7?HDCC78A;:;A;<DJGC?G
;II;=7G7CI?;;HI;CHJH:;IDJI;=7G7CI?;HI7IJI7?G;
*'%! %$ &
\ ';EGDEG?TI7?G;;HIG;HEDCH78A;:;E7N;GA;H
GTE7G7I?DCHD997H?DCCT;HE7GAf?CHI7AA7I?DC:;9;
EGD:J?I;IDJA;HK?H?I;HCT9;HH7?G;HEDJGAJ?7EEG;C:G;
QJI?A?H;G9;EGD:J?I
\ /DJI:DBB7=;7J<?C?:;Af7EE7G;?A:D?IVIG;H?=C7AT
7JEGUH:JB7=7H?CDY7TIT;<<;9IJTAf79>7I:7CHA;H
>;JG;HHJ?K7CIA7A?KG7?HDC:;Af7EE7G;?A
\ DBB7=;H97JHTHQA7E;?CIJG;DJQAfTB7?A7EGUH
A?KG7?HDC
\ $CHI7AA7I?DC?C9DGG;9I;eAf?CHI7AA7I?DC9DGG;9I;?C9AJI
A78DCC;9?G9JA7I?DC:f7?GEDJGA;HNHIUB;:;
GT<G?=TG7I?DC:;HEDHH?8?A?ITH:;8G7C9>;B;CI7JM
9?G9J?IHTA;9IG?FJ;H:f7A?B;CI7I?DC;C;7J;I7JIG;H
\ -;BEA79;B;CI:;H<JH?8A;HDJGT7GB;B;CI:;H
:?H@DC9I;JGH
\ -;BEA79;B;CI:;H7BEDJA;HTA;9IG?FJ;H
\ DBB7=;HHJ8?HE7GAf7EE7G;?AQA7HJ?I;:fJC799?:;CI
:fJC?C9;C:?;:f?CDC:7I?DCHDJ;C97H:;<DG9;
B7@;JG;
\ 0I?A?H7I?DC9DGG;9I;;I;CIG;I?;C7:TFJ7I:;Af7EE7G;?A
H;ADCA;B7CJ;A:fJI?A?H7I?DCGT=A7=;9DGG;9I:;H
9DBB7C:;H
\ +;GI;:;H7A?B;CIH:Z;QA7:TI;G?DG7I?DC
\ ';H;GK?9;Hf?A;HI?BEDHH?8A;:f7KD?G799UH7JEGD:J?I
EDJG9;<7?G;
\ ' "-)/)f ./+.- .+*).' .*((" .
$)$- /.
Feuillet de données relatives à la performance
Cartouche MWF du système de
Filtration d’eau GE SmartWater
Ce système a été essayé selon les normes NSF/ANSI 42/53 pour une réduction des substances énumérées ci-dessous.
La concentration des substances indiquées dans l’eau qui entre dans le système a été réduite à une concentration inférieure
ou égale à la limite permise pour l’eau quittant le système, telle que précisée par la norme NSF/ANSI 42/53.*
1,.?0@=>49?H2=H>/0>H.@=4?HF;:@=@90@?474>,?4:9>,9>.:8;?0@=
:=81
!
221?>1>?4K?5<@1>
"-=-8L?=1 '%" #@-75?K :D1991 227@19? $K0@/?5:9 $K0@/?5:9
5927@19?/:9/19?=-?5:9 5927@19?1 :D1991 -C58@8 :D1991 5958@8 1C531-9?1859
>ADG;
e B=' B=' B=' B='
/* ee eeeeee
+7GI?9JA;H
e
E7GI?9A;HB'B?C?BJB
B' B' B' _
:=81
!
221?>01>-9?K
"-=-8L?=1 '%" #@-75?K :D1991 227@19? $K0@/?5:9 $K0@/?5:9
5927@19?/:9/19?=-?5:9 5927@19?1 :D1991 -C58@8 :D1991 5958@8 1C531-9?1859
/JG8?:?IN )/0 )/0 )/0 )/0 )/0 )/0
.EDG;H
_
GT:J9I?DC 'B?C?BJB
' ' ' _
H8;HIDH _
GT:J9I?DC
Q
<?8G;H'`B (!' (!' (!' _
+ADB87JE#
B=' B=' B=' B=' B=' B='
+ADB87JE#
B=' B=' B=' B=' B=' B='
(;G9JG;QE# B=' B=' B=' B=' B=' B='
(;G9JG;QE# B=' B=' B=' B=' B=' B='
A79>ADG; B=' B=' B=' B=' B=' B='
'?C:7C; B=' B=' B=' B=' B=' B='
B=' B=' B=' B=' B=' B='
/DM7E>UC; B=' B=' B=' B=' B=' B='
;COUC; B=' B=' B=' B=' B=' B='
7G8D<JG7C; B=' B=' B=' B=' B=' B='
?9>ADGD8;COUC;
B=' B=' B=' B=' B=' B='
IG7O?C; B=' B=' B=' B=' B=' B='
'0>?H@?474>,9?@9/H-4?/02;8@90;=0>>4:9/0;>42@9;/0N0?@90?08;/0MNMMNM
0>@=0>09;,=?4.@70>870>;,=?4.@70>@?474>H>H?,409?/0O84.=:9
!'(@94?H>/0?@=-4/4?H9H;3H7:8H?=4<@0
Spécifications d’opération
n 7E79?IT9;GI?<?T;@JHFJfQB7M?BJB:;=7AADCHA@JHFJfQB7M?BJB:;H?MBD?HEDJGA;HBD:UA;HCDC:DITH:fJCKDN7CI?C:?97I;JG
:;G;BEA79;B;CI:;<?AIG;@JHFJfQB7M?BJB:fJC7CEDJGA;HBD:UA;H:DITH:fJCKDN7CI?C:?97I;JG:;G;BEA79;B;CI:;<?AIG;
n M?=;C9;;CB7I?UG;:;EG;HH?DCQ87GQEH?H7CH9>D9
n /;BETG7IJG;[d[[d[!
n T8?IAEB=EB
Exigences générales d’installation/opération/entretien
n !7?I;H9DJA;GA?IG;H
i =7AADCHQ:T8?IB7M?B7A7<?C:;A?8TG;G:;Af7?G
n -;BEA79;OA797GIDJ9>;ADGHFJ;A;KDN7CI9A?=CDI;DJADGHFJ;A;:T8?I:f;7J;HIGT:J?IEDJGA;H7EE7G;?AHH7CHKDN7CIH
Avis spéciaux
n ';H:?G;9I?K;H:f?CHI7AA7I?DCA7:?HEDC?8?A?IT:;E?U9;H;I:;H;GK?9;7?CH?FJ;A7=7G7CI?;HI7C:7G:HDCI;MET:?T;H7K;9A;EGD:J?I
n
;HNHIUB;:f;7JEDI78A;:D?IVIG;;CIG;I;CJ9DC<DGBTB;CI7JM:?G;9I?K;H:J<78G?97CIN9DBEG?HA;G;BEA79;B;CI:;H97GIDJ9>;H:J<?AIG;
n )fJI?A?H;OE7HADGHFJ;Af;7JEGTH;CI;JC:7C=;GB?9GD8?DAD=?FJ;DJADGHFJ;Af;7J;HI:fJC;FJ7A?IT?C9DCCJ;H7CH:TH?C<;9I;G7:TFJ7I;B;CI
A;HNHIUB;7K7CIDJ7EGUHA;HNHIUB;E;JIH;GK?GEDJG:;Af;7J:TH?C<;9IT;FJ?EDJGG7?I9DCI;C?G:;HHEDG;H<?AIG78A;H
n
';H9DCI7B?C7CIHDJ7JIG;HHJ8HI7C9;HG;I?GT;HDJGT:J?I;HE7G9;HNHIUB;:;IG7?I;B;CI:;Af;7JC;HDCIE7HCT9;HH7?G;B;CI:7CHKDIG;;7J
n 1TG?<?;OEDJGKDJH7HHJG;G:;KDJH9DC<DGB;G7JMAD?H;IGU=A;B;CIHAD97JM;I:;AfTI7I
n )DI;OFJ;8?;CFJ;Af;HH7?7;JA?;J:7CH:;H9DC:?I?DCHCDGB7A;H:;A78DG7ID?G;B7?HFJ;A;G;C:;B;CIGT;AE;JIK7G?;G';HHNHIUB;H:D?K;CI
VIG;?CHI7AATH;I<DC9I?DCC;G9DC<DGBTB;CI7JMEGD9T:JG;H;I:?G;9I?K;HG;9DBB7C:T;HE7GA;<78G?97CI
NSF
]
!78G?FJT;EDJG";C;G7A A;9IG?9DBE7CN'DJ?HK?AA;&4 + ./)D()
/;HIT;;I9;GI?<?T;H;ADCA;HCDGB;H;I:;).$).!
EDJGA7GT:J9I?DC:;
:=81
!
221?>1>?4K?5<@1>
0C?IT9>?B?FJ;
'fD:;JG;IA;=DZI:;9>ADG;
0C?IT:;<?AIG7I?DCBT97C?FJ;
-T:J9I?DC:;E7GI?9JA;H97IT=DG?;$
:=81
!
221?>01>-9?K
0C?IT:;GT:J9I?DC9>?B?FJ;
-T:J9I?DC7A79>ADG;;I7IG7O?C;
-T:J9I?DC8;COUC;;I97G8D<JG7C
-T:J9I?DC:?9>ADGD8;COUC;;I
-T:J9I?DCEADB8;IA?C:7C;
-T:J9I?DCB;G9JG;;IIDM7E>UC;
0C?IT:;<?AIG7I?DCBT97C?FJ;
-T:J9I?DC:;IJG8?:?IT
-T:J9I?DC:;HEDG;H;I7H8;HIDH
Soutien au consommateur.
&4?0*0-,;;,=047>H70.?=:8H9,20=>
www.electromenagersge.ca
1DJH7K;OJC;FJ;HI?DCDJKDJH7K;O8;HD?C:f7?:;EDJGKDIG;7EE7G;?ATA;9IGDBTC7=;GDCI79I;OCDJHE7G
$CI;GC;I7JH?I;BBB171/?=:819-31=>31/- >;JG;HE7G@DJGIDJHA;H@DJGH:;Af7CCT;
&0=A4.0/0=H;,=,?4:9> 1.800.561.3344
.;GK?9;:;GTE7G7I?DCH" ;HIIDJIEGUH:;KDJH
+DJG<7?G;GTE7G;GKDIG;TA;9IGDBTC7=;G" ?AHJ<<?I:;CDJHITATE>DC;G
&?@/4:/0.:9.0;?4:9=H,74>?0
.JG:;B7C:;" E;JI<DJGC?GJC;8GD9>JG;HJGAf7BTC7=;B;CI:fJC;9J?H?C;EDJGA;HE;GHDCC;H
QBD8?A?ITGT:J?I;
P9G?K;O ?G;9I;JG-;A7I?DCH7K;9A;H9DCHDBB7I;JGH(78;7C7:7$C9
JG;7J!79IDGN'7C;
(DC9IDC) (
#=:7:92,?4:9/02,=,9?40 www.electromenagersge.ca
9>;I;OJC9DCIG7I:f;CIG;I?;C" 7K7CIFJ;KDIG;=7G7CI?;Cf;ME?G;;I8TCT<?9?;O:fJCG787?HHJ8HI7CI?;A?CH?
A;H;GK?9;7EGUHK;CI;" H;G7IDJ@DJGHAQ7EGUH;ME?G7I?DC:;A7=7G7CI?;
(5>5?1E9:?=1>5?1)1.:@-;;171E9:@>-@
#4I.0>0?,..0>>:4=0>
;JMFJ?:TH?G;CIGTE7G;G;JMBVB;HA;JGHTA;9IGDBTC7=;GHE;JK;CIG;9;KD?GE?U9;H;I799;HHD?G;H
:?G;9I;B;CIQA7B7?HDC97GI;H1$.(7HI;G7G:;I?H9DK;G799;EIT;H
Les directives stipulées dans le présent manuel peuvent être effectuées par n’importe quel utilisateur. Les
autres réparations doivent généralement être effectuées par un technicien qualifié. Soyez prudent, car
une réparation inadéquate peut affecter le fonctionnement sécuritaire de l’appareil.
1DJHIGDJK;G;O:7CHA;HE7=;H@7JC;H:;KDIG;7CCJ7?G;A;CJBTGD:J;CIG;:;H;GK?9;(78;A;EAJHEGD9>;
JIG;B;CI7EE;A;OCDJH7J
:9?,.?0D9:@>
.?KDJHCfVI;HE7HH7I?H<7?I:JH;GK?9;7EGUHK;CI;:DCIKDJH7K;O8TCT<?9?T
"=185L=1819? 9DBBJC?FJ;O7K;9A;H=;CHFJ?DCIGTE7GTKDIG;7EE7G;?A
9>@5?1 H?KDJHCfVI;HIDJ@DJGHE7HH7I?H<7?I;CKDN;OIDJHA;H:TI7?AHdCJBTGD:;ITATE>DC;9DBEG?Hd7J
?G;9I;JG-;A7I?DCH7K;9A;H9DCHDBB7I;JGH(78;7C7:7$C9
JG;7J!79IDGN'7C;
(DC9IDC) (
9>.=4A0DA:?=0,;;,=047H70.?=:8H9,20= www.electromenagersge.ca
9>/=5A1EA:?=1-;;-=157K71/?=:8K9-31=1905=1/?-@>>5?O?<@1;:>>5.71 ;A77BTA?DG;G7CDH
9DBBJC?97I?DCH;ICDIG;H;GK?9;7EGUHK;CI;1DJHEDJK;OT=7A;B;CICDJH;CKDN;GE7GA7EDHI;
A;<DGBJA7?G;:f?CH9G?EI?DC@D?CIQKDIG;:D9JB;CI7I?DC

Información de seguridad. . . . . . 90, 91
Instrucciones de operación
Características adicionales. . . . . . . . . . . . . . . 96
Cómo reemplazar
las bombillas de luz . . . . . . . . . . . . . . . . . . . . . 102
Congelador. . . . . . . . . . . . . . . . . . . . . . . . . . . . . . . 98
Cuidado y limpieza
del refrigerador . . . . . . . . . . . . . . . . . . . . 100, 101
El dispensador de agua . . . . . . . . . . . . . . . . . . 99
El filtro de agua. . . . . . . . . . . . . . . . . . . . . . . . . . . 94
Gavetas preservadoras
y contenedores . . . . . . . . . . . . . . . . . . . . . . . . . . 97
Los controles del refrigerador . . . . . . . . 92, 93
Los estantes y compartimientos
del refrigerador . . . . . . . . . . . . . . . . . . . . . . . 95, 96
Máquina de hielo automática . . . . . . . . . . . . 99
Instrucciones de instalación
Cómo instalar el soporte
de piso anti-volcaduras . . . . . . . . . . 106, 107
Cómo invertir el vaivén
de la puerta (Modelos de
refrigerador de una sola
puerta únicamente). . . . . . . . . . . . . . . . 115–117
Cómo reemplazar la gaveta
del congelador . . . . . . . . . . . . . . . . . . . . . . . . . . 114
Cómo retirar la gaveta
del congelador . . . . . . . . . . . . . . . . . . . . . . . . . . 113
Cómo retirar y volver a colocar
las puertas (Modelos de refrigerador
de doble puerta únicamente) . . . . . 118–121
Equipos de recorte y paneles
de decoración. . . . . . . . . . . . . . . . . . . . . . 103, 104
Instalación de la tubería
del agua . . . . . . . . . . . . . . . . . . . . . . . . . . . 122–124
Instalación del refrigerador . . . . . . . . 108–112
Preparación para
instalar el refrigerador . . . . . . . . . . . . . . . . . . 105
Solucionar problemas . . . . . . . . 125–129
Sonidos normales de la operación. . . . . . 125
Servicio al consumidor
Garantía para consumidores
en los Estados Unidos. . . . . . . . . . . . . . . . . . . 130
Hoja de datos de funcionamiento . . . . . . 131
Servicio al consumidor . . . . . . . . . . . . . . . . . . 135
89
Anote aquí los números de modelo y de
serie:
No. ______________________________
No. ______________________________
Usted los verá en una etiqueta en el interior
del compartimiento de refrigerador en
la parte superior en el lado derecho.
Servicio al consumidor
Solucionar problemas
OperaciónSeguridad Instalación

INFORMACIONES IMPORTANTES DE SEGURIDAD.
LEA PRIMERO TODAS LAS INSTRUCCIONES.
¡ADVERTENCIA!
(?11?@1-<->-@;?J8;<->-8;?25:1?=A1?101?/>5.1:1:1?@1!-:A-8018<>;<51@->5;
$%(#"&&(%
A-:0;A?1181/@>;0;9G?@5/;??53-8-?<>1/-A/5;:1?.F?5/-?01?13A>50-05:/8AD1:0;8-??53A51:@1?
n Antes de usarse, este refrigerador deberá estar
instalado y ubicado de acuerdo con las
instrucciones de instalación.
n No permita que los niños se suban, se paren o se
cuelguen de las charolas del refrigerador. Podría
dañarse el refrigerador y causarles serias lesiones.
n No toque las superficies frías del congelador
cuando tenga las manos húmedas o mojadas.
La piel se podría adherir a las superficies
extremadamente frías.
n No guarde ni use gasolina u otros vapores o líquidos
inflamables cerca de este o cualquier
otro aparato.
n Aleje los dedos fuera de las áreas donde se puede
pinchar los dedos; los espacios entre las puertas
y entre las puertas y los gabinetes son
necesariamente estrechos. Cierre las puertas
con cuidado en la presencia de los niños.
n Si su refrigerador tiene un dispositivo automático
para hacer hielo, evite el contacto con las partes
móviles del mecanismo de expulsión, o con
el elemento calefactor localizado en la parte inferior
del dispositivo para hacer hielo. No ponga los dedos
ni las manos en el mecanismo automático para
hacer hielo mientras el refrigerador esté conectado.
n Desconecte el refrigerador antes de limpiarlo o
efectuar reparaciones.
NOTA: %1/;91:0-9;?1:2F@5/-91:@11:/->3->
/A-8=A51>?1>B5/5;-A:<1>?;:-8/-8525/-0;
n El colocar el control en posición 0 (apagado) no
quita la corriente del circuito de la luz.
n No vuelva a congelar los alimentos congelados una
vez que se hayan descongelado.
90
&%&!"'&(%%%#%
El atrapamiento y la sofocación de los niños no
son un problema del pasado. Los refrigeradores
abandonados son un peligro…aunque sea sólo por
“pocos días.” Si se deshace de su viejo refrigerador,
por favor siga las instrucciones abajo para ayudarnos
a prevenir algún accidente.
Antes de deshacerse de su viejo
refrigerador o congelador:
n Quite las puertas.
n Deje los entrepaños en su sitio para que los niños
no se suban.
Refrigerantes
Todos los aparatos de refrigeración contienen
refrigerantes, los cuales se deben retirar antes de
la eliminación del producto de acuerdo con la ley
federal. Si va a desechar algún aparato antiguo de
refrigeración, consulte con la compañía a cargo
de desechar el aparato para saber qué hacer.
(&# &+'"&#"
1.50;-8;?-//501:@1?<;@1:/5-81?=A1<A051>-:;/A>>5>.-6;01@1>95:-0-?/;:05/5;:1??1
>1/;951:0-1?@>5/@-91:@1:;A?->/-.81?011C@1:?5J:
Sin embargo, si decidiera usarlos, es absolutamente necesario que sea del tipo UL trifilar para aparatos
y cuente con una clavija con conexión a tierra y que el cable eléctrico sea de 15 amperios (mínimo) y
120 voltios.
¡PELIGRO! RIESGO DE QUE
UN NIÑO PUEDA QUEDAR ATRAPADO
Servicio al consumidor Solucionar problemas Operación SeguridadInstalación

Servicio al consumidor
Solucionar problemas
OperaciónSeguridad Instalación
GEAppliances.com
91
¡ADVERTENCIA!
#!##"'% '%
-6;:5:3A:-/5>/A:?@-:/5-01.1/;>@->;=A5@->8-@1>/1>-<A:@-@51>>-018-/8-B56-$->-?A?13A>50-0
<1>?;:-81?@1-<->-@;01.1>F/;:1/@->?101.50-91:@1-@51>>-
El cable eléctrico de este aparato está equipado con
una clavija de tres puntas (tierra) que enchufa en un
contacto estándar de pared de tres salidas (tierra)
para reducir al mínimo la posibilidad de daños por un
choque eléctrico con este aparato.
Haga que un electricista calificado verifique el
enchufe de la pared y el circuito para asegurarse que
la salida esté conectada debidamente a tierra.
Donde se disponga sólo de un contacto de pared con
salida para dos puntas, es su responsabilidad personal
y su obligación reemplazarlo por un contacto adecuado
para tres puntas con conexión a tierra.
El refrigerador deberá conectarse siempre en su
propio contacto eléctrico individual que tenga
un voltaje que vaya de acuerdo con la tabla de
clasificación.
Esto garantiza la mejor ejecución y evita la
sobrecarga del circuito eléctrico de la casa y los
daños a causa del sobrecalentamiento de los cables.
Nunca desconecte el refrigerador jalando el cable.
Tome siempre firmemente la clavija y sáquela del
contacto sin doblarla.
Repare o reemplace inmediatamente todos los cables
eléctricos de servicio que se hayan desgastado o
dañado en alguna otra forma. No utilice cables que
muestren roturas o daños por abrasión a lo largo de
éste ni en la clavija o en alguno de sus extremos.
Al alejar su refrigerador de la pared, cuide que no
pase sobre el cable o lo dañe.
)#% %,&(%(#&!"' &
$%(#"&&(%
GUARDE ESTAS INSTRUCCIONES
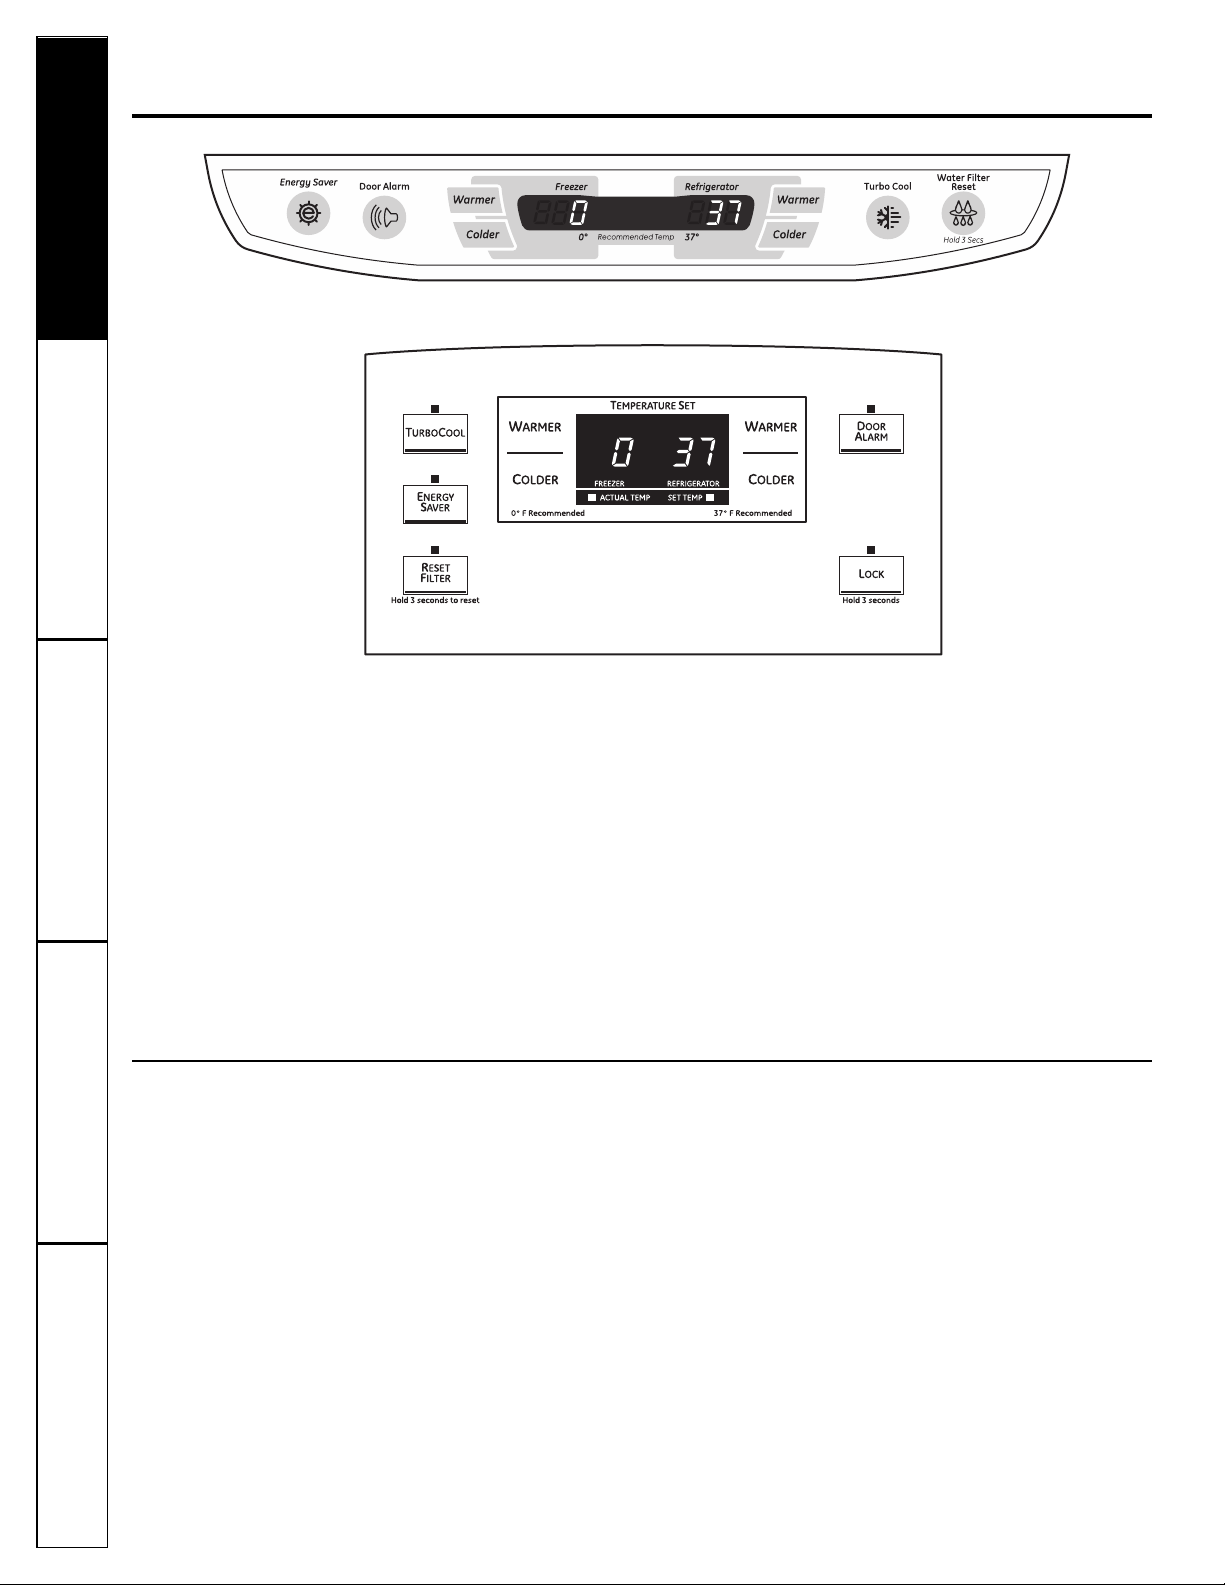
Los controles con niveles
de temperaturas.
<->-;@>;?9;018;?B1-8-<F35:-?53A51:@1
Para modelos con controles en la puerta:
Para cambiar la temperatura, presione y libere
el botón WARMER (MÁS CALIENTE) o COLDER
(MÁS FRÍO). La luz de ACTUAL TEMP (temp real) se
encenderá y la pantalla mostrará la temperatura real.
Para cambiar la temperatura, pulse el botón
WARMER (más caliente) o COLDER (más frío) hasta
que aparezca la temperatura deseada.
Para controles dentro del refrigerador:
Al abrir la puerta puede verse la temperatura
real. Para cambiar la temperatura, presione las
almohadillas WARMER (más caliente) o COLDER (más
frío) hasta visualizar la temperatura deseada.
Una vez la temperatura deseada haya sido ajustada,
la pantalla de la temperatura regresará a las
temperaturas reales del refrigerador y del congelador
después de 5 segundos. Puede que sean necesarios
varios ajustes. Cada vez que usted ajuste los
controles, permita que transcurran 24 horas para que
el refrigerador alcance la temperatura que usted ha
ajustado.
Para apagar el sistema de enfriamiento, pulse el
botón WARMER (MÁS CALIENTE) para el refrigerador o
el congelador hasta que la pantalla muestre OFF
(Apagado). Para accionar la unidad una vez más,
presione el botón COLDER (MÁS FRÍO), para el
refrigerador o el congelador. Entonces presione otra
vez e irá a los puntos preajustados de 0° F para el
congelador y 37° F para el refrigerador. Ajustar uno o
ambos controles a la posición OFF (APAGADO) detiene
la refrigeración tanto en el compartimiento del
congelador como en el refrigerador, pero no
interrumpe el suministro eléctrico hacia el
refrigerador.
92
Servicio al consumidor Solucionar problemas Operación SeguridadInstalación
;?/;:@>;81?01@19<1>-@A>-B51:1:<>1/;:253A>-0;?012F.>5/--37° F @-:@;<->-18
/;9<->@591:@;018>12>531>-0;>D-0° F <->-18/;9<->@591:@;018/;:318-0;>161
<-?->4;>-?<->-=A18-@19<1>-@A>-?1[email protected]/11:8;?:5B181?<>1/;:253A>-0;?
;?/;:@>;81?018-@19<1>-@A>-<A101:1C45.5>@-:@;8-@19<1>-@A>-[email protected]/50-SET
/;9;8-@19<1>-@A>->1-81:18>12>531>-0;>D1:18/;:318-0;> -@19<1>-@A>->1-8
<A101B->5->8531>-91:@1018-@19<1>-@A>-256-0-?13K:?AA?;D18-9.51:@101
;<1>-/5J:
6A?@->A:;;-9.;?/;:@>;81?-8-<;?5/5J:OFF $#01@51:18->12>531>-/5J:
@-:@;1:18/;9<->@5951:@;018/;:318-0;>/;9;1:18>12>531>-0;><1>;:;5:@1>>A9<1
18?A95:5?@>;18G/@>5/;4-/5-18>12>531>-0;>
NOTA: 8>12>531>-0;>?11:BH-/;:A:-<18H/A8-01<>;@1//5J:=A1/A.>18;?/;:@>;81?
018-@19<1>-@A>-&51?@-<18H/A8-:;?1>1@5>J0A>-:@18-5:?@-8-/5J:4F3-8;-4;>-
Cómo cambiar la temperatura
(en algunos modelos)
(en algunos modelos)
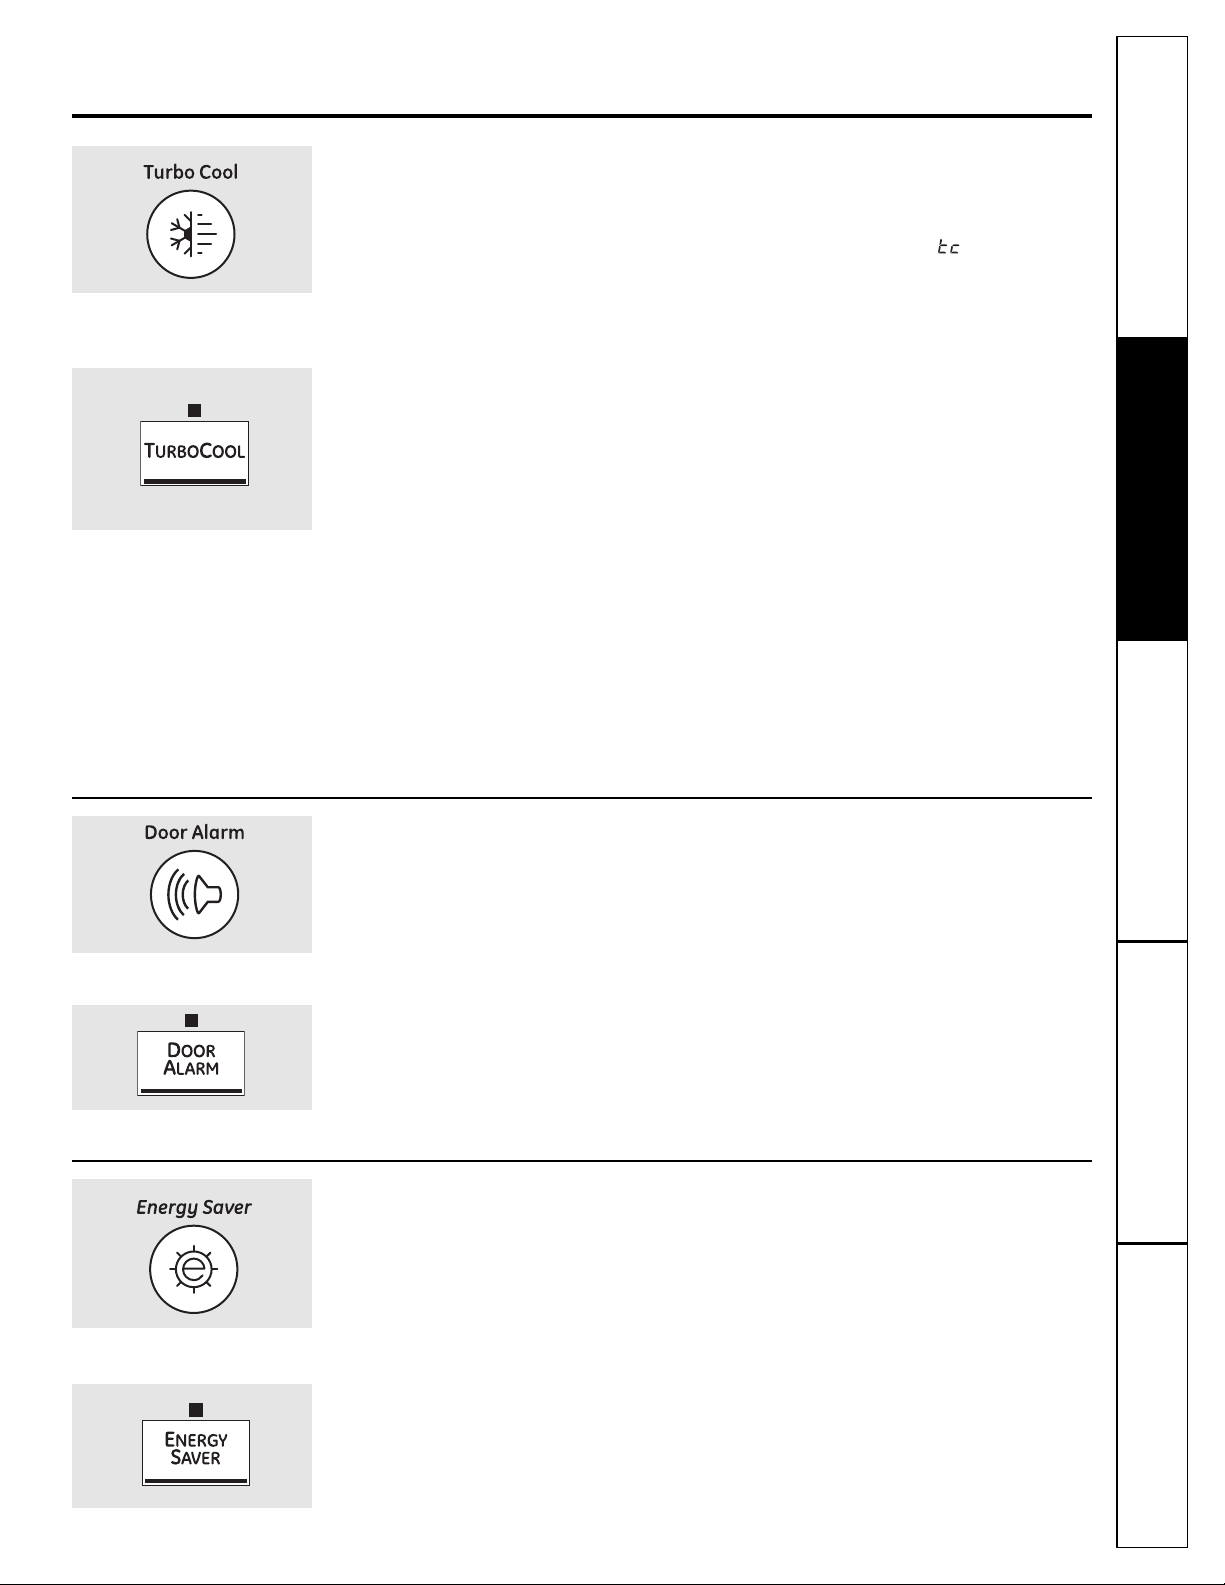
Servicio al consumidor
Solucionar problemas
OperaciónSeguridad Instalación
93
Acerca de TurboCool.
™
1:-83A:;?9;018;? GEAppliances.com
Cómo funciona
TurboCool enfría rápidamente el
compartimiento del refrigerador para enfriar
los alimentos más rápidamente.
Use TurboCool cuando agregue grandes
cantidades de alimentos al compartimiento
del refrigerador, guardando alimentos
después de que han estado expuestos a
temperatura ambiental o cuando se
disponga a guardar comida sobrante.
También puede ser usado si el refrigerador
ha estado sin suministro eléctrico por un
período extenso.
Una vez activado, el compresor se
encenderá inmediatamente y los
ventiladores harán el ciclo de encendido
y apagado a altas velocidades, según sea
necesario por ocho horas. El compresor
continuará funcionando hasta que el
compartimiento del refrigerador se refrigere
a aproximadamente 34º F (1º C), luego hará
el ciclo de encendido y apagado para
mantener este ajuste. Después de 8 horas, o
si el TurboCool es presionado otra vez, el
compartimiento del refrigerador regresará al
ajuste original.
Cómo usar
Presione TurboCool. La temperatura
del refrigerador mostrará .
Después de que TurboCool sea completado,
el compartimiento del refrigerador regresará
al ajuste original.
NOTAS: La temperatura del refrigerador no
puede cambiarse durante
TurboCool.
La temperatura del congelador
no es afectada durante TurboCool.
Cuando abra la puerta del
refrigerador durante TurboCool,
los ventiladores continuarán
funcionando si han hecho
el ciclo de encendido.
Sobre la alarma de la puerta 1:-83A:;?9;018;?
La alarma de la puerta comenzará a sonar si
cualquier de las puertas queda abierta por
más de 2 minutos. Una vez que se cierra la
puerta, el sonido para.
(en algunos modelos)
(en algunos modelos)
(en algunos modelos)
(en algunos modelos)
Sobre Energy Saver (Ahorro de Energía) 1:-83A:;?9;018;?
Este producto está equipado con una
característica de ahorro de energía. El
refrigerador se empaca con la característica
de ahorro de energía activada.
Con el tiempo, puede formarse humedad en
la superficie frontal del gabinete del
refrigerador y provocar herrumbre. Si
aparece humedad en la superficie frontal
del gabinete del refrigerador, apague
la característica de ahorro de energía
presionando y liberando la almohadilla
ENERGY SAVER en el panel de control.
(en algunos modelos)
(en algunos modelos)

Cartucho del filtro
El cartucho del filtro de agua está ubicado en
la esquina superior derecha trasera del
compartimento del refrigerador.
Reemplazar el filtro
Hay una luz indicadora de reemplazo del
cartucho del filtro de agua en la pantalla
de temperatura. Si se enciende una luz de
color naranja, se debe cambiar el filtro en
poco tiempo. El cartucho del filtro debe
cambiarse si se enciende una luz de color
rojo o si disminuye el flujo de agua hacia
el dispensador o hacia el dispositivo para
hacer hielo.
Instalar el cartucho del filtro
Si está reemplazando el cartucho,
primero retire el anterio girándolo hacia
la izquierda lentamente. NO tire del
cartucho hacia abajo. Puede perder
un poco de agua.
PRECAUCIÓN: &5?14-
=A10-0;-5>1-@>-<-0;1:18?5?@19-18
/->@A/4;018258@>;<;0>H-?1>1C<A8?-0;
/;:2;>911?>19;B50;(?1<>1/-A/5J:
/A-:0;8;>19A1B-
Retire el papel de aluminio protector
del extremo del cartucho.
Llene el cartucho de reemplazo con agua
del grifo para permitir que fluya mejor
del dispensador inmediatamente
después de la instalación.
Alinee la flecha del cartucho y el soporte
del cartucho, lentamente rote el cartucho
en sentido de las agujas del reloj hasta
que pare. Cuando el cartucho está
instalado apropiadamente, usted siente
un “clic” cuando encaja en su lugar. No
lo apriete demasiado.
Deje correr 1
1
⁄2 galón (6 litros) del
dispensero para despejar el sistema y
para evitar chisporroteos. Ver la sección
J9;A?->1805?<1:?-0;>
Presione la tecla de RESET WATER
FILTER (resetear el filtro de agua) y
sostenga durante 3 segundos.
NOTA: Un cartucho del filtro recién instalado
podría causar que el agua chisporrotee
desde el dispensador.
Tapón de derivación del filtro
Se debe usar el tapón de derivación del filtro
cuando un cartucho de filtro de
reemplazamiento no se puede encontrar.
El dispensador y el dispositivo para hacer
hielo no pueden funcionar sin el filtro o
sin el tapón de derivación del filtro.
Filtros de recambio:
Para pedir cartuchos adicionales en los
Estados Unidos, visite nuestro sitio Web,
GEAppliances.com, o llame a GE para
partes y accesorios al 800.626.2002.
Modelo de filtro MWF
El filtro de agua. 1:-83A:;?9;018;?
94
Servicio al consumidor Solucionar problemas Operación SeguridadInstalación
(En algunos modelos)
(En algunos modelos)
Portacartuchos
Portacartuchos

95
Servicio al consumidor
Solucionar problemas
OperaciónSeguridad Instalación
Reorganización de los estantes
Para quitar:
Quite todos los elementos del estante.
Incline el estante en la parte del frente.
Levante el estante hacia arriba en la
parte de atrás y saque el estante.
Para reemplazarlo:
Mientras inclina el estante hacia arriba,
inserte el gancho superior en la parte
posterior del estante en la ranura de la
corredera.
Baje el frente del estante hasta que la
parte inferior del estante se ajuste en
su lugar.
Estantes a prueba de salpicaduras 1:-83A:;?9;018;?
Los estantes a prueba de salpicaduras tienen
bordes especiales para evitar que las
salpicaduras se rieguen a los estantes
inferiores. Para retirar o reemplazar los
estantes, vea %1;>3-:5E-/5J:018;?1?@-:@1?
Sobre los estantes y compartimientos. GEAppliances.com
";@;0-?8-?/->-/@1>H?@5/-?1?@F:<>1?1:@1?1:@;0;?8;?9;018;?
Algunos modelos tienen estantes con
cable que pueden ajustarse de la misma
manera.
Los estantes en el compartimiento del refrigerador son ajustables.
Compartimiento del refrigerador
Estante deslizante a prueba de salpicaduras 1:-83A:;?9;018;?
El estante deslizante a prueba de
salpicaduras le permite alcanzar alimentos
almacenados detrás de otros. Los bordes
especiales están diseñados para ayudar a
evitar que las salpicaduras se rieguen a los
estantes inferiores.
Para retirarlo:
Retire todos los alimentos del estante.
Deslice el estante hacia fuera hasta
que pare.
Levante el borde del frente del estante
hasta que las pestañas centrales estén
por encima de la barra del frente.
Continúe halando el estante hacia
delante hasta que se pueda retirar.
Para reemplazarlo:
Coloque las pestañas del estante
posterior justo al frente de las muescas
centrales en el marco del estante.
Deslice el estante hasta que las pestañas
centrales estén ligeramente detrás de la
barra frontal.
Baje el estante a su lugar hasta que esté
horizontal y deslice el estante.
?13K>1?101=A1181?@-:@11?@G<8-:;
01?<AG?018->15:?@-8-/5J:D:;?19A1B-
85.>191:@1018-0;-8-0;
?13K>1?101=A119<A618;?1?@-:@1?
/;9<81@-91:@1-:@1?01/1>>->8-<A1>@-

Sobre los estantes y compartimientos.
Servicio al consumidor Solucionar problemas Operación SeguridadInstalación
Compartimientos no ajustables en la puerta
Para retirarlos: Levante el compartimiento
recto y luego hálelo.
Para reemplazarlos: Inserte
el compartimiento en los soportes
moldeados en la puerta y empuje hacia
abajo. Éste se ajustará en su lugar.
Compartimientos ajustables en la puerta
Los compartimientos ajustables pueden
llevarse fácilmente del refrigerador al área de
trabajo.
Para retirarlos: Levante el estante recto y
luego hálelo.
Para reemplazar o cambiar de lugar: Deslice
el compartimiento justo encima de los
soportes de la puerta, y presione hacia abajo.
El compartimiento se trabará en su lugar.
El reborde ayuda a evitar la caída,
derramamiento o deslizamiento de
elementos pequeños que se almacenen en el
estante de la puerta. Agarre el retenedor del
dedo cerca de la parte posterior del reborde
y muévalo para ajustarlo a sus necesidades.
Sobre las características adicionales.
";@;0-?8-?/->-/@1>H?@5/-?1?@F:<>1?1:@1?1:@;0;?8;?9;018;?
Estante para bebidas no ajustable
Para quitar: Levante el estante hacia arriba,
luego tire hacia afuera.
Para volver a colocar: Enganche el estante
en los soportes moldeados de la puerta y
presione hacia abajo. Se trabará en su lugar.
Divisor ajustable en la canasta del congelador
La canasta del congelador cuenta con
un divisor que puede ser reposicionado
o retirado.
Para retirar: Empuje el divisor hacia adelante
hasta que las lengüetas de la parte trasera
se encuentren fuera de las ranuras. Gire el
divisor un poco hacia el costado para liberar
las lengüetas de alineación y saque hacia
afuera.
Para reemplazar: Gire el divisor suavemente
hacia un costado, de modo que las lengüetas
de la parte frontal entren en las ranuras de
ventilación de la canasta. Coloque el divisor
de modo que las lengüetas de alineación
trasera se ajusten en su posición en las
ranuras de ventilación trasera.
Para reposicionar: Retire el divisor. Deslice
el divisor hacia la izquierda o la derecha
hasta la ubicación deseada y realice el
reemplazo como se indica más arriba.
Lengüetas
96
Organizador de Congelador Opcional
El organizador de congelador opcional cabe
sobre el extremo frontal de la canasta inferior
del congelador y se puede retirar o agregar
según sea necesario.
Para retirar: Levante el organizador de
congelador
Para reemplazar: Baje el organizador
verificando que el gancho se ajuste sobre el
borde frontal del canasto inferior del
congelador.
Organizador
Servicio al consumidor
Solucionar problemas
OperaciónSeguridad Instalación
97
Sobre las gavetas preservadoras y contenedores. GEAppliances.com
";@;0-?8-?/->-/@1>H?@5/-?1?@F:<>1?1:@1?1:@;0;?8;?9;018;?
Gaveta preservadora de frutas y vegetales
El exceso de agua que pueda acumularse
al fondo de las gavetas debe retirarse y se
deben limpiar las gavetas.
Gaveta preservadora de humedad ajustable 1:-83A:;?9;018;?
Deslice el control completamente hasta la
posición HIGH (alto) para ofrecer la alta
humedad recomendada para la mayoría
de los vegetales.
Lleve el control por completo hasta la
posición LOW (bajo) para ofrecer los niveles
bajos de humedad recomendados para la
mayoría de las frutas.
Contenedor para Deli de temperatura ajustable 1:-83A:;?9;018;?
Deslice el control por completo hacia el
extremo izquierdo para la temperatura
más fría.
Para quitar:
Quite los estantes de frutas y vegetales.
Tire del cajón hacia afuera hasta que
se detenga.
Levante la tapa para poder acceder a las
4 trabas de giro.
Gire las cuatro trabas de giro hasta
destrabarlas.
Levante el frente del cajón hacia arriba y
luego afuera.
Para volver a colocar:
Verifique que las cuatro trabas
se encuentren en la posición destrabada.
Coloque los lados del cajón en los
soportes, asegurando que las trabas de
giro encajen en las ranuras del cajón.
Ajuste las cuatro trabas girándolas a la
posición de trabado.
Baje la tapa y deslice el cajón hacia
adentro.
Vuelva a colocar los estantes de frutas
y vegetales
.
Cómo quitar y volver a colocar la bandeja para fiambres
Trabas de giro
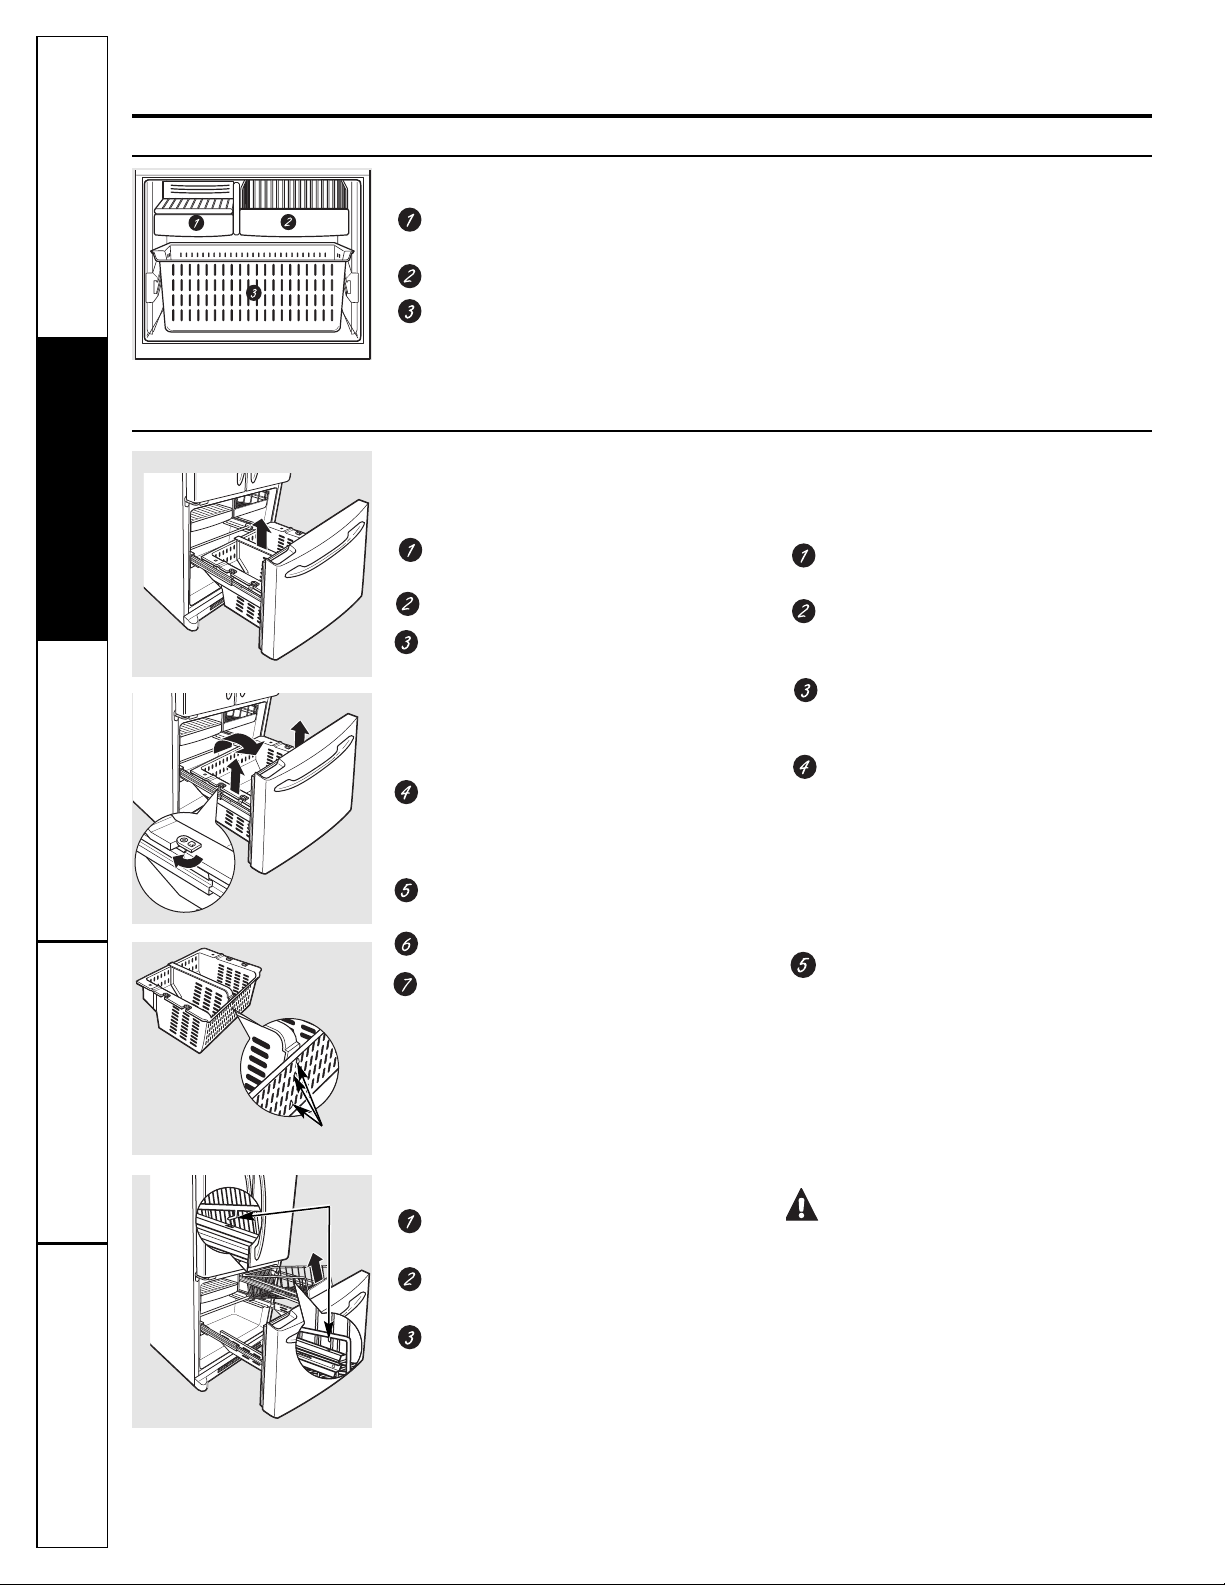
98
Estantes y canastas del congelador
Un estante por encima del recipente para
hielo
Una canasta de ancho medio
Una canasta profunda de ancho
completo con divisor
Sobre el congelador.
";@;0-?8-?/->-/@1>H?@5/-?1?@F:<>1?1:@1?1:@;0;?8;?9;018;?
El aspecto y las características pueden
variar
Servicio al consumidor Solucionar problemas Operación SeguridadInstalación
Retiro de la canasta
Para retirar la canasta profunda de ancho
completo:
Abra la gaveta del congelador hasta
que pare.
Levante el organizador de congelador
Empuje el divisor hacia adelante hasta
que las lengüetas de alineación traseras
estén fuera de las ranuras. Gire el divisor
un poco hacia el costado para liberar las
lengüetas de alineación frontales y
levante hacia afuera.
La canasta del congelador se apoya
sobre los soportes metálicos deslizables y
se coloca en su lugar con cierres
balanceables.
Gire los cierres balanceables desde la
posición horizontal a la vertical.
Abra las puertas del refrigerador.
Eleve la canasta y rote la misma hacia
usted. Deslice desde el costado del cajón
Cuando vuelva a colocar la canasta
profunda de ancho completo:
Incline la canasta hacia usted, y lleve
hacia abajo en el cajón.
Coloque la canasta en los soportes
metálicos deslizables y sobre los cierres
balanceables.
Gire los cierres balanceables desde la
posición horizontal a la verticale para
cerrar la canasta en su lugar.
Gire el divisor suavemente hacia un
costado, de modo que las lengüetas
de la parte frontal entren en las ranuras
de ventilación de la canasta. Coloque
el divisor de modo que las lengüetas de
ubicación trasera se ajusten en su
posición en las ranuras de ventilación
trasera.
Baje el organizador verificando que el
gancho se ajuste sobre el borde frontal
del canasto inferior del congelador.
Para retirar la canasta de ancho medio:
Hale la canasta hacia fuera hasta
el punto del freno.
Levante la canasta hacia arriba en el
frente para liberarla de las correderas.
Levante la parte posterior hacia arriba
y hacia fuera de la corredera.
PRECAUCIÓN:
Siempre cerciórese de cerrar completamente
la canasta.
Al reemplazar la canasta, cerciórese de que
las pestañas y los ganchos metálicos en los
costados de la canasta encajen arriba de
la parte superior de las correderas de la
canasta.
El aspecto puede variar
Lengüetas
Lengüetas
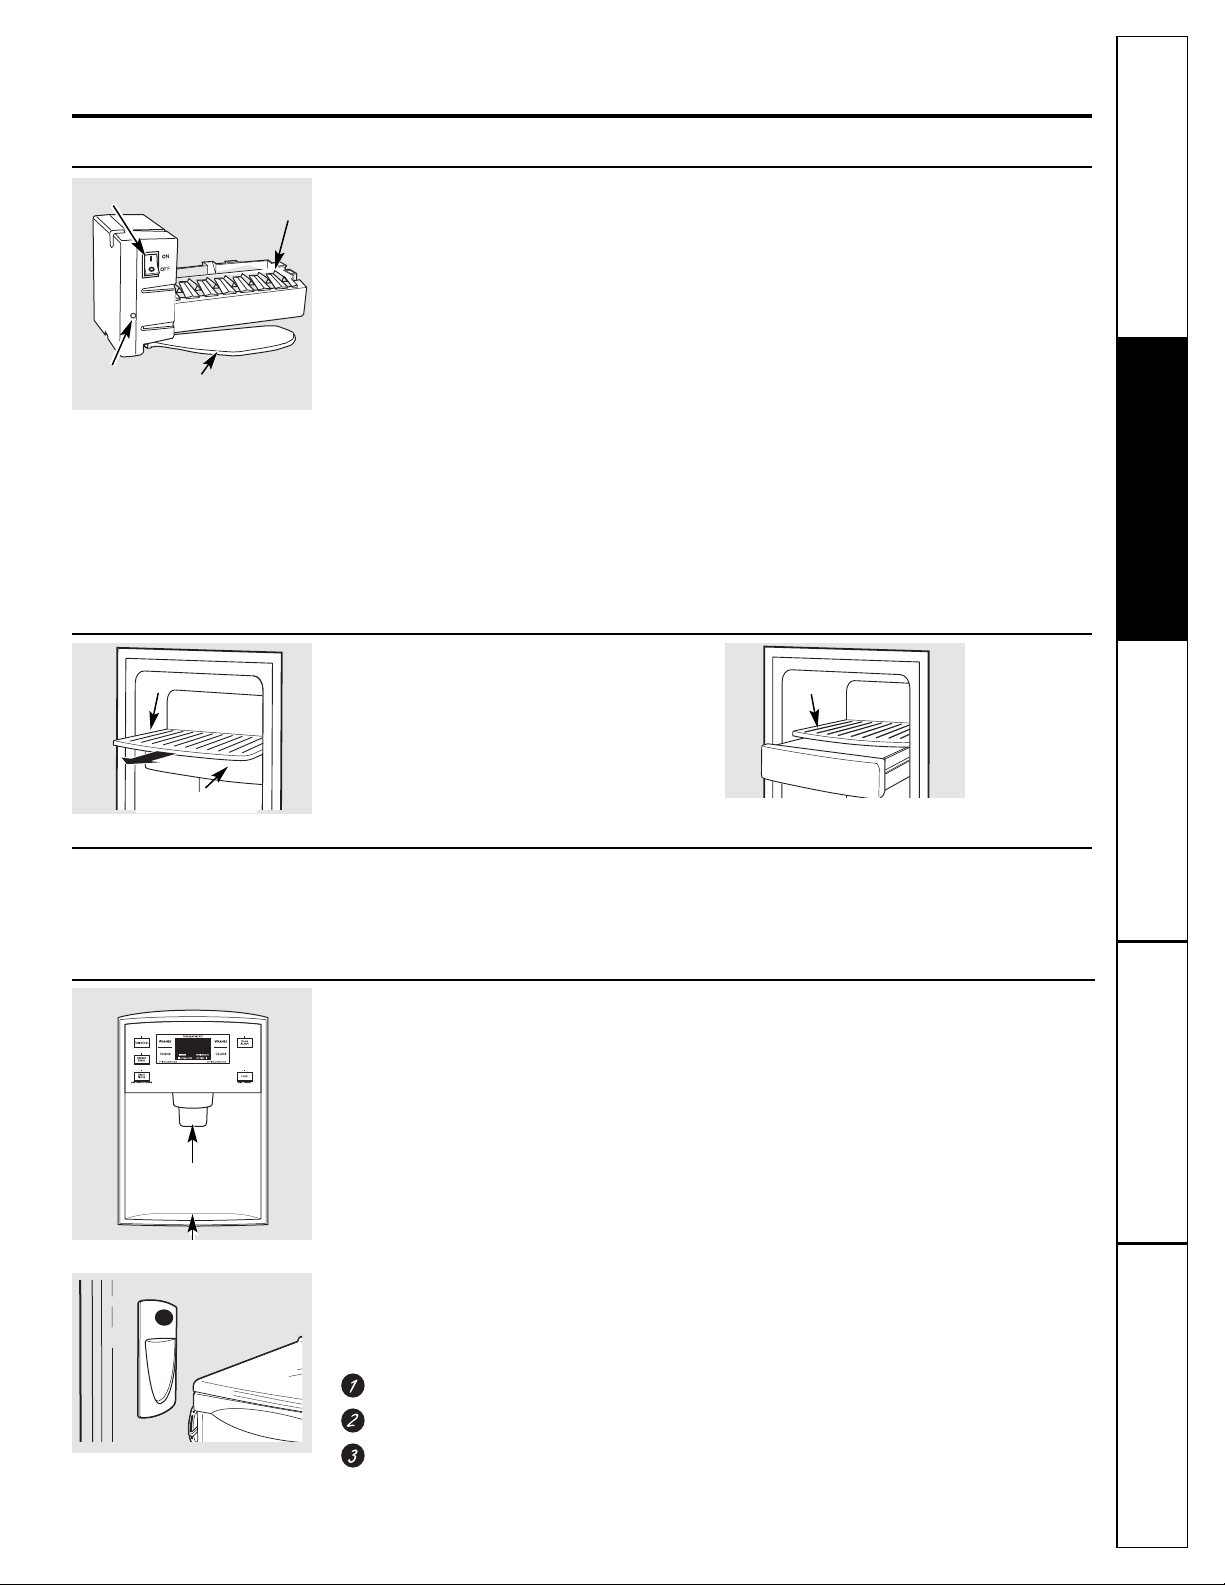
Servicio al consumidor
Solucionar problemas
OperaciónSeguridad Instalación
99
Máquina de hielo automática
1:-83A:;?9;018;?
La máquina de hielos producirá siete cubos por ciclo,
aproximadamente entre 100 y 130 cubos en un
periodo de 24 horas, dependiendo de la temperatura
del compartimiento del congelador, la temperatura
del cuarto, el número de veces que se abre la puerta
y otras condiciones de uso.
Vea más abajo para la forma de alcanzar el hielo
y el interruptor eléctrico.
Si el refrigerador se opera antes de hacer la conexión
del agua hacia la máquina de hielo, fije el interruptor
de corriente en la posición O (apagado).
Cuando se haya conectado el refrigerador
al suministro de agua, fije el interruptor de corriente
en la posición I (encendido). La luz de encendido del
dispositivo de hacer hielo será de color verde cuando
el interruptor de la luz del congelador esté pulsado o
cuando la puerta del congelador se encuentre
cerrada.
La máquina de hielos se llenará de agua cuando
se enfríe a –10°C (15°F). Un refrigerador recién
instalado se puede tomar entre 12 y 24 horas para
empezar a hacer cubos de hielo.
Escuchará un zumbido cada vez que la máquina de
hielos se llene de agua.
Deseche los primeros cubos de hielo para permitir
que la línea del agua se limpie.
Asegúrese de que nada interfiera con el movimiento
del brazo indicador.
Cuando el contenedor se llene al nivel del brazo
indicador, la máquina de hielos dejará de producir
hielos. Es normal que varios cubos de hielo se junten.
Si el hielo no se usa con frecuencia, los cubos de
hielo viejo se volverán turbios, con sabor rancio y se
encogerán.
NOTA: :4;3->1?/;:<>1?5J:01-3A-5:21>5;>-8
<>;9105;1?<;?5.81=A11?/A/4118/5/8;018-
9F=A5:-014518;?B->5-?B1/1?-84-/1>A:8;@101
4518;
NOTA: ;:253A>1185:@1>>A<@;>011:1>3H-1:8-
<;?5/5J:O (apagado) ?518?A95:5?@>;01-3A-1?@F
-<-3-0;
Sobre la máquina de hielo automática. GEAppliances.com
(:>12>531>-0;>>1/51:@191:@15:?@-8-0;<A101@;9->1:@>1D4;>-?<->-19<1E->-4-/1>4518;
Máquina
de hielos
Brazo indicador
Interruptor de corriente
Luz verde de
la corriente
Kit de accesorios de la máquina de hielos
Si su refrigerador no viene ya equipado con
una máquina de hielos automática, existe un kit
accesorio para la máquina de hielos que está
disponible por un costo adicional.
Revise en la parte posterior del refrigerador en busca
del kit para la máquina de hielos específica que
necesita para su modelo.
Cómo alcanzar el hielo
y el interruptor eléctrico
Para alcanzar el interruptor eléctrico de
la máquina de hielos, hale el estante por encima
del recipiente para hielo directamente hacia fuera.
Siempre cerciórese de reemplazar el estante.
Para alcanzar el hielo, simplemente hale
el recipiente hacia delante.
Para alcanzar el hielo
Estante
Recipiente para hielo
Para alcanzar el interruptor eléctrico.
Estante
Recipiente para hielo
Para usar el dispensador externo 1:-83A:;?9;018;?
Presione el vaso suavemente contra el brazo
del dispensador.
El recogedor no se vacía solo. Para evitar las
manchas de agua, el recogedor y la parrilla se
deberán limpiar regularmente.
&5:;4-D05?@>5.A/5J:01-3A-/A-:0;18>12>531>-0;>
1?@F<>591>-91:@15:?@-8-0;4-D<;?5.5850-001-5>1
1:18?5?@19-018-8H:1-01-3A-#<>59-18.>-E;018
05?<1:?-0;>D0161/;>>1>
R 3-8J:85@>;?<->-
18595:->18-5>1-@>-<-0;018-8H:1-01-3A-D881:->
18?5?@19-$->-18595:->8-?59<A>1E-?018-8H:1-
01-3A-01?1/418;?<>591>;??15?B-?;?01-3A-
Para bloquear el dispensador
Presione la tecla LOCK (Bloqueo) durante
3 segundos para cerrar el dispensador y el panel
de control. Para desbloquearlo, presione la misma
tecla durante 3 segundos nuevamente.
Door Alarm (Alarma de puerta)
Para configurar la alarma, presione la almohadilla
DOOR ALARM (alarma de puerta). La luz indicadora
se iluminará. Esta alarma sonará si cualquiera de la
puerta estuviera abierta por más de 2 minutos. El
sonido cesa automáticamente al cerrarse la puerta.
Recogedor
Brazo de
dispensador
Para usar el dispensador interno 1:-83A:;?9;018;?
El dispensador de agua está ubicado en la pared
izquierda dentro del compartimiento del refrigerador.
Para dispensar agua:
Sostenga el vaso contra el hueco.
Presione el botón dispensador de agua.
Sostenga el vaso debajo del dispensador entre
2 y 3 segundos luego de liberar el botón del
dispensador. Es posible que continúe dispensando
agua luego de que el botón fue liberado.
&5:;?105?<1:?--3A-/A-:0;18>12>531>-0;>?15:?@-8-
<;><>591>-B1E1?<;?5.81=A18-/-I1>H-01-3A-
/;:@1:3--5>1$>1?5;:118.;@J:05?<1:?-0;>0A>-:@1<;>
8;91:;?95:A@;?<->-18595:->18-5>1-@>-<-0;018-
/-I1>H-01-3A-D<->-881:->18?5?@19-01-3A-A>-:@1
1?@1<>;/1?;1?<;?5.81=A11805?<1:?-0;><>;0AE/-A:
>A50;2A1>@1-91050-=A1?118595:-18-5>1018-/-I1>H-
01-3A-25:01859<5->8-?59<A>1E-?1:8-/-I1>H-01
-3A-01?/->@18;?<>591>;?B-?;?01-3A-
NOTA: 25:011B5@->01<J?5@;?01-3A-18
05?<1:?-0;>01.1?1>859<5-0;1:2;>9-
<1>5J05/-/;:A:<-I;859<5;;A:-1?<;:6-

Servicio al consumidor Solucionar problemas Operación SeguridadInstalación
100
Cuidado y limpieza del refrigerador.
Limpiar el exterior
Las manijas de la puerta y los ornamentos.
Se limpian con un paño humedecido con
una solución de detergente suave y agua.
Seque con un paño suave. No use cera en
las manijas de la puerta ni en los
ornamentos.
Mantenga limpio el terminado. Limpie con
un paño limpio ligeramente humedecido con
cera para aparatos de cocina o un
detergente suave y agua. Seque y pula con
un paño limpio y suave.
";859<5118>12>531>-0;>/;:A:<-I;?A/5;
<->-@>-?@1?:5/;:A:<-I;4K910;?@;?
<;0>H-:016->>1?50A;?=A1-21/@1:-8-
<5:@A>-";A?11?@>;<-6;?859<5-0;>1?1:
<;8B;.8-:=A1-0;>1?
:5859<5-0;>1?=A1/;:@1:3-:.8-:=A1-0;>
D-=A11?@;?<>;0A/@;?<;0>H-:>-D->D
01?<>1:01>18-/-.-0;01<5:@A>-
Limpiar el interior
Para evitar olores, deje una caja abierta de
bicarbonato de sodio en los compartimientos
del refrigerador y del congelador.
Desconecte el refrigerador antes de
limpiarlo. Si no fuera posible, exprima el
exceso de humedad de la esponja o del paño
cuando se limpie alrededor de botones,
bombillas o controles.
Use cera para electrodomésticos en el
interior entre las puertas.
Use agua caliente y una solución de
bicarbonato de sodio—aproximadamente
una cucharada (15 ml) de bicarbonato de
sodio por cada cuarto (1 litro) de agua.
Esta solución limpia y neutraliza olores.
Enjuague y seque.
Después de limpiar los sellos magnéticos
de las puertas, aplique una capa delgada de
vaselina del lado de la bisagra. Esto ayuda a
evitar que los sellos magnéticos se doblen o
se peguen.
B5@1859<5->8;?1?@-:@1?01B50>5;2>H;?/;:
-3A-/-851:@1D-=A18-1C@>19-0521>1:/5-01
@19<1>-@A>-<A1014-/1>=A1?1=A51.>1:
!-:1618;?1?@-:@1?01B50>5;/;:/A50-0;
4;/->B50>5;@19<8-0;<A1014-/1>=A1?1
>;9<11:<10-E;?
";8-B1<->@1?<8F?@5/-?018>12>531>-0;>1:18
8-B-<8-@;?
Piezas plásticas plateadas. Limpie las
piezas con agua jabonosa. Limpie con una
esponja, paño húmedo o toalla de papel.
No raspe con esponjillas de metal u otros
limpiadores abrasivos.

Servicio al consumidor
Solucionar problemas
OperaciónSeguridad Instalación
101
GEAppliances.com
Atrás del refrigerador
Se deberá tener cuidado al retirar el
refrigerador de la pared. Todos los tipos de
recubrimiento de pisos se pueden dañar,
sobre todo los recubrimientos acojinados
y los que tienen superficies repujadas.
Eleve las patas niveladoras ubicadas en la
parte inferior frontal del refrigerador.
Hale el refrigerador en forma recta y empuje
nuevamente para devolverlo a su posición.
Mover el refrigerador en dirección lateral
puede causar daños al recubrimiento del
piso o al refrigerador.
Baje las patas niveladoras hasta que toquen
el piso.
819<A6->18>12>531>-0;>-?A8A3->
-?13K>1?101:;<-?->?;.>118/-.8118G/@>5/;
:5?;.>18-8H:1-01-8591:@-/5J:018-
9F=A5:-014518;?1:-83A:;?9;018;?D
-?13A>1=A118?;<;>@1-:@5B;8/-0A>-?
1?@G-//5;:-0;?5/;>>1?<;:01
Preparación para vacaciones
En el caso de vacaciones o ausencias
prolongadas, quite los alimentos y
desenchufe el refrigerador. Limpie el interior
con solución de bicarbonato de una
cucharada (15 ml) de bicarbonato por un
cuarto (1 litro) de agua. Deje abiertas las
puertas.
Coloque el interruptor de alimentación
eléctrica de la máquina de hielo en la
posición O (apagado) y cierre el suministro
de agua al refrigerador.
Si la temperatura pueda llegar al punto
de congelación, haya una persona calificada
para desaguar el sistema del suministro
de agua para evitar daños a la propiedad
causados por inundación.
En caso de mudanza
Asegure todos los elementos sueltos como
parrilla de la base, entrepaños y recipientes
pegándolos con cinta adhesiva en su lugar
para evitar daños.
Al usar una carretilla para mover el
refrigerador, no haga descansar la parte
frontal o trasera del refrigerador contra la
carretilla. Esto podría dañar el refrigerador.
Manéjelo sólo desde los laterales del
refrigerador.
?13K>1?101=A118>12>531>-0;>?1/;8;=A1
1:<;?5/5J:B1>@5/-80A>-:@18-9A0-:E-

Servicio al consumidor Solucionar problemas Operación SeguridadInstalación
102
Luces del refrigerador
1:-83A:;?9;018;?
PRECAUCIÓN: -?
.;9.588-?<;0>H-:1?@->/-851:@1?
Desconecte el refrigerador.
Para retirar el protector de la luz, tome el
protector por la parte posterior y hale
hacia fuera para liberar las pestañas en
la parte posterior.
Rote el protector hacia abajo y luego
hacia delante para liberar las pestañas al
frente del protector.
Después de reemplazarlo con una
bombilla de electrodomésticos del mismo
o de inferior voltaje, reemplace
el protector.
Conecte de nuevo el refrigerador.
NOTA: Las bombillas del artefacto pueden
solicitarse en Piezas y Accesorios de GE,
800.626.2002.
Luz del congelador
Cómo reemplazar las bombillas.
5>->18/;:@>;8-8-<;?5/5J:0 (apagado) :;18595:-8-/;>>51:@11:18/5>/A5@;018A/1?
PRECAUCIÓN: -?
.;9.588-?<;0>H-:1?@->/-851:@1?
Desconecte el refrigerador.
Quite la cesta del congelador para tener
acceso. La bombilla se encuentra en la
parte de atrás del congelador cubierta
por un protector.
Para quitarla, coja el protector por arriba
y estire para soltar las lengüetas
inferiores.
Después de reemplazarlo con una
bombilla de electrodomésticos del
mismo o de inferior voltaje, reemplace
el protector y la cesta del congelador.
Conecte de nuevo el refrigerador.
Luces LED del refrigerador 1:-83A:;?9;018;?
Un técnico autorizado debe reemplazar
la luz LED.
El aspecto puede variar
Protector
de bombilla

103
Servicio al consumidor
Solucionar problemas
OperaciónSeguridad Instalación
Equipos de recorte y paneles de decoración.
Lea estas instrucciones por completo y con detenimiento.
:@1?01/;91:E->
83A:;?9;018;?1?@F:1=A5<-0;?/;:1=A5<;?01>1/;>@1=A181<1>95@1:5:?@-8-><-:181?01
<A1>@-(?@10<A101?;85/5@-><-:181?0101/;>-/5J:<>1/;>@-0;?:13>;?A.8-:/;?1:$51E-?D
//1?;>5;?01;<A101-3>13-><-:181?019-01>-<->-4-/1>6A13;/;:8;?
3-.5:1@1?01?A/;/5:-
Paneles de menos de 1/4″ (6 mm) de grosor
Cuando instale paneles de madera de menos de 1/4″ (6 mm) de grosor, necesitará crear un panel de relleno,
como un cartón de 1/8″ (3 mm), que debe ir entre el frente de la puerta y el panel de madera. Si va a instalar
los paneles de decoración pre-cortados, en el kit se incluyen paneles de relleno precortados. El grosor
combinado del panel de decoración o de madera y el panel de relleno debe ser de 11/32″ (8,7 mm) y el panel
mismo no debe ser mayor a 1/4″ (6 mm).
$->-9;018;?=A1>1=A51>1:<-:181?
Paneles de 1/4″ de grosor o menos
1/4″ máx.
La manija y los recortes superior e inferior quedan frente a la superficie de la puerta, lo que requiere que el
relleno tenga una longitud y ancho menores al panel. Utilice las guías de abajo y pegue con cinta el relleno
a la parte trasera del panel.
Puerta izquierda de alimentos frescos
Puerta del congelador
Relleno
2 1/2″ (63,5 mm)
3/4″ (19 mm)
3/4″ (19 mm)
Panel
Relleno
2 1/2″ (63,5 mm)
3/4″ (19 mm)
Panel
Puerta derecha de alimentos frescos
Relleno
2 1/2″ (63,5 mm)
3/4″ (19 mm)
3/4″ (19 mm)
Panel

Servicio al consumidor Solucionar problemas Operación SeguridadInstalación
104
Equipos de recorte y paneles de decoración.
Dimensiones para paneles de madera a medida
3/4″ (19 mm) o panel elevado
Puede utilizarse un diseño de panel elevado atornillado o pegado a un soporte de un grosor de 1/4″ (6 mm), o una placa
fresada de 3/4″ (19 mm). La parte elevada del panel debe fabricarse para permitir espacios libres de por lo menos 2″
(5,1 cm) desde el lado de la manija para que haya espacio para los dedos.
Los paneles de grosor mayor a 1/4″ (6 mm), hasta un máximo de 3/4″ (19 mm), requerirán que el perímetro externo del panel
de 5/16″ (8 mm) no sea más grueso de 1/4″ (6 mm).
595@-/5;:1?01<1?;<->-<-:181?-91050-
8591:@;?2>1?/;?8.?739FC<->-/-0-<A1>@-
$A1>@-018/;:318-0;>8.?739FC
Espacio de 2″
(5,1 cm) en
el lado de
la manija
Panel de
apariencia
Puerta del
refrigerador
Grosor del soporte
de 1/4″ (6 mm)
3/4″
(19 mm)
Panel más grueso de 1/4″ (6 mm)
1/4″ (6 mm) máx.
3/4″ (19 mm)
5/16″ (8 mm)
Puerta derecha de alimentos frescos
Puerta del congelador
Parte superior,
derecha e
inferior
16 29/32″ (42,9 cm)
5/16″ (8 mm)
mínimo a un
grosor de 1/4″
(6 mm)
Parte elevada
del panel
2″ (51 mm)
mínimo a un
grosor de 1/4″
(6 mm)
Lado de la manija
26 3/32″
(66,3 cm)
2″ (51 mm) mínimo a un
grosor de 1/4″ (6 mm)
Lado de la manija
Lados izquierdo,
derecho e
inferior
5/16″ (8 mm) mínimo a
un grosor de 1/4″ (6 mm)
35 29/32″ (91,2 cm)
Parte
elevada
del panel
38 15/16″
(98,9 cm)
Puerta izquierda de alimentos frescos
Parte superior,
izquierda e
inferior
16 29/32″ (42,9 cm)
5/16″ (8 mm)
mínimo a un
grosor de 1/4″
(6 mm)
Parte elevada
del panel
2″ (51 mm)
mínimo a un
grosor de 1/4″
(6 mm)
Lado de la manija
38 15/16″
(98,9 cm)
1/8″
(3 mm)
1/8″
(3 mm)
1/8″
(3 mm)
1/8″
(3 mm)
1/8″
(3 mm)
1/4″
(6 mm)
1/4″
(6 mm)
1/4″
(6 mm)
1/4″
(6 mm)
1/4″
(6 mm)
1/8″
(3 mm)
1/4″
(6 mm)
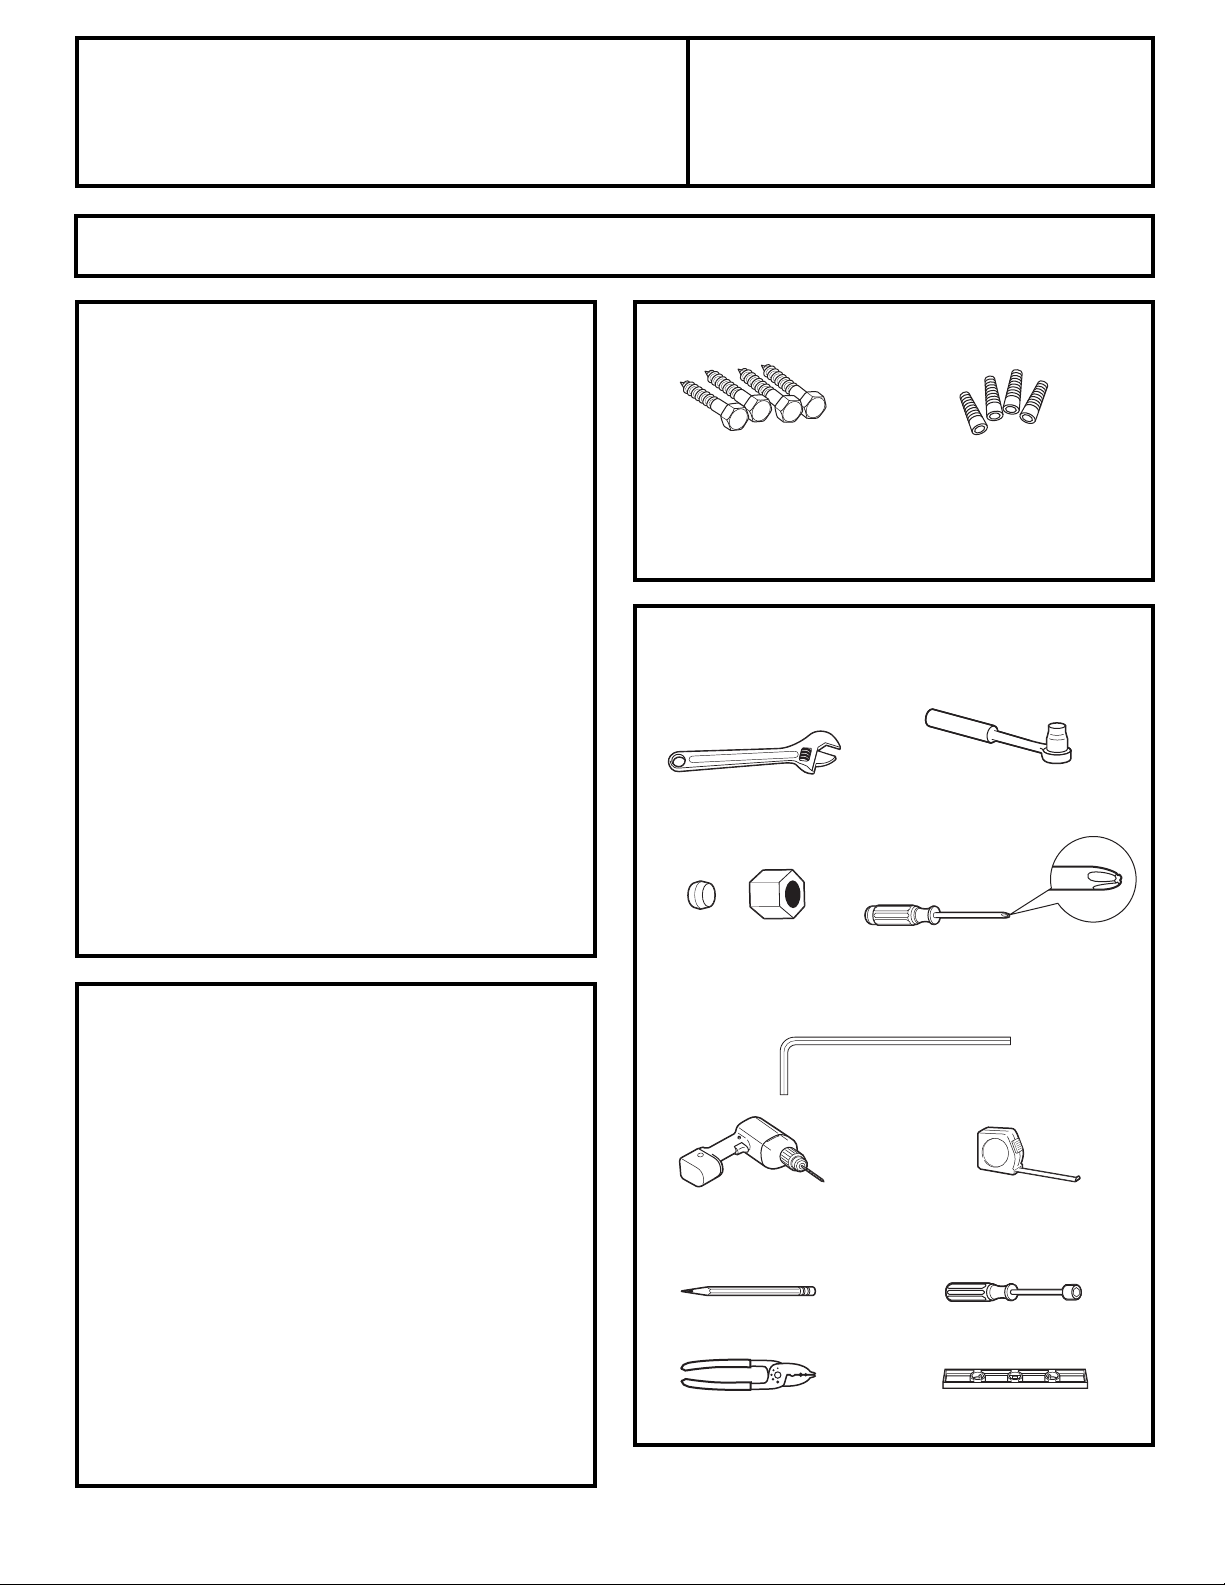
Lea estas instrucciones completa y cuidadosamente.
•
IMPORTANTE — Guarde estas instrucciones
para uso del inspector local.
•
IMPORTANTE — Observe todos los códigos y
órdenes de ley.
• Nota al instalador – Asegúrese de dejar estas
instrucciones con el consumidor.
• Nota al consumidor – Conserve estas instrucciones para
referencia futura.
• Nivel de destreza – La instalación de este aparato
requiere de destrezas mecánicas básicas.
• Tiempo de ejecución – Instalación del refrigerador
20 minutos
Instalación de la línea de agua
30 minutos
Instalación del soporte
anti-volcaduras 20 minutos
• La instalación apropiada es la responsabilidad del
instalador.
• La falla del producto debido a una instalación
inadecuada no está cubierta por la garantía.
¿Preguntas? Llame al 800.GE.CARES (800.432.2737) o bien visite nuestra página Web: GEAppliances.com
Instrucciones para
Refrigerador
la Instalación
Modelos 21 y 25
ANTES DE INICIAR
HERRAMIENTAS QUE
USTED PUEDE NECESITAR
PREPARACIÓN
CÓMO MOVER EL REFRIGERADOR AL INTERIOR
Si el refrigerador no entra por una puerta, se pueden
retirar la puerta del refrigerador y la gaveta del
congelador.
• Para retirar la puerta del refrigerador, consulte el Paso 1
en la sección J9;5:B1>@5>18B-5BG:018-<A1>@-.
• Para retirar la gaveta del congelador, consulte la sección
J9;>1@5>->8-3-B1@-018/;:318-0;>.
SUMINISTRO DE AGUA HACIA LA MÁQUINA DE HIELOS Y EL
DISPENSADOR (EN ALGUNOS MODELOS)
Si el refrigerador tiene una máquina de hielos, se tendrá que
conectar a una tubería de agua potable fría. Un kit de
suministro de agua (contiene tubería de cobre, válvula de
cierre, accesorios e instrucciones) está disponible con un
costo adicional a través de su proveedor, visitando nuestra
página Web GEAppliances.com o bien a través de Partes y
Accesorios, 800.626.2002.
Llave ajustable
Tuerca de compresión de 1/4″
y férula (manga) (modelos con
máquina de hielos solamente)
Destornillador Phillips
Destornillador de casquillo
de 3/8″ y de 10 mm
105
Llaves Allen de 3/32″,
1/8″ y 1/4″
Lápiz
Broca de perforadora
de 1/8″ y perforadora
eléctrica o de mano
Cinta métrica
Llave de tuercas de 1/4″
Pinza corta alambres
Nivel
MATERIALES QUE NECESITA (no incluidos)
Pernos de fijación
Mangos de anclaje
Para el soporte anti-volcaduras montado sólo en pisos
de HORMIGÓN
Broca de perforadora apropiada para anclajes
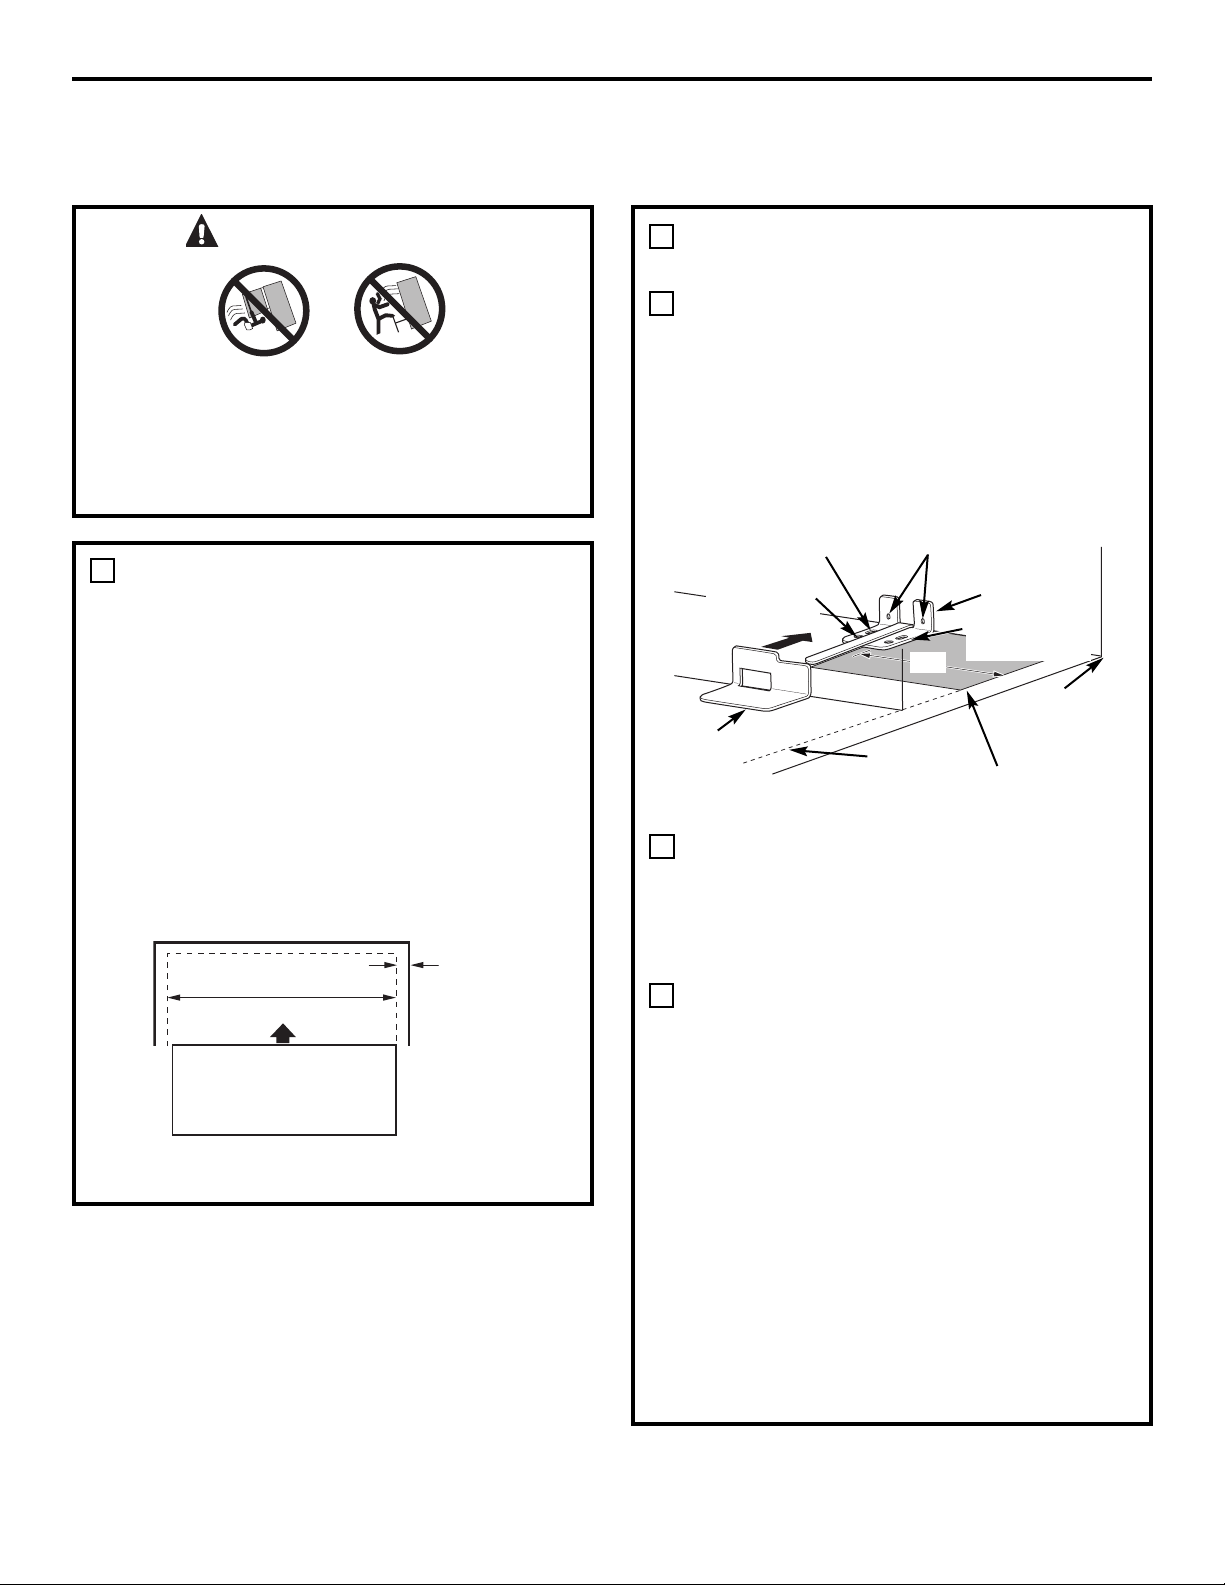
CÓMO UBICAR EL SOPORTE
DE PISO ANTI-VOLCADURAS
Coloque la plantilla de ubicación del soporte
de piso anti-volcaduras (incluida en el kit anti-
volcaduras) sobre el piso contra la pared
trasera, dentro de W, alineada con la ubicación
deseada del lado derecho del refrigerador
(ver Figura 1).
Coloque el soporte de piso anti-volcaduras
sobre la plantilla de ubicación con los orificios
de piso derechos alineados con los orificios
de piso indicados en la lámina de plantilla,
aproximadamente 7
1
⁄4″ desde el extremo
de la lámina o el lado derecho del refrigerador.
Sostenga en posición y utilice el soporte de
piso anti-volcaduras como una plantilla para
marcar los orificios en base a su configuración
y tipo de construcción, como puede verse en el
Paso 3. Marque las ubicaciones de los orificios
con un lápiz, clavo o punzón.
NOTA:
• Se REQUIERE utilizar por lo menos 2 tornillos
para montar el soporte de piso (uno en cada
lado del soporte de piso anti-volcaduras).
Los dos deben encontrarse en la pared
o en el piso. La figura 2 indica todas las
configuraciones de montaje aceptables para
tornillos. Identifique los orificios de tornillos
en el soporte anti-volcaduras para su
configuración.
MIDA LA APERTURA DEL GABINETE
DISPONIBLE EN RELACIÓN
AL ANCHO DEL REFRIGERADOR
Mida el ancho de la apertura del gabinete
donde se colocará el refrigerador, W.
Tenga en cuenta cualquier saliente de la
mesada, el grosor del zócalo y cualquier
espacio deseado. El ancho, W, no debe ser
menor a las 36 pulgadas. El refrigerador
deberá colocarse aproximadamente en la
mitad de esta apertura.
ADVERTENCIA
En ciertas circunstancias, este refrigerador
puede inclinarse hacia adelante.
Pueden provocarse lesiones personales.
Instale el soporte anti-volcaduras incluido con
este refrigerador.
1
Grosor del zócalo
o saliente de la
mesada (lo que
sea mayor)
además de
cualquier
espacio deseado
Pared trasera
Frente
Lado
derecho
2
A
B
C
W
Soporte
base en el
refrigerador
2 orificios
en la pared
Lado derecho
del refrigerador
Piso – Hormigón
(2 orificios)
Piso – Madera (2
orificios)
7
1
⁄4”
Lámina de plantilla de
ubicación
Soporte
de piso a
instalar
Orificios
en la derecha
Extremo derecho
trasero de la pared
del gabinete
REFRIGERADOR
Figura 1 – Perspectiva general
de la instalación
106
Instrucciones para la instalación
CÓMO INSTALAR EL SOPORTE DE PISO
ANTI-VOLCADURAS (en modelos de 21 pies)
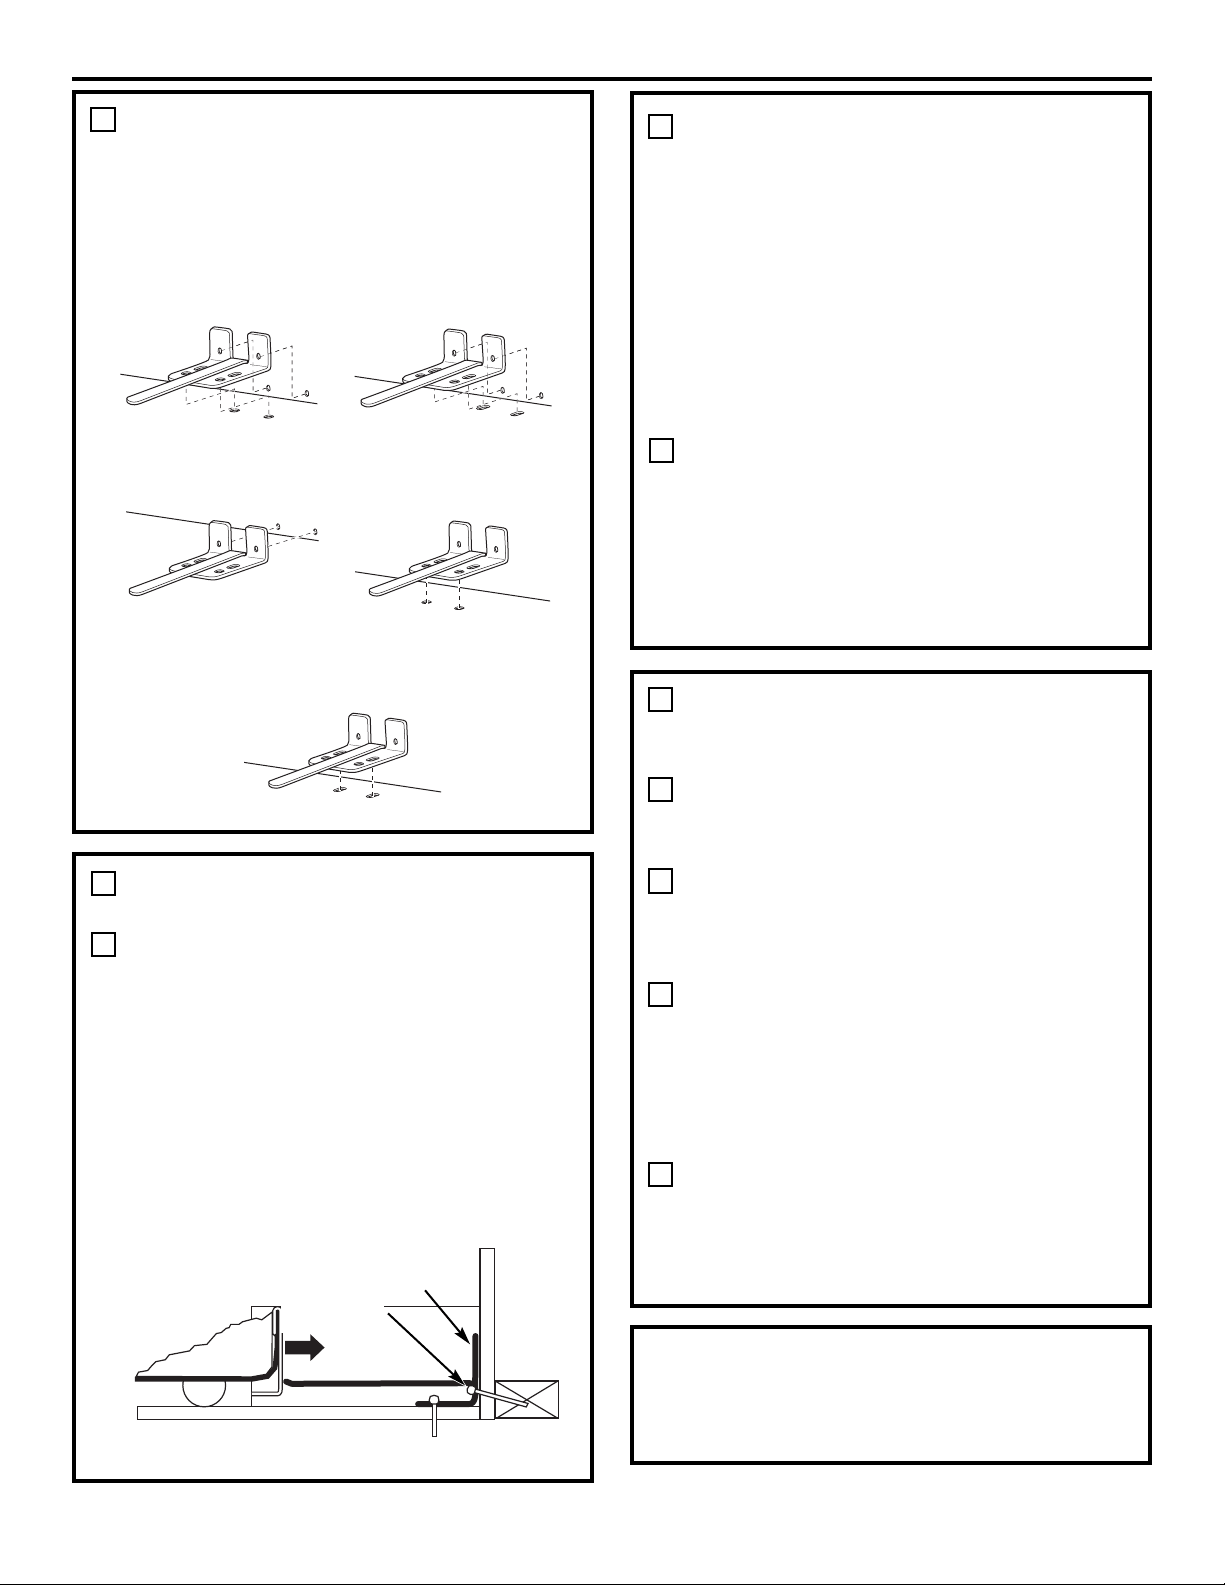
Instrucciones para la instalación
CÓMO UBICAR EL SOPORTE
DE PISO ANTI-VOLCADURAS (cont.)
2
Instalación preferida –
Madera
Instalación preferida –
Hormigón
Mínimo aceptable N°1 –
Soporte de placa de pared
Mínimo aceptable N°2 –
Piso de madera
Mínimo aceptable N°3 –
Piso de hormigón
Figura 2 – Ubicaciones de tornillos
aceptables
Construcción de pared y piso de HORMIGÓN:
• Anclajes requeridos (no incluidos):
4 por cada perno de fijación de 1/4″ x 1 1/2″
4 por cada anclaje de manguito de 1/2″ de diámetro
externo
• Perfore los orificios del tamaño recomendado para
anclajes en hormigón en el centro de los orificios
marcados en el Paso 2.
• Instale los anclajes de manguito dentro de los orificios
perforados. Coloque el soporte de piso anti-
volcaduras como se señala en el Paso 2. Quite la
plantilla de ubicación del piso.
• Instale los pernos de fijación a través del soporte de
piso anti-volcaduras y ajuste de manera adecuada.
Construcción de pared de MADERA y piso de CERÁMICA:
• Para este caso especial, ubique los 2 orificios de pared
identificados en la Fig. 1. Perfore un orificio piloto de
1/8″ en ángulo (aprox. como puede verse en la Fig. 3)
en el centro de cada orificio.
• Instale el soporte de piso anti-volcaduras utilizando la
instalación mínima aceptable #1, como puede verse
en la Fig. 2.
C
B
INSTALACIÓN DE SOPORTE
ANTI-VOLCADURAS
Construcción de pared y piso de MADERA:
• Perfore la cantidad apropiada de orificios piloto de
1/8″ en el centro de cada orificio de soporte de piso
que se está usando (puede usarse un clavo o punzón
si no cuenta con una perforadora) Y quite la plantilla
de ubicación del piso.
• Instale el soporte de piso anti-volcaduras ajustando
bien los 2, o preferentemente 4, tornillos #10-16 de
cabeza hexagonal en su lugar, como puede verse en
la Figura 3.
3
A
CÓMO COLOCAR EL REFRIGERADOR PARA
ACCIONAR EL PISO ANTI-VOLCADURAS Y LOS
SOPORTES DE BASE
Antes de colocar el refrigerador en su lugar, conecte el
cable de energía en el tomacorriente y conecte la línea
de agua (si corresponde). Controle la presencia de
pérdidas.
Ubique el lado derecho del refrigerador y mueva hacia
atrás aproximadamente alineado con el lado derecho
de la apertura del gabinete, W. Esto debe posicionar el
soporte de piso anti-volcaduras para poder conectar el
soporte de base anti-volcaduras con el refrigerador.
Con cuidado, deslice el refrigerador dentro de la
apertura del gabinete hasta que se detenga por
completo. Verifique que el frente del refrigerador esté
alineado con la parte frontal del gabinete. Si no es así,
balancee suavemente el refrigerador de adelante a
atrás hasta que se enganche y usted note que el
refrigerador está completamente apoyado contra la
pared trasera.
OPCIONAL: Ajuste las configuraciones de altura de la
rueda trasera (y delantera) para enganchar por
completo los soportes anti-volcaduras traseros,
mientras también alinea el frente del refrigerador
con la parte frontal del gabinete.
4
A
C
B
D
NOTA:
Si separa el refrigerador de la pared por cualquier
razón, asegúrese de que el soporte de piso anti-
volcaduras esté enganchado cuando se vuelva
a colocar el refrigerador contra la pared.
Extremo trasero
derecho del
refrigerador
Piso
Soporte de
placa de
pared
Soporte
de piso
2 tornillos
deben entran
en madera o
soporte de
metal
Pared
107
Figura 3 – Conexión a la pared y piso
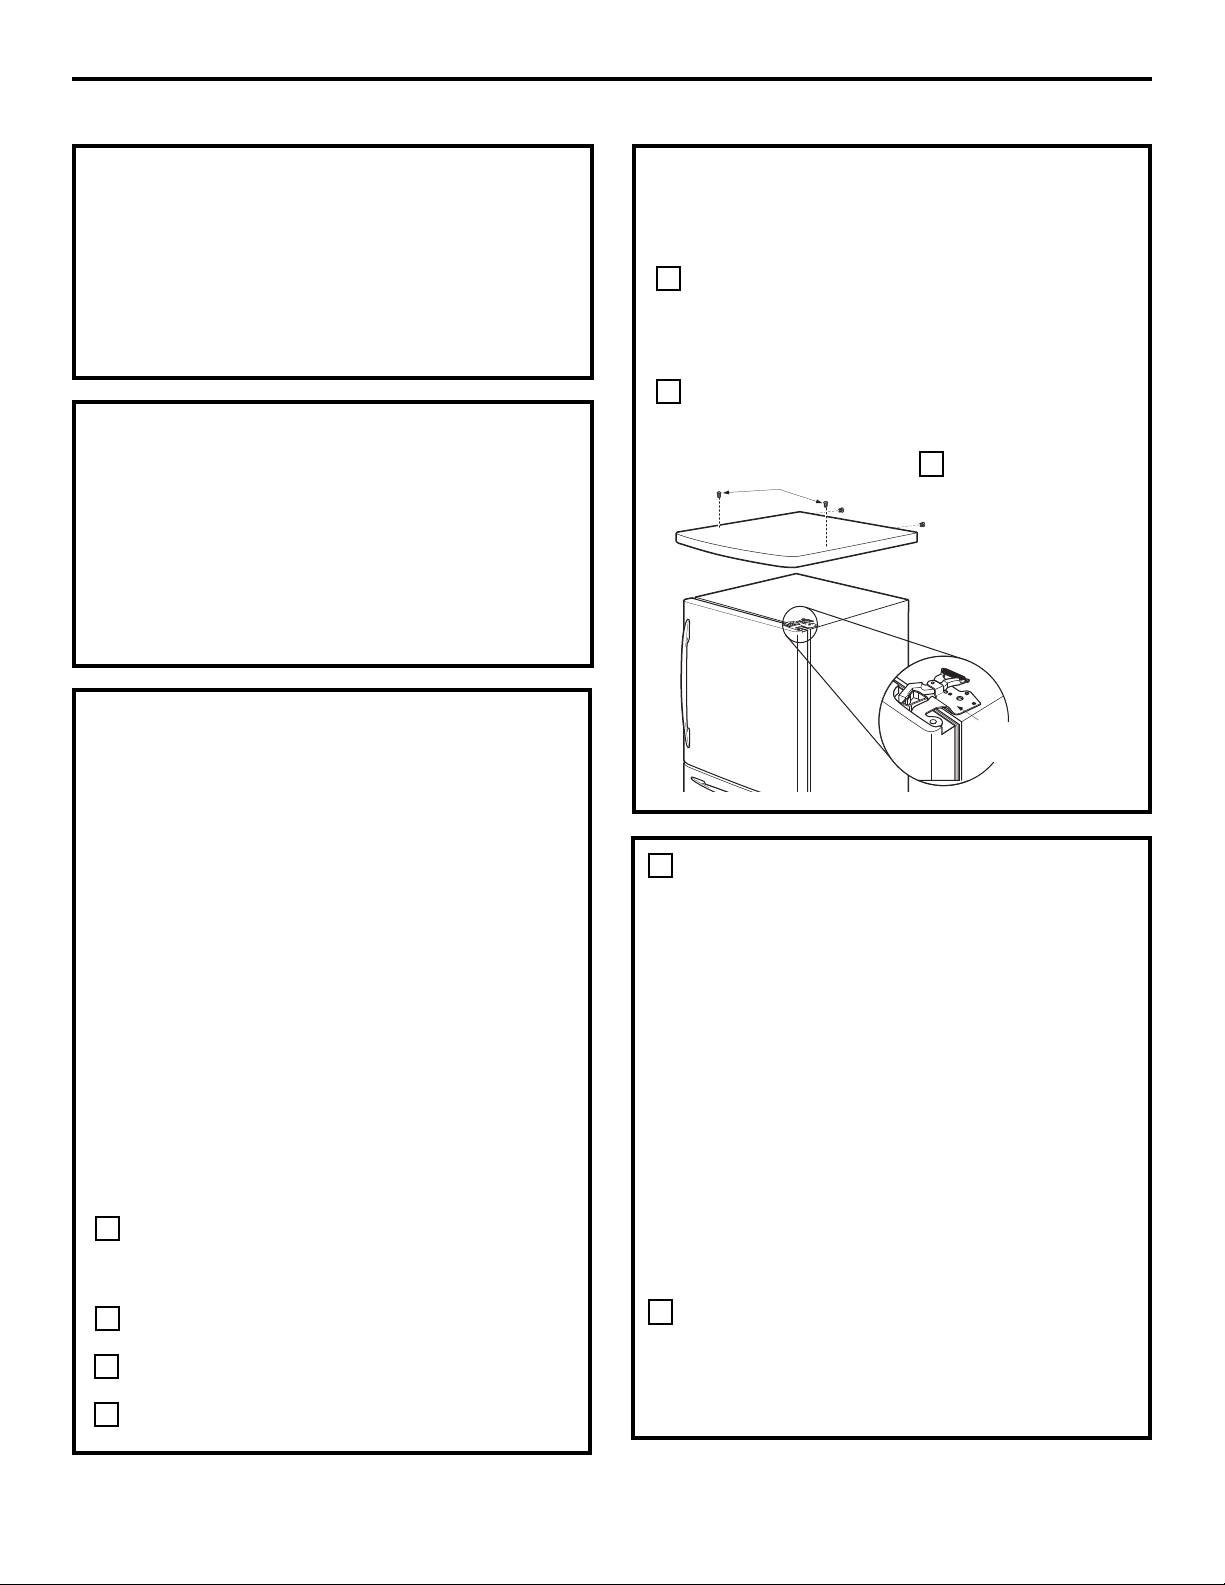
Instrucciones para la instalación
INSTALACIÓN DEL REFRIGERADOR
UBICACIÓN DEL REFRIGERADOR
• No instale el refrigerador donde la temperatura baje de 60°F
(16°C) ya que no correrá con suficiente frecuencia para mantener
las temperaturas apropiadas.
• No instale el refrigerador donde la temperatura suba por encima
de 100°F (37°C) ya que no funcionará correctamente.
• Instálelo en un piso fuerte para que lo soporte con carga
completa.
ESPACIO LIBRE
Permita el siguiente espacio para una fácil instalación, apropiada
circulación del aire y conexiones de plomería y eléctricas:
Modelos de
profundidad Modelos de gran
estándar capacidad
Costados
1/8″ (3 mm) 1/8″ (3 mm)
Arriba
1″ (25 mm) 1″ (25 mm)
Atrás
1″ (25 mm) 1/2″ (13 mm)
CÓMO CONECTAR EL REFRIGERADOR
A LA LÍNEA DE AGUA DE LA CASA
(los modelos de máquinas de hielo y de dispensadores)
Se requiere un suministro de agua fría para la operación de la
máquina de hielos. Si no existe un suministro de agua fría,
usted necesitará hacer uno. Ver la sección :?@-8-/5J:018-
@A.1>H-01-3A-.
NOTAS:
• Antes de hacer la conexión, cerciórese de que el cable
eléctrico del refrigerador no esté conectado al interruptor
de la pared.
• Si el refrigerador no tiene un filtro de agua, recomendamos
que instale uno si su suministro de agua tiene arena o
partículas que pudieran obstruir la pantalla de la válvula de
agua del refrigerador. Instálelo en la línea de agua cerca
del refrigerador. Si usted está usando un kit de tubería
de refrigeración GE SmartConnect,
™
usted necesitará una
tubería adicional (WX08X10002) para conectar el filtro. No
use tuberías plásticas para instalar el filtro.
Si usted está usando tubería de cobre, coloque una tuerca de
compresión y una férula (manga) en el extremo de la tubería
que viene del suministro de agua fría de la casa.
Si se encuentra usando tuberías de GE SmartConnect,
™
las
tuercas están ya ensambladas a la tubería.
1
A
RETIRO DE LA TAPA SUPERIOR (continuación)
(en algunos modelos)
REINSTALACIÓN DE LAS PUERTAS, GAVETAS Y
LA TAPA SUPERIOR
Baje la puerta cuidadosamente a la bisagra central. Reinstale
la bisagra superior. NOTA: Cerciórese que la puerta se
encuentre alineada apropiadamente con la parte superior
de la tapa para evitar el reajuste de la puerta durante la
reinstalación de la tapa superior.
Coloque la tapa sobre la parte superior del refrigerador.
Reinstale los tornillos originales en la parte superior y la
trasera de la tapa.
Reinstale la gaveta
inferior del
congelador. Consulte
la sección titulada
“Cómo reemplazar
la gaveta del
congelador”.
F
RETIRO DE LA TAPA SUPERIOR
(en algunos modelos)
• NOTA IMPORTANTE: Este refrigerador tiene una profundidad
de 34
1
/2 pulgadas. Las puertas y los pasillos que llevan a la
ubicación de la instalación deben tener un ancho de por lo
menos 36 pulgadas para dejar las puertas y las manijas
conectadas al refrigerador mientras éste se transporta a la
ubicación de la instalación. Si los pasillos tiene menos que
36 pulgadas, las puertas y las manijas del refrigerador se
pueden rayar y dañar con facilidad. Se pueden retirar la tapa
superior y las puertas para permitir el traslado seguro del
refrigerador al interior. Empiece con el Paso A.
• Omita el Paso A si no se necesita retirar las puertas. Deje
la cinta y todo el embalaje en las puertas hasta que el
refrigerador se encuentre en su destino final.
• REMOCIÓN DE LA CORREDERA: Incline el refrigerador hacia
ambos lados para retirar la corredera.
• NOTA: Utilice una carretilla de mano almohadillada para
trasladar el refrigerador. Coloque el refrigerador en la
carretilla de mano con un costado contra la carretilla.
Recomendamos fuertemente que DOS PERSONAS trasladen y
completen la instalación.
Localice y retire los dos tornillos de cabeza Phillips en la parte
superior del refrigerador. Retire los dos tornillos en cada lado
en la parte posterior de la tapa superior. Despegue y retire la
tapa superior.
Retire la puerta de la comida fresca. Consulte los Pasos 1, 2 y 3
en la sección titulada “Cómo invertir el vaivén de la puerta”.
Retire la gaveta inferior del congelador. Consulte la sección
titulada “Cómo retirar la gaveta del congelador”.
Traslade el refrigerador a la ubicación de la instalación.
A
B
C
D
E
G
108
A
Bisagra
superior B
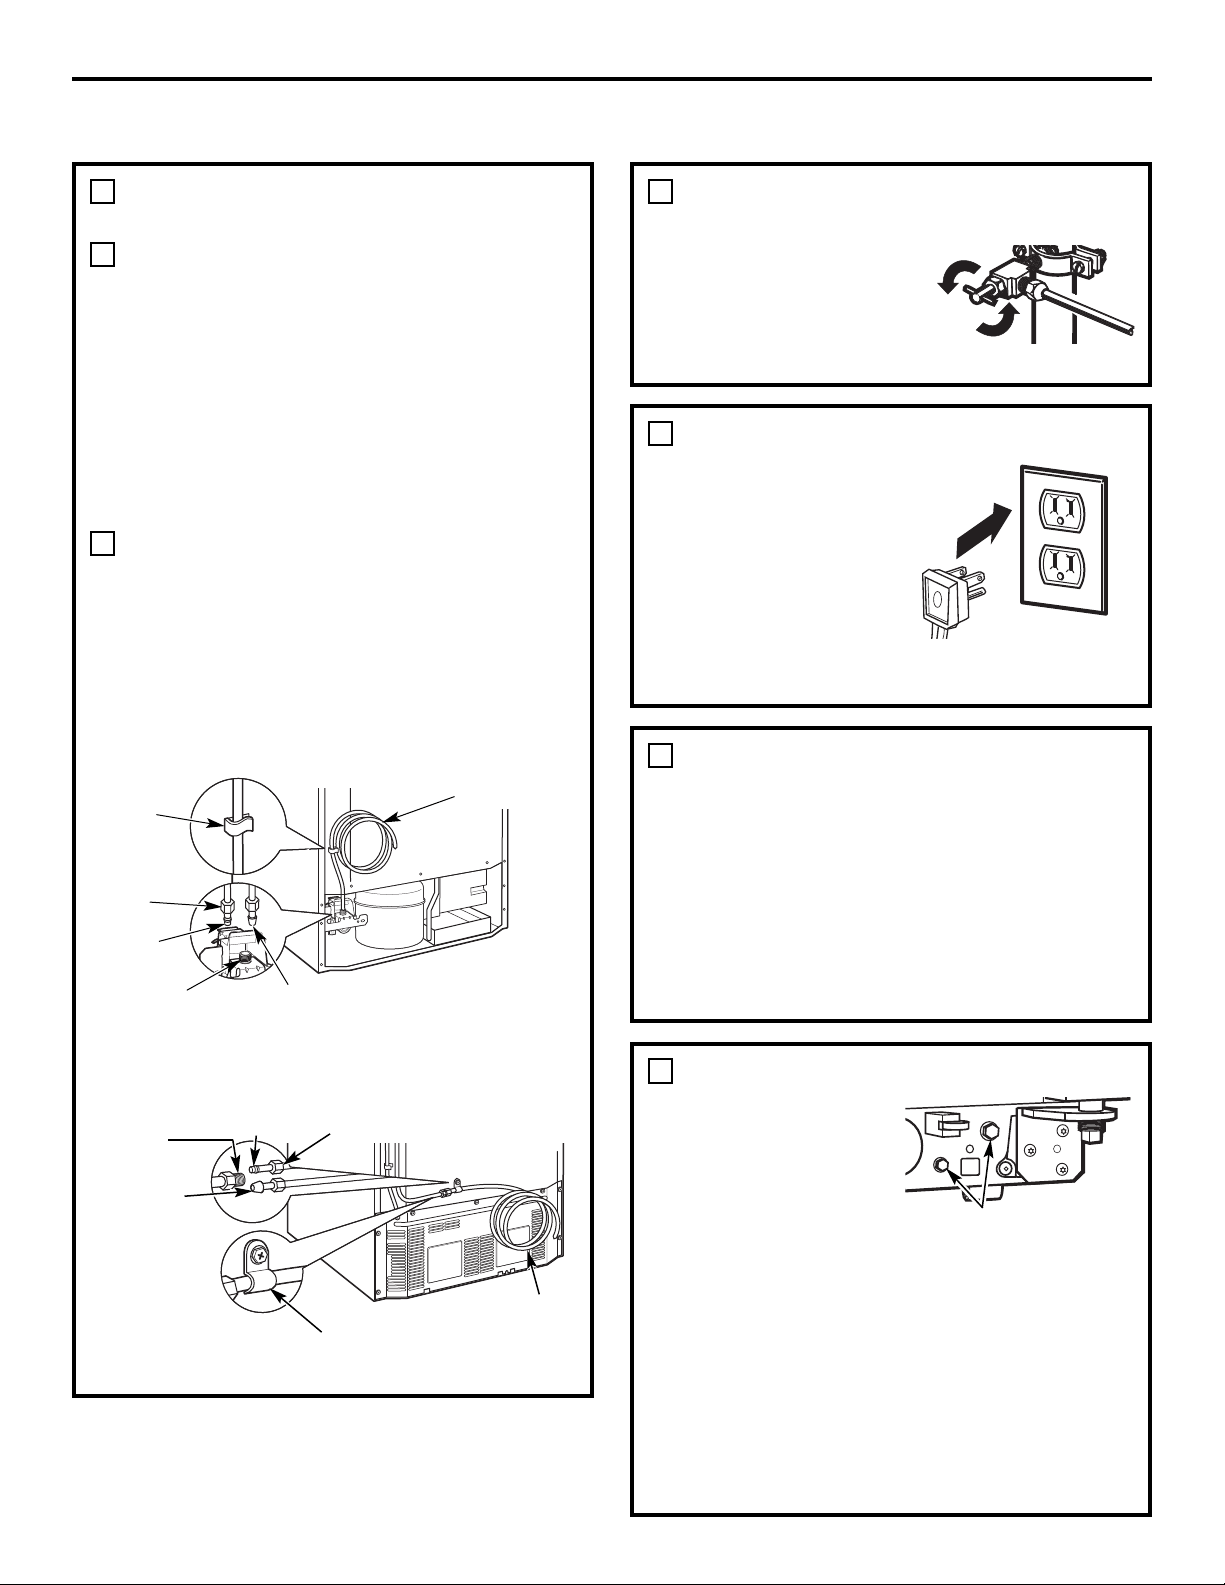
Instrucciones para la instalación
CÓMO CONECTAR EL REFRIGERADOR A
LA LÍNEA DE AGUA DE LA CASA
(cont.)
Si usted está usando tubería de cobre, inserte
el extremo de la tubería en la conexión del refrigerador,
en la parte posterior del refrigerador, hasta donde sea
posible. Mientras sostiene la tubería, apriete el
accesorio.
Si se encuentra usando tuberías de GE
SmartConnect,
™
inserte el extremo moldeado de la
tubería en la conexión del refrigerador en la parte
posterior del refrigerador, y apriete la tuerca de
compresión hasta que esté apretada a mano. Entonces
apriete una vuelta adicional con una llave. Si la aprieta
demasiado causará fugas.
Apriete la tubería en la abrazadera proporcionada para
sostenerla en su posición. Es posible que usted necesite
levantar la abrazadera haciendo palanca.
Una de las ilustraciones siguientes será
el aspecto de la conexión que tendrá su
refrigerador.
Modelos de máquinas de hielo dispuestas para
funcionar
Modelos de máquinas de hielo que necesitan
instalación
1
B
C
109
ACTIVE LA CONEXIÓN DE AGUA
(modelos con la máquina de hielos o el
dispensador)
Haga pasar la corriente
de agua en la válvula de cierre
(el suministro de agua de la
casa) e inspeccione en busca de fugas.
2
CONECTE EL REFRIGERADOR
En modelos con la
máquina de hielos:
antes del conectar el
refrigerador, cerciórese de
que el interruptor de la
máquina de hielos está
colocada en la posición
O (apagado).
Ver la información adjunta sobre la conexión a tierra del
cable eléctrico.
3
COLOQUE EL REFRIGERADOR
EN SU LUGAR
Traslade el refrigerador a su ubicación final. Verifique
que la parte trasera del refrigerador enganche el
soporte anti-volcaduras de manera correcta. El soporte
de piso anti-volcaduras debe estar alineado con la
abertura de la parte trasera inferior del refrigerador, y
entrar a través de la abertura cuando se coloca el
refrigerador en su lugar. (Para más información, ver
página 106, Paso 2A).
4
Tubería de 1/4″
Abrazadera
de la tubería
Tuerca de compresión
de 1/4″
Férula
(manga)
Tubería de
SmartConnect
™
Conexión del
refrigerador
Tubería de cobre
de 1/4″
Tuerca de
compresión
de 1/4″
Férula
(manga)
Tubería de
SmartConnect
™
Conexión del
refrigerador
Abrazadera de
la tubería
CÓMO NIVELAR EL REFRIGERADOR
Gire los tornillos de ajuste
del frente en sentido de
las agujas del reloj para
levantar el refrigerador, y
en contra de las agujas
del reloj para bajarlo.
Use una llave hexagonal
de 3/8″ con extensión o una llave ajustable.
Para ajustar los tornillos giratorios de los modelos
de gran capacidad de 21’:
Estos modelos también tienen rodillos ajustables
posteriores para que usted pueda alinear el refrigerador
con los gabinetes de la cocina. Use una llave hexagonal
de 3/8″ con extensión para girar los tornillos
posteriores—en sentido de las agujas del reloj para
levantar el refrigerador, y en contra de las agujas del
reloj para bajarlo.
5
Tornillos de ajuste del rodillo
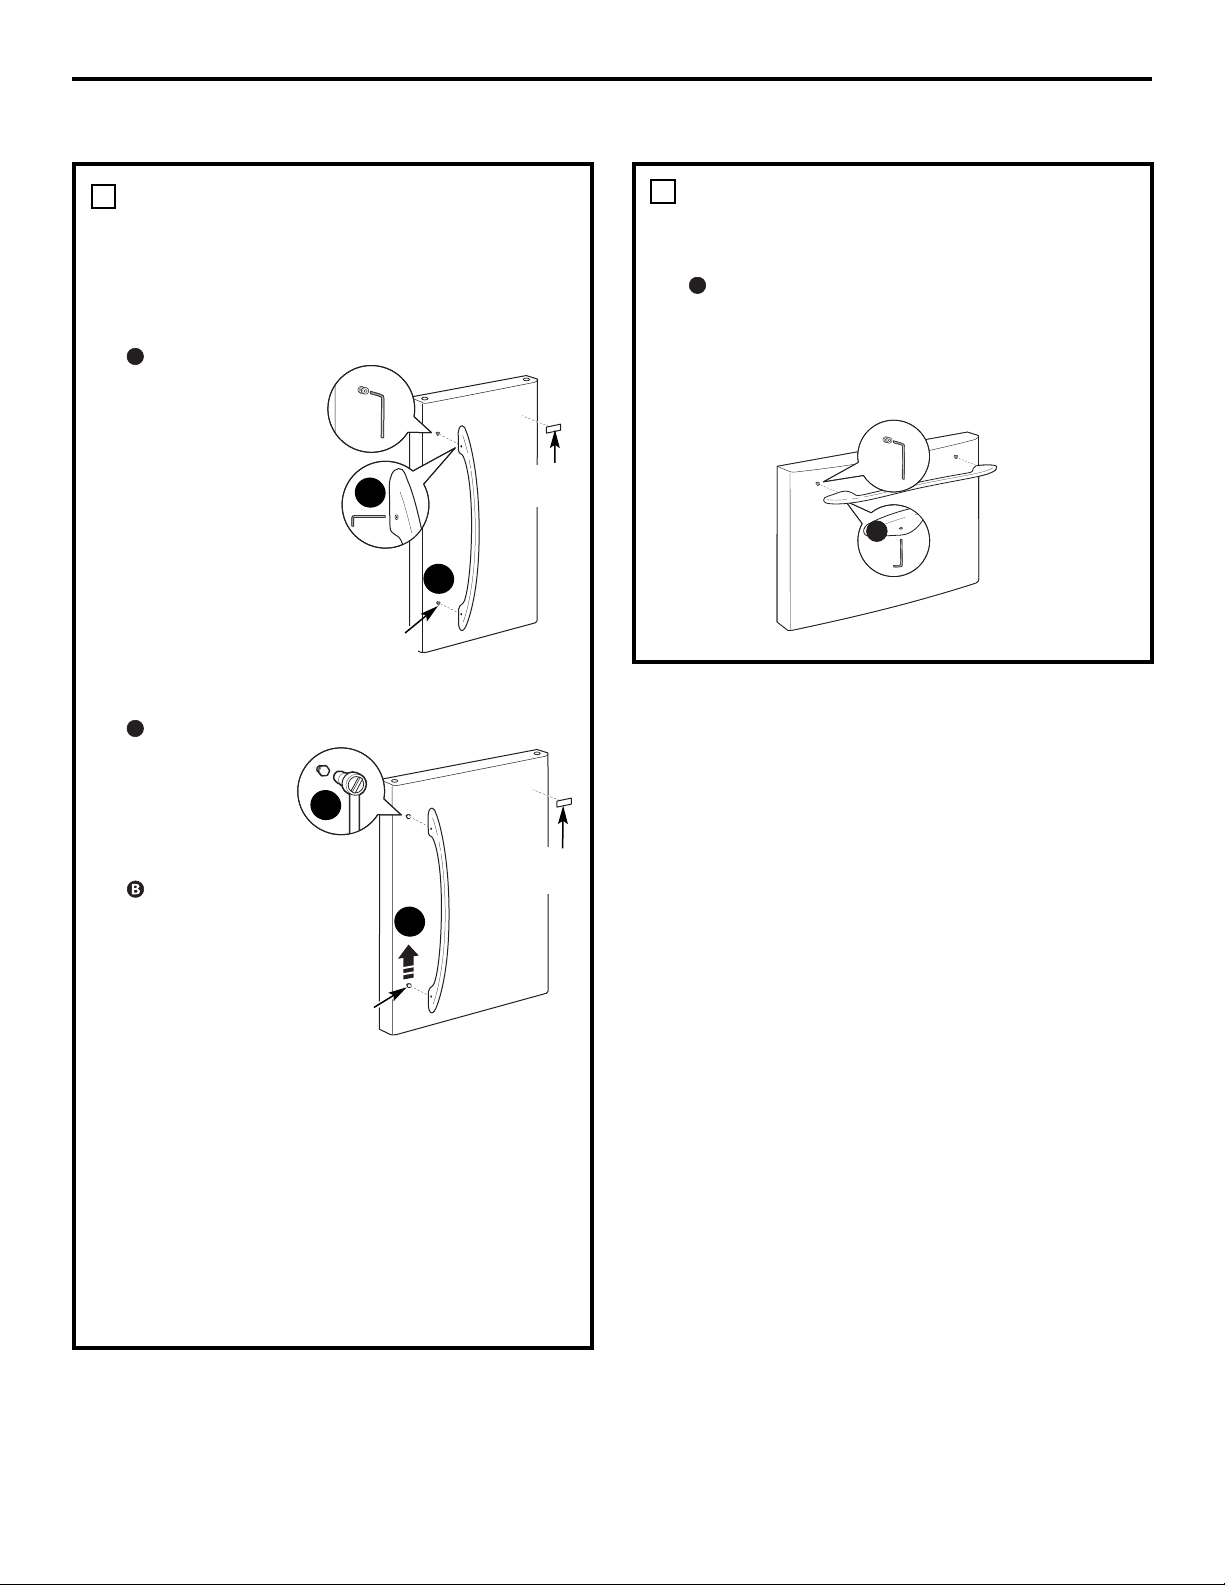
Instrucciones para la instalación
RETIRE LA MANIJA DE LA PUERTA DE
ALIMENTOS FRESCOS
(Para la colocación en el lugar de
instalación o la inversión de las manijas –
en algunos modelos)
Manija de acero inoxidable (en algunos modelos):
CÓMO REMOVER LA
MANIJA DE LA
PUERTA: Afloje los
tornillos de fijación
con una llave Allen
de 3/32″ y retire la
manija. NOTA: Para
modelos de doble
puerta siga el mismo
procedimiento en la
puerta opuesta.
Manija plástica (en
algunos modelos):
CÓMO QUITAR LA MANIJA DE LA PUERTA: Baje la
lengüeta ubicada
en la parte inferior
de la manija y
deslícela hacia
arriba, sacándola
de las fijaciones.
PARA INVERTIR LA
MANIJA DE LA
PUERTA (en
algunos modelos):
• Retire los tornillos
de montaje de la
manija con una
llave Allen de 1/4″ y traslade los tornillos de montaje de
la manija al lado derecho.
• Quite la insignia del logo.
• Remover y transferir el tapón al lado izquierdo de la
puerta de alimentos frescos. NOTA: Use un elemento
plástico y plano a fin de no dañar la puerta. Quite los
restos de adhesivo de la puerta con un detergente
suave. Retire la cobertura de papel de la parte trasera
de la insignia del logo antes de colocar la chapa sobre
la puerta.
A
A
6
RETIRE LA MANIJA DE LA PUERTA DEL
CONGELADOR
Manijas de acero inoxidable y plástico:
Afloje los tornillos de fijación ubicados en la parte
inferior de la manija con una llave Allen de 1/8″
ó 3/32″ y retire la manija.
NOTA: Para ajustar o retirar los tornillos de montaje de
la manija utilice una llave Allen de 1/4″.
A
7
A
110
A
B
A
B
Tornillos
de montaje
Tornillos
de montaje
Insignia
del logo
Insignia
del logo
(la apariencia puede variar)
(la apariencia puede variar)
INSTALACIÓN DEL REFRIGERADOR (cont.)
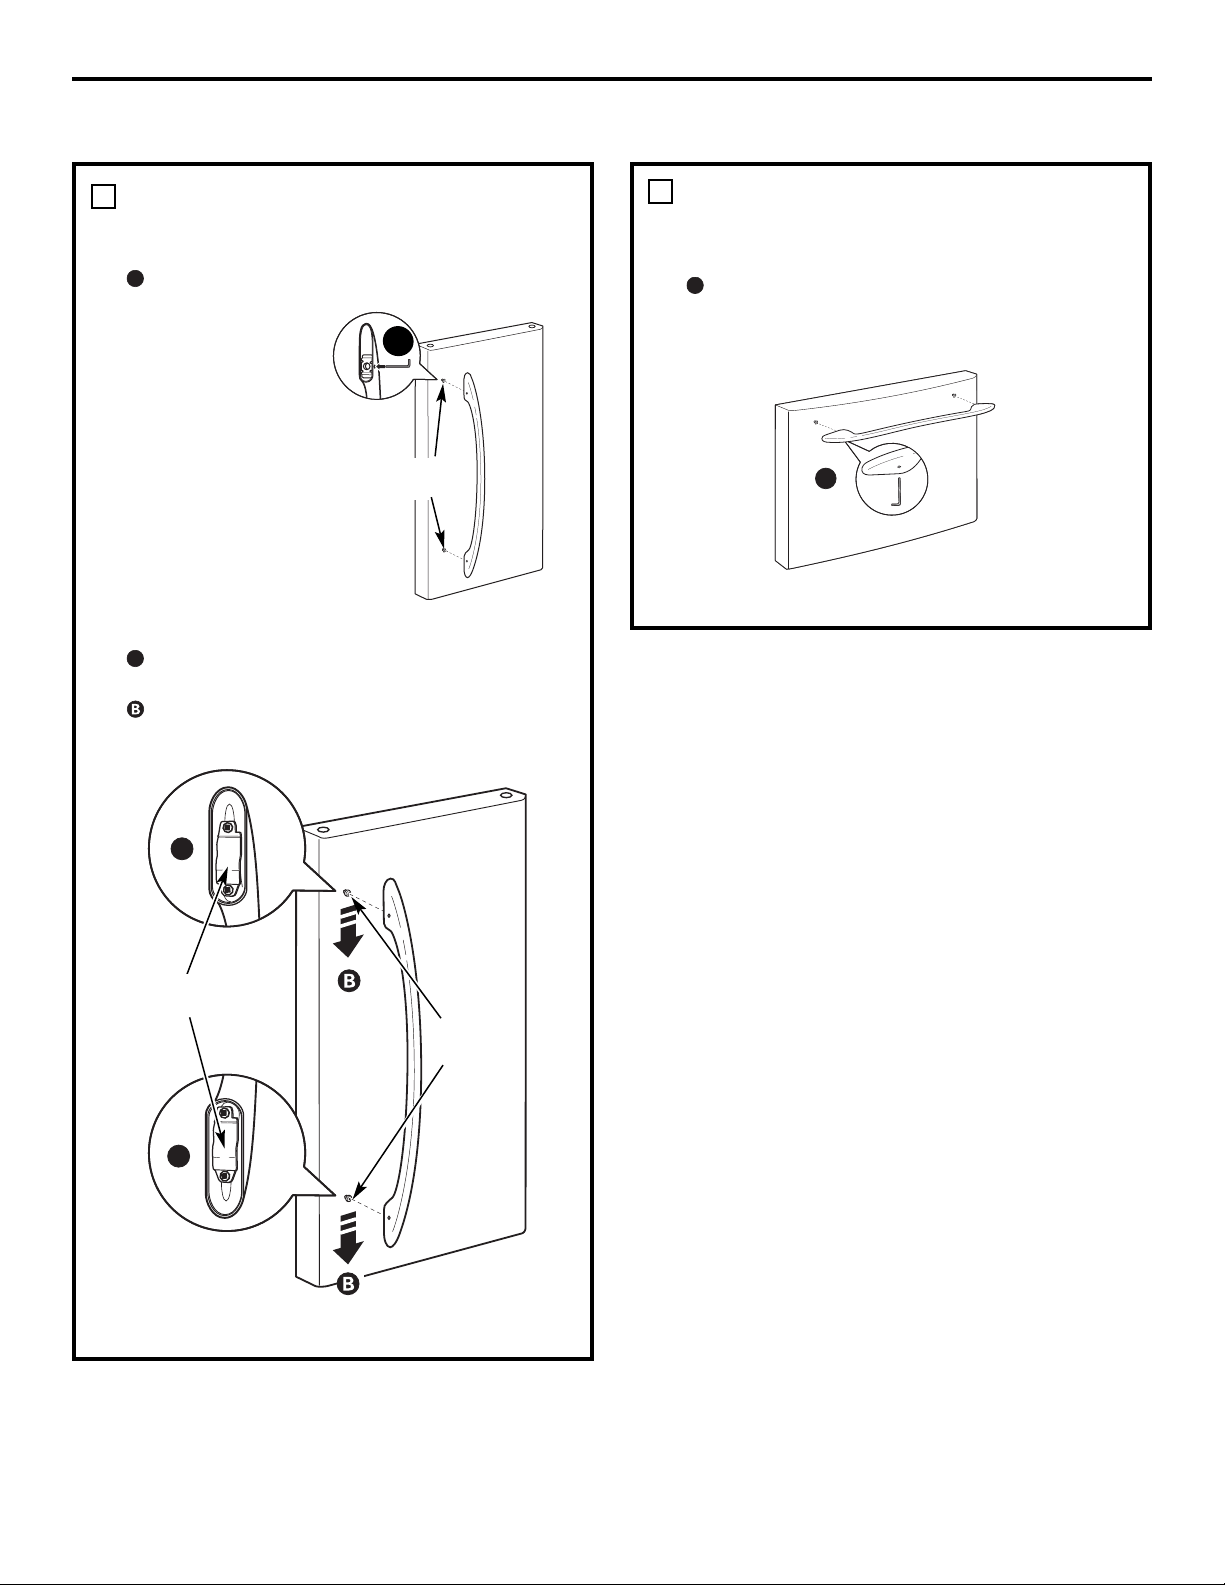
Instrucciones para la instalación
111
SUJETE LA MANIJA DE LA PUERTA DE
ALIMENTOS FRESCOS
Manija de acero inoxidable
:
Sujete la manija
a los tornillos de
montaje y ajuste los
tornillos de fijación
con una llave Allen
de 3/32″. NOTA:
Para modelos de
doble puerta siga
el mismo
procedimiento en la
puerta opuesta.
Manija plástica:
Para sujetar la manija a los tornillos de montaje
alinee las ranuras con los tornillos de montaje.
Deslícela hasta que encaje firmemente en su lugar.
A
A
8
SUJETE LA MANIJA DE LA PUERTA DEL
CONGELADOR
Manijas de acero inoxidable y plástico:
Sujete la manija firmemente a los tornillos de montaje
y ajuste los tornillos de fijación en la parte inferior
de la manija con una llave Allen de 1/8″ ó 3/32″.
A
9
A
(la apariencia puede variar)
A
Tornillos
de montaje
(la apariencia puede variar)
(la apariencia puede variar)
Tornillos
de montaje
Ranuras en la parte
posterior de la manija
A
A
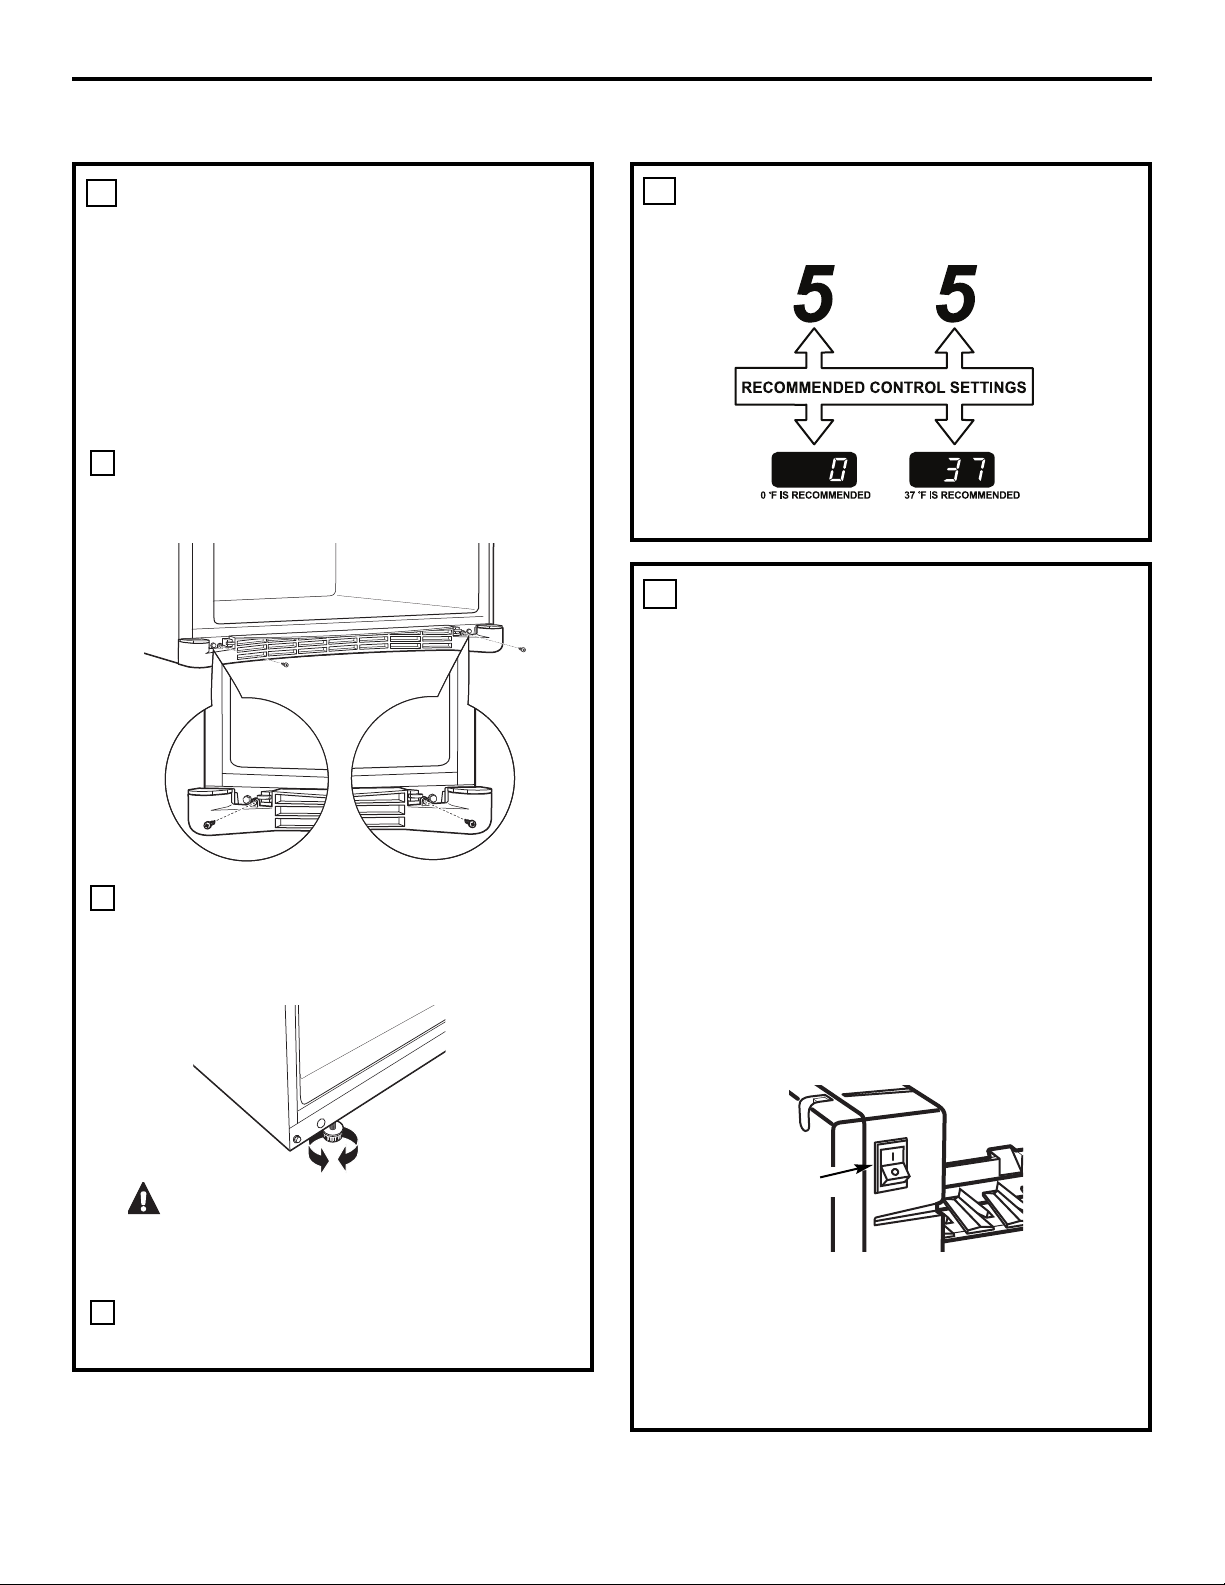
CÓMO NIVELAR EL REFRIGERADOR
Las patas niveladoras tienen dos propósitos:
1) Las patas niveladoras se ajustan para que el
refrigerador esté colocado firmemente en el
piso y no tambalee.
2) Las patas niveladoras sirven como un freno
estabilizador para sostener el refrigerador
firmemente en posición durante la
operación y limpieza. Las patas niveladoras
también evitan que el refrigerador se incline.
Saque la parrilla quitando los dos tornillos
Phillips.
Gire las patas niveladoras en sentido de las
agujas del reloj para levantar el refrigerador,
y en contra de las agujas del reloj para
bajarlo.
PRECAUCIÓN: Para evitar
posibles lesiones personales o daños
a la propiedad, las patas niveladoras deben
tocar firmemente el piso.
Vuelva a colocar la parrilla introduciendo los dos
tornillos Phillips.
10
B
A
AJUSTE LOS CONTROLES
Ajuste los controles donde se recomienda.
11
RETIRE EL EMBALAJE INICIE
LA MÁQUINA DE HIELO
(modelos con máquina de hielos)
A) Retire toda la cinta y el embalaje protector
y de espuma de las repisas y las gavetas.
B) Retire los amarres de las canastas del
congelador.
C) Coloque la casta de mitad de ancho en las
correderas de la gaveta. Consulte la sección
titulada Acerca del congelador para las
instrucciones.
Fije el interruptor de la máquina de hielos
en la posición de I (encendido). La máquina
de hielos no empezará a operar hasta que
alcance su temperatura de operación de 15° F
(–9° C) o menor. Luego, empezará a operar
automáticamente. Será necesario de 2 a 3 días
para que se llene el recipiente para hielo.
NOTA:
En condiciones de menor presión del agua,
la válvula de agua puede encenderse hasta
3 veces para suministrar suficiente agua a la
máquina de hielos.
12
Interruptor
112
Instrucciones para la instalación
C
INSTALACIÓN DEL REFRIGERADOR (cont.)
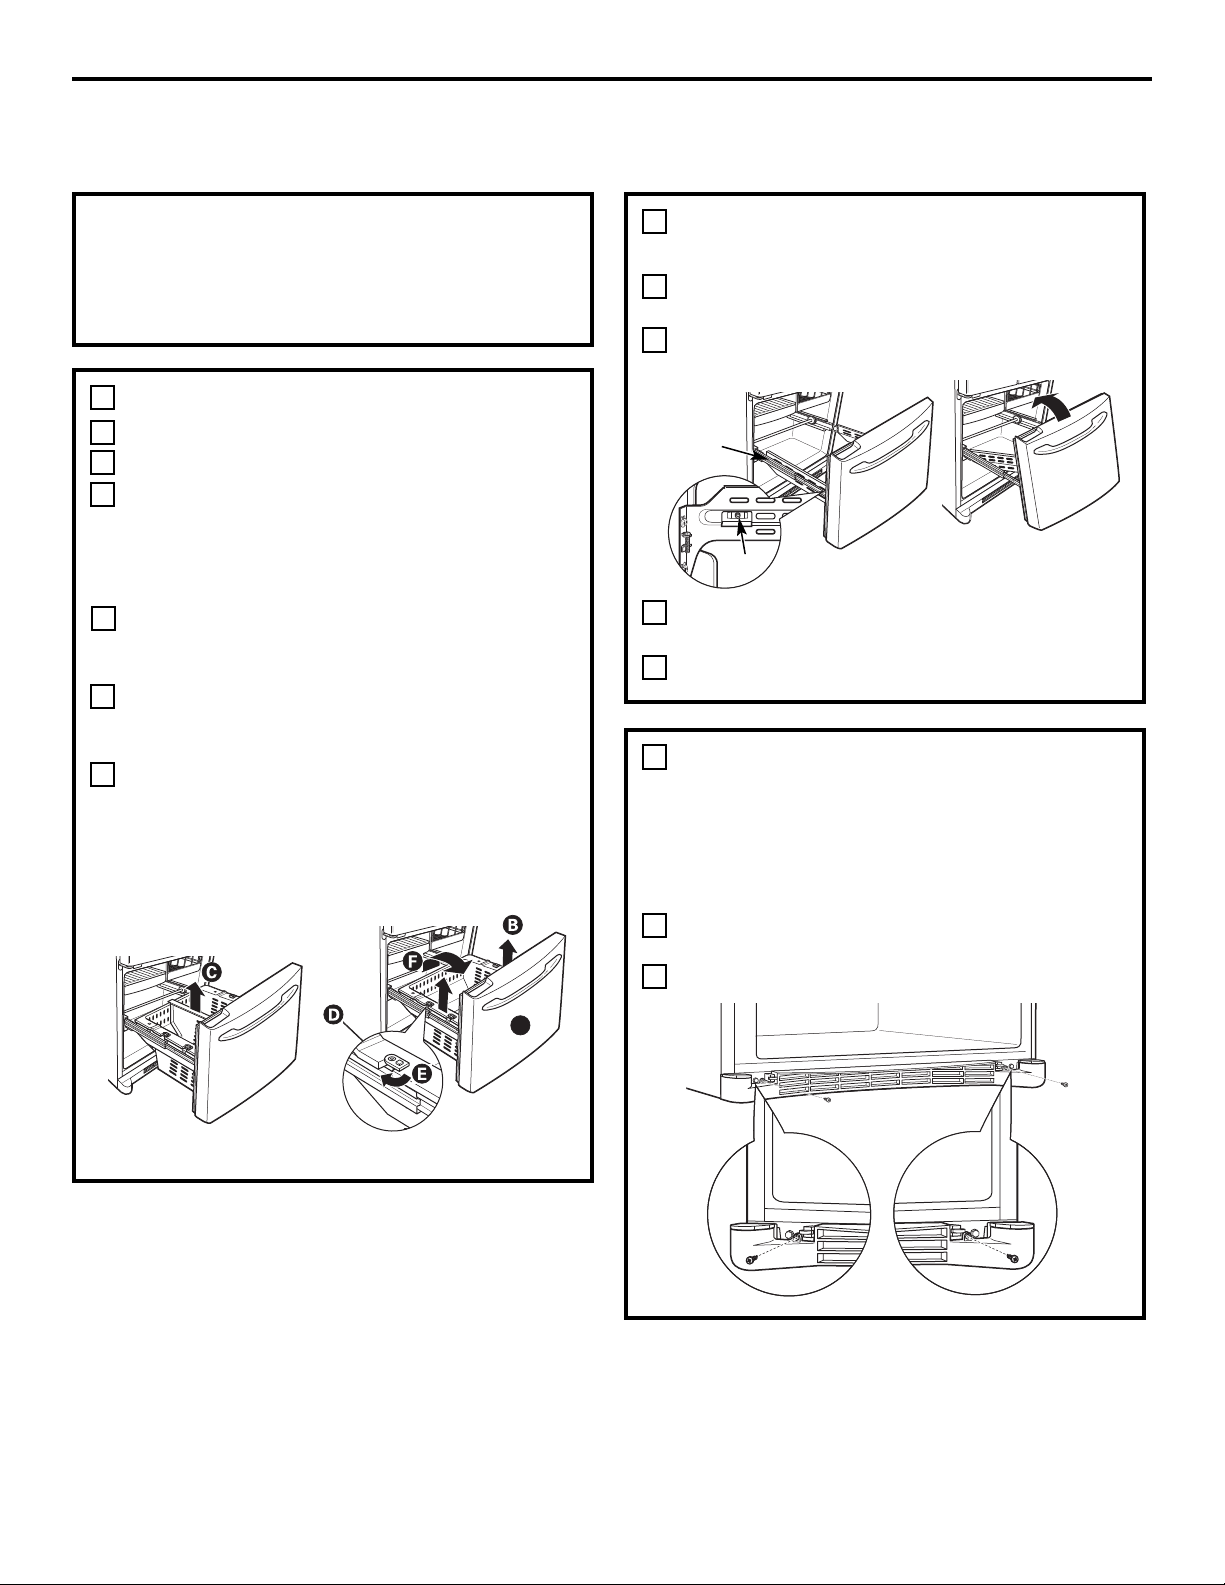
Instrucciones para la instalación
CÓMO RETIRAR LA GAVETA DEL CONGELADOR
(en algunos modelos)
RETIRE LA CANASTA
Abra la gaveta del congelador hasta que pare.
Levante el organizador de congelador
Empuje el divisor hacia adelante hasta que las
lengüetas de la parte trasera se encuentren fuera
de las ranuras. Gire el divisor un poco hacia el
costado para liberar las lengüetas de alineación
y saque hacia afuera.
La canasta del congelador se apoya sobre los
soportes metálicos deslizables y se coloca en su
lugar con cierres balanceables.
Gire los cierres balanceables desde la posición
vertical a la horizontal. Abra las puertas del
refrigerador.
Eleve la canasta y rote la misma hacia usted.
Deslice desde el costado del cajón.
1
A
B
D
RETIRE LA REJILLA DE LA BASE
(si es necesario)
Si después de retirar la gaveta del congelador
y la puerta del refrigerador, el refrigerador
todavía no cabe a través de una puerta,
se pueden retirar la rejilla de la base.
Retire los tornillos con cabeza tipo Phillips
sobre ambos lados de la parrilla de la base.
Empuje la parrilla hacia afuera.
3
Si es necesario, es posible retirar la gaveta del
congelador para que el refrigerador quepa en
áreas estrechas.
Lea estas instrucciones completa y cuidadosamente.
RETIRE EL FRENTE DE LA GAVETA
DESDE LAS CORREDERAS
Retire el tornillo con cabeza hexagonal desde
cada lado de la unión del riel.
Incline el frente del cajón hacia el refrigerador
y levante hacia afuera.
Coloque el frente de la gaveta en una
superficie donde no se raye.
Empuje los rieles dentro del gabinete.
2
A
A
C
C
D
B
Ensambladura
de los riele
Tornillo
E
B
113
F
A
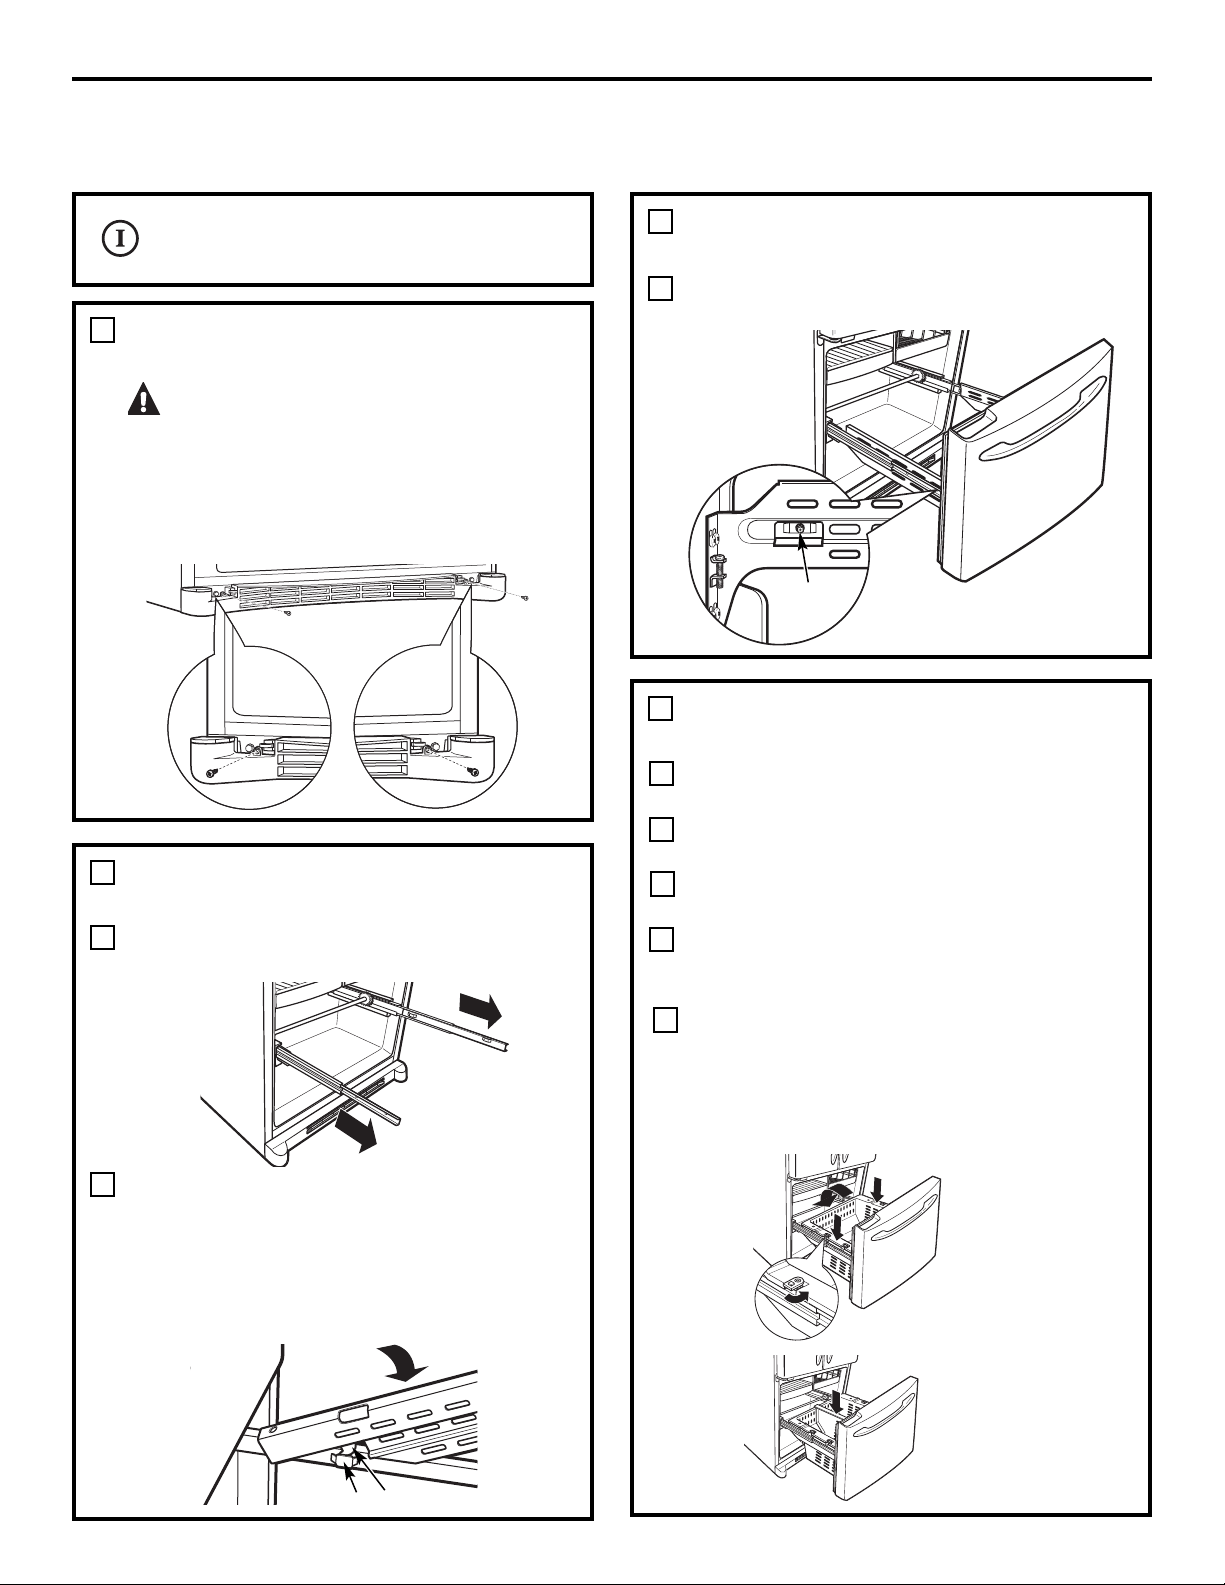
Instrucciones para la instalación
CÓMO REEMPLAZAR LA GAVETA DEL CONGELADOR
(en algunos modelos)
Es posible que sean necesarias dos personas
para completar este procedimiento.
UNA Y ASEGURE EL FRENTE DE
LA GAVETA A LAS CORREDERAS
Hale las ensambladuras de las correderas hasta
la máxima longitud en cada lado del gabinete.
Hay dos lengüetas en el riel de cada cajón
y dos ranuras en cada unión de los rieles
del refrigerador. Aliñe los rieles del cajón con
las uniones de los rieles, incline el cajón hacia
el refrigerador, y coloque las lengüetas en las
ranuras de la unión de los rieles. Baje el cajón
hasta su posición.
2
A
B
REEMPLACE LA CANASTA
DEL CONGELADOR
Incline la canasta hacia adelante, y lleve hacia
abajo en el cajón.
Baje el organizador verificando que el gancho se ajuste
sobre el borde frontal del canasto inferior del congelador.
Coloque la canasta en los soportes metálicos
deslizables y sobre los cierres balanceables.
Gire los cierres balanceables desde la posición
horizontal a la vertical para cerrar la canasta
en su lugar.
Gire el divisor suavemente hacia un costado,
de modo que las lengüetas de la parte frontal
entren en las ranuras de ventilación de la canasta.
Coloque el divisor de modo que las lengüetas
de ubicación trasera se ajusten en su posición
en las ranuras de ventilación trasera.
3
A
B
C
Ranura Lengüeta
REEMPLACE LA PARRILLA DE LA BASE
(si se retiró antes)
PRECAUCIÓN: Tenga cuidado
de no tensionar en exceso los tornillos, ya que
esto podrá generar una fisura en la parrilla.
Aliñe la parrilla de la base y reemplace los
2 tornillos con cabeza tipo Phillips sobre cada
lado de la parrilla de la base.
1
UNA Y ASEGURE EL FRENTE DE
LA GAVETA A LAS CORREDERAS (CONT.)
Reemplace los tornillos con cabeza hexagonal
para asegurar el cajón.
2
C
D
114
Tornillo
E
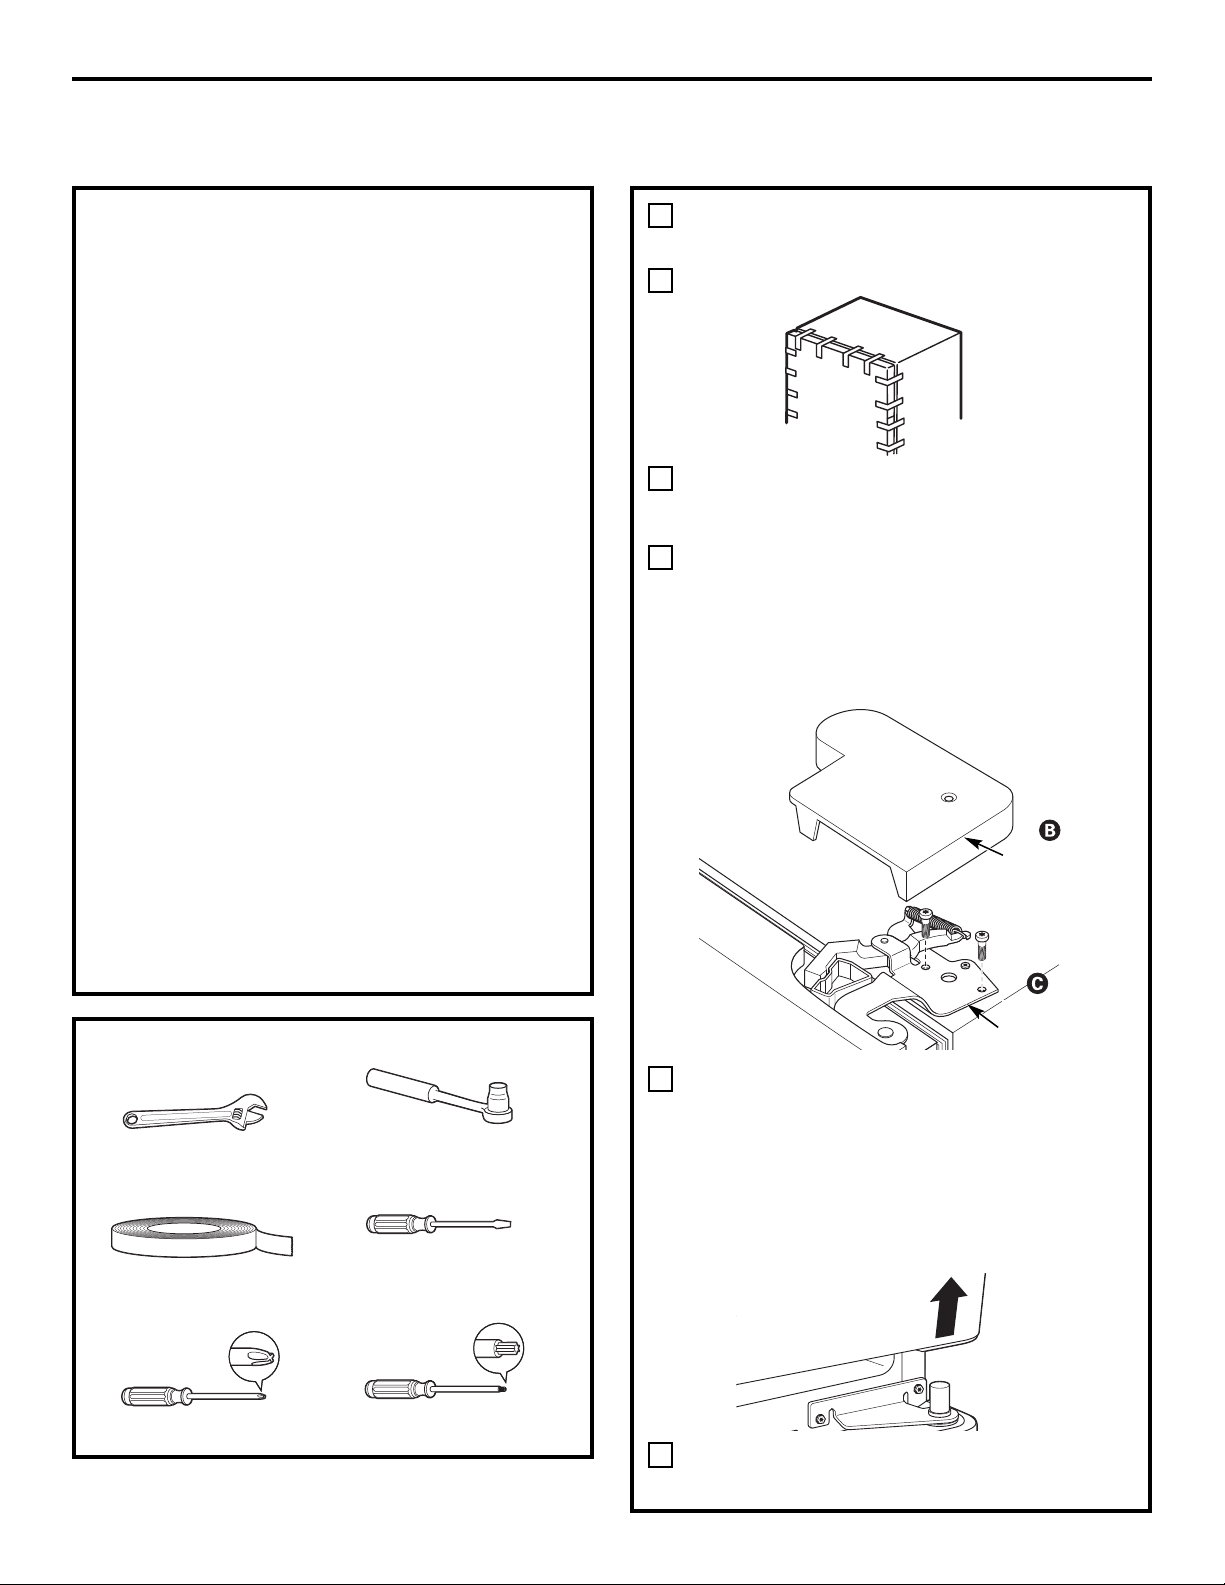
HERRAMIENTAS NECESARIAS
Instrucciones para la instalación
CÓMO INVERTIR EL VAIVÉN DE LA PUERTA
(Modelos de refrigerador de una sola puerta únicamente)
NOTAS IMPORTANTES
Al invertir el vaivén de la puerta:
NOTA: El vaivén de la puerta no es reversible en modelos de
acero inoxidable.
• Lea las instrucciones completas antes de empezar.
• Las piezas están incluidas en el conjunto de bisagras de la
puerta.
• Manipule las partes con cuidado para evitar rayar
la pintura.
• Coloque los tornillos según las partes a las que
corresponden para evitar usarlos en el lugar incorrecto.
• Disponga de una superficie de trabajo que no raye para
colocar las puertas.
IMPORTANTE: Una vez empiece, no mueva el gabinete hasta
que la inversión del vaivén de la puerta no esté completa.
Estas instrucciones son para cambiar las bisagras del lado
derecho al lado izquierdo—si alguna vez desea cambiar
nuevamente las bisagras al lado derecho, siga estas mismas
instrucciones e invierta todas las referencias de izquierda y
derecha.
• Una vez que se ha finalizado la inversión del vaivén de la
puerta, retire la cobertura adhesiva de la parte trasera de
la chapa del logo y asegúrese de que ésta se encuentre
correctamente alineada y fijada a la puerta.
NOTA: Se incluye una insignia del logo de repuesto con
el kit de la bisagra.
Desconecte el refrigerador de la toma eléctrica.
Desocupe todos los estantes de la puerta, incluyendo
el compartimiento de productos lácteos.
Destornillador de pala plana
Cinta de enmascarar
Llave ajustable
Destornillador de casquillo
de 5/16″
RETIRE LA PUERTA
DEL REFRIGERADOR
Pegue la puerta por completo con cinta.
Saque la tapa de la bisagra de la parte superior
del refrigerador quitando los tornillos Phillips y
tirando hacia arriba.
Con un destornillador de casquillo de 5/16″,
retire los pernos que aseguran la bisagra
superior al gabinete. Luego, levante la bisagra
directamente hacia arriba para liberar el
pasador de la bisagra de la boquilla en la parte
superior de la puerta.
Retire la cinta e incline la puerta en dirección
contraria al gabinete. Levante la puerta del
pasador de la bisagra central. Cerciórese de que
el dedal plástica del pasador de la bisagra
permanezca en el pasador de la bisagra o al
interior del orificio del pasador de la bisagra de
la puerta que se encuentra en la parte de abajo
de la puerta.
Coloque la puerta en una superficie que
no raye con la parte interior hacia arriba.
1
A
B
C
D
E
Destornillador Phillips
Llave torx T-20
Tapa de
la bisagra
Bisagra
superior
115

Instrucciones para la instalación
RETIRE LA BISAGRA CENTRAL
Mediante una llave de cubo de 5/16″, quite los
pernos que sujetan la bisagra central al
gabinete. Coloque la bisagra y los pernos
a un lado.
2
116
CÓMO INVERTIR EL VAIVÉN DE LA PUERTA (cont.)
INSTALE LA BISAGRA CENTRAL
Pase al lado derecho el botón obturador y tapa
de orificio de tornillo de los orificios de la
bisagra del lado izquierdo.
Instale la bisagra central del kit en el lado
izquierdo.
NOTA: Se necesitará una nueva bisagra para el
lado izquierdo (incluida en el kit de bisagras para
puerta).
3
A
B
TRASLADE EL FRENO DE LA PUERTA
DEL REFRIGERADOR
Retire el freno de la puerta en el lado derecho
de la parte inferior de la puerta del
refrigerador retirando los dos tornillos.
Mueva el dedal plástico del orificio de
la bisagra hacia el orificio opuesto.
Instale el freno de la puerta en el lado
izquierdo, cerciorándose de alinear los
orificios de los tornillos en el freno de
la puerta con los orificios en la parte inferior
de la puerta.
4
A
B
C
Parte inferior de la puerta del
refrigerador (lado derecho)
Parte inferior de la puerta del
refrigerador (lado izquierdo)
A
TRASLADE LA MANIJA DE LA PUERTA
DEL REFRIGERADOR HACIA LA
DERECHA
Para obtener las instrucciones
correspondientes, consulte las secciones
“Cómo retirar la manija de la puerta
de alimentos frescos” y “Cómo sujetar
la manija de la puerta de alimentos frescos.”
5
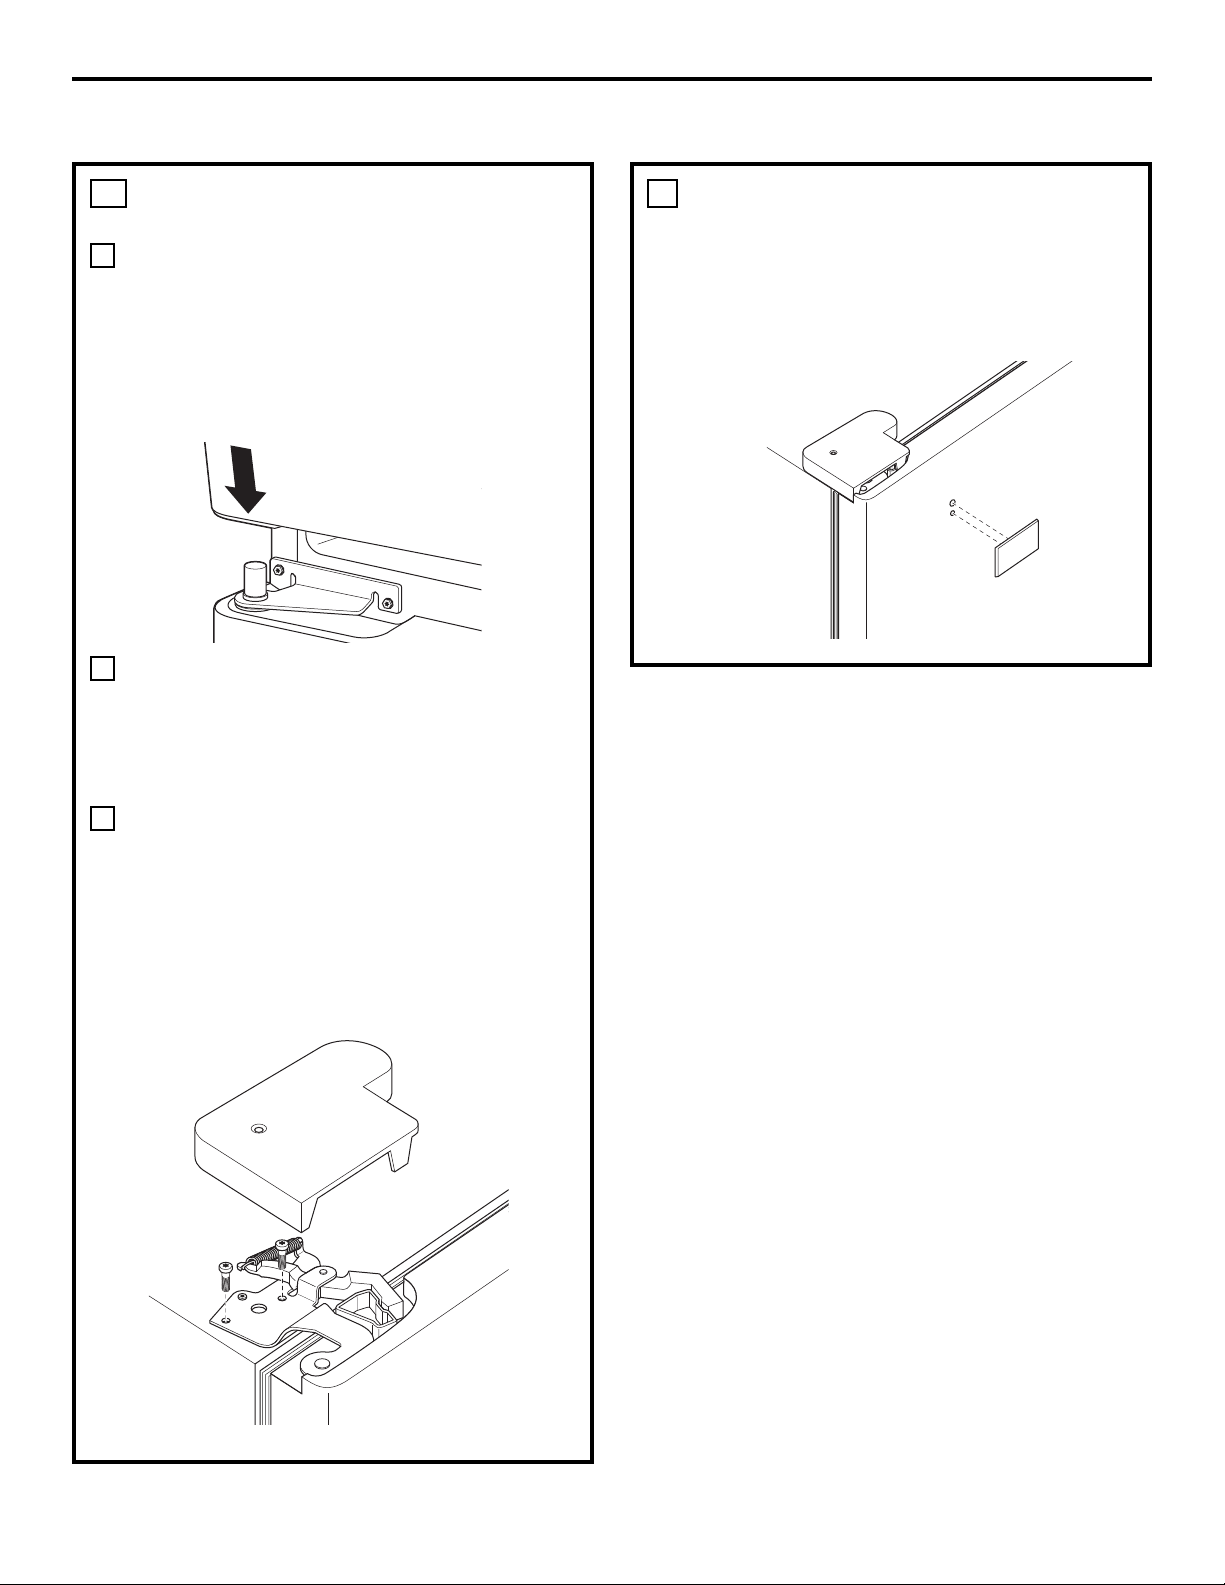
117
Instrucciones para la instalación
VUELVA A COLGAR LA PUERTA DEL
REFRIGERADOR
Baje la puerta del refrigerador en el pasador
de la bisagra central. Cerciórese de que el
dedal plástica del pasador de la bisagra esté
en el pasador de la bisagra central o al
interior del orificio del pasador de la bisagra
de la puerta que se encuentra en la parte de
abajo de la puerta.
Inserte el pasador de la bisagra superior en el
orificio de la bisagra encima de la puerta del
refrigerador. Cerciórese de que la puerta esté
alineada con el gabinete. Una la bisagra a la
parte superior del gabinete libremente con los
pernos.
Cerciórese de que el sello magnético en la
puerta esté nivelado contra el gabinete y no
esté doblado. Apoye la puerta en el lado de la
manija y cerciórese de que esté recta y el
espacio entre las puertas sea uniforme al
frente. Mientras sostiene la puerta en su lugar,
apriete los pernos de la bisagra superior.
Reemplace la tapa de la bisagra.
6
A
B
C
INSTALE LA INSIGNIA DEL LOGO
Quite el papel que cubre el adhesivo y alinee
los pernos de la parte trasera de la insignia
con los orificios de la puerta. Aplique presión a
la insignia para garantizar que se haya pegado
a la puerta.
7

Instrucciones para la instalación
CÓMO RETIRAR LAS PUERTAS
(Modelos de refrigerador de doble puerta únicamente)
HERRAMIENTAS NECESARIAS
NOTAS IMPORTANTES
NOTA: El vaivén de la puerta no es reversible.
• Lea las instrucciones completas antes de empezar.
• Manipule las partes con cuidado para evitar rayar la
pintura.
• Coloque los tornillos según las partes a las que
corresponden para evitar usarlos en el lugar incorrecto.
• Disponga de una superficie de trabajo que no raye para
colocar las puertas.
IMPORTANTE: Una vez empiece, no mueva el gabinete.
Estas instrucciones son para retirar las puertas.
Desconecte el refrigerador de la toma eléctrica.
Desocupe todos los estantes de la puerta, incluyendo
el compartimiento de productos lácteos.
RETIRE LAS PUERTAS
DEL REFRIGERADOR
Pegue las puertas por completo con cinta.
Comience primero con la puerta de la derecha:
Quite el tornillo que ajusta la tapa de la bisagra
central, levante la tapa de la bisagra y coloque
a un costado sobre el refrigerador.
Quite las conexiones de agua y de energía.
1
A
118
Destornillador
de pala plana
Cinta de enmascarar
Llave ajustable
Destornillador de casquillo
de 3/8″ y de 10 mm
Destornillador Phillips
B
Quite la tapa de la
bisagra (1 tornillo
Phillips)
C
Conexión de agua
Quite la abrazadera de
resorte de metal. Utilice
un destornillador para
presionar y sacar la
abrazadera de trabado
plástica roja hacia abajo.
C1
Conexión
de agua
Presione el
anillo rojo y
sostenga.
Tire del
tubo.
Conexión de
energía
Marca negra
alineada con
el montaje de
anillo.
Para desconectar,
separe la conexión
de energía
C2
C3
(para modelos con dispensador de agua)
(para modelos con dispensador de agua)

Instrucciones para la instalación
119
RETIRE LA PUERTA OPUESTA
Siga el mismo procedimiento en la puerta
opuesta. No hay alambres, líneas de agua o
tapas de bisagras centrales en el lado opuesto.
3
RETIRE LA GAVETA DEL CONGELADOR
Para obtener las instrucciones
correspondientes, ver la sección de Cómo
retirar la gaveta del congelador.
4
RETIRE LA PUERTA
DEL REFRIGERADOR (cont.)
Saque la tapa de la bisagra en la parte superior
del refrigerador quitando los tornillos Phillips y
tirando hacia arriba.
Mediante una llave de cubo de 5/16″, quite
los pernos que sujetan la bisagra superior al
gabinete. Luego levante la bisagra hacia arriba
para liberar el perno de la bisagra del
receptáculo de la parte superior de la puerta.
Quite la cinta e incline la puerta en sentido
contrario al gabinete. Levante la puerta
sacándola del perno de la bisagra central.
Verifique que el capuchón plástico del perno de
la bisagra no se salga del perno de la bisagra o
del orificio del perno de la bisagra de la puerta
ubicado en la parte inferior de la puerta.
Coloque la puerta sobre una superficie que no
raye, con la parte interna hacia arriba.
1
D
F
CÓMO QUITAR LA BISAGRA CENTRAL
Mediante una llave de cubo de 5/16″, quite los
pernos que sujetan la bisagra central al
gabinete. Coloque la bisagra y los pernos
a un lado.
2
Tapa de
la bisagra
Bisagra
superior
E
G
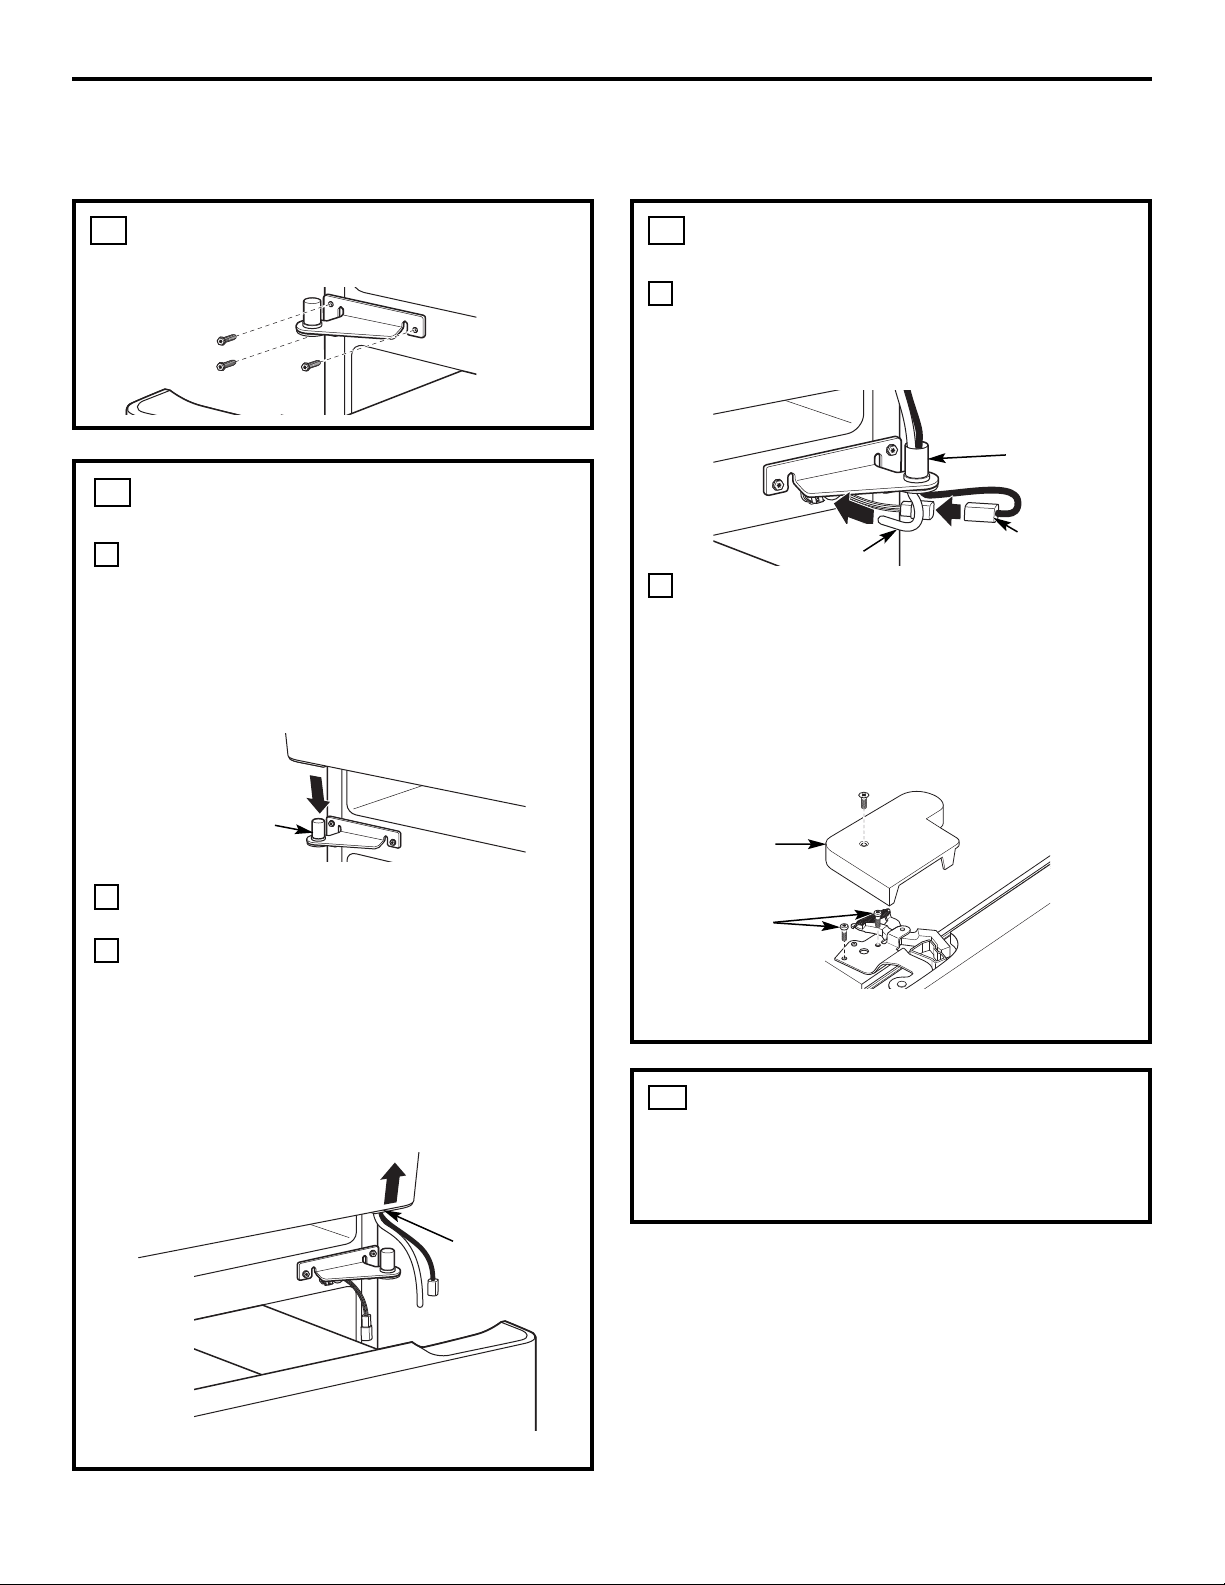
REEMPLACE LA PUERTA OPUESTA
Siga el mismo procedimiento en la puerta
opuesta. No hay línea de agua o tapa de
bisagra.
3
Instrucciones para la instalación
CÓMO VOLVER A COLOCAR LAS PUERTAS
(Modelos de refrigerador de doble puerta únicamente)
120
INSTALE LA BISAGRA CENTRAL
Instale la bisagra central en cada lado.
VUELVA A COLGAR LAS PUERTAS DEL
REFRIGERADOR
Baje la puerta del refrigerador en el pasador
de la bisagra central. Cerciórese de que el
dedal plástica del pasador de la bisagra
permanezca en el pasador de la bisagra
central o al interior del orificio del pasador
de la bisagra de la puerta que se encuentra
en la parte de abajo de la puerta.
Pegue firmemente la puerta con cinta o pida
a otra persona que sostenga la puerta.
Dirija los cables a través de la ranura del perno
de la bisagra derecha inferior. Inserte el
pasador de la bisagra superior en el orificio de
la bisagra encima de la puerta del refrigerador.
Cerciórese de que la puerta esté alineada con
el gabinete y la puerta opuesta. Una la bisagra
a la parte superior del gabinete libremente
con los pernos.
2
A
B
C
VUELVA A COLGAR LAS PUERTAS DEL
REFRIGERADOR (CONT.)
En las puertas de la derecha, pase los cables y
línea de agua a través del perno de la bisagra
central. Luego conecte la línea de agua y el
empalme de 4 pernos.
Cerciórese de que el sello magnético en
la puerta esté nivelado contra el gabinete
y no esté doblado. Cerciórese de que esté recta
y el espacio entre las puertas sea uniforme al
frente. Mientras sostiene la puerta alineada en
su lugar, apriete los pernos de la bisagra
superior. Reemplace la tapa de la bisagra
y el tornillo.
2
E
D
1
Pasador
de la bisagra
Ranura
del perno
de la bisagra
derecha inferior
(la apariencia puede variar)
Conector
de 4 pernos
Línea
de agua
Perno de
bisagra central
Pernos
de la bisagra
superior
Tapa de la
bisagra
(la apariencia puede variar)
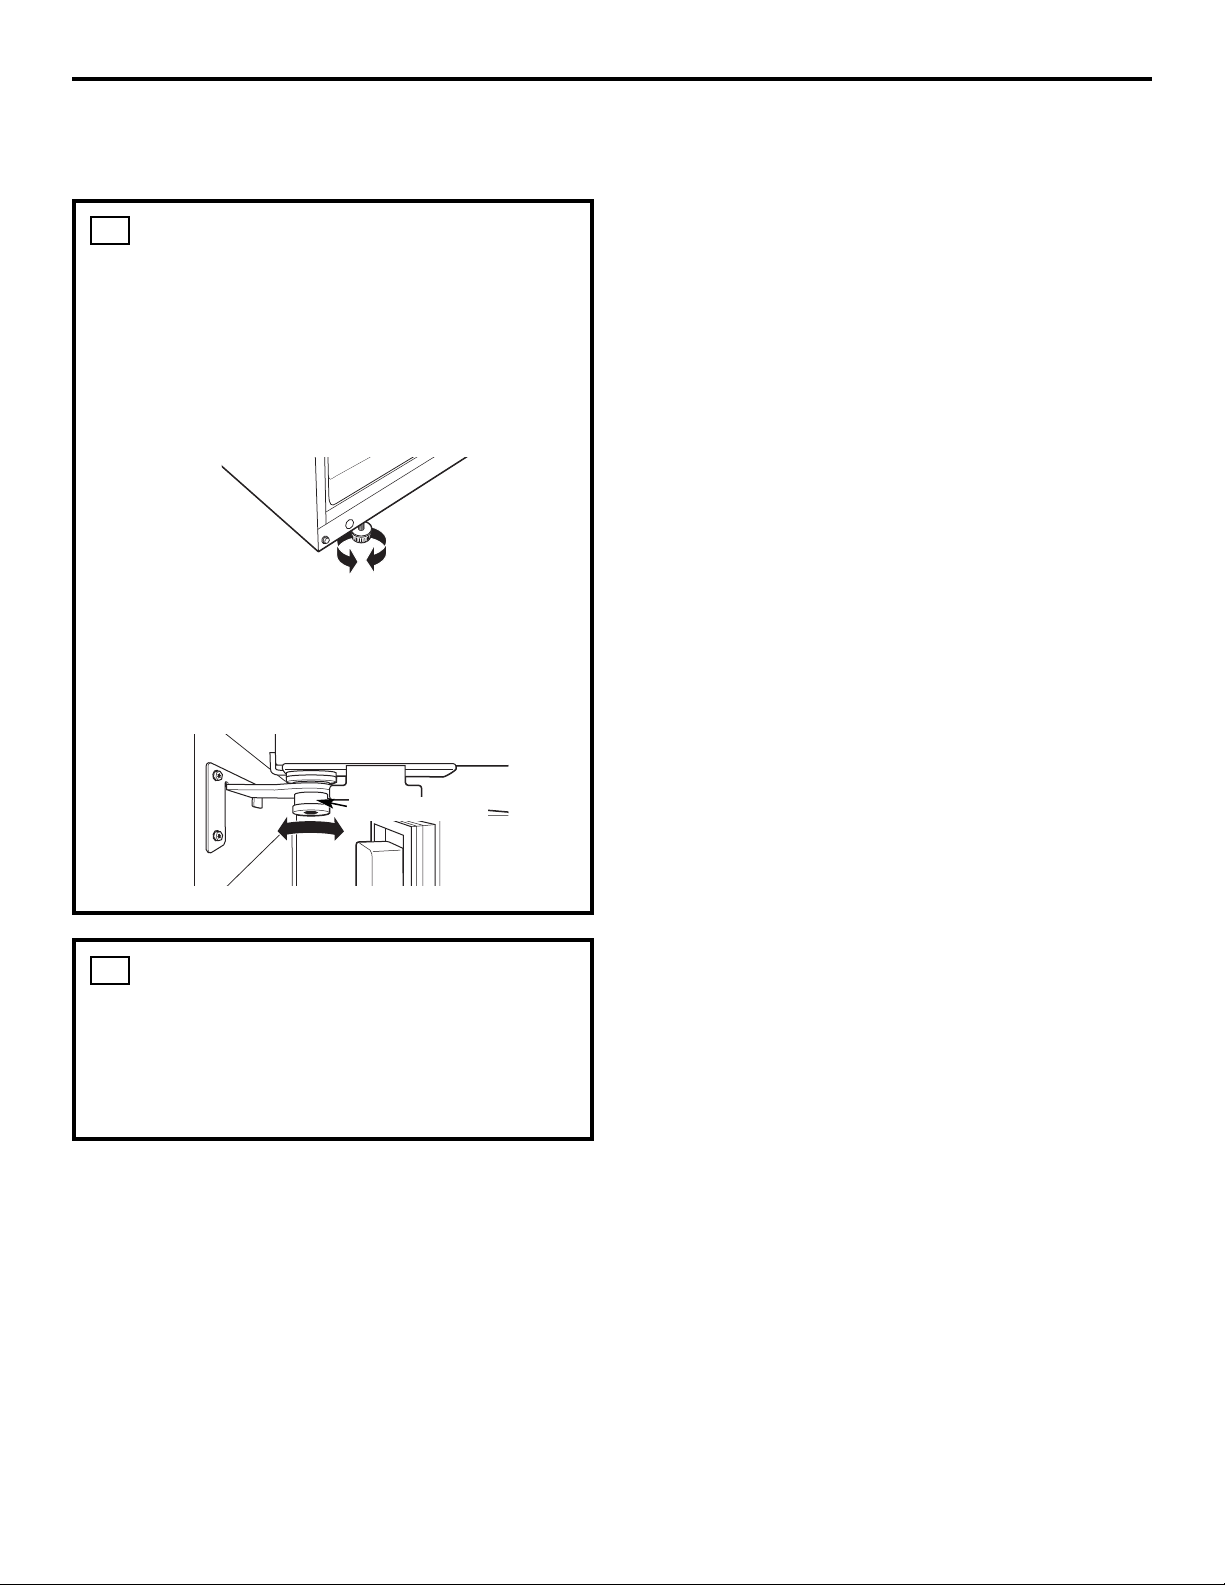
CÓMO ALINEAR LAS PUERTAS DOBLES
Si la parte superior de las puertas está
desigual, primero intente levantar la puerta
más baja girando la pata niveladora en el
mismo costado de la puerta hasta que las
puertas estén niveladas. Si la unidad
permanece inestable, vuelva a ajustar las
patas niveladoras hasta que la unidad esté
estable.
Si las puertas continúan desparejas, gire el
perno ajustable para elevar, o bajar, la puerta
izquierda para que esté al mismo nivel de la
derecha. Utilice una llave Allen de 1/4″ para
girar el perno.
4
REEMPLACE LA GAVETA
DEL CONGELADOR
Para obtener las instrucciones
correspondientes, ver la sección
de Cómo reemplazar la gaveta del
congelador.
Instrucciones para la instalación
121
5
Perno ajustable

• Kit de tubería de cobre para el refrigerador o
SmartConnect
™
de GE, 1/4″ de diámetro externo para
conectar el refrigerador al suministro de agua. Si usa
cobre, asegúrese de que ambos extremos de la tubería
se corten uniformemente.
Para determinar la cantidad de tubería que necesita:
mida la distancia desde la válvula del agua en la parte
posterior del refrigerador hasta el tubo de suministro de
agua. Asegúrese de que haya suficiente tubería adicional
para permitir que el refrigerador se pueda mover de la
pared después de la instalación.
Los kits de tubería para el refrigerador SmartConnect
™
de GE están disponibles en las siguientes longitudes:
6′ (1,8 m) – WX08X10006
15′ (4,6 m) – WX08X10015
25′ (7,6 m) – WX08X10025
NOTA: La única tubería de plástico aprobada de
GE es la que viene provista con los kits de tubería para
el refrigerador SmartConnect
™
de GE. No use ninguna
otra tubería plástica para el suministro del agua ya
que la tubería está bajo presión todo el tiempo.
Ciertos tipos de plástico se fracturarán o se romperán
con el tiempo y causarán daños en su casa debido
al agua.
• Un kit de suministro de agua de GE (contiene tubería,
válvula de apagado y accesorios enumerados abajo)
está disponible a un costo adicional en su tienda o por
medio de Partes y Accesorios, 800.626.2002.
• Un suministro de agua fría. La presión del agua debe
estar entre 20 y 120 p.s.i. (1,4–8,1 bar).
• Taladro eléctrico.
• Llave de 1/2″ o ajustable.
• Destornillador plano y de estrella.
INSTALACIÓN DE LA TUBERÍA DEL AGUA
(MODELOS CON MÁQUINA DE HIELOS)
Los kits de cobre recomendados para el suministro de agua
son WX8X2, WX8X3 o WX8X4, dependiendo de la cantidad
de tubería necesaria. Las tuberías plásticas aprobadas para
el suministro de agua son las tuberías para el refrigerador
SmartConnect
™
de GE (WX08X10006, WX08X10015 y
WX08X10025).
Al conectar su refrigerador a un Sistema de Agua de
Ósmosis Inversa de GE, la única instalación aprobada es con
un RVKIT de GE. Para otros sistemas de agua de ósmosis
inversa, siga las instrucciones del fabricante.
Si el suministro de agua hacia el refrigerador es desde un
Sistema de Filtro de Agua de Ósmosis Inversa Y el
refrigerador también tiene un filtro de agua, use el tapón
de derivación del filtro del refrigerador. Usar el cartucho de
filtro del agua del refrigerador en conjunto con el filtro de
Ósmosis Inversa puede resultar en cubos de hielo huecos.
Esta instalación de la tubería del agua no está garantizada
por el fabricante del refrigerador o de la máquina de hielos.
Siga estas instrucciones cuidadosamente para minimizar
el riesgo de un daño costoso por el agua.
El martilleo del agua (agua golpeando contra la tubería)
en la tubería de la casa puede causar daños a las partes
del refrigerador y conducir a un goteo o inundación por
agua. Llame a un plomero calificado para corregir el
martilleo del agua antes de instalar la tubería del agua
al refrigerador.
Para evitar quemaduras y daños con el producto, no
conecte la tubería del agua a la tubería del agua caliente.
Si usa el refrigerador antes de conectar la tubería,
asegúrese de que el interruptor de corriente de la
máquina de hielos esté en la posición O (apagado).
No instale la tubería de la máquina de hielos en lugares
donde la temperatura caiga por debajo del nivel de
congelamiento.
Al usar cualquier aparato eléctrico (como un taladro
eléctrico) durante la instalación, asegúrese de que el
aparato esté aislado o conectado de manera que evite
el peligro de una descarga eléctrica, o se opere por
baterías.
Todas las instalaciones se deben realizar según
los requisitos del código local de plomería.
ANTES DE INICIAR
Instrucciones para la instalación
QUÉ NECESITA
122

• Dos tuercas de compresión de 1/4″ de diámetro
exterior y 2 férulas (mangas)—para conectar la tubería
de cobre a la válvula de apagado y la válvula del agua
del refrigerador.
O bien
• Si está usando un kit de tubería para el refrigerador
SmartConnect
™
de GE, los accesorios necesarios ya
vienen preinstalados en la tubería.
• Si su tubería existente de cobre para el agua tiene un
accesorio con vuelo en el extremo, necesitará un
adaptador (disponible en las tiendas de suministros de
plomería) para conectar la línea del agua al refrigerador
O BIEN, podrá cortar el accesorio con vuelo con un
cortador de tubos y luego usar un accesorio de
compresión. No corte el extremo formado de
la tubería para el refrigerador SmartConnect
™
de GE.
• Válvula de cierre para conectar a la línea del
agua fría. La válvula de apagado deberá tener una
entrada de agua con un diámetro interno mínimo de
5/32″ en el punto de conexión a la TUBERÍA DEL AGUA
FRÍA. Las válvulas de apagado tipo silla vienen incluidas
en muchos kits de suministro de agua. Antes de
comprar, asegúrese de que una válvula tipo silla cumple
con los códigos de plomería en su localidad.
Instrucciones para la instalación
CIERRE EL SUMINISTRO PRINCIPAL
DE AGUA
Abra el grifo más cercano por suficiente tiempo
para limpiar la tubería del agua.
Instale la válvula de apagado en la tubería del agua
de consumo más frecuentemente utilizada.
1
Seleccione una ubicación para la válvula que
sea fácilmente accesible. Es mejor conectarla en
el costado de una tubería vertical de agua.
Cuando sea necesario conectarla en una
tubería horizontal de agua, haga la conexión en
la parte superior o al lado, en vez de hacerlo en
la parte de abajo, para evitar retirar cualquier
sedimento de la tubería del agua.
SELECCIONE LA UBICACIÓN
DE LA VÁLVULA
2
123
Perfore un orificio de 1/4″ en la tubería del agua
(incluso si está usando una válvula auto
perforadora), usando una broca afilada. Retire
cualquier sobrante que resulte de perforar el
orificio en la tubería.
Tenga cuidado de no permitir que se filtre
agua hacia el taladro.
No perforar un orificio de 1/4″ puede resultar
en menor producción de hielo o cubos más
pequeños.
PERFORE EL ORIFICIO PARA
LA VÁLVULA
3
QUÉ NECESITA (CONT.)

Una la válvula de apagado a la tubería de agua
fría con la abrazadera para el tubo.
NOTA: Se deberán seguir los Códigos 248CMR de
Plomería para el Estado de Massachusetts. Las
válvulas tipo silla son ilegales y su uso no está
permitido en Massachusetts. Consulte con un
plomero licenciado.
INSTALE LA VÁLVULA DE APAGADO
4
Abrazadera para
el tubo
Tubería vertical
de agua fría
Válvula de
apagado
tipo silla
Coloque la tuerca de compresión y férula para la
tubería de cobre (manga) en el extremo de la
tubería y conéctela a la válvula de apagado.
Asegúrese de que la tubería esté complemente
insertada en la válvula. Apriete la tuerca de
compresión firmemente.
Para tubería de plástico de un kit de tubería para
el refrigerador SmartConnect
™
de GE, inserte el
extremo moldeado de la tubería en la válvula de
apagado y apriete la tuerca de compresión
hasta que esté firmemente apretada a mano,
luego apriete un giro adicional con una llave.
Apretar demasiado puede causar fugas.
NOTA: Se deberán seguir los Códigos 248CMR de
Plomería para el Estado de Massachusetts. Las
válvulas tipo silla son ilegales y su uso no está
permitido en Massachusetts. Consulte con un
plomero licenciado.
CONECTE LA TUBERÍA A LA VÁLVULA
7
Válvula de
apagado
tipo silla
Tuerca de compresión
Tuerca de empaque
Válvula de salida
Férula (manga)
Abra el suministro principal de agua y lave la
tubería hasta que el agua esté limpia.
Cierre el agua en la válvula después de que un
cuarto (1 litro) se haya eliminado por la tubería.
LAVE LA TUBERÍA
8
INSTALACIÓN DE LA TUBERÍA DEL AGUA (CONT.)
Instrucciones para la instalación
Tubería
SmartConnect
™
Apriete los tornillos de la abrazadera hasta que
la arandela sellante empiece a hincharse.
NOTA: No apriete demasiado la tubería ya que
podría romperse.
APRIETE LA ABRAZADERA
DEL TUBO
5
Arandela
Extremo de entrada
Abrazadera para
el tubo
Tornillo de
la abrazadera
Rote la tubería entre la línea del agua fría
y el refrigerador.
Rote la tubería a través de un orificio perforado
en la pared o en el piso (detrás del refrigerador
o del gabinete de la base adyacente) lo más
cerca posible a la pared.
DIRIJA LA TUBERÍA
6
Para completar la instalación del refrigerador, regrese al
Paso 1 en :?@-8-/5J:018>12>531>-0;>
124

Servicio al consumidor
Solucionar problemas
OperaciónSeguridad Instalación
125
Sonidos normales de la operación. GEAppliances.com
Antes de solicitar un servicio…
&;8A/5;:-><>;.819-?
O4;>>1@519<;D05:1>;%1B5?18-?@-.8-?1:8-??53A51:@1?
<F35:-?D@-8B1E:;:1/1?5@->F01?;85/5@->A:?1>B5/5;
Problema Causas Posibles Qué hacer
El refrigerador no Refrigerador en ciclo de • Espere 30 minutos para que la descongelación se termine.
funciona descongelar.
Control en posición 0 (apagado). • Mueva el control hasta un ajuste de temperatura.
El refrigerador esté desconectado. • Empuje la clavija completamente en el enchufe.
Fusible fundido/interruptor • Reemplace el fusible o reajuste el interruptor.
de circuito roto.
;?>12>531>-0;>1?9F?:A1B;?<>;0A/1:?;:50;?0521>1:@1?-8;?9;018;?9F?-:@53A;? ;?
>12>531>-0;>1?9;01>:;?@51:1:9F?2A:/5;:1?DA?-:@1/:;8;3H-9F?>1/51:@1
HMMMM...
WHOOSH....
n
El nuevo compresor de alta eficiencia puede funcionar más
rápido y durar más que el de su refrigerador anterior y
puede escuchar un zumbido de tono alto o un sonido
pulsante mientras opera.
n
Puede escuchar un sonido de soplido cuando las puertas se
cierran. Esto se debe a que la presión se está estabilizando
dentro del refrigerador.
n
Puede escuchar los ventiladores moviéndose a gran
velocidad. Esto pasa cuando el refrigerador se conecta por
primera vez, cuando las puertas se abren frecuentemente
o cuando se guarda gran cantidad de alimentos en el
refrigerador o en los compartimientos del congelador. Los
ventiladores están ayudando a mantener las temperaturas
correctas.
n
Los ventiladores cambian la velocidad para suministrar
enfriamiento óptimo y ahorrar energía.
CHASQUIDOS, ESTALLIDOS,
CRUJIDO
n
Puede escuchar sonidos como de crujido o estallidos cuando
el refrigerador se conecta por primera vez. Esto pasa a
medida que el refrigerador se enfría hasta la temperatura
correcta.
n
El control del congelador produce un chasquido cuando
el compresor inicia o para.
n
El reloj del descongelador produce un chasquido al iniciar y
terminar el ciclo de descongelación.
n
Expansión y contracción de las bobinas durante o después
del ciclo de descongelación puede causar sonidos como
de crujido o estallidos.
n
En modelos con máquina de hielos, después de completar un
ciclo de hacer hielo, se pueden escuchar los cubos de hielo
cuando caen a la bandeja de hielos.
n
En modelos con un dispensador, durante la distribución
de agua, puede escuchar el movimiento de las líneas de
agua a la distribución inicial y después la liberación del botón
del dispensador.
SONIDOS DE AGUA
n
El fluido del refrigerante a través de las bobinas puede
producir un sonido de borboteo como de agua hirviendo.
n
El agua que cae en el calentador de descongelación puede
causar un chisporroteo, estallido o zumbido durante el ciclo
de descongelación.
n
Un ruido de agua cayendo se puede escuchar durante el
ciclo de descongelación a medida que el hielo se derrite del
evaporador y fluye hacia la bandeja de drenaje.
n
El cierre de las puertas puede producir un sonido de
gorgoteo debido a la estabilización de la presión.
¿Usted escucha lo que yo escucho? Estos sonidos son normales.
¡WHIR!
$->-5:2;>9-/5J:-05/5;:-8?;.>18;?>A50;?
:;>9-81?018-9F=A5:-014518;?/;:?A8@1
8-?1//5J:Sobre la máquina de hielos
automática.
Servicio al consumidor Solucionar problemas Operación SeguridadInstalación
Antes de solicitar un servicio…
Problema Causas Posibles Qué hacer
Vibraciones o sacudidas
Las patas niveladoras • Vea J9;:5B18->18>12>531>-0;>
(una vibración ligera requieren un ajuste.
es normal)
El motor opera durante Es normal cuando • Espere 24 horas para que el refrigerador se enfríe
períodos prolongados o el refrigerador es recién completamente.
se arranca y se para con instalado en su casa.
frecuencia. (Refrigeradores
Ocurre cuando hay largas • Eso es normal.
modernos con más espacio
cantidades de alimentos
de almacenamiento y un
en el refrigerador.
congelador más grande
Se dejó abierta la puerta. • Revise si un paquete mantiene la puerta abierta.
requieren más tiempo de
Clima caluroso o aperturas • Eso es normal.
operación. Se arrancan y
frecuentes de la puerta.
se paran a menudo para
Controles de temperatura • Vea ;?/;:@>;81?
mantener temperaturas
ajustados al punto más frío.
Se ha activado la función • Esto es normal cuando la función TurboCool está activada.
TurboCool. Ver &;.>1'A>.;;;8 para más información.
Compartimiento del El control de temperatura • Vea ;?/;:@>;81?
refrigerador o congelador
no se fijó bastante frío.
demasiado cálido
Clima caluroso o aperturas • Fije el control de temperatura un paso más frío.
frecuentes de la puerta. Vea ;?/;:@>;81?
Se dejó abierta la puerta. • Revise si hay un paquete que mantiene la puerta abierta.
Escarcha o cristales Se dejó abierta la puerta. • Revise si hay un paquete que mantiene la puerta abierta.
de hielo en alimentos
Apertura de puertas muy
congelados (escarcha
frecuente o muy prolongada.
en paquete es normal)
Formación lenta del hielo
Se dejó abierta la puerta. • Revise si hay un paquete que mantiene la puerta abierta.
El control de temperatura • Vea ;?/;:@>;81?
no es bastante frío.
La máquina de hielos El interruptor de corriente de • Mueva el interruptor a la posición de I (encendido)
automática no funciona de la máquina de hielos no está La luz de encendido del dispositivo de hacer hielo
(en algunos modelos) encendido. será de color verde cuando el interruptor de la luz del
congelador esté pulsado o cuando la puerta del congelador
se encuentre cerrada.
El suministro del agua está • Consulte la sección J9;5:?@-8->8-@A.1>H-018-3A-
apagado o no está conectado.
El compartimiento del • Espere 24 horas para que el refrigerador se enfríe
congelador no es muy frío. completamente.
Hay cubos amontonados en • Nivele los cubos con la mano.
el recipiente de almacenamiento
que causan que la máquina de
hielos se apague.
Los cubos de hielo están • Apague la máquina de hielos, retire los cubos y vuelva
obstruidos en la máquina a encender la máquina de hielos.
de hielos. (La luz verde de la
máquina dehielos está
intermitente).
La luz del dispositivo de hacer • Esto es normal cuando la puerta del congelador está
hielo no está encendida. abierta. La luz de encendido del dispositivo de hacer hielo
será de color verde cuando el interruptor de la luz del
congelador esté pulsado o cuando la puerta del congelador
se encuentre cerrada.
126

Servicio al consumidor
Solucionar problemas
OperaciónSeguridad Instalación
127
GEAppliances.com
Problema Causas Posibles Qué hacer
Sonido de zumbido El interruptor del suministro • Coloque el interruptor en la posición 0 (apagado).
frecuente eléctrico de la máquina de Mantenerlo en la posición I (encendido) dañará la
hielos está en la posición válvula de agua.
I (encendido), pero el suministro
de agua hacia el refrigerador
no ha sido conectado.
Cubos pequeños o Filtro de agua tapado. • Reemplace el cartucho del filtro con uno nuevo o
huecos con el tapón.
Los cubos tienen mal Alimentos transmitiendo • Envuelva bien los alimentos.
olor/sabor olor/sabor a los cubos.
El interior del refrigerador • Vea A50-0;D859<51E-
requiere limpieza.
• Mantenga una caja abierta de bicarbonato de sodio en
el refrigerador; cámbiela cada tres meses.
El refrigerador huele Alimentos transmitiendo • Alimentos con olores fuertes deben estar tapados.
olores al refrigerador.
• Guarde una caja de bicarbonato de sodio en el
refrigerador; cámbiela cada tres meses.
El interior requiere limpieza. • Vea A50-0;D859<51E-
Se forma humedad No es extraño durante • Seque la superficie con un paño suave y ajuste el
en la superficie del periodos de alta humedad. control del refrigerador una marca más hacia lo frío.
refrigerador
Humedad se forma al Abrir la puerta con mucha
interior (en clima húmedo, frecuencia o por mucho tiempo.
el aire lleva la humedad
al refrigerador cuando
las puertas se abren)
La luz del compartimiento No hay corriente en el toma • Reemplace el fusible o vuelva a iniciar el interruptor.
del refrigerador o del corriente.
congelador no funciona
Bombilla quemada o suelta. • Consulte la sección J9;>119<8-E->8-.;9.588-
Aire caliente de la parte Motor de enfriamiento normal
de abajo del refrigerador del flujo del aire. En el proceso
de refrigeración, es normal
que salga calor de la parte
inferior del refrigerador. Algunas
cubiertas de piso son sensibles y
se decolorarán ante estas
temperaturas normales y seguras.
Congelamiento de Los alimentos están muy • Mueva los alimentos lejos del ventilador.
alimentos en el cercanos al ventilador en la
refrigerador parte posterior del refrigerador.
El control del refrigerador • Mueva el control del refrigerador a una temperatura
está en un nivel demasiado frío. menos fría un incremento a la vez.
Brillo color naranja El calentador de • Esto es normal.
en el congelador descongelación está encendido.
128
Servicio al consumidor Solucionar problemas Operación SeguridadInstalación
Antes de solicitar un servicio…
Problema Causas Posibles Qué hacer
La puerta/gaveta no se Las patas niveladoras •Consulte la sección :?@-8-/5J:018>12>531>-0;>
cierra sola necesitan ajuste.
La puerta/gaveta del Esto es normal si después de •Esto indica que hay un buen sellante en la puerta/gaveta
congelador se abre cuando
abrirse, la puerta/gaveta del del congelador. Si la puerta/gaveta del congelador no se
la puerta del refrigerador congelador se cierra sola. cierra automáticamente después de abrirse, entonces
está cerrada consulte la sección anterior, Problema: -<A1>@-3-B1@-
018>12>531>-0;>:;?1/51>>-?;8-
El agua tiene un El dispensador de agua no •Dispense el agua hasta que todo el sistema del agua se
sabor/olor malo se uso por mucho tiempo. llene de nuevo.
El agua en el primer Eso es normal con un •Espere 24 horas para que se enfríe el refrigerador.
vaso está tibia refrigerador recién instalado.
El dispensador de agua no •Dispense el agua hasta que todo el sistema del agua se
se uso por mucho tiempo. llene de nuevo.
El sistema de agua se ha • Espere algunas horas para que se enfrié el agua.
desaguado.
El dispensador de agua Suministro de agua •Vea :?@-8->8-8H:1-01-3A-
no funciona apagado o no conectado.
Filtro de agua tapado. •Reemplace el cartucho del filtro o remueve el filtro
y instale el tapón.
Aire atrapado en el sistema •Presione el brazo del dispensador por un par de
del agua. minutos.
El agua del depósito está •Configure el control del refrigerador a una temperatura
congelada porque los controles más elevada y espere 24 horas. Si no sale agua después
están configurados a una de 24 horas, llame al servicio técnico.
temperatura muy baja.
El agua chorrea del Cartucho del filtro recién •Deje correr 1
1
⁄2 galón (6 litros) del dispensador para
dispensador instalado. despejar el sistema.
No sale agua y el Está tapada la línea de agua • Llame a un plomero.
dispositivo para hacer o la llave de paso.
hielo no funciona
Filtro de agua tapado. •Reemplace el cartucho del filtro o remueve el filtro y
instale el tapón.
El cartucho del filtro no está •Remueva y reinstale el cartucho del filtro, cerciorándose
instalado apropiadamente. de que encaja en su lugar. La cuchilla en el extremo del
cartucho deberá colocarse verticalmente.
El agua se está fugando El vaso no está siendo sostenido •Sostenga el vaso debajo del dispensador por 2 ó 3
del dispensador debajo del dispensador por segundos después de liberar el botón del dispensador.
suficiente tiempo después de El agua podría continuar dispensándose después de
que el botón es liberado. que el botón sea liberado.
Puede haber aire presente •Dispense agua por al menos 2 minutos para retirar
en el sistema de la tubería el aire del sistema.
del agua que causa que el
agua gotee después de que
el agua se haya dispensado.

129
Servicio al consumidor
Solucionar problemas
OperaciónSeguridad Instalación
GEAppliances.com
Problema Causas Posibles Qué hacer
La pantalla muestra La función TurboCool • Ver &;.>1'A>.;;;8 para más información.
se encuentra activada.
La luz del indicador del Esto es normal. •Ver &;.>118258@>;01-3A- para más información.
filtro de agua cambió
de color
La luz del indicador del El indicador de filtro de agua •Presione y sostenga por 3 segundos la tecla RESET WATER
filtro de agua continúa debe resetearse. FILTER (Resetear el filtro de agua). Ver &;.>118258@>;01
roja aún después de haber
-3A- para más información.
cambiado el filtro de agua
La luz del indicador del Esto es normal. Si se enciende •Ver &;.>118258@>;01-3A- para más información.
filtro de agua no está una luz de color naranja, se debe
encendida cambiar el filtro en poco tiempo.
El cartucho del filtro debe
cambiarse si se enciende
una luz de color rojo.
La manija está floja / La manija debe ajustarse. •Ver las secciones J9;?A61@->8-9-:56-018-<A1>@-01
la manija tiene una brecha
-8591:@;?2>1?/;? y J9;?A61@->8-9-:56-018/;:318-0;>
para información más detallada.
El refrigerador emite Esto es la alarma de la puerta. •Cierre la puerta.
un sonido
El ajuste de control no En algunos modelos, las •Si los ajustes de control no se alumbran, inspeccione
está encendido bombillas en la parte superior del para verificar si existe alguna bombilla quemada, y
compartimiento del refrigerador cambie si es necesario.
alumbran los ajustes de control
de la temperatura.
Las puertas del Es necesario realinear las puertas. •Ver la sección J9;-85:1->8-?<A1>@-?0;.81? localizada
refrigerador no están bajo J9;B;8B1>-/;8;/->8-?<A1>@-?!;018;?01
uniformes (en los modelos
>12>531>-0;>010;.81<A1>@-K:5/-91:@1.
de doble puerta)
?@-3->-:@H-?11C@51:01-8/;9<>-0;>;>535:-8D/A-8=A51>/;9<>-0;><;?@1>5;>01<>;0A/@;?/;9<>-0;?<->-A?;
>1?501:/5-801:@>;01?@-0;?(:50;?&518<>;0A/@;1?@F?5@A-0;1:A:F>1-=A1:;05?<;:101?1>B5/5;<;><->@1
01A:<>;B110;>01?1>B5/5;-A@;>5E-0;01<;0>H-@1:1>=A14-/1>?1/->3;018;?/;?@1?011:BH;;.51:
<;0>H-?;85/5@F>?181=A1881B118<>;0A/@;-A:-/1:@>;01?1>B5/5;01-A@;>5E-0;<->->1-85E->8->1<->-/5J:
:8-?7-8-3->-:@H-1C/8AD118/;?@;011:BH;;8-?B5?5@-?01?1>B5/5;-?A/-?-
83A:;?1?@-0;?:;<1>95@1:8-1C/8A?5J:;8-?8595@-/5;:1?010-I;?5:/501:@-81?;/;:?1/A1:/5-81??@-3->-:@H-
0-01>1/4;?813-81?1?<1/H25/;?DA?@10<;0>H-@1:1>;@>;?01>1/4;?=A1B->5->F:011?@-0;-1?@-0;$->-?-.1>
/AF81??;:?A?01>1/4;?813-81?/;:?A8@1-8-;25/5:-01-?A:@;?018/;:?A950;>8;/-8;8-;25/5:-018@@;>:1D1:1>-8
1:?A8;/-850-0
Garante: General Electric Company. Louisville, KY 40225
Garantía del Refrigerador. $->-/;:?A950;>1?1:8;?((
';0;?8;??1>B5/5;?013->-:@H-8;?<>;<;>/5;:-::A1?@>;?1:@>;?
01%1<->-/5J:01F.>5/-;:A1?@>;?@G/:5/;?A?@;91>->1
M
-A@;>5E-0;?$->-/;:/1>@->A:-/5@-01>1<->-/5J:1:8H:1-B5?H@1
:;?-8<<85-:/1?/;9;88-91-8%&
A-:0;88-91<->-?;85/5@->?1>B5/5;<;>2-B;>@1:3--9-:;18
:K91>;01?1>51D18:K91>;019;018;
Por el período de: GE reemplazará:
MODELOS GE y GE PROFILE:
Un año Cualquier parte del refrigerador que falle debido a defectos en los materiales o en
<->@5>018-21/4- la fabricación. Durante esta garantía limitada de un año, GE también proporcionará, sin costo
018-/;9<>-;>535:-8 alguno, toda la mano de obra y el servicio relacionado—para reemplazar partes defectuosas.
Treinta días Cualquier parte del cartucho de filtro de agua que falle debido a defectos en los materiales o
<->@5>018-21/4- manufactura. Durante esta garantía limitada de treinta días, GE también proporcionará sin costo,
01/;9<>-;>535:-8 un cartucho de filtro de agua de repuesto.
018>12>531>-0;>
MODELOS DE GE PROFILE SOLAMENTE:
Cinco años
Cualquier parte del sistema sellado de refrigeración (compresor, condensador, evaporador y tuberías
<->@5>018-21/4- de conexión) que fallen debido a defectos en los materiales o fabricación. Durante esta garantía
018-/;9<>-;>535:-8 limitada de cinco años del sistema sellado de refrigeración, GE también proporcionará, sin costo
alguno, toda la mano de obra y el servicio relacionado para reemplazar partes defectuosas del
sistema sellado de refrigeración.
n Viajes de servicio a su hogar para enseñarle cómo usar
el producto.
n Instalación o entrega inapropiada, o mantenimiento
impropio.
n Fallas del producto si hay abuso, mal uso, o uso para
otros propósitos que los propuestos, o uso para fines
comerciales.
n Pérdida de alimentos por averías.
n Causar daños después de la entrega.
n Reemplazo de fusibles de su hogar o reajuste de
interruptores de circuito.
n Reemplazo del cartucho del filtro para agua, si incluidos,
debido a presión de agua afuera de las limites de
operación especificados o sedimento excesivo en el
suministro de agua.
n Reemplazo de las bombillas, si incluidos, o los filtros
de agua, si incluidos.
n Daño al producto causado por accidente, fuego,
inundaciones, o actos de Dios.
n Daño incidental o consecuencial causado por posibles
defectos con el aparato.
n Producto no accesible para facilitar el servicio requerido.
Lo que GE no cubrirá:
>-<1-=AH?A>1/5.;
&1>1=A51>12-/585@-><>A1.-
018-21/4-01/;9<>-
;>535:-8<->-;.@1:1>A:
?1>B5/5;.-6;8-3->-:@H-
EXCLUSIÓN DE GARANTÍAS IMPLÍCITAS—Su único y exclusivo derecho es la reparación del producto, tal
y como se indica en esta Garantía limitada. Cualquier garantía implícita, incluyendo las garantías
implícitas de comerciabilidad o adecuación para un fin determinado, están limitadas a un año o el
período de tiempo más breve permitido por la ley.
130
Servicio al consumidor Solucionar problemas Operación SeguridadInstalación
131
Hoja de Datos de Funcionamiento
Sistema de Filtración GE SmartWater
Cartucho MWF
Este sistema se ha sometido a las pruebas NSF/ANSI 42/53 a fin de reducir las sustancias presentadas a continuación.
Se redujo la concentración de las sustancias indicadas en el agua que ingresan en el sistema a una concentración menor
o igual al límite permitido para el agua que sale del sistema, como se especifica en NSF/ANSI 42/53.*
-/@;>1?015:/;><;>-0;?<->-8-A@585E-/5J::;91050-
Estándar No. 42: Efectos estéticos
Parámetros USEPA Calidad del Promedio de Effluent % de reducción Reducción
MCL influente concentración influente Promedio Máximo Promedio Máximo mínima necesaria
Cloro
— 2,0 mg/L + 10% 1,96 mg/L 0,06 mg/L 0,11 mg/L 96,77% 94,74% > 50%
T & O —— ——————
Partículas
** — at least 10.000 particles/mL 6.400.000 #/mL 58.833 #/mL 150.000 #/mL 99,14% 97,97% ≥ 85%
Estándar No. 53: Efectos Relativos a la Salud
Parámetros USEPA Calidad del
Promedio de
Effluent % de reducción Reducción
MCL influente concentración influente Promedio Máximo Promedio Máximo mínima necesaria
Turbidez
0,5 NTU 11 + 1 NTU*** 10,5 NTU 0,14 NTU 0,28 NTU 98,54% 97,20% 0,5 NTU
Quistes
≥ 99,95% Reduction Minimum 50.000 L 118.750 #/L < 1 #/L 4 #/L > 99,99% > 99,99% ≥ 99,95%
Asbestos ≥ 99% Reduction 10
7
–10
8
fibras/L; > 10µm 57 MF/L 0,996 MF/L < 1 MF/L 99,60% 99,39% ≥ 99%
Plomo a pH 6,5
0,015 mg/L 0,15 mg/L + 10% 0,1567 mg/L < 0,001 mg/L < 0,001 mg/L 99,36% 99,29% 0,010 mg/L
Plomo a pH 8,5
0,015 mg/L 0,15 mg/L + 10% 0,1433 mg/L < 0,001 mg/L < 0,001 mg/L 99,30% 99,29% 0,010 mg/L
Mercurio a pH 6,5 0,002 mg/L 0,006 mg/L + 10% 0,0059 mg/L 0,000350 mg/L 0,0007 mg/L 94,70% 87,50% 0,002 mg/L
Mercurio a pH 8,5 0,002 mg/L 0,006 mg/L + 10% 0,0057 mg/L 0,000325 mg/L 0,0006 mg/L 93,20% 89,29% 0,002 mg/L
Alacloro 0,002 mg/L 0,04 mg/L + 10% 0,0367 mg/L 0,00023 mg/L 0,0004 mg/L 99,34% 98,67% 0,002 mg/L
Lindane 0,0002 mg/L 0,002 mg/L + 10% 0,0020 mg/L < 0,00002 mg/L < 0,00002 mg/L 99,00% 98,95% 0,0002 mg/L
2,4-D 0,070 mg/L 0,210 mg/L + 10% 0,2033 mg/L 0,00337 mg/L 0,011000 mg/L 98,32% 94,50% 0,070 mg/L
Toxafeno 0,003 mg/L 0,015 mg/L + 10% 0,0160 mg/L 0,00100 mg/L 0,001000 mg/L 93,44% 91,67% 0,003 mg/L
Benceno 0,005 mg/L 0,015 mg/L + 10% 0,0145 mg/L 0,000500 mg/L 0,000500 mg/L 96,51% 95,83% 0,005 mg/L
Carbofurano 0,040 mg/L 0,080 mg/L + 10% 0,0830 mg/L 0,001000 mg/L 0,001000 mg/L 98,78% 98,65% 0,04 mg/L
1,4 diclorobenceno
0,075 mg/L 0,225 mg/L + 10% 0,2283 mg/L 0,000500 mg/L 0,000500 mg/L 99,78% 99,77% 0,075 mg/L
Atrazine 0,003 mg/L 0,009 mg/L + 10% 0,0087 mg/L < 0,0005 mg/L < 0,0005 mg/L 94,22% 93,33% 0,003 mg/L
$>;.-0;A@585E-:0;A:-@-?-0128A6;013<9895:<>1?5J:01<?533/9<01N@19<01LNL
!105/5J:1:<->@H/A8-?98 -?<->@H/A8-?A?-0-?1>-:01P95/>J:
(:50-01?01@A>.501E"1218;9G@>5/-Q"'(
Especificaciones de Operación
n Capacidad: certificado para hasta 300 galones (1135 litros); hasta seis meses para los modelos sin luz indicadora de reemplazo de filtro;
hasta un año para los modelos con luz indicadora de reemplazo de filtro
n Requerimientos de presión: 40–120 psi (2,8–8,2 bar), sin choque
n Temperatura: 33°–100°F (0,6°–38°C)
n Tasa de flujo: 0,5 gpm (1,9 lpm)
Requerimientos Generales de Instalación/Operación/Mantenimiento
n Deje correr 1
1
⁄2 galón (6 litros) con el grifo completamente abierto para sacar el aire atrapado.
n Reemplace el cartucho cuando la luz indicadora parpadee o cuando se reduzca la tasa de flujo de agua en unidades que no incluyen indicador.
Avisos Especiales
n Las instrucciones de instalación, las piezas, la información sobre la disponibilidad de servicio y la garantía estándar se incluyen con el producto
al enviarlo.
n Este sistema de agua potable debe mantenerse conforme a las instrucciones del fabricante, incluyendo el reemplazo de los cartuchos.
n No se utiliza en los sitios donde el agua es de calidad microbiológicamente dudosa, ni con aguas de calidad desconocida, sin una desinfección adecuada
antes o después del sistema; el sistema puede utilizarse con aguas desinfectadas que puedan contener quistes filtrables.
n
Los contaminantes u otras substancias que este sistema de tratamiento de agua puede remover o reducir, no están presentes, necesariamente, en su agua.
n Verifique el acatamiento de las leyes y reglamentos estatales y locales.
n Tome en cuenta que aunque las pruebas se realizaron bajo condiciones estándar de laboratorio, el resultado real puede variar. Los sistemas se
deben instalar y operar de acuerdo con los procedimientos y las pautas que recomienda el fabricante.
Hecho por General Electric, Appliance Park, Louisville, KY 40225 EPA EST. No. 070595-MN-001
NSF
®
Probado y Certificado según las normas ANSI/NSF 42 y 53 para la
reducción de:
Estándar No. 42: Efectos Estéticos
U
nidad química
E
l sabor y olor de cloro
U
nidad de filtrado mecánico
Reducción de partículas, Clase I
Estándar No. 53: Efectos sobre la salud
U
nidad de reducción química
Reducción de alacloro y atrazina
Reducción del benceno y carbofurano
Reducción de 1,4 diclorobenceno y 2,4-D
Reducción de plomo y lindano
Reducción de mercurio y toxafeno
U
nidad de filtrado mecánico
Reducción de turbidez
Reducción de quistes y asbestos

132
Notas.
Solucionar problemas
Servicio al consumidor Operación SeguridadInstalación

133
Servicio al consumidor
Solucionar problemas
OperaciónSeguridad Instalación
Notas. GEAppliances.com

134
Notas.
Solucionar problemas
Servicio al consumidor Operación SeguridadInstalación
135
Servicio al consumidor.
$F35:-*1.01<<85-:/1?
GEAppliances.com
¿Tiene alguna pregunta sobre su electrodoméstico? ¡Pruebe la página Web de GE Appliances 24 horas al día,
cualquier día del año! Para mayor conveniencia y servicio más rápido, ya puede descargar los Manuales de los
Propietarios, pedir piezas o incluso hacer una cita en línea para que vengan a realizar una reparación.
&;85/5@1A:->1<->-/5J: GEAppliances.com
El servicio de expertos GE está a tan sólo un paso de su puerta. ¡Entre en línea y solicite su reparación cuando le
venga bien cualquier día del año! O llame al 800.GE.CARES (800.432.2737) durante horas normales de oficina.
%1-8 5211?53:&@A05;
?@A05;0105?1I;<->-8-B50->1-8
GEAppliances.com
GE apoya el concepto de Diseño Universal—productos, servicios y ambientes que pueden usar gente de todas
las edades, tamaños y capacidades. Reconocemos la necesidad de diseñar para una gran gama de habilidades
y dificultades físicas y mentales. Para más detalles cobre las aplicaciones de GE Diseño Universal, incluyendo
ideas de diseño para la cocina para personas con discapacidades, mire nuestra página Web hoy mismo. Para
personas con dificultades auditivas, favor de llamar al 800.TDD.GEAC (800.833.4322).
->-:@H-?-9<85-0-? GEAppliances.com
Compre una garantía ampliada y obtenga detalles sobre descuentos especiales disponibles mientras su garantía
está aún activa. Puede comprarla en línea en cualquier momento, o llamar al (800.626.2224) durante horas
normales de oficina. GE Consumer Home Services estará aún ahí cuando su garantía termine.
$51E-?D-//1?;>5;? GEAppliances.com
Aquellos individuos con la calificación necesaria para reparar sus propios electrodomésticos pueden
pedir que se les manden las piezas o accesorios directamente a sus hogares (aceptamos las tarjetas
VISA, MasterCard y Discover). Haga su pedido en línea hoy, 24 horas cada día o llamar por teléfono
al 800.626.2002 durante horas normales de oficina.
Las instrucciones descritas en este manual cubren los procedimientos a seguir por cualquier usuario.
Cualquier otra reparación debería, por regla general, referirse a personal calificado autorizado. Debe
ejercerse precaución ya que las reparaciones incorrectas pueden causar condiciones de funcionamiento
inseguras.
$J:3-?11:/;:@-/@;/;::;?;@>;? GEAppliances.com
Si no está satisfecho con el servicio que recibe de GE, póngase en contacto con nosotros en nuestra
página Web indicando todos los detalles así como su número de teléfono o escríbanos a:
General Manager, Customer Relations
GE Appliances, Appliance Park
Louisville, KY 40225
%135?@>1?A181/@>;0;9G?@5/; GEAppliances.com
¡Registre su nuevo electrodoméstico en línea —cuando usted prefiera! El registrar su producto a tiempo le
proporcionará, si surgiera la necesidad, una mejor comunicación y un servicio más rápido bajo los términos de
su garantía. También puede enviar su tarjeta de registro pre-impresa que se incluye en el material de embalaje
o recorte y use el formulario de este Manual del Propietario.
Consumer Support.
<<85-:/1?*1.?5@1
In the U.S.: GEAppliances.com
Have a question or need assistance with your appliance? Try the GE Appliances Website 24 hours a day,
any day of the year! For greater convenience and faster service, you can now download Owner’s Manuals,
order parts or even schedule service on-line. In Canada: www.GEAppliances.ca
&/410A81&1>B5/1 In the U.S.: GEAppliances.com
Expert GE repair service is only one step away from your door. Get on-line and schedule your service at your
convenience any day of the year! Or call 800.GE.CARES (800.432.2737) during normal business hours.
In Canada, call 1.800.561.3344
%1-8 5211?53:&@A05; In the U.S.: GEAppliances.com
GE supports the Universal Design concept—products, services and environments that can be used by people of all
ages, sizes and capabilities. We recognize the need to design for a wide range of physical and mental abilities and
impairments. For details of GE’s Universal Design applications, including kitchen design ideas for people with disabilities,
check out our Website today. For the hearing impaired, please call 800.TDD.GEAC (800.833.4322).
In Canada, contact: Manager, Consumer Relations, Mabe Canada Inc.
Suite 310, 1 Factory Lane
Moncton, N.B. E1C 9M3
C@1:010*->>-:@51? In the U.S.: GEAppliances.com
Purchase a GE extended warranty and learn about special discounts that are available while your warranty is still
in effect. You can purchase it on-line anytime, or call 800.626.2224 during normal business hours. GE Consumer Home
Services will still be there after your warranty expires. In Canada, call 1.888.261.2133
$->@?-:0//1??;>51? In the U.S.: GEAppliances.com
Individuals qualified to service their own appliances can have parts or accessories sent directly to their homes (VISA,
MasterCard and Discover cards are accepted). Order on-line today, 24 hours every day or by phone at
800.626.2002 during normal business hours.
Instructions contained in this manual cover procedures to be performed by any user. Other servicing generally
should be referred to qualified service personnel. Caution must be exercised, since improper servicing may cause
unsafe operation.
Customers in Canada should consult the yellow pages for the nearest Mabe service center, or call 1.800.661.1616.
;:@-/@(? In the U.S.: GEAppliances.com
If you are not satisfied with the service you receive from GE, contact us on our Website with all the details including your
phone number, or write to: General Manager, Customer Relations
GE Appliances, Appliance Park
Louisville, KY 40225
In Canada: www.GEAppliances.ca, or write to: Director, Consumer Relations, Mabe Canada Inc.
Suite 310, 1 Factory Lane
Moncton, N.B. E1C 9M3
%135?@1>,;A><<85-:/1 In the U.S.: GEAppliances.com
Register your new appliance on-line—at your convenience! Timely product registration will allow for enhanced
communication and prompt service under the terms of your warranty, should the need arise. You may also
mail in the pre-printed registration card included in the packing material. In Canada: www.GEAppliances.ca
$>5:@105:!1C5/;