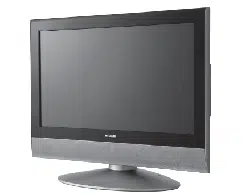
32" LCD Television
Model
32LD380TA
USER'S MANUAL
取扱説明書
用
户手册
Έ˾˿
êìäéÇéÑëíÇé èéãúáéÇÄíÖãü
3V90441A [E] COVER 31/10/05, 9:23 AM1
32LD380T
A
HITACHI
<+9' ݵۍᐯѦஇᔶŔඁᏁྐʪᆤຊփڄᆤé
Љ܇୕܇ϏၳݵմߟᏻݠЉږڄᆤංᆤé
WFTB!ݥᆐ૧ፇኯljೕۉጱՔጚၹࣷڦฆՔă
ᆶಈׂఁഄ၎ᆌᆶኁڦฆՔጀ֩ฆՔă
ඃñ
ʹ˾ڄ˖ࣅϚ͵ಏΕڄશٜʓЉӢé௪ეؠʹ˾ˀڄᎤთʿዯέé
ᆤე
<-' ֜ >-' ݵ/(3˙ڄංᆤé
ጀ :
Ԩ֩ڦాඹሞ࿄ঢ়༵๖ڦ൧ူࣷᆶ߀ۯăሰฆණྺܔీ၄ᇀԨ֩ዐڦٱဃփڅሴඪă
ฆՔණ
WHB!ࢅ!YHB!JCNࠅິڦጀ֩ฆՔă
NOTE:
The information in this manual is subject to change without notice. The manufacturer assumes no responsibility for
any errors that may appear in this manual.
TRADEMARK ACKNOWLEDGEMENT
VGA and XGA are registered trademarks of International Business Machines Corporation.
VESA is a trademark of a nonprofit organization, Video Electronics Standard Association.
All brand or product names are trademarks or registered trademarks of their respective holders.
ÇçàåÄçàÖ:
è‰ÓÒÚ‡‚ÎÂÌ̇fl ‚ ‰‡ÌÌÓÏ ÛÍÓ‚Ó‰ÒÚ‚Â ËÌÙÓχˆËfl ÏÓÊÂÚ ·˚Ú¸ ËÁÏÂÌÂ̇ ·ÂÁ Ô‰‚‡ËÚÂθÌÓ„Ó
ۂ‰ÓÏÎÂÌËfl. èÓËÁ‚Ó‰ËÚÂθ Ì ÌÂÒÂÚ ÌË͇ÍÓÈ ÓÚ‚ÂÚÒÚ‚ÂÌÌÓÒÚË Á‡ ͇ÍË ·˚ ÚÓ ÌË ·˚ÎÓ Ó¯Ë·ÍË,
ÍÓÚÓ˚ ÏÓ„ÛÚ ‚ÒÚÂÚËÚ¸Òfl ‚ ‰‡ÌÌÓÏ ÛÍÓ‚Ó‰ÒÚ‚Â.
èéÑíÇÖêÜÑÖçàÖ èêÄÇ çÄ íéêÉéÇõÖ åÄêäà
VGA Ë XGA fl‚Îfl˛ÚÒfl Á‡Â„ËÒÚËÓ‚‡ÌÌ˚ÏË ÚÓ„Ó‚˚ÏË Ï‡Í‡ÏË International Business Machines
Corporation.
VESA fl‚ÎflÂÚÒfl ÚÓ„Ó‚ÓÈ Ï‡ÍÓÈ ÌÂÍÓÏϘÂÒÍÓÈ Ó„‡ÌËÁ‡ˆËË Video Electronics Standard Association.
ÇÒ ̇Á‚‡ÌËfl ÔÓ‰ÛÍÚÓ‚ Ë Ï‡ÓÍ fl‚Îfl˛ÚÒfl ÚÓ„Ó‚˚ÏË Ï‡Í‡ÏË ËÎË Á‡Â„ËÒÚËÓ‚‡ÌÌ˚ÏË ÚÓ„Ó‚˚ÏË
χ͇ÏË, ÔË̇‰ÎÂʇ˘ËÏË ËÁ Á‡ÍÓÌÌ˚Ï Ó·Î‡‰‡ÚÂÎflÏ.
3V90441A [E] COVER 31/10/05, 9:23 AM2
32LD380T
A
HITACHI
1
ENGLISH
USER'S MANUAL
Thank you very much for purchasing the HITACHI LCD Television.
Before using your television, please carefully read the "SAFETY
INSTRUCTIONS" and this "USER'S MANUAL" so you will know how to
operate the television properly. Keep this manual in a safe place. You
will find it useful in the future.
Notes on lnstallation Work:
This product is marketed assuming that it is installed by qualified
personnel with enough skill and competence. Always have an
installation specialist or your dealer install and set up the product.
HITACHI cannot assume liabilities for damage caused by mistake
in installation or mounting, misuse, modification or a natural
disaster.
Note for Dealers:
After installation, be sure to deliver this manual to the customer
and explain to the customer how to handle the product.
3V90441A [E] P01-07 31/10/05, 9:20 AM1
32LD380T
A
HITACHI

2
Large-screen, high-definition LCD
display panel
The 32-inch color LCD display panel, with a
resolution of 1366(H) x 768(V) pixels, creates a
high-definition, large-screen (aspect ratio : 16:9)
and low-profile flat display. Free from electromag-
netic interferences from geomagnetic sources and
ambient power lines, the panel produces high-
quality display images free from color
misconvergence and display distortion.
Easy-to-use remote control and on
screen display system
The remote control included eases the work of
setting display controls. Further, the on-screen
display system, displays the status of signal
reception and display control settings in an easy-
to-view fashion.
Connecting to an Audio Visual De-
vice
• Three composite/S terminals
*1
, three composite
terminals
*2
, two component terminals
*2
and a
HDMI terminal have been added. A composite
video output terminal is also provided as a
monitoring output.
*1
A composite/S terminal = A side input
*2
If two composite terminal and two component
terminal are used at the same time, the
component terminal would govern.
• A wide range of devices can also be connected
besides personal computers.
FEATURESFEATURES
Important
Please read this User's Manual thoroughly,
especially the Safety Instructions on Page 4 to 7.
Mis-use may cause damage to your LCD
television, which could shorten its lifespan, or
cause injury to yourself. Should you encounter any
difficulty in the set-up or operation of your
television, firstly refer to the Troubleshooting guide
at the rear of this manual. In the unlikely event of a
problem occurring with your LCD television, switch
off at the mains sockets, pull out the plugs, and
contact your dealer immediately.
CAUTION
Under no circumstances remove the rear cover of
your LCD television.
Never guess or take any chances with electrical
equipment of any kind - it is better to be safe than
sorry!
Software Notice
It is prohibited for the end user of this product to
copy, reverse engineer or reverse compile the
software included therein, save to the extent
permitted by law.
LCD Television
After the LCD television has been on for any length
of time, you will notice that the screen becomes
warm. Please note that this is normal.
Sometimes the screen might have some tiny bright
or dark spots.
Please note that this is normal.
CAUTION
To prevent scratches or damages to the LCD
screen, do not knock or rub the surface with sharp
or hard objects. Clean the screen with a soft cloth
moistened with warm water and dry with a
soft cloth. A mild soap may be used if the screen is
extremely dirty.
Do not use harsh or abrasive cleaners!
CAUTION
Use a soft cloth to clean the cabinet and control
panel of the television. When excessively soiled
dilute a neutral detergent in water, wet and wring
out the soft cloth and afterward wipe with a dry soft
cloth.
Never use acid/alkaline detergent, alcoholic
detergent, abrasive cleaner, powder soap, OA
cleaner, car wax, glass cleaner, etc. especially
because they would cause discoloration, scratches
or cracks.
3V90441A [E] P01-07 31/10/05, 9:20 AM2
32LD380T
A
HITACHI
3
ENGLISH
FEATURES .......................................................... 2
SAFETY INSTRUCTIONS ................................... 4
ABOUT LCD PANEL ............................................ 8
Location of controls .............................................. 9
Remote Control .................................................. 10
Antenna connection ........................................... 12
Connections to other equipment ........................ 13
Quick guide for MENU-operation ....................... 18
Selecting the video input source ........................ 18
On-screen Language Selection ......................... 19
Teletext Language Selection ............................. 19
Automatic station presetting with
the built-in Tuner ................................................ 20
Change the order of stored channel .................. 21
Manual TV station presetting ............................. 22
Basic Operation.................................................. 23
Timer functions................................................... 24
Stereo reception with the built-in tuner .............. 25
Bass, Treble and Balance .................................. 27
Perfect volume ................................................... 27
Turning off the built-in speakers ......................... 28
Using the WOW™ surround sound feature ....... 28
Brightness, Contrast, Color and Sharpness ....... 29
DNR ................................................................... 29
Selecting the color temperature ......................... 30
Film mode .......................................................... 30
Picture format ..................................................... 31
Scrolling the PANORAMIC-Wide picture ........... 32
Back light............................................................ 33
Using the panel lock feature .............................. 34
PC-Setting .......................................................... 35
Selecting the HDMI audio input source .............. 36
Teletext .............................................................. 37
Conceal stored channels ................................... 39
Color system adjusting ....................................... 40
Troubleshooting table......................................... 41
Specifications ..................................................... 41
CONTENTS
Notes about This Manual
• The information in this manual is subject to change without notice.
• While meticulous care has been taken in the preparation of this manual, you are requested to notify
your dealer or us should you have any comments, views or questions about our product.
• Fully understand the prerequisites to using the product, such as hardware and software
specifications and constraints, in using the product. We are not held liable for damages caused by
improper handling of the product.
• Reproduction of this manual in whole or in part without our prior written permission is prohibited.
• The product names mentioned in this manual may be trademarks or registered trademarks of their
respective owners.
3V90441A [E] P01-07 31/10/05, 9:20 AM3
32LD380T
A
HITACHI
4
SAFETY INSTRUCTIONS
This LCD television has been designed and manufactured to meet international safety standards, but like any electrical
equipment, care must be taken if you are to obtain the best results and safety is to be assured. Before using this product,
please read and understand the Safety Instructions thoroughly to ensure correct usage, and follow all the instructions.
About the Symbols
Various symbols are used in this manual, the user’s manual and on the product itself to ensure correct usage, to
prevent danger to the user and others, and to prevent property damage. The meanings of these symbols are described
below. It is important that you read these descriptions thoroughly and fully understand the contents.
WARNING
CAUTION
This symbol indicates information that, if ignored, could possibly result in personal injury or
even death due to incorrect handling.
This symbol indicates information that, if ignored, could result possibly in personal injury or
physical damage due to incorrect handling.
Typical Symbols
This symbol indicates an additional warning (including cautions). An illustration is provided to clarify the contents.
This symbol indicates a prohibited action. The contents will be clearly indicated in an illustration or nearby
(the symbol to the left indicates that disassembly is prohibited).
This symbol indicates a compulsory action. The contents will be clearly indicated in an illustration or nearby
(the symbol to the left indicates that the power plug should be disconnected from the power outlet).
WARNING
Never use the television if a problem should occur.
Abnormal operations such as smoke, strange odor, no image, no sound, excessive sound, damaged
casing, elements, cables, penetration of liquids or foreign matter, etc. can cause a fire or electrical
shock.
In such case, immediately turn off the power switch and then disconnect the power plug from the power
outlet. After making sure that the smoke or odor has stopped, contact your dealer. Never attempt to
make repairs yourself because this could be dangerous.
Do not insert liquids or foreign objects.
Penetration of liquids or foreign objects could result in fire or electrical shock. Use special caution in
households where children are present. If liquids or foreign objects should enter the television, immedi-
ately turn off the power switch, disconnect the power plug from the power outlet and contact your dealer.
• Do not place the television in a bathroom.
• Do not expose the television to rain or moisture.
• Do not place flower vases, pots, cups, cosmetics, liquids such as water, etc on or around the televi-
sion.
• Do not place metals, combustibles, etc on or around the television.
Never disassemble or modify the television.
The television contains high voltage components. Modification could result in fire or electrical shock.
• Never remove any fixed cover.
Do not give the television any shock or impact.
If the television should be shocked and/or broken, it could result in an injury, and continued use could
result in fire or electrical shock. If the glass panel is broken or damaged, immediately turn off the power
switch, disconnect the power plug from the power outlet and contact your dealer.
Do not place the television on an unstable surface.
If the television should be dropped and/or broken, it could result in an injury, and continued use could
result in fire or electrical shock.
• Do not place the television on an unstable, slant or vibrant surface such as a wobbly or inclined stand.
Do not obstruct the ventilation of the television.
If the ventilation is obstructed during the operation of the television or just after switching off the power, it
could result in damage and shorten the lifespan of your television due to overheating. Make sure there is
ample ventilation.
• Keep a space of 100mm (10cm) or more between the sides, rear and top of the television and other
objects such as walls.
• Do not place anything around ventilation openings of the television.
• Never block ventilation openings.
• Do not put the LCD screen side up.
• Do not cover the television with a tablecloth, etc.
• Do not place the television on a carpet or bedding, or near a curtain.
Use only the correct power outlet.
Incorrect power supply could result in fire or electrical shock. Use only the correct power outlet depend-
ing on the indication on the television and the safety standard.
• The enclosed power cord must be used depending on the power outlet to be used.
Disconnect the
plug from the
power outlet.
Do not
disassemble.
3V90441A [E] P01-07 31/10/05, 9:20 AM4
32LD380T
A
HITACHI
5
ENGLISH
Be cautious of the power cord connection.
Incorrect connection of the power cord could result in fire or electrical shock.
• Do not touch the power cord with a wet hand.
• Check that the connecting portion of the power cord is clean (with no dust), before using.
Use a soft and dry cloth to clean the power plug.
• Insert the power plug into a power outlet firmly. Avoid using a loose, unsound outlet or
contact failure.
• Do not cut off the fitted power plug, the removal of which could lead to impaired
performance. If you wish to extend the lead, obtain an appropriate extension lead or
consult your dealer.
• Should you require replacing the fuse in the molded plug with a new fuse, then please
replace with new one of the same value, type and approval as the original. Ensure the
fuse cover is returned to its original position.
Be sure to keep safety ground connection.
• Connect the ground terminal of AC inlet of this television with the ground terminal
provided at the power outlet using the enclosed power cord. If the provided plug does
not fit your outlet, consult an electrician for replacement of the obsolete outlet.
• The socket-outlet must be installed near the television and easily accessible.
Be careful in handling the power cord and external connection
cables.
If you keep using a damaged the power cord or cables, it can cause a fire or electrical
shock. Do not apply too much heat, pressure or tension to the power cord and cables.
If the power cord or cables are damaged (exposed or broken core wires, etc.), contact
your dealer.
• Do not place the television or heavy objects on the power cord and cables. Also, do not
place a spread, cover, etc, over them because this could result in the inadvertent placing
of heavy objects on the concealed power cord or cables.
• Do not pull the power cord and cables. When connecting and disconnecting the power
cord or cables, do it with your hand holding the plug or connector.
• Do not place the cord near the heater.
• Do not touch the power plug just after disconnecting it from the power outlet to prevent
electric shock.
• Do not touch the power plug when lightening is close to you.
• Avoid coiling the power cord and bending it sharply.
• Protect the power cord from being walked on, pinched particularly at plugs conveniences
receptacles, and the point where they exit from the apparatus.
• Do not modify the power cord.
Be careful in handling the battery of the remote control.
Incorrect handling of the battery could result in fire or personal injury. The battery may
explode if not handled properly.
• Keep the battery away from children and pets. If swallowed consult a physician
immediately for emergency treatment.
• Do not allow the battery to be exposed to fire or water.
• Avoid fire or high-temperature environment.
• Do not hold the battery with metallic tweezers.
• Keep the battery in a dark, cool and dry place.
• Do not short circuit the battery.
• Do not recharge, disassemble or solder the battery.
• Do not physically impact the battery.
• Use only the battery specified in the manual of this television.
• Make sure the plus and minus terminals are correctly aligned when loading the battery.
• If you observe a leakage of the battery, wipe out the liquid and then replace the battery.
If the liquid adheres your body or clothes, rinse well with water.
• Obey the local laws on disposing the battery.
About the Symbols (continued)
WARNING
Surely connect
the ground wire.
SAFETY INSTRUCTIONS (continued)
3V90441A [E] P01-07 31/10/05, 9:21 AM5
32LD380T
A
HITACHI
6
SAFETY INSTRUCTIONS (continued)
Disconnect the
plug from the
power outlet.
CAUTION
Be careful in moving the television.
Neglect could result in an injury or damage.
• Do not move the television during use. Before moving, disconnect the power plug and all
external connections.
• You are advised to move the television with two persons.
• Avoid any impact or shock to the television; particularly take care of glass screen.
Do not put anything on top of the television.
Placing anything on the television could result in loss of balance or falling, and cause an injury or damage.
Use special caution households where children are present.
Avoid a humid or dusty place.
Placing the television in a smoke, a highly humid, dusty place, oily soot or corrosive gas could result in
fire or electrical shock.
• Do not place near the kitchen, a humidifier or other place where there is oil, smoke or humidity.
Avoid a high temperature environment.
The heat could have adverse influence on the television and other parts, and could result in
transformation, melting or fire.
• Do not place the television, the remote control and other parts in direct sunlight or near a hot object
such as heater, etc.
• Do not put the television in a place where the temperature is widely changing.
Remove the power cord for complete separation.
• For safety purposes, disconnect the power cord if the television is not to be used for prolonged
periods of time.
• Before cleaning, turn off and unplug the television. Neglect could result in fire or electrical shock.
PRECAUTIONS
Installation environment
Do not obstruct a ventilation hole.
Do not put the television on carpet or blanket, or near a curtain which has a possibility of obstructing a
ventilation hole of the television.
Do not put the television in the following places.
• Hot places such as near heater, place exposed to the direct rays of the sun.
•
A place where the temperature is widely changing.
• Places with soot, dust or high humidity.
• Poor air ventilation place.
• Place near fire.
• A wet place such as bathroom, or shower room.
• Place where you can trip over it.
• Always vibrating or strongly vibrating places.
• Distorted or unstable places.
How to view the television
If you use the television in too dark a room, your eyes may become tired.
Please use it in a reasonably bright room.
Avoid direct rays of the sun to the screen in order to prevent eye fatigue.
Your eyes will get fatigued after viewing the television for long period of time.
Relax your eyes by viewing away from the television from time to time.
Please watch the television in downward direction.
Avoid a image retention
• Do not display images having sharp brightness differences or high-contrast images, such as monochrome
characters and graphic patterns, for long.
• Do not leave stationary images appearing for long, but try to refresh them at appropriate intervals of time.
• Turn down the contrast and brightness controls.
How to clean the LCD screen panel of the television
Before cleaning the television, turn off the television and disconnect the power plug from the power outlet.
To prevent scratching or damaging the LCD screen face, do not knock or rub the surface with sharp or hard objects.
Clean the screen with a soft cloth moistened with warm water and dry with a soft cloth. If it is not enough, then use a
cloth with mild detergent. Do not use harsh or abrasive cleaners.
How to clean the cabinet of the television
Use a soft cloth to clean the cabinet and control panel of the television. When excessively soiled dilute a neutral
detergent in water, wet and wring out the soft cloth and afterward wipe with a dry soft cloth.
Never use acid/alkaline detergent, alcoholic detergent, abrasive cleaner, powder soap, OA cleaner, car wax, glass
cleaner, etc. especially because they would cause discoloration, scratches or cracks.
Disconnect the
plug from the
power outlet.
3V90441A [E] P01-07 31/10/05, 9:21 AM6
32LD380T
A
HITACHI

7
ENGLISH
SAFETY INSTRUCTIONS (continued)
Prevention of an obstacle to Radio receivers
This television has been designed pursuant to the international EMI standards. This is to prevent a
problem to Radio receivers.
• Keep the television away from Radio.
• Adjust Radio antennas in order for the television not to receive interference.
• The antenna cable of Radio should be kept away from the television.
• Use a coaxial cable for antenna.
You can check if this television influences Radio receivers by turning off all other equipment other than
the television.
If you find a problem receiving Radio when using the television, check the instructions mentioned
above.
Precautions for the cable connection
• Do ensure that all connections, (including the power plug, extension leads and interconnections
between the pieces of equipment), are properly made and in accordance with the manufacturers
instructions. Switch off and withdraw the power plug before making or changing connections.
• Confirm the connector is fixed tightly when the signal cable is connected.
Also confirm the screws on the connector are tightened.
• Plug the power cord of the television into a different socket from that for other equipment, such as
Radio etc.
• Use a plug with ground terminal and make sure that it connects to the ground.
Precaution during transportation
Please pay attention when you transport this television because it is heavy.
Furthermore, use the original carton box and its packaging materials when the television is transported.
Failure to transport the television in any carton except the original carton may result in damage to the
television. Save the original carton box and all packing material.
Do not physically impact the remote control.
A physical impact could cause damage or malfunction of the remote control.
• Take care not to drop the remote control.
• Do not place heavy objects on the remote control.
Avoid strong rays.
Any strong rays (such as direct sun rays or room lighting) onto the remote control sensors could
invalidate the remote control.
Avoid radio interference.
Any interfering radiation could cause distorted images or noises.
• Avoid radio generator such as a mobile telephone, transceiver, etc. around the television.
Set the sound volume at a suitable level.
It is better to keep the volume level low and close the windows at night to protect the neighborhood
environment.
Precautions for the installation
• Do not use makeshift stands and NEVER fix legs with wood screws - to ensure complete safety,
always fit the manufacturers approved stand or legs with the fixings provided according to the
instructions.
• Use only with the cart, stand, tripod, bracket, or table specified by the dealer, or sold with the
apparatus. When a cart is used, use caution when moving the cart/apparatus combination to avoid
injury from tip-over.
• This product is designed to comply with the recommended safety standards for tilt and stability. Do
not apply excessive pulling force to the front, or top, of the cabinet that could cause the product to
overturn resulting in product damage and/or personal injury.
• Follow instructions for wall, shelf or ceiling mounting as recommended by the manufacturer.
• Only use the attachments/accessories specified by the manufacturer.
• Consult your dealer if you are in any doubt about installation, operation or safety of your equipment.
Other precautions
• Do not leave equipment switched on when it is unattended unless it is specifically stated that it is
designed for unattended operation or has a stand-by mode. Switch off using the switch on the
equipment and show your family how to do this. Make special arrangements for infirm or handicapped
people.
• Disposal of this product may require specific instructions pertaining to your resident region.
• Never guess or take any chances with electrical equipment of any kind - it is better to be safe than
sorry!
3V90441A [E] P01-07 31/10/05, 9:21 AM7
32LD380T
A
HITACHI

8
ABOUT LCD PANEL
Common phenomena of LCD Panel
The following are the common phenomena when operating LCD Panel due to its structural reason.
Please note that they are not malfunctions.
•Defective Spots on Panel
The LCD panel is manufactured with high-precision technology. However, there might be some spots
that are not emitted, brighter than the others, or in different colors, etc.
•Surface on Panel
The LCD panel displays images by blinking the fluorescent lamps internally. This could raise the
temperature of the display surface.
In addition, do not impact strongly on the surface of the panel because LCD panel is made with fine
processing glass.
•Residual image
When a still image or menu is displayed on the screen for a short time (about a minute)and then
switches to another image, it may leave an “after-image” on the screen.
The residual image will disappear on its own.
•The Usage under the Low Temperature Environment
Because of the structural characteristics of the LCD panel, the response speed of the LCD panel
becomes slower when the ambient temperature around the monitor becomes too low. In some cases, it
may cause the residual image.
The residual image will disappear on its own as the temperature goes up and back to normal.
3V90441A [E] P08 31/10/05, 9:21 AM8
32LD380T
A
HITACHI
9
ENGLISH
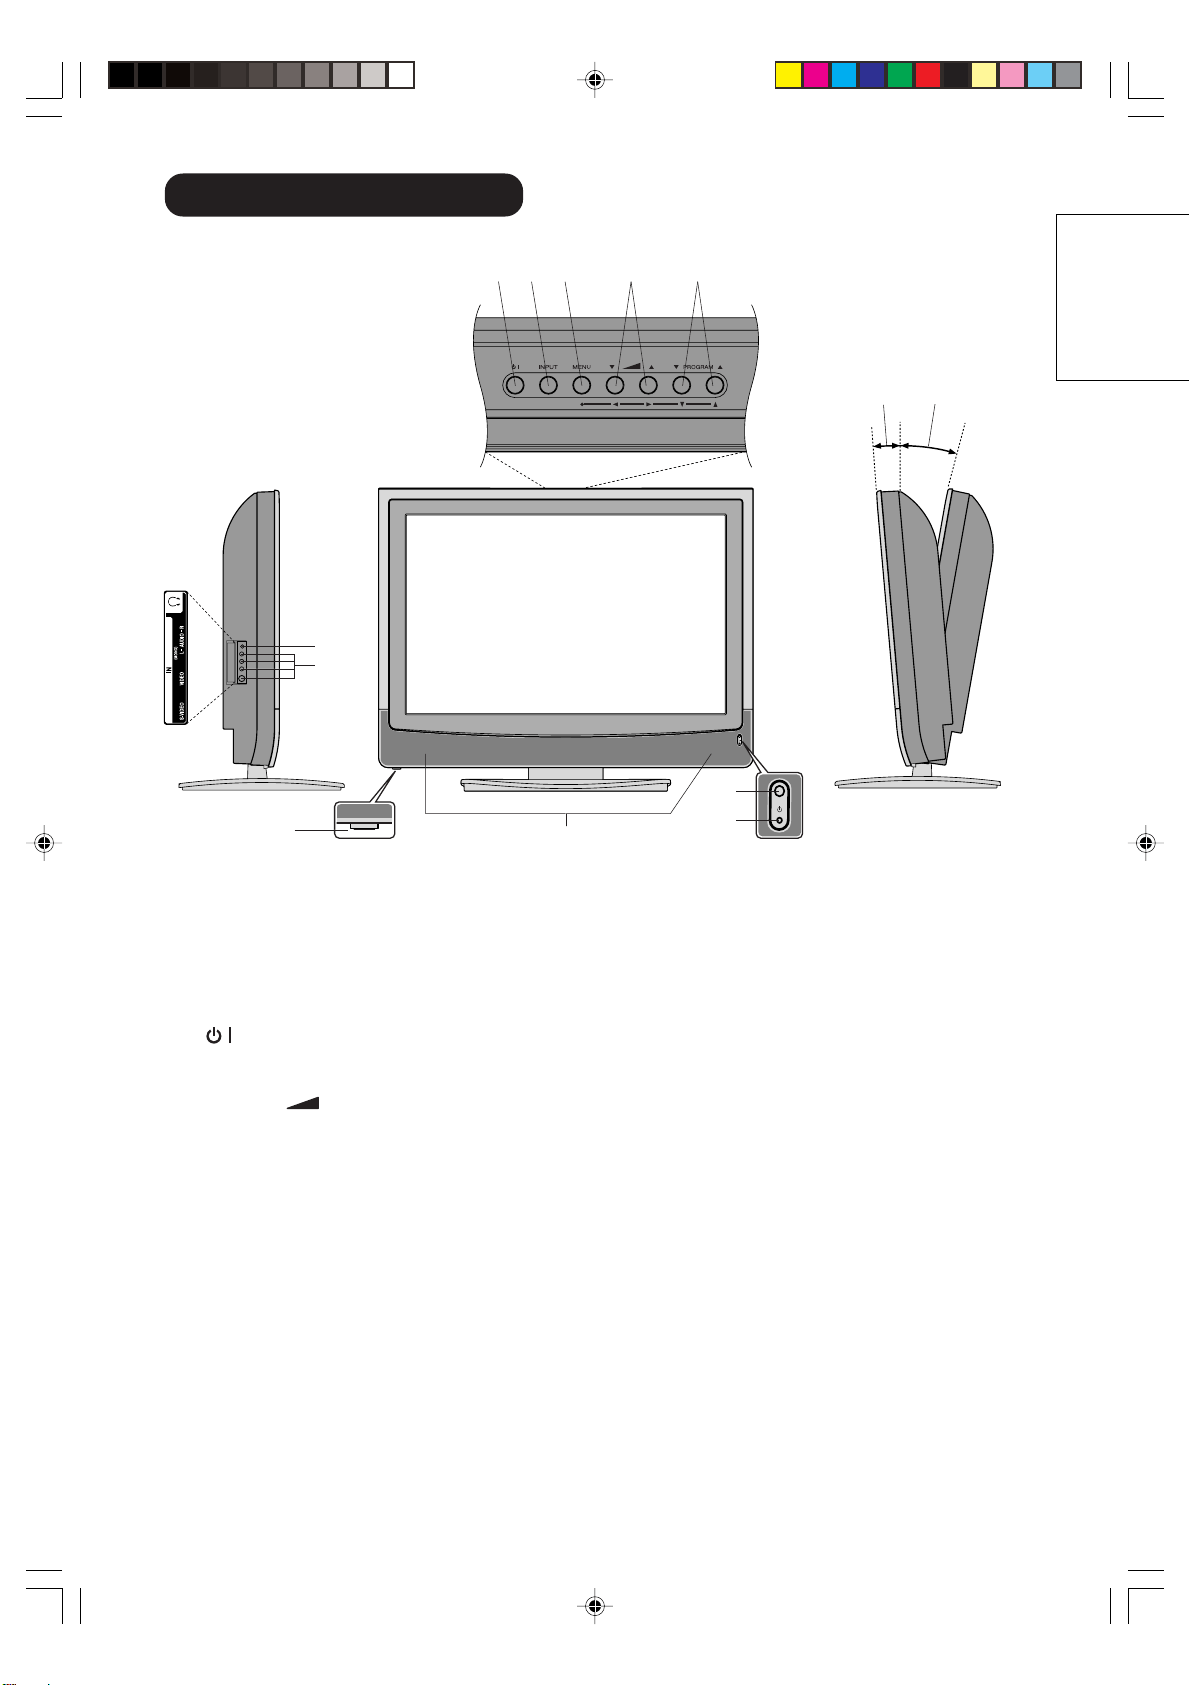
Location of controls
Description of Indicators and Controls
1. (SUB-POWER) button: To turn the unit standby mode on and off.
2. INPUT-button: Select input mode for TV/AV/COMPONENT/HDMI/PC.
3. MENU-button: To display the menu-screen.
4. VOLUME
▲/▼ buttons : To adjust the volume. In Menu : Setting.
5. PROGRAM ▲/▼ buttons: Press ▲ to change to a higher numbered channel set into memory. Press
▼ to change to a lower numbered channel set into memory. In Menu : Setting. In Standby : Turning
on the unit.
6. HEADPHONES jack: Plug headphones with a mini plug (3.5 mm) into this jack.
7. AV3-Input: Input for analogue A/V-Signal (Composite). If your equipment has an S-video connector,
use an S-video cable instead of a standard yellow video cable (You still must connect the standard
red and white audio cables for full system connection, but do not connect a standard yellow video
cable at the same time or the picture performance will be unacceptable.)
8. Main Power Switch: To turn the unit on or off completely.
9. Loudspeakers
10. Remote sensor
11. STANDBY/ON mode indicator: It lights up in red at STANDBY, and in green at POWER ON.
Approx. 6˚
Approx. 2˚
Right Side
You can adjust the angle of
the TV-screen for 2˚ forward
or for 6˚ backward from
vertical angle.
Front Side
Left Side
2
34
5
7
9
8
1
Top
11
10
6
3V90441A [E] P09-12 31/10/05, 9:21 AM9
32LD380T
A
HITACHI

10
Function Page
Turn the unit on or off
Sleep-Timer
Display program position number
Turn the sound on/off
Select channel
Select Teletext page
Switches between the present channel and the
last selected channel
Sub Page selection
Call Menu
Select TV-channel or
Teletext
page step by step
In Menu: Setting
In Standby: Turning on the unit
Volume
In Menu: Setting
Memorize
Select input source
Two Channel-Sound AUDIO 1/2 selector
Teletext page 100
Teletext ON/ Mix/ OFF
Reset Sound/Picture
Teletext enlargement
Program position-skipping
Answer a Quiz
Teletext-Timer display
Hold the text page
Fastext/TOPtext buttons
Select picture format
Remote Control
18
23
23
23
20
23
37 39
23
38
23
37 39
18
23
18
26
38
37
27
29
35
38
38
39
23
38
37
31
3V90441A [E] P09-12 31/10/05, 9:21 AM10
32LD380T
A
HITACHI
11
ENGLISH
30 30
Z
Z
Z
Z
Z
Z
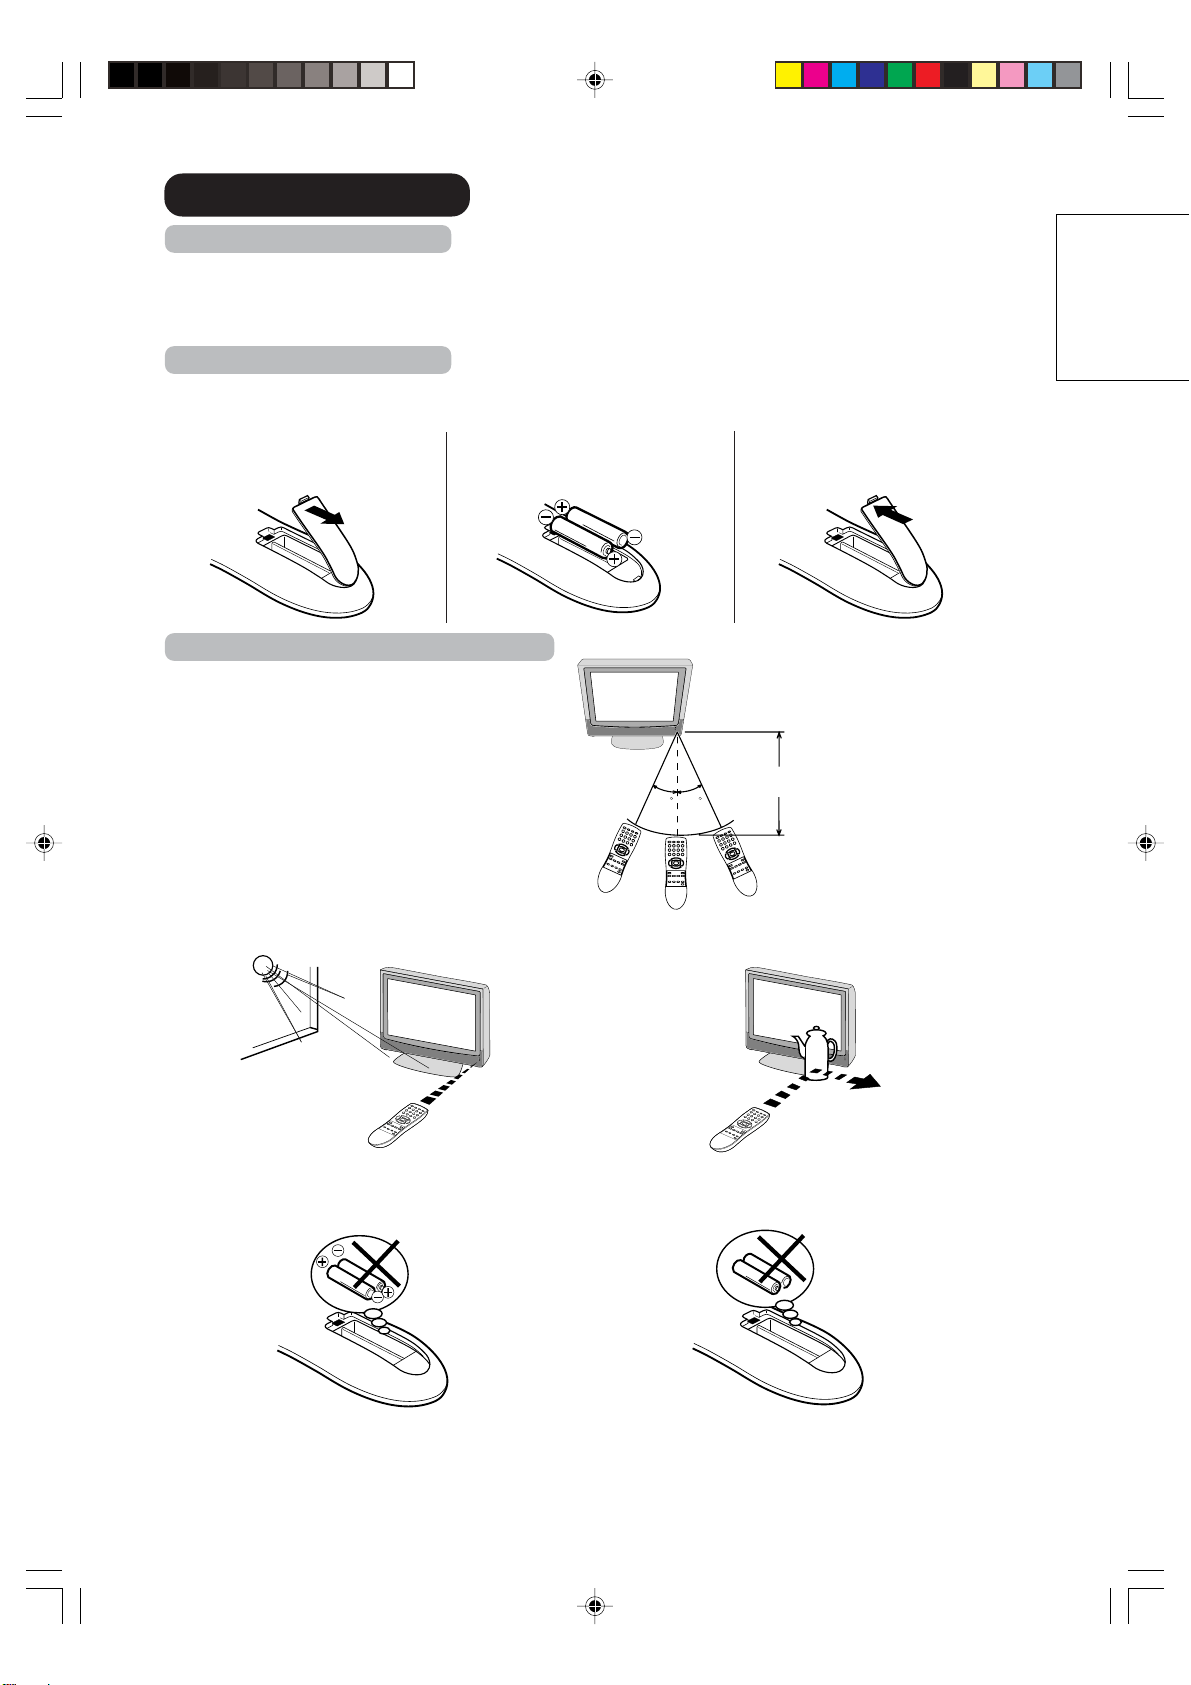
Install the batteries
Use batteries type UM-4 (AAA-Size).
Do not use the storage batteries. The remote control does not work properly with weak voltage from the storage
batteries. Replace the exhausted batteries with new batteries. Never charge batteries. Batteries may explode by
the charge.
Note:
An exhausted empty batteries may leak, namely corrosive electrolyte will leak out. The remote control may
damage by it. Therefore remove the exhausted batteries early.
3
1
Open the battery compart-
ment.
Close the battery
compartment.
2
Install the batteries as shown
below.
The remote control handset will not work properly in the following cases:
If bright sunlight directly beams onto the unit front. If an obstacle is placed between the unit and the
handset.
If the batteries have not been installed according
to their polarities.
If the batteries are weak.
Distance of Remote Control Operation
Point the remote control
directly at the remote sensor.
Transmitter window
Maximum distance approx. 5m
Remote Control
Remote sensor
3V90441A [E] P09-12 31/10/05, 9:21 AM11
32LD380T
A
HITACHI
12
Antenna connection
Note: Before you connect something:
• To avoid every possible damage, turn off the TV-unit with Main Power Switch and then pull the power
plug out.
• Arrange the desired connection.
• When the connection made up firmly and correctly, connect the unit to AC100-240V, 50/60Hz and turn
the unit on.
• For safety, install an external aerial conforming to AS1417.1 (applicable for Australia only).
Connect the antenna as shown below. Connect the unit with an outdoor antenna (A) or a cable-net (B). In
case of reception disturbance, consult with a specialist of antenna.
(A) Outdoor antenna: If the outdoor antenna already exists, you can also connect to it for analog TV-
program.
(B) Antenna connection: The built-in Hyperband CATV tuner can receive all analog cable television
programs.
(C) Audio/Video/Subwoofer output: To connect with an audio amplifier and external speakers or
Subwoofer, and adjust the audio level using the TV’s remote control.
To control the audio, turn off the TV's built-in speakers
28
.
Signal from Video output jack are composite video signals.
(D) AV1/AV2 input: To the connection of audio and composite video/S-video cables.
(E) COMPONENT-1/2 input: To the connection of audio and component cables.
(F) PC Monitor input (PC):
16 35
.
(G) HDMI input:
16 36
.
(H) Power supply: Connect the supplied power cable. Connect to AC100-240V, 50/60Hz.
Never repair a damaged AC power cord with isolation-tape. Have a specialist exchange with a new AC
power cord. Do not let your pet loose near the cable. To bite isolation is danger of life. Above all, a rat,
a parakeet, a hamster, a rabbit and other toothed animals can bite the cable.
(I) Bracket holes: Fix a wall mounting bracket (not supplied) here.
(D)(B) (C) (G)(F)
(A)
(E) (H)
(I)
3V90441A [E] P09-12 31/10/05, 9:21 AM12
32LD380T
A
HITACHI
13
ENGLISH
The exact arrangement you use to interconnect various video and audio components to the LCD televi-
sion is dependent on the model and features of each component. Check the Owner's Manual provided
with each component for the location of video and audio inputs and outputs.
The connection diagrams below are offered as suggestions. You may need to modify them to accommo-
date your particular assortment of components. The diagrams are intended to show component video and
audio interconnections only.
Note: Select a appropriate external input mode
18
.
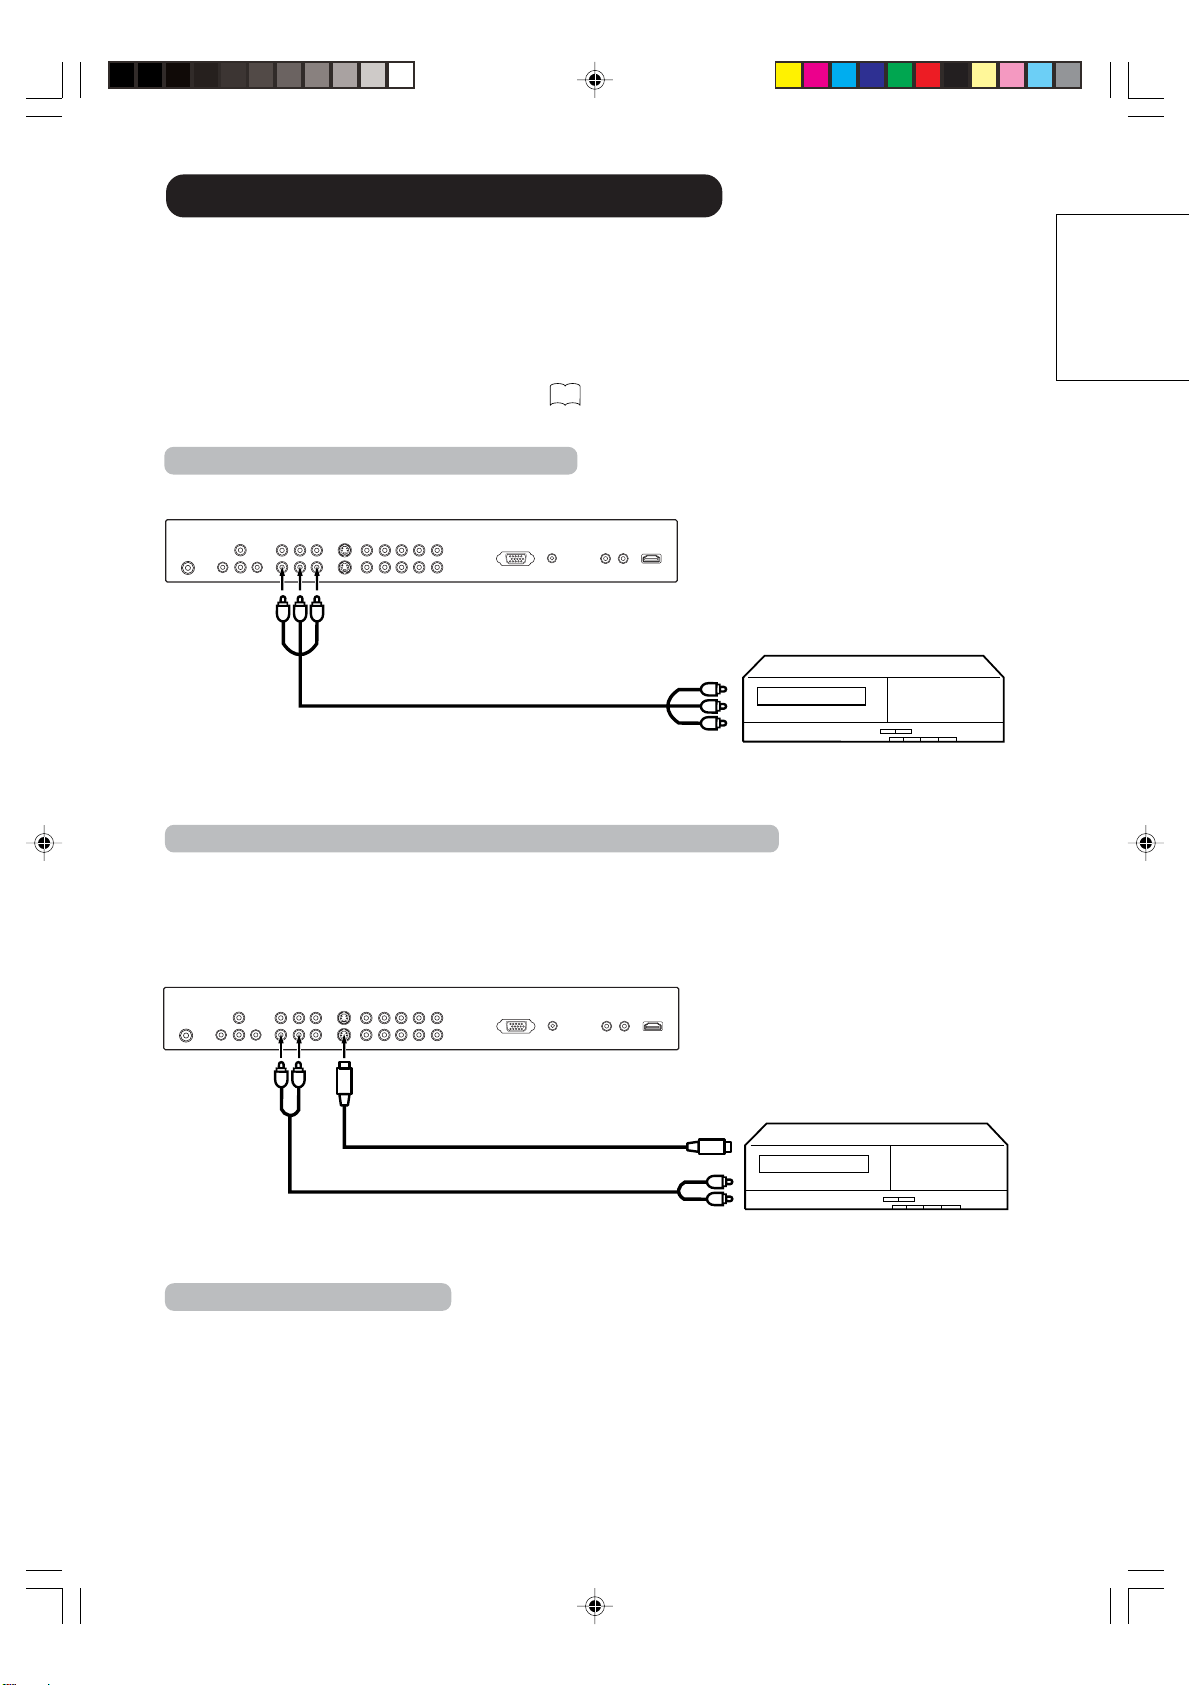
To connect the LCD television to a VCR with an S-Video cord
If you connect a VCR with a S-VIDEO cord to the S-VIDEO IN jack on the rear of the
LCD television
, you
must also connect
the audio cords to the AUDIO IN jacks on the rear of the LCD television. The S-VIDEO
cord only carries the video signal. The audio signal is separate.
NOTE:
When the S-video cord and the video cord are connected to each jack at the same time, the S-video cord
tak
es precedence over the video cord.
To S-Video OUT
To Audio OUT
Audio cord (not supplied)
S-Video cord (not supplied)
To S-VIDEO IN 1 (or 2)
Rear lower of the LCD television
To Audio/Video OUT
Audio/Video cord (not supplied)
To AV IN 1 (or 2)
To AUDIO
IN 1 (or 2)
Rear lower of the LCD television
Connections to other equipment
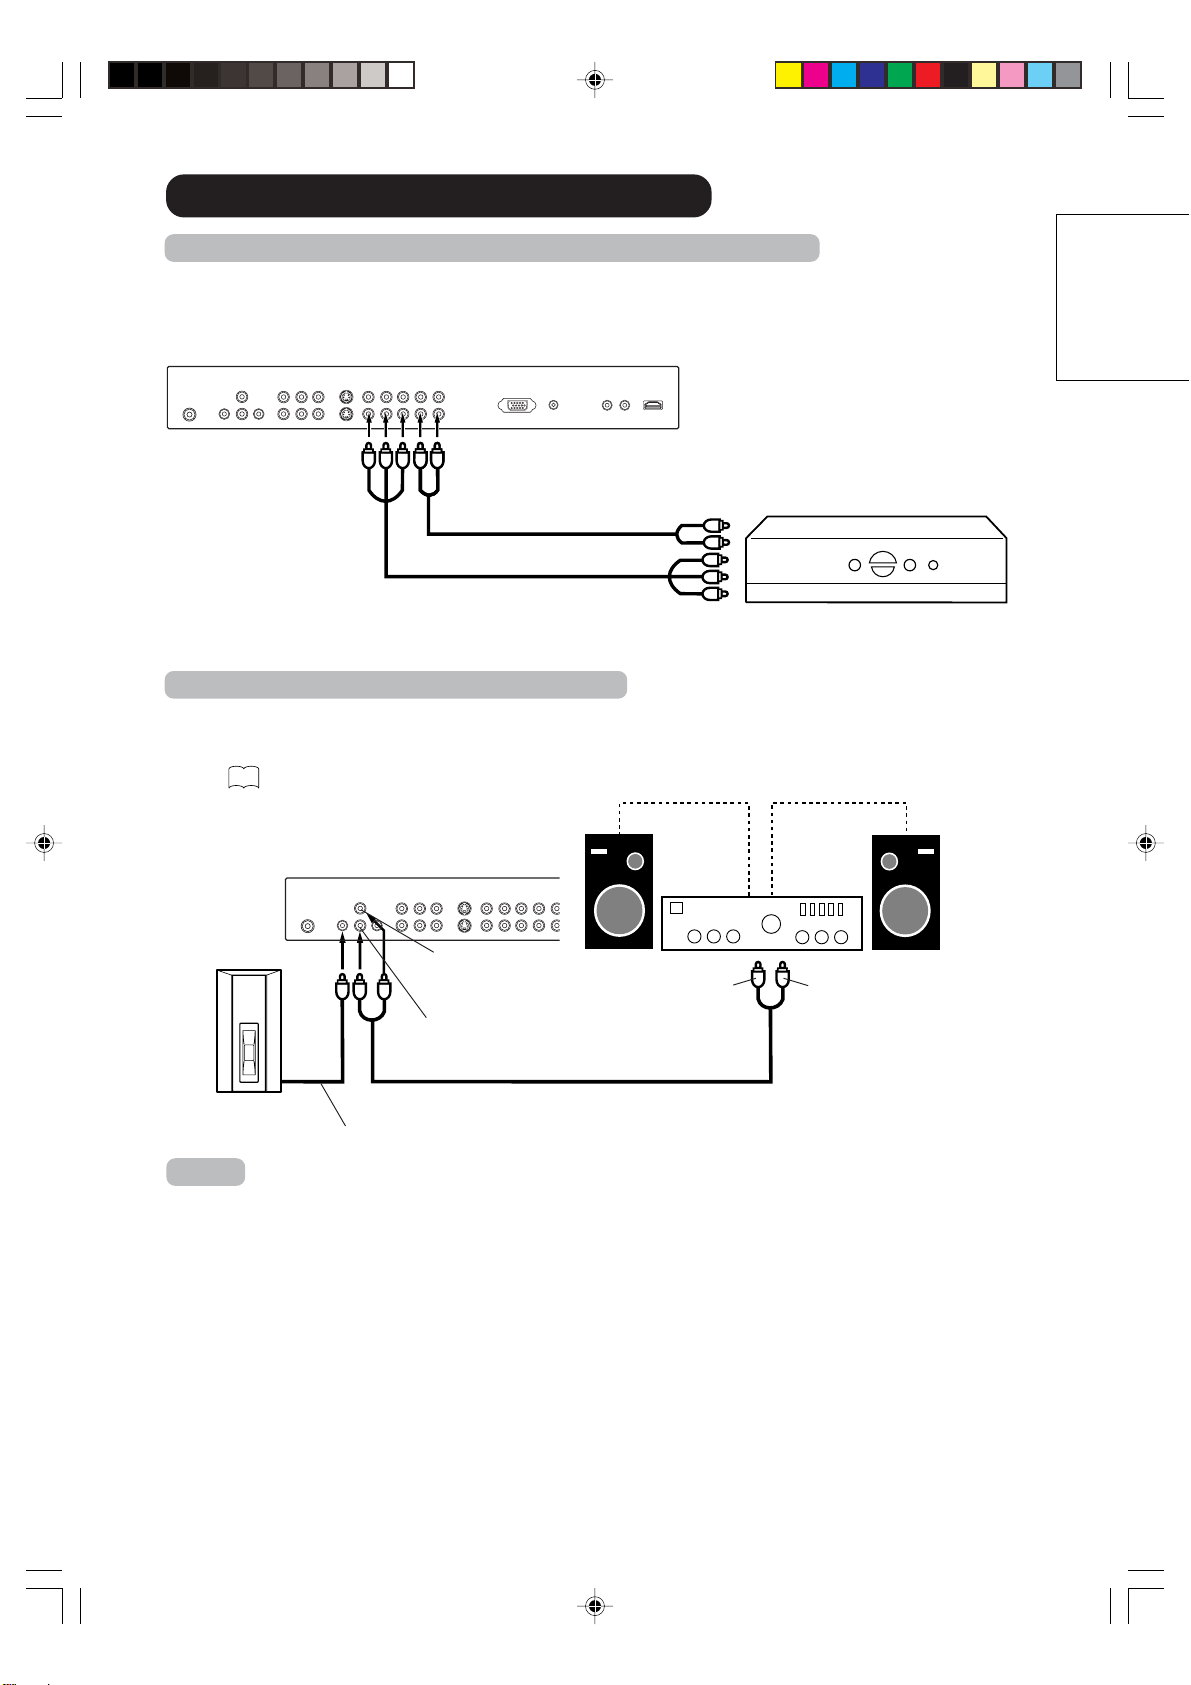
To connect the LCD television to a VCR
3V90441A [E] P13-17 31/10/05, 9:21 AM13
32LD380T
A
HITACHI
14
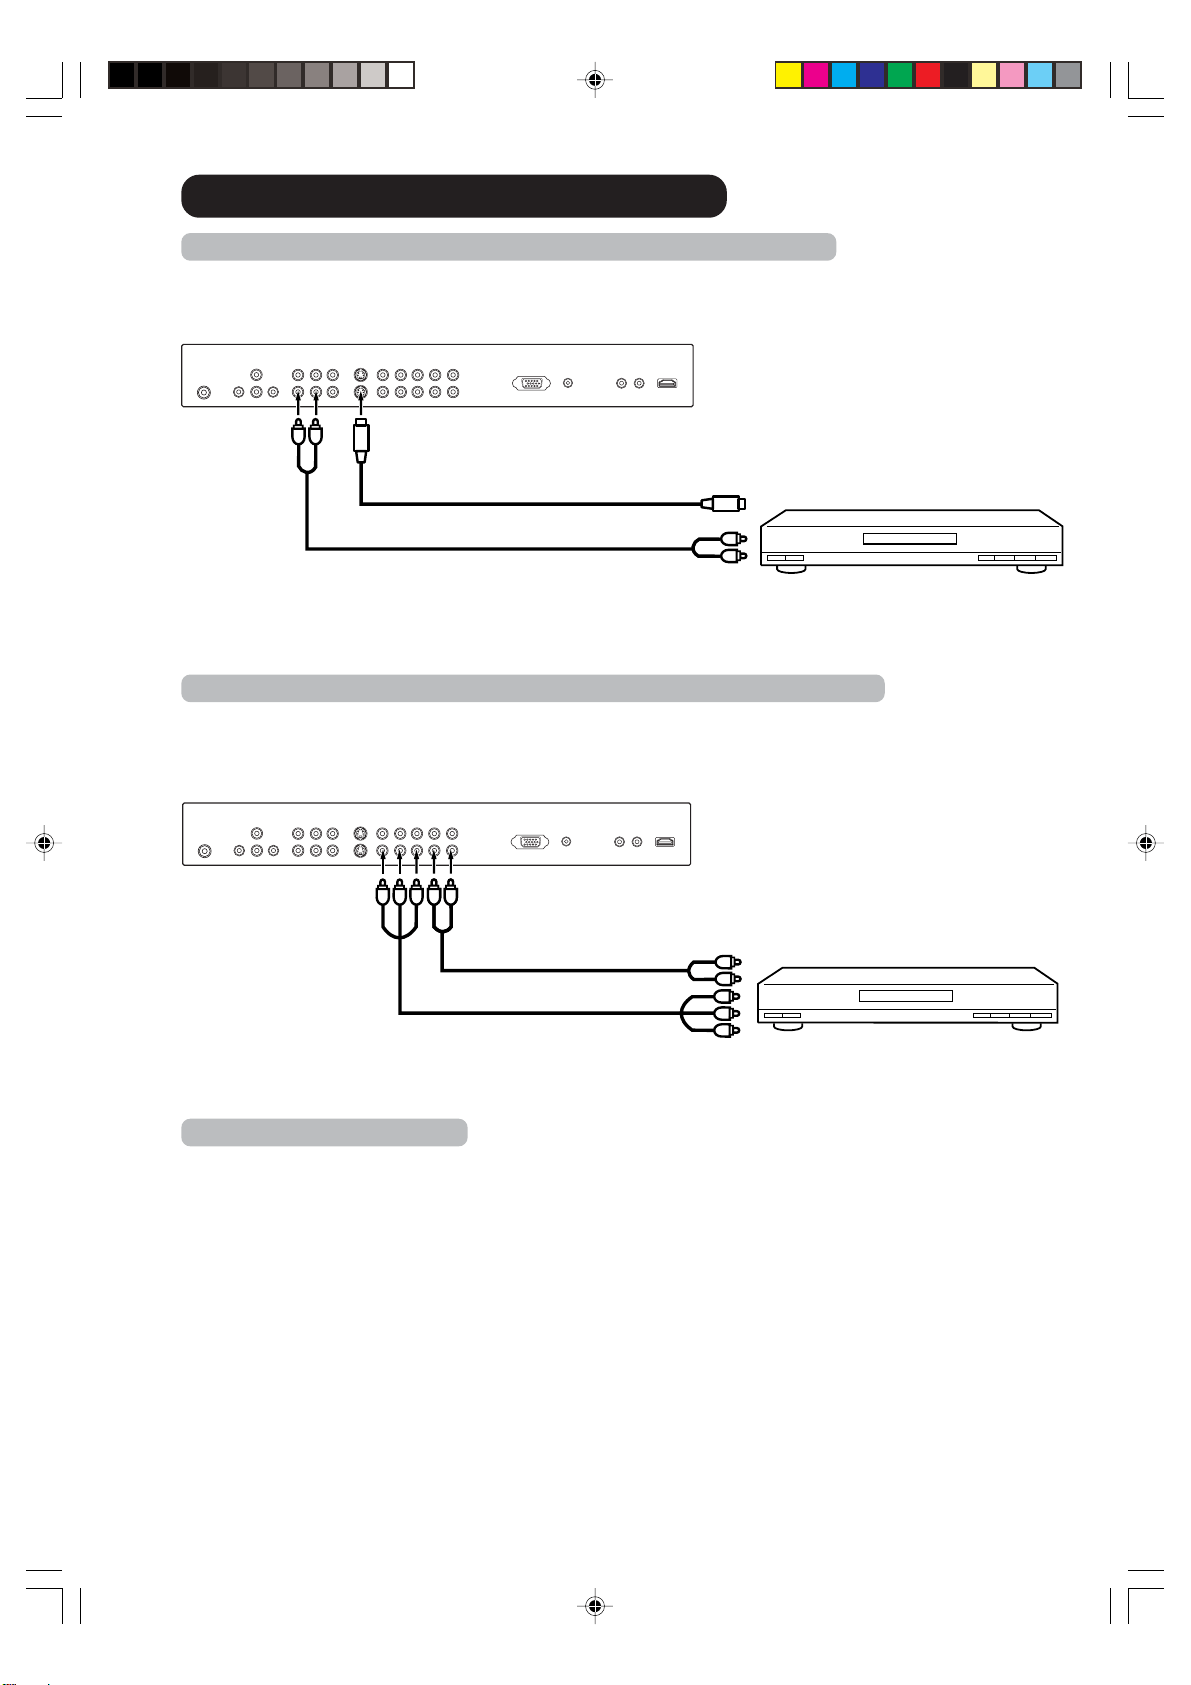
Rear lower of the LCD television
If your DVD player or Satellite receiver has a S-Video out jack, connect cords as shown.
Rear lower of the LCD television
To S-Video OUT
Audio cord (not supplied)
To Audio OUT
S-Video cord (not supplied)
To S-VIDEO IN 1 (or 2)
If your DVD player has component video out jacks, connect your LCD television to a DVD player using a
component video cord. It can greatly enhance picture quality and performance.
To Component OUT
To Audio OUT
Audio cord (not supplied)
Video cord (not supplied)
To AUDIO
IN 1 (or 2)
To COMPONENT-1
(or 2)
Connections to other equipment
To connect the LCD television to a DVD player/Satellite receiver
To connect the LCD television to a DVD player with component video
NOTE:
Component Video input of this unit are for use of device which output interlaced signals (PAL: 576i/1080i
or NTSC:
480i/1080i) and progressive signals (PAL: 576p/720p or NTSC: 480p/720p).
3V90441A [E] P13-17 31/10/05, 9:21 AM14
32LD380T
A
HITACHI
15
ENGLISH
Rear lower of the LCD television
To Component OUT
To Audio OUT
Video cord (not supplied)
Audio cord (not supplied)
To COMPONENT-1
(or 2)
Connections to other equipment
To connect the LCD television to a DTV receiver/set-top box
If you connect a DTV receiver/set-top box, connect your LCD television to a DTV receiver/set-top box
using a component video cord.
Connecting an audio system or Subwoofer
This connection allows you to use an audio amplifier and external speakers or Subwoofer, and adjust
the audio level using the LCD television’s remote control.
To control the audio, turn off the LCD television’s built-in speakers (see “Turning off the built-in speak-
ers” on
28
).
Note:
To hear sound when using an external audio amplifier or Subwoofer, the volume of both the LCD
television and the amplifier/Subwoofer must be set above 0 (zero).
For example, if the volume of the LCD television is set to 0, you will not be able to hear any sound, even
if the volume of the amplifier/Subwoofer is at its highest level.
To Audio (L) Input
To Audio (R) Input
Audio cord (not supplied)
Amplifier
Rear lower of the LCD television
AUDIO (R)
OUTPUT
AUDIO (L)
OUTPUT
Subwoofer
Subwoofer cord (not supplied)
3V90441A [E] P13-17 31/10/05, 9:21 AM15
32LD380T
A
HITACHI
16
Audio cord (not supplied)
VGA cable (not supplied)
Monitor Television modes
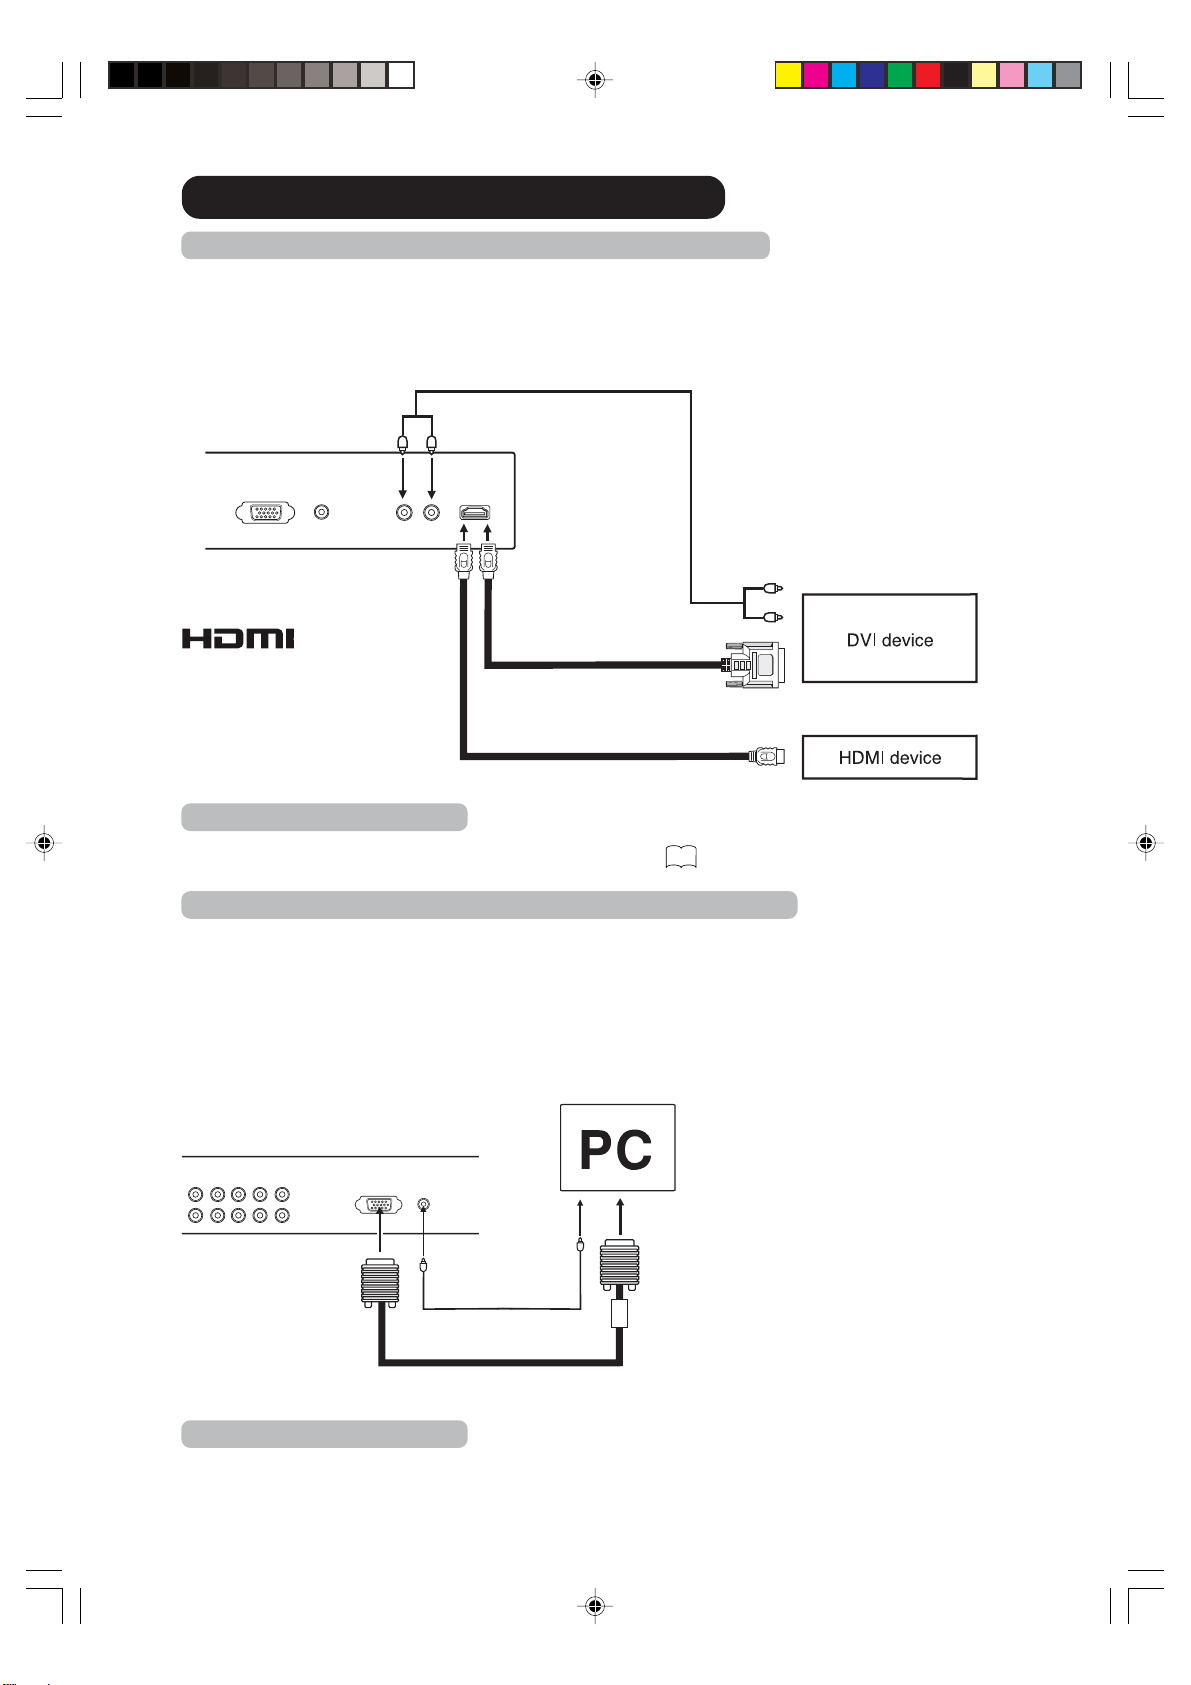
MODE Resolution Refresh rate
VGA 640x480 60Hz
VGA 720x400 70Hz
WVGA 848x480 60Hz
SVGA 800x600 60Hz
XGA 1024x768 60Hz
WXGA 1280x720/768 60Hz
WXGA 1360x768 60Hz
Rear lower of the LCD television
To connect the LCD television to a HDMI or a DVI device
The HDMI input receives digital audio and uncompressed video from a HDMI device or uncompressed
digital video from a DVI device.
When you connect to a DVI device with a HDMI-to-DVI adapter cable, it transfers only the video signal.
Separate analog audio cords are required.
Rear lower of the
LCD television
HDMI - to - DVI adapter cable
(HDMI type A connector)
(not supplied)
Audio cord (not supplied)
HDMI cable (type A connector)
(not supplied)
To DVI output
To HDMI out
or
To PC AUDIO
IN jack
To PC IN
Connections to other equipment
NOTE:
You must choose an appropriate setting for each connection
36
.
To connect the LCD television to a PC (Personal Computer)
Before you connect this LCD television to your PC, change the adjustment of your PC’s Resolution and
Refresh rate (60 Hz).
Connect one end of a (male to male) VGA cable to the video card of the computer and the other end to
the
VGA connector PC MONITOR on the back of the
LCD television
. Attach the connectors firmly with the
screws on the plug.
In case of a Multimedia computer, connect the audio cable to the audio output of
your Multimedia computer and to the AUDIO connector of the PC AUDIO IN jack of the LCD television.
Switch on the computer. The LCD television can operate as the computer monitor.
Note:
If there is no video signal from the computer when the unit is in PC mode, “NO SYNC. SIGNAL” will appear
on the
TV-screen for approx. 10 seconds.
HDMI, the HDMI logo and High-
Definition Multimedia Interface
are trademarks or registered
trademarks of HDMI Licensing
LLC.
3V90441A [E] P13-17 31/10/05, 9:21 AM16
32LD380T
A
HITACHI
17
ENGLISH
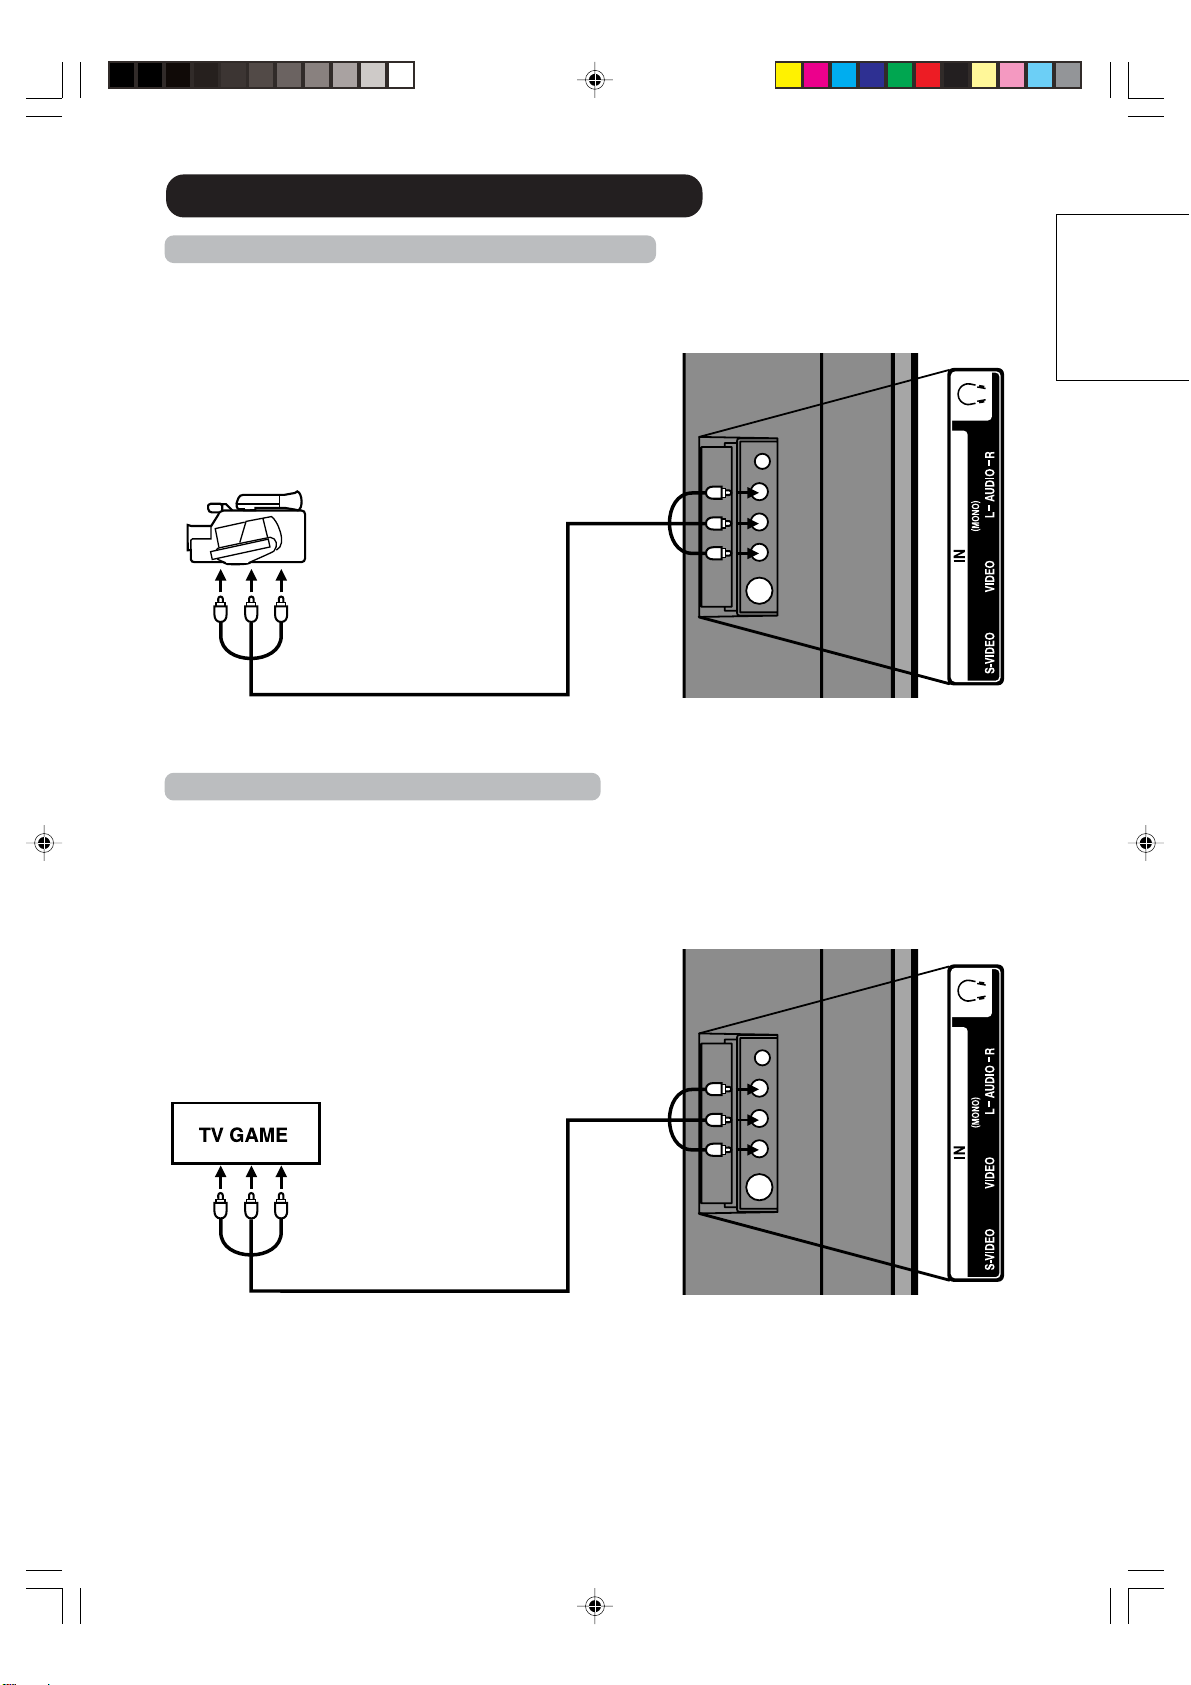
Side of the LCD television
Audio/Video cord (not supplied)
To Audio/Video OUT
Side of the LCD television
To Audio/Video OUT
Audio/Video cord (not supplied)
Connections to other equipment
To connect the LCD television to a camcorder
To playback from a camcorder, connect the camcorder to the LCD television as shown.
To connect the LCD television to a Game
The LCD television can also be used as a television device for many video games. However, due to the
wide variety of signals generated by these devices and subsequent hook-up variations required, they have
not all been included in the suggested connection diagrams. You'll need to consult each component's
Owner's Manual for additional information.
3V90441A [E] P13-17 31/10/05, 9:21 AM17
32LD380T
A
HITACHI
18
18
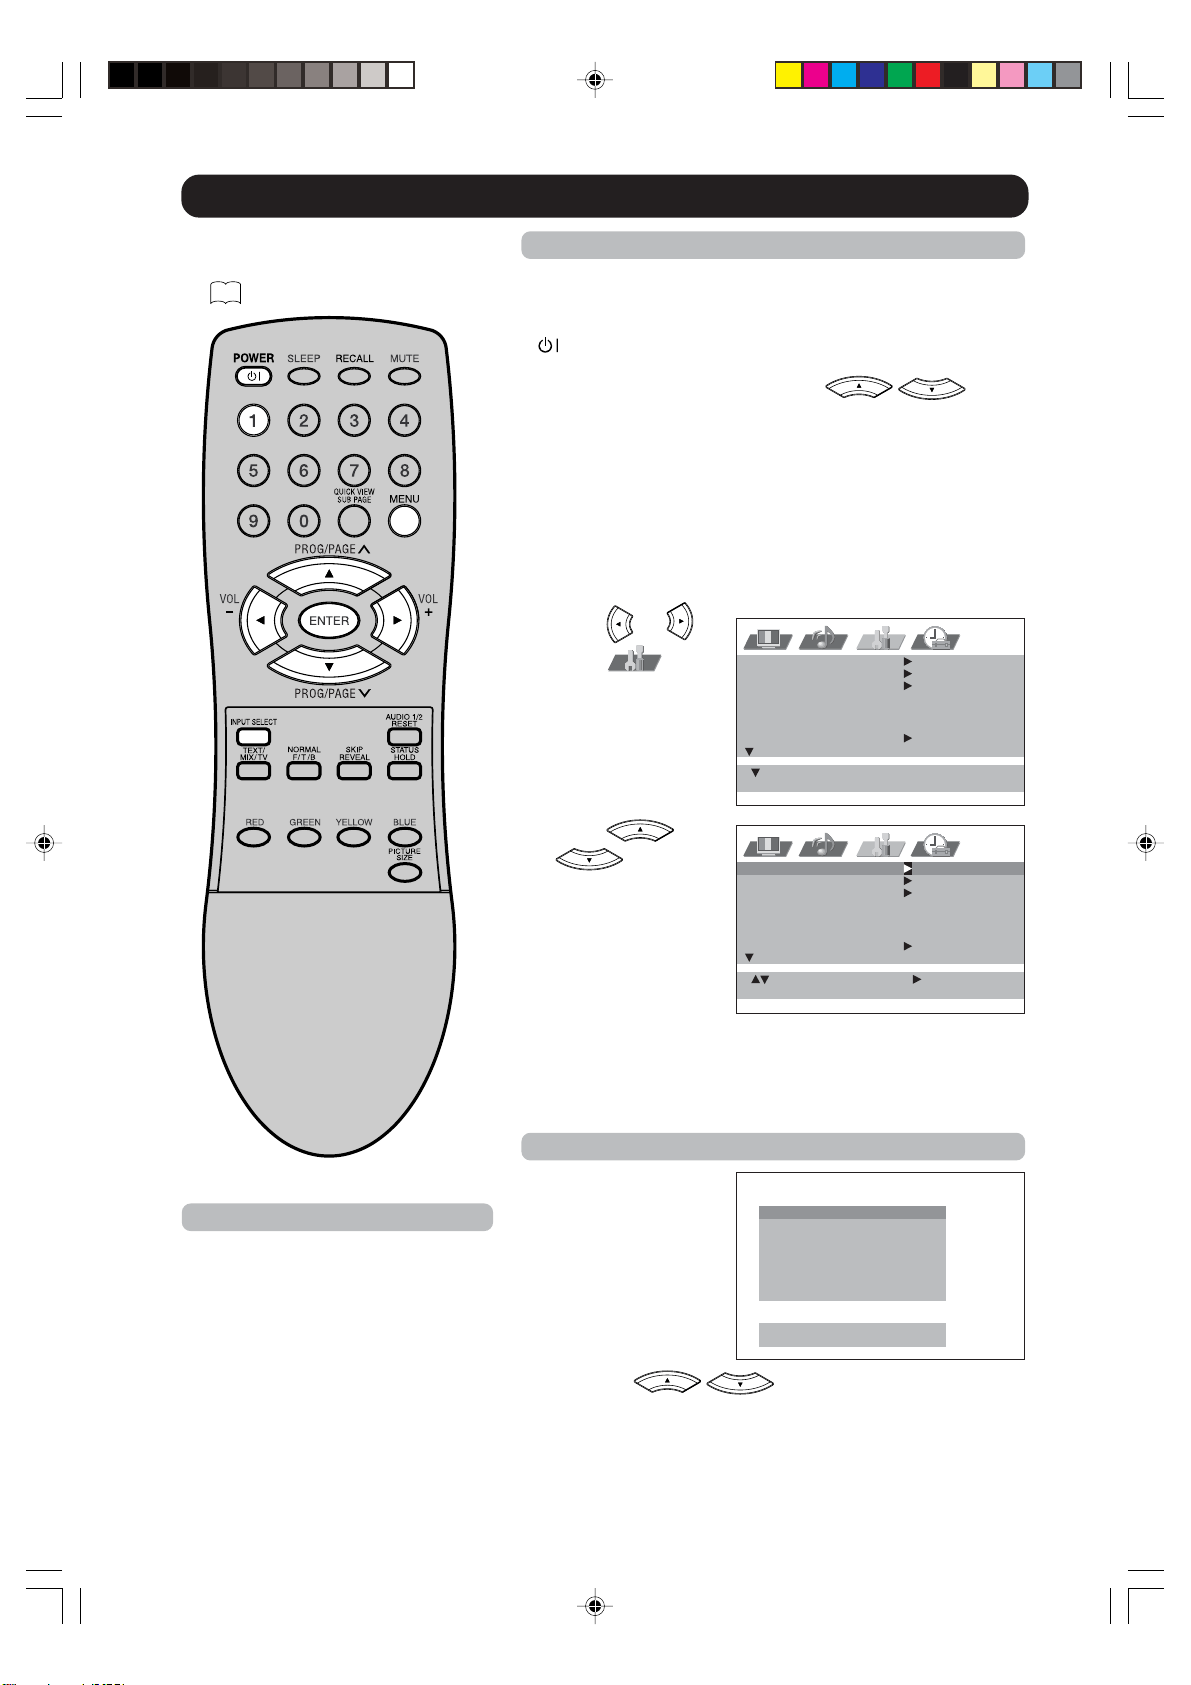
Quick guide for MENU-operation/Selecting the video input source
Make sure the antenna connection
and power supply as the description
on
12
.
: SELECT : ADJUST
: RETURNMENU
AUTO TUNING
MANUAL TUNING
SORT
TEXT LANGUAGE WEST
LANGUAGE ENGLISH
VERTICAL POSITION
: SELECT : EXITMENU
AUTO TUNING
MANUAL TUNING
SORT
TEXT LANGUAGE WEST
LANGUAGE ENGLISH
VERTICAL POSITION
Quick guide for MENU-operation
Preparation:
• Turn on the unit with Main Power Switch on the bottom left
of screen. Standby indicator will light up in red. Then press
(SUB-POWER) on the unit or remote control. Standby
indicator will change to green. You can also turn on the unit
with PROGRAM ▲/▼ on the unit or
/ on the
remote control.
• Press 1. CH1 will appear.
Call MENU and for example: Select AUTO TUNING.
1
Press MENU.
If you press MENU for the first time after the purchase, the
Language-selection screen (step 1 on next page) will
appear.
2
Press or to
select
.
3
Press or
to select
AUTO TUNING.
... on the following
pages the MENU can
be called in the same
way as here.
4
Press MENU repeatedly until the MENU disappears.
Note:
If no buttons are pressed for more than
approx. 60 seconds, the MENU
disappears automatically.
Selecting the video input source
Press INPUT SELECT to
view a signal from another
device connected to your
TV, such as a VCR or
DVD player. You can
select each input source
depending on which input
jacks you used to connect
your devices.
To select the video input
source, press
/ or the corresponding number
button. Then press ENTER within 6 seconds.
0
1
2
3
4
5
6
7
.
.
.
.
.
.
.
.
T
A
A
A
C
C
H
P
V
V
V
V
O
O
D
C
1
2
3
M
M
M
P
P
I
O
O
N
N
E
E
N
N
T
T
1
2
[
E
0
N
–
T
7
E
]
R
:
:
S
S
E
E
L
T
ECT
3V90441A [E] P18-24 31/10/05, 9:21 AM18
32LD380T
A
HITACHI
19
ENGLISH
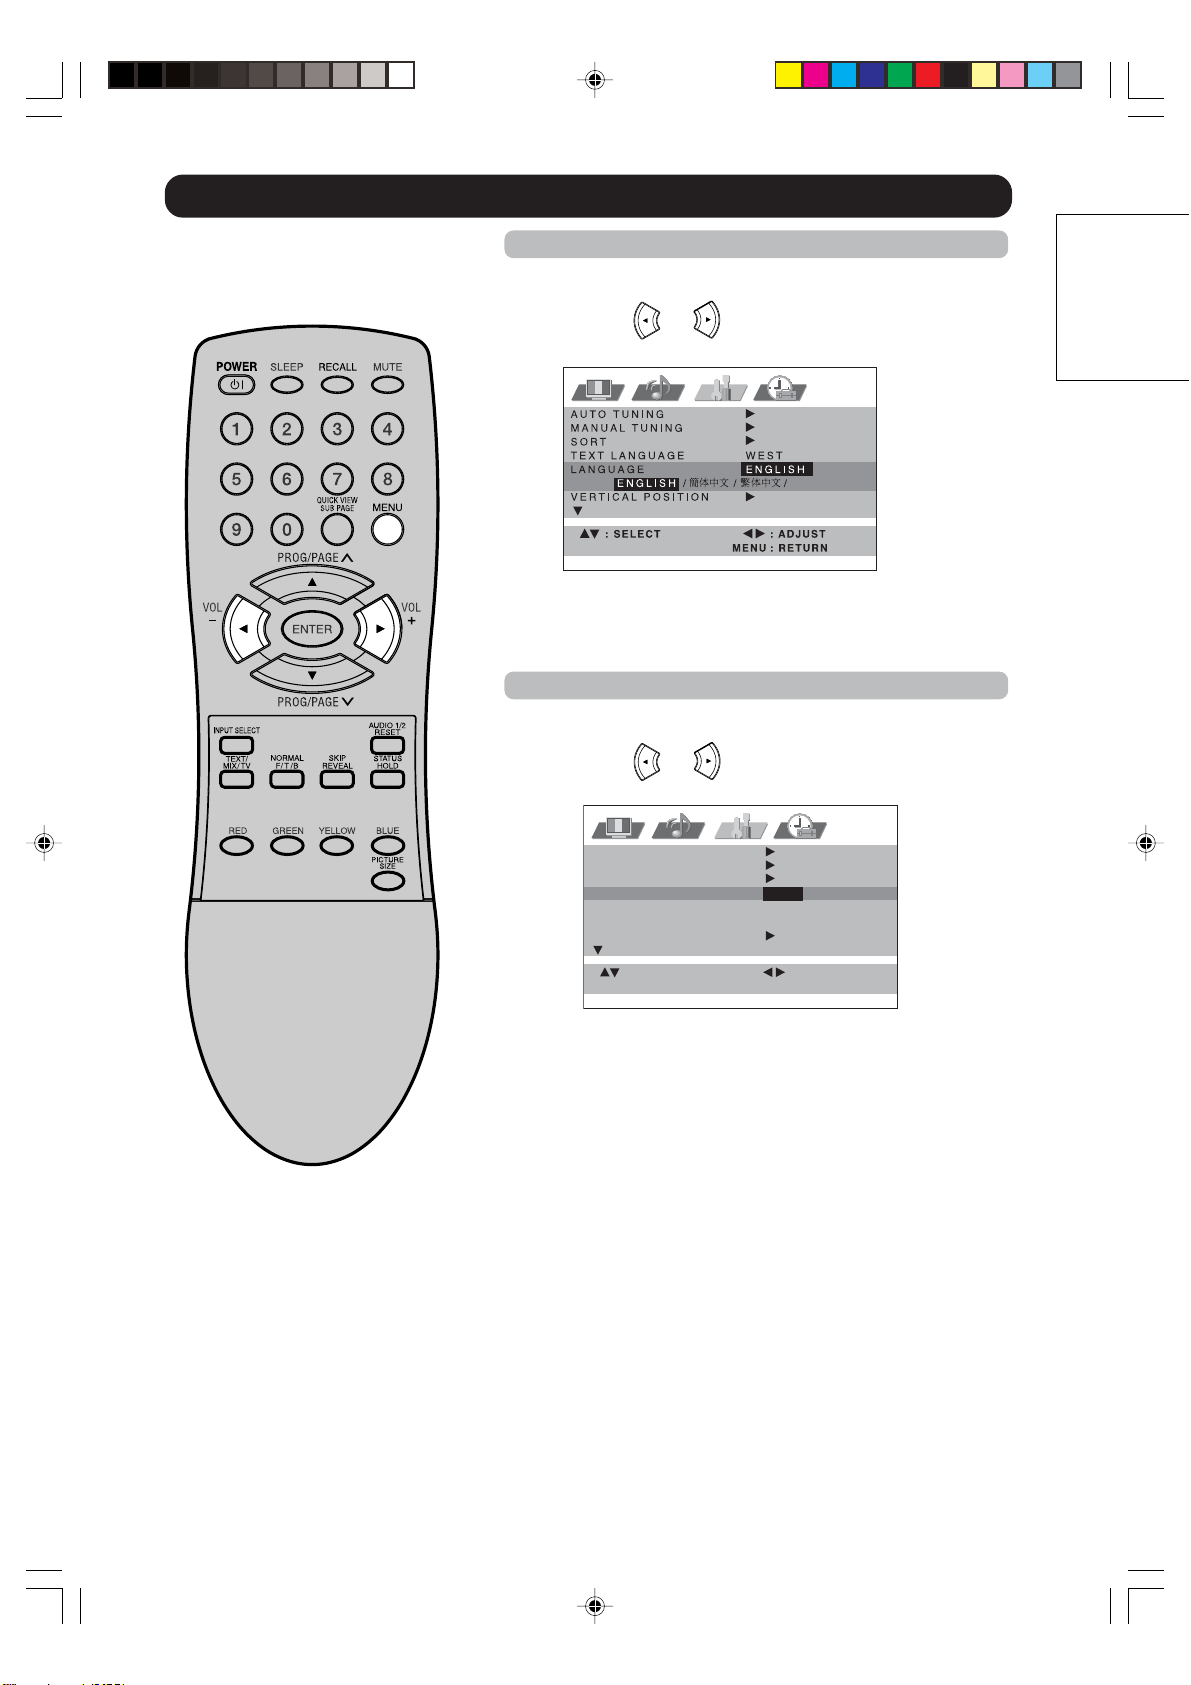
On-screen Language Selection/Teletext Language Selection
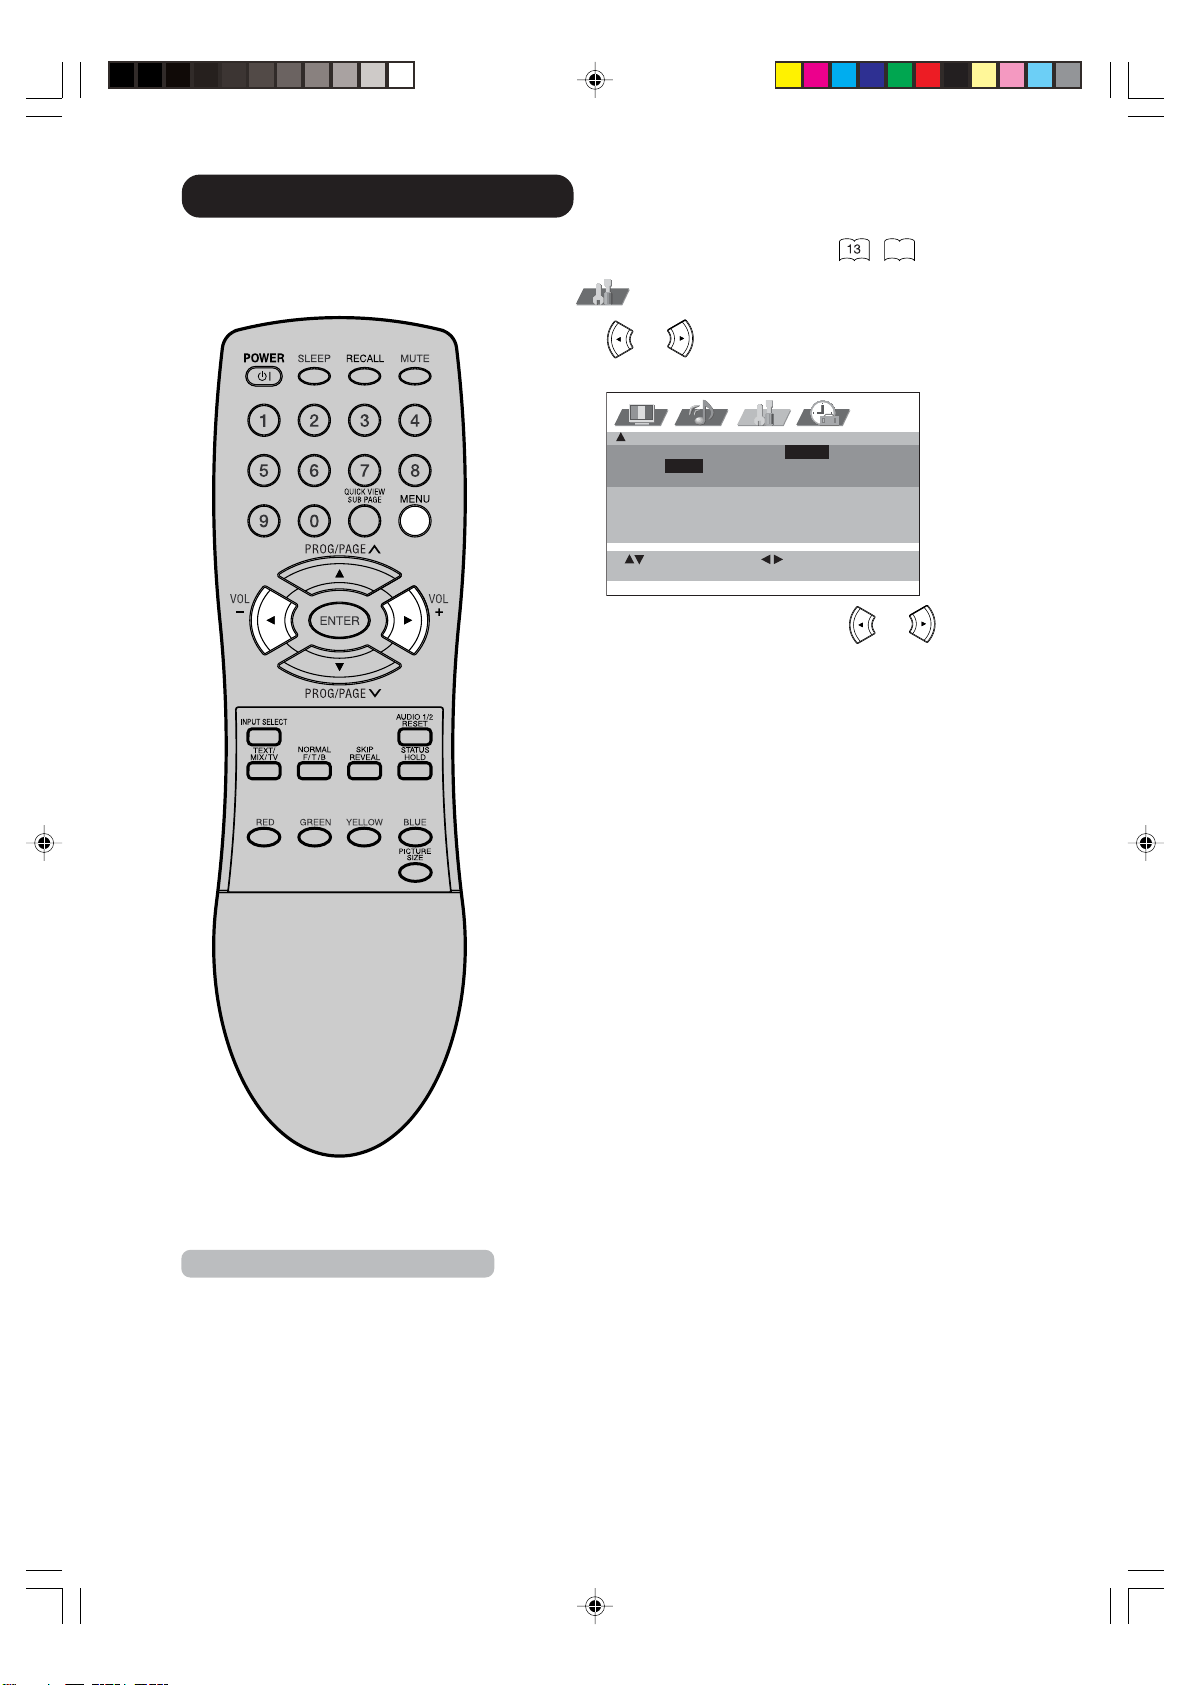
1
Select LANGUAGE.
Then press
or to select the desired language.
2
Press MENU repeatedly until the MENU disappears.
On-screen Language Selection
1
Select TEXT LANGUAGE.
Then press
or to select WEST or EAST.
2
Press MENU repeatedly until the MENU disappears.
PìCCäàâ
: SELECT : ADJUST
: RETURNMENU
AUTO TUNING
MANUAL TUNING
SORT
TEXT LANGUAGE WEST/EAST
LANGUAGE ENGLISH
VERTICAL POSITION
Teletext Language Selection
3V90441A [E] P18-24 31/10/05, 9:21 AM19
32LD380T
A
HITACHI

20
20
PAL CH 1
: RETURNMENU
Automatic station presetting with the built-in Tuner
Your television has an Automatic Tuning System which makes tuning in your television easy. This
Automatic Tuning System scans the entire reception range in your area and automatically stores
all available channels of suitable signal strength in the correct order. Please note that the Auto
tuning facility can only search for analogue signals - if you have any digital decoders connected,
please refer to their instructions for details of how to set them up.
: SELECT : ADJUST
: RETURNMENU
AUTO TUNING
MANUAL TUNING
SORT
TEXT LANGUAGE WEST
LANGUAGE ENGLISH
VERTICAL POSITION
Preparation:
Connect a antenna or a cable-net.
Do not connect any other unit or cable.
To avoid every reception disturbance, all connected unit must
be turned off and power supply is disconnected.
Press 1-button. CH1 will appear.
1
Select AUTO TUNING.
2
Then press .
The broadcast-searcher searches the broadcasts and
stores them in order. During the search the sound is
muted.
When all programs have been stored, the AUTO TUNING
menu will appear automatically.
Note:
If you receive a signal of NTSC4.43 from
ANT IN (e
.g. connect with your VCR) and
then tuning with AUTO TUNING, its color
and sound may not come out. But it is
not a failure.
In case you tune to the NTSC4.43-
signal, perform MANUAL TUNING on
setting color system on step 2 as
“NTSC4.43”.
3V90441A [E] P18-24 31/10/05, 9:21 AM20
32LD380T
A
HITACHI
21
ENGLISH
Change the order of stored channel
1
Select SORT.
Then press
.
2
Press or until the position number that
you want to move appears (e.g. CH 40), then press
ENTER.
3
Press or until the program-position on
which you want to put the moving program appears (e.g.
CH 5), then press ENTER.
4
The original program 40 is now stored in memory position 5.
To arrange the other channels, repeat this procedure.
5
Press MENU repeatedly until the MENU disappears.
The Automatic station presetting
stores the found station in a
specific order. This order can be
changed.
: SELECT : ADJUST
: RETURNMENU
AUTO TUNING
MANUAL TUNING
SORT
TEXT LANGUAGE WEST
LANGUAGE ENGLISH
VERTICAL POSITION
Note:
To arrange all channels, begin with pro-
g
ram 1.
Furthermore, continue this procedure to
select the broadcast that should be seen
on program-position 2, 3, 4 and so on.
3V90441A [E] P18-24 31/10/05, 9:21 AM21
32LD380T
A
HITACHI
22
22
Example: Preset the BBC on program position 2.
1
Select MANUAL TUNING. Then press .
2
Press or to select color system (e.g. PAL).
Then press ENTER.
3
Press . The auto search starts forward. It will stop at
each station with good reception. Press
again until you
receive the BBC. Then press ENTER.
4
Press or to select sound system (e.g. AUTO).
Then press ENTER.
5
The channel position number will be highlighted. Press
or repeatedly until the number next to
CH change to 2. Then press ENTER.
The BBC was now stored in the channel position CH 2.
6
Repeat the steps 2 - 5 to preset other TV stations.
7
Press MENU repeatedly until the MENU disappears.
Usually Automatic station presetting stores all stations of each reception-area. In case of bad
receiving condition, some broadcasts may not be stored. These stations can also be stored
manually.
: RETURNMENU: SET
ENTER
PAL CH 1
AUTO
: ADJUST
: SELECT : ADJUST
: RETURNMENU
AUTO TUNING
MANUAL TUNING
SORT
TEXT LANGUAGE WEST
LANGUAGE ENGLISH
VERTICAL POSITION
Manual TV station presetting
Notes:
• The auto search stops at the best
receiving position automatically
.
A manual fine tuning is normally not
necessary. If want, you can do the
manual fine tuning additionally. In
step 3, when the auto search
stopped at each station, press
or until the desired
fine tuning achieved.
Then press ENTER.
• The search moves up to the next
station position automatically. If
want, you can also hold the search
manually. Press
or at the
desired position. The search keeps
hold. If want, do the fine tuning as
the description above.
: RETURNMENU: SET
ENTER
: ADJUST
3V90441A [E] P18-24 31/10/05, 9:21 AM22
32LD380T
A
HITACHI
23
ENGLISH
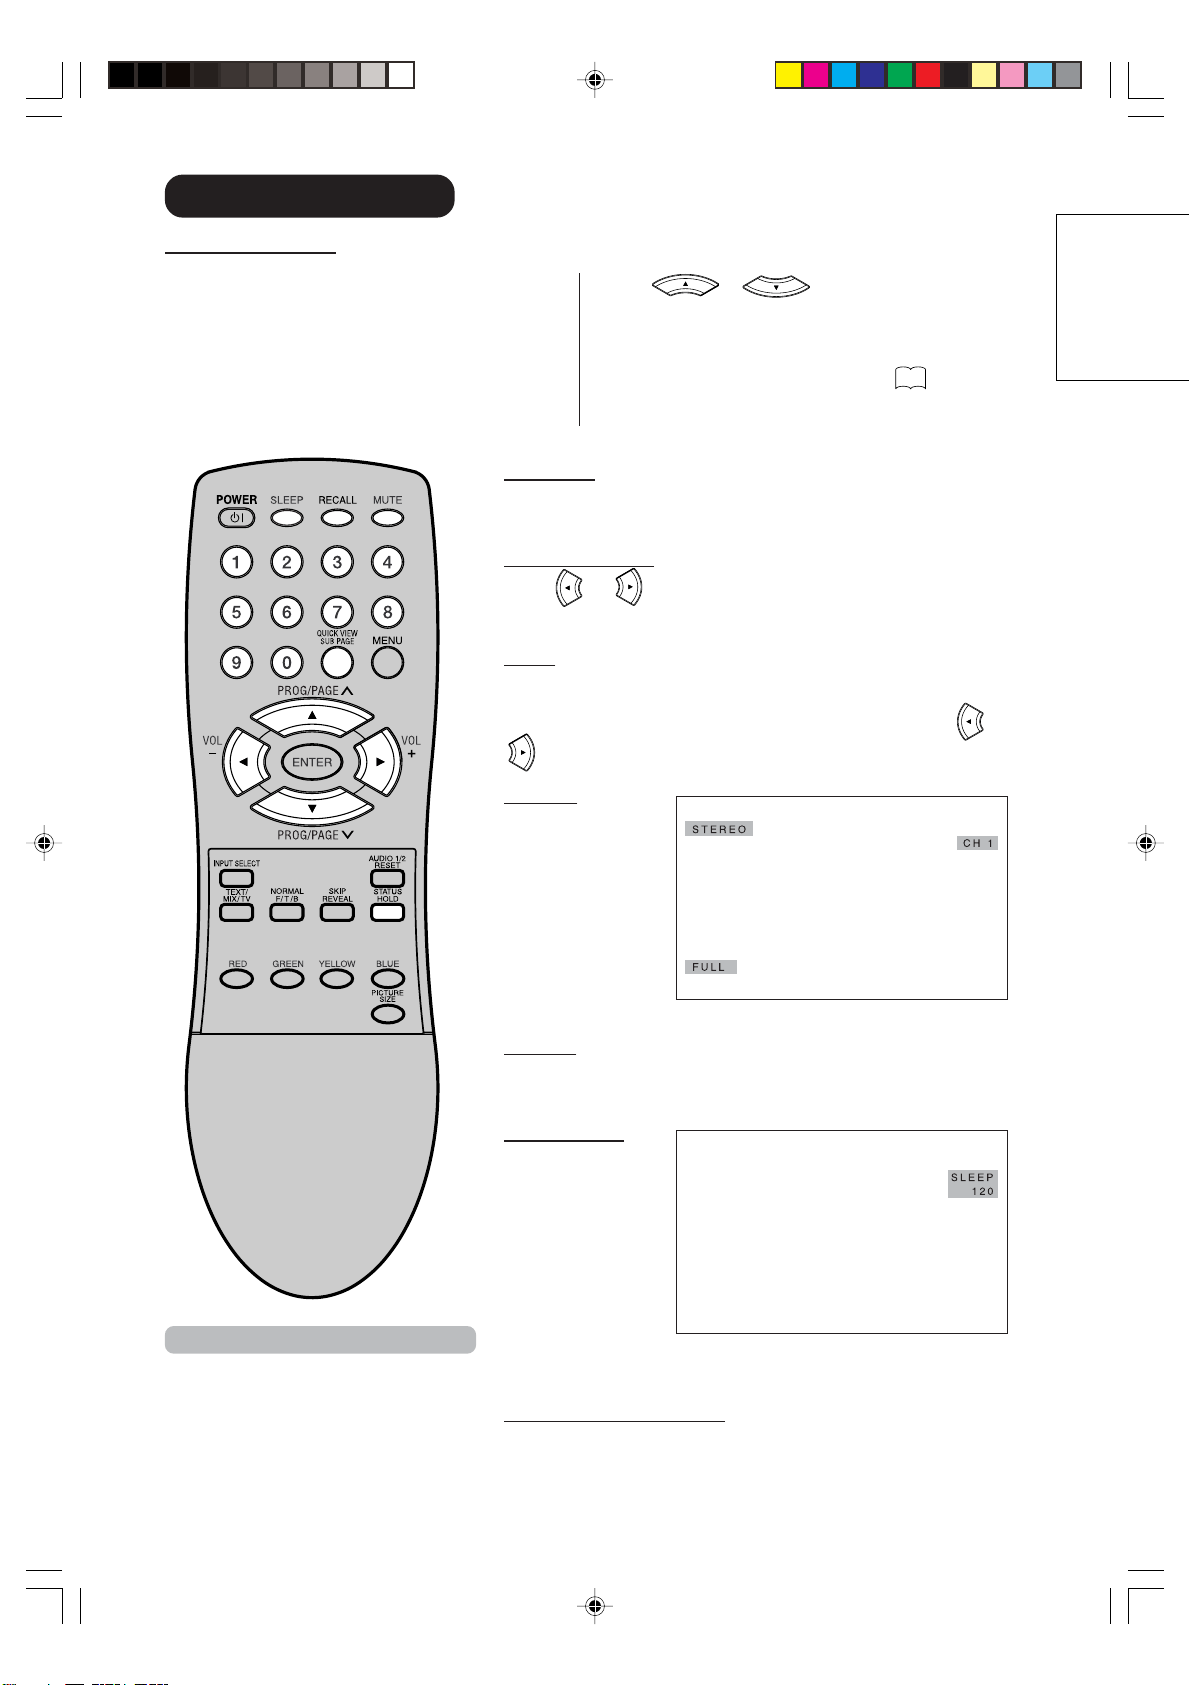
Basic Operation
Press or to change to the program
forward or backward. The changing takes approx. 2
seconds. If the auto search stored only 5 stations,
these only 5 also will appear. Still uncovered or
hidden store position will not appear
39
.
Channel selection
With the 10 number buttons.
Example:
• CH 2: Press 0, 0, 2 continuously. The station
stored in the position 2 will appear.
• CH 29: Press 0, 2, 9 continuously. The station
stored in the position 29 will appear.
• CH 107: Press 1, 0, 7 continuously. The station
stored in the position 107 will appear.
QuickView
QUICK VIEW button allows you to go back to the last selected
channel.
Volume adjusting
Press
or to adjust the volume. The volume level
disappears after 4 seconds.
MUTE
Press MUTE. The sound will be cut off. MUTE will appear for
approx. 4 seconds.
The muting can be released by pressing MUTE again or
or
.
RECALL
Press RECALL.
Channel number
and wide screen
type will appear.
The display will
disappear after 4
seconds.
STATUS
Press STATUS. The clock and a program information will appear
approx. 2 seconds later, if the station supported.
SLEEP TIMER
Press SLEEP.
SLEEP and the
minutes until the
shut-off will
appear. Each time
you press SLEEP
the number near
SLEEP will
change.
When the displayed time runs out, the unit will switch to
standby. The display will disappear after approx. 4 seconds.
To cancel the sleep timer:
Press SLEEP repeatedly until “0” appears.
Note:
If the built-in tuner does not receive
an
ything (e.g. if no antenna is con-
nected) during TV-operation, then the
TV-unit will change to standby after
approx. 15 minutes.
3V90441A [E] P18-24 31/10/05, 9:22 AM23
32LD380T
A
HITACHI
24
Timer functions
The on timer feature allows you to
automatically turn on your TV after a
preset amount of time (up to 12
hours and 59 minutes) at the
selected channel.
The off timer also allows you to turn
off your TV after a preset amount of
time. You can set the off timer in
conjunction with the on timer.
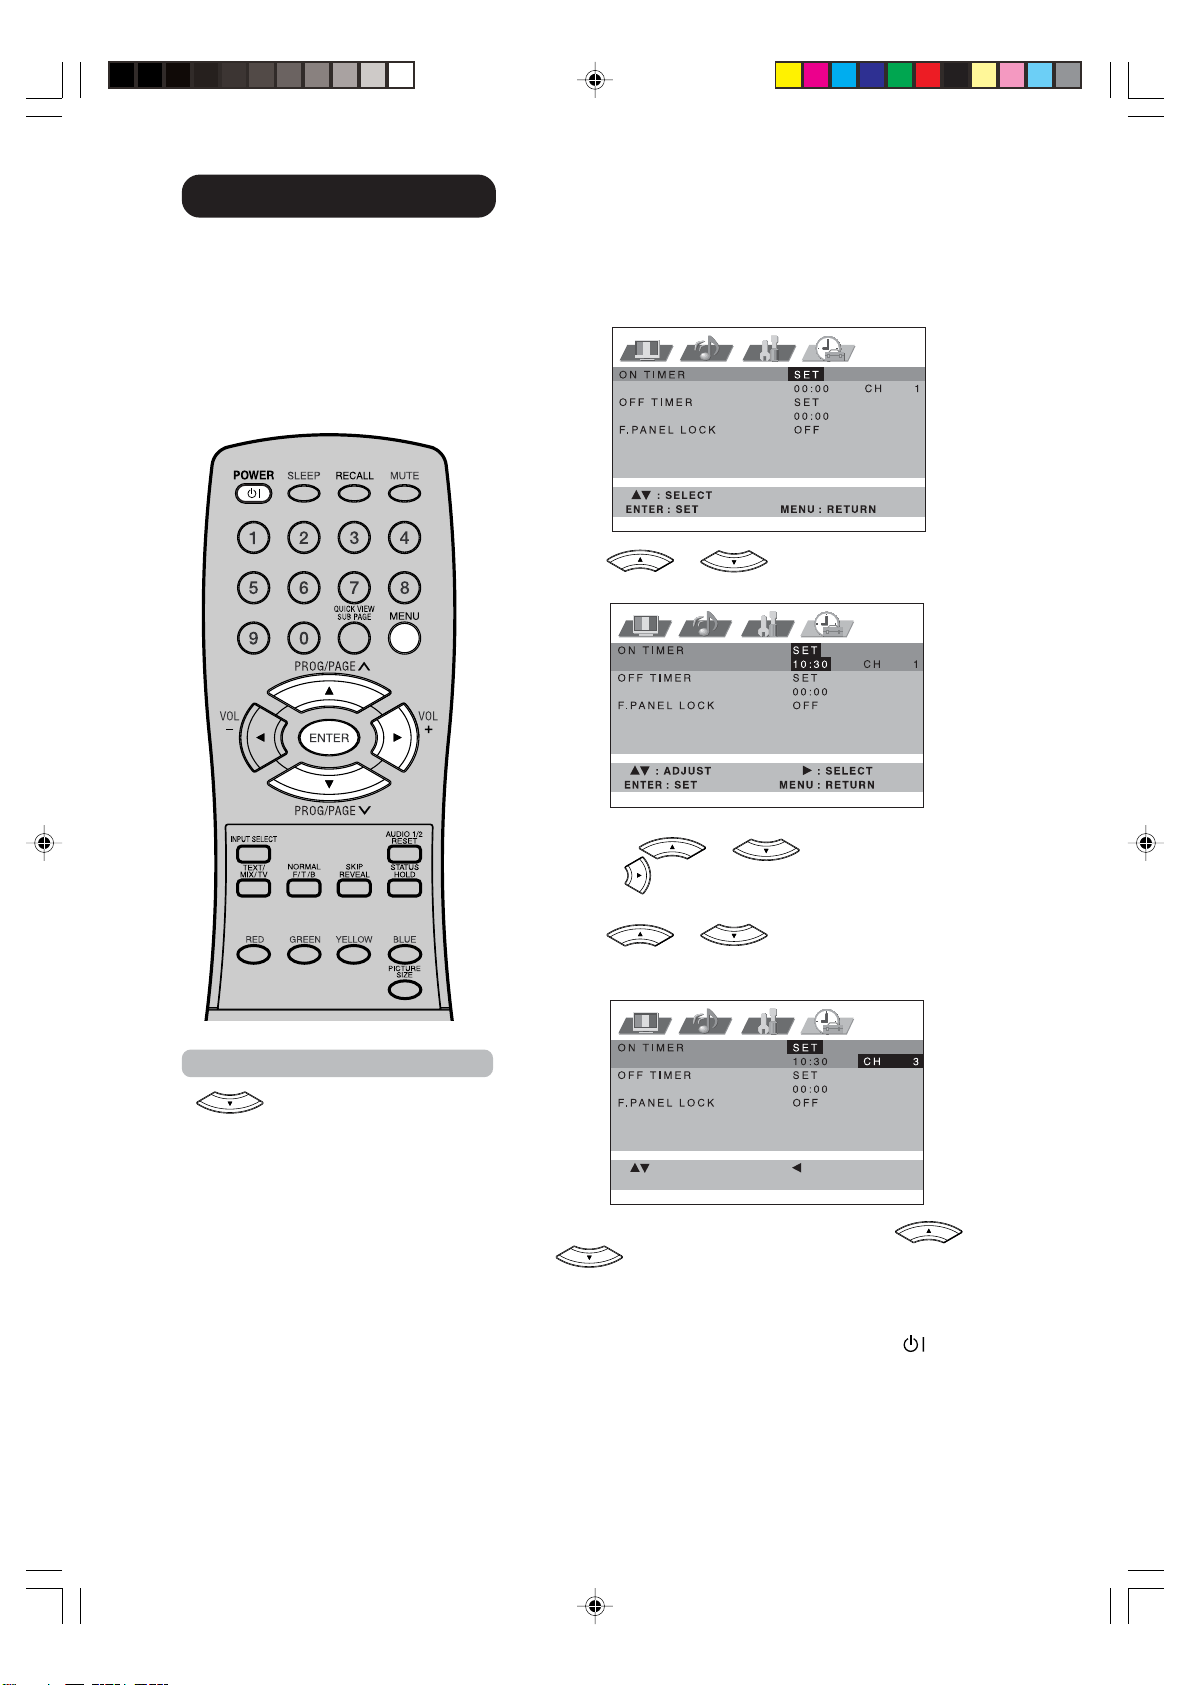
Example: Turning on the TV to channel 3 at 10:30.
1
Select ON TIMER.
Then press ENTER.
2
Press or to enter the hours and minutes
at which you want your TV to automatically switch on.
• For rapid time change in ten minute intervals, press and
hold the
or button.
Press
.
3
Press or to select the channel you wish
to display when you TV switches on.
Press ENTER.
If you wish to set the OFF TIMER, press
or
to select OFF TIMER at step 1.
4
Press MENU repeatedly until the MENU disappears.
Put your TV into standby mode by pressing
(SUB-
POWER) button.
MENU: SET
ENTER
: RETURN
: SELECT: ADJUST
Notes:
•
button allows you to set the
time in step 2 backward.
• When a timer-event is executed, the
timer will return to 00:00.
• If the OFF TIMER and SLEEP-
timer overlapped, the TV will shut off
with the earlier reached timer.
• The TV will automatically turn off
approximately 1 hour later after the
ON TIMER turns on the TV. If you
wish to continue watching the TV,
press any button to cancel the one
hour automatic shut off. This shut off
feature prevents the TV from playing
continuously if no OFF TIMER is set.
If OFF TIMER is set, the shut off
feature does not work.
3V90441A [E] P18-24 31/10/05, 9:22 AM24
32LD380T
A
HITACHI
25
ENGLISH
Stereo reception with the built-in tuner
This built-in Tuner can receive
Stereo-/2 channel-program. In case
the Stereo broadcast was send out
with NICAM, this unit can
distinguish these NICAM Stereo
broadcasts automatically.
Notes:
• In case of bad reception, the stereo
sound also can be disturbed.
•
A stereo is not available in the
broadcast area of only NTSC.
"NICAM ST" illuminates
for approx. 4 seconds
when a NICAM
STEREO broadcast
signal is received.
"NICAM M1"
illuminates for approx.
4 seconds when a
NICAM MONO A
broadcast signal is
received.
"NICAM M1/M2"
illuminates for approx.
4 seconds when a
NICAM MONO A and
MONO B broadcast
signal is received.
It will be displayed for
the NICAM signal for
approx. 4 seconds
when the "NICAM OFF"
is selected in menu
screen.
A2 Stereo reception
"STEREO" illuminates
for approx. 4 seconds
when a A2 STEREO
broadcast signal is
received.
NICAM AUTO / OFF
BASS 25
TREBLE 25
BALANCE 0
PERFECT VOLUME OFF
SPEAKERS ON
HDMI HDMI
: SELECT : ADJUST
: RETURNMENU
NICAM stereo sound reception:
1
Select NICAM.
Press
or to select AUTO or OFF.
Select OFF if you want no NICAM-reception.
2
Press MENU repeatedly until the MENU disappears.
Followings can be displayed by NICAM-reception.
3V90441A [E] P25-31 31/10/05, 9:22 AM25
32LD380T
A
HITACHI
26
Stereo reception with the built-in tuner
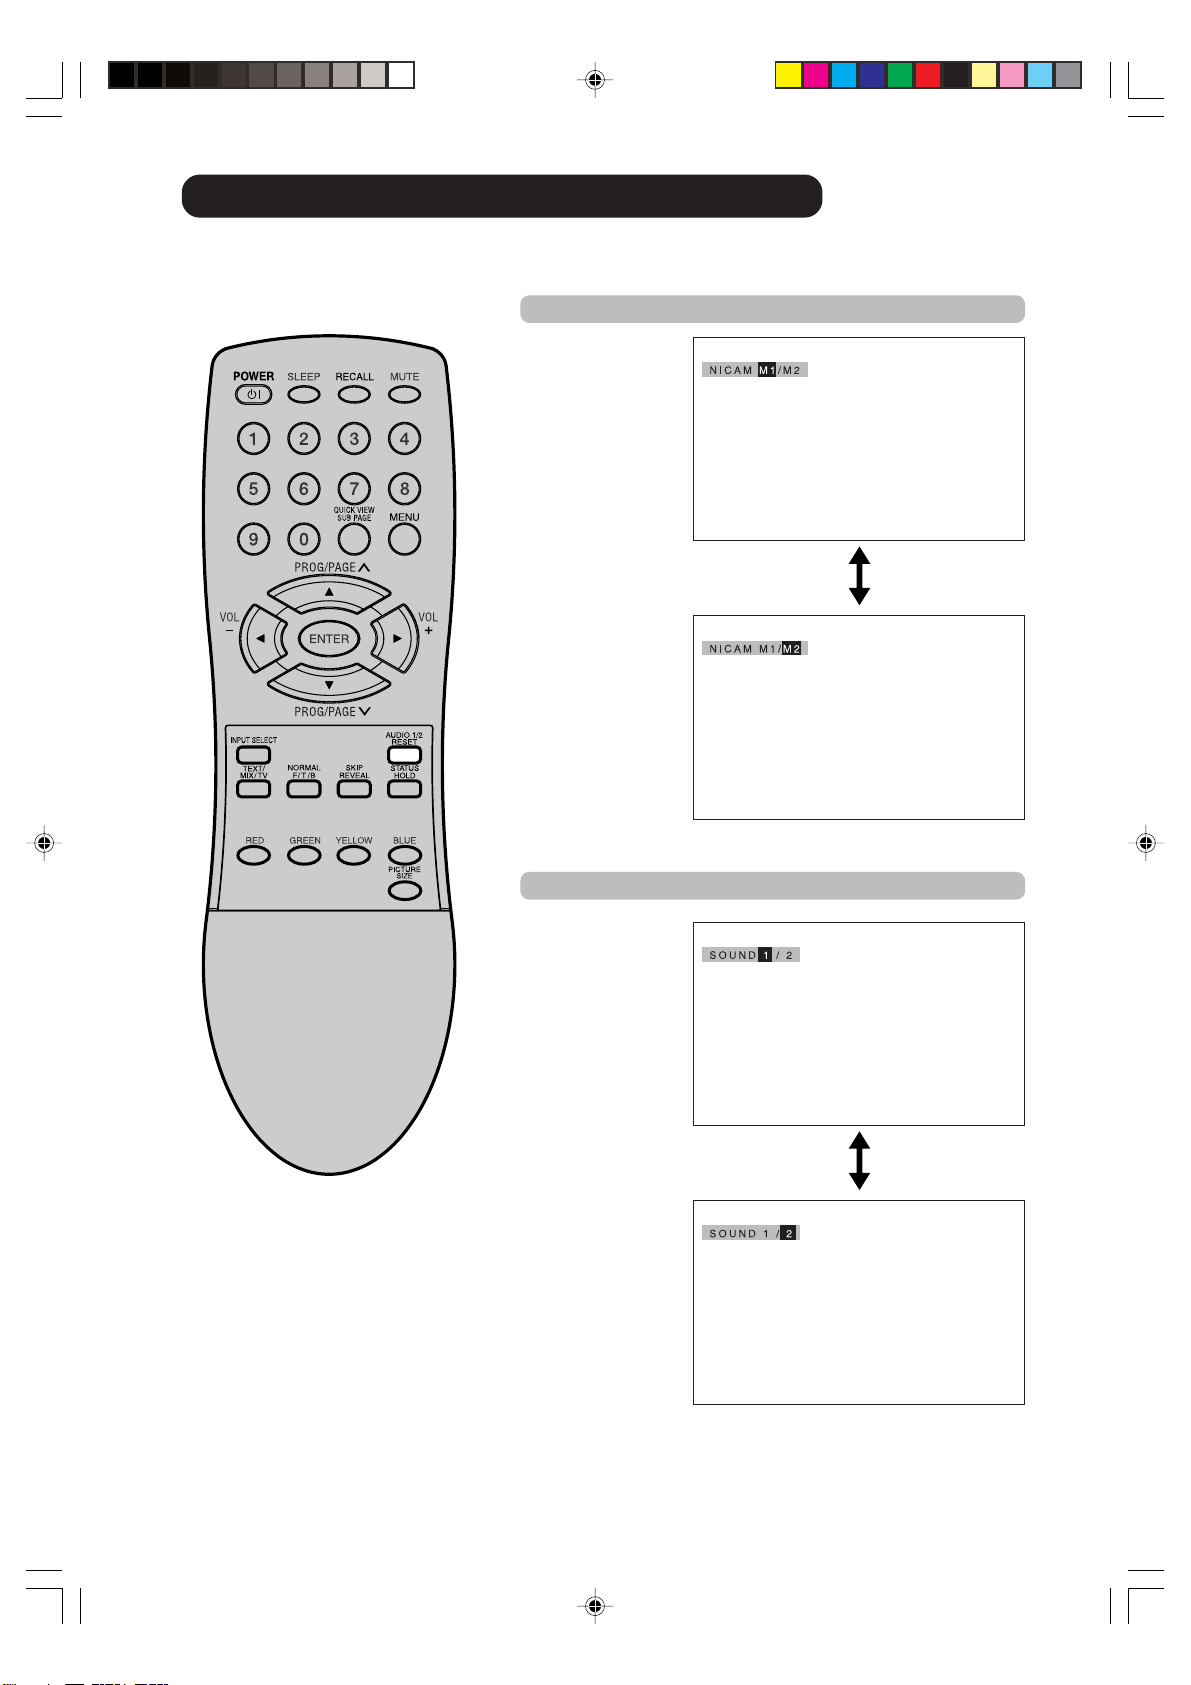
In case of 2 channel-sound reception,
you can select the desired sound with
AUDIO 1/2.
Each time you press the AUDIO 1/2, the both sound channels
alternate with each other.
NICAM-2 channel-Sound reception
A2 STEREO-2 channel-Sound reception
3V90441A [E] P25-31 31/10/05, 9:22 AM26
32LD380T
A
HITACHI
27
ENGLISH
Bass, Treble and Balance/Perfect Volume
1
Select BASS. Then press or to adjust the bass.
If you wish to set the treble or balance, press
or to select TREBLE or BALANCE.
2
Press MENU repeatedly until the MENU disappears.
NICAM AUTO
BASS 25
TREBLE 25
BALANCE 0
PERFECT VOLUME OFF
SPEAKERS ON
HDMI HDMI
: RETURNMENU
: ADJUST: SELECT
: RESET
NORMAL
Bass, Treble, and Balance
Perfect volume
This will automatically adjust volume so each channel and input
has the same average volume level.
1
Select PERFECT VOLUME. Then press or to
select ON or OFF.
2
Press MENU repeatedly until the MENU disappears.
NICAM AUTO
BASS 25
TREBLE 25
BALANCE 0
PERFECT VOLUME ON/OFF
SPEAKERS ON
HDMI HDMI
: RETURNMENU
: ADJUST: SELECT
Note:
To centralize BASS, TREBLE and
BALANCE, press MENU and select
each setting option (e.g. BASS). Then
press NORMAL. The selected option
return to center level.
3V90441A [E] P25-31 31/10/05, 9:22 AM27
32LD380T
A
HITACHI

28
Turning off the built-in speakers/Using the wow
TM
surround sound feature
NICAM AUTO
BASS 25
TREBLE 25
BALANCE 0
PERFECT VOLUME OFF
SPEAKERS ON / OFF
HDMI HDMI
: RETURNMENU
: ADJUST: SELECT
Turning off the built-in speakers
Use this feature to turn the TV speakers off when you connect
an audio system
15
.
1
Select SPEAKERS.
Then press
or to select ON or OFF.
2
Press MENU repeatedly until the MENU disappears.
Notes:
• Make sure the volume control of your
audio amplifier is set to a moder
ate
listening level.
• If the broadcast is monaural, the
SRS 3D effect will not work.
• The headphone jack, variable audio
OUT jacks and Subwoofer OUT jack
do not output any of the WOW audio
features.
WOW, SRS and
®
symbol are
trademarks of SRS Labs, Inc.
WOW technology is incorporated
under license from SRS Labs, Inc.
WOW SRS 3D ON / OFF
FOCUS ON
TruBass HIGH
: RETURNMENU
: ADJUST: SELECT
Using the WOW™ surround sound feature
WOW is a special combination of SRS Labs audio technologies
that creates a thrilling surround sound experience with deep,
rich bass from stereo sound sources. Your TV’s audio will
sound fuller, richer, and wider. WOW consists of three features;
SRS 3D, FOCUS, and TruBass.
1
Select desired WOW feature you want to adjust.
Then press
or to select the desired mode.
• SRS 3D — To turn on or off the surround sound effect.
• FOCUS — To turn on or off the vocal emphasis effect.
• TruBass — To select your desired bass expansion level
(HIGH, LOW or OFF).
2
Press MENU repeatedly until the MENU disappears.
3V90441A [E] P25-31 31/10/05, 9:22 AM28
32LD380T
A
HITACHI
29
ENGLISH
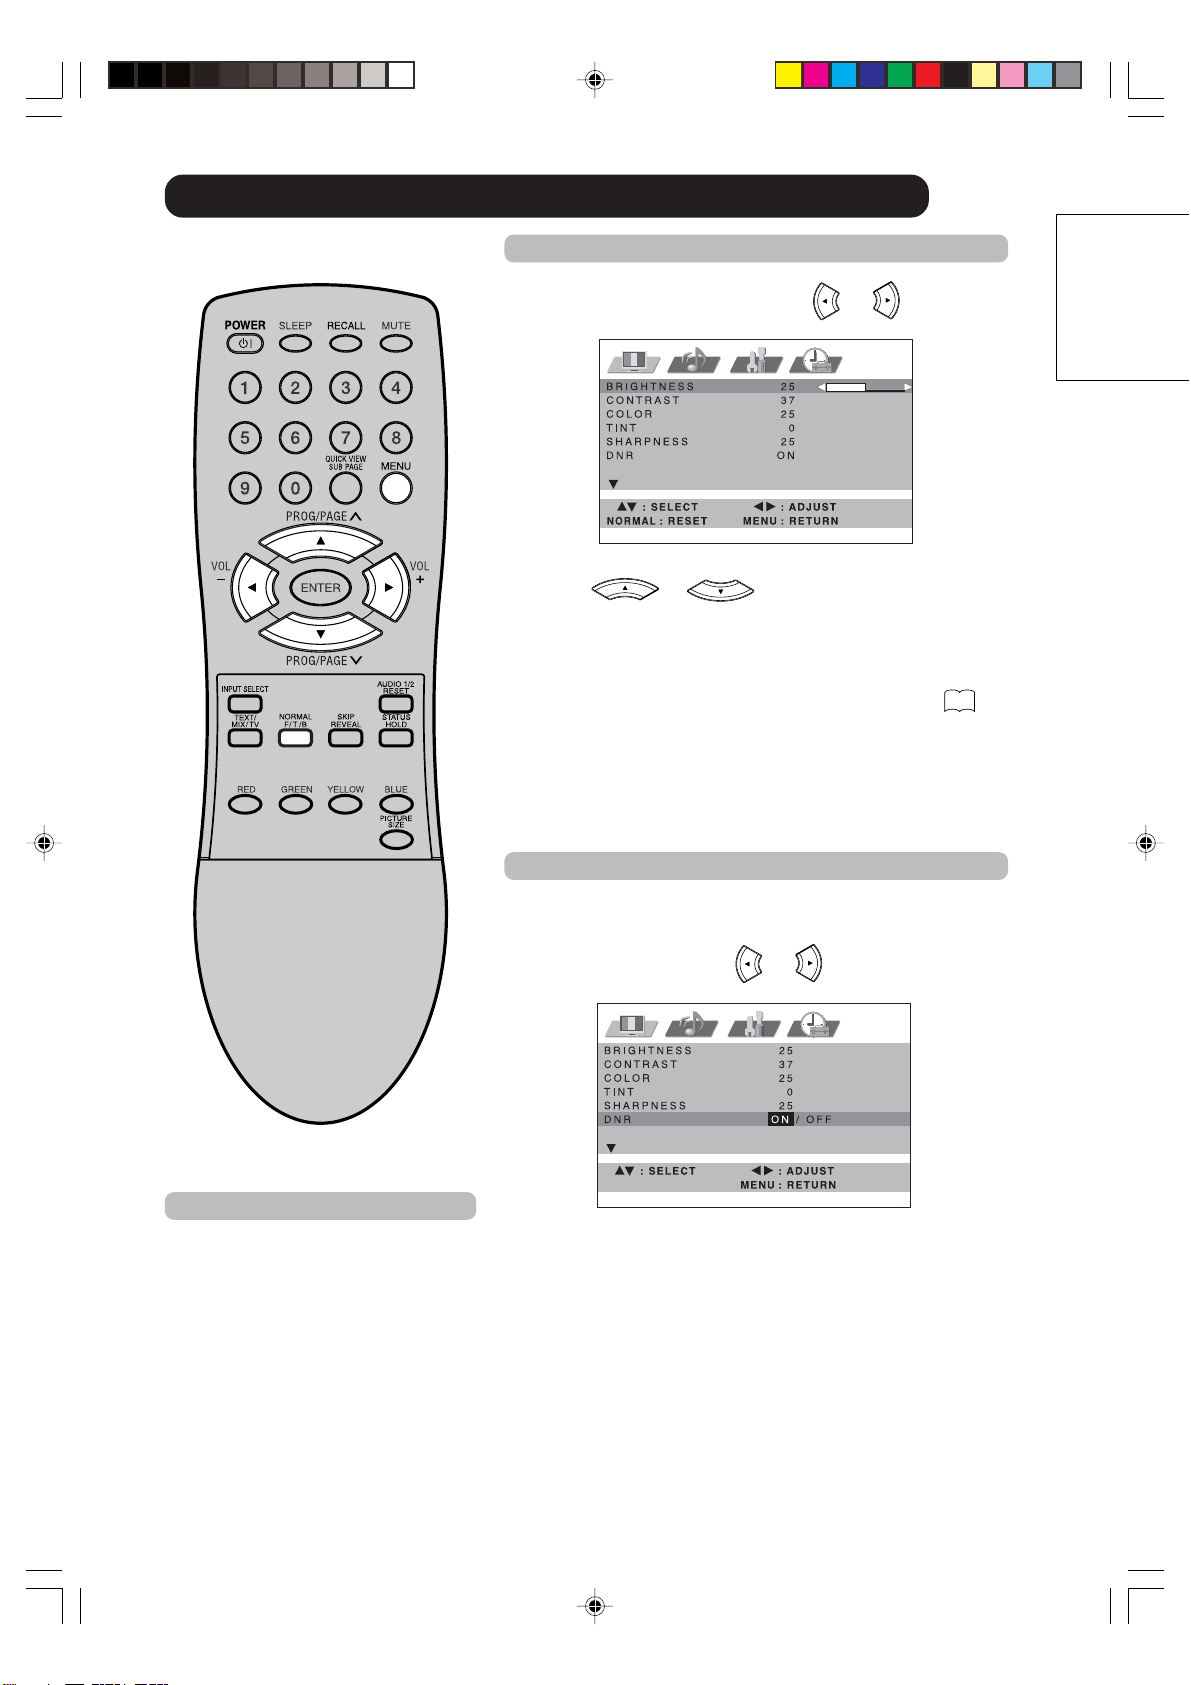
Brightness, Contrast, Color and Sharpness/DNR
1
Select BRIGHTNESS. Then press or to adjust the
brightness.
If you wish to set the contrast, color, tint, or sharpness,
press
or to select CONTRAST,
COLOR, TINT, or SHARPNESS.
The menu “TINT” can be selected at AV-Playback, if a
NTSC 3.58MHz signal comes in through a AV socket and
NTSC or AUTO was selected at COLOR SYSTEM
40
.
2
Press MENU repeatedly until the MENU disappears.
2
Press MENU repeatedly until the MENU disappears.
Brightness, Contrast, Colour and Sharpness
DNR
DNR (Digital Noise Reduction) can reduce the roughness of
the picture.
1
Select DNR. Then press or to select ON or
OFF.
Notes:
• To centralize these picture adjust-
ments, press NORMAL in step 1.
•
In HDMI or COMPONENT mode, the
“DNR”-option can not be selected.
3V90441A [E] P25-31 31/10/05, 9:22 AM29
32LD380T
A
HITACHI
30
Selecting the color temperature/Film mode
COLOR
TEMPERATURE COOL
COOL / NORMAL / WARM
FILM MODE OFF
: RETURNMENU
: ADJUST: SELECT
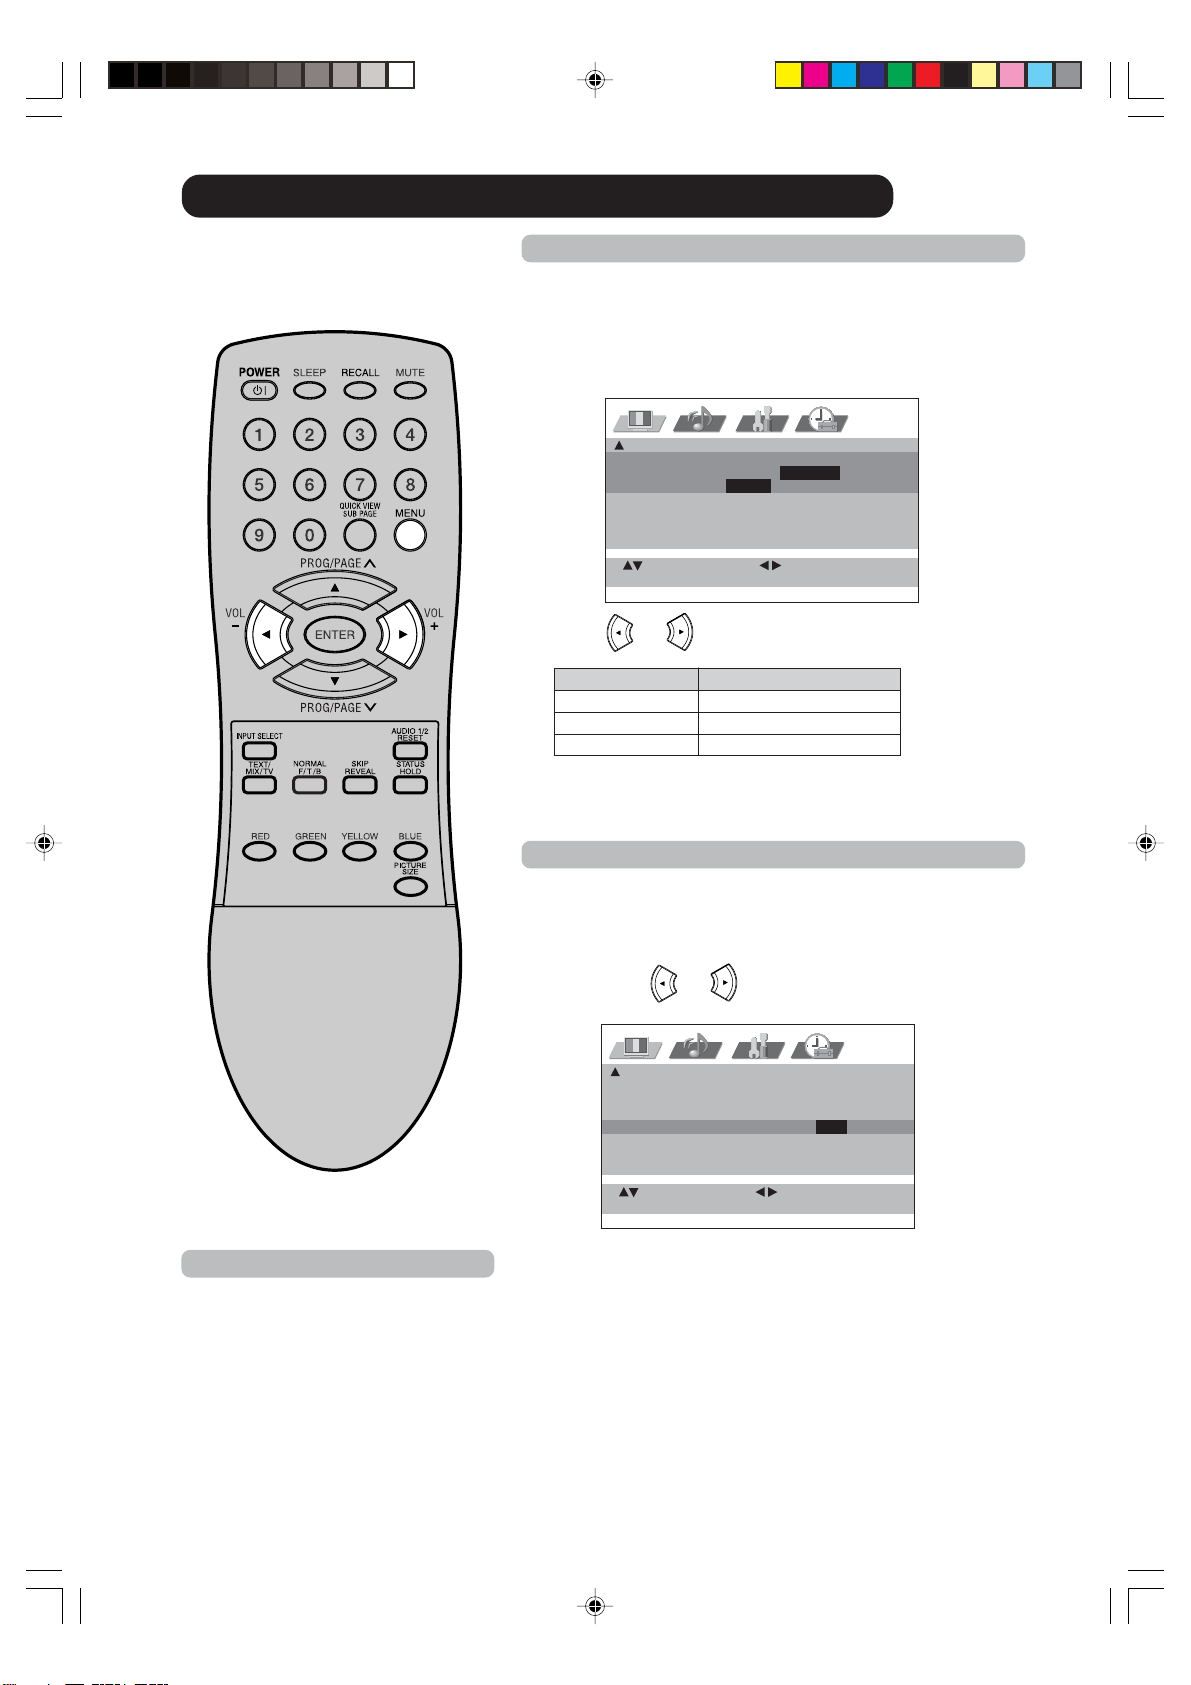
Selecting the color temperature
Change the picture quality by selecting from three
preset color temperatures –cool, normal and warm–
as described in the following table;
1
Select COLOR TEMPERATURE.
2
Press or to select the desired setting.
Mode Picture Quality
COOL Bluish
NORMAL Neutral
WARM Reddish
3
Press MENU repeatedly until the MENU disappears.
Film mode
You can set the TV to automatically detects the movie film
material and faithfully reproduces the original film image.
1
Select FILM MODE.
Then press
or to select ON or OFF.
2
Press MENU repeatedly until the MENU disappears.
COLOUR
TEMPERATURE COOL
FILM MODE ON / OFF
: RETURNMENU
: ADJUST: SELECT
Note:
FILM MODE is not available in PAL or
SECAM-signal mode.
3V90441A [E] P25-31 31/10/05, 9:22 AM30
32LD380T
A
HITACHI
31
ENGLISH
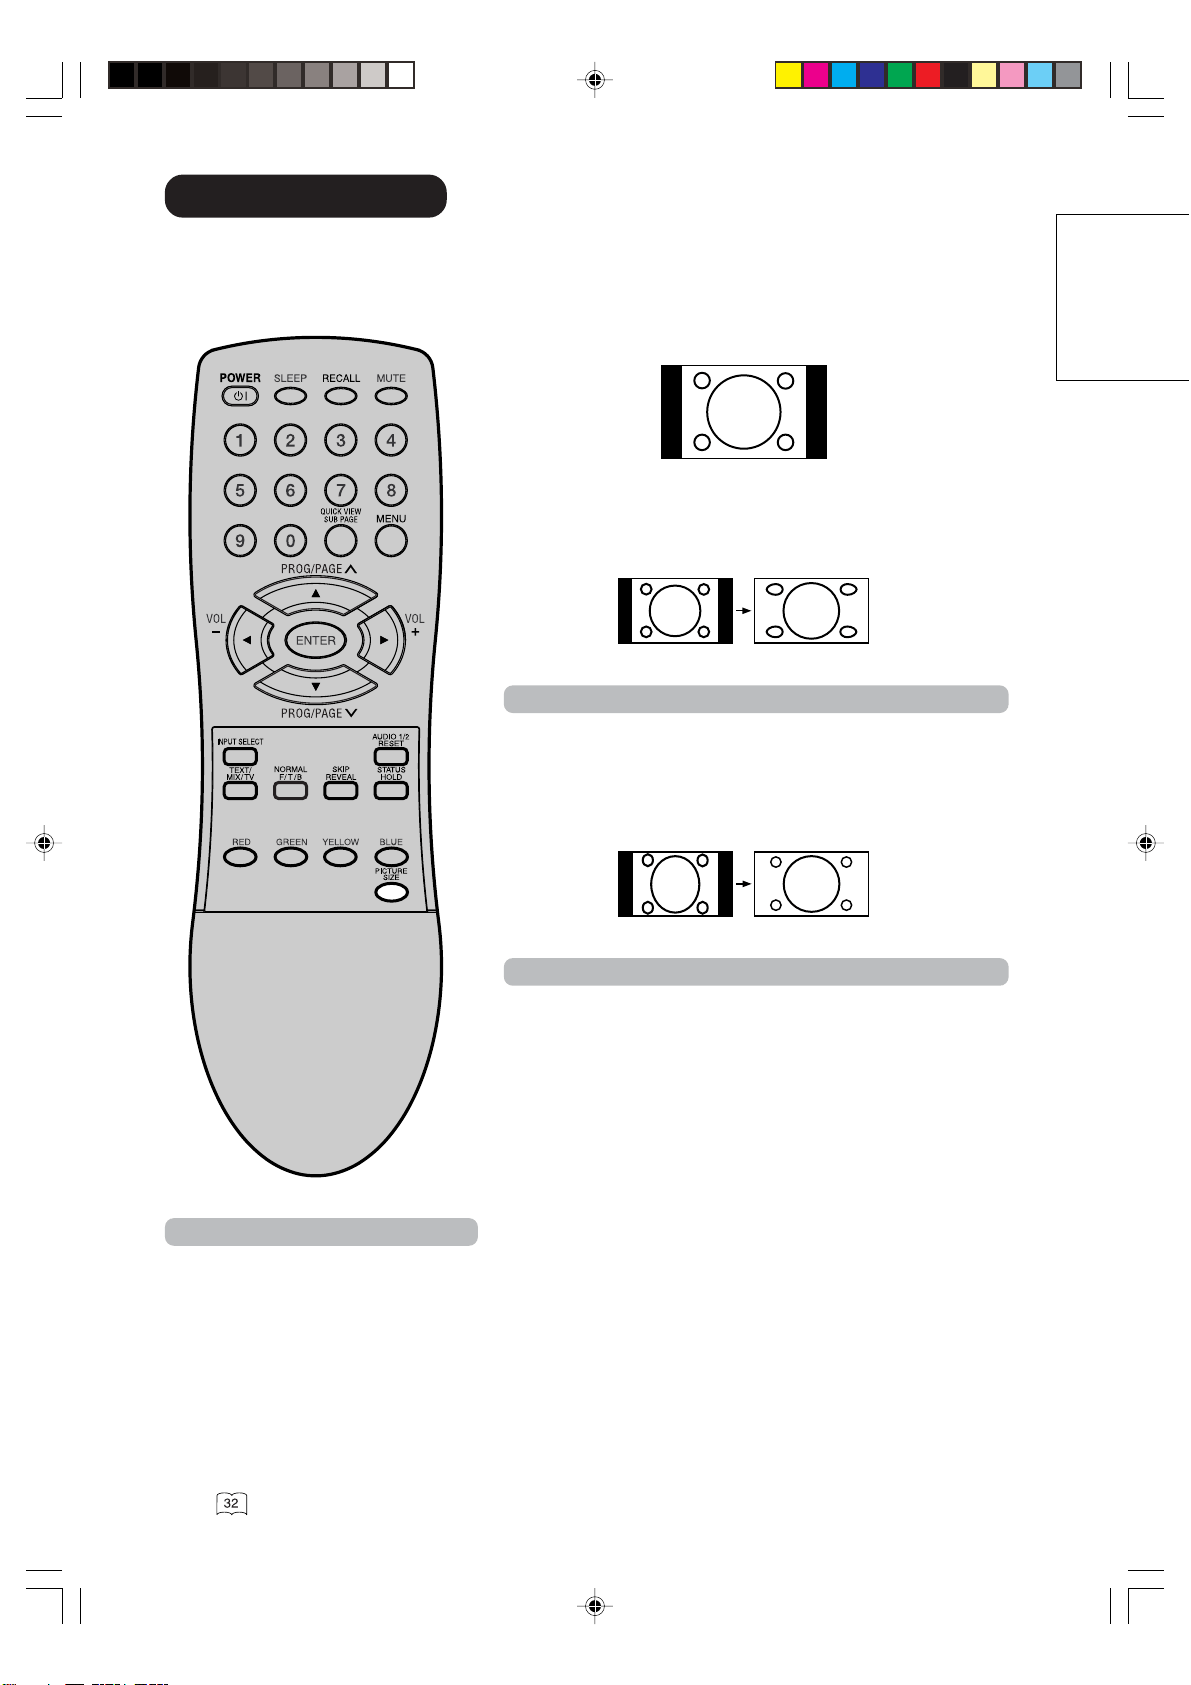
Picture format
Each time the PICTURE SIZE button is pressed, the screen display size will change in sequence.
4:3
It shows a 4:3-picture in original size with black bands on left
and right side.
PANORAMIC
:
Stretches the left and right hand sides of a 4:3 picture
horizontally to fill the screen, while leaving the centre of the
picture unstretched.
Note:
In this mode the picture is geometrically distorted on the left
and the right sides of the screen.
FULL
This mode is used with 16:9 signals from a D
VD or digital
decoder.
Note:
16:9 format signals can only come from external sources - the
b
uilt-in tuner does not receive signals in this format.
(FULL)
Notes:
• In PC mode, the PICTURE SIZE fea-
ture is available only for FULL- or
4:3- format. (In “WXGA INPUT” and
“WVGA INPUT”-mode, the PICTURE
SIZE feature is not available.)
•
In HDMI/COMPONENT1/2 mode of
scanning rate: 720p and 1080i, the
PICTURE SIZE feature is not available.
• In PANORAMIC mode, the top of the
picture will be slightly cut off. If you want
to see this part you can scroll the pic-
ture
.
(PANORAMIC)
3V90441A [E] P25-31 31/10/05, 9:22 AM31
32LD380T
A
HITACHI
32
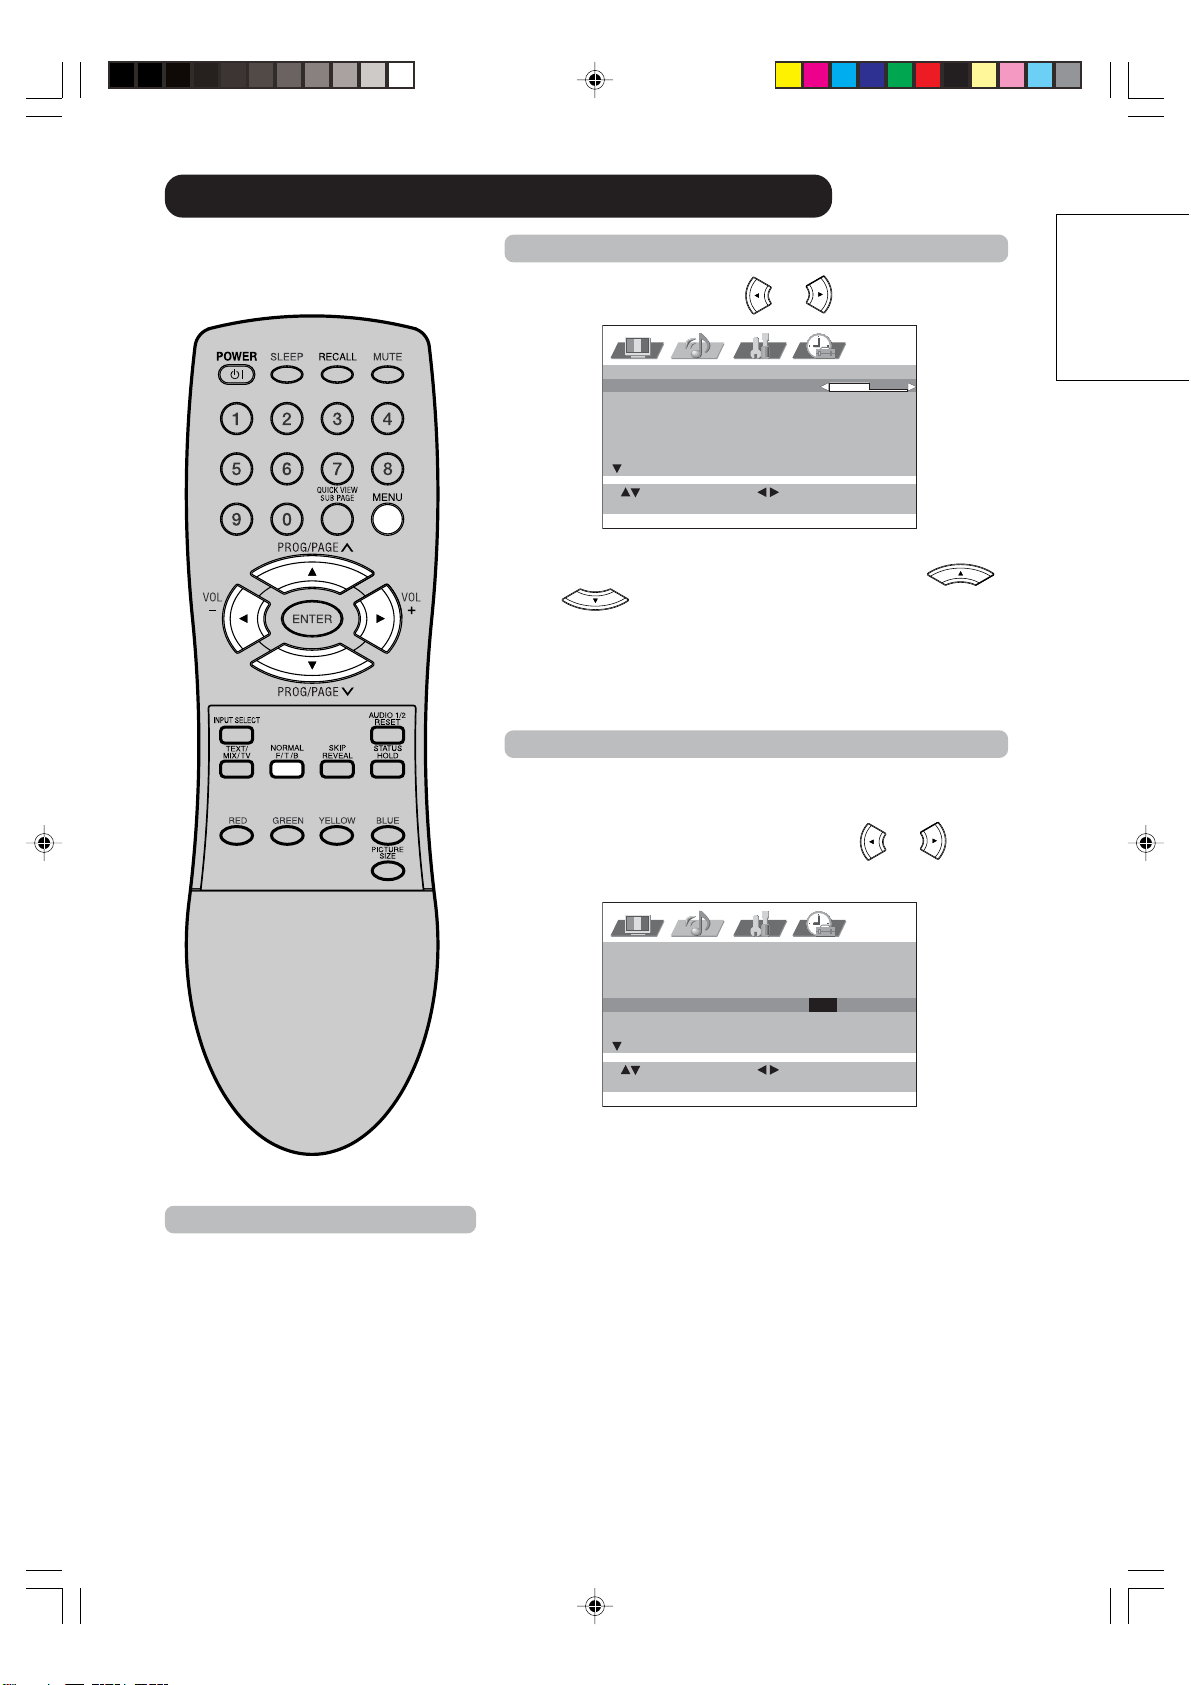
Scrolling the PANORAMIC-Wide picture
: SELECT : ADJUST
: RETURNMENU
AUTO TUNING
MANUAL TUNING
SORT
TEXT LANGUAGE WEST
LANGUAGE ENGLISH
VERTICAL POSITION
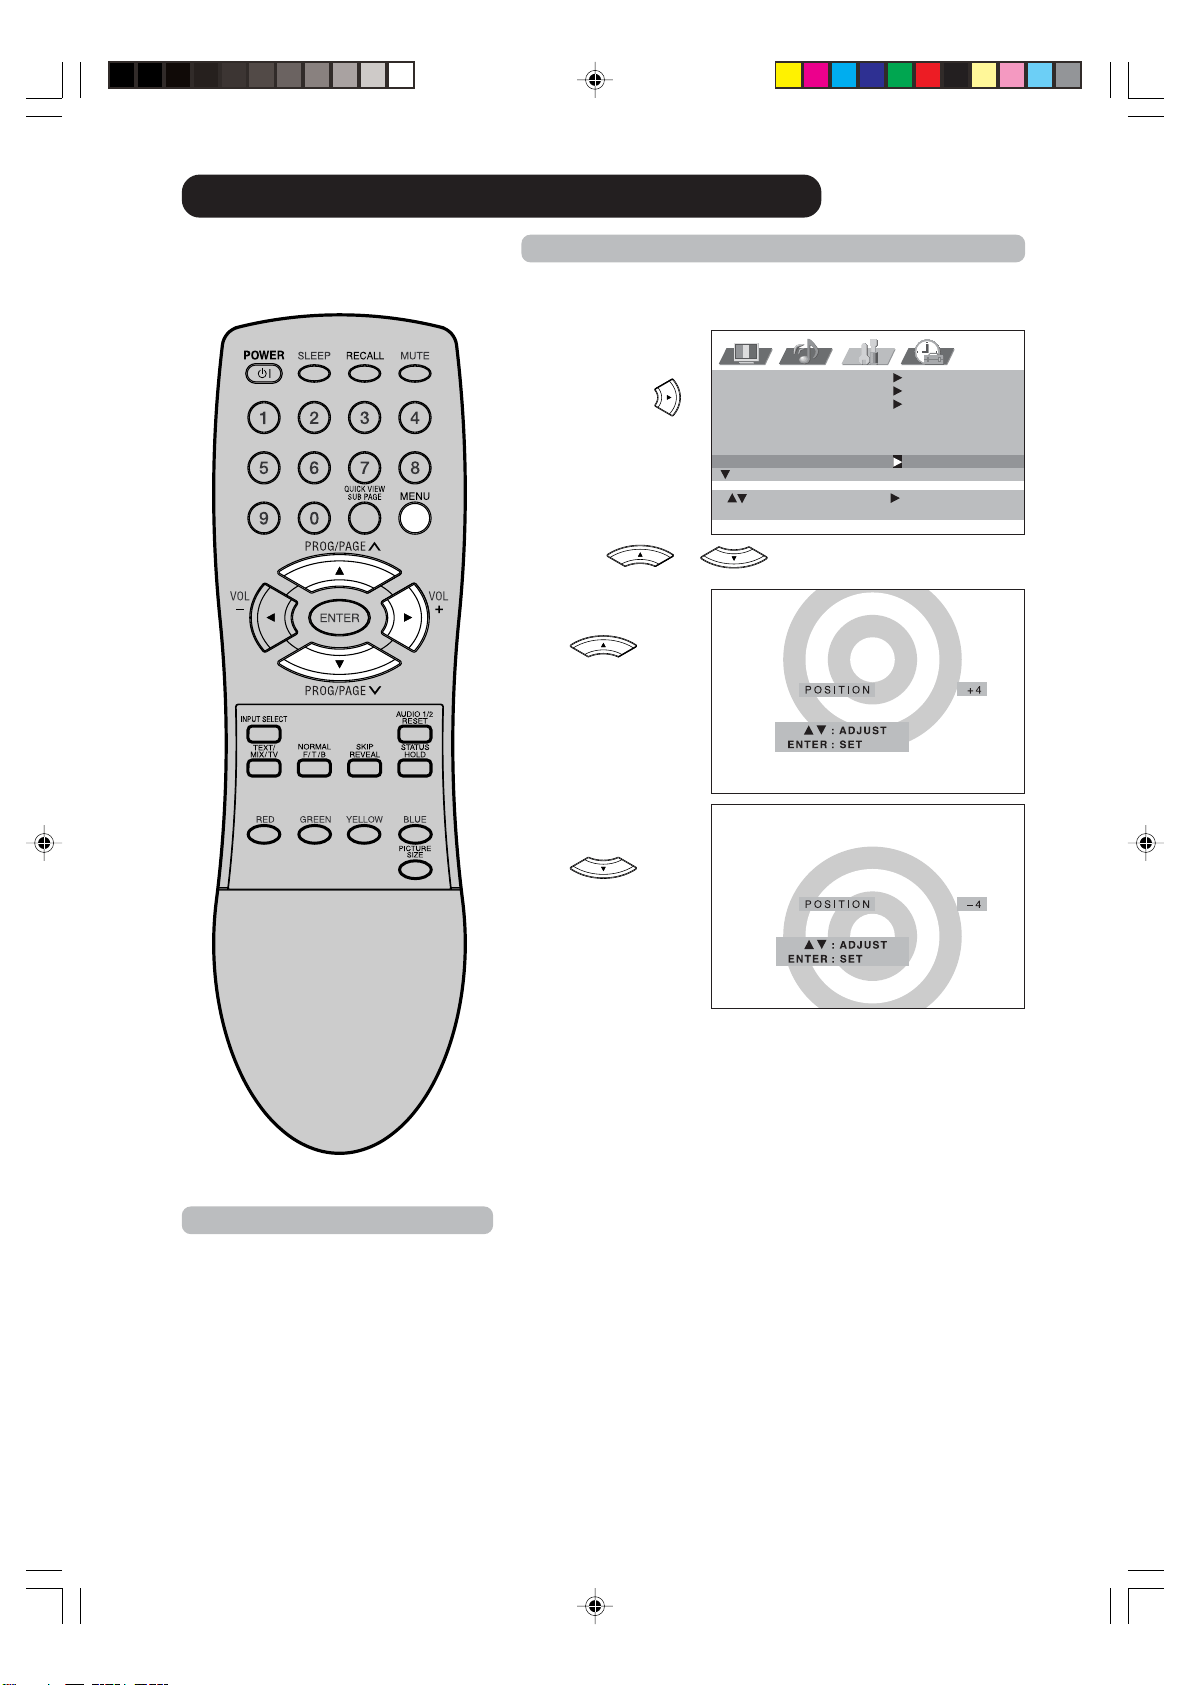
Scrolling the PANORAMIC-wide picture
During the PANORAMIC-wide mode you can adjust the vertical
picture position.
1
Select VERTI-
CAL POSITION.
Then press
.
2
Press or to adjust the vertical position of
the picture.
• To raise the
picture, press
.
• To lower the
picture, press
.
3
Press MENU repeatedly until the MENU disappears.
Note:
You cannot move the picture vertically
in other wide mode
.
3V90441A [E] P32-39 31/10/05, 9:22 AM32
32LD380T
A
HITACHI

33
ENGLISH
Back light
1
Select
BACKLIGHT.
Then press
or to adjust
the level you
require appears.
2
Press MENU repeatedly until the MENU disappears.
Note:
To initialize the adjusted value, press
NORMAL in step 1.
Y
ou can use the Back light feature
to adjust the screen brightness for
improved picture clarity.
3V90441A [E] P32-39 31/10/05, 9:22 AM33
32LD380T
A
HITACHI

34
You can lock the front panel buttons
to prevent your settings from being
changed accidentally (by children,
for example).
When the panel lock is in ON, all
control buttons on the TV front
panel (except POWER) do not
operate.
1
Select F.PANEL LOCK.
Then press
to display the password entering screen.
2
Using the 10 number buttons to enter your password,
then press ENTER.
The F.PANEL LOCK menu screen appears.
If you input the password for the first time, enter the same
password again for confirmation.
• If you input wrong number, “ERROR” will appear for
approx. 4 seconds. Then input correct number again.
3
Select F.PANEL LOCK and press or to select ON.
4
Press MENU repeatedly until the MENU disappears.
If a button on the front panel is pressed, the message
“F.PANEL LOCK” appears for approx 4 seconds.
To unlock the panel
Select OFF at step 3 above.
To change password
At step 3 above select NEW PASSWORD and press
to
display the password entering screen. Then input new
password.
Using the panel lock feature
ON TIMER SET
00:00 CH 1
OFF TIMER SET
00:00
F.PANEL LOCK OFF
: RETURNMENU
: ADJUST: SELECT
PASSWORD
: RETURNMENU
: SETENTER
[0—9]
: SELECT
F.PANEL LOCK ON / OFF
NEW PASSWORD
: RETURNMENU
: ADJUST: SELECT
3V90441A [E] P32-39 31/10/05, 9:22 AM34
32LD380T
A
HITACHI
35
ENGLISH
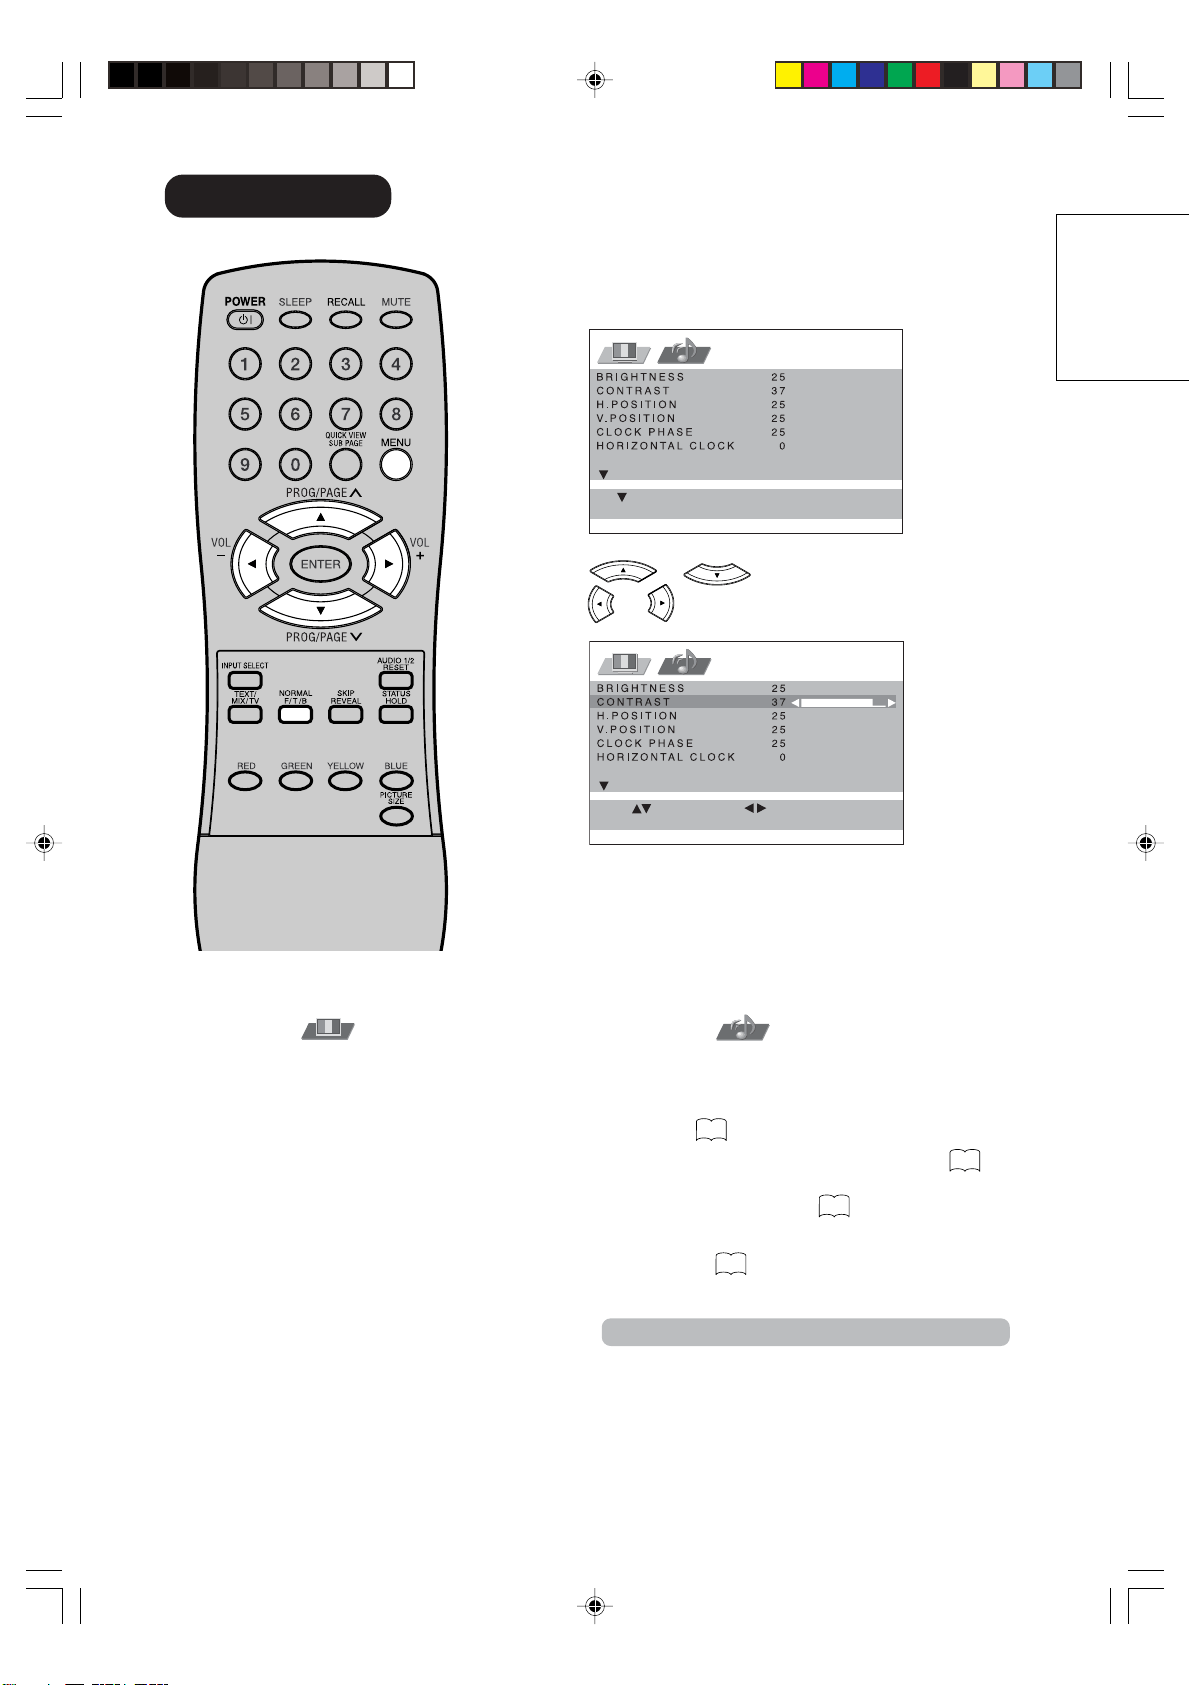
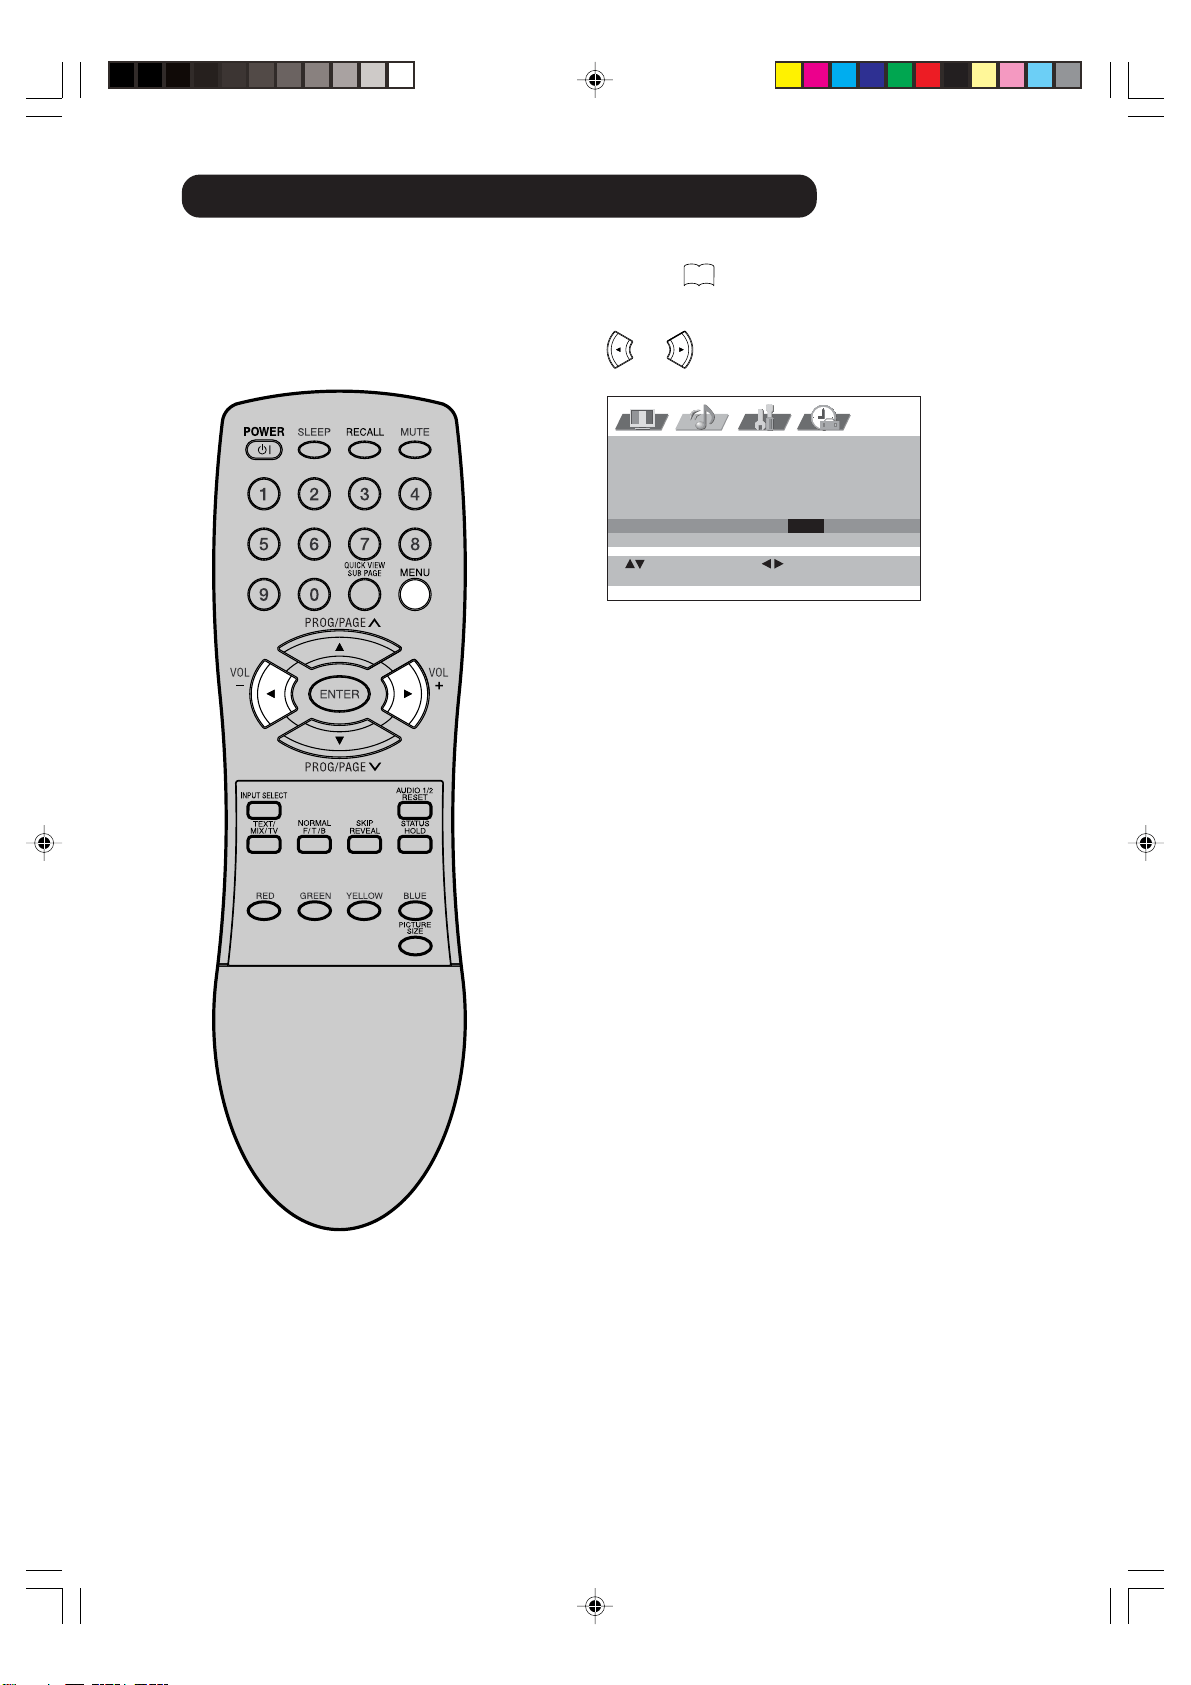
Example: Adjust the contrast.
1
During PC mode press MENU once. The Menu appears on
the TV-screen.
2
Press or to select CONTRAST. Then
press
or to adjust CONTRAST.
3
Press MENU repeatedly until the MENU disappears.
Description about the each setting option:
PC-Setting
AUDIO Menu
BASS/TREBLE/BALANCE: Tone setting menu; the
NORMAL button resets these values to the middle.
PERFECT VOLUME: Select PERFECT VOLUME
ON or OFF
27
.
SPEAKERS: Select SPEAKERS
ON or OFF
28
.
: RETURNMENU
: SELECT
: RESET
NORMAL
: ADJUST
: EXITMENU
: SELECT
PICTURE Menu
BRIGHTNESS and CONTRAST: can be set as you
are accustomed to your TV. : the NORMAL button
resets these values to the middle.
H.POSITION and V.POSITION: to adjust the
horizontal and vertical placing of the image.
CLOCK PHASE and HORIZONTAL CLOCK:
eliminates the horizontal (HORIZONTAL CLOCK)
and vertical (CLOCK PHASE) interfering lines.
AMPLITUDE RED/GREEN/BLUE: influences the
colour balance. : the NORMAL button resets these
values to the middle.
WXGA MODE: When you input WXGA, set this
option to “ON”.
WVGA MODE: When you input WVGA, set this
option to “ON”.
HDMI: Select HDMI or DVI
36
.
WOW SRS 3D/FOCUS/TruBass: Adjust desired
WOW feature
28
.
Note:
The PC Monitor Menu settings are not effective for
nor
mal TV-mode or external input mode.
3V90441A [E] P32-39 31/10/05, 9:22 AM35
32LD380T
A
HITACHI
36
Selecting the HDMI audio input source
NICAM AUTO
BASS 25
TREBLE 25
BALANCE 0
PERFECT VOLUME OFF
SPEAKERS ON
HDMI HDMI/DVI
: RETURNMENU
: ADJUST: SELECT
You must choose an appropriate HDMI audio input setting for
each connection on
16
.
1
Select HDMI.
Press
or to select HDMI or DVI.
2
Press MENU repeatedly until the MENU disappears.
3V90441A [E] P32-39 31/10/05, 9:22 AM36
32LD380T
A
HITACHI
37
ENGLISH
Teletext
Teletext is sent page by page. This unit is able to automatically store up to 812 pages.
Storage lasts until all pages have been received. The pages can only be accessed when they have been
stored. This can take a moment.
Fastext/Toptext
The Fastext/Toptext is teletext with a special directory.
On the lower part of the screen there are four different coloured
fields (red, green, yellow and blue). These fields lead directly to
the pages shown within. The coloured buttons on the remote
control correspond to the coloured fields. Press the appropriate
coloured button (RED, GREEN, YELLOW, BLUE) in order to
activate the desired colour field.
Switch on / off Teletext
Teletext is not transmitted by all channels.
Select the channel that shows teletext.
Press TEXT/MIX/TV. You will now see a teletext page. The
channel you have chosen does not send teletext if 100 is
shown.
Press TEXT/MIX/TV again. Teletext and TV picture are shown
simultaneously.
Press TEXT/MIX/TV again in order to switch off teletext.
Press TEXT/MIX/TV again in order to switch on teletext again.
The last page which was stored is now shown.
Note:
You cannot select any other channels as long as teletext is
switched on. Switch teletext off when you want to switch over
to another channel.
Select Page
Press
or until the page you desire appears.
Or ... enter the requested page number by using the 10
Number Buttons.
And if you mistype something, just enter the complete 3-digit
wrong page number then enter the desired number again. Or
... press one of the coloured teletext buttons so that a page
from Fastext/Toptext is shown.
3V90441A [E] P32-39 31/10/05, 9:22 AM37
32LD380T
A
HITACHI
38
667 667 BBC-Text 21.07.03 15:01:38
1/2
Teletext
Hold Pages
Some pages are divided up into subpages by the channel.
Subpages are automatically shown in turn, as they are transmit-
ted. In order to hold the page, press HOLD. Press HOLD again in
order to display the next subpage.
Directly Select Subpages
You can directly select the subpages if required.
Example:
Page 667 from BBC comprises of 2 subpages. In the right upper
corner you will, for example, see 1/2. That means that page one
of 2 subpages is being shown at the moment.
Press SUB PAGE in order to select subpage 2. 4 dashes (----) are
shown. Enter 0 0 0 2. It can take a minute before subpage 0002
appears.
Press SUB PAGE again in order to switch off the subpage feature.
You can only select other teletext pages when the subpage
feature is switched off.
Enlargement
In order to enlarge the display, press F/T/B.
Either the upper or lower half of the screen is enlarged.
Each time you press F/T/B you switch between the display of the
upper or lower half of the screen or the full picture.
Answering Quiz Questions
Some pages contain quiz questions with concealed answers.
Press REVEAL in order to show the answers.
Reset
Press RESET in order to show page 100.
3V90441A [E] P32-39 31/10/05, 9:22 AM38
32LD380T
A
HITACHI
39
ENGLISH
Conceal stored channels
The stored channels are switched back or fore individually using
or . Channels that should not appear can be
concealed. These channels are not deleted. They can be ac-
cessed at any time with the 10 Number Buttons.
1
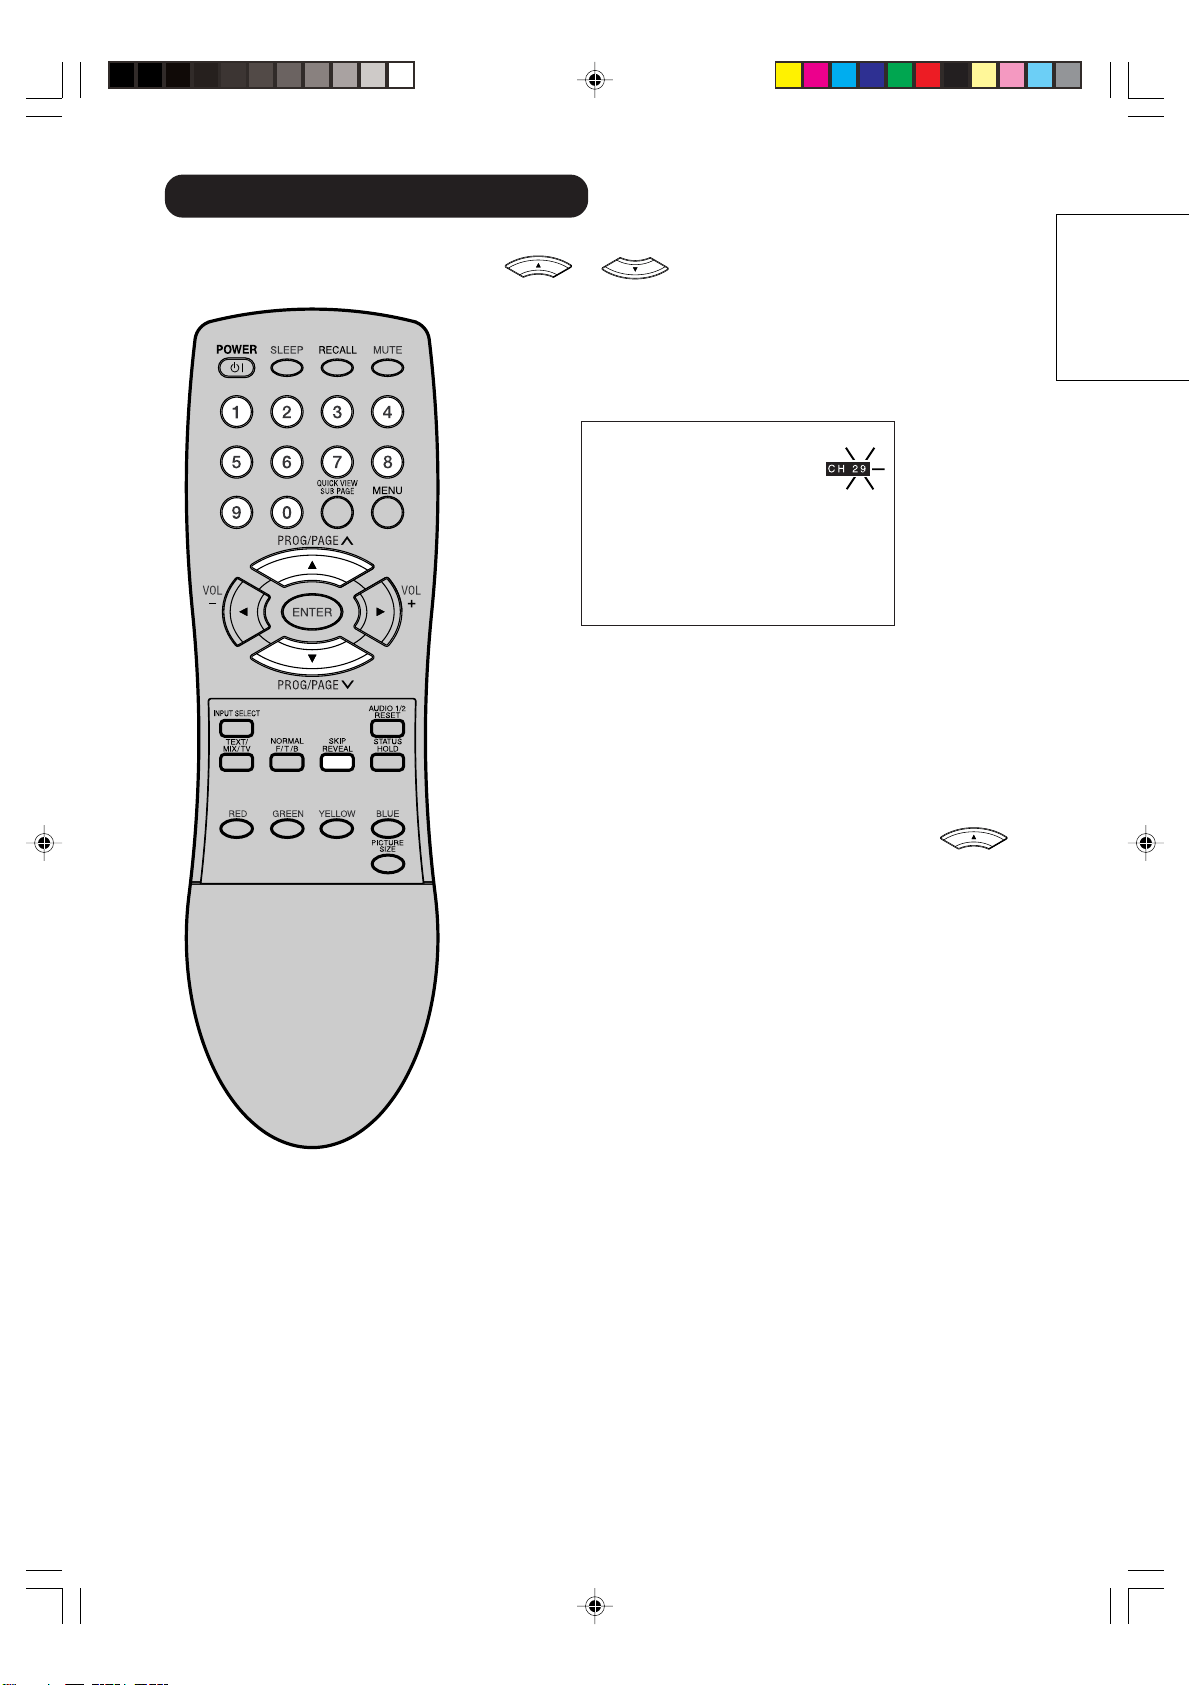
Select the channel to be concealed (i.e. CH29).
Press SKIP.
The programme number flashes.
2
Select the next channel to be concealed.
Press SKIP.
The programme number flashes.
You can conceal as many channels as you like.
Example:
5 channels are automatically stored via the automatic
channel storage feature. When you keep pressing
then the channel will appear in the following order:
1, 2, 3, 4, 5, 1, 2, 3, 4, 5, 1, ... etc.
Now conceal programme places 3 and 5. The sequence is
now 1, 2, 4, 1, 2, 4, 1,... etc.
Cancel Concealment of Channels
Select the concealed channels with the 10 Number Buttons.
The programme number flashes.
Press SKIP.
The programme number no longer flashes.
This channel is no longer concealed.
3V90441A [E] P32-39 31/10/05, 9:22 AM39
32LD380T
A
HITACHI
40
Connect with another equipment
~
17
.
1
In menu, select COLOR SYSTEM.
2
Press or to select AUTO.
3
If AUTO option does not work, press or to select
desired color (e.g. NTSC 3.58).
4
Press MENU repeatedly until the menu disappears.
: RETURNMENU
: ADJUST
: SELECT
COLOR SYSTEM AUTO
AUTO/PAL/SECAM/NTSC4.43
NTSC3.58/PAL60
BACKLIGHT 16
Color system adjusting
Note:
COLOR SYSTEM is available only in
AV1/AV2/AV3 mode.
3V90441A [E] P40-BACK 31/10/05, 9:22 AM40
32LD380T
A
HITACHI
41
ENGLISH
Troubleshooting table / Specifications
In menu, TUNING-line
can not be selected.
The unit is set to AV mode. Press 1 on the remote
control.
Symptom
Possible solution
Page
No picture, no sound
Switch on the set.
Check the 100~240 V wall outlet.
Select appropriate input mode.
No reception Preset the station without using the AV cable.
Press 1 on the remote control.
Connect the antenna.
Check your antenna.
The TV switches off with
missing antenna input signal
This is normal.
15 minutes after the antenna signal has disappeared,
the set will change to standby.
Specifications
Color System:
Frequency Range:
Power Supply:
Power Consumption:
LCD:
HDMI input:
Output Power:
Surrounding temperature:
Operating Humidity:
Dimensions:
Weight:
Accessories:
PAL/SECAM/NTSC
1~S6, S7~S36, S37~E69
AC 100~240V, 50/60Hz
Operation: approx. 170W
Stand by: approx. 1W
31.5" TYPE (80 cm visible)
TFT low-glass Active Matrix Colour LCD, 1366 x 768 Pixel
Brightness: 500 cd/m2
View Lange:Left/Right: 85 degree Up/Down: 85 degree
HDMI compliant (type A connector)
HDCP compliant
Suggested scan rates:
PAL: 576i/576p/720p/1080i
NTSC: 480i/480p/720p/1080i
HDMI Audio: 2-channel PCM
32/44.1/48 kHz sampling frequency
16/20/24 bits per sample
10W x 2 (MAX)
Operation: 5°C ~ 40°C
Storage: –20°C ~ 60°C
Less than 80%RH
82.2(W) x 60.4(H) x 33.3(D) cm
approx. 19 kg (w/o Accessories)
2 batteries (AAA/R03/UM-4)
Remote control unit
AC cord
Weight and dimensions are approximate. Because we continually strive to improve our products we
may change specifications and designs without prior notice.
Troubleshooting table
Please check the following items, before you request for service.
18
12
12
23
20
Wrong Colours
Colour and Brightness errors can occur when the
viewing angle / ambient air temperature (see technical
specifications) are exceeded.
3V90441A [E] P40-BACK 31/10/05, 9:22 AM41
32LD380T
A
HITACHI

3V90441A [E] P40-BACK 31/10/05, 9:22 AM42
32LD380T
A
HITACHI