Loading ...
Loading ...
Loading ...
4
OPERATION
Before using
Remove all securing tapes. Wash inside the
appliance with lukewarm water and bicarbonate of
soda (5 ml to 0.5 litre of water).
Do not use soap or detergent as the smell may
linger. Dry thoroughly.
Control Panel
minMAX
C
A
B
D
E
ALARM
SUPER
ON
N
S
A - Fast freeze knob
B - Thermostat control
C - Operation light
D - Fast freeze light
E - Alarm light
Start your appliance
Insert the plug into the wall socket. The pilot light (C)
will light up to show that the appliance is on.
Temperature control
The temperature within the freezer is controlled by
the thermostat situated at the top of the cabinet.
To operate the freezer proceed as follows:
Turn the thermostat control beyond the «
■» position.
When you first start the freezer, we suggest that you
turn the thermostat control to a medium setting.
For easier turning of this control, use a small
coin.The internal temperature of the freezer is
automatically adjusted by the thermostat to ensure
safe food storage.
However, if the appliance is working in unfavourable
room conditions such as
- poor ventilation,
- high temperature,
- frequent door openings,
it may be necessary to select a more suitable
setting.
To obtain a lower temperature, turn the thermostat
control towards max; to obtain a higher temperature
turn the control towards min.
Control Panel
A. Fast freeze knob
When you place fresh food in the appliance, turn the
fast freeze knob to “S”.
B. Thermostat control
When you first start the freezer we suggest that you
turn the thermostat to a medium setting by using a
coin that fits the groove.
Min = lowest setting, minimum cold
Max = highest setting, maximum cold
C. Operation light
The operation light is illuminated continuously, to
show that the appliance is on.
D. Fast freeze light
The fast freeze light is illuminated, to show that the
fast freeze function is working.
E. Alarm light
If the alarm light (E) lights up, it indicates that the
temperature within the freezer has reached a level
where the safe food storage is no longer ensured.
When the freezer is first switched on, the alarm light
will stay on until the temperature has dropped to a
safe level for the storage of frozen food.
Freezing fresh food
In any 24 hour period you can freeze up to 22 kg of
fresh food.
When you first start the freezer or after a period of
non-use, turn the fast freeze knob to «S» 24 hours
before you want to freeze your food (the yellow light
(D) lights up).
If the freezer is already in operation, the fast-freeze
knob should be activated about 2-3 hours before
freezing fresh food.
13
INSTALLATION
Positioning
This appliance should only be installed at a location
where the ambient temperature corresponds to the
climate classification indicated on the rating plate,
which is located at the left on the inside of the
appliance.
The following table shows which ambient
temperature is correct for each climate classification:
SN +10°C to + 32°C
N +16°C to + 32°C
ST +18°C to + 38°C
T +18°C to + 43°C
It should be located in a dry atmosphere, out of
direct sunlight and away from extreme temperature
e.g. not next to a boiler or radiator, or in a very cold
room e.g. an outhouse, where the temperatures may
fall below 10°C (50°F). If these temperatures are
exceeded i.e. colder or warmer, then the appliance
may not operate correctly.
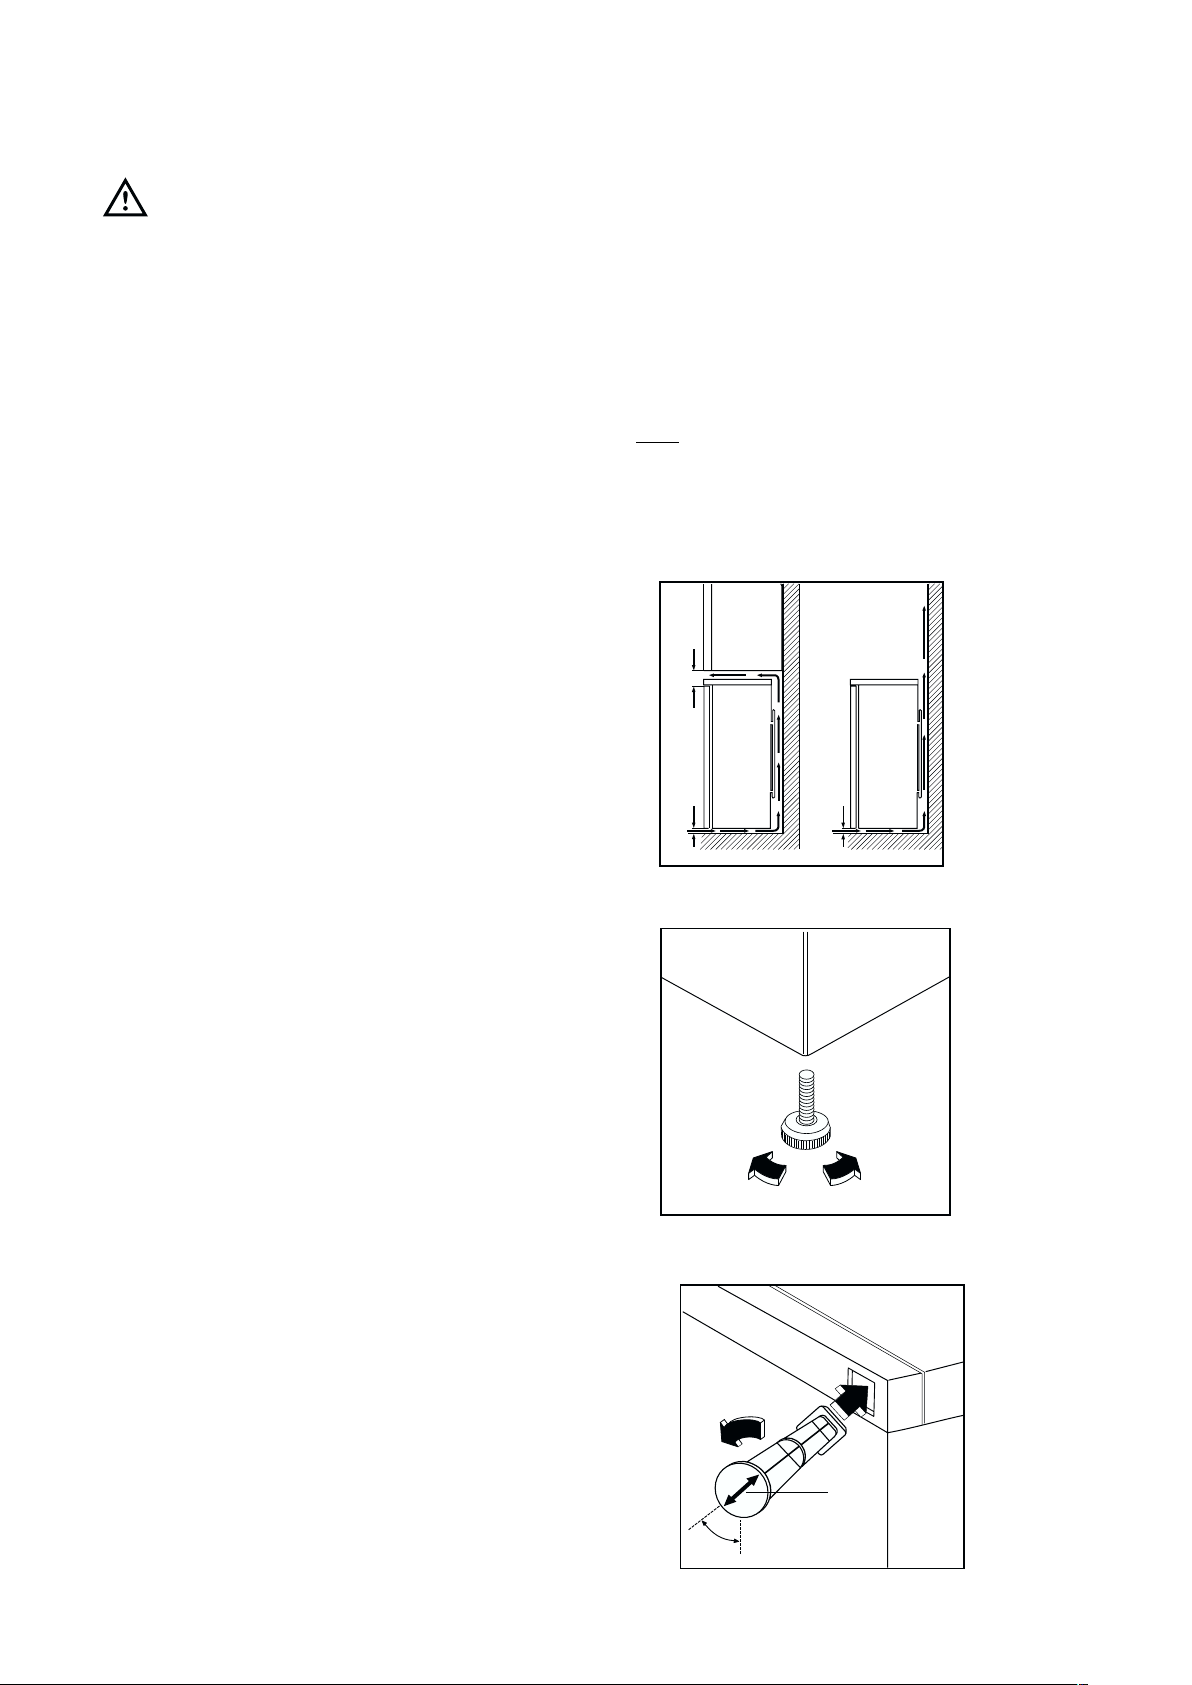
You should also ensure that air can circulate freely
around the back and the top of the cabinet. There
must also be at least 100 mm (4”) distance between
the top of the cabinet and any overhanging kitchen
furniture (A). Ideally, the appliance should not be
positioned beneath overhanging furniture (B).
There should also be a gap of 25 mm either side of
the appliance. Do not obstruct the space
underneath. The back of the cabinet may be placed
close to the wall but must not touch it. DO NOT
install in places with restricted ventilation.
Adjust the level of the appliance by screwing out the
adjustable foot, or feet, at the bottom of the cabinet
using your fingers.
D200
100 mm10 mm
10 mm
A
B
NP00
Warning
IF YOU ARE DISCARDING AN OLD APPLIANCE
THAT HAS A LOCK OR CATCH ON THE DOOR,
YOU MUST ENSURE THAT IT IS MADE
UNUSABLE TO PREVENT YOUNG CHILDREN
BEING TRAPPED INSIDE.
Rear spacers
The plastic bag containing all relevant
documentation also contains two spacers to be fitted
into special holes in the back of the appliance.
Fit the spacers into the holes, taking care to ensure
that the arrow (A) is positioned as shown in the
diagram. Then turn them through 45° (arrow (A)
vertical) until they lock into place.
Important
It must be possible to disconnect the appliance from
the mains power supply; the plug must therefore be
easily accessible after installation.
PR60
A
45°
Depending upon the position which you choose for
your appliance, you may wish to reverse the way in
which the door opens. To do this, refer to instructions
on “Door reversal directions” paragraph.
Loading ...
Loading ...
Loading ...