Allow to stand for a minimum of 3 hours before plugging in to the mains
The temperature in the appliance is controlled by the temperature control knob located inside the fridge. Rotate the control knob left or right to regulate the temperature inside the fridge.
On the temperature control, MIN is the warmest setting and MAX is the coldest setting. Under normal conditions the temperature control should be set the
MID position. The MAX setting should be used as a rapid cool setting and should only be set 2 hours before a large amount of food is placed in the fridge. The temperature control should be put back to the MID setting after the food has been placed in the fridge, if this is not done the temperature in the fridge compartment could fall below 0ºC as the compressor will run continuously.
Once the temperature control has been set, close the door and plug in the appliance. We recommend that the door is not opened for a minimum of 4 hours to allow the appliance to reach the standard operating temperature.
Note: The standard operating temperature for the fridge compartment should be between 0ºC and 4ºC.
Note: The temperature of the freshly stored food and how often the door is opened affects the temperature in the refrigerator compartment. If required, change the temperature setting.
Note: The temperature of the freshly stored food and how often the door is opened affects the temperature in the refrigerator compartment. If required, change the temperature setting.
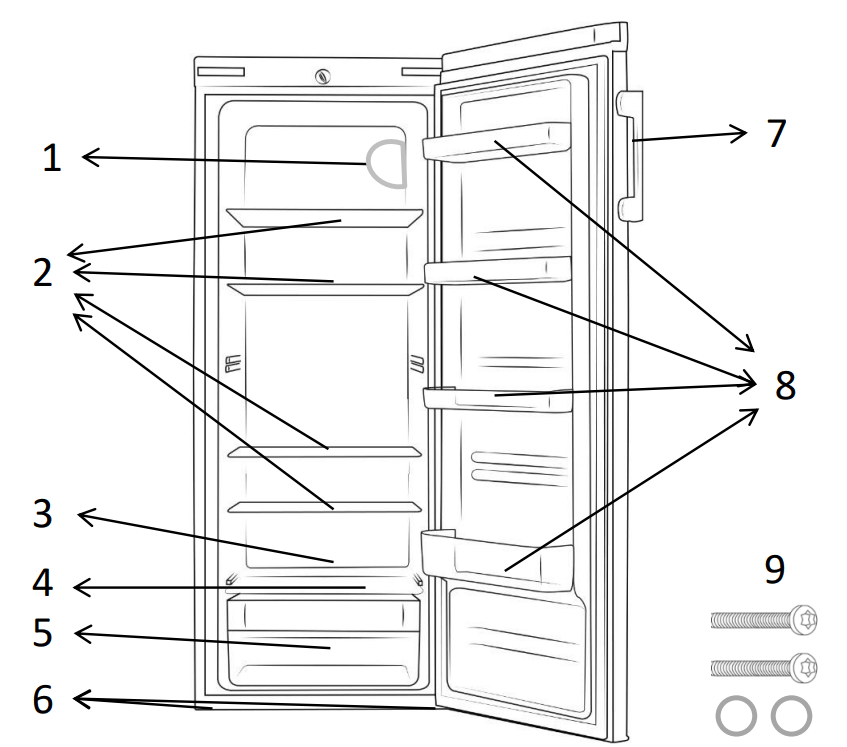
Handle Assemble
Tools Required: Cross headed screwdriver and a flat headed screwdriver.
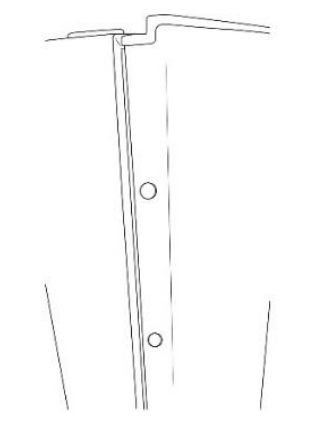
1. Remove the plastic screw hole caps on the side of the door you require the handle to be installed on with a flat headed screw driver. You must ensure that the screw hole caps are unscrewed and not pulled out or flicked out with a screw driver. Otherwise the screw part of the screw holes caps will break and become stuck.
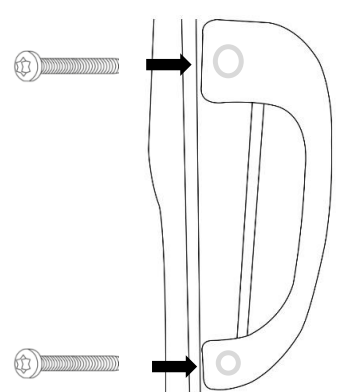
2. Align the holes on the handle with those on the side of the door and fix it in to place with the metal screws provided.
3. Cover the holes on the handle with the plastic hole caps.
Door Reversal
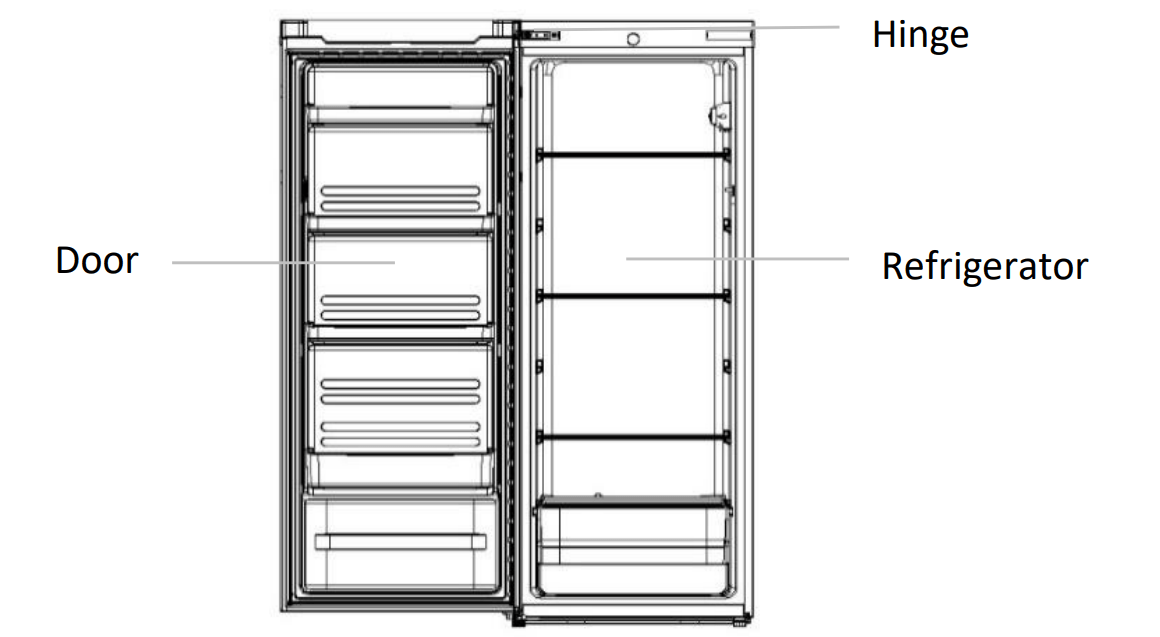
Please note that the product is supplied as standard with the hinge on the right hand side (left opening). Should you wish to change the door opening to the right hand side then please follow the below instructions:
You will need to tilt the fridge backward to access the lower hinge which holds screws. Do not tilt more than 45 degrees and do not lay the fridge flat on its side.
For your own safety, a minimum of 2 people should lift or tilt this product.
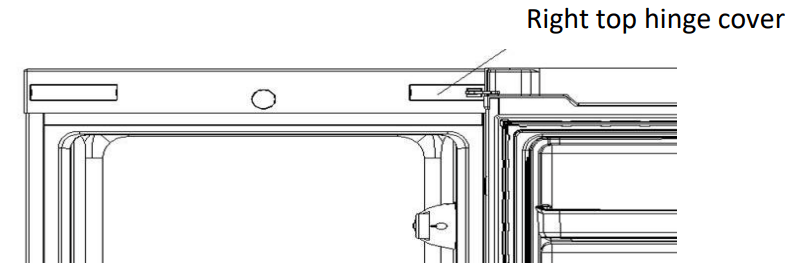
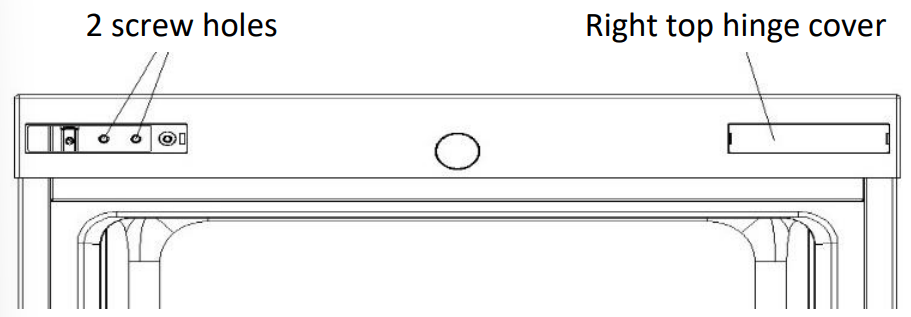
1 Remove the right top hinge cover with a flat headed screwdriver.
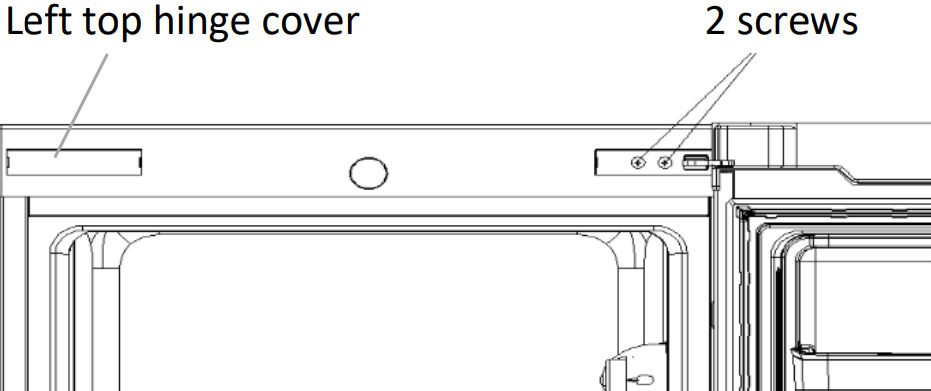
2. Remove the left top hinge cover and the screws that fix the right top hinge in place with a cross headed screwdriver. Remove the hinge and the door.
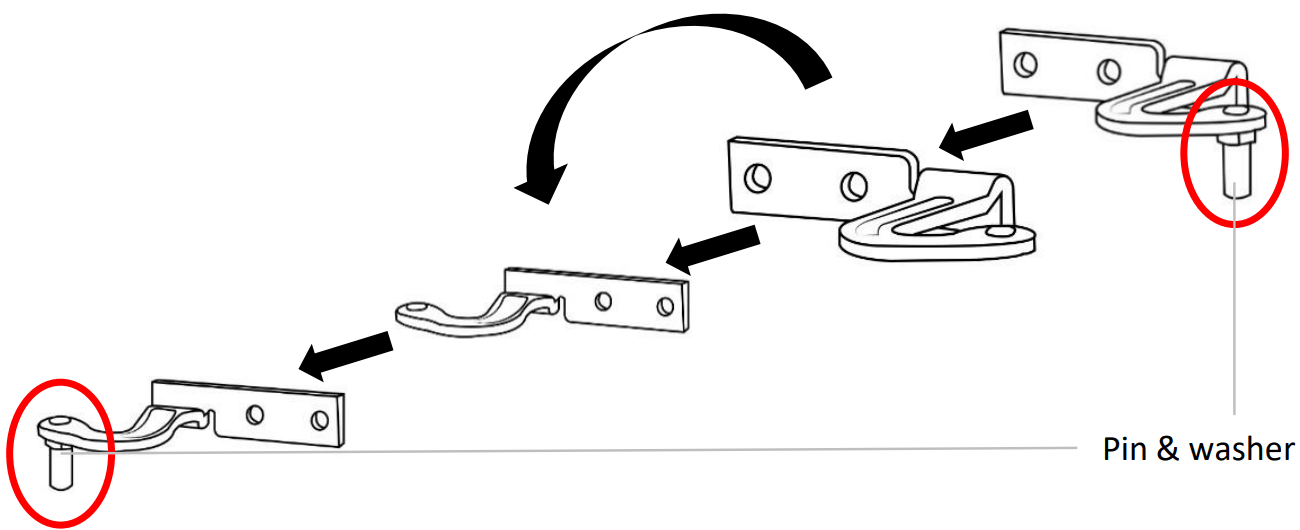
3. Remove the top hinge and fix it on the left side on the appliance and door.
i. Remove the hinge from the appliance, then remove the pin and washer from the hinge (use a spanner to remove the washer). Flip over the hinge bracket and reinsert the washer and pin (please see the image below). Do not fix the hinge in to place at this stage (please see step 7).
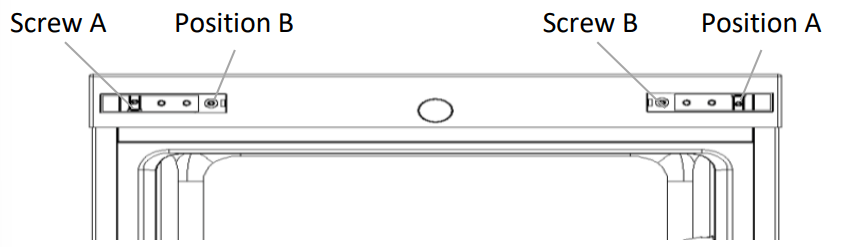
4. Remove screw A and fix it in to position A, then remove screw B and fix it in to position B.
5. Replace the right top hinge cover.
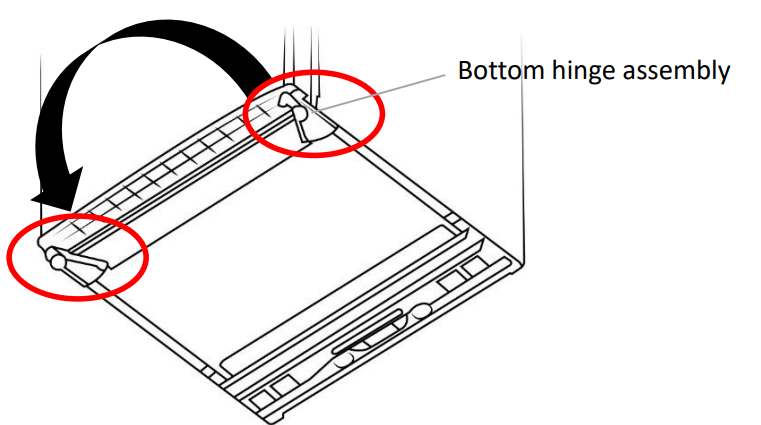
6. Tilt the appliance no more than 45 degrees and remove the right bottom hinge by removing the 3 screws with a cross headed screwdriver. Then remove the adjustable foot on the left side by unscrewing it by hand. Fix the bottom hinge to the left side with the screws and put the adjustable foot on the right hand side.
7. Position the door on the bottom hinge and then set the door in the correct position at the top. Put the pin of the hinge in to the door and then install the top hinge on the left hand side and fix it in place with 2 screws. Ensure the door is aligned horizontally and vertically so that the seals are closed on all sides before finally tightening the top hinge.
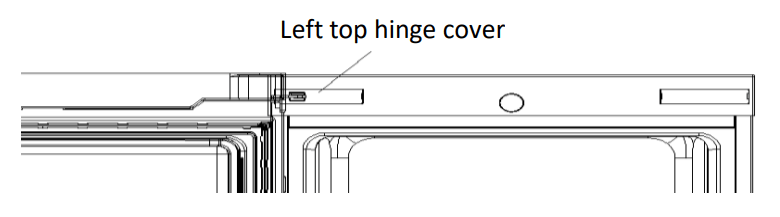
8. Install the left top hinge cover
9. Change the side of the door the handle is installed on. Check that the door opens and shuts correctly after you have completed the door reversal process. The appliance must now be upright for a minimum of 3 hours before turning it on.
Replacing the Bulb
The light is an energy efficient, long life LED. Therefore should not need replacing throughout the life of the product however if it does it has to be replaced by a qualified engineer.
Energy Saving Advice
Do not install the appliance close to sources of heat, such as a cooker, dishwasher or radiator.
Locate the appliance in a cool well-ventilated room and make sure that the air vents are clear.
Try to avoid keeping the doors open for a long time, warm air will enter the cabinet and may cause a build-up of ice as well as affecting the energy consumption. Ensure there are no obstructions preventing the doors from closing properly.
Ensure that the door seals are clean and there are no tears or splits.
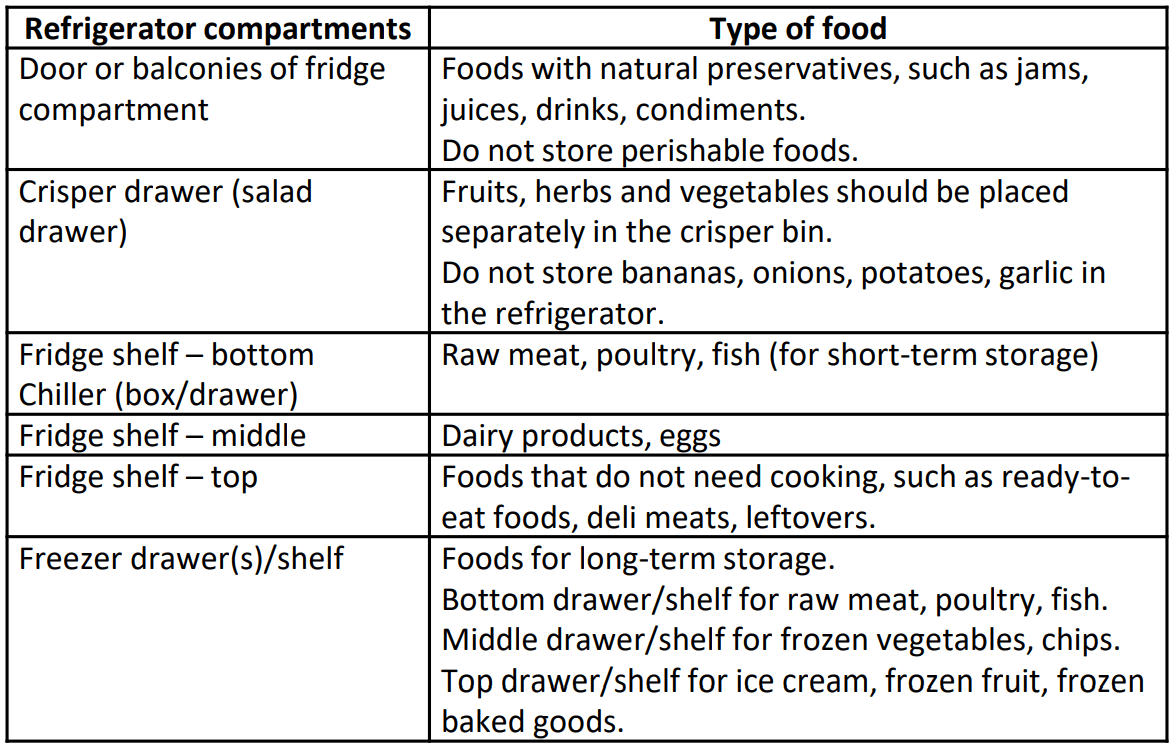
Keep the most perishable foods, (those with a short shelf-life, such as cooked meats), in the coldest part of the fridge. The Salad Crisper Box is the warmest part of your fridge and should be used for vegetables, salads and fruits etc.
Do not overload the appliance: the cooling air that circulates to keep the appliance cold gets blocked and pockets of warm air form.
Do not put hot food into the fridge or freezer – let it cool down first.
Food Storage Advice
MAINTENANCE & CLEANING
Internal Cleaning
Do not pour water over the appliance.
The cavity should be cleaned periodically using a solution of bicarbonate of soda and lukewarm water (5ml to 0.5 litre of water)
Clean the accessories separately with soap and water. Do not put them in the dishwasher.
Do not use abrasive products, detergents or soaps.
After washing, rinse with clean water and dry carefully.
When you have finished cleaning reconnect the plug with dry hands.
External Cleaning
Wash the outer cabinet with warm soapy water. Do NOT use abrasive products.
There are sharp edges on the underside of the product so care should be taken when cleaning.
Once or twice a year dust the rear of the appliance and the compressor at the back of the appliance, with a brush or vacuum cleaner, as an accumulation of dust will affect the performance of the appliance and cause increased energy consumption.
When not in Use
When the appliance is not in use for long periods, disconnect from the electricity supply, empty all of the food and clean the inside. Leave the door open to prevent the build-up of odours.
TROUBLESHOOTING
The fridge doesn't work
Check that the appliance is switched on.
Check that there has not been a power cut.
Check that the plug is not faulty.
Check that the fuse has not blown.
Check that the voltage is correct for the appliance.
Are there any faults with the socket? For this purpose, try the plug of your appliance by connecting it to a socket which you are sure is working.
The temperature inside the appliance is not cold enough
Check that there is not too much food in the appliance.
Check that the thermostat is set to a suitable temperature.
Check that the appliance is not placed in direct sunlight, or too near to a heating source.
Check that the ambient temperature is within the operation limits of the appliance.
Are the doors of the appliance opened frequently? Once the door is opened, the humidity found in the air in the room enters the appliance, especially if the humidity levels in the room are very high. The more frequently the door is opened in humid conditions the more chance of the build up of moisture.
The temperature within the appliance is too cold.
Increase the working temperature by adjusting the thermostat to a lower setting.
The highest setting should only be used as a rapid cool setting and should only be set 2 hours before a large amount of food is placed in the fridge. If this is not done the temperature in the fridge compartment could fall below 0ºC as the compressor will run continuously.
The inner surfaces of the appliance are wet
Caused by condensation - dry the inside of the appliance.
The outer surfaces of the appliance are wet
Caused by condensation - dry the outer of the appliance carefully.
Smell/odour
Check all the food and drink that is in the fridge is in date and correctly packaged. If it isn’t then it should be removed immediately or repackaged.
Check for spillages on each shelf, rack and drawer. You may need to remove the drawers to check that no spillages have settled underneath them. As spillages that have not been cleaned and have been left can cause smells and unwanted odours.
Check the drainage pipe is not clogged or the drip tray at the back of the appliance is full. The pipe can be cleared by pouring hot water through, but you must ensure the appliance is turned off, the plug is removed from the socket and a jug or bucket is in place to catch the flow of water.
The doors do not close properly
Ensure there are no obstructions preventing door closure.
Check the door compartments and shelves are correctly in place.
Check the door seal is not warped or torn.
Check the appliance is level.
Unusual noises
Check that the appliance is on a flat, level surface and is stable.
Check the spacing's around the appliance and ensure it is not touching other items.
Bubbling and gurgling sound: • This noise is emitted as the coolant fluid flows through the pipes within the system. This is normal.
Water flowing sound: • This is the normal sound of water flowing into the drain trough during the defrosting process.
If the appliance is operating noisily (compressor noise): This is normal. This noise indicates that the compressor is operating normally. As the compressor is being energized, it might run a bit more noisily for a short period of time.