User manual
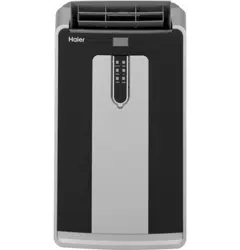
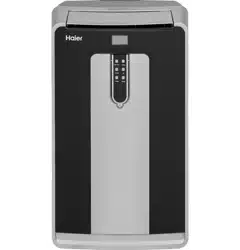
PART AND FEATURES

1. Air Outlet
2. Control Panel
3. Handle
4. Remote Control Cradle
5. Casters
6. Air Inlet
7. Air Outlet
8. Upper Drain
9. Power Cord
10. Lower Drain
NOTE: Please ensure if the water outlet drain is well installed before use.
Power Cord
TEST When this button is pressed or when there is a current leak, the unit will not operate.
RESET After resolving the problem, ress the reset button to resume operation.

INSTALLATION REQUIREMENTS
LOCATION REQUIREMENTS
- Place the air conditioner on a flat, level surface in a location that is at least 20" (51 cm) from any wall.
NOTE: The recommended distance from the window for optimal performance is 31.5 (80 cm).
- Maintain a minimum 20" (51 cm) clearance around the air conditioner to not block airflow.
- Keep the air conditioner free of any obstructions such as drapes, curtains, blinds, etc.
- The exhaust hose should be free of any obstructions.
- Do not place the air conditioner on an unstable or raised surface because it could fall and cause damage or injury.
- Do not place the air conditioner in direct sunlight or near a heat source such as baseboard heaters, stoves, etc.
- The window panel can be installed in a window with a minimum 20" (51 cm) to a maximum 46" (117 cm) opening.
ELECTRICAL REQUIREMENTS

POWER SUPPLY CORD
Wiring Requirements
- 115 Volt, 60Hz, 15-amp fused grounded 3 prong outlet
- The use of a time-delay fuse or time-delay circuit breaker is recommended.
- Use a dedicated circuit only.
NOTE: Do not operate any other electrical appliances on this circuit or you may trip the circuit breaker/fuse.
If this power supply cord is damaged, it cannot be repaired. It must be replaced with a cord from the product manufacturer. If the power supply cord is damaged call Haier Customer Service: 1-877-337-3639.

To test the power supply cord before operation:
- Plug the power cord into a grounded 3 prong outlet.
- Press the Test button, and then press and release the Reset button to restore power.
REQUIRED GROUNDING METHOD
This air conditioner must be grounded. The air conditioner is equipped with a power supply cord that has a 3 prong grounding plug. The power supply cord must be plugged into a mating, grounded 3 prong outlet, and grounded in accordance with all local codes and ordinances.

STEP 1 - UNPACK AIR CONDITIONER

- Remove packaging materials. Save the carton and the foam packaging for storing the air conditioner when not in use.
NOTE: There are NO packing materials inside the air conditioner to remove-Do Not open the cabinet.
- Properly dispose of/recycle all packing material.
- Handle the air conditioner gently.
- Keep the air conditioner upright and level. Do not set the air conditioner on its side, front, back or upside down.
STEP 2 - INSTALL EXHAUST
1. Connect the connectors #2 and #3 to two sides of exhaust hose # 1 to create an exhaust assembly.

2. Sliding in one end of hose assembly (with hose connector # 2) to rear panel.

Then turn knob to fix the hose assembly firmly.
NOTE: Smaller diameter hose to slide in from right of rear panel, and the larger one from left side.

STEP 3- INSTALL WINDOW PANELS
1. Insert the window panel B and C to each end of the main panel A. Adjust to fix the length of window

2. Open the window and place window panels into window. Adjust the extension panels to fit width or height of window by the screw and nut sets mounted on the main panel A.

STEP 4-ATTACH EXHAUST HOSE TO THE EXHAUST NOZZLE
1. Insert the other end of the exhaust hose assembly (with hose connector #3) onto the window bracket.

2. Repeat Steps 2-4 for the installation of the second hose assembly.
STEP 5-COMPLETE INSTALLATION

- Plug the power cord into a grounded 3 prong outlet.
- Press the Reset button on the power cord to ensure the safety plug is providing power to the air conditioner.
- Allow 8" of space around the unit for proper air circulation.
- When removing the portable air conditioner for storage, the window panel may be left in place. Simply place the cover (#5) over the hole on the window panel.
CONTROL PANEL

BUTTONS
A Power On/Off
B. Mode
Press the mode button for desired setting.
Cool:  sign appears in LCD display when in cooling.
Dehumidification:  sign appears in LCD display when in dehumidification mode.
Fan:  sign appears in LCD display when in the fan mode.
Heat:  sign appears in LCD display when in the heat mode. (HPND14XHT Only).
C. Fan Speed
There are 3 adjustable speeds in the cool and fan mode: Low, Medium, and High. In dehumidification mode, and room temperature is greater than 77° F, fan speed can be adjusted; otherwise fan speed is fixed to "low".
D. On/Off Timer
To set the timer for a 1-24-hour delay until the air conditioner turns off:
- When you use the timer setting button while the unit is operating, you can preset a time for the unit to turn off.
- When you use the timer setting button while the unit is on standby, you can preset a time for the unit to turn on.
- If you press the "ON/OFF" button, the preset timer function will be canceled.
- Timer setting range is 1-24 hours.
To clear Timer Delay program:
NOTE: Air conditioner can be either on or off.
- Press the Timer Button.
- Press and hold the minus button until the timer display has cleared.
To change the remaining time (in hours):
- Press the Timer Button.
- Press the plus or minus button to change the delay time from 1 to 24 hours.
E. Setting the Temperature
To set the temperature, press the + or - key to raise or lower the temperature. The temperature can be raised or lowered in the cool mode. The temperature cannot be adjusted in fan or dehumidification mode. Press+and- simultaneously to switch between °F and °C.
NOTE: The temperature can be set between 61°F to 89°F (Cool mode) and 61°F to 80° F (Heat Mode).
F. LCD Display
When STOP indicator light turns on, the internal water tank has filled with condensate water and the air conditioner will turn off automatically. See "Portable Air Conditioner Care" for directions on draining the air conditioner.
REMOTE CONTROL

1. Power On/Off 
2. Mode 
Cool:  sign appears in LCD display when in cooling.
Dehumidification:  sign appears in LCD display when in dehumidification mode.
Fan:  sign appears in LCD display when in the fan mode.
Heat:  sign appears in LCD display when in the heat mode. (HPND14XHT Only).
3. Fan Speeds 
There are 3 adjustable speeds in the cool and fan mode: Low, Medium and High. In dehumidification mode, and room temperature is greater than 77° F, fan speed can be adjusted; Otherwise fan speed is fixed to "low".
4. On/Off Timer 
To set the timer for a 1-24-hour delay until the air conditioner turns off:
- When you use the timer setting button while the unit is operating, you can preset a time for the unit to turn off.
- When you sue the timer setting button while the unit is on standby, you can present a time for the unit to turn on.
- If you press the "ON/OFF" button, the preset timer function will be canceled.
- Timer setting range is 1-24 hours.
To clear Timer Delay program:
NOTE: Air conditioner can be either on or off.
- Press the Timer Button.
- Press and hold the minus button until the timer display has cleared.
To change the remaining time (in hours):
- Press the Timer Button.
- Press the plus or minus button to change the delay time from 1 to 24 hours.
- The new delay time will display.
5. Setting the Temperaturel 
To set the temperature, press the or- keys to raise or lower the temperature. The temperature can be raised or lowered in the cool mode. The temperature cannot be adjusted in fan or dehumidification mode.
NOTE; The temperature can be set between 61°F to 89° F (Cool Mode) and 61°F to 80° F (Heat Mode).
AIR CONDITIONER USE
IMPORTANT: If the air conditioner has been tilted on its side, wait 24 hours before turning on the air conditioner to allow the oil to return to the compressor. This will prevent the air conditioner from failing prematurely.
- Allow 20" (51 cm) of space around the unit for proper air circulation.
- Do Not operate the air conditioner without air filters in place.
- Do not spill liquid on the control panel; it may cause an electrical short to the interior electronic parts that would either disable them or cause them to function improperly.
- When turning on the air conditioner for the first time after plugging it into an electrical outlet, the unit will start in Cooling mode set at 75°F (24°C), and at High fan speed.
- When turning on the unit after previous use, it will remember the last settings used.
- After a normal shut down, please wait for 3 minutes before restarting the unit.
- In Cooling mode, this unit should not require water to be removed. This model has a unique design that continuously evaporates the water.
- When the unit is operated in high humidity conditions, you may need to empty the water tank periodically.
- The unit will shut down automatically when the water tank is full. The Water Full indicator illuminates to alert you of this condition.
AIR CONDITIONER CARE

CLEANING
1. Unplug or disconnect power.
2. Use only a soft cloth dampened with water to clean the cabinet.
NOTE:
- Do not use a liquid or spray cleaner to clean the air conditioner.
- DO NOT use chemicals, abrasives, ammonia, chlorine bleach, concentrated detergents, solvents or scouring pads. Some of these chemicals/items may damage and/or discolor your air conditioner.
3. Dry thoroughly with a soft cloth.
4. Plug in or reconnect power.
AIR FILTERS
The air filters should be cleaned at least once a week for your unit to operate at optimum efficiency.
IMPORTANT: Do Not operate the air conditioner without air filters in place.
- Unplug or disconnect power.
- Remove the filter panel by pulling forward until the tabs release.

- Wash or vacuum the dust from the air filters.
- Reinstall the filter panel.
- Plug in or reconnect power.
INTERNAL WATER TANK
The Water Full indicator illuminates, when the internal water tank has filled with condensed water.
To Empty the Internal Water Tank:
- Unplug or disconnect power.
- Place a shallow 1 quart or larger pan (not included) below the lower drain located on the back (near the bottom) of the air conditioner.
- Remove the cap and the rubber plug and drain the water. tank.
- Re-insert the drain plug and screw the cap snugly into place.
- Plug in or reconnect power.
STORAGE
If the unit is not being used for a long period of time:
- Unplug or disconnect power.
- Drain the water from the water tank. See "Air Conditioner Care."
- Use the original packaging to repack the unit to avoid a buildup of dust or dirt.
- Store the air conditioner in a cool, dry location.
TROUBLESHOOTING
First try the solutions suggested here to possibly avoid the cost of a service call.
Unit does not start or operate
- Power supply cord is not plugged into an outlet.
- Plug the power cord into a grounded 3 prong outlet.
- Power supply cord has tripped.
- Press and release the RESET button on the power supply cord.
- The Power button has not been pressed.
- Press the Power button on the Control Panel or Remote Control to turn ON the air conditioner.
- There is no power to the electrical outlet.
- Plug a working lamp into the outlet to check for power.
- A household fuse has blown or a circuit breaker has tripped.
- Replace the fuse or reset the circuit breaker.
- The control was programmed for a Time Delay.
- Cancel the Time Delay. See "Control Panel."
- The batteries in the remote control are dead.
- The internal water tank is full. NOTE: The air conditioner automatically turns off, and the Water Full indicator illuminates to alert you of this condition.
- Empty the water tank. See "Air ConditionerCare."
Remote control is not working
- Batteries are dead.
- Batteries are installed incorrectly.
- Make sure the batteries are inserted in the correct position.
Air conditioner is working but the room is not cooling.
- The room temperature is hot. NOTE: On extremely hot and humid days, the air conditioner will take longer to cool the room.
- Allow time for the room to cool when you first turn on the unit.
- Make sure the air conditioner has an adequate BTU rating for the size of the room being cooled.
- The control is set incorrectly to Fan or Dehum mode.
- Set the Mode to Cool and the Fan Speed to High.
- Airflow is restricted.
- Remove any obstacles to the airflow and redirect airflow for uniform cooling.
- Temperature set too high.
- Lower the set temperature.
- Air filters are dirty or restricted.
- Clean the air filter. See "Air Conditioner Care."
- Air conditioner installed incorrectly
- Check the exhaust hose and window panel for proper installation.
- Doors and windows are open.
- Close the doors and windows to the room being cooled to prevent cooled air from escaping.
LIMITED WARRANTY
For The Period Of: One Year From the date of the original purchase
Will Replace: Replacement, repair, or refund of the original retail price for any product which fails due to a defect in materials or workmanship. If the unit is exchanged, the replacement unit is warranted for the remainder of your product's original one-year warranty period. GE Appliances will, at its sole discretion, replace the product with a product of the same or comparable functionality and quality or refund the original retail price.
In order to Make a Warranty Claim During the First 90 Days from the Date of Original Purchase:
- Properly pack your unit. We recommend using the original carton and packing materials.
- Return the product to the retail location where it was purchased.
- Include in the package a copy of the sales receipt or other evidence of date of original purchase. Also print your name and address and a description of the defect.
In order to Make a Warranty Claim During the Remainder of the One-Year Warranty:
- Locate your original sales receipt and make a note of your model and serial number.
- Call 1.877.337.3639 (in the United States) to initiate the product replacement process. In Canada, call 1.877.470.9174.
- You will be asked to provide your name, address, date of purchase, model and serial number.
- GE Appliances will arrange for a carton to be sent to your home to recover the product.
- Please return all requested materials (postage pre-paid) in the carton provided. Please include a description of the defect.
- You should receive your replacement product or refund within 7 to 10 business days after your package is received.
What Will Not Cover:
- Customer instruction. This owner's manual provides information regarding operating instructions and user controls.
- Improper installation. If you have an installation problem, or if the air conditioner is of improper capacity, contact your dealer or installer. You are responsible for providing adequate electrical connecting facilities.
- Failure of the product resulting from modifications to the product or due to unreasonable use including failure to provide reasonable and necessary maintenance.
- Replacement of house fuses or resetting of circuit breakers.
- Failure due to corrosion on models not corrosion-protected.
- Damage to the product caused by improper power supply voltage, accident, fire, floods or acts of God.
- Incidental or consequential damage caused by possible defects with this air conditioner.
- Damage caused after delivery.
EXCLUSION OF IMPLIED WARRANTIES - Your sole and exclusive remedy is product repair as provided in this Limited Warranty. Any implied warranties, including the implied warranties of merchantability or fitness for a particular purpose, are limited to one year or the shortest period allowed by law.
For US Customers: This warranty is extended to the original purchaser and any succeeding owner for products purchased for home use within the USA. If the product is located in an area where service by a GE Appliances Authorized Servicer is not available, you may be responsible for a trip charge or you may be required to bring the product to an Authorized GE Appliances Service location for service. In Alaska, the warranty excludes the cost of shipping or service calls to your home.
Some states do not allow the exclusion or limitation of incidental or consequential damages. This warranty gives you specific legal rights, and you may also have other rights which vary from state to state. To know what your legal rights are, consult your local or state consumer affairs office or your state's Attorney General.