Loading ...
Loading ...
Loading ...
23
49-80781
<RXURYHQKDVVL[UDFNSRVLWLRQV5HFRPPHQGHGUDFN
positions for various types of foods are provided in the
&RRNLQJ*XLGH$GMXVWLQJUDFNSRVLWLRQLVRQHZD\WR
LPSDFWFRRNLQJUHVXOWV)RUH[DPSOHLI\RXZRXOGSUHIHU
darker tops on cakes, muffins, or cookies, try moving
food one rack position higher. If you find foods are too
brown on top try moving them down next time.
:KHQEDNLQJZLWKPXOWLSOHSDQVDQGRQPXOWLSOHUDFNV
HQVXUHWKHUHLVDWOHDVWòEHWZHHQSDQVWRDOORZ
sufficient space for air to flow.
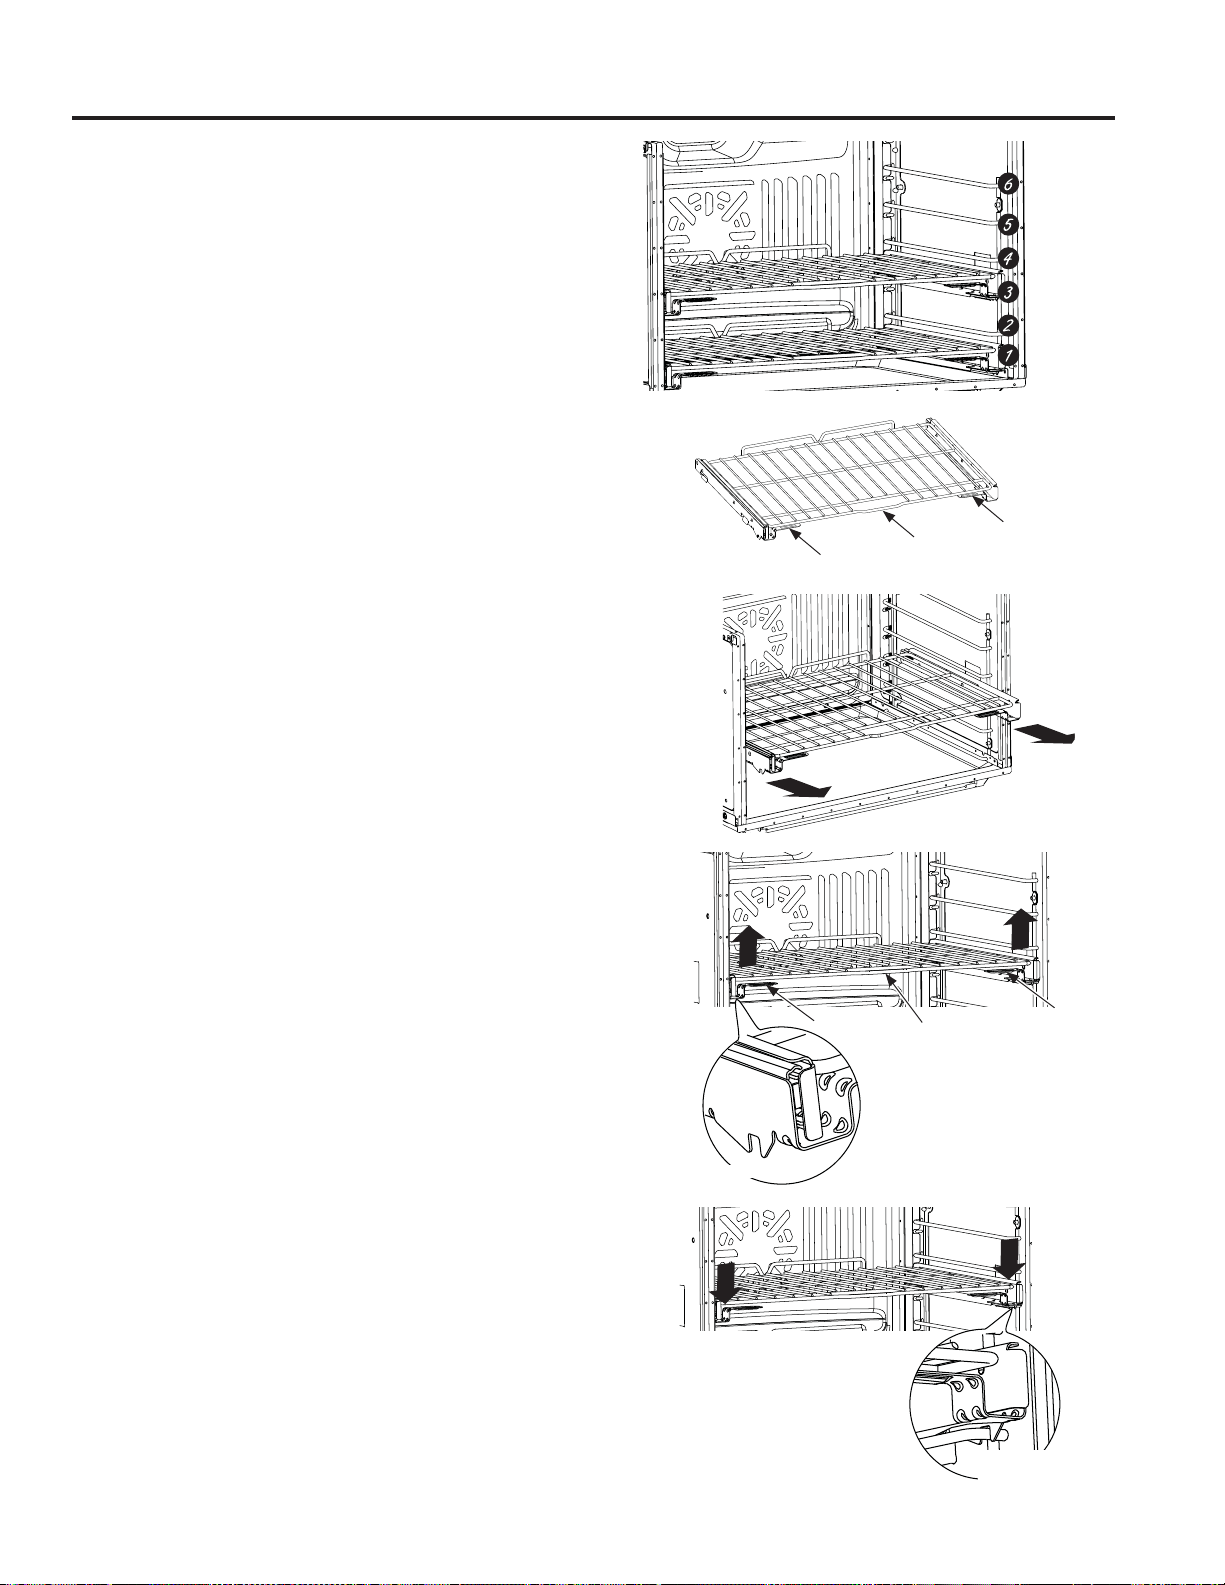
Oven Racks
<RXURYHQPD\KDYHH[WHQVLRQUDFNVDQGRUWUDGLWLRQDO
flat racks.
7RDYRLGSRVVLEOHEXUQVSODFHWKHUDFNVLQWKHGHVLUHG
position before you turn the oven on.
Extension Racks
([WHQVLRQUDFNVKDYHDQLQVWDOOIHDWXUHWKDWORFNVLQWRWKH
UDFNVXSSRUWVJXLGHVRQERWKVLGHV2QFHWKHLQVWDOO
feature is locked into place, always pull the rack out,
by its upper front rail, to its full extension stop position,
when placing or removing cookware.
If extension racks are difficult to extend, lubricate the
racks with the graphite lubricant provided with your
RYHQ5HPRYHWKHUDFNIURPWKHRYHQUHPRYHGHEULVLQ
the slide tracks with a paper towel, shake the graphite
lubricant and place 4 small drops on the two bottom
WUDFNVRIWKHOHIWDQGULJKWVLGHV2SHQDQGFORVHWKH
rack several times to distribute the lubricant.
7RRUGHUDGGLWLRQDOJUDSKLWHOXEULFDQWUHDGWKH
$VVLVWDQFHDQG$FFHVVRULHVVHFWLRQDWWKHEHJLQQLQJRI
this manual.
To Remove An Extension Rack:
0DNHVXUHWKHUDFNLVSXVKHGDOOWKHZD\LQWRWKH
oven.
*UDVSWKHUDFNE\ERWKLWVXSSHUIURQWUDLODQGLWV
lower handles on two sides and lift straight up to
unlock the rack from the rack supports.
)LUPO\KROGLQJRQWRERWKWKHXSSHUIURQWUDLODQGORZHU
KDQGOHVRQERWKVLGHVSXOOWKHUDFNIRUZDUG*UDVSWKH
UDFNRQERWKVLGHVLIQHFHVVDU\7KHQUHPRYHLWIURP
the oven.
To Replace An Extension Rack:
1. Place the rear portion of the rack onto the rack
supports (guides) as shown in the picture.
+ROGWKHXSSHUIURQWUDLODQGORZHUKDQGOHVDQGSXVK
the rack all the way in until the install feature locks
into the front rack support.
If extension racks are difficult to replace or remove, wipe
WKHRYHQUDFNVXSSRUWVZLWKFRRNLQJRLO'RQRWZLSHRLO
on the rack slides.
LOWER OVEN: Racks
Racks
The oven
has 6 rack
positions
Upper Front Rail
Handle
Handle
Handle
Handle
Upper Front Rail
Lift to unlock
from the rack
support
Install Feature
Front Rack
Lock
Hold the upper front rail and lower
handles and push the rack all the
way in until the install feature locks
on the front support
Loading ...
Loading ...
Loading ...