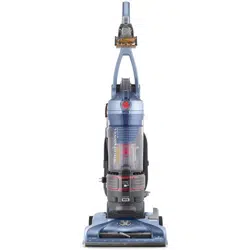
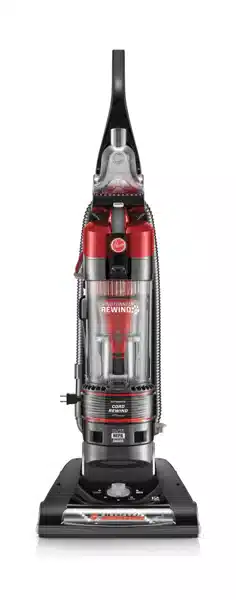
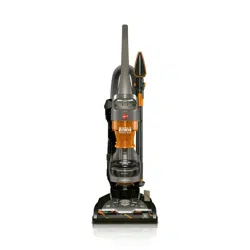
User Manual
VACUUM ASSEMBLY
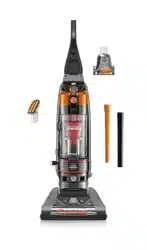
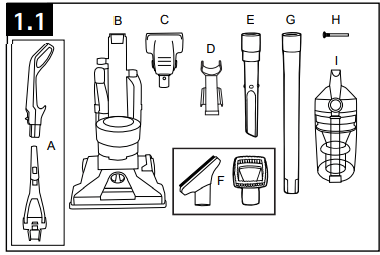
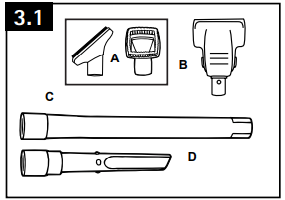
Carton contents
A. Handle*
B. Vacuum Base
C. Powered Hand Tool*
D. Powered Hand Tool Clip
E. Crevice Tool
F. Dusting/Upholstery Tool*
G. Wand
H. Screw (for assembly)
I. Dirt Cup
*Varies per model
Remove all parts from carton and identify each item shown.
Make sure all parts are located before disposing of packing materials.
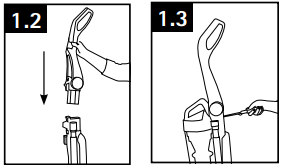
Attach handle
(varies per model)
Note: Remove the screw located in the vacuum base and set aside until instruction 1.3
1.2 Insert handle section into vacuum base. Push down firmly.
1.3 Using a Phillips screwdriver, fasten (1) screw behind handle into vacuum base.
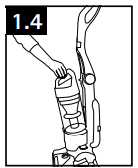
Attach dirt cup
1.4 Place bottom of dirt cup into vacuum body first. Pivot cup into vacuum. Dirt cup is secure when you hear a click
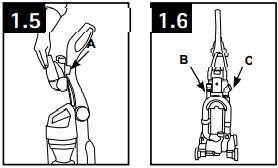
Position Tools
1.5 Secure Powered Hand Tool Clip (A) over ridges on side of handle. Attach bottom of Powered Hand Tool and pivot into clip until secure.
1.6 Place Crevice Tool into Wand and slide into tool storage area on left back side (B) of vacuum and place Upholstery Tool on right back side (C) of vacuum as shown.
HOW TO USE
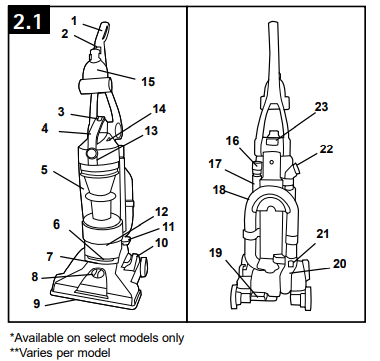
Vacuum Description
- Handle**
- ON/OFF Switch
- Dirt Cup Release Button
- Carry Handle
- Dirt Cup
- Stair Cleaning Handle
- Headlight*
- Height Adjustment
- Furniture Guard
- Brushroll On/Off Pedal* (Suction Only Mode)
- Cord Rewind Pedal*
- Filter made with HEPA media and Carbon Filter* Access
- Rinsable Filter Access
- System Check Indicator
- Powered Hand Tool**
- Crevice Tool
- Wand
- Hose
- Handle Release Pedal
- Hose Tube
- Hose Release Button
- Dusting/ Upholstery Tool**
- Folding Handle Release*
ON-OFF Switch
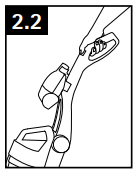
2.2 Plug cord into elec�trical outlet.
To turn vacuum ON, push ON/OFF switch once. To turn vacuum OFF, push switch again.
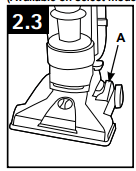
SUCTION ONLY MODE
2.3 For optimal cleaning performance on bare floors, brushroll should be turned off.
The vacuum is shipped with the brushroll in the ON position. To turn brushroll OFF for Suction Only Mode, step on pedal (A)
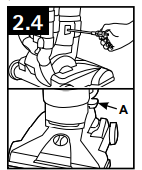
CORD REWIND AND STORAGE
2.4 Grasp the end of the plug and pull to release cord from cord reel until red tape is reached.
To return cord for storage, hold plug and press down Cord Release Pedal (A) on side of cord reel. Hold plug when rewinding onto cord reel. Do not allow plug to whip when rewinding.
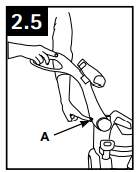
FOLDING HANDLE for storage.
2.5 Press Handle Release (A) to fold the handle to storage posi�tion.
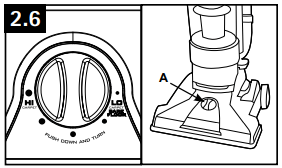
CARPET HEIGHT ADJUSTMENT
2.6 To adjust height setting, PUSH DOWN and TURN knob (A) to desired height setting.
For maximum cleaning performance, the following carpet height settings are recommended:
- Lowest setting: for all types of carpet and bare floors.
- Higher settings: for very deep pile carpet, where easier pushing effort is desired, while maintaining good cleaning performance
Tools allow for cleaning surfaces above the floor and for reaching hard to clean areas.
The vacuum is ready for tool use when handle is in upright position.
On models with “Suction Only Mode”, always place vacuum in “Suction Only Mode” for tool use.
Select Proper Tool
A. Use Upholstery Tool to clean upholstered furniture, draperies, mattresses, clothing, and carpeted stairs. (Tool varies per model)
B. Powered Hand Tool may be used for upholstered furniture, draperies, mattresses, clothing, automobile interiors, and carpeted stairs. (Tool varies per model)
C. Wand is used to give extra length to your hose. Use it with any of the above tools.
D. Crevice Tool may be used in tight spaces, corners and along edges in such places as dresser drawers, upholstered furniture, stairs and base boards.
Removing Hose
To remove hose for tool use, press the hose release button and pull hose end out.
To lock back into place, push hose into hose tube until you hear a click.
Attach Wand and Tools
To attach tool or wand to hose, push firmly into place.
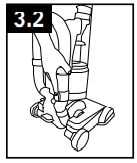
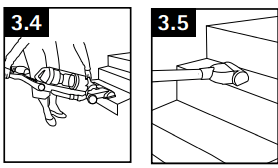
Stair Cleaning
3.4 Lift vacuum by Stair Cleaning Handle and position on stairs. Clean forward to back. Never leave the vacuum standing on stairs when not cleaning.
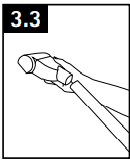
3.5 Use the Hose and Powered Hand Tool (Tool varies per model) for stair cleaning. When using tools, always turn the brushroll off by stepping on the “Suction Only Mode” pedal (available on select models only) as shown in diagram 2.3.
How to Clean Tools
To clean Hose and Powered Hand Tool, wipe with a damp cloth. DO NOT submerge in water.
Other cleaning tools may be washed in warm water with a detergent. Rinse and air dry 24 hours before using.
MAINTENANCE
Familiarize yourself with these home maintenance tasks as proper use and care of your vacuum will ensure continued cleaning effectiveness.
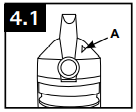
The System Check Indicator located at (A), alerts you to possible system performance issues.
If System Check Indicator is red:
1. Rinsable filter and/or filter made with HEPA media is dirty.
- Clean rinsable filter and/or filter made with HEPA media - reference
2. Dirt cup is full and/or clogged.
3. Brushroll and/or hose is clogged.
- Check hose for clogging
- Check brushroll for clogging
Any other servicing should be done by an authorized service representative.
NOTICE
A Thermal Protector has been designed into your cleaner to protect it from overheating. When the thermal protector activates the cleaner will stop running.
If this happens proceed as follows:
- Turn cleaner OFF and unplug it from the electrical outlet.
- Empty dirt cup.
- Inspect and remove blockage along the dirt path. This blockage may occur at the: nozzle inlet, hose connector, hose, dirt cup inlet, cyclonic filter, Rinsable filter, and HEPA filter.
- When cleaner is unplugged and motor cools for 30 minutes, the thermal protector will deactivate and cleaning may continue.
If the thermal protector continues to activate after following the above steps, your cleaner needs servicing.
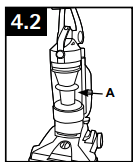
Dirt Cup
When to Empty
4.2 To maintain optimal performance, empty the dirt cup before the dirt cup reaches the max line (A). Place the vacuum in the upright position before removing the dirt cup.
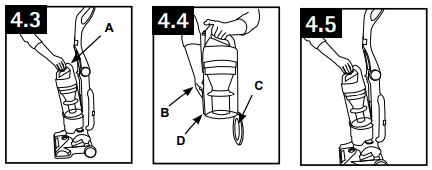
How to Empty
4.3 Press dirt cup release button (A) and pivot cup out.
4.4 Hold dirt cup over trash receptacle, push dirt cup door release lever (B) to open dirt cup door (C).
Close dirt cup door (C). Press firmly to secure at front (D).
4.5 Place bottom of dirt cup into vacuum body first. Pivot dirt cup into vacuum body and press firmly until it locks into place.
Filters: When to Clean
To maintain optimal performance, filters should be cleaned at least every two months under normal use.
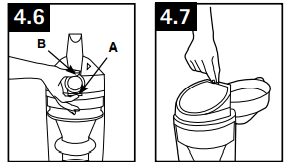
Rinsable Filter: How to Clean
Remove dirt cup as described in Fig. 4.3.
4.6 Pull up on dirt cup latch (A) to open.
4.7 Pull on the filter to remove Rinsable Filter.
Hold filter under running water for two minutes to remove dirt and debris. Squeeze filter twice while underwater. Remove from water and squeeze a final time to remove excess water.
Replace filter, tab side out.
Close lid securely by pushing at (B) until it clicks as shown in Fig. 4.6.
Replace dirt cup as described in Fig 4.5.
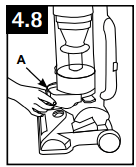
Filter Made With HEPA Media: How to Clean
4.8 With fingers in slots, pull filter frame (A) straight out. Hold filter over a trash receptacle and tap out dirt and debris.
Slide back into position on vacuum.
CAUTION ! To reduce the risk of injury from moving parts, unplug vacuum before servicing. Do not use vacuum without dirt cup or filters in place.
Carbon Filter : How to Clean
(Available on select models only).
Your Carbon Filter is located on the underside of the Filter made with HEPA media.
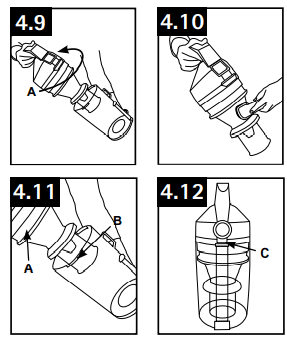
Cyclonic Filter Assembly: How to Clean
Remove dirt cup as described in Fig. 4.3.
4.9 Twist filter assembly (A) counterclockwise. Remove assembly from dirt cup.
4.10 Dirt and debris can be cleaned from the filter assembly with the Dusting/ Upholstery Tool.
4.11 Place the filter assembly on the dirt cup, aligning (3) tabs (A) on filter with (3) slots on dirt cup (B) and twist it clockwise to secure into position.
4.12 The Hoover® emblem and center lines on the dirt cup should align on the front of the dirt cup (C) if assembled correctly.
Replace dirt cup as described in Fig. 4.5.
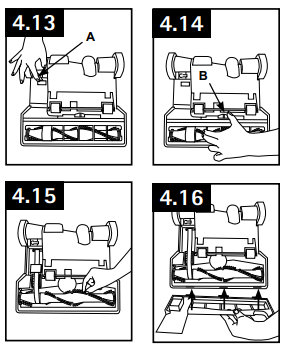
BRUSHROLL: How to Clean
4.13 Turn vacuum over so bottom side is facing up. Rotate red upper latch (A) counterclockwise.
4.14 Slide red lower latch (B) to the unlock position.
4.15 Pivot out bottom plate and remove any debris and/or hair from brushroll.
4.16 Reposition bottom plate, aligning the three tabs along front edge of nozzle guard with the three slots in nozzle. Rotate back into position. Slide red lower latch to Lock position, and rotate red upper latch clockwise.
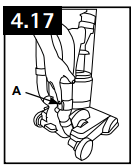
HOSE: How to Clean
4.17 To remove hose for tool use, press the hose release button (A) and pull hose end out.
Clear away debris or obstructions from hose. Do not use sharp objects to clean out hose as they can cause damage. To lock back into place, push hose into hose tube until you hear a click.
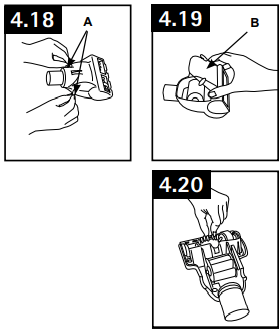
Powered Hand Tool: How to Clean
(Tool varies per model)
4.18 Turn tool so bottom faces up. Rotate the latches (A) on either side of tool.
4.19 Remove bottom plate (B).
4.20 Remove any debris and/ or hair from brushroll. Replace bottom plate by aligning tabs along front edge of tool. Rotate latches back into locked position.
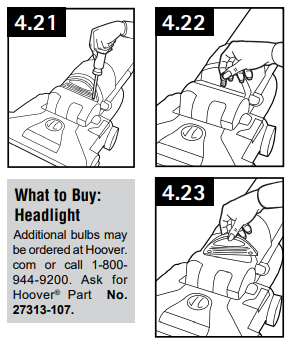
HEADLIGHT: how to replace
Removing lens
Press Handle Release Pedal and place handle in low position.
4.21 Using a Phillips screwdriver, remove (2) screws as shown and lift off lens.
Installing bulb
4.22 Pull old bulb straight out of socket. Push new bulb straight into socket until locked in place.
Excessive force is not required.
Twisting or turning bulb not required.
Replacing lens
4.23 Reposition lens and secure with screws.
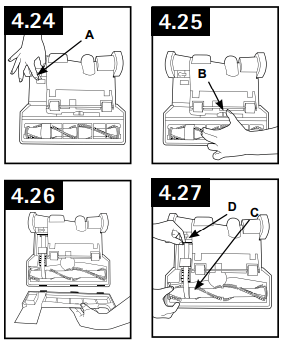
BELT
The belt is located under the bottom plate of the vacuum and should be checked from time to time to be sure it is in good condition.
When to replace
Replace belt if it is stretched, cut or broken. To check the belt, refer to Fig. 4.24 - 4.26.
How to replace
4.24 Turn vacuum over so bottom side is facing up.
Rotate red upper latch (A) counter clockwise.
4.25 Slide red lower latch (B) to the unlock position.
4.26 Lift off bottom plate.
4.27 Remove used belt from brushroll (C) then from motor shaft (metal rod) (D) and discard.
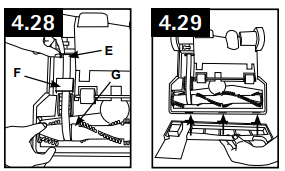
What to Buy: Belt
Use only genuine HOOVER® belts with your vacuum.
When purchasing a new belt for models with Brushroll On/Off (Suction Only Mode), ask for Flat Belt - HOOVER® part No. 562289001 or AH20065.
When purchasing a new belt for models without Brushroll On/Off (Suction Only Mode), ask for Stretch Belt - HOOVER® part No. 38528058 or AH20080.
If desired, additional belts can be purchased at Hoover.com or 1-800-944-9200
4.28 With lettering on outside of belt, slide new belt over motor shaft (metal rod) (E).
Push other end of belt through belt guide (F) and over metal pulley*, then slip around area of brushroll without bristles (G).
With belt in place, pull and slide brushroll into nozzle making sure that the brushroll end caps are in the correct orientation.
4.29 Reposition bottom plate, aligning the three tabs along front edge of nozzle guard with the three slots in nozzle. Rotate back into position. Slide red lower latch to Lock position, and rotate red upper latch clockwise to secure bottom plate.
*Models without “Suction Only Mode” do not have the metal pulley
TROUBLESHOOTING
If a minor problem occurs, it usually can be solved quite easily when the cause is found by using the checklist below.
Any other servicing should be done by an authorized service representative.
Vacuum won’t run
- Power cord not firmly plugged into outlet.
- Blown fuse or tripped breaker.
- Check fuse or breaker in home. Replace fuse/reset breaker in home.
- Thermal Protector activated.
- Unplug and allow vacuum to cool for 30min. (This willl reset the thermal protector)
System Check Indicator has turned red or Vacuum won’t pick up or Low suction
- Rinsable Filter and/ or Filter made with HEPA media is dirty.
- Clean Rinsable Filter and or Filter made with HEPA media
- Dirt cup full and/ or clogged.
- Broken or worn belt.
- Brushroll and/ or Hose clogged.
- Check Hose Check Brushroll
- Carpet height setting is incorrect.
- Set Carpet Height Adjustment to appropriate setting for carpet being cleaned
- Suction Only Mode is ON.
- Step on Brushroll ON/OFF Pedal to turn Suction Only Mode OFF
Cord Rewind does not work
- Cord reel does not retract.
- Call 1-800-944-9200 for the nearest authorized service representative
Dust escaping from vacuum
- Dirt cup full
- Dirt cup not installed correctly.
- Review Dirt Cup removal & replacement
- Hose not installed correctly.
- Rinsable and/ or Filter made with HEPA media not installed completely.
- Review Filter Removal and Cleaning
Headlight not working
- Bulb burnt out.
- Loose electrical wires.
- Call 1-800-944-9200 for nearest authorized Hoover® dealer.
Vacuum is difficult to push or won’t move forward
- Carpet height setting is incorrect.
- Set Carpet Height Adjustment knob to appropriate setting for carpet being cleaned
Powered Hand Tool brushroll won’t turn
- Too much pressure being applied to tool.
- Continue using tool applying light pressure.
- Blockage.
- Low vacuum suction.
- Check items under “Vacuum won’t pick or Low suction.”
Smoky/burning smell detected
- Belt broken or stretched.
- Brushroll is clogged.
- Clear/ remove debris from brushroll
WARRANTY
Limited TWO Year Warranty
WHAT THIS WARRANTY COVERS
When used and maintained in normal household use and in accordance with the Owner’s Manual, your HOOVER® product is warranted against original defects in material and workmanship for a full two year from date of purchase (the “Warranty Period”). During the Warranty Period, Hoover® will provide labor and parts, at no cost to you, to correct any such defect in products purchased in the United States, U.S. Military Exchanges and Canada.
HOW TO MAKE A WARRANTY CLAIM
If this product is not as warranted, take or send the product to either a Hoover® Authorized Warranty Service Dealer along with proof of purchase. For an automated referral to authorized service outlets in the U.S.A., phone: 1-800-944-9200 OR visit Hoover® online at www.hoover.com. For additional assistance or information concerning this Warranty or the availability of warranty service outlets, phone the Hoover® Consumer Response Center, Phone 1-800-944-9200, Mon-Fri 8am-7pm EST.
WHAT THIS WARRANTY DOES NOT COVER
This Warranty does not cover: use of the product in a commercial operation (such as maid, janitorial and equipment rental services), brushroll, belt, improper maintenance of the product, damage due to misuse, acts of God, nature, vandalism or other acts beyond the control of Hoover®, owner’s acts or omissions, use outside the country in which the product was initially purchased and resales of the product by the original owner. This warranty does not cover pick up, delivery, transportation or house calls. However, if you mail your product to a Hoover® Authorized Warranty Service Dealer, cost of shipping will be paid one way.
This warranty does not apply to products purchased outside the United States, including its territories and possessions, outside a U.S. Military Exchange and outside of Canada. This warranty does not cover products purchased from a party that is not an authorized retailer, dealer, or distributor of Hoover® products.
OTHER IMPORTANT TERMS
This Warranty is not transferable and may not be assigned. This Warranty shall be governed and construed under the laws of the state of Ohio. The
Warranty Period will not be extended by any replacement or repair performed under this
Warranty.
THIS WARRANTY IS THE EXCLUSIVE WARRANTY AND REMEDY PROVIDED BY HOOVER®. ALL OTHER WARRANTIES, EXPRESSED OR IMPLIED, INCLUDING WARRANTIES OF MERCHANTABILITY OR FITNESS FOR PARTICULAR PURPOSE, ARE DISCLAIMED. IN NO EVENT WILL HOOVER BE LIABLE FOR ANY SPECIAL, INDIRECT, INCIDENTAL OR CONSEQUENTIAL DAMAGES OF ANY KIND OR NATURE TO OWNER OR ANY PARTY CLAIMING THROUGH OWNER, WHETHER BASED IN CONTRACT, NEGLIGENCE, TORT OR STRICT PRODUCTS LIABILITY OR ARISING FROM ANY CAUSE WHATSOEVER. Some states do not allow the exclusion of consequential damages, so the above exclusion may not apply to you. This warranty gives you specific rights; you may also have others that vary from state to state.