Model: OTC TENS with TENS Belt
Item # : 21017
PRG

1
TABLE OF CONTENTS
Introduction to TENS ....................................................................................02
Indications / Contraindications / Warnings.......................................................03
Contents ........................................................................................................06
Description of device and functional buttons..................................................07
Program Details........................................................................................08
Preparation for use........................................................................................09
Electrodes and electrodes placement...........................................................10
Using the device.............................................................................................12
Ending your treatment session.......................................................................12
Special features.............................................................................................13
Caring for your device.....................................................................................13
Changing the battery......................................................................................14
Troubleshooting..............................................................................................15
Technical Specications..................................................................................15

2
Chapter 1: INTRODUCTION TO TENS
(1) GENERAL DESCRIPTION
The device is a battery operated pulse generator that sends electrical impulses through electrodes
to the body to reach nerves causing pain. Electrical impulses can be adjusted by changing the pulse
width and rate. The strength is individually adjusted using the 2 channels. A slide button (button lock
function) protects the device from accidental changes while in use.
(2) EXPLANATION OF PAIN
Pain is the body’s natural warning mechanism and is intended to prevent additional injury. Pain is
important, as without it, vital parts of our body might be injured or damaged without our knowledge.
While ointments, drugs or even surgery can be used to treat chronic pain, these are all utilized with
varying degrees of success, as each individual patient and condition is different. TENS offers a
unique alternative method of pain relief with no potentially harmful side effects.
(3) WHAT IS TENS
TENS, Transcutaneous Electrical Nerve Stimulator, is a battery powered electrical unit which uses
electrodes placed onto the skin over a painful area to deliver electrical impulses to the nerve bers
which lie underneath the skin surface. It provides pain relief by blocking pain signals to the brain via
the spinal cord and peripheral nervous system. TENS also stimulates production of endorphins, the
body’s own “painkillers”.
(4) COMMON APPLICATIONS FOR TENS
Although dependent on your specic pain problem, TENS devices have been used successfully to
treat many conditions, including:
CHRONIC PAIN
Cervical (Neck) – Amputation – Phantom Limb – Headache – Lower Back – Lumbago – Leg Pain –
Arthritis
ACUTE PAIN
Post Operative – Muscle and Joint – Tendonitis – Fractures – Tennis Elbow

3
Chapter 2: INDICATIONS / CONTRAINDICATIONS / WARNINGS
Read the operation manual in its entirely before using the device.
INDICATIONS:
This device may be used, with a physician/clinician’s prescription, for the symptomatic relief and
management of chronic (long term) pain and for the treatment of post-operative and post-traumatic
pain.
CONTRAINDICATIONS
• Heart Disease – Use caution prior to using this device on patients suspected of having heart
disease.
• Cardiac pacemakers – Do not use this device if you have a demand-type cardiac pacemaker or
any implanted debrillator.
• Trans cerebral stimulation – Do not apply electrical stimulation trans cerebrally (through the
head).
• Epilepsy – Use caution for patients with suspected or diagnosed epilepsy when using this
device.
• Carotid sinus – Do not apply electrical stimulation to carotid sinus region of the neck.
• Unknown etiology – Do not use this device if pain symptoms are undiagnosed. Use only after
the origin / caused of pain has been determined by your doctor.
• Hemorrhages – Use caution when there is a tendency to hemorrhage, such as following acute
trauma or fracture.
• Post-surgical use – Use caution following recent surgical procedures when muscle contraction
may disrupt the healing process.
• Uterus – Do not use electrical stimulation during menstruation.
• Sensory loss – Do not use electrical stimulation where sensory nerve damage is present by a
loss of normal skin sensation.
• Skin irritation – If patient experiences skin irritation due to electrical stimulation, stop using the
device and consult the clinician. Irritation may be reduced by an alternative conductive medium
or an alternative electrode placement. Isolated cases of skin irritation may occur at the site of
electrode placement following long term application.
• Adverse reactions – In addition to skin irritation, inammation and burns beneath the electrodes
are potential adverse reactions. Follow directions carefully.

4
WARNINGS
• Pregnancy – The safety of using electrical stimulation during pregnancy or birth has not been
established.
• Central origin pain – This device is not effective for pain of central origin (including headaches).
• Prescription – Use electrical stimulation only in the prescribed manner and for the prescribed
reason.
• Symptomatic treatment – This device is a symptomatic treatment and, as such, suppresses
the sensation of pain which would otherwise serve as a protective or warning mechanism of your
body.
• Keep out of reach of children – Do not store or use this device near children.
• Electronic equipment – Electronic monitoring equipment (such as ECG and EKG alarms) may
not operate properly when electrical stimulation devices are in use.
• Machinery operation – Never operate potentially dangerous machinery such as power saws,
automobiles, etc. while using this device.
• Uncomfortable stimulation – If the stimulation levels are uncomfortable or become
uncomfortable, reduce the intensity (amplitude) to a comfortable level. Contact your physician /
clinician if this does not resolve the problem or if the problem persists or re-occurs at your next
prescribed treatments session.
• Neck stimulation –Do not place electrodes across the neck or mouth. Severe spasm of the
laryngeal and pharyngeal muscles may occur. This may be strong enough to close off the airway
or cause breathing difculty.
• Long-term effects – The long-term effects of chronic use of electrical stimulation are unknown.
• Damage from liquids – Do not immerse the stimulator unit in water or other liquids.
• High frequency surgical devices – Simultaneous connection of a patient to a high frequency
surgical device while using this device may result in burns at the site of the electrodes and
possible damage to the stimulator. Discontinue use before surgery.
• Microwave or radio frequency sources – Operation in close proximity to shortwave or
microwave therapy equipment may shut the stimulator off.
• Flammable – Do not use the device in an environment where ammable or explosive fumes may
exist.
• External use – This device is for external use only
• Lead connection – Do not connect the lead wires to an alternating current (AC) power source or
other equipment not

5
▲Danger
The device does not have AAP/APG protection.
Extreme hazard is possible if used in the presence of explosives, ammable materials or ammable
anesthetics. Caution should be used when applying the device to patients suspected of having heart
conditions. Further clinical data is needed to show if there are adverse side effects on those with
coronary disease.
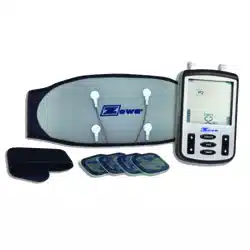
6
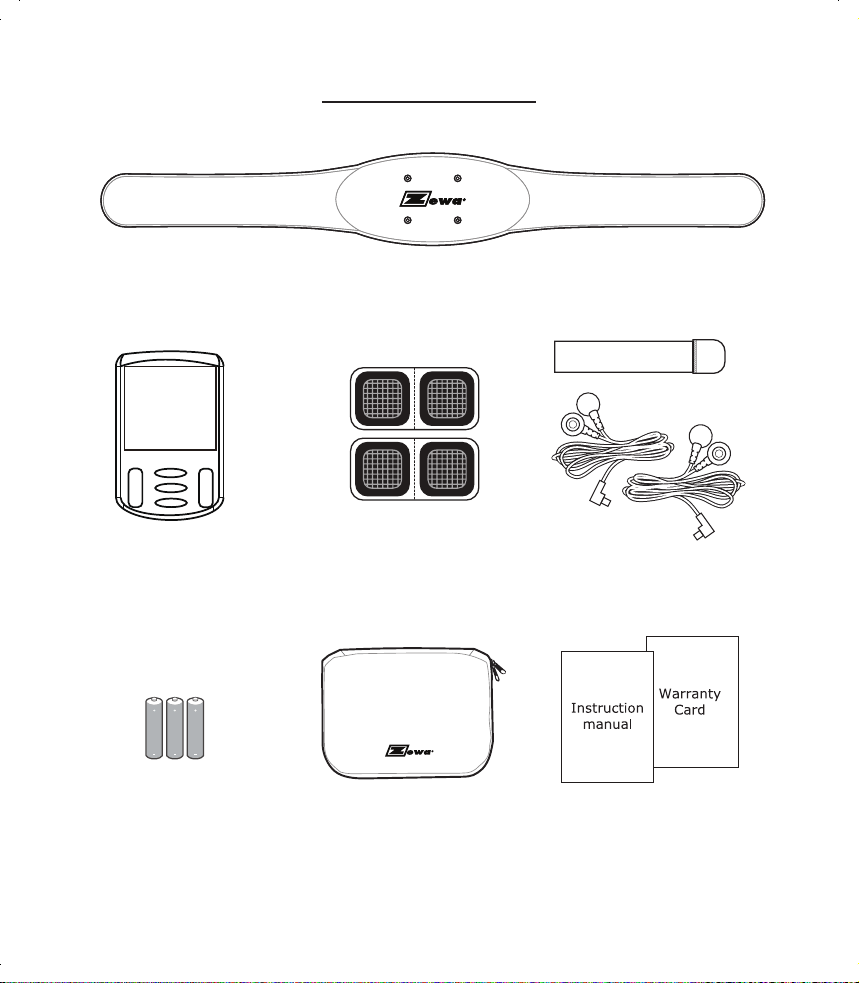
Chapter 3: CONTENTS
PRG
P1 P5
P2 P6
P3 P7
P4 P8
6
7
8
10
9

7
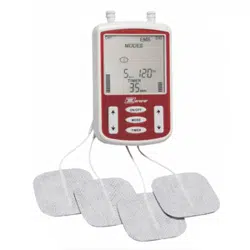
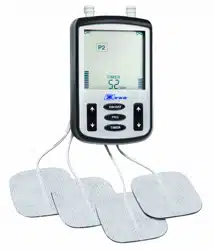
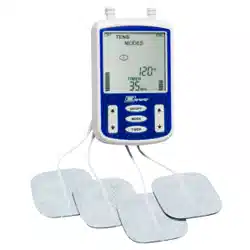
Chapter 4: DESCRIPTION OF DEVICE AND FUNCTIONAL BUTTONS
1. ON/OFF Button: Turns the power on and off.
2. PRG Button: Used to select a program.
3. TIMER Button: Used to program timer, 5 – 95 minutes or continuous (5 minute increments).
4. ↑ ↓ Buttons: Used to increase / decrease intensity level for CH 1 and CH 2.
5. Sliding Switch: Lock / unlock buttons
Belt
6. Electrode pad Channel 1
7. Electrode pad Channel 2
8. CH1 push button connectors
9. CH2 push button connectors
10. Velcro
PRG
P1 P5
P2 P6
P3 P7
P4 P8
6
7
8
10
9
PRG
P1 P5
P2 P6
P3 P7
P4 P8
6
7
8
10
9
8
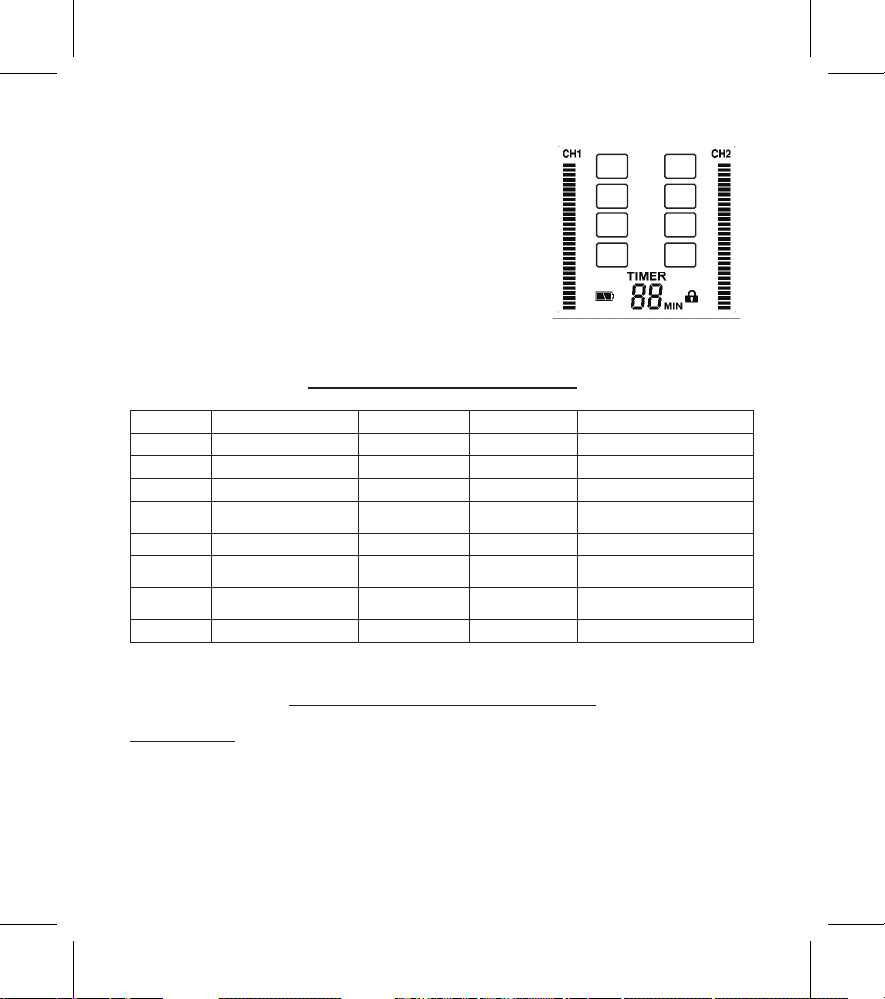
The LCD Display:
1. Intensity level for Ch1 & Ch2 (30 levels)
2. Program Number
3. Timer (5-95 min. and continuous)
4. Symbol of button lock function
5. Low battery indicator
Chapter 5: PROGRAM DETAILS
Program Pulse intensity max. Pulse width Frequency Mode
P1 100 mA 260μs 15 Hz Constant (C)
P2 100 mA 260μs 100 Hz Burst(B)
P3 100 mA 260μs 120 Hz Constant (C)
P4 100 mA 260μs ~150μs 2 Hz ~100 Hz
Modulated Rate and
Width
P5 100 mA 260μs ~150μs 100 Hz Modulation Width (MW)
P6 100 mA 260μs 7 Hz ~80 Hz
Strength-Duration and
Rate
P7 100 mA 260μs ~150μs 120 Hz
Strength-Duration and
Width
P8 100 mA P1 – P7 Sequential
Chapter 6: PREPARATION FOR USE
Insert batteries:
Your device operates with 3 AAA batteries. Please install batteries with polarities as indicated. Make
sure the battery strip is placed below the batteries.
CAUTION: Never force a battery into the battery compartment. A battery that does not fit can
damage the stimulator. This device requires 3 AAA batteries, never attempt to use any other battery
type.
PRG
P1 P5
P2 P6
P3 P7
P4 P8
6
7
8
10
9
9
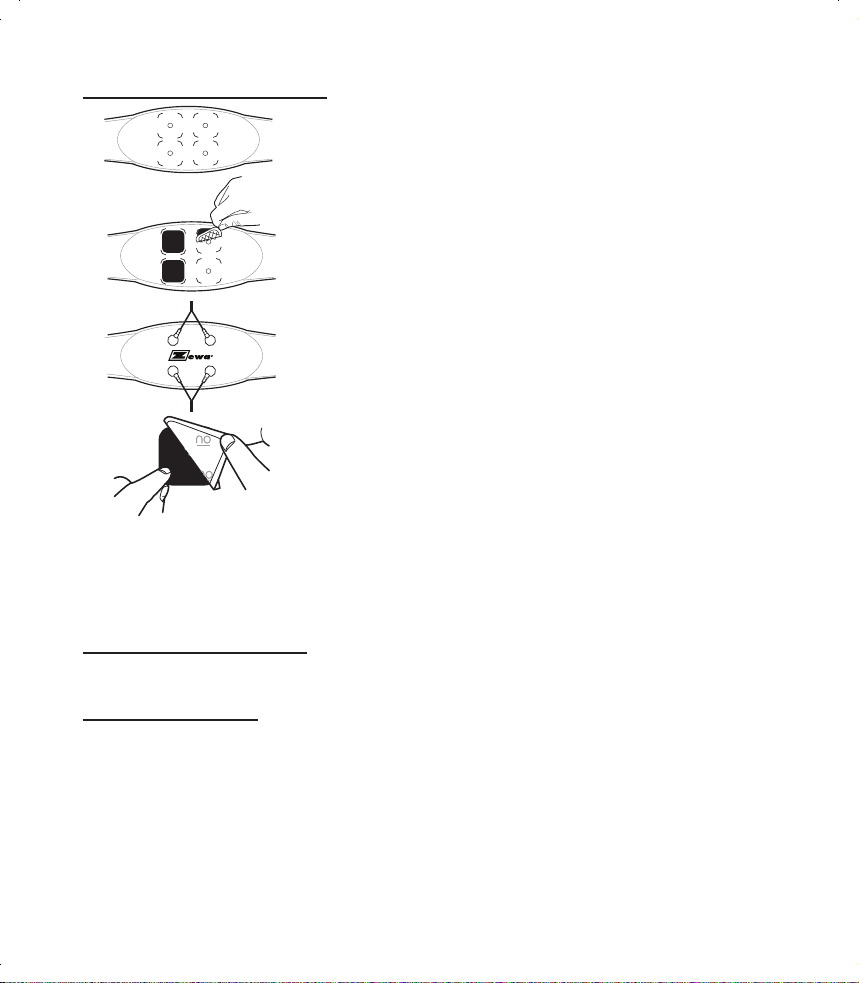
PREPARING THE BELT FOR USE
1. The OTC TENS comes with 4 electrodes, packed in 2 pairs. Each
pair has 1 large perforated plastic backing imprinted with “no”.
Separate the 2 electrodes at the perforation (do not remove any
plastic backing from the pads). There will now be four pads in front
of you.
2. Lay the belt at on a table, with the inside of the belt facing up as
indicated on the picture.
3. Remove the plastic backing from the top of the pads ( the top of
the pad is the side which has a grid pattern). Leave the backing
marked “on” on the pads.
4. Position the pads with the grid pattern side down centrally on the
marked locations onto the belt. Press the pads down rmly onto
the belt.
5. Turn the belt over and connect the 2 connection wires (4
connections) to the button connectors on the belt.
6. Remove the plastic covers marked "on" from all 4 electrodes.
Note: Once all plastic covers are removed one side of the
electrode sticks to the belt and other side will stick to your body.
Warning: Only use the belt, when all four electrodes are attached to the belt.
Note: Only use the original electrodes that come with the device. Use separate electrode pads for
each user. These may be ordered from your supplier.
ADJUSTING THE BELT WIDTH
The belt width can be adjusted with the Velcro fastener on the belt. If the belt is too small you can
use the extension Velcro which will extend the belt to 60”.
PUTTING ON THE BELT
1. Prior to putting on the belt, remove any cream and ointment residues from your skin. The skin
must be grease-free. Do not place the belt on injured or inamed areas of skin (wounds, spots,
rashes, reddening, etc.).
2. Put the belt around your torso. Position it on the area of the body to be treated.
3. Once placed in the right position, pull the 2 ends of the belt together and place the Velcro
fastener on the belt connecting the 2 ends. Tighten the belt so that it is comfortable.
4. The belt can be tightened or loosened by moving the end of the belt to a tighter or looser position
using the Velcro fastener.
PRG
P1 P5
P2 P6
P3 P7
P4 P8
6
7
8
10
9

10
Chapter 7: USING THE DEVICE
1. Connect the 2 wires to the TENS control unit.
2. Place Belt around your torso. Position it on the area of the body to be treated.
3. Turn the Device ON by pressing the “ON/OFF” button.
4. To change to another program press the “PRG” button.
5. To change the timer, press the “TIMER” button.
6. The device will turn off automatically if the timer was set (count down minutes are shown on the
display). If it was set to C (continuous) the device has to be turned OFF manually.
7. To turn the device OFF manually, press the “ON/OFF” button for 3 seconds.
Note 1:
When the device is in use and the “PRG” button is pushed, the intensity levels will change to “0” and
the last selected program starts ashing.
Note 2:
If no button is pushed for 10 seconds while in programming mode, the device will stop ashing. To
return into programming mode follow steps above by pressing the “PRG” button.
Note 3:
If the device is in programming mode (intensity bars are at “0”), the device will automatically turn
OFF after 60 seconds if no button is pushed.
Note: Use care when you plug and unplug the wires. Pulling on the lead wire instead of its insulated
connector may cause wire breakage.
Caution: Never insert the plug of the lead wire into an AC power supply or other equipment not
specied as safe for the lead wires.
Chapter 8: ENDING YOUR TREATMENT SESSION
After the device shuts off, use the following steps as a quick reference for ending your session:
• Disconnect the lead wire(s) from the control unit.
• Remove the wires from the TENS unit.
• You can leave the pads on the belt, but the exposed side has to be covered with the plastic
backing. Use the 4 plastic backings labeled “no” and stick them onto the pads, this will increase
the lifespan of these pads.
• When removing electrodes, always pull in the direction of hair growth. DO NOT REMOVE
ELECTRODES WHILE THEY ARE CONNECTED TO THE UNIT TO AVOID ANY ELECTRIC
DISCHARGE. Do NOT pull on the wires, but peel off on the corner of the electrode.
• Disconnect the lead wire(s) from the Belt.
• Store the components in the storage bag.

11
Chapter 9: SPECIAL FEATURES
Button Lock Function:
Slide the sliding switch to lock or unlock. The lock feature will lock all buttons so that no accidental
changes can be made during a treatment.
Automatic Shutoff
• The device turns off automatically when not in use and no button is pressed for 60 seconds.
• The device will turn off automatically when the timer reaches “0” minutes.
Intensity Level Reset
1. For your safety and comfort, the intensity level will reset to 0 each time the device is turned off,
including after a therapy session.
2. For your safety and comfort, the intensity level will reset to 0 in case the device is changed into
programming mode (pressing the “MODE” button 2 times).
Low Battery Indicator
The low battery indicator is displayed whenever the battery is low. The battery needs to be changed.
Programming Recall
The last treatment and timer setting is automatically saved and will appear on the display when the
device is turned on for the next treatment.
Chapter 10: CARING FOR YOUR DEVICE
The device may be cleaned by gently wiping it with a damp cloth moistened with mild soap and
water. Never immerse the device in water or other liquids.
Wipe lead wires with a damp cloth as described above if they become soiled.
To properly store the device for an extended period of time, remove the battery from the device. Put
the device and accessories in the storage bag and store in a cool dry location.

12
Chapter 11: CHANGING THE BATTERY
• When the low battery symbol is displayed, the battery is too weak to power the device and it
is time to change it. At this point, the device will shut off until a fresh battery is inserted. If you
decide to install a new battery before the device has shut itself off, be sure to turn the power off
before you undertake to change the battery.
• To change the battery, open the battery compartment as you did when you rst installed it. Pull
out the old batteries and insert new ones according to directions.
CAUTIONS:
1. Do not connect the stimulator to any electrical outlet.
2. Remove batteries from the device during storage to prevent battery leakage. Failure to do
so may damage the device.
3. Replace battery if device was immersed in water or liquid.
4. Never recharge alkaline batteries. An explosion may result.
5. Dispose of all batteries according to current federal, state, and local regulations.
13
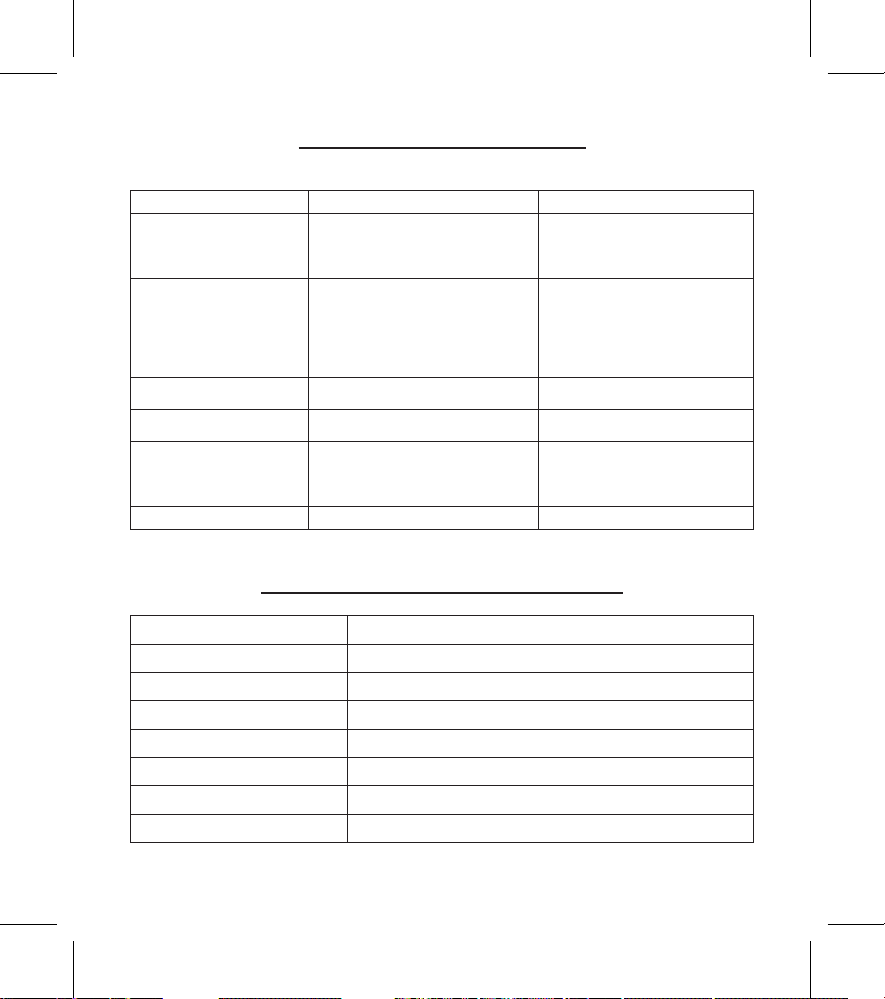
Chapter 12: TROUBLESHOOTING
If your device does not function properly:
Problem Possible Cause Solution
Stimulation is weak
1. Low Batteries
2. Poor electrode contact
3. Worn electrodes
1. Change Batteries
1. Reapply electrodes, secure
rmly
2. Replace electrodes
Stimulation stops
1. Low Batteries
2. Poor electrode contact
3. Damaged or worn lead wires
and/or electrodes
4. Therapy time complete
1. Change Batteries
2. Reapply electrodes, secure
rmly
3. Replace lead wires and/or
electrodes
4. Restart device
Stimulation weakens with
minutes after start
Normal “adaptation” response Increase intensity
Unintentional muscle
contractions
Intensity too high Decrease intensity
Stimulation
uncomfortable
1. Intensity too high
2. Improper electrode placement
3. Poor electrode contact
1. Decrease intensity
2. Reposition electrodes
3. Reapply electrodes, secure
rmly
Stimulation ineffective Improper electrode placement Reposition electrodes
Note: If there is any other problem, please call Zewa customer service at 1-888-993-3592.
Chapter 13: TECHNICAL SPECIFICATIONS
Wave form Asymmetrical Bi-Phasic square pulse
Channel Dual, isolated between channels
Modes 8 modes
Pulse rate Range 2~120Hz(pk)
Pulse width Range 150~260uS(pk)
Pulse Intensity Adjustable 0-100mA peak into 500 ohm load each channel
Timer 5~95 min and Continuous
Power supply 3 x AAA Batteries (4.5V)
※
All electrical specication ±20%
。

Model: OTC TENS with TENS Belt