
W11307643C
Table of Contents/Table des matières...................................................................................2
USE AND CARE GUIDE
For questions about features, operation/performance, parts, accessories, or service,
call 1-800-JENNAIR (1-800-536-6247) or visit our website at www.jennair.com.
In Canada, call 1-800-JENNAIR (1-800-536-6247) or visit our website at www.jennair.ca.
Get the app, connect instructions, terms of use, and privacy policy at www.jennair.com/connect.
GUIDE D’UTILISATION ET D’ENTRETIEN
Au Canada, pour assistance, installation ou service, composez le 1-800-JENNAIR (1-800-536-6247)
ou visitez notre site Web à www.jennair.ca.
JENNAIR
®
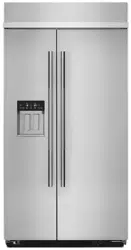
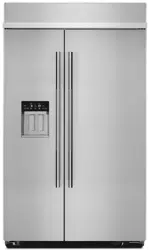
FRENCH DOOR
REFRIGERATOR
RÉFRIGÉRATEUR JENNAIR
®
AVECPORTEÀDOUBLE BATTANT
Para obtener acceso a “Instrucciones para el usuario del refrigerador” en español, o para obtener información adicional acerca de su
producto, visite: www.jennair.com.
Necesitará su número de modelo y de serie, ubicado en el interior del compartimiento del refrigerador.

2
TABLE OF CONTENTS
REFRIGERATOR SAFETY ..............................................................3
PARTS AND FEATURES ................................................................4
What’s New Behind the Doors? ...................................................5
GETTING STARTED .......................................................................6
REFRIGERATOR CONNECTIVITY FEATURES ...........................7
CONNECTIVITY SETUP .................................................................8
INSTALLATION INSTRUCTIONS .................................................10
Unpack the Refrigerator .............................................................10
Location Requirements ..............................................................10
Remove and Replace Refrigerator Doors ..................................11
Remove and Replace Freezer Drawer Fronts ............................14
Electrical Requirements .............................................................15
Water Supply Requirements ......................................................15
Connect the Water Supply .........................................................15
Handle Installation and Removal ...............................................17
Refrigerator Leveling and Door Closing .....................................18
FILTERS AND ACCESSORIES ...................................................18
Water Filtration System ..............................................................18
Install FreshFlow™ Air Filter ......................................................20
Install Produce Preserver (on some models) .............................20
Accessories ................................................................................21
REFRIGERATOR USE ..................................................................21
Opening and Closing Doors .......................................................21
Using the Controls .....................................................................22
External Dispenser Controls ......................................................24
Lighting the Refrigerator ............................................................24
Water and Ice Dispensers ..........................................................24
Ice Maker and Storage Bin .......................................................27
Shelves, Bins, and Drawers .......................................................29
Freezer Drawers .........................................................................31
Audio Reference .........................................................................31
REFRIGERATOR CARE ...............................................................32
Cleaning .....................................................................................32
Lights ..........................................................................................33
Vacation and Moving Care .........................................................33
TROUBLESHOOTING—CONNECTED MODELS ......................34
TROUBLESHOOTING ..................................................................35
PERFORMANCE DATA SHEET ...................................................44
WARRANTY ..................................................................................45
TABLE DES MATIÈRES
SÉCURITÉ DU RÉFRIGÉRATEUR...............................................46
PIÈCES ET CARACTÉRISTIQUES ..............................................47
Quoi de neuf en coulisse? .........................................................48
POUR COMMENCER ...................................................................49
CARACTÉRISTIQUES DE CONNEXION
DU RÉFRIGÉRATEUR .................................................................50
CONFIGURATION DE LA CONNECTABILITÉ ............................ 51
INSTRUCTIONS D’INSTALLATION .............................................53
Déballage du réfrigérateur..........................................................53
Exigences d’emplacement .........................................................53
Retrait et réinstallation des portes du réfrigérateur ...................54
Retrait et remplacement de l’avant du tiroir de congélation .....57
Spécications électriques ..........................................................58
Spécications de l’alimentation eneau .....................................58
Raccordement à la canalisation d’eau ......................................58
Installation et retrait des poignées .............................................60
Nivellement du réfrigérateur etfermeture de la porte................61
FILTRES ET ACCESSOIRES .......................................................61
Système de ltration d’eau ........................................................61
Installation du ltre à air FreshFlow™ ........................................ 63
Installation du conservateur de produits frais
(sur certains modèles) ................................................................63
Accessoires ................................................................................64
UTILISATION DU RÉFRIGÉRATEUR ..........................................64
Ouverture et fermeture des portes .............................................64
Utilisation des commandes .......................................................65
Commandes de distributeur externe .........................................67
Éclairage du réfrigérateur ...........................................................67
Distributeurs d’eau et de glaçons ..............................................67
Machine à glaçons et bac d’entreposage .................................70
Tablettes, balconnets et tiroirs ...................................................72
Tiroirs du congélateur ................................................................74
Référence audio .........................................................................74
ENTRETIEN DU RÉFRIGÉRATEUR ............................................75
Nettoyage ...................................................................................75
Lampes .......................................................................................76
Précautions à prendre pour les vacances
ou le déménagement .................................................................76
DÉPANNAGE – MODÈLES AVEC CONNEXION ........................77
DÉPANNAGE .................................................................................78
FICHE DE DONNÉES RELATIVES AU RENDEMENT................87
GARANTIE .....................................................................................88
3
You can be killed or seriously injured if you don't immediately
You
can be killed or seriously injured if you don't
follow
All safety messages will tell you what the potential hazard is, tell you how to reduce the chance of injury, and tell you what can
happen if the instructions are not followed.
Your safety and the safety of others are very important.
We have provided many important safety messages in this manual and on your appliance. Always read and obey all safety
messages.
This is the safety alert symbol.
This symbol alerts you to potential hazards that can kill or hurt you and others.
All safety messages will follow the safety alert symbol and either the word “DANGER” or “WARNING.”
These words mean:
follow instructions.
instructions.
DANGER
WARNING
REFRIGERATOR SAFETY
IMPORTANT SAFETY INSTRUCTIONS
WARNING:
To reduce the risk of fire, electric shock, or injury when using your refrigerator, follow these basic precautions:
SAVE THESE INSTRUCTIONS
■ Plug into a grounded (earthed) outlet.
■ Do not remove ground prong.
■ Do not use an adapter.
■ Do not use an extension cord.
■ Disconnect power before servicing.
■ Replace all parts and panels before operating.
■ Remove doors from your old refrigerator.
■ Use nonflammable cleaner.
■ Do not store or use petrol, flammable liquids or gas in the
vicinity of this or other electrical appliances. The fumes can
cause fires or explosions.
■ Do not store explosive substances such as aerosol cans
with a flammable propellant in this refrigerator.
■ Do not use or place electrical devices inside the refrigerator
compartments if they are not of the type expressly
authorized by the manufacture.
■ Use two or more people to move and install refrigerator.
■ Disconnect power before installing ice maker (on ice maker
kit ready models only).
■ A qualified service technician must install the water line and
ice maker.
■ Connect to a potable water supply only.
■ Use a sturdy glass when dispensing ice (on some models).
■ This appliance is not intended for use by persons (including
children) with reduced physical, sensory or mental
capabilities, or lack of experience and knowledge, unless
they have been given supervision or instruction concerning
use of the appliance by a person responsible for their safety.
■
Children should be supervised to ensure that they do not
play with the appliance.
■ To avoid the risk of children becoming trapped and
suffocating, do not allow them to play or hide inside the
refrigerator.
■ If the power supply cord is damaged, it must be replaced by
the manufacturer or its service agent or a similarly qualified
person.
4
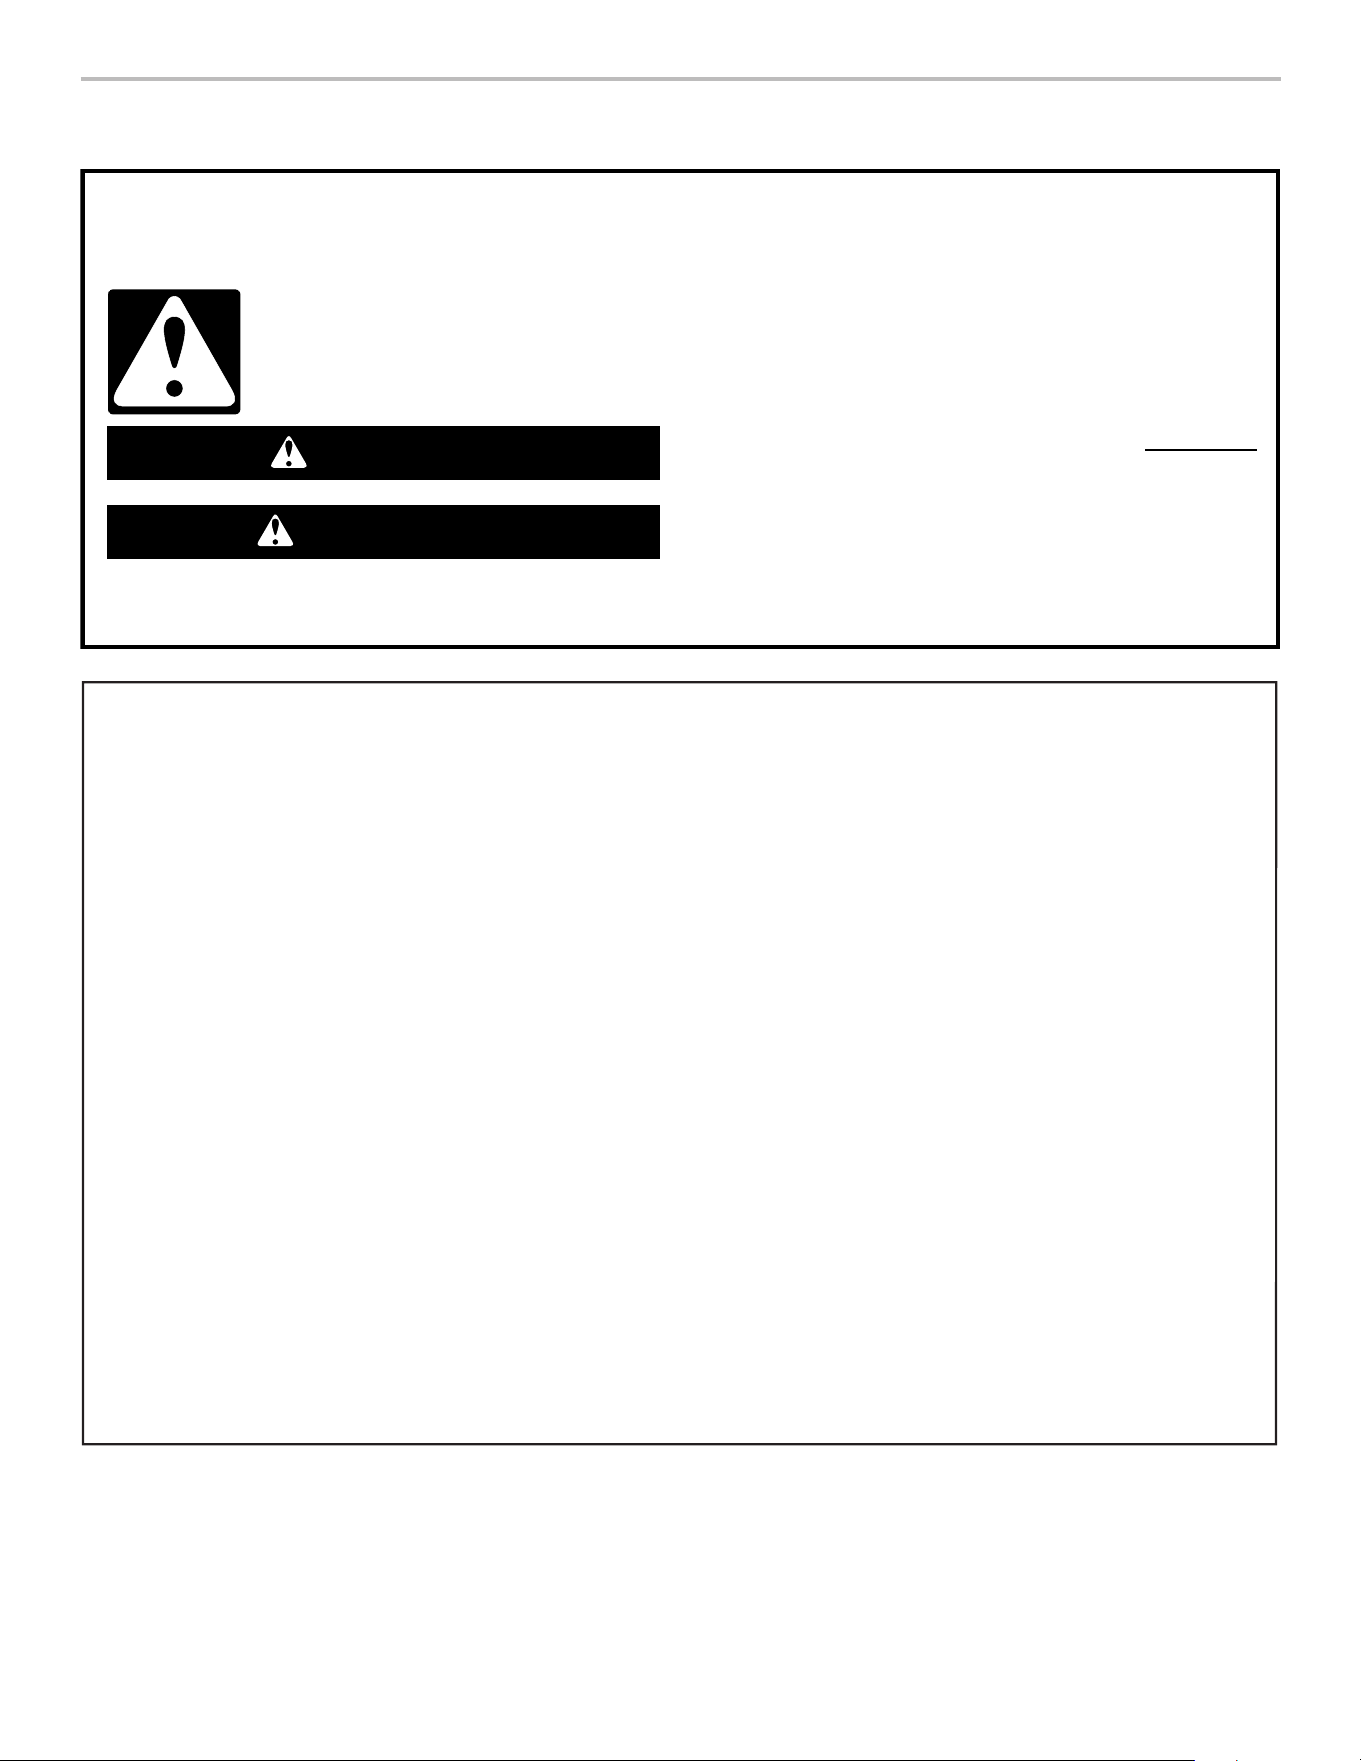
PARTS AND FEATURES
Gallon
Door Bin
Air Filter
Medium
Door Bin
Humidiseal™
Crisper Drawers
Temperature-
Controlled
Pantry Drawer
In-Door-Ice
®
Storage Bin
Fold-Away Glass
Shelf
Small Door
Bin (2)
Gallon Door
Bin (4)
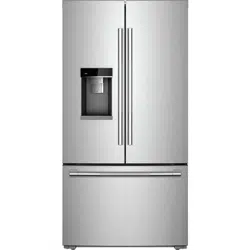
Proper Disposal of
Your Old Refrigerator
WARNING
Suffocation Hazard
Remove doors from your old refrigerator.
Failure to do so can result in death or
brain damage.
IMPORTANT: Child entrapment and suffocation are not
problems of the past. Junked or abandoned refrigerators are
still dangerous—even if they will sit for “just a few days.” If
you are getting rid of your old refrigerator, please follow these
instructions to help prevent accidents.
Before You Throw Away Your Old Refrigerator or Freezer:
■ Take off the doors.
■ Leave the shelves in place so that children may not easily
climb inside.
Important information to know about disposal of
refrigerants:
Dispose of refrigerator in accordance with Federal and Local
regulations. Refrigerants must be evacuated by a licensed,
EPA certified refrigerant technician in accordance with
established procedures.
Wi-Fi SAID
(smart appliance
ID sticker)
Temperature
Controls
Wine Rack — Optional
Water Filter
Herb Tender
®
Container
Pull-Out Platter
Adjustable Glass
Shelves
Glide-Out Freezer
Drawer
5
Your JennAir
®
French door refrigerator comes equipped with various
innovative storage and energy-efcient features.
Obsidian Interior
This dramatic interior showcases food items throughout the
refrigerator and provides a sharper contrast than white interiors.
Includes coordinating crisper drawers and freezer.
Energy and Normal Operating Sounds
Your new French door bottom-mount refrigerator has been
designed with a Linear Compressor to optimize energy efciency
and better regulate temperatures to match cooling demand. You
may notice that it operates differently than your previously owned
refrigerator. This allows the refrigerator to respond at variable
speeds and optimize cooling needs by avoiding abrupt start/stop
cycles.
In-Door-Ice
®
Storage Bin
The ice maker and ice storage bin are located in the door for easy
access to ltered ice while freeing up valuable shelf space inside
and adding additional door bins for more usable space.
Twin Fresh™ Climate Control System
The refrigerator and freezer compartments have separate
evaporators to provide fresh food and frozen food with optimal
storage climates: cool and humid in the fresh food, cold and dry
in the freezer, no mixing of air between the compartments to
reduce the transfer of food odors and tastes from refrigerator to
freezer and allow freezer air to remain dry to control frost and
reduce freezer burn.
FreshFlow™ Air Filter
An air lter is 15 times more powerful than baking soda at
reducing common food odors inside the refrigerator. Replace
your air lter every 6 months for maximum odor reduction.
Water Dispenser with Measured Fill
The Measured Fill feature allows you to dispense a desired
amount of ltered water in handy increments like 8, 16, or 24 oz.
Water Dispenser with Favorite Fill
The Favorite Fill feature allows you to save 2 custom presets that
can be programmed for favorite items that are frequently lled like
a coffee pot or a water bottle.
Fold-Away Glass Shelf
This special shelf provides a exible storage option for tall items
by allowing half the shelf to fold out of the way.
Pull-Out Platter
This full-width slide-out shelf is ideal for holding nished dishes
waiting to be served or for ingredients needing more preparation.
Electronic Temperature-Controlled Pantry Drawers
These drawers provide precise, independent temperature control
with 4 specialized settings for maximum exibility.
Herb Tender
®
Container
This removable accessory provides a dedicated space to help
optimize herb freshness.
Humidiseal™ Crisper Drawers
These drawers maintain a higher humidity level than the main
refrigerator compartment to help keep produce fresh.
Small Items Bin
This bonus storage area is perfect for butter, cream cheese, or
salad/condiment packets.
Interior LED Theater Lighting
Multiple strips of LED lights inside the refrigerator compartment,
freezer compartment, and interior drawers minimize shadows and
evenly distribute light throughout the refrigerator.
Soft, Auto-Close Technology
Provides smooth operation of drawer glides with an auto-close
design that pulls drawers closed.
Door Ajar Alarm
A helpful alarm sounds when the refrigerator door or freezer
drawer is left ajar.
Power Outage Indicator
If the power should go out while you are away from home, this
indicator will let you know that the refrigerator has been without
power.
Wi-Fi Connectivity
This refrigerator can connect with in-home Wi-Fi to provide
remote control through an app, available to download for use
with either iOS or Android devices.
House Symbol
This function automatically turns on after the
appliance is provisioned and registered. Pressing
the Connect button, will turn off this function
temporarily.
Humidiseal™
Crisper Drawers
What’s New Behind the Doors?
To view videos on door removal/
replacement, door adjustment, water
filter installation, air filter installation,
shelf adjustment or removal, and
Wi-Fi (if applicable) connectivity,
scan the code to the left with your
mobile device.
6
GETTING STARTED
INSTALLATION CHECKLIST
✔ Electrical Power
■ Plug refrigerator into a grounded 3 prong outlet.
✔ Doors
■ If doors need to be removed during installation, see the
“Remove and Replace Doors” in the instructions.
■ Check that handles are secure and installed according to the
instructions.
■ Doors seal completely.
■ Refrigerator is level. (Remove base grille and adjust leveling
feet so they are snug against the oor.)
■ Doors are even across the top. (Use door alignment feature if
necessary.)
■ Base grille is properly attached to the refrigerator.
✔ Ice and Water System (on some models)
■ Connect refrigerator to a cold water supply with 20-120 psi
water pressure, as specied in the instructions.
■ Make sure the household water supply is connected and
turned on.
■ Check that the water supply line behind refrigerator is not
kinked.
■ Only use recommended water supply tubing, copper, or PEX,
as specied in the instructions.
■ Install water lter according to the instructions.
■ Flush water system with 3 gallons (11.4 L) of water, as
specied in the instructions.
■ Check for water leaks at all connections.
■ Turn on ice maker if refrigerator is connected to water supply.
(If not connected to water supply, turn off ice maker.)
✔ Final Checks
■ Install air lter according to instructions in corresponding
packaging.
■ Remove all shipping material.
■ Set temperature controls to the recommended setting.
■ Save instructions and other literature.
■ Send in Registration Card or register your product online.
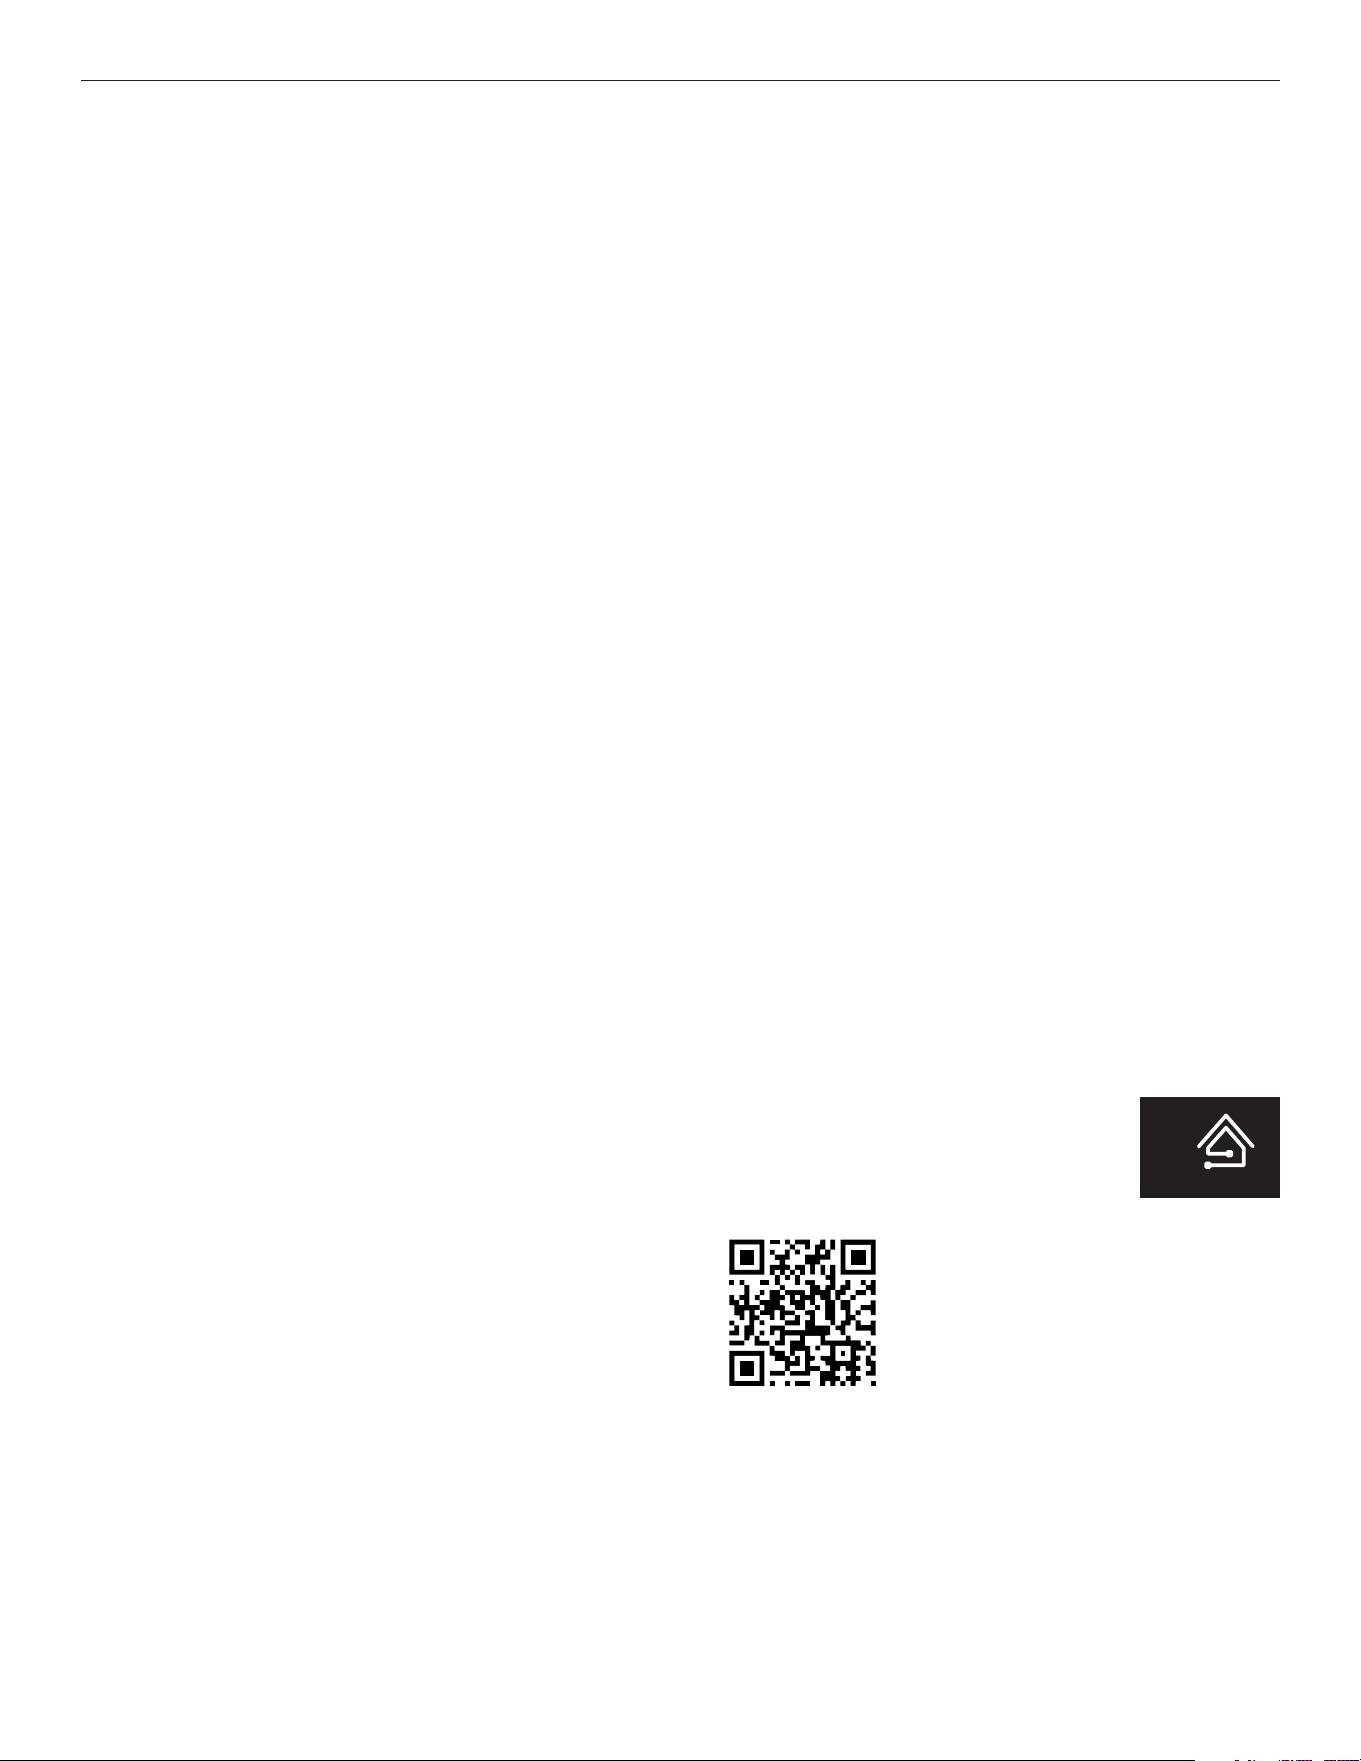
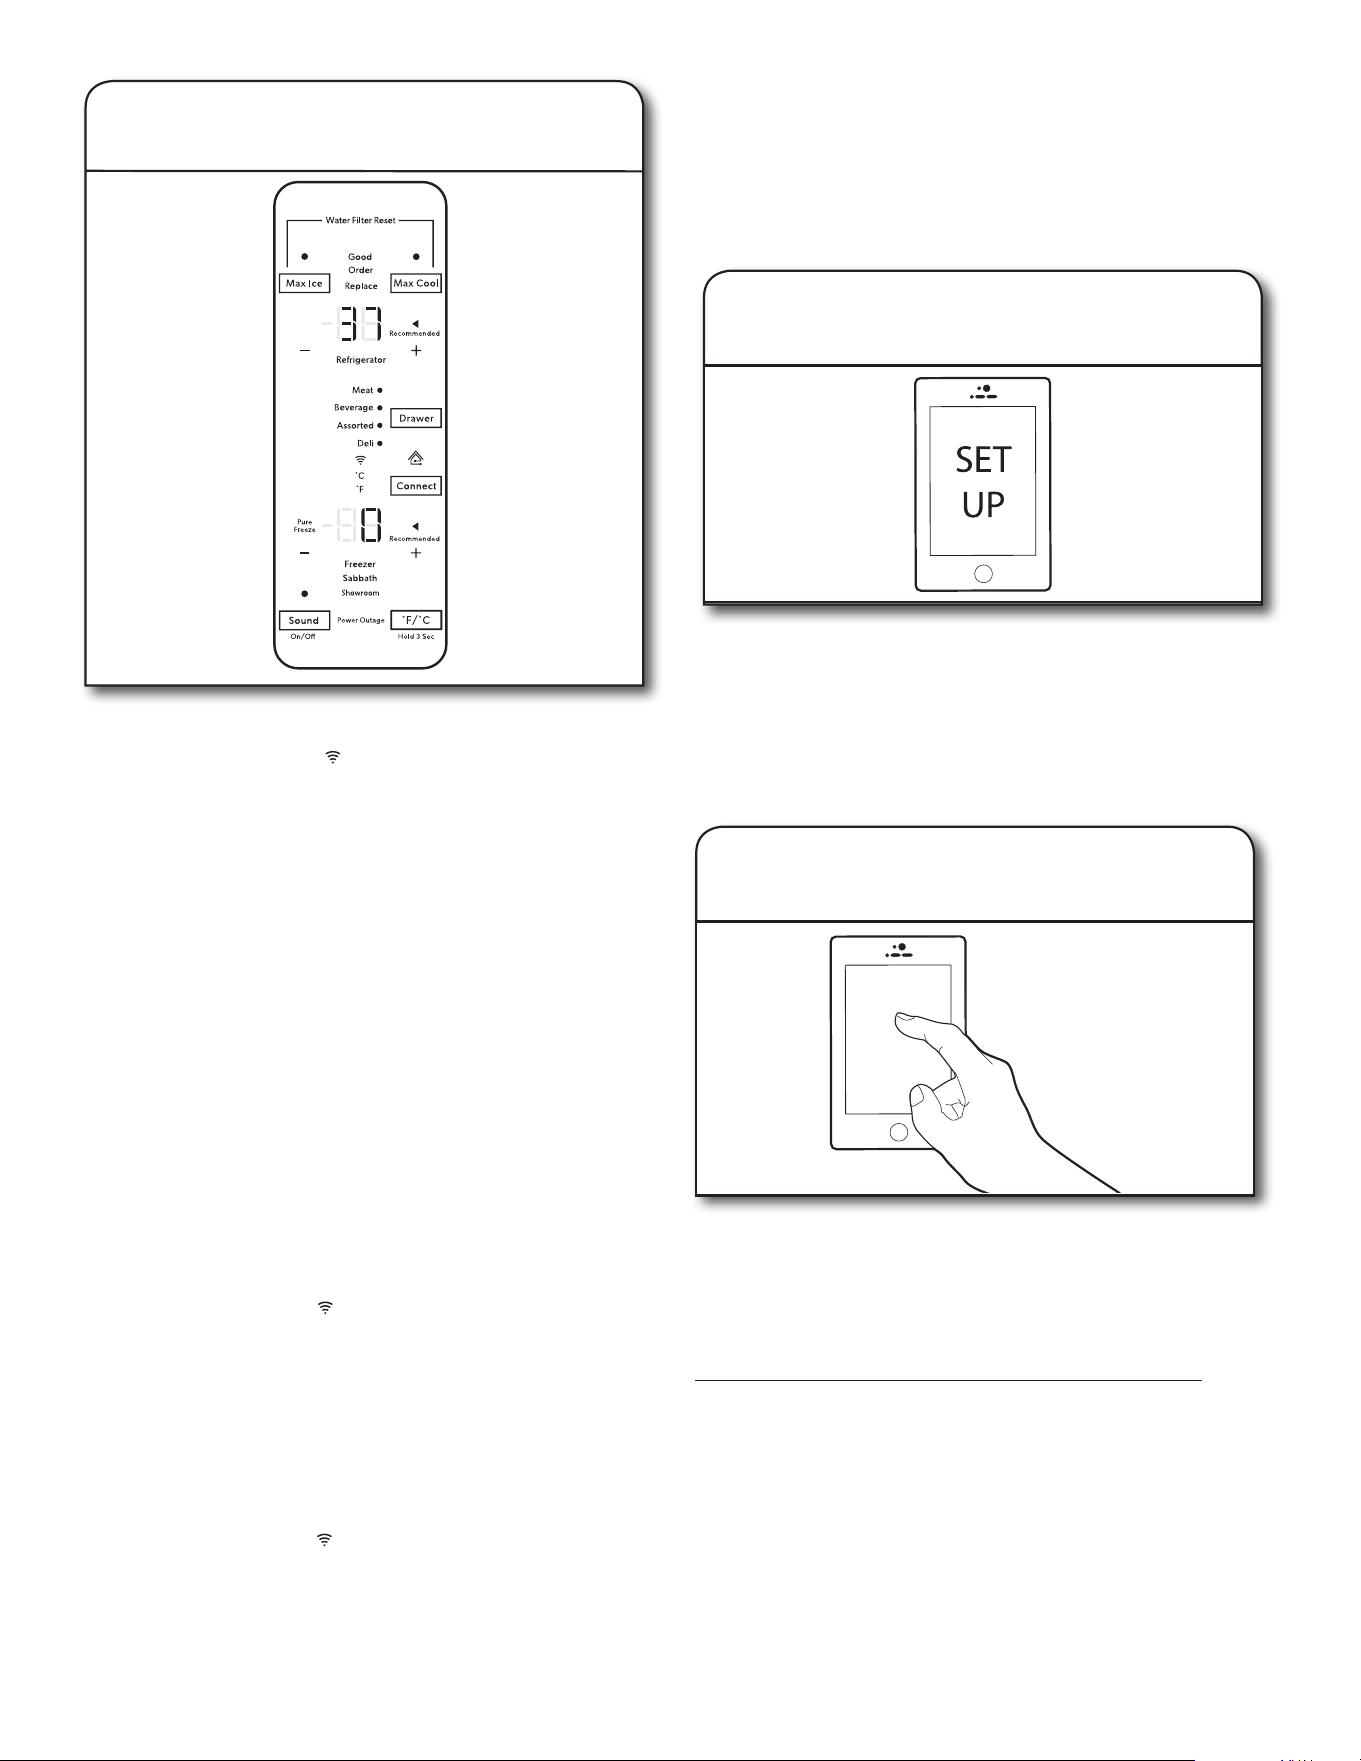
WATER FILTER INSTALLATION
■ Locate the water lter compartment in the lower left-hand side
of the refrigerator compartment. Push on the right side of the
lter door to open.
■ Align the arrow on the water lter cap with the cutout notch in
the lter housing and insert lter.
Electrical Shock Hazard
Plug into a grounded 3 prong outlet.
Do not remove ground prong.
Do not use an adapter.
Do not use an extension cord.
Failure to follow these instructions can result in death,
fire, or electrical shock.
WARNING
■ Once the lter is inserted, turn the lter clockwise 90° (1/4 turn)
until it locks into the housing.
■ Push water lter door closed to latch.
■ Flush 3 gallons (11.4 L) of water through the water system to
clear air from the water line and to keep the dispenser from
dripping and/or avoiding decreased dispenser ow.
NOTE: If the lter is not installed correctly, water may
dispense at a lower ow rate and there will be slower ice
production. Improper lter installation may also cause the
water lter housing to leak.
Align Refrigerator Doors
✔ If doors are uneven:
■ Ensure the refrigerator is level.
■ Keeping both refrigerator doors closed, pull out the freezer
drawer. Locate the bottom hinge pin of the right-hand
refrigerator door. The alignment screw is inside the bottom
hinge pin.
■ Insert the short end of the 1/8" hex-key wrench (packed with
the Door Handle Installation Instructions) into the bottom hinge
pin until it is fully engaged in the alignment screw.
To raise the refrigerator door, turn the hex key to the right.
To lower the door, turn the hex key to the left.
DOOR ALIGNMENT
Tools Required
Depending on the width of the door opening, the following tools
may be required to remove, replace, and align the refrigerator
doors.
Tools Needed:
■ 1/4" hex nut driver – base grille, freezer drawer screws, and
brake/leveling feet
Tools Provided:
■ 1/8" hex key – handle setscrews and door alignment
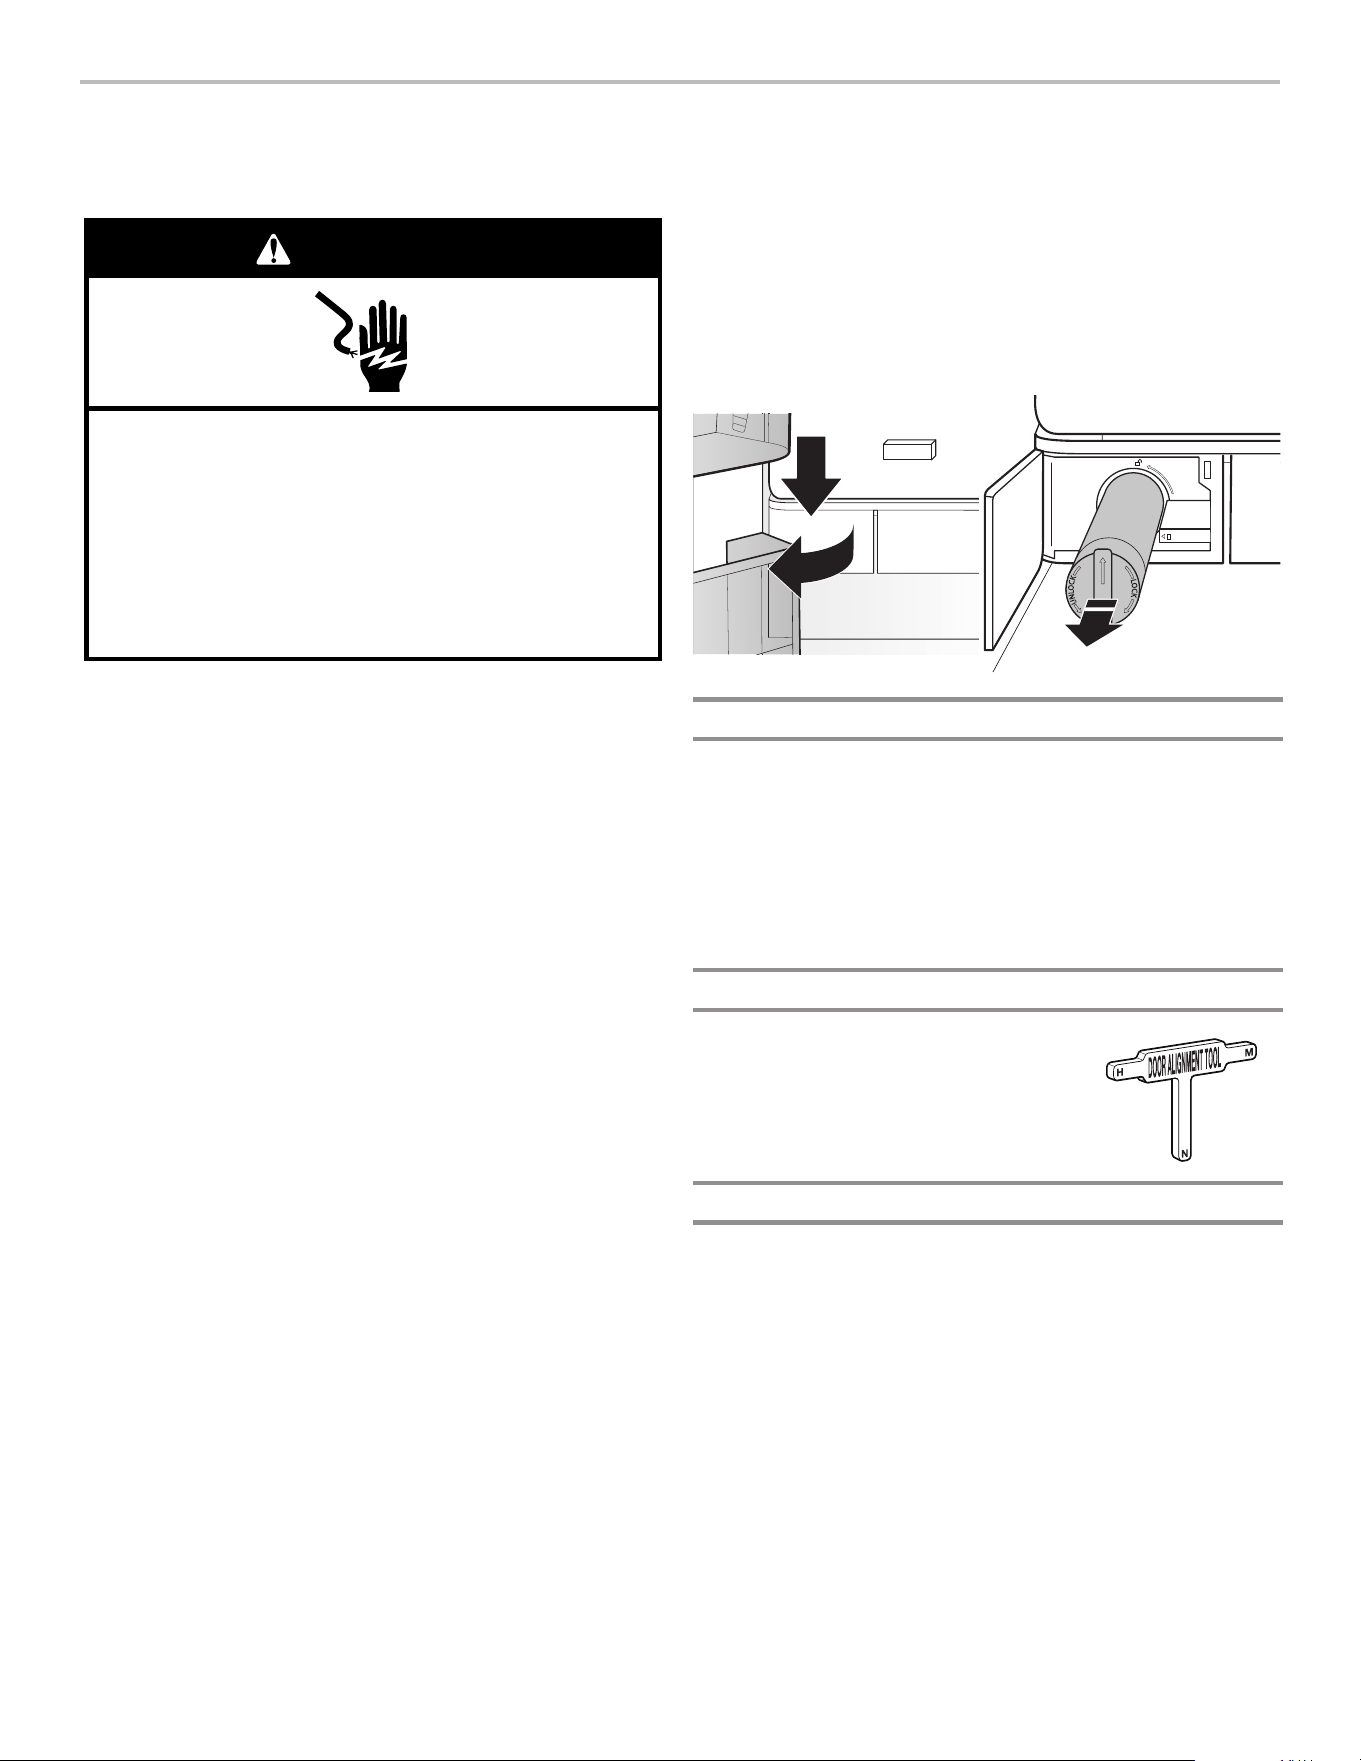
Door alignment tool instructions
Features:
■ Creates an even horizontal gap
between the refrigerator doors.
■ Solves door alignment issues
during installation and improves door seal.
7
Shelf Height Adjustment
Shelf height can be adjusted by changing the adjustable shelf
mounts between their vertical and horizontal positions.
■ Carefully lift the shelf off the shelf mounts and turn the ipper
to the desired orientation.
■ Repeat for remaining shelf mounts.
■ Ensure the shelf is properly seated on the shelf mounts.
■ Continue to turn the alignment screw until the tops of the door
are aligned.
NORMAL OPERATING SOUNDS
Your new French door bottom mount refrigerator has been
designed to optimize energy efciency and better regulate
temperatures to match cooling demand.
You may notice that it operates differently from your previously
owned refrigerator.
It is normal for the high-efciency compressor to run for extended
periods of time at varying speeds in order to consume only the
energy necessary for optimum efciency.
In addition, during various stages of the cooling cycle, you may
hear normal operating sounds that are unfamiliar to you.
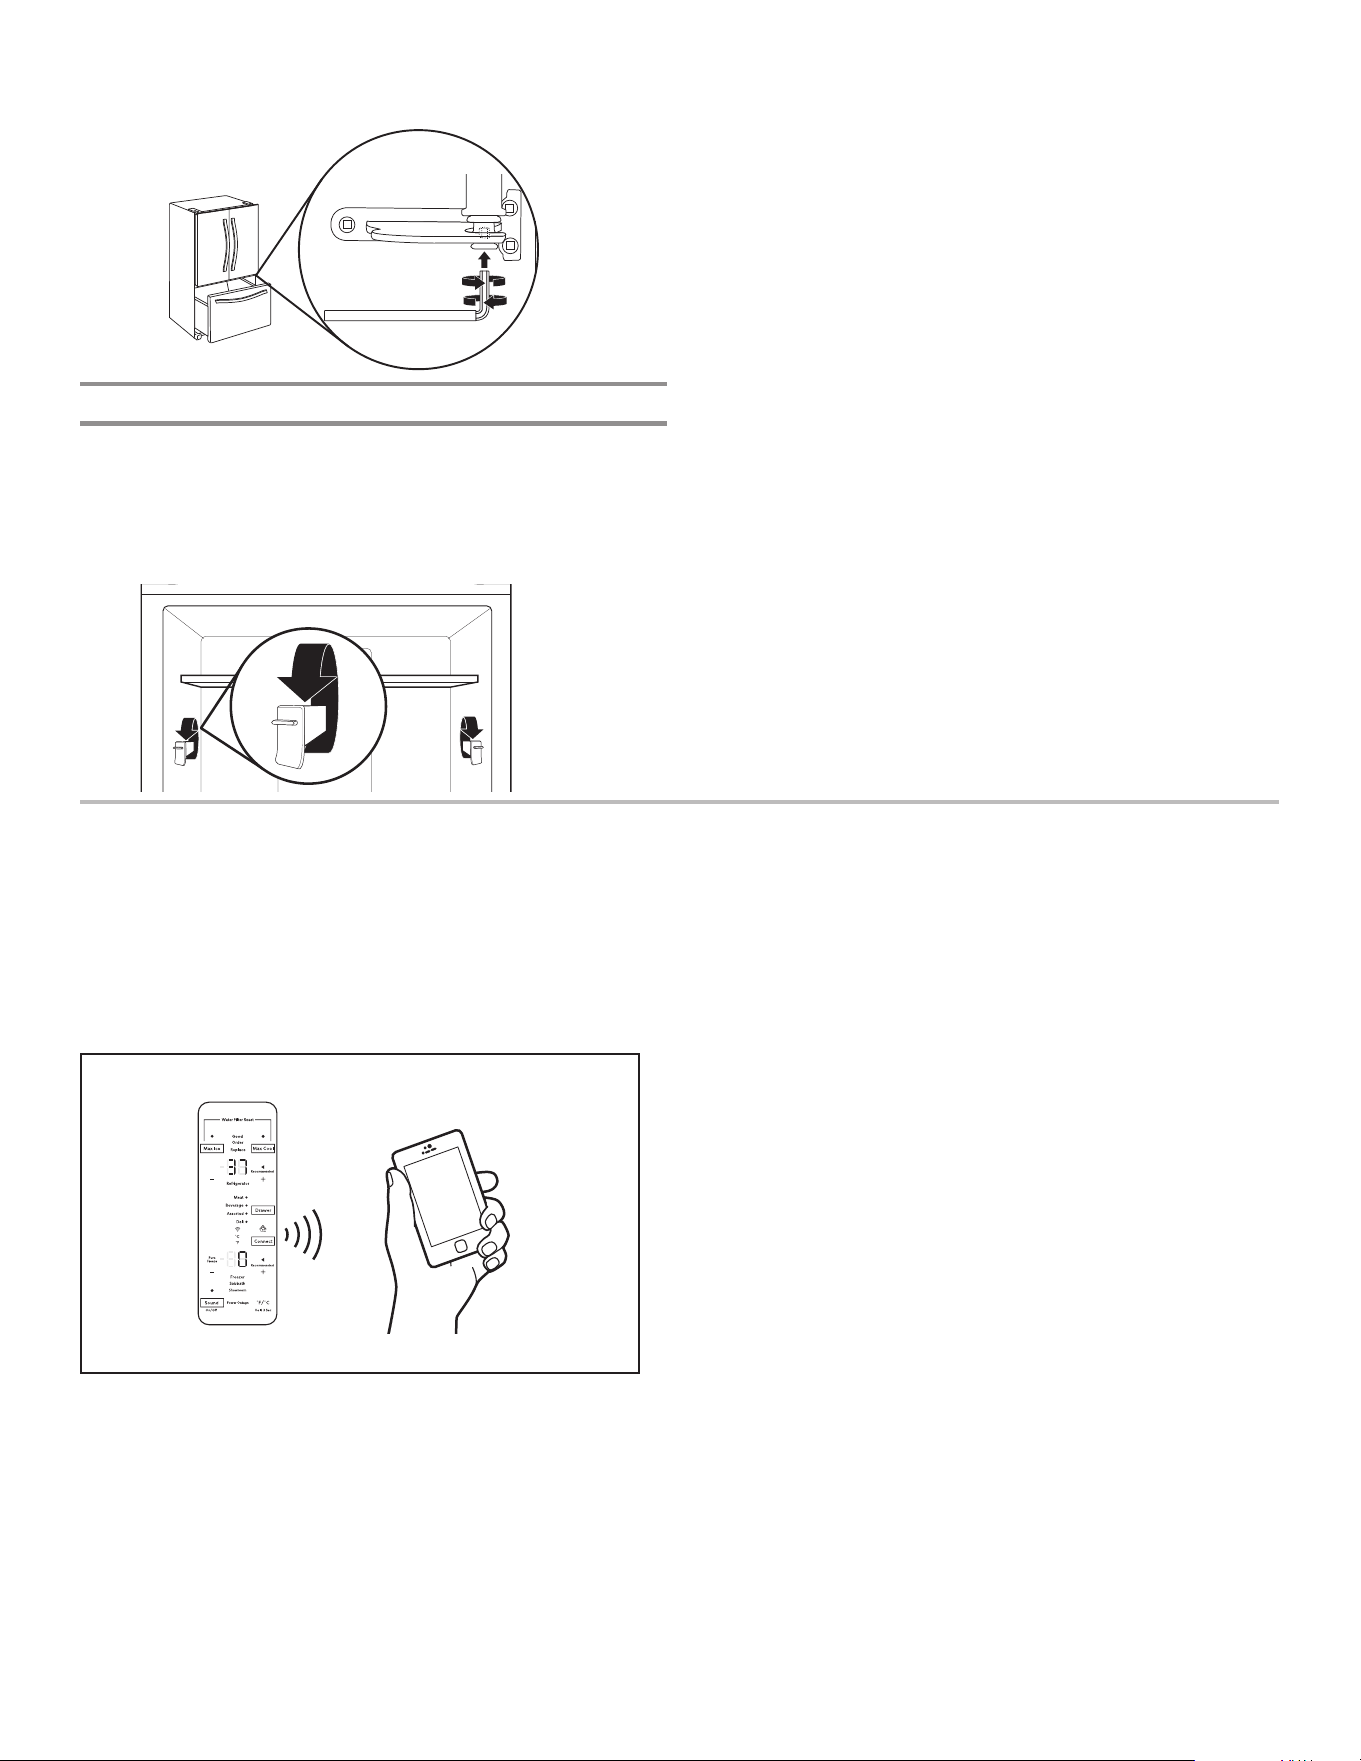
REFRIGERATOR CONNECTIVITY FEATURES
(on some models)
Wi-Fi connectivity allows your Smart Refrigerator to connect to the Internet and interact with the JennAir
®
app from your smartphone or
mobile device. This connection opens up several Smart options to you — options intended to save you valuable time and energy. Refer
to the “Troubleshooting—Connected Models” section of this Use & Care Guide, check any connection instructions for your specic
router, and refer to alternate instructions at www.jennair.com/connect or call 1-877-559-2603.
NOTE: Requires Wi-Fi and account creation. App features and functionality subject to change. Subject to Terms of Service available at:
www.jennair.com/connect. Data rates may apply.
SMART FEATURES
Smart Features help make your everyday a little more efcient
by letting you remotely monitor, manage, and maintain your
refrigerator.
Remote Temperature Control
What it does: Allows you to control your refrigerator remotely
from your mobile device via the JennAir
®
app.
What it does for you: Lets you control temperatures in your
refrigerator, freezer, and temperature-controlled pantry remotely—
not just when you are standing in front of it.
Water Filter Status
What it does: Gives you a look at the life remaining for your water
lter before replacement is needed. This allows you to reset the
lter.
What it does for you: Helps you be more efcient in planning
for ordering and replacing lters.
Auto Reorder App
What it does: Allows you to order replacement lters,
consumables, and accessories via the JennAir
®
app for
delivery directly to your home.
What it does for you: Simplies ordering correct water and air
lters—no trips to the store searching for the correct lters.
Door Ajar Alert
What it does: Sends you a notication when one of the doors of
the refrigerator has been left open.
What it does for you: Alerts you to door-open status so you
can close the door(s) or call home to ask someone else to close
door(s) before over-temperature situation arises.
Power Outage Alerts
What it does: Sends you a notication when power
to your refrigerator is disconnected, returns, and when
the highest temperature is reached in the refrigerator
and freezer compartments during the power outage.
What it does for you: Alerts you to power status and duration
of outage to provide input regarding disposition of refrigerator/
freezer contents.
8
CONNECTIVITY SETUP
(on some models)
IMPORTANT: Proper installation of your refrigerator prior to use is your responsibility. Be sure to read and follow the User Instructions
that came with your refrigerator.
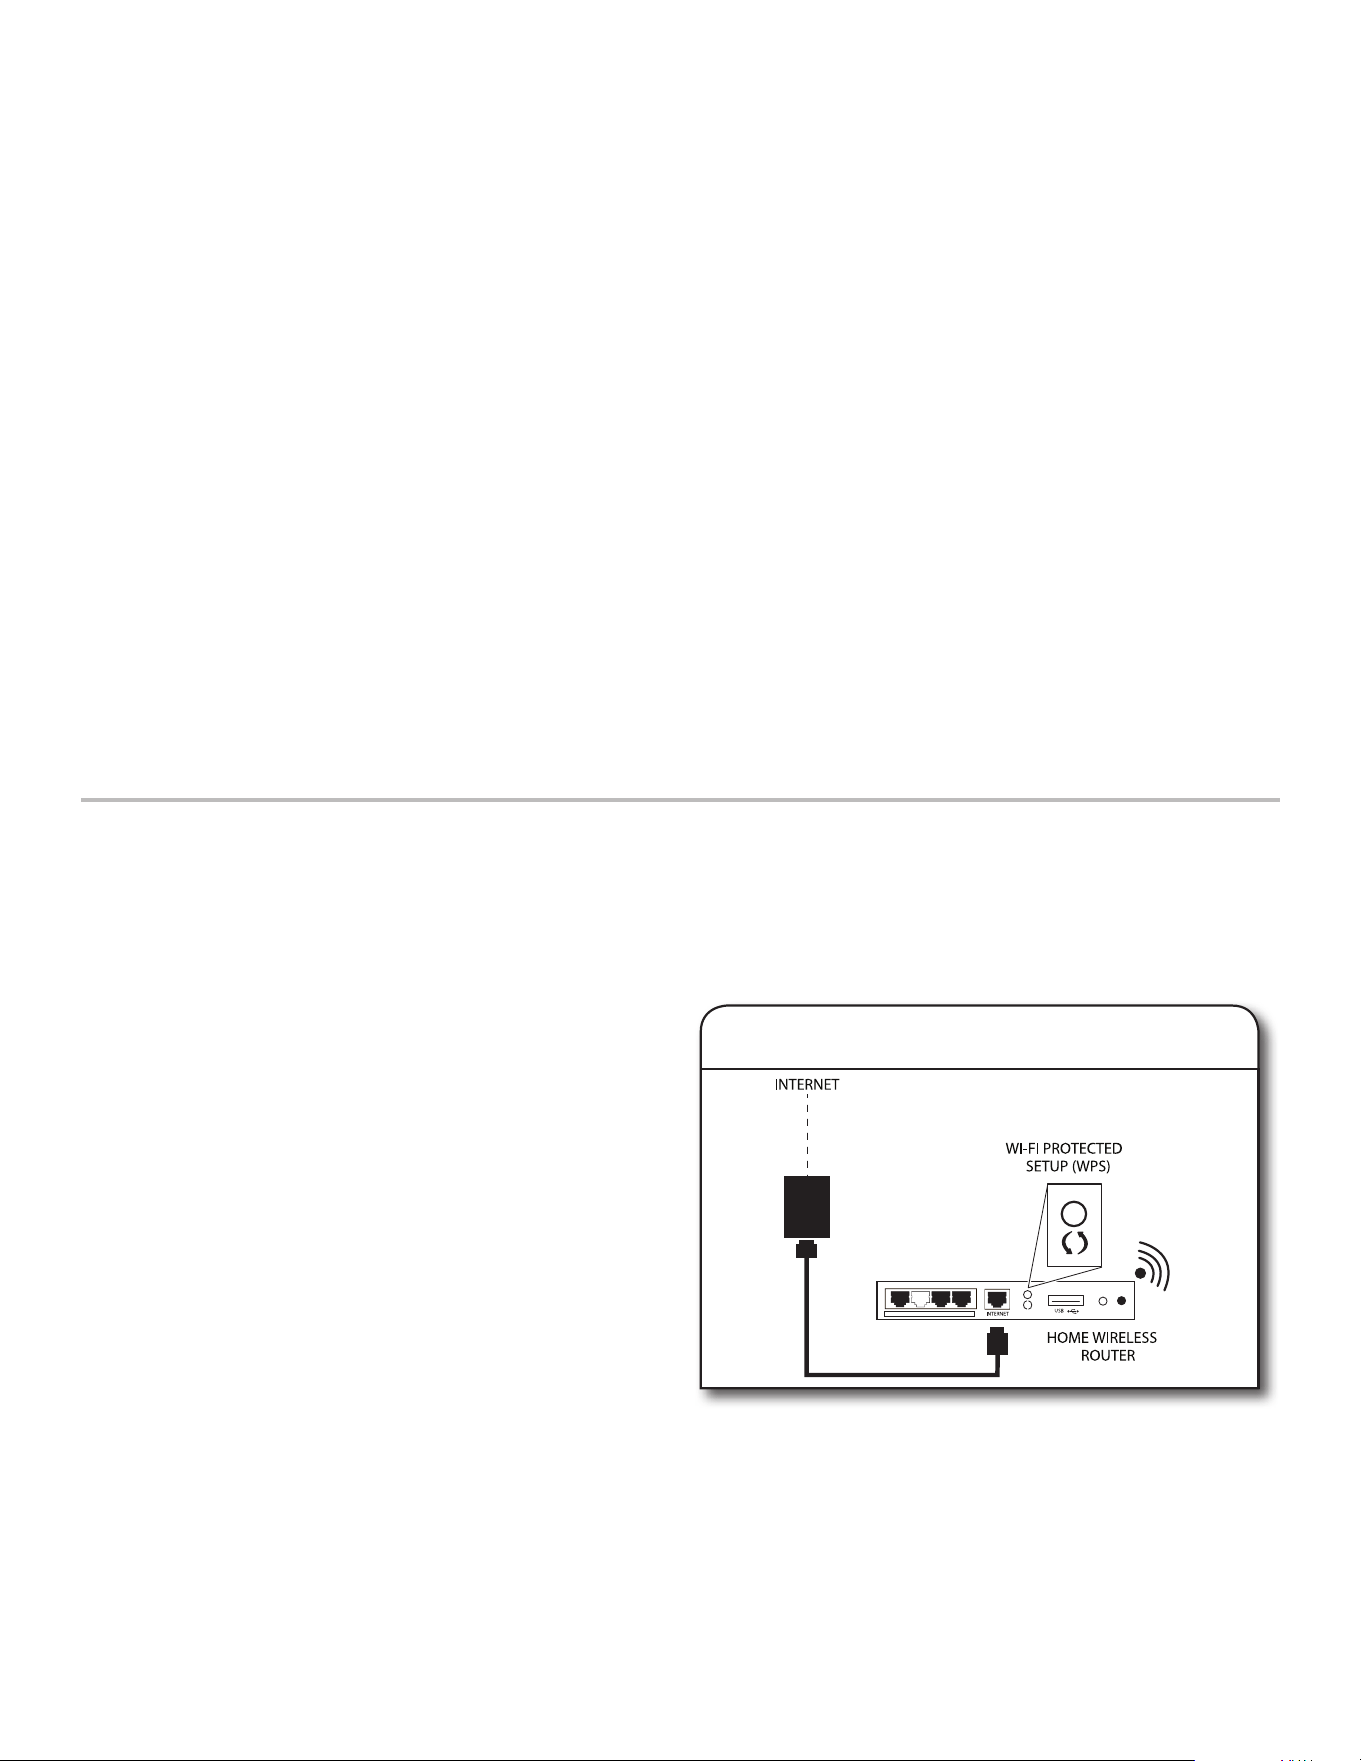
Automatic Set-Up Instructions—Wi-Fi Protected Setup (WPS)
Press the WPS button on the router. An indicator light will
begin blinking.
HELPFUL TIP: The WPS function on your router is active
for 2 minutes. Complete the next step within that timeframe
or you will need to reinitiate WPS.
1. Setup router
You will need:
• A home wireless router capable of WPS. The router should
be ON and have a live Internet connection.
• The Smart Appliance Identication Number (SAID) from your
refrigerator. This is located on a sticker on the front side of the
right-hand hinge cover of the refrigerator.
NOTE: If your home wireless router is not equipped with a WPS
button, please check the user manual of your router to conrm
if it is WPS capable. If not, alternate set-up instructions are at
www.jennair.com/connect.
Over Temperature
What it does: Sends you a notication when the temperature in
your refrigerator rises and reaches above a specied value in the
refrigerator and freezer compartments.
What it does for you: Alerts you to over-temperature status to
provide input regarding disposition of refrigerator/freezer contents.
Max Cool
What it does: Allows you to control your refrigerator remotely
from your mobile device via the JennAir
®
app.
What it does for you: Lets you turn on/off Max Cool options
remotely to make temperatures colder in the refrigerator in
anticipation of loading newly purchased grocery items. Lowers
internal temperatures for 24 hours.
Max Ice
What it does: Allows you to control your freezer remotely from
your mobile device via the JennAir
®
app.
What it does for you: Lets you turn on/off Max Ice remotely
to increase ice production. Reduces the set temperature to the
lowest possible setting for 24 hours to maximize ice production.
Pure Freeze
®
Mode Control
What it does: Allows you to receive status of your refrigerator
remotely to your mobile device via the JennAir
®
app.
What it does for you: Informs you whether Pure Freeze
®
mode is
active in your refrigerator to reduce freezer burn and help frozen
items maintain their appearance and taste.
Sabbath Mode
What it does: Allows the door of the refrigerator or freezer to be
opened or closed during the Sabbath or other religious holidays
without activating the interior lights or controls. Allows you to turn
on and off remotely from your mobile device via the JennAir
®
app.
What it does for you: Lets you turn on/off Sabbath mode options
remotely.
Dispenser Light Brightness Control
What it does: Allows you to control your refrigerator remotely to
your mobile device via the JennAir
®
app.
What it does for you: Lets you turn on/off the dispenser lighting
remotely.
Favorite Fill Control
What it does: Allows you to change your Favorite Fill values
on your refrigerator remotely using your mobile device via the
JennAir
®
app.
What it does for you: Lets you set and save Favorite Fill values
remotely.
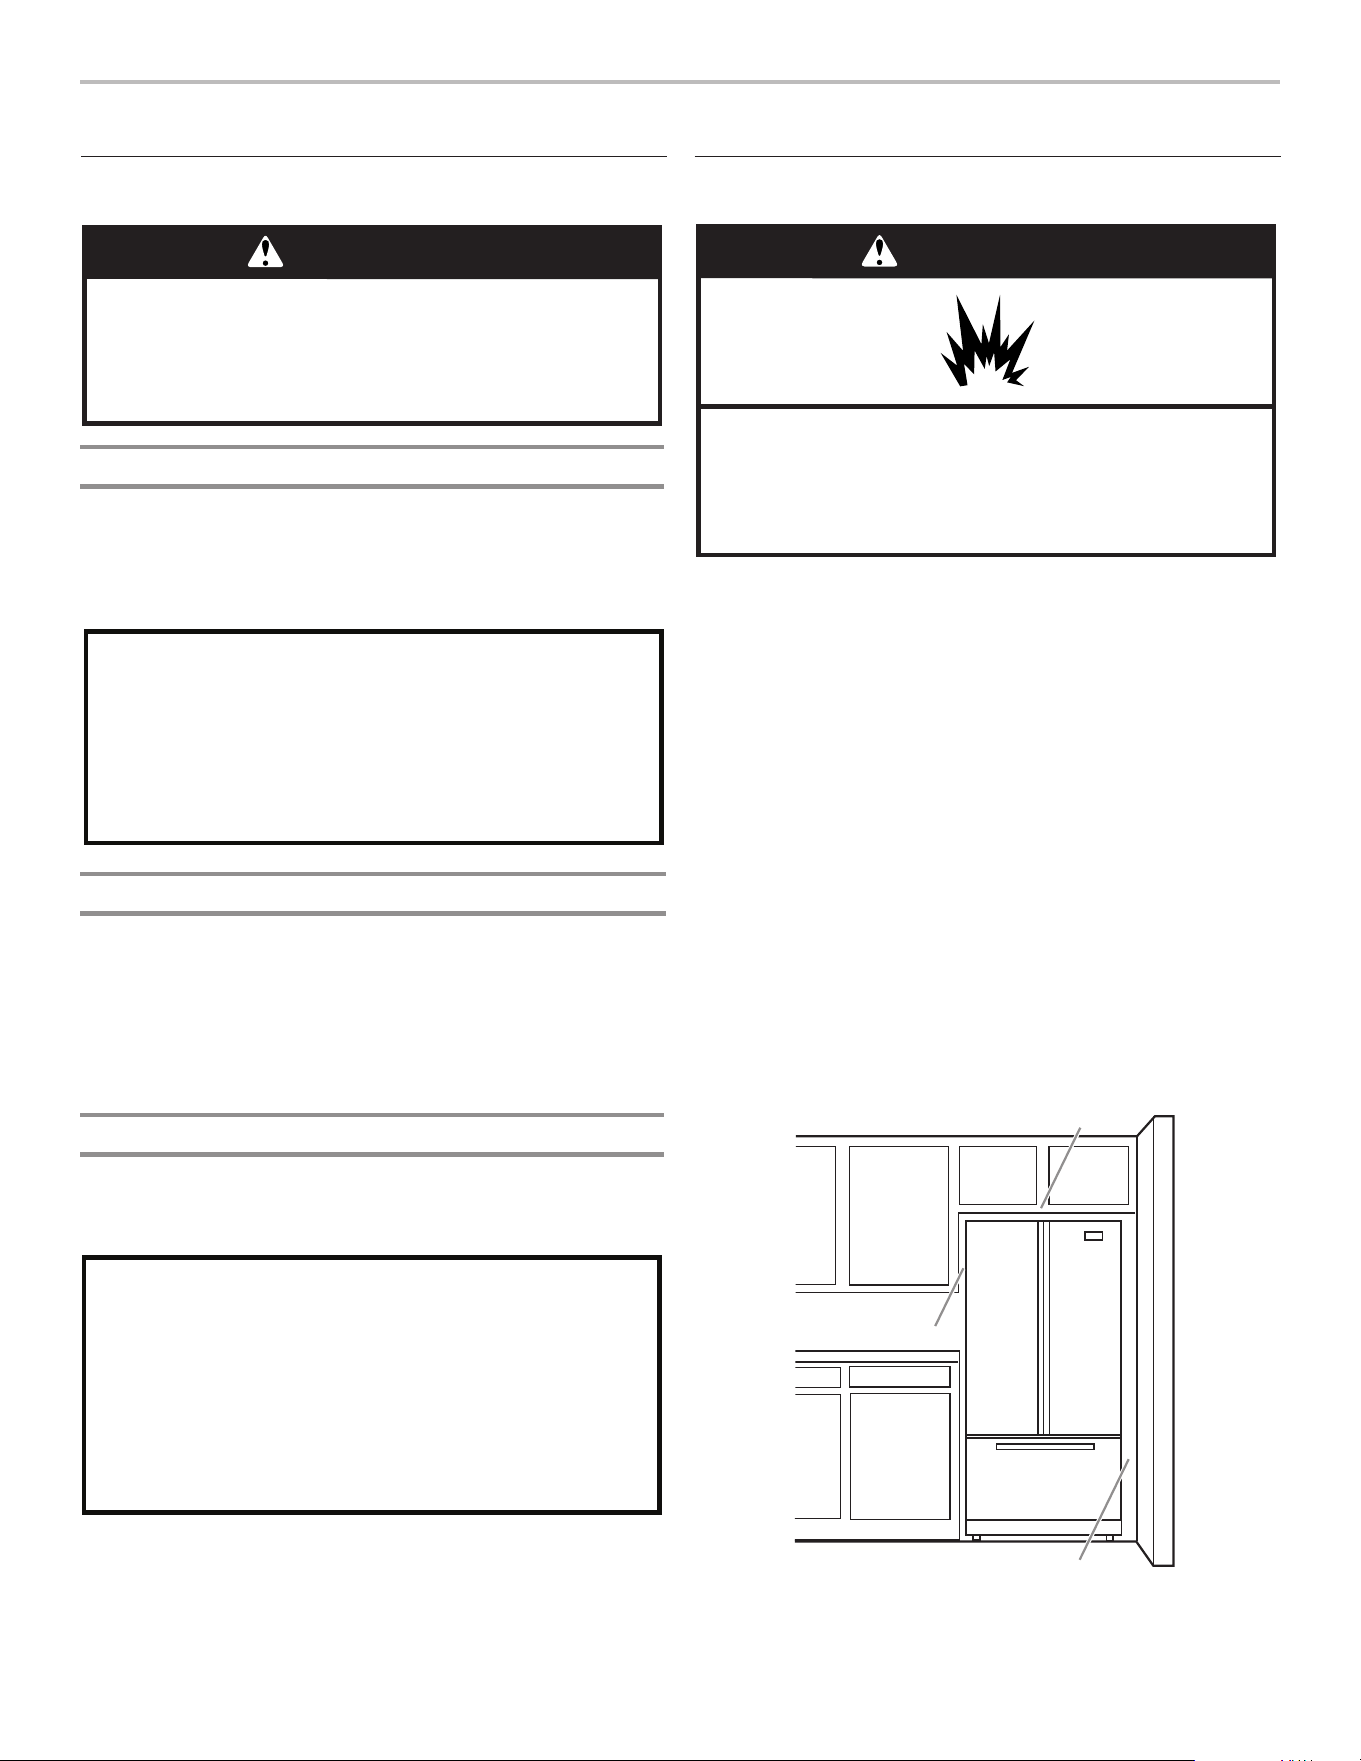
GET STARTED
Refer to the Quick Connect packet that came with your
refrigerator, or go to www.jennair.com/connect and follow
the instructions to get connected.
Check the JennAir
®
app frequently for additional information and
features.
Requires Wi-Fi and account creation. App features and
functionality subject to change. Subject to Terms of Service
available at: www.jennair.com/connect. Data rates may apply.
9
If Your Refrigerator Doesn’t Connect:
If your refrigerator and router fail to connect after 2 minutes,
the Wi-Fi status indicator will blink rapidly for 5 seconds
and then turn off. Refer to the “Troubleshooting—Connected
Models” section of this Use & Care Guide, check any connection
instructions for your specic router, and refer to alternate
instructions at www.jennair.com/connect or call
1-877-559-2603.
3. Download JennAir
®
app and
set up user account
From your mobile device, smartphone, or tablet, go to
www.jennair.com/connect and follow the instructions
to download and install the JennAir
®
app.
Once installed, tap the JennAir
®
app icon to open the app. You
will be guided through the steps to set up a user account. The
app will make sure to get the necessary personal and home
information as well as information about your energy company.
Registering your refrigerator in your account is a necessary
step in order for you to take full advantage of the Smart
features. When prompted by the app, enter the SAID (case
sensitive), which can be found on a sticker on the front side
of the right hand hinge cover of the refrigerator.
My Smart Appliance ID# is:
■ The Wi-Fi status indicator on the refrigerator control panel
will blink slowly while your refrigerator and router attempt
to connect.
■ Note that this blinking only applies to rst-time registration
after provisioning. No blinking behavior for automatic
reconnection after a connection is established.
■ Once you’ve connected your refrigerator to your home
Wi-Fi network, it will remain linked even if the power goes
out, you move the appliance, or if you put it in storage for
a while.
■ If you replace your wireless router (or get a different
Smart refrigerator), you will need to repeat this
connectivity set-up process.
4. Register your refrigerator in your
user account
NOTE: If this is your rst Smart Appliance, you will need to
download the JennAir
®
app and create an online user account.
If you already have the app and a user account, please skip ahead
to Step 4 “Register your refrigerator in your user account.”
To disconnect Wi-Fi, press and hold Connect button between
7 and 15 seconds, the <Wi-Fi> and <house> icons will turn off,
indicating that you have disabled the Wi-Fi radio.
To reconnect Wi-Fi, press and hold Connect button for
3 seconds on the Home screen.
The Wi-Fi status indicator ( ) on the refrigerator control panel will
blink slowly while your refrigerator and router attempt to connect.
If the connection is successful, the Wi-Fi status indicator will
come on and remain lit.
To disconnect your refrigerator from your router, press and hold
CONNECT for more than 15 seconds. The <Wi-Fi> and <house>
icons will turn off, indicating that your refrigerator is completely
disconnected from Wi-Fi and your router.
To re-connect your refrigerator to your router and reconnect Wi-Fi,
press and hold CONNECT for 3 seconds on the Home screen.
The Wi-Fi status indicator ( ) on the refrigerator control panel will
blink slowly while your refrigerator and router attempt to connect.
If the connection is successful, the Wi-Fi status indicator will
come on and remain lit.
Press the WPS button on the router. An indicator light will begin
blinking.
HELPFUL TIP: The WPS function on your router is active for
2 minutes. Complete the next step within that timeframe or you
will need to reinitiate WPS.
Press and hold Connect button for 3 seconds on Home screen.
The Wi-Fi status indicator ( ) on the refrigerator control panel
will blink slowly while your refrigerator and router attempt to
connect.
If the connection is successful, the Wi-Fi status indicator will
come on and remain lit.
2. Setup refrigerator
(time-sensitive step)
10
INSTALLATION INSTRUCTIONS
Unpack the Refrigerator
WARNING
Excessive Weight Hazard
Use two or more people to move and install
refrigerator.
Failure to do so can result in back or other injury.
Remove the Packaging
■ Remove tape and glue residue from surfaces before turning on
the refrigerator. Rub a small amount of liquid dish soap over
the adhesive with your ngers. Wipe with warm water and dry.
■ Do not use sharp instruments, rubbing alcohol, ammable
uids, or abrasive cleaners to remove tape or glue. These
products can damage the surface of your refrigerator.
■ Dispose of/recycle all packaging materials.
Clean Before Using
After you remove all of the packaging materials, clean the inside
of your refrigerator before using it. See the cleaning instructions
in the “Refrigerator Care” section.
Important information to know about glass shelves
and covers:
Do not clean glass shelves or covers with warm water when
they are cold. Shelves and covers may break if exposed to
sudden temperature changes or impact, such as bumping.
Tempered glass is designed to shatter into many small,
pebble-size pieces. This is normal. Glass shelves and covers
are heavy. Use both hands when removing them to avoid
dropping.
Location Requirements
IMPORTANT: This appliances is intended to be used in household
and similar applications such as:
■ Staff kitchen areas in shops, ofce and other working
environments,
■ Farm houses and by clients in hotels, motels and other
residential type environments,
■ Bed and breakfast type environments,
■ Catering and similar non-retail applications.
To ensure proper ventilation for your refrigerator, allow for a
minimum 3/16" (0.48 cm) of space on each side and
1/4" (0.64 cm) at the top. Allow for a minimum 1" (2.54 cm) space
behind the refrigerator. If your refrigerator has an ice maker, allow
extra space at the back for the water line connections. When
installing your refrigerator next to a xed wall, leave a
14" (35.56 cm) minimum space between the refrigerator and wall
to allow the door to swing open.
NOTE: This refrigerator is intended for use in a location where
the temperature ranges from a minimum of 55°F (13°C) to a
maximum of 110°F (43°C). The preferred room temperature
range for optimum performance, which reduces electricity usage
and provides superior cooling, is between 60°F (15°C) and 90°F
(32°C). It is recommended that you do not install the refrigerator
near a heat source such as an oven or radiator.
WARNING
Explosion Hazard
Keep flammable materials and vapors, such as
gasoline, away from refrigerator.
Failure to do so can result in death, explosion, or fire.
14" (35.56 cm)
3/16" (0.48 cm)
Refrigerator Delivery
■ A minimum door opening of 33" (838 mm) is required. If
door opening is 36" (914 mm) or less, then removal of doors,
drawer, and hinges is required.
■ Cart the refrigerator from the side for all door openings
When Moving Your Refrigerator:
Your refrigerator is heavy. When moving the refrigerator for
cleaning or service, be sure to cover the oor with
cardboard or hardboard to avoid oor damage. Always pull
the refrigerator straight out when moving it. Do not wiggle or
“walk” the refrigerator when trying to move it, as oor
damage could occur.
1/4" (0.64 cm)
11
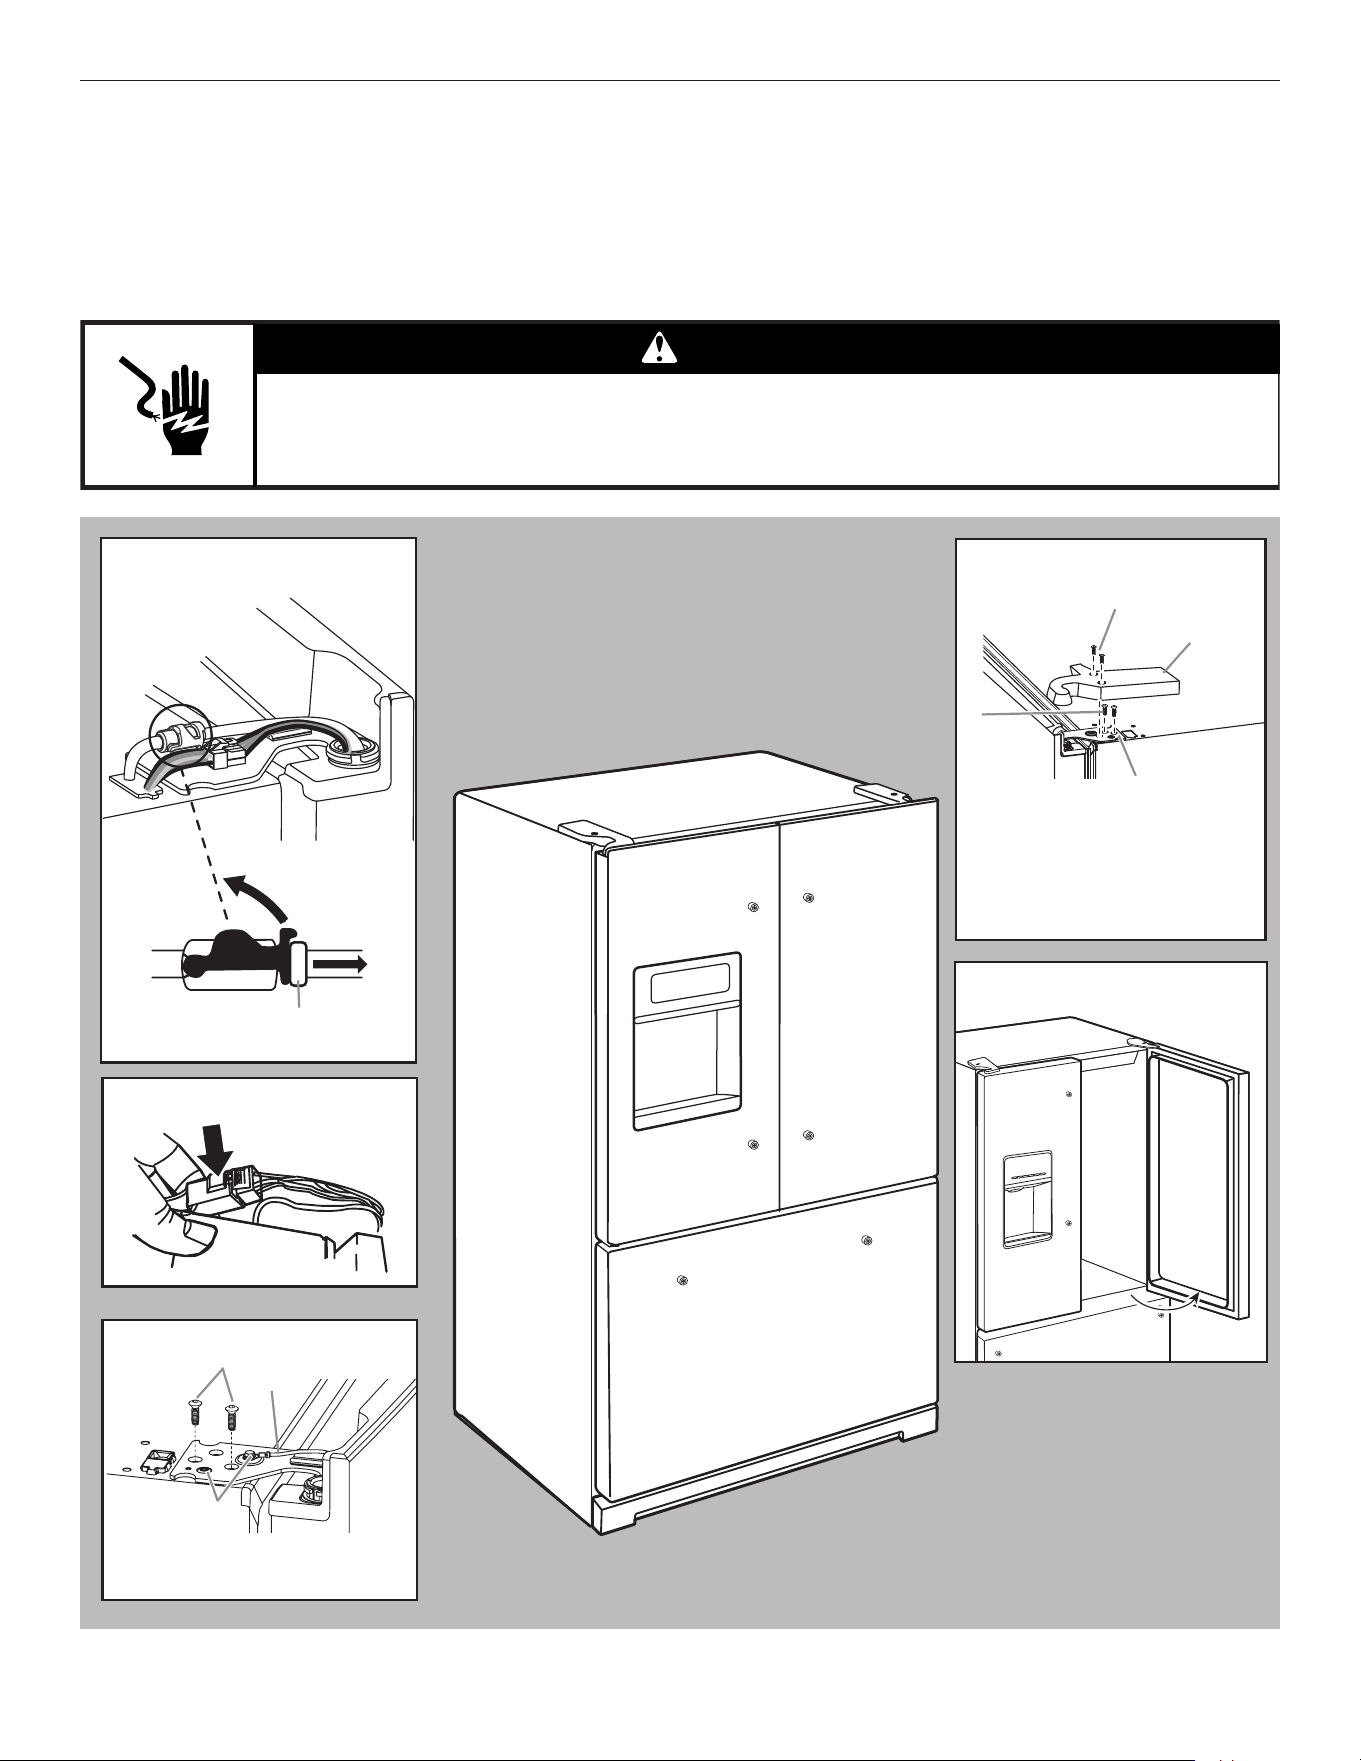
Remove and Replace Refrigerator Doors
NOTE: Measure the width of your house door opening to see whether or not you need to remove the refrigerator doors to move the
refrigerator into your home. If refrigerator door removal is necessary, see the following instructions.
IMPORTANT: If the refrigerator was previously installed and you are moving it out of the home, before you begin, turn the refrigerator
control off. Unplug the refrigerator or disconnect power. Remove food and adjustable door or utility bins from doors.
Gather the required tools and read all instructions before removing doors.
TOOLS NEEDED: Torx T25
†
screwdriver and a #2 Phillips screwdriver
WARNING
Electrical Shock Hazard
Disconnect power before removing doors.
Failure to do so can result in death or electrical shock.
Water Dispenser
Tubing Connection
Wiring Plug
Top Right Hinge
Top Left Hinge
A
A. Outer ring
C
B
A
A. Torx T25 screws
B. Ground wire (Do not remove.)
C. Do not remove screws.
90°
Door at 90° Angle
to Cabinet°
A. Torx T25 screws
B. Hinge cover screw
C. Top hinge cover
D. Top hinge
A
B
C
D
†
Torx and T25 are trademarks of Acument Intellectual Properties, LLC.
12
Bottom Door Hinge
For your convenience, the refrigerator doors have bottom hinges
with door closers. These closers allow the doors to swing fully
closed with just a gentle push.
IMPORTANT: So that the closers feature will operate properly,
the doors must be removed only when open to a 90° angle to the
front of the cabinet. If one or both doors were not at a 90° angle
when removed, the bottom door hinge must be reset.
90°
Reset the Door Hinge
1. Lift the door from the bottom hinge pin, and place it on a
at surface.
2. Using a Torx T25 screwdriver, remove the bottom hinge with
the bushing from the cabinet.
A. Bushing
B. Hinge base
3. Insert the bottom hinge and bushing into the corresponding
slot in the bottom of the door.
NOTE: Make sure that the base of the hinge is parallel to the
bottom of the door.
A. Hinge base parallel to the bottom edge of the door
4. Turn the hinge until the hinge base is at a 90° angle to the
bottom edge of the door.
A. Hinge base turned to a 90° angle with the bottom edge of the door
5. Remove the hinge from the door. Using a Torx T25
screwdriver, reattach the bottom hinge to the refrigerator
cabinet.
6. The hinge is now reset and prepared for the door to be
replaced. See “Replace Refrigerator Doors” later in
this section.
A
B
A
90°
A
Remove Refrigerator Doors
WARNING
Electrical Shock Hazard
Disconnect power before removing doors.
Failure to do so can result in death or electrical shock.
Remove Right-Hand Door
1. Unplug refrigerator or disconnect power.
2. Keep the refrigerator doors closed until you are ready to lift
them free from the cabinet.
NOTE: Provide additional support for the refrigerator door
while the hinges are being removed. Do not depend on the
door gasket magnets to hold the door in place while you are
working.
3. Using a Phillips screwdriver, remove the cover from the
top hinge.
WARNING
Excessive Weight Hazard
Use two or more people to move and install
refrigerator.
Failure to do so can result in back or other injury.
13
A. Top hinge cover screw
B. Top hinge cover
C. Torx T25 screws
D. Top hinge
WARNING
Excessive Weight Hazard
Use two or more people to lift the refrigerator door.
Failure to do so can result in back or other injury.
5. Open the door until it is at a 90° angle to the front of the
cabinet.
6. Lift the refrigerator door from the bottom hinge pin. The top
hinge will come away with the door.
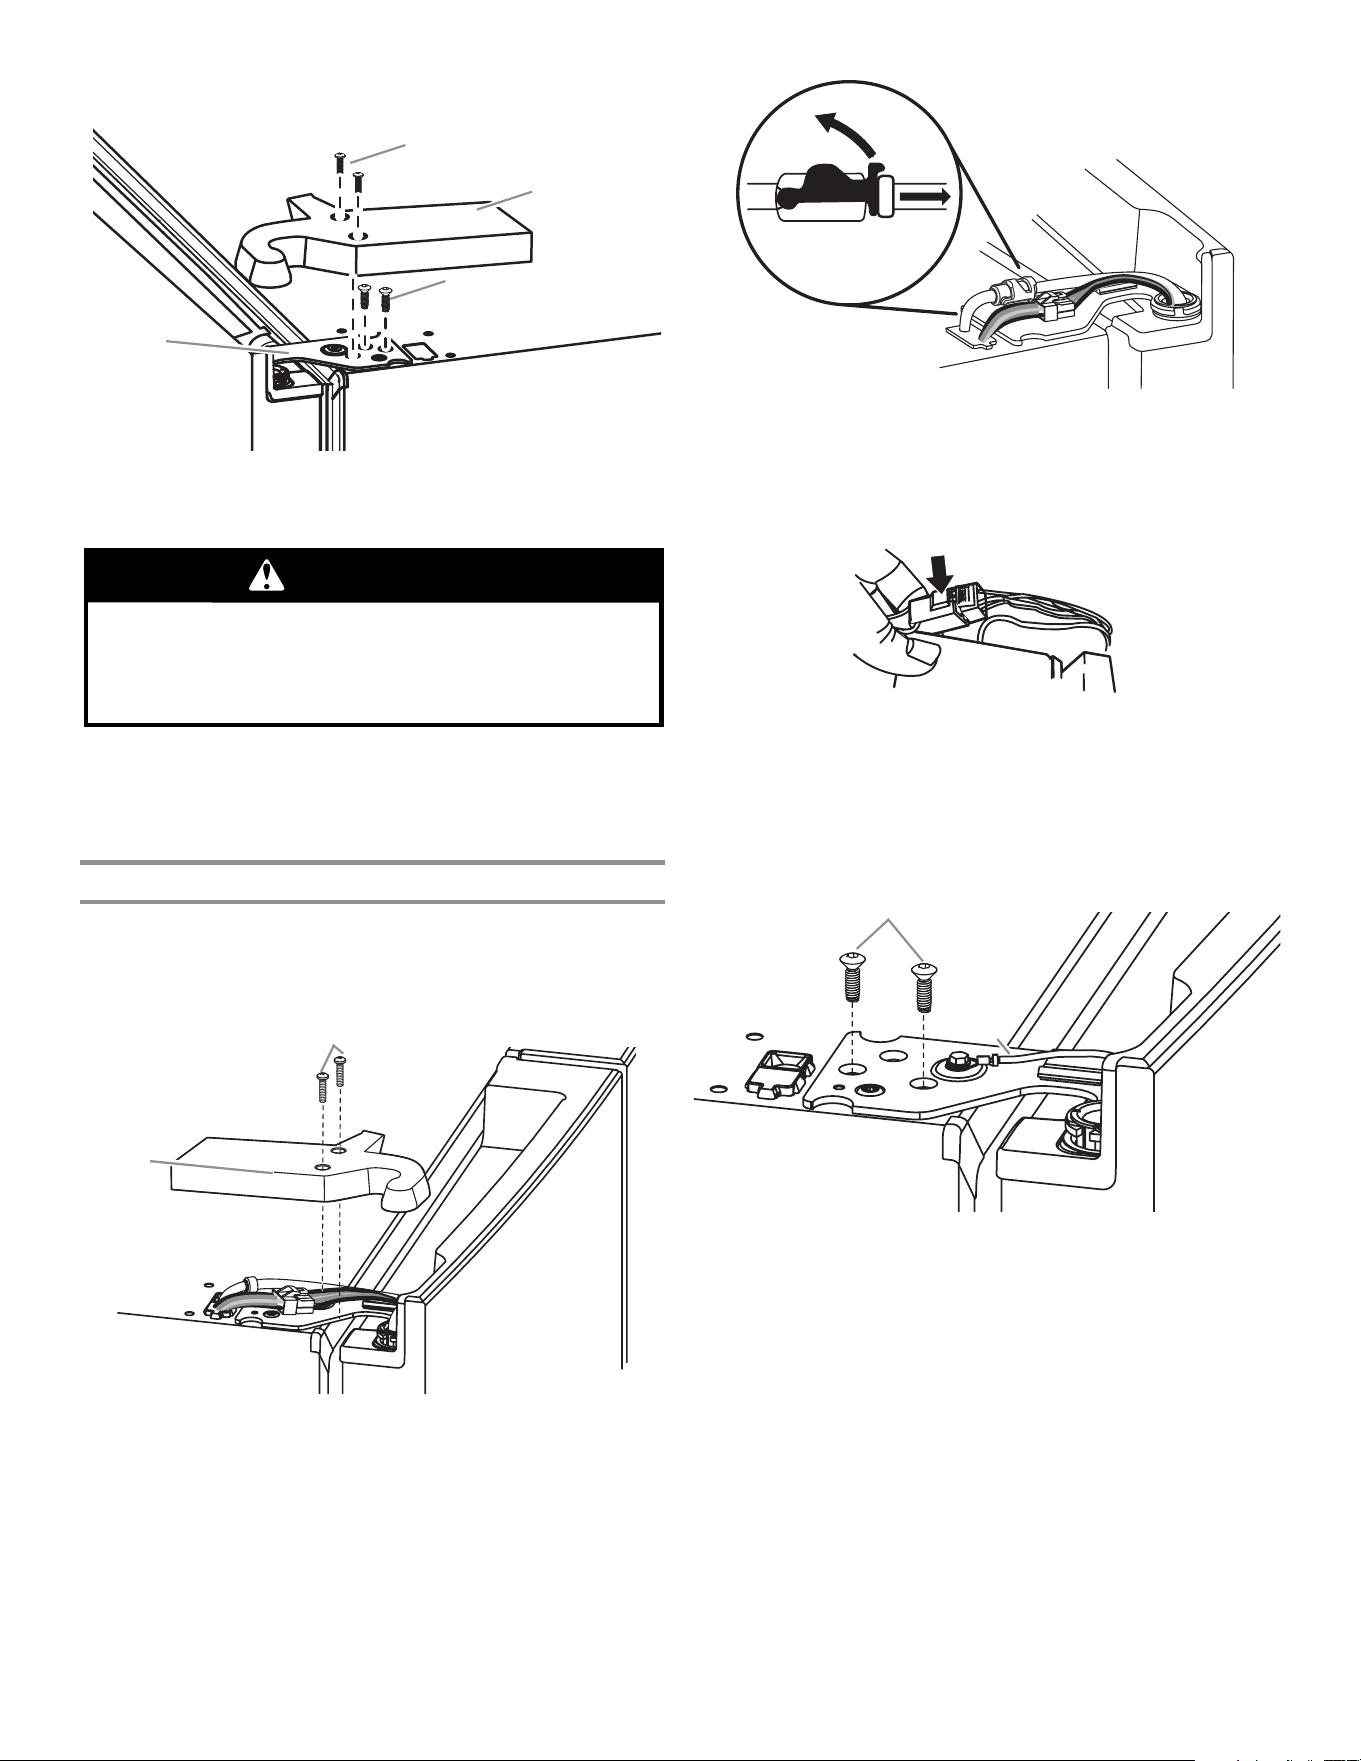
Remove Left-Hand Door
IMPORTANT: The tubing and wiring for the water dispenser run
through the left-hand door hinge, so they must be disconnected
before removing the door.
1. Using a at head screwdriver, remove the cover from the top
hinge.
A. Top hinge cover screw B. Top hinge cover
2. Disconnect the water dispenser tubing located on top of the
door hinge. Firmly pull up on the clasp. Then, pull the tubing
out of the fitting.
NOTE: The water dispenser tubing remains attached to the
left-hand refrigerator door.
3. Disconnect the wiring plug located on top of the door hinge.
■ Grasp each side of the wiring plug. With your left thumb,
press down to release the catch and pull the sections of
the plug apart.
NOTE: Do not remove the green ground wire. It should
remain attached to the door hinge.
A. Torx T25 screws
B. Ground wire (Do not remove.)
4. Using the Torx T25
screwdriver, remove the 2 internal screws
from the top hinge and set aside.
NOTES:
■ Provide additional support for the refrigerator door while
the hinges are being removed. Do not depend on the door
gasket magnets to hold the door in place while you are
working.
A
B
5. Lift the refrigerator door from the bottom hinge pin. The top
hinge will come away with the door.
NOTE: It may not be necessary to remove the bottom hinges
and brake feet assemblies to move the refrigerator through a
doorway.
■ Only if necessary, use a Torx T25 screwdriver to remove
the bottom hinges and brake feet screws.
4. Using the Torx T25 screwdriver, remove the 2 screws from the
top hinge and set aside.
A
B
C
D
A
B
14
Replace Right-Hand Refrigerator Door
1. Set the right-hand door onto the bottom hinge pin.
2. Insert the top hinge pin into the open hole in the top
of the refrigerator door.
3. Using the 3 Torx T25 screws, fasten the hinge
to the cabinet. Do not tighten the screws completely.
Replace Left-Hand Refrigerator Door
IMPORTANT: Do not intertwine the water tubing and wiring
bundles when reconnecting them.
1. Set the left-hand door onto the bottom hinge pin.
2. Using the 3 Torx T25 screws, fasten the hinge to the cabinet.
Do not tighten the screws completely.
3. Reconnect the water dispenser tubing.
Insert the tubing rmly into the tting until it stops. Close the
clasp around the tubing. The clasp snaps into place between
the tting and the collar. Connect blue female side with blue
male side and clasp. Repeat with gray female and gray male
side.
4. Reconnect the electrical wiring.
■ Push together the 2 sections of the wiring plug.
Final Steps
1. Completely tighten the 6 internal Torx T25 screws (3 on the
right-hand door hinge and 3 on the left-hand door hinge).
2. Replace both top hinge covers.
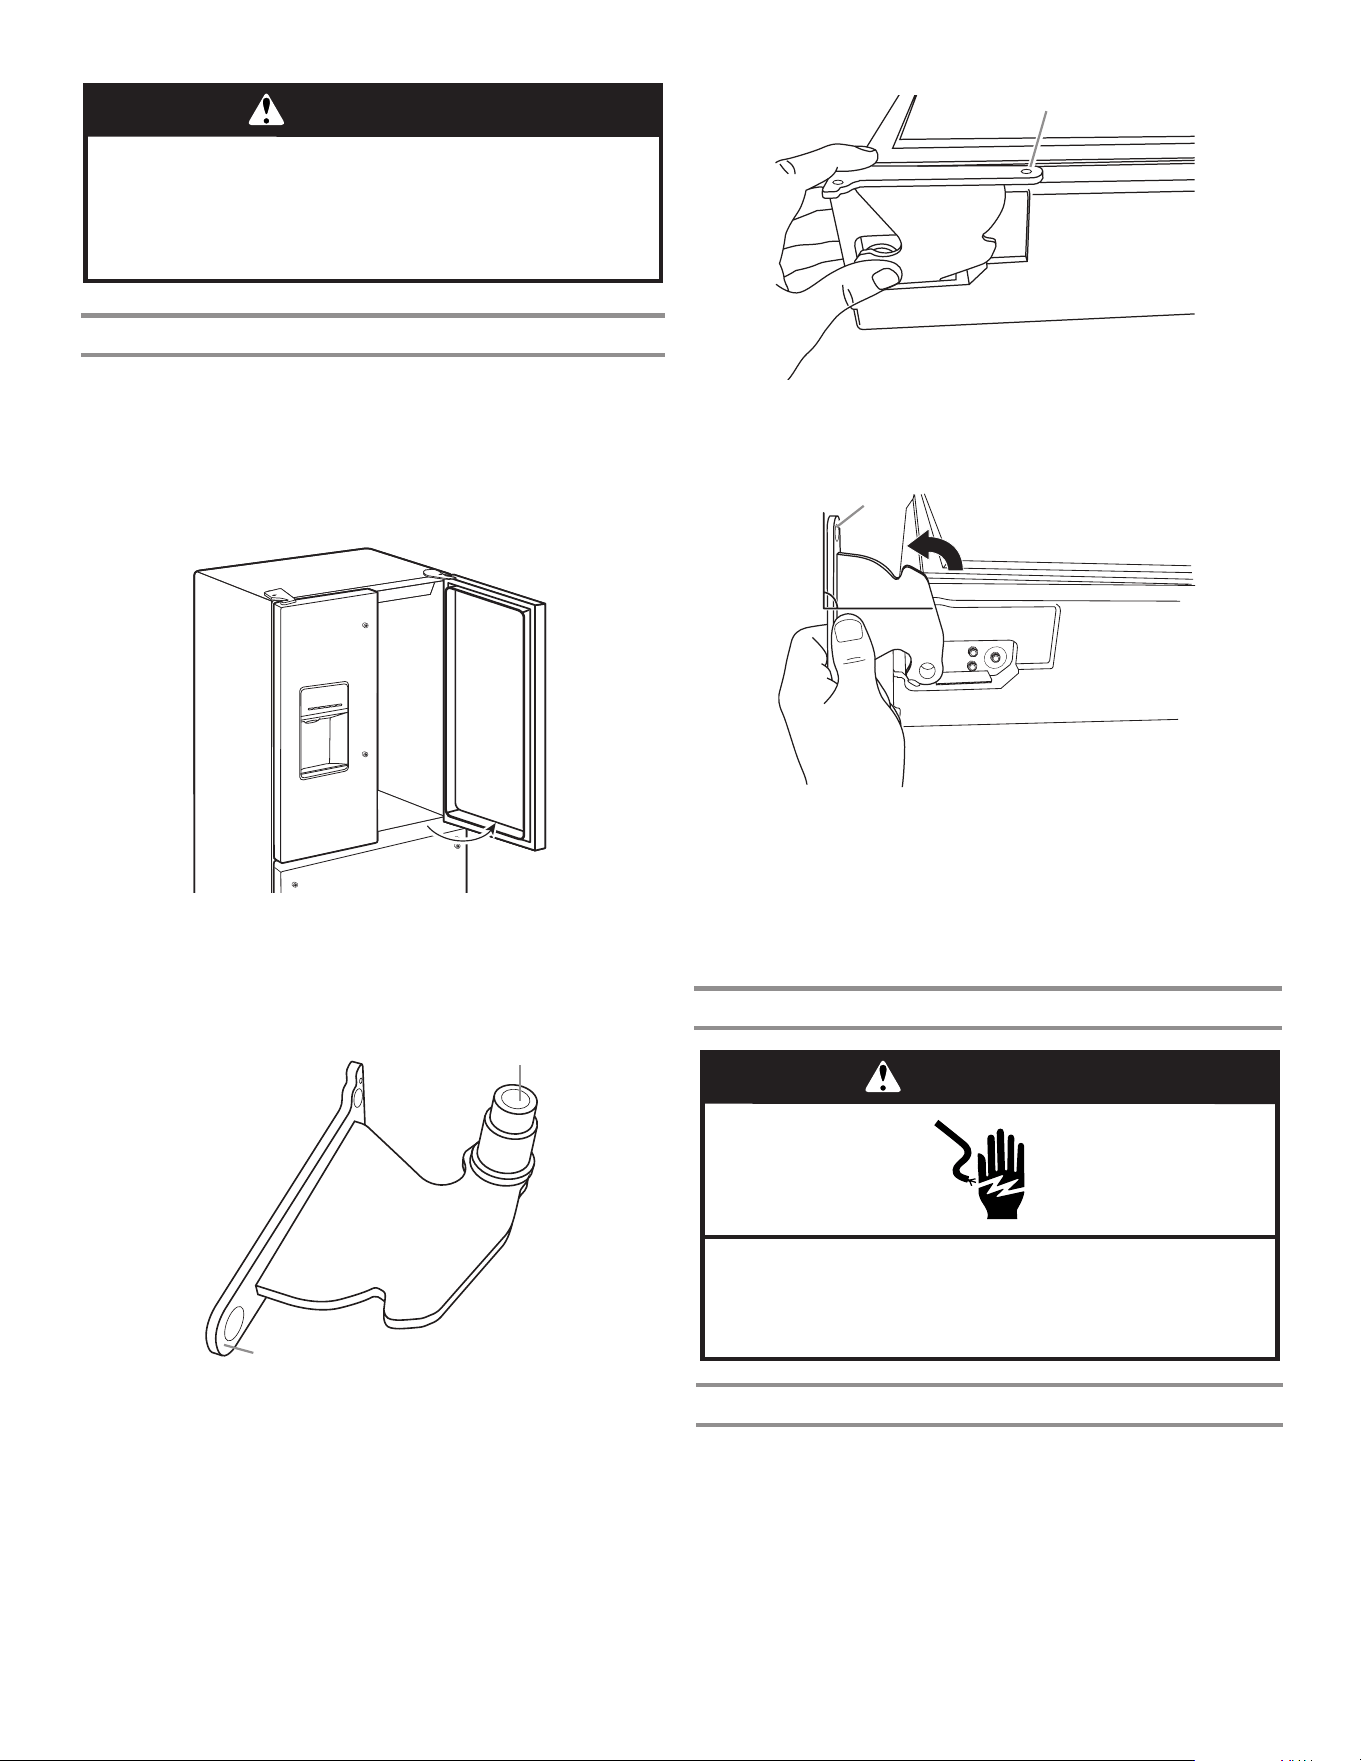
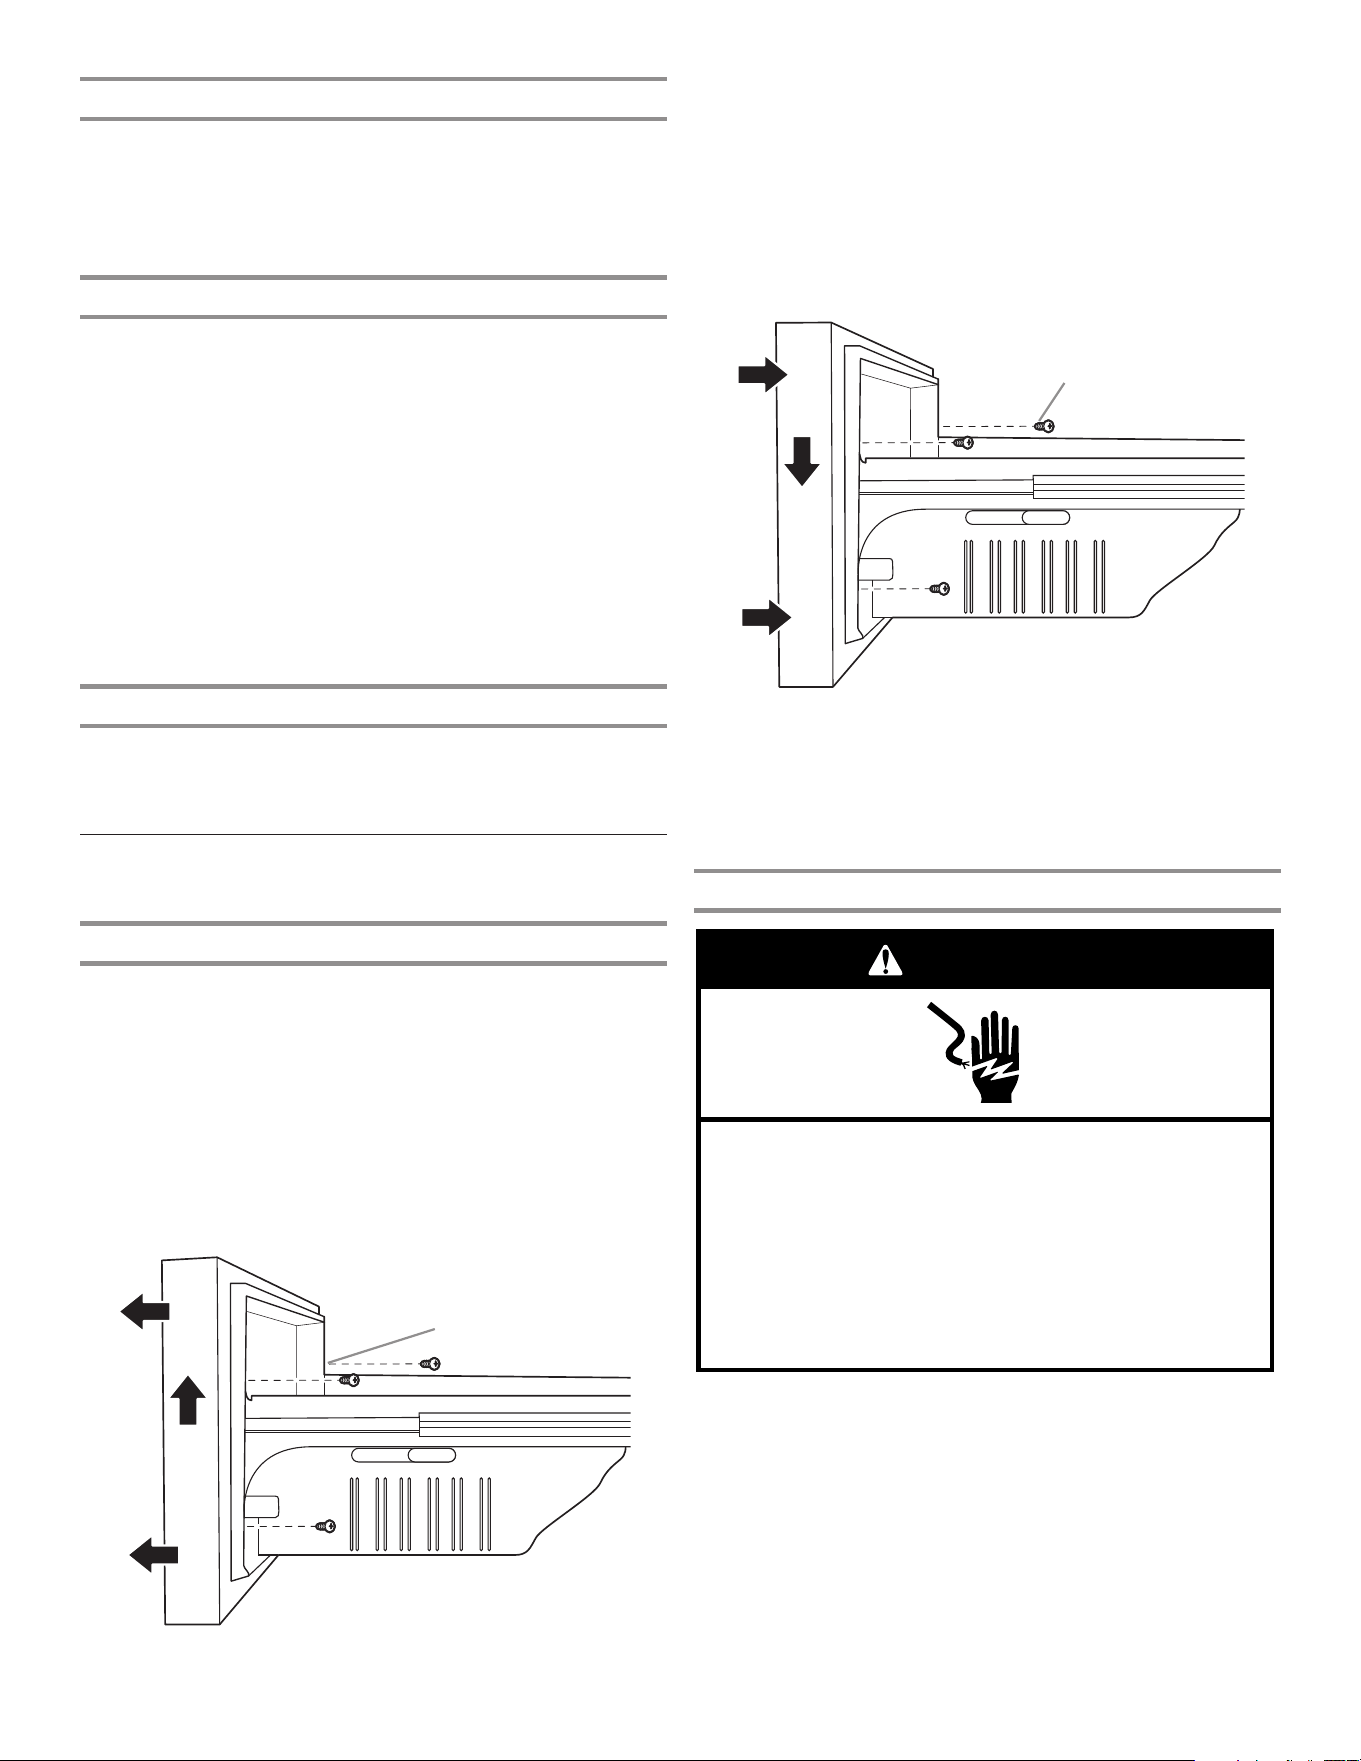
Remove and Replace
Freezer Drawer Fronts
Freezer Drawer
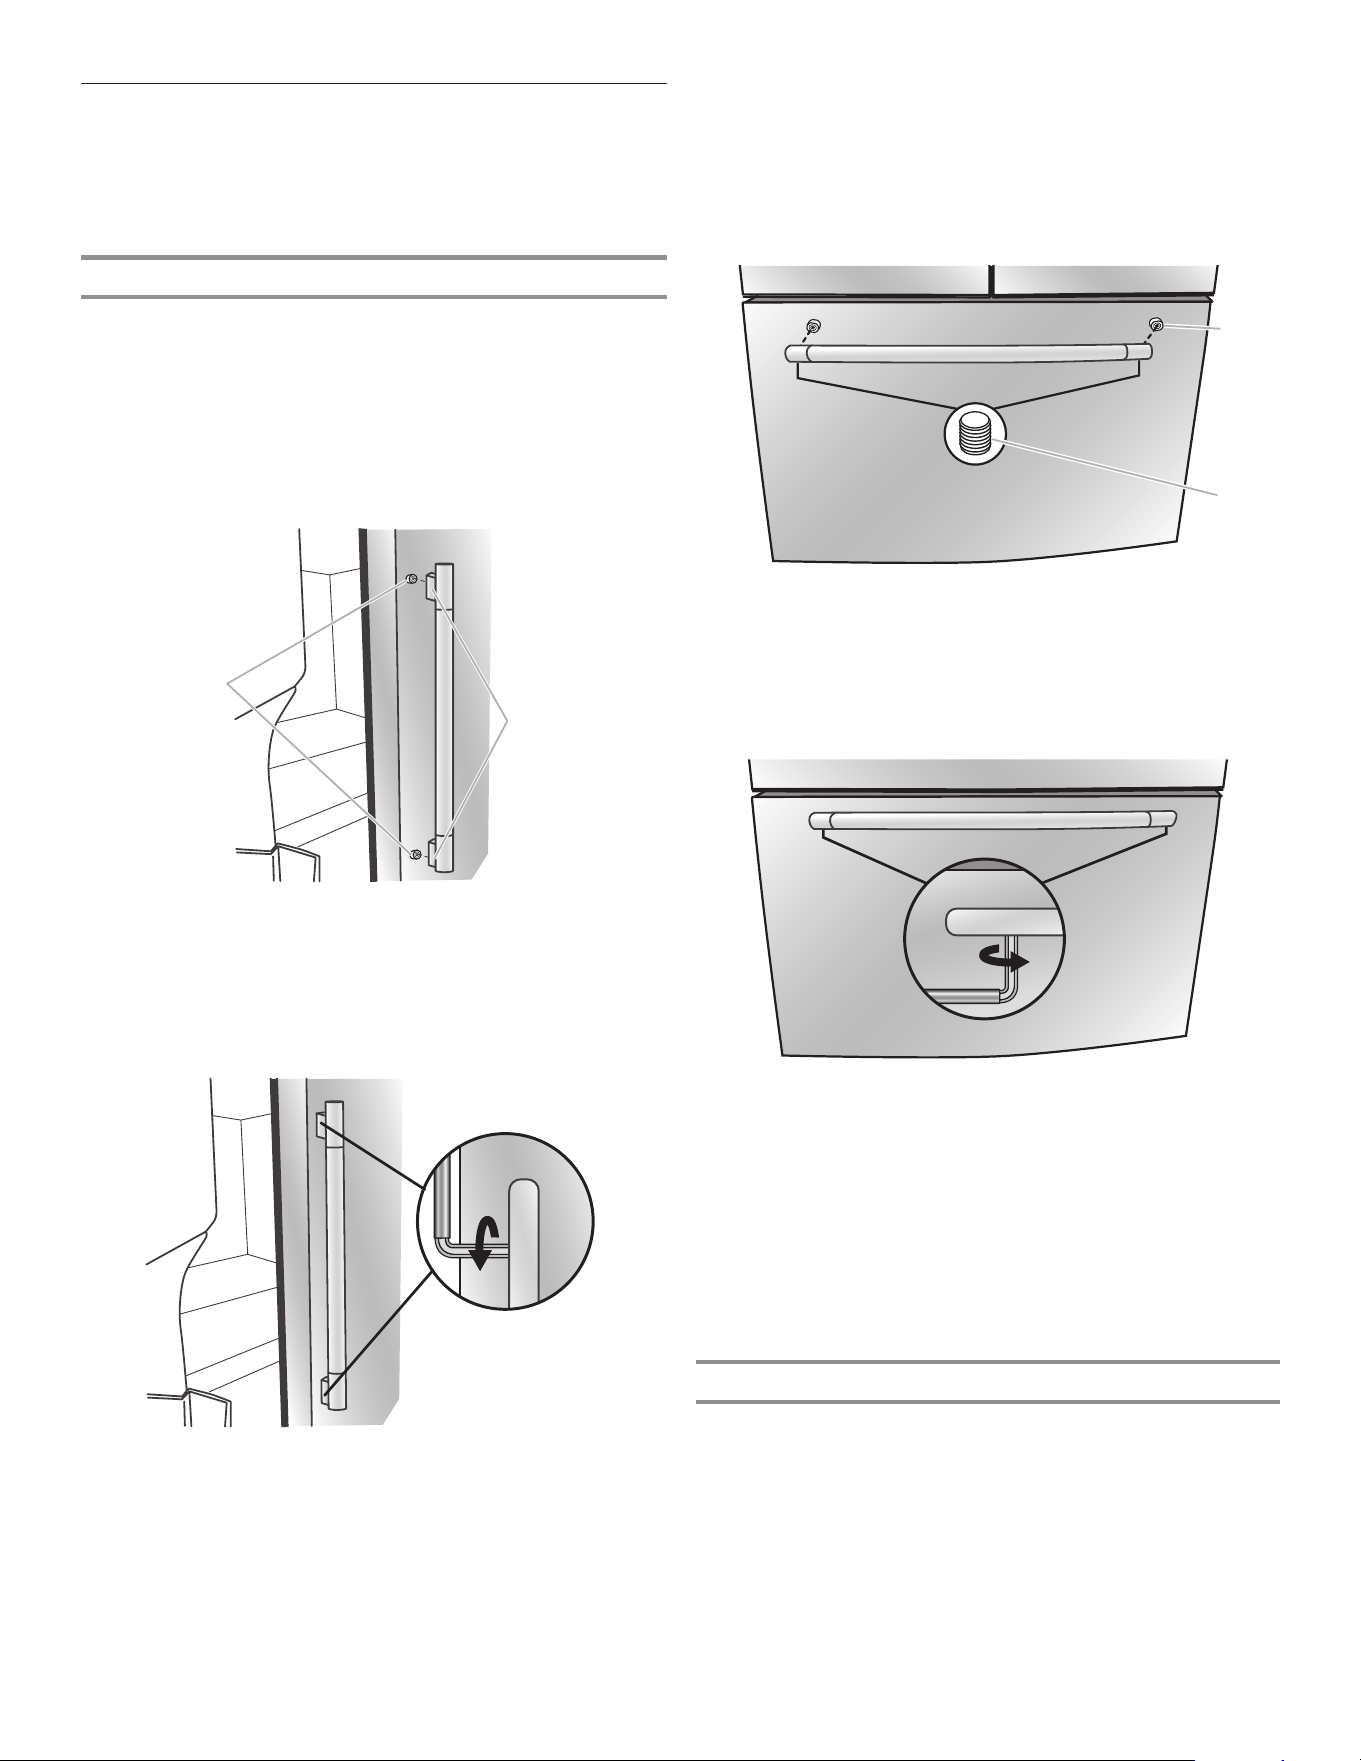
Remove Drawer Front
1. Open the freezer drawer to its full extension.
2. Loosen the 2 top screws that fasten the drawer front to the
drawer glides. The 2 screws (1 on the left-hand side and
1 on the right-hand side) are located inside the drawer front.
3. Remove the 2 screws at the bottom, inside the drawer front
that fasten the drawer front to the drawer glides.
4. Lift up on the drawer front to release the screws from the
drawer glide bracket slot.
A. Drawer glide bracket slots
Replace Drawer Front
1. Pull out the freezer drawer glides to their full extension.
2. Holding the drawer front by its sides, align the top screws,
located at the bottom inside the drawer front, with the drawer
glide bracket slots.
NOTE: It helps if one person holds the drawer glides steady
while another person aligns the drawer front and inserts the
studs into the slots.
A. Drawer front screw
3. Tighten the 2 screws at the top of the drawer front (1 on the
left-hand side and 1 on the right-hand side) and install the
2 screws on the bottom.
A
Final Steps
1. Plug into a grounded 3 prong outlet.
2. Reset the controls. See the “Using the Controls” section.
3. Return all removable parts and food to the drawers.
Electrical Shock Hazard
Plug into a grounded 3 prong outlet.
Do not remove ground prong.
Do not use an adapter.
Do not use an extension cord.
Failure to follow these instructions can result in death,
fire, or electrical shock.
WARNING
A
15
Electrical Requirements
Electrical Shock Hazard
Plug into a grounded 3 prong outlet.
Do not remove ground prong.
Do not use an adapter.
Do not use an extension cord.
Failure to follow these instructions can result in death,
fire, or electrical shock.
WARNING
Before you move your refrigerator into its nal location, it is
important to make sure you have the proper electrical connection.
Recommended Grounding Method
A 115 V, 60 Hz, AC only 15 A or 20 A fused, grounded electrical
supply is required. It is recommended that a separate circuit
serving only your refrigerator and approved accessories be
provided. Use an outlet that cannot be turned off by a switch. Do
not use an extension cord.
If the supply cord is damaged, it must be replaced by the
manufacturer or its service agent or a similarly qualied person.
Do not use a cord that shows cracks or abrasion damage along
its length or at either the plug or connector end.
IMPORTANT: If this product is connected to a GFCI (Ground Fault
Circuit Interrupter) protected outlet, nuisance tripping of the power
supply may occur, resulting in loss of cooling. Food quality and
avor may be affected. If nuisance tripping has occurred, and if
the condition of the food appears poor, dispose of the food.
NOTE: Before performing any type of installation or cleaning, turn
off cooling, and then disconnect the refrigerator from the electrical
source. When you have nished, reconnect the refrigerator to the
electrical source and turn on cooling. See the “Using the Controls”
section.
Water Supply Requirements
A cold water supply with water pressure between 30 and 120 psi
(207 and 827 kPa) is required to operate the water dispenser and
ice maker.
NOTE: If the water pressure is less than what is required, the ow
of water from the water dispenser could decrease or ice cubes
could be hollow or irregular shaped. If you have questions about
your water pressure, call a licensed, qualied plumber.
Reverse Osmosis Water Supply
IMPORTANT: The pressure of the water supply coming out
of a reverse osmosis system and supplying the water inlet valve
of the refrigerator needs to be between 35 and 120 psi (241 and
827 kPa).
If a reverse osmosis water ltration system is connected to
your home cold water supply, the water pressure to the reverse
osmosis system needs to be a minimum of 40 to 60 psi (276 to
414 kPa).
■ Check to see whether the sediment lter in the reverse
osmosis system is blocked. Replace the lter if necessary.
■ Allow the storage tank on the reverse osmosis system to rell
after heavy use. The tank capacity could be too small to keep
up with the requirements of the refrigerator.
NOTE: Faucet-mounted reverse osmosis systems are
not recommended.
■ If your refrigerator has a water lter, it may further reduce
the water pressure when used in conjunction with a reverse
osmosis system. Remove the water lter. See the “Water
Filtration System” section.
If you have questions about your water pressure, call a licensed,
qualied plumber.
Connect the Water Supply
Read all directions before you begin.
IMPORTANT:
■ Connect to potable water supply only.
■ Plumbing must be installed in accordance with the
International Plumbing Code and any local codes and
ordinances.
■ Copper and PEX tubing connections from the household
water line to the refrigerator are acceptable and will help
avoid off-taste or odor in your ice or water. Check for leaks.
If PEX tubing is used instead of copper, we recommend the
following Part Numbers: W10505928RP (7 ft [2.14 m] jacketed
PEX), 8212547RP (5 ft [1.52 m] PEX), or W10267701RP
(25 ft [7.62 m] PEX).
■ Install tubing only in areas where temperatures will remain
above freezing.
Tools Needed:
Gather the required tools and parts before starting installation.
■ Flat-blade screwdriver
■ 7/16" and 1/2" open-end wrenches or two adjustable
wrenches
■ 1/4" nut driver
NOTE: Do not use a piercing-type or 3/16" (4.76 mm) saddle valve
which reduces water ow and clogs easier.
Do not use with water that is microbiologically unsafe or
of unknown quality without adequate disinfection before
or after the system. Systems certified for cyst reduction
may be used on disinfected waters that may contain
filterable cysts.
16
4. Now you are ready to connect the copper tubing to the
shut-off valve. Use 1/4" (6.35 mm) O.D. (outside diameter)
soft copper tubing to connect the shut-off valve and the
refrigerator.
■ Ensure that you have the proper length needed for the job.
Be sure both ends of the copper tubing are cut square.
■ Slip compression sleeve and compression nut onto copper
tubing as shown. Insert end of tubing into outlet end squarely
as far as it will go. Screw compression nut onto outlet end with
adjustable wrench. Do not overtighten.
A. Compression sleeve
B. Compression nut
C. Copper tubing
Connect to Refrigerator
Follow the connection instructions specic to your model.
1. Remove plastic cap from water valve inlet port. Attach the
copper tubing to the valve inlet using a compression nut
and sleeve as shown. Tighten the compression nut. Do not
overtighten. Conrm copper tubing is secure by pulling on
copper tubing.
2. Create a service loop with the copper tubing. Avoid kinks
when coiling the copper tubing. Secure copper tubing to
refrigerator cabinet with a “P” clamp.
A
C
B
A. Copper tubing
B. “P” clamp
C. Compression nut
D. Compression sleeve
Complete the Installation
1. Plug into a grounded 3 prong outlet.
2. Flush the water system. See the “Water and Ice Dispensers”
section.
NOTE: Allow 24 hours to produce the rst batch of ice. Discard
the rst 3 batches of ice produced. Allow 3 days to completely
ll the ice storage bin.
Electrical Shock Hazard
Plug into a grounded 3 prong outlet.
Do not remove ground prong.
Do not use an adapter.
Do not use an extension cord.
Failure to follow these instructions can result in death,
fire, or electrical shock.
WARNING
A
B
C
D
3. Turn on water supply to refrigerator and check for leaks.
Correct any leaks.
4. If ice is desired, turn on the ice maker.
5. Place the free end of the tubing into a container or sink and
turn on main water supply to ush out tubing until water is
clear. Turn off shut-off valve on the water pipe.
NOTE: Always drain the water line before making the nal
connection to the inlet of the water valve to avoid possible
water valve malfunction.
6. Bend the copper tubing to meet the water line inlet which
is located on the back of the refrigerator cabinet as shown.
Leave a coil of copper tubing to allow the refrigerator to be
pulled out of the cabinet or away from the wall for service.
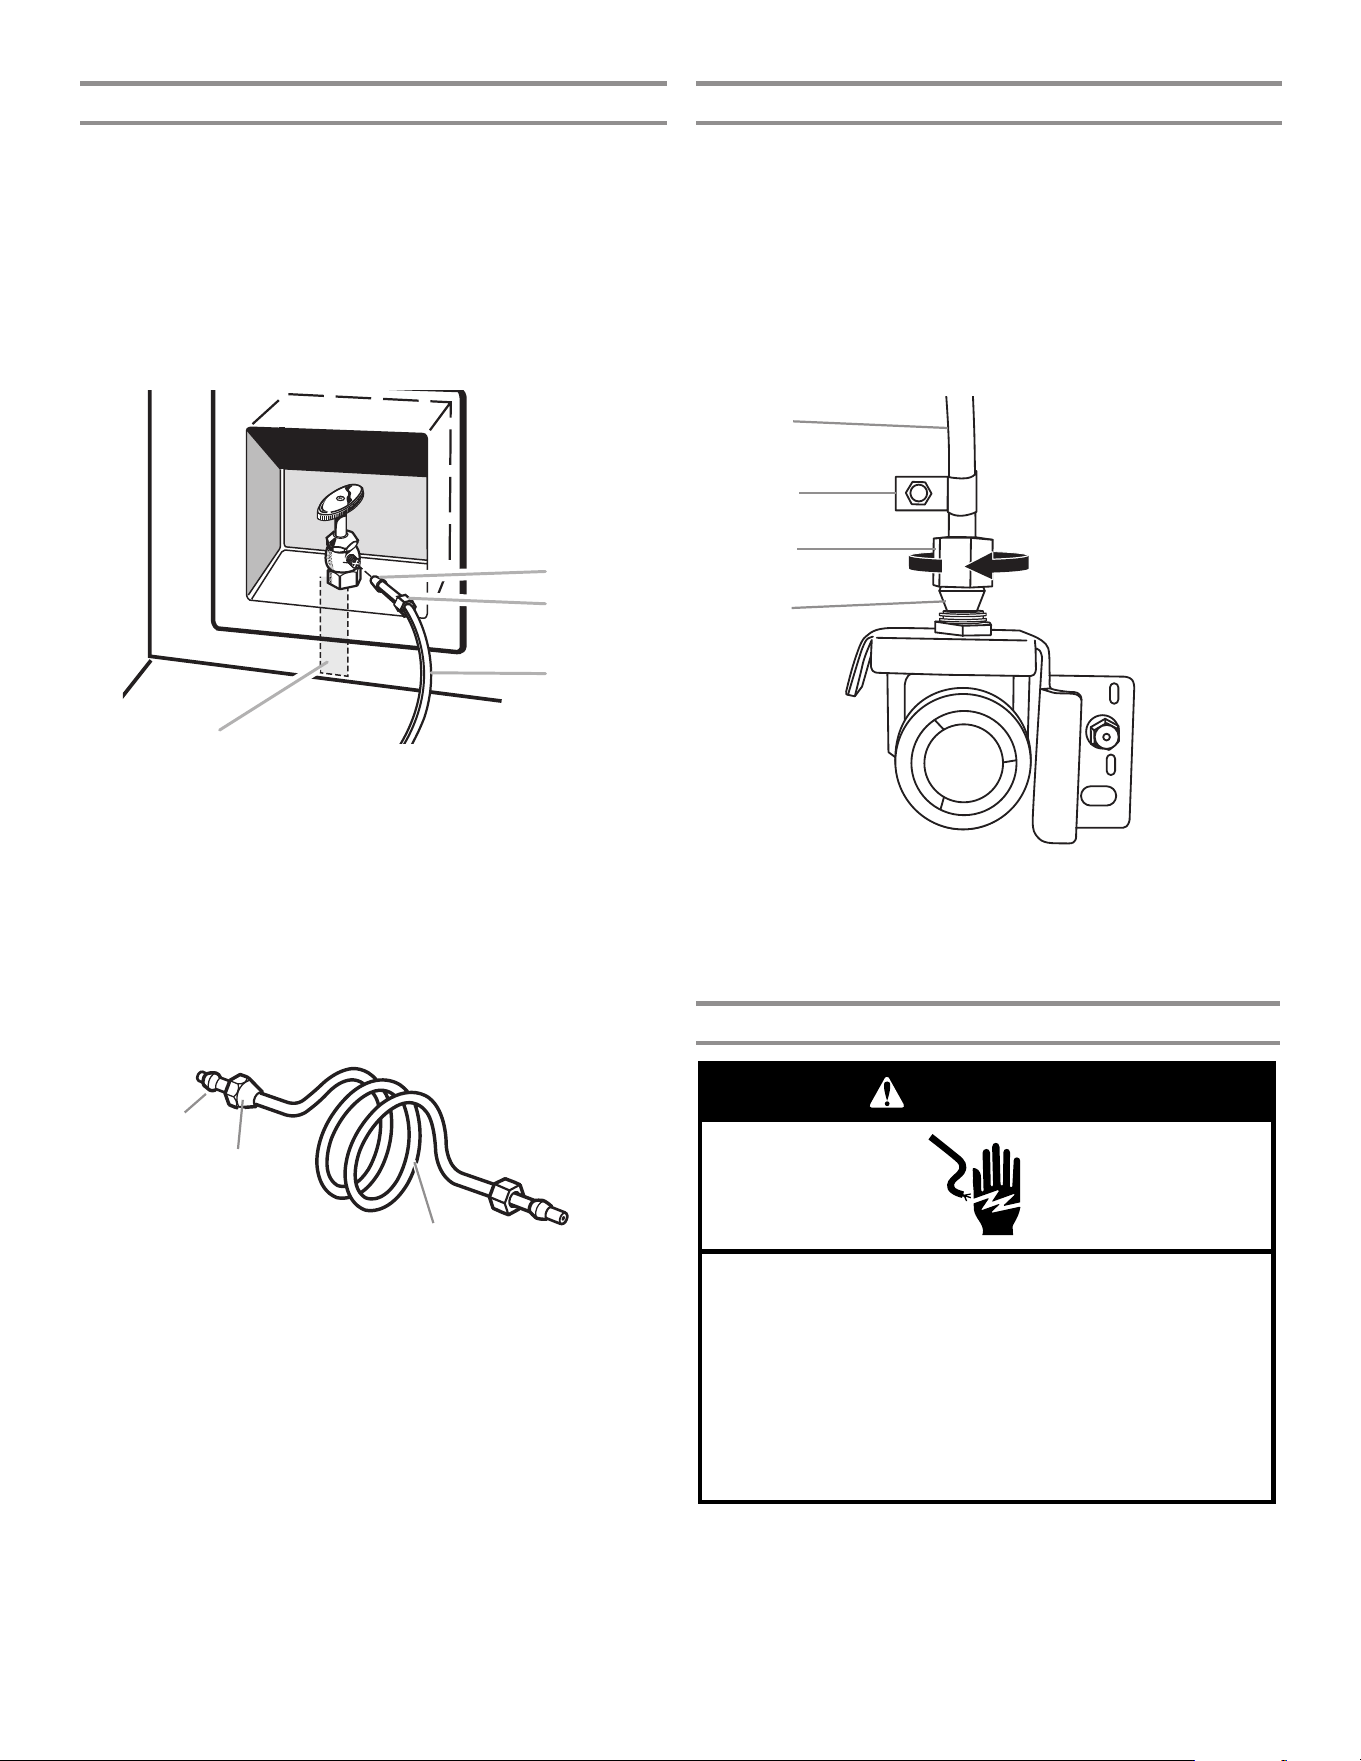
Connect to Water Line
IMPORTANT: If you have turned the refrigerator on before the
water was connected, turn off the ice maker.
1. Unplug refrigerator or disconnect power.
2. Turn off main water supply. Turn on nearest faucet long
enough to reduce water pressure in the water line.
3. Use a quarter-turn shut-off valve or the equivalent, served by
a 1/2" household supply line.
NOTE: To allow sufcient water ow to the refrigerator, a minimum
1/2"
(12.7 mm) size household supply line is recommended.
A
B
C
D
A. Sleeve
B. Nut
C. Copper tubing (to refrigerator)
D. Household supply line (1/2" minimum)
17
A. Shoulder screws
B. Setscrews inside the handle
Handle Installation and Removal
Parts Included: refrigerator door handles (2), freezer drawer
handle (1), 1/8" hex key, spare setscrew(s)
NOTE: The freezer drawer handle is shorter than the refrigerator
door handles. Handle style may vary by model.
Install Handles
Refrigerator Doors
NOTE: Handle mounting setscrews are preinstalled inside
the handle.
1. Remove the handles from the packaging inside the
refrigerator and place them on a soft surface.
2. Open a refrigerator compartment door. On the closed
door, place a handle onto the shoulder screws so that
the setscrews are facing the adjacent door.
3. Firmly push the handle toward the door until the handle base
is ush against the door.
4. While holding the handle, insert the short end of the hex key
into the upper hole and slightly rotate the hex key until key is
engaged in the setscrew.
5. Using a clockwise motion, tighten the setscrew just until
setscrew begins to contact the shoulder screw. Do not
fully tighten.
6. Repeat steps 4 and 5 to fasten the lower setscrew.
7. Once both setscrews have been partially tightened as
instructed in the previous steps, fully tighten both setscrews.
IMPORTANT: When the screws feel tight, tighten them an
additional quarter turn. The handle is not properly installed
without this extra tightening.
A. Shoulder screw
B. Setscrews inside the handle
2. Firmly push the handle toward the drawer until the handle
base is ush against the drawer.
3. Insert the short end of the hex key into the left-hand hole and
slightly rotate the hex key until key is engaged in the setscrew.
4. Using a left-to-right motion, tighten the setscrew a quarter
turn at a time just until setscrew begins to contact the
shoulder screw. Do not fully tighten.
5. Repeat steps 3 and 4 to fasten the right-hand setscrew to
the shoulder screw.
6. Once both setscrews have been partially tightened as
instructed in the previous steps, fully tighten both setscrews.
IMPORTANT: When the screws feel tight, tighten them an
additional quarter turn. The handle is not properly installed
without this extra tightening.
7. Save the hex key and all instructions.
Remove the Handles
1. While holding the handle, insert the short end of the hex key
into a setscrew hole and slightly rotate the hex key until it is
engaged in the setscrew.
2. Using a right-to-left motion, loosen the setscrew a quarter
turn at a time.
3. Repeat steps 1 and 2 for the other setscrew. Slowly pull
the handle away from the door or drawer.
4. If necessary, use a Phillips screwdriver to remove the
shoulder screws from the door.
A
B
8. Repeat steps 2 through 7 to install the other handle onto
the adjacent refrigerator door.
Freezer Drawer
1. With the drawer closed, place the handle onto the shoulder
screws so that the setscrews are facing down toward the
oor.
A
B
18
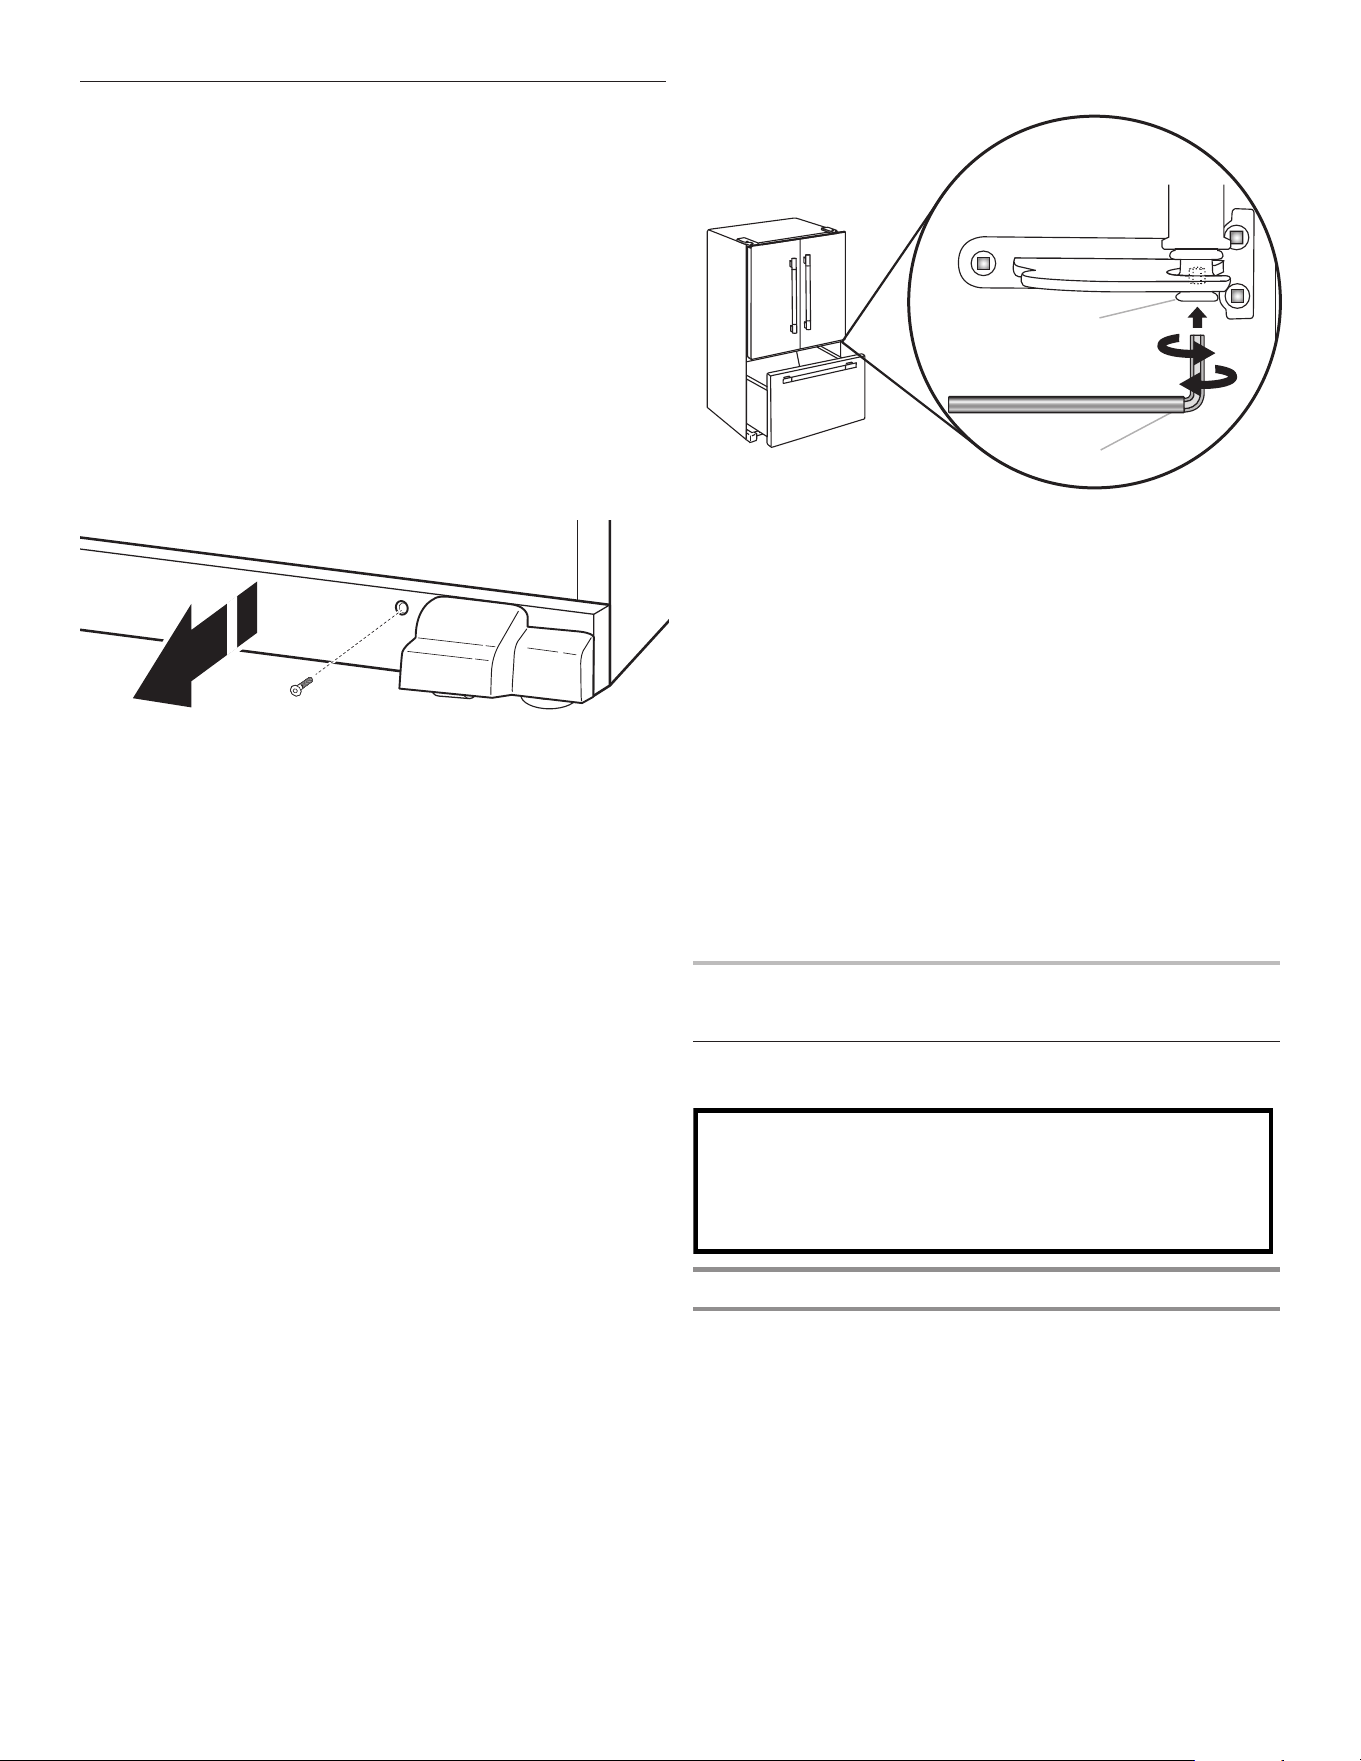
Refrigerator Leveling
and Door Closing
The base grille covers the adjustable brake feet and roller
assemblies located at the bottom of the refrigerator below the
freezer drawer. Before making any adjustments, remove the base
grille and move the refrigerator to its nal location.
Tools Needed: 1/4" hex driver
Tools Provided: 1/8" hex-key
1. Use a 1/4" hex driver to remove both screws in base grille.
2. Remove the base grille. Using both hands, grasp the grille
rmly and pull it toward you. Open the freezer drawer to
access the brake feet.
NOTE: To allow the refrigerator to roll easier, raise the brake
feet by turning them counterclockwise. The front rollers will
be touching the oor.
7. Make sure the refrigerator is steady. If the refrigerator seems
unsteady or rolls forward when a door or drawer is pulled
open, adjust the brake feet.
To Steady the Refrigerator:
■ Open the freezer drawer. Using a 1/4" hex driver, turn both
brake feet clockwise the same amount until the brake feet
are snug against the oor. Check again. If not satised,
continue to adjust the brake feet by half turns of the screw
until the refrigerator does not roll forward when the drawer
is opened.
NOTE: Having someone push against the top of the
refrigerator takes some weight off the brake feet. This makes
it easier to turn the screws. Do not push with excessive force
that tilts the refrigerator.
8. Replace the base grille by aligning the ends of the grille with
the leveling assemblies on each side and snapping the grille
into place. Use a 1/4" hex driver to reinstall screws.
A. Bottom hinge pin
B. 1/8"hex-key wrench
■ Continue to turn the alignment screw until the doors are
aligned.
3. Move the refrigerator to its nal location.
4. Using the 1/4" hex driver, lower the brake feet. Turn them
clockwise until the rollers are off the oor and both brake feet
are snug against the oor. This keeps the refrigerator from
rolling forward when opening the refrigerator doors or freezer
drawer.
IMPORTANT: If you need to make further adjustments
involving the brake feet, you must turn both brake feet the
same amount to keep the refrigerator level.
5. Use a level to make sure the refrigerator is level from side to
side and front to back.
6. Make sure the doors are even at the top and that the space
between the bottom of the refrigerator doors and the top of
the freezer drawer is even. If necessary, align the doors.
To Align the Doors:
■ Keeping both refrigerator doors closed, pull out the freezer
drawer. Locate the bottom hinge pin of the right-hand
refrigerator door. The alignment screw is inside the bottom
hinge pin.
■ Insert the short end of the 1/8" hex-key wrench (packed with
the Door Handle Installation Instructions) into the bottom hinge
pin until it is fully engaged in the alignment screw.
To raise the refrigerator door, turn the hex key to the right.
To lower the door, turn the hex key to the left.
A
B
Do not use with water that is microbiologically unsafe or
of unknown quality without adequate disinfection before
or after the system. Systems certified for cyst reduction
may be used on disinfected waters that may contain
filterable cysts.
Replace and Install the Water Filter
The water lter should be replaced every 6 months based on
a ow rate of .50 gpm-.60 gpm (1.89-2.27 lpm) that lters
200 gallons (757 L) of water.
To order a replacement lter, contact us. See the “Accessories”
section in the Use and Care Guide for information on ordering.
FILTERS AND ACCESSORIES
Water Filtration System
19
1. Push the water lter door to open, located bottom left of
refrigerator compartment.
2. Twist the water lter and turn 90° counterclockwise to unlock.
3. Pull the lter out of the housing.
4. Remove the water lter cap from the water lter being
replaced.
5. Install the water lter cap onto the new lter. Be sure to align
the arrows so the groves in lter align with ribs in lter cap.
6. Insert the lter into the housing.
7. Twist the water lter and turn 90° clockwise until it locks into
place and the arrows are aligned.
8. Push the water lter door closed.
The Water Filter Status Lights
The Water Filter status lights will help you know when to change
your water lter. The app will also send notications to your
mobile device and tell you the status of the JennAir
®
app for
the lter life.
■ ORDER FILTER (yellow) - It is almost time to change the
water lter. “Order Filter” display is ON all of the time but
OFF in Showroom mode and Sabbath mode.
■ REPLACE FILTER (red) - Replace the water lter. While you
are dispensing water, “Replace Filter” will blink 7 times and
an alert tone will sound 3 times.
NOTE: “REPLACE FILTER” will remain illuminated if the lter
is not reset on the user interface (UI).
■ RESET FILTER - Touch MAX COOL and MAX ICE for
3 seconds to reset water lter. The display will do a
3 second countdown, then ash the icon and play a tone.
20
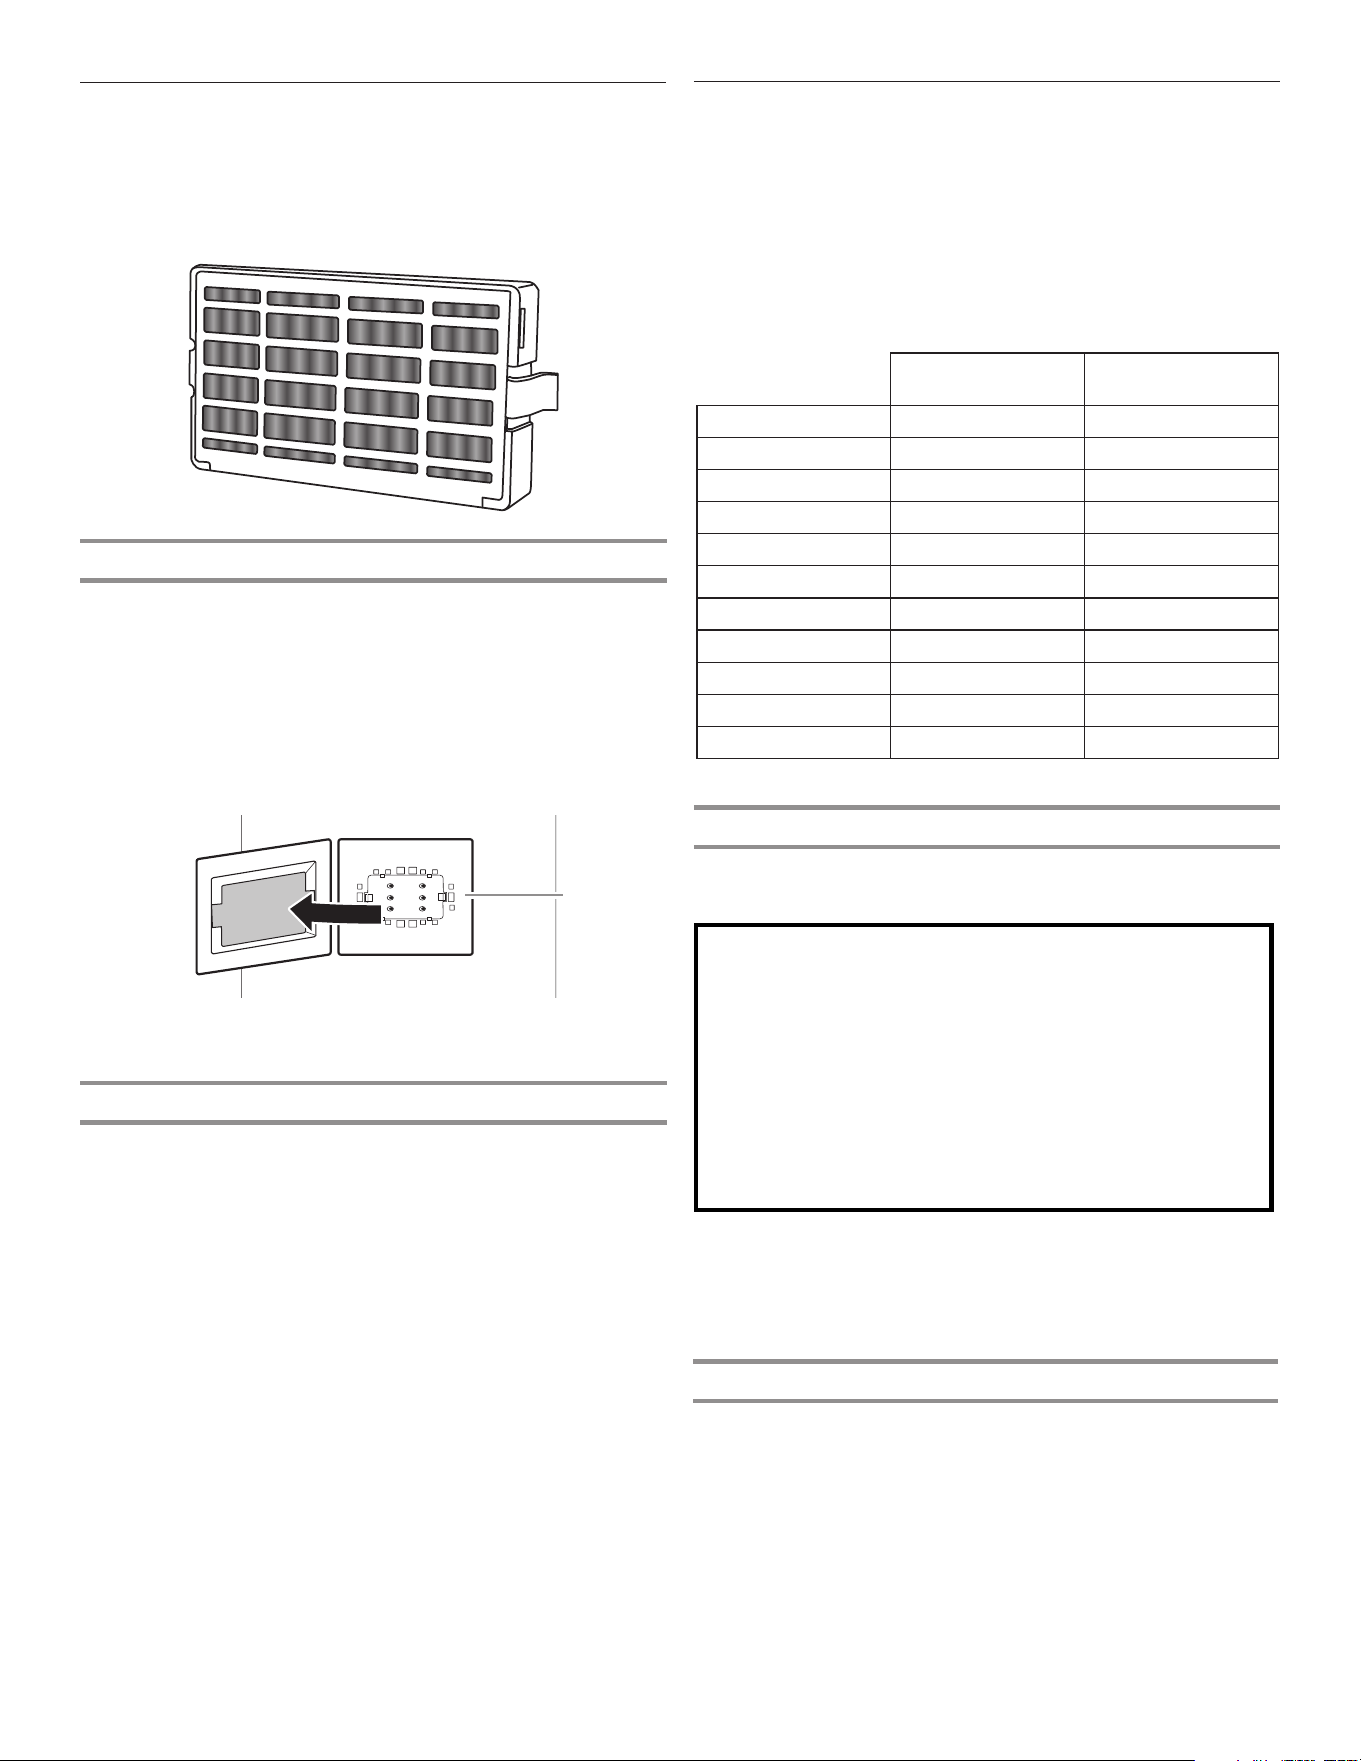
Install FreshFlow™ Air Filter
An air lter is 15 times more powerful than baking soda at
reducing common food odors inside the refrigerator.
On some models, your refrigerator’s accessory packet includes
an air lter which must be installed prior to use.
Installing the FreshFlow™ Air Filter
Install the air lter behind the vent cover, located on the rear wall
near the middle of the refrigerator.
1. Remove the air lter from its packaging.
2. Pull out plastic cover over the vented cover.
NOTE: When cover is removed for the rst time, a small foam part
the size of the lter will need to be removed and discarded.
3. Snap lter into place, close cover.
A. Air filter
Replacing the FreshFlow™ Air Filter
The disposable air lter should be replaced every 6 months. Some
air lters have an indicator that replacement is needed.
To order a replacement air lter, contact us. See the “Accessories”
section in the Use and Care Guide for information on ordering.
1. Open cover and remove the used air lter by squeezing in on
the side tabs.
2. Install the new air lter using the instructions in the previous
sections.
Sensitivity
to Ethylene
Ethylene
Production
Apples High Very High
Asparagus Medium Very Low
Berries Low Low
Broccoli High Very Low
Cantaloupe Medium High
Carrots Low Very Low
Citrus Fruit Medium Very Low
Grapes Low Very Low
Lettuce High Very Low
Pears High Very High
Spinach High Very Low
A
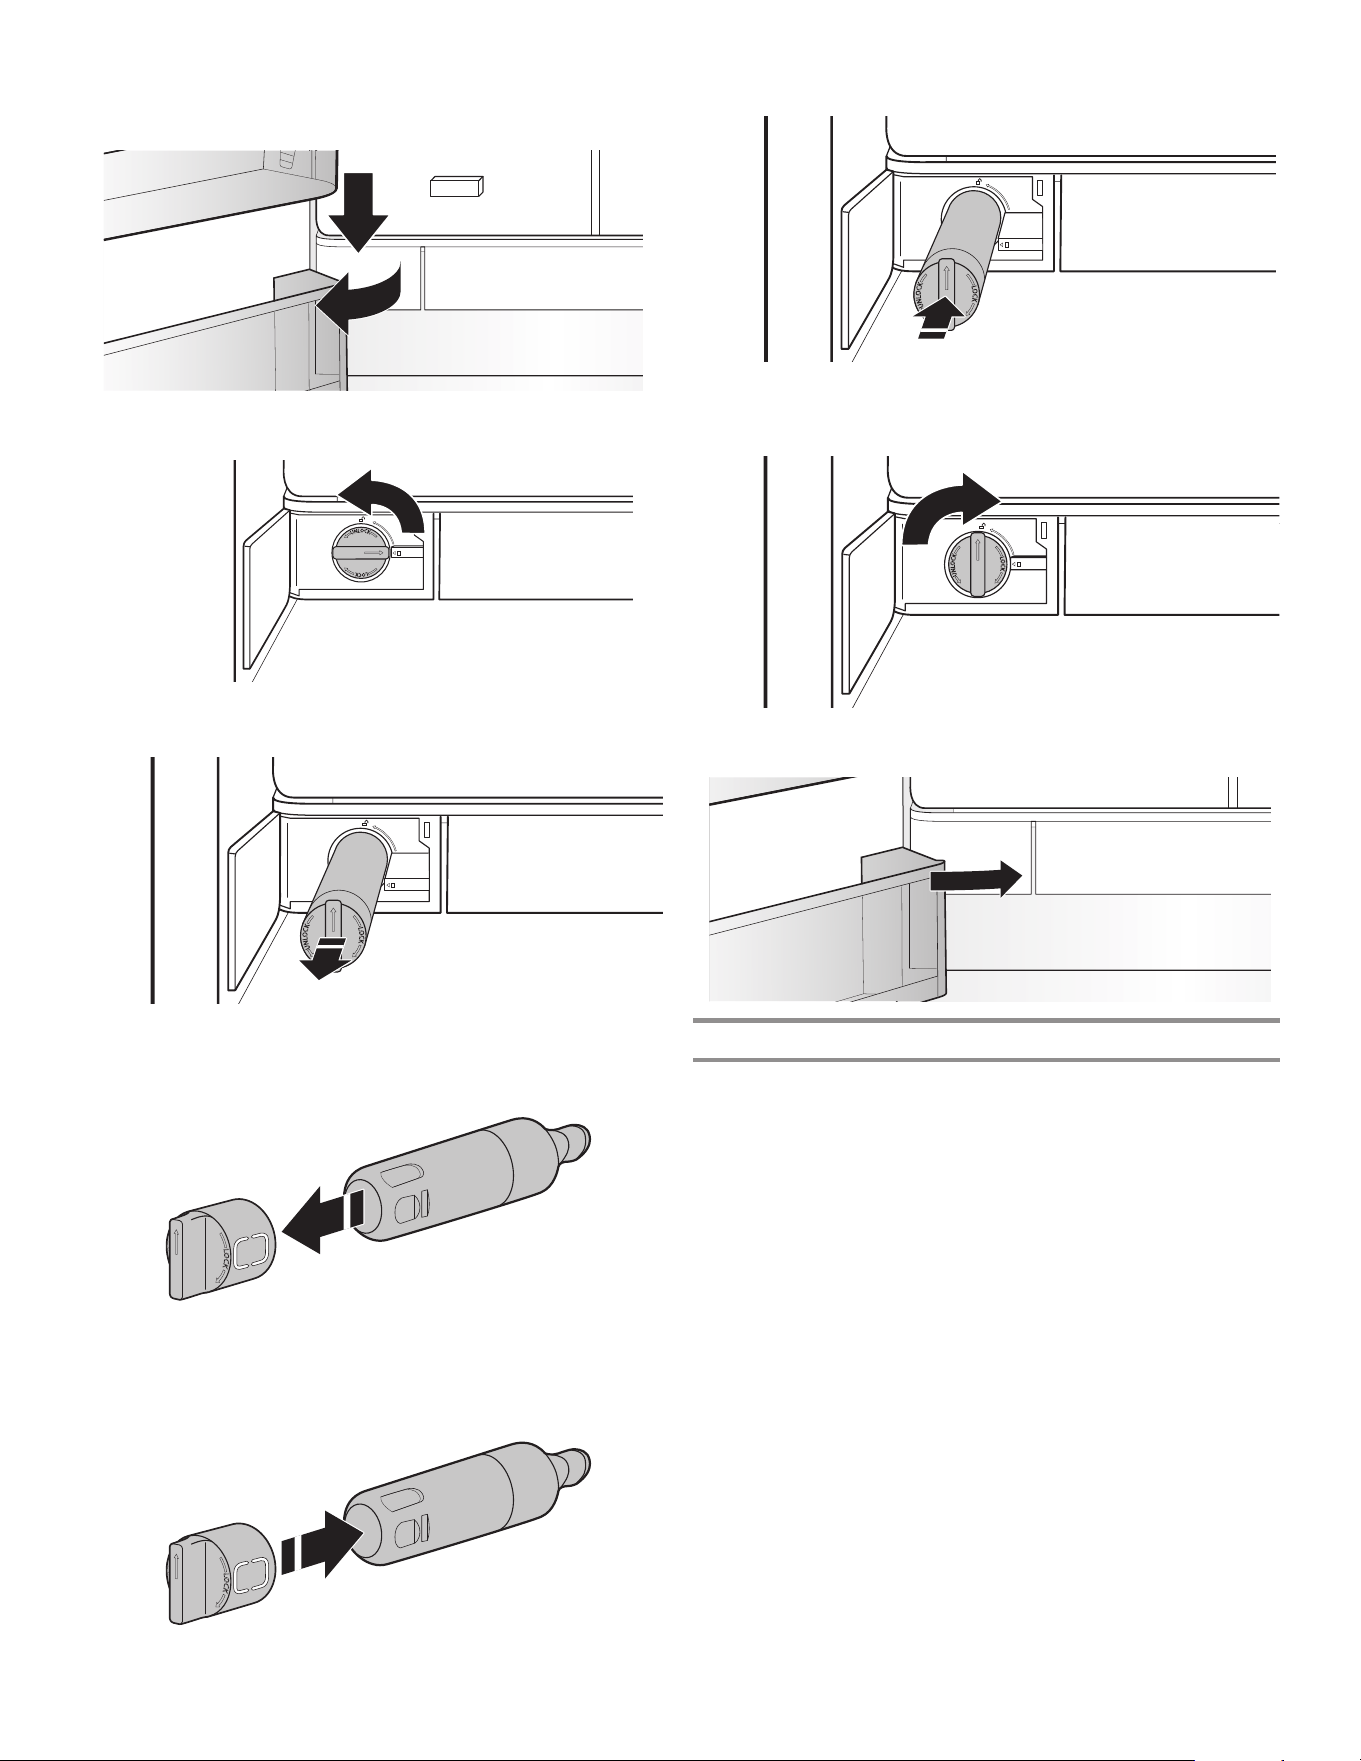
Installing the Produce Preserver
For your convenience, the suction-mounted produce preserver
can be installed in either the crisper or the refrigerated drawers.
CAUTION: IRRITANT
MAY IRRITATE EYES AND SKIN. DANGEROUS FUMES
FORM WHEN MIXED WITH OTHER PRODUCTS.
Do not mix with cleaning products containing ammonia,
bleach or acids. Do not get in eyes, on skin or clothing. Do
not breathe dust. Keep out of reach of children.
FIRST AID TREATMENT: Contains potassium
permanganate. If swallowed, call a Poison Control Center or
doctor immediately. Do not induce vomiting. If in eyes, rinse
with water for 15 minutes. If on skin, rinse with water.
1. Wash the interior of a drawer with a solution of mild dish soap
and warm water and dry thoroughly.
2. Find the package containing the Produce Preserver inside the
refrigerator and install the Produce Preserver into the drawer,
according to the instructions provided in the package.
Replacing the Produce Preserver
The disposable packet(s) should be replaced every 6 months or
when the status indicator changes completely from white to red.
To order replacements, contact us. See the “Accessories” section
for information on ordering.
1. Remove the used packets from the produce preserver
housing.
2. Remove the used status indicator.
3. Install the replacement packets and status indicator using the
instructions included in the package.
Install Produce Preserver
(on some models)
The produce preserver absorbs ethylene to slow the ripening
process of many produce items. As a result, certain produce items
will stay fresh longer.
Ethylene production and sensitivity varies, depending on the type
of fruit or vegetable. To preserve freshness, it is best to separate
produce with sensitivity to ethylene from fruits that produce
moderate-to-high amounts of ethylene.
21
Accessories
The following accessories are available for your refrigerator.
To order an accessory, contact us and ask for the part number.
In the U.S.A., visit our website www.jennair.com/accessories
or call 1-800-JENNAIR (1-800-536-6247).
In Canada, visit our webpage www.jennair.ca or call
1-800-JENNAIR (1-800-536-6247).
Affresh
®
Stainless Steel Cleaner:
In U.S.A., order Part #W10355016
In Canada, order Part #W10355016B
Affresh
®
Stainless Steel Wipes:
In U.S.A., order Part #W10355049
In Canada, order Part #W10355049B
Affresh
®
Kitchen & Appliance Cleaner:
In U.S.A., order Part #W10355010
In Canada, order Part #W10355010B
Water Filter:
In U.S.A., order Part #EDR2RXD1
In Canada, order Part #EDR2RXD1B
Air Filter:
Order Part #W10311524 or AIR1
Produce Preserver Starter kit:
Order Part #P1KL6S1CS
Produce Preserver Rell kit:
Order Part #P1KC6R1
Herb Tender
®
Container:
Order Part #W10882409
REFRIGERATOR USE
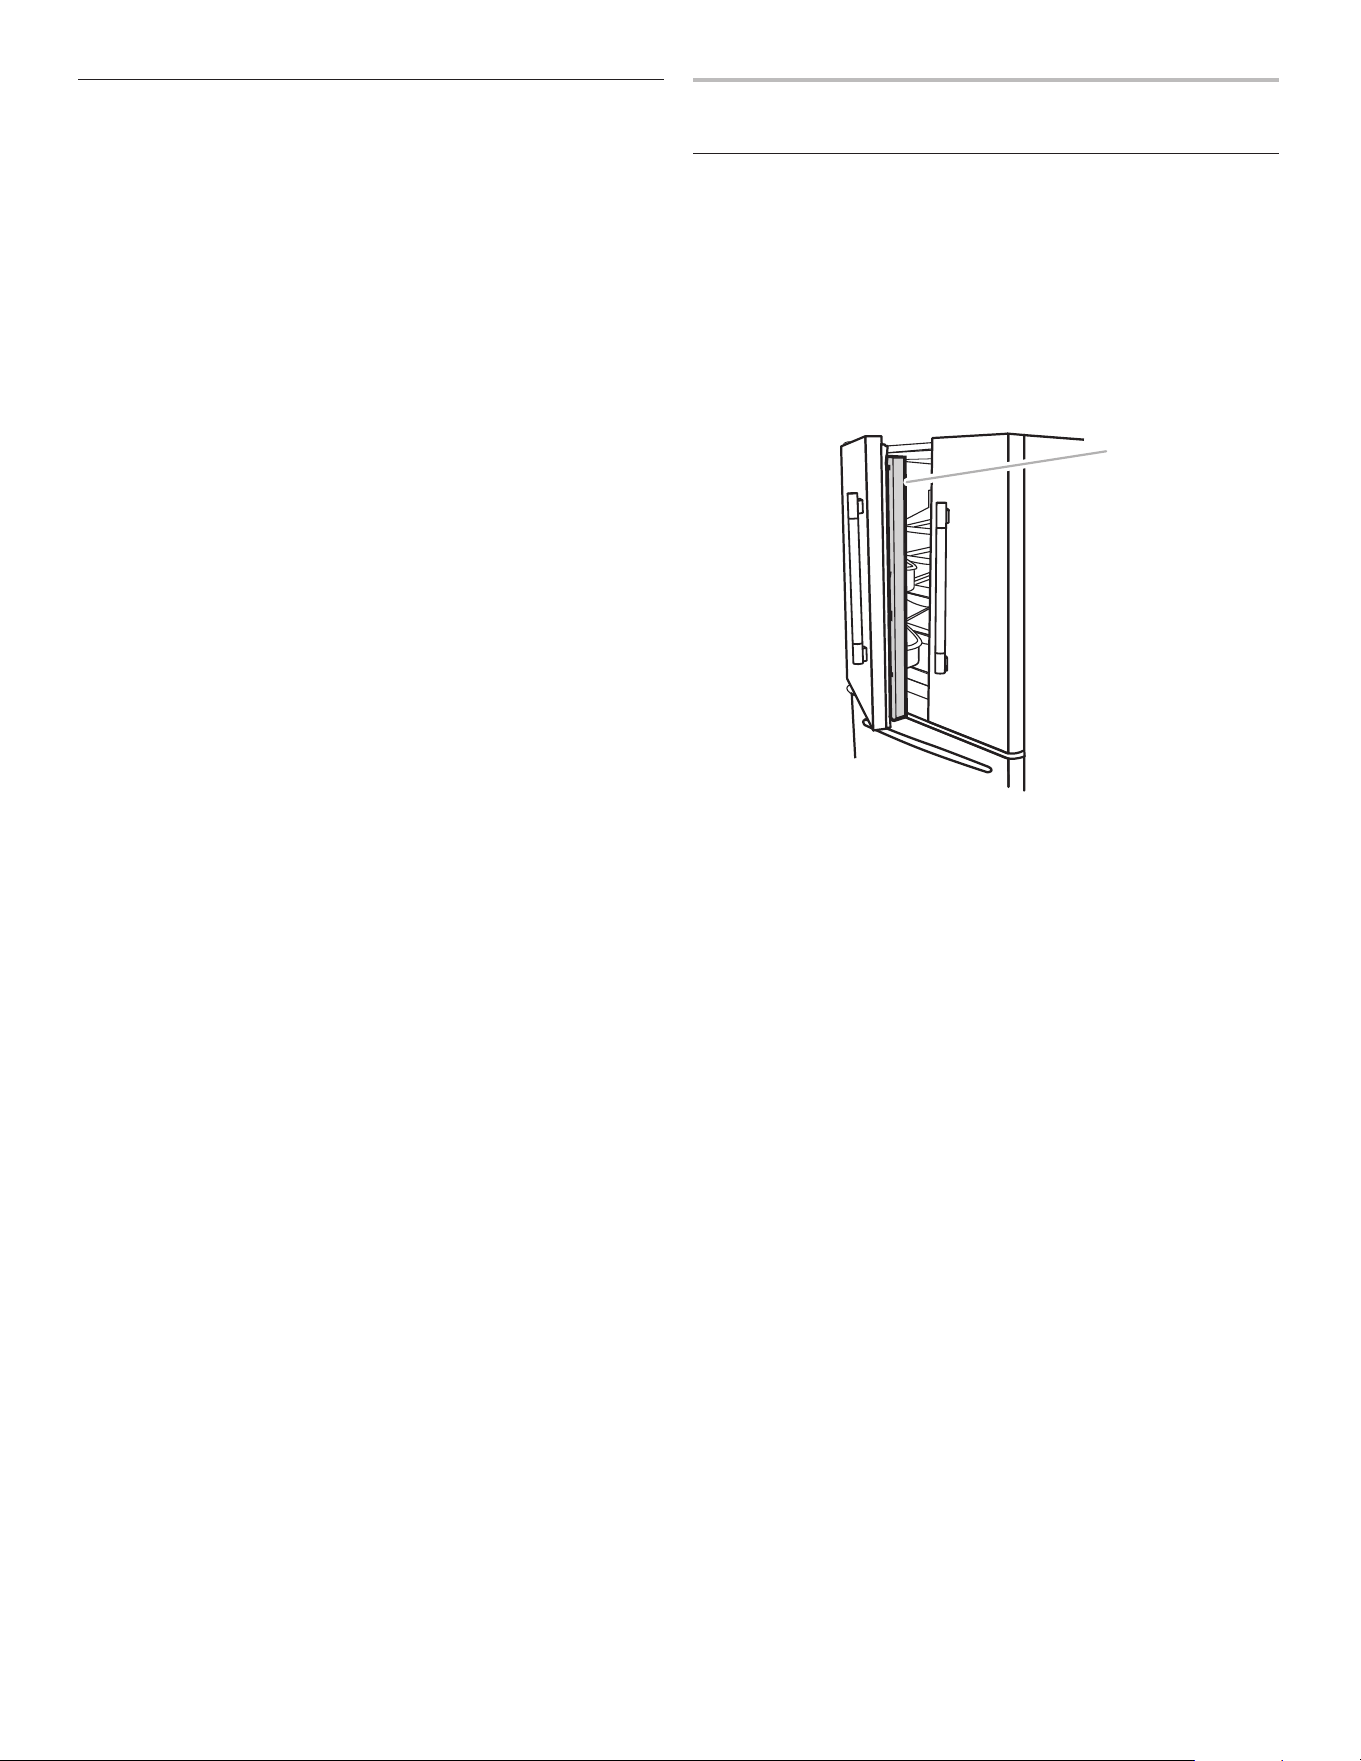
Opening and Closing Doors
There are 2 refrigerator compartment doors. The doors can
be opened and closed either separately or together. There is a
vertically hinged seal on the left refrigerator door.
■ When the left-side door is opened, the hinged seal
automatically folds inward so that it is out of the way.
■ When both doors are closed, the hinged seal automatically
forms a seal between the 2 doors.
A
A. Hinged seal
22
Using the Controls
Viewing and Adjusting Temperature Set Points
For your convenience, your refrigerator and freezer controls are
preset at the factory.
When you rst install your refrigerator, make sure that the
controls are still set to the recommended set points. The factory
recommended set points are 37°F (3°C) for the refrigerator and
0°F (-18°C) for the freezer.
IMPORTANT:
■ Wait 24 hours before you put food into the refrigerator. If you
add food before the refrigerator has cooled completely, your
food may spoil.
NOTE: Adjusting the set points to a colder-than-recommended
setting will not cool the compartments
any faster.
■ If the temperature is too warm or too cold in the refrigerator or
freezer, rst check the air vents to be sure they are not blocked
before adjusting the controls.
■ The recommended settings should be correct for normal
household use. The controls are set correctly when milk or
juice is as cold as you like and when ice cream is rm.
NOTE: Areas such as a garage, basement, or porch may have
higher humidity or extreme temperatures. You may need to
adjust the temperature away from the recommended settings
to accommodate for these conditions.
■ Wait at least 24 hours between adjustments. Recheck the
temperatures before other adjustments are made.
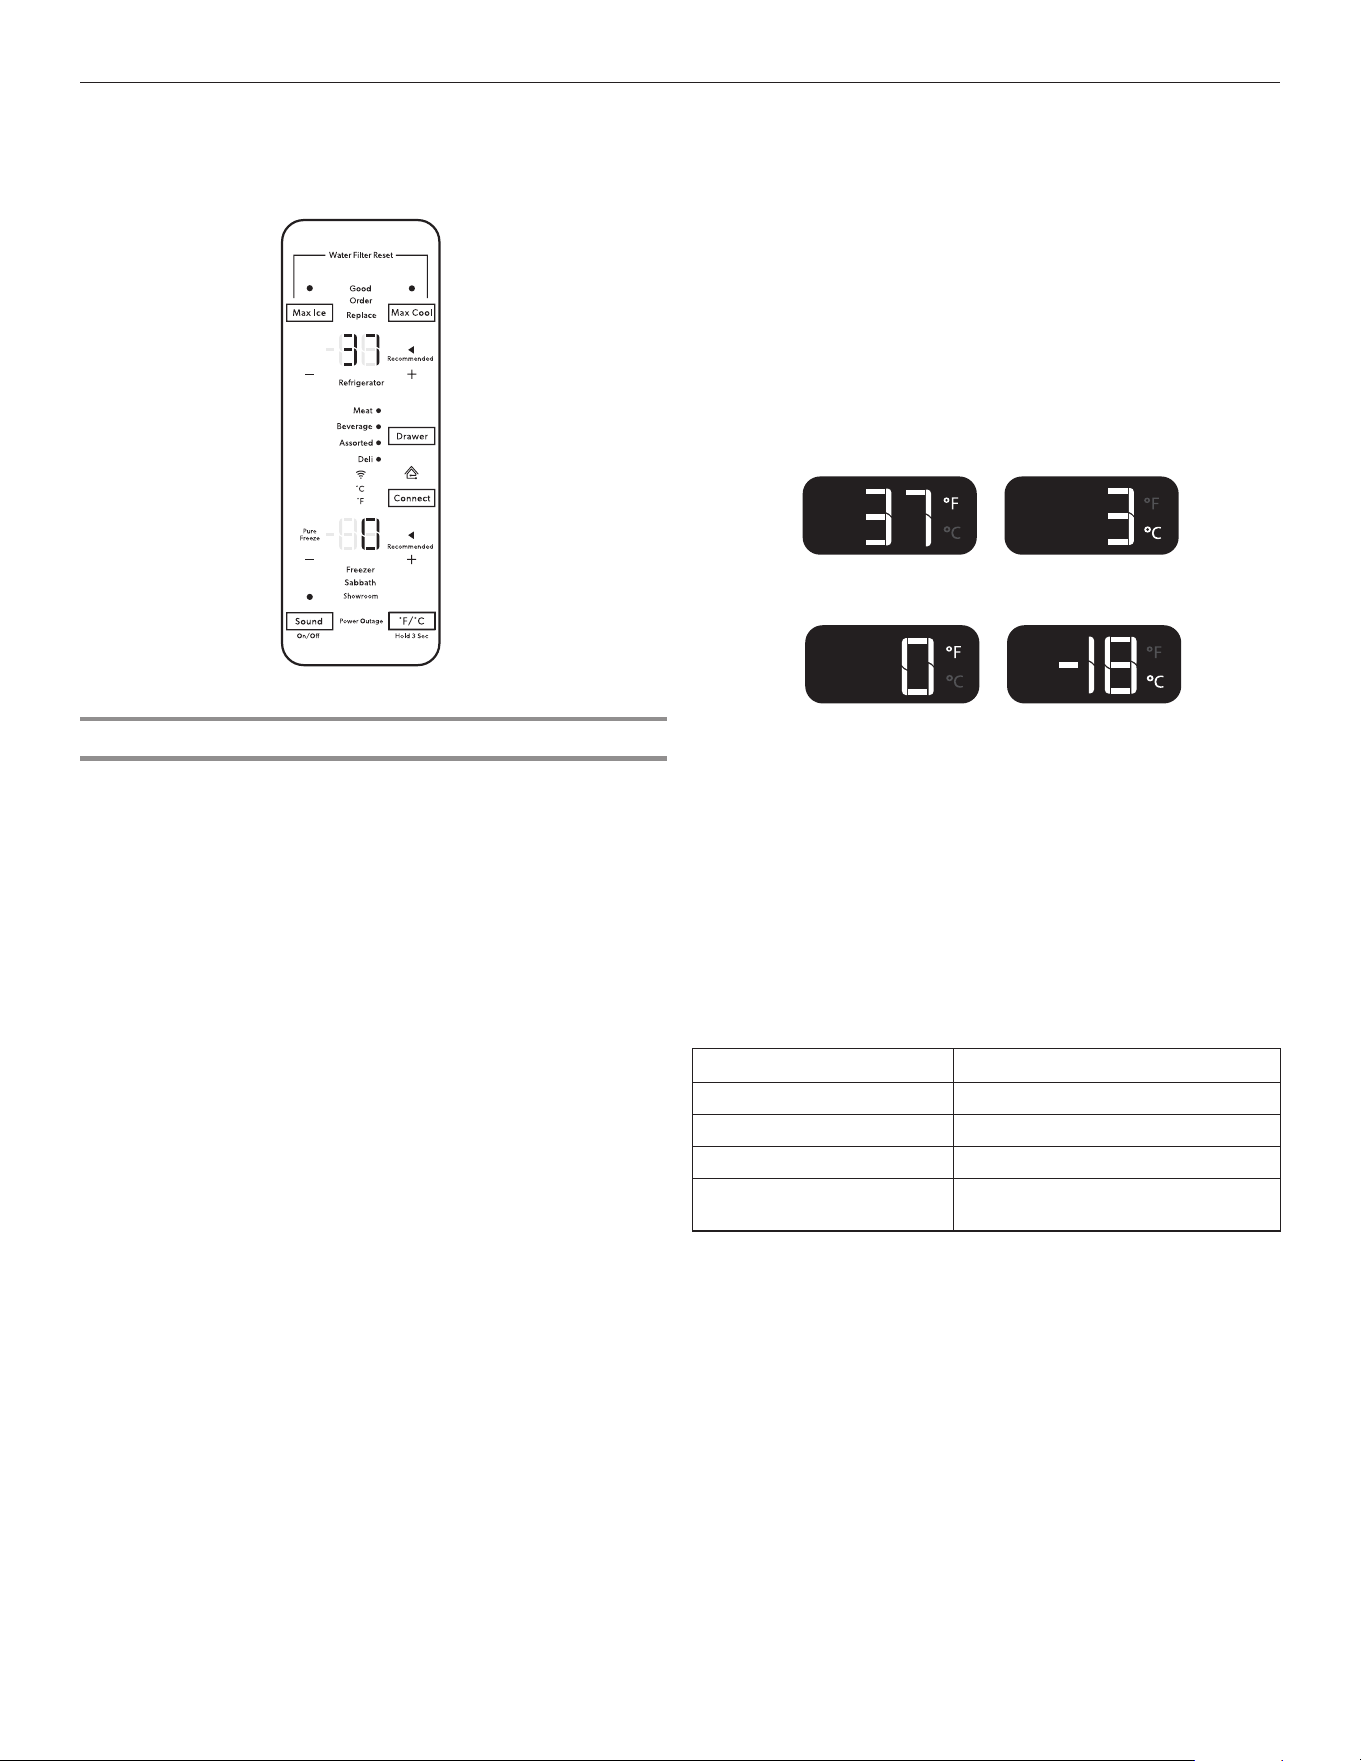
View Temperature Set Points
1. Touch [+]/[—] for refrigerator or [+]/[—] for freezer toggle
through temperature set points.
NOTE: To view temperature in degrees Celsius, touch
and hold the [°F/°C] button for 3 seconds and the temperature
display will change. To return to Fahrenheit, touch and hold
[°F/°C] for 3 seconds and the temperature display will change.
To activate Temperature mode for Pantry Drawer, touch
DRAWER and toggle through 4 optional temperature settings:
Meat, Beverage, Assorted, and Deli. The display will show the
temperature set point of the selected setting for the Pantry
Drawer.
Recommended Refrigerator Temperature
Recommended Freezer Temperature
Adjust Temperature Set Points
Refrigerator set point range: 33°F to 45°F (1°C to 7°C)
Freezer set point range: -6°F to 5°F (-22°C to -15°C)
1. Touch [+]/[—] to adjust the Refrigerator zone. The display will
show the temperature set point of the selected compartment
as shown.
2. When the temperature in is the range of Pure Freeze
®
, the
display will light up. Pure Freeze
®
is active at the coldest
freezer set point.
When adjusting temperature set points,
use the following chart as a guide:
CONDITION: TEMPERATURE ADJUSTMENT:
REFRIGERATOR too cold REFRIGERATOR setting 1° higher
REFRIGERATOR too warm REFRIGERATOR setting 1° lower
FREEZER too cold FREEZER setting 1° higher
FREEZER too warm/
Too little ice
FREEZER setting 1° lower
The touch-activated controls are located above the external
dispenser and on the side of the left inner refrigerator door.

23
Max Cool
The Max Cool feature assists with periods of high refrigerator use,
full grocery loads, or temporarily warm room temperatures.
■ To turn on the Max Cool feature, press the Max Cool button.
When the button is pressed, the icon will blink 3 times, and
appear on the display screen.
■ To manually turn off the Max Cool feature, press the Max Cool
button and the display will blink 3 times and turn off. The Max
Cool feature will remain on for 24 hours unless manually turned
off. Adjusting the refrigerator temperature
will automatically turn off the Max Cool feature.
NOTE: Setting the freezer to a colder temperature may make
some foods, such as ice cream, harder.
Max Ice
The Max Ice feature assists with increasing the cooling for the
freezer compartment in order to increase ice production.
■ To turn on or off the Max Ice feature, press the Max Ice button.
When the button is pressed to turn the feature on, the icon will
blink 3 times, and appear on the display screen.
■ To manually turn off the Max Ice feature, press the Max Ice
button and the display will blink 3 times and turn off. The Max
Ice feature will remain on for 24 hours unless manually turned
off. Adjusting the refrigerator temperature will automatically
turn off the Max Ice feature.
NOTE: Setting the freezer to a colder temperature may make
some foods, such as ice cream, harder.
Water Filter Reset
Displays the status of the water filter. To reset the filter, press MAX
ICE and MAX COOL for 3 seconds. After countdown, the Good
icon will blink 3 times and remain lit.
NOTE: The Water Filter status lights on the internal controls will
let you know when to change your water lter.
■ ORDER FILTER (Yellow) - Order a replacement water lter.
■ REPLACE FILTER (Red) - Replace the water lter. While you
are dispensing water, “Replace” Filter icon will ash constantly
from beginning to the end of dispensing. After 14 days without
replacing the water lter, the “Replace” Filter icon will blink
7 times and an alert tone will sound 3 times at the end of
dispensing. See the “Water Filtration System” section.
NOTE: REPLACE FILTER will remain illuminated if a lter reset
is not done.
■ RESET FILTER - Touch MAX ICE and MAX COOL at the same
time on the Temperature Control display for 3 seconds to reset
water lter. The display will do a 3-second countdown and
then ash the icon and play a tone.
Filter Status
The JennAir
®
app will send an alert that displays the water lter
status.
Pure Freeze
®
Mode
This feature minimizes moisture migration from frozen food.
This in turn reduces the freezer burn occurrence.
To turn on the Pure Freeze
®
mode, toggle to the coldest freezer
temperature set point.
To turn off the Pure Freeze
®
mode, toggle from the coldest freezer
set point to any other temperature.
Sound On/Off
The Sound button allows the customer to turn the sound on
and off.
■ To turn on the Sound feature, press the Sound button. When
the button is pressed, the sound icon will blink 3 times and
appear on the display screen.
■ To manually turn off the Sound feature, press the Sound button
and the display will blink 3 times and turn off.
Power Outage
The Power Outage indicator lets you know if the power supply to
the refrigerator has been off and the freezer temperature has risen.
The control panel display will read “Power Outage” and an alert
tone will sound 3 times. Touch any button to stop the tone and
touch any button again to turn off Power Outage icon.
Once the power outage has been conrmed, “Power Outage” icon
will disappear and the display will return to the Home screen.
Showroom Mode
This mode is used when the refrigerator is on display in a retail
store or if you want to turn the cooling off and deactivate all other
functions except interior lighting. Showroom mode can be used
when going on vacation. See the “Vacation and Moving Care”
section for proper steps on leaving your refrigerator in this mode
for long periods of time.
If you turn on Showroom mode, the word “Showroom” will light
up on the display. Enter or Exit Showroom mode by pressing and
holding °F/°C and DRAWER at the same time for 3 seconds.
NOTE: Empty ice maker if refrigerator is going to be turned off for
an extended period of time.
Sabbath Mode
Allows the door of the refrigerator or freezer to be opened or
closed during the Sabbath or other religious holidays without
activating the interior lights or controls.
The freezer and refrigerator user set points remain unchanged
while in this mode. If you unintentionally turn on Sabbath mode,
the word “Sabbath” will light up on the display. Enter and exit
Sabbath mode by pressing and holding °F/°C and SOUND at the
same time for 3 seconds.
NOTE: You will be unable to dispense or change temperature set
points in Sabbath mode. Your interior lighting and control panels
will all be inactive in Sabbath mode.
24
Additional Features
Door Ajar Alarm
The Door Ajar Alarm feature sounds an alarm when the refrigerator
door(s) or freezer drawer is open for 5 minutes and cooling is
turned on. The alarm will repeat every 2 minutes. Close all doors
and drawer to turn it off.
NOTE: To mute the audible alarm while keeping the doors open,
such as while cleaning the inside of the refrigerator, touch any
button on the control panel. The alarm sound will be temporarily
turned off, but the Door Ajar icon will still be displayed on the
dispenser control panel.
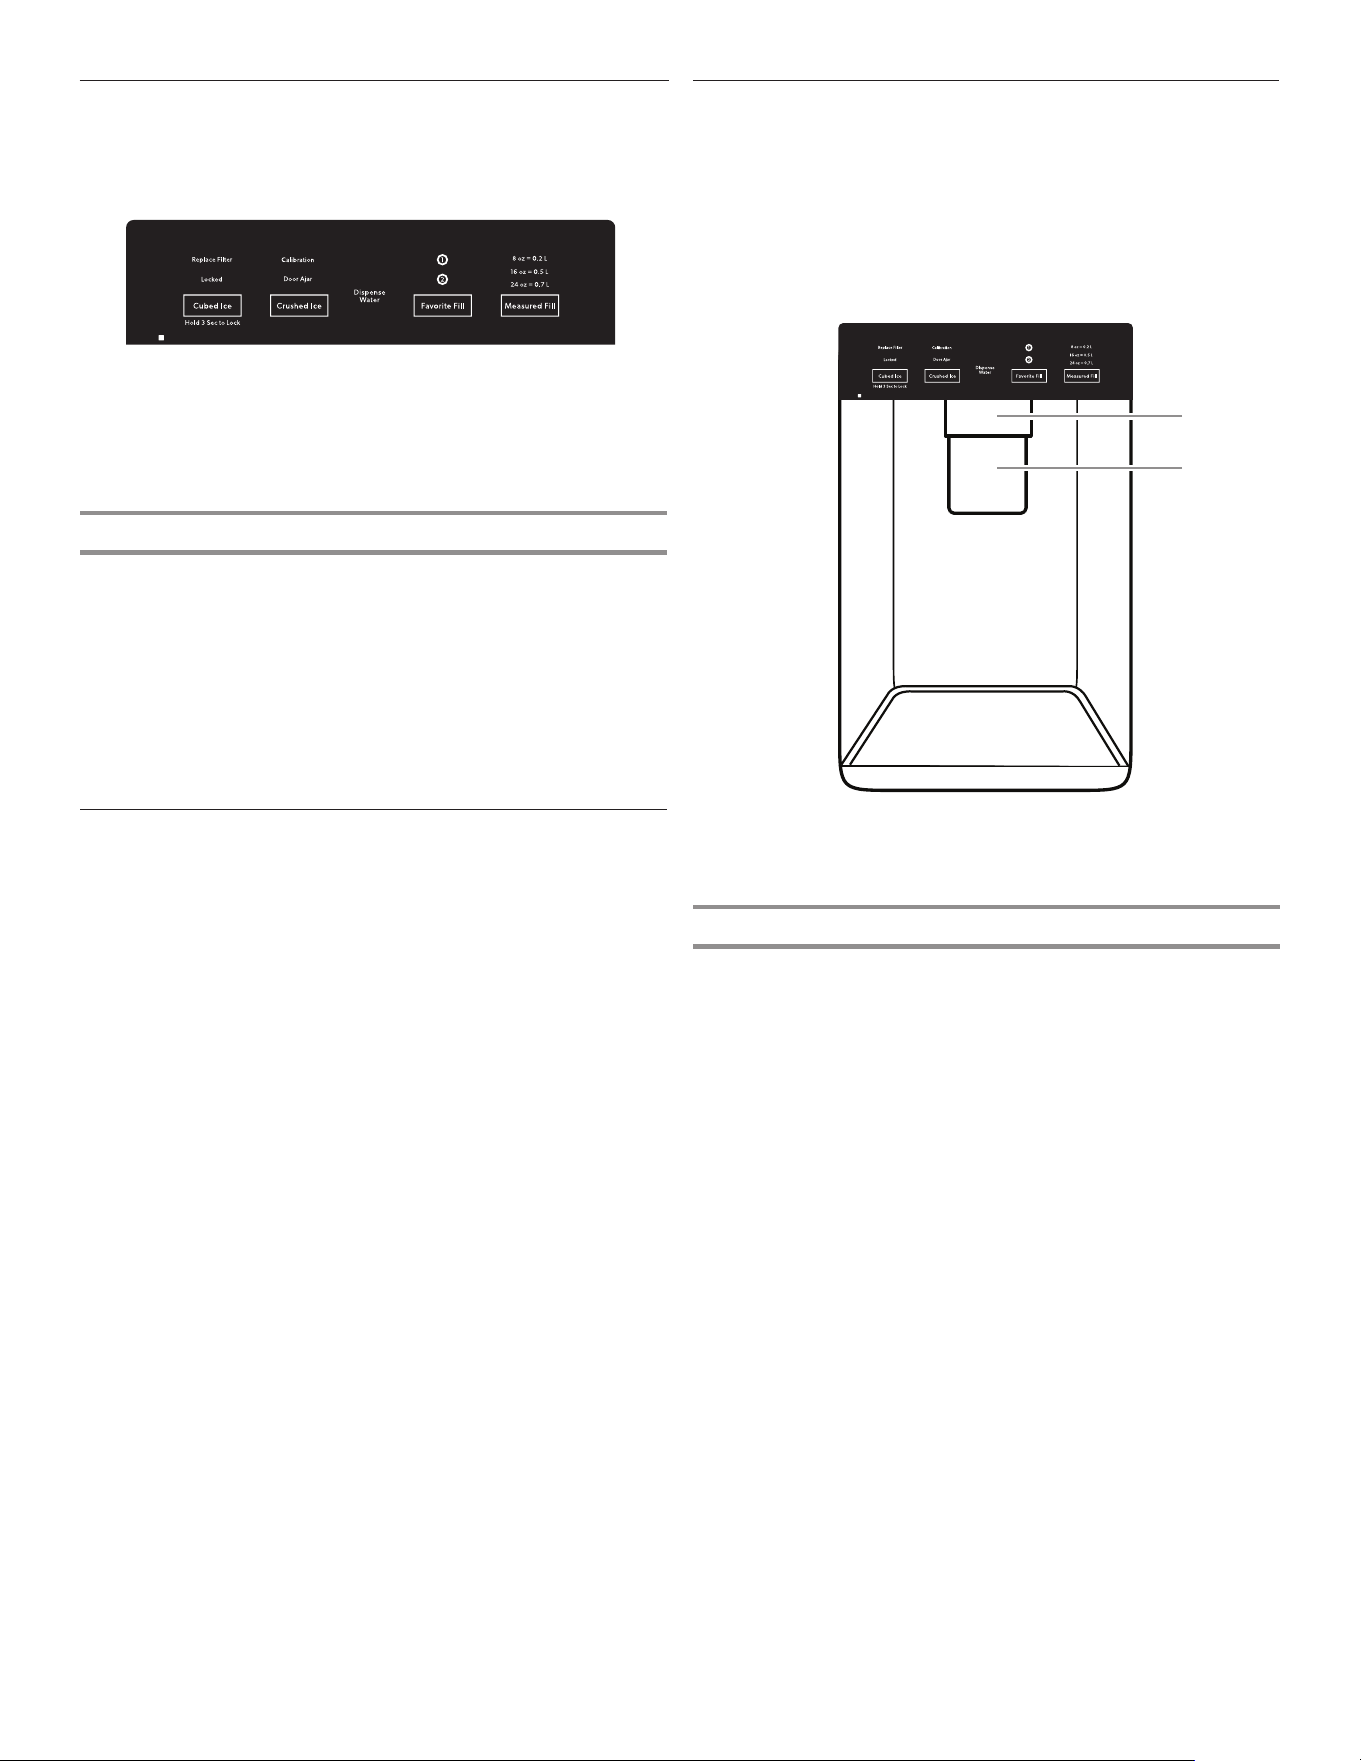
Water and Ice Dispensers
IMPORTANT:
■ Allow 3 hours for the refrigerator to cool down and chill water.
■ Allow 24 hours to produce the rst batch of ice. Discard the
rst 3 batches of ice produced.
■ The dispensing system will not operate if the left-hand
refrigerator door is open.
!
Calibration
!
Door
Ajar
!
Replace
Filter
!
"#$#!
!
%&#'#(')!"#$#!
!
Order Filter
!
a1 oz = b1 L
!
a2 oz = b2 L
!
a3 oz = b3 L
!
Dispense
!
Flush the Water System
Air in the water dispensing system can cause the water dispenser
to drip. After connecting the refrigerator to a water source or
replacing the water lter, ush the water system.
Flushing the water dispensing system forces air from the water
line and lter and prepares the water lter for use. Additional
ushing may be required in some households.
NOTE: As air is cleared from the system, water may spurt out of
the dispenser.
1. Using a sturdy container, depress and hold the water
dispenser paddle for 5 seconds.
2. Release the dispenser paddle for 5 seconds. Repeat steps
1 and 2 until water begins to ow.
3. Once water begins to ow, continue depressing and releasing
the dispenser pad (5 seconds on, 5 seconds off) until a total
of 3 gal. (12 L) has been dispensed.
B
A
A. Water dispenser paddle
B. Ice dispenser paddle
Lighting the Refrigerator
The refrigerator has an interior light that comes on any time the
door is opened.
NOTE: The light is an LED which does not need to be replaced.
If the LED does not illuminate when the door is opened, call
Service to replace the light. See “Assistance or Service” in the
“Warranty” section for contact information.
External Dispenser Controls
The control is located above the external dispenser of the
refrigerator.
IMPORTANT: The display screen on the dispenser control panel
will turn off automatically and enter “sleep” mode when the
control buttons and dispenser paddles have not been used for
2 minutes or more. Touch any control button to reactivate the
display screen. The Home screen will appear as shown.

25
Calibrate Measured Fill
Household water pressure may affect the accuracy of the
Measured Fill feature. So, for optimum performance of your
water dispenser, you must rst calibrate Measured Fill.
IMPORTANT:
■ Flush the water system before calibrating Measured Fill.
■ For best results, calibration should be performed when water is
not being used in the house.
1. Place a sturdy measuring cup (1-cup [237 mL] size) on the
dispenser tray centered in front of the ice/water dispenser
paddle.
NOTE: Depending on your model, a measuring cup may be
provided.
!
Calibration
!
Door
Ajar
!
Replace
Filter
!
"#$#!
!
%&#'#(')!"#$#!
!
Order Filter
!
a1 oz = b1 L
!
a2 oz = b2 L
!
a3 oz = b3 L
!
Dispense
!
A. Water dispenser paddle
B. Ice dispenser paddle
C. Measuring cup (1 cup)
Ensure that you do not have any Measured Fill preset selected.
2. Touch and hold the Measured Fill button for 3 seconds to
enter into Calibration mode. The Calibration and Measured
Fill icons will illuminate and remain lit while the Measured Fill
feature is being calibrated.
NOTE: You may touch MEASURED FILL to exit at any time in
Calibration mode. The Calibration and Measured Fill icons will
disappear.
3. Press and hold the water dispenser paddle, as needed, to
dispense water to the 1-cup ll line in the measuring cup.
NOTE: If overlling or spilling occurs, discard the water and
restart the calibration process.
4. When 1 cup of water has been correctly dispensed into
the measuring cup, touch MEASURED FILL to conrm the
calibration.
5. When Measured Fill calibration has been conrmed, the
Calibration icon will disappear and the display will return
to the home screen.
B
A
C
Save Favorite Fill
Household water pressure may affect the accuracy of the Favorite
Fill feature. So, for optimum performance of your water dispenser,
you must rst calibrate Measured Fill.
IMPORTANT:
■ Flush the water system before saving Favorite Fill.
■ For best results, calibration should be performed when water is
not being used in the house.
1. Place a preferred-size cup on the dispenser tray centered in
front of the ice/water dispenser paddle.
2. Select either Favorite 1 or Favorite 2, and then touch and
hold the Favorite Fill button for 3 seconds to enter into Saving
mode. The Favorite Fill icon will illuminate and remain lit while
the Favorite Fill feature is being saved.
NOTE: You may touch FAVORITE FILL to exit at any time in
Saving mode and the display will return to the Home screen.
3. Press and hold the water dispenser paddle, as needed, to
dispense water to the preferred-size cup.
NOTE: If overlling or spilling occurs, discard the water and
restart the saving process.
4. When the preferred amount of water has been correctly
dispensed into the cup, touch the Favorite Fill button to
conrm the favorite amount.
5. When Favorite Fill amount has been conrmed, the display
will return to the home screen.
Dispensing
Touch CUBED ICE or CRUSHED ICE for your ice selection.
NOTES:
■ For crushed ice, cubes are crushed before being
dispensed. This may cause a slight delay when dispensing
crushed ice. Noise from the ice crusher is normal and
pieces of ice may vary in size.
■ When changing from crushed to cubed, a few ounces of
crushed ice will be dispensed along with the rst cubes.
26
Dispensing Water
IMPORTANT:
■ Dispense at least 1 qt (1 L) of water every week to maintain
a fresh supply.
■ If the ow of water from the dispenser decreases, it could
be caused by low water pressure.
■ With the water lter removed, dispense 1 cup (237 mL)
of water. If 1 cup (237 mL) of water is dispensed in
8 seconds or less, the water pressure to the refrigerator
meets the minimum requirement.
■ If it takes longer than 8 seconds to dispense 1 cup
(237 mL) of water, the water pressure to the refrigerator
is lower than recommended. See the “Water Supply
Requirements” and “Troubleshooting” sections for
suggestions.
To Dispense Water - Standard:
1. Press a sturdy glass against the water dispenser paddle.
2. Remove the glass to stop dispensing.
NOTE: The Dispense Water button does not enable standard
dispensing. It only functions in Measured Fill or Favorite Fill
mode.
To Dispense Water - Measured Fill:
Measured Fill allows you to dispense a specied amount
of water with the touch of a few buttons.
1. Put a sturdy glass under water spout. Touch
MEASURED FILL to activate.
NOTE: The amount of water you select will be dispensed.
Make sure the container can hold the entire volume. If ice
is in the container, you may need to adjust your selection.
2. Touch MEASURED FILL to turn on, then touch to select
8 oz (0.2 L), 16 oz (0.5 L), or 24 oz (0.7 L). Touch the fourth
time to exit Measured Fill display.
3. Touch DISPENSE WATER (center button) or press paddle and
the selected amount of water will be dispensed.
NOTES:
■ The Measured Fill dispenser will automatically time out after
1 minute of inactivity.
■ You can rell several glasses with the same measurement by
continuing to touch DISPENSE WATER (center button) after
each glass ll.
Measured Fill options are listed in the following chart:
Units
Ounces 8 16 24
Cups 1 2 3
Liters 0.2 0.5 0.7
NOTE: Most coffee cups (commonly 4 to 6 oz [118 to 177 mL]
per cup) are not the same size as a measuring cup (8 oz [237 mL]).
You may need to recalibrate Measured Fill to underll or to avoid
unintentionally overlling coffee cups.
4. Dispense water.
NOTE: While dispensing water, the ow of water will
automatically stop once the desired volume has been
dispensed.
■ Press a sturdy glass against the dispenser paddle below
the water spout.
OR
■ Place the glass below the water spout and touch
DISPENSE WATER for hands-free dispensing.
5. To pause dispensing before the selected volume has been
dispensed, touch DISPENSE WATER a second time or touch
the water dispenser paddle. Touch DISPENSE WATER or
paddle again to resume dispensing remaining amount.
NOTE: If you stop dispensing before the desired volume has
been dispensed, the display will turn off after 1 minute. If you
have not resumed by then, it will reset back to the original
amount.
6. To select a new volume or start dispensing the same volume
again, you must rst nish dispensing the selected volume or
turn off the Measured Fill feature (either by waiting 1 minute,
so it will automatically turn off, or by touching CUBED ICE
or CRUSHED ICE to manually turn it off), and then select
Measured Fill again.
To Dispense Water - Favorite Fill:
Favorite Fill allows you to dispense a preferred amount of water
with the touch of a few buttons.
1. Put a sturdy glass under water spout. Touch FAVORITE FILL
to activate.
NOTE: The amount of water you select will be dispensed.
Make sure the container can hold the entire volume. If ice
is in the container, you may need to adjust your selection.
2. Touch FAVORITE FILL to turn on, then touch to select
Favorite 1 or Favorite 2. Touch the third time to exit
Favorite Fill display.
3. Touch DISPENSE WATER (center button) and the selected
amount of water will be dispensed.
NOTES:
■ The Favorite Fill dispenser will automatically time out after
1 minute of inactivity.
■ You can rell several glasses with the same measurement by
continuing to touch DISPENSE WATER (center button) after
each glass ll.
4. Dispense water.
NOTE: While dispensing water, the ow of water will
automatically stop once the desired volume has been
dispensed.
■ Press a sturdy glass against the dispenser paddle below
the water spout.
OR
■ Place the glass below the water spout, and touch
DISPENSE WATER for hands-free dispensing.
5. To pause dispensing before the selected volume has been
dispensed, touch DISPENSE WATER a second time or touch
the water dispenser paddle. Touch DISPENSE WATER or
paddle again to resume dispensing remaining amount.
NOTE: If you stop dispensing before the desired volume has
been dispensed, the display will turn off after 1 minute. If you
have not resumed by then, it will reset back to the original
amount.
6. To select a new volume or start dispensing the same volume
again, you must rst nish dispensing the selected volume
or turn off the Favorite Fill feature (either by waiting 1 minute
so it will automatically turn off or by touching CUBED ICE
or CRUSHED ICE to manually turn it off), and then select
Favorite Fill again.
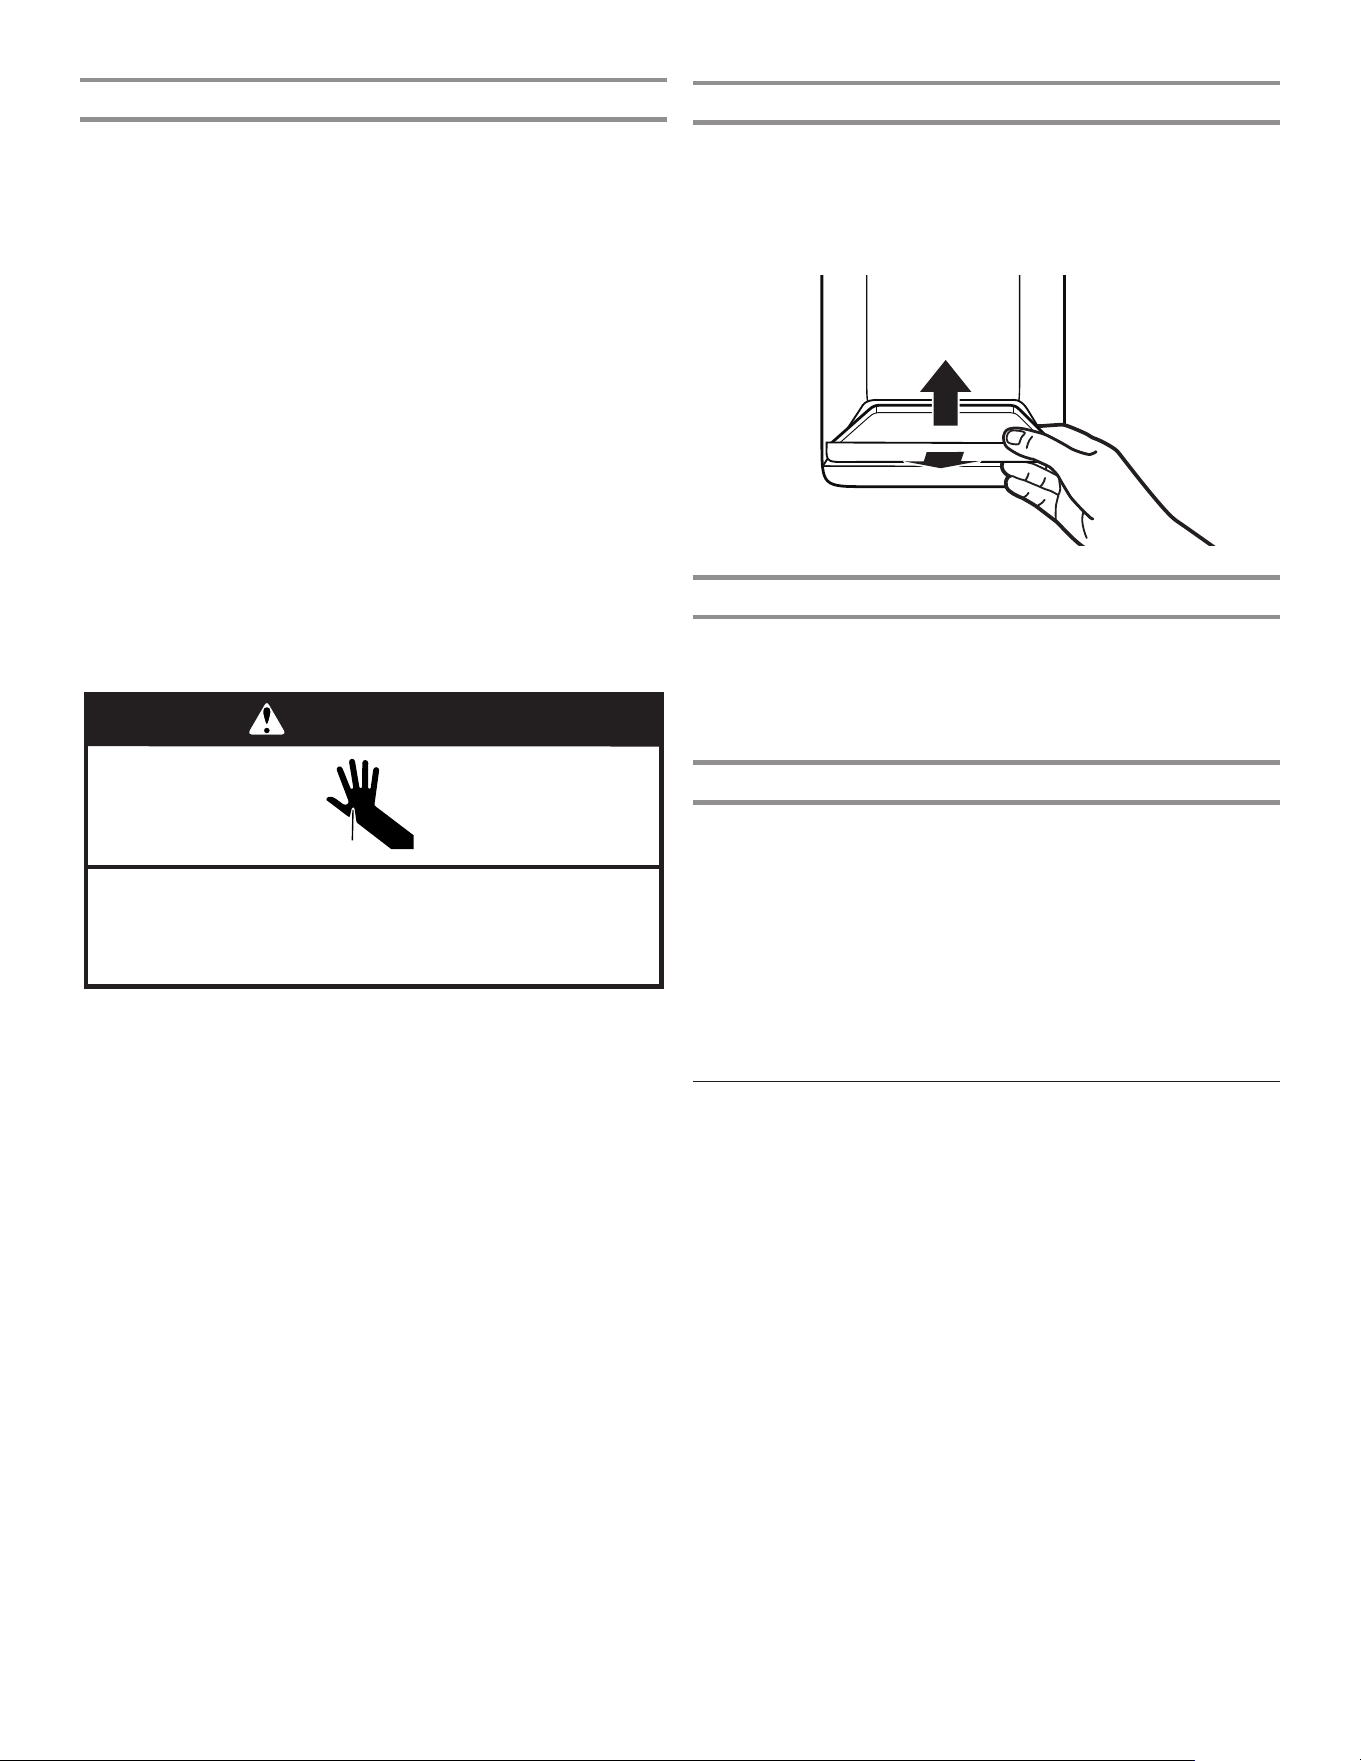
27
The Ice Dispenser
IMPORTANT:
■ If the ice cubes are hollow or have an irregular shape, it could
be because of low water pressure. See the “Water Supply
Requirements” section.
■ Ice travels from the ice storage bin through the dispenser
chute to the dispenser. To turn off the ice maker, see the
“Ice Maker and Storage Bin” section.
■ The dispenser may continue to make noise and ice may
continue to dispense for several seconds after releasing
the dispenser button or paddle.
To Clean the Ice Dispenser Chute:
Humidity causes ice to naturally clump together. Ice particles can
build up until the ice dispenser chute becomes blocked.
If ice is not dispensed regularly, it may be necessary to empty the
ice storage bin and clean the ice delivery chute, the ice storage
bin, and the area beneath the storage bin every 2 weeks.
■ If necessary, remove the ice clogging the storage bin and
delivery chute using a plastic utensil.
■ Clean the ice delivery chute and the bottom of the ice storage
bin using a warm, damp cloth, and then dry thoroughly.
To Dispense Ice - Paddle Dispensing
1. Select the desired type of ice by pressing CUBED ICE or
CRUSHED ICE.
Cut Hazard
Use a sturdy glass when dispensing ice.
Failure to do so can result in cuts.
WARNING
2. Press a sturdy glass against the dispenser paddle. Hold the
glass close to the dispenser opening, so ice does not fall
outside of the glass.
IMPORTANT: You do not need to apply a lot of pressure to
the paddle to activate the ice dispenser. Pressing hard will not
make the ice dispense faster or in greater quantities.
3. Remove the glass to stop dispensing.
NOTE: Ice may continue to dispense for several seconds after
removing the glass from the dispenser paddle. The dispenser may
continue to make noise for a few seconds after dispensing.
The Dispenser Drip Tray
The drip tray can be removed to carry to the sink to empty
or clean.
■ Lift up on the front edge of the tray and pull forward to remove.
■ The drip tray can also slide out to assist in Measured/
Favorite Fill.
!
Calibration
!
Door
Ajar
!
Replace
Filter
!
"#$#!
!
%&#'#(')!"#$#!
!
Order Filter
!
a1 oz = b1 L
!
a2 oz = b2 L
!
a3 oz = b3 L
!
Dispense
!
The Dispenser Light
1. When you use the dispenser, the light will automatically
turn on.
2. The dispenser light also serves as an automatic night light.
Once the ambient light in the room is reduced, the auto
sensor will cause the dispenser light to illuminate.
The Dispenser Lock
The dispenser can be locked for easy cleaning or to avoid
unintentional dispensing by small children and pets.
NOTE: The lock feature does not shut off power to the refrigerator
or the dispenser light. It simply deactivates the controls and
dispenser levers. To turn off the ice maker, see the “Ice Maker and
Storage Bin” section.
■ Touch and hold CUBED ICE for 3 seconds to lock the
dispenser.
■ Touch and hold CUBED ICE for 3 seconds to unlock the
dispenser.
■ The display screen indicates when the dispenser is locked.
Ice Maker and Storage Bin
IMPORTANT: To avoid low ice production and poor quality ice,
ush the water system before turning on the ice maker. See the
“Water Dispenser” section.
■ Following installation, allow 24 hours to produce the rst batch
of ice. Discard the rst 3 batches of ice produced.
Allow 2 to 3 days to ll the ice storage bin.
■ The quality of your ice will be only as good as the quality of
the water supplied to your ice maker. Avoid connecting the ice
maker to a softened water supply. Water softener chemicals
(such as salt) can damage parts of the ice maker and lead to
poor quality ice. If a softened water supply cannot be avoided,
make sure the water softener is operating properly and is well-
maintained.
■ If the ice in the storage bin clumps together, break up ice using
a plastic utensil and discard. Do not use anything sharp to
break up the ice. This can cause damage to the ice bin and the
dispenser mechanism.
■ Do not store anything in the ice storage bin.
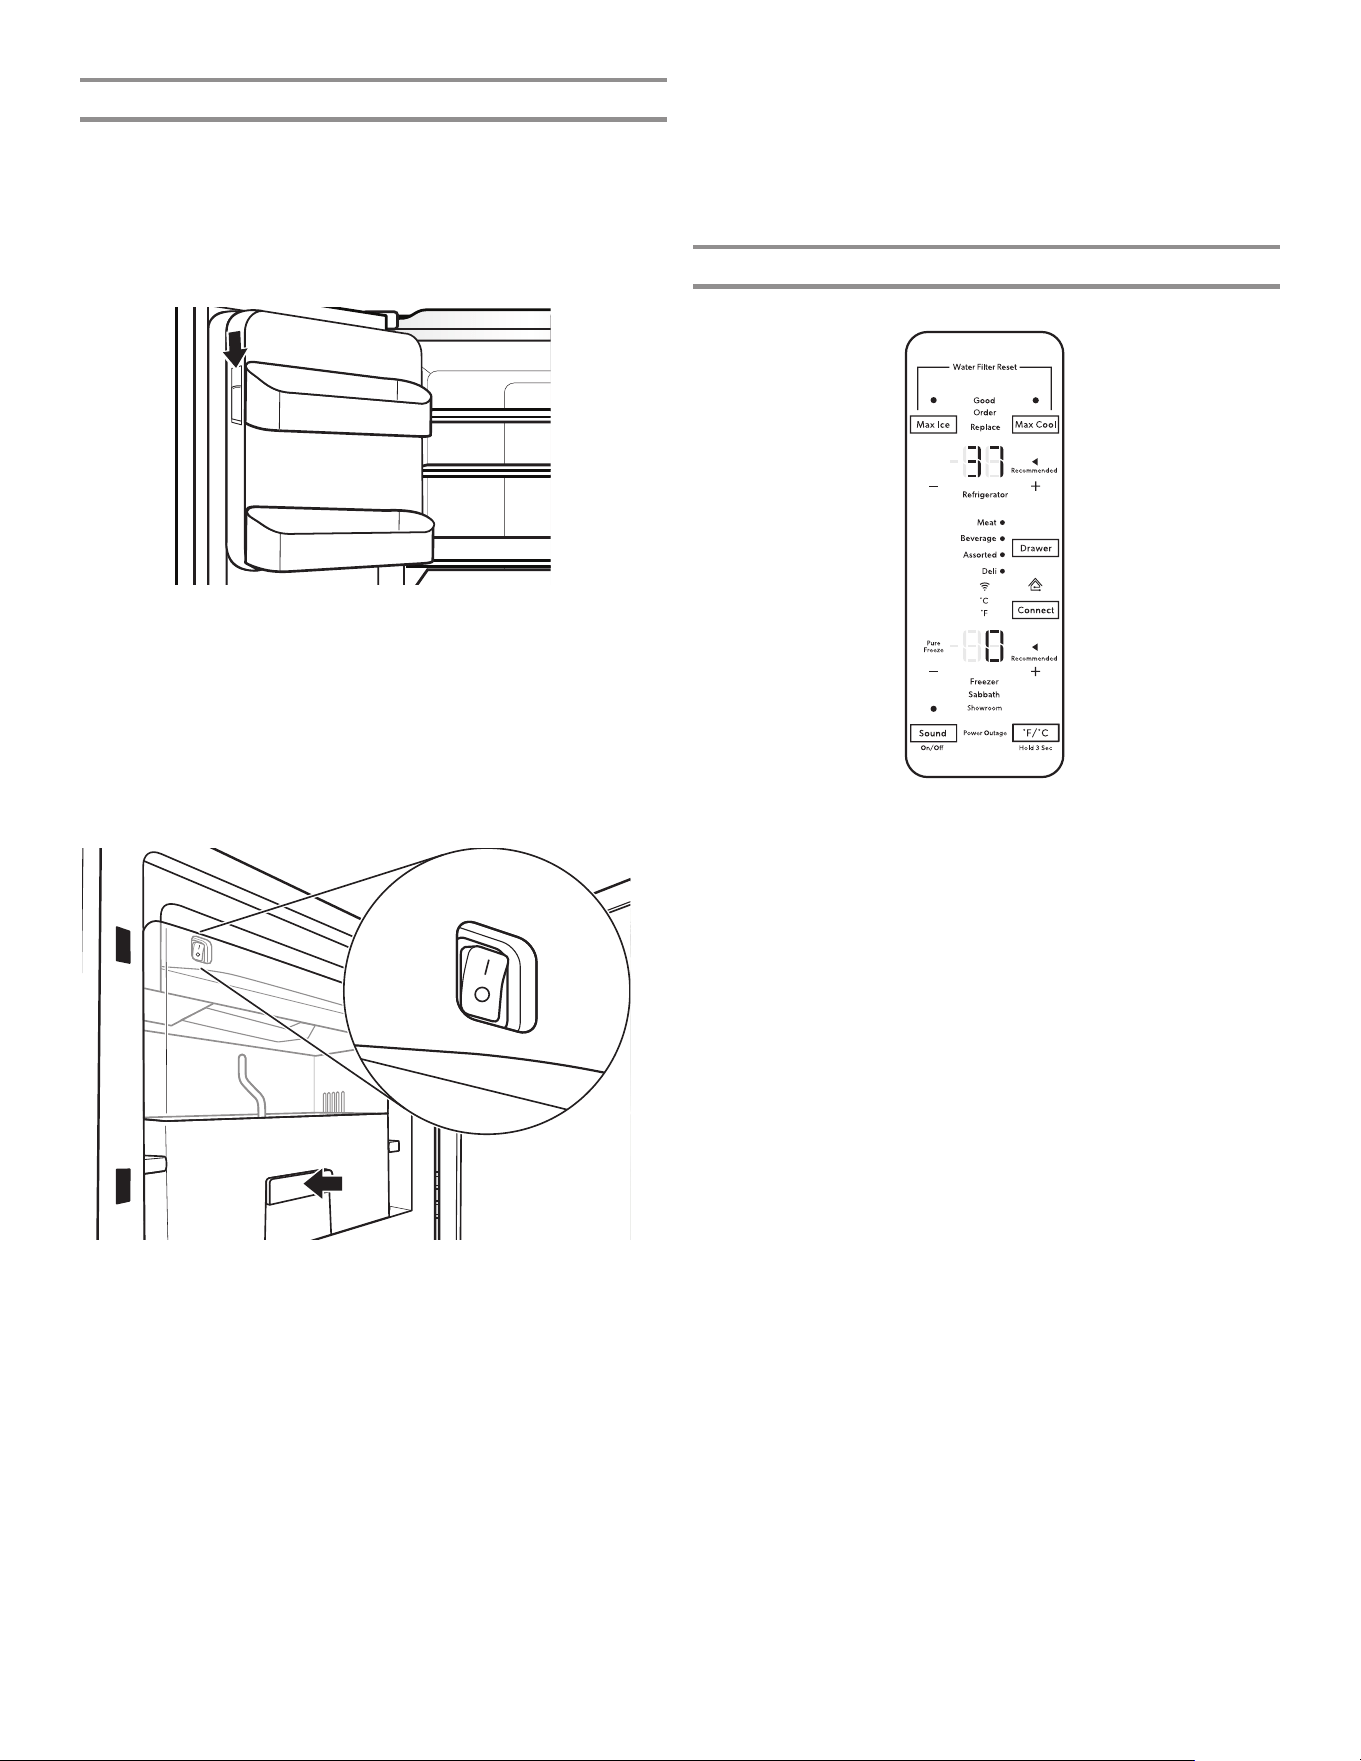
28
Style 1 - Ice Maker in the Refrigerator
The ice maker is located on the left door behind the bins. Ice
cubes are ejected into the ice storage bin located on the left-hand
refrigerator door.
Turn the Ice Maker On/Off
1. Push up on the latch on the left-hand side of the ice
compartment to open the door.
2. Turn on the ice maker by moving the switch to the On (I)
position.
NOTES:
■ To manually turn off the ice maker, move the control to the
Off (O) position.
■ Your ice maker has an automatic shutoff. The sensor will
automatically stop ice production if the storage bin is full,
if the door is open or the storage bin is removed. The
control will remain in the On (up) position.
3. Close the ice compartment door.
Remove and Replace the Ice Storage Bin
■ Remove the ice storage bin by inserting your ngers into the
hole at the base of the bin and pulling the latch to release the
bin from the compartment. Lift the storage bin up and pull it
straight out.
■ Replace the storage bin inside the ice compartment and push
down to make sure it is rmly in place.
Ice Production Rate
■ The ice maker should produce approximately 3.2 lbs (1.5 kg)
of ice per day under normal operation.
■ To increase ice production, select the “Max Ice” feature from
the control panel. The ice maker should produce approximately
4.2 lbs (1.9 kg) of ice per day. See the “Using the Controls”
section.
Style 2 - Ice Maker in the Freezer (on some models)
Turn the Ice Maker On/Off
To turn the ice maker on, touch Max Ice on the display on the
left inner door panel. The icon will blink 3 times and remains lit
in the display screen.
To manually turn the ice maker off, touch Max Ice. The display
will blink 3 times and turn off.
NOTES:
■ Your ice maker has an automatic shutoff. The sensor will
automatically stop ice production if the storage bin is full or
the door is open. The control will remain in the On position.
■ Turn off the ice maker before removing the ice storage bin
to serve ice or to clean the bin. This will keep the ice cubes
from dropping out of the ice maker and into the freezer
compartment. After replacing the ice storage bin, turn on
the ice maker.
Ice Production Rate
■ Your ice maker should produce approximately 3.5 lbs (1.6 kg)
of ice per day under normal operation.
■ To increase ice production, select the “Max Ice” feature from
the control panel. The ice maker should produce approximately
4.6 lbs (2.1 kg) of ice per day. See the “Using the Controls”
section
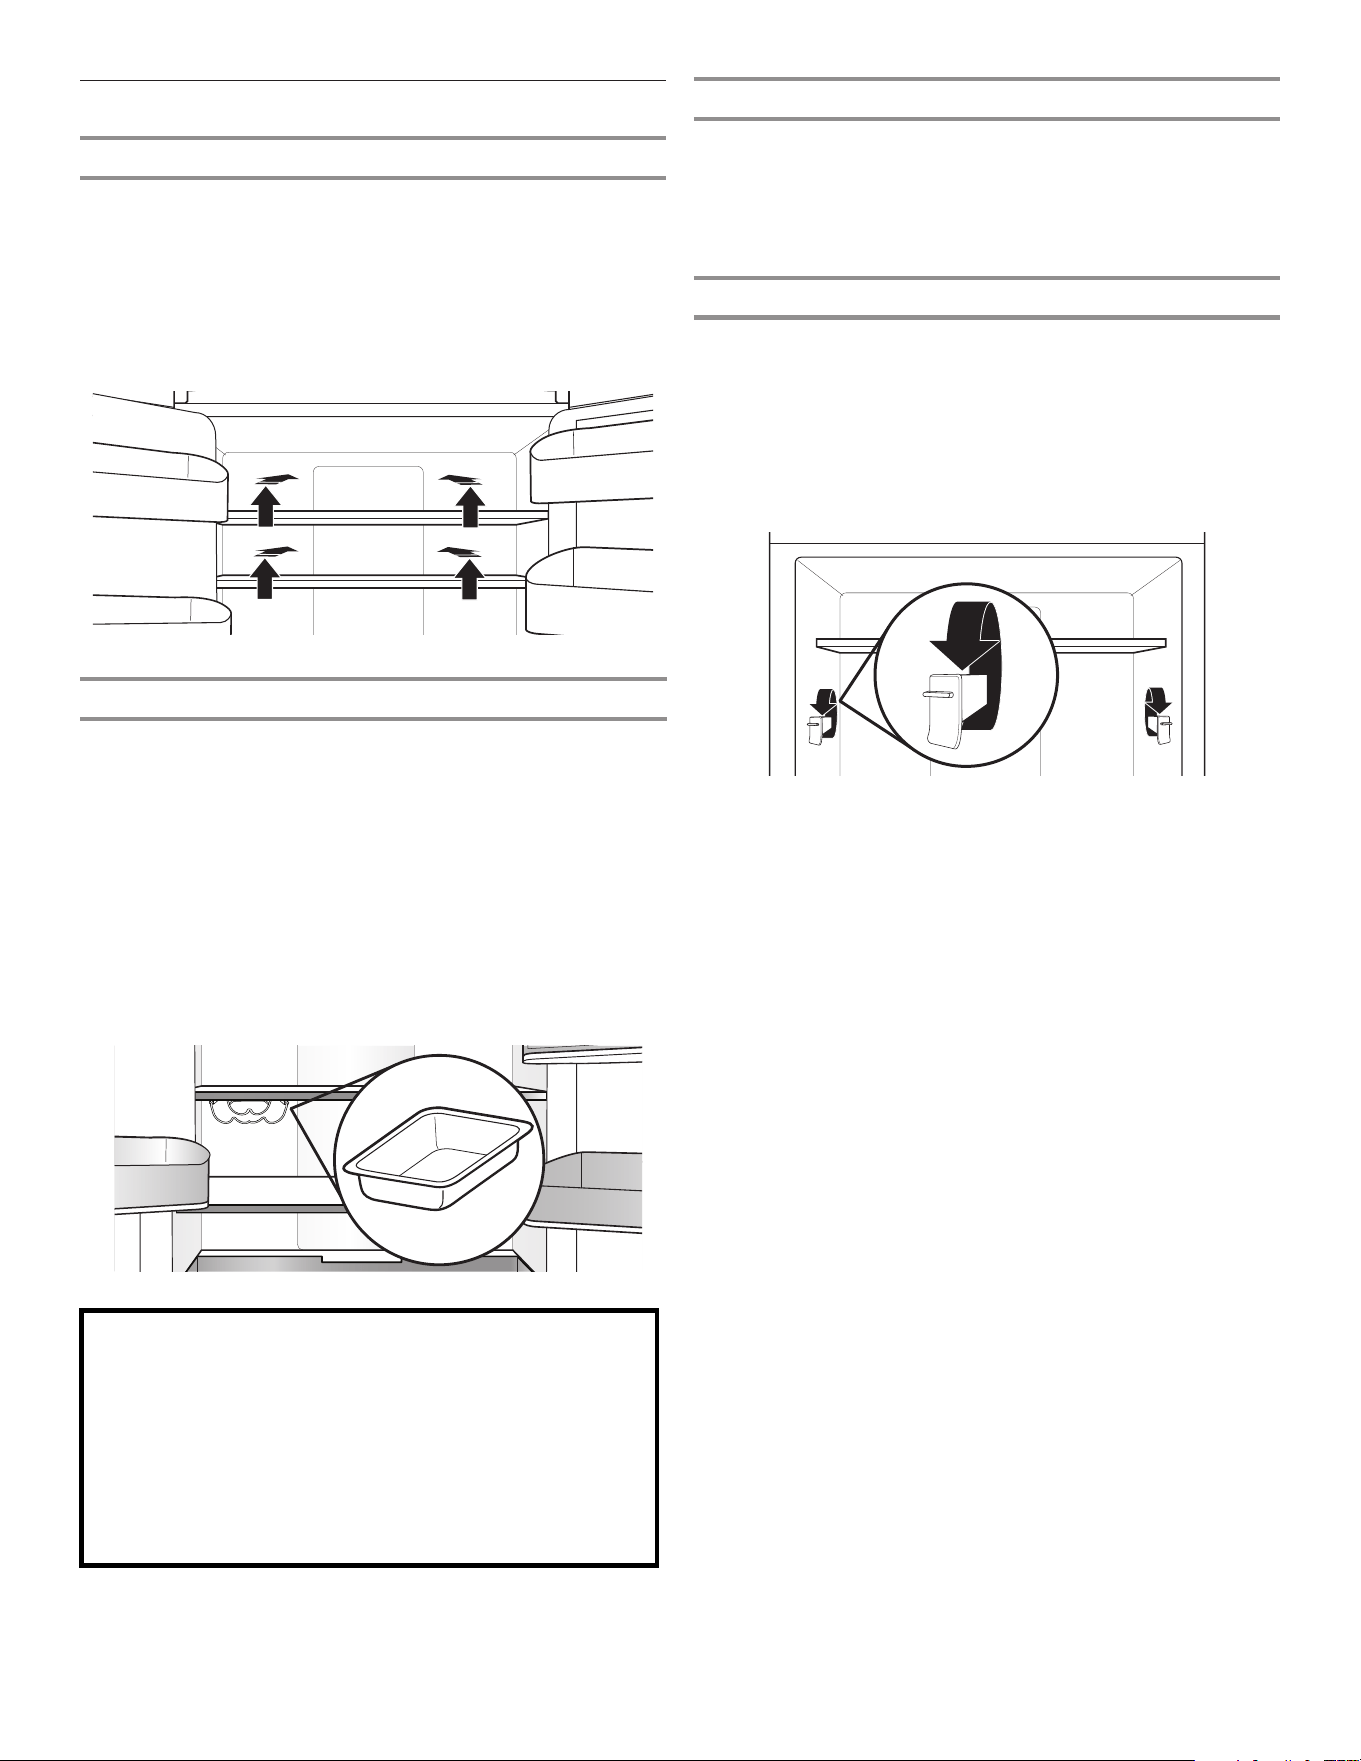
29
Shelves, Bins, and Drawers
Fold-Away Glass Shelf
Some shelves will tuck away to create room for taller objects.
Some models have 2 fold-away glass shelves.
1. To retract the front section of the shelf, push the adjustable
portion of the shelf as far back as needed toward the rear of
the refrigerator.
2. Extend the front glass and front trim of the shelf by pulling the
retracted portion of the shelf outward until it is fully extended.
Important information to know about glass shelves
and covers:
Do not clean glass shelves or covers with warm water when
they are cold. Shelves and covers may break if exposed to
sudden temperature changes or impact, such as bumping.
Tempered glass is designed to shatter into many small,
pebble-size pieces. This is normal. Glass shelves and covers
are heavy. Use both hands when removing them to avoid
dropping.
Shelves and Shelf Frames
The shelves in your refrigerator are adjustable to meet your
individual storage needs.
Storing similar food items together in your refrigerator and
adjusting the shelves to t different heights of items will make
nding the exact item you want easier. It will also reduce the
amount of time the refrigerator door is open and save energy.
Shelf Height Adjustment
Shelf height can be adjusted by changing the adjustable shelf
mounts between their vertical and horizontal positions.
1. Carefully lift the shelf off the shelf mounts and turn the ipper
to the desired orientation.
2. Repeat for remaining shelf mounts.
3. Apply pressure to the top of the shelf to ensure the shelf is
properly seated on the shelf mounts.
To remove and replace shelves:
1. Make sure adjustable shelf mounts are in the lower position
before removing shelves. Also doors will need to be open at
a 90˚ angle. If open wider, it will make it harder to remove the
shelves.
2. Remove the middle shelf or top shelf by lifting it up and out
of the shelf supports. Then pull the shelf forward and tilt down
to a vertical position. Turn the shelf at an angle and pull out of
the refrigerator.
NOTES:
■ Will need to remove middle shelf rst before removing
top shelf.
■ Innity-slide glass shelves should be pushed back in.
When tilted up, make sure glass does not slide to front.
3. Remove the bottom shelf by lifting it up and out of the
shelf supports. Then pull the shelf forward and tilt up to a
vertical position. Turn the shelf at an angle and pull out of
the refrigerator.
4. Replace the middle and top shelves by putting the shelf in
the refrigerator at an angle with the shelf front down. Lift the
front of the shelf up and in until rear shelf drops into the shelf
supports. Lower the front of the shelf and make sure that the
shelf is in position.
5. Replace the bottom shelf by putting the shelf in the
refrigerator at an angle with the shelf up. Lift the front of
the shelf down and in until rear shelf drops into the shelf
supports. Lower the front of the shelf and make sure that
the shelf is in position.
Shelves with under-shelf lighting (on some models)
By moving LED lighting to a new spot under the shelves, this
leading-edge technology improves interior refrigerator lighting
and aids in locating storage items.
Wine Rack and/or Pan
Under one shelf, there are brackets installed to the supports (one
bracket on each support). The wine rack or pan rests in these
brackets. The wine rack holds 2 bottles without taking up shelf
space.
To remove and replace the wine rack:
1. Remove the wine rack/pan by lifting it up off the brackets.
Press the right-hand side of the rack inward until it is free of
its bracket. Lower the right-hand side slightly and disengage
the left-hand side from its bracket.
2. Replace the wine rack/pan by inserting the left-hand side into
its bracket. Press inward on the right-hand side until it will
slide past the bracket edge and set it into its bracket.
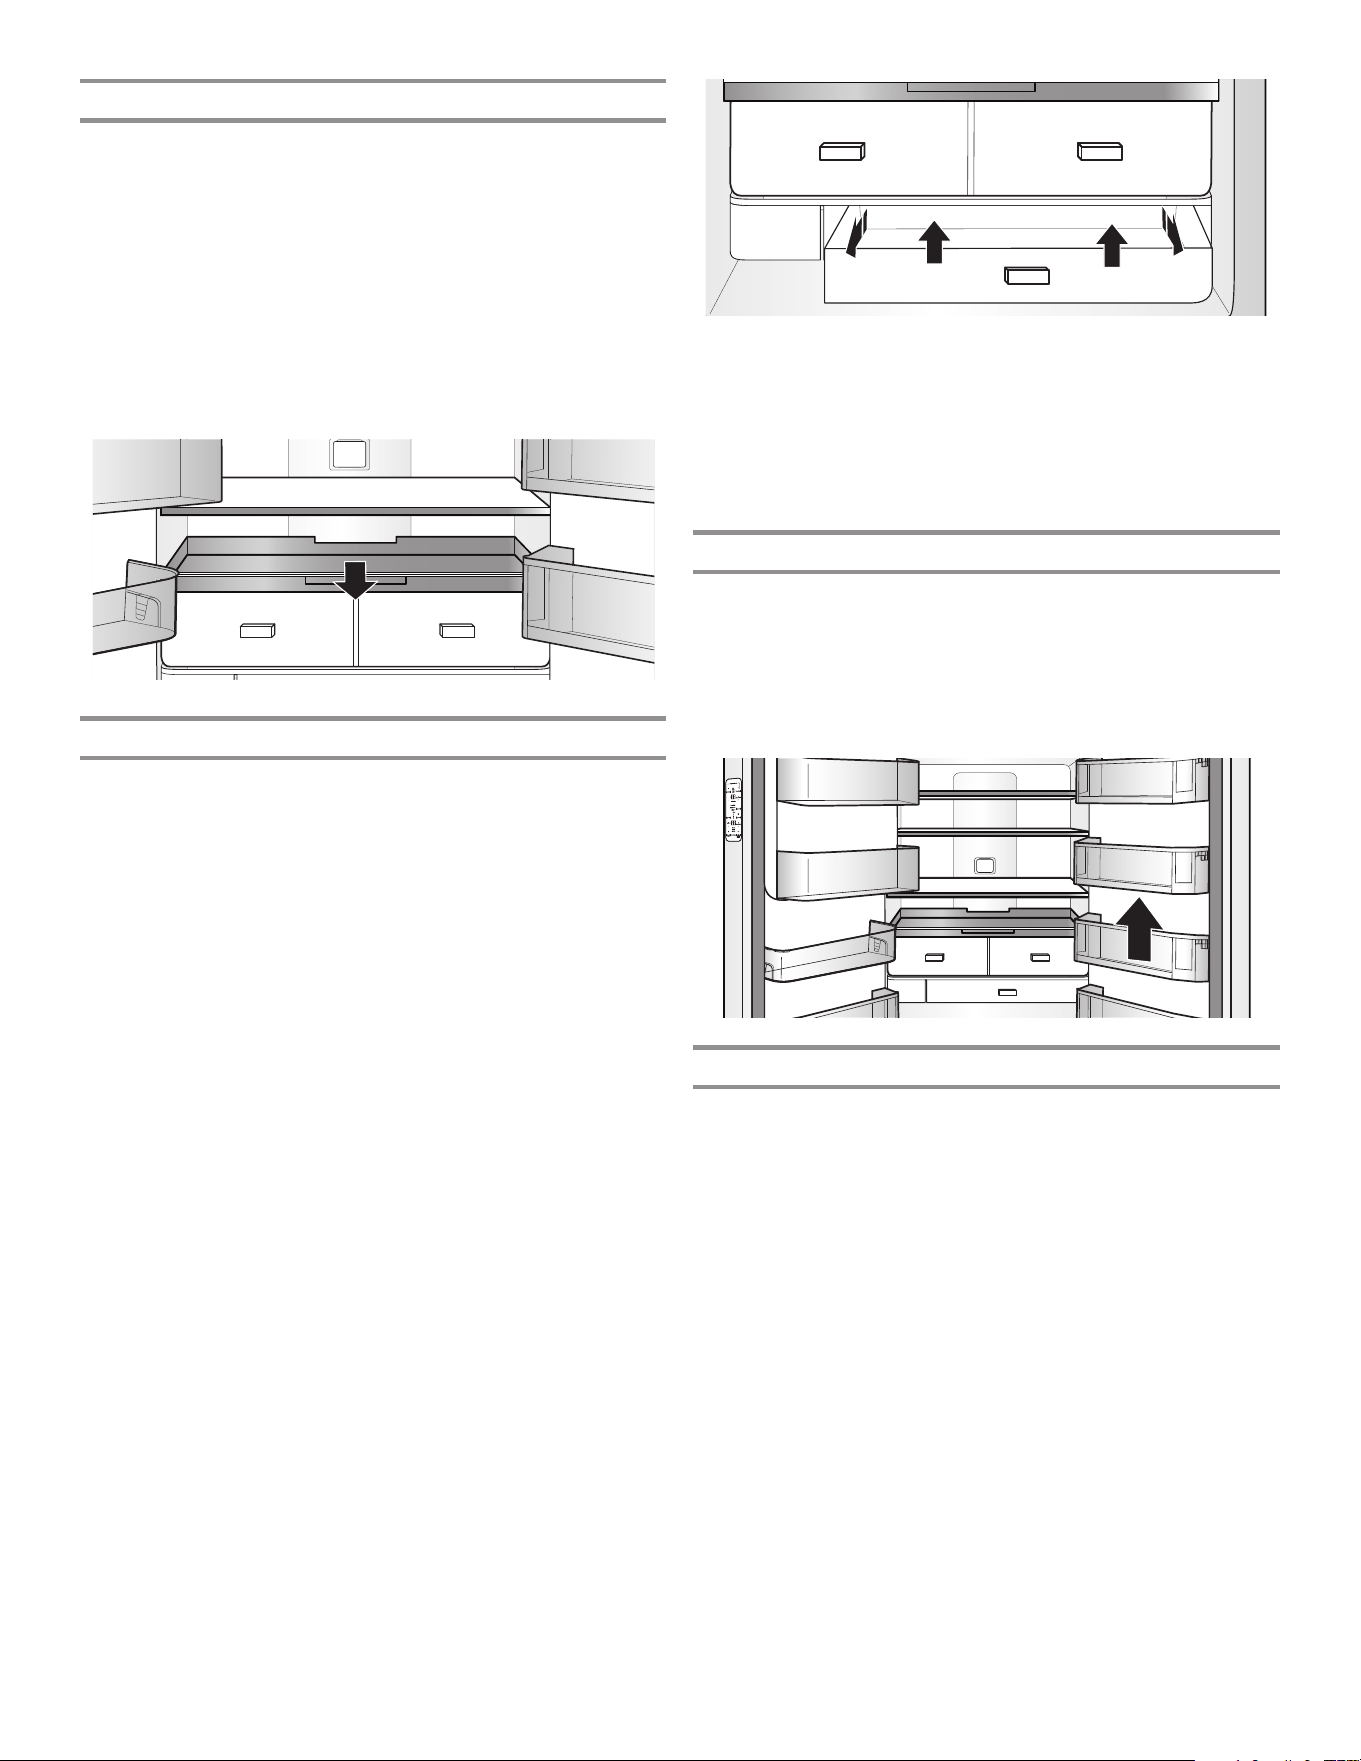
30
Pull-Out Platter
To remove and replace Pull-Out Platter:
NOTE: Refrigerator doors will need to be removed to remove
platter pocket. See the “Remove and Replace Refrigerator Doors”
section for more information.
1. Pull the pull-out platter to the fully open position or when
it stops.
2. Locate the pull-out platter retention clips on both sides.
These are in the side under the pull-out platter.
3. Push the clip up from the bottom with your nger.
4. After both clips have been disengaged, carefully remove
the pull-out platter toward the front of the refrigerator.
Humidiseal™ Crisper Drawers
To remove and replace the drawers:
1. Grasp the handle at the bottom of the drawer and slide the
drawer straight out to the stop. Lift the drawer off the bottom
guide.
2. Replace the drawer by placing it on the bottom drawer guide
and pushing it past the drawer stop into position.
To remove the crispers cover (can remove only if pull-out
platter is removed rst):
1. Remove the pull-out platter rst.
2. Holding the glass insert rmly with one hand, press up in
center of glass insert until it rises above the plastic frame.
Gently slide the glass insert forward to remove.
To replace crisper(s) cover:
1. Remove the crisper pan, pull-out platter, and crisper glass
before removing the crisper.
2. Fit back of cover frame into supports on side walls of the
refrigerator and lower the front of the cover frame into place.
3. Slide rear of glass insert into cover frame and lower front into
place.
Refrigerator Door Bins
The bins on your refrigerator door are adjustable to meet your
individual storage needs. The gallon-sized bins make it easy to
customize door storage to hold gallon containers.
Door Bin Divider (on some models)
This divider ts in the door bin to divide the bin and elevate
smaller items at the back of the bin.
Herb Tender
®
Container
A container to store herbs and the water to keep them fresh
is located within the herb bin. For your convenience, you can
reposition the Herb Tender
®
container anywhere in the bin.
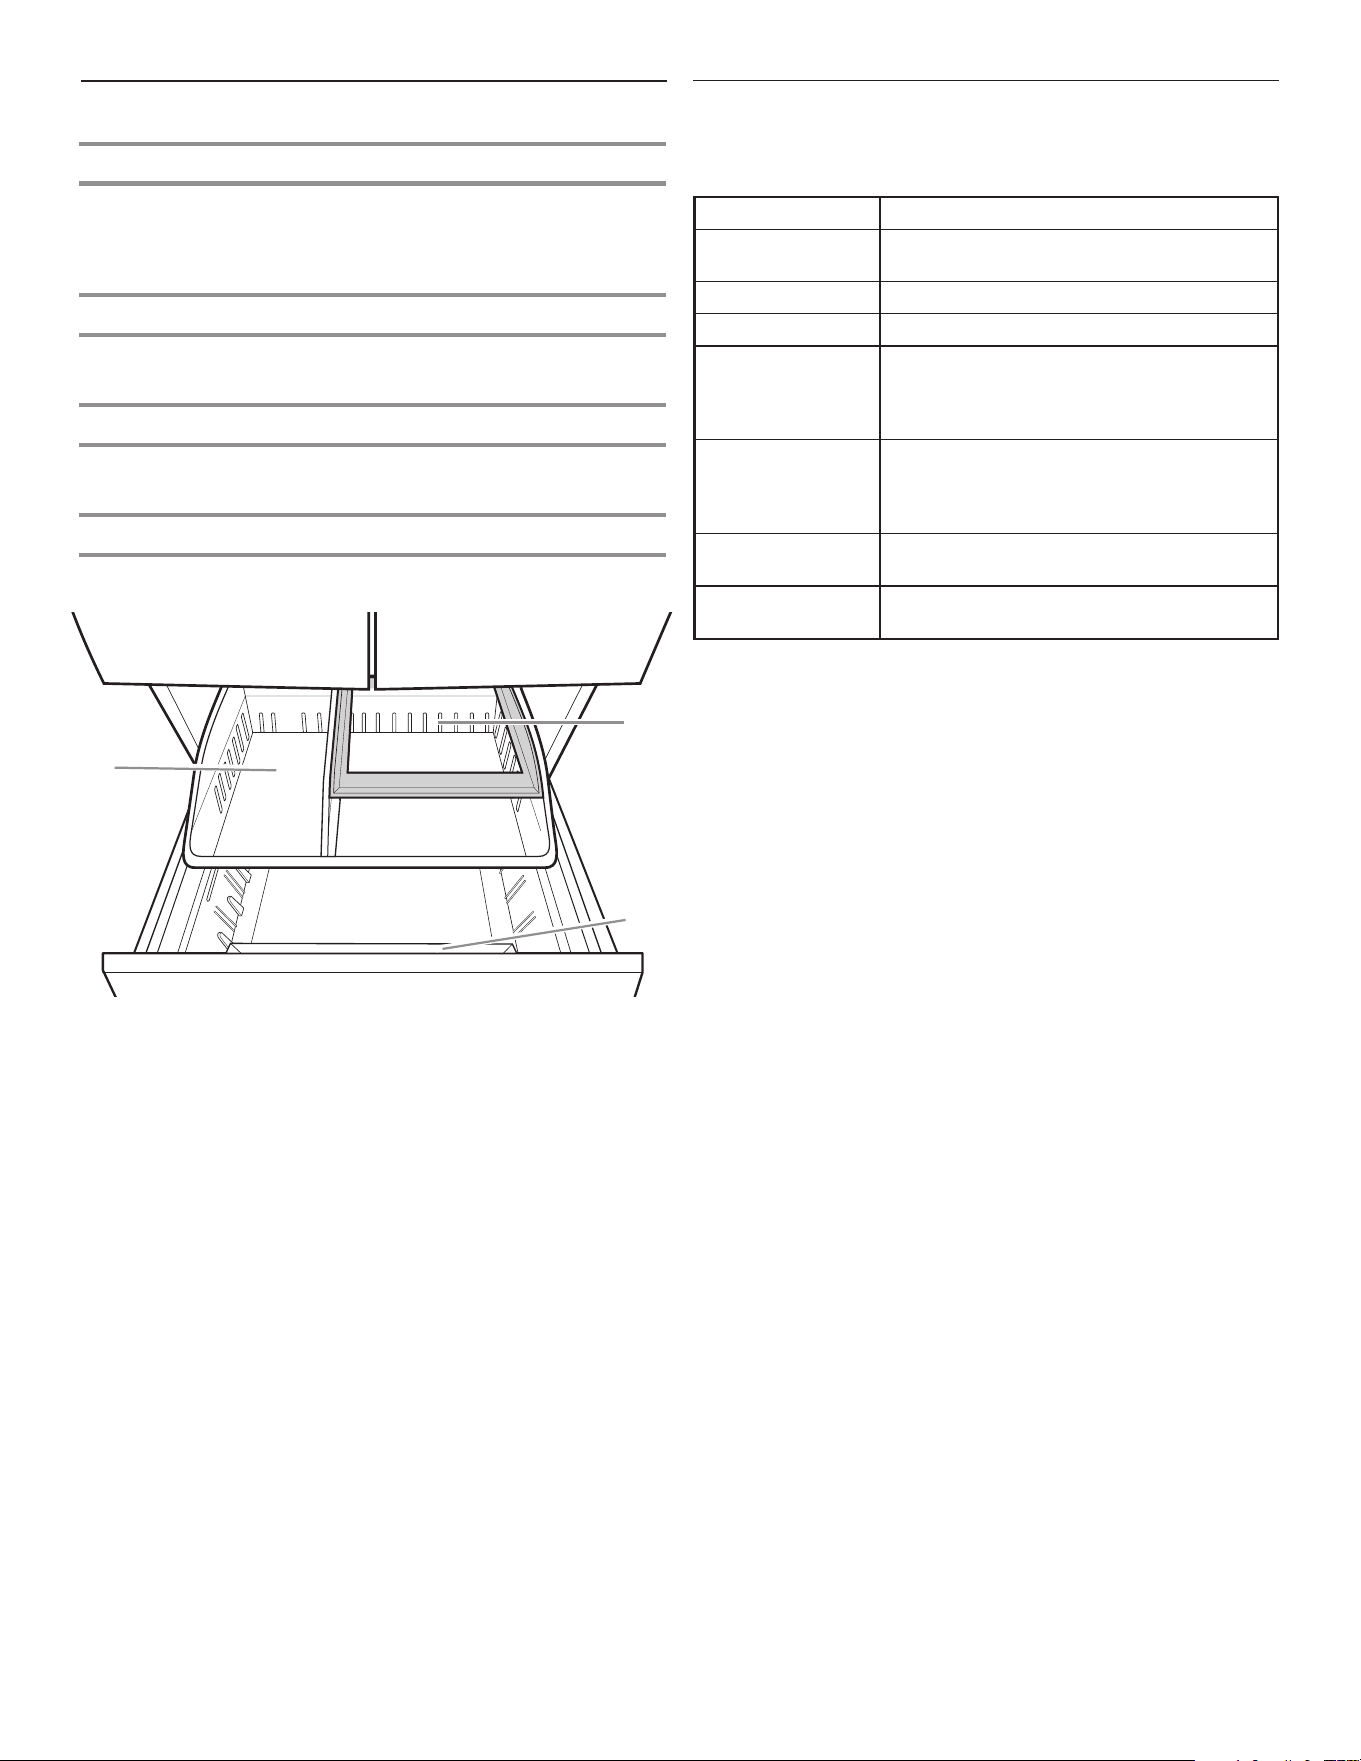
31
Freezer Drawers
Small Items Bin (on some models)
This drawer divider is not removable and is for small, delicate
items. For storage exibility, the drawer bin can move forward
and back, allowing you to store larger items in one section of
the freezer.
Pizza Pocket
Space at the front of the drawer allows vertical storage of
additional pizza boxes.
Third Tier
This shelf is not removable. To allow access, the third tier is able
to move backward, allowing reach to items in the area below.
Ice Bin (on some models)
Ice storage for second ice maker
A. Pizza pocket
B. Third tier
C. Ice bin (not shown)
Audio Reference
Tone Assignment
Tone Name Usage Examples
POWER ON Cooling system is turned on every time the
product is powered on.
POWER OFF Cooling system is turned off.
KEY PRESS User presses a valid button.
INVALID (ERROR) User presses 2 or more valid buttons at
the same time. Count-down interruption
for press-and-hold buttons. User presses
pad when dispensing is not allowed.
ENGAGE UI is locked. Max Ice is turned on.
Measured Fill dispensing complete.
Smart Grid is turned on when Wi-Fi
connection is initiated by user.
DISENGAGE UI is unlocked. Max Ice is turned off.
Dispensing has timed out.
ALERT Wi-Fi alert, Door Ajar alert, or Wi-Fi
connection is lost for 12 hours.
This table is for quick reference only. See corresponding sections
for details. In case of inconsistency, section details will prevail.
B
A
C
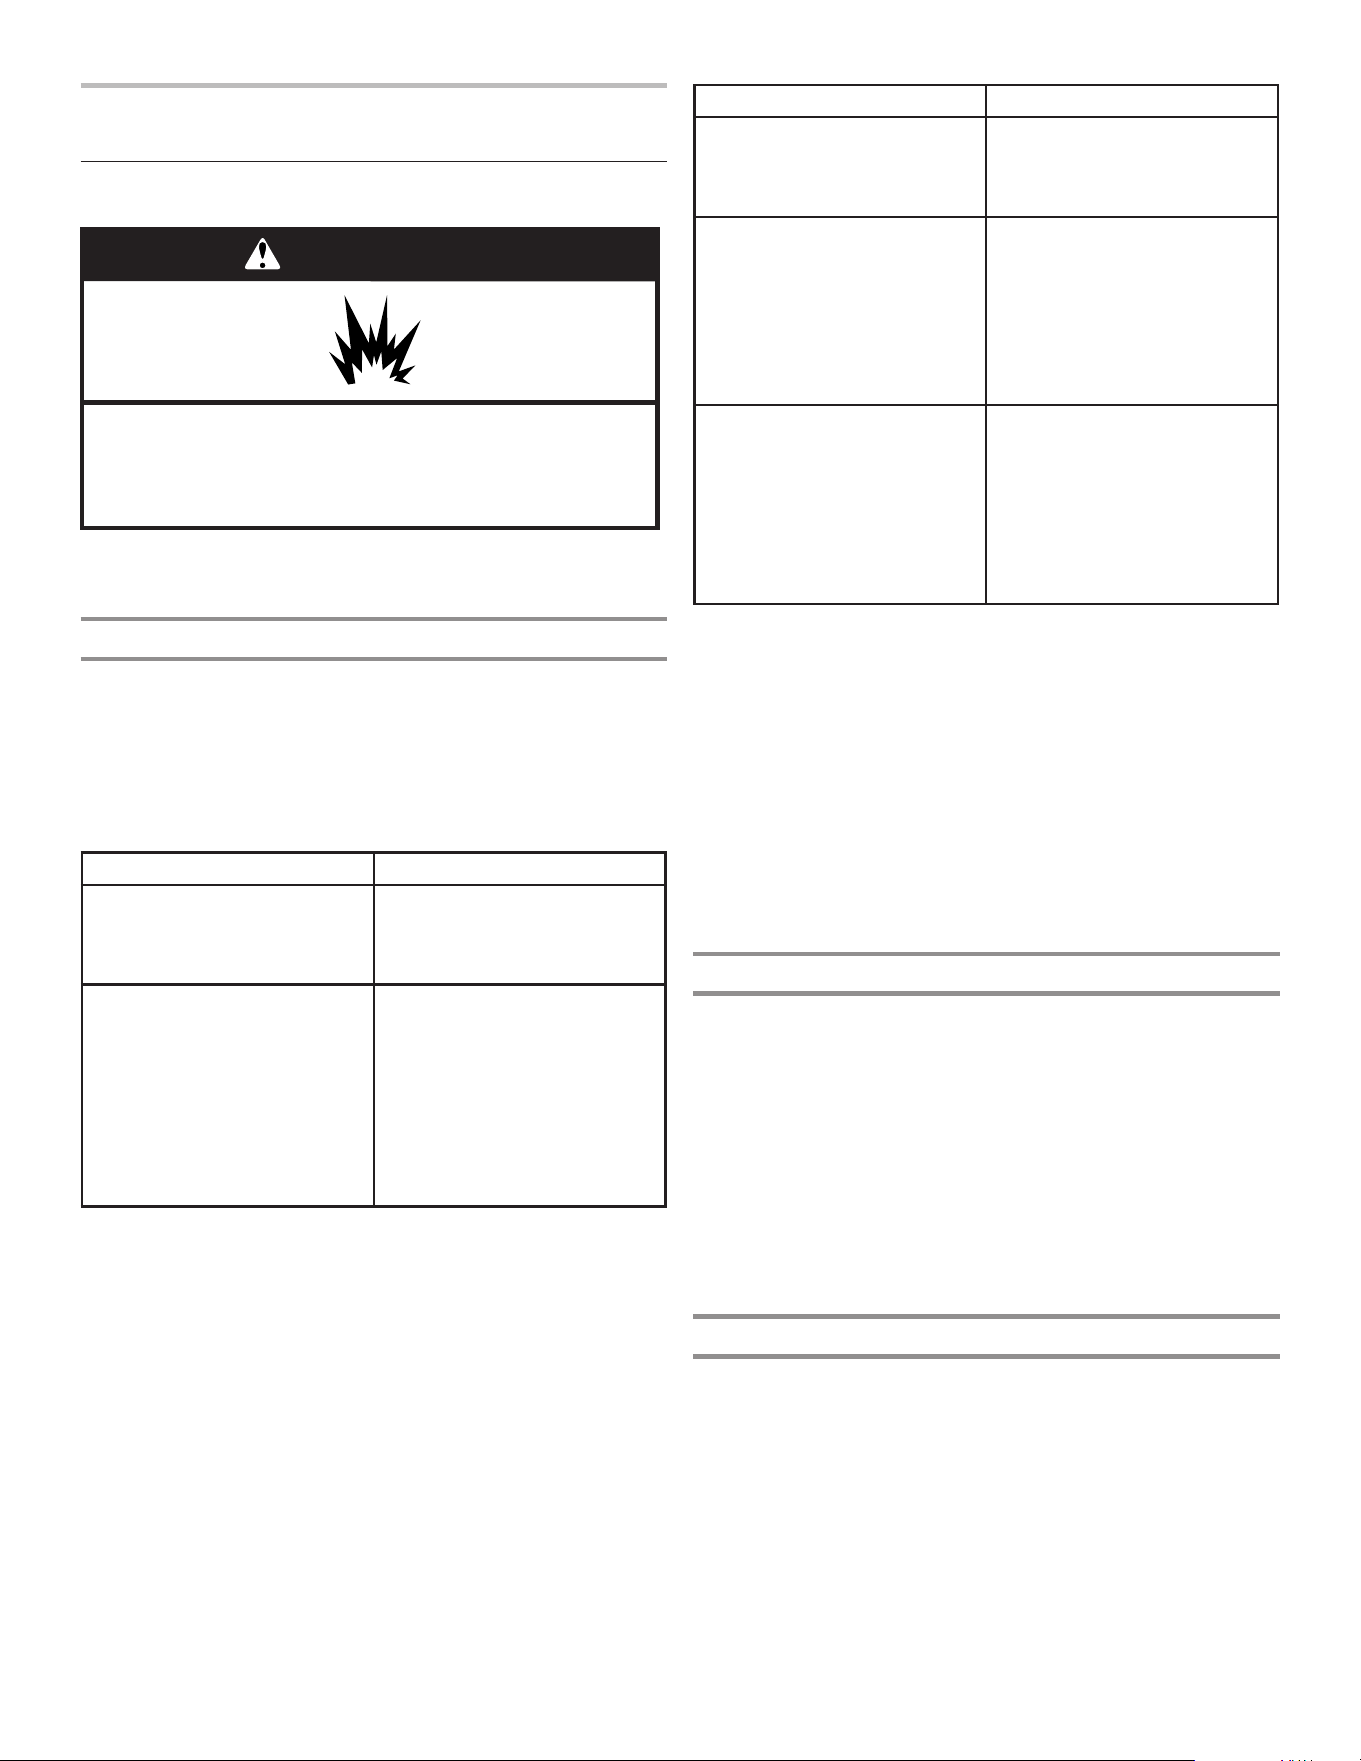
32
REFRIGERATOR CARE
Cleaning
WARNING
Explosion Hazard
Use nonflammable cleaner.
Failure to do so can result in death, explosion, or fire.
Both the refrigerator and freezer sections defrost automatically.
However, clean both sections about once a month to avoid
buildup of odors. Wipe up spills immediately.
Exterior Cleaning
Please see the exterior cleaning information specic to your
model.
Style 1 - Smooth Door
IMPORTANT: Damage to smooth nish due to improper use of
cleaning products or using non-recommended cleaning products
is not covered under the warranty. Sharp or blunt instruments will
mar the nish.
DO USE DO NOT USE
✔ Soft, clean cloth ✘ Abrasive cloths
✘ Paper towels or newsprint
✘ Steel-wool pads
✔ Warm, soapy water
with a mild detergent
✘ Abrasive powders or liquids
✘ Window sprays
✘ Ammonia
✘ Acidic or vinegar-based
cleaners
✘ Oven cleaners
✘ Flammable uids
NOTE: Paper towels scratch and may dull the clear coat of the
painted door. To avoid possible damage, use only soft, clean
cloths to polish and wipe the door.
Style 2 - Stainless Steel
IMPORTANT:
■ Use recommended stainless steel cleaners and cloths
only. Damage to stainless steel nish due to improper use
of cleaning products or using non-recommended cleaning
products is not covered under the warranty.
■ Avoid exposing stainless steel appliances to caustic or
corrosive elements such as high-salt, high-moisture or
high-humidity environments. Damage due to exposure
to these elements is not covered under the warranty.
DO USE DO NOT USE
✔ Soft, clean cloth ✘ Abrasive cloths
✘ Paper towels or newsprint
✘ Steel-wool pads
✔ Warm, soapy water
with a mild detergent
✘ Abrasive powders or liquids
✘ Ammonia
✘ Citrus-based cleaners
✘ Acidic or vinegar-based
cleaners
✘ Oven cleaners
✔ For heavy soil, use ONLY
a stainless steel cleaner
designed for appliances. To
order the cleaner, see the
“Accessories” section.
✘ Stainless steel cleaner is for
stainless steel parts only! Do
not allow the stainless steel
cleaner and polish to come
into contact with any plastic
parts such as the trim
pieces, dispenser covers,
or door gaskets.
NOTES:
■ If unintentional contact does occur, clean plastic part with a
sponge and mild detergent in warm water. Dry thoroughly with
a soft cloth.
■ Just because a cleaner is a liquid does not mean it is
nonabrasive. Many liquid cleansers formulated to be gentle
on tile and smooth surfaces still damage stainless steel.
■ Citric acid permanently discolors stainless steel. To avoid
damaging the nish of your stainless steel refrigerator:
Do not allow these substances to remain on the nish:
✘ Mustard ✘ Citrus-based sauces
✘ Tomato juice ✘ Citrus-based products
✘ Marinara sauce
Interior Cleaning
IMPORTANT: Refrigerator shelves with under-shelf, LED lighting
are not dishwasher safe.
1. Unplug refrigerator or disconnect power.
2. Hand wash, rinse, and dry removable parts and interior
surfaces thoroughly. Use a clean sponge or soft cloth and
a mild detergent in warm water.
NOTE: Do not use abrasive or harsh cleaners such as window
sprays, scouring cleansers, ammable uids, cleaning waxes,
concentrated detergents, bleaches, or cleansers containing
petroleum products on plastic parts, interior and door liners,
or gaskets.
3. Plug in refrigerator or reconnect power.
Condenser Cleaning
There is no need for routine condenser cleaning in normal
home operating environments. If the environment is particularly
greasy or dusty or there is signicant pet trafc in the home, the
condenser should be cleaned every 6 months to ensure maximum
efciency.
If you need to clean the condenser, please call for service.

33
Lights
The lights in both the refrigerator and freezer compartments
are LEDs which do not need to be replaced. If the lights do not
illuminate when the door or drawer is opened, call for assistance
or service. In the U.S.A., call 1-800-253-1301. In Canada, call
1-800-807-6777.
Vacation and Moving Care
Vacations
If You Choose to Leave the Refrigerator On While You’re
Away:
1. Use up any perishables and freeze other items.
2. If your refrigerator has an automatic ice maker and is
connected to the household water supply, turn off the water
supply to the refrigerator. Property damage can occur if the
water supply is not turned off.
3. If you have an automatic ice maker, turn off the ice maker.
■ Press the switch to OFF for the door ice maker.
4. Empty the ice bin.
If You Choose to Turn Off the Refrigerator Before You Leave:
NOTE: Put refrigerator in Showroom mode while on vacation.
See the “Using the Controls” section.
1. Remove all food from the refrigerator.
2. If your refrigerator has an automatic ice maker:
■ Turn off the water supply to the ice maker at least one day
ahead of time.
■ When the last load of ice drops, press the switch to OFF
for display to be unlit on the top inside of the refrigerator,
depending on your model.
3. Empty the ice bin.
4. Turn off the Temperature controls. See the “Using the
Controls” section.
5. Clean refrigerator, wipe it, and dry well.
6. Tape rubber or wood blocks to the tops of both doors to prop
them open far enough for air to get in. This stops odor and
mold from building up.
Moving
When you are moving your refrigerator to a new home, follow
these steps to prepare it for the move.
1. If your refrigerator has an automatic ice maker:
■ Turn off the water supply to the ice maker at least 1 day
ahead of time.
■ Disconnect the water line from the back of the refrigerator.
■ When the last load of ice drops, press the switch to OFF
either on the ice maker or the control, depending on your
model.
2. Remove all food from the refrigerator and pack all frozen food
in dry ice.
3. Empty the ice bin.
4. Unplug refrigerator.
5. Clean, wipe, and dry thoroughly.
6. Take out all removable parts, wrap them well, and tape them
together so they don’t shift and rattle during the move.
7. Depending on the model, raise the front of the refrigerator so
it rolls more easily OR raise the leveling screws so they don’t
scrape the oor. See the “Adjust the Doors” or “Refrigerator
Leveling and Door Closing” sections.
8. Tape the doors closed and tape the power cord to the back of
the refrigerator.
When you get to your new home, put everything back and refer to
the “Installation Instructions” section for preparation instructions.
Also, if your refrigerator has an automatic ice maker, remember to
reconnect the water supply to the refrigerator.
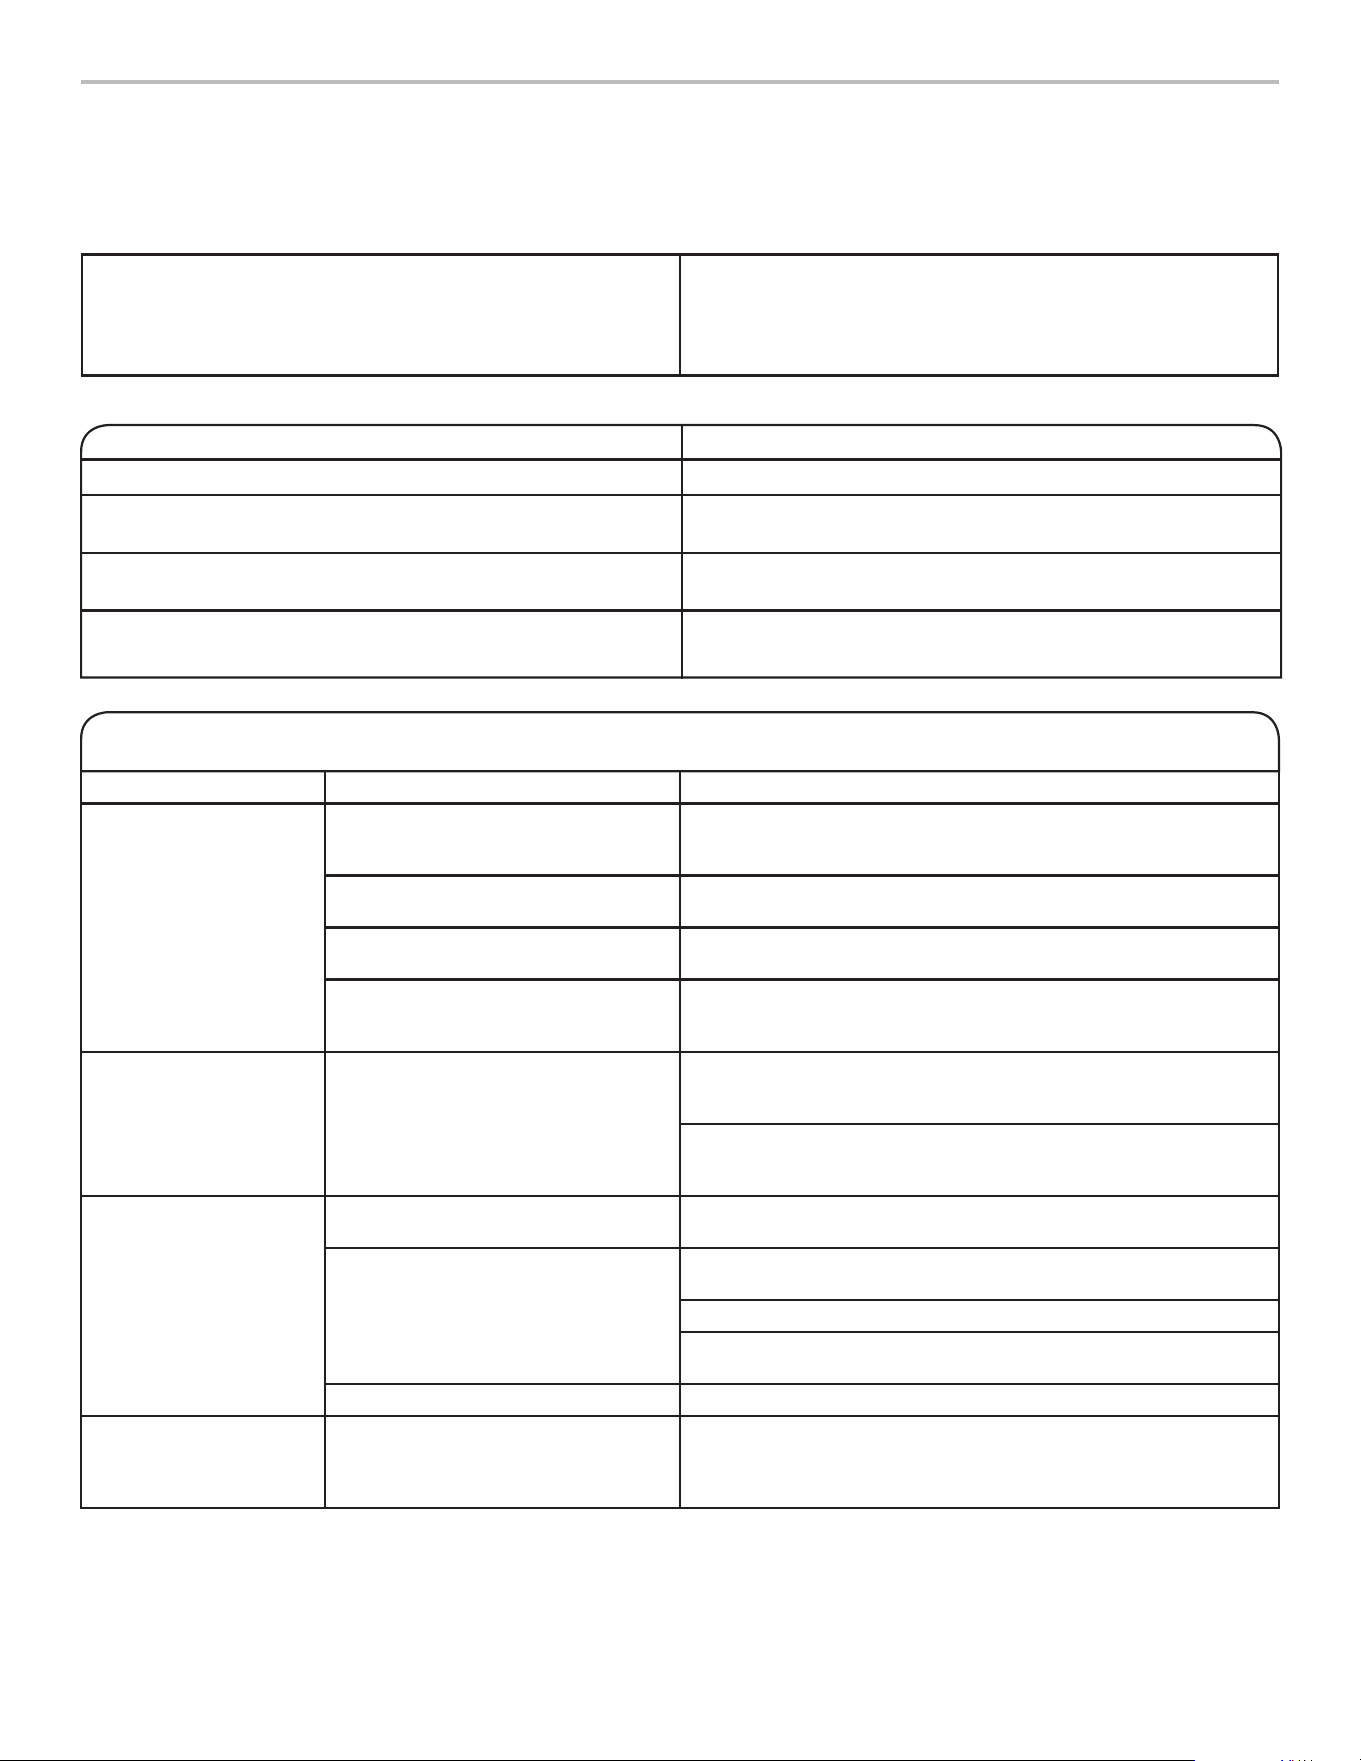
34
TROUBLESHOOTING—CONNECTED MODELS
First try the solutions suggested here. If you need further assistance or more recommendations that may help you avoid a service
call, refer to the warranty page in this manual, visit www.jennair.com/connect or call 1-877-559-2603. In Canada, visit
www.jennair.ca/fr/connect.
Contact us by mail with any questions or concerns at the address below:
In the U.S.A.:
JennAir Brand Home Appliances
Customer eXperience Center
553 Benson Road
Benton Harbor, MI 49022-2692
In Canada:
JennAir Brand Home Appliances
Customer eXperience Centre
200 – 6750 Century Ave.
Mississauga, Ontario L5N 0B7
Please include a daytime phone number in your correspondence.
First try the solutions suggested here or visit our website at www.jennair.com/connect.
If you experience Possible Causes Solution
Refrigerator is not
connected to home
Wi-Fi router. (Wi-Fi icon
is OFF.)
The refrigerator may be in Standby
mode.
Touch and hold Connect button together for 3 seconds to see
the Wi-Fi icon blinking, then lights are ON solid. All indicator
lights are OFF when in Standby mode.
The refrigerator has never been
connected to the home Wi-Fi router.
See the “Connectivity Setup” section.
Lost connection to home Wi-Fi router Check whether the router is ON and working with other
computers or devices in the home (able to access the Internet).
Weak signal strength or signal
interference between the refrigerator
and router
Try to place the wireless router closer to the refrigerator.
It may be necessary to install a Wi-Fi range extender.
Wi-Fi icon does not light
at all after touching and
holding CONNECT.
Something may be wrong with the
refrigerator.
Unplug or disconnect refrigerator power for 30 seconds.
Return power. Repeat Wi-Fi connecting process.
Verify that the refrigerator operates correctly, except for
not being able to connect. Call for possible additional
troubleshooting.
Refrigerator is connected
to home Wi-Fi router, but
JennAir
®
app does not
work.
Connection to the JennAir
®
app may
be unavailable.
Check Internet.
User account has not been properly
set up or the refrigerator has not
been registered in an account.
See the “Connectivity Setup” section or the JennAir
®
app directly
for account setup and refrigerator registration instructions.
Verify that the refrigerator is paired with your account in the app.
Verify correct email address, mobile number, and notication
preferences.
Router is not connected to Internet. Check other devices connected to Internet through same router.
No connection of
refrigerator after
several attempts.
Wi-Fi disconnected Touch and hold Connect button for 3 seconds to enable Wi-Fi.
Power off service breaker for 30 or more seconds, power back
on, and then use alternate set-up instructions available at
www.jennair.com/connect.
Connection Status Control Panel Indicator Lights
Refrigerator is not connected. Wi-Fi icon is OFF.
Refrigerator is attempting to connect to home Wi-Fi icon is blinking slowly.
Wi-Fi router.
Refrigerator is connected to home Wi-Fi router, but Wi-Fi icon is ON.
JennAir
®
app or Smart Grid functions do not work.
Refrigerator is connected to home Wi-Fi router and the Wi-Fi icon is ON.
JennAir
®
app works.
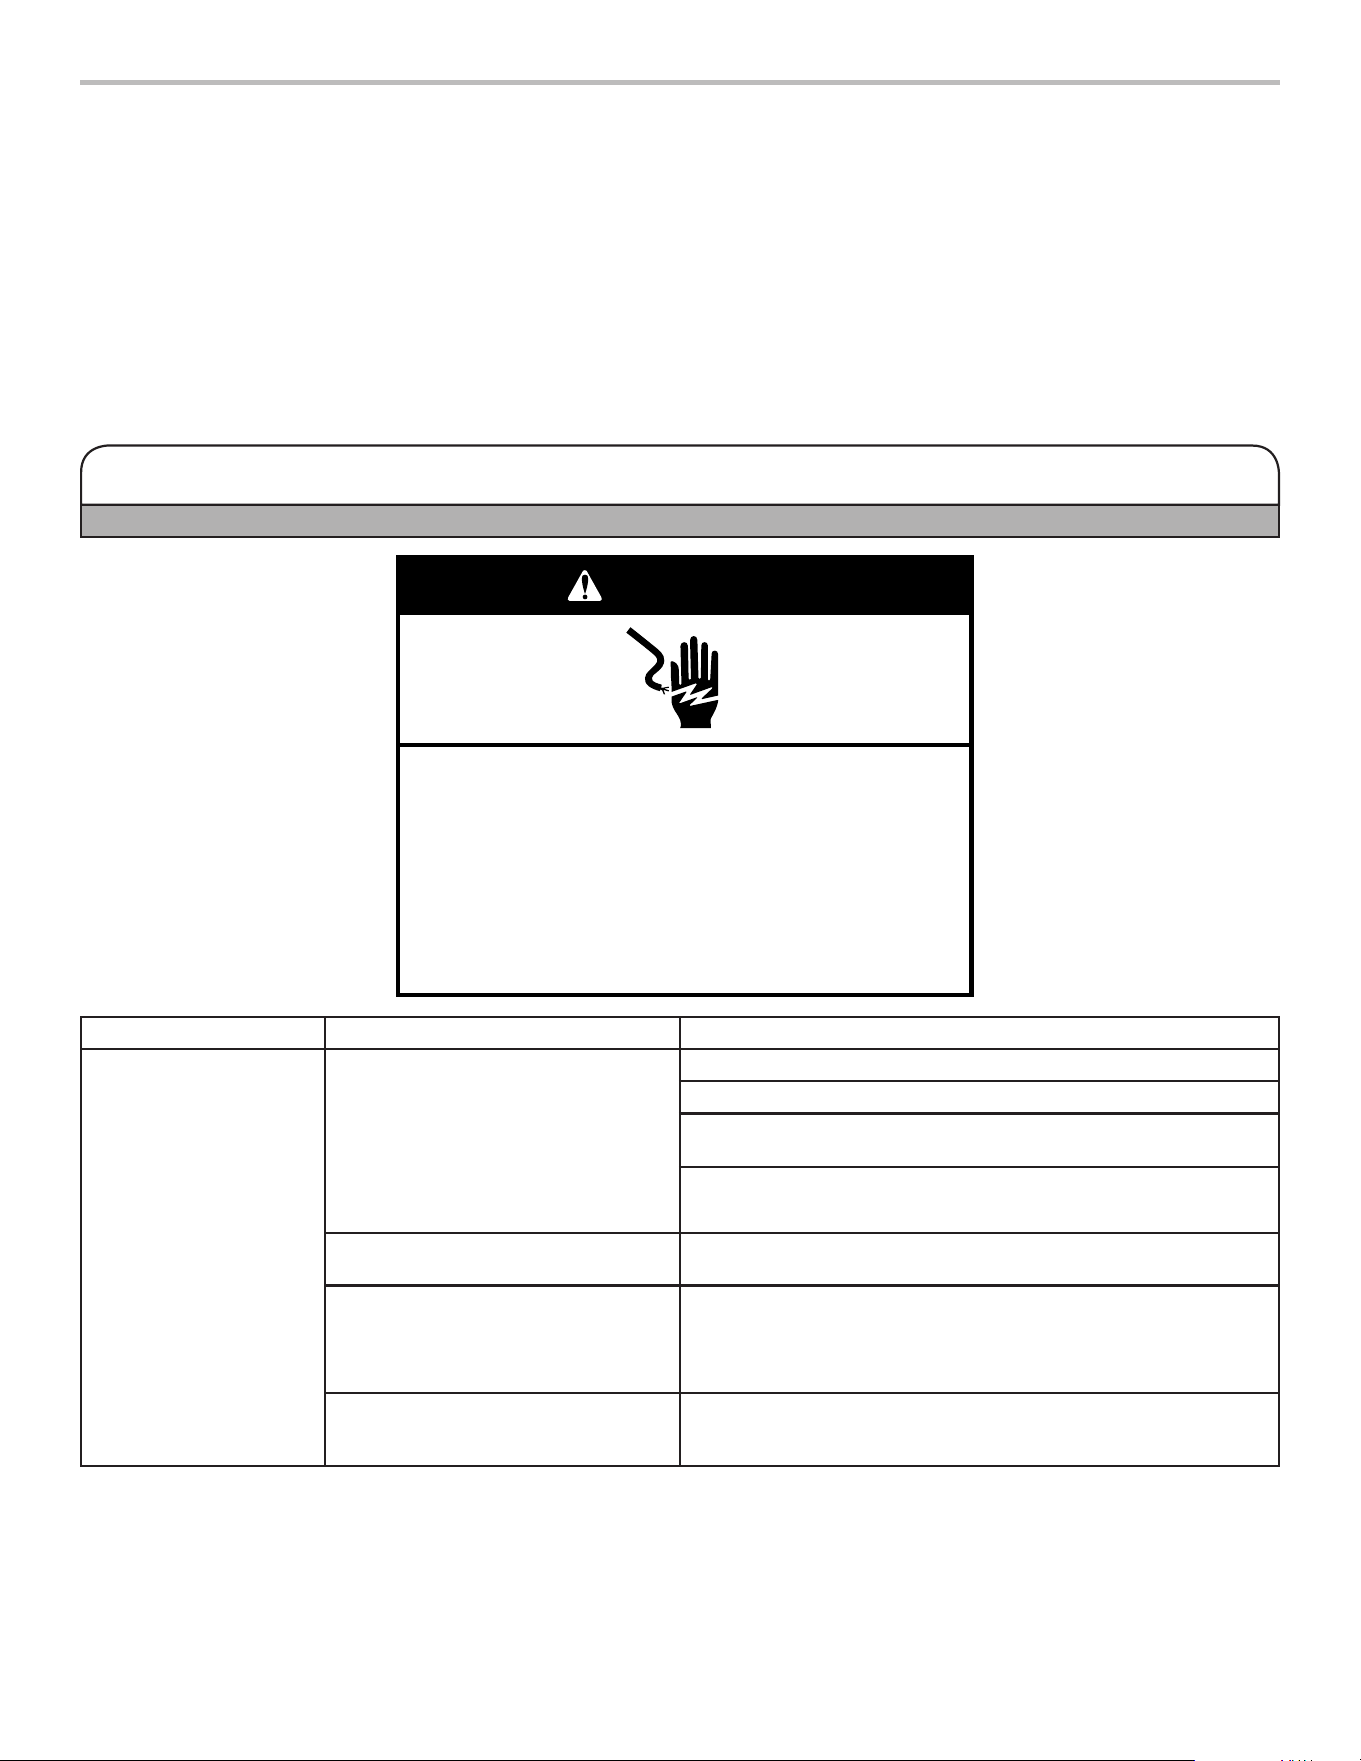
35
Refrigerator Operation
First try the solutions suggested here or visit our website at www.jennair.custhelp.com.
Electrical Shock Hazard
Plug into a grounded 3 prong outlet.
Do not remove ground prong.
Do not use an adapter.
Do not use an extension cord.
Failure to follow these instructions can result in death,
fire, or electrical shock.
WARNING
If you experience Possible Causes Solution
The refrigerator will not
operate.
Check electrical supply. Plug the power cord into a grounded 3 prong outlet.
Do not use an extension cord.
Make sure there is power to the outlet. Plug in a lamp to see if the
outlet is working.
Reset a tripped circuit breaker. Replace any blown fuses.
NOTE: If problems continue, contact an electrician.
Check controls. Make sure the controls are turned on. See the “Using the
Controls” section.
New installation Allow 24 hours following installation for the refrigerator to cool
completely.
NOTE: Adjusting the temperature controls to the coldest setting
will not cool either compartment more quickly.
Refrigerator control is in Showroom
mode (on some models).
If the refrigerator is in Showroom mode, cooling is turned off and
“Showroom” will be illuminated on the control panel. See the
“Using the Controls” section for more information.
TROUBLESHOOTING
First try the solutions suggested here. If you need further assistance or more recommendations that may help you avoid a service
call, refer to the warranty page in this manual, visit www.jennair.custhelp.com or call 1-800-253-1301. In Canada, visit
www.jennair.ca.
Contact us by mail with any questions or concerns at the address below:
In the U.S.A.:
JennAir Brand Home Appliances
Customer eXperience Center
553 Benson Road
Benton Harbor, MI 49022-2692
In Canada:
JennAir Brand Home Appliances
Customer eXperience Centre
200 – 6750 Century Ave.
Mississauga, Ontario L5N 0B7
Please include a daytime phone number in your correspondence.
36
If you experience Possible Causes Solution
Refrigerator Operation (cont.)
The motor seems to run
too much.
High-efciency compressor and fans Larger, more efcient refrigerators run longer at lower, more
energy-efcient speeds.
The room or outdoor temperature
is hot.
It is normal for the refrigerator to work longer under these
conditions. For optimum performance, place the refrigerator in an
indoor, temperature-controlled environment. See the “Location
Requirements” section.
A large amount of warm food has
been recently added.
Warm food will cause the refrigerator to run longer until the air
cools to the desired temperature.
The door(s) are opened too frequently
or for too long.
Warm air entering the refrigerator causes it to run more. Open the
door less often.
The refrigerator door or freezer
drawer is ajar.
Make sure the refrigerator is level. See the “Refrigerator Leveling
and Door Closing” section. Keep food and containers from
blocking the door.
The refrigerator control is set too
cold.
Adjust the refrigerator control to a less-cold setting until the
refrigerator temperature is as desired.
The door or drawer gasket is dirty,
worn, or cracked.
Clean or change the gasket. Leaks in the door seal will cause
the refrigerator to run longer in order to maintain desired
temperatures.
The lights do not work. Your refrigerator is equipped with LED
lighting which does not need to be
replaced.
If there is power to the refrigerator and the lights do not illuminate
when a door or drawer is opened, call for service or assistance.
Doors have been open longer than
10 minutes.
Close the doors and drawer to reset and open to resume
lighted task.
The door switch is not sensing the
door opening.
Ensure there are no magnets or electronic devices within
3" (7.6 cm) of the hinge cover.
The Temperature
Controls UI does
not turn on.
The door switch is not sensing the
door opening.
Ensure there are no magnets or electronic devices within
3" (7.6 cm) of the hinge cover.
Unusual Noise
To listen to normal refrigerator sounds, go to the Product Help/FAQ section of the brand website and search for “normal sounds.”
Below are listed some normal sounds with explanations.
The refrigerator seems
noisy.
The compressor in your new
refrigerator regulates temperature
more efciently while using less
energy and operates quietly.
Due to this reduction in operating noise, you may notice
unfamiliar noises that are normal.
Sound of the compressor
running longer than
expected
High-efciency compressor and fans Larger, more-efcient refrigerators run longer at lower, more
energy-efcient speeds.
Pulsating/Whirring Fans/compressor adjusting to
optimize performance during normal
compressor operation
This is normal.
Popping Contraction/expansion of inside walls,
especially during initial cooldown
This is normal.
Hissing/Dripping Flow of refrigerant or ow of oil in the
compressor
This is normal.
Vibration The refrigerator may not be steady. Adjust the leveling screws and lower the leveling foot rmly
against the oor. See the “Refrigerator Leveling and Door
Closing” section.
First try the solutions suggested here or visit our website at www.jennair.custhelp.com.
TROUBLESHOOTING
37
If you experience Possible Causes Solution
Unusual Noise (cont.)
Rattling/Banging Movement of the water lines against
the refrigerator cabinet or of items
placed on top of the refrigerator
cabinet
Move excess water line away from the refrigerator cabinet or
fasten excess tubing to the cabinet. See “Connect the Water
Supply” section or remove items from the top of the refrigerator.
Sizzling Water dripping on the heater during
Defrost cycle
This is normal.
Water running/Gurgling May be heard when ice melts during
the Defrost cycle and water runs into
the drain pan.
This is normal.
Buzzing and clicking Heard when the water valve opens
and closes to dispense water and/or
ll the ice maker.
If the refrigerator is connected to a water line, this is normal. If
the refrigerator is not connected to a water line, turn off the ice
maker.
Repetitive clicking Dual evaporator valve regulating the
cooling operation.
You may hear rapid repetitive clicking sounds as the unit switches
from cooling one compartment to cooling the other. This sound is
normal.
Creaking/Cracking/
Grinding
May be heard as ice is being ejected
from the ice maker mold.
This is normal.
Clatter May be heard when the ice falls into
the ice storage bin.
This is normal.
Temperature and Moisture
Temperature is too warm. The refrigerator has just been
installed.
Allow 24 hours following installation for the refrigerator to cool
completely.
Cooling is turned off. Turn on cooling. See the “Using the Controls” section.
The controls are not set correctly for
the surrounding conditions.
Adjust the controls a setting colder. Check the temperature in
24 hours. See the “Using the Controls” section.
The door(s) are opened often or not
closed completely. Allows warm air to
enter refrigerator.
Minimize door openings and keep doors fully closed.
A large load of food was recently
added.
Allow several hours for refrigerator to return to normal
temperature.
Temperature is too cold
in the refrigerator/crisper.
The refrigerator air vent(s) are
blocked.
If the air vent located in the middle rear of the refrigerator
compartment is blocked by items placed directly in front of it, the
refrigerator will get too cold. Move items away from the air vent.
The controls are not set correctly for
the surrounding conditions.
Adjust the controls a setting warmer. Check the temperature in
24 hours. See the “Using the Controls” section.
The ice storage bin is not in the
correct position.
See the “Ice Maker and Storage Bin” sections.
Temperature is too cold
in the pantry drawer.
The control is not set correctly for the
items stored in drawer.
Adjust the temperature setting. See the “Using the Controls”
section.
There is interior moisture
buildup.
NOTE: Some moisture
buildup is normal.
The room is humid. A humid environment contributes to moisture buildup.
The door(s) are opened often or not
closed completely. Allows humid air
to enter the refrigerator.
Minimize door openings and close doors completely.
The door(s) are blocked open. Move food packages away from door.
A bin or shelf is in the way. Push bin or shelf back into the correct position.
Storing liquid in open containers This adds humidity to the refrigerator interior. Keep all containers
tightly covered.
First try the solutions suggested here or visit our website at www.jennair.custhelp.com.
TROUBLESHOOTING
38
First try the solutions suggested here or visit our website at www.jennair.custhelp.com.
If you experience Possible Causes Solution
Temperature and Moisture (cont.)
There is frost/ice
buildup in the freezer
compartment.
The drawer is opened often or left
open.
Minimize drawer openings and close drawer completely
after use.
Poor door seal Ensure door seals are making full contact with the refrigerator
cabinet to allow for an adequate seal.
Temperature controls are not set
correctly.
See the “Using the Controls” section for recommended
temperature settings.
Ice and Water
The ice maker is not
producing ice or is not
producing enough ice.
The refrigerator is not connected to
a water supply or the water supply
shut-off valve is not turned on.
Connect refrigerator to water supply and turn water shut-off valve
to fully open.
There is a kink in the water source
line.
A kink in the line can reduce water ow. Straighten the water
source line.
The ice maker is not turned on. Make sure the ice maker is ON. See the “Ice Maker and Storage
Bin” section.
The refrigerator has just been
installed.
Wait 24 hours after ice maker installation for ice production to
begin. Wait 3 days for full ice production.
The refrigerator door is not closed
completely.
Close the door rmly. If it does not close completely, see “The
doors will not close completely” in this table.
A large amount of ice was recently
removed.
Allow sufcient time for ice maker to produce more ice. See the
“Ice Maker and Storage Bin” section for ice production rates.
An ice cube is jammed in the ice
maker.
Remove ice from the ice maker with a plastic utensil.
A water lter is installed on the
refrigerator.
Remove the water lter and operate the ice maker. If ice volume
improves, then the lter may be clogged or incorrectly installed.
Replace lter or reinstall it correctly.
A reverse osmosis water ltration
system is connected to the cold water
supply.
This can decrease water pressure. See the “Water Supply
Requirements” section.
The ice cubes are hollow
or small.
NOTE: This is an
indication of low water
pressure.
The water shut-off valve is not fully
open.
Turn the water shut-off valve fully open.
There is a kink in the water source
line.
A kink in the line can reduce water ow. Straighten the water
source line.
A water lter is installed on the
refrigerator.
Remove lter and operate ice maker. If ice quality improves, then
the lter may be clogged or incorrectly installed. Replace lter or
reinstall it correctly.
A reverse osmosis water ltration
system is connected to the cold water
supply.
This can decrease water pressure. See the “Water Supply
Requirements” section.
Questions remain regarding water
pressure.
Call a licensed, qualied plumber.
TROUBLESHOOTING
39
If you experience Possible Causes Solution
Ice and Water (cont.)
Off-taste, odor, or gray
color in the ice or water
Newly installed refrigerator requires
ush of water system.
Flush the water system. See the “Water and Ice Dispensers”
section for water system ushing instructions.
Recently installed or replaced
plumbing connections. New plumbing
connections can cause discolored or
off-avored ice and water.
Discard ice and wash the ice storage bin. Flush the water system
with 3 gal. (12 L) of water. Allow 24 hours for the ice maker to
make new ice and discard the rst 3 batches of ice produced.
Using a water supply connection type
other than recommended
It is recommended to use copper tubing or JennAir
®
supply line,
Part Number 8212547RP. See the “Connect the Water Supply”
section.
The ice has been stored too long. Discard ice and wash ice storage bin. Allow 24 hours for ice
maker to make new ice.
The water has been stored too long. Dispense at least 1 qt (1 L) of water per week to maintain a fresh
supply.
Odor from stored food has transferred
to the ice.
Use airtight, moisture-proof packaging to store food.
There are minerals (such as sulfur)
in the water.
A water lter may need to be installed to remove the minerals.
There is a water lter installed on the
refrigerator.
Gray or dark discoloration in ice may indicate that the water
ltration system needs additional ushing. Flush the water system
after installing and before using a new water lter. See the “Water
and Ice Dispensers” section for water lter ushing instructions.
The water lter needs to be replaced. Replace the disposable water lter at least every 6 months or
when indicated. See the “Water Filtration System” section.
The water and ice
dispenser will not
operate properly.
The refrigerator is not connected to
a water supply or the water supply
shut-off valve is not turned on.
Connect the refrigerator to the water supply, and turn the water
shut-off valve to fully open.
There is a kink in the water source
line.
A kink in the water line can reduce water ow from the water
dispenser and result in hollow or irregular shaped ice. Straighten
the water source line.
The refrigerator has just been
installed.
Flush and ll the water system. See the “Water and Ice
Dispensers” section.
The water pressure to the house is
not at or above 35 psi (241 kPa).
The water pressure to the house determines the ow from the
dispenser. See the “Water Supply Requirements” section.
A reverse osmosis water ltration
system is connected to the cold water
supply.
A reverse osmosis water ltration system can decrease water
pressure. See the “Water Supply Requirements” section.
The water lter may be clogged. Remove the water lter and operate dispenser. If water ow
increases, your lter is clogged and needs to be replaced.
See the “Water Filtration System” section.
The water lter is installed incorrectly. Remove the water lter and reinstall. See the “Water Filtration
System” section.
First try the solutions suggested here or visit our website at www.jennair.custhelp.com.
TROUBLESHOOTING
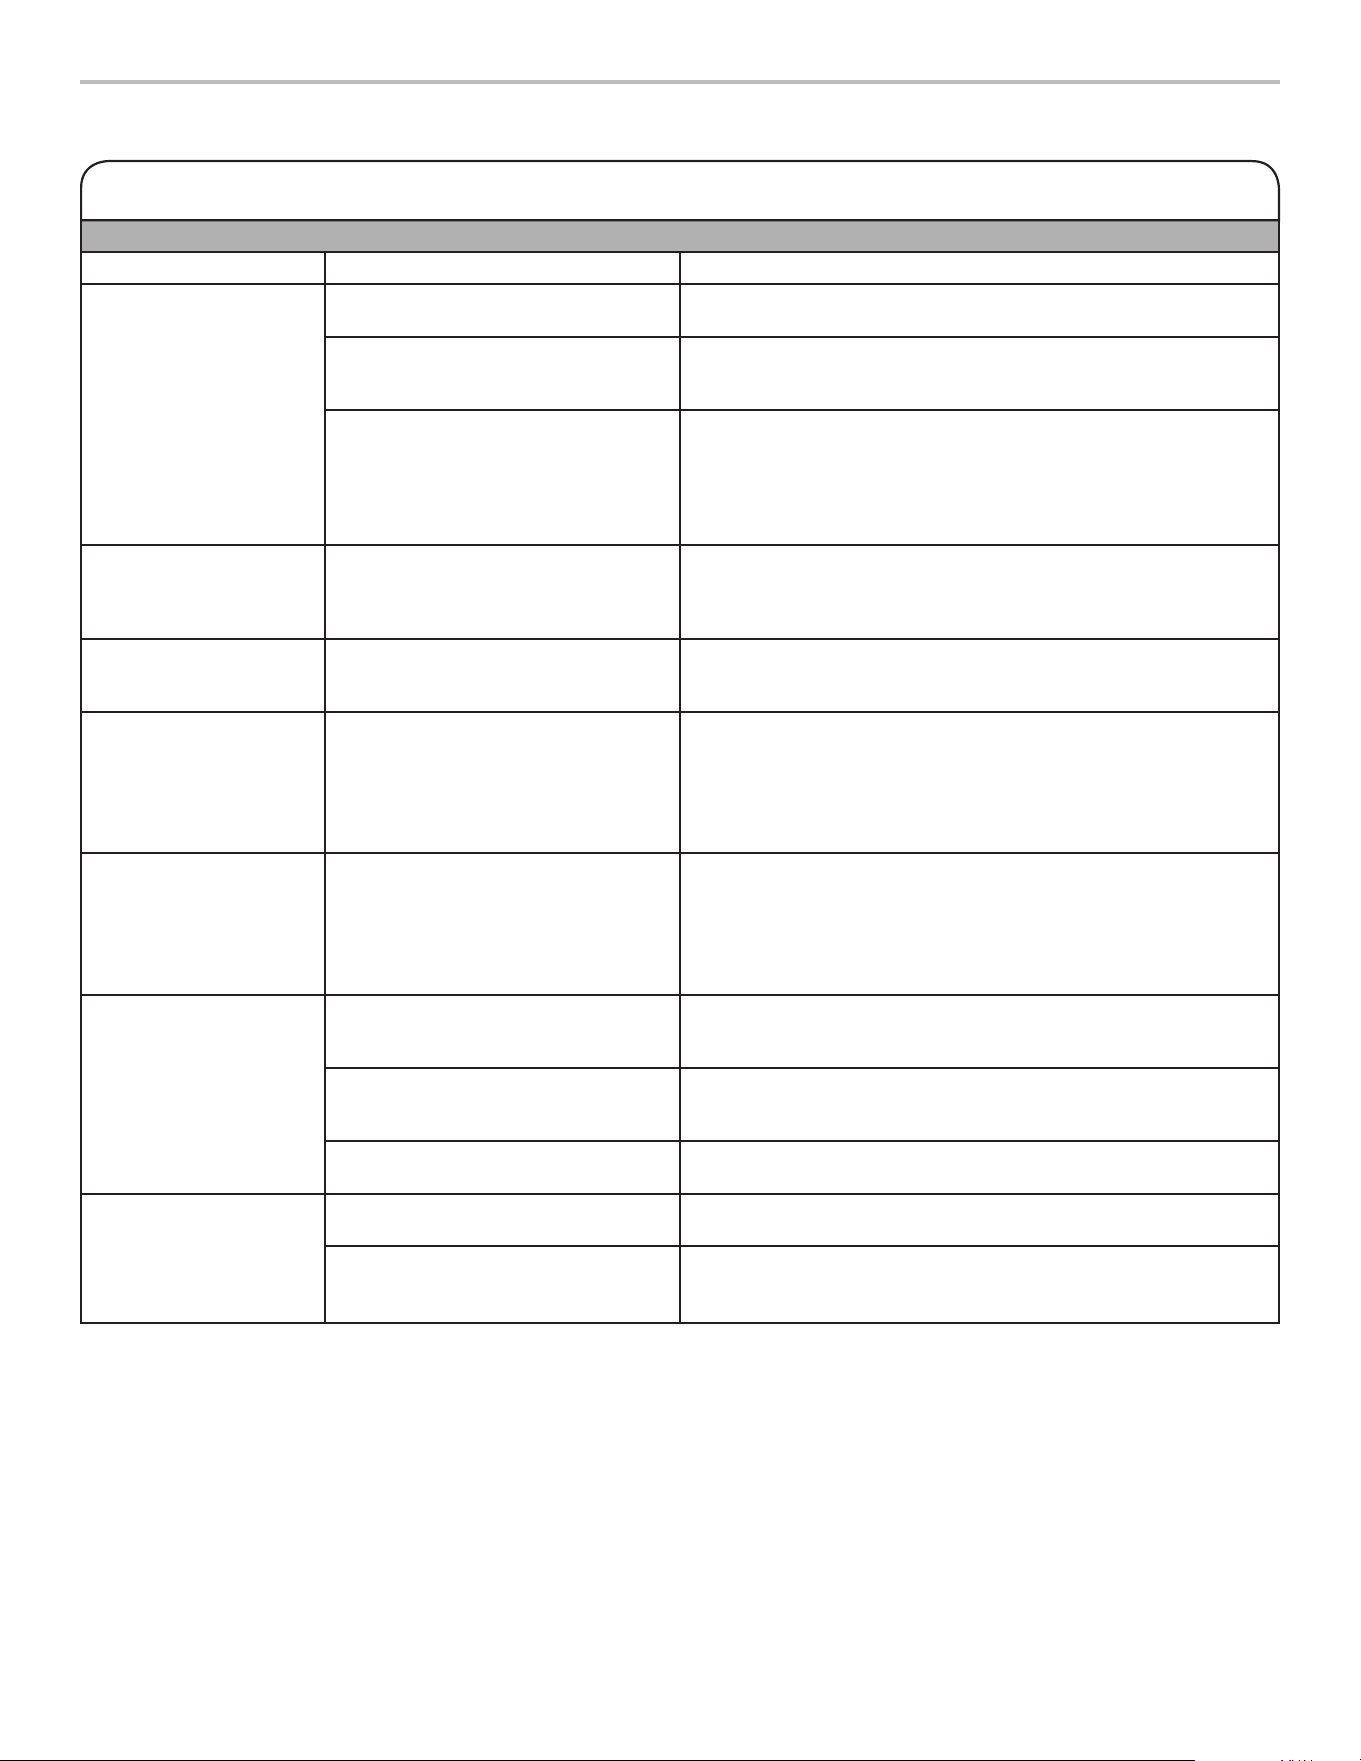
40
Ice and Water (cont.)
First try the solutions suggested here or visit our website at www.jennair.custhelp.com.
TROUBLESHOOTING
If you experience Possible Causes Solution
The water and ice
dispenser will not
operate properly. (cont.)
The refrigerator door or freezer
drawer is not closed completely.
Close the door or drawer rmly. If it does not close completely,
see “The doors will not close completely.”
The refrigerator doors were recently
removed.
Make sure the water dispenser wire/tube assembly has been
properly reconnected at the top of the refrigerator door. See the
“Remove and Replace Refrigerator Doors” section.
Ice is clogged in the ice storage bin or
ice is blocking the ice delivery chute.
Remove the ice clogging the storage bin and delivery chute,
using a plastic utensil if necessary. Clean the ice delivery chute
and the bottom of the ice storage bin using a warm, damp cloth,
then dry both thoroughly. To avoid clogging and to maintain a
fresh supply of ice, empty the storage bin and clean both the
storage bin and delivery chute every 2 weeks.
Ice bin is difcult to
remove from door.
Ice level in bin may be high and
uneven from normal ice production
and augering of ice during
dispensing.
Dispense 2-3 glasses of ice, then try removing the ice bin.
The ice dispenser
jams while dispensing
crushed ice.
Crushed ice is blocking the ice
delivery chute.
Switch from crushed ice to cubed ice to clear the ice dispenser.
Then switch back to crushed ice.
Water is leaking or
dripping from the
dispenser system.
NOTE: A few drops of
water after dispensing
is normal.
The glass was not held under the
dispenser long enough.
Hold the glass under the dispenser 2 to 3 seconds after releasing
the dispenser lever.
Ice continues to ow
from the dispenser.
NOTE: A few cubes
dispensed after releasing
the dispenser lever is
normal.
The glass was not held under the
dispenser long enough.
Hold the glass under the dispenser 2 to 3 seconds after releasing
the dispenser lever.
Water continues to
drip from the dispenser
beyond the rst few
drops.
The refrigerator has just been
installed.
Flushing the water system removes the air from the lines which
causes the water dispenser to drip. Flush the water system.
See the “Water and Ice Dispensers” section.
The water lter was recently installed
or replaced.
Flushing the water system removes the air from the lines which
causes the water dispenser to drip. Flush the water system.
See the “Water and Ice Dispensers” section
There may be a loose water
connection.
Check for water in bottom of refrigerator compartment, hinge
area, or by household connection in back of product.
Water is leaking from the
back of the refrigerator.
The water line connections were not
fully tightened.
See the “Connecting the Water” section.
Recently removed the doors and did
not fully tighten water line connection.
See the “Remove and Replace Refrigerator Doors” section.

41
If you experience Possible Causes Solution
The doors will not close
completely.
The door is blocked open. Move food packages away from door.
A bin or shelf is in the way. Push bin or shelf back into the correct position.
Recently installed Remove all packaging materials.
The doors are difcult
to open.
The door gaskets are dirty or sticky. Clean gaskets and contact surfaces with mild soap and warm
water. Rinse and dry with soft cloth.
The doors appear to be
uneven.
The doors need to be aligned or the
refrigerator needs to be leveled.
See the “Refrigerator Leveling and Door Closing” section.
The refrigerator is
unsteady or it rolls
forward when opening
and closing doors.
The refrigerator brake feet are not
snug against the oor.
Remove the base grille. Turn both brake feet (1 on each side)
clockwise, the same amount, until they are snug against the oor.
See the “Refrigerator Leveling and Door Closing” section.
WARNING
Explosion Hazard
Use nonflammable cleaner.
Failure to do so can result in death, explosion, or fire.
To view an animation showing how to adjust and align the doors, refer to the Product Help/FAQ section of the brand website and
search for “Refrigerator Leveling and Door Closing.”
First try the solutions suggested here or visit our website at www.jennair.custhelp.com.
TROUBLESHOOTING
If you experience Possible Causes Solution
Ice and Water (cont.)
Crushed or cubed ice
misses the glass when
dispensing ice.
The glass is not held close enough to
where the ice exits the chute.
Hold the glass close to where the ice exits the chute.
Water from the dispenser
is warm.
Water from the dispenser is chilled to
50°F (10°C).
This is normal.
The refrigerator has just been
installed.
Allow 24 hours after installation for the water supply to cool
completely.
A large amount of water was recently
dispensed.
Allow 3 hours for the water supply to cool completely.
Water has not been recently
dispensed.
The rst glass of water may not be cool. Discard the rst glass
of water dispensed.
The refrigerator is not connected to
a cold water pipe.
Make sure the refrigerator is connected to a cold water pipe.
See the “Water Supply Requirements” section.
Doors

42
Connected Appliance Regulatory Notices
Federal Communications Commission
(FCC) Compliance Notice
This equipment has been tested and found to comply with the limits
for a Class B digital device, pursuant to Part 15 of the FCC Rules.
These limits are designed to provide reasonable protection against
harmful interference in a residential installation. This equipment
generates, uses, and can radiate radio frequency energy and, if not
installed and used in accordance with the instructions, may cause
harmful interference to radio communications. However, there is no
guarantee that interference will not occur in a particular installation.
If this equipment does cause harmful interference to radio or
television reception, which can be determined by turning the
equipment off and on, the user is encouraged to try to correct
the interference by one of the following measures:
– Reorient or relocate the receiving antenna.
– Increase the separation between the equipment and receiver.
– Connect the equipment into an outlet on a circuit different
from that to which the receiver is connected.
– Consult the dealer or an experienced radio/TV technician for help.
This device complies with Part 15 of the FCC Rules. Operation
is subject to the following two conditions:
1. This device may not cause harmful interference, and
2. This device must accept any interference received,
including interference that may cause undesired operation.
Changes or modications not expressly approved by the party
responsible for compliance could void the user’s authority to
operate the equipment.
RF Exposure Information
To comply with FCC/IC RF exposure requirements for mobile
transmitting devices, this transmitter should only be used or
installed at locations where there is at least 20 cm separation
distance between the antenna and all persons.
To comply with FCC/IC RF exposure limits for general
population/uncontrolled exposure, the antenna(s) used for this
transmitter must be installed to provide a separation distance of
at least 20 cm from all persons and must not be co-located or
operating in conjunction with any other antenna or transmitter.
Industry Canada (IC) Compliance Notice
This Device complies with Industry Canada License-exempt RSS
standard(s). Operation is subject to the following two conditions:
1. This device may not cause interference,
2. This device must accept any interference, including
interference that may cause undesired operation of the device.
Under Industry Canada regulations, this radio transmitter may
only operate using an antenna of a type and maximum (or lesser)
gain approved for the transmitter by Industry Canada. To reduce
potential radio interference to other users, the antenna type and
its gain should be so chosen that the equivalent isotropically
radiated power (e.i.r.p.) is not more than that necessary for
successful communication.
This radio transmitter IC: 10248A-XPWG3 has been approved by
Industry Canada to operate with the antenna types listed below with
the maximum permissible gain and required antenna impedance for
each antenna type indicated. Antenna types not included in this list,
having a gain greater than the maximum gain indicated for that type,
are strictly prohibited for use with this device.
To comply with FCC and Industry Canada RF radiation
exposure limits for general population, the antenna(s) used for
this transmitter must be installed such that a minimum separation
distance of 20 cm is maintained between the radiator (antenna)
and all persons at all times and must not be co-located or
operating in conjunction with any other antenna or transmitter.
Antenna Maximum Permissible Required
Type Antenna Gain (dBi) Impedance (OHM)
Slot 1.76 50
OEM Responsibilities to comply with FCC
and Industry Canada Regulations
The XPWG3 Module has been certied for integration into
products only by OEM integrators under the following conditions:
1. The antenna(s) must be installed such that a minimum
separation distance of 20 cm is maintained between the
radiator (antenna) and all persons at all times.
2. The transmitter module must not be co-located or operating
in conjunction with any other antenna or transmitter.
As long as the two conditions above are met, further transmitter
testing will not be required. However, the OEM integrator is
still responsible for testing their end-product for any additional
compliance requirements required with this module installed (for
example, digital device emissions, PC peripheral requirements, etc.).
IMPORTANT NOTE: In the event that these conditions cannot
be met (for certain congurations or co-location with another
transmitter), then the FCC and Industry Canada authorizations
are no longer considered valid and the FCC ID and IC
Certication Number cannot be used on the nal product.
In these circumstances, the OEM integrator will be responsible
for re-evaluating the end product (including the transmitter) and
obtaining a separate FCC and Industry Canada authorization.
End Product Labeling
The XPWG3 Module is labeled with its own FCC ID and IC
Certication Number. If the FCC ID and IC Certication Number are
not visible when the module is installed inside another device, then
the outside of the device into which the module is installed must also
display a label referring to the enclosed module. In that case, the nal
end product must be labeled in a visible area with the following:
“Contains Transmitter Module FCC ID: A5UXPWG3”
“Contains Transmitter Module IC: 10248A-XPWG3”
or
“Contains FCC ID: A5UXPWG3”
“Contains IC: 10248A-XPWG3”
The OEM of the XPWG3 Module must only use the approved
antenna(s), which have been certied with this module. The OEM
integrator has to be aware not to provide information to the end
user regarding how to install or remove this RF module or change
RF related parameters in the user manual of the end product.
The user manual for the end product must include
the following information in a prominent location:
“To comply with FCC and Industry Canada RF radiation
exposure limits for general population, the antenna(s) used for
this transmitter must be installed such that a minimum separation
distance of 20 cm is maintained between the radiator (antenna)
and all persons at all times and must not be co-located or
operating in conjunction with any other antenna or transmitter.”

43
Connected Appliance Regulatory Notices (cont.)
Open Source License Usage
The following statements refer to the portions of this software
based in part on FreeRTOS v7.0.2, http://www.freertos.org.
The use of this software is governed by the terms of GNU
General Public License v. 2, which is available at:
http://www.gnu.org/licenses/gpl-2.0.html. A copy of the source
code may be obtained by written request for the software by
name to [email protected], along with the address
for delivery.
The following statements refer to those portions
of the software copyrighted by Eclipse Foundation, Inc.
Copyright (c) 2007, Eclipse Foundation, Inc. and its licensors.
All rights reserved.
Redistribution and use in source and binary forms, with or
without modication, are permitted provided that the following
conditions are met:
• Redistributions of source code must retain the above
copyright notice, this list of conditions, and the following
disclaimer.
• Redistributions in binary form must reproduce the above
copyright notice, this list of conditions, and the following
disclaimer in the documentation and/or other materials
provided with the distribution.
• Neither the name of the Eclipse Foundation, Inc. nor the
names of its contributors may be used to endorse or promote
products derived from this software without specic prior
written permission.
THIS SOFTWARE IS PROVIDED BY THE COPYRIGHT
HOLDERS AND CONTRIBUTORS “AS IS” AND ANY EXPRESS
OR IMPLIED WARRANTIES, INCLUDING, BUT NOT LIMITED
TO, THE IMPLIED WARRANTIES OF MERCHANTABILITY AND
FITNESS FOR A PARTICULAR PURPOSE ARE DISCLAIMED.
IN NO EVENT SHALL THE COPYRIGHT OWNER OR
CONTRIBUTORS BE LIABLE FOR ANY DIRECT, INDIRECT,
INCIDENTAL, SPECIAL, EXEMPLARY, OR CONSEQUENTIAL
DAMAGES (INCLUDING, BUT NOT LIMITED TO,
PROCUREMENT OF SUBSTITUTE GOODS OR SERVICES;
LOSS OF USE, DATA, OR PROFITS; OR BUSINESS
INTERRUPTION) HOWEVER CAUSED AND ON ANY THEORY
OF LIABILITY, WHETHER IN CONTRACT, STRICT LIABILITY,
OR TORT (INCLUDING NEGLIGENCE OR OTHERWISE)
ARISING IN ANY WAY OUT OF THE USE OF THIS SOFTWARE,
EVEN IF ADVISED OF THE POSSIBILITY OF SUCH DAMAGE.
Portions of this software are copyright (c) Sawtooth Consulting
Ltd. 2006-2015 All rights reserved.
Portions of this software are copyright (c) Arrayent, Inc.
2015 All rights reserved.
The following statements refer to those portions of the software
copyrighted by Swedish Institute of Computer Science.
Copyright (c) 2001-2004 Swedish Institute of Computer Science.
All rights reserved.
Redistribution and use in source and binary forms, with or
without modication, are permitted provided that the following
conditions are met:
1. Redistributions of source code must retain the above
copyright notice, this list of conditions, and the following
disclaimer.
2. Redistributions in binary form must reproduce the above
copyright notice, this list of conditions, and the following
disclaimer in the documentation and/or other materials
provided with the distribution.
3. The name of the author may not be used to endorse or
promote products derived from this software without specic
prior written permission.
THIS SOFTWARE IS PROVIDED BY THE AUTHOR “AS IS”’
AND ANY EXPRESS OR IMPLIED WARRANTIES, INCLUDING,
BUT NOT LIMITED TO, THE IMPLIED WARRANTIES OF
MERCHANTABILITY AND FITNESS FOR A PARTICULAR
PURPOSE ARE DISCLAIMED. IN NO EVENT SHALL THE
AUTHOR BE LIABLE FOR ANY DIRECT, INDIRECT, INCIDENTAL,
SPECIAL, EXEMPLARY, OR CONSEQUENTIAL DAMAGES
(INCLUDING, BUT NOT LIMITED TO, PROCUREMENT OF
SUBSTITUTE GOODS OR SERVICES; LOSS OF USE, DATA, OR
PROFITS; OR BUSINESS INTERRUPTION) HOWEVER CAUSED
AND ON ANY THEORY OF LIABILITY, WHETHER IN CONTRACT,
STRICT LIABILITY, OR TORT (INCLUDING NEGLIGENCE OR
OTHERWISE) ARISING IN ANY WAY OUT OF THE USE OF THIS
SOFTWARE, EVEN IF ADVISED OF THE POSSIBILITY OF SUCH
DAMAGE.
The following statements refer to those portions
of the software copyrighted by Marvell International Ltd.
Copyright (c) Marvell International Ltd.
All rights reserved.
DISCLAIMER. THIS SOFTWARE IS PROVIDED BY THE
COPYRIGHT HOLDERS AND CONTRIBUTORS “AS IS”
AND ANY EXPRESS OR IMPLIED WARRANTIES, INCLUDING,
BUT NOT LIMITED TO, THE IMPLIED WARRANTIES OF
MERCHANTABILITY AND FITNESS FOR A PARTICULAR
PURPOSE ARE DISCLAIMED. IN NO EVENT SHALL THE
COPYRIGHT OWNER OR CONTRIBUTORS BE LIABLE FOR
ANY DIRECT, INDIRECT, INCIDENTAL, SPECIAL, EXEMPLARY,
OR CONSEQUENTIAL DAMAGES (INCLUDING, BUT NOT
LIMITED TO, PROCUREMENT OF SUBSTITUTE GOODS OR
SERVICES; LOSS OF USE, DATA, OR PROFITS; OR BUSINESS
INTERRUPTION) HOWEVER CAUSED AND ON ANY THEORY
OF LIABILITY, WHETHER IN CONTRACT, STRICT LIABILITY,
OR TORT (INCLUDING NEGLIGENCE OR OTHERWISE)
ARISING IN ANY WAY OUT OF THE USE OF THIS SOFTWARE,
EVEN IF ADVISED OF THE POSSIBILITY OF SUCH DAMAGE.
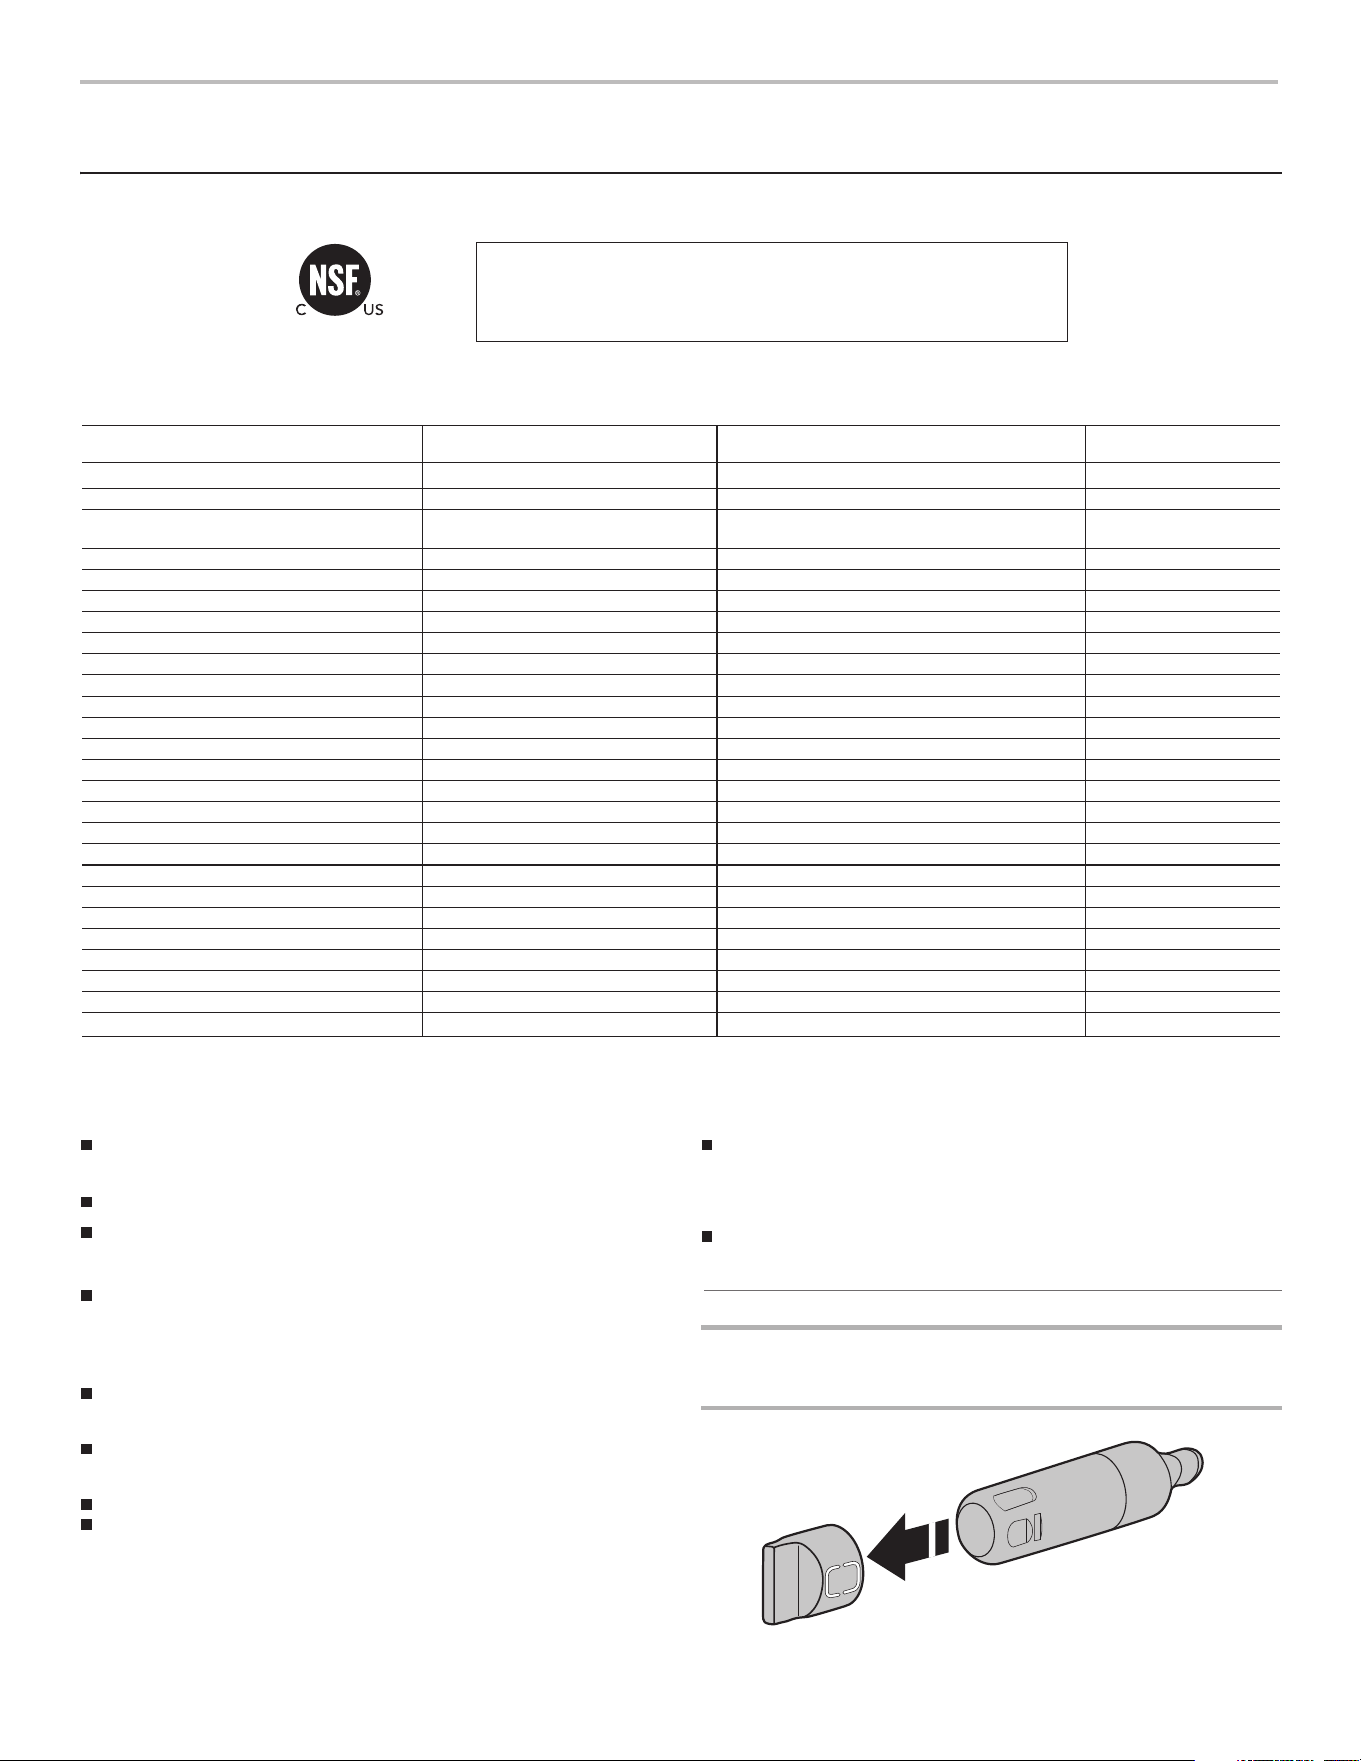
44
PERFORMANCE DATA SHEET
PERFORMANCE DATA SHEET
Water Filtration System
Model P9WB2L/P9RFWB2L Capacity 200 Gallons (757 Liters)
This system has been tested according to NSF/ANSI Standards 42, 53, 401, and CSA B483.1 for the reduction of the substances listed below.
The concentration of the indicated substances in water entering the system was reduced to a concentration less than or equal to the permissible
limit for water leaving the system, as specified in NSF/ANSI Standards 42, 53, 401, and CSA B483.1.
Test Parameters: pH = 7.5 ± 0.5 unless otherwise noted. Flow = 0.75 gpm (2.84 Lpm). Pressure = 60 psig (413.7 kPa). Temp. = 68°F to 71.6°F (20°C to
22°C). Rated service capacity = 200 gallons (757 liters).
The compounds certified under NSF 401 have been deemed as “emerging compounds/incidental contaminants.” Emerging compounds/incidental
contaminants are those compounds that have been detected in drinking water supplies at trace levels. While occurring at only trace levels, these
compounds can affec
t the public acceptance/perception of drinking water quality.
It is important that operational, maintenance, and filter replacement
requirements be carried out for the product to perform as advertised.
Property damage can occur if all instructions are not followed.
The disposable cartridge must be changed at least every 6 months.
Use replacement filter P9RFWB2L, part #EDR2RXD1/EDR2RXD1B.
2015 suggested retail price of $49.99 U.S.A./$49.99 Canada. Prices
are subject to change without notice.
The filter monitor system measures the amount of water that passes
through the filter and alerts you when it is time to replace the filter.
Refer to the “Using the Controls” or “Water Filtration System” section
(in the User Instructions or User Guide) to learn how to check the
water filter status.
After changing the water filter, flush the water system. See “Water
and Ice Dispensers” or “Water Dispenser” in the User Instructions or
User Guide.
These contaminants are not necessarily in your water supply. While
testing was performed under standard laboratory conditions, actual
performance may vary.
The product is for cold water use only.
The water system must be installed in compliance with state and
local laws and regulations.
Do not use with water that is microbiologically unsafe or of unknown
quality without adequate disinfection before or after the system.
Systems certified for cyst reduction may be used on disinfected
waters that may contain filterable cysts.
EPA Est. No. 082047-TWN-001
Refer to the “Warranty” section (in the User Instructions or User
Guide) for the Manufacturer’s limited warranty, name and telephone
number.
Application Guidelines/Water Supply Parameters
System tested and certified by NSF International against NSF/ANSI
Standard 42, 53, 401, and CSA B483.1 for
the reduction of contaminants specified on the Performance
Data Sheet.
Substance Reduction Aesthetic Effects Influent Challenge Concentration Maximum Permissable
Product Water Concentration
Average% Reduction
%01 ± L/gm 0.2rodO/etsaT enirolhC
%0.79 noitcuder %05
Particulate Class I
* At least 10,000 particle %9.99>noitcuder %58Lm/s
Contaminant Reduction Influent Challenge Concentration Maximum Permissable
Product Water Concentration
Average%Reduction
%6.89 / %3.99>L/gm 010.0%01 ±L/gm 51.05.8 Hp @ / 5.6 Hp @ :daeL
%8.39L/gm 500.0%01 ± L/gm 510.0enezneB
%8.99L/gm 570.0%01 ± L/gm 522.0enezneborolhciD-p
%9.18L/gm 040.0%01 ± L/gm 80.0narufobraC
%59>L/gm 300.0%01 ± 510.0enehpaxoT
%0.78L/gm 300.0%01 ± L/gm 900.0enizartA
01sotsebsA
7
to 10
8
fibers/L
††
%99>%99
Live Cysts
†
%99.99>%59.99 .nim L/000,05
%9.69UTN 5.0 %01 ± UTN 11ytidibruT
%2.99>L/gm 2000.0%01 ± 200.0enadniL
%
6.69L/gm 500.0%01 ± L/gm 510.0enelyhteorolhcarteT
%3.29L/gm 06.0%01 ± L/gm 8.1enezneborolhciD-O
%9.68L/gm 07.0%01 ± L/gm 1.2enezneblyhtE
%8.99>L/gm 70.0%01 ± L/gm 012.0enezneborolhcirT-4,2,1
%5.88L/gm 70.0%01 ± L/gm 012.0D - 4,2
%6.99L/gm 1.0%01 ± L/gm 0.2enerytS
%5.39L/gm 0.1%01 ± L/gm 0.3eneuloT
%7.18L/gm 200.0%01 ± L/gm 600.0nirdnE
%7.59L/gn 03%02 ± 002lolonetA
%1.69L/gn 02%02 ± 041mirpohtemirT
%3.69L/gn
02%02 ± 041noruniL
%3.59L/gn 02%02 ± 041enortsE
%5.59L/gn 002%02 ± 0041lonehplynoN
Water Supply
Water Pressure
Water Temperature
Service Flow Rate
Potable City or Well
30 - 120 psi (207 - 827 kPa)
33° - 100°F (0.6° - 37.8°C)
0.75 gpm (2.84 L/min.) @ 60 psi
*
†
††
Class I particle size: >0.5 to <1 um
Based on the use of Cryptosporidium parvum oocysts
Fibers greater than 10 um in length
®
NSF is a registered trademark of NSF International.
45
08/17
IF YOU NEED SERVICE:
1. Before contacting us to arrange service, please determine whether your product requires repair. Some questions can be addressed without
service. Please take a few minutes to review the Troubleshooting section of the Use and Care Guide or visit https:// producthelp.jennair.com.
2. All warranty service is provided exclusively by our authorized JennAir Service Providers. In the U.S. and Canada, direct all requests
for warranty service to:
JennAir Customer eXperience Center
1-800-JENNAIR (1-800-536-6247).
If outside the 50 United States or Canada, contact your authorized JennAir dealer to determine whether another warranty applies.
JENNAIR
®
REFRIGERATOR
LIMITEDWARRANTY
ATTACH YOUR RECEIPT HERE. PROOF OF PURCHASE IS REQUIRED
TO OBTAIN WARRANTY SERVICE.
Please have the following information available when you call the
Customer eXperience Center:
■ Name, address, and telephone number
■ Model number and serial number
■ A clear, detailed description of the problem
■ Proof of purchase, including dealer or retailer name and address
TEN YEAR LIMITED WARRANTY
WHAT IS COVERED WHAT IS NOT COVERED
TWO YEAR LIMITED WARRANTY (PARTS & LABOR)
For two years from the date of purchase, when this major appliance is
installed, operated, and maintained according to instructions attached to
or furnished with the product, JennAir brand of Whirlpool Corporation or
Whirlpool Canada LP (hereafter “JennAir”) will pay for factory specied
replacement parts and repair labor to correct defects in materials or
workmanship that existed when this major appliance was purchased,
or at its sole discretion replace the product. In the event of product
replacement, your appliance will be warranted for the remaining term of
the original unit’s warranty period.
THIRD THROUGH FIFTH YEAR LIMITED WARRANTY ON CAVITY
LINER AND SEALED REFRIGERATION SYSTEM (PARTS & LABOR)
In the third through fth years from the date of purchase, when this
major appliance is installed, operated, and maintained according to the
instructions attached to or furnished with the product, JennAir brand
will pay for factory specied replacement parts and repair labor for the
following components to correct non-cosmetic defects in materials and
workmanship in this part that prevent function of the refrigerator and that
existed when this major appliance was purchased:
■ Refrigerator/freezer cavity liner if the part cracks due to defective
materials or workmanship
■ Sealed Refrigeration system (includes compressor, evaporator,
condenser, dryer and connecting tubing).
SIXTH THROUGH TENTH YEAR LIMITED WARRANTY
(SEALED REFRIGERATION SYSTEM ONLY – LABOR NOT INCLUDED)
In the sixth through tenth year from the date of purchase, when this major
appliance is installed, operated, and maintained according to instructions
attached to or furnished with the product, JennAir brand will pay for
factory specied replacement parts for the following components to
correct defects in materials or workmanship in the sealed refrigeration
system (includes compressor, evaporator, condenser, dryer, and
connecting tubing) that existed when this major appliance was purchased.
YOUR SOLE AND EXCLUSIVE REMEDY UNDER THIS LIMITED
WARRANTY SHALL BE PRODUCT REPAIR AS PROVIDED HEREIN.
Service must be provided by a JennAir designated service company.
This limited warranty is valid only in the United States or Canada and
applies only when the major appliance is used in the country in which it
was purchased. This limited warranty is effective from the date of original
consumer purchase. Proof of original purchase date is required to obtain
service under this limited warranty.
1. Commercial, non-residential, multiple-family use, or use
inconsistent with published user, operator, or installation
instructions.
2. In-home instruction on how to use your product.
3. Service to correct improper product maintenance or installation,
installation not in accordance with electrical or plumbing codes,
or correction of household electrical or plumbing (e.g., house
wiring, fuses or water inlet hoses).
4. Consumable parts (e.g., light bulbs, batteries, air or water
lters, preservation solutions).
5. Defects or damage caused by the use of non-genuine JennAir
parts or accessories.
6. Damage from accident, misuse, abuse, re, oods, acts of
God, or use with products not approved by JennAir.
7. Repairs to parts or systems to correct product damage
or defects caused by unauthorized service, alteration or
modication of the appliance.
8. Cosmetic damage, including scratches, dents, chips, and other
damage to appliance nishes unless such damage results
from defects in materials and workmanship and is reported to
JennAir within 30 days.
9. Discoloration, rust, or oxidation of surfaces resulting from
caustic or corrosive environments including, but not limited to,
high salt concentrations, high moisture or humidity, or exposure
to chemicals.
10. Food or medicine loss due to product failure.
11. Pickup or delivery. This product is intended for in-home repair.
12. Travel or transportation expenses for service in remote
locations where an authorized JennAir servicer is not available.
13. Removal or reinstallation of inaccessible appliances or built-in
xtures (e.g., trim, decorative panels, ooring, cabinetry, islands,
countertops, drywall) that interfere with servicing, removal, or
replacement of the product.
14. Service or parts for appliances with original model/serial
numbers removed, altered ,or not easily determined.
The cost of repair or replacement under these excluded
circumstances shall be borne by thecustomer.
DISCLAIMER OF IMPLIED WARRANTIES
IMPLIED WARRANTIES, INCLUDING ANY IMPLIED WARRANTY OF MERCHANTABILITY OR IMPLIED WARRANTY OF FITNESS FOR A
PARTICULAR PURPOSE, ARE LIMITED TO TEN YEARS OR THE SHORTEST PERIOD ALLOWED BY LAW. Some states and provinces do not allow
limitations on the duration of implied warranties of merchantability or tness, so this limitation may not apply to you. This warranty gives you specic
legal rights, and you also may have other rights that vary from state to state or province to province.
DISCLAIMER OF REPRESENTATIONS OUTSIDE OF WARRANTY
JennAir makes no representations about the quality, durability, or need for service or repair of this major appliance other than the representations
contained in this warranty. If you want a longer or more comprehensive warranty than the limited warranty that comes with this major appliance,
you should ask JennAir or your retailer about buying an extended warranty.
LIMITATION OF REMEDIES: EXCLUSION OF INCIDENTAL AND CONSEQUENTIAL DAMAGES
YOUR SOLE AND EXCLUSIVE REMEDY UNDER THIS LIMITED WARRANTY SHALL BE PRODUCT REPAIR AS PROVIDED HEREIN. JENNAIR
SHALL NOT BE LIABLE FOR INCIDENTAL OR CONSEQUENTIAL DAMAGES. Some states and provinces do not allow the exclusion or limitation of
incidental or consequential damages, so these limitations and exclusions may not apply to you. This warranty gives you specic legal rights, and you
also may have other rights that vary from state to state or province to province.
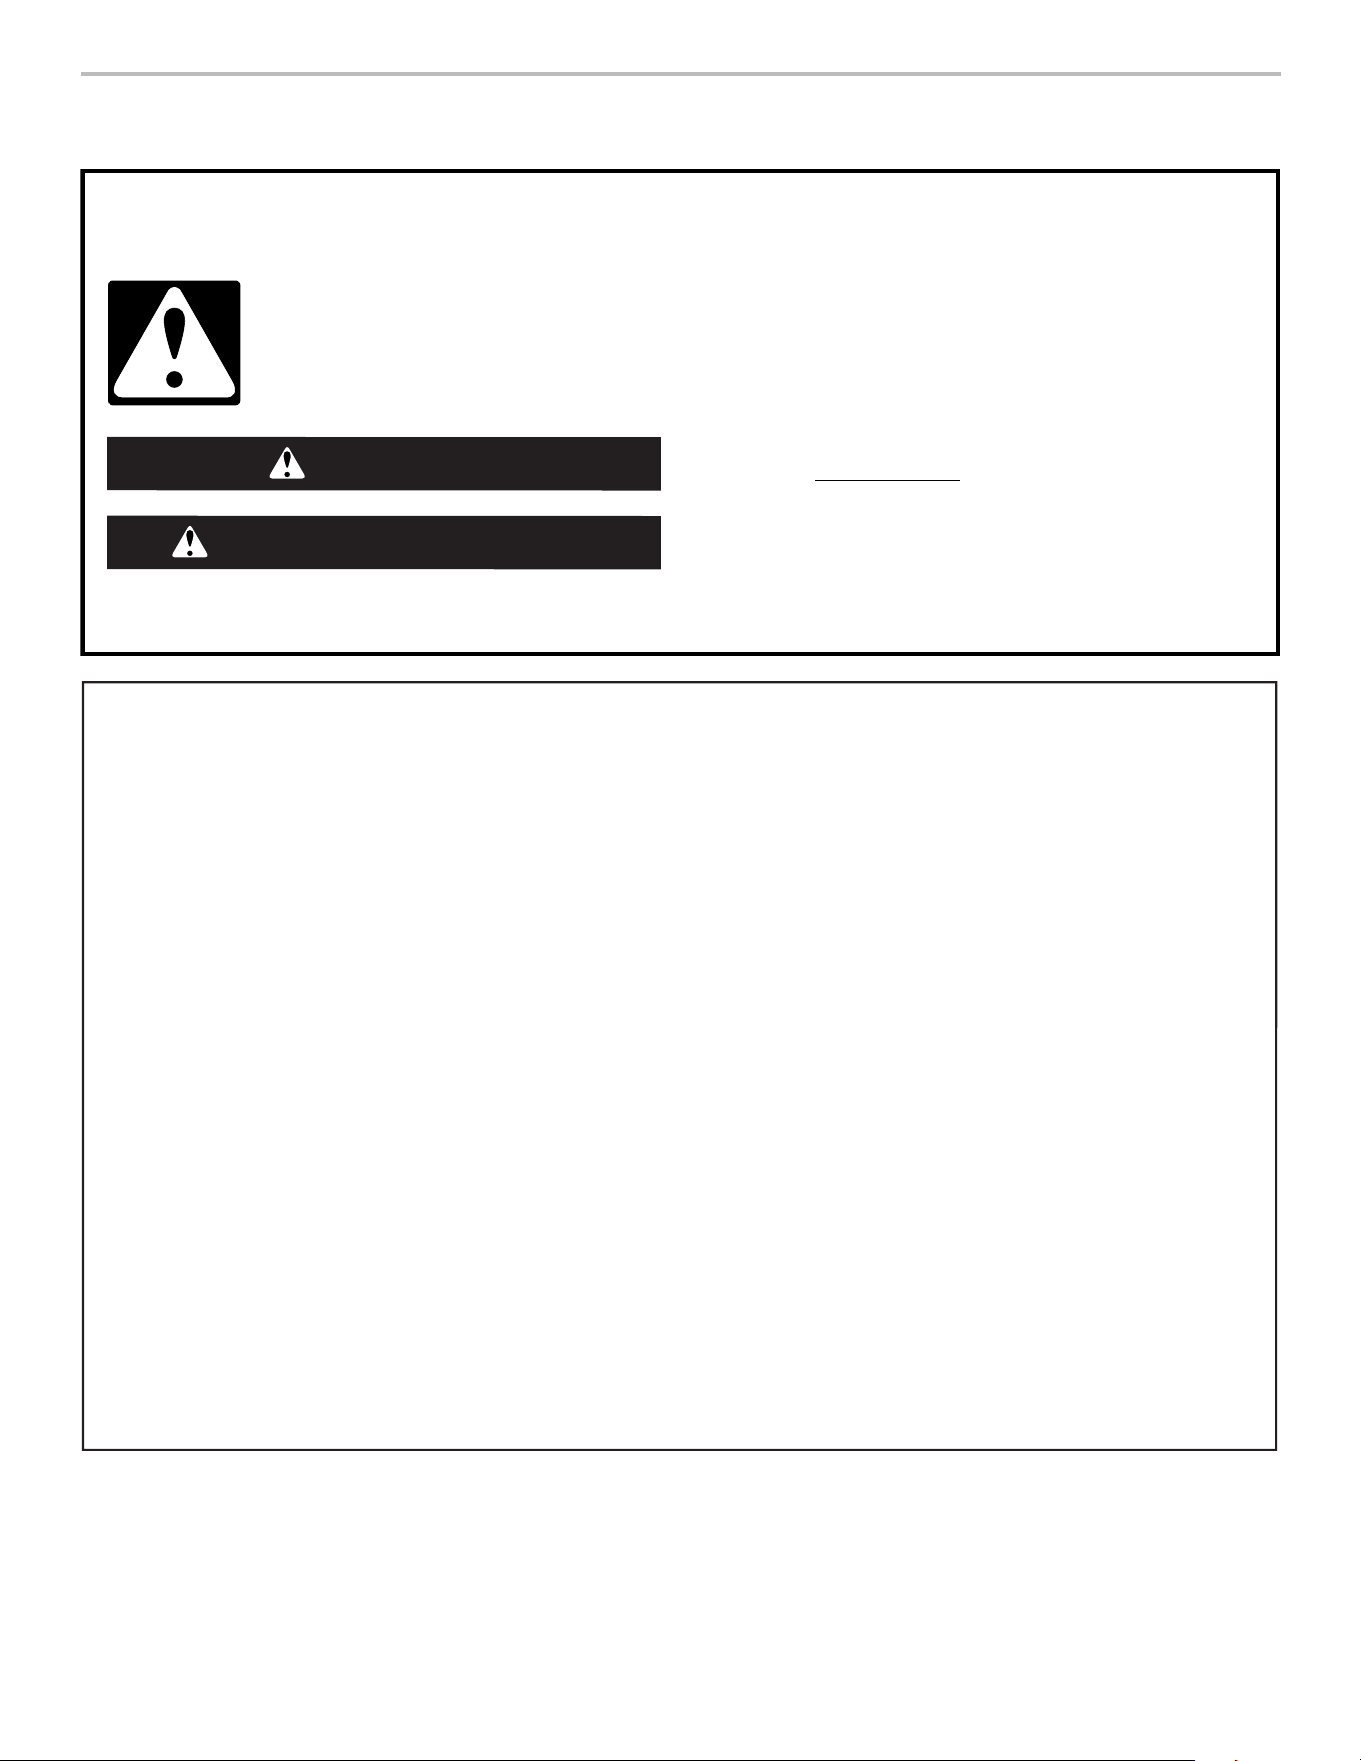
46
Risque possible de décès ou de blessure grave si vous ne
suivez pas immédiatement les instructions.
Risque possible de décès ou de blessure grave si vous
ne suivez pas les instructions.
Tous les messages de sécurité vous diront quel est le danger potentiel et vous disent comment réduire le risque de blessure et
ce qui peut se produire en cas de non-respect des instructions.
Votre sécurité et celle des autres est très importante.
Nous donnons de nombreux messages de sécurité importants dans ce manuel et sur votre appareil ménager. Assurez-vous de
toujours lire tous les messages de sécurité et de vous y conformer.
AVERTISSEMENT
DANGER
Voici le symbole d’alerte de sécurité.
Ce symbole d’alerte de sécurité vous signale les dangers potentiels de décès et de blessures graves à vous
et à d’autres.
Tous les messages de sécurité suivront le symbole d’alerte de sécurité et le mot “DANGER” ou
“AVERTISSEMENT”. Ces mots signifient :
SÉCURITÉ DU RÉFRIGÉRATEUR
AVERTISSEMENT :
Pour réduire le risque d’incendie, de choc électrique ou de blessure dans le cadre de l’utilisation du
réfrigérateur, suivre les consignes de base suivantes :
IMPORTANTES INSTRUCTIONS DE SÉCURITÉ
CONSERVEZ CES INSTRUCTIONS
■
Brancher sur une prise de terre (reliée à la masse).
■
Ne pas retirer la broche de terre.
■
Ne pas utiliser d’adaptateur.
■
Ne pas utiliser de rallonge.
■ Débrancher la source de courant électrique avant l'entretien.
■ Replacer pièces et panneaux avant de faire la remise en marche.
■ Enlever les portes de votre vieux réfrigérateur.
■ Utiliser un produit de nettoyage ininflammable.
■
Ne pas utiliser ou conserver d’essence ni de liquides ou gaz
inflammables à proximité de cet ou d’autres appareils électriques. Les
fumées peuvent causer des incendies ou des explosions.
■
Ne pas conserver de substances explosives, par exemple des bombes
aérosols contenant un agent propulseur, dans ce réfrigérateur.
■
Ne pas utiliser ni placer dans les compartiments du réfrigérateur des
dispositifs électriques d’un type autre que celui expressément autorisé
par le fabricant.
■ Utiliser deux ou plus de personnes pour déplacer et installer le
réfrigérateur.
■ Débrancher le réfrigérateur avant l'installation de la machine à
glaçons (seulement pour modèles prêts à recevoir une machine
à glaçons).
■
Un technicien qualifié doit installer le tuyau d’eau et le
distributeur de glaçons.
■
Raccorder uniquement à une arrivée d’eau potable.
■ Utiliser un verre robuste pour prendre des glaçons (sur
certains modèles).
■ Cet appareil ne convient pas à une utilisation par des
personnes (y compris des enfants) à capacités physiques,
sensorielles ou mentales réduites, ou possédant un
manque d'expérience et de connaissances, à moins
qu'elles ne soient placées sous supervision ou qu'elles
aient reçu des instructions concernant l’utilisation de
l'appareil par une personne responsable de leur sécurité.
■ Les enfants doivent être placés sous surveillance afin de
s'assurer qu'ils ne jouent pas avec l'appareil.
■
Pour éviter le risque que des enfants restent enfermés à
l’intérieur et s’asphyxient, ne pas les laisser jouer ou se cacher
dans le réfrigérateur.
■
Si le cordon d’alimentation est endommagé, il doit être remplacé
par le fabricant ou son technicien d’entretien ou une personne
présentant une qualification similaire.

47
PIÈCES ET CARACTÉRISTIQUES
Compartiment
de porte pour
contenant de
un gallon
Filtre à air
Balconnet
de porte
moyen
Tiroirs-bacs
à légumes
Humidiseal™
Tiroir à contrôle
de température
distinct
Bac à
glaçons
In-Door-Ice
®
Tablette en
verre pliable
Petit balconnet
de porte (2)
Compartiment de
porte de capacité
de un gallon (4)
Mise au rebut
du vieux réfrigérateur
AVERTISSEMENT
Risque de suffoquer
Enlever les portes de votre vieux réfrigérateur.
Le non-respect de cette instruction peut causer
un décès ou des lésions cérébrales.
IMPORTANT: Le risque qu’un enfant puisse se retrouver coincé
et suffoquer n’est pas chose du passé. Les réfrigérateurs jetés
ou abandonnés restent dangereux, même s’ils ne restent à
l’extérieur que pour “quelques jours seulement”. Si l’ancien
réfrigérateur doit être mis au rebut, suivre les instructions
suivantes afin d’éviter les accidents.
Avant de jeter l’ancien réfrigérateur ou congélateur:
■ Enlever les portes.
■ Laisser les tablettes en place de sorte que les enfants ne
puissent pas y pénétrer facilement.
Renseignements importants à propos de la mise au
rebut des fluides réfrigérants :
Mettre le réfrigérateur au rebut conformément à la
réglementation fédérale et locale. Les fluides réfrigérants
doivent être évacués par un technicien certifié et agréé par
l’EPA conformément aux procédures établies.
SAID Wi-Fi
(autocollant
d’identifiant Smart
Appliance ID)
Commandes
detempérature
Support à vin – optionnel
Filtre à eau
Boîte Herb
Tender
®
Tablette amovible
Tablettes en
verre réglables
Tiroir de
congélation
Glide-Out
48
Votre réfrigérateur JennAir
®
avec porte à double battant est équipé de plusieurs caractéristiques innovantes
concernant l’entreposage et la fonction éconergique.
Intérieur obsidienne
Cet intérieur spectaculaire met en valeur les produits alimentaires
partout dans le réfrigérateur, et offre un contraste plus marqué que
les intérieurs blancs. Coordination des tiroirs-bacs à légumes et
du congélateur comprise.
Consommation d’énergie et bruits de
fonctionnement normaux
Votre nouveau réfrigérateur à double battant avec porte double
et congélateur en bas possède un compresseur linéaire qui
offre une consommation éconergique optimale et une régulation
de la température plus efcace an de pallier les besoins de
refroidissement. Il est possible de remarquer qu’il fonctionne
différemment de votre réfrigérateur précédent. Ceci permet au
réfrigérateur de fonctionner à des vitesses variables et d’optimiser
le refroidissement en évitant les démarrages/arrêts brusques.
Bac à glaçons In-Door-Ice
®
La machine à glaçons et le bac d’entreposage sont situés dans la
porte pour permettre un accès facile aux glaçons tout en libérant
de l’espace de tablettes à l’intérieur et en ajoutant des balconnets
de porte supplémentaires pour offrir plus d’espace d’utilisation.
Système de contrôle de la température Twin Fresh™
Le réfrigérateur et le congélateur sont munis d’évaporateurs
séparés pour offrir une température d’entreposage optimale
pour les aliments frais et congelés. L’environnement reste donc
frais et humide pour les aliments frais et froid et sec pour les
aliments congelés. Puisqu’il n’y a pas d’échange d’air entre les
deux sections, il y a peu de transfert d’odeurs et de goûts du
réfrigérateur vers le congélateur. De plus, l’air froid reste sec pour
réduire la production de givre et limiter les brûlures de congélation.
Filtre à air FreshFlow™
Un ltre à air est 15fois plus puissant que le bicarbonate de
soude pour réduire les odeurs courantes d’aliments à l’intérieur
du réfrigérateur. Remplacer le ltre à air tous les 6mois pour une
réduction maximale des odeurs.
Distributeur d’eau avec remplissage mesuré
La fonction de remplissage mesuré vous permet de distribuer une
quantité désirée d’eau ltrée à coups de 8, 16 ou 24oz.
Distributeur d’eau avec remplissage préféré
La fonction Favorite Fill (remplissage préféré) permet d’enregistrer
2 préréglages personnalisés qu’il est possible de programmer
pour les articles préférés qu’il faut souvent remplir comme une
cafetière ou une bouteille d’eau.
Tablette en verre pliable
Cette tablette spéciale offre une option de rangement exible pour
les articles de grande taille en se repliant à moitié pour libérer de
l’espace.
Tablette amovible
Cette tablette pleine largeur coulissante est parfaite pour les plats
qui n’attendent que d’être servis ou les ingrédients qui nécessitent
plus de préparation.
Tiroir à contrôle électronique de température distinct
Ces tiroirs sont munis de commandes de température distinctes
et précises avec quatre réglages spécialisés pour offrir un
maximum de exibilité.
Boîte Herb Tender
®
Cet accessoire amovible offre un espace pour aider à conserver
les nes herbes fraîches.
Tiroirs-bacs à légumes Humidiseal™
Ces tiroirs maintiennent un niveau d’humidité plus élevé que le
compartiment principal du réfrigérateur, pour aider à garder les
produits frais
Compartiment pour petits articles
Cet espace de rangement supplémentaire est parfait pour le
beurre, le fromage à la crème ou les sachets de condiment ou
devinaigrette.
Éclairage effet théâtral à DEL
De multiples bandes lumineuses à DEL situées à l’intérieur du
compartiment réfrigérateur, du compartiment congélateur et des
tiroirs intérieurs réduisent les ombres et répartissent uniformément
la lumière partout dans le réfrigérateur.
Technologie de fermeture automatique en douceur
Technologie qui permet de faire glisser tout en douceur les tiroirs
et qui possède un système de fermeture automatique.
Alarme de porte entrouverte
Une alarme retentit lorsque la porte du réfrigérateur ou du tiroir du
congélateur est laissée ouverte.
Témoin de coupure de courant
Si le courant est interrompu alors que vous êtes loin de votre
domicile, ce témoin vous avertit du fait que l’alimentation
électrique du réfrigérateur a été interrompue.
Connexion Wi-Fi
Ce réfrigérateur peut se connecter au réseau Wi-Fi de votre
domicile et être commandé à distance à l’aide d’une application
téléchargeablepour appareils iOS ou Android.
Symbole d’accueil
Cette fonction est automatiquement activée une
fois l’appareil mis à disposition et enregistré. Une
pression sur le bouton [Connect (connecter)]
désactive temporairement la fonction.
Quoi de neuf en coulisse?
Pour visionner une vidéo expliquant
comment enlever/remettre en place
une porte, ajuster une porte, installer un
filtre à eau ou à air, positionner ou retirer
une tablette et effectuer une connexion
Wi-Fi (le cas échéant), balayer le code de
gauche à l’aide de votre appareil mobile.
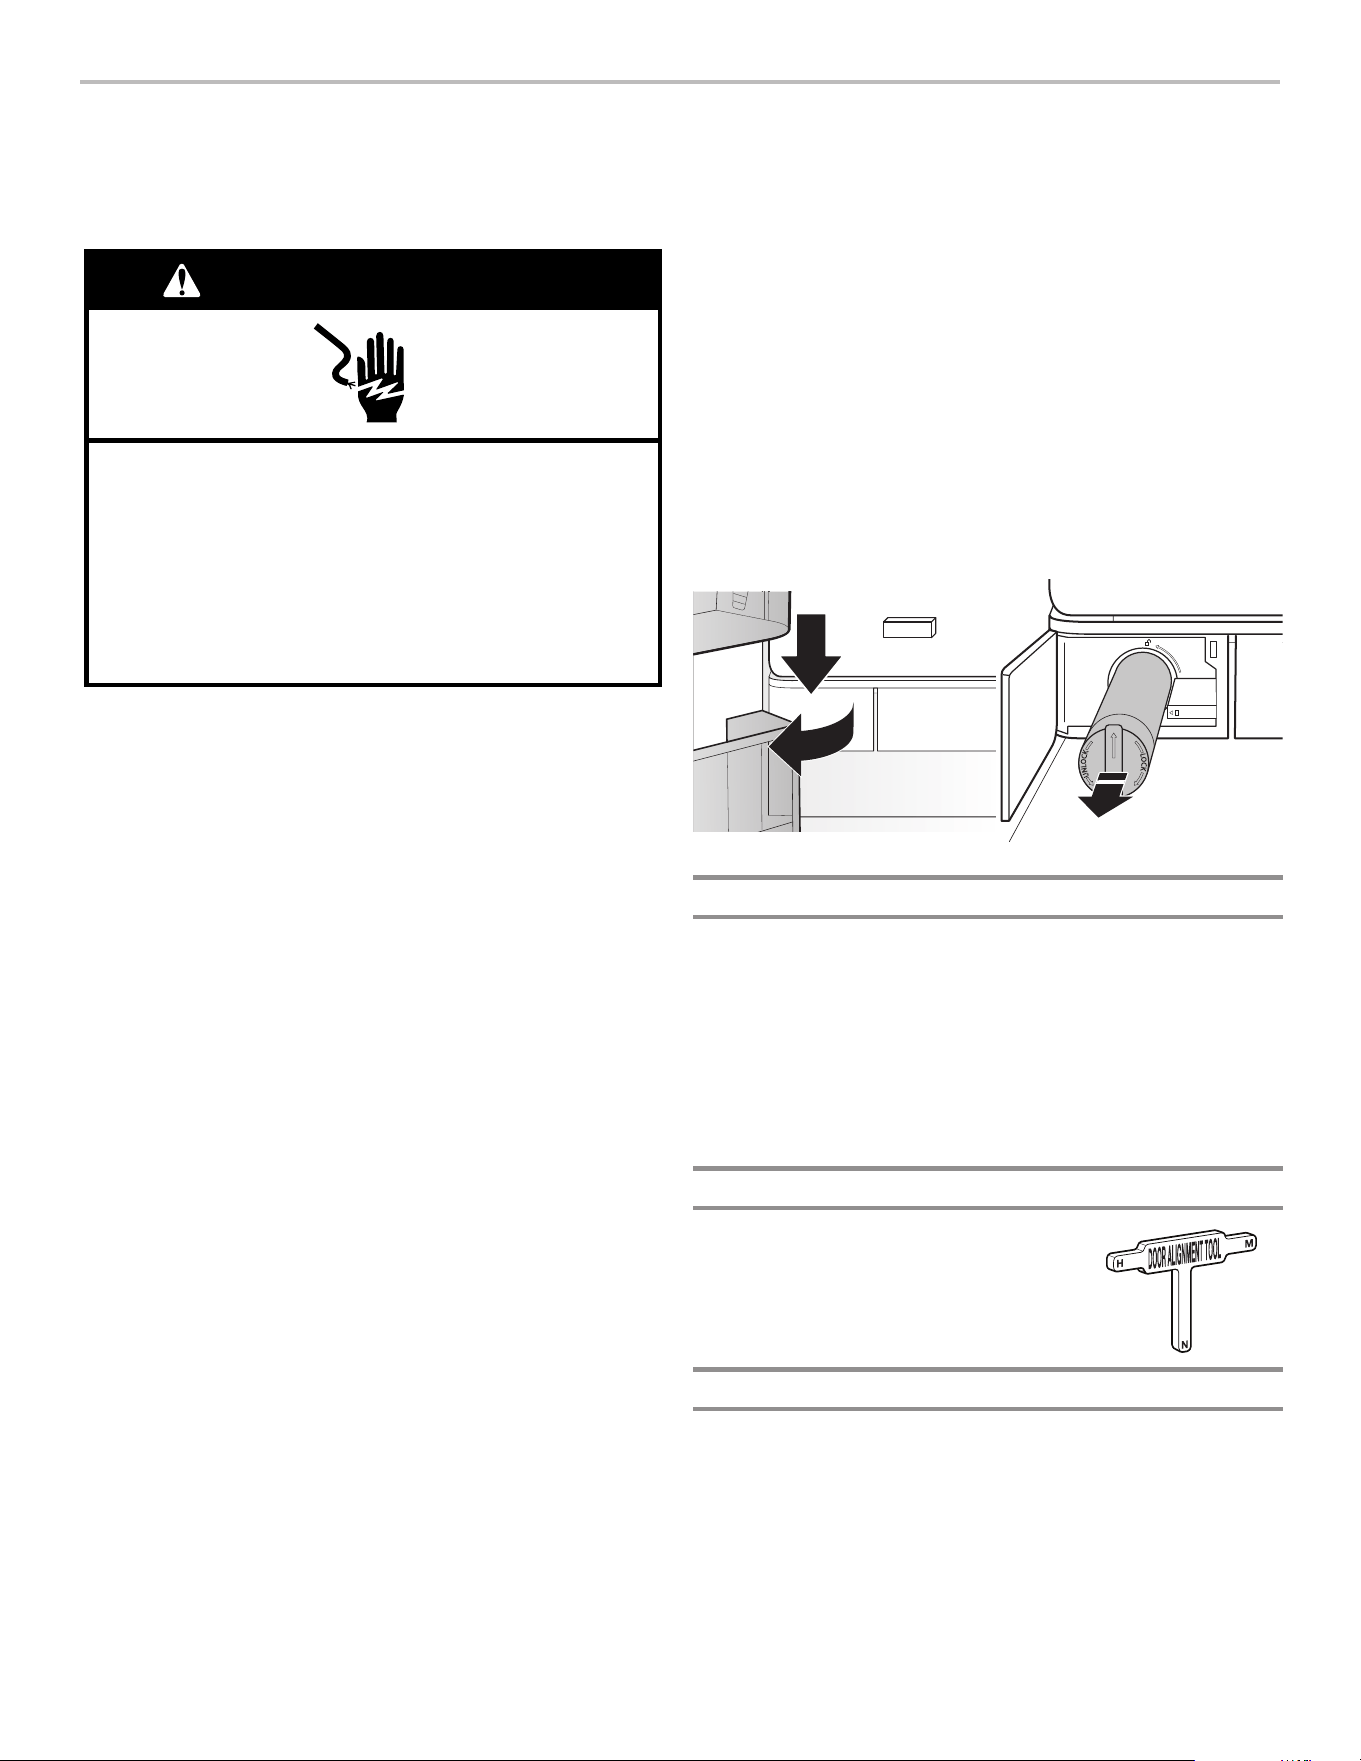
49
POUR COMMENCER
LISTE DE VÉRIFICATION POUR
L’INSTALLATION
✔Alimentation électrique
■ Brancher le réfrigérateur sur une prise à 3 alvéoles reliée à
laterre.
✔ Portes
■ Si les portes doivent être retirées lors de l’installation,
sereporter à la section “Retirer et replacer les portes”
desinstructions.
■ S’assurer que les poignées sont bien xées et installées selon
les instructions.
■ Les portes ferment complètement hermétiquement.
■ Le réfrigérateur est de niveau. (retirer la grille de la base et
ajuster les pieds de nivellement de façon à ce qu’ils soient en
contact avec le plancher).
■ Les portes sont alignées à leurs rives supérieures. (Utiliser la
fonction d’ajustement de la porte au besoin).
■ La grille de la base est convenablement xée au réfrigérateur.
✔ Système de glaçons et d’eau (sur certains modèles)
■ Raccorder le réfrigérateur à une canalisation d’alimentation en
eau froide avec pression de 20 à 120 psi comme spécié dans
les instructions.
■ S’assurer que l’alimentation en eau courante est raccordée et
OUVERTE.
■ S’assurer que la canalisation d’alimentation en eau, située
derrière le réfrigérateur, n’est pas déformée.
■ N’utiliser que la canalisation d’alimentation en eau
recommandée (cuivre ou PEX) conformément aux instructions.
■ Installer le ltre à eau conformément aux instructions.
■ Rincer le système de distribution d’eau à l’aide de 3gallons
(11,4 L) d’eau, conformément aux instructions.
■ Vérier l’absence de fuites au niveau de chaque raccord.
■ Mettre en marche la machine à glaçons si le réfrigérateur est
raccordé à l’alimentation en eau. (Éteindre la machine à glaçons
s’il n’est pas raccordé à une canalisation d’arrivée d’eau.)
✔ Dernières vérifications
■ Installer le ltre à air conformément aux instructions dans les
emballages correspondants.
■ Retirer tout l’emballage d’expédition.
■ Régler les commandes de température aux réglages
recommandés.
■ Conserver les instructions et autres documents éventuels.
■ Envoyer la carte d’enregistrement ou enregistrer le produit
enligne.
AVERTISSEMENT
Risque de choc électrique
Brancher sur une prise à 3 alvéoles reliée à la terre.
Ne pas enlever la broche de liaison à la terre.
Ne pas utiliser un adaptateur.
Ne pas utiliser un câble de rallonge.
Le non-respect de ces instructions peut causer
un décès, un incendie ou un choc électrique.
INSTALLATION DU FILTRE À EAU
■ Repérer le compartiment du ltre à eau sur le côté gauche
inférieur du réfrigérateur. Appuyer sur le côté droit de la porte
du ltre pour l’ouvrir.
■ Aligner la èche sur le capuchon du ltre à eau avec l’encoche
du logement du ltre et insérer le ltre dans le logement.
■ Après l’avoir inséré, tourner le ltre dans le sens horaire de 90°
(1/4 tour) jusqu’à ce qu’il s’emboîte dans le logement.
■ Refermer la porte du ltre à eau pour la verrouiller.
■ Rincer le système de distribution d’eau à l’aide de 3gallons
(11,4 L) d’eau pour évacuer l’air de la canalisation d’eau et
pour empêcher le distributeur de goutter ou de réduire le débit
dudistributeur.
REMARQUE: Si le ltre n’est pas installé correctement,
ledébit d’eau sera plus faible et la production de glaçons
pluslente. La mauvaise installation d’un ltre peut aussi laisser
fuir le compartiment du ltre.
Alignement des portes du réfrigérateur
✔ Si les portes ne sont pas bien alignées.
■ Vérier que le réfrigérateur est d’aplomb.
■ Tout en gardant les deux portes du réfrigérateur fermées, retirer
le tiroir du congélateur. Repérer l’axe de charnière inférieure de
la porte de droite du réfrigérateur. La vis d’alignement se trouve
à l’intérieur de l’axe de la charnière inférieure.
■ Introduire l’extrémité courte de la clé à tête hexagonale de
1/8po (jointe aux instructions d’installation de la poignée de
porte) dans l’axe de la charnière inférieure jusqu’à ce qu’elle
soit complètement engagée dans la vis d’alignement.
ALIGNEMENT DES PORTES
Outillage nécessaire
En fonction de la largeur de l’ouverture de la porte, les outils
suivants s’avéreront peut-être nécessaires pour retirer, réinstaller
et aligner les portes du réfrigérateur.
Outils nécessaires:
■ Clé hexagonale de 1/4po – grille de la base, vis du tiroir du
congélateur et pieds de nivellement/freins
Outil fourni:
■ Clé à tête hexagonale de 1/8 po – Vis de blocage de la poignée
et d’alignements des portes
Instructions d’utilisation des outils d’alignement de portes
Caractéristiques:
■ Crée un espace parfaitement horizontal
entre les portes du réfrigérateur.
■ Résout les problèmes d’alignement des
portes pendant l’installation et améliore
l’étanchéité des portes.
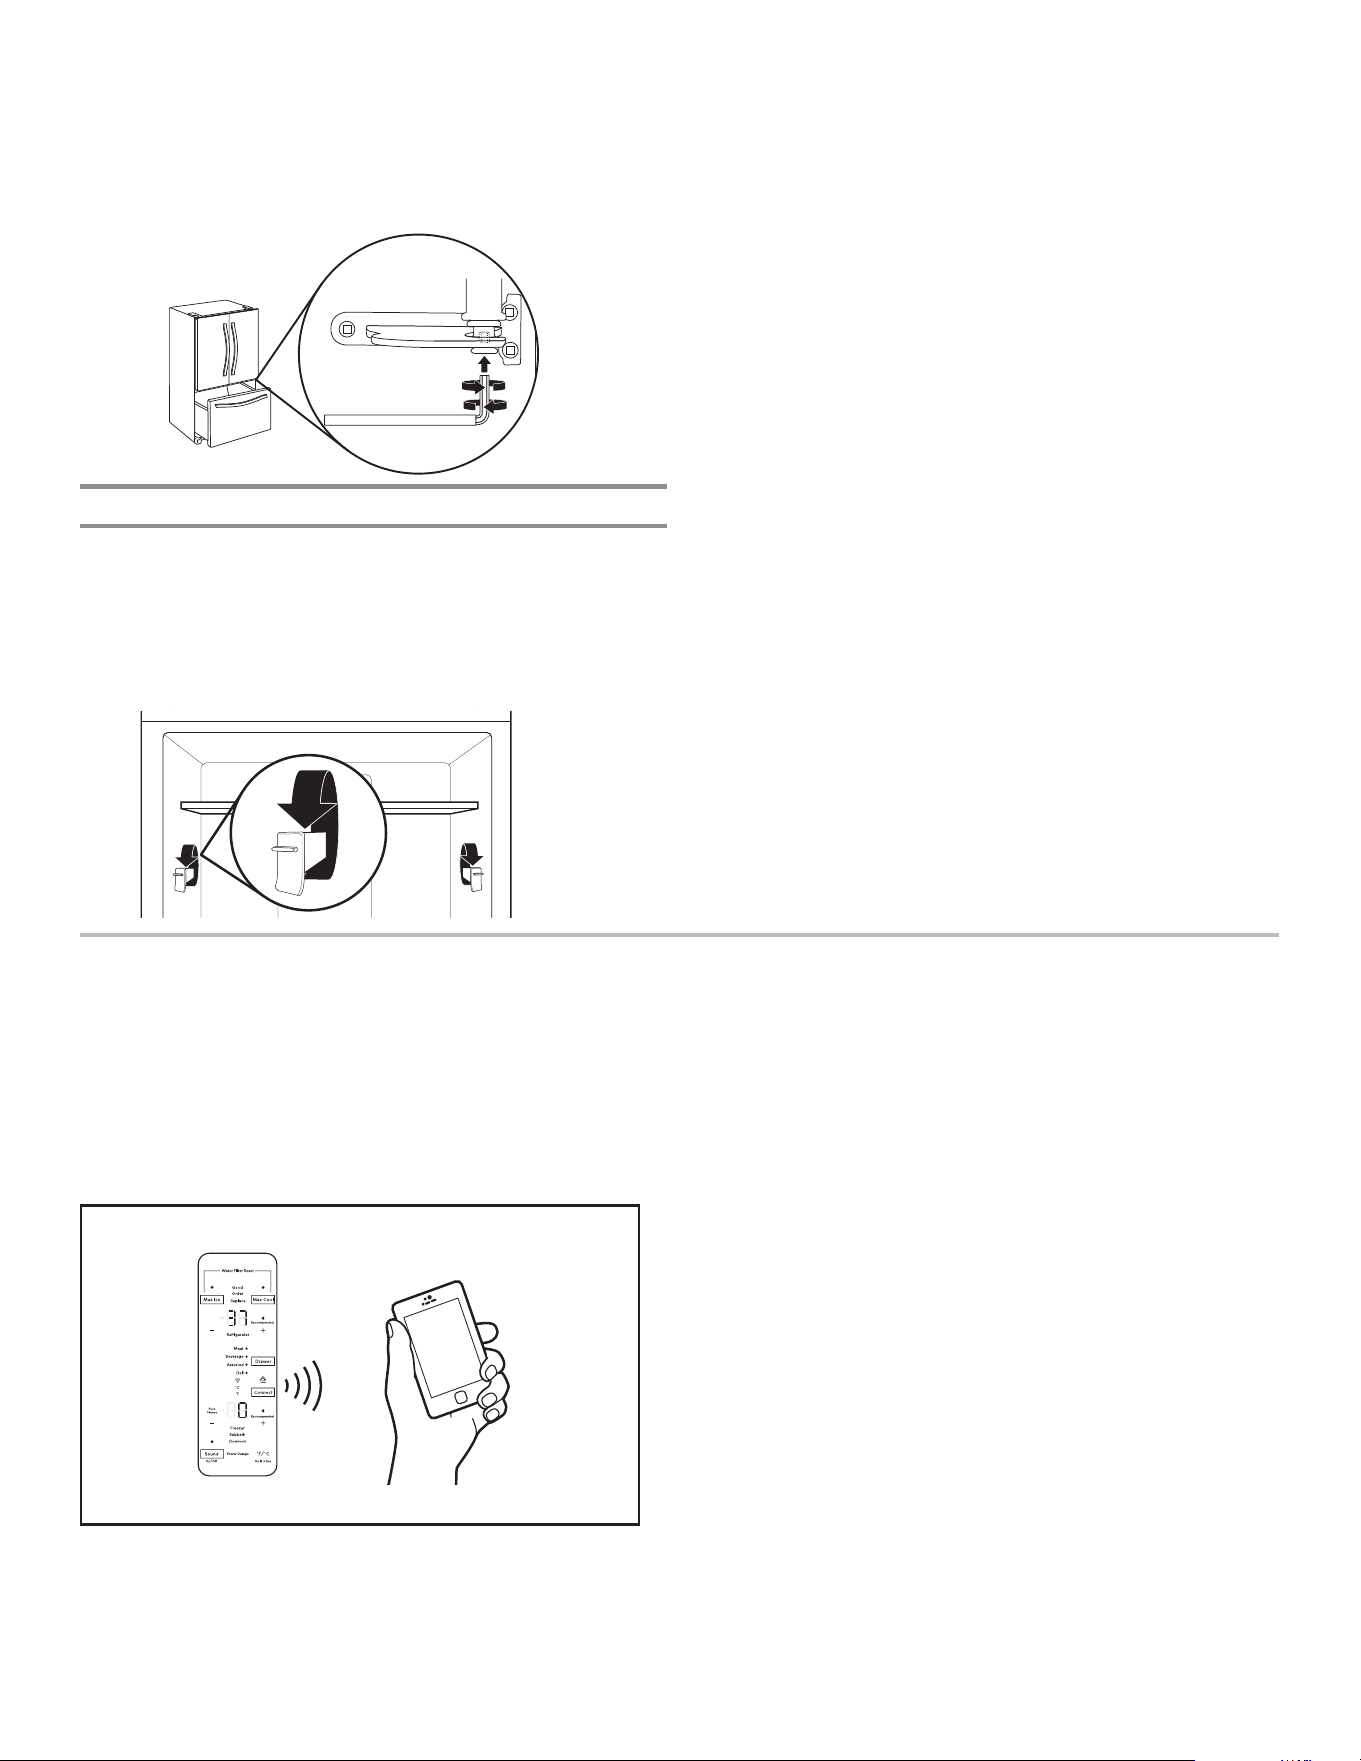
50
Réglage de la hauteur de tablettes
La hauteur de tablette peut être ajustée en repositionnant les
supports ajustables de tablettes sur leurs axes vertical et horizontal.
■ Retirer doucement la tablette en la soulevant de ses supports,
puis tourner la languette selon l’orientation souhaitée.
■ Répéter l’opération pour les supports de tablette restants.
■ Vous assurer que la tablette est convenablement remise en
place sur ses supports.
Pour soulever la porte du réfrigérateur, tourner la clé à tête
hexagonale vers la droite.
Pour abaisser la porte, tourner la clé à tête hexagonale vers
lagauche.
■ Continuer à tourner la vis d’alignement jusqu’à ce que le
dessus de la porte soit aligné.
BRUITS DEFONCTIONNEMENT NORMAUX
Votre nouveau réfrigérateur avec porte à double battant et
congélateur en bas est conçu pour un niveau éconergique
optimal et une régulation de la température plus efcace an
depallier les besoins de refroidissement.
Vous remarquerez peut-être qu’il fonctionne différemment de
votre réfrigérateur précédent.
Il est normal que le compresseur haute efcacité fonctionne à
vitesse variable pendant une durée prolongée, et ce, an de
consommer uniquement le niveau d’énergie nécessaire à une
efcacité maximale.
D’autre part, au cours de différentes étapes du programme de
refroidissement, des bruits de fonctionnement normaux qui ne
vous sont pas familiers peuvent être entendus.
CARACTÉRISTIQUES DE CONNEXION DU RÉFRIGÉRATEUR
(sur certains modèles)
La connectabilité Wi-Fi permet au réfrigérateur intelligent de se connecter à Internet et d’interagir avec l’application JennAir
®
sur
votre téléphone intelligent ou appareil mobile. Cette connexion ouvre plusieurs options intelligentes pour l’utilisateur: des options
conçues pour économiser du temps précieux et de l’énergie. Consulter la section “Dépannage – modèles avec connexion” de ce guide
d’utilisation et d’entretien, vérier les instructions de connexion de votre routeur ainsi que les instructions alternatives au
www.jennair.com/connect ou composer le 1877559-2603.
REMARQUE: Connexion Wi-Fi et création d’un compte requis. Les fonctions de l’application peuvent changer. Assujetti aux conditions
disponibles au www.jennair.com/connect. Des frais de transfert de données peuvent s’appliquer.
FONCTIONS INTELLIGENTES
Les fonctions intelligentes aident à rendre la vie de tous les jours
plus simple en laissant la possibilité à l’utilisateur de surveiller,
gérer et entretenir son réfrigérateur à distance.
Commande de la température à distance
Description: Permet de commander le réfrigérateur à distance à
partir de l’application JennAir
®
installée sur un appareil mobile.
Avantages: Permet de régler la température du réfrigérateur,
ducongélateur et du garde-manger à distance, pas seulement
ense tenant près de l’appareil.
État du ltre à eau
Description: Permet de connaître l’autonomie restante du ltre
à eau avant qu’un remplacement soit nécessaire. Permet de
réinstaller le ltre.
Avantages: Aide à planier de façon plus efcace la commande
de ltres neufs et leur remplacement.
Application de renouvellement automatique
Description: L’application JennAir
®
permet de commander des
ltres de rechange, des pièces consomptibles et des accessoires
pour une livraison directement à domicile.
Avantages: Simplie la commande de ltres à eau et à air
appropriés (plus besoin d’aller chercher les ltres corrects dans un
magasin).
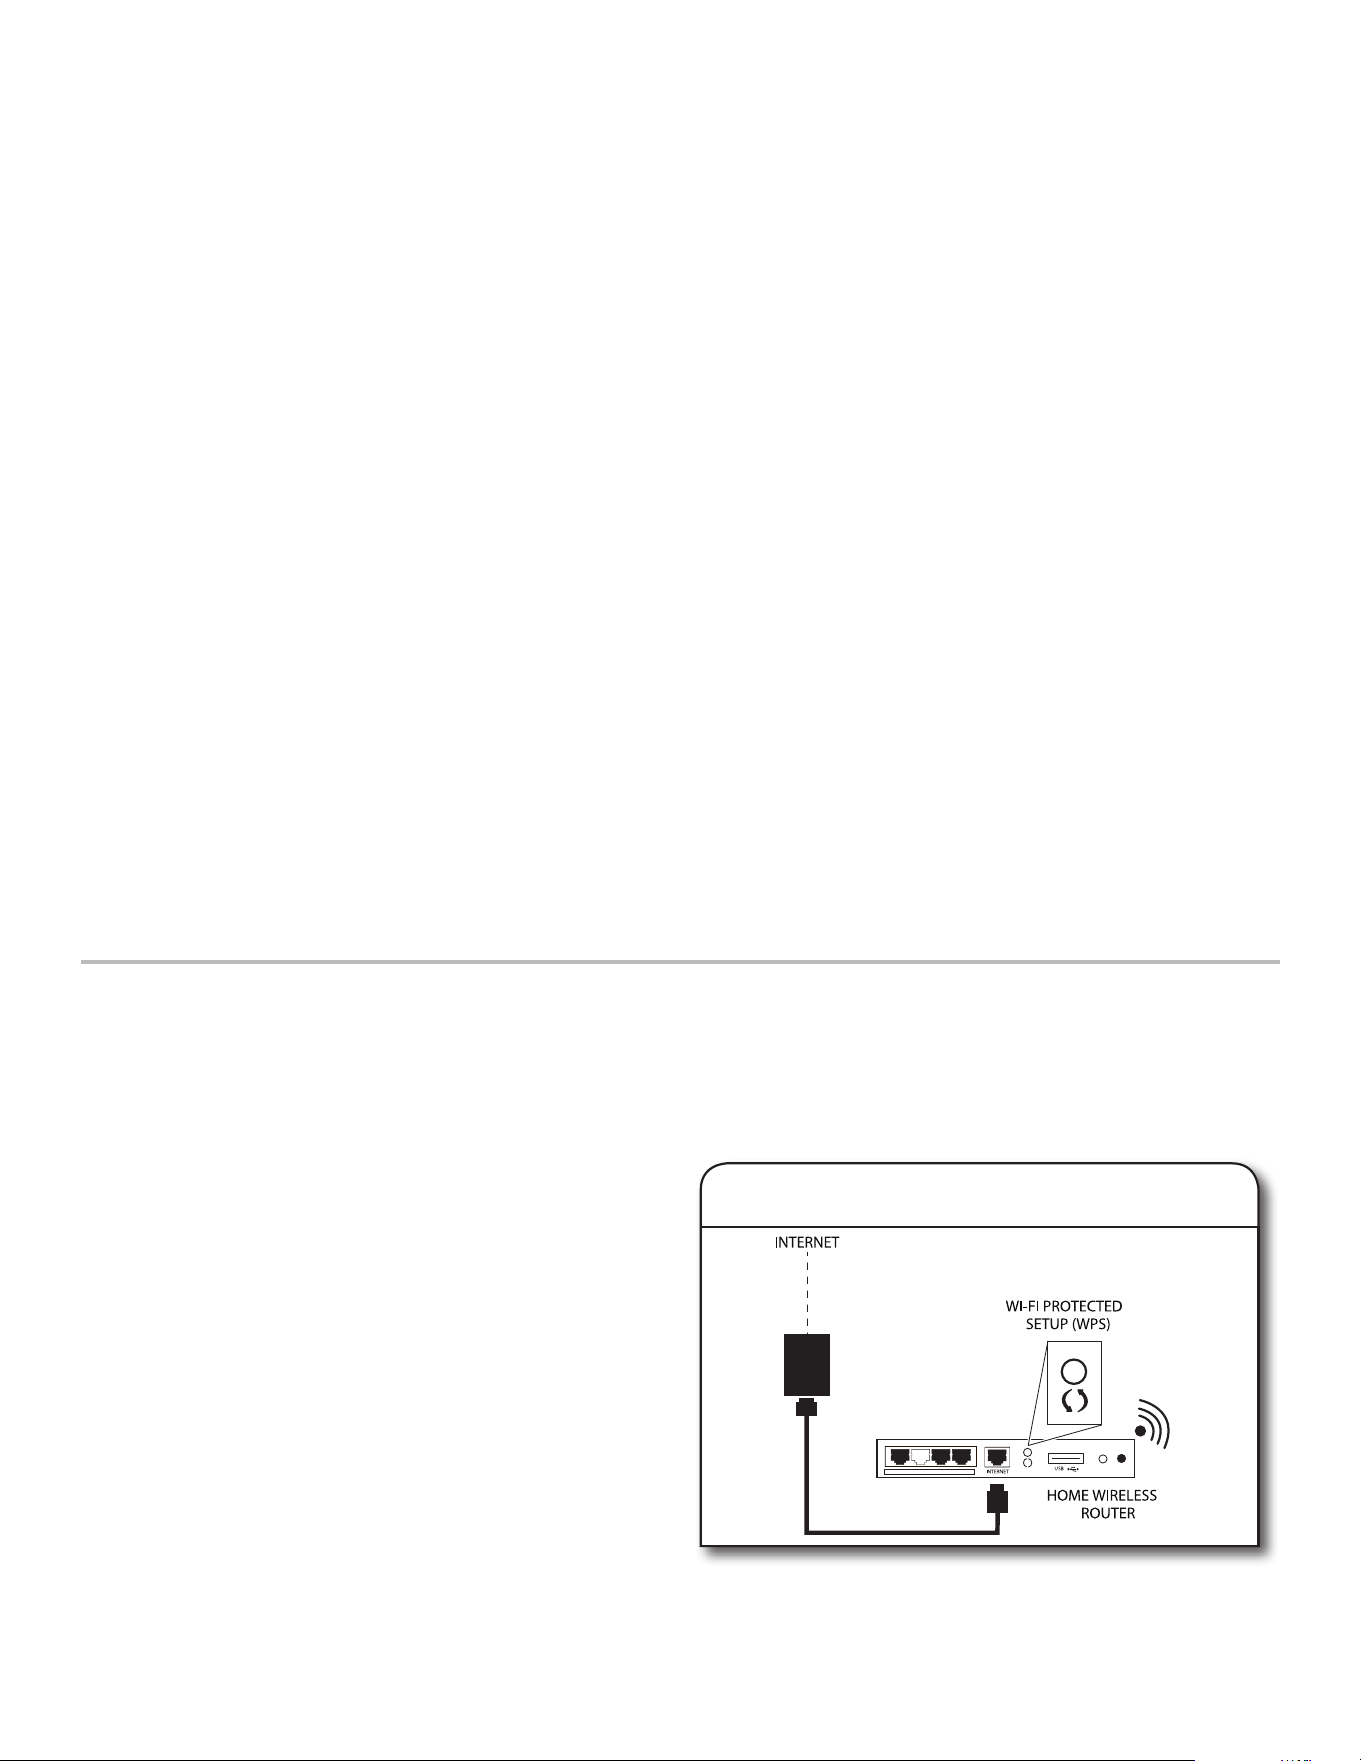
51
CONFIGURATION DE LA CONNECTABILITÉ
(sur certains modèles)
IMPORTANT: Il est de la responsabilité de l’utilisateur de bien installer le réfrigérateur avant de l’utiliser. Bien lire et suivre le guide
d’utilisation qui accompagne le réfrigérateur.
Instructions de conguration automatique – Conguration protégée Wi-Fi
Appuyer sur le bouton de conguration protégée Wi-Fi du
routeur. Un témoin lumineux clignotera.
CONSEIL UTILE: Cette fonction de votre routeur s’active pendant
2minutes. Il est important d’effectuer la prochaine étape dans
cette période pour ne pas devoir recommencer cette procédure.
1. Conguration du routeur
Il faut:
• Un routeur sans l domestique avec protocole Conguration
protégée Wi-Fi. Le routeur devra être en marche et connecté
àl’Internet.
• L’identiant Smart Appliance Identication Number (SAID) de
ce réfrigérateur. L’identiant gure sur l’autocollant appliqué
sur la partie avant du couvercle de la charnière de droite du
réfrigérateur.
REMARQUE: Si votre routeur sans l domestique n’est pas
muni d’un bouton de conguration protégée Wi-Fi, consulter le
manuel d’utilisation du routeur pour conrmer qu’il peut utiliser
ce protocole. Si ce n’est pas le cas, utiliser les instructions de
conguration alternative proposées au www.jennair.com/connect.
Avertissement de porte entrouverte
Description: Envoie une notication lorsqu’une des portes du
réfrigérateur n’a pas été refermée.
Avantages: Informe l’utilisateur qu’une porte est entrouverte pour
qu’il puisse la fermer ou appeler à la maison pour que quelqu’un
d’autre ferme la porte avant qu’un problème de température ne se
produise.
Alertes de coupure de courant
Description: Envoie une notication en cas de panne d’alimentation
du réfrigérateur, lorsque la panne est terminée et lorsque des
températures élevées sont atteintes dans les compartiments
réfrigérateur et congélateur pendant la panne decourant.
Avantages: Informe l’utilisateur de l’état de l’alimentation et de
la durée de la panne pour offrir des données concernant l’état
ducontenu du réfrigérateur et du congélateur.
Dépassement de la température
Description: Envoie une notication lorsque la température du
réfrigérateur augmente et atteint une valeur supérieure à la valeur
spéciée dans les compartiments réfrigérateur et congélateur.
Avantages: Informe l’utilisateur de l’état de température
excessive pour offrir des données concernant l’état du contenu du
réfrigérateur/congélateur.
Refroidissement maximal
Description: Permet de commander le réfrigérateur à distance à
partir de l’application JennAir
®
installée sur un appareil mobile.
Avantages: Permet de mettre en marche et d’arrêter l’option
de refroidissement maximal pour abaisser la température du
réfrigérateur en vue d’ajouter de nouveaux aliments. Abaisse la
température pendant 24 heures.
Production de glaçons maximale
Description: Permet de commander le congélateur à distance à
partir de l’application JennAir
®
installée sur un appareil mobile.
Avantages: Permet de mettre en marche et d’arrêter l’option de
production de glaçons maximale pour augmenter la production
de glaçons. Utilise le plus bas réglage de température possible
pendant 24 heures pour maximiser la production de glaçons.
Contrôle du mode Pure Freeze
®
Description: Permet de recevoir l’état du réfrigérateur à distance
sur l’application JennAir
®
installée sur un appareil mobile.
Avantages: Indique si le mode Pure Freeze
®
est actif dans le
réfrigérateur pour réduire les brûlures de congélation et faire en sorte
que les aliments congelés conservent leur apparence et leurgoût.
Mode Sabbat
Description: Permet d’ouvrir la porte du réfrigérateur ou du
congélateur pendant le Sabbat ou une autre fête religieuse sans
activer les commandes ou l’éclairage intérieurs. Permet de
l’activer et de le désactiver à distance à partir de l’application
JennAir
®
installée sur un appareil mobile.
Avantages: Permet de mettre en marche et d’arrêter à distance
l’option du mode Sabbat.
Commande de luminosité d’éclairage du distributeur
Description: Permet de commander le réfrigérateur à distance à
partir de l’application JennAir
®
installée sur un appareil mobile.
Avantages: Permet de mettre en marche et d’arrêter à distance
l’éclairage du distributeur.
Commande de remplissage préféré
Description: Permet de modier à distance les valeurs de la
fonction Favorite Fill (remplissage préféré) du réfrigérateur, à partir
de l’application JennAir
®
installée sur un appareil mobile.
Avantages: Permet de dénir et d’enregistrer à distance les
valeurs de la fonction Favorite Fill (remplissage préféré).
PREMIERS PAS
Consulter le kit Quick Connect (connexion rapide) fourni avec
le réfrigérateur ou le site www.jennair.com/connect et se
conformer aux instructions de connexion.
Consulter régulièrement l’application JennAir
®
pour obtenir des
renseignements et des fonctions supplémentaires.
Connexion Wi-Fi et création d’un compte requis. Les fonctions de
l’application peuvent changer. Assujetti aux conditions décrites
au: www.jennair.com/connect. Des frais de transfert de
données peuvent s’appliquer.
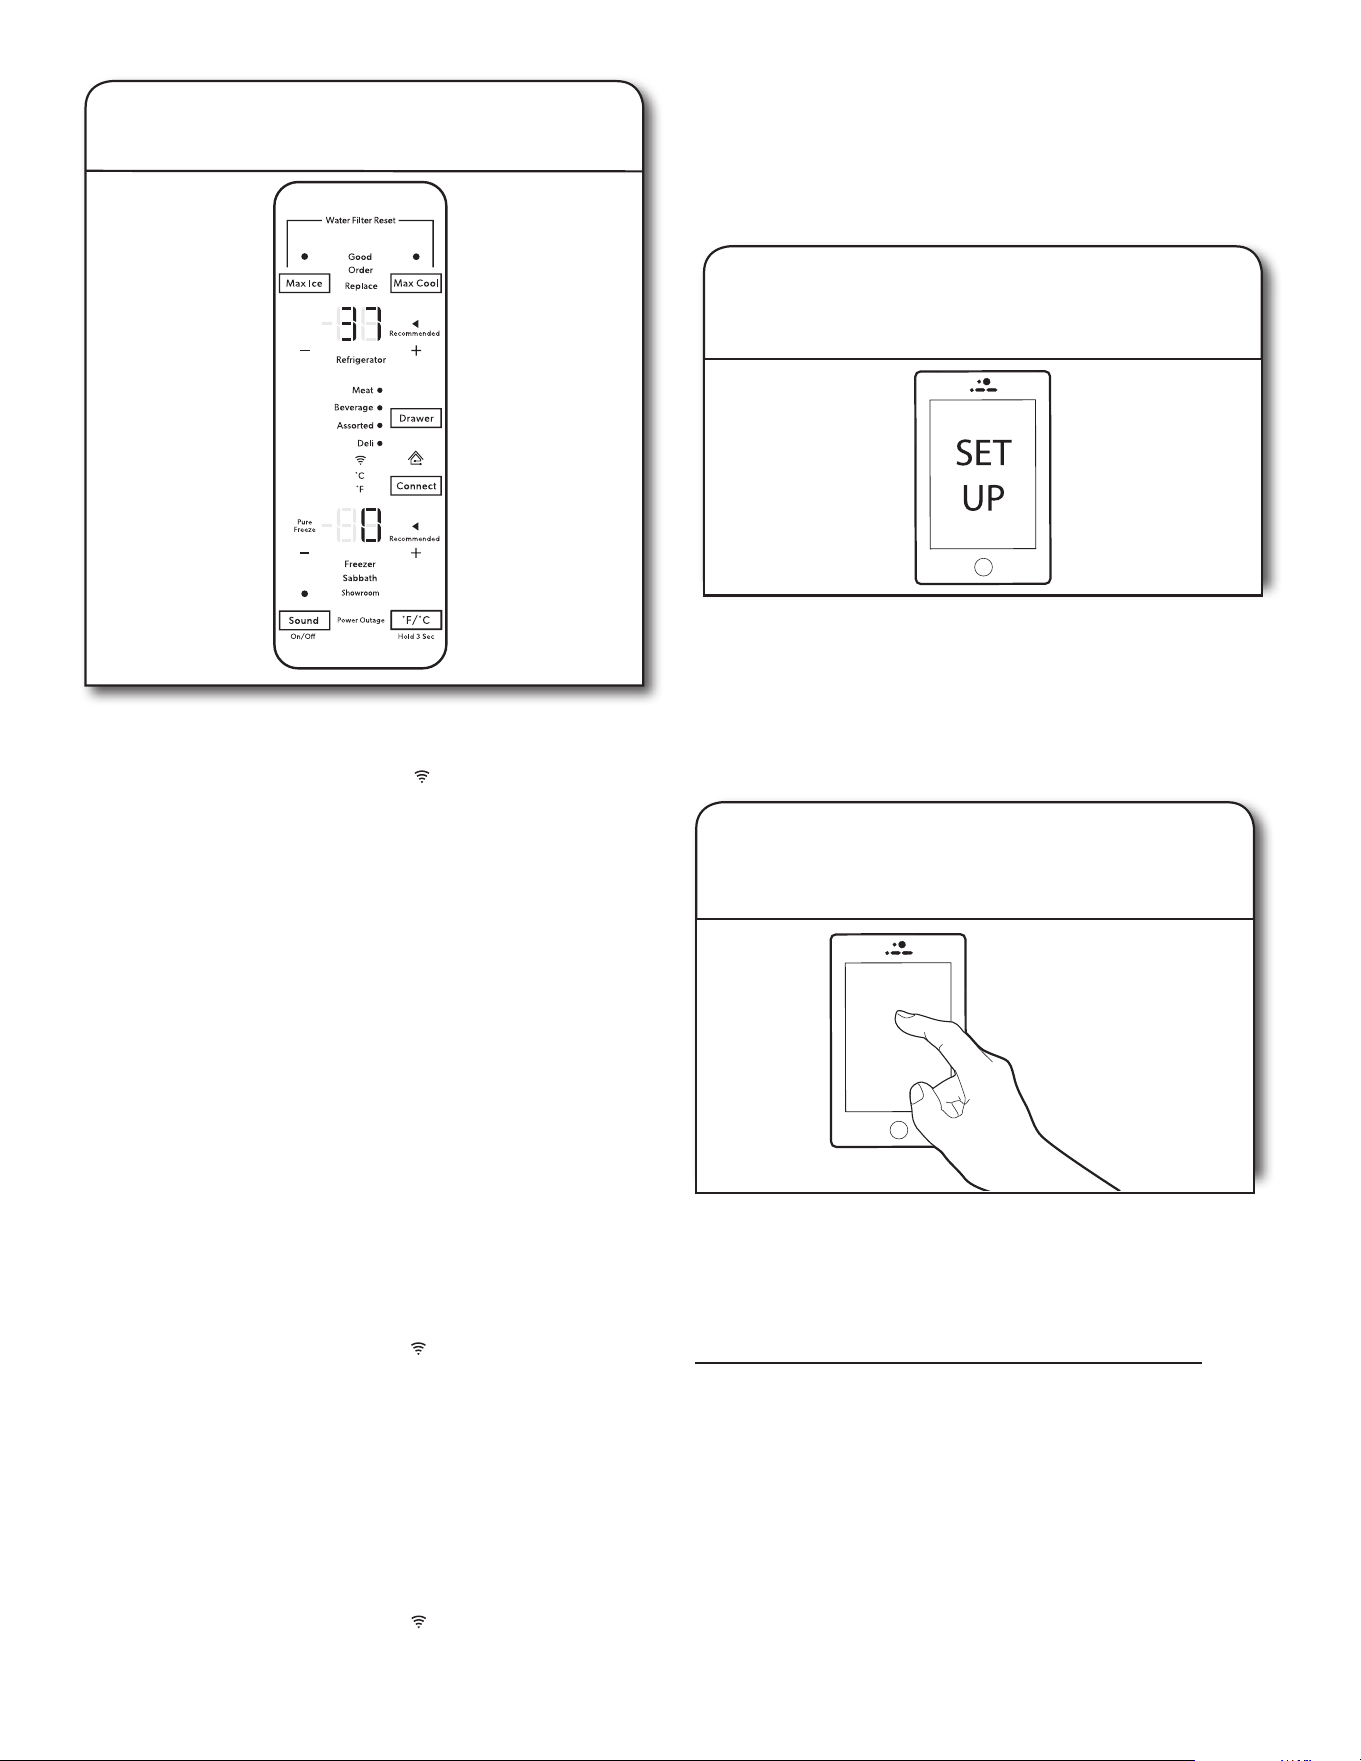
52
Si la connexion échoue:
Si la connexion entre le réfrigérateur et le routeur échoue après
2minutes, l’indicateur d’état de connexion Wi-Fi clignotera
rapidement pendant 5secondes puis s’éteindra. Consulter la
section “Dépannage – modèles avec connexion” de ce guide
d’utilisation et d’entretien, vérier les instructions de connexion
de votre routeur ainsi que les instructions alternatives au
www.jennair.com/connect ou composer le 1877559-2603.
3. Téléchargement de l’application
JennAir
®
et conguration du
compted’utilisateur
À l’aide de votre appareil mobile, téléphone intelligent ou tablette,
visiter le www.jennair.com/connect et suivre les instructions de
téléchargement et d’installation de l’application JennAir
®
.
Une fois installée, toucher l’icône de l’application JennAir
®
pour
l’ouvrir. Suivre les étapes de conguration du compte d’utilisateur.
L’application s’assure d’obtenir les renseignements personnels
et du domicile nécessaires, ainsi que les renseignements au sujet
de votre fournisseur d’électricité.
Il est nécessaire d’enregistrer le réfrigérateur dans son compte
d’utilisateur pour tirer plein avantage des fonctions intelligentes.
Lorsque l’application le demande, enregistrer l’identiant SAID
(sensible à la case) inscrit sur un autocollant situé sur le côté
avant du couvercle de charnière droit du réfrigérateur.
Mon identiant Smart Appliance est:
■ Le témoin d’état de connexion Wi-Fi de la commande du
réfrigérateur clignotera lentement pendant le processus de
connexion entre le réfrigérateur et le routeur.
■ Noter que ce clignotement ne se produit que lors du
premier enregistrement après la mise à disposition.
Aucun clignotement ne se produit pendant la reconnexion
automatique une fois la connexion établie.
■ Une fois le réfrigérateur connecté au réseau Wi-Fi domestique,
la connexion restera active même si une panne de courant se
produit, l’appareil est déplacé ou l’appareil est entreposé pour
une longue période.
■ Le processus de connexion devra être répété en cas
de remplacement du routeur ou d’achat d’un nouveau
réfrigérateur intelligent.
4. Enregistrement de votre
réfrigérateur dans votre
compted’utilisateur
REMARQUE: S’il s’agit de votre premier appareil Smart
Appliance, le téléchargement de l’application JennAir
®
et la
création d’un compte d’utilisateur en ligne seront nécessaires.
S’il ne s’agit pas de votre premier appareil Smart Appliance,
passer à l’étape4 “Enregistrer votre appareil dans votre compte
d’utilisateur”.
Pour déconnecter la Wi-Fi, appuyer sur le bouton Connect
(connecter) entre 7 et 15 secondes, les icônes <Wi-Fi>et
<maison> s’éteignent, indiquant que le Wi-Fi est désactivé.
Dans l’écran d’accueil, appuyer sur le bouton Connect (connecter)
pendant 3 secondes pour reconnecter le Wi-Fi.
Le témoin d’état de connexion Wi-Fi ( ) de la commande du
réfrigérateur clignotera lentement pendant le processus de
connexion entre le réfrigérateur et le routeur.
Si la connexion réussit, le témoin d’état de connexion Wi-Fi cesse
de clignoter pour rester allumé.
Pour déconnecter le réfrigérateur du routeur, appuyer sur
CONNECT (connecter) pendant plus de 15 secondes. Les icônes
<Wi-Fi> et <maison> s’éteignent indiquant que le réfrigérateur est
complètement déconnecté du Wi-Fi et du routeur.
Pour reconnecter le réfrigérateur au routeur et reconnecter le
Wi-Fi, appuyer sur CONNECT (connecter) pendant 3 secondes
dans l’écran d’accueil.
Le témoin d’état de connexion Wi-Fi ( ) de la commande du
réfrigérateur clignotera lentement pendant le processus de
connexion entre le réfrigérateur et le routeur.
Si la connexion réussit, le témoin d’état de connexion Wi-Fi cesse
de clignoter pour rester allumé.
Appuyer sur le bouton de conguration protégée Wi-Fi du routeur.
Un témoin lumineux clignotera.
CONSEIL UTILE: Cette fonction de votre routeur s’active pendant
2minutes. Il est important d’effectuer la prochaine étape dans
cette période pour ne pas devoir recommencer cette procédure.
Dans l’écran d’accueil, appuyer sur le bouton Connect
(connecter) pendant 3 secondes.
Le témoin d’état de connexion Wi-Fi ( ) de la commande du
réfrigérateur clignotera lentement pendant le processus de
connexion entre le réfrigérateur et le routeur.
Si la connexion réussit, le témoin d’état de connexion Wi-Fi
cessede clignoter pour rester allumé.
2. Conguration du réfrigérateur
(étape avec temps limité)
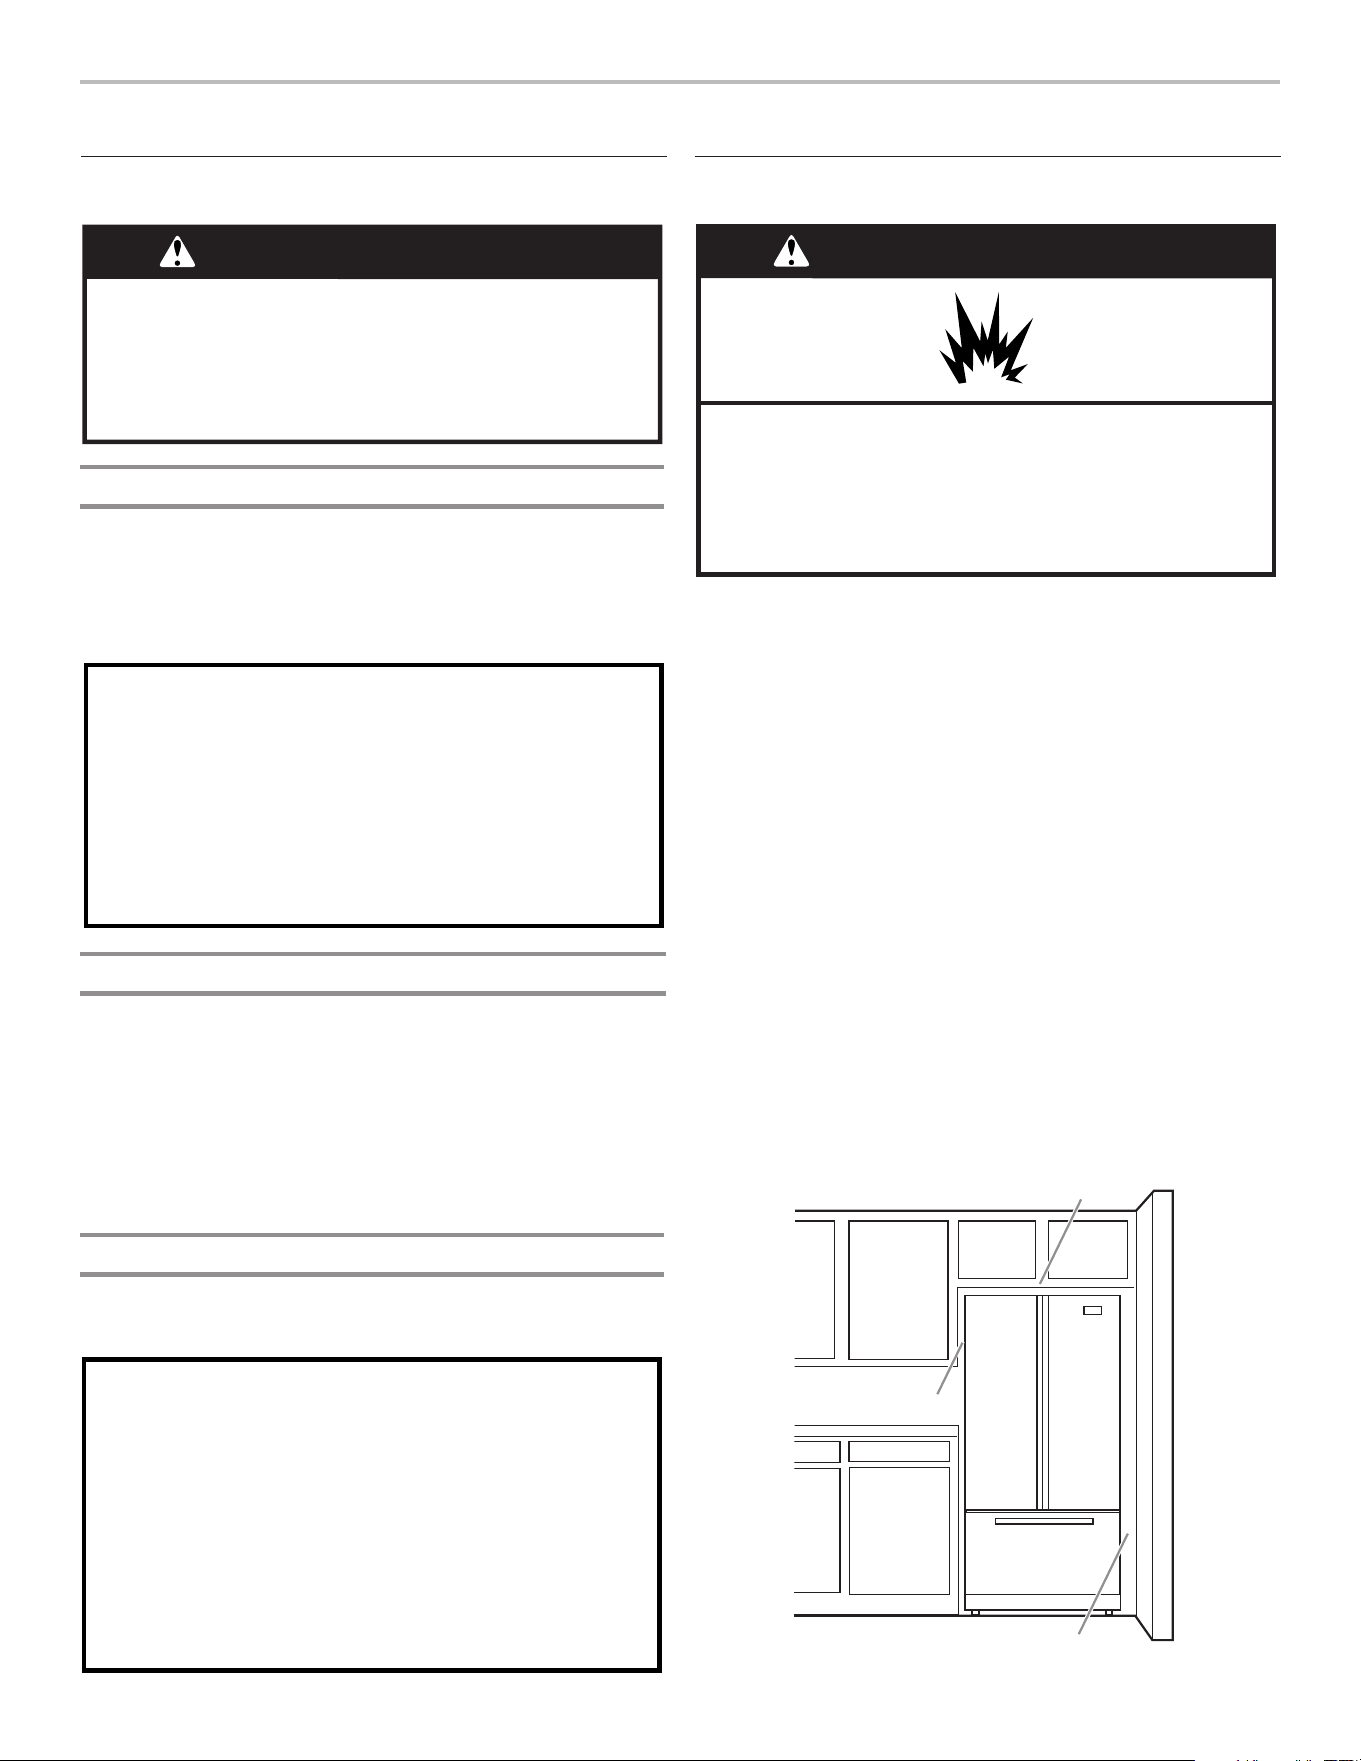
53
INSTRUCTIONS D’INSTALLATION
Déballage du réfrigérateur
AVERTISSEMENT
Risque du poids excessif
Utiliser deux ou plus de personnes pour déplacer et
installer le réfrigérateur.
Le non-respect de cette instruction peut causer
une blessure au dos ou d'autre blessure.
Retrait des matériaux d’emballage
■ Enlever tout résidu de ruban adhésif et de colle des surfaces
du réfrigérateur avant de le mettre en marche. Frotter une
petite quantité de savon liquide à vaisselle sur l’adhésif avec
les doigts. Rincer à l’eau tiède et sécher.
■ Ne pas utiliser d’instruments coupants, d’alcool à friction, de
liquides inammables ou de nettoyants abrasifs pour enlever le
ruban adhésif ou la colle. Ces produits peuvent endommager
la surface du réfrigérateur.
■ Éliminer/recycler tous les matériaux d’emballage.
Nettoyage avant utilisation
Après avoir enlevé tous les matériaux d’emballage, nettoyer
l’intérieur du réfrigérateur avant de l’utiliser. Voir les instructions
de nettoyage dans la section “Entretien du réfrigérateur”.
Importants renseignements à savoir au sujet des tablettes
et des couvercles en verre :
Ne pas nettoyer les tablettes ou couvercles en verre avec de
l’eau tiède quand ils sont froids. Les tablettes et les
couvercles peuvent se briser s'ils sont exposés à des
changements soudains de température ou à un impact tel
que coup brusque. Le verre trempé est conçu pour éclater
en d’innombrables pièces minuscules. Ceci est normal. Les
tablettes et les couvercles en verre sont lourds. Les saisir à
deux mains lors de leur dépose afin d'éviter de les faire
tomber.
Exigences d’emplacement
IMPORTANT : Cet appareil est destiné à un usage domestique et
à d’autres usages similaires tels que :
■ espace de cuisine pour personnel de boutiques, bureaux et
autres environnements professionnels,
■ résidences fermières et utilisation par les clients d’hôtels, de
motels et d’autres types de résidences,
■ environnements de type chambres d’hôtes,
■ Banquets et autres utilisations non commerciales semblables.
Pour obtenir une aération appropriée pour ce réfrigérateur, laisser
un espace minimum de 3/16 po (0,48cm) de chaque côté et
1/4 po (0,64 cm) au sommet. Laisser un espace maximum de 1po
(2,54cm) derrière le réfrigérateur. Si le réfrigérateur comporte une
machine à glaçons, s’assurer qu’un espace additionnel est prévu
à l’arrière pour permettre les raccordements des conduits d’eau.
En cas d’installation du réfrigérateur près d’un mur xe, laisser un
minimum de 14po (35,56cm) entre le réfrigérateur et le mur pour
permettre à la porte de s’ouvrir sans obstruction.
REMARQUE: Ce réfrigérateur est conçu pour être utilisé dans
un endroit où la température est comprise entre un minimum
de 55°F (13°C) et un maximum de 110°F (43°C). La plage de
température ambiante idéale pour un rendement optimal est
comprise entre 60°F (15°C) et 90°F (32°C). Respecter cette
plage de température permet aussi de réduire la consommation
d’électricité et d’optimiser l’efcacité du refroidissement. Il est
recommandé de ne pas installer le réfrigérateur près d’une source
de chaleur comme un four ou un radiateur.
Risque d'explosion
Garder les matériaux et les vapeurs inflammables, telle
que l'essence, loin du réfrigérateur.
Le non-respect de cette instruction peut causer
un décès, une explosion ou un incendie.
AVERTISSEMENT
14po (35,56cm)
3/16po (0,48cm)
Livraison du réfrigérateur
■ Une ouverture de porte minimum de 33po (838mm) est
nécessaire. Si l’ouverture est inférieure ou égale à 36po
(914mm), il faudra enlever les portes, tiroirs et charnières.
■ Pousser le chariot avec le réfrigérateur de côté pour toutes les
ouvertures de porte.
Déplacement de votre réfrigérateur :
Votre réfrigérateur est lourd. Lors du déplacement de votre
réfrigérateur pour le nettoyage ou un entretien ou réparation,
veiller à recouvrir le plancher avec du carton ou un panneau
de fibres dures pour éviter qu'il ne subisse tout dommage.
Toujours tirer le réfrigérateur tout droit lors de son
déplacement. Ne pas incliner le réfrigérateur d’un côté ou de
l’autre ni le “faire marcher” en essayant de le déplacer car le
plancher pourrait être endommagé.
1/4po (0,64cm)
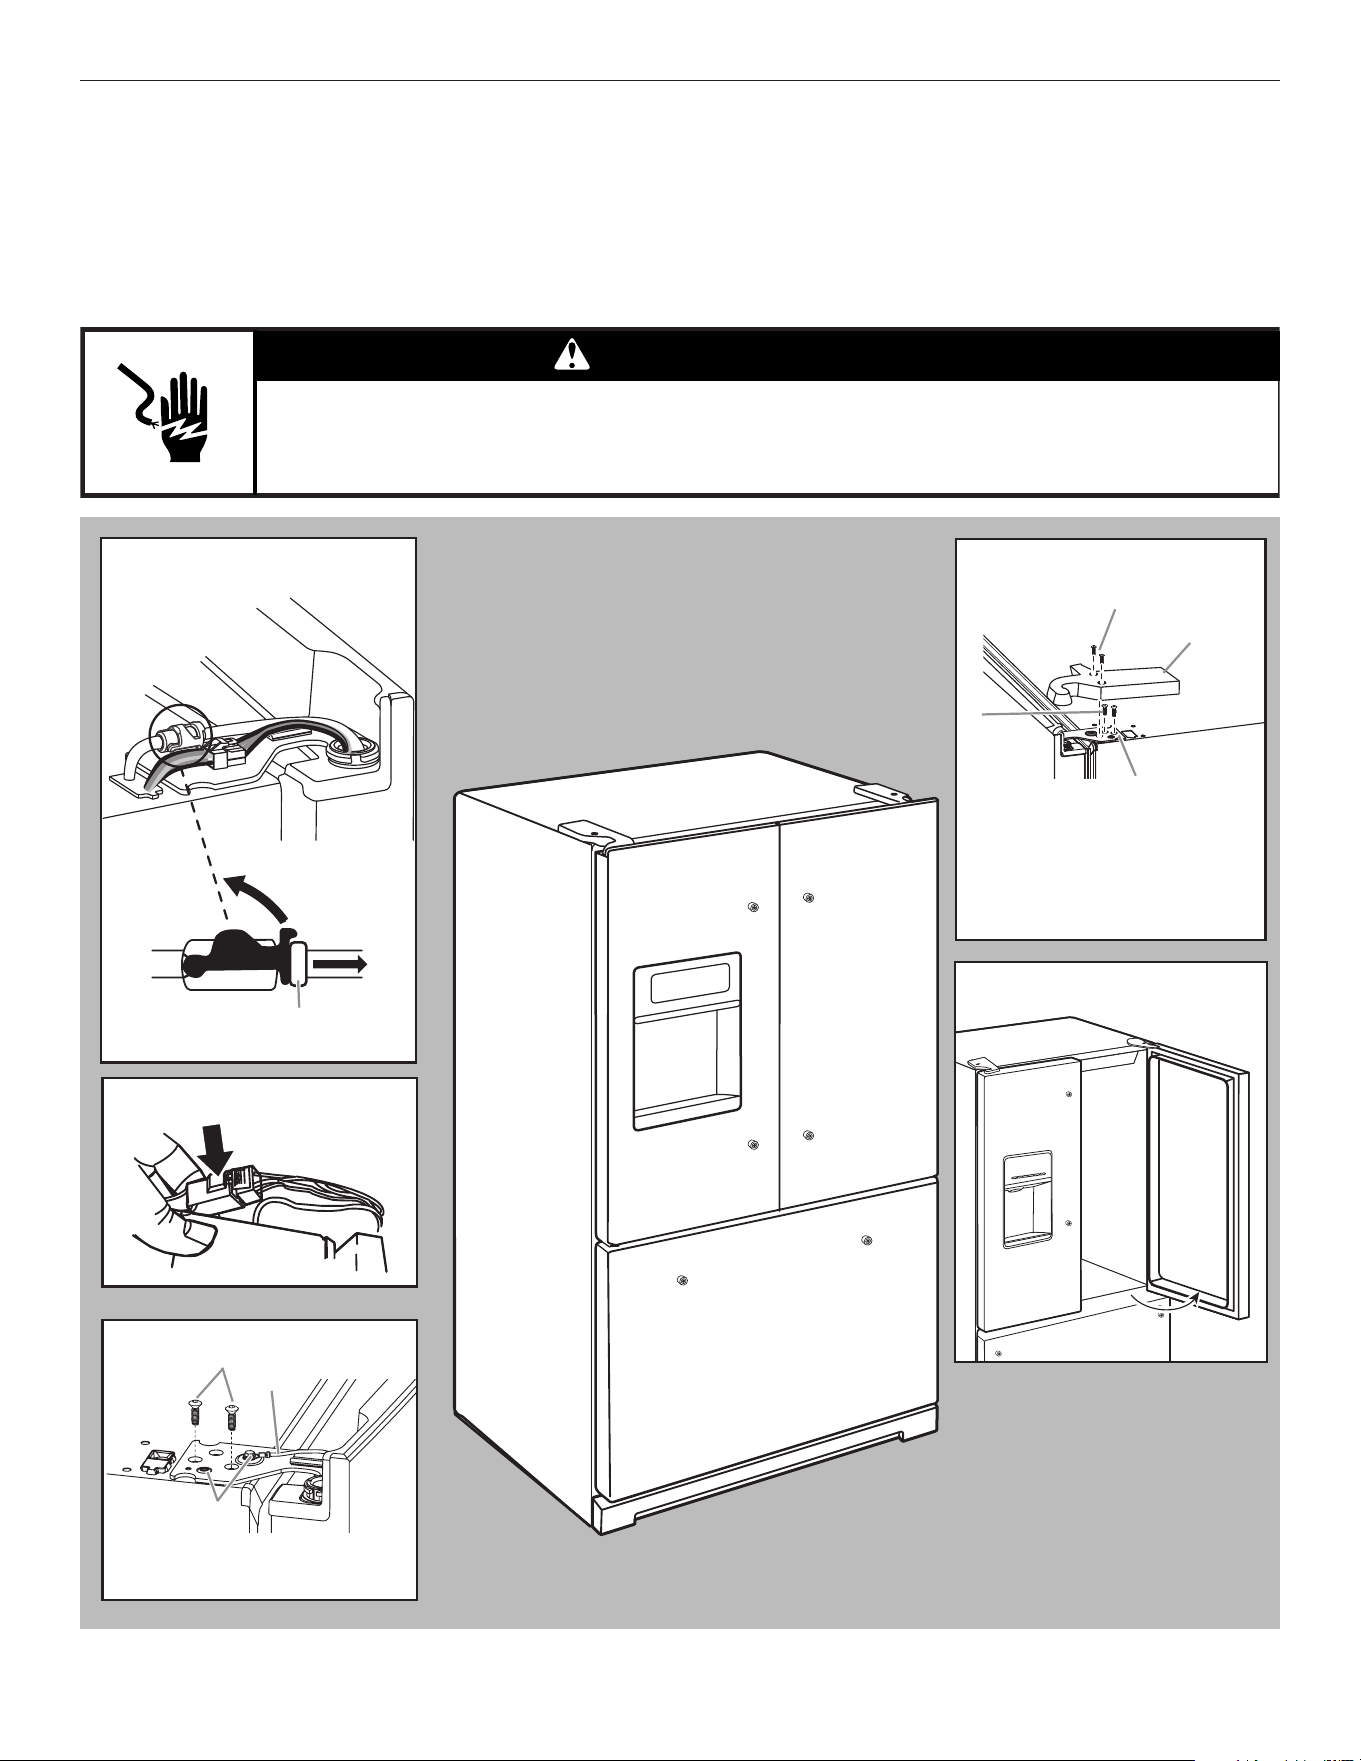
54
Retrait et réinstallation des portes du réfrigérateur
REMARQUE: En fonction de la largeur de l’ouverture de la porte de la maison, il faudra peut-être retirer les portes du réfrigérateur pour
pouvoir introduire le réfrigérateur dans le domicile. Si les portes du réfrigérateur doivent être retirées, consulter les instructions suivantes.
IMPORTANT: Si le réfrigérateur était déjà installé et qu’il doit être déplacé hors de votre domicile, effectuer d’abord les opérations
suivantes: Fermer la commande du réfrigérateur. Débrancher le réfrigérateur ou déconnecter la source de courant électrique. Retirerles
aliments et les balconnets de la porte du réfrigérateur.
Rassembler les outils nécessaires et lire toutes les instructions avant de retirer les portes.
OUTILS NÉCESSAIRES: Tournevis TorxT25
†
et tournevis cruciforme no2
AVERTISSEMENT
Risque de choc électrique
Déconnecter la source de courant électrique avant d'enlever les portes.
Le non-respect de cette instruction peut causer un décès ou un choc électrique.
Raccord de tuyau du
distributeur d’eau
Fiche de câblage
Charnière supérieure droite
Charnière supérieure gauche
A
A. Bague externe
C
B
A
A. Vis TorxT25
B. Conducteur de mise à la terre
(nepas retirer)
C. Ne pas retirer les vis
90°
Porte formant un angle de
90° par rapport à la caisse
A. Vis TorxT25
B. Vis du couvre-charnière
C. Couvre-charnière supérieur
D. Charnière supérieure
A
B
C
D
†
Torx et T25 sont des marques déposées de Acument Intellectual Properties, LLC.
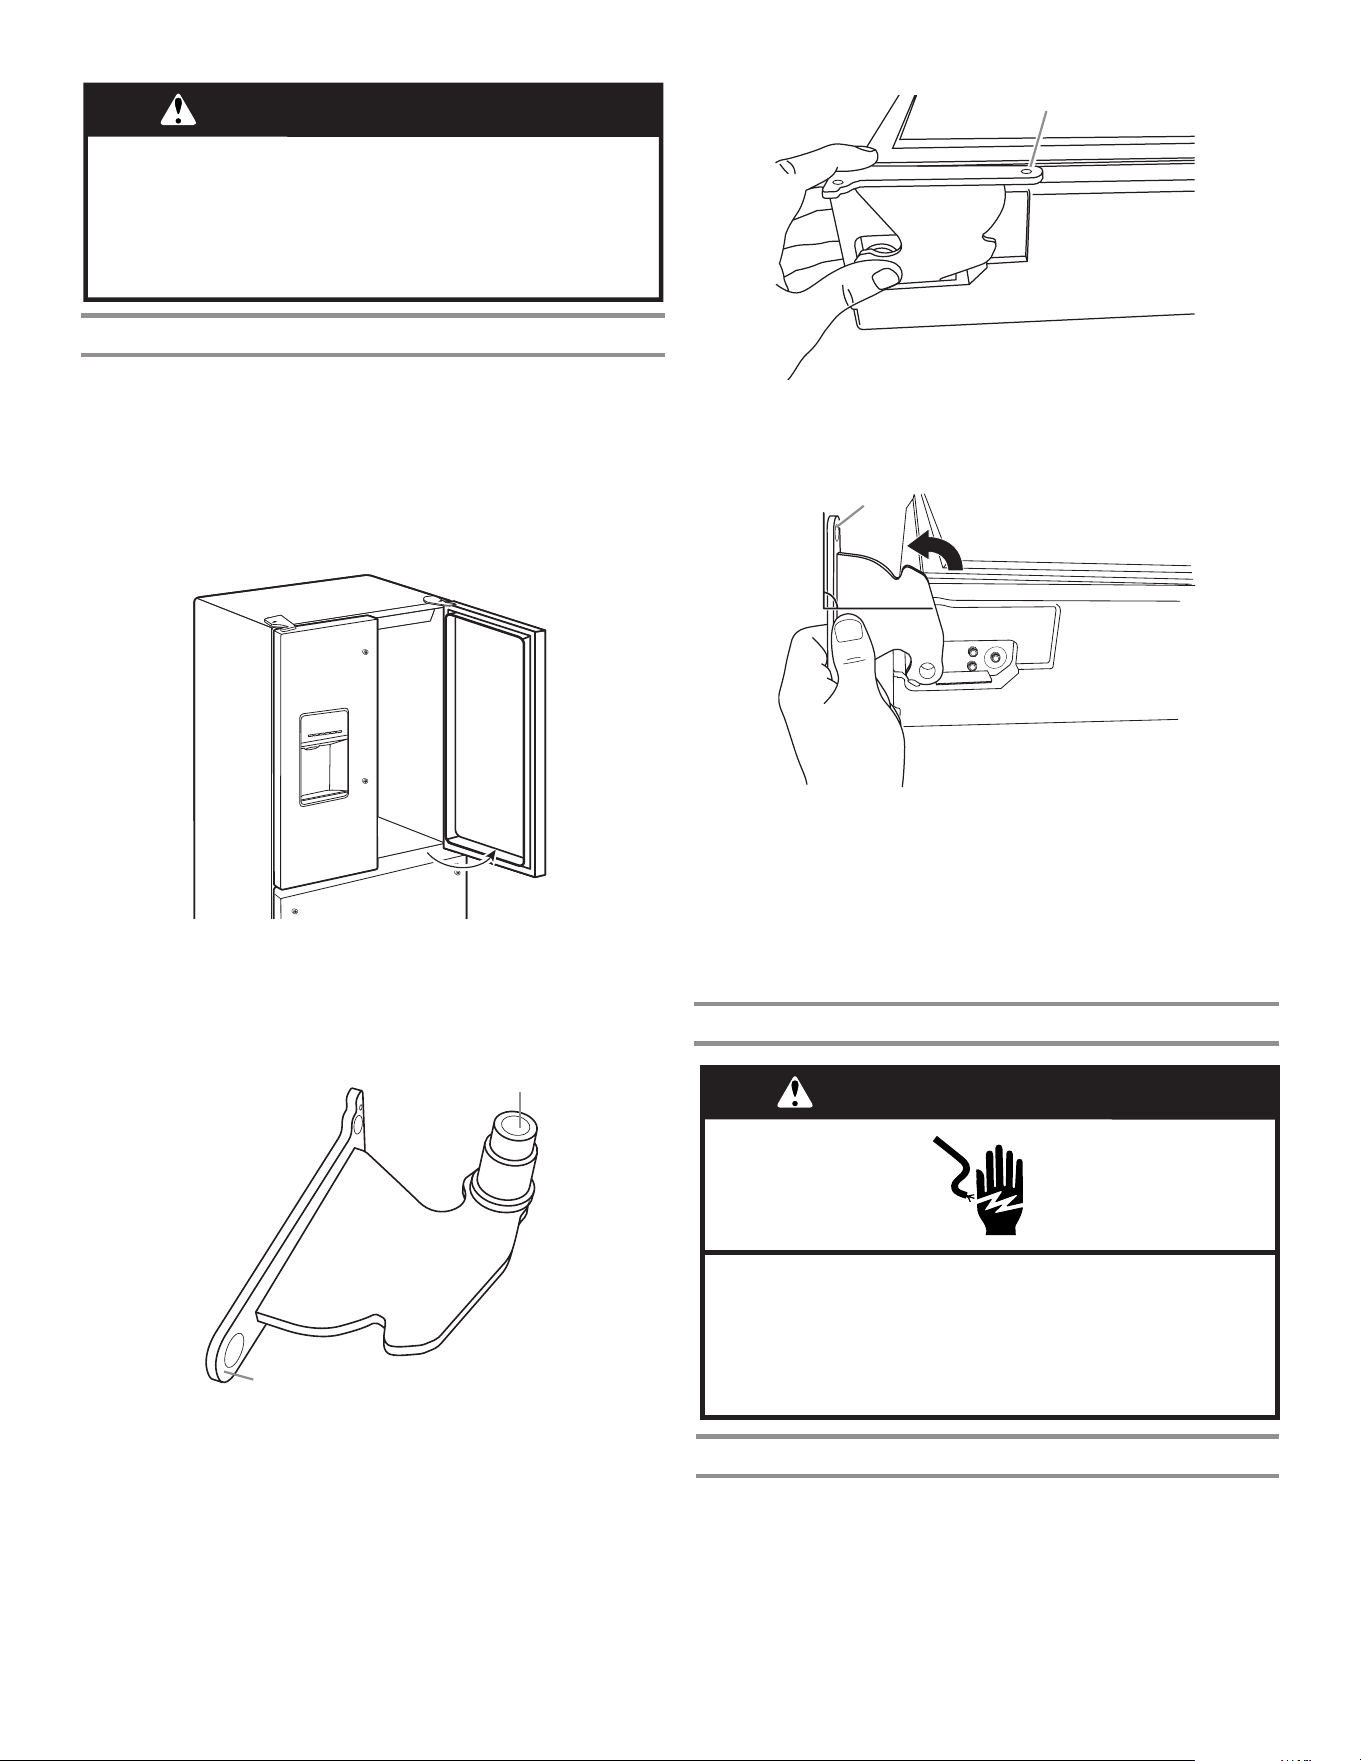
55
Charnière inférieure de la porte
Pour plus de commodité, les portes du réfrigérateur comportent des
charnières inférieures avec ferme-porte. Ces ferme-porte permettent
aux portes de se fermer complètement d’un simple toucher.
IMPORTANT: Pour que la fonction de ferme-porte fonctionne
correctement, les portes doivent être retirées uniquement
lorsqu’elles sont ouvertes à un angle de 90° par rapport à la partie
avant du placard. Si l’une ou l’autre des portes n’était pas à un
angle de 90° lors de la dépose, la charnière de porte inférieure
doit être réinitialisée.
90°
Réinitialisation de la charnière de porte
1. Soulever la porte hors de la charnière inférieure et la placer
sur une surface de niveau.
2. À l’aide d’un tournevis TorxT25, retirer la charnière inférieure
avec le coussinet hors de la caisse du réfrigérateur.
A. Bague
B. Base de la charnière
3. Insérer la charnière inférieure et le coussinet dans la fente
correspondante dans le bas de la porte.
REMARQUE: S’assurer que la base de la charnière est parallèle
au bas de la porte.
A. Base de la charnière parallèle au rebord inférieur de la porte
4. Tourner la charnière jusqu’à ce que la base de cette dernière soit
à un angle de 90° par rapport au rebord inférieur de la porte.
A. Base de la charnière tournée à un angle de 90° par rapport au rebord
inférieur de la porte
5. Retirer la charnière de la porte. À l’aide d’un tournevis
TorxT25, xer de nouveau la charnière inférieure au
réfrigérateur.
6. La charnière est maintenant réinitialisée et prête pour la
réinstallation de la porte. Consulter la section “Réinstallation
des portes du réfrigérateur” plus loin dans cette section.
A
B
A
90°
A
Retrait des portes du réfrigérateur
AVERTISSEMENT
Risque de choc électrique
Déconnecter la source de courant électrique avant
d'enlever les portes.
Le non-respect de cette instruction peut causer
un décès ou un choc électrique.
Retrait de la porte de droite
1. Débrancher le réfrigérateur ou déconnecter la source de
courant électrique.
2. Laisser les portes du réfrigérateur fermées jusqu’au moment
de les détacher de la caisse.
REMARQUE: Prévoir un support supplémentaire pour la
porte du réfrigérateur pendant le retrait des charnières.
Laforce d’attraction des aimants de la porte ne suffit pas
àlamaintenir en place pendant la manutention.
AVERTISSEMENT
Risque du poids excessif
Utiliser deux ou plus de personnes pour déplacer et
installer le réfrigérateur.
Le non-respect de cette instruction peut causer
une blessure au dos ou d'autre blessure.
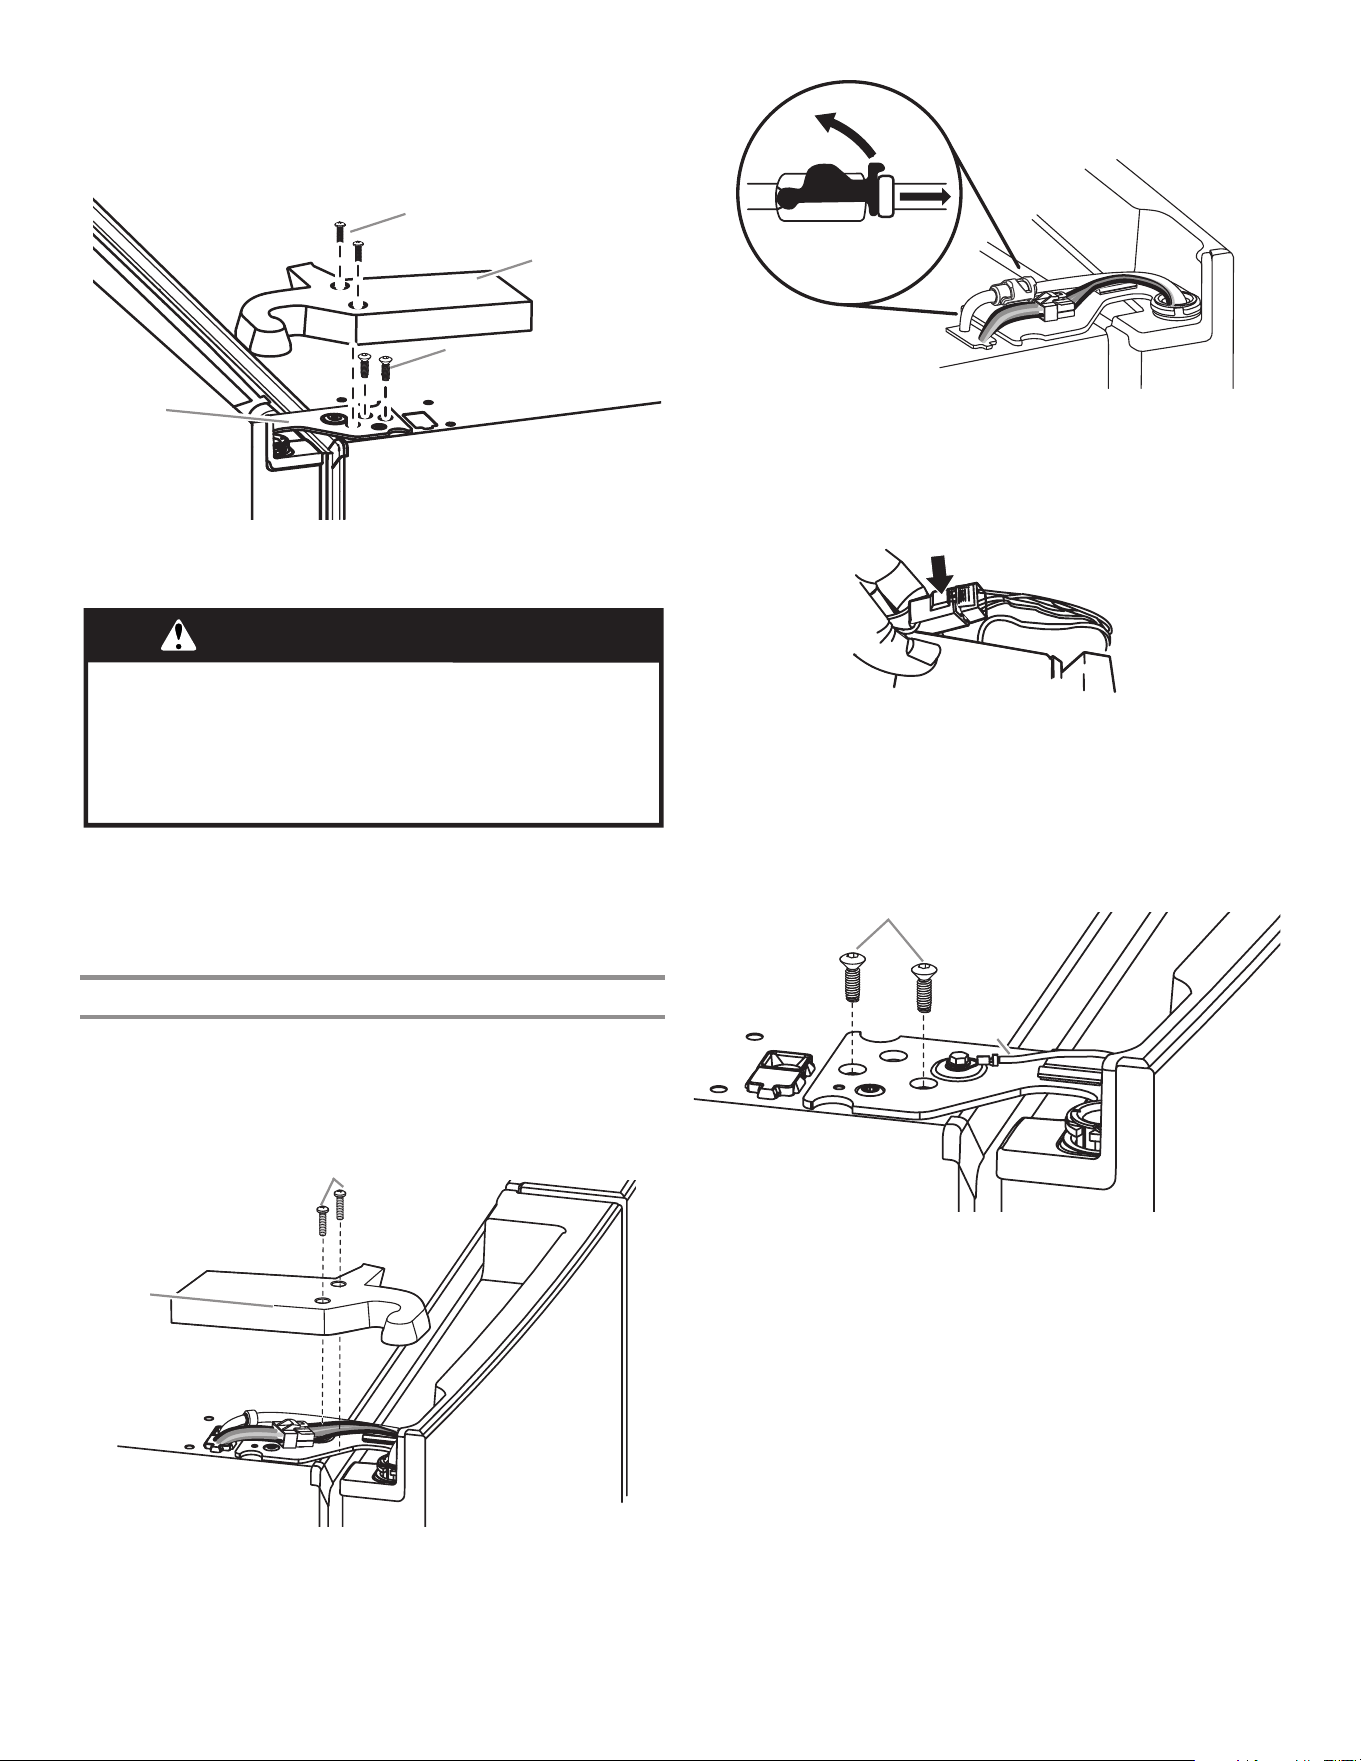
56
A. Vis du couvre-charnière supérieur
B. Couvre-charnière supérieur
C. Vis TorxT25
D. Charnière supérieure
AVERTISSEMENT
Risque du poids excessif
Utiliser deux ou plus de personnes pour soulever la
porte du réfrigérateur.
Le non-respect de cette instruction peut causer
une blessure au dos ou d'autre blessure.
5. Ouvrir la porte jusqu’à ce qu’elle soit à un angle de 90° par
rapport à l’avant de la caisse.
6. Soulever la porte du réfrigérateur de l’axe de la charnière
inférieure. La charnière supérieure se dégage en même temps
que la porte.
Retrait de la porte de gauche
IMPORTANT: Étant donné que le raccordement de l’eau et le
câblage électrique passent par la charnière de la porte de gauche,
ils doivent être déconnectés avant de retirer la porte.
1. À l’aide d’un tournevis à tête plate, retirer le couvre-charnière
de la charnière supérieure.
A. Vis du couvre-charnière supérieur B. Couvre-charnière supérieur
2. Débrancher le tuyau du distributeur d’eau situé sur la
charnière de la porte. Tirer fermement l’attache vers le haut.
Tirer ensuite le tuyau hors du raccord.
REMARQUE: Le tuyau du distributeur d’eau reste xé à la
porte de gauche du réfrigérateur.
3. Débrancher le câblage situé sur la charnière de la porte.
■ Saisir chaque côté de la che de câblage. Avec le pouce
gauche, appuyer sur le loquet pour le dégager et écarter
les deux sections de la che.
REMARQUE: Ne pas retirer le conducteur vert relié à la
terre. Il doit rester xé à la charnière de porte.
A. Vis TorxT25
B. Conducteur de mise à la terre (ne pas retirer)
4. Avec le tournevis TorxT25, enlever les 2vis de la charnière du
haut et les conserver pour plus tard.
REMARQUES:
■ Prévoir un support supplémentaire pour la porte du
réfrigérateur pendant le retrait des charnières. La force
d’attraction des aimants de la porte ne suft pas à la
maintenir en place pendant la manutention.
A
B
5. Soulever la porte du réfrigérateur de l’axe de la charnière
inférieure. La charnière supérieure se dégage en même temps
que la porte.
REMARQUE: Il ne sera peut-être pas nécessaire d’enlever
les charnières inférieures et les pieds de stabilisation pour
faire passer le réfrigérateur dans un cadre de porte.
■ Au besoin, utiliser un tournevis TorxT25 pour enlever la
charnière du bas et les vis des pieds de stabilisation.
3. À l’aide d’un tournevis cruciforme, retirer le couvre-charnière
de la charnière supérieure.
4. Avec le tournevis TorxT25, enlever les 2vis de la charnière du
haut et les conserver pour plus tard.
A
B
C
D
A
B
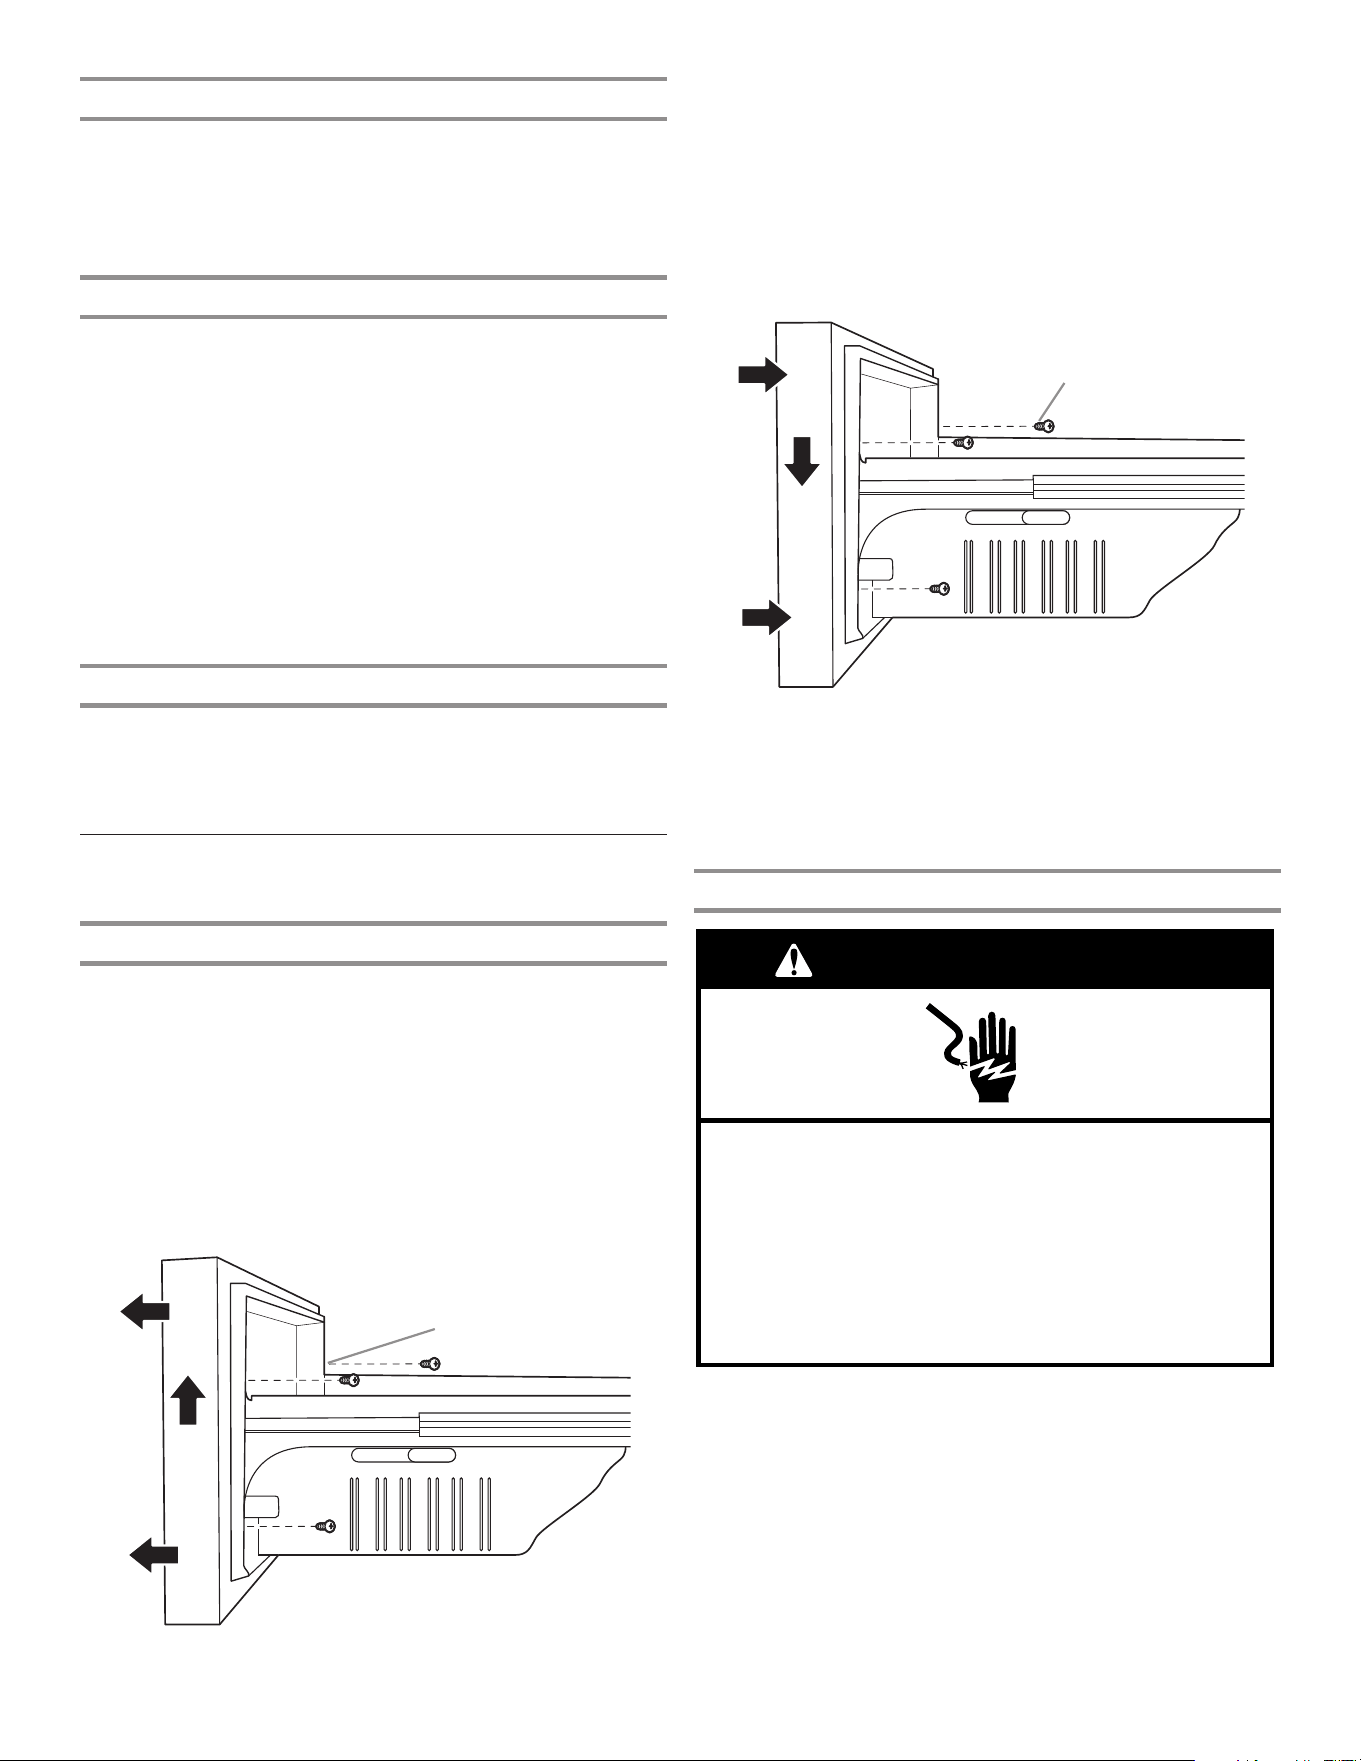
57
Réinstallation de la porte de droite du réfrigérateur
1. Placer la porte de droite sur l’axe de charnière inférieure.
2. Insérer l’axe de charnière supérieure dans le trou béant du
sommet de la porte du réfrigérateur.
3. À l’aide des 3vis TorxT25, serrer la charnière à la caisse.
Nepas complètement serrer les vis.
Réinstallation de la porte de gauche du réfrigérateur
IMPORTANT: Ne pas emmêler le tuyau d’eau et les faisceaux de
câblage en les reconnectant.
1. Placer la porte de gauche sur l’axe de charnière inférieure.
2. À l’aide des 3vis TorxT25, serrer la charnière à la caisse.
Nepas complètement serrer les vis.
3. Raccorder le tuyau du distributeur d’eau.
Enfoncer fermement le tuyau dans le raccord jusqu’à ce qu’il
s’arrête. Fixer l’attache autour du tube. L’attache se xe autour
du raccord et du collier. Brancher les côtés femelle et mâle
bleus, puis serrer. Répéter avec les côtés femelle et mâle gris.
4. Rebrancher le câblage.
■ Remboîter les deux sections de la che de câblage.
Étapes nales
1. Serrer complètement les six vis internes TorxT25 (trois sur
la charnière de la porte de droite et trois sur la charnière de
laporte de gauche).
2. Réinstaller les deux couvre-charnières supérieurs.
Retrait et remplacement de l’avant
du tiroir de congélation
Tiroir du congélateur
Retrait de l’avant du tiroir
1. Ouvrir complètement le tiroir de congélation.
2. Desserrer les deux vis supérieures xant l’avant du tiroir aux
glissières de tiroir. Les deux vis (une à gauche et une à droite)
se trouvent à l’intérieur de l’avant du tiroir.
3. Retirer les deux vis situées au bas, à l’intérieur de l’avant du
tiroir qui maintient l’avant du tiroir aux glissières du tiroir.
4. Soulever l’avant du tiroir pour dégager les vis des encoches
de la patte de glissière du tiroir.
A. Encoches de la patte de glissière du tiroir
Réinstallation de l’avant du tiroir
1. Déployer complètement les glissières de tiroir du congélateur.
2. Tout en saisissant l’avant du tiroir par les côtés, aligner la vis
du haut, située à l’intérieur de l’avant du tiroir, en bas, avec
les encoches des supports de glissières de tiroir.
REMARQUE: Pour faciliter l’opération, une personne peut
maintenir les glissières de tiroir en place pendant qu’une autre
aligne l’avant du tiroir et insère les pitons dans les encoches.
A. Vis de l’avant du tiroir
3. Serrer les deux vis situées au sommet de l’avant du tiroir
(uneà gauche et une à droite) et installer les deux vis du bas.
A
Étapes nales
1. Brancher sur une prise de courant à 3 alvéoles, reliée à la
terre.
2. Réinitialiser les commandes. Voir la section “Utilisation des
commandes”.
3. Replacer toutes les pièces amovibles et aliments dans les
tiroirs.
AVERTISSEMENT
Risque de choc électrique
Brancher sur une prise à 3 alvéoles reliée à la terre.
Ne pas enlever la broche de liaison à la terre.
Ne pas utiliser un adaptateur.
Ne pas utiliser un câble de rallonge.
Le non-respect de ces instructions peut causer
un décès, un incendie ou un choc électrique.
A
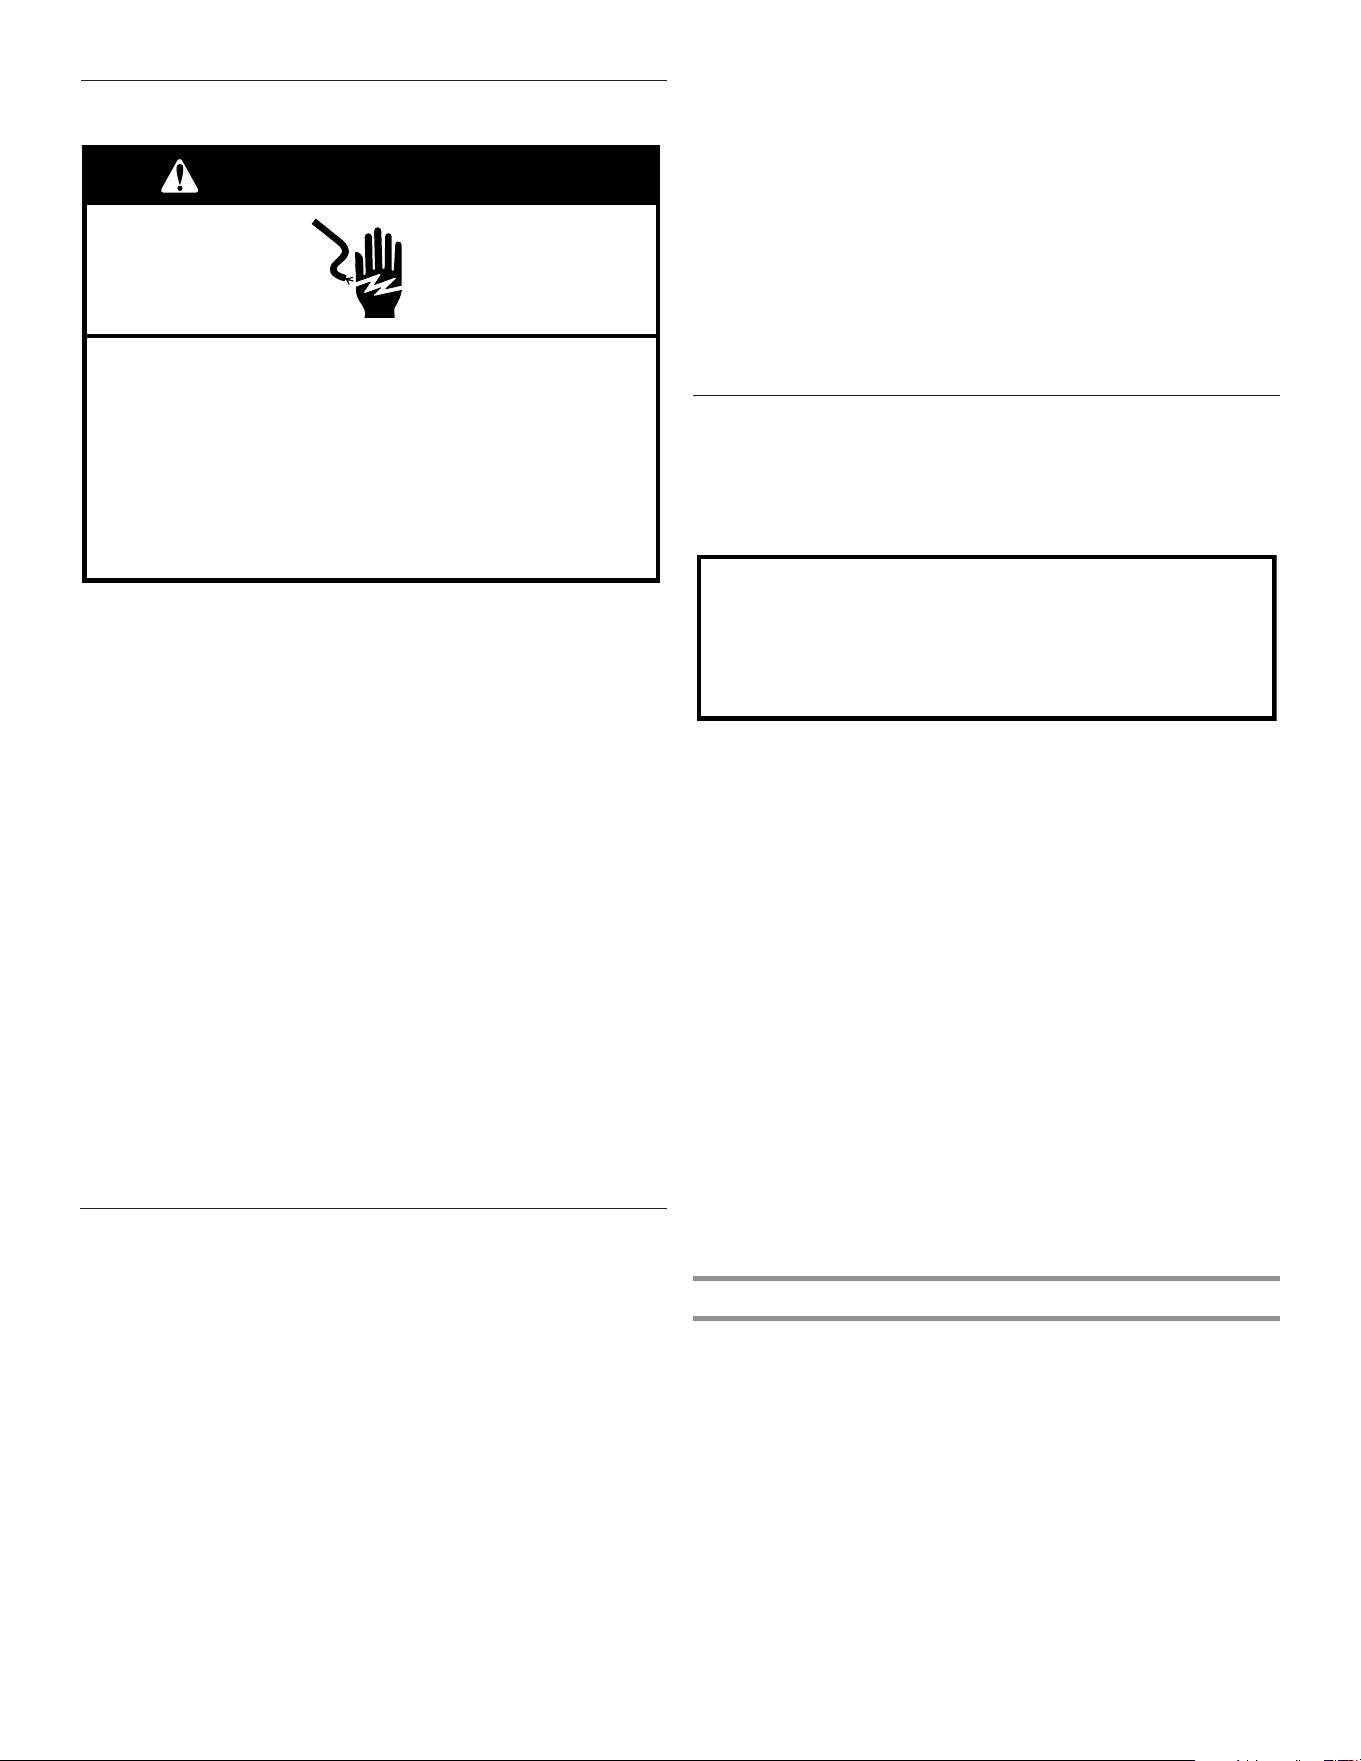
58
Spécifications électriques
AVERTISSEMENT
Risque de choc électrique
Brancher sur une prise à 3 alvéoles reliée à la terre.
Ne pas enlever la broche de liaison à la terre.
Ne pas utiliser un adaptateur.
Ne pas utiliser un câble de rallonge.
Le non-respect de ces instructions peut causer
un décès, un incendie ou un choc électrique.
Avant de placer le réfrigérateur à son emplacement nal, ilest
important de s’assurer d’avoir le raccordement électrique approprié.
Méthode recommandée de liaison à la terre
Chaque appareil doit être alimenté par un circuit à 115V CA à
60Hz relié à la terre et protégé par un fusible de 15A ou 20A.
Onrecommande que le réfrigérateur et les accessoires approuvés
soient alimentés par un circuit indépendant. Utiliserune prise de
courant dont l’alimentation ne peut pas êtreinterrompue par un
interrupteur. Ne pas utiliser de rallonge.
Si le cordon d’alimentation est endommagé, il doit être remplacé
par le fabricant, son agent de service ou toute autre personne
également qualiée. Ne pas utiliser un cordon craquelé ou qui
présente des dommages d’abrasion sur la gaine, la che ou le
connecteur.
IMPORTANT: Si ce produit est connecté à une prise protégée par
un disjoncteur de fuite à la terre, un déclenchement intempestif
peut se produire et causer une perte de refroidissement. La
qualité et la saveur des aliments risquent d’être affectées. Si un
déclenchement intempestif se produit et siles aliments semblent
de piètre qualité, jeter les aliments.
REMARQUE: Avant de procéder à tout type d’installation ou de
nettoyage, fermer la commande de refroidissement comme illustré,
puis déconnecter le réfrigérateur de la source d’alimentation.
Une fois l’opération terminée, reconnecter le réfrigérateur à la
source d’alimentation et ouvrir de nouveau la commande de
refroidissement. Voir la section “Utilisation des commandes”.
Spécifications de l’alimentation
eneau
Une alimentation en eau froide avec une pression entre 30 et 120
lb/po² (207 et 827 kPa) est nécessaire pour faire fonctionner le
distributeur d’eau et la machine à glaçons.
REMARQUE: Si la pression en eau est inférieure aux critères
minimaux, le débit du distributeur d’eau pourrait diminuer ou
entraîner la formation de glaçons creux ou de forme irrégulière. Si
vous avez des questions au sujet de la pression de votre eau, faire
appel à un plombier qualié agréé.
Alimentation en eau par osmose inverse
IMPORTANT: La pression de l’alimentation en eau entre le
système d’osmose inverse et le robinet d’arrivée d’eau du
réfrigérateur doit être entre 35 et 120lb/po² (241 à 827kPa).
Si un système de ltration de l’eau par osmose inverse est
raccordé à l’alimentation en eau froide, la pression de l’eau au
système doit être d’un minimum de 40 à 60lb/po² (276 à 414kPa).
■ Vérier que le ltre à sédiment dans le système à osmose
inverse n’est pas obstrué. Remplacer le ltre si nécessaire.
■ Laisser le réservoir du système d’osmose inverse se remplir
après une utilisation intense. La capacité du réservoir est peut-
être trop faible pour répondre aux spécications du réfrigérateur.
REMARQUE: Un système d’osmose inverse monté sur
robinet est déconseillé.
■ Si le réfrigérateur comporte un ltre à eau, celui-ci peut réduire
la pression de l’eau lorsqu’il est utilisé avec un système
d’osmose inverse. Enlever le ltre à eau. Consulter la section
“Système de ltration de l’eau”.
Pour toute question au sujet de la pression de l’eau, faire appel à
un plombier qualié agréé.
Raccordement à la canalisation d’eau
Lire toutes les instructions avant de commencer.
IMPORTANT:
■ Brancher sur une arrivée d’eau potable uniquement.
■ Réaliser l’installation de plomberie conformément aux
prescriptions du International Plumbing Code et des normes et
codes locaux en vigueur.
■ Il est possible d’utiliser des raccords en cuivre ou en
polyéthylène réticulé pour le raccordement de la canalisation
d’eau du domicile au réfrigérateur – ils contribuent à éviter que
l’eau ait un goût ou une odeur désagréable. Vérier qu’il n’y a
pas de fuites.
Si on utilise un tuyau en polyéthylène réticulé au lieu d’un tuyau
de cuivre, nous recommandons les numéros de pièce suivants:
W10505928RP (PEX chemisé de 7pi [2,14m]), 8212547RP (PEX
de 5pi [1,52m]), ou W10267701RP (PEXde25pi [7,62m]).
■ Installer des tuyaux seulement là où les températures resteront
au-dessus du point de congélation.
Outils nécessaires:
Rassembler les outils et pièces nécessaires avant d’entreprendre
l’installation.
■ Tournevis à lame plate
■ Clés plates de 7/16 po et 1/2 po ou deux clés à molette
■ Tourne-écrou de 1⁄4po
REMARQUE: Ne pas employer de robinet d’arrêt à étrier de
3/16po (4,76mm) ou de type à percer, car cela réduit le débit
d’eau et augmente le risque d’obstruction.
Raccordement à la canalisation d’eau
IMPORTANT: Si le réfrigérateur est mis en marche avant de
raccorder la canalisation d’eau, mettre la machine à glaçons à l’arrêt.
1. Débrancher le réfrigérateur ou déconnecter la source de
courant électrique.
2. Couper l’alimentation principale en eau. Ouvrir le robinet le
plus proche sufsamment longtemps pour réduire la pression
de l’eau dans la canalisation d’eau.
3. Utiliser un robinet d’arrêt quart de tour ou équivalent alimenté
par une canalisation d’alimentation domestique de 1/2po.
REMARQUE: Pour que le réfrigérateur reçoive un débit
d’eau sufsant, on recommande l’emploi d’une canalisation
d’alimentation domestique en cuivre de
1/2 po
(12,7mm).
Ne pas utiliser pour le filtrage d'une eau
microbiologiquement polluée ou de qualité inconnue en
l'absence d'un dispositif de désinfection adéquat avant ou
après le système. Les systèmes certifiés pour la réduction
de kyste peuvent être utilisés pour l'eau désinfectée qui
peut contenir des kystes filtrables.
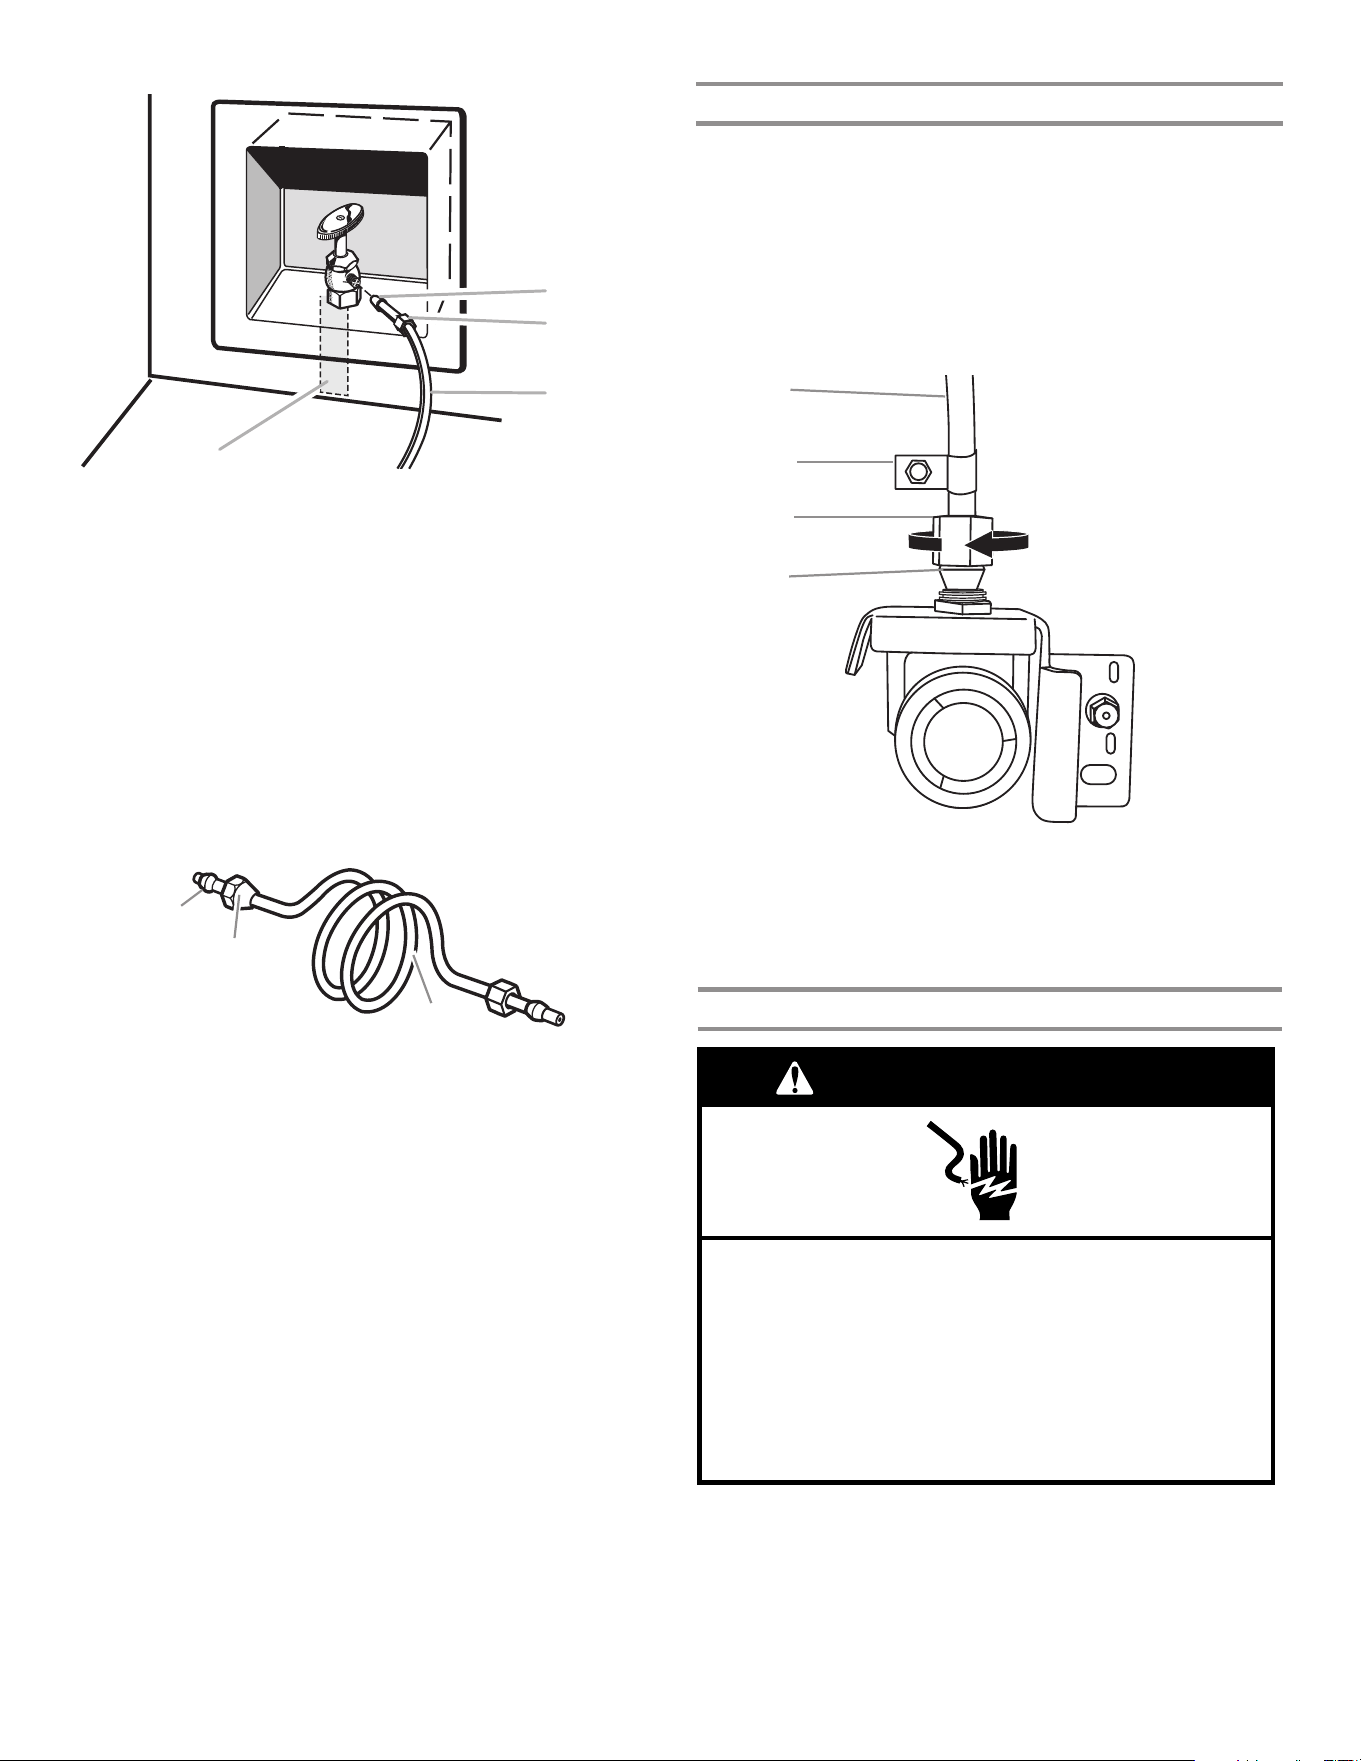
59
A
B
C
D
A. Bague
B. Écrou
C. Canalisation en cuivre (jusqu’au réfrigérateur)
D. Canalisation d’alimentation en eau du domicile
(1/2 po minimum)
4. Il est maintenant possible de connecter le tuyau en cuivre au
robinet d’arrêt. Utiliser un tube en cuivre de 1/4 po (6,35mm)
de diamètre extérieur pour raccorder le robinet d’arrêt au
réfrigérateur.
■ S’assurer d’avoir la longueur nécessaire pour une
installationcorrecte. Il faut s’assurer que les deux extrémités
du tuyau en cuivre sont bien coupées à angle droit.
■ Installer la bague et l’écrou à compression sur le tuyau en cuivre
comme indiqué. Insérer l’extrémité du tuyau aussi profondément
que possible dans l’extrémité de sortie et à l’équerre.
Visserl’écrou de compression sur l’extrémité de sortie du raccord
à l’aide d’une clé à molette. Ne pas serrer excessivement.
A. Bague de compression
B. Écrou de compression
C. Tube en cuivre
5. Placer l’extrémité libre de la canalisation dans un contenant
ou un évier et rétablir l’alimentation principale en eau pour
nettoyer le tuyau jusqu’à ce que l’eau soit limpide. Fermer le
robinet d’arrêt sur le tuyau d’alimentation en eau.
REMARQUE: Toujours vidanger le tuyau d’alimentation en
eau avant de faire le raccordement nal sur l’entrée du robinet
pour éviter tout mauvais fonctionnement éventuel du robinet.
6. Courber le tuyau de cuivre de façon à le raccorder à l’arrivée
de la canalisation d’eau située à l’arrière de la caisse du
réfrigérateur, comme illustré. Laisser une partie du tube en
cuivre enroulée pour permettre de dégager le réfrigérateur
duplacard ou du mur en cas de dépannage.
A
C
B
Achever l’installation
1. Brancher l’appareil sur une prise à 3 alvéoles reliée à la terre.
2. Rincer le système de distribution d’eau. Consulter la section
“Distributeurs d’eau et de glaçons”.
REMARQUE: Prévoir un délai de 24 heures pour la production du
premier lot de glaçons. Jeter les 3premières quantités de glaçons
produites. Prévoir un délai de 3 jours pour le remplissage complet
du bac d’entreposage.
AVERTISSEMENT
Risque de choc électrique
Brancher sur une prise à 3 alvéoles reliée à la terre.
Ne pas enlever la broche de liaison à la terre.
Ne pas utiliser un adaptateur.
Ne pas utiliser un câble de rallonge.
Le non-respect de ces instructions peut causer
un décès, un incendie ou un choc électrique.
3. Ouvrir l’arrivée d’eau alimentant le réfrigérateur et vérier
l’absence de fuites. Éliminer toute fuite détectée.
4. Si des glaçons sont souhaités, mettre la machine à glaçons
en marche.
Raccordement au réfrigérateur
Suivre les instructions relatives au modèle utilisé pour le
raccordement.
1. Ôter le capuchon de plastique de l’orice d’entrée d’eau.
Raccorder le tube de cuivre au robinet d’arrivée d’eau à l’aide
d’un écrou et d’une bague de compression, comme illustré.
Serrer l’écrou de compression. Ne pas serrer excessivement.
Vérier la solidité du raccordement en tirant sur le tube en cuivre.
2. Créer une boucle de service avec le tube en cuivre. Éviterde
déformer le tube de cuivre en l’enroulant. Fixer le tube en
cuivre à la caisse du réfrigérateur à l’aide d’une bride “P”.
A. Tube en cuivre
B. Bride en “P”
C. Écrou à compression
D. Bague de compression
A
B
C
D
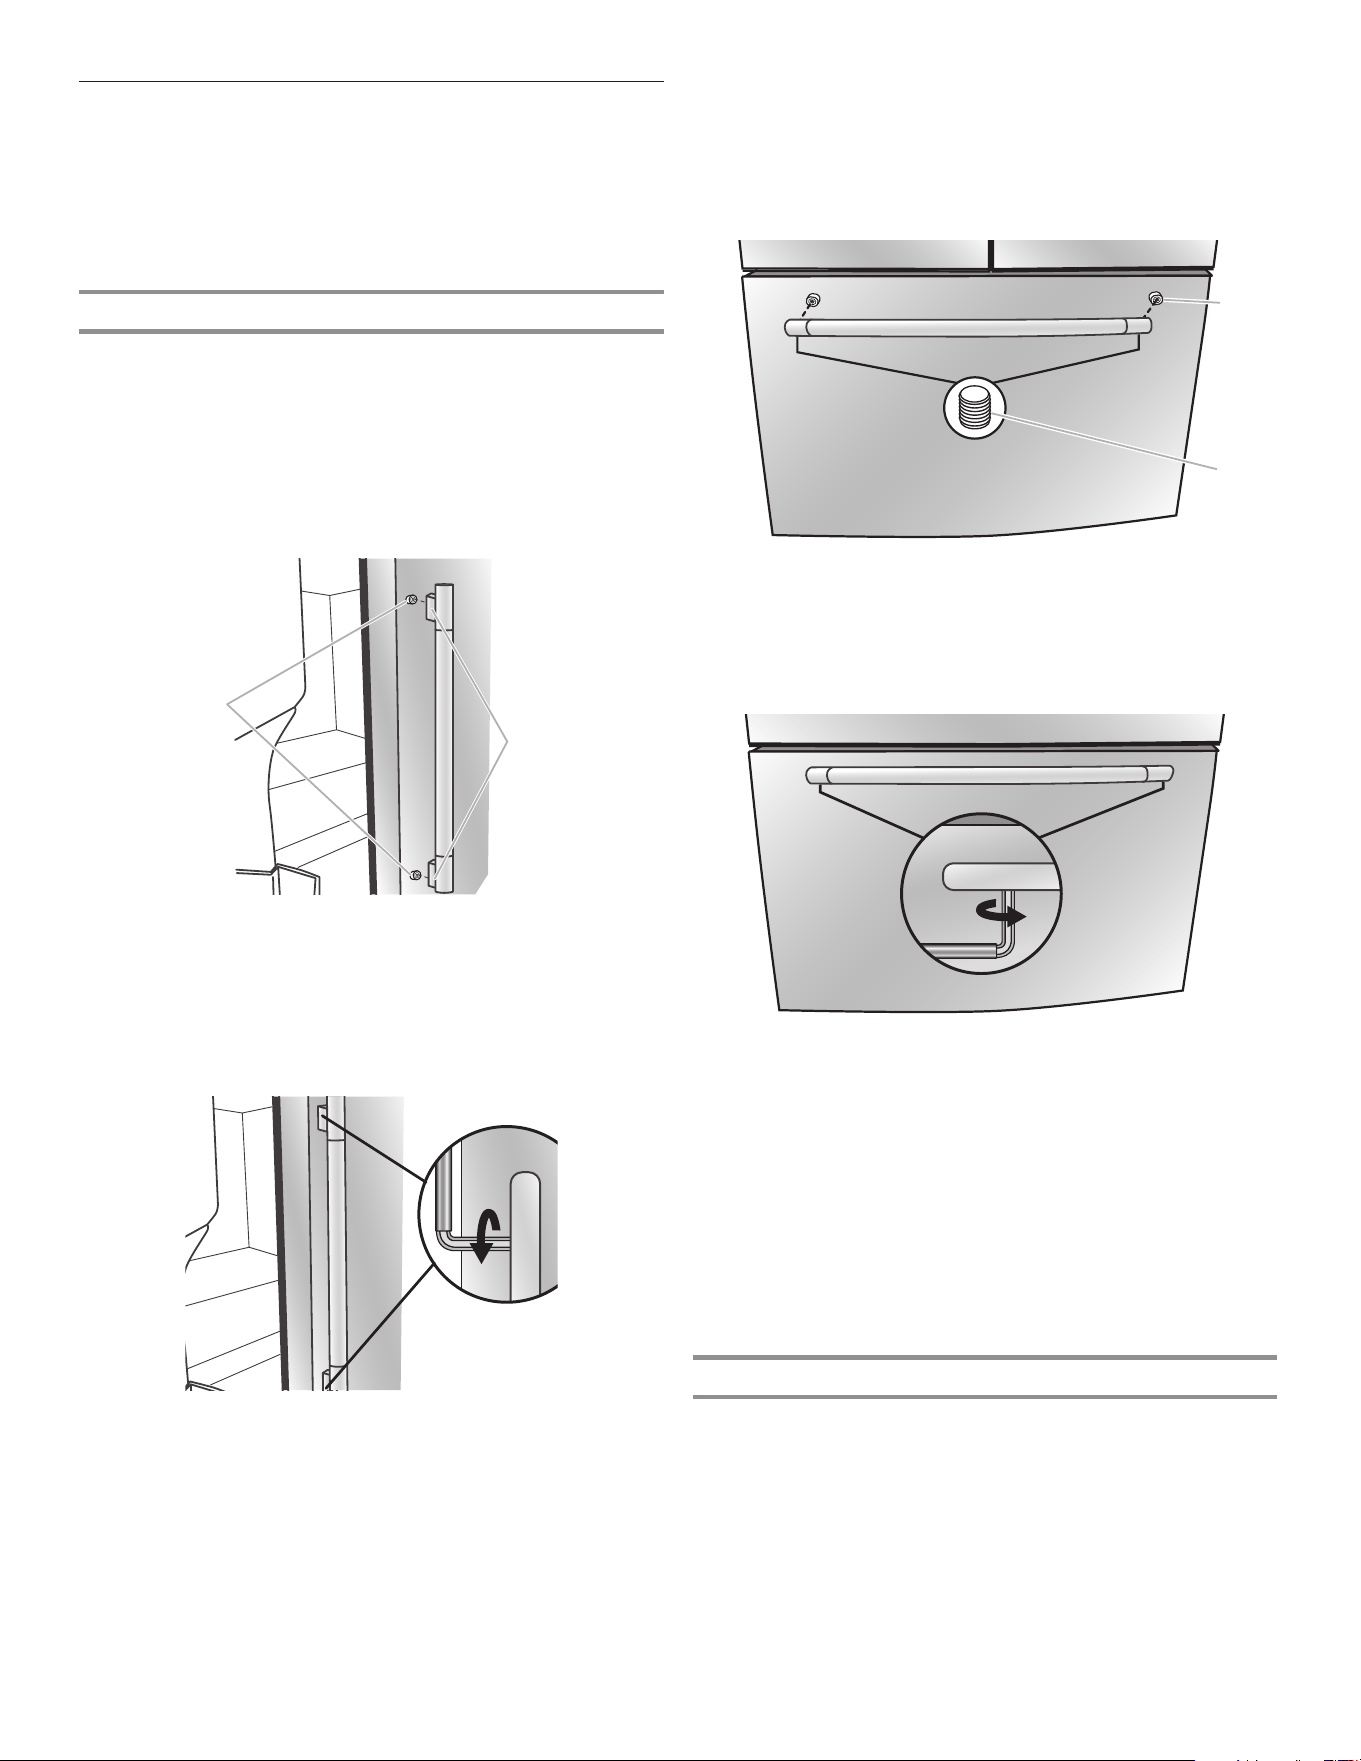
60
A. Vis à épaulement
B. Vis de blocage à l’intérieur de la poignée
3. Pousser fermement la poignée vers la porte jusqu’à ce que la
base de la poignée soit en afeurement de la porte.
4. Tout en maintenant la poignée, introduire le côté court de
la clé à tête hexagonale dans le trou supérieur, puis tourner
légèrement la clé à tête hexagonale pour l’engager dans la vis
de blocage.
5. Serrer la vis de blocage jusqu’à ce qu’elle commence à
toucher la vis à épaulement en la tournant dans le sens
horaire. Ne pas serrer complètement.
6. Répéter les étapes4 et 5 pour serrer la vis de blocage
inférieure.
7. Une fois que les deux vis de blocage ont été partiellement
serrées comme décrit dans les étapes précédentes, serrer
complètement les deux vis de blocage.
IMPORTANT: Lorsque les vis semblent serrées, les
serrer d’un quart de tour supplémentaire. Sans ce serrage
supplémentaire, la poignée ne sera pas correctement
installée.
A. Vis à épaulement
B. Vis de blocage à l’intérieur de la poignée
2. Pousser fermement la poignée vers le tiroir jusqu’à ce que la
base de la poignée soit en afeurement avec le tiroir.
3. Introduire le côté court de la clé à tête hexagonale dans le
trou gauche, puis tourner légèrement la clé à tête hexagonale
pour l’engager dans la vis de blocage.
4. En tournant la clé de gauche à droite, serrer la vis de blocage
d’un quart de tour à la fois, jusqu’à ce que la vis de blocage
commence à toucher la vis à épaulement. Ne pas serrer
complètement.
5. Répéter les étapes3 et 4 pour serrer la vis de blocage du
côté droit sur la vis à épaulement.
6. Une fois que les deux vis de blocage ont été partiellement
serrées comme décrit dans les étapes précédentes, serrer
complètement les deux vis de blocage.
IMPORTANT: Lorsque les vis semblent serrées, les serrer d’un
quart de tour supplémentaire. Sans ce serrage supplémentaire,
la poignée ne sera pas correctement installée.
7. Conserver la clé à tête hexagonale et toutes les instructions.
Démontage des poignées
1. Tout en maintenant la poignée, introduire le côté court de la
clé à tête hexagonale dans le trou d’une vis de blocage, puis
tourner légèrement la clé à tête hexagonale pour l’engager
dans la vis de blocage.
2. Desserrer la vis de blocage en la tournant d’un quart de tour
à la fois dans le sens droit vers gauche.
3. Répéter les étapes1 et 2 pour l’autre vis de blocage.
Tirerlentement sur la poignée pour la dégager de la porte
oudu tiroir.
4. Si nécessaire, retirer les vis à épaulement de la porte avec un
tournevis Phillips.
A
B
A
B
8. Répéter les étapes2 à 7 pour installer l’autre poignée sur
laporte adjacente du réfrigérateur.
Tiroir du congélateur
1. Avec le tiroir fermé, placer la poignée sur les vis à
épaulement de façon à ce que les vis de blocage soient
orientées vers le plancher.
Installation et retrait des poignées
Pièces incluses: Poignées de la porte du réfrigérateur (2),
poignée du tiroir du congélateur (1), clé hexagonale 1/8po et vis
de réglage supplémentaires.
REMARQUE: La poignée du tiroir du congélateur est plus courte
que les poignées de porte du réfrigérateur. Le style des poignées
peut varier selon le modèle.
Installation des poignées
Portes du réfrigérateur
REMARQUE: Les vis de blocage sont préinstallées sur la poignée.
1. Retirer les poignées de l’emballage à l’intérieur du
réfrigérateur et les placer sur une surface plane.
2. Ouvrir la porte du compartiment de réfrigération. Sur la porte
fermée, placer une poignée sur les vis à épaulement de façon
à ce que les vis de blocage soient orientées vers la porte
adjacente.
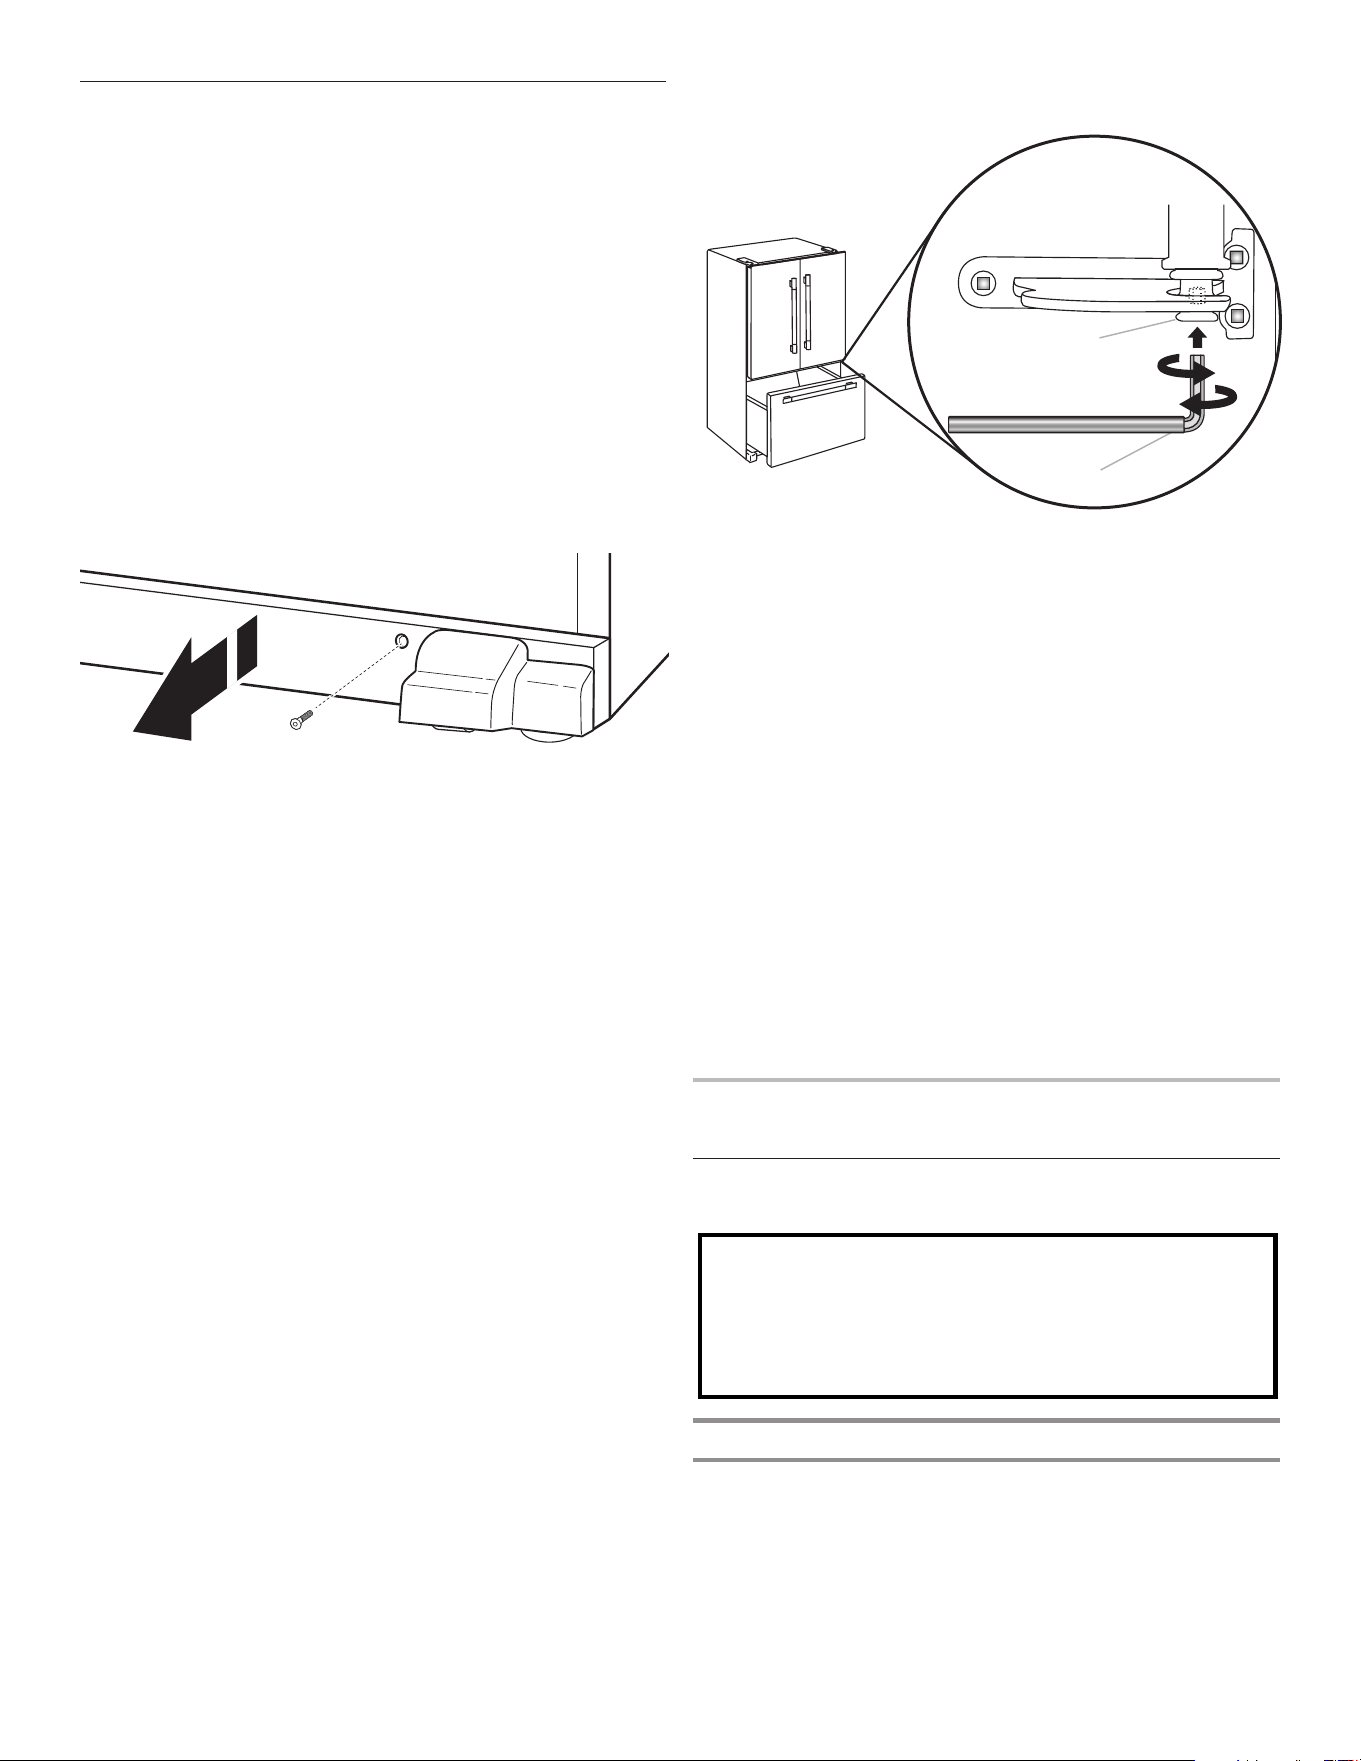
61
Nivellement du réfrigérateur
etfermeture de la porte
La grille de base recouvre les pieds de stabilisation réglables
et les roulettes situées au bas du réfrigérateur sous le tiroir du
congélateur. Avant de réaliser les ajustements, retirer la grille de la
base et déplacer le réfrigérateur à son emplacement dénitif.
Outils nécessaires: Tourne-écrou de 1/4 po
Outil fourni: Clé hexagonale de 1/8 po
1. Utiliser une clé hexagonale de 1/4 po pour retirer les deux vis
de la base de la grille.
2. Retirer le casier de la base. Saisir la grille fermement et la
tirer vers soi en utilisant les deux mains. Ouvrir le tiroir du
congélateur pour accéder aux pieds de stabilisation.
REMARQUE: Pour permettre au réfrigérateur de rouler plus
facilement, soulever les pieds de stabilisation en les tournant
dans le sens antihoraire. Les roulettes avant toucheront le
plancher.
7. S’assurer que le réfrigérateur est stable. Si le réfrigérateur
semble instable ou qu’il roule vers l’avant lorsqu’on ouvre la
porte ou le tiroir, régler les pieds de stabilisation.
Stabilisation du réfrigérateur:
■ Ouvrir le tiroir du congélateur. Utiliser un tourne-écrou de
1/4 po pour tourner les deux pieds de stabilisation du
même nombre de tours dans le sens horaire, jusqu’à ce
qu’ils soient fermement en appui sur le sol. Vérier de
nouveau. Si le résultat n’est pas satisfaisant, continuer de
régler les pieds de nivellement en tournant la vis par demi-
tours jusqu’à ce que le réfrigérateur ne roule plus vers
l’avant lors de l’ouverture du tiroir.
REMARQUE: Le fait d’exercer une pression contre le dessus
du réfrigérateur permet d’alléger le poids appliqué aux
pieds de stabilisation. Ceci facilite le réglage des vis. Ne pas
pousser en exerçant une force excessive pour ne pas faire
basculer le réfrigérateur.
A. Axe de charnière inférieure
B. Clé hexagonale de 1/8po
■ Continuer à tourner la vis d’alignement jusqu’à ce que les
portes soient alignées.
3. Déplacer le réfrigérateur jusqu’à sa position de service nale.
4. À l’aide d’un tourne-écrou de 1/4po, abaisser le pied de
stabilisation. Les tourner dans le sens horaire, jusqu’à ce
que les roulettes ne touchent plus le sol et que les deux
pieds de stabilisation soient fermement en appui sur le
sol. Cetarrangement vise à empêcher le réfrigérateur de
rouler vers l’avant à l’ouverture des portes ou du tiroir de
congélation.
IMPORTANT: Si des ajustements sont nécessaires par la
suite et si cela comprend les pieds de stabilisation, les deux
pieds de stabilisation doivent être tournés de façon égale pour
conserver l’aplomb du réfrigérateur.
5. À l’aide d’un niveau, vérier que le réfrigérateur est d’aplomb
transversalement et d’avant en arrière.
6. Vérier que le dessus des portes est égal et que l’espace
entre le bas des portes du réfrigérateur et le haut du tiroir
duréfrigérateur est égal. Au besoin, aligner les portes.
Pour aligner les portes:
■ Tout en gardant les deux portes du réfrigérateur fermées, retirer
le tiroir du congélateur. Repérer l’axe de charnière inférieure de
la porte de droite du réfrigérateur. La vis d’alignement se trouve
à l’intérieur de l’axe de la charnière inférieure.
■ Introduire l’extrémité courte de la clé à tête hexagonale de
1/8po (jointe aux instructions d’installation de la poignée de
porte) dans l’axe de la charnière inférieure jusqu’à ce qu’elle
soit complètement engagée dans la vis d’alignement.
Pour soulever la porte du réfrigérateur, tourner la clé à tête
hexagonale vers la droite.
Pour abaisser la porte, tourner la clé à tête hexagonale vers la
gauche.
A
B
Ne pas utiliser pour le filtrage d'une eau
microbiologiquement polluée ou de qualité inconnue en
l'absence d'un dispositif de désinfection adéquat avant ou
après le système. Les systèmes certifiés pour la réduction
de kyste peuvent être utilisés pour l'eau désinfectée qui
peut contenir des kystes filtrables.
Remplacer et installer le ltre à eau
Le ltre à eau devrait être remplacé tous les 6 moins en fonction
d’un débit de 0,50 à 0,60 gallon par minute (1,89-2,27 Lpm) pour
un total de 200 gallons (757 L) ltrés.
Pour commander un ltre de rechange, nous contacter.
Consulterla section “Accessoires” du Guide d’utilisation et
d’entretien pour obtenir des renseignements sur le processus
decommande.
8. Réinstaller la grille de la base en alignant les extrémités de
la grille avec les dispositifs de nivellement de chaque côté et
emboîter la grille. Utiliser une clé hexagonale de 1/4 po pour
réinstaller les vis.
FILTRES ET ACCESSOIRES
Système de filtration d’eau
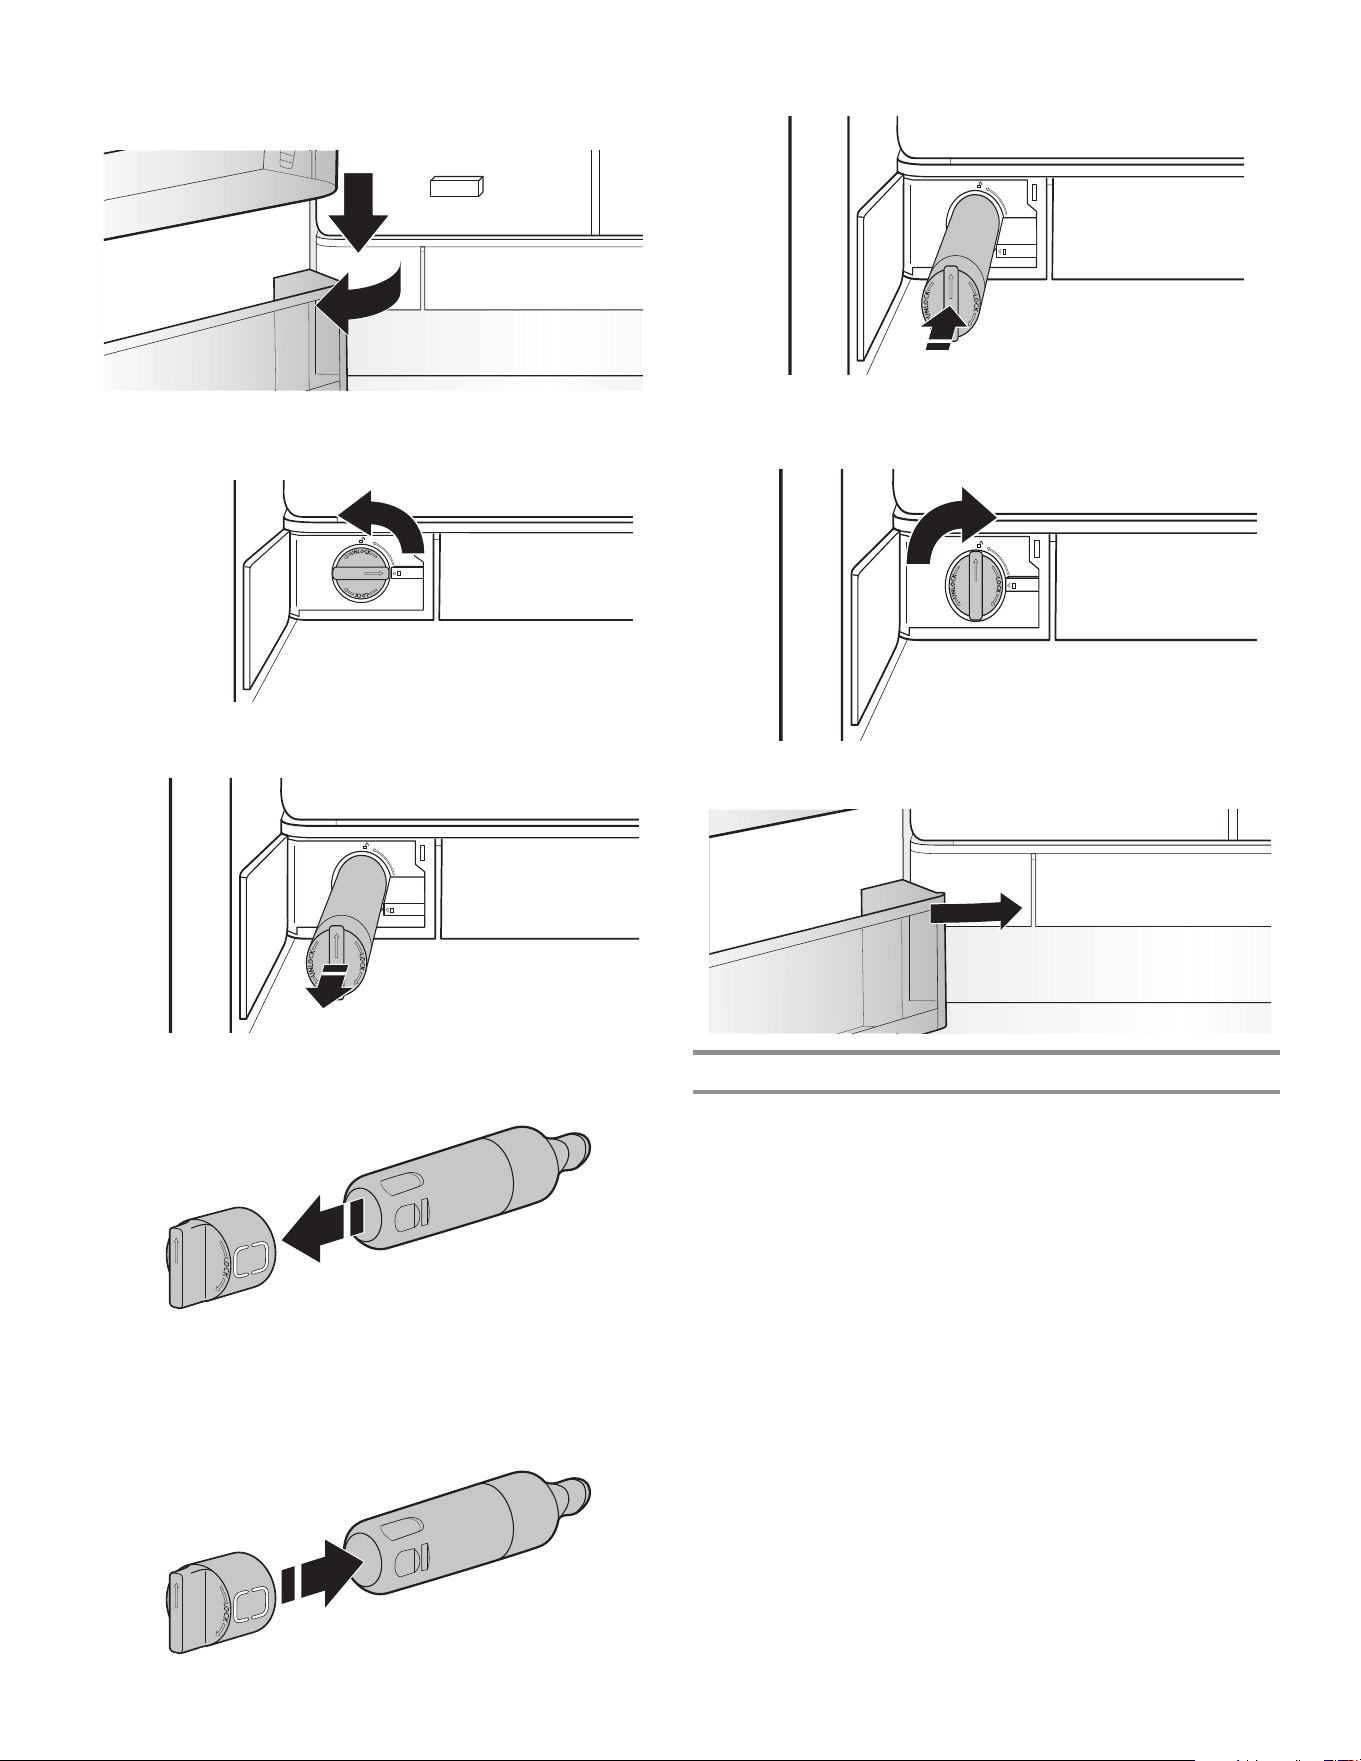
62
1. Pousser sur la porte du ltre à eau située dans le coin inférieur
gauche du réfrigérateur pour l’ouvrir.
2. Pivoter le ltre à eau et tourner de 90° dans le sens antihoraire
pour le déverrouiller.
3. Retirer le ltre du compartiment.
4. Retirer le capuchon du ltre à eau qui doit être remplacé.
5. Installer le capuchon de ltre à eau sur le nouveau ltre.
Aligner correctement les èches pour que les rainures du ltre
soient alignées avec les nervures du capuchon.
6. Placer le ltre dans le compartiment.
7. Pivoter le ltre à eau et tourner de 90° dans le sens horaire
pour le verrouiller en place et aligner les èches.
8. Refermer la porte du ltre à eau.
Témoin lumineux du ltre à eau
Le témoin lumineux de l’état du ltre à eau vous aidera à savoir
quand changer le ltre à eau. L’application enverra aussi des
notications à votre appareil mobile et vous indiquera l’état de
l’application JennAir
®
pour l’autonomie du ltre.
■ COMMANDER FILTRE (jaune) – Il est presque temps de
changer le ltre à eau. L’icône “Order Filter” (commander ltre)
s’afche en tout temps, mais est éteinte en mode Exposition
etSabbat.
■ REMPLACER FILTRE (rouge) – Remplacer le ltre à eau.
Aucours de la distribution d’eau, “Replace Filter” (remplacer
ltre) clignote sept fois et un signal d’alerte retentit trois fois.
REMARQUE: L’icône “REPLACE FILTER” (remplacer ltre)
reste allumée si le ltre n’est pas réinitialisé sur l’interface
utilisateur (IU).
■ RÉINITIALISATION DU FILTRE – Appuyer sur MAX COOL
(refroidissement rapide) et MAX ICE (production de glaçons
maximale) pendant 3secondes pour réinitialiser le ltre à eau.
L’afchage exécutera un compte à rebours de 3secondes,
puisfera clignoter l’icône et fera entendre un signal.
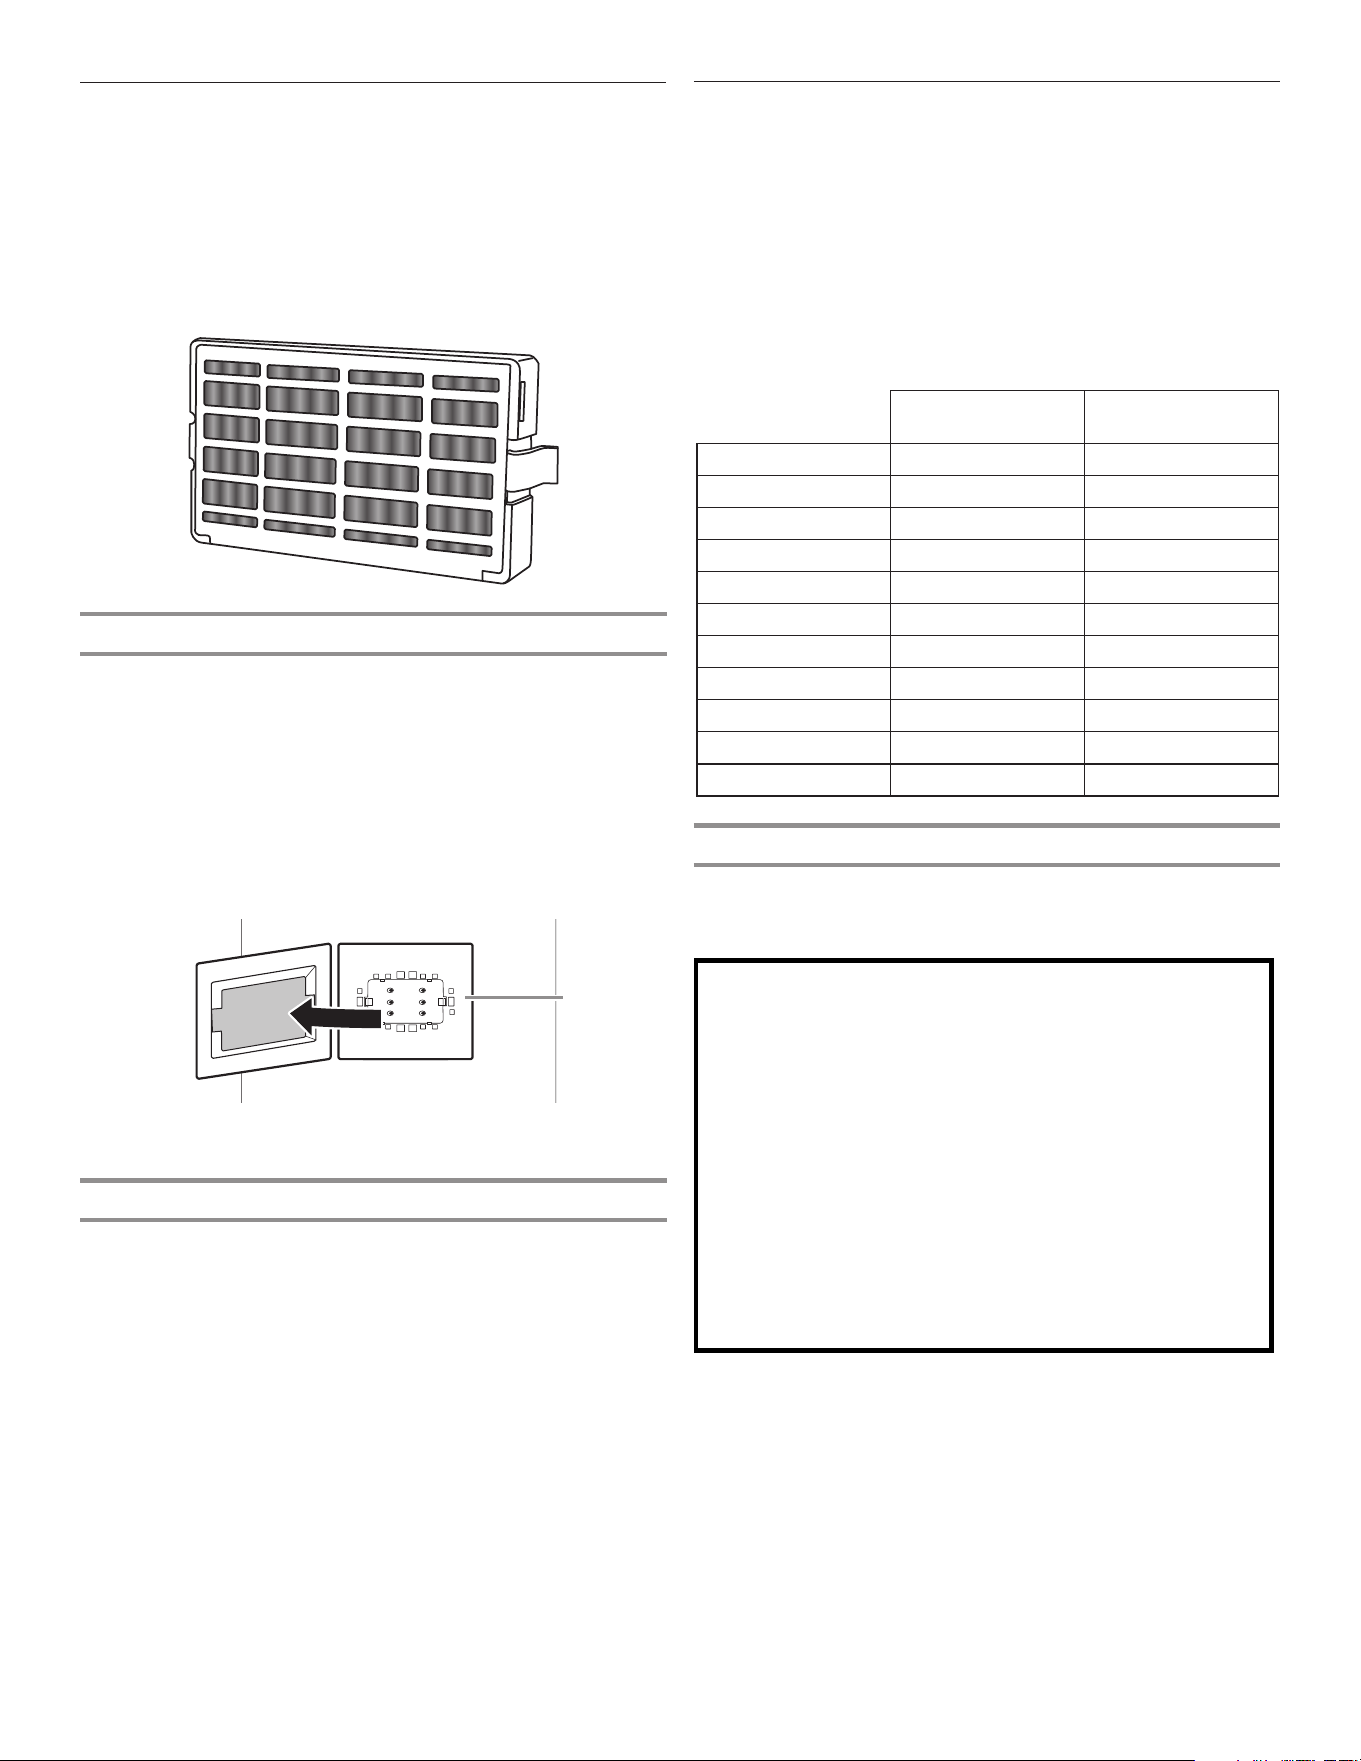
63
Installation du filtre à air
FreshFlow™
Un ltre à air est 15fois plus puissant que le bicarbonate de
soude pour réduire les odeurs courantes d’aliments à l’intérieur du
réfrigérateur.
Sur certains modèles, le sachet d’accessoires du réfrigérateur
comprend un ltre à air qui doit être installé avant d’utiliser le
réfrigérateur.
Installation du ltre à air FreshFlow™
Installer le ltre derrière le couvercle d’aération situé le long de la
paroi arrière, près du milieu du réfrigérateur.
1. Retirer le ltre à air de son emballage.
2. Tirer sur le couvercle de plastique sur le couvercle de
ventilation.
REMARQUE: Lorsque le couvercle est enlevé pour la première
fois, une petite pièce en mousse de la taille du ltre devra être
retirée et jetée.
3. Enclencher le ltre en place, fermer le couvercle
A. Filtre à air
Remplacement du ltre à air FreshFlow™
La cartouche de ltre à air jetable doit être remplacée tous
les 6mois. Certains ltres à air sont dotés d’un indicateur de
remplacement.
Pour commander un ltre à air de rechange, nous contacter.
Consulter la section “Accessoires” du Guide d’utilisation et
d’entretien pour obtenir des renseignements sur le processus
decommande.
1. Ouvrir le couvercle, puis retirer l’ancien ltre à air en serrant
les onglets latéraux.
2. Installer le ltre à air en suivant les instructions des sections
précédentes.
Sensibilité à
l’éthylène
Production
d’éthylène
Pommes Élevée Très élevé
Asperges Moyenne Très bas
Petits fruits Basse Basse
Brocoli Élevée Très bas
Cantaloup Moyenne Élevée
Carottes Basse Très bas
Agrume Moyenne Très bas
Raisin Basse Très bas
Laitue Élevée Très bas
Poires Élevée Très élevé
Épinards Élevée Très bas
A
Installation du conservateur pour produits frais
Pour plus de commodité, le conservateur pour produit frais à
xation par succion peut être installé dans le bac à légumes ou
les tiroirs réfrigérés.
ATTENTION : IRRITANT
PEUT IRRITER LES YEUX ET LA PEAU. DÉGAGE DES
ÉMANATIONS DANGEREUSES LORSQUE MÉLANGÉ
AVEC D’AUTRES PRODUITS.
Ne pas mélanger avec d’autres agents de nettoyage tels
que l’ammoniaque, un agent de blanchiment ou des
acides. Éviter tout contact avec les yeux, la peau ou les
vêtements. Ne pas respirer les poussières. Tenir hors de la
portée des enfants.
PREMIERS SOINS : Contient du permanganate de
potassium. En cas d’ingestion, appeler immédiatement un
centre antipoison ou un médecin. Ne pas provoquer le
vomissement. En cas de contact avec les yeux, rincer avec
de l’eau pendant 15 minutes. En cas de contact avec la
peau, bien rincer avec de l’eau.
1. Laver l’intérieur de chaque tiroir à l’aide d’une solution de
savon doux et d’eau tiède; sécher complètement.
2. Trouver l’emballage contenant le conservateur pour produits
frais à l’intérieur du réfrigérateur, puis installer le conservateur
pour produits frais dans le tiroir selon les instructions fournies
dans l’emballage.
Installation du conservateur de
produits frais (sur certains modèles)
Le sachet de conservation pour produits frais absorbe l’éthylène,
permettant ainsi un ralentissement du processus de maturation
de nombreux produits frais. Ainsi, la fraîcheur de certains produits
frais est prolongée.
La production d’éthylène et la sensibilité des produits à l’éthylène
varient selon le type de fruit ou de légume. Pour préserver la
fraîcheur des produits, il est conseillé de séparer les produits frais
sensibles à l’éthylène des fruits qui en produisent en quantité
modérée à élevée.
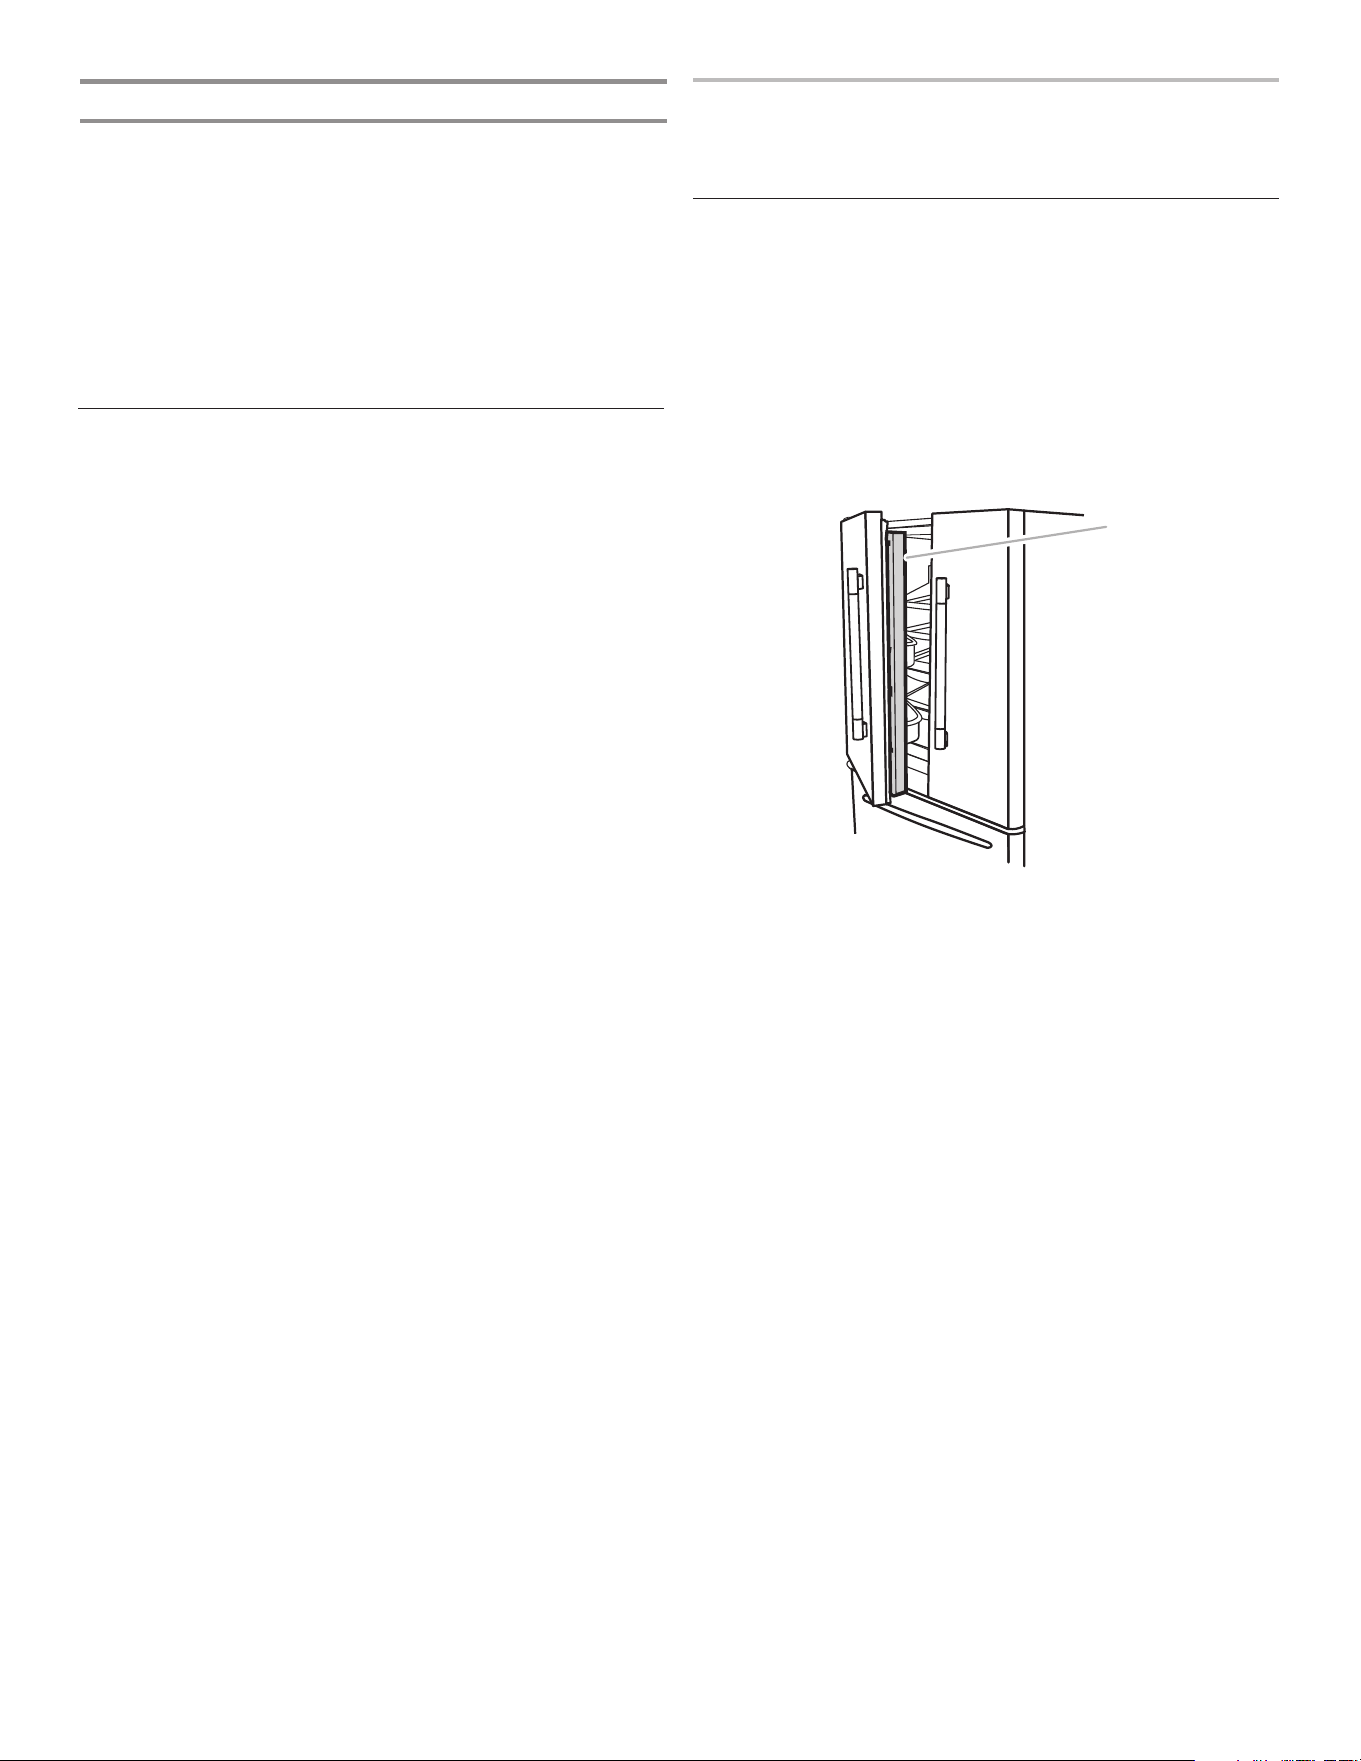
64
Accessoires
Les accessoires suivants sont disponibles pour ce réfrigérateur.
Pour commander un accessoire, nous contacter et demander le
numéro de pièce.
Aux É.-U., visiter notre site Web au www.jennair.com/accessories
ou composer le 1800JENNAIR (1800536-6247).
Au Canada, consulter notre page Web au www.whirlpoolparts.ca
ou composer le 1800JENNAIR (1800536-6247).
Nettoyant pour acier inoxydable affresh
®
Aux États-Unis, commander la pièce numéroW10355016
Au Canada, commander le numéro de pièceW10355016B
Lingettes pour acier inoxydable affresh
®
Aux États-Unis, commander la pièce numéroW10355049
Au Canada, commander le numéro de pièceW10355049B
Nettoyant pour la cuisine et les électroménagers affresh
®
Aux États-Unis, commander la pièce numéroW10355010
Au Canada, commander le numéro de pièceW10355010B
Filtre à eau:
Aux États-Unis, commander la pièce numéroEDR2RXD1
Au Canada, commander le numéro de pièceEDR2RXD1B
Filtre à air:
Commander le numéro de pièceW10311524 ou AIR1
Trousse de démarrage pour conservateur pour produits frais:
Commander le numéro de pièceP1KL6S1CS
Ensemble-recharge de conservateur pour produits frais:
Commander le numéro de pièceP1KC6R1
Boîte Herb Tender
®
:
Commander le numéro de pièceW10882409
UTILISATION DU
RÉFRIGÉRATEUR
Ouverture et fermeture des portes
Le compartiment de réfrigération possède 2portes. Les portes
peuvent être ouvertes et fermées séparément ou ensemble.
Ilya sur la porte de gauche du réfrigérateur un joint à charnière
verticale.
■ Lors de l’ouverture de la porte du côté gauche, le joint à
charnière se replie automatiquement vers l’intérieur pour qu’il
n’y ait pas d’interférence.
■ Lorsque les deux portes sont fermées, le joint à charnière
assure automatiquement l’étanchéité entre les 2 portes.
A
A. Joint à charnière
Remplacement du sachet de conservation pour produits frais
Le sachet jetable doit être remplacé tous les 6mois ou lorsque le
témoin est entièrement passé du blanc au rouge.
Pour commander des ltres de rechange, nous contacter.
Consulter la section “Accessoires” pour connaître le processus de
commande.
1. Retirer les sachets usagés du logement du conservateur pour
produits frais.
2. Retirer le témoin usagé.
3. Installer les sachets et le témoin neufs en suivant les
instructions incluses dans l’emballage.
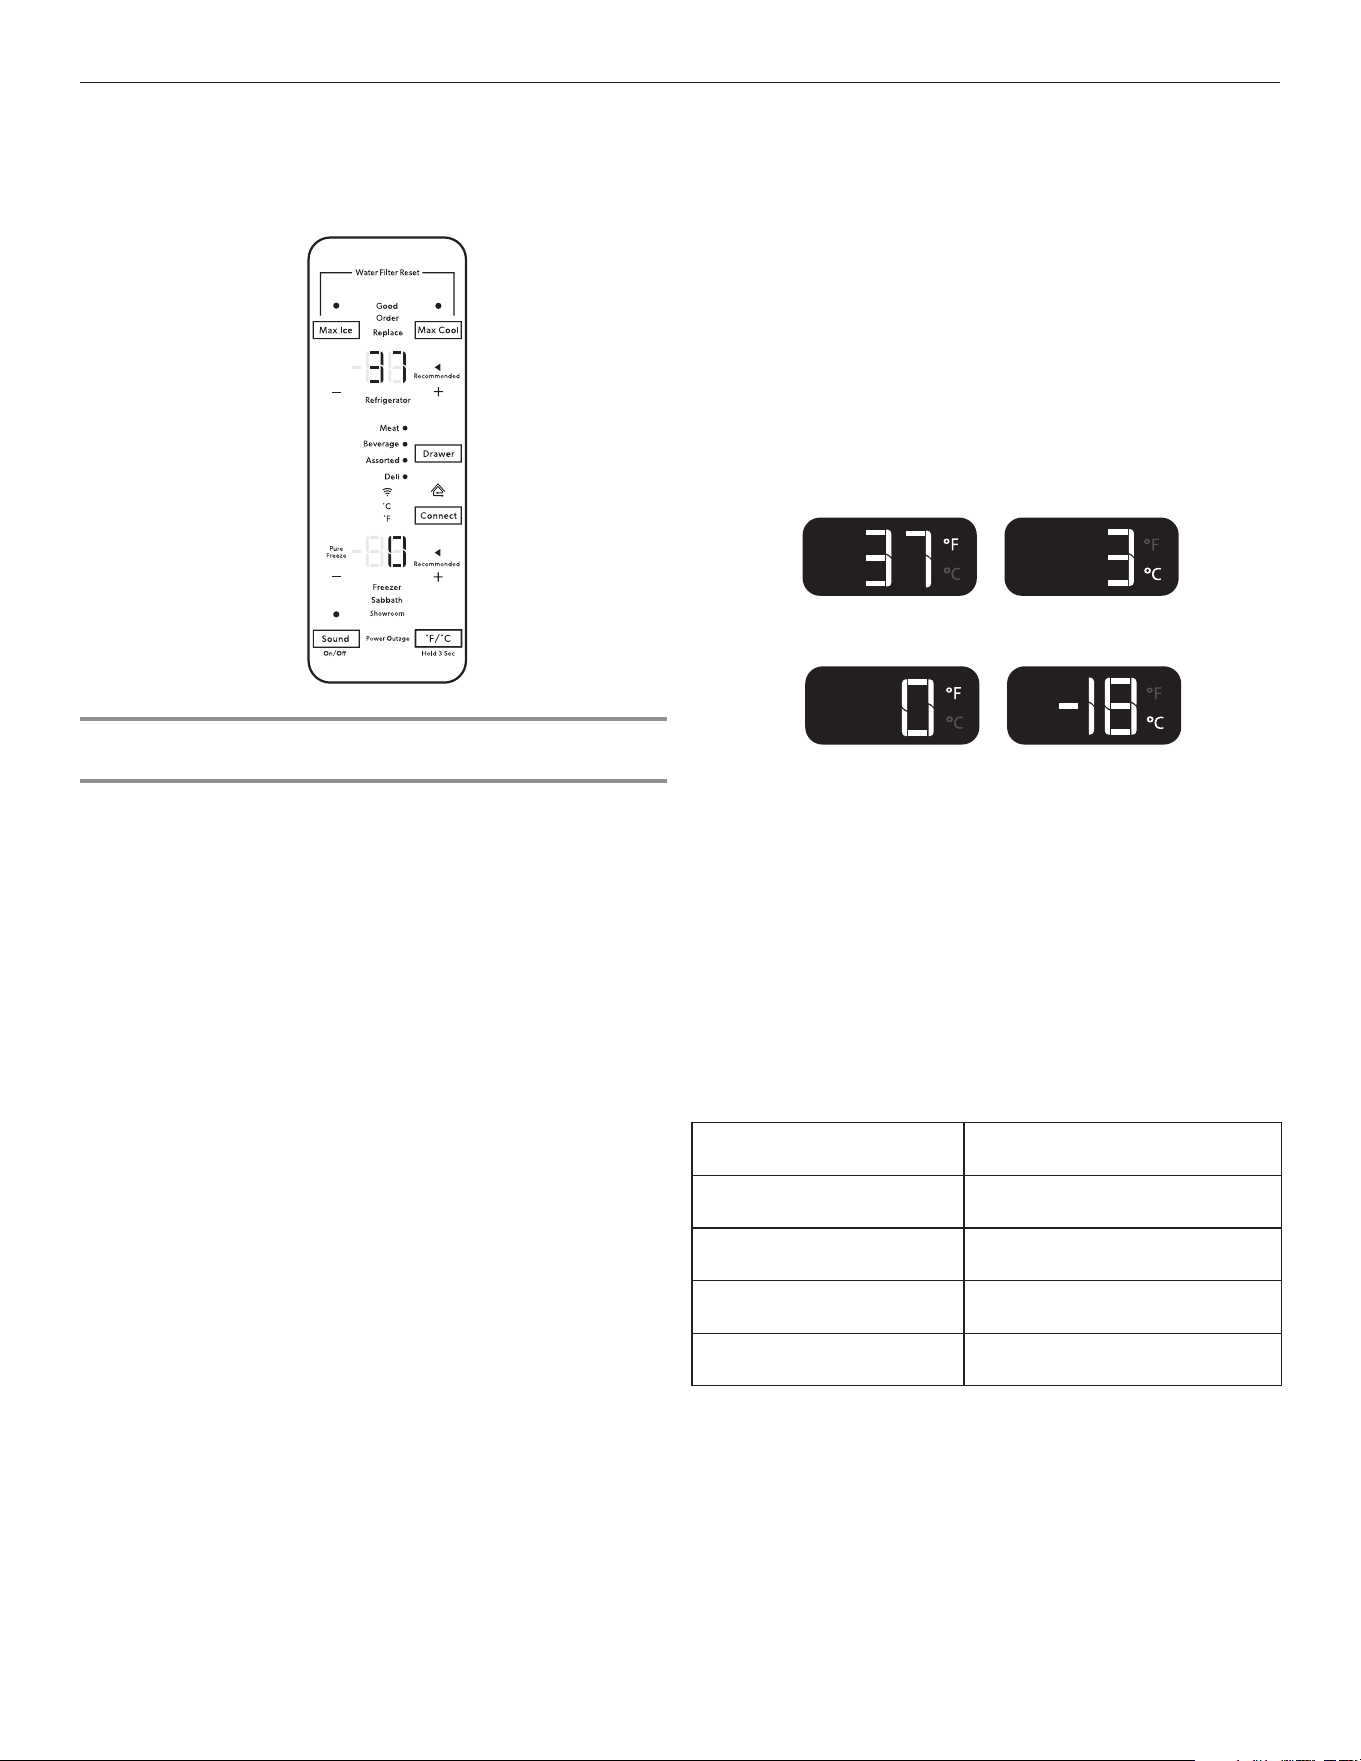
65
Utilisation des commandes
Visualisation et modication des points de réglage de
température
À titre de commodité, les commandes du réfrigérateur et du
congélateur sont préréglées à l’usine.
Lors de l’installation initiale du réfrigérateur, s’assurer que les
commandes sont encore préréglées aux points de réglage
recommandés. Les points de réglage recommandés à l’usine
sont de 37°F (3°C) pour le réfrigérateur et 0°F (-18°C) pour
lecongélateur.
IMPORTANT:
■ Attendre 24heures avant d’ajouter des aliments dans
le réfrigérateur. Si on ajoute des aliments avant que le
réfrigérateur ne soit complètement refroidi, les aliments
risquent de se gaspiller.
REMARQUE: Placer les points de réglage à un niveau plus
froid que celui qui est recommandé ne refroidira pas les
compartiments plus rapidement.
■ Si la température est trop tiède ou trop froide dans le
réfrigérateur ou le congélateur, vérier d’abord les évents
pour s’assurer qu’ils ne sont pas bloqués, avant de régler
lescommandes.
■ Les réglages recommandés devraient être corrects pour
une utilisation domestique normale. Les réglages sont faits
correctement lorsque le lait ou le jus sont aussi froids que
désiré et lorsque la crème glacée est ferme.
REMARQUE: Dans des zones comme un garage, un sous-
sol ou un porche, la température peut être extrême ou le taux
d’humidité supérieur à celui de votre domicile. Il peut s’avérer
nécessaire de modier la température à d’autres réglages que
les réglages recommandés an de s’adapter à ces conditions.
■ Attendre au moins 24heures entre chaque modication.
Vérier à nouveau les températures avant de procéder à
d’autres modications.
Consulter les points de réglage de température
1. Appuyer sur [+]/[-] pour le réfrigérateur ou sur [+]/[-] pour le
congélateur pour passer d’un point de réglage de température
à l’autre.
REMARQUE: Pour afcher la température en degrés Celsius,
maintenir enfoncé le bouton [°F/°C], l’afchage changera
après 3secondes. Pour revenir en Fahrenheit, maintenir
enfoncés le bouton [°F/°C], l’afchage changera après
3secondes.
Pour activer le mode Température du garde-manger, appuyer
sur DRAWER (tiroir), puis choisir entre les quatre options de
réglage de température: Meat, Beverage, Assorted et Deli
(viande, boisson, assortiment et charcuterie). L’afchageindique
le point de réglage de température du garde-manger.
Température recommandée du réfrigérateur
Température recommandée du congélateur
Modication des points de réglage de température
Échelle des points de réglage pour le réfrigérateur: 33°F à 45°F
(1°C à 7°C)
Échelle des points de réglage pour le congélateur: -6°F à 5°F
(-22°C à -15°C)
1. Appuyer sur [+]/[-] pour régler la zone réfrigérateur.
L’afchageindique le point de réglage de température du
compartiment sélectionné, comme illustré.
2. Lorsque la température se situe à l’intérieur de la plage
Pure Freeze
®
, l’afchage s’allume. Pure Freeze
®
est activé au
point de réglage le plus froid du congélateur.
Pour modier les points de réglage de température,
utiliserletableau suivant comme guide:
CONDITION: RÉGLAGE DE LA
TEMPÉRATURE:
RÉFRIGÉRATEUR trop froid RÉFRIGÉRATEUR Réglage 1°
plus élevé
RÉFRIGÉRATEUR trop tiède RÉFRIGÉRATEUR Réglage 1°
plus bas
CONGÉLATEUR trop froid CONGÉLATEUR Réglage 1° plus
élevé
CONGÉLATEUR trop tiède/
trop peu de glaçons
CONGÉLATEUR Réglage 1° plus
bas
Les commandes tactiles sont situées au-dessus du distributeur
externe et à l’intérieur, sur le côté de la porte gauche du
réfrigérateur.

66
Max Cool (refroidissement maximal)
La caractéristique Max Cool (refroidissement maximal) est utile
lors de périodes d’utilisation intense du réfrigérateur, de l’ajout
d’une grande quantité d’aliments ou de l’élévation temporaire de
la température de la pièce.
■ Pour activer la fonction de refroidissement maximale, appuyer
sur le bouton Max Cool (refroidissement maximal). Lorsque ce
bouton est appuyé, l’icône clignote 3fois, puis reste afchée.
■ Pour désactiver manuellement la fonction de refroidissement
maximale, appuyer sur le bouton Max Cool (refroidissement
maximal). L’afchageclignote 3 fois et s’éteint. La fonction
de refroidissement maximale reste activée pendant 24heures
à moins d’être désactivée manuellement. Le réglage de la
température du réfrigérateur aura pour effet de désactiver
automatiquement la fonction de refroidissement maximale.
REMARQUE: Le réglage du congélateur à une température
plus froide peut rendre certains aliments, comme la crème
glacée, plus durs.
Max Ice (production de glaçons maximale)
La fonction de production de glaçons maximale est utile pour
augmenter le refroidissement du compartiment congélateur et la
production de glaçons.
■ Pour activer ou désactiver la fonction de production de
glaçons maximale, appuyer sur le bouton Max Ice (production
de glaçons maximale). Lorsque ce bouton est appuyé pour
mettre la fonction en marche, l’icône clignote 3fois, puis reste
afchée.
■ Pour désactiver manuellement la fonction de production de
glaçons maximale, appuyer sur le bouton Max Ice (production
de glaçons maximale). L’afchageclignote 3 fois et s’éteint.
La fonction de production de glaçons maximale reste activée
pendant 24heures, àmoins d’être annulée manuellement.
Leréglage de la température duréfrigérateur aura pour effet
dedésactiver automatiquement la fonction de production de
glaçons maximale.
REMARQUE: Le réglage du congélateur à une température
plus froide peut rendre certains aliments, comme la crème
glacée, plus durs.
Replace Fiter (Réinitialisation du ltre à eau)
Affiche l’état du filtre à eau. Pour réinitialiser le filtre, appuyer sur
MAX ICE (glacons max.) et MAX COOL (refroidissement maximal)
pendant 3 secondes. Après le compte à rebours, l’icône Good
(Bon) clignotera 3 fois et restera allumée.
REMARQUE: Les témoins lumineux de l’état du ltre à eau
situés sur les commandes externes vous aideront à savoir quand
changer le ltre à eau.
■ COMMANDER FILTRE (jaune) – Commander un ltre à eau de
rechange.
■ REMPLACER FILTRE (rouge) – Remplacer le ltre à eau.
L’icône de remplacement du ltre à eau clignote pendant toute
la période de distribution d’eau. Si après 14 jours, le ltre à eau
n’est pas encore remplacé, l’icône de remplacement du ltre
clignote 7 fois et une alarme sonore retentit 3 fois à la n de
la distribution. Consulter la section “Système de ltration de
l’eau”.
REMARQUE: REPLACE FILTER (remplacer ltre) reste allumé
si aucun ltre n’est installé.
■ RÉINITIALISATION DU FILTRE – Appuyer sur les boutons
de l’afchage de température Max Ice (production de
glaçons maximale) et Max Cool (refroidissement maximal)
simultanément pendant 3secondes pour réinitialiser le
ltre à eau. L’afchageeffectuera un compte à rebours de
3secondes, puisfera clignoter l’icône et entendre une tonalité.
État du ltre
L’application JennAir
®
enverra une alerte qui afchera le ltre à
eau.
Mode Pure Freeze
®
Cette fonction réduit la migration d’humidité des aliments congelés.
Ceci a pour effet de réduire les brûlures de congélation.
Pour activer le mode Pure Freeze
®
, basculer vers le point de
réglage de congélation le plus froid.
Pour désactiver le mode Pure Freeze
®
, basculer du point de
réglage de congélation le plus froid vers n’importe quelle autre
température.
Sound On/Off (Activation et désactivation du son)
Le bouton Sound (son) permet au client d’activer et de désactiver
le son.
■ Pour activer la fonction de son, appuyer sur le bouton Sound
(son). Lorsque ce bouton est appuyé, l’icône du son clignote
3fois, puis reste afchée.
■ Pour désactiver manuellement la fonction de son, appuyer sur
le bouton Sound (son). L’afchage clignote 3 fois et s’éteint.
Power Outage (Panne de courant)
Le témoin de panne de courant indique à l’utilisateur que
l’alimentation électrique du réfrigérateur a été interrompue et
quela température du congélateur s’est élevée.
L’afchage de température du tableau de commande indiquera
“Power Outage” (panne de courant) et une alarme retentira à trois
reprises. Appuyer sur un bouton pour faire cesser l’alarme, puis
sur un autre bouton pour fermer l’icône de panne de courant.
Une fois la panne de courant conrmée, l’icône “Power Outage”
(panne de courant) disparaît et l’afchage revient à l’écran
d’accueil.
Showroom Mode (Mode d’exposition)
Ce mode est utilisé lorsque le réfrigérateur est exposé dans un
magasin de détail ou si on souhaite désactiver le refroidissement
et toutes les autres fonctions sauf l’éclairage intérieur. Le mode
d’exposition peut être utilisé pendant une absence. Voir la section
“Précautions à prendre pour les vacances ou le déménagement”
pour en savoir plus sur la procédure à suivre pour laisser le
réfrigérateur dans ce mode pendant des périodes prolongées.
Si le mode d’exposition est activé, le mot “Showroom
(exposition)” s’allume sur l’afchage. Pour accéder au mode
d’exposition ou en sortir, appuyer simultanément sur °F/°C et
DRAWER (tiroir) pendant 3 secondes.
REMARQUE: Vider la machine à glaçons si le réfrigérateur doit
être éteint pendant une période prolongée.
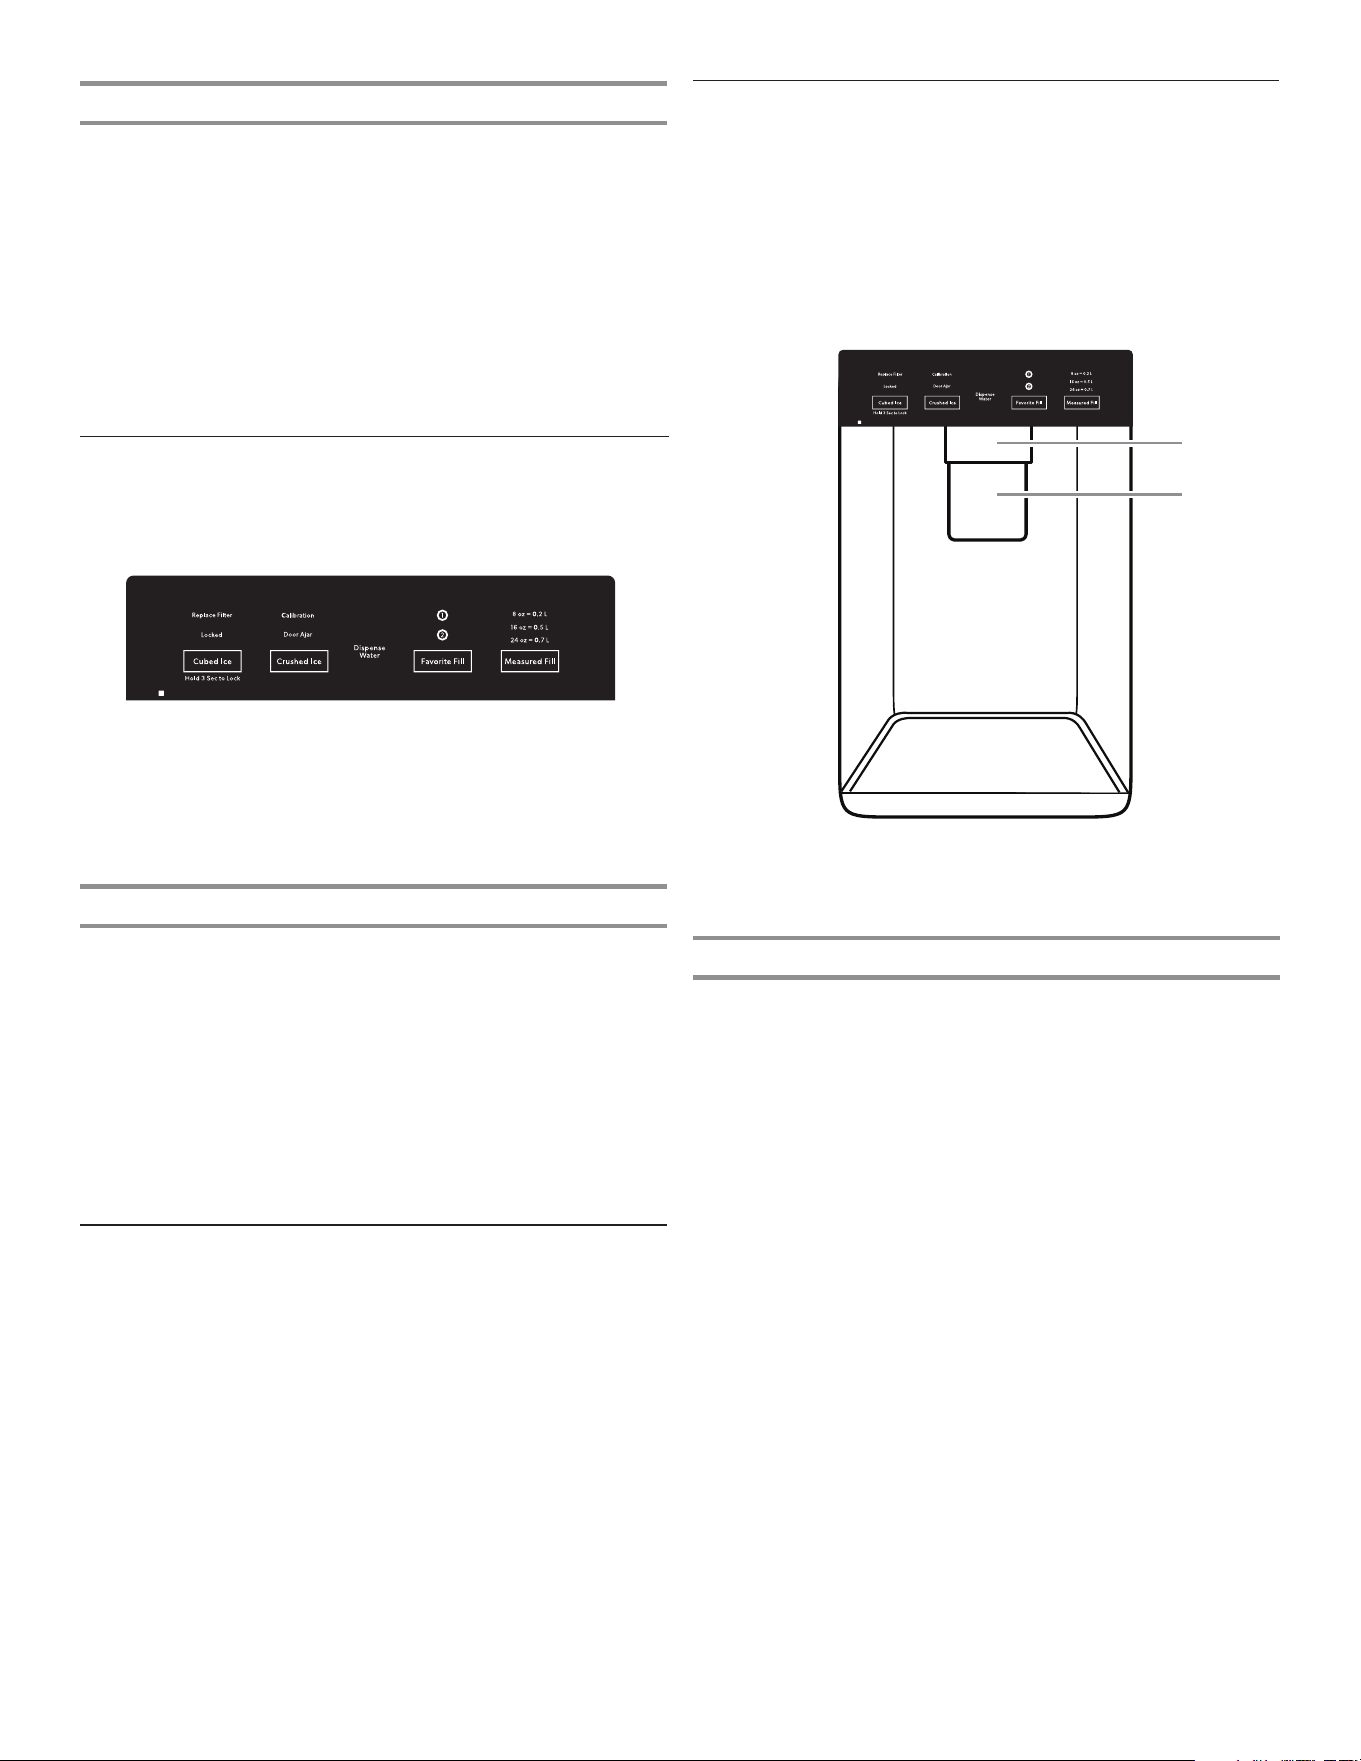
67
Caractéristiques supplémentaires
Alarme de porte entrouverte
La fonction d’alarme de porte entrouverte fait retentir un signal
d’alarme lorsqu’une porte ou un tiroir du congélateur est
ouvert pendant 5minutes et que le refroidissement est activé.
L’alarmeretentit toutes les 2minutes. Fermer le tiroir et toutes
lesportes pour désactiver l’alarme.
REMARQUE: Pour que l’alarme sonore cesse de retentir tout
en gardant les portes ouvertes, comme pendant le nettoyage de
l’intérieur du réfrigérateur, appuyer sur n’importe quel bouton du
tableau de commande. Le son de l’alarme sera temporairement
fermé, mais l’icone Door Ajar (porte entrouverte) restera afchée
sur le tableau de commande du distributeur.
Distributeurs d’eau et de glaçons
IMPORTANT:
■ Attendre 3heures pour que le réfrigérateur et l’eau refroidissent.
■ Prévoir un délai de 24 heures pour la production du premier
lot de glaçons. Jeter les 3premières quantités de glaçons
produites.
■ Le système de distribution ne fonctionne pas lorsque la porte
gauche du réfrigérateur est ouverte.
!
Calibration
!
Door
Ajar
!
Replace
Filter
!
"#$#!
!
%&#'#(')!"#$#!
!
Order Filter
!
a1 oz = b1 L
!
a2 oz = b2 L
!
a3 oz = b3 L
!
Dispense
!
Rinçage du circuit d’eau
De l’air piégé dans le système de distribution d’eau peut
faire dégoutter le distributeur d’eau. Après avoir raccordé le
réfrigérateur à une source d’alimentation en eau ou remplacé le
ltre à eau, vidanger le circuit d’eau.
Le fait de rincer le système de distribution d’eau évacue l’air de la
canalisation et du ltre et conditionne le ltre à eau. Un amorçage
supplémentaire peut s’avérer nécessaire dans certains domiciles.
REMARQUE: Pendant l’évacuation de l’air du système, de l’eau
peut gicler du distributeur.
1. Utiliser un récipient robuste pour appuyer sur la plaque du
distributeur d’eau pendant 5secondes.
2. Relâcher la plaque du distributeur pendant 5secondes.
Répéter les étapes1 et 2, jusqu’à ce que l’eau commence
àcouler.
3. Une fois que l’eau commence à couler, continuer d’appuyer
et de relâcher la plaque du distributeur (appui pendant
5secondes, relâchement pendant 5secondes) jusqu’à ce
qu’un total de 3gal (12l) ait été distribué.
B
A
A. Plaque du distributeur d’eau
B. Plaque de distribution de glace
Éclairage du réfrigérateur
Le réfrigérateur est muni d’une lampe intérieure qui s’allume
chaque fois que la porte est ouverte.
REMARQUE: La lampe est une DEL qui n’a pas besoin d’être
remplacée.
Si la DEL ne s’allume pas quand on ouvre la porte, appeler le
service de dépannage pour faire changer la lampe. Consulter la
section “Assistance ou service” de la Garantie pour obtenir plus
de renseignements.
Commandes de distributeur externe
La commande se trouve sur le dessus du distributeur externe du
réfrigérateur.
IMPORTANT: L’écran d’afchage sur le tableau de commande
du distributeur s’éteint automatiquement et entre au mode “Veille”
lorsque les boutons de commande et les leviers du distributeur
n’ont pas été utilisés pendant au moins 2minutes. Appuyer
sur n’importe quel bouton de commande pour réactiver l’écran
d’afchage. L’écran d’accueil apparaît comme indiqué.
Mode Sabbath (Sabbat)
Permet d’ouvrir la porte du réfrigérateur ou du congélateur
pendant le Sabbat ou une autre fête religieuse sans activer les
commandes ou l’éclairage intérieurs.
Les points de réglage d’utilisation du congélateur et du réfrigérateur
restent inchangés dans ce mode. Si on active involontairement le
mode Sabbat, le mot “Sabbath” (Sabbat) s’allume sur l’afchage.
Pour accéder au mode Sabbath (Sabbat) ou en sortir, appuyer
simultanément sur °F/°C et SOUND (son) pendant 3 secondes.
REMARQUE: Il est impossible d’utiliser le distributeur ou de
modier les points de réglage de la température en mode Sabbat.
L’éclairage intérieur et les tableaux de commande sont tous
désactivés en mode Sabbat.
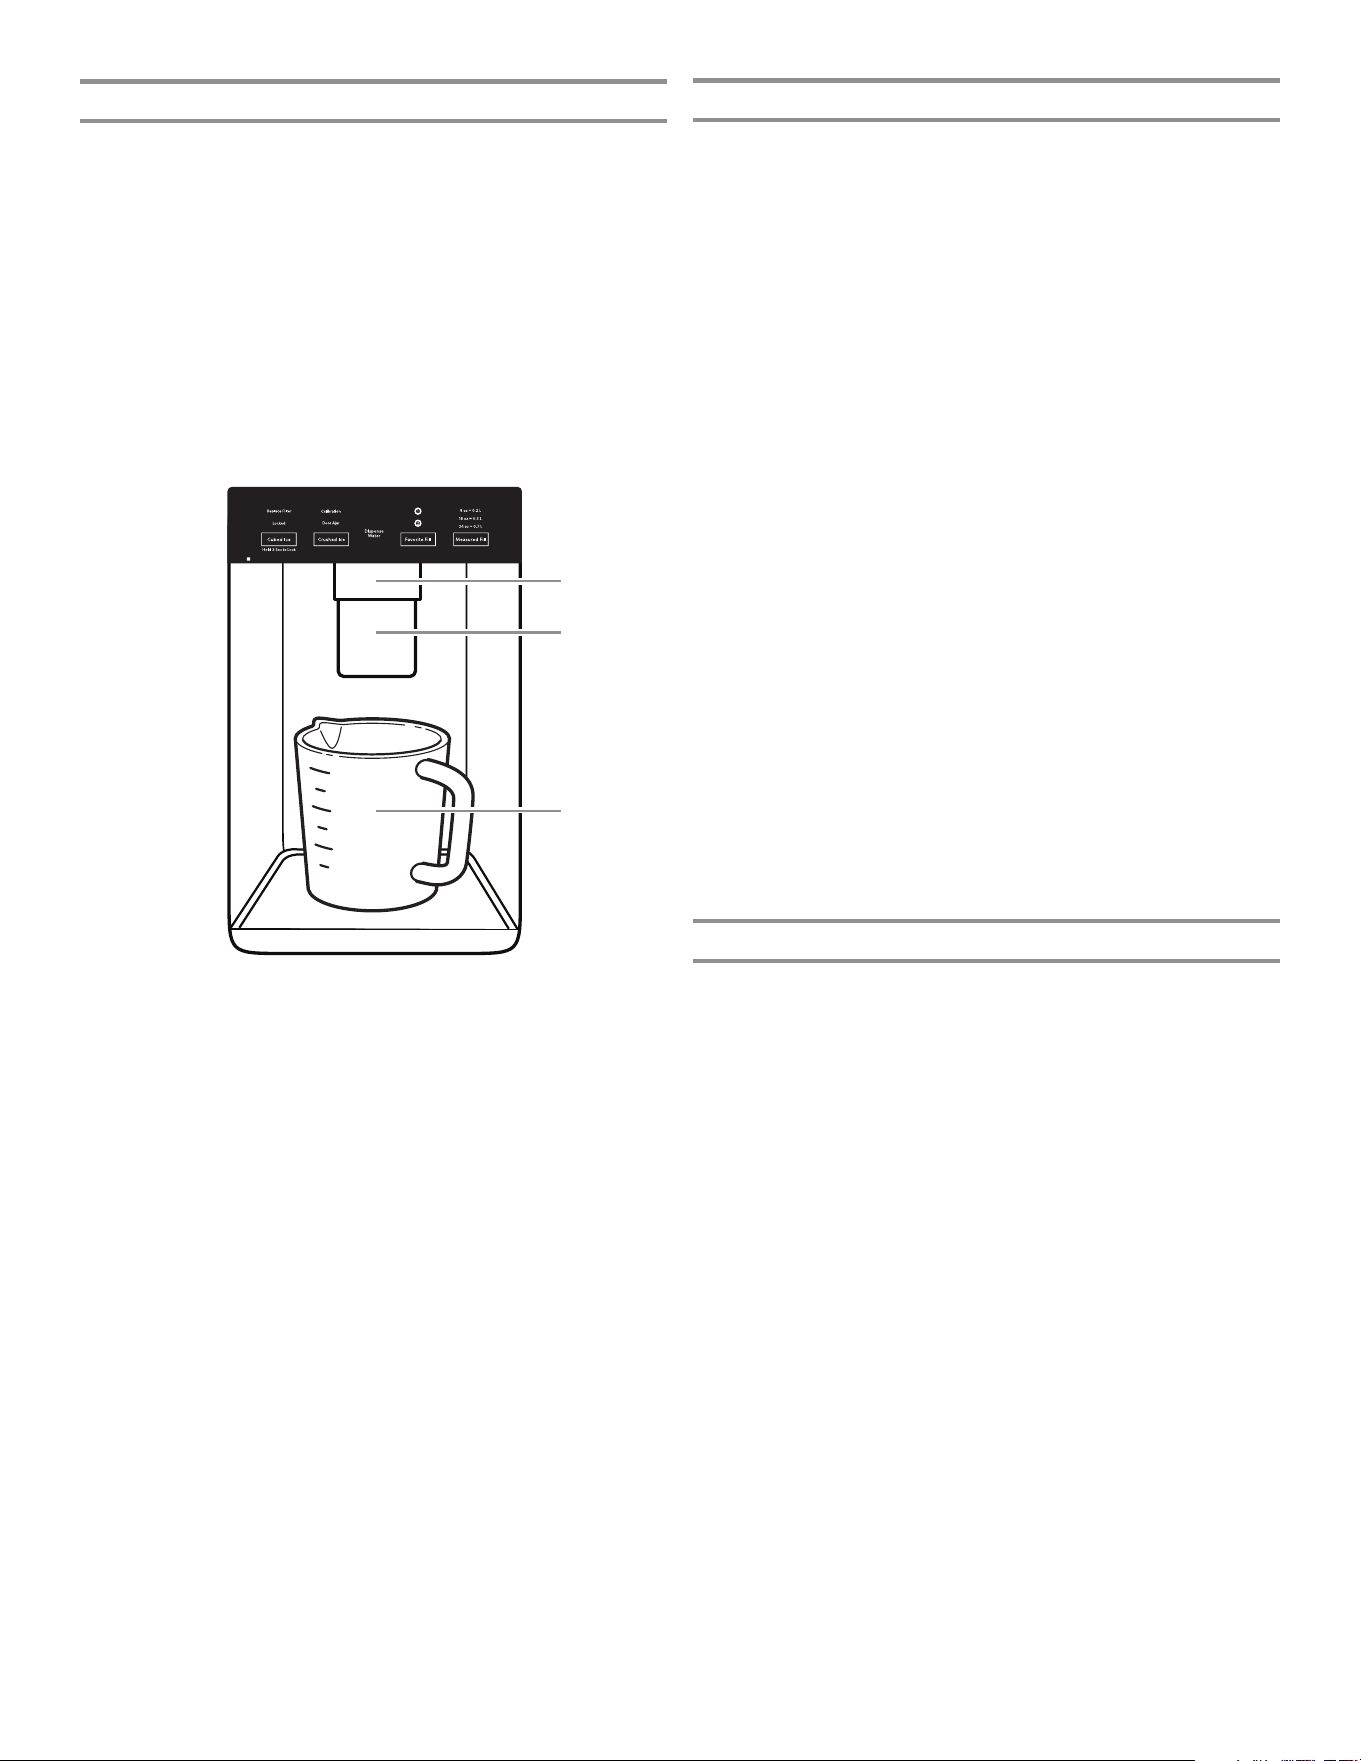
68
Calibration du remplissage mesuré
La pression en eau du domicile peut affecter la précision de la
fonction de remplissage mesuré. Pour un rendement optimal
du distributeur d’eau, il faut d’abord calibrer la fonction de
remplissage mesuré.
IMPORTANT:
■ Purger le circuit d’eau avant de calibrer le remplissage mesuré.
■ Pour de meilleurs résultats, le calibrage doit être effectué
lorsque personne n’utilise d’eau dans le domicile.
1. Placer une tasse à mesurer robuste (format 1tasse 237ml))
sur le plateau d’égouttement du distributeur, centrée devant
laplaque de distribution d’eau/de glaçons.
REMARQUE: Pour certains modèles, une tasse à mesurer est
incluse.
!
Calibration
!
Door
Ajar
!
Replace
Filter
!
"#$#!
!
%&#'#(')!"#$#!
!
Order Filter
!
a1 oz = b1 L
!
a2 oz = b2 L
!
a3 oz = b3 L
!
Dispense
!
A. Plaque du distributeur d’eau
B. Plaque de distribution de glace
C. Tasse à mesurer (1 tasse)
Veiller à ne pas sélectionner de préréglage pour la fonction de
remplissage mesuré.
2. Appuyer sur le bouton Measured Fill (remplissage mesuré)
pendant 3secondes pour entrer dans le mode de calibration.
Lesicônes Calibration (calibration) et Measured Fill
(remplissage mesuré) s’allument et restent allumées pendant
le calibrage de la fonction de remplissage mesuré.
REMARQUE: Appuyer sur un bouton de MEASURED FILL
(remplissage mesuré) pour sortir du mode de calibration à tout
moment. Les icônes Calibration (calibration) et Measured Fill
(remplissage mesuré) s’éteignent.
3. Maintenir enfoncée la plaque du distributeur à eau, aussi
longtemps que nécessaire, pour remplir la tasse d’eau jusqu’à
la ligne de remplissage de 1tasse.
REMARQUE: Si un remplissage excessif ou un renversement
se produit, jeter l’eau et réinitialiser le processus de calibrage.
4. Une fois qu’une tasse d’eau a été correctement versée dans
la tasse à mesurer, appuyer sur le bouton MEASURED FILL
(remplissage mesuré) pour conrmer le calibrage.
5. Une fois le calibrage de la fonction de remplissage mesuré
conrmé, l’icône Calibration (calibration) disparaît et
l’afchage revient à l’écran d’accueil.
B
A
C
Sauvegarder le remplissage préféré
La pression en eau du domicile peut affecter la précision de la
fonction de remplissage préféré. Pour un rendement optimal
du distributeur d’eau, il faut d’abord calibrer la fonction de
remplissage mesuré.
IMPORTANT:
■ Purger le circuit d’eau avant de sauvegarder le remplissage
préféré.
■ Pour de meilleurs résultats, le calibrage doit être effectué
lorsque personne n’utilise d’eau dans le domicile.
1. Placer une tasse d’une taille appréciée sur le plateau
d’écoulement du distributeur, centrée devant la plaque de
distribution d’eau/de glaçons.
2. Sélectionner Favorite 1 (préféré 1) ou Favorite 2 (préféré2)
puis appuyer sur le bouton Favorite Fill (remplissage
préféré) pendant 3 secondes pour accéder au mode Saving
(sauvegarder). L’icôneFavorite Fill (remplissage préféré)
s’allume, elle reste allumée pendant la sauvegarde de la
fonction de remplissage préféré.
REMARQUE: Il est possible d’appuyer sur le bouton
FAVORITE FILL pour quitter à tout moment le mode de
sauvegarde. Dans ce cas, l’afchage revient à l’écran
d’accueil.
3. Appuyer et maintenir appuyée la plaque du distributeur d’eau
le temps nécessaire pour remplir la tasse d’eau de la quantité
préférée.
REMARQUE: Si un remplissage excessif ou un renversement
se produit, jeter l’eau et réinitialiser le processus de
sauvegarde.
4. Une fois la quantité d’eau préférée correctement versée dans
la tasse, appuyer sur le bouton Favorite Fill (remplissage
préféré) pour conrmer la quantité préférée.
5. Une fois le calibrage de la fonction de remplissage préféré
conrmé, l’afchage revient à l’écran d’accueil.
Distribution
Appuyer sur la touche CUBED ICE (glaçons) ou CRUSHED ICE
(glace concassée) pour la sélection de glaçons.
REMARQUES:
■ Pour de la glace concassée, les glaçons sont concassés
avant d’être distribués. Cette action peut causer un court
délai lors de la distribution de glace concassée. Le bruit
du broyeur de glaçons est normal et la dimension des
morceaux de glace peut varier.
■ Lorsqu’on passe du mode glace concassée au mode
glaçons, quelques onces de glace concassée sont
distribuées avec les premiers glaçons.

69
Distribution d’eau
IMPORTANT:
■ Distribuer au moins 1pte (1l) d’eau chaque semaine pour
maintenir un approvisionnement en eau fraîche.
■ La diminution du débit en provenance du distributeur peut être
causée par une faible pression en eau.
■ Avec le ltre à eau retiré, verser l’équivalent d’une (1) tasse
d’eau (237ml). Si l’équivalent d’une tasse (237ml) d’eau
est distribué en 8secondes ou moins, cela signie que
la pression en eau alimentant le réfrigérateur répond au
critère minimal.
■ S’il faut plus de 8secondes à la machine pour distribuer
l’équivalent d’une tasse (237ml) d’eau, cela signie que la
pression en eau alimentant le réfrigérateur est inférieure au
niveau recommandé. Consulter la section “Spécications
de l’alimentation en eau” et “Dépannage” pour des
suggestions sur la marche à suivre.
Distribution d’eau– Normale:
1. Appuyer un verre résistant contre la plaque du distributeur d’eau.
2. Retirer le verre pour arrêter la distribution.
REMARQUE: Le bouton de distribution d’eau ne permet pas la
distribution normale. Il ne fonctionne qu’en mode de remplissage
mesuré ou de remplissage préféré.
Distribution d’eau – Remplissage mesuré:
La fonction de remplissage mesuré permet de distribuer une
quantité d’eau précise en appuyant simplement sur quelques
boutons.
1. Placer un verre robuste sous le bec verseur. Appuyer sur
MEASURED FILL (remplissage mesuré) pour activer.
REMARQUE: La quantité d’eau distribuée correspondra à la
quantité sélectionnée. Vérier que le récipient peut contenir la
totalité du volume. Si de la glace se trouve dans le récipient,
ilfaut peut-être modier la sélection.
2. Appuyer sur MEASURED FILL (remplissage mesuré) pour
activer la fonction, puis toucher pour sélectionner 8oz (0,2l)
16oz (0,5l) ou 24oz (0,7l). Appuyer une quatrième fois pour
quitter l’afchage du remplissage mesuré.
3. Appuyer sur DISPENSE WATER (distribution d’eau)
(boutoncentral) ou sur la plaque pour distribuer la quantité
d’eau souhaitée.
REMARQUES:
■ Le distributeur de remplissage mesuré s’arrêtera
automatiquement après 1minute d’inactivité.
■ Il est possible de remplir plusieurs verres en utilisant la même
mesure en continuant d’appuyer sur la touche DISPENSE
WATER (distribution d’eau) (bouton central) après chaque
remplissage.
Les options de remplissage mesuré sont indiquées dans le
tableau suivant:
Unités
Onces 8 16 24
Tasses 1 2 3
Litre 0,2 0,5 0,7
REMARQUE: La plupart des tasses à café (généralement de
4 à 6oz (118 à 177ml) par tasse) ne sont pas de la même taille
qu’une tasse à mesurer (8oz (237ml)). Il peut être nécessaire
de modier le volume du remplissage mesuré pour éviter un
remplissage excessif non intentionnel des tasses à café.
4. Distribuer de l’eau.
REMARQUE: Pendant la distribution d’eau, le débit d’eau
s’arrête automatiquement une fois que le volume désiré a été
distribué.
■ Appuyer un verre robuste contre la plaque de distribution
sous le bec verseur.
OU
■ Placer le verre sous le bec verseur et appuyer sur le
bouton DISPENSE WATER (distribution d’eau) pour une
distribution sans mains.
5. Pour mettre la distribution en attente avant que la quantité
sélectionnée n’ait été atteinte, appuyer sur DISPENSE
WATER (distribution d’eau) une deuxième fois ou sur la
plaque de distribution. Appuyer de nouveau sur DISPENSE
WATER (distribution d’eau) ou sur la plaque pour reprendre
ladistribution de la quantité d’eau restante.
REMARQUE: Si on arrête la distribution avant que la quantité
d’eau désirée soit atteinte, l’afchage se ferme après 1 minute.
Si la distribution ne reprend pas pendant ce laps de temps,
elle se réinitialise à la quantité initiale.
6. Pour sélectionner un nouveau volume ou relancer la
distribution d’un volume identique, il faut d’abord nir de
distribuer le volume sélectionné ou désactiver la fonction de
remplissage mesuré (en attendant 1minute que la machine
s’éteigne automatiquement ou en appuyant sur CUBED ICE
(glaçons) ou CRUSHED ICE (glace concassée) pour l’éteindre
manuellement) et la réactiver ensuite.
Distribution d’eau – Remplissage préféré:
La fonction de remplissage préféré permet de distribuer une quantité
d’eau souhaitée en appuyant simplement sur quelques boutons.
1. Placer un verre robuste sous le bec verseur. Appuyer sur
FAVORITE FILL (remplissage préféré) pour activer.
REMARQUE: La quantité d’eau distribuée correspondra à la
quantité sélectionnée. Vérier que le récipient peut contenir la
totalité du volume. Si de la glace se trouve dans le récipient,
ilfaut peut-être modier la sélection.
2. Appuyer sur FAVORITE FILL (remplissage préféré) pour activer
la fonction, puis de nouveau pour choisir entre Favorite 1
(préféré 1) et Favorite 2 (favoris 2). Appuyer une troisième
foispour quitter l’afchage du remplissage préféré.
3. Appuyer sur DISPENSE WATER (distribution d’eau) (bouton
central) et la quantité d’eau souhaitée sera distribuée.
REMARQUES:
■ Le distributeur de remplissage préféré s’arrêtera
automatiquement après 1minute d’inactivité.
■ Il est possible de remplir plusieurs verres en utilisant la même
mesure en continuant d’appuyer sur la touche DISPENSE WATER
(distribution d’eau) (bouton central) après chaque remplissage.
4. Distribuer de l’eau.
REMARQUE: Pendant la distribution d’eau, le débit d’eau
s’arrête automatiquement une fois que le volume désiré a été
distribué.
■ Appuyer un verre robuste contre la plaque de distribution
sous le bec verseur.
OU
■ Placer le verre sous le bec verseur et appuyer sur le
bouton DISPENSE WATER (distribution d’eau) pour une
distribution sans mains.
5. Pour mettre la distribution en attente avant que la quantité
sélectionnée n’ait été atteinte, appuyer sur DISPENSE
WATER (distribution d’eau) une deuxième fois ou sur la
plaque de distribution. Appuyer de nouveau sur DISPENSE
WATER (distribution d’eau) ou sur la plaque pour reprendre la
distribution de la quantité d’eau restante.
REMARQUE: Si on arrête la distribution avant que la quantité
d’eau désirée soit atteinte, l’afchage se ferme après 1 minute.
Si la distribution ne reprend pas pendant ce laps de temps,
elle se réinitialise à la quantité initiale.
6. Pour sélectionner un nouveau volume ou relancer la
distribution d’un volume identique, il faut d’abord nir de
distribuer le volume sélectionné ou désactiver la fonction de
remplissage préféré (en attendant 1minute que la machine
s’éteigne automatiquement ou en appuyant sur CUBED ICE
(glaçons) ou CRUSHED ICE (glace concassée) pour l’éteindre
manuellement) et la réactiver ensuite.
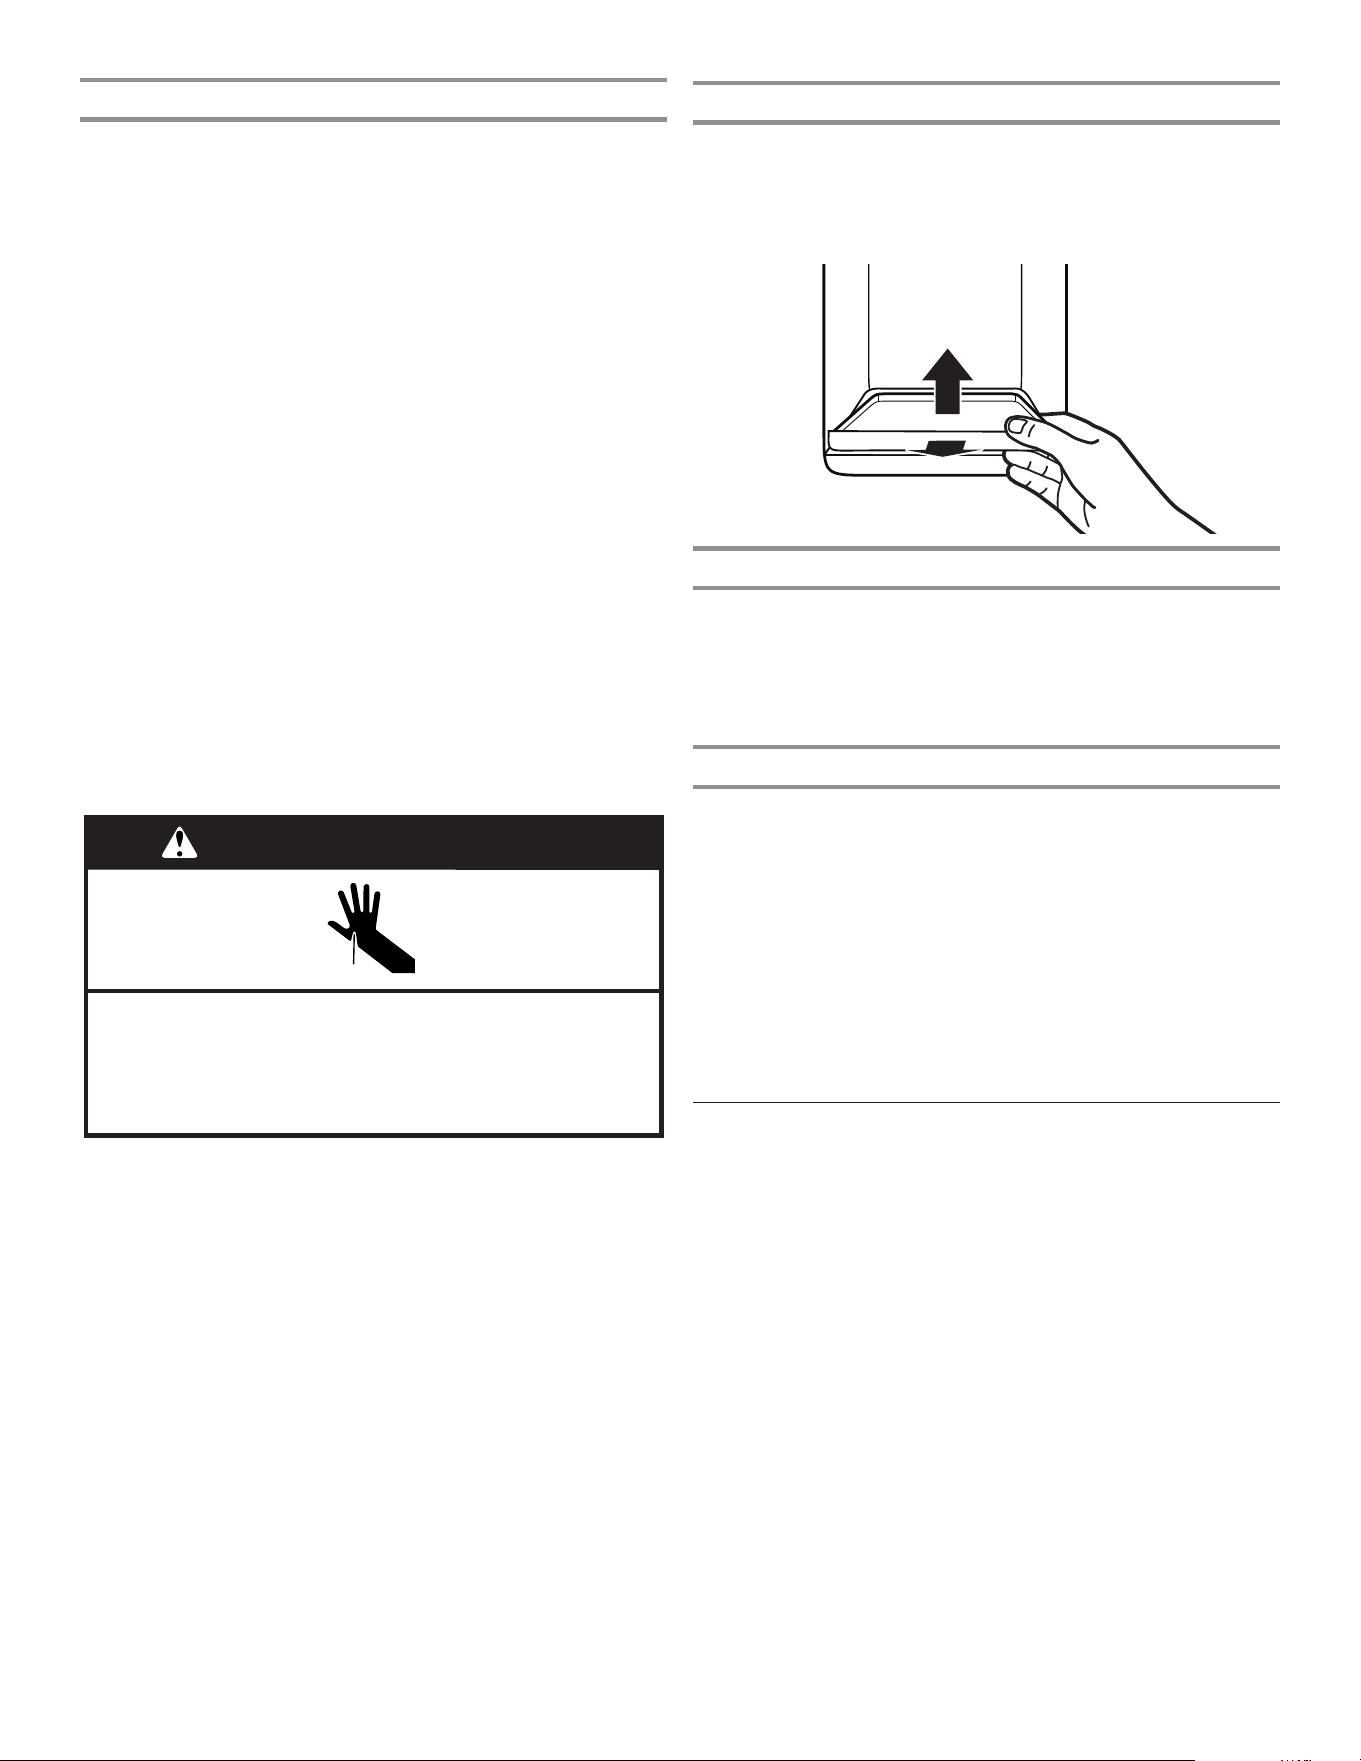
70
Distributeur à glaçons
IMPORTANT:
■ Des glaçons creux ou dont la forme est irrégulière peuvent
être causés par une faible pression d’eau. Voir la section
“Spécications de l’alimentation en eau”.
■ Les glaçons passent du bac d’entreposage à glaçons au
distributeur par le goulet du distributeur. Pour éteindre la
machine à glaçons, consulter la section “Machine à glaçons
etbac d’entreposage”.
■ Il est possible que le distributeur continue à faire du bruit et à
distribuer des glaçons pendant plusieurs secondes après avoir
relâché le bouton ou la plaque du distributeur.
Nettoyage du goulot du distributeur à glaçons:
L’humidité entraîne l’agglomération des glaçons. Des particules
de glace peuvent s’accumuler et obstruer le goulot du distributeur
à glaçons.
Si on n’a pas besoin de distribuer des glaçons régulièrement,
ilpeut s’avérer nécessaire de vider le bac d’entreposage à
glaçons et de nettoyer à la fois le goulot de distribution des
glaçons, le bac d’entreposage à glaçons et la zone située sous
lebac d’entreposage toutes les 2semaines.
■ Si nécessaire, retirer les glaçons obstruant le bac
d’entreposage et le goulot de distribution des glaçons à l’aide
d’un ustensile en plastique.
■ Nettoyer le goulot de distribution des glaçons et le fond du bac
d’entreposage à glaçons à l’aide d’un chiffon tiède et humide,
puis sécher soigneusement ces deux sections.
Distribution de glaçons – plaque de distribution
1. Sélectionner le type de glace désiré en appuyant sur
CUBEDICE (glaçons) ou CRUSHED ICE (glace concassée).
Risque de coupure
Utiliser un verre robuste pour prendre des glaçons.
Le non-respect de cette instruction peut causer
des coupures.
AVERTISSEMENT
2. Appuyer un verre robuste contre la plaque de distribution.
Tenir le verre près de l’ouverture du distributeur pour que les
glaçons ne tombent pas à côté du verre.
IMPORTANT: Il n’est pas nécessaire d’exercer une pression
importante sur la plaque pour activer le distributeur de
glaçons. Une pression forte ne donne pas une distribution
plus rapide de glaçons ou des quantités plus grandes.
3. Retirer le verre pour arrêter la distribution.
REMARQUE: La distribution de glaçons peut se poursuivre
pendant plusieurs secondes après que le verre a été retiré de la
plaque du distributeur. Le distributeur peut continuer à faire du
bruit pendant quelques secondes après la distribution.
Plateau d’égouttement du distributeur
Le plateau d’égouttement peut être enlevé pour en vider le
contenu dans l’évier ou le nettoyer.
■ Soulever l’avant du plateau et tirer vers l’avant pour le retirer.
■ Le plateau d’égouttement peut également être retiré pour
faciliter le remplissage mesuré/préféré.
Lumière du distributeur
1. Lorsqu’on utilise le distributeur, l’éclairage s’allume
automatiquement.
2. La lumière du distributeur peut aussi servir de veilleuse
automatique la nuit. Une fois la lumière ambiante de la pièce
tamisée, le capteur automatique permettra à la lumière du
distributeur de s’allumer.
Verrouillage du distributeur
Le distributeur peut être verrouillé pour faciliter le nettoyage ou
pour éviter la distribution involontaire par de jeunes enfants ou par
des animaux de compagnie.
REMARQUE: La fonction de verrouillage n’interrompt
pas l’alimentation électrique au réfrigérateur ni la lampe du
distributeur. Elle sert simplement à désactiver les commandes
et leviers du distributeur. Pour éteindre la machine à glaçons,
consulter la section “Machine à glaçons et bac d’entreposage”.
■ Appuyer sur CUBED ICE (glaçons) pendant 3secondes pour
verrouiller le distributeur.
■ Appuyer sur CUBED ICE (glaçons) pendant 3secondes pour
déverrouiller le distributeur.
■ L’écran d’afchage indique si le distributeur est verrouillé.
Machine à glaçons et bac
d’entreposage
IMPORTANT: An d’éviter une faible production de glaçons ou
des glaçons de mauvaise qualité, vidanger le circuit d’eau avant
de mettre en marche la machine à glaçons. Consulter la section
“Distributeur d’eau”.
■ Prévoir un délai de 24heures après l’installation pour la
production des premiers glaçons. Jeter les 3premières
quantités de glaçons produites. Accorder 2 à 3jours au bac
d’entreposage des glaçons pour qu’il se remplisse.
■ La qualité des glaçons dépend de la qualité de l’eau fournie
à la machine à glaçons. Éviter de connecter la machine à
glaçons à une alimentation en eau adoucie. Les produits
chimiques adoucisseurs d’eau (comme le sel) peuvent
endommager certaines pièces de la machine à glaçons et
entraîner une mauvaise qualité de glaçons. Si l’alimentation en
eau adoucie ne peut être évitée, s’assurer que l’adoucisseur
d’eau fonctionne bien et qu’il est bien entretenu.
■ Si des glaçons sont agglomérés dans le bac d’entreposage,
les briser à l’aide d’un ustensile en plastique et les jeter.
Nepas utiliser d’objet pointu pour briser la glace. Ceci peut
endommager le bac d’entreposage et le mécanisme du
distributeur.
■ Ne rien conserver à l’intérieur du bac à glaçons.
!
Calibration
!
Door
Ajar
!
Replace
Filter
!
"#$#!
!
%&#'#(')!"#$#!
!
Order Filter
!
a1 oz = b1 L
!
a2 oz = b2 L
!
a3 oz = b3 L
!
Dispense
!
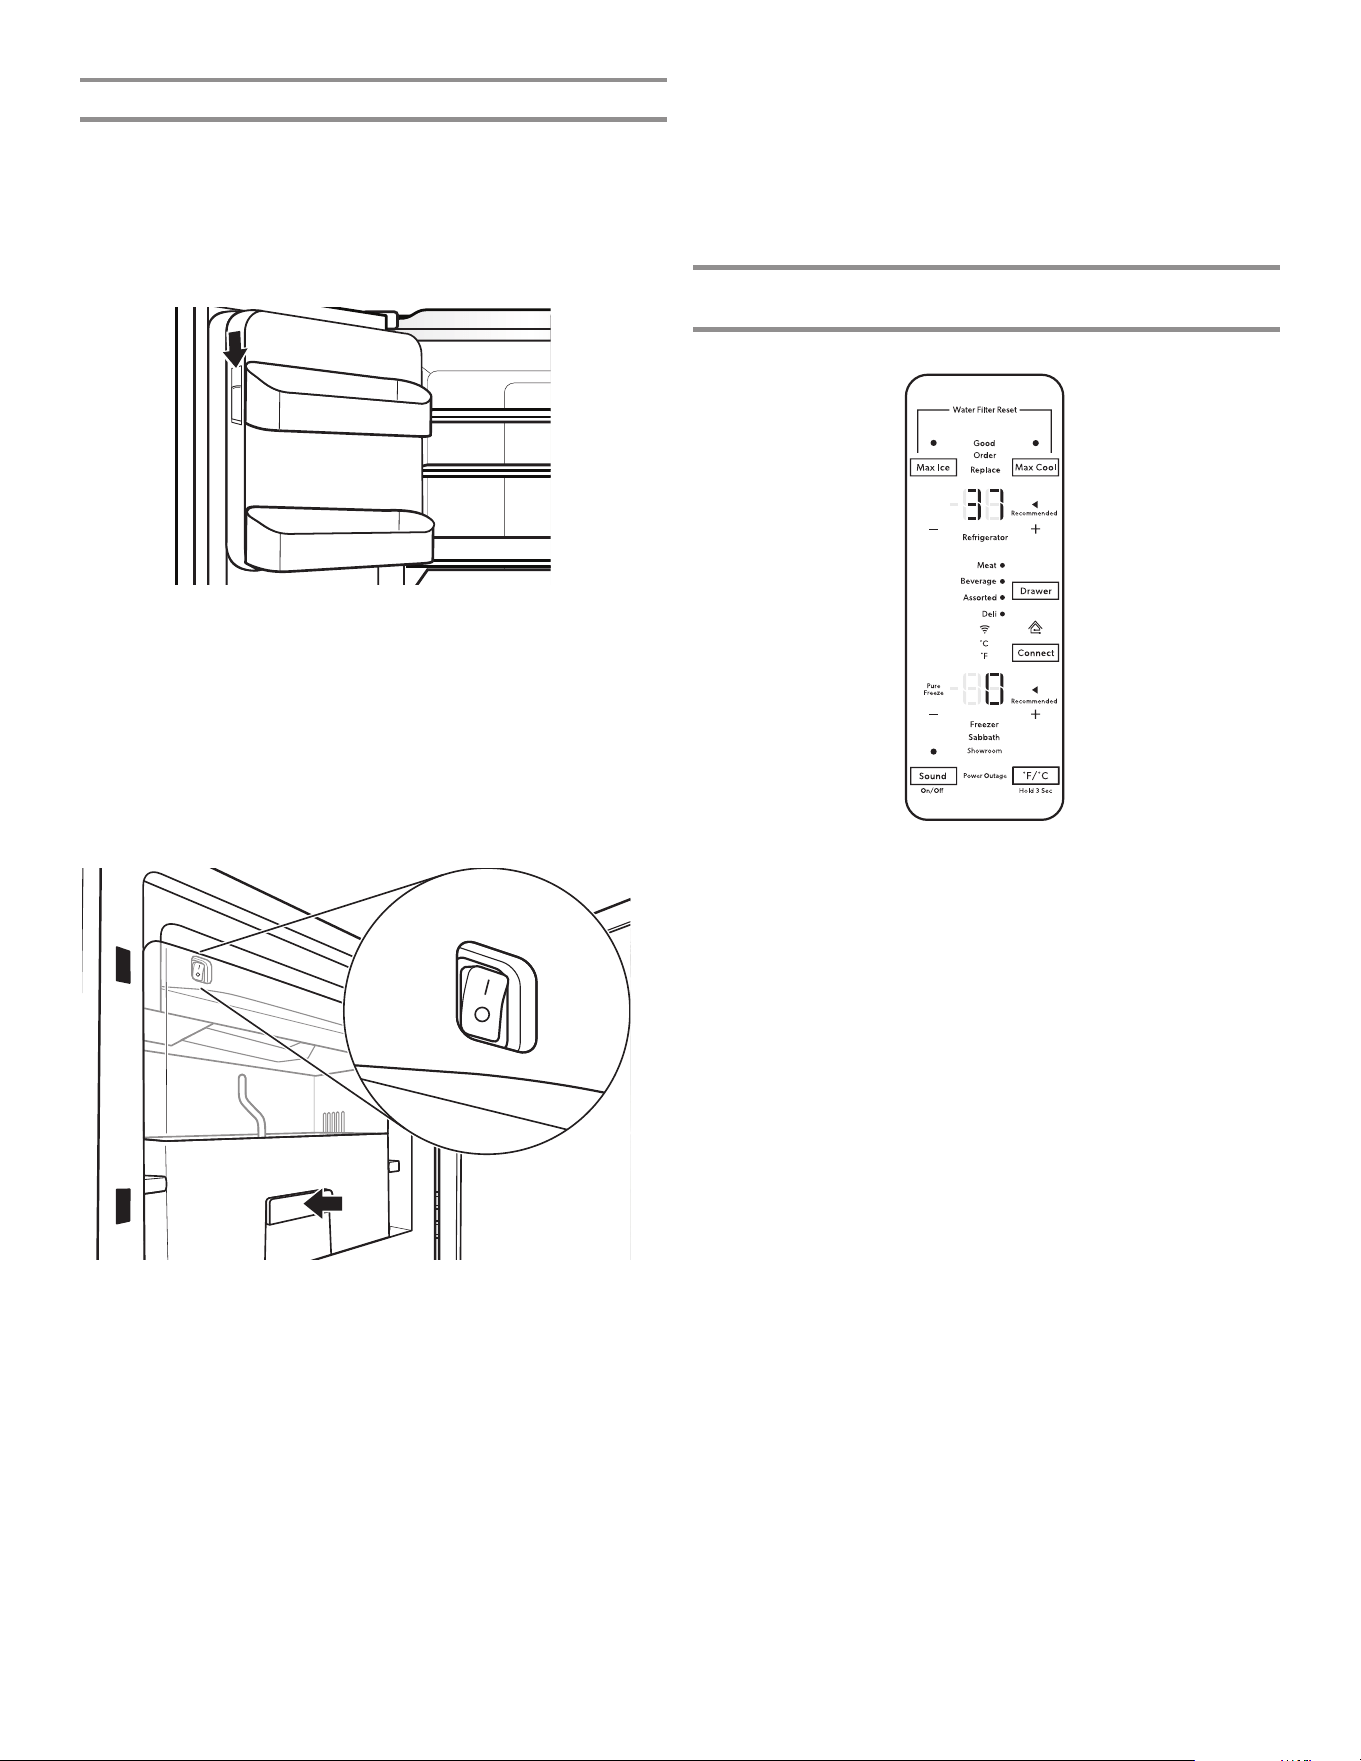
71
Style1 – Machine à glaçons dans le réfrigérateur
La machine à glaçons est située dans la porte de gauche, derrière
les balconnets. Les glaçons sont éjectés dans le bac d’entreposage
à glaçons situé sur la porte de gauche du réfrigérateur.
Mise en marche/arrêt de la machine à glaçons
1. Pousser le loquet sur le côté gauche du compartiment à
glaçons pour ouvrir la porte.
2. Mettre en marche la machine à glaçons en tournant le
commutateur à la position marche (I).
REMARQUES:
■ Pour arrêter manuellement la machine à glaçons, placer la
commande à la position arrêt (O).
■ La machine à glaçons comporte un système d’arrêt
automatique. Le détecteur arrête automatiquement la
production de glaçons si le bac d’entreposage est plein, si
la porte est ouverte ou si on retire le bac d’entreposage à
glaçons. La commande restera en position marche.
3. Fermer la porte du compartiment à glaçons.
Retrait et réinstallation du bac d’entreposage à glaçons
■ Retirer le bac d’entreposage à glaçons en insérant les doigts
dans le trou situé à la base du bac et en tirant le loquet pour
libérer le bac du compartiment. Soulever le bac d’entreposage
à glaçons en le soulevant et en le dégageant en ligne droite.
■ Réinstaller le bac d’entreposage dans le compartiment à glaçons
et appuyer dessus pour s’assurer qu’il est bien en place.
Taux de production des glaçons
■ Dans des conditions d’utilisation normales, la machine à glaçons
devrait produire environ 3,2lb (1,5kg) de glaçons par jour.
■ Pour augmenter la production de glaçons, sélectionner la
fonction Max Ice (production de glaçons maximale) à partir du
tableau de commande. La machine à glaçons devrait produire
environ 4,2lb (1,9kg) de glaçons par jour. Voir la section
“Utilisation des commandes”.
Style2 – Machine à glaçons dans le congélateur
(surcertains modèles)
Mise en marche/arrêt de la machine à glaçons
Pour mettre en marche la machine à glaçons, appuyer sur la
touche Max Ice (production de glaçon maximale) située sur
l’afchage à l’intérieur de la porte de gauche. L’icône clignote
3fois, puis reste afchée.
Pour fermer manuellement la machine à glaçons, appuyer sur la
touche Max Ice (production de glaçons maximale). L’afchage
clignote 3 fois, puis s’éteint.
REMARQUES:
■ La machine à glaçons comporte un système d’arrêt
automatique. Le détecteur arrête automatiquement la
production de glaçons si le bac d’entreposage est plein, sila
porte est ouverte. La commande restera en position de marche.
■ Éteindre la machine à glaçons avant de retirer le bac
d’entreposage pour servir des glaçons ou pour nettoyer le
bac. Ceci empêchera les glaçons de tomber de la machine à
glaçons et dans le compartiment de congélation. Après avoir
remplacé le bac d’entreposage, mettre en marche la machine
à glaçons.
Taux de production des glaçons
■ Dans des conditions d’utilisation normales, votre machine à
glaçons devrait produire environ 3,5lb (1,6kg) de glaçons
parjour.
■ Pour augmenter la production de glaçons, sélectionner la
fonction Max Ice (production de glaçons maximale) à partir du
tableau de commande. La machine à glaçons devrait produire
environ 4,6lb (2,1kg) de glaçons par jour. Voir la section
“Utilisation des commandes”.
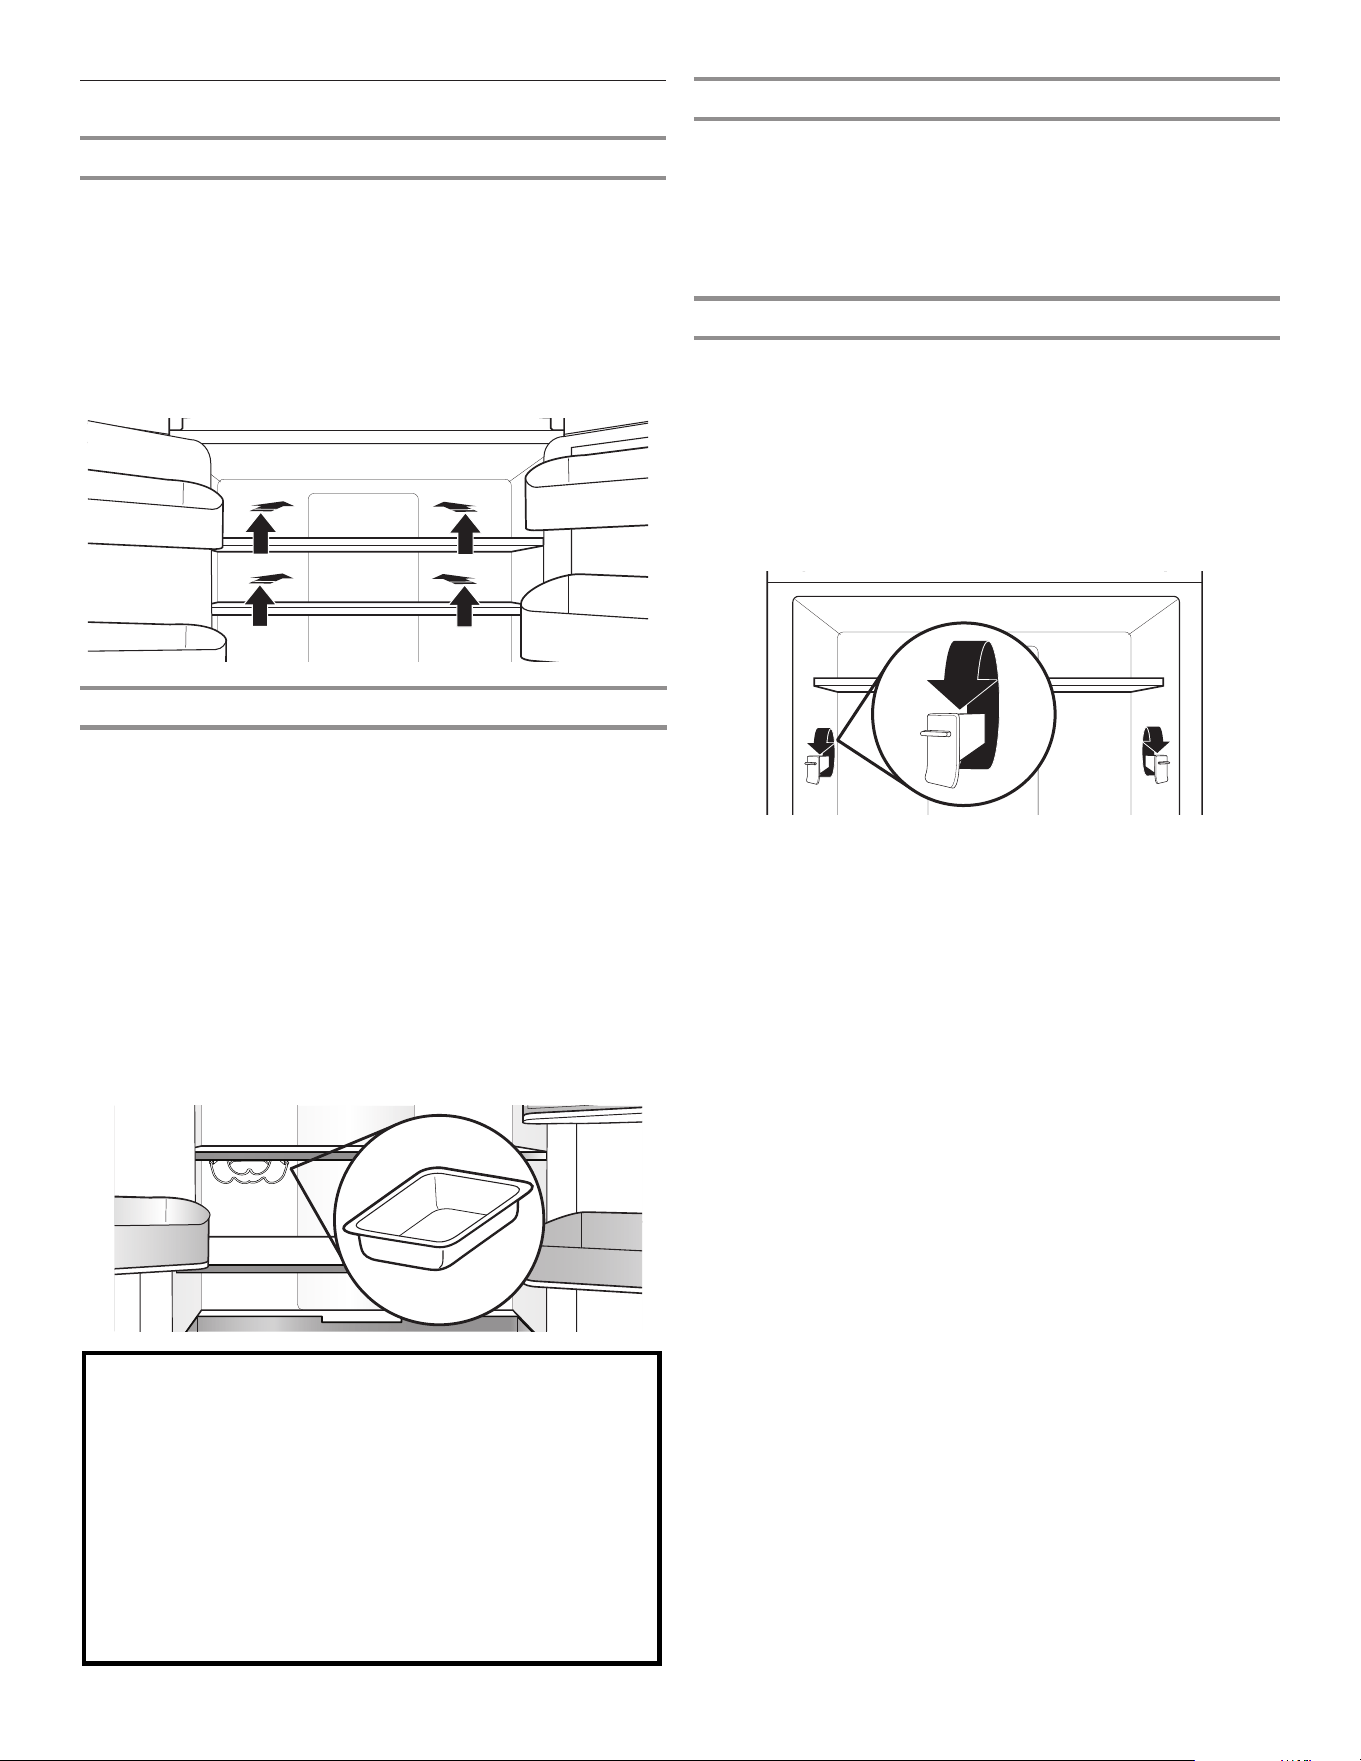
72
Tablettes, balconnets et tiroirs
Tablette en verre pliable
Certaines tablettes se rabattent pour créer de la place pour
des articles plus grands. Certains modèles sont munis de deux
tablettes en verre pliable.
1. Pour rabattre la section avant de la tablette, pousser sur la
section réglable de la tablette vers l’arrière du réfrigérateur,
aussi loin qu’il est possible de le faire.
2. Déployer l’avant en verre et la garniture de la tablette en tirant
sur la partie rétractée de la tablette jusqu’à ce qu’elle soit
complètement déployée.
Importants renseignements à savoir au sujet des tablettes
et des couvercles en verre :
Ne pas nettoyer les tablettes ou couvercles en verre avec de
l’eau tiède quand ils sont froids. Les tablettes et les
couvercles peuvent se briser s'ils sont exposés à des
changements soudains de température ou à un impact tel
que coup brusque. Le verre trempé est conçu pour éclater
en d’innombrables pièces minuscules. Ceci est normal. Les
tablettes et les couvercles en verre sont lourds. Les saisir à
deux mains lors de leur dépose afin d'éviter de les faire
tomber.
Tablettes et cadres de tablettes
Les tablettes de réfrigérateur sont réglables an de s’adapter à
vos besoins de rangement.
An de pouvoir trouver plus facilement l’article recherché, on peut
remiser ensemble des aliments semblables dans le réfrigérateur
et régler les tablettes pour les adapter aux différentes tailles
d’articles. Ceci réduira également la durée d’ouverture de la porte
du réfrigérateur et permettra d’économiser de l’énergie.
Réglage de la hauteur de tablettes
La hauteur de tablette peut être ajustée en repositionnant
les supports ajustables de tablettes sur leurs axes vertical et
horizontal.
1. Retirer doucement la tablette en la soulevant de ses supports,
puis tourner la languette selon l’orientation souhaitée.
2. Répéter l’opération pour les supports de tablette restants.
3. Appliquer une pression sur le haut de la tablette pour vérier
qu’elle est correctement appuyée sur les supports de tablette.
Pour enlever et réinstaller les tablettes:
1. S’assurer que les supports ajustables de tablettes sont
placés à la position la plus basse avant de retirer les tablettes.
Lesportes doivent aussi être ouvertes à un angle de 90°.
Les tablettes seront plus difciles à retirer si les portes sont
ouvertes plus grand.
2. Ôter la tablette du milieu ou supérieure en la soulevant pour
lasortir des supports de tablette. Tirer ensuite sur la tablette
et l’incliner en position verticale vers le bas. Incliner la tablette
à un angle et la retirer du réfrigérateur.
REMARQUES:
■ La tablette du milieu doit être retirée avant celle du haut.
■ Les tablettes coulissantes en verre Innity devraient être
repoussées vers le fond. Lorsqu’elles sont inclinées, s’assurer
que le verre ne glisse pas vers l’avant.
3. Ôter la tablette du bas en la soulevant pour la sortir des
supports de tablette. Tirer ensuite sur la tablette en l’inclinant
à la verticale vers le haut. Incliner la tablette à un angle et la
retirer du réfrigérateur.
4. Replacer la tablette du milieu et du haut en les plaçant dans le
réfrigérateur en utilisant un angle, l’avant de la tablette vers le
bas. Soulever l’avant de la tablette vers le haut jusqu’à ce que
l’arrière de la tablette se place sur les supports de tablette.
Abaisser l’avant de la tablette et s’assurer que la tablette est
bien en position.
5. Replacer la tablette du bas en la plaçant dans le réfrigérateur
en utilisant un angle, l’avant de la tablette vers le haut. Incliner
l’avant de la tablette jusqu’à ce que l’arrière de la tablette
se place sur les supports de tablette. Abaisser l’avant de la
tablette et s’assurer que la tablette est bien en position.
Tablettes équipées d’éclairage à DEL par en dessous
(sur certains modèles)
En déplaçant l’éclairage à DEL à un nouvel emplacement sous
les tablettes, cette technologie de pointe améliore l’éclairage de
l’intérieur du réfrigérateur et aide à retrouver les articles désirés.
Casier ou support à vin
Sous une des tablettes, des équerres de support sont accrochées
sur les crémaillères (une équerre sur chaque crémaillère). Le casier
ou support à vin est accroché sur les équerres. Deux bouteilles
peuvent être rangées dans le support à vin sans prendre d’espace
de tablette.
Retrait et réinstallation du casier à vin:
1. Dépose – Soulever le casier/support à vin pour le dégager de
ses supports. Comprimer le côté droit (vers l’intérieur) pour le
libérer totalement du support incorporé à l’équerre. Abaisser
légèrement le côté droit, puis dégager le côté gauche du
support incorporé à l’équerre de gauche.
2. Réinstallation – Insérer le côté gauche du casier/support à vin
dans le support incorporé à l’équerre de gauche. Comprimer
le côté droit (vers l’intérieur) pour pouvoir faire glisser ce côté
dans le support incorporé à l’équerre de droite.
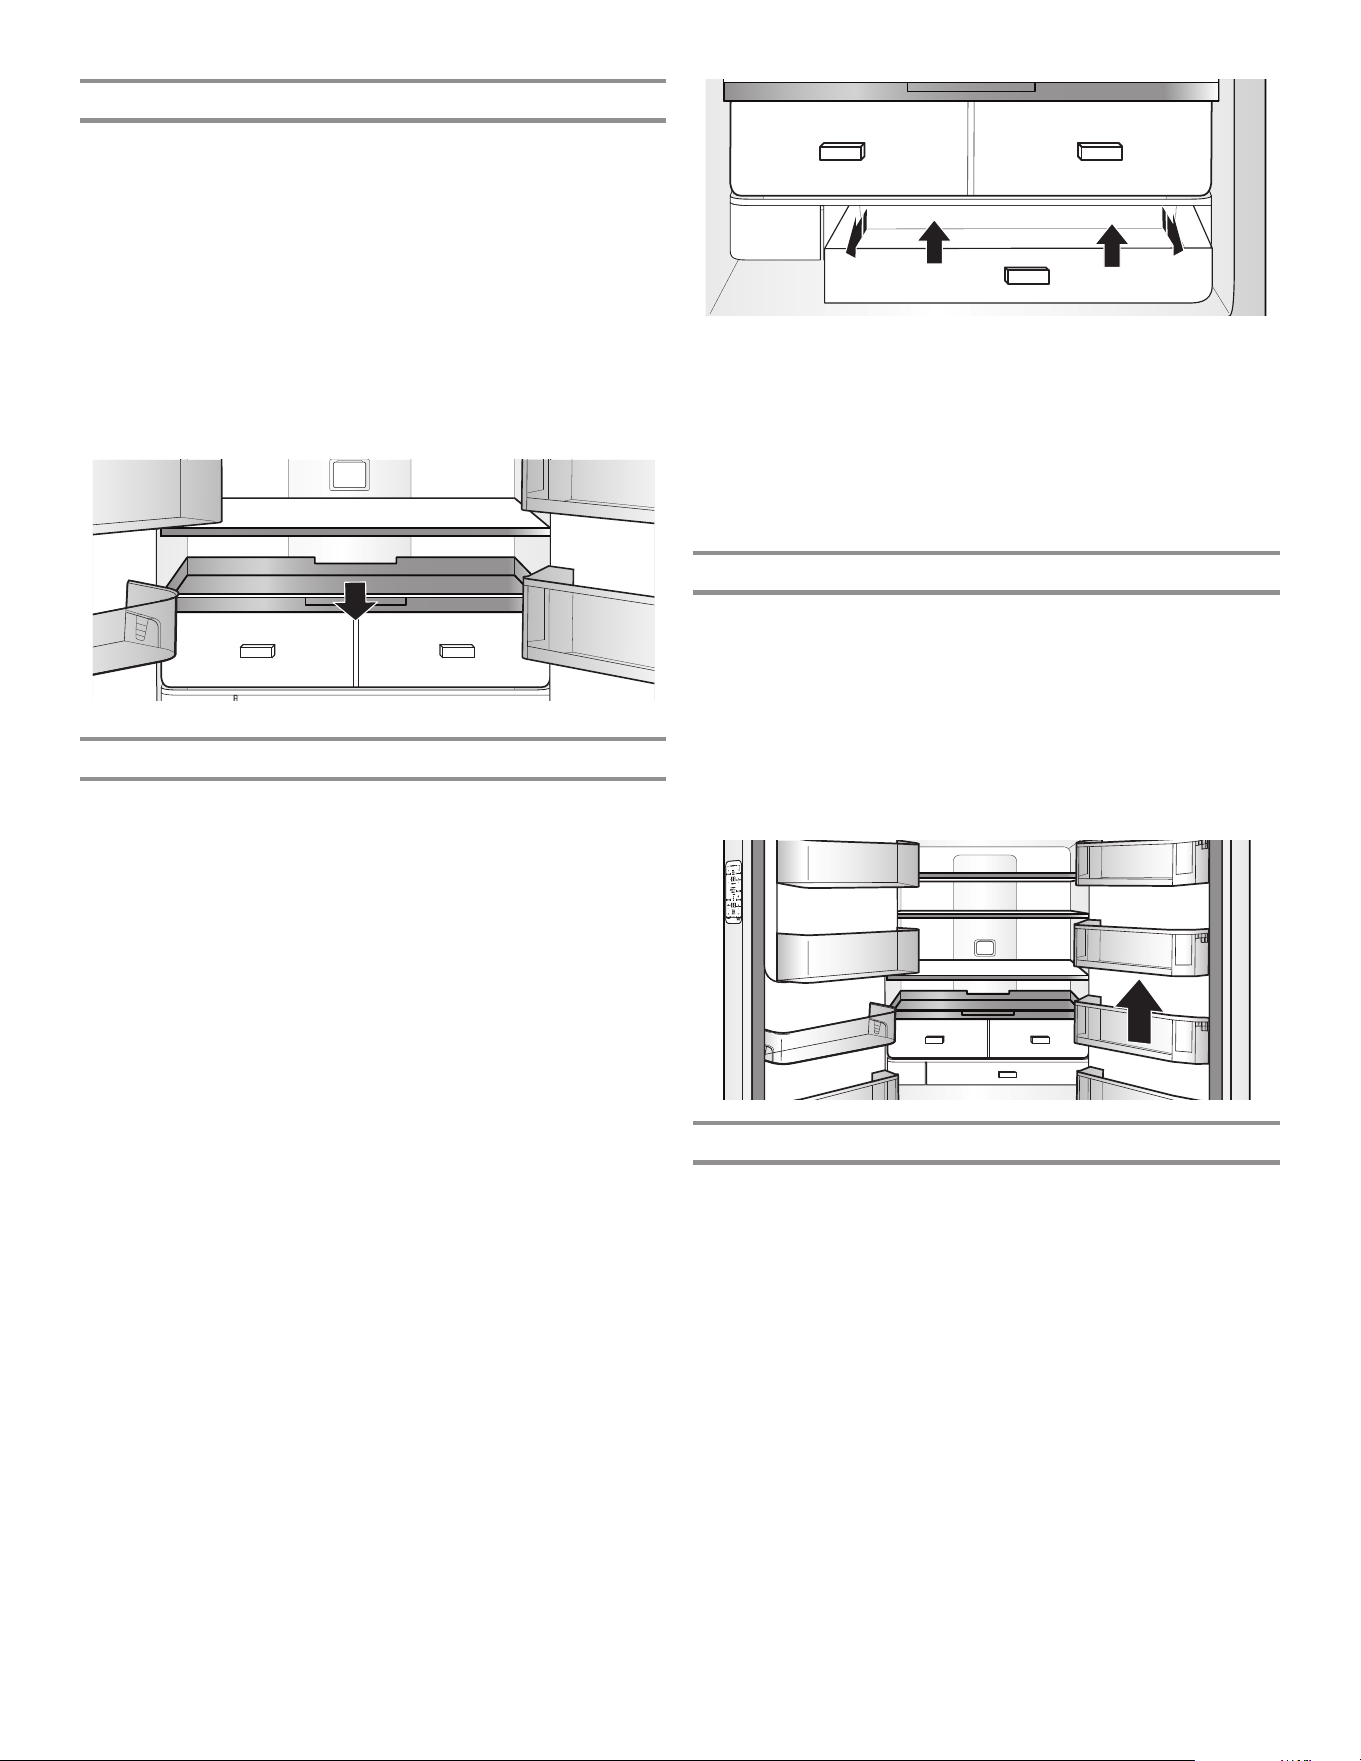
73
Tablette amovible
Enlever et réinstaller une tablette amovible:
REMARQUE: Les portes du réfrigérateur doivent être enlevées
an de pouvoir retirer l’espace de rangement à plateau. Voir la
section “Enlever et remplacer les portes du réfrigérateur” pour
plus d’informations.
1. Tirer sur la tablette amovible jusqu’à ce qu’elle soit en
position ouverte complète.
2. Localiser les pinces de retenue de la tablette amovible situées
de chaque côté. Elles sont situées sous la tablette amovible.
3. Appuyer sur les pinces du bas à l’aide de vos doigts.
4. Une fois les pinces désengagées, retirer avec soins la tablette
amovible.
Tiroirs-bacs à légumes Humidiseal™
Retrait et réinstallation des tiroirs:
1. Saisir la poignée au bas du tiroir et soulever l’avant du tiroir
jusqu’à passer la butée du tiroir et extraire le tiroir en le faisant
glisser vers l’extérieur jusqu’à la butée. Retirer le tiroir des
guides inférieurs.
2. Replacer le tiroir en le plaçant sur la glissière inférieure du
tiroir et en le poussant au-delà de la butée d’arrêt du tiroir.
Pour enlever le couvercle des bacs à légumes (ne peut être
enlevé que si la tablette amovible est d’abord enlevée):
1. Enlever tout d’abord la tablette amovible.
2. En maintenant fermement l’encart de verre d’une main,
appuyer sur le milieu de l’encart de verre jusqu’à ce qu’il
s’élève au-dessus du cadre en plastique. Faire glisser
doucement l’encart de verre vers l’avant pour le retirer.
Remise en place du couvercle des bacs à légumes:
1. Retirer le plateau du bac à légumes, la tablette amovible et le
verre du bac à légumes avant d’ôter le bac à légumes.
2. Placer l’arrière du cadre du couvercle dans les supports des
parois latérales du réfrigérateur et abaisser l’avant du cadre
du couvercle pour le mettre en place.
3. Faire glisser l’encart arrière de verre dans le cadre du
couvercle et abaisser l’avant pour le mettre en place.
Balconnets de porte du réfrigérateur
Les balconnets dans les portes du réfrigérateur sont réglables
an de s’adapter à vos besoins de rangement. Les balconnets
de grande taille permettent de facilement personnaliser l’espace
de rangement des portes pour y ranger des bouteilles de grande
taille.
Séparateur de balconnets de porte (sur certains modèles)
Le séparateur peut être utilisé dans les balconnets de porte pour
les diviser et soulever les articles plus petits rangés à l’arrière du
balconnet.
Boîte Herb Tender
®
Le bac à nes herbes comporte une boîte pour y ranger les
herbes et l’eau pour les conserver fraîches. Pour plus de
commodité, il est possible de placer la boîte Herb Tender
®
n’importe où dans le bac.
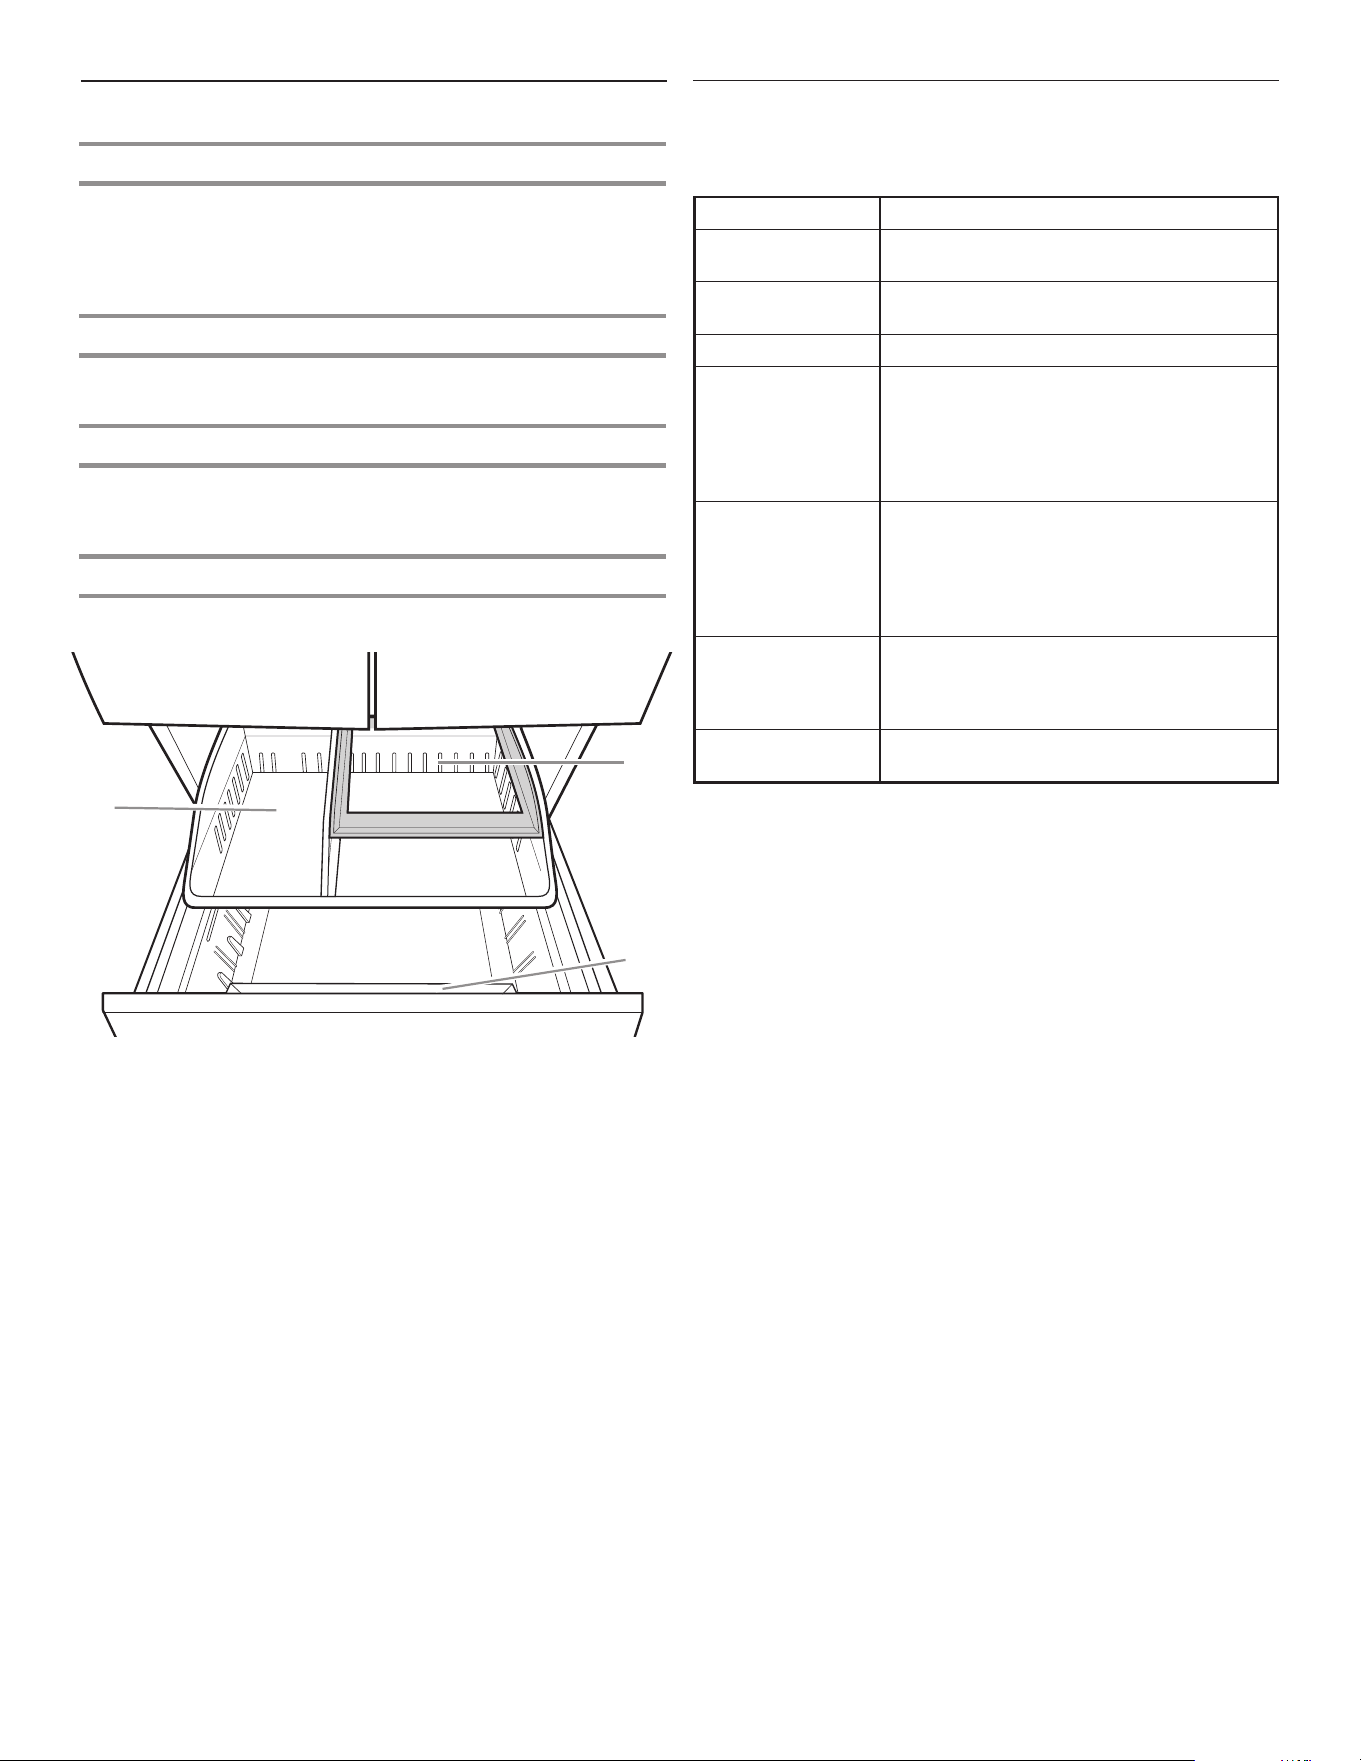
74
Tiroirs du congélateur
Compartiment pour petits articles (sur certains modèles)
Le séparateur de tiroir ne peut être enlevé et est conçu pour les
articles petits et délicats. Pour une plus grande souplesse de
rangement, on peut déplacer le tiroir vers l’avant ou l’arrière pour
entreposer des articles plus gros dans une section donnée du
congélateur.
Espace à pizza
Un espace à l’avant du tiroir permet le stockage à la verticale de
boîtes de pizza supplémentaires.
Troisième niveau
Cette tablette ne peut être enlevée. Pour permettre l’accès, le
troisième niveau peut être déplacé vers l’arrière, ce qui permet
d’atteindre des articles dans la zone de dessous.
Bac à glaçons (sur certains modèles)
Stockage des glaçons de la deuxième machine à glaçons
A. Espace à pizza
B. Troisième niveau
C. Bac à glaçons (non présenté)
Référence audio
Tonalités
Nom de tonalité Exemples d’utilisation
APPAREIL MIS
SOUS TENSION
Le système de refroidissement se met en
marche dès que le produit est alimenté.
ARRÊT DE
L’ALIMENTATION
Le système de refroidissement est
désactivé.
TOUCHE UTILISÉE L’utilisateur appuie sur une touche valide.
INVALIDE
(ERREUR)
L’utilisateur appuie sur 2boutons valides
ou plus en même temps. Le compte à
rebours est interrompu pendant la pression
des boutons. L’utilisateur appuie sur la
plaque lorsque la distribution n’est pas
autorisée.
ENGAGÉ L’IU est déverrouillée. La fonction
production de glaçons maximale est
activée. La distribution du remplissage
mesuré est terminée. Smart Grid est activé
lorsqu’une connexion Wi-Fi est exécutée
par l’utilisateur.
DÉSENGAGÉ L’IU est déverrouillée. La fonction
production de glaçons maximale est
désactivée. Le décompte du distributeur
est terminé.
ALERTE Alerte Wi-Fi, porte entrouverte ou
connexion Wi-Fi perdue pendant 12heures.
Tableau de référence rapide seulement. Consulter la section
correspondante pour plus de détails. En cas de différence,
utiliserles renseignements de la section.
B
A
C
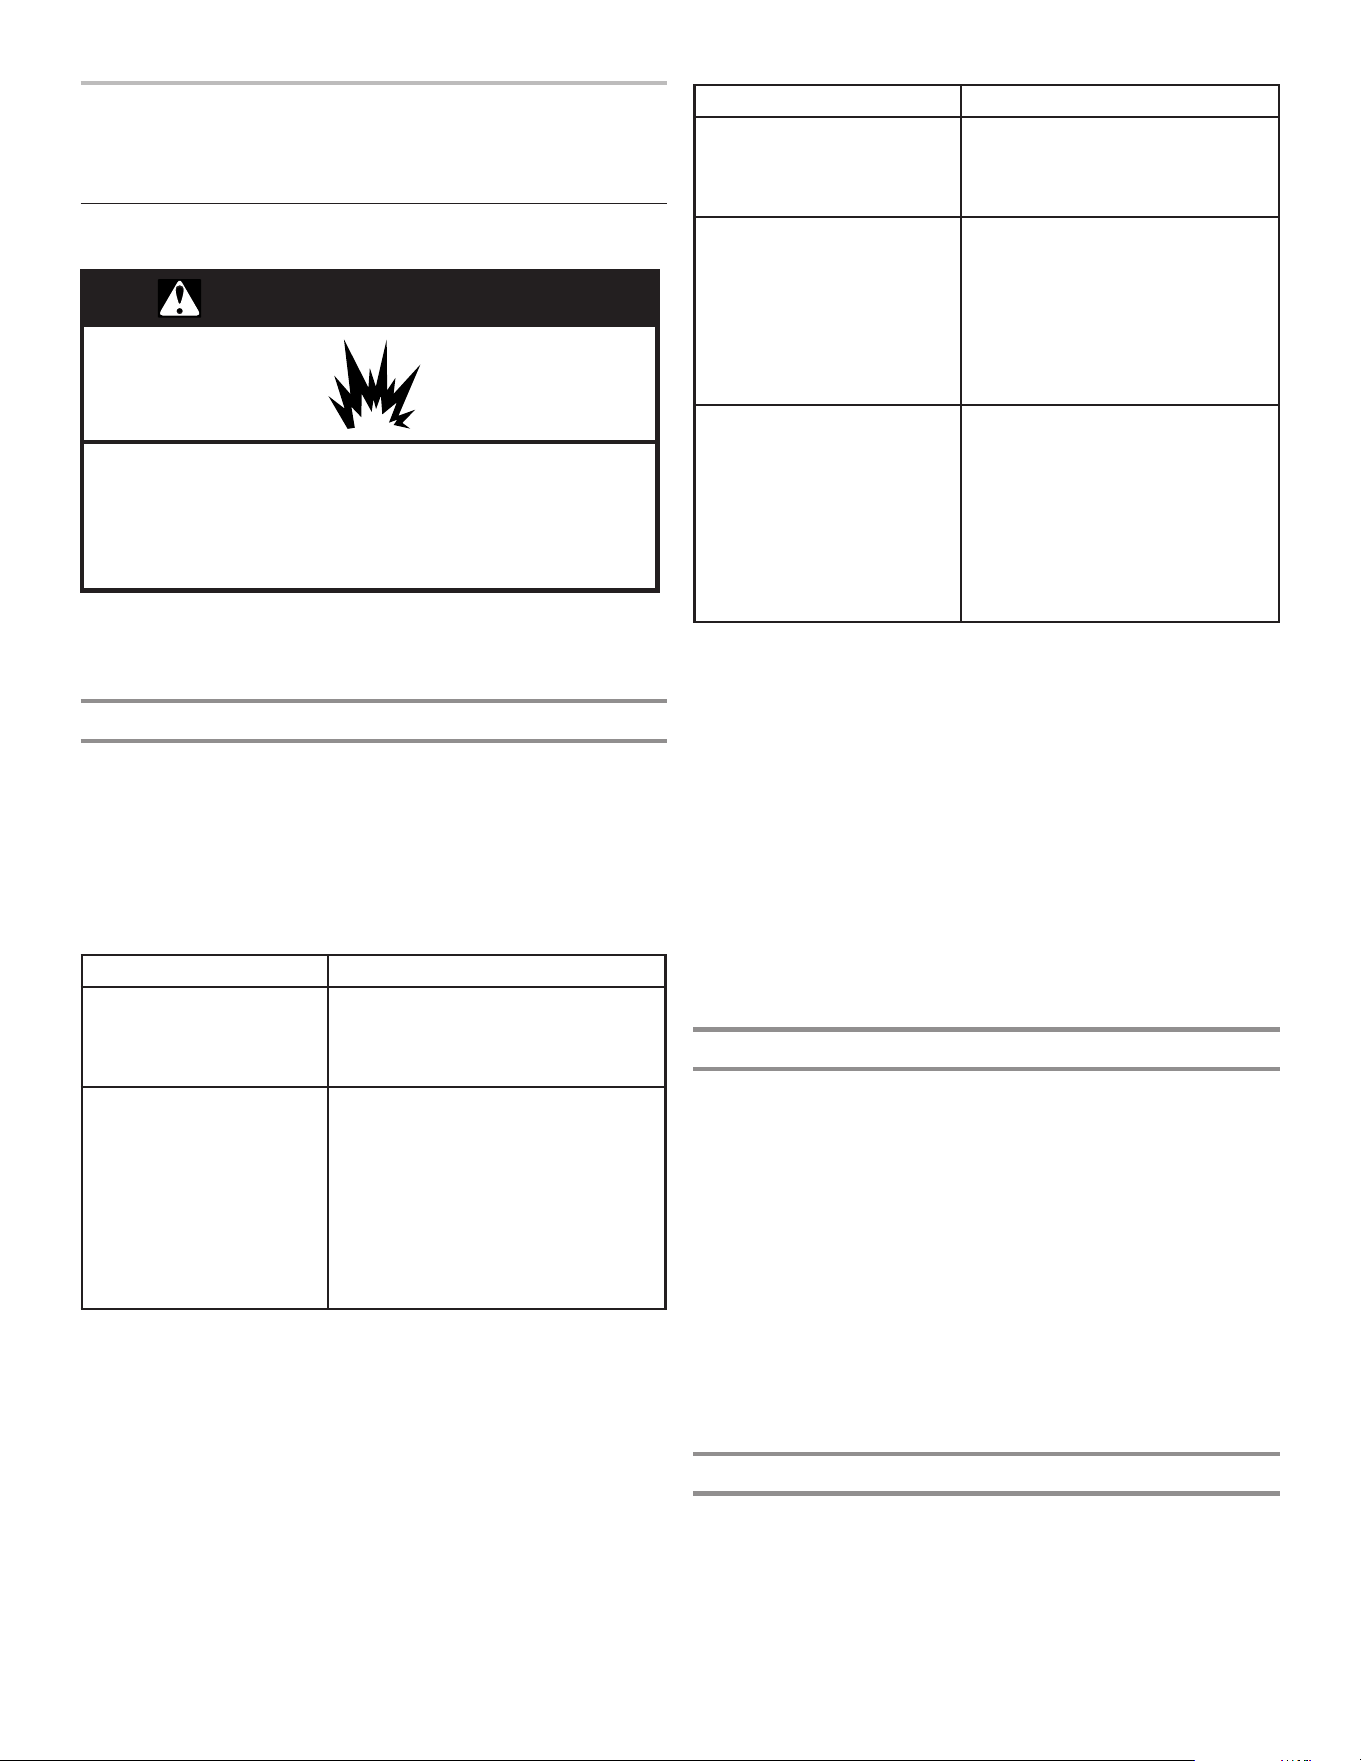
75
ENTRETIEN DU
RÉFRIGÉRATEUR
Nettoyage
AVERTISSEMENT
Risque d'explosion
Utiliser un produit de nettoyage ininflammable.
Le non-respect de cette instruction peut causer un décès,
une explosion ou un incendie.
Les sections de réfrigération et de congélation se dégivrent
automatiquement. Toutefois, nettoyer les deux compartiments
environ une fois par mois an d’éviter une accumulation d’odeurs.
Essuyer les renversements immédiatement.
Nettoyage des surfaces externes
Consulter les instructions de nettoyage extérieur relatives à votre
modèle.
Style1– Porte lisse
IMPORTANT: Les dommages au revêtement lisse en raison
d’un mauvais usage des produits nettoyants ou de l’utilisation de
produits nettoyants non recommandés ne sont pas couverts par
la garantie. Des instruments aiguisés ou coupants dépareraient
lerevêtement.
UTILISER NE PAS UTILISER
✔ Chiffon doux et propre ✘ Chiffons abrasifs
✘ Essuie-tout ou papier journal
✘ Tampons en laine d’acier
✔ Eau tiède et
savonneuse avec
détergent doux
✘ Poudres ou liquides abrasifs
✘ Nettoyants à vitre en vaporisateur
✘ Ammoniaque
✘ Nettoyants acides ou à base
devinaigre
✘ Nettoyants à four
✘ Fluides inammables
REMARQUE: Les essuie-tout peuvent éraer et ternir le
revêtement transparent de la porte peinte. An d’éviter tout
dommage éventuel, utiliser des chiffons en tissu doux pour polir
et essuyer la porte.
Style2 – Acier inoxydable
IMPORTANT:
■ N’utiliser que les produits de nettoyage et les lingettes pour
acier inoxydable uniquement. Les dommages au revêtement
en acier inoxydable en raison d’un mauvais usage des produits
nettoyants ou de l’utilisation de produits nettoyants non
recommandés ne sont pas couverts par la garantie.
■ Ne pas exposer les électroménagers en acier inoxydable à
des éléments caustiques ou corrosifs tels que le sel, un niveau
élevé d’humidité ou des environnements très humides. Les
dommages causés par l’exposition à de tels éléments ne sont
pas couverts par la garantie.
UTILISER NE PAS UTILISER
✔ Chiffon doux et propre ✘ Chiffons abrasifs
✘ Essuie-tout ou papier journal
✘ Tampons en laine d’acier
✔ Eau tiède et savonneuse
avec détergent doux
✘ Poudres ou liquides abrasifs
✘ Ammoniaque
✘ Nettoyants à base d’agrumes
✘ Nettoyants acides ou à base
devinaigre
✘ Nettoyants à four
✔ Pour les saletés
importantes, utiliser
UNIQUEMENT un
nettoyant pour acier
inoxydable conçu pour
les appareils concernés.
Pour commander le
nettoyant, voir la section
“Accessoires”.
✘ Le nettoyant pour acier
inoxydable doit être utilisé sur
les pièces en acier inoxydable
uniquement! Veiller à ce
que le nettoyant et poli pour
acier inoxydable n’entre pas
en contact avec les pièces
de plastique comme les
garnitures, couvercles de
distributeurs ou joints de porte.
REMARQUES:
■ En cas de contact non intentionnel, nettoyer la pièce de
plastique avec une éponge et un détergent doux dans de l’eau
tiède. Sécher soigneusement avec un chiffon doux.
■ Un nettoyant sous forme liquide ne signie pas forcément qu’il
n’est pas abrasif. Beaucoup de nettoyants liquides formulés
pour nettoyer le carrelage et autres surfaces lisses en douceur
peuvent tout de même endommager l’acier inoxydable.
■ L’acide citrique décolore l’acier inoxydable de façon dénitive.
An d’éviter d’endommager le ni en acier inoxydable du
réfrigérateur:
Ne pas laisser les produits suivants pendant une durée
prolongée sur le revêtement
✘ Moutarde ✘ Sauces à base d’agrumes
✘ Jus de tomate ✘ Produits à base d’agrumes
✘ Sauce marinera
Nettoyage de l’intérieur
IMPORTANT: Les tablettes du réfrigérateur équipées d’éclairage
DEL par en dessous ne sont pas lavables au lave-vaisselle.
1. Débrancher le réfrigérateur ou déconnecter la source de
courant électrique.
2. Laver à la main, rincer et sécher les pièces amovibles et les
surfaces internes soigneusement. Utiliser une éponge propre
ou un linge doux et un détergent doux dans de l’eau tiède.
REMARQUE: Ne pas utiliser de nettoyants puissants
ou abrasifs tels que les nettoyants à vitre en atomiseurs,
nettoyants à récurer, liquides inammables, cires nettoyantes,
détergents concentrés, agents de blanchiment ou nettoyants
contenant du pétrole sur les pièces en plastique, les garnitures
intérieures et garnitures de portes ou sur les joints de portes.
3. Brancher le réfrigérateur ou reconnecter la source de courant
électrique.
Nettoyage du condensateur
Le condensateur n’a pas besoin d’être nettoyé souvent dans
des conditions de fonctionnement domestique normales.
Sil’environnement est particulièrement graisseux, poussiéreux,
ous’il y a des animaux domestiques dans la maison,
lecondensateur devrait être nettoyé tous les 6mois pour
assurerune efcacité maximale.
Communiquer avec le service si le condensateur a besoin
d’être nettoyé.

76
Lampes
Les lampes dans le réfrigérateur et le congélateur sont à DEL et
n’ont pas besoin d’être remplacées. Si les lampes ne s’allument
pas lorsqu’on ouvre la porte, appeler les numéros fournis pour
obtenir de l’aide ou un dépannage. Aux États-Unis, composer
le1800 253-1301. Au Canada, composer le 1 800 807-6777.
Précautions à prendre pour les
vacances ou le déménagement
Vacances
Si le réfrigérateur est laissé en marche pendant son absence:
1. Consommer toutes les denrées périssables et congeler les
autres articles.
2. Si le réfrigérateur comporte une machine à glaçons automatique
et qu’il est raccordé à la source d’approvisionnement en eau
du domicile, fermer la source d’approvisionnement en eau du
réfrigérateur. Des dommages matériels peuvent subvenir si
l’alimentation en eau n’est pas coupée.
3. Si votre machine à glaçons est automatique, éteindre la
machine à glaçons.
■ Mettre le commutateur de la machine à glaçons de la porte
sur arrêt.
4. Vider le bac à glaçons.
Si l’utilisateur choisit d’arrêter le réfrigérateur avant son
absence:
REMARQUE: Placer le réfrigérateur en mode d’exposition
encasd’absence.
Voir la section “Utilisation des commandes”.
1. Enlever tous les aliments du réfrigérateur.
2. Si le réfrigérateur est équipé d’une machine à glaçons
automatique:
■ Fermer l’approvisionnement en eau de la machine à
glaçons au moins un jour à l’avance.
■ Lorsque les derniers glaçons tombent, appuyer sur le
commutateur de fermeture pour éteindre l’affichage du
haut, à l’intérieur du réfrigérateur, selon le modèle.
3. Vider le bac à glaçons.
4. Éteindre les commandes de température. Voir la section
“Utilisation des commandes”.
5. Nettoyer le réfrigérateur, l’essuyer et bien le sécher.
6. À l’aide d’un ruban adhésif, placer des blocs de caoutchouc
ou de bois dans la partie supérieure de chaque porte de façon
à ce qu’elles soient sufsamment ouvertes pour permettre
à l’air d’entrer et d’éviter l’accumulation d’odeur oude
moisissure.
Déménagement
En cas de déménagement et de déplacement du réfrigérateur
dans une nouvelle habitation, suivre ces étapes pour préparer le
déménagement.
1. Si le réfrigérateur est équipé d’une machine à glaçons
automatique:
■ Fermer l’approvisionnement en eau de la machine à
glaçons au moins un jour à l’avance.
■ Débrancher la canalisation d’eau de l’arrière du
réfrigérateur.
■ Lorsque les derniers glaçons tombent, appuyer sur le
commutateur pour fermer la machine à glaçons de la
porte ou les commandes, selon le modèle.
2. Retirer tous les aliments du réfrigérateur et placer tous les
aliments congelés dans de la neige carbonique.
3. Vider le bac à glaçons.
4. Débrancher le réfrigérateur.
5. Bien nettoyer, essuyer et sécher.
6. Retirer toutes les pièces amovibles, bien les envelopper et
les attacher ensemble avec du ruban adhésif pour qu’elles ne
bougent et ne s’entrechoquent pas durant le déménagement.
7. Selon le modèle, soulever l’avant du réfrigérateur pour qu’il
roule plus facilement OU soulever les pieds de nivellement
pour qu’ils n’égratignent pas le plancher. Consulter la section
“Ajustement des portes” ou “Fermeture et alignement des
portes”.
8. Fermer les portes à l’aide de ruban adhésif et xer le cordon
d’alimentation à la partie arrière du réfrigérateur.
Lors de l’arrivée au nouveau domicile, remettre tout en place
et consulter la section “Instructions d’installation” pour les
instructions de préparation. Aussi, si le réfrigérateur comporte une
machine à glaçons automatique, ne pas oublier de rebrancher
l’approvisionnement en eau au réfrigérateur.
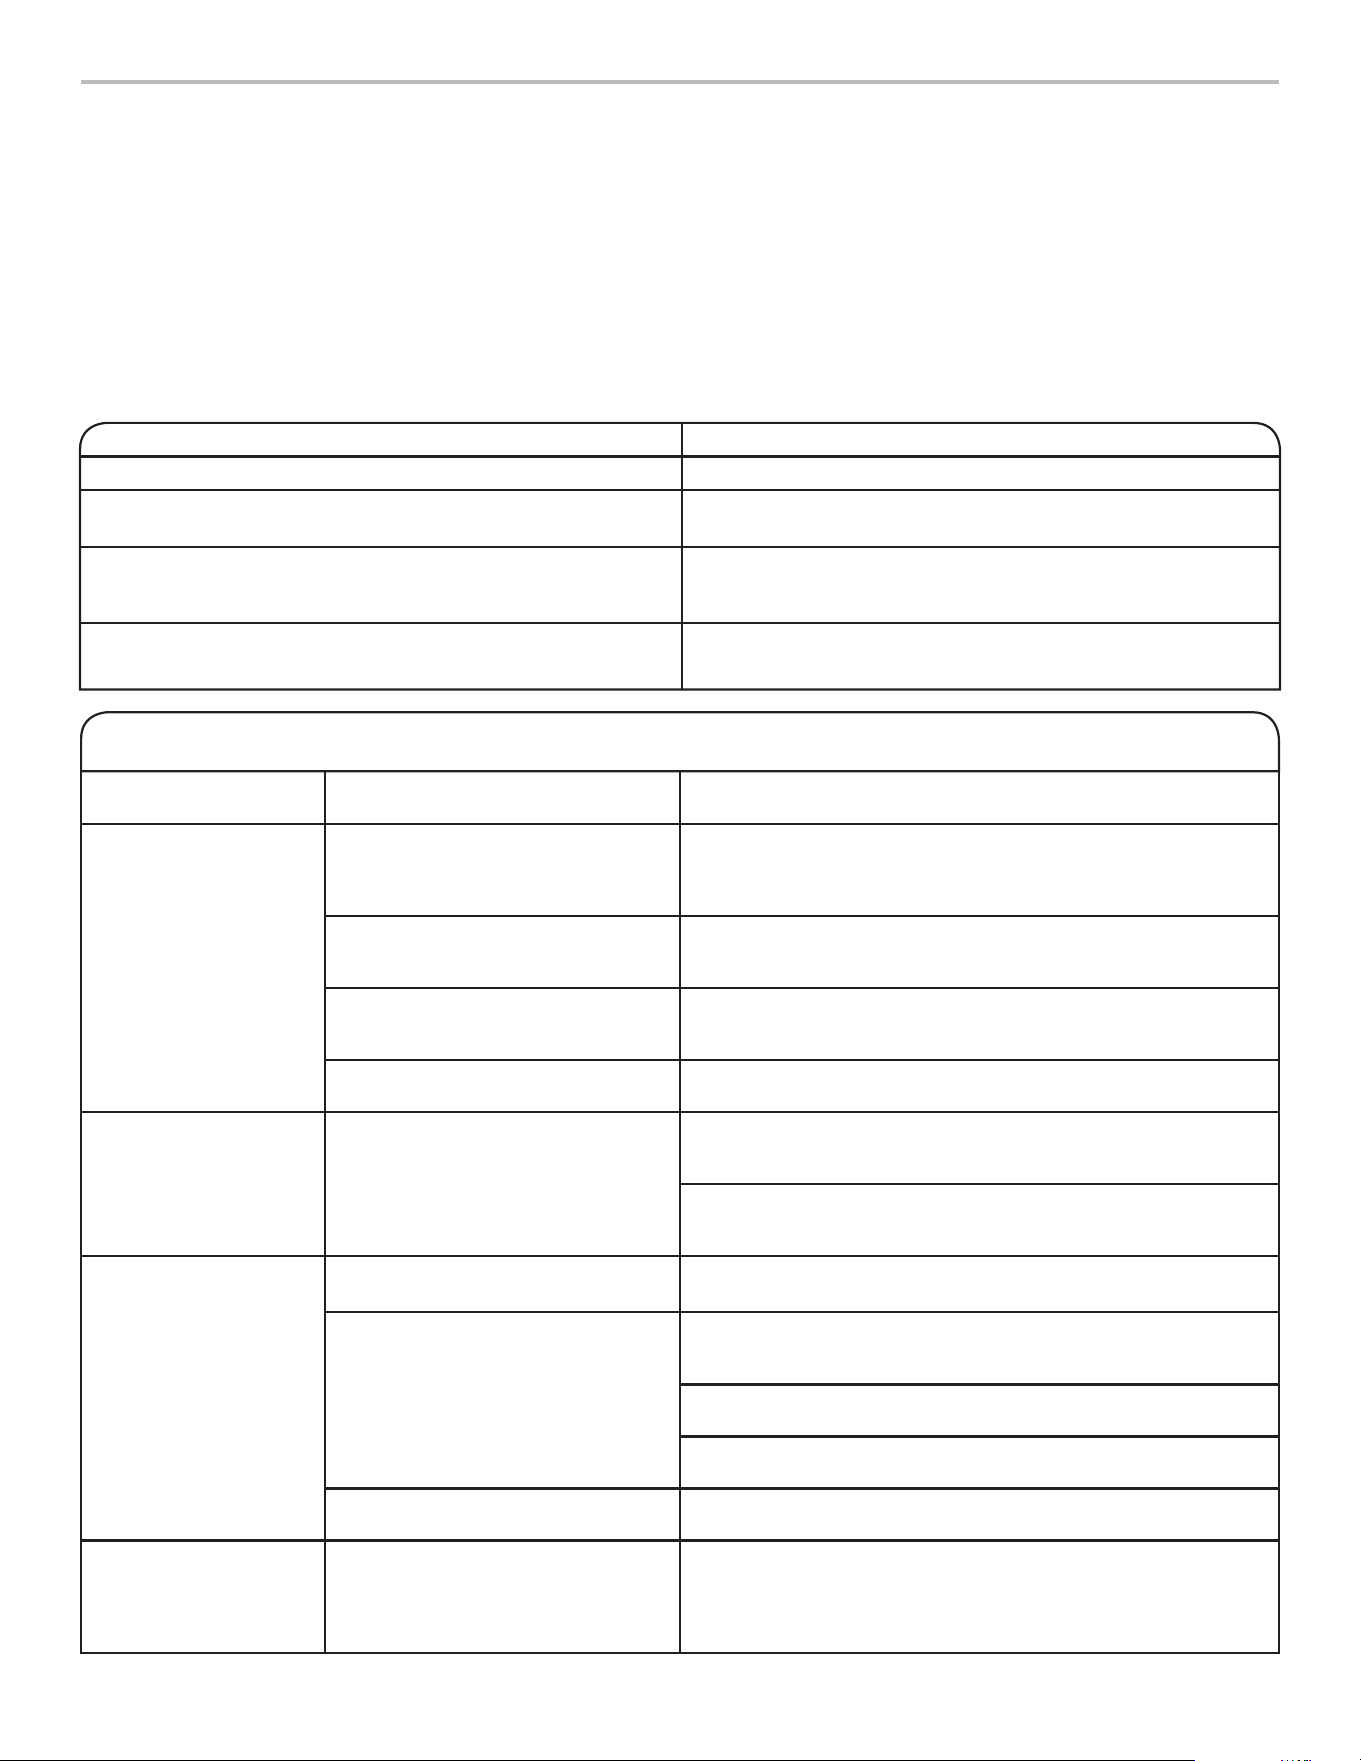
77
DÉPANNAGE – MODÈLES AVEC CONNEXION
Essayez d’abord les solutions suggérées ici. Pour obtenir de l’aide ou des conseils qui permettront peut-être d’éviter une intervention
de dépannage, consulter la page de garantie de ce manuel, visiter le site Web au www.jennair.com/connect ou composer le
1877559-2603. Au Canada, visiter le www.jennair.ca/fr/connect.
Il est possible d’adresser ses commentaires ou questions par courrier à l’adresse ci-dessous:
Aux États-Unis:
JennAir Brand Home Appliances
Customer eXperience Center
553 Benson Road
Benton Harbor, MI 49022-2692
Au Canada:
JennAir Brand Home Appliances
Customer eXperience Centre
200 – 6750 Century Ave.
Mississauga, Ontario L5N 0B7
Veuillez indiquer dans votre correspondance un numéro de téléphone où l’on peut vous joindre dans la journée.
Essayer d’abord les solutions suggérées ici ou visiter notre site Web au www.jennair.com/connect.
Si les problèmes
suivants surviennent
Causes possibles Solution
Le réfrigérateur n’est pas
connecté au routeur Wi-Fi
domestique. (L’icône Wi-
Fi est fermée.)
Le réfrigérateur peut être en mode
Attente.
Appuyer sur le bouton Connect (connecter) pendant 3secondes
pour voir l’icône Wi-Fi clignoter, puis s’allumer complètement.
Toutes les lumières des témoins sont fermées pendant le mode
Attente.
Le réfrigérateur n’a encore jamais
été branché au routeur Wi-Fi
domestique.
Consulter la section “Conguration de la connectivité”.
Perte de la connexion avec le routeur
Wi-Fi domestique.
Vérier si le routeur est en marche et fonctionnel en utilisant
d’autres ordinateurs ou appareils de la maison (capables
d’accéder à Internet).
Signal faible ou interférence entre le
réfrigérateur et le routeur.
Essayer de positionner le routeur sans l plus près du réfrigérateur.
Il pourrait être nécessaire d’installer un amplicateur Wi-Fi.
L’icône Wi-Fi ne s’allume
pas après avoir appuyé
sur le bouton CONNECT.
Il peut y avoir un problème avec le
réfrigérateur.
Débrancher le réfrigérateur ou déconnecter la source de courant
électrique pendant 30secondes.
Rebrancher. Répéter le processus de connexion Wi-Fi.
Vérier que le réfrigérateur fonctionne correctement (sauf pour le
problème de connexion). Appeler pour un éventuel dépannage
supplémentaire.
Le réfrigérateur est
connecté au routeur
Wi-Fi domestique, mais
l’application JennAir
®
ne
fonctionne pas.
La connexion à l’application JennAir
®
peut ne pas être disponible.
Vérier Internet.
Le compte d’utilisateur n’a pas
été correctement conguré ou le
réfrigérateur n’a pas été enregistré
pour ce compte.
Consulter la section “Conguration de la connectivité” ou
l’application JennAir
®
pour connaître les instructions de
conguration du compte et d’enregistrement du réfrigérateur.
Vérier que le réfrigérateur est jumelé à votre compte dans
l’application.
Vérier que le courriel, le numéro d’appareil mobile et les
préférences de notication sont corrects.
Le routeur n’est pas connecté à
Internet.
Vérier que d’autres appareils peuvent se connecter à Internet
en utilisant le même routeur.
Aucune connexion avec
le réfrigérateur après
plusieurs tentatives.
Wi-Fi déconnecté Appuyer sur le bouton Connect (connecter) pendant 3 secondes
pour activer le Wi-Fi. Fermer le disjoncteur pendant environ
30 secondes ou plus, puis le réenclencher. Utiliser ensuite les
instructions de conguration alternative disponibles au
www.jennair.com/connect.
État de connexion Témoins lumineux du panneau de commande
Le réfrigérateur n’est pas connecté. L’icône Wi-Fi est fermée
Le réfrigérateur essaie de se connecter au routeur Wi-Fi
domestique
L’icône Wi-Fi clignote lentement.
Le réfrigérateur est connecté au routeur Wi-Fi
domestique, mais l’application JennAir
®
ou la fonction
Smart Grid ne fonctionne pas
L’icône Wi-Fi est allumée
Le réfrigérateur est connecté au routeur Wi-Fi
domestique et l’application JennAir
®
fonctionne
L’icône Wi-Fi est allumée
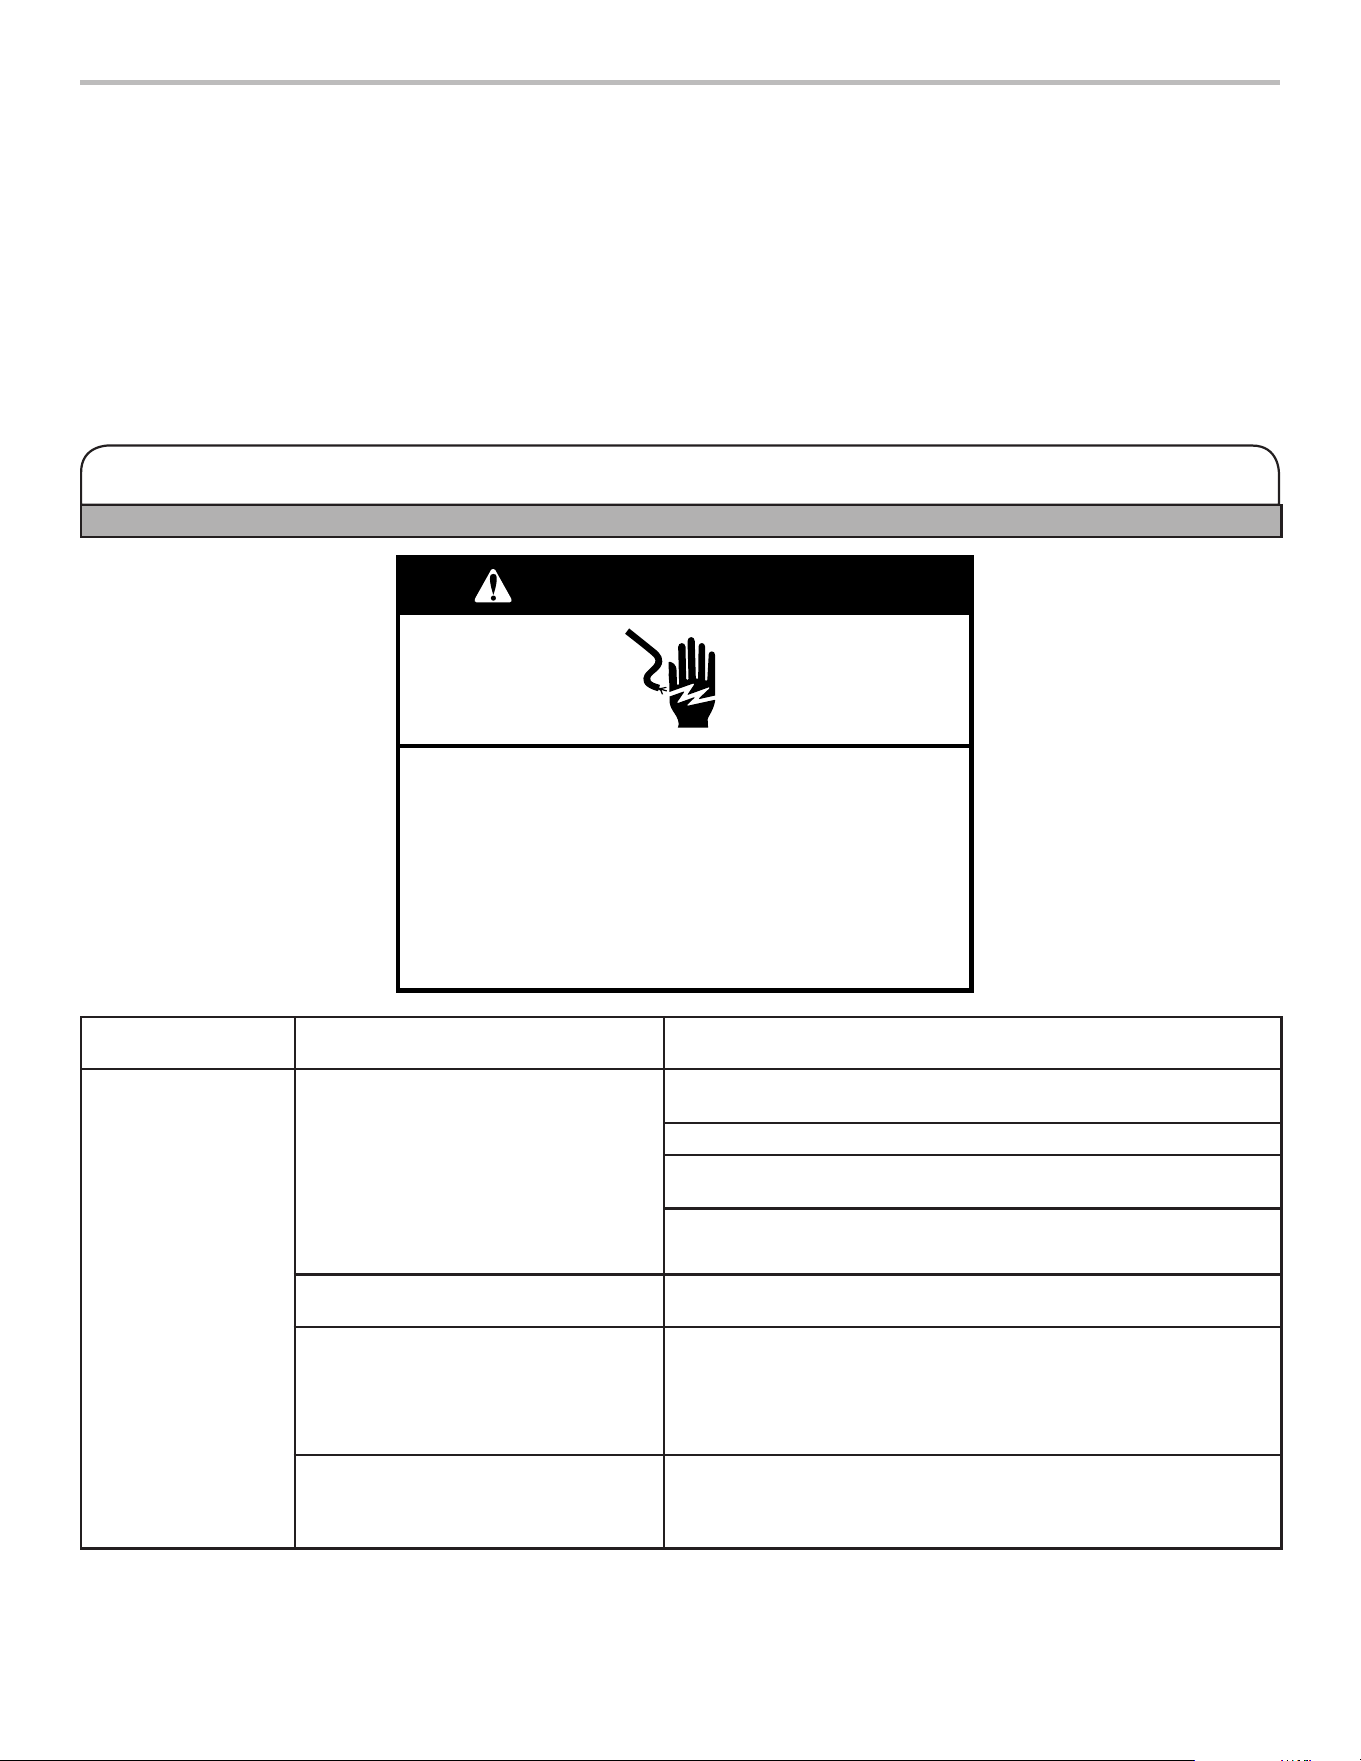
78
Fonctionnement du réfrigérateur
Essayer d’abord les solutions suggérées ici ou visiter notre site Web au www.jennair.custhelp.com.
AVERTISSEMENT
Risque de choc électrique
Brancher sur une prise à 3 alvéoles reliée à la terre.
Ne pas enlever la broche de liaison à la terre.
Ne pas utiliser un adaptateur.
Ne pas utiliser un câble de rallonge.
Le non-respect de ces instructions peut causer
un décès, un incendie ou un choc électrique.
Si les problèmes
suivants surviennent
Causes possibles Solution
Le réfrigérateur ne
fonctionne pas.
Inspecter l’alimentation électrique. Brancher le cordon d’alimentation dans une prise à 3alvéoles reliée
à la terre.
Ne pas utiliser de rallonge.
S’assurer que la prise est alimentée. Brancher une lampe pour voir
si la prise fonctionne.
Réarmer le disjoncteur déclenché. Remplacer tout fusible grillé.
REMARQUE: Si le problème persiste, appeler un électricien.
Inspecter les commandes. S’assurer que les commandes sont activées. Voir la section
“ Utilisation des commandes”.
Nouvelle installation Accorder 24heures après l’installation pour que le réfrigérateur se
refroidisse complètement.
REMARQUE: Le fait de placer les commandes de température
sur le réglage le plus froid ne refroidira pas le compartiment plus
rapidement.
Les commandes du réfrigérateur sont
en mode d’exposition (sur certains
modèles).
Si le réfrigérateur est en mode d’exposition, le refroidissement est
désactivé et “Exposition” s’allume sur le tableau de commande.
Consulter la section “Utilisation des commandes” pour plus de
renseignements.
DÉPANNAGE
Essayez d’abord les solutions suggérées ici. Pour obtenir de l’aide ou des conseils qui permettront peut-être d’éviter une intervention
de dépannage, consulter la page de garantie de ce manuel, visiter le site www.jennair.custhelp.com ou composer le 1800253-1301.
Au Canada, visiter le www.jennair.ca.
Il est possible d’adresser ses commentaires ou questions par courrier à l’adresse ci-dessous:
Aux États-Unis:
JennAir Brand Home Appliances
Customer eXperience Center
553 Benson Road
Benton Harbor, MI 49022-2692
Au Canada:
JennAir Brand Home Appliances
Customer eXperience Centre
200 – 6750 Century Ave.
Mississauga, Ontario L5N 0B7
Veuillez indiquer dans votre correspondance un numéro de téléphone où l’on peut vous joindre dans la journée.
79
Si les problèmes
suivants surviennent
Causes possibles Solution
Fonctionnement du réfrigérateur (suite)
Le moteur semble
fonctionner
excessivement
Compresseur et ventilateur à
rendement élevé
Un réfrigérateur éconergique de grande taille fonctionne à une
vitesse inférieure et plus éconergique que d’autres appareils.
La température de la pièce ou la
température extérieure est élevée.
Il est normal que le réfrigérateur fonctionne pendant plus longtemps
dans ces conditions. Pour un rendement optimal, placer le
réfrigérateur dans un environnement d’intérieur à température
stable. Voir la section “Exigences d’emplacement”.
Une grande quantité d’aliments tièdes
a été récemment ajoutée.
Lorsqu’on place des aliments tièdes dans le réfrigérateur, l’appareil
fonctionne plus longtemps: jusqu’à ce que l’air soit refroidi à la
température désirée.
Les portes sont ouvertes fréquemment
ou pendant trop longtemps.
L’air tiède qui entre dans le réfrigérateur prolonge son
fonctionnement. Ouvrir la porte moins souvent.
La porte du réfrigérateur ou du tiroir du
congélateur est entrouverte.
Vérier que le réfrigérateur est de niveau. Consulter la section
“Fermeture et alignement des portes”. Empêcher les aliments et les
récipients d’obstruer la porte.
La commande du réfrigérateur est
placée à un réglage trop froid.
Placer la commande du réfrigérateur à un réglage moins froid
jusqu’à ce que la température du réfrigérateur souhaitée soit
atteinte.
Le joint de la porte ou du tiroir est sale,
usagé ou craquelé.
Nettoyer ou remplacer le joint d’étanchéité. Si le joint de la porte
présente des fuites, le réfrigérateur fonctionnera plus longtemps
pour maintenir la température souhaitée.
Les ampoules ne
fonctionnent pas.
Votre réfrigérateur est muni de DEL qui
ne doivent pas être remplacées par
l’utilisateur.
Si le réfrigérateur est alimenté, mais que les DEL ne fonctionnent
pas lorsqu’une porte ou un tiroir est ouvert, communiquer avec le
service pour obtenir de l’aide.
Les portes ont été ouvertes pendant
plus de 10minutes.
Fermer les portes et le tiroir à réinitialiser, puis les rouvrir pour
reprendre la tâche surlignée.
Le contacteur de la porte ne détecte
pas l’ouverture de la porte.
S’assurer qu’aucun aimant ou appareil électronique se trouve à
moins de 3 po (7,6 cm) du couvre-charnière.
L’IU des commandes
de température ne
s’allume pas.
Le contacteur de la porte ne détecte
pas l’ouverture de la porte.
S’assurer qu’aucun aimant ou appareil électronique se trouve à
moins de 3 po (7,6 cm) du couvre-charnière.
Sons inhabituels
Pour écouter des bruits qui font partie du fonctionnement normal du réfrigérateur, consulter la section Aide avec le produit/FAQ du
site Web de notre marque à la section “Bruits normaux”. Voici une liste de sons normaux, accompagnée d’explications.
Le réfrigérateur
semble bruyant
Le compresseur de votre nouveau
réfrigérateur régule la température plus
efcacement tout en utilisant moins
d’énergie; il fonctionne aussi plus
silencieusement.
Les bruits de fonctionnement étant moins importants, il sera
possible de remarquer des bruits inconnus qui sont en réalité
normaux.
Le bruit du
compresseur qui
fonctionne plus
longtemps que prévu.
Compresseur et ventilateur à
rendement élevé
Un réfrigérateur éconergique de grande taille fonctionne à une
vitesse inférieure et plus éconergique que d’autres appareils.
Pulsation/
bruissement
Les ventilateurs/le compresseur qui se
règlent pour optimiser le rendement
durant le fonctionnement normal du
compresseur
Ceci est normal.
Éclatement Contraction/expansion des parois
internes, surtout lors du refroidissement
initial
Ceci est normal.
Sifement/
égouttement
Écoulement de liquide réfrigérant ou
d’huile dans le compresseur
Ceci est normal.
Vibration Le réfrigérateur n’est peut-être pas
stable.
Ajuster les vis de nivellement et abaisser le pied de nivellement
avant de façon à ce qu’il soit bien en contact avec le plancher.
Consulter la section “Fermeture et alignement des portes”.
Essayer d’abord les solutions suggérées ici ou visiter notre site Web au www.jennair.custhelp.com.
DÉPANNAGE
80
Si les problèmes
suivants surviennent
Causes possibles Solution
Sons inhabituels (suite)
Entrechoquement/
martèlement
Mouvement des conduites d’eau contre
la caisse du réfrigérateur ou d’objets
posés sur le dessus de la caisse du
réfrigérateur
Éloigner l’excédent de canalisation d’eau de la caisse du
réfrigérateur ou la xer dessus. Consulter la section “Raccordement
de l’eau” ou retirer les objets du sommet du réfrigérateur.
Grésillement De l’eau goutte sur l’élément de
chauffage durant le programme de
dégivrage
Ceci est normal.
Écoulement d’eau/
gargouillement
Peut se produire lorsque la glace fond
lors du programme de dégivrage et
que l’eau s’écoule dansle plateau de
dégivrage.
Ceci est normal.
Bourdonnement et
cliquetis
Se produit lorsque le robinet d’eau
s’ouvre et se referme pour distribuer de
l’eau ou remplir la machine à glaçons.
Si le réfrigérateur est raccordé à une canalisation d’arrivée d’eau,
cela est normal. Éteindre la machine à glaçons si le réfrigérateur
n’est pas raccordé à une canalisation d’arrivée d’eau.
Cliquetis répétitif Soupape de régulation double de la
fonction de refroidissement
Un son de cliquetis rapide et répétitif peut être entendu lorsque
l’unité passe du refroidissement d’un compartiment à un autre. Ceci
est normal.
Craquement/broyage Peut se produire lorsque la glace est
éjectée du moule à glaçons.
Ceci est normal.
Fracas Peut se produire lorsque les glaçons
tombent dans le bac d’entreposage.
Ceci est normal.
Température et humidité
La température est
trop élevée.
Le réfrigérateur vient d’être installé. Accorder 24heures après l’installation pour que le réfrigérateur se
refroidisse complètement.
Le refroidissement est désactivé.
Activer le refroidissement. Voir la section “Utilisation des commandes”.
Le réglage des commandes n’est pas
adapté à l’environnement de l’appareil.
Régler les commandes à un cran plus froid. Vérier la température au
bout de 24heures. Voir la section “Utilisation des commandes”.
La/les portes sont ouvertes fréquemment
ou ne sont pas complètement fermées.
Ceci permet à l’air chaud de pénétrer
dans le réfrigérateur.
Minimiser les ouvertures de porte et garder les portes
complètement fermées.
Une grande quantité d’aliments a été
récemment ajoutée.
Attendre quelques heures pour permettre au réfrigérateur de revenir
à une température normale.
La température est
trop basse dans le
réfrigérateur/bac à
légumes.
L’ouverture/les ouvertures d’évacuation
du réfrigérateur est/sont bloquée(s).
Si l’ouverture d’évacuation située au milieu à l’arrière du
compartiment de réfrigération est obstruée par des articles placés
directement devant, le réfrigérateur sera trop froid. Éloigner les
objets de l’ouverture d’évacuation.
Le réglage des commandes n’est pas
adapté à l’environnement de l’appareil.
Régler les commandes à un réglage plus chaud. Vérier la
température au bout de 24heures. Voir la section “Utilisation des
commandes”.
Le bac d’entreposage à glaçons est
mal installé.
Voir la section “Machine à glaçons et bac/seau de stockage”.
La température est
trop basse dans le
garde-manger.
Le réglage des commandes n’est pas
adapté aux articles entreposés dans le
tiroir.
Modier le réglage de température. Voir la section “Utilisation des
commandes”.
Il y a accumulation
d’humidité à l’intérieur.
REMARQUE:
Unecertaine
accumulation
d’humiditéest
normale.
La pièce est humide. Un environnement humide contribue à l’accumulation d’humidité.
La/les portes sont ouvertes fréquemment
ou ne sont pas complètement fermées.
Cela permet à l’air humide de pénétrer
dans le réfrigérateur.
Minimiser les ouvertures de porte et garder les portes
complètement fermées.
Une porte est bloquée en position
ouverte.
Déplacer les emballages d’aliments pour libérer la porte.
Un compartiment ou une tablette
bloque le passage.
Replacer le compartiment ou la tablette correctement.
Entreposage de liquides dans des
récipients ouverts
Cela ajoute de l’humidité à l’intérieur du réfrigérateur. Bien fermer
tous les récipients.
Essayer d’abord les solutions suggérées ici ou visiter notre site Web au www.jennair.custhelp.com.
DÉPANNAGE
81
Essayer d’abord les solutions suggérées ici ou visiter notre site Web au www.jennair.custhelp.com.
Si les problèmes
suivants surviennent
Causes possibles Solution
Température et humidité (suite)
Du givre ou de la
glace s’est accumulé
dans le compartiment
de congélation.
Le tiroir est fréquemment ouvert ou est
laissé ouvert.
Réduire les ouvertures du tiroir et garder le tiroir complètement
fermé.
Joint de la porte en mauvais état S’assurer que les joints de porte sont en parfait contact avec la
caisse du réfrigérateur pour que l’étanchéité soit assurée.
Les commandes de température ne
sont pas correctement réglées.
Consulter la section “Utilisation des commandes” pour connaître
les réglages de température recommandés.
Glaçons et eau
La machine à glaçons
ne produit pas ou
pas sufsamment
deglaçons.
Le réfrigérateur n’est pas raccordé
à l’alimentation en eau ou le robinet
d’arrêt d’eau n’est pas ouvert.
Brancher le réfrigérateur à l’alimentation en eau et ouvrir le robinet
d’arrêt d’eau complètement.
La canalisation de la source d’eau du
domicile comporte une déformation.
Une déformation dans la canalisation peut réduire l’écoulement
d’eau. Redresser la canalisation d’eau.
La machine à glaçons n’est pas allumée. S’assurer que la machine à glaçons est en marche. Voir la section
“Machine à glaçons et bac/seau de stockage”.
Le réfrigérateur vient d’être installé. Attendre 24 heures après l’installation de la machine à glaçons pour
que la production de glaçons commence. Attendre 3jours pour que
la production de glaçons soit complète.
La porte du réfrigérateur n’est pas
complètement fermée.
Bien fermer la porte. Si elle ne ferme pas complètement,
consulterla partie “Les portes ne ferment pas bien” plus loin
danscette section.
Une grande quantité de glaçons a été
récemment prélevée.
Attendre sufsamment pour que la machine à glaçons produise
plus de glaçons. Consulter la section “Machine à glaçons et bac
d’entreposage” pour connaître le taux de production de glaçons.
Un glaçon est coincé dans la machine
à glaçons.
Enlever le glaçon de la machine avec un ustensile en plastique.
Un ltre à eau est installé sur le
réfrigérateur.
Enlever le ltre à eau et faire fonctionner la machine à glaçons. Sile
volume de glace augmente, le ltre est probablement obstrué ou
mal installé. Remplacer le ltre ou le réinstaller correctement.
Un système de ltration de l’eau
par osmose inverse est raccordé à
l’alimentation en eau froide.
Ceci peut réduire la pression de l’eau. Voir la section “Spécications
de l’alimentation en eau”.
Les glaçons sont
creux ou petits.
REMARQUE:
Celaindique une
faible pression d’eau.
Le robinet d’arrêt de la canalisation
d’eau n’est pas complètement ouvert.
Ouvrir le robinet d’arrêt complètement.
La canalisation de la source d’eau du
domicile comporte une déformation.
Une déformation dans la canalisation peut réduire l’écoulement
d’eau. Redresser la canalisation d’eau.
Un ltre à eau est installé sur le
réfrigérateur.
Enlever le ltre et faire fonctionner la machine à glaçons. Si la
qualité des glaçons s’améliore, le ltre est probablement obstrué ou
mal installé. Remplacer le ltre ou le réinstaller correctement.
Un système de ltration de l’eau
par osmose inverse est raccordé à
l’alimentation en eau froide.
Ceci peut réduire la pression de l’eau. Voir la section “Spécications
de l’alimentation en eau”.
D’autres questions concernant la
pression de l’eau?
Appeler un plombier agréé et qualié.
DÉPANNAGE
82
Si les problèmes
suivants surviennent
Causes possibles Solution
Glaçons et eau (suite)
Mauvais goût,
mauvaise odeur ou
couleur grise des
glaçons ou de l’eau
Lorsqu’on vient d’installer un
réfrigérateur, le système de
distributiond’eau doit être rincé.
Rincer le système de distribution d’eau. Consulter la section
“Distributeurs d’eau et de glaçons” pour des instructions sur le
rinçage du système de distribution d’eau.
Raccords de plomberie récemment
installés ou remplacés. Des raccords
de plomberie neufs peuvent entraîner
une décoloration ou un mauvais goût
des glaçons et de l’eau.
Jeter les glaçons et laver le bac d’entreposage à glaçons. Rincer le
circuit d’eau avec 3gal (12l) d’eau. Attendre 24heures pour que
la machine à glaçons produise de nouveaux glaçons et jeter les
3premiers lots de glaçons produits.
La canalisation d’alimentation en
eau est différente de celle qui est
recommandée.
L’utilisation d’une canalisation en cuivre ou d’une canalisation
d’alimentation en eau JennAir
®
est recommandée – numéro
de pièce8212547RP. Consulter la section “Raccordement à la
canalisation d’eau”.
Les glaçons ont été conservés pendant
trop longtemps.
Jeter les glaçons et laver le bac d’entreposage à glaçons. Attendre
24 heures pour la fabrication de nouveaux glaçons.
L’eau a été conservée pendant trop
longtemps.
Distribuer au moins 1pte (1l) d’eau chaque semaine pour maintenir
un approvisionnement en eau fraîche.
Les glaçons ont pris l’odeur des
aliments.
Utiliser des emballages hermétiques et à l’épreuve de l’humidité
pour conserver les aliments.
L’eau contient des minéraux (tels que
le soufre).
L’installation d’un ltre à eau peut être requise an d’enlever les
minéraux.
Un ltre à eau est installé sur le
réfrigérateur.
Une décoloration grise ou foncée de la glace indique que le
système de ltration de l’eau nécessite un rinçage supplémentaire.
Rincer le circuit d’eau avant d’installer ou d’utiliser un nouveau ltre
à eau. Consulter la section “Distributeurs d’eau et de glaçons” pour
des instructions sur le rinçage du ltre à eau.
Le ltre à eau doit être remplacé. Remplacer le ltre à eau jetable au moins tous les 6mois ou lorsque
signalé. Consulter la section “Système de ltration de l’eau”.
Le distributeur
d’eau et de glaçons
ne fonctionne pas
correctement.
Le réfrigérateur n’est pas raccordé
à l’alimentation en eau ou le robinet
d’arrêt d’eau n’est pas ouvert.
Brancher le réfrigérateur à l’alimentation en eau et ouvrir
complètement le robinet d’arrêt d’eau.
La canalisation de la source d’eau du
domicile comporte une déformation.
Une déformation dans la canalisation d’eau peut réduire le débit au
distributeur d’eau et entraîner la formation de glaçons creux ou de
forme irrégulière. Redresser la canalisation d’eau.
Le réfrigérateur vient d’être installé. Rincer et remplir le système de distribution d’eau. Consulter la
section “Distributeurs d’eau et de glaçons”.
La pression en eau du domicile est
inférieure à 35lb/po² (241kPa).
La pression en eau du domicile détermine la taille du débit depuis le
distributeur. Voir la section “Spécications de l’alimentation en eau”.
Un système de ltration de l’eau
par osmose inverse est raccordé à
l’alimentation en eau froide.
Un système de ltration de l’eau par osmose inverse peut réduire
la pression de l’eau. Voir la section “Spécications de l’alimentation
en eau”.
Le ltre à eau est peut-être obstrué. Enlever le ltre à eau et faire fonctionner le distributeur. Si le débit
d’eau augmente, cela signie que votre ltre est obstrué et doit être
remplacé. Consulter la section “Système de ltration de l’eau”.
Le ltre à eau est mal installé. Enlever le ltre à eau et le réinstaller. Consulter la section “Système
de ltration de l’eau”.
Essayer d’abord les solutions suggérées ici ou visiter notre site Web au www.jennair.custhelp.com.
DÉPANNAGE

83
Glaçons et eau (suite)
Essayer d’abord les solutions suggérées ici ou visiter notre site Web au www.jennair.custhelp.com.
DÉPANNAGE
Si les problèmes
suivants surviennent
Causes possibles Solution
Le distributeur
d’eau et de glaçons
ne fonctionne pas
correctement. (suite)
La porte du réfrigérateur ou du tiroir du
congélateur est entrouverte.
Bien fermer la porte ou le tiroir. Si elle ne ferme pas complètement,
voir “Les portes ne ferment pas complètement”.
Les portes du réfrigérateur ont été
récemment enlevées.
S’assurer que l’assemblage câble/tuyau du distributeur d’eau a été
correctement reconnecté au sommet de la porte du réfrigérateur.
Voir la section “Enlever et remplacer les portes du réfrigérateur”.
Des glaçons obstruent le bac
d’entreposage ou le goulet de
distribution des glaçons.
À l’aide d’un ustensile en plastique, si nécessaire, retirer les
glaçons obstruant le bac d’entreposage ou le goulet de distribution
des glaçons. Nettoyer le goulet de distribution et le fond du bac
d’entreposage à l’aide d’un chiffon tiède et humide, puis sécher
soigneusement ces deux sections. Pour éviter toute obstruction
et maintenir un approvisionnement frais en glaçons, vider le bac
d’entreposage et nettoyer à la fois le bac d’entreposage et le goulet
de distribution toutes les 2semaines.
Le bac à glaçons est
difcile à retirer de la
porte.
La quantité de glaçons dans le
bac peut être élevée et inégale en
comparaison à une production de
glaçons normale, la glace peut ainsi
créer de la pression sur les parois.
Distribuer 2 à 3 verres de glaçons, puis essayer d’enlever le bac.
Le distributeur de
glaçons se bloque
lorsqu’il distribue de
la glace concassée.
De la glace concassée obstrue le
goulet de distribution de glaçons.
Pour dégager le distributeur à glaçons, passer de la glace
concassée au mode glaçons. Revenir ensuite à la glace concassée.
De l’eau suinte ou
dégoutte du système
de distribution.
REMARQUE: Il est
normal que quelques
gouttes s’écoulent de
la machine après la
distribution d’eau.
Le verre n’a pas été maintenu sous le
distributeur assez longtemps.
Maintenir le verre sous le distributeur2 à 3secondes après avoir
relâché le levier du distributeur.
Distribution continue
de glaçons.
REMARQUE:
Ledistributeur
peut laisser passer
quelques glaçons
après que le bras
ait été relâché,
c’estnormal.
Le verre n’a pas été maintenu sous le
distributeur assez longtemps.
Maintenir le verre sous le distributeur2 à 3secondes après avoir
relâché le levier du distributeur.
De l’eau continue
de dégoutter du
distributeur – plus
que quelques
gouttes.
Le réfrigérateur vient d’être installé. Le fait de rincer le circuit d’eau permet d’éliminer l’air retenu dans
les canalisations, ce qui entraîne l’égouttement du distributeur.
Rincer le système de distribution d’eau.
Consulter la section “Distributeurs d’eau et de glaçons”.
Le ltre à eau a été récemment installé
ou changé.
Le fait de rincer le circuit d’eau permet d’éliminer l’air retenu dans
les canalisations, ce qui entraîne l’égouttement du distributeur.
Rincer le système de distribution d’eau.
Consulter la section “Distributeurs d’eau et de glaçons”
Une connexion d’eau peut ne pas être
bien serrée.
Vérier la présence d’eau dans le compartiment inférieur du
réfrigérateur, dans la zone de la charnière ou près de la connexion à
la canalisation d’alimentation domestique à l’arrière du réfrigérateur.
De l’eau fuit
par l’arrière du
réfrigérateur.
Les raccords de la canalisation d’eau
n’ont pas été complètement serrés
Consulter la section “Raccordement à la canalisation d’eau”.
Les portes ont été récemment retirées
et le raccord de la canalisation en eau
n’a pas été complètement serré
Voir la section “Enlever et remplacer les portes du réfrigérateur”.
84
Si les problèmes
suivants surviennent
Causes possibles Solution
La porte ne ferme pas
complètement.
La porte est bloquée en position
ouverte.
Déplacer les emballages d’aliments pour libérer la porte.
Un compartiment ou une tablette
bloque le passage.
Replacer le compartiment ou la tablette correctement.
Récemment installé Enlever tous les matériaux d’emballage.
Les portes sont difciles
à ouvrir.
Les joints de la porte sont collants
ousales.
Nettoyer les joints et les surfaces de contact au savon doux et à
l’eau tiède. Rincer et sécher avec un linge doux.
Les portes semblent mal
alignées.
Les portes doivent être alignées ou
l’aplomb du réfrigérateur effectué.
Consulter la section “Fermeture et alignement des portes”.
Le réfrigérateur est
instable ou roule vers
l’avant lorsqu’on ouvre
ou ferme les portes.
Les pieds de nivellement ne sont pas
fermement en appui sur le sol.
Retirer le casier de la base. Tourner les deux pieds de
stabilisation (un de chaque côté) du même nombre de tours dans
le sens horaire, jusqu’à ce qu’ils soient fermement en appui sur le
sol. Consulter la section “Fermeture et alignement des portes”.
AVERTISSEMENT
Risque d'explosion
Utiliser un produit de nettoyage ininflammable.
Le non-respect de cette instruction peut causer un décès,
une explosion ou un incendie.
Pour voir une vidéo détaillant l’ajustement et l’alignement des portes, consulter la section Aide avec le produit/FAQ du site Web de
notre marque et chercher “Fermeture et alignement des portes”.
Essayer d’abord les solutions suggérées ici ou visiter notre site Web au www.jennair.custhelp.com.
DÉPANNAGE
Si les problèmes
suivants surviennent
Causes possibles Solution
Glaçons et eau (suite)
De la glace
concassée ou des
glaçons tombent à
côté du verre pendant
la distribution.
Le verre n’est pas tenu sufsamment
près de la chute de glaçons.
Tenir le verre plus près de la chute de glaçons.
L’eau du distributeur
est tiède.
L’eau du distributeur est réfrigérée à
50°F (10°C).
Ceci est normal.
Le réfrigérateur vient d’être installé. Attendre 24heures après l’installation pour que l’alimentation en
eau refroidisse complètement.
Une grande quantité d’eau a été
récemment distribuée.
Accorder 3heures pour que l’alimentation en eau refroidisse
complètement.
On n’a pas distribué d’eau récemment. Le premier verre d’eau peut ne pas être froid. Jeter le premier verre
d’eau distribué.
Le réfrigérateur n’est pas raccordé à
une canalisation d’arrivée d’eau froide.
S’assurer que le réfrigérateur est raccordé à la canalisation
d’arrivée d’eau froide.
Voir la section “Spécications de l’alimentation en eau”.
Portes
85
Avis d’application de la réglementation de la connexion des
électroménagers
Déclaration de conformité de la Commission fédérale des
communications (FCC)
Cet appareil a été testé et déclaré conforme aux limites pour
appareils numériques de classe B, selon la section15 des
règlements de la FCC (Federal Communications Commission).
Ces limites sont conçues dans le but d’assurer une protection
raisonnable contre des interférences nuisibles dans une installation
résidentielle. Cet appareil génère, utilise et peut émettre l’énergie
de fréquence radio et, s’il n’est pas installé ni utilisé conformément
aux instructions, peut causer des interférences nuisibles aux
communications radio. Cependant, il se peut que des interférences
se produisent dans une installation particulière. Si cet appareil
cause des interférences nuisibles à la réception radio ou télévision,
pouvant être déterminées par le fait d’allumer et d’éteindre
l’appareil, l’utilisateur est encouragé à essayer de corriger les
interférences en suivant l’un ou plusieurs des conseils suivants:
–Réorienter ou déplacer l’antenne de réception.
–Augmenter la distance séparant l’appareil du récepteur.
– Brancher l’appareil sur un circuit différent de celui où le
récepteur est branché.
– Contacter un revendeur ou un technicien radio/télévision
qualié pour obtenir de l’aide.
Cet appareil est conforme à la norme FCC, partie15. Le bon
fonctionnement de l’appareil est fonction de deux conditions:
1. Cet appareil ne doit pas produire de brouillage dommageable et
2. Cet appareil doit accepter tout brouillage radioélectrique subi,
même si le brouillage est susceptible d’en compromettre le
fonctionnement.
Tous changements ou modications n’ayant pas été expressément
approuvés par la partie responsable de la conformité pourraient
annuler l’autorité de l’utilisateur à utiliser l’appareil.
Renseignements sur l’exposition aux
radiofréquences(RF)
Pour satisfaire aux exigences de la FCC et IC d’exposition pour
les appareils de transmission mobiles, cet émetteur ne devrait
être qu’utilisé ou installé dans un lieu séparant l’antenne et toutes
les personnes par 20cm ou plus.
Pour satisfaire aux exigences de la FCC et IC de limite d’exposition
pour la population générale/incontrôlée, l’antenne utilisée avec
cet émetteur doit être installée à une distance de 20cm ou plus
de toute personne et ne doit pas être co-utilisée ou fonctionner en
même temps qu’une autre antenne ou qu’un émetteur.
Déclaration de conformité d’Industrie Canada (IC)
Cet appareil satisfait aux prescriptions des documents CNR/
RSS d’Industrie Canada (utilisation sans licence). Le bon
fonctionnement de l’appareil est fonction de deux conditions:
1. Cet appareil ne doit pas produire de brouillage;
2. Cet appareil doit être compatible avec n’importe quelle
interférence, y compris des interférences causées par
l’utilisation involontaire de l’appareil.
En vertu des règlements d’Industrie Canada, cet émetteur radio
ne peut fonctionner qu’à l’aide d’une antenne d’un type et de
gain maximum (ou moins) approuvé pour l’émetteur par Industrie
Canada. Pour réduire les interférences radio potentielles pour
les autres utilisateurs, le type d’antenne et son gain doivent
être choisis de sorte que la puissance isotrope rayonnée
équivalente (PIRE) ne dépasse pas ce qui est nécessaire pour
une communication réussie.
Cet émetteur radio IC: 10248A-XPWG3 a été approuvé par
Industrie Canada pour fonctionner avec les types d’antennes
énumérés ci-dessous avec le gain maximal admissible et
l’impédance d’antenne requise pour chaque type d’antenne
indiqué. Les types d’antennes non inclus dans cette liste, ayant
un gain supérieur au gain maximum indiqué pour ce type,
sontstrictement interdits pour une utilisation avec cet appareil.
Pour satisfaire aux exigences de la FCC et d’Industrie Canada
sur les l’exposition aux radiations de radiodiffusion, les antennes
utilisées avec cet émetteur doivent être installées de telle sorte
qu’il y ait une distance de 20cm ou plus séparant la source de
radiation (antenne) et toute personne en tout temps et ne doit
pas être co-utilisée ou fonctionner en même temps qu’une autre
antenne ou qu’un émetteur.
Le présent appareil est conforme aux CNR d’Industrie Canada
applicables aux appareils radio exempts de licence. L’exploitation
est autorisée aux deux conditions suivantes :
(1) l’appareil ne doit pas produire de brouillage, et
(2) l’utilisateur de l’appareil doit accepter tout brouillage
radioélectrique subi, même si le brouillage est susceptible
d’en compromettre le fonctionnement.
Conformément à la réglementation d’Industrie Canada, le présent
émetteur radio peut fonctionner avec une antenne d’un type et
d’un gain maximal (ou inférieur) approuvé pour l’émetteur par
Industrie Canada. Dans le but de réduire les risques de brouillage
radioélectrique à l’intention des autres utilisateurs, il faut
choisir le type d’antenne et son gain de sorte que la puissance
isotrope rayonnée équivalente (p.i.r.e.) ne dépasse pas l’intensité
nécessaire à l’établissement d’une communication satisfaisante.
Le présent émetteur radio IC : 10248A-XPWG3 a été approuvé
par Industrie Canada pour fonctionner avec les types d’antenne
énumérés ci-dessous et ayant un gain admissible maximal et
l’impédance requise pour chaque type d’antenne. Les types
d’antenne non inclus dans cette liste, ou dont le gain est
supérieur au gain maximal indiqué, sont strictement interdits
pourl’exploitation de l’émetteur.
Type
d’antenne
Gain admissible maximal
d’antenne (dBi)
L’impédance
requise (OHM)
À fentes 1,76 50
Pour satisfaire aux exigences de la FCC et IC d’exposition aux
radiofréquences, une distance de séparation de 20 cm ou plus
doit être maintenue entre cet appareil et des personnes lors
de fonctionnement du dispositif. Pour assurer la conformité
des opérations au plus près que cette distance n’est pas
recommandée. L’antenne utilisée pour ce transmetteur ne doit
pas être co-localisés en conjonction avec toute autre antenne ou
transmetteur.
Responsabilités du FEO à satisfaire aux règlements de la
FCC et d’Industrie Canada.
Le moduleXPWG3 des produits est certié seulement si
l’intégration par le FEO respecte les conditions suivantes:
1. Les antennes doivent être installées de telle sortie qu’il y ait
une distance de 20cm ou plus entre la radiation (antenne) et
toutes les personnes en tout temps.
2. L’émetteur ne doit pas être colocalisé en conjonction avec
toute autre antenne ou tout émetteur.
Aucune évaluation supplémentaire d’émission n’est requise si
les deux conditions précédentes sont respectées. Cependant, le
FEO intégrateur demeure responsable du contrôle de ses produits
pour répondre aux exigences supplémentaires concernant ce
module (par exemple, émissions d’appareil numérique, exigences
périphériques d’un ordinateur personnel, etc.).
REMARQUE IMPORTANTE: Lorsque ces conditions ne peuvent
être respectées (pour certaines congurations ou colocalisations
avec un autre émetteur), les autorisations de la FCC et d’Industrie
Canada ne sont plus considérées valides et les numéros de
certication ID et IC de la FCC ne peuvent pas être utilisés sur
le produit. Dans ces circonstances, le FEO intégrateur sera
responsable de réévaluer le produit (incluant l’émetteur) et d’obtenir
une autorisation séparée de la FCC et d’Industrie Canada.
Étiquette de produit
L’étiquette du moduleXPWG3 est munie des numéros de
certications ID et IC de la FCC. Si les numéros de certications
ID et IC de la FCC ne sont pas visibles lorsque le module est
installé dans un autre appareil, l’extérieur de l’appareil dans lequel
le module est installé doit aussi afcher une étiquette de référence
pour le module. Dans cette situation, le produit nal doit posséder
une étiquette visible contenant les renseignements suivants:
Type
d’antenne
Gain maximum d’antenne
admissible (dBi)
Impédance requise
(OHM)
Encoche 1,76 50

86
Avis d’application de la réglementation de la connexion des
électroménagers (suite)
“Contient un émetteur FCC ID: A5UXPWG3”
“Contient un émetteur IC: 10248A-XPWG3”
ou
“Contient FCC ID: A5UXPWG3”
“Contient IC: 10248A-XPWG3”
Le FEO du moduleXPWG3 ne doit utiliser que les antennes
approuvées et certiées pour ce module. Le FEO intégrateur ne
doit pas fournir les renseignements à l’utilisateur nal concernant
l’installation et le démontage de ce module RF ou les modications
de paramètres RF dans le guide d’utilisation du produit nal.
Le guide d’utilisation du produit doit comprendre les
renseignements suivants:
“Pour satisfaire aux exigences de la FCC et d’Industrie Canada
sur les l’exposition aux radiations de radiodiffusion, les antennes
utilisées avec cet émetteur doivent être installées de telle sorte
qu’il y ait une distance de 20cm ou plus séparant la source de
radiation (antenne) et toute personne en tout temps et ne doit
pas être co-utilisée ou fonctionner en même temps qu’une autre
antenne ou qu’un émetteur.”
Utilisation de la licence de source ouverte
Les déclarations suivantes concernent les parties de ce logiciel
selon FreeRTOSv7.0.2, http://www.freertos.org.
L’utilisation de ce logiciel est assujettie aux conditions de
lalicence publique générale GNU v. 2, disponible au:
http://www.gnu.org/licenses/gpl-2.0.html. Une copie du code
source peut être obtenue en effectuant une demande pour
obtenir le logiciel à [email protected] et en indiquant
l’adresse de retour.
La déclaration suivante concerne les parties du logiciel
protégéespar des droits d’auteur par Eclipse Foundation,
Inc.Copyright (c) 2007, Eclipse Foundation, Inc. et ses concédants.
Tous droits réservés.
La redistribution et l’utilisation en formats source et binaire, avec
ou sans modication, sont permises si les conditions suivantes
sont respectées:
• La redistribution du code source doit comporter la mention de
protection par droits d’auteur, cette liste de conditions et l’avis
de non-responsabilité suivante.
• La redistribution en format binaire doit comporter la mention de
protection par droits d’auteur, cette liste de conditions et l’avis
de non-responsabilité suivante dans sa documentation ou le
matériel fourni pendant la distribution.
• Ni le nom Eclipse Foundation, Inc.ou les noms de ses
collaborateurs peuvent être utilisés pour approuver ou
promouvoir les produits dérivés du logiciel sans une
autorisation écrite préalable.
CE LOGICIEL EST FOURNI PAR LES DÉTENTEURS DU DROIT
D’AUTEUR ET SES COLLABORATEURS “EN L’ÉTAT” SANS
QU’AUCUNE GARANTIE D’AUCUNE SORTE, IMPLICITE
OU EXPLICITE, N’Y SOIT RATTACHÉE Y COMPRIS, SANS
S’Y LIMITER, LES GARANTIES IMPLICITES DE QUALITÉ
MARCHANDE ET D’ADÉQUATION À UNE UTILISATION
PARTICULIÈRE. EN AUCUN CAS, LE TITULAIRE DES DROITS
D’AUTEUR OU LES COLLABORATEURS NE PEUVENT ÊTRE
TENUS RESPONSABLES D’UN QUELCONQUE DOMMAGE
DIRECT, INDIRECT, ACCESSOIRE, PARTICULIER, EXEMPLAIRE
OU CONSÉCUTIF (Y COMPRIS, MAIS SANS S’Y LIMITER,
L’ACQUISITION DE PRODUITS OU SERVICES DE SUBSTITUTION;
LA PERTE DE JOUISSANCE, DE DONNÉES OU DE BÉNÉFICES;
OU LES PERTES D’EXPLOITATION) QUELLES QU’EN SOIENT LES
CAUSES ET QUEL QUE SOIT LE TYPE DE RESPONSABILITÉ,
CONTRACTUELLE, SANS FAUTE OU FONDÉE SUR UN DÉLIT
CIVIL (Y COMPRIS PAR NÉGLIGENCE OU POUR UNE AUTRE
CAUSE) RÉSULTANT D’UNE MANIÈRE OU D’UNE AUTRE DE
L’UTILISATION DE CE LOGICIEL, MÊME SI MENTION A ÉTÉ FAITE
DE LA POSSIBILITÉ DE TELS DOMMAGES.
Des parties de ce logiciel sont protégées par des droits d’auteur
(c) de Sawtooth Consulting Ltd. 2006-2015 tous droits réservés.
Des parties de ce logiciel sont protégées par des droits d’auteur
(c) Arrayent, Inc. 2015 tous droits réservés.Les déclarations
suivantes concernent les parties de ce logiciel protégées par
droits d’auteur de Swedish Institute of Computer Science.
Tous droits réservés (c) 2001-2004 Swedish Institute of Computer
Science. Tous droits réservés.
La redistribution et l’utilisation en formats source et binaire, avec
ou sans modication, sont permises si les conditions suivantes
sont respectées:
1. La redistribution du code source doit être accompagnée de la
mention de protection par droits d’auteur précédente, de cette
liste de conditions et de l’avis de non-responsabilité suivante.
2. La redistribution en format binaire doit comporter la mention
de protection par droits d’auteur précédente, cette liste de
conditions et l’avis de non-responsabilité suivante dans sa
documentation ou le matériel fourni pendant la distribution.
3. Le nom de l’auteur ne doit pas être utilisé pour approuver
ou promouvoir les produits dérivés de ce logiciel sans avoir
précédemment obtenu une autorisation écrite.
CE LOGICIEL EST FOURNI PAR L’AUTEUR “EN L’ÉTAT” SANS
QU’AUCUNE GARANTIE D’AUCUNE SORTE, IMPLICITE
OU EXPLICITE, N’Y SOIT RATTACHÉE Y COMPRIS, SANS
S’Y LIMITER, LES GARANTIES IMPLICITES DE QUALITÉ
MARCHANDE ET D’ADÉQUATION À UNE UTILISATION
PARTICULIÈRE. EN AUCUN CAS, L’AUTEUR NE PEUT ÊTRE
TENU RESPONSABLE D’UN QUELCONQUE DOMMAGE
DIRECT, INDIRECT, ACCESSOIRE, PARTICULIER, EXEMPLAIRE
OU CONSÉCUTIF (Y COMPRIS, MAIS SANS S’Y LIMITER,
L’ACQUISITION DE PRODUITS OU SERVICES DE SUBSTITUTION;
LA PERTE DE JOUISSANCE, DE DONNÉES OU DE BÉNÉFICES;
OU LES PERTES D’EXPLOITATION) QUELLES QU’EN SOIENT
LESCAUSES ET QUEL QUE SOIT LE TYPE DE RESPONSABILITÉ,
CONTRACTUELLE, SANS FAUTE OU FONDÉE SUR UN DÉLIT
CIVIL (Y COMPRIS PAR NÉGLIGENCE OU POUR UNE AUTRE
CAUSE) RÉSULTANT D’UNE MANIÈRE OU D’UNE AUTRE DE
L’UTILISATION DE CE LOGICIEL, MÊME SI MENTION A ÉTÉ FAITE
DE LA POSSIBILITÉ DE TELS DOMMAGES.
Cette déclaration concerne les parties du logiciel sous droits
d’auteur par Marvell International Ltd Droits d’auteur (c) Marvell
International Ltd. Tous droits réservés.
AVIS DE NON-RESPONSABILITÉ. CE LOGICIEL EST FOURNI
PAR LES DÉTENTEURS DU DROIT D’AUTEUR ET SES
COLLABORATEURS “EN L’ÉTAT” SANS QU’AUCUNE GARANTIE
D’AUCUNE SORTE, IMPLICITE OU EXPLICITE, N’Y SOIT
RATTACHÉE Y COMPRIS, SANS S’Y LIMITER, LES GARANTIES
IMPLICITES DE QUALITÉ MARCHANDE ET D’ADÉQUATION À
UNE UTILISATION PARTICULIÈRE. EN AUCUN CAS, LE TITULAIRE
DES DROITS D’AUTEUR OU LES COLLABORATEURS NE
PEUVENT ÊTRE TENUS RESPONSABLES D’UN QUELCONQUE
DOMMAGE DIRECT, INDIRECT, ACCESSOIRE, PARTICULIER,
EXEMPLAIRE OU CONSÉCUTIF (Y COMPRIS, MAIS SANS S’Y
LIMITER, L’ACQUISITION DE PRODUITS OU SERVICES DE
SUBSTITUTION; LA PERTE DE JOUISSANCE, DE DONNÉES OU
DE BÉNÉFICES; OU LES PERTES D’EXPLOITATION) QUELLES
QU’EN SOIENT LES CAUSES ET QUEL QUE SOIT LE TYPE DE
RESPONSABILITÉ, CONTRACTUELLE, SANS FAUTE OU FONDÉE
SUR UN DÉLIT CIVIL (Y COMPRIS PAR NÉGLIGENCE OU POUR
UNE AUTRE CAUSE) RÉSULTANT D’UNE MANIÈRE OU D’UNE
AUTRE DE L’UTILISATION DE CE LOGICIEL, MÊME SI MENTION
AÉTÉ FAITE DE LA POSSIBILITÉ DE TELS DOMMAGES.
87
FICHE DE DONNÉES RELATIVES AU RENDEMENT
FEUILLE DE DONNÉES SUR LA PERFORMANCE
Système de filtration d’eau intérieur
Modèle P9WB2L/P9RFWB2L /Capacité : 200 gallons (757 litres)
Ce produit a été testé selon les normes NSF/ANSI 42, 53, 401 et CSA B483.1 pour la réduction des substances énumérées ci-dessous. La
concentration des substances indiquées dans l’eau entrant dans le système a été réduite à une concentration moindre ou égale
à la limite permissible pour l’eau qui quitte le système, comme spécifié dans les normes NSF/ANSI 42, 53, 401 et CSA B483.1
Paramètres de test : pH = 7,5 ± 0,5 à moins d’indications contraires. Débit = 0,75 gpm (2,84 Lpm). Pression = 60 lb/po
2
(413,7 kPa).
Température = 68 °F à 71,6 °F (20 °C à 22 °C). Capacité de service nominale = 200 gallons (757 litres). Les composés certifiés en vertu
de la norme NSF 401 sont considérés comme appartenant à la catégorie des “composés émergents/contaminants secondaires”. Les “composés
émergents/contaminants secondaires” sont des composés qui ont été détectés à de faibles concentrations dans des sources d’approvisionnement
en eau potable; même s’ils n’apparaissent qu’à de faibles concentrations, ces composés peuvent influencer la perception et le niveau d’acceptation de
la qualité de l’eau potable par le public.
Il est essentiel que les exigences de fonctionnement, d’entretien et de
remplacement de filtres soient respectées pour que ce produit donne le
rendement annoncé. Des dommages matériels peuvent subvenir si toutes
les instructions ne sont pas respectées.
La cartouche jetable doit être remplacée tous les 6 mois au plus tard.
Utiliser le filtre de rechange P9RFWB2L, référence EDR2RXD1/
EDR2RXD1B. Prix suggéré au détail en 2015 de 49,99 $US/49,99 $ CAN.
Les prix peuvent être modifiés sans préavis.
Le système de contrôle du filtre mesure la quantité d’eau qui passe
par le filtre et vous alerte lorsqu’il faut remplacer le filtre. Consulter les
sections “Utilisation des commandes” ou “Système de filtration d’eau”
(dans les instructions d’utilisation ou le Guide d’utilisation) pour savoir
comment vérifier l’état du filtre à eau.
Après avoir remplacé le filtre à eau, purger le système d’eau. Voir
“Distributeurs d’eau et de glaçons”ou “Distributeurs d’eau” dans les
instructions d’utilisation ou le guide d’utilisation.
Ces contaminants ne sont pas nécessairement présents dans votre
approvisionnement en eau. Même si le test a été effectué dans des
conditions de laboratoire standard, le rendement réel peut varier.
Le produit ne doit être utilisé que pour l’eau froide.
Le circuit d’eau doit être installé conformément aux lois et règlements
locaux et à ceux de la province ou de l’État concerné.
Ne pas utiliser pour le filtrage d’une eau microbiologiquement polluée
ou de qualité inconnue en l’absence d’un dispositif de désinfection
adéquat avant ou après le système. Les systèmes certifiés pour la
réduction de kyste peuvent être utilisés pour l’eau désinfectée qui peut
contenir des kystes filtrables. EPA Est. No. 082047-TWN-001
Consulter à la section “Garantie” (dans les instructions d’utilisation ou
le guide d’utilisation) pour la garantie limitée, le nom et le numéro de
téléphone du fabricant.
Directives d’application/paramètres d’approvisionnement en eau
Système testé et certifié par NSF International en vertu de la
norme NSF/ANSI 42, de la norme NSI 53, de la norme 401 et de la
norme CSA B483.1 pour la réduction des substances énumérées
ci-dessous.
Réd. de substances
Effets esthétiques
Concentration dans l’eau à
traiter
Limite permissible de concentration du produit
dans l’eau
% de réd.
moyenne
Goût/odeur de chlore
Particules (classe I*)
2,0 mg/L ± 10 %
Au moins 10 000 particules/mL
50 % réduction
85 % réduction
97,0 %
>99,9 %
Réduction de contaminant Concentration dans l’eau à
traiter
Limite permissible de concentration du produit
dans l’eau
% de réd.
moyenne
% 6,89 / % 3,99> L/g m 010,0% 01 ±L/g m 51,0 pH 6,5/à pH 8,5 : bmo l P
B
enzène % 8,39L/g m 500,0% 01 ± L / gm 510 , 0
% 8,99L/g m 570,0% 01 ± L / gm 522 , 0enèznebo r o l hc i d-p
% 9,18L/g m 040,0% 01 ± L/g m 80,0narufobraC
% 5 9 >L/g m 300,0% 01 ± 51
0,0enèhpaxoT
% 0,78L/g m 300,0% 01 ± L / gm 900 , 0en i za r tA
01so t sebsA
7
à 10
8
fibres/L
††
% 9 9 >% 9 9
Kystes opérationnels
†
% 99 , 99>% 59,99. n im L / 000 05
% 9,69NTu 5,0 % 01 ± NTu 11ét idibruT
% 2,99>L / gm 2000 , 0% 01 ± 200 , 0enadniL
% 6,69L/g m 500,0% 01 ± L / gm 510 , 0enè l yh t éo r o l hca r t éT
% 3,29L/g m 06,0% 01 ± L/g m 8,1enèznebo r o l hc i d-O
% 9,68L/g m 07,0% 01 ± L/g m 1,2enèzneb l yh t É
% 8,99>L/g m 70,0% 01 ± L / gm 012 , 0enèznebo r o l hc i r T- 4 , 2 , 1
% 5,88L/g m 70,0%
01 ± L / gm 012 , 0D - 4,2
% 6,99L/g m 1,0% 01 ± L/g m 0,2enè r y tS
% 5,39L/g m 0,1% 01 ± L/g m 0,3enèu l oT
% 7,18L/g m 200,0% 01 ± L / gm 600 , 0en i r dnE
% 7,59L / gn 03% 02 ± 002lolonetA
% 1,69L / gn 02% 02 ± 041
em i r p o h t ém i r T
% 3,69L / gn 02% 02 ± 041noruniL
% 3,59L / gn 02% 02 ± 041eno r t sE
% 5,59L / gn 002% 02 ± 0041
l onéhp l ynoN
Approvisionnement en eau
Pression de l’eau
Température de l’eau
Débit nominal
Pression d’eau
30 à 120 lb/po
2
(207 à 827 kPa)
33 ° à 100 °F (0,6 ° à 37,8 °C)
0,75 g p m (2,84 L/m) à 60 lb/po
2
*
†
††
Classe I - taille des particules : > 0,5 à <1 µm
Cas de la filtration de kystes de Cryptosporidium parvum.
Fibres de longueur supérieure à 10 µm
®
NSF est une marque déposée de NSF International.
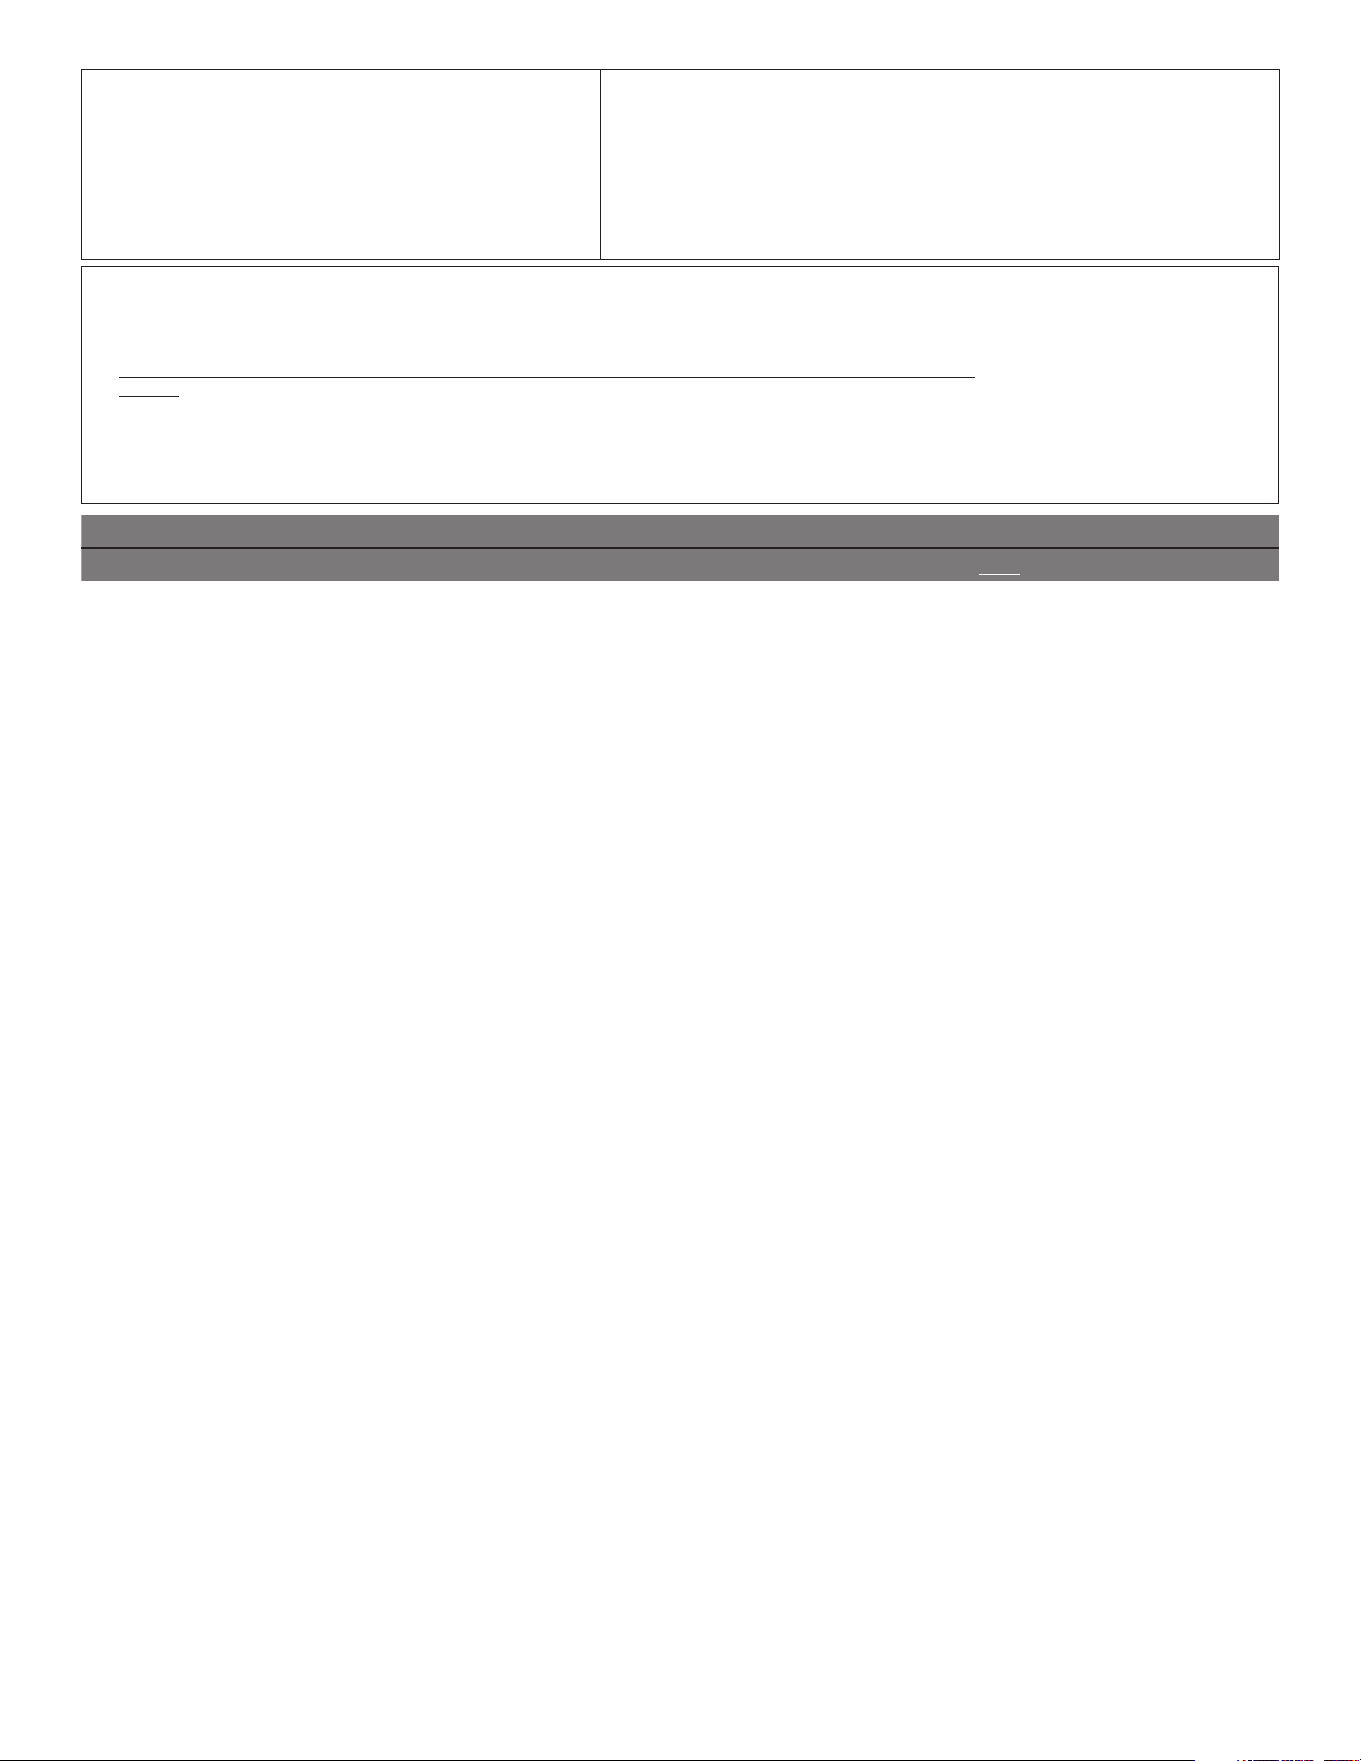
88
SI VOUS AVEZ BESOIN DE SERVICE :
1. Avant de nous contacter pour obtenir un dépannage, veuillez déterminer si des réparations sont nécessaires pour votre produit. Certains
problèmes peuvent être résolus sans intervention de dépannage. Prenez quelques minutes pour parcourir la section Dépannage ou Résolution
de problèmes du guide d’utilisation et d’entretien, ou rendez-vous sur le site https://www.jennair.ca.
2. Tout service sous garantie doit être effectué exclusivement par nos fournisseurs de dépannage autorisés
JennAir. Aux É.-U. et au Canada, dirigez toutes vos demandes de service sous garantie au
Centre d’eXpérience de la clientèle JennAir
1-800-JENNAIR (1-800-536-6247).
Si vous résidez à l’extérieur du Canada et des 50 États des États-Unis, contactez votre marchand JennAir autorisé pour déterminer si une autre
garantie s’applique.
GARANTIE LIMITÉE
DES APPAREILS
DERÉFRIGÉRATION
JENNAIR
®
ATTACHEZ ICI VOTRE REÇU DE VENTE. UNE PREUVE D’ACHAT EST
OBLIGATOIRE POUR OBTENIR L’APPLICATION DE LA GARANTIE.
Lorsque vous appelez le centre d’eXpérience de la clientèle, veuillez garder à
disposition les renseignements suivants :
■ Nom, adresse et numéro de téléphone
■ Numéros de modèle et de série
■ Une description claire et détaillée du problème rencontré
■ Une preuve d’achat incluant le nom et l’adresse du marchand ou du détaillant
GARANTIE LIMITÉE DE DIX ANS
CE QUI EST COUVERT CE QUI N’EST PAS COUVERT
GARANTIE LIMITÉE DE DEUX ANS (PIÈCES ET MAIN D’ŒUVRE)
Pendant deux ans à compter de la date d’achat, lorsque ce gros appareil
ménager est installé, utilisé et entretenu conformément aux instructions
jointes à ou fournies avec le produit, la marque Jenn Air de Whirlpool
Corporation ou Whirlpool Canada, LP (ci-après désignées “Jenn Air”)
décidera à sa seule discrétion de remplacer le produit ou de couvrir le
coût des pièces spéciées par l’usine et de la main-d’œuvre nécessaires
pour corriger les vices de matériaux ou de fabrication qui existaient
déjà lorsque ce gros appareil ménager a été acheté. S’il est remplacé,
l’appareil sera couvert pour la période restant à courir de la garantie
limitée d’un an du produit d’origine.
GARANTIE LIMITÉE DE LA DEUXIÈME À LA CINQUIÈME ANNÉE
INCLUSIVEMENT SUR LA DOUBLURE DE LA CAVITÉ ET SUR
LE SYSTÈME DE RÉFRIGÉRATION SCELLÉ (PIÈCES ET MAIN-
D’ŒUVRE)
De la deuxième à la cinquième année inclusivement à compter de la date
d’achat initiale, lorsque ce gros appareil ménager est installé, utilisé et
entretenu conformément aux instructions jointes au produit ou fournies
avec, la marque JennAir paiera pour les pièces de rechange spéciées
par l’usine et la main-d’œuvre concernant les composants suivants pour
corriger les défauts non esthétiques de matériau ou de fabrication de
ladite pièce qui empêchent le réfrigérateur de fonctionner et qui étaient
déjà présents lorsque ce gros appareil ménager a été acheté :
■ Doublure de la cavité du réfrigérateur/congélateur si la pièce se
ssure en raison d’un vice de matériau ou de fabrication.
■ Système de réfrigération scellé (y compris le compresseur,
l’évaporateur, le condenseur, le séchoir et les conduits de connexion).
GARANTIE LIMITÉE DE LA SIXIÈME À LA DIXIÈME ANNÉE
(SYSTÈME DE RÉFRIGÉRATION SCELLÉ UNIQUEMENT MAIN-
D’OEUVRE NON COMPRISE)
De la sixième à la dixième année inclusivement à compter de la date
d’achat, lorsque ce gros appareil ménager est installé, utilisé et entretenu
conformément aux instructions jointes à ou fournies avec le produit, la
marque JennAir paiera pour les pièces de rechange spéciées par l’usine
pour corriger les vices de matériaux ou de fabrication sur le système de
réfrigération scellé qui existaient déjà lorsque ce gros appareil ménager
a été acheté pour les pièces suivantes : compresseur, évaporateur,
condenseur, sécheuse et conduits de connexion.
LE SEUL ET EXCLUSIF RECOURS DU CLIENT DANS LE CADRE DE
LA PRÉSENTE GARANTIE LIMITÉE CONSISTE EN LA RÉPARATION
PRÉVUE PAR LA PRÉSENTE. Le service doit être fourni par une
compagnie de service désignée par Jenn Air. Cette garantie limitée
est valide uniquement aux États-Unis ou au Canada et s’applique
exclusivement lorsque le gros appareil ménager est utilisé dans le pays
où il a été acheté. La présente garantie limitée est valable à compter de la
date d’achat initial par le consommateur. Une preuve de la date d’achat
initial est exigée pour obtenir un dépannage dans le cadre de la présente
garantie limitée.
1. Usage commercial, non résidentiel ou par plusieurs familles, ou
non-respect des instructions de l’utilisateur, de l’opérateur ou des
instructions d’installation.
2. Visite d’instruction à domicile pour montrer à l’utilisateur comment
utiliser l’appareil.
3. Visites de service pour rectier une installation ou un entretien fautifs
du produit, une installation non conforme aux codes d’électricité ou
de plomberie, ou la rectication de l’installation électrique ou de la
plomberie du domicile (ex : câblage électrique, fusibles ou tuyaux
d’arrivée d’eau du domicile).
4. Pièces consomptibles (ex : ampoules, batteries, ltres à air ou à eau,
solutions de conservation, etc.).
5. Défauts ou dommage résultant de l’utilisation de pièces ou
accessoires JennAir non authentiques.
6. Dommages causés par : accident, mésusage, abus, incendie,
inondations, catastrophe naturelle ou l’utilisation de produits non
approuvés par JennAir.
7. Réparations aux pièces ou systèmes dans le but de rectier un
dommage ou des défauts résultant d’une réparation, altération ou
modication non autorisée faite à l’appareil.
8. Défauts d’apparence, notamment les éraures, traces de choc,
ssures ou tout autre dommage subi par le ni de l’appareil ménager,
à moins que ces dommages ne résultent de vices de matériaux ou de
fabrication et ne soient signalés à JennAir dans les 30 jours suivant la
date d’achat.
9. Décoloration, rouille ou oxydation des surfaces résultant
d’environnements caustiques ou corrosifs incluant des
concentrations élevées de sel, un haut degré d’humidité ou une
exposition à des produits chimiques (exemples non exhaustifs).
10. Perte d’aliments ou de médicaments due à la défaillance du produit.
11. Enlèvement ou livraison. Ce produit est conçu pour être réparé à
l’intérieur du domicile.
12. Frais de déplacement et de transport pour le dépannage/la réparation
dans une région éloignée où une compagnie de service JennAir
autorisée n’est pas disponible.
13. Retrait ou réinstallation d’appareils inaccessibles ou de dispositifs
préinstallés (ex : garnitures, panneaux décoratifs, plancher, meubles,
îlots de cuisine, plans de travail, panneaux de gypse, etc.) qui
entravent le dépannage, le retrait ou le remplacement du produit.
14. Service et pièces pour des appareils dont les numéros de série et de
modèle originaux ont été enlevés, modiés ou ne peuvent pas être
facilement identiés.
Le coût d’une réparation ou d’un remplacement dans le cadre de
ces circonstances exclues est à la charge du client.

CLAUSE D’EXONÉRATION DE RESPONSABILITÉ AU TITRE DES GARANTIES IMPLICITES
LES GARANTIES IMPLICITES, Y COMPRIS LES GARANTIES APPLICABLES DE QUALITÉ MARCHANDE OU D’APTITUDE À UN USAGE
PARTICULIER, SONT LIMITÉES À DIX AN OU À LA PLUS COURTE PÉRIODE AUTORISÉE PAR LA LOI. Certains États et provinces ne permettent
pas de limitation sur la durée des garanties implicites de qualité marchande ou d’aptitude à un usage particulier, de sorte que la limitation ci-dessus
peut ne pas être applicable dans votre cas. Cette garantie vous confère des droits juridiques spéciques et vous pouvez également jouir d’autres
droits qui peuvent varier d’une juridiction à l’autre.
EXONÉRATION DE RESPONSABILITÉ DANS LES DOMAINES NON COUVERTS PAR LA GARANTIE
JennAir décline toute responsabilité au titre de la qualité, de la durabilité ou en cas de dépannage ou de réparation nécessaire sur ce gros appareil
ménager autre que les responsabilités énoncées dans la présente garantie. Si vous souhaitez une garantie plus étendue ou plus complète que
la garantie limitée fournie avec ce gros appareil ménager, adressez-vous à JennAir ou à votre détaillant pour obtenir les modalités d’achat d’une
garantie étendue.
LIMITATION DES RECOURS; EXCLUSION DES DOMMAGES FORTUITS OU INDIRECTS
LE SEUL ET EXCLUSIF RECOURS DU CLIENT DANS LE CADRE DE LA PRÉSENTE GARANTIE LIMITÉE CONSISTE EN LA RÉPARATION
PRÉVUE PAR LA PRÉSENTE. JENNAIR N’ASSUME AUCUNE RESPONSABILITÉ POUR LES DOMMAGES FORTUITS OU INDIRECTS. Certains
États et certaines provinces ne permettent pas l’exclusion ou la limitation des dommages fortuits ou indirects de sorte que ces limitations et
exclusions peuvent ne pas être applicables dans votre cas. Cette garantie vous confère des droits juridiques spéciques et vous pouvez également
jouir d’autres droits qui peuvent varier d’une juridiction à l’autre.
08/17
W11307643C
W11310001C - SP
®
/™ ©2019 All rights reserved. Used under license in Canada.
Tous droits réservés. Utilisé sous licence au Canada.
10/19