
HAQ9 E1L
W11213351C
21-Apr-2018 01:11:37 EDT | RELEASED
In some European factories the letter "W" of the part code mentioned herein will be automatically
replaced by the number "4000" (e.g. "W12345678" becomes "400012345678")

2
English REFRIGERATOR USER INSTRUCTIONS ................................................................. 3
Italiano ISTRUZIONI PER L’USO DEL FRIGORIFERO .......................................................... 27
21-Apr-2018 01:11:37 EDT | RELEASED
In some European factories the letter "W" of the part code mentioned herein will be automatically
replaced by the number "4000" (e.g. "W12345678" becomes "400012345678")

3
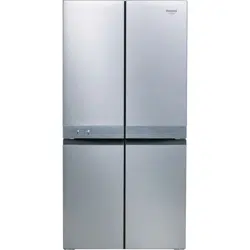
FRENCH DOOR BOTTOM MOUNT REFRIGERATOR
USE AND CARE GUIDE
FRIGORIFERO ALL’AMERICANA
CON CONGELATOREINBASSO
GUIDA ALL’USO E ALLA MANUTENZIONE
Table of Contents/Sommario
REFRIGERATOR SAFETY ..............................................................4
Proper Disposal of Your Old Refrigerator .......................................7
PARTS AND FEATURES ................................................................8
INSTALLATION INSTRUCTIONS ...................................................9
Getting Started ................................................................................. 9
Unpack the Refrigerator ..................................................................9
Location Requirements ..................................................................10
Electrical Requirements .................................................................10
Remove and Replace Refrigerator Doors .....................................12
Remove and Replace Freezer/Multi Temperature Door ................14
Refrigerator Levelling .....................................................................15
Using the Controls .........................................................................16
Lighting the Refrigerator ................................................................17
REFRIGERATOR USE ..................................................................18
Opening and Closing Doors ..........................................................18
SHELVES, BINS AND DRAWERS ................................................19
Freezer Storage Compartments ....................................................20
Audio Reference ............................................................................20
Accessories ....................................................................................20
Assistance or Service ....................................................................20
REFRIGERATOR CARE ...............................................................21
Cleaning .........................................................................................21
Lights ..............................................................................................22
Holiday and Moving Care ..............................................................22
TROUBLESHOOTING ..................................................................23
SICUREZZA DEL FRIGORIFERO ................................................27
Smaltimento corretto del vecchiofrigorifero ................................30
COMPONENTI E FUNZIONI ........................................................31
ISTRUZIONI DI INSTALLAZIONE ................................................32
Per iniziare ......................................................................................32
Disimballare il frigorifero ................................................................32
Requisiti per il posizionamento ......................................................33
Requisiti elettrici .............................................................................33
Rimuovere e sostituire le porte del frigorifero ...............................35
Rimuovere e sostituire la porta delcongelatore/
temperature multiple ......................................................................37
Messa in piano del frigorifero ........................................................38
Uso dei comandi ............................................................................39
Luce del frigorifero .........................................................................40
USO DEL FRIGORIFERO .............................................................41
Apertura e chiusura delle porte .....................................................41
RIPIANI, BALCONCINI E CASSETTI ..........................................42
Comparti del congelatore ..............................................................43
Spiegazione dei segnali sonori ......................................................43
Accessori........................................................................................43
Servizio di assistenza .....................................................................43
MANUTENZIONE DEL FRIGORIFERO .......................................44
Pulizia .............................................................................................44
Luci .................................................................................................45
Inutilizzo e trasporto .......................................................................45
RISOLUZIONE DEI PROBLEMI ...................................................46
21-Apr-2018 01:11:37 EDT | RELEASED
In some European factories the letter "W" of the part code mentioned herein will be automatically
replaced by the number "4000" (e.g. "W12345678" becomes "400012345678")
4
REFRIGERATOR SAFETY
Your safety and the safety of others are very important.
All safety messages will tell you what the potential hazard is, tell you how to reduce the chance of injury, and tell you what can
happen if the instructions are not followed.
We have provided many important safety messages in this manual and on your appliance. Always read and obey all safety
messages.
This is the safety alert symbol.
This symbol alerts you to potential hazards that can kill or hurt you and others.
All safety messages will follow the safety alert symbol and either the word “DANGER” or “WARNING.”
These words mean:
You can be killed or seriously injured if you don't immediately
follow instructions.
You
can be killed or seriously injured if you don't
follow
instructions.
DANGER
WARNING
21-Apr-2018 01:11:37 EDT | RELEASED
In some European factories the letter "W" of the part code mentioned herein will be automatically
replaced by the number "4000" (e.g. "W12345678" becomes "400012345678")
5
SAFETY INSTRUCTIONS
Before using the appliance, read these safety
instructions. Keep them nearby for future reference.
These instructions and the appliance itself provide
important safety warnings, to be observed at all
times. The manufacturer declines any liability for
failure to observe these safety instructions, for
inappropriate use of the appliance or incorrect
setting of controls.
Very young children (0-3 years) should be kept
away from the appliance. Young children (3-8
years) should be kept away from the appliance
unless continuously supervised. Children from 8
years old and above and persons with reduced
physical, sensory or mental capabilities or lack of
experience and knowledge can use this appliance
only if they are supervised or have been given
instructions on safe use and understand the
hazards involved. Children must not play with the
appliance. Cleaning and user maintenance must
not be carried out by children without supervision.
PERMITTED USE
CAUTION: The appliance is not intended to
be operated by means of an external switching
device, such as a timer, or separate remote
controlled system.
This appliance is intended to be used in
household and similar applications such as: sta
kitchen areas in shops, oces and other working
environments; farm houses; by clients in hotels,
motels, bed & breakfast and other residential
environments.
This appliance is not for professional use. Do
not use the appliance outdoors.
The appliance is designed for operation in places
where the ambient temperature comes within
the following ranges, according to the climatic
class given on the rating plate. The appliance may
not work properly if it is left for a long time at a
temperature outside the specied range.
Climatic Class Amb. T. (°C)
SN: From 10 to 32 °C; N: From 16 to 32 °C
ST: From 16 to 38 °C; T: From 16 to 43 °C
This appliance does not contain CFCs. The
refrigerant circuit contains R600a (HC). Appliances
with Isobutane (R600a): isobutane is a natural gas
without environmental impact, but is ammable.
Therefore, make sure the refrigerant circuit pipes
are not damaged, especially when emptying the
refrigerant circuit.
WARNING: Do not damage the appliance
refrigerant circuit pipes.
WARNING: Keep ventilation openings, in the
appliance enclosure or in the built-in structure,
clear of obstruction.
IMPORTANT TO BE READ AND
OBSERVED
WARNING: Do not use mechanical, electric or
chemical means other than those recommended
by the Manufacturer to speed up the defrost
process.
WARNING: Do not use or place electrical
devices inside the appliance compartments if
they are not of the type expressly authorised by
the Manufacturer.
WARNING: Ice makers and/or water dispensers
not directly connected to the water supply must
be lled with potable water only.
WARNING: Automatic ice-makers and/or water
dispensers must be connected to a water supply
that delivers potable water only, with mains water
pressure between 0.17 and 0.81 MPa (1.7 and
8.1bar).
Do not store explosive substances such as
aerosol cans with a ammable propellant in this
appliance.
Do not swallow the contents (non-toxic) of the
ice packs (provided with some models). Do not
eat ice cubes or ice lollies immediately after taking
them out of the freezer since they may cause cold
burns.
For products designed to use an air lter inside
an accessible fan cover, the lter must always be in
position when the refrigerator is in function.
Do not store glass containers with liquids in the
freezer compartment since they may break. Do
not obstruct the fan (if included) with food items.
After placing the food check that the door of the
compartments closes properly, especially the
freezer door.
Damaged gaskets must be replaced as soon as
possible.
Use the refrigerator compartment only for
storing fresh food and the freezer compartment
only for storing frozen food, freezing fresh food
and making ice cubes.
Avoid storing unwrapped food in
direct contact with internal surfaces of
the refrigerator or freezer compartments.
Appliances could have special compartments
(Fresh Food Compartment, Zero Degree Box, etc.).
Unless specied in the specic booklet of product,
they can be removed, maintaining equivalent
performances.
INSTALLATION
The appliance must be handled and installed by
two or more persons- risk of injury. Use protective
gloves to unpack and install- risk of cuts.
Installation, including water supply (if any) and
electrical connections, and repairs must be carried
out by a qualied technician. Do not repair or
replace any part of the appliance unless specically
stated in the user manual. Keep children away
from the installation site.
21-Apr-2018 01:11:37 EDT | RELEASED
In some European factories the letter "W" of the part code mentioned herein will be automatically
replaced by the number "4000" (e.g. "W12345678" becomes "400012345678")

6
After unpacking the appliance, make sure that it has
not been damaged during transport. In the event
of problems, contact the dealer or your nearest
After-sales Service. Once installed, packaging
waste (plastic, styrofoam parts etc.) must be stored
out of reach of children - risk of suocation. The
appliance must be disconnected from the power
supply before any installation operation - risk of
electric shock. During installation, make sure the
appliance does not damage the power cable - risk
of re or electric shock. Only activate the appliance
when the installation has been completed.
Be careful not to damage the oors (e.g. parquet)
when moving the appliance. Install the appliance
on a oor or support strong enough to take its
weight and in a place suitable for its size and use.
Make sure the appliance is not near a heat source
and that the four feet are stable and resting on
the oor, adjusting them as required, and check
that the appliance is perfectly level using a spirit
level. Wait at least two hours before switching the
appliance on, to ensure that the refrigerant circuit
is fully ecient.
To guarantee adequate ventilation, leave a
space on both sides and above the appliance. The
distance between the rear of the appliance and
the wall behind the appliance should be 50mm,
to avoid access to hot surfaces. A reduction of this
space will increase the Energy consumption of
product.
WARNING: To avoid a hazard due to instability,
positioning or xing of the appliance must be done
in accordance with the manufacturer instructions.
It is forbidden to place the refrigerator in such
way that the metal hose of gas stove, metal gas or
water pipes, or electrical wires are in contact with
the refrigerator back wall (condenser coil).
If it is necessary to replace the doors, please
contact the Technical Assistance Center.
ELECTRICAL WARNINGS
It must be possible to disconnect the appliance
from the power supply by unplugging it if plug
is accessible, or by a multi-pole switch installed
upstream of the socket in accordance with the
wiring rules and the appliance must be earthed
in conformity with national electrical safety
standards.
Do not use extension leads, multiple sockets
or adapters. The electrical components must not
be accessible to the user after installation. Do not
use the appliance when you are wet or barefoot.
Do not operate this appliance if it has a damaged
power cable or plug, if it is not working properly,
or if it has been damaged or dropped.
If the supply cord is damaged, it must be replaced
with an identical one by the manufacturer, its
service agent or similarly qualied persons in
order to avoid a hazard- risk of electric shock.
WARNING: When positioning the appliance,
ensure the supply cord is not trapped or damaged.
WARNING: Do not locate multiple portable
socket-outlets or portable power supplies at the
rear of the appliance.
CLEANING AND MAINTENANCE
WARNING: Ensure that the appliance is switched
o and disconnected from the power supply
before performing any maintenance operation;
never use steam cleaning equipment - risk of
electric shock.
Do not use abrasive or harsh cleaners such as
window sprays, scouring cleansers, ammable
uids, cleaning waxes, concentrated detergents,
bleaches or cleansers containing petroleum
products on plastic parts, interior and door liners
or gaskets. Do not use paper towels, scouring
pads, or other harsh cleaning tools.
DISPOSAL OF PACKAGING MATERIALS
The packaging material is 100% recyclable and is marked with the
recycle symbol .
The various parts of the packaging must therefore be disposed of
responsibly and in full compliance with local authority regulations
governing waste disposal.
DISPOSAL OF HOUSEHOLD APPLIANCES
This appliance is manufactured with recyclable or reusable materials.
Dispose of it in accordance with local waste disposal regulations.
For further information on the treatment, recovery and recycling of
household electrical appliances, contact your local authority, the
collection service for household waste or the store where you purchased
the appliance. This appliance is marked in compliance with European
Directive 2012/19/EU, Waste Electrical and Electronic Equipment (WEEE).
By ensuring this product is disposed of correctly, you will help prevent
negative consequences for the environment and human health.
The symbol on the product or on the accompanying documentation
indicates that it should not be treated as domestic waste but must be
taken to an appropriate collection center for the recycling of electrical
and electronic equipment.
ENERGY SAVING TIPS
Install the appliance in a dry, well ventilated room far away from any heat
source (eg. radiator, cooker, etc.) and in a place not exposed directly to
the sun. If required, use an insulating plate.
To guarantee adequate ventilation follow installation instructions.
Insucient ventilation at the back of the product increases energy
consumption and decreases cooling eciency.
Frequent door opening might cause an increase in Energy Consumption.
The internal temperature of the appliance and the Energy Consumption
may be aected also by the ambient temperature, as well as location of
the appliance. Temperature setting should take into consideration these
factors.
Reduce door opening to a minimum.
When thawing frozen food, place in the refrigerator. The low temperature
of the frozen products cools the food in the refrigerator. Allow warm food
and drinks to cool down before placing in the appliance.
Positioning of the shelves in the refrigerator has no impact on the
ecient usage of energy. Food should be placed on the shelves in such
way to ensure proper air circulation (food should not touch each other
and distance between food and rear wall should be kept).
You can increase storage capacity of frozen food by removing baskets
and, if present, Stop Frost shelf.
Do not worry about noises coming from the compressor which are
described as normal noises in this product’s Quick Guide.
21-Apr-2018 01:11:37 EDT | RELEASED
In some European factories the letter "W" of the part code mentioned herein will be automatically
replaced by the number "4000" (e.g. "W12345678" becomes "400012345678")
7
Proper Disposal of Your Old
Refrigerator
IMPORTANT: Child entrapment and suffocation are not problems
of the past. Scrapped or abandoned refrigerators are still
dangerous—even if they will sit for “just a few days.” If you are
getting rid of your old refrigerator, please follow these instructions
to help avoid accidents.
Before You Throw Away Your Old Refrigerator or Freezer:
■ Take off the doors.
■ Leave the shelves in place so that children cannot easily climb
inside.
WARNING
Suffocation Hazard
Remove doors from your old refrigerator.
Failure to do so can result in death or brain damage.
Important information to know about disposal of
refrigerants:
Dispose of refrigerator in accordance with Federal and Local
regulations. Refrigerants must be evacuated by a licensed,
refrigerant technician in accordance with established
procedures.
21-Apr-2018 01:11:37 EDT | RELEASED
In some European factories the letter "W" of the part code mentioned herein will be automatically
replaced by the number "4000" (e.g. "W12345678" becomes "400012345678")
8
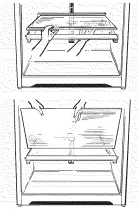
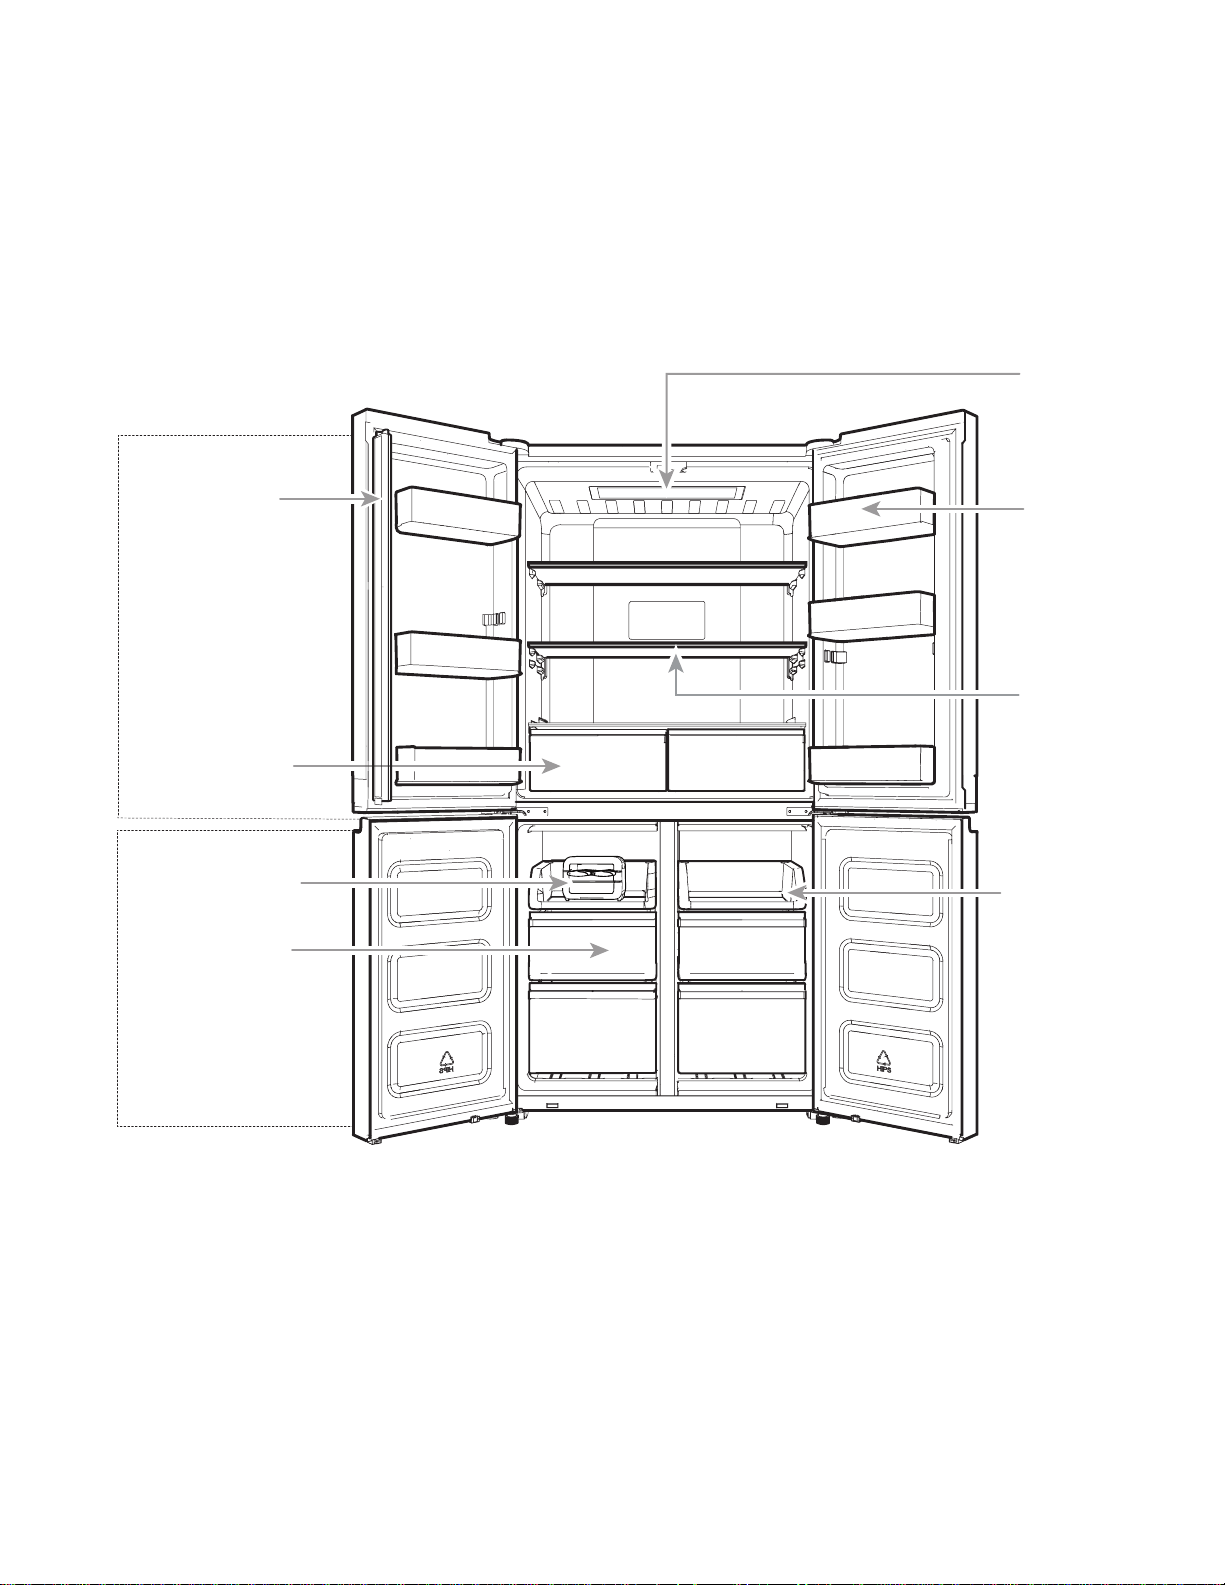
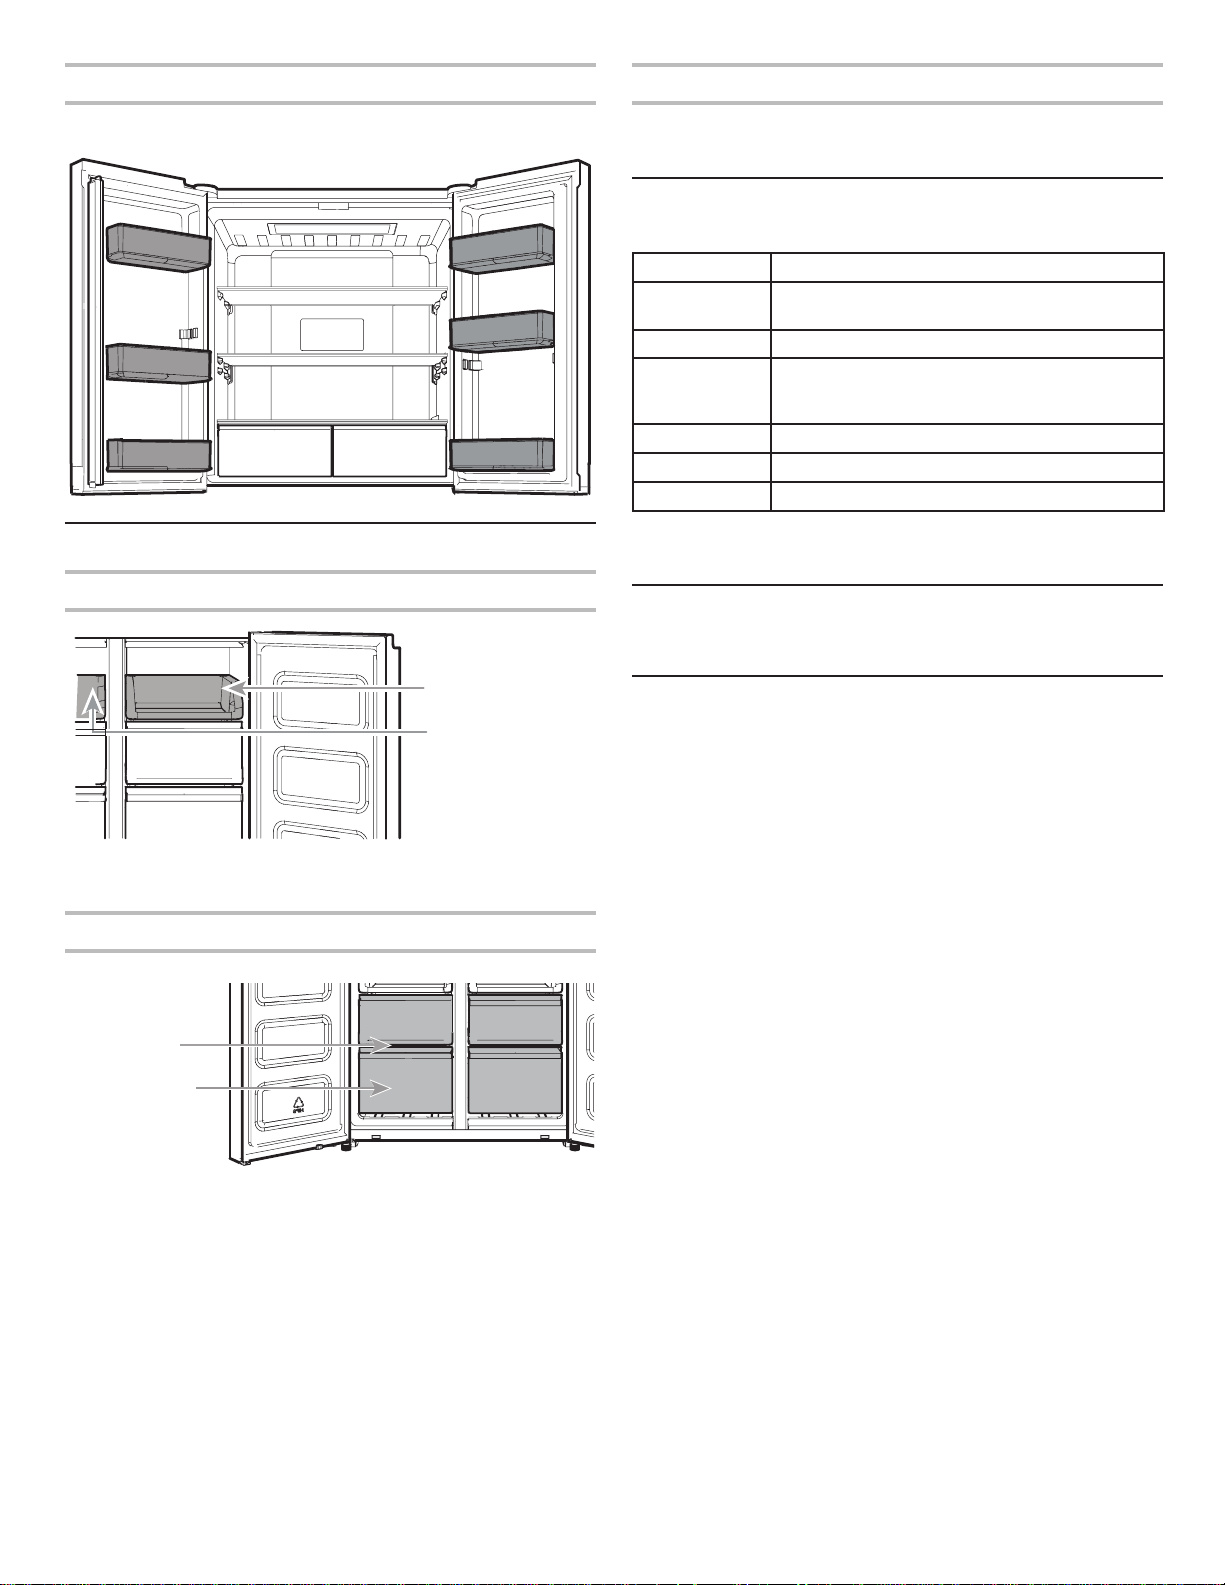
PARTS AND FEATURES
Hinged seal
A
B
Balcony
Top Light
Glass Shelf
A . Refrigerator
B . Freezer
Fresh Crisper
Freezer Tray
Super Freeze
Drawers
Ice maker
21-Apr-2018 01:11:37 EDT | RELEASED
In some European factories the letter "W" of the part code mentioned herein will be automatically
replaced by the number "4000" (e.g. "W12345678" becomes "400012345678")
9
INSTALLATION INSTRUCTIONS
Getting Started
INSTALLATION CHECKLIST
Electrical Power
■ Plug refrigerator into a earthed socket.
Doors
■ If doors need to be removed during installation, see the
“Remove and Replace Refrigerator Doors” and “Remove and
Replace Freezer Door Fronts” sections.
■ Doors seal completely.
■ Refrigerator is level. Adjust leveling feet so they are snug
against the oor.
■ Doors are even across the top. (Use door alignment feature if
necessary).
Final Checks
■ Remove all shipping material.
■ Set temperature controls to the recommended setting.
■ Save instructions and other literature.
■ In order to receive a more complete assistance, please
register your product on http://www.hotpoint.eu/register.
Unpack the Refrigerator
Refrigerator Delivery
A minimum door opening of 838 mm (33") is required. If door
opening is 914 mm (36") or less, then removal of doors, drawer
and hinges is required.
Cart the refrigerator from the side for all door openings.
Remove the Packaging
■ Remove tape and glue residues from surfaces before
turning on the refrigerator. Rub a small amount of liquid dish
detergent over the adhesive with your ngers. Wipe with warm
water and dry.
■ Do not use sharp instruments, rubbing alcohol, ammable
uids, or abrasive cleaners to remove tape or glue. These
products can damage the surface of your refrigerator.
■ Dispose of/recycle all packaging materials.
Clean Before Using
After you remove all of the packaging materials, clean inside of
your refrigerator before using it. See cleaning instructions in the
“Refrigerator Care” section.
WARNING
Electrical Shock Hazard
Plug into a grounded (earthed) outlet.
Do not remove ground prong.
Do not use an adapter.
Do not use an extension cord.
Failure to follow these instructions can result in death,
fire, or electrical shock.
WARNING
Excessive Weight Hazard
Use two or more people to move and install
refrigerator.
Failure to do so can result in back or other injury.
When Moving Your Refrigerator:
Your refrigerator is heavy. When moving the refrigerator for
the refrigerator straight out when moving it. Do not wiggle or
damage could occur.
21-Apr-2018 01:11:37 EDT | RELEASED
In some European factories the letter "W" of the part code mentioned herein will be automatically
replaced by the number "4000" (e.g. "W12345678" becomes "400012345678")
10
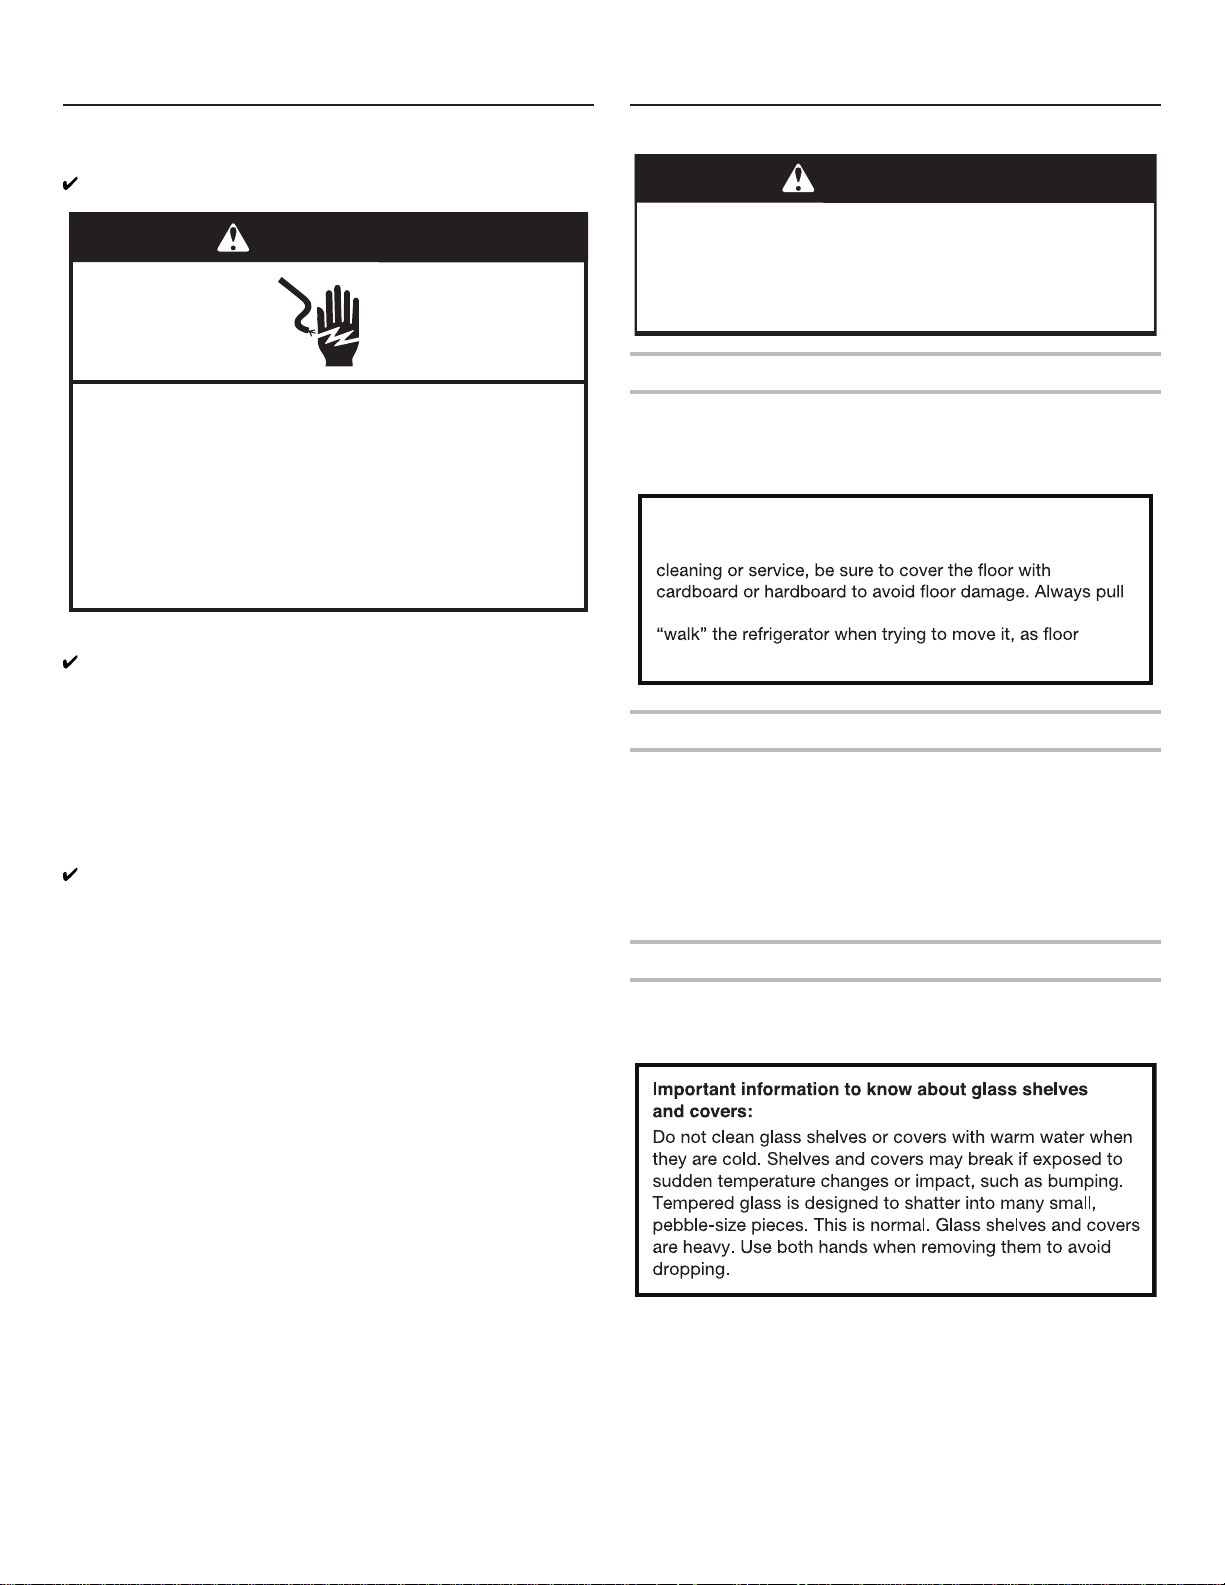
Location Requirements
To ensure proper ventilation for your refrigerator, allow for a
1.25 cm space on each side and at the top. Allow for a 5 cm
space behind the refrigerator. If your refrigerator has an ice maker,
allow extra space at the back for the water line connections.
When installing your refrigerator next to a xed wall, leave a 9.5
cm minimum space between the refrigerator and wall to allow the
door to swing open.
NOTE: This refrigerator is intended for use in a location where
the temperature ranges from a minimum of 10°C to a maximum
of 43°C. The preferred room temperature range for optimum
performance, which reduces electricity usage and provides
superior cooling, is between 15°C and 32°C. It is recommended
that you do not install the refrigerator near a heat source, such as
an oven or radiator.
Electrical Requirements
IMPORTANT: Installation and the electrical connection must
be carried out by a qualied technician according to the
manufacturer’s instructions and in compliance with the local
safety regulations.
■ The refrigerator is designed to operate on a separate 220-240
Volt, 10 A, 50/60 Hz circuit.
■ Make sure the voltage specied on the rating plate
corresponds to that of your home.
■ It must be possible to disconnect the appliance from power
supply by unplugging it or by means of a main two pole
switch installed upstream of the socket.
■ If supply cord is damaged, it must be replaced by the
manufacturer, its service agent or similarly qualied persons in
order to avoid a hazard.
Before you move your refrigerator into its nal location, it is
important to make sure you have the proper electrical connection:
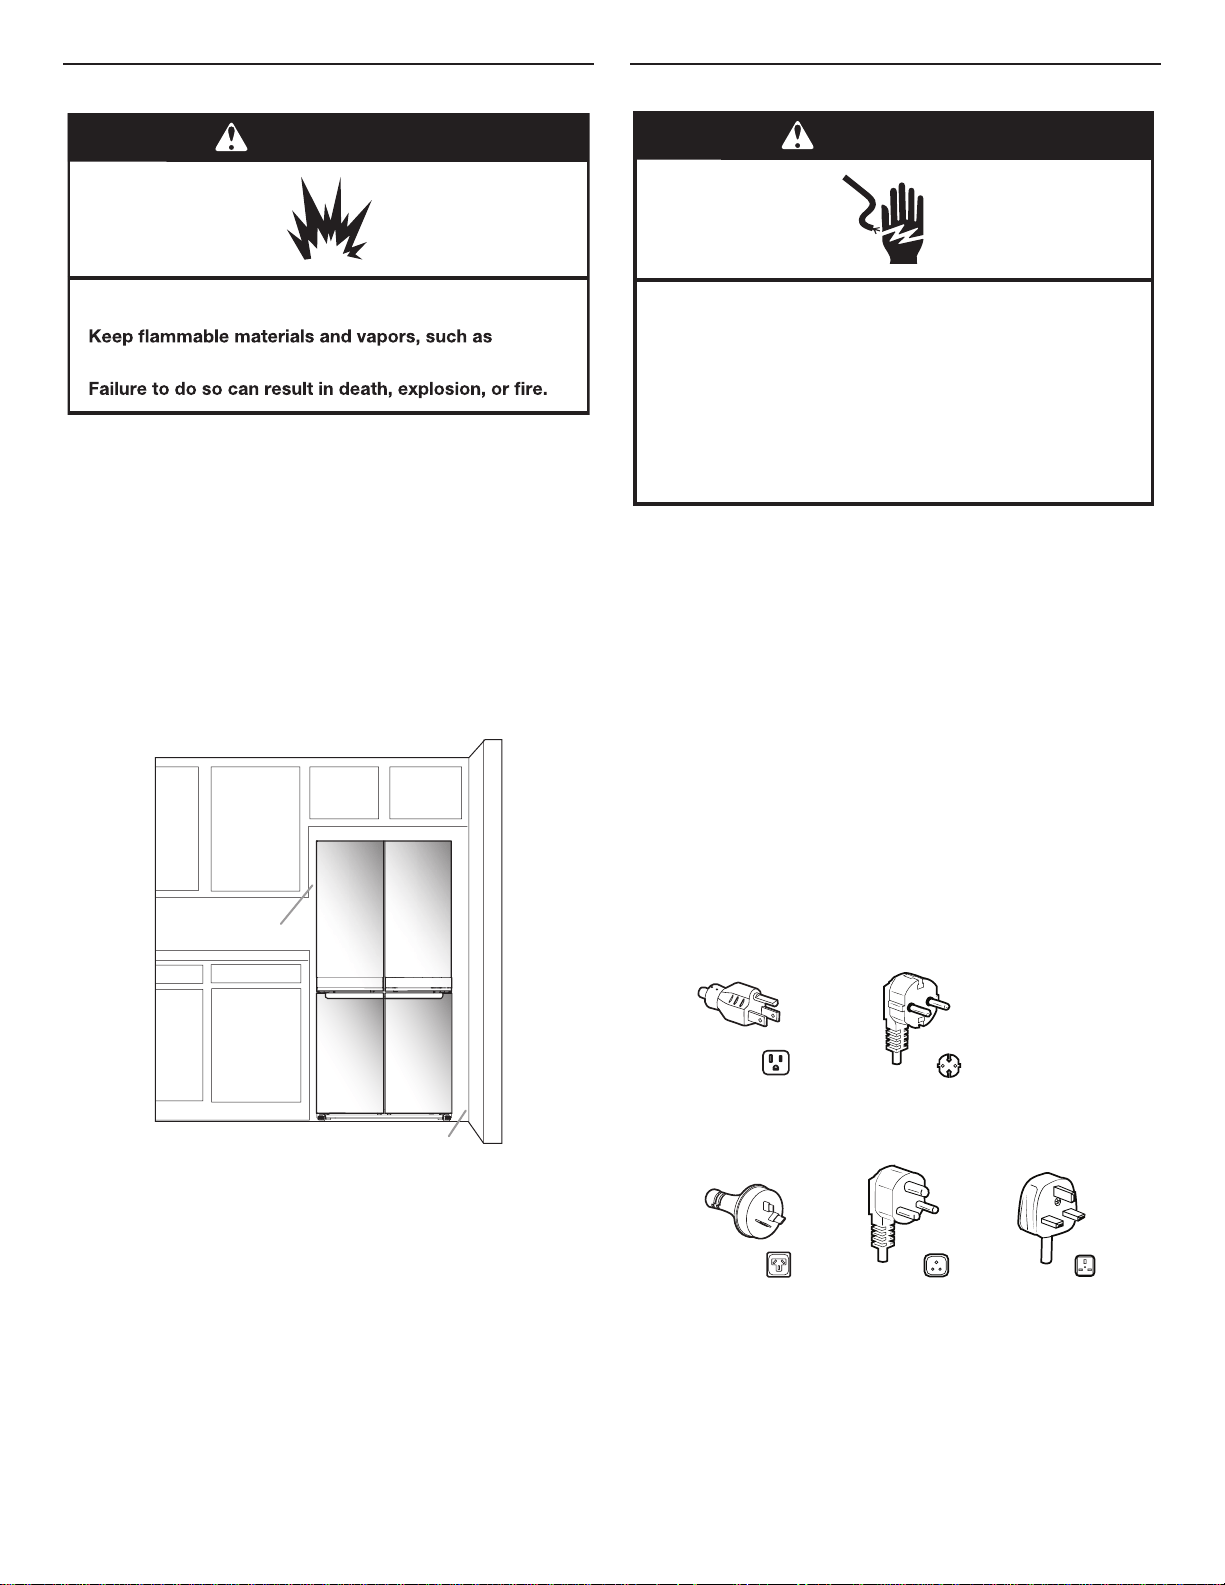
Recommended Earthing Method
220-240 Volt 50 Hz, 220 Volt 60 Hz, or 230/240 Volt 50 Hz AC
only 10 A fused and earthed electrical supply is required.
For Australia and New Zealand:
Your new appliance has been especially manufactured to meet all
Australian Standards and Conditions.
Some notations in the installation instructions may refer to
electrical requirements in other countries, so we draw your
particular attention to these specic notes.
Your appliance needs to be plugged into a 230/240 Volt 50 Hz
AC only 10 A earthed socket.
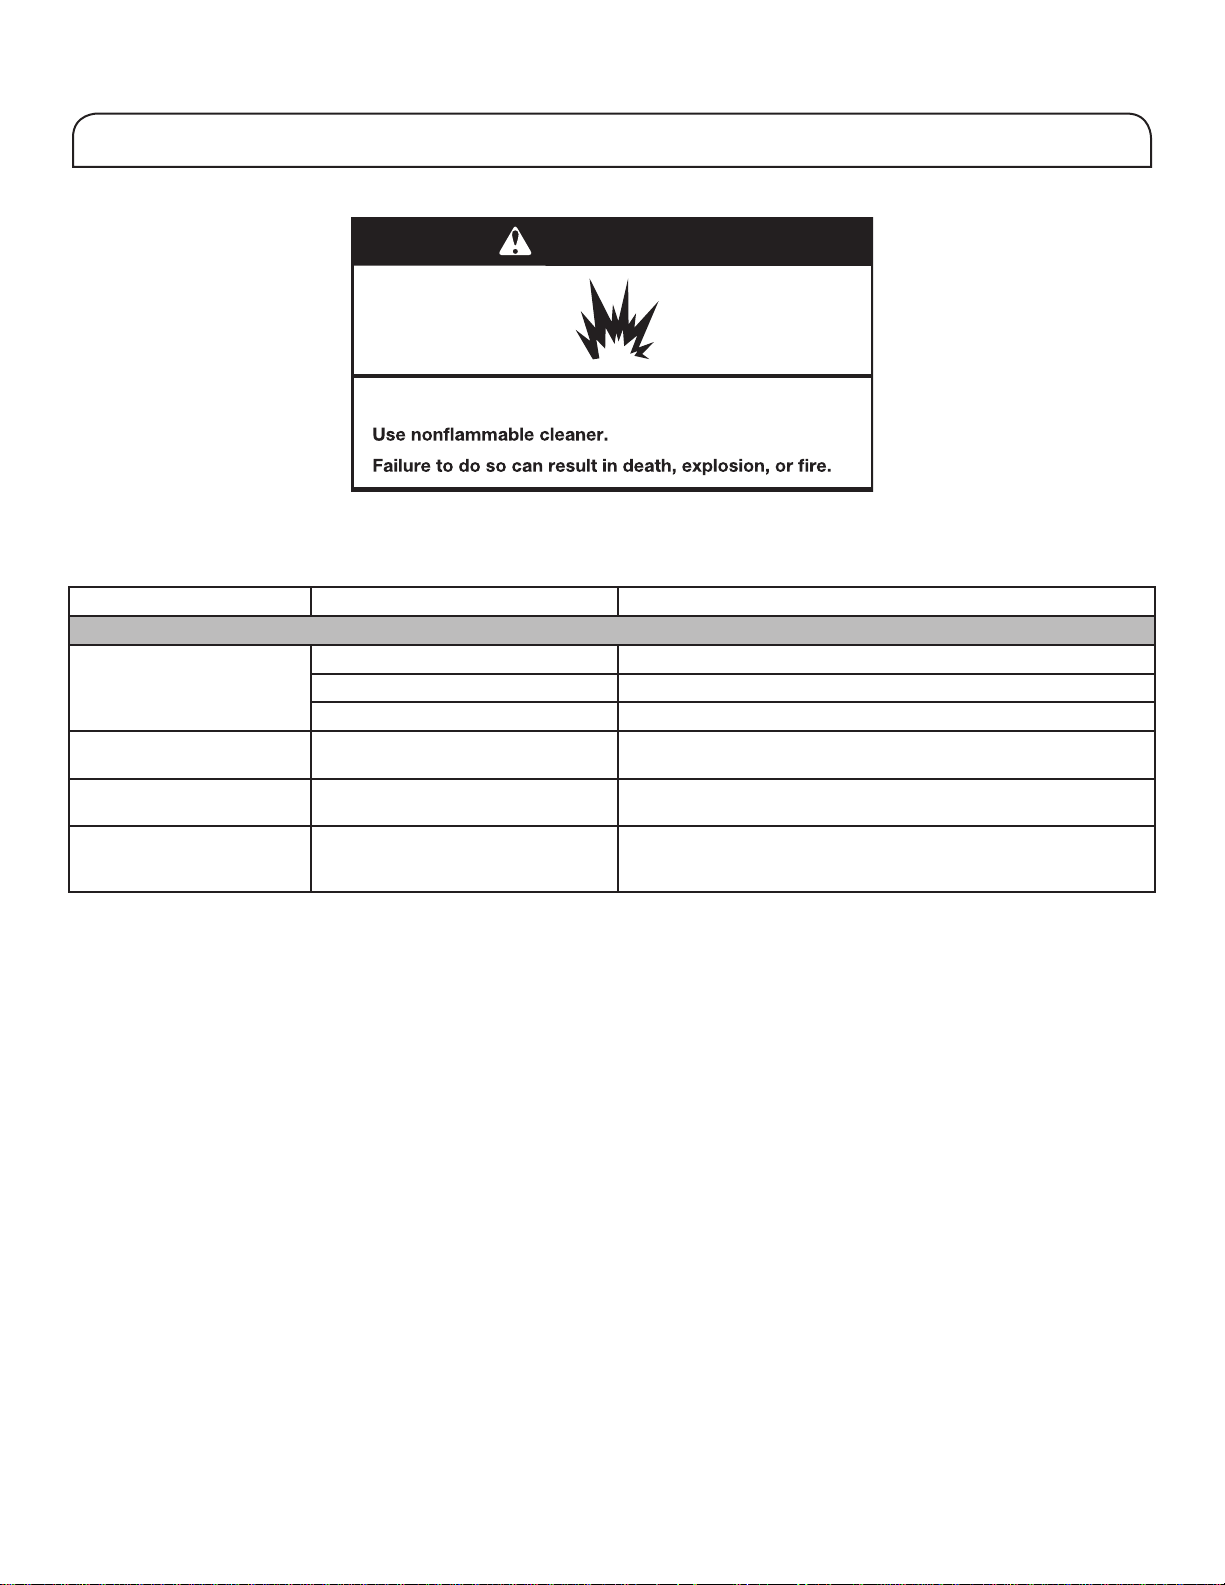
WARNING
Explosion Hazard
gasoline, away from refrigerator.
1,25 cm
9,5 cm
WARNING
Electrical Shock Hazard
Plug into a grounded (earthed) outlet.
Do not remove ground prong.
Do not use an adapter.
Do not use an extension cord.
Failure to follow these instructions can result in death,
fire, or electrical shock.
Type I
Type E and F
Type B
Type M
Type G
21-Apr-2018 01:11:37 EDT | RELEASED
In some European factories the letter "W" of the part code mentioned herein will be automatically
replaced by the number "4000" (e.g. "W12345678" becomes "400012345678")
11
Electrical Requirements (Great Britain and Ireland only)
IMPORTANT: This refrigerator must be earthed.
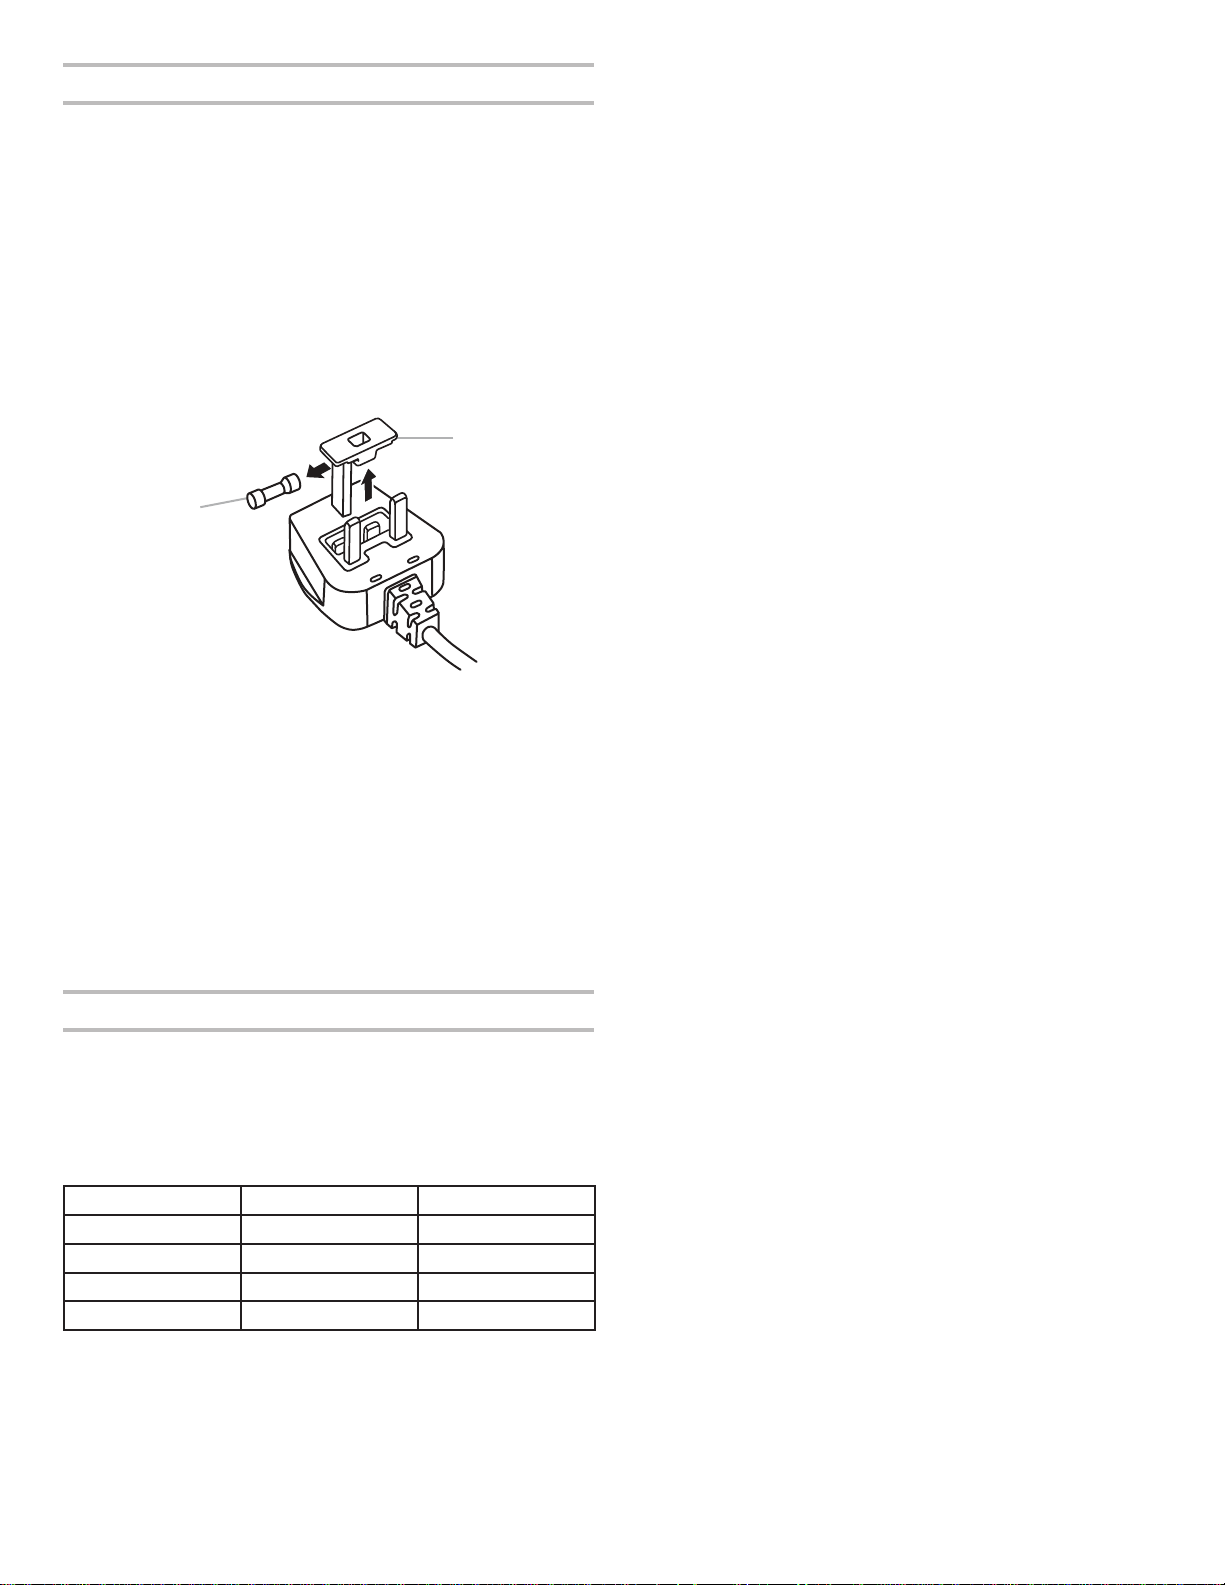
Fuse Replacement
If main lead of this refrigerator is tted with a BS1363A, 13 A
fused plug, to replace a fuse in this type plug use an A.S.T.A.
approved fuse to BS 1362 type and proceed as follows:
1. Remove fuse cover (A) and fuse (B).
2. Fit replacement 13 A fuse into fuse cover.
3. Reinsert both fuse and its cover into plug.
IMPORTANT: The fuse cover must be retted when changing a
fuse. If fuse cover is lost, plug must not be used until a correct
replacement cover is tted. A correct replacement is identied by
colour insert or colour “word” embossed on the base of plug.
Replacement fuse covers are available at your local electrical
shop.
For the Republic of Ireland (only):
The information given in respect of Great Britain will frequently
apply, but a third type of plug and socket is also used, the 2-pin,
side earth type.
Socket/Plug (valid for both countries):
If tted plug is not suitable for your socket, please contact After-
sales Service for further instruction. Please do not attempt to
change plug yourself. This procedure needs to be carried out
by a qualied technician in compliance with the manufacturer’s
instructions and current standard safety regulations.
Temperature
This refrigerator is designed for operation in places where the
temperature comes within following ranges, according to climatic
class shown on the rating plate. The refrigerator may not work
properly if it is left for a long time at a temperature outside the
specied range.
NOTE: It is recommended that you do not install the refrigerator
near a heat source, such as an oven or radiator.
Climatic Class Amb. T. (°C) Amb. T. (°F)
SN From 10 to 32 From 50 to 90
N From 16 to 32 From 61 to 90
ST From 16 to 38 From 61 to 100
T From 16 to 43 From 61 to 110
A. Fuse cover
B. Fuse
A
B
21-Apr-2018 01:11:37 EDT | RELEASED
In some European factories the letter "W" of the part code mentioned herein will be automatically
replaced by the number "4000" (e.g. "W12345678" becomes "400012345678")
12
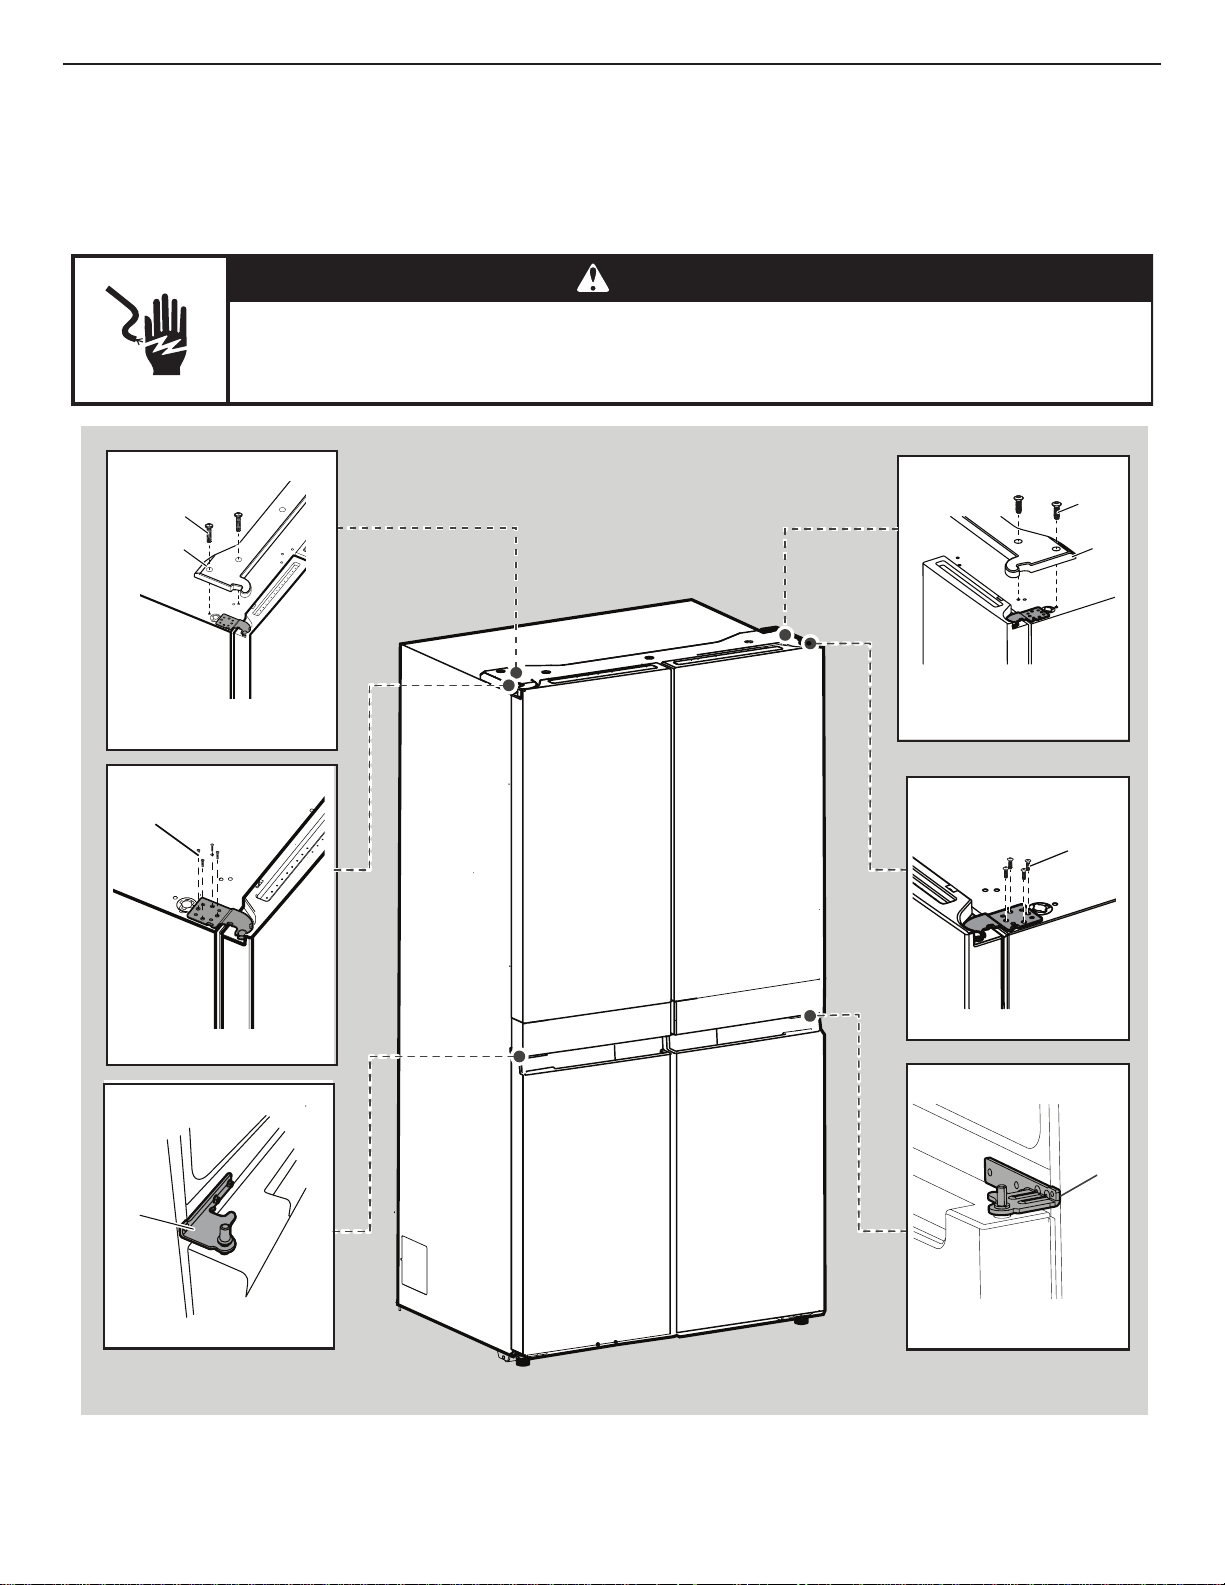
Remove and Replace Refrigerator Doors
NOTE: Measure the width of your door opening to see whether or not you need to remove refrigerator doors to move refrigerator into
your home. If door removal is necessary, see the following instructions.
IMPORTANT: If refrigerator was previously installed and you are moving it out of the home, turn refrigerator control off before you begin
removing the doors. Unplug refrigerator or disconnect power. Remove food and adjustable door or utility bins from doors.
Gather required tools and read all instructions before removing doors.
TOOLS NEEDED: 6 mm socket wrench, 5 mm socket wrench and #2 Phillips screwdriver.
WARNING
Electrical Shock Hazard
Disconnect power before removing doors.
Failure to do so can result in death or electrical shock.
A
Top Left Hinge
Middle Left Hinge
Top Left Hinge Cover
Top Right Hinge Cover
A. 5 mm socket screws
A. Hinge
A. Hinge
A. Top Hinge Cover screws
B. Top Hinge Cover
A. Top Hinge Cover screws
B. Top Hinge Cover
Top Right Hinge
Middle Right Hinge
A. 5 mm socket screws
A
A
A
B
A
B
A
21-Apr-2018 01:11:37 EDT | RELEASED
In some European factories the letter "W" of the part code mentioned herein will be automatically
replaced by the number "4000" (e.g. "W12345678" becomes "400012345678")
13
Remove Refrigerator Doors
Remove Right-Hand Door
1. Unplug refrigerator or disconnect power.
2. Keep refrigerator doors closed until you are ready to lift them
free from the cabinet.
NOTE: Provide additional support for refrigerator door while
hinges are being removed. Do not depend on the door gasket
magnets to hold the door in place while you are working.
3. Using a Phillips screwdriver, remove cover from top hinge.
4. Using 5 mm socket wrench, remove four screws from top
hinge and set aside.
5. Lift refrigerator door from middle hinge pin. The top hinge will
come away with door.
Remove Left-Hand Door
IMPORTANT: The wiring for UI run through left-hand door hinge,
so they must be disconnected before removing the door.
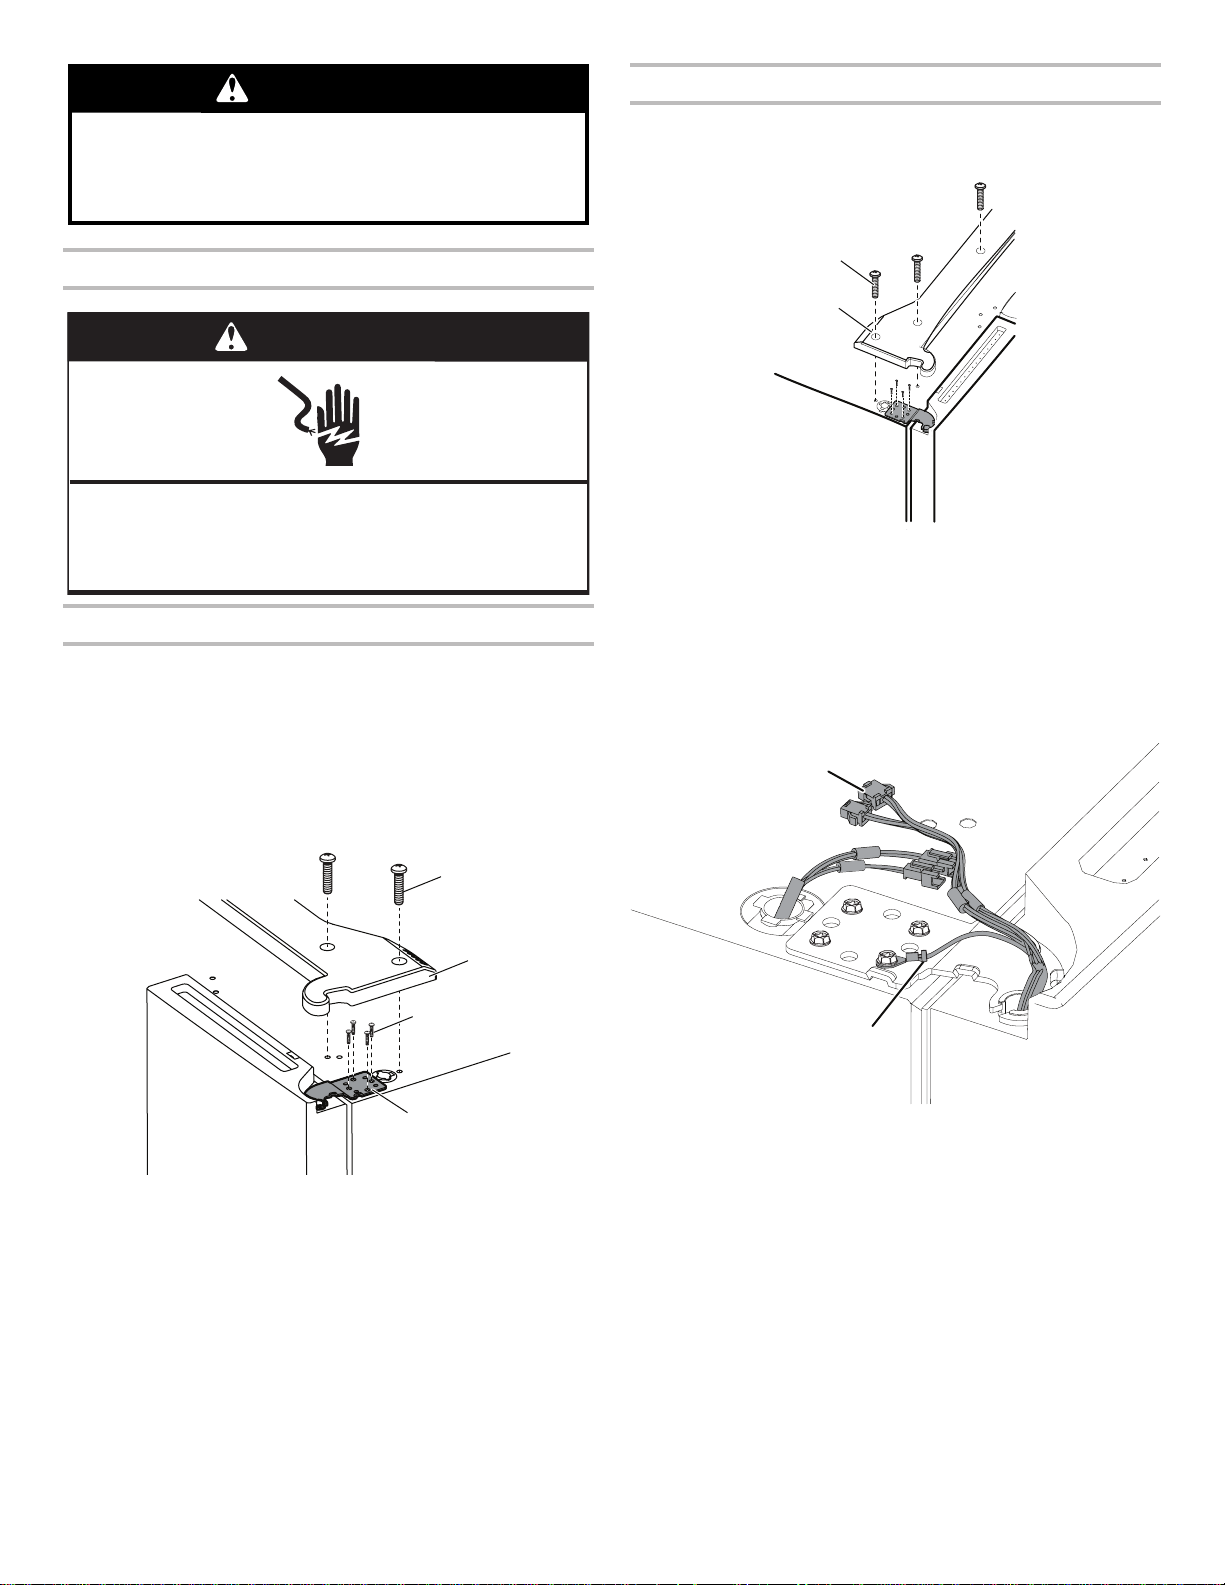
1. Using a Phillips screwdriver, remove cover from top hinge.
2. Disconnect two wiring plugs located on top of door hinge.
■ Grasp each side of wiring plugs. With your left thumb, press
down to release the catch and pull the sections of the plugs
apart.
WARNING
Excessive Weight Hazard
Use two or more people to lift the refrigerator door.
Failure to do so can result in back or other injury.
WARNING
Electrical Shock Hazard
Disconnect power before removing doors.
Failure to do so can result in death or electrical shock.
A. Top hinge cover screw
B. Top hinge cover
C. 5 mm socket screws
D. Top hinge
A
B
C
D
A. Top hinge cover screw
B. Top hinge cover
A
B
A
A. Wiring Plug
B. Ground (earth) connector
B
21-Apr-2018 01:11:37 EDT | RELEASED
In some European factories the letter "W" of the part code mentioned herein will be automatically
replaced by the number "4000" (e.g. "W12345678" becomes "400012345678")
14
3. Using 5 mm socket wrench, remove four internal screws from
top hinge and set aside.
NOTE: Provide additional support for refrigerator door while
hinges are being removed. Do not depend on door gasket
magnets to hold the door in place while you are working.
4. Lift refrigerator door from bottom hinge pin. The top hinge will
come away with door.
NOTE: It may not be necessary to remove bottom hinges and
brake feet assemblies to move refrigerator through a doorway.
■ Only if necessary, use 6 mm socket wrench and #2 Phillips
screwdriver to remove middle hinge.
Replace Right-Hand Refrigerator Door
1. Set right-hand door onto middle hinge pin.
2. Insert top hinge pin into open hole in top of refrigerator door.
3. Using four 5 mm socket screws, fasten hinge to cabinet. Do
not tighten screws completely.
Replace Left-Hand Refrigerator Door
1. Set left-hand door onto middle hinge pin.
2. Using four 5 mm socket screws, fasten hinge to cabinet. Do
not tighten screws completely.
3. Reconnect electrical wiring.
■ Push together two sections of the wiring plug.
■ Reconnect earth wire to the hinge screw.
Final Steps
1. Completely tighten eight 5 mm socket screws.
2. Replace top hinge covers.
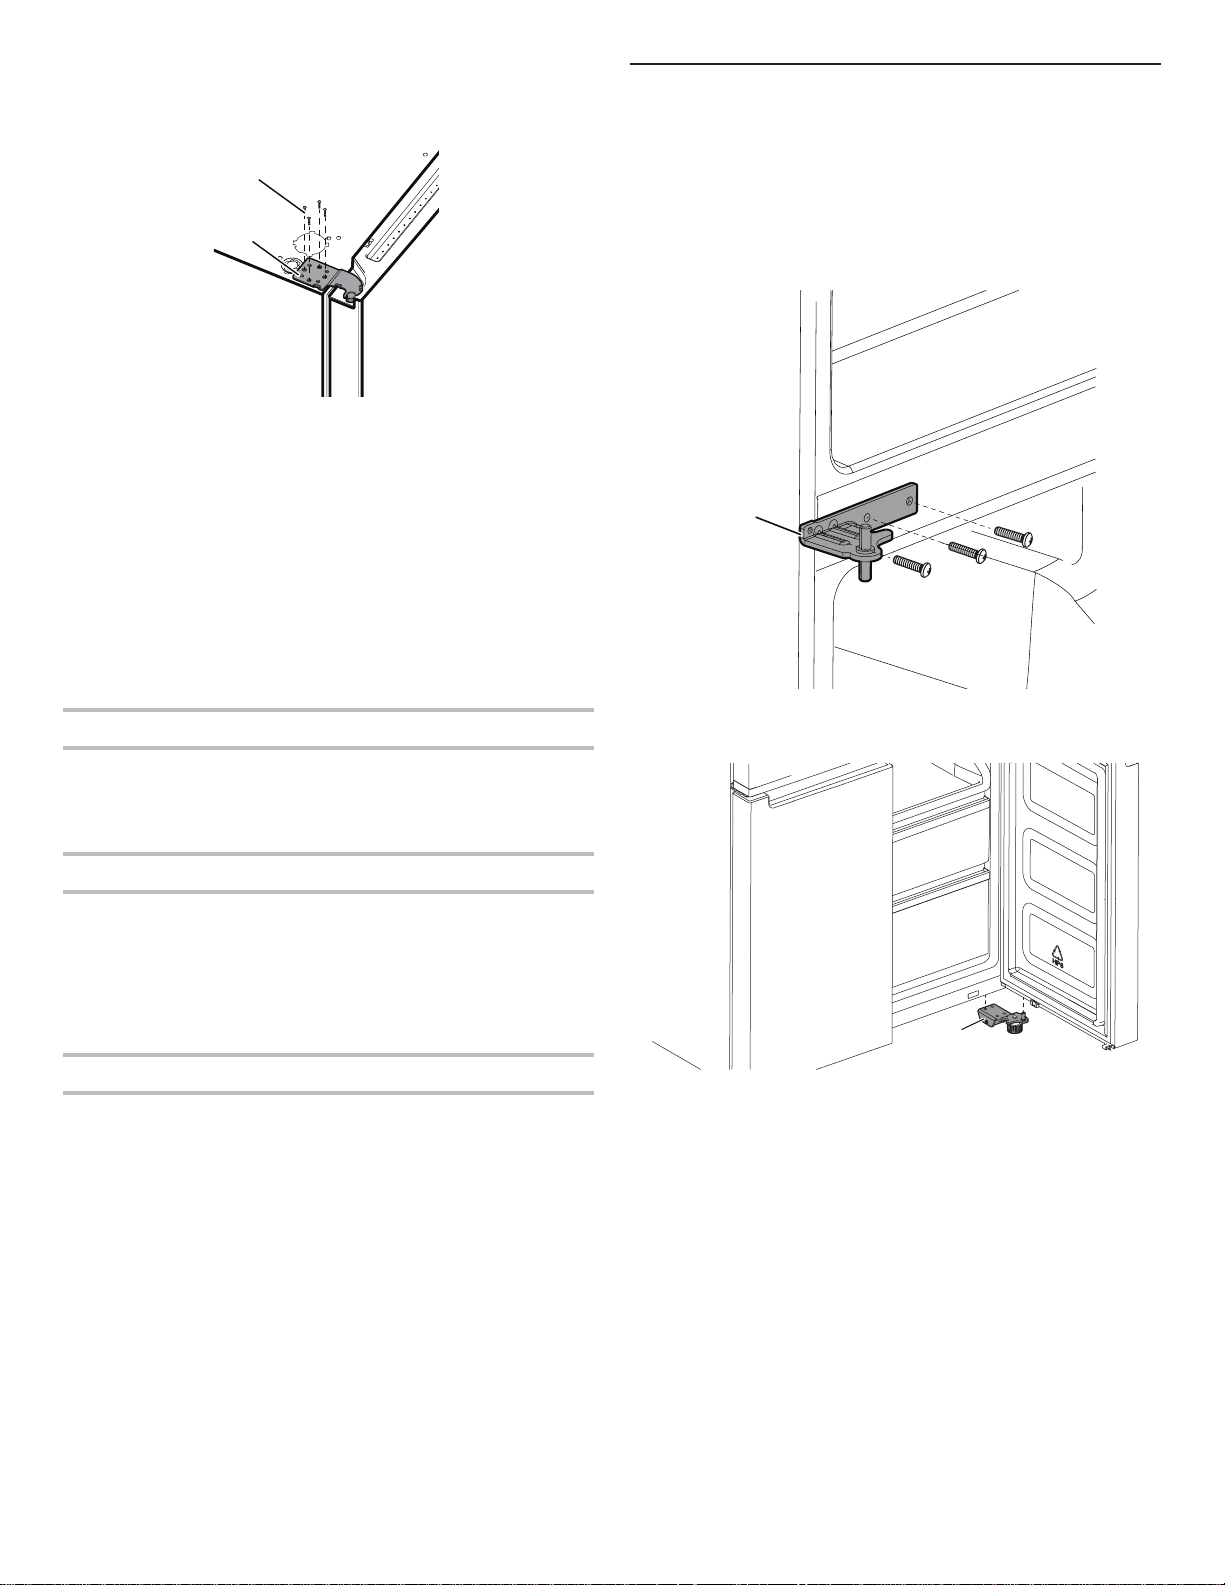
Remove and Replace Freezer/Multi
Temperature Door
1. Keep freezer doors closed until you are ready to lift them free
from the cabinet.
NOTE: Provide additional support for freezer door while hinges
are being removed. Do not depend on door gasket magnets to
hold the door in place while you are working.
■ Using #2 Phillips screwdriver and 6 mm socket wrench to
remove middle hinge from cabinet.
■ Lift freezer door from bottom hinge pin.
A. 5 mm socket screws
B. Top Hinge
A
B
A. Middle hinge
A
A. Bottom hinge
A
21-Apr-2018 01:11:37 EDT | RELEASED
In some European factories the letter "W" of the part code mentioned herein will be automatically
replaced by the number "4000" (e.g. "W12345678" becomes "400012345678")
15
Final Steps
1. Plug into an grounded (earthed) socket.
2. Return all removable parts and food to the drawers.
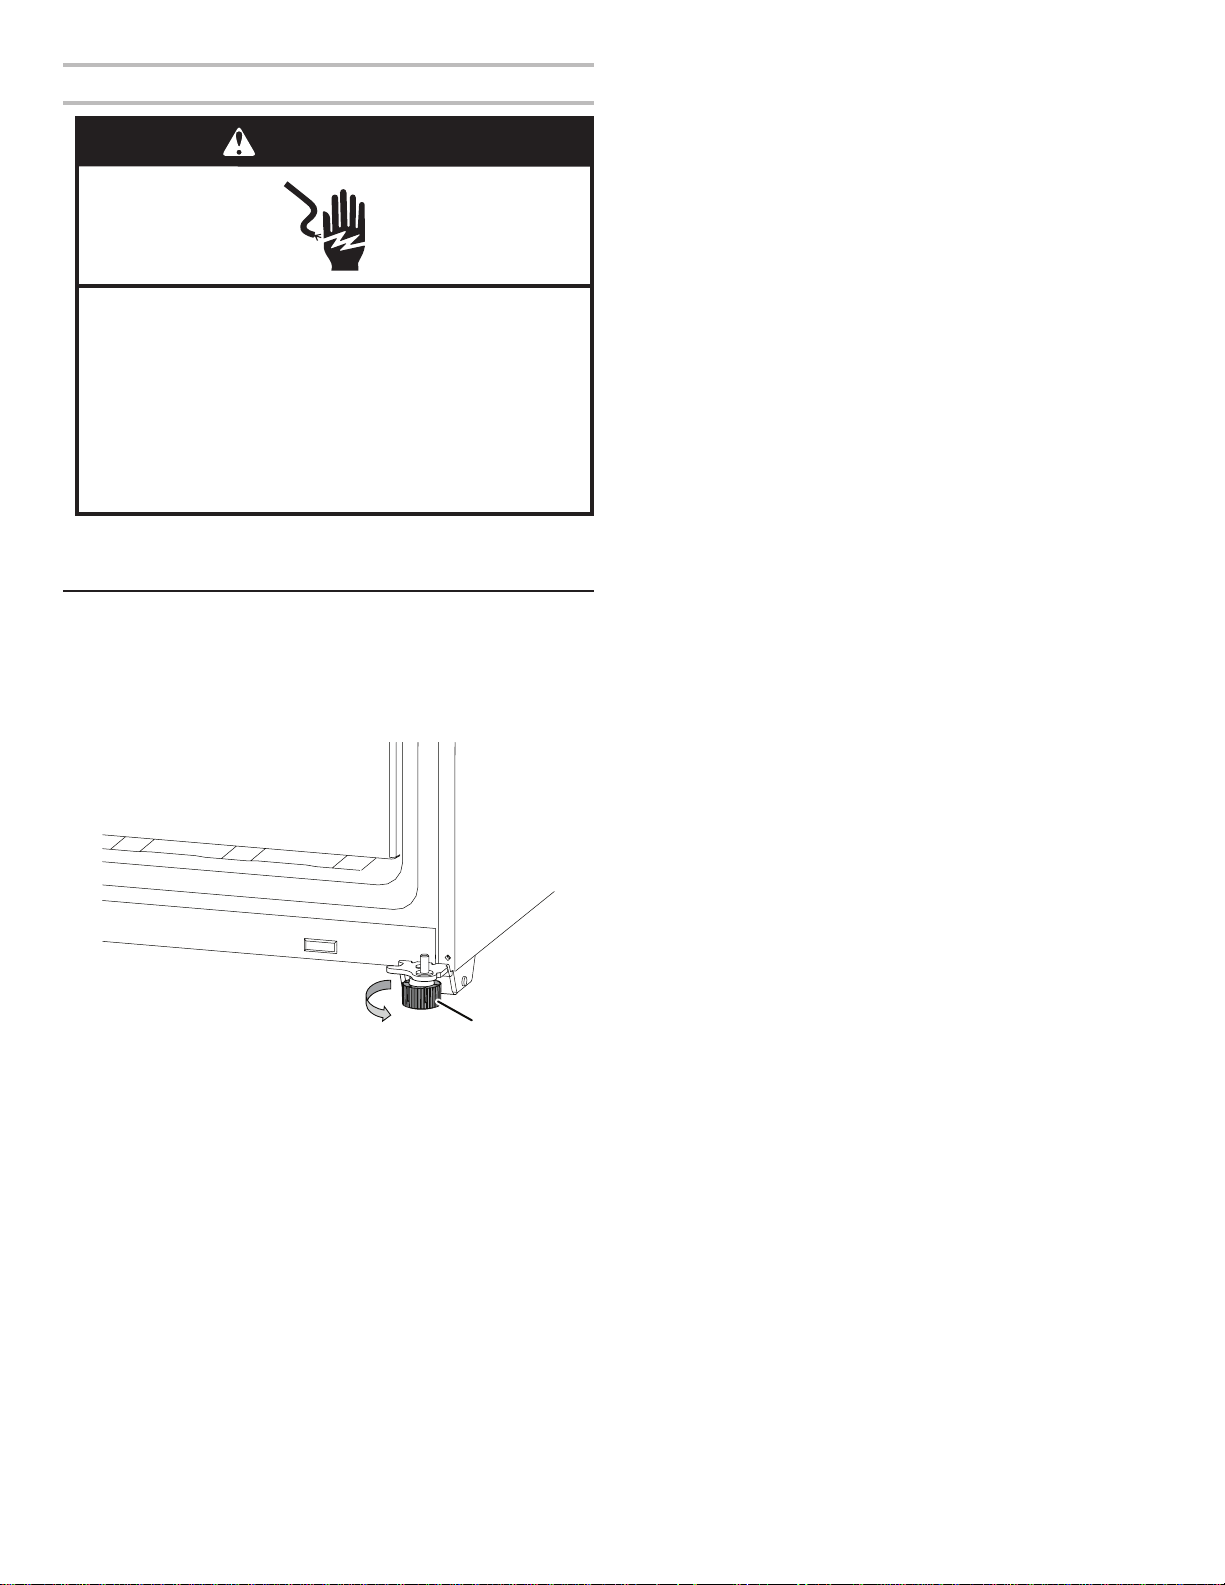
Refrigerator Levelling
1. Move refrigerator to its nal location.
2. Using hand, rotate brake feet. Turn them counterclockwise
until rollers are off oor and both brake feet are snug against
the oor. This keeps the refrigerator from rolling forward when
opening the doors.
IMPORTANT: If you need to make further adjustments
involving brake feet, you must turn both brake feet same
amount to keep the refrigerator level.
3. Use a level to make sure refrigerator is level from side to side
and front to back.
WARNING
Electrical Shock Hazard
Plug into a grounded (earthed) outlet.
Do not remove ground prong.
Do not use an adapter.
Do not use an extension cord.
Failure to follow these instructions can result in death,
fire, or electrical shock.
A. Brake feet
A
21-Apr-2018 01:11:37 EDT | RELEASED
In some European factories the letter "W" of the part code mentioned herein will be automatically
replaced by the number "4000" (e.g. "W12345678" becomes "400012345678")

16
Using the Controls
The touch-activated controls are located on left hand refrigerator door. The control panel includes information about various buttons and
indicators. Refrigerator and freezer temperature indicator shows last temperature set point.
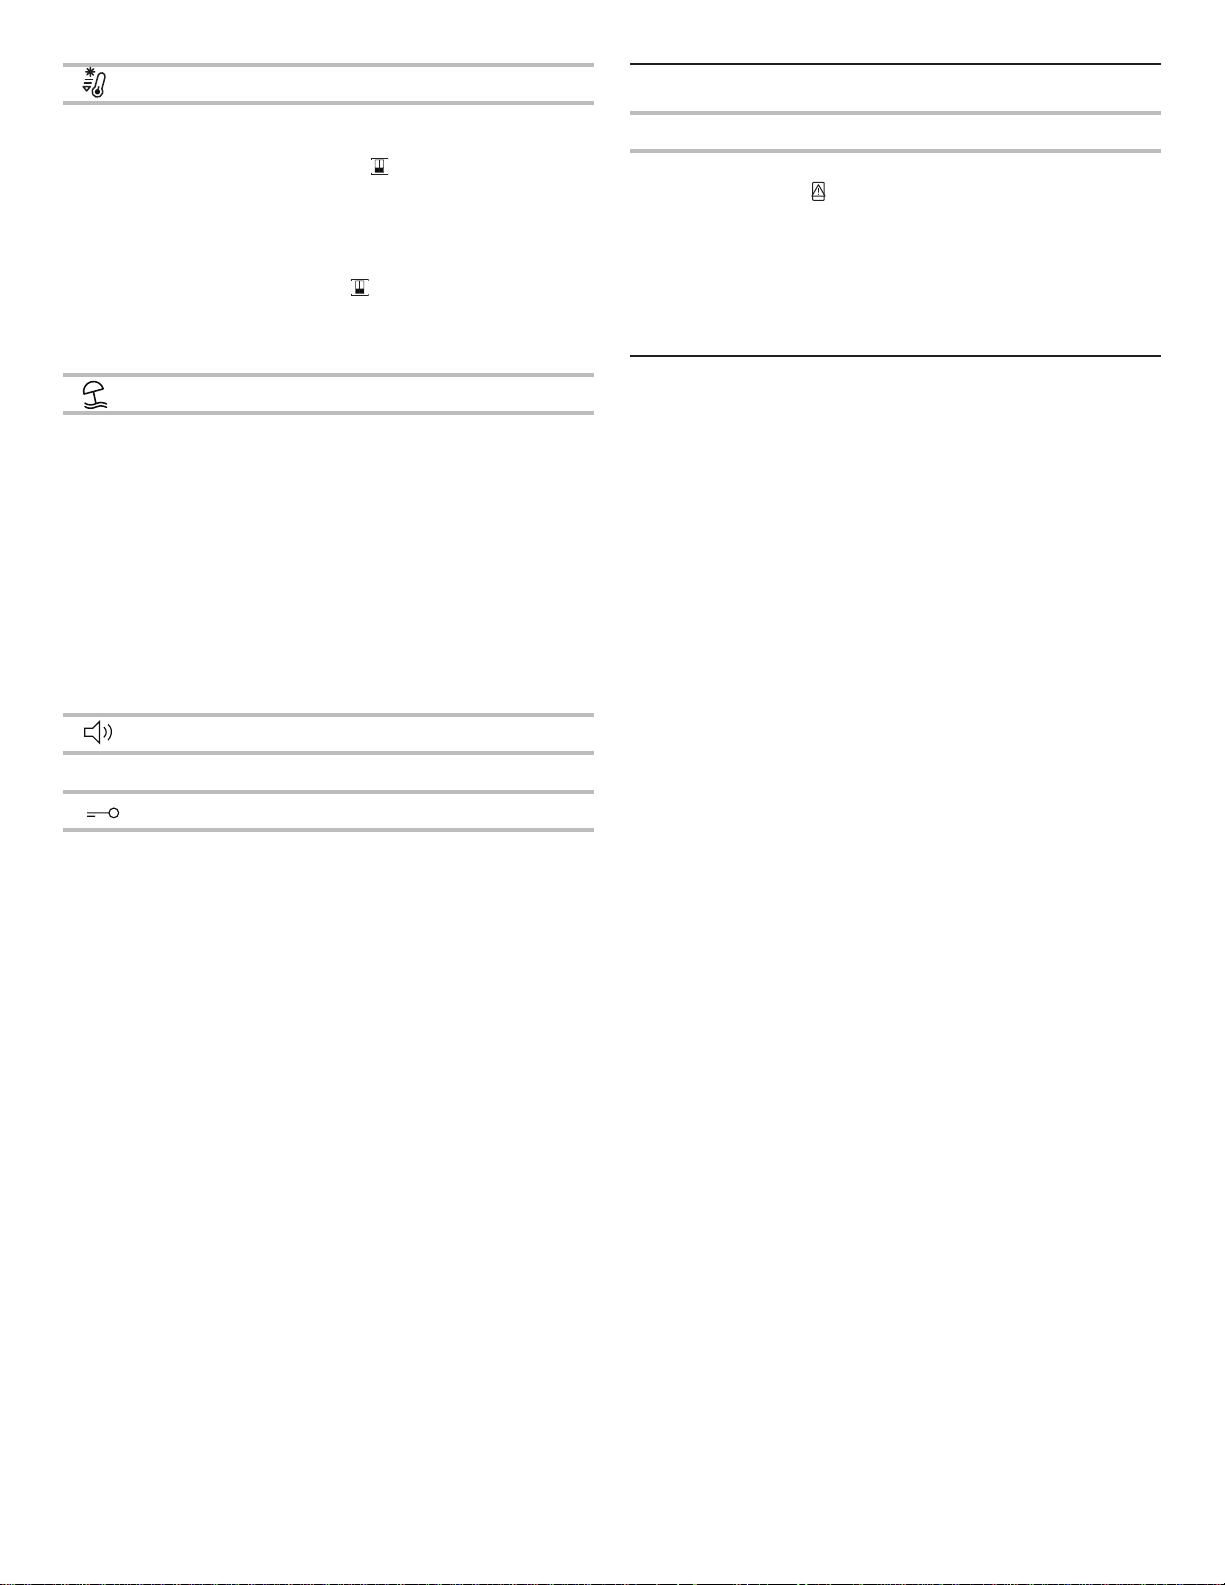
1. Sound Indicator
2. Sound ON/OFF Button
3. Refrigerator Temperature Button (hold 3 sec for Super Cool)
4. Freezer Temp Button (hold 3 sec for Super Freeze)
5. Key Lock Indicator
6. Key Lock Button
7. Door Open Indicator
8. Super Freeze Indicator
9. Super Cool Indicator
10. Holiday Mode Button
11. Holiday Mode Indicator
The Control Panel will automatically turn off after one minute of inactivity. To turn on the control panel, press any key.
Viewing and Adjusting Temperature Set Points
Adjusting Refrigerator and Freezer Compartment
Temperature:
For your convenience, your refrigerator and freezer controls are
preset at the factory.
When you rst install your refrigerator, make sure that controls are
still set to recommended set points. The factory recommended
set points are 3°C for refrigerator and -18°C for freezer.
Pressing Refrigerator or Freezer Temperature button will toggle
through temperature set points in Celsius (°C).
IMPORTANT:
■ Wait 24 hours before you put food into the refrigerator. If you
add food before the refrigerator has cooled completely, your
food may spoil.
NOTE: Adjusting the set points to a colder-than
recommended setting will not cool compartments any faster.
■ If temperature is too warm or too cold in refrigerator or freezer,
rst check air vents to be sure they are not blocked before
adjusting the controls.
■ The recommended settings should be correct for normal
household use. The controls are set correctly when milk or
juice is as cold as you like and when ice cream is rm.
NOTE: Areas such as a garage, basement or porch may have
higher humidity or extreme temperatures. You may need to
adjust temperature away from the recommended settings to
accommodate for these conditions.
■ Wait at least 24 hours between adjustments. Recheck
temperatures before other adjustments are made.
When adjusting temperature set points, use the following
chart as a guide:
CONDITION: TEMPERATURE ADJUSTMENT:
Refrigerator too cold Refrigerator setting 1° higher
Refrigerator too warm Refrigerator setting 1° lower
Freezer too cold Freezer setting 1° higher
Freezer too warm/
too little ice
Freezer setting 1° lower
Super Cool
The Super Cool feature assists with periods of high refrigerator
use, full grocery loads, or temporarily warm room temperatures.
■ To turn on the Super Cool feature, press and hold the
Refrigerator Temperature button for 3 seconds. When
feature is activated, the Super Cool icon will be illuminated.
The Super Cool feature will remain on for 2 hours unless
manually turned off.
■ To manually turn off Super Cool feature, press and hold the
Refrigerator Temperature button for 3 seconds. The Super
Cool icon will turn off when the feature is not activated.
■ Adjusting refrigerator temperature will automatically turn off
the Super Cool feature.
1
2
4
3
5
6
7
8
9
10
11
21-Apr-2018 01:11:37 EDT | RELEASED
In some European factories the letter "W" of the part code mentioned herein will be automatically
replaced by the number "4000" (e.g. "W12345678" becomes "400012345678")
17
Super Freeze
The amount of fresh food (in kg) that can be frozen in 24 hours is
indicated on appliance rating plate.
■ Press Freezer Temperature button for 3 seconds (until the
Super Freeze Indicator lights up), 24 hours before placing
fresh food in the freezer. After placing fresh food in the freezer,
24 hours on Super Freeze function is generally sufcient; After
50 hrs the Super freeze function automatically deactivates.
■ To manually turn off the Super Freeze feature, press and hold
the Freezer Temperature button for 3 seconds. The Super
Freeze icon will turn off.
■ Adjusting the freezer temperature will automatically turn off
the Super Freeze feature.
Holiday Mode
This mode is designed to avoid your appliance from wasting
energy during times when it’s not in regular use (when you are in
holiday for example).
By selecting this function the temperature of refrigerator
compartment (RC) will automatically be set to 12°C.
■ To use holiday mode, press the mode button until the Holiday
mode indicator is lit on the display.
■ To exit holiday mode, press the mode button until no mode
icon is lit on the display.
■ Adjusting the refrigerator temperature will automatically turn
off the Holiday Mode feature.
IMPORTANT: If this mode is selected then all food and drinks
must be removed from the refrigerator compartment.
Sound ON-OFF
Press button to activate/deactivate Sound Feedback.
Key Lock
■ Press and hold Lock button for 3 seconds to activate the lock
feature.
■ To deactivate lock, press and hold the Lock button for 3
seconds.
The lock feature will ignore all interaction with the control panel
until user unlocks the control panel. This feature is meant to avoid
unintentional changing of settings.
Additional Features
Door Open Alarm
■ The Door Open Alarm feature sounds an alarm and blinks the
“Door Open” icon when any of the four doors is open for 2
minutes or more.
■ The alarm will repeat every 5 minutes. Close all doors to turn
it off.
NOTE: To mute audible alarm while keeping the doors open, such
as while cleaning the inside of the refrigerator, touch any button
on control panel. The alarm sound will be temporarily turned off,
but the Door Open icon will still be displayed on the control panel.
Lighting the Refrigerator
The refrigerator has an interior light that comes on any time the
door is opened.
NOTE: The light is LED which does not need to be replaced. If the
LED does not illuminate when the door is opened, call service to
replace the light.
21-Apr-2018 01:11:37 EDT | RELEASED
In some European factories the letter "W" of the part code mentioned herein will be automatically
replaced by the number "4000" (e.g. "W12345678" becomes "400012345678")
18
REFRIGERATOR USE
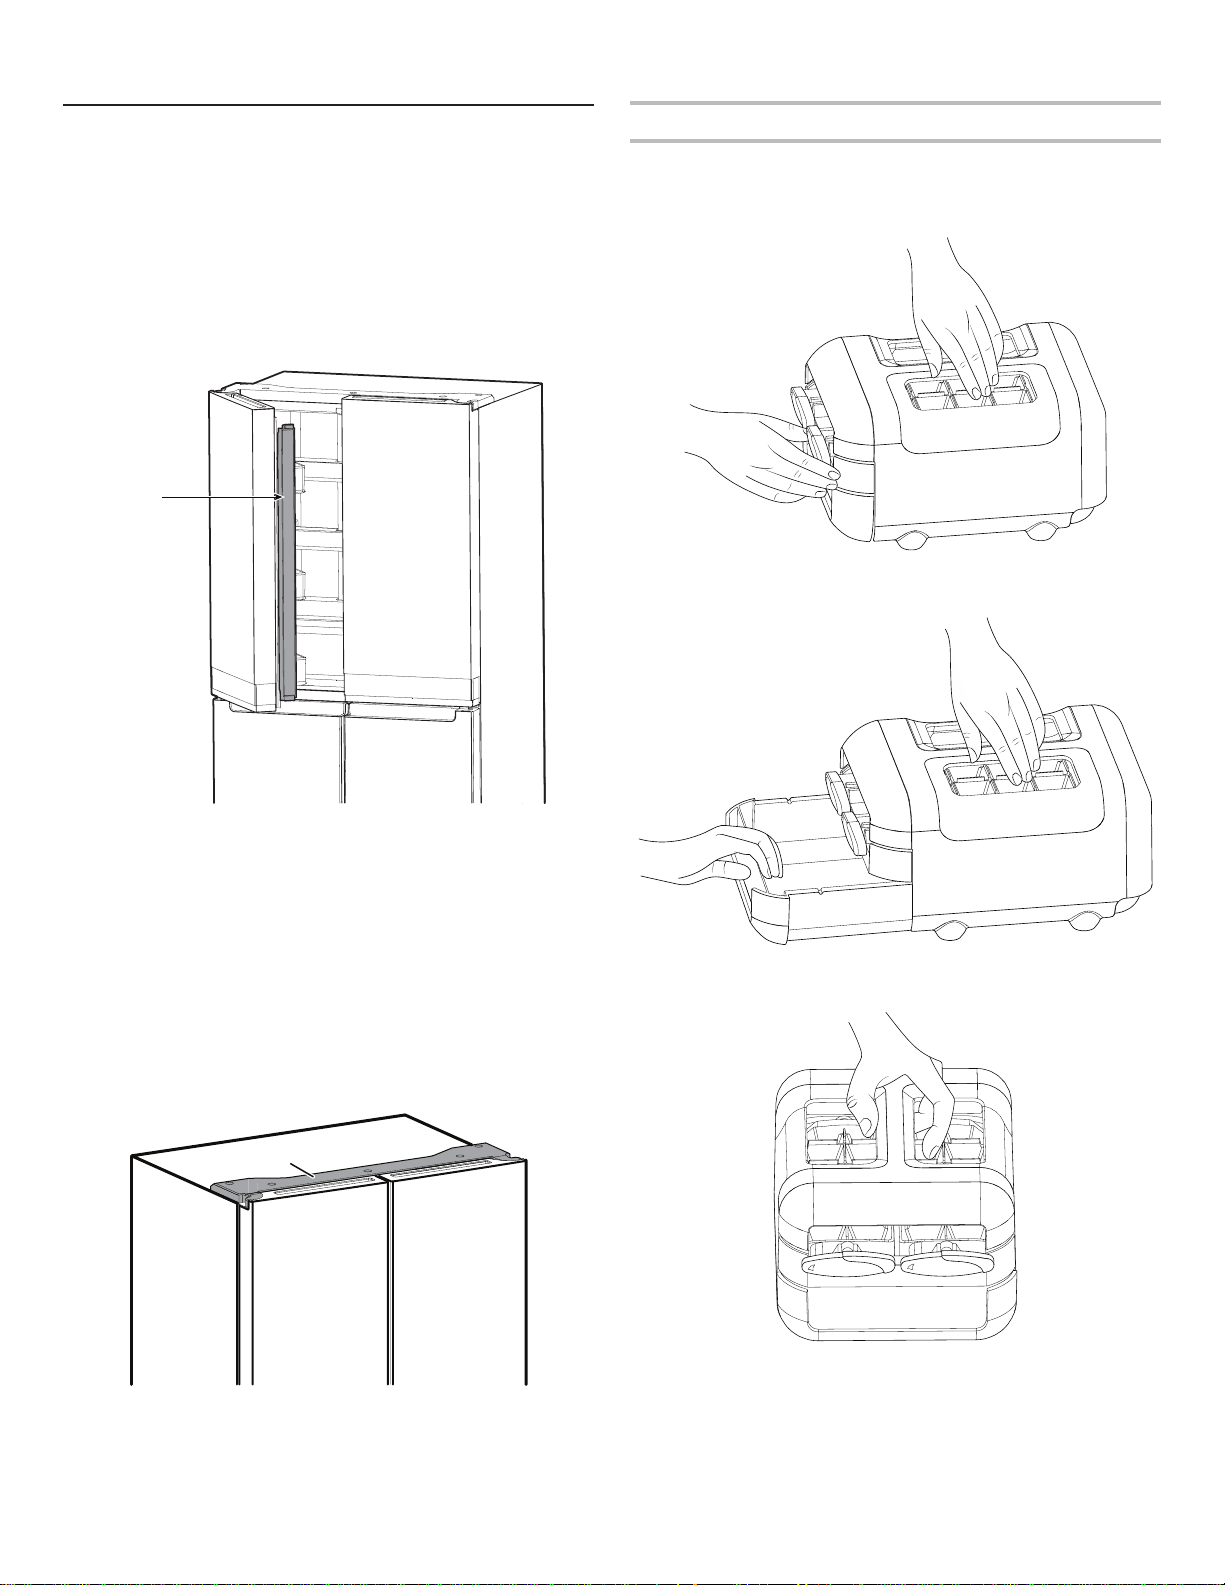
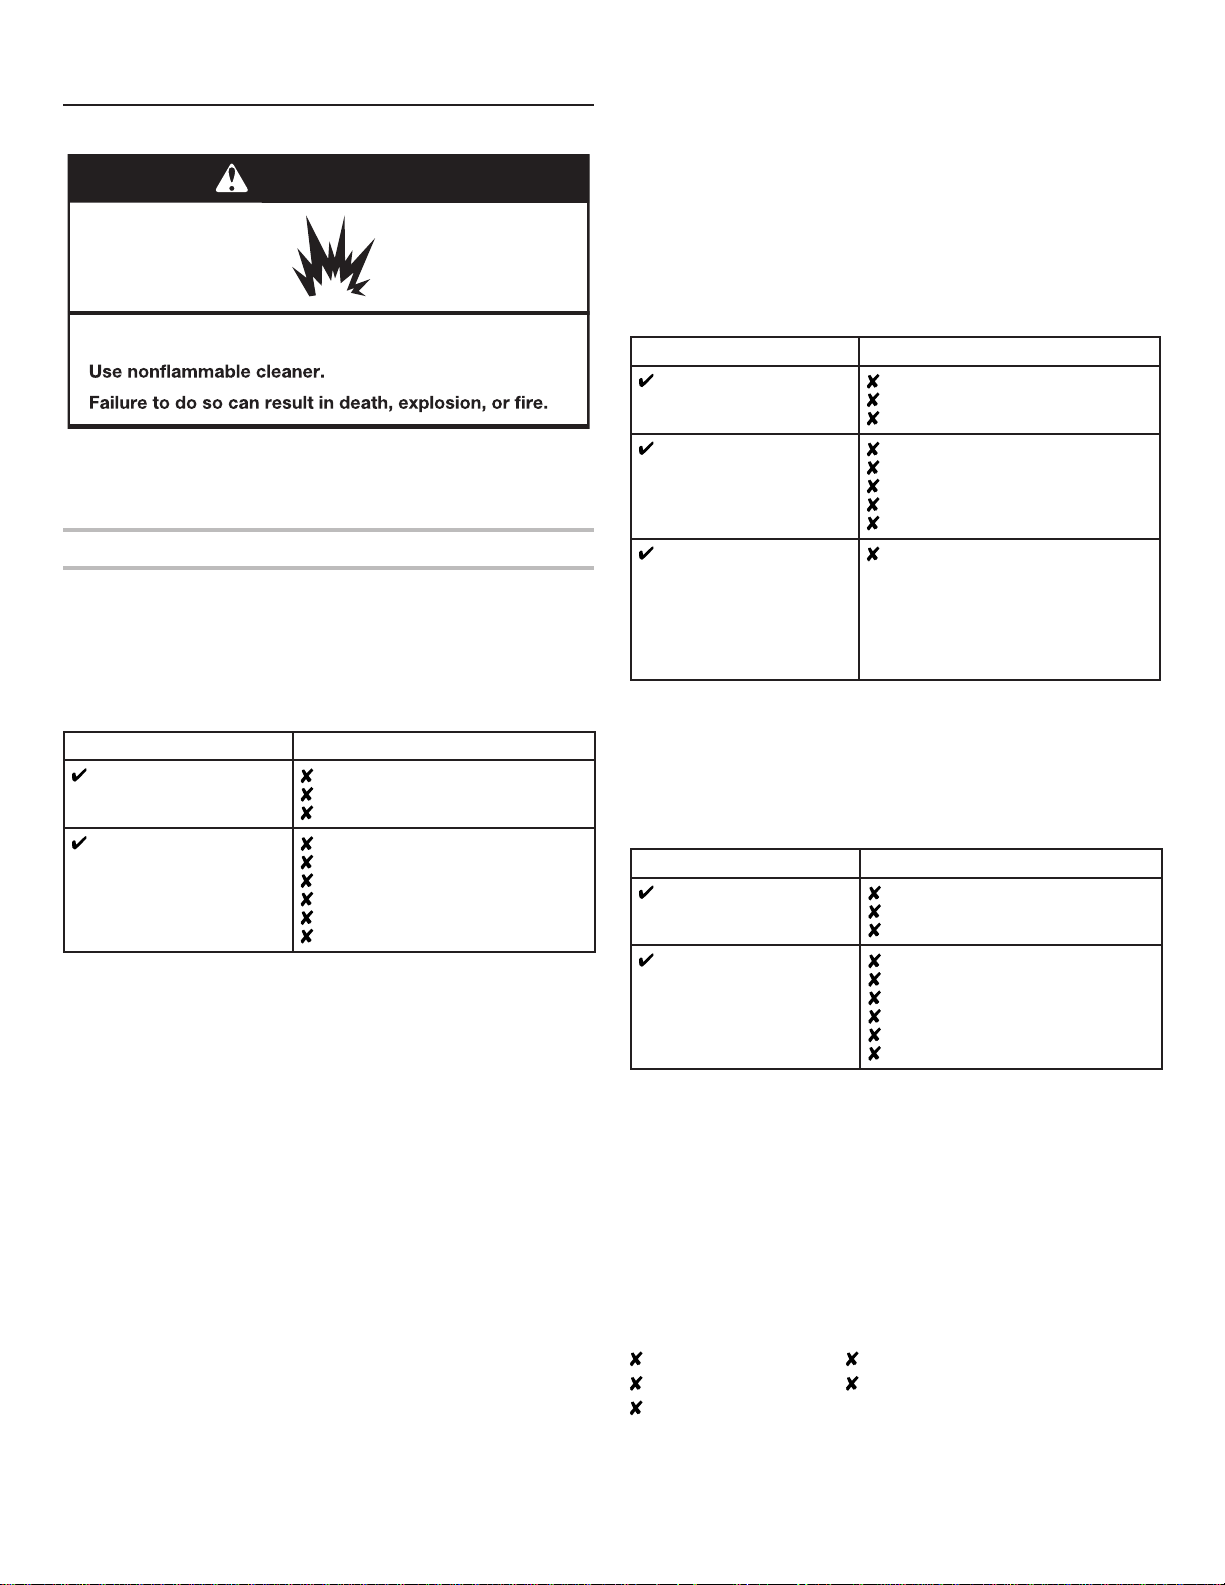
Opening and Closing Doors
There are two refrigerator compartment doors. The doors can
be opened and closed either separately or together. There is a
vertically hinged seal on the left refrigerator door.
■ When left-side door is opened, hinged seal automatically folds
inward so that it is out of the way.
■ When both doors are closed, hinged seal automatically forms
a seal between the two doors.
NOTE: When closing the door, the hinged seal should be in
correct position (be bent inside). Otherwise it will hit the right door
or the xing shaft.
The refrigerator compartment door switch is located in top left
and right hinge cover.
■ For Freezer and Multi Temperature Zone, door switch is
located in the bottom mullion.
■ The door switch uses magnet to sense door opening/closing.
■ Ensure there are no magnet or electronic devices (Speaker,
Coolvox
®
etc.) within 7.62 cm of hinge cap.
NOTE: The light will not turn on if door opening is not detected.
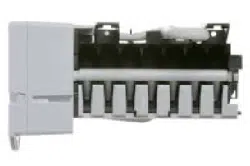
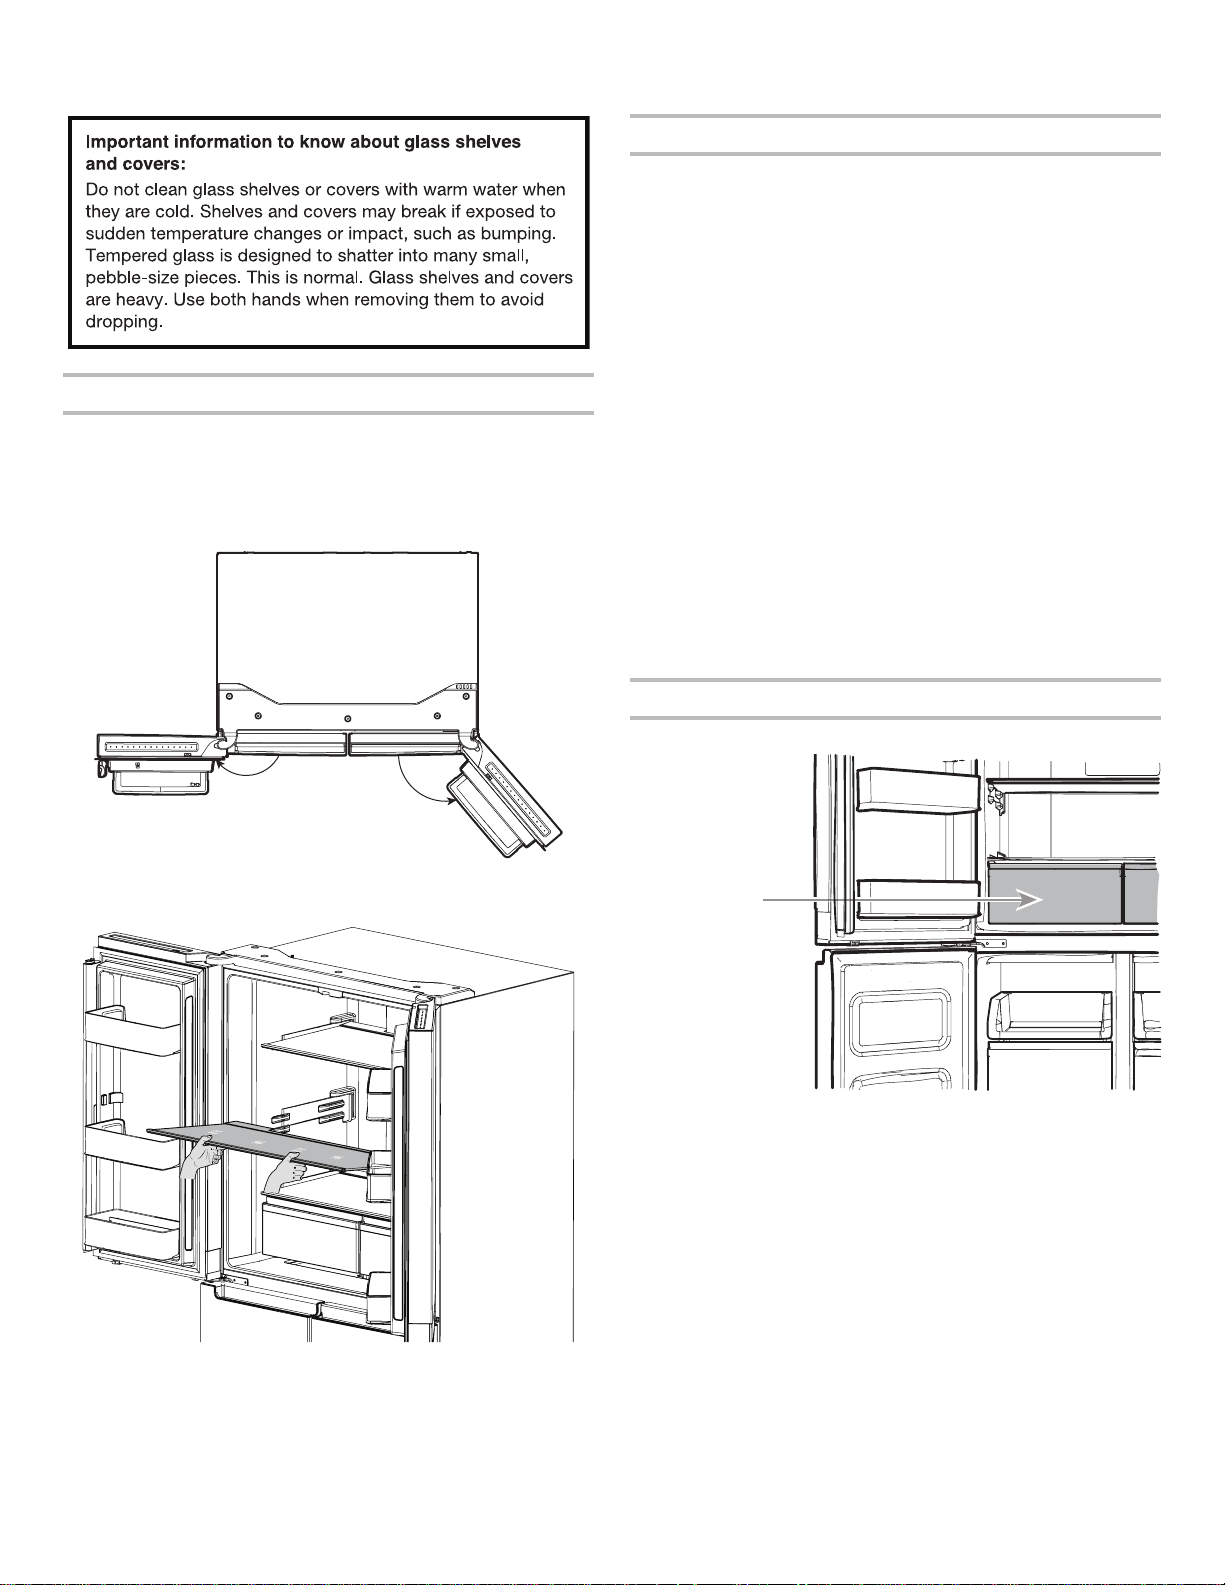
Ice Maker
■ To make ice, ll ice tray with puried water and place Manual
Ice maker into Freezer top shelf. Allow time till ice gets formed
and once ice is ready, turn the knobs in clockwise direction to
eject ice cubes into the ice container.
■ Lift ice container slightly and pullout ice container to get
access to ice cubes.
Manual ice maker assembly can be taken out of the freezer when
ice is not required to make more compartment in freezer.
A. Hinged seal
A
A. Hinge cover
A
21-Apr-2018 01:11:37 EDT | RELEASED
In some European factories the letter "W" of the part code mentioned herein will be automatically
replaced by the number "4000" (e.g. "W12345678" becomes "400012345678")
19
SHELVES, BINS AND DRAWERS
Shelf Height Adjustment
Shelf height can be adjusted by changing its location from bottom
support to upper support and vice versa.
■ Open right side door to its full opening.
■ Open left side door to its full opening and then lift the door to
open 180°.
■ Take shelf out of refrigerator and place it to desired mounting
position.
■ Ensure shelf is properly seated on the shelf mounts.
Shelves and Shelf Frames
The shelves in your refrigerator are adjustable to meet your
individual storage needs.
Storing similar food items together in your refrigerator and
adjusting the shelves to t different heights of items will make
nding the exact item you want easier. It will also reduce the
amount of time the refrigerator door is open and save energy.
To remove and replace shelves:
1. Open the right side door to its full opening and left side door
to its full opening and lift left door to open 180°.
2. Remove the middle shelf or top shelf by lifting it up and out of
the shelf supports. Then pull the shelf forward and tilt down
to a vertical position. Turn the shelf at an angle and pull out of
the refrigerator.
3. Remove bottom shelf by lifting it up and out of shelf supports.
Then pull shelf forward and tilt up to a vertical position. Turn
shelf at an angle and pull out of refrigerator.
4. Replace middle and top shelves by putting shelf in the
refrigerator at an angle with the shelf front down. Lift the front
of the shelf up and slide in until the rear of the shelf drops into
the shelf supports. Lower the front of the shelf and make sure
that the shelf is in position.
5. Replace bottom shelf by putting shelf in refrigerator at an
angle with shelf up. Lift front of shelf down and slide in until
rear shelf drops into shelf supports. Lower front of shelf and
make sure that shelf is in position.
Fresh Crisper
To remove and replace the Fresh Crispers:
1. Grasp handle of the Fresh Crisper and slide the Fresh Crisper
straight out to the stop. Lift the Fresh Crisper off the bottom
guide.
2. Replace/putting back the Fresh Crisper by placing it on the
bottom Fresh Crisper guide and pushing it past the Fresh
Crisper stop into position.
180°
130°
Fresh Crisper
21-Apr-2018 01:11:37 EDT | RELEASED
In some European factories the letter "W" of the part code mentioned herein will be automatically
replaced by the number "4000" (e.g. "W12345678" becomes "400012345678")
20
Refrigerator Balconies
The balcony on your refrigerator door are adjustable to meet your
individual storage needs.
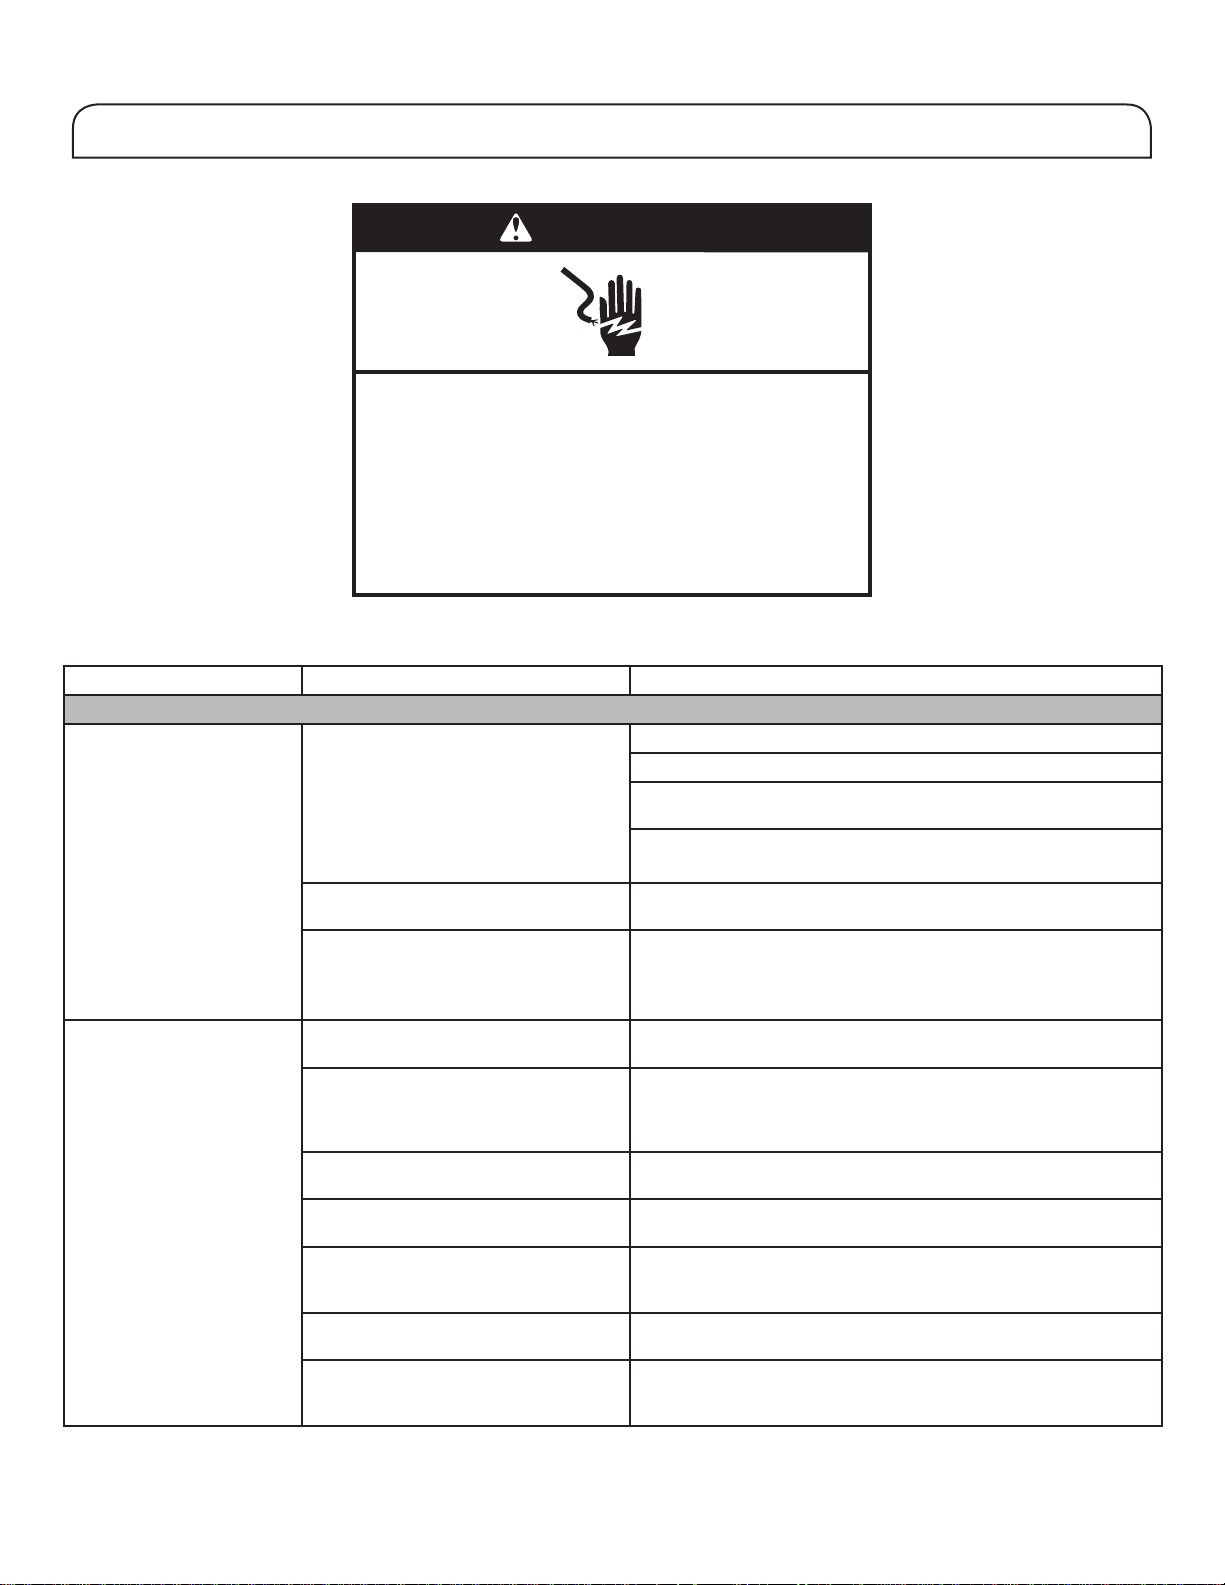
Freezer Storage Compartments
Freezer Tray
Freezer tray is useful to easily access frequently used products,
freeze or simply store leftovers or small items.
Super Freeze Drawers
Two freezer drawers in each freezer compartments located under
the Freezer Tray allowing you to conveniently store big volume
items. Super Freeze option allows you to store all your frozen
good safely and transparently.
For maximum freezer capacity, you may remove the freezer
drawer to expose the freezer shelf.
To remove the upper drawer:
1. Grasp handle of drawer and slide drawer straight out to stop.
Lift the drawer off bottom guide.
2. Replace/putting back drawer by placing it on bottom drawer
guide and pushing it past drawer stop into position.
Freezer Shelf
To maximize freezer capacity, you may remove mid drawer to
expose freezer shelf beneath. You can then store upper drawer
and load food directly on top of shelf.
Audio Reference
Tone Assignment
Tone Name Usage Examples
Power On Cooling system is turned on every time
product is powered on.
Key Press User presses a valid button.
Invalid (Error) User presses two or more valid buttons at
same time. Count-down interruption for press-
and-hold buttons.
Engage Acknowledgement of entry into any mode.
Disengage Acknowledgement of exit from any mode.
Alert Door Ajar alert.
This table is for quick reference only. See corresponding sections
for details. In case of inconsistency, section details will prevail.
Accessories
To order accessories, contact the dealer from whom you
purchased your refrigerator.
Assistance or Service
Before calling for assistance or service, please check the
“Troubleshooting” section. It may save you the cost of a service
call. If you still need help, follow the instructions below.
If you need replacement parts
To locate factory-specied replacement parts in your area,
contact the dealer from whom you purchased your refrigerator.
Warranty
Contact the dealer from whom you purchased the refrigerator for
warranty information.
Keep this book and your sales slip together for future
reference. You must provide proof of purchase or installation
date for in-warranty service.
Write down the following information about your appliance to help
you obtain assistance or service if you ever need it. You will need
to know your complete model number and serial number. You
can nd this information on the model and serial number label,
located on the inside wall of the refrigerator compartment.
Dealer name______________________________________________
Serial number_____________________________________________
Address__________________________________________________
Phone number____________________________________________
Model number____________________________________________
Purchase date_____________________________________________
Freezer Tray
Freezer Shelf
Super Freezer
Drawers
21-Apr-2018 01:11:37 EDT | RELEASED
In some European factories the letter "W" of the part code mentioned herein will be automatically
replaced by the number "4000" (e.g. "W12345678" becomes "400012345678")
21
REFRIGERATOR CARE
Cleaning
All of the Refrigerator, Freezer and Multi Temperature sections
defrost automatically. However, clean all the sections about once
a month to avoid build-up of odours. Wipe up spills immediately.
Exterior Cleaning
Please see the exterior cleaning information specic to your
model.
Style 1 — Smooth Door
IMPORTANT: Damage to smooth nish due to improper use of
cleaning products or using non-recommended cleaning products
is not covered under the warranty. Sharp or blunt instruments will
mar the nish.
DO USE DO NOT USE
Soft, clean cloth
Abrasive cloths
Paper towels or newsprint
Steel-wool pads
Warm, soapy water with
a mild detergent
Abrasive powders or liquids
Window sprays
Ammonia
Acidic or vinegar-based Cleaners
Oven cleaners
Flammable uids
NOTE: Paper towels scratch and may dull the clear coat of
painted door. To avoid possible damage, use only soft, clean
clothes to polish and wipe the doors.
Style 2 — Stainless Steel
IMPORTANT:
■ Use recommended stainless steel cleaners and cloths
only. Damage to stainless steel nish due to improper use
of cleaning products or using non-recommended cleaning
products is not covered under the warranty.
■ Avoid exposing stainless steel appliances to caustic or
corrosive elements such as high-salt, high-moisture, or high-
humidity environments. Damage due to exposure to these
elements is not covered under the warranty.
DO USE DO NOT USE
Soft, clean cloth
Abrasive cloths
Paper towels or newsprint
Steel-wool pads
Warm, soapy water
with a mild detergent
Abrasive powders or liquids
Ammonia
Citrus-based cleaners
Acidic or vinegar-based cleaners
Oven cleaners
For heavy soil, use only
a stainless steel cleaner
designed for appliances.
To order the cleaner,
contact the dealer from
whom you purchased
your refrigerator.
Stainless steel cleaner is for
stainless steel parts only. Do not
allow the stainless steel cleaner
and polish to come into contact
with any plastic parts such as the
trim pieces, dispenser covers, or
door gaskets.
Style 3 — Fingerprint-Resistant Stainless
IMPORTANT:
■ Avoid exposing stainless steel appliances to caustic or
corrosive elements such as high-salt, high-moisture, or high-
humidity environments. Damage due to exposure to these
elements is not covered under the warranty.
DO USE DO NOT USE
Soft, clean cloth
Abrasive cloths
Paper towels or newsprint
Steel-wool pads
Warm, soapy water with
a mild detergent
Abrasive powders or liquids
Window sprays
Ammonia
Acidic or vinegar-based cleaners
Oven cleaners
Flammable uids
NOTES:
■ If unintentional contact does occur, clean plastic part with a
sponge and mild detergent in warm water. Dry thoroughly with
a soft cloth.
■ Just because a cleaner is a liquid does not mean it is non-
abrasive. Many liquid cleansers formulated to be gentle on tile
and smooth surfaces still damage stainless steel.
■ Citric acid permanently discolours stainless steel.
■ To avoid damaging the nish of your stainless steel
refrigerator:
Do not allow these substances to remain on the nish:
Mustard Citrus-based sauces
Tomato juice Citrus-based products
Marinara sauce
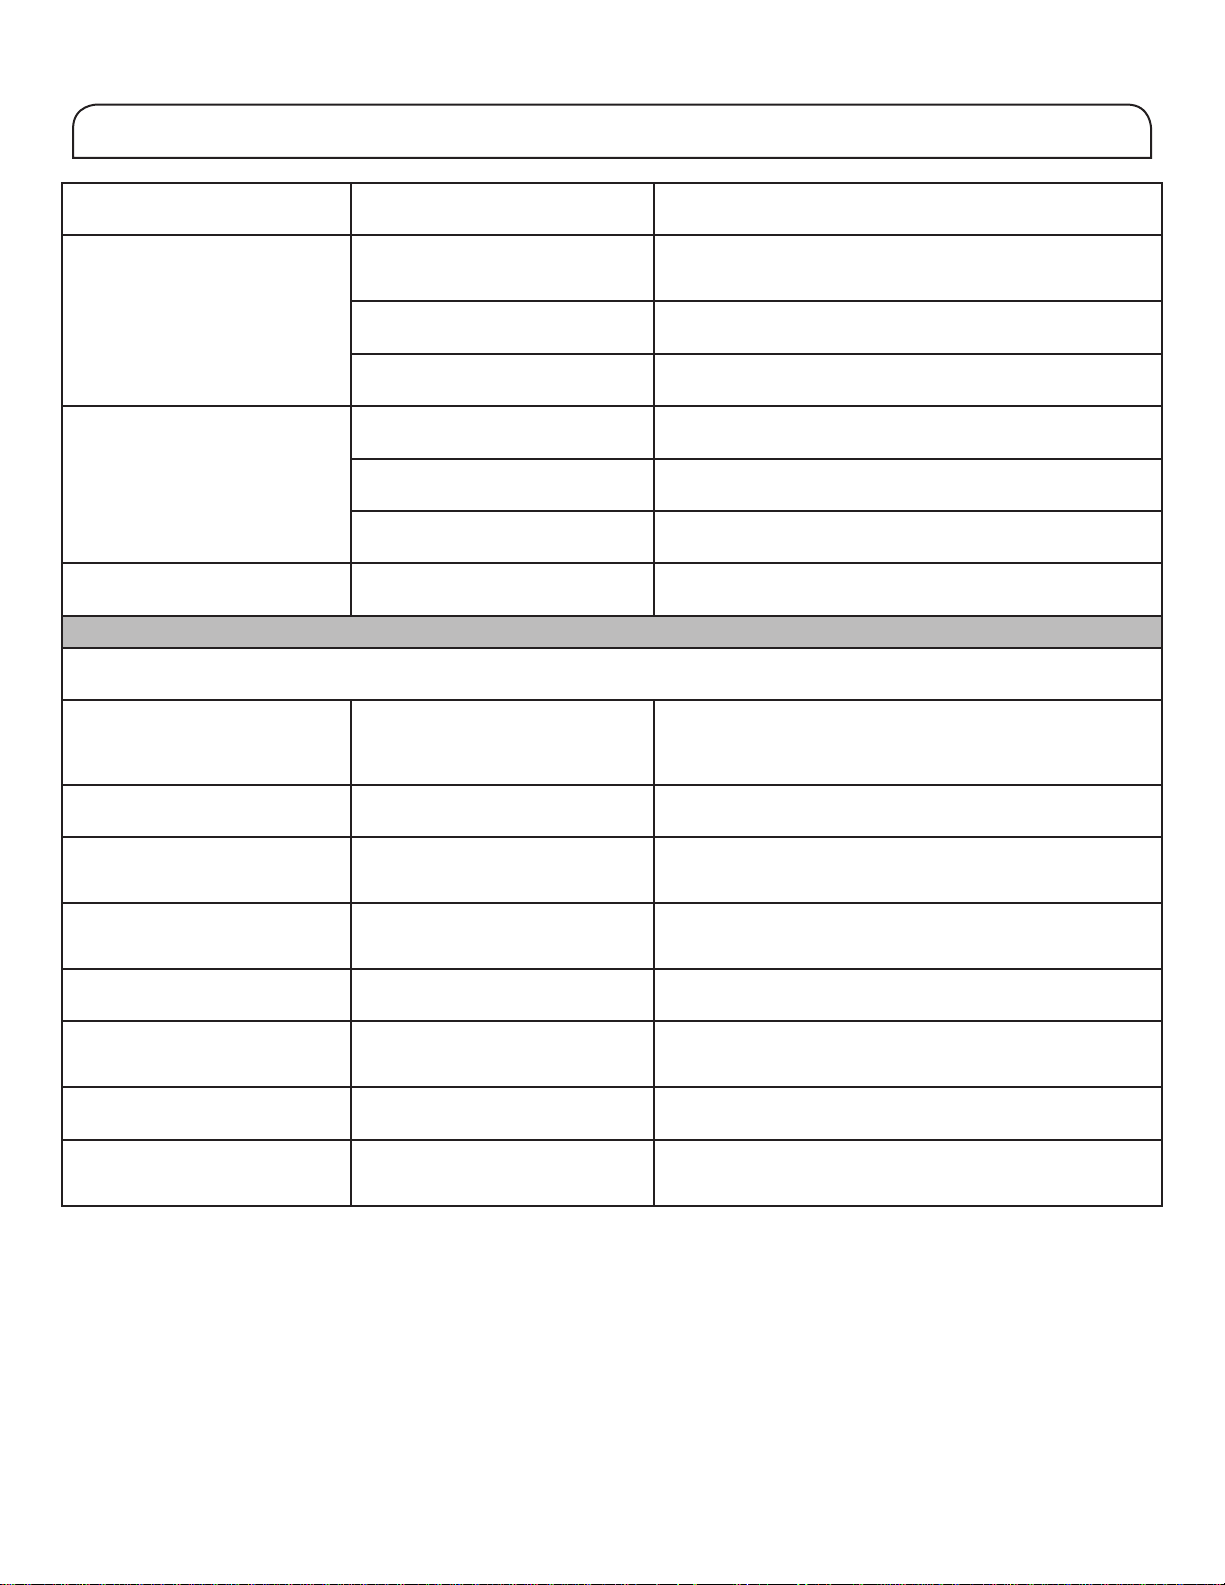
WARNING
Explosion Hazard
21-Apr-2018 01:11:37 EDT | RELEASED
In some European factories the letter "W" of the part code mentioned herein will be automatically
replaced by the number "4000" (e.g. "W12345678" becomes "400012345678")

22
Interior Cleaning
1. Unplug refrigerator or disconnect power.
2. Hand wash, rinse, and dry removable parts and interior
surfaces thoroughly. Use a clean sponge or soft cloth and a
mild detergent in warm water.
NOTE: Do not use abrasive or harsh cleaners such as window
sprays, scouring cleansers, ammable uids, cleaning waxes,
concentrated detergents, bleaches, or cleansers containing
petroleum products on plastic parts, interior and door liners,
or gaskets.
3. Plug in refrigerator or reconnect power.
Condenser
This refrigerator has skin condenser on both sides of refrigerator.
It is normal to feel warm on the sides.
Lights
The lights in both refrigerator and freezer compartments are LEDs
which do not need to be replaced. If lights do not illuminate when
door is opened, contact dealer from whom you purchased your
refrigerator.
Holiday and Moving Care
Holidays
If You Choose to Leave the Refrigerator On While You’re
Away:
1. Use up any perishables and freeze other items.
2. If your refrigerator has an automatic ice maker and is
connected to household water supply, turn off water supply to
refrigerator. Property damage can occur if water supply is not
turned off.
3. If you have an automatic ice maker, turn off ice maker.
■ Press switch to Off (O) for door ice maker.
4. Empty ice bin.
If You Choose to Turn Off the Refrigerator Before You Leave:
NOTE: Put refrigerator in Demo Mode while on Holiday. See the
“Using the Controls” section.
1. Remove all food from the refrigerator.
2. If your refrigerator has an automatic ice maker:
■ Turn off water supply to ice maker at least 1 day ahead of
time.
■ When last load of ice drops, press the switch to Off (O)
for display to be unlit on the top inside of refrigerator,
depending on your model.
3. Empty ice bin.
4. Turn off temperature controls. See the “Using the Controls”
section.
5. Clean refrigerator, wipe it and dry well.
6. Tape rubber or wood blocks to the tops of both doors to prop
them open far enough for air to get in. This stops odours and
mould from building up.
Moving
When you are moving your refrigerator to a new home, follow
these steps to prepare it for the move.
1. If your refrigerator has an automatic ice maker:
■ Turn off water supply to ice maker at least 1 day ahead of
time.
■ Disconnect water line from back of the refrigerator.
■ When last load of ice drops, press the switch to Off (O)
either on ice maker or control, depending on your model.
2. Remove all food from refrigerator and pack all frozen food in
dry ice.
3. Empty ice bin.
4. Unplug refrigerator.
5. Clean, wipe and dry thoroughly.
6. Take out all removable parts, wrap them well and tape them
together so they don’t shift and rattle during the move.
7. Depending on the model, raise the front of refrigerator so it
rolls more easily or raise the levelling screws so they do not
scrape the oor. See the “Adjust the Doors” or “Refrigerator
Levelling and Door Closing” sections.
8. Tape doors closed and tape power cable to back of the
refrigerator.
When you get to your new home, put everything back and refer to
the “Installation Instructions” section for preparation instructions.
Also, if your refrigerator has an automatic ice maker, remember to
reconnect water supply to refrigerator.
21-Apr-2018 01:11:37 EDT | RELEASED
In some European factories the letter "W" of the part code mentioned herein will be automatically
replaced by the number "4000" (e.g. "W12345678" becomes "400012345678")
23
TROUBLESHOOTING
If you experience Possible Causes Solution
Refrigerator Operation
The refrigerator will not
operate.
Check electrical supply. Plug the power cable into an earthed socket.
Do not use an extension cable.
Make sure there is power to the socket. Plug in a lamp to see if
the socket is working.
Reset a tripped circuit breaker. Replace any blown fuses.
NOTE: If problems continue, contact an electrician.
Check controls. Make sure the controls are turned on. See the “Using the
Controls” section.
New installation. Allow 24 hours following installation for the refrigerator to cool
completely.
NOTE: Adjusting temperature controls to the coldest setting will
not cool either compartment more quickly.
The motor seems to run
too much.
High-efciency compressor and fans. Larger, more efcient refrigerators run longer at lower, more
energy efcient speeds.
The room or outdoor temperature is
hot.
It is normal for refrigerator to work longer under these
conditions. For optimum performance, place refrigerator in an
indoor, temperature-controlled environment. See the “Location
Requirements” section.
A large amount of warm food has
been recently added.
Warm food will cause refrigerator to run longer until the air cools
to the desired temperature.
The door(s) are opened too frequently
or for too long.
Warm air entering refrigerator causes it to run more. Open the
door less often.
The refrigerator door or freezer drawer
is open.
Make sure refrigerator is level. See the “Refrigerator Levelling
and Door Closing” section. Keep food and containers from
blocking the door.
The refrigerator control is set too cold. Adjust refrigerator control to a less-cold setting until the
refrigerator temperature is as desired.
The door or drawer gasket is dirty,
worn, or cracked.
Clean or change the gasket. Leaks in the door seal will cause
the refrigerator to run longer in order to maintain desired
temperatures.
First try the solutions suggested here to possibly avoid a service call.
WARNING
Electrical Shock Hazard
Plug into a grounded (earthed) outlet.
Do not remove ground prong.
Do not use an adapter.
Do not use an extension cord.
Failure to follow these instructions can result in death,
fire, or electrical shock.
21-Apr-2018 01:11:37 EDT | RELEASED
In some European factories the letter "W" of the part code mentioned herein will be automatically
replaced by the number "4000" (e.g. "W12345678" becomes "400012345678")
24
TROUBLESHOOTING
If you experience Possible Causes Solution
The lights do not work. Your refrigerator is equipped with
LED lighting which does not need
to be replaced.
If there is power to refrigerator and lights do not illuminate
when a door or drawer is opened, call for service or
assistance.
Doors have been open longer than
10 minutes.
Close the doors and drawer to reset and open to resume
lighted task.
The door switch is not sensing the
door opening.
Ensure there are no magnets or electronic devices within 7.6
cm (3") of the hinge cover.
The Temperature Control UI does
not turn on.
The Temperature Control UI went
to sleep.
Press any button on the UI to wake up the The Temperature
Control UI.
The Temperature Control UI
buttons are not working well.
Try cycling power on the refrigerator to make the buttons
reset. If problem continuous, call for service or assistance.
The Temperature Control UI is not
receiving power.
Check the wiring harness at the door hinge.
Unable to adjust setting on The
Temperature Control UI.
Door is open and Door ajar alarm is
activated.
Close the door.
Unusual Noise
To listen to normal refrigerator sounds, go to the Product Help/FAQ section of the brand website and search for “normal sounds.”
Below are listed some normal sounds with explanations.
The refrigerator seems noisy. The compressor in your new
refrigerator regulates temperature
more efciently while using less
energy and operates quietly.
Due to this reduction in operating noise, you may notice
unfamiliar noises that are normal.
Sound of the compressor running
longer than expected.
High-efciency compressor and
fans.
Larger, more-efcient refrigerators run longer at lower, more
energy efcient speeds.
Pulsating/Whirring Fans/compressor adjusting to
optimize performance during
normal compressor operation.
This is normal.
Popping Contraction/expansion of inside
walls, especially during initial cool
down.
This is normal.
Hissing/Dripping Flow of refrigerant or ow of oil in
the compressor.
This is normal.
Vibration The refrigerator may not be steady. Adjust the levelling screws and lower levelling foot rmly
against oor. See the “Refrigerator Levelling and Door
Closing” section.
Sizzling Water dripping on the heater during
Defrost cycle.
This is normal.
Water running/Gurgling May be heard when ice melts
during the Defrost cycle and water
runs into the drain pan.
This is normal.
First try the solutions suggested here to possibly avoid a service call.
21-Apr-2018 01:11:37 EDT | RELEASED
In some European factories the letter "W" of the part code mentioned herein will be automatically
replaced by the number "4000" (e.g. "W12345678" becomes "400012345678")

25
TROUBLESHOOTING
If you experience Possible Causes Solution
Temperature and Moisture
Temperature is too warm. The refrigerator has just been
installed.
Allow 24 hours following installation for refrigerator to cool
completely.
The controls are not set
correctly for the surrounding
conditions.
Adjust controls a setting colder. Check temperature in 24 hours.
See the “Using the Controls” section.
The door(s) are opened often
or not closed completely.
Allows warm air to enter
refrigerator.
Minimize door openings and keep doors fully closed.
A large load of food was
recently added.
Allow several hours for refrigerator to return to normal temperature.
Holiday mode is on. Turn off the Holiday mode. See the “Using the Control” section.
Temperature is too cold in the
refrigerator/crisper.
The refrigerator air vent(s)
are blocked.
If the air vent located in the middle rear of refrigerator compartment
is blocked by items placed directly in front of it, the refrigerator will
get too cold. Move items away from the air vent.
The controls are not set
correctly for the surrounding
conditions.
Adjust the controls a setting warmer. Check the temperature in 24
hours. See the “Using the Controls” section.
Temperature is too cold in the
temperature controlled drawer.
The control is not set
correctly for the items stored
in drawer.
Adjust the temperature setting. See the “Using the Controls” in the
“Refrigerator Use” section.
There is interior moisture build-
up.
NOTE: Some moisture build-up
is normal.
The room is humid. A humid environment contributes to moisture build-up.
The door(s) are opened often
or not closed completely.
Allows humid air to enter the
refrigerator.
Minimize door openings and close doors completely.
The door(s) are blocked
open.
Move food packages away from door.
A bin or shelf is in the way. Push bin or shelf back into the correct position.
Storing liquid in open
containers.
This adds humidity to the refrigerator interior. Keep all containers
tightly covered.
There is frost/ice build-up in the
freezer compartment.
The door is opened often or
left open.
Minimize door openings and close drawer completely after use.
The door has poor door seal. Ensure door seals are making full contact with the refrigerator
cabinet to allow for an adequate seal.
Temperature controls are not
set correctly.
See the “Using the Controls” section for recommended
temperature settings.
First try the solutions suggested here to possibly avoid a service call.
21-Apr-2018 01:11:37 EDT | RELEASED
In some European factories the letter "W" of the part code mentioned herein will be automatically
replaced by the number "4000" (e.g. "W12345678" becomes "400012345678")
26
TROUBLESHOOTING
To view an animation showing how to adjust and align the doors, refer to the Product Help/FAQ section of the brand website and
search for “Door Closing and Door Alignment.”
If you experience Possible Causes Solution
Doors
The doors will not close
completely.
The door is blocked open. Move food packages away from door.
A bin or shelf is in the way. Push bin or shelf back into the correct position.
Recently installed. Remove all packaging materials.
The doors are difcult to
open.
The door gaskets are dirty or sticky. Clean gaskets and contact surfaces with mild soap and warm
water. Rinse and dry with soft cloth.
The doors appear to be
uneven.
The doors need to be aligned or the
refrigerator needs to be levelled.
If you need to align door please call for service.
The refrigerator is unsteady
or it rolls forward when
opening and closing doors.
The refrigerator brake feet are not
snug against the oor.
Turn both brake feet (one on each side) counterclockwise, the
same amount, until they are snug against the oor. See the
“Refrigerator Levelling and Door Closing” section.
First try the solutions suggested here to possibly avoid a service call.
WARNING
Explosion Hazard
21-Apr-2018 01:11:37 EDT | RELEASED
In some European factories the letter "W" of the part code mentioned herein will be automatically
replaced by the number "4000" (e.g. "W12345678" becomes "400012345678")
27
SICUREZZA DEL FRIGORIFERO
La vostra sicurezza e quella degli altri sono della massima importanza.
Tutti i messaggi per la sicurezza segnalano quali sono i rischi potenziali, indicano come ridurre possibili lesioni e spiegano
cosa può succedere se non si seguono le istruzioni.
Il presente manuale e l'apparecchio contengono numerosi messaggi per la sicurezza. Leggere e rispettare sempre tutti i
messaggi per la sicurezza.
Questo è il simbolo di avviso di sicurezza.
Il simbolo informa di potenziali rischi che possono causare il decesso o ferite all'utente e ad altre persone.
Tutti i messaggi per la sicurezza sono preceduti dal simbolo di avviso di sicurezza e dalla
parola "PERICOLO" o “AVVERTENZA”.
Queste parole significano:
Se non si seguono immediatamente le istruzioni si rischia
la morte o lesioni gravi.
Se non si seguono le istruzioni si rischia la morte o lesioni
gravi.
PERICOLO
AVVERTENZA
21-Apr-2018 01:11:37 EDT | RELEASED
In some European factories the letter "W" of the part code mentioned herein will be automatically
replaced by the number "4000" (e.g. "W12345678" becomes "400012345678")
28
ISTRUZIONI DI SICUREZZA
Prima di utilizzare l’apparecchio leggere le presenti
istruzioni di sicurezza. Tenerle sempre a portata di
mano per consultazioni future. Queste istruzioni
e l’apparecchio stesso forniscono importanti
avvertenze di sicurezza, da osservare in ogni
momento. Il produttore declina ogni responsabilità
per il mancato rispetto di queste avvertenze di
sicurezza, per un uso improprio dell’apparecchio
oper una errata regolazione dei comandi.
I bambini molto piccoli (0-3 anni) devono
essere tenuti lontano dall’apparecchio. Ibambini
piccoli (3-8 anni) devono essere tenuti lontano
dall’apparecchio, a meno che non siano
costantemente sorvegliati. I bambini dagli 8 anni
in su e le persone con capacità siche, sensoriali
o mentali ridotte o con scarsa esperienza e
conoscenza possono utilizzare questo apparecchio
solo se sono sorvegliati o se hanno ricevuto
istruzioni per un uso sicuro e ne comprendono
i pericoli. I bambini non devono giocare con
l’apparecchio. La pulizia e la manutenzione non
devono essere eettuate da bambini, a meno che
non siano sorvegliati da adulti.
USO CONSENTITO
ATTENZIONE: L’apparecchio non è destinato ad
essere messo in funzione tramite un dispositivo
di commutazione esterno, come un timer, o un
sistema di comando a distanza separato.
Questo apparecchio è destinato ad essere
utilizzato in applicazioni domestiche e similari
quali: cucine per il personale di negozi, uci e altri
ambienti di lavoro; agriturismi; da clienti in hotel,
motel, bed & breakfast e altri ambienti residenziali.
Questo apparecchio non è per uso professionale.
Non usare l’apparecchio all’aperto.
L’apparecchio è progettato per funzionare in
luoghi in cui la temperatura ambiente è compresa
negli intervalli seguenti, secondo la classe climatica
indicata sulla targhetta dati. L’apparecchio
potrebbe non funzionare correttamente se
lasciato a lungo a una temperatura che non rientra
nei valori dell’intervallo specicato.
Classe climatica (°C)
SN: da 10 a 32 °C; N: da 16 a 32 °C
ST: da 16 a 38 °C; T: da 16 a 43 °C
Questo apparecchio è privo di CFC. Il circuito
refrigerante contiene R600a (HC). Apparecchi con
Isobutano (R600a): l’isobutano é un gas naturale
senza eetti sull’ambiente, ma è inammabile.
Accertarsi pertanto che i tubi del circuito
refrigerante non siano danneggiati, soprattutto
durante lo svuotamento del circuito refrigerante.
AVVERTENZA: Non danneggiare i tubi del
circuito refrigerante,dell’apparecchio.
AVVERTENZA: Mantenere libere da ostruzioni le
aperture di ventilazione dell’apparecchio o della
struttura a incasso.
IMPORTANTE DA LEGGERE
ERISPETTARE
AVVERTENZA: Non utilizzare mezzi meccanici,
elettrici o chimici diversi da quelli raccomandati
dal fabbricante per accelerare il processo di
sbrinamento.
AVVERTENZA: Non utilizzare o collocare
dispositivi elettrici all’interno dei comparti
dell’apparecchio se non sono del tipo
espressamente autorizzato dal fabbricante.
AVVERTENZA: Le macchine per il ghiaccio e/o
i distributori di acqua non collegati direttamente
alla rete idrica devono essere riempiti solo con
acqua potabile.
AVVERTENZA: Le macchine del ghiaccio
e/o i distributori di acqua automatici devono
essere collegati a una rete idrica che eroghi
esclusivamente acqua potabile, con una pressione
della rete idrica compresa tra 0,17 e 0,81 MPa
(1,7e8,1 bar).
Non conservare all’interno dell’apparecchio
sostanze esplosive quali bombolette spray con
propellente inammabile.
Non ingerire il liquido (atossico) contenuto
negli accumulatori di freddo (in dotazione con
alcuni modelli). Non mangiare cubetti di ghiaccio
o ghiaccioli appena tolti dal congelatore per
evitare il rischio di ustioni da freddo.
Per prodotti che prevedono l’utilizzo di un ltro
dell’aria all’interno di un copriventola accessibile,
il ltro deve essere sempre in posizione quando
ilfrigorifero è in funzione.
Non conservare i contenitori in vetro con liquidi
nel comparto congelatore perché potrebbero
rompersi. Non ostruire la ventola (se presente) con
alimenti. Dopo aver posizionato il cibo controllare
che la porta dei comparti si chiuda correttamente,
specialmente la porta del congelatore.
Le guarnizioni danneggiate devono essere
sostituite il prima possibile.
Utilizzare il comparto frigorifero solo per
conservare gli alimenti freschi e il comparto
congelatore solo per conservare gli alimenti
surgelati, congelare gli alimenti freschi e preparare
cubetti di ghiaccio.
Evitare di conservare gli alimenti non
imballati a diretto contatto con le superci
interne dei comparti frigorifero o congelatore.
Gli apparecchi potrebbero avere comparti speciali
(comparto alimenti freschi, contenitore zero gradi,
ecc). Se non specicato nell’apposito libretto del
prodotto, possono essere rimossi, mantenendo
prestazioni equivalenti.
INSTALLAZIONE
L’apparecchio deve essere maneggiato e
installato da due o più persone - rischio di lesioni.
Utilizzare guanti protettivi per disimballare e
installare - rischio di tagli.
21-Apr-2018 01:11:37 EDT | RELEASED
In some European factories the letter "W" of the part code mentioned herein will be automatically
replaced by the number "4000" (e.g. "W12345678" becomes "400012345678")
29
L’installazione, compresi eventuali allacciamenti
idrici ed elettrici, e le riparazioni devono essere
eseguite da un tecnico qualicato. Non riparare
o sostituire alcuna parte dell’apparecchio se
non espressamente indicato nel manuale d’uso.
Tenerei bambini lontano dal luogo di installazione.
Dopo aver disimballato l’apparecchio, assicurarsi
che non sia stato danneggiato durante iltrasporto.
In caso di problemi, contattare il rivenditore o
l’assistenza post-vendita più vicina. Una volta
eettuata l’installazione, i riuti di imballaggio
(plastica, polistirolo ecc.) devono essere collocati
fuori dalla portata dei bambini - rischio di
soocamento. L’apparecchio deve essere scollegato
dalla rete elettrica prima di qualsiasi operazione di
installazione - pericolo di scossa elettrica. Durante
l’installazione, assicurarsi che l’apparecchio non
danneggi il cavo di alimentazione - rischio di
incendio o scossa elettrica. Attivare l’apparecchio
solo al termine dell’installazione.
Fare attenzione a non danneggiare i pavimenti
(per es. parquet) durante lo spostamento
dell’apparecchio. Installare l’apparecchio su un
pavimento o su un supporto sucientemente
resistente per sopportare il peso e in un luogo
adatto alle dimensioni e all’uso. Accertarsi che
l’apparecchio non sia vicino a una fonte di calore
eche i quattro piedini siano stabili e appoggiati
sul pavimento, regolandoli come richiesto,
e vericare che l’apparecchio sia perfettamente
in piano utilizzando una livella a bolla d’aria.
Attendere almeno due ore prima di accendere
l’apparecchio per assicurarsi che il circuito
refrigerante sia perfettamente funzionante.
Per garantire un’adeguata ventilazione, lasciare
uno spazio su entrambi i lati e sopra l’apparecchio.
La distanza tra la parte posteriore dell’apparecchio
e la parete retrostante deve essere di 50 mm, per
evitare l’accesso alle superci calde. Una riduzione
di questo spazio aumenterà il consumo energetico
del prodotto.
AVVERTENZA: Per evitare pericoli dovuti
all’instabilità, si deve eseguire il posizionamento o
ssaggio dell’apparecchio come da istruzioni del
fabbricante. È vietato posizionare il frigorifero in
un modo tale che le condutture metalliche di stufe
a gas, le tubazioni del gas, i condotti dell’acqua
o i cavi elettrici siano a contatto con la parete
posteriore del frigorifero (bobina condensatore).
Se è necessario sostituire le porte, contattare
ilCentro Assistenza Tecnica.
AVVERTENZE ELETTRICHE
Deve essere possibile scollegare l’apparecchio
dalla rete elettrica staccando la spina se la spina
è accessibile, oppure mediante un interruttore
multipolare installato a monte della presa in
conformità alle norme di cablaggio elettrico
el’apparecchio deve essere collegato a una presa
di terra in conformità alle norme nazionali di
sicurezza elettrica.
Non utilizzare prolunghe, prese multiple o
adattatori. I componenti elettrici non devono
essere accessibili all’utente dopo l’installazione.
Non utilizzare l’apparecchio quando si è bagnati
o a piedi nudi. Non azionare l’apparecchio se
presenta un cavo o una spina di alimentazione
danneggiati, se non funziona correttamente o se
ha subito danni o è caduto.
Se il cavo di alimentazione è danneggiato, deve
essere sostituito con uno identico da parte del
fabbricante, dal personale di assistenza o da una
persona qualicata per evitare il rischio di scosse
elettriche.
AV VERTENZA: Quando si posiziona l’apparecchio,
assicurarsi che il cavo di alimentazione non sia
bloccato o danneggiato.
AVVERTENZA: Non collocare prese multiple o
alimentatori portatili sul retro dell’apparecchio.
PULIZIA E MANUTENZIONE
AVVERTENZA: Accertarsi che l’apparecchio sia
spento e scollegato dalla rete elettrica prima di
eettuare qualsiasi operazione di manutenzione;
non utilizzare mai pulitori a vapore - rischio di
scosse elettriche.
Non utilizzare detergenti abrasivi o aggressivi
come spray per vetri, polveri abrasive, liquidi
inammabili, cere per pulizia, detersivi concentrati,
candeggina o detergenti contenenti derivati del
petrolio su parti in plastica, rivestimenti interni e
porte o guarnizioni. Non utilizzare asciugamani
di carta, tamponi abrasivi o altri attrezzi di pulizia
aggressivi.
SMALTIMENTO DEI MATERIALI DI IMBALLAGGIO
Il materiale di imballaggio è riciclabile al 100% ed è contrassegnato con
il simbolo del riciclo .
Le varie parti dell’imballaggio devono pertanto essere smaltite in modo
responsabile e nel pieno rispetto delle norme locali vigenti in materia di
smaltimento dei riuti.
SMALTIMENTO DI ELETTRODOMESTICI
Questo apparecchio è realizzato con materiali riciclabili o riutilizzabili.
Smaltire in conformità alle norme locali per lo smaltimento dei riuti.
Per ulteriori informazioni sul trattamento, il recupero e il riciclaggio
degli elettrodomestici, contattare l’ente locale competente, il servizio di
raccolta dei riuti domestici o il negozio presso il quale è stato acquistato
l’apparecchio. Questo apparecchio è contrassegnato in conformità alla
Direttiva Europea 2012/19/UE sui riuti di apparecchiature elettriche
ed elettroniche (RAEE). Assicurandovi che questo prodotto sia smaltito
correttamente, contribuirete ad evitare conseguenze negative per
l’ambiente e la salute umana.
Il simbolo sul prodotto o sulla documentazione di accompagnamento
indica che esso non deve essere trattato come riuto domestico, ma
deve essere portato in un apposito centro di raccolta per il riciclaggio
delle apparecchiature elettriche ed elettroniche.
21-Apr-2018 01:11:37 EDT | RELEASED
In some European factories the letter "W" of the part code mentioned herein will be automatically
replaced by the number "4000" (e.g. "W12345678" becomes "400012345678")
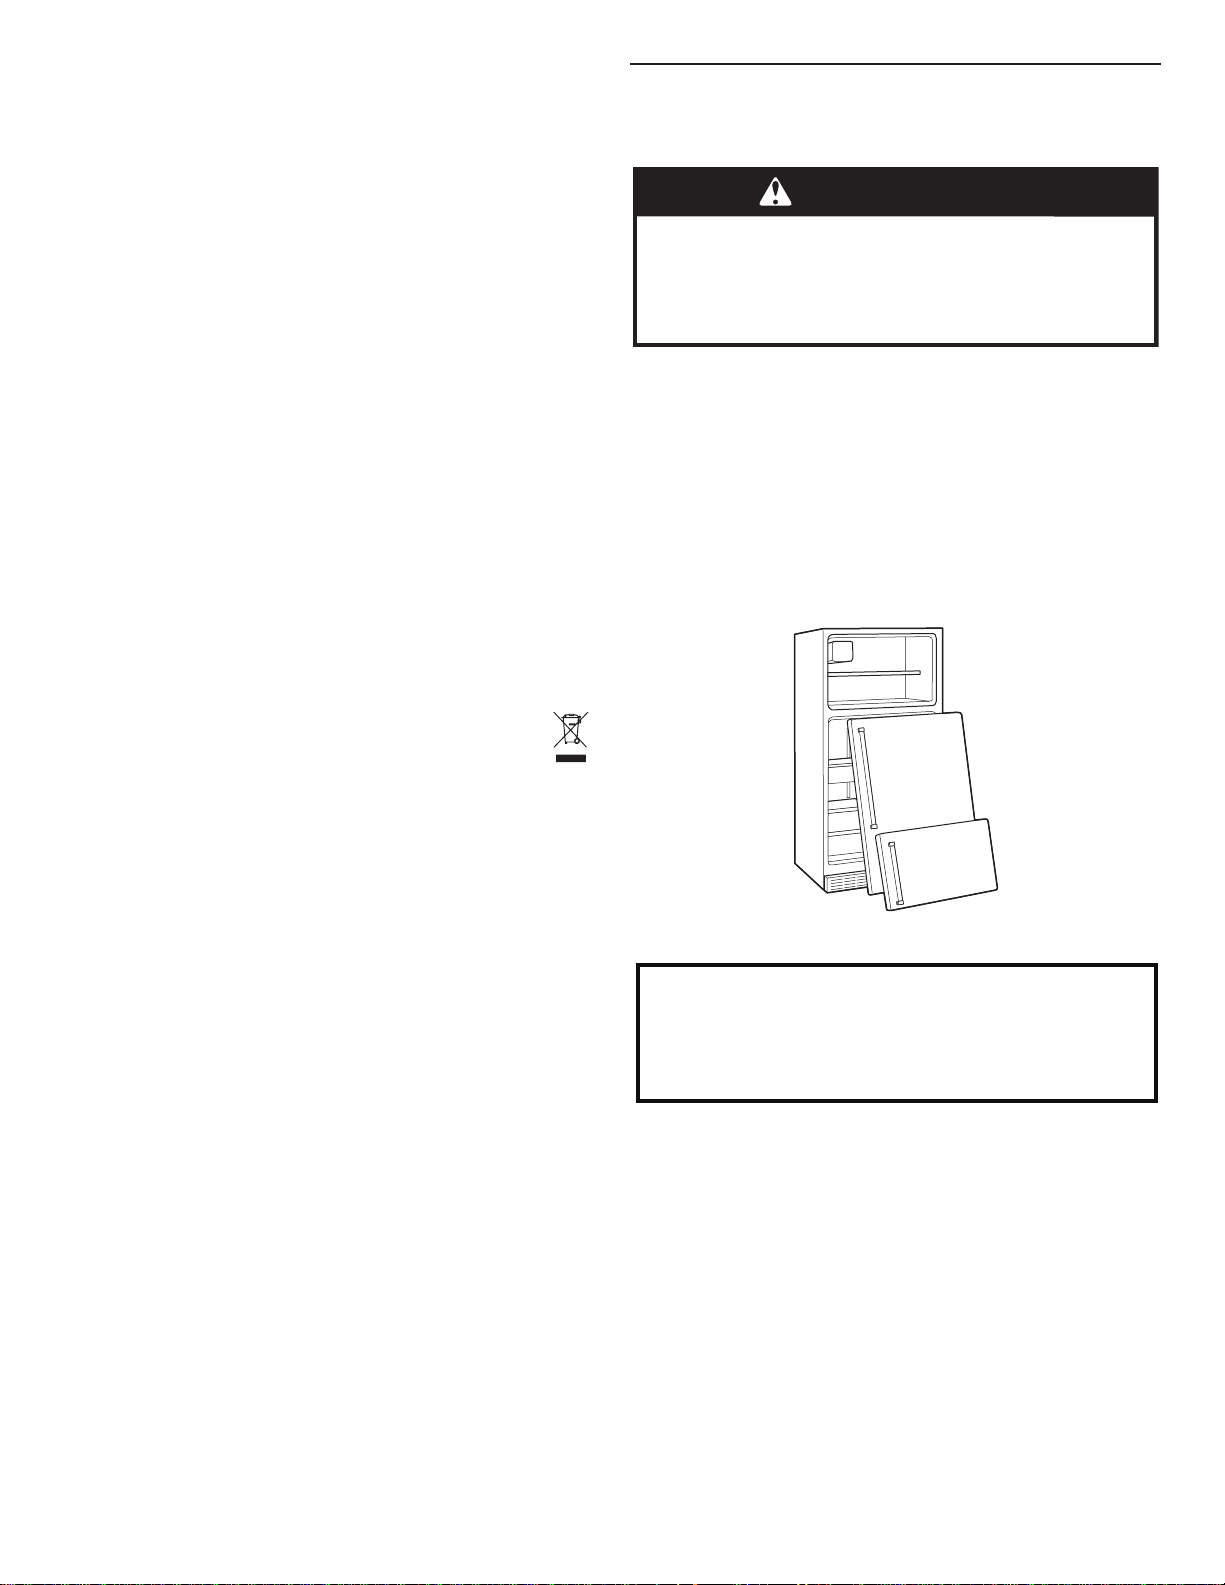
30
CONSIGLI PER IL RISPARMIO ENERGETICO
Installare l’apparecchio in un ambiente asciutto e ben ventilato lontano
da qualsiasi fonte di calore (per es. termosifone, fornello, ecc.) e in un
luogo non esposto direttamente al sole. Se necessario, utilizzare una
piastra isolante.
Per garantire una ventilazione adeguata seguire le istruzioni di
installazione. Una ventilazione insuciente sul retro del prodotto
aumenta il consumo energetico e riduce l’ecienza del rareddamento.
L’apertura frequente della porta potrebbe causare un aumento del
consumo energetico. La temperatura interna dell’apparecchio e il
consumo di energia possono essere inuenzati anche dalla temperatura
ambiente e dalla posizione dell’apparecchio. L’impostazione della
temperatura deve tenere conto di questi fattori.
Ridurre al minimo l’apertura della porta.
Quando si scongelano i cibi congelati, metterli in frigorifero. La bassa
temperatura dei prodotti surgelati raredda il cibo in frigorifero.
Lasciarrareddare cibi e bevande caldi prima di riporli nell’ apparecchio.
Il posizionamento dei ripiani in frigorifero non ha alcun impatto sull’uso
eciente dell’energia. Gli alimenti devono essere collocati sui ripiani in
modo da garantire una corretta circolazione dell’aria (gli alimenti non
devono toccarsi e deve essere mantenuta una distanza tra gli alimenti e
la parete posteriore).
È possibile aumentare la capacità di conservazione dei cibi surgelati
rimuovendo i cestelli e, se presente, il ripiano Stop Frost.
Eventuali rumori provenienti dal compressore non devono preoccupare
in quanto sono da considerarsi normali come descritto nella Guida
Rapida del prodotto.
Smaltimento corretto del
vecchiofrigorifero
IMPORTANTE: gli incidenti fatali che coinvolgono bambini che
restano intrappolati negli elettrodomestici non appartengono
al passato. I frigoriferi abbandonati o buttati nelle discariche
costituiscono ancora oggi un pericolo, anche se lasciati “solo
per qualche giorno”. Quando si decide di disfarsi del vecchio
frigorifero, seguire queste istruzioni per contribuire a evitare
incidenti.
Prima di disfarsi del vecchio frigorifero o congelatore:
■ Togliere le porte.
■ Lasciare in sede i ripiani in modo che i bambini non possano
accedere facilmente all’interno.
AVVERTENZA
Pericolo di soffocamento
Rimuovere le porte del vecchio frigorifero.
La mancata osservanza di queste istruzioni può essere
causa di decesso o danni cerebrali.
Informazioni importanti sullo smaltimento dei
refrigeranti:
Smaltire il frigorifero in conformità alle normative nazionali
e locali. I refrigeranti devono essere evacuati da un tecnico
autorizzato in conformità alle procedure stabilite.
21-Apr-2018 01:11:37 EDT | RELEASED
In some European factories the letter "W" of the part code mentioned herein will be automatically
replaced by the number "4000" (e.g. "W12345678" becomes "400012345678")
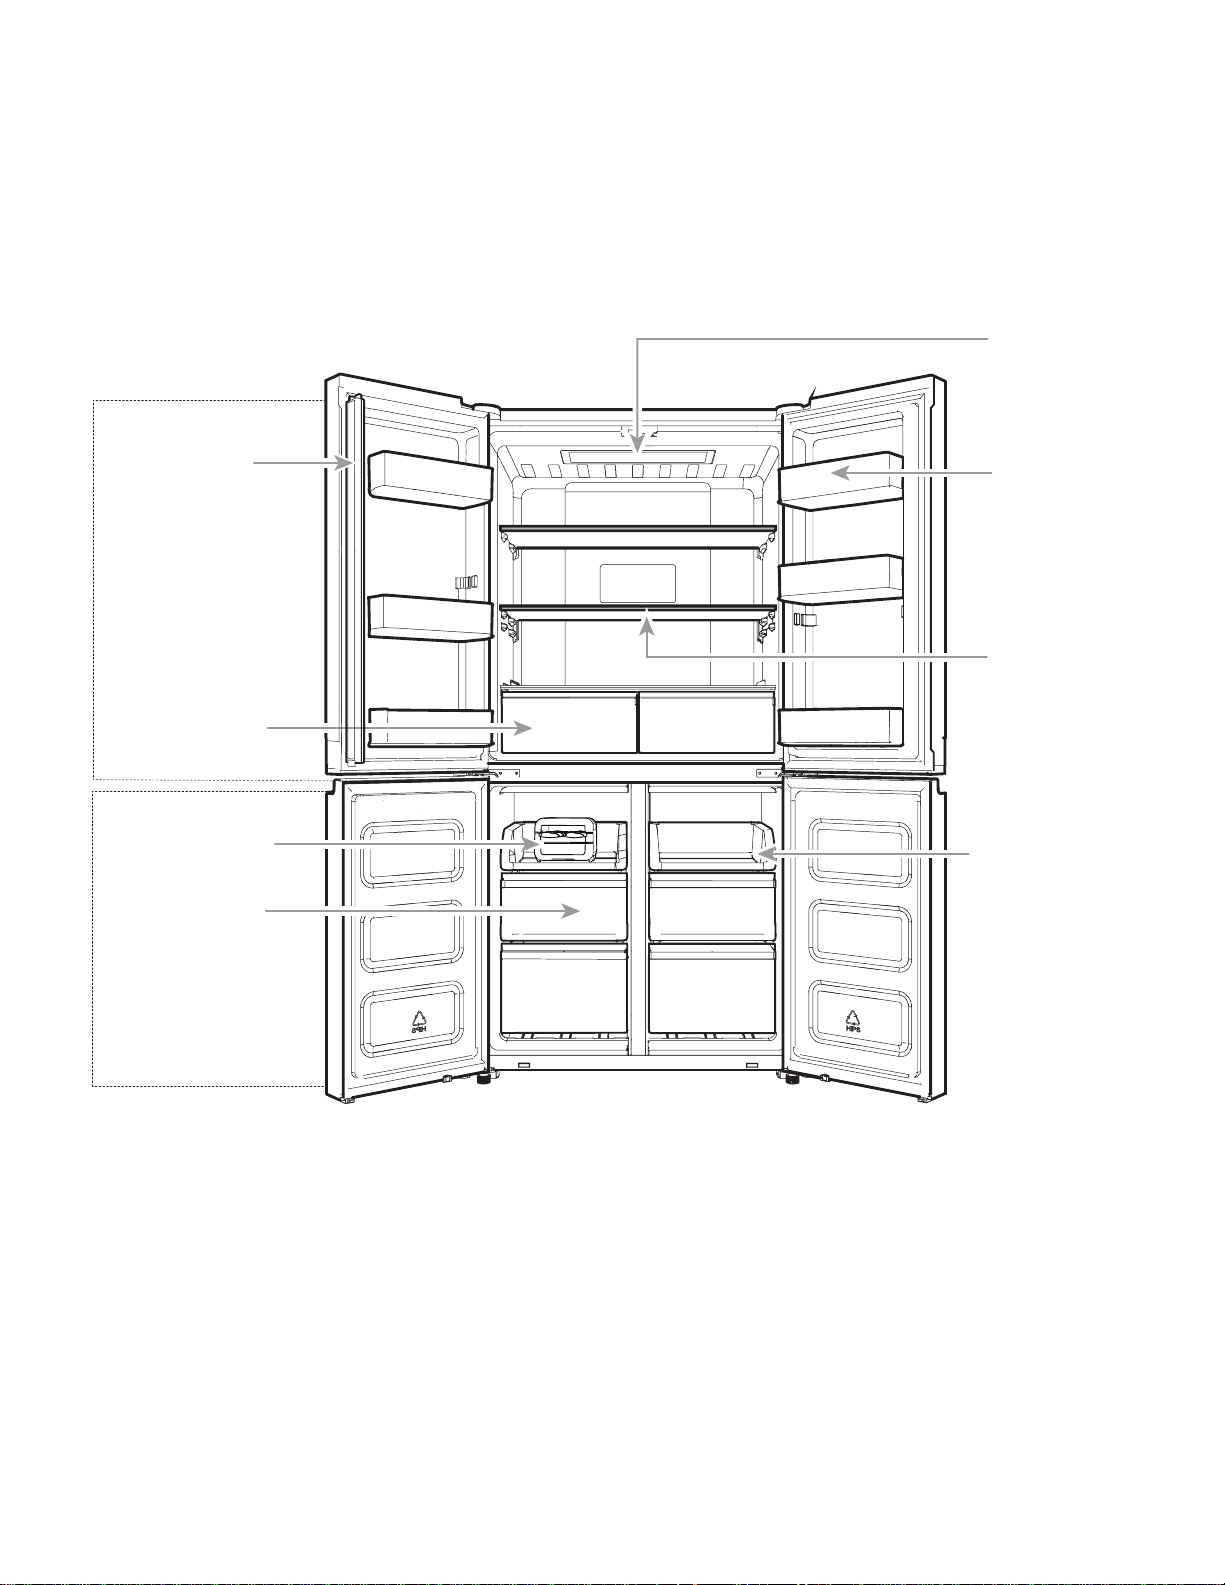
31
COMPONENTI E FUNZIONI
Guarnizione
incernierata
A
B
Balconcino
Luce superiore
Ripiano in vetro
A . Frigorifero
B . Congelatore
Cassetto
verdure fresche
Vassoio congelatore
Cassetti Super
Congelamento
Macchina del
ghiaccio
21-Apr-2018 01:11:37 EDT | RELEASED
In some European factories the letter "W" of the part code mentioned herein will be automatically
replaced by the number "4000" (e.g. "W12345678" becomes "400012345678")
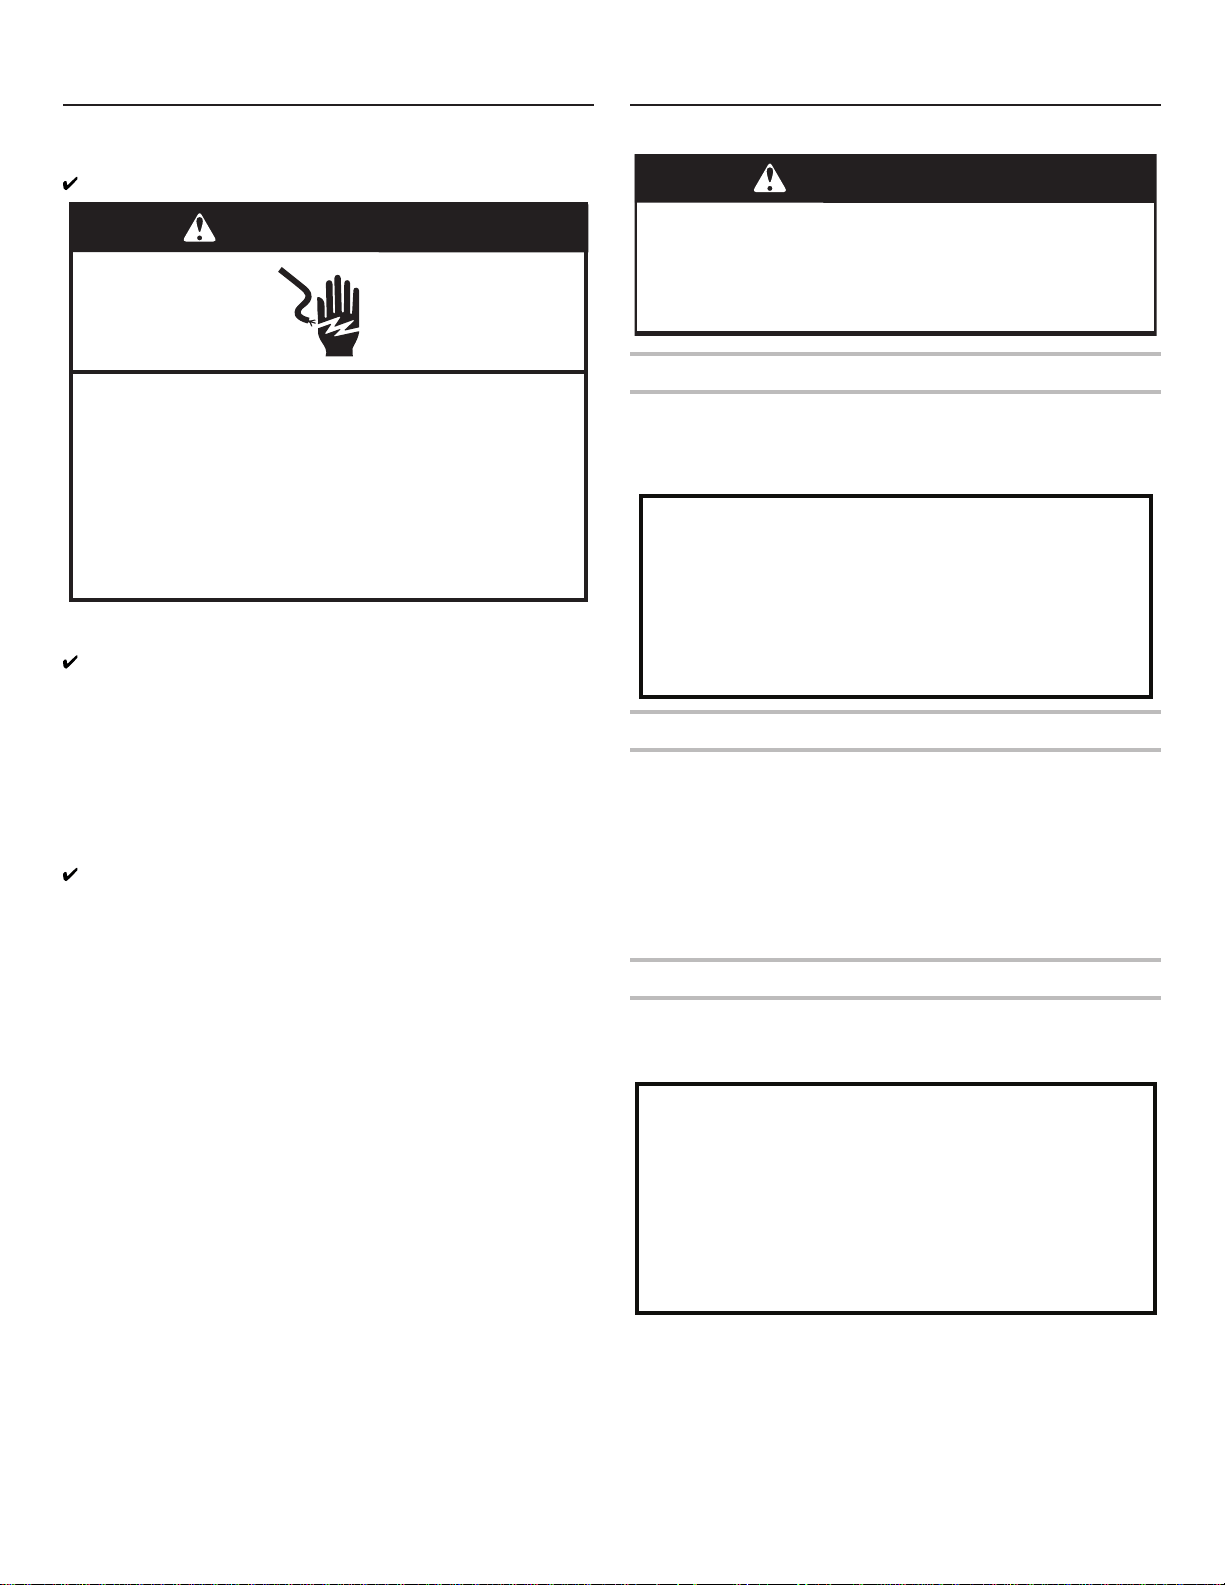
32
ISTRUZIONI DI INSTALLAZIONE
Per iniziare
LISTA DI CONTROLLO PER L’INSTALLAZIONE
Corrente elettrica
■ Inserire la spina del frigorifero in una presa con messa a terra.
Porte
■ Se durante l’installazione occorre rimuovere le porte, vedere
le sezioni “Rimuovere e sostituire le porte del frigorifero”
e“Rimuovere e sostituire i frontali del cassetto congelatore”.
■ La guarnizione delle porte isola completamente.
■ Il frigorifero è in piano. Regolare i piedini di livellamento in
modo che siano aderenti al pavimento.
■ Le porte sono allineate in alto. (Usare la funzione Allineamento
porte se necessario).
Controlli nali
■ Rimuovere tutti i materiali di imballaggio.
■ Impostare i comandi di temperatura sui valori consigliati.
■ Conservare le istruzioni e l’altra eventuale documentazione.
■ Per ricevere un’assistenza più completa, si prega di registrare
il prodotto su http://www.hotpoint.eu/register
Disimballare il frigorifero
Consegna del frigorifero
È necessaria un’apertura porta minima di 838 mm. Se l’apertura
della porta è uguale o inferiore a 914 mm occorre rimuovere le
porte, il cassetto e le cerniere.
Caricare il frigo su un carrello dal lato in cui aprono le porte.
Rimuovere l’imballo
■ Rimuovere residui di nastro e colla dalle superci prima
di accendere il frigorifero. Stronare una piccola quantità
di detergente liquido per piatti sull’adesivo con le dita.
Sciacquare con acqua tiepida e asciugare.
■ Non usare strumenti aflati, stronare alcol, liquidiinammabili
o detergenti abrasivi per rimuovere il nastro o la colla.
Questiprodotti possono danneggiare la supercie del
frigorifero.
■ Smaltire/riciclare tutti i materiali di imballo.
Pulire prima dell’uso
Dopo aver rimosso tutti i materiali di imballo, pulire l’interno del
frigorifero prima di usarlo. Consultare le istruzioni per la pulizia
nella sezione “Manutenzione del frigorifero”.
AVVERTENZA
Rischio di folgorazione
Inserire la spina in una presa con messa a terra.
Non rimuovere il polo di messa a terra.
Non utilizzare un riduttore.
Non utilizzare prolunghe.
La mancata osservanza di queste istruzioni può
essere causa di decesso, incendio o folgorazione.
AVVERTENZA
Pericolo peso eccessivo
Spostare e installare il frigorifero in due o più persone.
La mancata osservanza potrebbe essere causa di
lesioni alla schiena o di altro tipo.
Quando si sposta il frigorifero:
Il frigorifero è pesante. Quando si sposta il frigorifero per la
pulizia o l'assistenza, assicurarsi di coprire il pavimento con
cartone o compensato per evitare di danneggiare il
pavimento. Spostare sempre il frigorifero mantenendolo
diritto. Non far ondeggiare o far "camminare" il frigorifero
quando si tenta di spostarlo per evitare di danneggiare il
pavimento.
Informazioni importanti da sapere sui ripiani e coperchi
in vetro:
Non pulire i ripiani o i coperchi in vetro con acqua calda
quando sono freddi. I ripiani e i coperchi possono rompersi
se esposti a bruschi cambiamenti di temperatura o collisione,
ad esempio urtandoli. Il vetro temperato si frantuma in tanti
piccoli frammenti delle dimensioni di sassolini. È normale.
I ripiani e i coperchi in vetro sono pesanti. Usare entrambe le
mani per rimuoverli per evitare di farli cadere.
21-Apr-2018 01:11:37 EDT | RELEASED
In some European factories the letter "W" of the part code mentioned herein will be automatically
replaced by the number "4000" (e.g. "W12345678" becomes "400012345678")
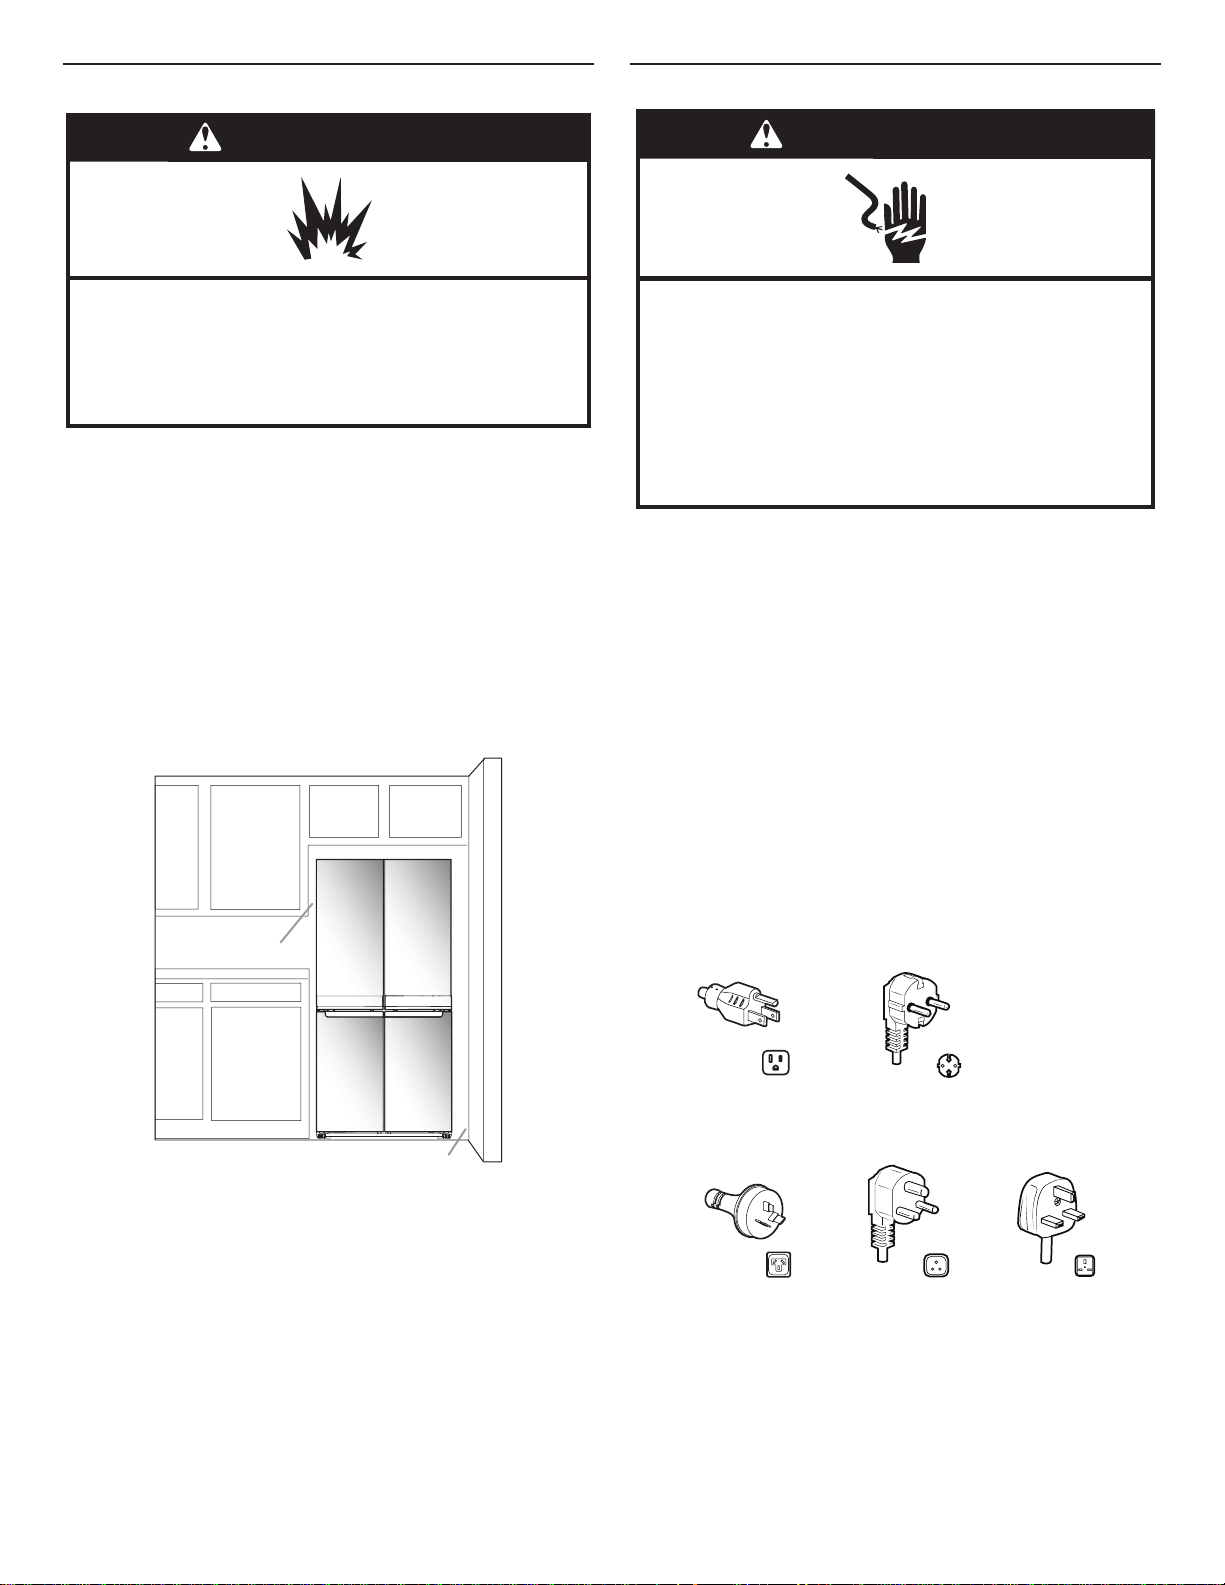
33
Requisiti per il posizionamento
Per assicurare un corretto ricircolo d’aria intorno al frigorifero,
lasciare una spazio di 1,25 cm su ciascun lato e in alto.
Lasciareuno spazio di 5 cm dietro il frigorifero. Se il frigorifero è
dotato di macchina per il ghiaccio, lasciare più spazio sul retro per
i collegamenti del circuito idraulico. Quando si installa il frigorifero
accanto a una parete ssa, lasciare almeno 9,5 cm di spazio tra
ilfrigorifero e la parete per consentire l’apertura della porta.
NOTA: Questo frigorifero è destinato all’uso in ambienti con
temperature comprese tra un minimo di 10°C e un massimo
di 43°C. L’intervallo di temperatura ambiente consigliato per
prestazioni ottimali, che riduce il consumo di energia elettrica
e fornisce un raffreddamento superiore, è compreso tra 15°C
e32°C. Si raccomanda di non installare il frigorifero vicino a fonti
di calore, come forni o radiatori.
Requisiti elettrici
IMPORTANTE: l’installazione e il collegamento elettrico devono
essere eseguiti da un tecnico qualicato, in conformità alle
istruzioni del fabbricante e conformemente alle norme locali
vigenti in materia di sicurezza.
■ Il frigorifero è progettato per funzionare su un circuito
separato di 220-240 Volt, 10 A, 50/60 Hz.
■ Assicurarsi che la tensione specicata sulla targhetta dati
corrisponda a quella della rete domestica.
■ Deve essere possibile disconnettere l’apparecchio
dall’alimentazione elettrica disinserendo la spina oppure
utilizzando un interruttore bipolare di rete posto a monte
dellapresa.
■ Se il cavo di alimentazione è danneggiato, deve essere
sostituito dal fabbricante, da personale di assistenza o
daunapersona con qualica analoga per evitare rischi.
Prima di spostare il frigorifero nella posizione denitiva è importante
assicurarsi di disporre di un allacciamento elettrico idoneo.
Metodo di messa a terra raccomandato
Alimentazione CA 220-240 Volt 50 Hz, 220 Volt 60 Hz o
230/240Volt 50 Hz a soli 10A con messa a terra.
Per Australia e Nuova Zelanda:
Il vostro nuovo elettrodomestico è stato appositamente fabbricato
per soddisfare tutte le Normative e condizioni australiane.
Alcune indicazioni nelle istruzioni di installazione possono far
riferimento a requisiti elettrici di altri paesi, prestare quindi
particolare attenzione a queste note speciche.
L’apparecchio deve essere collegato a una presa CA 230/240 Volt
50 Hz a soli 10A con messa a terra.
AVVERTENZA
Rischio di esplosione
Tenere materiali e vapori infiammabili, come benzina,
lontano dal frigorifero.
La mancata osservanza di queste istruzioni può essere
causa di decesso, esplosione o incendio.
1,25 cm
9,5 cm
AVVERTENZA
Rischio di folgorazione
Inserire la spina in una presa con messa a terra.
Non rimuovere il polo di messa a terra.
Non utilizzare un riduttore.
Non utilizzare prolunghe.
La mancata osservanza di queste istruzioni può
essere causa di decesso, incendio o folgorazione.
Tipo I
Tipo E ed F
Tipo B
Tipo M
Tipo G
21-Apr-2018 01:11:37 EDT | RELEASED
In some European factories the letter "W" of the part code mentioned herein will be automatically
replaced by the number "4000" (e.g. "W12345678" becomes "400012345678")
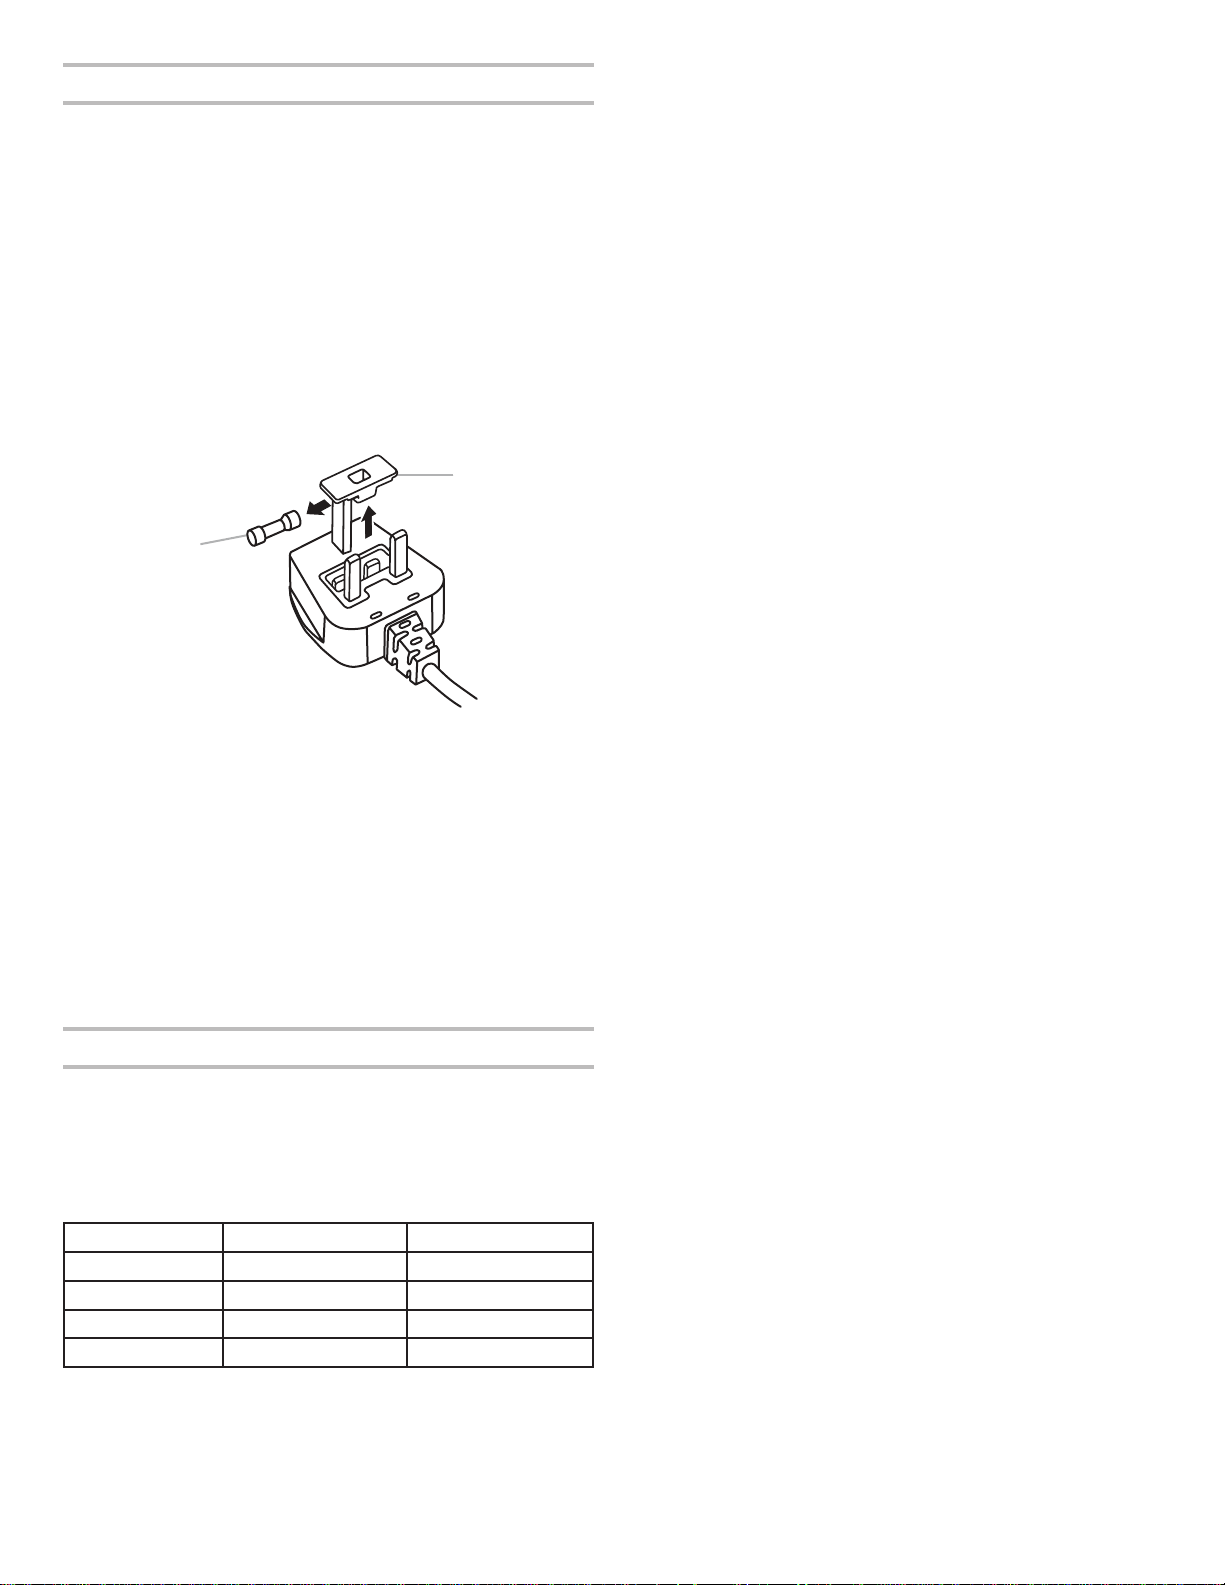
34
Requisiti elettrici (solo per Gran Bretagna e Irlanda)
IMPORTANTE: il frigorifero deve essere collegato a terra.
Sostituzione del fusibile
Se il cavo principale di questo frigorifero è dotato di un fusibile
BS1363A, presa fusibile 13A, per sostituire un fusibile in questo
tipo di presa utilizzare un fusibile A.S.T.A. omologato BS 1362
eprocedere come segue:
1. Rimuovere il coprifusibile (A) e il fusibile (B).
2. Inserire il nuovo fusibile da 13A nel coprifusibile.
3. Reinserire fusibile e coprifusibile nella spina.
IMPORTANTE: quando si cambia il fusibile si deve rimettere in
sede anche il coprifusibile. Se si perde il coprifusibile, la spina
non deve essere utilizzata no a quando non verrà installato un
coprifusibile adatto. La posizione corretta è indicata dall’inserto
colorato o dalla “scritta” colorata in rilievo alla base della spina.
Nei negozi di ricambi elettrici, sono disponibili coprifusibili di
ricambio.
Solo per la Repubblica d’Irlanda:
molto spesso sono applicabili le informazioni fornite per la Gran
Bretagna, tuttavia viene utilizzato un terzo tipo di spina e relativa
presa: a due poli con il polo di terra laterale.
Presa/spina (valide per entrambi i paesi)
Se la spina fornita in dotazione non è adatta alla propria presa,
contattare il Servizio Assistenza per ulteriori istruzioni. Non tentare
di cambiare da soli la spina. Questa operazione deve essere
eseguita da un tecnico qualicato in conformità alle istruzioni
delproduttore e alle norme vigenti in materia di sicurezza.
Temperatura
L’apparecchio è progettato per il funzionamento in ambienti in
cui la temperatura sia compresa nei seguenti intervalli, a seconda
della classe climatica riportata sulla targhetta dati. Il frigorifero
potrebbe non funzionare correttamente se lasciato a lungo a una
temperatura che non rientra nei valori dell’intervallo specicato.
NOTA: Si consiglia di non installare il frigorifero vicino a una fonte
di calore, come una stufa o un termosifone.
Classe climatica Temp. ambiente (°C) Temp. ambiente (°F)
SN Da 10 A 32 Da 50 A 90
N Da 16 A 32 Da 61 A 90
ST Da 16 A 38 Da 61 A 100
T Da 16 A 43 Da 61 A 110
A. Coprifusibile
B. Fusibile
A
B
21-Apr-2018 01:11:37 EDT | RELEASED
In some European factories the letter "W" of the part code mentioned herein will be automatically
replaced by the number "4000" (e.g. "W12345678" becomes "400012345678")
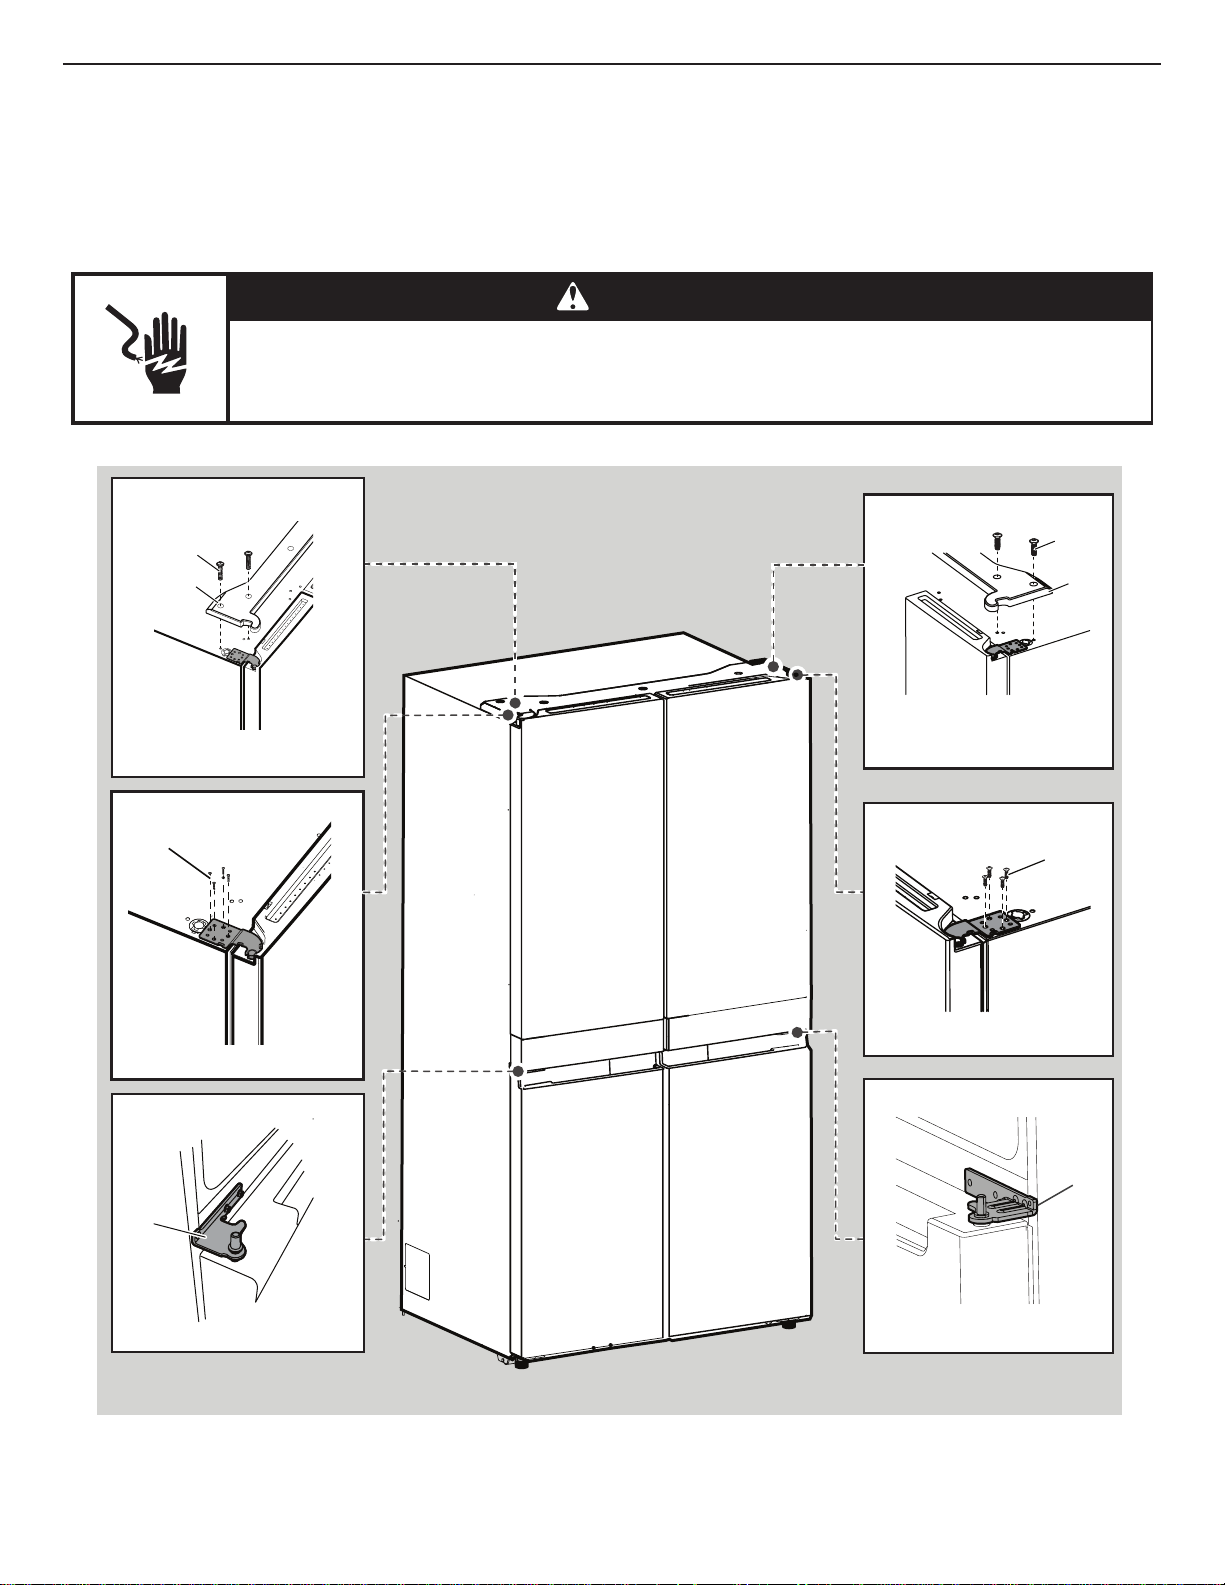
35
Rimuovere e sostituire le porte del frigorifero
NOTA: misurare la larghezza dell’apertura porta per vericare se è necessario rimuovere le porte del frigorifero per portare in casa
l’elettrodomestico. Se è necessario rimuovere le porte, seguire queste istruzioni.
IMPORTANTE: se il frigorifero era già installato e deve essere trasportato all’esterno, spegnere il frigorifero prima di iniziare a rimuovere
le porte. Staccare la spina del frigorifero o scollegare l’alimentazione di rete. Togliere gli alimenti e gli sportelli o balconcini rimovibili
dalleporte.
Preparare gli attrezzi richiesti e leggere tutte le istruzioni prima di rimuovere le porte.
ATTREZZI RICHIESTI: chiave a brugola da 6 mm, chiave a brugola da 5 mm e cacciavite a croce n.2.
AVVERTENZA
Rischio di folgorazione
Scollegare l'alimentazione prima di rimuovere le porte.
La mancata osservanza di queste istruzioni può essere causa di decesso o di folgorazione.
A
Cerniera superiore
sinistra
Cerniera mediana sinistra
Copricerniera superiore
sinistra
Copricerniera superiore
destra
A. Viti a brugola 5 mm
A. Cerniera
A. Cerniera
A. Viti copricerniera superiore
B. Copricerniera
A. Viti copricerniera superiore
B. Copricerniera
Cerniera superiore destra
Cerniera mediana destra
A. Viti a brugola 5 mm
A
A
A
B
A
B
A
21-Apr-2018 01:11:37 EDT | RELEASED
In some European factories the letter "W" of the part code mentioned herein will be automatically
replaced by the number "4000" (e.g. "W12345678" becomes "400012345678")

36
Rimuovere le porte del frigorifero
Rimuovere la porta destra
1. Staccare la spina del frigorifero o scollegare l’alimentazione
direte.
2. Tenere chiuse le porte del frigorifero no a quando si è pronti
per toglierle dal vano frigo sollevandole.
NOTA: sostenere la porta del frigorifero durante la rimozione delle
cerniere. Non afdarsi ai magneti sulla guarnizione della porta per
il sostegno della porta mentre si lavora.
3. Con un cacciavite a croce, rimuovere il copricerniera superiore.
4. Utilizzando una chiave a brugola da 5 mm, rimuovere quattro
viti dalla cerniera superiore e tenerle da parte.
5. Sollevare la porta del frigorifero dal perno della cerniera
mediana. La cerniera superiore viene via insieme alla porta.
Rimuovere la porta sinistra
IMPORTANTE: i cablaggi per l’interfaccia passano attraverso la
cerniera della porta sinistra quindi devono essere scollegati prima
di rimuovere la porta.
1. Con un cacciavite a croce, rimuovere il copricerniera superiore.
2. Scollegare le due spine del cablaggio situate nella parte
superiore della cerniera della porta.
■ Afferrare entrambi i lati delle spine del cablaggio.
Conilpollice sinistro premere verso il basso per rilasciare
il fermo e dividere le sezioni delle spine.
AVVERTENZA
Pericolo peso eccessivo
Per sollevare la porta del frigorifero occorrono due o
più persone.
onde evitare lesioni alla schiena o di altro tipo.
Rischio di folgorazione
Scollegare l'alimentazione prima di rimuovere le porte.
La mancata osservanza di queste istruzioni può essere
causa di decesso o di folgorazione.
AVVERTENZA
A. Vite copricerniera superiore
B. Copricerniera superiore
C. Viti a brugola 5 mm
D. Cerniera superiore
A
B
C
D
A. Vite copricerniera superiore
B. Copricerniera superiore
A
B
A
A. Spina cablaggio
B. Connettore di messa a terra
B
21-Apr-2018 01:11:37 EDT | RELEASED
In some European factories the letter "W" of the part code mentioned herein will be automatically
replaced by the number "4000" (e.g. "W12345678" becomes "400012345678")
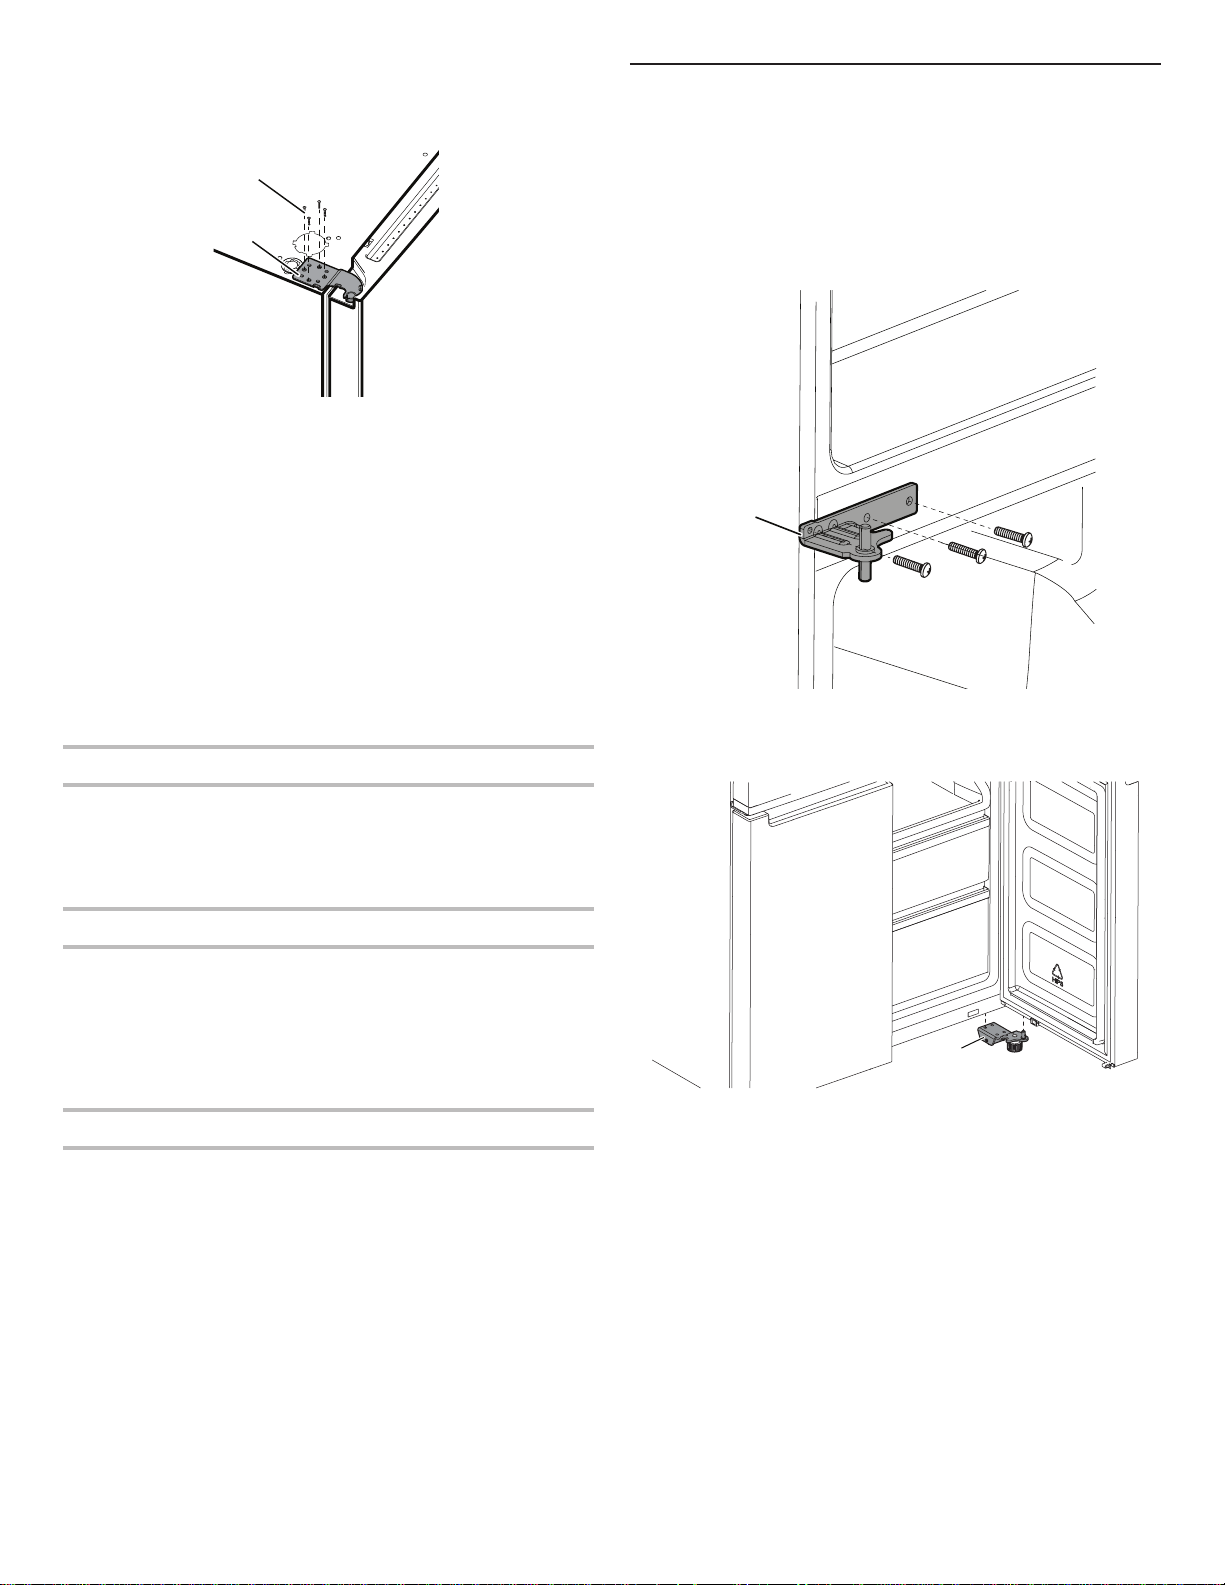
37
3. Utilizzando una chiave a brugola da 5 mm, rimuovere quattro
viti interne dalla cerniera superiore e tenerle da parte.
NOTA: sostenere la porta del frigorifero durante la rimozione delle
cerniere. Non afdarsi ai magneti sulla guarnizione della porta per
il sostegno della porta mentre si lavora.
4. Sollevare la porta del frigorifero dal perno della cerniera della
parte inferiore. La cerniera superiore viene via insieme alla porta.
NOTA: potrebbe non essere necessario rimuovere le cerniere
inferiori e i gruppi piedini frenati per far passare il frigorifero
attraverso la porta.
■ Utilizzare una chiave a brugola da 6 mm e un cacciavite
a croce n. 2 per rimuovere la cerniera mediana solo se
necessario.
Sostituire la porta destra del frigorifero
1. Poggiare la porta destra sul perno della cerniera mediana.
2. Inserire il perno della cerniera superiore nel foro aperto sulla
sommità della porta del frigorifero.
3. Utilizzando quattro viti con esagono incassato da 5 mm,
ssare la cerniera al vano. Non serrare completamente le viti.
Sostituire la porta sinistra del frigorifero
1. Poggiare la porta sinistra sul perno della cerniera mediana.
2. Utilizzando quattro viti con esagono incassato da 5 mm,
ssare la cerniera al vano. Non serrare completamente le viti.
3. Ricollegare i cavi elettrici.
■ Spingere insieme le due sezioni della spina dei cablaggi.
■ Ricollegare il lo di terra alla vite della cerniera.
Passaggi nali
1. Serrare completamente le otto viti con esagono incassato da
5 mm.
2. Rimontare i due copricerniera.
Rimuovere e sostituire la porta
delcongelatore/temperature multiple
1. Tenere chiuse le porte del congelatore no a quando si è
pronti per toglierle dal vano sollevandole.
NOTA: sostenere la porta del congelatore durante la rimozione
delle cerniere. Non afdarsi ai magneti sulla guarnizione della
porta per il sostegno della porta mentre si lavora.
■ Utilizzare un cacciavite a croce n. 2 e una chiave a brugola
da6 mm per rimuovere la cerniera mediana dal vano.
■ Sollevare la porta del congelatore dal perno della cerniera
inferiore.
A. Viti a brugola 5 mm
B. Cerniera superiore
A
B
A. Cerniera mediana
A
A. Cerniera inferiore
A
21-Apr-2018 01:11:37 EDT | RELEASED
In some European factories the letter "W" of the part code mentioned herein will be automatically
replaced by the number "4000" (e.g. "W12345678" becomes "400012345678")
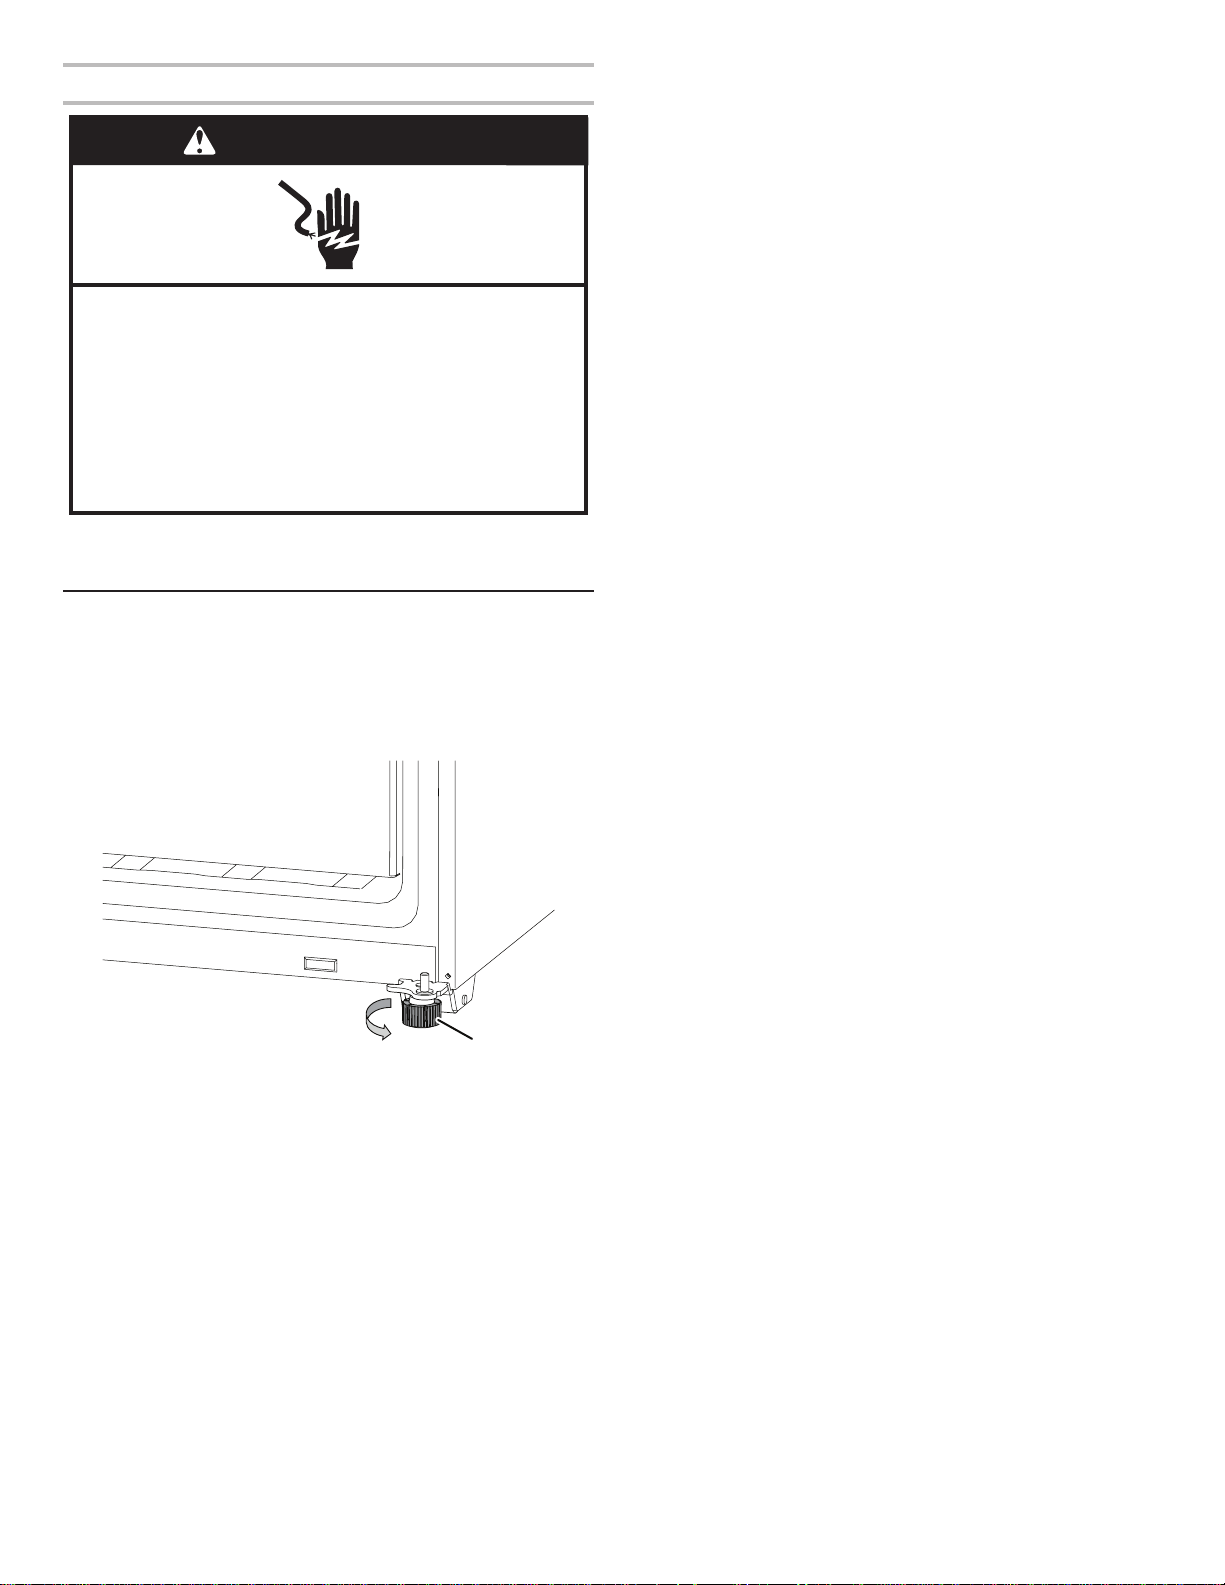
38
Passaggi nali
1. Inserire la spina in una presa con messa a terra.
2. Rimettere tutte le parti rimovibili e gli alimenti nei cassetti.
Messa in piano del frigorifero
1. Spostare il frigorifero nella posizione denitiva.
2. Ruotare manualmente i piedini frenati. Ruotarli in senso
antiorario no a quando i rulli si staccano dal pavimento ed
entrambi i piedini frenati sono ben ssi sul pavimento. I piedini
frenati evitano che il frigorifero venga avanti quando si aprono
le porte.
IMPORTANTE: se occorre eseguire altre regolazioni che
coinvolgono i piedini frenati, è necessario ruotare entrambi
i piedini frenati in modo uniforme per mantenere in piano
ilfrigorifero.
3. Utilizzare una livella per controllare che i due anchi e la parte
anteriore e quella posteriore siano in piano.
AVVERTENZA
Rischio di folgorazione
Inserire la spina in una presa con messa a terra.
Non rimuovere il polo di messa a terra.
Non utilizzare un riduttore.
Non utilizzare prolunghe.
La mancata osservanza di queste istruzioni può
essere causa di decesso, incendio o folgorazione.
A. Piedino frenato
A
21-Apr-2018 01:11:37 EDT | RELEASED
In some European factories the letter "W" of the part code mentioned herein will be automatically
replaced by the number "4000" (e.g. "W12345678" becomes "400012345678")
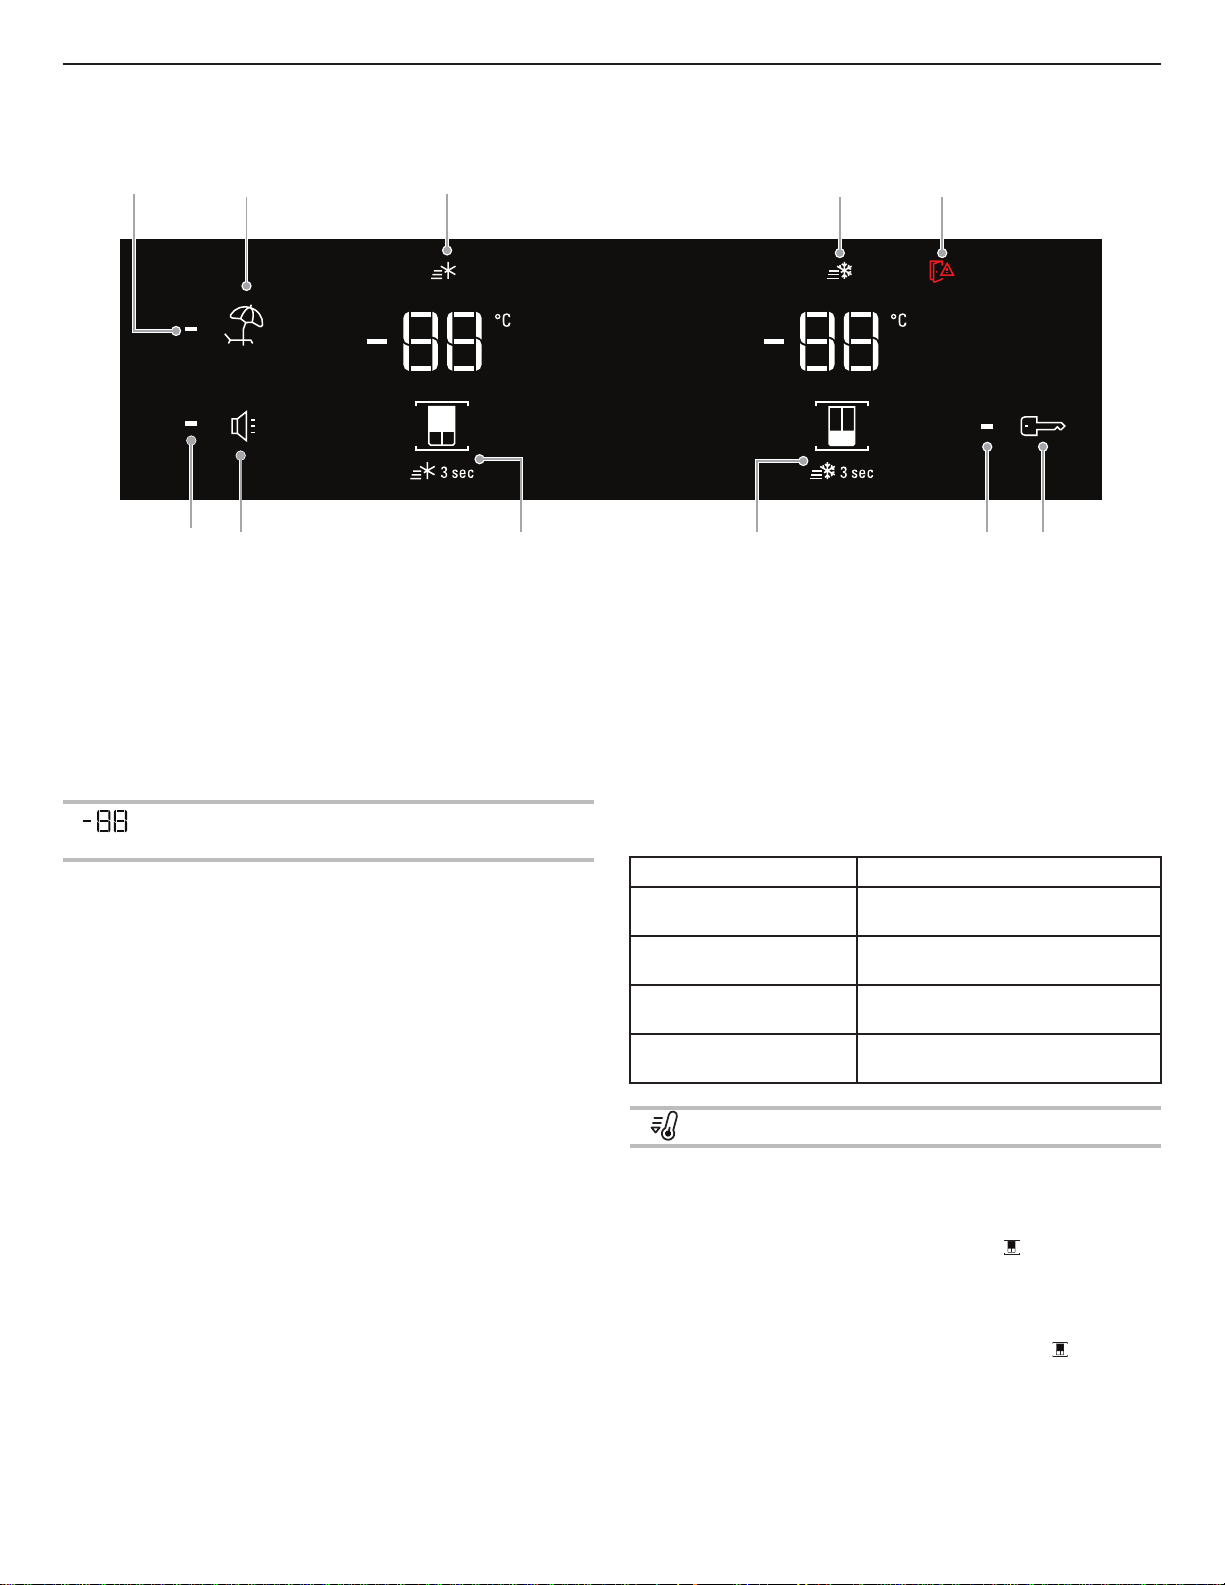
39
Uso dei comandi
I controlli touch si trovano sulla porta sinistra del frigorifero. Il pannello di controllo contiene informazioni su vari pulsanti e indicatori.
Gliindicatori di temperatura del frigorifero e del congelatore mostrano l’ultimo setpoint di temperatura.
1. Indicatore Segnali sonori
2. Pulsante Segnali sonori ON/OFF
3. Pulsante Temperatura Frigorifero (tenere premuto 3 sec. per
Super Raffreddamento)
4. Pulsante Temperatura Congelatore (tenere premuto 3 sec. per
Super Congelamento)
5. Indicatore Blocco chiave
6. Pulsante Blocco chiave
7. Spia Porta aperta
8. Indicatore Super Congelamento
9. Indicatore Super Raffreddamento
10. Pulsante modo Vacanze
11. Indicatore modo Vacanze
Il pannello di controllo si spegne automaticamente dopo un minuto di inattività. Per accendere il pannello di controllo, premere un tasto
qualsiasi.
Visualizzazione e regolazione dei setpoint
ditemperatura
Regolazione della temperatura del comparto frigorifero e
delcomparto congelatore:
Per praticità i comandi del frigorifero e del congelatore sono
preimpostati in fabbrica.
Quando si installa il frigorifero per la prima volta assicurarsi
che icomandi siano ancora impostati sui setpoint consigliati.
Isetpoint di fabbrica consigliati sono 3°C per il frigorifero e -18°C
per il congelatore.
Premendo il pulsante Temperatura Frigorifero o Congelatore si
commutano i setpoint di temperatura in gradi Celsius (°C)
IMPORTANTE:
■ Attendere 24 ore prima di inserire gli alimenti in frigorifero.
Sesi inseriscono alimenti prima che il frigorifero si sia
raffreddato completamente, si potrebbero deteriorare.
NOTA: abbassando le temperature al di sotto dei setpoint
consigliati non servirà a raffreddare i comparti più rapidamente.
■ Se la temperatura del frigorifero o del congelatore è troppo
calda o troppo fredda, controllare che le prese d’aria non
siano bloccate prima di regolare i comandi.
■ Le impostazioni consigliate dovrebbero essere idonee
per il normale uso domestico. I comandi sono impostati
correttamente se la temperatura del latte o dei succhi di frutta
è corretta e quando il gelato è solido.
NOTA: in aree come un garage, un seminterrato o una
veranda potrebbero esserci umidità più elevata o temperature
estreme. Pertanto potrebbe essere necessario regolare le
impostazioni di temperatura rispetto a quelle consigliate
peradattarle a tali condizioni.
■ Attendere almeno 24 ore tra una regolazione e l’altra.
Controllare di nuovo le temperature prima di procedere
adaltre regolazioni.
Quando si regolano i setpoint di temperatura,
utilizzare questa tabella come guida:
CONDIZIONE: REGOLAZIONE TEMPERATURA:
Frigorifero troppo freddo Impostazione frigorifero di un 1°
inpiù
Frigorifero troppo caldo Impostazione frigorifero di un 1°
inmeno
Congelatore troppo freddo Impostazione congelatore di un 1°
in più
Congelatore troppo caldo/
troppo poco ghiaccio
Impostazione congelatore di un 1°
in meno
Super Raffreddamento
La funzione Super Raffreddamento è utile nei periodi di utilizzo
intenso del frigorifero, quando è pieno o per temperature
ambiente temporaneamente calde.
■ Per attivare la funzione Super Raffreddamento, tenere
premuto il pulsante Temperatura Frigorifero per 3 secondi.
Quandolafunzione è attivata, l’icona di Super Raffreddamento
si accende. La funzione Super Raffreddamento rimane accesa
per 2 ore a meno che non venga disattivata manualmente.
■ Per disattivare manualmente la funzione Super Raffreddamento,
tenere premuto il pulsante Temperatura Frigorifero per
3secondi. L’icona di Super Raffreddamento si spegne quando
la funzione non è attivata.
■ Se si regola la temperatura del frigorifero, la funzione Super
Raffreddamento si disattiva automaticamente.
1
2
4
3
5
6
7
8
9
10
11
21-Apr-2018 01:11:37 EDT | RELEASED
In some European factories the letter "W" of the part code mentioned herein will be automatically
replaced by the number "4000" (e.g. "W12345678" becomes "400012345678")
40
Super Congelamento
La quantità di cibo fresco (in kg) che può essere congelato in
24ore è indicata sulla targhetta dell’apparecchio.
■ Premere il pulsante Temperatura Congelatore per 3secondi
(no a quando l’indicatore di Super Congelamento si accende),
24 ore prima di mettere cibo fresco nel congelatore. Dopoaver
posizionato il cibo fresco nel congelatore, 24ore sulla funzione
Super Congelamento sono generalmente sufcienti; dopo 50 ore
la funzione Super Congelamento si disattiva automaticamente.
■ Per disattivare manualmente la funzione Super Congelamento,
tenere premuto il pulsante Temperatura Congelatore per
3secondi. L’icona di Super Congelamento si disattiva.
■ Se si regola la temperatura del congelatore, la funzione Super
Congelamento si disattiva automaticamente.
Modo Vacanze
Questa modalità è progettata per evitare che l’apparecchio
sprechi energia nei periodi in cui non viene utilizzato regolarmente
(ad esempio durante le ferie).
Selezionando questa funzione, la temperatura del comparto
frigorifero verrà impostata automaticamente su 12°C.
■ Per utilizzare il modo Vacanze, premere il pulsante
corrispondente nché si accende l’indicatore del modo
Vacanze sul display.
■ Per uscire dal modo Vacanze, premere il pulsante
corrispondente nché non sarà più accesa l’icona del modo
Vacanze sul display.
■ Se si regola la temperatura del frigorifero, la funzione del
modo Vacanze si disattiva automaticamente.
IMPORTANTE: se si seleziona questa modalità, tutti i cibi e
lebevande devono essere rimossi dal comparto frigorifero.
Segnali sonori ON-OFF
Premere il pulsante per attivare/disattivare la segnalazione sonora.
Blocco chiave
■ Tenere premuto il pulsante di Blocco per 3 secondi,
perattivare la funzione Blocco.
■ Per disattivare il blocco, tenere premuto il pulsante di Blocco
per 3 secondi.
La funzione Blocco ignora tutte le interazioni con il pannello
di controllo nché l’utente non sblocca il pannello di controllo.
Questa funzione consente di evitare modiche involontarie delle
impostazioni.
Funzioni aggiuntive
Spia Porta aperta
■ La funzione Spia porta aperta emette un allarme e fa
lampeggiare l’icona di “Porta aperta” quando una
dellequattro porte è rimasta aperta per almeno 2 minuti.
■ L’allarme si ripete ogni 5 minuti. Chiudere tutte le porte per
disattivarlo.
NOTA: per silenziare l’allarme sonoro mentre le porte sono aperte,
ad esempio durante la pulizia dell’interno del frigorifero, toccare
un pulsante qualsiasi sul pannello comandi. L’allarme sonoro
viene temporaneamente sospeso, ma l’icona della Porta aperta
rimane visualizzata sul pannello comandi.
Luce del frigorifero
Il frigo dispone di una luce interna che si accende quando si apre
la porta.
NOTA: la luce è a LED e non serve quindi sostituire la lampadina.
Se i LED non si accendono quando si apre la porta, rivolgersi
all’assistenza tecnica.
21-Apr-2018 01:11:37 EDT | RELEASED
In some European factories the letter "W" of the part code mentioned herein will be automatically
replaced by the number "4000" (e.g. "W12345678" becomes "400012345678")
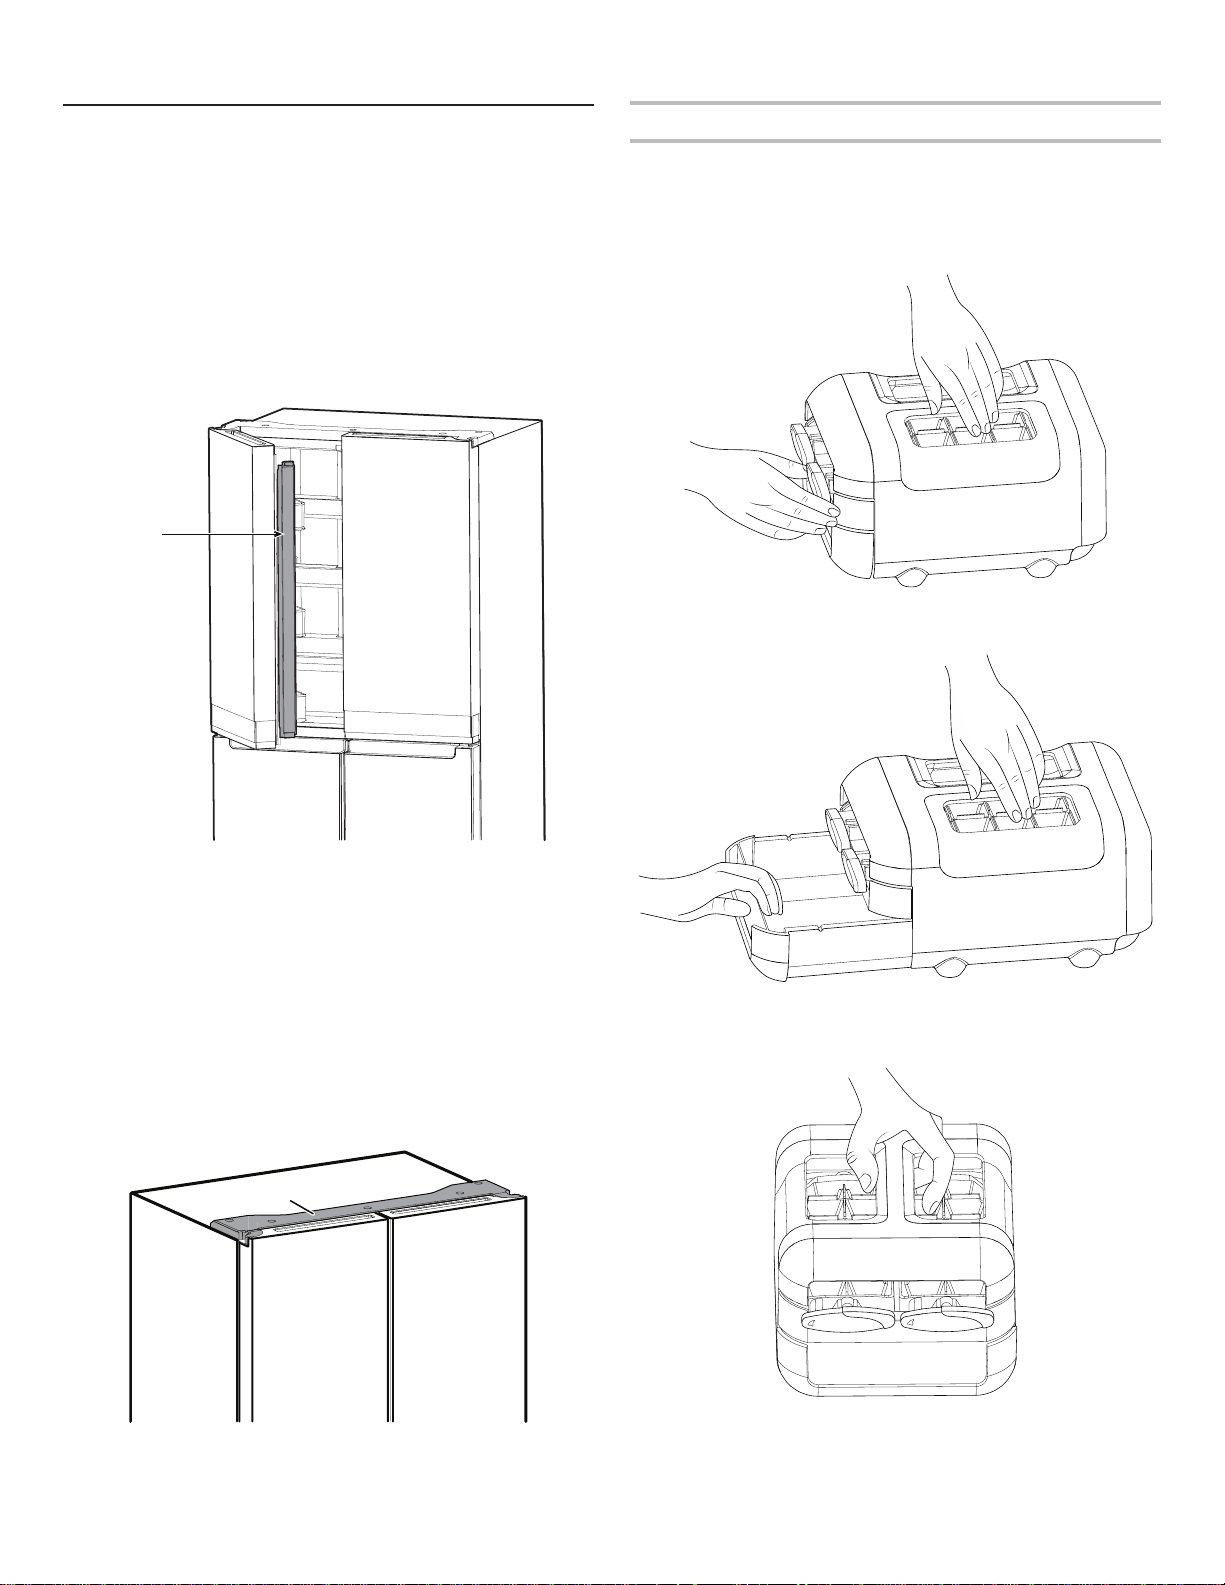
41
USO DEL FRIGORIFERO
Apertura e chiusura delle porte
Le porte del vano frigorifero sono due. Si possono aprire e
chiudere insieme o separatamente. La porta sinistra del frigorifero
comprende una guarnizione incernierata verticalmente.
■ Quando la porta sinistra viene aperta, la guarnizione
incernierata si ripiega automaticamente all’interno in modo
danon intralciare.
■ Quando entrambe le porte sono chiuse, la guarnizione
incernierata forma automaticamente una sigillatura tra le
dueporte
NOTA: Quando si chiude la porta, la guarnizione incernierata
deve essere nella posizione corretta (ripiegata all'interno). In caso
contrario premerà contro la porta destra o la staffa di ssaggio.
I due interruttori delle porte del comparto frigorifero si trovano
rispettivamente sui copricerniera superiori destro e sinistro.
■ Per la zona di congelamento e multi temperatura, l’interruttore
della porta si trova nel montante inferiore.
■ L’interruttore porta utilizza un magnete per rilevare l’apertura/
chiusura della porta.
■ Assicurarsi che non vi siano magneti o apparecchi elettronici
(altoparlanti, Coolvox
®
ecc.) entro 7,62 cm dal copricerniera.
NOTA: la luce non si accende se non viene rilevata l’apertura
della porta.
Macchina del ghiaccio
■ Per la preparazione del ghiaccio, riempire il vassoio del
ghiaccio con acqua puricata e collocare la macchina del
ghiaccio manuale nel ripiano superiore del congelatore.
Aspettare che si formi il ghiaccio e una volta che il ghiaccio
èpronto, girare le manopole in senso orario per espellere i
cubetti di ghiaccio nel contenitore del ghiaccio.
■ Sollevare leggermente il contenitore del ghiaccio ed estrarre
ilcontenitore per accedere ai cubetti di ghiaccio.
Il gruppo manuale della macchina del ghiaccio può essere
rimosso dal congelatore quando non si desidera fare il ghiaccio
per ottenere maggior spazio nel congelatore.
A. Guarnizione incernierata
A
A. Copricerniera
A
21-Apr-2018 01:11:37 EDT | RELEASED
In some European factories the letter "W" of the part code mentioned herein will be automatically
replaced by the number "4000" (e.g. "W12345678" becomes "400012345678")
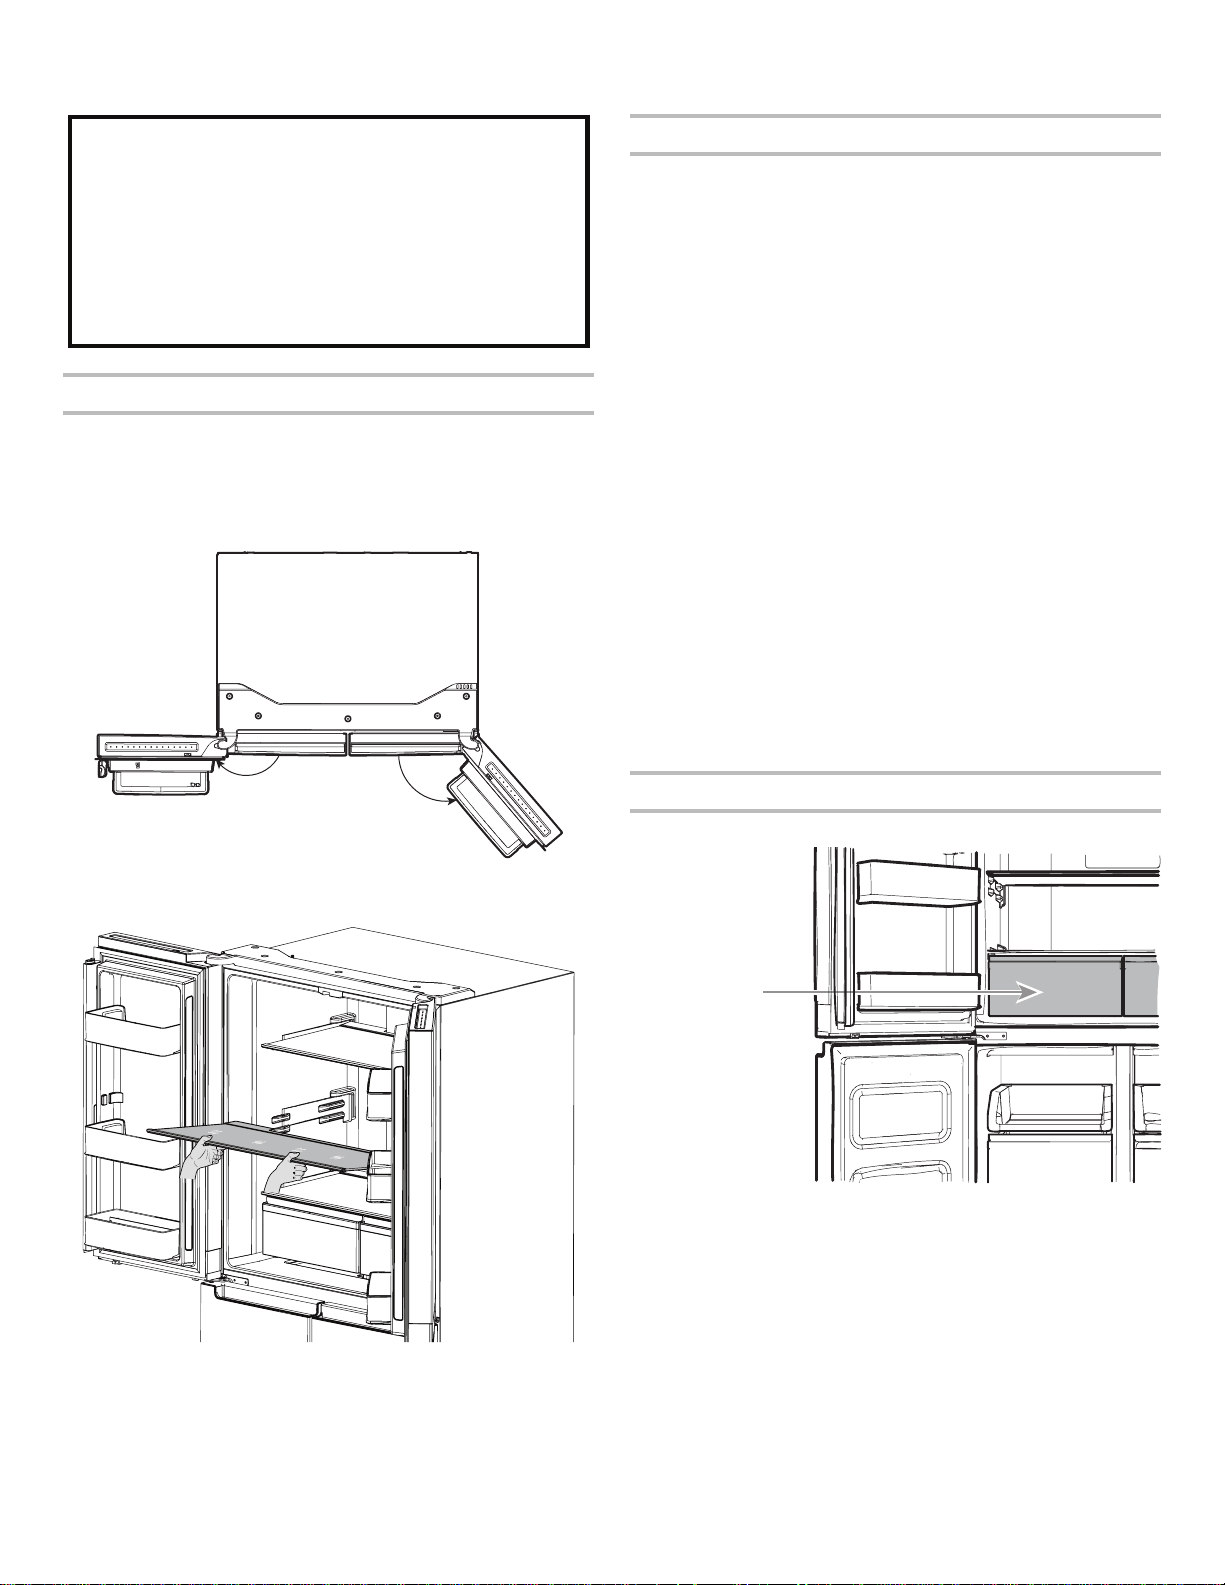
42
RIPIANI, BALCONCINI E CASSETTI
Regolazione altezza ripiano
L’altezza del ripiano può essere regolata cambiando la sua
posizione dal supporto inferiore a quello superiore e viceversa.
■ Aprire lo sportello laterale destro no all’apertura completa.
■ Aprire la porta laterale sinistra no all’apertura completa e
sollevare la porta per aprirla a 180°.
■ Estrarre il ripiano dal frigorifero e posizionarlo nella posizione
di montaggio desiderata.
■ Assicurarsi che i ripiani siano riposizionati fermamente sui
rispettivi supporti.
Ripiani e strutture di supporto dei ripiani
I ripiani del frigorifero sono regolabili per rispondere alle singole
esigenze.
Riporre insieme alimenti simili nel frigo e regolare la posizione
delle mensole in altezza aiuta trovare subito ciò che si cerca.
Siriduce inoltre il tempo in cui le porte restano aperte,
avantaggio del risparmio energetico.
Per rimuovere e reinserire i ripiani:
1. Aprire la porta laterale destra no all’apertura completa e la
porta laterale sinistra no all’apertura completa e sollevare
laporta sinistra per aprirla a 180°.
2. Rimuovere il ripiano mediano o superiore sollevandolo e
staccandolo dai supporti ripiano. Tirare quindi il ripiano
in avanti e inclinarlo verso il basso in posizione verticale.
Ruotareil ripiano in obliquo ed estrarlo dal frigo.
3. Rimuovere il ripiano inferiore sollevandolo e staccandolo dai
supporti ripiano. Tirare quindi il ripiano in avanti e inclinarlo
verso l’alto in posizione verticale. Ruotare il ripiano in obliquo
ed estrarlo dal frigo.
4. Per reinserire i ripiani mediano e superiore introdurli nel
frigorifero tenendoli inclinati orizzontalmente con la parte
anteriore verso il basso. Alzare quindi la parte anteriore e far
scivolare il ripiano all’interno nché la parte posteriore poggia
sui supporti. Abbassare la parte anteriore e assicurarsi che
ilripiano sia in sede.
5. Per reinserire il ripiano inferiore introdurre il ripiano
inclinato orizzontalmente con la parte anteriore verso l’alto.
Abbassarequindi la parte anteriore e far scivolare il ripiano
all’interno nché la parte posteriore poggia sui supporti.
Abbassare la parte anteriore e assicurarsi che il ripiano
siainsede.
Cassetto verdure fresche
Per rimuovere e reinserire i cassetti Verdura fresca:
1. Afferrare la maniglia del cassetto Verdura fresca ed estrarlo
no a quando si arresta. Sollevare il cassetto Verdure fresca
dalla guida inferiore.
2. Per riposizionare/reinserire il cassetto Verdura fresca,
poggiarlo sulla guida inferiore e spingerlo oltre il fermo nché
si blocca in sede.
Informazioni importanti da sapere sui ripiani e coperchi
in vetro:
Non pulire i ripiani o i coperchi in vetro con acqua calda
quando sono freddi. I ripiani e i coperchi possono rompersi
se esposti a bruschi cambiamenti di temperatura o collisione,
ad esempio urtandoli. Il vetro temperato si frantuma in tanti
piccoli frammenti delle dimensioni di sassolini. È normale.
I ripiani e i coperchi in vetro sono pesanti. Usare entrambe le
mani per rimuoverli per evitare di farli cadere.
180°
130°
Cassetto
verdure fresche
21-Apr-2018 01:11:37 EDT | RELEASED
In some European factories the letter "W" of the part code mentioned herein will be automatically
replaced by the number "4000" (e.g. "W12345678" becomes "400012345678")
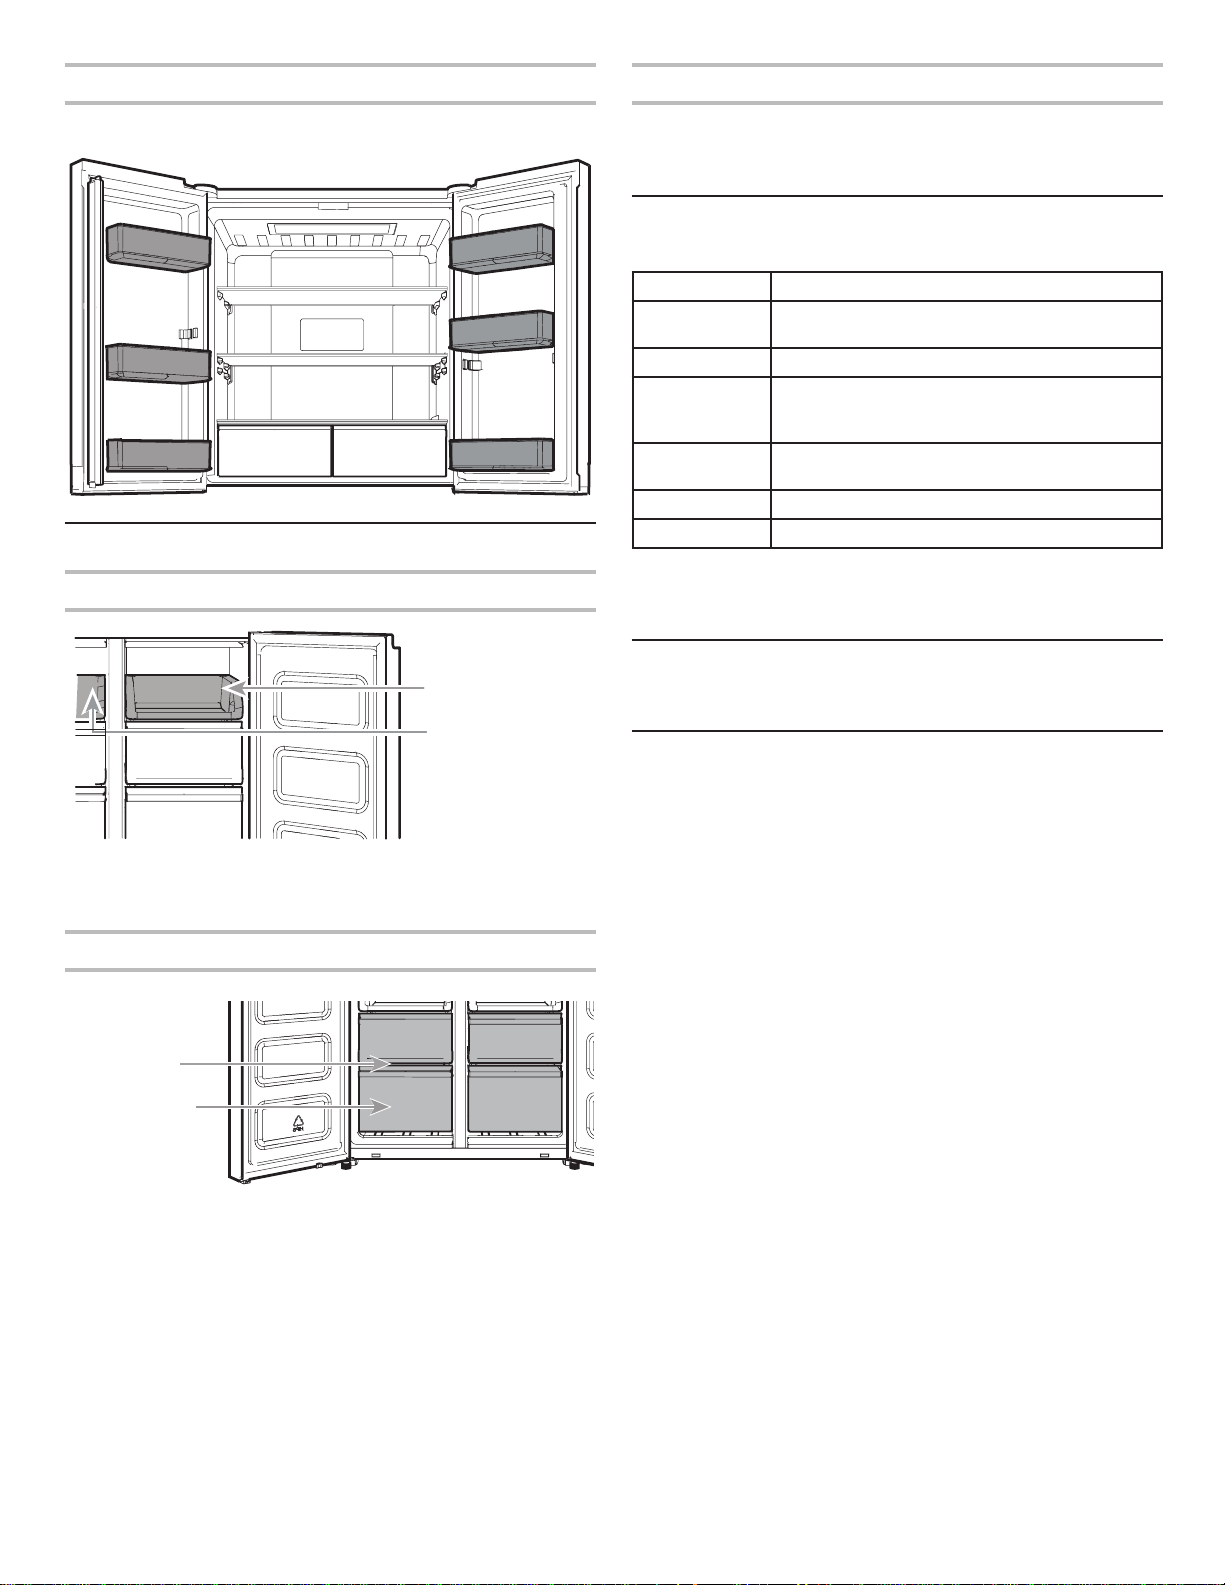
43
Balconcini del frigorifero
I balconcini sulle porte del frigorifero sono regolabili, per
rispondere alle singole esigenze.
Comparti del congelatore
Vassoio congelatore
Il vassoio del congelatore è utile per accedere facilmente ai
prodotti di uso frequente, congelare o semplicemente conservare
avanzi o piccoli oggetti.
Cassetti Super Congelamento
Due cassetti in ciascuno scomparto Congelatore, situati sotto al
vassoio Congelatore, consentono di conservare comodamente
oggetti di grande volume. L’opzione Super Congelamento consente
di conservare tutti gli alimenti surgelati in modo sicuro etrasparente.
Per massimizzare la capacità del congelatore, è possibile
rimuovere il cassetto per accedere al ripiano.
Per rimuovere il cassetto superiore:
1. Afferrare la maniglia del cassetto ed estrarlo no a quando si
arresta. Sollevare il cassetto dalla guida inferiore.
2. Per riposizionare/reinserire il cassetto, poggiarlo sulla guida
inferiore e spingerlo oltre il fermo del cassetto nché si ferma
in sede.
Ripiano congelatore
Per ottimizzare la capacità del congelatore è possibile rimuovere
il cassetto mediano per accedere al ripiano sottostante del
congelatore. In questo modo è possibile caricare gli alimenti
direttamente sul ripiano.
Spiegazione dei segnali sonori
Assegnazione tono
Nome tono Esempi di utilizzo
Accensione L’impianto di raffreddamento si attiva ogni
volta che il prodotto si accende.
Pressione tasti L’utente ha premuto un tasto valido.
Non valido
(errore)
L’utente preme due o più pulsanti validi
contemporaneamente. Interruzione del conto
alla rovescia per i pulsanti da tenere premuti.
Operazione
eseguita
Riconoscimento di entrata in qualsiasi modalità.
Uscita Conferma dell’uscita da una modalità.
Avviso Avviso di apertura porta.
Questa tabella ha solo funzione di riferimento rapido. Per i dettagli
consultare le sezioni corrispondenti. In caso di incongruenze vale
quanto descritto nelle varie sezioni.
Accessori
Per ordinare gli accessori, rivolgersi al rivenditore presso cui è
stato acquistato il frigorifero.
Servizio di assistenza
Prima di rivolgersi al servizio di assistenza consultare la sezione
“Risoluzione dei problemi”. Potrebbe farvi risparmiare il costo
della chiamata all’assistenza. Se il problema non è risolvibile
seguire le istruzioni seguenti.
Se occorrono parti di ricambio
Per sapere dove trovare ricambi di fabbrica specici localmente,
rivolgersi al rivenditore presso cui è stato acquistato il frigorifero.
Garanzia
Per informazioni sulla garanzia contattare il rivenditore presso cui
è stato acquistato il frigorifero.
Conservare questo manuale e la ricevuta d’acquisto insieme
per futuro riferimento. Per usufruire del servizio di garanzia è
necessario fornire la prova d’acquisto o la data di installazione.
Scrivere le seguenti informazioni relative all’apparecchio per
ricevere assistenza o manutenzione qualora ve ne fosse bisogno.
Servirà il numero del modello e il numero di serie completi.
Queste informazioni sono riportate nell’etichetta sulla parete
interna del comparto frigorifero.
Nome rivenditore ___________________________________________
Numero di serie ____________________________________________
Indirizzo ___________________________________________________
Numero telefonico __________________________________________
Numero modello ____________________________________________
Data di acquisto ____________________________________________
Vassoio
congelatore
Ripiano
congelatore
Cassetti Super
congelamento
21-Apr-2018 01:11:37 EDT | RELEASED
In some European factories the letter "W" of the part code mentioned herein will be automatically
replaced by the number "4000" (e.g. "W12345678" becomes "400012345678")
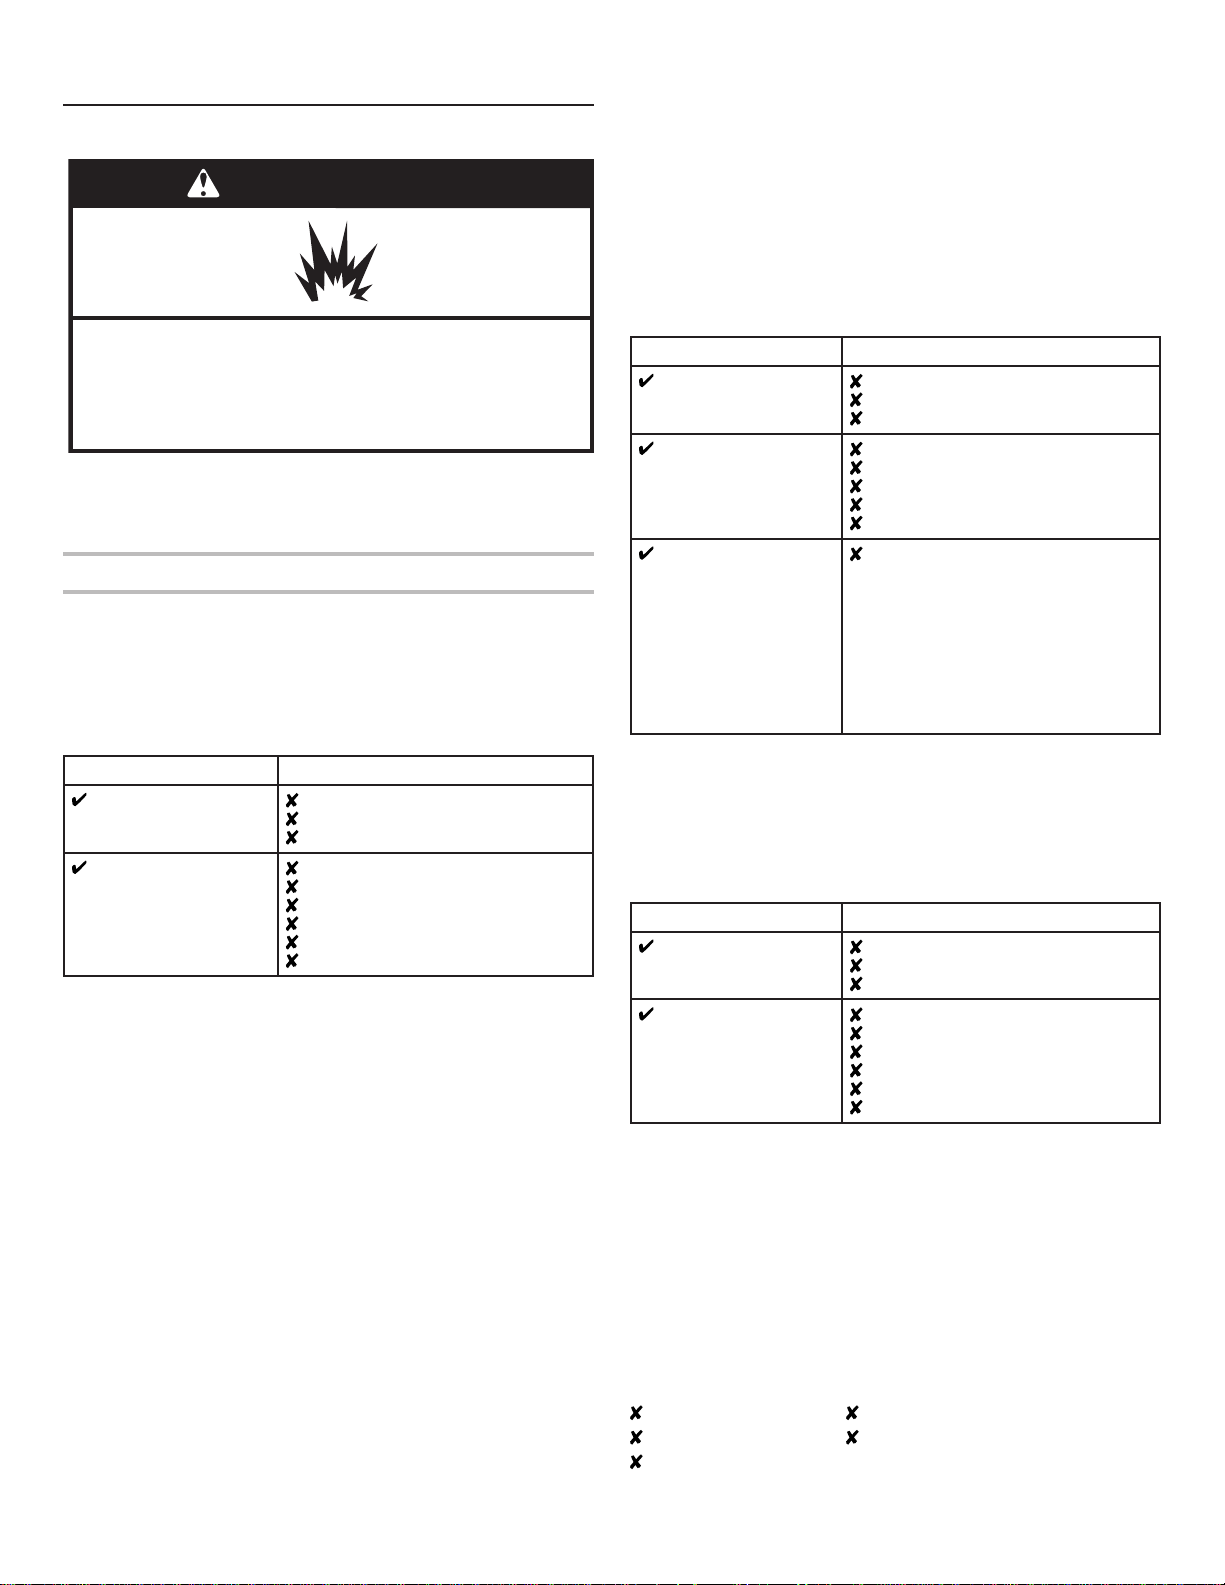
44
MANUTENZIONE DEL FRIGORIFERO
Pulizia
Tutte le sezioni Frigorifero, Congelatore e Multi-Temperatura si
sbrinano automaticamente. Tuttavia, pulire tutte le sezioni circa
una volta al mese per evitare la formazione di odori. In caso di
versamento di liquidi, asciugare subito.
Pulizia dell’esterno
Consultare le informazioni per la pulizia esterna speciche per
ilproprio modello.
Tipo 1 — Porta liscia
IMPORTANTE: i danni alla nitura liscia dovuti all’uso improprio
di prodotti di pulizia o all’uso di detergenti non raccomandati non
sono coperti dalla garanzia. Strumenti aflati o duri grafano la
nitura.
USARE NON USARE
Panno morbido, pulito
Panni abrasivi
Tovaglioli di carta o carta da giornale
Tamponi in lana di acciaio
Soluzione di acqua
calda con detergente
delicato
Polveri o liquidi abrasivi
Spray lavavetri
Ammoniaca
Detergenti a base di acido o aceto
Detergenti per forni
Liquidi inammabili
NOTA: la carta da cucina grafa e può opacizzare il rivestimento
chiaro della porta verniciata. Per evitare possibili danni usare solo
panni morbidi e puliti per lucidare e pulire le porte.
Tipo 2 — Acciaio inox
IMPORTANTE:
■ Usare esclusivamente i panni e i detergenti per acciaio
consigliati. I danni alla nitura in acciaio inossidabile dovuti
all’uso improprio di prodotti di pulizia o all’uso di detergenti
non raccomandati non sono coperti dalla garanzia.
■ Evitare di esporre gli elettrodomestici in acciaio inossidabile
aelementi caustici o corrosivi come ambienti altamente salini,
ad elevata condensa o umidità. I danni dovuti all’esposizione
a questi elementi non sono coperti da garanzia.
USARE NON USARE
Panno morbido,
pulito
Panni abrasivi
Tovaglioli di carta o carta da giornale
Tamponi in lana di acciaio
Soluzione di acqua
calda con detergente
delicato
Polveri o liquidi abrasivi
Ammoniaca
Detergenti a base di agrumi
Detergenti a base di acido o aceto
Detergenti per forni
Per sporco resistente
usare esclusivamente
un detergente per
acciaio specico per
gli elettrodomestici.
Perordinare il
detergente, rivolgersi
al rivenditore presso
cui è stato acquistato
ilfrigorifero.
Il detergente per acciaio è solo per
le parti in acciaio. Non far entrare in
contatto il detergente e lucidante per
acciaio inox con parti in plastica come
le niture, i coperchi dell’erogatore o
le guarnizioni delle porte.
Tipo 3 — Acciaio anti impronte
IMPORTANTE:
■ Evitare di esporre gli elettrodomestici in acciaio inossidabile
aelementi caustici o corrosivi come ambienti altamente salini,
ad elevata condensa o umidità. I danni dovuti all’esposizione
a questi elementi non sono coperti da garanzia.
USARE NON USARE
Panno morbido,
pulito
Panni abrasivi
Tovaglioli di carta o carta da giornale
Tamponi in lana di acciaio
Soluzione di acqua
calda con detergente
delicato
Polveri o liquidi abrasivi
Spray lavavetri
Ammoniaca
Detergenti a base di acido o aceto
Detergenti per forni
Liquidi inammabili
NOTE:
■ In caso di contatto accidentale pulire le parti in plastica con
una spugna e una soluzione di detersivo delicato e acqua
calda. Asciugare bene con un panno morbido.
■ Solo perché un detergente è liquido non signica che non
sia non-abrasivo. Molti detergenti liquidi formulati per essere
delicati sulle piastrelle e le superci lisce, di fatto danneggiano
l’acciaio inossidabile.
■ L’acido citrico macchia in modo permanente l’acciaio.
■ Per evitare di danneggiare la nitura in acciaio inox del frigorifero:
Evitare che queste sostanze rimangano sulla nitura:
Senape Salse a base di agrumi
Succo di pomodoro Prodotti a base di agrumi
Sugo al pomodoro
AVVERTENZA
Rischio di esplosione
Usare detergenti non infiammabili.
la mancata osservanza potrebbe essere causa di
decesso, esplosione o incendio.
21-Apr-2018 01:11:37 EDT | RELEASED
In some European factories the letter "W" of the part code mentioned herein will be automatically
replaced by the number "4000" (e.g. "W12345678" becomes "400012345678")
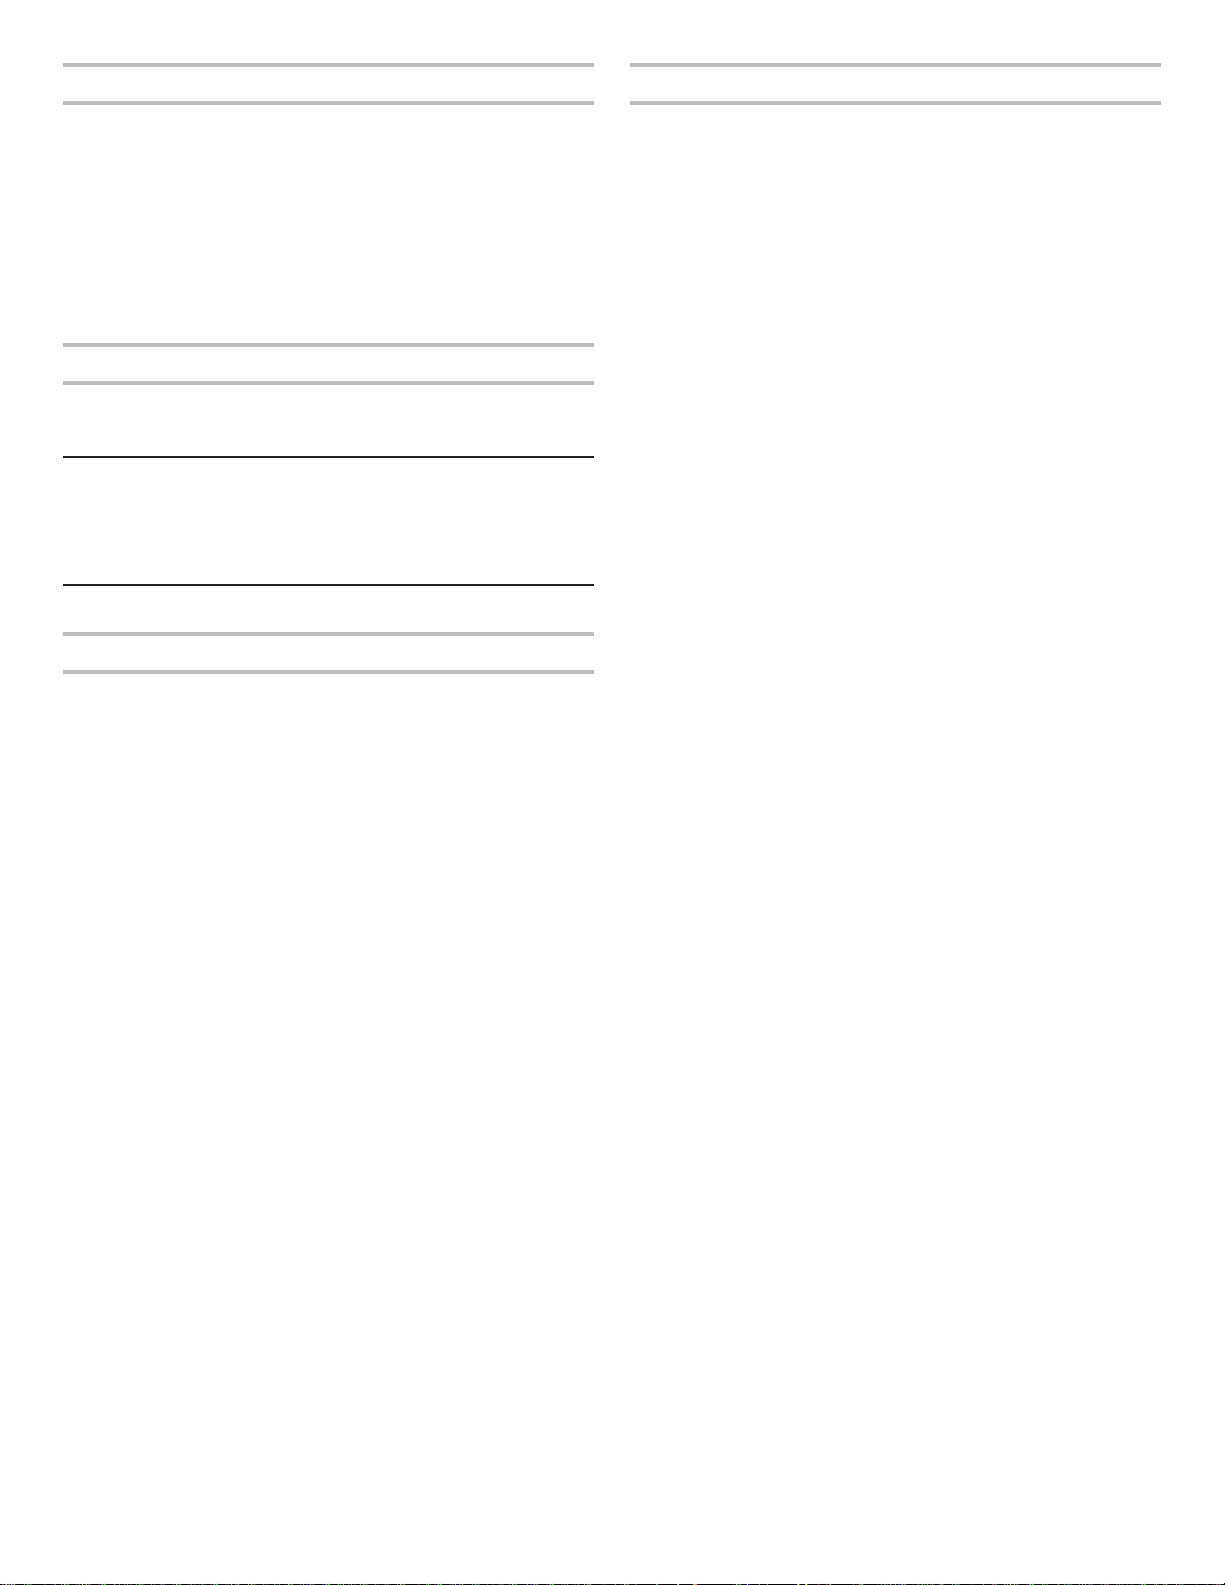
45
Pulizia dell’interno
1. Staccare la spina del frigorifero o scollegare l’alimentazione
direte.
2. Lavare a mano, sciacquare e asciugare tutte le parti rimovibili
e le superci interne. Usare una spugna pulita o un panno
morbido e un detersivo delicato diluito in acqua calda.
NOTA: non usare detergenti abrasivi o aggressivi come spray
per vetri, polveri abrasive, liquidi inammabili, cere per pulizia,
detersivi concentrati, candeggina o detergenti contenenti
derivati del petrolio sulle parti in plastica, l’interno, l’interno
delle porte o le guarnizioni.
3. Inserire la spina del frigorifero o ricollegare l’alimentazione.
Condensatore
Questo frigorifero è dotato di condensatore a nastratura di
serpentine preformate nei anchi del mobile frigorifero. È normale
sentire caldo su entrambi i lati.
Luci
Le luci nei comparti Frigorifero e Congelatore sono a LED e non
necessitano di sostituzione. Se quando si apre la porta le luci
non si accendono, contattare il rivenditore presso cui è stato
acquistato il frigorifero.
Inutilizzo e trasporto
Vacanze
Se si decide di lasciare acceso il frigorifero mentre si è in
vacanza:
1. Consumare tutti i deperibili e congelare il resto.
2. Se il frigorifero è dotato di una macchina del ghiaccio
automatica ed è collegato alla rete idrica, chiudere il rubinetto
di alimentazione dell’acqua al frigorifero. Se il rubinetto non
viene chiuso possono vericarsi danni materiali.
3. Se si dispone di una macchina del ghiaccio automatica,
spegnere la macchina del ghiaccio.
■ Portare su spento (O) l’interruttore della macchina del
ghiaccio integrata nella porta.
4. Vuotare il cestello del ghiaccio.
Se si decide di spegnere il frigorifero prima di partire:
NOTA: Impostare il frigorifero in modalità Demo per il periodo in
cui si sarà assenti. Vedere la sezione “Uso dei comandi”.
1. Rimuovere tutti gli alimenti dal frigorifero.
2. Se il frigorifero è dotato di macchina per il ghiaccio
automatica:
■ Chiudere il rubinetto di alimentazione dell’acqua alla
macchina del ghiaccio almeno 1 giorno prima.
■ Quando viene prodotto l’ultimo carico di ghiaccio portare
l’interruttore su spento (O) in modo che il display in alto
all’interno del frigorifero si spenga, in base al modello.
3. Vuotare il cestello del ghiaccio.
4. Spegnere i comandi di temperatura. Vedere la sezione
“Usodei comandi”.
5. Pulire il frigo, passarlo con un panno umido e asciugare bene.
6. Applicare con nastro di carta spessori di gomma o di legno
nella parte superiore delle porte, in modo che restino aperte
per far circolare l’aria. Si eviterà la formazione di muffa e
cattivi odori.
Trasloco
Se si deve trasportare il frigorifero in una nuova casa, seguire
questa procedura per preparare il frigo al trasloco.
1. Se il frigorifero è dotato di macchina per il ghiaccio automatica:
■ Chiudere il rubinetto di alimentazione dell’acqua alla
macchina del ghiaccio almeno 1 giorno prima.
■ Scollegare la linea dell’acqua dal retro del frigorifero.
■ Quando viene prodotto l’ultimo carico di ghiaccio portare
l’interruttore su spento (O) sulla macchina del ghiaccio o
sui comandi, a seconda del modello.
2. Togliere tutti gli alimenti dal frigorifero e radunare tutti i
congelati in un imballo con ghiaccio secco.
3. Vuotare il cestello del ghiaccio.
4. Scollegare la spina del frigorifero.
5. Pulire, passare con un panno umido e asciugare bene.
6. Togliere tutte le parti rimovibili, incartarle accuratamente
e ssarle insieme con nastro adesivo in modo che non si
spostino e non traballino durante il trasloco.
7. In base al modello, sollevare la parte anteriore del frigorifero
in modo che scorra meglio sui rulli o sollevare le viti di messa
in piano in modo che non grafno il pavimento. Consultare le
sezioni “Regolare le porte” o “Messa in piano del frigorifero
echiusura porte”.
8. Fissare con nastro adesivo le porte chiuse e il cavo di
alimentazione sul retro del frigorifero.
Una volta nella nuova casa, rimettere tutto a posto e fare
riferimento alla sezione “Istruzioni di installazione” per preparare
il frigorifero. Inoltre, se il frigorifero è dotato di una macchina del
ghiaccio automatica, ricordarsi di ricollegare la rete idrica al frigo.
21-Apr-2018 01:11:37 EDT | RELEASED
In some European factories the letter "W" of the part code mentioned herein will be automatically
replaced by the number "4000" (e.g. "W12345678" becomes "400012345678")
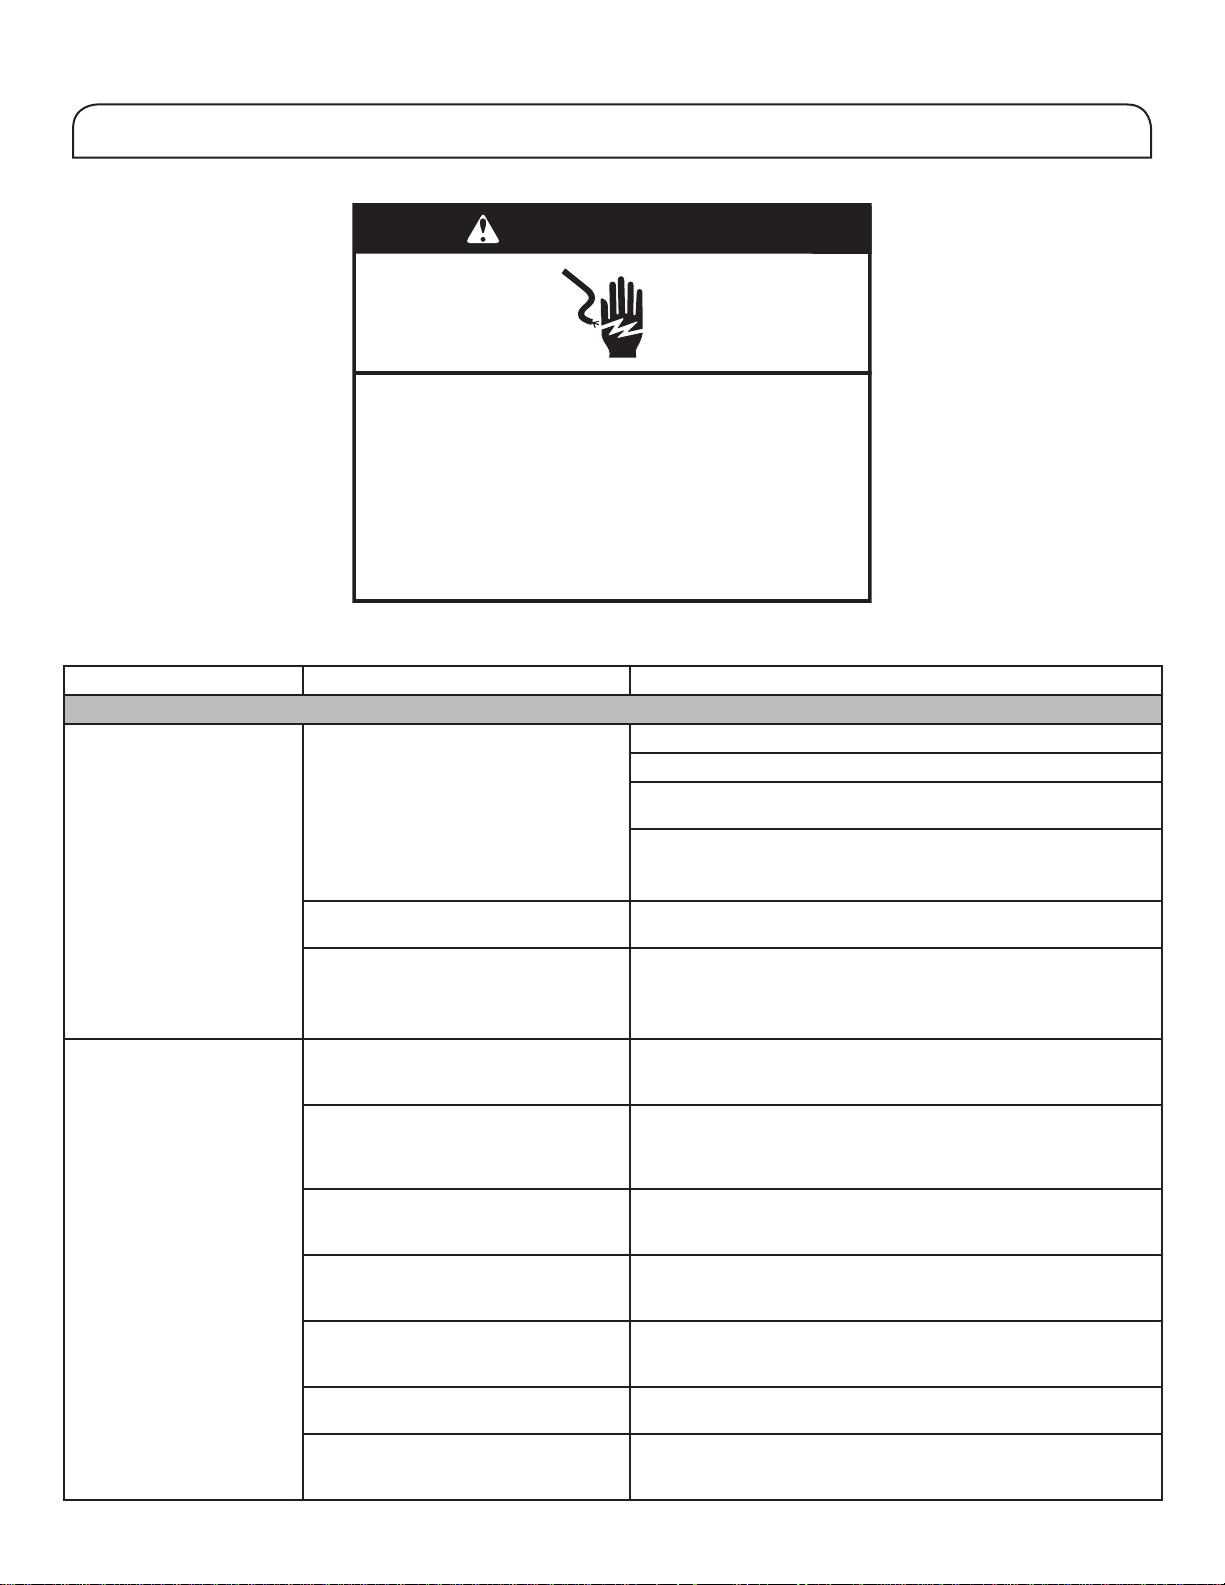
46
RISOLUZIONE DEI PROBLEMI
Problema Cause possibili Soluzione
Funzionamento del frigorifero
Il frigorifero non funziona. Controllare l’alimentazione elettrica. Inserire il cavo di alimentazione in una presa con messa a terra.
Non utilizzare prolunghe.
Accertarsi che la presa sia alimentata. Collegare una lampada
per vericare che la presa funzioni.
Resettare l’interruttore di circuito scattato. Sostituire eventuali
fusibili bruciati.
NOTA: se il problema persiste rivolgersi a un elettricista.
Controllare i comandi. Assicurarsi che i comandi siano accesi. Vedere la sezione
“Usodei comandi”.
Nuova installazione. Attendere 24 ore dopo l’installazione afnché il frigorifero si
raffreddi completamente.
NOTA: regolare i comandi di temperatura sui valori più bassi
non serve a raffreddare più rapidamente nessun comparto.
Il motore sembra rimanere
in funzione troppo a lungo.
Ventole e compressore ad alta
efcienza.
I frigoriferi più grandi ed efcienti rimangono in funzione più a
lungo a velocità più ridotte con velocità più efcienti dal punto
di vista dei consumi.
La temperatura ambiente o esterna
èmolto calda.
È normale che il frigorifero rimanga in funzione più a lungo
in queste condizioni. Per prestazioni ottimali, posizionare il
frigorifero in un ambiente interno con temperatura controllata.
Consultare la sezione “Requisiti dell’ambiente di installazione”.
Di recente è stata aggiunta una grande
quantità di alimenti.
L’introduzione di cibo a temperatura ambiente causa il
funzionamento prolungato del frigorifero che deve raffreddare
l’aria no alla temperatura desiderata.
Le porte vengono aperte troppo spesso
o rimangono aperte troppo alungo.
L’aria più calda che entra nel frigorifero fa sì che il motore di
raffreddamento funzioni più a lungo. Aprire la porta meno di
frequente.
La porta del frigorifero o il cassetto
delcongelatore sono aperti.
Assicurarsi che il frigorifero sia in piano. Consultare la sezione
“Messa in piano del frigorifero e chiusura porte”. Evitare che
alimenti o contenitori blocchino la porta.
Il frigorifero è impostato su una
temperatura troppo bassa.
Regolare il comando del frigorifero su un’impostazione meno
fredda no a raggiungere la temperatura desiderata.
La guarnizione della porta o del
cassetto è sporca, usurata o rotta.
Pulire o cambiare la guarnizione. Se vi sono perdite nella
guarnizione della porta, il frigorifero rimane in funzione più
alungo per mantenere la temperatura desiderata.
Provare le soluzioni indicate di seguito prima di contattare l'assistenza.
AVVERTENZA
Rischio di folgorazione
Inserire la spina in una presa con messa a terra.
Non rimuovere il polo di messa a terra.
Non utilizzare un riduttore.
Non utilizzare prolunghe.
La mancata osservanza di queste istruzioni può
essere causa di decesso, incendio o folgorazione.
21-Apr-2018 01:11:37 EDT | RELEASED
In some European factories the letter "W" of the part code mentioned herein will be automatically
replaced by the number "4000" (e.g. "W12345678" becomes "400012345678")
47
RISOLUZIONE DEI PROBLEMI
Problema Cause possibili Soluzione
Le luci non funzionano. Il frigorifero è dotato di
illuminazione a LED che non
necessita di sostituzione.
Se il frigorifero riceve alimentazione e le luci non si
accendono quando si apre una porta o il cassetto,
rivolgersial servizio di assistenza.
Le porte sono rimaste aperte per
più di 10 minuti.
Chiudere le porte e il cassetto per resettare il sistema, quindi
aprirli per riattivare le luci.
L’interruttore della porta non rileva
l’apertura della porta.
Assicurarsi che non vi siano magneti o apparecchi elettronici
entro 7,6 cm dal coperchio della cerniera.
L’interfaccia del controllo
temperatura non si accende.
L’interfaccia del controllo
temperatura è disattivata.
Premere un pulsante qualsiasi dell’interfaccia per riattivare
l’interfaccia del controllo temperatura.
I pulsanti dell’interfaccia del
controllo temperatura non
funzionano correttamente.
Provare ad accendere e spegnere il frigorifero per resettare
i pulsanti. Se il problema persiste, rivolgersi ad servizio
assistenza.
L’interfaccia del controllo
temperatura non riceve
alimentazione.
Controllare il cablaggio della cerniera della porta.
Impossibile regolare l’impostazione
dall’ interfaccia di controllo
temperatura.
La porta è aperta e viene attivato
l’allarme laterale della porta.
Chiudere lo sportello.
Rumore insolito
Per ascoltare i normali rumori emessi dal frigorifero, andare alla sezione Guida del prodotto/Domande frequenti del sito web del brand
e cercare i “rumori normali”. Di seguito sono elencati alcuni rumori normali con le relative spiegazioni.
Il frigorifero sembra rumoroso. Il compressore del vostro nuovo
frigorifero regola la temperatura
in modo più efciente utilizzando
meno energia, di conseguenza il
suo funzionamento è più silenzioso
in generale.
La riduzione della rumorosità può far sì che si notino meglio
altri rumori non familiari, ma che sono del tutto normali.
Il rumore del compressore si
sente più a lungo del previsto.
Ventole e compressore ad alta
efcienza.
I frigoriferi più grandi ed efcienti rimangono in funzione più
a lungo a velocità più ridotte con velocità più efcienti dal
punto di vista dei consumi.
Rumore pulsante/brusio Le ventole/compressore si regolano
per ottimizzare le prestazioni
durante il normale funzionamento
del compressore
È normale.
Scoppiettii Contrazione/espansione delle
pareti interne, in particolare durante
il raffreddamento iniziale.
È normale.
Fischi/gocciolamento Flusso del refrigerante o usso
dell’olio del compressore.
È normale.
Vibrazione Il frigorifero potrebbe non essere
stabile.
Regolare le viti di messa in piano e abbassare i piedini
saldamente contro il pavimento. Consultare la sezione
“Messa in piano del frigorifero e chiusura porte”.
Sfrigolio Acqua che gocciola sulla resistenza
durante il ciclo di sbrinamento.
È normale.
Acqua che scorre/gorgoglii Si possono sentire quando il
ghiaccio si scioglie durante il ciclo
di sbrinamento e l’acqua scorre
nella vaschetta di raccolta.
È normale.
Provare le soluzioni indicate di seguito prima di contattare l'assistenza.
21-Apr-2018 01:11:37 EDT | RELEASED
In some European factories the letter "W" of the part code mentioned herein will be automatically
replaced by the number "4000" (e.g. "W12345678" becomes "400012345678")
48
RISOLUZIONE DEI PROBLEMI
Problema Cause possibili Soluzione
Temperatura e condensa
La temperatura è troppo alta. Il frigorifero è appena stato
installato.
Attendere 24 ore dopo l’installazione afnché il frigorifero si raffreddi
completamente.
I comandi non sono
impostati correttamente per
le condizioni ambientali.
Regolare il comandi su una temperatura più fredda. Controllare la
temperatura dopo 24 ore. Vedere la sezione “Uso dei comandi”.
Le porte vengono aperte
troppo spesso o non sono
completamente chiuse.
Lasciano entrare aria calda
nel frigorifero.
Aprire le porte il meno possibile e chiuderle completamente.
Sono stati introdotti molti
alimenti di recente.
Attendere qualche ora perché il frigorifero torni alla sua temperatura
normale.
Il modo Vacanze è attivo. Disattivare il modo Vacanze. Vedere la sezione “Uso dei comandi”.
La temperatura nel frigorifero/
cassetto frutta e verdura è
troppo fredda.
Le prese d’aria del frigorifero
sono bloccate.
Se la presa d’aria del frigorifero, che si trova al centro della parete
posteriore interna, viene coperta da oggetti appoggiati direttamente
davanti ad essa, il frigorifero si raffredda eccessivamente.
Allontanare gli oggetti dalla presa d’aria.
I comandi non sono impostati
correttamente per le
condizioni ambientali.
Regolare il comandi su una temperatura più calda. Controllare la
temperatura dopo 24 ore. Vedere la sezione “Uso dei comandi”.
La temperatura nel cassetto
atemperatura controllata è
troppo bassa.
Il comando non è impostato
correttamente per gli elementi
conservati nel cassetto.
Regolare l’impostazione della temperatura. Vedere la sezione
“Usodei comandi” in “Uso del frigorifero”.
C’è accumulo di umidità
all’interno.
NOTA: L’accumulo di un po’
diumidità è normale.
L’ambiente è umido. Un ambiente umido contribuisce alla formazione di condensa.
Le porte vengono aperte
troppo spesso o non sono
completamente chiuse.
Lasciano entrare l’umidità
nel frigorifero.
Aprire le porte il meno possibile e chiuderle bene.
Le porte sono bloccate in
posizione aperta.
Allontanare le confezioni di alimenti dalla porta.
Un balconcino o un ripiano
intralciano la chiusura.
Spingere il balconcino o il ripiano nella posizione corretta.
Riporre i liquidi in recipienti
aperti.
In questo caso aumenta l’umidità all’interno del frigorifero.
Chiuderebene tutti i contenitori.
C’è formazione di brina/ghiaccio
nel comparto congelatore.
La porta viene aperta spesso
o è stata lasciata aperta.
Aprire la porta il meno possibile e chiuderla completamente dopo
l’uso.
La guarnizione della porta
non è in buono stato.
Assicurarsi che le guarnizioni delle porte aderiscano completamente
al vano frigorifero per fornire un isolamento adeguato.
I comandi di temperatura
non sono impostati
correttamente.
Vedere la sezione “Uso dei comandi” per le impostazioni di
temperatura consigliate.
Provare le soluzioni indicate di seguito prima di contattare l'assistenza.
21-Apr-2018 01:11:37 EDT | RELEASED
In some European factories the letter "W" of the part code mentioned herein will be automatically
replaced by the number "4000" (e.g. "W12345678" becomes "400012345678")
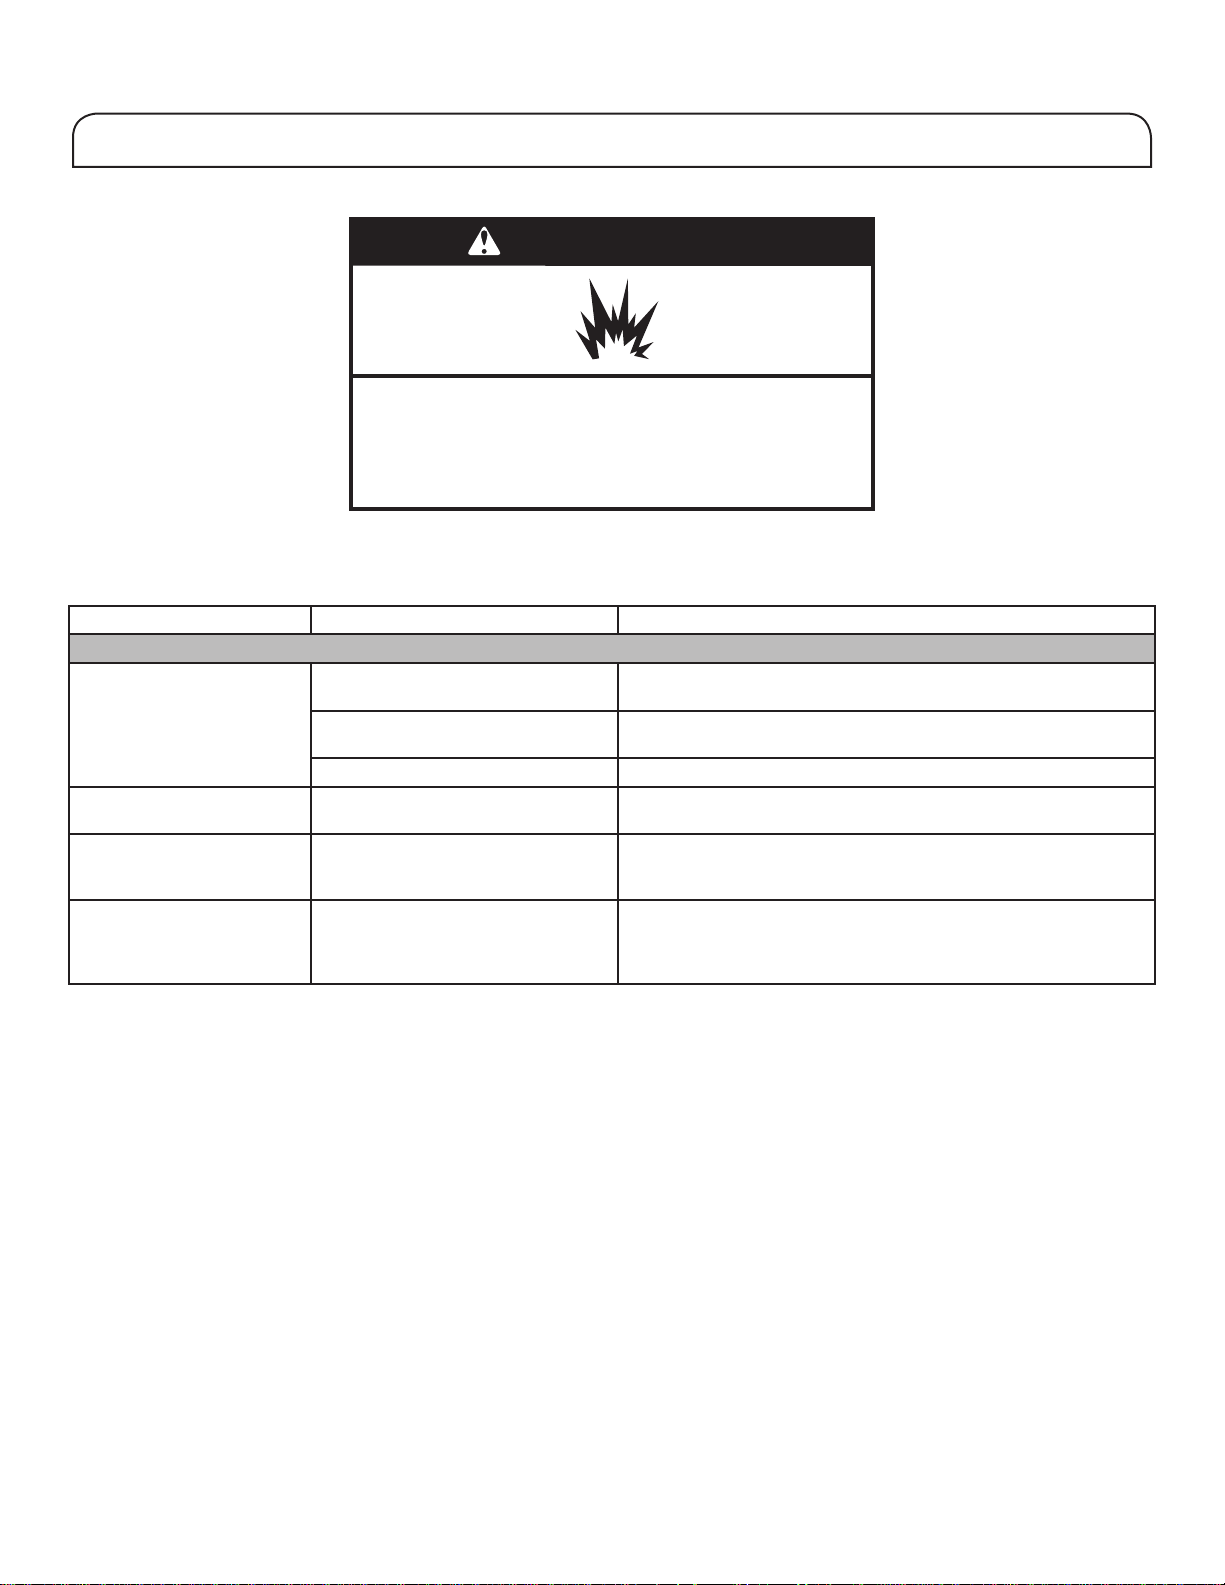
RISOLUZIONE DEI PROBLEMI
Per visualizzare un’animazione che mostra come regolare e allineare le porte, far riferimento alla sezione Guida del prodotto/Domande
frequenti del sito web del brand e cercare “Chiusura porte e allineamento porte”.
Problema Cause possibili Soluzione
Porte
Le porte non si chiudono
completamente.
La porta è bloccata in posizione
aperta.
Allontanare le confezioni di alimenti dalla porta.
Un balconcino o un ripiano
intralciano la chiusura.
Spingere il balconcino o il ripiano nella posizione corretta.
Installato di recente. Rimuovere tutti i materiali di imballaggio.
È difcile aprire le porte. Le guarnizioni delle porte sono
sporche o appiccicose.
Pulire le guarnizioni e le superci di contatto con sapone
delicato e acqua calda. Sciacquare e asciugare con un panno.
Le porte sembrano
disassate.
Le porte devono essere allineate
oppure il frigorifero deve essere
messo in piano.
Se è necessario allineare le porte, rivolgersi all’assistenza.
Il frigorifero sembra
instabile o viene avanti
quando si aprono e
chiudono le porte.
I piedini frenati del frigorifero non
sono aderenti al pavimento.
Ruotare i due piedini frenati (uno su ciascun lato) in senso
antiorario, in modo uguale, no a quando aderiscono al
pavimento. Consultare la sezione “Messa in piano del frigorifero
e chiusura porte”.
Provare le soluzioni indicate di seguito prima di contattare l'assistenza.
AVVERTENZA
Rischio di esplosione
Usare detergenti non infiammabili.
la mancata osservanza potrebbe essere causa di
decesso, esplosione o incendio.
W11213351C
©2018 Tutti i diritti riservati.
04/18
21-Apr-2018 01:11:37 EDT | RELEASED
In some European factories the letter "W" of the part code mentioned herein will be automatically
replaced by the number "4000" (e.g. "W12345678" becomes "400012345678")