User Manual
SPECIFICATIONS
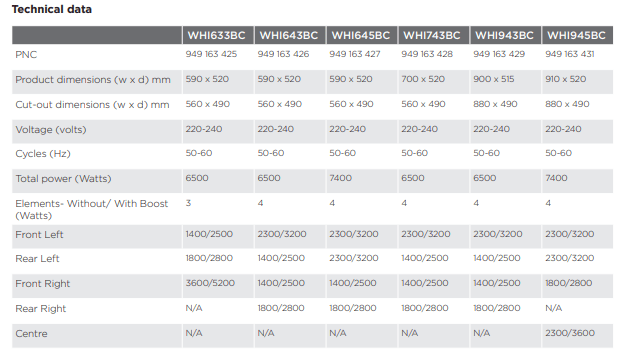
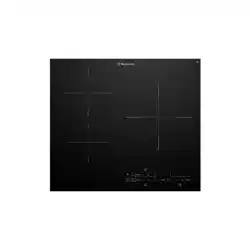
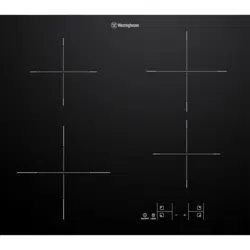
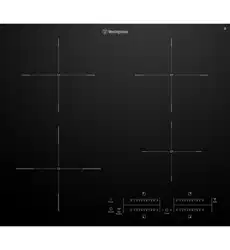
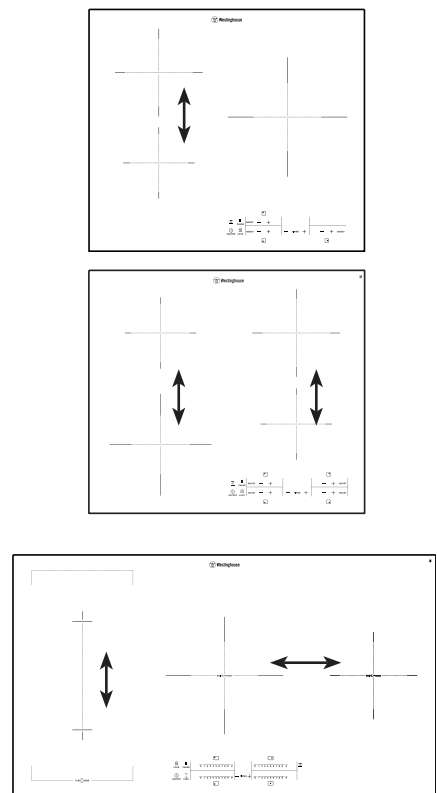
PRODUCT DESCRIPTION
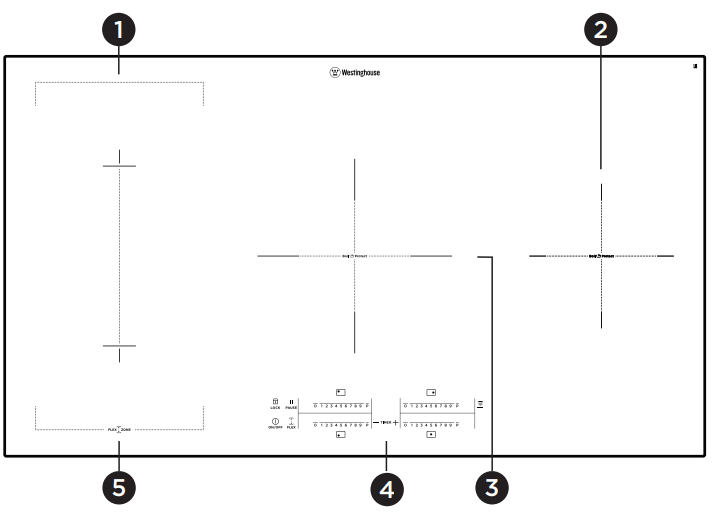
1 Induction cooking zone 2300 W, with Power function 3200 W (minimum cookware diameter =180 mm).
2 Induction cooking zone 1800 W, with Power function 2800 W (minimum cookware diameter =145 mm).
3 Induction cooking zone 2300 W, with Power function 3600 W (minimum cookware diameter =180 mm).
4 Control panel
5 Induction cooking zone 2300 W, with Power function 3200 W (minimum cookware diameter =180 mm)
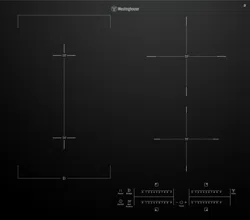
Control panel layout
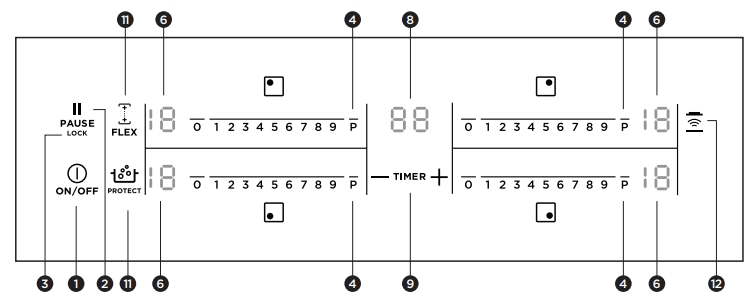
Use the sensor fields to operate the appliance. The displays, indicators and sounds tell which functions operate.
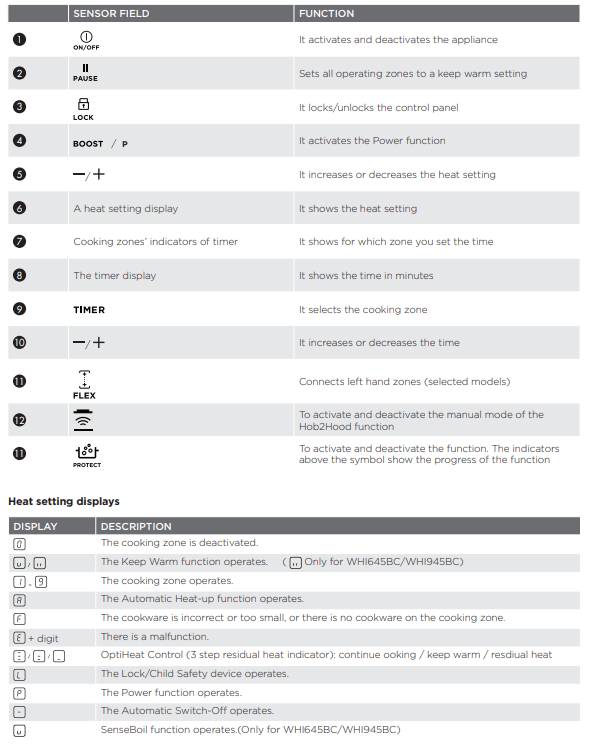
OptiHeat Control ( 3 step residual heat indicator)
OptiHeat Control shows the level of the residual heat. The induction cooking zones make the heat necessary for cooking directly in the bottom of the cookware. The glass ceramic is hot from the heat of the cookware.
OPERATING INSTRUCTIONS
Activation and deactivation
Touch for 1 second to activate or deactivate the appliance.
Automatic switch off
The function deactivates the appliance automatically if:
- All cooking zones are deactivated ( 0 ).
- You do not set the heat setting after you activate the appliance.
- You spill something or put something on the control panel for more than 10 seconds, (a pan, a cloth, etc). The sound operates some time and the appliance deactivates. Remove the object or clean the control panel.
- The appliance become too hot (e.g. when a saucepan boils dry). Before you use the appliance again, the cooking zone must be cool.
- You use incorrect cookware. The symbol F comes on and the cooking zone deactivates automatically after 2 minutes.
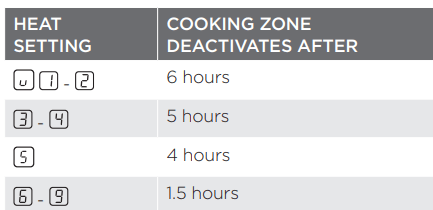
- You do not deactivate a cooking zone or change the heat setting. After some time, - comes on and the appliance deactivates. See the Heat Setting display table below.
The times of Automatic Switch Off
The heat setting
Touch + adjacent to the element you want to control to increase the heat setting. Touch - adjacent to the element you want to control to decrease the heat setting. The display shows the heat setting. Touch + and - adjacent to the element you want to control at the same time to deactivate the cooking zone (applies to WHI643BC, WHI633BC, WHI743BC and WHI943BC).
Touch the control bar at the heat setting. Chnage to the left or the right, if it is neccessary. Do not release before you have a correct heat setting. The display shows the heat setting. (applies to WHI645BC and WHI945BC)
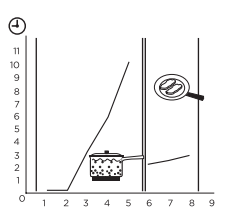
Automatic heat up
You can get a necessary heat setting in a shorter time if you activate the Automatic Heat Up function. This function sets the highest heat setting for some time (see the illustration), and then decreases to the necessary heat setting.
To start the Automatic Heat Up function for a cooking zone:
- Touch BOOST . The symbol
 comes on in the display.
- Immediately touch + adjacent to the element you want to control. The symbol
 comes on in the display.
- Immediately touch - adjacent to the element you want to control again and again until the necessary heat setting comes on. After 3 seconds
 comes on in the display.
- To stop the function touch + adjacent to the element you want to control.
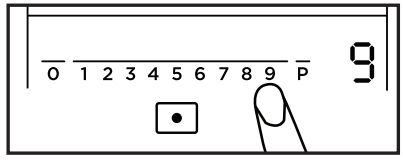
To start the Automatic Heat Up function for a cooking zone: (For WHI645BC and WHI945BC Models)
- Touch P
- Immediately touch the necessary heat setting. After 3 seconds comes on in the display. To stop the function change the heat setting.
Power function
The Power function makes more power available to the induction cooking zones. The Power function is activated for 10 minutes at most. After, that the induction cooking zone automatically sets back to highest heat setting. To activate, touch BOOST(on WHI645BC and WHI945BC modes is P) comes on. To deactivate, touch BOOST (on WHI645BC and WHI945BC models is P) or - (on WHI645BC and WHI945BC models touch any necessary heat setting ) adjacent to the element you want to control.
Power management
The power management divides the power between two cooking zones in a pair (see the illustration). The power function increases the power to the maximum level for one cooking zone in the pair. It automatically decreases the power in the second cooking zone to a lower level. The display for the reduced zone change between two levels
Pause (models with independent pause button)
The  function sets all cooking zones that operate to the lowest heat setting
  .
.
When  operates, you cannot change the heat setting.
The  function does not stop the timer function.
- To activate this function
 touch The
  symbol comes on. For WHI645BC/WHI945BC models the
  symbol come on.
- To deactivate this function touch
 . The heat setting that you set before comes on.
Flex Function (models WHI645BC & WHI945BC)
The  Function can be used with the griddle plate accessory (sold separately).
The function connects two cooking zones and they operate as one.
First set the heat setting for one of the left hand cooking zones. To start the Flex function touch  .
.
To set or change the heat setting touch one of the left hand controls.
To stop the Flex function touch  . The cooking zones will then operate independently
Timer
Use the Count Down Timer to set how long the cooking zone operates for only this one time. Set the Timer after the selection of the cooking zone.
You can set the heat setting before or after you set the timer.
- To set the cooking zone: touch TIMER again and again until the indicator of a necessary cooking zone comes on.
- To activate or change the Timer: touch + or - of the timer to set the time ( 00 - 99 minutes). When the indicator of the cooking zone starts to flash slow, the time counts down.
- To deactivate the Timer: set the cooking zone with TIMER and touch - to deactivate the Timer. The remaining time counts back to 00. The indicator of the cooking zone goes out.
- To see the remaining time: set the cooking zone with TIMER. The indicator of the cooking zone starts to flash quickly. The display shows the remaining time. When the time comes to an end, the sound operates and 00 flashes. The cooking zone deactivates.
- To stop the sound: touch TIMER . You can use the Timer as a minute minder while the cooking zones do not operate. Touch TIMER . Touch + or - to set the time. When the time comes to an end, the sound operates and 00 flashes
- To stop the sound: touch TIMER .
Lock (models with independent lock button)
When the cooking zones operate, you can lock the control panel, but not ON/OFF . It prevents an accidental change of the heat setting.
First set the heat setting. To start this function touch  . The symbol
  comes on for 4 seconds. The Timer stays on.
To stop this function touch  The heat setting that you set before comes on. When you stop the appliance, you also stop this function
CARE AND CLEANING
Care and cleaning
Clean the appliance after each use. Always use cookware with clean bottom.
IMPORTANT
Scratches or dark stains on the glass ceramic have no effect on how the appliance operates.
To remove the dirt:
1. Remove immediately: melted plastic, plastic foil, and food with sugar. If not, the dirt can cause damage to the appliance. Use a special scraper for the glass. Put the scraper on the glass surface at an acute angle and move the blade on the surface.
Remove after the appliance is sufficiently cool: limescale rings, water rings, fat stains, shiny metallic discolorations. Use a special cleaning agent for glass ceramic or stainless steel.
2. Clean the appliance with a moist cloth and some detergent.
3. At the end rub the appliance dry with a clean cloth.
TROUBLESHOOTING
You cannot activate or operate the hob.
- The hob is not connected to an electrical supply or it is connected incorrectly.
- Check if the hob is correctly connected to the electrical supply. Refer to the connection diagram.
- The fuse is blown.
- Make sure that the fuse is the cause of the malfunction. If the fuse is blown again and again, contact a qualified electrician.
- You do not set the heat setting for 10 seconds.
- Activate the hob again and set the heat setting in less than 10 seconds.
- You touched 2 or more sensor fields at the same time.
- Touch only one sensor field.
- There is water or fat stains on the control panel.
An acoustic signal sounds and the hob deactivates. An acoustic signal sounds when the hob is deactivated.
- You put something on one or more sensor fields.
- Remove the object from the sensor fields.
The hob deactivates.
- You put something on the sensor field.
- Remove the object from the sensor field.
Residual heat indicator does not come on.
- The zone is not hot be cause it operated only for a short time or the sensor is damaged.
- If the zone operated sufficiently long to be hot, speak to an Authorised Service Centre.
Hob2Hood does not work.
- You covered the control panel.
- Remove the object from the control panel.
- You use a very tall pot which blocks the signal.
- Use a smaller pot, change the cooking zone or operate the hood manually.
Automatic Heat Up does not operate.
- The zone is hot.
- Let the zone become sufficiently cool.
- The highest heat setting is set.
- The highest heat setting has the same power as the function.
The heat setting changes between two levels.
- Power management operates.
The sensor fields become hot.
- The cookware is too large or you put it too near to the controls.
- Put large cookware on the rear zones, if possible.
There is no sound when you touch the panel sensor fields.
- The sounds are deactivated.
- Activate the sounds. Refer to "Daily use".
L comes on.
- Child Safety Device or Lock operates
F comes on.
- There is no cookware on the zone.
- Put cookware on the zone.
- The cookware is unsuitable.
- Use suitable cookware. Refer to "Hints and tips".
- The diameter of the bottom of the cookware is too small for the zone.
- Use cookware with correct dimensions. Refer to "Technical data".
F and 1 appear alternately
- The power is too low due to unsuitable cookware or an empty pot.
- Use the appropriate type of cookware. Refer to "Hints and Tips" and "Technical Data". Do not activate any zone with an empty pot on it."
F and 2 appear alternately
- The pot is empty or contains some liquid other than water, e.g. oil.
- Avoid using the function with liquids other than water.
F and 3 appear alternately
- There is too much or too little water in the pot. You boiled some food other than water and potatoes. The boiling point was moved in time and the SenseBoil® function could not work properly."
- Refer to "Hints and Tips". Only boil water and potatoes with the use of SenseBoil®.
You hear a beep sound, the indicators above  blink and the SenseBoil® function does not start.
- None of the cooking zones is ready to be used with the SenseBoil® function. There is some residual heat on the cooking zones you want to choose or they are still in use.
- Finish your previous cooking activities and choose a free cooking zone without any residual heat.
E and a number come on.
- There is an error in the hob.
- Deactivate the hob and activate it again after 30 seconds. If E comes on again, disconnect the hob from the electrical supply. After 30 seconds, connect the hob again. If the problem continues, speak to an Authorised Service Centre.
You can hear a constant beep noise.
- The electrical connection is incorrect.
- Disconnect the hob from the electrical supply. Ask a qualified electrician to check the installation.