
Write the model and serial
numbers here:
Model # ____________________
Serial # ____________________
You can find them on a label on
the side trim or on the front of the
(lower) oven behind the oven door.
GE is a trademark of the General Electric Company. Manufactured under trademark license.
ENGLISH / FRANÇAIS /
ESPAÑOL
OWNER’S MANUAL
WALL OVEN
Convection Built-In Electric
49-2000254 Rev. 6 09-24
JKS5000 - 27” Single Wall Oven
JTS5000 - 30” Single Wall Oven
JKD5000 - 27” Double Wall Oven
JTD5000 - 30” Double Wall Oven
SAFETY INFORMATION ..........3
USING THE OVEN
Single Wall Oven Controls ...............6
Double Wall Oven Controls ..............7
Options ...............................8
Settings ...............................8
Sabbath Mode .........................10
Oven Racks ........................... 11
Aluminum Foil and Oven Liners ..........13
Cookware .............................13
Cooking Modes ........................14
Probe ................................15
Cooking Guide - Lower Oven ............16
Cooking Guide - Upper/Single Oven .....17
Cooking Guide - Air Fryer ...............18
CARE AND CLEANING
Oven .................................19
Probe ................................20
Oven Light ............................20
Oven Door ............................21
TROUBLESHOOTING TIPS .......22
LIMITED WARRANTY ............24
ACCESSORIES ....................25
CONSUMER SUPPORT ...........26

2 49-2000254 Rev. 6
THANK YOU FOR MAKING GE APPLIANCES A PART OF YOUR HOME.
Whether you grew up with GE Appliances, or this is your first, we’re happy to have you in the family.
We take pride in the craftsmanship, innovation and design that goes into every GE Appliances
product, and we think you will too. Among other things, registration of your appliance ensures that we
can deliver important product information and warranty details when you need them.
Register your GE appliance now online. Helpful websites and phone numbers are available in the
Consumer Support section of this Owner’s Manual. You may also mail in the pre-printed registration
card included in the packing material.

49-2000254 Rev. 6 3
READ AND SAVE THESE INSTRUCTIONS
IMPORTANT SAFETY INFORMATION
READ ALL INSTRUCTIONS BEFORE USING THE APPLIANCE
SAFETY INFORMATION
WARNING
GENERAL SAFETY INSTRUCTIONS
Ŷ 8VHWKLVDSSOLDQFHRQO\IRULWVLQWHQGHGSXUSRVHDV
described in the Owner’s Manual.
Ŷ%HVXUH\RXUDSSOLDQFHLVSURSHUO\LQVWDOOHGDQG
grounded by a qualified installer in accordance with
the provided installation instructions.
Ŷ'RQRWDWWHPSWWRUHSDLURUUHSODFHDQ\SDUWRI\RXU
oven unless it is specifically recommended in this
manual. All other servicing should be performed by a
qualified technician.
Ŷ%HIRUHSHUIRUPLQJDQ\VHUYLFHGLVFRQQHFWWKH
power supply at the household distribution panel by
removing the fuse or switching off the circuit breaker.
Ŷ,IWKHKHDWLQJHOHPHQWLQWKHDSSOLDQFHGHYHORSV
a glowing spot or shows other signs of damage,
do not use that area of the appliance. A glowing
spot indicates the element may fail and present
a potential burn, fire, or shock hazard. Turn the
appliance off immediately and have heating element
replaced by a qualified service technician.
Ŷ%HVXUHDOOSDFNLQJPDWHULDOVDUHUHPRYHGIURPWKH
appliance before operating to prevent ignition of
these materials.
Ŷ$YRLGVFUDWFKLQJRULPSDFWLQJJODVVGRRUVRUFRQWURO
SDQHOV'RLQJVRPD\OHDGWRJODVVEUHDNDJH
Ŷ'RQRWFRRNRQDSURGXFWZLWKEURNHQJODVV6KRFN
fire, or cuts may occur.
Ŷ'RQRWOHDYHFKLOGUHQDORQH²FKLOGUHQVKRXOGQRW
be left alone or unattended in an area where an
appliance is in use. They should never be allowed to
climb, sit or stand on any part of the appliance.
Ŷ
CAUTION
'RQRWVWRUHLWHPVRILQWHUHVWWR
children in cabinets above an appliance - children
climbing on the oven to reach items could be
seriously injured.
Ŷ 1HYHUXVH\RXUDSSOLDQFHIRUZDUPLQJRUKHDWLQJ
the room.
Ŷ8VHRQO\GU\SRWKROGHUV²PRLVWRUGDPSSRWKROGHUV
RQKRWVXUIDFHVPD\UHVXOWLQEXUQVIURPVWHDP'R
QRWOHWSRWKROGHUVWRXFKKRWKHDWLQJHOHPHQWV'R
not use a towel or other bulky cloth in place of pot
holders.
Ŷ'RQRWWRXFKWKHEXUQHUVJULGGOHVRQVRPH
PRGHOVJUDWHVRQVRPHPRGHOVWKHFRRNWRSRU
oven heating elements, or the interior surface of
the oven. These surfaces may remain hot enough
to burn for an extended period of time following
cooking, even though they no longer appear to be
on or hot.
Ŷ'XULQJDQGDIWHUXVHGRQRWWRXFKRUOHWFORWKLQJ
or other flammable materials contact any interior
area of the oven; allow sufficient time for cooling
first. Other surfaces of the appliance may become
hot enough to cause burns. Potentially hot surfaces
LQFOXGHEXUQHUVRUKHDWLQJHOHPHQWVJUDWHVRQ
some models), cooktop surface, oven vent openings,
surfaces near the openings, crevices around the
oven door, metal trim parts above the door, any
backguard, or shelves located above cooking
surface.
Ŷ'RQRWXVHDQ\W\SHRIIRLORUOLQHUWRFRYHUWKH
bottom of the oven or anywhere in the oven, except
as described in the Owner’s Manual. Oven liners can
trap heat or melt, resulting in damage to the product
and risk of shock, smoke or fire.
Ŷ'RQRWKHDWXQRSHQHGIRRGFRQWDLQHUV3UHVVXUH
could build up and the container could burst, causing
an injury.
Ŷ&RRNIRRGWKRURXJKO\WRKHOSSURWHFWDJDLQVW
foodborne illness. Minimum safe food temperature
UHFRPPHQGDWLRQVDUHSURYLGHGE\WKH86'$
DQG)'$8VHDIRRGWKHUPRPHWHUWRWDNHIRRG
temperatures and check several locations.
WARNING
Read all safety instructions before using the product. Failure to follow these instructions may result
in fire, electrical shock, serious injury or death.
4 49-2000254 Rev. 6
SAFETY INFORMATION
READ AND SAVE THESE INSTRUCTIONS
WARNING
IN THE EVENT OF A FIRE, TAKE THE FOLLOWING
STEPS TO PREVENT INJURY AND FIRE SPREADING
Ŷ 'RQRWXVHZDWHURQJUHDVHILUHV1HYHUSLFNXS
a flaming pan. Turn the controls off. Smother a
flaming pan on a surface unit by covering the pan
completely with a well-fitting lid, cookie sheet or flat
WUD\8VHDPXOWLSXUSRVHGU\FKHPLFDORUIRDPW\SH
fire extinguisher.
Ŷ ,IWKHUHLVDILUHLQWKHRYHQGXULQJEDNLQJVPRWKHU
the fire by closing the oven door and turning the
oven off or by using a multi-purpose dry chemical or
foam-type fire extinguisher.
Ŷ ,IWKHUHLVDILUHLQWKHRYHQGXULQJVHOIFOHDQWXUQ
WKHRYHQRIIDQGZDLWIRUWKHILUHWRJRRXW'RQRW
IRUFHWKHGRRURSHQ,QWURGXFWLRQRIIUHVKDLUDW
self-clean temperatures may lead to a burst of flame
from the oven. Failure to follow this instruction may
result in severe burns.
IMPORTANT SAFETY INFORMATION
READ ALL INSTRUCTIONS BEFORE USING THE APPLIANCE
WARNING
OVEN SAFETY INSTRUCTIONS
Ŷ 6WDQGDZD\IURPWKHDSSOLDQFHZKHQRSHQLQJWKH
oven door. Hot air or steam which escapes can
cause burns to hands, face and/or eyes.
Ŷ 'RQRWXVHWKHRYHQLIDKHDWLQJHOHPHQWGHYHORSV
a glowing spot during use or shows other signs
of damage. A glowing spot indicates the heating
element may fail and present a potential burn, fire,
or shock hazard. Turn the oven off immediately and
have the heating element replaced by a qualified
service technician.
Ŷ .HHSWKHRYHQYHQWXQREVWUXFWHG
Ŷ 1HYHUSODFHFRRNLQJXWHQVLOVSL]]DRUEDNLQJVWRQHV
or any type of foil or liner on the oven floor. These
items can trap heat or melt, resulting in damage to
the product and risk of shock, smoke or fire.
Ŷ 3ODFHRYHQUDFNVLQGHVLUHGORFDWLRQZKLOHRYHQLV
FRRO,IUDFNPXVWEHPRYHGZKLOHRYHQLVKRWEH
careful to avoid touching hot surfaces and do not let
pot holder contact hot heating element in oven.
Ŷ 'RQRWOHDYHLWHPVVXFKDVSDSHUFRRNLQJXWHQVLOV
RUIRRGLQWKHRYHQZKHQQRWLQXVH,WHPVVWRUHGLQ
an oven can ignite.
Ŷ
'RQRWOHDYHLWHPVRQWKHFRRNWRSQHDUWKHRYHQYHQW
,WHPVPD\RYHUKHDWUHVXOWLQJLQDULVNRIILUHRUEXUQV
Ŷ 1HYHUEURLOZLWKWKHGRRURSHQ
Ŷ .HHSWKHRYHQIUHHIURPJUHDVHEXLOGXS*UHDVHLQ
the oven may ignite.
Ŷ :KHQXVLQJFRRNLQJRUURDVWLQJEDJVLQWKHRYHQ
follow the manufacturer’s directions.
Ŷ SHOCK OR BURN HAZARD:%HIRUHUHSODFLQJ
oven light bulb, disconnect the electrical power to
the appliance at the main fuse or circuit breaker
panel. Failure to do so may result in electric shock
or burn.
Ŷ
CAUTION
BURN HAZARD: The glass cover
and bulb should be removed when cool. Touching
hot glass with bare hands or a damp cloth can
cause burns.
Ŷ 'RQRWXVHDQ\W\SHRIIRLORUOLQHUWRFRYHUWKH
oven bottom or anywhere in the oven, except as
described in the Owner’s Manual. Oven liners can
trap heat or melt, resulting in damage to the product
and risk of shock, smoke or fire.
WARNING
KEEP FLAMMABLE MATERIALS AWAY FROM THE OVEN
Failure to do so may result in fire or personal injury.
Ŷ 'RQRWVWRUHRUXVHIODPPDEOHPDWHULDOVLQDQRYHQ
including paper, plastic, pot holders, linens, wall
coverings, curtains, drapes and gasoline or other
flammable vapors and liquids.
Ŷ 1HYHUZHDUORRVHILWWLQJRUKDQJLQJJDUPHQWVZKLOH
using the appliance. These garments may ignite if
they contact hot surfaces, causing severe burns.
Ŷ 'RQRWOHWFRRNLQJJUHDVHRURWKHUIODPPDEOH
materials accumulate in or near the oven. Grease in
the oven or near the oven may ignite.
Ŷ'RQRWVWRUHDQ\IODPPDEOHPDWHULDOVRUWHPSHUDWXUH
sensitive items inside of or on the appliance.
Ŷ&OHDQYHQWLODWLQJKRRGVIUHTXHQWO\*UHDVHVKRXOG
not be allowed to accumulate on the hood or filter.
Ŷ Remote Operation - This appliance is configurable
WRDOORZUHPRWHRSHUDWLRQDWDQ\WLPH'RQRWVWRUH
any flammable materials or temperature sensitive
items inside of the appliance.

49-2000254 Rev. 6 5
SAFETY INFORMATION
READ AND SAVE THESE INSTRUCTIONS
IMPORTANT SAFETY INFORMATION
READ ALL INSTRUCTIONS BEFORE USING THE APPLIANCE
How to Remove Protective Shipping Film and Packaging Tape
Carefully grasp a corner of the protective shipping film
with your fingers and slowly peel it from the appliance
VXUIDFH'RQRWXVHDQ\VKDUSLWHPVWRUHPRYHWKHILOP
Remove all of the film before using the appliance for the
first time.
To assure no damage is done to the finish of the
product, the safest way to remove the adhesive from
packaging tape on new appliances is an application of
a household liquid dishwashing detergent. Apply with a
soft cloth and allow to soak.
NOTE:7KHDGKHVLYHPXVWEHUHPRYHGIURPDOOSDUWV,W
cannot be removed if it is baked on.
Consider recycling options for your appliance packaging
material.
The remote enable equipment installed on this oven
has been tested and found to comply with the limits for
D&ODVV%GLJLWDOGHYLFHSXUVXDQWWRSDUWRIWKH)&&
Rules. These limits are designed to:
(a) provide reasonable protection against harmful
interference in a residential installation. This equipment
generates, uses and can radiate radio frequency energy
and, if not installed and used in accordance with the
instructions, may cause harmful interference to radio
communications. However, there is no guarantee that
LQWHUIHUHQFHZLOOQRWRFFXULQDSDUWLFXODULQVWDOODWLRQ,I
this equipment does cause harmful interference to radio
or television reception, which can be determined by
turning the equipment off and on, the user is encouraged
to try to correct the interference by one or more of the
following measures:
Ŷ5HRULHQWRUUHORFDWHWKHUHFHLYLQJDQWHQQD
Ŷ,QFUHDVHWKHVHSDUDWLRQEHWZHHQWKHHTXLSPHQWDQG
receiver.
Ŷ&RQQHFWWKHHTXLSPHQWLQWRDQRXWOHWRQDFLUFXLW
different from that to which the receiver is connected.
Ŷ&RQVXOWWKHGHDOHURUDQH[SHULHQFHGUDGLR79
technician for help.
(b) accept any interference received, including
interference that may cause undesired operation of the
device.
Note that any changes or modifications to the wireless
communication device installed on this oven that are not
expressly approved by the manufacturer could void the
user's authority to operate the equipment.
PROPER DISPOSAL OF YOUR APPLIANCE
'LVSRVHRIRUUHF\FOH\RXUDSSOLDQFHLQDFFRUGDQFHZLWK)HGHUDODQG/RFDO5HJXODWLRQV&RQWDFW\RXUORFDO
authorities for the environmentally safe disposal or recycling of your appliance.
WARNING
SELF-CLEANING OVEN SAFETY INSTRUCTIONS
The self-cleaning feature operates the oven at temperatures high enough to burn away food soils in the oven.
Follow these instructions for safe operation.
Ŷ 'RQRWWRXFKRYHQVXUIDFHVGXULQJVHOIFOHDQ
RSHUDWLRQ.HHSFKLOGUHQDZD\IURPWKHRYHQGXULQJ
self-cleaning. Failure to follow these instructions
may cause burns.
Ŷ %HIRUHRSHUDWLQJWKHVHOIFOHDQF\FOHUHPRYHSDQV
shiny metal oven racks, any aluminum foil, and
other utensils from the oven. Only dark-colored
porcelain-coated oven racks may be left in the
oven. Failure to do so may cause damage to these
items and the oven and present a potential burn or
fire hazard.
Ŷ
%HIRUHRSHUDWLQJWKHVHOIFOHDQF\FOHZLSHJUHDVHDQG
food soils from the oven. Excessive amount of grease
may ignite leading to smoke damage to your home.
Ŷ ,IWKHVHOIFOHDQLQJPRGHPDOIXQFWLRQVWXUQWKH
oven off and disconnect the power supply. Have it
serviced by a qualified technician.
Ŷ 'RQRWXVHDSURWHFWLYHFRDWLQJWROLQHWKHRYHQDQG
do not use commercial oven cleaner unless certified
for use in a self-cleaning oven.
Ŷ 'RQRWFOHDQWKHGRRUJDVNHWV7KHGRRUJDVNHWV
are essential for a good seal. Care should be taken
not to rub, damage or move the gaskets.
Ŷ IMPORTANT: The health of some birds is
extremely sensitive to the fumes given off during
the self-cleaning cycle of any range. Move birds to
another well-ventilated room.

6 49-2000254 Rev. 6
Single Wall Oven Controls
USING THE OVEN: Single Wall Oven Controls
1. Convection Cooking Modes: Convection
cooking modes use increased air circulation
to improve performance. The type of benefit
depends on the mode. Your oven has the following
FRQYHFWLRQFRRNLQJPRGHV&RQYHFWLRQ%DNHDQG
Convection Roast. See the Cooking Modes section
for more information.
2. Traditional Cooking Modes: Your oven
KDVWKHIROORZLQJWUDGLWLRQDOFRRNLQJPRGHV%DNH
%URLO3URRIDQG:DUP6HHWKH&RRNLQJ0RGHV
section for more information.
3. Clean: Your oven has two cleaning modes: Self
Clean and Steam Clean. See the Cleaning the
Oven section for important information about using
these modes.
4. Start/Enter: Must be pressed to start any
cooking, cleaning, or timed function. NOTE:,I\RXU
display and keys dim, opening the oven door or
pressing any key will wake and illuminate the control.
5. Cancel/Off: &DQFHOV$//RYHQRSHUDWLRQV
except the clock and timer.
6. Timer: Works as a countdown timer. Press the
Timer pad and use the number pads to program the
time in hours and minutes. Press the Start/Enter
pad. The oven will continue to operate when the
timer countdown is complete. To turn the timer off,
press the Timer pad.
7. Air Fry: This allows the user to access the Air Fry
cooking mode. See the Cooking Modes section for
more information.
8. Lock Controls: /RFNVRXWWKHFRQWUROVRWKDW
pressing the pads does not activate the controls.
Press and hold the 0 pad, for three seconds to lock
or unlock the control. Cancel/Off is always active,
even when the control is locked.
9. Oven Light: Turns the oven light on or off.
10. Options and Settings: The Options and
Settings pads open up more detailed menus in the
display that allow access to additional functions and
cooking modes. For each, you select the function in
the display using the associated number pad. You
can exit at any time by pressing the Options or
Settings pad again. See the Settings, Options, and
Cooking Modes Sections for more details.
Control button shapes are representative; your oven may have alternate button shapes. Control buttons are
designed to become visible when the oven door is opened or if the controls are pressed in the area of a button.
1
2
7
4895
36
10

49-2000254 Rev. 6 7
Double Wall Oven Controls
USING THE OVEN:'RXEOH:DOO2YHQ&RQWUROV
Control button shapes are representative; your oven may have alternate button shapes. Control buttons are
designed to become visible when the oven door is opened or if the controls are pressed in the area of a button.
1. Upper Oven and Lower Oven:
'HVLJQDWHVZKLFKRYHQWKHFRQWUROVZLOORSHUDWH
Select an oven before following the steps for
starting a cooking or cleaning mode.
2. Convection Cooking Modes
(upper oven only): Convection cooking
modes use increased air circulation to improve
performance. See the Cooking Modes section for
more information.
3. Traditional Cooking Modes: Your oven
KDVWKHIROORZLQJWUDGLWLRQDOFRRNLQJPRGHV%DNH
%URLOand Warm. See the Cooking Modes section
for more information.
4. Clean: Your oven has two cleaning modes: Self
Clean and Steam Clean. See the Cleaning the
Oven section for important information about using
these modes.
5. Start/Enter: Must be pressed to start any
cooking, cleaning, or timed function. NOTE:,I\RXU
display and keys dim, opening the oven door or
pressing any key will wake and illuminate the control.
6. Cancel/Off: &DQFHOV$//RYHQRSHUDWLRQV
except the clock and timer.
7. Timer: Works as a countdown timer. Press the
Timer pad and use the number pads to program the
time in hours and minutes. Press the Start/Enter
pad. The oven will continue to operate when the
timer countdown is complete. To turn the timer off,
press the Timer pad.
8. Air Fry: This allows the user to access the Air Fry
cooking mode. See the Cooking Modes section for
more information.
9. Oven Light(s): Turns the oven light on or off.
10. Lock Controls: /RFNVRXWWKHFRQWUROVRWKDW
pressing the pads does not activate the controls.
Press and hold the 0 pad, for three seconds to lock
or unlock the control. Cancel/Off is always active,
even when the control is locked.
11. Options and Settings: The Options and
Settings pads open up more detailed menus in the
display that allow access to additional functions and
cooking modes. For each, you select the function in
the display using the associated number pad. You
can exit at any time by pressing the Options or
Settings pad again. See the Settings, Options, and
Cooking Modes Sections for more details.
1
1
6
6
3
7
259
4
8
10
11

8 49-2000254 Rev. 6
* Compatible Apple or Android devices and home WiFi network required.
Options
USING THE OVEN: Options / Settings
7KHRSWLRQVSDGRSHQVXSDPHQXRIPRUHFRRNLQJPRGHVZKHQWKHRYHQLVRII,WRSHQVDPHQXZLWKDGGLWLRQDOIHDWXUHV
if a cooking mode is already in process. You can exit the menu at any time by pressing the Options pad again.
You must first select a mode (bake, convection bake, convection roast) and then select Options to get to the
following functions.
Cook Time
Counts down cooking time and turns off the oven when the
FRRNLQJWLPHLVFRPSOHWH,QLWLDWHHLWKHUDEDNHRUZDUP
mode, but don’t press Start. Press the Options pad, follow
the screen prompts and use the number pads to program
a cooking time in hours and minutes, then press Start.
Delay Time
'HOD\VZKHQWKHRYHQZLOOWXUQRQ8VHWKLVWRVHWD
time when you want the oven to start. Select a desired
FRRNLQJPRGH8VHWKHQXPEHUSDGWRSURJUDPDEDNLQJ
temperature. Press the Options pad and select Delay
Time8VHWKHQXPEHUSDGVWRSURJUDPWKHWLPHRIGD\
for the oven to turn on, and then press Start/Enter. With
cooking modes, a cook time may also be programmed if
desired. Follow the directions under Cook Time for setting
WKLVIHDWXUH'HOD\7LPHLVQRWDYDLODEOHZLWKDOOPRGHV
NOTE::KHQXVLQJWKH'HOD\7LPHIHDWXUHIRRGVWKDW
spoil easily – such as milk, eggs, fish, stuffing, poultry,
and port – should not be allowed to sit for more than
KRXUEHIRUHRUDIWHUFRRNLQJ5RRPWHPSHUDWXUH
SURPRWHVWKHJURZWKRIKDUPIXOEDFWHULD%HVXUHWKDWWKH
oven light is off because heat from the bulb will speed
harmful bacteria growth.
Oven Probe (upper only on double oven
models)
NOTE: Only accessible through traditional and
convection cooking modes.
Monitors internal food temperature and turns the oven
off when the food reaches the programmed temperature.
,QVHUWWKHSUREHSUHVVWKHGHVLUHGFRRNLQJPRGHDQG
program the probe temperature. See the Cooking Modes
Section for more information. The probe can only be used
ZLWK%DNH&RQYHFWLRQ%DNHDQG&RQYHFWLRQ5RDVW
The Options and Settings pads open up more detailed menus in the display that allow access to additional functions.
For each you select the function in the display using the associated number pad. You can exit at any time by pressing
the Options or Settings pad again.
WiFi Connect and Remote Enable
Your oven is designed to provide you with two-way
communication between your appliance and smart
GHYLFH%\XVLQJWKH:L)L&RQQHFWIHDWXUHV\RXZLOO
be able to control essential oven operations such as
temperature settings, timers and cooking modes using
your smartphone or tablet.*
Select Settings then Wifi then follow the instructions on
\RXUSKRQHDSS,WLVQHFHVVDU\WRWXUQRQ:L)LEHIRUH
using Remote Enable on your oven.
Connecting your WiFi Connect Enabled Oven
What you will need
Your GE Appliances oven uses your existing home WiFi
network to communicate between the appliance and
\RXUVPDUWGHYLFH,QRUGHUWRVHWXS\RXU*($SSOLDQFHV
oven, you will need to gather some information:
(DFK*($SSOLDQFHVRYHQKDVDFRQQHFWHGDSSOLDQFH
LQIRUPDWLRQODEHOWKDWLQFOXGHVDQ$SSOLDQFH83'
,'7KLVLVDQLPSRUWDQWGHWDLOWKDW\RXZLOOQHHGWR
connect to the appliance The label is typically located
inside the door of the oven or drawer.
2. Have your smart phone or tablet ready with the ability
to access the internet and download apps.
3. You will need to know the password of your home
WiFi router. Have this password ready while you are
setting up your GE Appliances oven.
Connect your GE Appliances oven
2Q\RXUVPDUWSKRQHRUWDEOHWYLVLW
GEAppliances.com/connect to learn more about
connected appliance features and to download the
appropriate app.
2. Follow the app onscreen instructions to connect your
GE Appliances oven.
3. Once the process is complete, the connection light
located on your GE Appliances oven display will stay
on solid and the app will confirm you are connected.
Settings
Contains FCC: ZKJ-WCATA009
UPD ID: XX-XX-XX-XX-XX-XX
PT. NO. XXXXXXXXXXXX
Contains IC: 10229A-WCATA009
MAC ID: D8-28-C9-XXXXXXXX
Connected Appliance Information
6DPSOH/DEHO

49-2000254 Rev. 6 9
USING THE OVEN: Settings
Settings (Cont.)
WiFi Connect and Remote Enable (Cont.)
,IWKHFRQQHFWLRQOLJKWGRHVQRWWXUQRQRULVEOLQNLQJ
IROORZWKHLQVWUXFWLRQVRQWKHDSSWRUHFRQQHFW,I
issues continue, please call the Connected Call
&HQWHUDQGDVNIRUDVVLVWDQFH
regarding oven wireless connectivity.
To connect additional smart devices, disconnect from
WiFi and the first device, then reconnect to WiFi and
UHSHDWVWHSVDQG7KHXQLWFDQRQO\EHFRQQHFWHGWR
one device at a time.
1RWHWKDWDQ\FKDQJHVRUPRGLILFDWLRQVWRWKHUHPRWH
enable device installed on this oven that are not
expressly approved by the manufacturer could void the
user’s authority to operate the equipment.
REMOTE STARTING YOUR OVEN
To be able to start the oven remotely once connected to
WiFi, press the Remote Enable pad and the icon will
turn on in the display. The oven can now be remotely
started with a connected device. The icon must be lit
to start the oven remotely. The icon is not required to
change the oven temperature while it is running, set a
timer or to turn the oven off from the phone app while the
icon shows it is Wifi Connected.
To disconnect your phone from Remote Enable, press
the Remote Enable pad and the icon will turn off.
NOTE: )RRGVWKDWVSRLOHDVLO\²VXFKDVPLONHJJVILVK
VWXIILQJVSRXOWU\DQGSRUN²VKRXOGQRWEHDOORZHGWR
VLWIRUPRUHWKDQKRXUEHIRUHRUDIWHUFRRNLQJ5RRP
WHPSHUDWXUHSURPRWHVWKHJURZWKRIKDUPIXOEDFWHULD%H
sure that the oven light is off because heat from the bulb
will speed harmful bacteria growth.
Clock
This setting sets the oven clock time. Press the Settings
pad and select Clock. Select Set Clock and follow the
instructions to set the clock. This feature also specifies
how the time of day will be displayed. You can select a
VWDQGDUGKRXUFORFN+KRXUPLOLWDU\WLPHGLVSOD\
+RUQRFORFNGLVSOD\HG2II3UHVVWKHSettings pad,
select Set Clock and select either 12/24 hr or On/Off.
Auto Conv (Auto Conversion)
:KHQXVLQJ&RQYHFWLRQ%DNHFRRNLQJ$XWR5HFLSH
Conversion will automatically convert the regular baking
temperatures entered to convection bake cooking
WHPSHUDWXUHVZKHQWXUQHGRQ1RWHWKDWWKLVRSWLRQ
does not convert convection bake cooking times, it only
converts temperatures. This feature may be turned on or
off. Select Settings and Auto Conversion then follow
the prompts to turn this feature on or off.
Auto Off
7KLVIHDWXUHVKXWVWKHRYHQGRZQDIWHUKRXUVRI
FRQWLQXRXVRSHUDWLRQ,WPD\EHHQDEOHGRUGLVDEOHG
Select Settings and Auto Off to turn this feature on or off.
Sound
You can adjust the volume and type of alert your
appliance uses. Select Settings and Sound. Follow
prompts for making volume adjustments or for changing
between continuous and single alert tones. A continuous
setting will continue to sound a tone until a button on
the control is pressed. The oven tone volume can be
adjusted. The control will sound the oven tone at the new
volume level each time the sound level is changed.
F/C (Fahrenheit or Celsius)
The oven control is set to use Fahrenheit temperatures
)EXW\RXFDQFKDQJHLWWRXVH&HOVLXVWHPSHUDWXUHV
&6HOHFWSettings and F/C to alter between
temperature scales displayed.
Adjust the Oven temperature
This feature allows the oven baking and convection
baking temperature to be adjusted up to 35ºF hotter
RUGRZQWR)FRROHU8VHWKLVIHDWXUHLI\RXEHOLHYH
your oven temperature is too hot or too cold and wish to
FKDQJHLW7KLVDGMXVWPHQWDIIHFWV%DNHDQG&RQYHFWLRQ
%DNHPRGHV1RRWKHUFRRNLQJPRGHVDUHDIIHFWHG
Select Settings and Oven Adjust to add More Heat
or Less Heat and then press SaveIRUGRXEOHRYHQV
XVHWKH8SSHU2YHQRU/RZHU2YHQPHQXVHOHFWLRQ
FRUUHVSRQGLQJWRWKHRYHQWREHDGMXVWHG'RQRWXVH
thermometers, such as those found in grocery stores,
to check the temperature setting of your oven. These
WKHUPRPHWHUVPD\YDU\GHJUHHV
Oven Info
Select Settings and Oven Info to display the Model
1XPEHUDQG6RIWZDUH9HUVLRQ

49-2000254 Rev. 6
Sabbath Mode
USING THE OVEN: Sabbath Mode
6DEEDWK PRGH GLVDEOHV WKH RYHQ OLJKWV WKH RYHQ OLJKW ZLOO QRW WXUQ RQ ZKHQ WKH GRRU LV RSHQHG DOO VRXQGV WKH FRQWURO
ZLOO QRW EHHS ZKHQ D EXWWRQ LV SUHVVHG &RQYHFWLRQ %URLO :DUP 3URRI &RRN 7LPH 7LPHU &ORFN DQG 'HOD\ 7LPH
IXQFWLRQV 6DEEDWK PRGH FDQ RQO\ EH XVHG ZLWK %DNH 7KLV IHDWXUH FRQIRUPV WR -HZLVK 6DEEDWK UHTXLUHPHQWV
Setting the Sabbath Mode
Press the Settings pad, select Sabbath, and select
Turn on. A single bracket “]” will appear in the display
indicating that the Sabbath mode is set. The clock will
not be displayed.
Starting a Continuous Bake
3UHVV WKH Bake SDG )RU GRXEOH RYHQV WKLV RSHUDWHV
WKH XSSHU RYHQ ,I GHVLULQJ WR XVH /RZHU 2YHQ SUHVV
Lower Oven and then Bake.)
,I WKH GHVLUHG WHPSHUDWXUH LV ) SUHVV Start/
Enter ,I D GLIIHUHQW FRRNLQJ WHPSHUDWXUH LV GHVLUHG
use the 1 through 5 number pads to select a preset
cooking temperature, then press Start/Enter. Refer
to the graphic below to determine which pad sets the
desired cooking temperature.
After a delay, a second bracket “] [“ will appear in the
display indicating that the oven is baking.
Adjusting the Temperature
Press Bake (or press Lower Oven and then Bake for
lower oven in a double oven unit), use the 1 through
5 number pads to select a different preset cooking
temperature, and press Start/Enter.
Starting a Timed Bake
3UHVV WKH Bake pad.
,I WKH GHVLUHG WHPSHUDWXUH LV ) XVH WKH 6 through
0 QXPEHU SDGV WR VHOHFW D FRRNLQJ WLPH ,I D FRRNLQJ
WHPSHUDWXUH RWKHU WKDQ ) LV GHVLUHG XVH WKH 1
through 5 number pads to select a preset cooking
temperature, then select the cooking time. Refer to
the graphic on this page to determine which pad sets
the desired cooking temperature and cooking time.
3. Press Start/Enter.
After a delay, a second bracket “] [“ will appear in the
display indicating that the oven is baking. When the cook
time expires, the display will change back to a single
bracket “]” indicating that the oven is no longer baking.
1R WRQH ZLOO VRXQG ZKHQ WKH FRRN WLPH LV FRPSOHWH
Exit the Sabbath Mode
To exit Sabbath mode, make sure that the oven is
turned off. Press and hold the Settings pad to turn
Sabbath mode off.
Sabbath Mode Power Outage Note
,I SRZHU RXWDJH RFFXUV GXULQJ 6DEEDWK PRGH WKH XQLW ZLOO
remain in Sabbath mode but off when power is restored.
7HPSHUDWXUH )
7LPH KRXUV
325
2.5h
3h
4h
2h
3.5h
) ) ) ) )
KRXUV KRXUV KRXUV KRXUV KRXUV
49-2000254 Rev. 6
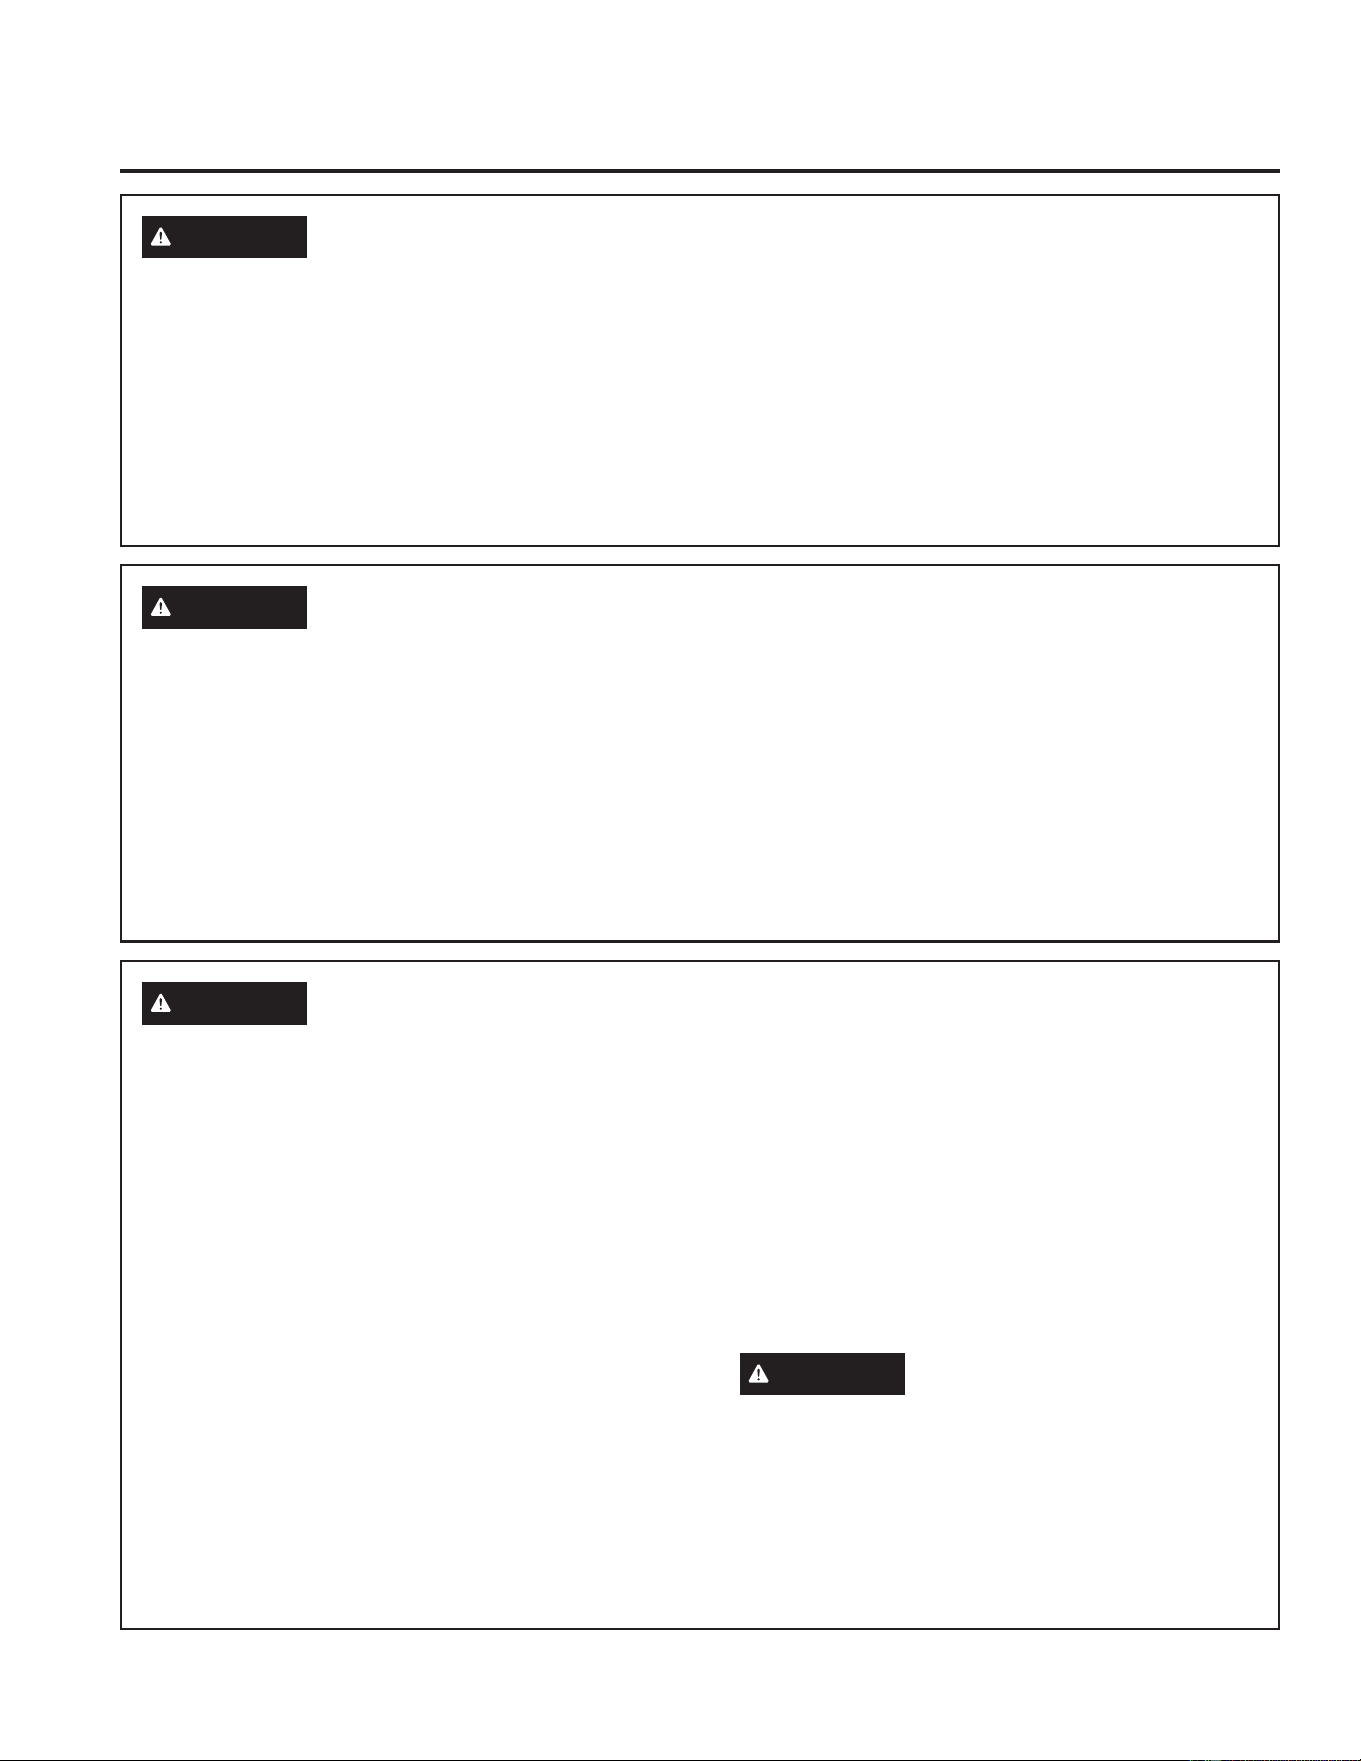
Your oven has six rack positions. Recommended rack
positions for various types of foods are provided in the
Cooking Guide. Adjusting rack position is one way to
impact cooking results. For example, if you would prefer
darker tops on cakes, muffins, or cookies, try moving
IRRGRQHUDFNSRVLWLRQKLJKHU,I\RXILQGIRRGVDUHWRR
brown on top try moving them down next time.
When baking with multiple pans and on multiple racks,
ensure there is sufficient space between pans to allow
air to flow.
Your Oven may have extension racks and/or traditional
flat racks.
To avoid possible burns, place the racks in the desired
position before you turn the oven on.
Traditional Flat Racks
When placing and removing cookware, pull the rack out
WRWKHEXPSVWRSSRVLWLRQRQWKHUDFNVXSSRUW
To remove a rack, pull it toward you, tilt the front end up
and pull it out.
7RUHSODFHSODFHWKHFXUYHGHQGRIWKHUDFNVWRSORFNV
onto the oven supports, tilt up the front of the rack and
push the rack in.
Racks may become difficult to slide, especially after a
self-clean. Put some vegetable oil on a soft cloth or paper
towel and rub onto the left and right edges of the racks.
NOTE: 8VLQJRWKHUFRRNLQJRLOVZLOOFDXVHDGLVFRORULQJ
or a rust like color residue on the racks and cavity sides.
To clean this residue, use a soap and water or a vinegar
and water solution. Rinse with clean water and dry with a
soft cloth.
Oven Racks
USING THE OVEN: Oven Racks

49-2000254 Rev. 6
USING THE OVEN: Oven Racks
Oven Racks (Cont.)
Extension Racks
Always pull the rack out by its upper front rail to its fully
open position, when placing or removing cookware.
Extension racks cannot be used in the top rack position.
,IH[WHQVLRQUDFNVDUHGLIILFXOWWRH[WHQGOXEULFDWHWKH
racks with the graphite lubricant provided with your
oven. Remove the rack from the oven, remove debris in
the side tracks with a paper towel, shake the graphite
lubricant and place 4 small drops on the two bottom
tracks of the left and right sides. Open and close the
rack several times to distribute the lubricant.
To order additional graphite lubricant, read the
Accessories section of the manual.
To Remove An Extension Rack:
0DNHVXUHWKHUDFNLVSXVKHGDOOWKHZD\LQWRWKHRYHQ
so that side paddles on the rack disengage from the
oven support.
6OLGHWKHUDFNWRZDUG\RXWRWKHEXPSVWRSSRVLWLRQ
on the rack support.
3. Firmly grasp both sides of the rack frame and the
sliding rack, tilt the front end up and pull it out.
To Replace An Extension Rack:
)LUPO\JUDVSERWKVLGHVRIWKHUDFNIUDPHDQGWKH
sliding rack.
3ODFHWKHFXUYHGHQGRIWKHUDFNVWRSORFNVRQWR
the oven supports, tilt up the front of the rack and
push it in as far as it will go.
,IH[WHQVLRQUDFNVDUHGLIILFXOWWRUHSODFHRUUHPRYHZLSH
WKHRYHQUDFNVXSSRUWVZLWKYHJHWDEOHRLO'RQRWZLSHRLO
on the rack slides.
NOTE: 8VLQJRWKHUFRRNLQJRLOVZLOOFDXVHDGLVFRORULQJ
or a rust like color residue on the racks and cavity sides.
To clean this residue, use a soap and water or a vinegar
and water solution. Rinse with clean water and dry with a
soft cloth.
To Lubricate the Paddle:
Shake lubricant and apply to the moving parts of the
paddle mechanisms as shown.
8SSHU)URQW
Rail
Fully Open Position
Grasp here

49-2000254 Rev. 6
CAUTION
Do not use any type of foil or oven liner to cover the oven bottom. These items can trap heat
or melt, resulting in damage to the product and risk of shock, smoke or fire. Damage from improper use of
these items is not covered by the product warranty.
)RLOPD\EHXVHGWRFDWFKVSLOOVE\SODFLQJDVKHHWRQDORZHUUDFNVHYHUDOLQFKHVEHORZWKHIRRG'RQRWXVHPRUH
IRLOWKDQQHFHVVDU\DQGQHYHUHQWLUHO\FRYHUDQRYHQUDFNZLWKDOXPLQXPIRLO.HHSIRLODWOHDVW´IURPRYHQZDOOV
to prevent poor heat circulation.
Cookware Guidelines
The material, finish, and size of cookware affect baking
performance.
'DUNFRDWHGDQGGXOOSDQVDEVRUEKHDWPRUHUHDGLO\
than light, shiny pans. Pans that absorb heat more
readily can result in a browner, crisper, and thicker crust.
,IXVLQJGDUNDQGFRDWHGFRRNZDUHFKHFNIRRGHDUOLHU
WKDQPLQLPXPFRRNWLPH,IXQGHVLUDEOHUHVXOWVDUH
obtained with this type of cookware consider reducing
oven temperature by 25º F next time.
Shiny pans can produce more evenly cooked baked
goods such as cakes and cookies.
Glass and ceramic pans heat slowly but retain heat well.
These types of pans work well for dishes such as pies
and custards.
Air insulated pans heat slowly and can reduce bottom
browning.
.HHSFRRNZDUHFOHDQWRSURPRWHHYHQKHDWLQJ
Cookware
USING THE OVEN:$OXPLQXP)RLODQG2YHQ/LQHUV&RRNZDUH
Aluminum Foil and Oven Liners

49-2000254 Rev. 6
Cooking Modes
USING THE OVEN: Cooking Modes
Your new oven has a variety of cooking modes to help you get the best results. These modes are described below.
Refer to the Cooking Guide section for recommendations for specific foods. Remember, your new oven may perform
differently than the oven it is replacing.
Baking and Roasting Modes
Select a mode for baking and roasting based on the
type and quantity of food you are preparing. When
preparing baked goods such as cakes, cookies, and
pastries always preheat the oven first. Follow recipe
UHFRPPHQGDWLRQVIRUIRRGSODFHPHQW,IQRJXLGHOLQHV
are provided, center food in the oven.
Traditional Bake
The traditional bake mode is intended for single rack
cooking. This mode uses heat primarily from the lower
element but also from the upper element to cook
food. To use this mode press the Bake pad, enter
a temperature, and then press Start. Preheating is
generally recommended when using this mode.
Convection Bake (upper only on double
oven models)
7KH&RQYHFWLRQ%DNHPRGHLVLQWHQGHGIRUEDNLQJRQ
multiple racks at the same time. This mode uses heat
primarily from the rear element but also heat from the
upper and lower elements, along with air movement
from the convection fan to enhance cooking evenness.
Your oven is equipped with Auto Recipe Conversion,
so it is not necessary to convert the temperature when
XVLQJWKLVPRGH%DNLQJWLPHPLJKWEHVOLJKWO\ORQJHUIRU
multiple racks than what would be expected for a single
rack. To use this mode press the Convection pad, then
select Convection Bake, enter a temperature, and then
press Start. Always preheat when using this mode.
Convection Roast (upper only on double
oven models)
The Convection Roast mode is intended for roasting
whole cuts of meat on a single rack. This mode uses
heat from the lower, upper, and rear elements along
with air movement from the convection fan to improve
EURZQLQJDQGUHGXFHFRRNLQJWLPH,WLVQRWQHFHVVDU\WR
convert temperature. Check food earlier than the recipe
suggested time when using this mode or use a meat
probe. To use this mode press the Convection pad,
then select Convection Roast, enter a temperature, and
then press Start,WLVQRWQHFHVVDU\WRSUHKHDWZKHQ
using this mode.
Broiling Modes
Always broil with the door closed. The broil element in
this oven is very powerful. Monitor food closely while
EURLOLQJ8VHFDXWLRQZKHQEURLOLQJRQXSSHUUDFN
positions as placing food closer to the broil element
increases smoking, spattering, and the possibility of fats
igniting. For best performance center food below the broil
heating element. Broiling on rack position 6, in single
and lower cavities, is not recommended.
Try broiling foods that you would normally grill. Adjust
rack positions to adjust the intensity of the heat to the
food. Place foods closer to the broil element when a
seared surface and rare interior is desired. Thicker foods
and foods that need to be cooked through should be
broiled on a rack position farther from the broiler or by
XVLQJ%URLO/R
Broil Hi
7KH%URLO+LPRGHXVHVLQWHQVHKHDWIURPWKHXSSHU
HOHPHQWWRVHDUIRRGV8VH%URLO+LIRUWKLQQHUFXWVRI
meat and/or foods you prefer less done on the interior.
To use this mode press the Broil pad, then select Hi
Broil, and press Start,WLVQRWQHFHVVDU\WRSUHKHDW
when using this mode.
Broil Lo
7KH%URLO/RPRGHXVHVOHVVLQWHQVHKHDWIURPWKHXSSHU
element to cook food thoroughly while also producing
VXUIDFHEURZQLQJ8VH%URLO/RIRUWKLFNHUFXWVRIPHDW
and/or foods that you would like cooked all the way
through. To use this mode press the Broil pad, then
select Lo Broil, and press Start,WLVQRWQHFHVVDU\WR
preheat when using this mode.
Proof
3URRIPRGHLVGHVLJQHGIRUULVLQJIHUPHQWLQJDQG
SURRILQJEUHDGGRXJKV,QVRPHPRGHOV3URRILVIRXQG
by selecting Options. Press Proof and then press Start.
&RYHUGRXJKZHOOWRSUHYHQWGU\LQJRXW%UHDGZLOOULVH
PRUHUDSLGO\WKDQDWURRPWHPSHUDWXUH1RWHWKDWIRU
double wall ovens, proof can not be run when running a
clean mode in the lower oven.
Warm
Warm mode is designed to keep hot foods hot for up to
KRXUV,QVRPHPRGHOV:DUPLVIRXQGE\VHOHFWLQJ
Options. Press Warm and then press Start. Cover
foods that need to remain moist and do not cover foods
WKDWVKRXOGEHFULVS3UHKHDWLQJLVQRWUHTXLUHG'RQRW
use warm to heat cold food other than crisping crackers,
FKLSVRUGU\FHUHDO,WLVDOVRUHFRPPHQGHGWKDWIRRGQRW
be kept warm for more than 2 hours.
Air Fry
The Air Fry mode is a special, no-preheat convection
cooking mode designed to produce foods with a crispier
exterior than traditional oven cooking. The Air Fry mode
is intended for single rack cooking only. Select Air Fry,
then select the desired set temperature and press Start.
7KHWHPSHUDWXUHFDQEHVHWEHWZHHQ)DQG)
Preheating is not recommended for this mode. Follow
traditional oven recipe or package guidelines for set
temperatures and cook times; adjust cook time to achieve
your desired crispness. Additional guidelines for using this
mode can be found in the Cooking Guide.

49-2000254 Rev. 6
Probe
USING THE OVEN: Probe
WARNING
Consuming undercooked food can result in foodborne illness. Use probe according to
the following instructions to ensure all portions of the food reach minimum safe cooking temperatures.
Recommendations for minimum safe food temperatures can be found at foodsafety.gov or IsItDoneYet.gov.
,QWHUQDOIRRGWHPSHUDWXUHLVIUHTXHQWO\XVHGDVDQ
indicator of doneness, especially for roasts and poultry.
The Probe mode monitors the internal food temperature
and turns the oven off when the internal food
temperature reaches the programmed temperature.
Always check the temperature at multiple locations in
the food with a food thermometer after cooking to ensure
that all portions of the food have reached the minimum
safe internal temperature for that food.
Proper Probe Placement
After preparing the meat and placing it on the cooking
pan follow these instructions for proper probe placement.
Ŷ ,QVHUWWKHSUREHLQWRWKHIRRGVRWKDWWKHWLSRIWKH
probe will rest in the center of the thickest part of
the food. For best performance the probe should
EHIXOO\LQVHUWHGLQWRWKHIRRG,IWKHSUREHLVQRW
located properly, it may not accurately measure the
temperature of the coolest portion of the food. Some
foods, particularly small items, are not well suited for
cooking with the probe due to their shape or size.
Ŷ 7KHSUREHVKRXOGQRWWRXFKERQHIDWRUJULVWOH
Ŷ )RUZKROHSRXOWU\LQVHUWWKHSUREHLQWRWKHWKLFNHVW
part of the breast.
Ŷ )RUERQHOHVVURDVWVLQVHUWWKHSUREHLQWRWKHFHQWHU
of the roast.
Ŷ )RUERQHLQKDPRUODPELQVHUWWKHSUREHLQWRWKH
center of the lowest large muscle or joint.
Ŷ )RUFDVVHUROHVRUGLVKHVVXFKDVPHDWORDILQVHUWWKH
probe into the center of the dish.
Ŷ )RUILVKLQVHUWWKHSUREHIURPMXVWDERYHWKHJLOOLQWR
the meatiest area, parallel to the backbone.
Probe Usage
7KHWHPSHUDWXUHSUREHFDQRQO\EHXVHGZLWK%DNH
&RQYHFWLRQ%DNHDQG&RQYHFWLRQ5RDVW
To use the probe with preheating:
6HOHFWWKHGHVLUHGFRRNPRGHBake, Convection
Bake, or Convection Roast) pad and enter the
desired cooking temperature with the number pads.
,QVHUWWKHSUREHLQWRWKHIRRGVHH3URSHU3UREH
Placement). Place the food in the oven and connect
the probe into the probe outlet in the oven. The probe
outlet can be found in the upper oven.
3. Once the oven is preheated, place the food in the
oven and connect the probe to the probe outlet,
PDNLQJVXUHLWLVIXOO\LQVHUWHG8VHFDXWLRQWKHRYHQ
walls and probe outlet are hot.
4. When the probe is connected, the display will prompt
you to enter the desired food temperature. The
maximum internal food temperature that you can set
LV)
To use the probe without preheating:
,QVHUWWKHSUREHLQWRWKHIRRGVHH3URSHU3UREH
Placement).
2. Place the food in the oven and connect the probe into
the probe outlet in the oven. The probe outlet can be
found in the upper oven.
3. Press the Cook ModeSDGTraditional Bake,
Convection Bake, or Convection Roast) and
enter the desired cooking temperature with the
number pads. Press Options and select Probe then
follow the display prompts to enter the desired food
temperature.
Probe Care Guidelines
Ŷ 8VHRISUREHVRWKHUWKDQWKHRQHSURYLGHGZLWKWKLV
product may result in damage to the probe outlet.
Ŷ 8VHWKHKDQGOHVRIWKHSUREHDQGSOXJZKHQLQVHUWLQJ
and removing them from the meat and outlet
Ŷ 7RDYRLGGDPDJLQJ\RXUSUREHGRQRWXVHWRQJVWR
pull on the cable when removing it.
Ŷ 7RDYRLGEUHDNLQJWKHSUREHPDNHVXUHIRRGLV
completely defrosted before inserting the probe.
Ŷ 7RSUHYHQWSRVVLEOHEXUQVGRQRWXQSOXJWKHSUREH
from the outlet until the oven has cooled.
Ŷ 1HYHUOHDYHWKHSUREHLQVLGHWKHRYHQGXULQJDVHOIRU
steam clean cycle.
Ŷ 'RQRWVWRUHWKHSUREHLQWKHRYHQ
49-2000254 Rev. 6
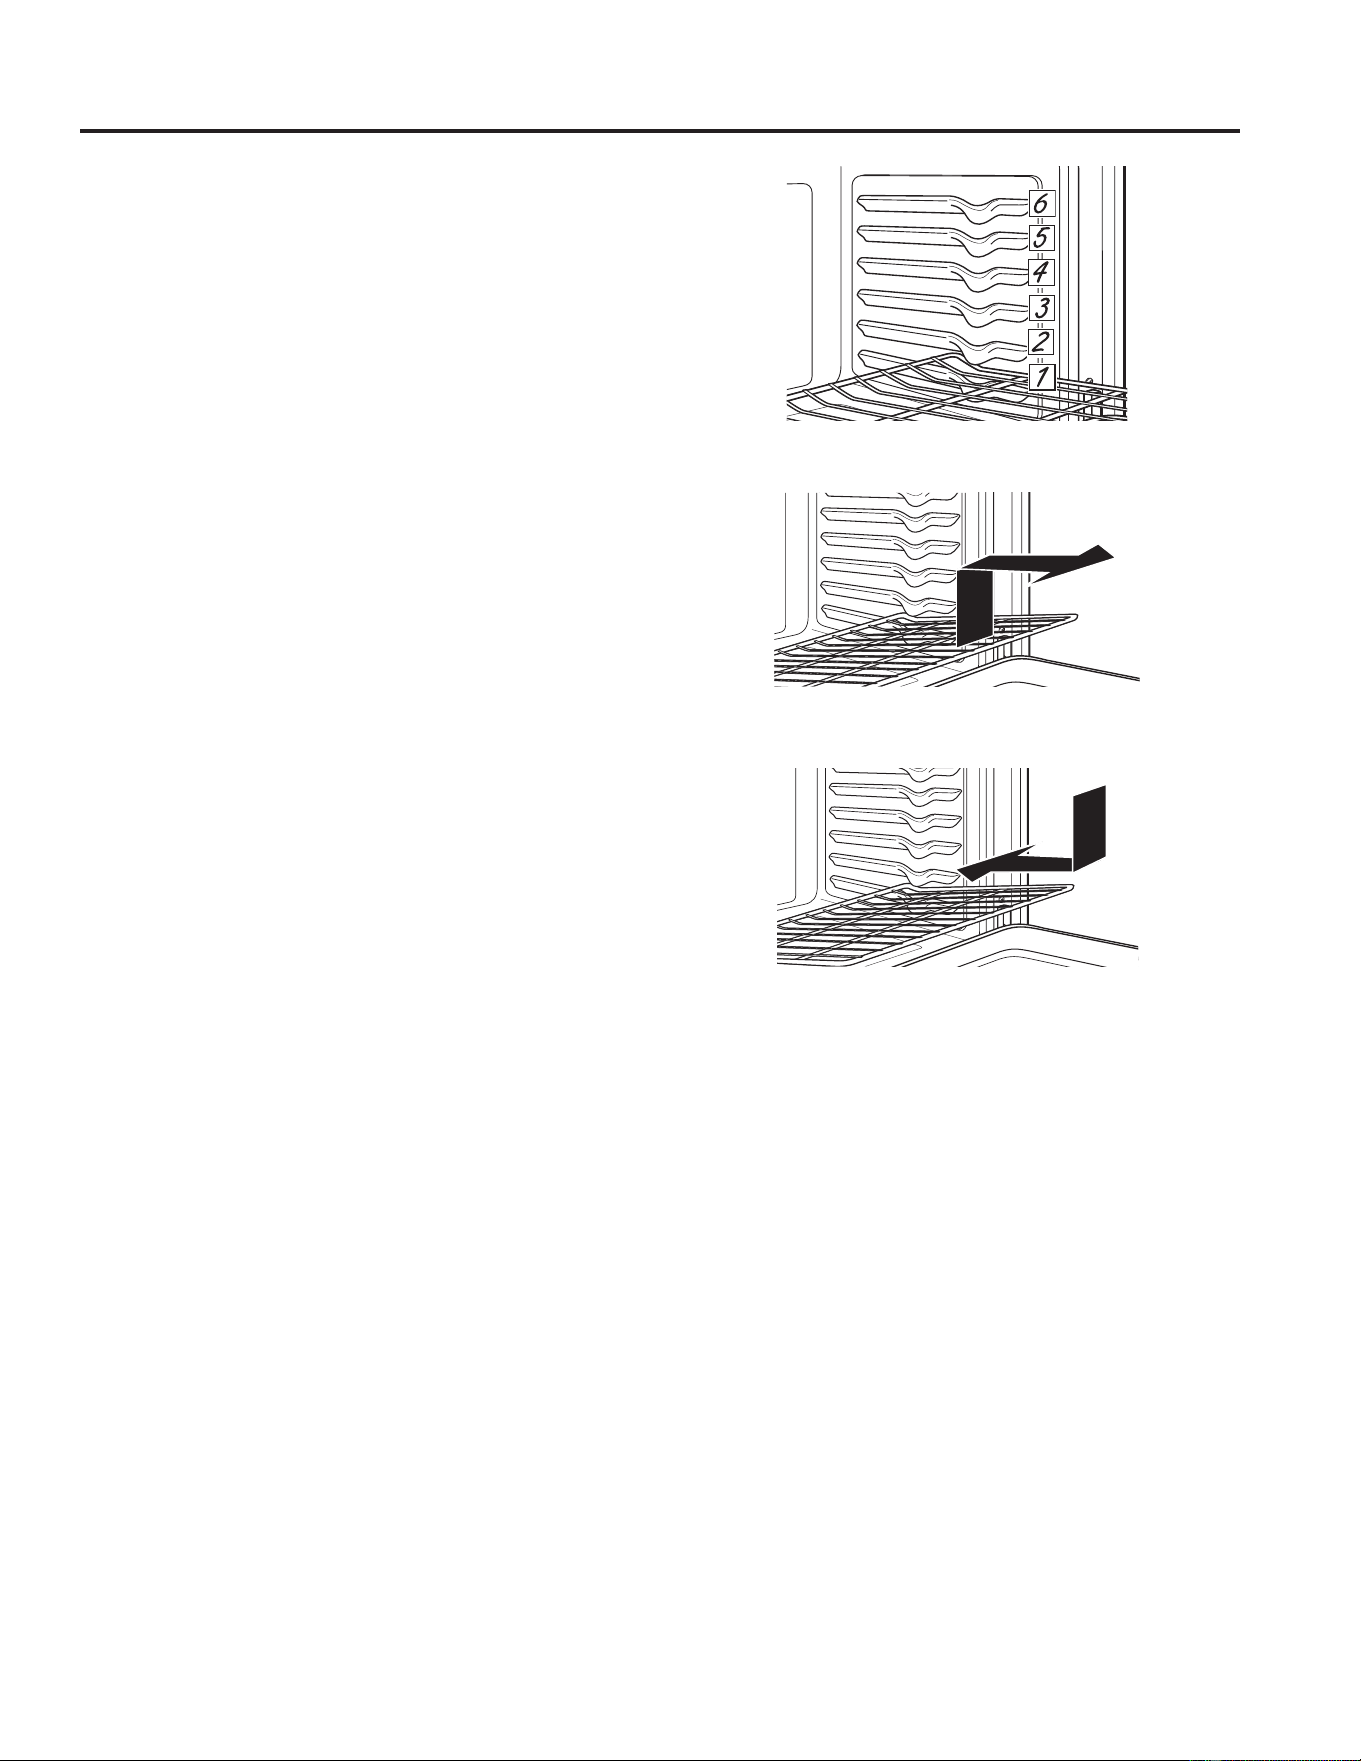
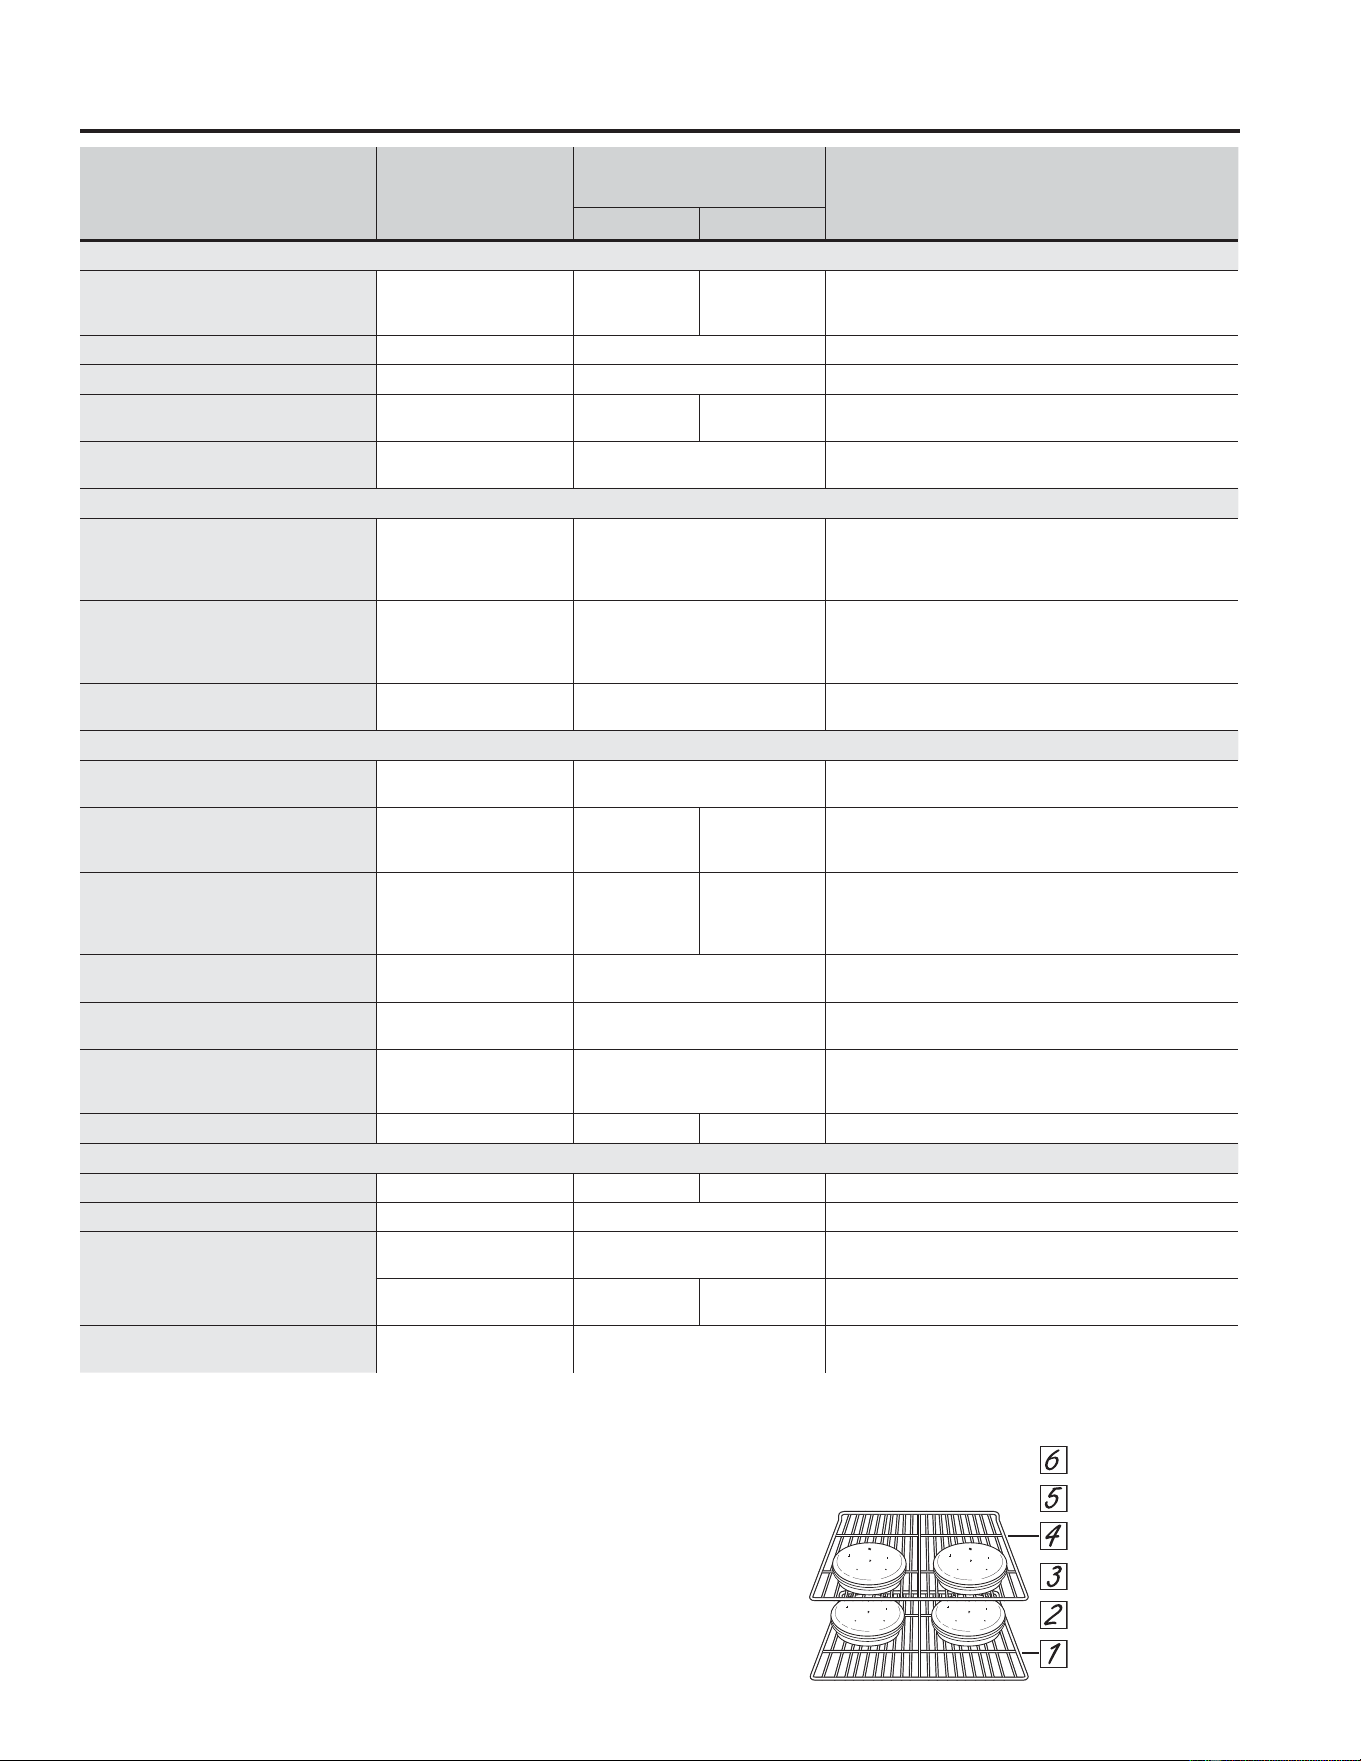
*When baking four cake layers at a time, use racks
2 and 4. Place the pans as shown so that one pan is
not directly above another.
Cook food thoroughly to help protect against food
borne illness. Minimum safe food temperature
recommendations for food safety can be found at
IsItDoneYet.gov. Make sure to use a food thermometer
to take food temperatures.
USING THE OVEN: Cooking Guide
Cooking Guide - Lower Oven
FOOD TYPE
RECOMMENDED
MODE(S)
RECOMMENDED
RACK POSITION(S) ADDITIONAL SUGGESTIONS
Baked Goods
/D\HUFDNHVVKHHWFDNHVEXQGW
cakes, muffins, quick breads on a
Single Rack
7UDGLWLRQDO%DNH 3 8VHVKLQ\FRRNZDUH
/D\HUFDNHVRQ0XOWLSOH5DFNV 7UDGLWLRQDO%DNH 2 and 4 (QVXUHDGHTXDWHDLUIORZVHHLOOXVWUDWLRQEHORZ
&KLIIRQFDNHVDQJHOIRRG 7UDGLWLRQDO%DNH 8VHVKLQ\FRRNZDUH
Cookies, biscuits, scones on a
Single Rack
7UDGLWLRQDO%DNH 3 8VHVKLQ\FRRNZDUH
Cookies, biscuits, scones on Multiple
Racks
7UDGLWLRQDO%DNH 2 and 4
For foods like sugar cookies, switch food location
partially through cooking for more even cooking
results between racks. Ensure adequate airflow.
Beef & Pork
Hamburgers %URLO+L 5
8VHDEURLOSDQPRYHIRRGGRZQIRUPRUH
doneness/less searing. Watch food closely when
broiling. For best performance center food below
the broil heating element.
Steaks & Chops %URLO+L 5
8VHDEURLOSDQPRYHIRRGGRZQIRUPRUH
doneness/less searing. Watch food closely when
broiling. For best performance center food below
the broil heating element.
Roasts 7UDGLWLRQDO%DNH 2
/HDYHXQFRYHUHGXVHDORZVLGHGSDQVXFK
as a broil pan. Preheating is not necessary.
Poultry
Whole chicken 7UDGLWLRQDO%DNH 2
8VHDORZVLGHGSDQVXFKDVDEURLOSDQ
Preheating is not necessary.
%RQHLQFKLFNHQEUHDVWVOHJVWKLJKV
%URLO/R
7UDGLWLRQDO%DNH
3
%URLOVNLQVLGHGRZQILUVW:DWFKIRRGFORVHO\ZKHQ
broiling. For best performance when broiling,
center food below the broil heating element.
%RQHOHVVFKLFNHQEUHDVWV
%URLO/R
7UDGLWLRQDO%DNH
3
Move food down for more doneness/less searing
and up for greater searing/browning when broiling.
For best performance when broiling, center food
below the broil heating element.
Whole turkey 7UDGLWLRQDO%DNH RU
8VHDORZVLGHGSDQVXFKDVDEURLOSDQ
Preheating is not necessary.
7XUNH\%UHDVW 7UDGLWLRQDO%DNH 2
8VHDORZVLGHGSDQVXFKDVDEURLOSDQ
Preheating is not necessary.
Fish %URLO/R
WKLFNRUOHVV
!LQFK
Watch food closely when broiling. For best
performance center food below the broil
heating element.
Casseroles 7UDGLWLRQDO%DNH 3
Frozen Convenience Foods
Potato products, chicken nuggets,
appetizers on a Single Rack
7UDGLWLRQDO%DNH 3 8VHVKLQ\FRRNZDUH
Potato products, chicken nuggets,
appetizers on Multiple Racks
7UDGLWLRQDO%DNH 2 and 4
8VHVKLQ\FRRNZDUH
Switch food location partially
through cooking for more even cooking results.
49-2000254 Rev. 6
*When baking four cake layers at a time, use racks
DQG3ODFHWKHSDQVDVVKRZQVRWKDWRQHSDQLV
not directly above another.
Cook food thoroughly to help protect against food
borne illness. Minimum safe food temperature
recommendations for food safety can be found at
IsItDoneYet.gov. Make sure to use a food thermometer
to take food temperatures.
USING THE OVEN: Cooking Guide
Cooking Guide - Upper/Single Oven
FOOD TYPE
RECOMMENDED
MODE(S)
RECOMMENDED
RACK POSITION(S)
ADDITIONAL SUGGESTIONS
27” 30”
Baked Goods
/D\HUFDNHVVKHHWFDNHVEXQGW
cakes, muffins, quick breads on a
Single Rack
7UDGLWLRQDO%DNH 2 ext. or 3 flat 3 8VHVKLQ\FRRNZDUH
/D\HUFDNHVRQ0XOWLSOH5DFNV &RQYHFWLRQ%DNH H[WDQGIODW (QVXUHDGHTXDWHDLUIORZVHHLOOXVWUDWLRQEHORZ
&KLIIRQFDNHVDQJHOIRRG 7UDGLWLRQDO%DNH 8VHVKLQ\FRRNZDUH
Cookies, biscuits, scones on a
Single Rack
7UDGLWLRQDO%DNH 2 ext. or 3 flat 3 8VHVKLQ\FRRNZDUH
Cookies, biscuits, scones on
Multiple Racks
&RQYHFWLRQ%DNH H[WDQGIODW Ensure adequate airflow.
Beef & Pork
Hamburgers %URLO+L 5
8VHDEURLOSDQPRYHIRRGGRZQIRUPRUHGRQHQHVV
less searing. Watch food closely when broiling. For
best performance center food below the broil heating
element.
Steaks & Chops %URLO+L 5
8VHDEURLOSDQPRYHIRRGGRZQIRUPRUHGRQHQHVV
less searing. Watch food closely when broiling. For
best performance center food below the broil heating
element.
Roasts
7UDGLWLRQDO%DNH
Convection Roast
2 ext. or 3 flat
/HDYHXQFRYHUHGXVHDORZVLGHGSDQVXFK
as a broil pan. Preheating is not necessary.
Poultry
Whole chicken
7UDGLWLRQDO%DNH
Convection Roast
2 ext. or 3 flat
8VHDORZVLGHGSDQVXFKDVDEURLOSDQ3UHKHDWLQJ
is not necessary.
%RQHLQFKLFNHQEUHDVWVOHJV
thighs
%URLO/R
7UDGLWLRQDO%DNH
Convection Roast
3 ext.
2 ext. or 3 flat
2 ext. or 3 flat
3
%URLOVNLQVLGHGRZQILUVW:DWFKIRRGFORVHO\ZKHQ
broiling. For best performance when broiling, center
food below the broil heating element.
%RQHOHVVFKLFNHQEUHDVWV
%URLO/R
7UDGLWLRQDO%DNH
Convection Roast
3 ext.
2 ext. or 3 flat
2 ext. or 3 flat
3
Move food down for more doneness/less searing and
up for greater searing/browning when broiling. For
best performance when broiling, center food below
the broil heating element.
Whole turkey
7UDGLWLRQDO%DNH
Convection Roast
RU
8VHDORZVLGHGSDQVXFKDVDEURLOSDQ3UHKHDWLQJ
is not necessary.
7XUNH\%UHDVW
7UDGLWLRQDO%DNH
Convection Roast
2 ext. or 3 flat
8VHDORZVLGHGSDQVXFKDVDEURLOSDQ3UHKHDWLQJ
is not necessary.
Fish %URLO/R
WKLFNRUOHVV
!LQFK
Watch food closely when broiling. For best
performance center food below the broil
heating element.
Casseroles 7UDGLWLRQDO%DNH 2 ext. or 3 flat 3
Frozen Convenience Foods
Pizza on a single rack 7UDGLWLRQDO%DNH 2 ext. or 3 flat 3 8VHVKLQ\FRRNZDUH
Pizza on multiple racks &RQYHFWLRQ%DNH H[WRUIODW 8VHVKLQ\FRRNZDUH
Potato products, chicken nuggets,
appetizers on a Single Rack
&RQYHFWLRQ%DNH
7UDGLWLRQDO%DNH
2 ext. or 3 flat 8VHVKLQ\FRRNZDUH
$LU)U\VLQJOHDQG
upper ovens only)
4 flat 8VHGDUNFRRNZDUHRUFRRNLHVKHHW
Potato products, chicken nuggets,
appetizers on Multiple Racks
&RQYHFWLRQ%DNH H[WDQGIODW
8VHVKLQ\FRRNZDUH6ZLWFKIRRGORFDWLRQSDUWLDOO\
through cooking for more even cooking results.
49-2000254 Rev. 6
USING THE OVEN: Cooking Guide
Cooking Guide
Air Fry Cooking Guide
Air Fry is a special, no-preheat, cooking mode that
is designed to produce foods with a crispier exterior
than traditional oven cooking. Select Air Fry, then
input the desired set temperature and press Start. The
WHPSHUDWXUH FDQ EH VHW EHWZHHQ ) DQG )
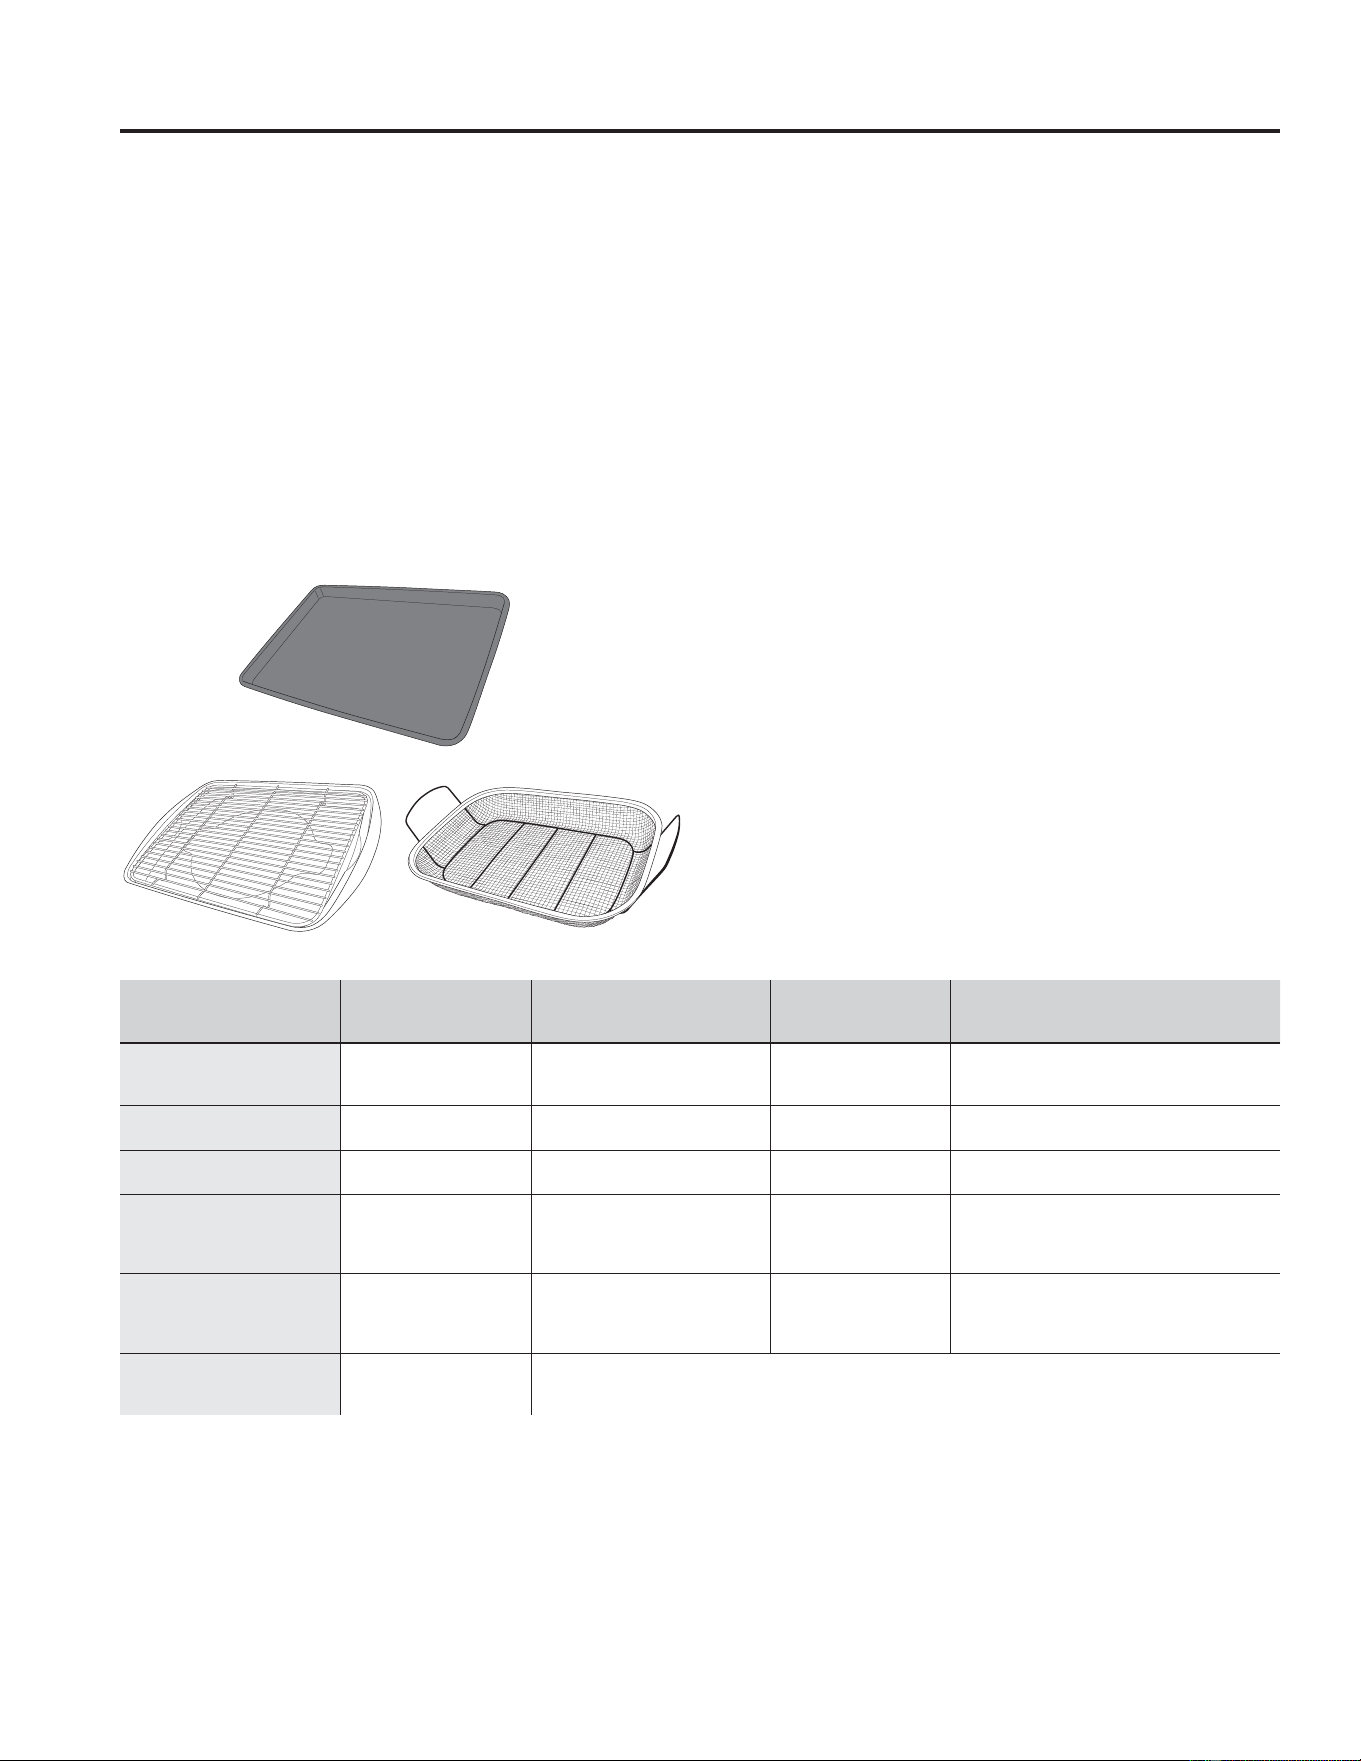
Air Fry Cookware Guidelines
• Only use broil safe cookware when using Air Fry mode.
• A dark sheet pan is recommended. A dark pan
promotes better browning and crisping.
• Oven baking baskets and baking grids can also be
used. A sheet pan should be placed on the rack below
the foods to catch any drippings when using a baking
basket.
General Tips for Air Fry Mode
• The Air Fry mode is designed for cooking on a single
rack.
• The Air Fry mode is designed to be used without
preheating.
5DFN SRVLWLRQ IODW LV UHFRPPHQGHG IRU PRVW IRRGV,I
foods are browning too rapidly try using a lower rack
position.
• Foods may cook faster than expected if the oven is
already hot when food is placed in the oven.
• When air frying foods with sauce, it is recommended to
apply the sauce at the end of cooking.
,I IRRGV DUH EURZQLQJ WRR TXLFNO\ WU\ D ORZHU UDFN
position or lower oven set temperature.
• For packaged foods, use traditional oven cooking
instructions for set temperature and expected cook
time.
,W LV QRW QHFHVVDU\ WR IOLS RU VWLU IRRG GXULQJ FRRNLQJ
• Arrange food in a single layer on the pan, do not
overload the pan.
• Always check internal food temperature to confirm
minimum safe temperatures have been reached.
Minimum safe food temperatures can be found on
packages and at IsItDoneYet.gov.
FOOD TYPE
RECOMMENDED
RACK POSITION(S)
RECOMMENDED
SET TEMPERATURES (F)
RECOMMENDED
COOK TIME (MIN) NOTES
Fresh boneless fish or
poultry pieces, breaded such
as nuggets, tenders, fillets
4 flat
8VHU ORZHU VHW WHPSHUDWXUHV IRU ODUJHU SLHFHV
8VH VKLQ\ FRRNZDUH
Fresh bone in
chicken wings
4 flat
Salt wings or coat in a dry rub, if using sauce
apply after cooking or toward the end of cooking
Fresh bone in chicken
drumsticks or thighs
4 flat 8VHU ORZHU VHW WHPSHUDWXUHV IRU ODUJHU SLHFHV
Fresh French fries,
WKLQ ò LQFK
4 flat
Parchment paper is recommended when
preparing fresh French fries. For crispier fries,
toss fries in corn starch or rice flour before
cooking.
Fresh French fries,
WKLFN ! ò LQFK
4 flat
Parchment paper is recommended when
preparing fresh French fries. For crispier fries,
toss fries in corn starch or rice flour before
cooking.
Frozen packaged
foods
4 flat
8VH WUDGLWLRQDO RYHQQRW $LU )U\ FRRNLQJ LQVWUXFWLRQV DV D JXLGHOLQH IRU VHW WHPSHUDWXUH DQG FRRN WLPH$GGLWLRQDO
FRRN WLPH EH\RQG UHFRPPHQGHG SDFNDJH WLPH PD\ EH UHTXLUHG IRU VRPH IRRGV ,I RYHQ LV KRW ZKHQ VWDUWLQJ IRRG
may cook faster than the minimum package time.
Primary recommended cookware
Alternate cookware options

49-2000254 Rev. 6
%HVXUHHOHFWULFDOSRZHULVRIIDQGDOOVXUIDFHVDUHFRROEHIRUHFOHDQLQJDQ\SDUWRIWKHRYHQ
Control Panel
,W¶VDJRRGLGHDWRZLSHWKHFRQWUROSDQHODIWHUHDFKXVH
Clean with mild soap and water or vinegar and water,
rinse with clean water and polish dry with a soft cloth.
'RQRWXVHDEUDVLYHFOHDQVHUVVWURQJOLTXLGFOHDQVHUV
plastic scouring pads or oven cleaners on the control
SDQHO²WKH\ZLOOGDPDJHWKHILQLVK
Oven Exterior
'RQRWXVHRYHQFOHDQHUVXQOHVVFHUWLILHGIRUVHOI
cleaning oven), abrasive cleansers, strong liquid
cleansers, steel wool, plastic scouring pads, or cleaning
powders on the interior or exterior of the oven. Clean
with a mild soap and water or vinegar and water solution.
Rinse with clean water and dry with a soft cloth. When
cleaning surfaces, make sure that they are at room
temperature and not in direct sunlight.
,IVWDLQRQWKHGRRUYHQWWULPLVSHUVLVWHQWXVHDPLOG
abrasive cleaner and a sponge-scrubber for best results.
Spillage of marinades, fruit juices, tomato sauces and
basting liquids containing acids may cause discoloration
DQGVKRXOGEHZLSHGXSLPPHGLDWHO\/HWKRWVXUIDFHV
cool, then clean and rinse.
Painted Surfaces and Black Stainless Steel (on some models)
Painted surfaces may include the door and trim around
the control panel. Clean these with soap and water or a
vinegar and water solution.
'RQRWXVHFRPPHUFLDORYHQFOHDQHUVFOHDQLQJSRZGHUV
steel wool or harsh abrasives on any painted surface,
LQFOXGLQJ%ODFN6WDLQOHVV6WHHO
Stainless Steel - Excluding Black Stainless Steel (on some models)
'RQRWXVHDVWHHOZRROSDGLWZLOOVFUDWFKWKHVXUIDFH
To clean the stainless steel surface, use warm sudsy
water or a stainless steel cleaner or polish. Always wipe
the surface in the direction of the grain. Follow the cleaner
instructions for cleaning the stainless steel surface.
&OHDQHUVZLWKR[DOLFDFLGVXFKDV%DU.HHSHUV)ULHQG6RIW
Cleanser™ will remove surface rust, tarnish and small
EOHPLVKHV8VHRQO\DOLTXLGFOHDQVHUIUHHRIJULWDQGUXELQ
the direction of the brush lines with a damp, soft sponge.
To inquire about purchasing cleaning products including
stainless steel appliance cleaner or polish read the
Accessories sections of this manual.
Oven Interior
The interior of your new oven can be cleaned manually
or by using the Steam Clean or Self Clean modes.
Spillage of marinades, fruit juices, tomato sauces and
basting liquids containing acids may cause discoloration
DQGVKRXOGEHZLSHGXSLPPHGLDWHO\/HWKRWVXUIDFHV
cool, then clean and rinse.
Manual Cleaning
'RQRWXVHRYHQFOHDQHUVXQOHVVFHUWLILHGIRUVHOI
cleaning oven), abrasive cleaners, strong liquid
cleansers, steel wool, scouring pads, or cleaning
powders on the interior of the oven. Clean with a mild
soap and water or vinegar and water solution. Rinse with
clean water and dry with a soft cloth. When cleaning
surfaces, make sure that they are at room temperature.
Steam Clean Mode
Steam clean is intended to clean small spills using water
and a lower cleaning temperature than Self-Clean.
To use the Steam Clean feature, wipe grease and soils
from the oven. Pour one cup of water into the bottom of
the oven. Close the door. Press the Clean pad twice
and then press Start. On some models, the oven door
PD\ORFN<RXVKRXOGQRWRSHQWKHGRRUGXULQJWKH
minute steam clean as this will decrease the steam
clean performance. Wipe out any excess water and any
remaining soil.
NOTE: Water in the bottom of the oven may be hot right
after finishing the cycle.
Self Clean Mode
5HDG6HOI&OHDQLQJ2YHQ6DIHW\,QVWUXFWLRQVDWWKH
beginning of this manual before using Self Clean Mode.
Self clean uses very high temperatures to clean the oven
interior. The oven door will lock when using this feature.
%HIRUHRSHUDWLQJWKHVHOIFOHDQF\FOHZLSHXSJUHDVH
and soils from the oven. Remove all items from the oven
RWKHUWKDQHQDPHOHGGDUNFRORUUDFNV6KLQ\RUVLOYHU
racks, the meat probe, and any cookware or other items
should all be removed from the oven before initiating a
self-clean cycle. Close the door. Press the Clean pad
once and a default self-clean time is displayed. The
FOHDQWLPHFDQEHFKDQJHGWRDQ\WLPHEHWZHHQ
DQGKRXUVE\XVLQJWKHQXPEHUSDGVWRHQWHUD
different time and pressing Start. For heavily soiled
ovens, the maximum 5 hour clean time is recommended.
,I\RXZLVKWRXVHWKHGHIDXOWWLPHSUHVVWKHStart pad
immediately after pressing the Clean pad. The oven
will turn off automatically when the self-clean cycle is
complete. The door will stay locked until the oven has
cooled down. After the oven has cooled down wipe any
ash out of the oven.
IMPORTANT: The health of some birds is extremely
sensitive to the fumes given off during the self-cleaning cycle
of any range. Move birds to another well-ventilated room.
CARE AND CLEANING: Oven
Oven
49-2000254 Rev. 6
WARNING
SHOCK OR BURN HAZARD:%HIRUHUHSODFLQJRYHQOLJKWEXOEGLVFRQQHFWWKHHOHFWULFDOSRZHUWRWKH
oven at the main fuse or circuit breaker panel. Failure to do so may result in electric shock or burn.
CAUTION
BURN HAZARD: The glass cover and bulb should be removed when cool. Touching hot glass with
bare hands or a damp cloth can cause burns.
'LVFRQQHFWSRZHUDWWKHPDLQIXVHRUFLUFXLWEUHDNHU
panel.
2. Remove oven racks.
3. Slide a flat blade screwdriver or butter knife between
the metal housing and the glass light cover.
NOTE: on some models there is a metal clip visibly
holding the glass. The tool needs inserted between
the metal housing and the clip holding the glass.
4. Support the glass light cover with two fingers to prevent
the cover from falling to the bottom of the oven.
5. Gently twist the screwdriver blade or butter knife to
ORRVHQWKHJODVVOLJKWFRYHU%HFDUHIXOQRWWRFKLS
the oven coating.
6. Remove the glass light cover.
7. Remove the bulb by firmly grasping and sliding the
bulb straight out until the two prongs have cleared
the ceramic holder.
'RQRWWRXFKWKHJODVVRIWKHQHZUHSODFHPHQWEXOE
ZLWK\RXUILQJHUV,WZLOOFDXVHWKHEXOEWRIDLOZKHQLW
lights. Grasp the replacement bulb with a clean towel
or facial tissue with the prongs facing down. Align
the two prongs in the ceramic holder, pressing gently
until the bulb is securely in the ceramic socket.
9. Slide the protective lens into the holder and push
until the clips snap into the housing.
5HFRQQHFWSRZHU
Oven Light
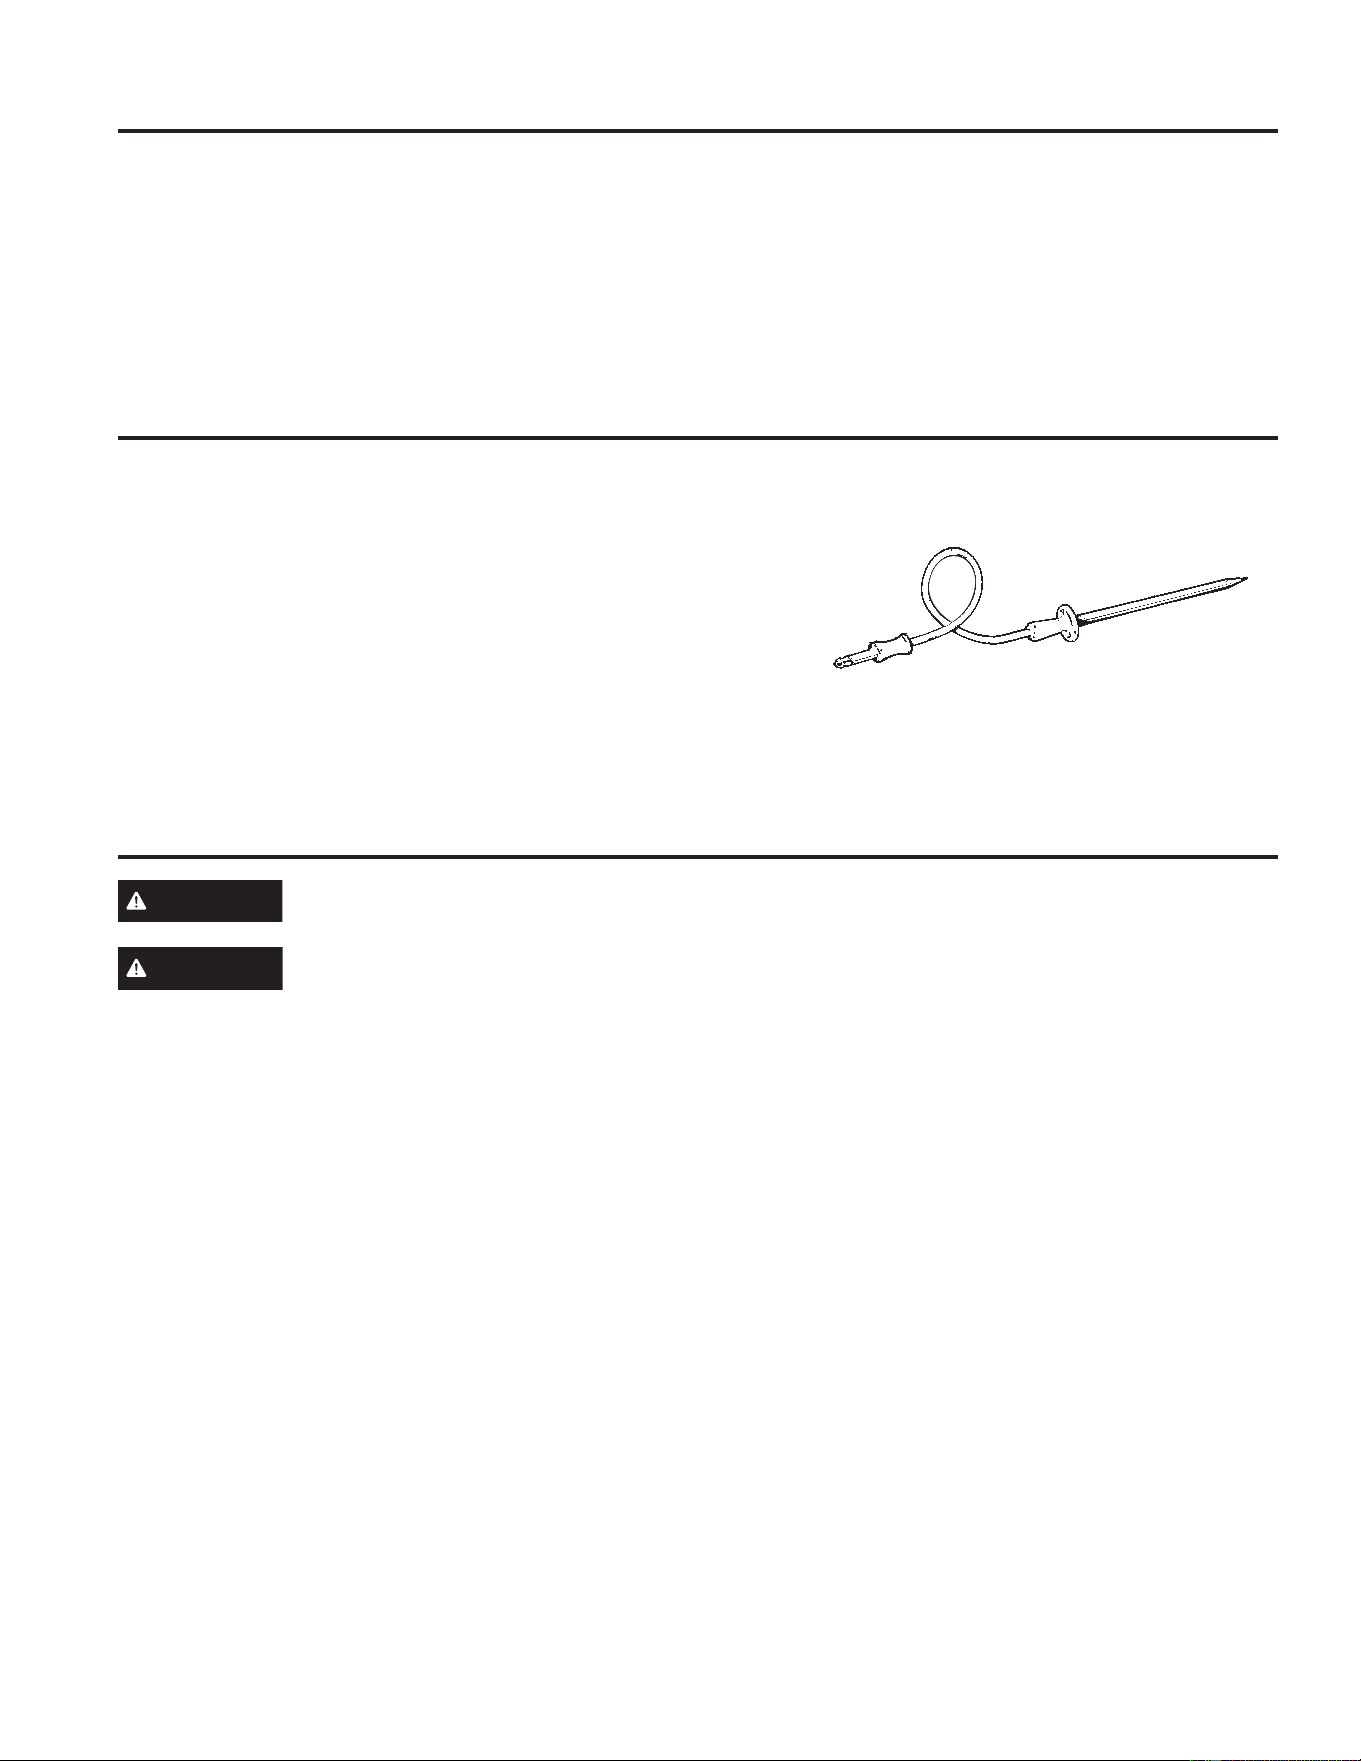
Probe
The temperature probe may be cleaned with soap and
water or a soap-filled scouring pad. Cool the temperature
probe before cleaning. Scour stubborn spots with a
soap-filled scouring pad, rinse and dry.
To order additional temperature probes read the
Assistance and Accessories sections at the beginning of
this manual.
Ŷ 'RQRWLPPHUVHWKHWHPSHUDWXUHSUREHLQZDWHU
Ŷ 'RQRWVWRUHWKHWHPSHUDWXUHSUREHLQWKHRYHQ
Ŷ 'RQRWOHDYHWKHWHPSHUDWXUHSUREHLQVLGHWKHRYHQ
during a self or steam clean cycle.
Oven (Cont.)
Oven Racks
Racks that are enameled, not shiny, can be left in the
cavity during self clean, or can be washed with warm,
soapy water.
Racks may be more difficult to slide, especially after a
self-clean. Put some vegetable oil on a soft cloth or paper
towel and rub onto the left and right edges.
NOTE:8VLQJRWKHUFRRNLQJRLOVZLOOFDXVHDGLVFRORULQJ
or a rust like color residue on the racks and cavity sides.
To clean this residue, use a soap and water or a vinegar
and water solution. Rinse with clean water and dry with a
soft cloth.
CARE AND CLEANING:2YHQ3UREH2YHQ/LJKW
49-2000254 Rev. 6
CARE AND CLEANING:2YHQ'RRU
Oven Door Removal
NOTE:'RRUUHPRYDOLVQRWDUHTXLUHPHQWIRULQVWDOODWLRQ
of the product but is an added convenience.
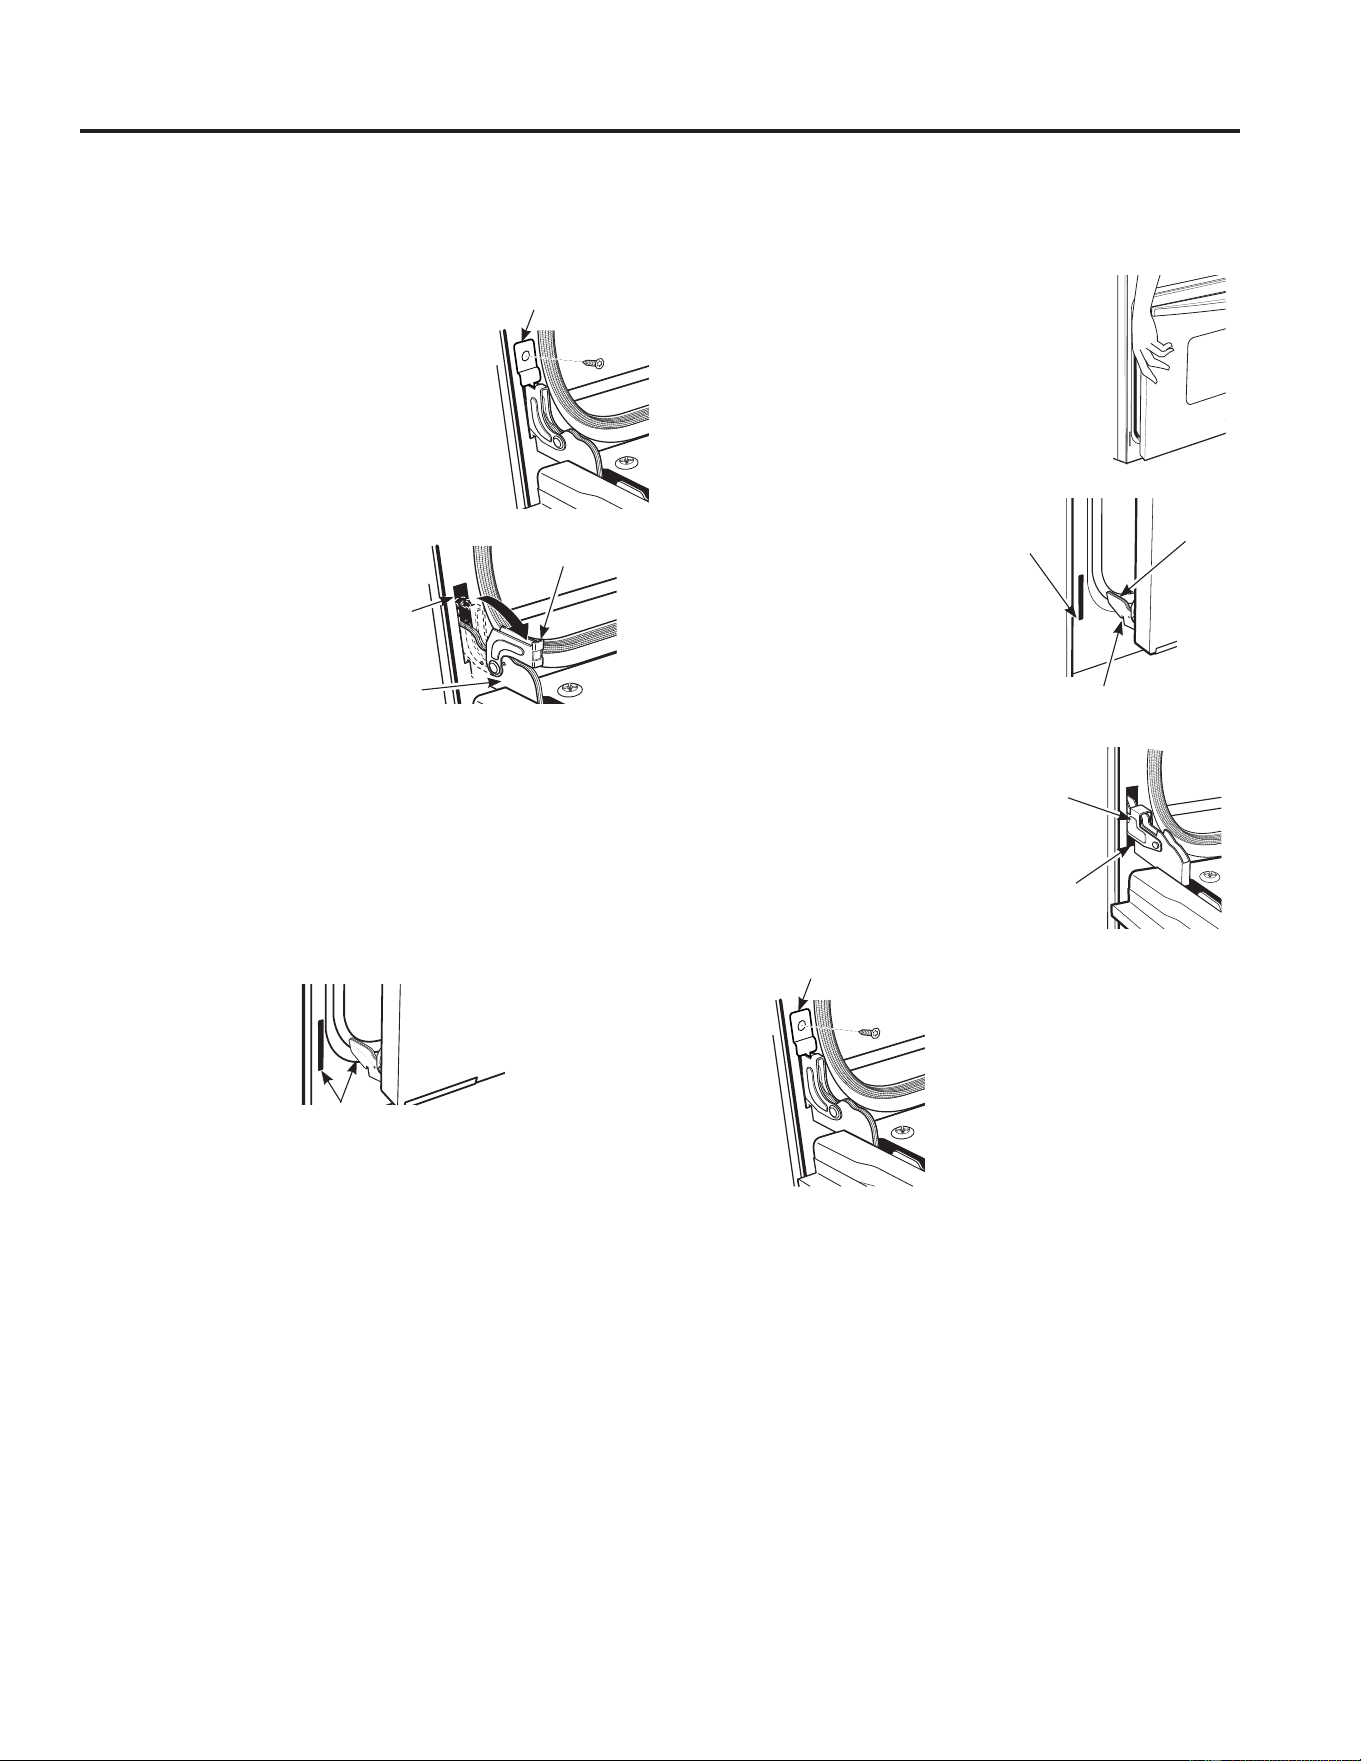
To remove the door:
2SHQWKHRYHQGRRUDVIDUDVLWZLOO
go.
5HPRYHKLQJHEUDFNHWLISUHVHQW
from front frame and set aside. The
hinge bracket must be replaced for
proper door functionality when door
is reinstalled.
3. Push both hinge locks down toward
the door frame to the
unlocked position. This
may require a flat-blade
screwdriver. DO NOT
LIFT THE DOOR BY
THE HANDLE!
4. Place hands on both
sides of the door and close the oven door to the
UHPRYDOSRVLWLRQDSSUR[LPDWHO\´±´>FP±
cm] from the closed position).
/LIWWKHGRRUXSDQGRXWXQWLOWKHKLQJHDUPVFOHDUWKH
slots. NOTE:7KHRYHQGRRULVYHU\KHDY\%HVXUH
you have a firm grip before lifting the oven door off
WKHKLQJHV8VHFDXWLRQRQFHWKHGRRULVUHPRYHG
'RQRWOD\WKHGRRURQLWVKDQGOH7KLVFRXOGFDXVH
dents or scratches.
Replacing the Oven Door
NOTE: The oven door is heavy. You may need help
lifting the door high enough to slide it into the hinge slots.
'RQRWOLIWWKHGRRUE\WKHKDQGOH
/LIWWKHRYHQGRRUE\JUDVSLQJHDFK
side.
2. With the door at the same angle as the
UHPRYDOSRVLWLRQDSSUR[LPDWHO\´±´
>FP±FP@IURPWKHFORVHGSRVLWLRQ
seat the notch of the hinge arm into the
bottom edge of the hinge slot. The notch
of the hinge arm must be
fully seated into the bottom
of the slot.
)XOO\RSHQWKHGRRU,IWKH
door will not fully open, the
indentation is not seated
correctly in the bottom edge
of the slot.
4. Push the hinge locks up
against the front frame of the
oven cavity, to the locked
position.
5. Replace hinge bracket
LISUHVHQW7KHKLQJH
bracket must be
replaced for proper door
functionality.
6. Close the oven door.
Oven Door
Hinge in
/RFNHG
Position
1RWFKRI+LQJH
Securely Fitted
,QWR%RWWRPRI
Hinge Slot
%RWWRP
Edge of
Slot
Hinge
Arm
+LQJH1RWFK
+LQJH%UDFNHW
Hinge Clears Slot
+LQJH%UDFNHW
Hinge
Slot
Hinge
Arm
+LQJH8QORFNHG
Position
22 49-2000254 Rev. 6
Save time and money! Review the charts on the following pages or visit GEAppliances.com/ge/service-and-
support/cookingproducts.htm for helpful articles and support videos before you call for service.
Problem Possible Cause What To Do
My new oven doesn't
cook like my old one.
Is something wrong
with the temperature
settings?
Your new oven has a different cooking
system from your old oven and therefore
may cook differently than your old oven.
For the first few uses, follow your recipe times
DQGWHPSHUDWXUHVFDUHIXOO\,I\RXVWLOOWKLQN\RXU
new oven is too hot or too cold, you can adjust
the temperature yourself to meet your specific
cooking preference. NOTE: This adjustment affects
%DNHDQG&RQYHFWLRQ%DNH0XOWLLWZLOOQRWDIIHFW
&RQYHFWLRQ5RDVW%URLORU&OHDQ
Food does not bake
properly
Oven controls improperly set. See the Cooking Modes section.
Rack position is incorrect or rack is not level. See the Cooking Modes section and Cooking Guide.
,QFRUUHFWFRRNZDUHRUFRRNZDUHRILPSURSHU
size being used.
See the Cookware section.
Oven temperature needs adjustment. See the Settings section.
,QJUHGLHQWVXEVWLWXWLRQ Substituting ingredients can change the recipe
outcome.
Food does not broil
properly
Oven controls improperly set. Make sure you select the appropriate broil mode.
,PSURSHUUDFNSRVLWLRQEHLQJXVHG See Cooking Guide for rack location suggestions.
Food being cooked in a hot pan. Make sure cookware is cool.
Cookware not suited for broiling. 8VHDSDQVSHFLILFDOO\GHVLJQHGIRUEURLOLQJ
Aluminum foil used on the broiling pan and
grid has not been fitted properly and
slit as recommended.
,IXVLQJDOXPLQXPIRLOFRQIRUPWRSDQVOLWV
,QVRPHDUHDVWKHSRZHUYROWDJHPD\EH
low.
3UHKHDWWKHEURLOHOHPHQWIRUPLQXWHV
Oven temperature too
hot or too cold
Oven temperature needs adjustment. See the Settings section.
Oven does not work or
appears not to work
A fuse in your home may be blown or the
circuit breaker tripped.
Replace the fuse or reset the circuit breaker.
Oven controls improperly set. 6HHWKH8VLQJWKH2YHQVHFWLRQ
Oven is in Sabbath Mode. 9HULI\WKDWWKHRYHQLVQRWLQ6DEEDWK0RGH6HH
the Settings section.
“Crackling” or
“popping” sound
This is the sound of the metal heating and
cooling during both the cooking and cleaning
functions.
This is normal.
Why is my range making
a "clicking" noise when
using my oven?
Your range has been designed to maintain a
tighter control over your oven's temperature.
You may hear your oven's heating elements
"click" on and off more frequently than in
older ovens to achieve better results during
baking, broiling, convection, and self-clean
cycles.
This is normal.
Clock and timer do not
work
A fuse in your home may be blown or the
circuit breaker tripped.
Replace the fuse or reset the circuit breaker.
Oven light does not
work
/LJKWEXOELVORRVHRUGHIHFWLYH Tighten or replace bulb.
Pad operating light is broken. Call for service.
Oven will not self-clean The temperature is too high to set a
self-clean operation.
Allow the oven to cool and reset the controls.
Oven controls improperly set. See the Cleaning the Oven section.
Troubleshooting tips ... %HIRUH\RXFDOOIRUVHUYLFH
TROUBLESHOOTING TIPS

49-2000254 Rev. 6 23
TROUBLESHOOTING TIPS
Problem Possible Cause What To Do
Excessive smoking during
clean cycle
Excessive soil or grease. Press the Cancel/Off pad. Open the windows to rid
the room of smoke. Wait until the
goes off. Wipe
up the excess soil and reset the clean cycle.
Excessive smoking during
broiling
Food too close to burner element. /RZHUWKHUDFNSRVLWLRQRIWKHIRRG
Oven door will not open
after a clean cycle
Oven too hot. Allow the oven to cool below locking temperature.
Oven not clean after a
clean cycle
Oven controls improperly set. See the Cleaning the Oven section.
Oven was heavily soiled. Clean up heavy spillovers before starting the clean
cycle. Heavily soiled ovens may need to self-clean
again or for a longer period of time.
flashes in the display
The self-clean cycle has been selected but
the door is not closed.
Close the oven door.
is on when you want to
cook
The oven door is locked because the
temperature inside the oven has not
dropped below the locking temperature.
Press the Cancel/Off pad. Allow the oven to cool.
“F— and a number or
letter” flash in the display
You have a function error code. Press the Cancel/Off pad. Allow the oven to cool
for one hour. Put the oven back into operation.
,IWKHIXQFWLRQFRGHUHSHDWV 'LVFRQQHFWDOOSRZHUWRWKHRYHQIRUDWOHDVW
VHFRQGVDQGWKHQUHFRQQHFWSRZHU,IWKHIXQFWLRQ
error code repeats, call for service.
Display goes blank A fuse in your home may be blown or the
circuit breaker tripped.
Replace the fuse or reset the circuit breaker.
The clock is turned off. See the Settings section.
Oven is in Sabbath Mode. 9HULI\WKDWWKHRYHQLVQRWLQ6DEEDWK0RGH
See the Settings section.
Power outage, clock
flashes
Power outage or surge 5HVHWWKHFORFN,IWKHRYHQZDVLQXVH\RXPXVW
reset it by pressing the Cancel/Off pad, setting the
clock and resetting any cooking function.
“Burning” or “oily” odor
emitting from the vent
This is normal in a new oven and will
disappear in time.
To speed the process, set a self-clean cycle for a
minimum of 3 hours. See the Cleaning the Oven
section.
Strong odor An odor from the insulation around the
inside of the oven is normal for the first few
times the oven is used.
This is temporary and will go away after several
uses or a self-clean cycle.
Fan noise A cooling fan may automatically turn on. This is normal. The cooling fan will turn on to cool
LQWHUQDOSDUWV,WPD\UXQIRUXSWRKRXUVDIWHU
the oven is turned off.
My oven door glass
appears to be "tinted" or
have a "rainbow" color. Is
this defective?
1R7KHLQQHURYHQJODVVLVFRDWHGZLWK
a heat barrier to reflect the heat back into
the oven to prevent heat loss and keep the
outer door cool while baking.
7KLVLVQRUPDO8QGHUFHUWDLQOLJKWRUDQJOHV\RX
may see this tint or rainbow color.
Sometimes the oven takes
longer to preheat to the
same temperature
Cookware or food in oven The cookware or food in the oven will cause the
oven to take longer to preheat. Remove items to
reduce preheat time.
1XPEHURIUDFNVLQRYHQ Adding more racks to the oven will cause the oven
to take longer to preheat. Remove some racks.
'LIIHUHQWFRRNLQJPRGHV The different cooking modes use different preheat
methods to heat the oven for the specific cooking
mode. Some modes will take longer than others
LHFRQYHFWLRQEDNHPXOWL
Oven will not work
remotely
Router issues, no wireless signal, etc. For assistance with oven wireless network
FRQQHFWLYLW\SOHDVHFDOO
Oven is not connected.
Troubleshooting tips ... %HIRUH\RXFDOOIRUVHUYLFH

24 49-2000254 Rev. 6
Staple your receipt here. Proof of the original purchase
date is needed to obtain service under the warranty.
GEAppliances.com
All warranty service for your appliance is provided exclusively by GE Appliances, a Haier company’s Factory Service
Centers, or by a service technician authorized by GE Appliances to provide warranty service for your appliance.
To schedule service online, visit us at GEAppliances.com/service,RUFDOO*($SSOLDQFHVDW*(&$5(6
,Q&DQDGDSOHDVHYLVLWgeappliances.ca/after-sales-support. Please have your serial number and your
model number available when calling for service.. Service that has not been scheduled or otherwise arranged for by GE
Appliances will not be covered under this warranty, including any parts and/or services provided.
Servicing your appliance may require the use of the onboard data port for diagnostics. This gives a GE Appliances factory
service technician the ability to quickly diagnose any issues with your appliance and helps GE Appliances improve its
SURGXFWVE\SURYLGLQJ*($SSOLDQFHVZLWKLQIRUPDWLRQRQ\RXUDSSOLDQFH,I\RXGRQRWZDQW\RXUDSSOLDQFHGDWDWREH
sent to GE Appliances, please advise your technician not to submit the data to GE Appliances at the time of service.
What GE Appliances will not cover:
Ŷ Service trips to your home to teach you how to use
the product.
Ŷ ,PSURSHULQVWDOODWLRQGHOLYHU\RUPDLQWHQDQFH
Ŷ )DLOXUHRIWKHSURGXFWLILWLVDEXVHGPLVXVHG
modified or used for other than the intended purpose
or used commercially.
Ŷ 5HSODFHPHQWRIKRXVHIXVHVRUUHVHWWLQJRIFLUFXLW
breakers.
Ŷ 'DPDJHWRWKHSURGXFWFDXVHGE\DFFLGHQWILUH
floods or acts of God.
Ŷ ,QFLGHQWDORUFRQVHTXHQWLDOGDPDJHFDXVHGE\SRVVLEOH
defects with this appliance.
Ŷ 'DPDJHFDXVHGDIWHUGHOLYHU\
Ŷ 3URGXFWQRWDFFHVVLEOHWRSURYLGHUHTXLUHGVHUYLFH
Ŷ 6HUYLFHWRUHSDLURUUHSODFHOLJKWEXOEVH[FHSWIRU
/('ODPSV
Ŷ 'DPDJHWRILQLVKVXFKDVVXUIDFHUXVWWDUQLVKRUVPDOO
blemishes not reported within 48 hours of delivery.
LIMITED WARRANTY
GE Appliances Electric Oven Limited Warranty
EXCLUSION OF IMPLIED WARRANTIES
<RXUVROHDQGH[FOXVLYHUHPHG\LVSURGXFWUHSDLUDVSURYLGHGLQWKLV/LPLWHG:DUUDQW\$Q\LPSOLHGZDUUDQWLHV
including the implied warranties of merchantability or fitness for a particular purpose, are limited to one year or
the shortest period allowed by law.
This limited warranty is extended to the original purchaser and any succeeding owner for products purchased for
KRPHXVHZLWKLQWKH86$,IWKHSURGXFWLVORFDWHGLQDQDUHDZKHUHVHUYLFHE\D*($SSOLDQFHV$XWKRUL]HG6HUYLFHU
is not available, you may be responsible for a trip charge or you may be required to bring the product to an Authorized
*($SSOLDQFHV6HUYLFHORFDWLRQIRUVHUYLFH,Q$ODVNDWKHOLPLWHGZDUUDQW\H[FOXGHVWKHFRVWRIVKLSSLQJRUVHUYLFH
calls to your home.
Some states do not allow the exclusion or limitation of incidental or consequential damages. This limited warranty
gives you specific legal rights, and you may also have other rights which vary from state to state. To know what your
legal rights are, consult your local or state consumer affairs office or your state’s Attorney General.
Warrantor: GE Appliances, a Haier company
/RXLVYLOOH.<
Warrantor in Canada: MC Commercial, Burlington, ON, L7R 5B6
Extended Warranties: Purchase a GE Appliances extended warranty and learn about special discounts that are
available while your warranty is still in effect. You can purchase it online anytime at
GEAppliances.com/extended-warranty
RUFDOOGXULQJQRUPDOEXVLQHVVKRXUV*($SSOLDQFHV6HUYLFHZLOOVWLOOEHWKHUHDIWHU\RXUZDUUDQW\H[SLUHV
,Q&DQDGDYLVLWGEAppliances.ca/en/support/purchase-extended-warranty or call 866.277.9842.
For the period of GE Appliances will replace
One year
From the date
of the original
purchase
Any partRIWKHRYHQZKLFKIDLOVGXHWRDGHIHFWLQPDWHULDOVRUZRUNPDQVKLS'XULQJWKLV
limited one-year warranty, GE Appliances will provide, free of charge, all labor and in-home
service to replace the defective part.

49-2000254 Rev. 6 25
ACCESSORIES
Accessories
Looking For Something More?
GE Appliances offers a variety of accessories to
improve your cooking and maintenance experiences!
Refer to the Consumer Support page for phone numbers
and website information.
The following products and more are available:
Accessories
6PDOO%URLOHU3DQô´[ó´[ò³
/DUJH%URLOHU3DQô´[ó´[ò³
;/%URLOHU3DQ´[ó´[³
Parts
Oven racks
´1HYHU6FUXE*OLGH5DFN
´1HYHU6FUXE*OLGH5DFN
Oven elements
/LJKWEXOEV
Cleaning Supplies
CitruShine™ Stainless Steel Wipes
Stainless Steel Appliance Cleaner
*UDSKLWH/XEULFDQW
7KHODUJHEURLOHUSDQGRHVQRWILWLQ´´UDQJHV
7KH;/EURLOHUSDQGRHVQRWILWLQ´ZDOORYHQV´GURSLQV
RU´´UDQJHV
*** )RUXVHZLWK1HYHU6FUXEJOLGHUDFNV

26 49-2000254 Rev. 6
CONSUMER SUPPORT
Consumer Support
GE Appliances Website
Have a question or need assistance with your appliance? Try the GE Appliances Website 24 hours a day, any day
of the year! You can also shop for more great GE Appliances products and take advantage of all our on-line support
VHUYLFHVGHVLJQHGIRU\RXUFRQYHQLHQFH,QWKH86GEAppliances.com,Q&DQDGDGEAppliances.ca.
Register Your Appliance
Register your new appliance on-line at your convenience! Timely product registration will allow for enhanced
communication and prompt service under the terms of your warranty, should the need arise. You may also mail in
the pre-printed registration card included in the packing material.
,QWKH86GEAppliances.com/register
,Q&DQDGDProdsupport.mabe.ca/crm/Products/ProductRegistration.aspx
Schedule Service
Expert GE Appliances repair service is only one step away from your door. Get on-line and schedule your service at
your convenience any day of the year.
,QWKH86GEAppliances.com/serviceRUFDOOGXULQJQRUPDOEXVLQHVVKRXUV
,Q&DQDGDGEAppliances.ca/en/support/service-requestRUFDOO
Extended Warranties
Purchase a GE Appliances extended warranty and learn about special discounts that are available while your
warranty is still in effect. You can purchase it on-line anytime. GE Appliances Services will still be there after your
warranty expires.
,QWKH86GEAppliances.com/extended-warrantyRUFDOOGXULQJQRUPDOEXVLQHVVKRXUV
,Q&DQDGDGEAppliances.ca/en/support/purchase-extended-warranty or call 866.277.9842
Remote Connectivity
)RUDVVLVWDQFHZLWKZLUHOHVVQHWZRUNFRQQHFWLYLW\IRUPRGHOVZLWKUHPRWHHQDEOHYLVLWRXUZHEVLWHDW
GEAppliances.com/connect RUFDOOLQWKH86
,Q&DQDGDYLVLWRXUZHEVLWHDWGEAppliances.ca/connect RUFDOO
Parts and Accessories
,QGLYLGXDOVTXDOLILHGWRVHUYLFHWKHLURZQDSSOLDQFHVFDQKDYHSDUWVRUDFFHVVRULHVVHQWGLUHFWO\WRWKHLUKRPHV
9,6$0DVWHU&DUGDQG'LVFRYHUFDUGVDUHDFFHSWHG2UGHURQOLQHWRGD\KRXUVHYHU\GD\
,QWKH86GEApplianceparts.com or by phone at 877.959.8688 during normal business hours.
Instructions contained in this manual cover procedures to be performed by any user. Other servicing
generally should be referred to qualified service personnel. Caution must be exercised, since improper
servicing may cause unsafe operation.
Customers in Canada should consult the yellow pages for the nearest Mabe Service Center, visit our Website at
GEAppliances.ca/en/products/parts-filters-accessoriesRUFDOO
Contact Us
,I\RXDUHQRWVDWLVILHGZLWKWKHVHUYLFH\RXUHFHLYHIURP*($SSOLDQFHVFRQWDFWXVRQRXU:HEVLWHZLWKDOOWKH
details including your phone number, or write to:
,QWKH86*HQHUDO0DQDJHU&XVWRPHU5HODWLRQV_*($SSOLDQFHV$SSOLDQFH3DUN_/RXLVYLOOH.<
GEAppliances.com/contact
,Q&DQDGD'LUHFWRU&XVWRPHU5HODWLRQV0DEH&DQDGD,QF_6XLWH)DFWRU\/DQH_0RQFWRQ1%(&0
GEAppliances.ca/en/contact-us

Four électrique à convection
49-2000254 Rev. 6 09-24
JKS5000 - Four encastré simple
de 27po (68,6cm)
JTS5000 - Four encastré simple
de 30po (76,2cm)
JKD5000 - Four encastré double
de 27po (68,6cm)
JTD5000 - Four encastré double
de 30po (76,2cm)
SÉCURITÉ ..........................3
UTILISATION DU FOUR
Commandes de four mural simple ........6
Commandes de four mural double ........7
Options ...............................8
Réglages ..............................8
Sabbat ...............................10
Grilles de four ......................... 11
Papier d’aluminium et protections
pour four .............................13
Ustensiles de cuisson ...................13
Modes de cuisson ......................14
Sonde thermique ......................15
Guide de cuisson - Four inférieur ........16
Guide de cuisson - Four supérieur/simple . 17
Guide de cuisson - Friteuse à air chaud . . . 18
ENTRETIEN ET NETTOYAGE
Four .................................19
Sonde thermique ......................20
Lampe du four ........................20
Porte du four ..........................21
CONSEILS DE DÉPANNAGE .....22
GARANTIE LIMITÉE ..............24
ACCESSOIRES ....................25
SERVICE À LA CLIENTÈLE ......26
FRANÇAIS
FOUR ENCASTRÉ
MANUEL DE
L'UTILISATEUR
GE est une marque de commerce de General Electric Company. Fabriqué sous licence d'utilisation de marque de commerce.
Veuillez écrire ces numéros ici :
Numéro du modèle ________________
Numéro de série ___________________
Vous pouvez les trouver sur une étiquette
sur la garniture latérale ou à l’avant du four
(inférieur) derrière la porte du four.

2 49-2000254 Rev. 6
MERCI DE PERMETTRE À ÉLECTROMÉNAGERS GE DE FAIRE PARTIE
DE VOTRE FOYER.
Que vous ayez grandi avec des électroménagers GE ou qu'il s'agisse de votre premier appareil GE,
nous sommes heureux de vous avoir dans la famille.
Nous sommes fiers du savoir-faire, de l'innovation et du design qui font partie intégrante de tous les
électroménagers GE que nous fabriquons, et nous pensons que vous le serez aussi. À cet égard,
l'enregistrement de votre appareil nous assure que nous pourrons vous fournir des informations
importantes sur votre appareil et des détails sur sa garantie si vous en avez besoin.
Enregistrez votre électroménager GE en ligne dès maintenant. Des sites Web et des numéros
de téléphone utiles sont disponibles dans la section « Service à la clientèle » de ce manuel de
l'utilisateur. Vous pouvez également envoyer par courrier la carte d'enregistrement préimprimée
qui se trouve dans l'emballage de votre appareil.
49-2000254 Rev. 6 3
SÉCURITÉ
LISEZ ET CONSERVEZ CES INSTRUCTIONS
CONSIGNES DE SÉCURITÉ IMPORTANTES
LISEZ TOUTES LES INSTRUCTIONS AVANT D'UTILISER L'APPAREIL
AVERTISSEMENT
CONSIGNES GÉNÉRALES DE SÉCURITÉ
Ŷ8WLOLVH]FHWpOHFWURPpQDJHUXQLTXHPHQWDX[ILQV
mentionnées dans ce manuel d’utilisation.
Ŷ/¶LQVWDOODWLRQHWODPLVHjODWHUUHGRLYHQWrWUHUpDOLVpHVSDU
un installateur qualifié en conformité avec les instructions
d’installation fournies.
Ŷ7RXWUpJODJHUpSDUDWLRQRXHQWUHWLHQTXLQ¶HVWSDV
spécifiquement recommandé dans le manuel d’utilisation
GRLWrWUHHIIHFWXp81,48(0(17SDUXQLQVWDOODWHXU
d’électroménagers ou un technicien d’entretien qualifiés.
Ŷ$YDQWG¶HIIHFWXHUTXHOTXHUpSDUDWLRQFRXSH]O¶DOLPHQWDWLRQ
électrique au panneau de distribution électrique du
domicile en retirant le fusible ou en désarmant le
disjoncteur
Ŷ$VVXUH]YRXVTXHWRXWOHPDWpULHOG¶HPEDOODJHHVW
retiré de la cuisinière avant l’utilisation afin de prévenir
l’inflammation de ce matériel.
ŶeYLWH]GHUD\HURXGHKHXUWHUOHVSRUWHVGHYHUUHOHV
tables de cuisson ou les panneaux de commande. Cela
pourrait causer le bris du verre.
Ŷ1HFXLVH]SDVG¶DOLPHQWVVXUXQSURGXLWGRQWOHYHUUHHVW
brisé. Cela poserait un risque de décharge électrique,
d’incendie ou de coupure.
Ŷ1HODLVVH]SDVOHVHQIDQWVVDQVVXUYHLOODQFH/HVHQIDQWV
QHGRLYHQWSDVrWUHODLVVpVVHXOVQLVDQVVXUYHLOODQFHGDQV
OD]RQHG¶XWLOLVDWLRQGHODSSDUHLO,OVQHGRLYHQWMDPDLV
grimper, s’asseoir ou se tenir debout sur l'appareil.
Ŷ
ATTENTION
1HUDQJH]SDVOHVREMHWVGLQWpUrW
pour les enfants dans des armoires au-dessus d'un four,
les enfants grimpant sur le four pour atteindre des objets
SRXUUDLHQWrWUHJUDYHPHQWEOHVVpV
Ŷ1¶XWLOLVH]MDPDLVFHWpOHFWURPpQDJHUSRXUUpFKDXIIHURX
chauffer la pièce.
Ŷ1HODLVVH]SHUVRQQHJULPSHUVHWHQLUGHERXWRX
s'accrocher à la porte du four, au tiroir ou à la table
de cuisson. Cela pourrait endommager l'appareil ou
le renverser et provoquer des blessures graves, voire
mortelles.
Ŷ8WLOLVH]XQLTXHPHQWGHVPLWDLQHVGHIRXUVqFKHVOH
contact de mitaines humides ou mouillées sur des
surfaces très chaudes peut causer des brûlures par la
vapeur. Ne laissez pas les mitaines ou maniques isolantes
toucher les éléments chauffants chauds. N’utilisez pas une
serviette ou autre linge de grande taille à la place d’une
poignée ou de mitaines.
Ŷ1HWRXFKH]SDVOHVEUOHXUVOHVSODTXHVGHFXLVVRQ
(certains modèles), les grilles (certains modèles), la table
de cuisson ou les éléments chauffants du four, ni la
surface intérieure du four. Ces surfaces peuvent rester
assez chaudes pour causer des brûlures, et ce, durant
XQHORQJXHSpULRGHDSUqVODFXLVVRQPrPHVLHOOHVQH
VHPEOHQWSOXVrWUHDOOXPpHVRXFKDXGHV
Ŷ3HQGDQWHWDSUqVO¶XWLOLVDWLRQQHWRXFKH]SDVO¶LQWpULHXU
GXIRXUHWQHODLVVH]SDVGHVYrWHPHQWVRXG¶DXWUHV
matières inflammables entrer en contact avec une zone
de l’intérieur du four; laissez d’abord suffisamment de
temps pour refroidir. D’autres surfaces de l’électroménager
peuvent devenir suffisamment chaudes pour causer
GHVEUOXUHV/HVVXUIDFHVSRWHQWLHOOHPHQWFKDXGHV
comprennent les brûleurs ou les éléments chauffants,
les grilles (certains modèles), la surface de la table de
cuisson, les orifices des évents du four, les surfaces
proches des ouvertures, les interstices autour de la porte
du four, les pièces de garniture métalliques au-dessus de
la porte, les dosserets ou les étagères situées au-dessus
de la surface de cuisson.
Ŷ1HFKDXIIH]SDVGHVFRQWHQDQWVGDOLPHQWVQRQRXYHUWV
/¶DXJPHQWDWLRQGHODSUHVVLRQSHXWIDLUHpFODWHUOH
contenant et causer des blessures.
Ŷ&XLVH]OHVDOLPHQWVjIRQGSRXUYRXVSUpPXQLUFRQWUH
OHVPDODGLHVG¶RULJLQHDOLPHQWDLUH/HVUHFRPPDQGDWLRQV
relatives à la température alimentaire minimale et
VpFXULWDLUHVRQWIRXUQLHVSDUO86'$HWOD)'$8WLOLVH]XQ
thermomètre pour aliments et vérifiez à plusieurs endroits.
ŶGardez la hotte du ventilateur et les filtres à graisse
propres afin de maintenir une bonne ventilation et prévenir
OHVIHX[GHJUDLVVHe7(,*1(=OHYHQWLODWHXUHQFDV
GLQFHQGLH/DVRXIIODQWHHQPDUFKHSHXWSURSDJHUOHV
flammes.
AVERTISSEMENT
9HXLOOH]OLUHWRXWHVOHVFRQVLJQHVDYDQWG¶XWLOLVHUFHSURGXLW/HQRQUHVSHFWGHFHVLQVWUXFWLRQVSRXUUDLW
entraîner un incendie, un choc électrique, une blessure grave voire la mort.
4 49-2000254 Rev. 6
AVERTISSEMENT
EN CAS D'INCENDIE, PRENEZ LES MESURES SUIVANTES POUR
ÉVITER LES BLESSURES ET LA PROPAGATION DU FEU
Ŷ 1HYHUVH]SDVGHDXVXUXQIHXGHJUDLVVH1HSUHQH]
MDPDLVXQHFDVVHUROHHQIODPPHV0HWWH]OHVFRPPDQGHV
jODSRVLWLRQG¶DUUrW2))eWRXIIH]XQHFDVVHUROHHQ
flammes sur un brûleur de surface en la recouvrant
complètement avec un couvercle bien ajusté, une tôle
jELVFXLWVRXXQSODWHDXSODW8WLOLVH]XQH[WLQFWHXUj
mousse ou à poudre chimique multi-usages.
Ŷ 6LXQIHXVHGpFODUHGDQVOHIRXUSHQGDQWODFXLVVRQ
étouffez-le en fermant la porte du four et en éteignant le
IRXU2))RXHQXWLOLVDQWXQH[WLQFWHXUjSRXGUHVqFKH
ou à mousse.
Ŷ 6XUFHUWDLQVPRGqOHV6LXQIHXVHGpFODUHGDQVOHIRXU
pendant l’autonettoyage, éteignez le four et attendez
que le feu s’éteigne. Ne forcez pas l’ouverture de la
SRUWH/¶LQWURGXFWLRQG¶DLUIUDLVjGHVWHPSpUDWXUHV
d’autonettoyage peut provoquer un jaillissement de
IODPPHVGDQVOHIRXU/¶RPLVVLRQG¶REVHUYHUFHWWH
instruction peut occasionner des brûlures graves.
AVERTISSEMENT
CONSIGNES DE SÉCURITÉ DU FOUR
Ŷ 7HQH]YRXVjO¶pFDUWORUVTXHYRXVRXYUH]ODSRUWHGXIRXU
/DYDSHXURXO¶DLUFKDXGVTXLV¶pFKDSSHQWSHXYHQWEUOHU
les mains, la figure et/ou les yeux.
Ŷ 6LO¶pOpPHQWFKDXIIDQWGDQVO¶DSSDUHLOGpYHORSSHXQH
tache incandescente ou montre d’autres signes de
GRPPDJHVQ¶XWLOLVH]SDVFHWWH]RQHGHO¶DSSDUHLO8QH
tache incandescente indique que l'élément peut tomber
en panne et présenter un risque de brûlure, d'incendie
RXGHGpFKDUJHpOHFWULTXHeWHLJQH]LPPpGLDWHPHQW
l'appareil et faites remplacer l'élément chauffant par un
technicien qualifié.
Ŷ 1HEORTXH]SDVOHVpYHQWVGXIRXU
Ŷ 1HSODFH]MDPDLVGXVWHQVLOHVGHSLHUUHVjSL]]DRX
de cuisson, ou tout type de papier aluminium ou de
UHYrWHPHQWVXUOHSODQFKHUGXIRXU&HVDUWLFOHVSHXYHQW
emprisonner la chaleur ou fondre, endommageant le
produit et causant un risque de décharge électrique,
d'enfumage ou d'incendie.
Ŷ /HIRXUGRLWrWUHUHIURLGLDYDQWGHSODFHUOHVJULOOHVGXIRXU
DX[HPSODFHPHQWVGpVLUpV6LODJULOOHGRLWrWUHGpSODFpH
alors que le four est chaud, veillez à ne pas toucher les
surfaces chaudes et ne laissez pas la mitaine isolante
entrer en contact avec l’élément chauffant du four.
Ŷ 1HODLVVH]SDVGHVDUWLFOHVWHOVTXHGXSDSLHUGHV
ustensiles de cuisson ou des aliments dans le four
ORUVTX¶LOQ¶HVWSDVXWLOLVp/HVDUWLFOHVUDQJpVGDQVOHIRXU
peuvent s’enflammer.
Ŷ 1HODLVVH]SDVGHVDUWLFOHVVXUODWDEOHGHFXLVVRQSUqV
GHO¶pYHQWGXIRXU/HVDUWLFOHVSHXYHQWVXUFKDXIIHUHW
poser un risque d’incendie ou de brûlure.
Ŷ 1HJULOOH]MDPDLVDYHFODSRUWHRXYHUWH
Ŷ *DUGH]OHIRXUH[HPSWG¶DFFXPXODWLRQGHJUDLVVH/D
graisse dans le four peut prendre feu.
Ŷ /RUVTXHYRXVXWLOLVH]GHVVDFVGHFXLVVRQRXGH
rôtisserie dans le four, suivez les directives du fabricant.
Ŷ RISQUE DE DÉCHARGE ÉLECTRIQUE OU DE
BRÛLURE : $YDQWGHUHSODFHUO¶DPSRXOHGXIRXUFRXSH]
l’alimentation électrique du four au fusible principal ou
DXSDQQHDXGXGLVMRQFWHXU/¶RPLVVLRQGHSUHQGUHFHWWH
précaution peut occasionner une décharge électrique ou
une brûlure.
Ŷ
ATTENTION
RISQUE DE BRÛLURE :$WWHQGH]TXH
le couvercle de verre et l’ampoule soient refroidis avant de
OHVUHWLUHU7RXFKHUGXYHUUHFKDXGDYHFOHVPDLQVQXHV
ou un linge humide peut causer des brûlures.
Ŷ1XWLOLVH]DXFXQW\SHGHSDSLHUDOXPLQLXPRXGH
UHYrWHPHQWSRXUFRXYULUOHIRQGGXIRXURXQLPSRUWH
où dans le four, sauf tel que décrit dans le manuel
G¶XWLOLVDWLRQ/HVGRXEOXUHVGHIRXUSHXYHQWHPSULVRQQHUOD
chaleur ou fondre, endommageant le produit et causant un
risque de choc électrique, d'enfumage ou d'incendie.
SÉCURITÉ
LISEZ ET CONSERVEZ CES INSTRUCTIONS
CONSIGNES DE SÉCURITÉ IMPORTANTES
LISEZ TOUTES LES INSTRUCTIONS AVANT D'UTILISER L'APPAREIL
AVERTISSEMENT
GARDER LES MATÉRIAUX INFLAMMABLES À L’ÉCART DE LA TABLE DE CUISSON
Le non-respect de ces instructions pourrait entraîner un incendie ou une blessure.
Ŷ $EVWHQH]YRXVGHUDQJHURXG¶XWLOLVHUGHVPDWpULDX[
inflammables dans ou à proximité du four, y compris
du papier, du plastique, des poignées, des nappes, des
UHYrWHPHQWVPXUDX[GHVULGHDX[GHVVWRUHVDLQVLTXHGH
l’essence ou d’autres vapeurs ou liquides inflammables.
Ŷ 1HSRUWH]MDPDLVGHYrWHPHQWVDPSOHVRXSHQGDQWV
ORUVGHO¶XWLOLVDWLRQGHO¶pOHFWURPpQDJHU&HVYrWHPHQWV
pourraient s’enflammer s’ils entrent en contact avec des
surfaces chaudes, ce qui pourrait entraîner des brûlures
graves.
Ŷ 1HODLVVH]SDVODJUDLVVHGHFXLVVRQRXG¶DXWUHVPDWLqUHV
inflammables s’accumuler dans ou à proximité du four.
Ces matières pourraient prendre feu.
Ŷ 1HUDQJH]SDVGHVPDWLqUHVLQIODPPDEOHVRXGHV
articles sensibles à la température à l’intérieur de
l’électroménager.
Ŷ 1HWWR\H]IUpTXHPPHQWOHVKRWWHVGHYHQWLODWLRQ1H
laissez pas la graisse s’accumuler sur la hotte ou le filtre.
Ŷ (Sur certains modèles) Fonctionnement à distance
- Cet appareil est configurable pour permettre un
fonctionnement à distance à tout moment.

49-2000254 Rev. 6 5
SÉCURITÉ
LISEZ ET CONSERVEZ CES INSTRUCTIONS
CONSIGNES DE SÉCURITÉ IMPORTANTES
LISEZ TOUTES LES INSTRUCTIONS AVANT D'UTILISER L'APPAREIL
Comment retirer le film protecteur d’expédition et le ruban adhésif d’emballage
Saisissez délicatement un coin du film protecteur d’expédition
avec vos doigts et le décoller lentement de la surface de
l’appareil. N’utilisez pas d’objets pointus pour retirer le film.
Retirez complètement le film avant d’utiliser l’appareil pour la
première fois.
3RXUDVVXUHUQHSDVHQGRPPDJHUODILQLWLRQGXSURGXLWOD
façon la plus sûre pour enlever le ruban adhésif de l’emballage
sur les nouveaux appareils consiste à appliquer un détergent à
vaisselle liquide à l’aide d’un chiffon doux et à laisser tremper.
REMARQUE : 7RXVOHVHPEDOODJHVGHSURWHFWLRQGRLYHQWrWUH
retirés de toutes les pièces. Cela sera impossible une fois
cuits.
Considérez les options de recyclage des matériaux
d’emballage de votre électroménager.
MISE AU REBUT ADÉQUATE DE VOTRE ÉLECTROMÉNAGER
Veuillez jeter ou recycler votre électroménager conformément aux règlements fédéraux ou locaux. Communiquez avec les
instances locales pour en savoir plus sur la mise au rebut ou le recyclage de votre électroménager.
El equipo de acceso remoto instalado en este horno fue
probado y cumple con los límites establecidos para un
dispositivo digital de clase B, según la parte 15 de la Normativa
de la FCC. Estos límites fueron diseñados para:
(a) brindar una protección razonable contra interferencias
nocivas en una instalación residencial. Este equipo genera,
usa y puede emitir energía de radiofrecuencia y, si no se
instala y utiliza de acuerdo con las instrucciones, puede
ocasionar interferencias perjudiciales en las comunicaciones
de radio. Sin embargo, no se garantiza que no se presenten
interferencias en una instalación en particular. Si el equipo
provoca interferencias perjudiciales para la recepción de radio
o televisión, lo cual puede comprobar encendiendo y apagando
el equipo, se aconseja al usuario que intente corregir la
interferencia con una de las siguientes medidas:
Ŷ5HRULHQWHRUHXELTXHODDQWHQDUHFHSWRUD
Ŷ$XPHQWHODVHSDUDFLyQHQWUHHOHTXLSR\HOUHFHSWRU
Ŷ&RQHFWHHOHTXLSRDXQWRPDFRUULHQWHGHXQFLUFXLWRGLIHUHQWH
del tomacorriente al que se encuentra conectado el
receptor.
Ŷ3DUDVROLFLWDUD\XGDFRQVXOWHFRQHOSURYHHGRUPLQRULVWDRD
XQWpFQLFRH[SHULPHQWDGRGHUDGLR79
(b) tolerar cualquier interferencia recibida, incluyendo las
interferencias que puedan provocar un funcionamiento no
deseado del dispositivo.
Observe que todos los cambios o modificaciones sobre el
dispositivo de comunicación inalámbrico instalado en este
horno que no estén expresamente aprobados por el fabricante
podrían anular la autoridad del usuario para operar el
equipamiento.
AVERTISSEMENT
CONSIGNES DE SÉCURITÉ DU FOUR AUTONETTOYANT
(Sur certains modèles)
/DIRQFWLRQG¶DXWRQHWWR\DJHpOqYHODWHPSpUDWXUHGXIRXUjGHVGHJUpVVXIILVDQWVSRXUEUOHUFRPSOqWHPHQWOHVVDOLVVXUHV
alimentaires dans le four. Suivez les instructions suivantes pour un fonctionnement sûr.
Ŷ 1HWRXFKH]SDVOHVVXUIDFHVGXIRXUSHQGDQWOH
processus d’autonettoyage. Gardez les enfants à l’écart
GXIRXUSHQGDQWO¶DXWRQHWWR\DJH/¶RPLVVLRQGREVHUYHU
ces instructions peut occasionner des brûlures.
Ŷ $YDQWGXWLOLVHUOHF\FOHGDXWRQHWWR\DJHUHWLUH]OHV
casseroles, les grilles de four en métal brillant, tout papier
d'aluminium et tout autre ustensile du four. Seules les
JULOOHVGHIRXUUHYrWXHVGHSRUFHODLQHGHFRXOHXUIRQFpH
SHXYHQWrWUHODLVVpHVGDQVOHIRXU/HQRQUHVSHFWGH
cette consigne peut endommager ces articles et le four, et
présenter un risque de brûlure ou d'incendie.
Ŷ $YDQWG¶XWLOLVHUOHF\FOHG¶DXWRQHWWR\DJHHVVX\H]OD
JUDLVVHHWOHVVDOLVVXUHVDOLPHQWDLUHVGDQVOHIRXU8QH
quantité excessive de graisse peut s’enflammer et causer
des dommages par la fumée.
Ŷ 6LOHPRGHG¶DXWRQHWWR\DJHQHIRQFWLRQQHSDVELHQ
éteignez le four et débranchez l’alimentation électrique.
Faites réparer l’appareil par un technicien qualifié.
Ŷ 1¶XWLOLVH]SDVGHQHWWR\DQWVSRXUOHIRXU$XFXQQHWWR\DQW
SRXUIRXUFRPPHUFLDORXUHYrWHPHQWGHSURWHFWLRQSRXU
IRXUGHTXHOTXHVRUWHTXHFHVRLWQHGRLWrWUHXWLOLVpGDQV
RXDXWRXUG¶XQHSDUWLHGXIRXUjPRLQVG¶rWUHFHUWLILpSRXU
une utilisation dans un four autonettoyant.
Ŷ 1HQHWWR\H]SDVOHVMRLQWVG¶pWDQFKpLWpGHSRUWH&HV
joints sont essentiels pour garantir l’étanchéité. Veillez à
ne pas frotter, endommager ou déplacer les joints.
Ŷ IMPORTANT: &HUWDLQVRLVHDX[VRQWH[WUrPHPHQW
sensibles aux vapeurs dégagées durant le cycle
G¶DXWRQHWWR\DJHGHQ¶LPSRUWHTXHOOHFXLVLQLqUH3ODFH]OHV
oiseaux dans une autre pièce, bien ventilée.

6 49-2000254 Rev. 6
Commandes de four mural simple
UTILISATION DU FOUR : Commandes de four mural simple
1. Modes de cuisson par convection : /HVPRGHVGH
cuisson par convection utilisent une circulation d’air accrue
SRXUDPpOLRUHUOHVSHUIRUPDQFHV/HW\SHGHEpQpILFH
dépend du mode. Votre four dispose des modes de
cuisson par convection suivants : Cuisson par convection
HWU{WLVVDJHSDUFRQYHFWLRQ9R\H]ODVHFWLRQ0RGHVGH
cuisson pour plus d’informations.
2. Modes de cuisson traditionnelle : Votre four est doté des
PRGHVGHFXLVVRQWUDGLWLRQQHOOHVXLYDQWV%DNH%URLO3URRI
HW:DUP9R\H]ODVHFWLRQ0RGHVGHFXLVVRQSRXUSOXV
d’informations.
3. Nettoyage : Votre four dispose de deux modes de
nettoyage : Self Clean et Steam Clean. Reportez-vous à
la section Nettoyage du four pour obtenir des informations
importantes sur l’utilisation de ces modes
4. Démarrer / Entrer : $SSX\H]VXUFHWWHWRXFKHSRXU
démarrer une fonction de cuisson, de nettoyage ou minutée.
REMARQUE : Si l’affichage et les touches s’assombrissent,
l’ouverture de la porte du four ou l’appui sur n’importe quelle
touche réveillera et illuminera le panneau de commande.
5. Annuler/Arrêter (Cancel/Off) : $QQXOH7287(6OHV
opérations du four à l’exception de l’horloge et de la
minuterie.
6. Minuterie (Timer) : Fonctionne comme un compte à
UHERXUV$SSX\H]VXUODWRXFKHTimer et utilisez les
touches numériques pour programmer l’heure en heures et
HQPLQXWHV$SSX\H]VXUODWRXFKH6WDUW(QWHU/HIRXUYD
FRQWLQXHUjIRQFWLRQQHUXQHIRLVOHGpFRPSWHWHUPLQp3RXU
désactiver la minuterie, appuyez sur la touche Timer.
7. Friture à air chaud (Air Fry) : Cette fonction permet à
l’utilisateur d’accéder au mode de friture à air chaud. Voyez
ODVHFWLRQ0RGHVGHFXLVVRQSRXUSOXVG¶LQIRUPDWLRQV
8. Verrouillage des commandes (Lock Controls) : Verrouille
la commande de sorte qu’une pression sur les touches
Q¶DFWLYHSDVOHVFRPPDQGHV$SSX\H]VXUODWRXFKH©0 »
durant trois secondes pour verrouiller ou déverrouiller les
FRPPDQGHV/DWRXFKHCancel/Off est toujours active,
PrPHORUVTXHOHVFRPPDQGHVVRQWYHUURXLOOpHV
9. Lampe du four (Oven Light) : $OOXPHRXpWHLQWODODPSHGX
four.
10. Options et paramètres : /HVWRXFKHV2SWLRQVHW6HWWLQJV
ouvrent des menus plus détaillés à l’écran qui permettent
d’accéder à d’autres fonctions et modes de cuisson. Vous
sélectionnez chaque fonction sur l’affichage à l’aide de la
touche numérique correspondante. Vous pouvez quitter
à tout moment en appuyant de nouveau sur Options ou
Settings&RQVXOWH]OHVVHFWLRQV3DUDPqWUHV2SWLRQVHW
0RGHVGHFXLVVRQSRXUSOXVGHGpWDLOV
Les formes des touches de commande sont représentatives; votre four peut avoir des formes de touches différentes. Les
touches de commande sont conçues pour être visibles lorsque la porte du four est ouverte ou lorsque les commandes sont
enfoncées dans la zone d’une touche.
1
2
7
4895
36
10
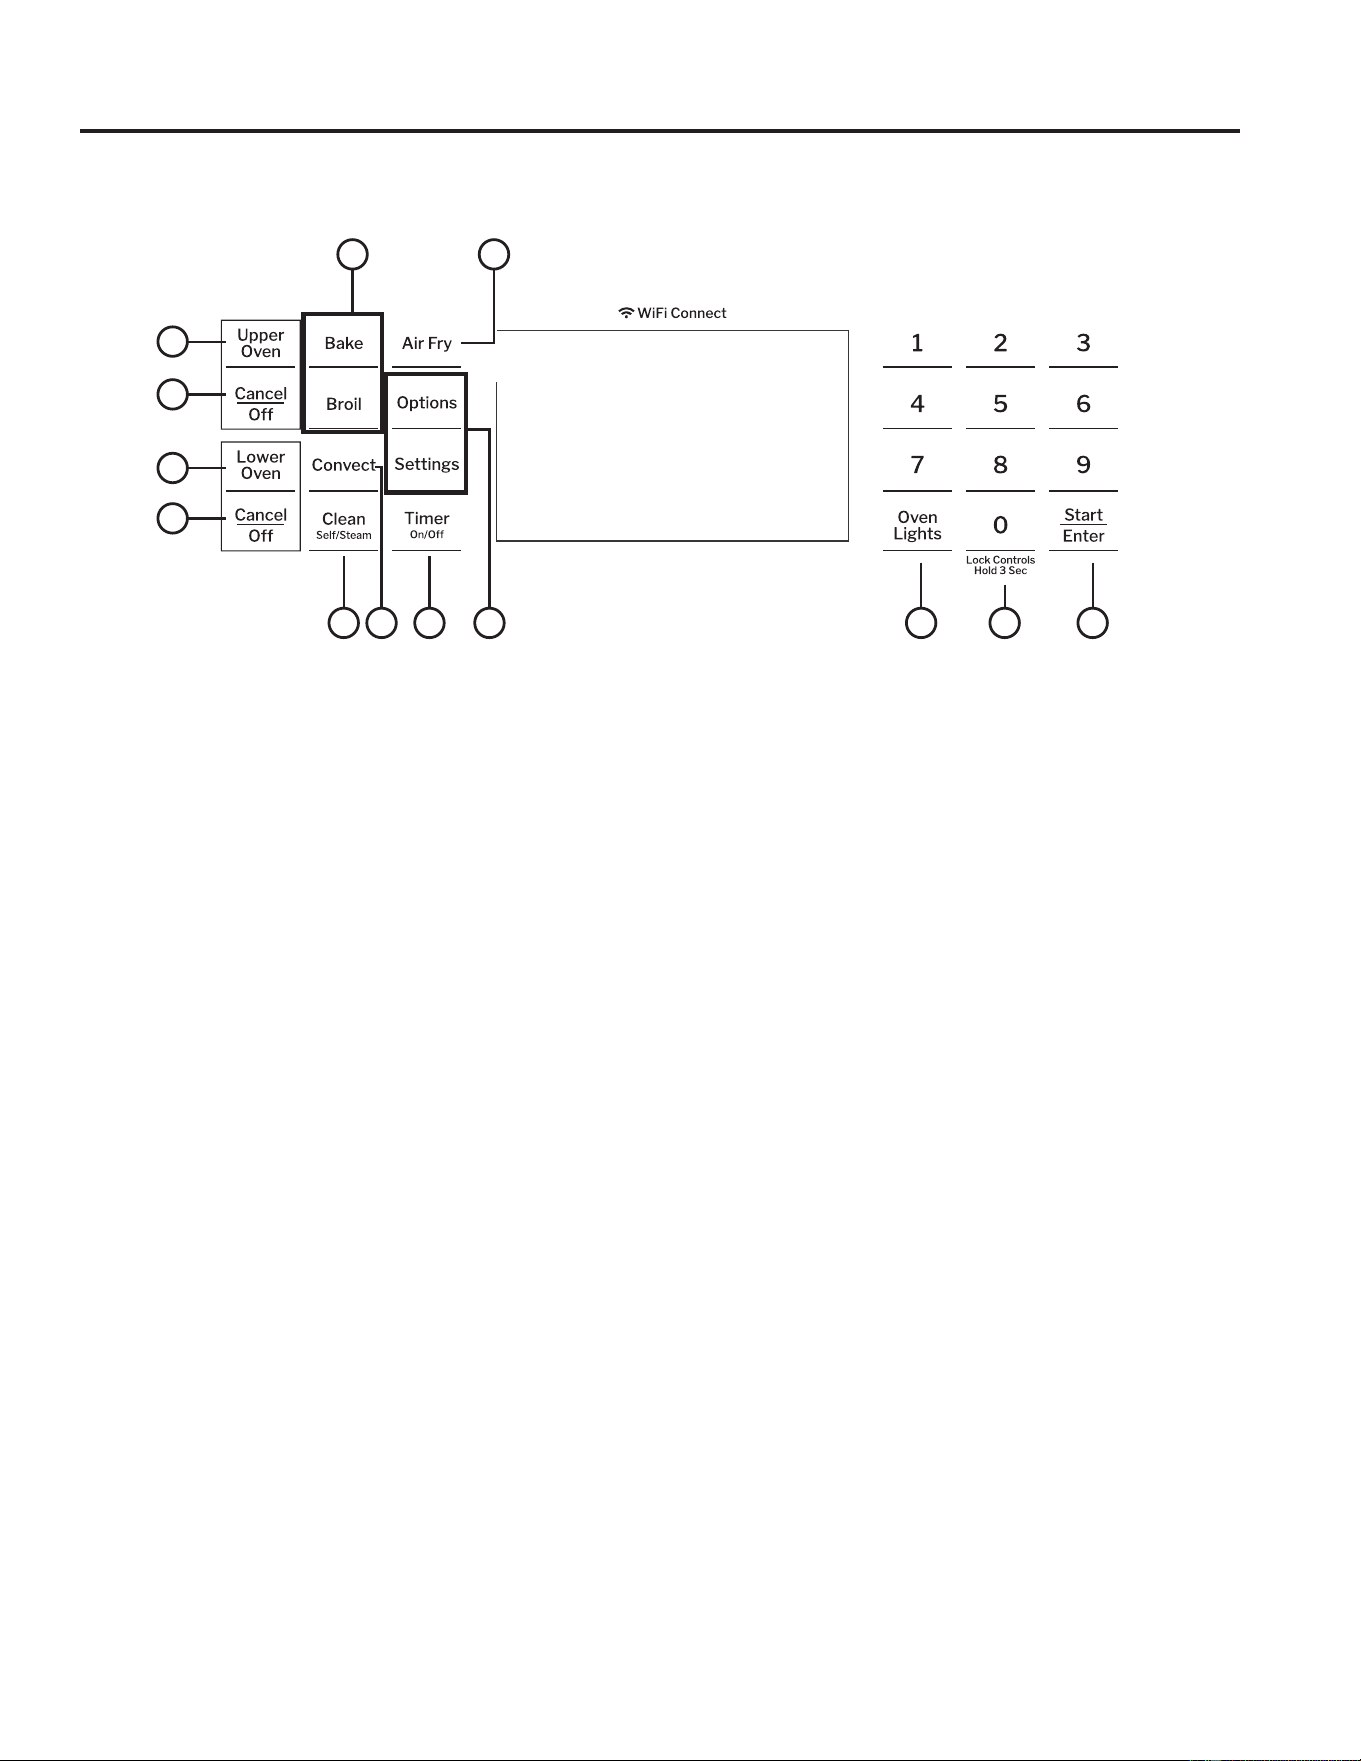
49-2000254 Rev. 6 7
Commandes de four mural double
UTILISATION DU FOUR : Commandes de four mural double
Les formes des touches de commande sont représentatives; votre four peut avoir des formes de touches différentes. Les
touches de commande sont conçues pour être visibles lorsque la porte du four est ouverte ou lorsque les commandes sont
enfoncées dans la zone d’une touche.
1. Four supérieur et four inférieur : ,QGLTXHOHIRXUTXHOHV
commandes vont contrôler. Sélectionnez un four avant de
suivre les étapes de démarrage d’un mode de cuisson ou
de nettoyage.
2. Modes de cuisson par convection (four supérieur
seulement) : /HVPRGHVGHFXLVVRQSDUFRQYHFWLRQ
utilisent une circulation d’air accrue pour améliorer les
SHUIRUPDQFHV9R\H]ODVHFWLRQ0RGHVGHFXLVVRQSRXU
plus d’informations.
3. Modes de cuisson traditionnelle : Votre four est doté
des modes de cuisson traditionnelle suivants : Bake, Broil
HW:DUP9R\H]ODVHFWLRQ0RGHVGHFXLVVRQSRXUSOXV
d’informations.
4. Nettoyage : Votre four dispose de deux modes de
nettoyage : Self Clean et Steam Clean. Reportez-vous à
la section Nettoyage du four pour obtenir des informations
importantes sur l’utilisation de ces modes.
5. Démarrer/Entrer (Start/Enter) : $SSX\H]VXUFHWWHWRXFKH
pour démarrer une fonction de cuisson, de nettoyage
ou minutée. REMARQUE : Si l’affichage et les touches
s’assombrissent, l’ouverture de la porte du four ou l’appui
sur n’importe quelle touche réveillera et illuminera le
panneau de commande.
6. Annuler/Arrêter (Cancel/Off) : $QQXOH7287(6OHV
opérations du four à l’exception de l’horloge et de la
minuterie.
7. Minuterie (Timer) : Fonctionne comme un compte à
UHERXUV$SSX\H]VXUODWRXFKH7LPHUHWXWLOLVH]OHVWRXFKHV
numériques pour programmer l’heure en heures et en
PLQXWHV$SSX\H]VXUODWRXFKHStart/Enter/HIRXUYD
FRQWLQXHUjIRQFWLRQQHUXQHIRLVOHGpFRPSWHWHUPLQp3RXU
désactiver la minuterie, appuyez sur la touche Timer.
8. Friture à air chaud (Air Fry) : Cette fonction permet à
l’utilisateur d’accéder au mode de friture à air chaud. Voyez
ODVHFWLRQ0RGHVGHFXLVVRQSRXUSOXVG¶LQIRUPDWLRQV
9. Lampe(s) du four (Oven Lights) : $OOXPHRXpWHLQWOD
lampe du four.
10.Verrouillage des commandes (Lock Controls) : Verrouille
la commande de sorte qu’une pression sur les touches
Q¶DFWLYHSDVOHVFRPPDQGHV$SSX\H]VXUODWRXFKH©
» durant trois secondes pour verrouiller ou déverrouiller
OHVFRPPDQGHV/DWRXFKH&DQFHO2IIHVWWRXMRXUVDFWLYH
PrPHORUVTXHOHVFRPPDQGHVVRQWYHUURXLOOpHV
11. Options et paramètres : /HVWRXFKHV2SWLRQVHW6HWWLQJV
ouvrent des menus plus détaillés à l’écran qui permettent
d’accéder à d’autres fonctions et modes de cuisson. Vous
sélectionnez chaque fonction sur l’affichage à l’aide de la
touche numérique correspondante. Vous pouvez quitter
à tout moment en appuyant de nouveau sur Options ou
Settings&RQVXOWH]OHVVHFWLRQV3DUDPqWUHV2SWLRQVHW
0RGHVGHFXLVVRQSRXUSOXVGHGpWDLOV
1
1
6
6
3
7
259
4
8
10
11

8 49-2000254 Rev. 6
$SSDUHLOVFRPSDWLEOHV$SSOHRX$QGURLGHWUpVHDX:L)LGRPHVWLTXHUHTXLV
Options
UTILISATION DU FOUR : 2SWLRQV / Réglages
/DWRXFKH2SWLRQVRXYUHXQPHQXG¶DXWUHVPRGHVGHFXLVVRQORUVTXHOHIRXUHVWpWHLQW,ORXYUHXQPHQXDYHFGHVIRQFWLRQV
supplémentaires si un mode de cuisson est déjà en cours. Vous pouvez quitter le menu à tout moment en appuyant de nouveau sur
2SWLRQV
Vous devez d’abord sélectionner un mode (Bake, Convection Bake, Convection Roast), puis sélectionner Options pour
accéder aux fonctions suivantes.
Temps de cuisson (Cook Time)
/DPLQXWHULHIDLWOHFRPSWHjUHERXUVGXWHPSVGHFXLVVRQHW
pWHLQWOHIRXUORUVTXHOHWHPSVGHFXLVVRQHVWWHUPLQp/DQFH]XQ
mode Bake ou Warm, mais n’appuyez pas sur Start$SSX\H]
sur la touche Options, suivez les instructions à l’écran et utilisez
les touches numériques pour programmer un temps de cuisson
en heures et minutes, puis appuyez sur Start.
Délai (Delay Time)
5HWDUGHODPLVHHQPDUFKHGXIRXU8WLOLVH]FHWWHIRQFWLRQ
pour régler l’heure à laquelle vous voulez que le four démarre.
6pOHFWLRQQH]OHPRGHGHFXLVVRQVRXKDLWp8WLOLVH]OHVWRXFKHV
numériques pour programmer une température de cuisson.
$SSX\H]VXUODWRXFKHOptions et sélectionnez Delay Time.
8WLOLVH]OHVWRXFKHVQXPpULTXHVSRXUSURJUDPPHUO¶KHXUHGH
mise en marche du four, puis appuyez sur Start/Enter.$YHFOHV
PRGHVGHFXLVVRQXQWHPSVGHFXLVVRQSHXWpJDOHPHQWrWUH
programmé si vous le souhaitez. Suivez les instructions sous
7HPSVGHFXLVVRQSRXUUpJOHUFHWWHIRQFWLRQ/¶RSWLRQ&RRN7LPH
n’est pas disponible avec tous les modes.
REMARQUE : /RUVTXHYRXVXWLOLVH]ODIRQFWLRQ'HOD\7LPHOHV
aliments qui se gâtent facilement, tels que lait, œufs, poisson,
IDUFHYRODLOOHHWSRUF±QHGRLYHQWSDVrWUHODLVVpVVDQV
réfrigération plus d’une (1) heure avant ou après la cuisson.
/DWHPSpUDWXUHDPELDQWHIDYRULVHODFURLVVDQFHGHEDFWpULHV
QRFLYHV$VVXUH]YRXVGHIHUPHUODODPSHGXIRXUFDUODFKDOHXU
de l’ampoule accélère la croissance des bactéries nocives.
Sonde du four (four supérieur seulement
sur les modèles à four double)
REMARQUE :$FFHVVLEOHXQLTXHPHQWYLDOHVPRGHVGH
cuisson traditionnels et par convection.
/DVRQGHPHVXUHODWHPSpUDWXUHLQWHUQHGHVDOLPHQWVHWpWHLQW
le four lorsque celui-ci atteint la température programmée.
,QVpUH]ODVRQGHDSSX\H]VXUOHPRGHGHFXLVVRQVRXKDLWp
et programmez la température de la sonde. Voyez la section
0RGHVGHFXLVVRQSRXUSOXVG¶LQIRUPDWLRQV/DVRQGHSHXWrWUH
utilisée uniquement avec les modes Bake, Convection Bake et
Convection Roast.
/HVWRXFKHV2SWLRQVHW6HWWLQJVRXYUHQWGHVPHQXVSOXVGpWDLOOpVVXUO¶DIILFKDJHTXLSHUPHWWHQWG¶DFFpGHUjG¶DXWUHVIRQFWLRQV
Vous sélectionnez chaque fonction sur l’affichage à l’aide de la touche numérique correspondante. Vous pouvez quitter à tout
PRPHQWHQDSSX\DQWGHQRXYHDXVXU2SWLRQVRX6HWWLQJV
Connexion Wi-Fi et contrôle à distance
Votre four est conçu pour vous procurer une communication
bidirectionnelle entre votre électroménager et un appareil
intelligent. Grâce aux fonctions WiFi Connect (connexion Wi-Fi),
vous serez en mesure de contrôler les fonctions essentielles du
four telles que le réglage de la température, les minuteries et
les modes de cuisson à l’aide d’une tablette ou d’un téléphone
intelligent.*
Sélectionnez Settings, puis Wifi, puis suivez les instructions
GHO¶DSSOLFDWLRQGHYRWUHWpOpSKRQH,OHVWQpFHVVDLUHG¶DFWLYHU
la connexion Wi-Fi avant d’utiliser Remote Enable (contrôle à
distance) sur votre four.
Connexion de votre four compatible Wi-Fi
Ce dont vous aurez besoin
9RWUHIRXU*($SSOLDQFHVXWLOLVHYRWUHUpVHDX:L)LGRPHVWLTXH
existant pour communiquer entre l’appareil et votre appareil
LQWHOOLJHQW3RXUFRQILJXUHUYRWUHIRXU*($SSOLDQFHVYRXV
devrez rassembler quelques informations :
&KDTXH*($SSOLDQFHVIRXUFRPSRUWHXQHpWLTXHWWH
d’informations sur la connectivité de l’appareil sur laquelle
ILJXUHXQLGHQWLILDQWG¶pOHFWURPpQDJHU83',OV¶DJLWG¶XQ
renseignement important nécessaire pour vous connecter à
O¶DSSDUHLO/¶pWLTXHWWHVHWURXYHJpQpUDOHPHQWjO¶LQWpULHXUGH
la porte du four ou du tiroir.
3UpSDUH]YRWUHWpOpSKRQHLQWHOOLJHQWRXWDEOHWWHSRXUrWUH
SUrWjDFFpGHUjO¶,QWHUQHWHWWpOpFKDUJHUOHVDSSOLFDWLRQV
3. Vous devez connaître le mot de passe de votre routeur
:L)LGRPHVWLTXH$\H]FHPRWGHSDVVHjSRUWpHGHOD
PDLQORUVGHODFRQILJXUDWLRQGHYRWUHIRXU*($SSOLDQFHV
Connexion de votre four GE Appliances
1. Sur votre téléphone intelligent ou votre tablette, visitez
GEAppliances.com/connect pour en savoir plus sur les
fonctions de l’appareil connecté et télécharger l’application
appropriée.
2. Suivez les instructions sur l’écran de l’application pour
FRQQHFWHUYRWUHIRXU*($SSOLDQFHV
8QHIRLVOHSURFHVVXVWHUPLQpOHYR\DQWGHFRQQH[LRQ
VLWXpVXUO¶pFUDQGHYRWUHIRXU*($SSOLDQFHVV¶DOOXPHUDHW
O¶DSSOLFDWLRQFRQILUPHUDTXHYRXVrWHVFRQQHFWp
Réglages
Contains FCC: ZKJ-WCATA009
UPD ID: XX-XX-XX-XX-XX-XX
PT. NO. XXXXXXXXXXXX
Contains IC: 10229A-WCATA009
MAC ID: D8-28-C9-XXXXXXXX
Connected Appliance Information
Exemple d’étiquette

49-2000254 Rev. 6 9
UTILISATION DU FOUR : Réglages
Réglages (suite)
Connexion Wi-Fi et contrôle à distance (suite)
4. Si le voyant de connexion ne s’allume pas ou s’il
clignote, suivez les instructions de l’application pour vous
reconnecter. Si le problème persiste, veuillez appeler le
FHQWUHG¶DSSHOVFRQQHFWpDXHWGHPDQGHU
de l’aide concernant la connectivité sans fil du four.
3RXUFRQQHFWHUG¶DXWUHVDSSDUHLOVLQWHOOLJHQWVGpFRQQHFWH]
vous du Wi-Fi et du premier appareil, puis reconnectez-vous
DX:L)LHWUpSpWH]OHVpWDSHVHW/HIRXUQHSHXWrWUH
connecté qu’à un seul appareil intelligent à la fois.
Notez que toute modification ou remplacement du dispositif
de communication à distance de ce four qui n’est pas
explicitement approuvé(e) par le fabricant peut annuler le droit
de l’utilisateur de se servir de cet équipement.
DÉMARRAGE À DISTANCE DE VOTRE FOUR
3RXUSRXYRLUGpPDUUHUOHIRXUjGLVWDQFHXQHIRLVFRQQHFWp
au Wi-Fi, appuyez sur la touche Remote Enable et l’icône
s’allume sur l’afficheur. Vous pouvez maintenant démarrer le
four à distance à l’aide de votre appareil intelligent connecté.
/¶LF{QH GRLWrWUHDOOXPpHSRXUGpPDUUHUOHIRXUjGLVWDQFH
/¶LF{QH n’est pas nécessaire pour modifier la température
du four en cours de fonctionnement, pour régler une minuterie
ou pour éteindre le four à partir de l’application du téléphone
lorsque l’icône indique qu’il est connecté au Wi-Fi.
3RXUGpFRQQHFWHUYRWUHWpOpSKRQHGXFRQWU{OHjGLVWDQFH
appuyez sur la touche Remote Enable et l’icône s’éteint.
REMARQUE :/HVDOLPHQWVTXLVHJkWHQWUDSLGHPHQWWHOVTXH
ODLW°XIVSRLVVRQIDUFHYRODLOOHHWSRUFQHGRLYHQWSDVrWUH
laissés sans réfrigération plus d’une (1) heure avant ou après
ODFXLVVRQ/DWHPSpUDWXUHDPELDQWHIDYRULVHODFURLVVDQFHGH
EDFWpULHVQRFLYHV$VVXUH]YRXVGHIHUPHUODODPSHGXIRXUFDU
la chaleur de l’ampoule accélère la croissance des bactéries
nocives.
Horloge (Clock)
Cette option permet de régler l’heure de l’horloge du four.
$SSX\H]VXUODWRXFKHSettings et sélectionnez Clock.
Sélectionnez Set Clock et suivez les instructions pour régler
l’horloge. Cette fonction spécifie également comment l’heure
sera affichée. Vous pouvez sélectionner un affichage standard
12 heures (12H), un affichage de l’heure militaire 24 heures
+RXDXFXQDIILFKDJHG¶KRUORJH2II$SSX\H]VXUODWRXFKH
Settings, sélectionnez Set Clock et sélectionnez 12/24 hr ou
On/Off.
Convection automatique (Auto Conv)
/RUVTXHYRXVXWLOLVH]ODFXLVVRQSDUFRQYHFWLRQ&RQYHFWLRQ
Bake) et le rôtissage par convection (Convection Roast), la
IRQFWLRQGHFRQYHUVLRQGHUHFHWWHDXWRPDWLTXH$XWR5HFLSH
Conversion) convertit automatiquement les températures de
cuisson régulières en températures de cuisson par convection.
Notez que cette fonction ne convertit pas les temps de cuisson
par convection, mais uniquement la température. Cette fonction
SHXWrWUHDFWLYpHRXGpVDFWLYpH6pOHFWLRQQH]Settings et
Auto Conversion, puis suivez les instructions pour activer ou
GpVDFWLYHU2QRX2IIFHWWHIRQFWLRQ
Arrêt automatique (Auto Off)
&HWWHIRQFWLRQPHWOHIRXUHQDUUrWDSUqVKHXUHVGH
IRQFWLRQQHPHQWFRQWLQX2QSHXWDFWLYHURXGpVDFWLYHUFHWWH
fonction. Sélectionnez Settings et Auto Off pour activer ou
désactiver cette fonction.
Son (Sound)
Vous pouvez régler le volume sonore et le type d’alerte
que votre électroménager utilise. Sélectionnez Settings et
Sound. Suivez les instructions pour régler le volume ou pour
passer d’une tonalité d’alerte continue à une tonalité unique.
8QUpJODJHFRQWLQXpPHWWUDXQHWRQDOLWpMXVTX¶jFHTXHYRXV
appuyiez sur une touche de commande. Vous pouvez aussi
UpJOHUOHYROXPHVRQRUHGXIRXU/HSDQQHDXGHFRPPDQGHIHUD
entendre la tonalité du nouveau volume sonore chaque fois que
celui-ci est changé.
F/C (Fahrenheit ou Celsius)
/DFRPPDQGHGXIRXUHVWSUpUpJOpHSRXUXWLOLVHUGHV
températures en degrés Fahrenheit (F) mais vous pouvez
changer pour des degrés Celsius (C). Sélectionnez Settings et
F/C pour passer d’une unité de température à l’autre.
Ajustement de la température du four
Cette caractéristique permet de régler la température de
cuisson du four et de cuisson par convection jusqu’à 35
)SOXVFKDXGHRXMXVTX¶j)SOXVIURLGH8WLOLVH]FHWWH
fonction si vous souhaitez modifier la température du four
parce que vous croyez qu’elle est trop élevée ou trop basse.
Cet ajustement agit sur les modes Bake et Convection Bake.
$XFXQDXWUHPRGHGHFXLVVRQQ¶HVWFRQFHUQp6pOHFWLRQQH]
Settings et Oven Adjust SRXUDMRXWHUSOXVGHFKDOHXU0RUH
+HDWRXPRLQVGHFKDOHXU/HVV+HDWSXLVDSSX\H]VXUSave
SRXUOHVIRXUVGRXEOHVVpOHFWLRQQH]OHIRXUVXSpULHXU8SSHU
2YHQRXLQIpULHXU/RZHU2YHQjUpJOHU1¶XWLOLVH]SDVGH
thermomètres, comme ceux que l’on trouve dans les épiceries,
pour vérifier le réglage de la température de votre four. Ces
WKHUPRPqWUHVSHXYHQWYDULHUGHjGHJUpV
Informations du four
Sélectionnez Settings et Oven Info pour afficher le numéro de
modèle et la version logicielle.
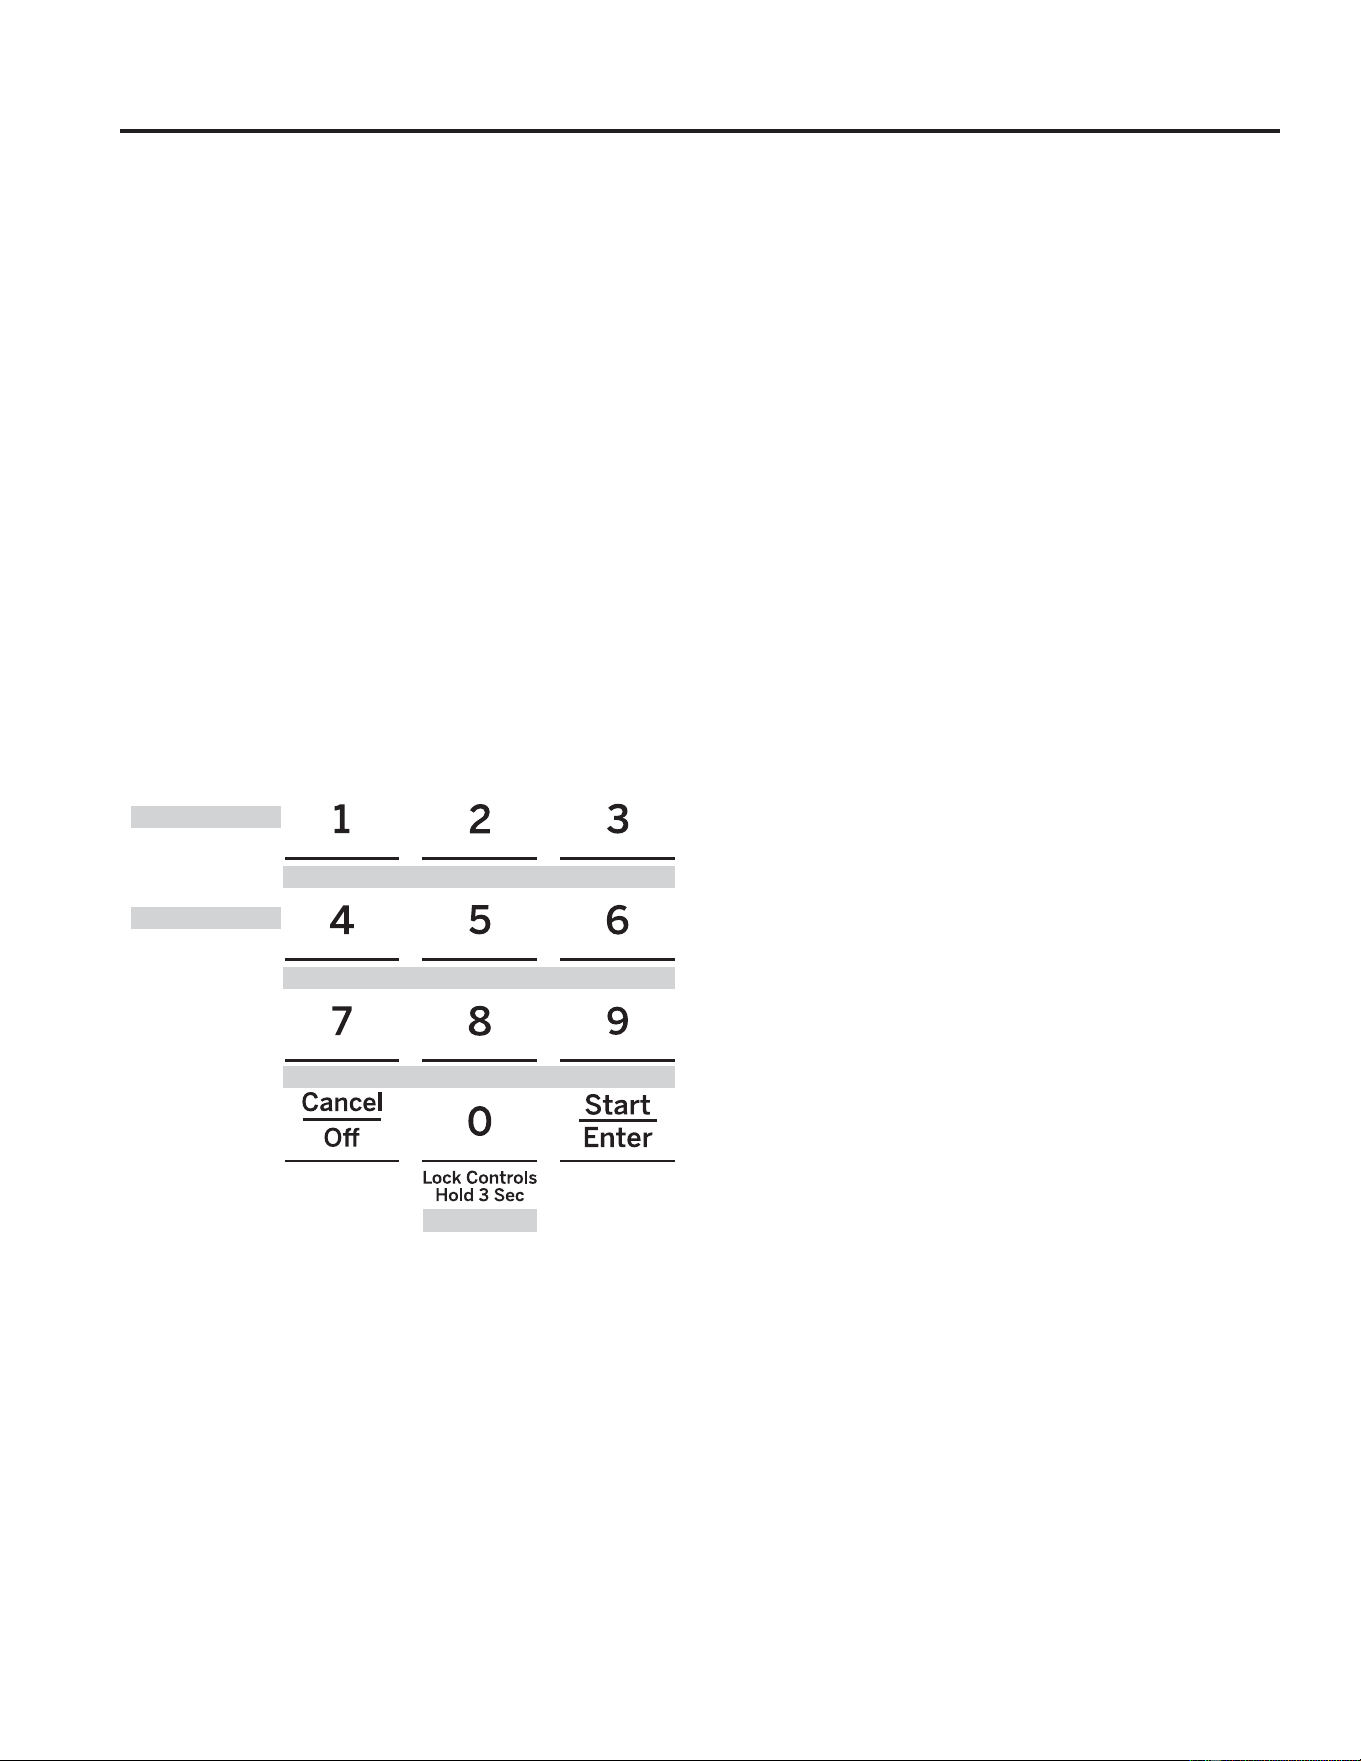
49-2000254 Rev. 6
Sabbat
UTILISATION DU FOUR : Sabbat
/HPRGHVDEEDWGpVDFWLYHOHVOXPLqUHVGXIRXUODOXPLqUHGXIRXUQHV¶DOOXPHUDSDVORUVTXHODSRUWHVHUDRXYHUWHWRXVOHVVRQVOH
tableau de commande n’émettra pas de bip lorsque vous appuierez sur l’écran) OHVIRQFWLRQV&RQYHFWLRQ%URLO:DUP3URRI&RRN
7LPH7LPHU&ORFNHW'HOD\7LPH/HPRGHVDEEDWSHXWXQLTXHPHQWrWUHXWLOLVpHQPRGHGHFXLVVRQDXIRXU%DNH Cette fonction
satisfait les exigences relatives au sabbat de la confession juive.
Activation du mode Sabbat
$SSX\H]VXUODWRXFKHSettings, sélectionnez Sabbath, puis
7XUQRQ8QFURFKHWIHUPDQW©@ªV¶DIILFKHSRXULQGLTXHUTXHOH
PRGH6DEEDWHVWDFWLYp/¶KRUORJHQHVHUDSDVDIILFKpH
Démarrage d’une cuisson continue
$SSX\H]VXUBake$YHFOHVIRXUVGRXEOHVF¶HVWOHIRXU
supérieur qui est concerné. Si vous souhaitez utiliser le four
inférieur, appuyez sur Lower Oven, puis sur Bake.)
6LODWHPSpUDWXUHVRXKDLWpHHVW)DSSX\H]VXU
Start/Enter. Si une température de cuisson différente
est souhaitée, utilisez les touches numériques 1 à 5 pour
sélectionner une température préréglée, puis appuyez sur
Start/Enter. Reportez-vous à l’illustration ci-dessous pour
déterminer la touche qui règle la température de cuisson
souhaitée.
$SUqVXQFHUWDLQWHPSVXQGHX[LqPHFURFKHW©@>ªDSSDUDvWj
l’écran pour indiquer que le four est en train de cuire.
Ajustement de la température
$SSX\H]VXUBake (ou appuyez sur Lower Oven puis Bake
pour le four inférieur dans un four double), utilisez les touches
numériques 1 à 5 pour sélectionner une température de
cuisson préréglée différente, et appuyez sur Start/Enter.
Démarrage d’une cuisson minutée
$SSX\H]VXUBake.
6LODWHPSpUDWXUHVRXKDLWpHHVW)XWLOLVH]OHV
WRXFKHVQXPpULTXHVjSRXUVpOHFWLRQQHUXQWHPSVGH
cuisson. Si vous souhaitez une température de cuisson
DXWUHTXH)XWLOLVH]OHVWRXFKHVQXPpULTXHVj
pour sélectionner une température de cuisson préréglée,
puis sélectionnez le temps de cuisson. Reportez-vous à
l’illustration de cette page pour déterminer quelle touche
permet de régler la température et le temps de cuisson
souhaités.
$SSX\H]VXUStart/Enter.
$SUqVXQFHUWDLQWHPSVXQGHX[LqPHFURFKHW©@>ªDSSDUDvWj
O¶pFUDQSRXULQGLTXHUTXHOHIRXUHVWHQWUDLQGHFXLUH/RUVTXH
le temps de cuisson est écoulé, l’affichage revient à un seul
FURFKHW©@ªLQGLTXDQWTXHOHIRXUQ¶HVWSOXVHQWUDLQGHFXLUH
$XFXQVLJQDOVRQRUHQ¶HVWpPLVORUVTXHOHWHPSVGHFXLVVRQ
est terminé.
Quitter le mode Sabbat
3RXUTXLWWHUOHPRGH6DEEDWDVVXUH]YRXVTXHOHIRXUHVW
pWHLQW0DLQWHQH]XQHSUHVVLRQVXUODWRXFKH6HWWLQJVSRXU
désactiver le mode Sabbat.
Remarque sur les pannes de courant en
mode Sabbat
Si une panne de courant survient pendant le mode Sabbat,
l’appareil reste en mode Sabbat mais s’éteint lorsque le
courant est rétabli.
7HPSHUDWXUH)
7LPHKRXUV
325
2.5h
3h
4h
2h
3.5h
) ) ) ) )
KRXUV KRXUV KRXUV KRXUV KRXUV
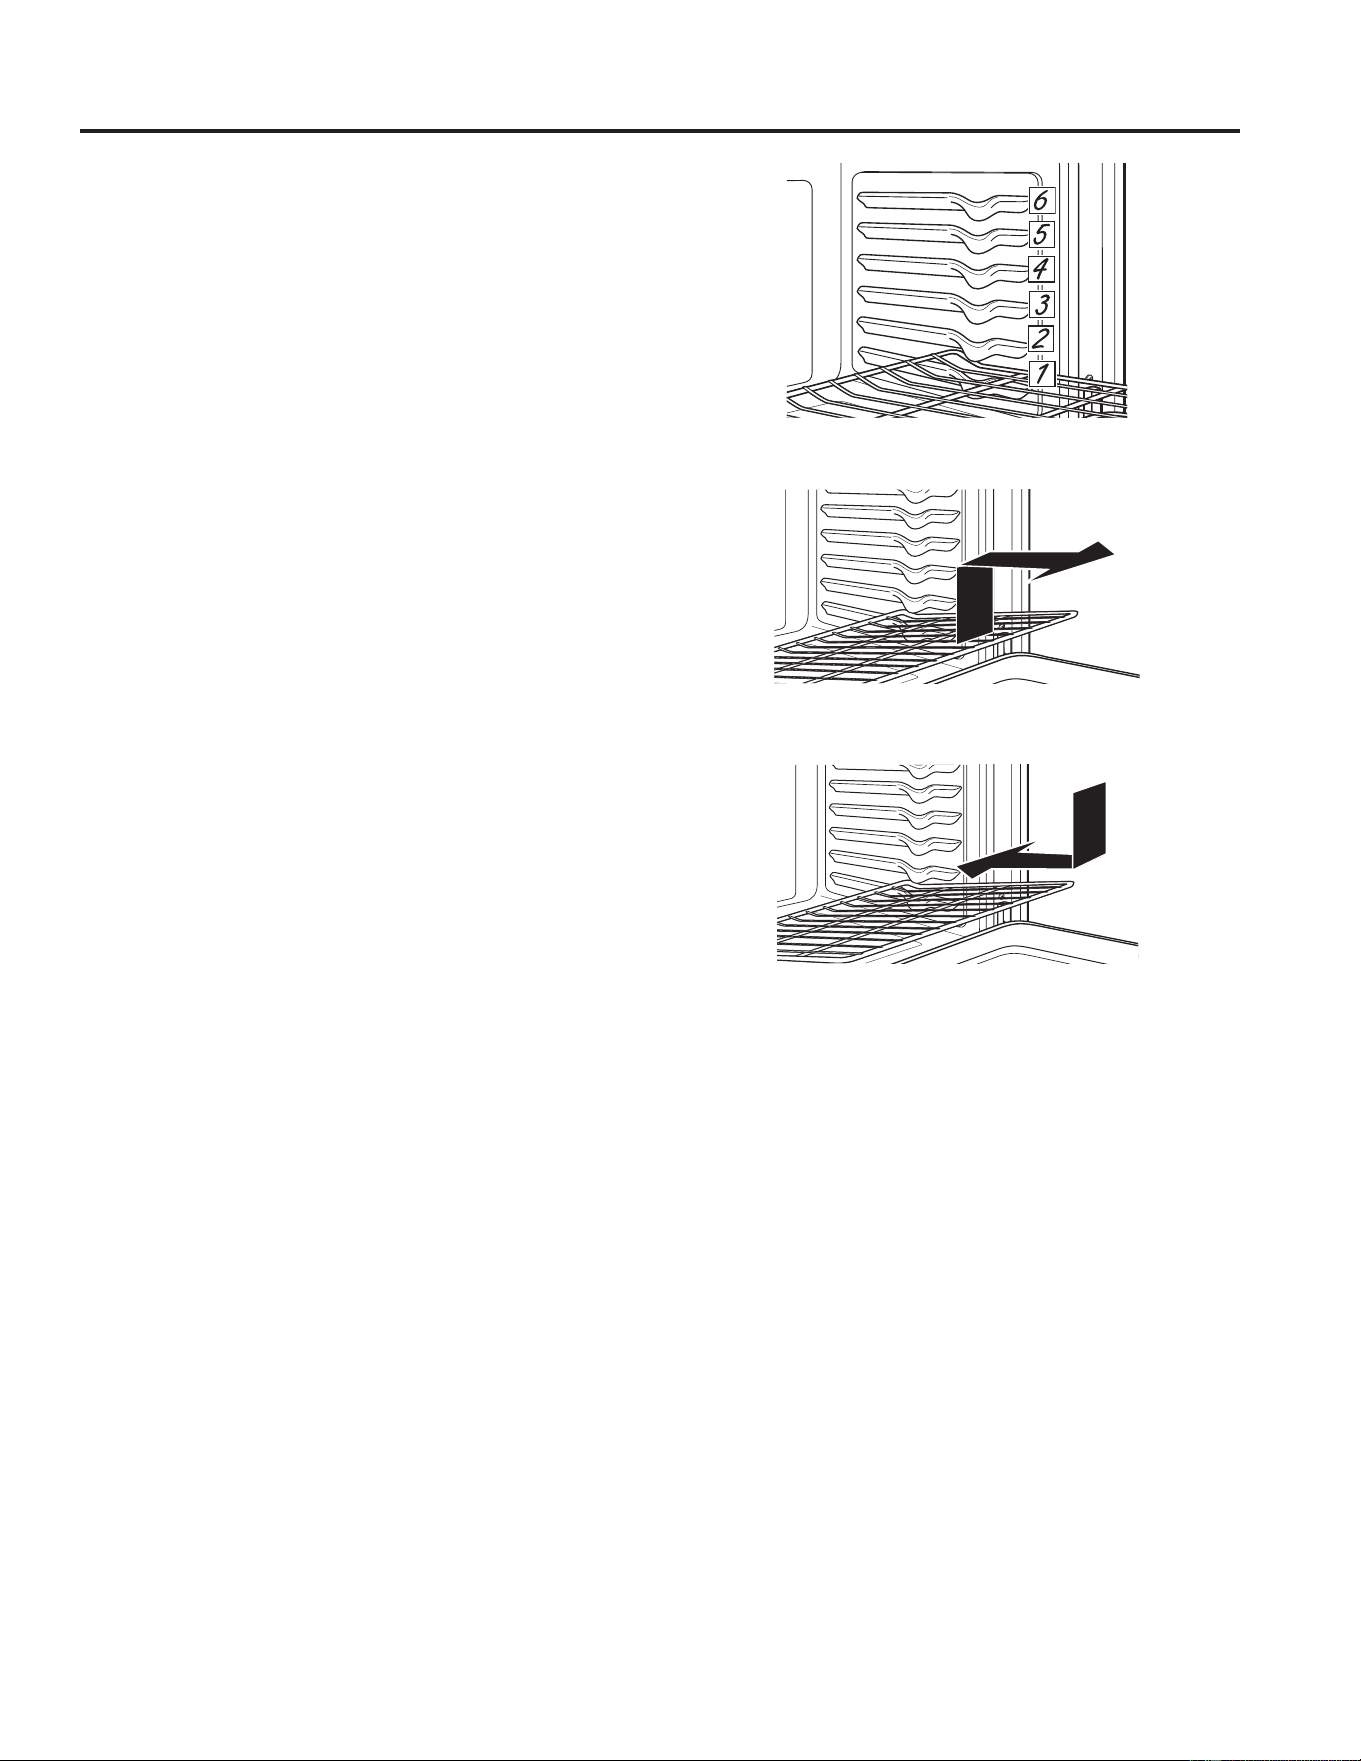
49-2000254 Rev. 6 11
Grilles de four
UTILISATION DU FOUR : Grilles de four
9RWUHIRXUSRVVqGHVL[SRVLWLRQVGHJULOOH/H*XLGHGHFXLVVRQ
contient des recommandations quant à la position des grilles à
XWLOLVHUHQIRQFWLRQGHVW\SHVGDOLPHQWVjFXLUH/HUpJODJHGH
la position de la grille est une façon d'optimiser le rendement
GHODFXLVVRQ3DUH[HPSOHVLYRXVSUpIpUH]TXHYRVJkWHDX[
vos muffins ou vos biscuits soient très brunis, placez la grille à
un cran supérieur. Si vos aliments brunissent trop, placez votre
grille à un cran inférieur la prochaine fois.
/RUVGHODFXLVVRQDYHFGHQRPEUHXVHVFDVVHUROHVHWGH
nombreuses grilles, assurez-vous que l'espace entre les
casseroles est suffisant pour favoriser une bonne
circulation d'air.
9RWUHIRXUSHXWrWUHPXQLGHJULOOHVFRXOLVVDQWHVHWRXGHJULOOHV
plates traditionnelles.
3RXUpYLWHUOHVEUOXUHVSODFH]ODRXOHVJULOOHVj
l'emplacement désiré avant d'allumer le four.
Grilles plates
/RUVTXHYRXVPHWWH]GHVXVWHQVLOHVGHFXLVVRQGDQVOHIRXURX
OHVHQUHWLUH]WLUH]OHVJULOOHVMXVTXjODEXWpHGDUUrWGXVXSSRUW
de grille.
3RXUUHWLUHUXQHJULOOHWLUH]ODYHUVYRXVVRXOHYH]HQODYDQW
et sortez-la.
3RXUUHPHWWUHXQHJULOOHHQSODFHSODFH]VRQF{WpUHFRXUEp
FUDQVGDUUrWVXUOHVXSSRUWVRXOHYH]HQODYDQWHWSRXVVH]OD
à l'intérieur.
/HVJULOOHVSHXYHQWrWUHGLIILFLOHVjIDLUHJOLVVHUSDUWLFXOLqUHPHQW
DSUqVXQDXWRQHWWR\DJH$SSOLTXH]GHOKXLOHYpJpWDOHVXUXQ
chiffon doux ou un essuie-tout, puis enduisez d'huile les côtés
droit et gauche de la grille.
REMARQUE : /XWLOLVDWLRQGDXWUHVW\SHVGKXLOHVGHFXLVVRQ
entraînera une décoloration ou la formation d'un résidu de
couleur semblable à de la rouille sur les grilles et les côtés de
ODFDYLWp3RXUQHWWR\HUFHUpVLGXXWLOLVH]GXVDYRQHWGHOHDX
ou une solution de vinaigre et d'eau. Rincez à l'eau claire et
asséchez avec un chiffon doux et propre.
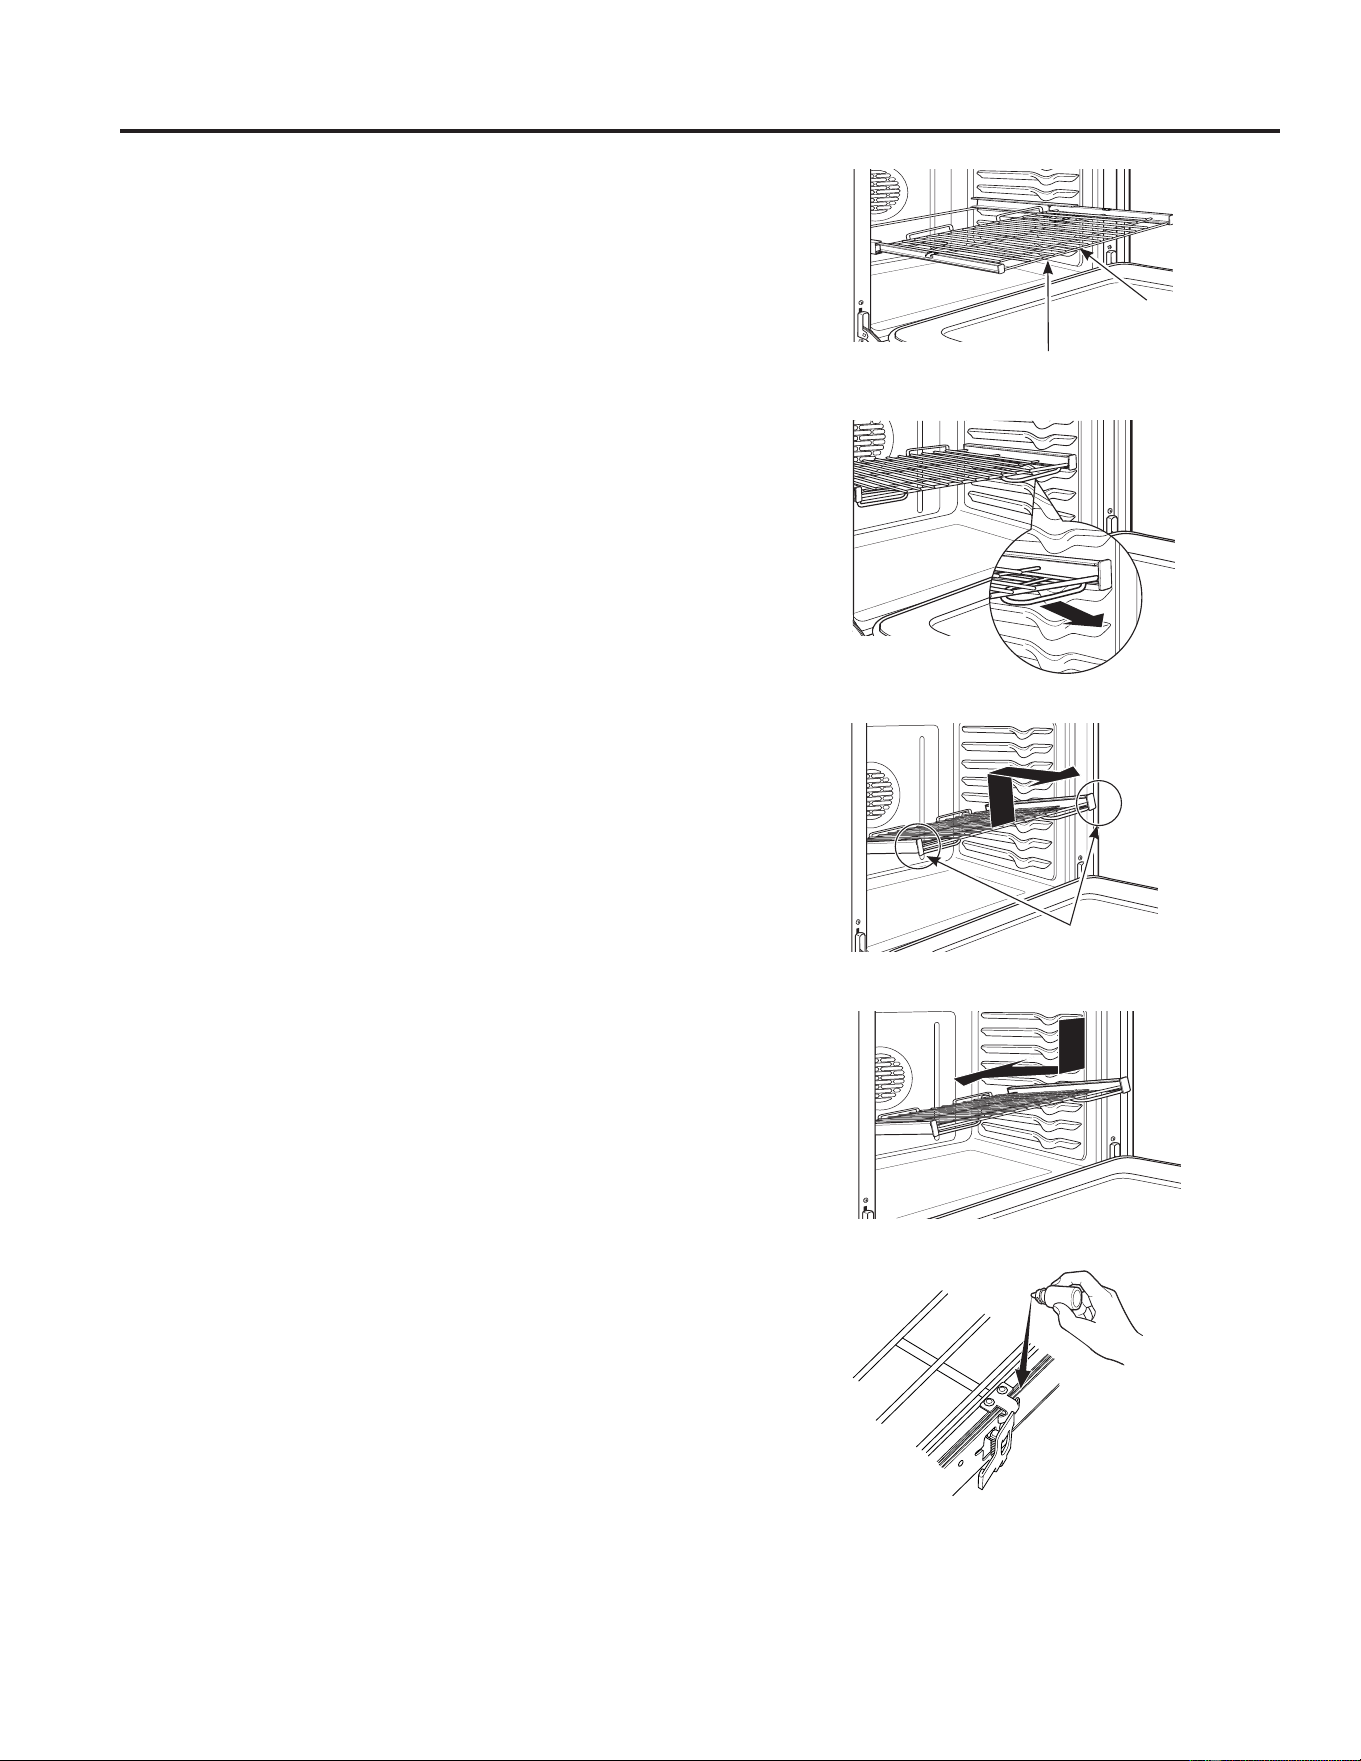
12 49-2000254 Rev. 6
UTILISATION DU FOUR : Grilles de four
Grilles de four (suite)
Grilles coulissantes
/RUVTXHYRXVPHWWH]GHVXVWHQVLOHVGHFXLVVRQGDQVOHIRXU
ou les en retirez, tirez toujours la grille à la position d'extension
PD[LPDOHHQXWLOLVDQWODEDUUHVXSpULHXUHDYDQW/HVJULOOHV
FRXOLVVDQWHVQHSHXYHQWrWUHXWLOLVpHVjODSRVLWLRQGH
grille supérieure.
Si les grilles coulissantes sont difficiles à tirer, lubrifiez-les avec
le lubrifiant à base de graphite livré avec votre four. Retirez la
grille du four, enlevez tous les résidus qui se trouvent dans les
glissières latérales avec un essuie-tout, secouez le contenant
de lubrifiant à base de graphite et appliquez 4 gouttes dans les
GHX[JOLVVLqUHVLQIpULHXUHVJDXFKHHWGURLWH2XYUH]HWIHUPH]
la grille plusieurs fois pour étendre le lubrifiant.
3RXUFRPPDQGHUXQOXEULILDQWjEDVHGHJUDSKLWHUHSRUWH]
YRXVODVHFWLRQ©$FFHVVRLUHVªGXPDQXHO
Pour retirer une grille coulissante :
$VVXUH]YRXVTXHODJULOOHHVWFRPSOqWHPHQWHQIRQFpHGDQV
le four, de façon à ce que les leviers latéraux du cadre de la
grille puissent se désenclencher du support du four.
7LUH]ODJULOOHMXVTXjODEXWpHGDUUrWGXVXSSRUWGHJULOOH
7HQH]IHUPHPHQWOHVGHX[F{WpVGXFDGUHGHODJULOOHHWOD
grille coulissante, soulevez son extrémité avant et sortez-la
du four.
Pour remettre en place une grille coulissante :
7HQH]IHUPHPHQWOHVGHX[F{WpVGXFDGUHGHODJULOOH
et la grille coulissante.
3ODFH]OH[WUpPLWpDUURQGLHGHODJULOOHFUDQVGDUUrWVXUOHV
supports du four, soulevez son extrémité avant et poussez
la grille aussi loin que possible.
Si les grilles coulissantes sont difficiles à replacer ou à retirer,
enduisez les supports de grille d'huile végétale. N'enduisez pas
d'huile les glissières de la grille.
REMARQUE : /XWLOLVDWLRQGDXWUHVW\SHVGKXLOHVGHFXLVVRQ
entraînera une décoloration ou la formation d'un résidu de
couleur semblable à de la rouille sur les grilles et les côtés de
ODFDYLWp3RXUQHWWR\HUFHUpVLGXXWLOLVH]GXVDYRQHWGHOHDX
ou une solution de vinaigre et d'eau. Rincez à l'eau claire et
asséchez avec un chiffon doux et propre.
Pour lubrifier les leviers :
$JLWH]OHOXEULILDQWHWYHUVH]HQVXUOHVSLqFHVPRELOHV
des mécanismes de levier, tel qu'illustré.
7HQH]LFL
Rail avant
supérieur
Extension complète

49-2000254 Rev. 6 13
Directives relatives aux ustensiles de cuisson
/HPDWpULHOOHILQLHWODWDLOOHGHO¶XVWHQVLOHGHFXLVVRQRQW
une incidence sur le rendement de la cuisson.
/HVFDVVHUROHVIRQFpHVUHFRXYHUWHVG¶XQHQGXLWHWPDWHV
absorbent plus de chaleur que les casseroles minces et
EULOODQWHV/HVFDVVHUROHVTXLDEVRUEHQWSOXVIDFLOHPHQWOD
chaleur produisent des croûtes brunes, croustillantes et plus
épaisses. Si vous utilisez des ustensiles de cuisson foncés
et recouverts d’un enduit, vérifiez la cuisson avant le temps
prescrit dans la recette. Si vous obtenez de mauvais résultats
avec ce type d’ustensile de cuisson, réduisez la température
GXIRXUGH)&ODSURFKDLQHIRLV
/HVFDVVHUROHVOXVWUpHVSHUPHWWHQWGHFXLUHXQLIRUPpPHQW
les aliments, comme les gâteaux et les biscuits.
/HVFDVVHUROHVHQYHUUHRXHQFpUDPLTXHVHUpFKDXIIHQW
lentement, mais conservent la chaleur plus longtemps.
Ces types d’ustensiles de cuisson conviennent parfaitement
aux tartes et croustades.
/HVXVWHQVLOHVGHFXLVVRQLVROpVVHUpFKDXIIHQWOHQWHPHQW
et peuvent réduire le brunissement des aliments.
Gardez les ustensiles de cuisson propre pour favoriser
une cuisson uniforme.
Ustensiles de cuisson
UTILISATION DU FOUR :
3DSLHUG¶DOXPLQLXPHWSURWHFWLRQVSRXUIRXU8VWHQVLOHVGHFXLVVRQ
Papier d’aluminium et protections pour four
ATTENTION
Ne recouvrez pas la sole du four de papier d'aluminium ni de protection pour four d'aucune sorte.
Ils sont susceptibles de retenir la chaleur ou de fondre, ce qui pourrait endommager le produit ou provoquer un choc
électrique, de la fumée ou un incendie. Les dommages résultant d'une utilisation inappropriée de ces articles ne sont pas
couverts par la garantie du produit.
2QSHXWXWLOLVHUGXSDSLHUGDOXPLQLXPSRXUUHFXHLOOLUOHVpFODERXVVXUHVHQSRVDQWXQHIHXLOOHVXUXQHJULOOHLQIpULHXUHTXHOTXHV
centimètres sous les aliments. N'utilisez pas plus de papier qu'il n'en faut et ne couvrez jamais entièrement une grille de four
DYHFGXSDSLHUGDOXPLQLXP3ODFH]OHSDSLHUGDOXPLQLXPjDXPRLQVSRFPGHVSDURLVGXIRXUDILQGpYLWHUXQH
mauvaise circulation de la chaleur.

14 49-2000254 Rev. 6
Modes de cuisson
UTILISATION DU FOUR :0RGHVGHFXLVVRQ
Votre nouveau four offre de nombreux modes de cuisson pour vous aider à obtenir de meilleurs résultats. Ces modes de cuisson
sont décrits ci-dessous. Reportez-vous à la section « Guide de cuisson » pour obtenir des recommandations spécifiques à chaque
type d’aliments. N’oubliez pas que votre nouveau four peut offrir un fonctionnement différent de celui de votre ancien four.
Modes de cuisson et de rôtissage (Baking et
Roasting)
Sélectionnez un mode de cuisson et de rôtissage selon le type
HWODTXDQWLWpG¶DOLPHQWVTXHYRXVSUpSDUH]/RUVTXHYRXV
préparez des produits de boulangerie tels que gâteaux, biscuits,
et pâtisseries préchauffez toujours le four d’abord. Suivez les
recommandations de la recette pour la position des aliments.
En l’absence de recommandations, centrez les aliments dans le
centre du four.
Cuisson au four traditionnelle (Traditional Bake)
/HPRGHGHFXLVVRQWUDGLWLRQQHOOHHVWFRQoXSRXUXQHFXLVVRQ
sur une seule grille. Ce mode utilise surtout l’élément inférieur
PDLVDXVVLO¶pOpPHQWVXSpULHXUSRXUFXLUHOHVDOLPHQWV3RXU
utiliser ce mode, appuyez sur Bake, entrez une température,
SXLVDSSX\H]VXU6WDUW/HSUpFKDXIIDJHHVWJpQpUDOHPHQW
recommandé quand on utilise ce mode.
Cuisson par convection (Convection Bake) (four
supérieur seulement sur les fours doubles)
/HPRGHGHFXLVVRQSDUFRQYHFWLRQHVWGHVWLQpjXQHFXLVVRQ
simultanée sur plusieurs grilles. Ce mode utilise surtout la
chaleur de l’élément arrière mais aussi celle des éléments
VXSpULHXUHWLQIpULHXUGHPrPHTX¶XQPRXYHPHQWG¶DLUGX
ventilateur de convection afin d’améliorer l’uniformité de la
cuisson. Votre four est équipé de la fonction de conversion
GHUHFHWWHDXWRPDWLTXH$XWR5HFLSH&RQYHUVLRQGHVRUWH
qu’il n’est pas nécessaire de convertir la température lorsque
YRXVXWLOLVH]FHPRGH/¶XWLOLVDWLRQGHSOXVLHXUVJULOOHVSOXW{W
qu’une seule peut légèrement prolonger le temps de cuisson.
3RXUXWLOLVHUFHPRGHDSSX\H]VXUODWRXFKH&RQYHFWLRQSXLV
sélectionnez Convection Bake, entrez une température et
appuyez sur Start3UpFKDXIIH]WRXMRXUVOHIRXUORUVTXHYRXV
utilisez ce mode.
Rôtissage par convection (Convection
Roast) (four supérieur seulement sur les
modèles à four double)
/HPRGHGHU{WLVVDJHSDUFRQYHFWLRQ&RQYHFWLRQ5RDVW
est conçu pour rôtir des coupes de viande entières sur une
seule grille. Ce mode utilise la chaleur des éléments inférieur,
supérieur et arrière ainsi que le mouvement d’air du ventilateur
de convection pour améliorer le brunissement et réduire le
WHPSVGHFXLVVRQ,OQ¶HVWSDVQpFHVVDLUHGHFRQYHUWLUOD
WHPSpUDWXUH/RUVTXHYRXVXWLOLVH]FHPRGHYpULILH]OHVDOLPHQWV
plus tôt que le temps suggéré par la recette ou utilisez une
VRQGHjYLDQGH3RXUXWLOLVHUFHPRGHDSSX\H]VXUODWRXFKH
Convection, puis sélectionnez Convection Roast, entrez une
température et appuyez sur Start/HSUpFKDXIIDJHQ¶HVWSDV
nécessaire avec ce mode.
Modes de grillage
*ULOOH]WRXMRXUVDYHFODSRUWHIHUPpH/¶pOpPHQWGHJULOODJHGHFH
four est très puissant. Surveillez les aliments étroitement lorsque
YRXVOHVJULOOH]8VH]GHSUXGHQFHORUVGXJULOODJHVXUOHVSRVLWLRQV
de grille supérieures car approcher les aliments de l’élément de
grillage augmente la fumée, les éclaboussements et la possibilité
d’enflammer la graisse. Le grillage sur la position de grille 6,
dans un four simple ou inférieur, n’est pas recommandé.
Commencez par des aliments que vous avez l’habitude de
griller. Réglez les positions de grille pour ajuster l’intensité de la
FKDOHXUVXUO¶DOLPHQW3ODFH]O¶DOLPHQWSOXVSUqVGHO¶pOpPHQWGH
grillage lorsqu’une surface plus grillée ou un intérieur plus cuit
HVWVRXKDLWp/HVDOLPHQWVSOXVpSDLVHWFHX[TXLGRLYHQWrWUH
FXLWVjF°XUGRLYHQWrWUHJULOOpVVXUXQHJULOOHSOXVpORLJQpHGX
JULORXHQXWLOLVDQWODIRQFWLRQ%URLO/R
Grillage maximal (Broil Hi)
/HPRGH%URLO+LXWLOLVHXQHFKDOHXULQWHQVHGHO¶pOpPHQW
VXSpULHXUSRXUEUXQLUOHVDOLPHQWV8WLOLVH]%URLO+,SRXUOHV
coupes de viande plus minces et/ou les aliments que vous
SUpIpUH]PRLQVFXLWVjO¶LQWpULHXU3RXUXWLOLVHUFHPRGHDSSX\H]
sur la touche Broil, puis sélectionnez Hi Broil, et appuyez sur
Start/HSUpFKDXIIDJHQ¶HVWSDVQpFHVVDLUHDYHFFHPRGH
Grillage minimal (Broil Lo)
/HPRGH%URLO/RXWLOLVHXQHFKDOHXUPRLQVLQWHQVHGHO¶pOpPHQW
supérieur pour cuire les aliments à fond tout en produisant aussi
OHEUXQLVVDJHGHODVXUIDFH8WLOLVH]%URLO/RSRXUOHVFRXSHV
de viandes plus épaisses ou les aliments que vous souhaitez
FXLUHGHSDUWHQSDUW3RXUXWLOLVHUFHPRGHDSSX\H]VXUOD
WRXFKH%URLOVpOHFWLRQQH]+R%URLOHWDSSX\H]VXU6WDUW/H
préchauffage n’est pas nécessaire avec ce mode.
Proof
/HPRGH3URRIIHUPHQWDWLRQHVWFRQoXSRXUIDLUHOHYHU
(fermenter) les pâtes à pain. Sur certains modèles, on peut
WURXYHUOHPRGH3URRIHQVpOHFWLRQQDQWOptions$SSX\H]VXU
Proof, puis sur Start. Couvrez bien la pâte pour éviter qu’elle
QHVqFKH/HSDLQOqYHUDSOXVUDSLGHPHQWTX¶jWHPSpUDWXUH
ambiante. Notez que sur les fours doubles, la fermentation ne
SHXWSDVrWUHODQFpHORUVTXHOHPRGHQHWWR\DJHHVWHQFRXUV
dans le four inférieur.
Maintien au chaud
/HPRGH:DUPHVWFRQoXSRXUPDLQWHQLUOHVDOLPHQWVFKDXGV
à une température plus élevée jusqu’à 3 heures durant. Sur
certains modèles, le mode Warm se trouve en sélectionnant
Options$SSX\H]VXUWarm, puis sur Start. Recouvrez les
aliments qu’il faut maintenir humides sauf ceux que l’on souhaite
croustillants.
/HSUpFKDXIIDJHQ¶HVWSDVQpFHVVDLUH1¶XWLOLVH]
pas Warm pour réchauffer les aliments froids à l’exception
GHVFUDTXHOLQVGHVFURXVWLOOHVHWGHVFpUpDOHVVqFKHV2Q
recommande aussi de ne pas garder les aliments au chaud
durant plus de 2 heures.
Friture à air chaud (Air Fry)
/DIULWXUHjDLUFKDXG$LU)U\HVWXQPRGHGHFXLVVRQSDU
convection spécial, sans préchauffage, conçu pour donner aux
aliments un surface extérieure plus croustillante par rapport à la
FXLVVRQDXIRXUWUDGLWLRQQHOOH/HPRGH$LU)U\HVWFRQoXSRXU
une cuisson sur un seule grille.Sélectionnez Air Fry, entrez
la température souhaitée et appuyez sur Start. Vous pouvez
UpJOHUODWHPSpUDWXUHHQWUH)HW)/HSUpFKDXIIDJH
n’est pas recommandé pour ce mode. Suivez la recette pour
four traditionnelle ou les instructions de l’emballage pour choisir
les températures et les temps de cuisson; ajustez le temps
de cuisson pour obtenir la croustillance désirée. Des conseils
supplémentaires pour ce mode figurent dans le guide de cuisson.

49-2000254 Rev. 6 15
Sonde thermique
UTILISATION DU FOUR : Sonde thermique
/DWHPSpUDWXUHLQWHUQHGHO¶DOLPHQWHVWIUpTXHPPHQWXWLOLVpHFRPPHLQGLFDWHXUGHFXLVVRQDGpTXDWHHQSDUWLFXOLHUSRXUOHV
U{WLVHWODYRODLOOH/DVRQGHPHVXUHODWHPSpUDWXUHLQWHUQHGHVDOLPHQWVHWpWHLQWOHIRXUORUVTXHFHOXLFLDWWHLQWODWHPSpUDWXUH
programmée.
Insertion correcte de la sonde
Positionnement de la sonde thermique
$SUqVDYRLUSUpSDUpODYLDQGHHWO¶DYRLUSODFpHVXU
l’ustensile de cuisson, suivez ces consignes pour placer
la sonde correctement.
Ŷ ,QVpUH]ODVRQGHGDQVO¶DOLPHQWGHPDQLqUHjFHTXH
sa pointe soit positionnée au centre de la partie la plus
pSDLVVHGHO¶DOLPHQW3RXUGHVSHUIRUPDQFHVRSWLPDOHV
ODVRQGHGRLWrWUHHQWLqUHPHQWLQVpUpHGDQVODQRXUULWXUH
Si la sonde n’est pas placée correctement, elle pourrait ne
pas mesurer avec précision la température de la partie la
plus froide de l’aliment. Certains aliments, en particulier les
aliments de faibles dimensions, ne sont pas bien adaptés
pour la cuisson avec la sonde en raison de leur forme ou
de leur taille.
Ŷ /DVRQGHQHGRLWWRXFKHUQLRVQLJUDVQLFDUWLODJH
Ŷ 3RXUXQHYRODLOOHHQWLqUHLQVpUH]ODVRQGHGDQVODSDUWLH
la plus épaisse de la poitrine.
Ŷ 3RXUXQU{WLGpVRVVpLQVpUH]ODVRQGHGDQVOHFHQWUH
du rôti.
Ŷ 3RXUXQMDPERQRXGHO¶DJQHDXDYHFRVLQVpUH]ODVRQGH
au centre du grand muscle ou de l’articulation la plus
basse.
Ŷ 3RXUXQPHWVHQFRFRWWHFRPPHOHSDLQGHYLDQGHLQVpUH]
la sonde dans le centre de l’aliment.
Ŷ 3RXUOHSRLVVRQLQVpUH]ODVRQGHMXVWHDXGHVVXVGHOD
branchie et dans la partie la plus charnue, parallèlement
à la colonne vertébrale.
Utilisation de la sonde thermique
/DVRQGHQHSHXWrWUHXWLOLVpHTX¶DYHFOHVPRGHV%DNH
Convection Bake et Convection Roast.
Utilisation de la sonde avec le préchauffage :
1. Sélectionnez le mode de cuisson souhaité (Bake,
Convection Bake, or Convection Roast) et entrez la
température de cuisson souhaitée à l’aide des touches
numériques.
,QVpUH]ODVRQGHGDQVO¶DOLPHQWUHSRUWH]YRXVjODVHFWLRQ
©3RVLWLRQQHPHQWGHODVRQGHWKHUPLTXHª3ODFH]
l’aliment dans le four et branchez la sonde dans sa prise
jO¶LQWpULHXUGXRXGHVIRXU/DSULVHGHODVRQGHVHWURXYH
dans le four supérieur.
3. 8QHIRLVTXHOHIRXUHVWSUpFKDXIIpSODFH]O¶DOLPHQWGDQV
le four et branchez la sonde dans sa prise en vous assurant
qu’elle est complètement insérée. Faites attention, car les
parois du four et la prise de sonde sont chaudes.
4. /RUVTXHODVRQGHHVWFRQQHFWpHO¶DIILFKDJHYRXVLQYLWH
jHQWUHUODWHPSpUDWXUHVRXKDLWpHSRXUO¶DOLPHQW/D
température interne maximale que vous pouvez régler pour
O¶DOLPHQWHVW)
Utilisation de la sonde sans préchauffage :
,QVpUH]ODVRQGHGDQVO¶DOLPHQWUHSRUWH]YRXVjODVHFWLRQ
©3RVLWLRQQHPHQWGHODVRQGHWKHUPLTXHª
3ODFH]O¶DOLPHQWGDQVOHIRXUHWEUDQFKH]ODVRQGHGDQVVD
SULVHjO¶LQWpULHXUGXRXGHVIRXU/DSULVHGHODVRQGHVH
trouve dans le four supérieur.
3. Sélectionnez le mode de cuisson souhaité (Bake,
Convection Bake, or Convection Roast) et entrez la
température de cuisson souhaitée à l’aide des touches
QXPpULTXHV$SSX\H]VXU2SWLRQVHWVpOHFWLRQQH]3UREH
puis suivez les instructions de l’affichage pour entrer la
température souhaitée pour l’aliment.
Consignes d’entretien de la sonde
thermique
Ŷ /¶XWLOLVDWLRQGHVRQGHVGLIIpUHQWHVGHFHOOHIRXUQLHDYHFFH
produit risque d’endommager la sonde.
Ŷ 8WLOLVH]OHVSRLJQpHVGHODVRQGHHWGHODILFKHORUVTXH
vous les insérez dans la viande/la prise ou les en retirez.
Ŷ 1HUHWLUH]SDVODVRQGHGHO¶DOLPHQWRXGHODSULVHHQWLUDQW
sur son câble au moyen d’une pince. Vous risqueriez de
l’endommager.
Ŷ 3RXUpYLWHUGHFDVVHUODVRQGHDVVXUH]YRXVTXHO¶DOLPHQW
est complètement décongelé avant d’insérer la sonde.
Ŷ 3RXUpYLWHUOHVEUOXUHVQHGpEUDQFKH]SDVODVRQGH
de la prise avant que le four n’ait refroidi.
Ŷ 1HODLVVH]MDPDLVODVRQGHjO¶LQWpULHXUGXIRXUSHQGDQW
l’autonettoyage ou le nettoyage à la vapeur.
Ŷ 1HUDQJH]SDVODVRQGHGDQVOHIRXU
AVERTISSEMENT
Consommer des aliments insuffisamment cuits peut entraîner une maladie d'origine
alimentaire. Utilisez la sonde thermique en suivant les instructions suivantes pour vous assurer que toutes les
parties de l'aliment atteignent une température de cuisson sécuritaire minimale. Des recommandations pour des
températures minimales de sécurité alimentaire peuvent être trouvées sur foodsafety.gov ou IsItDoneYet.gov.
Vérifiez toujours la température à plusieurs endroits dans l'aliment à l'aide d'un thermomètre pour aliment afin de
vous assurer que toutes les portions de l'aliment ont atteint la température interne souhaitée.

16 49-2000254 Rev. 6
/RUVTXHYRXVIDLWHVFXLUHTXDWUHFRXFKHVGHJkWHDXjODIRLV
utilisez les grilles 2 et 4. 3ODFH]OHVPRXOHVFRPPHPRQWUp
de manière à ce qu’un moule ne se retrouve pas directement
au-dessus d’un autre.
Faites bien cuire les aliments pour éviter les intoxications
DOLPHQWDLUHV3RXUFRQQDvWUHODWHPSpUDWXUHPLQLPDOHHW
sécuritaire des aliments, visitez le site Web à IsItDoneYet.
gov$VVXUH]YRXVG¶XWLOLVHUXQWKHUPRPqWUHSRXUFRQQDvWUHOD
température des aliments.
UTILISATION DU FOUR : Guide de cuisson
Guide de cuisson - Four inférieur
TYPE D'ALIMENT
MODES DE CUISSON
RECOMMANDÉS
POSITIONS DE GRILLE
RECOMMANDÉES SUGGESTIONS ADDITIONNELLES
Produits de boulangerie et pâtisseries
Gâteaux à étages, gâteaux plats, gâteaux Bundt,
muffins, pains à préparation rapide sur une seule
grille
Cuisson traditionnelle 3 8WLOLVH]XQXVWHQVLOHGHFXLVVRQDXILQLEULOODQW
Gâteaux à étages* sur plusieurs grilles Cuisson traditionnelle 2 et 4
$VVXUH]XQHFLUFXODWLRQG¶DLUDGpTXDWHYRLUO¶LOOXVWUDWLRQFL
dessous).
Gâteaux des anges Cuisson traditionnelle 1 8WLOLVH]XQXVWHQVLOHGHFXLVVRQDXILQLEULOODQW
Biscuits, pains cuits en galettes sur une seule
grille
Cuisson traditionnelle 3 8WLOLVH]XQXVWHQVLOHGHFXLVVRQDXILQLEULOODQW
Biscuits, pains cuits en galettes sur plusieurs
grilles
Cuisson traditionnelle 2 et 4
3HQGDQWODFXLVVRQFKDQJH]SDUWLHOOHPHQWODSRVLWLRQGHVDOLPHQWV
tels que les biscuits au sucre pour des résultats plus uniformes
HQWUHOHVJULOOHV3URFXUH]XQHERQQHFLUFXODWLRQG¶DLU
Bœuf et porc
Galettes de bœuf haché Broil Hi 5
8WLOLVH]XQHOqFKHIULWHDEDLVVH]OHVDOLPHQWVGDQVOHIRXUSRXUXQH
cuisson plus en profondeur/moins grillée. Vérifiez fréquemment les
DOLPHQWVORUVTXHYRXVXWLOLVH]ODFXLVVRQDXJULO3RXUGHPHLOOHXUV
résultats, placez l’aliment au centre du four, sous l’élément de gril.
Biftecks et côtelettes Broil Hi 5
8WLOLVH]XQHOqFKHIULWHDEDLVVH]OHVDOLPHQWVGDQVOHIRXUSRXUXQH
cuisson plus en profondeur/moins grillée. Vérifiez fréquemment les
DOLPHQWVORUVTXHYRXVXWLOLVH]ODFXLVVRQDXJULO3RXUGHPHLOOHXUV
résultats, placez l’aliment au centre du four, sous l’élément de gril.
Rôtis Cuisson traditionnelle 2
Ne couvrez pas; utilisez un ustensile moins profond, comme une
OqFKHIULWH/HSUpFKDXIIDJHQ¶HVWSDVQpFHVVDLUH
Volaille
3RXOHWHQWLHU Cuisson traditionnelle 2
8WLOLVH]XQXVWHQVLOHGHFXLVVRQSHXSURIRQGFRPPHXQHOqFKHIULWH
/HSUpFKDXIIDJHQ¶HVWSDVQpFHVVDLUH
3RLWULQHVFXLVVHVKDXWVGHFXLVVHGHSRXOHW
%URLO/R
Cuisson traditionnelle
3
Grillez d’abord avec la peau vers le bas. Vérifiez fréquemment les
DOLPHQWVORUVTXHYRXVXWLOLVH]ODFXLVVRQDXJULO3RXUGHPHLOOHXUHV
performances lors de la cuisson au gril, centrez les aliments sous
l’élément chauffant du gril.
3RLWULQHVGHSRXOHWGpVRVVpHV
%URLO/R
Cuisson traditionnelle
3
$EDLVVH]OHVDOLPHQWVGDQVOHIRXUSRXUXQHFXLVVRQSOXVHQ
profondeur/moins grillée, et disposez-les plus haut dans le
IRXUSRXUOHVJULOOHUHWOHVEUXQLUGDYDQWDJH3RXUGHPHLOOHXUHV
performances lors de la cuisson au gril, centrez les aliments sous
l’élément chauffant du gril.
Dinde entière Cuisson traditionnelle 1 ou 2
8WLOLVH]XQXVWHQVLOHGHFXLVVRQSHXSURIRQGFRPPHXQHOqFKHIULWH
/HSUpFKDXIIDJHQ¶HVWSDVQpFHVVDLUH
3RLWULQHGHGLQGH Cuisson traditionnelle 2
8WLOLVH]XQXVWHQVLOHGHFXLVVRQSHXSURIRQGFRPPHXQHOqFKHIULWH
/HSUpFKDXIIDJHQ¶HVWSDVQpFHVVDLUH
Poisson %URLO/R
5 (épaisseur de
1/2 po/1 cm ou moins)
4 (épaisseur > 1/2 po/1 cm)
Vérifiez fréquemment les aliments lorsque vous utilisez la cuisson
DXJULO3RXUGHPHLOOHXUVUpVXOWDWVSODFH]O¶DOLPHQWDXFHQWUHGX
four, sous l’élément de gril.
Mets mijotés Cuisson traditionnelle 3
Aliments préparés surgelés
3URGXLWVGHSRPPHVGH
terre, croquettes de poulet,
hors-d’œuvre sur une seule grille
Cuisson traditionnelle 3 8WLOLVH]XQXVWHQVLOHGHFXLVVRQDXILQLEULOODQW
3URGXLWVGHSRPPHVGHWHUUH
croquettes de poulet,
hors-d’œuvre
sur plusieurs grilles
Cuisson traditionnelle 2 et 4
8WLOLVH]XQXVWHQVLOHGHFXLVVRQDXILQLEULOODQW'pSODFH]
légèrement les aliments pendant la cuisson pour garantir une
cuisson uniforme.
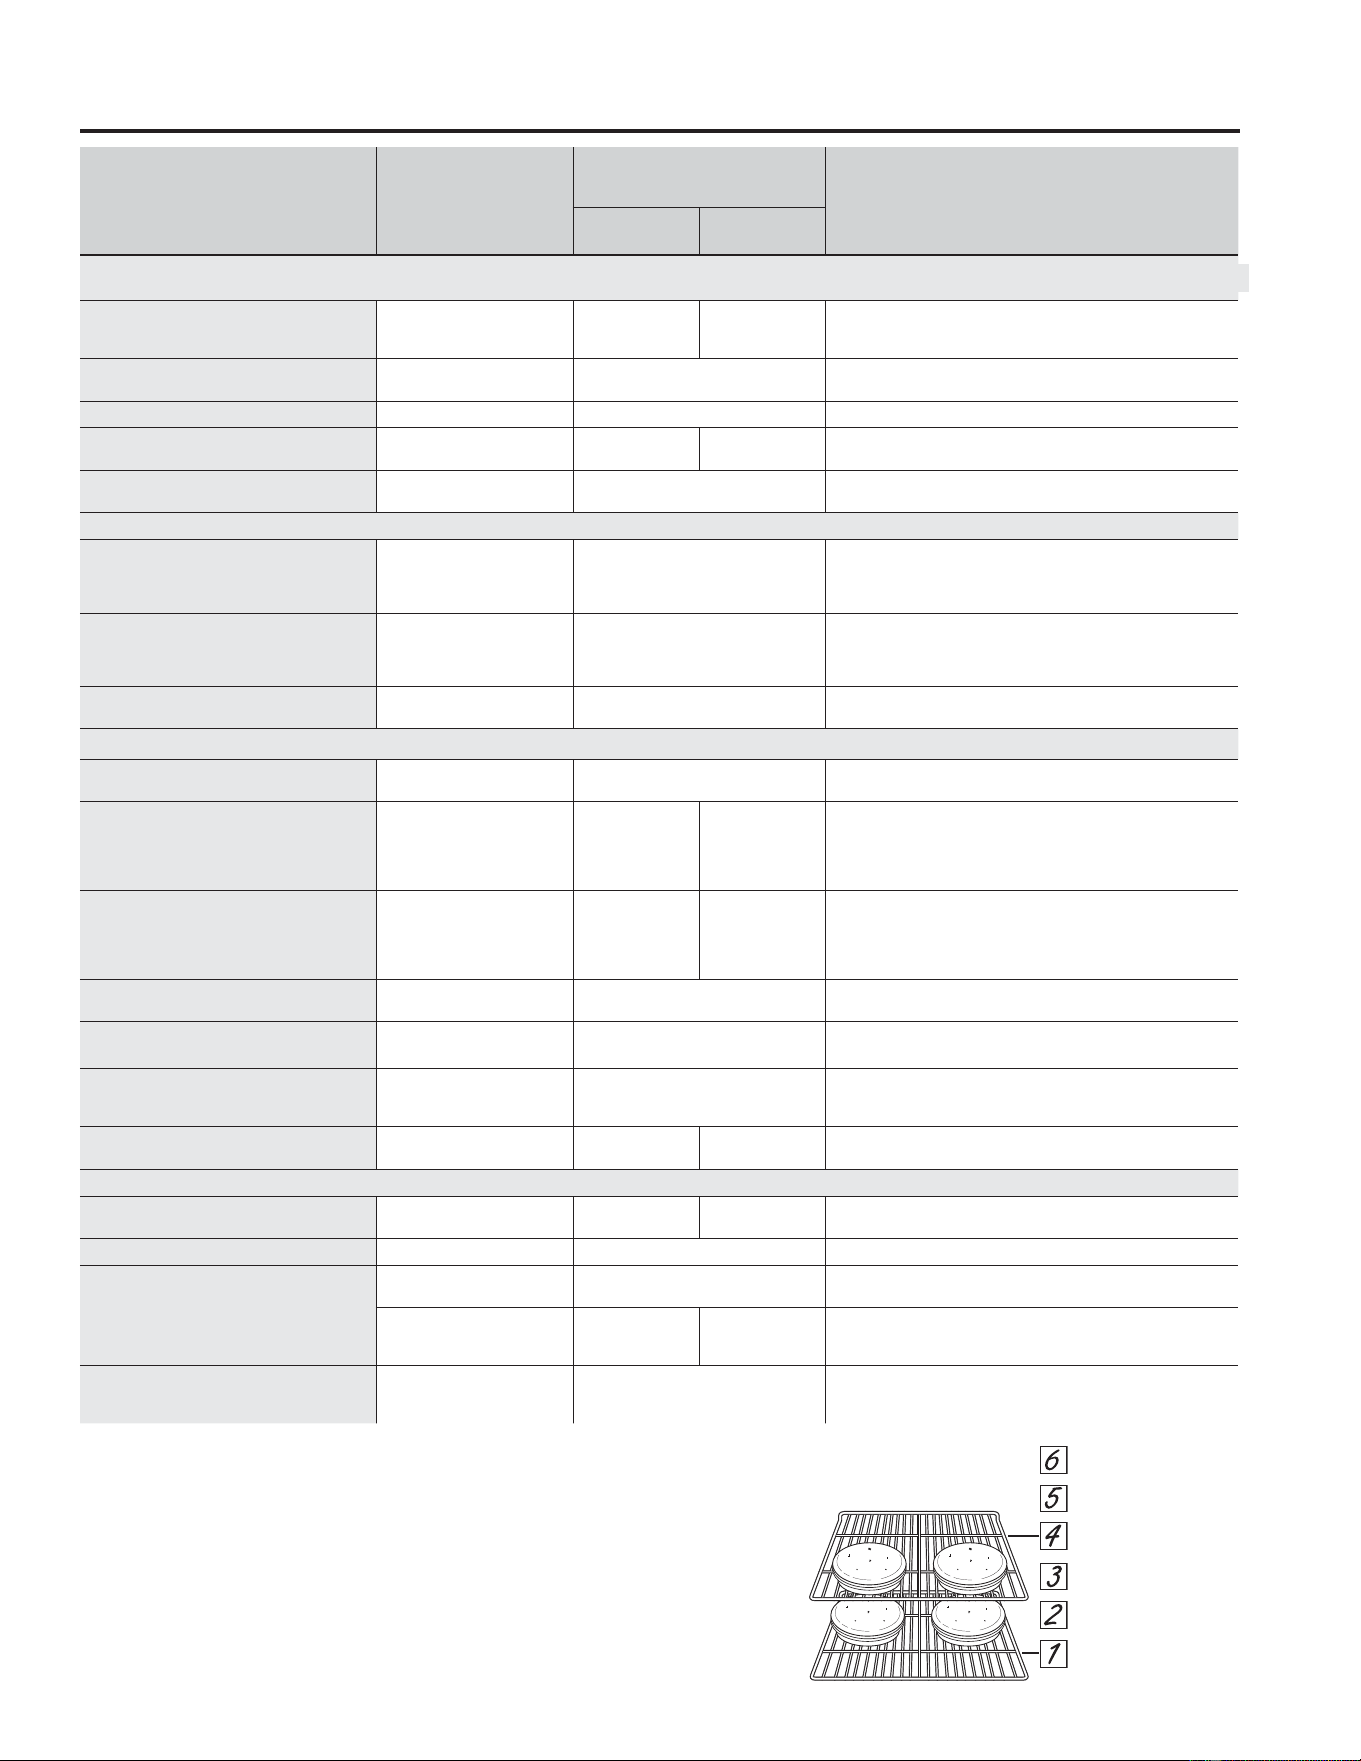
49-2000254 Rev. 6 17
/RUVTXHYRXVIDLWHVFXLUHTXDWUHFRXFKHVGHJkWHDXjODIRLV
utilisez les grilles 1 et 4.
3ODFH]OHVPRXOHVFRPPHPRQWUp
de manière à ce qu’un moule ne se retrouve pas directement
au-dessus d’un autre.
Faites bien cuire les aliments pour éviter les intoxications
DOLPHQWDLUHV3RXUFRQQDvWUHODWHPSpUDWXUHPLQLPDOHHW
sécuritaire des aliments, visitez le site Web à IsItDoneYet.
gov$VVXUH]YRXVG¶XWLOLVHUXQWKHUPRPqWUHSRXUFRQQDvWUHOD
température des aliments.
UTILISATION DU FOUR : Guide de cuisson
Guide de cuisson- Four supérieur ou four simple
TYPE D’ALIMENT
MODES DE CUISSON
RECOMMANDÉS
POSITIONS DE GRILLE
RECOMMANDÉES
SUGGESTIONS ADDITIONNELLES
27 po
(68,6 cm)
30 po
(76,2 cm)
Produits de boulangerie et pâtisseries
Gâteaux à étages, gâteaux plats, gâteaux
Bundt, muffins, pains à préparation rapide
sur une seule grille
Cuisson traditionnelle
2 (coulissante) ou
3 (plate)
3 8WLOLVH]XQXVWHQVLOHGHFXLVVRQDXILQLEULOODQW
Gâteaux à étages* sur plusieurs grilles Cuisson à convection 1 (coulissante) et 4 (plate)
$VVXUH]XQHFLUFXODWLRQG¶DLUDGpTXDWHYRLUO¶LOOXVWUDWLRQFL
dessous).
Gâteaux des anges Cuisson traditionnelle 1 8WLOLVH]XQXVWHQVLOHGHFXLVVRQDXILQLEULOODQW
Biscuits, pains cuits en galettes sur une
seule grille
Cuisson traditionnelle
2 (coulissante) ou
3 (plate)
3 8WLOLVH]XQXVWHQVLOHGHFXLVVRQDXILQLEULOODQW
Biscuits, pains cuits en galettes sur plusieurs
grilles
Cuisson à convection 1 (coulissante) et 4 (plate) $VVXUH]XQHFLUFXODWLRQG¶DLUDGpTXDWH
Bœuf et porc
Galettes de bœuf haché Broil Hi 5
8WLOLVH]XQHOqFKHIULWHDEDLVVH]OHVDOLPHQWVGDQVOHIRXUSRXUXQH
cuisson plus en profondeur/moins grillée. Vérifiez fréquemment les
DOLPHQWVORUVTXHYRXVXWLOLVH]ODFXLVVRQDXJULO3RXUGHPHLOOHXUV
résultats, placez l’aliment au centre du four, sous l’élément de gril.
Biftecks et côtelettes Broil Hi 5
8WLOLVH]XQHOqFKHIULWHDEDLVVH]OHVDOLPHQWVGDQVOHIRXUSRXUXQH
cuisson plus en profondeur/moins grillée. Vérifiez fréquemment les
DOLPHQWVORUVTXHYRXVXWLOLVH]ODFXLVVRQDXJULO3RXUGHPHLOOHXUV
résultats, placez l’aliment au centre du four, sous l’élément de gril.
Rôtis
Cuisson traditionnelle
Cuisson à convection
2 (coulissante) ou 3 (plate)
Ne couvrez pas; utilisez un ustensile moins profond, comme une
OqFKHIULWH/HSUpFKDXIIDJHQ¶HVWSDVQpFHVVDLUH
Volaille
3RXOHWHQWLHU
Cuisson traditionnelle
Rôtissage à convection
2 (coulissante) ou 3 (plate)
8WLOLVH]XQXVWHQVLOHGHFXLVVRQSHXSURIRQGFRPPHXQH
OqFKHIULWH/HSUpFKDXIIDJHQHVWSDVQpFHVVDLUH
3RLWULQHVFXLVVHVKDXWVGHFXLVVHGHSRXOHW
%URLO/R
Cuisson traditionnelle
Rôtissage à convection
2 (coulissante)
2 (coulissante) ou
3 (plate)
2 (coulissante) ou
3 (plate)
3
Grillez d'abord avec la peau vers le bas. Vérifiez fréquemment les
DOLPHQWVORUVTXHYRXVXWLOLVH]ODFXLVVRQDXJULO3RXUGHPHLOOHXUHV
performances lors de la cuisson au gril, centrez les aliments sous
l'élément chauffant du gril.
3RLWULQHVGHSRXOHWGpVRVVpHV
%UR,O/R
Cuisson traditionnelle
Rôtissage à convection
3 (coulissante)
2 (coulissante) ou
3 (plate)
2 (coulissante) ou
3 (plate)
3
$EDLVVH]OHVDOLPHQWVGDQVOHIRXUSRXUXQHFXLVVRQSOXVHQ
profondeur/moins grillée, et disposez-les plus haut dans le
IRXUSRXUOHVJULOOHUHWOHVEUXQLUGDYDQWDJH3RXUGHPHLOOHXUHV
performances lors de la cuisson au gril, centrez les aliments sous
l'élément chauffant du gril.
Dinde entière
Cuisson traditionnelle
Rôtissage à convection
1 ou 2
8WLOLVH]XQXVWHQVLOHGHFXLVVRQSHXSURIRQGFRPPHXQH
OqFKHIULWH/HSUpFKDXIIDJHQHVWSDVQpFHVVDLUH
3RLWULQHGHGLQGH
Cuisson traditionnelle
Rôtissage à convection
2 (coulissante) ou 3 (plate)
8WLOLVH]XQXVWHQVLOHGHFXLVVRQSHXSURIRQGFRPPHXQH
OqFKHIULWH/HSUpFKDXIIDJHQHVWSDVQpFHVVDLUH
Poisson %URLO/R
5 (épaisseur de
1/2 po/1 cm ou moins)
4 (épaisseur > 1/2 po/1 cm)
Vérifiez fréquemment les aliments lorsque vous utilisez la cuisson
DXJULO3RXUGHPHLOOHXUVUpVXOWDWVSODFH]ODOLPHQWDXFHQWUHGX
four, sous l'élément de gril.
Mets mijotés Cuisson traditionnelle
2 (coulissante) ou
3 (plate)
3
Aliments préparés surgelés
3L]]DVXUXQHVHXOHJULOOH Cuisson traditionnelle
2 (coulissante) ou
3 (plate)
3 8WLOLVH]XQXVWHQVLOHGHFXLVVRQDXILQLEULOODQW
3L]]DVVXUSOXVLHXUVJULOOHV Cuisson à convection 1 (coulissante) ou 4 (plate) 8WLOLVH]XQXVWHQVLOHGHFXLVVRQDXILQLEULOODQW
3URGXLWVGHSRPPHVGH
terre, croquettes de poulet,
hors-d'œuvre sur une seule grille
Cuisson à convection
Cuisson traditionnelle
2 (coulissante) ou 3 (plate) 8WLOLVH]XQXVWHQVLOHGHFXLVVRQDXILQLEULOODQW
Friture à convection
(sur les fours simples et
supérieurs uniquement)
4 (plate) 8WLOLVH]GHVXVWHQVLOHVGHFXLVVRQIRQFpVRXXQHSODTXHjELVFXLWV
3URGXLWVGHSRPPHVGHWHUUH
croquettes de
poulet, hors-d'œuvre
sur plusieurs grilles
Cuisson à convection 1 (coulissante) ou 4 (plate)
8WLOLVH]XQXVWHQVLOHGHFXLVVRQDXILQLEULOODQW'pSODFH]
légèrement les aliments pendant la cuisson pour garantir une
cuisson uniforme.
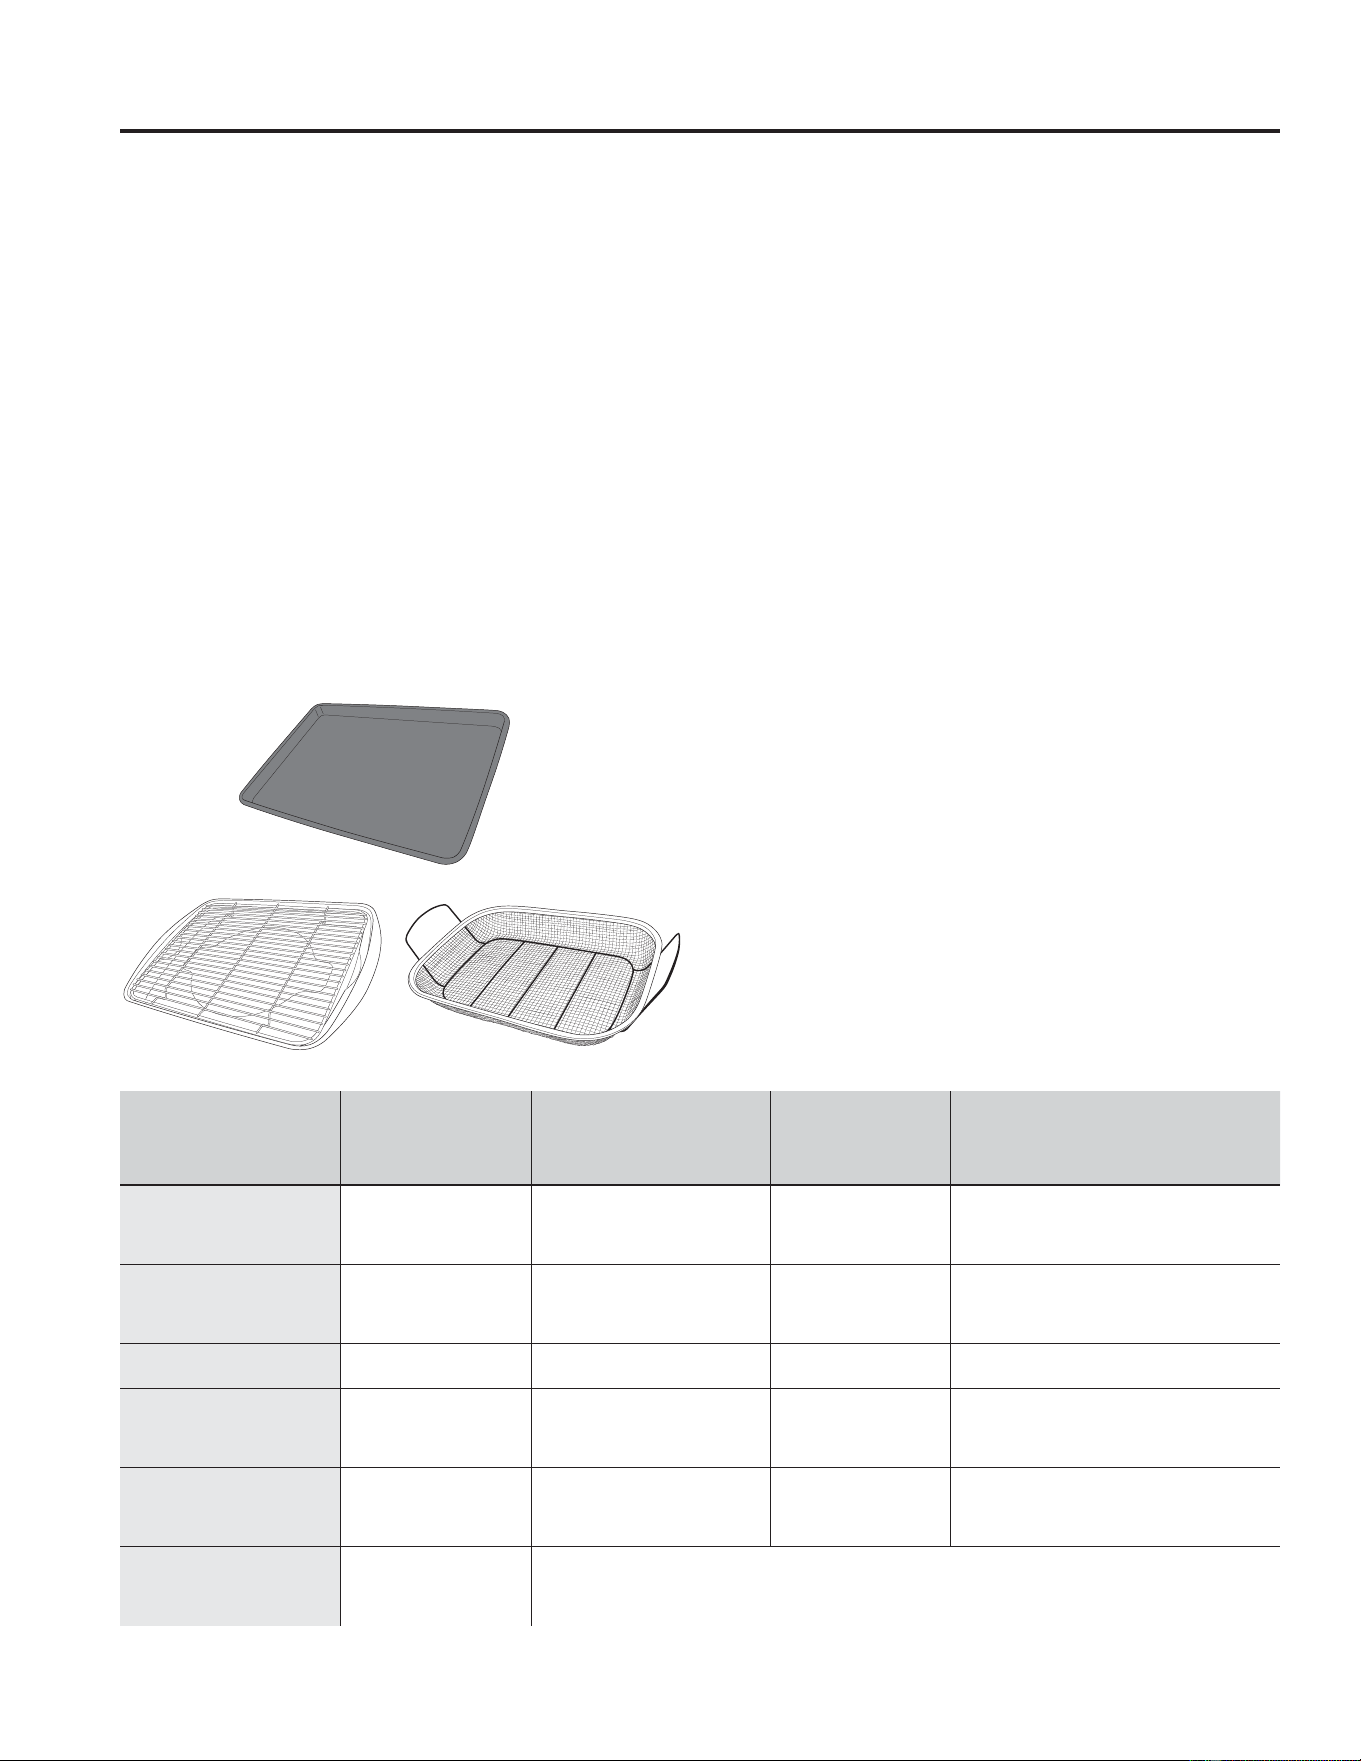
18 49-2000254 Rev. 6
Guide de friture à convection
/HPRGHGHIULWXUHjFRQYHFWLRQHVWXQPRGHGHFXLVVRQ
à convection sans préchauffage conçu pour obtenir un
extérieur plus croustillant que la cuisson au four traditionnelle.
Sélectionnez Air Fry (Friture à convection) puis sélectionnez
la température de réglage désirée et appuyez sur Start (mise
en marche)/DWHPSpUDWXUHSHXWrWUHUpJOpHHQWUH)HW
)
Directives pour les ustensiles de friture à
convection
8WLOLVH]VHXOHPHQWGHVXVWHQVLOHVGHFXLVVRQDSSURXYpVSRXU
le gril lorsque vous utilisez le mode de friture à convection.
/¶XWLOLVDWLRQG¶XQHSODTXHjSkWLVVHULHIRQFpHHVW
UHFRPPDQGpH8QHSODTXHIRQFpHSHUPHWWUDG¶REWHQLUXQ
meilleur brunissage et plus de croustillance.
• Des paniers de cuisson et des grilles de cuisson au four
SHXYHQWpJDOHPHQWrWUHXWLOLVpVPDLVXQHSODTXHGHFXLVVRQ
GRLWrWUHSODFpHVXUODJULOOHVLWXpHVRXVOHVDOLPHQWVSRXU
récupérer les gouttes provenant de la cuisson des aliments.
Conseils généraux pour le mode de friture à
convection (Air Fry)
/HPRGHGHIULWXUHjFRQYHFWLRQHVWFRQoXSRXUXQHFXLVVRQ
sur une seule grille
/HPRGHGHIULWXUHjFRQYHFWLRQ$LU)U\HVWFRQoXSRXUrWUH
utilisé sans préchauffage.
/DSRVLWLRQGHJULOOHHVWUHFRPPDQGpHSRXUODSOXSDUWGHV
aliments. Si les aliments brunissent trop rapidement, essayez
d’utiliser la position inférieure de la grille.
/HVDOLPHQWVSHXYHQWFXLUHSOXVUDSLGHPHQWTXHSUpYXVLOH
four est déjà chaud lorsque vous insérerez des aliments dans
le four.
/RUVTXHYRXVIDLWHVIULUHGHVDOLPHQWVjFRQYHFWLRQDYHFGHOD
sauce, il est recommandé de badigeonner la sauce à la fin de
la cuisson.
• Si les aliments brunissent trop rapidement, essayez la
position inférieure de la grille ou abaissez le réglage de
température.
3RXUOHVDOLPHQWVHPEDOOpVVXLYH]OHVLQVWUXFWLRQVGHFXLVVRQ
au four traditionnel pour régler la température et la durée de
cuisson prévues.
,OQ¶HVWSDVQpFHVVDLUHGHUHWRXUQHURXGHUHPXHUOHVDOLPHQWV
pendant la cuisson.
• Disposez les aliments en une seule couche sur la plaque
sans toutefois la surcharger.
• Vérifiez toujours la température interne des aliments pour
respecter les températures de cuisson sécuritaire minimum.
/HVWHPSpUDWXUHVPLQLPXPVGHFXLVVRQVpFXULWDLUHVH
retrouvent sur les emballages et sur le site IsItDoneYet.gov
VRXVO¶RQJOHW7HPSpUDWXUHGHFXLVVRQVpFXULWDLUH
.
UTILISATION DU FOUR : Guide de cuisson
Guide de cuisson (suite)
ALIMENTS
POSITION
DE GRILLE
RECOMMANDÉE
RÉGLAGES DE
TEMPÉRATURE
RECOMMANDÉES (°F)
DURÉE DE
CUISSON
RECOMMANDÉE
(MIN.) REMARQUES
3RLVVRQIUDLVVDQVDUrWHVRX
morceaux de volaille, panés
comme des pépites, filets,
bâtonnets
4 plate j j
8WLOLVH]OHVUpJODJHVGHWHPSpUDWXUHOHVSOXV
EDVSRXUOHVSOXVJURVPRUFHDX[8WLOLVH]GHV
ustensiles de cuisson brillants
$LOHVGHSRXOHWVIUDvFKHV
avec os
4 plate j j
Salez les ailes ou enrobez-les d’épices à
frotter sèches. Si vous utilisez de la sauce,
badigeonnez-la après la cuisson ou juste avant
la fin.
$LOHVRXFXLVVHVGHSRXOHW
fraîches avec os
4 plate j j
8WLOLVH]OHVUpJODJHVGHWHPSpUDWXUHOHVSOXVEDV
pour les plus gros morceaux
Frites fraîches minces
(< 1/2 po)
4 plate j j
Du papier parchemin est recommandé pour la
SUpSDUDWLRQGHIULWHVIUDvFKHV3RXUGHVIULWHV
plus croustillantes, secouez-les dans de la fécule
de maïs ou de farine de riz avant la cuisson.
Frites fraîches épaisses
(> 1/2 po)
4 plate j j
Du papier parchemin est recommandé pour la
SUpSDUDWLRQGHIULWHVIUDvFKHV3RXUGHVIULWHV
plus croustillantes, secouez-les dans de la fécule
de maïs ou de farine de riz avant la cuisson.
$OLPHQWVFRQJHOpVHPEDOOpV 4 plate
Respectez les instructions de cuisson au four traditionnel (pas le mode de friture à convection) comme guide
SRXUUpJOHUODWHPSpUDWXUHHWODGXUpHGHFXLVVRQ8QHGXUpHGHFXLVVRQSOXVORQJXHTXHFHOOHUHFRPPDQGpHVXU
O¶HPEDOODJHSHXWrWUHQpFHVVDLUHSRXUFHUWDLQVDOLPHQWV6LOHIRXUHVWGpMjFKDXGORUVTXHYRXVFRPPDQGH]OD
cuisson, les aliments peuvent cuire plus rapidement que la durée minimum indiquée sur l’emballage.
3ULQFLSDOXVWHQVLOHGHFXLVVRQUHFRPPDQGp
$XWUHVRSWLRQVGXVWHQVLOHVGHFXLVVRQ

49-2000254 Rev. 6 19
$VVXUH]YRXVTXHWRXVOHVERXWRQVVRQWHQSRVLWLRQG¶DUUrWHWTXHWRXWHVOHVVXUIDFHVVRQWIURLGHVDYDQWGHQHWWR\HUODFXLVLQLqUH
Tableau de commande
,OHVWUHFRPPDQGpGHQHWWR\HUOHWDEOHDXGHFRPPDQGHDSUqV
chaque utilisation. Nettoyez-le avec du savon doux et de l’eau
ou un mélange de vinaigre et d’eau, rincez-le à l’eau claire
et séchez-le avec un chiffon doux pour le polir. N’utilisez pas
de nettoyant abrasif, de nettoyant liquide fort, de tampon à
récurer en plastique ou de nettoyant pour four sur le tableau de
FRPPDQGH,OVHQGRPPDJHUDLHQWVRQUHYrWHPHQW
Surfaces extérieures du four
N’utilisez pas de nettoyant pour four, de nettoyant abrasif, de
nettoyant liquide fort, de laine d’acier, de tampon à récurer
en plastique ou de poudre à récurer pour nettoyer l’extérieur
GXIRXU8WLOLVH]XQVDYRQGRX[HWGHO¶HDXRXXQHVROXWLRQ
de vinaigre et d’eau. Rincez à l’eau claire et asséchez avec
XQFKLIIRQGRX[HWSURSUH/RUVGXQHWWR\DJHGHVVXUIDFHV
assurez-vous qu’elles sont à la température ambiante et
qu’elles ne sont pas exposées aux rayons directs du soleil.
Si une tache persiste sur les garnitures des évents, utilisez un
nettoyant abrasif doux et le côté grattoir d’une éponge pour
GHPHLOOHXUVUpVXOWDWV/HVpFODERXVVXUHVGHPDULQDGHMXVGH
fruit, sauce tomate et jus de cuisson contiennent des éléments
acides qui peuvent causer une décoloration. Elles doivent donc
rWUHLPPpGLDWHPHQWHVVX\pHV/DLVVH]OHVVXUIDFHVFKDXGHV
refroidir, plus nettoyez-les et rincez-les.
Surfaces peintes et de couleur noire en acier inoxydable (certains modèles)
/HVVXUIDFHVSHLQWHVSHXYHQWLQFOXUHODSRUWHHWODJDUQLWXUH
entourant le tableau de commande. Nettoyez-les avec de l’eau
et du savon ou avec une solution d’eau et de vinaigre.
N’utilisez pas de nettoyant commercial pour four, de poudre
nettoyante, de laine d’acier ou d’abrasif fort sur les surfaces
peintes, y compris l’acier inoxydable noir.
Acier inoxydable (à l’exception de l’acier inoxydable noir) (certains modèles)
N’utilisez pas de tampon en laine d’acier; il raierait la surface.
3RXUQHWWR\HUODVXUIDFHHQDFLHULQR[\GDEOHXWLOLVH]GHO¶HDX
tiède savonneuse ou un produit de nettoyage ou à polir pour
acier inoxydable. Essuyez toujours la surface dans le sens
du grain. Suivez les instructions du nettoyant pour surface en
acier inoxydable.
/HVQHWWR\DQWVFRQWHQDQWGHO¶DFLGHR[DOLTXHFRPPH%DU
Keepers Friend Soft Cleanser
0&
permettent d’éliminer la rouille,
le ternissement et les petits défauts de la surface
GXIRXU8WLOLVH]XQLTXHPHQWOHVQHWWR\DQWVOLTXLGHVVDQV
granule et frottez dans le sens du grain avec une éponge
douce et humide.
3RXUHQVDYRLUGDYDQWDJHVXUO¶DFKDWGHSURGXLWVGHQHWWR\DJH
y compris les nettoyants pour appareils électroménagers en
acier inoxydable ou les produits de polissage, consultez les
VHFWLRQV©$FFHVVRLUHVªHW©6HUYLFHjODFOLHQWqOHªjODILQ
de ce manuel.
Intérieur du four
/¶LQWpULHXUGHYRWUHQRXYHDXIRXUSHXWrWUHQHWWR\pjODPDLQ
ou en utilisant les fonctions de nettoyage à la vapeur ou
d’autonettoyage.
/HVpFODERXVVXUHVGHPDULQDGHMXVGHIUXLWVDXFHWRPDWH
et jus de cuisson contiennent des éléments acides qui
SHXYHQWFDXVHUXQHGpFRORUDWLRQ(OOHVGRLYHQWGRQFrWUH
LPPpGLDWHPHQWHVVX\pHV/DLVVH]OHVVXUIDFHVFKDXGHV
refroidir, plus nettoyez-les et rincez-les.
Nettoyage manuel
N’utilisez pas de nettoyant pour four (sauf si certifié pour four à
autonettoyage), de nettoyant liquide fort, de laine d’acier ou de
WDPSRQjUpFXUHUjO¶LQWpULHXUGXIRXU8WLOLVH]XQVDYRQGRX[
et de l’eau ou une solution de vinaigre et d’eau. Rincez à l’eau
FODLUHHWDVVpFKH]DYHFXQFKLIIRQGRX[HWSURSUH$VVXUH]
vous que les surfaces sont à la température ambiante avant de
les nettoyer.
Nettoyage à la vapeur
/HQHWWR\DJHjODYDSHXUSHUPHWGHQHWWR\HUOHVGpYHUVHPHQWV
mineurs au moyen d’eau, à une température inférieure que
celle utilisée pour l’autonettoyage.
$YDQWG¶XWLOLVHUODIRQFWLRQGHQHWWR\DJHjODYDSHXUHVVX\H]
la graisse et les résidus qui se trouvent dans la cavité du four.
Versez une tasse d’eau dans le fond du four. Fermez la porte.
$SSX\H]GHX[IRLVVXUClean, puis sur Start. Sur certains
modèles, la porte du four peut se verrouiller. Vous ne devez
SDVRXYULUODSRUWHSHQGDQWOHQHWWR\DJHjODYDSHXUGH
minutes parce que cela réduira l’efficacité de ce nettoyage.
(VVX\H]WRXWH[FpGHQWG¶HDXHWGHVDOHWpTXLSRXUUDLWrWUH
resté. REMARQUE : /¶HDXTXLVHWURXYHDXIRQGGXIRXUSHXW
rWUHFKDXGHDSUqVODILQGXSURJUDPPH
Autonettoyage
/LVH]OHVLQVWUXFWLRQVUHODWLYHVjO¶DXWRQHWWR\DJHGXIRXU
au début de ce manuel avant d’utiliser cette fonction.
/¶DXWRQHWWR\DJHXWLOLVHGHVWHPSpUDWXUHVWUqVpOHYpHVSRXU
QHWWR\HUO¶LQWpULHXUGXIRXU/DSRUWHGXIRXUVHYHUURXLOOH
ORUVTXHFHWWHIRQFWLRQHVWDFWLYpH$YDQWGHODQFHUOH
programme d’autonettoyage, essuyez la graisse et les saletés
susceptibles de se trouver dans le four. Enlevez tous les
éléments du four, mis à part les grilles émaillées (de couleur
IRQFpH/HVVXSSRUWVGHJULOOHjILQLOXVWUpRXDUJHQWpOD
sonde thermique et tout autre ustensile de cuisson, ou tout
DXWUHDUWLFOHGRLYHQWrWUHUHWLUpVGXIRXUDYDQWGHODQFHU
OHSURJUDPPHG¶DXWRQHWWR\DJH)HUPH]ODSRUWH$SSX\H]
une fois sur Clean et un temps d’autonettoyage par défaut
V¶DIILFKH/HWHPSVGXQHWWR\DJHSHXWrWUHPRGLILpHQWUH
HWKHXUHVHQXWLOLVDQWOHVWRXFKHVQXPpULTXHVSRXUHQWUHU
un temps différent et en appuyant sur Start3RXUOHVIRXUV
très sales, le temps de nettoyage maximum de 5 heures est
recommandé. Si vous souhaitez utiliser le temps par défaut,
appuyez sur Start immédiatement après avoir appuyé sur
Clean/HIRXUV¶pWHLQWDXWRPDWLTXHPHQWORUVTXHOHF\FOH
G¶DXWRQHWWR\DJHHVWWHUPLQp/DSRUWHGHPHXUHYHUURXLOOpH
MXVTX¶jFHTXHOHIRXUVHVRLWUHIURLGL/RUVTXHOHIRXUDUHIURLGL
essuyez la cendre qui se sera formée dans le four.
IMPORTANT : &HUWDLQVRLVHDX[VRQWH[WUrPHPHQWVHQVLEOHV
aux fumées dégagées pendant l’autonettoyage d’un four.
Déplacez-les dans une autre pièce bien aérée.
ENTRETIEN ET NETTOYAGE : Four
Four
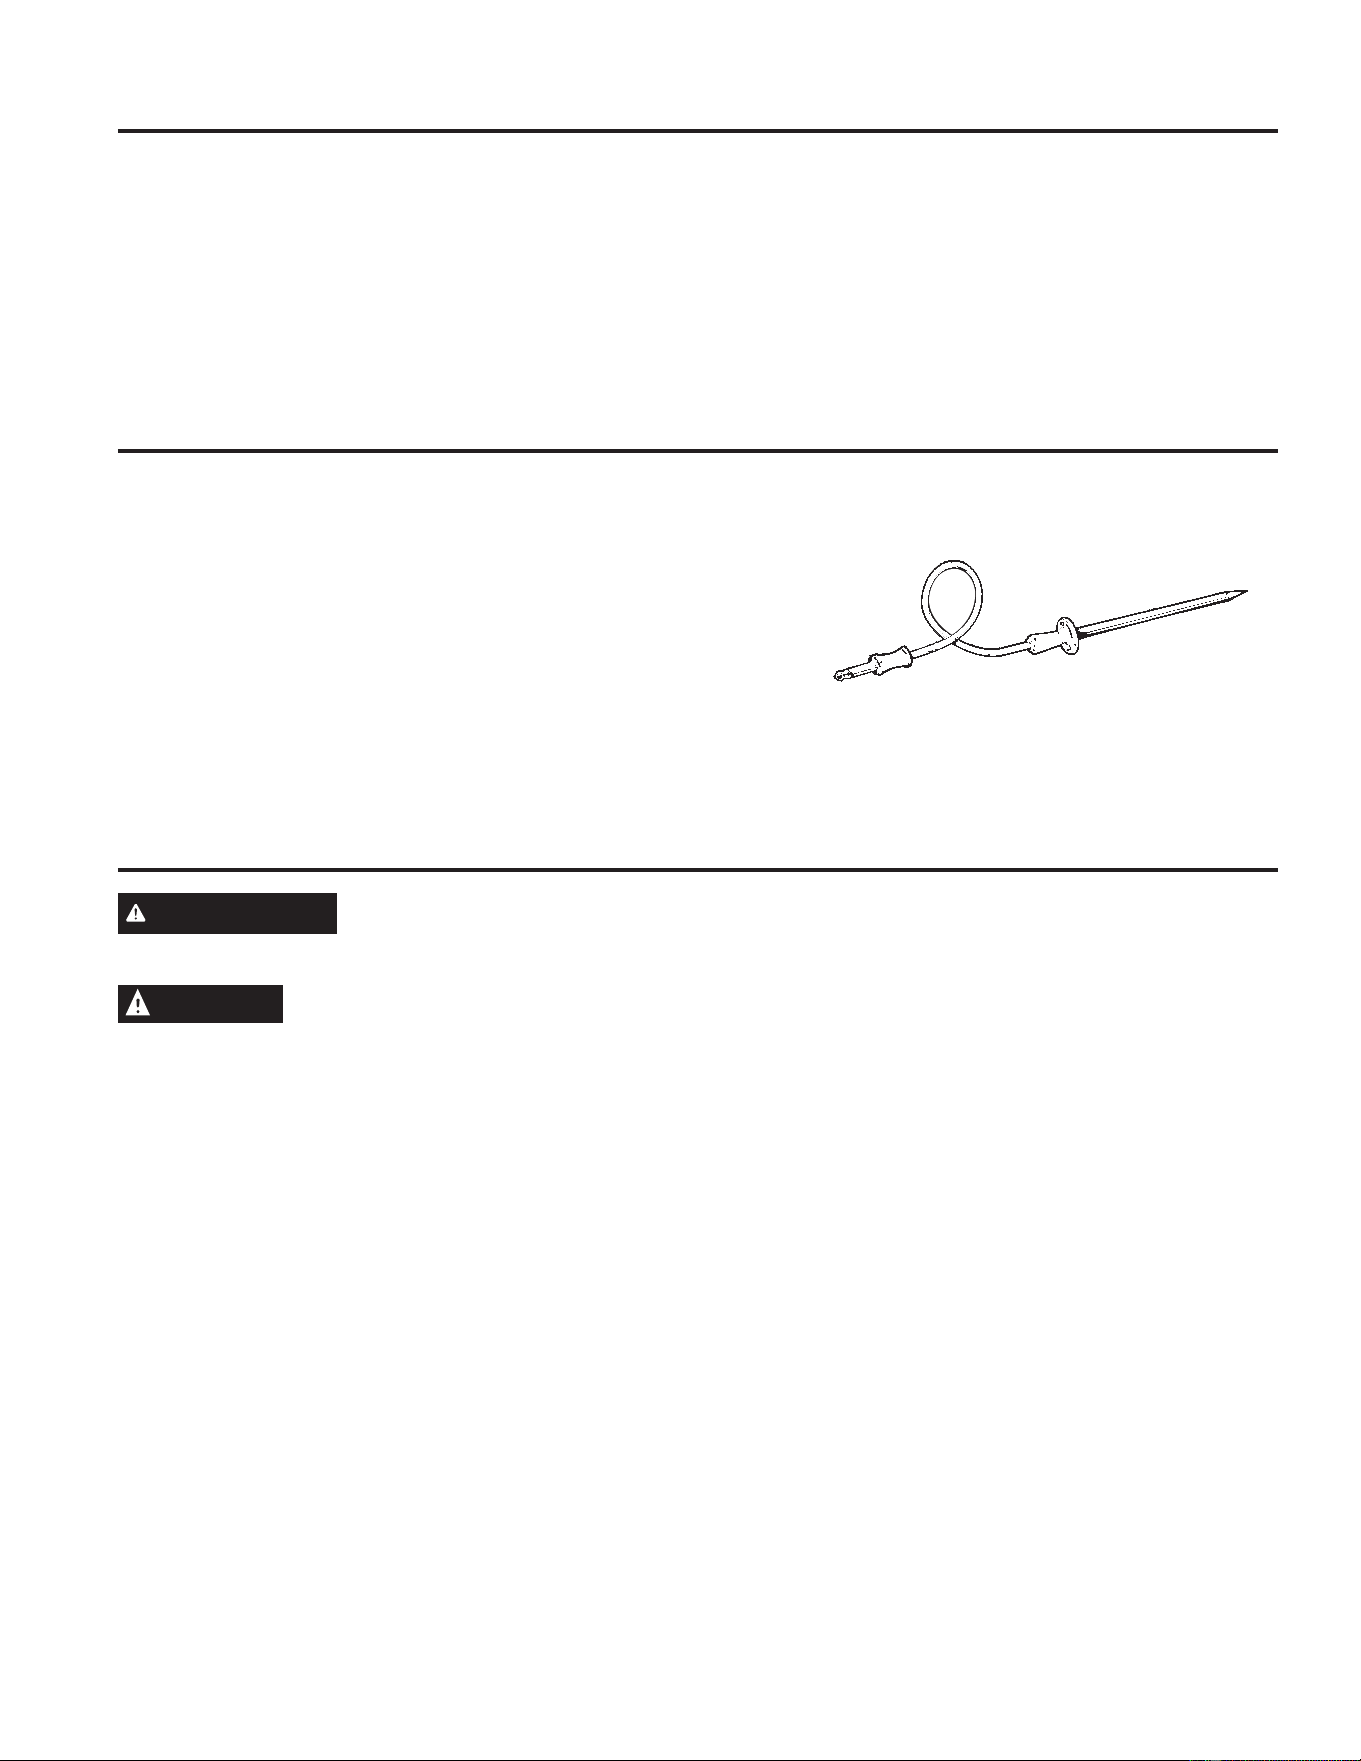
49-2000254 Rev. 6
AVERTISSEMENT
RISQUE DE CHOC ÉLECTRIQUE OU D’INCENDIE :$YDQWGHUHPSODFHUO¶DPSRXOHFRXSH]
O¶DOLPHQWDWLRQGXIRXUDXQLYHDXGXWDEOHDXGHGLVWULEXWLRQGLVMRQFWHXUVRXIXVLEOHV/HQRQUHVSHFWGH
cette consigne peut entraîner un choc électrique ou des brûlures.
ATTENTION
RISQUE DE BRÛLURE :/¶DPSRXOHHWOHFRXYUHDPSRXOHHQYHUUHGRLYHQWrWUHUHWLUpVORUVTX¶LOVVRQWIURLGV
7RXFKHUOHYHUUHFKDXGjPDLQQXHRXDYHFXQFKLIIRQKXPLGHSHXWFDXVHUGHVEUOXUHV
1. Coupez le courant au niveau du tableau de distribution
(fusible ou disjoncteur).
2. Retirez les grilles du four.
3. Faites glisser un tournevis à lame plate ou un couteau à
beurre entre le boîtier métallique et le couvercle en verre
de l’ampoule. REMARQUE : Sur certains modèles, il
y a une attache métallique qui maintient visiblement le
YHUUH/¶RXWLOGRLWrWUHLQVpUpHQWUHOHERvWLHUPpWDOOLTXHHW
l’attache retenant le verre.
4. Soutenez le couvercle en verre de l’ampoule avec
deux doigts pour éviter que le couvercle ne tombe
au fond du four.
7RXUQH]GRXFHPHQWODODPHGXWRXUQHYLVRXGXFRXWHDXj
beurre pour desserrer le couvercle en verre de l’ampoule.
9HLOOH]jQHSDVpEUpFKHUOHUHYrWHPHQWGXIRXU
6. Retirez le couvercle de l’ampoule.
7. Retirez l’ampoule en la saisissant fermement et en la
faisant glisser vers l’extérieur jusqu’à ce que les deux
broches se soient dégagées de la douille en céramique.
8. Ne touchez pas le verre de la nouvelle ampoule de
remplacement avec vos doigts. Cela entraînera des
GRPPDJHVjO¶DPSRXOHSRXYDQWO¶HPSrFKHUGHV¶DOOXPHU
Saisissez l’ampoule de remplacement avec une serviette
propre ou un mouchoir en papier avec les broches
YHUVOHEDV$OLJQH]OHVGHX[EURFKHVGDQVODGRXLOOH
en céramique, en appuyant doucement jusqu’à ce que
l’ampoule soit bien en place dans la douille.
9. Faites glisser le couvercle de protection dans le support
et poussez jusqu’à ce que les fixations s’enclenchent
dans le boîtier.
5HEUDQFKH]O¶DOLPHQWDWLRQ
Lampe du four
Sonde thermique
/DVRQGHWKHUPLTXHSHXWrWUHQHWWR\pHDYHFGHO¶HDX
savonneuse ou un tampon à récurer imbibé de savon.
/DLVVH]ODVRQGHWKHUPLTXHUHIURLGLUDYDQWGHODODYHU
Frottez les taches rebelles avec un tampon à récurer imbibé
de savon, rincez et séchez.
3RXUFRPPDQGHUGHVVRQGHVWKHUPLTXHVDGGLWLRQQHOOHV
UHSRUWH]YRXVDX[VHFWLRQV©$FFHVVRLUHVªHW©6HUYLFH
à la clientèle » à la fin de ce manuel.
Ŷ 1¶LPPHUJH]SDVODVRQGHWKHUPLTXHGDQVO¶HDX
Ŷ Ne rangez pas la sonde thermique dans le four.
Ŷ Ne laissez jamais la sonde thermique à l’intérieur du four
pendant l’autonettoyage ou le nettoyage à la vapeur.
Four (suite)
Grilles du four
/HVJULOOHVpPDLOOpHVQRQEULOODQWHVSHXYHQWrWUHODLVVpHVGDQV
ODFDYLWpSHQGDQWO¶DXWRQHWWR\DJHRXSHXYHQWrWUHODYpHVDYHF
de l’eau chaude savonneuse.
/HVJULOOHVSHXYHQWGHYHQLUGLIILFLOHVjJOLVVHUHQSDUWLFXOLHU
après un cycle d’autonettoyage. Enduisez un linge doux ou une
serviette en papier d’un peu d’huile végétale et frottez les bords
latéraux.
REMARQUE : D’autres types d’huiles de cuisson peuvent
causer de la décoloration ou des résidus de couleur rouille
sur les grilles et les parois de la cavité. Nettoyez ces résidus
avec de l’eau savonneuse ou une solution d’eau et de vinaigre.
Rincez à l’eau claire et séchez avec un linge doux.
ENTRETIEN ET NETTOYAGE : Four6RQGHWKHUPLTXH/DPSHGXIRXU
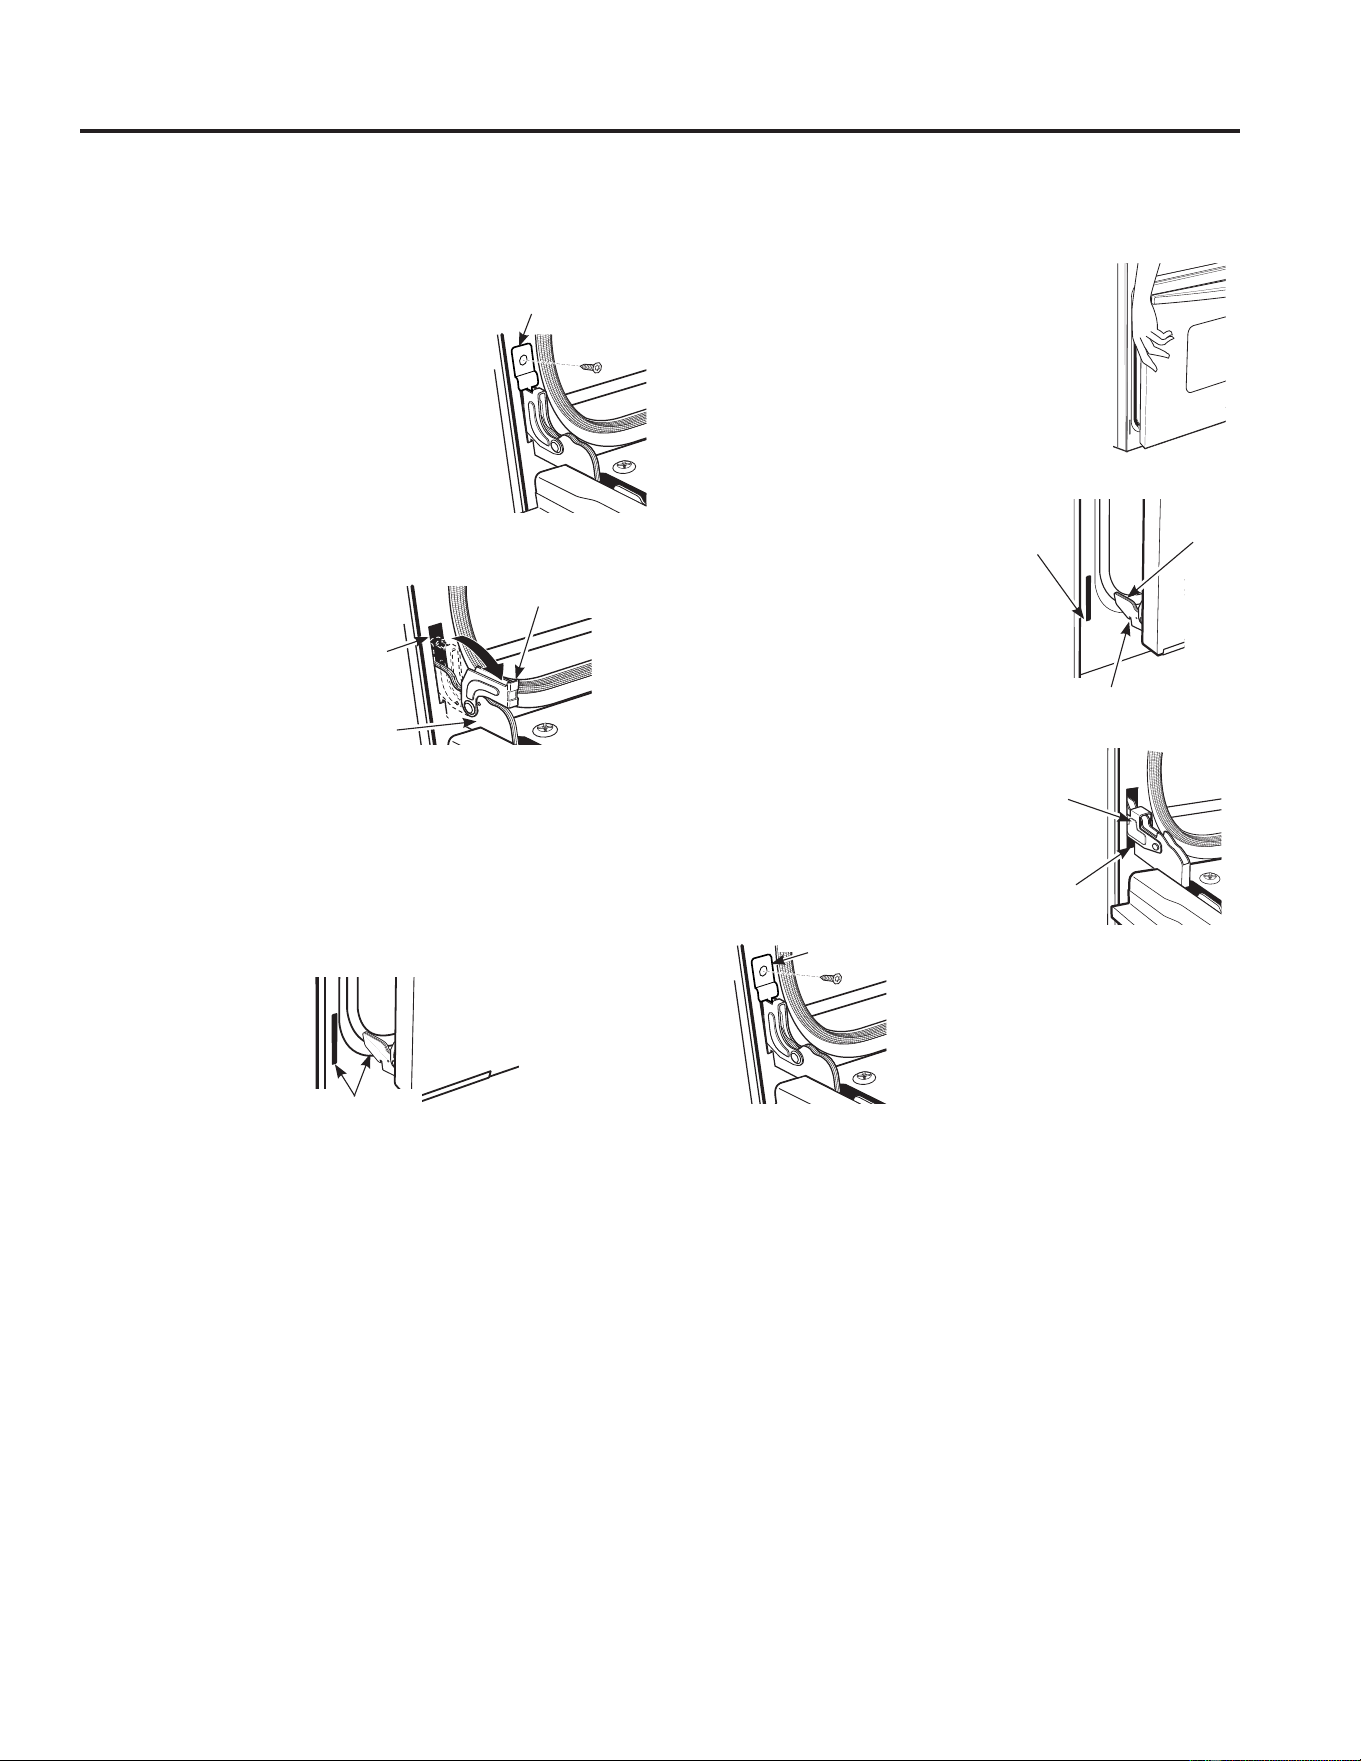
49-2000254 Rev. 6 21
ENTRETIEN ET NETTOYAGE : 3RUWHGXIRXU
Retrait de la porte du four
REMARQUE : /HUHWUDLWGHODSRUWHQ¶HVWSDVUHTXLVSRXU
l’installation du produit mais il peut la faciliter.
Pour retirer la porte :
2XYUH]ODSRUWHGXIRXUDXVVLORLQTX¶HOOHOHSRXUUD
2. Retirez le support de charnière (si
présent) du cadre avant et mettez-le de
F{Wp/HVXSSRUWGHFKDUQLqUHGRLWrWUH
replacé pour que la porte fonctionne
correctement lorsque la porte est
réinstallée.
3. 3RXVVH]OHVYHUURXVGHFKDUQLqUHYHUV
le bas et le cadre de porte jusqu’à la
SRVLWLRQGHGpYHUURXLOODJH8QWRXUQHYLV
à lame plate peut s’avérer nécessaire.
NE SOULEVEZ PAS LA PORTE PAR LA POIGNÉE!
4. 3ODFH]OHVPDLQV
des deux côtés de
la porte et fermez
la porte du four
jusqu’à la position
de retrait (environ
jSR>FPj
FP@GHSXLVOD
position fermée).
5. Soulevez la porte verticalement puis vers l’extérieur
jusqu’à ce que les bras des charnières sortent des fentes.
REMARQUE : /DSRUWHGXIRXUHVWWUqVORXUGH$VVXUH]
vous d’avoir une prise solide avant de soulever la porte
KRUVGHVFKDUQLqUHV8VH]GHSUXGHQFHXQHIRLVODSRUWH
retirée. Ne déposez pas la porte sur sa poignée. Cela
pourrait causer des bosses ou des rayures.
Remise en place de la porte du four
REMARQUE :/DSRUWHGXIRXUHVWWUqVORXUGH'HO¶DLGHSHXW
s’avérer nécessaire pour soulever la porte suffisamment haut
pour la glisser dans les fentes de charnière. Ne soulevez pas
la porte par la poignée.
1. Soulevez la porte du four en l’agrippant de
chaque côté.
$YHFODSRUWHGDQVOHPrPHDQJOHTXHSRXU
ODSRVLWLRQGHUHWUDLWHQYLURQjSR>
FPjFP@GHSXLVODSRVLWLRQIHUPpH
rentrez l’encoche du bras de charnière dans
le bord inférieur de la fente de charnière.
/¶HQFRFKHGXEUDVGHFKDUQLqUHGRLWrWUH
complètement insérée dans le
bas de la fente.
2XYUH]ODSRUWHFRPSOqWHPHQW
Si la porte n’est pas totalement
ouverte, l’encoche ne reposera
pas à fond sur le bord inférieur
de la fente.
3RXVVH]OHVYHUURXVGH
charnière vers le haut contre
le cadre frontal de la cavité du
four, jusqu’à la position de
verrouillage.
5. Replacer le support de
charnière (si présent).
/HVXSSRUWGHFKDUQLqUH
GRLWrWUHUHSODFpSRXU
que la porte fonctionne
correctement.
6. Fermez la porte du four.
Porte du four
Bord
inférieur
de la
fente
Bras de
charnière
Encoche de charnière
/DFKDUQLqUHVRUWGHODIHQWH
Support de charnière
Fente de
charnière
Bras de
charnière
3RVLWLRQDYHF
charnière déverrouillée
Charnière
en position
verrouillée
Encoche de
charnière rentrée
solidement
dans le bas
de la fente de
charnière
Support de charnière

22 49-2000254 Rev. 6
eFRQRPLVH]GXWHPSVHWGHO¶DUJHQW3DVVH]HQUHYXHOHVWDEOHDX[VLWXpVGDQVOHVSDJHVVXLYDQWHVRXYLVLWH]
Electromenagersge.ca/fr/soutien/demande-de-service pour des articles utiles et des vidéos d’aide avant
d’appeler le service de dépannage.
Problème Causes possibles Solutions
Mon nouveau four ne cuit pas
les aliments comme mon ancien
four. Y a-t-il un problème avec
le réglage de la température?
Votre nouveau four est doté d'un système de cuisson
différent de celui de votre ancien four; par conséquent, il
peut cuire les aliments différemment.
3RXUODSUHPLqUHXWLOLVDWLRQUHVSHFWH]OHVWHPSVHWOHV
températures indiqués dans votre recette. Si vous pensez toujours
que votre four chauffe trop ou ne chauffe pas assez, vous pouvez
DMXVWHUODWHPSpUDWXUHYRXVPrPH REMARQUE : Cet ajustement
DJLWVXUOHVPRGHV%DNHHW&RQYHFWLRQ%DNH0XOWLLOQ¶DJLWSDVVXU
les modes Convection Roast, Broil ou Clean.
Les aliments ne cuisent pas
correctement
/HVFRPPDQGHVGXIRXUVRQWPDOUpJOpHV 5HSRUWH]YRXVjODVHFWLRQ©0RGHVGHFXLVVRQª
/DJULOOHQDSDVpWpSODFpHVXUODERQQHSRVLWLRQ
dans le four ou n'est pas de niveau.
5HSRUWH]YRXVjODVHFWLRQ©0RGHVGHFXLVVRQªHWDX*XLGHGH
cuisson.
8VWHQVLOHGHFXLVVRQLQDSSURSULpRXGHGLPHQVLRQV
inadéquates.
5HSRUWH]YRXVjODVHFWLRQ©8VWHQVLOHVGHFXLVVRQª
/DWHPSpUDWXUHGXIRXUGRLWrWUHDMXVWpH Reportez-vous à la section « Réglages ».
Substitution d'ingrédients /DVXEVWLWXWLRQGLQJUpGLHQWVSHXWPRGLILHUOHUpVXOWDW
Les aliments ne grillent pas
correctement
/HVFRPPDQGHVGXIRXUVRQWPDOUpJOpHV $VVXUH]YRXVGHVpOHFWLRQQHUOHPRGHGHFXLVVRQ
au gril approprié.
3RVLWLRQGHJULOOHLQDSSURSULpH Consultez le Guide de cuisson pour des suggestions sur la
position des grilles.
/HVDOLPHQWVVRQWFXLWVGDQVXQXVWHQVLOHFKDXG $VVXUH]YRXVTXHOXVWHQVLOHGHFXLVVRQHVWIURLG
8QXVWHQVLOHGHFXLVVRQLQDSSURSULpSRXUOHJULO
est utilisé.
8WLOLVH]XQXVWHQVLOHGHFXLVVRQFRQoXSRXUOHJULO
/HSDSLHUGDOXPLQLXPXWLOLVpGDQVODOqFKHIULWHRXVXUOD
grille n'est pas installé selon les recommandations.
Si vous utilisez du papier d'aluminium, pratiquez des ouvertures
vis-à-vis des ouvertures de la lèchefrite.
Dans certaines régions, la tension électrique
SHXWrWUHEDVVH
3UpFKDXIIH]OpOpPHQWGHJULOSHQGDQWPLQXWHV
Température du four trop
chaude ou trop froide
/DWHPSpUDWXUHGXIRXUGRLWrWUHDMXVWpH Reportez-vous à la section « Réglages ».
Le four ne fonctionne pas, ou
semble ne pas fonctionner
8QIXVLEOHGHYRWUHGRPLFLOHSHXWrWUHJULOOp
ou le disjoncteur s'est déclenché.
Remplacez le fusible ou réenclenchez le disjoncteur.
/HVFRPPDQGHVGXIRXUVRQWPDOUpJOpHV 5HSRUWH]YRXVjODVHFWLRQ©8WLOLVDWLRQGXIRXUª
/HIRXUHVWHQPRGHVDEEDW $VVXUH]YRXVTXHOHIRXUQHVWSDVHQPRGHVDEEDW5HSRUWH]
vous à la section « Réglages ».
Bruits de crépitement
ou de craquement
Ces sons proviennent du métal qui chauffe et refroidit
pendant les fonctions de cuisson et d'autonettoyage.
Cela est normal.
Pourquoi ma cuisinière
émet-elle un cliquetis lorsque
j'utilise le four?
Votre four a été conçu pour maintenir avec précision
VDWHPSpUDWXUH/HVpOpPHQWVFKDXIIDQWVSHXYHQWDLQVL
émettre plus souvent des clics que les anciens modèles
de four, cela afin d'optimiser la cuisson,
le grillage, la convection et l'autonettoyage.
Cela est normal.
L'horloge et la minuterie ne
fonctionnent pas
8QIXVLEOHGHYRWUHGRPLFLOHSHXWrWUHJULOOp
ou le disjoncteur s'est déclenché.
Remplacez le fusible ou réenclenchez le disjoncteur.
La lampe du four ne fonctionne
pas
/¶DPSRXOHHVWPDOVHUUpHRXHOOHHVWJULOOpH Resserrez ou remplacez l’ampoule.
/DWRXFKHTXLFRPPDQGHODODPSHHVWEULVpH Faites un appel de service.
L'autonettoyage ne fonctionne
pas
/DWHPSpUDWXUHGXIRXUHVWWURSpOHYpHSRXUSURJUDPPHU
l'autonettoyage.
/DLVVH]OHIRXUUHIURLGLUHWUHSURJUDPPH]OH
/HVFRPPDQGHVGXIRXUVRQWPDOUpJOpHV Reportez-vous à la section sur le nettoyage du four.
Conseils de dépannage... $YDQWGHFRQWDFWHUOHVHUYLFHGHGpSDQQDJH
CONSEILS DE DÉPANNAGE
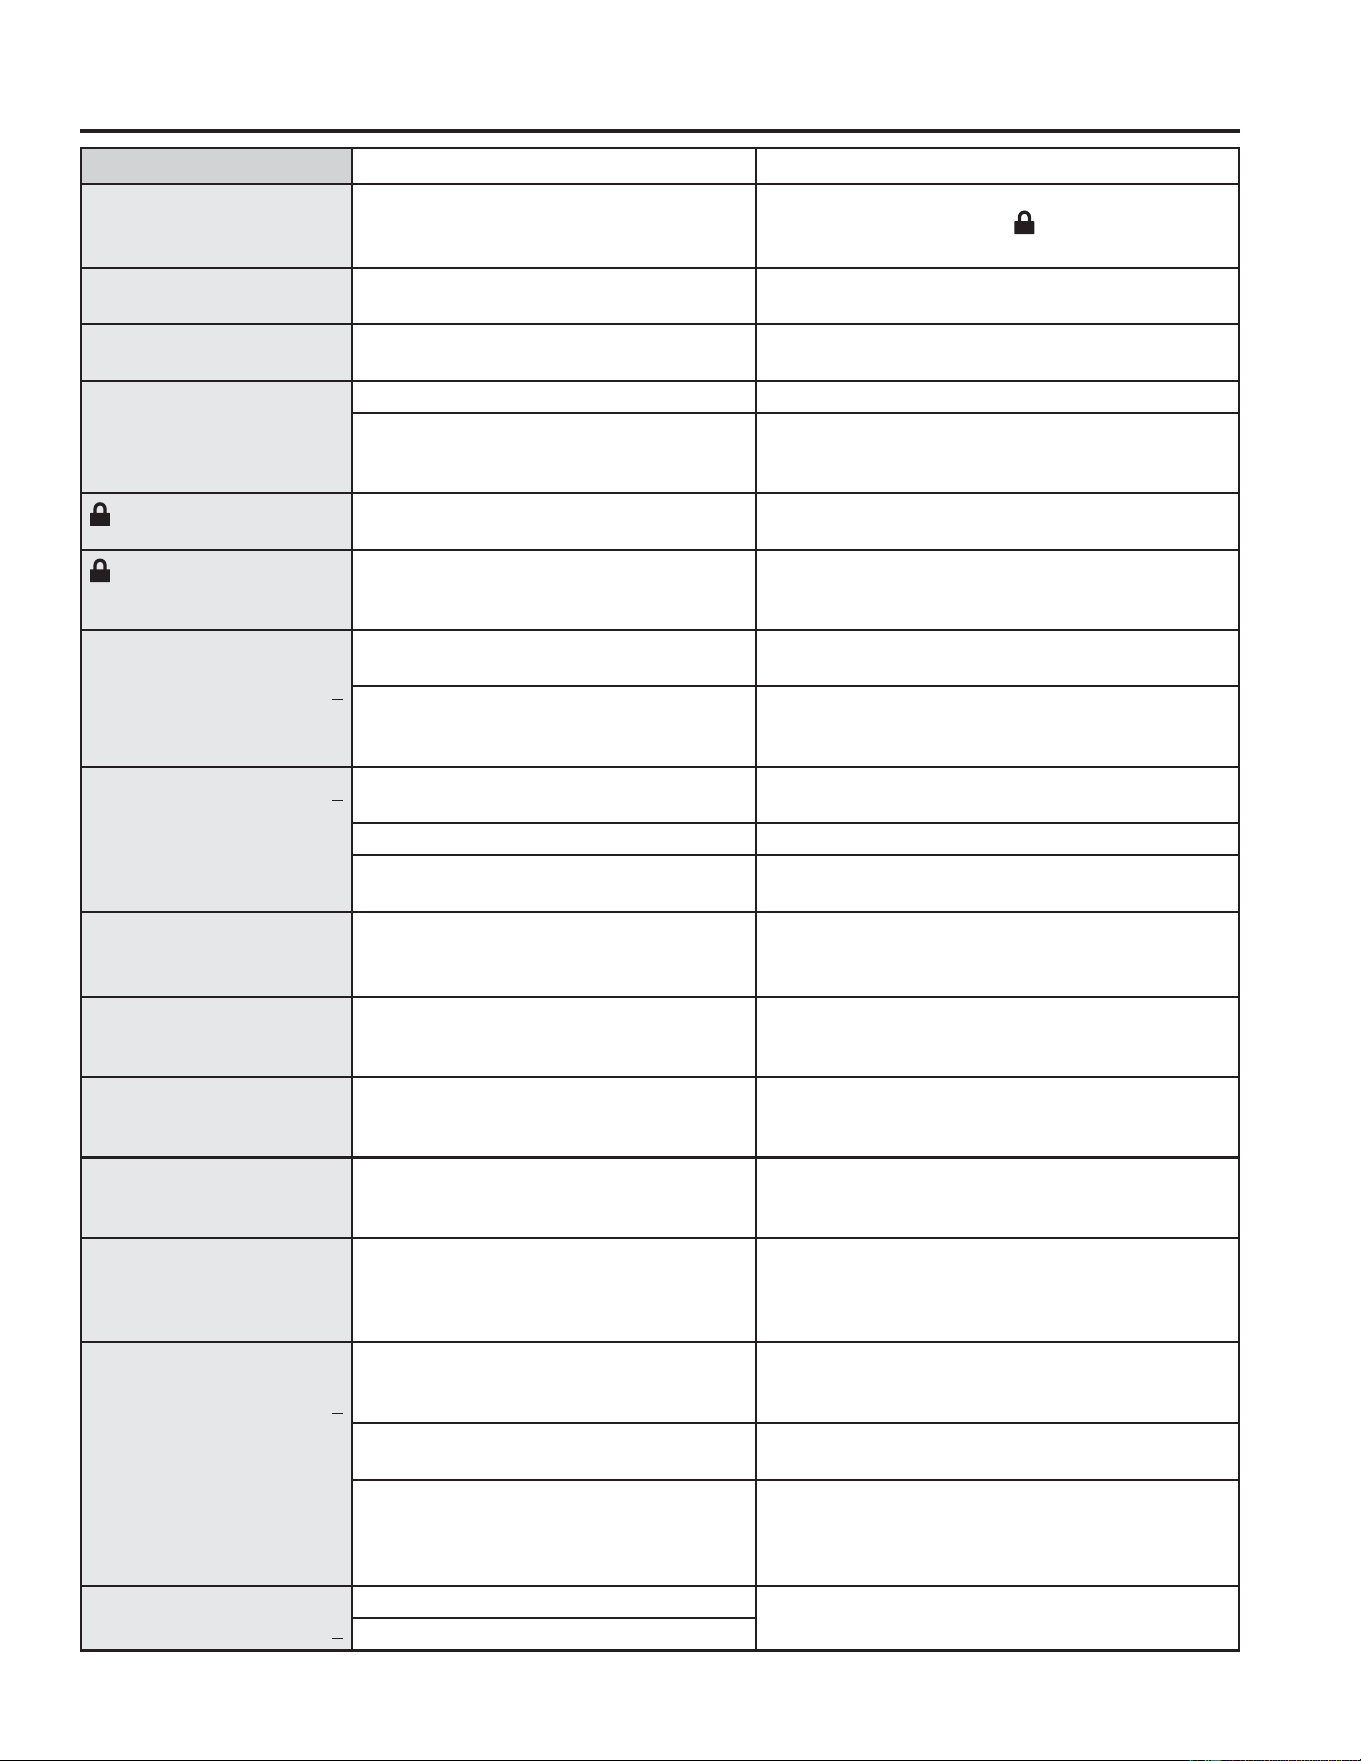
49-2000254 Rev. 6 23
CONSEILS DE DÉPANNAGE
Problème Causes possibles Solutions
Fumée excessive pendant le
cycle de nettoyage
Saleté ou graisse excessive. $SSX\H]VXU&DQFHO2II2XYUH]OHVIHQrWUHVSRXUYHQWLOHUOD
IXPpH3DWLHQWH]MXVTX¶jFHTXHOH s’éteigne. Essuyez l’excès
de saleté et réinitialisez le cycle de nettoyage.
Fumée excessive en mode de
cuisson au gril
/HVDOLPHQWVVRQWWURSSUqVGHOpOpPHQW $EDLVVH]ODJULOOHGDQVOHIRXU
La porte du four ne s'ouvre pas
après l'autonettoyage
Four trop chaud. /DLVVH]ODWHPSpUDWXUHGXIRXUUHGHVFHQGUHHQGHVVRXV
de la température de verrouillage.
Le four n'est pas propre après
l'autonettoyage
/HVFRPPDQGHVGXIRXUVRQWPDOUpJOpHV Reportez-vous à la section sur le nettoyage du four.
/HIRXUpWDLWWUqVVDOH Nettoyez les éclaboussures importantes avant de lancer
ODXWRQHWWR\DJH/HVIRXUVWUqVVDOHVSHXYHQWQpFHVVLWHU
un second autonettoyage ou un autonettoyage plus long.
clignote sur l’affichage
/HF\FOHG¶DXWRQHWWR\DJHDpWpVpOHFWLRQQpPDLVOD
porte n’est pas fermée.
Fermez la porte du four.
est allumé lorsque vous
voulez cuisiner
/DSRUWHGXIRXUHVWYHUURXLOOpHFDUODWHPSpUDWXUHj
l’intérieur du four n’a pas chutée en dessous de la
température de verrouillage.
$SSX\H]VXUCancel/Off/DLVVH]OHIRXUUHIURLGLU
« F– » suivi d'un chiffre ou
d'une lettre sont affichés sur
l'écran ACL
,OVDJLWGXQFRGHGHUUHXUGHIRQFWLRQ $SSX\H]VXUDismissHIIDFHUVXUOpFUDQ$&//DLVVH]
le four refroidir pendant une heure. Rallumez le four.
Si le code de fonction réapparaît. &RXSH]ODOLPHQWDWLRQGXIRXUSHQGDQWDXPRLQVVHFRQGHVSXLV
rétablissez-la. Si le code d'erreur de fonction réapparaît, contactez
un service de réparation.
L’écran devient vide. 8QIXVLEOHGHYRWUHGRPLFLOHSHXWrWUHJULOOpRXOH
disjoncteur a été déclenché.
Remplacez le fusible ou réenclenchez le disjoncteur.
/¶KRUORJHHVWpWHLQWH 9R\H]ODVHFWLRQ3DUDPqWUHV6HWWLQJV
/HIRXUHVWGDQVOHPRGH6DEEDW Vérifiez que le four n’est pas en mode Sabbat. Voyez la section
3DUDPqWUHV6HWWLQJV
Panne de courant, réinitialisation
de l'horloge
Coupure de courant ou surtension. Remettez l'horloge à l'heure. Si le four était en cours d'utilisation,
vous devez le reprogrammer en appuyant sur la touche Cancel/Off,
en remettant l'horloge à l'heure et en reprogrammant la fonction de
cuisson choisie.
Odeur de « brûlé » ou d'huile
provenant de l'évent
Cela est normal pour un nouveau four et disparaît avec
le temps.
3RXUDFFpOpUHUFHSURFHVVXVSURJUDPPH]XQDXWRQHWWR\DJHGDX
moins 3 heures. Reportez-vous à la section sur le nettoyage du
four.
Forte odeur ,OHVWQRUPDOTXXQHRGHXUVHGpJDJHGHOLVRODQWGH
l'intérieur du four pendant les premières utilisations du
four.
Ceci est temporaire et cessera avec le temps ou après
un cycle d'autonettoyage.
Bruit de ventilateur 8QYHQWLODWHXUGHUHIURLGLVVHPHQWSHXW
automatiquement se mettre en marche.
&HODHVWQRUPDO/HYHQWLODWHXUGHUHIURLGLVVHPHQWVHPHWWUDHQ
marche pour refroidir les composants internes.
,OSHXWIRQFWLRQQHUMXVTXjKDSUqVODUUrWGXIRXU
La vitre de ma porte de four
semble teintée ou présente un
arc-en-ciel. Est-elle défectueuse?
1RQ/HYHUUHLQWpULHXUGHODSRUWHGXIRXUHVWUHYrWX
d'une barrière thermique qui réfléchit la chaleur dans
le four pour prévenir la perte de chaleur et pour garder
l'extérieur de la porte froide pendant la cuisson.
Cela est normal. Dans certaines conditions d'éclairage
et selon l'angle de vue, il est possible de percevoir une teinte ou les
couleurs de l'arc-en-ciel.
Il arrive que le four prenne plus
de temps à préchauffer pour
atteindre la même température
8VWHQVLOHGHFXLVVRQRXDOLPHQWGDQVOHIRXU /XVWHQVLOHGHFXLVVRQRXOHVDOLPHQWVSODFpVGDQVOHIRXU
prolongent le préchauffage. Retirez les aliments pour diminuer le
temps de préchauffage.
Nombre de grilles dans le four. /DMRXWGHJULOOHVGDQVOHIRXUSURORQJHOHWHPSVGHSUpFKDXIIDJH
Retirez quelques grilles.
0RGHVGHFXLVVRQGLYHUV /HVGLIIpUHQWVPRGHVGHFXLVVRQXWLOLVHQWGLIIpUHQWHVPpWKRGHVGH
préchauffage pour chauffer le four. Certains modes de cuisson
prendront plus de temps que d'autres (ex. : cuisson à convection
multiple).
Le four ne fonctionne pas à
distance
3UREOqPHVGHURXWHXUSDVGHVLJQDOVDQVILOHWF 3RXUREWHQLUGHODLGHVXUODFRQQHFWLYLWpUpVHDXVDQVILO
GXIRXUYHXLOOH]DSSHOHUOH
/HIRXUQHVWSDVFRQQHFWp
Conseils de dépannage... $YDQWGHFRQWDFWHUOHVHUYLFHGHGpSDQQDJH

24 49-2000254 Rev. 6
Garantie limitée du four électrique GE Appliances
GARANTIE LIMITÉE
$JUDIH]YRWUHIDFWXUHLFL8QHSUHXYHGHODGDWHGDFKDWGRULJLQH
est requise pour obtenir des services sous garantie.
electromenagersge.ca
7RXVOHVVHUYLFHVGHJDUDQWLHSRXUYRWUHDSSDUHLOVRQWIRXUQLVH[FOXVLYHPHQWSDU*($SSOLDQFHVOHV&HQWUHVGHVHUYLFHG¶XVLQHG¶XQH
VRFLpWp+DLHURXSDUXQWHFKQLFLHQG¶HQWUHWLHQDXWRULVpSDU*($SSOLDQFHVjIRXUQLUXQVHUYLFHGHJDUDQWLHSRXUYRWUHDSSDUHLO3RXU
faire la demande d’une réparation en ligne, visitez GEAppliances.com/serviceRXDSSHOH]eOHFWURPpQDJHUV*(DX*(
&$5(6$X&DQDGDYHXLOOH]YLVLWHUelectromenagersge.ca/soutien-apres-vente .
Veuillez avoir les numéros de série
HWGHPRGqOHGHYRWUHDSSDUHLOjSRUWpHGHPDLQORUVTXHYRXVDSSHOH]SRXUREWHQLUXQVHUYLFH/HVUpSDUDWLRQVTXLQ¶RQWSDVpWp
SURJUDPPpHVRXRUJDQLVpHVDXWUHPHQWSDU*($SSOLDQFHVQHVHURQWSDVFRXYHUWHVSDUFHWWHJDUDQWLH\FRPSULVOHVSLqFHVHWRX
les services fournis.
/DUpSDUDWLRQGHYRWUHDSSDUHLOSHXWQpFHVVLWHUOXWLOLVDWLRQGXQDFFqVHPEDUTXpDX[GRQQpHVSRXUGpWHUPLQHUOHGLDJQRVWLF&HOD
SHUPHWjXQWHFKQLFLHQGHUpSDUDWLRQGeOHFWURPpQDJHUV*(GHGLDJQRVWLTXHUUDSLGHPHQWWRXWSUREOqPHDYHFYRWUHDSSDUHLOHW
DLGHeOHFWURPpQDJHUV*(jDPpOLRUHUVHVSURGXLWVHQOXLIRXUQLVVDQWGHOLQIRUPDWLRQVXUYRWUHDSSDUHLO6LYRXVQHYRXOH]SDVTXH
OHVGRQQpHVGHYRWUHDSSDUHLOVRLHQWWUDQVPLVHVjeOHFWURPpQDJHUV*(YHXLOOH]DYLVHUOHWHFKQLFLHQGHQHSDVWUDQVPHWWUHGH
GRQQpHVjeOHFWURPpQDJHUV*(DXPRPHQWGHODUpSDUDWLRQ
Ce que Électroménagers GE ne couvre pas :
Ŷ 7RXWHYLVLWHjYRWUHGRPLFLOHSRXUYRXVH[SOLTXHUOH
fonctionnement de l'appareil.
Ŷ /LQVWDOODWLRQODOLYUDLVRQRXOHQWUHWLHQLQDSSURSULpV
de l'appareil.
Ŷ 7RXWHGpIHFWXRVLWpGXSURGXLWORUVTXLODpWpXWLOLVpGHIDoRQ
abusive ou inadéquate, employé à toute autre fin que celle
pour laquelle il a été conçu, modifié ou utilisé à des fins
commerciales.
Ŷ /HUHPSODFHPHQWGHVIXVLEOHVRXOHUpHQFOHQFKHPHQWGHV
disjoncteurs.
Ŷ 7RXWGRPPDJHDXSURGXLWDWWULEXDEOHjXQDFFLGHQWjXQ
incendie, à une inondation ou à une catastrophe naturelle.
Ŷ 'RPPDJHVDFFLGHQWHOVRXFRQVpFXWLIVFDXVpVSDU
d'éventuels défauts de cet appareil.
Ŷ /HVGRPPDJHVVXUYHQXVDSUqVODOLYUDLVRQ
Ŷ /HVHUYLFHV¶LOHVWLPSRVVLEOHG¶DYRLUDFFqVDXSURGXLW
Ŷ /HVHUYLFHSRXUUpSDUHURXUHPSODFHUOHVDPSRXOHVj
O¶H[FHSWLRQGHVODPSHV'(/
Ŷ /HVGRPPDJHVDXILQLWHOVTXHODURXLOOHGHVXUIDFHOH
ternissement ou les petites imperfections qui ne sont pas
rapportés dans les 48 heures suivant la livraison.
EXCLUSIONS DES GARANTIES IMPLICITES
9RWUHVHXOHWXQLTXHUHFRXUVHVWGHIDLUHUpSDUHUOHSURGXLWGDQVOHFDGUHGHFHWWHJDUDQWLHOLPLWpH7RXWHJDUDQWLHLPSOLFLWH
incluant la garantie de qualité marchande ou d'aptitude du produit à un usage particulier, est limitée à un an ou à la période
la plus courte autorisée par la loi.
Cette garantie limitée est offerte à l'acheteur initial, ainsi qu'à tout propriétaire subséquent d'un produit acheté en vue d'une
XWLOLVDWLRQGRPHVWLTXHDX[eWDWV8QLV6LOHSURGXLWVHVLWXHGDQVXQH]RQHRDXFXQUpSDUDWHXUDJUppSDUeOHFWURPpQDJHUV*(
QHVWGLVSRQLEOHYRXVGHYUH]SHXWrWUHDVVXPHUOHVIUDLVGHGpSODFHPHQWGHFHOXLFLRXDSSRUWHUOHSURGXLWjXQDWHOLHUGH
UpSDUDWLRQDJUppSDUeOHFWURPpQDJHUV*((Q$ODVNDODJDUDQWLHOLPLWpHH[FOXWOHVFRWVGH[SpGLWLRQHWOHVDSSHOVGHVHUYLFH
nécessitant une visite à domicile.
'DQVFHUWDLQVeWDWVLOHVWLQWHUGLWGH[FOXUHRXGHOLPLWHUOHVGRPPDJHVLQGLUHFWVRXDFFHVVRLUHV,OHVWDORUVSRVVLEOHTXHOHV
OLPLWDWLRQVRXH[FOXVLRQVFLGHVVXVQHVDSSOLTXHQWSDVGDQVYRWUHFDV/DSUpVHQWHJDUDQWLHOLPLWpHYRXVFRQIqUHGHVGURLWV
MXULGLTXHVVSpFLILTXHV9RXVSRXYH]EpQpILFLHUGDXWUHVGURLWVTXLYDULHQWGXQeWDWRXGXQHSURYLQFHjODXWUH3RXUFRQQDvWUH
OHVGURLWVGRQWYRXVEpQpILFLH]GDQVYRWUHeWDWRXYRWUHSURYLQFHFRPPXQLTXH]DYHFOHEXUHDXGHODSURWHFWLRQGXFRQVRPPDWHXU
GHYRWUHUpJLRQGHYRWUHeWDWRXGHYRWUHSURYLQFHRXOHSURFXUHXUJpQpUDO
Garant, États-Unis : GEAPPLIANCES, a Haier company
/RXLVYLOOH.<
Garant au Canada : MC Commercial, Burlington, ON, L7R 5B6
Garanties prolongées : $FKHWH]XQHJDUDQWLHSURORQJpHGH*($SSOLDQFHVHWDSSUHQH]HQSOXVVXUOHVUDEDLVVSpFLDX[
disponibles pendant que votre garantie est valide. Vous pouvez l’acheter en ligne en tout temps en allant sur :
Electromenagersge.ca/fr/soutien/achat-d-une-garantie-prolongee
RXHQDSSHODQWDXSHQGDQWOHVKHXUHVG¶RXYHUWXUHQRUPDOHV/HVHUYLFHGH*($SSOLDQFHVVHUDHQFRUHOj
après l’expiration de votre garantie.
Pendant une période de Électroménagers GE remplacera
Un an
À compter de la date
d'achat d'origine
Toute pièce du four qui se révèle défectueuse en raison d'un vice de matériau ou de fabrication.
$XFRXUVGHFHWWHgarantie limitée d'un aneOHFWURPpQDJHUV*(IRXUQLUDpJDOHPHQWsans frais,
toute la main-d'œuvre pour le remplacement de la pièce défectueuse à domicile.

49-2000254 Rev. 6 25
ACCESSOIRES
Vous manquez de quelque chose?
Électroménagers GE propose une panoplie d'accessoires
qui permettent d'améliorer votre expérience de cuisson
et de nettoyage!
Reportez-vous à la page du service à la clientèle pour obtenir
les numéros de téléphone et des informations sur le site Web.
/HVSURGXLWVVXLYDQWVHWGDXWUHVVRQWRIIHUWV
Accessoires
Accessoires
3HWLWHOqFKHIULWHô[ó[òSR[[FP
*UDQGHOqFKHIULWHô[ó[òSR[[FP
7UqVJUDQGHOqFKHIULWH[ó[óSR[[FP
Pièces
Grilles de four
eOpPHQWVGHIRXU
$PSRXOHV
Sonde thermique
Fournitures de nettoyage
/LQJHWWHV&LWUX6KLQH
0&
pour acier inoxydable
Nettoyant pour appareil en acier inoxydable
/XEULILDQWjEDVHGHJUDSKLWH
/DJUDQGHOqFKHIULWHQHFRQYLHQWSDVDX[FXLVLQLqUHVGHSRSRFPFP
/DWUqVJUDQGHOqFKHIULWHQHFRQYLHQWSDVDX[IRXUVHQFDVWUpVGHSRFP
DX[FXLVLQLqUHVHQFDVWUDEOHVGHSRFPRXDX[FXLVLQLqUHVGHSRFP
ou 24 po (61 cm).

26 49-2000254 Rev. 6
Service à la clientèle
SERVICE À LA CLIENTÈLE
Site Web des électroménagers GE
9RXVDYH]GHVTXHVWLRQVRXEHVRLQGDVVLVWDQFHFRQFHUQDQWYRWUHDSSDUHLO"&RQVXOWH]OHVLWH:HEGeOHFWURPpQDJHUV*(
DFFHVVLEOHKHXUHVVXUWRXVOHVMRXUVGHODQQpH9RXVSRXYH]pJDOHPHQWDFKHWHUGDXWUHVH[FHOOHQWVSURGXLWV
GeOHFWURPpQDJHUV*(HWEpQpILFLHUGHWRXVQRVVHUYLFHVGHVRXWLHQHQOLJQHFRQoXVSRXUYRWUHFRPPRGLWp
$X[eWDWV8QLVGEAppliances.com$X&DQDGDelectromenagersge.ca.
Enregistrez votre appareil
(QUHJLVWUH]YRWUHQRXYHODSSDUHLOHQOLJQHDXPRPHQWTXLYRXVFRQYLHQWOHPLHX[/HQUHJLVWUHPHQWGHYRWUHSURGXLWGDQVOHV
délais prescrits permet une meilleure communication et un service rapide, selon les modalités de votre garantie, si besoin est.
Vous pouvez également envoyer par courrier la carte d'enregistrement préimprimée qui se trouve dans l'emballage de votre
appareil.
$X[eWDWV8QLVGEAppliances.com/register
$X&DQDGDProdsupport.mabe.ca/crm/Products/ProductRegistration.aspx
Demande de service
3RXUEpQpILFLHUGXVHUYLFHGHUpSDUDWLRQGeOHFWURPpQDJHUV*(LOVXIILWGHQRXVFRQWDFWHU9RXVSRXYH]GHPDQGHUXQHUpSDUDWLRQ
en ligne à toute heure du jour, au moment qui vous convient le mieux.
$X[eWDWV8QLVGEAppliances.com/serviceRXDSSHOH]DXSHQGDQWOHVKHXUHVQRUPDOHVGRXYHUWXUH
$X&DQDGDElectromenagersge.ca/fr/soutien/demande-de-service/RXDSSHOH]DX
Garanties prolongées
3URFXUH]YRXVXQHJDUDQWLHSURORQJpHeOHFWURPpQDJHUV*(HWLQIRUPH]YRXVDXVXMHWGHVUDEDLVVSpFLDX[RIIHUWVWRXWDXORQJGH
ODGXUpHGHYRWUHJDUDQWLH9RXVSRXYH]YRXVODSURFXUHUHQOLJQHHQWRXWWHPSV/HVHUYLFHjODFOLHQWqOHGeOHFWURPpQDJHUV*(
sera toujours disponible après expiration de votre garantie.
$X[eWDWV8QLVGEAppliances.com/extended-warrantyRXDSSHOH]DXSHQGDQWOHVKHXUHVQRUPDOHVGRXYHUWXUH
$X&DQDGDelectromenagersge.ca/fr/soutien/achat-d-une-garantie-prolongeeRXDSSHOH]DX
Connectivité à distance
3RXUGHODVVLVWDQFHFRQFHUQDQWODFRQQHFWLYLWpUpVHDXVDQVILOSRXUOHVPRGqOHVDYHFDFWLYDWLRQjGLVWDQFH
visitez notre site Web à GEAppliances.com/connect RXDSSHOH]DXDX[eWDWV8QLV
$X&DQDGDYLVLWH]QRWUHVLWH:HEjelectromenagersge.ca/fr/nouvelles-et-promotions/nouveautes/wifi-connect/ ou appelez
DX
Pièces et accessoires
/HVSHUVRQQHVD\DQWOHVFRPSpWHQFHVUHTXLVHVSRXUUpSDUHUHOOHVPrPHVOHXUVDSSDUHLOVSHXYHQWUHFHYRLUGLUHFWHPHQW
jODPDLVRQGHVSLqFHVRXDFFHVVRLUHVOHVFDUWHV9,6$0DVWHU&DUGHW'LVFRYHUVRQWDFFHSWpHV&RPPDQGH]HQOLJQH
dès aujourd'hui, 24 heures sur 24.
$X[eWDWV8QLVGEApplianceparts.com ou téléphonez au 877.959.8688 pendant les heures normales d'ouverture.
Les directives fournies dans le présent manuel comportent des procédures que n'importe quel utilisateur peut effectuer.
Les autres types de réparation doivent généralement être confiés à un technicien qualifié. Faites preuve de prudence :
une réparation ou un entretien mal effectué peut rendre l'utilisation de l'appareil dangereuse.
/HVFOLHQWVDX&DQDGDGRLYHQWFRQVXOWHUOHVSDJHVMDXQHVSRXUFRQQDvWUHOHFHQWUHGHUpSDUDWLRQ0DEHOHSOXVSURFKHYLVLWHU
notre site Web à Electromenagersge.ca/fr/produits/filtres-et-accessoiresRXWpOpSKRQHUDX
Pour nous joindre
6LYRXVQrWHVSDVVDWLVIDLWGXVHUYLFHDSUqVYHQWHGeOHFWURPpQDJHUV*(FRPPXQLTXH]DYHFQRXVVXUQRWUHVLWH:HEHQ
fournissant tous les détails et votre numéro de téléphone, ou écrivez à :
$X[eWDWV8QLV*HQHUDO0DQDJHU&XVWRPHU5HODWLRQV_*($SSOLDQFHV$SSOLDQFH3DUN_/RXLVYLOOH.<
GEAppliances.com/contact
$X&DQDGD'LUHFWHXUUHODWLRQVDYHFOHVFRQVRPPDWHXUV0DEH&DQDGD,QF_)DFWRU\/DQHEXUHDX_0RQFWRQ1%(&0
electromenagersge.ca/fr/contactez-nous

GE es una marca registrada de General Electric Company. Fabricado bajo licencia de marca.
MANUAL DEL
PROPIETARIO
Escriba los números de modelo y
serie aquí:
Nº de Modelo ________________
Nº de Serie __________________
Los podrá encontrar en una
etiqueta en el borde lateral o en el
frente del horno (inferior) detrás
de la puerta del horno.
HORNO DE PARED
Eléctrico con Convección Incorporado
49-2000254 Rev. 6 09-24
INFORMACIÓN DE SEGURIDAD ... 3
USO DEL HORNO
Controles del Horno de Pared Simple ........ 6
Controles del Horno de Pared Doble ......... 7
Options (Opciones) ........................ 8
Settings (Configuraciones) .................. 8
Modo Sabático ............................10
Estantes del Horno .........................11
Papel de Aluminio y Cobertores del Horno ....13
Utensilios .................................13
Modos de Cocción .........................14
Probe (Sonda). . . . . . . . . . . . . . . . . . . . . . . . . . . . . 15
Guía de Cocción - Horno Inferior. . . . . . . . . . . . .16
Guía de Cocción - Horno Superior/ Simple ....17
Guía de Cocción - Freír con Aire .............18
CUIDADO Y LIMPIEZA
Horno ....................................19
Probe (Sonda). . . . . . . . . . . . . . . . . . . . . . . . . . . . 20
Luz del Horno ............................20
Puerta del Horno ..........................21
CONSEJOS PARA LA
SOLUCIÓN DE PROBLEMAS ...... 22
GARANTÍA LIMITADA .............. 24
ACCESORIOS ........................ 25
SOPORTE PARA
EL CONSUMIDOR ................... 26
Horno de Pared Simple
JKS5000 de 27"
Horno de Pared Simple
JTS5000 de 30”
Horno de Pared Doble
JKD5000 de 27"
Horno de Pared Doble
JTD5000 de 30"
ESPAÑOL

2 49-2000254 Rev. 6
GRACIAS POR HACER QUE GE APPLIANCES SEA PARTE DE SU HOGAR.
Ya sea que haya crecido usando GE Appliances, o que ésta es su primera vez, nos complace
tenerlo en la familia.
Sentimos orgullo por el nivel de arte, innovación y diseño de cada uno de los electrodomésticos de
GE Appliances, y creemos que usted también. Entre otras cosas, el registro de su electrodoméstico
asegura que podamos entregarle información importante del producto y detalles de la garantía
cuando los necesite.
Registre su electrodoméstico GE ahora a través de Internet. Sitios Web y números telefónicos útiles
están disponibles en la sección de Soporte para el Consumidor de este Manual del Propietario.
También puede enviar una carta en la tarjeta de inscripción preimpresa que se incluye con
el material embalado.

49-2000254 Rev. 6 3
LEA Y GUARDE ESTAS INSTRUCCIONES
INFORMACIÓN IMPORTANTE DE SEGURIDAD
LEA TODAS LAS INSTRUCCIONES ANTES DE USAR ESTE ELECTRODOMÉSTICO
INFORMACIÓN DE SEGURIDAD
ADVERTENCIA
INSTRUCCIONES GENERALES DE SEGURIDAD
Ŷ8VHHVWHDSDUDWRVyORFRQHOREMHWLYRSDUDHOTXHIXH
creado, como se describe en el Manual del Propietario.
Ŷ6ROLFLWHTXHXQLQVWDODGRUFDOLILFDGRLQVWDOHVX
electrodoméstico y que esté adecuadamente conectado
a tierra, de acuerdo con las instrucciones de instalación
provistas.
Ŷ1RLQWHQWHUHSDUDURUHHPSOD]DUQLQJXQDSDUWHGHOKRUQR
a menos que se recomiende específicamente en este
manual. Cualquier otra reparación deberá ser realizada
por un técnico calificado.
Ŷ$QWHVGHUHDOL]DUFXDOTXLHUVHUYLFLRWpFQLFRGHVFRQHFWHHO
suministro de corriente desde el panel de distribución del
hogar, retirando el fusible o desconectando el disyuntor.
Ŷ6LHOHOHPHQWRSDUDFDOHQWDUHQHOHOHFWURGRPpVWLFR
desarrolla una mancha brillante o muestra otros signos de
GDxRQRXVHGLFKDiUHDGHOHOHFWURGRPpVWLFR8QSXQWR
brillante indica que el elemento puede fallar y presentar
una posible quemadura, incendio o descarga eléctrica.
Apague el electrodoméstico de inmediato y solicítele a un
técnico calificado del servicio que reemplace el elemento
de calentamiento.
Ŷ$VHJ~UHVHGHTXHWRGRVORVPDWHULDOHVGHOHPEDODMHVHDQ
retirados del electrodoméstico antes de su uso, a fin de
evitar que estos materiales se incendien.
Ŷ(YLWHUD\RQHVRLPSDFWRVVREUHODVSXHUWDVGHYLGULR
placas de cocción o paneles de control. Hacer esto podrá
producir la rotura de vidrios.
Ŷ1RFRFLQHVREUHXQSURGXFWRFRQXQYLGULRURWR6HSRGUiQ
producir descargas, incendios o cortes.
Ŷ1RGHMHDORVQLxRVVRORVRVLQDWHQFLyQHQXQiUHDGRQGH
XQDSDUDWRHVWpHQXVR1XQFDGHEHSHUPLWLUVHTXHVH
suban, sienten o paren en cualquier parte de este aparato.
Ŷ
PRECAUCIÓN
1RFRORTXHDUWtFXORVGHLQWHUpV
para los niños sobre los gabinetes que están sobre un
aparato – si los niños se trepan sobre el horno para llegar
a estos artículos podrían sufrir lesiones graves.
Ŷ1XQFDXVHHOHOHFWURGRPpVWLFRSDUDFDOHQWDUR
calefaccionar la habitación.
Ŷ6yORXVHDJDUUDGHUDVVHFDVODVDJDUUDGHUDVK~PHGDV
o mojadas colocadas en superficies calientes pueden
SURYRFDUTXHPDGXUDVGHYDSRU1RSHUPLWDTXHODV
agarraderas tengan contacto con las unidades de la
superficie ni con los elementos para calentar del horno.
1RXWLOLFHWRDOODVXRWUDVWHODVJUXHVDVHQOXJDUGHXQD
agarradera.
Ŷ1RWRTXHORVTXHPDGRUHVSODQFKDVHQDOJXQRV
PRGHORVSDUULOODVHQDOJXQRVPRGHORVODVXSHUILFLH
de cocción o los elementos calefactores del horno, ni
la superficie interior del horno. Estas superficies podrán
permanecer lo suficientemente caliente como para quemar
durante un período de tiempo prolongado luego de la
cocción, incluso aunque ya no parezcan estar encendidas
o calientes.
Ŷ'XUDQWH\GHVSXpVGHOXVRQRWRTXHQLSHUPLWDTXHWHODV
u otros materiales inflamables toquen cualquier área
interior del horno; espere hasta que haya pasado un
tiempo suficiente hasta que se enfríen. Otras superficies
del electrodoméstico se podrán calentar lo suficiente como
para ocasionar lesiones. Las superficies potencialmente
calientes incluyen quemadores o elementos calefactores,
SDUULOODVHQDOJXQRVPRGHORVVXSHUILFLHGHFRFFLyQ
aberturas de la ventilación del horno, superficies cercanas
a las aberturas, grietas alrededor de la puerta del horno,
partes con marcos metálicos por encima de la puerta,
cualquier protección trasera, o repisas ubicadas encima de
una superficie de cocción.
Ŷ1RXVHQLQJ~QWLSRGHSDSHOGHDOXPLQLRRUHYHVWLPLHQWR
para cubrir la parte inferior del horno o cualquier parte
del mismo, excepto como se describe en este Manual del
Propietario. Los revestimientos para horno pueden atrapar
el calor o derretirse, ocasionando daños sobre el producto
y el riesgo de descarga, humo o incendio.
Ŷ1RFDOLHQWHUHFLSLHQWHVFHUUDGRVGHDOLPHQWRV3RGUtD
haber una acumulación de presión en el recipiente y éste
podría explotar, provocando lesiones.
Ŷ&RFLQHODFRPLGDFRPSOHWDPHQWHSDUDHYLWDUTXHVH
SURGX]FDQHQIHUPHGDGHVDSDUWLUGHODFRPLGD(O86'$
\OD)'$EULQGDQODVUHFRPHQGDFLRQHVGHWHPSHUDWXUD
PtQLPDSDUDXQDFRPLGDVHJXUD8WLOLFHXQWHUPyPHWUR
para tomar la temperatura de la comida y haga controles
en diferentes ubicaciones.
ADVERTENCIA
/HDWRGDVODVLQVWUXFFLRQHVGHVHJXULGDGDQWHVGHXWLOL]DUHVWHSURGXFWR1RVHJXLUHVWDVLQVWUXFFLRQHV
puede generar un incendio, una descarga eléctrica, lesiones corporales o la muerte.
4 49-2000254 Rev. 6
LEA Y GUARDE ESTAS INSTRUCCIONES
INFORMACIÓN DE SEGURIDAD
ADVERTENCIA
INSTRUCCIONES DE SEGURIDAD DEL HORNO
Ŷ 0DQWpQJDVHDOHMDGRGHOKRUQRDODEULUODSXHUWDGHO
mismo. El aire caliente o el vapor que sale puede causar
quemaduras en las manos, rostro y/u ojos.
Ŷ 6LHOHOHPHQWRSDUDFDOHQWDUHQHOHOHFWURGRPpVWLFR
desarrolla una mancha brillante o muestra otros signos
GHGDxRQRXVHGLFKDiUHDGHOHOHFWURGRPpVWLFR8Q
punto brillante indica que el elemento para calentar
puede fallar y generar una posible quemadura, incendio
o descarga eléctrica. Apague el horno de inmediato y
solicite a un técnico calificado del servicio que reemplace
el elemento para calentar.
Ŷ (PSXMDUKDFLDDIXHUDORVHVWDQWHVKDVWDORVEORTXHRV
de detención o hasta la posición completamente abierta
es conveniente para levantar comidas pesadas. Esto
también es una precaución contra quemaduras por tocar
las superficies calientes de las puertas o las paredes del
horno.
Ŷ 0DQWHQJDGHVREVWUXLGDODYHQWLODFLyQGHOKRUQR
Ŷ 1XQFDFRORTXHORVXWHQVLOLRVGHFRFLQDSLHGUDVSDUD
pizza u horneado o cualquier otro tipo de aluminio o
cobertor en la base del horno. Estos ítems pueden
atrapar el calor o derretirse, ocasionando daños sobre el
producto y el riesgo de descargas, humo o incendios.
Ŷ
Coloque los estantes del horno en la ubicación deseada
mientras éste se encuentra frío. Si es necesario mover el
estante mientras el horno está caliente, tenga cuidado de
evitar tocar superficies calientes y evite que el mango de la
olla tenga contacto con el elemento calentador en el horno.
Ŷ 1RGHMHSURGXFWRVWDOHVFRPRSDSHOXWHQVLOLRVGHFRFLQDQL
comida en el horno cuando éste no se encuentre en uso.
Los
artículos guardados en el horno se pueden incendiar.
Ŷ 1XQFDDVHFRQODSXHUWDDELHUWD
Ŷ 0DQWHQJDHOKRUQROLEUHGHDFXPXODFLyQGHJUDVD/D
grasa del horno se puede incendiar.
Ŷ $OXVDUODVEROVDVSDUDFRFLQDURGRUDUHQHOKRUQRVLJD
las instrucciones del fabricante.
Ŷ PELIGRO DE DESCARGA O QUEMADURA: Antes de
reemplazar la bombilla de luz del horno, desconecte la
corriente eléctrica del horno desde el fusible principal o
desde el panel del disyuntor. Si esto no se cumple, se
podrá producir una descarga eléctrica o un incendio.
Ŷ
PRECAUCIÓN
RIESGO DE INCENDIO: La
tapa de vidrio y la bombilla de luz se deberán retirar
cuando estén frías. Tocar el vidrio caliente sin protección
en las manos o con una tela húmeda podrá ocasionar
quemaduras.
INFORMACIÓN IMPORTANTE DE SEGURIDAD
LEA TODAS LAS INSTRUCCIONES ANTES DE USAR ESTE ELECTRODOMÉSTICO
ADVERTENCIA
EN CASO DE INCENDIO, SIGA LOS SIGUIENTES PASOS
PARA EVITAR LA PROPAGACIÓN DEL FUEGO
Ŷ 1RXWLOLFHDJXDHQLQFHQGLRVGHJUDVD1XQFDOHYDQWH
una sartén en llamas. Apague los controles. Apague
una sartén en llamas sobre una unidad de superficie
cubriendo la sartén por completo con una tapa que
ajuste bien, una plancha para galletas o una bandeja
SODQD8WLOLFHXQTXtPLFRVHFRPXOWLXVRRXQH[WLQWRUGH
incendios de espuma.
Ŷ 6LKD\XQLQFHQGLRHQHOKRUQRGXUDQWHHOKRUQHDGR
apáguelo cerrando la puerta del horno y apagando el
control o usando un químico seco multiuso o un extintor
de incendios de espuma.
Ŷ 6LKD\XQLQFHQGLRHQHOKRUQRGXUDQWHODDXWROLPSLH]D
apague el horno y espere a que el incendio se consuma.
1RDEUDODSXHUWDGHOKRUQRDODIXHU]D El ingreso de aire
IUHVFRDWHPSHUDWXUDVGHDXWROLPSLH]DSXHGHSURYRFDU
XQDH[SORVLyQGHOODPDVGHVGHHOKRUQR1RVHJXLUHVWD
instrucción puede provocar quemaduras graves.
ADVERTENCIA
MANTENGA LOS MATERIALES INFLAMABLES ALEJADOS DE LA ESTUFA
Si esto no se cumple, se podrán sufrir lesiones personales graves o incendios.
Ŷ 1RDOPDFHQHRXWLOLFHPDWHULDOHVLQIODPDEOHVGHQWURGH
un horno o cerca de la estufa, tales como papel, plástico,
agarraderas, telas, recubrimientos de pared, cortinas y
gasolina u otros vapores y líquidos inflamables.
Ŷ 1XQFDXVHYHVWLPHQWDVKROJDGDVRDPSOLDVPLHQWUDV
utilice el aparato. Estas vestimentas pueden prenderse
fuego si entran en contacto con superficies calientes,
provocando quemaduras graves.
Ŷ 1RSHUPLWDTXHODJUDVDGHODFRFFLyQXRWURVPDWHULDOHV
inflamables se acumulen dentro de la estufa o en su
cercanía. La grasa dentro del horno o sobre la estufa
puede encenderse.
Ŷ 1RJXDUGHPDWHULDOHVLQIODPDEOHVQLtWHPVVHQVLEOHVDOD
temperatura dentro del electrodoméstico.
Ŷ /LPSLHODVFDPSDQDVGHYHQWLODFLyQGHIRUPDIUHFXHQWH
1RVHGHEHSHUPLWLUODDFXPXODFLyQGHJUDVDHQOD
campana o el filtro.
Ŷ (QDOJXQRVPRGHORVFuncionamiento Remoto (VWH
electrodoméstico permite su configuración para permitir
un funcionamiento remoto en cualquier momento.

49-2000254 Rev. 6 5
LEA Y GUARDE ESTAS INSTRUCCIONES
INFORMACIÓN DE SEGURIDAD
Cómo Retirar la Película Protectora de Envío y la Cinta de Embalaje
Con cuidado tome un extremo de la película protectora
de envío con los dedos y lentamente retire la misma de la
VXSHUILFLHGHOHOHFWURGRPpVWLFR1RXWLOLFHQLQJ~QSURGXFWR
filoso para retirar la película. Retire toda la película antes de
usar el electrodoméstico por primera vez.
Para asegurar que no haya daños sobre el acabado del
producto, la forma más segura de retirar el adhesivo de la cinta
de embalaje en electrodomésticos nuevos es aplicando un
detergente líquido hogareño para lavar platos. Aplique con una
tela suave y deje que se seque.
NOTA: El adhesivo deberá ser eliminado de todas las partes.
1RVHSXHGHUHWLUDUVLVHKRUQHDFRQpVWHGHQWUR
Tenga en cuenta las opciones de reciclaje del material de
embalaje de su electrodoméstico.
INFORMACIÓN IMPORTANTE DE SEGURIDAD
LEA TODAS LAS INSTRUCCIONES ANTES DE USAR ESTE ELECTRODOMÉSTICO
El equipo de acceso remoto instalado en este horno fue
probado y cumple con los límites establecidos para un
GLVSRVLWLYRGLJLWDOGHFODVH%VHJ~QODSDUWHGHOD1RUPDWLYD
GHOD)&&(VWRVOtPLWHVIXHURQGLVHxDGRVSDUD
(a) brindar una protección razonable contra interferencias
nocivas en una instalación residencial. Este equipo genera,
usa y puede emitir energía de radiofrecuencia y, si no se
instala y utiliza de acuerdo con las instrucciones, puede
ocasionar interferencias perjudiciales en las comunicaciones
de radio. Sin embargo, no se garantiza que no se presenten
interferencias en una instalación en particular. Si el equipo
provoca interferencias perjudiciales para la recepción de radio
o televisión, lo cual puede comprobar encendiendo y apagando
el equipo, se aconseja al usuario que intente corregir la
LQWHUIHUHQFLDFRQXQDGHODVVLJXLHQWHVPHGLGDV
Ŷ5HRULHQWHRUHXELTXHODDQWHQDUHFHSWRUD
Ŷ$XPHQWHODVHSDUDFLyQHQWUHHOHTXLSR\HOUHFHSWRU
Ŷ&RQHFWHHOHTXLSRDXQWRPDFRUULHQWHGHXQFLUFXLWRGLIHUHQWH
del tomacorriente al que se encuentra conectado el
receptor.
Ŷ3DUDVROLFLWDUD\XGDFRQVXOWHFRQHOSURYHHGRUPLQRULVWDRD
un técnico experimentado de radio/ TV.
(b) tolerar cualquier interferencia recibida, incluyendo las
interferencias que puedan provocar un funcionamiento no
deseado del dispositivo.
Observe que todos los cambios o modificaciones sobre el
dispositivo de comunicación inalámbrico instalado en este
horno que no estén expresamente aprobados por el fabricante
podrían anular la autoridad del usuario para operar el
equipamiento.
FORMA ADECUADA DE DESCARTAR SU ELECTRODOMÉSTICO
'HVFDUWHRUHFLFOHVXHOHFWURGRPpVWLFRGHDFXHUGRFRQODV5HJXODFLRQHV)HGHUDOHV\/RFDOHV&RPXQtTXHVHFRQODV
autoridades locales para descartar o reciclar su electrodoméstico de forma ambientalmente segura.
ADVERTENCIA
INSTRUCCIONES DE SEGURIDAD DEL HORNO
CON LIMPIEZA AUTOMÁTICA
La función de limpieza automática usa el horno en temperaturas lo suficientemente altas como para consumir la suciedad de
comida que haya dentro del horno. Para un funcionamiento seguro, siga estas instrucciones.
Ŷ 1RWRTXHODVVXSHUILFLHVGHOKRUQRGXUDQWHHOFLFORGH
limpieza automática. Mantenga a los niños alejados del
horno durante la limpieza automática. Si no se siguen
estas instrucciones, se podrán producir quemaduras.
Ŷ $QWHVGHXWLOL]DUHOFLFORGHOLPSLH]DDXWRPiWLFDUHWLUH
las ollas, estantes de metal brillante del horno y otros
utensilios que haya en el horno. Sólo se podrán dejar
dentro del horno los estantes para horno de color oscuro
FRQUHYHVWLPLHQWRGHSRUFHODQD1RKDFHUHVWRSRGUi
ocasionar daños sobre estos ítems y sobre el horno, y
presentar una posible quemadura o riesgo de incendio.
Ŷ $QWHVGHXWLOL]DUHOFLFORGHOLPSLH]DDXWRPiWLFDOLPSLH
ODJUDVD\UHVWRVGHFRPLGDTXHKD\DHQHOKRUQR8QD
cantidad excesiva de grasa se puede incendiar, lo cual
puede producir daños con humo en su hogar.
Ŷ 6LHOPRGRGHOLPSLH]DDXWRPiWLFDIXQFLRQDGHIRUPD
incorrecta, apague el horno y desconecte el suministro de
corriente. Solicite el servicio de un técnico calificado.
Ŷ 1RXVHXQDFDSDSURWHFWRUDSDUDFXEULUHOKRUQRQL
use limpiadores de horno comerciales, a menos que
estén certificados para su uso en un horno con limpieza
automática.
Ŷ 1ROLPSLHODVMXQWDVGHODSXHUWD/DVMXQWDVGHODSXHUWD
son esencial para un buen sellado. Se debe tener
cuidado de no frotar, dañar ni mover las junta.
Ŷ IMPORTANTE: La salud de algunas aves es
extremadamente sensible a los humos emitidos durante
el ciclo de limpieza automática de cualquier estufa.
Coloque las aves en otra habitación bien ventilada.
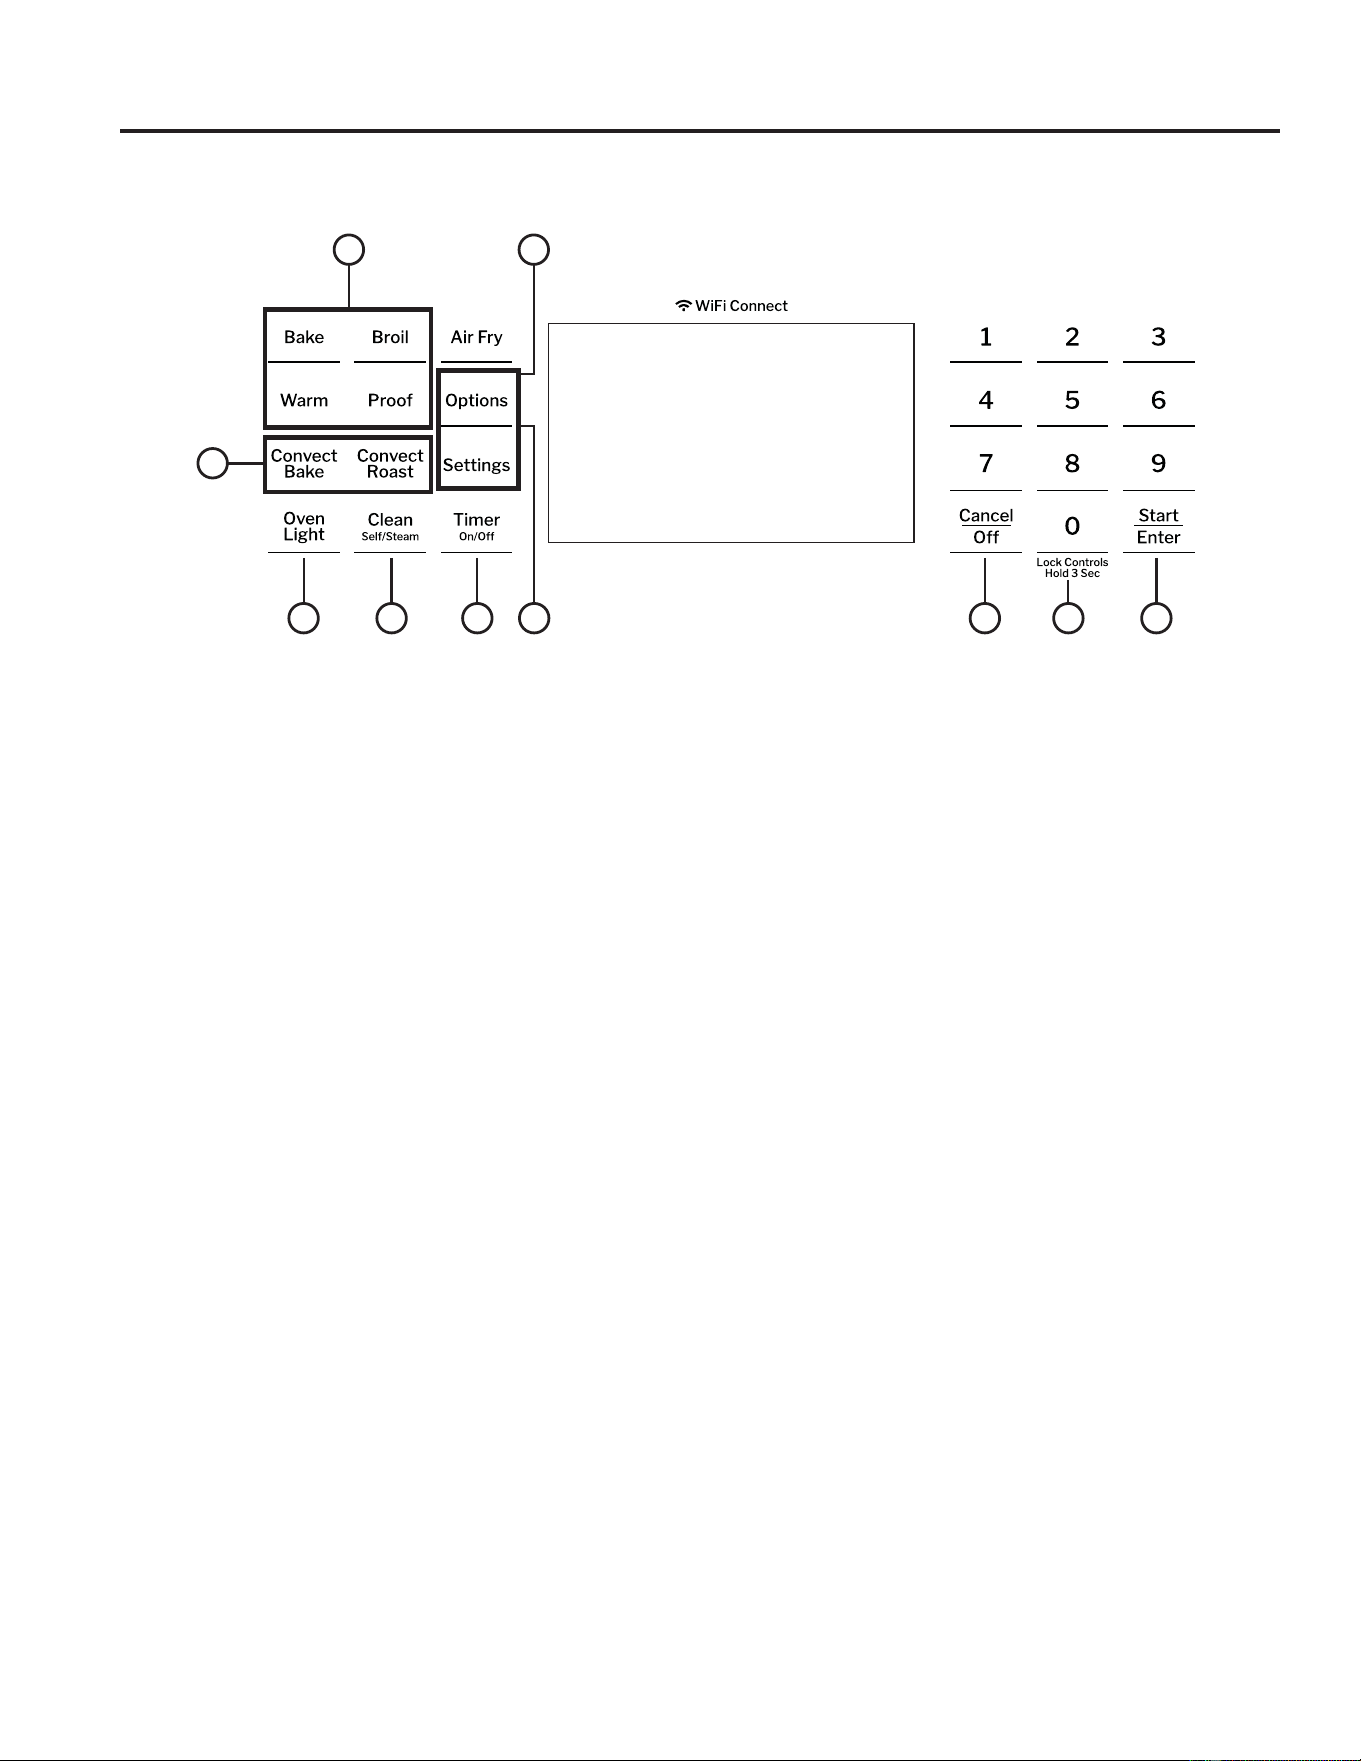
6 49-2000254 Rev. 6
Controles del Horno de Pared Simple
USO DEL HORNO: Controles del Horno de Pared Simple
Las formas del botón de control son representativas; su horno puede contar con formas de botones alternativas.
Los botones de control fueron diseñados para estar visibles cuando la puerta del horno es abierta o si los controles
son presionados dentro del área de un botón.
1. Convection Cooking Modes (Modos de
Cocción por Convección): Los modos de
cocción por convección utilizan una circulación de aire
incrementada para mejorar el rendimiento. El tipo de
beneficio depende del modo. Su horno cuenta con los
VLJXLHQWHVPRGRVGHFRFFLyQSRUFRQYHFFLyQ&RQYHFWLRQ
%DNH+RUQHDUSRU&RQYHFFLyQ\&RQYHFWLRQ5RDVW
$VDUSRU&RQYHFFLyQ3DUDPiVLQIRUPDFLyQFRQVXOWHOD
sección de Modos de Cocción.
2. Traditional Cooking Modes (Modos de
Cocción Tradicionales): Su horno cuenta con los
VLJXLHQWHVPRGRVGHFRFFLyQWUDGLFLRQDOHV%DNH+RUQHDU
%URLO$VDU3URRI/HXGDU\:DUP&DOHQWDU3DUDPiV
información, consulte la sección de Modos de Cocción.
3. Clean (Limpieza): El horno cuenta con dos modos
GHOLPSLH]D6HOI&OHDQ/LPSLH]D$XWRPiWLFD\6WHDP
&OHDQ/LPSLH]DFRQ9DSRU3DUDDFFHGHUDLQIRUPDFLyQ
importante sobre el uso de estos modos, consulte la
sección de Limpieza del Horno.
4. Start/Enter (Iniciar/ Ingresar): Se deberá
presionar para comenzar cualquier función de cocción,
limpieza o por tiempo. NOTA: Si la pantalla y las teclas
se atenúan, abrir la puerta del horno o presionar cualquier
tecla activarán e iluminarán el control.
5. Cancel/Off (Cancelar/ Apagar): Cancelar
72'$6ODVRSHUDFLRQHVGHOKRUQRH[FHSWRHOUHORM\HO
temporizador.
6. Timer (Temporizador): Funciona como un
temporizador con cuenta regresiva. Presione la tecla
Timer (Temporizador) y utilice las teclas numéricas para
programar el tiempo en horas y minutos. Presione la
tecla Start/Enter (Iniciar/ Ingresar). El horno continuará
funcionando cuando la cuenta regresiva del temporizador
se haya completado. Para apagar el temporizador,
presione la tecla Timer (Temporizador).
7. Air Fry (Freír con Aire): Esta función le permite
DOXVXDULRDFFHGHUDOPRGRGHFRFFLyQ$LU)U\)UHtU
con Aire). Para más información, consulte la sección de
Modos de Cocción.
8. Lock Controls (Controles de Bloqueo):
Bloquean el control de modo que al presionar las teclas
no se activen los controles. Mantenga presionada la tecla
0 durante tres segundos para bloquear o desbloquear el
control. La función Cancel/Off (Cancelar/ Apagar) siempre
está activa, incluso cuando el control está bloqueado.
9. Oven Light (Luz del Horno): Enciende o
DSDJDODOX]HVGHOKRUQR
10. Options (Opciones) y Settings
(Configuraciones): /DVWHFODV2SWLRQV2SFLRQHV
\6HWWLQJV&RQILJXUDFLRQHVDEUHQPHQ~VPiVGHWDOODGRV
en la pantalla, los cuales permiten acceso a funciones
adicionales y modos de cocción. Para cada uno, seleccione
la función en la pantalla a través de la tecla numérica
asociada. Puede salir en cualquier momento presionando la
tecla Options (Opciones) o Settings (Configuraciones)
nuevamente. Para más detalles, consulte las secciones de
Configuraciones, Opciones y Modos de Cocción.
1
2
7
4895
36
10
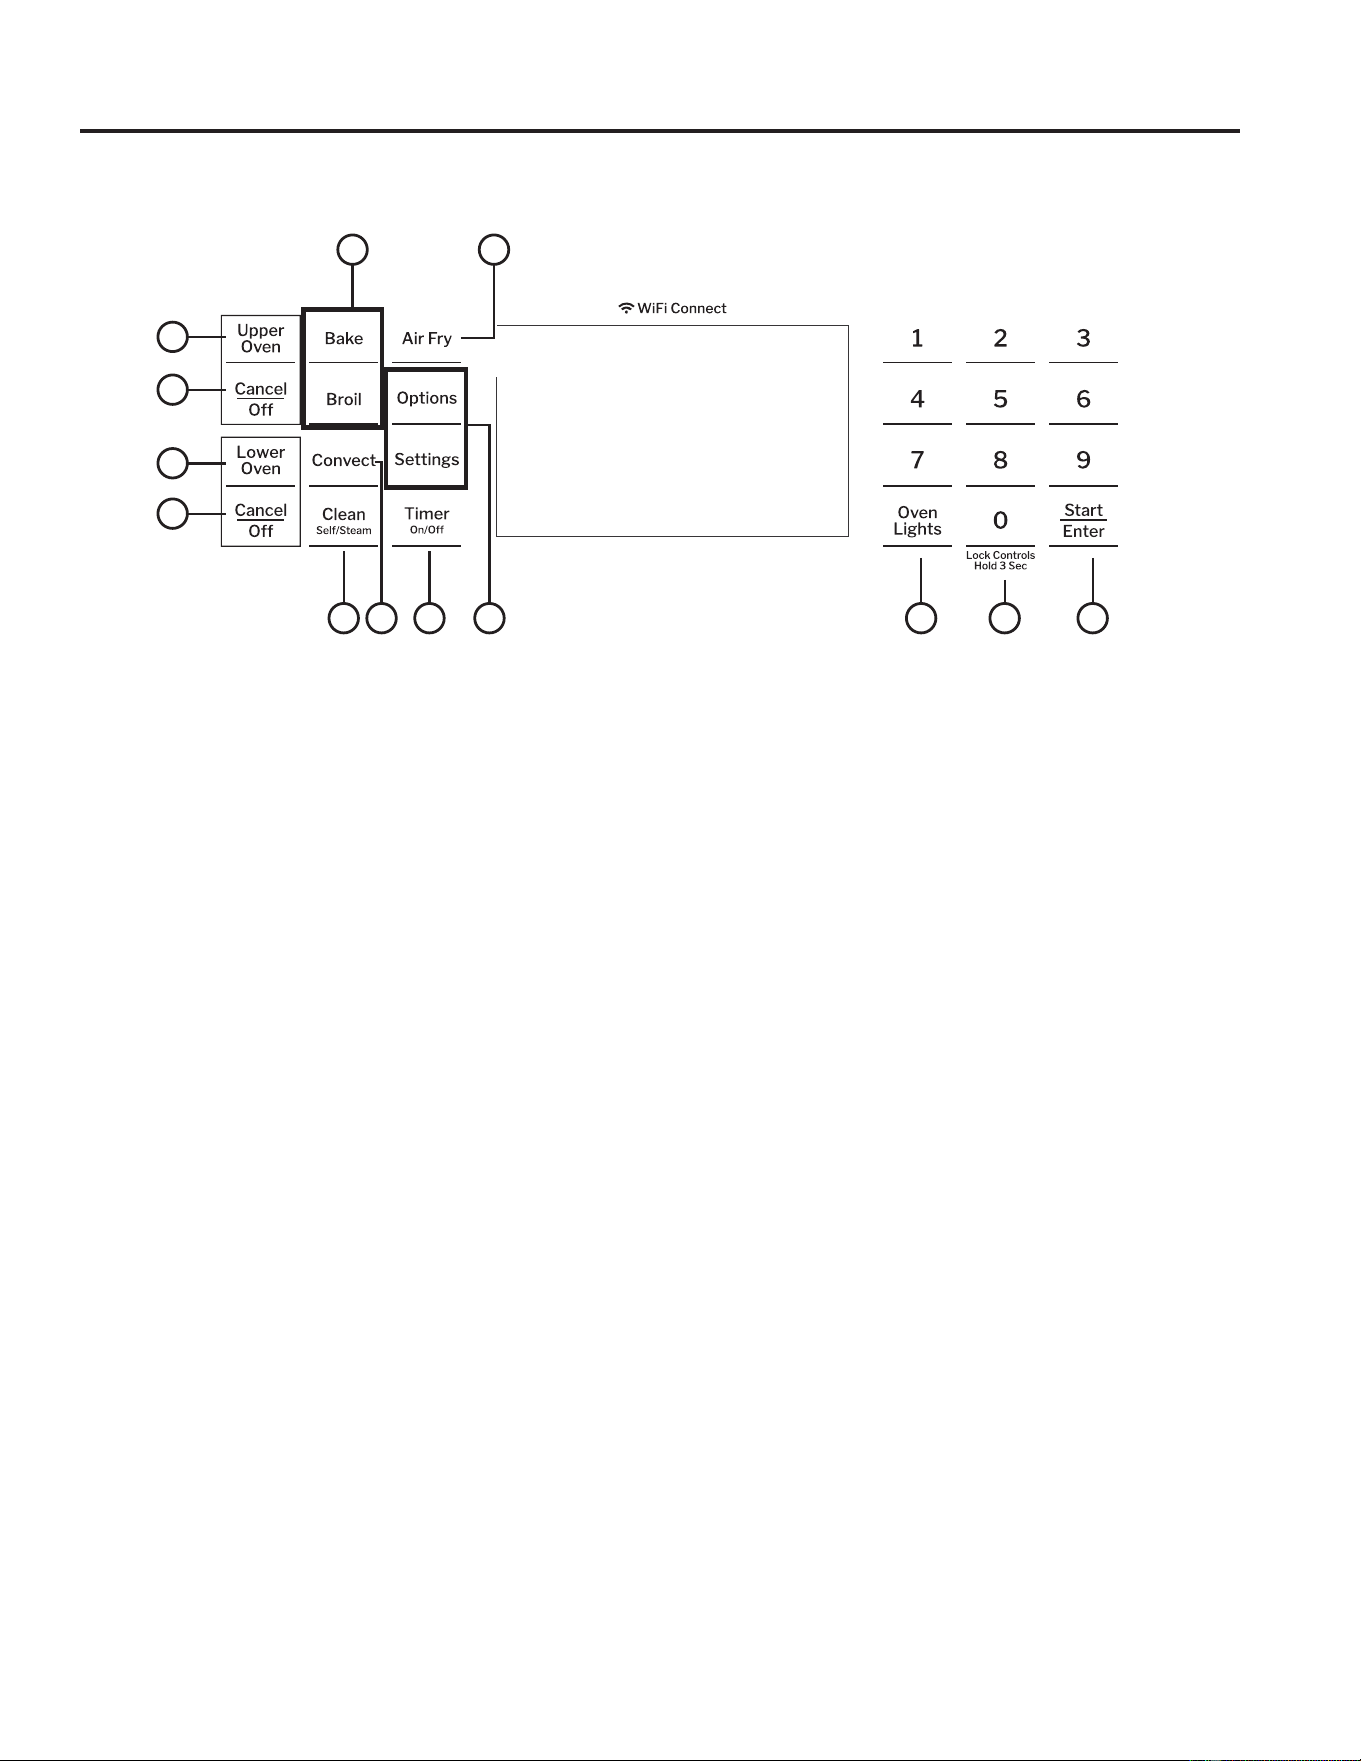
49-2000254 Rev. 6 7
Controles del Horno de Pared Doble
USO DEL HORNO:&RQWUROHVGHO+RUQRGH3DUHG'REOH
Las formas del botón de control son representativas; su horno puede contar con formas de botones alternativas.
Los botones de control fueron diseñados para estar visibles cuando la puerta del horno es abierta o si los controles
son presionados dentro del área de un botón.
1. Upper Oven and Lower Oven (Horno
Superior y Horno Inferior): 'HVLJQDTXpKRUQR
operarán los controles. Seleccione un horno antes de
seguir los pasos para comenzar con una cocción o con el
modo de limpieza.
2. Convection Cooking Modes (Modos de
Cocción por Convección) (sólo el horno
Superior): Los modos de cocción por convección
utilizan una circulación de aire incrementada para mejorar
el rendimiento. Para más información, consulte la sección
de Modos de Cocción.
3. Traditional Cooking Modes (Modos de
Cocción Tradicionales): Su horno cuenta con
ORVVLJXLHQWHVPRGRVGHFRFFLyQWUDGLFLRQDOHV%DNH
+RUQHDU%URLO$VDUDQG:DUP&DOHQWDULQIRUPDFLyQ
consulte la sección de Modos de Cocción.
4. Clean (Limpieza): El horno podrá contar con dos
PRGRVGHOLPSLH]D6HOI&OHDQ/LPSLH]D$XWRPiWLFD
\6WHDP&OHDQ/LPSLH]DDO9DSRU3DUDDFFHGHUD
información importante sobre el uso de estos modos,
consulte la sección de Limpieza del Horno.
5. Start/Enter (Iniciar/ Ingresar): Se deberá
presionar para comenzar cualquier función de cocción,
limpieza o por tiempo. NOTA: Si la pantalla y las teclas
se atenúan, abrir la puerta del horno o presionar cualquier
tecla activarán e iluminarán el control.
6. Cancel/Off (Cancelar/ Apagar): Cancelar
72'$6ODVRSHUDFLRQHVGHOKRUQRH[FHSWRHOUHORM\HO
temporizador.
7. Timer (Temporizador): Funciona como un
temporizador con cuenta regresiva. Presione la tecla
Timer (Temporizador) y utilice las teclas numéricas para
programar el tiempo en horas y minutos. Presione la
tecla Start/Enter (Iniciar/ Ingresar). El horno continuará
funcionando cuando la cuenta regresiva del temporizador
se haya completado. Para apagar el temporizador,
presione la tecla Timer (Temporizador).
8. Air Fry (Freír con Aire): Esta función le permite
DOXVXDULRDFFHGHUDOPRGRGHFRFFLyQ$LU)U\)UHtU
con Aire). Para más información, consulte la sección de
Modos de Cocción.
9. Oven Light(s) (Luz(es) del Horno):
(QFLHQGHRDSDJDODOX]HVGHOKRUQR6LHOFRQWUROGH
VXKRUQRQRFXHQWDFRQODWHFODWiFWLO2YHQ/LJKW/X]GHO
Horno), una perilla encenderá la luz del horno.
10. Lock Controls (Controles de Bloqueo):
Bloquean el control de modo que al presionar las teclas
no se activen los controles. Mantenga presionada la tecla
0 durante tres segundos para bloquear o desbloquear el
control. La función Cancel/Off (Cancelar/ Apagar) siempre
está activa, incluso cuando el control está bloqueado.
11. Options and Settings (Opciones y
Configuraciones): /DVWHFODV2SWLRQV2SFLRQHV
\6HWWLQJV&RQILJXUDFLRQHVDEUHQPHQ~VPiVGHWDOODGRV
en la pantalla, los cuales permiten acceso a funciones
adicionales y modos de cocción. Para cada uno,
seleccione la función en la pantalla a través de la tecla
numérica asociada. Puede salir en cualquier momento
SUHVLRQDQGRODWHFOD2SWLRQV2SFLRQHVR6HWWLQJV
&RQILJXUDFLRQHVQXHYDPHQWH3DUDPiVGHWDOOHV
consulte las secciones de Configuraciones, Opciones y
Modos de Cocción.
1
1
6
6
3
7
259
4
8
10
11

8 49-2000254 Rev. 6
Options (Opciones)
USO DEL HORNO:2SWLRQV2SFLRQHV
* Se requiere el uso de dispositivos y de una red WiFi hogareña que sean compatibles con Apple o Android.
Settings (Configuraciones)
La tecla de opciones abre un menú con más modos de cocción cuando el horno está apagado. Abre un menu con funciones
adicionales si un modo de cocción ya está en proceso. Puede salir del menú en cualquier momento presionando la tecla Options
(Opciones) nuevamente.
Primero deberá seleccionar un modo (hornear, hornear por convección, dorar por convección) y luego seleccionar
Options (Opciones) para acceder a las siguientes funciones.
Cook Time (Tiempo de Cocción)
Cuenta el tiempo de cocción y apaga el horno cuando el
tiempo de cocción está completo. Inicie el modo para hornear
o calentar, pero no presione Start (Iniciar). Presione la tecla
Options (Opciones), siga las instrucciones en pantalla y use
las teclas numéricas para programar un tiempo de cocción en
horas y minutos, y luego presione Start (Iniciar).
Delay Time (Tiempo de Retraso)
*HQHUDXQUHWUDVRFXDQGRHOKRUQRHVHQFHQGLGR8VHHVWD
tecla para configurar el momento en que desee que el horno
VHLQLFLH6HOHFFLRQHXQPRGRGHFRFFLyQGHVHDGR8VHOD
tecla numérica para programar una temperatura de horneado.
Presione la tecla Options (Opciones) y seleccione Delay
Time (Tiempo de Retraso)8VHODVWHFODVQXPpULFDVSDUD
programar la hora del día en que desee que el horno se
encienda, y luego presione Start/Enter (Iniciar/ Ingresar). Si lo
desea, con los modos de cocción también se podrá programar
un tiempo de cocción. Siga las instrucciones de Cook Time
7LHPSRGH&RFFLyQSDUDFRQILJXUDUHVWDIXQFLyQ La función
'HOD\5HWUDVRQRHVWiGLVSRQLEOHHQWRGRVORVPRGRV
NOTA:$OXVDUODIXQFLyQ'HOD\7LPH7LHPSRGH5HWUDVRODV
comidas que se echan a perder rápidamente, tales como leche,
huevo, pescado, rellenos, ave y cerdo, no se deberán dejar
reposar por más de 1 hora antes y después de la cocción. La
temperatura ambiente estimula el desarrollo de bacterias nocivas.
Asegúrese de que la luz del horno esté apagada, ya que el calor
de la lámpara acelerará el crecimiento de bacterias nocivas.
Oven Probe (Sonda del Horno) (superior
sólo en modelos de horno doble)
NOTA: Sólo accesible a través de los modos de cocción
tradicional y por convección.
Monitorea la temperatura interna de la comida y apaga el horno
cuando la comida alcanza la temperatura programada. Inserte
la sonda, presione el modo de cocción deseado, y programe
la temperatura de la sonda. Para más información, consulte la
sección de Modos de Cocción. La sonda sólo puede ser usada
FRQODVIXQFLRQHV%DNH+RUQHDU&RQYHFWLRQ%DNH+RUQHDU
SRU&RQYHFFLyQ\&RQYHFWLRQ5RDVW'RUDUSRU&RQYHFFLyQ
/DVWHFODV2SWLRQV2SFLRQHV\6HWWLQJV&RQILJXUDFLRQHVDEUHQPHQ~VPiVGHWDOODGRVHQODSDQWDOODORVFXDOHVSHUPLWHQ
acceso a funciones adicionales. Para cada uno, seleccione la función en la pantalla a través de la tecla numérica asociada. Puede
salir en cualquier momento presionando la tecla Options (Opciones) o Settings (Configuraciones) nuevamente.
Conexión WiFi y Acceso Remoto
Su horno de está diseñado para brindarle una comunicación
recíproca entre su electrodoméstico y dispositivos inteligentes.
Mediante el uso de las funciones WiFi Connect, usted podrá
controlar funciones esenciales de su horno tales como las
configuraciones de temperatura, temporizadores y modos de
cocción, utilizando su teléfono inteligente o tableta*.
Seleccione Settings (Configuraciones), luego WiFi y luego
siga las instrucciones de la aplicación de su teléfono. Es
necesario activar la función WiFi antes de usar Remote Enable
$FFHVR5HPRWRHQVXKRUQR
Conexión de su Horno con Opción de WiFi Connect
Qué necesitará
Su horno de GE Appliances utiliza su red de WiFi hogareña
existente para realizar la comunicación entre el electrodoméstico
y su dispositivo inteligente. A fin de configurar su horno de GE
$SSOLDQFHVXVWHGQHFHVLWDUiUHXQLUFLHUWDLQIRUPDFLyQ
1. Cada horno de GE Appliances cuenta con una etiqueta
informativa del electrodoméstico conectado, que incluye
,'GH83'GHO(OHFWURGRPpVWLFReVWHHVXQGHWDOOH
importante que necesitará para realizar la conexión al
electrodoméstico. La etiqueta está ubicada normalmente
dentro de la puerta del horno o en el cajón.
2. Su teléfono inteligente o tableta deben estar preparados con
la capacidad de acceder a Internet y descargar aplicaciones.
8VWHGGHEHUiFRQRFHUODFRQWUDVHxDGHOHQUXWDGRU:L)LGH
su hogar. Tenga esta contraseña a mano al configurar el
horno de GE Appliances.
Conexión de su horno de GE Appliances
1. A través de su teléfono inteligente o tableta, visite
GEAppliances.com/connect para aprender más sobre las
funciones del electrodoméstico conectado y para descargar
la aplicación correspondiente.
2. Siga las instrucciones en pantalla de la aplicación para
conectar su horno de GE Appliances.
8QDYH]TXHHOSURFHVRVHKD\DFRPSOHWDGRODOX]
de conexión ubicada en la pantalla de su horno GE
Appliances, permanecerá en sólido y la aplicación
confirmará que usted está conectado.
Contains FCC: ZKJ-WCATA009
UPD ID: XX-XX-XX-XX-XX-XX
PT. NO. XXXXXXXXXXXX
Contains IC: 10229A-WCATA009
MAC ID: D8-28-C9-XXXXXXXX
Connected Appliance Information
Ejemplo de Etiqueta

49-2000254 Rev. 6 9
USO DEL HORNO:6HWWLQJV&RQILJXUDFLRQHV
Settings (Configuraciones) (Cont.)
Conexión WiFi y Acceso Remoto (Cont.)
4. Si la luz de conexión no se enciende o está titilando, siga
las instrucciones en la aplicación para volver a realizar
la conexión. Si los problemas continúan, comuníquese al
&RQQHFWHG&DOO&HQWHU&HQWURGH&RQH[LyQGH/ODPDGDV
al 1.866.626.2000 y solicite asistencia en relación a la
conectividad inalámbrica del horno.
Para conectar dispositivos inteligentes adicionales, realice la
desconexión de la red WiFi y el primer dispositivo, luego vuelva
a realizar la conexión a la red WiFi y repita los pasos 1 y 2. La
unidad sólo podrá ser conectada a un dispositivo por vez.
Observe que todos los cambios o modificaciones al dispositivo
de acceso remoto instalado en este horno que no están
expresamente aprobados por el fabricante podrían anular la
autoridad del usuario para operar el equipamiento.
INICIO DEL HORNO EN FORMA REMOTA
Para poder iniciar el horno en forma remota una vez conectado
a WiFi, presione la tecla Remote Enable (Acceso Remoto)
y el ícono se encenderá en la pantalla. El horno puede ser
iniciado ahora de forma remota con un dispositivo conectado.
El ícono deberá estar iluminado para iniciar el horno de
IRUPDUHPRWD1RVHUHTXLHUHHOtFRQR para modificar la
temperatura del horno mientras esté funcionando, configurar un
temporizador o apagar el horno desde la aplicación del teléfono
mientras el ícono muestre que está Conectado a WiFi.
3DUDGHVFRQHFWDUVXWHOpIRQRGH5HPRWH(QDEOH$FFHVR
Remoto Activado), presione la tecla Remote Enable (Acceso
Remoto Activado) y el ícono se apagará.
NOTA: Las comidas que se echan a perder rápidamente,
tales como leche, huevos, pescado, rellenos, ave y cerdo, no
se deberán dejar reposar por más de 1 hora antes y después
de la cocción. La temperatura ambiente estimula el desarrollo
de bacterias nocivas. Asegúrese de que la luz del horno esté
apagada, ya que el calor de la lámpara acelerará el crecimiento
de bacterias nocivas.
Clock (Reloj)
Esta configuración ajusta el tiempo del reloj del horno. Presione
la tecla Settings (Configuraciones) y seleccione Clock
(Reloj). Seleccione Set Clock (Configurar Reloj) y siga las
instrucciones para configurar el reloj. Esta función también
especifica cómo se mostrará la hora del día. Puede seleccionar
HOUHORMFRQKRUDHVWiQGDUGHKRUDV+ODKRUDPLOLWDU
GHKRUDV+RTXHQRVHH[KLEDQLQJ~QUHORM2II
$SDJDGR3UHVLRQHODWHFODSettings (Configuraciones),
seleccione Set Clock (Configurar Reloj) y seleccione la
opción 12/24 u On/Off (Encender/ Apagar).
Auto Conv (Conversión Automática)
$OXVDUODVRSFLRQHVGHFRFFLyQ&RQYHFWLRQ%DNH+RUQHDUSRU
&RQYHFFLyQ$XWR5HFLSH&RQYHUVLRQ&RQYHUVLyQGH5HFHWD
Automática) convertirá de forma automática las temperaturas
de horneado regular ingresadas a temperaturas de cocción
de horneado por convección cuando se active. Se debe
observar que esta opción no convierte los tiempos de cocción
del horneado por convección, sino sólo las temperaturas.
Esta función podrá ser encendida o apagada. Seleccione
Settings (Configuraciones) y Auto Conversion (Conversión
Automática), y luego siga las indicaciones para activar o
desactivar esta función.
Auto Off (Apagado Automático)
Esta función apaga el horno luego de 12 horas de
funcionamiento continuo. Podrá estar activada o desactivada.
Seleccione Settings (Configuraciones) y Auto Off (Apagado
Automática) para activar o desactivar esta función.
Sound (Sonido)
Podrá ajustar el volumen y el tipo de alerta que su dispositivo
utilice. Seleccione Settings (Configuraciones) y Sound
(Sonido). Siga las instrucciones para realizar ajustes de
volumen o para cambiar entre tonos de alerta continuos o
VLPSOHV8QDFRQILJXUDFLyQFRQWLQXDVHJXLUiKDFLHQGRTXHXQ
tono suene hasta que un botón del control sea presionado. El
volumen del tono del horno podrá ser ajustado. El control hará
que el tono del horno suene en el nuevo nivel de volumen cada
vez que el nivel de sonido sea modificado.
F/C (Fahrenheit o Celsius)
El control del horno está configurado para su uso con
WHPSHUDWXUDV)DKUHQKHLW)SHURSXHGHVHUPRGLILFDGR
DWHPSHUDWXUDV&HOVLXV&6HOHFFLRQHSettings
(Configuraciones) y F/C para alternar entre las escalas de
temperatura exhibidas.
Adjust the Oven temperature (Ajuste de la
Temperatura del Horno)
Esta función permite que la temperatura de horneado del horno
y de horneado por convección sean ajustadas hasta 35°F más
FDOLHQWHR)PiVIUtD8VHHVWDIXQFLyQVLFRQVLGHUDTXHOD
temperatura de su horno está demasiado caliente o demasiado
fría y desea modificarla. Este ajuste afecta los modos Bake
+RUQHDU\&RQYHFWLRQ%DNH+RUQHDUSRU&RQYHFFLyQ
1LQJ~QRWURPRGRGHFRFFLyQVHYHDIHFWDGR Seleccione
Settings (Configuraciones) y Oven Adjust (Ajuste del
Horno) para agregar More Heat (Más Calor) o Less Heat
(Menos Calor) y luego presione Save (Guardar) SDUDKRUQRV
GREOHVXVHODVHOHFFLyQGHOPHQ~GH8SSHU2YHQ+RUQR
6XSHULRUR/RZHU2YHQ+RUQR,QIHULRUFRUUHVSRQGLHQWH
DOKRUQRTXHVHUiFRQILJXUDGR1RXVHWHUPyPHWURVWDOHV
como los que se encuentran en tiendas, para controlar la
configuración de temperatura del horno. Estos termómetros
pueden variar entre 20 y 40 grados.
Oven Info (Información del Horno)
Seleccione Settings (Configuraciones) y Oven Info
(Información del Horno)SDUDPRVWUDUHO1~PHURGH0RGHOR\
la Versión del Software.
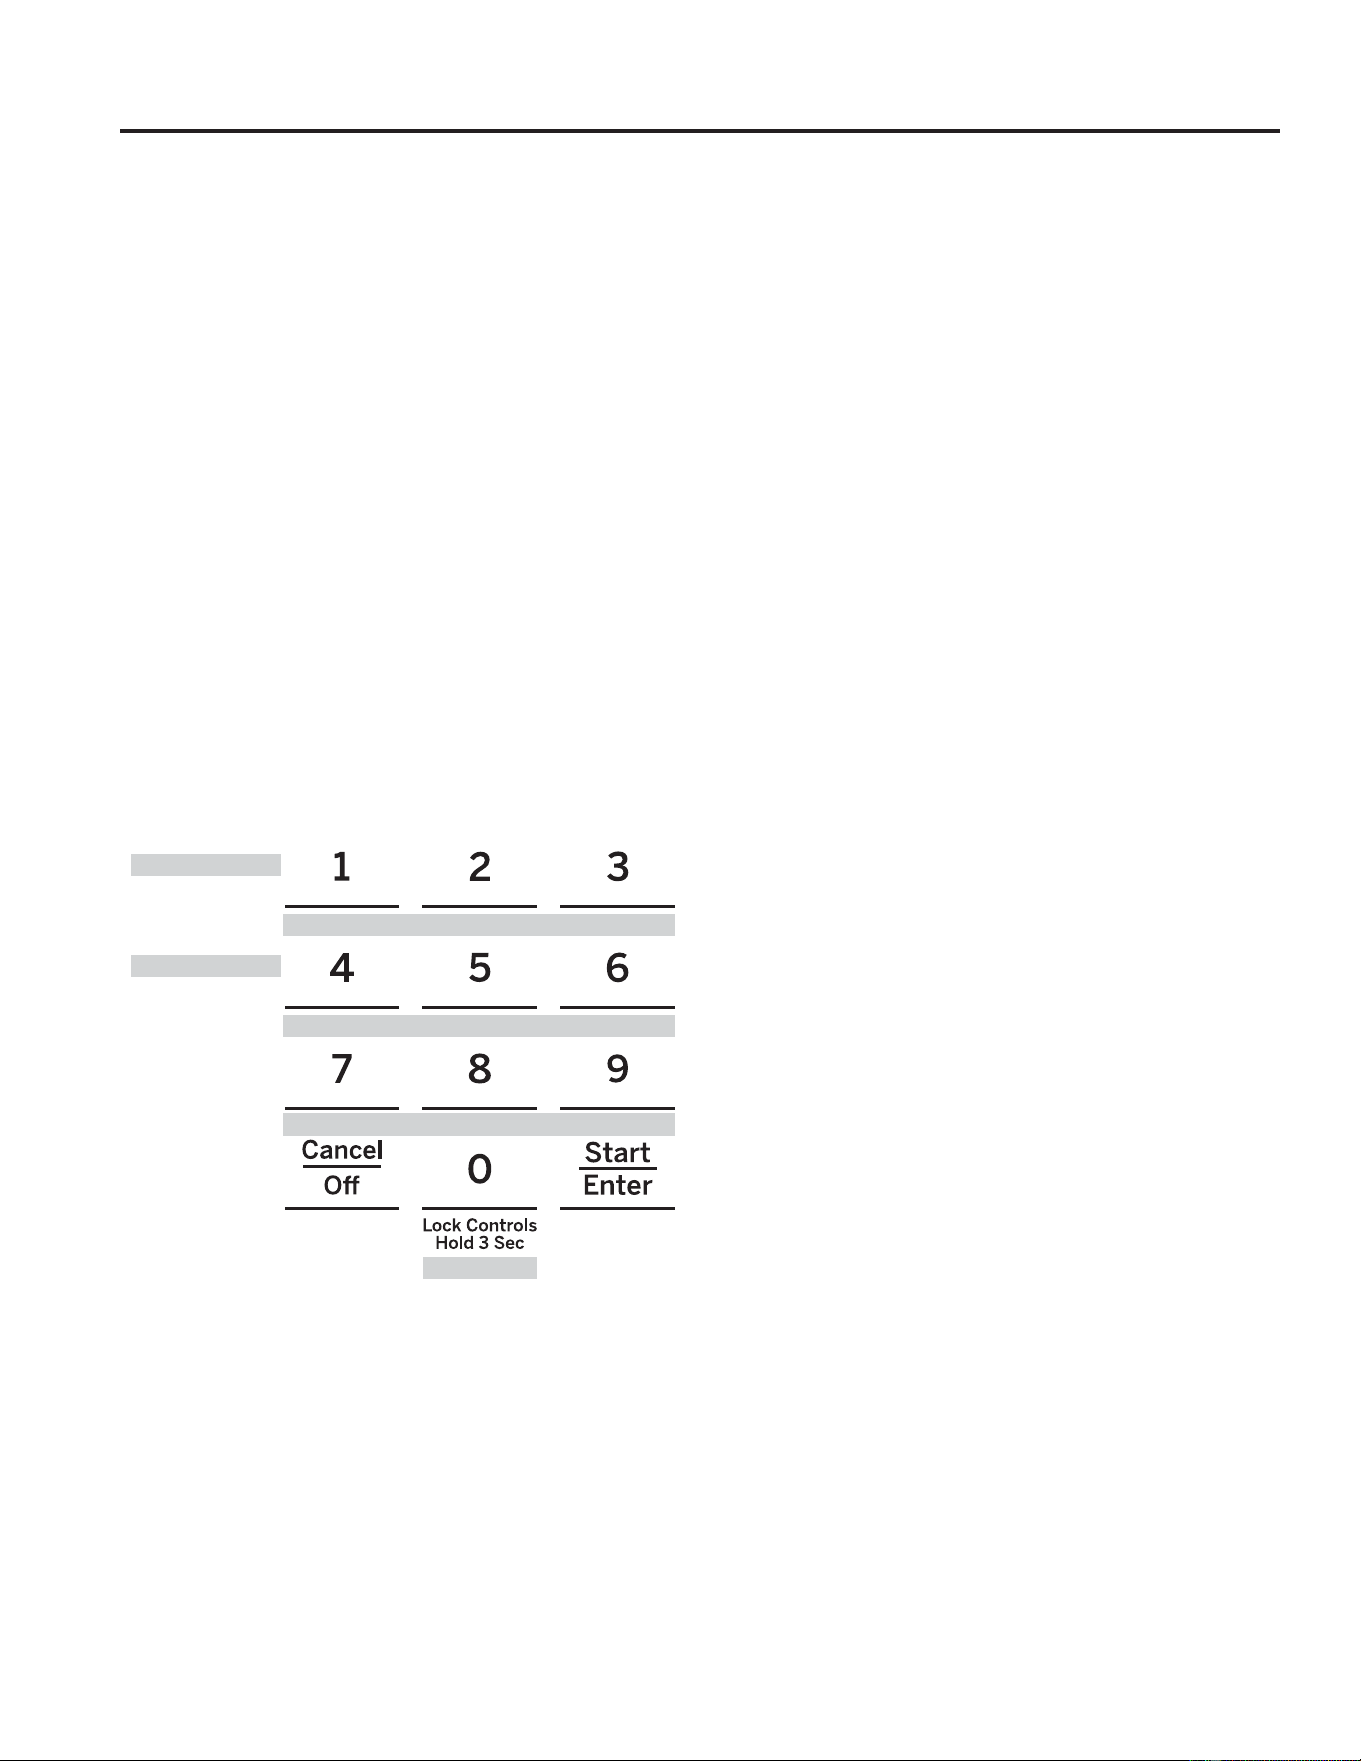
10 49-2000254 Rev. 6
Modo Sabático
USO DEL HORNO: Modo Sabático
Modo Sabático
(OPRGRVDEiWLFRGHVDFWLYDODVOXFHVGHOKRUQRODOX]GHOKRUQRQRVHHQFHQGHUiFXDQGRODSXHUWDVHDDELHUWDWRGRVORV
VRQLGRVHOFRQWUROQRHPLWLUiXQSLWLGRFXDQGRVHSUHVLRQHXQERWyQORVPRGRVGH$VDGR&DOHQWDU/HXGDU7LHPSRGH
Cocción, Temporizador, Reloj, y las funciones de Tiempo Retrasado. El modo sabático sólo puede ser usado con la función Bake
+RUQHDU(VWDIXQFLyQVHDFWLYDFRQIRUPHFRQORVUHTXLVLWRV6DEiWLFRV-XGtRV
Configuración del Modo Sabático
Presione la tecla Settings (Configuraciones), seleccione
Sabbath (Sabático) y seleccione Turn On (Encender)8Q
solo corchete “]” aparecerá en la pantalla, indicando que el
modo sabático fue configurado. El reloj no aparecerá.
Inicio del Horneado Continuo
1. Presione la tecla Bake (Hornear)3DUDKRUQRVGREOHV
permite utilizar el horno superior. Si se desea usar el
+RUQR,QIHULRUSUHVLRQH/RZHU2YHQ+RUQR,QIHULRU\
OXHJR%DNH+RUQHDU
2. Si la temperatura deseada es 350ºF, presione Start/
Enter (Iniciar/Ingresar). Si se desea una temperatura de
cocción diferente, use las teclas numéricas de 1 a 5 para
seleccionar una temperatura de cocción predeterminada,
y luego presione Start/Enter (Iniciar/Ingresar). Consulte
el siguiente gráfico para determinar qué tecla configura la
temperatura de cocción deseada.
Luego de una demora, un segundo corchete “] [“ aparecerá en
la pantalla, indicando que el horno está horneando.
Ajuste de Temperatura
Presione Bake (Hornear) RSUHVLRQH/RZHU2YHQ+RUQR
,QIHULRU\OXHJR%DNH+RUQHDUSDUDXVDUHOKRUQRLQIHULRUHQ
un unidad con horno doble), use las teclas numéricas de 1 a 5
para seleccionar una temperatura de cocción actual diferente,
y presione
Start/Enter (Iniciar/Ingresar).
Inicie un Horneado por Tiempo
1. Presione la tecla Bake (Hornear).
2. Si la temperatura deseada es de 350ºF, use las teclas
numéricas de 6 a 0 para seleccionar un tiempo de cocción.
Si se desea una temperatura de cocción diferente a
350ºF, use las teclas numéricas de 1 a 5 para seleccionar
una temperatura de cocción predeterminada, y luego
seleccione el tiempo de cocción. Consulte el gráfico
en esta página para determinar qué tecla configura la
temperatura de cocción deseada y el tiempo de cocción.
3. Presione Start/Enter (Iniciar/Ingresar).
Luego de una demora, un segundo corchete “] [“ aparecerá
en la pantalla, indicando que el horno está horneando.
Cuando el tiempo de cocción finalice, la pantalla volverá a
cambiar a un solo corchete “]”, indicando que el horno ya no
HVWiKRUQHDQGR1RVRQDUiQLQJ~QWRQRFXDQGRHOWLHPSRGH
cocción se haya completado.
Salir del Modo Sabático
Para salir del modo sabático, asegúrese de que el horno
esté apagado. Mantenga presionada la tecla Settings
(Configuraciones)SDUDGHVDFWLYDUHOPRGR6DEEDWK6DEiWLFR
Aviso de Corte de Corriente durante el
Modo Sabático
Si se produce un corte de corriente durante el modo Sabático,
la unidad permanecerá en el modo Sabático pero apagada
cuando vuelva la corriente.
7HPSHUDWXUD)
7LHPSRKRUDV
200
325
2.5h
250
400
3h
4h
300
2h
3.5h
1 = 200° F, 2 = 250° F, 3 = 300° F, 4 = 325° F, 5 = 400° F
6 = 2 horas, 7 = 2.5 horas 8 = 3 horas, 9 = 3.5 horas, 0 = 4 horas
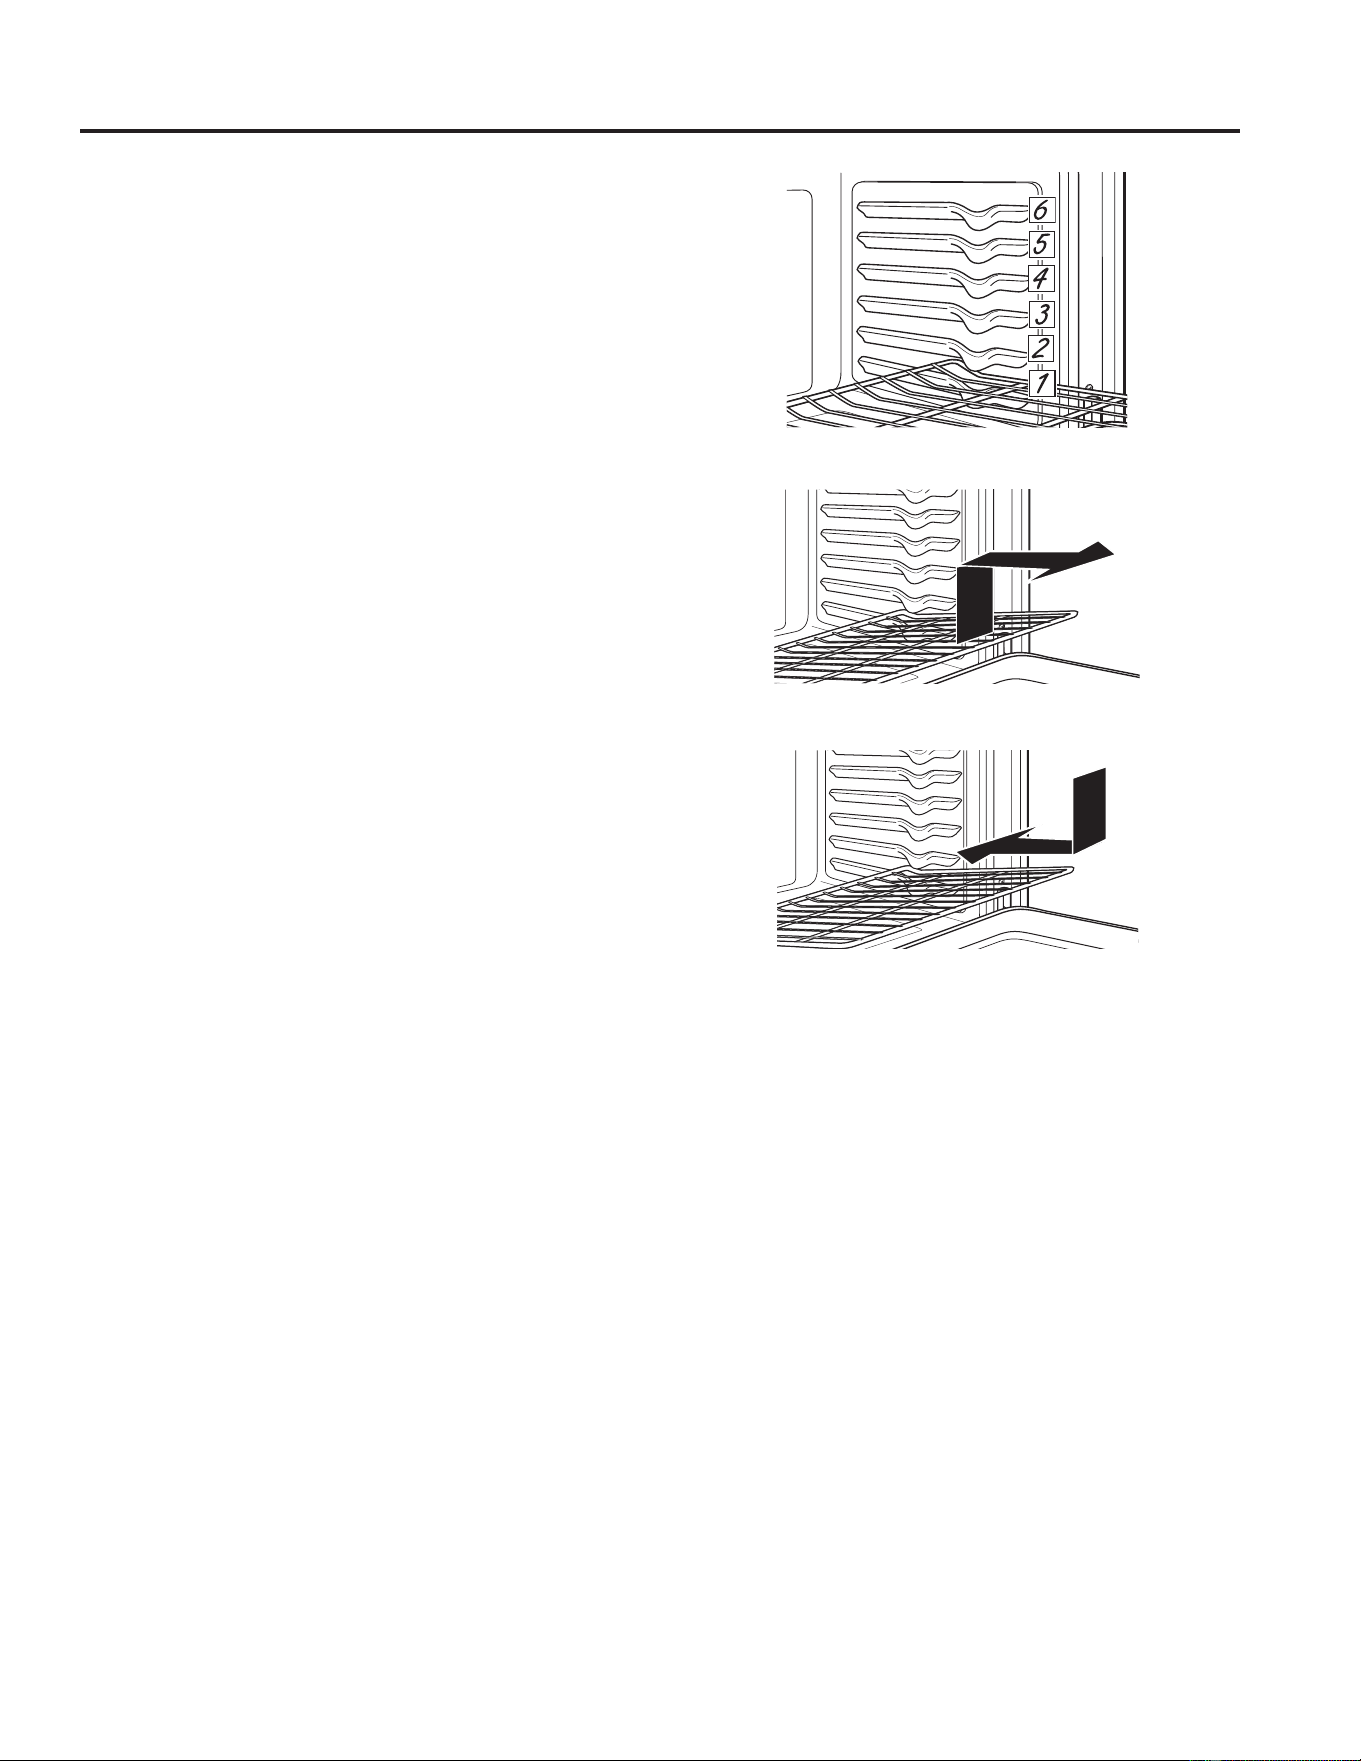
49-2000254 Rev. 6 11
USO DEL HORNO: Estantes del Horno
El horno cuenta con seis posiciones de estantes. En la Guía
de Cocción, se brindan recomendaciones de posiciones de
los estantes para diferentes tipos de comidas. Se ajusta un
estante en una dirección para afectar los resultados de cocción.
Por ejemplo, si se prefieren partes superiores más oscuras en
tartas, panecillos o galletas, pruebe moviendo la comida a un
estante que se encuentre una posición más arriba. Si encuentra
que las comidas están demasiado doradas en la parte superior,
pruebe moviendo las mismas más abajo la próxima vez.
Al hornear con múltiples ollas y en múltiples estantes,
asegúrese de que haya suficiente espacio entre las ollas para
que fluya el aire.
Es posible que su horno cuente con estantes extensibles y/o
estantes planos tradicionales.
Para evitar posibles quemaduras, coloque los estantes en la
posición deseada antes de encender el horno.
Estantes Planos Tradicionales
Al colocar y retirar utensilios de cocina, empuje el estante
KDFLDDIXHUDGHOWRSHSRVLFLyQGHGHWHQFLyQVREUHHOVRSRUWH
del estante.
Para retirar el estante, empuje el mismo hacia usted, incline el
extremo frontal hacia arriba y empuje hacia afuera.
Para hacer un reemplazo, coloque el extremo curvo del
HVWDQWHEORTXHDGRUHVHQORVVRSRUWHVGHOKRUQRLQFOLQHKDFLD
arriba el frente y empuje el estante hacia adentro.
Es posible que resulte difícil deslizar los estantes, especialmente
luego de la limpieza automática. Coloque un poco de aceite
vegetal en una tela suave o papel y frote el mismo sobre los
extremos izquierdos y derechos de los estantes.
NOTA: El uso de otros aceites de cocina provocará una
descoloración o un residuo de color similar al óxido en los
estantes y laterales de las cavidades. Para limpiar este
residuo, use agua y jabón o una solución de vinagre y agua.
Enjuague con agua limpia y seque con una tela seca.
Estantes del Horno
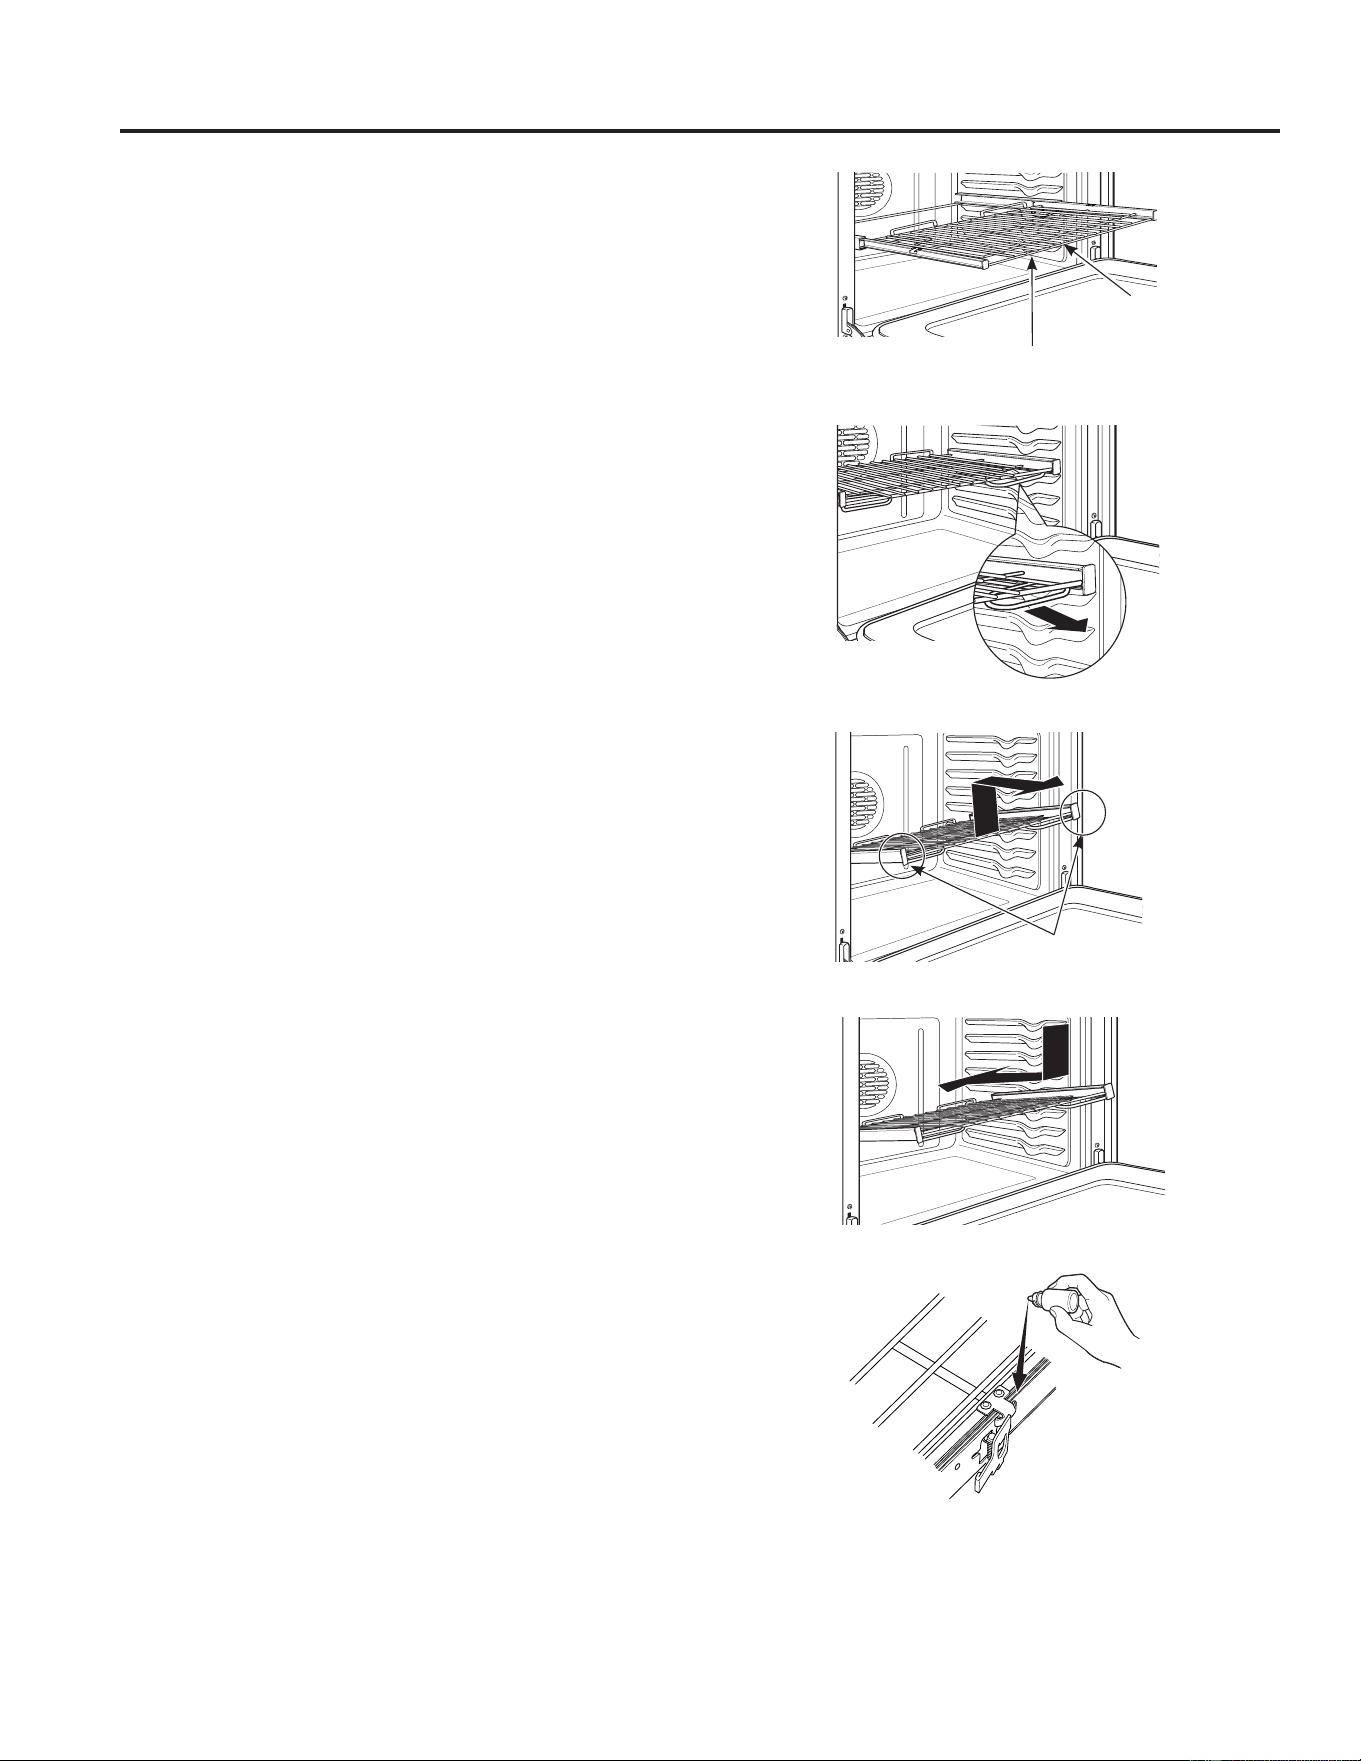
12 49-2000254 Rev. 6
Estantes Extensibles
Siempre empuje hacia afuera el estante desde el riel frontal
superior hasta la posición de detención en su máxima extensión,
al colocar o retirar utensilios. Los estantes extensibles no
podrán ser usados en la posición del estante superior.
Si resulta difícil extender estos estantes, lubrique los mismos
con lubricante de grafito, provisto con el horno. Retire el
estante del horno, retire cualquier obstrucción en el recorrido
deslizable con una toalla de papel, agite el lubricante de grafito
y coloque 4 gotitas en los dos recorridos inferiores de los lados
izquierdo y derecho. Abra y cierre el estante varias veces para
distribuir el lubricante.
Para ordenar un lubricante de grafito adicional, lea la sección
de Accesorios de este manual.
Para Retirar un Estante Extensible:
1. Asegúrese de introducir la parrilla hasta el fondo del horno,
de modo que las paletas laterales del armazón de la parrilla
se desenganchen de la cavidad.
'HVOLFHODSDUULOODKDFLDXVWHGKDVWDTXHOOHJXHDOWRSH
SRVLFLyQGHWHQLGDGHOVRSRUWHGHODSDUULOOD
3. Tome de manera firme ambos lados de la estructura del
estante y deslizando este último, incline el extremo del
frente hacia arriba y empuje hacia fuera.
Para Reemplazar un Estante Extensible:
1. Tome firmemente ambos lados del armazón de la parrilla y
la parrilla deslizable.
2. Coloque el extremo curvo del estante en la posición
deseada, incline el frente hacia arriba y presione la parrilla
hacia adentro.
Si resulta difícil reemplazar o retirar los estantes extensibles,
limpie los soportes de los estantes del horno con aceite vegetal.
1RTXLWHHODFHLWHGHFRFLQDGHOHVSDFLRGHGHVOL]DPLHQWR
NOTA: El uso de otros aceites de cocina provocará una
descoloración o un residuo de color similar al óxido en los
estantes y laterales de las cavidades. Para limpiar este
residuo, use agua y jabón o una solución de vinagre y agua.
Enjuague con agua limpia y seque con una tela seca.
Para lubricar la paleta:
Agite el lubricante y aplique el mismo a las partes móviles de
los mecanismos de las paletas como se muestra.
Riel frontal
superior
Posición de apertura total
Tomar aquí
USO DEL HORNO: Estantes del Horno
Estantes del Horno (Cont.)

49-2000254 Rev. 6 13
Papel de Aluminio y Cobertores del Horno
Utensilios
USO DEL HORNO:3DSHOGH$OXPLQLR\&REHUWRUHVGHO+RUQR8WHQVLOLRV
PRECAUCIÓN
No use ningún tipo de aluminio o cobertor de horno para cubrir el fondo del horno. Estos ítems
pueden atrapar el calor o derretirse, ocasionando daños sobre el producto y el riesgo de descargas, humo o incendios.
Los daños por uso inadecuado de estos ítems no están cubiertos por la garantía del producto.
Se podrá usar aluminio para evitar derrames, colocando una hoja sobre un estante inferior varias pulgadas debajo de la comida.
1RXVHPiVDOXPLQLRTXHHOQHFHVDULR\QXQFDFXEUDWRWDOPHQWHHOHVWDQWHGHXQKRUQRFRQSDSHOGHDOXPLQLR0DQWHQJDHO
aluminio a por lo menos 1 1/2” de las paredes del horno, para evitar una circulación deficiente del calor.
Pautas de Uso de Utensilios
El material, el acabado y el tamaño de los utensilios afectan el
horneado.
Las ollas oscuras, revestidas y opacas absorben el calor más
rápidamente que las ollas claras y brillantes. Al usar ollas
que absorben el calor más rápidamente, las comidas podrán
resultar más doradas, crocantes y con una capa más gruesa.
Si utiliza utensilios oscuros y revestidos, controle la comida
antes del tiempo mínimo de cocción. Si se obtienen resultados
no deseados con este tipo de utensilios, considere la posibilidad
de reducir la temperatura del horno en 25º F la próxima vez.
Las ollas brillantes pueden producir resultados de horneado
más parejos en tortas y galletas.
Las ollas de vidrio y cerámica calientan con lentitud, pero
retienen bien el calor.
Estos tipos de ollas funcionan bien con platos tales como
tartas y postres con natilla.
Las ollas con aislante de aire calientan lentamente y pueden
producir fondos dorados.
Mantenga los utensilios limpios para una cocción más pareja.

14 49-2000254 Rev. 6
Su nuevo horno posee una variedad de modos de cocción para que pueda obtener los mejores resultados. Estos modos
se describen a continuación. Para acceder a recomendaciones para comidas específicas, consulte la sección de la Guía de
Cocción. Recuerde que es posible que su nuevo horno funcione de manera diferente que aquel que está reemplazando.
Modos de Horneado y Dorado
Seleccione un modo para hornear y dorar basado en el tipo y
cantidad de comida que está preparando. Al preparar comidas
horneadas tales como tartas, galletas y masas, siempre
precaliente el horno primero. Siga las recomendaciones de
la receta sobre la colocación de la comida. Si no se brindan
pautas, centre la comida en el horno.
Horneado Tradicional
El modo de horneado tradicional está pensado para la cocción
en un solo estante. Este modo usa el calor principalmente
desde el elemento inferior, pero también desde el elemento
superior para cocinar la comida. Para usar este modo,
presione la tecla Bake (Hornear), ingrese una temperatura,
y luego presione Start (Iniciar). El precalentamiento
generalmente se recomienda al usar este modo.
Horneado por Convección (superior sólo en
modelos de horno doble)
(OPRGR&RQYHFWLRQ%DNH+RQHDGRSRU&RQYHFFLyQHVWi
pensado para honear en múltiples estantes al mismo tiempo.
Este modo utiliza el calor principalmente desde el elemento
trasero, pero también calienta desde los elementos superior
e inferior, junto con el movimiento de aire desde el ventilador
por convección para mejorar una cocción pareja. El horno está
HTXLSDGRFRQODIXQFLyQ$XWR5HFLSH&RQYHUVLRQ&RQYHUVLyQ
de Receta Automática); de modo que no es necesario convertir
la temperatura al usar este modo. Es posible que el tiempo de
horneado sea un poco más prolongado con estantes múltiples,
en comparación con lo que se espera con un solo estante. Para
usar este modo, presione la tecla Convection (Convección),
luego seleccione Convection Bake (Horneado por
Convección), ingrese una temperatura, y luego presione Start
(Iniciar). Siempre realice el precalentamiento al usar este modo.
Dorar por Convección (superior sólo en
modelos de horno doble)
(OPRGR&RQYHFWLRQ5RDVW'RUDGRSRU&RQYHFFLyQHVWi
pensado para dorar cortes enteros de carne en un solo
estante. Este modo utiliza el calor de los elementos inferior,
superior y trasero, junto con el movimiento del ventilador por
convección, a fin de mejorar el dorado y reducir el tiempo de
FRFFLyQ1RHVQHFHVDULRFRQYHUWLUODWHPSHUDWXUD&XDQGRXVH
este modo, o si usa la sonda, controle la comida antes que el
tiempo sugerido en la receta. Para usar este modo, presione la
tecla Convection (Convección), luego seleccione Convection
Roast (Asado por Convección), ingrese una temperatura,
y luego presione Start (Iniciar)1RHVQHFHVDULRUHDOL]DUHO
precalentamiento al usar este modo.
Modo para Asar
Siempre ase con la puerta cerrada. El elemento para asar en
el horno es muy potente. Monitoree la comida de cerca al asar.
Tenga cuidado al asar en posiciones de estantes superiores,
ya que colocar la comida más cerca del elemento para asar
incrementa el humo, salpicaduras y la posibilidad de que se
incendien las grasas. No se recomienda asar en el estante
de la posición 6, en cavidades simples e inferiores.
Intente asar las comidas que normalmente haría a la parrilla.
Ajuste las posiciones de los estantes para ajustar la intensidad
del calor a la comida. Coloque las comidas más cerca del
elemento para asar, cuando se desee una superficie más
cocinada y un interior poco cocido. Las comidas más gruesas
y las comidas cuyo interior debe ser cocinado deberían ser
asadas en un estante en una posición alejada del usado para
DVDURXVDQGRODVIXQFLRQHV%URLO/R$VDU%DMR
Asar Alto
(OPRGR%URLO+L$VDU$OWRXVDFDORULQWHQVRGHOHOHPHQWR
VXSHULRUSDUDVRDVDUODVFRPLGDV8VHODIXQFLyQ%URLO+L$VDGR
Alto) para cortes más delgados de carne y/o comidas que
prefiera que quedan menos cocinadas en su interior. Para usar
este modo, presione la tecla Broil (Asar), luego seleccione
Hi Broil (Asado Alto) y luego presione Start (Iniciar)1RHV
necesario realizar el precalentamiento al usar este modo.
Asar Bajo
(OPRGR%URLO/R$VDU%DMRXVDPHQRVFDORULQWHQVRGHO
elemento superior para cocinar la comida completamente
PLHQWUDVWDPELpQVHUHDOL]DHOGRUDGRVXSHUILFLDO8VHOD
IXQFLyQ%URLO/R$VDGR%DMRSDUDFRUWHVGHFDUQHPiV
gruesos y/o comidas que desee que queden completamente
cocinadas. Para usar este modo, presione la tecla Broil
(Asar), luego seleccione Lo Broil (Asado Bajo) y luego
presione Start (Iniciar)1RHVQHFHVDULRUHDOL]DUHO
precalentamiento al usar este modo.
Leudar
(OPRGR3URRI/HXGDUHVWiGLVHxDGRSDUDHOHYDUIHUPHQWDU
y leudar) masas de pan. En algunos modelos, se podrá
HQFRQWUDU3URRI/HXGDUVHOHFFLRQDQGROptions (Opciones).
Presione Proof (Leudar) y luego presione Start (Iniciar).
Cubra bien la masa para evitar que se seque. El pan se
elevará más rápidamente que a temperatura ambiente. Se
deberá observar que con los hornos de pared doble, la función
para leudar no se podrá activar cuando se esté usando un
modo de limpieza en el horno inferior.
Calentar
(OPRGR:DUP&DOHQWDUHVWiGLVHxDGRSDUDPDQWHQHUFRPLGDV
calientes hasta durante 3 horas. En algunos modelos, se podrá
HQFRQWUDU:DUP&DOHQWDUVHOHFFLRQDQGROptions (Opciones).
Presione Warm (Calentar) y luego presione Start (Iniciar).
Cubra las comidas que necesitan mantener la humedad y no
FXEUDDTXHOODVFRPLGDVTXHGHEHUtDQTXHGDUFURFDQWHV1R
VHUHTXLHUHSUHFDOHQWDUODVPLVPDV1RXVHODIXQFLyQ:DUP
&DOHQWDUSDUDFDOHQWDUFRPLGDIUtDH[FHSWRJDOOHWDVFUXMLHQWHV
papas fritas o cereales secos. También se recomienda que la
comida no se mantenga caliente por más de dos horas.
Air Fry (Freír con Aire)
$LU)U\)UHtUFRQ$LUHHVXQPRGRGHFRFFLyQHVSHFLDOSRU
convección sin precalentamiento, diseñado para producir
comidas con un exterior más crocante que en cocciones con
KRUQRVWUDGLFLRQDOHV(OPRGR$LU)U\)UHtUFRQ$LUHIXH
diseñado para la cocción en un solo estante únicamente.
Seleccione Air Fry (Freír con Aire), y luego seleccione
la configuración de temperatura deseada y presione Start
,QLFLDU/DWHPSHUDWXUDVHSRGUiFRQILJXUDUHQWUH)\
)1RHVQHFHVDULRHOSUHFDOHQWDPLHQWRDOHVWDUHQHVWH
modo. Siga las pautas de la receta para hornos tradicionales o
del paquete en relación a los ajustes de temperatura y tiempos
de cocción; ajuste el tiempo de cocción para lograr la textura
crocante deseada. Se podrán encontrar pautas adicionales
para utilizar este modo en la Guía de Cocción.
Modos de Cocción
USO DEL HORNO: Modos de Cocción

49-2000254 Rev. 6 15
USO DEL HORNO:3UREH6RQGD
Probe (Sonda)
ADVERTENCIA
El consumo de comida semicruda puede hacer que se contraigan enfermedades producidas
por la comida. Use la sonda de acuerdo con las siguientes instrucciones, a fin de asegurar que todas las partes
de la comida alcancen temperaturas de cocción mínimamente seguras. Puede encontrar recomendaciones de
temperaturas de cocción mínimamente seguras en foodsafety.gov o en IsItDoneYet.gov.
La temperatura interna de la comida con frecuencia se usa
como indicador de que está lista, especialmente al dorar o
SUHSDUDUFDUQHGHDYH(OPRGR3UREH6RQGDPRQLWRUHDOD
temperatura interna de la comida y apaga el horno cuando
esta última alcanza la temperatura programada.
Controle siempre la temperatura en múltiples partes de la
comida, utilizando un termómetro de comidas luego de realizar
la cocción, a fin de asegurar que todas las partes de la misma
hayan alcanzado una temperatura interna mínimamente segura
en dicha comida.
Ubicación Correcta de la Sonda
Luego de preparar la comida y de colocarla en la olla, siga
estas instrucciones para una ubicación correcta de la sonda.
Ŷ ,QVHUWHODVRQGDHQODFRPLGDGHPRGRTXHODSXQWDGH
la sonda se apoye en el centro de la parte más gruesa de
la comida. Para un mejor rendimiento, la sonda debería
ser completamente insertada en la comida. Si la sonda
no es ubicada correctamente, es posible que no mida con
precisión la temperatura de la parte más fría de la comida.
Algunas comidas, particularmente las más pequeñas, no
son adecuadas para la cocción con el uso de una sonda,
debido a sus formas o tamaños.
Ŷ 1RGHEHUtDWRFDUHOKXHVRODJUDVDQLHOFDUWtODJR
Ŷ 3DUDFRFLQDUXQDYHHQWHUDLQVHUWHODVRQGDHQODSDUWH
más gruesa de la pechuga.
Ŷ 3DUDGRUDUVLQKXHVRVLQVHUWHODVRQGDHQHOFHQWURGHO
dorado.
Ŷ 3DUDFRFLQDUMDPyQRFRUGHURFRQKXHVRVLQVHUWHOD
sonda en el centro de la articulación o del músculo más
bajo y largo.
Ŷ 3DUDSUHSDrar cazuelas o platos tales como pastel de
carne, inserte la sonda en el centro del plato.
Ŷ 3DUDFRFLQDUSHVFDGRLQVHUWHODVRQGDMXVWRDUULEDGHOD
agalla en la zona más carnosa paralela a columna.
Uso de la Sonda
La sonda de temperatura sólo puede ser usada con las
IXQFLRQHV%DNH+RUQHDU&RQYHFWLRQ%DNH+RUQHDUSRU
&RQYHFFLyQ\&RQYHFWLRQ5RDVW'RUDUSRU&RQYHFFLyQ
Para usar la sonda con precalentamiento:
&RQILJXUHHOPRGRGHFRFFLyQGHVHDGRHornear, Hornear
por Convección, o Dorar por Convección) e ingrese la
temperatura de cocción deseada con las teclas numéricas.
,QVHUWHODVRQGDHQODFRPLGDFRQVXOWHVREUHOD8ELFDFLyQ
Correcta de la Sonda). Coloque la comida en el horno y
conecte la sonda en su correspondiente tomacorriente
en el horno. Encontrará la salida de la sonda en el horno
superior.
8QDYH]TXHHOKRUQRIXHSUHFDOHQWDGRFRORTXHODFRPLGD
en el mismo y conecte la sonda en su correspondiente
tomacorriente, asegurándose de que esté completamente
insertada. Tenga cuidado, ya que las paredes del horno y
el tomacorriente de la sonda están calientes.
4. Cuando la sonda esté conectada, la pantalla le indicará
que ingrese la temperatura deseada para la comida. La
temperatura interna máxima de la comida que se puede
configurar es 200° F..
Para usar la sonda sin precalentamiento:
,QVHUWHODVRQGDHQODFRPLGDFRQVXOWHVREUHOD8ELFDFLyQ
Correcta de la Sonda).
2. Coloque la comida en el horno y conecte la sonda en su
correspondiente tomacorriente en el horno. Encontrará la
salida de la sonda en el horno superior.
3. Presione la tecla del modo de cocción deseado
Horneado Tradicional, Hornear por Convección, o
Dorar por Convección) e ingrese la temperatura de
cocción deseada con las teclas numéricas. Presione
Options (Opciones) y seleccione Probe (Sonda) y
luego siga las instrucciones en pantalla para ingresar la
temperatura deseada para la comida.
Pautas para el Cuidado de la Sonda
Ŷ 6LVHXVDXQDVRQGDTXHQRVHDODSURYLVWDFRQHVWH
producto, se podrán producir daños sobre la salida de la
sonda.
Ŷ 8VHODVPDQLMDVGHODVRQGDDOHQFKXIDU\GHVHQFKXIDUOD
misma, luego de insertar o de retirar la sonda de la carne o
del tomacorriente.
Ŷ 3DUDHYLWDUGDxRVVREUHODVRQGDQRXVHDJDUUDGHUDVSDUD
empujar el cable al retirarlo.
Ŷ 3DUDHYLWDUURPSHUODVRQGDDVHJ~UHVHGHTXHOD
comida haya sido completamente descongelada antes de
insertarla.
Ŷ 3DUDHYLWDUSRVLEOHVTXHPDGXUDVQRGHVHQFKXIHODVRQGD
del tomacorriente del horno hasta que este último se haya
enfriado.
Ŷ 1XQFDGHMHODVRQGDGHQWURGHOKRUQRGXUDQWHXQFLFORGH
limpieza automática o de limpieza con vapor.
Ŷ 1RJXDUGHODVRQGDGHQWURGHOKRUQR

16 49-2000254 Rev. 6
USO DEL HORNO: *XtDGH&RFFLyQ+RUQR,QIHULRU
Guía de Cocción - Horno Inferior
*Al hornear cuatro tortas con capas a la vez, use los estantes
2 y 4. Coloque las ollas como se muestra, de modo que no
quede una olla encima de la otra.
Cocine la comida completamente para evitar que se
produzcan enfermedades a partir de la comida. Puede
encontrar recomendaciones sobre temperatura mínima para
cocinar de forma segura en IsItDoneYet.gov. Asegúrese de
usar un termómetro de comidas para medir la temperatura de
las mismas.
TIPO DE COMIDA
MODO(S)
RECOMENDADO(S)
POSICIÓN(ES)
DE ESTANTES
RECOMENDADA SUGERENCIAS ADICIONALES
Productos Horneados
Tortas con capas, tortas rectangulares,
roscas, panecillos, pan rápido en un
Solo Estante
Horneado Tradicional 3 8VHXWHQVLOLRVEULOODQWHV
Tortas con capas* en Múltiples Estantes Horneado Tradicional 2 y 4
Asegúrese de que haya un flujo de aire adecuado
9HDODLOXVWUDFLyQ
7RUWDVGHJUDVDSDVWHOGHiQJHO Horneado Tradicional 1 8VHXWHQVLOLRVEULOODQWHV
Galletas, galletitas, bizcochitos en un
Solo Estante
Horneado Tradicional 3 8VHXWHQVLOLRVEULOODQWHV
Galletas, galletitas, bizcochitos en
Múltiples Estantes
Horneado Tradicional 2 y 4
Con comidas tales como galletas con azúcar, cambie la
ubicación de la comida parcialmente durante la cocción, a fin
de lograr resultados de cocción más parejos entre los estantes.
Bife y Cerdo
Hamburguesas Asar Alto 5
8VHXQDROODSDUDDVDU0XHYDODFRPLGDKDFLDDEDMRSDUDTXH
quede más preparada y menos soasada. Preste atención a la
comida al asarla. Para un mejor rendimiento, centre la comida
debajo del elemento calentador para asar.
Bifes y Chuletas Asar Alto 5
8VHXQDROODSDUDDVDU0XHYDODFRPLGDKDFLDDEDMRSDUDTXH
quede más preparada y menos soasada. Preste atención a la
comida al asarla. Para un mejor rendimiento, centre la comida
debajo del elemento calentador para asar.
'RUDGRV Horneado Tradicional 2
'HMHVLQFXEULUXVHXQDROODFKDWDWDOFRPRXQDROODSDUDDVDU
1RVHUHTXLHUHSUHFDOHQWDUOD
Ave
Pollo entero Horneado Tradicional 2
8VHXQDROODFKDWDWDOFRPRXQDROODSDUDDVDU
1RVHUHTXLHUHSUHFDOHQWDUOD
Pechugas, patas, muslos con huesos
Asado Bajo
Horneado Tradicional
3
Ase del lado de la piel hacia abajo primero. Preste atención a la
comida al asarla. Para un mejor rendimiento, centre la comida
debajo del elemento calentador para asar.
Pechugas de pollo deshuesadas
Asado Bajo
Horneado Tradicional
3
Mueva la comida más abajo para que quede más preparada y
menos soasada y más arriba para soasar/ dorar al asar. Para
un mejor rendimiento, centre la comida debajo del elemento
calentador para asar.
Pavo entero Horneado Tradicional 1 o 2
8VDXQDROODFKDWDWDOFRPRXQDROODSDUDDVDU
1RVHUHTXLHUHSUHFDOHQWDUOD
Pechuga de Pavo Horneado Tradicional 2
8VHXQDROODFKDWDWDOFRPRXQDROODSDUDDVDU
1RVHUHTXLHUHSUHFDOHQWDUOD
Pescado Asado Bajo
PLWDGGHOJURVRU
o menos)
!SXOJDGD
Preste atención a la comida al asarla. Para un mejor
rendimiento, centre la comida debajo del elemento calentador
para asar.
Cazuelas Horneado Tradicional 3
Comidas Congeladas a Conveniencia
Productos con papa, patitas de pollo
fritas, aperitivos en un Solo Estante
Horneado Tradicional 3 8VHXWHQVLOLRVEULOODQWHV
Productos con papa, patitas de pollo
fritas, aperitivos en Múltiples Estantes
Horneado Tradicional 2 y 4
8VHXWHQVLOLRVEULOODQWHVCambie la ubicación de la comida
parcialmente durante la cocción, a fin de obtener resultados de
cocción más parejos.
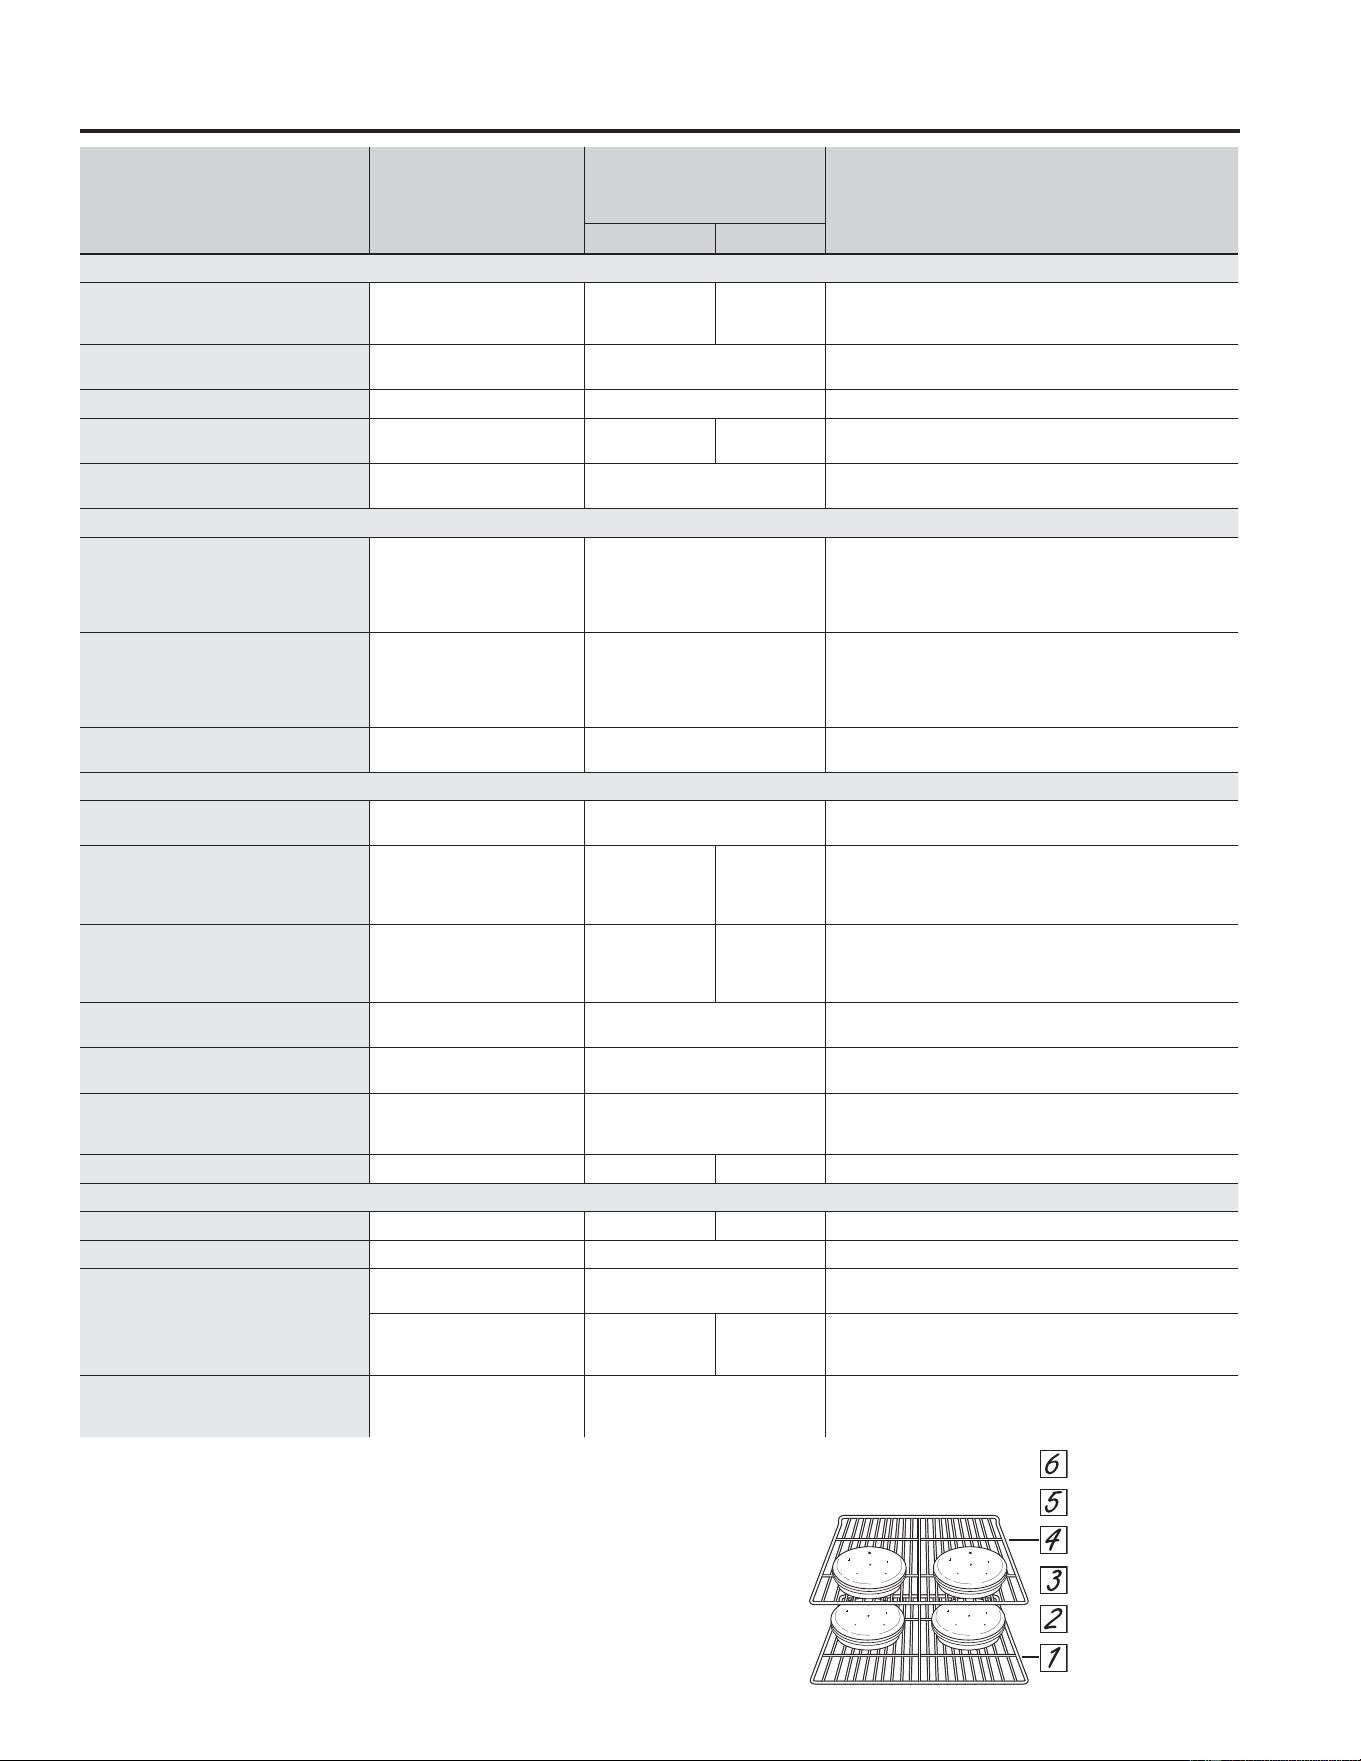
49-2000254 Rev. 6 17
USO DEL HORNO: *XtDGH&RFFLyQ+RUQR6XSHULRU6LPSOH
Guía de Cocción - Horno Superior/ Simple
*Al hornear cuatro tortas con capas a la vez, use los estantes
1 y 4. Coloque las ollas como se muestra, de modo que no
quede una olla encima de la otra.
Cocine la comida completamente para evitar que se
produzcan enfermedades a partir de la comida. Puede
encontrar recomendaciones sobre temperatura mínima para
cocinar de forma segura en IsItDoneYet.gov. Asegúrese de
usar un termómetro de comidas para medir la temperatura de
las mismas.
TIPO DE COMIDA
MODO(S)
RECOMENDADO(S)
POSICIÓN(ES)
DE ESTANTES
RECOMENDADA
SUGERENCIAS ADICIONALES27” 30”
Productos Horneados
Tortas con capas, tortas
rectangulares, roscas, panecillos, pan
rápido en un Solo Estante
Horneado Tradicional 2 ext. o 3 planos 3 8VHXWHQVLOLRVEULOODQWHV
Tortas con capas* en Múltiples
Estantes
Horneado por Convección 1 ext. y 4 planos
Asegúrese de que haya un flujo de aire adecuado
9HDODLOXVWUDFLyQ
7RUWDVGHJUDVDSDVWHOGHiQJHO Horneado Tradicional 1 8VHXWHQVLOLRVEULOODQWHV
Galletas, galletitas, bizcochitos en un
Solo Estante
Horneado Tradicional 2 ext. o 3 planos 3 8VHXWHQVLOLRVEULOODQWHV
Galletas, galletitas, bizcochitos en
Múltiples Estantes
Horneado por Convección 1 ext. and 4 planos Asegúrese de que haya un flujo de aire adecuado.
Bife y Cerdo
Hamburguesas Asar Alto 5
8VHXQDROODSDUDDVDU0XHYDODFRPLGDKDFLDDEDMR
para que quede más preparada y menos soasada.
Preste atención a la comida al asarla. Para un mejor
rendimiento, centre la comida debajo del elemento
calentador para asar.
Bifes y Chuletas Asar Alto 5
8VHXQDROODSDUDDVDU0XHYDODFRPLGDKDFLDDEDMR
para que quede más preparada y menos soasada.
Preste atención a la comida al asarla. Para un mejor
rendimiento, centre la comida debajo del elemento
calentador para asar.
'RUDGRV
Horneado Tradicional
Asado por Convección
2 ext. o 3 planos
'HMHVLQFXEULUXVHXQDROODFKDWDWDOFRPRXQDROODSDUD
DVDU1RVHUHTXLHUHSUHFDOHQWDUOD
Ave
Pollo entero
Horneado Tradicional
Asado por Convección
2 ext. o 3 planos
8VHXQDROODFKDWDWDOFRPRXQDROODSDUDDVDU
1RVHUHTXLHUHSUHFDOHQWDUOD
Pechugas, patas, muslos con huesos
Asado Bajo
Horneado Tradicional
Asado por Convección
3 ext.
2 ext. o 3 planos
2 ext. o 3 planos
3
Ase del lado de la piel hacia abajo primero. Preste
atención a la comida al asarla. Para un mejor
rendimiento, centre la comida debajo del elemento
calentador para asar.
Pechugas de pollo deshuesadas
Asado Bajo
Horneado Tradicional
Asado por Convección
3 ext.
2 ext. o 3 planos
2 ext. o 3 planos
3
Mueva la comida más abajo para que quede más
preparada y menos soasada y más arriba para soasar/
dorar al asar. Para un mejor rendimiento, centre la
comida debajo del elemento calentador para asar.
Pavo entero
Horneado Tradicional
Asado por Convección
1 o 2
8VDXQDROODFKDWDWDOFRPRXQDROODSDUDDVDU
1RVHUHTXLHUHSUHFDOHQWDUOD
Pechuga de Pavo
Horneado Tradicional
Asado por Convección
2 ext. o 3 planos
8VHXQDROODFKDWDWDOFRPRXQDROODSDUDDVDU
1RVHUHTXLHUHSUHFDOHQWDUOD
Pescado Asado Bajo
PLWDGGHOJURVRURPHQRV
!SXOJDGD
Preste atención a la comida al asarla. Para un mejor
rendimiento, centre la comida debajo del elemento
calentador para asar.
Cazuelas Horneado Tradicional 2 ext. o 3 planos 3
Comidas Congeladas a Conveniencia
Pizza en un estante simple Horneado Tradicional 2 ext. o 3 planos 3 8VHXWHQVLOLRVEULOODQWHV
Pizza en estantes múltiples Horneado por Convección 1 ext. o 4 planos 8VHXWHQVLOLRVEULOODQWHV
Productos con papa, patitas de pollo
fritas, aperitivos en un Solo Estante
Horneado por Convección
Horneado Tradicional
2 ext. o 3 planos 8VHXWHQVLOLRVEULOODQWHV
)ULWXUDFRQ$LUHHQKRUQRV
simples y superiores
únicamente)
4 planos 8VHXQXWHQVLOLRRVFXURRXQDEDQGHMDGHJDOOHWDV
Productos con papa, patitas de pollo
fritas, aperitivos en Múltiples Estantes
Horneado por Convección 1 ext. o 4 planos
8VHXWHQVLOLRVEULOODQWHV&DPELHODXELFDFLyQGHOD
comida parcialmente durante la cocción, a fin de obtener
resultados de cocción más parejos.
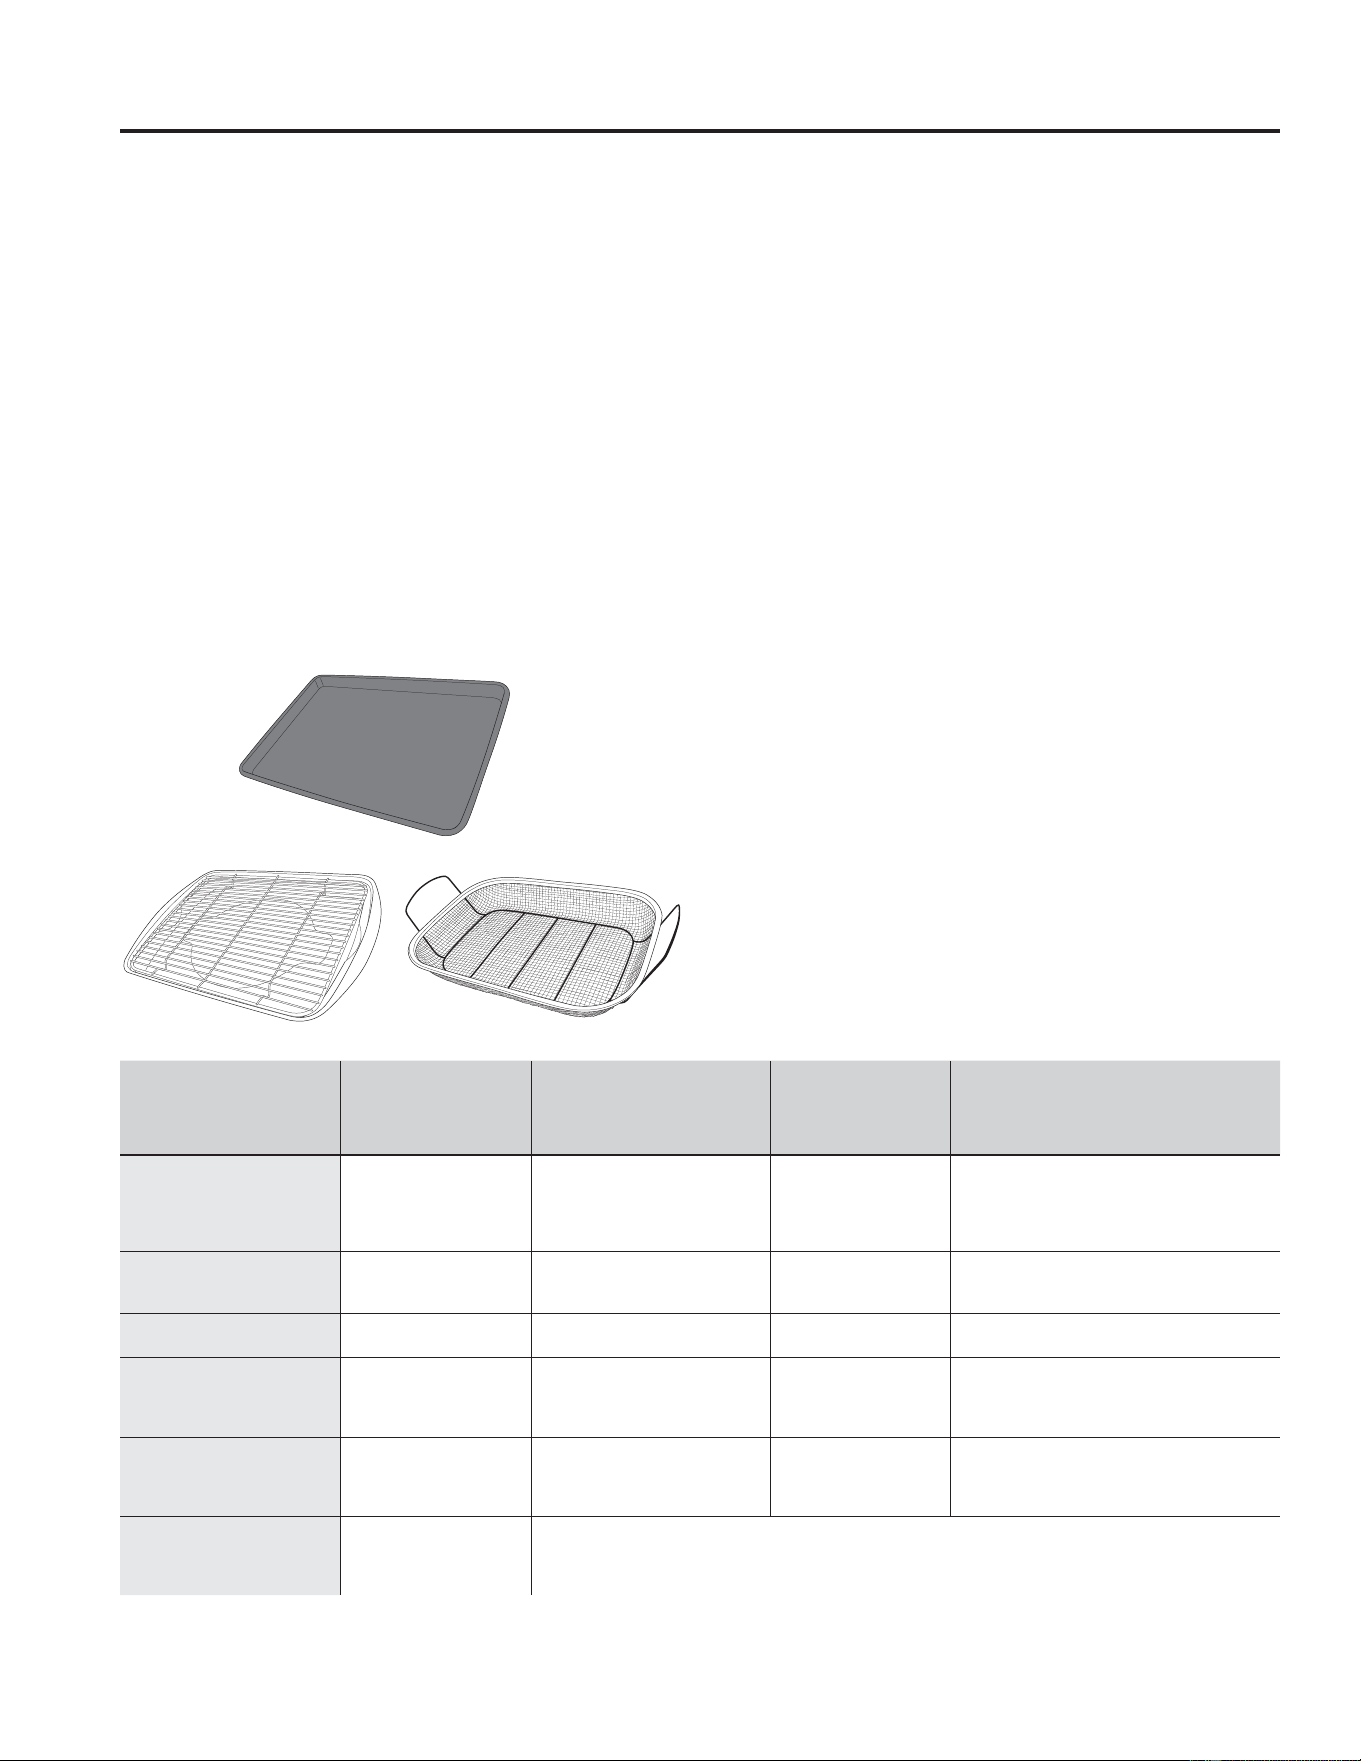
18 49-2000254 Rev. 6
USO DEL HORNO: Guía de Cocción
Guía de Cocción
Modo de Cocción para Freír con Aire
$LU)U\)UHtUFRQ$LUHHVXQPRGRGHFRFFLyQHVSHFLDOSRU
convección sin precalentamiento, diseñado para producir
comidas con un exterior más crocante que en cocciones
FRQKRUQRVWUDGLFLRQDOHV6HOHFFLRQH$LU)U\)UHtUFRQ$LUH
y luego ingrese la configuración de temperatura deseada y
SUHVLRQH6WDUW,QLFLDU/DWHPSHUDWXUDVHSXHGHFRQILJXUDU
entre 300°F and 500°F.
Pautas del Utensilio para Freír con Aire
8WLOLFHXWHQVLOLRVGHXVRVHJXURSDUDDVDUDOXWLOL]DUHOPRGR
$LU)U\)UHtUFRQ$LUH
6HUHFRPLHQGDHOXVRGHXQDEDQGHMDGHOiPLQDRVFXUD8QD
bandeja oscura promueve un mejor dorado y que la comida
quede más crocante.
• También se podrán usar canastas de horneado en el horno
y rejillas de horneado. Se deberá colocar una bandeja plana
sobre el estante debajo de las comidas, a fin de atrapar
cualquier goteo al usar la canasta de horneado.
Consejos Generales sobre el Modo para
Freír con Aire
(OPRGR$LU)U\)UHtUFRQ$LUHIXHGLVHxDGRSDUDFRFLQDUHQ
un solo estante.
(OPRGR$LU)U\)UHtUFRQ$LUHIXHGLVHxDGRSDUDXQXVRVLQ
pre calentamiento.
• Se recomienda la posición del estante 4 planos para la
mayoría de las comidas. Si las comidas se están dorando
demasiado rápido, intente usar una posición de estante
inferior.
• Las comidas se podrán cocinar más rápido de lo esperado si
el horno ya está caliente cuando se coloca la comida en el
mismo.
• Al freír con aire comidas con salsa, se recomienda aplicar
esta última al final de la cocción.
• Si las comidas se doran demasiado rápido, intente colocar la
misma en un estante que se encuentre en un posición más
baja o en una configuración de temperatura de horno más
baja.
• En el caso de comidas empaquetadas, utilice las
instrucciones de cocción tradicionales para horno en relación
a la configuración de temperatura y tiempos de cocción
esperados.
1RHVQHFHVDULRYROWHDURUHYROYHUODFRPLGDGXUDQWHOD
cocción.
8ELTXHODFRPLGDHQXQDVRODFDSDVREUHODEDQGHMDVLQ
sobrecargar la misma.
• Siempre controle la temperatura interior de la comida, a
fin de confirmar que se hayan alcanzado las temperaturas
mínimas seguras. Las temperaturas mínimas seguras
de la comida se podrán encontrar en los paquetes y en
IsItDoneYet.gov.
TIPO DE COMIDA
POSICIÓN(ES)
DE ESTANTES
RECOMENDADAS
CONFIGURACIÓN
DE TEMPERATURA
RECOMENDADA (°F)
TIEMPO DE
COCCIÓN
RECOMENDADO
(MÍN.) NOTAS
Trozos de pescado
fresco deshuesado o ave,
empanados en forma de
patitas, frituras crocantes,
filetes
4
planos
8VHFRQILJXUDFLRQHVGHWHPSHUDWXUDPiV
EDMDVSDUDSLH]DVPiVJUDQGHV8VHXWHQVLOLRV
brillantes.
Huesos frescos de alitas
de pollo
4
planos
Sale las alitas o cubra las mismas con un roce
en seco si usará salsa luego de la cocción o
hacia el final de la cocción.
Huesos frescos de patas o
muslos de pollo
4
planos
8VHFRQILJXUDFLRQHVGHWHPSHUDWXUDPiVEDMDV
para piezas más grandes.
Papas fritas frescas y
GHOJDGDVòSXOJDGD
4
planos
Se recomienda el uso de papel para hornear al
preparar papas fritas frescas. Para frituras más
crocantes, mezcle las papas fritas con almidón
de maíz o harina de arroz antes de la cocción.
Papas fritas frescas y
GHOJDGDVòSXOJDGD
4
planos
Se recomienda el uso de papel para hornear al
preparar papas fritas frescas. Para frituras más
crocantes, mezcle las papas fritas con almidón
de maíz o harina de arroz antes de la cocción.
Comidas envasadas
congeladas
4
planos
8VHODVLQVWUXFFLRQHVGHFRFFLyQSDUDKRUQRWUDGLFLRQDOQRSDUD)UHtUFRQ$LUHFRPRJXtDGHFRQILJXUDFLyQGH
temperatura y tiempo de cocción. Con algunas comidas, se podrá requerir un tiempo de cocción adicional diferente
al tiempo recomendado en el paquete. Si el horno está caliente al iniciar la cocción, la comida se podrá cocinar
más rápido que el tiempo mínimo que figura en el paquete.
8WHQVLOLRSULQFLSDOUHFRPHQGDGR
Opciones de utensilios alternativos

49-2000254 Rev. 6 19
Asegúrese de que la corriente eléctrica esté apagada y que todas las superficies estén frías antes de limpiar cualquier parte del horno.
Panel de Control
8QDEXHQDLGHDHVOLPSLDUHOSDQHOGHFRQWUROOXHJRGHFDGD
uso. Limpie con un jabón suave y agua o vinagre y agua,
enjuague con agua limpia y pula en seco con una tela suave.
1RXVHOLPSLDGRUHVDEUDVLYRVOLPSLDGRUHVOtTXLGRVIXHUWHV
almohadillas para fregar de plástico ni limpiadores de horno en
el panel de control; dañarán el acabado.
Exterior del Horno
1RXVHOLPSLDGRUHVGHKRUQROLPSLDGRUHVDEUDVLYRV
limpiadores líquidos fuertes, estropajos de acero, almohadillas
para fregar de plástico, ni polvos limpiadores en el interior
o el exterior del horno. Limpie el mismo con agua y jabón o
una solución de vinagre y agua. Enjuague con agua limpia y
seque con una tela seca. Al limpiar supeficies, asegúrese de
que estén a temperatura ambiente y fuera del contacto con
la luz solar. Si las manchas en el borde de la ventana de la
puerta son persistentes, use un limpiador abrasivo suave o
una esponja con estropajo para obtener un mejor resultado. El
derrame de adobo, jugos de fruta, salsas de tomate y líquidos
para humedecer que contengan ácidos pueden ocasionar
GHVFRORUDFLyQ\VHGHEHUiQOLPSLDUGHLQPHGLDWR'HMHTXHODV
superficies calientes se enfríen, y luego limpie y enjuague.
Superficies pintadas y Acero Inoxidable Negro (en algunos modelos)
Las superficies pintadas podrán incluir la puerta y el borde
alrededor del panel de control. Límpielas con jabón y agua o
con una solución de agua y vinagre.
1RXWLOLFHOLPSLDGRUHVGHKRUQRFRPHUFLDOHVSROYRVOLPSLDGRUHV
esponjillas de acero o abrasivos potentes sobre cualquier
superficie pintada, LQFOX\HQGRHO$FHUR,QR[LGDEOH1HJUR
Acero Inoxidable – Excluyendo el Acero Inoxidable Negro (en algunos modelos)
1RXVHYLUXWDVGHDFHURpVWDVGDxDUiQODVXSHUILFLH
Para limpiar la superficie de acero inoxidable, use agua tibia
con jabón o un limpiador o pulidor para acero inoxidable.
Siempre limpie la superficie en la dirección del veteado. Siga
las instrucciones del limpiador para limpiar la superficie de
acero inoxidable.
Los limpiadores con ácido oxálico tales como Bar Keepers
Friend Soft Cleanser™ eliminarán el óxido, deslustres y
SHTXHxDVPDQFKDVVREUHODVXSHUILFLH8VHVyORXQOLPSLDGRU
líquido libre de material abrasivo y frote en la dirección de las
líneas del cepillo con una esponja suave y húmeda.
Para realizar consultas sobre la adquisición de productos,
incluyendo limpiadores o pulidores para electrodomésticos de
acero inoxidable, lea las secciones de Asistencia y Accesorios,
en el comienzo de este manual.
Interior del Horno
El interior de su nuevo horno puede ser limpiado de forma
PDQXDORXWLOL]DQGRORVPRGRV6WHDP&OHDQ/LPSLH]DFRQ
9DSRUR6HOI&OHDQ/LPSLH]D$XWRPiWLFD
El derrame de adobo, jugos de fruta, salsas de tomate y líquidos
para humedecer que contengan ácidos pueden ocasionar
descoloración y se deberán limpiar de inmediato. Espere a que
las superficies calientes se enfríen, y luego limpie y enjuague.
Limpieza Manual
1RXVHOLPSLDGRUHVGHKRUQRDPHQRVTXHHVWpQFHUWLILFDGRV
para hornos con limpieza automática), limpiadores abrasivos,
limpiadores líquidos fuertes, estropajos de acero, almohadillas
para fregar, ni polvos limpiadores en el interior del horno.
Limpie el mismo con agua y jabón o una solución de vinagre
y agua. Enjuague con agua limpia y seque con una tela seca.
Al limpiar supeficies, asegúrese de que estén a temperatura
ambiente y fuera del contacto con la luz solar.
Modo de Limpieza con Vapor
La limpieza con vapor está pensada para limpiar pequeños
derrames usando agua y a una temperatura de limpieza más
EDMDTXHODIXQFLyQ6HOI&OHDQ/LPSLH]D$XWRPiWLFD
3DUDXVDUODIXQFLyQ6WHDP&OHDQ/LPSLH]DFRQ9DSRUOLPSLH
las grasas y suciedades del horno. Vierta una taza de agua en la
parte inferior del horno. Cierre la puerta. Presione la tecla Clean
(Limpiar) dos veces y luego presione Start (Iniciar). En algunos
PRGHORVODSXHUWDGHOKRUQRVHSRGUiEORTXHDU1RVHGHEHUi
abrir la puerta durante los 30 minutos de la limpieza con vapor,
ya que esto reducirá su rendimiento.
Limpie cualquier exceso de
agua y cualquier suciedad que haya quedado. NOTA: El agua en
la parte inferior del horno podrá estar caliente justo después de
finalizado el ciclo.
Modo de Limpieza Automática
Lea las Instrucciones de Seguridad del Horno con Limpieza
Automática, en el comienzo de este manual antes de usar
HOPRGR6HOI&OHDQ/LPSLH]D$XWRPiWLFD(VWHPRGRXVD
temperaturas muy altas para limpiar el interior del horno.
Cuando use esta función, la puerta del horno se trabará. Antes
de utilizar el ciclo de limpieza automática, limpie la grasa
y restos de comida que haya en el horno. Retire todos los
DUWtFXORVGHOKRUQRH[FHSWRORVHVWDQWHVHVPDOWDGRVFRORU
oscuro). Los estantes brillosos o de plata, la sonda para carne,
y cualquier utensilio u otros artículos deberían ser retirados del
horno antes de iniciar un ciclo de limpieza automática. Cierre
la puerta. Presione la tecla Clean (Limpiar) y se exhibirá
un tiempo de limpieza automática por omisión. El tiempo de
limpieza puede ser modificado en cualquier momento entre las
\ODVKRUDVXVDQGRODVWHFODVQXPpULFDVSDUDLQJUHVDU
un tiempo diferente y presionando Start (Iniciar). Si desea
usar el tiempo por omisión, presione la tecla Start (Iniciar)
inmediatamente luego de presionar la tecla Clean (Limpiar)
El horno se apagará de forma automática cuando el ciclo de
limpieza automática sea completado. La puerta permanecerá
EORTXHDGDKDVWDTXHHOKRUQRVHKD\DHQIULDGR8QDYH]TXH
el horno se haya enfriado, limpie cualquier ceniza que haya
quedado en el horno.
IMPORTANTE: Las emanaciones producidas por el ciclo de
autolimpieza de cualquier horno afectan la salud de algunas
aves de manera notoria. Procure llevar sus aves a otra
habitación bien ventilada.
Horno
CUIDADO Y LIMPIEZA: Horno
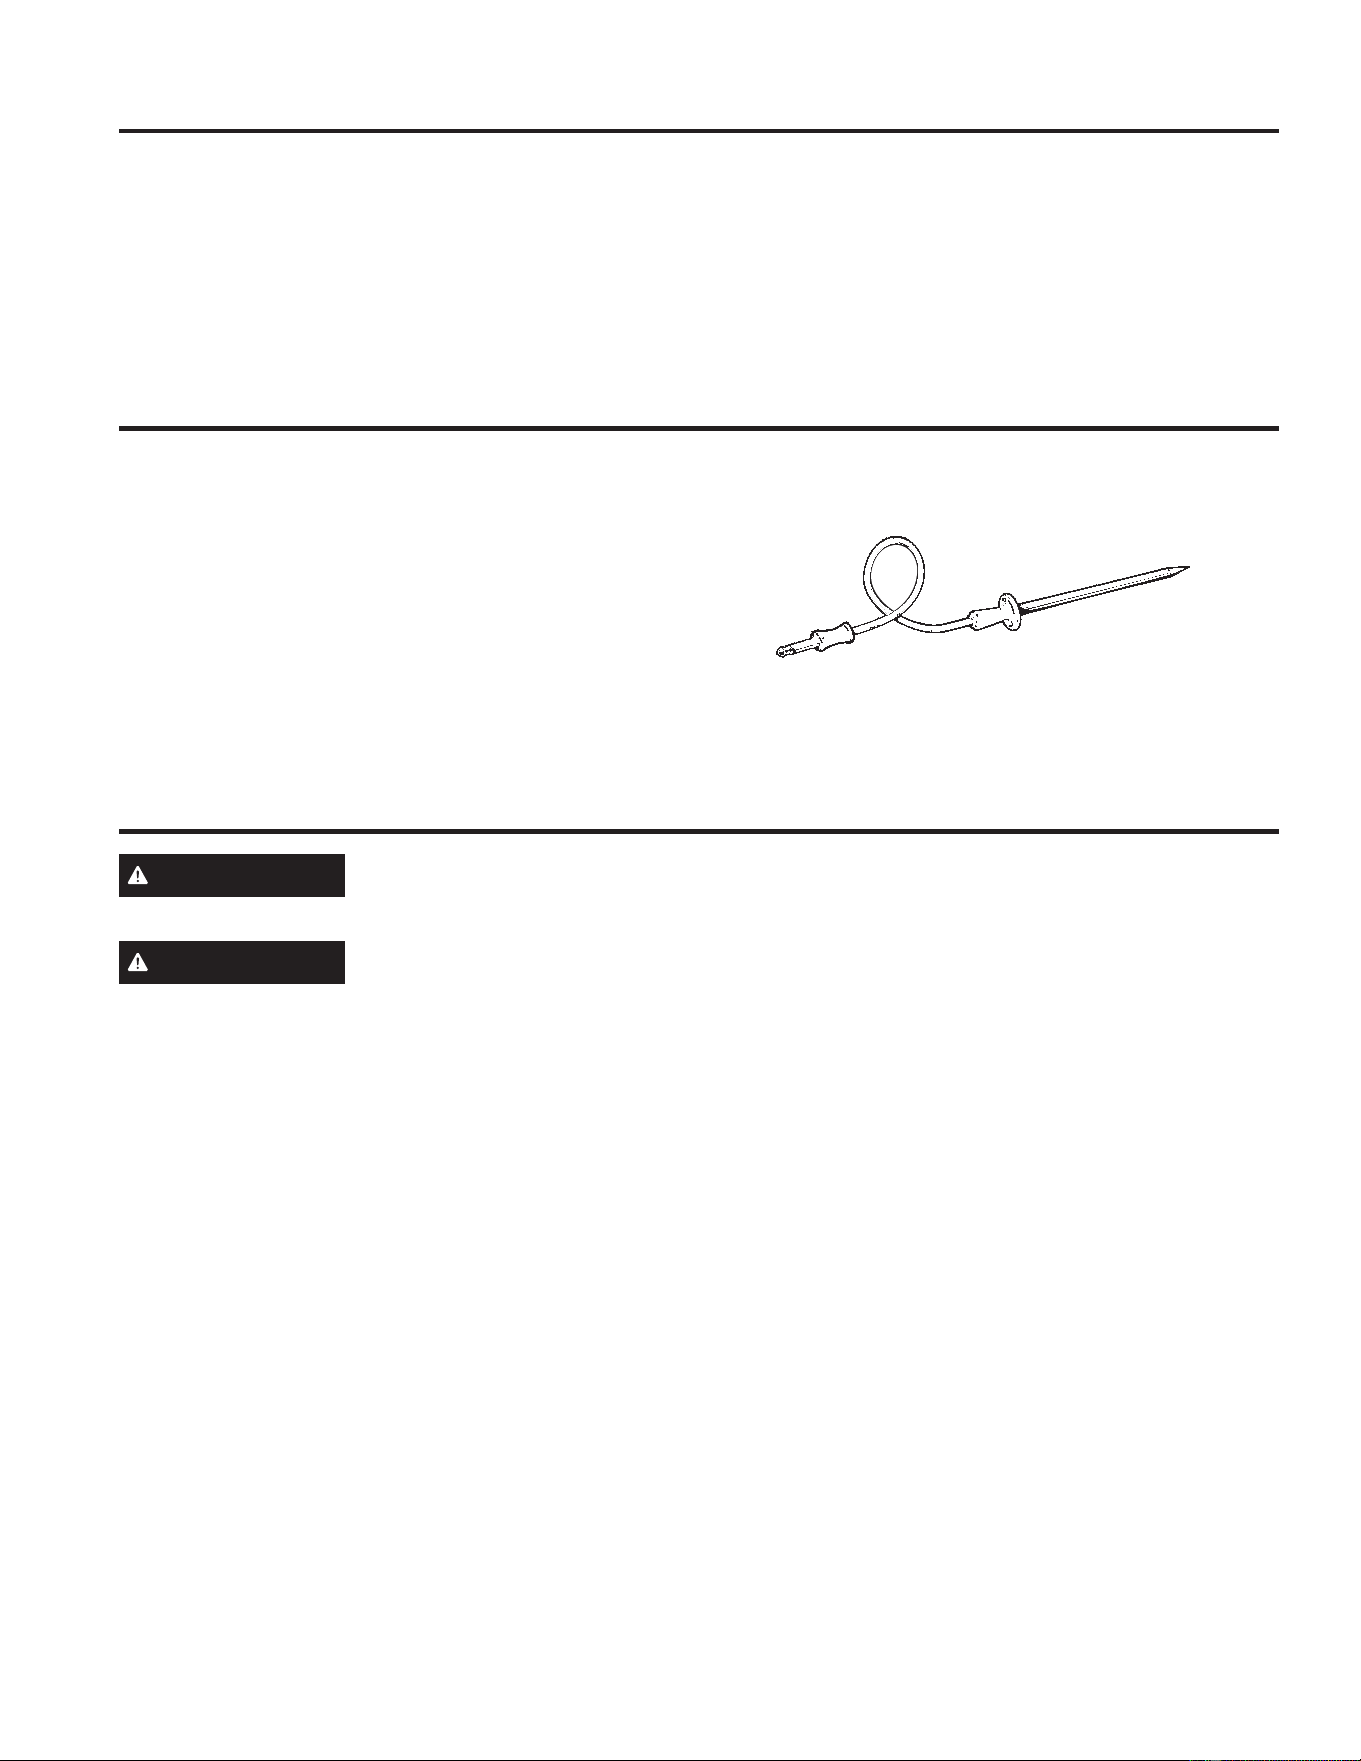
20 49-2000254 Rev. 6
ADVERTENCIA
PELIGRO DE DESCARGA O QUEMADURAS: Antes de reemplazar la lámpara de luz del horno,
desconecte la conexión eléctrica del horno del fusible principal o del panel del disyuntor. Si esto no se
cumple, se podrá producir una descarga eléctrica o un incendio.
PRECAUCIÓN
RIESGO DE INCENDIO: La tapa de vidrio y la lámpara de luz se deberán retirar cuando estén frías. Tocar
el vidrio caliente sin protección en las manos o con un trapo húmedo puede ocasionar quemaduras.
'HVFRQHFWHODFRUULHQWHGHVGHHOIXVLEOHSULQFLSDORHO
panel del disyuntor.
2. Retire los estantes del horno.
'HVOLFHXQGHVWRUQLOODGRUGHSXQWDSODQDRXQFXFKLOOR
para untar manteca entre la carcasa metálica y la tapa
de luz de vidrio. NOTA: algunos modelos cuentan con un
sujetador metálico que visiblemente sostiene el vidrio. Es
necesario insertar la herramienta entre la carcasa metálica
y el sujetador que sostiene el vidrio.
4. Apoye la tapa de luz de vidrio con dos dedos para evitar
que se caiga al fondo del horno. Tenga cuidado de no
astillar la cubierta del horno.
'HIRUPDVXDYHJLUHODSXQWDGHOGHVWRUQLOODGRURGHO
cuchillo para untar manteca, a fin de aflojar la tapa de luz
de vidrio. Tenga cuidado de no astillar la cubierta del horno.
6. Retire la tapa de luz de vidrio.
7. Retire la lámpara sosteniendo firmemente y deslizando
la misma hacia afuera, hasta que las dos clavijas hayan
dejado el soporte de cerámica.
1RWRTXHHOYLGULRGHODQXHYDOiPSDUDFRQORVGHGRV
Esto hará que la lámpara falle al dar luz. Tome la lámpara
de reemplzado con una toalla limpia o un pañuelo de
papel con las clavijas hacia abajo. Aliñe las dos clavijas
en el soporte de cerámica, presionando suavemente hasta
que la lámpara quede asegurada en la ficha de cerámica.
'HVOLFHODVOHQWHVSURWHFWRUDVGHOVRSRUWH\SUHVLRQHKDVWD
que las pinzas queden enganchadas en la caja.
10. Vuelva a conectar la corriente.
Luz del Horno
La sonda de temperatura se puede limpiar con agua y jabón
o con una almohadilla de estropajo llena de jabón. Enfríe
la sonda de temperatura antes de su limpieza. Fregue las
manchas difíciles con una almohadilla de estropajo llena de
jabón, enjuague y seque.
Para ordenar más sondas de temperatura, lea la sección de
Asistencia y Accesorios en el comienzo de este manual.
Ŷ 1RVXPHUMDODVRQGDGHWHPSHUDWXUDHQDJXD
Ŷ 1RJXDUGHODVRQGDGHWHPSHUDWXUDGHQWURGHOKRUQR
Ŷ 1XQFDGHMHODVRQGDGHWHPSHUDWXUDGHQWURGHOKRUQRGXUDQWH
un ciclo de limpieza automática o de limpieza con vapor.
Probe (Sonda)
Horno (Cont.)
Estantes del Horno
Los estantes que estén esmaltados, y no sean brillosos, se
podrán dejar en la cavidad durante la limpieza automática o se
podrán lavar con agua caliente y jabón.
Es posible que resulte más difícil deslizar los estantes,
especialmente luego de la limpieza automática. Coloque aceite
vegetal en una tela húmeda o toalla de papel y frote sobre los
extremos izquierdo y derecho.
NOTA: El uso de otros aceites de cocina provocará una
descoloración o un residuo de color similar al óxido en los
estantes y laterales de las cavidades. Para limpiar este residuo,
use agua y jabón o una solución de vinagre y agua. Enjuague
con agua limpia y seque con una tela seca.
CUIDADO Y LIMPIEZA:+RUQR3UREH6RQGD/X]GHO+RUQR
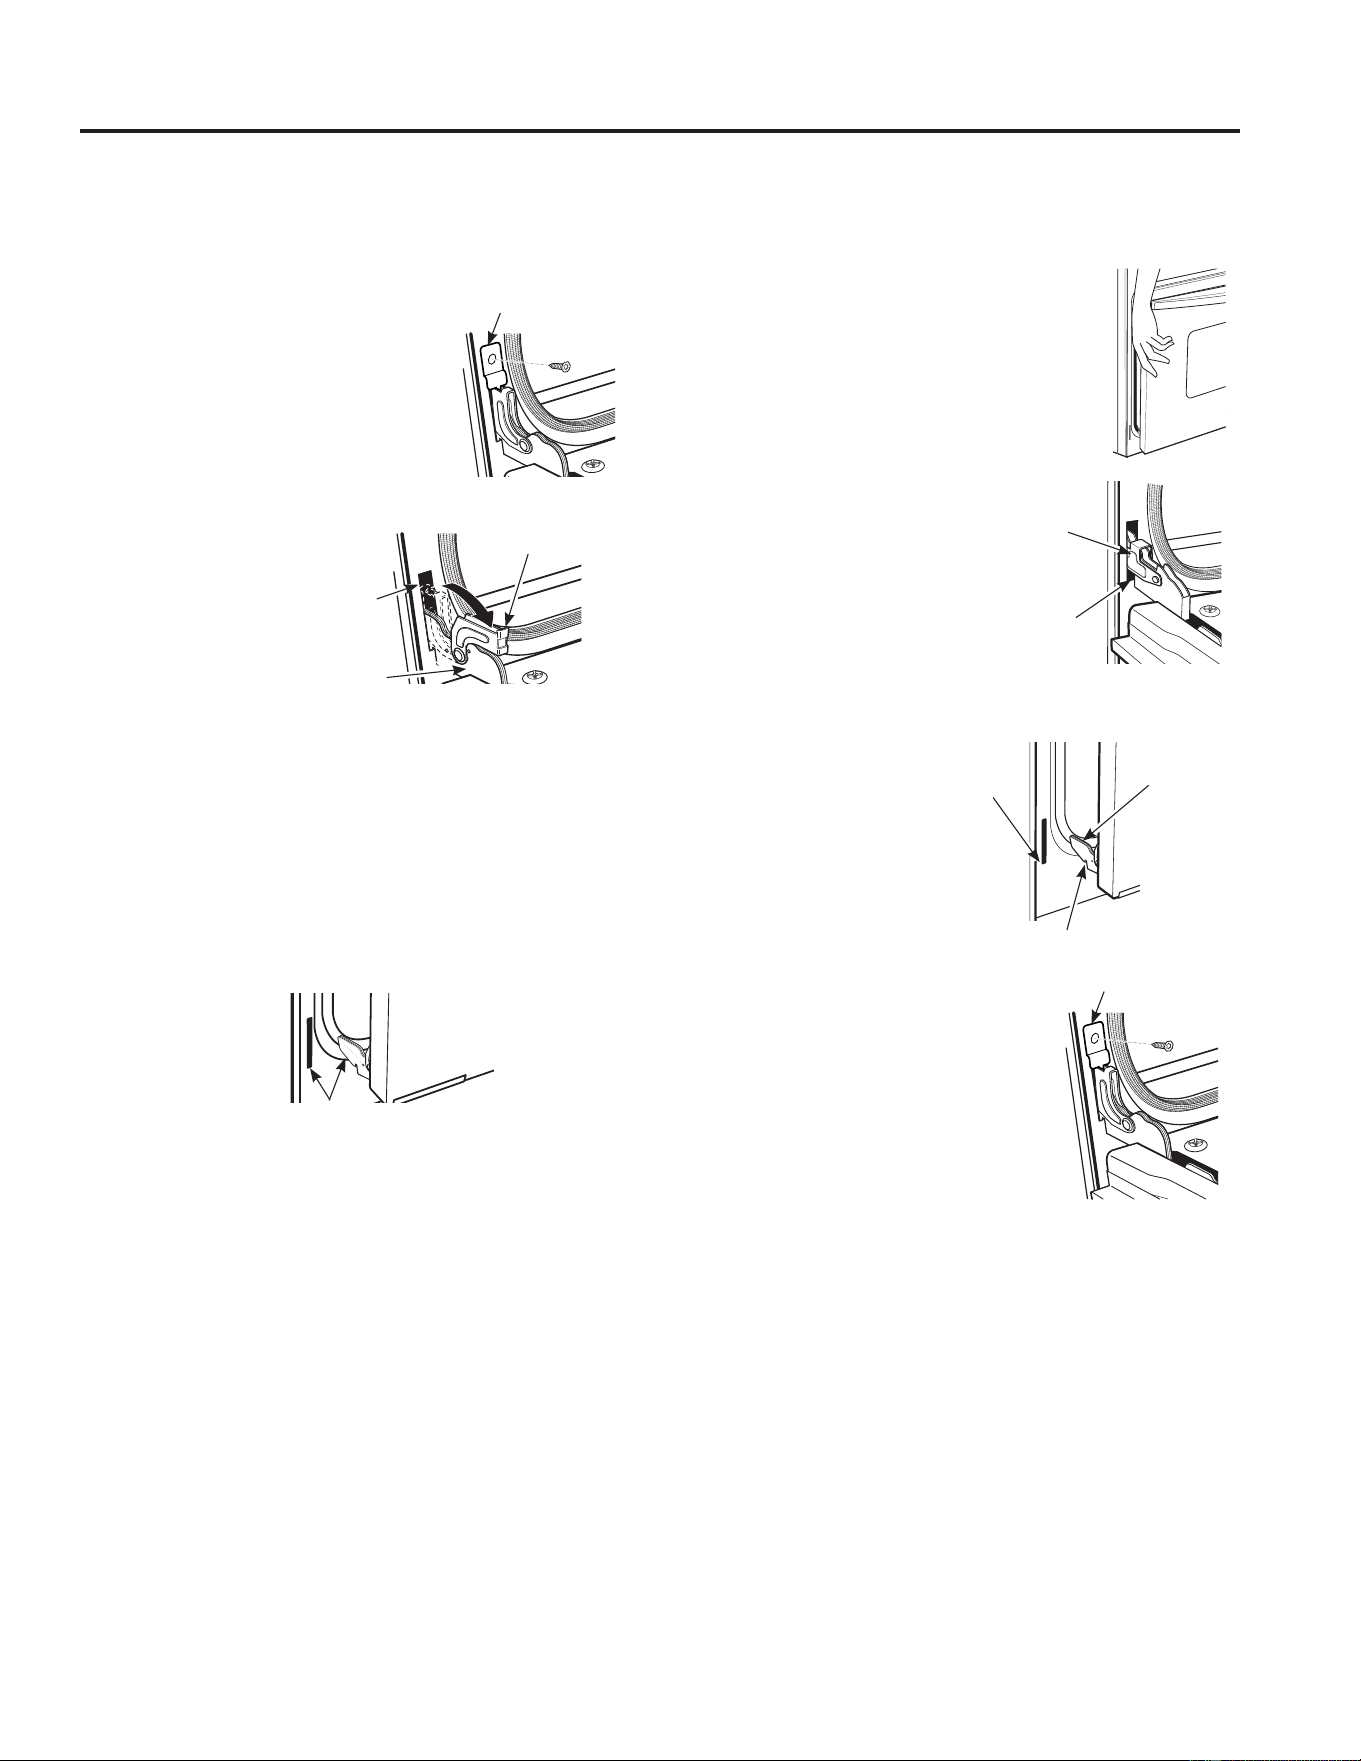
49-2000254 Rev. 6 21
CUIDADO Y LIMPIEZA: Puerta del Horno
Retiro de la Puerta del Horno
NOTA: La remoción de la puerta no es un requerimiento de la
instalación del producto, pero es una comodidad adicional.
Para quitar la puerta:
1. Abra la puerta del horno en su totalidad.
5HWLUHHOVRSRUWHGHODELVDJUDGH
estar presente) de la estructura
frontal y déjelo a un lado. El soporte
de la bisagra debe ser colocado
nuevamente para un funcionamiento
apropiado de la puerta cuando está
última sea reinstalada.
3. Presione ambas
trabas de la bisagra
hacia abajo en
dirección del marco
de la puerta hasta
destrabarlas. Para
esto puede hacer
falta un destornillador
de lados planos. ¡NO
LEVANTE LA PUERTA DE LA MANIJA!
4. Coloque las manos sobre ambos lados y cierre la puerta
GHOKRUQRKDVWDODSRVLFLyQGHUHPRFLyQDSUR[LPDGDPHQWH
1”–2” [2,5 cm–5,1 cm] de la posición de cierre).
5. Levante la puerta hasta que los brazos de la bisagra hayan
salido de las ranuras. NOTA: La puerta del horno es muy
pesada. Asegúrese de tener un agarre firme antes de
levantar la puerta del horno de sus bisagras. Tenga cuidado
XQDYH]TXHKD\DTXLWDGRODSXHUWD1RGHSRVLWHODSXHUWD
sobre la manija. Esto puede provocar abolladuras o rayones.
Reemplazo de la Puerta del Horno
NOTA: La puerta del horno es pesada. Puede necesitar ayuda
para levantar la puerta lo suficiente como para deslizarla dentro
GHODVUDQXUDVGHODELVDJUD1ROHYDQWHODSXHUWDGHODPDQLMD
1. Levante la puerta del horno tomándola de
ambos lados.
2. Con la puerta en el mismo ángulo de la
SRVLFLyQGHUHPRFLyQDSUR[LPDGDPHQWH
1”–2” [2,5 cm–5,1 cm] desde la posición de
cerrado), introduzca la muesca del brazo
de la bisagra dentro del extremo inferior de
la ranura de la bisagra. La ranura del brazo
de la bisagra debe estar
bien colocada en la parte
inferior de la ranura.
3. Abra la puerta por
completo. Si la puerta no
se abre por completo,
la muesca no está bien
colocada en el extremo
inferior de la ranura.
4. Presione las trabas de la
bisagra hacia arriba contra
el
armazón frontal de la
cavidad del horno, hasta
alcanzar la posición de
trabado.
5. Reemplace el soporte
GHODELVDJUDGHHVWDU
presente). El soporte de la
bisagra debe ser colocado
nuevamente para un funcionamiento
apropiado de la puerta.
6. Cierre la puerta del horno.
Puerta del Horno
Bisagra en
la posición
de trabado
Ranura de la
bisagra bien
colocada en la
parte inferior de
la ranura de la
bisagra
Lado
inferior de
la ranura
Brazo
de la bisagra
Ranura de la bisagra
Soporte de la Bisagra
La bisagra sale de la ranura
Soporte de la Bisagra
Ranura
de la
bisagra
Brazo
de la
bisagra
Posición destrabada
de la bisagra

22 49-2000254 Rev. 6
¡Ahorre tiempo y dinero! Revise los cuadros de las siguientes páginas o visite GEAppliances.com/ge/service-and-support/
cookingproducts.htm para acceder a artículos y videos de apoyo útiles antes de llamar al servicio técnico.
Consejos para la Solución de Problemas... Antes de solicitar el servicio técnico
Problema Causa Posible Qué Hacer
Mi horno nuevo
no cocina como el
anterior. ¿Hay algún
problema con las
configuraciones de
temperatura?
Su horno nuevo cuenta con un sistema de cocción
diferente con relación al anterior y, por lo tanto, es
posible que cocine de forma diferente.
En los primeros usos, use los tiempos y temperaturas de
su receta con cuidado. Si aún piensa que su horno nuevo
cocina con demasiado calor o demasiado frío, podrá ajustar
el termostato usted mismo para aplicar su preferencia de
cocción específica. NOTA: Este ajuste afecta los modos
%DNH+RUQHDU\&RQYHFWLRQ%DNH0XOWL+RUQHDGRSRU
Convección Múltiple); no afectará las funciones Convection
5RDVW'RUDUSRU&RQYHFFLyQ%URLO$VDUR&OHDQ/LPSLDU
La comida no se
hornea de forma
apropiada
Controles del horno configurados de forma incorrecta. Consulte la sección Modos de Cocción.
La posición del estante es incorrecta o el estante no
está nivelado.
Consulte la sección Modos de Cocción y la Guía de Cocción.
8VRGHXQDFDFHURODLQFRUUHFWDRGHXQDFDFHURODGH
tamaño incorrecto.
&RQVXOWHODVHFFLyQ8WHQVLOLRV
La temperatura del horno debe ser ajustada. &RQVXOWHODVHFFLyQ6HWWLQJV&RQILJXUDFLRQHV
Sustitución de ingredientes
Sustituir ingredientes puede modificar el resultado de la receta.
La comida no asa de
forma apropiada
Controles del horno configurados de forma incorrecta. Asegúrese de seleccionar el modo correcto para asar.
Se usó una posición incorrecta del estante. Para acceder a sugerencias de ubicación de estantes,
consulte la Guía de Cocción.
Se cocinó comida en una olla caliente. Asegúrese de que el utensilio esté frío
8WHQVLOLRGHFRFLQDLQDGHFXDGRSDUDDVDU 8VHXQDROODHVSHFtILFDPHQWHGLVHxDGDSDUDDVDU
El papel de aluminio usado para la olla y la rejilla para
asar no se ajustó ni cortó de forma apropiada, según
lo recomendado.
Si usará papel de aluminio, deberá usarse conforme con las
aberturas de la olla.
En algunas áreas, es posible que el nivel de corriente
YROWDMHVHDEDMR
Precaliente el elemento para asar durante 10 minutos.
La temperatura
del horno es
demasiado caliente
o demasiado fría
La temperatura del horno debe ser ajustada. &RQVXOWHODVHFFLyQ6HWWLQJV&RQILJXUDFLRQHV
El horno no funciona
o parece no
funcionar
Es posible que un fusible de su hogar se haya
quemado o que el disyuntor se haya desconectado.
Reemplace el fusible o reinicie el disyuntor.
Controles del horno configurados de forma incorrecta. &RQVXOWHODVHFFLyQ8VRGHO+RUQR
(OKRUQRVHHQFXHQWUDHQ6DEEDWK0RGH0RGR
Sabático)
9HULILTXHTXHHOKRUQRQRHVWpHQ6DEEDWK0RGH0RGR
6DEiWLFR&RQVXOWHODVHFFLyQ6HWWLQJV&RQILJXUDFLRQHV
Sonido de
“chisporroteo” o
“traqueo”
eVWHHVHOVRQLGRGHPHWDOFDOHQWiQGRVHRHQIULiQGRVH
durante las funciones de cocción y limpieza..
Esto es normal.
¿Por qué la estufa
hace un sonido de
“clic” cuando uso el
horno?
Su estufa fue diseñada para mantener un control más
ajustado sobre la temperatura del horno. Es posible
que escuche que los elementos de calentamiento del
horno hagan sonidos de “clic” con mayor frecuencia
que con hornos más antiguos para lograr mejores
resultados durante los ciclos de horneado, asado,
convección y limpieza automática.
Esto es normal.
El reloj y el
temporizador no
funcionan
Es posible que un fusible de su hogar se haya
quemado o que el disyuntor se haya desconectado.
Reemplace el fusible o reinicie el disyuntor.
La luz del horno no
funciona
La lámpara está floja o presenta defectos. Ajuste o reemplace la lámpara.
La luz de funcionamiento del interruptor está rota. Llame al servicio técnico.
El modo de limpieza
automática del
horno no funciona
La temperatura del horno es demasiado caliente
como para configurar la limpieza automática.
Espere a que el horno se enfríe y reinicie los controles.
Los controles del horno están configurados de forma
incorrecta.
Consulte la sección de Limpieza del Horno.
CONSEJOS PARA LA SOLUCIÓN DE PROBLEMAS

49-2000254 Rev. 6 23
CONSEJOS PARA LA SOLUCIÓN DE PROBLEMAS
Consejos para la Solución de Problemas... Antes de solicitar el servicio técnico
Problema Causa Posible Qué Hacer
Exceso de humo
durante un ciclo de
limpieza
Suciedad o grasa excesiva. Presione la tecla Cancel/Off (Cancelar/ Apagar) Abra las
ventanas para liberar el humo en la habitación. Espere hasta
que
se apague. Limpie el exceso de suciedad y reinicie el
ciclo de limpieza.
Humo excesivo al asar
La comida está demasiado cerca del quemador. Baje la posición del estante con comida.
La puerta del horno
no se abrirá luego de
un ciclo de limpieza
El horno está demasiado caliente. Espere a que el horno se enfríe por debajo de la temperatura
de bloqueo.
El horno no limpia
luego de un ciclo de
limpieza
Los controles del horno están configurados de forma
incorrecta.
Consulte la sección de Limpieza del Horno.
El horno estaba demasiado sucio. Limpie derrames excesivos antes de iniciar el ciclo de
limpieza. Es posible que, en hornos con mucha suciedad, sea
necesario usar la limpieza automática nuevamente o usarla
durante un período de tiempo más prolongado.
parpadea en la
pantalla
El ciclo de limpieza automática fue seleccionado pero
la puerta no está cerrada.
Cierre la puerta del horno.
está encendido
cuando desea
cocinar
La puerta del horno está bloqueada debido a que
la temperatura interior del horno no descendió por
debajo de la temperatura de bloqueo.
Presione la tecla Cancel/Off (Cancelar/ Apagar)'HMHTXHHO
horno se enfríe.
“F – y un número
o letra” titila en la
pantalla
Tiene un código de error de función. Presione la tecla Cancel/Off (Cancelar/ Apagar) Permita
que el horno se enfríe durante una hora. Vuelva a poner el
horno en funcionamiento.
Si el código de función se repite. 'HVFRQHFWHWRWDOPHQWHODFRUULHQWHGHODFRFLQDGXUDQWHSRU
lo menos 30 minutos y vuelva a conectar la misma. Si el
código de error de función se repite, llame al servicio técnico.
La pantalla queda en
blanco
Es posible que un fusible de su hogar se haya
quemado o que el disyuntor se haya desconectado.
Reemplace el fusible o reinicie el disyuntor.
El reloj está apagado. &RQVXOWHODVHFFLyQ6HWWLQJV&RQILJXUDFLRQHV
El horno se encuentra en Sabbath Mode
0RGR6DEiWLFR
9HULILTXHTXHHOKRUQRQRHVWpHQ6DEEDWK0RGH0RGR
6DEiWLFR&RQVXOWHODVHFFLyQ6HWWLQJV&RQILJXUDFLRQHV
Corte de corriente, el
reloj titila
Corte o exceso de corriente
Reinicie el reloj. Si el horno estuvo en uso, deberá reiniciar el
mismo presionando la tecla Cancel/ Off (Cancelar/ Apagar)
configurando el reloj y reiniciando cualquier función de cocción.
Olor a “quemado”
o “aceite” desde la
ventilación
Esto es normal en un horno nuevo y desaparecerá
con el tiempo.
Para acelerar el proceso, configure un ciclo de limpieza
automática por un mínimo de 3 horas. Consulte la sección de
Limpieza del Horno.
Olor fuerte 8QRORUHQODDLVODFLyQDOUHGHGRUGHOLQWHULRUGHOKRUQR
es normal desde las primeras veces en que el horno
es usado.
Esto es temporario y desaparecerá luego de varios usos o de
un ciclo de limpieza automática.
Ruido del ventilador Es posible que un ventilador de enfriamiento se active
automáticamente.
Esto es normal. El ventilador de enfriamiento se encenderá
para enfriar las partes internas. Es posible que funcione
hasta durante una hora y media, una vez que el horno se
haya apagado.
La puerta de vidrio
del horno parece
estar “teñida” o tener
un color “arcoíris”.
¿Es esto un defecto?
1R(OYLGULRGHOKRUQRLQWHUQRHVWiFXELHUWRFRQXQD
barrera de calor que refleja este último nuevamente
hacia el horno, a fin de evitar la pérdida de calor y de
mantener fría la puerta externa mientras se hornea.
Esto es normal. Bajo ciertas luces y ángulos, es posible que
visualice esta tinta o arcoíris.
A veces el horno
tarda más en
precalentarse a la
misma temperatura
8WHQVLOLRRFRPLGDHQHOKRUQR El utensilio o la comida en el horno hará que éste tarde más
en precalentarse. Retire estos artículos para reducir el tiempo
de precalentamiento.
1~PHURGHHVWDQWHVHQHOKRUQR Agregar más estantes al horno hará que éste tarde más en
precalentarse. Retire algunos estantes.
'LIHUHQWHVPRGRVGHFRFFLyQ Los diferentes modos de cocción utilizan diferentes métodos
de precalentamiento para calentar el horno en un modo de
cocción específico. Algunos modos tardarán más que otros
WDOHVFRPRKRUQHDGRSRUFRQYHFFLyQP~OWLSOH
El horno no funciona
en forma remota
Problemas en el enrutador, no hay señal
inalámbrica, etc.
Para solicitar asistencia con la conectividad de red
inalámbrica, comuníquese al 800.220.6899.
El horno no está conectado.

24 49-2000254 Rev. 6
Garantía Limitada del Horno Eléctrico de GE Appliances
GARANTÍA LIMITADA
Abroche su recibo aquí. Para acceder al servicio técnico de acuerdo con
la garantía deberá contar con la prueba de la fecha original de compra.
GEAppliances.com
Todo el servicio de garantía de su electrodoméstico es provisto exclusivamente por GE Appliances, Centros de Servicio de Fábrica
de la compañía Haier, o por un técnico del servicio autorizado por GE Appliances para brindar el servicio de garantía de su
electrodoméstico.
Para programar una visita del servicio técnico a través de Internet, visítenos en GEAppliances.com/service, o
OODPHDO*(&$5(6&XDQGROODPHSDUDVROLFLWDUHOVHUYLFLRWHQJDORVQ~PHURVGHVHULH\PRGHORGLVSRQLEOHV(O
servicio técnico que no haya sido programado o de otro modo organizado por GE Appliances no estará cubierto bajo esta garantía,
incluyendo cualquier parte y/o servicios provistos.
Para realizar el servicio técnico de su electrodoméstico, se podrá requerir el uso de datos del puerto de abordaje para su diagnóstico.
Esto da al técnico del servicio de fábrica de GE Appliances la habilidad de diagnosticar de forma rápida cualquier problema con
su electrodoméstico, y de ayudar a GE Appliances a mejorar sus productos al brindarle a GE Appliances la información sobre su
electrodoméstico. Si no desea que los datos de su electrodoméstico sean enviados a GE Appliances, solicitamos que le indique a su
técnico no entregar los datos a GE Appliances en el momento del servicio.
Qué no cubrirá GE Appliances:
Ŷ Viajes del técnico del servicio a su hogar para enseñarle
sobre cómo usar el producto.
Ŷ ,QVWDODFLyQHQWUHJDRPDQWHQLPLHQWRLQDGHFXDGRV
Ŷ )DOODVGHOSURGXFWRHQFDVRGHDEXVRPDOXVRPRGLILFDFLyQ
o uso para propósitos diferentes al original o uso comercial.
Ŷ 5HHPSOD]RGHIXVLEOHVGHODFDVDRUHLQLFLRGHGLV\XQWRUHV
Ŷ 'DxRVRFDVLRQDGRVVREUHHOSURGXFWRSRUDFFLGHQWH
incendio, inundaciones o catástrofes naturales.
Ŷ 'DxRVLQFLGHQWDOHVRFRQVHFXHQWHVFDXVDGRVSRUSRVLEOHV
defectos sobre este producto.
Ŷ 'DxRFDXVDGRGHVSXpVGHODHQWUHJD
Ŷ 3URGXFWRQRDFFHVLEOHSDUDEULQGDUHOVHUYLFLRUHTXHULGR
Ŷ 6ROLFLWHHOVHUYLFLRWpFQLFRSDUDUHSDUDURUHHPSOD]DUODV
OiPSDUDVH[FHSWRODVOiPSDUDV/('
Ŷ 'DxRVVREUHHODFDEDGRWDOHVFRPRy[LGRVREUHOD
superficie, deslustres o manchas pequeñas no informadas
dentro de las 48 horas luego de la entrega.
EXCLUSIÓN DE GARANTÍAS IMPLÍCITAS
Su única y exclusiva alternativa es la reparación del producto, como se indica en la Garantía Limitada. Las
garantías implícitas, incluyendo garantías implícitas de comerciabilidad o conveniencia sobre un propósito
particular, se limitan a un año o al período más corto permitido por la ley.
Esta garantía limitada se extiende al comprador original y a cualquier propietario posterior de los productos
FRPSUDGRVSDUDXVRGRPpVWLFRGHQWURGH((88 Si el producto está en un área donde no se encuentra disponible
un Proveedor Autorizado del Servicio Técnico de GE Appliances, usted será responsable por el costo de un viaje o se
podrá requerir que traiga el producto a una ubicación del Servicio Técnico de GE Appliances autorizado para recibir el
servicio. En Alaska, la garantía limitada excluye el costo de envío o visitas de servicio a su domicilio. Algunos estados
no permiten la exclusión o limitación de daños fortuitos o consecuentes. Esta garantía limitada le otorga derechos
legales específicos, y usted también podría tener otros derechos que varían de estado a estado. Para conocer cuáles
son sus derechos legales, consulte a la oficina de asuntos del consumidor local o estatal o al Fiscal de su estado.
Garante: GE Appliances, a Haier company
Louisville, KY 40225
Garantías Extendidas: Adquiera una garantía extendida de GE Appliances y conozca los descuentos especiales que
están disponibles mientras su garantía aún está vigente. Puede acceder a la misma a través de Internet en cualquier
momento en
GEAppliances.com/extended-warranty
o llamando al 800.626.2224 durante el horario comercial. Los Servicios para los GE Appliances aún estarán
disponibles cuando su garantía caduque.
Por el Período de GE Appliances reemplazará
Un Año
'HVGHODIHFKDGHOD
compra original
Cualquier parteGHOKRUQRTXHIDOOHGHELGRDXQGHIHFWRHQORVPDWHULDOHVRODIDEULFDFLyQ'XUDQWHHVWD
garantía limitada de un año, GE Appliances también proveerá, sin costo, todo el trabajo y el servicio
en el hogar para reemplazar la parte que presente defectos.

49-2000254 Rev. 6 25
ACCESORIOS
Accesorios
¿Busca Algo Más?
¡GE Appliances ofrece una variedad de accesorios para
mejorar sus experiencias de cocción y mantenimiento!
Para acceder a números telefónicos e información de sitios
Web, consulte la página de Soporte para el Consumidor.
(VWRV\RWURVSURGXFWRVHVWiQGLVSRQLEOHV
Accesorios
2OODSDUD$VDU3HTXHxDô´[ó´[ò³
2OODSDUD$VDU*UDQGHô´[ó´[ò³
2OODSDUD$VDU([WUD*UDQGHô´[ó´[ò³
Piezas
Estantes del horno
(VWDQWH'HVOL]DEOH1HYHU6FUXEGH´
(VWDQWH'HVOL]DEOH1HYHU6FUXEGH´
Elementos del horno
Lámparas de luz
Suministros de Limpieza
Limpiadores de Acero Inoxidable CitriShine™
Limpiador de Electrodomésticos de Acero Inoxidable
Lubricante de Grafito***
*La olla para asar grande no entra en cocinas de 20”/24”.
** La olla XL no entra en hornos de pared de 24”, empotrables de 27”
o cocinas de 20”/24”.
*** 3DUDXVRFRQHVWDQWHVGHVOL]DEOHV1HYHU6FUXE

26 49-2000254 Rev. 6
Soporte para el Consumidor
SOPORTE PARA EL CONSUMIDOR
Sitio Web de GE Appliances
¢'HVHDUHDOL]DUXQDFRQVXOWDRQHFHVLWDD\XGDFRQVXHOHFWURGRPpVWLFR"£,QWHQWHDWUDYpVGHO6LWLR:HEGH*($SSOLDQFHVODV
KRUDVGHOGtDFXDOTXLHUGtDGHODxR8VWHGWDPELpQSXHGHFRPSUDUPiVHOHFWURGRPpVWLFRVPDUDYLOORVRVGH*($SSOLDQFHV\
aprovechar todos nuestros servicios de soporte a través de Internet, diseñados para su conveniencia.
(Q((88GEAppliances.com
Registre su Electrodoméstico
£5HJLVWUHVXHOHFWURGRPpVWLFRQXHYRDWUDYpVGH,QWHUQHWVHJ~QVXFRQYHQLHQFLD8QUHJLVWURSXQWXDOGHVXSURGXFWRSHUPLWLUi
una mejor comunicación y un servicio más puntual de acuerdo con los términos de su garantía, en caso de surgir la necesidad.
También puede enviar una carta en la tarjeta de inscripción preimpresa que se incluye con el material embalado.
(Q((88GEAppliances.com/register
Servicio Programado
El servicio de reparación de expertos de GE Appliances está a sólo un paso de su puerta. Conéctese a través de Internet y programe
VXVHUYLFLRDVXFRQYHQLHQFLDFXDOTXLHUGtDGHODxR(Q((88GEAppliances.com/service
o comuníquese al 800.432.2737 durante el horario de atención comercial.
Garantías Extendidas
Adquiera una garantía extendida de GE Appliances y conozca los descuentos especiales que están disponibles mientras su
garantía aún está vigente. La puede adquirir en cualquier momento a través de Internet. Los servicios de GE Appliances aún
estarán allí cuando su garantía caduque.
(Q((88GEAppliances.com/extended-warranty
o comuníquese al 800.626.2224 durante el horario de atención comercial.
Conectividad Remota
3DUDVROLFLWDUDVLVWHQFLDSDUDODFRQHFWLYLGDGGHUHGLQDOiPEULFDSDUDPRGHORVFRQDFFHVRUHPRWR
visite nuestro sitio web en GEAppliances.com/connect RFRPXQtTXHVHDOHQ((88
Piezas y Accesorios
Aquellos individuos calificados para realizar el servicio técnico de sus propios electrodomésticos podrán solicitar el envío de
SLH]DVRDFFHVRULRVGLUHFWDPHQWHDVXVKRJDUHVVHDFHSWDQODVWDUMHWDV9,6$0DVWHU&DUG\'LVFRYHU2UGHQHKR\DWUDYpVGH
,QWHUQHWGXUDQWHODVKRUDVWRGRVORVGtDV(Q((88GEApplianceparts.com o de forma telefónica al 877.959.8688 durante
el horario de atención comercial.
Las instrucciones que figuran en este manual cubren los procedimientos que serán realizados por cualquier usuario.
Otros servicios técnicos generalmente deben ser derivados a personal calificado del servicio. Se deberá tener cuidado,
ya que una reparación indebida podrá hacer que el funcionamiento no sea seguro.
Contáctenos
Si no se encuentra satisfecho con el servicio que recibió de GE Appliances, comuníquese con nosotros a través de nuestro sitio
:HEFRQWRGRVORVGHWDOOHVLQFOX\HQGRVXQ~PHURWHOHIyQLFRRHVFULEDD
(Q((88*HQHUDO0DQDJHU&XVWRPHU5HODWLRQV_*($SSOLDQFHV$SSOLDQFH3DUN_/RXLVYLOOH.<
GEAppliances.com/contact


