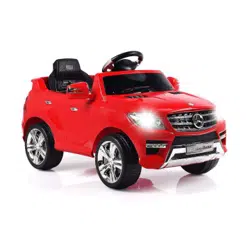
Mercedes-Benz 2020 GLC 300 SUV Car
Product's Documents
Below are documents related to this product, you can read online or download:
- Owner's manual - (English) Read Online | Download pdf

Owner's Guide Cars


Notes on climate control
An interior air filter in combination with the prefilter in the engine compartment must always be used so that the air conditioning system, pollution level monitoring and the air filtration work correctly. Make sure that the filter is installed correctly and the filter housing in the engine compartment is closed correctly using the cap and always tightly sealed when in operation. Use filters recommended and approved by Mercedes-Benz. Always have service work carried out at a qualified specialist workshop.
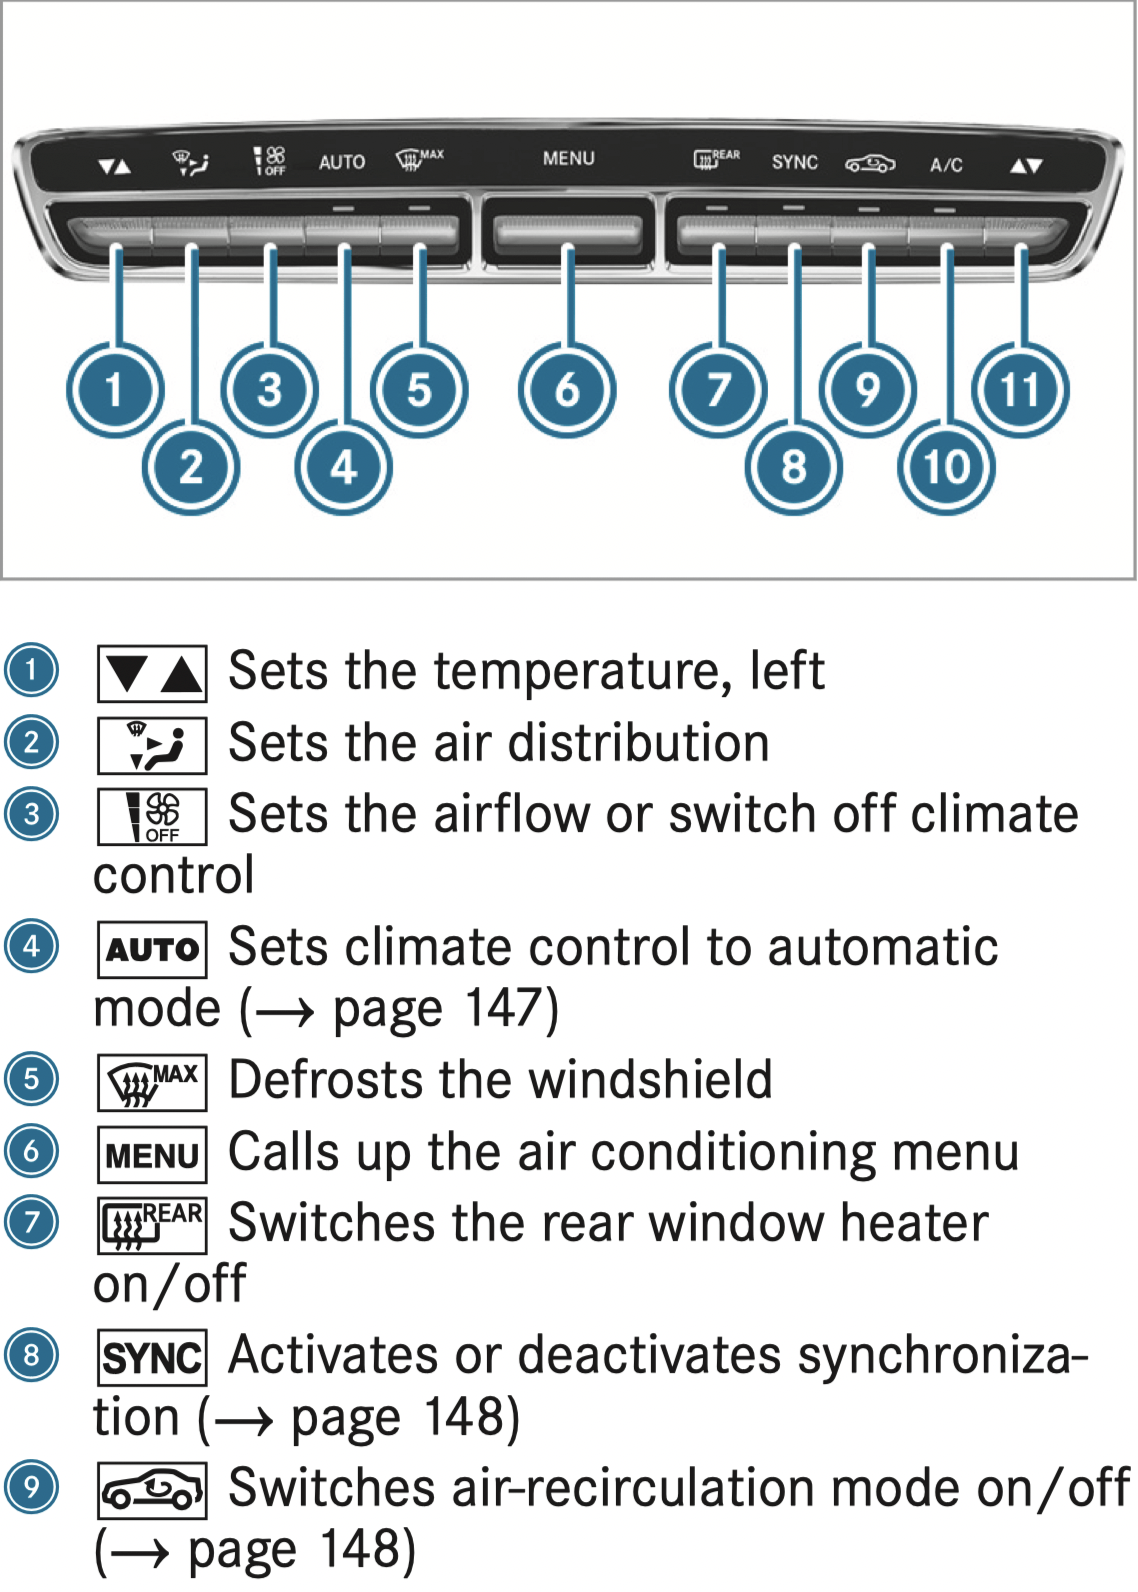
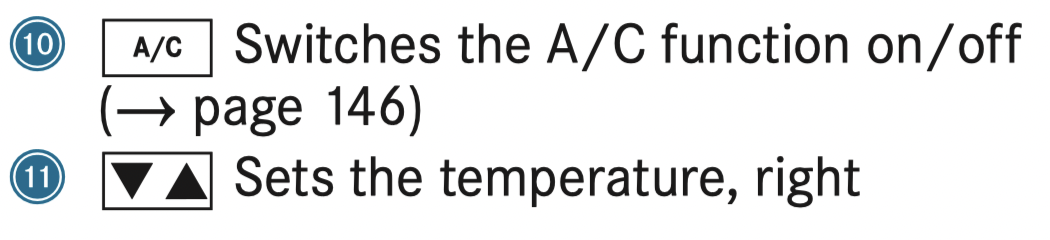
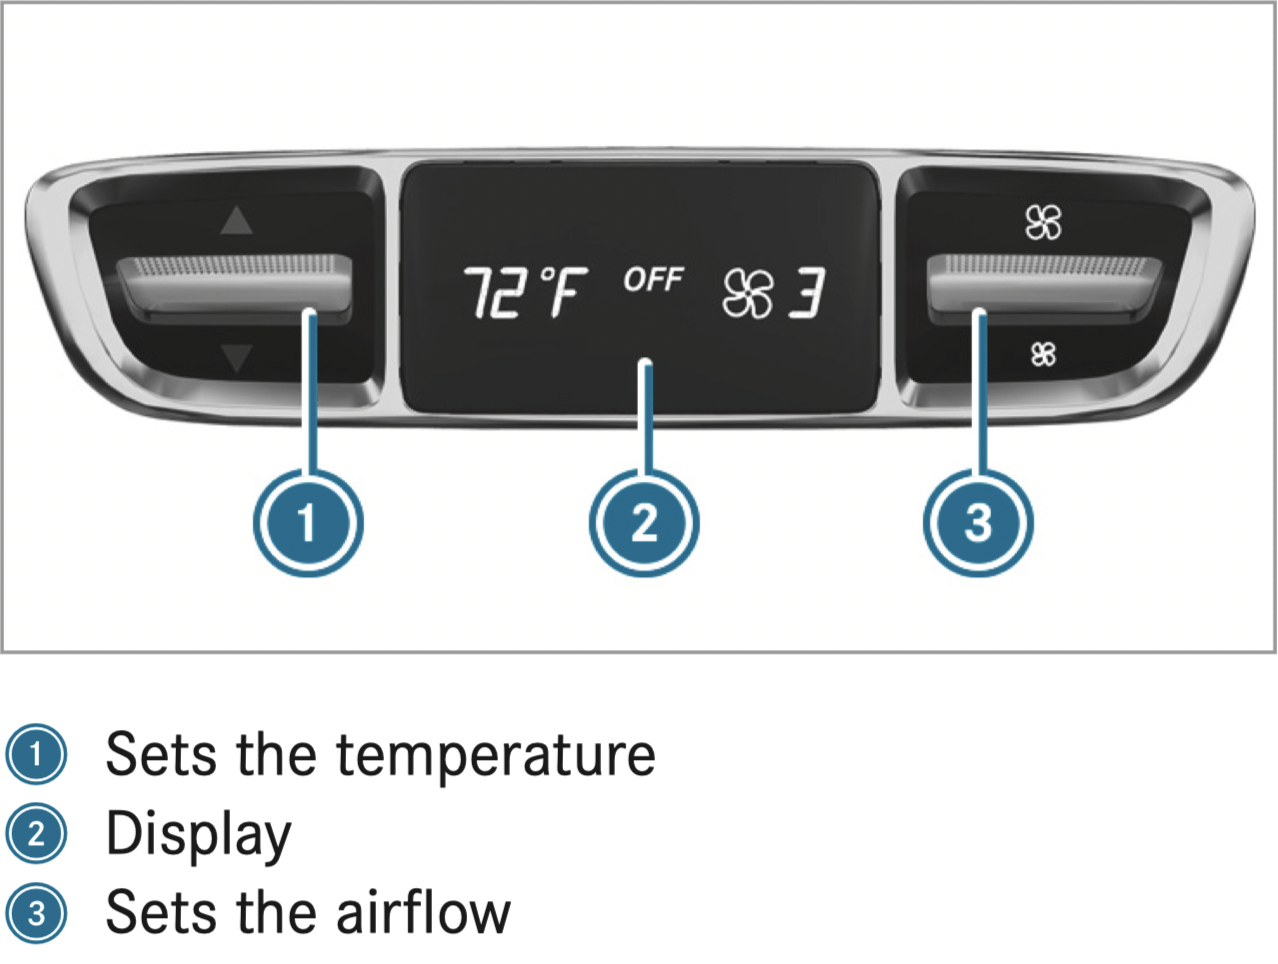
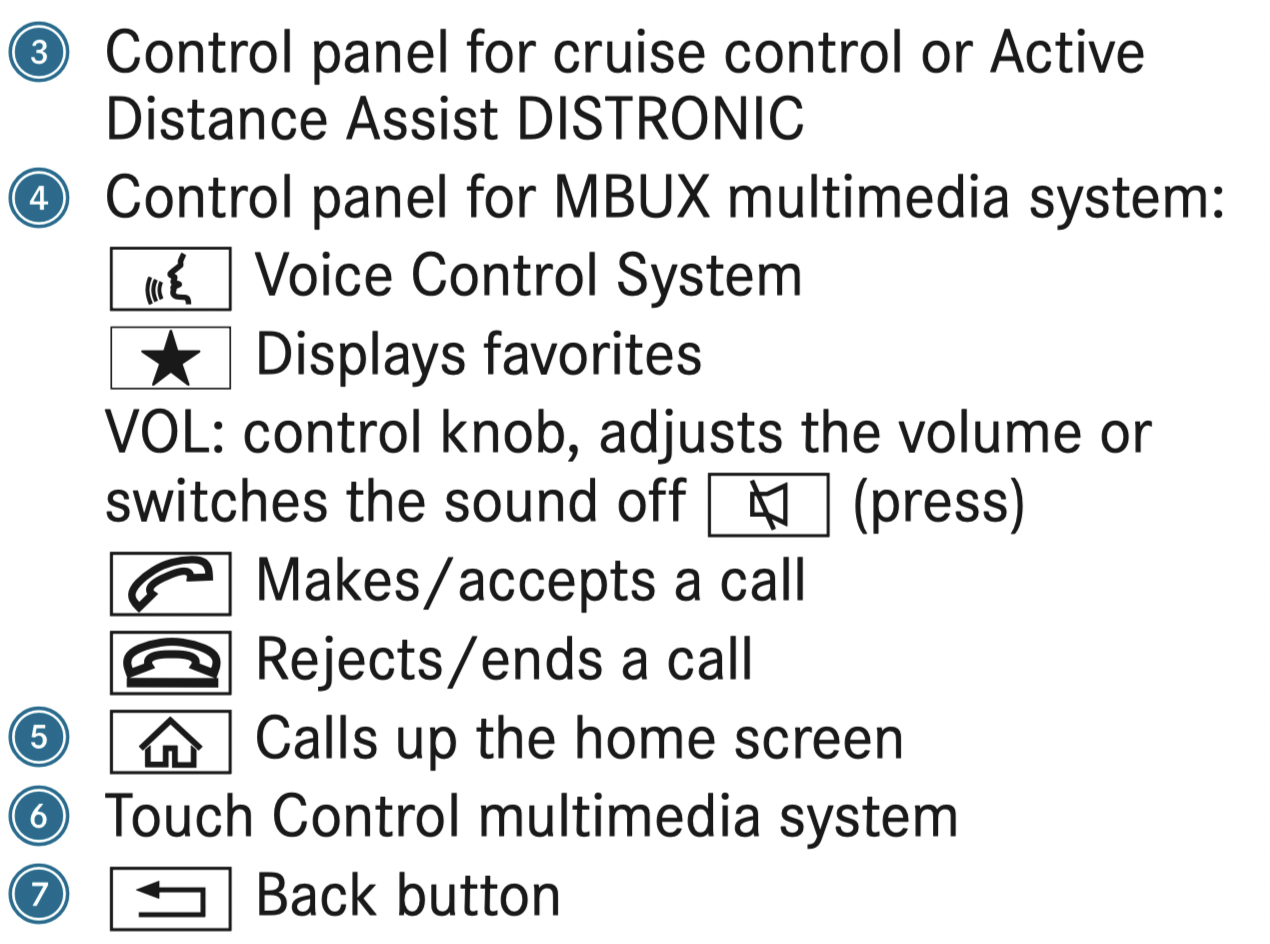
Overview of the control panel for dual-zone automatic climate control
The indicator lamps on the buttons indicate that the corresponding function is activated.
Plug-in hybrid: be sure to observe the notes in the Supplement. Otherwise, you may not recognize dangers.
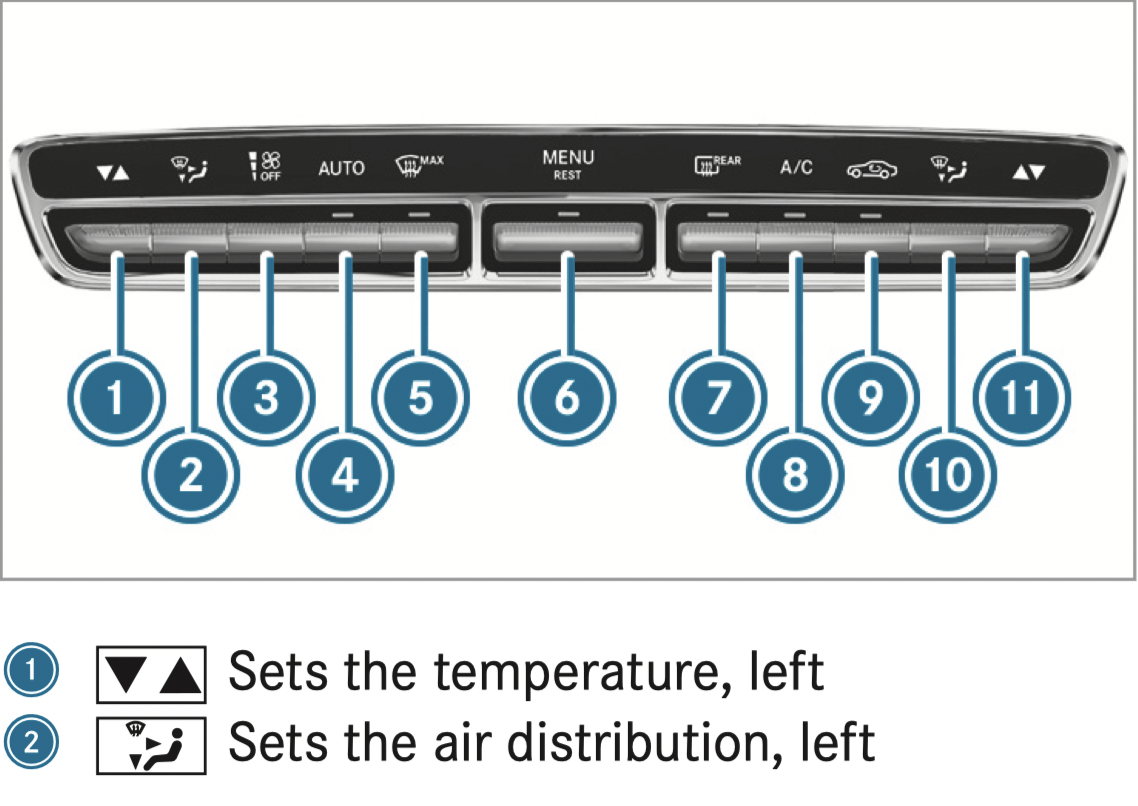
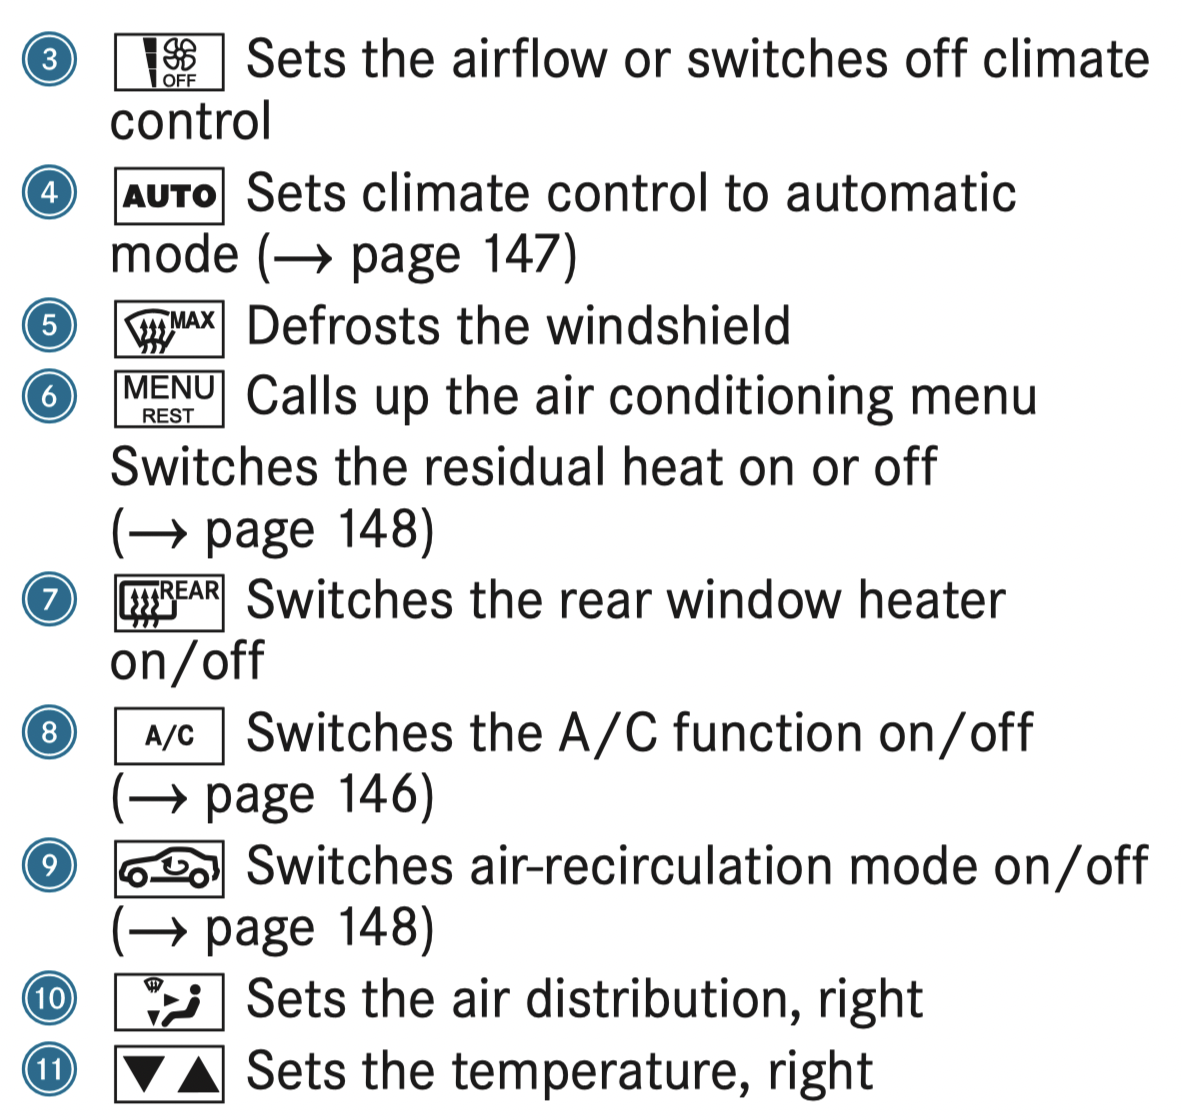
Overview of the control panel for 3-zone automatic climate control
The indicator lamps on the buttons indicate that the corresponding function is activated.
Plug-in hybrid: be sure to observe the notes in the Supplement. Otherwise, you may fail to recognize dangers.
Rear operating unit
Switching climate control on/off
 button.
 button.
If climate control is switched off, the windows may fog up more quickly. Switch off climate control only briefly.
Switching the A/C function on or off via the control panel
The A/C function heats, cools and dehumidifies the vehicle's interior air.
 button.
Switch off the A/C function only briefly; otherwise, the windows may fog up more quickly.
Condensation may drip from the underside of the vehicle when cooling mode is active. This is not a sign that there is a malfunction.
Calling up the air conditioning menu
Calling up the air conditioning menu using the multimedia system
Calling up the air conditioning menu using the button on the control panel
 button on the control panel.
The button on the control panel is not available on all equipment variants. In this case, the air conditioning menu can only be called up using the multimedia system.
Activating/deactivating the A/C function via the multimedia system
The A/C function heats, cools and dehumidifies the vehicle's interior air.
Setting climate control to automatic mode
In automatic mode, the set temperature is controlled and maintained at a constant level by the air supply
 button.
 or
or  button.
Climate style
Climate style function
In automatic mode, you can select the following climate style settings for the driver's and front passenger areas:
Adjusting the climate mode settings
Overview of the air distribution settings
The symbols on the display indicate which vents the airflow is being directed through:
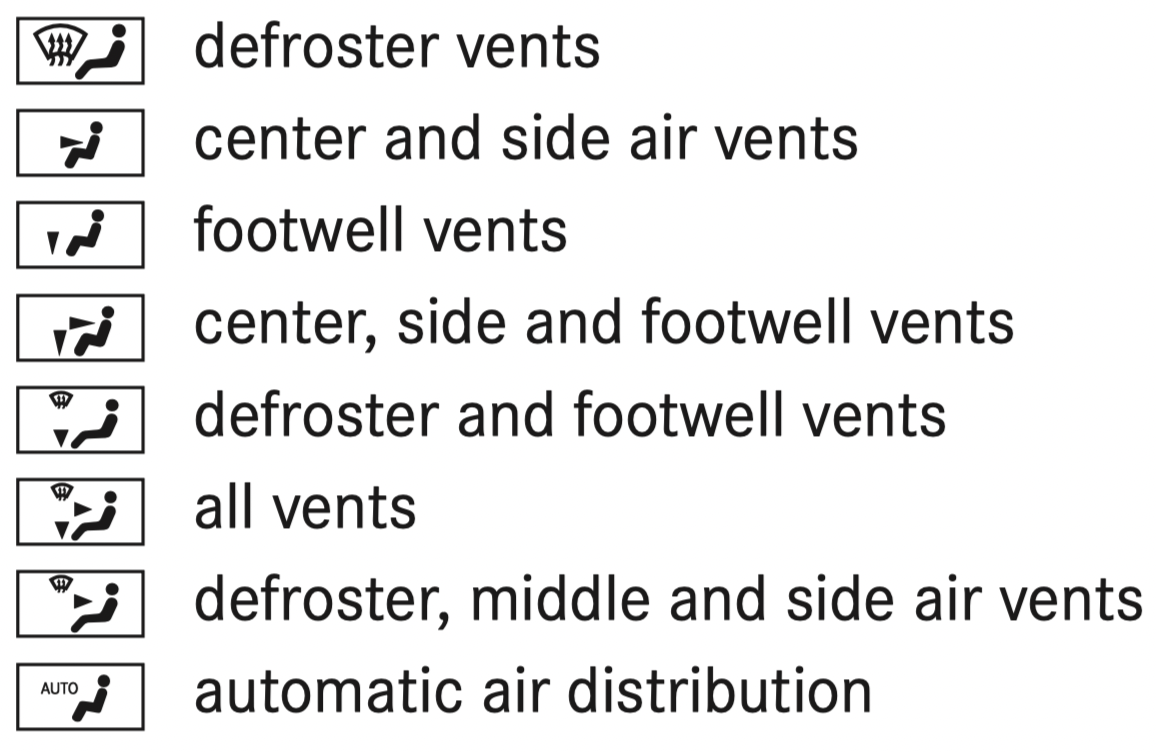
Setting the air distribution
 ,
,  or
or  .
.Several air distribution options can be selected at the same time, for example to set the temperature/air conditioning for the windshield and the footwells simultaneously. The  climate control for the windshield can only be selected for the first seat row.
Activating/deactivating the climate control synchronization function via the control panel
Climate control can be set centrally using the synchronization function. The temperature and air distribution settings for the driver's side are adopted automatically for the front passenger side.
 button.
The synchronization function is deactivated if the settings for one of the other climate zones are changed.
Activating/deactivating the climate control synchronization function using the multimedia system
Climate control can be set centrally using the synchronization function. The driver's settings for temperature, air quantity and air distribution are adopted automatically for all climate zones.
Removing condensation from the windows
Windows fogged up on the inside
or button. button.
Windows fogged up on the outside
button.Switching air-recirculation mode on/off
Press the  button. The interior air will be recirculated.
Air-recirculation mode automatically switches to fresh air mode after some time.
If air-recirculation mode is switched on, the windows may fog up more quickly. Switch on air-recirculation mode only briefly.
Switching the residual heat on or off
Requirements:
It is possible to make use of the residual heat from the engine to continue heating or ventilating the front compartment of the vehicle for approximately 30 minutes.
 button.
Residual heat is switched off automatically.
Activating/deactivating ionization
The ionization improves the quality of the vehicle's interior air. The ionization of the interior air is odorless.
Fragrance system
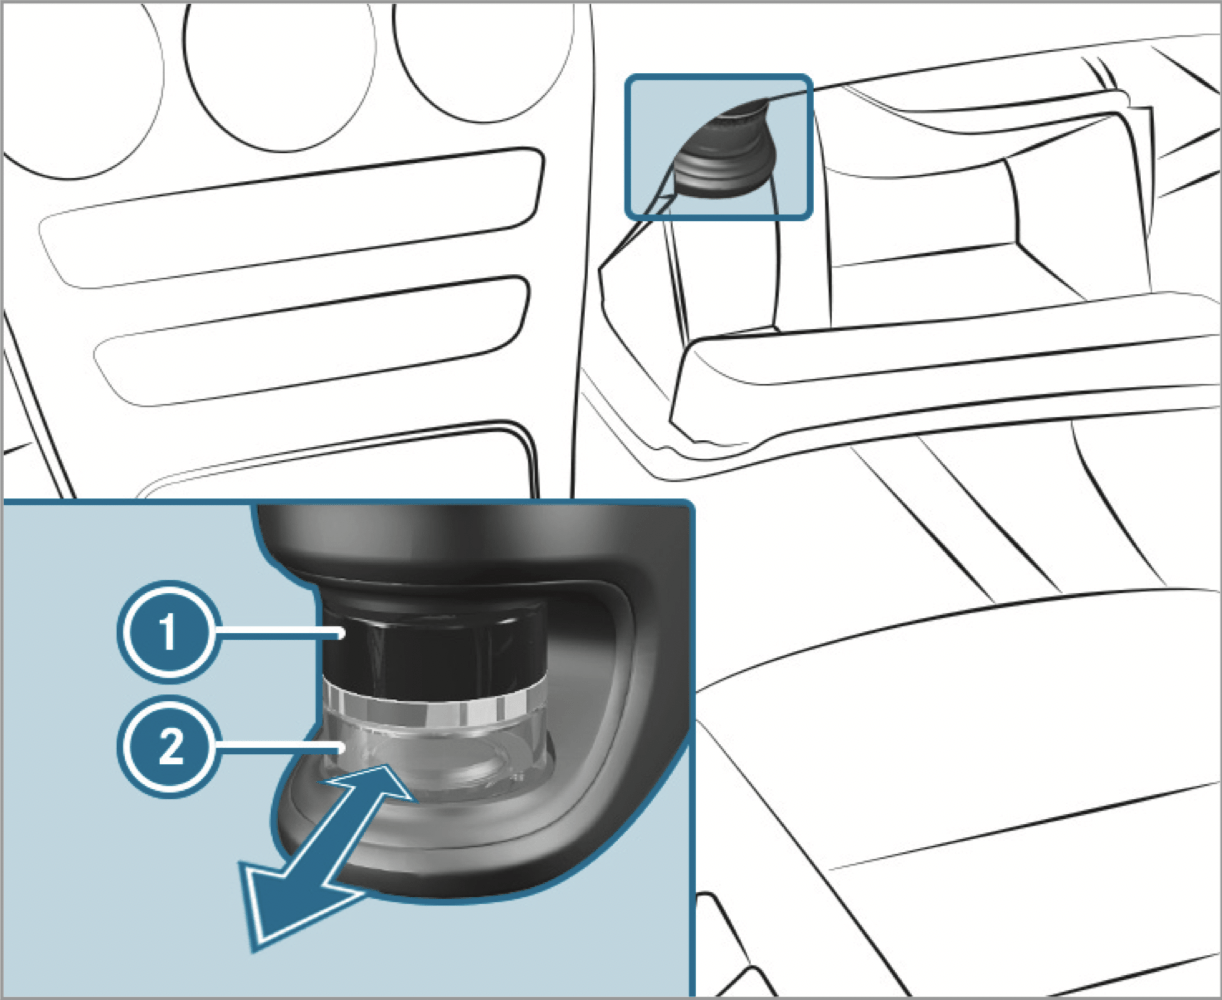
Setting the fragrance system
Requirements:
The fragrance system distributes a pleasant fragrance throughout the vehicle interior from a flacon located in the glove box.
The intensity levels can be selected in the following order: Strong - Medium - Weak Off
Inserting or removing the flacon of the fragrance system
WARNING - Risk of injury from liquid perfume: If children open the flacon, they could drink the liquid perfume or it could come into contact with their eyes.
ENVIRONMENTAL NOTE: Environmental damage due to improper disposal of full flacons

Full flacons must not be disposed of with household waste.

Full flacons must be taken to a harmful substance collection point.
If you do not use genuine Mercedes-Benz interior perfumes, observe the manufacturers' safety notices on the perfume packaging.
Dispose of the genuine Mercedes-Benz interior perfume flacon when it is empty and do not refill it.
Refillable flacon
Always refill the empty refillable flacon with the same perfume. Observe the separate information sheet attached to the flacon.
Air vents
Adjusting the front air vents
WARNING ‑ Danger of burns or frostbite due to being too close to the air vents
To guarantee the flow of fresh air through the air vents into the vehicle interior, comply with the following:
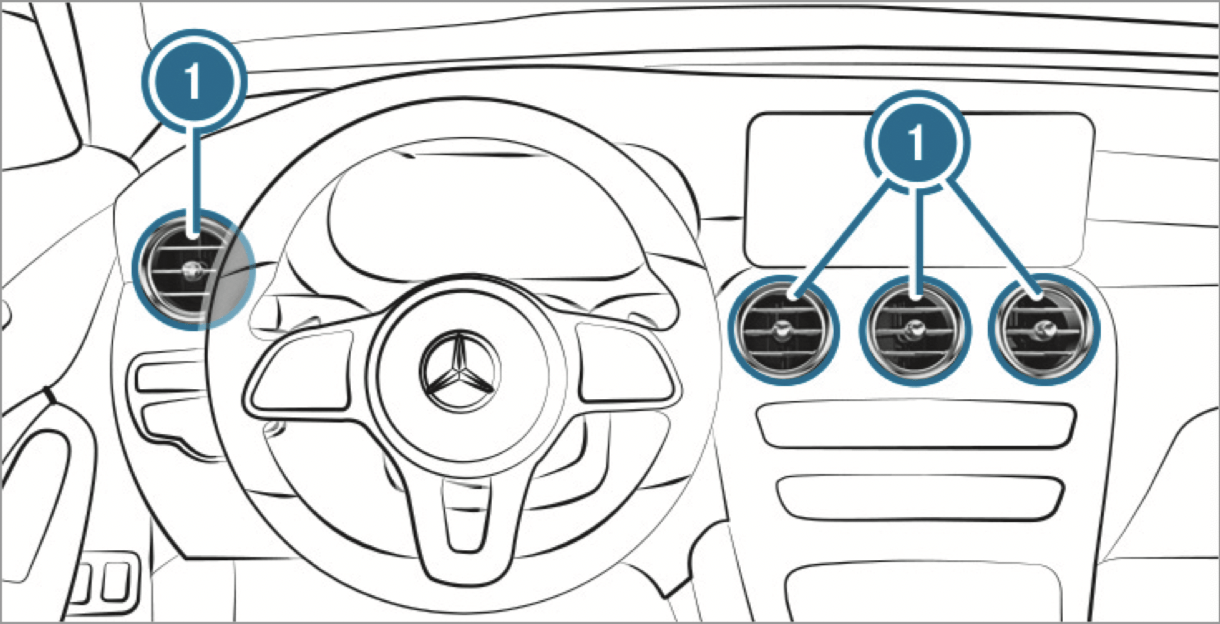
Adjusting the rear air vents

Mercedes-AMG vehicles: be sure to observe the notes in the Supplement. Otherwise, you may fail to recognize dangers.
Plug-in hybrid: be sure to observe the notes in the Supplement. Otherwise, you may fail to recognize dangers.
WARNING - Risk of accident due to an instrument display malfunction
If the Instrument Display has failed or malfunctioned, you may not recognize function restrictions applying to safety relevant systems.
The operating safety of your vehicle may be impaired.
If the operating safety of your vehicle is impaired, park the vehicle immediately and safely. Contact a qualified specialist workshop.
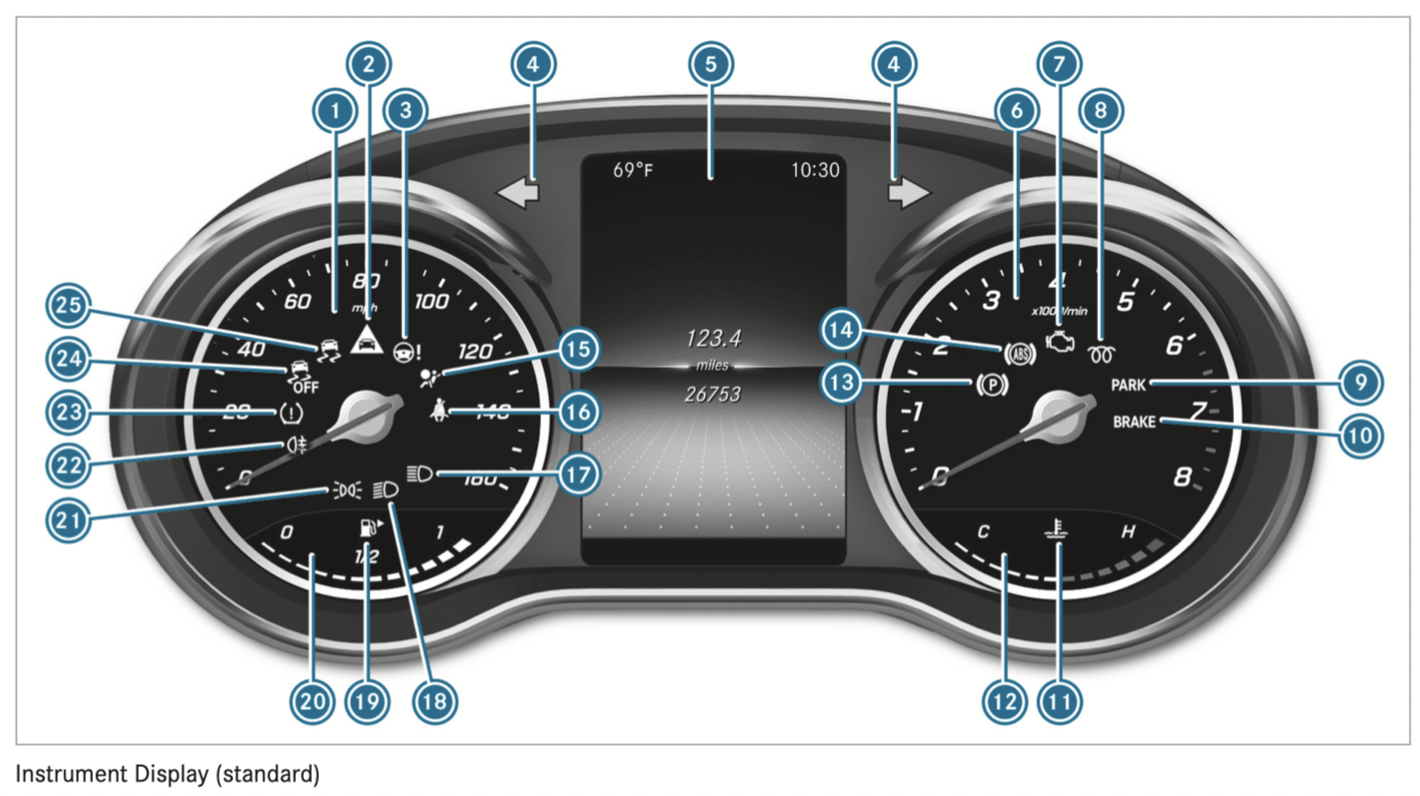
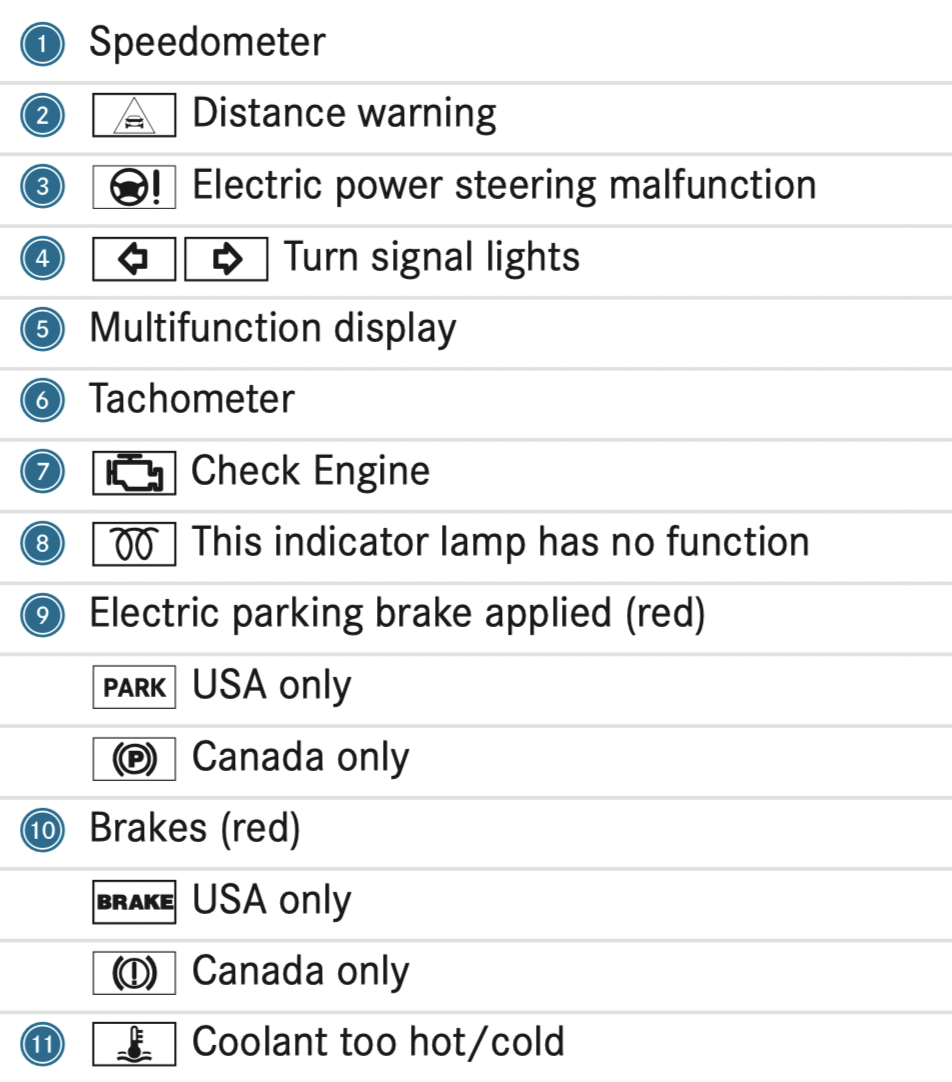
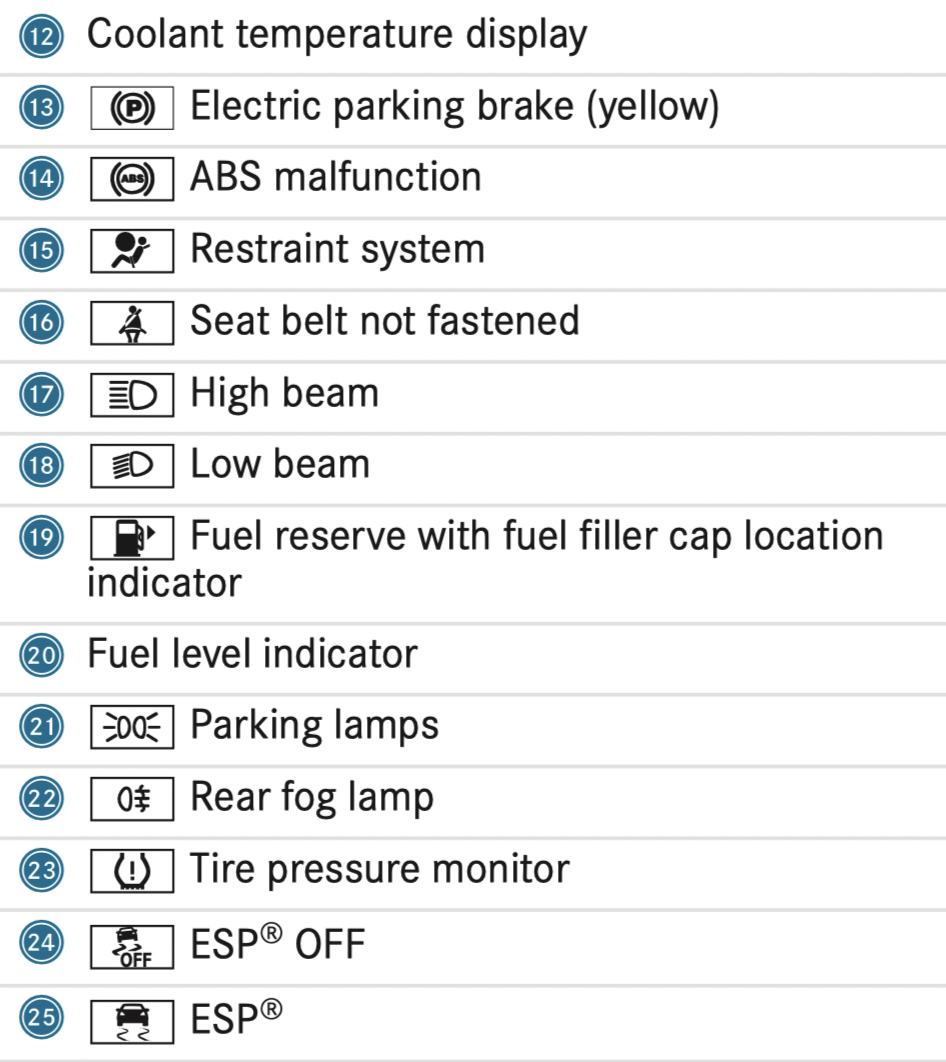
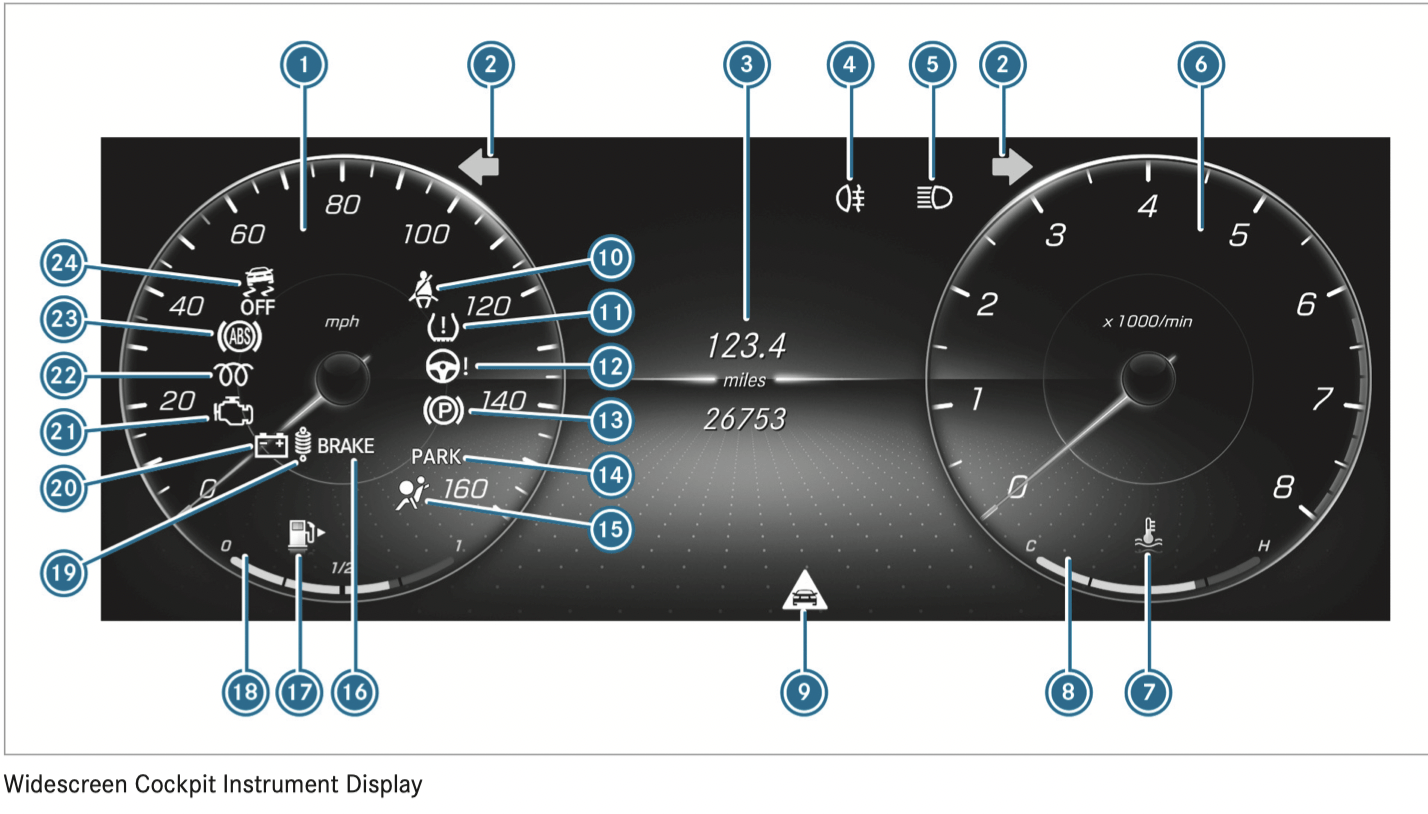
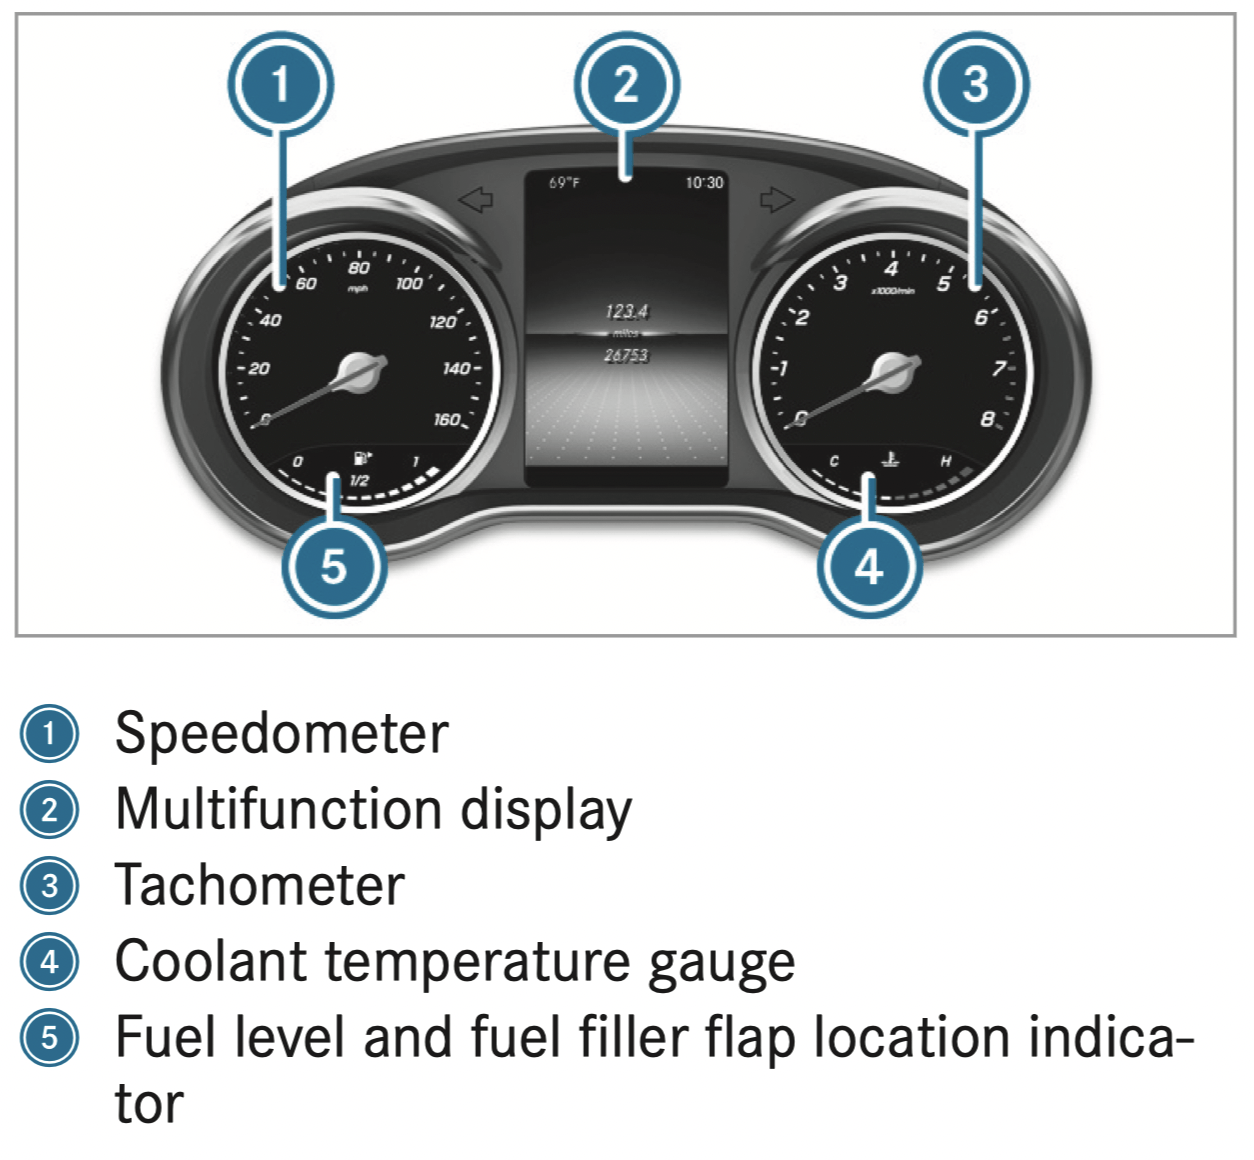
Instrument Display (standard)
Instrument Display in the Widescreen Cockpit
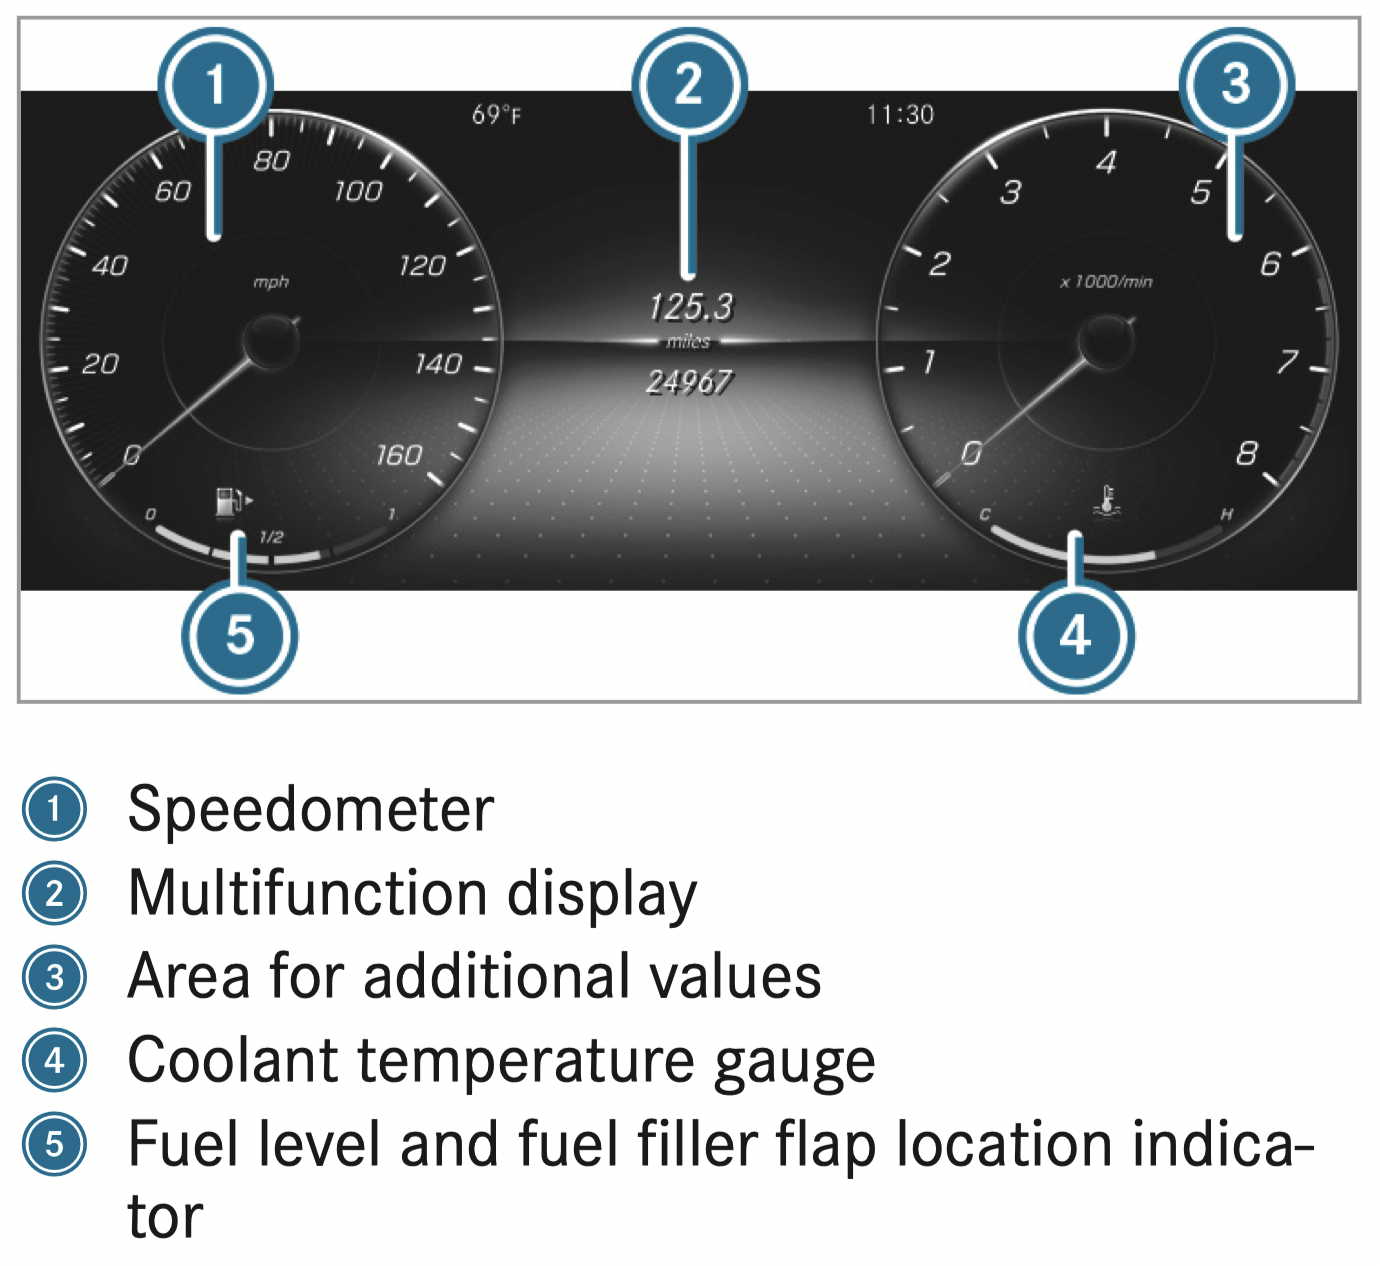
Further display content can be shown on the display for additional values
The segments on speedometer 1 indicate the system status for the following:
NOTE: Engine damage due to excessively high engine speeds
The engine will be damaged if you drive with the engine in the overrevving range.
The fuel supply will be interrupted to protect the engine when the red mark on the tachometer (overrevving range) is reached.
During normal operating conditions, coolant temperature display 4 may rise to the red mark.
WARNING - Danger of burns when opening the hood
If you open the hood when the engine has overheated or during a fire in the engine compartment, you could come into contact with hot gases or other escaping operating fluids.
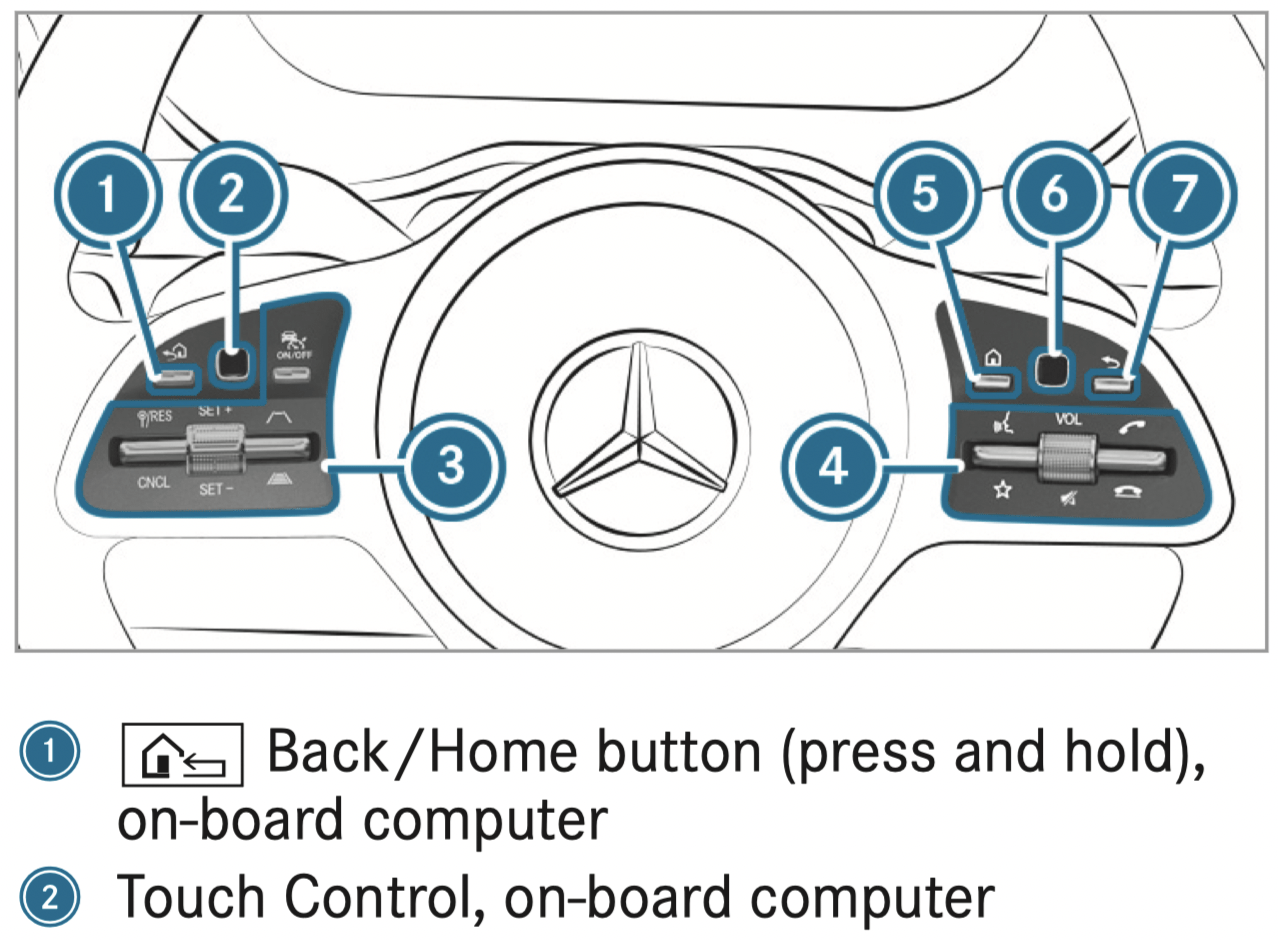
Function of the ASSYST PLUS service interval display
The ASSYST PLUS service interval display on the Instrument Display provides information on the remaining time or distance before the next service due date.
You can hide this service display using the back button on the left-hand side of the steering wheel.
Depending on how the vehicle is used, the ASSYST PLUS service interval display may shorten the service interval, e.g. in the following cases:
Mercedes-Benz recommends avoiding such operating conditions.
You can obtain information concerning the servicing of your vehicle from a qualified specialist workshop, e.g. an authorized Mercedes-Benz Center.
Displaying the service due date
On-board computer

The next service due date is displayed.
Make sure to observe the following further related subject:
Information on regular maintenance work
NOTE: Premature wear through failure to observe service due dates
Service work which is not carried out at the right time or incompletely can lead to increased wear and damage to the vehicle.
Special service requirements
The prescribed service interval is based on normal operation of the vehicle. Maintenance work will need to be performed more often if the vehicle is operated under arduous conditions or increased loads.
The ASSYST PLUS service interval display is only an aid. The driver of the vehicle bears responsibility as regards to whether maintenance work needs to be performed more often than specified based on the actual operating conditions and/or loads.
Examples of arduous operating conditions:
In these or similar operating conditions, have the interior air filter, engine air cleaner, engine oil and oil filter etc. changed more frequently. The tires must be checked more frequently if the vehicle is operated under increased loads. Further information can be obtained at a qualified specialist workshop.
Battery disconnection periods
The ASSYST PLUS service interval display can only calculate the service due date when the battery is connected.
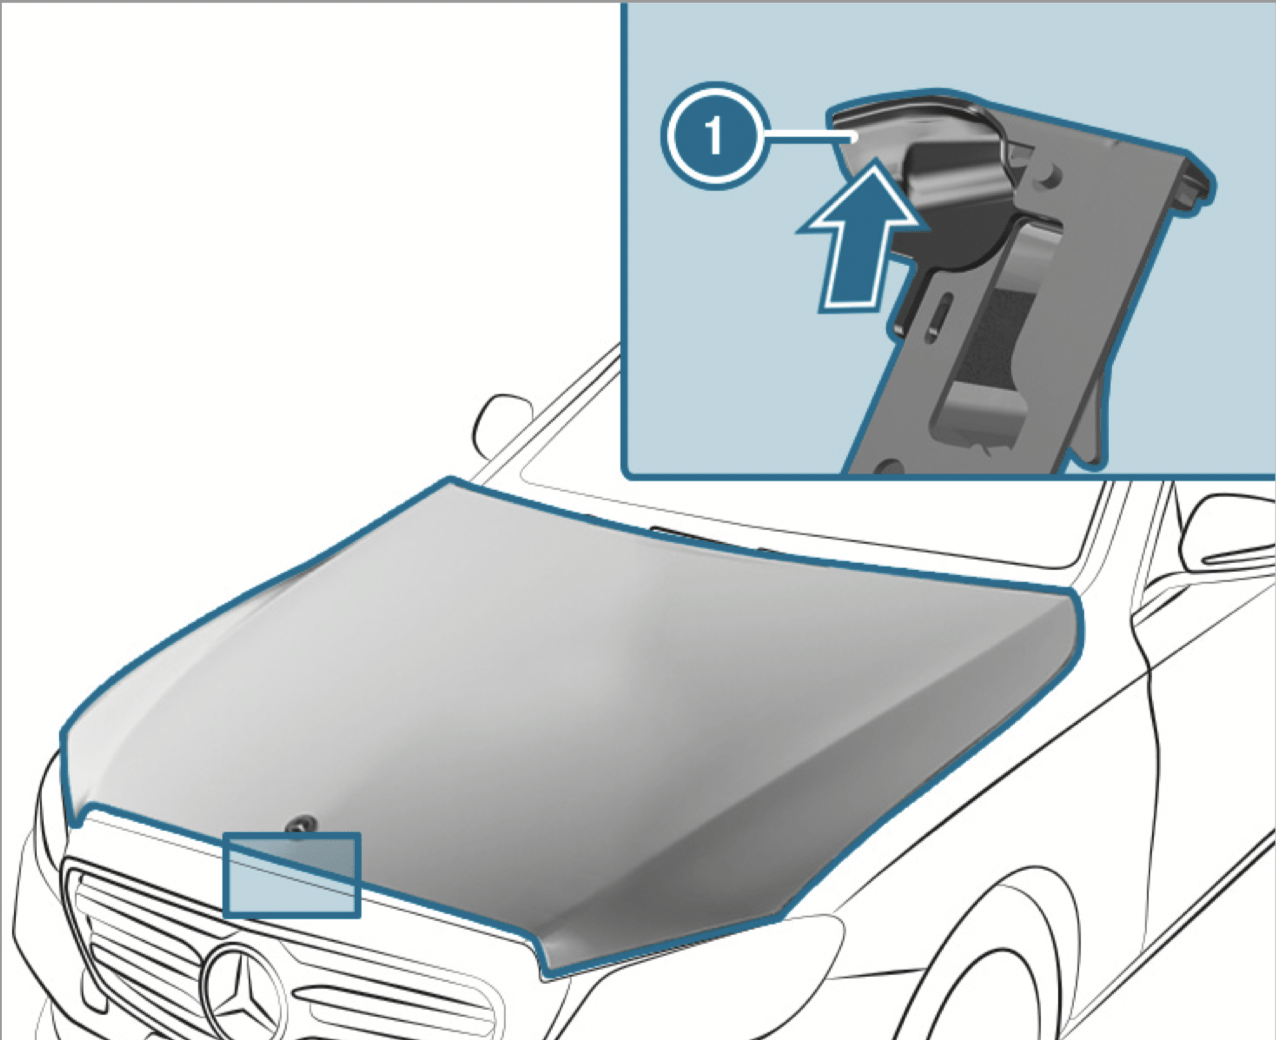
Opening/closing the hood
WARNING - Risk of accident if the engine hood is unlatched while driving
An unlocked engine hood may open up when the vehicle is in motion and block your view.
WARNING - Risk of accident and injury when opening and closing the engine hood
When opening or closing the engine hood, it may suddenly drop into the end position.
There is a risk of injury for anyone in the engine hood's range of movement.
WARNING - Danger of burns when opening the hood
If you open the hood when the engine has overheated or during a fire in the engine compartment, you could come into contact with hot gases or other escaping operating fluids.
WARNING - Risk of injury due to moving parts
Certain components in the engine compartment may continue to move or suddenly move again even after the ignition has been switched off, e.g. the cooler fan.
Make sure of the following before performing tasks in the engine compartment:
WARNING - Risk of injury from touching component parts under voltage
The ignition system and the fuel injection system work under high voltage. If you touch component parts which are under voltage, you could receive an electric shock.
WARNING - Risk of burns from hot component parts in the engine compartment
Certain components in the engine compartment can be very hot, e.g. the engine, the radiator and parts of the exhaust system.
WARNING - Risk of injury from using the windshield wipers while the engine hood is open
When the engine hood is open and the windshield wipers are set in motion, you can be trapped by the wiper linkage.
Plug-in hybrid: observe the notes in the Supplement. Otherwise, you may fail to recognize dangers.

Engine oil
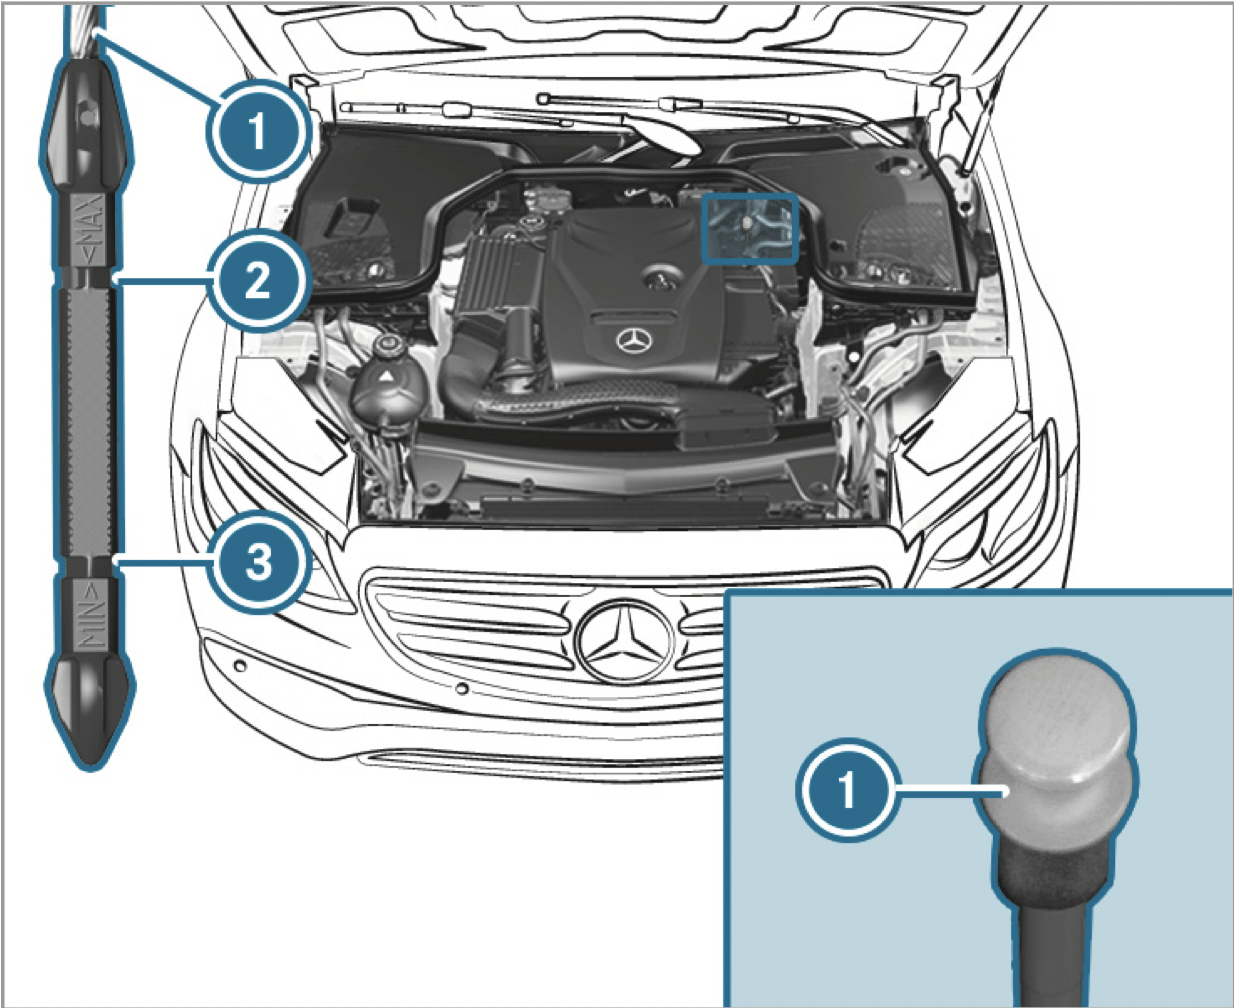
Checking the engine oil level using the oil dipstick
WARNING - Risk of burns from hot component parts in the engine compartment
Certain components in the engine compartment can be very hot, e.g. the engine, the radiator and parts of the exhaust system.
Plug-in hybrid: be sure to observe the notes in the Supplement. Otherwise, you may not recognize dangers.
Requirements:
The engine must have an oil dipstick. If not, the engine oil level can be checked only with the on-board computer
Depending on the engine, the oil dipstick may be installed in the engine compartment in different locations.
The waiting time before checking the oil level when the engine is at normal operating temperature is five minutes.
Checking the engine oil level using the onboard computer
Requirements
The engine oil level is determined during driving. Determining the engine oil level can take up to 30 minutes with a normal driving style and even longer with an active driving style.
In order to receive a result as quickly as possible:
On-board computer:

You will see one of the following messages on the multifunction display:
Repeat the request after a maximum of 30 minutes driving.
Add 1.1 US qt (1 l) of engine oil.
Drain off any excess engine oil that has been added. To do so, consult a qualified specialist workshop.
Switch on the ignition to check the engine oil level.
Consult a qualified specialist workshop.
Close the hood.
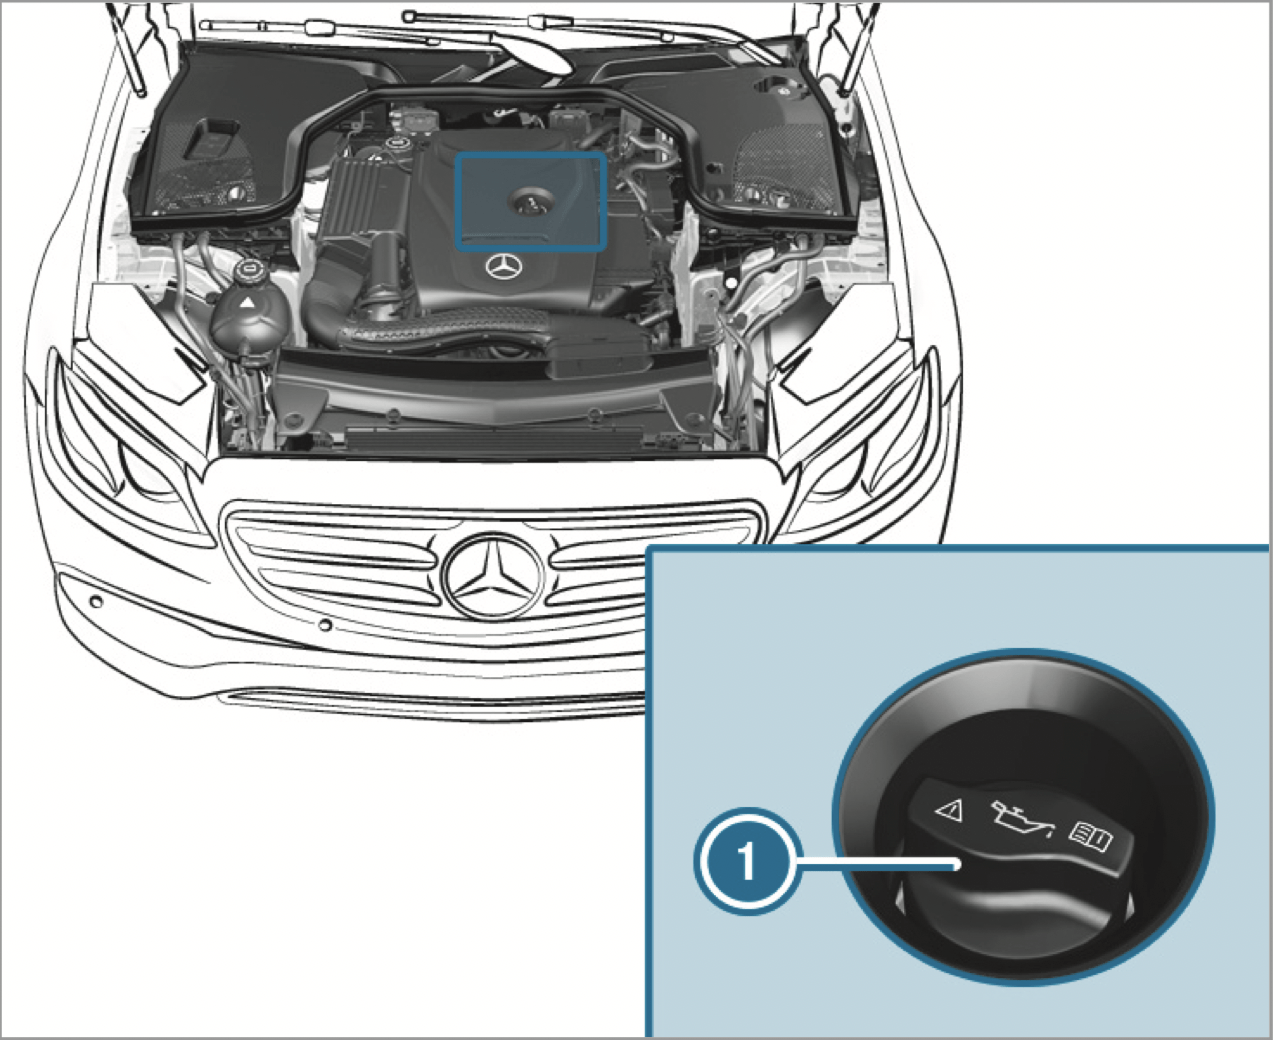
Adding engine oil
WARNING - Risk of burns from hot component parts in the engine compartment
Certain components in the engine compartment can be very hot, e.g. the engine, the radiator and parts of the exhaust system.
WARNING - Risk of fire and injury from engine oil
If engine oil comes into contact with hot component parts in the engine compartment, it may ignite.
NOTE: Engine damage caused by an incorrect oil filter, incorrect oil or additives
NOTE: Damage caused by adding too much engine oil
Too much engine oil can damage the engine or the catalytic converter.
Checking coolant level
WARNING - Risk of burns from hot component parts in the engine compartment
Certain components in the engine compartment can be very hot, e.g. the engine, the radiator and parts of the exhaust system.
WARNING - Danger of burns when opening the hood
If you open the hood when the engine has overheated or during a fire in the engine compartment, you could come into contact with hot gases or other escaping operating fluids.
WARNING - Risk of scalding from hot coolant
The engine cooling system is pressurized, particularly when the engine is warm. If you open the cap, you could be scalded by hot coolant spraying out.
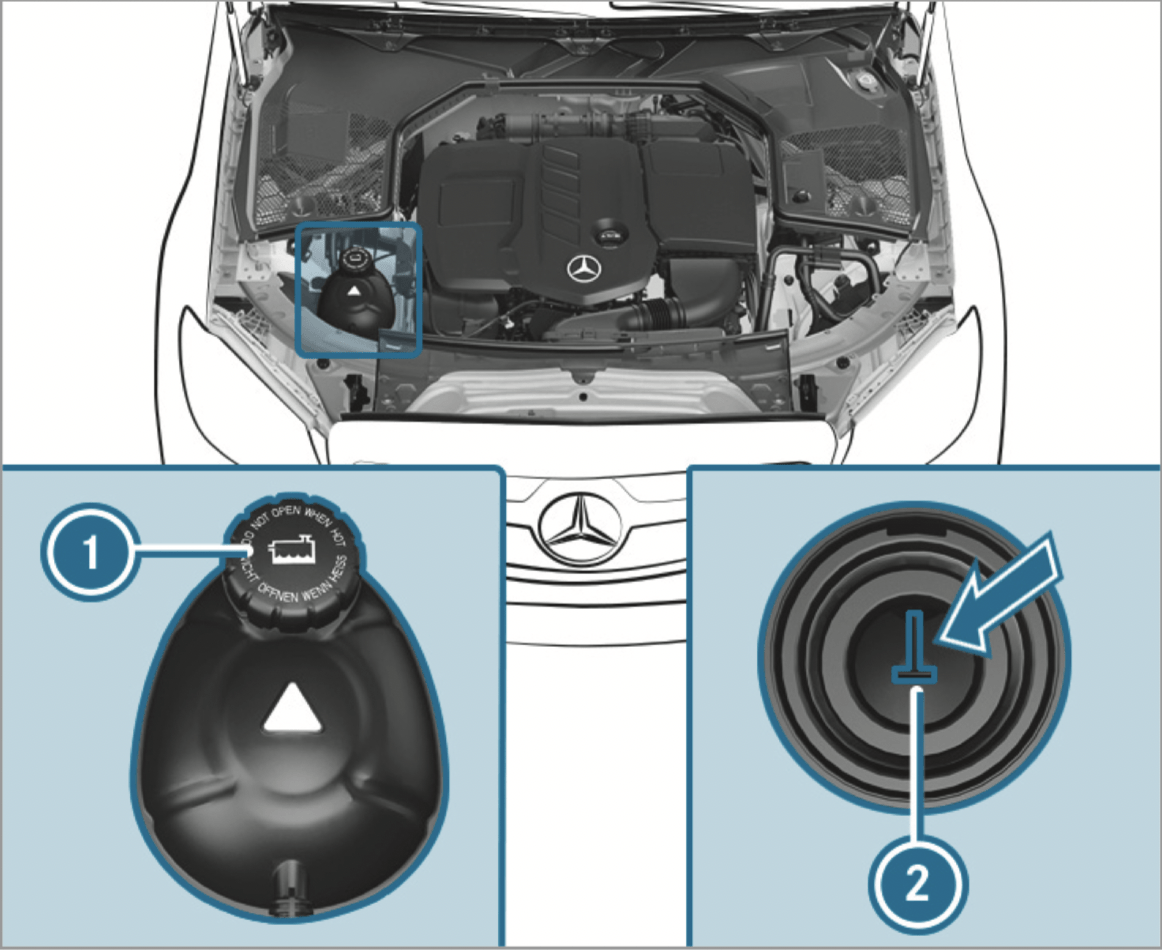
The coolant level is correct in the following cases:
If necessary, add coolant that has been approved for Mercedes-Benz.
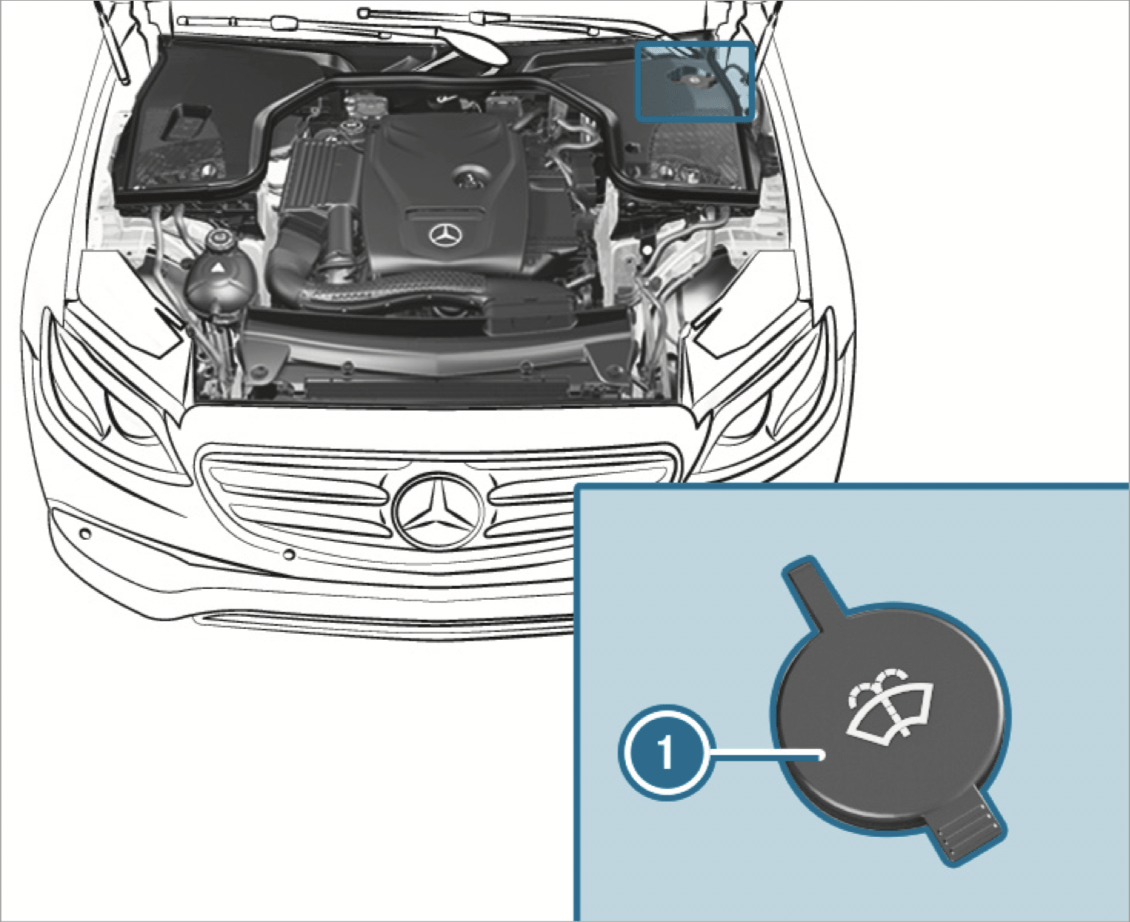
Adding washer fluid to the windshield washer system
WARNING - Risk of burns from hot component parts in the engine compartment
Certain components in the engine compartment can be very hot, e.g. the engine, the radiator and parts of the exhaust system.
WARNING - Danger of burns when opening the hood
If you open the hood when the engine has overheated or during a fire in the engine compartment, you could come into contact with hot gases or other escaping operating fluids.
WARNING ‑ Risk of fire and injury from windshield washer concentrate
Windshield washer concentrate is highly flammable. It could ignite if it comes into contact with hot engine component parts or the exhaust system.
Keeping the air-water duct free
Keep the area between the hood and the windshield free of deposits, e.g. ice, snow and leaves.
Notes on washing the vehicle in a car wash
WARNING - Risk of accident due to reduced braking effect after washing the vehicle
The braking effect is reduced after washing the vehicle.
NOTE: Damage due to unsuitable car wash
To avoid damage to your vehicle when using a car wash, ensure the following beforehand:
In car washes with a conveyor system: if you would like to leave the vehicle while it is being washed, make sure the SmartKey is located in the vehicle. The park position P is otherwise automatically engaged.
If, after the car wash, you remove the wax from the windshield and wiper rubbers, this will prevent smearing and reduce wiper noise.
Information on using a power washer
WARNING - Risk of accident when using high-pressure cleaning equipment with round-spray nozzles
The water jet from a round-spray nozzle (dirt grinder) may cause damage to tires and suspension components that is not visible.
Components damaged in this way may fail unexpectedly.
To avoid damage to your vehicle, observe the following when using a power washer:
Washing the vehicle by hand
Observe the legal requirements, e.g. in a number of countries, washing by hand is only permitted in specially designated wash bays.
Notes on paintwork/matte finish paintwork care
Observe the following information:
Paintwork
Matte finish
Notes on cleaning decorative foils
Observe the notes on matte finish care in the chapter "Notes on paintwork/matte finish paintwork care" (/ page 430). They also apply to matte decorative foils.
Observe the following information:
Cleaning
Avoiding damage to the decorative foil
Scratches, corrosive deposits, areas affected by corrosion and damage caused by incorrect care cannot always be completely repaired. In such cases, visit a qualified specialist workshop.
You can obtain more information on care and cleaning products from the manufacturer.
In the case of foil-wrapped surfaces, optical differences may occur between the surfaces that were not protected by a decorative foil after removing a decorative foil.
Have work or repairs to decorative foils carried out at a qualified specialist workshop, e.g. in an authorized Mercedes-Benz Center.
Notes on care of vehicle parts
WARNING - Risk of entrapment if the windshield wipers are switched on while the windshield is being cleaned
If the windshield wipers are set in motion while you are cleaning the windshield or wiper blades, you can be trapped by the wiper arm.
WARNING - Risk of burns from the tailpipe and tailpipe trims
The exhaust tailpipe and tailpipe trims can become very hot. If you come into contact with these parts of the vehicle, you could burn yourself.
Observe the following information:
Wheels/rims
Windows
Wiper blades
Exterior lighting
Sensors
Side running boards
Rear view camera and 360°Camera
Tailpipes
Notes on care of the interior
WARNING - Risk of injury from plastic parts breaking off after the use of solvent-based care products
Care and cleaning products containing solvents can cause surfaces in the cockpit to become porous.
When the airbags are deployed, plastic parts may break away.
WARNING - Risk of injury or death from bleached seat belts
Bleaching or dyeing seat belts can severely weaken them.
This can, for example, cause seat belts to tear or fail in an accident.
Observe the following information:
Seat belts
Display
Plastic trim
Real wood/trim elements
Headliner
Carpet
Genuine leather seat covers
DINAMICA seat covers
Imitation leather seat covers
| Display messages | Possible causes/consequences and ---> Solutions |
|---|---|
|
SRS Malfunction Service Required |
WARNING - Risk of injury due to malfunctions in the restraint system If the restraint system is malfunctioning, restraint system components may be triggered unintentionally or may not deploy as intended during an accident. This may affect the Emergency Tensioning Devices or airbags, for example.
Recognition of a restraint system malfunction:
Consult a qualified specialist workshop immediately. |
|
Front Left Malfunction Service Required (example) |
WARNING - Risk of injury due to malfunctions in the restraint system If the restraint system is malfunctioning, restraint system components may be triggered unintentionally or may not deploy as intended during an accident. This may affect the Emergency Tensioning Devices or airbags, for example.
Recognition of a restraint system malfunction:
Consult a qualified specialist workshop immediately. |
|
Left Side Curtain Airbag Malfunction Service Required (example) |
WARNING - Risk of injury or fatal injury due to malfunctions in the window airbag If the window airbag is malfunctioning, it might be triggered unintentionally or might not be triggered at all in the event of an accident with high deceleration.
Consult a qualified specialist workshop immediately. |
| Front Passenger Airbag Disabled See Operator's Manual |
WARNING - Risk of injury or fatal injury due to a disabled front passenger airbag If the front passenger airbag is disabled, the front passenger airbag will not be deployed in the event of an accident and cannot perform its intended protective function. A person in the front passenger seat could then, for example, come into contact with the vehicle's interior, especially if the person is sitting too close to the cockpit.
Stop the vehicle immediately in accordance with the traffic conditions. Check the status of the automatic front passenger airbag actuation. If necessary, consult a qualified specialist workshop immediately. |
| Front Passenger Airbag Enabled See Operator's Manual |
* The front passenger airbag is enabled while the vehicle is in motion:
The system may detect objects or forces that are adding to the weight applied to the seat. WARNING - Risk of injury or fatal injury if a child restraint system is used while the front passenger front airbag is enabled If you secure a child in a child restraint system on the front passenger seat and the front passenger airbag is enabled, the front passenger airbag can deploy in the event of an accident. The child could be struck by the airbag.
NEVER use a rearward facing child restraint on a seat protected by an ACTIVE AIRBAG in front of it, DEATH or SERIOUS INJURY to the CHILD can occur. Stop the vehicle immediately in accordance with the traffic conditions. Check the status of the automatic front passenger airbag actuation. If necessary, consult a qualified specialist workshop immediately. |
| PRE-SAFE Inoperative See Operator's Manual |
* The PRE‑SAFE ® functions are malfunctioning.
|
| Display messages | Possible causes/consequences and ---> Solutions |
|---|---|
|
Obtain a New Key |
* The SmartKey needs to be replaced.
|
|
Replace Key Battery |
* The SmartKey battery is discharged.
|
|
Key Not Detected (white display message) |
* The SmartKey is currently undetected.
|
|
Key Not Detected (red display message) |
* The SmartKey cannot be detected and may no longer be in the vehicle. The SmartKey is no longer in the vehicle and you switch off the engine:
Ensure that the SmartKey is in the vehicle. If the SmartKey detection function has a malfunction due to a strong radio signal source:
|
|
Place the Key in the Marked Space See Operator's Manual |
* SmartKey detection is malfunctioning.
|
|
Don't Forget Your Key |
* A warning tone also sounds. This message reminds you to take your key with you when you leave the vehicle. |
| Display messages | Possible causes/consequences and ---> Solutions |
|---|---|
|
Check Left Low Beam (example) |
* The corresponding light source is faulty.
LED light bulbs: the display message for the corresponding lamp appears only when all the light-emitting diodes in the lamp are faulty. |
|
Malfunction See Operator’s Manual |
* The exterior lighting is malfunctioning.
|
|
Automatic Headlamp Mode Inoperative |
* The light sensor is malfunctioning.
|
|
Active Headlamps Inoperative |
* The active headlamps are malfunctioning.
|
|
Switch On Headlamps |
* You are driving without low-beam headlamps.
|
|
Switch Off Lights |
* You are leaving the vehicle and the lights are still switched on.
|
|
Intell. Light System Inoperative |
* The Intelligent Light System is faulty. The lighting system continues to function properly without the functions of the Intelligent Light System.
|
| Adaptive Highbeam Assist Currently Unavailable See Operator's Manual |
* Adaptive Highbeam Assist is temporarily unavailable. The system limits have been reached
Once the cause of the problem is no longer present, the system will be available again. The Adaptive Highbeam Assist Now Available display message will appear. |
| Adaptive Highbeam Assist Inoperative |
* Adaptive Highbeam Assist is malfunctioning.
|
| Adaptive Highbeam Assist Camera View Restricted See Operator's Manual |
* The camera view is restricted. Possible causes are:
Driving systems and driving safety systems may be malfunctioning or temporarily unavailable. Once the cause of the problem is no longer present, the driving systems and driving safety systems will be available again. If the display message does not disappear:
|
| Hazard Warning Flashers Malfunctioning |
* The hazard warning lamp switch is malfunctioning.
|
| Display messages | Possible causes/consequences and ---> Solutions |
|---|---|
|
Vehicle Ready to Drive Switch the Ignition Off Before Exiting |
* You are leaving the vehicle when it is in a ready-to-drive state.
|
|
Steering Malfunction Increased Physical Effort See Operator's Manual |
* The power steering assistance is malfunctioning. WARNING - Risk of an accident due to altered steering characteristics If the power assistance of the steering fails partially or completely, you will need to use more force to steer.
If safe steering is possible, drive on carefully. Visit or consult a qualified specialist workshop immediately. |
|
Steering Malfunction Stop Immediately See Operator's Manual |
* The steering is malfunctioning. Steering capability is significantly impaired. WARNING - Risk of accident if steering capability is impaired If the steering does not function as intended, the vehicle's operating safety is jeopardized.
Stop the vehicle immediately in accordance with the traffic conditions. Do not continue driving under any circumstances. Consult a qualified specialist workshop. |
 |
* At least one door is open.
|
 |
* The hood is open. WARNING - Risk of accident if the engine hood is unlatched while driving An unlocked engine hood may open up when the vehicle is in motion and block your view.
Stop the vehicle immediately, paying attention to road and traffic conditions. Close the hood. |
 |
* The tailgate is open. DANGER - Risk of exhaust gas poisoning Combustion engines emit poisonous exhaust gases such as carbon monoxide. Exhaust gases can enter the vehicle interior if the tailgate is open when the engine is running, especially if the vehicle is in motion.
Close the tailgate. |
|
Rear Left Backrest Not Latched (example) |
* The seat backrest of the corresponding seat is not engaged.
|
|
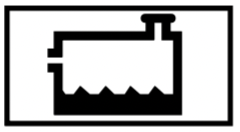
Check Washer Fluid |
* The washer fluid level in the washer fluid reservoir has dropped below the minimum.
|
| Display messages | Possible causes/consequences and ---> Solutions |
|---|---|
|
Check Coolant Level See Operator's Manual |
* The coolant level is too low. NOTE Engine damage due to insufficient coolant
Add coolant. Have the cooling system checked at a qualified specialist workshop. |
|
Coolant Too Hot Stop Vehicle Turn Engine Off |
* The coolant is too hot.
WARNING - Danger of burns when opening the hood If you open the hood when the engine has overheated or during a fire in the engine compartment, you could come into contact with hot gases or other escaping operating fluids.
Wait until the engine has cooled down. Make sure that the air supply to the radiator is not impaired. Avoiding high loads on the engine, drive to the nearest qualified specialist workshop. In doing so, ensure that the coolant temperature display remains below the red marking. |
|
* The fan motor is faulty.
|
|
| To switch engine off, press and hold Start/Stop button for at least 3 secs. or press 3 times. |
* You have pressed the start/stop button while driving.
|
|
Fuel Level Low |
* The fuel supply has dropped into the reserve range.
|
|
Gas Cap Loose |
* The fuel filler cap is not closed correctly or the fuel system is leaking.
|
| Display messages | Possible causes/consequences and ---> Solutions |
|---|---|
| Apply Brake to Shift from 'P' |
* You have attempted to shift the transmission out of park position
|
| To Deselect P or N, Depress Brake and Start Engine |
* You have attempted to shift the transmission out of park position
|
| Only Shift to 'P' when Vehicle is Stationary |
* Park position
|
| Apply Brake to Shift to 'R' |
* You have attempted to select transmission position
|
| Driver's Door Open & Transmission Not in P Risk of Vehicle Rolling Away |
* The driver's door is not fully closed and transmission position
|
| N Permanently Active Risk of Rolling Away |
* While the vehicle is rolling or while you are driving, neutral
|
| Service Required Do Not Shift Gears Visit Dealer |
* The transmission is malfunctioning. The transmission position can no longer be changed.
|
| Reversing Not Possible Service Required |
* The transmission is malfunctioning. The transmission position
|
| Transmission Malfunction Stop |
* The transmission is malfunctioning. The transmission shifts to neutral
|
| Stop Vehicle Leave Engine Running Wait Transmission Cooling |
* The transmission is overheating. Pulling away may be temporarily impaired or not possible.
|
| Auxiliary Battery Malfunction |
* The auxiliary battery for the transmission is no longer being charged.
|
| Display messages | Possible causes/consequences and ---> Solutions |
|---|---|
|
(USA only)
(Canada only) Parking Brake See Operator's Manual |
* The yellow To apply:
If it is not possible to apply the electric parking brake:
* The yellow To release:
or
If it is still not possible to release the electric parking brake:
* The yellow The electric parking brake is malfunctioning. The electric parking brake could not be applied or released.
To apply:
To release:
If the electric parking brake cannot be applied or the red
* The yellow If the battery charge level is too low:
To apply:
If the electric parking brake is not to be applied, e.g. at an automatic car wash or when the vehicle is being towed, leave the ignition switched on. This does not include having the vehicle towed with the rear axle raised. If the electric parking brake is not applied automatically:
If it is still not possible to apply the electric parking brake:
To release:
If it is still not possible to release the electric parking brake:
|
|
(USA only)
(Canada only) Please Release Parking Brake |
* The red The electric parking brake is applied while you are driving:
Check the conditions for automatic release of the electric parking brake. Release the electric parking brake manually. |
|
(USA only)
(Canada only) Turn On the Ignition to Release the Parking Brake |
* The red You have attempted to release the electric parking brake with the ignition switched off.
|
|
(USA only)
(Canada only) Check Brake Fluid Level |
* There is insufficient brake fluid in the brake fluid reservoir. WARNING - Risk of an accident due to low brake fluid level If the brake fluid level is too low, the braking effect and the braking characteristics may be impaired.
Stop the vehicle immediately in accordance with the traffic conditions. Do not continue driving under any circumstances. Do not add brake fluid. Consult a qualified specialist workshop. |
|
Check Brake Pads See Operator's Manual |
* The brakepads have reached the wear limit. WARNING - Risk of accident due to restricted braking power When the brake pads have reached their wear limit, the braking power may be restricted.
Consult a qualified specialist workshop. |
|
ATTENTION ASSIST Inoperative |
* ATTENTION ASSIST is malfunctioning.
|
|
ATTENTION ASSIST: Take a Break! |
* ATTENTION ASSIST has detected fatigue or an increasing lack of concentration on the part of the driver.
|
| Active Parking Assist and PARKTRONIC Inoperative See Operator's Manual |
* Active Parking Assist and Parking Assist PARKTRONIC are malfunctioning.
|
|
Malfunction Drive at Max. 50 mph |
* The AIR BODY CONTROL is functioning only to a limited extent. The vehicle's handling characteristics may be affected.
|
|
Lowering |
* The vehicle level may be lowered for the following reasons:
|
|
Vehicle Rising |
* Your vehicle is adjusting to the level you have selected. |
| Drive More Slowly |
* You are driving too fast for the selected vehicle level.
|
|
Max. Speed 12 mph |
* You are driving too fast for the selected vehicle level.
|
|
Stop Vehicle Vehicle Too Low |
* You have pulled away despite the vehicle level being too low.
If the display message does not disappear and a warning tone also sounds, AIR BODY CONTROL is malfunctioning:
* NOTE The tires of the front axle or the front fenders could be damaged by large steering movements
Set a higher vehicle level Depending on the malfunction, the vehicle will be raised. |
|
Vehicle Rising Please Wait |
* The vehicle level is too low. The vehicle will be raised to the selected vehicle level.
|
| Active Steering Assist Currently Unavailable See Operator's Manual |
* Active Steering Assist is temporarily unavailable. The ambient conditions are outside the system limits (/ page 207).
|
| Active Steering Assist Inoperative |
* Active Steering Assist is malfunctioning. Active Distance Assist DISTRONIC remains available.
|
 |
* Active Steering Assist has reached the system limits. You have not steered independently for a considerable period of time.
|
| Beginning Emergency Stop |
* Your hands are not on the steering wheel. Emergency stop is initiated.
You can cancel the deceleration at any time by performing one of the following actions:
|
| Active Steering Assist Currently Unavailable Due to Multiple Emergency Stops |
* Active Steering Assist is temporarily unavailable due to multiple emergency stops.
|
| Active Lane Keeping Assist Currently Unavailable See Operator's Manual |
* Active Lane Keeping Assist is temporarily unavailable. The ambient conditions are outside the system limits (/ page 245). Vehicles with Active Steering Assist: The camera view may be limited by the windshield.
Vehicles with Active Steering Assist: If the display message does not disappear:
|
| Active Lane Keeping Assist Inoperative |
* Active Lane Keeping Assist is malfunctioning.
|
| Blind Spot Assist Currently Unavailable See Operator's Manual |
* Blind Spot Assist is temporarily unavailable. The system limits have been reached.
or
|
| Blind Spot Assist Inoperative |
* Blind Spot Assist is malfunctioning.
|
| Blind Spot Assist Not Available When Towing a Trailer See Operator's Manual |
* When you establish the electrical connection to the trailer, Blind Spot Assist is unavailable.
|
| Active Blind Spot Assist Currently Unavailable See Operator's Manual |
* Active Blind Spot Assist is temporarily unavailable. The system limits have been reached
or
|
| Active Blind Spot Assist Inoperative |
* Active Blind Spot Assist is malfunctioning.
|
| Active Blind Spot Asst. Not Available When Towing a Trailer See Operator's Manual |
* When you establish the electrical connection to the trailer, Active Blind Spot Assist is unavailable.
|
| Traffic Sign Assist Currently Unavailable See Operator's Manual |
* Traffic Sign Assist is temporarily unavailable.
|
| Traffic Sign Assist Inoperative |
* Traffic Sign Assist is malfunctioning.
|
| Traffic Sign Assist Camera View Restricted See Operator's Manual |
* The camera view is restricted. Possible causes:
Driving systems and driving safety systems may be malfunctioning or temporarily unavailable. Once the cause of the problem is no longer present, the driving systems and driving safety systems will be available again. If the display message does not disappear:
|
|
Off |
* The HOLD function is deactivated because the vehicle is slipping or a condition for activation is not fulfilled.
|
|
--- mph |
* Active Distance Assist DISTRONIC cannot be activated as not all activation conditions are fulfilled.
|
|
Suspended |
* If you depress the accelerator pedal beyond the Active Distance Assist DISTRONIC setting, the system will be put into passive mode |
|
Off |
* Active Distance Assist DISTRONIC was deactivated. If a warning tone also sounds, Active Distance Assist DISTRONIC has deactivated automatically |
| Active Distance Assist Currently Unavailable See Operator's Manual |
* Active Distance Assist DISTRONIC is temporarily unavailable. The ambient conditions are outside the system limits.
|
| Active Distance Assist Inoperative |
* Active Distance Assist DISTRONIC is malfunctioning. Other driving systems and driving safety systems may also be malfunctioning.
|
| Active Distance Assist Now Available | * Active Distance Assist DISTRONIC is operational again and can be activated |
|
Inoperative |
* The Downhill Speed Regulation is malfunctioning.
|
|
Not in Curr. Drive Prog. |
* The Downhill Speed Regulation is not available in the currently selected drive program.
|
|
Max. Speed 25 mph |
* The maximum speed of 25 mph (40 km/h) for the Downhill Speed Regulation has been exceeded.
|
|
--- mph |
* Cruise control cannot be activated as not all activation conditions are fulfilled.
|
|
* Cruise control is malfunctioning. |
* Cruise control is malfunctioning.
|
| Cruise Control Off |
* Cruise control has been deactivated. If there is an additional warning tone, cruise control has been deactivated automatically |
| Display messages | Possible causes/consequences and ---> Solutions |
|---|---|
|
Currently Unavailable See Operator's Manual |
* ABS and ESP ® are temporarily unavailable. Other driving systems and driving safety systems may also be temporarily unavailable. The brake system will continue to operate normally. Braking distance may increase in an emergency braking situation. WARNING - Risk of skidding if ABS and ESP ® are malfunctioning If ABS and ESP ® are malfunctioning, the wheels could lock when braking and ESP ® cannot carry out vehicle stabilization. The steering capability and braking characteristics are thus severely impaired. The braking distance in an emergency braking situation can increase. In addition, other driving safety systems are switched off.
Drive carefully on a suitable stretch of road, making slight steering movements at a speed above 19 mph (30 km/h). If the display message does not disappear, consult a qualified specialist workshop immediately. Drive carefully. |
|
Inoperative See Operator's Manual |
* ABS and ESP ® are malfunctioning. Other driving systems and driving safety systems may also be malfunctioning. The brake system will continue to operate normally. Braking distance may increase in an emergency braking situation. WARNING - Risk of skidding if ABS and ESP ® are malfunctioning If ABS and ESP ® are malfunctioning, the wheels could lock when braking and ESP ® cannot carry out vehicle stabilization. The steering capability and braking characteristics are thus severely impaired. The braking distance in an emergency braking situation can increase. In addition, other driving safety systems are switched off.
Drive on carefully. Consult a qualified specialist workshop immediately. |
|
Currently Unavailable See Operator's Manual |
* ESP ® is temporarily unavailable. Other driving systems and driving safety systems may also be malfunctioning. WARNING - Risk of skidding if ESP ® is malfunctioning If ESP ® is malfunctioning, ESP ® cannot carry out vehicle stabilization. In addition, other driving safety systems are switched off.
Drive carefully on a suitable stretch of road, making slight steering movements at a speed above 19 mph (30 km/h). If the display message does not disappear, consult a qualified specialist workshop immediately. Drive carefully. |
|
Inoperative See Operator's Manual |
* ESP ® is malfunctioning. Other driving systems and driving safety systems may also be malfunctioning. The brake system will continue to operate normally. Braking distance may increase in an emergency braking situation. WARNING - Risk of skidding if ESP ® is malfunctioning If ESP ® is malfunctioning, ESP ® cannot carry out vehicle stabilization. In addition, other driving safety systems are switched off.
Drive on carefully. Consult a qualified specialist workshop immediately. |
|
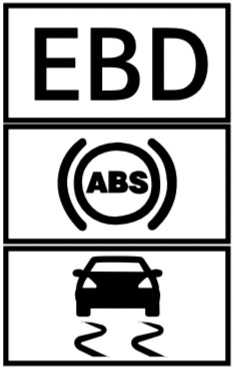
Inoperative See Operator's Manual |
* EBD, ABS and ESP ® are malfunctioning. Other driving systems and driving safety systems may also be malfunctioning. WARNING - Risk of skidding if EBD, ABS and ESP ® are malfunctioning If EBD, ABS and ESP ® are malfunctioning, the wheels can lock when braking and ESP ® cannot carry out vehicle stabilization. The steering capability and braking characteristics are thus severely impaired. The braking distance in an emergency braking situation can increase. In addition, other driving safety systems are switched off.
Drive on carefully. Consult a qualified specialist workshop immediately. |
| Active Brake Assist Functions Currently Limited See Operator's Manual |
* Vehicles with the Driving Assistance Package: Active Brake Assist with cross-traffic function, Evasive Steering Assist or PRE‑SAFE ® PLUS are temporarily unavailable or only partially available. Vehicles without the Driving Assistance Package: Active Brake Assist is temporarily unavailable or only partially available. The ambient conditions are outside the system limits.
|
| Active Brake Assist Functions Limited See Operator's Manual |
* Vehicles with Driving Assistance Package: Active Brake Assist with cross-traffic function, Evasive Steering Assist or PRE‑SAFE ® PLUS is malfunctioning. Vehicles without Driving Assistance Package: Active Brake Assist is malfunctioning.
|
| Radar Sensors Dirty See Operator's Manual |
* The radar sensor system is malfunctioning. Possible causes:
Driving systems and driving safety systems may be malfunctioning or temporarily unavailable. Once the cause of the problem is no longer present, the driving systems and driving safety systems will be available again. If the display message does not disappear:
|
| Display messages | Possible causes/consequences and ---> Solutions |
|---|---|
| Mercedes me connect Services Limited See Operator's Manual |
* Service limited. At least one of the main functions of the Mercedes me connect system is malfunctioning.
|
|
Inoperative |
* At least one of the main functions of the Mercedes me connect system or of the SOS emergency call system is malfunctioning.
|
| Display messages | Possible causes/consequences and ---> Solutions |
|---|---|
|
12 V Battery See Operator's Manual |
* The engine is off and the battery charge level is too low.
To charge the battery:
* If the message appears while the engine is running, this indicates an on-board electrical system malfunction.
|
|
See Operator's Manual |
* The battery is not being charged. NOTE: Possible engine damage if you continue driving
Pull over and stop the vehicle safely and switch off the engine, paying attention to road and traffic conditions. Consult a qualified specialist workshop. |
|
Stop Vehicle See Operator's Manual |
* The battery is no longer being charged and the battery charge level is too low. NOTE: Possible engine damage if you continue driving
Pull over and stop the vehicle safely as soon as possible in accordance with the traffic conditions. Do not continue driving under any circumstances. Switch off the engine. Consult a qualified specialist workshop. |
|
Stop Vehicle Leave Engine Running |
* The battery charge level is too low.
|
| Display messages | Possible causes/consequences and ---> Solutions |
|---|---|
| Tire Press. Monitor Currently Unavailable |
* There is interference from a powerful radio signal source. As a result, no signals from the tire pressure sensors are being received. The tire pressure monitor is temporarily unavailable.
|
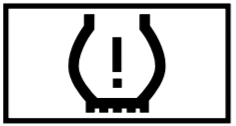
| Tire Press. Monitor Inoperative |
* The tire pressure monitor is malfunctioning. WARNING - There is a risk of an accident if the tire pressure monitoring system is malfunctioning If the tire pressure monitoring system is malfunctioning, it is not able to issue a warning if there is pressure loss in one or more of the tires. Underinflated tires may, for example, impair the driving, steering and braking characteristics.
Consult a qualified specialist workshop. |
| Tire Pressure Monitor Inoperative No Wheel Sensors |
* The wheels installed do not have suitable tire pressure sensors. The tire pressure monitor is deactivated.
|
|
Wheel Sensor(s) Missing |
* There is no signal from the tire pressure sensor of one or more wheels. No pressure value is displayed for the affected tire.
|
|
Check Tires |
* The tire pressure in one or more tires has dropped significantly. The wheel position is displayed. WARNING - Risk of an accident due to insufficient tire pressure Tire pressures that are too low pose the following hazards:
You could then lose control of the vehicle.
Stop the vehicle in accordance with the traffic conditions. Check the tire pressure and the tires. |
|
Please Correct Tire Pressure |
* The tire pressure is too low in at least one of the tires, or the difference in tire pressure between the individual wheels is too great.
|
|
Warning Tire Malfunction |
* The tire pressure in one or more tires has dropped suddenly. The wheel position is displayed. WARNING - Risk of an accident from driving with a flat tire Flat tires are dangerous in the following ways:
You could then lose control of the vehicle.
Notes on flat tires
|
| Tires Overheated |
* At least one tire is overheating. The affected tires are displayed in red. At temperatures close to the limit value, the tires are displayed in yellow.
|
| Decrease Speed |
* At least one tire is overheating. The affected tires are displayed in red. At temperatures close to the limit value, the tires are displayed in yellow. WARNING - Risk of an accident from driving with overheated tires Overheated tires may burst, particularly at high speeds.
Reduce speed so that the tires cool down. |
| Display messages | Possible causes/consequences and ---> Solutions |
|---|---|
| Check Tire Pressure Soon |
* Canada only: The tire pressure loss warning system has detected a significant loss of pressure. WARNING - Risk of an accident due to insufficient tire pressure Tire pressures that are too low pose the following hazards:
You could then lose control of the vehicle.
Stop the vehicle in accordance with the traffic conditions. Check the tire pressure and the tires. When the tire pressure is correct, restart the tire pressure loss warning system |
| Check Tire Pressure Then Restart Run Flat Indicator |
* Canada only: The tire pressure loss warning system generated a display message and has not been restarted since.
|
| Run Flat Indicator Inoperative |
* Canada only: The tire pressure loss warning system is malfunctioning.
|
| Display messages | Possible causes/consequences and ---> Solutions |
|---|---|
|
Check Engine Oil At Next Refueling |
* The engine oil level has dropped to the minimum level. NOTE: Engine damage caused by driving with insufficient engine oil
Check the engine oil level when next refueling. Add engine oil Notes on engine oil |
|
Check Engine Oil Level (Add 1 quart) |
* Display message only for certain engines: The engine oil level has dropped to the minimum level. NOTE: Engine damage caused by driving with insufficient engine oil
When next refueling, add 1.1 US qt (1 l) of engine oil. Notes on engine oil. |
|
Engine Oil Reduce Oil Level |
* Display message only for certain engines: The engine oil level is too high. NOTE: Engine damage caused by driving with excess engine oil
Consult a qualified specialist workshop immediately and have the engine oil level reduced. |
|
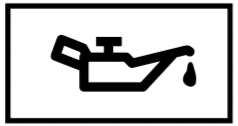
Engine Oil Level Low Stop Vehicle Turn Engine Off |
* Display message only for certain engines: The engine oil level is too low. NOTE: Engine damage caused by driving with insufficient engine oil
Stop the vehicle immediately in accordance with the traffic conditions. Do not continue driving under any circumstances. Switch off the engine. Add 1.1 US qt (1 l) of engine oil. Check the engine oil level. Notes on engine oil. |
|
Engine Oil Pressure Stop Switch Off Engine |
* Display message only for certain engines: The engine oil pressure is too low. NOTE: Engine damage caused by driving with insufficient engine oil pressure
Stop the vehicle immediately in accordance with the traffic conditions. Do not continue driving under any circumstances. Consult a qualified specialist workshop. |
|
Engine Oil Level Cannot Be Measured |
* The electrical connection to the oil level sensor has been interrupted or the oil level sensor is faulty.
|
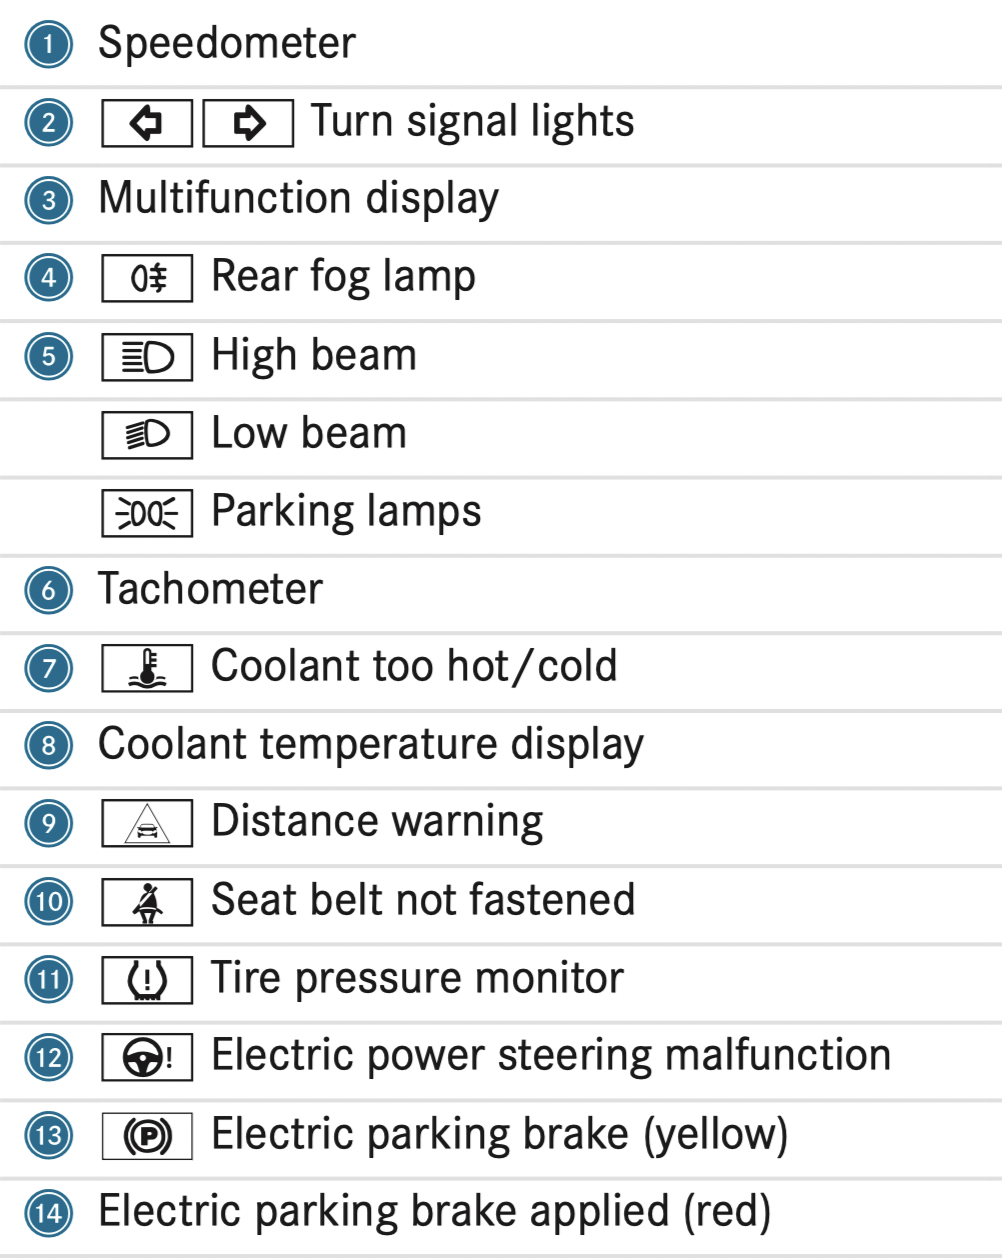
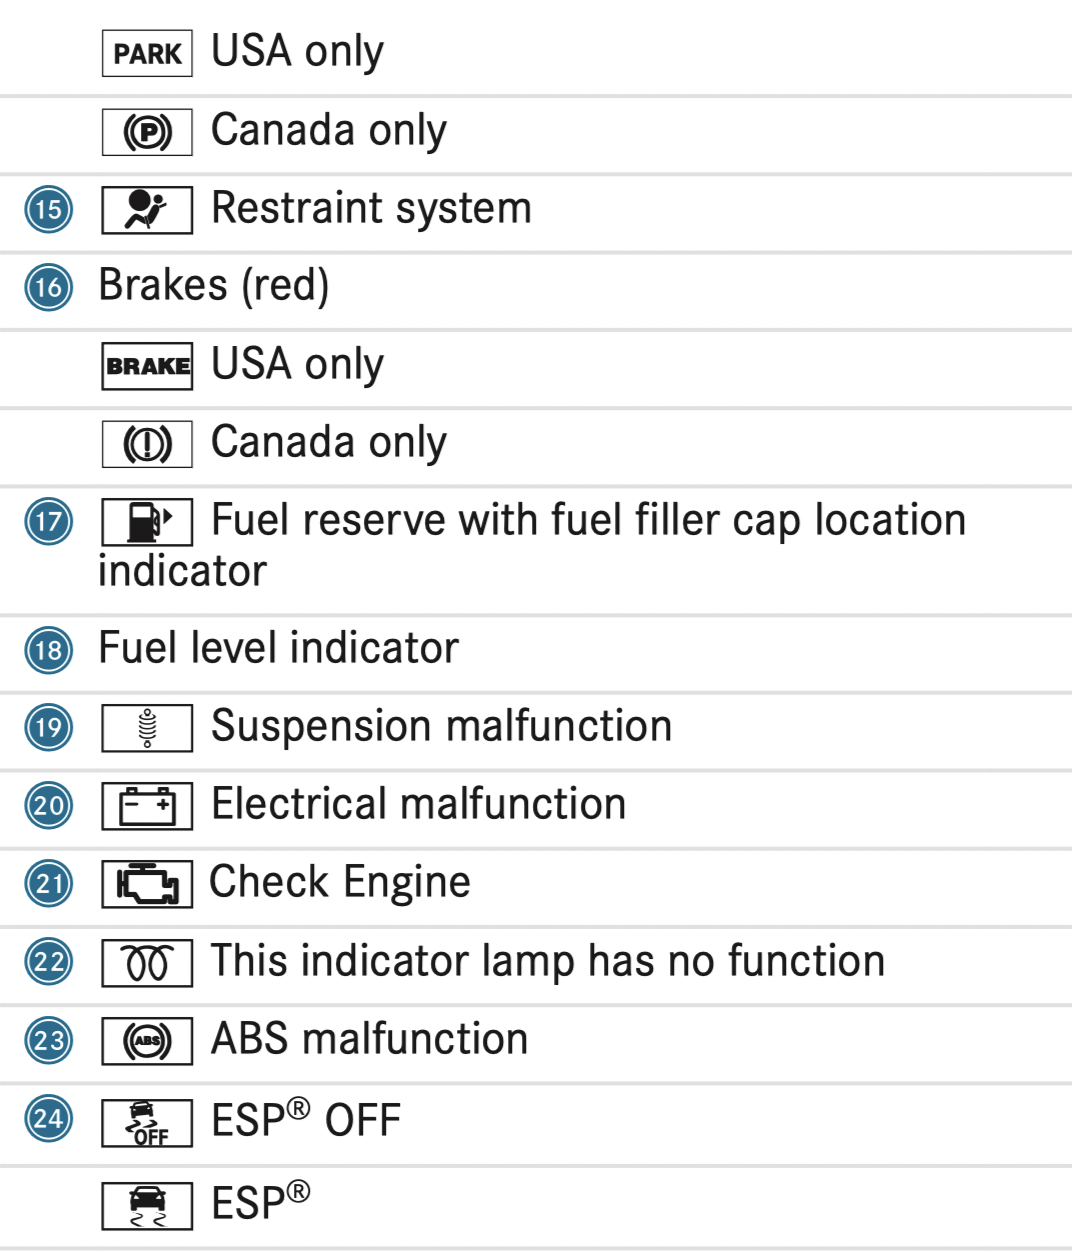
Warning and indicator lamps
Overview of indicator and warning lamps
Some systems will perform a self-test when the ignition is switched on. Some indicator and warning lamps may briefly light up or flash. This behavior is non-critical. These indicator and warning lamps indicate a malfunction only if they light up or flash after the engine has been started or during a journey.
| Warning/indicator lamp | Possible causes/consequences and ---> Solutions |
|---|---|
|
Restraint system warning lamp |
The red restraint system warning lamp is lit while the engine is running. *The restraint system is malfunctioning (/ page 34). WARNING - Risk of injury due to malfunctions in the restraint system If the restraint system is malfunctioning, restraint system components may be triggered unintentionally or may not deploy as intended during an accident. This may affect the Emergency Tensioning Devices or airbags, for example.
Drive on carefully. Note the messages on the multifunction display. Visit a qualified specialist workshop immediately. |
|
Seat belt warning lamp flashes |
The red seat belt warning lamp flashes and an intermittent warning tone sounds. *The driver or front passenger has not fastened their seat belt while the vehicle is in motion.
*There are objects on the front passenger seat.
|
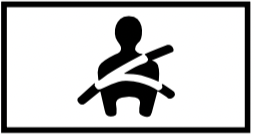
| Seat belt warning lamp lights up |
The red seat belt warning lamp will light up for six seconds once the engine has started. In addition, a warning tone may sound. *The seat belt warning lamp reminds the driver and front passenger to fasten their seat belts.
If you have placed objects on the front passenger seat, the seat belt warning lamp may remain lit. |
| Warning/indicator lamp | Possible causes/consequences and ---> Solutions |
|---|---|
|
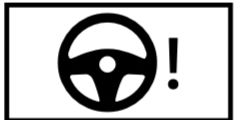
Warning lamp for electric power steering |
The red electric power steering warning lamp is lit while the engine is running. *The power-assisted steering or the steering itself is malfunctioning. WARNING - Risk of accident if steering capability is impaired If the steering does not function as intended, the vehicle's operating safety is jeopardized.
Note the messages on the multifunction display. |
| Warning/indicator lamp | Possible causes/consequences and ---> Solutions |
|---|---|
|
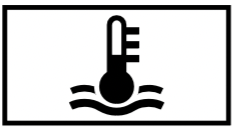
Coolant warning lamp |
The red coolant warning lamp is lit while the engine is running. *Possible causes:
If there is an additional warning tone, the coolant temperature has exceeded the maximum permissible temperature. WARNING - Danger of burns when opening the hood If you open the hood when the engine has overheated or during a fire in the engine compartment, you could come into contact with hot gases or other escaping operating fluids.
Stop the vehicle immediately in accordance with the traffic conditions and switch off the engine. Do not continue driving under any circumstances. Note the messages on the multifunction display. If the coolant temperature display is at the lower end of the temperature scale:
or
|
|
Engine diagnosis warning lamp |
The yellow Check Engine warning lamp is lit while the engine is running. *A malfunction has occurred in the engine, the exhaust system or the fuel system. The emission limit values may be exceeded and the engine may be in emergency mode. In some states, legal requirements stipulate that you must immediately consult a qualified specialist workshop as soon as the yellow Check Engine warning lamp lights up.
|
|
Electrical malfunction warning lamp |
The red electrical malfunction warning lamp is lit. * There is a malfunction in the electrics.
|
|
Fuel reserve warning lamp |
The yellow fuel reserve warning lamp lights up while driving. *There has been pressure loss in the fuel system. The fuel filler cap is not closed correctly or the fuel system is leaking.
If the fuel filler cap has already been closed correctly:
|
|
Fuel reserve warning lamp |
The yellow fuel reserve warning lamp is lit while the engine is running. * The fuel supply has dropped into the reserve range.
|
| Warning/indicator lamp | Possible causes/consequences and ---> Solutions |
|---|---|
|
Red indicator lamp, electric parking brake applied (USA only)
Red indicator lamp, electric parking brake applied (Canada only)
Yellow electric parking brake indicator lamp is malfunctioning |
The red electric parking brake indicator lamp flashes or is lit. The yellow indicator lamp is also lit if the electric parking brake malfunctions. * Observe the messages on the multifunction display. |
|
Brake warning lamp (USA)
Brakes warning lamp (Canada)
|
The red brake system warning lamp is lit while the engine is running. *Possible causes are:
WARNING - Risk of accident and injury if brake force boosting is malfunctioning If brake force boosting is malfunctioning, increased brake pedal force may be necessary for braking. The braking characteristics may be impaired. The braking distance can increase in emergency braking situations.
WARNING - Risk of an accident due to low brake fluid level If the brake fluid level is too low, the braking effect and the braking characteristics may be impaired.
Pull over and stop the vehicle safely as soon as possible, paying attention to road and traffic conditions. Do not continue driving under any circumstances. Observe the messages on the multifunction display. Consult a qualified specialist workshop. |
| Warning/indicator lamp | Possible causes/consequences and ---> Solutions |
|---|---|
|
Warning lamp for distance warning function |
The red distance warning lamp lights up while the vehicle is in motion. *The distance to the vehicle in front is too small for the speed selected. If there is an additional warning tone, you are approaching an obstacle at too high a speed.
Function of Active Brake Assist |
|
Suspension warning lamp |
The yellow AIR BODY CONTROL warning lamp is lit. * A malfunction has occurred in the AIR BODY CONTROL.
|
| Warning/indicator lamp | Possible causes/consequences and ---> Solutions |
|---|---|
|
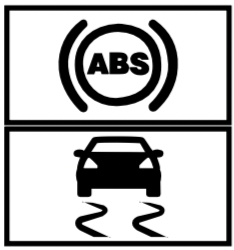
ABS warning lamp |
The yellow ABS warning lamp is lit while the engine is running. *ABS is malfunctioning. If there is an additional warning tone, EBD is malfunctioning. Other driving systems and driving safety systems may also be malfunctioning. WARNING - There is a risk of skidding if EBD or ABS is malfunctioning If EBD or ABS is malfunctioning, the wheels may lock when braking. The steering capability and braking characteristics are thus severely impaired. The braking distance in an emergency braking situation can increase. In addition, other driving safety systems are switched off.
Drive on carefully. Note the messages on the multifunction display. Visit a qualified specialist workshop. |
|
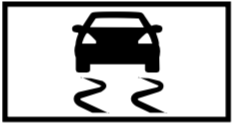
ESP ® warning lamp flashes |
The yellow ESP ® warning lamp flashes while the vehicle is in motion. * At least one wheel and tire assembly has reached its grip limit.
|
|
ESP ® warning lamp lights up |
The yellow ESP ® warning lamp is lit while the engine is running. * ESP ® is malfunctioning Other driving systems and driving safety systems may also malfunction. WARNING - Risk of skidding if ESP ® is malfunctioning If ESP ® is malfunctioning, ESP ® cannot carry out vehicle stabilization. In addition, other driving safety systems are switched off.
Drive on carefully. Observe the messages on the multifunction display. Visit a qualified specialist workshop. |
|
ESP ® OFF warning lamp |
The yellow ESP ® OFF warning lamp is lit while the engine is running. * ESP ® is deactivated. WARNING - Risk of skidding when driving with ESP ® deactivated If ESP ® is deactivated, ESP ® cannot carry out vehicle stabilization. The availability of further driving safety systems is also limited.
If ESP ® cannot be activated, ESP ® is malfunctioning.
Observe the notes on deactivating ESP ® |
| Warning/indicator lamp | Possible causes/consequences and ---> Solutions |
|---|---|
|
Tire pressure monitoring system warning lamp flashes |
The yellow tire pressure monitoring system warning lamp (pressure loss/malfunction) flashes for approximately one minute and then remains lit. *The tire pressure monitoring system is defective. WARNING - There is a risk of an accident if the tire pressure monitoring system is malfunctioning If the tire pressure monitoring system is malfunctioning, it is not able to issue a warning if there is pressure loss in one or more of the tires. Underinflated tires may, for example, impair the driving, steering and braking characteristics.
Visit a qualified specialist workshop. |
|
Tire pressure monitoring system warning lamp lights up |
The yellow tire pressure monitoring system warning lamp (pressure loss/malfunction) is lit. *The tire pressure monitoring system has detected tire pressure loss in at least one of the tires. WARNING - Risk of an accident due to insufficient tire pressure Tire pressures that are too low pose the following hazards:
You could then lose control of the vehicle.
Stop the vehicle, paying attention to road and traffic conditions. Check the tire pressure and the tires. |


 restraint system warning lamp does not light up when the ignition is switched on.

 or
or  position.

 and into another transmission position.
 ,
,  or neutral
  .
.

 indicator lamp is lit. The electric parking brake is malfunctioning.
 (USA only) or