Instruction manual Dishwasher
Getting to know your appliance
Control panel
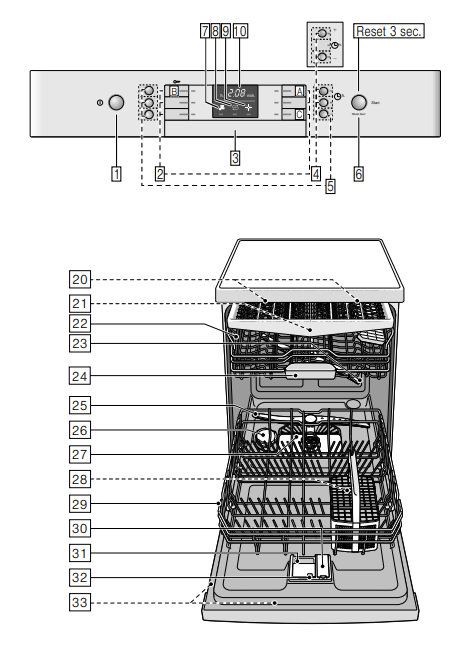
- On/off switch
- Programme buttons (number depending on the features of your dishwasher)
- Door opener
- Time preselection
- Additional functions/programme buttons (number depending on the features of your dishwasher)
- START button
- Display "Check water supply
- Salt refill indicator
- Rinse aid refill indicator
- Display window
Appliance interior
20. Interior light *
21. Cutlery drawer
22. Top basket
23. Upper spray arm
24. Tablet collecting tray
25. Lower spray arm
26. Dispenser for special salt
27. Filters
28. Cutlery basket *
29. Bottom basket
30. Dispenser for rinse aid
31. Detergent dispenser
32. Lock for detergent dispenser
33. Rating plate
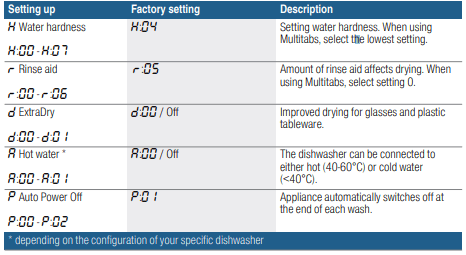
Overview of menu
The dishwasher has been preset with certain settings for your convenience. The settings can be found in the individual chapters. You can change these factory settings.
Water softening system / special salt
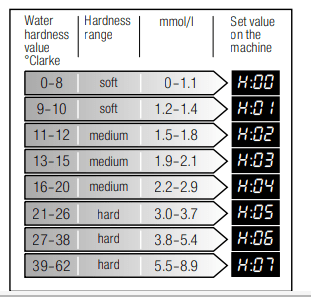
To ensure good rinsing results, the dishwasher requires soft water, i.e. water which is low in lime, otherwise limescale will be deposited on the utensils and interior container. Tap water above 7° dH (1.2 mmol/l) must be softened. The water is softened with special salt (regeneration salt) in the water softening system of the dishwasher. The setting and therefore the required amount of salt depends on the degree of hardness of your tap water (see following water hardness table).
Water hardness table
Adjusting the water softening system
You can set the amount of salt that should be added to a value between  and
and  . No salt is needed with the setting .
Here’s how to set up the amount of added salt:
- Ask your local water utility company for the water hardness value of the tap water.
- Required setting can be found in the water hardness table.
- Switch on ON/OFF switch .
- Hold down the programme button C and then repeatedly press the START button A until
 appears in the display window.
- Release both buttons. The LED of the 6 button flashes and the digital display 10 shows the factory setting

- Press the programme button A. Each time the button is pressed, the set value increases by one level; when it reaches the value the display jumps back to (Off).
- Press START button 6. The chosen setting has now been stored in your dishwasher.
Additional functions
 Express Wash/ Speed Perfect/ (VarioSpeed)
This function can reduce the running time by approx. 20% to 50% depending on the selected rinse programme. To obtain optimum cleaning and drying results at a reduced running time, water and energy consumption are increased.
 Half load *
Half l oadIf you have only a few items to wash (e.g. glasses, cups, plates), you can switch to “half load”. This will save water, energy and time. It is recommended to put a little less detergent in the detergent dispenser than for a full load.
 hygienePlus (HygienePlus) *
This function increases the temperatures and retains them for an extra long time to obtain a defined disinfection performance. Continuous use of this function increases the hygiene status. This additional option is ideal for cleaning e.g. chopping boards and baby bottles
 intensiveZone *
Perfect for a mixed load. You can wash very soiled pots and pans in the lower basket together with normally soiled utensils in the upper basket. The spray pressure in the lower basket is intensified, the rinsing temperature is increased slightly.
 extraDry *
An increased temperature during the final rinse and an extended drying phase ensure that even plastic parts dry better. There is a slight increase in the energy consumption
 Shine and Dry *
By increasing the amount of water during the rinse cycle and extending the drying phase, stains are prevented and the drying result is improved. There is a slight increase in the energy consumption. Rinse aid is recommended for the high gloss drying function (even when using combination detergents).
 Energy Save *
The “Energy Save” function can be used to reduce water and energy consumption. The running time is extended for optimum cleaning and drying results.
Opertating the appliance
Programme data
The programme data (consumption values) can be found in the quick reference guide. They refer to normal conditions and the set water hardness value  Different influencing factors such as water temperature or line pressure may result in deviations.
AquaSensor (depending on the features of your dishwasher)
The Aqua sensor is an optical measuring device (light barrier) which measures the turbidity of the rinsing water. The AquaSensor is used according to the programme. If the AquaSensor is active, “clean” rinsing water can be transferred to the next rinse bath and water consumption can be reduced by 3–6 litres. If the turbidity is greater, the water is drained and is replaced with fresh water. In the automatic programmes the temperature and running time can also be adjusted to the degree of soiling.
Switching on the appliance
1. Turn tap fully on.
2. Switch on ON/OFF switch 1 The Eco 50° programme has been preset for environmentally friendly operation whenever the appliance starts. This programme remains selected if no other programme button 2 is pressed.
3. Press START button 6.
Programme sequence starts
Note: For ecological reasons the Eco 50° programme is preset whenever the appliance starts. This conserves environmental resources and not least saves you money.
The Eco 50° programme is a particularly environmentally friendly programme. According to EU regulation 1016/2010 it is the “Standard programme” which is the most efficient standard cleaning cycle for cleaning normally soiled utensils in terms of the combined energy and water consumption for cleaning these types of utensils.
Remaining running time display
When the programme is selected, the remaining programme time is indicated in the display window 10.
The running time is determined during the programme by the water temperature, the quantity of dishes as well as the degree of soiling and may vary (depending on the selected programme).
Time preselection (depending on the configuration of your specific dishwasher)
You can delay the start of the programme in hourly steps by up to 24 hours.
Here’s how to set up the delay:
1. Switch on ON/OFF switch 1
2. Press the timer programming button 4+ repeatedly until  appears in the display window.
3. Keep pressing the timer programming button 4- or + until the desired time is displayed.
4. Press START button 6 The delay timer has been activated.
5. To clear the specified delay, press the button 4- or + repeatedly until  appears in the display window.
Until the programme has started, you can change your selection in any way you like
Programme end The programme has finished when the value  appears in the display window 10
Auto Power Off (Automatic switch-off after end of programme) or interior lighting (depending on the features of your dishwasher)
To save power you can set the dishwasher to switch off automatically 1 minute or 120 minutes after the end of the programme.You can choose a setting from 
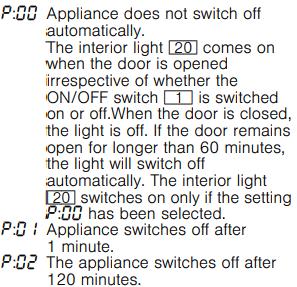
Note: Note that with the settings  and
and  , the interior light 20 is switched off. To activate the interior lighting, press the ON/OFF switch 1 .If the door is open for longer than 60 minutes, the light will switch off automatically.
Here is how to change the setting:
1. Switch on the ON/OFF switch 1
2. Hold down the programme button  and then repeatedly press the START button 6 until
  .. appears in the display window.
3. Release both buttons. The LED of the button flashes and the digital display 10 lights up to show the value ..
4. Press the programme button repeatedly until the value  . appears in the display window 10
5. Press programme button  Each time the button is pressed, the set value increases by one level; when it reaches the value the display jumps back to
6. Press START button 6. The set value is saved.
Switching off the appliance
Shortly after the end of the programme:
1. Switch off ON/OFF switch 1.
2. Turn off water supply (does not apply to appliances with Aqua-Stop).
3. Remove the utensils when they have cooled down.
Note: When the programme ends, leave the appliance to cool down a while before opening it. This will prevent steam from escaping and causing long-term damage to your built-in furniture
Interrupting the programme
Caution!
Expansion (overpressure) may cause the appliance door to jump open and/or water to escape! If the door was opened on an appliance which has a hot water connection or is heated, always leave the door ajar for several minutes and then close it.
1. Switch off ON/OFF switch 1. The LEDs go out. The programme is saved.
2. Switch on the ON/OFF switch 1 again to continue the programme.
Terminating the programme (Reset)
1. Press the START button 6 and hold it down for about 3 seconds. The value  ‚ appears in the display window 10. The programme sequence lasts about 1 minute. The value appears in the display window 10.
2. Switch off ON/OFF switch 1
Changing the programme
When the START button 6 has been pressed, the programme cannot be changed. The only way a programme can be changed is by Cancel programme (Reset).
ExtraDry
The final rinse uses a higher temperature which improves the drying result. The running time may increase slightly. (Be careful if you have delicate tableware)
Here is how to change the setting:
1. Switch on the ON/OFF switch 1
2. Hold down the programme button and then repeatedly press the START button 6 until .. appears in the display window 10
3. Release both buttons. The LED of the button flashes and the digital display 10 lights up to show the value  ..
..
4. Press the programme button repeatedly until the value  . appears in the display window 10
5. Press programme button Each time the button is pressed, the set value increases by one level; when it reaches the value  the display jumps back to
6. Press START button 6. The set value is saved.
Cleaning and maintenance
A regular inspection and maintenance of your machine will help to prevent faults. This saves time and prevents problems.
Overall status of the dishwasher
*The interior of your dishwasher is predominantly self-cleaning. In order to remove deposits, your dishwasher automatically changes the running of the programme (such as by increasing the cleaning temperature) at certain intervals. This will lead to higher consumption values when running this programme.
*Depending on the features of your dishwasher
If you should find deposits in the interior of the dishwasher in spite of this, remove these deposits as follows:
1. Fill the detergent dispenser 31 with detergent.
2. Select the programme with the highest temperature.
3. Start the programme without dishes.
 Warning
Health hazard due to detergents containing chlorine!
Always use chlorine-free detergents.
Notes
- Only clean the appliance with special detergents/appliance cleaners which are suitable for use with dishwashers.
- Regularly wipe the door seals using a damp cloth and a little washing-up liquid. This will keep the door seal clean and hygienic.
- Leave the door open slightly if the appliance will not be used for a while. This will prevent an unpleasant odour from developing.
- Never clean the dishwasher using a steam cleaner. The manufacturer is not liable for any consequential damage.
- Wipe the front of the dishwasher and the control panel regularly using a damp cloth and a little washing-up liquid.
- Do not use sponges with a rough surface or abrasive detergents. These could scratch the surface.
- For dishwashers with a stainless steel front, avoid using sponge cloths, or rinse these thoroughly several times before using them for the first time. This will prevent corrosion
Machine Care (Machine cleaning cycle) 
Machine Care used in combination with commercially available machine cleaning detergent is a suitable programme for cleaning your dishwasher. Deposits such as grease and limescale can cause your dishwasher to malfunction. In order to avoid such faults and to reduce the development of odours, we recommend cleaning the dishwasher at regular intervals.
(depending on the features of your dishwasher) As soon as the Machine Care display lights up in the control panel, or you are advised to do so on the front display, run the Machine cleaning programme Machine Care without loading any tableware. After you have run the Machine Care the display in the control panel will go out.
If your dishwasher does not have a reminder function, follow the instructions for use on the machine cleaning detergents.
Notes
- Remove any coarse soiling in the interior using a damp cloth.
- Run the programme without dishes, and in combination with a machine cleaning detergent.
- Use a special machine cleaning detergent, and not dishwasher detergent.
- Observe the safety instructions and the instructions for use on the machine cleaning detergent packaging.
- (depending on the features of your dishwasher) After three rinse cycles, the display in the control panel will go out automatically, even if you have not run the Machine cleaning cycle programme.
Special salt and rinse aid
Top up the salt and/or rinse aid as soon as either of the refill indicators on the control panel 8 or 9 lights up
Filters
The filters 27 keep large foreign objects in the rinsing water away from the pump. hese foreign objects may occasionally block the filters.
The filter system consists of
- a coarse filter
- a flat fine filter
- a microfilter
1. After each washing cycle check the filters for residue.
2. Unscrew filter cylinder as illustrated and take out filter system
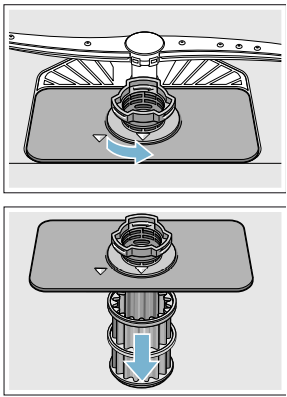
3. Remove any residue and clean filters under running water.
4. Re-install filter system in reverse sequence and ensure that the arrow marks are opposite each other after closing the filter system.
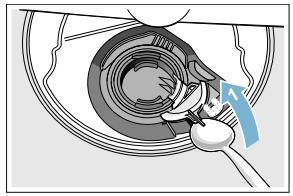
Spray arms
Limescale and contaminants in the rinsing water may block nozzles and bearings on the spray arms 23 and 25.
1. Check outlet nozzles on the spray arms for blockages.
2. Unscrew the upper spray arm 23 (1) and remove downwards (2).
3. Remove the lower spray arm 25 upwards.
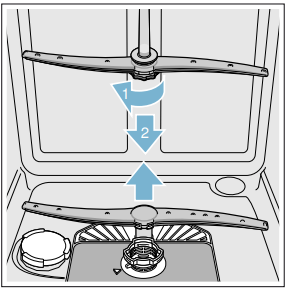
4. Clean spray arms under running water.
5. Re-engage or screw on spray arms.
Fault, what to do?
Experience has shown that you can rectify most faults which occur in daily operation yourself. This ensures that the appliance is quickly available to you again. In the following overview you can find possible causes of malfunctions and helpful information for rectifying them.
Note: If the appliance stops during dishwashing or does not start for no obvious reason, first run the Abort programme function (Reset)  "Operating the appliance" on page 27.
Warning
Improper
repairs or use of non-original spare parts may cause considerable damage and put the user at considerable risk!
Always have repairs carried out by technicians. If a component has to be replaced, always use original spare parts.
Waste water pump
Large food remnants or foreign objects which were not captured by the filters may block the waste water pump. The rinsing water will then be above the filter.
Warning
Danger of cutting!
Sharp and pointed objects or glass fragments may block the waste water pump. Always carefully remove foreign objects.
Clean the waste water pump as follows:
1. Disconnect the dishwasher from the power supply.
2. Take out top basket 22 and bottom basket 29
3. Remove the filters 27
4. Scoop out water, use a sponge if required.
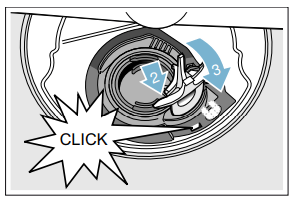
5. Prise off the pump cover (as shown) using a spoon. Grip the pump cover by the crosspiece and lift diagonally inwards (1). Remove cover completely.
6. Check impeller wheel and remove any foreign objects.
7. Place pump cover in the original position (2) and press down until it engages (3).
8. Install filters.
9. Re-insert baskets.
Fault table
“Check water supply” display lights up
- Supply hose kinked
- Install supply hose without kinks.
- Tap turned off.
- Tap jammed or calcified.
- Turn on water supply. Flow rate must be at least 10 l/min. when water supply is open.
- Filter in the water supply blocked.
- Switch off the appliance and pull out the mains plug. Turn off water supply. Unscrew water connection
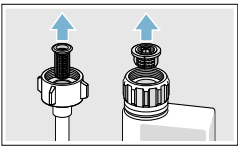
Clean filter in the supply hose. Screw water connection on again. Check for leaks. Reconnect power supply. Switch on the appliance.
Fault code  is lit.
- Intake opening (on right inside of appliance) covered by utensils.
- Arrange utensils so that the intake opening is not obstructed.
Fault code  is lit.
- Heating element calcified or soiled.
- Clean appliance with dishwasher cleaning agent or descaler. Operate the dishwasher with water softening system and check the setting." Water softening system/special salt" on page 12
Fault code  is lit.
- Water protection system activated.
- Turn off water supply. Call customer service and quote the fault code.
Fault code  is lit.
- Water protection system activated.
- Turn off water supply. Call customer service and quote the fault code.
Fault code  is lit.
- Constant water supply
- Turn off water supply. Call customer service and quote the fault code.
Fault code  is lit.
- Filters 27 are soiled or blocked.
- Clean filters."Filters" on page 33
Fault code  is lit
- Waste-water hose kinked or blocked.
- Install hose without kinks, remove any residue.
- Siphon connection still sealed.
- Check connection to siphon and open if required.
- Cover on the waste water pump loose.
- Lock cover correctly. "Waste water pump" on page 34
Fault code  is lit
- Waste water pump blocked or cover on the waste water pump is not locked in position.
- Clean pump and lock cover correctly. "Waste water pump" on page 34
Fault code  is lit
- Mains voltage too low.
- No appliance fault, have the mains voltage and electrical installation checked.
A different fault code is indicated on the digital display.
- A technical fault has probably occurred.
- Switch off the appliance with the ON/OFF switch After a short time restart the appliance. If the problem recurs, turn off water supply and pull out the mains plug. Call customer service and quote the fault code.
 appears on the digital display 1 (depending on the configuration of your specific dishwasher)
- Not a fault!
- See turboSpeed 20 min. in the chapter “Overview of programmes”. (depending on the configuration of your specific dishwasher)
Refill indicator for salt 8 and/or rinse 9 aid is lit.
- No rinse aid.
- No salt
- Refill with special salt.
- Sensor does not detect salt tablets.
- Use different special salt.
Refill indicator for salt 8 and/or rinse 9 aid is not lit.
- Refill indicator switched off.
- Activation/deactivation (see chapter “Water softening system/Special salt” Page 12 or “Rinse aid” Page 14)
- There is still enough special salt/rinse aid available.
- Check refill indicator, levels
The Machine Care display lights up. (depending on the configuration of your specific dishwasher)
- Machine Care is recommended.
- Run the Machine Care programme using a special dishwasher cleaning agent and without loading any utensils. The display will go out automatically after three wash cycles whether or not the Machine Care programme is carried out.
Water is left in the appliance at the end of the programme
- Filter system or area under the filters 27 is blocked.
- Clean filters and area underneath.
- Programme has not yet finished
- Wait until programme ends or reset
Utensils not dry.
- Not enough rinse aid in the dispenser, or none at all.
- Programme without drying was selected.
- Select programme with drying. "Overview of programmes" on page 24
- Water collecting in depressions on the utensils and cutlery.
- Arrange utensils in a sloping position, arrange affected utensils as sloping as possible.

- The combined detergent used has a poor drying performance.
- Use different combination detergent with better drying performance. Use of rinse aid also improves the drying performance
- The extra drying option to increase drying was not activated.
- Activate intensive drying. "Operating the appliance" on page 27
- Utensils were removed too early or drying process had not ended yet.
- Wait until the programme ends, or wait until 30 minutes after the end of the programme before removing the utensils.
- The eco rinse aid used has a limited drying performance.
- Use a proprietary rinse aid. Eco products may have limited effectiveness.
Plastic utensils not dry
- Special properties of plastic.
- Plastic has a lower heat storage capacity and therefore dries less well
Cutlery not dry.
- Cutlery not arranged properly in the cutlery basket.
- Separate cutlery if possible, prevent contact points.
- Cutlery not arranged properly in the cutlery drawer.
- Arrange cutlery properly and separate if possible
Appliance interior wet after wash cycle
- No appliance fault.
- On account of the “Condensation drying” principle, water droplets are physically induced and required in the container. The humidity in the air condenses on the inner walls of the dishwasher, drains and is pumped out
Food remnants on the utensils.
- Utensils placed too closely together, utensils basket overfilled.
- Arrange utensils with adequate clearance between them ensuring that the spray jets can reach the surface of the utensils. Prevent contact points.
- Spray arm rotation obstructed.
- Arrange utensils so that the spray arm can rotate without obstruction.
- Spray arm nozzles are blocked.
- Clean the spray arm nozzles. "Cleaning and maintenance" on page 31
- Filters 27 dirty.
- Clean filters. "Cleaning and maintenance" on page 31
- Filters 27 inserted incorrectly and/or not engaged.
- Insert and engage filters correctly.
- Wash programme too weak.
- Select a more intensive wash programme. Increase sensitivity of the sensors.
- Utensils precleaned too intensely; sensors therefore decide on weak programme sequence. Stubborn soiling cannot be completely removed.
- Do not prerinse utensils. Remove only large food remnants. Increase sensitivity of the sensors. Recommended programme Eco 50° or Intensive.
- Tall narrow receptacles in corner areas are not rinsed adequately.
- Do not place hollow receptacles too obliquely and do not place in the corner area.
- Top basket 22 on right and left not set to same height.
- Set top basket to same height using side levers
Food remnants on the dishes when pause function is used. (depending on the configuration of your specific dishwasher)
- Dishes added too late.
- Only interrupt the rinse programme in the initial phase to add more dishes.
Detergent residue
- Detergent dispenser cover 31 blocked by utensils and therefore does not open fully.
- Utensils must not be placed above the tablet collecting tray 24. These may block the lid of the detergent dispenser and prevent it from opening fully. "Upper basket" on page 16 Do not place utensils or fragrance dispenser in the tablet collecting tray.
- Detergent dispenser cover 31 blocked by the tablet.
- Tablet must be inserted flat and not upright.
- Tablets used in the quick or short programme. Dissolving time of the detergent is not reached in the selected short programme.
- Dissolving time of tablets too long for a quick or short programme. Use a detergent powder or select a more intensive programme.
- Washing effect and dissolving performance are reduced after a prolonged storage time or detergent is very lumpy.
Water stains on plastic parts.
- Droplet formation on plastic surface is physically unavoidable. After drying, water stains are visible.
- Use a more intensive programme (more water changes). Arrange utensils in a sloping position. Use rinse aid. If required, increase softening setting
Washable or water-soluble coatings in the container or on the door.
- Detergent substances are deposited. These coatings cannot usually be removed with chemicals (appliance cleaner, ...).
- Change detergent brand. Clean appliance mechanically.
- If there is a “white coating” on the container floor, the water softening system has been set marginally.
- Increase softening setting and change detergent if required.
- Salt dispenser cover 26 not closed.
- Close salt dispenser cover correctly.
- Only for glasses: Initial glass corrosion – can only apparently be wiped off.
- See “Glass and utensil damage” Page 16
White, stubborn coatings; limescale on the utensils, container or door.
- Detergent substances are deposited. These coatings cannot usually be removed with chemicals (appliance cleaner, ...).
- Change detergent brand. Clean appliance mechanically.
- Hardness range incorrectly set or water hardness greater than 8.9 mmol/l.
- Set water softening system according to instructions for use or top up salt.
- 3 in 1 detergent or bio/eco detergent not effective enough.
- Set water softening system according to instructions for use or use separate detergents (proprietary detergent, salt, rinse aid).
- Underdosing of detergent.
- Increase detergent dosage or change detergent.
- Too gentle wash programme selected.
- Select a more intensive wash programme
Tea or lipstick residue on the utensils.
- Too low rinsing temperature.
- Select programme with higher washing temperature.
- Too little or unsuitable detergent.
- Use suitable detergent at correct dosage.
- Utensils precleaned too intensely; sensors therefore decide on weak programme sequence. Stubborn soiling cannot be completely removed.
- Do not prerinse utensils. Remove only large food remnants. Increase sensitivity of the sensors. Recommended programme Eco 50°
Coloured (blue, yellow, brown), difficult to remove to non-removable coatings in the appliance or on stainless steel utensils.
- Film formation consisting of ingredients from vegetables (e.g. cabbage, celery, potatoes, noodles, ...) or the tap water (e.g. manganese).
- Can be partly removed with machine cleaner or by mechanical cleaning. Coatings are harmless.
- Film formation caused by metallic components on silver or aluminium utensils.
- Can be partly removed with machine cleaner or by mechanical cleaning.
Coloured (yellow, orange, brown), easily removable deposits inside the appliance (mainly in the floor area).
- Film formation consisting of ingredients from food remnants and substances from the tap water (limescale), “soapy”
- Check function of the water softening system (refill with salt) or, if using combined detergents (tablets), activate water softening system.
Discolouration of the plastic parts inside the appliance.
- Plastic parts inside the appliance may become discoloured during the service life of the dishwasher.
- Discolouration is normal and will not impair the function of the dishwasher
Plastic parts discoloured.
- Too low rinsing temperature.
- Select programme with higher washing temperature.
- Utensils precleaned too intensely; sensors therefore decide on weak programme sequence. Stubborn soiling cannot be completely removed.
- Do not prerinse utensils. Remove only large food remnants. Increase sensitivity of the sensors. Recommended programme Eco 50°
Removable streaks on glasses, glasses with metallic appearance and cutlery.
- Too much rinse aid.
- Set rinse aid amount to lower setting.
- No rinse aid added or setting too low.
- Add rinse aid and check dosage (recommended setting 4–5).
- Detergent residue in the final rinse. Detergent dispenser cover blocked by utensils (cover does not open fully).
- Detergent dispenser cover must not be obstructed by utensils. Do not place utensils or fragrance dispenser in the tablet collecting tray.
- Utensils precleaned too intensely; sensors therefore decide on weak programme sequence. Stubborn soiling cannot be completely removed.
- Do not prerinse utensils. Remove only large food remnants. Increase sensitivity of the sensors. Recommended programme Eco 50°
Initial or existing, irreversible clouding of glass.
- Glasses not dishwasher-proof, only suitable for dishwasher.
- Use dishwasher-proof glasses. Avoid long steam phase (standing time after wash cycle ends). Use wash cycle at lower temperature. Set water softening system according to the water hardness (if required one setting lower). Use detergent with glass protection component.
Rust spots on the cutlery.
- Cutlery is not sufficiently rust-resistant. Knife blades are frequently more severely affected.
- Use rust-resistant cutlery.
- Cutlery will also rust if rusting parts are rinsed at the same time (pan handles, damaged utensil baskets, etc.).
- Do not wash rusting parts.
- Salt content in the rinsing water too high, as salt dispenser lock not fastened firmly or salt was spilled while being refilled.
- Fasten salt dispenser lock firmly or remove spilled salt
Appliance cannot be switched on or operated.
- Malfunction.
- Disconnect appliance from the power supply; pull out the mains plug or switch off the fuse. Wait at least 5 seconds, then connect the appliance to the power supply
Appliance does not start.
- The mains fuse has tripped.
- Power cord not inserted.
- Ensure that the power cord is plugged all the way into the back of the appliance and into the socket. Check that the socket functions.
- The appliance door has not been shut properly.
- Pause function is active. (depending on the configuration of your specific dishwasher)
- Press the Start button 6. (depending on the configuration of your specific dishwasher)
Programme starts automatically.
- You did not wait until programme ended.
The door is difficult to open.
- Child-proof lock is activated.
- Deactivate childproof lock.
Door cannot be closed.
- Door lock has been activated.
- Close door with increased force.
- Door cannot be closed due to installation.
- Check appliance installation: Door or attached parts must close without obstruction.
Cover on the detergent dispenser cannot be closed.
- Detergent dispenser or cover guide blocked by sticky detergent residue
- Remove detergent residue.
Detergent residue in the detergent dispenser 31 or in the tablet collecting tray 24.
- Spray arms blocked by utensils, therefore detergent is not rinsed out.
- Ensure that the spray arms can rotate freely.
- The detergent dispenser was damp when filled.
- Pour detergent into the dry detergent dispenser only
Appliance stops in the programme or programme is interrupted.
- Door not closed properly.
- Do not place utensils or fragrance dispenser in the tablet collecting tray. Top basket presses against the door and prevents door from being closed securely.
- Check whether rear panel is being pressed in, e.g. by socket or by hose holder which has not been removed.
- Power and/or water supply interrupted.
- Restore power and/or water supply.
Filling valves making striking noises.
- Depends on domestic installation, as no appliance fault. No effect on appliance function.
- No remedial action possible.
Knocking or rattling noise.
- Spray arm strikes the utensils, utensils not positioned correctly.
- Position utensils so that the spray arms do not strike the utensils.
- If there is a low load, the water jets strike the washing tank directly.
- Load the appliance with more utensils or distribute the utensils more evenly in the dishwasher.
- Light utensils move during the wash cycle.
- Arrange light utensils securely.
Unusual foam formation.
- Hand washing-up liquid in the
- Immediately refill rinse aid dispenser with
rinse aid.
- rinse aid dispenser.
- Rinse aid spilled. Remove rinse aid with a cloth.
Overview of programmes
The max. possible number of programmes is illustrated in this overview. The corresponding programmes and their arrangement can be found on the fascia.
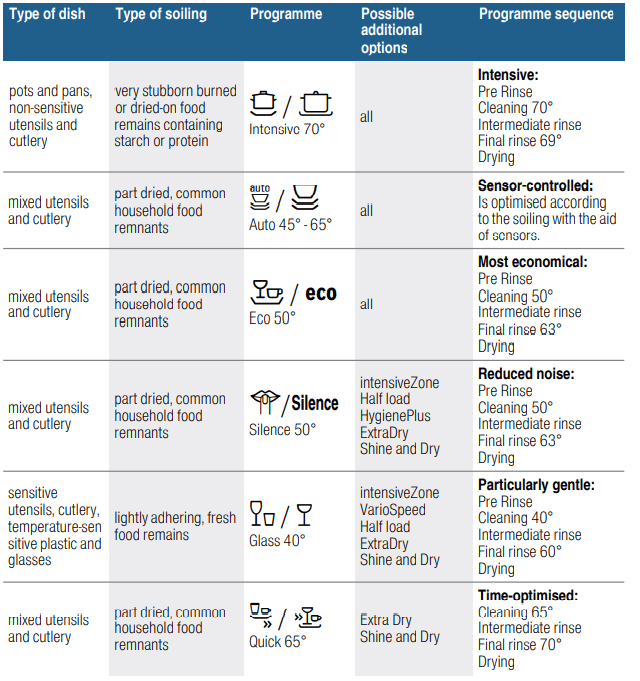
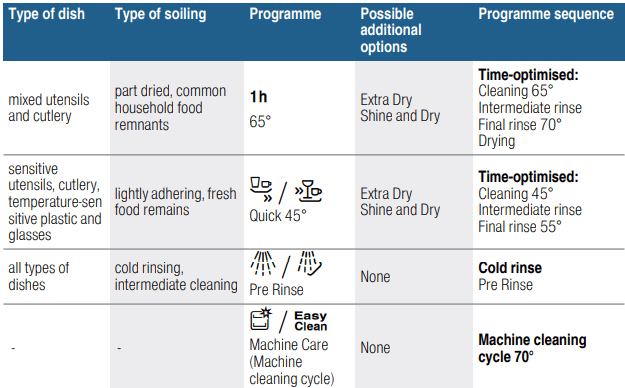
Programme selection
You can select a suitable programme according to the type of utensils and type of soiling.
Information for test institutes
Test institutes receive the information for comparability tests (e.g. according to EN60436).
These are the conditions for conducting the tests, however these are not the results or consumption values. Request by e-mail to: [email protected] The product number (E no.) and the production number (FD) are required which you can find on the rating plate 33 on the appliance door.