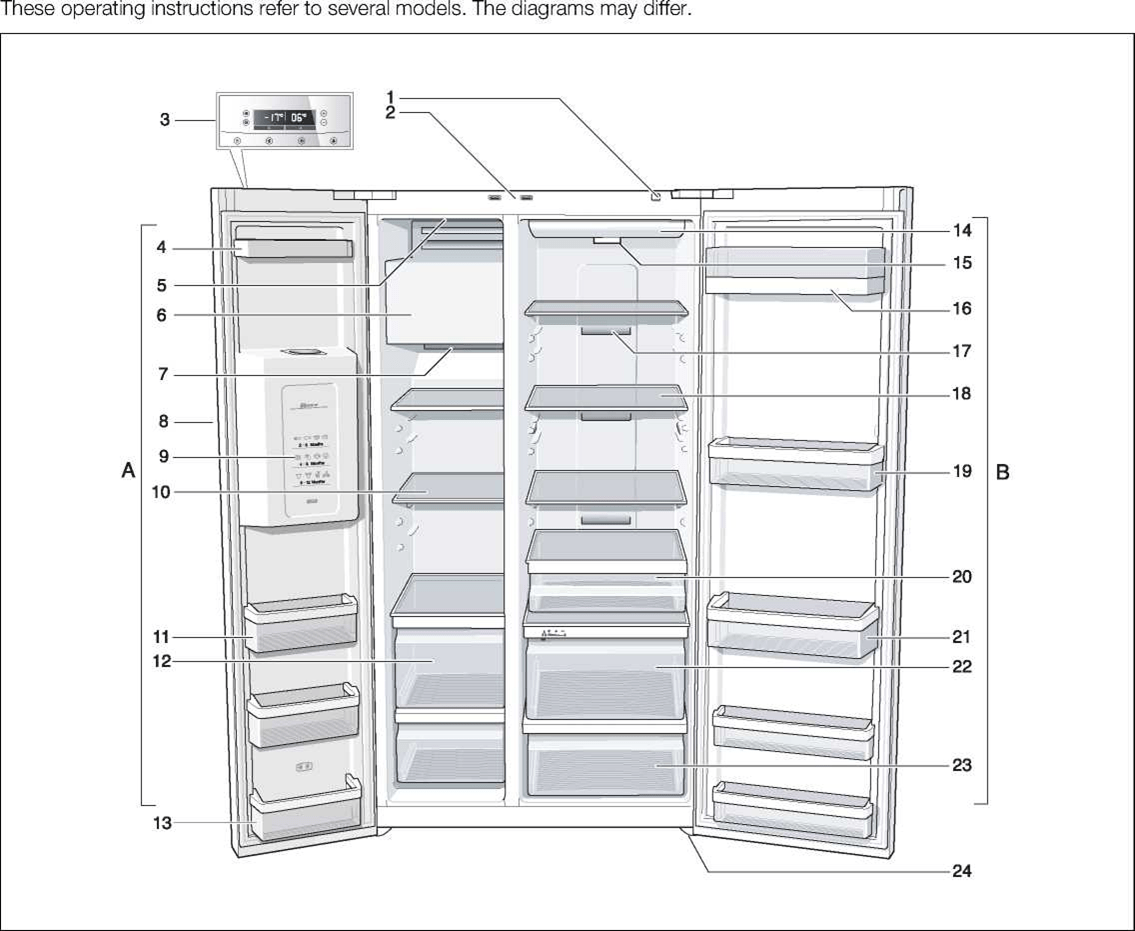
A Freezer compartment can be selected from -14°C to -24 °C
B Refrigerator compartment can be selected from +2 °C to +8 °C
On/Off button
Light switch for refrigerator and freezer compartments
Control and display panel
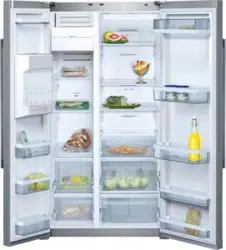
Door storage compartment
On/Off switch ice maker
Ice maker/lce cube container
Air outlet openings
Ice and water dispenser
Frozen-food calendar
Glass shelves in freezer compartment
Door storage compartment
Freezer drawer
Door storage compartment (2-star compartment) for short-term storage of food and ice cream.
Light, refrigerator compartment
Particle filter/Water filter
Butter and cheese compartment
Air outlet openings
Glass shelves in refrigerator compartment
Door storage compartment
Delicatessen drawer
Door storage compartment for large bottles
Vegetable compartment with humidity filter
Vegetable container
Height-adjustable feet
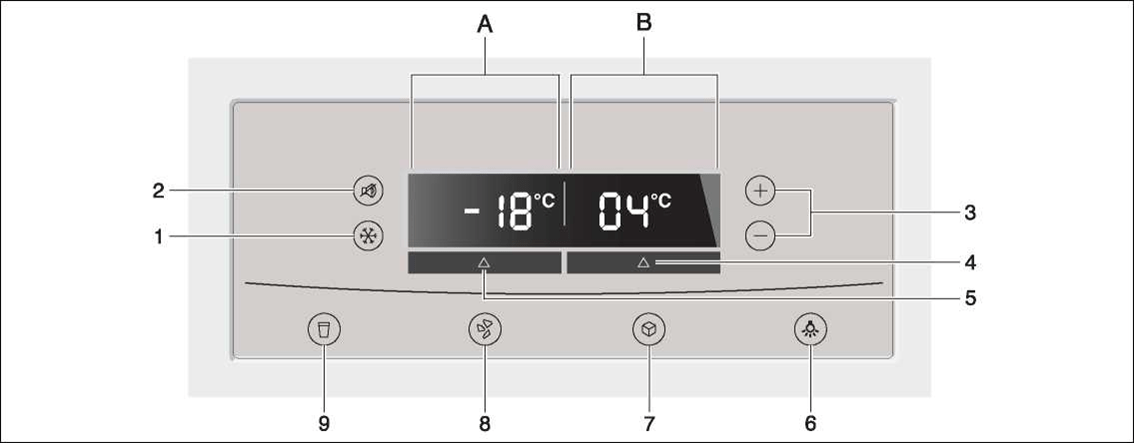
Control and display panel
The fascia and display panel on the door consists of a touch pad.
Touch the keypad to actuate the cor responding function.
1. “super” button
To switch on the Super freeze or Super cool functions.
See “Super freeze” and “Supercool” section.
2. “alarm off/lock” button
The button is used to
a) switch off the warning signal. See ’’Warning signal” section.
b) switch the button lock on and off.
When the “lock” function is activated, no settings are possible via the control panel.
Exception: If there is a warning message, the “alarm off/lock” button can be pressed.
To switch on and off, press button for 5 seconds. When the function is switched on, “lock” is lit on the display panel.
3. “+/-” button
The selected temperature is set with the “+” and “-” buttons.
4. ’’fridge” button
To implement settings for the refrigerator compartment area, press button until “fridge” is lit in the display panel.
5. “freezer” button
To implement settings for the freezer compartment, press button until “freezer” is lit on the display panel.
6. On/Off “light” button for ice and water dispenser
7. Dispenser button for ice cubes
8. Dispenser button for crushed ice
9. Water dispenser button
A Display panel, freezer compartment
B Display panel, refrigerator compartment
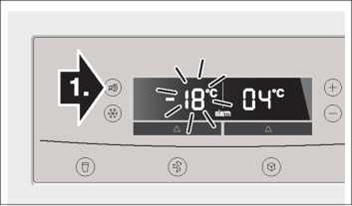
Switching on the appliance
Switch on the appliance with the On/ Off button.
Press the “alarm off/lock” button.
The warning signal switches off.
The “alarm” display goes out as soon as the set temperature has been reached.
The preset temperatures are reached after several hours. Do not put any food in the appliance beforehand.
The factory has recommended thefol-lowing temperatures:
Refrigerator compartment: +4°C
Freezer compartment: -18°C
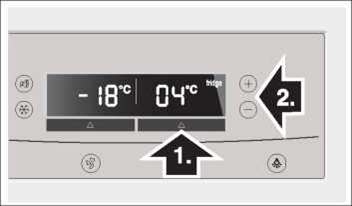
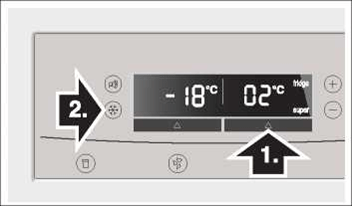
Selecting the temperature
Refrigerator compartment
1. Select the refrigerator compartment area with the “fridge” button until “fridge” is lit on the display panel.
2. Set the temperature with the + (warmer) or - (cooler) selection buttons.
The temperature can be set at 1 °C intervals.
The refrigerator compartment can be set from +2 °C to +8 °C.
Perishable food should not be stored warmer than +4 °C.
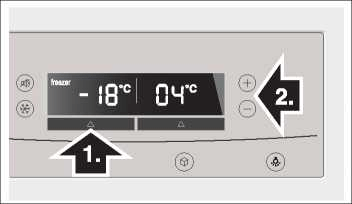
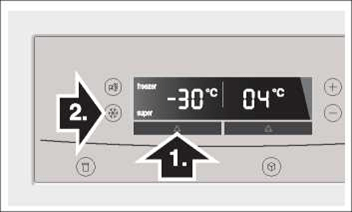
Freezer compartment
1. Press “freezer” button until “freezer” is lit on the display panel.
2. Set the temperature with the + (warmer) or - (cooler) selection buttons.
The freezer compartment can be set from -14°C to -24°C. The value last indicated is saved by the system.
Warning signal
In the following cases a warning signal may sound.
The door warning signal
The door warning signal sounds if one of the appliance doors is open for longer than one minute. Close the door to switch off the warning signal.
Press the “alarm off/lock” button to switch off the warning signal.
Temperature warning signal
The temperature warning signal switches on if the freezer or refrigerator compartment is too warm and the food is at risk of thawing.
The acoustic and optical signals may be actuated without risk to the frozen food when:
The appliance is switched on.
Large quantities of fresh food are placed in the freezer.
Freezer compartment
The set temperature of the freezer compartment flashes and “alarm” is displayed.
Press the “alarm off/lock” button to switch off the warning signal.
The temperature display indicates for 10 seconds the warmest temperature which was reached in the freezer compartment. Then the set temperature is displayed again.
The “alarm” display goes out as soon as the set temperature has been reached.
Attention!
Do not refreeze food which has started to thaw or already thawed. It can only be refrozen when it has been used to prepare a ready meal (boiled or fried). No longer store the frozen produce for the max. storage period.
Refrigerator compartment
“alarm” is indicated on the refrigerator compartment display panel.
Press the “alarm off/lock” button to switch off the warning signal.
Attention!
If the refrigerator compartment has become too warm, cook warmed refrigerated food before consumption. If in doubt, do not use raw food.
Supercooling
Super cooling cools the refrigerator compartment to the lowest temperature for approx. 6 hours. Then the temperature set before super mode is automatically restored.
Super cooling is recommended especially:
Before placing large quantities of food in the refrigerator compartment.
To cool drinks quickly.
Switch on super cooling
1. Select the refrigerator compartment area with the “fridge” button until “fridge” is lit on the display.
2. Then press the “super” button. “super” is indicated on the display panel.
Switching off super cooling
As when switching on super cooling, select the refrigerator compartment area, then press the “super” button. “super” goes out on the display panel.
Super freezing
Food should be frozen solid as quickly as possible. Vitamins, nutritional values, appearance and taste are therefore retained.
To prevent an undesirable temperature rise when placing fresh food in the freezer compartment, switch on fast freeze several hours beforehand.
As a rule, 4-6 hours is adequate.
If max. freezing capacity is to be utilised, 24 hours are required.
Smaller quantities of food can be frozen without super freezing.
Switching on super freezing
1. Select the freezer compartment area with the “freezer” button. “freezer” is lit on the display panel.
2. Then press the “super” button. “super” is lit on the display panel.
Switching off super freezing
To switch off, press the “super” button again.
Super freezing automatically switches off after 21/2 days at the latest.
Selecting the temperature unit
The temperature can be displayed in degrees Celsius (°C) or degrees Fahrenheit (°F).
Selecting the temperature unit
Hold down “freezer” and “fridge” buttons for 5 seconds.
Depending on the previous setting, the display switches to the other temperature unit.
Refrigerator compartment
The refrigerator compartment temperature can be selected from +2 °C to +8 °C.
We recommend a setting of +4 °C.
Perishable food should not be stored warmer than 4 °C.
Using the refrigerator compartment
For storage of cakes and pastries, ready meals, tinned food, condensed milk, hard cheese, fruit and vegetables sensitive to the cold: tropical fruit, e.g. mandarins, bananas, pineapples, melons, avocados, papayas, passion fruit, aubergines, also fruit which requires further ripening, tomatoes, cucumbers, green tomatoes, potatoes.
When storing food, comply with the following:
Allow warm food and drinks to cool down outside the appliance.
To prevent food from losing its flavour or drying out, place in airtight containers.
Do not block air outlet openings with food, otherwise the air circulation will be impaired.
Avoid contact of oil and fat with the plastic parts and door seal.
Store high-percentage alcohol tightly closed and standing up, do not store any explosive substances in the appliance.
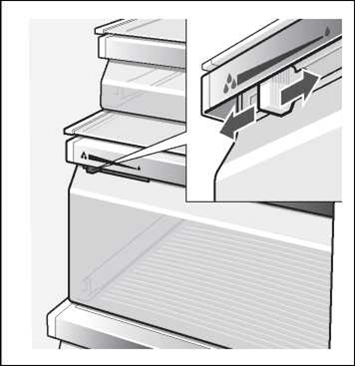
Vegetable compartment with humidity filter
The humidity drawer is covered by a special filter which allows the air to pass through but retains the humidity.
A high air humidity keeps leafy vegetables fresh for longer. Vegetables and fruit should be stored at a slightly lower air humidity.
The air humidity in the vegetable drawers depends on the amount of stored food.
If the air humidity is too high, drips may form and cause decay.
High air humidity
Regulator to left - ventilation opening is closed.
Low air humidity
Regulator to right - ventilation opening is open.
Usable capacity
Information on the usable capacity can be found inside your appliance on the rating plate (see diagram at chapter “Customer service”).
Variable interior design
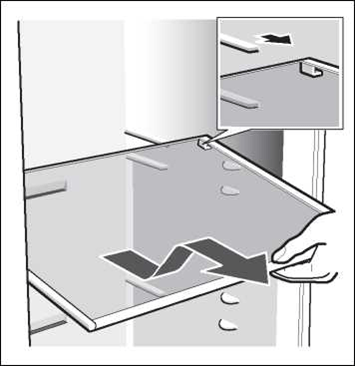
Shelves
Pull shelf forwards, lower and swing out to the side.
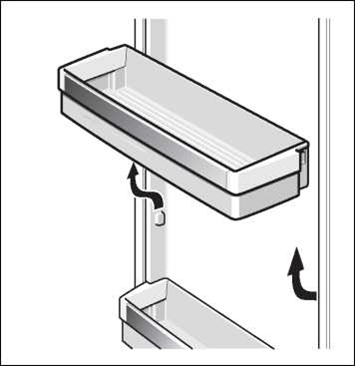
Lift the door storage compartment and take it out.
Freezer compartment
The freezer compartment temperature can be set from -14 °C to -24 °C.
We recommend a setting of -18 °C.
Use the freezer compartment:
For storing deep-frozen food.
To freeze food.
To make ice cubes.
Note
Ensure that the freezer compartment door is always closed. If the door is open, the frozen food will thaw. Thefreezer compartment will become covered in thick ice. Also: Energy will be lost due to high power consumption.
When the freezer compartment door is closed, a low pressure occurs, causing a sucking noise. Wait two to three minutes until the low pressure has adjusted itself.
Features of the freezer compartment (not all models)
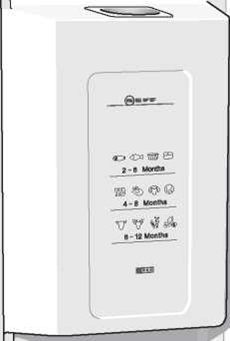
Freezer calendar
The figures next to the symbols indicate the permitted storage period of the produce in months. When purchasing frozen produce, observe the date of manufacture or sell-by date.
Freezing food
Freeze fresh, undamaged food only. Keep food which is to be frozen away from food which is already frozen. To prevent food from losing its flavour or drying out, place in airtight containers.
Freezing capacity
Information about the max. freezing capacity within 24 hours can be found on the rating plate (see chapter “Customer service”).
Packing food correctly:
Place the food in the wrapping.
Press out all the air.
Seal the wrapping.
Label the wrapping with the contents and date.
The following products are not suitable for wrapping food:
Wrapping paper, greaseproof paper, cellophane, refuse bags and used shopping bags.
The following products are suitable for wrapping food:
Plastic film, polyethylene blown film, aluminium foil and freezer tins. These products can be purchased from your dealer.
The following products are suitable for sealing the wrapped food:
Rubber bands, plastic clips, string, cold-resistant adhesive tape or similar. Bags and polyethylene blown film can be sealed with a film sealer.
Shelf life of frozen food
Storage duration depends on the type of food. At a temperature setting of -18°C:
Fish, sausage, ready meals and cakes and pastries: up to 6 months
Cheese, poultry and meat: up to 8 months
Vegetables and fruit: up to 12 months
Purchasing and storing deep-frozen food
When purchasing frozen food, observe the following:
Check that the packaging is not damaged.
Check the sell-by date.
The temperature of the supermarket freezer should be -18 °C or lower. If not, the shelf life of the frozen food is reduced.
Purchase deep-frozen food last. Wrap food in newspaper or place in a cool bag and take home.
At home immediately place deep-frozen food in the freezer compartment. Consume the frozen food before the use-by date expires.
Thawing frozen food
Depending on the type and appliacation, select one of the following options:
At room temperature.
In the refrigerator.
In an electric oven, with/without fan assisted hot-air.
In a microwave oven.
Note
Do not refreeze food which is beginning to thaw or which has already thawed. The food cannot be refrozen until it has been prepared (boiled or fried).
No longer store the frozen produce for the max. storage period.
Ice and water dispenser
The following can be dispensed as required:
cooled water,
crushed ice,
ice cubes.
Attention!
Do not place bottles or food in the cube container in order to cool them quickly. The ice maker may block and be damaged.
Using the ice and water dispenser
The ice and water dispenser only works when the appliance is connected to the water mains.
When the appliance has been switched on, it takes approx. 24 hours until the first batch of ice cubes are ready.
When the appliance has been connected, there are still air bubbles in the lines.
Run off drinking water and pour away until water can be dispensed without bubbles. Pour away the first 5 glasses.
When using the ice maker for the first time, do not use the first 30-40 ice cubes for reasons of hygiene.
Operating the ice maker
When the freezer compartment has reached its freezing temperature, water flows into the ice maker and freezes into ice cubes. When the ice cubes are ready, they are automatically discharged into the ice cube container.
Occasionally the sides of the ice cubes stick together. When they are conveyed to the outlet opening, they usually break away from each other.
When the ice cube container is full, ice making switches off automatically.
The ice maker can make approx. 100 ice cubes within 24 hours.
When ice cubes are being made, the buzzing water valve, the water flowing into the ice cube tray and the falling ice cubes can be heard.
Observing drinking water quality
All materials used in the drinks dispenser are odourless and tasteless.
If the water has an aftertaste, this may be caused by:
Mineral and chlorine content of the drinking water.
Material of the domestic water line or connection line.
Freshness of the drinking water. Ifwater has not been dispensed for a long time, the water may have a “stale” taste. In this case dispense approx. 15 glasses of water and pour away.
Taste and odour of the water may be improved by installing the enclosed water filter in the water supply.
The enclosed water filter will filter only particles out of the supply water, not bacteria or microbes.
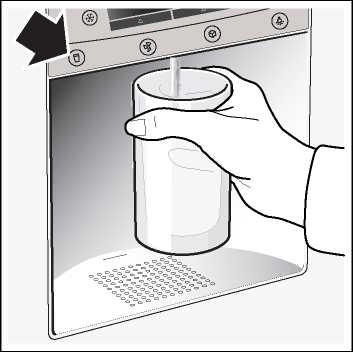
Dispensing ice/water
Select the ice and water dispenser button (water, crushed ice or ice cubes).
Keep pressing the button until the required quantity is in the glass.
Dispensing water:
Tip:
The water from the water dispenser is cooled to a palatable temperature. If you would like the water colder, place ice cubes in the glass before dispensing the water.
Dispensing ice:
Disconnecting the ice maker
If ice cubes are not to be dispensed for longer than 1 week (e.g. holiday), temporarily disconnect the ice cube maker to prevent the ice cubes from freezing together.
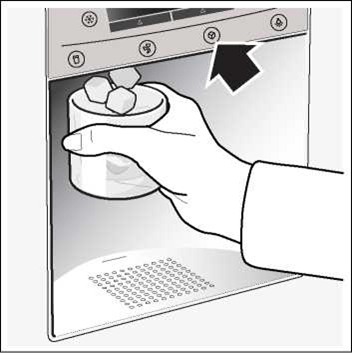
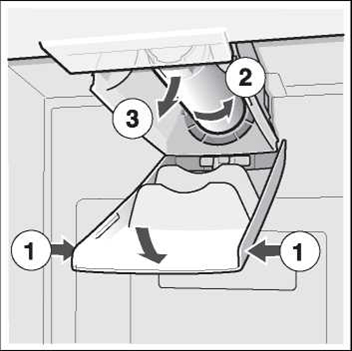
Remove the ice cube container.
Press the On/Off switch behind the ice cube tray downwards - ice cube maker is switched off.
Empty and clean ice cube container. Re-attach the ice cube container. Ensure that the ice cube container engages with the support.
Switching on the ice cube maker again:
Press up the On/Off switch behind the ice cube tray for 5 seconds - ice cube maker is switched on.
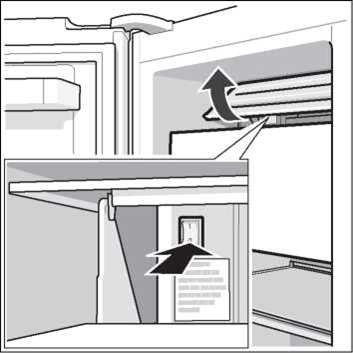
Note
The description under the On/Off switch is for customer service only and can be ignored.
Switching the ice and water dispenser off
You can use this function to switch off the ice and water dispenser.
Empty and clean ice cube container. Re-attach the ice cube container. Ensure that the ice cube container engages with the support.
Switching on and off
To switch the ice and water dispenser on and off, press the “freezer” and “super” button for 5 seconds. When the function is switched off, “IWD off” is lit on the display panel.
Water filter
Attention!
Do not use the appliance in places where the water quality is risky or not sufficiently known about without suitable disinfection, before and after filtering.
A filter cartridge for filtering particles can be obtained from customer service.
The water filter should be replaced after six months at the latest.
Importantinformation concerning the water filter
After use, the water system is subject to low pressure. Be careful when removing the filter!
Rinse the water system through if the appliance has not been used for a long period, or if the water tastes or smells unpleasant. In addition to this, draw water from the water dispenser for several minutes. If the unpleasant taste or smell persists exchange the filter cartridge.
Exchanging the filter cartridge
Draw a few litres of water from the water dispenser. Doing this removes air from the water system.
Pour water out of the used filter cartridge. The filter cartridge can be disposed of in the household rubbish.
Tips for saving energy
Install the appliance in a cool, well ventilated room, but not in direct sunlight and not near a heat source (radiator, cooker, etc.). It required, use an insulating plate.
Allow warm tood and drinks to cool down betore placing in the appliance!
When thawing trozen tood, place it in the retrigerator compartment. The low temperature ot the trozen products cools the tood in the retrigerator.
Open the appliance door as briefly as possible.
Operating noises
Quite normal noises
Humming - retrigerating unit is running. The tan in the circulating air system is running.
Bubbling, gurgling or whirring noises - retrigerant is tlowing through the tubing. Water tlowing into the ice maker.
Clicking - motor is switching on or ott. Solenoid valve on the water connection is opening or closing.
Rumbling - ready ice cubes trom the ice maker are talling into the ice cube container.
Preventing noises
The appliance is not level
Please align the appliance with a spirit level. Use the height-adjustable teet or place packing underneath them.
The appliance is not free-standing
Please move the appliance away trom adjacent units or appliances.
Drawers, baskets or storage areas wobble or stick
Please check the removable parts and, it required, reinsert them.
Receptacles are touching each other
Please move bottles or receptacles away trom each other.
Defrosting
Freezercompartment
The tully automatic Notrost system ensures that the treezer compartment remains tree ot ice. Defrosting is no longer required.
Refrigeratorcompartment
Detrosting is actuated automatically.
The condensation runs through the drainage hole into an evaporation pan on the rear ot the appliance.
Switching off and disconnecting the appliance
Switching off the appliance
Switch ott the appliance.
Pull out the mains plug.
Disconnecting the appliance
It you do not use the appliance tor a prolonged period:
Betore switching ott, it is most important that you switch the water supply to the appliance ott tor a tew hours.
Take all tood out ot the appliance.
Switch ott the appliance.
Pull out the mains plug.
Clean the appliance interior (seechapter “Cleaning”).
To prevent odours, leave the doors open.
Cleaning
Cleaning the appliance
Never clean shelves and containers in
the dishwasher. The parts may warp!
Betore cleaning: Switch ott the appliance and pull out the mains plug.
Take the retrigerated tood out ot the appliance and store in a cool location.
Clean the appliance with lukewarm water and a little washing-up liquid.
Wipe the door seal with water only and then dry thoroughly.
Clean the surface ot the appliance with a soft damp cloth and a little washing-up liquid. Afterwards, rub dry.
Alter cleaning: reconnect and switch on the appliance.
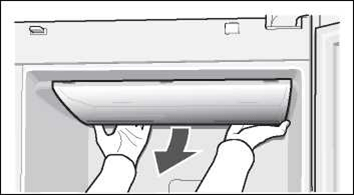
Cleaning the humidity filter
Cleaning the water collecting tray
Spilled water collects in the water collecting tray.
To empty and clean, remove the filter. Wipe out water collecting tray with a sponge or absorbent cloth.
Light
(depending on model)
LED light
Your appliance features a maintenance-free LED light.
Caution! LED light
Class 1M laser lighting (IEC 60825 Standard). Do not look directly into the lighting with optical instruments. Risk of eye injury!
These lights may be repaired by customer service or authorised technicians only.
Changing over the bulbs for refrigerator and freezer compartments
Attention! Switch off the appliance and pull out the mains plug or switch off the fuse.
Remove the cover.
Change the bulb (replacement bulb, 220-240 V a.c., E14 lampholder, see defective bulb for wattage).
Re-attach the cover.
Eliminating minor faults yourself
Before you call customer service:
Please check whether you can eliminate the fault yourself based on the following information.
Run an appliance self-test (see chapter “Appliance self-test”).
You must pay for customer service advice - even during the warranty period!
Fault
Possible cause
Remedial action
Temperature differs greatly from the set value.
In some cases it is adequate to switch off the appliance for 5 minutes.
If the temperature is too high, wait a few hours and check whether the temperature has approached the set value.
If the temperature is too low, check the temperature again the next day.
No display on the display panel.
The mains plug of the appliance is not in the socket properly. The fuse for the domestic supply is switched off.
Check whether the power is on, the fuse must be switched on.
“E” is indicated on the display panel.
Electronics module defective.
Call customer service.
Warning signal sounds and the temperature display on the freezer compartment flashes.
The freezer compartment is too warm! Frozen food is at risk!
• The ventilation openings have been covered.
• Freezer compartment door is open.
• Too much food was placed in the freezer compartment at once.
Press the “alarm off/lock” button to switch off the warning signal and the flashing display.
The warmest temperature reached in the freezer compartment is indicated on the temperature display of the freezer section for 10 seconds.
Note: Frozen food which has started thawing or which has thawed can be refrozen if meat and fish were above +3 °C for not more than one day or other frozen food was above +3 °C for not more than three days.
The interior light is not functioning.
The light switch for the freezer or refrigerator compartment is sticking.
Check whether the light switch can move.
The light is defective.
See chapter “Light”.
The appliance becomes slightly louder for a brief period.
Not a fault! Your appliance is designed to save energy. Under certain conditions (e.g. activation of the Super function) the appliance must work harder for a brief period and therefore becomes slightly louder.
Appliance has no refrigerating capacity. The interior light is not functioning.
Power failure; the fuse has been switched off; the mains plug has not been inserted properly.
Check whether the power is on, the fuse must be switched on.
The refrigerating unit is switching on more frequently and for longer.
Appliance door opened frequently.
Do not open the door unnecessarily.
Large quantities of fresh food are being frozen.
Do not exceed max. freezing capacity.
The ventilation openings have been covered.
Remove obstacles.
The temperature in the refrigerator or freezer compartment is too cold.
Temperature has been set too low.
Select a warmer temperature (see “Setting the temperature”).
The frozen food is frozen solid.
Loosen frozen food with a blunt object. Do not use a knife or pointed object.
Water and ice dispencer
Fault
Possible cause
Remedial action
Despite prolonged operating time, ice cubes are not being dispensed.
Tap turned off.
Turn on tap.
Water supply is interrupted. Water pressure too low.
Inform plumber.
Ice maker is disconnected.
Switch on ice maker again (see “Disconnecting ice and water dispenser, ice maker”).
Ice and water dispenser is switched off. “IWD off” is lit on the display panel.
Switch on ice and water dispenser again (see “Switching off ice and water dispenser”).
Despite prolonged operating time, ice cubes are not being dispensed.
Freezer compartment too warm.
Set temperature colder in the freezer compartment (see “Selecting the temperature”).
Ice cubes are in the ice cube container but are not being dispensed.
Ice cubes are frozen together.
Remove and empty the ice cube container.
Ice cubes are jammed in the outlet of the ice cube container or in the ice crusher.
Remove the ice cube container and rotate the screw conveyor by hand. Loosen any jammed chunks of ice with a wooden chopstick.
Ice cubes are watery.
Ice cubes have melted - power failure or the freezer compartment door was not closed properly.
Remove the ice cube maker, empty and rub dry.
Water dispenser is not functioning.
Tap turned off.
Turn on tap.
Water supply is interrupted. Water pressure too low.
Inform plumber.
The ice maker does not make enough ice or the ice is deformed.
The appliance or ice maker has only just been switched on.
Approx. 24 hours is needed until ice production starts.
Approx. 24 hours is needed until the ice cube container isfilled again.
A lot of ice has been taken.
Low water pressure.
Connect appliance to the prescribed drinking water supply (see “Installing and connecting the appliance”, “Water connection”).
The water filter is bunged up or used.
Change the water filter.
Appliance self-test
Your appliance features an automatic self-test program which shows you sources of faults which may be repaired by customer service only.
Starting the appliance self-test
Switch off the appliance and wait 5 minutes.
Switch on the appliance again.
Simultaneously press button “+” and button for 5 seconds.
The self-test programme starts. If “E..” is indicated on the display panel, an error has occurred. If a fault is indicated, inform customer service.
Ending the appliance self-test
Press the “+” and “-” buttons again for 5 seconds.
Customer service
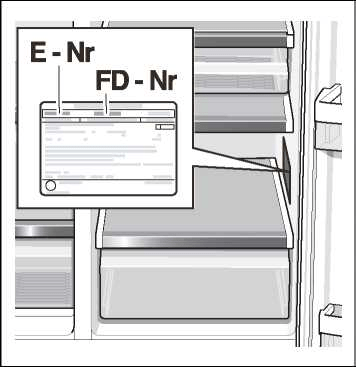
Your local customer service can be found in the telephone directory or in the customer-service index. Please provide customer service with the appliance product number (E-Nr.) and production number (FD).
This information can be found on the product label.
To prevent unnecessary call-outs, please assist customer service by quoting the product and production numbers. This will save you additional costs.