RMT-P1BT 4-748-147-21(1) RMT-P1BT 4-748-147-21(1) RMT-P1BT 4-748-147-21(1) RMT-P1BT 4-748-147-21(1)
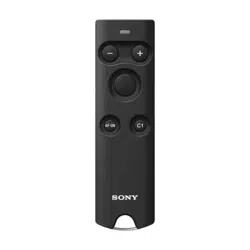
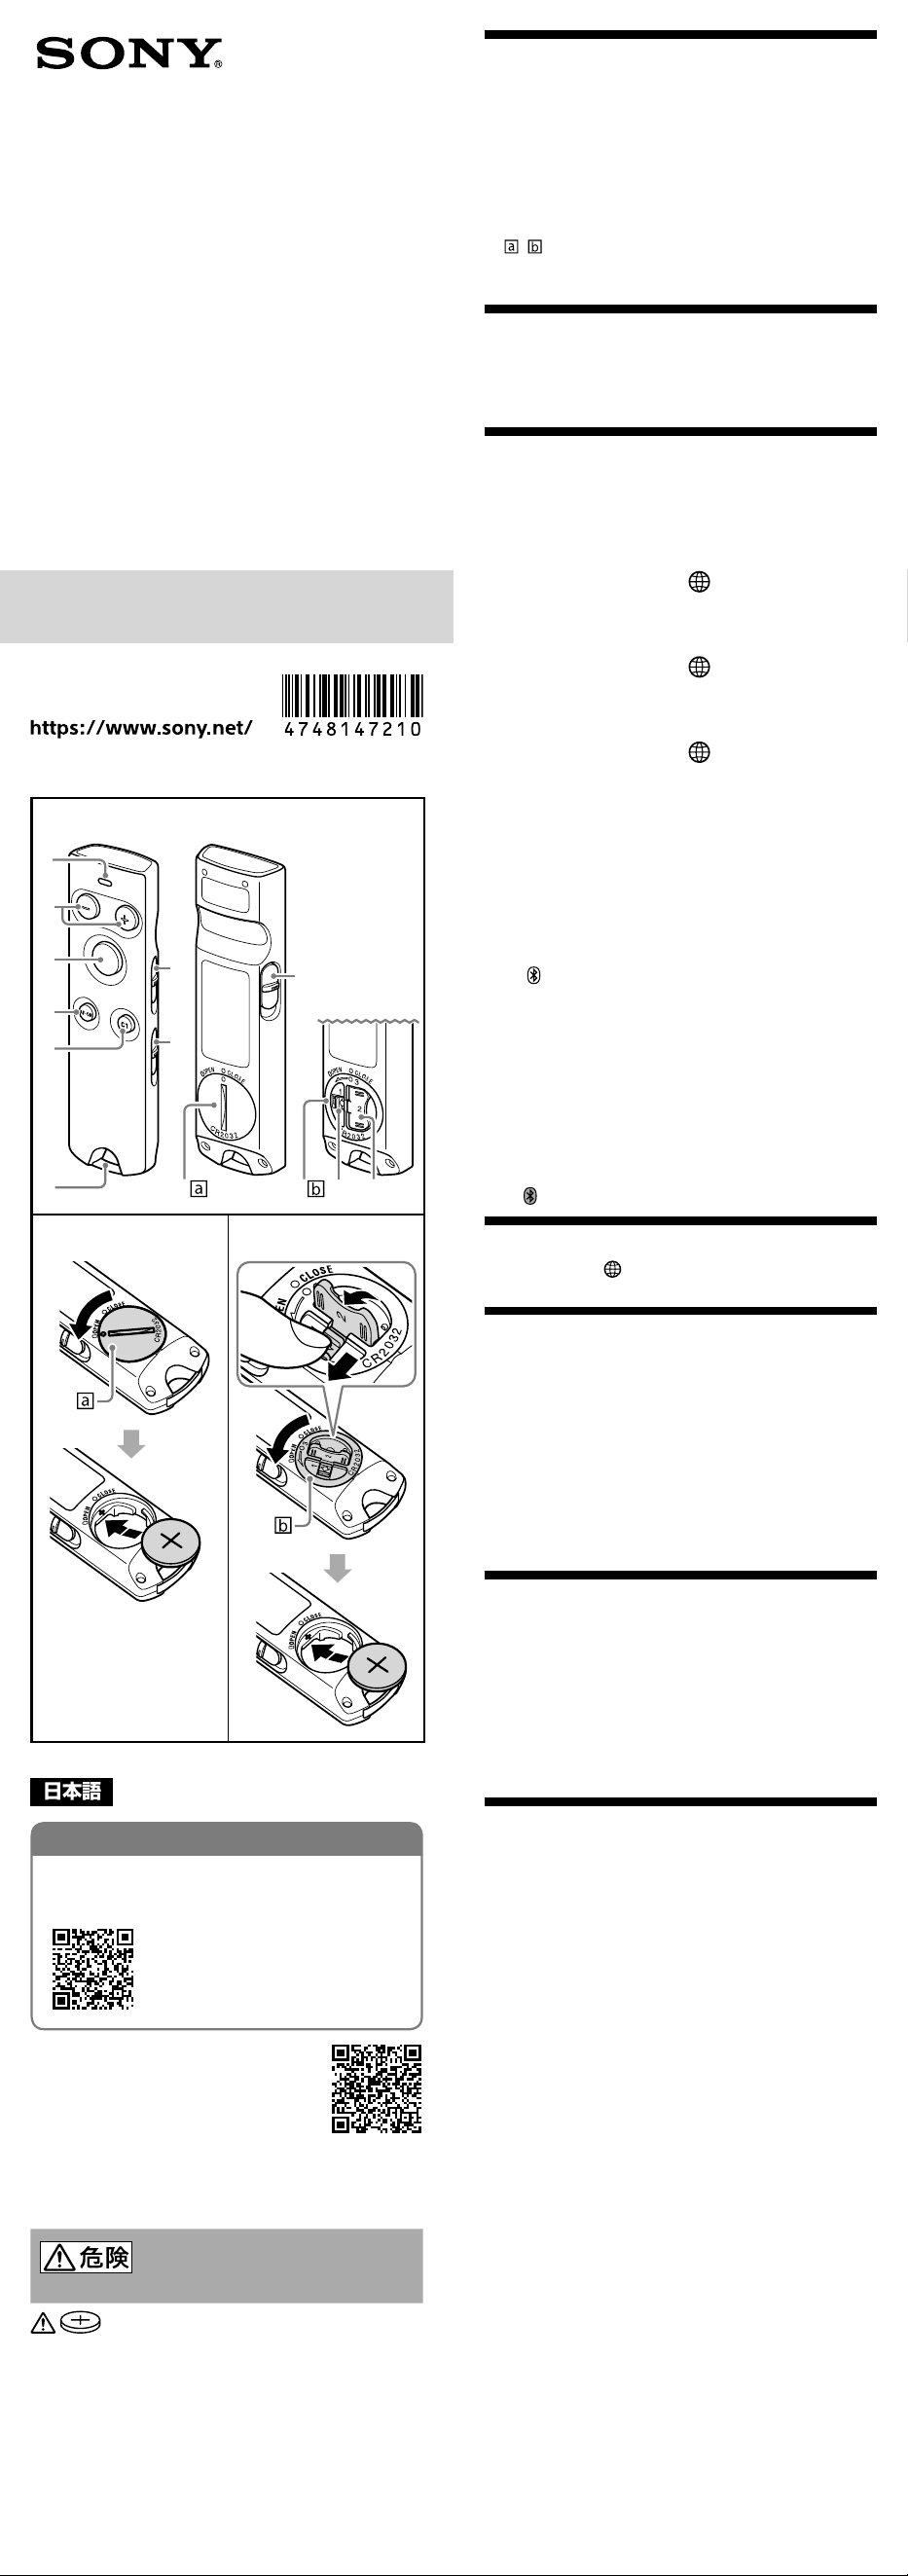
各部名称
1 ランプ
2 フォーカス/ズームボタン
3 レリーズ/RECボタン
4 AF-ONボタン
5 C1ボタン
6 ストラップ取り付け部
7 ZOOM/FOCUSスイッチ
8 MOVIE/STILLスイッチ
9 LOCKスイッチ
10- / 電池カバー
11電池カバーLOCKツマミ
12電池カバー回転ツマミ
電池を入れる
電池の+極側を上面にして入れてください。(電池ケースの+マーク
は、電池の向きを示しています。)
電池カバーを閉めるときは、電池カバーを「CLOSE」側に止まるまで回
します。
本機とカメラをペアリングする
• 下記は、ソニー製レンズ交換式デジタルカメラおよびデジタルスチ
ルカメラの手順の一例です。詳しい手順については、ヘルプガイド
をご覧ください。
• あらかじめ、リモコンのLOCKスイッチが「LOCK」と反対側の位置に
なっているかご確認ください。
1
カメラで、MENU
(ネットワーク)
[Bluetooth設定]または[Bluetooth]
[Bluetooth機能]
[入]を選ぶ。
2
カメラで、MENU
(ネットワーク)
([転送/リモート]
)[Bluetooth リモコン]
[入]を選ぶ。
3
カメラで、MENU
(ネットワーク)
[Bluetooth設定]または[Bluetooth]
[ペアリング]を選ぶ。
4
リモコンのレリーズ/RECボタンとフォー
カス/ズームボタンの+側を同時に7秒以上
押し込む。
5
カメラの画面に接続確認メッセージが表示
されるので、カメラで[確認]を選択する。
• が表示され、ペアリングが開始されます。
•ペアリングが完了すると、[ペアリングしました]と
表示されます。
ご注意
• ペアリングに失敗すると、リモコンのランプがすばやく点滅します。
その場合は、手順を最初からやり直してください。
• 以下の場合は、再度ペアリングを行ってください。
‒ 別のカメラをリモコンで操作するとき(別のカメラとリモコンを
接続後、元のカメラに接続するときもペアリングをし直す必要が
あ り ま す 。)
‒ カメラのネットワーク設定をリセットしたとき
• Bluetooth接続中、リモコンを操作しないままでいるとカメラの画
面に (Bluetooth未接続)が表示される場合があります。
カメラの設定を確認する
カメラで、MENU
( ネ ッ ト ワ ー ク )
([転送/リモート]
)
[Bluetoothリモコン]
[入]となっていることを確認してください。
撮影する
リモコンでカメラを操作して撮影します。
詳しくは、ヘルプガイドもあわせてご覧ください。
1
リモコンのMOVIE/STILLスイッチを切り替
える。
•静止画を撮影する場合:STILL
•動画を撮影する場合:MOVIE
2
レリーズ/RECボタンを押す。
•静止画を撮影するときは、半押ししてピントを合わ
せ、深く押し込んで撮影します。
主な仕様
外形寸法(幅/高さ/奥行き)(約):
33mm×116.5mm×15.1mm
質量(約):
35g(電池含まず)
同梱物:
リモートコマンダー(1)、リチウムコイン電池(CR2032)(1)、
印刷物一式
仕様および外観は、改良のため予告なく変更することがありますが、
ご了承ください。
保証書とアフターサービス
保証書
• この製品には保証書が添付されていますので、お買い上げの際、お
受け取りください。
• 所定事項の記入および記載内容をお確かめのうえ、大切に保管して
ください。
• 保証期間は、お買い上げ日より1年間です。
アフターサービス
調子が悪いときはまずチェックを
ヘルプガイドなどを参考にして故障かどうかお調べください。
それでも具合の悪いときは
ソニーの相談窓口にご相談ください。
保証期間中の修理は
保証書の記載内容に基づいて修理させていただきます。詳しくは保
証書をご覧ください。
保証期間経過後の修理は
修理によって機能が維持できる場合は、ご要望により有料修理させて
いただきます。
部品の保有期間について
当社では本機の補修用性能部品(製品の機能を維持するために必要な
部品)を、製造打ち切り後最低7年間保有しています。ただし、故障の
状況その他の事情により、修理に代えて製品交換をする場合がありま
すのでご了承ください。保有期間が経過したあとも、故障箇所によっ
ては修理可能の場合がありますので、お買い上げ店か、ソニーの相談
窓口にご相談ください。
ご相談になるときは次のことをお知らせくだ
さい。
• 型名:RMT-P1BT
• 故障の状態:できるだけ詳しく
• お買い上げ年月日
Bluetooth®ワードマークおよびロゴは、BluetoothSIG,Inc.が所有
する登録商標であり、ソニーグループ株式会社はこれらのマークをラ
イセンスに基づいて使用しています。
About the manual for this product
This guide describes the necessary preparations to start using
the product, basic operations, etc. For details, refer to the “Help
Guide” (web manual).
“Help Guide” (Web manual)
https://rd1.sony.net/help/ilc/1820/h_zz/
• This unit is Remote Commander which is
compatible with the Bluetooth function.
For the camera models that can connect to
the unit, visit the following website.
https://www.sony.net/dics/p1bt/
• Handle this unit with care to avoid the risk of dropping it or
letting it exposed to liquid.
• This unit is designed to be dust and moisture-resistant, but is
not waterproof or splash-proof. When you use the product in
rainy conditions, do not let the product get wet.
WARNING
Do not ingest battery, chemical burn hazard.
This unit contains a coin/button cell battery. If the coin/button
cell battery is swallowed, it can cause severe internal burns in just
2 hours and can lead to death.
Keep new and used batteries away from children. If the battery
cover does not close securely, stop using the product and keep it
away from children.
If you think batteries might have been swallowed or placed inside
any part of the body, seek immediate medical attention.
For Customers in the U.S.A.
For question regarding your product or for the Sony Service
Center nearest you, call 1-800-222-SONY (7669) .
Supplier’s Declaration of Conformity
Trade Name : SONY
Model : RMT-P1BT
Responsible Party : Sony Electronics Inc.
Address : 16535 Via Esprillo, San Diego, CA 92127 U.S.A.
Telephone Number : 858-942-2230
Disposal of waste batteries and electrical and electronic
equipment (applicable in the European Union and other
countries with separate collection systems)
This symbol on the product, the battery or on the packaging
indicates that the product and the battery shall not be treated
as household waste. On certain batteries this symbol might
be used in combination with a chemical symbol. The chemical
symbol for lead (Pb) is added if the battery contains more than
0.004% lead. By ensuring that these products and batteries
are disposed of correctly, you will help to prevent potentially
negative consequences for the environment and human health
which could be caused by inappropriate waste handling. The
recycling of the materials will help to conserve natural resources.
In case of products that for safety, performance or data integrity
reasons require a permanent connection with an incorporated
battery, this battery should be replaced by qualified service staff
only. To ensure that the battery and the electrical and electronic
equipment will be treated properly, hand over these products at
end-of-life to the appropriate collection point for the recycling of
electrical and electronic equipment. For all other batteries, please
view the section on how to remove the battery from the product
safely. Hand the battery over to the appropriate collection point
for the recycling of waste batteries. For more detailed information
about recycling of this product or battery, please contact your
local Civic Office, your household waste disposal service or the
shop where you purchased the product or battery.
Identifying the parts
1 Indicator
2 Focus/Zoom button
3 Shutter-release/REC button
4 AF-ON button
5 C1 button
6 Strap holder
7 ZOOM/FOCUS switch
8 MOVIE/STILL switch
9 LOCK switch
10- / Battery cover
11 Battery cover locking latch
12 Battery cover turning knob
Inserting the battery
Insert the battery so that the + terminal is facing upward. (+ on
the battery chamber indicates the direction of the battery.)
To close the battery cover, turn the battery cover toward “CLOSE”
until it stops.
Pairing the unit with the camera
• The following is an example of a procedure for Sony
Interchangeable Lens Digital Cameras and Sony digital still
cameras. For detailed procedures, refer to the Help Guide.
• Before you start, check that the Remote Commander’s LOCK
switch is in the position to the opposite of “LOCK.”
1
On the camera, select MENU
(network)
[Bluetooth Settings] or
[Bluetooth]
[Bluetooth Function]
[On].
2
On the camera, select MENU
(network)
([Transfer/Remote]
)
[Bluetooth Rmt Ctrl]
[On].
3
On the camera, select MENU
(network)
[Bluetooth Settings] or
[Bluetooth]
[Pairing].
4
On the Remote Commander, press and
hold the Shutter-release/REC button and
the + side of the Focus/Zoom button at
the same time for at least 7 seconds.
5
When a confirmation message appears
on the camera's screen, select [OK].
• appears and pairing begins.
• When pairing is complete, [Paired.] appears.
Note
• If pairing fails, the Remote Commander's indicator flashes
rapidly. If this happens, redo the procedure from the beginning.
• In the following situations, pair the Remote Commander and
the camera again.
– When using the Remote Commander to operate a different
camera (After having connected the Remote Commander
with a different camera, you also must pair the Remote
Commander and the original camera again when connecting
to the original camera.)
– When the camera's network settings have been reset
• If the Remote Commander is not used for a period of time
during a Bluetooth connection, (no Bluetooth connection)
may appear on the camera’s screen.
Confirming the setting on the
camera
On the camera, select MENU
(network)
([Transfer/Remote]
)
[Bluetooth Rmt Ctrl] and make sure that [On] is selected.
Shooting
Use the Remote Commander to operate the camera for shooting.
For details, also refer to the Help Guide.
1
Toggle the Remote Commander’s MOVIE/
STILL switch.
• To shoot a still image: STILL
• To shoot a video: MOVIE
2
Press the Shutter-release/REC button.
• Press the button halfway down to focus, and then
press it all the way down to shoot a still image.
Specifications
Dimensions (W/H/D) (Approx.):
33 mm × 116.5 mm × 15.1 mm (1 5/16 in. × 4 5/8 in. × 5/8 in.)
Mass (Approx.):
35 g (1.3 oz) (Without the battery)
Included items:
Remote Commander (1), Lithium coin cell battery (CR2032) (1),
Set of printed documentation
Design and specifications are subject to change without notice.
The Bluetooth® word mark and logos are registered trademarks
owned by the Bluetooth SIG, Inc. and any use of such marks by
Sony Group Corporation is under license.
À propos du manuel de ce produit
Ce manuel présente les étapes nécessaires au démarrage
de ce produit, les opérations générales, etc. Pour plus
d'informations, reportez-vous au « Guide d’aide » (manuel en
ligne).
« Guide d'aide » (Manuel en ligne)
https://rd1.sony.net/help/ilc/1820/h_zz/
• Cet appareil est une télécommande
compatible avec la fonction Bluetooth.
Pour les modèles d'appareil photo pouvant
se connecter à l'appareil, visitez le site
internet ci-dessous.
https://www.sony.net/dics/p1bt/
• Manipulez cet appareil avec précaution pour éviter tout risque
de chute ou exposition à un liquide.
• Cet appareil est conçu pour résister à la poussière et
à l’humidité, mais il n’est pas étanche à l’eau ni aux
éclaboussures. Par temps pluvieux, veillez à ce que le produit
ne se mouille pas.
AVERTISSEMENT
N'avalez pas la pile, risque de brûlure chimique.
L'appareil est doté d'une pile bouton. Si la pile bouton est avalée,
2 heures suffisent pour qu’elle provoque des brûlures internes
graves qui peuvent être fatales.
Rangez les piles neuves et usagées hors de portée des enfants. Si
le couvercle des piles ne se ferme plus convenablement, cessez
d’utiliser le produit et rangez-le hors de portée des enfants.
Si vous pensez que des piles ont peut-être été avalées ou
glissées à l’intérieur d’une partie quelconque du corps, consultez
immédiatement un médecin.
Elimination des piles et accumulateurs et des
équipements électriques et électroniques usagés
(applicable dans les pays de l'Union Européenne et dans
les autres pays disposant de systèmes de collecte
sélective)
Ce symbole apposé sur le produit, la pile ou l’accumulateur,
ou sur l’emballage, indique que le produit et les piles et
accumulateurs fournis avec ce produit ne doivent pas être traités
comme de simples déchets ménagers. Sur certains types de
piles, ce symbole apparaît parfois combiné avec un symbole
chimique. Le symbole pour le plomb (Pb) est rajouté lorsque ces
piles contiennent plus de 0,004 % de plomb. En vous assurant
que les produits, piles et accumulateurs sont mis au rebut de
façon appropriée, vous participez activement à la prévention des
conséquences négatives que leur mauvais traitement pourrait
provoquer sur l’environnement et sur la santé humaine. Le
recyclage des matériaux contribue par ailleurs à la préservation
des ressources naturelles. Pour les produits qui, pour des
raisons de sécurité, de performance ou d’intégrité des données,
nécessitent une connexion permanente à une pile ou à un
accumulateur intégré(e), il conviendra de vous rapprocher d’un
Service Technique qualifié pour effectuer son remplacement. En
rapportant votre appareil électrique, les piles et accumulateurs
en fin de vie à un point de collecte approprié vous vous assurez
que le produit, la pile ou l'accumulateur intégré sera traité
correctement. Pour tous les autres cas de figure et afin d’enlever
les piles ou accumulateurs en toute sécurité de votre appareil,
reportez-vous au manuel d’utilisation. Rapportez les piles et
accumulateurs, et les équipements électriques et électroniques
usagés au point de collecte approprié pour le recyclage. Pour
toute information complémentaire au sujet du recyclage de ce
produit ou des piles et accumulateurs, vous pouvez contacter
votre municipalité, votre déchetterie locale ou le point de vente
où vous avez acheté ce produit.
Description des éléments
1 Témoin
2 Touche de mise au point/zoom
3 Touche du déclencheur/REC
4 Touche AF-ON
5 Touche C1
6 Trou de sangle
7 Commutateur ZOOM/FOCUS
8 Commutateur MOVIE/STILL
9 Commutateur LOCK
10- / Couvercle de la pile
11 Verrou de blocage du couvercle de la pile
12 Languette de rotation du couvercle de la pile
Installation de la pile
Installez la pile avec la borne + dirigée vers le haut.
(+ du compartiment de la pile précise la direction de la pile.)
Pour fermer le couvercle de la pile, tournez à fond le couvercle de
la pile vers «CLOSE».
Jumelage de l’appareil et de
l’appareil photo
• L'exemple ci-dessous présente la procédure pour un appareil
photo à objectif interchangeable Sony et un appareil photo
numérique Sony. Pour plus d'informations sur les procédures,
reportez-vous au Guide d'aide.
• Avant de commencer, vérifiez que la position du commutateur
LOCK de la télécommande est opposée à « LOCK ».
1
Sur l'appareil photo, sélectionnez MENU
(réseau)
[Réglages Bluetooth] ou
[Bluetooth]
[Fonction Bluetooth]
[ON].
2
Sur l'appareil photo, sélectionnez MENU
(réseau)
([Transfert/à dist.]
)
[C. à dist. Bluetooth]
[ON].
3
Sur l'appareil photo, sélectionnez MENU
(réseau)
[Réglages Bluetooth] ou
[Bluetooth]
[Jumelage].
4
Sur la télécommande, appuyez de
manière prolongée simultanément sur
la touche du déclencheur/REC et sur la
partie + de la touche de mise au point/
Zoom pendant au moins sept secondes.
5
Lorsqu'un message de confirmation
s'affiche à l'écran de l'appareil photo,
sélectionnez [OK].
• s'affiche et le jumelage commence.
• Une fois le jumelage terminé, [Jumelé.] s'affiche.
Remarque
• Si le jumelage échoue, le témoin de la télécommande clignote
rapidement. Dans ce cas, recommencez la procédure depuis
le début.
• Dans les cas suivants, recommencez le jumelage de la
télécommande et l'appareil.
– Si la télécommande a été utilisée pour contrôler un autre
appareil photo (après avoir connecté la télécommande à
un autre appareil photo, vous devez également procéder à
un nouveau jumelage entre la télécommande et l'appareil
photo d'origine lors du branchement à ce dernier).
– Si les réglages réseau de l'appareil photo ont été réinitialisés.
• Si la télécommande n'est pas utilisée pendant longtemps lors
d'une connexion Bluetooth, (aucune connexion Bluetooth)
risque de s'afficher à l'écran de l'appareil photo.
Confirmation de la configuration
sur l’appareil photo
Sur l’appareil photo, sélectionnez MENU
(réseau)
([Transfert/à dist.]
) [C. à dist. Bluetooth] et assurez-vous que
[ON] est sélectionné.
Prise de vue
Utilisez la télécommande pour contrôler l'appareil photo pendant
une prise de vue.
Pour plus d'informations, reportez-vous au Guide d'aide.
1
Positionnez le commutateur MOVIE/STILL
de la télécommande.
• Pour la prise de vue une photo : STILL
• Pour l'enregistrement d'une vidéo : MOVIE
2
Appuyez sur la touche du déclencheur/
REC.
• Appuyez à mi-course sur cette touche pour
effectuer la mise au point, puis appuyez à fond
pour prendre une photo.
Spécifications
Dimensions (L/H/P) (environ) :
33 mm × 116,5 mm × 15,1 mm (1 5/16 po. × 4 5/8 po. × 5/8 po.)
Poids (environ) :
35 g (1,3 oz) (Sans la pile)
Articles inclus :
Télécommande (1), Pile bouton au lithium (CR2032) (1), Jeu de
documents imprimés
La conception et les spécifications peuvent être modifiées sans
préavis.
La marque et les logos Bluetooth® sont des marques déposées
détenues par Bluetooth SIG, Inc. et sont utilisées sous licence par
Sony Group Corporation.
Acerca del manual para este producto
Esta guía describe los preparativos necesarios para empezar
a utilizar el producto, las operaciones básicas, etc. Para los
detalles, consulte la “Guía de ayuda” (manual en la web).
“Guía de ayuda” (manual en la web)
https://rd1.sony.net/help/ilc/1820/h_zz/
• Esta unidad es un controlador remoto que
es compatible con la función Bluetooth.
Para los modelos de cámara que pueden
conectarse a la unidad, visite el sitio web
siguiente.
https://www.sony.net/dics/p1bt/
• Manipule esta unidad con cuidado para evitar el riesgo de que
se caiga o se exponga a líquidos.
• Esta unidad ha sido diseñada para ser resistente al polvo
y a la humedad, pero no es a prueba de agua o a prueba
de salpicaduras. Cuando utilice el producto en condiciones
lluviosas, no deje que el producto se moje.
AVISO
No ingiera la pila. Existe riesgo de quemadura química.
Esta unidad contiene una pila de botón/plana. Si se ingiere la pila
de botón/plana, puede causar quemaduras internas graves en
tan solo 2 horas y podría ocasionar la muerte.
Mantenga las pilas nuevas y las usadas fuera del alcance de los
niños. Si la cubierta de la pila no se cierra de forma segura, deje
de utilizar el producto y manténgalo fuera del alcance de los
niños.
Si cree que las pilas podrían haber sido ingeridas o colocadas
dentro de cualquier parte del cuerpo, póngase en contacto con el
médico inmediatamente.
Tratamiento de las baterías y equipos eléctricos y
electrónicos al final de su vida útil (aplicable en la Unión
Europea y otros países con sistemas de tratamiento
selectivo de residuos)
Este símbolo en el producto, la batería o el embalaje indica que
el producto y la batería no pueden tratarse como un residuo
doméstico normal. En algunas baterías este símbolo puede
utilizarse en combinación con un símbolo químico. Se añadirá
el símbolo químico del plomo (Pb) si la batería contiene más
del 0,004 % de plomo. Al asegurarse de que estos productos
y baterías se desechan correctamente, ayudará a prevenir las
posibles consecuencias negativas para la salud y el medio
ambiente que podrían derivarse de su incorrecta manipulación.
El reciclaje de los materiales ayuda a preservar los recursos
naturales. En el caso de productos, que por razones de seguridad,
rendimiento o mantenimiento de datos, requieran una conexión
permanente con la batería incorporada, esta batería deberá
reemplazarse únicamente por personal técnico cualificado para
ello. Para asegurarse de que la batería se desecha correctamente,
entregue estos productos al final de su vida útil en un punto de
recogida adecuado para el reciclado de aparatos eléctricos y
electrónicos. Para el resto de baterías, consulte la sección donde
se indica cómo extraer la batería del producto de forma segura.
Deposite la batería en el correspondiente punto de recogida para
el reciclado de baterías. Si desea obtener información detallada
sobre el reciclaje de este producto o de la batería, póngase en
contacto con el ayuntamiento, el punto de recogida más cercano
o el establecimiento donde ha adquirido el producto o la batería.
AVISO IMPORTANTE PARA MÉXICO
La operación de este equipo está sujeta a las siguientes dos
condiciones: (1) es posible que este equipo o dispositivo no cause
interferencia perjudicial y (2) este equipo o dispositivo debe
aceptar cualquier interferencia, incluyendo la que pueda causar
su operación no deseada.
Para consultar la información relacionada al número del
certificado, refiérase a la etiqueta del empaque y/o del producto.
Identificación de los
componentes
1 Indicador
2 Botón de enfoque/zoom
3 Botón disparador/REC
4 Botón AF-ON
5 Botón C1
6 Soporte para correa
7 Conmutador ZOOM/FOCUS
8 Conmutador MOVIE/STILL
9 Conmutador LOCK
10- / Cubierta de la pila
11 Cierre de bloqueo de la cubierta de la pila
12 Perilla de giro de la cubierta de la pila
Inserción de la pila
Inserte la pila de forma que el terminal + quede hacia arriba.
(+ del compartimento de la pila indica la dirección de la pila.)
Para cerrar la cubierta de la pila, gire la cubierta de la pila hacia
“CLOSE” hasta que se detenga.
Emparejamiento de la unidad
con la cámara
• El siguiente es un ejemplo de un procedimiento para cámaras
digitales de lentes intercambiables Sony y cámaras de
fotografía digitales Sony. Con respecto a los procedimientos
detallados, consulte la Guía de ayuda.
• Antes de comenzar, compruebe que el conmutador LOCK del
controlador remoto esté en la posición opuesta a “LOCK”.
1
En la cámara, seleccione MENU
(red)
[Ajustes Bluetooth] u [Bluetooth]
[Función Bluetooth]
[Activar].
2
En la cámara, seleccione MENU
(red)
([Transfer./remoto]
)
[M. a dist. Bluetooth]
[Activar].
3
En la cámara, seleccione MENU
(red)
[Ajustes Bluetooth] u [Bluetooth]
[Emparejamiento].
4
En el controlador remoto, mantenga
pulsado el botón disparador/REC y el
lado + del botón de enfoque/zoom al
mismo tiempo durante 7 segundos por lo
menos.
5
Cuando aparezca un mensaje de
confirmación en la pantalla de la cámara,
seleccione [Aceptar].
• Aparecerá y se iniciará el emparejamiento.
• Cuando finalice el emparejamiento aparecerá
[Emparejado.].
Nota
• Si el emparejamiento falla, el indicador del controlador remoto
parpadeará rápidamente. Si sucede esto, vuelva a realizar el
procedimiento desde el principio.
• En las situaciones siguientes, empareje de nuevo el controlador
remoto y la cámara.
– Cuando utilice el controlador remoto para operar una cámara
diferente (Después de haber conectado el controlador
remoto con una cámara diferente, cuando lo conecte a la
cámara original deberá emparejar de nuevo el controlador
remoto y la cámara original.)
– Cuando se hayan reinicializado los ajustes de red de la
cámara
• Si el controlador remoto no se utiliza durante cierto período de
tiempo durante una conexión Bluetooth, en la pantalla de la
cámara puede aparecer (sin conexión Bluetooth).
Confirmación del ajuste de la
cámara
En la cámara, seleccione MENU
(red)
([Transfer./remoto]
)
[M. a dist. Bluetooth] y asegúrese de que haya seleccionado
[Activar].
Toma de imágenes
Utilice el controlador remoto para tomar imágenes con la cámara.
Con respecto a los detalles, consulte la Guía de ayuda.
1
Cambie la posición del conmutador
MOVIE/STILL del controlador remoto.
• Para tomar una fotografía: STILL
• Para grabar un vídeo: MOVIE
2
Pulse el botón disparador/REC.
• Pulse el botón hasta la mitad para enfocar, y
después púlselo fondo para tomar una fotografía.
Especificaciones
Dimensiones (An/Al/Pr) (Aprox.):
33 mm × 116,5 mm × 15,1 mm
Peso (Aprox.):
35 g (Sin la pila)
Elementos incluidos:
Controlador remoto (1), Pila de botón de litio (CR2032) (1), Juego
de documentación impresa
El diseño y las especificaciones están sujetos a cambio sin previo
aviso.
La marca de palabra y los logotipos Bluetooth® son marcas
comerciales registradas propiedad de Bluetooth SIG,Inc.,
y cualquier utilización de tales marcas por parte de
SonyGroup Corporation se realiza bajo licencia.
Über die Anleitung für dieses Produkt
Diese Anleitung beschreibt die notwendigen Vorbereitungen
für die Inbetriebnahme des Produkts, grundlegende
Funktionen usw. Einzelheiten dazu schlagen Sie bitte in der
„Hilfe“ (Web-Anleitung) nach.
„Hilfe“ (Web-Anleitung)
https://rd1.sony.net/help/ilc/1820/h_zz/
• Dieses Gerät ist eine Fernbedienung, die mit
der Bluetooth-Funktion kompatibel ist.
Bezüglich Kameramodellen, die mit dem
Gerät verbunden werden können, besuchen
Sie die folgende Website.
https://www.sony.net/dics/p1bt/
• Behandeln Sie dieses Gerät vorsichtig, um zu vermeiden dass
es herunterfällt oder Flüssigkeiten ausgesetzt wird.
• Dieses Gerät ist von der Konstruktion her staub- und
feuchtigkeitsbeständig, aber nicht wasserdicht oder
spritzwassergeschützt. Wenn Sie das Produkt bei Regen
benutzen, achten Sie darauf, dass es nicht nass wird.
WARNUNG
Die Batterie nicht verschlucken, Gefahr der chemischen Verätzung.
Dieses Gerät enthält eine Münz-/Knopfbatterie. Wird die
Knopfzelle versehentlich verschluckt, kann dies innerhalb von
2 Stunden zu schweren inneren Verätzungen führen, u.U. mit
Todesfolge.
Bewahren Sie neue und gebrauchte Batterien für Kinder
unerreichbar auf. Wenn sich der Batteriedeckel nicht sicher
schließen lässt, verwenden Sie das Produkt nicht weiter und
bewahren Sie es für Kinder unerreichbar auf.
Wenn Sie den Verdacht haben, dass eine Batterie möglicherweise
verschluckt oder in irgendeine Körperöffnung gesteckt wurde,
suchen Sie sofort ärztliche Hilfe auf.
Entsorgung von gebrauchten Batterien und Akkus und
gebrauchten elektrischen und elektronischen Geräten
(anzuwenden in den Ländern der Europäischen Union
und anderen Ländern mit einem separaten
Sammelsystem für diese Produkte)
Das Symbol auf dem Produkt, der Batterie/dem Akku oder der
Verpackung weist darauf hin, dass das Produkt oder die Batterie/
der Akku nicht als normaler Haushaltsabfall zu behandeln
sind. Ein zusätzliches chemisches Symbol Pb (Blei) unter der
durchgestrichenen Mülltonne bedeutet, dass die Batterie/
der Akku einen Anteil von mehr als 0,004 % Blei enthält. Durch
Ihren Beitrag zum korrekten Entsorgen des Produktes und der
Batterie/des Akkus schützen Sie die Umwelt und die Gesundheit
Ihrer Mitmenschen. Umwelt und Gesundheit werden durch
falsches Entsorgen gefährdet. Materialrecycling hilft, den
Verbrauch von Rohstoffen zu verringern. Bei Produkten, die auf
Grund ihrer Sicherheit, der Funktionalität oder als Sicherung
vor Datenverlust eine ständige Verbindung zur eingebauten
Batterie/zum eingebauten Akku benötigen, sollte die Batterie/
der Akku nur durch qualifiziertes Servicepersonal ausgetauscht
werden. Um sicherzustellen, dass das Produkt und die Batterie/
der Akku korrekt entsorgt werden, geben Sie das Produkt
zwecks Entsorgung an einer geeigneten Annahmestelle für
das Recycling von elektrischen und elektronischen Geräten ab.
Für alle anderen Batterien/Akkus entnehmen Sie die Batterie/
den Akku bitte entsprechend dem Kapitel über die sichere
Entfernung der Batterie/des Akkus. Geben Sie die Batterie/den
Akku an einer geeigneten Annahmestelle für das Recycling von
Batterien/Akkus ab. Weitere Informationen über das Recycling
dieses Produkts oder der Batterie/des Akkus erhalten Sie von
Ihrer Gemeinde, den kommunalen Entsorgungsbetrieben oder
dem Geschäft, in dem Sie das Produkt gekauft haben. Hinweis
für Lithiumbatterien: Bitte geben Sie nur entladene Batterien an
den Sammelstellen ab. Wegen Kurzschlussgefahr überkleben
Sie bitte die Pole der Batterie mit Klebestreifen. Sie erkennen
Lithiumbatterien an den Abkürzungen Li oder CR.
Identifikation der Teile
1 Anzeige
2 Fokus/Zoom-Taste
3 Auslöser/REC-Taste
4 AF-ON-Taste
5 C1-Taste
6 Riemenhalter
7 ZOOM/FOCUS-Schalter
8 MOVIE/STILL-Schalter
9 LOCK-Schalter
10- / Batteriedeckel
11 Batteriedeckel-Verriegelungsschieber
12 Batteriedeckel-Drehknopf
Einsetzen der Batterie
Setzen Sie die Batterie so ein, dass die Seite + nach oben weist.
(+ im Batteriefach zeigt die Richtung der Batterie an.)
Zum Schließen des Batteriedeckels drehen Sie den Batteriedeckel
in Richtung „CLOSE“ bis zum Anschlag.
Kopplung des Geräts mit der
Kamera
• Im Folgenden finden Sie ein Beispiel für ein Verfahren für
Digitalkameras mit Wechselobjektiv von Sony und digitale
Fotokameras von Sony. Einzelheiten finden Sie in der Hilfe.
• Bevor Sie beginnen, überprüfen Sie, ob der LOCK-Schalter der
Fernbedienung in der entgegengesetzten Position von „LOCK“
ist.
1
An der Kamera wählen Sie MENU
(Netzwerk)
[Bluetooth-Einstlg.]
oder [Bluetooth]
[Bluetooth-
Funktion]
[Ein].
2
An der Kamera wählen Sie MENU
(Netzwerk)
([Übertrag./Fernb.]
)
[Bluetooth-Fernbed.]
[Ein].
3
An der Kamera wählen Sie MENU
(Netzwerk)
[Bluetooth-Einstlg.] oder
[Bluetooth]
[Kopplung].
4
An der Fernbedienung halten Sie die
Auslöser/REC-Taste und die Seite +
der Fokus/Zoom-Taste gleichzeitig
mindestens 7 Sekunden lang gedrückt.
5
Wenn eine Bestätigungsmeldung auf
dem Bildschirm der Kamera erscheint,
wählen Sie [OK].
• erscheint, und der Kopplungsvorgang beginnt.
• Wenn der Kopplungsvorgang abgeschlossen ist,
erscheint [Gekoppelt.].
Hinweis
• Wenn der Kopplungsvorgang fehlschlägt, blinkt die Anzeige
der Fernbedienung schnell. In diesem Fall wiederholen Sie das
Verfahren von Anfang an.
• Führen Sie in den folgenden Situationen den
Kopplungsvorgang für die Fernbedienung und die Kamera neu
aus.
– Wenn Sie die Fernbedienung zum Bedienen einer anderen
Kamera verwenden (Nachdem Sie die Fernbedienung
mit einer anderen Kamera verbunden haben, müssen Sie
die Fernbedienung und die ursprüngliche Kamera erneut
koppeln, wenn Sie eine Verbindung zur ursprünglichen
Kamera herstellen.)
– Wenn die Netzwerkeinstellungen der Kamera rückgesetzt
wurden
• Wenn die Fernbedienung während einer Bluetooth-Verbindung
längere Zeit nicht benutzt wird, erscheint möglicherweise
(keine Bluetooth-Verbindung) auf dem Bildschirm der
Kamera.
Bestätigen der Einstellung der
Kamera
An der Kamera wählen Sie MENU
(Netzwerk)
([Übertrag./
Fernb.]
) [Bluetooth-Fernbed.] und stellen sicher, dass [Ein]
gewählt ist.
Aufnehmen
Verwenden Sie die Fernbedienung zur Bedienung der Kamera zur
Aufnahme.
Einzelheiten finden Sie in der Hilfe.
1
Stellen Sie den MOVIE/STILL-Schalter an
der Fernbedienung um.
• Zum Aufnehmen eines Standbildes: STILL
• Zum Aufnehmen von Video: MOVIE
2
Drücken Sie die Auslöser/REC-Taste.
• Drücken Sie die Taste halb ein, um scharfzustellen
und drücken Sie sie ganz ein, um ein Foto
aufzunehmen.
Technische Daten
Abmessungen (B/H/T) (ca.):
33 mm × 116,5 mm × 15,1 mm
Gewicht (ca.):
35 g (Ohne die Batterie)
Mitgeliefertes Zubehör:
Fernbedienung (1), Lithium-Knopfbatterie (CR2032) (1),
Anleitungen
Änderungen, die dem technischen Fortschritt dienen, bleiben
vorbehalten.
Der Schriftzug und die Logos von Bluetooth® sind Eigentum
von Bluetooth SIG, Inc., und ihre Verwendung durch die
SonyGroup Corporation erfolgt unter Lizenz.
本機のマニュアルについて
このスタートガイドは、本機をはじめてお使いになるときに必要な
準備、基本的な使いかたなどを説明しています。
詳しい使いかたは、ヘルプガイド(Web取扱説明書)をご覧ください。
ヘルプガイド(Web取扱説明書)
https://rd1.sony.net/help/ilc/1820/ja/
• 本機は、Bluetooth対応のリモートコマンダー
(以降、リモコンとよぶ)です。
本機に接続可能なカメラについては、以下の
サイトでご確認ください。
https://www.sony.net/dics/p1bt/
• 落としたり、液体がかかったりしないようにて
いねいに扱ってください。
• 本機は防じん、防滴性に配慮して設計されて
いますが、防水性能は備えていません。雨中で
の使用時は、本機に雨がかからないようにして
ください。
漏液、発熱、発火、破裂、誤飲による
大けがややけど、火災などを避けるため、
下記の注意事項をお守りください。
危険
電池を飲み込まないでください。化学やけどの原因となります。
本製品には、コイン/ボタン電池が内蔵または同梱されています。
コイン/ボタン電池を飲み込むと、2時間程度で重度の内臓のやけどを
引き起こし、死亡に至ることがあります。新しい電池や使用済みの電
池は子供の手の届かないところに保管してください。電池カバーが
しっかりと閉じない場合は、使用をやめ、子供の手の届かないところ
に保管してください。電池を飲み込んだり体のどこかに入れたりした
と思われる場合は、直ちに医師の診察を受けてください。コイン/ボタ
ン電池は充電しないでください。
10-
10-
1
2
4
7
9
8
5
3
6 11 1210- 10-
RMT-P1BT
© 2022 Sony Corporation
Printed in China
4-748-147-21(1)
スタートガイド/Startup Guide/Guide de
démarrage/Guía de inicio/
Einführungsanleitung/Beknopte gids/
Startguide/Guida di avvio/Guia de início/
入门指南
/入門指南
リモートコマンダー
Remote Commander
Télécommande
遥控器
RMT-P1BT 4-748-147-21(1) RMT-P1BT 4-748-147-21(1) RMT-P1BT 4-748-147-21(1) RMT-P1BT 4-748-147-21(1)
各部名称
1 ランプ
2 フォーカス/ズームボタン
3 レリーズ/RECボタン
4 AF-ONボタン
5 C1ボタン
6 ストラップ取り付け部
7 ZOOM/FOCUSスイッチ
8 MOVIE/STILLスイッチ
9 LOCKスイッチ
10- / 電池カバー
11電池カバーLOCKツマミ
12電池カバー回転ツマミ
電池を入れる
電池の+極側を上面にして入れてください。(電池ケースの+マーク
は、電池の向きを示しています。)
電池カバーを閉めるときは、電池カバーを「CLOSE」側に止まるまで回
します。
本機とカメラをペアリングする
• 下記は、ソニー製レンズ交換式デジタルカメラおよびデジタルスチ
ルカメラの手順の一例です。詳しい手順については、ヘルプガイド
をご覧ください。
• あらかじめ、リモコンのLOCKスイッチが「LOCK」と反対側の位置に
なっているかご確認ください。
1
カメラで、MENU
(ネットワーク)
[Bluetooth設定]または[Bluetooth]
[Bluetooth機能]
[入]を選ぶ。
2
カメラで、MENU
(ネットワーク)
([転送/リモート]
)[Bluetooth リモコン]
[入]を選ぶ。
3
カメラで、MENU
(ネットワーク)
[Bluetooth設定]または[Bluetooth]
[ペアリング]を選ぶ。
4
リモコンのレリーズ/RECボタンとフォー
カス/ズームボタンの+側を同時に7秒以上
押し込む。
5
カメラの画面に接続確認メッセージが表示
されるので、カメラで[確認]を選択する。
• が表示され、ペアリングが開始されます。
•ペアリングが完了すると、[ペアリングしました]と
表示されます。
ご注意
• ペアリングに失敗すると、リモコンのランプがすばやく点滅します。
その場合は、手順を最初からやり直してください。
• 以下の場合は、再度ペアリングを行ってください。
‒ 別のカメラをリモコンで操作するとき(別のカメラとリモコンを
接続後、元のカメラに接続するときもペアリングをし直す必要が
あ り ま す 。)
‒ カメラのネットワーク設定をリセットしたとき
• Bluetooth接続中、リモコンを操作しないままでいるとカメラの画
面に (Bluetooth未接続)が表示される場合があります。
カメラの設定を確認する
カメラで、MENU
( ネ ッ ト ワ ー ク )
([転送/リモート]
)
[Bluetoothリモコン]
[入]となっていることを確認してください。
撮影する
リモコンでカメラを操作して撮影します。
詳しくは、ヘルプガイドもあわせてご覧ください。
1
リモコンのMOVIE/STILLスイッチを切り替
える。
•静止画を撮影する場合:STILL
•動画を撮影する場合:MOVIE
2
レリーズ/RECボタンを押す。
•静止画を撮影するときは、半押ししてピントを合わ
せ、深く押し込んで撮影します。
主な仕様
外形寸法(幅/高さ/奥行き)(約):
33mm×116.5mm×15.1mm
質量(約):
35g(電池含まず)
同梱物:
リモートコマンダー(1)、リチウムコイン電池(CR2032)(1)、
印刷物一式
仕様および外観は、改良のため予告なく変更することがありますが、
ご了承ください。
保証書とアフターサービス
保証書
• この製品には保証書が添付されていますので、お買い上げの際、お
受け取りください。
• 所定事項の記入および記載内容をお確かめのうえ、大切に保管して
ください。
• 保証期間は、お買い上げ日より1年間です。
アフターサービス
調子が悪いときはまずチェックを
ヘルプガイドなどを参考にして故障かどうかお調べください。
それでも具合の悪いときは
ソニーの相談窓口にご相談ください。
保証期間中の修理は
保証書の記載内容に基づいて修理させていただきます。詳しくは保
証書をご覧ください。
保証期間経過後の修理は
修理によって機能が維持できる場合は、ご要望により有料修理させて
いただきます。
部品の保有期間について
当社では本機の補修用性能部品(製品の機能を維持するために必要な
部品)を、製造打ち切り後最低7年間保有しています。ただし、故障の
状況その他の事情により、修理に代えて製品交換をする場合がありま
すのでご了承ください。保有期間が経過したあとも、故障箇所によっ
ては修理可能の場合がありますので、お買い上げ店か、ソニーの相談
窓口にご相談ください。
ご相談になるときは次のことをお知らせくだ
さい。
• 型名:RMT-P1BT
• 故障の状態:できるだけ詳しく
• お買い上げ年月日
Bluetooth®ワードマークおよびロゴは、BluetoothSIG,Inc.が所有
する登録商標であり、ソニーグループ株式会社はこれらのマークをラ
イセンスに基づいて使用しています。
About the manual for this product
This guide describes the necessary preparations to start using
the product, basic operations, etc. For details, refer to the “Help
Guide” (web manual).
“Help Guide” (Web manual)
https://rd1.sony.net/help/ilc/1820/h_zz/
• This unit is Remote Commander which is
compatible with the Bluetooth function.
For the camera models that can connect to
the unit, visit the following website.
https://www.sony.net/dics/p1bt/
• Handle this unit with care to avoid the risk of dropping it or
letting it exposed to liquid.
• This unit is designed to be dust and moisture-resistant, but is
not waterproof or splash-proof. When you use the product in
rainy conditions, do not let the product get wet.
WARNING
Do not ingest battery, chemical burn hazard.
This unit contains a coin/button cell battery. If the coin/button
cell battery is swallowed, it can cause severe internal burns in just
2 hours and can lead to death.
Keep new and used batteries away from children. If the battery
cover does not close securely, stop using the product and keep it
away from children.
If you think batteries might have been swallowed or placed inside
any part of the body, seek immediate medical attention.
For Customers in the U.S.A.
For question regarding your product or for the Sony Service
Center nearest you, call 1-800-222-SONY (7669) .
Supplier’s Declaration of Conformity
Trade Name : SONY
Model : RMT-P1BT
Responsible Party : Sony Electronics Inc.
Address : 16535 Via Esprillo, San Diego, CA 92127 U.S.A.
Telephone Number : 858-942-2230
Disposal of waste batteries and electrical and electronic
equipment (applicable in the European Union and other
countries with separate collection systems)
This symbol on the product, the battery or on the packaging
indicates that the product and the battery shall not be treated
as household waste. On certain batteries this symbol might
be used in combination with a chemical symbol. The chemical
symbol for lead (Pb) is added if the battery contains more than
0.004% lead. By ensuring that these products and batteries
are disposed of correctly, you will help to prevent potentially
negative consequences for the environment and human health
which could be caused by inappropriate waste handling. The
recycling of the materials will help to conserve natural resources.
In case of products that for safety, performance or data integrity
reasons require a permanent connection with an incorporated
battery, this battery should be replaced by qualified service staff
only. To ensure that the battery and the electrical and electronic
equipment will be treated properly, hand over these products at
end-of-life to the appropriate collection point for the recycling of
electrical and electronic equipment. For all other batteries, please
view the section on how to remove the battery from the product
safely. Hand the battery over to the appropriate collection point
for the recycling of waste batteries. For more detailed information
about recycling of this product or battery, please contact your
local Civic Office, your household waste disposal service or the
shop where you purchased the product or battery.
Identifying the parts
1 Indicator
2 Focus/Zoom button
3 Shutter-release/REC button
4 AF-ON button
5 C1 button
6 Strap holder
7 ZOOM/FOCUS switch
8 MOVIE/STILL switch
9 LOCK switch
10- / Battery cover
11 Battery cover locking latch
12 Battery cover turning knob
Inserting the battery
Insert the battery so that the + terminal is facing upward. (+ on
the battery chamber indicates the direction of the battery.)
To close the battery cover, turn the battery cover toward “CLOSE”
until it stops.
Pairing the unit with the camera
• The following is an example of a procedure for Sony
Interchangeable Lens Digital Cameras and Sony digital still
cameras. For detailed procedures, refer to the Help Guide.
• Before you start, check that the Remote Commander’s LOCK
switch is in the position to the opposite of “LOCK.”
1
On the camera, select MENU
(network)
[Bluetooth Settings] or
[Bluetooth]
[Bluetooth Function]
[On].
2
On the camera, select MENU
(network)
([Transfer/Remote]
)
[Bluetooth Rmt Ctrl]
[On].
3
On the camera, select MENU
(network)
[Bluetooth Settings] or
[Bluetooth]
[Pairing].
4
On the Remote Commander, press and
hold the Shutter-release/REC button and
the + side of the Focus/Zoom button at
the same time for at least 7 seconds.
5
When a confirmation message appears
on the camera's screen, select [OK].
• appears and pairing begins.
• When pairing is complete, [Paired.] appears.
Note
• If pairing fails, the Remote Commander's indicator flashes
rapidly. If this happens, redo the procedure from the beginning.
• In the following situations, pair the Remote Commander and
the camera again.
– When using the Remote Commander to operate a different
camera (After having connected the Remote Commander
with a different camera, you also must pair the Remote
Commander and the original camera again when connecting
to the original camera.)
– When the camera's network settings have been reset
• If the Remote Commander is not used for a period of time
during a Bluetooth connection, (no Bluetooth connection)
may appear on the camera’s screen.
Confirming the setting on the
camera
On the camera, select MENU
(network)
([Transfer/Remote]
)
[Bluetooth Rmt Ctrl] and make sure that [On] is selected.
Shooting
Use the Remote Commander to operate the camera for shooting.
For details, also refer to the Help Guide.
1
Toggle the Remote Commander’s MOVIE/
STILL switch.
• To shoot a still image: STILL
• To shoot a video: MOVIE
2
Press the Shutter-release/REC button.
• Press the button halfway down to focus, and then
press it all the way down to shoot a still image.
Specifications
Dimensions (W/H/D) (Approx.):
33 mm × 116.5 mm × 15.1 mm (1 5/16 in. × 4 5/8 in. × 5/8 in.)
Mass (Approx.):
35 g (1.3 oz) (Without the battery)
Included items:
Remote Commander (1), Lithium coin cell battery (CR2032) (1),
Set of printed documentation
Design and specifications are subject to change without notice.
The Bluetooth® word mark and logos are registered trademarks
owned by the Bluetooth SIG, Inc. and any use of such marks by
Sony Group Corporation is under license.
À propos du manuel de ce produit
Ce manuel présente les étapes nécessaires au démarrage
de ce produit, les opérations générales, etc. Pour plus
d'informations, reportez-vous au « Guide d’aide » (manuel en
ligne).
« Guide d'aide » (Manuel en ligne)
https://rd1.sony.net/help/ilc/1820/h_zz/
• Cet appareil est une télécommande
compatible avec la fonction Bluetooth.
Pour les modèles d'appareil photo pouvant
se connecter à l'appareil, visitez le site
internet ci-dessous.
https://www.sony.net/dics/p1bt/
• Manipulez cet appareil avec précaution pour éviter tout risque
de chute ou exposition à un liquide.
• Cet appareil est conçu pour résister à la poussière et
à l’humidité, mais il n’est pas étanche à l’eau ni aux
éclaboussures. Par temps pluvieux, veillez à ce que le produit
ne se mouille pas.
AVERTISSEMENT
N'avalez pas la pile, risque de brûlure chimique.
L'appareil est doté d'une pile bouton. Si la pile bouton est avalée,
2 heures suffisent pour qu’elle provoque des brûlures internes
graves qui peuvent être fatales.
Rangez les piles neuves et usagées hors de portée des enfants. Si
le couvercle des piles ne se ferme plus convenablement, cessez
d’utiliser le produit et rangez-le hors de portée des enfants.
Si vous pensez que des piles ont peut-être été avalées ou
glissées à l’intérieur d’une partie quelconque du corps, consultez
immédiatement un médecin.
Elimination des piles et accumulateurs et des
équipements électriques et électroniques usagés
(applicable dans les pays de l'Union Européenne et dans
les autres pays disposant de systèmes de collecte
sélective)
Ce symbole apposé sur le produit, la pile ou l’accumulateur,
ou sur l’emballage, indique que le produit et les piles et
accumulateurs fournis avec ce produit ne doivent pas être traités
comme de simples déchets ménagers. Sur certains types de
piles, ce symbole apparaît parfois combiné avec un symbole
chimique. Le symbole pour le plomb (Pb) est rajouté lorsque ces
piles contiennent plus de 0,004 % de plomb. En vous assurant
que les produits, piles et accumulateurs sont mis au rebut de
façon appropriée, vous participez activement à la prévention des
conséquences négatives que leur mauvais traitement pourrait
provoquer sur l’environnement et sur la santé humaine. Le
recyclage des matériaux contribue par ailleurs à la préservation
des ressources naturelles. Pour les produits qui, pour des
raisons de sécurité, de performance ou d’intégrité des données,
nécessitent une connexion permanente à une pile ou à un
accumulateur intégré(e), il conviendra de vous rapprocher d’un
Service Technique qualifié pour effectuer son remplacement. En
rapportant votre appareil électrique, les piles et accumulateurs
en fin de vie à un point de collecte approprié vous vous assurez
que le produit, la pile ou l'accumulateur intégré sera traité
correctement. Pour tous les autres cas de figure et afin d’enlever
les piles ou accumulateurs en toute sécurité de votre appareil,
reportez-vous au manuel d’utilisation. Rapportez les piles et
accumulateurs, et les équipements électriques et électroniques
usagés au point de collecte approprié pour le recyclage. Pour
toute information complémentaire au sujet du recyclage de ce
produit ou des piles et accumulateurs, vous pouvez contacter
votre municipalité, votre déchetterie locale ou le point de vente
où vous avez acheté ce produit.
Description des éléments
1 Témoin
2 Touche de mise au point/zoom
3 Touche du déclencheur/REC
4 Touche AF-ON
5 Touche C1
6 Trou de sangle
7 Commutateur ZOOM/FOCUS
8 Commutateur MOVIE/STILL
9 Commutateur LOCK
10- / Couvercle de la pile
11 Verrou de blocage du couvercle de la pile
12 Languette de rotation du couvercle de la pile
Installation de la pile
Installez la pile avec la borne + dirigée vers le haut.
(+ du compartiment de la pile précise la direction de la pile.)
Pour fermer le couvercle de la pile, tournez à fond le couvercle de
la pile vers «CLOSE».
Jumelage de l’appareil et de
l’appareil photo
• L'exemple ci-dessous présente la procédure pour un appareil
photo à objectif interchangeable Sony et un appareil photo
numérique Sony. Pour plus d'informations sur les procédures,
reportez-vous au Guide d'aide.
• Avant de commencer, vérifiez que la position du commutateur
LOCK de la télécommande est opposée à « LOCK ».
1
Sur l'appareil photo, sélectionnez MENU
(réseau)
[Réglages Bluetooth] ou
[Bluetooth]
[Fonction Bluetooth]
[ON].
2
Sur l'appareil photo, sélectionnez MENU
(réseau)
([Transfert/à dist.]
)
[C. à dist. Bluetooth]
[ON].
3
Sur l'appareil photo, sélectionnez MENU
(réseau)
[Réglages Bluetooth] ou
[Bluetooth]
[Jumelage].
4
Sur la télécommande, appuyez de
manière prolongée simultanément sur
la touche du déclencheur/REC et sur la
partie + de la touche de mise au point/
Zoom pendant au moins sept secondes.
5
Lorsqu'un message de confirmation
s'affiche à l'écran de l'appareil photo,
sélectionnez [OK].
• s'affiche et le jumelage commence.
• Une fois le jumelage terminé, [Jumelé.] s'affiche.
Remarque
• Si le jumelage échoue, le témoin de la télécommande clignote
rapidement. Dans ce cas, recommencez la procédure depuis
le début.
• Dans les cas suivants, recommencez le jumelage de la
télécommande et l'appareil.
– Si la télécommande a été utilisée pour contrôler un autre
appareil photo (après avoir connecté la télécommande à
un autre appareil photo, vous devez également procéder à
un nouveau jumelage entre la télécommande et l'appareil
photo d'origine lors du branchement à ce dernier).
– Si les réglages réseau de l'appareil photo ont été réinitialisés.
• Si la télécommande n'est pas utilisée pendant longtemps lors
d'une connexion Bluetooth, (aucune connexion Bluetooth)
risque de s'afficher à l'écran de l'appareil photo.
Confirmation de la configuration
sur l’appareil photo
Sur l’appareil photo, sélectionnez MENU
(réseau)
([Transfert/à dist.]
) [C. à dist. Bluetooth] et assurez-vous que
[ON] est sélectionné.
Prise de vue
Utilisez la télécommande pour contrôler l'appareil photo pendant
une prise de vue.
Pour plus d'informations, reportez-vous au Guide d'aide.
1
Positionnez le commutateur MOVIE/STILL
de la télécommande.
• Pour la prise de vue une photo : STILL
• Pour l'enregistrement d'une vidéo : MOVIE
2
Appuyez sur la touche du déclencheur/
REC.
• Appuyez à mi-course sur cette touche pour
effectuer la mise au point, puis appuyez à fond
pour prendre une photo.
Spécifications
Dimensions (L/H/P) (environ) :
33 mm × 116,5 mm × 15,1 mm (1 5/16 po. × 4 5/8 po. × 5/8 po.)
Poids (environ) :
35 g (1,3 oz) (Sans la pile)
Articles inclus :
Télécommande (1), Pile bouton au lithium (CR2032) (1), Jeu de
documents imprimés
La conception et les spécifications peuvent être modifiées sans
préavis.
La marque et les logos Bluetooth® sont des marques déposées
détenues par Bluetooth SIG, Inc. et sont utilisées sous licence par
Sony Group Corporation.
Acerca del manual para este producto
Esta guía describe los preparativos necesarios para empezar
a utilizar el producto, las operaciones básicas, etc. Para los
detalles, consulte la “Guía de ayuda” (manual en la web).
“Guía de ayuda” (manual en la web)
https://rd1.sony.net/help/ilc/1820/h_zz/
• Esta unidad es un controlador remoto que
es compatible con la función Bluetooth.
Para los modelos de cámara que pueden
conectarse a la unidad, visite el sitio web
siguiente.
https://www.sony.net/dics/p1bt/
• Manipule esta unidad con cuidado para evitar el riesgo de que
se caiga o se exponga a líquidos.
• Esta unidad ha sido diseñada para ser resistente al polvo
y a la humedad, pero no es a prueba de agua o a prueba
de salpicaduras. Cuando utilice el producto en condiciones
lluviosas, no deje que el producto se moje.
AVISO
No ingiera la pila. Existe riesgo de quemadura química.
Esta unidad contiene una pila de botón/plana. Si se ingiere la pila
de botón/plana, puede causar quemaduras internas graves en
tan solo 2 horas y podría ocasionar la muerte.
Mantenga las pilas nuevas y las usadas fuera del alcance de los
niños. Si la cubierta de la pila no se cierra de forma segura, deje
de utilizar el producto y manténgalo fuera del alcance de los
niños.
Si cree que las pilas podrían haber sido ingeridas o colocadas
dentro de cualquier parte del cuerpo, póngase en contacto con el
médico inmediatamente.
Tratamiento de las baterías y equipos eléctricos y
electrónicos al final de su vida útil (aplicable en la Unión
Europea y otros países con sistemas de tratamiento
selectivo de residuos)
Este símbolo en el producto, la batería o el embalaje indica que
el producto y la batería no pueden tratarse como un residuo
doméstico normal. En algunas baterías este símbolo puede
utilizarse en combinación con un símbolo químico. Se añadirá
el símbolo químico del plomo (Pb) si la batería contiene más
del 0,004 % de plomo. Al asegurarse de que estos productos
y baterías se desechan correctamente, ayudará a prevenir las
posibles consecuencias negativas para la salud y el medio
ambiente que podrían derivarse de su incorrecta manipulación.
El reciclaje de los materiales ayuda a preservar los recursos
naturales. En el caso de productos, que por razones de seguridad,
rendimiento o mantenimiento de datos, requieran una conexión
permanente con la batería incorporada, esta batería deberá
reemplazarse únicamente por personal técnico cualificado para
ello. Para asegurarse de que la batería se desecha correctamente,
entregue estos productos al final de su vida útil en un punto de
recogida adecuado para el reciclado de aparatos eléctricos y
electrónicos. Para el resto de baterías, consulte la sección donde
se indica cómo extraer la batería del producto de forma segura.
Deposite la batería en el correspondiente punto de recogida para
el reciclado de baterías. Si desea obtener información detallada
sobre el reciclaje de este producto o de la batería, póngase en
contacto con el ayuntamiento, el punto de recogida más cercano
o el establecimiento donde ha adquirido el producto o la batería.
AVISO IMPORTANTE PARA MÉXICO
La operación de este equipo está sujeta a las siguientes dos
condiciones: (1) es posible que este equipo o dispositivo no cause
interferencia perjudicial y (2) este equipo o dispositivo debe
aceptar cualquier interferencia, incluyendo la que pueda causar
su operación no deseada.
Para consultar la información relacionada al número del
certificado, refiérase a la etiqueta del empaque y/o del producto.
Identificación de los
componentes
1 Indicador
2 Botón de enfoque/zoom
3 Botón disparador/REC
4 Botón AF-ON
5 Botón C1
6 Soporte para correa
7 Conmutador ZOOM/FOCUS
8 Conmutador MOVIE/STILL
9 Conmutador LOCK
10- / Cubierta de la pila
11 Cierre de bloqueo de la cubierta de la pila
12 Perilla de giro de la cubierta de la pila
Inserción de la pila
Inserte la pila de forma que el terminal + quede hacia arriba.
(+ del compartimento de la pila indica la dirección de la pila.)
Para cerrar la cubierta de la pila, gire la cubierta de la pila hacia
“CLOSE” hasta que se detenga.
Emparejamiento de la unidad
con la cámara
• El siguiente es un ejemplo de un procedimiento para cámaras
digitales de lentes intercambiables Sony y cámaras de
fotografía digitales Sony. Con respecto a los procedimientos
detallados, consulte la Guía de ayuda.
• Antes de comenzar, compruebe que el conmutador LOCK del
controlador remoto esté en la posición opuesta a “LOCK”.
1
En la cámara, seleccione MENU
(red)
[Ajustes Bluetooth] u [Bluetooth]
[Función Bluetooth]
[Activar].
2
En la cámara, seleccione MENU
(red)
([Transfer./remoto]
)
[M. a dist. Bluetooth]
[Activar].
3
En la cámara, seleccione MENU
(red)
[Ajustes Bluetooth] u [Bluetooth]
[Emparejamiento].
4
En el controlador remoto, mantenga
pulsado el botón disparador/REC y el
lado + del botón de enfoque/zoom al
mismo tiempo durante 7 segundos por lo
menos.
5
Cuando aparezca un mensaje de
confirmación en la pantalla de la cámara,
seleccione [Aceptar].
• Aparecerá y se iniciará el emparejamiento.
• Cuando finalice el emparejamiento aparecerá
[Emparejado.].
Nota
• Si el emparejamiento falla, el indicador del controlador remoto
parpadeará rápidamente. Si sucede esto, vuelva a realizar el
procedimiento desde el principio.
• En las situaciones siguientes, empareje de nuevo el controlador
remoto y la cámara.
– Cuando utilice el controlador remoto para operar una cámara
diferente (Después de haber conectado el controlador
remoto con una cámara diferente, cuando lo conecte a la
cámara original deberá emparejar de nuevo el controlador
remoto y la cámara original.)
– Cuando se hayan reinicializado los ajustes de red de la
cámara
• Si el controlador remoto no se utiliza durante cierto período de
tiempo durante una conexión Bluetooth, en la pantalla de la
cámara puede aparecer (sin conexión Bluetooth).
Confirmación del ajuste de la
cámara
En la cámara, seleccione MENU
(red)
([Transfer./remoto]
)
[M. a dist. Bluetooth] y asegúrese de que haya seleccionado
[Activar].
Toma de imágenes
Utilice el controlador remoto para tomar imágenes con la cámara.
Con respecto a los detalles, consulte la Guía de ayuda.
1
Cambie la posición del conmutador
MOVIE/STILL del controlador remoto.
• Para tomar una fotografía: STILL
• Para grabar un vídeo: MOVIE
2
Pulse el botón disparador/REC.
• Pulse el botón hasta la mitad para enfocar, y
después púlselo fondo para tomar una fotografía.
Especificaciones
Dimensiones (An/Al/Pr) (Aprox.):
33 mm × 116,5 mm × 15,1 mm
Peso (Aprox.):
35 g (Sin la pila)
Elementos incluidos:
Controlador remoto (1), Pila de botón de litio (CR2032) (1), Juego
de documentación impresa
El diseño y las especificaciones están sujetos a cambio sin previo
aviso.
La marca de palabra y los logotipos Bluetooth® son marcas
comerciales registradas propiedad de Bluetooth SIG,Inc.,
y cualquier utilización de tales marcas por parte de
SonyGroup Corporation se realiza bajo licencia.
Über die Anleitung für dieses Produkt
Diese Anleitung beschreibt die notwendigen Vorbereitungen
für die Inbetriebnahme des Produkts, grundlegende
Funktionen usw. Einzelheiten dazu schlagen Sie bitte in der
„Hilfe“ (Web-Anleitung) nach.
„Hilfe“ (Web-Anleitung)
https://rd1.sony.net/help/ilc/1820/h_zz/
• Dieses Gerät ist eine Fernbedienung, die mit
der Bluetooth-Funktion kompatibel ist.
Bezüglich Kameramodellen, die mit dem
Gerät verbunden werden können, besuchen
Sie die folgende Website.
https://www.sony.net/dics/p1bt/
• Behandeln Sie dieses Gerät vorsichtig, um zu vermeiden dass
es herunterfällt oder Flüssigkeiten ausgesetzt wird.
• Dieses Gerät ist von der Konstruktion her staub- und
feuchtigkeitsbeständig, aber nicht wasserdicht oder
spritzwassergeschützt. Wenn Sie das Produkt bei Regen
benutzen, achten Sie darauf, dass es nicht nass wird.
WARNUNG
Die Batterie nicht verschlucken, Gefahr der chemischen Verätzung.
Dieses Gerät enthält eine Münz-/Knopfbatterie. Wird die
Knopfzelle versehentlich verschluckt, kann dies innerhalb von
2 Stunden zu schweren inneren Verätzungen führen, u.U. mit
Todesfolge.
Bewahren Sie neue und gebrauchte Batterien für Kinder
unerreichbar auf. Wenn sich der Batteriedeckel nicht sicher
schließen lässt, verwenden Sie das Produkt nicht weiter und
bewahren Sie es für Kinder unerreichbar auf.
Wenn Sie den Verdacht haben, dass eine Batterie möglicherweise
verschluckt oder in irgendeine Körperöffnung gesteckt wurde,
suchen Sie sofort ärztliche Hilfe auf.
Entsorgung von gebrauchten Batterien und Akkus und
gebrauchten elektrischen und elektronischen Geräten
(anzuwenden in den Ländern der Europäischen Union
und anderen Ländern mit einem separaten
Sammelsystem für diese Produkte)
Das Symbol auf dem Produkt, der Batterie/dem Akku oder der
Verpackung weist darauf hin, dass das Produkt oder die Batterie/
der Akku nicht als normaler Haushaltsabfall zu behandeln
sind. Ein zusätzliches chemisches Symbol Pb (Blei) unter der
durchgestrichenen Mülltonne bedeutet, dass die Batterie/
der Akku einen Anteil von mehr als 0,004 % Blei enthält. Durch
Ihren Beitrag zum korrekten Entsorgen des Produktes und der
Batterie/des Akkus schützen Sie die Umwelt und die Gesundheit
Ihrer Mitmenschen. Umwelt und Gesundheit werden durch
falsches Entsorgen gefährdet. Materialrecycling hilft, den
Verbrauch von Rohstoffen zu verringern. Bei Produkten, die auf
Grund ihrer Sicherheit, der Funktionalität oder als Sicherung
vor Datenverlust eine ständige Verbindung zur eingebauten
Batterie/zum eingebauten Akku benötigen, sollte die Batterie/
der Akku nur durch qualifiziertes Servicepersonal ausgetauscht
werden. Um sicherzustellen, dass das Produkt und die Batterie/
der Akku korrekt entsorgt werden, geben Sie das Produkt
zwecks Entsorgung an einer geeigneten Annahmestelle für
das Recycling von elektrischen und elektronischen Geräten ab.
Für alle anderen Batterien/Akkus entnehmen Sie die Batterie/
den Akku bitte entsprechend dem Kapitel über die sichere
Entfernung der Batterie/des Akkus. Geben Sie die Batterie/den
Akku an einer geeigneten Annahmestelle für das Recycling von
Batterien/Akkus ab. Weitere Informationen über das Recycling
dieses Produkts oder der Batterie/des Akkus erhalten Sie von
Ihrer Gemeinde, den kommunalen Entsorgungsbetrieben oder
dem Geschäft, in dem Sie das Produkt gekauft haben. Hinweis
für Lithiumbatterien: Bitte geben Sie nur entladene Batterien an
den Sammelstellen ab. Wegen Kurzschlussgefahr überkleben
Sie bitte die Pole der Batterie mit Klebestreifen. Sie erkennen
Lithiumbatterien an den Abkürzungen Li oder CR.
Identifikation der Teile
1 Anzeige
2 Fokus/Zoom-Taste
3 Auslöser/REC-Taste
4 AF-ON-Taste
5 C1-Taste
6 Riemenhalter
7 ZOOM/FOCUS-Schalter
8 MOVIE/STILL-Schalter
9 LOCK-Schalter
10- / Batteriedeckel
11 Batteriedeckel-Verriegelungsschieber
12 Batteriedeckel-Drehknopf
Einsetzen der Batterie
Setzen Sie die Batterie so ein, dass die Seite + nach oben weist.
(+ im Batteriefach zeigt die Richtung der Batterie an.)
Zum Schließen des Batteriedeckels drehen Sie den Batteriedeckel
in Richtung „CLOSE“ bis zum Anschlag.
Kopplung des Geräts mit der
Kamera
• Im Folgenden finden Sie ein Beispiel für ein Verfahren für
Digitalkameras mit Wechselobjektiv von Sony und digitale
Fotokameras von Sony. Einzelheiten finden Sie in der Hilfe.
• Bevor Sie beginnen, überprüfen Sie, ob der LOCK-Schalter der
Fernbedienung in der entgegengesetzten Position von „LOCK“
ist.
1
An der Kamera wählen Sie MENU
(Netzwerk)
[Bluetooth-Einstlg.]
oder [Bluetooth]
[Bluetooth-
Funktion]
[Ein].
2
An der Kamera wählen Sie MENU
(Netzwerk)
([Übertrag./Fernb.]
)
[Bluetooth-Fernbed.]
[Ein].
3
An der Kamera wählen Sie MENU
(Netzwerk)
[Bluetooth-Einstlg.] oder
[Bluetooth]
[Kopplung].
4
An der Fernbedienung halten Sie die
Auslöser/REC-Taste und die Seite +
der Fokus/Zoom-Taste gleichzeitig
mindestens 7 Sekunden lang gedrückt.
5
Wenn eine Bestätigungsmeldung auf
dem Bildschirm der Kamera erscheint,
wählen Sie [OK].
• erscheint, und der Kopplungsvorgang beginnt.
• Wenn der Kopplungsvorgang abgeschlossen ist,
erscheint [Gekoppelt.].
Hinweis
• Wenn der Kopplungsvorgang fehlschlägt, blinkt die Anzeige
der Fernbedienung schnell. In diesem Fall wiederholen Sie das
Verfahren von Anfang an.
• Führen Sie in den folgenden Situationen den
Kopplungsvorgang für die Fernbedienung und die Kamera neu
aus.
– Wenn Sie die Fernbedienung zum Bedienen einer anderen
Kamera verwenden (Nachdem Sie die Fernbedienung
mit einer anderen Kamera verbunden haben, müssen Sie
die Fernbedienung und die ursprüngliche Kamera erneut
koppeln, wenn Sie eine Verbindung zur ursprünglichen
Kamera herstellen.)
– Wenn die Netzwerkeinstellungen der Kamera rückgesetzt
wurden
• Wenn die Fernbedienung während einer Bluetooth-Verbindung
längere Zeit nicht benutzt wird, erscheint möglicherweise
(keine Bluetooth-Verbindung) auf dem Bildschirm der
Kamera.
Bestätigen der Einstellung der
Kamera
An der Kamera wählen Sie MENU
(Netzwerk)
([Übertrag./
Fernb.]
) [Bluetooth-Fernbed.] und stellen sicher, dass [Ein]
gewählt ist.
Aufnehmen
Verwenden Sie die Fernbedienung zur Bedienung der Kamera zur
Aufnahme.
Einzelheiten finden Sie in der Hilfe.
1
Stellen Sie den MOVIE/STILL-Schalter an
der Fernbedienung um.
• Zum Aufnehmen eines Standbildes: STILL
• Zum Aufnehmen von Video: MOVIE
2
Drücken Sie die Auslöser/REC-Taste.
• Drücken Sie die Taste halb ein, um scharfzustellen
und drücken Sie sie ganz ein, um ein Foto
aufzunehmen.
Technische Daten
Abmessungen (B/H/T) (ca.):
33 mm × 116,5 mm × 15,1 mm
Gewicht (ca.):
35 g (Ohne die Batterie)
Mitgeliefertes Zubehör:
Fernbedienung (1), Lithium-Knopfbatterie (CR2032) (1),
Anleitungen
Änderungen, die dem technischen Fortschritt dienen, bleiben
vorbehalten.
Der Schriftzug und die Logos von Bluetooth® sind Eigentum
von Bluetooth SIG, Inc., und ihre Verwendung durch die
SonyGroup Corporation erfolgt unter Lizenz.
本機のマニュアルについて
このスタートガイドは、本機をはじめてお使いになるときに必要な
準備、基本的な使いかたなどを説明しています。
詳しい使いかたは、ヘルプガイド(Web取扱説明書)をご覧ください。
ヘルプガイド(Web取扱説明書)
https://rd1.sony.net/help/ilc/1820/ja/
• 本機は、Bluetooth対応のリモートコマンダー
(以降、リモコンとよぶ)です。
本機に接続可能なカメラについては、以下の
サイトでご確認ください。
https://www.sony.net/dics/p1bt/
• 落としたり、液体がかかったりしないようにて
いねいに扱ってください。
• 本機は防じん、防滴性に配慮して設計されて
いますが、防水性能は備えていません。雨中で
の使用時は、本機に雨がかからないようにして
ください。
漏液、発熱、発火、破裂、誤飲による
大けがややけど、火災などを避けるため、
下記の注意事項をお守りください。
危険
電池を飲み込まないでください。化学やけどの原因となります。
本製品には、コイン/ボタン電池が内蔵または同梱されています。
コイン/ボタン電池を飲み込むと、2時間程度で重度の内臓のやけどを
引き起こし、死亡に至ることがあります。新しい電池や使用済みの電
池は子供の手の届かないところに保管してください。電池カバーが
しっかりと閉じない場合は、使用をやめ、子供の手の届かないところ
に保管してください。電池を飲み込んだり体のどこかに入れたりした
と思われる場合は、直ちに医師の診察を受けてください。コイン/ボタ
ン電池は充電しないでください。
10-
10-
1
2
4
7
9
8
5
3
6 11 1210- 10-
RMT-P1BT
© 2022 Sony Corporation
Printed in China
4-748-147-21(1)
スタートガイド/Startup Guide/Guide de
démarrage/Guía de inicio/
Einführungsanleitung/Beknopte gids/
Startguide/Guida di avvio/Guia de início/
入门指南
/入門指南
リモートコマンダー
Remote Commander
Télécommande
遥控器

RMT-P1BT 4-748-147-21(1) RMT-P1BT 4-748-147-21(1) RMT-P1BT 4-748-147-21(1) RMT-P1BT 4-748-147-21(1)
Over de handleiding voor dit product
Deze gids beschrijft de noodzakelijke voorbereidingen voor u
het product kunt gebruiken, de basisbediening enz. Raadpleeg
voor details de "Helpgids" (webhandleiding).
"Helpgids" (Webhandleiding)
https://rd1.sony.net/help/ilc/1820/h_zz/
• Dit toestel is een afstandsbediening die
compatibel is met Bluetooth.
Raadpleeg voor de specifieke
cameramodellen die verbinding kunnen
maken met dit toestel de volgende website:
https://www.sony.net/dics/p1bt/
• Ga zorgvuldig om met dit toestel om te voorkomen dat het valt
of dat het wordt blootgesteld aan vloeistoffen.
• Dit toestel is ontworpen bestand te zijn tegen stof en vocht,
maar is niet (spat-)waterdicht. Als u dit apparaat onder
regenachtige omstandigheden gebruikt, zorgt u ervoor dat het
apparaat niet nat wordt.
WAARSCHUWING
Slik de batterij niet in. Gevaar voor chemische brandwonden.
Dit toestel bevat een knoopcel als batterij. Als de knoopcelbatterij
ingeslikt wordt, kan deze in slechts 2 uur ernstige inwendige
brandwonden veroorzaken en tot de dood leiden.
Houd nieuwe en gebruikte batterijen uit de buurt van kinderen.
Als het batterijdeksel niet goed sluit, moet u stoppen met het
gebruiken van het product en moet u het uit de buurt van
kinderen houden.
Als u denkt dat batterijen zijn ingeslikt of in een lichaamsdeel zijn
gestopt, dient u direct een arts te raadplegen.
Verwijdering van oude batterijen, elektrische en
elektronische apparaten (van toepassing in de Europese
Unie en andere landen met afzonderlijke
inzamelingssystemen)
Dit symbool op het product, de batterij of op de verpakking
wijst erop dat het product en de batterij, niet als huishoudelijk
afval behandeld mogen worden. Op sommige batterijen
kan dit symbool gebruikt worden in combinatie met een
chemisch symbool. Het chemisch symbool voor lood (Pb) wordt
toegevoegd wanneer de batterij meer dan 0,004% lood bevat.
Door deze producten en batterijen op juiste wijze af te voeren,
vermijdt u mogelijke negatieve gevolgen voor mens en milieu
die zijn gekoppeld aan verkeerde afvalbehandeling. Het recyclen
van materialen draagt bij aan het behoud van natuurlijke
bronnen. In het geval dat de producten om redenen van
veiligheid, prestaties dan wel in verband met data-integriteit een
permanente verbinding met een ingebouwde batterij vereisen,
mag deze batterij enkel door gekwalificeerd servicepersoneel
worden vervangen. Om ervoor te zorgen dat de batterij,
elektrische en elektronische apparaten op een juiste wijze zal
worden behandeld, dienen deze producten aan het eind van hun
levenscyclus worden ingeleverd bij het juiste inzamelingspunt
voor het recyclen van elektrisch en elektronisch materiaal. Voor
alle andere batterijen verwijzen we u naar het hoofdstuk over
het veilig verwijderen van batterijen. Lever de batterijen in bij
het juiste inzamelingspunt voor het recyclen van batterijen. Voor
meer informatie over het recyclen van dit product of de batterij,
kunt u contact opnemen met de gemeentelijke instanties, de
organisatie belast met de verwijdering van huishoudelijk afval of
de winkel waar u het product of batterij hebt gekocht.
Overzicht van de onderdelen
1 Indicator
2 Scherpstel-/Zoomknop
3 Ontspan-/REC-knop
4 AF-ON-knop
5 C1-knop
6 Riemhouder
7 ZOOM/FOCUS-schakelaar
8 MOVIE/STILL-schakelaar
9 LOCK-schakelaar
10- / Batterijdeksel
11 Vergrendeling batterijdeksel
12 Draaiknop batterijdeksel
Plaatsen van de batterij
Breng de batterij zo in dat de + pool naar buiten wijst.
(De + in het batterijcompartiment geeft de juiste richting van de
batterij aan.)
Om het batterijdeksel dicht te doen, moet u het batterijdeksel
naar "CLOSE" draaien tot het stopt.
Het toestel koppelen met de
camera
• Hier volgt een voorbeeld van de procedure voor Sony digitale
camera's met verwisselbare lens en Sony digitale camera's.
Raadpleeg voor de gedetailleerde procedures de Helpgids.
• Controleer voor u begint of op de afstandsbediening de LOCK-
schakelaar in de stand tegenover "LOCK" staat.
1
Selecteer op de camera MENU
(netwerk)
[Bluetooth-instelling.]
of [Bluetooth]
[Bluetooth-
functie]
[Aan].
2
Selecteer op de camera MENU
(netwerk)
([Overdr./op afst.]
)
[Bluetooth-afst.bed.]
[Aan].
3
Selecteer op de camera MENU
(netwerk)
[Bluetooth-instelling.] of
[Bluetooth]
[Koppeling].
4
Houd op de afstandsbediening de
Ontspan-/REC-knop en de + kant van
de Scherpstel-/Zoom-knop tegelijk
tenminste 7 seconden lang ingedrukt.
5
Wanneer er een bevestiging verschijnt op
het scherm van de camera, moet u [OK]
selecteren.
• verschijnt en het koppelen zal beginnen.
• Wanneer het koppelen voltooid is, zal de melding
[Gekoppeld.] verschijnen.
Let op
• Als het koppelen mislukt, zal de indicator van de
afstandsbediening snel gaan knipperen. Als dit gebeurt, moet u
de procedure opnieuw van het begin af aan uitvoeren.
• In de volgende situaties moet u de afstandsbediening en de
camera opnieuw aan elkaar koppelen.
– Wanneer u de afstandsbediening gebruikt om een andere
camera te bedienen (nadat u de afstandsbediening
met een andere camera hebt verbonden, moet u de
afstandsbediening en de oorspronkelijke camera opnieuw
koppelen wanneer u weer verbinding wilt maken met de
oorspronkelijke camera.)
– Wanneer de netwerkinstellingen van de camera zijn gereset
• Als de afstandsbediening langere tijd niet wordt gebruikt
terwijl er een verbinding via Bluetooth in werking is, is het
mogelijk dat (geen Bluetooth-verbinding) verschijnt op het
scherm van de camera.
Bevestigen van de instelling op
de camera
Selecteer op de camera MENU
(netwerk)
([Overdr./
op afst.]
) [Bluetooth-afst.bed.] en zorg ervoor dat [Aan] is
geselecteerd.
Opnames maken
Gebruik de afstandsbediening om opnames te maken met de
camera.
Raadpleeg voor details de Helpgids.
1
Zet op de afstandsbediening de
MOVIE/STILL-schakelaar op een andere
instelling.
• Een foto maken: STILL
• Een video maken: MOVIE
2
Druk op de Ontspan-/REC-knop.
• Druk deze knop half in om scherp te stellen en
druk de knop helemaal in om de opname te
maken.
Technische gegevens
Afmetingen (b/h/d) (ong.):
33 mm × 116,5 mm × 15,1 mm
Gewicht (ong.):
35 g (Zonder de batterij)
Meegeleverde items:
Afstandsbediening (1), Lithium knoopcel (CR2032) (1), Handleiding
en documentatie
Wijzigingen in ontwerp en technische gegevens voorbehouden,
zonder kennisgeving.
Het Bluetooth® woordmerk en logo’s zijn gedeponeerde
handelsmerken van Bluetooth SIG, Inc. en elk gebruik van zulke
merken door Sony Group Corporation gebeurt onder licentie.
Om handboken för denna produkt
Den här guiden beskriver nödvändiga förberedelser för att
börja använda produkten, grundläggande användning etc. För
närmare information, se ”Hjälpguide” (webbmanual).
”Hjälpguide” (webbmanual)
https://rd1.sony.net/help/ilc/1820/h_zz/
• Denna enhet är en fjärrkontroll som är
kompatibel med Bluetooth-funktionen.
För information om kameramodeller som
kan anslutas till enheten, besök följande
webbplats.
https://www.sony.net/dics/p1bt/
• Hantera denna enhet försiktigt så att den inte tappas eller
utsätts för vätska.
• Denna enhet är konstruerad för att vara damm- och
fuktavstötande, men är inte vattentät eller stänksäker. Se till att
produkten inte blir våt om du använder den när det regnar.
VARNING
Batteriet får inte förtäras, risk för kemiska brännskador.
Denna enhet innehåller ett knappcellsbatteri. Om
knappcellsbatteriet sväljs kan allvarliga inre brännskador
uppkomma inom endast 2 timmar och detta kan leda till döden.
Förvara nya och använda batterier utom räckhåll för barn. Om
batteriluckan inte stängs korrekt, ska produkten inte användas
och den ska förvaras utom räckhåll för barn.
Sök omedelbar läkarhjälp om du tror att batterier kan ha svalts
eller hamnat inuti någon del av kroppen.
Hantering av förbrukade batterier samt elektrisk och
elektronisk utrustning (gäller inom EU och andra länder
med separata insamlingssystem)
Symbolen på produkten, batteriet eller förpackningen anger att
produkten och batteriet inte ska hanteras som hushållsavfall.
På vissa batterier kan denna symbol användas i kombination
med en kemisk symbol. Den kemiska symbolen för bly (Pb)
läggs till om batteriet innehåller mer än 0,004 % bly. Genom
att säkerställa att dessa produkter och batterier hanteras på
rätt sätt bidrar du till att förebygga eventuella negativa miljö-
och hälsoeffekter som orsakas av felaktig avfallshantering.
Återvinning av materialet bidrar till att bevara naturresurser.
När det gäller produkter som av säkerhets-, prestanda- eller
dataintegritetsskäl kräver permanent anslutning till ett
inbyggt batteri ska detta batteri alltid bytas av en auktoriserad
servicetekniker. För att säkerställa att batteriet och de elektriska
och elektroniska produkterna hanteras korrekt ska de levereras
till en lämplig återvinningsstation för elektriska och elektroniska
produkter när de är förbrukade. Information om alla andra
batterityper finner du i avsnittet om säker borttagning av
batteriet. Lämna in batteriet på en lämplig återvinningsstation för
förbrukade batterier. Kontakta dina lokala myndigheter, din lokala
avfallshanteringstjänst eller affären där du köpte produkten eller
batteriet för mer detaljerad information om hur du återvinner
produkten eller batteriet.
Delarnas namn
1 Indikator
2 Fokus/zoomknapp
3 Avtryckar/REC-knapp
4 AF-ON-knapp
5 C1-knapp
6 Remhållare
7 ZOOM/FOCUS-omkopplare
8 MOVIE/STILL-omkopplare
9 LOCK-omkopplare
10- / Batterilucka
11 Batterilucka låsspärr
12 Batterilucka vridknopp
Sätta i batteriet
Sätt i batteriet så att +-polen är vänd uppåt.
(+ i batterifacket anger riktningen för batteriet.)
För att stänga batteriluckan, vrid batteriluckan mot ”CLOSE” tills
det tar stopp.
Parkoppla enheten med
kameran
• Det följande är ett exempel på ett tillvägagångssätt för
Sony digitalkameror med utbytbart objektiv och Sony
digitala stillbildskameror. För information om detaljerade
tillvägagångssätt, se Hjälpguiden.
• Innan du börjar, kontrollera att fjärrkontrollens LOCK-
omkopplare är i läget motsatt läget ”LOCK”.
1
På kameran, välj MENU
(nätverk)
[Bluetooth-inst.] eller
[Bluetooth]
[Bluetooth-funktion]
[På].
2
På kameran, välj MENU
(nätverk)
([Överföra/Fjärr]
)
[Bluetooth-fjärrkntr.]
[På].
3
På kameran, välj MENU
(nätverk)
[Bluetooth-inst.] eller
[Bluetooth]
[Ihopparning].
4
På fjärrkontrollen, tryck på och håll ned
avtryckar/REC-knappen och +-sidan av
fokus/zoomknappen samtidigt i minst
7 sekunder.
5
När ett bekräftelsemeddelande visas på
kamerans skärm, välj [OK].
• visas och parkopplingen påbörjas.
• När parkopplingen är slutförd, visas [Ihopparad.].
Observera
• Om parkopplingen misslyckas, blinkar fjärrkontrollens indikator
snabbt. Om detta inträffar, gör om proceduren från början.
• I följande situationer ska fjärrkontrollen och kameran
parkopplas igen.
– När fjärrkontrollen används för att styra en annan kamera
(efter att ha anslutit fjärrkontrollen med en annan
kamera, måste du också parkoppla fjärrkontrollen och
den ursprungliga kameran igen när du ansluter till den
ursprungliga kameran.)
– När kamerans nätverksinställningar har återställts
• Om fjärrkontrollen inte används under en stund under en
Bluetooth-anslutning, kan det hända att (ingen Bluetooth-
anslutning) visas på kamerans skärm.
Bekräfta inställningen på
kameran
På kameran, välj MENU
(nätverk)
([Överföra/Fjärr]
)
[Bluetooth-fjärrkntr.] och se till att [På] är valt.
Fotografering
Använd fjärrkontrollen för att styra kameran för fotografering.
För närmare information, se även Hjälpguiden.
1
Växla fjärrkontrollens MOVIE/STILL-
omkopplare.
• För att ta en stillbild: STILL
• För att ta en video: MOVIE
2
Tryck på avtryckar/REC-knappen.
• Tryck ned knappen halvvägs för att ställa in
skärpan, och tryck sedan ned den helt för att ta
en stillbild.
Specifikationer
Yttermått (B/H/D) (ca.):
33 mm × 116,5 mm × 15,1 mm
Vikt (ca.):
35 g (Utan batteriet)
Inkluderade artiklar:
Fjärrkontroll (1), Litium knappcellsbatteri (CR2032) (1),
Uppsättning tryckt dokumentation
Rätt till ändring av design och specifikationer förbehålles.
Bluetooth®-ordmärket och logotyperna är registrerade
varumärken som ägs av Bluetooth SIG, Inc. och all användning av
sådana märken av Sony Group Corporation sker under licens.
Informazioni sul manuale del prodotto
In questa guida sono descritte le preparazioni necessarie per
iniziare a usare il prodotto, le operazioni di base, ecc. Per i
dettagli fare riferimento alla “Guida” (manuale web).
“Guida” (manuale web)
https://rd1.sony.net/help/ilc/1820/h_zz/
• Questa unità è un telecomando compatibile
con la funzione Bluetooth.
Per i modelli di fotocamera compatibili con
questa unità, visitare il seguente sito web:
https://www.sony.net/dics/p1bt/
• Maneggiare con cura l’unità per evitare il rischio che cada o che
venga a contatto con liquidi.
• Questa unità è progettata per essere resistente alla polvere
e all’umidità, ma non è resistente all’acqua o agli spruzzi. Se
si usa il prodotto in caso di pioggia, evitare che il prodotto si
bagni.
AVVERTENZA
Non ingerire la batteria, pericolo di ustione chimica.
L’unità contiene una batteria a pastiglia/bottone. Se la batteria a
pastiglia/bottone viene ingerita, può causare gravi ustioni interne
in sole 2 ore e portare al decesso.
Tenere le batterie nuove e usate lontano dai bambini. Se il
coperchio della batteria non si chiude saldamente, interrompere
l’uso del prodotto e tenerlo lontano dai bambini.
Se si ritiene che le batterie siano state ingerite o inserite in
qualsiasi parte del corpo, consultare immediatamente un medico.
Smaltimento delle batterie (pile e accumulatori) esauste
e delle apparecchiature elettriche ed elettroniche a fine
vita (applicabile in tutti i Paesi dell'Unione Europea e
negli altri Paesi con sistema di raccolta differenziata)
Questo simbolo sul prodotto, batteria o imballo indica che il
prodotto non deve essere considerato come un normale rifiuto
domestico. Su talune batterie questo simbolo può essere
utilizzato in combinazione con un simbolo chimico. Il simbolo
chimico del piombo (Pb) è aggiunto se la batteria contiene più
dello 0,004% di piombo. Assicurandovi che questi prodotti e le
batterie siano smaltiti correttamente, contribuirete a prevenire
potenziali conseguenze negative per l'ambiente e per la salute
che potrebbero essere causate dal trattamento inappropriato
dei medesimi prodotti o batterie. Il riciclo dei materiali aiuterà
a preservare le risorse naturali. Nel caso di prodotti che per
ragioni di sicurezza, prestazioni o integrità dei dati richiedano
una connessione permanente con una batteria in essi
incorporata, la stessa dovrà essere sostituita esclusivamente da
personale qualificato. Per assicurarsi che la batteria sia trattata
correttamente, si prega di consegnare i prodotti a fine vita in
un centro di raccolta idoneo per il riciclo di apparecchiature
elettriche ed elettroniche. Per tutte le altre batterie, si prega
di consultare la sezione relativa alla rimozione sicura della
batteria dal prodotto. Si prega di consegnare le batterie in un
centro di raccolta idoneo per il riciclo delle batterie esauste.
Per informazioni più dettagliate sul riciclo di questi prodotti
o batterie, si prega di contattare il vostro Comune, il servizio
di smaltimento rifiuti ovvero il punto vendita presso il quale è
stato acquistato il prodotto o la batteria. In caso di smaltimento
abusivo di batterie o di apparecchiature elettriche ed elettroniche
potrebbero essere applicate le sanzioni previste dalla normativa
vigente (valido solo per l'Italia).
Identificazione delle parti
1 Indicatore
2 Tasto Messa a fuoco/Zoom
3 Tasto Sblocco otturatore/REC
4 Tasto AF-ON
5 Tasto C1
6 Supporto cinghia
7 Interruttore ZOOM/FOCUS
8 Interruttore MOVIE/STILL
9 Interruttore LOCK
10- / Coperchio del vano della batteria
11 Fermo di chiusura del coperchio del vano della batteria
12 Manopola di rotazione del coperchio del vano della batteria
Inserimento della batteria
Inserire la batteria in modo che il polo + sia rivolto verso l’alto.
(Il segno + sul vano batteria indica la direzione della batteria.)
Per chiudere il coperchio del vano della batteria, girare il
coperchio del vano della batteria verso “CLOSE” fino a quando si
arresta.
Associazione dell’unità alla
fotocamera
• Il seguente è un esempio di procedura per le fotocamere
digitali con obiettivo intercambiabile Sony e le fotocamere
digitali Sony. Per le procedure dettagliate, fare riferimento alla
Guida.
• Prima di iniziare, controllare che l’interruttore LOCK del
telecomando sia nella posizione opposta a “LOCK”.
1
Sulla fotocamera, selezionare MENU
(rete)
[Impostaz. Bluetooth] o
[Bluetooth]
[Funzione Bluetooth]
[Attiv.].
2
Sulla fotocamera, selezionare MENU
(rete)
([Trasf./Remoto]
)
[Cntrl remt Bluetooth]
[Attiv.].
3
Sulla fotocamera, selezionare MENU
(rete)
[Impostaz. Bluetooth] o
[Bluetooth]
[Associazione].
4
Sul telecomando, tenere premuto il
tasto Sblocco otturatore/REC e il lato
con il segno + del tasto Messa a fuoco/
Zoom contemporaneamente per almeno
7secondi.
5
Quando viene visualizzato un messaggio
di conferma sullo schermo della
fotocamera, selezionare [OK].
• Viene visualizzato e l’associazione inizia.
• Quando l’associazione è completata, viene
visualizzato [Associati.].
Nota
• Se l’associazione non riesce, l’indicatore del telecomando
lampeggia rapidamente. In tal caso, ripetere la procedura
dall’inizio.
• Nelle situazioni seguenti, associare di nuovo il telecomando e
la fotocamera.
– Quando si usa il telecomando per azionare una fotocamera
diversa (dopo avere collegato il telecomando a una
fotocamera diversa, è necessario associare di nuovo
il telecomando alla fotocamera originale quando la si
ricollega).
– Quando vengono reimpostate le impostazioni di rete della
fotocamera.
• Se il telecomando non viene usato per un periodo di tempo
durante una connessione Bluetooth, sullo schermo della
fotocamera può apparire (nessuna connessione Bluetooth).
Confermare l'impostazione sulla
fotocamera
Sulla fotocamera, selezionare MENU
(rete)
([Trasf./Remoto]
)
[Cntrl remt Bluetooth] e controllare che sia selezionato [Attiv.].
Riprese
Usare il telecomando per azionare la fotocamera per le riprese.
Per i dettagli, fare riferimento alla Guida.
1
Spostare l’interruttore MOVIE/STILL del
telecomando.
• Per scattare una foto: STILL
• Per registrare un video: MOVIE
2
Premere il tasto Sblocco otturatore/REC.
• Premere il tasto fino a metà corsa per mettere a
fuoco, quindi premerlo a fondo per scattare una
foto.
Caratteristiche tecniche
Dimensioni (L/A/P) (circa):
33 mm × 116,5 mm × 15,1 mm
Peso (circa):
35 g (Senza batteria)
Parti incluse:
Telecomando (1), Batteria a bottone al litio (CR2032) (1),
corredo di documentazione stampata
Il disegno e le caratteristiche tecniche sono soggetti a modifiche
senza preavviso.
Il marchio denominativo e i loghi Bluetooth® sono marchi
commerciali registrati di proprietà di Bluetooth SIG, Inc. e il loro
utilizzo da parte di Sony Group Corporation è concesso in licenza.
Acerca do manual para este produto
Este guia descreve os preparativos necessários para começar a
utilizar o produto, operações básicas, etc. Para mais detalhes,
consulte o “Guia de Ajuda” (manual online).
“Guia de Ajuda” (manual online)
https://rd1.sony.net/help/ilc/1820/h_zz/
• Esta unidade é um Telecomando que é
compatível com a função Bluetooth.
Para os modelos de câmaras que podem
ser ligados à unidade, visite o seguinte
Web site:
https://www.sony.net/dics/p1bt/
• Manuseie esta unidade com cuidado para evitar o risco de ela
cair ou de a expor a líquidos.
• Esta unidade foi concebida para ser resistente à poeira e
à humidade, mas não é à prova de água nem de salpicos.
Quando utilizar o produto em condições de chuva, não deixe o
produto molhar-se.
AVISO
Não engula a pilha, existe o risco de ocorrer queimadura química.
Esta unidade contém uma pilha tipo moeda. Em caso de ingestão
da pilha, poderá sofrer queimaduras graves em apenas 2 horas,
que poderão resultar em morte.
Mantenha as pilhas novas e usadas fora do alcance das
crianças. Se a tampa do compartimento das pilhas não fechar
adequadamente, deixe de utilizar o produto e mantenha-o fora
do alcance das crianças.
Se suspeitar que a pilha foi engolida ou inserida em qualquer
parte do corpo, consulte imediatamente um médico.
Tratamento de pilhas, baterias e equipamentos elétricos
e eletrónicos no final da sua vida útil (aplicável na União
Europeia e em países com sistemas de recolha seletiva
de resíduos)
Este símbolo, colocado no produto, na pilha ou bateria ou na
embalagem, indica que o produto e a pilha ou bateria não
devem ser tratados como resíduos urbanos indiferenciados. Em
determinadas pilhas e baterias, este símbolo pode ser utilizado
em combinação com um símbolo químico. O símbolo químico
para chumbo (Pb) é adicionado se a pilha ou bateria contiver
mais de 0,004% de chumbo. Ao garantir uma eliminação
adequada destes produtos e destas pilhas ou baterias, irá
ajudar a evitar potenciais consequências negativas para o meio
ambiente e para a saúde pública que poderiam ser provocadas
por um tratamento incorreto destes resíduos. A reciclagem dos
materiais contribuirá para a conservação dos recursos naturais.
Se, por motivos de segurança, desempenho ou proteção de
dados, os produtos necessitarem de uma ligação permanente
a uma pilha ou bateria integrada, esta só deve ser substituída
por profissionais qualificados. Acabado o período de vida útil
dos produtos, coloque-os num ponto de recolha de produtos
elétricos/eletrónicos, de forma a garantir o tratamento adequado
dos produtos e da pilha ou bateria integrada. Para todas as
outras pilhas ou baterias, consulte as instruções do produto
sobre a remoção da mesma. Deposite a pilha ou bateria num
ponto de recolha destinado à reciclagem de resíduos de pilhas e
baterias. Para informações mais detalhadas sobre a reciclagem
deste produto ou desta pilha ou bateria, contacte o município
onde reside, os serviços de recolha de resíduos da sua área ou a
loja onde adquiriu o produto ou a pilha ou bateria.
Identificar as peças
1 Indicador
2 Botão de focagem/zoom
3 Botão de libertação do obturador/REC
4 Botão AF-ON
5 Botão C1
6 Gancho para a correia de pulso
7 Interruptor ZOOM/FOCUS
8 Interruptor MOVIE/STILL
9 Interruptor LOCK
10- / Tampa do compartimento das pilhas
11 Fecho da tampa do compartimento das pilhas
12 Manípulo de abertura da tampa do compartimento das pilhas
Introduzir a pilha
Introduza a pilha de modo a que o terminal + esteja virado para
cima.
(+ no compartimento das pilhas indica o sentido das pilhas.)
Para fechar a tampa do compartimento das pilhas, rode a tampa
do compartimento das pilhas para a posição “CLOSE” até parar.
Emparelhar a unidade com a
câmara
• Segue-se um exemplo de um procedimento para Câmaras
Digitais de Objetivas Intercambiáveis da Sony e Câmaras
Fotográficas Digitais da Sony. Para mais detalhes dos
procedimentos, consulte o Guia de Ajuda.
• Antes de começar, verifique se o interruptor LOCK do
Telecomando está na posição oposta a “LOCK”.
1
Na câmara, selecione MENU
(rede)
[Definições Bluetooth] ou
[Bluetooth]
[Função Bluetooth]
[Lig.].
2
Na câmara, selecione MENU
(rede)
([Transf./Remota]
) [Cont. rem. Bluetooth]
[Lig.].
3
Na câmara, selecione MENU
(rede)
[Definições Bluetooth] ou
[Bluetooth]
[Emparelhamento].
4
No Telecomando, prima e mantenha
premido o botão de libertação do
obturador/REC e o lado + do botão
de focagem/zoom ao mesmo tempo
durante pelo menos 7 segundos.
5
Quando aparecer uma mensagem de
confirmação no ecrã da câmara, selecione
[OK].
• Aparece o símbolo e o emparelhamento inicia-se.
• Terminado o emparelhamento, aparece a
indicação [Emparelhado.].
Nota
• Se o emparelhamento falhar, o indicador do Telecomando pisca
rapidamente. Se isso acontecer, repita o procedimento desde
o início.
• Nas seguintes situações, emparelhe novamente o Telecomando
e a câmara:
– Quando utilizar o Telecomando para operar outra câmara
(Depois de ter ligado o Telecomando a outra câmara,
também tem de emparelhar novamente o Telecomando e a
câmara original quando voltar a ligá-lo à câmara original.)
– Quando as definições de rede da câmara forem redefinidas
• Se o Telecomando não for utilizado durante um período de
tempo durante uma ligação por Bluetooth, poderá aparecer o
símbolo (sem ligação por Bluetooth) no ecrã da câmara.
Confirmar a definição na câmara
Na câmara, selecione MENU
(rede)
([Transf./Remota]
)
[Cont. rem. Bluetooth] e certifique-se de que [Lig.] está
selecionado.
Tirar fotografias
Utilize o Telecomando para operar a câmara para tirar fotografias.
Para mais detalhes, consulte também o Guia de Ajuda.
1
Alterne o interruptor MOVIE/STILL do
Telecomando.
• Para tirar uma fotografia: STILL
• Para gravar um vídeo: MOVIE
2
Prima o botão de libertação do
obturador/REC.
• Prima o botão até meio para focar e depois prima
o botão completamente para tirar uma fotografia.
Especificações
Dimensões (L/A/P) (aprox.):
33 mm × 116,5 mm × 15,1 mm
Peso (aprox.):
35 g (Sem a pilha)
Itens incluídos:
Telecomando(1), Pilha de iões de lítio tipo moeda (CR2032) (1),
Documentos impressos
O design e as especificações estão sujeitos a alterações sem
aviso prévio.
A marca e os logos Bluetooth® são marcas registadas
propriedade da Bluetooth SIG, inc. e a utilização de tais marcas
pela Sony Group Corporation está sob licença.
保留备用
使用本装置之前,请阅读本文档。
关于本产品的说明书
本指南介绍了开始使用本产品以及进行基本
操作等所需的准备工作。有关详细信息,请
参阅“帮助指南”(Web 说明书)。
“帮助指南”(Web 说明书)
https://rd1.sony.net/help/
ilc/1820/h_zz/
• 本装置是一款兼容Bluetooth功
能的遥控器。
有关可以连接本装置的相机型
号,请访问以下网站:
https://www.sony.net/dics/p1bt/
• 请小心操作本装置,以免其跌落到地上;也
不要使其暴露在液体环境中。
• 本装置具有防尘和防潮设计,但是不防水或
防溅水。当您在阴雨条件下使用本产品时,
请不要让本产品淋湿。
警告
请勿吞咽电池,这会有化学烧灼危险。
本装置中包含纽扣电池。如果吞咽纽扣电池,
则2小时内就可能造成严重的体内烧灼并导致
死亡。
请将新旧电池均放到儿童够不到的地方。如果
电池舱盖没有紧闭,请停止使用产品并将其放
到儿童够不到的地方。
如果您认为电池可能已被吞咽或进入到人体
内,请立即就医。
[频率范围、发射功率、天线类型、天线增益]
2.400 0-2.483 5 GHz : ≤ 20 dBm (e.i.r.p.)
单极天线, 0 dBi
禁用无线相关的功能
在搭乘飞机等需要关闭无线电通讯时,请将
LOCK开关拨置LOCK一侧。
部件识别
1 指示灯
2 对焦/变焦按钮
3 快门释放/REC按钮
4 AF-ON按钮
5 C1按钮
6 腕带孔
7 ZOOM/FOCUS开关
8 MOVIE/STILL开关
9 LOCK开关
10- / 电池舱盖
11 电池舱盖锁紧装置
12 电池舱盖旋钮
插入电池
插入电池时,使+端子朝上。
(电池盒上的+指示了电池的方向。)
要关闭电池舱盖,请将电池舱盖朝“CLOSE”方
向转动,直到转不动为止。
将本装置与相机配对
• 以下是Sony可更换镜头数码相机和Sony数码
照相机的连接过程示例。有关详细的操作过
程,请参阅帮助指南。
• 开始之前,检查遥控器的LOCK开关是否处
于“LOCK”的相反位置。
1
在相机上,选择MENU
(网络)
[Bluetooth设置]或[Bluetooth]
[Bluetooth功能]
[开]。
2
在相机上,选择MENU
(网络)
([传输/远程]
)[Bluetooth遥控]
[开]。
3
在相机上,选择MENU
(网络)
[Bluetooth设置]或[Bluetooth]
[配对]。
4
在遥控器上,同时按住快门释放/REC按
钮和对焦/变焦按钮的+侧至少7秒钟。
5
当相机屏幕上出现确认信息时,选择[确
定]。
• 此时出现 并开始配对。
• 配对完成后,会出现[已配对。]。
注意
• 如果配对失败,遥控器的指示灯会快速闪
烁。如果出现这种情况,请从头开始重新执
行上述过程。
• 在下列情况下,请重新对遥控器和相机进行
配对:
– 使用遥控器操作其他相机时(将遥控器与
其他相机连接后,当连接原相机时,也必
须重新对遥控器和原相机进行配对。)
– 重置相机的网络设置时
• 如果在Bluetooth连接期间有一段时间未使用
遥控器,相机屏幕上可能会出现
(无Bluetooth连接)。
确认相机的设置
在相机上,选择MENU
(网络)
([传输/远程]
)[Bluetooth遥控],并确保选
择[开]。
拍摄
利用遥控器可以操作相机进行拍摄。
有关详细信息,另请参阅帮助指南。
1
切换遥控器的MOVIE/STILL开关。
• 拍摄静止影像:STILL
• 拍摄视频:MOVIE
2
按下快门释放/REC按钮。
• 半按该按钮可进行对焦,全按则可拍摄
静止影像。
规格
尺寸(宽/高/深)(近似值):
33 mm × 116.5 mm × 15.1 mm
质量(近似值):
35 g (没有电池)
所含物品:
遥控器 (1)、纽扣锂电池 (CR2032) (1)、成套印
刷文件
设计或规格如有变动,恕不另行通知。
Bluetooth®文字商标和徽标是归Bluetooth SIG,
Inc.所有的注册商标,Sony Group Corporation
对任何此类商标的使用都获得了许可。
關於本產品的手冊
本指南說明使用產品前的必要準備工作、基本操作等等。如需詳細
資訊,請參閱“說明指南”(線上手冊)。
“說明指南”(線上手冊)
https://rd1.sony.net/help/ilc/1820/h_zz/
• 本裝置為相容於Bluetooth功能的遙控器。
關於可連接至本裝置的相機型號,請瀏覽以下
網站。
https://www.sony.net/dics/p1bt/
• 請小心使用本裝置,以避免掉落或接觸到液體。
• 本裝置具有防塵與防潮設計,但不防水,也不防濺。在雨天環境下
使用本產品時,切勿讓產品淋濕。
警告
不可吞食電池,以免有化學燒傷的危險。
本裝置包含一個硬幣/鈕扣型電池。如果誤食硬幣/鈕扣型電池,短短2
小時內便有可能引起嚴重體內灼傷,並可能導致死亡。
請將新舊電池存放在兒童無法觸及的地方。如果電池蓋無法確實緊
閉,請停止使用該產品,並存放在兒童無法觸及的地方。
如果電池可能已經被吞下或放入體內任何部位,應立即就醫。
廢電池請回收
零件識別
1 指示燈
2 對焦/變焦按鈕
3 快門釋放/REC按鈕
4 AF-ON按鈕
5 C1按鈕
6 掛繩孔
7 ZOOM/FOCUS開關
8 MOVIE/STILL開關
9 LOCK開關
10- / 電池蓋
11 電池蓋鎖定閂
12 電池蓋旋鈕
插入電池
插入電池並使+端子朝上。
(電池室上的+表示電池方向。)
如果要關閉電池蓋,請將電池蓋朝“CLOSE”轉到底。
配對本產品與相機
• 以下為Sony可換鏡頭數位相機及Sony數位照相機的操作程序範例。
如需詳細的程序說明,請參閱說明指南。
• 開始前,請確定遙控器的LOCK開關位於“LOCK”的相反位置。
1
在相機上,選擇MENU
(網路)
[Bluetooth設定]或[Bluetooth]
[Bluetooth功能]
[開]。
2
在相機上,選擇MENU
(網路)
([傳輸/遠程]
)[Bluetooth遙控]
[開]。
3
在相機上,選擇MENU
(網路)
[Bluetooth設定]或[Bluetooth]
[配對]。
4
在遙控器上,同時按住快門釋放/REC按鈕和
對焦/變焦按鈕的+側至少7秒。
5
相機螢幕上出現確認訊息時,請選擇[確定]。
• 會顯示且配對會開始執行。
• 配對完成時,隨即會顯示[已配對。]。
備註
• 如果配對失敗,遙控器的指示燈會快速閃爍。如果發生此情形,請
重新執行程序。
• 在下列情況下,請重新對遙控器與相機進行配對。
– 使用遙控器操作其他相機時(若遙控器曾連接至其他相機,當連
接至原相機時,必須重新對遙控器與原相機進行配對。)
– 相機的網路設定已經重設時
• 在Bluetooth連線期間,如果遙控器閒置一段時間,
(無Bluetooth連線)可能顯示在相機螢幕上。
確認相機的設定
在相機上,選擇MENU
(網路)
([傳輸/遠程]
)
[Bluetooth遙控]並確定選擇[開]。
拍攝
使用遙控器操作相機進行拍攝。
如需詳細資訊,另請參閱說明指南。
1
切換遙控器的MOVIE/STILL開關。
• 拍攝靜態影像:STILL
• 拍攝影片:MOVIE
2
按下快門釋放/REC按鈕。
• 半按下按鈕進行對焦,然後全按下以拍攝靜態影像。
規格
尺寸(寬/高/深)(概略值):
33mm×116.5mm×15.1mm
質量(概略值):
35g(沒有電池)
所含物品:
遙控器(1)、硬幣型鋰電池(CR2032)(1)、成套印刷文件
設計和規格有所變更時,恕不另行奉告。
Bluetooth®字樣與標誌是BluetoothSIG,Inc.註冊及擁有的商標,
SonyGroupCorporation是在授權下使用任何此類標誌。