Here you will learn about your new oven. The control panel and the individual operating controls are explained. You will find information on the cooking compartment and the accessories.
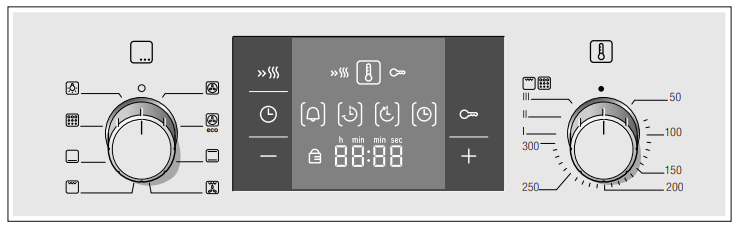
Control panel
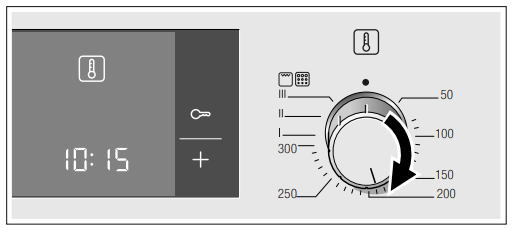
Here you will see an overview of the control panel. All of the symbols never appear in the display at the same time. Depending on the appliance model, individual details may differ.
Control knobs
The control knobs are retractable. To lock it in or out, press the control knob in the off position.
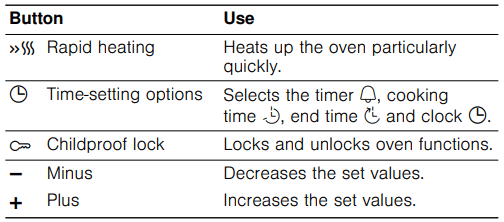
Buttons
The sensors are located under the individual buttons. They must not be pressed too firmly. Only touch the corresponding symbol.
Buttons and display
You can use the buttons to set various additional functions. On the display, you can read the values that you have set.
The time-setting option that is currently selected in the display is indicated by brackets [ ] around the corresponding symbol. Exception: For the clock, the symbol only lights up if the time is being changed.
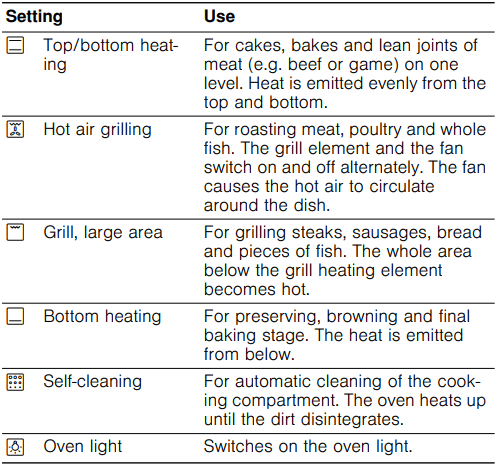
Function selector
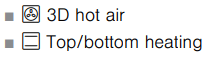
Use the function selector to set the type of heating.
* Type of heating used to determine the energy efficiency class in accordance with EN50304.
* Type of heating used to determine the energy efficiency class in accordance with EN50304.
If you make settings, the symbol lights up in the display. The oven light in the cooking compartment switches on.
Note: So that the heat is well distributed, the fan switches on briefly during the heating up phase when top or bottom heating is used.
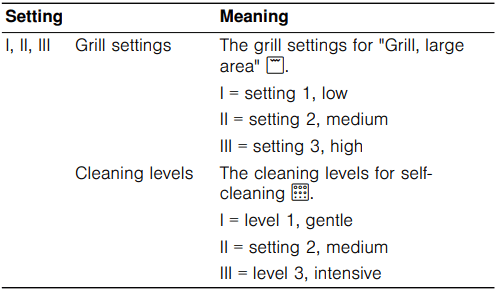
Temperature selector
Use the temperature selector to set the temperature, grill setting or cleaning setting.
Heating symbol
While the oven is heating up, the symbol is lit in the display. When the optimum time for placing the dish in the oven has been reached and the oven is maintaining the temperature, the symbol is no longer lit.
The symbol never lights up during grilling or cleaning.
Cooking compartment
The oven light is located in the cooking compartment. A cooling fan protects the oven from overheating.
Oven light
During operation, the oven light in the cooking compartment is on. When temperatures up to 60 °C are selected, and when self-cleaning is activated, the light switches off. This enables precise temperature regulation.
The setting on the function selector can be used to switch on the light without heating the oven.
Cooling fan
The cooling fan switches on and off as required. The hot air escapes above the door. Caution: do not cover the ventilation slots. Otherwise the oven will overheat.
So that the cooking compartment cools down more quickly after operation, the cooling fan continues to run for a certain period afterwards.
Your accessories
The accessories supplied with your appliance are suitable for making many meals. Ensure that you always insert the accessories into the cooking compartment the right way round.
There is also a selection of optional accessories, with which you can improve on some of your favourite dishes, or simply to make working with your oven more convenient.
Inserting accessories
You can insert the accessories into the cooking compartment at 5 different levels. Always insert them as far as they will go so that the accessories do not touch the door panel.
The accessories can be pulled out approximately halfway until they lock in place. This allows dishes to be removed easily.
When sliding the accessories into the cooking compartment, ensure that the indentation is at the back. They can only lock in place from this position.
Note: The accessories may deform when they become hot. Once they cool down again, they regain their original shape. This does not affect their operation.
You can buy accessories from the after-sales service, from specialist retailers or online. Please specify the HEZ number.
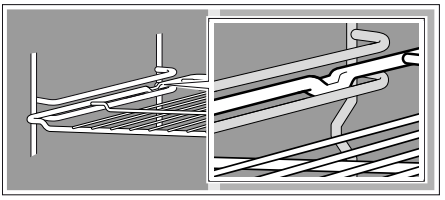
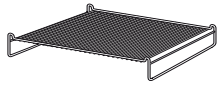
Wire rack
For ovenware, cake tins, joints, grilled items and frozen meals. Insert the wire rack with the open side facing the oven door and the curvature pointing downwards
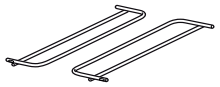
Insert grid
For roasting.
Place the wire insert in the universal pan with the legs facing downwards. This ensures that dripping fat and meat juices are collected.
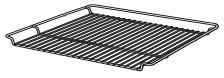
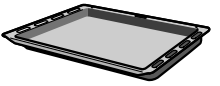
Universal pan
For moist cakes, pastries, frozen meals and large roasts. It can also be used to catch dripping fat when you are grilling directly on the wire rack.
Slide in the universal pan with the sloping edge facing the oven door.
Accessory holder
Insert on the left and right. During self-cleaning, the universal pan, for example, can be left in for cleaning.
Optional accessories
You can purchase optional accessories from the after-sales service or specialist retailers. You will find a comprehensive range of products for your oven in our brochures and on the Internet. The availability of optional accessories and the option for ordering these online varies from country to country. Please see the sales brochures for more details.
Not all optional accessories are suitable for every appliance. When purchasing, please always quote the exact designation (E-no.) of your appliance.
Setting the oven
There are various ways in which you can set your oven. Here we will explain how you can select the desired type of heating and temperature or grill setting. You can select the oven cooking time and end time for your dish. Please refer to the section on Setting the time-setting options.
Type of heating and temperature
Example in the picture: Top/bottom heating at 190 °C.
1. The function selector is used to set the type of heating.
2.Set the temperature or grill setting using the temperature selector.
The oven begins to heat up.
Switching off the oven
Turn the function selector to the off position.
Changing the settings
The type of heating and temperature or grill setting can be changed at any time using their respective selectors.
Rapid heating
With rapid heating, your oven reaches the temperature selected particularly quickly.
Use rapid heating when temperatures above 100 °C are selected. The following types of heating are suitable:
To ensure an even cooking result, do not place your dish in the cooking compartment until rapid heating is complete.
Set the type of heating and temperature.
Press the button.
The symbol lights up in the display. The oven begins to heat up.
The rapid heating process is complete
A signal sounds. The symbol in the display goes out. Put your dish in the oven.
Cancelling rapid heating
Press the button. The symbol in the display goes out.
Care and cleaning
With good care and cleaning, your oven will remain clean and fully-functioning for a long time to come. Here we will explain how to maintain and clean your oven correctly.
Notes
Slight differences in the colours on the front of the oven are caused by the use of different materials, such as glass, plastic and metal.
Shadows on the door panel which look like streaks, are caused by reflections made by the oven light.
Enamel is baked on at very high temperatures. This can cause some slight colour variations. This is normal and does not affect their function. The edges of thin trays cannot be completely enamelled. As a result, these edges can be rough. This will not impair the anti-corrosion protection.
Cleaning agents
To ensure that the different surfaces are not damaged by using the wrong type of cleaning agent, observe the information in the table. Do not use
harsh or abrasive cleaning agents,
cleaning agents with a high concentration of alcohol,
hard scouring pads or sponges,
high-pressure cleaners or steam cleaners.
Wash new sponge cloths thoroughly before use.
Area
Cleaning agents
Control panel
Hot soapy water:
Clean with a dish cloth and dry with a soft cloth. Do not use glass cleaners or glass scrapers.
Stainless steel
Hot soapy water:
Clean with a dish cloth and dry with a soft cloth. Remove traces of limescale, grease, starch and albumin (e.g. egg white) immediately. Corrosion can form under such residues.
Special stainless steel cleaning products suitable for hot surfaces are available from our after-sales service or from specialist retailers. Apply a very thin layer of the cleaning product with a soft cloth.
Door panels
Glass cleaner:
Clean with a soft cloth. Do not use a glass scraper.
Door cover
Stainless steel cleaning agents (available from our after-sales service or from specialist retailers): Please observe the manufacturer's instructions.
Cooking compartment
Hot soapy water or a vinegar solution: Clean with a dish cloth. If there are heavy deposits of dirt, use a stainless steel scouring pad or oven cleaner. Only use when the cooking compartment is cold.
It is best to use the self-cleaning function. Observe the instructions in the Self-cleaning section when doing so.
Glass cover for the oven light
Hot soapy water:
Clean with a dish cloth.
Rails
Hot soapy water:
Soak and clean with a dish cloth or brush.
Telescopic shelves
Hot soapy water:
Clean with a dish cloth or a brush. Do not remove the lubricant while the pullout rails are pulled out – it is best to clean them when they are inserted. Do not soak, clean in the dishwasher, or leave in the oven during self-cleaning. The rails may be damaged causing them to jam.
Accessories
Hot soapy water:
Soak and clean with a dish cloth or brush.
Detaching and refitting the rails
The rails can be removed for cleaning. The oven must have cooled down.
Detaching the rails
Lift up the front of the rail
and unhook it (figure A).
Then pull the whole rail forward
and remove it (Fig. B)
Clean the rails with cleaning agent and a sponge. For stubborn deposits of dirt, use a brush.
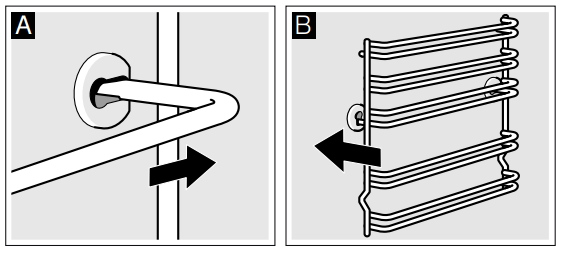
Refitting the rails
First insert the rail into the rear socket, press it to the back slightly (figure A),
and then hook it into the front socket (figure B).
The rails fit both the left and right sides. Ensure that, as shown in figure B, levels 1 and 2 are below and levels 3, 4 and 5 are above.
Detaching and attaching the oven door
For cleaning purposes and to remove the door panels, you can detach the oven door.
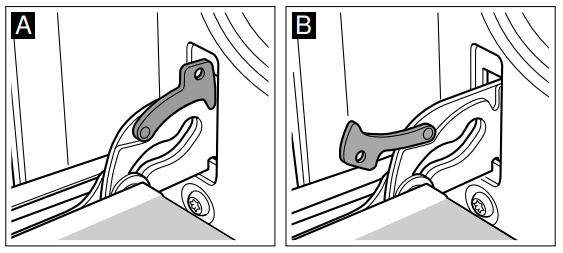
The oven door hinges each have a locking lever. When the locking levers are closed (figure A), the oven door is secured in place. It cannot be detached. When the locking levers are open in order to detach the oven door (Fig. B), the hinges are locked. They cannot snap shut.
Detaching the door
Open the oven door fully.
Fold up the two locking levers on the left and right (figure A).
Close the oven door as far as the limit stop. With both hands, grip the door on the left and right-hand sides. Close the door a little further and pull it out (figure B).
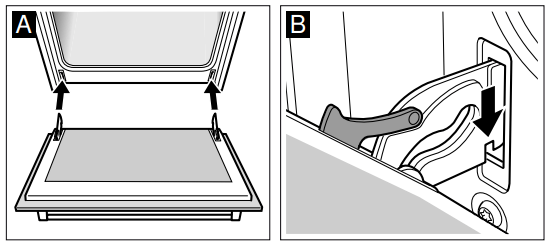
Attaching the door
Reattach the oven door in the reverse sequence to removal.
When attaching the oven door, ensure that both hinges are inserted straight into the opening (figure A).
The notch on the hinge must engage on both sides (figure B).
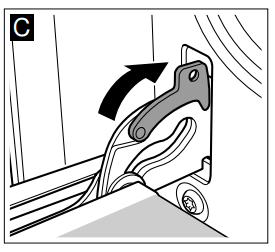
3. Fold back both locking levers (figure C). Close the oven door.
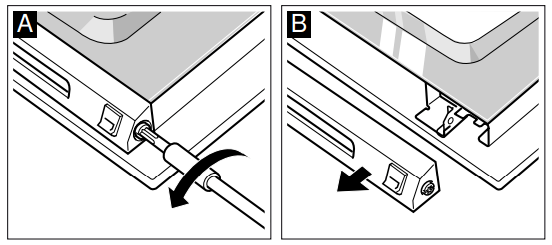
Removing the door cover
The oven door cover can become discoloured. To carry out thorough cleaning, you can remove the cover.
Open the oven door fully.
Unscrew the oven door cover. To do this, undo the left and right screws (figure A).
Remove the cover (figure B).
Make sure that the oven door is not closed while the cover is removed. The inner panel may be damaged. Clean the cover with a stainless-steel cleaning agent.
4. Replace the cover and secure it in position.
5. Close the oven door.
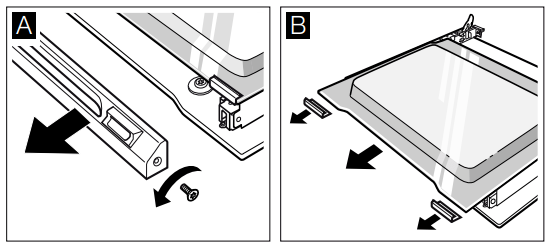
Removing and installing the door panels
To facilitate cleaning, you can remove the glass panels from the oven door.
When removing the inner panels, pay attention to the sequence in which the panels are removed. In order to reassemble the panels in the correct sequence, use the numbers that appear on each panel.
Removal
Detach the oven door and lay it on a cloth with the handle facing down.
Unscrew the cover at the top of the oven door. To do this, unscrew the left and right screws (fig. A).
Lift the top panel up and pull it out and remove the two small seals (fig. B).
4. Unscrew the retaining clips on the right and left. Lift the panel and remove the clips from the panel (fig. C).
5. Remove the seal from the bottom of the panel (fig. D). Pull the seal and remove it up and out. Pull out the panel.
6.Pull the lower panel at an angle, upwards and out.
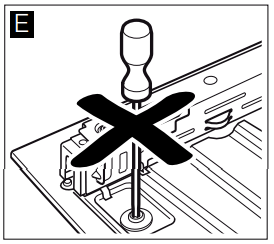
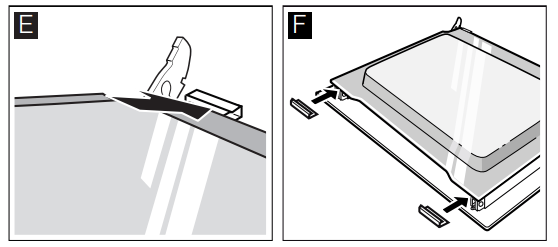
7. Do NOT unscrew the left and right-hand screws from the sheet metal part (fig. E).
Clean the panels with glass cleaner and a soft cloth
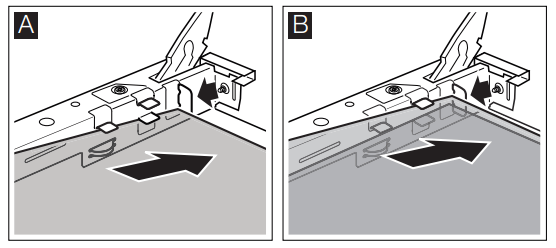
Installation
During installation, make sure that the lettering "top right" is upside down at the bottom left of both panels.
Insert the lower panel at an angle towards the back (fig. A).
Slide in the middle panel (fig. B).
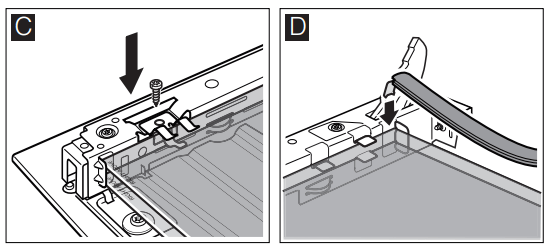
3.Stick the retaining clips onto the right and left-hand side of the panel, aligning them so that the retaining carriers are over the screw holes, and then screw into place (fig. C).
4. Hook the seal in to the bottom of the panel again (fig. D).
5. Insert the uppermost panel at an angle to the back into the brackets. Take care not to push the seal to the back (fig. E).
6. Insert the two small seals on the left and right of the panel again (fig. F).
7.Put the cover back in place and screw it on.
8.Attach the oven door.
Do not use the oven again until the panels have been correctly installed.
Troubleshooting
Malfunctions often have simple explanations. Refer to the table before calling the after-sales service as you may be able to remedy the fault yourself.
Malfunction table
If a dish doesn't turn out as well as you had hoped, refer to the section Tested for you in our cooking studio, where you will find plenty of cooking tips and tricks.
Problem
Possible cause
Remedy/information
The oven does not work.
The circuit breaker is defective.
Look in the fuse box and check that the circuit breaker is in working order.
Power cut
Check whether the kitchen light or other kitchen appliances are working.
and zeros light up in the display.
Power cut
Reset the clock.
The oven does not heat up.
There is dust on the contacts.
Turn the control knobs back and forth several times.
The oven door cannot be opened. The symbol lights up in the display.
The oven door is locked by self-cleaning.
Wait until the oven has cooled down and the symbol goes out.
The oven does not heat up. The colon in the display flashes.
The oven is in demonstration mode.
Switch off the circuit breaker in the fuse box and switch it on again after approximately 20 seconds. Now, within approx. 2 minutes, press and hold the button for approx. 4 seconds until the colon lights up constinuously
F8 appears in the display.
Automatic switch-off has been activated.
Turn the function selector to the off position.
Error messages
If an error message with E appears, press the button. Then reset the clock. If the error message appears again, call the after-sales service.
You can take remedial action yourself if the following error messages are displayed.
Error message
Possible cause
Remedy/information
E011
A button was depressed for too long or is covered up.
Press all buttons individually. Check whether any buttons are jammed, covered up or soiled.
E115
The temperature in the cooking compartment is too high.
The oven door locks and heating is suspended. Wait until the oven has cooled down. Press the button and reset the clock.
Risk of electric shock!
Incorrect repairs are dangerous. Repairs may only be carried out by one of our trained after-sales engineers.
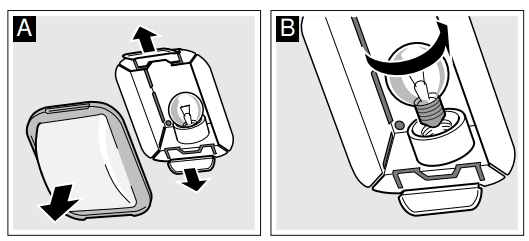
Replacing the bulb in the oven ceiling light
If the bulb in the oven light fails, it must be replaced. Heatresistant, 40 watt spare bulbs can be obtained from our aftersales service or a specialist retailer. Only use these bulbs.
1.Place a tea towel in the oven when it is cold to prevent damage.
2. Remove the glass cover. To do this, press back the metal tabs with your thumb (Fig. A).
3. Unscrew the bulb and replace it with one of the same type (Fig. B).
4. Refit the glass cover. When doing this, insert it on one side and press firmly on the other side. The glass cover will click into place.
5. Remove the tea towel and switch on the circuit breaker.
Glass cover
You must replace a damaged glass cover. Suitable glass covers may be obtained from the after-sales service. Please specify the E number and FD number of your appliance.

 symbol only lights up if the time is being changed.
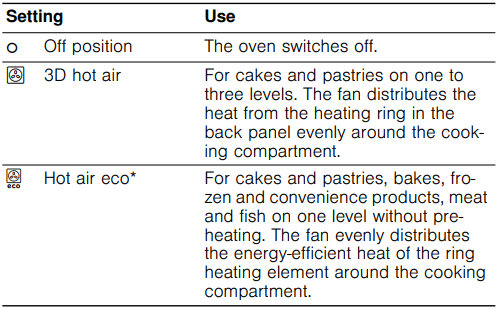
 symbol lights up in the display. The oven light in the cooking compartment switches on.
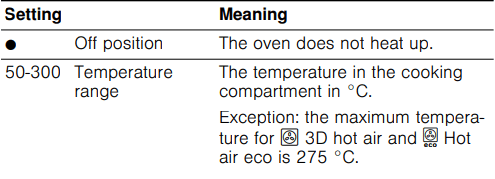
 symbol is lit in the display. When the optimum time for placing the dish in the oven has been reached and the oven is maintaining the temperature, the
  setting on the function selector can be used to switch on the light without heating the oven.
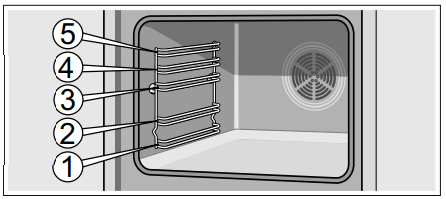

 Top/bottom heating at 190 °C.
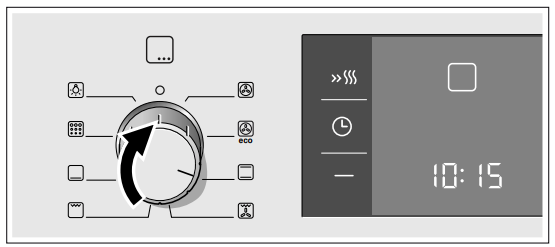
 button.
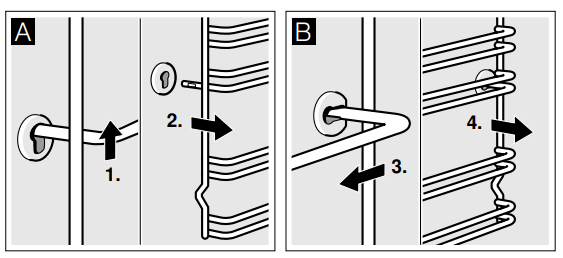


 and zeros light up in the display.
 symbol lights up in the display.
 self-cleaning.
 button for approx. 4 seconds until the colon lights up constinuously