Owner's Guide Televisions
(Image shown may differ from your TV.)
You can operate the TV by pressing the button or moving the joystick left, right, up, or down.

Basic Functions
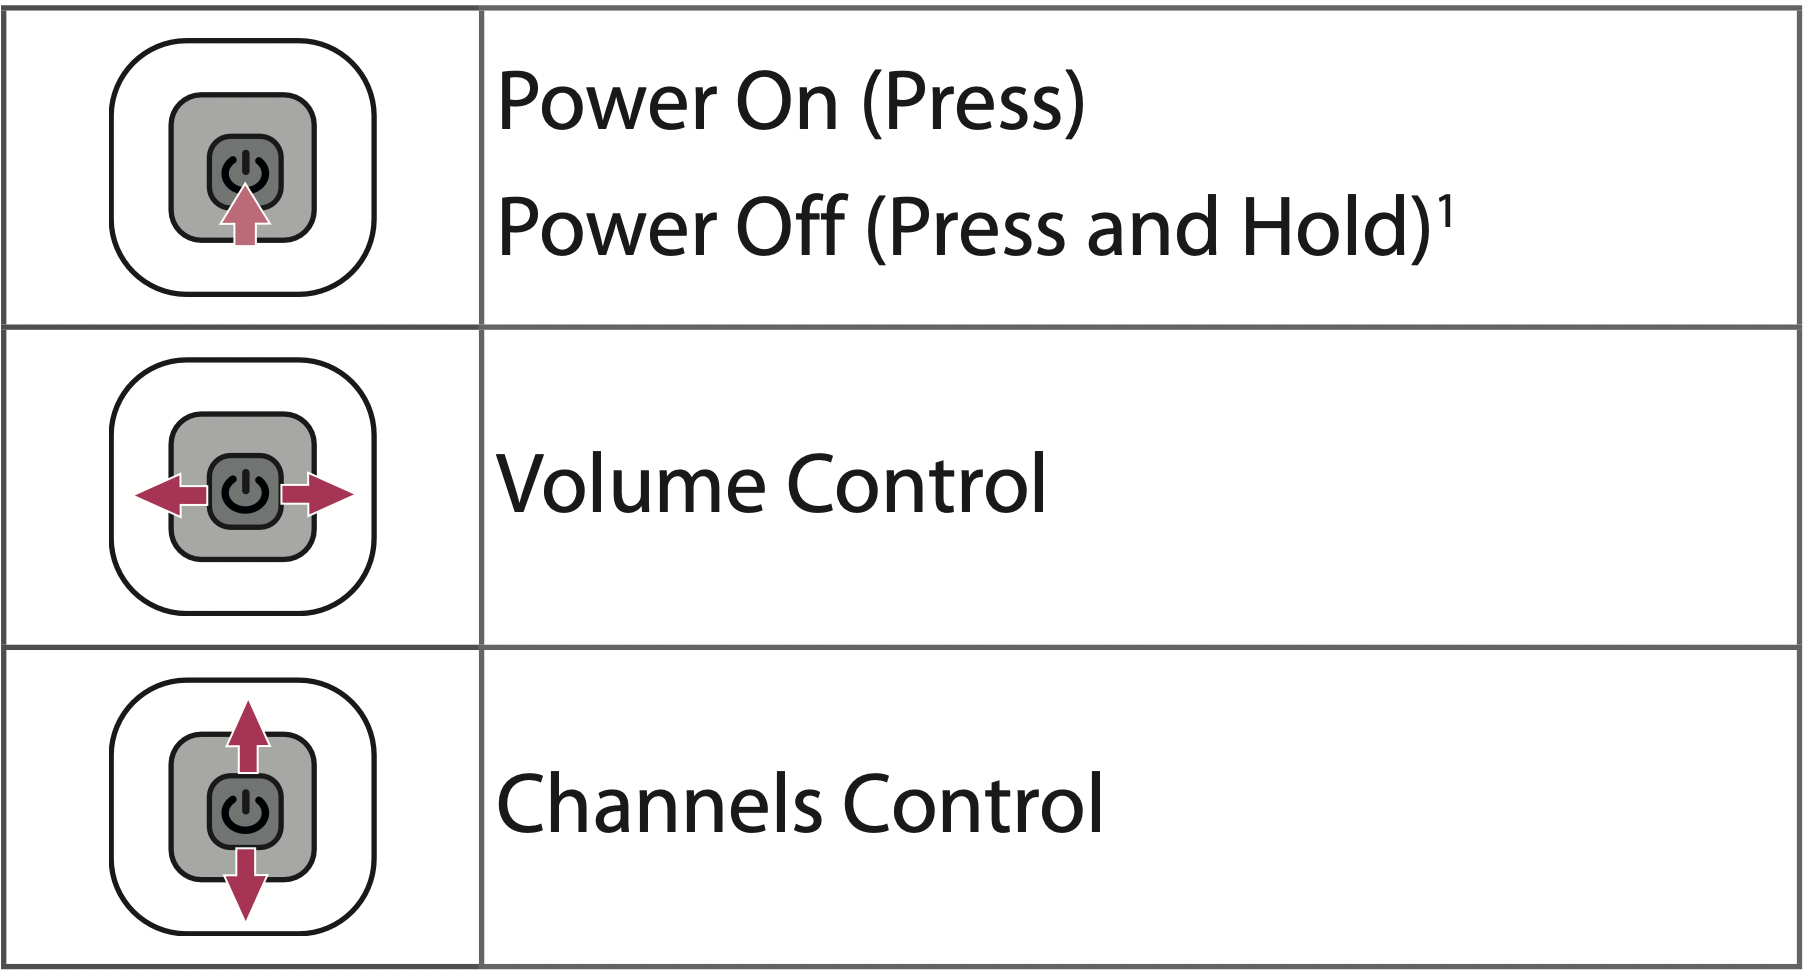
- If the menu button is on the screen, pressing and holding the joystick button will let you exit the menu.
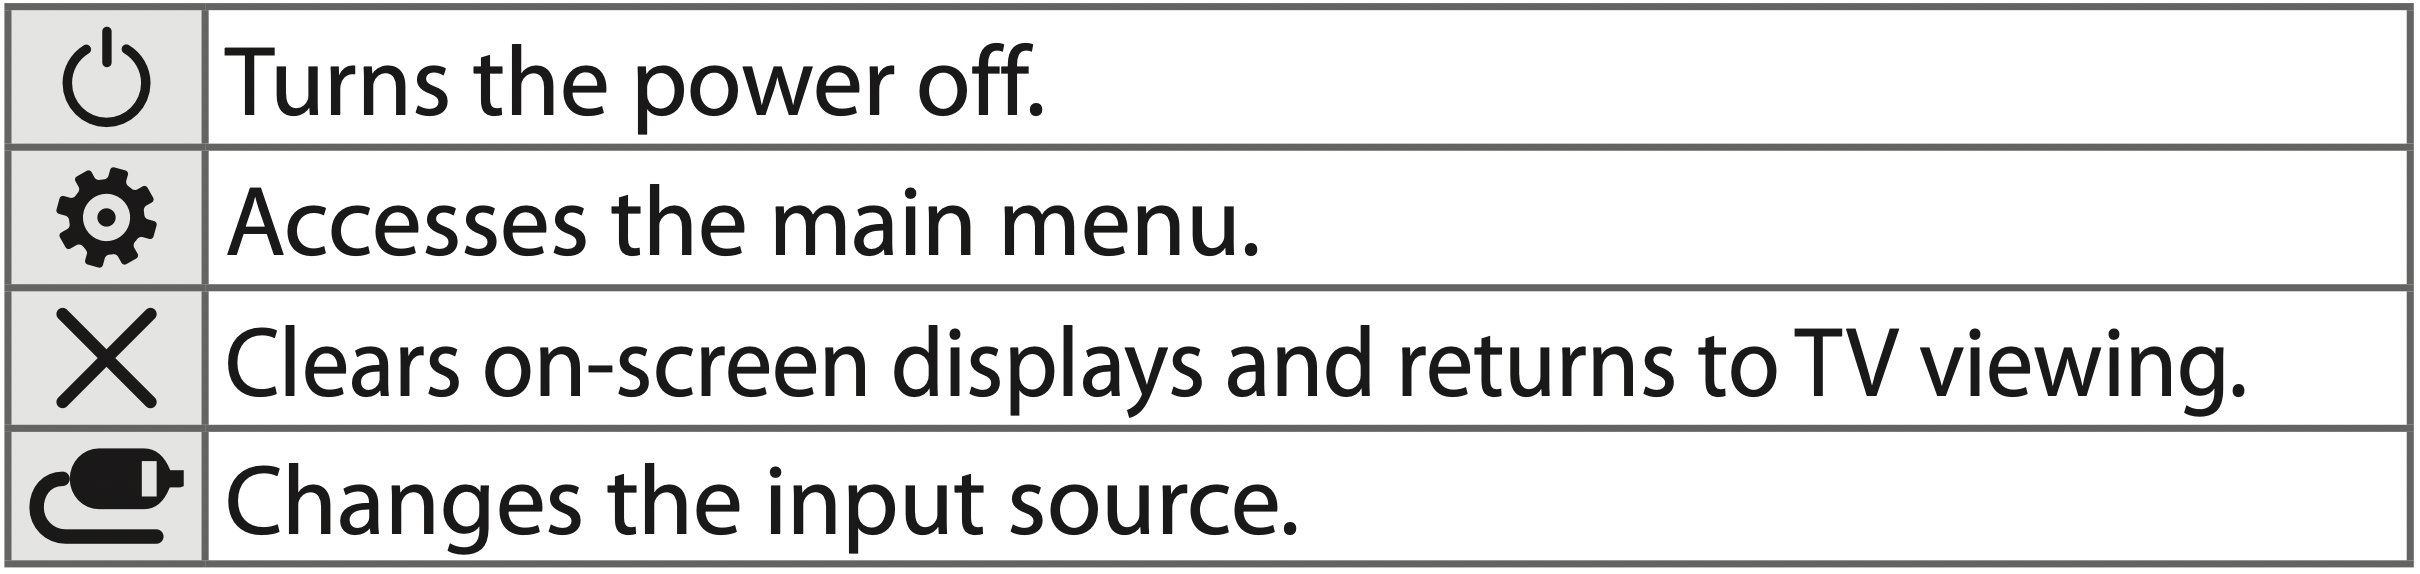
Adjusting the Menu
When the TV is turned on, press button  one time. You can adjust the Menu items pressing or moving the buttons.
NOTE: If you press the joystick button first, you may not be able to adjust the volume level and saved programmes.
CAUTION: When your finger over the joystick button and push it to the up, down, left or right, be careful not to press the joystick button.
Mounting on a table
- Lift and tilt the TV into its upright position on a table.
Leave a 100 mm (3.9 inches) (minimum) space from the wall for proper ventilation.
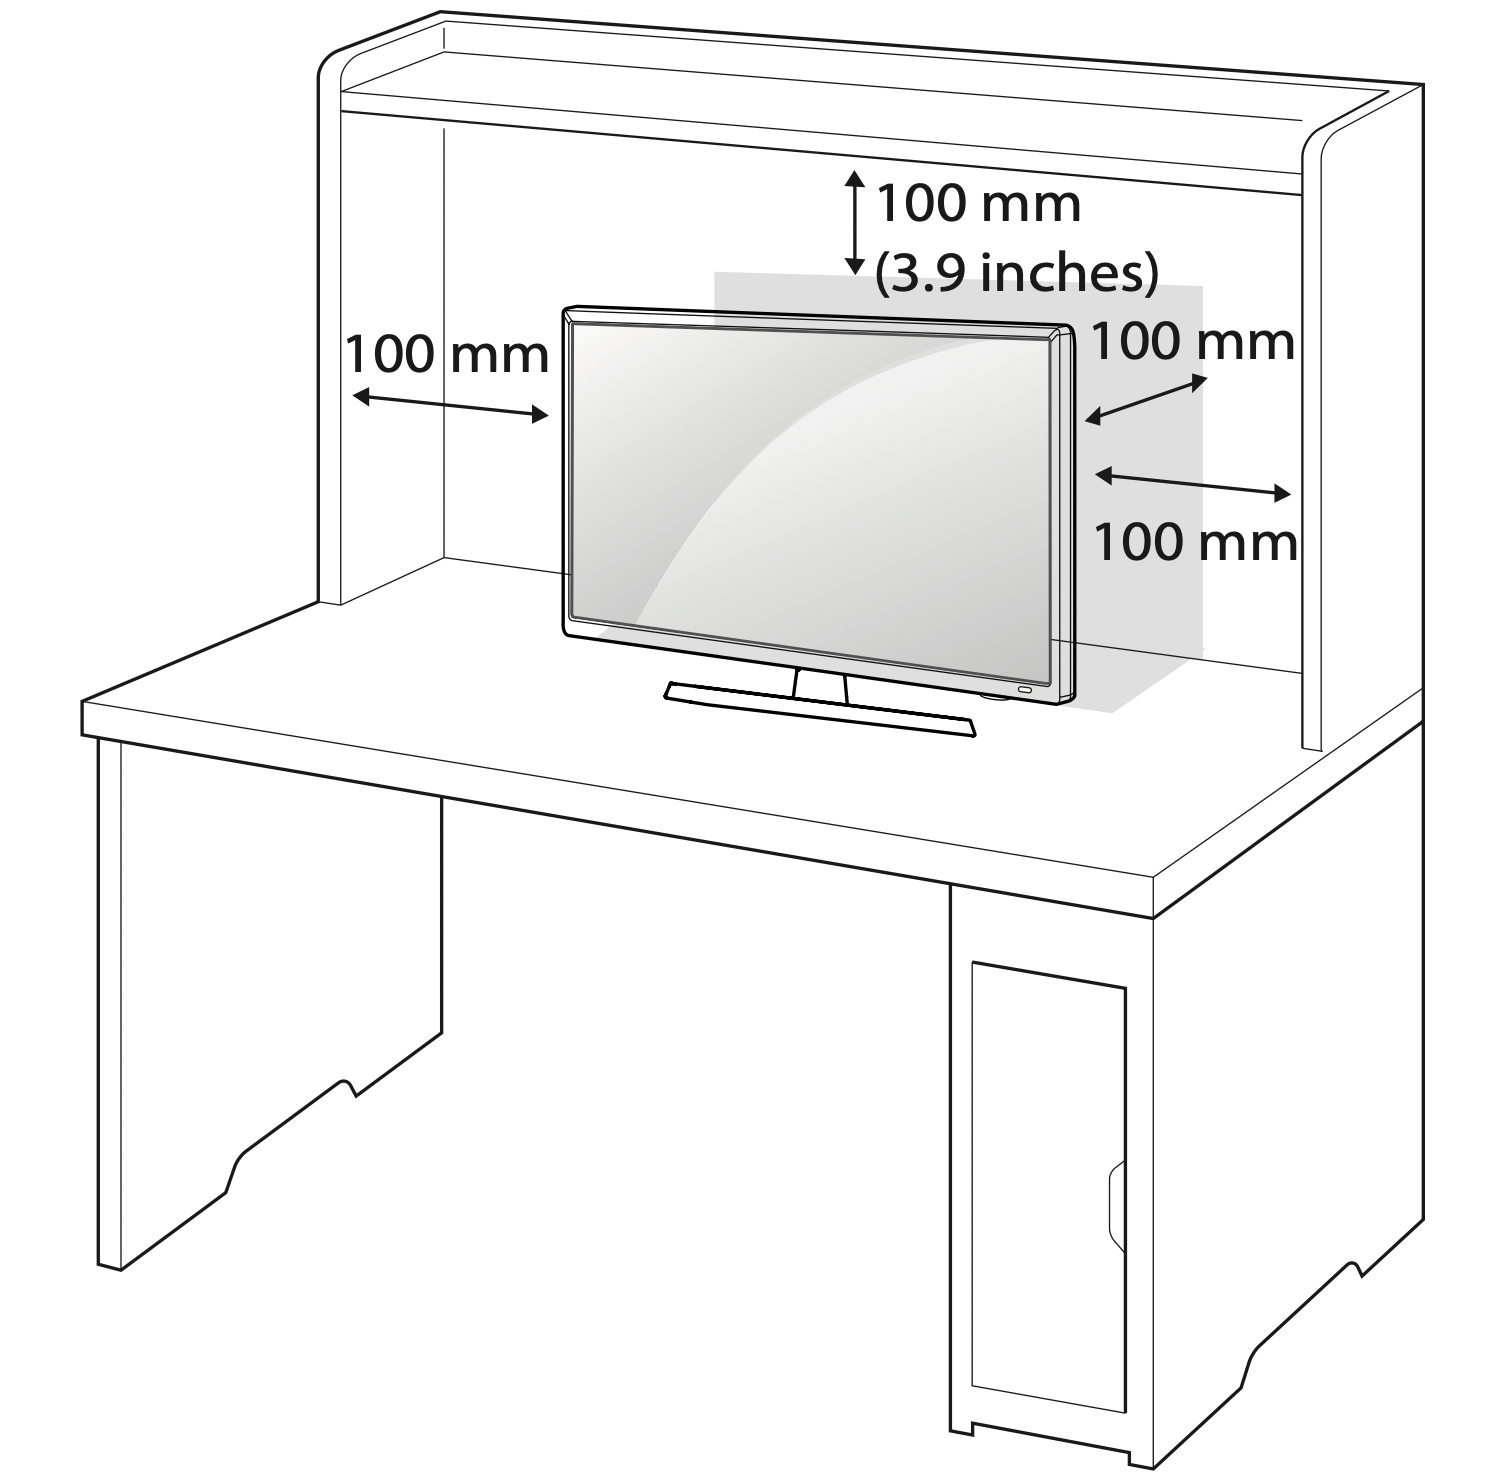
- Connect the power cord to a wall outlet.
CAUTION:
- Do not place the TV near or on sources of heat, as this may result in fire or other damage.
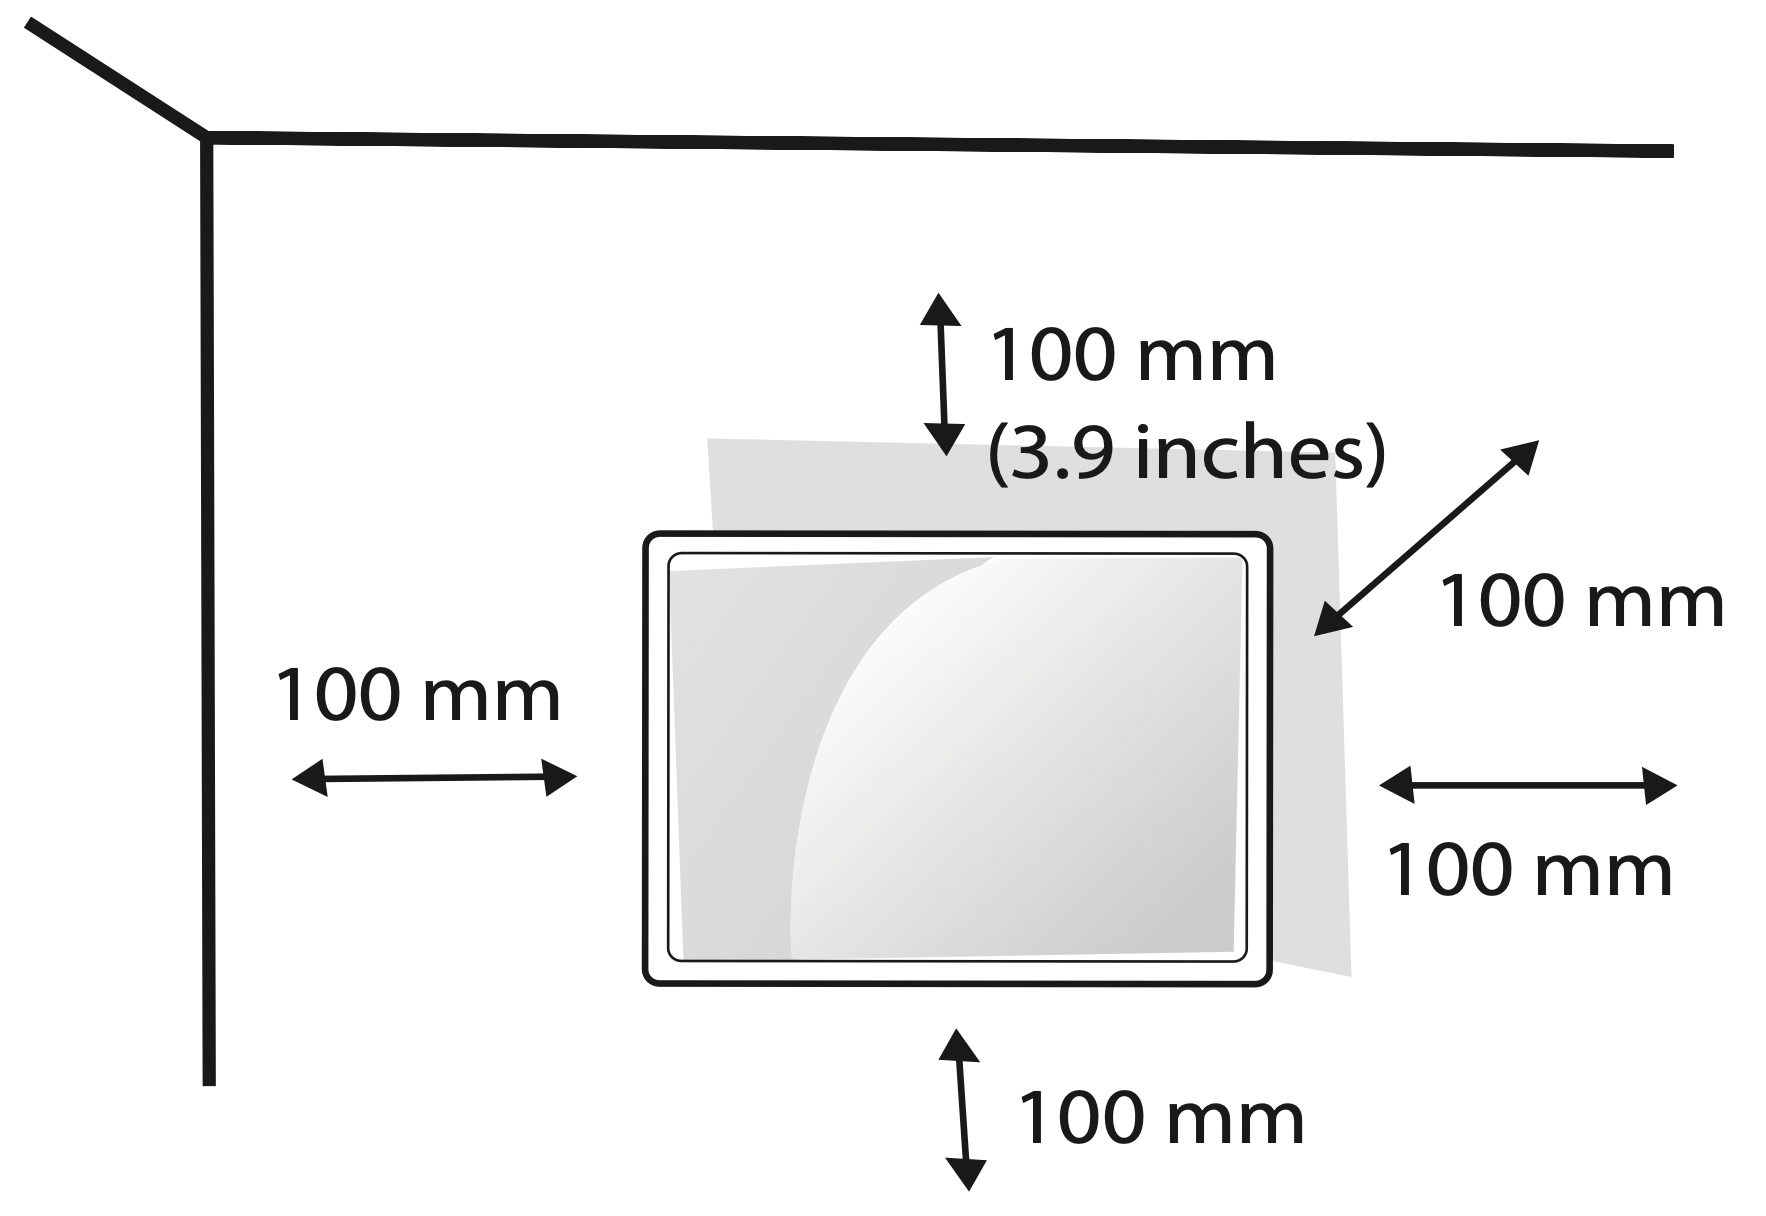
Mounting on a wall
An optional wall mount can be used with your LG Television. Consult with your local dealer for a wall mount that supports the VESA standard used by your TV model. Carefully attach the wall mount bracket at the rear of the TV. Install the wall mount bracket on a solid wall perpendicular to the floor. If you are attaching the TV to other building materials, please contact qualified personnel to install the wall mount. Detailed instructions will be included with the wall mount. We recommend that you use an LG brand wall mount. The LG wall mount is easy to adjust or to connect the cables. When you do not use LG’s wall mount bracket, use a wall mount bracket where the device is adequately secured to the wall with enough space to allow connectivity to external devices. If you are using a non-adjustable mount, attach the mount to the wall. Attach the cables to the TV first, then attach the TV to the mount.
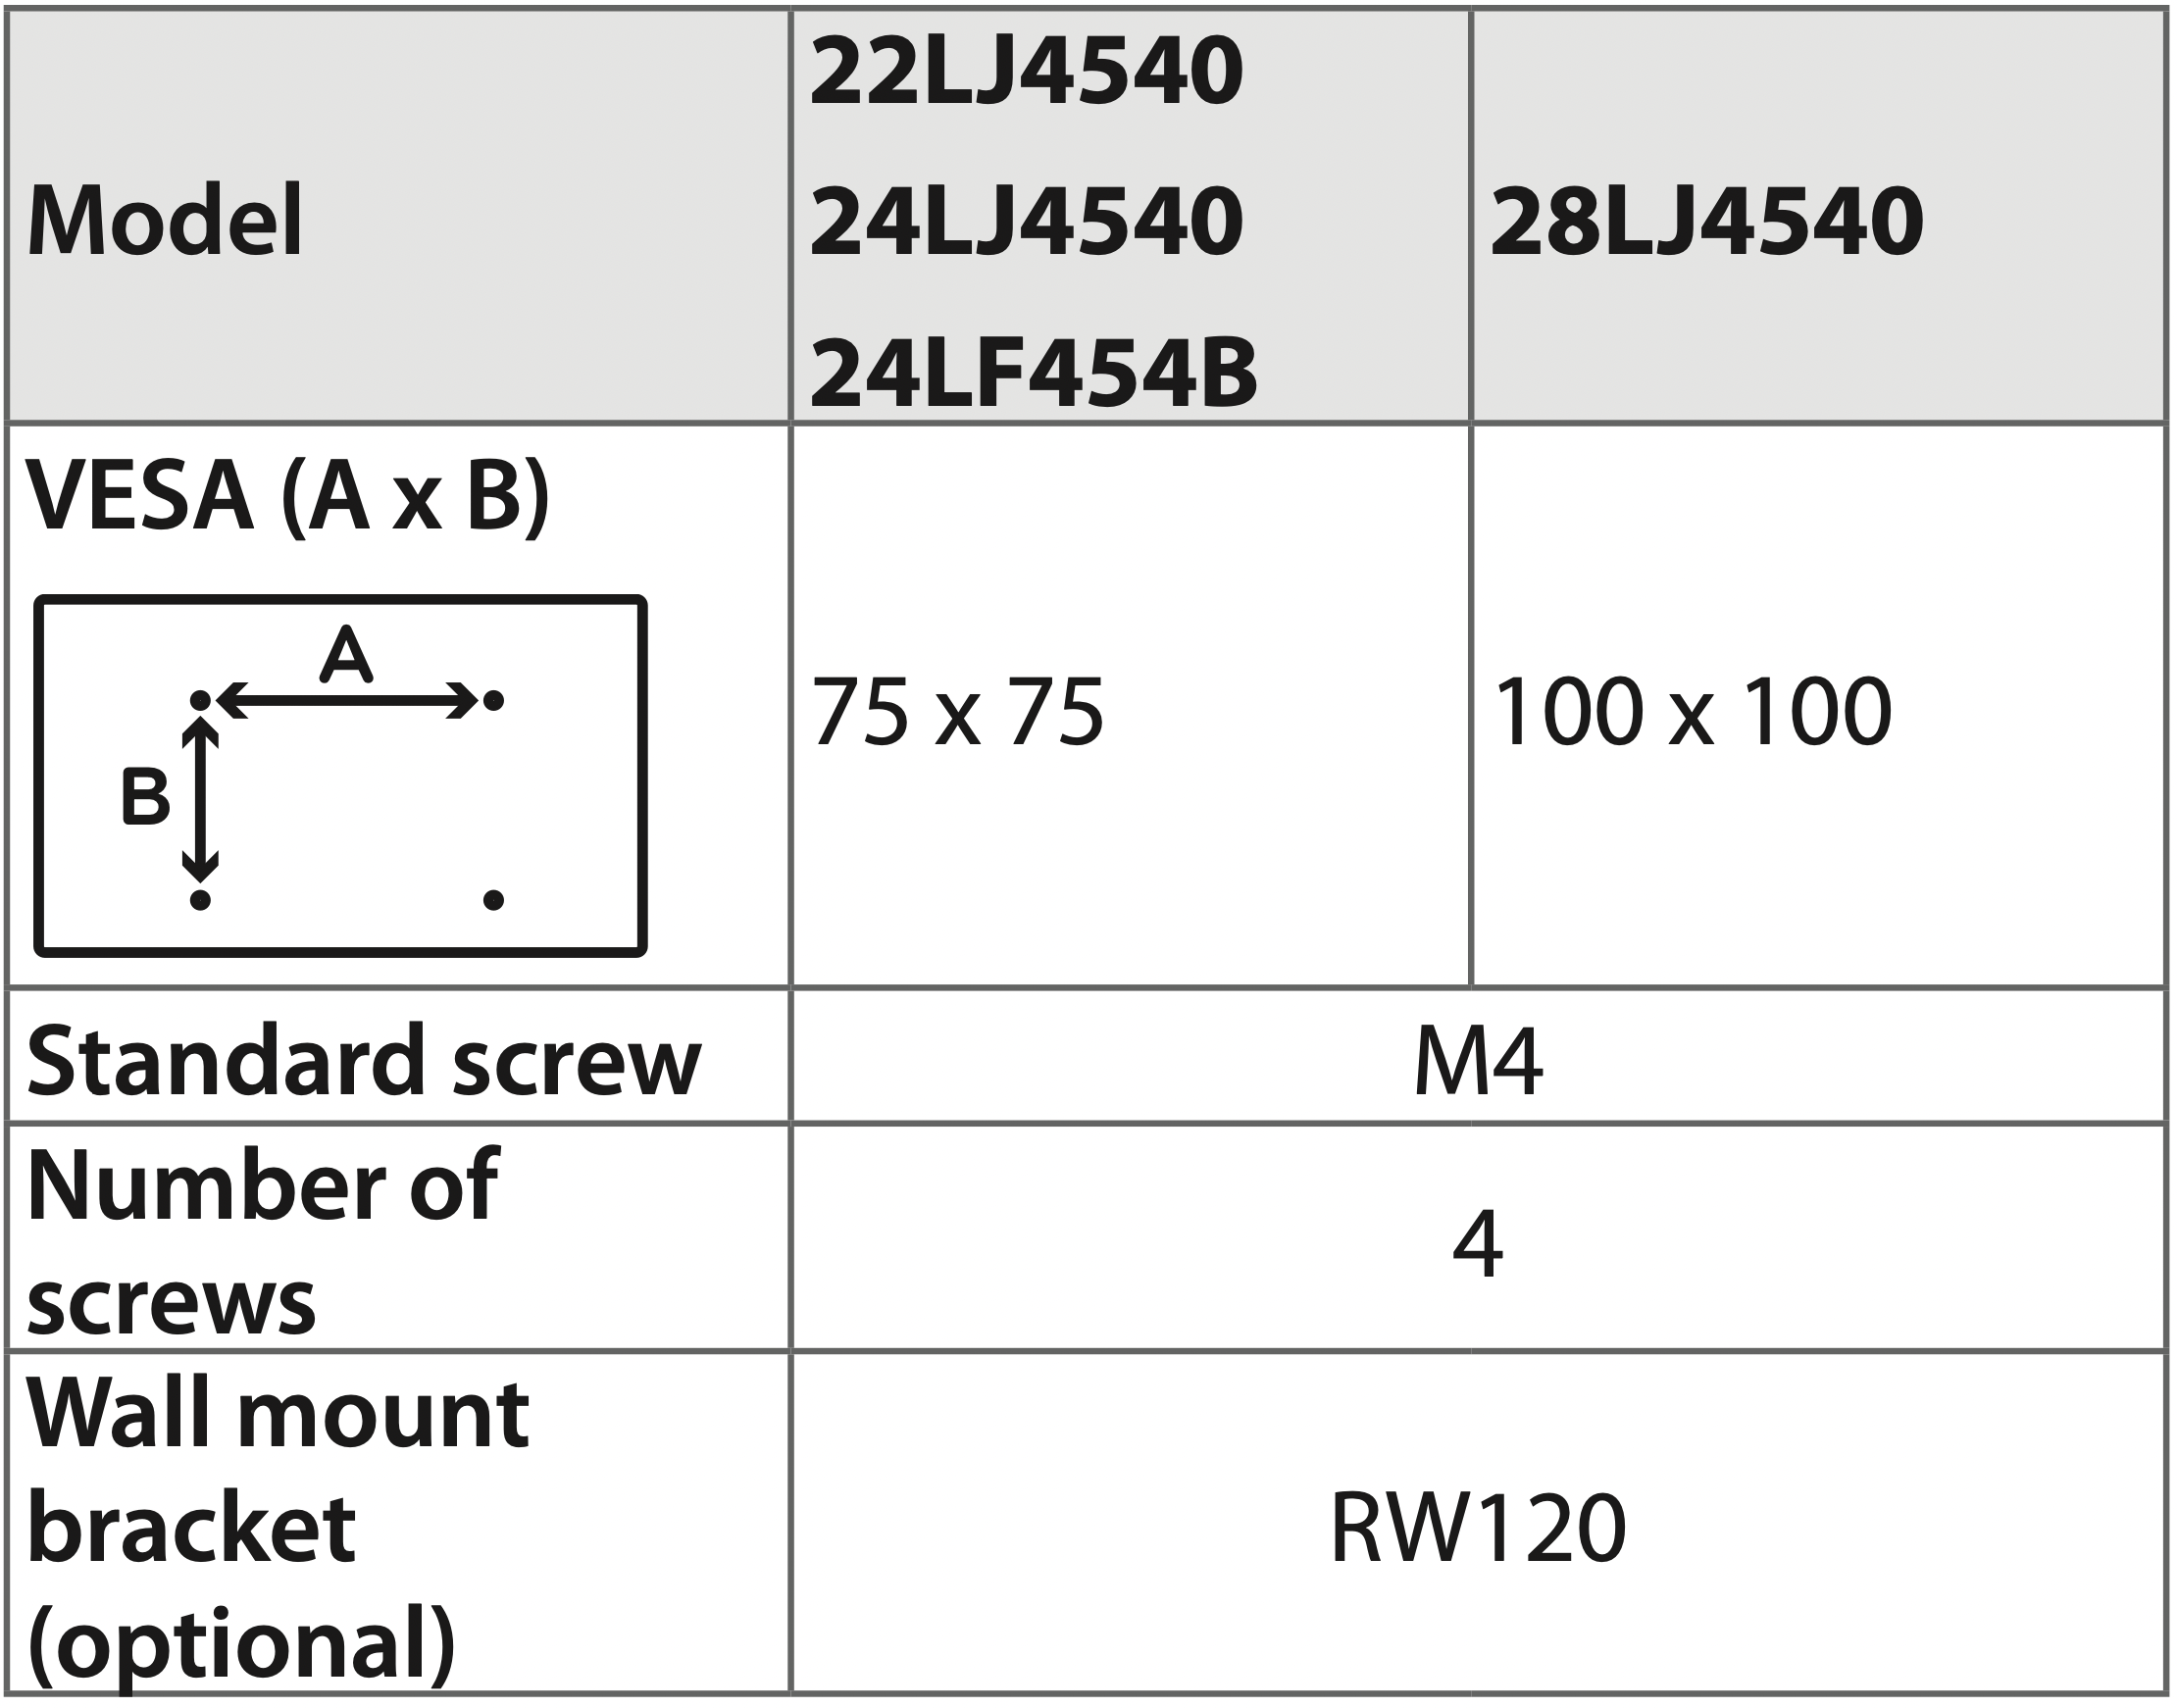
Make sure to use screws and wall mounts that meet the VESA standard. Standard dimensions for the wall mount kits are described in the following table.
CAUTION:
- Must use the enclosed screw in the box. (Depending on model)
- Disconnect the power before moving or installing the TV. Otherwise electric shock may occur.
- Remove the stand before installing the TV on a wall mount by performing the stand attachment in reverse.
- If you install the TV on a ceiling or slanted wall, it may fall and result in severe injury. Use an authorized LG wall mount and contact the local dealer or qualified personnel. When using a third-party wall mount, it is not covered by the warranty.
- Do not overtighten the screws as this may cause damage to the TV and void your warranty.
- Use the screws and wall mounts that meet the VESA standard. Any damages or injuries by misuse or using an improper accessory are not covered by the warranty.
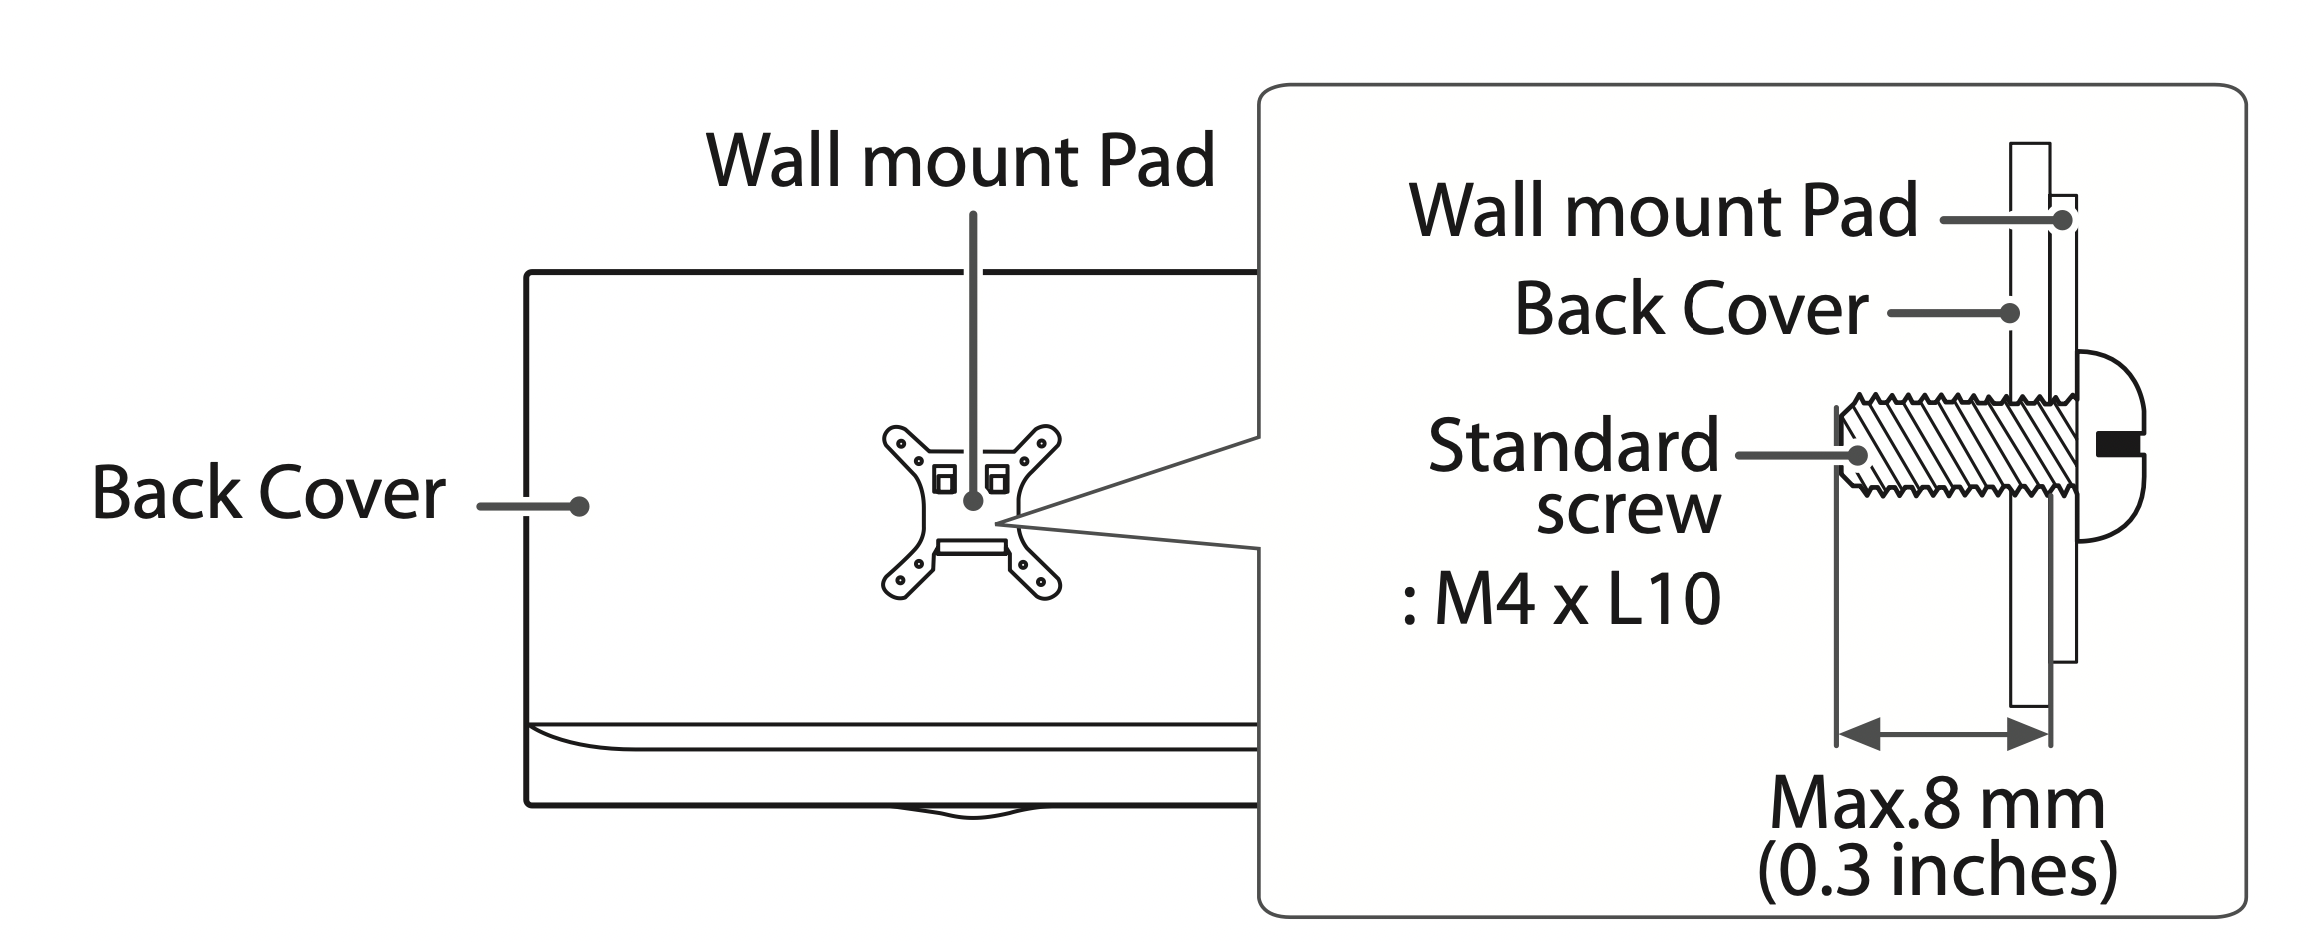
- Screw length from outer surface of back cover should be under 8 mm (0.3 inches).
NOTE:
- Use the screws that are listed on the VESA standard screw specifications.
- The wall mount kit includes an installation manual and necessary parts.
- The wall mount bracket is optional. You can obtain additional accessories from your local dealer.
- The length of screws may differ depending upon the wall mount. Make sure to use the proper length.
- For more information, refer to the manual supplied with the wall mount.
Connections
You can connect various external devices to the TV. Supported external devices are: HD receivers, DVD players, VCRs, audio systems, USB storage devices, PC, gaming devices, and other external devices. For more information on an external device’s connection, refer to the manual provided with each device.
NOTE:
- If you record a TV program on a DVD recorder or VCR, make sure to connect the TV signal input cable to the TV through a DVD recorder or VCR. For more information about recording, refer to the manual provided with the connected device.
- The external device connections shown may differ slightly from illustrations in a manual.
- Connect external devices to the TV regardless about the order of the TV port.
- If you connect a gaming device to the TV, use the cable supplied with the gaming device.
- Refer to the external equipment’s manual for operating instructions.
- In PC mode, there may be noise associated with the resolution, vertical pattern, contrast, or brightness. If noise is present, change the PC output to another resolution, change the refresh rate to another rate, or adjust the brightness and contrast on the PICTURE menu until the picture is clear.
- Depending upon the graphics card, some resolution settings may not allow the image to be positioned on the screen properly.
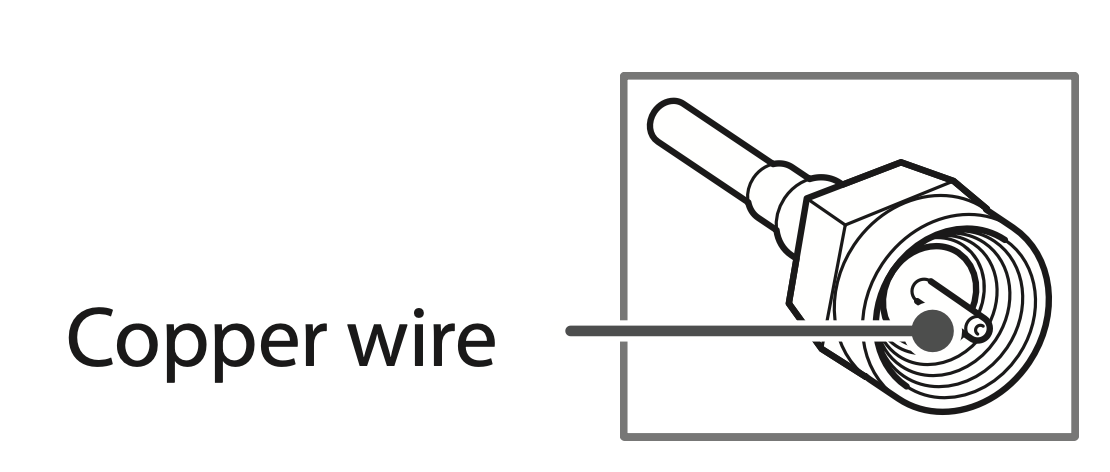
Connecting to an antenna or cable
Connect an antenna, cable, or cable box to watch TV. The illustrations may differ from the actual items and an RF cable is optional.
CAUTION
- Make sure not to bend the copper wire of the RF cable.
- Complete all connections between devices, and then connect the power cord to the power outlet to prevent damage to your TV.
NOTE
- Use a signal splitter to use 2 TVs or more.
- DTV Audio Supported Codec: MPEG, Dolby Digital.
Other connections
Connect your TV to external devices. For the best picture and audio quality, connect the external device and the TV with the HDMI cable. Depending upon the model, a cable may not be provided.
Remote control
The descriptions in this manual are based on the buttons on the remote control. Please read this manual carefully and use the TV correctly. To install batteries, open the battery cover, replace batteries (1.5 V AAA) matching the  and
and  ends to the label inside the compartment, and close the battery cover. Failure to match the correct polarities of the battery may cause the battery to burst or leak, resulting in fire, personal injury, or ambient pollution. To remove the batteries, perform the installation actions in reverse. This remote uses infrared light. When in use, it should be pointed in the direction of the TV’s remote sensor.
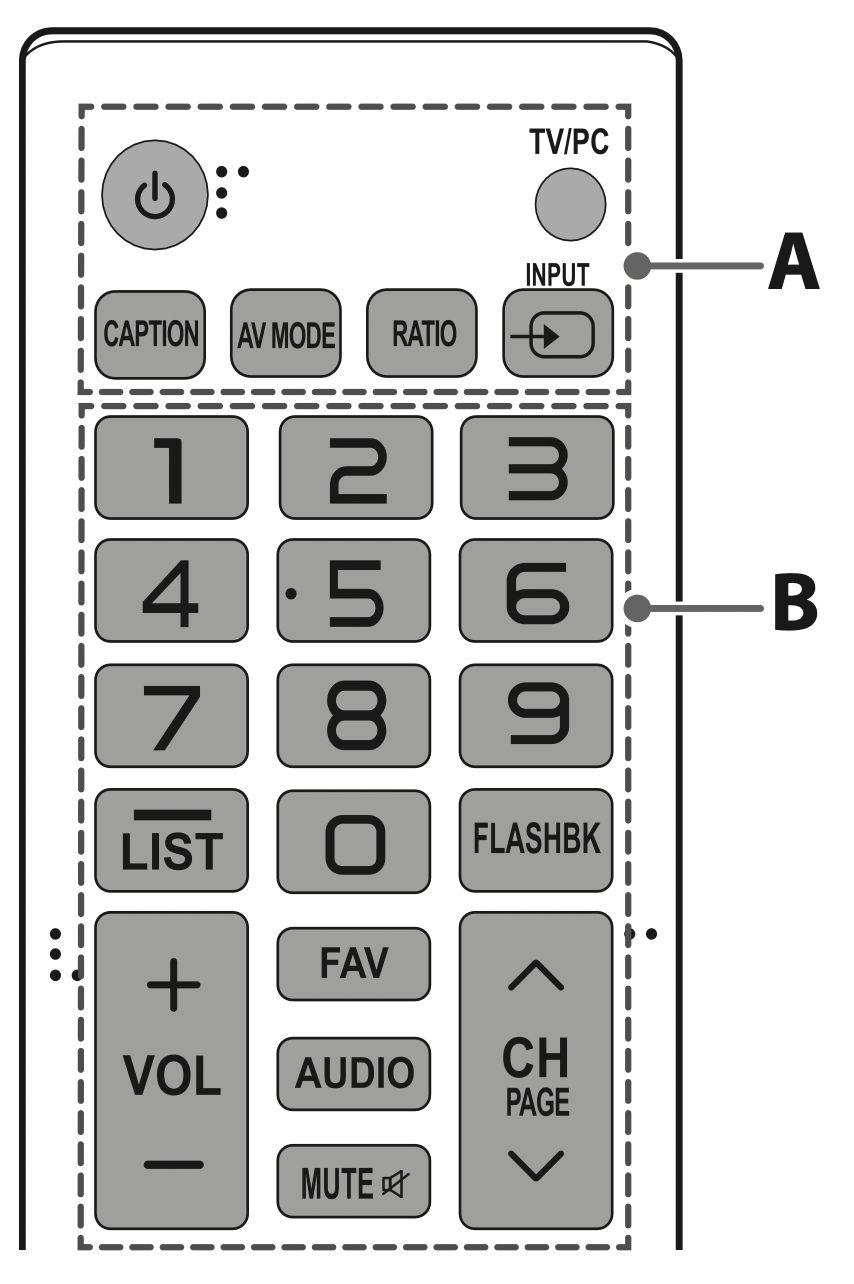
A
 (Power) Turns the TV on or off.
TV/PC Selects TV or PC mode.
CAPTION Activates or deactivates the subtitles.
AV MODE Selects an AV mode.
RATIO Resizes an image.
INPUT  Selects the input mode.
B
Number buttons Enters numbers.
 (Dash) Accesses the saved channel list.
LIST Alternates between the two last channels selected. (pressing repeatedly).
+ VOL - Adjusts the volume level.
FAV Accesses your favorite channel list.
AUDIO Digital signal: Changes the audio language. Analog signal: Changes the MTS sound. (MTS : Multichannel Television Sound)
MUTE  Mutes all sounds.
 CH
CH  Scrolls through the saved channels.
PAGE Moves to the previous or next screen.
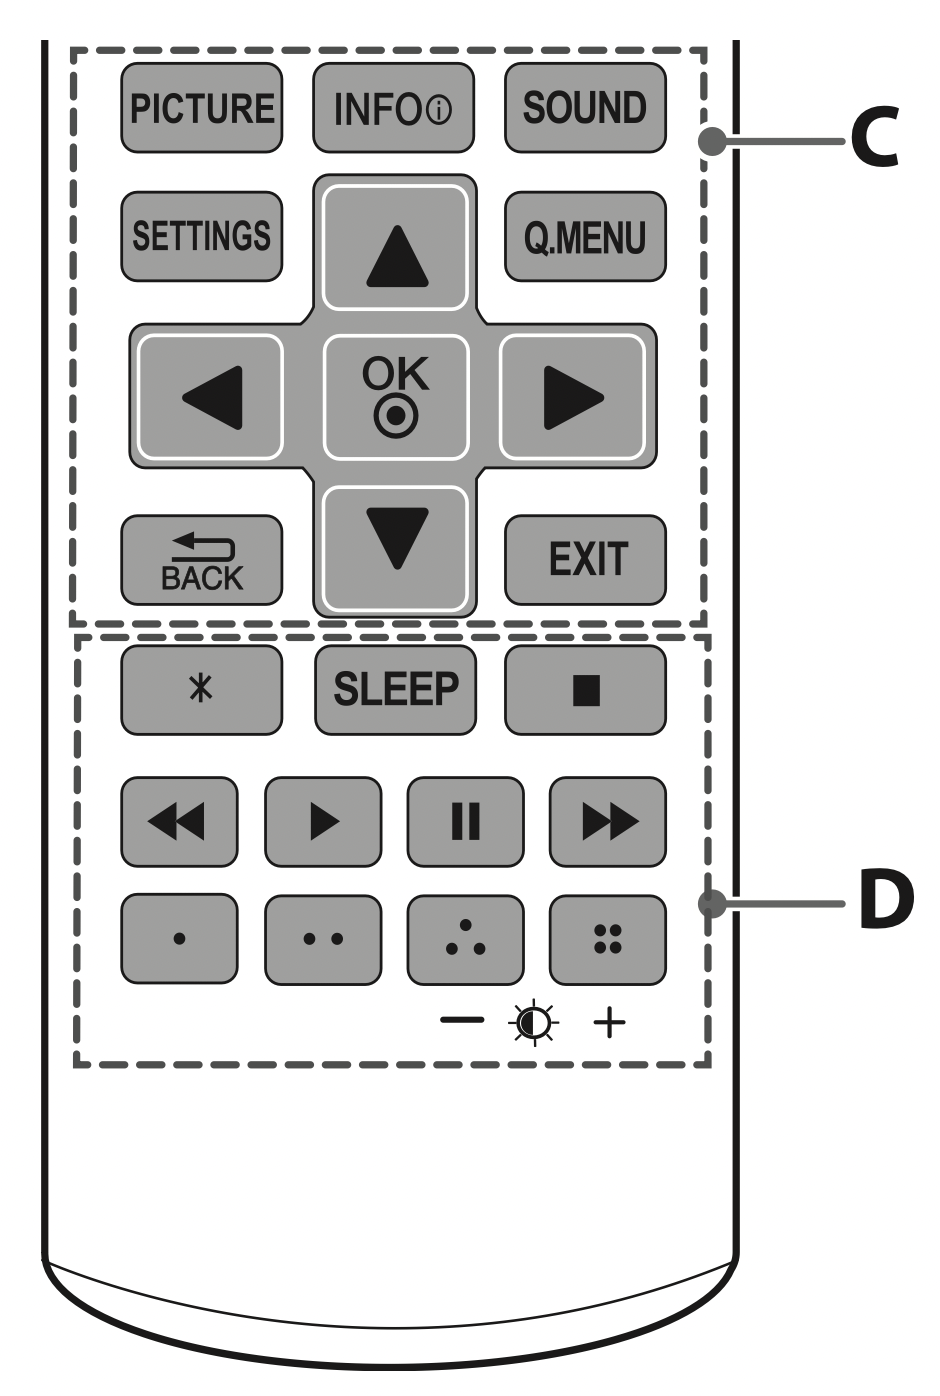
C
PICTURE Changes the image mode.
INFO  Shows information on the current program.
SOUND Changes the sound mode.
SETTINGS Accesses the main menu.
Q.MENU Accesses the quick menu.
Navigation buttons (  ) Scrolls through menus or options.
OK  Selects menus or options and confirms your input.
 BACK Returns to the previous screen.
EXIT Clears all on-screen displays and returns to TV viewing.
D
 Not functional.
SLEEP Sets the length of time until the TV to turns off.
Control buttons (  ) Controls the compatible devices (USB).
 These access special functions in some menus.
 (Backlight) Adjusts the brightness of the screen by controlling the screen backlight.
Settings
To set up the channels automatically
SETTINGS → CHANNEL → Auto Tuning
Memorizes automatically the channels being broadcast.
- The channels will not be memorized properly if the antenna/cable is not installed correctly.
- Auto Tuning memorizes the channels that are currently being broadcast.
- If Lock System is turned on, a pop-up window will appear asking for password.
To select picture mode
SETTINGS → PICTURE → Picture Mode
Select the picture mode optimized for the viewing environment or the program.
- Vivid: Adjusts the video image for the retail environment by enhancing the contrast, brightness, color, and sharpness.
- Standard: Adjusts the image for a normal environment.
- APS: The Energy Saver feature changes settings on the TV to reduce power consumption.
- Cinema: Optimizes the video image for a cinematic look to enjoy movies as if you are in a movie theater.
- Game: Optimizes the video image for fast moving video such as PCs or games.
- Expert 1, 2: Adjusts the detailed video image settings for video experts as well as general viewers.
To set advanced control
SETTINGS → PICTURE → Picture Mode → Advanced Control or Expert Control
For each picture mode, screen can be calibrated; or for a special screen, picture settings can be adjusted. Select the desired Picture Mode.
- Dynamic Contrast: Adjusts the contrast to the optimal level according to the brightness of the image.
- Dynamic Color: Adjusts colors to make the image appear in more natural colors.
- Skin Color: Skin color spectrum can be separately set to implement the skin color as defined by the user.
- Sky Color: Sky color is set separately.
- Grass Color: Natural color spectrum (meadows, hills, etc.) can be separately set.
- Gamma: Sets the gradation curve according to the output of picture signal in relation to the input signal.
- Color Gamut: Selects the range of colors that can be expressed.
- Edge Enhancer: Shows clearer and distinctive yet natural edges of the video.
- Color Filter: Filters a specific color spectrum in RGB colors to fine-tune color saturation and hue accurately.
- Color Temperature: Adjusts the overall tone of the screen as desired. In Expert mode, detailed fine-tuning can be set via Gamma method, etc.
- Color Management System: This is a system that experts use when they adjust color with a test pattern. They can select from six color areas (Red / Green / Blue / Cyan / Magenta / Yellow) without affecting other colors. For normal images, adjustments may not result in noticeable color changes.
- Depending upon input signal or other picture settings, the range of detailed items for adjustment may differ.
To set additional picture options
SETTINGS → PICTURE → Picture Option → Picture Mode
[Depending upon model] Adjusts detailed setting for images.
- Noise Reduction: Eliminates noise in the picture.
- MPEG Noise Reduction: Eliminates noise generated while creating digital picture signals.
- Black Level: Adjusts the brightness and contrast of the screen to suit the black level.
- Real Cinema: Optimizes the screen for movie viewing.
- Motion Eye Care: [Depending upon model] Saves power consumption by adjusting the brightness corresponding to the movement of the image on the screen.
- Depending upon input signal or other picture settings, the range of detailed items for adjustment may differ.
To use Energy Saving feature
SETTINGS → PICTURE →  Energy Saving
Saves electric power by adjusting screen brightness.
- Off: Turns off the Energy Saving.
- Minimum/Medium/Maximum: Applies the preset Energy Saving.
- Screen off: Screen is turned off and only sound is played. Press any button except Power button on the remote control to turn the screen back on.
To use Eye Comfort Mode feature
SETTINGS → PICTURE → Eye Comfort Mode
- If you turn this option on, color temperature will be automatically adjusted to reduce eye strain.
- On: Automatically adjusts the screen color temperature.
- Off: Turns off the Eye Comfort Mode.
To use TV speaker
SETTINGS → AUDIO → TV Speaker
[Depending upon model]
Sound is output through the TV speaker.
To set password
SETTINGS → LOCK → Set Password
Sets or changes the TV password.
The initial password is set to 0000.
To set the caption
SETTINGS → OPTION → Caption
View captions when the TV station provides captioned programming. Program captions work only on digital/analog broadcasts or external input.
Change Caption to On and select caption settings.
CC 1-4 (Closed Captioning) / Text 1-4 Displays the audio portion of a TV program as text on the TV screen. CC1 is the most common mode in use. Field 1 data channels: two Captions (CC1, CC2), two Text (T1, T2). Field 2 data channels: two Captions (CC3, CC4), two Text (T3, T4).
Service 1-6 This is only available for the digital broadcasting system.
Set up the size and color of the captions on Digital Option. Please select Set by Program or Custom. Select Custom to adjust minute options such as the captions’ size and color.
To return to initial settings
SETTINGS → OPTION → Initial Setting
Returns to initial default mode by deleting all optional setup. Once initialization is completed, the TV will turn off and on by itself.
- When Lock System is in place, a pop-up window appears and asks for password
- Do not turn off the power during initialization.
To use the audio guidance
[This feature is available in certain countries only.]
SETTINGS → OPTION → Audio Guidance
If Audio Guidance is set to On, audio guides will be provided in various situations, such as when you change channels, adjust the volume or change settings and input signals.
- Speed: Adjust the speed of spoken guide.
- Volume: Adjust the volume of spoken guide.
- Pitch: Adjusts the tone of spoken guide.
- For visually impaired users.
To remove the USB device
[Only 28LJ4540]
Q.MENU → Eject USB
Once the message that the USB device was removed is displayed, remove the device from the TV.
- After selecting to remove USB device, the USB storage Device cannot be read. Remove the USB storage device and then reconnect it.
Warning when using USB storage devices
[Only 28LJ4540]
- The TV recognizes only a USB storage device.
- If you connect a USB storage device to the TV through a USB hub, your TV may not recognize the USB storage device.
- The TV may not recognize a USB storage device that requires a special driver.
- The recognition speed of a USB storage device may differ depending upon the device.
- Only use a USB storage device which has normal music or image files.
- Use only USB storage devices that are formatted as a FAT 32 or NTFS file system.
- You may need to connect a USB storage device to an external power supply with a power adapter.
- If the TV does not recognize a connected USB storage device, replace the cable and try again. Do not use an excessively long cable.
- The TV does not support some USB storage devices properly.
- You can use a multi-partition (up to 4) USB storage device.
- The file alignment method of a USB storage device is similar to the one of Windows XP.
- You cannot create or delete a folder saved in a USB storage device directly on the TV.
- The number of characters for a file name is up to 100 English characters.
- If there are too many folders and files in one folder, it may not operate properly.
- The recommended capacity for a USB external hard disk is 2 TB or less and for a USB storage device is 32 GB or less.
- If a USB external hard disk with the Energy Saving feature does not work, turn the USB external hard disk off and on again to make it work properly. For more information, refer to the user manual of the USB external hard disk.
- The Electrostatic discharge can cause USB device’s malfunction. In this case, USB Device has to be plugged again.
Troubleshooting
- Cannot control the TV with the remote control.
- Check if anything such as tape has been placed over the receiver.
- Check if there is any obstacle between the product and the remote control.
- Replace the batteries with new ones.
- No image display and no sound is produced.
- Check if the product is turned on.
- Check if the power cord is connected to a wall outlet.
- Check if there is a problem in the wall outlet by connecting other products.
- The TV turns off suddenly.
- Check the power control settings. The power supply may be interrupted.
- Check if the Off Time / Sleep Timer feature is activated in the TIME settings.
- If there is no signal while the TV is on, the TV will turn off automatically after 15 minutes of inactivity.