Documents: Go to download!
User Manual
- User Manual - (English, French, Spanish)
- User Guide - (English)
- Installation Intructions - (English)
- Dimension Guide - (English)
- ICE MAKER USE
- ICE MAKER CARE
- TROUBLESHOOTING
Table of contents
Owner Manual ICE MAKER
ICE MAKER USE
How Your Ice Maker Works
When you first start your ice maker, the water pan will fill and the system will rinse itself before starting to make ice. The rinsing process takes about 5 minutes.
Under normal operating conditions, the ice maker will cycle at preset temperatures. The ice level sensor located in the ice storage bin will monitor the ice levels.
IMPORTANT: If the water supply to the ice maker is turned off, be sure to set the ice maker control to OFF.
The Ice Making Process
- Water is constantly circulated over a freezing plate. As the water freezes into ice, the minerals in the water are rejected. This produces a sheet of ice with a low mineral content.
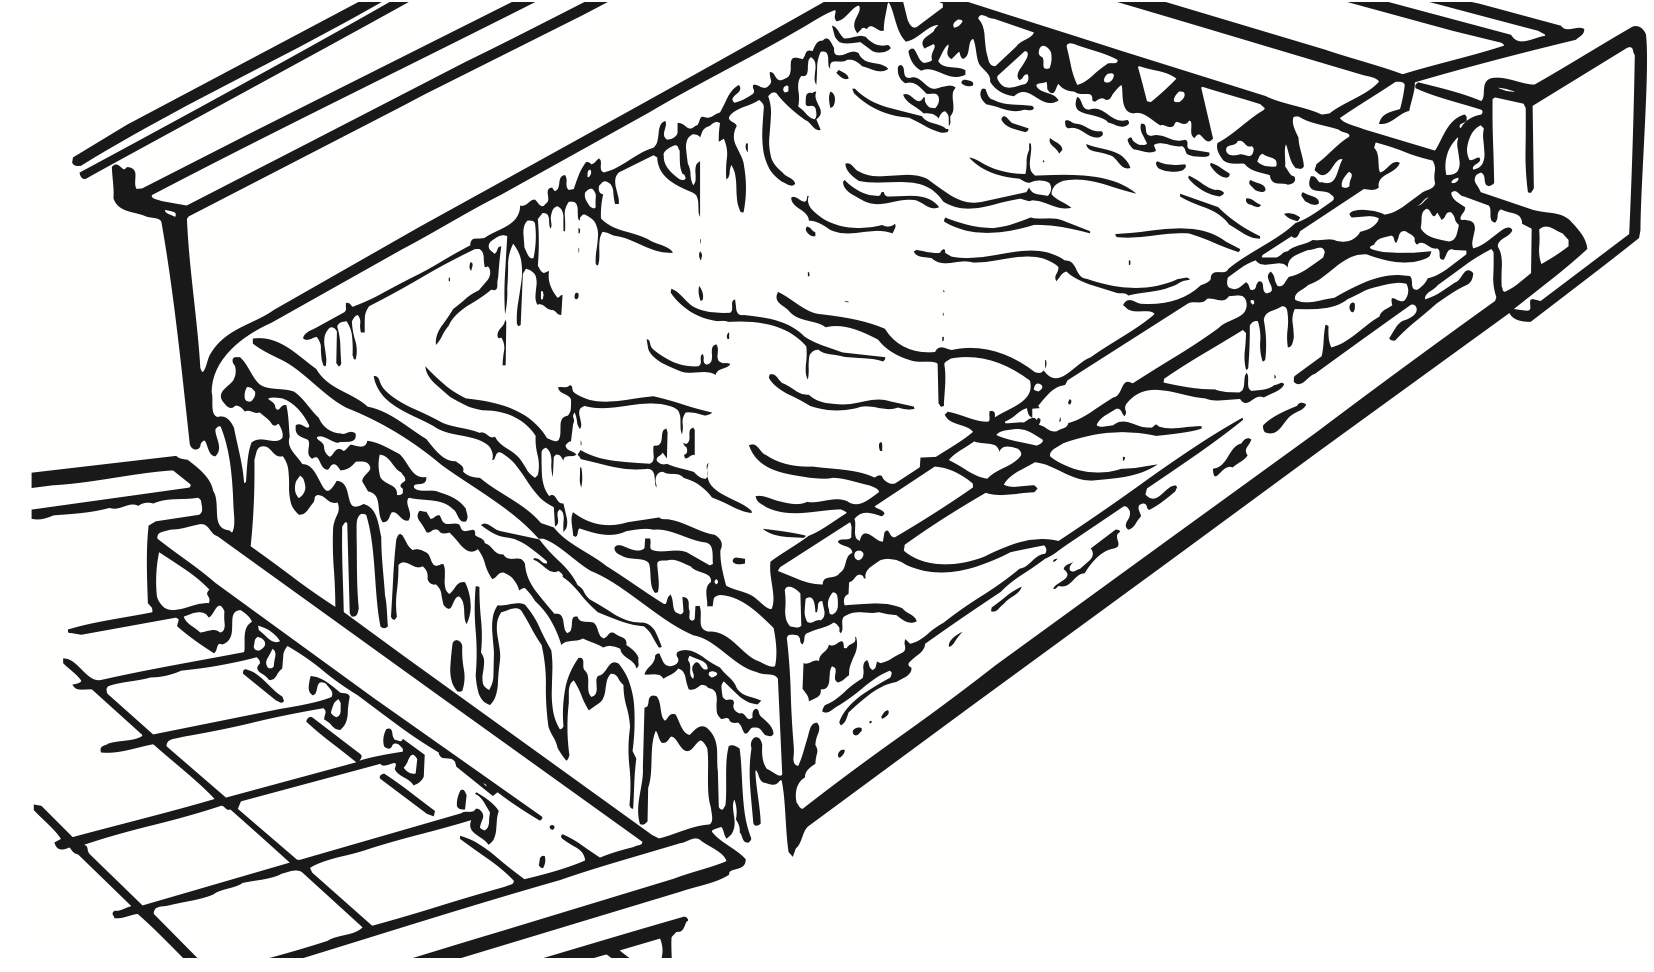
- When the desired thickness is reached, the ice sheet is released and slides onto a cutter grid. The grid divides the sheet into individual cubes.
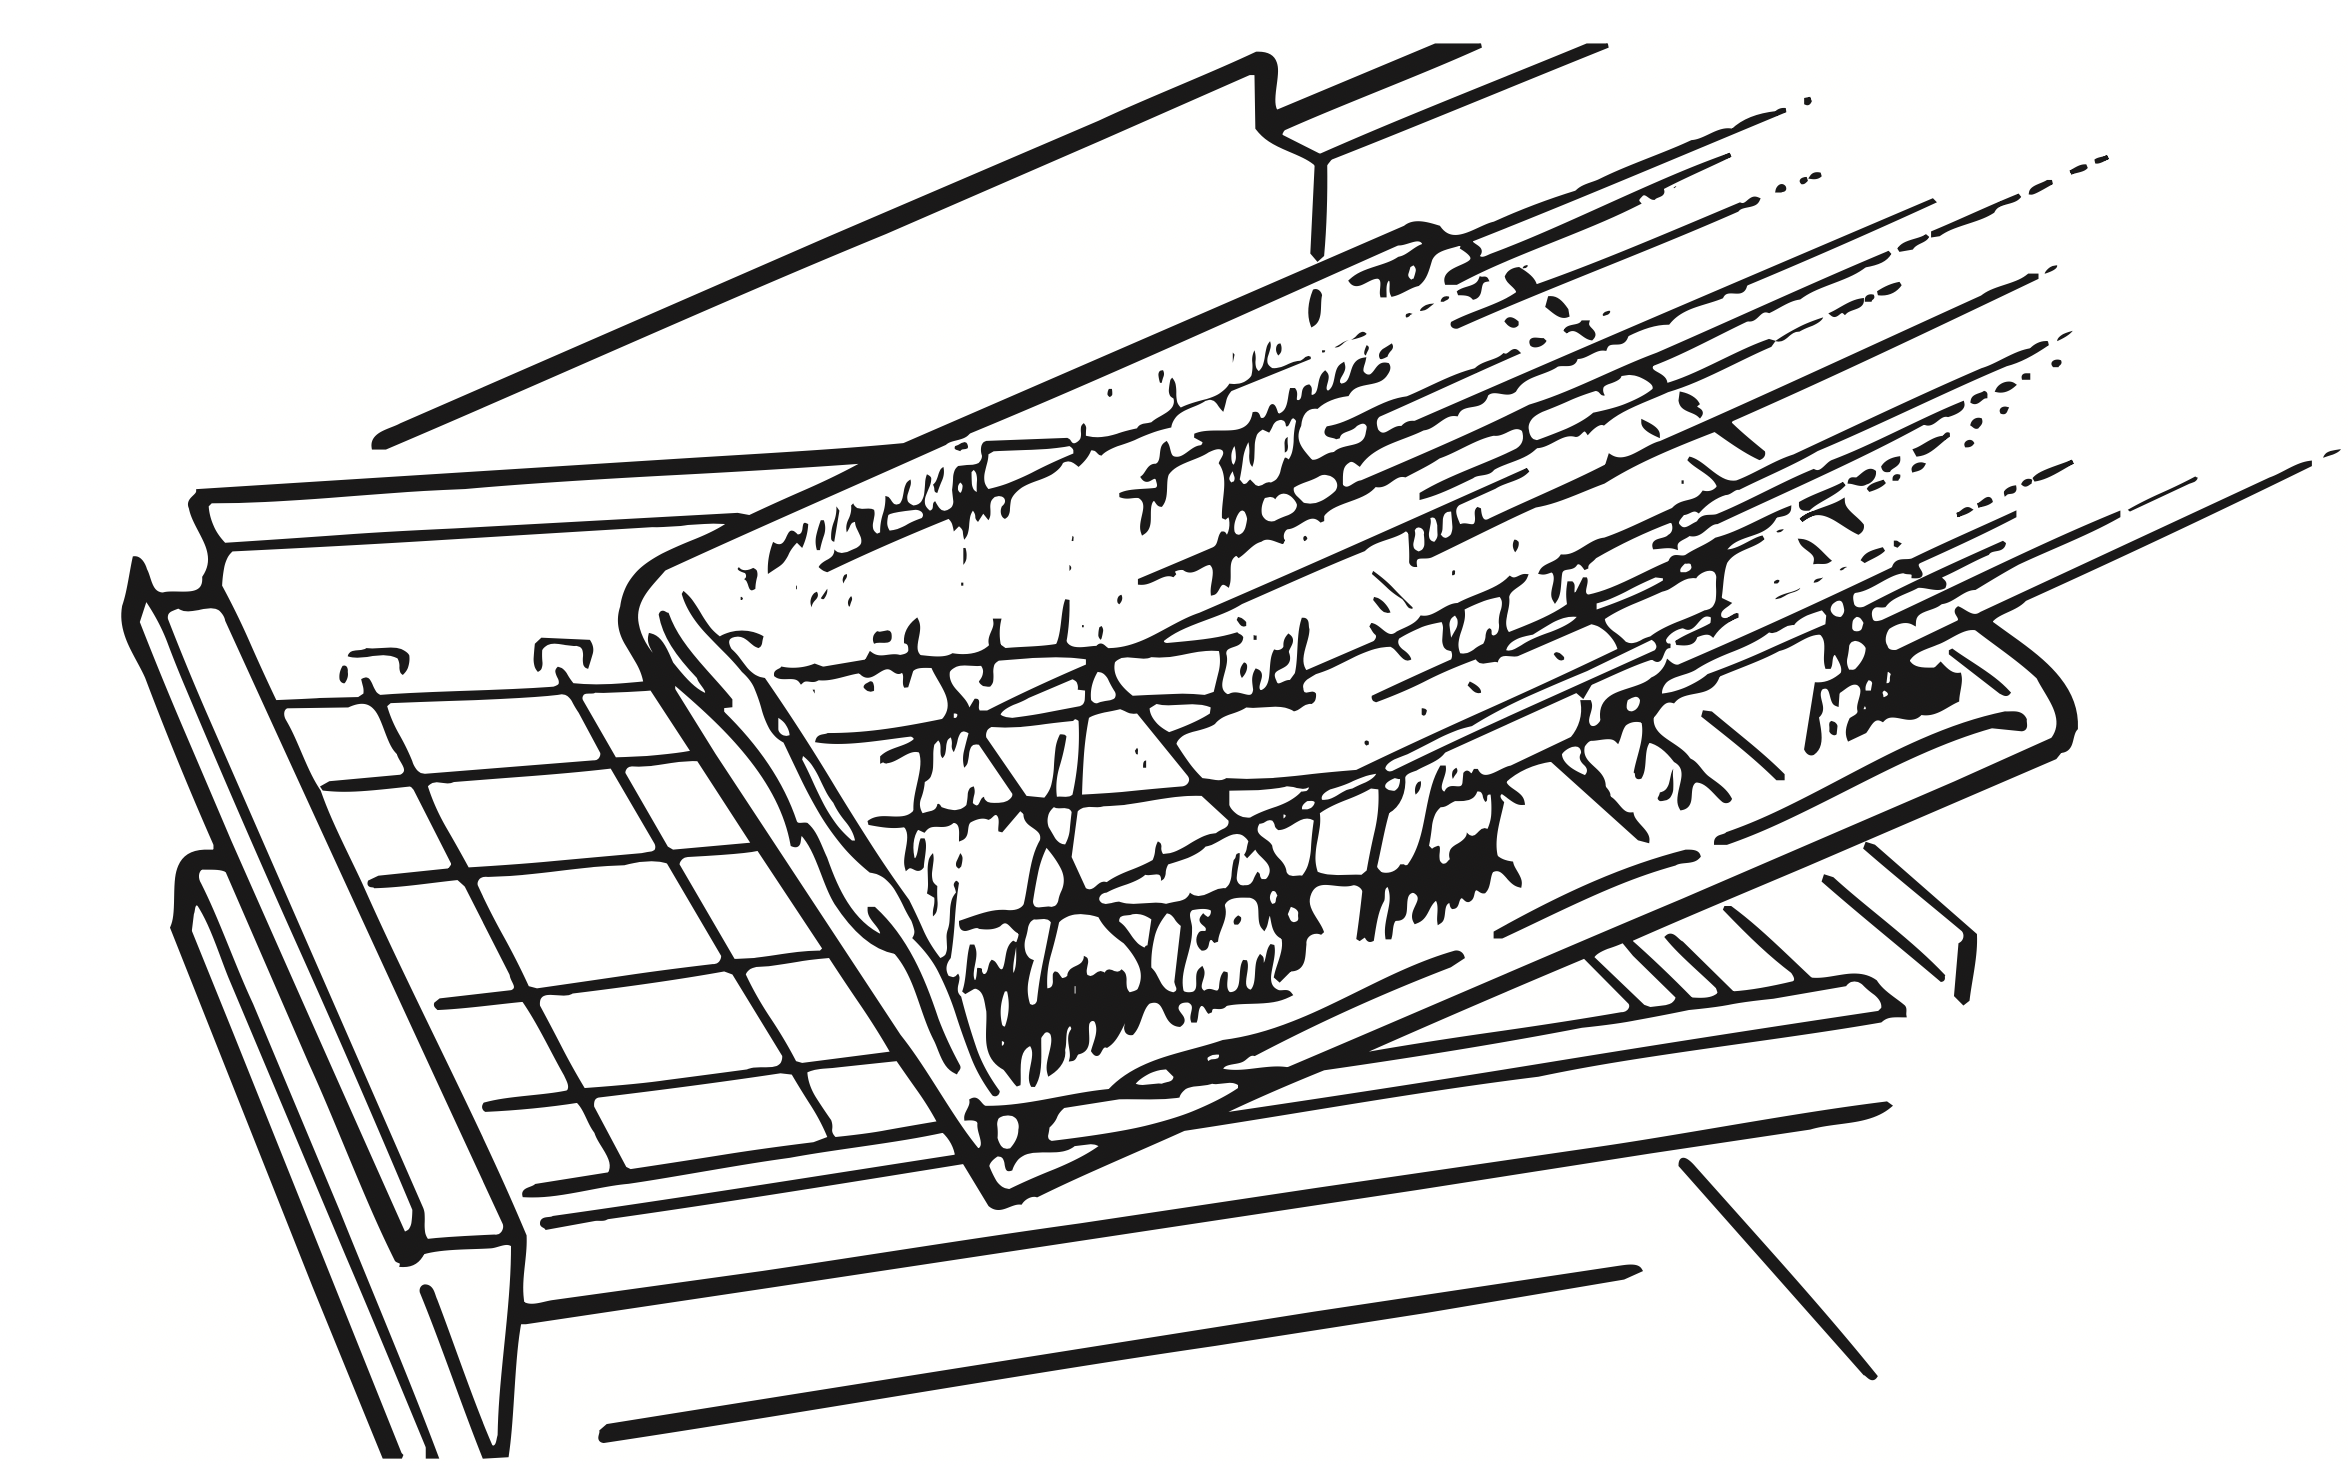
- The water containing the rejected minerals is drained after each freezing cycle.
- Fresh water enters the machine for the next ice making cycle.
- Cubes fall into the storage bin. When the bin is full, the ice maker shuts off automatically and restarts when more ice is needed. The ice bin is not refrigerated, and some melting will occur. The amount of melting varies with room temperature.
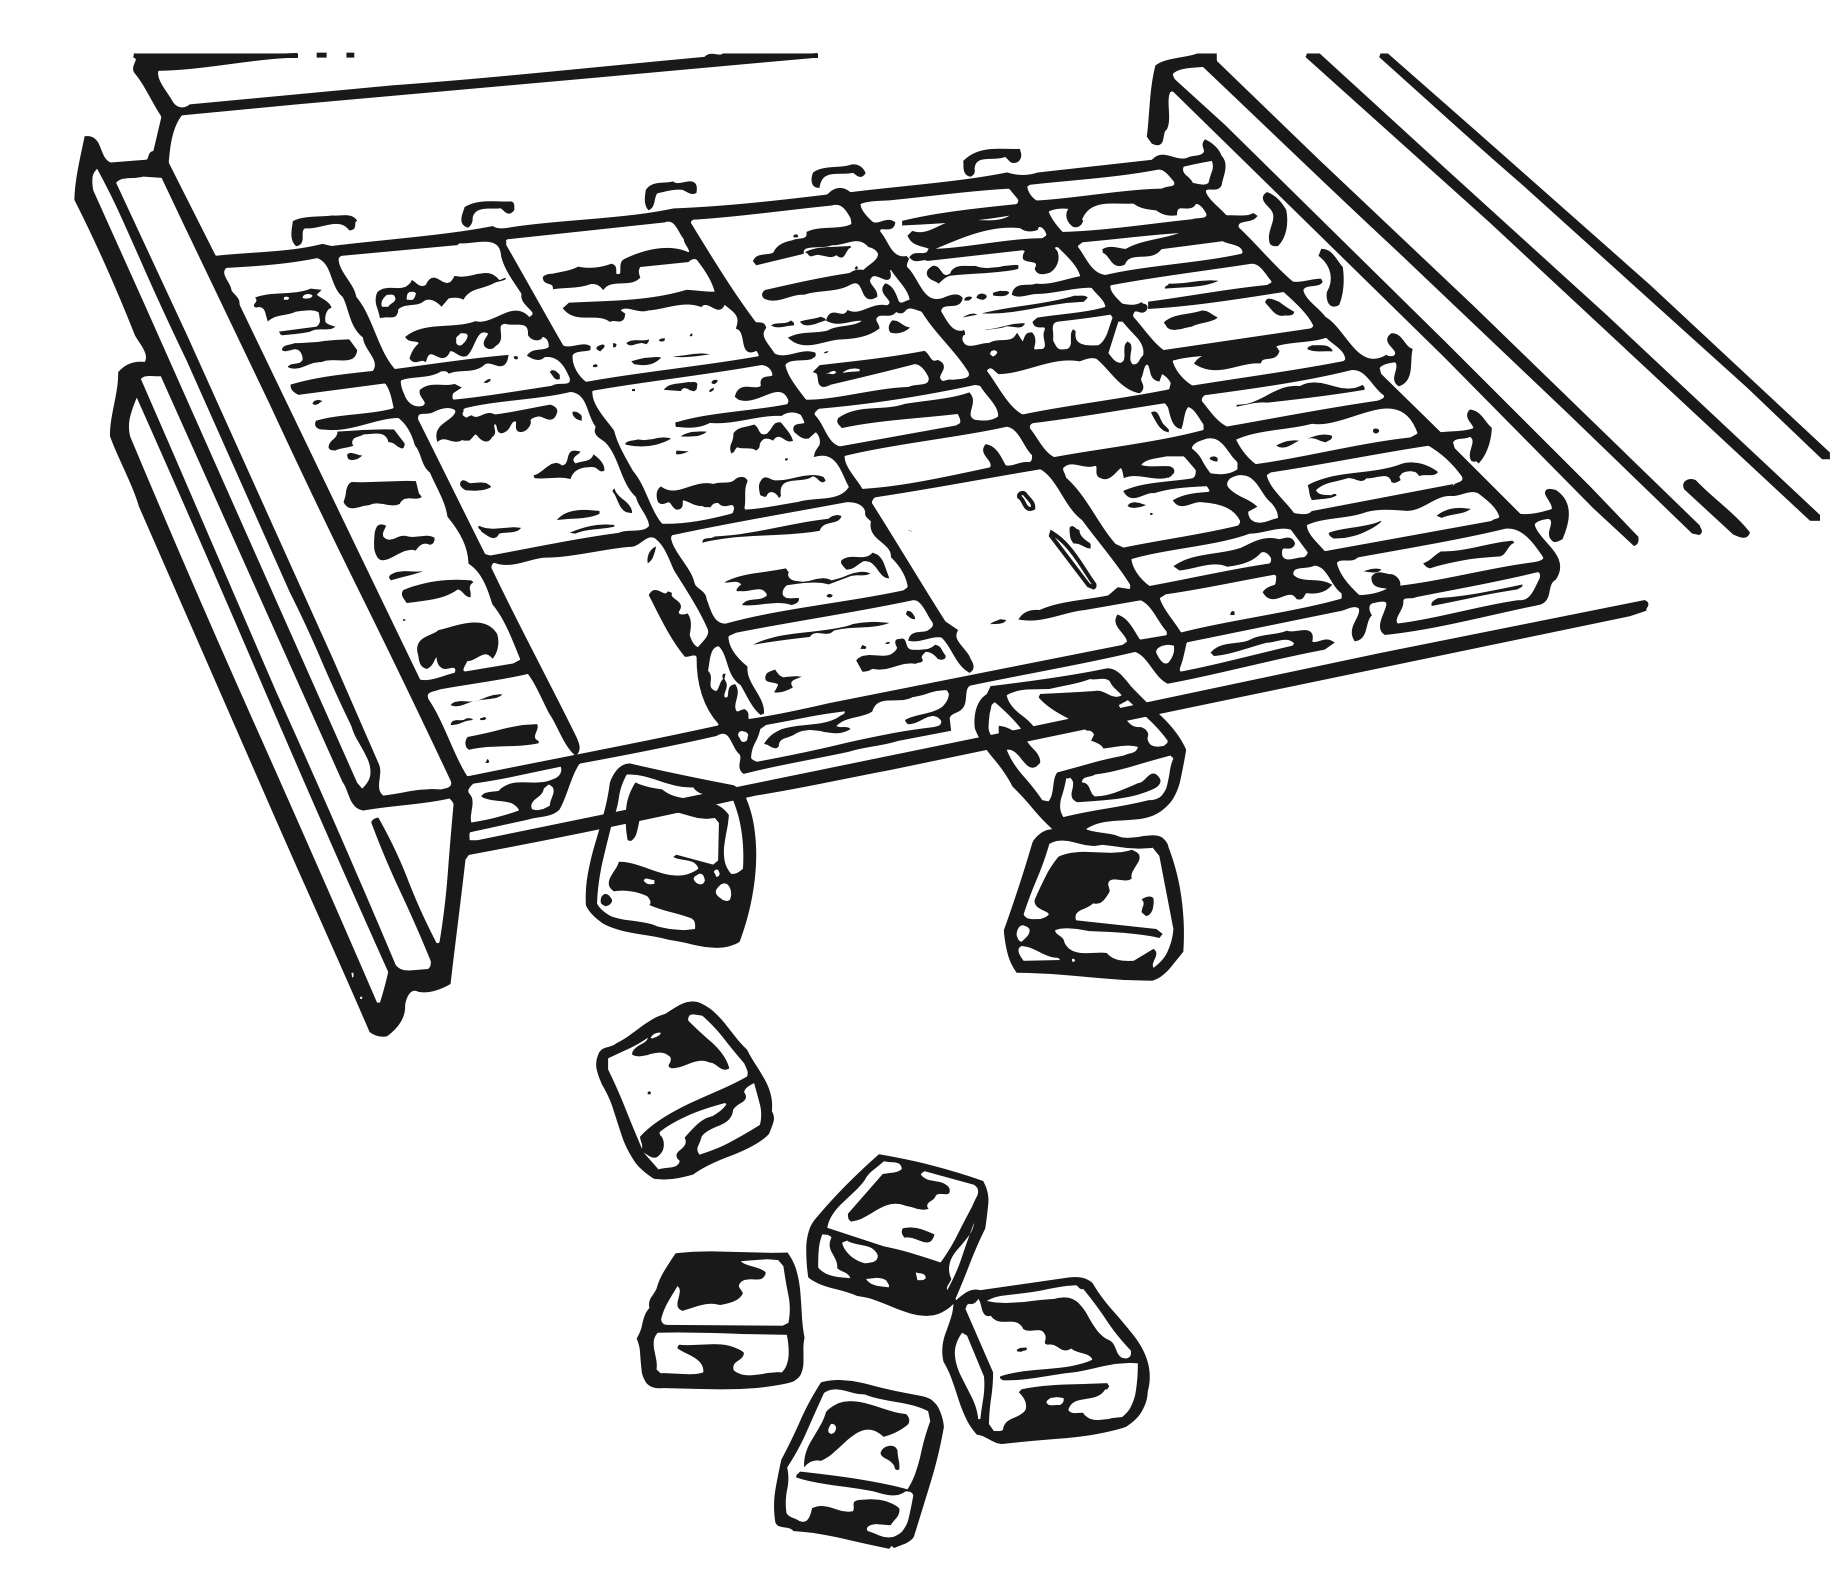
NOTE: As the room and water temperatures vary, so will the amount of ice produced and stored. This means that higher operating temperatures result in reduced ice production.
Using the Controls
- To start ice production, press ON/OFF.
- To stop ice maker operation, press ON/OFF.
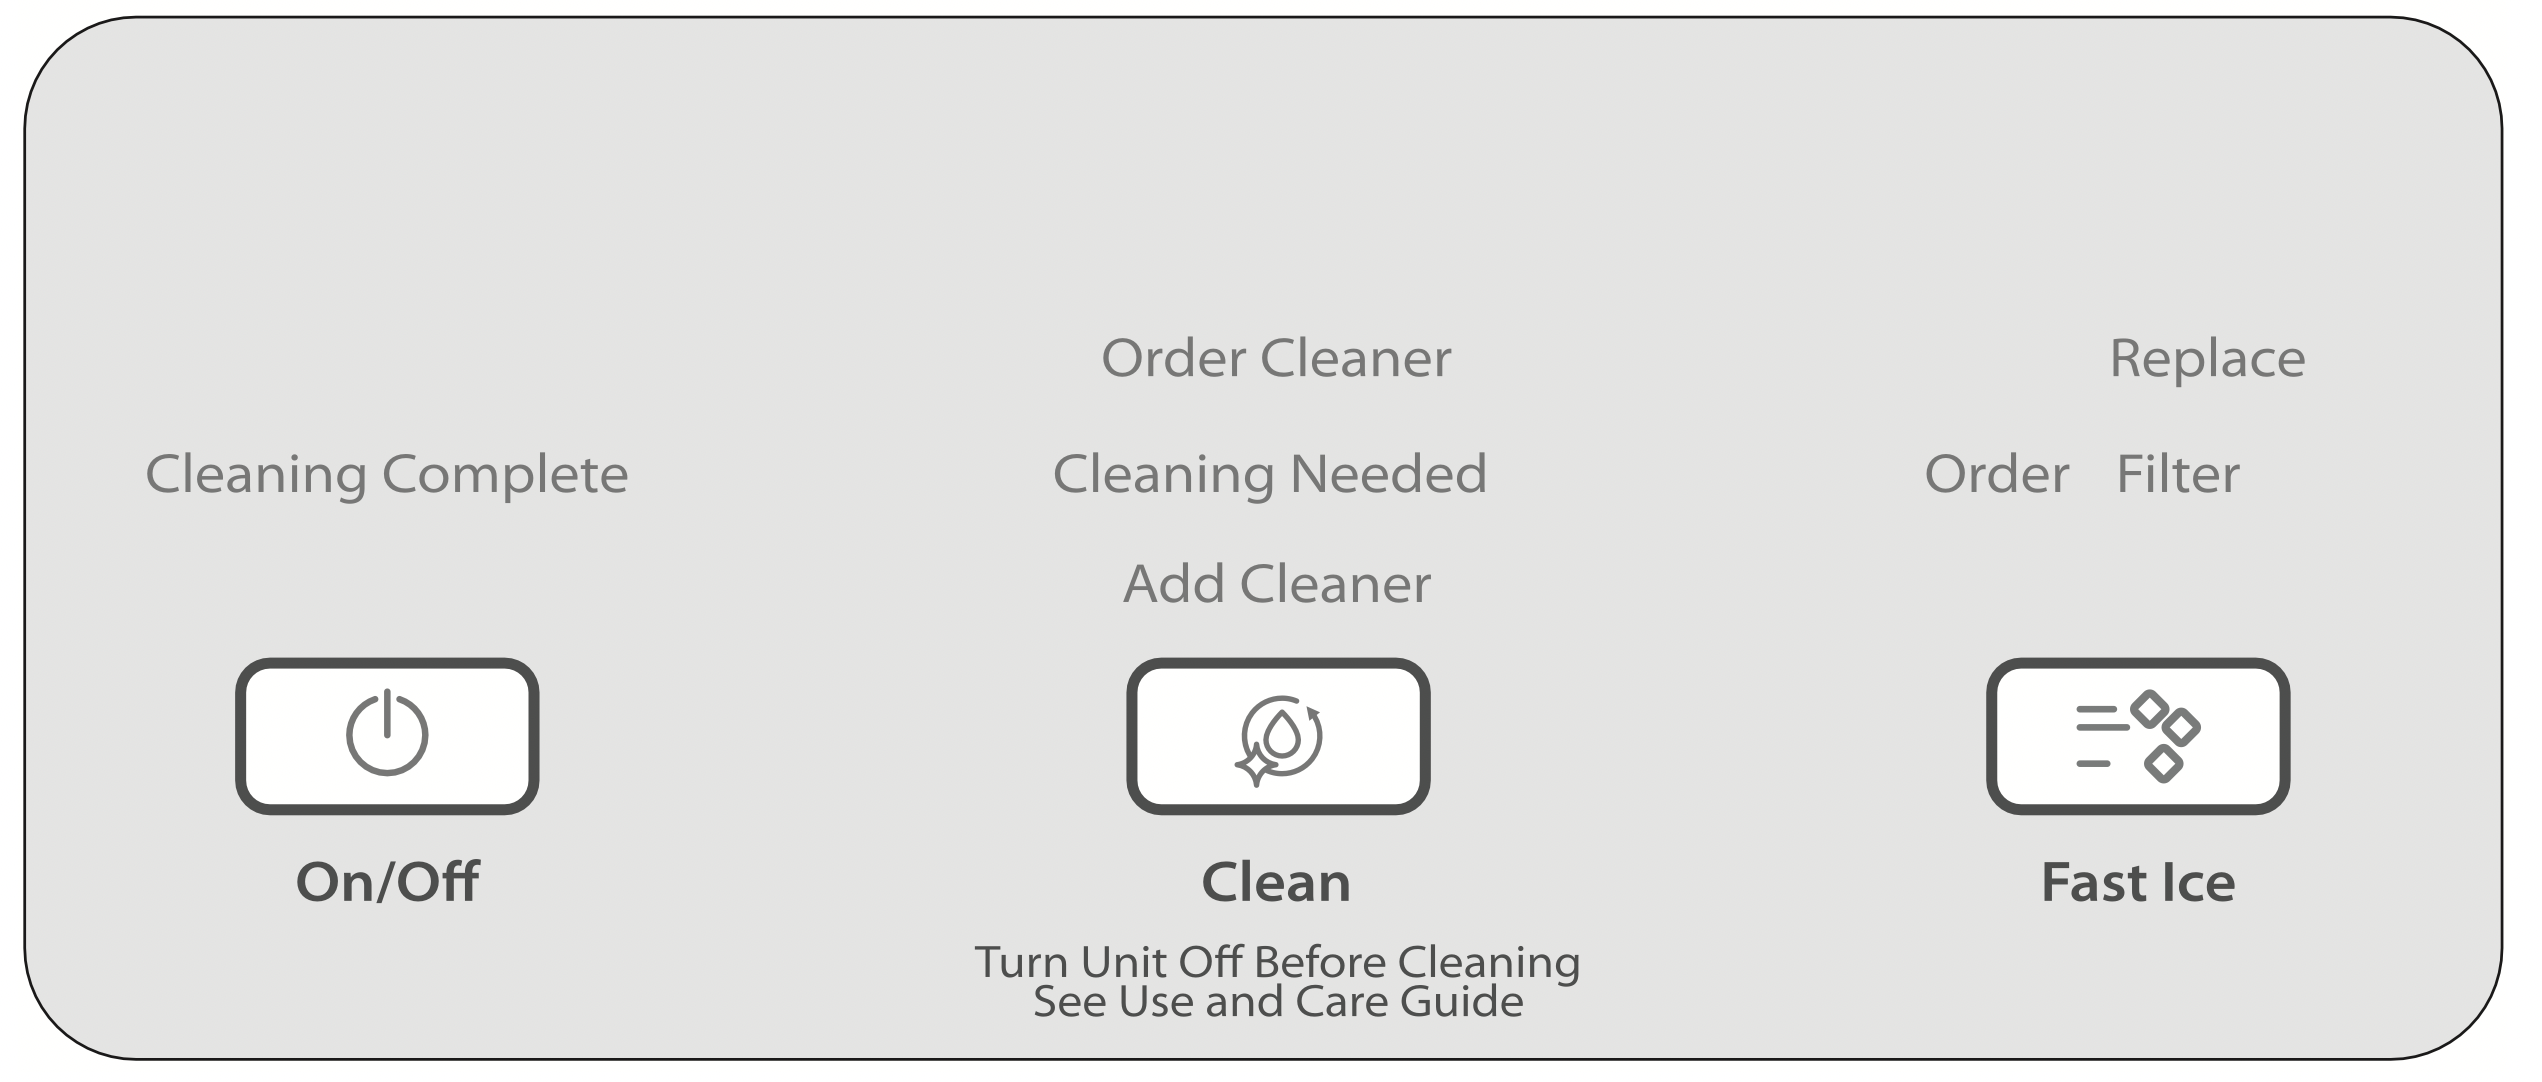
NOTES:
- Pressing the On/Off button does not shut off power to the ice maker.
- Allow 24 hours to produce the first batch of ice. Discard the first 2 batches produced.
Fast Ice Mode
Select the Fast Ice feature when you have an upcoming need for a large amount of ice and the ice bin is low or empty. Fast Ice mode will produce a greater quantity of ice in a 24-hour period.
- Press FAST ICE while the ice maker is on. The indicator light will illuminate.
- Press FAST ICE again to turn off the Max Ice feature. The indicator light will turn off.
- The Fast Ice mode will be on when you first turn on the product. It will turn off after 24 hours. To turn Fast Ice back on, press FAST ICE.
Clean
It is recommended that you clean the ice maker when the “Cleaning Needed” light is illuminated or 9 months has elapsed or ice production decreases significantly. To clean your ice maker, see “Ice Maker System” in the “Cleaning” section.
Door Ajar Alarm
The Door Ajar Alarm feature sounds an alarm when the ice maker door is open for 5 minutes. The alarm will repeat every 2 minutes. Close the door to turn off. The feature then resets and will reactivate when the door is left open again for 5 minutes.
Normal Sounds
Your new ice maker may make sounds that are not familiar to you. Because the sounds are new to you, you might be concerned about them. Most of the new sounds are normal. Hard surfaces such as floors, walls and cabinets can make the sounds seem louder than they actually are. The following describes the kinds of sounds that might be new to you and what may be making them.
- You will hear a buzzing sound when the water valve opens to fill the water pan for each cycle.
- Rattling noises may come from the flow of the refrigerant or the water line. Items stored on top of the ice maker can also make noises.
- The high-efficiency compressor may make a pulsating or high pitched sound.
- Water running over the evaporator plate may make a splashing sound.
- Water running from the evaporator plate to the water pan may make a splashing sound.
- As each cycle ends, you may hear a gurgling sound due to the refrigerant flowing in your ice maker.
- You may hear air being forced over the condenser by the condenser fan.
- During the harvest cycle, you may hear a “thud” when the ice sheet slides from the evaporator onto the cutter grid.
- When you first start the ice maker, you may hear water running continuously. The ice maker is programmed to run a rinse cycle before it begins to make ice.
- If the ice maker is connected to a water supply pressure in excess of 60 psi, you may hear a loud sound during water filling associated with the flow of water through the inlet valve. Call a licensed, qualified plumber to determine the best method to reduce the supply water pressure (50 psi is recommended).
ICE MAKER CARE
Cleaning
The ice making system and the air cooled condenser need to be cleaned regularly for the ice maker to operate at peak efficiency and to avoid premature failure of system components. See the “Ice Maker System” and the “Condenser” sections.
Exterior Surfaces
Wash the exterior enamel surfaces and gaskets with warm water and mild soap or detergent. Wipe and dry. Regular use of a good household appliance cleaner and wax will help maintain the finish. Do not use abrasive cleaners on enamel surfaces as they may scratch the finish.
For products with a stainless steel exterior, use a clean sponge or soft cloth and a mild detergent in warm water. Do not use abrasive or harsh cleaners. Do not use chlorine bleach on the stainless steel surfaces.
Ice Maker System
Minerals that are removed from water during the freezing cycle will eventually form a hard scaly deposit in the water system. Cleaning the system regularly helps remove the mineral scale buildup. How often you need to clean the system depends upon how hard your water is. With hard water of 15 to 20 grains/gal. (4 to 5 grains/liter), you may need to clean the system as often as every 9 months.
NOTE: Use one 16 oz (473 mL) bottle of approved ice maker cleaner. To order, see “Accessories.”
- Press the ON/OFF button.
- Wait 5 to 10 minutes for the ice to fall into the storage bin.
- Unscrew the drain cap from the bottom of the water pan located inside the storage bin as shown. Allow the water to drain completely.
- Replace the drain cap securely on the water pan. If the drain cap is loose, water will empty from the water pan and you will have either thin ice or no ice.
- Read and follow all handling information on the cleaner bottle before completing the steps below. Use one 16 oz (473 mL) bottle of approved ice maker cleaner.
- Pour one bottle of solution into the water pan. Fill the bottle twice with tap water and pour it into the water pan.
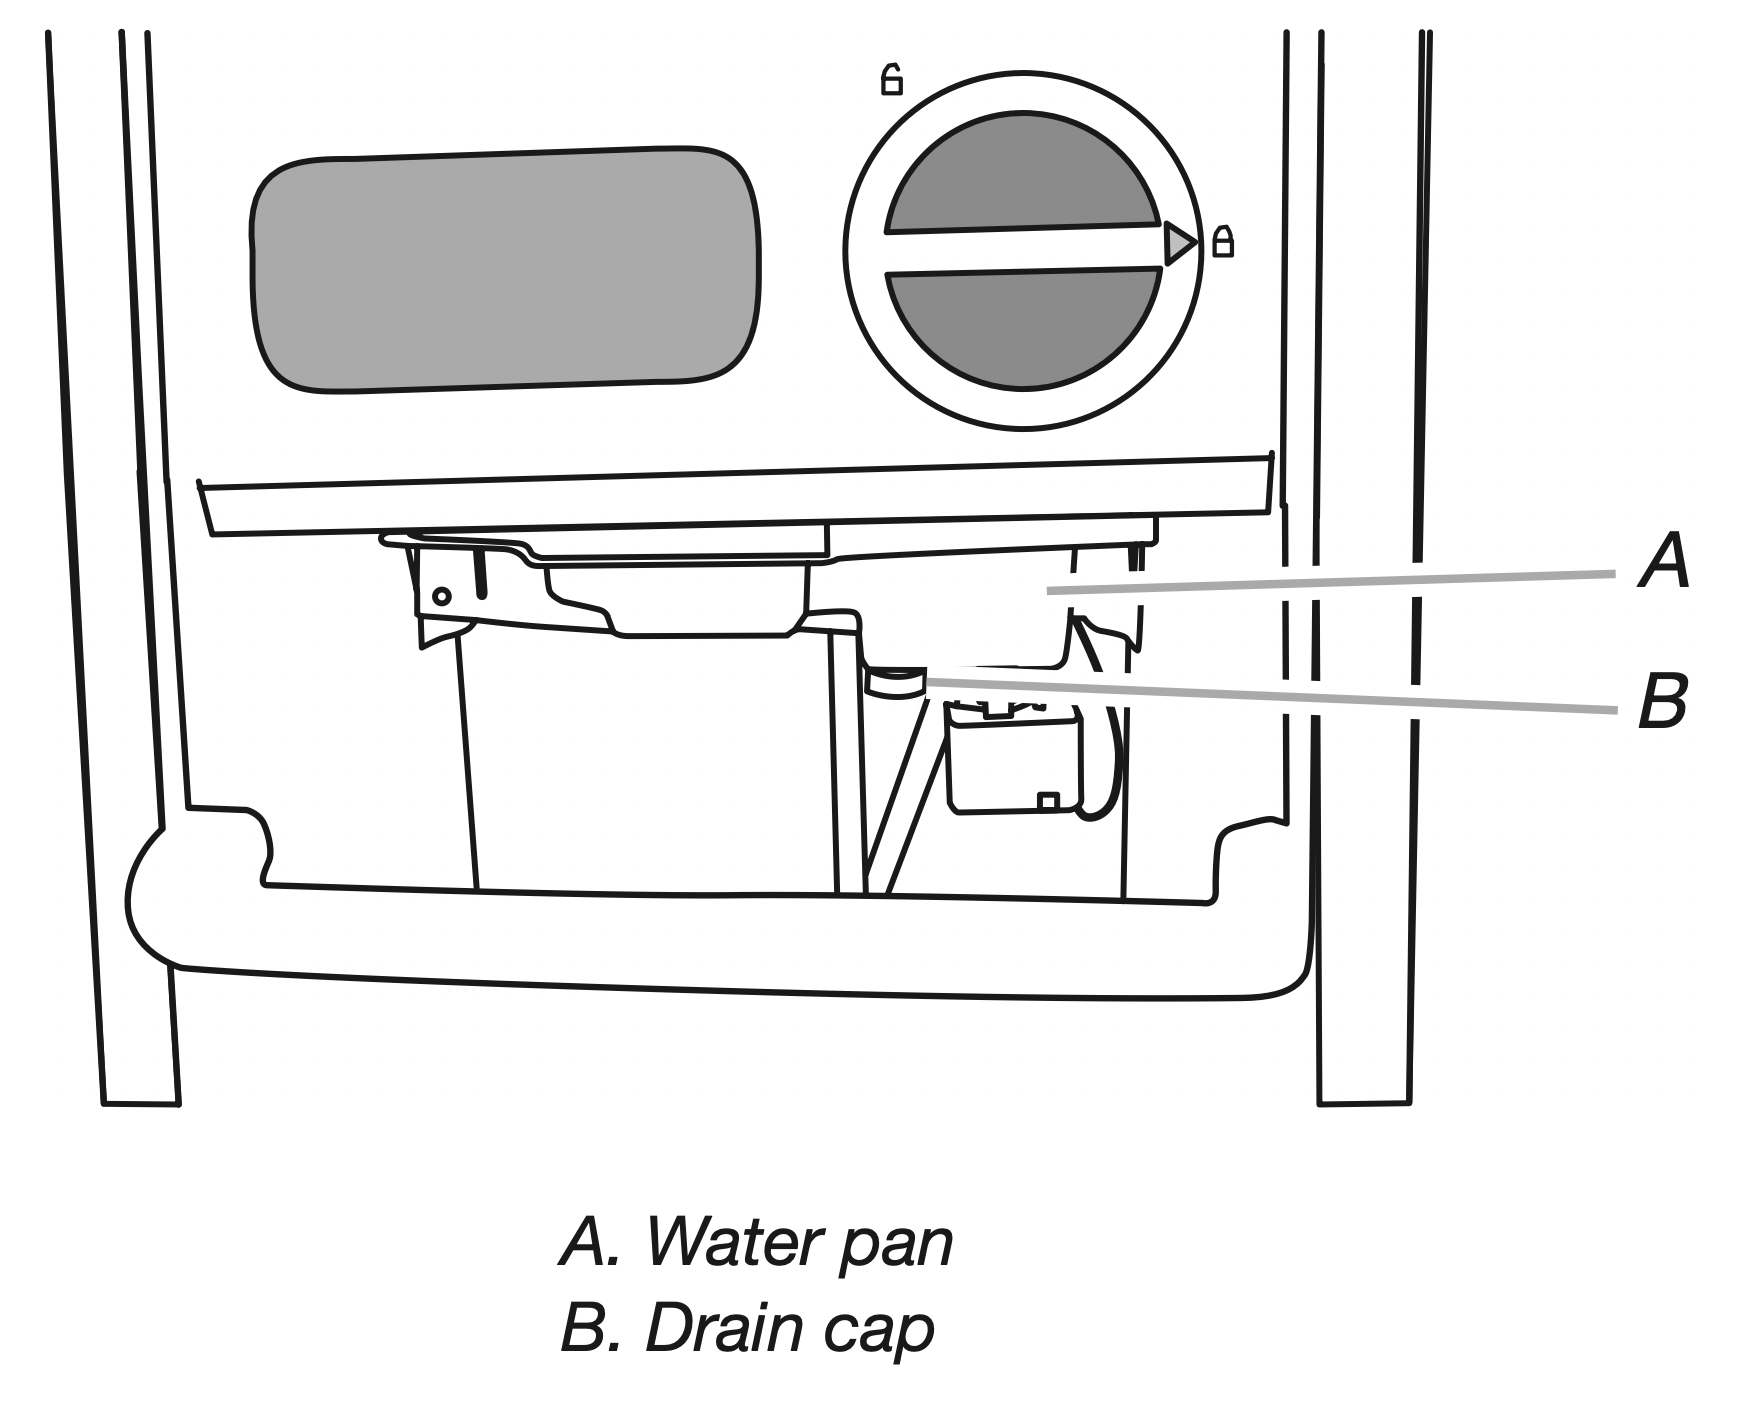
- Press the CLEAN button. See “Using the Controls.” The Clean button will blink, indicating that the cleaning cycle is in process. When the “Cleaning Complete” light is illuminated (approximately 70 minutes), the cleaning cycle is complete. During the cleaning cycle, the system will both clean and rinse itself.
- After the cleaning cycle is complete, remove the drain cap from the water pan. Look for any cleaning solution left in the water pan. If cleaning solution drains from the water pan, you should run the clean cycle again. Be sure to refill the water pan with cleaner before starting the clean cycle again. Be sure to replace the drain cap securely on the water pan. If the drain cap is loose, water will empty from the water pan and you will have either thin ice or no ice.
NOTE: Severe scale buildup may require repeated cleaning with a fresh quantity of cleaning solution. - Press the ON/OFF button to resume ice production.
Condenser
A Dirty or Clogged Condenser
- Obstructs proper airflow.
- Reduces ice making capacity.
- Causes higher than recommended operating temperatures which may lead to component failure.
WARNING - Electrical Shock Hazard
- Disconnect power before cleaning.
- Replace all parts and panels before operating.
- Failure to do so can result in death or electrical shock.
- Unplug ice maker or disconnect power.
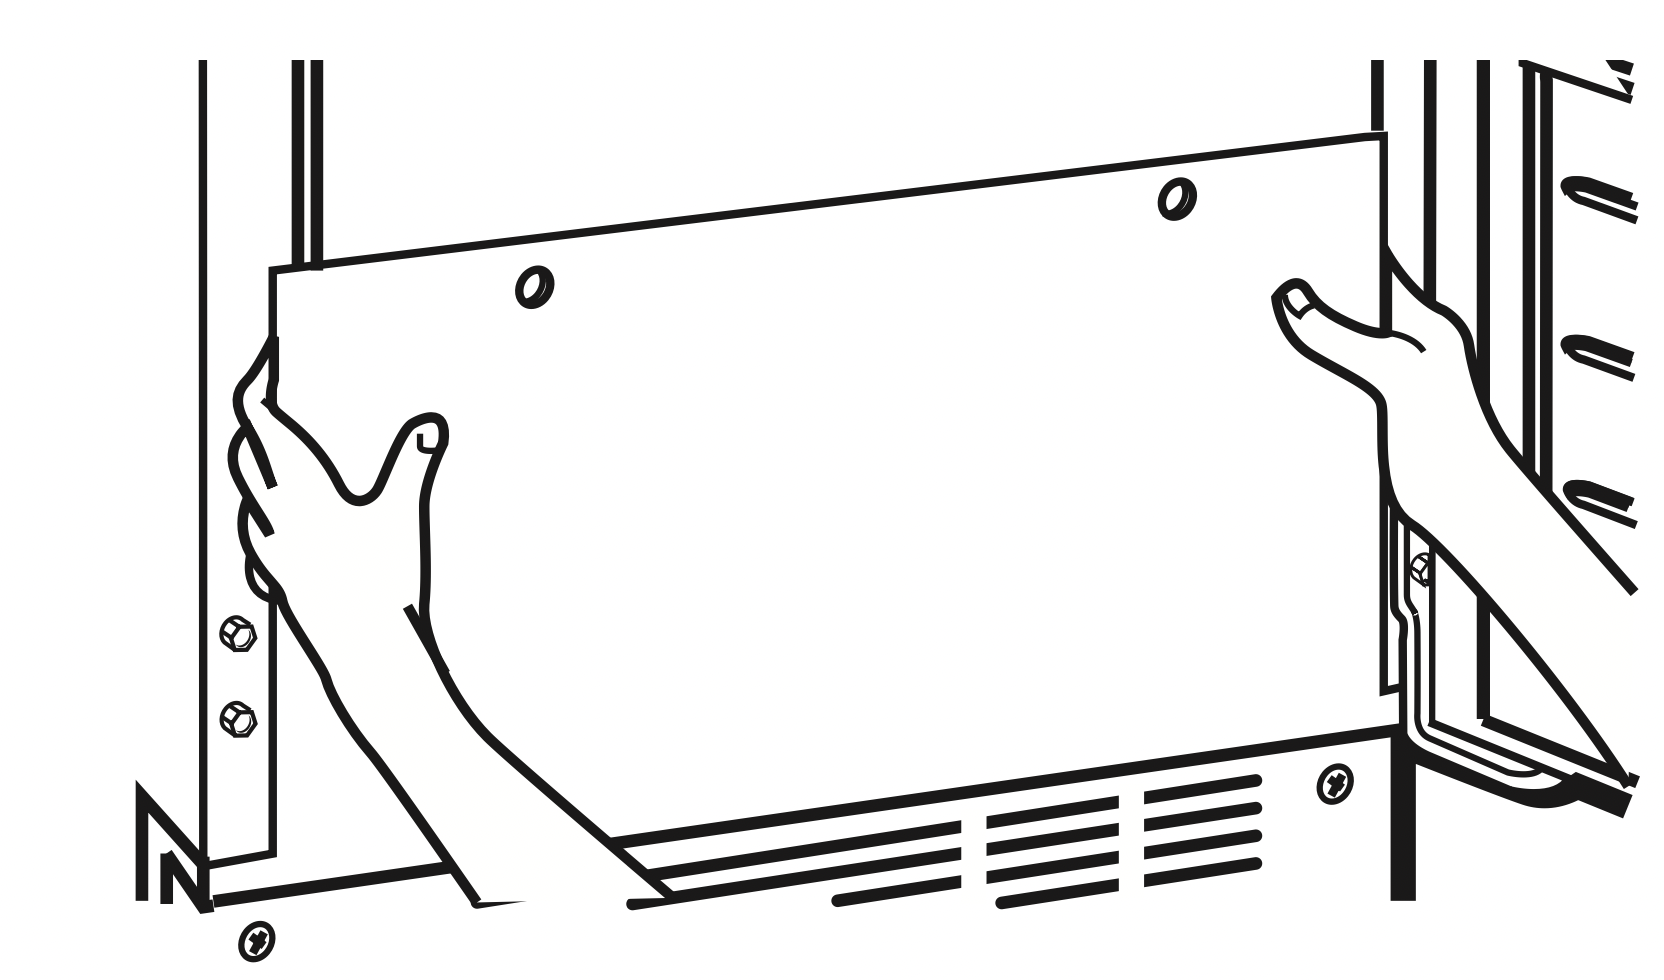
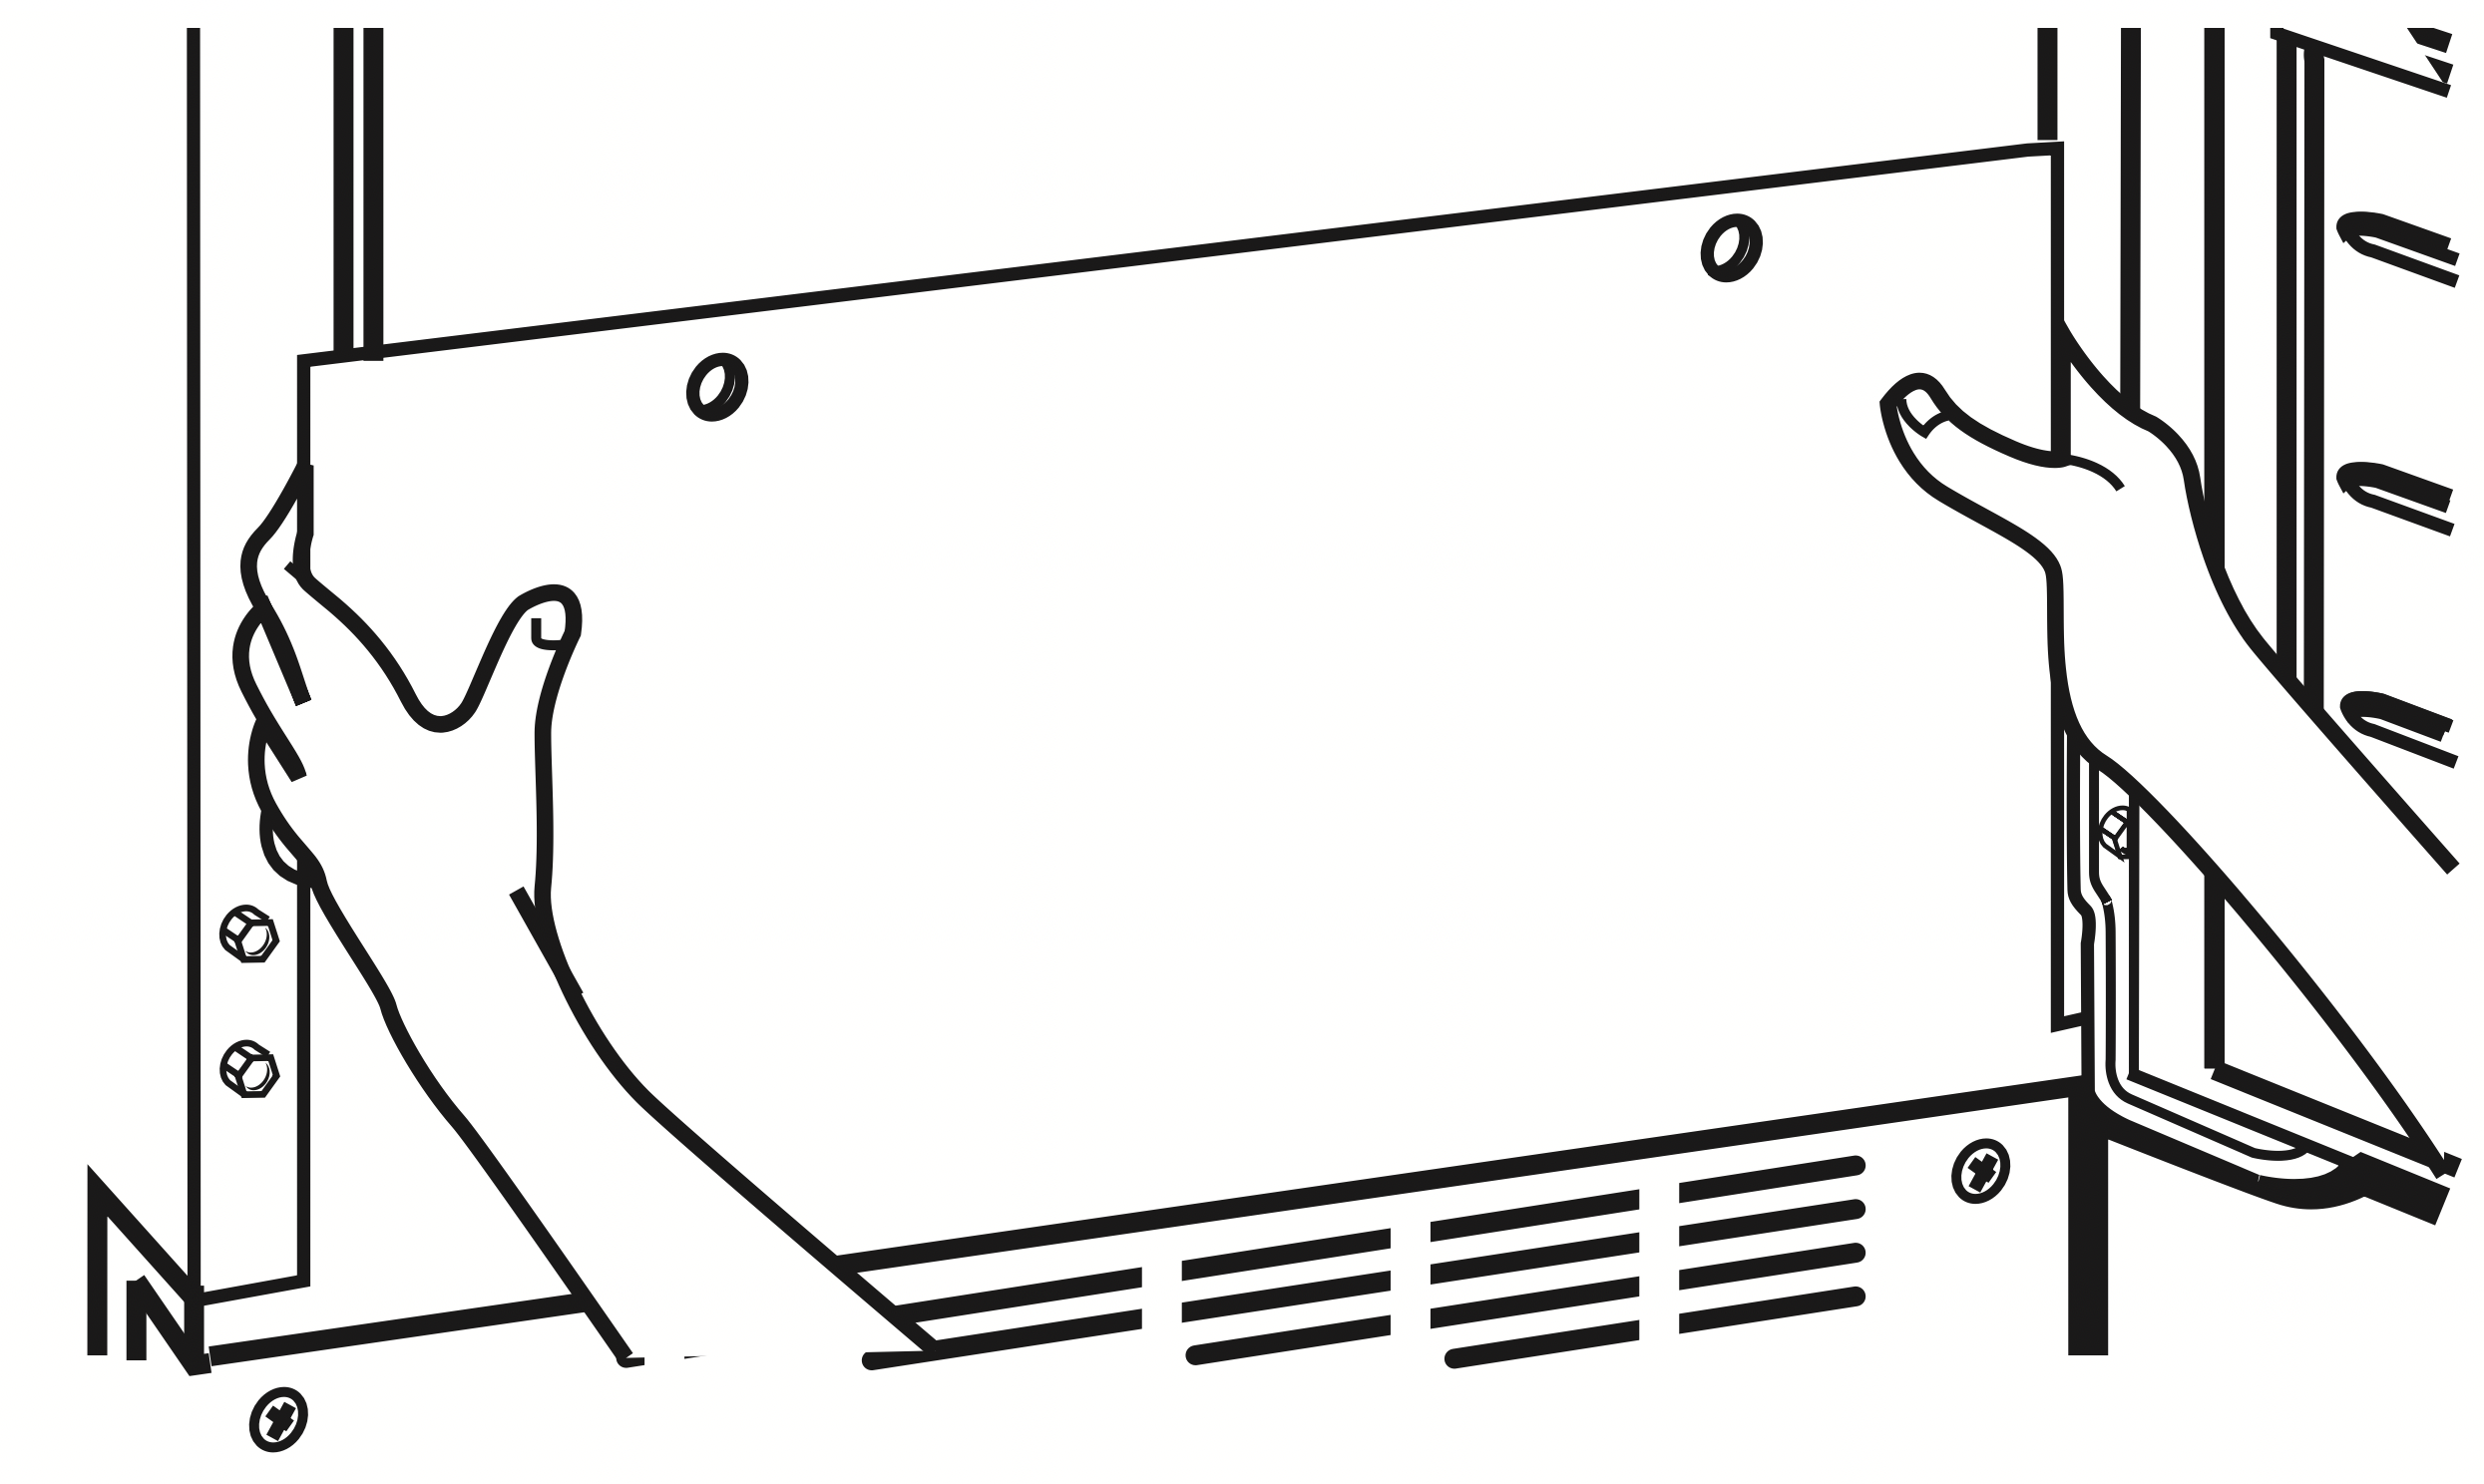
- Remove the 2 screws in the lower access panel and the 2 screws from the base grille area of the front panel support.
- Pull the bottom forward and then pull down to remove the lower access panel.
See other models: WRSA88FIHN WRS586FIEM WRS321SDHV WRS325SDHV WRB322DMHV
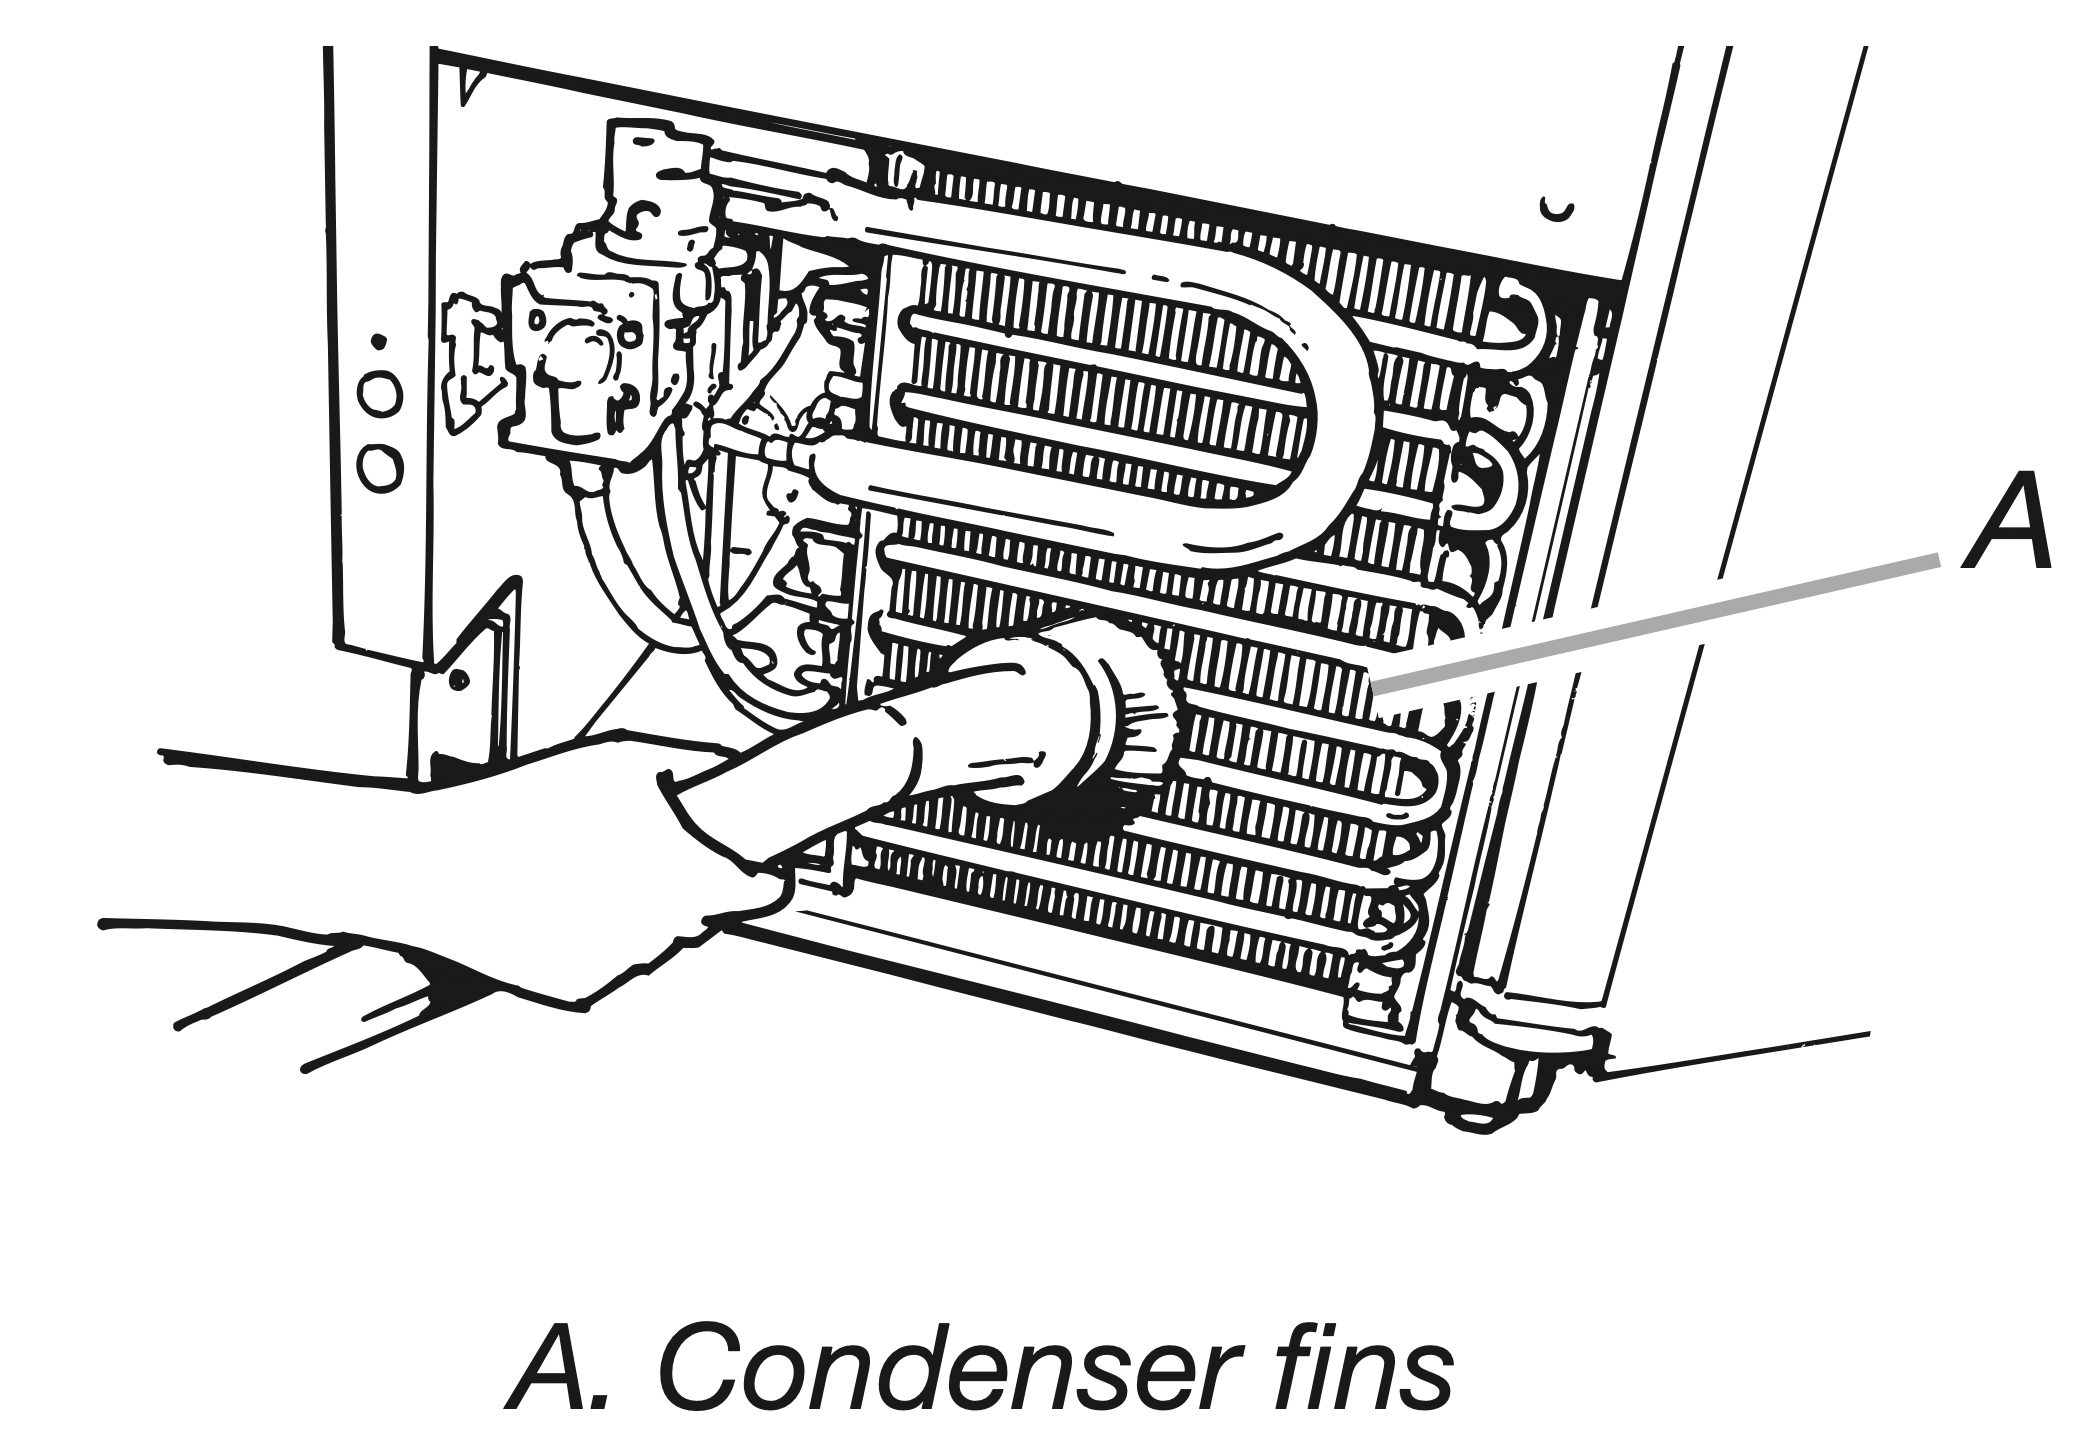
- Remove dirt and lint from the condenser fins and the unit compartment with a brush attachment on a vacuum cleaner.
- Replace the lower access panel using the 4 screws.
- Plug in ice maker or reconnect power.
Interior Components
- Unplug ice maker or disconnect power.
- Open the storage bin door and remove any ice that is in the bin.
- Remove the drain cap from the water pan and drain thoroughly. Replace the drain cap securely on the water pan. If the drain cap is loose, water will empty from the water pan, and you will have either thin ice or no ice.
- Pull out on the bottom of the cutter grid cover until the snaps release to remove.
- Unplug the wiring harness from the left side of the cutter grid.
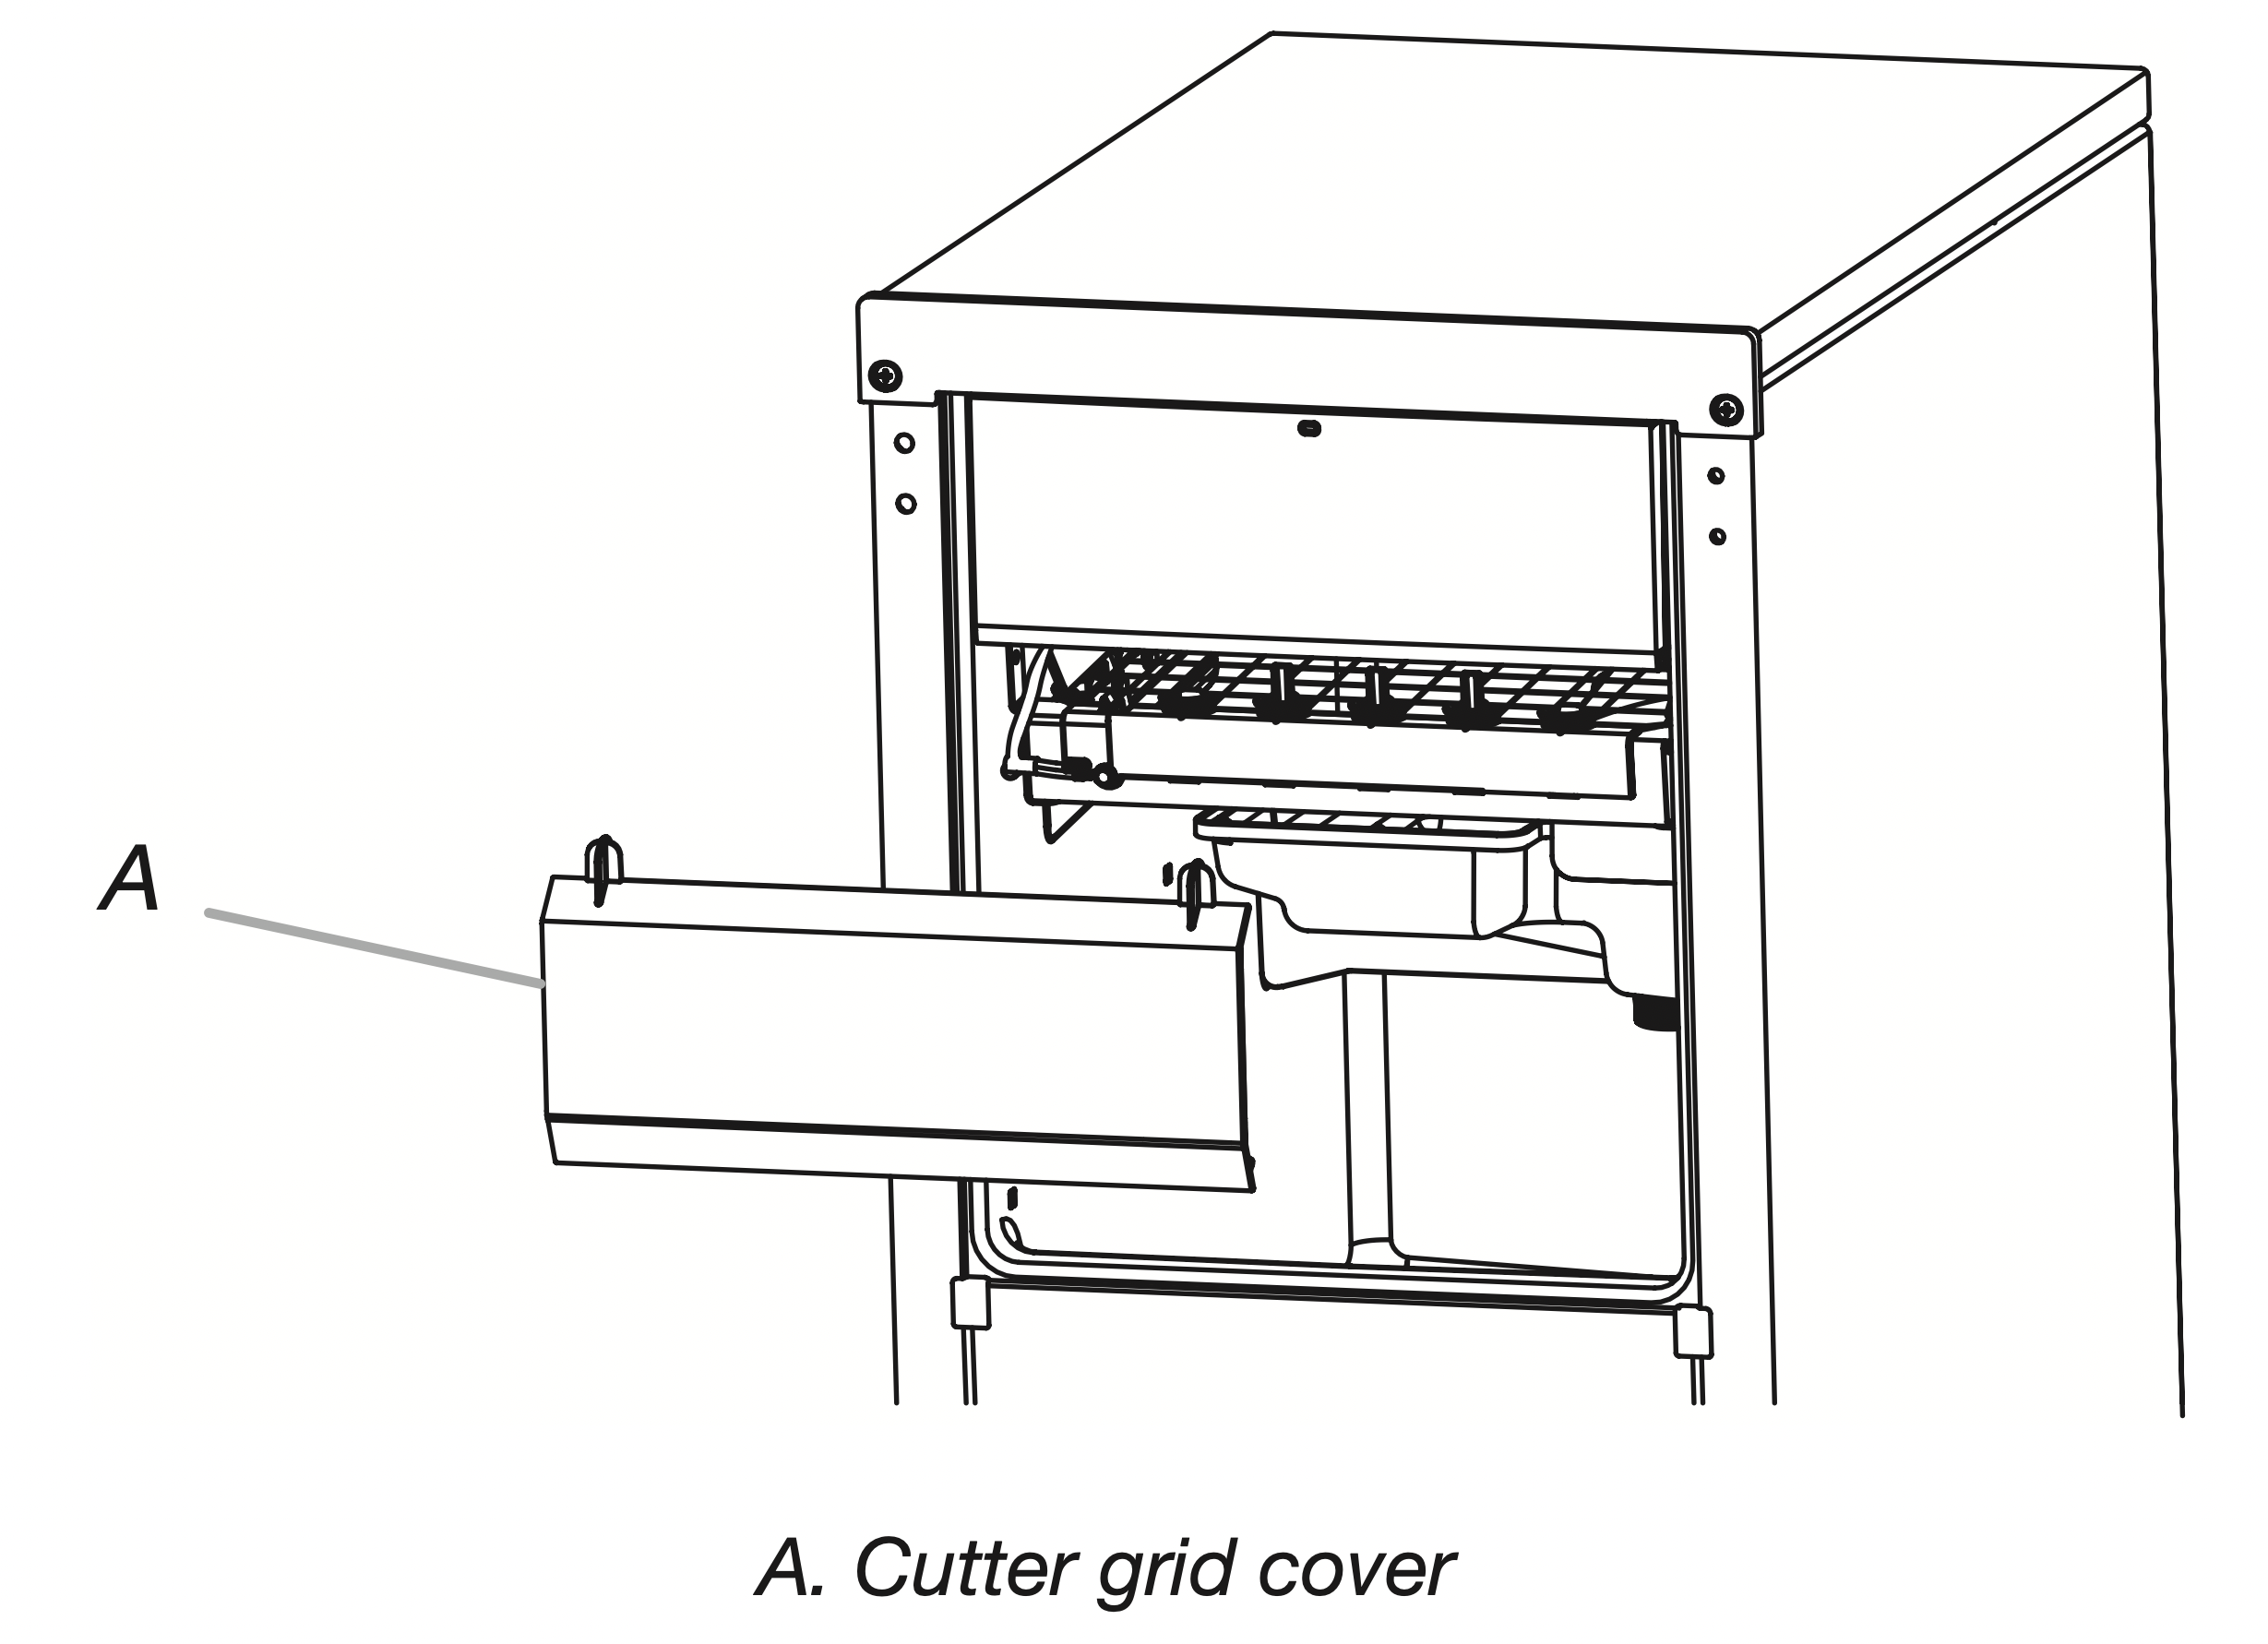
- Unplug the ice level sensor from the right side of the cutter grid. Pull the ice level sensor down and forward away from the cutter grid.
- Remove the right-hand and left-hand screws. Lift the cutter grid up and out.
NOTE: Make sure the plastic spacer from the right-hand side of the cutter grid bracket stays with the cutter grid.

- Remove the mounting screw that holds the water pan in place. Pull out on the front of the water pan.
- Disconnect the pump bracket from the water pan and unplug the water pan drain pump.
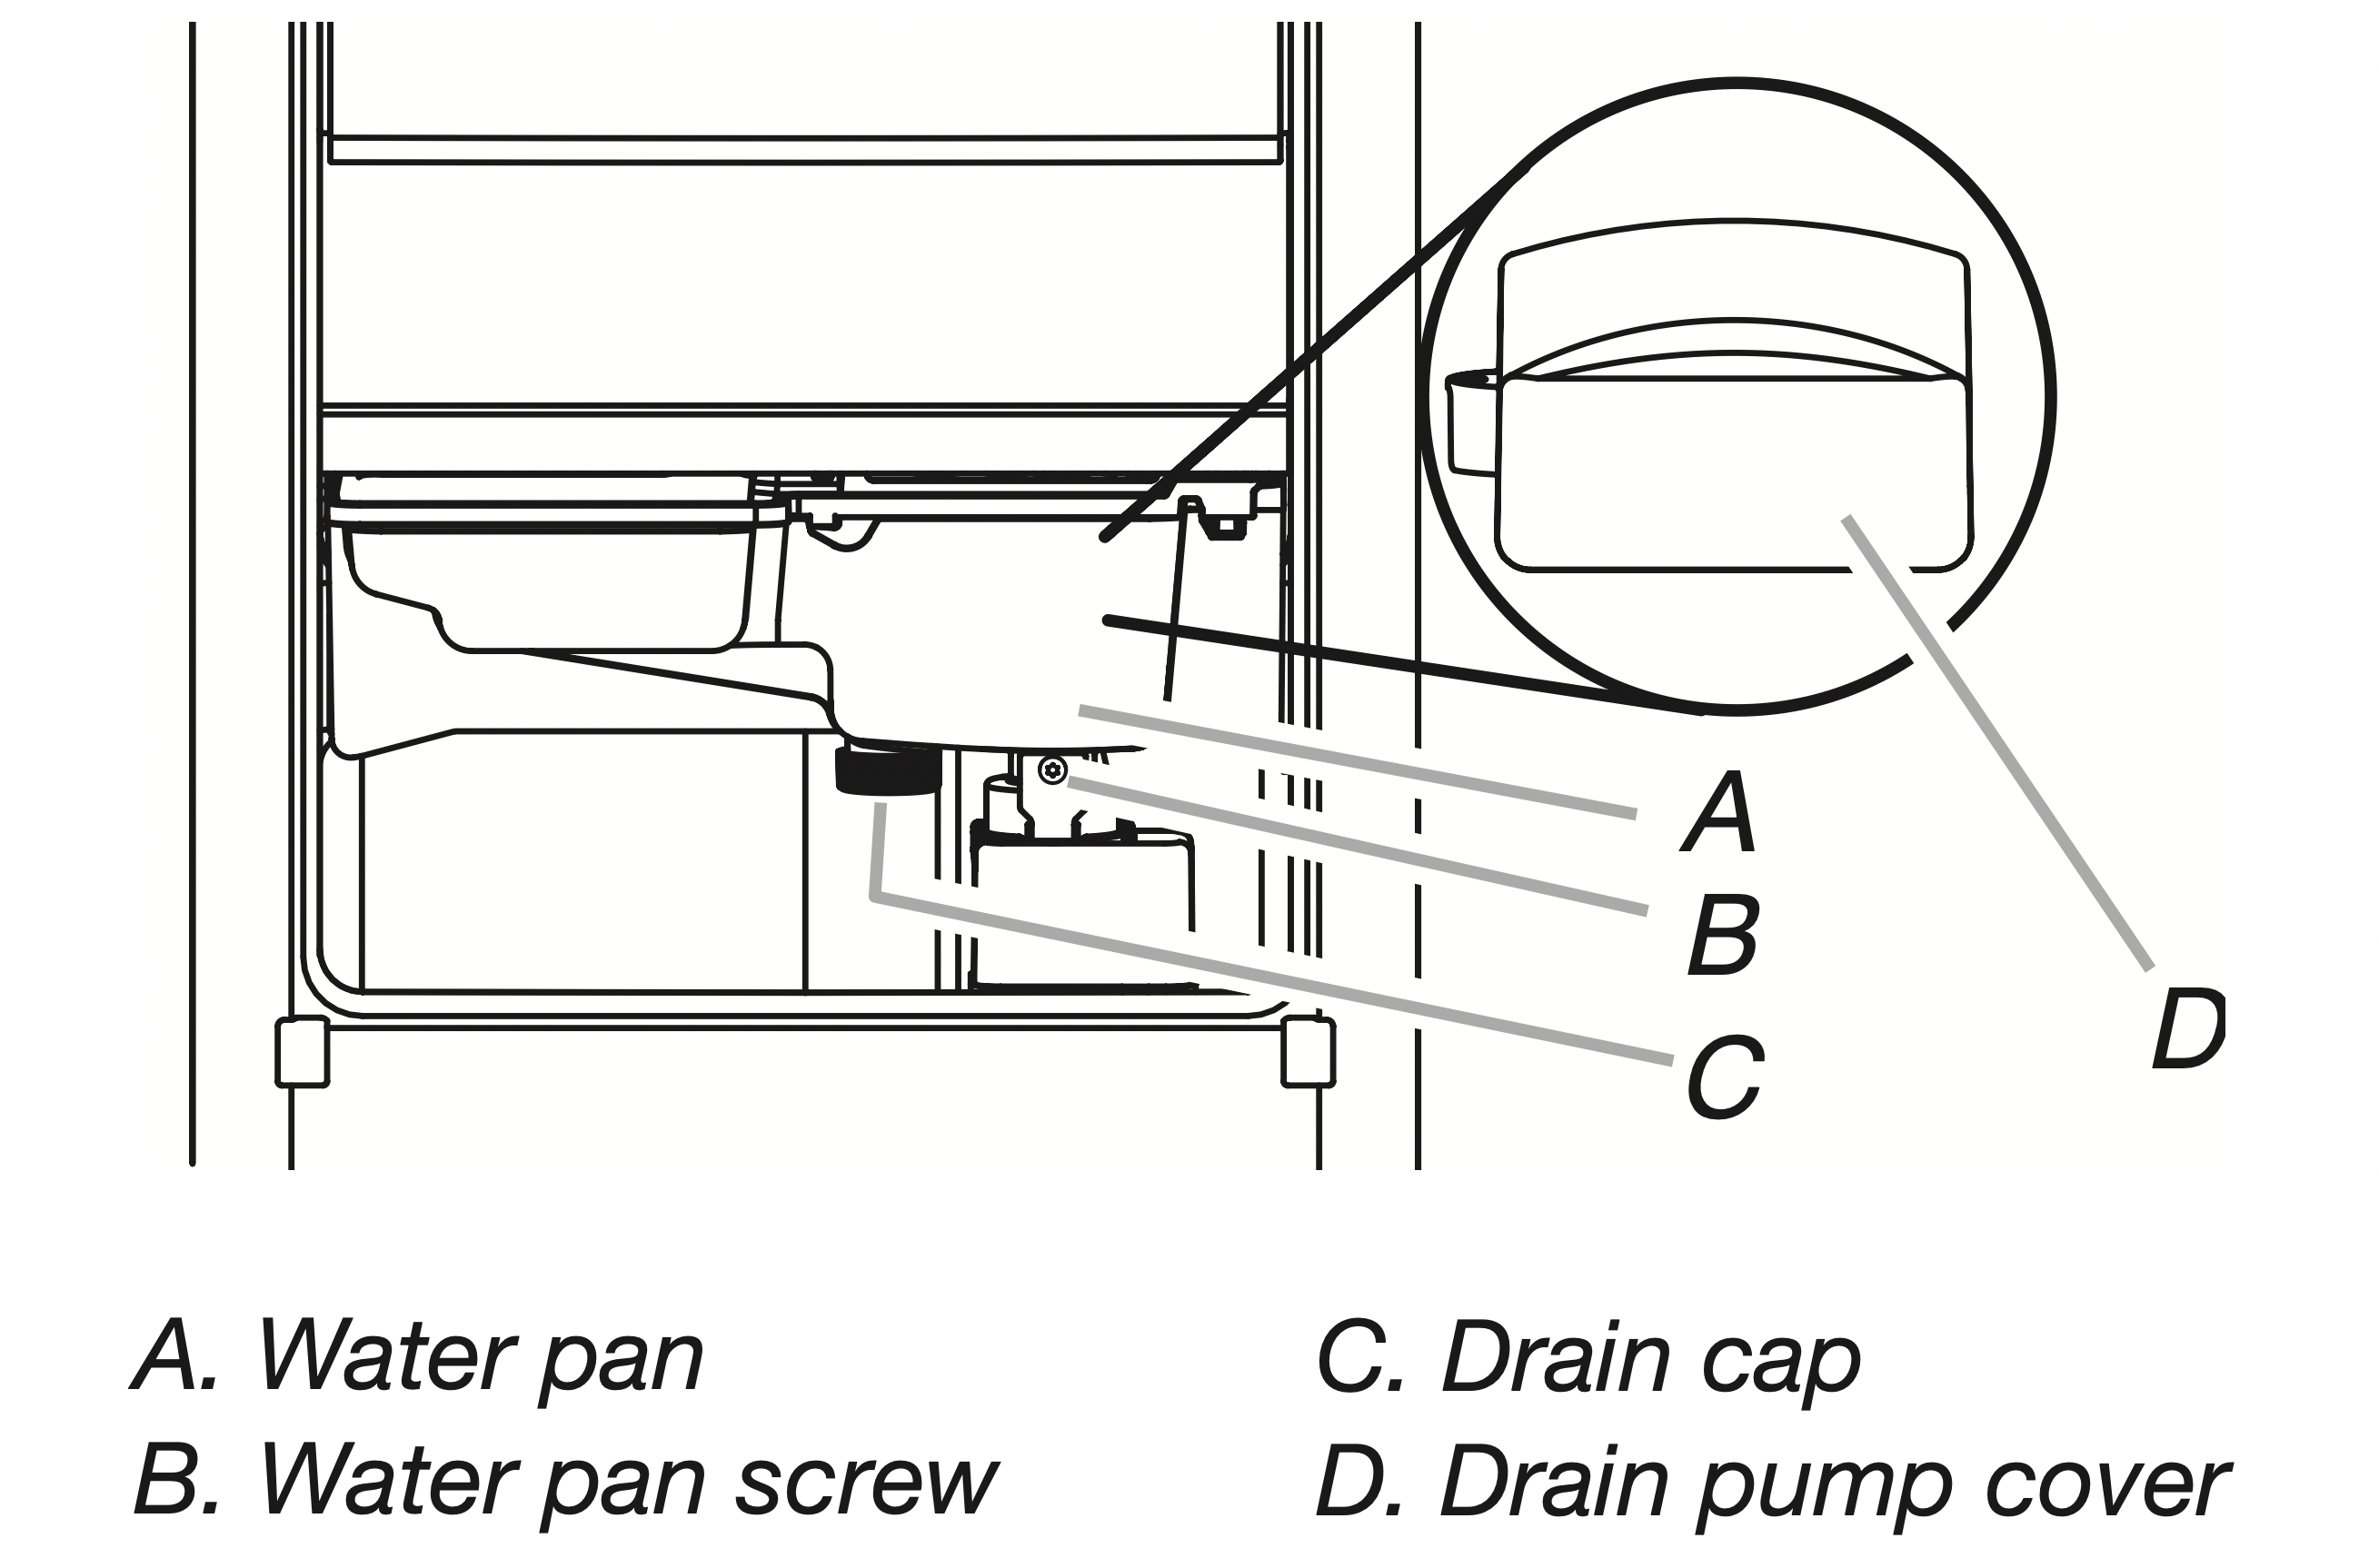
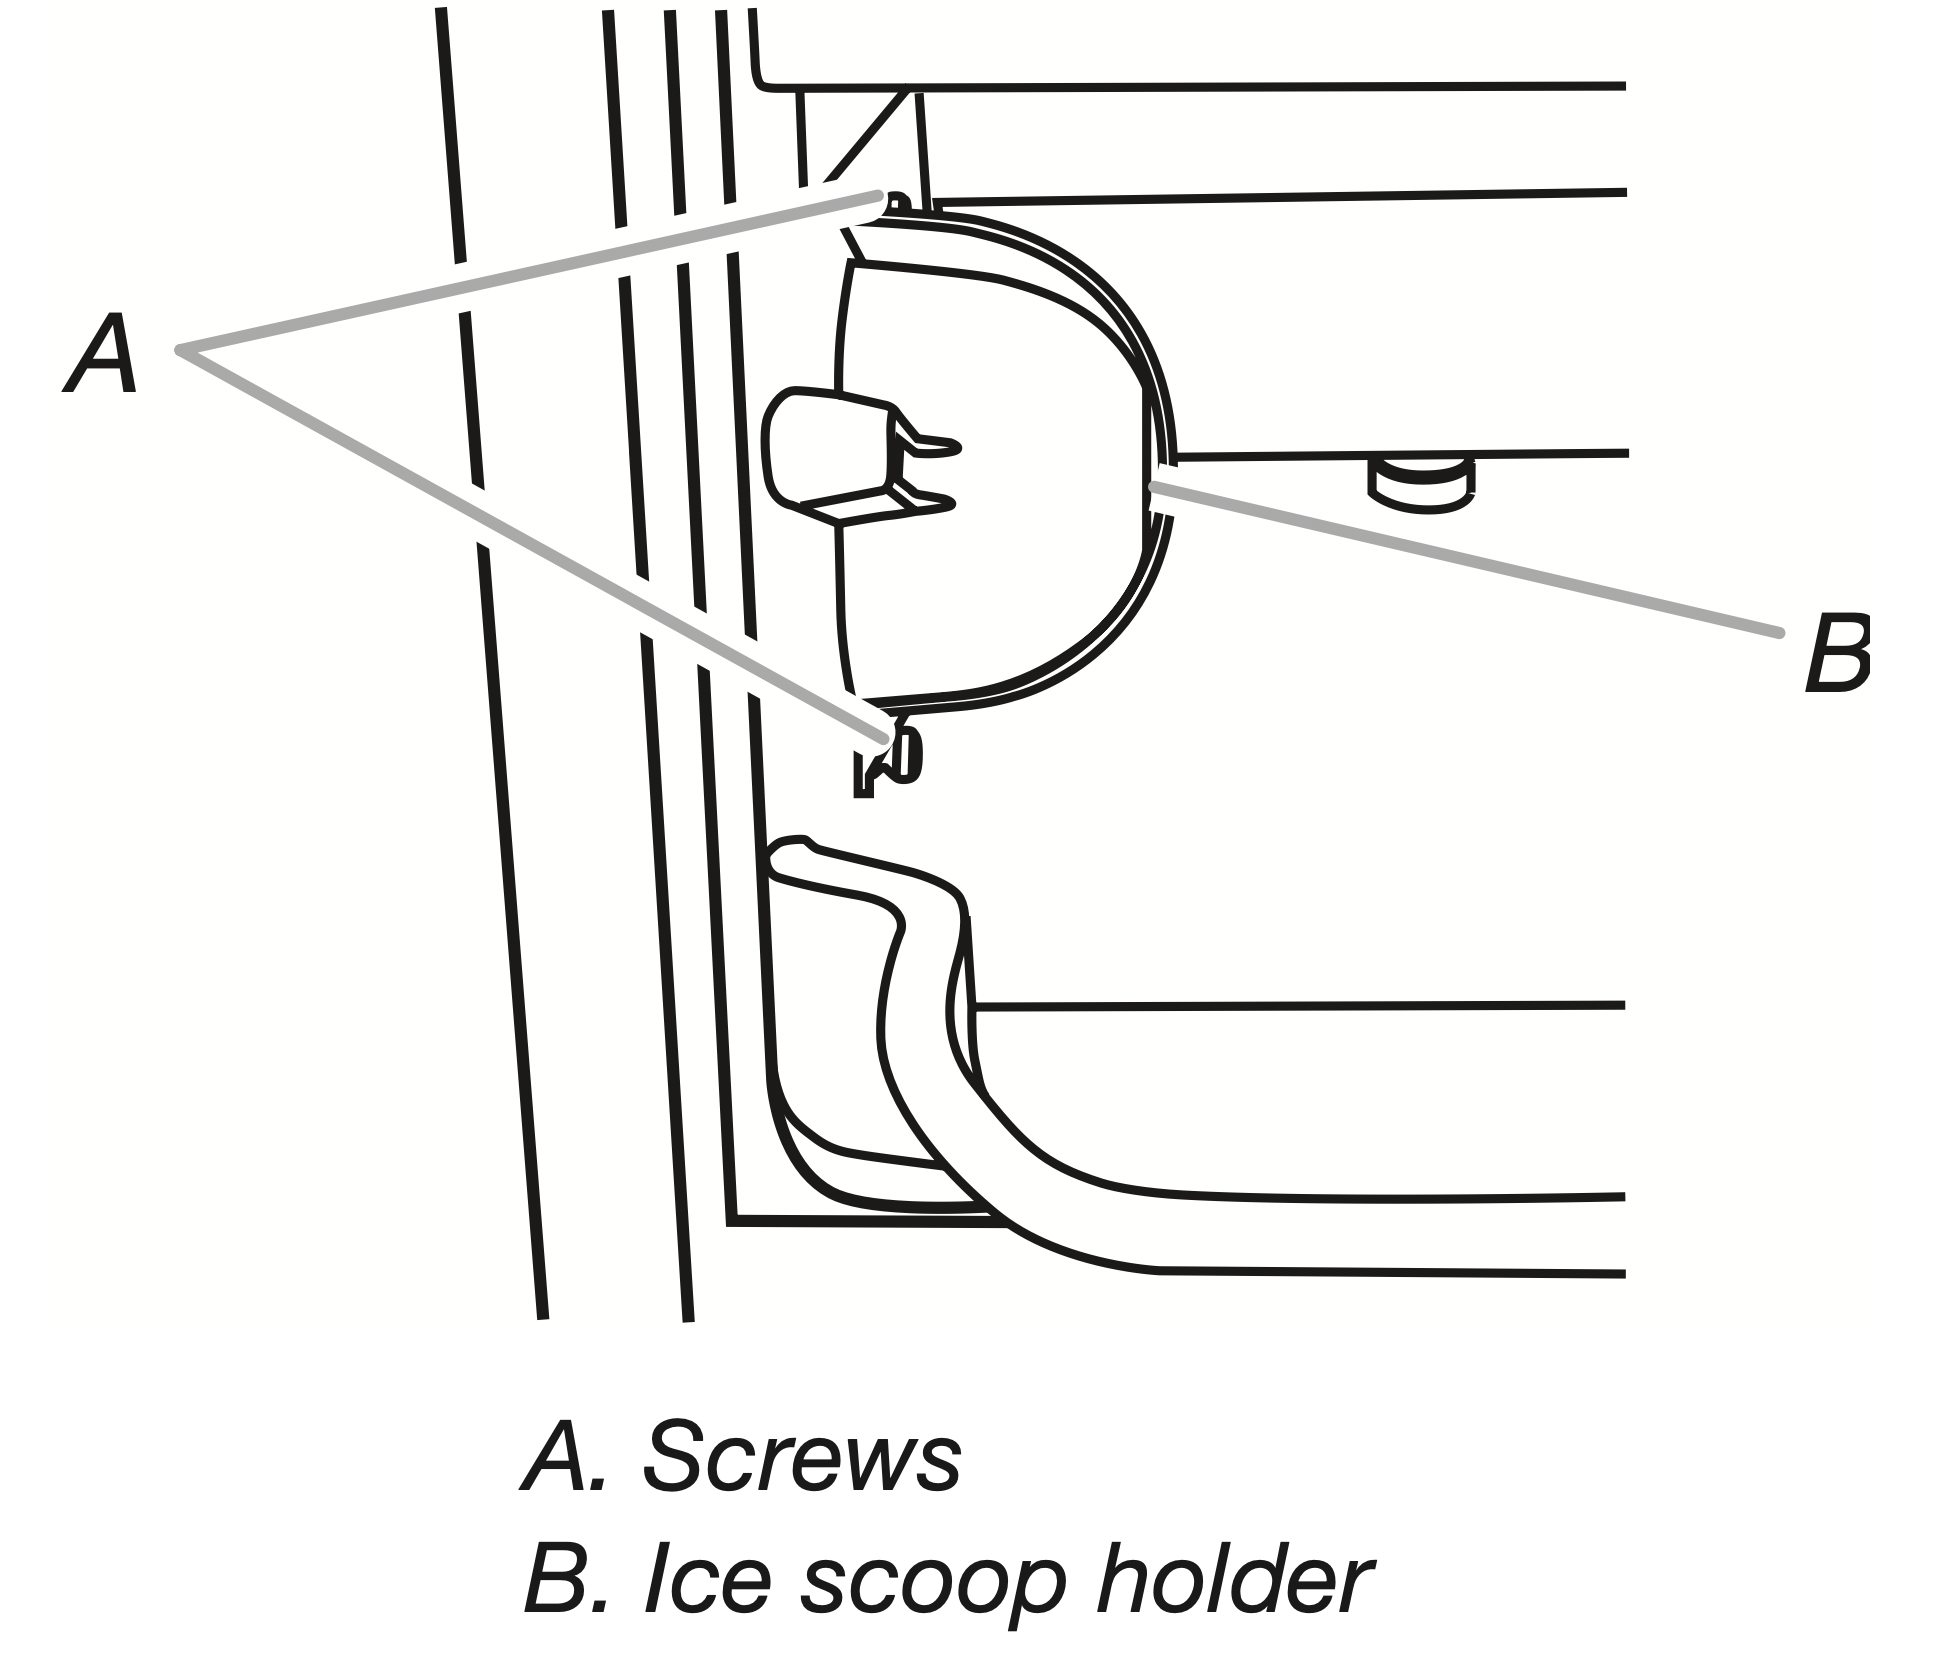
- Remove, clean and replace the ice scoop and ice scoop holder.
NOTE: On some models, the ice scoop holder is located in the upper left of the unit, and on other models, the ice scoop holder is located in the lower left of the unit.
After removing the ice scoop, remove the holder by removing the 2 screws.
Wash the ice scoop holder along with the other interior components using the following instructions.
Replace the ice scoop holder by replacing the screws.
- Wash the interior components (cutter grid, exterior of hoses, and water pan) and the storage bin, door gasket, ice scoop, and ice scoop holder with mild soap or detergent and warm water. Rinse in clean water. Then clean the same parts with a solution of 1 tbs (15 mL) of household bleach in 1 gal. (3.8 L) warm water. Rinse again thoroughly in clean water.
NOTE: Do not remove hoses. Do not wash plastic parts in dishwasher. They cannot withstand temperatures above 145°F (63°C). - To replace the water pan, set the water pan inside the ice bin.
Hook up the water pan pump. Snap the pump bracket back onto the water pan and place back into position. Secure the water pan by replacing the mounting screw. - Check the following:
Drain cap from the water pan is securely in place. If the drain cap is loose, water will empty from the water pan, and you will have either thin ice or no ice.
Hose from water pan is inserted into storage bin drain opening. - Slide the cutter grid back into place and secure it by replacing the right-hand screw and plastic spacer. Then tighten the left-hand screw. Reconnect the cutter grid harness and the ice level sensor harness.
- Replace the cutter grid cover.
- Gently wipe the control panel with a soft, clean dishcloth using warm water and a mild liquid dish detergent.
- Plug in ice maker or reconnect power.
- After cleaning, make sure that all controls are set properly and that no control indicators are flashing.
Vacation and Moving Care
WARNING - Electrical Shock Hazard
- Disconnect power before servicing.
- Replace all parts and panels before operating.
- Failure to do so can result in death or electrical shock.
To Shut Down the Ice Maker:
- Unplug ice maker or disconnect power.
- Remove all ice from storage bin.
- Shut off the water supply.
- Remove the 2 screws in the lower access panel and the 2 screws from the base grille area of the front panel support. Pull forward to remove the lower access panel.
- Disconnect the inlet and outlet lines to the water valve. Allow these lines to drain and then reconnect to the valve.
- Replace lower access panel and screws.
- Drain water from water pan by removing the drain cap.
- If the room temperature will drop below 32°F (0°C), water must be removed from the drain line.
For Ice Makers with a Drain Pump Installed
Plug in ice maker or reconnect power.
Turn ice maker off and remove all remaining ice from ice bin.
Pour 1 qt (0.95 L) of water into the ice bin near the drain and let the ice maker stand for approximately 5 minutes. This will allow the water in the bin to drain into the drain pump so that the pump will remove the remaining water from the ice bin and the drain pump.
Unplug ice maker or disconnect power. - Before using again, clean the ice maker and storage bin.
- Plug into a grounded 3 prong outlet.
NOTE: All components of the ice maker are permanently lubricated at the factory. They should not require any additional oiling throughout the normal life of the machine.
TROUBLESHOOTING
Try the solutions suggested here first in order to avoid the cost of an unnecessary service call.
Ice Maker Operation
WARNING - Electrical Shock Hazard
- Plug into a grounded 3 prong outlet.
- Do not remove ground prong.
- Do not use an adapter.
- Do not use an extension cord.
- Failure to follow these instructions can result in death, fire, or electrical shock.
|
PROBLEM |
RECOMMENDED SOLUTIONS |
|---|---|
| Ice Maker Will Not Operate |
Check that it is plugged into a grounded 3 prong outlet. Check that the control is turned on. See “Using the Controls.” Replace the fuse or reset the circuit breaker. NOTE: If problems continue, contact an electrician. Room temperature must be above 45°F (7°C). Otherwise, bin thermostat may sense cold room temperature and shut off even though the bin is not full of ice. The ice maker may not restart once it does shut off. If there was a large amount of water added to the ice maker, wait a few minutes for the drain pump to clear. If there is still water in the bin, check to see whether the drain hose is kinked. For models with drain pumps, check that the drain hose is not damaged, or kinked or pinched between cabinet and ice maker. Use only Whirlpool approved drain pump kit, Part Number 1901A. |
| Ice Maker Seems Noisy |
Is the water in the reservoir overflowing? This is normal. This overflow helps to purge minerals that were removed from the water during the ice making process. Is there a “whooshing” sound? Check the following things:
Is there ice between the evaporator plate and the cutting grid? Check that the ice maker is level. See “Leveling.” If the ice maker is level, and the problem persists, run a cleaning cycle. See “Cleaning.” If the ice maker is connected to a water supply pressure in excess of 60 psi, you may hear a loud sound during water filling associated with the flow of water through the inlet valve. Call a licensed, qualified plumber to determine the best method to reduce the supply water pressure (50 psi is recommended). |
Ice Production
WARNING - Electrical Shock Hazard
- Disconnect power before servicing.
- Replace all parts and panels before operating.
- Failure to do so can result in death or electrical shock.
| PROBLEM |
RECOMMENDED SOLUTIONS |
|---|---|
| Ice Maker Runs But Produces No Ice |
Check that the control is turned on. Check that the water supply is properly connected and turned on. If the drain cap is loose, water will empty from the water pan, and you will have either thin ice or no ice. Tighten the drain cap. Clean the drain tube. Check that there are no kinks in the drain line. |
| Ice Maker Runs But Produces Very Little Ice |
Is the accelerated ice production feature turned on? This feature increases the ice production rate to provide you with more ice in the same amount of time. See “Using the Controls.” Room temperatures of more than 90ºF (32ºC) will normally reduce ice production. Dirt or lint may be blocking the airflow through the condenser. See “Condenser” in the “Cleaning” section. If there is white scale buildup in the ice maker’s water or freezing system, you should clean the ice maker. See “Interior Components” in the “Cleaning” section. If the drain cap is loose, water will empty from the water pan, and you will have either thin ice or no ice. Tighten the drain cap. Ensure that the cutter grid is securely in place and that its harness plug is connected. See “Interior Components” section of “Cleaning” for instructions on cutter grid removal. Check that water filter is properly installed. |
Ice Quality
| PROBLEM |
RECOMMENDED SOLUTIONS |
|---|---|
| Off Taste, Odor or Gray Color in the Ice |
Is there unusually high mineral content in the water supply? The water may need to be treated. Is there mineral scale buildup? Clean your ice maker. See “Ice Maker System” in the “Cleaning” section. Do not store any foods in the ice bin. Check that all packaging materials were removed at the time of installation. |
| Thin, Soft or Clumps of Ice |
Is there unusually high mineral content in the water supply? The water may need to be treated. Is there mineral scale buildup? Clean your ice maker. See “Ice Maker System” in the “Cleaning” section. Are there clumps of ice in the bin? If ice is not used regularly, it will melt and form clumps. Break the clumps with the ice scoop provided. |
Plumbing Problems
WARNING - Excessive Weight Hazard
- Use two or more people to move and install ice maker.
- Failure to do so can result in back or other injury.
|
PROBLEM |
RECOMMENDED SOLUTIONS |
|---|---|
| Water Not Entering Drain Properly |
Is the drain hose aligned over the drain? Move the ice maker to align the drain. See “Connect Water Supply.” NOTE: Service technicians cannot repair plumbing problems outside of the ice maker. Call a licensed, qualified plumber. |
