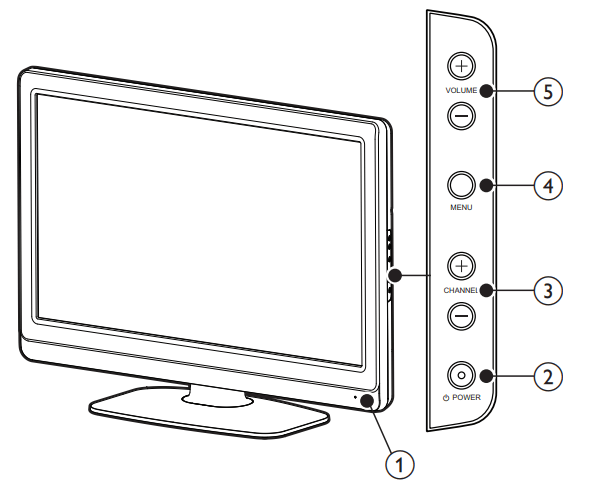
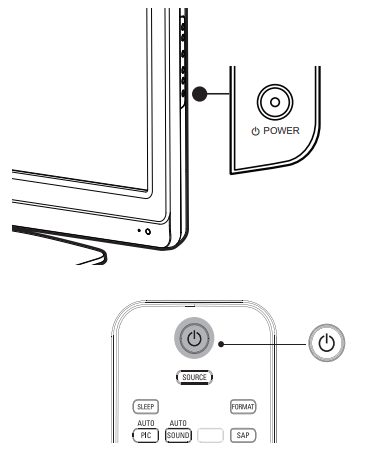
Switches the TV on or puts it in stand-by mode. The TV is not powered off completely unless it is physically unplugged.
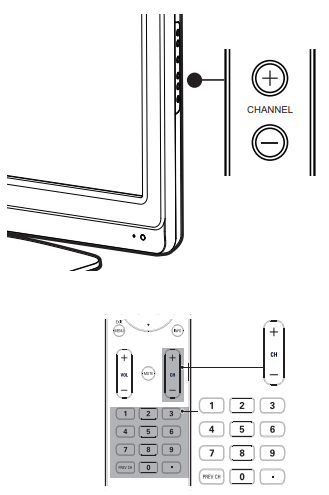
3. CHANNEL + / -
Switches to the next or previous channel.
4. MENU
Toggles the main menu on or off.
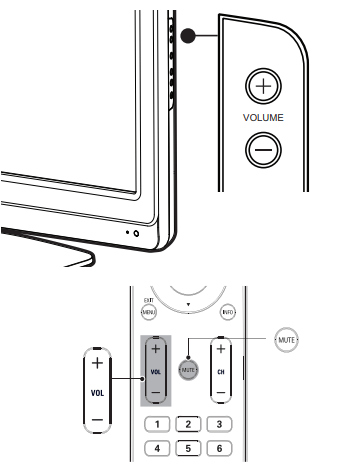
5. VOLUME+/-
Increases or decreases volume.
Remote control
1. (Standby-On)
Switches the TV on or puts it in stand-by mode. The TV is not powered off completely unless it is physically unplugged.
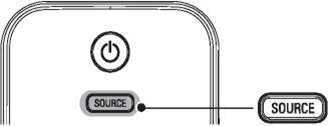
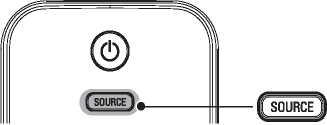
2. SOURCE
Selects connected devices.
3. FORMAT
Selects a picture format (see 'Changing picture format' on page 16).
4. SAP
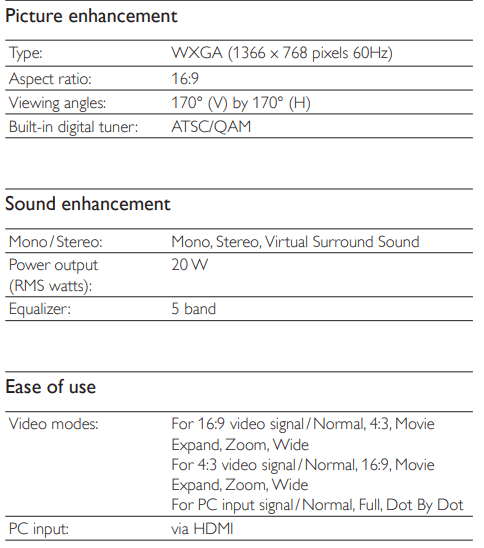
Digital Mode (DTV)
• Press to select the audio language.
Analog Mode (TV)
• Press to select the audio mode.
5. FREEZE
Press to pause screen image.
6. OK
Activates a selection or accesses the menu.
7. ▲ ▼ ◄ ► (Navigation buttons)
Navigates through the menus.
8. INFO
Displays information about the TV channel or accessory device.
The quality and accuracy of the information depends on the broadcaster: You might see a difference in broadcast time if the broadcast is from a different time zone.
9. CH +/-
Switches to the next or previous channel.
10. MUTE
Mutes or unmutes audio.
11. Number buttons
Select a channel, page or setting.
12. • (Dot)
Press the dot (•) for digital channels.
13. PREV CH
Returns to the previously viewed channel.
14. VOL+/-
Increases or decreases volume.
15. MENU / EXIT
Turns the menu on or off.
16. BACK
Returns to a previous screen.
17. AUTO SOUND
Cycles through preset sound settings
(see 'Changing auto sound mode' on page 17).
18. AUTO PIC
Cycles through preset picture settings
(see 'Changing auto picture mode' on page 15).
18. SLEEP
Sets a delay after which the TV switches to standby
Get started
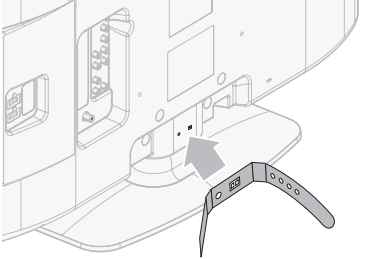
Mounting stand onto TV
Applicable to TVs without mounted stands.
Positioning the TV
In addition to reading and understanding safety instructions, consider the following before positioning your TV:
Ensure that you always have easy access to the AC power cord or plug to disconnect the TV from the power.
If the TV is mounted on a swivel base, ensure that no strain is placed on the AC power cord when the TV is swiveled. Strain on the AC power cord can loosen connections.
The ideal viewing distance for watching TV is three times its screen size.
Position the TV where light does not fall on the screen.
Connect your devices before you position the TV
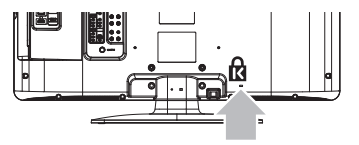
Using a Kensington lock
There is a Kensington security slot on the back of the TV. Prevent theft by looping a Kensington lock between the slot and a permanent object, such as a heavy table.
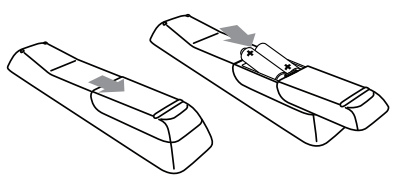
Installing the remote control batteries
Slide the battery cover off the back of the remote control.
Insert the 2 supplied batteries (AAA, 1.5V). Be sure the + and − ends of the batteries line up with the markings inside the case.
Slide the cover back into position
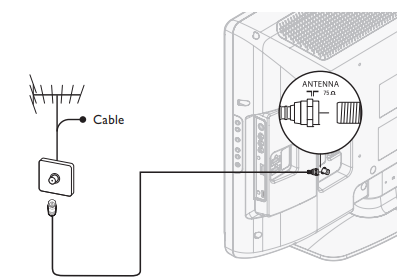
Connecting the antenna or cable
If you connect to an antenna
Any DTV programs that are broadcast in your area can be received for free through an antenna connection.
Contact your local content provider or your local electronics retailer if you are unsure about what HDTV programs are available in your area.
Broadcasters are transitioning from analog to digital TV This means that a given broadcaster can have channels available either in analog or in digital, or both analog and digital at the same time.
The TV produces stereo sound only if a stereo signal is broadcast.
If you connect to a cable
When your TV is connected to the cable socket, you might receive free digital and high definition programs (depending on your cable provider). The channel number for digital and high definition channels includes a dot “•”. For example, 11.1, 46.30, 108.201. Contact your cable provider for more information.
If you connect to a DBS (Direct Broadcast Satellite)
There are two main DBS systems: DirecTV and DishNetwork. These systems require a separate, proprietary set-top box to decode signals and send them to the TV The set-top box contains a digital TV tuner for receiving off-air digital broadcasts.
Contact your local DBS provider for more information about the connections and the TV channels.
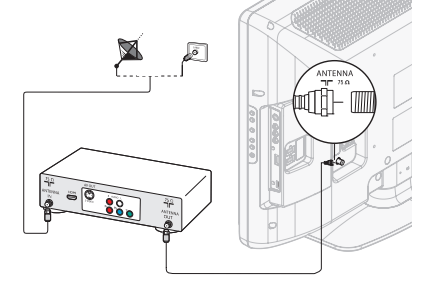
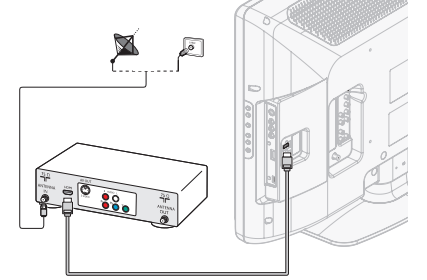
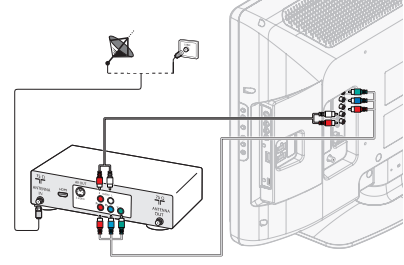
If you connect to a set-top box
A cable box or satellite set-top box can be connected to the TV through the following connections:
ANT
A/V (Composite Video and Audio)
S-Video
YPbPr (Component Video Input)
HDMI
For information about how to connect a set-top box, see the Quick Start Guide provided.
If you connect a set-top box through RF IN / OUT
If the TV is connected to a cable box or satellite set-top box via a coaxial connection, set the TV to channel 3 or 4, or to the channel specified by the service provider
If you connect a set-top box through HDMI
If the TV is connected to a cable box or satellite set-top box via HDMI, make sure you select the correct HDMI source by using SOURCE on this unit’s remote control.
If you connect a set-top box through component video input
If the TV is connected to a cable box or satellite set-top box via component video input, make sure you select the correct component video source by using SOURCE on this unit’s remote control.\
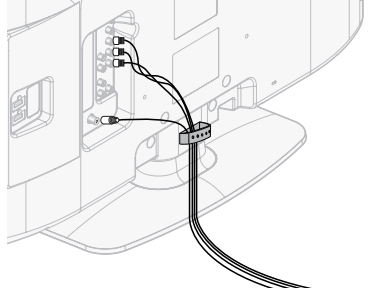
Managing cables
Route your antenna cable and all other cables through the cable holder at the back of the TV. The holder helps keep your cables tidy and easily manageable
1. Attach the cable holder as illustrated below
2. Pass cables through the cable holder to avoid tangles.
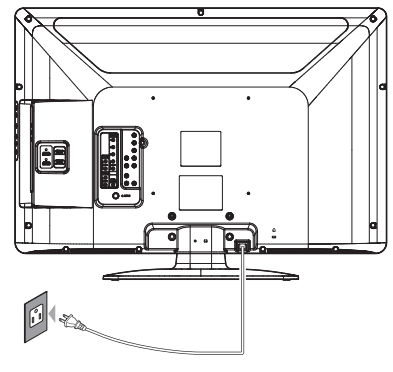
Plugging in the AC power cord
Connect the AC power cord plug to the power outlet. Ensure that the cord is tightly secured.
Switching on and initial setup
Before you switch on the TV, check that the AC power cord is properly connected. Press POWER at the right side of the TV, or press on the remote control. The TV normally takes 25-30 seconds to start up and the following screen appears the first time you turn on the TV.
Follow the on-screen instructions to select your language and complete your TV setup. Installation takes approximately 10 minutes.
Press to select the desired mode for energy saving, then press OK.
Select [Retail] if you want backlight to be brighter. Select [Home] to reduce power consumption. You must set [Home]. Otherwise, personalized picture and sound settings will not be memorized after the unit goes to stand-by mode.
Select [Retail], the unit will be set up with predefined setting for retail displays. In this setting, the power consumption may possibly exceed the limited requirement of the ENERGY STAR® qualification.
Select [Home], the unit will be set to maximize energy efficiency. Picture and sound settings can be adjusted and saved as per your personal preferences.
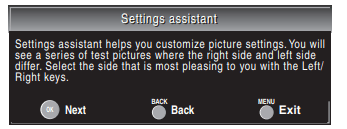
Press OK to begin [Settings assistant].
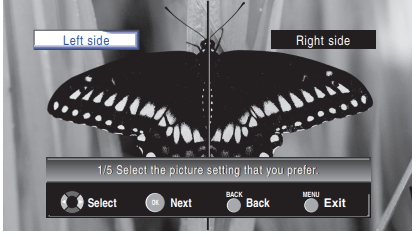
Press 5 times to select the side of the pictures that is the most pleasing to you. then press OK.
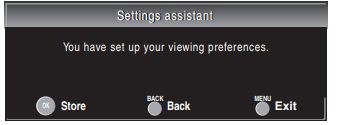
Press OK to finish [Settings assistant].
Use your TV
Switching on your TV and putting it in stand-by mode
To switch on
• Press . POWER at the side of the TV or press . (Standby-On) on the remote control.
To switch to standby
• Press . POWER at the side of the TV or press . (Standby-On) on the remote control again.
Switching channels
Press CHANNEL + / - on the side of the TV For digital channels, press a number (1 to 135) followed by a dot “•” and then the corresponding sub channel number (1 to 135). e.g. 108.30.
Press CH + / - or enter a number on the remote control.
Press PREV CH to return to the previously viewed channel.
Adjusting volume
To increase or decrease volume
Press VOL + / - on the remote control or press VOLUME + / - on the side of the TV
To mute or unmute sound
Press MUTE on the remote control to mute the sound.
Press MUTE again or VOL + / - to recover the original sound.
Still mode
You can pause the image shown on the TV screen.
Press FREEZE to pause the image shown on the TV screen.
The sound output will not be paused.
If no signal is detected or protected signal is received during still mode, the image remains paused and the sound output will be muted.
The still function will be released after 5 minutes.
To cancel still mode, press any button except (Standby-On).
Watching channels from a set-top box
To watch channels from a set-top box
1. Switch on the set-top box.
The picture from your set-top box might appear automatically on the TV screen.
2. Use the remote control of your set-top box to select channels.
If the picture does not appear
Press SOURCE repeatedly to select the set-top box and wait a few seconds for the picture to appear
Use the remote control of your set-top box to select channels.
Watching connected devices
To watch connected devices
1. Switch on the connected device.
The picture from your connected device might appear automatically on the TV screen.
2. Use the remote control of the device to select channels.
If the picture does not appear
Press SOURCE repeatedly to select the connected device and wait a few seconds for the picture to appear.
Use the remote control of the device to select channels.
Watching a Blu-ray disc
To watch a Blu-ray Disc
Insert a Blu-ray Disc into your player
Press ► (play) on the remote control of the Blu-ray Disc player:
The Blu-ray Disc might automatically play on the TV
If the picture does not appear
Press SOURCE repeatedly to select the Blu-ray Disc player and wait a few seconds for the picture to appear:
Use the remote control of the Blu-ray Disc player to play the disc.
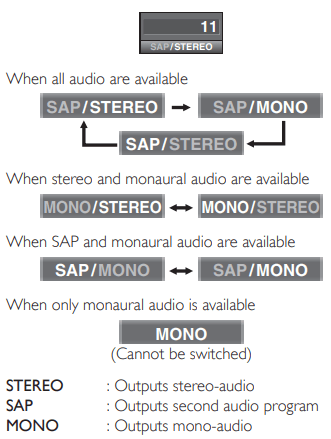
Switching audio mode
This section describes how to switch audio language in digital mode and how to switch audio in analog mode
1. Press SAP to display the currently selected language and the number of available languages.
2. Press SAP repeatedly to cycle through available audio languages.
Available languages differ depending on the broadcast. [Other] is displayed when the audio language cannot be acquired, or the acquired languages are other than English, Spanish or French.
Press SAP to display the currently selected audio mode. While receiving an MTS broadcast, press repeatedly to cycle through the available audio channel.
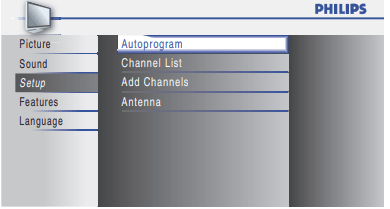
Install channels
The first time you set up your TV, you are prompted to select a menu language and to install TV and digital radio channels (if available). This chapter provides instructions on how to reinstall and fine-tune channels.
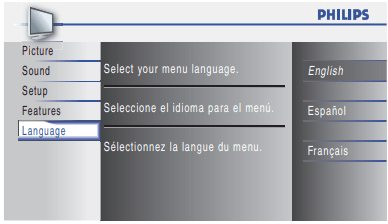
Selecting your menu language
1. Press MENU on the remote control and select [Language].
2. Select a language and press OK to confirm your choice.
3. Press MENU to exit.
Autoprogram
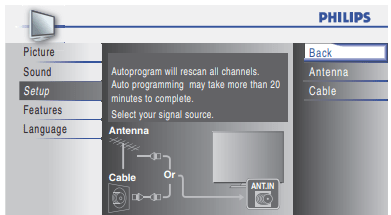
Before you install channels, ensure that you are registered with your cable TV provider and that your equipment is correctly connected.
1. Press MENU on the remote control and select [Setup] > [Autoprogram]
2. Press OK to start the installation
If you run [Autoprogram] when you have locked channels, a message appears asking to enter your PIN. Enter your PIN in order to complete the installation.
If you have forgotten your PIN, reset it as described in ' Changing your PIN' on page 18.
3.Select [Antenna] or [Cable] and press OK.
When [Antenna] is selected, the TV detects antenna signals. It searches for NTSC and ATSC channels available in your area.
When [Cable] is selected, the TV detects signals supplied by cable. It searches for NTSC, ATSC, and QAM modulated channels available in your area.
When autoprogramming is complete, the lowest memorized channel will be displayed.
4. Follow the on-screen instructions to complete the installation
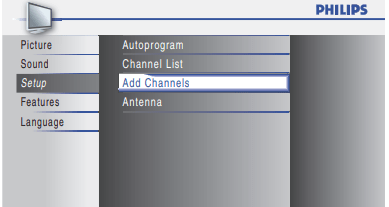
Add channels
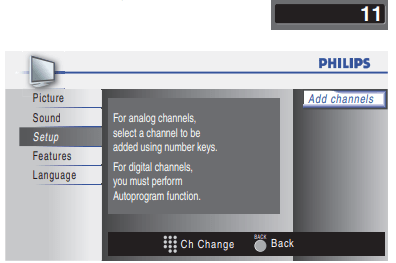
This function lets you add the channels that were not added by the autoprogram due to the receptible condition at the initial setup.
1. Press MENU on the remote control and [Setup] > [Add Channels].
2 Press a number (1 to 135) to enter the number of the channel you want to add, then press OK.
3. Press MENU to exit
Optimizing the signal quality from your antenna
You can optimize your signal quality by tuning in ATSC channels with weak signals, and adjusting the antenna.
Press MENU on the remote control and select [Setup] > [Antenna].
Press OK to confirm your choice.
Press a number (1 to 135) or press CH + or CH - to select the channel for which you want to check the digital signal strength.
Press MENU to exit.
Upgrade your TV software
Philips continuously tries to improve its products and we strongly recommend that you upgrade the TV software when upgrades are available. New software can be downloaded from our website using the model number of your TV (e.g. 32PFL 3515D) to find information.
Checking your current software version
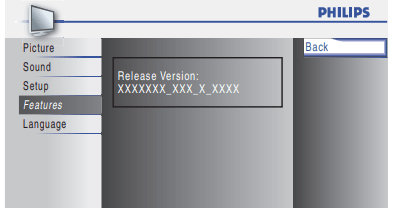
1. Press MENU on the remote control and select [Features] > [Current Software Info].
The version and a description of the current software is displayed, then press OK
2. Press MENU to exit.
Preparing for the software upgrade
You require the following equipment:
A PC with web browsing capability.
An archive utility that supports the ZIP-format (e.g. WinZip for Windows or Stufflt for Mac OS).
An empty clean formatted USB stick.
Upgrading software
1. Prepare the software upgrade (see 'Preparing for the software upgrade' on page 24).
2. If the TV is on, press POWER at the side of the TV
3. Connect your USB device to the service terminal on the side of yourTV
4. Switch on the TV.
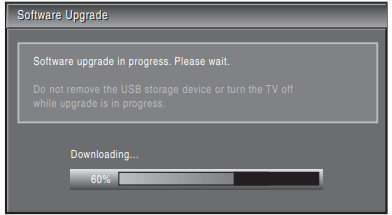
The TV scans the USB device for the upgraded software and automatically enters upgrade mode.
5. Read the on-screen instructions and confirm that you want to continue with the installation.
6. When the software upgrade is complete, remove the USB device.
7. PressPOWER at the side of the TV to make sure the unit goes to stand-by mode.
8. Switch on the TV.
→The TV starts up with the new software.
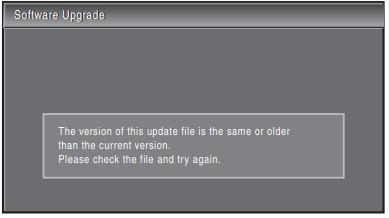
The following messages are displayed without starting software upgrade when it doesn’t fulfill the upgrade conditions.
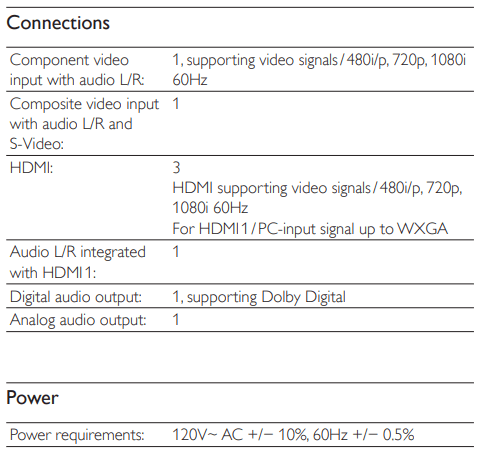
Connect devices
Connection overview
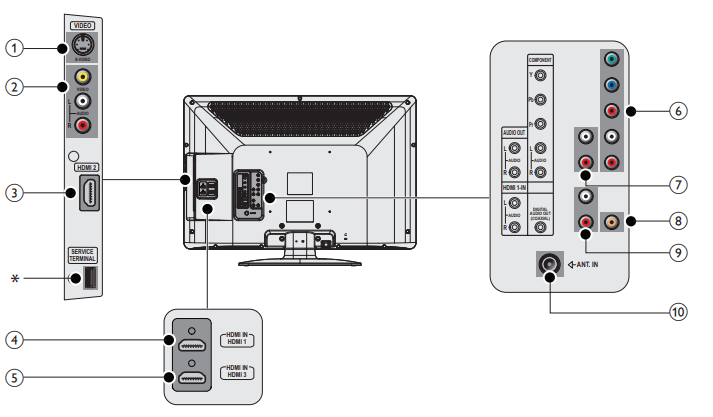
1. S-Video input jack (side)
S-Video (side) input connector to be used with Audio L/R connectors for camcorder, game console, etc. When you use the S-Video (side) for video signals, do not use Composite video (side) for video signals.
2. composite video and audio input jack (side)
Video input for analog devices such as DVD, camcorder, game console, etc. To be used with audio input.
3. HDMI 2 input jack
Digital audio and video input from high definition digital devices such as Blu-ray players.
4. HDMI 1 input jack
First HDMI in connector
5. HDMI 3 input jack
Third HDMI in connector
6. component video and audio input jack
Video input from analog devices such as DVD, receiver game console, etc. This connector is used with audio input.
7. analog audio output jack
Audio cable connection for an external device.
8. digital audio output jack
Digital audio output to home theaters and other digital audio systems.
9. audio input jack for HDMI 1
10. antenna input jack
Signal input from an antenna, cable or satellite.
* service terminal
Use this terminal only when a software update is necessary. USB memory only Do not connect any device to this terminal such as; digital camera, keyboard, mouse, etc.
Connecting your devices
This section describes how to connect a selection of devices with different connectors. Different types of connectors can be used to connect a device to your TV. The following sections describe examples only, other configurations are possible
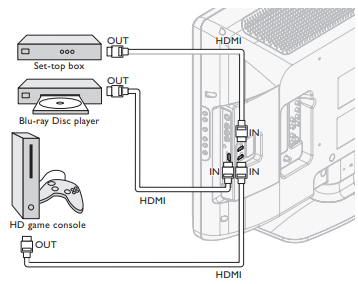
Connecting a set-top box, Blu-ray Disc player and HD game console via HDMI
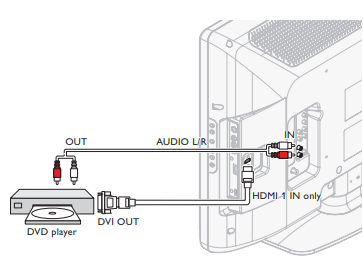
Connecting a DVD player via HDMI-DVI and analog audio
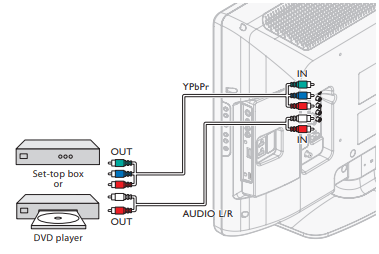
Connecting a set-top box, DVD player / recorder via component video connectors (YPbPr) and analog audio
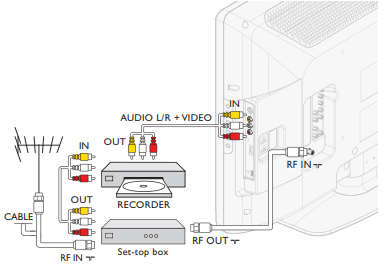
Connecting a set-top box, DVD player / recorder via composite connectors and analog audio
Do not place your recorder too close to the screen because some recorders can be susceptible to signals. If your recorder has an S-Video jack for improved picture quality, connect an S-Video cable with the S-Video input. Connect the audio cables to the audio L and R input jacks.
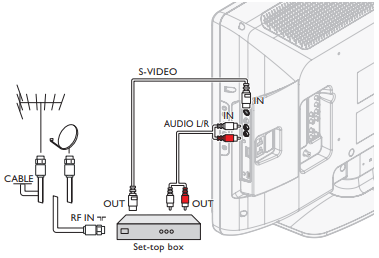
Connecting a set-top box via an S-Video connector and analog audio
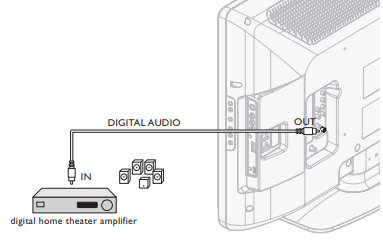
Connecting a digital home theater amplifier
Connecting a PC
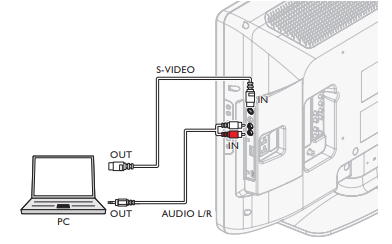
If you connect a PC with an S-Video connector at the side.
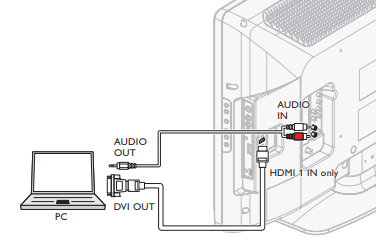
If you connect a PC with a HDMI-DVI connector.
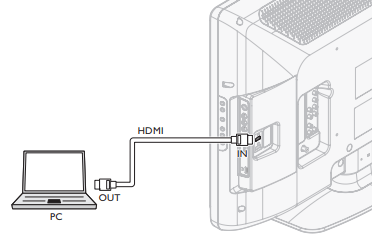
If you connect a PC with an HDMI connector
Troubleshooting
Problem
Possible cause and solution
No power or indicator light
The TV is not connected to the power
Press POWER at the side of the TV or on the
remote control.
Ensure that the AC power cord is connected tightly to the TV power connector and to the power socket outlet.
Remove the AC power cord from the power socket outlet, wait 60 seconds and reconnect the AC power cord.
Connect the TV to a different power socket outlet.
Error message on the screen with HDMI connection.
HDCP authentication fail.
PEnsure that your HDMI cable is certified.
Press SOURCE on the remote control to switch to another source and then switch back to the HDMI source.
Reset the accessory device and the TV Turn on the TV.
Select the HDMI channel.
Turn on the accessory device.
While the TV and the accessory device are powered on, unplug either end of the HDMI cable and then reinsert the cable.
No picture or sound is detected from the PC.
An incorrect HDMI input jack is connected or an audio cable is not connected.
Connect a HDMI-DVI cable to the HDMI 1 input jack on the TV.
Connect an audio cable to the HDMI 1-IN on the TV.
Press SOURCE on the remote control, and select the HDMI 1 source.
TV does not respond to the remote control.
Batteries are installed incorrectly, or low battery power: Ensure the indicator light on the TV blinks when you press the remote control buttons.
Ensure that you are using the TV remote control. Ensure that the batteries are inserted correctly and do not need to be replaced.
Remove the AC power cord from the power socket outlet, wait 60 seconds and reconnect the AC power cord.
The picture is distorted, stretched out, or has black bars on the side or top.
Broadcast video format.
Press FORMAT on the remote control to select the best picture format.
For some accessory devices, the picture format must be set in the accessory device.
No sound on the TV loudspeaker.
Volume level is set to zero - increase the volume. Sound is muted - press MUTE on the remote control.
Audio cable is not connected - for AV connection, ensure that the Audio L/R cable is connected as described in Connecting your devices (see 'Connecting your devices' on page 27). If you use a component cable, ensure that you have not crossed the red audio cable with the red video cable.
Audio output setting for the accessory device is incorrect. For HDMI connections, some accessory devices have an HDMI audio output setting that must be turned on for HDMI to HDMI connections. Check if [Sound] > [TV Speakers] > [Off] is set to [On]. No sound will be output when [TV Speakers] is set to [Off]._
Bad picture quality with a coaxial connection.
Standard definition channels are not as clear as high definition channels - connect the devices via component or HDMI cables
The picture is mostly red and green, or the picture misses red when connected to an accessory device via component cables.
Insecure / incorrect connection.
Ensure all the connections are made according to the color code.
Push the component cables all the way into the YPbPr sockets on the TV.
No picture or sound.
No picture or sound - ensure you have selected the correct channel. Incomplete channel installation. If the TV receives channels via an AV connection, set the TV to the correct source input. If the TV is connected directly to the wall via a coaxial connection, perform the auto-installation again.
Cannot control your TV and connected devices with one remote control.
Confirm that the connected devices are EasyLink compliant and are connected to your TV via an HDMI cable. Not all brands of devices such as Blu-ray Disc players use the same system as Philips EasyLink. Other brands might not work with Philips EasyLink.
Downloading an electronic copy
To obtain an electronic copy of this manual:
Point your browser
Choose your country of location.
Enter the model number or a keyword in the “Find your product” field. Alternatively, you can browse the catalog.
 POWER
POWER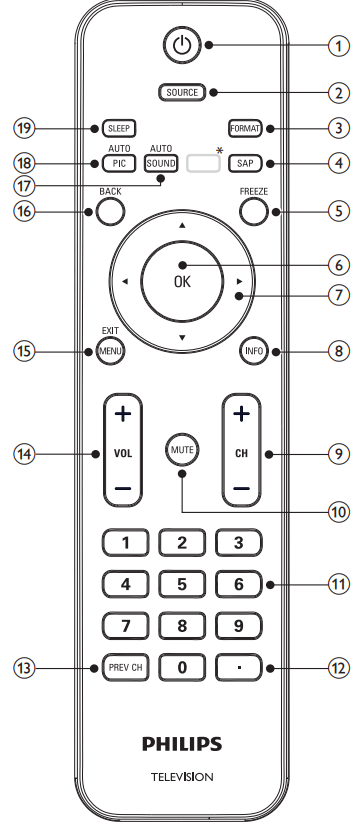
 (Standby-On)
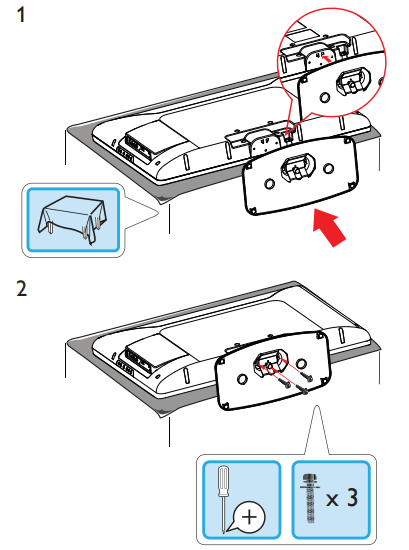
 POWER at the right side of the TV, or press
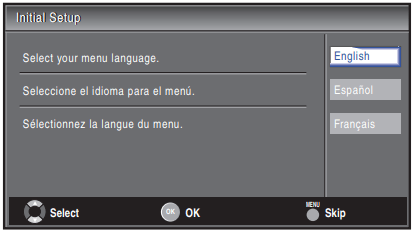
 to select the desired mode for energy saving, then press OK.
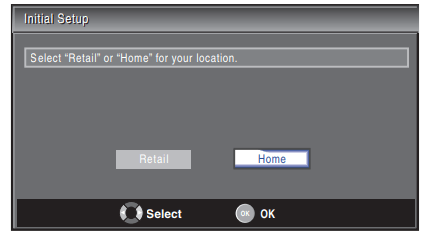

 (Standby-On).
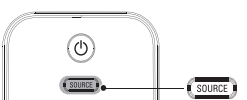


 POWER at the side of the TV
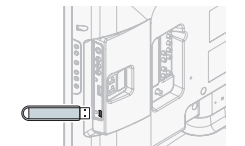
 POWER at the side of the TV or on the