Documents: Go to download!
User Manual
- User Manual - (English)
- Daily Reference Guide - (English)
- Program Chart - (English)
- Product Fiche - (English)
- Product Data Sheet - (English)
- Energy label - (English)
- Health Safety & Environmental - (English)
- PRODUCT DESCRIPTION
- CONTROL PANEL
- DESCRIPTION OF DISPLAYS
- ACCESSORIES
- INSERTING THE WIRE SHELF AND OTHER ACCESSORIES
- USING THE TURNSPIT (IF PRESENT)
- REMOVING AND REFITTING THE SHELF GUIDES
- FITTING THE SLIDING RUNNERS (ONLY IN SOME MODELS)
- FUNCTIONS
- USING THE APPLIANCE FOR THE FIRST TIME
- DAILY USE
- USEFUL TIPS
- COOKING TABLE
- TESTED RECIPES
- CLEANING
- MAINTENANCE
- TROUBLESHOOTING
Table of contents
PRODUCT DESCRIPTION
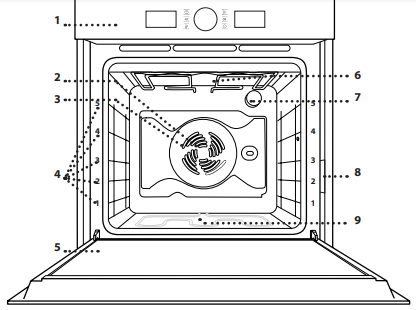
- Control panel
- Fan
- Circular heating element (non-visible)
- Shelf guides (the level is indicated on the front of the oven)
- Door
- Upper heating element/grill
- Lamp
- Identification plate (do not remove)
- Bottom heating element (non-visible)
Please note:
The cooling fan may switch itself on every so often during cooking in order to reduce energy consumption.
Once cooking is complete and the oven has been switched off, the cooling fan may continue to run for a certain period of time.
When the oven door is opened during cooking, the heating elements switch off.
CONTROL PANEL

1. LEFT-HAND DISPLAY
2. ON / OFF
For switching the oven on and off and for stopping an active function at any time .
3. BACK
For returning to the previous menu when configuring settings .
4. TEMPERATURE
For setting the temperature .
5. KNOB
For selecting menu items and changing or adjusting the settings of a function .
6. START
For starting functions and confirming settings .
7. TIME
For setting or changing the time and adjusting the cooking time .
8. CONFIRM
For confirming an item you have selected or the settings for a function .
9. RIGHT-HAND DISPLAY
DESCRIPTION OF DISPLAYS
LEFT HAND DISPLAY
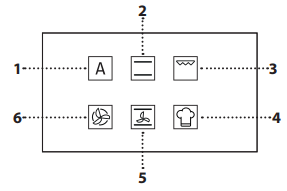
1. Automatic functions
2. Conventional function
3. Grill function
4. Special functions
5. Convection bake function
6. Forced air function
RIGHT HAND DISPLAY
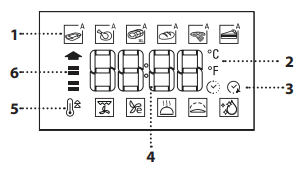
1. Automatic functions cluster
2. Unit of measurement temperature
3. Time options (duration, start delay)
4. Digital display (shows ,for example: the clock, all function values or settings)
5. Special functions cluster
6. Preheating phase indication
ACCESSORIES
WIRE SHELF
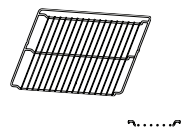
For use in cooking food or as a support for pans, baking pans and other ovenproof cooking receptacles
DRIP TRAY
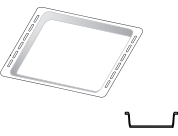
For use as an oven tray for cooking meat, fish, vegetables, focaccia, etc . or to collect cooking juices when positioned under the wire shelf
BAKING TRAY
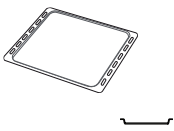
For use in cooking bread and pastry products, but also for meat, fish en papillotte, etc
SLIDING RUNNERS *
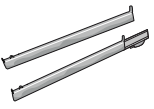
To facilitate inserting or removing accessories
TURNSPIT *
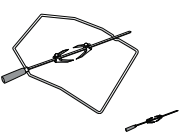
For roasting large pieces of meat and poultry . uniformly in conjunction with the “Turbo grill” function
GRILL PAN SET *
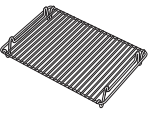
To be placed inside the drip tray, creating a useful set for grilling meat, fish or vegetables
*Available only on certain models
The number of accessories may vary depending on which model is purchased . Other accessories that are not supplied can be purchased separately from the After-Sales Service
INSERTING THE WIRE SHELF AND OTHER ACCESSORIES
1. Insert the wire shelf horizontally by sliding it across the shelf guides, making sure that the side with the raised edge is facing upwards
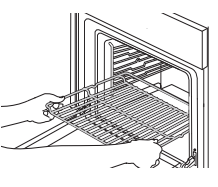
2. Other accessories, such as the drip tray and the baking tray, are inserted horizontally in the same way as the wire shelf .
USING THE TURNSPIT (IF PRESENT)
1. Insert the skewer into the centre of the meat and slide it in until it is held firmly in place on the fork
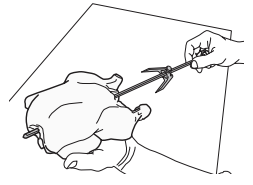
2. Push the second fork onto the skewer and slide it on until it holds the meat firmly in place
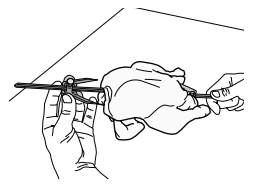
3. Tighten the fixing screw to secure it in position
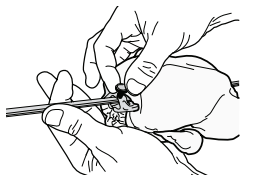
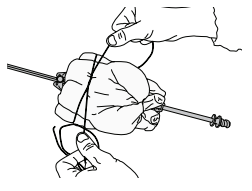
4. If cooking poultry, be sure to secure the meat with twine
5. Insert the support at the second level, then insert the tip of the skewer in the seating located on the rear wall of the oven compartment
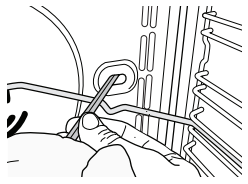
6. Rest the round part of the skewer on the relevant support
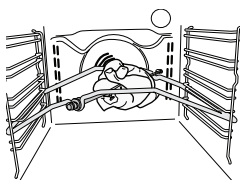
To use the turnspit, select the “Turbo grill” function . To collect the cooking juices, position the drip tray below the meat and add 500 ml of water .
To avoid burning yourself, manipulate the hot skewer with the plastic handle (which must be removed before cooking)
REMOVING AND REFITTING THE SHELF GUIDES
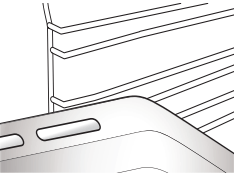
1. To remove the shelf guides, lift the guides up (1) and then gently pull the lower part out of its seating (2): the shelf guides can now be removed
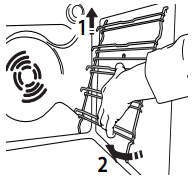
2. To refit the shelf guides, first fit them back into their upper seating
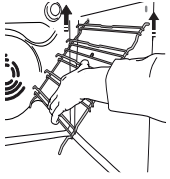
3. Keep them raised as you bring them nearer to the compartment
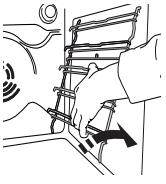
4. Position them into the lower seatings
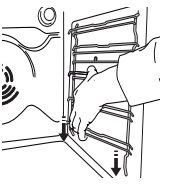
FITTING THE SLIDING RUNNERS (ONLY IN SOME MODELS)
1. Remove the shelf guides .
2. Remove the plastic protection from the sliding runners
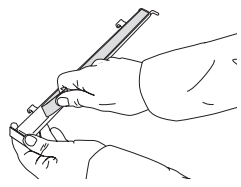
3. Fasten the upper clip of the runner to the shelf guide and slide it along as far as it will go . (fig . A); lower the other clip into position .
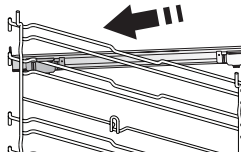
4. To secure the guide, press the lower portion of the clip firmly against the shelf guide . Make sure that the runners can move freely
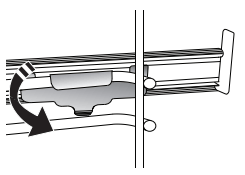
5. Repeat these steps on the other shelf guide on the same level . The sliding runners can be fitted on any level
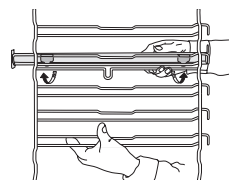
6. Refit the shelf guides
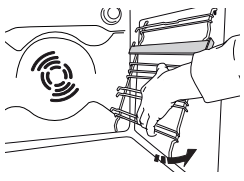
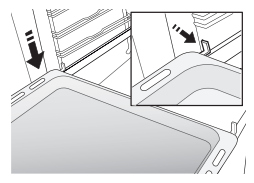
7. Position the accessories on the shelf guides
FUNCTIONS
 AUTOMATIC FUNCTIONS
 CASSEROLE
The function automatically selects the best cooking mode and temperature for baking any preparation based on pasta (lasagna, cannelloni, ecc) . The temperature may be modified in a given range to perfectly fit different recipes and personal tastes . Use the 3rd shelf . The oven doesn’t have to be preheated
 MEAT
MEAT
The function automatically selects the best cooking mode and temperature for roasting any type of meat (poultry, beef, veal, pork, lamb, ecc) . The temperature may be modified in a given range to perfectly fit different recipes and personal tastes . This function uses discontinuous, delicate fan assistance, which prevents excessive drying of foods . Use the 3rd shelf . The oven doesn’t have to be preheated before cooking
 MAXI COOKING
The function automatically selects the best cooking mode and temperature to cook large joints of meat (above 2 .5 kg) . It is advisable to turn the meat over during cooking for more even browning . It is best to baste the meat every now and again to prevent it from drying out .
Use the 1st or 2nd shelves, depending on the size of the joint . The oven doesn’t have to be preheated before cooking
 BREAD
BREAD
The function automatically selects the best cooking mode and temperature for baking any type of bread (baguettes, small breads, sandwich loaf, ecc) . The temperature may be modified in a given range to perfectly fit different recipes and personal tastes . Use the 2nd or 3rd shelf . The oven doesn’t have to be preheated
 PIZZA
PIZZA
The function automatically selects the best cooking mode and temperature for baking any type of pizza (thin pizza, homestyle pizza, focaccia, ect) . The temperature may be modified in a given range to perfectly fit different recipes and personal tastes . Use the 2nd shelf . The oven doesn’t have to be preheated
 PASTRY CAKES
The function automatically selects the best cooking mode and temperature for baking any sweet preparation (biscuits, leavened cakes, fruit tarts, ecc) . The temperature may be modified in a given range to perfectly fit different recipes and personal tastes . Use the 2nd or 3rd shelf . The oven does not have to be preheated
 CONVENTIONAL
For cooking any kind of dish on one shelf only . Use the 3rd shelf .
To cook pizza, savoury pies and sweets with liquid fillings, use the 1st or 2nd shelf .
Preheat the oven before placing food inside
 GRILL
GRILL
For grilling steaks, kebabs and sausages, cooking vegetables au gratin or toasting bread . It is advisable to place food on the 4th or 5th shelf . When grilling meat, we recommend using a drip tray to collect the cooking juices: Position the tray on any of the levels below the wire shelf and add 500 ml of drinking water .
The oven does not have to be preheated . During cooking the oven door must remain closed
 FORCED AIR
For cooking different foods that require the same cooking temperature on several shelves (maximum three) at the same time . This function can be used to cook different foods without odours being transferred from one food to another . Use the 3rd level to cook on one shelf only, 1st and 4th level to cook on two shelves, 1st, 3rd, 5th level to cook on three shelves .
Wait the end of preheating before placing food inside the oven
 CONVECTION BAKE
For cooking meat and cakes with juicy fillings (savoury or sweet) on single shelf . Use the 3rd shelf . Preheat the oven before cooking
 SPECIAL FUNCTIONS
 FAST PREHEATING
For preheating the oven quickly . To preheat the oven rapidly . At the end of preheating, the oven automatically selects the conventional function . Wait the end of preheating before placing food inside
 TURBO GRILL
For roasting large joints of meat (legs, roast beef, chicken) . Position the food on the middle shelves . We recommend using a Baking tray to collect the cooking juices: position it on the 1st or 2nd level, adding approx .half a litre of water . The oven does not have to be preheated . During cooking, the oven door must remain closed
 ECO FORCED AIR*
For cooking stuffed roasting joints and fillets of meat on a single shelf . Food is prevented from drying out excessively by gentle, intermittent air circulation . When this ECO function is in use, the light will remain switched off during cooking . To use the ECO cycle and therefore optimise power consumption, the oven door should not be opened until the food is completely cooked
 KEEP WARM
For keeping just-cooked food hot and crisp (e .g: meat, fried food or flans) . Place the food on the middle shelf
 RISING
For helping sweet or savoury dough to rise effectively . Place the dough on the 2nd shelf . The oven does not have to be preheated . To maintain the quality of proving, do not activate the function if the oven is still hot following a cooking cycle
 DIAMOND CLEAN
The action of the steam released during this special low-temperature cleaning cycle allows dirt and food residues to be removed with ease . Pour 200 ml of drinking water on the bottom of the oven and only activate the function when the oven is cold
USING THE APPLIANCE FOR THE FIRST TIME
1. SET THE TIME
You will need to set the time when you switch on the oven for the first time

The two digits for the hour will start flashing: Turn the knob to set the hour and press  to confirm

The two digits for the minutes will start flashing . Turn the knob to set the minutes and press  to confirm .
Please note: To change the time at a later point, press and hold  for at least one second while the oven is off and repeat the steps above.
You may need to set the time again following lengthy power outages.
2. HEAT THE OVEN
A new oven may release odours that have been left behind during manufacturing: this is completely normal .
Before starting to cook food, we therefore recommend heating the oven with it empty in order to remove any possible odours .
Remove any protective cardboard or transparent film from the oven and remove any accessories from inside it .
Heat the oven to 200 °C for around one hour, ideally using a function with air circulation (e .g . “Forced Air” or “Convection Bake”) .
Follow the instructions for setting the function correctly .
Please note: It is advisable to air the room after using the appliance for the first time.
DAILY USE
1. SELECT A FUNCTION
When the oven is off, only the time is shown on the display . Press and hold  to switch the oven on . Turn the knob to view the main functions available on the left-hand display . Select one and press .

To select a sub-function (where available), select the main function and then press  to confirm and go to the function menu

Turn the knob to view the sub-functions available on the right-hand display . Select one and press  to confirm .
2. SET THE FUNCTION
After having selected the function you require, you can change its settings .
The display will show the settings that can be changed in sequence .
TEMPERATURE/GRILL LEVEL

When the °C/°F icon flashes on the display, turn the knob to change the value, then press  to confirm and continue to alter the settings that follow (if possible) .
You can also set the grill level (3 = high, 2 = medium, 1 = low) at the same time

Please note: Once the function has started, you can change the temperature or the grill level by pressing  or by turning the knob directly.
DURATION

When the  icon flashes on the display, use the adjustment knob to set the cooking time you require and then press
  to confirm .
You do not have to set the cooking time if you want to manage cooking manually: Press  to confirm and start the function .
In this case, you cannot set the end cooking time by programming a delayed start .
Please note: You can adjust the cooking time that has been set during cooking by pressing  : Turn the knob to change the hour and press
  to confirm.
SETTING THE END COOKING TIME/
DELAYED START
In many functions, once you have set a cooking time you can delay starting the function by programming its end time .
Where you can change the end time, the display will show the time the function is expected to finish while the  icon flashes

If necessary, turn the knob to set the time you want cooking to end, then press  to confirm and start the function .
Place the food in the oven and close the door: The function will start automatically after the period of time that has been calculated in order for cooking to finish at the time you have set .

Please note: Programming a delayed cooking start time will disable the oven preheating phase. The oven will reach the temperature you require gradually, meaning that cooking times will be slightly longer than those listed in the cooking table.
During the waiting time, you can use the knob to change the programmed end time.
Press  or
or  to change the temperature and cooking time settings. Press
  to confirm when finished.
3. ACTIVATE THE FUNCTION
Once you have applied the settings you require, press  to activate the function .
You can press and hold  at any time to pause the function that is currently active .
4. PREHEATING
Some functions have an oven preheating phase: Once the function has started, the display indicates that the preheating phase has been activated

Once this phase has finished, an audible signal will sound and the display will indicate that the oven has reached the set temperature

At this point, open the door, place the food in the oven, close the door and start cooking by pressing  .
.
Please note: Placing the food in the oven before preheating has finished may have an adverse effect on the final cooking result.
Opening the door during the preheating phase will pause it.
The cooking time does not include a preheating phase.
You can always change the temperature you want to reach using the knob.
5. END OF COOKING
An audible signal will sound and the display will indicate that cooking is complete

To extend the cooking time without changing the settings, turn the knob to set a new cooking time and press  .
.
AUTOMATIC FUNCTIONS
TEMPERATURE RECOVERY
If the temperature inside the oven decreases during a cooking cycle because the door is opened, a special function will be activated automatically to restore the original temperature .
While the temperature is being restored, the display will show a “snake” animation until the set temperature has been reached

While a programmed cooking cycle is in progress, the cooking time will be increased according to how long the door was open in order to guarantee best results . .
SPECIAL FUNCTIONS
DIAMOND CLEAN
To activate the “Diamond Clean” function, with the oven cold, distribute 200 ml of water on the bottom of the oven cavity, then close the oven door .
Access special functions  and turn the knob to select
  from menu . then press
  to confirm .
Press  to start immediately the cleaning cycle, or press
  to set the end time/start delayed .
At the end of the cycle, let the oven colling down and remove any residual water in the oven and start cleaning using a sponge moistened with hot water (cleaning could be compromised if delayed by more than 15 minutes) .
Please note: The duration and temperature of cleaning cycle cannot be set.
KEY LOCK
To lock the keypad, press and hold  for at least 5 seconds

Do this again to unlock the keypad .
Please note: The key lock can also be activated while cooking is in progress.
For safety reasons, the oven can be switched off at any time by pressing 
USEFUL TIPS
HOW TO READ THE COOKING TABLE
The table lists the best function, accessories and level to use to cook various different types of food . Cooking times start from the moment food is placed in the oven, excluding preheating (where required)
Cooking temperatures and times are approximate and depend on the amount of food and the type of accessory used .
Use the lowest recommended settings to begin with and, if the food is not cooked enough, then switch to higher settings .
Use the accessories supplied and preferably darkcoloured metal cake tins and baking trays . You can also use Pyrex or stoneware pans and accessories, but bear in mind that cooking times will be slightly longer .
COOKING DIFFERENT FOODS AT THE SAME TIME
The “Forced Air” function enables you to cook different foods (such as fish and vegetables) on different shelves at the same time .
Remove the food which requires a shorter cooking time and leave the food which requires a longer cooking time in the oven .
DESSERTS
Cook delicate desserts with the conventional function on one shelf only .
Use dark-coloured metal baking pans and always place them on the wire shelf supplied .
To cook on more than one shelf, select the “Forced Air” function and position the cake tins on different shelves to facilitate the circulation of hot air .
To check whether a leavened cake is fully cooked, insert a wooden toothpick into the centre of the cake . If the toothpick comes out clean, the cake is ready .
If using non-stick baking pans, do not butter the edges as the dessert may not rise evenly around the edges .
If the item “swells” during baking, use a lower temperature next time and consider reducing the amount of liquid you add or stirring the mixture more gently .
Desserts with moist fillings (cheesecake or fruit pies) require the use of the "Convection Bake" function .
If the base of the cake is soggy, lower the shelf and sprinkle the bottom of the cake with breadcrumbs or biscuit crumbs before adding the filling
PIZZA
Lightly grease the trays to ensure the pizza has a crispy base .
Scatter the mozzarella over the pizza two thirds of the way through cooking .
PROVING
It is always best to cover the dough with a damp cloth before placing it in the oven .
Dough proving time with this function is reduced by approximately one third compared to proving at room temperature (20-25°C) .
The rising time for pizza starts at around one hour for 1 kg of dough .
MEAT
Use any kind of oven tray or pyrex dish suited to the size of the piece of meat being cooked .
For roast meat, it is best to add some stock to the bottom of the pan, basting the meat during cooking for added flavour . When the roast is ready, let it rest in the oven for another 10-15 minutes, or wrap it in aluminium foil .
When you want to grill meat, choose cuts with an even thickness all over in order to achieve uniform cooking results . Very thick pieces of meat require longer cooking times . To prevent the meat from burning on the outside, lower the position of the wire shelf, keeping the food farther away from the grill . Turn the meat two-thirds of the way through cooking .
To collect the cooking juices, place a drip tray with half a litre of water directly under the grill on which the meat is placed . Top-up when necessary
COOKING TABLE
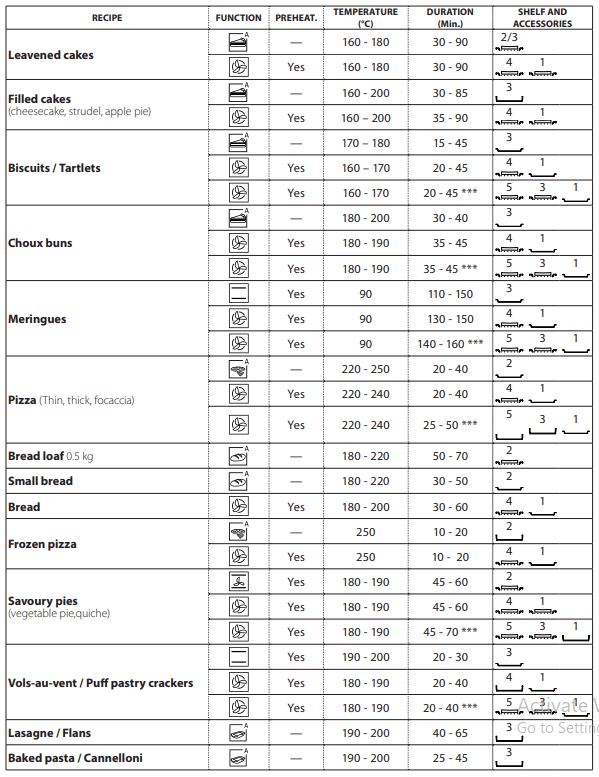
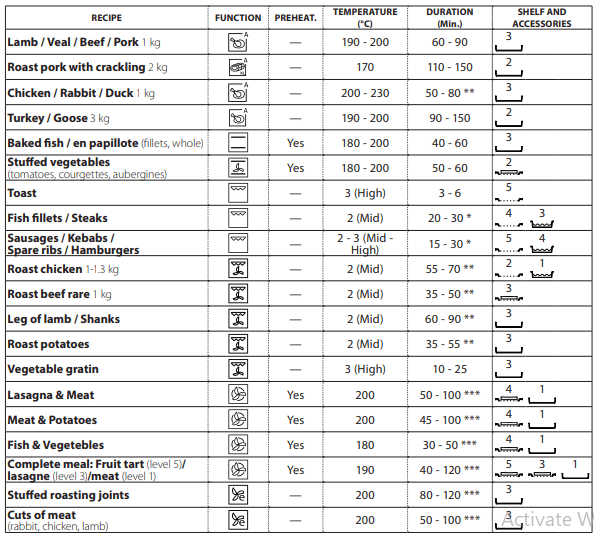
* Turn food halfway through cooking.
** Turn food two thirds of the way through cooking (if necessary).
*** Estimated length of time: dishes can be removed from the oven at different times depending on personal preference

TESTED RECIPES
Compiled for the certification authorities in accordance with the standard IEC 60350-1
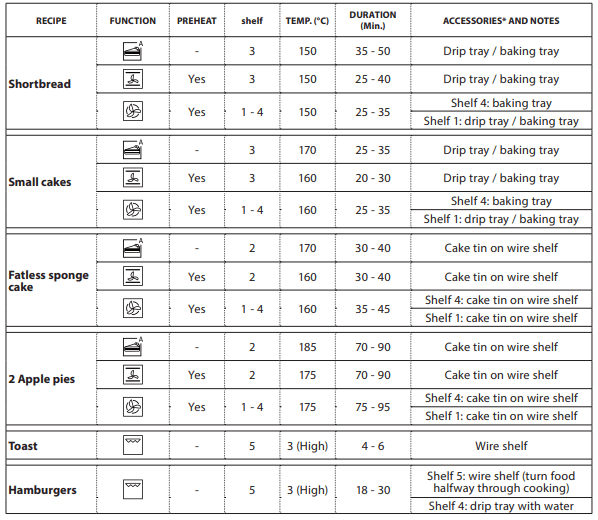
* You can obtain any accessories that are not supplied from our After-sales service .
The indications in the table are without use of sliding runners. Do the tests without these.
Energy efficiency class (according to standard IEC 60350-1): to carry out the test, use the specific table .
Preheating the empty oven (according to IEC 60350-1): test "CONVENTIONAL", "FORCED AIR", "FAST PREHEAT" functions .
Please note: Pastry function uses upper and lower heating elements only, without forced air circulation. It doesn't require preheating.

CLEANING
Do not use steam cleaning equipment.
Use protective gloves during all operations.
Carry out the required operations with the oven cold.
Disconnect the oven from the power supply.
Do not use wire wool, abrasive scourers or abrasive/corrosive cleaning agents, as these could damage the surfaces of the appliance.
EXTERIOR SURFACES
Clean the surfaces with a damp microfibre cloth . If they are very dirty, add a few drops of pH-neutral detergent . Finish off with a dry cloth .
Do not use corrosive or abrasive detergents . If any of these products inadvertently comes into contact with the surfaces of the appliance, clean immediately with a damp microfibre cloth .
INTERIOR SURFACES
- After every use, start cooling down the oven and then clean it while it is still a bit warm, removing any deposits or stains caused by food residues . To dry any condensation that has formed as a result of cooking food with a high water content, cool the oven completely and then wipe it with a cloth or sponge .
- Clean the glass door with a suitable liquid detergent .
- The oven door can be removed to facilitate cleaning .
- Activate the “Diamond Clean” function for optimum cleaning of the internal surfaces.
ACCESSORIES
Soak the accessories in a washing-up liquid solution after use, handling them with oven gloves if they are still hot .
Food residues can be removed using a washing-up brush or a sponge
MAINTENANCE
Use protective gloves during all operations.
Carry out the required operations with the oven cold.
Disconnect the oven from the power supply
REMOVING THE DOOR
1. Open the door fully
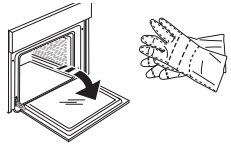
2. Lower the catches as far as they will go
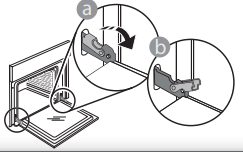
3. Close the door as much as you can
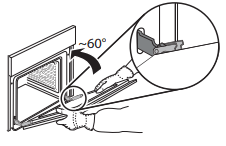
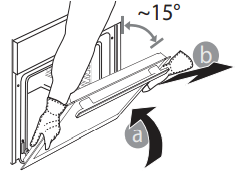
4. Take a firm hold of the door with both hands – do not hold it by the handle .
Simply remove the door by continuing to close it while pulling it upwards at the same time until it is released from its seating
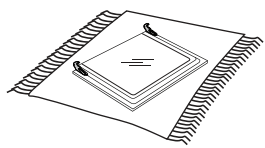
5. Put the door to one side, resting it on a soft surface
REFITTING THE DOOR
1. Hold the door near the oven and line up the hinge hooks with their seatings
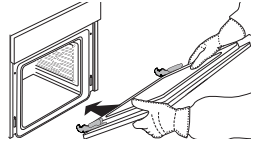
2. Fasten the upper part to the slots
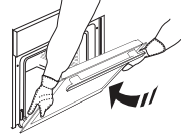
3. Lower the door and then open it fully
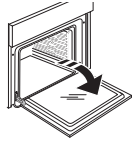
4. Lower the catches into their original position: make sure that you lower them down completely
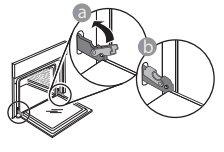
5. Apply gentle pressure to check that the catches are in the correct position .
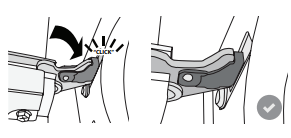
6. “CLICK” Try closing the door and check to make sure that it lines up with the control panel . If it does not, repeat the steps above: the door could become damaged if it does not work properly
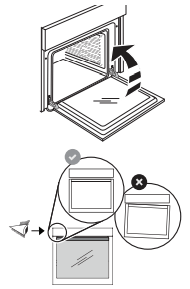
REPLACING THE LAMP
1. Disconnect the oven from the power supply .
2. Unscrew the cover from the light, replace the bulb and screw the cover back on the light
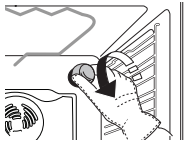
3. Reconnect the oven to the power supply
Please note: Only use 20-40 W/230 V type G9, T300°C halogen bulbs .
The bulb used in the product is specifically designed for domestic appliances and is not suitable for general room lighting within the home (EC Regulation 244/2009) .
Light bulbs are available from our After-Sales Service .
- If using halogen bulbs, do not handle them with your bare hands as your fingerprints could cause damage . Do not use the oven until the light cover has been refitted
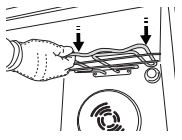
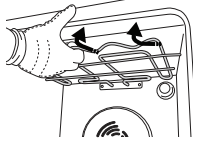
LOWERING THE UPPER HEATING ELEMENT
(ONLY IN SOME MODELS)
1. Remove the shelf guides
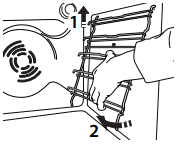
2. Carefully take the heating element out
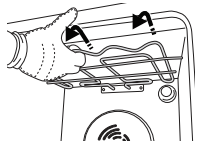
3. Lower the heating element
4. To reposition the heating element, lift it up, pulling it slightly towards you, be sure it comes to rest on the lateral supports
TROUBLESHOOTING
Any problems that arise or faults that occur can often be resolved easily .
Before contacting the After-sales Service, check the following table to see whether you can resolve the problem yourself .
If the problem persists, contact your nearest After-sales Service Centre
 Read the safety instructions carefully before carrying out any of the following work
| PROBLEM | POSSIBLE CAUSE | REMEDY |
| The oven is not working | Power cut. Disconnection from the mains. Malfunction | Check for the presence of mains electrical power and whether the oven is connected to the electricity supply. Turn off the oven and restart it to see if the problem persists. |
| The oven is not heating up | Function selected Door open. | Select a different function. Turn off the oven and restart it to see if the fault persists. Close the door and see if the fault persists. |
| The time is flashing | Power cut | You need to reset the time: Follow the instructions given in the “Using the appliance for the first time” section. |
| The display shows the letter “F” followed by a number | Fault | Contact you nearest Client After-sales Service Centre and state the number following the letter “F”. |
| The door will not close properly | The safety catches are in the wrong position. | Make sure that the safety catches are in the correct position by following the instructions for removing and refitting the door in the “Maintenance” section. |
See other models: PCN 750 T (AN) R /HA DD 642 /HA(MR) NT M11 91WK EU SA3 544 C IX E4D AA B C
