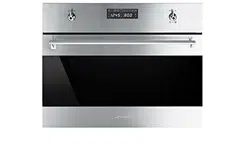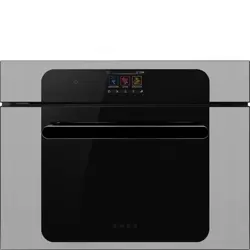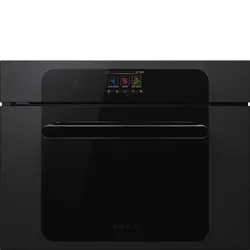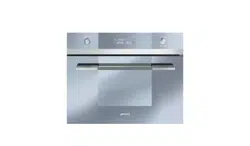

Instructions for Use
Combi Steam oven
Consignes d’utilisation
Four à vapeur Combi
1631028

Table of Contents
EN
2
INSTRUCTIONS FOR THE USER: these provide recommendations for
use, a description of the controls and the correct procedures for cleaning
and maintaining the appliance
INSTRUCTIONS FOR THE INSTALLER: these are intended for the
qualified engineer who is to install, commission and test the appliance
1 PRECAUTIONS FOR USE .............................................................................. 11
2 GET TO KNOW YOUR OVEN ......................................................................... 12
3 ACCESSORIES AVAILABLE .......................................................................... 12
4 BEFORE INSTALLATION ............................................................................... 13
5 DESCRIPTION OF FRONT PANEL CONTROLS ........................................... 13
6 USING THE OVEN .......................................................................................... 15
7 WATER FEEDING ........................................................................................... 16
8 SELECTING THE FUNCTION ......................................................................... 17
9 RECOMMENDED COOKING TABLES: COOKING WITH STEAM ................. 28
10 COOKING WITH THE GRILL .......................................................................... 33
11 COOKING WITH HOT AIR .............................................................................. 34
12 CARE AND MAINTENANCE ........................................................................... 36
13 OVEN CLEANING ........................................................................................... 39
14 EXTRAORDINARY MAINTENANCE ............................................................... 40
15 DISPOSAL INSTRUCTIONS - OUR ENVIRONMENT POLICY ...................... 42
16 BEFORE INSTALLATION ............................................................................... 44
17 POSITIONING THE OVEN .............................................................................. 48

Grounding Instructions
EN
EN
EN
3
This appliance must be connected to a
grounded, metallic, permanent wiring
system, or an equipment grounding
conductor should be run with the circuit
conductors and connected to the
equipment grounding terminal or lead on
the appliance.
Warning! IMPROPER USE OF THE
GROUNDING CAN RESULT IN A RISK OF
ELECTRICAL SHOCK.
Please refer to the Installation
Instructions for further information.

Safety Information
EN
EN
EN
EN
4
Carefully read the instructions before
installing and using the equipment. The
manufacturer is not liable for improper
installation and use of the equipment that
may cause injuries and damage. Always
keep the instructions at hand, so they can
be easily referred to during use.
IMPORTANT SAFEGUARDS
When using electrical appliances, basic safety
precautions should always be followed
including the following:
1. Proper Installation – Be sure your
appliance is properly installed and
grounded by a qualified technician.
2. Never Use Your Appliance for Warming
or Heating the Room.
3. Do Not Leave Children Alone – Children
should not be left alone or unattended in
area where appliance is in use. They
should never be allowed to sit or stand on
any part of the appliance.
4. Wear Proper Apparel – Loose-fitting or
hanging garments should never be worn
while using the appliance.
5. User Servicing – Do not repair or replace
any part of the appliance unless
specifically recommended in the manual.

Safety Information
EN
EN
EN
EN
5
All other servicing should be referred to a
qualified technician.
6. Storage in or on Appliance – Flammable
materials should not be stored in an oven
7. Do Not Use Water on Grease Fires –
Smother fire or flame or use dry chemical
or foam-type extinguisher.
8. Use Only Dry Potholders – Moist or damp
potholders on hot surfaces may result in
burns from steam. Do not let potholder
touch hot heating elements. Do not use a
towel or other bulky cloth.
9. Use Care When Opening Door – Let hot
air or steam escape before removing or
replacing food.
10. Do Not Heat Unopened Food Containers
– Build-up of pressure may cause
container to burst and result in injury.
11. Keep Oven Vent Ducts Unobstructed.
12. Placement of Oven Racks – Always place
oven racks in desired location while oven
is cool. If rack must be moved while oven
is hot, do not let potholder contact hot
heating element in oven.
13. DO NOT TOUCH HEATING ELEMENTS
OR INTERIOR SURFACES OF OVEN –
Heating elements may be hot even
though they are dark in color. Interior

Safety Information
EN
EN
EN
EN
6
surfaces of an oven become hot enough
to cause burns. During and after use, do
not touch, or let clothing or other
flammable materials contact heating
elements or interior surfaces of oven
until they have had sufficient time to
cool.
This Steam Oven is for household use

Safety Information
EN
EN
EN
EN
7
Safety of children and vulnerable adults
WARNING! Risk of choking, injury or
permanent disability.
This appliance can be used by children aged 8
years and above and persons with reduced
physical, sensory or mental capabilities or lack
of experience and knowledge if they are given
supervision or instructions concerning how to
use the appliance in a safe way and
understand the hazards involved.
Children should not play with the appliance.
Keep packaging materials away from children.
Risk of suffocation!
Keep children away from the appliance during
operation or when cooling.
Cleaning and maintenance should not be done
by children without supervision
Warnings on general safety
During installation, follow the instructions
supplied separately.
Only qualified personnel can install the
appliance and replace the cable.
WARNING: The appliance and its
accessible parts become hot during use. Care
should be taken to avoid touching heating
elements. Children less than 8 years of age

Safety Information
EN
EN
EN
EN
8
shall be kept away unless continuously
supervised.
During use the appliance becomes hot. Care
should be taken to avoid touching heating
elements inside the oven.
WARNING: Accessible parts may become
hot during use. Young children should be kept
away.
Do not use steam cleaners to clean the
appliance.
Do not use abrasive detergents or metal
scrapers to clean the appliance.
The electric connection is made via an
omnipolar switch, which is suitable for the
intensity to be tolerated and which has a
minimum gap of 3mm between its contacts,
which will ensure disconnection in case of
emergency or when cleaning the crockery
warmer. If a plug is used for the electric
connection, then it must be accessible after
installation.
The connection should include correct
earthing, in compliance with current norms.
Disconnect the appliance from the power
supply before carrying out any maintenance
operation

Safety Information
EN
EN
EN
EN
9
WARNING!
Before connecting the appliance compare the power data (voltage and frequency)
indicated on the characteristics plate with those of the power supply in question. If
these data do not match there may be problems. In case of doubt, contact an
electrician.
WARNING!
If the electrical wire plug is removed, the appliance must be installed and connected
by a technician. Contact a qualified electrician who knows and respects current
safety standards. The manufacturer cannot be held responsible for damage
resulting from fitting or connecting errors.
WARNING!
The electrical safety of the appliance can only be guaranteed if it is earthed. The
manufacturer cannot be held responsible for damage resulting from the absence of
or defects in the installation’s protection system (e.g. electrical shock).
WARNING!
Only use the appliance once it has been fitted into its built-in position. Only in this
manner can it be guaranteed that users cannot access the electrical components.
WARNING!
Never open up the appliance’s frame. Possible contacts with electrical conducting
parts or changes to electrical or mechanical components may represent a danger to
users’ safety and prejudice the correct working of the appliance.
WARNING!
Repairs and maintenance, especially of parts carrying electrical current, must only
be done by technicians authorised by the manufacturer. The manufacturer and
retailers do not accept responsibility for any damaged caused to people, animals or
property as a result of repairs and maintenance carried out by non-authorised
personnel.

Safety Information
EN
EN
EN
EN
10
WARNING!
Repairs undertaken during the guarantee period must only be done by technicians
authorised by the manufacturer. If this is not the case then any damage resulting
from the repair in question is excluded from the guarantee
WARNING!
The appliance must be disconnected from the electrical current when installation
and repair work is being done. To disconnect the appliance from the current, one of
the following conditions must apply:
• The switchboard fuses / circuit breakers must be disconnected.
• The plug should be removed from the socket. To remove the plug from the
socket do not pull on the electric cable but rather pull out the plug itself
directly.
Safety Information
EN
EN
EN
EN
11
1 PRECAUTIONS FOR USE
THIS MANUAL IS AN INTEGRAL PART OF THE APPLIANCE. TAKE GOOD
CARE OF IT AND KEEP IT TO HAND THROUGHOUT THE OVEN'S LIFE CYCLE.
WE URGE YOU TO READ THIS MANUAL AND ALL THE INFORMATION IT
CONTAINS CAREFULLY BEFORE USING THE APPLIANCE. INSTALLATION
MUST BE CARRIED OUT BY QUALIFIED STAFF IN COMPLIANCE WITH THE
RELEVANT REGULATIONS. THIS APPLIANCE IS INTENDED FOR HOUSEHOLD
USE AND COMPLIES WITH THE EEC DIRECTIVES CURRENTLY IN FORCE.
THE APPLIANCE IS BUILT TO PROVIDE THE FOLLOWING FUNCTION:
COOKING AND HEATING FOODS; ALL OTHER USES ARE TO BE
CONSIDERED IMPROPER.
THE MANUFACTURER DECLINES ALL LIABILITY FOR USES OTHER THAN
THOSE STATED ABOVE.
KEEP THE DOCUMENTATION OF THIS PRODUCT FOR FUTURE REFERENCE.
ALWAYS KEEP THE INSTRUCTION MANUAL HANDY. IF YOU LEND THE
STEAMER TO SOMEONE ELSE GIVE THEM THE MANUAL AS WELL!
NEVER USE THIS APPLIANCE FOR HEATING ROOMS.
NEVER LEAVE PACKAGING RESIDUES UNATTENDED IN THE HOME.
SEPARATE THE VARIOUS PACKAGING MATERIALS BY TYPE AND CONSIGN
THEM TO THE NEAREST SEPARATE DISPOSAL CENTRE.
THIS APPLIANCE IS TAGGED UNDER EUROPEAN DIRECTIVE 2002/96/EC ON
WASTE ELECTRICAL AND ELECTRONIC EQUIPMENT (WEEE).
THIS DIRECTIVE CONTAINS THE REGULATIONS GOVERNING THE
COLLECTION AND RECYCLING OF DECOMMISSIONED APPLIANCES
THROUGHOUT THE EUROPEAN UNION.
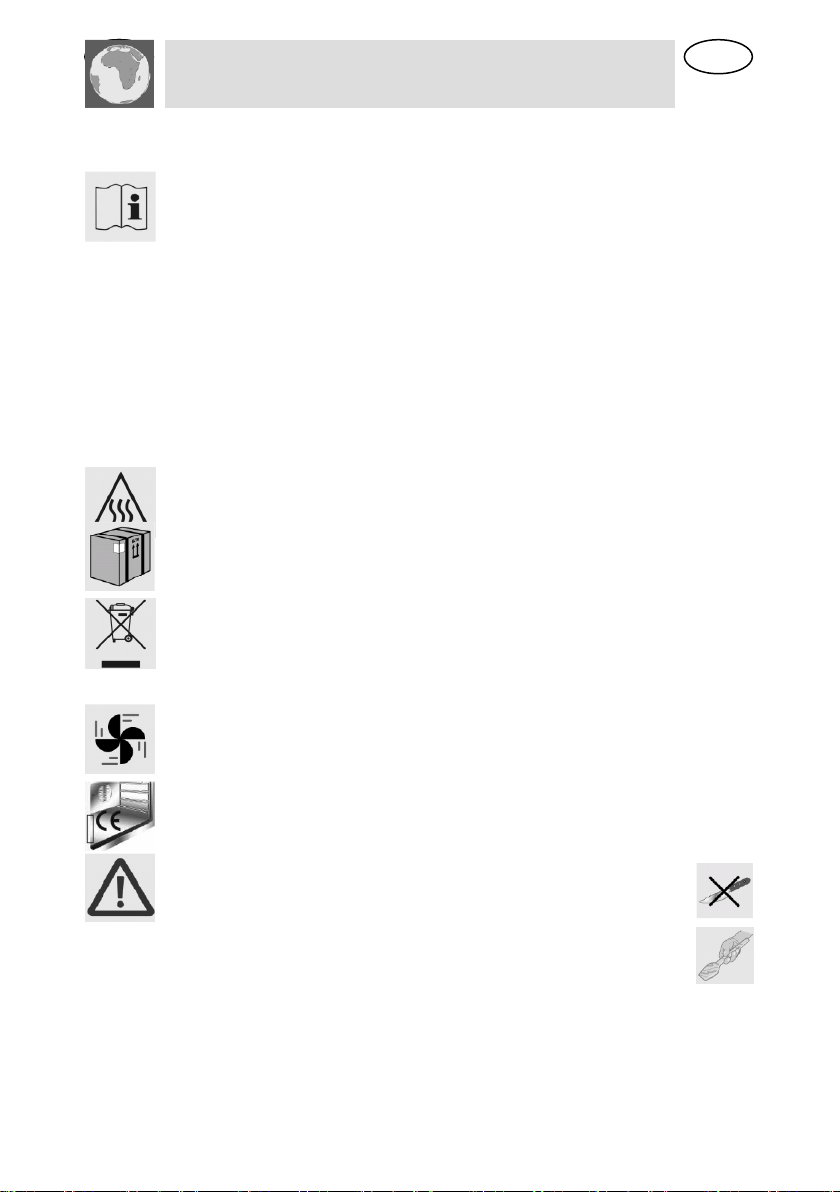
NEVER OBSTRUCT THE OPENINGS AND SLITS PROVIDED FOR
VENTILATION AND HEAT DISPERSAL.
THE NAMEPLATE WITH THE TECHNICAL DATA, SERIAL NUMBER AND MARK
IS IN A VISIBLE POSITION ON THE OVEN DOOR FRAME.
THE NAMEPLATE MUST NEVER BE REMOVED.
NEVER USE METAL SCOURING PADS OR SHARP SCRAPERS
WHICH WILL DAMAGE THE SURFACE.
USE ORDINARY NON-ABRASIVE PRODUCTS WITH THE AID OF
WOODEN OR PLASTIC UTENSILS IF NECESSARY. RINSE
THOROUGHLY AND DRY WITH A SOFT CLOTH OR CHAMOIS
LEATHER.
EN
Instructions for the User
12
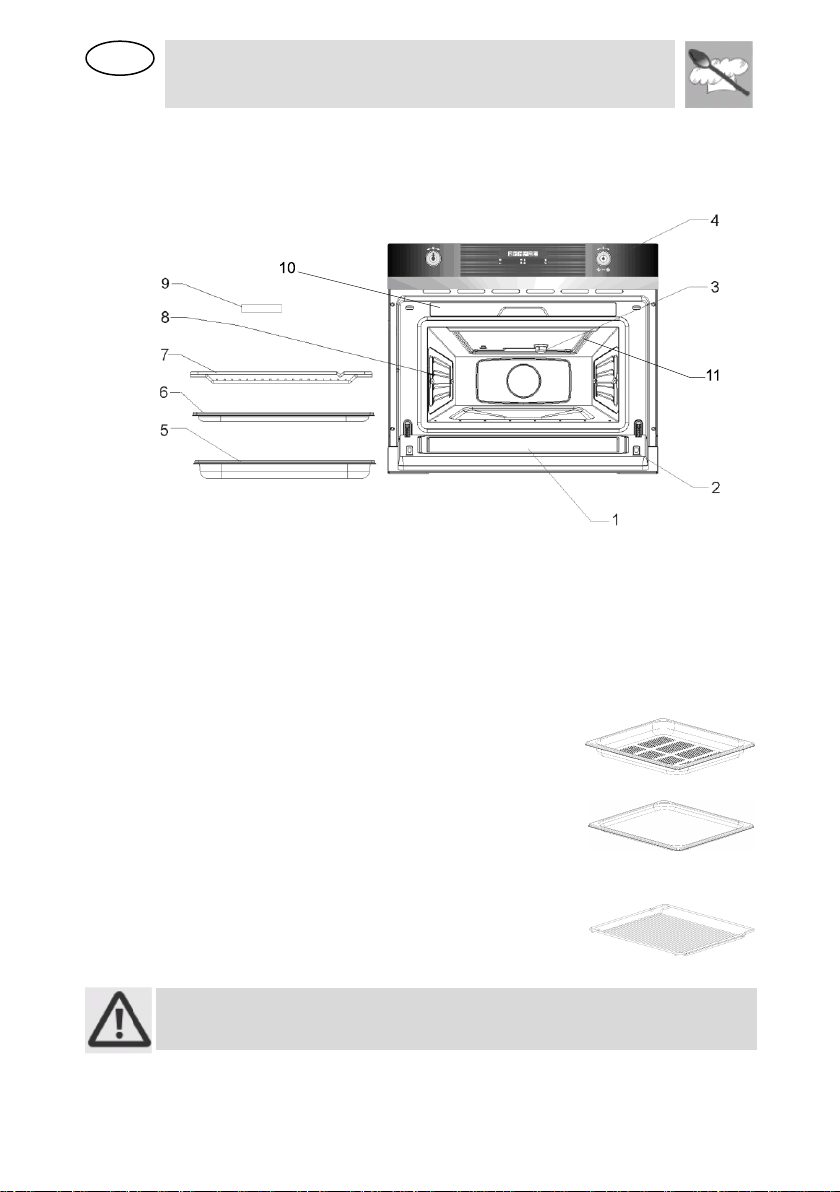
2 GET TO KNOW YOUR OVEN
1. – Door window glass
6. – Non-perforated container
2. – Catches
7. – Rack
3. – Lamp
8. – Shelf guides
4. – Control panel
9. – Sponge
5. – Perforated container
10. – Water tank
11. – Grill
3 ACCESSORIES AVAILABLE
Perforated container: suitable for cooking
fresh or deep frozen vegetables, meat and
poultry.
Non-perforated container: suitable for
steaming sensitive foods, e.g. compotes and
dumplings. You can use it with the perforated
container to catch the water.
Rack: used when cooking with small
containers, as for example, dessert bowls and
to regenerate plate dishes.
Oven accessories which may come into contact with foods are made from
materials compliant with the EC Regulation 1935-2004 and national
relevant regulations.
EN
Instructions for the User
13
4 BEFORE INSTALLATION
Never leave packaging residues unattended in the home. Separate waste
packaging materials by type and consign them to the nearest separate
disposal centre.
The inside of the appliance should be cleaned to remove all manufacturing
residues. For further information about cleaning, see point "CARE AND
MAINTENANCE".
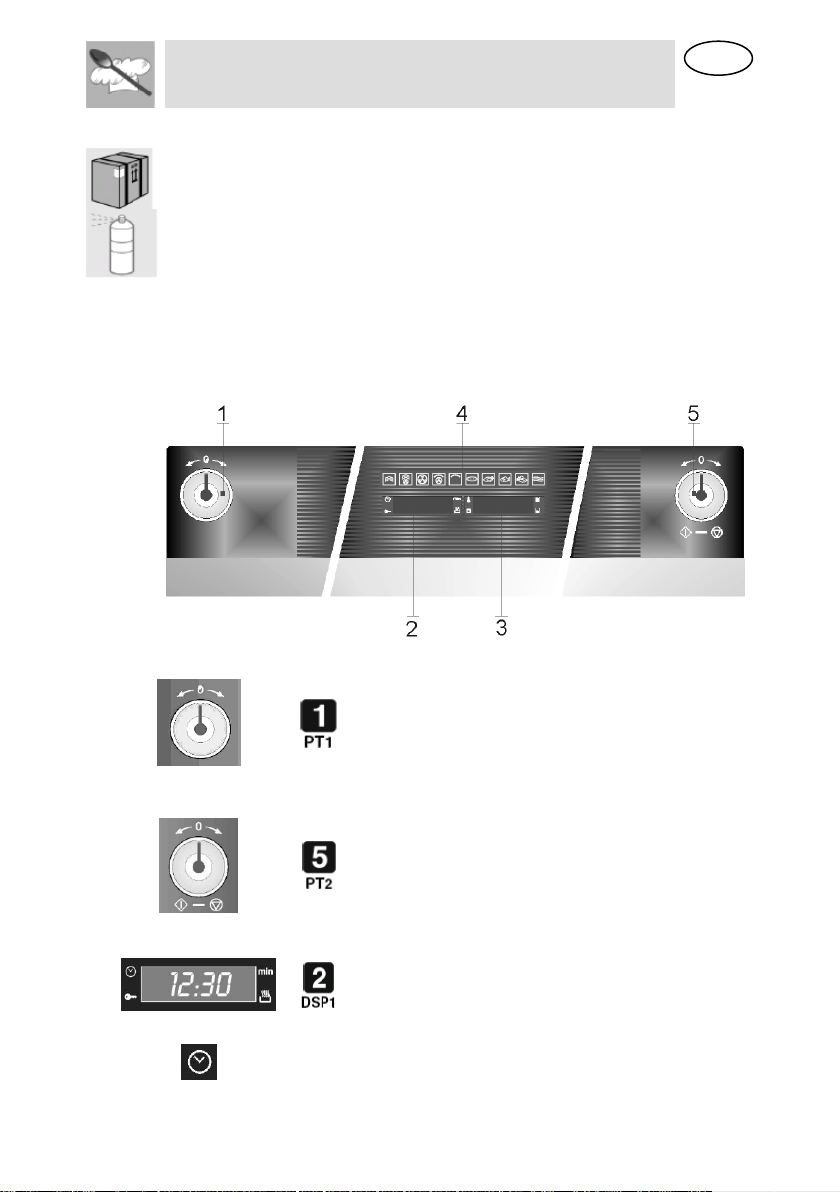
5 DESCRIPTION OF FRONT PANEL CONTROLS
All the appliance's control and monitoring devices are placed together on
the front panel. The table below provides the key to the symbols used.
Function’s
parameters
knob
This knob allows you to set
the time, select the cooking
temperature and duration
and program the cooking
start and end times. From
now on, for convenience it
will be referred to as PT1.
Function-
switch on
knob
This knob allows access to
the oven's three operating
settings, and is also used to
select a cooking function
(see point “Operating
settings”).
Current time /
Duration
display
This display shows the
current time or the cooking
duration.
Also visible are the function
cut-out light
Clock
Adjusting the cooking time
EN
Instructions for the User
14
Child lock out function
Child lock-out function mode on
(see point “9.3.4 Child safety lock-
out function”)
Cooking duration
Setting the cooking duration
Delayed start
Setting the cooking time with a
delayed start
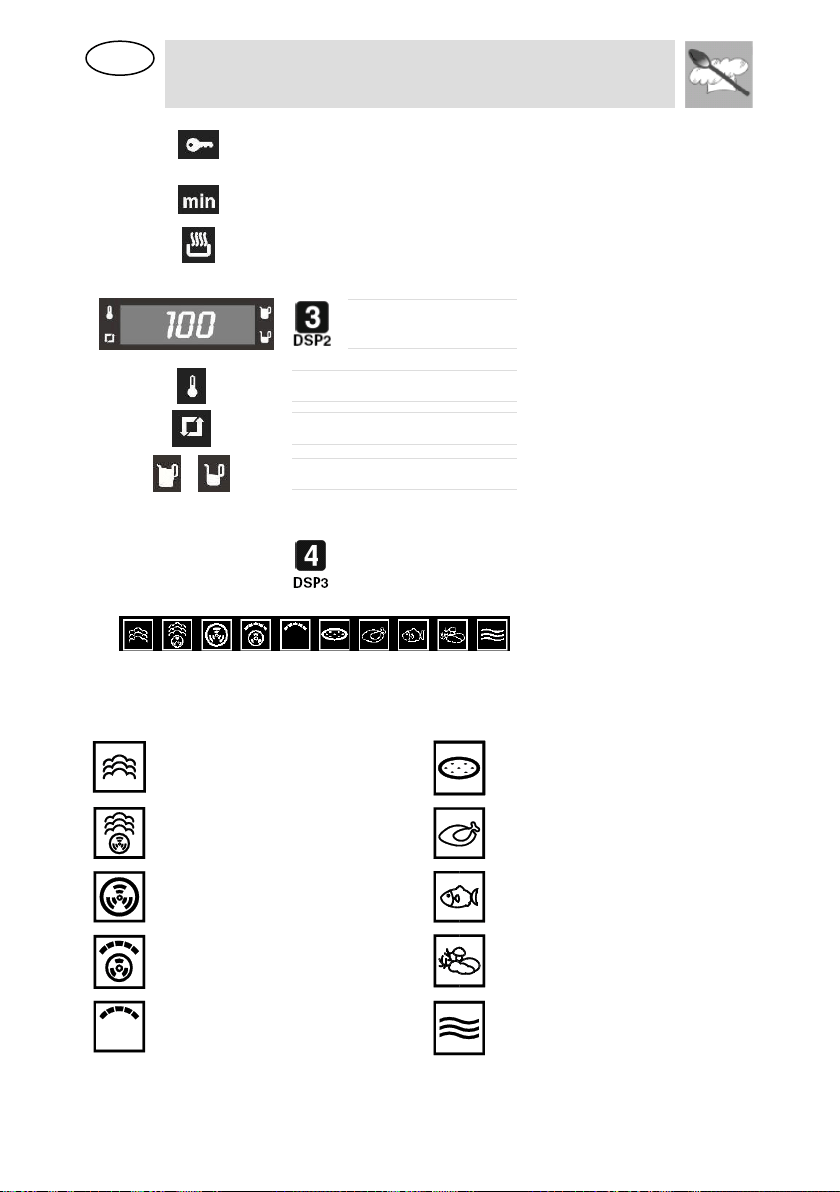
Temperature / Type
of food display
This display shows the
Parameters set for the function
required, or the Parameters set by
the user.
Temperature
The oven is heating up
Descale function
See point 9.3.2 Descale function
Water level indication
Indicates the existing water
quantity in the tank (see point 8.2
Water levels indication)
Function display
This display shows (illuminated) all
the cooking functions available for
selection. For instructions on how
to select a cooking function, see
point “9 Selecting a cooking
function”.
The table below provides a list of the functions available.
Please see chapter 10 for a more detailed description of the functions
STEAM
PIZZA / BREAD FUNCTION
HOT AIR + STEAM
MEAT COOKING
HOT AIR
FISH COOKING
HOT AIR + GRILL
VEGETABLES COOKING
GRILL ELEMENT
REHEATING & STERILISING
EN
Instructions for the User
15
6 USING THE OVEN
6.1 Precautions and General Advice
When the oven is used for the first time, it should be heated to the
maximum temperature for long enough to burn off any oily residues left by
the manufacturing process, which might contaminate foods with
unpleasant smells.
The accessories can contain hot water when they are taken from the oven,
therefore the use of gloves and particular attention are always
recommended
Oven accessories which may come into contact with foods are made from
materials compliant with the EC Regulation 1935-2004 and national
relevant regulations.
6.2 Operating settings
This product is programmed to provide 3 operating settings, which can
be\modified by pressing PT2.
Standby setting: activated as soon as the current time has been
confirmed, with DSP1 on and showing the current time.
ON setting: from the standby setting, press PT2 once. All the displays and
knobs light up.
OFF setting: from the ON setting, press PT2 once.
Only the symbol on DSP1 remains on.
The heating system is not activated immediately in any of these
functions, in order to improve operator safety.
6.3 First Use
At first use, or after a power failure, the oven's left hand-display, DSP1, will
show a flashing symbol. The oven will not operate until the clock,
the water hardness parameter and the calibration is set.
6.3.1 Setting the current time and the water hardness level
To set the current time, turn PT1 to the right and left to increase or
decrease the hours.
Press PT1 once to move on to setting the minutes. Turn it to the right and
left to increase or decrease the minutes.
Press PT1 again to confirm the current time and move on to water
hardness level setting. The DSP2 will show the word “Dur” and DSP1 will
show the water hardness level “MEd” (pre-set value).
Turn PT1 to the right and left to change the water hardness level value, as
described in table below
EN
Instructions for the User
16
Press PT1 to confirm the water hardness level.
TYPE
WATER HARDNESS
disp 1
Ca + Mg
(ppm)
English deg.
[°eH]
French deg.
[°dF]
German deg.
[°dH]
SOFT WATER
0 TO 150
0 TO 11
0 TO 15
0 TO 8
SOFT
MEDIUM WATER
151 TO 350
12 TO 25
16 TO 35
9 TO 20
MED
HARD WATER
351 TO 500
26 TO 35
36 TO 50
21 TO 28
HARD
6.3.2 Water Level calibration
After setting the water hardness, appears in the Display and the
water level lights shine.
Please take the Water tank completely off. Wait until the display and the
water tank lights disappear.
6.3.3 Changing the current time
It might become necessary to change the current time, for example at the
switch from summer to winter time. To do this, starting from the standby
setting (see point “Operating settings”) keep PT1 pressed for a few
seconds until the figures on DSP1 flash. Now repeat the operations
described in point “Setting the current time and water hardness level”.
6.3.4 Changing the current water hardness level
It might become necessary to change the current water hardness level. To
do this, please refer to point “10.3.3 changing the water hardness level”.
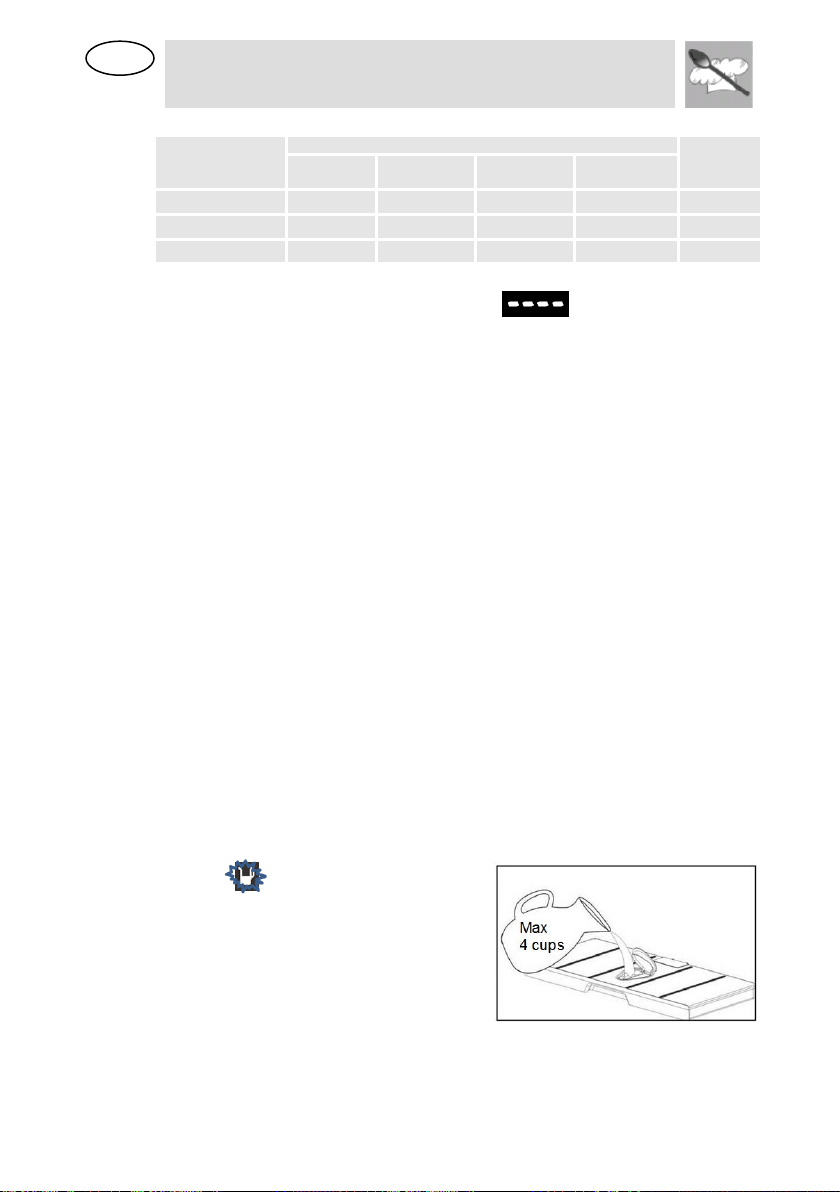
7 WATER FEEDING
All steam functions require the water tank to be full.
Fill the water tank up with cold, fresh drinking water (approximately 4 cups
/ 1 liter) and introduce it into the slot located above the cavity until you
hear a click.
If the indication “rES” appears, it means that the water tank was not
properly inserted.
7.1 Refilling the water
The contents of the water tank normally suffice for one cooking session of
aprox. 50 minutes.
If, however, the water tank needs to be refilled, the water refill light starts
to flash . Only fill the water tank
up to a maximum of 2 CUPS to
ensure that the water does not
overflow when it is pumped back to
the water tank. RISK OF
OVERFLOW.

EN
Instructions for the User
17
7.2 Water levels indication
The steamer indicates the existing water quantity in the tank through 3
levels, which correspond to the following percentages:
- – 0% to 20%
- – 20% to 60%
- – 60% to 100%
Remark: don’t refill the tank, if it’s placed. Please remove it completely and
wait > 20 sec. before placing it again.
7.3 Emptying the water tank
When the appliance is switched off, the residual water is pumped back into
the water tank.
While the water is being pumped the display shows “PUMP”.
This message stays on until the temperature of the water reaches 75º C
before it can be pumped back to the water tank.
If the display shows “FULL” it means that the water tank has too much
water inside. Please empty the tank and place it again.
Warning: the water in the tank may be hot. Danger of burns!
After the water is pumped back to the water tank, the display will show the
message “DEP” requiring the following actions:
1. Remove and empty the water tank.
2. Dry the water tank and introduce it back into the slot located above
the cavity. Clean and dry the cooking space.
3. Leave the appliance door open so that the cooking space can cool
down and dry completely.
IMPORTANT NOTE: It is advisable to remove the water tank and
empty it after a cooking cycle. This prevents the formation of bacteria
and limestone inside the appliance.
Don’t wash the water tank in the dishwasher machine.
If the water tank has not been removed from the oven and a new cooking
cycle is started, the oven displays the warning “DEP”.
This warning can be cleared by pressing PT2 and proceed with the new
cooking cycle without removing and emptying the water tank.
8 SELECTING THE FUNCTION
In the ON state only, a cooking function can be selected by first pressing
PT2 once and then turning PT2 to the right or left. The function selected
will change colour to “red” on DSP3. The preset cooking time will be
displayed on DSP1 and the preset parameters (temperature, food type)
are displayed on DSP2.
The suggested times and temperatures are guideline values. The actual
cooking time can vary according to the type and quality of the foods.
EN
Instructions for the User
18
8.1.1 Steam function (Manual program)
Press PT2 and rotate it to select this function.
Press PT1 to modify the preset parameters of cooking time and
temperature. The cooking duration light starts to blink.
Turn PT1 to the right or left to change the preset cooking duration
Press PT1 to validate and the temperature light starts to blink.
Turn PT1 to the right or left to change the preset temperature.
Please consider the information on the cooking table (see point 10).
Press PT2 to immediately start the cooking process or otherwise press
PT1 to set a different time for the cooking process start (please refer to
point “Delayed Start Time”).
8.1.2 Hot Air + Steam function
Press PT2 and rotate it to select the Hot Air + Steam function.
Press PT1 to set the parameters and the duration light starts to
blink. Turn PT1 to the right or left to change the preset cooking duration.
Press PT1 to validate and the temperature light starts to blink.
Turn PT1 to the right or left to change the temperature.
Press PT2 to immediately start the cooking process or otherwise press
PT1 to set a different time for the cooking process start.
The temperature light will blink until the cavity temperature has reached
the set value.
8.1.3 Hot Air function
Press PT2 and rotate it to select the Hot Air function.
Press PT1 to set the parameters and the duration light starts to
blink. Turn PT1 to the right or left to change the preset cooking duration.
Press PT1 to validate.
Turn PT1 to the right or left to change the temperature.
Press PT2 to immediately start the cooking process or otherwise press
PT1 to set a different time for the cooking process start.
The temperature light will blink until the cavity temperature has reached
the set value.
8.1.4 Grill Element + Hot Air
Press PT2 and rotate it to select this function.
Press PT1 to set the parameters and the duration light starts to blink.
Turn PT1 to the right or left to change the preset cooking duration.
Press PT1 to validate.
Turn PT1 to the right or left to change the temperature.
Press PT2 to immediately start the cooking process or otherwise press
PT1 to set a different time for the cooking process start (please refer to
point. “Delayed Start Time ”).
EN
Instructions for the User
19
The temperature light will blink until the cavity temperature has reached
the set value.
8.1.5 Grill Element function
Press PT2 and rotate it to select this function.
Press PT1 to set the parameters and the duration light starts to blink.
Turn PT1 to the right or left to change the preset cooking duration.
Press PT2 to immediately start the cooking process or otherwise press
PT1 to set a different time for the cooking process start (please refer to
point “Delayed Start Time”).
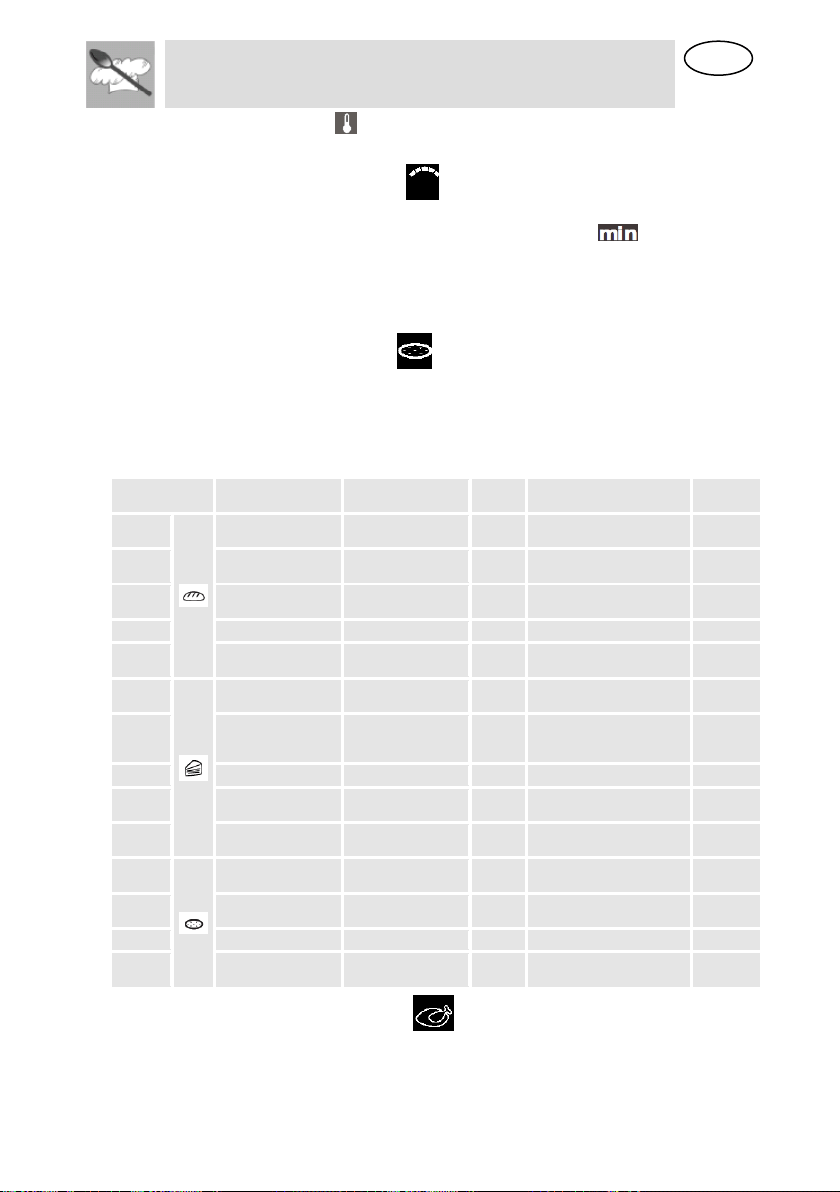
8.1.6 Pizza/Bread function
Press PT2 and rotate it to select the Pizza function.
Press PT1 to select the desired Pizza/Bread function program.
Turn PT1 to the right or left to change the preset time.
Press PT2 to immediately start the cooking process.
PROGRAM
FOOD
TEMPERATURE
(°F)
TIME
(MIN)
CONTAINER
LEVEL
P 1
BAKING BUNS
392
15
NON- PERFORATED
2
P 2
FROZEN BUNS
392
20
NON- PERFORATED
2
P 3
FRESH DOUGH
356
25
NON- PERFORATED
2
P 4
WHITE BREAD
374
40
NON- PERFORATED
2
P 5
BRAIDED
BREAD
392
30
NON- PERFORATED
2
P 6
BROWN BREAD
392
60
NON- PERFORATED
2
P 7
WHOLE WHEAT
BREAD
374
70
NON- PERFORATED
2
P 8
FRUIT BREAD
356
60
NON- PERFORATED
2
P 9
GRATIN, FRESH
320
50
NON- PERFORATED
2
P 10
GRATIN,
PRECOOKED
320
50
NON- PERFORATED
2
P 11
CASSEROLE,
FRESH
356
35
NON- PERFORATED
2
P 12
CASSEROLE,
PRECOOKED
356
30
NON- PERFORATED
2
P 13
FRESH PIZZA
428
15
NON- PERFORATED
2
P 14
FROZEN PIZZA
428
20
NON- PERFORATED
2
8.1.7 Meat Cooking function (Automatic program)
Press PT2 and rotate it to select the Meat Cooking function.
Press PT1 to modify the preset parameters and the DSP2 starts to blink.
EN
Instructions for the User
20
Turn PT1 to the right or left to change the preset food type displayed on
DSP2 (please refer to the table below).
The cooking duration is calculated based on the food’s type but can be
changed by pressing PT1.
Turn PT1 to the right or left to change the preset cooking duration.
Press PT2 to immediately start the cooking process or otherwise press
PT1 to set a different time for the cooking process start (please refer to
point “Delayed Start Time”).
The temperature will be automatically set to achieve the best results.
The following table shows the programmes, indicating the time that the
function will take.
PROGRAM
TYPE OF MEAT
TEMPERATURE ºF
TIME
(MIN)
CONTAINER
LEVEL
C 1
CHICKEN
BREAST
212
30
PERFORATED
2
C 2
SMOKED PORK
LOIN / PIECES
212
45
PERFORATED
2
C 3
TURKEY
ESCALOPE
212
20
PERFORATED
2
C 4
PORK FILET,
WHOLE
212
25
PERFORATED
2
C 5
VIENNA
SAUSAGES
194
15
PERFORATED
2
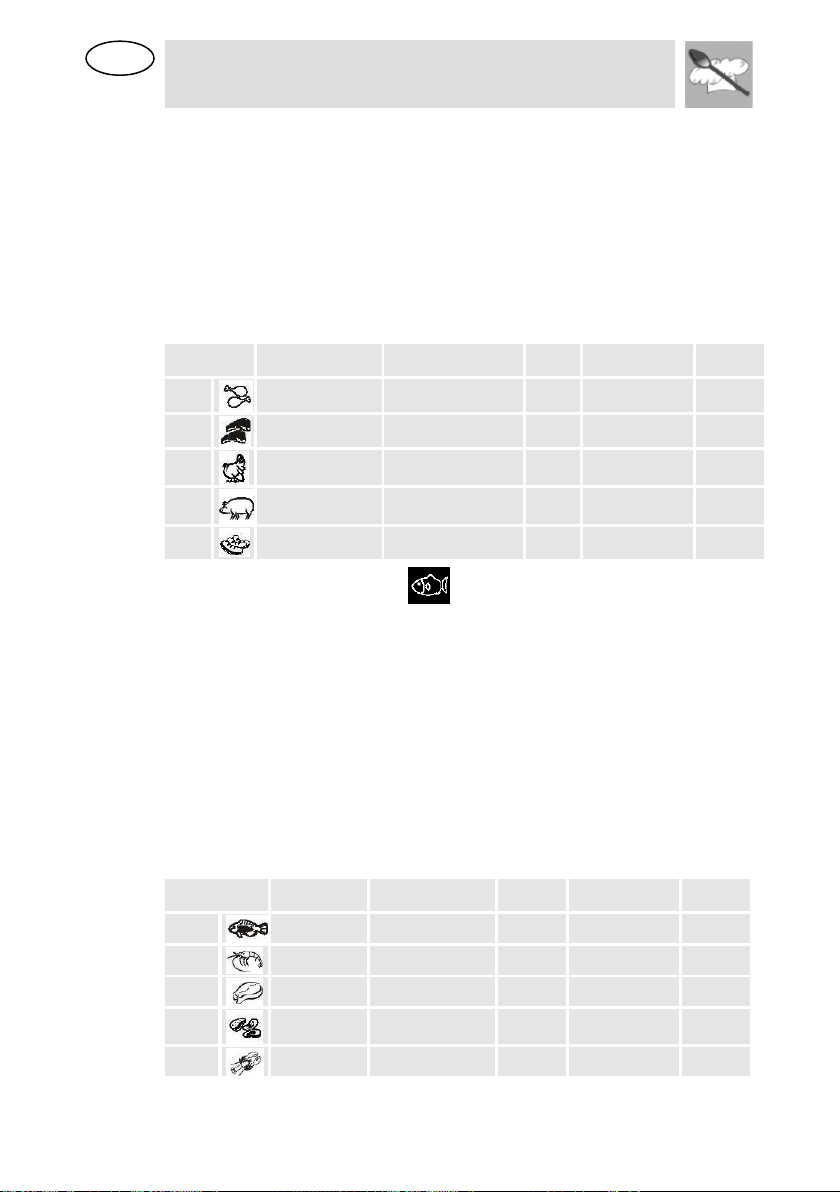
8.1.8 Fish Cooking function (Automatic program)
Press PT2 and rotate it to select this Fish Cooking function.
Press PT1 to modify the preset parameters and the DSP2 starts to blink.
Turn PT1 to the right or left to change the preset food type displayed on
DSP2.
The cooking duration is calculated based on the food’s type but can be
changed by pressing PT1.
Turn PT1 to the right or left to change the preset cooking duration.
Press PT2 to immediately start the cooking process or otherwise press
PT1 to set a different time for the cooking process start (please refer to
point “Delayed Start Time”).
The temperature will be automatically set to achieve the best results.
The following table shows the programmes, indicating the time that the
function will take.
PROGRAM
TYPE OF
FISH
TEMPERATURE
ºF
TIME
(MIN)
CONTAINER
LEVEL
b 1
TROUT
176
25
PERFORATED
2
b 2
SHRIMP
194
15
PERFORATED
2
b 3
FISH FILET
176
18
PERFORATED
2
b 4
MUSSELS
212
25
PERFORATED
2
b 5
LOBSTER
212
30
PERFORATED
1/2
EN
Instructions for the User
21
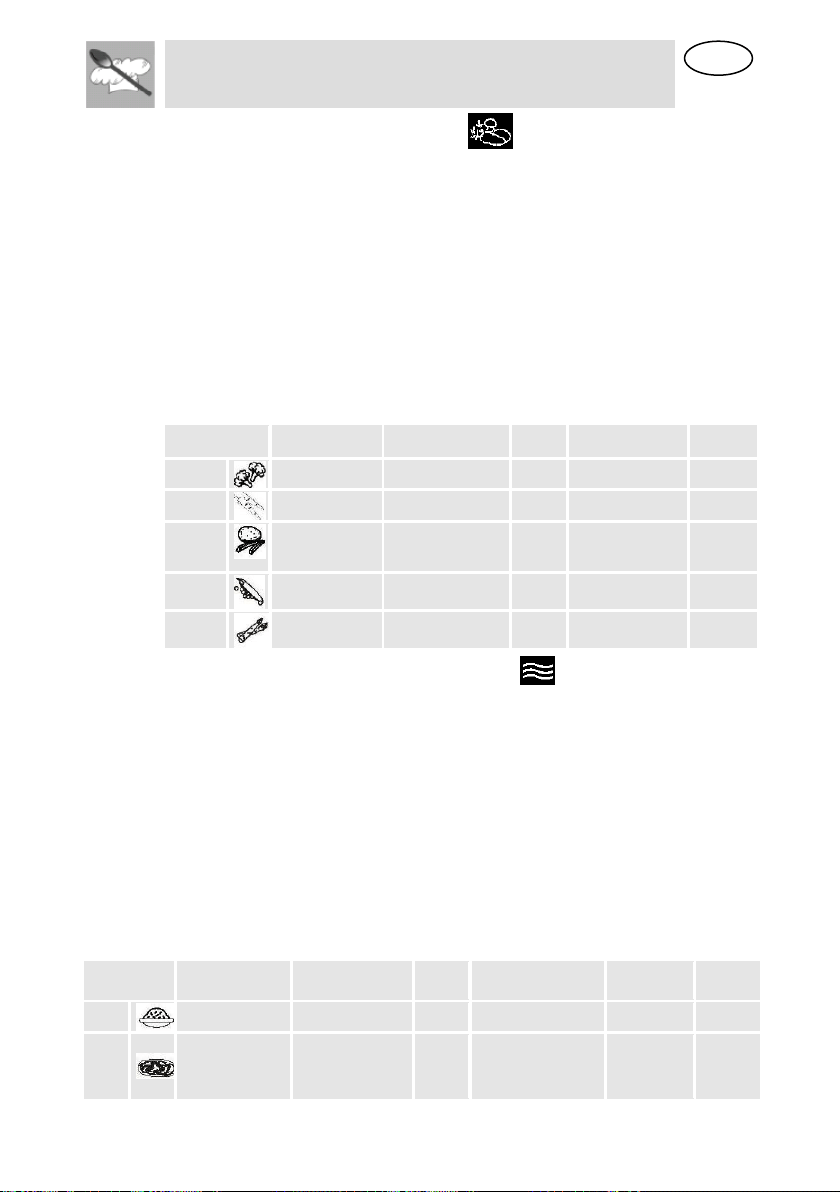
8.1.9 Vegetables Cooking function (Automatic program)
Press PT2 and rotate it to select the Vegetables Cooking function.
Press PT1 to modify the preset parameters and the DSP2 starts to blink.
Turn PT1 to the right or left to change the preset food type displayed on
DSP2.
The cooking duration is calculated based on the food’s type but can be
changed by pressing PT1.
Turn PT1 to the right or left to change the preset cooking duration.
Press PT2 to immediately start the cooking process or otherwise press
PT1 to set a different time for the cooking process start (please refer to
point “Delayed Start Time”).
The temperature will be automatically set to achieve the best results.
The following table shows the programmes, indicating the time that the
function will take.
PROGRAM
FOOD
TEMPERATURE
(°F)
TIME
(MIN)
CONTAINER
LEVEL
A 1
BROCCOLI
212
20
PERFORATED
2
A 2
CARROTS
212
25
PERFORATED
2
A 3
POTATOES
AND MIXED
VEGETABLES
212
25
PERFORATED
2
A 4
SNOW PEAS
212
15
PERFORATED
2
A 5
ASPARAGUS
212
25
PERFORATED
2
8.1.10 Re-Heating and Sterilising function (Automatic program)
Press PT2 and rotate it to select this function.
Press PT1 to modify the preset parameters and the DSP2 starts to blink.
Turn PT1 to the right or left to change the preset food type displayed on
DSP2.
The cooking duration is calculated based on the food’s type but can be
changed by pressing PT1.
Turn PT1 to the right or left to change the preset cooking duration.
Press PT2 to immediately start the defrost process or otherwise press PT1
to set a different time for the defrost process start (please refer to point
“Delayed Start Time”).
The temperature will be automatically set to achieve the best results.
The following table shows the programmes, indicating the time that the
function will take.
PROGRAM
TYPE OF
FOOD
TEMPERATURE
ºF
TIME
(MIN)
INSTRUCTIONS
CONTAINE
R
LEVEL
r 1
PLATE DISHES
212
13
RACK
2
r 2
READY-MADE
MEALS /
FROZEN
212
18
REMOVE LID
FROM
CONTAINER AND
PUT ON RACK.
RACK
2

EN
Instructions for the User
22
PROGRAM
TYPE OF
FOOD
TEMPERATURE
ºF
TIME
(MIN)
INSTRUCTIONS
CONTAINE
R
LEVEL
r 3
BEANS
212
35
STERILISING:
THE TIMES AND
TEMPERATURES
REFER TO 1L
PRESERVING
JARS.
RACK
2
r 4
CHERRIES
176
35
RACK
2
r 5
PLUMS
194
35
RACK
2
r 6
BABY
BOTTLES
212
12
RACK
2
8.1.11 Delayed Start Time
When PT1 is pressed to define a delayed start time the corresponding
light starts to blink, DSP1 shows the current time and DSP 2 shows
“Auto”.
Turn PT1 to the right or left to change the delayed start time.
Press PT2 to validate the delayed start time.
The oven enters in an idle state waiting for the defined start time. DSP3
shows the selected function and DSP1 and DSP2 show all the defined
parameters for the function continuously alternating.
If you wish to start the function before the selected time, just press PT2.
If you wish to cancel the programming, press PT2 for 3 seconds.
8.2 When the oven is working…
IT IS NORMAL THAT SOME STEAM ESCAPES THROUGH THE
OPENING BETWEEN THE DOOR AND CONTROL PANEL DURING THE
HEATING PERIOD. THE AMOUNT OF RELEASED STEAM WILL BE
REDUCED WHEN THE OVEN REACHES THE SET TEMPERATURE.
8.2.1 Interrupting a cooking cycle
You can stop the cooking process at any time by pressing the PT2 key
once or by opening the oven door.
The oven incorporates a steam-reduction function that is activated when
the Start/Stop key is pressed to gradually release the steam from the
cavity, so that there is no sudden rush of steam when the appliance door
is opened.
This function takes around 3 minutes and during it the display shows the
word “VAP”.
WARNING! WHEN OPENING THE DOOR DURING OR COMPLETION
OF THE COOKING CYCLE WITHOUT STOPPING IT AS DESCRIBED
ABOVE BE CAREFUL OF THE FLOW OF HOT AIR AND/OR STEAM
COMING OUT OF THE COOKING CHAMBER. STEP BACK OR TO THE
SIDE TO AVOID BURNS.
At this point:
Steam generation is stopped immediately although steam
continues to be produced until the water cools down in the
boiler.
The cavity walls and the water tank are still very hot. Danger of
burning!

EN
Instructions for the User
23
The timer stops and the display shows the remaining amount of
operating time.
If you wish, at this time you can:
Turn or stir the food to ensure it will be evenly cooked.
Modify the process parameters.
Cancel a cooking cycle
End of a cooking cycle.
To restart the process, close the door and press PT2.
8.2.2 Modifying parameters
The operating parameters (time, temperature, etc.) can only be modified
when the cooking process has been interrupted. Proceed as follows:
Press PT1 to activate the parameter modification mode. The
symbol starts to blink. Turn PT1 to the right or left to
change the remaining cooking duration.
Press PT1 to validate and the next parameter light starts to
blink. Proceed as described in the active function chapter to
modify the remaining parameters.
Press PT2 to continue the cooking process.
8.2.3 Cancelling a cooking cycle
If you wish to cancel the cooking process, press PT2 for 3 seconds.
You will then hear a beep and the oven will be in the condition described
in the following paragraph.
8.2.4 End of a cooking cycle
At the end of the set duration or when you press PT2 to finish the cooking
cycle, you will hear three beeps and the display will show the word “End”
flashing, the oven starts the steam-reduction function.
This function gradually releases the steam from the cavity, so that there is
no sudden rush of steam when the appliance door is opened.
This function takes around 3 minutes and during it the display shows the
word “VAP”. If you want to start a new cooking cycle press PT2 and rotate.
WARNING! WHEN OPENING THE DOOR DURING OR COMPLETION
OF THE COOKING CYCLE WITHOUT STOPPING IT AS DESCRIBED,
BE CAREFUL OF THE FLOW OF HOT AIR AND/OR STEAM COMING
OUT OF THE COOKING CHAMBER. STEP BACK OR TO THE SIDE TO
AVOID BURNS.
The cooling fan can continue to run for a certain length of time after
the appliance has been switched off. This is a normal function that is
meant to reduce the temperature inside the oven.
In the meantime, as soon as the water in the boiler reaches below 75 ºC it
is pumped back to the water tank. This phase can take as long as 10
minutes and the DSP1 shows the message “PUMP”. If the display shows
“FULL” it means that the water has to match water inside. Please empty
the tank and place it again.
When the display shows the word “DEP”, this means that the water was
pumped and that the water tank can be removed.
EN
Instructions for the User
24
Remove the water tank and dry it thoroughly. Let the cooking space cool
down for a moment and then clean and dry it with a cloth or sponge. The
door should be left open for some time so that the appliance can dry
completely.
8.2.5 Steam Flow
It is normal to have an intermittent steam flow, coming out from the oven
front.
This is especially noticeable in winter time or in high moisture
environments.
8.2.6 Residual water in the oven
To reduce the residual water in the oven, it is recommended to insert a
tray in the bottom rack level. The condensation released from the food
begins to drip on the tray. The remaining residual water can be easily
dried with a cloth.
8.3 Secondary menu
This appliance also has a concealed "secondary menu" allowing the user
to:
1. Activate or deactivate the Show Room function (which disables all
the heating elements so that only the control panel works);
2. Activate or deactivate the Child safety device ( );
3. Activate or deactivate the function which limits the maximum power
absorption to 3000 W;
4. Perform a Descale cycle;
5. Change the Water Hardness Level.
8.3.1 Show Room Function
With the oven in OFF status (see point “Operating settings”) keep PT1
pressed until the message OFF SHO appears on DSP1 and DSP2. This
means that the SHOW ROOM function (which disables all the heating
elements so that only the control panel works) is not active.
Turn PT1 to the right or left to activate (ON SHO) or deactivate (OFF SHO)
this function. To use the oven normally, set OFF SHO.

EN
Instructions for the User
25
After setting the parameter required, press PT2 to return the oven to the
initial standby status.
8.3.2 Child safety lock-out function
With the oven in OFF status (see point “Operating settings”) keep PT1
pressed until the message OFF SHO appears on DSP1. Now press PT1
once and the message “OFF BLOC” appears on DPS1.
Turn PT1 to the right or left to activate (ON BLOC) or deactivate (OFF
BLOC) this function, which locks out all the functions and knobs after 3
minutes of operation without any command from the user (when this
system is active, the symbol appears on DPS2).
After setting the parameter required, press PT2 to return the oven to the
initial standby status.
To exit the lockout status temporarily to modify a cooking program or
select a different function, keep PT1 pressed until the symbol
disappears from DSP2. The required changes can now be made, and 2
minutes after the last setting is made the lockout will come into operation
again.
To deactivate the lockout permanently, access the secondary menu and
switch the function off as described in this section.
8.3.3 Power selection function
This function allows the oven operation if there are limitations in the mains
power (e.g. 3 kW for Italian market). The cooking results will not be
affected but the cooking duration will be increased on some functions that
activated more than one heating element.
With the oven in OFF status (see point “Operating settings”) keep PT1
pressed until the message OFF SHO appears on DSP1. Now press PT1
once again and the message “OFF 3000” will appear on DPS1.
Turn PT1 to the right or left to activate (ON 3000) or deactivate (OFF
3000) this function, which limits the oven's maximum power absorption, in
any function, to 3000 W.
After setting the parameter required, press PT2 to return the oven to the
initial standby status.
8.3.4 Descale function
Warning: For safety reasons, the descaling process cannot be
interrupted and it takes about 45 minutes.
The appliance can be descaled with the appliance door open or closed.
To run a descaling cycle proceed as follows:
With the oven in OFF status (see point “Operating settings”) keep PT1
pressed until the message OFF SHO appears on DSP1. Now press PT1
(several times) until the message “ENTR CAL” appears on DPS1 and
DSP2.
Turn PT1 to the right and press PT2 at the same time to activate the
descale program . When this function is active, the symbol appears on
DPS2.

EN
Instructions for the User
26
When the display shows “0.5L”, remove the water tank.
Pour 0,5 litres of an adequate descaling solution into the water tank and
put the water tank back (see 11.2).
Press PT2 to start the Descale cycle that takes about 30 minutes.
When the display shows “1.0L” flashing and the oven emits a beep,
remove and empty the water tank.
Fill the water tank with 1,0 litres of cold water and put the water tank back.
Press PT2 to start the first rinsing cycle.
When the display again shows “1.0L” flashing and the oven emits a new
beep, remove and empty the water tank.
Fill the water tank with 1,0 litres of cold water and put the water tank back.
Press PT2 to start the second rinsing cycle.
When the rinsing cycle has finished the display shows “End”.
Remove, empty and dry the water tank.
8.3.5 Changing the water hardness level
With the oven in OFF status (see point “Operating settings”) keep PT1
pressed until the message OFF SHO appears on DSP1. Now press PT1
until the message “MED DUR” appears on DPS1 and DSP2.
Turn PT1 to the right or left to change the hardness level. Available
options are HARD, MED and SOFT.
After setting the parameter required, press PT2 to return the oven to the
initial standby status.
EN
Instructions for the User
27
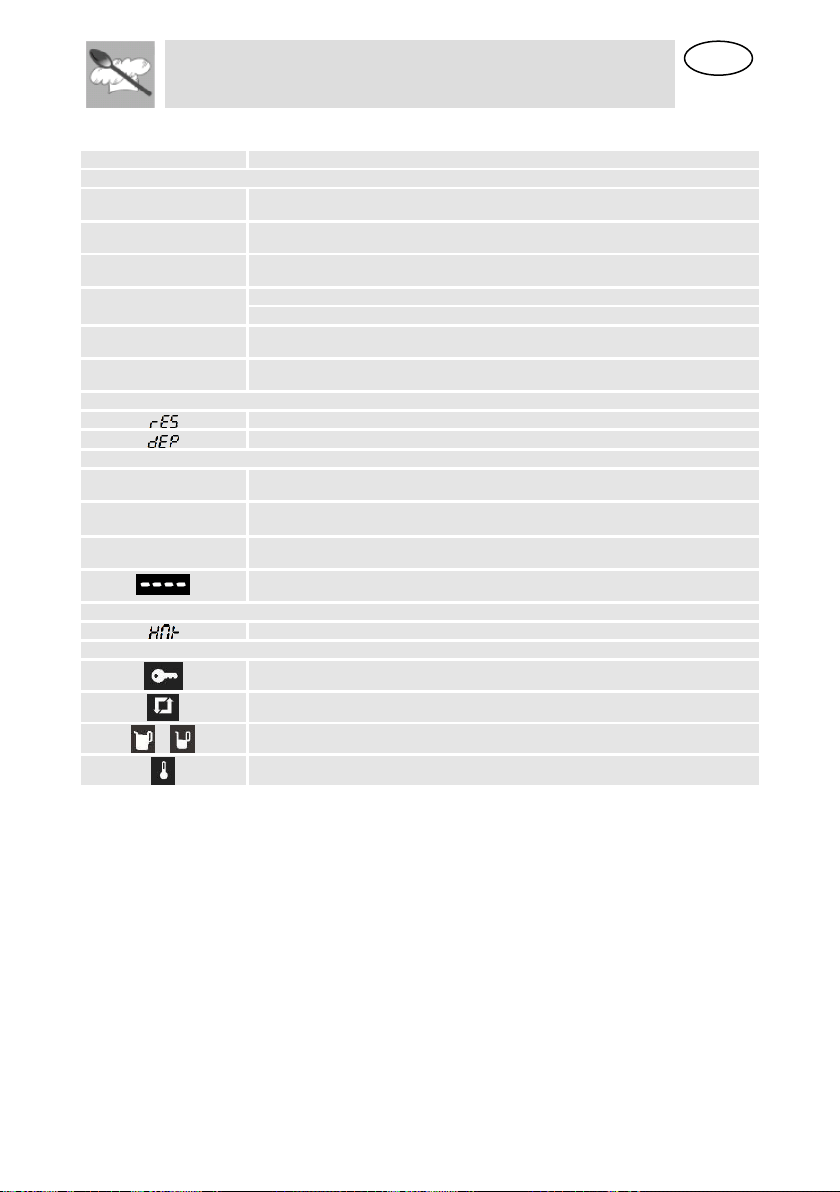
8.4 Display messages
DISPLAY
DESCRIPTION
DESCALING
SOFT
SOFT WATER.
med
MEDIUM WATER.
hard
HARD WATER.
CAL
APPLIANCE MUST BE DESCALED.
FLASHING – DESCALING STARTS.
0.5L
FEED 0.5 LITRE DESCALING SOLUTION INTO THE WATER TANK.
1.0L
FEED 1 LITRE COLD WATER INTO THE WATER TANK FOR RINSING.
WATER TANK
INDICATION THAT WATER TANK IS MISSING OR WRONGLY INSERTED
THE WATER TANK MUST BE REMOVED, EMPTIED AND REINSERTED.
STEAM REDUCTION AND WATER PUMPING
VAP
INDICATION THAT STEAM REDUCTION PROCESS IS ONGOING.
PUMP
INDICATION THAT COLD WATER IS ENTERING THE BOILER AND HOT
WATER IS BEING PUMPED TO THE WATER TANK.
FULL
THE WATER TANK MUST BE REMOVED, EMPTIED AND REINSERTED.
PERFORM WATER LEVEL CALIBRATION ( SEE 8.3.2)
SYSTEM WARNINGS
TEMPERATURE IN THE PCB IS TOO HIGH.
SYMBOLS
CHILD SAFETY LOCK-OUT FUNCTION
DESCALE FUNCTION
WATER LEVEL INDICATION
TEMPERATURE
8.5 Cooling fan system
The appliance is equipped with a cooling system which comes into
operation as soon as a cooking function starts.
Operation of the fans generates a normal air flow which comes out
above the door and may continue for a short time even after the oven
is switched off.
8.6 Inside light
The oven light comes on:
when the oven door is opened in standby status (point
“Operating settings”) or;
when the oven is working.
If the oven door is left open, the oven light will automatically shut-off after
10 minutes.

EN
Instructions for the User
28
9 RECOMMENDED COOKING TABLES: COOKING
WITH STEAM
For more detailed information about cooking refer to the following tables.
The suggested times and temperatures are guideline values. The actual
cooking time can vary according to the type and quality of the foods.
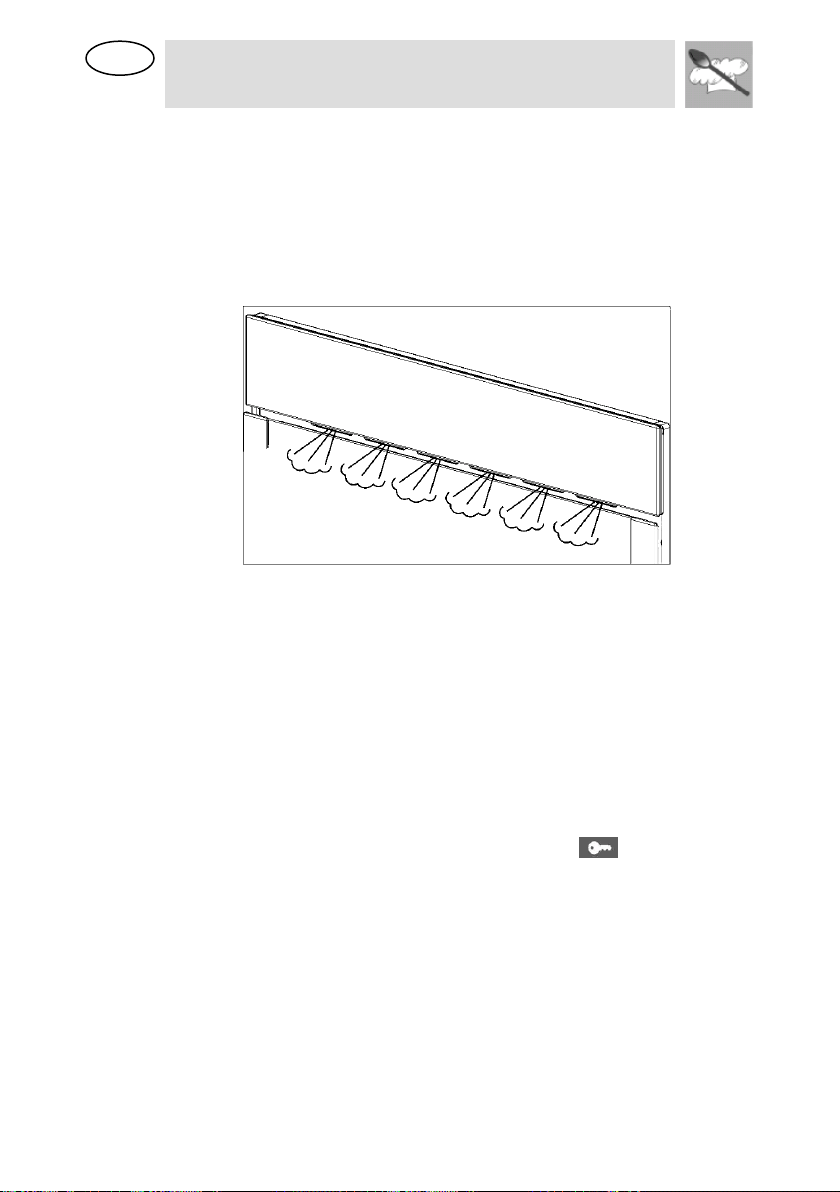
The levels indicated in the last column of the tables are explained in the
following picture.
The perforated container with the food should preferably be inserted into
the level 2. In this case it is important that the non-perforated container is
introduced into the level 1. This way, dripping liquids are collected and the
appliance does not get dirty.
Insert the rack, as described in the figure below.
To remove the rack, lift it upwards slightly at the front when the safety
notches connect with the sides of the oven (see figure).
We recommend using the rack together with the baking tray when cooking
items on the rack which might drip.
EN
Instructions for the User
29
9.1 Fish
FISH
QUANTITY
TEMPERATURE
(ºF)
TIME (MIN.)
CONTAINER
LEVEL
GILTHEAD SEA
BREAM
28.22 - 43.33 oz
175
30-40
PERFORATED
2
TROUT
4 x 8.82 oz
175
20-25
PERFORATED
2
SALMON FILET
17.64 – 35.27oz
175
15-25
PERFORATED
2
SALMON
TROUT
35.27 – 42.33 oz
175
25-35
PERFORATED
1/2
KING PRAWNS
17.64 – 35.27oz
175
15-20
PERFORATED
2
GREEN-SHELL
MUSSEL
35.27 – 52.9 oz
210
25-35
PERFORATED
2
HALIBUT FILET
17.64 – 35.27oz
175
20-25
PERFORATED
2
COCKLES
17.64 – 35.27oz
210
10-20
PERFORATED
2
LOBSTER
28.22 - 42.33 oz
210
25-30
PERFORATED
1/2
COD FILET
35.27 – 42.33 oz
175
20-25
PERFORATED
2
BLUE MUSSEL
35.27 – 42.33 oz
210
15-25
PERFORATED
2
LAKE TROUT
4 x 8.82 oz
175
25-30
PERFORATED
2
HADDOCK
35.27 – 42.33 oz
175
20-25
PERFORATED
2
TUNA FILET
17.64 – 35.27oz
175
15-20
PERFORATED
2
PIKE PERCH
4 x 8.82 oz
175
25-30
PERFORATED
2
9.2 Meat
MEAT
QUANTITY
TEMPERATURE
(ºF)
TIME (MIN.)
CONTAINER
LEVEL
CHICKEN LEG
4-10
210
40-45
PERFORATED
2
CHICKEN
BREAST
4-6
210
25-35
PERFORATED
2
SMOKED PORK
LOIN
17.64 –
35.27OZ
210
40-50
PERFORATED
2
TURKEY
ESCALOPE
4-8
210
20-25
PERFORATED
2
PORK FILET,
WHOLE
4-8
210
20-30
PERFORATED
2
SAUSAGES
175-210
10-15
PERFORATED
2
9.3 Eggs
EGGS
TEMPERATURE (ºF)
TIME (MIN.)
CONTAINER
LEVEL
EGGS IN GLASS
210
10-15
RACK
2
EGGS, HARD
210
15
RACK
2
EGGS, SOFT
210
10-12
RACK
2
9.4 Side dishes
SIDE DISHES
QUANTITY
TEMPERATURE
(ºF)
TIME (MIN.)
CONTAINER
LEVEL
PEARL BARLEY +
LIQUID
7.05oz + 13.53 fl oz
210
30-35
RACK,
2
SEMOLINA +
LIQUID
7.05oz + 10.14 fl oz
210
10-20
RACK
2
LENTILS +
LIQUID
7.05oz + 12.68 fl oz
210
20-50
RACK
2
RICE + LIQUID
7.05oz + 8.45 fl oz
210
25-40
RACK
2

EN
Instructions for the User
30
9.5 Vegetables
VEGETABLES
TEMPERATURE
(ºF)
TIME (MIN.)
CONTAINER
LEVEL
EGGPLANT/AUB
ERGINE
IN SLICES
210
15-20
PERFORATED
2
BEANS
210
35-45
PERFORATED
2
BROCCOLI
FLORETS WITH
STALK
210
25-30
PERFORATED
2
BROCCOLI
FLORETS
WITHOUT STALK
210
15-20
PERFORATED
2
CAULIFLOWER
FLORETS
210
25-30
PERFORATED
2
CAULIFLOWER
WHOLE HEAD
210
40-45
PERFORATED
1
PEAS
210
30-35
PERFORATED
2
FENNEL
IN STRIPES
210
15-20
PERFORATED
2
FENNEL
CUT IN HALF
210
20-30
PERFORATED
2
POTATOES
WITH SKIN
WHOLE, VERY
SMALL
210
20-25
PERFORATED
2
POTATOES
WITH SKIN
WHOLE, VERY
BIG
210
45-50
PERFORATED
2
POTATOES
WITHOUT SKIN
IN PIECES
210
20-25
PERFORATED
2
TURNIP
IN STICKS
210
20-25
PERFORATED
2
SNOW PEAS
210
15-20
PERFORATED
2
CARROTS
IN SLICES
210
25-30
PERFORATED
2
CORN COBS
210
50-60
PERFORATED
2
BELL PEPPERS
IN STRIPES
210
12-15
PERFORATED
2
HOT PEPPER
210
12-15
PERFORATED
2
MUSHROOMS
IN QUARTERS
210
12-15
PERFORATED
2
LEEKS
IN SLICES
210
10-12
PERFORATED
2
BRUSSELS
SPROUTS
210
25-35
PERFORATED
2
CELERY
IN STRIPES
210
15-20
PERFORATED
2
ASPARAGUS
210
20-35
PERFORATED
2
SPINACH
210
12-15
PERFORATED
2
CELERY
STALKS
210
25-30
PERFORATED
2
COURGETTE
IN SLICES
210
12-18
PERFORATED
2
9.6 Dumplings
DUMPLINGS
TEMPERATURE (ºF)
TIME (MIN.)
CONTAINER
LEVEL
SWEET DUMPLING
210
20-30
NOT PERFORATED
2
SWEET YEAST
DUMPLING
210
15-20
NOT PERFORATED
2
YEAST DUMPLING
210
15-25
NOT PERFORATED
2
BREAD DUMPLING
210
20-25
NOT PERFORATED
2
NAPKIN DUMPLING
210
25-30
NOT PERFORATED
2

EN
Instructions for the User
31
9.7 Desserts
DESSERTS
QUANTITY
TEMPERATURE
(ºF)
TIME
(MIN.)
CONTAINER
LEVEL
STEWED APPLES
17.64 - 52.9 oz
210
15-25
NOT PERFORATED
2
STEWED PEARS
17.64 - 52.9 oz
210
25-30
NOT PERFORATED
2
CRÈME BRÛLÉE
--
175
20-25
RACK
2
CRÈME CARAMEL
--
175
25-30
RACK
2
YOGURT
--
105
4-6 HRS.
RACK
2
STEWED PEACHES
17.64 - 52.9 oz
210
15-20
NOT PERFORATED
2
9.8 Fruit (Sterilising / Boiling down)
FRUIT
QUANTITY
TEMPERATURE
(ºF)
TIME
(MIN.)
CONTAINER
LEVEL
PEARS
4-6 4 fl.oz. glasses
210
30-35
RACK
1
CHERRIES
4-6 4 fl.oz. glasses
210
30-35
RACK
1
PEACHES
4-6 4 fl.oz. glasses
175
30-35
RACK
1
PLUMS
4-6 4 fl.oz. glasses
175
30-35
RACK
1
9.9 Regenerate
WARMING-UP
QUANTITY
TEMPERATURE
(ºF)
TIME
(MIN.)
CONTAINER
LEVEL
PLATE DISHES
1-2
210
12-15
RACK
2
PLATE DISHES
3-4
210
15-20
RACK
2
READY-MADE MEALS
210
15-20
RACK
2
9.10 Blanch
VEGETABLES
QUANTITY
TEMPERATURE
(ºF)
TIME
(MIN.)
CONTAINER
LEVEL
E.G. BEANS, LEEK
210
10-12
PERFORATED
2
CURLY KALE
35.27 – 42.33
oz
210
12-16
PERFORATED
2
SAVOY CABBAGE
10-20
210
12-15
PERFORATED
2
WHITE CABBAGE,
WHOLE
70.55 -88.18
oz
210
30-45
PERFORATED
1
TOMATOES, PEELED
175
12
RACK
2

EN
Instructions for the User
32
9.11 Defrost
VEGETABLES / SIDE DISH
TEMPERATURE
(ºF)
TIME (MIN.)
CONTAINER
LEVEL
BROCCOLI
FLORETS WITH
STALK
210
15-20
PERFORATED
2
MIXED
VEGETABLES
210
15-20
PERFORATED
2
SPINACH
LEAVES
PORTIONS
210
10-15
NOT PERFORATED
2
CAULIFLOWER
FLORETS
210
15-20
PERFORATED
2
PEAS
210
15-25
PERFORATED
2
CURLY KALE
BIGGER
PORTION
210
25-35
NOT PERFORATED
2
CARROTS
IN SLICES
210
15-20
PERFORATED
2
BRUSSELS
SPROUTS
210
20-25
PERFORATED
2
ASPARAGU
210
25-30
PERFORATED
2
READY-MADE
MEALS
210
AS
REQUIRED
RACK
2
BREAD
210
10-25
RACK
2
RICE
210
15-25
NOT PERFORATED
2
LENTILS
210
15-20
NOT PERFORATED
2
NOODLES
210
15-20
NOT PERFORATED
2
9.12 Two level cooking
Some suggestions:
When cooking with two levels the accessories should be always inserted
in the 2nd or 3rd level and in the 1st level.
Different cooking times are controlled this way:
Foods that need a longer cooking time should be placed in the upper area
of the oven. Foods with a shorter cooking time should be placed on the 1st
level.
One example: Vegetables, potatoes and fish.
Place the vegetables and potatoes in any suitable container on the rack
inserted in the 2nd or 3rd level.
Insert the fish in the 1st level.
When using the perforated tray to cook fish, the non-perforated tray must
be inserted in the bottom of the appliance to collect liquid dripping from the
fish. This way the appliance is kept clean.
Time: Vegetables and potatoes 25-35 Min.
Time: Fish – depending on type – 15-25 Min.
Select the longest cooking time. Because of the different levels the food is
ready at the same time, without any over cooking.

EN
Instructions for the User
33
10 COOKING WITH THE GRILL
For good results with the grill, use the grid iron supplied with the oven.
Fit the grid iron in such a way that it doesn’t come into contact with
the metal surfaces of the oven cavity since if it does there is a danger
of electric arcing which may damage the oven.
IMPORTANT POINTS:
1. When the microwave grill is used for the first time there will be some
smoke and a smell coming from the oils used during oven
manufacture.
2. The oven door window becomes very hot when the grill is working.
Keep children away.
3. When the grill is operating, the cavity walls and the grid iron become
very hot. You should use oven gloves.
4. If the grill is used for extended period of time it is normal to find that
the elements will switch themselves off temporarily due to the safety
thermostat.
5. Important! When food is to be grilled or cooked in containers you
must check that the container in question is suitable for microwave
use. See the section on types of ovenware!
6. When the grill is used it is possible that some splashes of fat may go
onto the elements and be burnt. This is a normal situation and does
not mean there is any kind of operating fault.
7. After you have finished cooking, clean the interior and the
accessories so that cooking remains do not become encrusted.
FISH
QUANTITY (OZ)
TIME (MIN.)
INSTRUCTIONS
VIS
BASS
SARDINES
28.22
6-8 FISH.
18-24
15-20
SPREAD LIGHTLY WITH BUTTER. AFTER HALF
OF COOKING TIME TURN AND SPREAD WITH
SEASONING.
MEAT
SAUSAGES
6-8 UNITS
22-26
PRICK AFTER HALF COOKING TIME AND TURN.
FROZEN HAMBURGERS
3 UNITS
18-20
TURN 2X OR 3X
SPARE RIB (APPROX. 3
CM THICK)
14.11
25-30
AFTER HALF OF COOKING TIME, BASTE AND
TURN.
OTHERS
TOAST
4 UNITS
1½-3
WATCH TOASTING. TURN
TOASTED SANDWICHES
2 UNITS
5-10
WATCH TOASTING.
Heat up the grill beforehand for 2 minutes. Unless indicated otherwise, use
the grid iron. Place the grid on a bowl so that the water and the fat can
drop. The times shown are merely indicative and can vary as a function of
the composition and quantity of the food, as well as the final condition
wished for. Fish and meat taste great if, before grilling, you brush them
with vegetable oil, spices and herbs and leave to marinate for a few hours.
Only add salt after grilling.
Sausages will not burst if you prick them with a fork before grilling.

EN
Instructions for the User
34
After half the grilling time has passed, check on how the cooking is going
and, if necessary, turn the food over.
The grill is especially suitable for cooking thin portions of meat and fish.
Thin portions of meat only need to be turned once, but thicker portions
should be turned several times.
11 COOKING WITH HOT AIR
11.1 Roasting
TYPE
QUANTITY
(OZ)
POWER
(WATT)
TEMPERA
TURE ºF
TIME
(MIN)
STANDING
TIME (MIN)
COMMENTS
BEEF STEW
35.27
200
320/338
80/90
10
DO NOT PUT LID ON
CONTAINER
PORK LOIN
17.64/21.16
200
356/374
35/40
10
DO NOT PUT LID ON
CONTAINER
WHOLE
CHICKEN
35.27/42.33
400
392
30/40
10
PUT LID ON CONTAINER.
BREAST FACING
UPWARDS. DO NOT TURN.
CHICKEN
PORTIONS
28.22
400
392
25/35
10
DO NOT PUT LID ON
CONTAINER. ARRANGE
PORTIONS WITH SKIN
FACING UPWARDS. DO
NOT TURN.
DUCK
52.91/59.97
200
392
70/80
10
PUT LID ON CONTAINER.
DO NOT TURN.
11.1.1 Advice for roasting meat
Turn the pieces of meat halfway through the cooking time. When the
roasted meat is ready you should let it stand for 10 minutes in the oven
with this switched off and closed. This will ensure the juices in the meat
are well distributed.
Add 2 to 3 soup spoons of gravy or similar liquid to lean meat and 8 to 10
soup spoons to stews, depending on the amount of meat in question.
The roasting temperature and time required depends on the type and
amount of meat being cooked.
If the weight of the meat to be roasted does not appear on the table
choose the settings for the weight immediately below and extend the
cooking times.
11.1.2 Advice on ovenware
Check that the ovenware fits inside the oven.
Hot glass containers should be put on a dry kitchen cloth. If such
containers are put on a cold or wet surface the glass may crack and break.
Use oven gloves to take the ovenware out of the oven.

EN
Instructions for the User
35
11.2 Cakes
TYPE
CONTAINER
LEVEL
TEMPERATURE (ºF)
TIME (MIN)
WALNUT CAKE
SPRING-FORM
TYPE TIN
1
228/356
30/35
FRUIT TART
SPRING-FORM
TYPE TIN
2
302/320
35/45
FRUIT CAKES
CAKE TIN WITH
CENTRAL HOLE
1
338/374
30/45
SAVOURY TARTS
SPRING-FORM
TYPE TIN
2
320/356
50/70
SIMPLE CAKE
(SPONGE CAKE)
SPRING-FORM
TYPE TIN
1
320/338
40/45
11.2.1 Tips over de bakvormen
The most commonly used type of baking ware is black metal tins.
11.2.2 Advice on how to bake cakes
Different amounts and types of pastry require different temperatures and
baking times. Try low settings first of all and then, if necessary, use higher
temperatures next time. A lower temperature will result in more uniform
baking. Always put the cake tray in the centre of the turntable.
11.2.3 Baking suggestions
11.2.4 How to check if the cake is properly cooked
Start sticking a tooth pick in the highest part of the cake 10 minutes before
the end of the baking time. When no dough sticks to the tooth pick the
cake is ready.
11.2.5 If the cake is very dark on the outside
Next time choose a lower temperature and let the cake bake for a longer
time.
11.2.6 If the cake is very dry
Make small holes in the cake with a tooth pick after baking has finished.
Then sprinkle the cake with some fruit juice or alcoholic drink. Next time
increase the temperature by about 10º and reduce the baking time.
11.2.7 If the cake does not come free when turned
Let the cake cool down for 5 to 10 minutes after baking and it will come
out of the tin more easily. If the cake still does not come free run a knife
carefully around the edges. Next time grease the cake tin well.

EN
Instructions for the User
36
12 CARE AND MAINTENANCE
12.1 Descaling
Whenever steam is produced, irrespective of the hardness of the local
water supply (i.e. the limescale content of the water), limescale is
deposited inside the steam generator.
The time interval between descaling depends on the hardness of the water
and frequency of use. If steaming 4×30 minutes per week, the appliance
must be descaled (depending on water hardness) roughly as follows:
WATER HARDNESS
LEVEL NO.
DESCALE AFTER ABOUT
VERY SOFT
SOFT
18 MONTHS
MEDIUM
MED
9 MONTHS
VERY HARD
HARD
6 MONTHS
The appliance automatically detects when descaling is necessary and
when this happens the Descale light turn on. If the Descaling procedure is
not performed, some cooking cycles after the Descale light starts to flash.
If once again the Descaling procedure is not performed, some cooking
cycles after the oven functioning is blocked, the Descale light stays on and
the display shows “CAL” blinking. The oven keep being blocked until the
descale procedure is performed
To run a descale cycle proceed as described in 10.3.2 Descale
function.
IMPORTANT NOTE: Failure to descale the appliance will likely impair
the functioning of or cause damage to the appliance.
12.2 Suitable descaling solutions
For descaling use suitable solution, as “durgol®” or liquid coffee machine
descaling solutions for example. Solutions containing foam agents are not
appropriate.
Warning! Do not use vinegar or vinegar-based products as they can
cause damage to the oven’s internal circuit.
12.3 Descaling Process
Please see point 9.3.4
12.4 Cleaning the oven
The steam oven cavity and front surface must be cleaned after each use.
All food remains and condensed water must be removed (see section on
Oven Cleaning). If the steam oven is not kept clean its surface may
deteriorate and this may shorten the oven’s working life.
For ease of cleaning, the shelf guides can be removed (see the following
chapter).
IMPORTANT NOTE: Don’t wash the water tank in the dishwasher
machine.
EN
Instructions for the User
37
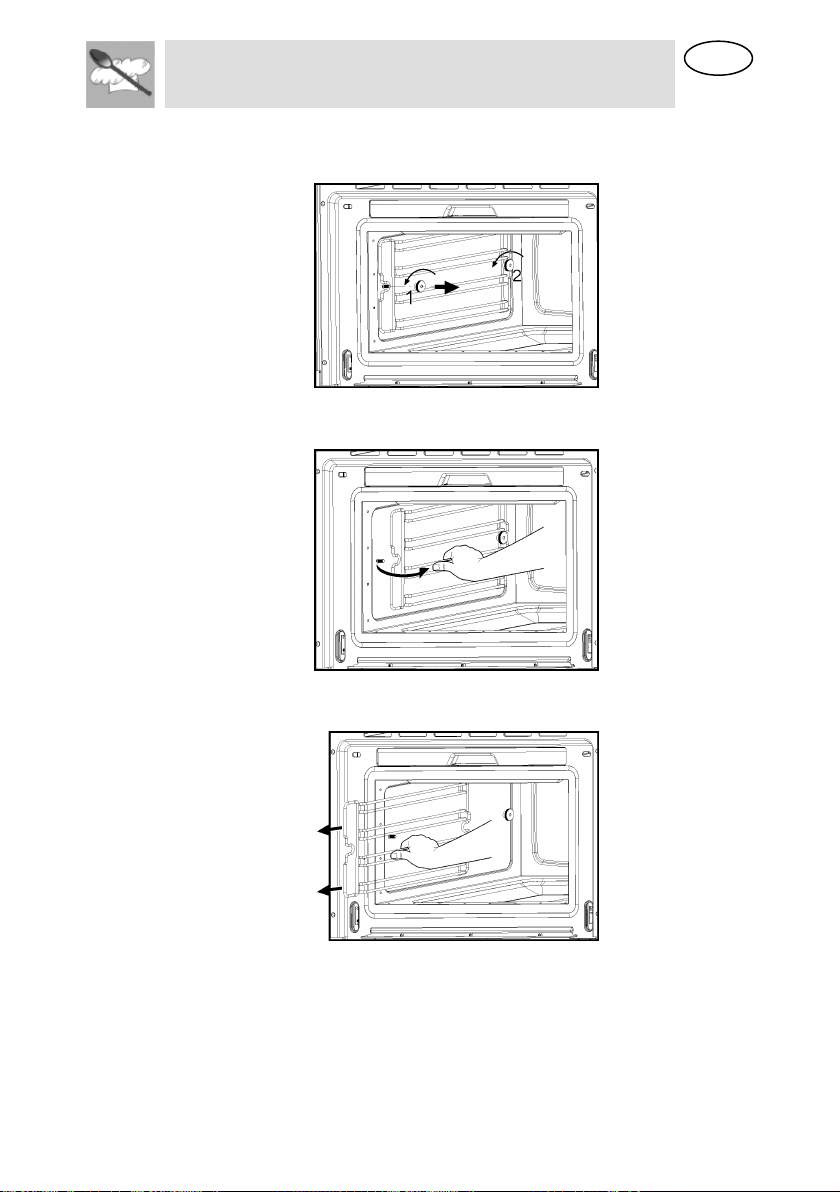
12.5 Removing the shelf guides
1. Unscrew and remove the knurled nuts 1 in the front of the shelf
guides in an anti-clockwise direction.
2. Unscrew and loosen the knurled nuts 2 in the back of the shelf guides
in an anti-clockwise direction. Do not completely remove these nuts.
3. Pull the shelf guides to the inside of the cavity and remove from the
front.
To put them back, insert the shelf guides into the knurled nuts 2 in the
back and position on the screws in the front.
Screw the knurled nuts 1 and 2 in a clockwise direction till tight.
EN
Instructions for the User
38
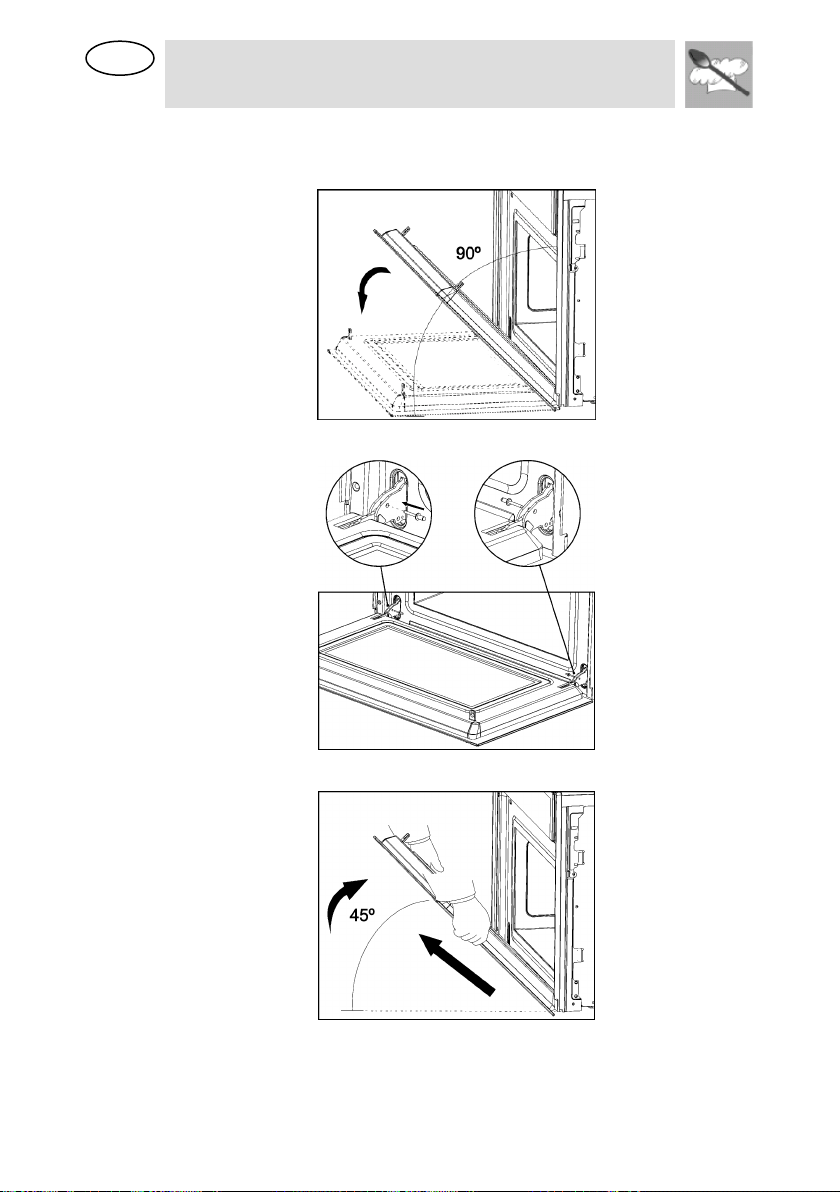
12.6 Removing the appliance door
1. Open the appliance door as far as it will go.
2. Insert 2 pins inside the holes in the hinges.
3. Close the appliance door just enough that it can be lifted out.
4. To reassemble, push the hinges into the holes from the front.
5. Open the appliance door as far as it will go and remove the pins.
EN
Instructions for the User
39
13 OVEN CLEANING
Warning! Cleaning should be done with the oven power switched off.
Take the plug out of the socket or switch off the oven’s power circuit.
Warning! Do not use aggressive or abrasive cleaning products, scourers
that scratch surfaces or sharp objects, since stains may appear. To clean
stainless steel parts, please use suitable detergent which does not contain
abrasive or acid substances or chlorine.
Warning! Never use high pressure or steam jet cleaning appliances.
13.1 Front surface
Normally you just need to clean the oven with a damp cloth. If it is very
dirty, add a few drops of dishwashing liquid to the cleaning water.
Afterwards, wipe the oven with a dry cloth.
In an oven with a finger print proof treatment front, use a mild glass
cleaning product and a soft cloth that does not release any fibres or
threads. Wipe from side to side without exerting any pressure on the
surface.
Immediately remove limescale, fat, starch or egg white stains. Corrosion
can occur under these stains.
Do not let any water get inside the oven.
13.2 Oven interior
After use, remove any water on the bottom of the cooking space with a
soft cloth. Leave the appliance door open so that the cooking space can
cool down.
To remove dirt that is harder to shift, use a non-aggressive cleaning
product. Do not use oven sprays or other aggressive or abrasive
cleaning products.
Always keep the door and the oven front very clean to ensure that
the door opens and closes properly.
Make sure water does not enter the oven ventilation holes.
The glass lamp cover is located on the oven ceiling and can be removed
easily for cleaning. For this you just need to unscrew it and clean it with
water and dishwashing liquid.
13.3 Accessories
Clean the accessories after each use. If they are very dirty, soak them first of
all and then use a brush and sponge. The accessories can be washed in a
dish washing machine except the water tank.

EN
Instructions for the User
40
14 EXTRAORDINARY MAINTENANCE
Occasionally, the oven will require minor servicing procedures or the
replacement of parts subject to wear and tear, such as gaskets, light bulbs,
etc. The specific operations for each procedure of this kind are provided below.
Before carrying out any operation involving access to live parts, disconnect the
appliance from the electricity supply.
14.1 What should I do if the oven doesn’t work?
WARNING! Any type of repair must only be done by a specialised
technician. Any repair done by a person not authorised by the
manufacturer is dangerous.
You do not need to contact Technical Assistance to resolve the following
questions.
Failure description
Solution
The display is not
showing!
- The time indication has been switched off (see
section on Operating Settings).
Nothing happens when
I press the keys!
- The Safety Block is active (see section on
Child Safety Lock-out function).
The oven does not
work!
- Check if the plug is correctly fitted in the
socket.
- Check if the oven power is switched on.
When the oven is
operating I can hear
some strange noises!
- It has to do with the operating noises that can
occur during the cooking process, e.g, by the
water pumps in the steam generator.
- The steam inside the cavity produces a
pressure build-up and sometimes the cavity
walls may produce noise when they react to the
pressure.
- These noises are normal, there is no problem.
The food doesn’t heat
up or heats very
slowly!
- You have selected the correct operating times
and temperature setting.
- The food you have put inside the oven is a
larger amount or colder than you usually put in.
The message “Err_”
appears in the display
- Please contact the Customer Care.
The appliance still
makes a noise after
the cooking process is
finished!
This is not a problem. The cooling fan keeps on
working for some time. When the temperature
has dropped sufficiently, the fan will switch itself
off.
The oven switches on
but the interior light
does not go on!
If all the functions work properly it is probable
that the lamp has blown. You can keep on using
the oven.
Display shows
Perform water level calibration (see 8.3.2)
EN
Instructions for the User
41
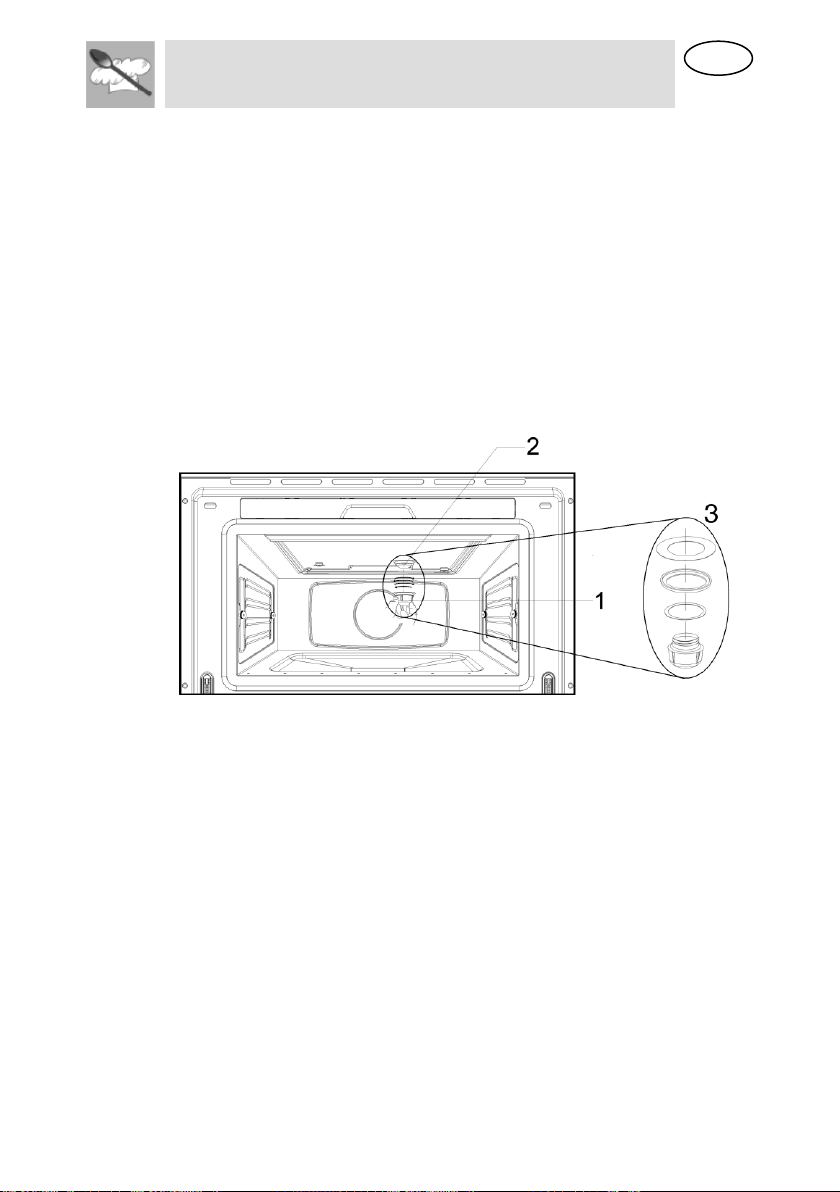
14.2 Replacing the light bulb
WARNING: Ensure that the appliance is switched off before replacing the
lamp to avoid the possibility of electric shock.
To replace the light bulb, proceed as follows:
Disconnect the oven from the power supply. Take the plug out
of the socket or switch off the oven’s power circuit.
Unscrew and remove the glass light cover (1).
Remove the light bulb (2). Warning! The bulb may be very hot.
Fit a new E14 230-240V/15W bulb. Follow the lamp manufacturer’s
instructions. IMPORTANT NOTE: Make sure that the sealing rings (3)
are applied in the correct sequence.
Screw the glass light cover into place (1).
Connect the oven again to the power supply.

Disposal Instructions
EN
EN
42
15 DISPOSAL INSTRUCTIONS -
OUR ENVIRONMENT POLICY
BY ENSURING THIS PRODUCT IS DISPOSED OF CORRECTLY, YOU WILL
HELP PREVENT
POTENTIAL NEGATIVE CONSEQUENCES FOR THE ENVIRONMENT AND
HUMAN HEALTH, WHICH COULD OTHERWISE BE CAUSED BY
INAPPROPRIATE WASTE HANDLING OF THIS PRODUCT. THE SYMBOL ON
THE PRODUCT INDICATES THAT THIS PRODUCT MAY NOT BE TREATED AS
HOUSEHOLD WASTE. INSTEAD IT SHALL BE HANDED OVER TO THE
APPLICABLE COLLECTION POINT FOR THE RECYCLING OF ELECTRICAL
AND ELECTRONIC EQUIPMENT.
DISPOSAL MUST BE CARRIED OUT IN ACCORDANCE WITH LOCAL
ENVIRONMENTAL REGULATIONS FOR WASTE DISPOSAL. FOR MORE
DETAILED INFORMATION ABOUT TREATMENT, RECOVERY AND RECYCLING
OF THIS PRODUCT, PLEASE CONTACT YOUR LOCAL CITY COUNCIL OFFICE.

Instructions for the Installer
EN
44
16 BEFORE INSTALLATION
Check that the input voltage indicated on the rating
plate is the same as the voltage of the power outlet you
are going to use. The rating plate is located on the front
part of the cavity and it is only visible after opening the
door.
If required by the National Electrical Code (or Canadian
Electrical Code), this appliance must be installed on a
separate branch circuit.
Installer – show the owner the location of the circuit
breaker or fuse. Mark it for easy reference.
Before installing, turn power OFF at the service panel.
Lock service panel to prevent power from being turned
ON accidentally.
Be sure your appliance is properly installed and
grounded by a qualified technician. Installation,
electrical connections and grounding must comply with
all applicable codes.
Open the oven door and take out all the accessories
and remove the packing material.
Do not remove the mica cover on the ceiling of the
interior! This cover stops fat and pieces of food
damaging the microwave generator.
Warning! The front surface of the oven may be
wrapped with a protective film. Before using the oven
for the first time, carefully remove this film, starting on
the inside.
Make sure that the oven is not damaged in any way.
Check that the oven door closes correctly and that the
interior of the door and the front of the oven opening are
not damaged. If you find any damage contact the
Technical Assistance Service.
DO NOT USE THE OVEN if the metal conduit is
damaged, if the oven does not function correctly or if it

Instructions for the Installer
EN
43
has been damaged or dropped. Contact the Technical
Assistance Service.
Place the oven on a flat and stable surface. The oven
must not be put close to any sources of heat, radios or
televisions.
16.1 Electrical supply
Before installing the oven have a qualified electrician
verify that your home is provided with adequate
electrical service and that the addition of the oven will
not overload the branch circuit on which it is to be
installed.
A separate three-wire or four-wire single phase, 240
Volt, 60 Hz, branch circuit is required.
For hook-up of the oven you will need to have an
approved junction box installed where it will be easily
reached through the front of the cabinet where the oven
will be located. The oven has 3 feet of conduit.
Allow two to three feet of slack in the line so that the
oven can be moved if servicing is ever necessary.
DO NOT shorten the flexible conduit.
16.2 Wiring requirements
When making the wire connections, use the entire
length of the conduit provided (3 feet). The conduit must
not be cut.
Before making connections make sure the power is off
and read and observe the following:
1. A separate three-wire or four-wire, single phase, 240 Volt, 60 Hz branch
circuit is required for the oven.
2. The oven must be connected with Copper or Aluminum wire.
3. In the United States:
Wiring must conform to the National Electrical Code, ANSI/NFPA No.
7 latest edition. You can obtain a copy of the National Electrical Code
by writing to: National Fire Protection Association Batterymarch Park
Quincy, MA 02269

Instructions for the Installer
EN
EN
45
In Canada:
Wiring must conform to Cana dian Electrical Code C22.1- latest
edition. You can obtain a copy of the Canadian Electrical Code by
writing to: Canadian Standards Association 178 Rexdale Boulevard
Rexdale (Toronto), Ontario, Canada M9W 1R3
4. Wire size (Copper or Aluminum wire) and connections must be suitable for
the rating of the appliance as per the National Electrical Code requirements.
The flexible armoured cable extending from the oven should be connected
directly to the junction box.
5. The junction box should be located so as to allow as much slack as possible
between the junction box and the oven so it can be moved if servicing is
ever required.
6. A U.L. listed conduit connector must be provided at each end of the power
supply cable.
16.3 Electrical connections
Be sure your appliance is properly installed and
grounded by a qualified technician. Ask your dealer
to recommend a qualified technician or an
authorized repair service.
This appliance is manufactured with a green GROUND
wire connected to the oven chassis. After making sure
that the power has been turned off, connect the flexible
conduit from the oven to the junction box using a U.L.
listed conduit connector. The figures and the
instructions provided below present the most common
way of connecting the ovens.
Your local codes and ordinances, of course, take
precedence over these instructions.
WARNING” Risk of Electric Shock, frame grounded
to neutral of appliance through a link.
Grounding through the neutral conductor is prohibited
for new branch-circuit installations (1996 NEC); mobile
homes; and recreational vehicles, or in an area where
local codes prohibit grounding through the neutral
conductor. For installations where grounding through
the neutral conductor is prohibited:
Disconnect the ground from the neutral at free end of conduit;
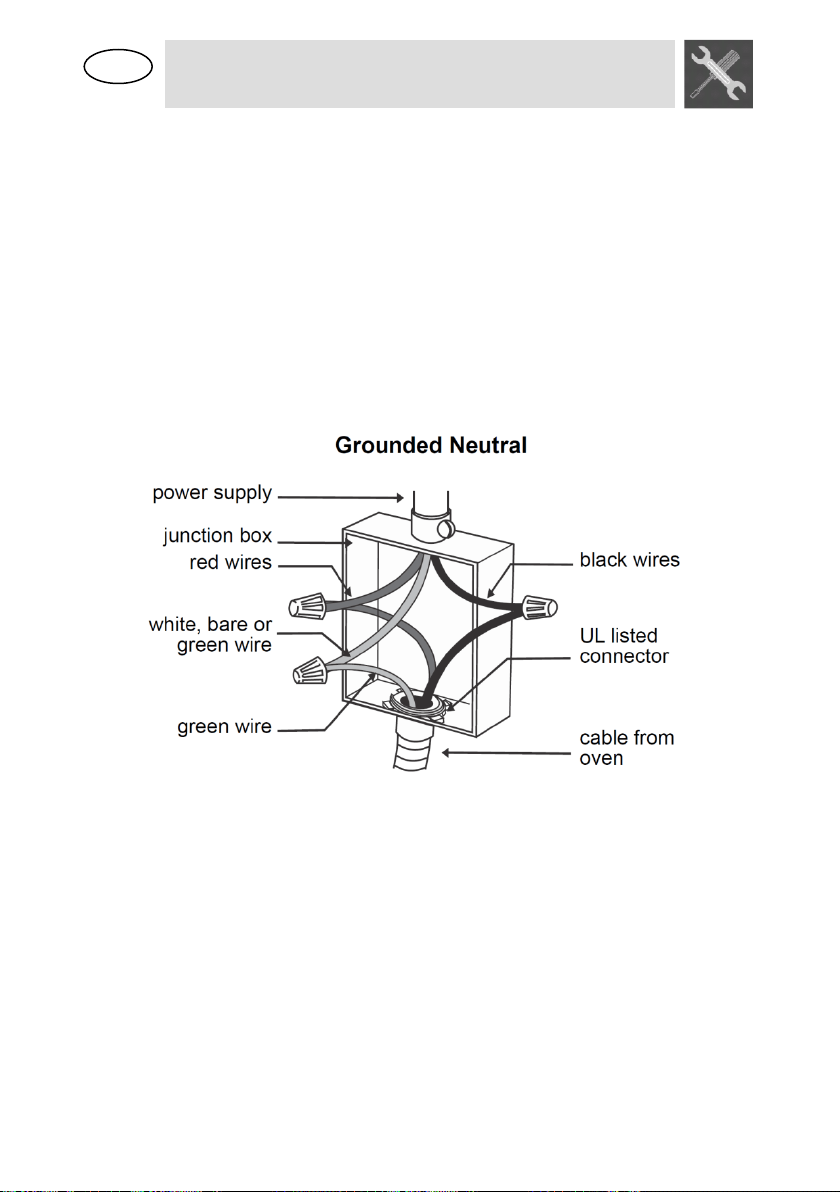
Instructions for the Installer
EN
47
Use grounding terminal or lead to ground unit; and
Connect neutral terminal or lead to branch circuit neutral in usual manner.
16.4 3-Wire branch circuit (for US only)
Refer to the following Figure, where local codes allow
the connection of GROUND wire from the oven to the
branch circuit NEUTRAL wire (gray or white colored
wire):
If local codes permit, connect the green GROUND wire from the oven and
the white wire from the oven to the branch circuit NEUTRAL wire (gray or
white colored wire).
Connect the red and black leads from the oven to the corresponding leads in
the junction box.
16.5 4-Wire branch circuit (for US and CANADA)
Refer to the following Figure:
Disconnect ground from neutral at free end of conduit.
Connect the green GROUND wire from the oven to the GROUND wire in the
junction box (bare or green colored wire).
Connect the red and black leads from the oven to the corresponding leads in
the junction box.

Instructions for the Installer
EN
48
16.6 After installation
The oven only functions when the door is closed
correctly.
After the first use, clean the inside of the oven and the
accessories, following the cleaning instructions given in
the section “Oven cleaning and maintenance”.
17 POSITIONING THE OVEN
The appliance is designed for building-in to cabinets made from any heat-
resistant material. Comply with the dimensions shown in following pictures.
When installing in tall units bear in mind that the top/rear of the unit must
have an opening 3,94’’ deep.

Instructions for the Installer
EN
49
Screw the 4 screws into the inside of the frame.
The manufacturer reserves the right to make any changes deemed useful for
improvement of his products without prior notice. The illustrations and description
contained in this manual are therefore not binding and are merely indicative