In this section, we will explain the display and controls.You will also find out about the various functions of your appliance.
Note: Depending on the appliance model, individual details and colours may differ.
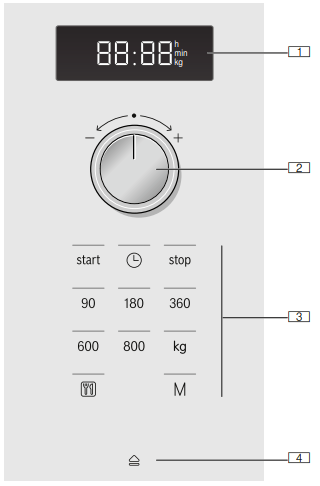
Control panel
You can set your appliance's various functions on the control panel. The current settings are shown on the display.
The overview shows the control panel when the appliance is switched on with a clock time that has been set.
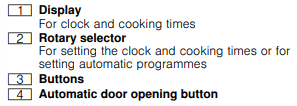
Controls
You will find a brief explanation of the various buttons below. These buttons allow you to set your appliance simply and directly.
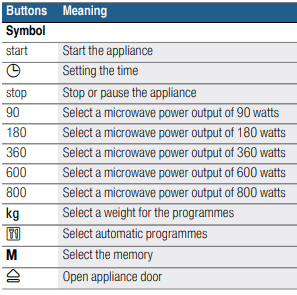
Buttons and their meaning
You will find a brief explanation of the various buttons below.
Rotary selector
The rotary selector is used to alter the default values and set values.
The rotary selector is retractable. Press on the rotary selector to lock it in or out.
Automatic door opening
The appliance door springs open if you activate the automatic door opening. You can fully open the appliance door manually.
The automatic door opening does not work in the event of a power cut. You can open the door manually.
Notes
If you open the appliance door during operation, the operation is paused.
When you close the appliance door, the operation does not continue automatically. You must restart the operation manually.
If the appliance has been switched off for a long time, the appliance door will open after a time delay.
Cooling fan
The appliance is equipped with a cooling fan. The fan may run on even if the oven has been switched off.
Notes
The cooking compartment remains cold during microwave operation. The cooling fan will still switch on. The fan may run on even when microwave operation has ended.
Condensation may appear on the door window, interior walls and floor. This is normal and does not adversely affect microwave operation. Wipe away the condensation after cooking.
Changing the signal duration
You will hear a signal when the appliance is switched off. You can change the duration of the acoustic signal.
Press the "start" button for approx. 6 seconds.
The new signal duration is adopted.
The clock reappears.
The following are possible:
Short signal duration - 3 tones
Long signal duration - 30 tones.
Before using for the first time
This section tells you what you need to do before using your microwave to prepare food for the first time. Read the section entitled "Safety information" beforehand. → "Important safety information" on page 4
Before you can use your new appliance, you will need to put the turntable in place correctly. You must also clean the cooking compartment and accessories.
Cleaning the cooking compartment and putting the turntable in place
Before using the appliance to prepare food for the first time, you must clean the cooking compartment and accessories.
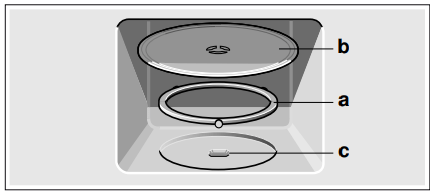
How to put the turntable in place
Place the roller ring a into the recess in the cooking compartment.
Make sure that the turntable b engages in the drive c in the centre of the cooking compartment floor.
Note: Never use the appliance without the turntable. Make sure that it is properly engaged.The turntable can turn clockwise or anti-clockwise.
Setting the clock
When the appliance is first connected or after a power cut, three zeros will appear in the display panel.
Press the button. œ appears in the display and the indicator lamp above the button lights up.
Set the clock using the rotary selector.
Press the button again.
The current time is set.
Hiding the clock
Press the button and then press Stop.
The display is blank.
Resetting the clock
Press the button.
"12:00" appears in the display. Make settings as detailed in points 2 and 3.
Change the clock, e.g. from summer to winter time
Set as described in point 1 to 3.
Cleaning the cooking compartment and accessories
To eliminate the new-appliance smell, wipe down the cooking compartment with hot soapy water when it is empty→ "Cleaning" on page 14
Microwave
You can use the microwave to cook, heat up or defrost food quickly.
To ensure optimum use of the microwave, please observe the notes on cookware and familiarise yourself with the data in the application tables at the end of the instruction manual. → "Tested for you in our cooking studio" on page 17
Try out the microwave straight away. You could heat up a cup of water for your tea, for example.
Use a large cup without any decorative gold or silver trim and place a teaspoon in it. Place the cup containing the water somewhat eccentrically on the turntable.
Press the 800 W button.
Use the rotary knob to set 1:30 minutes.
Press the "Start" button.
After 1 minute 30 seconds, a signal sounds. The water is hot.
Warning – Risk of scalding!
There is a possibility of delayed boiling when a liquid is heated. This means that the liquid reaches boiling temperature without the usual steam bubbles rising to the surface. Even if the container only vibrates a little, the hot liquid may suddenly boil over and spatter. When heating, always place a spoon in the container. This will prevent delayed boiling.
Cookware
Not all cookware is microwavable. So that your food is heated and the appliance is not damaged, only use microwavable cookware.
Suitable cookware
Heat-resistant cookware made of glass, glass ceramic, porcelain, ceramic or heat-resistant plastic are suitable. These materials allow microwaves to pass through.
Tip: Make sure that there is no leftover packaging, such as polystyrene pellets, in the cooking compartment. Wipe the smooth surfaces in the cooking compartment with a soft, damp cloth.
Cleaning the accessories
Clean the accessories thoroughly using soapy water and a dish cloth or soft brush.
You can also use serving dishes. This saves you having to transfer food from one dish to another. You should only use cookware with decorative gold or silver trim if the manufacturer guarantees that they are suitable for use in microwaves.
Unsuitable cookware
Metal cookware is unsuitable. Metal does not allow microwaves to pass through. Food in covered metal containers will remain cold.
Caution! Creation of sparks: Metal – e.g. a spoon in a glass – must be kept at least 2 cm from the cooking compartment walls and the inside of the door. Sparks can irreparably damage the glass on the inside of the door.
Cookware test
Never switch on the microwave unless there is food inside. The short cookware test is the only exception to this rule.
Perform the following test if you are unsure whether your cookware is suitable for use in the microwave.
Heat the empty cookware at maximum power for ½ to 1 minute.
Check the temperature of the cookware during this time.
The cookware should remain cold or warm to the touch.
The cookware is unsuitable if it becomes hot or sparks are generated.
In this case, stop the test.
Warning – Risk of burns! The accessible parts become very hot when in operation. Never touch hot parts. Keep children at a safe distance.
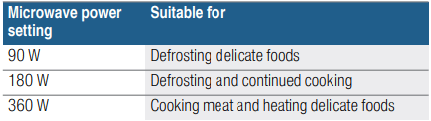
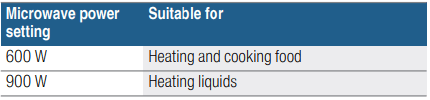
Microwave power settings
Note: You can set the 900 W microwave power setting for 30 minutes, 600 W for 1 hour, the other power settings for 1 hour and 39 minutes respectively.
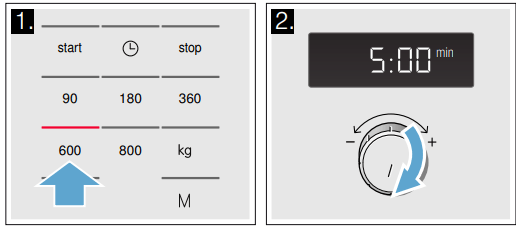
Setting the microwave
Example: Microwave power output 600 W, cooking time 5 minutes
1. Press the required microwave power setting.
The indicator light above the button lights up.
2. Use the rotary selector to set a cooking time.
3. Press the "Start" button.
The cooking time counts down in the display.
The cooking time has elapsed
A signal sounds. Open the appliance door or press Stop. The clock reappears.
Changing the cooking time
This can be done at any time. Change the cooking time using the rotary selector.
Pausing the appliance
Touch the Stop button once or open the appliance door. This pauses the appliance. The indicator above the Stop button will light up.After closing the door, touch the Start button again.
Cancelling operation
Press the Stop button twice, or open the door and press the Stop button once.
Note: You can also adjust the cooking time first and then the microwave power setting.
Memory
The memory function allows you to save the setting for a dish and call it up at any time.
The memory function is useful if you prepare one dish particularly frequently.
Saving memory settings
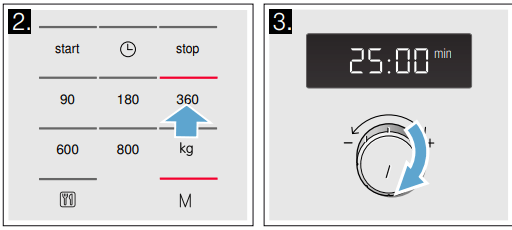
Example: 360 W, 25 minutes
1. Press the i button.
The indicator light above the button lights up.
2. Press the required microwave power setting.
The indicator light above the button lights up and "1:00 min" appears in the display.
3. Use the rotary selector to set the cooking time.
4. Confirm by pressing the M button.
The clock reappears. The setting has been saved.
Notes
You cannot save several microwave power settings one after the other.
You cannot save automatic programmes.
You can save the memory settings and start the appliance immediately. When finishing, instead of pressing M, press Start.
Saving a new setting in the memory: press the M button. The old settings appear. Save the new programme as described in steps 1-4.
Starting the memory
It is very easy to start the saved programme. Place your meal into the appliance. Close the appliance door.
1. Press the M button.
The saved settings are displayed.
2. Press the "Start" button.
The cooking time counts down in the display.
The cooking time has elapsed
A signal sounds. Open the appliance door or press Stop. The clock reappears.
Pausing the appliance
Touch the Stop button once or open the appliance door. This pauses the appliance. The indicator above the Stop button will light up.After closing the door, touch the Start button again.
Cancelling
Press the "stop" button twice, or open the door and press the "stop" button once.
Programmes
You can prepare food really easily using the various programmes. You select a programme and enter the weight of your food. The program then applies the most suitable settings.
Note: You can choose from 7 programmes.
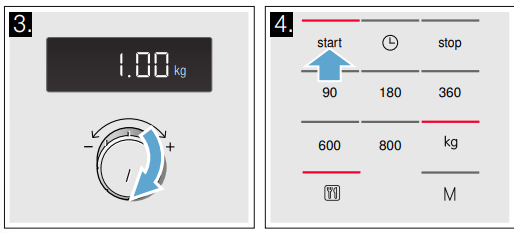
Setting a programme
Once you have selected a programme, make settings as follows:
1. Press the button repeatedly until the required programme number appears.
The indicator light above the button lights up.
2. Press the kg button.
The indicator light above the button lights up and a suggested value appears in the display.
3. Use the rotary selector to set the weight of the dish.
4. Press the "Start" button.
The cooking time for the programme starts counting down.
The cooking time has elapsed
A signal sounds. Open the appliance door or press Stop. The clock reappears.
Correction
Press the "stop" button twice and reset.
Pausing the appliance
Touch the Stop button once or open the appliance door. This pauses the appliance. The indicator above the Stop button will light up.After closing the door, touch the Start button again.
Cancelling
Press the "stop" button twice, or open the door and press the "stop" button once.
Notes
■ For some programmes, a signal sounds after a certain time. Open the appliance door and stir the food or turn the meat or poultry. After closing the door, press the "Start" button again.
■ You can query the programme number and weight using or kg. The queried value is shown for 3 seconds in the display
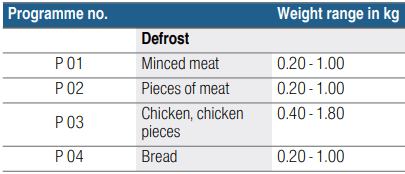
Defrosting using the automatic programmes
You can use the 4 defrosting programmes to defrost meat, poultry and bread.
Notes
Preparing food
Use food that has been frozen at -18 °C and stored in portion-sized quantities that are as thin as possible.
Take the food to be defrosted out of all packaging and weigh it. You need to know the weight to set the programme.
Liquid will be produced when defrosting meat or poultry. Drain off this liquid when turning meat and poultry and under no circumstances use it for other purposes or allow it to come into contact with other foods.
Ovenware
Place the food in a microwaveable shallow dish, e.g. a china or glass plate, but do not cover.
Resting time
The defrosted food should be left to stand for an additional 10 to 30 minutes until it reaches an even temperature. Large pieces of meat require a longer standing time than smaller pieces. Flat pieces of meat and items made from minced meat should be separated from each other before leaving to stand.
After this time, you can continue to prepare the food, even though thick pieces of meat may still be frozen in the middle. The giblets can be removed from poultry at this point.
Signal
For some programmes, a signal sounds after a certain time. Open the appliance door and separate the food out or turn the meat or poultry. Close the door and press the Start button.
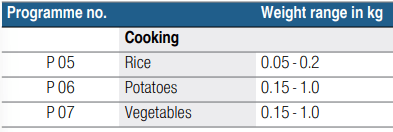
Cooking with the automatic programmes
With the 3 cooking programmes, you can cook rice, potatoes or vegetables.
Notes
Ovenware
The food must be cooked in microwaveable cookware with a lid. For rice, you should use a large, deep dish.
Preparing food
Weigh out the food. You need to know the weight to set the programme.
Rice:
Do not use boil-in-the-bag rice. Add the required amount of water, as specified on the packaging. This is usually two or three times the quantity of rice.
Potatoes:
For boiled potatoes, cut the fresh potatoes into small, even-sized pieces. Add one tablespoon of water for each 100 g boiled potatoes, and a little salt.
Fresh vegetables:
Weigh out the fresh, trimmed vegetables. Cut the vegetables into small, even-sized pieces. Add a tbsp water for each 100 g vegetables.
Signal
While the programme is running, a signal sounds after some time. Stir the food.
Resting time
Once the programme has finished, stir the food again. You should leave it to stand for another 5 to 10 minutes until it reaches an even temperature. The cooking result will depend on the quality and consistency of the food.
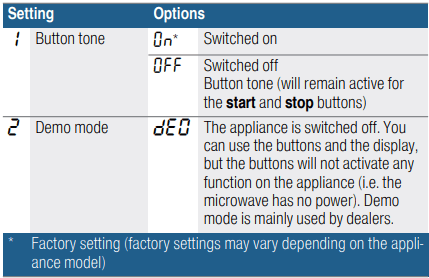
Basic settings
Your appliance has basic settings that you can change to suit your needs.
You can change the button tone on your appliance if you wish.
Changing the button tone
The appliance must be switched off when you do this.
1. Press and hold the start and stop buttons at the same time for a couple of seconds.
will appear in the display.
2. Touch the start button.
will start flashing in the display.
3. Turn the rotary selector to .
4. Touch the start button.
The setting has been applied.
5. Touch the stop button.
The button tone has been switched off.
You can change this setting at any time.
Cleaning
With good care and cleaning, your appliance will retain its appearance and remain fully functioning for a long time to come. We will explain here how you should correctly care for and clean your appliance.
Warning – Risk of electric shock!
Do not use any high-pressure cleaners or steam cleaners, which can result in an electric shock.
Warning – Risk of injury!
Scratched glass in the appliance door may develop into a crack. Do not use a glass scraper, sharp or abrasive cleaning aids or detergents.
Warning – Risk of serious harm to health!
The surface of the appliance may become damaged if it is not cleaned properly. Microwave energy may escape.
Clean the appliance on a regular basis, and remove any food remnants immediately.→ "Cleaning agent" on page 14
Warning – Risk of electric shock!
Do not immerse the appliance in water or clean under a jet of water.
Note: Unpleasant odours, for example after fish has been prepared, can be removed very easily. Add a few drops of lemon juice to a cup of water. Always place a spoon in the container to prevent delayed boiling. Heat the water for 1 to 2 minutes at maximum microwave output.
Cleaning agent
To ensure that the different surfaces are not damaged by using the wrong cleaning agent, observe the information in the table.
Do not use:
■ Harsh or abrasive cleaning agents.
■ Metal or glass scrapers to clean the door panels.
■ Metal or glass scrapers to clean the door seal.
■ Hard scouring pads or sponges.
■ Cleaning agents with a high alcohol content.
Wash new sponge cloths thoroughly before use
Area
Cleaning product
Appliance front
Hot soapy water: Clean using a dish cloth and then dry with a soft cloth. Do not use metal or glass scrapers for cleaning.
Appliance front with stainless steel
Hot soapy water: Clean using a dish cloth and then dry with a soft cloth. Remove splashes and patches of limescale, grease, starch and albumin (e.g. egg white) immediately. Corrosion can form under these patches or splashes. Special stainless-steel cleaning products are available from the after-sales service or from specialist retailers. Do not use glass cleaners or metal or glass scrapers for cleaning.
Cooking compartment made of stainless steel
Hot soapy water or vinegar solution: Clean using a dish cloth and then dry with a soft cloth.Do not use oven spray or any other aggressive oven cleaners or abrasive materials. Scouring pads, rough sponges and pan cleaners are also unsuitable. These items scratch the surface. Allow the interior surfaces to dry completely.
Recess in the cooking compartment
Damp cloth: Water must not be allowed to run into the appliance through the turntable drive. Dry the turntable drive with a cloth.
Turntable and roller ring
Hot soapy water: When placing the turntable back into its recess, it must engage properly.
Door panels
Glass cleaner: Clean with a dish cloth. Do not use glass scrapers.
Troubleshooting
If a fault occurs, there is often a simple explanation. Before calling the after-sales service, please refer to the fault table and attempt to correct the fault yourself.
Tip: If a dish does not turn out exactly as you wanted, refer to the following chapter, where you will find lots of tips and notes relating to the optimum settings.→ "Tested for you in our cooking studio" on page 17
Warning – Risk of electric shock!
Incorrect repairs are dangerous. Repairs may only be carried out and damaged power cables replaced by one of our trained after-sales technicians. If the appliance is defective, unplug the appliance from the mains or switch off the circuit breaker in the fuse box. Contact the after-sales service.
Fault table
Fault
Possible cause
Remedy/information
The appliance is not working
The plug is not plugged into the mains
Connect the appliance to the electricity supply
Power failure
Check whether other kitchen appliances are working
The circuit breaker/fuse is faulty
Check in the fuse box to make sure that the circuit breaker/fuse for the appliance is in working order
Faulty operation
Switch off the circuit breaker/fuse for the appliance in the fuse box and switch it back on after approximately 10 seconds
Three zeros are lit on the display
Power failure
Reset the time.
The appliance is not operating. A cooking time is shown on the display
The rotary selector has been accidentally turned.
Press the "stop" button.
The "start" button has not been pressed after the setting was applied.
Press the "start" button or cancel the setting by pressing the "stop" button.
The microwave is not working.
The door has not been properly closed.
Check whether food remnants or debris is/are trapped in the door.
The "start" button has not been pressed.
Press the "start" button.
It is taking longer than usual for food to heat up
The microwave power output has been set too low.
Select a higher microwave power setting.
A larger amount of food than usual has been placed in the appliance.
Double the amount – double the time.
The food was colder than usual.
Stir or turn the food during heating.
The turntable is making a scraping or grinding noise.
Dirt or debris in the area around the turntable drive.
Clean the roller ring and the recess in the cooking compartment.
The microwave has stopped for no apparent reason.
The microwave has a fault.
If this fault recurs, please call the after-sales service.
An M is shown on the display.
The appliance is in demo mode
Deactivate demo mode.
→ "Basic settings" on page 13
Error message " E - 3"
Fault in automatic door opening system.
If an error message is displayed, switch the appliance off and on again; if the message disappears, it was a one-off problem. If the fault occurs again or the error message is still displayed, please contact the aftersales service and provide the fault code.
 button.
  œ appears in the display and the indicator lamp above the
  Warning – Risk of scalding!
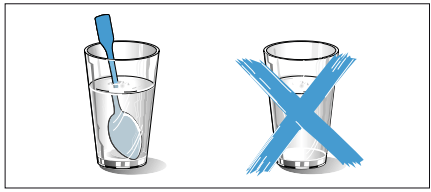
 button repeatedly until the required programme number appears.
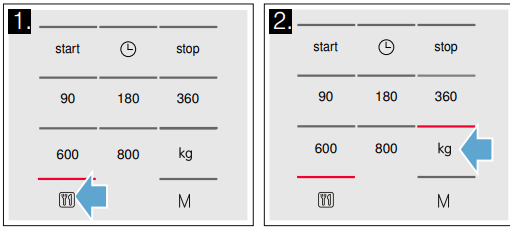
 will appear in the display.
  will start flashing in the display.
  .
.