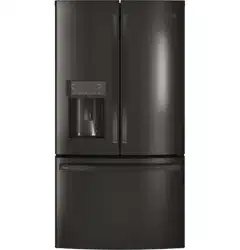
Space-saving ice maker* Ice maker and bin are located on the door creating more usable storage space.
Showcase LED lighting LED lighting is positioned throughout the interior to spotlight areas in the refrigerator. LEDs are located under the fresh food door to light the freezer when opened.
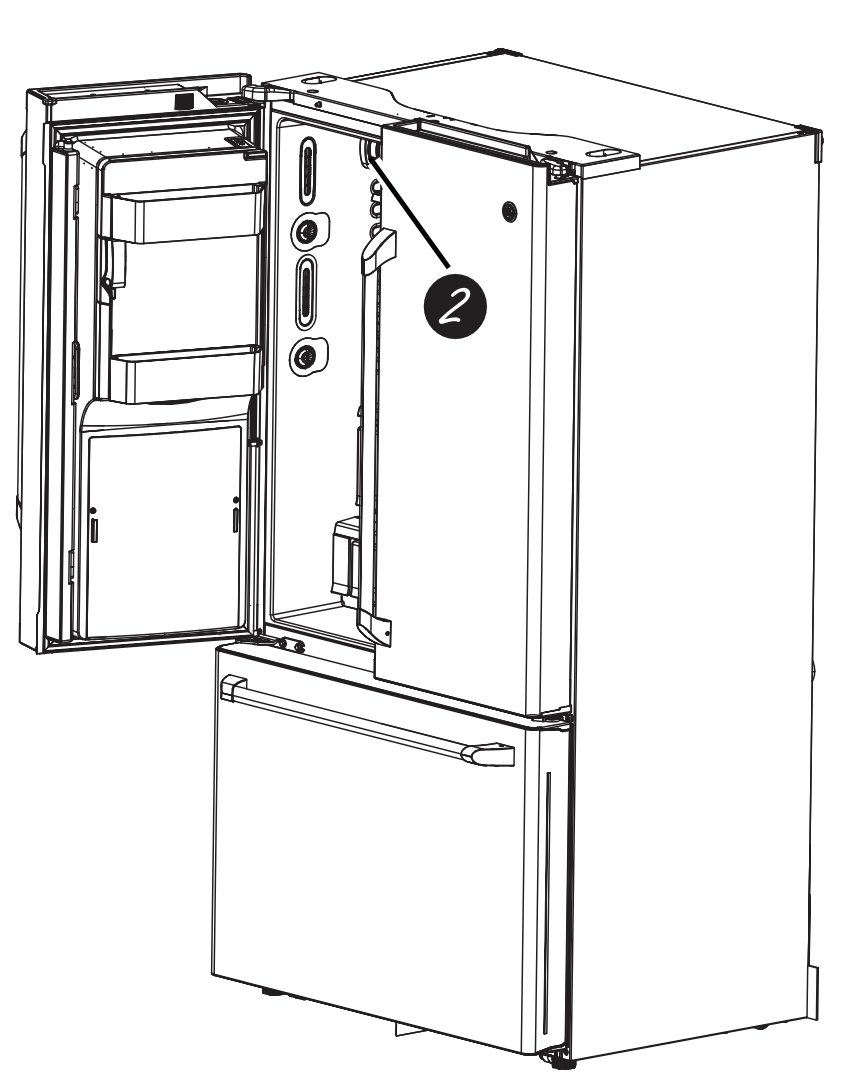
Drop-down tray* Allows for extra door storage when you need it and tucks away when you don’t.
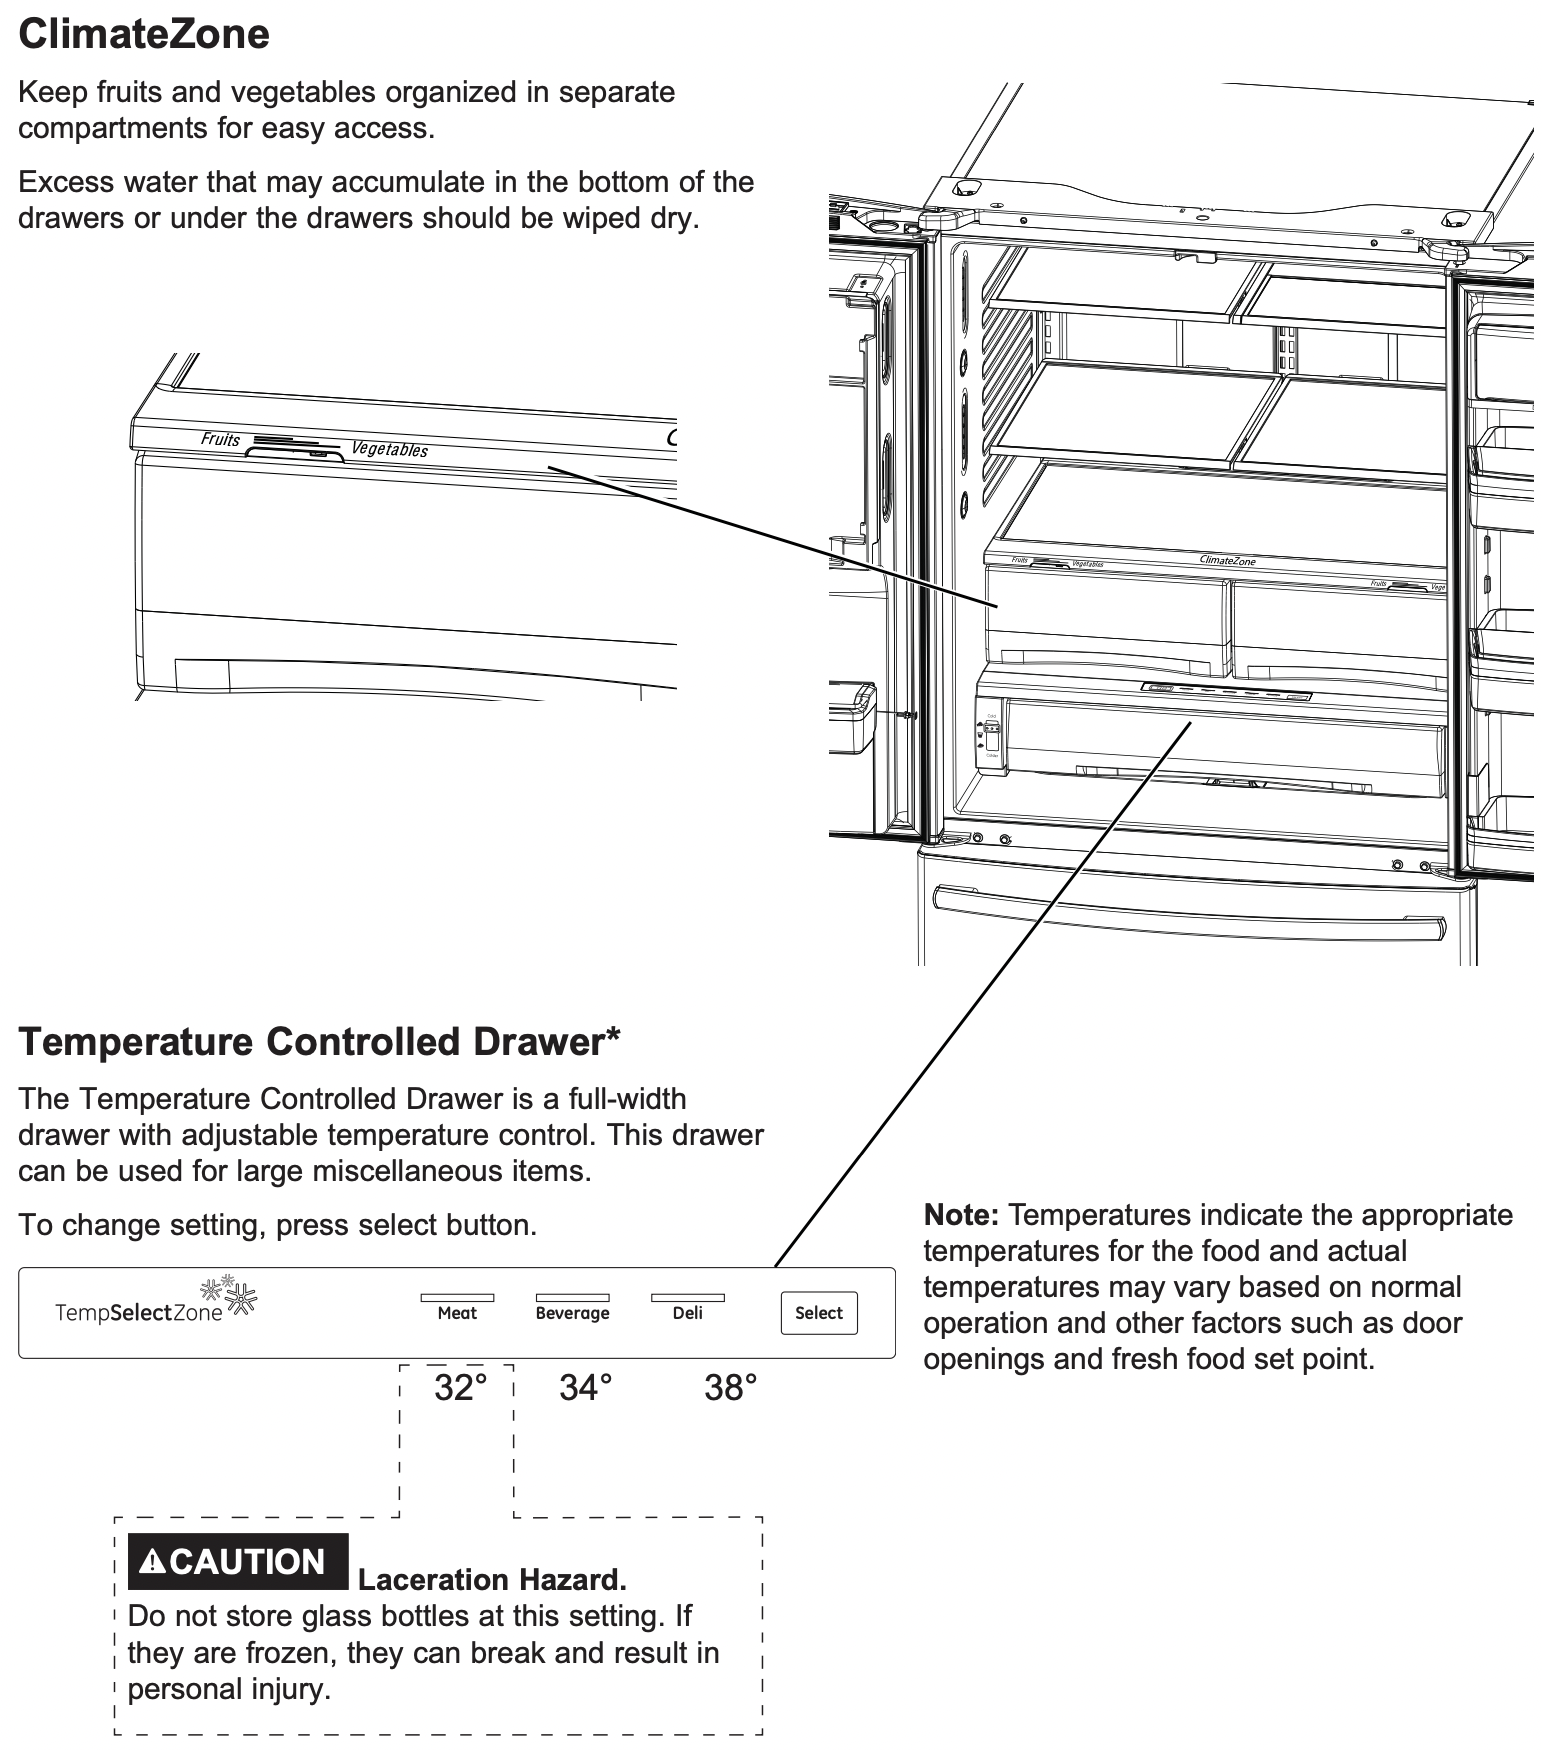
Full-width temperature controlled drawer Adjustable temperature control bin that can accommodate larger items.
Dairy bin Separate compartment for your items.
Ice bin/Ice maker* Ice maker with ice storage bins.
QuickSpaceTM shelf* Functions as a normal full-sized shelf when needed and easily slides back to store tall items below.
Spillproof shelves Designed to capture your spills for easier clean up.
Anti-slip Mat Liner that captures spills, keeps containers from shifting when the door is opened and is easily removable for cleaning.
Removable door bin Can be removed for those with a wall limiting the door opening.
Climate zone bin Separate bins for produce storage.
Water filter Filters water and ice.
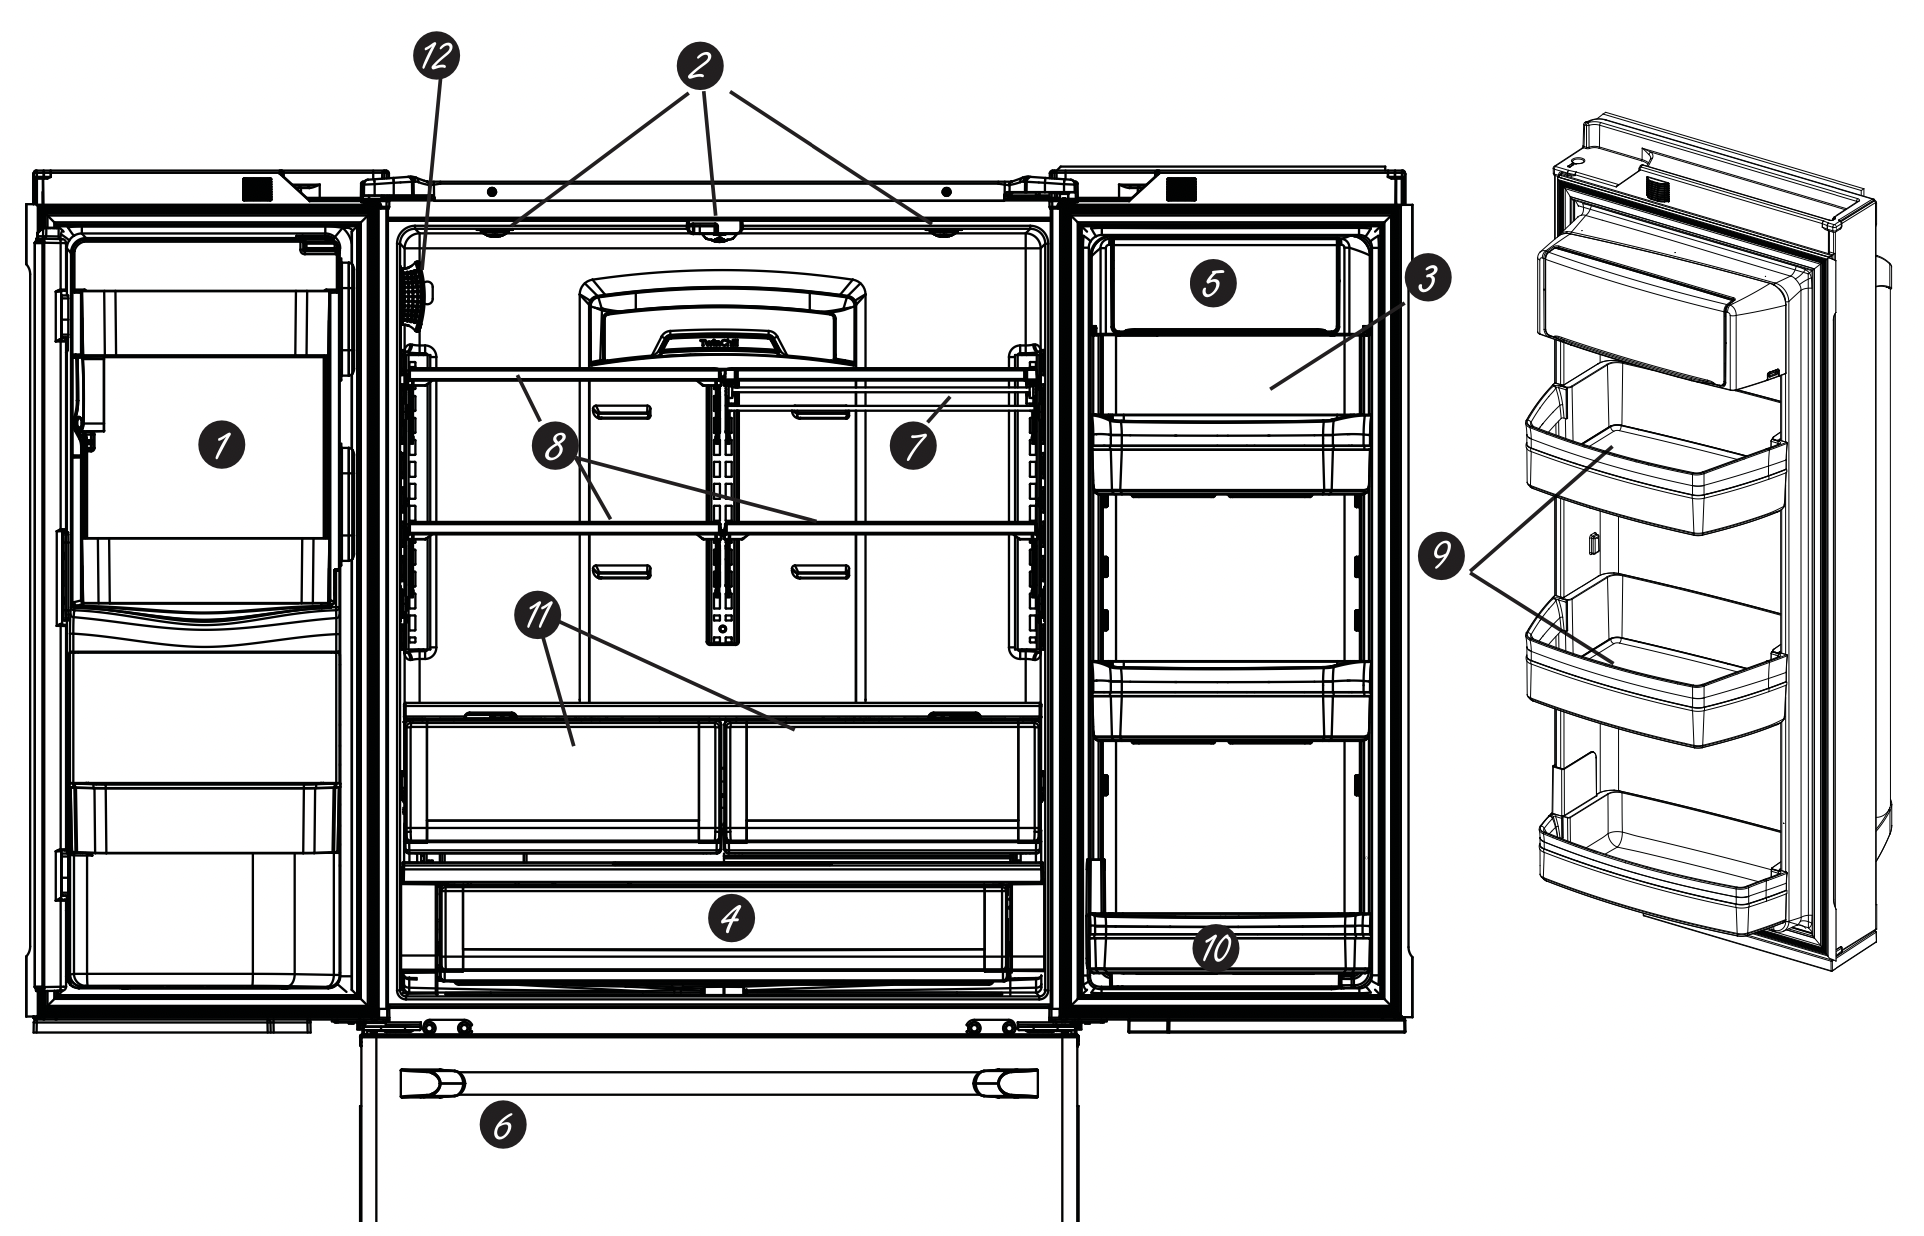
Space-saving ice maker* Ice maker and bin are located on the door creating more usable storage space.
Showcase LED lighting LED lighting is positioned throughout the interior to spotlight areas in the refrigerator. LEDs are located under the fresh food door to light the freezer when opened.
Full-width temperature controlled drawer Adjustable temperature control bin that can accommodate larger items.
Freezer Ice maker/Ice Bin* An ice maker in both compartments give you more ice whenever you need it. Available on Non-Dispense models, also available as a kit for some models.
QuickSpaceTM shelf* Functions as a normal full-sized shelf when needed and easily slides back to store tall items below.
Spillproof shelves Designed to capture your spills for easier clean up.
Removable door bin Can be removed for those with a wall limiting the door opening.
Climate zone bin Separate bins for produce storage.
Water filter Filters water and ice.
Rotating Bin* Can be rotated out for easy access.
Door in Door Latch* Squeeze the latch on the underside of the handle to open the outer door.
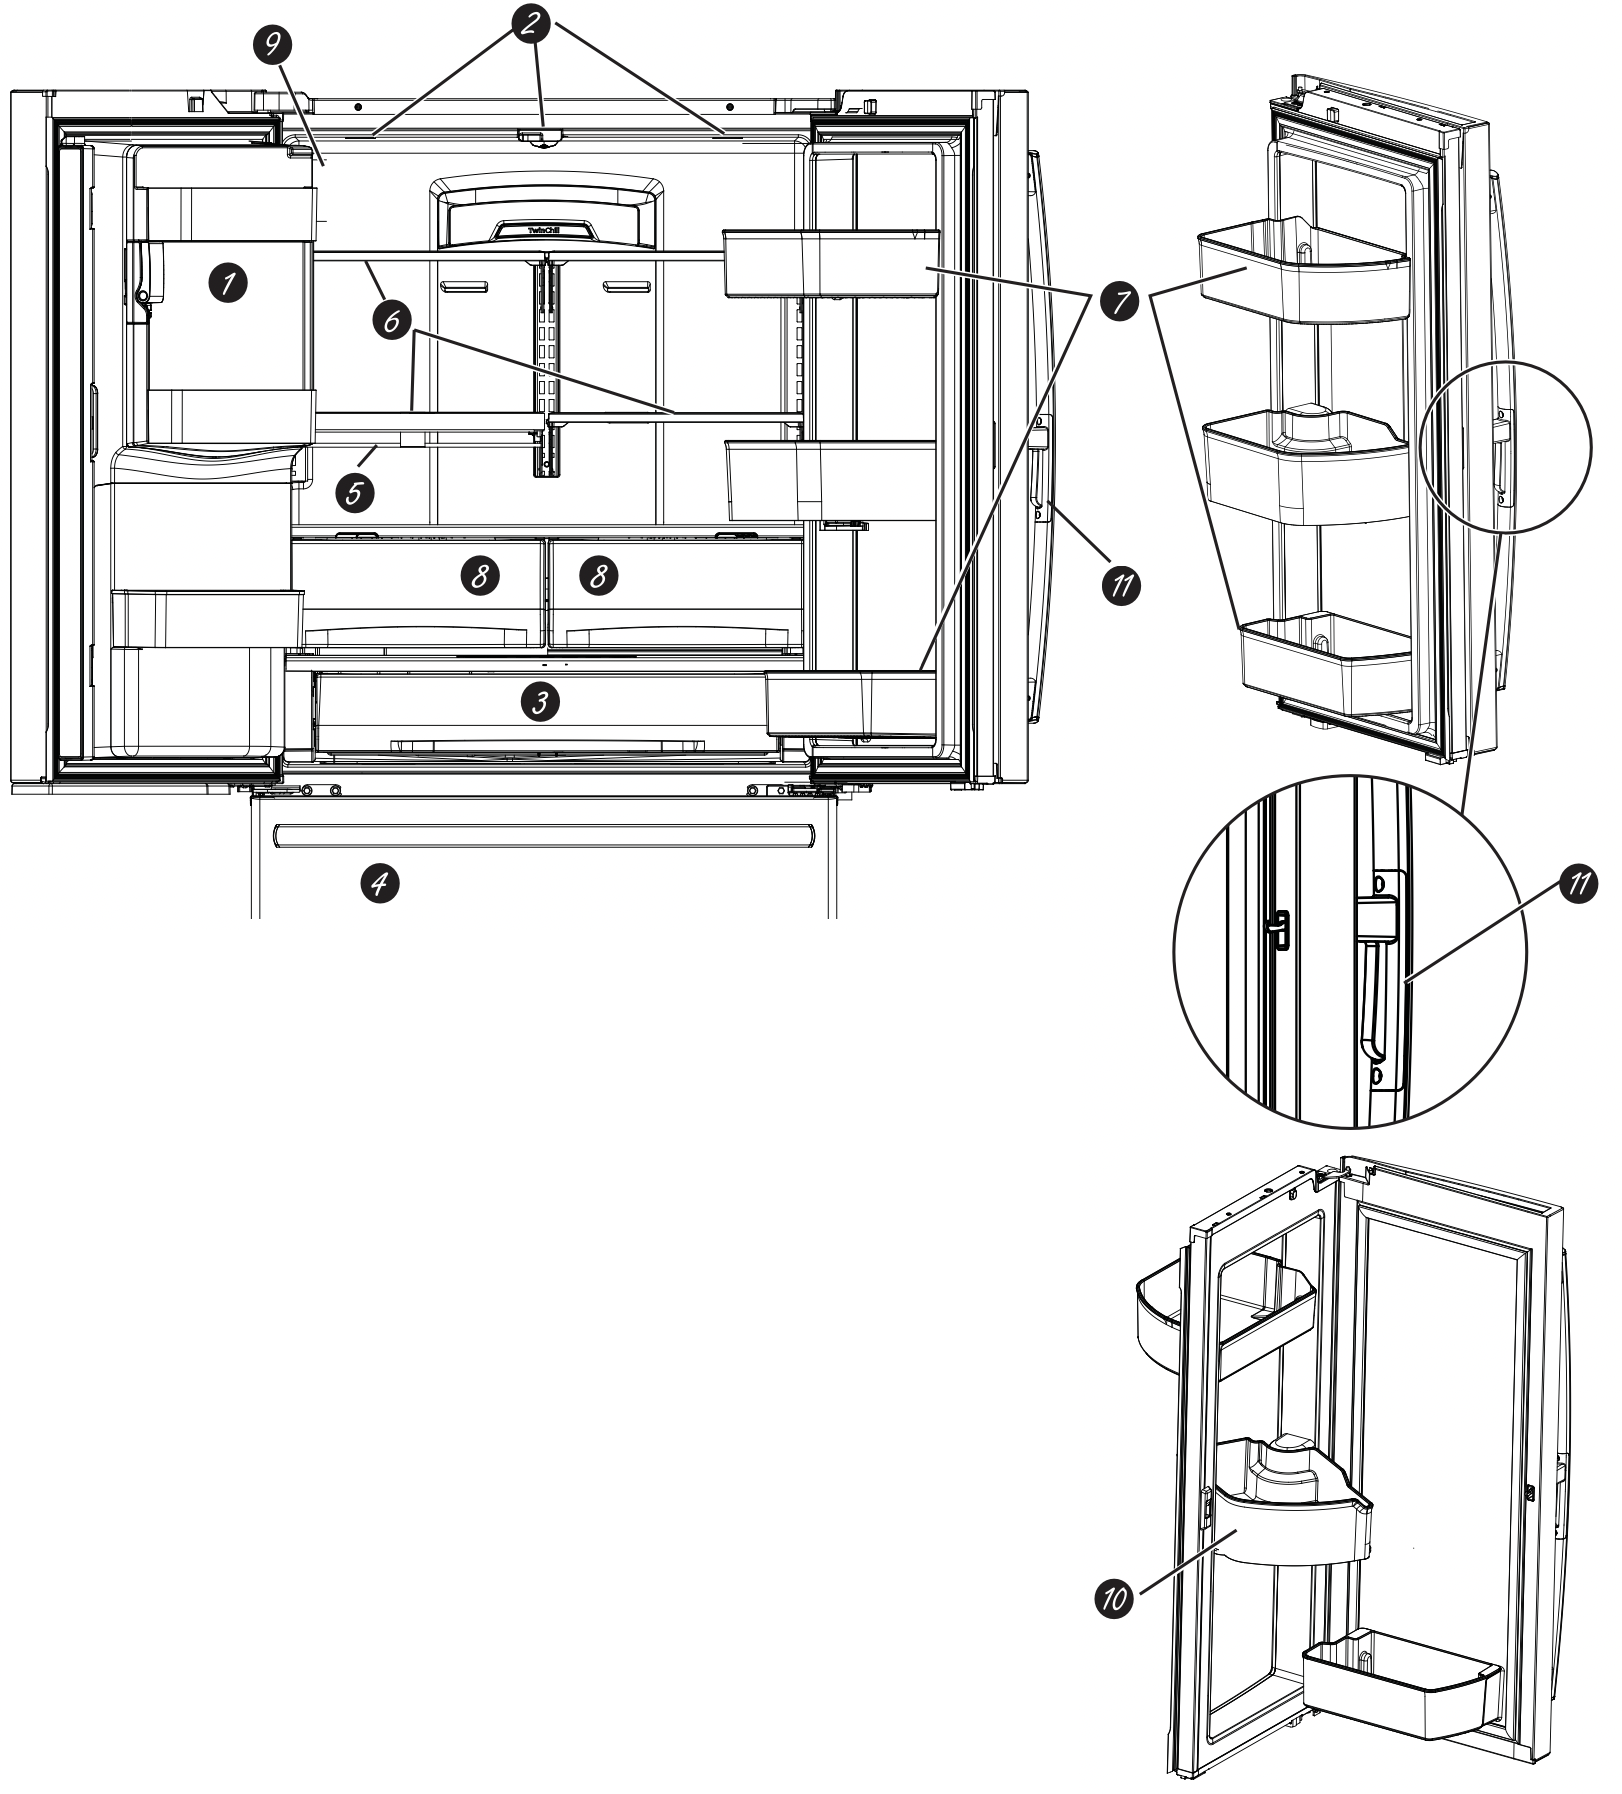
1. Door ice bin*
Open left fresh food door.
Pull down latch to release bin door.
Using handhold lift ice bucket up and out to clear locators in bottom of bin.
To replace the ice bucket, set it on the guide brackets and push until the ice bucket seats properly.
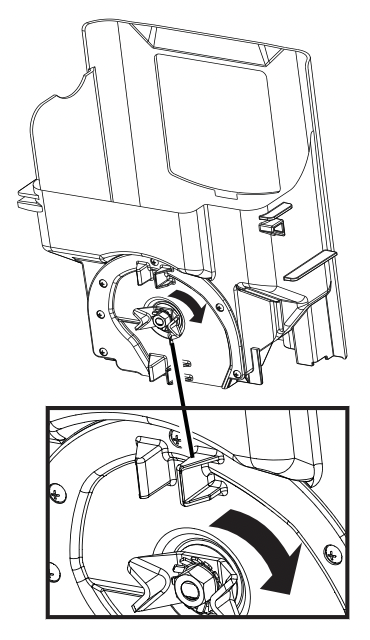
If bucket cannot be replaced, rotate the Ice Bucket Fork 1/4 turn clockwise.
2. Ice/water filter
Certified to reduce chlorine-resistant cysts, lead, select pharmaceuticals, and more. For easy filter replacement instructions.
WARNING - Scalding Hazard.*
Use of the hot water dispenser prior to purging air from the system may result in spurting of hot water and lead to hot water scalding. Follow the instructions for ''Water Filter - Step 3'' to purge all air from the system through the cold water dispenser prior to using the hot water dispenser.
The first time the hot water feature is used, confirm if you live above 5000 feet (1524 meters) (high altitude). This limits the temperature of the hot water system to avoid boiling. To access the high altitude selection, see Controls.
NOTE: The refrigerator is shipped with protective film covering the temperature controls. If this film was not removed during installation, remove it now.
The temperature controls are preset in the factory at 37°F for the refrigerator compartment and 0°F for the freezer compartment. Allow 24 hours for the temperature to stabilize to the preset recommended settings.
Control Style D: The temperature controls can display both the SET temperature as well as the actual temperature in the refrigerator and freezer. The actual temperature may vary slightly from the SET temperature based on usage and operating environment (PWE23 and GNE29 only).
Changing the Temperature for Control Style A
To Change the Refrigerator Temperature:
Press the Fridge button and current set temperature will display. Pressing and releasing the button will cycle through the available temperature settings. Press and hold button for Turbo Coolfeature. The display will show tC.
To Change the Freezer Temperature:
Press the Freezer button and current set temperature will display. Pressing and releasing the button will cycle through the available temperature settings. Press and hold button for Turbo Freeze feature. The display will show tF.
Cooling system can be turned off by pressing and holding Freezer and Start Heating. OFF will be displayed. To turn on, press Fridge or Freezer. ON will be displayed. Turning the cooling system off stops the cooling to the refrigerator, but it does not shut off the electrical power.
Changing the Temperature for Control Styles B and C
To change the temperature, press and release the Freezer or Fridge pad. The display will show the set temperature. To change the temperature, press either the Freezer or Fridge pad until the desired temperature is displayed. Press and hold button for Turbo Cool feature. The display will show tC. Press and hold button for Turbo Freeze feature. The display will show tF.
To turn off the cooling system press and hold the Fridge and Ice Maker buttons. To turn on, press Fridge or Freezer.
Turning the cooling system off stops the cooling to the refrigerator, but it does not shut off the electrical power.
Changing Temp. for Control Style D
Temperature Display is located on inside of left-hand refrigerator door. To change the temperature, press and release the REFRIGERATOR or FREEZER pad. The ACTUAL TEMP light will come on and the display will show the actual temperature. To change the temperature, tap either the REFRIGERATOR or FREEZER pad until the desired temperature is displayed.
To turn OFF cooling system, press and hold the REFRIGERATOR and FREEZER pads simultaneously for 3 seconds. When cooling system is OFF the display should read OF. To turn ON cooling system, press either REFRIGERATOR or FREEZER pad. The display will show the preset temperature settings of 37°F (3°C) for refrigerator and 0°F (-18°C) for freezer.
Turning the cooling system off stops the cooling to refrigerator, but it does not shut off the electrical power.
NOTE: For optimal temperature performance, we recommend to avoid placing food items directly at the air flow vents of the fresh food air tower and thus blocking the air flow.
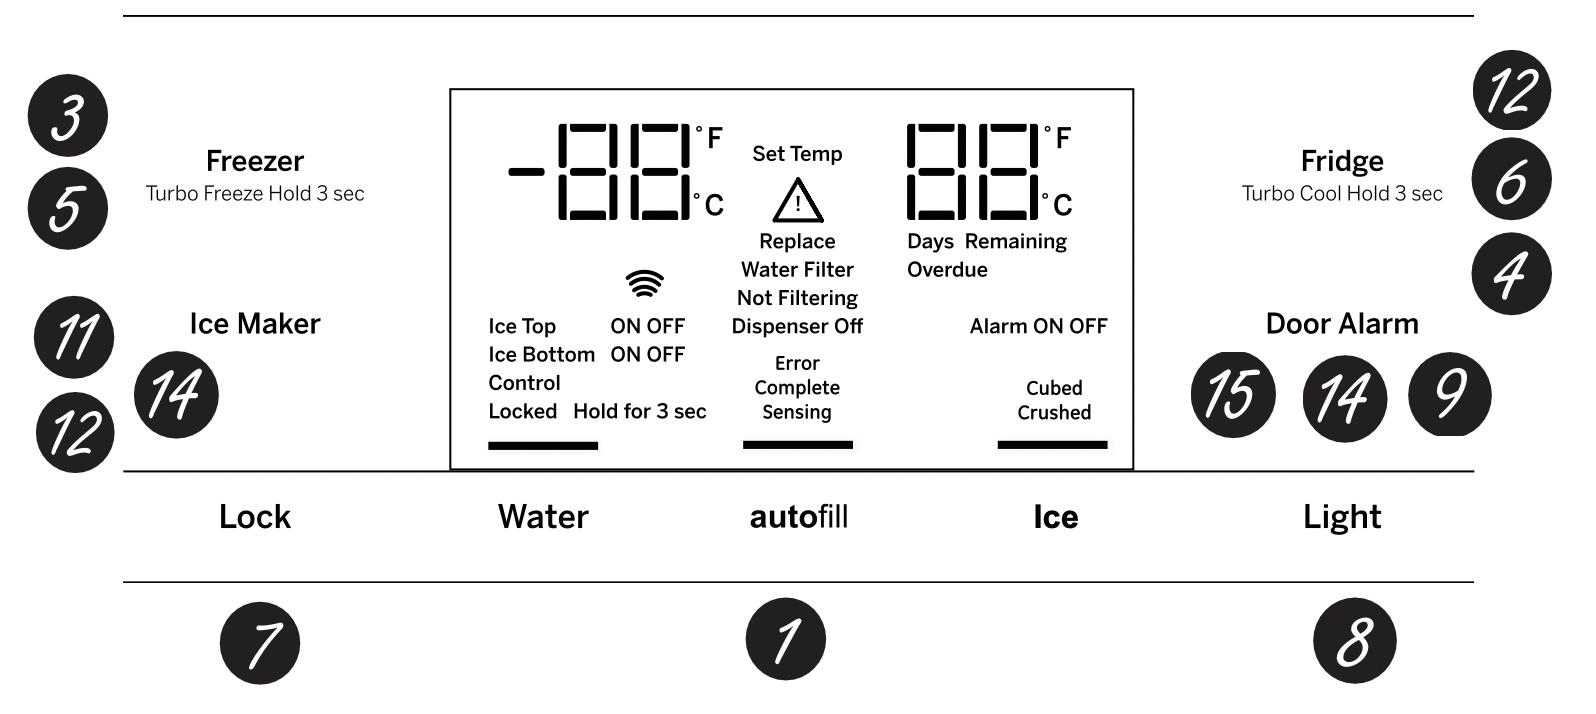
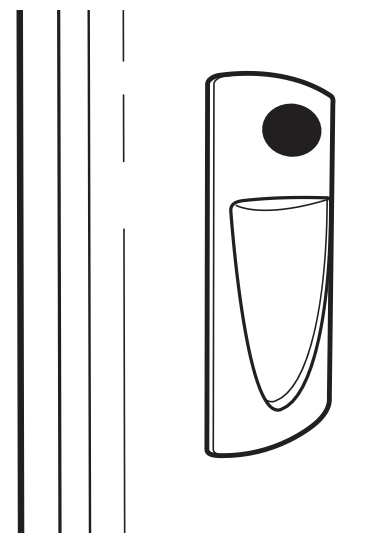
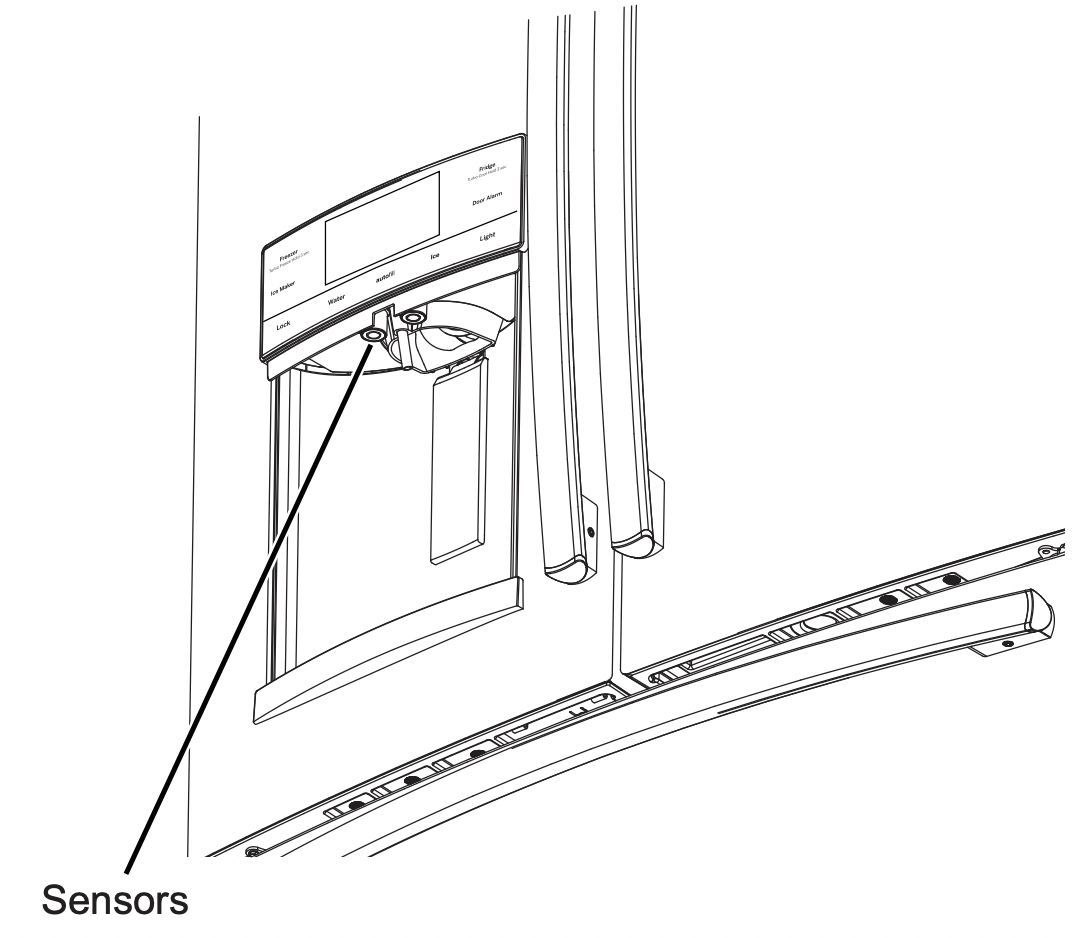
Hands-free Autofill* Hands-free Autofill uses sensors to monitor container height to automatically dispense filtered water without having to activate the paddle.
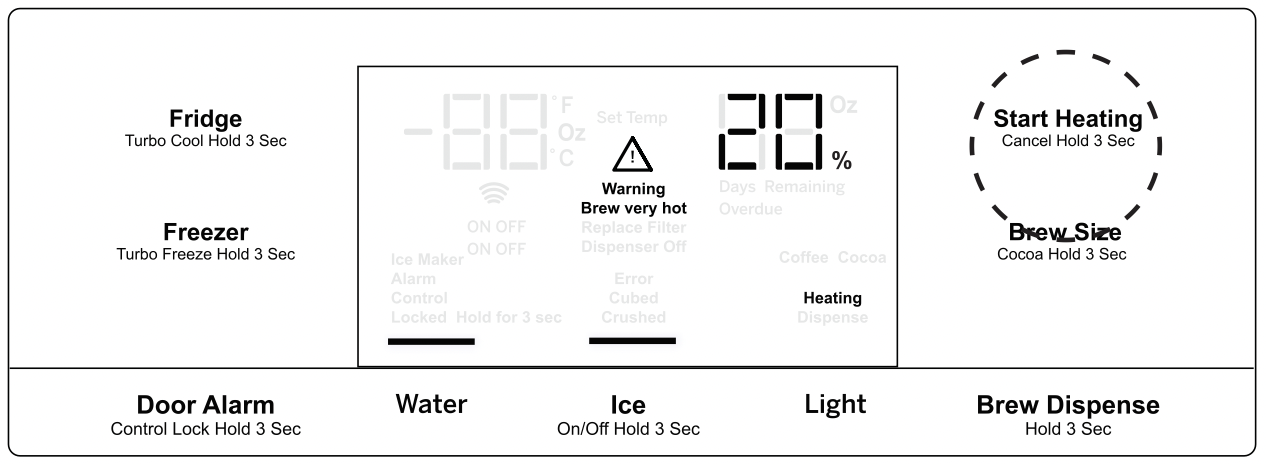
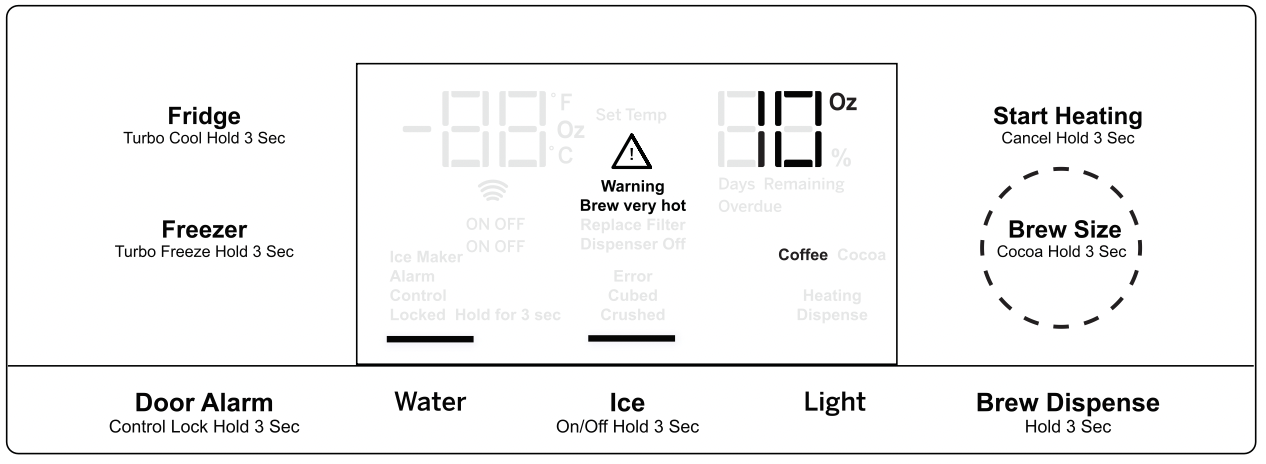
Start Heating* The Start Heating button is used to initiate the water heating for the Single Serve feature. To abort the Start Heating feature, press and hold the Start Heat button for 3 seconds.
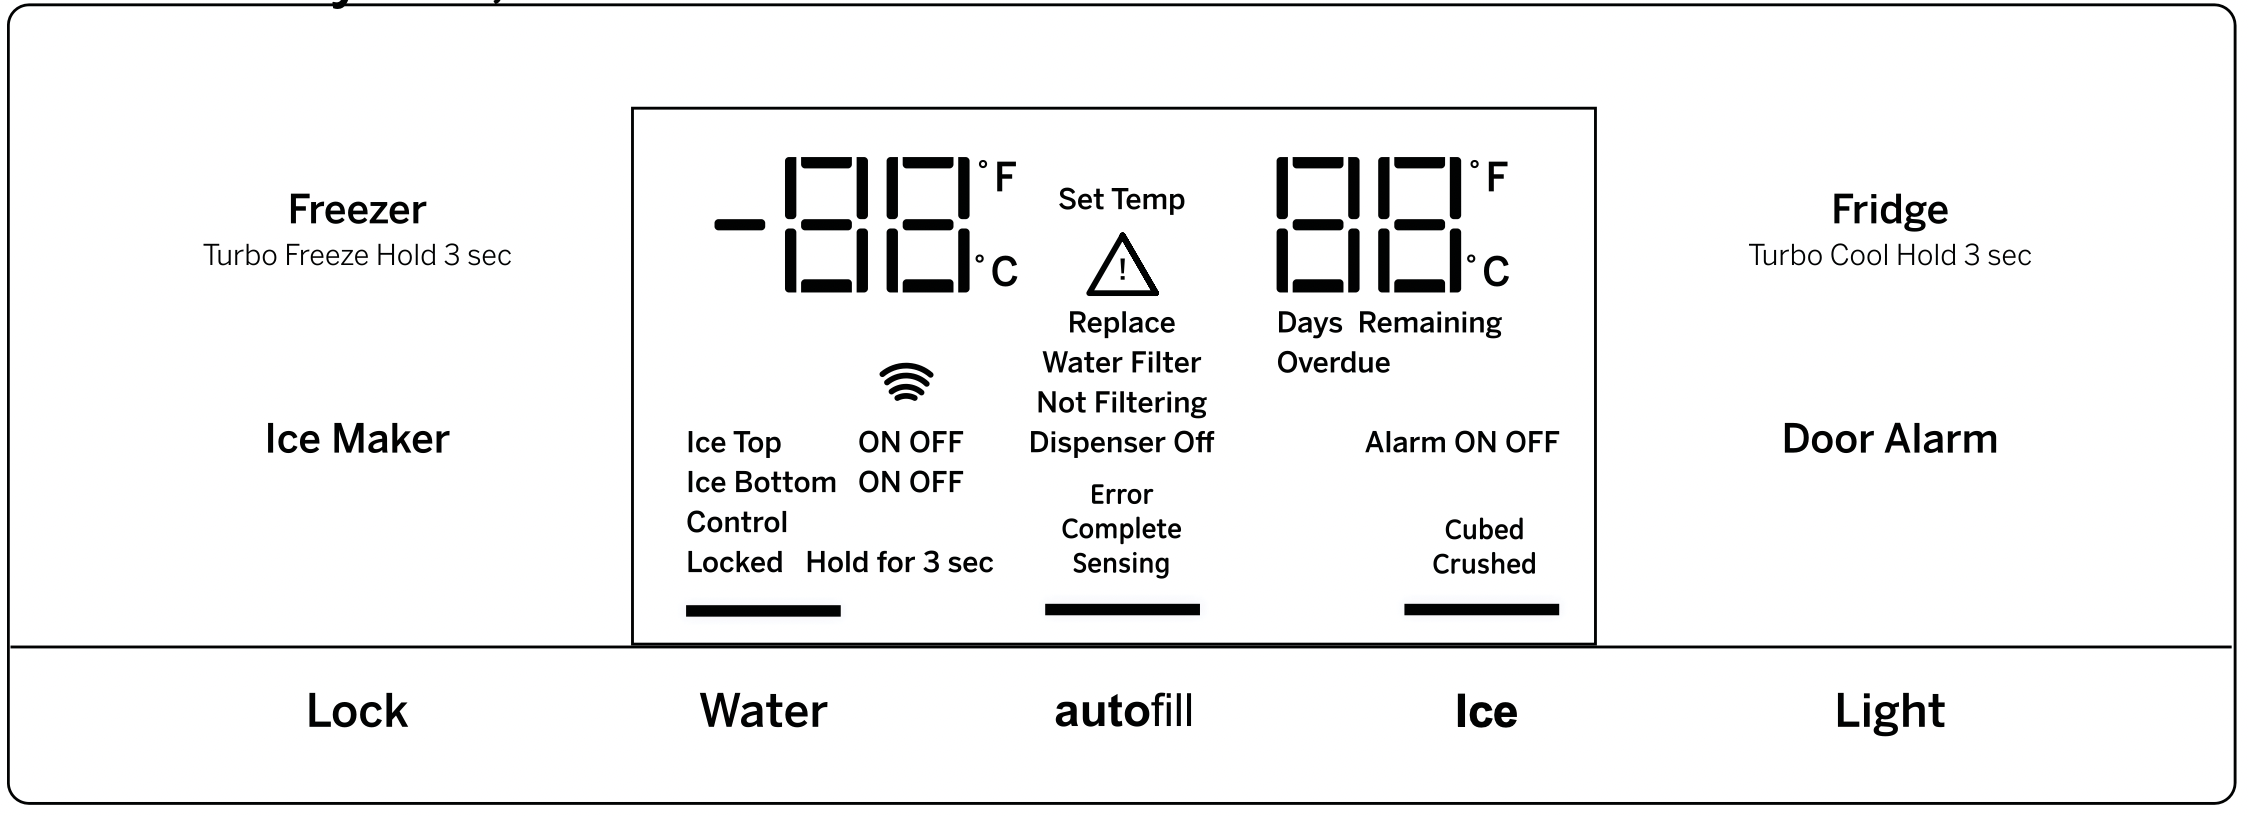
Freezer temp control Adjust freezer compartment temperature.
Fresh food temp control Adjust fresh food compartment temperature.
TurboFreezeTM setting Activate TurboFreeze to quickly restore freezer temperatures after frequent door openings.
TurboCoolTM setting Activate TurboCool to quickly restore fresh food temperature after frequent door openings.
Lock Controls Control Style A - Press and hold the Door Alarm pad for 3 seconds to lock out ice and water dispenser and all feature and temperature buttons. Control Styles B & C - Press Lock pad and hold 3 seconds to lock out ice and water dispenser and all feature and temperature buttons.
Dispenser light Lighting that can be turned on/off to light your dispense.
Door Alarm Sounds to alert when the freezer or fresh food doors have been left open. Press and hold Door Alarm pad and it will toggle the sound between low, high, and off.
Brew Size* The Brew Size button is used to select the desired cup size for single serve. Press and hold the button for 3 seconds to toggle the brew type between Coffee and Cocoa.
Ice maker setting Turn your ice makers on/off.
Cooling system On/Off Control Style A - Press and hold Freezer and Start Heating simultaneously to turn cooling system off. To turn cooling system on press either the Fridge or Freezer. Control Style B & C - Press and hold Fridge and Ice Maker simultaneously for 3 seconds to turn the cooling system off. To turn cooling system on press either the Fridge or Freezer.
Brew Dispense Press and hold Brew Dispense button for 3 seconds, but no longer than 6 seconds, to dispense coffee or cocoa.
F°/C° Control Style A - Press and hold Freezer and Brew Size to switch between F°/C°. Control Style B & C - Press and hold Ice Maker and Door Alarm simultaneously for 3 seconds to switch between F°/C°.
Sound Control for pad chimes Control Style A - Press and hold the Light pad: Once for High to Off, twice for Off to Low and three times for Low to High. Control Styles B & C - Press and hold the Door Alarm pad: Once for High to Off, twice for Off to Low and three times for Low to High.
High Altitude Control Style A (PYE and PFE only) - Press and hold Fridge and Door Alarm for to toggle between Hi Al and Lo AL for high altitude and low altitude.
Additional settings:
Connected Home ready* (PFE28P, PYE22P, PFH only)
Water Filter* - An indicator will illuminate when the filter needs to be replaced. When a new filter is installed the indicator will go off.
Additional Mode:
Sabbath Mode Control Style A - Press and hold Alarm and Light simultaneously for 3 seconds to enter/exit Sabbath mode. Control Style B & C - Press and hold Lock and Light simultaneously for 3 seconds to enter/exit Sabbath mode. Sabbath Mode will turn off or dim interior lights, temperature control and advanced features. Compressor will run on a timed defrost when in Sabbath mode.
Additional Mode:
Sabbath Mode Press and hold Door Alarm and Ice Maker simultaneously for 3 seconds to enter/exit Sabbath mode.
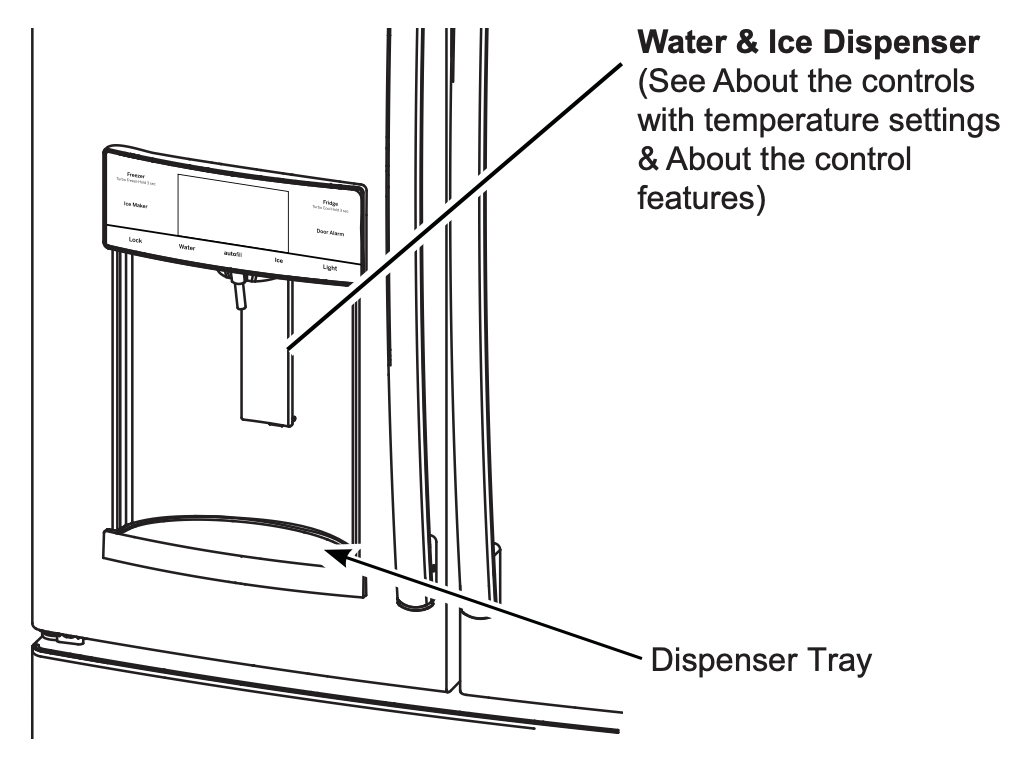
Dispenser*
WARNING - Laceration Hazard
Never put fingers or any other object into ice crusher discharge opening. Doing so can result in contacting the ice crushing blades and lead to serious injury or amputation.
Use a sturdy glass when dispensing ice. A delicate glass may break and result in personal injury.
If no water is dispensed when the refrigerator is first installed, there may be air in the water line system. Press the dispenser paddle for at least five minutes to remove trapped air from the water line and to fill the water system. To flush out impurities in the water line, throw away the first six full glasses of water.
To remove Dispenser Tray (Type A and B Only)
Pull Dispenser Tray out until it stops.
Locate tab in the center on the bottom and push up.
Pull Dispenser Tray assembly out.
Lift Dispenser Tray out at center notch to clean.
To remove Dispenser Tray (Type C Only)
Grasp Dispenser Tray and pull firmly until it comes out.
To reinstall Dispenser Tray (Type A and B Only)
Place the Dispenser Tray cover on top of catch tray and position under the two plastic retainers on either side.
Center Dispenser tray, and align with center guides.
Push in until it locks firmly in place.
To reinstall Dispenser Tray (Type C Only)
Line up the guide on tray bottom with track on dispenser and slide it in until it stops against the back of the dispenser.
Important Facts About Your Dispenser
Do not add ice from trays or bags to the door ice maker bucket. It may not crush or dispense.
Avoid overfilling glass with ice and use of narrow glasses. Backed-up ice can jam the chute or cause the door in the chute to freeze shut. If ice is blocking the chute remove the ice bucket, poke it through with a wooden spoon.
Beverages and foods should not be quick-chilled in the door ice maker bin. Cans, bottles or food packages in the storage drawer may cause the ice maker or auger to jam.
To keep dispensed ice from missing the glass, put the glass close to, but not touching, the dispenser opening.
Some crushed ice may be dispensed even though you selected CUBED ICE. This happens occasionally when a few cubes accidentally get directed to the crusher.
After crushed ice is dispensed, some water may drip from the chute.
Sometimes a small mound of snow will form on the door in the ice chute. This condition is normal and usually occurs when you have dispensed crushed ice repeatedly. The snow will eventually evaporate.
To Use the Internal Water Dispenser*
The water dispenser is located on the left wall inside the refrigerator compartment.
To dispense water:
Hold the glass against the recess.
Push the water dispenser button.
Hold the glass underneath the dispenser for 2–3 seconds after releasing the dispenser button. Water may continue to dispense after the button is released.
If no water is dispensed when the refrigerator is first installed, there may be air in the water line system. Press the dispenser button for at least 5 minutes to remove trapped air from the water line and to fill the water system. During this process, the dispenser noise may be loud as the air is purged from the water line system. To flush out impurities in the water line, throw away the first 6 glassfuls of water.
NOTE: To avoid water deposits, the dispenser should be cleaned periodically by wiping with a clean cloth or sponge.
AUTOFILL*
To Use HANDS FREE AUTOFILL:
Center container on Recess Dispenser Tray as far back as possible without activating paddle and remove hand from container
Press AUTOFILL
To Stop AUTOFILL
Press AUTOFILL to stop.
Important Facts about AUTOFILL
For optimum results, use a uniform container between 4-8'' (10-20 cm) tall and 2-6'' (5-15 cm) wide.
Fill level and functionality may vary on containers taller than 8'' (20 cm) or wider than 6'' (15 cm).
Container volumes may vary, if error message ''Not Found'' is given, try a different container.
AUTOFILL will time out.
Handles, staws, and garnishes on the rim of the container my cause overfilling or variation in fill volumes.
Splashing may occur depending on the location of the container, water flow rate, container shape, and ice cubes.
Keep sensors clean with a clean damp cloth, and do not spray liquid or cleaners directly on sensors.
AUTOFILL works best with household water pressure of 60 to 100 psi (414 to 689 kPa).
Ice in container may affect fill volume. If issues are experienced, use less ice.
Single Serve Keurig K-Cup Brewer*
Important Facts about HOT WATER
WARNING - Scalding Hazard.
The water coming from the dispenser is very hot and can cause scalds or burns. Read all warnings on page 5 prior to use.
Do not permit children to use the brewer.
Always use a container that is suitable for hot liquids (ceramic, foam, etc.)
Do not brew into a mug made of glass. Doing so may cause the glass to crack or break.
If you live above 5000 feet (1524 meters), press Fridge and Door Alarm and control will cycle from Low Altitude (Lo AL) to High Altitude (Hi AL).
DO NOT use the hot water dispenser immediately after installing a new water filter as it may result in spurting of hot water. Dispense cold water for about 5 minutes to purge air from the system prior to dispensing hot water.
How to use the single serve dispenser
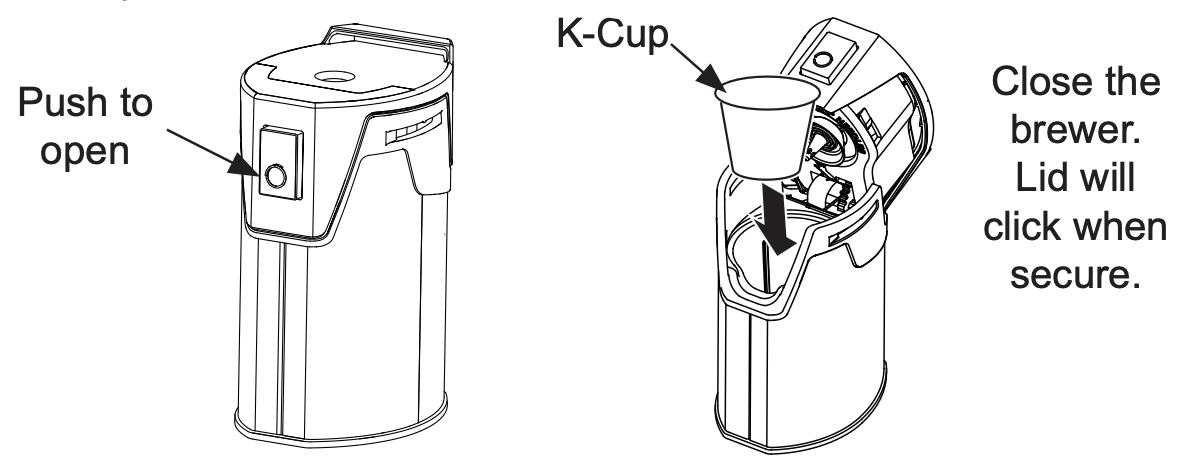
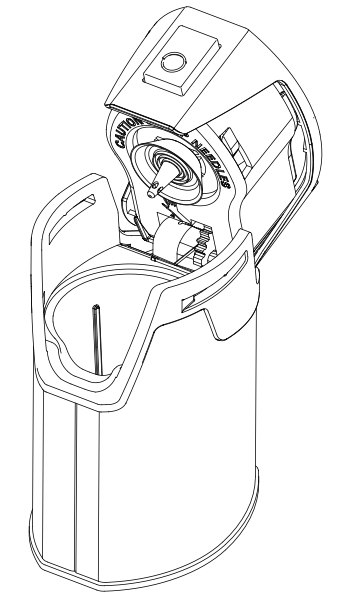
1. Load the K-Cup Brewer
Insert a Keurig K-Cup pod into the brewer and press down firmly (you will hear a popping sound).
CAUTION - Cut/Puncture Hazard.
There are two sharp needles located inside the K-Cup brewer. To avoid risk of injury, do not put your fingers inside the brewer. Use caution when cleaning.
Keep K-Cup brewer out of the reach of children, as they may be injured in using the K-Cup brewer incorrectly.
2. Two Ways To Brew
Press the Start Heating button. OR
Initiate heating with the GE Kitchen app.
3. Change Brew Size
Press the Brew Size button any time during the heating cycle to choose 6, 8, or 10 oz. The default size is 8 oz. Ensure the mug being used is large enough for the size selected.
NOTE: Press and hold the Brew Size button for 3 seconds to toggle between Coffee and Cocoa. The default is Coffee.
NOTE: To abort the heating cycle, press and hold the Start Heating button for 3 seconds. To abort the brew dispense cycle, press and hold the Start Heating button for 3 seconds, press the paddle, press any button on the display besides Brew Size or Brew Dispense, or open the right fresh food door.
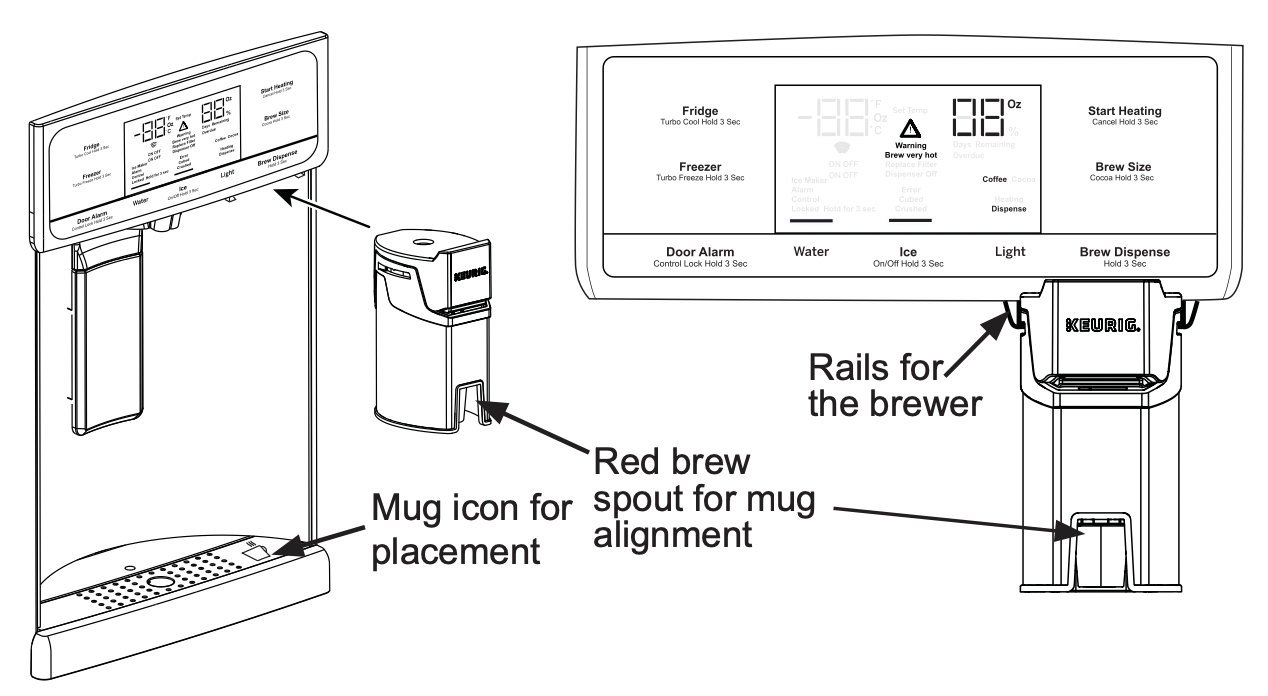
4. Dispense
Once the heating process is complete, the Dispense light on the display will flash.
To dispense, slide the brewer into the rails. Make sure the brewer is pushed all the way into the bracket. Place your mug on the drip tray mug icon, under the red brew spout. Press and hold Brew Dispense for 3 seconds until you hear the dispenser engage.
Cleaning the brewer
The K-Cup brewer is top rack dishwasher safe.
It is recommended to rinse it thoroughly after washing to remove all soap residue.
Periodic cleaning of dispenser recess area is recommended as staining may occur with usage of the K-Cup brewer.
Fresh Food Storage Options
Rearranging the Shelves
Shelves in the refrigerator compartment are adjustable.
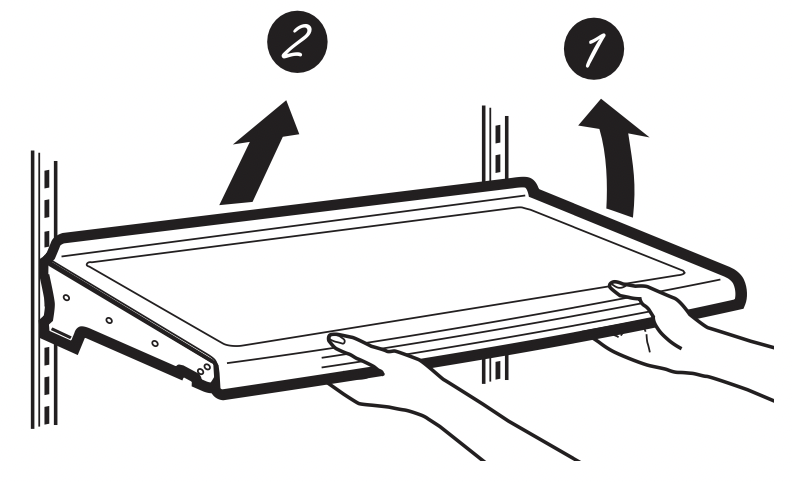
To remove:
Remove all items from the shelf.
Tilt the shelf up at the front.
Lift the shelf up at the back and bring the shelf out.
To replace:
While tilting the shelf up, insert the top hook at the back of the shelf in a slot on the track.
Lower the front of the shelf until the bottom of the shelf locks into place.
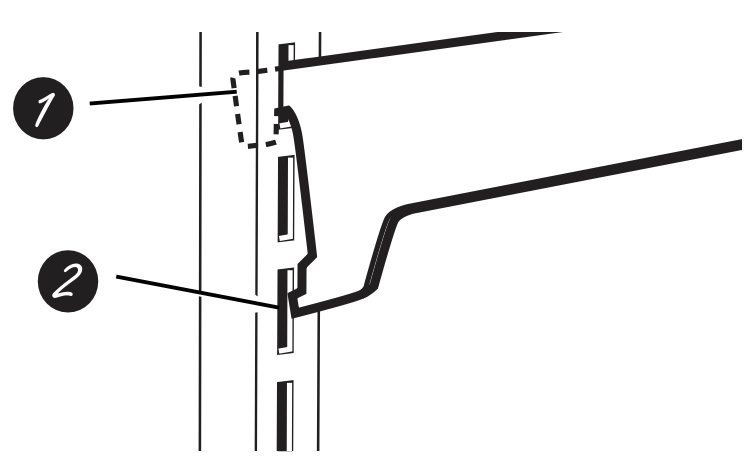
Spillproof Shelves
Spillproof shelves have special edges to help prevent spills from dripping to lower shelves.
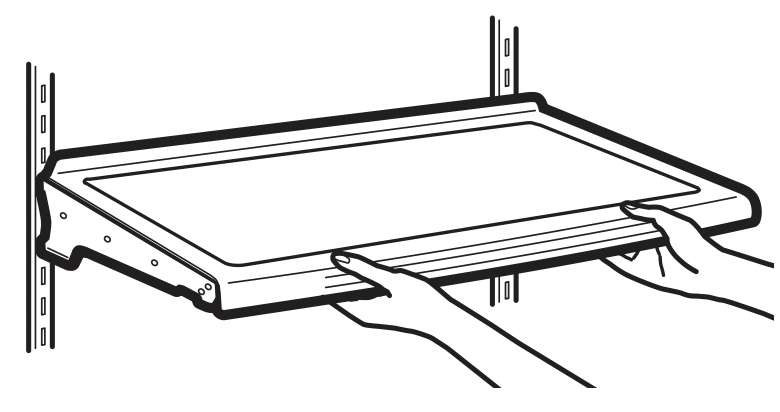
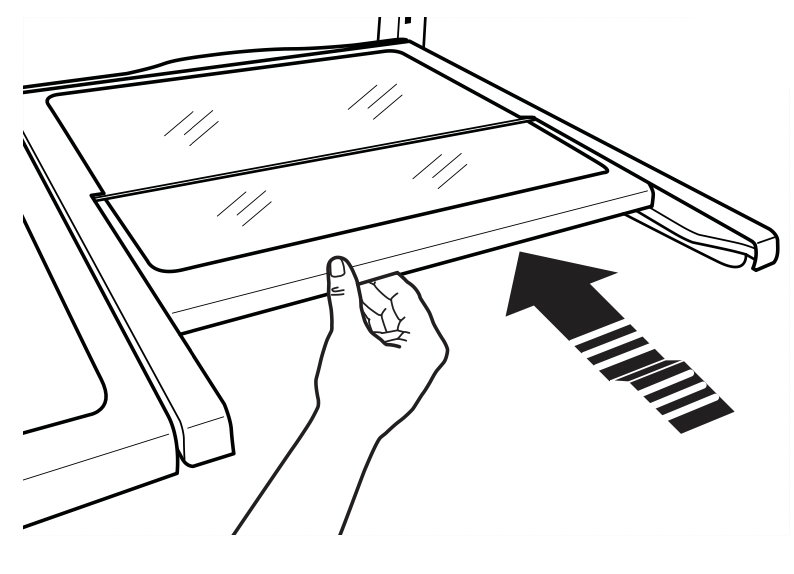
Quick Space Shelf *
This shelf splits in half and slides under itself for storage of tall items on the shelf below. This shelf can be removed and replaced or relocated (just like spillproof shelves).
NOTE: The back half of the Quick Space Shelf is not adjustable
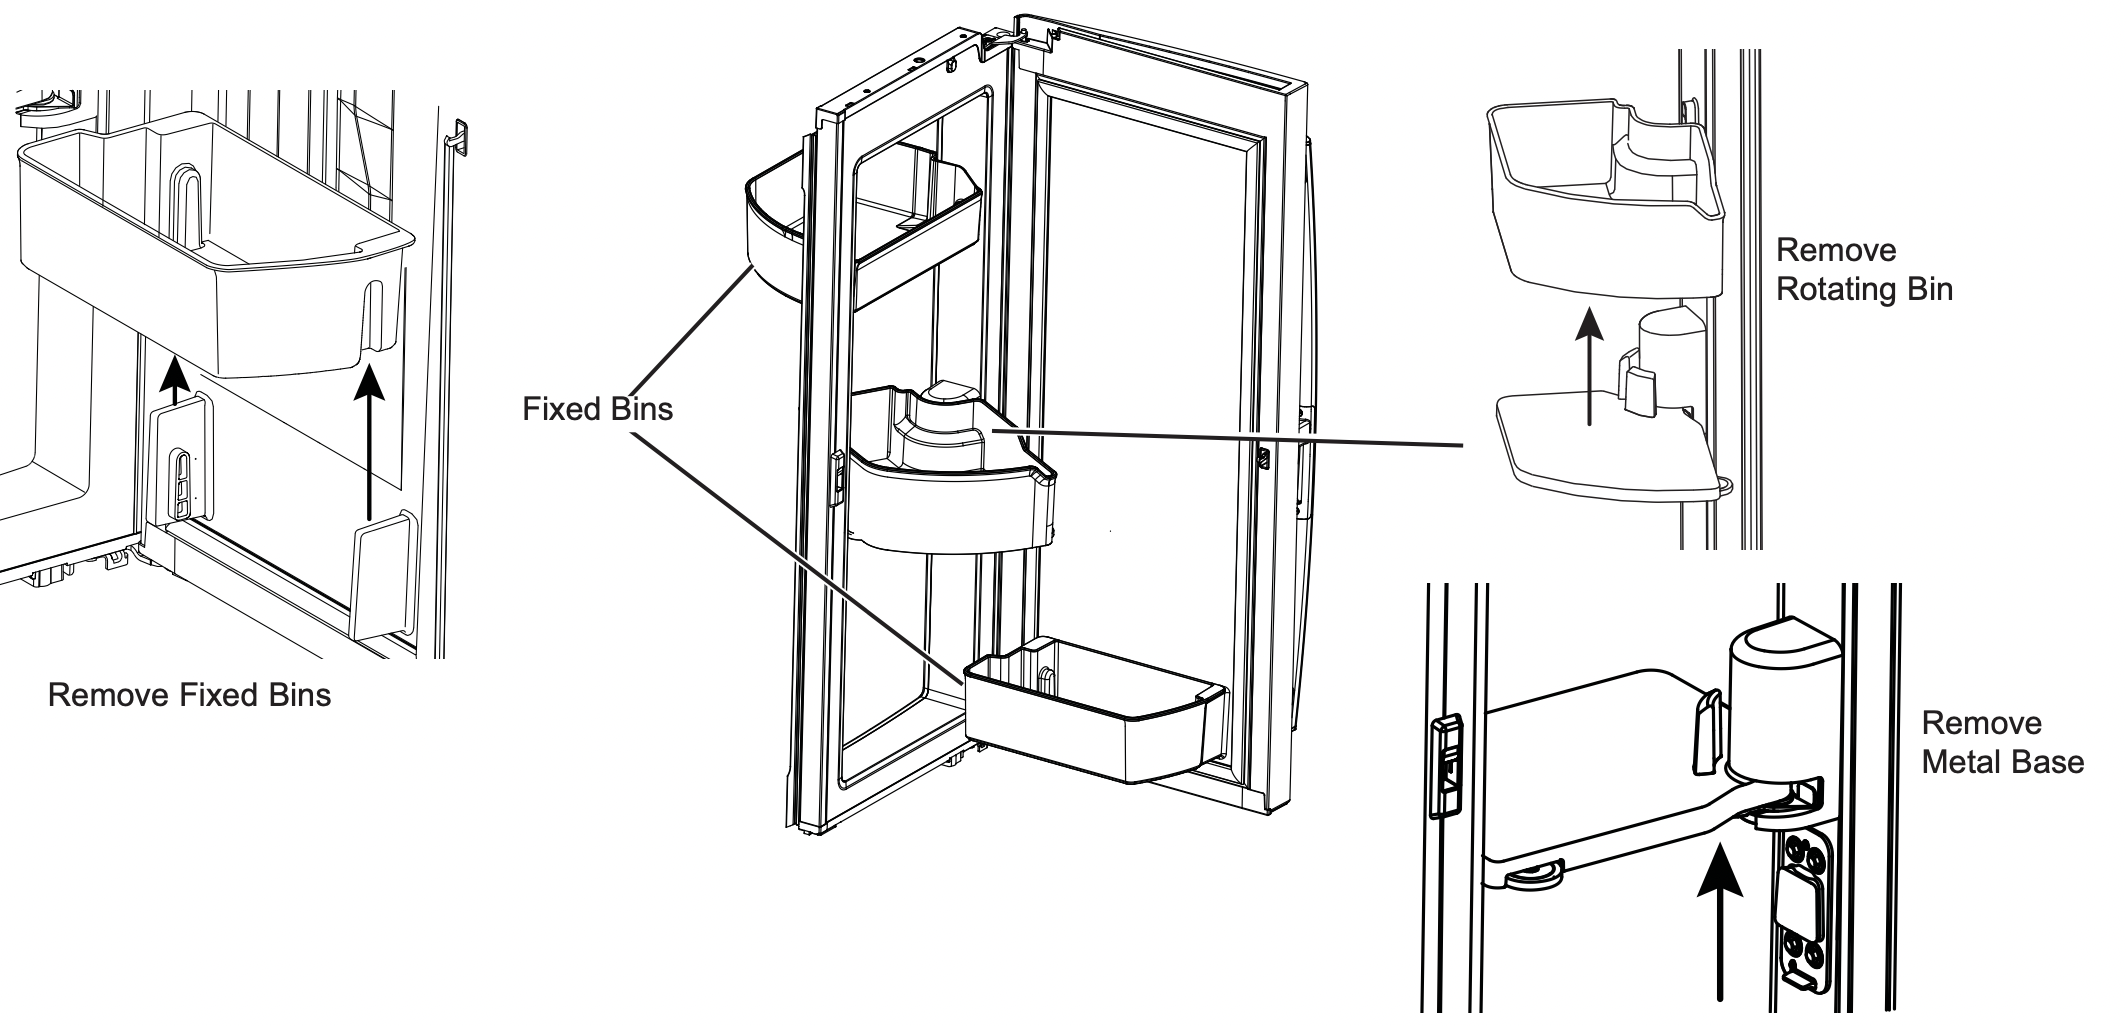
Right Door Bins
FIXED BINS can easily be carried from refrigerator to work area.
To remove: Lift bin straight up, then pull out.
ROTATING BIN:
To remove: Rotate bin outward then lift straight up. To remove Place hand under metal base and lift up.
To remove Metal Base: Place hand and lift up.
Left Door Bins
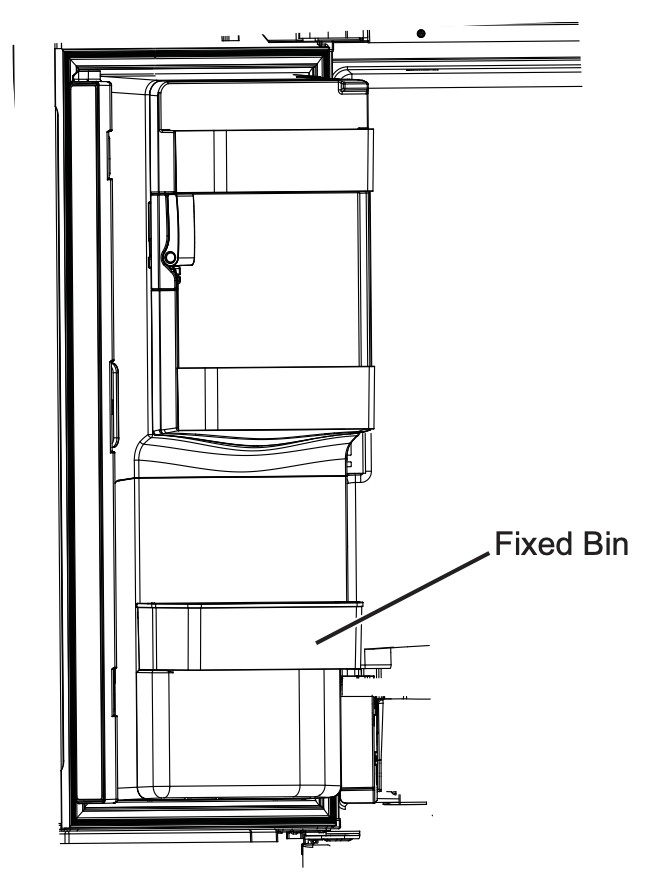
DISPENSER MODELS - FIXED BIN*
To remove: Lift the bin straight up, then pull out.
The ice maker door bins are not interchangeable, note the location upon removal and replace the bin in its proper location.
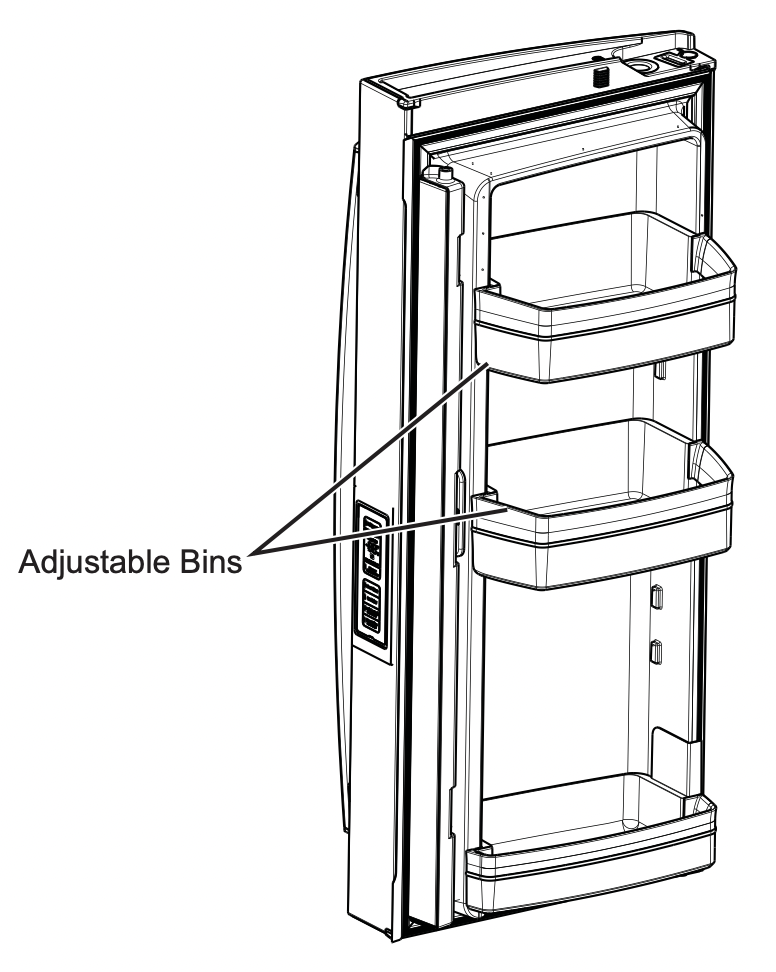
NON-DISPENSER MODELS - ADJUSTABLE BINS*
Adjustable bins can easily moved up or down the inside of the door to give better flexibility for storage.
To remove: Lift bin straight up, then pull out.
Climate Zone & Temperature Controlled Drawer
How to Remove and Replace Drawer
To remove:
Pull the drawer out to the stop position.
Lift the front of the drawer up and out.
To replace:
Pull left and right slides until fully extended.
Place drawer back in first and rotate drawer front down to seat on slide.
Push the drawer in to closed position.
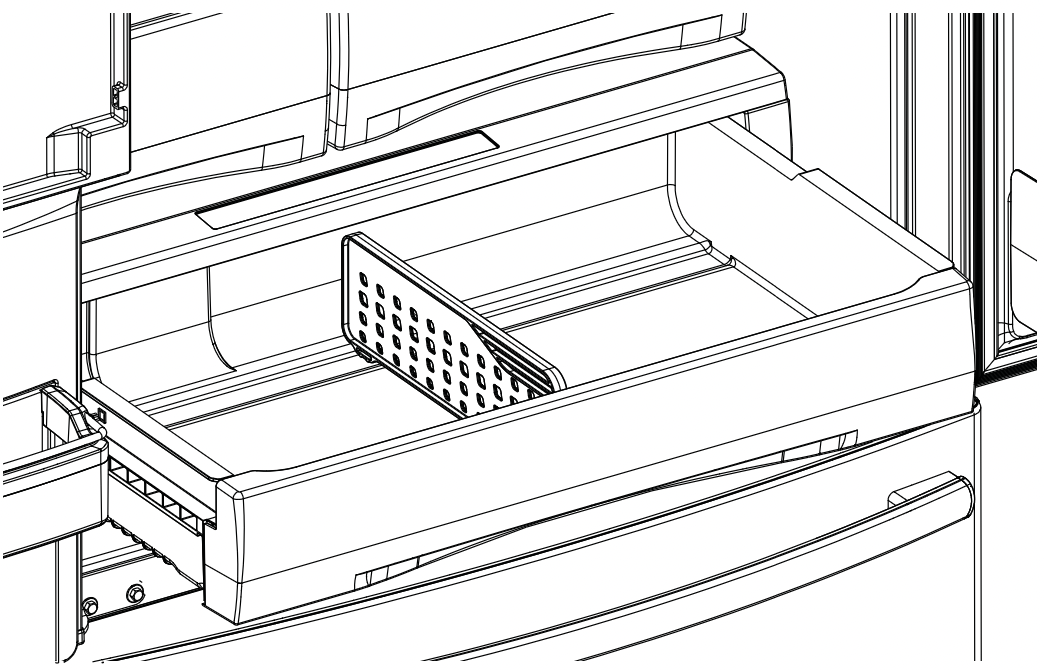
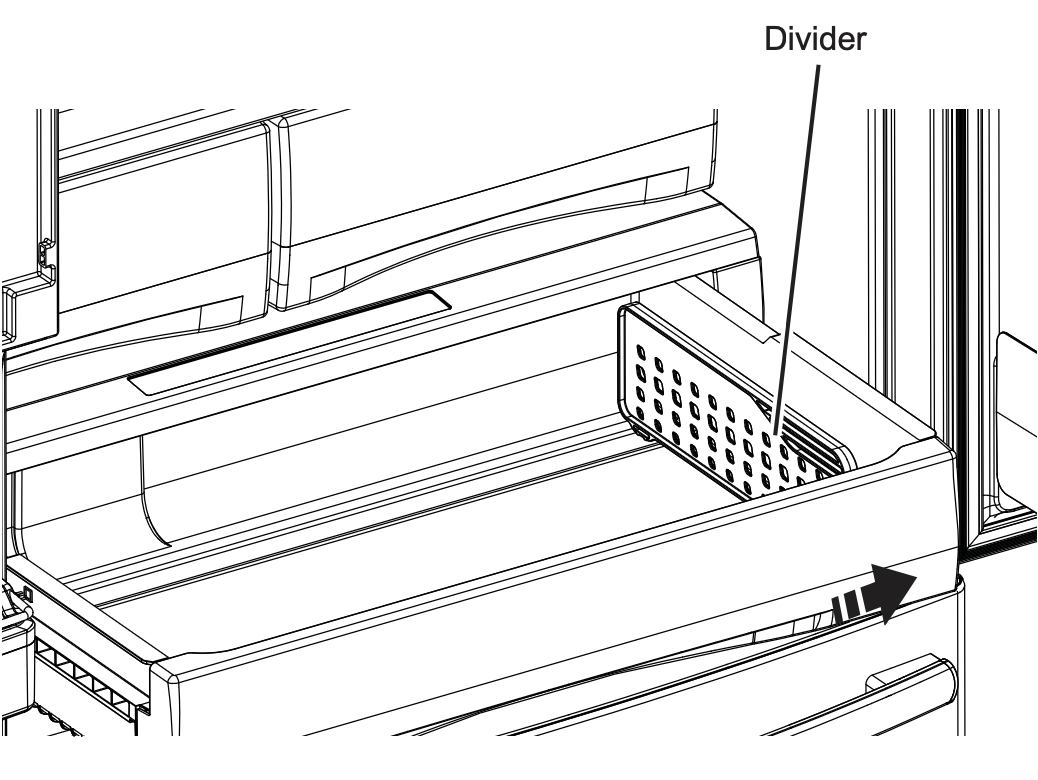
How to Remove and Replace Drawer Divider*
To remove:
Pull the drawer out to the stop position.
Raise the front side of the divider to unhook it from the rear wall of the drawer.
To replace:
Hook the back of the divider over the rear wall of the drawer.
Push the divider down.
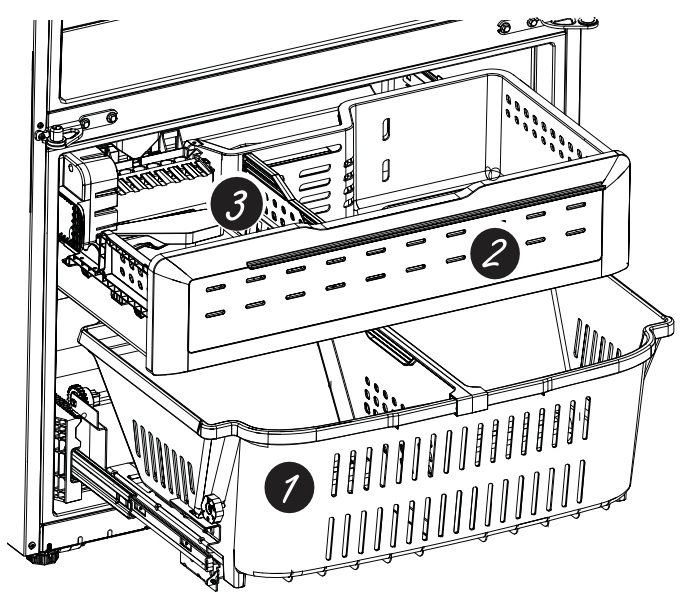
Baskets, Drawers, and Bins
Freezer Basket and Drawer
Basket.
Drawer.
Ice Bucket * (Available on Non-Dispense models only. Available as a IM Kit on some models).
Non-Adjustable Bin in the Freezer*
To remove: Push in plastic tab on either left or right side
To replace: Slide bin into location until it locks into place.
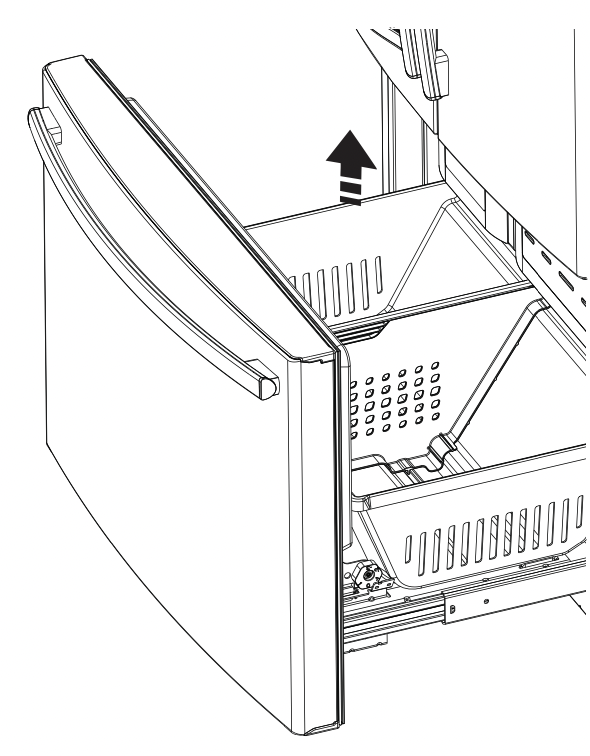
Basket Removal
To remove, standard depth models only:
Open freezer door to the stop position.
Remove freezer door bin by pushing plastic tab on either left or right side to release bin hinge pin.
Remove freezer basket by lifting up the rear of the basket and moving basket rearward until the front of the basket can be rotated upward and out.
Lift it out to remove.
To remove, counter depth models only:
Open fresh food doors.
Open freezer door to the stop position.
Remove freezer basket by lifting up the rear of the basket and rotate it upward.
Lift it out to remove.
To replace: Reverse step 1 through 4 to replace.
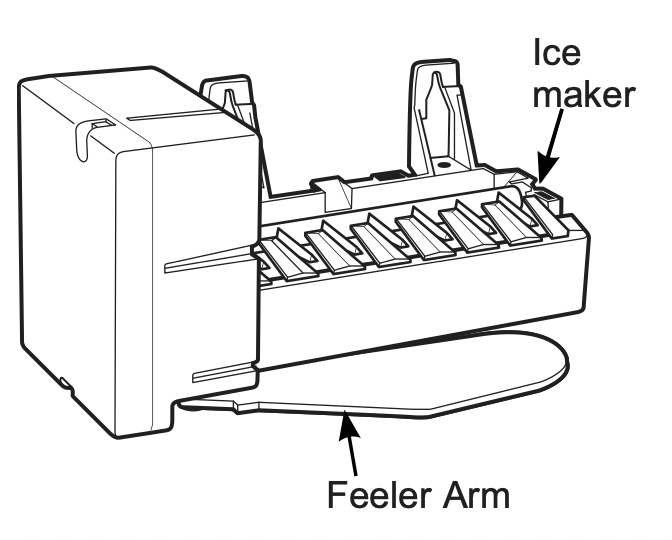
Automatic Ice Maker
A newly installed refrigerator may take 12 to 24 hours to begin making ice.
Warning
Connect to potable water supply only.
A cold water supply is required for automatic icemaker operation. The water pressure must be between 40 and 120 psi (275-827 kiloascals).
Automatic Ice maker*
The ice maker will produce seven cubes per cycle approximately 100–130 cubes in a 24-hour period, depending on freezer compartment temperature, room temperature, number of door openings and other use conditions.
The ice maker will fill with water when it cools to 15°F (-10°C). A newly installed refrigerator may take 12 to 24 hours to begin making ice cubes.
If the refrigerator is operated before the water line connection is made to the unit or if the water supply to an operating refrigerator is turned off, make sure that the ice maker is turned off. Once the water has been connected to the refrigerator, the ice maker may be turned on. See the table below for details.
You may hear a buzzing sound each time the ice maker fills with water.
Throw away the first few batches od ice to allow the water line to clear.
Be sure nothing interferes with the sweep of the feeler arm. When the bin fills to the level of the feeler arm, the ice maker will stop producing ice. It is normal for several cubes to be joined together.
If ice is not used frequently, old ice cubes will become cloudy, taste stale and shrink.
NOTE: In homes with lower-than-average water pressure, you may hear the ice maker cycle multiple times when making one batch of ice.
CAUTION
To minimize the risk of personal injury, avoid contact with the moving parts of the ejector mechanism, or with the heating element that releases the cubes. Do not place fingers or hands on the automatic ice making mechanism while the refrigerator is plugged in.
How to Turn the Ice Maker On/Off
Ice Bucket and Dispenser*
Open the ice box door on inside of the left door.
Pull up and out on the ice bucket in the left hand door to remove it from the compartment.
To replace the ice bucket, set it on the guide brackets and push until the ice bucket seats properly.
If bucket cannot be replaced, rotate the ice bucket fork 1/4 turn clockwise.
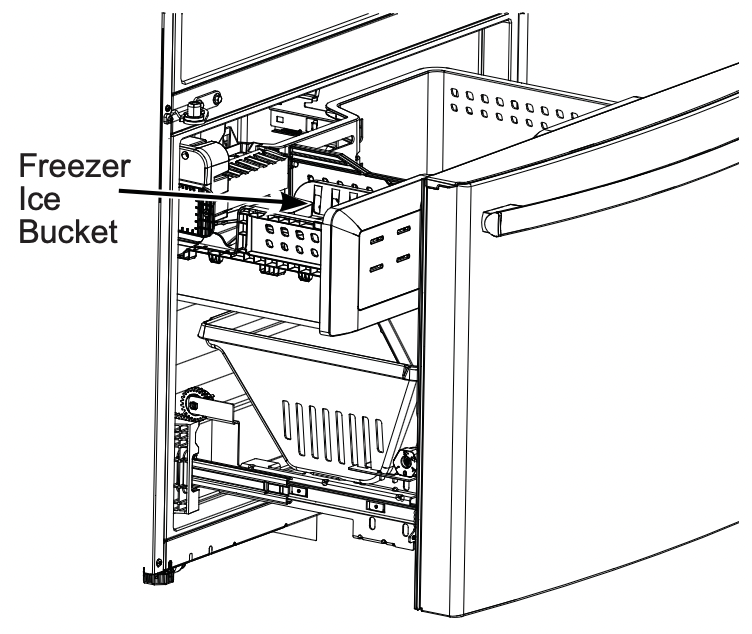
Ice Maker (Available on Non Dispense models, also available as IM Kit for some models)
There is additional ice storage in the freezer compartment drawer.
Open the freezer drawer.
The ice bucket is located on the left side of the upper basket.
Pull the upper basket forward to remove the ice bucket.
Care and Cleaning
Cleaning the Outside
Directions for Cleaning Outside Surfaces, Door Handles, and Trim
DO USE
DO NOT USE
Soft, clean cloth or sponge
Abrasive cloths, scrubbing sponges, scouring or steelwool pads
Mild detergent mixed with warm water
Approved stainless steel cleaners
Cleaners with oxaclic acid such as Bar Keepers Friend Soft CleanserTMcan be used to remove surface rust, tarnish and small blemisheson stainless steel surfaces only.
Abrasive powders or sprays
Window Sprays or Ammonia
Citrus or plant oil-based cleaners
Acidic or vinegar-based cleaners
Oven cleaners
Cleaners containing acetone (propanone)
Any cleaner with WARNING about plastic contact
NOTE: DO NOT allow stainless steel cleaner to come in contact with any plastic parts such as trim pieces, handle hardware and liners. If unintentional contact of cleaners with plastic parts does occur, clean plastic part with a sponge and mild detergent mixed with warm water.
Cleaning the Inside
To help prevent odors, leave an open box of baking soda in the refrigerator and freezer compartments.
Unplug the refrigerator before cleaning.
If this is not practical, wring excess moisture out of sponge or cloth when cleaning around switches, lights or controls.
Use an appliance wax polish on the side surface between the doors.
Use warm water and baking soda solution - about a tablespoon (15ml) of baking soda to a quart (1 liter) of water. This both cleans and neutralizes odors. Rinse and wipe dry.
To clean the inside metal panel*, open the outer door using the Door in Door Latch. Clean the panel with a mild detergent and then wipe dry with a soft cloth. Do not use any stainless steel cleaner on the panel as it may damage the surrounding plastic.
CAUTION: Do not clean glass shelves or coverswith warm water when they are cold. Glass shelves and covers may break if exposed to sudden temperature changes or impact such as bumping or dropping. Tempered glass is designed to shatter into many small pieces if it breaks. Do not wash any plastic refrigerator parts in the dishwasher.
Behind the Refrigerator
Be careful when moving the refrigerator away from the wall. All types of floor coverings can be damaged, particularly cushioned coverings and those with embossed surfaces.
Raise the leveling legs located at the bottom front of the refrigerator.
Pull the refrigerator straight out and return it to position by pushing it straight in. Moving the refrigerator in a side direction may result in damage to the floor covering or refrigerator.
Lower the leveling legs until they touch the floor.
WARNING - ELECTRICAL SHOCK HAZARD: When pushing the refrigerator back, make sure you don’t roll over the power cord or water supply line.
Preparing for Vacation
For long vacations or absences, remove food and unplug the refrigerator. Clean the interior with a baking soda solution of one tablespoon (15ml) of baking soda to one quart (1 liter) of water. Leave the doors open.
If the temperature can drop below freezing, have a qualified service technician drain the water supply system to prevent serious property damage due to flooding.
Turn refrigerator off or unplug the refrigerator.
Empty ice bucket
Turn water supply off
If you cut the water supply off, turn off the ice maker.
Upon returning from vacation:
Replace the water filter.
Run 2 gallons (7.57 liters) of water through the cold water dispenser (about 5 minutes) to flush the system.
Preparing to Move
Secure all loose items such as shelves and drawers by taping them securely in place to prevent damage.
When using a hand truck to move the refrigerator, do not rest the front or back of the refrigerator against the hand truck. This could damage the refrigerator.
Handle only from the sides of the refrigerator.
Be sure the refrigerator stays in an upright position during moving.
Replacing the Lights
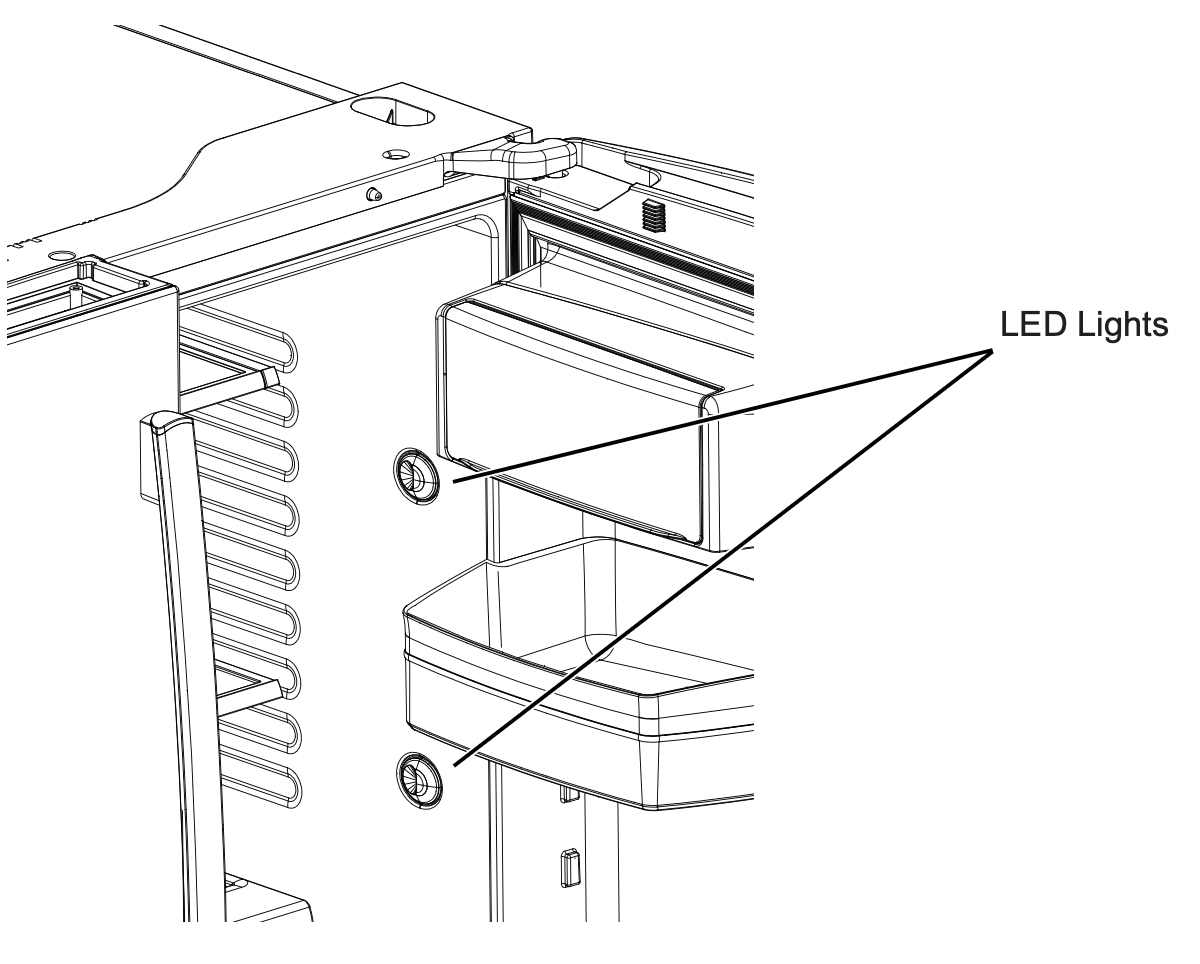
Refrigerator Lights (LEDs)
Appearance may vary by model.
There is LED lighting in fresh food compartment and on the bottom of the fresh food doors to light the freezer compartment.
An authorized technician will need to replace the LED light.
TROUBLESHOOTING
Normal Operating Conditions
Newer refrigerators sound different from older refrigerators.
Modern refrigerators have more features and use newer technology.
Do you hear what I hear? These conditions are normal.
The new high efficiency compressor may run faster and longer than your old refrigerator and you may hear a high-pitched hum or pulsating sound while it is operating.
You may hear a whoosing sound when the doors close. This is due to pressure equalizing within the refrigerator.
After dispensing ice, a motor will close the ice chute to keep warn room air from entering the ice bucket, maintaining ice at a freezing temperature. The hum of the motor closing the ice chute is normal, shortly after dispensing ice.
You may hear the fans spinning at high speeds. This happens when the refrigerator is first plugged in, when the doors are opened frequently or when a large amount of food is added to the refrigerator or freezer compartments. The fans are helping to maintain the correct temperatures.
The fans change speeds in order to provide optimal cooling and energy savings.
CLICKS, POPS, CRACKS and SNAPS
You may hear cracking or popping sounds when the refrigerator is first plugged in. This happens as the refrigerator cools to the correct temperature.
The compressor may cause a clicking or chirping sound when attempting to restart (this could take up to 5 minutes).
Expansion and contraction of cooling coils during and after defrost can cause a cracking or popping sound.
On models with an ice maker, after an ice making cycle, you may hear the ice cubes dropping into the ice bucket.
After dispensing ice, a motor will close the ice chute to keep warm room air from entering the ice bucket, maintaining ice at a freezing temperature.
The flow of refrigerant through the cooling coils may make a gurgling noise like boiling water.
Water dropping on the defrost heater can cause a sizzling, popping or buzzing sound during the defrost cycle.
A water dripping noise may occur during the defrost cycle as ice melts from the evaporator and flows into the drain pan.
Closing the door may cause a gurgling sound due to pressure equalization.
START UP COOLING
It can take up to 24 hours for the refrigerator and freezer temperatures to match the display. During that time refrigerator and freezer door openings should be minimized.
TIPS
Freezer cools first.
Refrigerator compartment cools last; it may take several hours after the freezer.
Turning off ice maker makes both fresh food and freezer food cool faster.
Problem
Possible Causes
What to Do
Water filter indicated as installed incorrectly or a leak is present on cap control panel.
Water filter installed backward or is leaking.
Check for leak. If no leak is present, remove filter/by pass plug**, rotate 180° and reinstall.
''Warning Triangle'' is lit Replace Filter/Replace Water Filter is lit. Over Due light is lit.
Water filter leaking or needs replacing Water filter backwards
Replace water filter, check for leak Remove filter,rotate 180° and reinstall
Dispenser Off is lit
Control A, B & C Wrong filter installed
Replace filter with proper filter Remove filter, rotate 180° and reinstall
Not filtering
Filter bypass installed Controls B & C.
Install correct water filter
Reset Filter is lit
Water filter leaking or needs replacing
Replace water filter, or install filter bypass **
Press and hold Reset Filter for 3 seconds to reset (Control D only).
Water filter indicator light is not lit
This is normal. This indicator will turn on to tell you that you need to replace the filter soon.
See About the Water Filter for more information.
Handle is loose/handle has a gap
Handle needs adjusting
See Attach Fresh Food Handle and Attach the Freezer Handle sections for detailed instructions.
Refrigerator beeping
This is door alarm
Turn off or disable with door closed
If door open and alarm is sounding, you can only snooze the alarm.
Not cooling
The cooling system is off
See About Controls.
Water has poor taste/odor*
Water dispenser has not been used for a long time
Dispense water, until all water in system is replenished.
Water in glass is warm*
Normal when refrigerator is first installed
Wait 24 hours for the refrigerator to completely cool down.
Water dispenser has not been used for a long time
Dispense water, until all water in system is replenished
Water system has drained
Allow several hours for replenished supply to chill
Water dispenser does not work*
Water supply line turned off or not connected
See Installing the Water Line
Water filter clogged or filter/by pass plug not installed
Replace filter cartridge or remove filter and install by pass plug**
Air may be trapped in the water system
Press the dispenser arm for at least 5 minutes.
Water in reservoir is frozen because the controls are set too cold
Set the refrigerator control to a warmer setting and wait 24 hours. If the water does not dispense after 24 hours, call for service.
Water spurting from dispenser*
Newly installed filter cartridge
Run water from the dispenser for 5 minutes (about 2 gallons).
No water or ice cube production*
Supply line or shutoff valve is clogged
Call a plumber
Water filter is clogged
Replace filter cartridge or remove filter and installbypass plug**
Filter cartridge not properly installed.
Remove and reinstall filter cartridge, being certain thatit locks in place.
Ice maker is turned off.
Check that the ice maker is turned on. See About theAutomatic Ice Maker.
Water is leaking from dispenser*
Air may be present in the water line system, causing water to drip after being dispensed
Dispense water for at least 5 minutes to remove air from system
AUTO FILL under fill/no fill*
Not all containers work with AUTOFILL
Try different container
Error message
See page 14
Clean sensor. See page 14.
AUTO FILL overfills*
Not all containers work with AUTO FILL
Try different container
Freezer cooling, fresh food not cooling
Normal, when refrigerator first plugged in or after extended power outage
Wait 24 hours for temperature in both compartments toreach selected temperatures.
Ice dispenser opens after closing freezer drawer*
Normal
The ice dispenser door may open after closing freezer door to allow access.
Low brewing flow rate
There may have been a dent at the bottom of K-Cup causing the pin to pierce the filter allowing coffee grounds clogging the bottom pin
Avoid using damaged/dented K-cups and clean the lower needle before next brew
Low brewing flow rate / water drips from inner door
Top needle of the brewer clogged
Unclog the top needle holes using a paper clip and rinse brewer. Rinse brewer after every use.
Brewer is not detected or hot water leakingfrom top of the brewer
Incorrect assembly of brewer in the bracket
Make sure that Keuring Logo is in the front. Push brewer all the way in the brackets.
Coffee dispensed with splash or bubble bursting
Blocked vent hole in the brewer
Make sure the vent hole at the bottom of the brewer isclear from food or any other contamination
Beverage quality not as expected
You may be using non-standard or out dated K-Cups
Recommend using official Keuring K-Cups that are not past expiration and have not been damaged
Liquid drips from the brewer after brewer cycle is completed and the brewer is removed from the bracket
It is possible for liquids to be retained by the brewer and drip when it is removed
Use a cloth or container to capture the drips when brewer is removed
Delay when using Keuring K-Cup Pod dispenser
To ensure a quality beverage is delivered, a short delay is required to ensure the refrigerator is operating correctly
Ensuring consistent, quality operation requires the refrigerator to delay dispense for a short period of time
After brewing, my powdered beverage is not fully cleared from the used pod
Depending on size selected, the powder may not dissolve fully. Some powdered beverages develop into ‘clumps’ when left sitting for some time
Shake the powdered pods before brewing to break up these clumps and allow better clearing. For powdered beverage with no filter, use the Cocoa cycle selection
Brewer lid is difficult to close
K-cup is not fully seated.
Press K- cup all the way down into the brewer prior to closing the lid. Lower needle must puncture K-cup before closing the brewer lid
Brewer leaks during the brew cycle
Trouble in closing brewer lid or damaged K-cup
Press K-cup all the way down into the brewer prior to closing the lid. Lower needle must puncture K-cup before closing the brewer lid. Recommend using official Keuring K-cups that have not been damaged and have a good seal between the top cover and plastic bottom.
Truth or Myth
Truth or Myth? --- Answer --- Explanation
The refrigerator water filter may require replacement prior to six months - TRUE
The water filter indicator will indicate the need to replace the water filter every six months or 170 gallons of water dispensed (select models only). Water quality varies from city to city. If water flow from the dispenser slows, or ice production decreases, the water filter should be replaced, even though the filter indicator may not indicate the need for replacement.
The automatic ice maker in my refrigerator will produce ice when the refrigerator is plugged into a power receptacle. - MYTH
The refrigerator must be connected to water, and the ice maker must be turned on. Make sure the ice maker is turned on, only after the water line is connected and water is turned on. The ice maker can be turned onoff from the controls and ensure the ice maker is on, as indicated on the refrigerator control panel. See About the Automatic Ice Maker.
After the refrigerator has been plugged in and connected to water, I will immediately have unlimited chilled water available from the water dispenser. - MYTH
The water dispenser tank located inside the refrigerator stores water for dispensing. The water in this tank requires 24 hours to chill after installation. High usage conditions will not allow time for the water to chill.
After water dispenses, a few drops of water are normal. - TRUE
A few drops of water may fall from the dispenser, after the dispenser paddle has been released. To minimize the drops, remove the glass slowly from the dispenser.
I will never see frost inside the freezer compartment. - MYTH
Frost inside the freezer typically indicates that the door is not properly sealed, or has been left open. If frost is found, clear the frost using a plastic spatula and towel, then check to ensure that no food packages or containers are preventing the freezer door from closing. Check the refrigerator control panel to ensure the door alarm is on.
When the refrigerator is installed, or after replacing the water filter, I must dispense water for five minutes. - TRUE
A newly installed refrigerator or water filter contains air in the water lines. Press the dispenser paddle and dispense cold water for at least 5 minutes to remove air from the water line, and flush the filter.
To fill the ice bucket to the maximum capacity, I should dispense 12 and 18 hours after installation. - TRUE
Dispensing 3-4 cubes 12 hours and 18 hours after installation, allows ice to disperse within the ice bucket, which in turns calls on the ice maker to produce additional ice. Normal ice production = 100 cubes in 24 hours.
I can use the water filter bypass plug to determine if the filter requires replacement. - TRUE
Decrease in flow from the water dispenser, or decreased ice production, may indicate the need to replace the water filter. Install the water filter bypass plug (provided with the refrigerator on some models*), and check flow from the dispenser. If water flow returns to normal with the bypass plug in place, replace the water filter.
The top of the refrigerator doors will always be aligned. - MYTH
Several things can affect the fresh food door alignment, including the floor the refrigerator is installed on and loading of doors. If the top of the fresh food doors are not aligned, use a 1/4'' allen wrench to adjust the right/left hand door. The adjustment screw is located on the bottom right or left hand side of the door; open the freezer door to access the screw.
Refrigerator door handles can be easily tightened. - TRUE
If door handles are loose or have a gap, the handle can be adjusted using a 1/8'' allen wrench, on set screws located on the ends of the handles.
There may be odor and taste problems with your ice. - TRUE
After starting the ice maker, throw away 24 hours of ice production to avoid odor and taste problems.
I can make fine adjustments to the fresh food doors to align them. - TRUE
If the fresh food doors are not aligned, use a 1/4'' Allen wrench to adjust the right hand door. The adjustment screw is located on the bottom of the right/left hand door. Open the freezer door to access.
Door handles should always be removed for installation. - MYTH
If the door must be removed do not remove the handles, or if the refrigerator will fit easily through the passage way opening. Adjust handles that are loose or have a gap, by adjusting 1/8'' set screws on either end of handles.
Door remove is always required for installation. - MYTH
Check chart on reverse side of this instruction. Doors should only be removed when necessary to prevent damage from passage way or access to final location.
Refrigerator doors that won’t close after installation, can be adjusted to close properly. - TRUE
Door mechanism works best if installed at 90°+. If installed at 180°, remove the door from the mid hinge, and swing the door 180° before reinstalling. See Reinstalling the Refrigerator Doors.
There is an adjustment to rear wheels. - MYTH
Front leveling legs are adjustable and should be used to balance the refrigerator. Leveling legs are used to make initial fresh food door adjustment.
Check for leaks after all water connections are made. - TRUE
While purging the air from the water system, check all water line connections for leaks. Check the connection to the household water supply at back of refrigerator, and door water line connect.
Any packaging residue can be cleaned off the refrigerator using any cleaner. - MYTH
Do not use wax, polish, bleach, or other products containing chlorine on Stainless Steel panels, door handles and trim. Check this instruction under ''Cleaning the Outside'' for full details.
Additionally, the document applies to other GE - General Electric models: DFE*, GFE*, GFS*, GNE*, PFH*, PFE*, PFD*, GFD*, GYE*, GYS*, PYE*, DYE*, PWE*, ZWE*, PYD*