User Manual for Refrigerator
Tips for saving energy
If you follow the instructions below, your appliance will use less power.
Note: The arrangement of the features does not affect the energy consumption of the appliance.
|
Installing the appliance
|
|
Keep the appliance out of direct sunlight.
|
The appliance must cool less frequently at low ambient temperatures and therefore consumes less power.
|
|
Install the appliance as far away as possible from heating elements, cooker and other heat sources: 3 cm to electric or gas cookers.
30 cm to an oil or solid-fuel cooker.
Note: If this is not possible, attach an insulating plate between the appliance and heat source.
|
|
Select an installation location at a room temperature of approx. 20 °C.
|
|
Use a cavity depth of 56 cm.
Caution!
Risk of burns!
Individual parts of the appliance become hot during operation. Touching these parts may result in burns.
|
The air on the rear panel of the appliance does not warm up so intensely. The appliance consumes less power if the warm air can escape.
|
|
Do not cover or block the ventilation openings.
|
|
Ventilate the room daily.
|
|
Using the appliance
|
|
Open the appliance door only briefly.
|
The air in the appliance does not warm up so intensely. The appliance must cool less frequently and therefore consumes less power.
|
|
Transport purchased food in a cool bag and place quickly in the appliance.
|
|
Allow warm food and drinks to cool down before placing in the appliance.
|
|
Thaw frozen food in the refrigerator compartment in order to utilise the low temperature of the frozen food.
|
|
Always leave a space between the food and the rear panel.
|
The air can circulate and the air humidity will remain constant. The appliance must cool less fre- quently and therefore consumes less power.
|
|
Pack food airtight.
|
|
Vacuum the back of the appliance once a year.
|
The air on the rear panel of the appliance does not warm up so intensely. The appliance consumes less power if the warm air can escape.
|
|
Do not cover or block the ventilation openings.
|
Before using your appliance for the first time
1. Remove leaflets, adhesive tape and protective film.
2. Clean the appliance.
 "Cleaning" on page 18
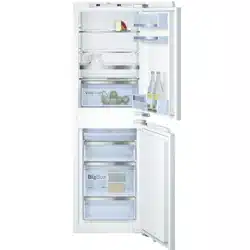
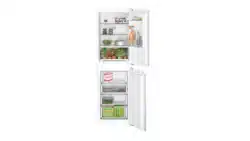
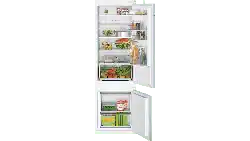
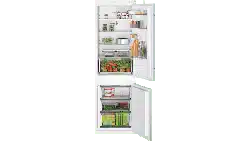
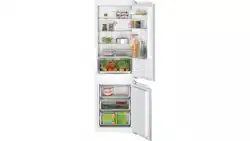
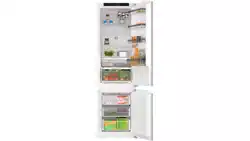
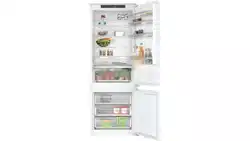
Appliance

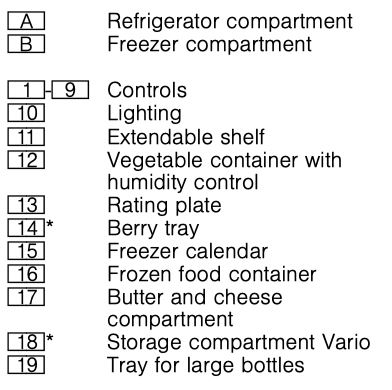
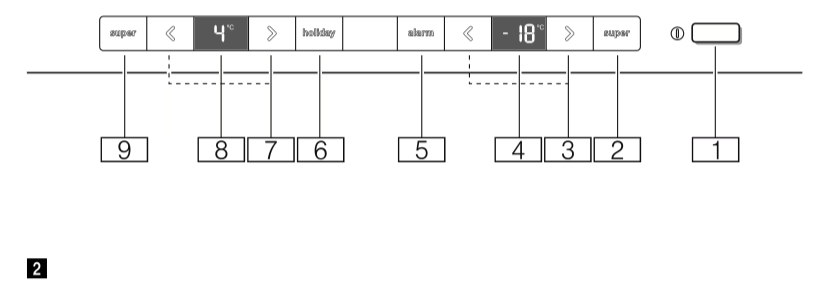
Controls
Interior fittings
(not all models)
Shelf
You can vary the shelf:
■ Pull out and remove the shelf.
Vario shelf
You can store tall items (e.g. cans or bottles):
■ Take out the front part of the shelf and push under the rear part.
Extendable shelf
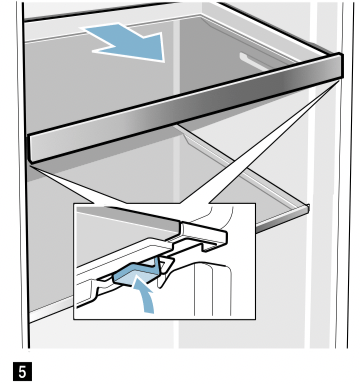
You can give yourself a better overview:
■ Pull out a shelf.
You can completely remove the shelf:
1. Press and hold down both buttons under the shelf.
2. Pull out the shelf, lower and swing out to the side.
Container
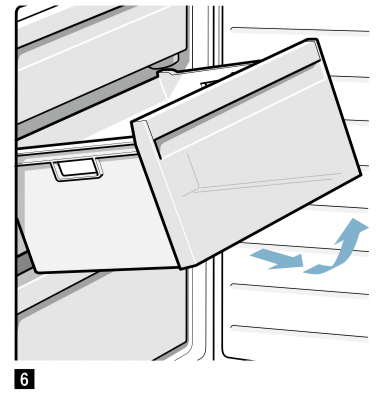
You can remove the container:
■ Pull out the container all the way, lift at the front and remove.
Storage compartment
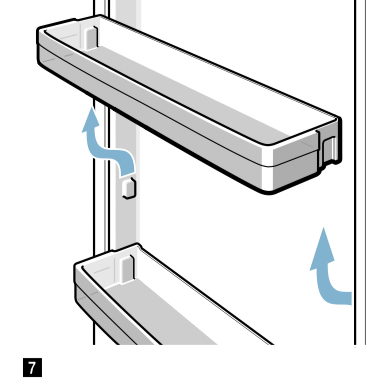
You can remove the storage compartment:
■ Lift up storage compartment and remove.
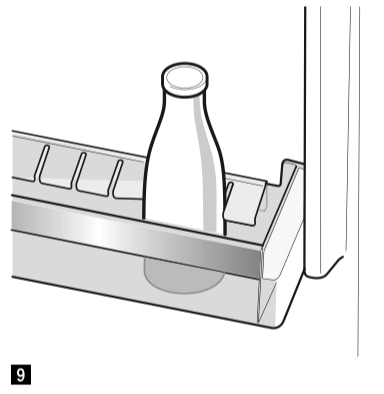
Storage compartment Vario

You can store large bottles in the lower storage compartment:
■ Push storage compartment to the right or left.
Bottle holder
When you open and close the door:
■ The bottle holder prevents the bottles from overturning.
Freezer calendar
Fig. 1/
The freezer calendar indicates the maximum storage duration in months at a constant temperature of –18 °C.
Ice cube tray
You can make ice cubes:
1. Fill the ice cube tray 3/4 full with water and place in the freezer compartment.
Note: If the ice cube tray is stuck to the freezer compartment, loosen with a blunt implement only (e.g. spoon handle).
2. To loosen the ice cubes, twist the ice cube tray slightly or hold briefly under flowing water.
Ice pack In the event of a power failure or a fault:
■ The ice pack delays the warming of the stored frozen food.
Note: The longest storage time is obtained by placing the ice pack on the food in the top compartment.
You can take out the ice pack for temporarily keeping food cool, e.g. in a cool bag.
Operating the appliance
Switching on the appliance
1. Press the  button.
The appliance begins to cool. Warning signal, flashing temperature display on the freezer compartment and lit button alarm indicate that the freezer compartment is still too warm.
2. Press the alarm button.
The warning signal switches off.
3. Setting the required temperature.
"Setting the temperature" on page 12
Operating tips
■ After the appliance has been switched on, it may take several hours until the set temperatures have been reached. Do not put in any food until the selected temperature has been reached.
■ The fully automatic NoFrost system ensures that the freezer compartment remains free of ice. Defrosting is not required.
■ The sides of the housing are partly heated slightly. This prevents condensation in the area of the door seal.
■ If the freezer compartment door cannot be immediately re-opened after it has been closed, wait until the resulting low pressure has equalised.
Switching off and disconnecting the appliance
Switching off the appliance
■ Press the button. The appliance no longer cools.
Disconnecting the appliance
If you do not use the appliance for a prolonged period:
1. Press the button.
The appliance no longer cools.
2. Pull out the mains plug or switch off the fuse.
3. Clean the appliance.
4. Leave the appliance open.
Setting the temperature
Recommended temperature
Refrigerator compartment: +4 °C
Freezer compartment: –18 °C
Refrigerator compartment
■ Keep pressing the button </> until the display indicates the required temperature.
Freezer compartment
■ Keep pressing the button </> until the display indicates the required temperature.
Sticker OK
(not all models)
You can use sticker OK to check whether the temperature in the refrigerator compartment reaches +4 °C or lower.
If the sticker does not indicate OK, gradually reduce temperature.
When the appliance is switched on, it may take up to 12 hours until the set temperature is reached.
Correct setting

Super cooling
Super cooling cools the refrigerator compartment as cold as possible.
Switch on super cooling mode, e.g.:
■ before placing large quantities of food in the compartment
■ for cooling drinks quickly
Note: When super cooling is switched on, increased operating noises may occur.
After 15 hours the appliance switches to normal operation.
Switching Super cooling on/off:
■ Press the super button. The button is lit when Super cooling is switched on.
Super freezing
Super freezing cools the freezer compartment as cold as possible.
Switch on super freezing mode, e.g.:
■ to freeze food solid as quickly as possible:
■ 4–6 hours before placing food weighing 2 kg or more in the freezer compartment
■ to use the max. freezing capacity
"Maximum freezing capacity" on page 15
Note: When super freezing is switched on, increased operating noises may occur.
After approx. 2 1/2 days the appliance switches to normal operation.
Switching Super freezing on/off:
■ Press the super button. The button is lit when Super freezing is switched on.
Holiday mode
If leaving the appliance for a long period of time, you can switch the appliance over to the energy-saving holiday mode.
The temperature in the refrigerator compartment is automatically switched to +14 °C.
Do not store any food in the refrigerator compartment during this time.
The temperature in the freezer compartment remains unchanged.
Switching holiday mode on/off:
■ Press the holiday button. When holiday mode is switched on, the button is lit and the refrigerator compartment temperature display no longer indicates a temperature.
Alarm
Door opening alarm
The door opening alarm (continuous sound) switches on if the appliance door is open for longer than one minute.
■ Close the door or press button alarm. The warning signal is switched off.
Temperature alarm
If the freezer compartment becomes too warm, the temperature alarm (intermittent signal) switches on.
Caution!
During the thawing process, bacteria may occur and spoil the frozen food Do not refreeze thawing or thawed food. Refreeze food only after cooking. Do not store the frozen produce for the max. storage period.
Note: The alarm may be actuated without risk to the frozen food in the following cases:
■ The appliance is switching on.
■ Large quantities of fresh food are put in.
■ The freezer compartment door has been open too long.
Indicating warmest temperature and switching off warning signal:
■ Press the alarm button.
The display briefly indicates the warmest temperature reached in the freezer compartment. Then the display indicates the set temperature again.
From this time on the warmest temperature is recalculated and saved.
Note: The button alarm remains lit until the set temperature has been reached again.
Refrigerator compartment
The refrigerator compartment is suitable for storing meat, sausages, fish, dairy products, eggs, ready meals and pastries.
The temperature can be set from +2 °C ... +8 °C.
The refrigerator compartment can also be used to store highly perishable foods in the short to medium term. The lower the selected temperature, the slower the enzymatic and chemical processes and deterioration by microorganisms. A temperature of +4 °C or lower ensures optimum freshness and safety of the stored foods.
Note when storing food
■ Store fresh, undamaged food. The quality and freshness will then be retained for longer.
■ In the case of ready products and bottled goods do not exceed the minimum sell-by date or use-by-date indicated by the manufacturer.
■ To retain aroma, colour and freshness, pack or cover food well before placing it in the appliance. This avoids transference of flavours and discolouration of the plastic parts.
■ Leave warm food and drinks to cool down before placing them in the refrigerator compartment.
Note the chill zones in the refrigerator compartment
The air circulation in the refrigerator compartment creates different chill zones.
Coldest zone
The coldest zone is between the arrow stamped on the side and the shelf underneath.
Note: Store perishable food (e.g. fish, sausages and meat) in the coldest zone.
Warmest zone
The warmest zone is at the very top of the door.
Note: Store e.g. hard cheese and butter in the warmest zone. Cheese can continue to release its flavour and the butter will still be easy to spread.
Vegetable container with humidity control
The vegetable container is the best storage location for fresh fruit and vegetables. You can adjust the air humidity in the vegetable container via the humidity controller and a special seal. This allows fresh fruit and vegetables to be stored twice as long as with conventional storage.
The air humidity in the vegetable container can be set according to the type and amount of products to be stored:
■ Mainly fruit as well as for a large load – set lower air humidity
■ Mainly vegetables as well as for a mixed load or small load – set higher air humidity
Notes
■ Fruit sensitive to cold (e.g. pineapple, banana, papaya and citrus fruit) and vegetables sensitive to cold (e.g. aubergines, cucumbers, zucchini, peppers, tomatoes and potatoes) should be stored outside the refrigerator at temperatures of approx. +8 °C – +12 °C for optimum preservation of quality and flavour.
■ Condensation may form in the vegetable container depending on the food and quantity stored. Remove condensation with a dry cloth and adjust air humidity in the vegetable container with the humidity controller.
Freezer compartment
The freezer compartment is suitable for:
■ storing frozen food
■ making ice cubes
■ freezing food
The temperature can be set from –16 °C ... –24 °C.
The freezer compartment can be used to store perishable foods long-term almost without any noticeable reduction in quality, as the low temperatures considerably slow down or stop deterioration. Appearance, flavour and all valuable ingredients are largely retained.
Long-term storage of food should be at –18 °C or lower.
The time between putting fresh food in the freezer compartment and it freezing solid depends on the following factors:
■ set temperature
■ type of food
■ amount of food in the freezer compartment
■ quantity and type of storage
Maximum freezing capacity
The maximum freezing capacity indicates the quantity of food which can be frozen solid within 24 hours.
Information on the max. freezing capacity can be found on the rating plate.
To use the maximum freezer capacity, switch on Super freeze 24 hours before placing the fresh food in the freezer compartment.
Prerequisites for max. freezing capacity
1. Approx. 24 hours before inserting fresh produce: switch on Super freeze.
"Super freezing" on page 13
2. Take the container out of the freezer compartment and stack the food directly on the shelves and on the floor of the freezer compartment.
3. First fill the upper compartment with food. This is where the food will freeze most quickly.
4. If the top compartment is inadequate, store the remaining quantity in the compartment underneath starting at the front right side.
5. Freeze fresh food as close as possible to the side panels.
Fully utilising the freezer volume
To place the maximum quantity of frozen food in the freezer compartment:
■ remove all fittings.
■ Store food directly on the shelves and on the floor of the freezer compartment.
Purchasing frozen food
■ Ensure the packaging is not damaged.
■ Do not exceed the minimum sell-by date.
■ The temperature in the supermarket freezer must be –18 °C or lower.
■ If possible, transport frozen food in a cool bag and place quickly in the freezer compartment.
Note when loading products
■ Freeze large quantities of food in the top compartment. This is where the food will freeze especially quickly and gently.
■ Distribute food in the compartments or frozen food containers.
■ Do not bring food which is to be frozen into contact with frozen food. If required, restack frozen food in the frozen food containers.
■ Important for unrestricted air circulation in the appliance: push in frozen food container all the way.
Freezing fresh food
Freeze only fresh and undamaged food.
Food which is boiled, fried or baked is more suitable for freezing than food which is raw.
Before freezing food, make preparations appropriate to the food in order to retain the best possible nutritional value, flavour and colour:
■ Vegetables: wash, chop, blanch.
■ Fruit: wash, pit and perhaps peel, possibly add sugar or ascorbic acid solution.
Information on how to do this can be found in the relevant literature.
Suitable for freezing
■ Baked goods
■ Fish and seafood
■ Meat
■ Poultry and game
■ Vegetables, fruit and herbs
■ Eggs without shells
■ Dairy products, e.g. cheese, butter and quark
■ Ready meals and leftovers, e.g. soups, stews, cooked meat and fish, potato dishes, soufflés and desserts
Not suitable for freezing
■ Types of vegetables which are usually eaten raw, e.g. lettuce or radishes
■ Unpeeled or hard boiled eggs
■ Grapes
■ Whole apples, pears and peaches
■ Yoghurt, soured milk, sour cream, creme fraiche and mayonnaise
Packing frozen food
The correct type of packaging and material selection are decisive factors in the retention of the product quality and prevent the development of freezer burn.
1. Place food in packaging.
2. Remove air.
3. Pack food airtight to prevent it from losing flavour and drying out.
4. Label packaging with contents and date of freezing.
Suitable packaging:
■ Plastic film
■ Tubular film made of polyethylene (PE)
■ Aluminium foil
■ Freezer containers
Suitable locks:
■ Rubber bands
■ Plastic clips
■ Cold-resistant adhesive tape
Not suitable packaging:
■ Wrapping paper
■ Greaseproof paper
■ Cellophane
■ Refuse bags and used shopping bags
Shelf life of frozen food at –18 °C
|
Fish, sausage, ready meals and cakes and pastries:
|
up to 6 months
|
|
Meat, poultry:
|
up to 8 months
|
|
Fruit, vegetables:
|
up to 12 months
|
Thawing frozen food
The thawing method must be adjusted to the food and application in order to retain the best possible product quality.
Thawing methods:
■ in the refrigerator compartment (especially suitable for animal-based foods such as fish, meat, cheese, quark)
■ at room temperature (bread)
■ in the microwave (food for immediate consumption or immediate preparation)
■ in the oven/cooker (food for immediate consumption or immediate preparation)
Caution!
Do not refreeze thawing or thawed food. You can only refreeze the food when it has been used for a ready-to-eat meal (boiled or fried).
The frozen food can no longer be stored for the maximum duration.
Defrosting
Refrigerator compartment
While the refrigerating unit is running, condensation droplets or frost form on the rear panel. This is due to functional reasons. It is not necessary to wipe off the condensation droplets or frost. The rear panel defrosts automatically. The condensation drains off into the condensation channel.
The condensation runs from the condensation channel to the evaporation pan where it evaporates.
Note: Keep the condensation channel and drainage hole clean so that the condensation can drain and odours do not form.
Freezer compartment
The fully automatic NoFrost system ensures that the freezer compartment remains free of ice. Defrosting is no longer required.
Cleaning
Caution!
Avoid damaging the appliance and the fittings.
■ Do not use abrasive, chloride or acidic cleaning agents or solvents.
■ Do not use scouring or abrasive sponges. The metallic surfaces may corrode.
■ Never clean the shelves or containers in the dishwasher. The parts may become deformed.
Proceed as follows:
1. Switch off the appliance.
2. Pull out the mains plug or switch off the fuse.
3. Take out the food and store in a cool location. If present: place ice pack on the food.
4. If present: wait until the layer of frost has thawed.
5. Clean the appliance with a soft cloth, lukewarm water and a little pH-neutral washing-up liquid. Caution! The rinsing water must not run into the light or through the drainage hole into the evaporation area.
6. Wipe door seal with clear water and dry thoroughly with a cloth.
7. Reconnect and switch on appliance and put in food.
Cleaning the equipment
To clean, take the variable parts out of the appliance.
"Interior fittings" on page 10
Condensation channel
Regularly clean the condensation channel and drainage hole with a cotton bud or similar implement to ensure that the condensation can drain.
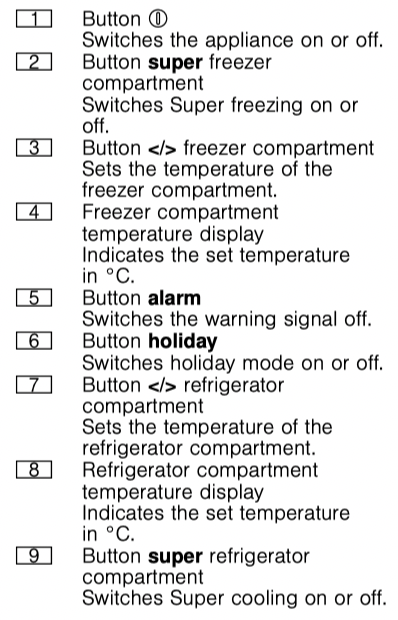
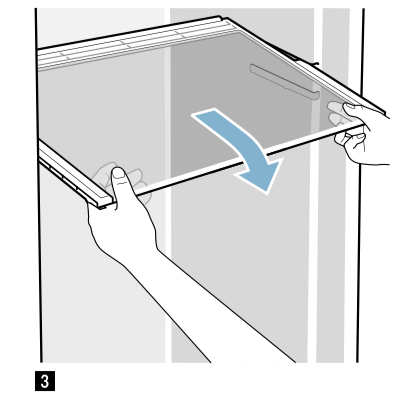
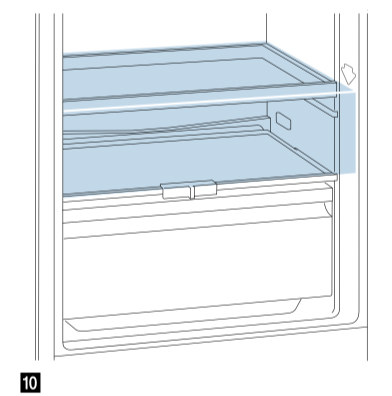
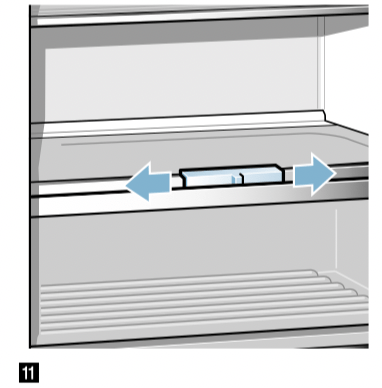
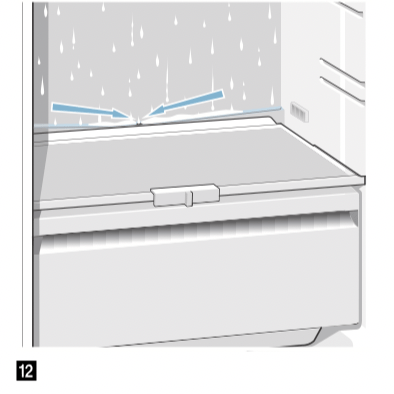
Shelf above the vegetable container
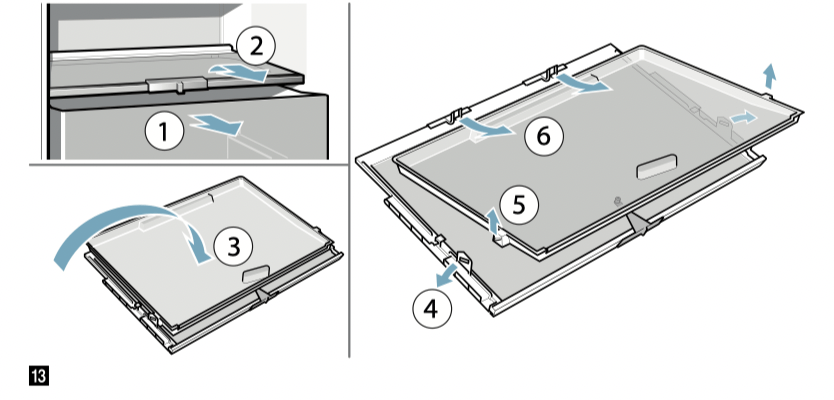
1. Pull out vegetable container.
2. Take out shelf and dismantle to clean.
Odours
If you experience unpleasant odours:
1. Switch off the appliance with the On/Off button .
2. Take all food out of the appliance.
3. Clean the inside."Cleaning" on page 18
4. Clean all packages.
5. Seal strong smelling food in order to avoid odours from forming.
6. Switch the appliance on again.
7. Store food in the appliance.
8. Check whether the formation of odours is still occurring after 24 hours.
Lighting
Your appliance features a maintenance-free LED light.
Only customer service or authorised technicians may repair the light.
Noises
Normal noises
Droning: A motor is running, e.g. refrigerating unit, fan.
Bubbling, buzzing or gurgling: Refrigerant is flowing through the tubes.
Clicking: Motor, switches or solenoid valves are switching on and off.
Cracking: Automatic thawing successful.
Preventing noises
Appliance is not level: Align appliance using a spirit level. If required, place a little packing underneath.
Containers, shelves or storage compartments wobble or stick: Check the removable fittings and re-insert if required.
Bottles or receptacles are touching each other: Move bottles or receptacles away from each other.
Faults – what to do?
Before you call customer service, use this table to check whether you can rectify the fault yourself.
Temperature differs greatly from the set value.
Switch off appliance for 5 minutes.
"Switching off and disconnecting the appliance" on page 12 If the temperature is too warm, check temperature again after a couple of hours.
If the temperature is too cold, check temperature again on the following day.
Displays do not illuminate.
|
The mains plug has not been inserted properly.
|
Connect the mains plug.
|
|
The fuse has tripped.
|
Check the fuses.
|
|
The power has failed.
|
Check whether the power is on.
|
Display indicates “E…”.
|
Electronics have detected a fault.
|
Call the customer service.
"Customer service" on page 22
|
A warning signal sounds and the alarm button is lit.
| |
Press the alarm button. Alarm is switched off.
|
|
Appliance door is open.
|
Close the appliance door.
|
|
Ventilation openings have been covered.
|
Clear ventilation openings.
|
|
Large quantities of fresh food were placed in the appliance.
|
Do not exceed max. freezing capacity.
|
Display flashes, warning signal sounds and button alarm is lit.
| |
Press the alarm button. Alarm is switched off.
|
|
Appliance door is open.
|
Close the appliance door.
|
|
Ventilation openings have been covered.
|
Clear ventilation openings.
|
|
Large quantities of fresh food were placed in the appliance.
|
Do not exceed max. freezing capacity.
|
Display flashes.
|
The temperature in the freezer compartment was too warm.
|
When button alarm has been pressed, the warmest temperature reached in the freezer compartment is displayed for 5 seconds. Press the alarm button. The display stops flashing.
|
Appliance is not cooling, display and lighting are lit.
|
Showroom mode switched on.
|
Start the appliance self-test.
"Customer service" on page 22 When the programme has ended, the appliance switches over to normal operation.
|